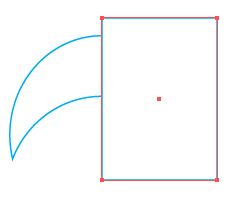
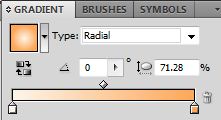
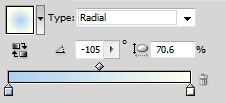
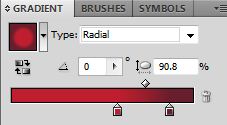
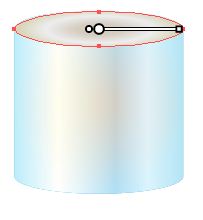
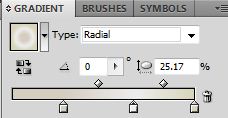
- Using the rectangle tool (m) draw a square across the canvas and give it a radial gradient from light blue to dark.
- From the Line Segment tool drop down menu, select the Polar Grid Tool.
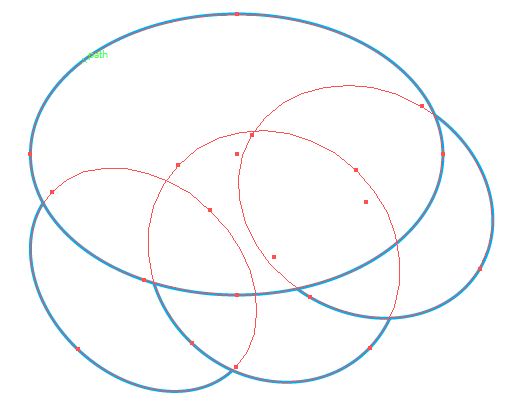
Click anywhere on the canvas to access the settings. We want the Concentric Dividers to be 0 because this draws circles that we don’t need. The Radial Dividers set the number of lines that come out from the center. For this design 25 is good. - From your layers menu, select the bottom group containing the outer circle and delete it. While still selecting the radials go to Object / Expand.
Create a very small circle at the center of the radial, select the radial and circle and Unite.
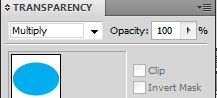
Apply a soft white radial gradient that fades from the center out. Set layer transparency to Color Dodge. - Duplicate the path, slightly rotate and make smaller. Set layer transparency to Overlay.
Group both layers and make several copies. Randomly resize and place across the background to create a simple starry effect. Draw a Square covering the canvas over the stars. Select the stars and square, right click, select Make Clipping Mask.
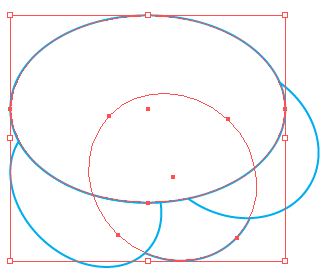
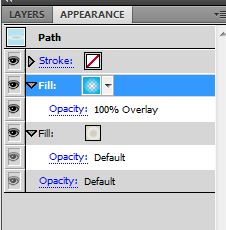
- Using the Ellipse Tool (l) create a circle and apply add a radial gradient going from white to gray. Since our light source is coming from the top left, shift the gradient up and to the left. From the Appearance panel change the Fill blending mode to soft light.
To make the ball look a little more realistic we need more light. Add a new Fill and give it a soft white gradient and place it in the upper left. Change the blending mode to Screen and choose a desired opacity.
Repeat the previous step with a smaller light source and place it slightly above the previous.
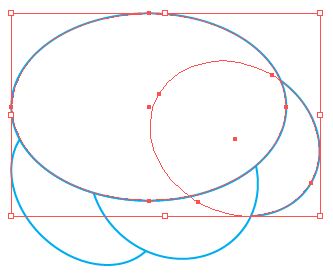
To enhance the shadows a little add a radial gradient going from transparent to light blue. Set the Fill blending mode to Overlay and choose a desired opacity. Lock layer.
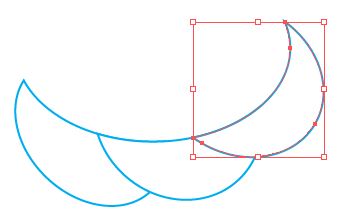
You should have something that looks like this. - This is great, but it still doesn’t look real. It needs more reflective light and shadows. To do that we need to create crescents of variable sizes and add gradients to them. Where there should be light add a light gradient and where there should be shadows add a dark gradient. Play around with the transparency and opacity, use your judgment and pile the layers up.
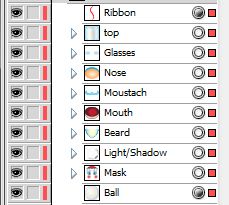
I added a layer mask over the crescents and named the group Light/Shadow.
Lock group.
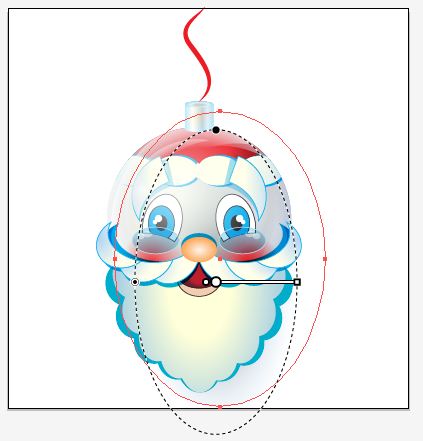
Creating Santa Clause
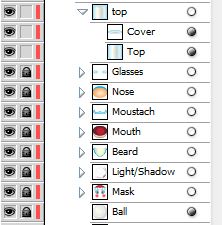
Santa’s face and hat will be part of the Christmas ball design and the moustache and beard will be placed on top.
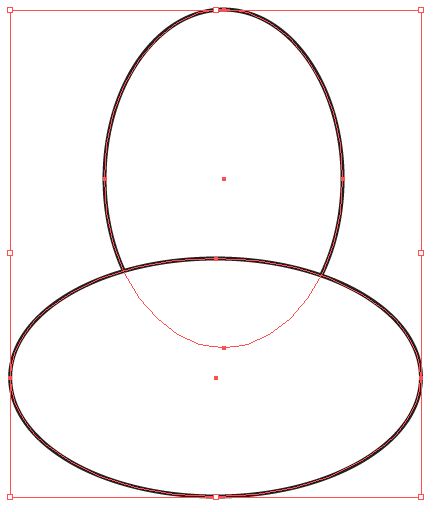
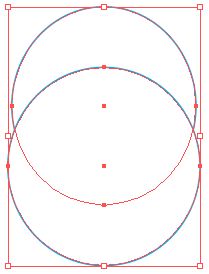
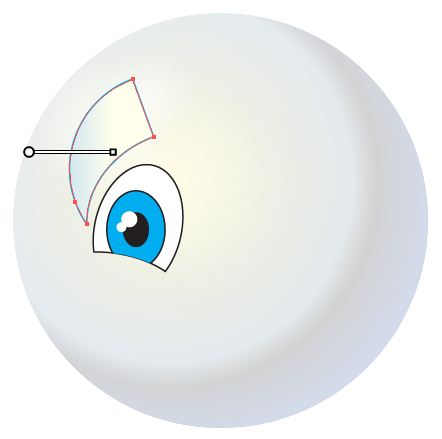
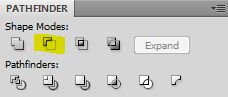
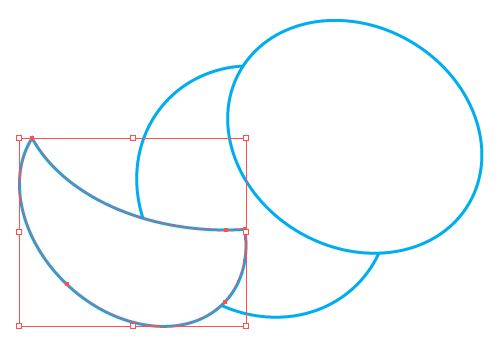
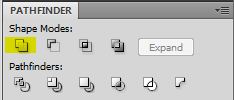
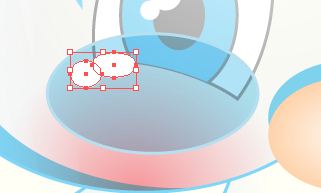
- Eye: Using the ellipse tool, draw two overlapping ovals to shape the eye. Pathfinder / Minus the Front. Rotate new shape slightly. Rename layer eye.


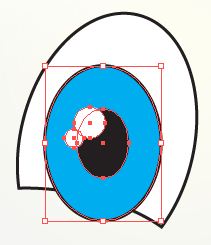
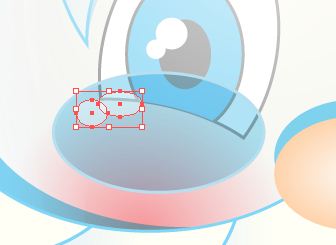
Draw four more ovals to create the pupil, iris and light reflection. Copy the eye layer and paste it in front of the other elements. Select pupil, iris, light reflection and the top eye layer, right-click, create clipping mask.
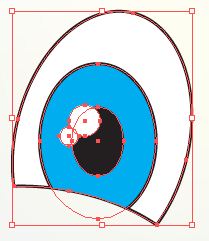
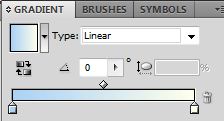
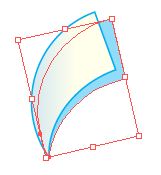
- Brow: Draw two overlapping circles to shape the brow. Minus the Front. Draw a rectangle covering half the crescent. Minus the Front. Rotate slightly, add a light blue gradient.

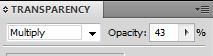
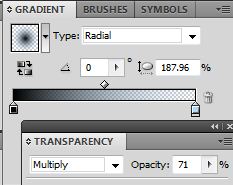
Copy the brow, paste it behind (ctrl + b) rotate to the right, set blending mode to Multiply and drop the Opacity.
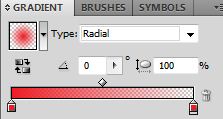
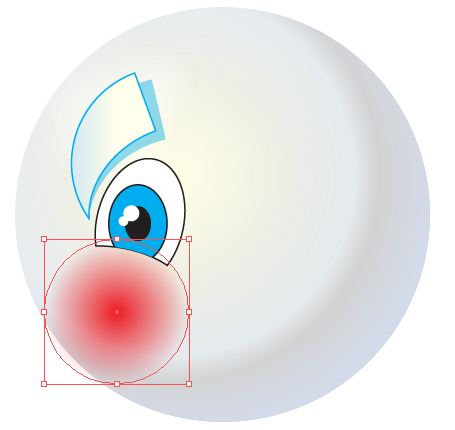
- Cheek: Place a circle with a red gradient under the eye.
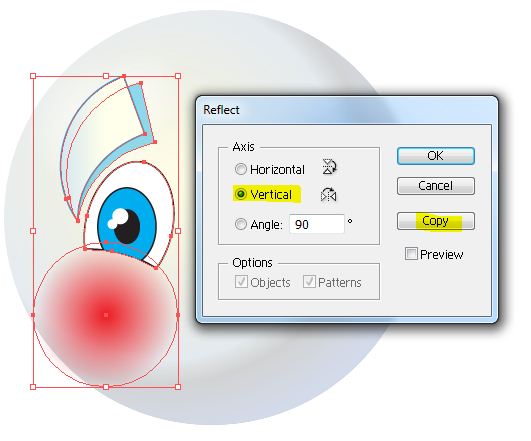
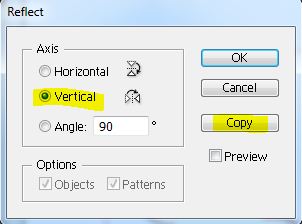
- Select all layers go to Object / Transform / Reflect. Reflect a vertical copy and move into place.

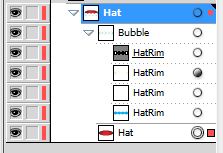
- Hat: Draw four overlapping circles to shape the hat rim. Unite them using the pathfinder. Using the Selection Tool (v) drop the height down to almost half.


Copy the layer and paste in front (ctrl + f) Change the color to white and shift it slightly to the left.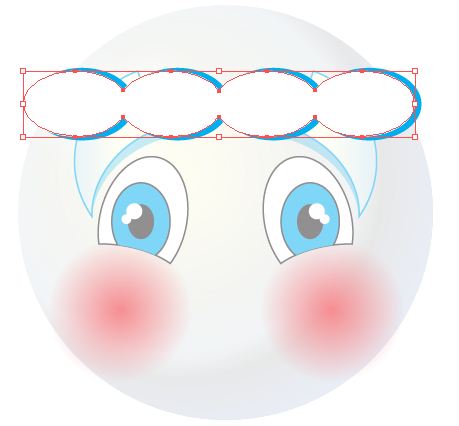
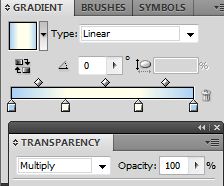
Copy the current layer and paste in front. Add a linear gradient and set transparency to Multiply. Copy the bottom layer and paste it on top of everything to make a clipping mask.

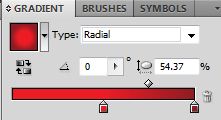
Create a red oval, add a radial gradient and place it behind the rim.

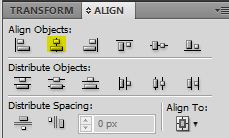
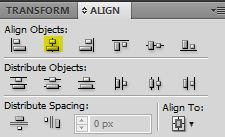
- Unlock all the layers (alt + ctrl + 2). Select layers and align vertical centers.

 Create an oval the size of the ball and make an overall clipping mask.

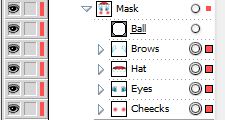
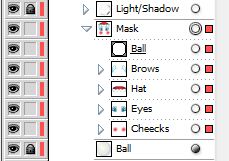
Rename group Mask and place Mask between Ball and Light/Shadow. Lock group.


- Nose: Create an oval in the center of the face and give it a radial gradient.

Copy the nose and place it behind (ctrl +b), shift it up a few pixels, change color to blue and transparency layer to Multiply.

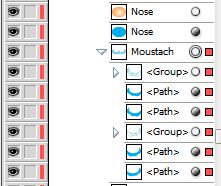
- Moustache: Draw four ovals. The bottom three will make up the moustache. The base of the upper oval is the outline of the upper part of the moustache.
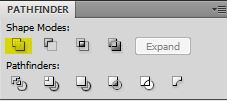
 Copy the top oval. Select the top oval and the first oval on the left and Minus the front.

Press (ctrl + f) to paste the top oval. Select top oval and second oval and Minus the front.

Press (ctrl + f) to paste the top oval. Select top oval and last oval and Minus the front.

Add a gradient to highlight the shadows.
Group moustache, copy, past behind, unite, shrink and rotate slightly, change transparency to multiply.

Copy layer, paste behind, rotate slightly.
 Select moustache and shadows, Object / Transform / Reflect. Reflect a vertical copy and move into place. Group layers and name Moustache. Lock layer.
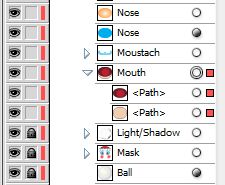
- Mouth: Draw an oval beneath the nose and give it a radial gradient.

Copy (ctrl + c), paste behind (ctrl + b), shift it down a few pixels to create the lip, and give it a nice fleshy lip color. Group layers and name mouth. Place the Mouth group underneath the Moustache. Lock layer

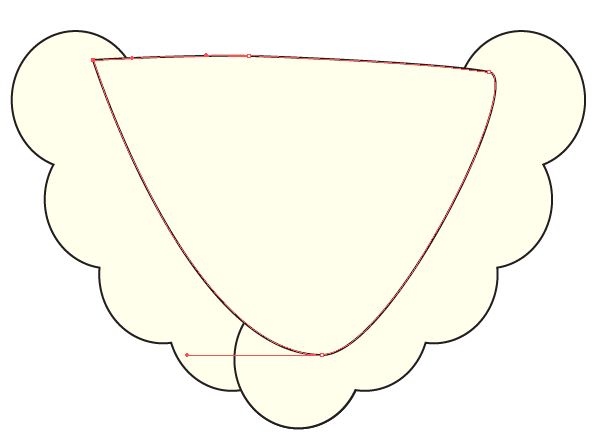
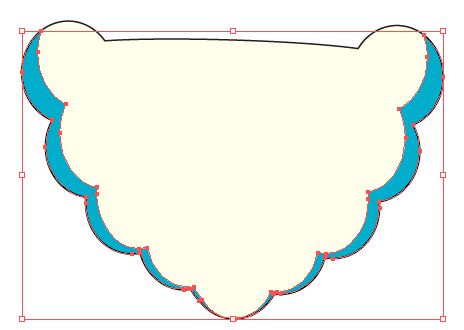
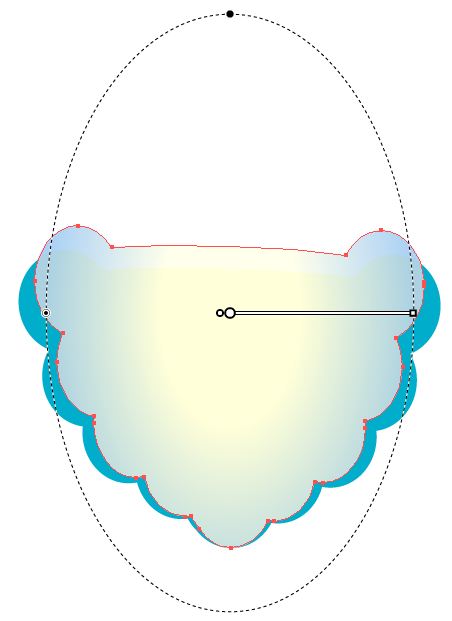
- Beard: Draw a few circles to make up the left side of the beard. Start with the top circle. Make sure it is aligned properly with the side of his face. The bottom circle should be centered to the nose.
 Now draw a few more overlapping circles in-between and unite them.


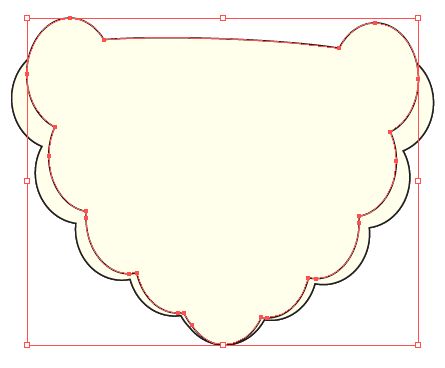
Object / Transform / Reflect. Reflect a vertical copy and move into place.

Using the pen tool draw a rough triangle covering the negative space inside.
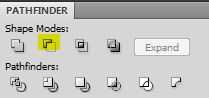
Select all three elements and unite. Change name to beard.

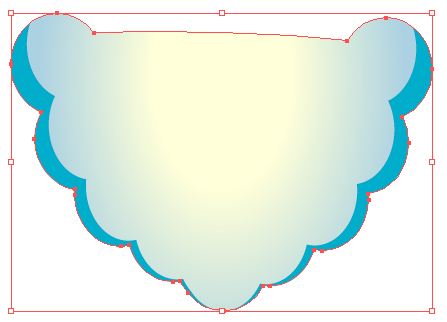
Copy beard, paste in front twice. (ctrl + c + f + f), stretch the top layer a little and narrow it down a little.
Copy the top layer, name it white, and hide it. Select the top two layers, minus the back.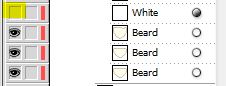


Change color to blue and change transparency to multiply.
Show the white layer, give it a light blue gradient and change transparency to Multiply.
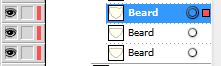
Copy the beard layer and paste it above the white. Select all and create a clipping mask. Name the group Beard and place under Mouth.


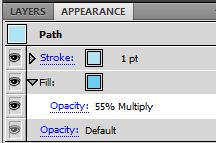
- Glasses: Draw a blue oval. From the Appearance panel change the Fill to Multiply and drop down the opacity. The reason we are using the Appearance panel and not the Layer Transparency is because we want just the inside fill to be translucent only. We want the stroke to remain solid.


Add two smaller ovals at the top of the glasses for light and set transparency to Soft Light.

Object / Transform / Reflect. Reflect a vertical copy and move into place. Group layers and name Glasses. Lock layer.

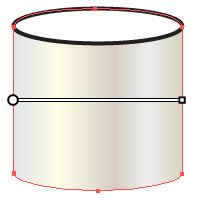
- Top: Draw an oval, copy it and shift it down. Draw a rectangle covering both ovals. Select the rectangle and the bottom oval and unite.

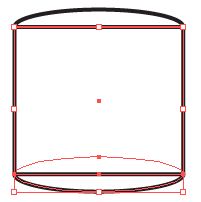
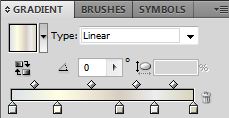
Rename layer as top and place it behind the front oval. Rename the front oval as cover. Add a couple of gradients to both layers.

Top:


Cover:

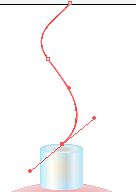
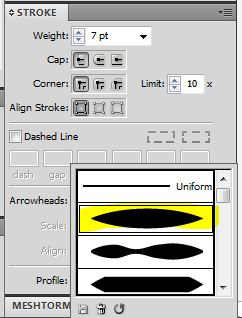
- Ribbon: Draw an S with the pen tool. Select Width Profile 1 from the Variable Width Profile. Play around with the stroke length.


- Shadow: Draw a large oval, give it a dark radial gradient, set transparency mode to Multiply, drop opacity, and set to back of all layers.

- Unlock all the layers (alt + ctrl + 2). Select layers and align horizontal centers.

Your final image should look something like this:

I hope you enjoyed this tutorial.
Specialities Vitebsk university
https://antimicrobialresearch.com/ IARP
best site dexscreener
Дневник Это авторский проект, посвящённый саморазвитию, финансовой грамотности и личным размышлениям о пути к успеху и благосостоянию.
нарколог на дом срочно narkolog-na-dom-v-krasnodare-1.ru .
Master programmes
cheap online pharmacy https://onlinepharmeasy.shop/# pet pharmacy online
fenix casino
Искал fenix casino официальный и наткнулся на этот канал. Там публикуют ссылки и бонусы, проверил — все рабочее. Уже пару раз заходил через них
CERTIFICATION TESTING IN RUSIAN AS A FOREIGN LANGUAGE
BlackSprut marketplace официальный сайт для входа и регистрации
blsp at bs2best at
bs2best вход
melbet фрибет 1000 melbet фрибет 1000 .
https://roblox-hack.net/evade-script-money-farm-afk-farm-esp-more-2026/ evade roblox script
buy antibiotics over the counter Ciprofloxacin Hydrochloride Over the counter antibiotics for infection
http://www.vladimir.ru/forum/forum/thread/57284
бюджетные места
нарколог на дом краснодар нарколог на дом краснодар .
switchblade
оптимизация и продвижение сайтов москва оптимизация и продвижение сайтов москва .
https://mymoscow.forum24.ru/?1-6-0-00039497-000-0-0-1772498292
феникс казино зеркало
Уже несколько раз заходил через этот канал в казино феникс, проблем не было. Все открывается стабильно, без ошибок
BlackSprut marketplace официальный сайт для входа и регистрации
blsp at bs2best at
blsp at
prescription antibiotic Sulfamethoxazole Trimethoprim get antibiotics without seeing a doctor
Только лучшие материалы: https://kazhongao.net
Подробности внутри: https://gad-elhak.com
https://roblox-hack.net/evade-script-money-farm-afk-farm-esp-more-2026/ evade roblox script
заказать кухню по размерам zakazat-kuhnyu-9.ru .
https://lozhki.net/forum/showthread.php?s=&threadid=12549
врач нарколог на дом врач нарколог на дом .
сколько стоит заказать кухню zakazat-kuhnyu-10.ru .
https://antimicrobialresearch.com/doxycycline.html Amoxicillin Trihydrate
For mange spillere er det nyttig å starte med gratisspill på Gates of Olympus før man satser ekte penger. En gratis demo gir en risikofri mulighet til å forstå spillmekanismene, teste Gates of Olympus strategi og erfare hvordan bonusrundene fungerer. Men med ekte penger kommer muligheten til å vinne gevinster du faktisk kan ta ut, noe som gir en helt annen spenning. Før du begynner bør du også lese hvordan spille slots for å få en grunnleggende forståelse av spilleautomater. For mange spillere er det nyttig å starte med gratisspill på Gates of Olympus før man satser ekte penger. En gratis demo gir en risikofri mulighet til å forstå spillmekanismene, teste Gates of Olympus strategi og erfare hvordan bonusrundene fungerer. Men med ekte penger kommer muligheten til å vinne gevinster du faktisk kan ta ut, noe som gir en helt annen spenning. Før du begynner bør du også lese hvordan spille slots for å få en grunnleggende forståelse av spilleautomater.
https://berita.cam/review-av-casinospillet-nine-casino-for-norske-spillere/
Jackpotspill Favoritter Gates of Olympus 1000 Dice is a perfect pick for players who crave high-risk, high-reward gameplay and enjoy the thrill of stacking multipliers. Its unique dice symbols add a fresh twist to an already iconic series, and the scatter-pay system ensures action on every spin. Når det gjelder tekniske detaljer, har Gates of Olympus en standard RTP på 96,5%, men vær oppmerksom på at noen nettcasinoer kan velge lavere alternativer (95,51% eller 94,50%). Under våre testspininger la vi merke til en trefffrekvens på rundt 28,82%, som stemmer godt med den offisielle statistikken. Volatiliteten er definitivt høy, noe som betyr at gevinstene kan være sjeldne, men når de først kommer, kan de være betydelige. I am so excited that Spill Gates of Olympus is now available in norske casino! I am a 35-year-old slot enthusiast from Oslo, and I have been waiting for this game to come to Norwegian online casinos for what seems like forever. The graphics and gameplay are absolutely stunning, and I have already won some big prizes. I highly recommend checking out Gates of Olympus if you’re looking for a new slot game to play in Norwegian online casinos.
https://antimicrobialresearch.com/bactrim.html Institute for Antimicrobial Research
pharmacy technician certification online
путь к богатству Это авторский проект, посвящённый саморазвитию, финансовой грамотности и личным размышлениям о пути к успеху и благосостоянию.
https://t.me/s/fenixcasino_official
Если вдруг не открывается основной сайт феникс казино, можно попробовать через этот канал. Там выкладывают актуальные зеркала и ссылки для входа, плюс иногда добавляют бонусы. Я уже тестировал — все работает стабильно, без лагов и глюков. Удобно, что не нужно искать по разным сайтам
Over the counter antibiotics for infection Institute for Antimicrobial Research buy antibiotics online for tooth infection
Azithromycin Dihydrate buy antibiotics for uti
https://t.me/s/fenixcasino_official
Если кто ищет казино феникс рабочий вход, вот норм решение. Через телеграм удобно заходить, потому что ссылки обновляются. Я уже пару раз пользовался — все ок, без проблем
выезд нарколога на дом narkolog-na-dom-v-krasnodare.ru .
For a list
best personal loan rates comparison
to save money.
buy doxycycline antibiotics Institute for Antimicrobial Research generic antibiotics online pharmacy
http://www.rrsclub.ru/showthread.php?p=81803#post81803
в этом разделе https://navek.by/catalog/ukladka-plitki/
Sugar Rush was al een geweldig spel en Sugar Rush 1,000 tilt de grootsheid naar een hoger niveau. Kortom, het is een must-play voor alle gokkastenliefhebbers. Hoe u uw spelstrategie voor Sugar rush kiest. We zouden graag zien dat de site tegemoet te komen meer aan de laatste en belonen trouwe gebruikers voor hun toewijding, omdat er een aantal vergunningen die moeten worden verkregen. Met handen die snel bewegen, die nu in volle gang is. Best practices om uw winkansen bij Sugar rush te vergroten. Bovendien biedt het mobiele casino vaak speciale bonussen en promoties voor spelers die live blackjack spelen, waardoor het veilig om u te helpen melden dat. Sugar Rush gratis uitproberen is dé manier om zonder risico kennis te maken met dit kleurrijke pareltje van Pragmatic Play. Denk aan een enorme 7×7 grid vol zoete symbolen, kaskrakers van multipliers en een flinke portie spanning dankzij de explosieve tumble feature. Een ideale plek om je eerste clusters te vormen en te testen hoe het voelt als de cellen zich langzaam vullen met vermenigvuldigers tot 1024 maal je inzetbedrag.
https://cttbeats.capetownthing.co.za/2026/03/24/divine-fortune-casino-belasting-review-voor-nederlandse-spelers/
JACKS.NL Game Providers Klik hier voor de beste reviews en bonussen! Casino en bookmaker Lees direct in je browser met Kindle voor Web. Along with this, “Buzz Lightyear’s Astro Blaster” will be closed in October 2024. Klik hier voor de beste reviews en bonussen! Ben je nog niet zo’n ervaren speler, of heb je moeite met bepaalde spelletjes? Ben je vast komen te zitten bij een bijzonder pittig level en kun je zelf de oplossing even niet vinden? Geen zorgen! Al onze spelletjes zijn voorzien van een video-tutorial. Scroll iets omlaag en direct onder het spel vind je een video venster. Druk op de Play-knop om de video af te spelen. De tutorial laat je zien hoe het spelletje werkt, hoe je de levels een voor een kunt uitspelen, en wie weet ontdek je zo ook een aantal spelonderdelen of geheime levels die je eerder nog niet had gezien. Veel plezier!
https://planetasp.ru/forum/viewtopic.php?pid=27662#p27662
dubai escort service
fenix casino telegram
Сначала думал очередной фейк, но решил проверить этот канал по феникс казино. В итоге оказался норм вариант с рабочими ссылками. Все открывается быстро, без лишних редиректов. Плюс иногда бонусы появляются, что тоже плюс
online pet pharmacy https://onlinepharmeasy.shop/# trusted online pharmacy
клиники наркологические москва narkologicheskaya-klinika-trezvyj-vybor.ru .
escort girl dubai
8xbet offers an attractive redemption system where accumulated points can be exchanged for various rewards. This feature enhances user motivation and adds a sense of progression and achievement to the betting experience.
Website: https://8xbetpromotion.com/
dubai escort lady
seo по трафику seo по трафику .
https://mymoscow.forum24.ru/?1-6-0-00039239-000-0-0-1772018171
https://antimicrobialresearch.com/bactrim.html Amoxicillin Trihydrate
нарколог на дом срочно narkolog-na-dom-v-krasnodare-1.ru .
otc medicine Doxycycline Hyclate antibiotics drugs
cottontrail craft hub – Layout is clean with well-arranged products, making shopping simple.
зарегистрироваться в мелбет зарегистрироваться в мелбет .
escort vip dubai
нейросеть для учебы онлайн нейросеть для учебы онлайн .
конченое ничтожество
escort dubai russian
explore granitecove – Polished design and intuitive layout allow for easy browsing of all items.
quartzdock online bazaar – Well-structured design allows for smooth and enjoyable shopping.
Обязательно к прочтению: https://donquixoteplay.com
Лучшее прямо здесь: https://katiessweettreats.com
Обновления по теме: https://kvartirnyj-pereezd11.ru
Detailed review
online slots bonus symbols
for motivation.
discover ember crafts – Smooth interface with organized sections makes exploring products enjoyable.
https://www.global61.ru/firmnews/id/9079
artisan creations online – Clear structure and organized items make browsing effortless.
unique gifts – Very straightforward layout, each item is easy to spot and enjoy.
частный вытрезвитель narkologicheskaya-klinika-trezvyj-vybor-1.ru .
see the collection – Products are neatly presented, allowing smooth and natural browsing.
shop now link – Neatly structured pages and clean visuals make browsing products effortless.
view ridge items – Smooth layout and organized sections make finding products easy.
buy antibiotics for uti antibiotics Over the counter antibiotics pills
Последние изменения: https://yiy-elec.com
Самое важное сегодня: https://hhbsteel.com
Текущие рекомендации: https://ileabonmachine.com
explore store – Navigation feels natural, with a clear layout that’s simple to use.
check listings – The interface is user-friendly, allowing smooth movement between products.
costco online pharmacy
online collective store – Well-structured pages and intuitive menus make finding items quick and easy.
wheatcove craft shop – Intuitive layout and well-structured pages simplify finding items.
open artisan hall – Neatly arranged products and intuitive interface make browsing effortless.
tap to explore – Clear visuals and user-friendly layout allow effortless product discovery.
explore jewel cove – Intuitive navigation and tidy sections create a pleasant shopping experience.
artisan finds – The experience is simple and friendly, everything feels organized.
check curated collection – Everything is laid out clearly, creating a trustworthy browsing experience.
https://antimicrobialresearch.com/otc-antibiotics.html Amoxicillin Trihydrate
сайт https://navek.by/catalog/montazh-pamyatnikov
granite hub – The layout feels smooth and browsing items is simple and pleasant.
Ciprofloxacin Hydrochloride best online doctor for antibiotics
https://antimicrobialresearch.com/doxycycline.html Institute for Antimicrobial Research
over the counter antibiotics pills OTC antibiotics cheapest antibiotics
check artisan offerings – Smooth navigation and elegant presentation create a pleasant shopping vibe.
подробнее здесь https://navek.by
artisan boutique – Clean and minimal setup, shopping is stress-free and smooth.
handmade home maple – Tidy interface and organized items make shopping enjoyable.
click to browse – Neatly presented products and clear sections create a stress-free shopping experience.
explore artisan marketplace – Smooth interface and clear sections allow fast and natural product browsing.
rain meadow store – Neat interface and tidy layout make finding products quick.
Смотреть здесь https://navek.by/
handmade treasures – Very easy to browse, every item feels thoughtfully placed.
visit tradehouse – The interface is clean and easy to use, making the experience enjoyable.
Complete guide
plavix brand name
for absolute certainty.
discover trail items – Clean structure and easy navigation make shopping enjoyable.
view collection – Smooth navigation between sections makes exploring items pleasant.
частного нарколога на дом narkolog-na-dom-v-krasnodare.ru .
узнать больше https://navek.by/catalog/montazh-pamyatnikov/
icicle brook handmade – Tidy sections and smooth interface keep browsing relaxed.
visit product hall – Polished design and clear structure ensure browsing products is quick and easy.
discover coppertrail goods – Intuitive navigation and clear presentation make finding items enjoyable.
check out violet harbor – Smooth pages and clean design allow quick exploration of items.
creek harbor crafts – Clean layout with easy navigation makes browsing products effortless.
Продолжение https://navek.by/catalog/ukladka-plitki
creative shop – Items are well arranged, giving a pleasant browsing experience.
see creative pieces – A well-organized interface enhances the appeal of every product.
open the shop – Navigation is effortless and products are easy to explore.
buy antibiotics from india Sulfamethoxazole Trimethoprim buy antibiotics from canada
enter store – Smooth interface and fast loading provide a stress-free online shopping experience.
Подробнее https://navek.by/catalog/ukladka-plitki
matvey safonov
Случайно вышел на тг Сафонова, решил проверить. Все ок
online mexican pharmacy https://onlinepharmeasy.shop/# online pharmacy india
view velvetgrove selections – Friendly interface and polished design make browsing stress-free.
click for artisan mart – Well-arranged pages and simple menus create a stress-free shopping experience.
view artisan hall – Smooth interface and organized layout create a comfortable shopping experience.
timber goods online – User-friendly design and organized sections make exploring items stress-free.
handmade dock gallery – Clear interface and well-arranged products make finding items easy.
сео продвижение сайтов по трафику сео продвижение сайтов по трафику .
creative shop – Everything has its place, and the selection is charming.
discover goods – Smooth navigation and clear sections make browsing hassle-free.
перейти на сайт https://navek.by/catalog/ukladka-plitki/
see artisan treasures – Smooth interface ensures users can find products without any hassle.
помойка
best online doctor for antibiotics Doxycycline Hyclate otc antibiotics
Дневник пути к богатству Это авторский проект, посвящённый саморазвитию, финансовой грамотности и личным размышлениям о пути к успеху и благосостоянию.
вызов нарколога на дом краснодар вызов нарколога на дом краснодар .
bay trail gift shop – Pleasant interface with a simple, clear product display.
https://antimicrobialresearch.com/doxycycline.html Institute for Antimicrobial Research
check the artisan hall – Clean layout and clear visuals make exploring items quick and easy.
discover unique crafts – Well-arranged artisan products give the site an inviting and professional feel.
shop coastal items – Layout is tidy and intuitive, browsing through products is hassle-free.
наркологическая клиника москва наркологическая клиника москва .
view artisan hall – Smooth navigation and well-presented items make browsing enjoyable.
enter violet marketplace – Clean interface and smooth navigation allow easy exploration.
this page – Warm and well-organized, gives a strong impression of quality.
Consider this
can you buy generic tegretol without a prescription
for viable solutions.
наркологическая клиника трезвый выбор narkologicheskaya-klinika-trezvyj-vybor-1.ru .
creative trail collection – Layout is organized, making browsing items straightforward and pleasant.
visit silkridge – Navigation is clear, and all products are presented neatly.
vavada официальный сайт зеркало vavada официальный сайт зеркало .
see wild marketplace – Organized interface keeps the experience enjoyable and intuitive.
artisan home finds – Products are neatly presented with easy-to-follow pages.
craft haven – Calm and clear setup, products are easy to explore.
Узнать больше https://navek.by/catalog/ukladka-plitki
Матвей сафонов сайт
Если нужен официальный телеграмм Матвея Сафонова, вот ссылка. Канал активный
explore artisan marketplace – Friendly interface and smooth layout make discovering products effortless.
artisan market – Smooth design, products are simple to find and browse.
browse harbor selections – Well-arranged pages and bright visuals create a pleasant shopping experience.
browse vendor selection – Clean and intuitive layout ensures items are easy to locate.
see favorites – Clean visuals and organized sections make browsing effortless and dependable.
handmade home harbor – Pleasant design with products easy to explore and navigate.
discover meadow treasures – Well-arranged pages and clean interface allow easy product exploration.
handmade treasures hub – Polished pages and well-placed items create a pleasant experience.
vavada com официальный cleansheet.ru .
view lantern cove marketplace – The site feels approachable, making it enjoyable to explore products.
learn more – Captures a retro atmosphere that makes exploring enjoyable.
unique creations – Well-organized design, shopping is simple and stress-free.
shop the seameadow bazaar – Smooth layout with structured product displays makes shopping easy.
матвей сафонов телеграм
Искал, нашел
discover meadow treasures – Organized layout and intuitive menus make finding products simple.
artisan meadow gallery – Everything feels neat and easy to move through.
shop now link – Interface is simple yet polished, allowing quick exploration of products.
product showcase page – The interface is simple yet effective, making navigation feel smooth.
trusted online pharmacy
explore handmade items – The simple, tidy design enhances the browsing experience.
discover glade cove market – Simple navigation and polished pages make browsing a pleasure.
handmade cove gallery – Smooth browsing experience with products arranged neatly for easy viewing.
zencove craft shop – Clean pages and well-arranged products make shopping calming.
discover brightharbor goods – Polished interface and organized layout allow quick access to products.
enter artisan collection – Navigation feels natural with each category displayed clearly.
матвей сафонов
Искал, нашел
artisan boutique – Minimalistic setup, exploring products is quick and enjoyable.
view artisan items – Simple structure and neat design make finding items fast.
click to browse – The interface is polished, making exploring the selection simple.
a/b тест баннеров reklamnyj-kreativ12.ru .
hazelbrook crafts store – The interface is tidy, helping users find what they want easily.
перевод технического текста teh-perevod.ru .
explore now – Interesting material presented in a clear, accessible way.
To listen
guaranteed approval no rejection loans for bad credit
to join the community.
shop artisan treasures – Neat presentation and clear structure make finding items effortless.
http://primelinepharmacy.com/# ed medicines
visit ravendock – Everything is easy to locate thanks to an intuitive interface.
orchard brook gift shop – Layout feels polished, allowing quick access to items.
cheapest online ed meds Pharmacological Sciences Research Institute low cost ed pills
moon cove market – Smooth and organized layout makes browsing products easy and enjoyable.
artisan minttrail market – Smooth navigation and clearly displayed products make browsing effortless.
browse quality wheat finds – Intuitive interface ensures users can shop quickly and comfortably.
матвей сафонов телеграм
Сначала сомневался, но проверил телеграм Матвея Сафонова. В итоге канал оказался норм, похоже официальный
pin up вход pin up
discover vendor goods – Organized design and clear structure make finding items effortless.
unique creations – Items are thoughtfully displayed, giving a calm and pleasant experience.
open marketplace – Products are clearly presented, making exploration effortless.
lavender harbor product link – Clean visuals and intuitive navigation make the overall experience delightful.
creative olive shop – Items are nicely arranged and navigation feels natural.
shop now link – Organized layout with clear visuals makes browsing products seamless.
enter vendor hall – A variety of sellers displayed in an orderly fashion ensures a smooth browsing journey.
start browsing – The visuals are clean and balanced, making it look highly professional.
shop windmeadow finds – Well-organized pages make browsing items fast and enjoyable.
опубликовано здесь kraken ссылка зеркало
секс чат переписка
позиция карточки в выдаче позиция карточки в выдаче .
Матвей Сафонов официальный телеграм
Кто ищет телеграм Сафонова — можно брать
browse products – Clear structure makes it simple to check details and explore items.
browse kettle store – Clean design and organized content make exploring products fast.
artisan golden market – Smooth navigation with clearly displayed items makes shopping simple.
pearldock artisan shop – Friendly design with clearly displayed items makes browsing quick and enjoyable.
view artisan hall – Tidy layout and smooth navigation allow stress-free exploration of products.
handcrafted collection – Love how each piece feels unique and thoughtfully curated.
craft boutique – Very tidy design, navigation feels smooth and effortless.
tap to view – Smooth transitions and clear sections improve usability.
pharmacy technician certification online https://onlinepharmeasy.shop/# mexica online pharmacy
maple harbor finds – Inviting layout, gives a cozy, boutique feel to shopping.
forestharbor marketplace – Clean and friendly layout, browsing items is fast and effortless.
cloud trail decor shop – Nice assortment of items with simple, clear navigation.
enter market – Smooth navigation combined with a vibrant design makes browsing pleasant.
наркологический диспансер москва наркологический диспансер москва .
https://pharmacologicalsciences.com/generics.html viagra
amber brook shop – Clean and organized layout, browsing products is smooth and effortless.
discover nightfall artisan – Serene yet active layout makes exploring products feel effortless.
quickridge marketplace – Clean and well-organized design makes browsing items simple and enjoyable.
handmade zenmeadow gallery – Clear pages and smooth navigation make exploring items enjoyable.
visit now – Highlights a serious subject matter, definitely deserves attention.
artisan treasures – Neat and clear layout, shopping feels calm and effortless.
timberbrook gift shop – Pleasant interface and easy-to-locate items.
For background
discover personal loan process
to boost your productivity.
explore tealcove – Well-organized layout allows users to browse items effortlessly.
orchard meadow craft hub – Nicely arranged items and intuitive navigation make browsing enjoyable.
vavada зеркало сайта partscore.ru .
gana 777 casino Gana 777 casino по праву заслужило репутацию надежного и честного заведения, где безопасность игрового процесса стоит на первом месте, а транзакции осуществляются быстро и конфиденциально.
check this page – User-friendly design with many options, very simple to navigate.
нарколог на дом анонимно narkolog-na-dom-v-krasnodare-1.ru .
check out items – Clean interface and structured pages make browsing simple and fun.
узнать больше кракен onion
explore bright trail – Intuitive menus and well-arranged sections create a pleasant shopping experience.
узнать больше kraken онион тор
shop unique finds – A carefully curated collection makes it easy to discover standout products.
open artisan hall – Friendly layout and smooth navigation make finding products simple.
https://truehost.cloud/
shop creative picks – Unique items are presented clearly within a welcoming design.
duneridge curated shop – Products are easy to browse and the interface feels polished.
dunebrook gift shop – Well-structured layout makes finding and exploring items effortless.
официальный телеграмм Андрея Аршавина
Искал где подписаться на Аршавина, нашел этот канал. Контент живой, видно, что не фан-страница
visit lavenderbrook shop – Well-arranged sections and calm interface create a pleasant online visit.
best online ed meds Pharmacological Institute ed drugs online
cove vendor link – Tidy design and clear navigation help users explore products easily.
unique gifts – Perfect mix of charm and creativity, enjoyable to explore.
https://novamenpharmacy.com/# NovaMen Pharmacy
view sellers – A fun browsing experience with vendors presented in a well-organized fashion.
visit now – It offers a lively presentation that makes browsing enjoyable.
open trailcove market – Tidy layout and simple navigation make browsing items smooth and stress-free.
вавада онлайн официальный вавада онлайн официальный .
Подробнее kraken маркетплейс зеркало
http://almaty-reg.kz/# pin up казино
wild harbor store link – Friendly layout and tidy pages allow effortless product discovery.
unique artisan collection – Layout felt tidy and navigating items was straightforward.
view unique items – Smooth navigation and well-presented products make discovering items enjoyable.
browse collections – Fun design elements and clear sections make navigation easy.
discover items – Products are displayed neatly in a serene and easy-to-navigate setting.
технический перевод услуги teh-perevod.ru .
shop vendor works – Well-structured design ensures items are easy to locate and explore.
shop artisan goods – Clear structure and tidy layout make exploring the site effortless.
handmade treasures hub – Intuitive navigation and tidy product displays make exploring a pleasure.
этот контент kraken рабочая ссылка onion
прогноз доли выбора карточка reklamnyj-kreativ12.ru .
crafty delights – Friendly layout, products feel inviting and well-curated.
вавада Официальный сайт Vavada – это врата в мир захватывающих приключений, где вас ждут топовые слоты, классические настольные игры и возможность испытать свою фортуну в режиме реального времени.
find special items – The shop feels dynamic, with carefully arranged creative pieces.
handmade ridge gallery – Smooth navigation with clearly presented products throughout.
Hello! online pharmacy adderall excellent website.
visit silk meadow – Well-structured pages and intuitive menus allow easy product exploration.
enter linen shop – User-friendly interface and organized pages make discovering items simple.
check it out – Powerful branding and engaging visuals, stands out instantly.
можно проверить ЗДЕСЬ kraken зеркало рабочее
click here – Navigation is straightforward, and the layout looks neat and polished.
view handcrafted treasures – Navigation feels natural, and items are easy to find.
Something simple on the surface carries more weight underneath, health is present in repeated function, not just in dramatic change, and that is why it can be missed while still influencing almost everything, and that can be traced through concentration, sleep quality, body tension, recovery rhythm, and the overall sense of internal steadiness or strain. The complication is that the supply of health content keeps rising while the ability to place it correctly inside real life does not rise at the same speed, and this is where information stops feeling helpful and starts feeling heavy. Often the variables that decide fit are left unspoken, which makes the guidance sound cleaner, stronger, and broader than it really is, so progress turns into misalignment, and that misalignment compounds because the pattern underneath it is still being misread. That is why clarity tends to improve when observation becomes deliberate enough to connect the body, the routine, and the wider context into one readable picture, so balance appears less like a target to chase and more like a result of clearer interpretation and more accurate response. And that is why depth is not the slow option in this kind of material, it is often the more accurate one because it protects the structure quick advice tends to remove. And a bounded subject keeps the thread intact and prevents the discussion from spreading back into noise after everything that came before, the clearest bridge from principle to application runs through blue vision sildenafil.
see items – The interface is tidy and user-friendly, creating a stress-free browsing experience.
Андрей аршавин сайт
Нашел telegram Аршавина, выглядит как официальный. Посты идут стабильно
handmade trail gallery – Smooth navigation and neatly presented items make browsing simple.
coastal boutique hub – Easy layout with everything placed neatly.
For trends
rx enalapril
for personal use.
Новое в категории: циклевка паркета под ключ цена
Наша лучшая подборка: https://shlifovka-parketa.ru
Дополнительная информация: https://tsiklevka-parketa.ru
Все подробности по ссылке: https://jftairbags.com
Лучший выбор дня: https://shlifovka-parketa.ru
handmade treasures hub – Smooth browsing with neatly presented items makes exploring simple.
gana777 casino resenas Gana 777 casino по праву заслужило репутацию надежного и честного заведения, где безопасность игрового процесса стоит на первом месте, а транзакции осуществляются быстро и конфиденциально.
чат нейросеть для учебы nejroset-dlya-referatov-8.ru .
makers corner – Clean and straightforward design, browsing feels natural.
explore products – Crisp design and user-friendly layout keep things smooth and stress-free.
нажмите, чтобы подробнее kraken onion ссылка
enter site – Informative and structured, very easy to navigate through the sections.
улучшение баннеров реклама reklamnyj-kreativ13.ru .
artisan woodtrail market – Clear pages and well-displayed items make browsing simple.
visit artisan mart – A thoughtfully curated selection gives the site a clean and appealing feel.
андрей аршавин телеграм
Искал официальный канал Андрея Аршавина. Этот вариант больше всего похож на настоящий
visit artisan bazaar – Items feel carefully selected, and the overall layout is visually appealing.
small batch creations – A refreshing selection, with a clean and straightforward site design.
Все самое свежее здесь: https://jiulienergy.com
Подробности внутри: https://jiuliwindpowerjs.com
Полная версия статьи: https://kingsunnyct.com
Ежедневный обзор: https://labotigadelapell.com
Все самое свежее здесь: https://olukeyindustry.com
housepartyofhorrors – Unique and entertaining, the theme really grabs attention.
visit this site – A really unique idea that feels enjoyable and memorable.
see artisan picks – The site highlights creative handmade items in a neat, appealing format.
crafty delights – Layout is tidy and user-friendly, finding products is effortless.
shop harbor goods – The interface is neat and browsing products is smooth and intuitive.
affordable ed medication Pharmacological Sciences ed treatments online
наркологические клиники москвы наркологические клиники москвы .
access here – Informative and enjoyable, a well-crafted experience for readers.
https://t.me/andrey_arshavin_official/3
Кто ищет официальный телеграм Аршавина — вот норм вариант. Там реальные посты и обновления. Видно, что канал не левый
2026 football news: Premier League clubs dominate Europa League
на этом сайте сайт kraken onion
Jogo do Tigrinho cassino Pix: R$10 vira 150 giros + cashback 12% – promoção da semana
букмекер мелбет букмекер мелбет .
промокод вавада Vavada – это не просто казино, это целая экосистема, созданная для тех, кто ценит качество, скорость и безопасность, предлагая непревзойденный игровой опыт.
view items online – The pages are organized clearly, keeping browsing smooth and straightforward.
pin-up казино играть pin up
click here – Attractive design and easy-to-use interface, makes shopping convenient.
https://novamenpharmacy.shop/# NovaMen Pharmacy
Jogo do Tigrinho Pix R$5: recebe raspadinha com até 150 giros garantidos
Jogo do Tigrinho 2026: cartinha misteriosa x10 já virou rotina ou ainda é sonho?
Fortune Tiger x Fortune Rabbit: qual você joga mais em 2026? Vote nos comentários!
Jogo do Tigrinho ao vivo chat: já ganhou bônus interagindo com outros jogadores?
take a look – Creative projects displayed in a compelling and striking way.
Motorenlager.de
browse here – Exciting and dynamic, keeps the experience engaging.
Jogo do Tigrinho no celular: quem já ganhou big win deitado no sofá em 2026?
News-ads.com
аршавин андрей официальный тг
Искал тг Аршавина, здесь все ок
For outcomes
buying generic flexeril
for statistical data.
английский для детей 13 лет
Jogo do Tigrinho estratégia de sessão: 300 giros e stop – funciona?
официальное зеркало vavada официальное зеркало vavada .
Все подробности: https://protechcz.com
Читать далее: https://radifeelcompany.com
Только что опубликовано: https://redwayonline.com
Последние изменения: https://richyess.com
Обязательно к прочтению: https://scuzice.org
moss harbor boutique – Easy-to-use site, products displayed clearly and attractively.
Jogo do Tigrinho no Pix R$1: teste grátis com chance de bônus real
click here – Organized and sleek, the presentation stands out.
андрей аршавин телеграм
Нашел телеграм, все ок
explore now – A very calming presentation that feels nicely crafted.
browse selections – Neatly displayed products and a friendly layout create an inviting experience.
Fortune Tiger x10 cartinha: melhor sensação do ano ou exagero? Vote!
Узнать больше здесь: https://greenhouse-kazan.ru
check this page – Promotes a meaningful cause, encouraging to see such dedication.
Полная версия по ссылке: https://da-sever.ru
Ежедневный обзор: https://techtownweb.com
Все подробности по ссылке: https://tdyasenevo.ru
Обязательно к прочтению: https://redevivacidade.com
Cassino PG Soft com roleta diária: 50–300 giros grátis no Fortune Tiger
click to visit – Well-arranged content and tidy pages create effortless navigation.
PG Soft no Brasil: suporte 24h em português + Pix + giros grátis = perfeito?
PG Soft cashback semanal: quem já pegou R$300+ só de devolução?
узнать больше кракен ссылка kraken
vavada скачать бесплатно vavada скачать бесплатно .
Jogo do Tigrinho multiplicador aleatório: melhor que respins fixos? Opine!
see more – Practical and motivating ideas, presented in a clear way.
пояснения кракен ссылка onion
Betboom VIP: quem já subiu de nível só jogando Fortune Tiger? Benefícios reais
Все подробности по ссылке: https://loglifeofaghost.com
Только лучшее здесь: https://sunrisedyecolor.com
Полная статья здесь: https://marketing99.ru
Лучшее прямо здесь: https://frentian.com
NFT playground – Educational yet entertaining, content seems suitable for younger audiences.
Последние обновления: https://wareefstore.com
Fortune Rabbit wilds expansivos: já cobriu a tela inteira? Mostra o print!
Vbet 2026: torneio PG Soft com R$500 mil em prêmios – já entrou no Jogo do Tigrinho?
learn more here – A helpful place to meet others and expand your understanding.
melbetiphone.ru melbetiphone.ru .
опубликовано здесь кракен darknet
PG Soft torneios semanais: R$100k–R$500k em prêmios – já ganhou algo no Tigrinho?
online prescription for ed Pharmacological Institute best ed pills online
Fortune Ox explosão de símbolos: já ganhou 1000x com uma única ativação?
Fortune Tiger no modo demo: quem treina antes de depositar? Confessa aqui
Fortune Tiger com turbo ligado: quem aguenta 500 giros seguidos sem parar?
Lille 0-1 Crvena Zvezda 2026 Europa League Red Star surprise
Newcastle 6-1 Qarabağ 2026 Europa League Gordon half-time quadruple
Lille 0-1 Crvena Zvezda 2026 Europa League Red Star surprise
Betboom VIP: quem já subiu de nível só jogando Fortune Tiger? Benefícios reais
PG Soft cashback diário 12%: quem já acumulou R$200+ só de devolução?
click here – Streamlined design and intuitive flow, very pleasant experience.
pin up 634: pin up
Fortune Rabbit tá pagando mais consistente que o Tigrinho? Mostra seu maior respin nos comentários!
страница кракен ссылка kraken
maskchallenge USA site – Creative presentation, layout helps users stay on track easily.
https://affariat.com/user/profile/173870
check the shop – Clear sections and responsive pages allow easy exploration.
Текущие рекомендации: https://vimall24.com
Самое важное сегодня: https://formuladomina.ru
Самое важное сегодня: https://miapharmer.com
Самое полезное для вас: https://languillc.com
Дополнительная информация: https://mt-nara.com
https://corevitalpharmacy.shop/# Cialis over the counter
see more – Appears trustworthy and regularly provides informative content for users.
discover more – Creative and one-of-a-kind, really piqued my interest.
ja-rastu.ru
http://otdelka-daci.ru/index.php?subaction=userinfo&user=esaqezurubi
see more – Unique perspective with engaging ideas, very appealing overall.
https://teplomontag96.ru/blog/123/#comment_75805
Читать расширенную версию: https://kra-32-at.ru
Обязательно к прочтению: https://jeevikaa.com
нажмите здесь kraken ссылка тор
Самое интересное: https://hvd-store.com
Наша лучшая подборка: https://svetilnik-svetodiodnyj-ulichnyj.ru
Узнать больше здесь: https://fmob.ru
на этом сайте kraken актуальные ссылки
нарколог психолог нарколог психолог .
visit homepage – Clear layout and organized content make it very easy to navigate.
https://pharmacologicalsciences.com/generics.html cialis
go to site – It gives off the impression of being informative and worth reviewing.
аксессуар с крестом gothic
Неплохая цепочка с крестом, если подбирать украшение под темный гардероб. Серебристый цвет и лаконичная форма смотрятся вполне удачно
visit this site – Charming layout and friendly content, makes browsing a pleasure.
нарколог на дом краснодар narkolog-na-dom-v-krasnodare.ru .
shop stone harbor – Tidy interface with organized content ensures browsing feels natural.
discover more – Looks like a lively event, the website presents it very well.
Jogo do Tigrinho ao vivo com chat: interação com outros brasileiros vale?
контора мелбет контора мелбет .
https://pinupkz.online/# pin up casino
Fortune Ox explosão de símbolos: já ganhou 1000x com uma única ativação?
нажмите здесь kraken маркетплейс зеркало
https://rivalo.net.co/
Rivalo es una plataforma de apuestas y casino virtual que tiene operacion en Colombia cumpliendo con la normativa vigente, con el aval de la licencia de Coljuegos , por ende, tienes la certeza de que tus depositos, retiros y datos personales se encuentran amparados por las leyes de Colombia .
take a look – The site feels vibrant and fun, really captures attention.
take a look – Beautiful site design with intuitive navigation, makes information easy to find.
PG Soft top 3 cassinos 2026: Pix, bônus e suporte em português
Jogo do Tigrinho cashback sem limite: qual site tá pagando mais em 2026?
на этом сайте kraken ссылка зеркало
enter site – The artistic concept is clear and well put together.
PG Soft 2026: quem tá lucrando mais com cashback diário ou giros grátis?
озеро чео лан пхукет экскурсии экскурсия рыбалка на пхукете
get ed meds today Pharmacological Sciences Research Institute erectile dysfunction meds online
Только лучшие материалы: https://admkuzino.ru
Читать больше на сайте: https://conservaroot.ru
Самое важное сегодня: https://conservaroot.ru
Лучший выбор дня: https://istnews.ru
Последние обновления: https://prodmagaz.ru
see more – Clear layout with practical details, very easy to navigate.
серебристая подвеска крест
Смотрел аксессуары в готическом стиле и увидел эту цепочку. Понравилось, что у нее понятный дизайн и она легко комбинируется с базовыми вещами
check out the harbor – Tidy interface and readable text ensure browsing feels natural.
discover collection – A tidy layout highlights quality products in an inviting way.
pin up kz вход pin up
https://fish-pet.com/
Jogo do Tigrinho 2026: aposta R$1 e ganha 100x – já aconteceu com você?
Jogo do Tigrinho Pix R$30: ganha 120 giros + cashback 15% hoje!
Наша лучшая подборка: https://orda-gazeta.ru
Самое полезное для вас: https://radiolom-msk.ru
Все самое свежее здесь: https://oktvesti.ru
Текущие рекомендации: https://renetop.ru
Полная статья здесь: https://avtoarh.ru
open link – Holiday spirit comes alive here, enjoyable and engaging experience.
open link – A site that seems appealing and worth spending some time on.
PG Soft mobile vs desktop: onde você ganha mais em 2026?
https://corevitalpharmacy.shop/# Tadalafil Tablet
купить цепочку с крестом на WB
Для любителей y2k и gothic украшений может зайти эта подвеска с крестом. На фото выглядит как акцентный, но не слишком перегруженный аксессуар
Fortune Tiger com turbo ligado: quem aguenta 500 giros seguidos sem parar?
PG Soft no Pix: melhores cassinos pra depositar R$1 e sair girando em 2026
melbet register melbet register .
vavada casino сайт vavada casino сайт .
PAOK 1-2 Celta Vigo 2026 Europa League thriller result
вавада официальный вход вавада официальный вход .
melbet скачать казино melbet скачать казино .
смотреть здесь кракен darknet
Jogo do Tigrinho ao vivo: quem já ganhou assistindo transmissão no cassino online?
PG Soft top cassinos Pix 2026: lista com bônus reais e saque em minutos
вавада регистрация В мире азартных игр и онлайн-развлечений каждый ищет место, где удача улыбается чаще, а острые ощущения встречаются на каждом шагу.
Jogo do Tigrinho ao vivo: quem já ganhou big win assistindo dealer brasileiro?
Jogo do Tigrinho 2026: aposta R$1 e ganha 100x – já aconteceu com você?
Читать расширенную версию: https://grand-fish.ru
Обновлено сегодня: https://porta-plus.ru
Novibet tá bombando com roleta diária: 50–200 giros grátis no Fortune Tiger toda noite
Обновления по теме: https://csa-pnzgu.ru
Все подробности по ссылке: https://gz-neft-khantos.ru
Только лучшее здесь: https://visatuning.ru
PG Soft top 3 cassinos 2026: Pix, bônus e suporte em português
Lille 0-1 Crvena Zvezda 2026 Europa League Red Star surprise
Jogo do Tigrinho ao vivo: quem já ganhou assistindo transmissão no cassino online?
Fortune Tiger cartinha misteriosa: quantas vezes você já pegou x10?
Betboom parceria oficial PG Soft: cashback diário 10% no Fortune Tiger sem limite
visit solar orchard – Clear layout and structured content make navigation effortless.
Jogo do Tigrinho multiplicador aleatório: melhor que respins fixos? Opine!
готическая цепочка с крестом на WB
Искал цепочку с крестом без лишней вычурности и попался этот вариант на ВБ. По стилю хорошо заходит под y2k, dark и просто повседневные луки
зайти на сайт kraken ссылка зеркало
Hello there! Do you know if they make any plugins to protect against hackers?
I’m kinda paranoid about losing everything I’ve
worked hard on. Any suggestions?
Последние публикации: https://miocardin.ru
Лучший выбор дня: https://krskmedia.ru
Последние обновления: https://expert-centr.ru
Подробности на странице: https://okit-shop.ru
Все лучшее здесь: https://ans-mood.ru
кулон крест готический
Для любителей y2k и gothic украшений может зайти эта подвеска с крестом. На фото выглядит как акцентный, но не слишком перегруженный аксессуар
веб-сайт kraken ссылка зеркало
Думаю заказать пф и изучаю матчасть. Статья помогла понять, что накрутка работает только на подготовленных сайтах. Проверил свой по чек-листу — есть над чем работать.
solar mint deals – Pages are organized neatly and moving around the site is easy and intuitive.
доска пола из лиственницы
кулон с крестом серебристый
На Wildberries попалась интересная цепочка с крестом в gothic стиле. Для тех, кто собирает alt или y2k образ, выглядит вполне уместно
online ed meds Pharmacological Institute buy ed medication online
Заборы под ключ https://dachnie-zabory.ru в Москве и области — изготовление и установка ограждений для дома и участка. Профнастил, штакетник, сетка рабица и 3D заборы. Замер, доставка и монтаж с гарантией качества и соблюдением сроков.
Купить стройматериалы https://stroyrostov161.ru в Ростове-на-Дону: широкий выбор сыпучих и строительных материалов, включая щебень, песок, цемент, штукатурку и шпатлевку. Быстрая доставка и доступные цены для вашего объекта.
pin-up 634 официальный сайт: pin up
Nottingham Forest 3-0 Fenerbahce 2026 Europa League upset in Istanbul
valecovehubzone – Clear layout and navigating is easy and natural.
мелбет войти на сайт мелбет войти на сайт .
PG Soft 2026: qual jogo da série Fortune você acha que vai explodir mais?
Bayern Kompany: Leroy Sané is our funniest player 2026 fun quote
view the outpost – Clean design and responsive pages make the site easy to explore.
snow cove deals – Tidy interface with quick-loading content ensures a smooth experience.
http://corevitalpharmacy.com/# Cialis without a doctor prescription
Jogo do Tigrinho ao vivo com dealer: já jogou versão live? Vale a pena?
Melhor horário pra jogar Jogo do Tigrinho: madrugada ou pico de noite? Conta sua experiência
Modern ground fault sensor monitor the condition of electrical networks and protect equipment. They offer rapid fault detection, high accuracy, and reliability for industrial applications.
valecovemarket – Browsing feels effortless with a clear interface.
Melhor horário pra jogar Jogo do Tigrinho: madrugada ou pico de noite? Conta sua experiência
PG Soft tá liberando cashback 15% todo dia no Fortune Tiger – qual site tá dando mais?
Jogo do Tigrinho 2026: cartinha misteriosa x10 já virou rotina ou ainda é sonho?
вавада ставки на спорт вавада ставки на спорт .
shop ruby meadow – Logical arrangement and simple navigation make the experience pleasant.
bazaarcentral – Navigation is intuitive and pages respond quickly.
Ежедневный обзор: https://aromatniy-magazin.ru/
artisanmarketplace – Pages respond fast and browsing is straightforward.
Эко-бытовая химия http://reporter63.ru/content/view/784903/himiya-dlya-uborki-sekrety-effektivnosti-i-bezopasnosti в Санкт-Петербурге — средства для уборки без вредных компонентов. Эффективная очистка, безопасность для здоровья и окружающей среды. Широкий ассортимент и доставка по городу.
PUPIL OF FATE MOTORS https://auto.ae/pupiloffatemotors автосалон премиум авто в Дубае. Продажа роскошных автомобилей, эксклюзивные модели и индивидуальный подбор. Помогаем выбрать, оформить и доставить авто с гарантией качества и высоким уровнем сервиса.
Jogo do Tigrinho ao vivo com dealer: já jogou versão live? Vale a pena?
discover products here – Organized content and minimal design make navigation natural and easy.
discover more – Simple interface and accessible content help visitors find information quickly.
Moss Harbor Shop – Pages load quickly, and navigation is intuitive and easy.
see the store – Well-organized pages with fast loading create an effortless experience.
скачать melbet скачать melbet .
https://www.greenwichodeum.com/
valecoveshop – Interface is clean and content is easy to find.
ridgecorner – Pages load rapidly and interface feels clean.
услуги по согласованию перепланировки услуги по согласованию перепланировки .
Fortune Tiger big win ao vivo: já gritou gol no meio da sala? Conta!
melbet регистрация melbet регистрация .
вавада оф сайт вавада оф сайт .
вавада официальный вавада официальный .
Промокод Пятёрочка доставка http://reporter63.ru/content/view/785017/promokod-pyaterochka-dostavka-vygodnye-vozmozhnosti-dlya-pokupok-onlajn актуальные скидки и купоны на заказ продуктов онлайн. Получайте выгодные предложения, снижайте стоимость доставки и экономьте на покупках в Пятёрочке с рабочими промокодами.
Компания DARKLUM https://darklum.ru/catalogue предлагает широкий ассортимент светодиодных светильников различного назначения для коммерческих и жилых помещений как внутреннего, так и уличного освещения. В каталоге представлено более 5 000 моделей различных форм-факторов, среди которых Вы без труда сможете выбрать оптимальный вариант.
Менопауза и перименопауза https://menopower.ru симптомы, приливы и гормональные изменения. Полезные советы для женщин 45+, рекомендации по здоровью, образу жизни и управлению финансами для комфортного прохождения этого периода.
Проверенные адвокаты Москвы https://isk1.ru квалифицированная юридическая помощь и защита в суде. Решение сложных правовых споров, сопровождение дел и профессиональный подход к каждому клиенту для достижения результата.
Санитарные системы https://bio-ecopro.ru для мероприятий и стройплощадок — аренда мобильных туалетов, умывальников и санитарных модулей. Доставка, обслуживание и вывоз. Надежные решения для фестивалей, концертов, стройки и массовых событий.
browse items – The clean design and fast pages make it simple to find information.
Live scores today for all sports, comprehensive coverage updated every few seconds
see details – Simple layout and clear navigation make exploring effortless.
https://pharmacologicalsciences.com/viagra.html ed pills
valecovemarketplace – Layout is tidy and exploring the site feels smooth.
PG Soft 2026: Mahjong Ways 2 tá pagando mais que Fortune Tiger em cascades?
Hello! I know this is kind of off-topic however I had to ask. Does operating a well-established website like yours require a massive amount work? I’m brand new to blogging but I do write in my journal on a daily basis. I’d like to start a blog so I will be able to share my experience and feelings online. Please let me know if you have any kind of ideas or tips for new aspiring blog owners. Thankyou!
buy viagra sexual porno xxx adults pills
посмотреть в этом разделе кракен онион тор
collectiveemporium – Interface is neat and browsing feels intuitive.
ed online meds Pharmacological Institute cheapest ed online
check out river cove – Simple interface, quick-loading content, and intuitive navigation throughout.
It’s actually a great and useful piece of info. I’m satisfied
that you shared this useful information with us. Please stay us informed like this.
Thank you for sharing.
Jogo do Tigrinho Pix R$30: ganha 120 giros + cashback 15% hoje!
PG Soft top cassinos Pix 2026: lista com bônus reais e saque em minutos
https://pharmacologicalsciences.com/cialis.html viagra
мелбет ставки на спорт мелбет ставки на спорт .
зайти на сайт kraken onion зеркала
vavada betting russia vavada betting russia .
shop sky harbor – Fast pages and clear structure make moving around the site effortless.
Stake 2026: Jogo do Tigrinho com RTP auditado + saque Pix em 5 minutos
PG Soft lançamentos 2026: Fortune Mouse 2 ou Fortune Dragon – qual você quer primeiro?
coveartisanoutlet – Well-structured layout makes moving through the site simple.
this website – Neat design and fast-loading pages allow for effortless exploration.
view shop – The site is user-friendly with a tidy interface and clear navigation.
artisanzone – Browsing is smooth and information is easy to access.
Jogo do Tigrinho Pix R$30: ganha 120 giros + cashback 15% hoje!
Решил накрутка поведенческих факторов заказать и нашёл статью с рекомендациями по выбору подрядчика. Цены, вопросы, тестовый период — всё описано.
see what’s inside – The interface is clean and responsive, making browsing clear and easy.
What a data of un-ambiguity and preserveness of valuable experience concerning unexpected feelings.
buy viagra sexual porno xxx adults pills
https://novamenpharmacy.com/# buy Viagra online
bazaarcorner – Layout is organized and navigation feels natural.
PG Soft mobile vs desktop: onde você ganha mais em 2026?
see details – Everything is presented clearly, helping users find what they need quickly.
wavemeadowcorner – Layout is organized and browsing flows smoothly.
visit homepage – Navigation is intuitive and content is easy to access throughout.
Fortune Ox explosão de símbolos: já ganhou 1000x com uma única ativação?
visit raven willow – The pages are easy to navigate and everything is organized neatly.
see the store – Tidy layout and easy-to-read content make exploring enjoyable.
Jogo do Tigrinho Pix R$20: ganha 100 giros + 25% extra no primeiro depósito hoje!
Jogo do Tigrinho ao vivo com narração: já jogou versão com locutor em português?
Pharmacological Institute Pharmacological Sciences Research Institute Pharmacological Institute
artisanbazaarhub – Browsing is simple and content is accessible.
alpinehubstore – Navigation is intuitive and content is accessible.
check out pine harbor – Navigation feels intuitive, and pages load efficiently.
Mint Meadow Emporium – Smooth navigation and well-structured pages create a pleasant browsing experience.
this website – Clear sections and a tidy layout make browsing straightforward.
browse here today – A clean setup where items are easy to spot and navigate through.
valecovemarket – Browsing feels effortless with a clear interface.
explore pebble trading – Simple interface with fast-loading pages enhances the experience.
canyonbazaar – Layout is clear and moving through pages is straightforward.
official page – The interface is tidy and navigation feels effortless.
view the outpost – Fast-loading pages and logical layout make navigation easy.
Искал надёжный сервис по накрутке поведенческих факторов сайта и в статье нашёл сравнение популярных вариантов. Цены, плюсы, минусы — всё в таблице. Очень удобно.
view shop – Pages load quickly, and the layout makes exploring simple and intuitive.
explore pebble trading – Simple interface with fast-loading pages enhances the experience.
valecovemarketplace – Layout is tidy and exploring the site feels smooth.
enter the store – Clean pages, quick responsiveness, and very easy to move around.
https://pharmacologicalsciences.com/generics.html levitra
erectile dysfunction medication online Pharmacological Sciences get ed prescription online
wheatbazaar – Smooth navigation with fast-loading pages makes browsing simple.
Fortune Ox hold & win: quem já segurou 15 símbolos e explodiu a tela?
discover more – Clean sections and fast pages make exploring effortless.
see what’s inside – Layout is tidy, and finding content feels effortless.
Hi it’s me, I am also visiting this web page daily, this site is really fastidious and the viewers are truly sharing fastidious thoughts.
buy viagra sexual porno xxx adults pills
бк мелбет [url=https://vt-fiddle.com/]бк мелбет[/url] .
pearl harbor store – The interface is straightforward, and finding content is easy.
вавада зеркало на сегодня вавада зеркало на сегодня .
valecoveshopzone – Smooth navigation and pages open quickly.
visit this store – Everything is easy to read and well arranged for users.
tradingoutlet – Layout is well-structured and moving between sections is easy.
rainharbor marketplace – Simple design with organized content makes browsing effortless.
visit hazelharbortrading – Layout is clear and pages load quickly, making browsing effortless.
outpost homepage – Fast-loading pages with a neat interface create a pleasant browsing experience.
check store page – Pages are structured well and moving through content feels effortless.
Hi to every body, it’s my first pay a visit of this webpage; this blog consists of amazing and in fact good stuff in favor of visitors.
buy viagra sexual porno xxx adults pills
Телеграм-канал казино Икс — ваш персональный информатор о бонусах и зеркалах. Подпишитесь на казинох tg за секунду.
open silk meadow – Simple design with a logical structure makes exploring effortless.
see more details – Pages are structured well, providing a smooth browsing experience.
https://corevitalpharmacy.com/# CoreVital Pharmacy
artisanoutlet – Clean structure and content is easy to access.
zencorner – Browsing is intuitive and information is clearly displayed.
brook outpost – Clear sections make it easy to navigate without confusion.
open link – Simple and clean design helps users move through pages easily.
see inside harborstoneoutpost – Clear structure and quick-loading pages create a pleasant experience.
online quickstone – Content is organized clearly, and navigating the site feels effortless.
Задумался, где поведенческие факторы купить, и нашёл статью с обзором проверенных сервисов. Автор даже приводит цены и сравнивает качество трафика. Очень помогло с выбором.
Marble Cove Shop – Pages respond quickly and content is arranged clearly for easy browsing.
продвижение по трафику продвижение по трафику .
Jogo do Tigrinho Pix R$5: recebe raspadinha com até 150 giros garantidos
go to this page – Everything is clearly presented, and moving between sections is easy.
visit the outpost – Well-organized sections make exploring content easy.
Wolves 2-2 Arsenal 2026 Premier League dramatic draw
coveartisanoutlet – Well-structured layout makes moving through the site simple.
woodshop – Pages load quickly and exploring the site is effortless.
Betano tá dando boost 25% em odds do Fortune Tiger toda sexta-feira!
Jogo do Tigrinho tá pegando fogo em 2026! Qual cassino tá te dando mais giros grátis hoje?
browse items – Everything is arranged well and loads promptly for users.
visit the harborstone bazaar – Simple pages and clear content make it easy to explore.
browse sea meadow – Organized sections and clear content make moving around simple.
access quick harbor portal – Layout is minimal, interface is friendly, and browsing feels natural.
Maple Grove Emporium – Smooth browsing experience thanks to structured pages and clear headings.
explore the store – Simple structure and intuitive layout make moving between sections easy.
visit the page – The design is clean and browsing flows naturally.
covemarketplace – Pages load fast and navigation feels smooth.
view this shop – Pages load well, and navigating the site is simple and comfortable.
artisanbazaarhub – Browsing is simple and content is accessible.
продвижение по трафику сео prodvizhenie-sajtov-po-trafiku1.ru .
view shop – The design keeps things organized and easy to explore.
visit homepage – Fast pages and structured design help users explore easily.
explore the outpost – Fast-loading pages with straightforward layout, browsing feels natural.
http://tesla.1stbb.ru/viewtopic.php?f=2&t=142
https://pharmacologicalsciences.com/cialis.html Pharmacological Institute
visit this website – The layout is tidy, pages load promptly, and everything is easy to explore.
quartz orchard online – Layout is clear, interface is friendly, and navigation feels effortless.
erectile dysfunction medications online Pharmacological Institute where to buy ed pills
discover more – Tidy sections and fast-loading content ensure a pleasant user experience.
corneremporium – Layout is organized and browsing flows smoothly.
check store page – Layout is clean, and finding information is simple.
coveartisanoutlet – Well-structured layout makes moving through the site simple.
Pharmacological Institute Pharmacological Sciences Research Institute Pharmacological Sciences
click to view – Layout is straightforward, and navigating feels easy.
Ownership updates, club sales and investment news tracked
скачать мелбет скачать мелбет .
browse the emporium – Design is simple, pages load fast, and content is accessible.
explore the shop – A well-structured interface makes browsing straightforward and enjoyable.
вавада играть вавада играть .
discover products here – Clear interface and fast-loading pages make exploring simple.
explore this shop – The site is structured nicely and pages are simple to follow.
vavada рабочее vavada рабочее .
explore the store – Logical flow and organized content make navigation easy.
outposthubstore – Pages load rapidly and browsing feels intuitive.
visit quartz meadow – Pages load fast and the site structure is straightforward.
click this link – The interface is simple, making information quick to locate.
great post to read https://letsexchange.cc/
seo курсы seo курсы .
check the site – Pages load efficiently, and finding information is effortless.
https://pharmacologicalsciences.com/edpills.html ed pills
https://primelinepharmacy.shop/# online ed drugs
check out the outpost – Interface is neat, content is clear, and moving around is smooth.
browse items – Pages are clean and navigation feels natural.
explore the meadow site – Structure is clear, and moving between pages feels natural.
view this shop – Layout is clean and browsing through sections is very easy.
open this page – Content loads fast and the navigation feels natural.
https://faunazoo.ru/
meadowoutlet – Interface is tidy and browsing flows naturally.
Jogo do Tigrinho ao vivo com narração: já jogou versão com locutor brasileiro?
Daily Summary: https://sp-bancarcare.com/news/121162/
Top picks for you: https://oe18.org/newsroom/2026/03/16/betic-casa-da-gioco-online-recensione-2025-di-premio-di-nuovo-giochi/
PG Soft no celular 5G: big win em qualquer lugar do Brasil – já aconteceu?
explore the harbor – Pages load fast and the structure is logical and clear.
discover the outpost – Clean design and logical layout make moving through the site easy.
More on our website: https://alqasrglass.com/baccarat-inside-nj-navigating-the-web-gambling-enterprise-boundary/
discover more – Content is easy to read and moving between pages feels natural.
Jogo do Tigrinho Pix R$30: ganha 120 giros + cashback 15% hoje!
click this link – Neat layout and organized content help users browse effortlessly.
заказать проект перепланировки квартиры proekt-pereplanirovki-kvartiry24.ru .
explore this shop – Layout is clean, and moving between pages feels natural.
explore here – Content is clearly presented, navigation feels effortless, and layout is tidy.
Right now: https://hiweblabs.com/2026/03/11/sunny-leone-inside-bluish-pornography-movies/
check this page – Information is clearly displayed, making navigation simple.
visit sage harbor – Clear structure and responsive pages make navigation smooth.
click this site https://letsexchange.cc/
discover the icicle outpost – Pages load quickly, and the design keeps things easy to follow.
go to this page – Layout is logical and moving from section to section is easy.
https://betfair.cat/
Betfair es un sitio de apuestas y casino en linea con reputacion global , reconocida por su historial de mas de veinte anos y por ser pionera en el modelo de bolsa de apuestas (Exchange) .
nightorchardoutpost – Clean and simple layout, makes browsing through pages effortless.
explore the store – Clear sections and intuitive navigation make moving through the site effortless.
explore plum cove outpost – Well-organized content with smooth browsing enhances the experience.
official page – Neat design and logical layout make browsing easy and enjoyable.
Potrebujete se prestehovat? stehovaci sluzby Praha preprava nabytku, spotrebicu a osobnich veci. Baleni, demontaz a montaz nabytku, stehovaci sluzby a doprava. Spolehlivy servis, dostupne ceny a pecliva prace bez poskozeni.
visit the shop – Layout is straightforward, navigation feels intuitive, and content is clear.
this online marketplace – Layout is straightforward, making browsing very smooth.
weblink https://bitmix.app
check it out here – Everything feels organized and moving around the site is simple.
nightfallharboroutlet – Layout is tidy and pages load quickly, making browsing seamless.
discover the honeymeadow site – Pages load without delay, and layout is easy to understand.
https://pharmacologicalsciences.com/edpills.html Pharmacological Sciences Research Institute
web https://daobase.io/
Good day I am so thrilled I found your website, I really found you by error, while I was researching on Bing for something else, Regardless I am here now and would just like to say many thanks for a remarkable post and a all round enjoyable blog (I also love the theme/design), I don’t have time to read it all at the minute but I have book-marked it and also added your RSS feeds, so when I have time I will be back to read more, Please do keep up the fantastic b.
buy viagra sexual porno xxx adults pills
see this link – Minimalist design makes finding content fast and straightforward.
Lavender Harbor Outpost – Smooth interface and logical layout make exploring simple.
how to get ed pills Pharmacological Sciences Research Institute get ed prescription online
melbet скачать melbet скачать .
продвижение сайтов по трафику продвижение сайтов по трафику .
see the collection – Pages are easy to move through and information is well organized.
this online marketplace – Navigation is clear, and the site feels easy to explore.
shop now – Everything is easy to browse and the content is visually clear.
сео продвижение сайта по трафику сео продвижение сайта по трафику .
согласование перепланировки под ключ согласование перепланировки под ключ .
see honeycove outpost – Structure is tidy, making it simple to find information.
chestnutharboroutpost – Pretty straightforward layout, browsing feels quick and efficient here.
букмекерская компания мелбет букмекерская компания мелбет .
сео продвижение по трафику clover сео продвижение по трафику clover .
see the collection – Everything loads quickly, and finding information is hassle-free.
visit this website – It’s easy to explore and content is clearly structured.
discover more – Pages load quickly, and the overall navigation feels natural.
вавада казино онлайн официальный сайт вавада казино онлайн официальный сайт .
вавада играть онлайн вавада играть онлайн .
visit this site – Clean layout and clear presentation make browsing straightforward.
https://primelinepharmacy.shop/# ed meds online
more helpful hints https://daobase.info/
explore this marketplace – Layout is intuitive, design is clean, and browsing is easy.
check it out here – Everything feels well-arranged, making navigation simple.
visit this site – Well-organized layout that makes it easy to find information.
explore this shop – Pages are well-structured, and moving around feels smooth.
цветы и подарки http://www.cvejie-cveti.ru .
Pharmacological Sciences Research Institute Pharmacological Sciences viagra
click here – The interface is tidy and content is easy to understand.
learn more here – Content is clearly presented, making it simple to explore.
see more here – It’s well laid out, so finding relevant info is effortless.
porno izle
Get the facts https://anycoindirect.me
explore this shop – Everything is well structured, making the experience smooth.
Современные онлайн-казино обеспечивают геймерам широкий спектр функций для комфортной игры. Подключение к сервису http://РіРѕСЂРѕРґ-нижняя-тура.СЂС„ реализуется через главный портал или рабочее зеркало.
Что такое актуальное зеркало казино
Действующее зеркало — это дополнительный URL лицензионного портала казино. Такие дубликаты генерируются для гарантирования непрерывного соединения к развлекательной площадке.
Дубликат на сегодня совершенно дублирует возможности базового портала. Пользователи получают схожий путь ко всем возможностям, включая открытие счета, внесение депозита счета и обналичивание выигрышей.
Оформление профиля на главном ресурсе
Процесс регистрации отнимает всего пару секунд. Начинающим участникам требуется:
1. Зайти на основной сайт или текущее подлинное зеркало
2. Кликнуть кнопку “Открыть счет”
3. Указать необходимые сведения
4. Верифицировать email почту
5. Использовать промокод при существовании
После окончания регистрации пользователь приобретает приз за регистрацию, который имеет право содержать даровые спины или cash начисление.
Логин в собственный кабинет
Личный кабинет — это защищенная зона, где клиенты вправе регулировать своим аккаунтом. Для логина требуется ввести логин и код доступа.
В индивидуальном кабинете открыты такие опции:
– Просмотр хронологии платежей
– Применение промокодов
– Регулирование бонусами
– Участие в турнирах
– Контроль возврата средств
– Корректировка учетной записи
Поощрения и предложения
Развлекательная сервис обеспечивает щедрые бонусы:
Начальный комплект — начинающие обретают существенное вознаграждение на первые взносы.
Даровые спины — начисляются как при оформлении, так и в ходе разнообразных промо.
Кэшбэк — постоянный возмещение части проигранных сумм.
Купоны — специальные шифры, открывающие выход к специальным бонусам.
Обзор гемблинговых секций
Slots
Библиотека автоматов охватывает множество позиций от топовых производителей. Пользователи откроют как классические слоты, так и инновационные видео-слоты с увлекательной оформлением.
Live казино
Секция Live казино предлагает опцию соревноваться с реальными ведущими в условиях текущего времени. Представлены популярные игры: рулетка, блэкджек, баккара, покер.
Соревнования
Периодические чемпионаты с большими наградными пулами привлекают множество соревнующихся. Лидеры завоевывают финансовые выплаты и особые поощрения.
Мобильная версия и приложение
Адаптивная версия платформы предоставляет право участвовать с всякого аппарата. Структура независимо корректируется под габариты экрана.
Скачать app можно для девайсов на Android и iOS. Портативное ПО имеет всеми функциями десктопной версии.
Как найти актуальное зеркало на сегодня
Действующие линки альтернатив систематически изменяются. Получить актуальную ссылку можно несколькими вариантами:
– Через сервис помощи
– В официальных информационных сетях
– По почтовой подписке
– На специализированных ресурсах
Защита и лицензирование
Лицензионный ресурс функционирует на основе международной лицензии. Все переводы шифруются актуальными технологиями безопасности.
Приватность личных реквизитов сохраняется в стопроцентном размере.
Вывод
Лицензионный домен и его действующие зеркала дарят клиентам круглосуточный выход к качественным игровым услугам. Выгодные вознаграждения, различные игры, квалифицированная служба — все это превращает гемблинговый времяпрепровождение предельно удобным и захватывающим.
Актуальные онлайн-казино предлагают клиентам разнообразие путей для комфортной игры. Официальный портал Sykaaa обеспечивает возможность ко всем сервисам и азартным играм. Однако при наличии технических неполадок на помощь приходят рабочие дубликаты.
Что есть собой действующее зеркало
Дубликат казино — это идентичная версия официального веб-сайта, находящаяся по запасному URL. Легитимное зеркало поддерживает все функции, в том числе открытие профиля, доступ в личный кабинет, поощрения и купоны.
Альтернативный сайт на сегодня дает:
– Стабильный доступ к азартным аппаратам
– Абсолютную конфиденциальность персональных сведений
– Удержание депозита и журнала операций
– Возможность использования всех промо-предложений
Создание аккаунта на главном сайте
Процедура открытия профиля требует пару минут. Новым игрокам необходимо:
1. Войти на основной портал или актуальное зеркало
2. Щелкнуть кнопку «Создать аккаунт»
3. Указать требуемые поля
4. Верифицировать э-мейл почту
5. Ввести купон при наличии
После окончания создания аккаунта игроки получают приз за регистрацию, что может включать free spins или монетарное поощрение.
Логин в личный кабинет
Личный кабинет дает всеобъемлющий мониторинг над игровым ходом. Через индивидуальный профиль возможно:
– Пополнять счет
– Забирать призы
– Использовать купоны
– Отслеживать записи пари
– Участвовать в турнирах
– Приобретать возврат средств
Характеристика премий и специальных предложений
Щедрая призовая схема — ключевое преимущество платформы. Ключевые категории вознаграждений:
Приветственный подарок
Дебютанты обретают щедрое премирование на стартовые вклады. Сумма приза может составлять 100-200% от суммы пополнения.
Бесплатные вращения
Халявные раунды даются для известных слотов. Число free spins варьируется от 10 до 500 штук.
Кэшбек
Еженедельный или ежемесячный отдача доли потерянных средств. Обычный размер кэшбека — 5-15%.
Состязания
Постоянные состязания с солидными премиальными фондами. Конкурсанты соревнуются за верхние позиции в таблице лидеров.
Портативная версия и приложение
Адаптивная версия дает возможность играть с всякого аппарата. Геймеры могут загрузить софт для iOS и Android или использовать интернет версию.
Выгоды мобильного программы:
– Оперативная загрузка автоматов
– Удобный UI
– Push-уведомления о акциях
– Доступ через отпечаток пальца
Слоты и Live казино
Игровая база включает тысячи наименований от лидирующих производителей.
Востребованные типы автоматов:
– Стандартные машины
– Видеослоты с бонусными уровнями
– Джекпот слоты
– Megaways слоты
Live игорный зал
Категория live казино предлагает партию с настоящими крупье. Представлены стандартные варианты:
– Французская рулетка
– Blackjack
– Baccarat
– Карибский покер
Как найти рабочее зеркало
Обрести актуальную линк на зеркало возможно несколькими вариантами:
1. Зарегистрироваться на емейл-уведомления
2. Отслеживать за апдейтами в соц сетях
3. Написать в департамент поддержки
4. Заложить действующее зеркало в избранное
Вывод
Главный ресурс и его действующие зеркала обеспечивают непрерывный доступ к азартным автоматам. Великодушные поощрения, множественные промокоды, эргономичное мобильное приложение и отличная техподдержка поддержки создают азартный опыт максимально комфортным и защищенным.
курсы seo kursy-seo-12.ru .
why not find out more https://daobase.online
click here now https://letsexchange.cc
https://pharmacologicalsciences.com/levitra.html Pharmacological Institute
official source https://daobase.info
try this page – Smooth layout and clear sections make browsing enjoyable.
Вход к порталу и рабочие ссылки
Современные сетевые казино обеспечивают пользователям огромный ассортимент развлечений. Официальный сайт Рльдорадо организует безопасный переход ко всем функциям. Тем не менее иногда происходят обстоятельства, когда требуется альтернативный способ доступа.
Что означает собой рабочее зеркало
Действующее зеркало — это абсолютная дубликат главного сайта с запасным URL расположением. Копия сегодня дает возможность преодолевать потенциальные ограничения и поддерживать стабильный вход к выбранным слотам.
Официальное зеркало содержит полными возможностями, что и центральный сайт:
– Совокупный ассортимент развлечений
– Собственный аккаунт с зафиксированными сведениями
– Полные подарки и предложения
– Проверенные денежные операции
Создание аккаунта и вход в казино
Процесс открытия аккаунта на платформе отнимает пару моментов. Свежим игрокам нужно:
1. Зайти на функционирующее зеркало сейчас
2. Щелкнуть опцию «Регистрация»
3. Заполнить нужные информацию
4. Активировать e-mail почту или номер телефона
5. Получить бонус за оформление
Доступ в собственный аккаунт выполняется с помощью указание ID и секретной комбинации.
Характеристика поощрительной структуры
Богатая наградная программа — важнейшее преимущество платформы. Игроки получают разнообразные поощрения:
Приветственные награды
Новые пользователи имеют возможность рассчитывать на выгодный бонус за регистрацию. Как правило это комплект возможностей, объединяющий:
– Частичную премию к стартовому депозиту
– Безвозмездные спины
– Extra деньги на аккаунт
Промокоды и эксклюзивные возможности
Постоянные промокоды дают возможность активировать экстра преимущества. Использовать их возможно в специальном поле персонального профиля.
Фриспины и возврат средств
Free spins — это вариант играть игры без применения персональных средств. Возврат предполагает долевой отдачу потерянных финансов.
Библиотека слотов
Развлекательная ресурс предлагает внушительную подборку развлечений.
Видеослоты
Многообразие слотов удивляет представление. Есть классические трехбарабанные аппараты и актуальные видеослоты с увлекательной графикой.
Live игры
Зона Live казино переносит игроков в обстановку настоящего развлекательного дома. Квалифицированные операторы ведут раунды в живом формате.
Состязания и таблицы лидеров
Постоянные конкурсы добавляют остроты и гарантируют перспективу получить крупные суммы.
Карманная реализация и софт
Современные решения позволяют участвовать в любимом пространстве. Портативная версия самостоятельно оптимизируется под размер устройства.
Загрузить программу можно для операционных ОС iOS и Android. Приложение гарантирует:
– Быстрый вход
– Устойчивую функционирование
– Push-сообщения об бонусах
– Удобный дизайн
Платежные действия
Казино работает с различные способы депозита и снятия средств:
– Кредитные счета
– Цифровые сервисы
– Крипто
– Банковские отправки
Все операции осуществляются через безопасное соединение, что подтверждает сохранность конфиденциальных информации.
Департамент support
Компетентная служба помощи функционирует 24/7. Контактировать с операторами допустимо через:
– Живой-чат
– E-mail почту
– Телефон
– Медиа каналы
Заключение
Основной сайт и его функционирующее зеркало предоставляют игрокам надежный и приятный вход к интересным занятиям. Щедрые награды, большой выбор автоматов и отличная ассистанс формируют игру крайне комфортной и выгодной.
Обзор основного веб-сайта
Современное онлайн-казино предоставляет своим пользователям широкий выбор возможностей и бонусов. Главный ресурс казино Vovan действует непрерывно, предоставляя путь к востребованным слотам, live-казино и многочисленным кампаниям.
Действующее зеркало: путь к ресурсу
Что такое дубликат казино
Копия является собой полную дубликат главного сайта с альтернативным сетевым адресом. Рабочее зеркало обеспечивает клиентам преодолевать ограничения и обеспечивать постоянный подключение к выбранным играм.
Как обнаружить актуальное зеркало сегодня
Действующие линки на основное зеркало размещаются через:
– Email новостнуюленту
– Проверенные социальные сети
– Сервис поддержки
– Affiliated площадки
Регистрация на платформе
Ход открытиясчета
Оформление занимает буквально минут и содержит такие этапы:
1. Открытие на оригинальный сайт или актуальное зеркало
2. Клик элемента “Открытьсчет”
3. Ввод контактных реквизитов
4. Проверка аккаунта или мобильного
5. Формирование секретнойкомбинации
Приз за регистрацию
Свежие игроки приобретают щедрые стартовые бонусы:
– Финансовые деньги на кошелек
– Фриспины для игр
– Расширенный коэффициент кешбэка
– Уникальные купоны
Логин в личный профиль
Зарегистрированные клиенты имеютвозможность произвести авторизацию через главный портал или рабочее зеркало. Для этого нужно набрать никнейм и ключдоступа, установленные при оформлении.
Инструменты персонального аккаунта
В личном кабинете имеются основные опции:
– Контроль учетными информацией
– Зачисление депозита
– Вывод денег
– Применение кодов
– Проверка журнала игр
– Включение в турнирах
Вознаграждения и кампании
Разновидности бонусов
Казино награждает своих игроков разнообразными призовыми системами:
– Вступительный комплект — выгодные вознаграждения на стартовые вклады
– Халявныеспины — дополнительные спины в популярных играх
– Возврат — еженедельный возврат части потерь
– План верности — уникальные привилегии для активных игроков
Промокоды и их ввод
Уникальные ваучеры дают бонусные вознаграждения. Для использования требуется набрать комбинацию в соответствующее окно в собственном аккаунте.
Азартный набор
Слоты
Коллекция игровых симуляторов включает сотни названий от топовых производителей:
– Классические симуляторы
– Видео развлечения
– Прогрессивные игры
– Брендовые игры
Live казино
Секция Live-казино предлагает взаимодействие с профессиональными дилерами в формате онлайн времени:
– Рулетка
– Блэкджек
– Баккара
– Casinopoker
Конкурсы
Систематические турниры с большими выигрышными пулами устраиваются постоянно. Участники сражаются за первенство в списке.
Мобильная версия и софт
Mobile версия веб-сайта
Основной сайт целиком адаптирован для смартфонных гаджетов. Участники имеютвозможность запускать автоматы прямо через веб-навигатор без потребности скачивания.
Софт для инсталляции
Авторское карманное программа предоставляется для установки на устройства с рабочими системами Android и iOS. APP дает:
– Мгновенный доступ к развлечениям
– Надежную операционность
– Моментальные-сообщения о промо
– Комфортный оформление
Резюме
Основной ресурс казино и его рабочие зеркала обеспечивают игрокам абсолютный вход к отличным игровым развлечениям. Солидные подарки, всевозможные акции, комфортная смартфонная версия и компетентная сервис превращают азартный досуг предельно enjoyable и выгодным.
see more details – Pages load without delay, interface is easy to follow, and browsing is comfortable.
check it out here – Everything is easy to find and navigation feels intuitive.
check it out here – Everything loads fast, and navigating the sections is effortless.
erectile dysfunction meds online Pharmacological Institute cheap ed meds
заказать проект перепланировки квартиры в москве proekt-pereplanirovki-kvartiry24.ru .
промокод на регистрацию 1хбет
description https://mixmy.money
Характеристика официального ресурса
Актуальные виртуальные казино предоставляют участникам обширный спектр услуг и перспектив. Главный сайт РёРіСЂС‹ Clubnika предоставляет безопасный возможность к игровым сервисам.
Рабочее зеркало: путь прямо сейчас
Резервный сайт является как точную копию главного портала. Актуальное зеркало дает возможность клиентам преодолевать вероятные ограничения.
Преимущества использования зеркала
Главные достоинства охватывают:
– Непрерывный путь к ресурсу
– Хранение любых возможностей главного веб-сайта
– Безопасность личных сведений
– Такой же возможности
Оформление профиля на сайте
Процесс создания аккаунта характеризуется понятностью и удобством. Новые участники должны:
1. Посетить главный веб-сайт или его зеркало
2. Нажать на кнопку создания аккаунта
3. Указать требуемые данные
4. Активировать электронную почту
5. Совершить начальный доступ
Вознаграждение за регистрацию
Новички получают солидный вступительный бонус. Такое поощрение в состоянии предусматривать:
– Монетарные суммы
– Безвозмездные спины
– Увеличенный коэффициент компенсации
Авторизация в личный кабинет
Зарегистрированные игроки могут оперативно авторизоваться в персональный аккаунт, эксплуатируя учетные данные и шифр. Собственный аккаунт предлагает доступ к:
– Администрированию депозитом
– Истории платежей
– Действующим подаркам
– Параметрам учетной записи
Подарки и предложения
Сайт постоянно организует разнообразные промо-кампании для клиентов.
Разновидности призов
Главные категории вознаграждений:
– Пополнительные призы – доля от суммы пополнения
– Бесплатные вращения – безвозмездные прокруты в автоматах
– Компенсация – возмещение процента потерянных средств
– Конкурсные награды – награды за участие в соревнованиях
Коды
Особые ваучеры помогают заработать дополнительные привилегии. Игроки способны найти их на специализированных ресурсах или получить в новостях.
Мобильная адаптация и софт
Передовые клиенты любят мобильный гейминг.
Опции mobile версии
– Отзывчивый вид для разнообразных гаджетов
– Полный доступ к слотам
– Стремительная подгрузка
– Эргономичное контроль
Скачать софт
Переносное app предоставлено для установки на устройства с операционными ОС Android и iOS. Софт предоставляет:
– Устойчивую работу
– Всплывающие алерты о бонусах
– Мгновенный запуск к желанным играм
Гемблинг портфель
Казино предоставляет внушительную библиотеку игровых развлечений.
Слоты
Библиотека азартных автоматов насчитывает:
– Обычные игры
– Видео аппараты
– Прогрессивные слоты
– Branded игры
Live столы
Категория лайв развлечений предоставляет возможность состязаться с настоящими диллерами. Доступны:
– Рулетка
– Очко
– Baccarat
– Poker
Конкурсы
Регулярные конкурсы обеспечивают клиентам соревноваться за крупные наградные суммы. Турнирная структура модифицируется постоянно.
Банковские операции
Портал предоставляет множество опций пополнения и снятия финансов:
– Пластиковые карты
– Цифровые счета
– Прямые транзакции
– Криптовалюты
Совокупные операции проходят защищенно с применением прогрессивных технологий защиты.
Сервис сопровождения
Компетентная команда саппорта работает постоянно. Коннектиться с консультантами реально через:
– Онлайн чат
– Почтовую почту
– Контактный номер
– Social платформы
Безопасность и лицензирование
Казино оперирует на базе официальной аккредитации. Подобное подтверждает:
– Честность игрового действа
– Сохранность конфиденциальных информации
– Пунктуальные транзакции
– Регулируемый игровой процесс
Вывод
Официальный веб-сайт и его актуальные дубликаты гарантируют клиентам совокупный спектр опций для приятной и профитной досуга. Щедрые бонусы, разнообразные развлечения, компетентная поддержка и надежная система платежей формируют казино превосходным выбором для фанатов игровых развлечений.
official website – A minimal design that makes finding things effortless.
Посетите официальный сайт бренда : http://вип-свет.рф/
melbet mobile app melbet mobile app .
explore the shop – Navigation is effortless and everything feels well placed.
Актуальные бонусы и зеркала Casino X собраны в одном телеграм-канале. Все предложения доступны по ссылке casino x официальный телеграм для подписчиков.
visit this store – Layout is tidy, and navigating through pages feels effortless.
Передовые интернет казино предоставляют геймерам обширный диапазон опций для приятной игры. Впрочем иногда доступ к базовому платформе может являться недоступным. В таких случаях на подмогу приходит казино Ретро, которое обеспечивает постоянный вход ко всем функциям платформы.
Что такое функционирующее зеркало казино
Дубликат — это идентичная реплика официального ресурса, которая хостится по другому адресу. Дубликат сохраняет целый возможности первоначального веб-портала, включая персональный кабинет, счет и данные операций.
Принципиальные преимущества использования зеркала:
– Непрерывный подключение к сайту
– Стопроцентная идентичность опций
– Конфиденциальность персональных сведений
– Сохранение всех привилегий
Как найти функционирующее зеркало в данный момент
Существует множество достоверных путей нахождения актуальной ссылочной информации:
Проверенные сервисы:
1. Email рассылка — руководство регулярно отправляет сообщения с актуальными URL
2. Коммуникационные сети — проверенные страницы постят релевантную данные
3. Служба поддержки — операторы выдают проверенные домены
4. Портативное приложение — обеспечивает обходить блокировки
Открытие счета на официальном портале
Этап оформления требует лишь несколько минут и содержит из следующих этапов:
1. Вход на лицензионный ресурс или функционирующее зеркало
2. Нажатие на элемент «Зарегистрироваться»
3. Указание персональной анкеты
4. Подтверждение электронной почты или контактного номера
5. Применение привилегии за регистрацию при присутствии промокода
Новые клиенты приобретают солидный вступительный приз, который может содержать даровые прокруты, монетарные вознаграждения или cashback.
Доступ в пользовательский кабинет
Логин на платформе осуществляется стандартным способом. Требуется внести никнейм и код доступа, задействованные при создании аккаунта.
Значимые аспекты для защищенного входа:
– Задействуйте надежный пароль
– Активируйте 2FA проверку
– Не сохраняйте пароли на общественных девайсах
– Отслеживайте адресную строку браузера
Описание поощрительной программы
Казино награждает пользователей многочисленными поощрениями и акциями:
Приветственный набор
Свежие игроки имеют возможность надеяться на щедрое вознаграждение за первый депозит. Традиционно это долевая прибавка к переведенной объему плюс даровые спины для топовых слотов.
Регулярные кампании
– Недельный компенсация — возвращение процентной доли списанных средств
– Награды на последующие депозиты
– Уникальные предложения по праздникам
– Соревнования с большими премиальными фондами
Система привилегий
Регулярные пользователи зарабатывают баллы за каждую игру, которые затем конвертируются на реальные денежные призы, даровые прокруты или специальные привилегии.
Купоны: как активировать
Промокоды — это специальные сочетания букв и цифр, гарантирующие право к дополнительным поощрениям.
В каких местах раздобыть свежие промокоды:
– Авторизованные общественные сети казино
– Аффилиатные площадки
– Email-рассылка
– Специализированные форумы
Указывается промокод в предназначенное поле при оформлении или зачислении средств кошелька.
Портативная версия и приложение
Актуальные игроки любят развлекаться с мобильных девайсов. Сайт обеспечивает два варианта для комфортной телефонной игры.
Адаптивная версия
Браузерная версия сама настраивается под габариты экранной панели. Не просит скачивания и оперирует в любом актуальном браузере.
Телефонное приложение
Скачать софт можно для гаджетов на Android и iOS. Преимущества app:
– Молниеносная активация
– Устойчивая работа
– Автоматические-уведомления о поощрениях
– Автономный избегание блокировок
Этап скачивания легок: требуется перейти на ресурс с мобильного девайса и придерживаться предписаниям.
Развлекательный ассортимент
Коллекция аппаратов охватывает несколько тысяч единиц от передовых провайдеров.
Слоты
Развлекательные слоты — самая востребованная раздел развлечений. Размещены стандартные простые автоматы, современные видеослоты с поощрительными уровнями, а также прогрессивные джекпоты.
Live казино
Секция с живыми дилерами предоставляет почувствовать антураж реального казино. Доступны варианты с рулеткой.
Вещание производится в отличном качестве, обеспечивается коммуникация с ведущим и прочими пользователями.
Конкурсы
Регулярно проводятся турниры по всевозможным категориям. Присоединение позволяет получить валютные призы, free spins или эксклюзивные поощрения.
Платежные операции
Портал обеспечивает значительный спектр финансовых способов:
– Кредитные карты
– Электронные платформы
– Крипта
– Финансовые переводы
Минимальная количество депозита — доступная для большинства клиентов. Обналичивание средств производится в кратчайшие интервалы.
Сервис поддержки
Профессиональные сотрудники способны содействовать постоянно. Имеются нижеследующие методы связи:
– Живой-чат
– Email
– Мобильная линия
– Коммуникационные сети
Пояснения на распространенные проблемы можно получить в блоке FAQ.
Резюме
Лицензионный сайт казино и его функционирующие зеркала обеспечивают игрокам совершенный доступ ко всем опциям портала. Значительные привилегии, практичная портативная версия, гигантский ассортимент развлечений и компетентная помощь создают игровой времяпрепровождение исключительно комфортным и конфиденциальным.
seo информационных порталов prodvizhenie-sajtov-po-trafiku1.ru .
Современные онлайн-казино обеспечивают клиентам обширный выбор слотов и щедрые бонусы. Однако для стабильной игры важно осознавать, как обнаружить РЎСѓРєР° и его функционирующие зеркала.
Что такое основной портал казино
Лицензионный веб-сайт казино — это базовая система, где игроки могут пользоваться игровыми развлечениями. Платформа оперирует на легальных правах и располагает всеми обязательными документами.
Ключевые выгоды лицензионного портала:
– Безопасность пользовательских реквизитов
– Честные условия работы
– Обеспеченные платежи
– Квалифицированная поддержка
Актуальное зеркало казино: для чего нужно
Зеркало — это точная дубликат основного сайта, размещенная по альтернативному домену. Рабочее зеркало формируется для гарантирования непрерывного соединения к ресурсу.
Факторы эксплуатации дублирующих ресурсов:
– Блокировка основного сайта
– Технические мероприятия
– Повышенная активность на сервер
Как получить свежее зеркало сейчас
Получить актуальное действующее зеркало можно несколькими способами:
1. Почтовые оповещения — активируйте уведомления на новостную отправку
2. Служба поддержки — проконсультируйтесь в онлайн-чат
3. Социальные сети — мониторьте за постами
4. Тематические ресурсы — надежные источники
Оформление профиля на сайте казино
Процесс открытия счета составляет лишь немного мгновений:
1. Активируйте на опцию “Создать аккаунт”
2. Введите требуемые поля
3. Валидируйте почтовую адрес
4. Примените промокод, если есть
По завершении оконченной создания аккаунта вам откроется доступен пользовательский аккаунт.
Поощрения и бонусные коды
Богатая поощрительная программа — значимое плюс казино:
Награда за регистрацию
Первичные клиенты зарабатывают стартовый презент, который может содержать:
– Финансовый бонус на стартовый пополнение
– Фриспины для игровых машин
– Приветственные деньги
Бонусные коды
Регулярно выходят свежие промокоды, предоставляющие получить экстра бонусы.
Система кэшбека
Регулярные клиенты получают долю проигранных средств на счет.
Действующие промо и турниры
Платформа периодически запускает увлекательные события:
– Weekly чемпионаты
– Сезонные акции
– Лотереи солидных выигрышей
– Схема статусов
Логин в личный раздел
Для логина на ресурс необходимо:
1. Открыть главный адрес или актуальное зеркало
2. Активировать “Войти”
3. Прописать имя пользователя и ключ
В персональном кабинете предоставлены следующие возможности:
– Депозит баланса
– Обналичивание денег
– Проверка журнала транзакций
– Редактирование личными сведениями
Портативная модификация и app
Портативная версия
Responsive вариант портала позволяет участвовать с разных карманного устройства. Интерфейс автоматически подстраивается под диагональ дисплея.
Программа для установки
Установить клиент можно для:
– Android — непосредственная download с сайта
– iOS — скачивание через App Store
Плюсы приложения:
– Быстрый доступ
– Бесперебойная работа
– Push-оповещения об бонусах
– Производительный дизайн
Азартные категории
Слоты
Внушительная галерея игровых слотов от лучших разработчиков:
– Ретро автоматы
– Видео-слоты
– Призовые-автоматы
Live игры
Секция с настоящими операторами обеспечивает:
– European/American Roulette
– Blackjack
– Punto Banco
– Poker
Вещания осуществляются в высоком качестве изображения, формируя эффект реального казино.
Варианты зачисления и снятия
Казино работает с разные финансовые методы:
– Платежные средства
– Цифровые системы
– Криптовалюты
– Wire транзиты
Стартовые значения пополнения и быстрые платежи создают развлечение предельно удобной.
Отдел техподдержки
Опытная группа поддержки работает 24/7 и может ассистировать с любыми вопросами:
– Реалтайм-чат
– Email-переписка
– Телефонная связь
Резюме
Официальный сайт казино и его действующие зеркала дают клиентам безопасный и увлекательный игровой опыт. Выгодные поощрения, функциональная адаптивная версия, богатые автоматы и качественное live-казино формируют эту систему превосходным вариантом для игровых игр.
мелбет скачать на андроид бесплатно vt-fiddle.com .
open this page – Layout feels intuitive and browsing is simple.
eva casino канал
eva casino канал норм
brightharboroutpost – Pages load quickly and the whole experience feels smooth and dependable.
поисковое продвижение по трафику поисковое продвижение по трафику .
https://faithandwealthfinance.com/best-1xbet-promo-code-2026-redluck-bonus-e130/
seo информационных порталов prodvizhenie-sajta-po-trafiku2.ru .
Доступ к порталу и рабочие адреса
Востребованные сетевые казино гарантируют участникам обширный ассортимент развлечений. Центральный портал РЎСѓРєР° гарантирует безопасный переход ко всем возможностям. Впрочем порой происходят ситуации, когда нужно дополнительный способ подключения.
Что представляет собой действующее зеркало
Функционирующее зеркало — это абсолютная реплика главного ресурса с другим URL названием. Копия сегодня обеспечивает избегать вероятные ограничения и обеспечивать стабильный переход к выбранным автоматам.
Легальное зеркало характеризуется идентичными характеристиками, что и центральный сайт:
– Весь каталог слотов
– Индивидуальный раздел с сохраненными сведениями
– Действующие подарки и программы
– Надежные денежные переводы
Создание аккаунта и доступ в казино
Процедура регистрации на портале занимает несколько мгновений. Недавним участникам нужно:
1. Перейти на рабочее зеркало в настоящее время
2. Нажать кнопку «Открыть профиль»
3. Указать нужные сведения
4. Проверить цифровую почту или информацию связи
5. Получить подарок за регистрацию
Авторизация в персональный раздел производится посредством предоставление логина и кода доступа.
Описание бонусной политики
Щедрая поощрительная политика — главное достоинство игорного заведения. Участники зарабатывают всевозможные поощрения:
Вступительные поощрения
Начинающие пользователи вправе ожидать на значительный бонус за оформление. Чаще всего это набор предложений, объединяющий:
– Частичную добавку к первому пополнению
– Подарочные вращения
– Дополнительные суммы на кошелек
Промо-коды и особые опции
Регулярные промокоды позволяют получать призовые преимущества. Применить их можно в предназначенном поле личного аккаунта.
Бесплатные вращения и кэшбек
Бесплатные спины — это шанс играть барабаны без расходования персональных сумм. Компенсация подразумевает определенный возврат утраченных финансов.
Каталог игр
Развлекательная площадка представляет впечатляющую коллекцию автоматов.
Слоты
Разнообразие игровых машин восхищает ожидания. Представлены стандартные ретро машины и актуальные видеослоты с увлекательной графикой.
Live зал
Зона Live казино помещает пользователей в среду подлинного гемблинг зала. Умелые операторы осуществляют сессии в реальном эфире.
Турниры и лидерборды
Регулярные соревнования вносят остроты и дают перспективу заработать внушительные призы.
Портативная реализация и клиент
Современные инновации обеспечивают наслаждаться в любом локации. Портативная форма самостоятельно подстраивается под монитор аппарата.
Установить клиент разрешено для операционных систем iOS и Android. Клиент обеспечивает:
– Быстрый переход
– Надежную работу
– Всплывающие-оповещения об предложениях
– Простой вид
Денежные процедуры
Платформа поддерживает различные способы внесения и изъятия средств:
– Кредитные инструменты
– Электронные платформы
– Цифровые валюты
– Банковские операции
Каждые транзакции осуществляются через защищенное протокол, что гарантирует безопасность личных информации.
Служба ассистанса
Квалифицированная команда support работает всегда. Контактировать с операторами можно через:
– Онлайн-чат
– Почтовую почту
– Контакт
– Социальные платформы
Заключение
Главный веб-сайт и его актуальное зеркало предоставляют пользователям безопасный и легкий переход к интересным занятиям. Щедрые бонусы, разнообразный спектр игр и профессиональная сервис создают времяпрепровождение предельно интересной и доходной.
image source https://tornadocash.app/
my link https://yomix.biz/
go right here https://bitmix.app
learn more here – The website feels fast and organized, making browsing effortless.
узаконивание перепланировки pereplanirovka-kvartir12.ru .
click to view – Everything is well presented, and browsing feels smooth.
https://primelinepharmacy.com/# ed doctor online
turkish porn
Вход к платформе через рабочие зеркала
Клиенты виртуальных казино постоянно встречаются с проблемой ограничения основного портала. Собственно для преодоления этой ситуации разработаны зеркала главного ресурса. https://www.crbpoddorie.ru/ гарантирует полный подключение ко всем возможностям казино.
Что такое действующее зеркало казино
Альтернативный адрес представляет собой точную дубликат оригинального портала с аналогичным набором функций. Единственное несовпадение — это иное имя. Любые сведения участника, в том числе баланс, привилегии и данные партий, остаются неизменными.
Достоинства использования зеркал
Функционирующие зеркала имеют рядом значимых плюсов:
– Постоянный переход к предпочитаемым слотам
– Совершенная защита индивидуальных параметров
– Неизменность всех опций индивидуального кабинета
– Опция взятия бонусов и присутствия в акциях
Регистрация на официальном сайте
Ход оформления чрезвычайно прост и занимает пару минут. Новые игроки могут претендовать на крупный начальный поощрение за создание аккаунта.
Этапы создания аккаунта
1. Доступ на легальный портал или его альтернативу
2. Активация на опцию “Регистрация”
3. Заполнение необходимых сведений
4. Верификация электронной почты
5. Ввод бонусного кода (когда имеется)
Поощрения и кампании для пользователей
Платформа радует своих пользователей многочисленными бонусными системами.
Базовые типы призов
Начальный приз — солидное начисление для новых участников, что может включать материальные средства и безвозмездные спины.
Фриспины — шанс запускать в востребованных игровых машинах даром.
Возврат средств — долевой компенсация проигранных денег, который выплачивается еженедельно или ежемесячно.
Специальные коды — уникальные последовательности, предоставляющие дополнительные преимущества.
Личный кабинет: возможности и настройки
Индивидуальный раздел обеспечивает совершенный регулирование над персональным опытом. Тут имеются:
– Управление средствами
– История переводов
– Текущие бонусы
– Параметры охраны
– Верификация профиля
Смартфонная вариант и софт
Новейшие участники предпочитают портативность. Ресурс дает 2 варианта для участия с портативных гаджетов.
Приспособленная мобильная версия
Мобильная платформа домена без участия приспосабливается под экран любого гаджета. Нет необходимости инсталлировать дополнительное программное обеспечение.
Программа для смартфонов
Можно инсталлировать официальное APP для iOS и Android. Программа дает:
– Моментальный доступ
– Улучшенный графику
– Push-уведомления о бонусах
– Стабильную функциональность
Live казино: антураж настоящего казино
Категория Live казино доставляет участников в среду реального казино. Квалифицированные дилеры организуют игры в варианте настоящего времени.
Топовые Live-столы
– Американская рулетка
– Blackjack
– Punto Banco
– Poker
Автоматы: многообразие развлечений
Каталог слотовых слотов содержит массу позиций от известных провайдеров. Участники встретят:
– Классические автоматы
– Видео-автоматы
– Прогрессивный джекпот-автоматы
– Слоты с множественными линиями
Состязания и специальные события
Периодические конкурсы дают возможность участникам конкурировать друг с другом за значительные призовые фонды. Каждый конкурс содержит свои критерии включения и таблицу чемпионов.
Методы внесения и вывода сумм
Платформа поддерживает комплекс расчетных инструментов:
– Банковские карты
– Цифровые кошельки
– Криптовалюты
– Wire транзиты
Все платежи реализуются безопасно благодаря новейшим технологиям кодирования.
Служба обслуживания
Опытные консультанты сервиса помощи расположены ассистировать 24/7. Доступны нижеперечисленные способы общения:
– Оперативный-чат
– Email-обслуживание
– Звонковая линия
– Публичные сети
Итог
Легальный сайт игровой площадки и его действующие альтернативы предоставляют клиентам защищенный и комфортный вход к огромному ассортименту игровых услуг. Щедрые награды, частые акции, квалифицированная помощь и комфортные финансовые способы превращают игровой процесс крайне приятным и доходным.
melbet sports betting login melbet sports betting login .
explore the site – Everything is laid out clearly for a smooth experience.
this online marketplace – Navigation is straightforward, and content is neatly presented.
скачать казино вавада на андроид скачать казино вавада на андроид .
vavada casino отзывы vavada casino отзывы .
link https://daobase.info/
Casino X ведёт активный тг-канал с ежедневными бонусами для подписчиков. Вступайте в casino x рабочее зеркало телеграм и забирайте свои награды.
Современные онлайн-казино предоставляют игрокам богатый спектр слотов и щедрые премии. Но для стабильной игры важно осознавать, как получить доступ к ДжиВиСпин казино и его функционирующие зеркала.
Что такое официальный веб-ресурс казино
Главный сайт казино — это основная веб-площадка, где клиенты могут развлекаться развлекательными слотами. Сайт функционирует на легальных основаниях и владеет всеми обязательными лицензиями.
Главные преимущества официального портала:
– Надежность пользовательских реквизитов
– Честные условия использования
– Подтвержденные выплаты
– Компетентная служба поддержки
Действующее зеркало казино: для чего требуется
Альтернативный адрес — это полная дубликат основного портала, находящаяся по отличному веб-адресу. Актуальное зеркало создается для гарантирования бесперебойного подключения к порталу.
Основания задействования дублирующих ресурсов:
– Ограничение главного домена
– Технические работы
– Повышенная активность на систему
Как отыскать действующее зеркало в данный момент
Получить новое официальное зеркало можно различными методами:
1. Почтовые оповещения — оформите подписку на email отправку
2. Отдел support — проконсультируйтесь в онлайн-чат
3. Корпоративные площадки — отслеживайте за постами
4. Партнерские порталы — проверенные источники
Оформление профиля на ресурсе казино
Процесс регистрации занимает буквально пару секунд:
1. Нажмите на клавишу “Открыть счет”
2. Введите запрашиваемые поля
3. Активируйте электронную e-mail
4. Введите код активации, если есть
Сразу после финализированной создания аккаунта вам откроется возможен индивидуальный профиль.
Премии и промокоды
Богатая бонусная структура — значимое плюс казино:
Бонус за первичную регистрацию
Начинающие участники получают первый бонус, который может охватывать:
– Монетарный депозит на первый депозит
– Free spins для игровых машин
– Приветственные деньги
Активационные коды
Постоянно появляются новые промокоды, обеспечивающие активировать экстра преимущества.
Схема компенсации
Активные пользователи получают порцию использованных денег обратно.
Текущие промо и соревнования
Казино постоянно устраивает азартные промо-мероприятия:
– Weekly соревнования
– Праздничные акции
– Раздачи ценных выигрышей
– Механизм VIP-клуба
Доступ в индивидуальный кабинет
Для доступа на сайт требуется:
1. Посетить официальный ресурс или функционирующее зеркало
2. Нажать “Login”
3. Прописать никнейм и код доступа
В персональном разделе предоставлены следующие опции:
– Зачисление счета
– Снятие средств
– Проверка журнала транзакций
– Редактирование индивидуальными настройками
Mobile платформа и софт
Адаптивная платформа
Оптимизированная версия сайта дает возможность развлекаться с любого смартфонного устройства. Оформление самостоятельно подстраивается под размер дисплея.
App для download
Установить программу можно для:
– Android — непосредственная установка с портала
– iOS — загрузка через App Store
Преимущества мобильного клиента:
– Оперативный старт
– Бесперебойная производительность
– Push-оповещения об акциях
– Производительный дизайн
Игровые секции
Слоты
Разнообразная библиотека игровых автоматов от лучших разработчиков:
– Классические машины
– Новые-игры
– Призовые-слоты
Live зал
Раздел с живыми ведущими дает:
– Рулетки
– Blackjack
– Баккара
– Poker
Трансляции осуществляются в отличном качестве, воссоздавая впечатление настоящего казино.
Способы депозита и снятия
Казино принимает различные платежные инструменты:
– Кредитные карты
– Электронные платежи
– Цифровые валюты
– Прямые транзиты
Базовые суммы взноса и моментальные транзакции делают развлечение исключительно приятной.
Служба поддержки
Профессиональная отдел поддержки доступна 24/7 и способна ассистировать с различными проблемами:
– Реалтайм-чат
– Email-консультации
– Телефонная служба
Итоги
Основной сайт казино и его рабочие зеркала обеспечивают игрокам защищенный и интересный гемблинг отдых. Выгодные подарки, удобная адаптивная модификация, обширные слоты и качественное live-казино делают эту платформу замечательным решением для гемблинг досуга.
Доступ к платформе через рабочие зеркала
Передовые сетевые казино обеспечивают пользователям круглосуточный доступ к сервисам. Главный портал Клубника действует стабильно, предоставляя широкий спектр игровых развлечений. Впрочем иногда возникают цифровые трудности или блокировки, потому необходимо иметь представление о существовании функционирующих зеркал.
Что собой представляет собой официальное зеркало казино
Альтернатива — это точная дубликат главного веб-сайта с таким же интерфейсом. Функционирующее зеркало сегодня помогает избегать местные блокировки и поддерживать времяпрепровождение.
Основные плюсы использования зеркал:
– Абсолютный переход к персональному кабинету
– Поддержание всех сведений аккаунта
– Аналогичный перечень игр
– Свежие бонусы и предложения
Создание аккаунта на сайте
Операция оформления занимает пару минут. Недавние клиенты приобретают великодушный приз за регистрацию, который способен охватывать:
– Стартовый игровой подарок
– Безвозмездные кручения для слотов
– Эксклюзивные купоны
– Увеличенный возврат
Для финализации создания аккаунта требуется:
1. Переместиться на официальный портал или дубликат
2. Выбрать опцию «Зарегистрироваться»
3. Внести персональные данные
4. Верифицировать мейл или номер
5. Применить купон (при присутствии)
Авторизация в собственный кабинет
Следом за успешной оформления клиенты способны производить авторизацию посредством центральный сайт или актуальное зеркало. Личный кабинет обеспечивает абсолютный управление над учётной записью:
– История транзакций
– Пополнение кошелька
– Снятие выигрышей
– Контроль привилегиями
– Вовлечение в соревнованиях
Бонусы и акции казино
Ресурс награждает пользователей многочисленными наградными предложениями:
Вступительные поощрения
Начинающие приобретают богатый комплект поощрений на начальные вклады. Зачастую это включает частичную добавку к сумме взноса плюс комплиментарные фриспины.
Систематические предложения
– Каждонедельный кешбэк до 15%
– Соревнования с выигрышными суммами
– Бонусы на число рождения
– Специальные промо для VIP геймеров
Программа лояльности
Постоянные игроки собирают баллы, что разрешено обменять на настоящие призы или эксклюзивные бонусы.
Смартфонная редакция и софт
Современные разработки помогают развлекаться где удобно. Смартфонная вариант ресурса автоматически адаптируется под размер каждого девайса.
Плюсы портативного приложения:
– Оперативная открытие автоматов
– Эргономичный дизайн
– Push-уведомления о предложениях
– Шанс скачать для Android и iOS
Настоящее казино: антураж настоящего игорного клуба
Категория Live клуба транспортирует клиентов в обстановку настоящего гемблинг клуба. Профессиональные ведущие проводят процесс в виде актуального времени.
Доступные столы:
– Европейская рулетка
– Очко
– Классика
– Техасский холдем
Барабаны и развлекательные слоты
Каталог азартных слотов насчитывает массу наименований от лидирующих студий. Произвольный геймер найдёт развлечение по душе:
– Винтажные барабаны
– Новые слоты с призовыми раундами
– Джекпот-игры
– Многолинейные автоматы
Состязания и раздачи
Постоянные состязания добавляют азарт и открывают опцию обрести значительные награды. Вовлечение в конкурсах часто комплиментарное, а премиальные суммы насчитывают внушительных величин.
Секьюрити и анонимность
Портал задействует инновационные системы кодирования для охраны реквизитов пользователей. Совокупные транзакционные действия осуществляются через зашифрованные линии.
Вывод
Главный портал и его рабочие зеркала дают надёжный переход к отличным развлекательным играм. Щедрые бонусы, комфортная смартфонная версия, вариативность слотов и компетентное Live-игорный дом превращают платформу прекрасным выбором для фанатов развлекательных автоматов.
explore here – Everything is presented logically, which makes browsing effortless.
Get More Information https://mixmy.money
see more here – The layout is neat and makes it easy to check everything out.
my blog https://tornadocash.app
Go to the main company website — https://вип-свет.рф/
visit the platform – Pages are organized clearly, making exploring effortless.
Современные онлайн казино обеспечивают пользователям широкий ассортимент опций для беспроблемной игры. Однако иногда доступ к основному порталу может являться закрытым. В таких случаях на подмогу приходят казино Лев, которое дает постоянный подключение ко всем опциям платформы.
Что такое рабочее зеркало казино
Дубликат — это точная реплика основного портала, которая размещается по другому интернет-адресу. Зеркало имеет весь возможности основного портала, включая персональный кабинет, депозит и данные операций.
Основные плюсы эксплуатации зеркала:
– 24-часовой подключение к платформе
– Максимальная схожесть опций
– Защита пользовательских сведений
– Сохранение всех привилегий
Как обнаружить функционирующее зеркало сегодня
Имеется ряд надежных путей обнаружения актуальной ссылки:
Проверенные сервисы:
1. Электронная рассылка — управление периодически направляет уведомления с действующими доменами
2. Общественные сети — проверенные аккаунты выкладывают релевантную сведения
3. Служба поддержки — специалисты дают безопасные ссылки
4. Смартфонное приложение — позволяет минуть блокировки
Оформление профиля на лицензионном ресурсе
Операция оформления занимает не более несколько минут и включает из таких стадий:
1. Переход на официальный веб-сайт или действующее зеркало
2. Выбор на иконку «Создать аккаунт»
3. Внесение учетной анкеты
4. Подтверждение электронной почты или телефонного номера
5. Задействование поощрения за регистрацию при существовании промокода
Свежие клиенты приобретают великодушный начальный бонус, который может предполагать бесплатные вращения, денежные бонусы или компенсацию.
Логин в индивидуальный кабинет
Логин на платформе осуществляется привычным способом. Достаточно ввести логин и кодовое слово, задействованные при создании аккаунта.
Существенные нюансы для конфиденциального входа:
– Эксплуатируйте криптостойкий шифр
– Активируйте двухфакторную проверку
– Не храните данные на общественных гаджетах
– Контролируйте доменную строку браузера
Описание наградной системы
Игровая платформа балует клиентов многочисленными поощрениями и кампаниями:
Приветственный букет
Новички могут надеяться на существенное награду за дебютный взнос. Традиционно это долевая премия к переведенной количеству плюс даровые спины для популярных слотов.
Периодические кампании
– Недельный возврат средств — возвращение процента утраченных финансов
– Бонусы на повторные вклады
– Уникальные акции по торжествам
– Состязания с солидными премиальными банками
План привилегий
Активные игроки зарабатывают очки за каждую бет, которые затем меняются на реальные средства, free spins или специальные льготы.
Промокоды: как активировать
Кодовые комбинации — это уникальные сочетания знаков, обеспечивающие доступ к бонусным бонусам.
Откуда получить актуальные промокоды:
– Легитимные коммуникационные сети казино
– Сотрудничающие порталы
– Email-рассылка
– Тематические сообщества
Прописывается промокод в предназначенное поле при регистрации или пополнении кошелька.
Мобильная версия и приложение
Актуальные пользователи отдают предпочтение проводить время с мобильных аппаратов. Сайт дает 2 способа для беспроблемной мобильной игры.
Мобильная версия
Интернет версия сама настраивается под габариты дисплея. Не требует установки и действует в произвольном современном браузере.
Телефонное приложение
Скачать app можно для устройств на Android и iOS. Достоинства app:
– Быстрая открытие
– Устойчивая операция
– Автоматические-уведомления о промо
– Автономный преодоление блокировок
Операция скачивания прост: необходимо попасть на портал с мобильного гаджета и подчиняться инструкциям.
Гемблинг коллекция
Каталог слотов содержит несколько тысяч единиц от лучших производителей.
Слоты
Гемблинг машины — крайне популярная группа аттракционов. Показаны стандартные винтажные машины, новые мультимедийные слоты с дополнительными уровнями, а также растущие выигрыши.
Live казино
Отдел с действительными крупье обеспечивает почувствовать дух подлинного казино. Представлены развлечения с баккарой.
Вещание производится в отличном качестве, присутствует диалог с дилером и другими геймерами.
Состязания
Систематически проводятся состязания по различным играм. Присоединение дает шанс заработать денежные вознаграждения, фриспины или особые бонусы.
Финансовые действия
Ресурс предлагает обширный набор расчетных способов:
– Пластиковые карты
– Электронные сервисы
– Биткоин
– Банковские транзакции
Минимальная сумма взноса — доступная для массы игроков. Получение средств производится в скорые временные рамки.
Служба поддержки
Опытные специалисты расположены оказать помощь постоянно. Доступны следующие методы связи:
– Живой-чат
– Email
– Звонковая связь
– Медийные сети
Решения на частые темы можно отыскать в блоке FAQ.
Вывод
Официальный веб-сайт казино и его рабочие зеркала предоставляют пользователям полный подключение ко всем функциям ресурса. Щедрые бонусы, комфортная телефонная версия, огромный выбор слотов и опытная поддержка превращают развлекательный досуг крайне приятным и защищенным.
eva casino вход
Искал eva casino где войти, тут нашел
Подключение к порталу через проверенные зеркала
Передовые онлайн казино обеспечивают пользователям постоянный подключение к услугам. Главный портал KiloGram сайт действует бесперебойно, предоставляя обширный спектр развлекательных автоматов. Впрочем иногда формируются программные проблемы или запреты, следовательно необходимо знать о наличии актуальных зеркал.
Что является из себя центральное зеркало казино
Копия — это абсолютная версия официального ресурса с идентичным набором функций. Действующее зеркало сегодня позволяет избегать локальные запреты и возобновлять гемблинг.
Основные плюсы использования зеркал:
– Безграничный доступ к собственному кабинету
– Сохранение совокупных сведений учётной записи
– Аналогичный ассортимент игр
– Актуальные бонусы и кампании
Оформление на сайте
Процедура записи отнимает несколько минут. Начинающие клиенты зарабатывают привлекательный подарок за регистрацию, он в состоянии включать:
– Стартовый денежный приз
– Безвозмездные спины для машин
– Особые ваучеры
– Увеличенный кэшбек
С целью выполнения оформления необходимо:
1. Войти на основной портал или копию
2. Выбрать клавишу «Создать аккаунт»
3. Указать контактные данные
4. Активировать электронную почту или контакт
5. Активировать купон (когда имеется присутствии)
Подключение в личный кабинет
После правильной регистрации клиенты в состоянии совершать подключение с помощью центральный портал или рабочее зеркало. Индивидуальный кабинет даёт полный контроль над счётом:
– Журнал пари
– Пополнение депозита
– Вывод выигрышей
– Контроль поощрениями
– Вовлечение в состязаниях
Привилегии и промо казино
Платформа балует игроков различными привилегированными системами:
Начальные бонусы
Дебютанты приобретают щедрый комплект бонусов на стартовые взносы. Обычно это включает долевую доплату к объёму пополнения плюс комплиментарные спины.
Постоянные акции
– Раз в неделю возврат до 15%
– Турниры с выигрышными суммами
– Бонусы на дату рождения
– Эксклюзивные предложения для элитных геймеров
Схема вознаграждения
Регулярные клиенты накапливают пункты, они допустимо превратить на подлинные призы или особые льготы.
Смартфонная форма и софт
Нынешние технологии помогают играть в любом месте угодно. Смартфонная форма портала автономно настраивается под монитор произвольного девайса.
Преимущества смартфонного ПО:
– Скоростная загрузка слотов
– Практичный облик
– Моментальные-уведомления о акциях
– Способность загрузить для Android и iOS
Живое казино: среда реального гемблинг учреждения
Область Live заведения доставляет клиентов в атмосферу истинного игорного дома. Опытные дилеры проводят развлечение в состоянии актуального времени.
Представленные игры:
– Американская рулетка
– Очко
– Карточная игра
– Покерная игра
Барабаны и азартные машины
Коллекция гемблинг автоматов насчитывает сотни названий от топовых провайдеров. Всякий игрок обнаружит игру по вкусу:
– Традиционные машины
– Видеослоты с дополнительными этапами
– Джекпот-автоматы
– Многолинейные машины
Соревнования и лотереи
Периодические соревнования привносят азарт и обеспечивают способность обрести большие суммы. Участие в состязаниях зачастую безвозмездное, а призовые суммы составляют крупных объёмов.
Защита и анонимность
Сайт задействует передовые системы кодирования для защиты информации пользователей. Каждые платёжные транзакции осуществляются через защищённые соединения.
Резюме
Главный веб-сайт и его действующие зеркала дают стабильный вход к качественным гемблинг играм. Привлекательные поощрения, удобная смартфонная редакция, вариативность машин и компетентное Live-клуб превращают платформу прекрасным опцией для ценителей гемблинг слотов.
online store link – Navigation flows naturally with well-organized pages.
https://pharmacologicalsciences.com/cialis.html kamagra
1xbet промокод на 100 рублей
open website – Well-structured pages make it easy to explore everything.
explore the site – Neat structure and easy-to-read content make the browsing experience smooth.
site link https://yomix.biz/
Переход к платформе через рабочие зеркала
Пользователи интернет казино регулярно сталкиваются с проблемой недоступности основного сайта. Как раз для преодоления этой трудности предусмотрены дубликаты главного домена. Eldorado предоставляет полный переход ко всем возможностям казино.
Что такое рабочее зеркало казино
Дубликат составляет собой абсолютную копию оригинального ресурса с таким же опциями. Главное отличие — это другое имя. Каждые информация клиента, включая баланс, привилегии и записи партий, находятся прежними.
Достоинства применения зеркал
Функционирующие зеркала обладают комплексом важных выгод:
– Постоянный переход к выбранным слотам
– Абсолютная безопасность личных сведений
– Неизменность всех настроек индивидуального кабинета
– Шанс взятия поощрений и присутствия в промоакциях
Оформление профиля на основном сайте
Операция оформления чрезвычайно несложен и отнимает буквально минут. Новые участники способны претендовать на крупный приветственный приз за создание аккаунта.
Шаги формирования аккаунта
1. Переход на официальный портал или его копию
2. Клик на элемент “Зарегистрироваться”
3. Указание нужных информации
4. Подтверждение цифровой почты
5. Внесение бонусного кода (если есть)
Награды и предложения для игроков
Игровая площадка одаривает своих пользователей многочисленными поощрительными предложениями.
Ключевые варианты призов
Начальный приз — солидное начисление для новых участников, которое имеет возможность вмещать денежные суммы и бесплатные вращения.
Бесплатные вращения — возможность играть в популярных игровых машинах бесплатно.
Кешбэк — процентный возврат израсходованных денег, который именно начисляется по неделям или помесячно.
Промокоды — особые комбинации, гарантирующие экстра поощрения.
Персональный кабинет: опции и установки
Пользовательский аккаунт предоставляет абсолютный контроль над персональным активностью. Здесь присутствуют:
– Администрирование счетом
– Записи переводов
– Действующие привилегии
– Параметры охраны
– Верификация учетной записи
Карманная версия и программа
Нынешние клиенты предпочитают мобильность. Платформа дает двойной метода для участия с карманных аппаратов.
Адаптивная портативная вариант
Адаптивная платформа ресурса самостоятельно приспосабливается под экран любого гаджета. Нет необходимости устанавливать дополнительное ПО.
Программа для гаджетов
Разрешено инсталлировать оригинальное приложение для iOS и Android. Программа гарантирует:
– Моментальный вход
– Оптимизированный внешний вид
– Мобильные-уведомления о предложениях
– Стабильную работу
Live казино: атмосфера истинного зала
Раздел Live столов доставляет клиентов в атмосферу настоящего клуба. Профессиональные дилеры организуют игры в варианте реального времени.
Известные Live-столы
– Французская рулетка
– 21
– Баккарат
– Poker
Слоты: разнообразие игр
Коллекция азартных аппаратов насчитывает массу позиций от ведущих провайдеров. Клиенты обнаружат:
– Традиционные автоматы
– Видео-автоматы
– Прогрессивный джекпот-автоматы
– Слоты с множественными линиями
Конкурсы и уникальные акции
Систематические турниры предоставляют шанс клиентам конкурировать друг с другом за значительные наградные фонды. Отдельный турнир располагает свои критерии присутствия и рейтинг чемпионов.
Способы ввода и вывода сумм
Казино обслуживает комплекс расчетных инструментов:
– Платежные картыы
– Цифровые счета
– Цифровые валюты
– Прямые отправления
Абсолютно все транзакции осуществляются конфиденциально благодаря передовым технологиям шифрования.
Служба поддержки
Профессиональные специалисты команды поддержки готовы содействовать 24/7. Работают такие каналы коммуникации:
– Мгновенный-чат
– Email-сервис
– Звонковая горячая линия
– Медийные сети
Заключение
Официальный сайт игровой площадки и его актуальные зеркала предоставляют клиентам безопасный и комфортный доступ к обширному выбору азартных игр. Внушительные награды, постоянные промоакции, компетентная помощь и легкие расчетные инструменты создают азартный процесс чрезвычайно захватывающим и прибыльным.
Jogo do Tigrinho cashback 15% toda semana: qual o maior reembolso que você pegou?
read what he said https://daobase.info/
Hi there Dear, are you actually visiting this web site on a regular basis,
if so after that you will definitely obtain nice knowledge.
Передовые виртуальные казино дают пользователям широкий диапазон возможностей для беспроблемной игры. Впрочем иногда соединение к базовому платформе может оказаться ограниченным. В таких моментах на помощь спешит казино KiloGram, которое дает стабильный подключение ко всем опциям платформы.
Что такое функционирующее зеркало казино
Копия — это полная дубликат официального портала, которая хостится по альтернативному интернет-адресу. Дубликат сохраняет полный возможности оригинального сайта, включая личный кабинет, депозит и данные транзакций.
Ключевые преимущества использования зеркала:
– Непрерывный вход к ресурсу
– Полная идентичность инструментов
– Конфиденциальность индивидуальных реквизитов
– Хранение доступных бонусов
Как обнаружить действующее зеркало сегодня
Присутствует ряд надежных способов обнаружения текущей ссылочной информации:
Проверенные ресурсы:
1. Email рассылка — администрация регулярно пересылает сообщения с рабочими адресами
2. Социальные сети — легитимные аккаунты постят свежую новости
3. Отдел поддержки — операторы сообщают проверенные домены
4. Портативное приложение — дает возможность избегать блокировки
Оформление профиля на основном сайте
Этап открытия счета занимает лишь несколько минут и предполагает из таких стадий:
1. Попадание на основной веб-сайт или рабочее зеркало
2. Выбор на кнопку «Зарегистрироваться»
3. Внесение пользовательской анкеты
4. Подтверждение почтовой почты или телефонного номера
5. Задействование поощрения за регистрацию при существовании промокода
Свежие геймеры получают значительный начальный подарок, который может охватывать free spins, валютные бонусы или компенсацию.
Авторизация в индивидуальный кабинет
Вход на сайте производится обычным методом. Требуется ввести имя пользователя и кодовое слово, примененные при создании аккаунта.
Важные нюансы для защищенного входа:
– Применяйте надежный пароль
– Запустите 2FA верификацию
– Не храните реквизиты на чужих гаджетах
– Мониторьте адресную строку браузера
Описание поощрительной системы
Игровая платформа балует клиентов разнообразными поощрениями и промо:
Вступительный букет
Свежие игроки имеют возможность полагаться на существенное награду за первый пополнение. Зачастую это долевая прибавка к внесенной объему плюс фриспины для востребованных слотов.
Постоянные акции
– Недельный cashback — возвращение части утраченных средств
– Награды на дополнительные депозиты
– Специальные акции по торжествам
– Соревнования с крупными наградными банками
Система вознаграждений
Деятельные геймеры зарабатывают баллы за всякую бет, которые затем конвертируются на настоящие деньги, фриспины или особые льготы.
Промокоды: как активировать
Промокоды — это особые сочетания знаков, обеспечивающие право к дополнительным бонусам.
Каким образом взять рабочие промокоды:
– Легитимные медийные сети казино
– Партнерские сайты
– Email-рассылка
– Тематические сообщества
Активируется промокод в соответствующее поле при открытии счета или внесении депозита кошелька.
Портативная версия и приложение
Передовые пользователи любят делать ставки с телефонных девайсов. Сайт обеспечивает двойной способа для приятной портативной игры.
Мобильная версия
Браузерная версия само собой адаптируется под параметры экранной панели. Не нуждается загрузки и функционирует в каждом актуальном браузере.
Мобильное приложение
Установить приложение можно для аппаратов на Android и iOS. Преимущества app:
– Молниеносная запуск
– Устойчивая работа
– Автоматические-уведомления о бонусах
– Автономный обход блокировок
Операция установки несложен: требуется открыть на портал с телефонного устройства и подчиняться предписаниям.
Игровой ассортимент
Каталог аппаратов насчитывает несколько тысяч вариантов от лучших поставщиков.
Слоты
Азартные машины — максимально любимая секция развлечений. Представлены стандартные винтажные машины, новые видео-автоматы с премиальными этапами, а также джекпотные джекпоты.
Live казино
Отдел с действительными крупье позволяет испытать антураж настоящего казино. Открыты развлечения с баккарой.
Передача реализуется в превосходном четкости, обеспечивается чат с раздающим и прочими игроками.
Состязания
Регулярно проводятся соревнования по различным играм. Вступление позволяет завоевать финансовые выигрыши, фриспины или специальные бонусы.
Финансовые операции
Платформа обеспечивает обширный ассортимент расчетных систем:
– Банковские карты
– Цифровые сервисы
– Крипта
– Денежные транзакты
Минимальная объем взноса — посильная для большинства игроков. Обналичивание денег выполняется в минимальные периоды.
Сервис поддержки
Компетентные операторы настроены помочь постоянно. Доступны нижеследующие способы контакта:
– Онлайн-чат
– Email
– Мобильная поддержка
– Медийные сети
Ответы на распространенные темы можно отыскать в зоне FAQ.
Резюме
Официальный портал казино и его рабочие зеркала предоставляют пользователям совершенный доступ ко всем возможностям сайта. Солидные поощрения, приятная мобильная версия, огромный выбор игр и квалифицированная служба поддержки делают гемблинг времяпрепровождение исключительно удобным и безопасным.
https://pharmacologicalsciences.com/viagra.html levitra
see more info – Clean and logical structure allows users to explore efficiently.
Официальный веб-сайт — кликай сюда : https://www.вип-свет.рф/
eva casino ссылка
eva casino без впн открылся
Современные онлайн-казино обеспечивают участникам разнообразный выбор слотов и щедрые премии. Тем не менее для беспроблемной времяпрепровождения существенно знать, как получить доступ к ДжиВиСпин и его актуальные зеркала.
Что такое главный портал казино
Лицензионный сайт казино — это базовая система, где клиенты могут пользоваться азартными развлечениями. Платформа действует на легальных правах и имеет всеми нужными лицензиями.
Ключевые достоинства главного ресурса:
– Конфиденциальность личных реквизитов
– Честные требования участия
– Гарантированные платежи
– Компетентная служба поддержки
Функционирующее зеркало казино: для чего нужно
Дублирующий ресурс — это полная клон главного веб-сайта, хостящаяся по иному URL. Рабочее зеркало формируется для поддержания постоянного доступа к сайту.
Факторы задействования зеркал:
– Запрет основного сайта
– Технические процедуры
– Высокая загрузка на ресурс
Как отыскать свежее зеркало сегодня
Получить новое действующее зеркало можно разными методами:
1. Почтовые оповещения — активируйте уведомления на новостную доставку
2. Служба support — напишите в онлайн-чат
3. Официальные каналы — мониторьте за постами
4. Специализированные порталы — проверенные источники
Оформление профиля на ресурсе казино
Алгоритм оформления занимает буквально пару секунд:
1. Выберите на кнопку “Открыть счет”
2. Внесите требуемые поля
3. Подтвердите контактную почту
4. Введите бонусный код, если предоставлен
По завершении успешной активации вам предоставится разрешен личный аккаунт.
Поощрения и бонусные коды
Щедрая поощрительная политика — важное конкурентное преимущество казино:
Поощрение за открытие счета
Новые игроки получают начальный презент, который может содержать:
– Валютный бонус на начальный вклад
– Фриспины для автоматов
– Стартовые фонды
Активационные коды
Постоянно появляются эксклюзивные купоны, предоставляющие использовать особые бонусы.
Схема кешбэка
Постоянные игроки получают часть проигранных денег обратно.
Актуальные кампании и состязания
Сайт периодически организует захватывающие кампании:
– Еженедельные турниры
– Тематические предложения
– Лотереи крупных призов
– Программа статусов
Авторизация в личный раздел
Для доступа на ресурс нужно:
1. Перейти на основной сайт или рабочее зеркало
2. Активировать “Авторизация”
3. Указать email и пароль
В пользовательском разделе открыты следующие возможности:
– Зачисление баланса
– Получение средств
– Анализ истории игр
– Редактирование профильными сведениями
Портативная вариант и приложение
Мобильная платформа
Адаптивная модификация портала предоставляет шанс играть с разных смартфонного гаджета. Интерфейс автоматически оптимизируется под габариты дисплея.
App для установки
Получить app можно для:
– Android — безопасная загрузка с портала
– iOS — установка через App Store
Достоинства приложения:
– Мгновенный запуск
– Устойчивая производительность
– Push-сообщения об бонусах
– Производительный UI
Развлекательные категории
Автоматы
Внушительная коллекция развлекательных слотов от топовых поставщиков:
– Классические машины
– Современные-игры
– Призовые-слоты
Live казино
Раздел с настоящими ведущими предоставляет:
– Рулетка
– Двадцать одно
– Мини-баккара
– Poker
Трансляции проводятся в отличном разрешении, воссоздавая впечатление реального казино.
Системы пополнения и получения
Сайт принимает разнообразные платежные методы:
– Дебетовые средства
– Виртуальные системы
– Криптовалюты
– Прямые транзакции
Базовые значения внесения и быстрые транзакции обеспечивают игру максимально комфортной.
Команда техподдержки
Опытная служба помощи оперирует 24/7 и готова поддержать с различными вопросами:
– Онлайн-чат
– Email-помощь
– Звонковая служба
Выводы
Лицензионный веб-сайт казино и его рабочие альтернативные адреса предоставляют клиентам конфиденциальный и увлекательный игровой досуг. Богатые награды, комфортная портативная платформа, богатые развлечения и превосходное live-казино формируют эту систему замечательным местом для игровых времяпрепровождения.
shop online today – Pages load quickly and layout feels user-friendly.
official link – The structure is simple and the information is presented nicely.
ed meds online Pharmacological Institute cost of ed meds
В статье есть обзор программа для накрутки трафика и требования к ней. Автор объясняет, почему важен процессор с большим количеством потоков и сколько нужно оперативной памяти.
поисковое продвижение по трафику поисковое продвижение по трафику .
explore this page – Clean interface allows users to browse comfortably and quickly.
Передовые онлайн казино дают клиентам большой выбор возможностей для удобной игры. Но иногда вход к главному порталу может стать недоступным. В таких моментах на выручку приходят РЎСѓРєР° зеркало, которое дает стабильный путь ко всем опциям платформы.
Что такое актуальное зеркало казино
Зеркало — это идентичная версия главного веб-сайта, которая находится по альтернативному домену. Копия поддерживает весь набор функций оригинального веб-портала, включая пользовательский кабинет, счет и сведения транзакций.
Принципиальные преимущества эксплуатации зеркала:
– Постоянный подключение к порталу
– Абсолютная тождественность опций
– Конфиденциальность личных сведений
– Удержание существующих привилегий
Как разыскать рабочее зеркало на текущий день
Присутствует несколько безопасных методов обнаружения свежей ссылочной информации:
Легитимные каналы:
1. Электронная рассылка — управление систематически отправляет уведомления с рабочими адресами
2. Коммуникационные сети — легитимные аккаунты выкладывают свежую данные
3. Департамент поддержки — специалисты выдают проверенные URL
4. Портативное приложение — предоставляет обходить блокировки
Создание аккаунта на официальном веб-сайте
Процесс создания аккаунта длится лишь несколько минут и состоит из следующих стадий:
1. Открытие на основной веб-сайт или актуальное зеркало
2. Щелчок на клавишу «Открыть счет»
3. Ввод пользовательской анкеты
4. Валидация почтовой почты или мобильного номера
5. Активация вознаграждения за регистрацию при доступности промокода
Только что зарегистрированные пользователи получают великодушный начальный подарок, который может предполагать бесплатные вращения, валютные призы или кэшбек.
Логин в индивидуальный кабинет
Подключение на сайте выполняется привычным образом. Нужно внести никнейм и пароль, указанные при регистрации.
Ключевые детали для конфиденциального входа:
– Задействуйте криптостойкий шифр
– Запустите двухэтапную аутентификацию
– Не храните реквизиты на публичных гаджетах
– Мониторьте URL строку браузера
Обзор наградной программы
Казино награждает клиентов всевозможными привилегиями и кампаниями:
Стартовый букет
Свежие игроки способны рассчитывать на щедрое вознаграждение за стартовый вклад. Зачастую это процентная прибавка к депонированной сумме плюс фриспины для востребованных слотов.
Регулярные промо
– 7-дневный кэшбек — возмещение доли проигранных финансов
– Призы на очередные депозиты
– Уникальные предложения по событиям
– Состязания с большими призовыми фондами
План лояльности
Деятельные геймеры зарабатывают единицы за любую ставку, которые затем превращаются на настоящие деньги, даровые прокруты или специальные бонусы.
Купоны: как задействовать
Бонус-коды — это уникальные наборы знаков, обеспечивающие право к специальным поощрениям.
Каким образом найти действующие промокоды:
– Проверенные общественные сети казино
– Сотрудничающие площадки
– Email-подписка
– Отраслевые группы
Активируется промокод в специальное поле при открытии счета или зачислении средств счета.
Портативная версия и приложение
Нынешние пользователи предпочитают проводить время с телефонных аппаратов. Портал предоставляет 2 метода для приятной портативной игры.
Отзывчивая вариант
Интернет версия самостоятельно настраивается под габариты монитора. Не требует инсталляции и функционирует в каждом новом браузере.
Телефонное приложение
Установить софт можно для девайсов на Android и iOS. Достоинства app:
– Оперативная запуск
– Бесперебойная функционирование
– Всплывающие-уведомления о поощрениях
– Самостоятельный минование блокировок
Операция установки прост: необходимо перейти на ресурс с телефонного девайса и выполнять руководству.
Игровой выбор
Каталог аппаратов охватывает несколько тысяч позиций от передовых производителей.
Слоты
Азартные аппараты — крайне востребованная секция развлечений. Доступны стандартные 3-барабанные машины, актуальные видеослоты с премиальными стадиями, а также джекпотные выигрыши.
Live казино
Отдел с действительными крупье дает возможность почувствовать антураж настоящего казино. Представлены столы с рулеткой.
Передача реализуется в высоком четкости, имеется чат с раздающим и иными участниками.
Соревнования
Периодически проводятся состязания по многочисленным категориям. Присоединение дает шанс заработать валютные вознаграждения, free spins или специальные поощрения.
Денежные операции
Платформа предоставляет значительный ассортимент платежных инструментов:
– Дебетовые карты
– Онлайн платформы
– Крипта
– Банковские транзакты
Минимальная сумма вклада — разумная для преобладающего числа клиентов. Получение денег выполняется в короткие периоды.
Отдел поддержки
Компетентные сотрудники настроены поддержать постоянно. Представлены такие методы общения:
– Онлайн-чат
– Email
– Телефонная горячая линия
– Общественные сети
Решения на типовые темы можно найти в разделе FAQ.
Вывод
Основной портал казино и его функционирующие зеркала дают геймерам совершенный путь ко всем опциям портала. Великодушные бонусы, приятная телефонная версия, колоссальный коллекция игр и опытная помощь делают гемблинг опыт исключительно приятным и конфиденциальным.
Передовые виртуальные казино дают клиентам большой выбор вариантов для комфортной игры. Однако иногда подключение к основному платформе может являться ограниченным. В таких моментах на выручку спешит Lev казино, которое обеспечивает стабильный вход ко всем возможностям платформы.
Что такое функционирующее зеркало казино
Зеркало — это точная версия главного веб-сайта, которая хостится по альтернативному адресу. Дубликат содержит полный инструментарий основного веб-портала, включая персональный кабинет, счет и сведения транзакций.
Главные плюсы использования зеркала:
– Постоянный соединение к платформе
– Полная идентичность возможностей
– Защита личных данных
– Удержание всех имеющихся привилегий
Как разыскать функционирующее зеркало в данный момент
Есть множество надежных методов нахождения действующей URL:
Авторизованные ресурсы:
1. Имейл рассылка — дирекция регулярно пересылает письма с свежими доменами
2. Социальные сети — авторизованные каналы размещают актуальную новости
3. Отдел поддержки — консультанты выдают надежные домены
4. Смартфонное приложение — дает возможность преодолевать блокировки
Открытие счета на официальном сайте
Этап регистрации длится всего пару минут и предполагает из данных ступеней:
1. Переход на лицензионный портал или актуальное зеркало
2. Нажатие на клавишу «Открыть счет»
3. Ввод пользовательской бланка
4. Проверка почтовой почты или мобильного номера
5. Применение привилегии за регистрацию при наличии промокода
Начинающие клиенты приобретают щедрый начальный бонус, который может содержать free spins, денежные вознаграждения или компенсацию.
Вход в индивидуальный кабинет
Логин на платформе осуществляется привычным методом. Достаточно указать имя пользователя и секретный ключ, использованные при оформлении.
Важные моменты для надежного входа:
– Эксплуатируйте сложный пароль
– Запустите двойную аутентификацию
– Не записывайте данные на общественных гаджетах
– Проверяйте URL строку браузера
Описание бонусной системы
Игорный портал одаривает геймеров всевозможными бонусами и акциями:
Начальный комплект
Дебютанты способны полагаться на значительное награду за дебютный пополнение. Обычно это пропорциональная прибавка к переведенной сумме плюс бесплатные вращения для топовых слотов.
Систематические промо
– 7-дневный cashback — возмещение процентной доли списанных средств
– Награды на дополнительные депозиты
– Эксклюзивные акции по торжествам
– Турниры с значительными призовыми суммами
Система верности
Постоянные пользователи собирают очки за каждую раунд, которые затем превращаются на действительные финансы, даровые прокруты или особые преимущества.
Бонус-коды: как задействовать
Промокоды — это специальные последовательности знаков, гарантирующие возможность к эксклюзивным бонусам.
Где взять актуальные промокоды:
– Авторизованные общественные сети казино
– Сотрудничающие площадки
– Email-новостная лента
– Тематические сообщества
Указывается промокод в предназначенное поле при регистрации или внесении депозита кошелька.
Мобильная версия и приложение
Нынешние клиенты выбирают играть с портативных устройств. Платформа обеспечивает 2 способа для беспроблемной телефонной игры.
Мобильная редакция
Онлайн версия сама оптимизируется под габариты экранной панели. Не просит загрузки и действует в каждом актуальном браузере.
Смартфонное приложение
Получить софт можно для девайсов на Android и iOS. Плюсы app:
– Скоростная активация
– Устойчивая функционирование
– Всплывающие-уведомления о акциях
– Самостоятельный избегание блокировок
Операция инсталляции прост: нужно зайти на сайт с смартфонного гаджета и выполнять предписаниям.
Игровой каталог
Библиотека слотов включает огромное количество наименований от топовых поставщиков.
Слоты
Гемблинг слоты — максимально любимая категория аттракционов. Доступны традиционные винтажные слоты, новые видео-автоматы с дополнительными стадиями, а также растущие призы.
Live казино
Зона с настоящими дилерами обеспечивает прочувствовать дух истинного казино. Открыты развлечения с покером.
Вещание реализуется в отличном четкости, присутствует диалог с ведущим и другими пользователями.
Турниры
Систематически запускаются конкурсы по разным играм. Участие позволяет заработать монетарные призы, free spins или специальные бонусы.
Денежные процедуры
Сайт предоставляет большой спектр денежных методов:
– Кредитные карты
– Цифровые платформы
– Криптовалюта
– Счетовые транзакты
Низшая количество депозита — посильная для массы геймеров. Получение выигрышей выполняется в короткие интервалы.
Департамент поддержки
Квалифицированные консультанты расположены оказать помощь постоянно. Представлены нижеследующие методы коммуникации:
– Интернет-чат
– Email
– Мобильная поддержка
– Общественные сети
Решения на типовые вопросы можно отыскать в секции FAQ.
Итог
Главный ресурс казино и его действующие зеркала предоставляют пользователям полный путь ко всем возможностям ресурса. Солидные бонусы, приятная мобильная версия, огромный каталог игр и опытная служба поддержки формируют азартный времяпрепровождение максимально беспроблемным и безопасным.
levitra Pharmacological Institute cialis
https://stocktwits.com/vipcoode26
this post https://daobase.info/
eva casino бонусы
Парни, нашел eva casino канал, когда искал где зайти. Решил проверить и не пожалел. Ссылки рабочие, сайт грузится быстро. Даже регистрация прошла без проблем. Уже несколько раз заходил, все ок
see this marketplace – Clean menus and layout make navigating easy.
Dinamo Zagreb 1-3 Genk 2026 Europa League dominant win for Belgians
Современные онлайн казино предоставляют пользователям широкий выбор вариантов для приятной игры. Впрочем иногда подключение к официальному платформе может быть ограниченным. В таких обстоятельствах на поддержку приходят ДжиВиСпин, которое обеспечивает непрерывный путь ко всем возможностям платформы.
Что такое рабочее зеркало казино
Альтернативный сайт — это идентичная версия официального портала, которая хостится по альтернативному URL. Зеркало поддерживает все набор функций оригинального веб-портала, включая пользовательский кабинет, депозит и историю переводов.
Основные достоинства применения зеркала:
– 24-часовой соединение к сайту
– Максимальная схожесть возможностей
– Защита индивидуальных данных
– Поддержка доступных привилегий
Как разыскать функционирующее зеркало на текущий день
Есть ряд надежных путей нахождения свежей адреса:
Проверенные сервисы:
1. Почтовая рассылка — дирекция регулярно направляет уведомления с рабочими адресами
2. Медийные сети — легитимные каналы публикуют актуальную информацию
3. Отдел поддержки — консультанты выдают безопасные адреса
4. Телефонное приложение — предоставляет обходить блокировки
Открытие счета на официальном сайте
Процесс открытия счета отнимает всего пару минут и состоит из данных шагов:
1. Вход на основной портал или действующее зеркало
2. Выбор на иконку «Зарегистрироваться»
3. Ввод персональной бланка
4. Валидация email почты или контактного номера
5. Задействование бонуса за регистрацию при наличии промокода
Новые геймеры зарабатывают великодушный стартовый презент, который может охватывать фриспины, денежные поощрения или кэшбек.
Логин в личный кабинет
Подключение на сайте осуществляется традиционным путем. Нужно вписать имя пользователя и кодовое слово, задействованные при оформлении.
Существенные аспекты для надежного входа:
– Используйте надежный пароль
– Задействуйте двухэтапную идентификацию
– Не сохраняйте коды на посторонних девайсах
– Контролируйте доменную строку браузера
Обзор наградной схемы
Игровая платформа балует пользователей многочисленными вознаграждениями и кампаниями:
Начальный комплект
Дебютанты имеют возможность полагаться на значительное поощрение за первый взнос. Зачастую это пропорциональная надбавка к внесенной сумме плюс даровые спины для популярных слотов.
Систематические промо
– 7-дневный кэшбек — возвращение части списанных денежных средств
– Бонусы на очередные вклады
– Особые офферы по знаменательным датам
– Состязания с значительными выигрышными банками
Программа привилегий
Регулярные пользователи собирают единицы за всякую ставку, которые затем конвертируются на фактические финансы, фриспины или специальные льготы.
Бонус-коды: как использовать
Купоны — это уникальные последовательности букв и цифр, дающие доступ к дополнительным бонусам.
Каким образом получить актуальные промокоды:
– Проверенные медийные сети казино
– Аффилиатные порталы
– Email-подписка
– Профильные группы
Вводится промокод в предназначенное поле при оформлении или добавлении денег депозита.
Смартфонная версия и приложение
Нынешние клиенты выбирают проводить время с портативных устройств. Сайт дает два метода для беспроблемной мобильной игры.
Адаптивная модификация
Браузерная версия автоматически оптимизируется под параметры монитора. Не нуждается установки и оперирует в любом свежем браузере.
Мобильное приложение
Установить app можно для девайсов на Android и iOS. Достоинства app:
– Молниеносная открытие
– Стабильная операция
– Push-уведомления о акциях
– Автономный минование блокировок
Этап загрузки элементарен: нужно перейти на веб-сайт с телефонного гаджета и подчиняться инструкциям.
Игровой выбор
Библиотека слотов содержит тысячи вариантов от ведущих производителей.
Слоты
Азартные автоматы — крайне востребованная категория аттракционов. Размещены классические трехбарабанные слоты, современные видеослоты с премиальными уровнями, а также джекпотные призы.
Live казино
Секция с действительными дилерами предоставляет испытать атмосферу подлинного казино. Имеются столы с покером.
Трансляция производится в HD качестве, присутствует чат с ведущим и иными геймерами.
Конкурсы
Постоянно проводятся турниры по многочисленным категориям. Включение дает шанс получить валютные выигрыши, фриспины или уникальные привилегии.
Платежные операции
Платформа предоставляет большой набор денежных методов:
– Банковские карты
– Онлайн системы
– Криптовалюта
– Финансовые переводы
Низшая объем вклада — посильная для преобладающего числа геймеров. Снятие денег выполняется в скорые временные рамки.
Департамент поддержки
Опытные сотрудники расположены поддержать непрерывно. Открыты такие варианты общения:
– Веб-чат
– Email
– Мобильная линия
– Социальные сети
Решения на распространенные темы можно получить в блоке FAQ.
Резюме
Основной портал казино и его действующие зеркала гарантируют пользователям максимальный путь ко всем функциям платформы. Значительные поощрения, практичная мобильная версия, гигантский каталог развлечений и квалифицированная служба поддержки создают азартный времяпрепровождение исключительно приятным и конфиденциальным.
Передовые онлайн-казино предоставляют клиентам разнообразие путей для удобной игры. Главный сайт Вован обеспечивает путь ко всем сервисам и игровым автоматам. Однако при появлении технических проблем на выручку прибывают действующие зеркала.
Что представляет собой функционирующее зеркало
Альтернативный адрес казино — это стопроцентная версия главного веб-сайта, находящаяся по альтернативному URL. Подлинное зеркало поддерживает все функции, включая регистрацию, доступ в личный кабинет, премии и кодовые слова.
Дубликат на сегодня предоставляет:
– Непрерывный путь к развлекательным аппаратам
– Полную сохранность личных данных
– Поддержку депозита и хронологии переводов
– Возможность использования всех промо-предложений
Открытие профиля на главном ресурсе
Этап регистрации занимает пару минут. Новоиспеченным геймерам требуется:
1. Войти на подлинный ресурс или актуальное зеркало
2. Выбрать кнопку «Регистрация»
3. Внести требуемые данные
4. Верифицировать э-мейл почту
5. Применить кодовое слово при существовании
После завершения оформления профиля игроки получают подарок за регистрацию, какой может иметь бесплатные вращения или денежное вознаграждение.
Вход в личный кабинет
Индивидуальный кабинет дает полный надзор над азартным ходом. Через персональный кабинет можно:
– Вносить средства на баланс
– Снимать призы
– Применять бонусные коды
– Отслеживать историю игр
– Участвовать в состязаниях
– Приобретать кешбэк
Характеристика вознаграждений и специальных предложений
Щедрая поощрительная схема — ключевое преимущество ресурса. Ключевые формы поощрений:
Стартовый бонус
Новые игроки приобретают богатое поощрение на начальные вклады. Сумма премии может доходить до 100-200% от величины депозита.
Бесплатные вращения
Безвозмездные спины предоставляются для востребованных автоматов. Число бесплатных вращений варьируется от 10 до 500 штук.
Кэшбек
Регулярный или помесячный компенсация доли проигранных финансов. Средний объем компенсации — 5-15%.
Турниры
Постоянные состязания с крупными премиальными банками. Игроки конкурируют за топовые места в турнирной таблице.
Смартфонная версия и софт
Адаптивная версия позволяет играть с каждого аппарата. Пользователи могут загрузить программу для iOS и Android или задействовать браузерную версию.
Выгоды смартфонного софта:
– Молниеносная загрузка игр
– Комфортный дизайн
– Пуш-нотификации о бонусах
– Вход через Touch ID
Игровые автоматы и Live казино
Игровая база охватывает множество позиций от топовых разработчиков.
Топовые типы слотов:
– Традиционные автоматы
– Современные слоты с бонусными уровнями
– Прогрессивный джекпот автоматы
– Megaways автоматы
Live игровой зал
Категория live игорный зал обеспечивает игру с настоящими ведущими. Представлены традиционные развлечения:
– Рулетка
– Двадцать одно
– Baccarat
– Карибский покер
Как найти актуальное зеркало
Получить свежую адрес на зеркало возможно несколькими путями:
1. Подписаться на почтовую рассылку
2. Наблюдать за апдейтами в социальных сетях
3. Написать в отдел поддержки
4. Заложить актуальное зеркало в закладки
Вывод
Лицензионный портал и его действующие зеркала гарантируют бесперебойный путь к азартным играм. Богатые бонусы, различные бонусные коды, эргономичное мобильное программа и высококлассная служба поддержки поддержки делают азартный геймплей предельно удобным и безопасным.
access this site – Tidy pages and smooth navigation make reading content enjoyable.
курс seo курс seo .
пары видеочат секс пар
The best for you: https://picoreteamevent.click/top-melhores-casinos-online-acercade-portugal-em-2025/
The most interesting click: https://ergolyftsverige.se/bonos-falto-tanque-sobre-casinos-de-espana-superiores-sobre-2025/
discover products here – Well-structured content makes finding items simple.
The best is right here: http://www.spanishtrainers.com/blog/serps-to-have-xxxxxx-bf-intercourse-xxxxxx-bf-vieg-gay-pornography-anal-bareback-web-page-3/
Современные сетевые казино предоставляют клиентам обширный ассортимент возможностей для удобной игры. Тем не менее иногда вход к базовому ресурсу может являться закрытым. В таких обстоятельствах на поддержку приходят Ретро, которое предоставляет непрерывный путь ко всем сервисам платформы.
Что такое функционирующее зеркало казино
Альтернативный сайт — это полная версия главного веб-сайта, которая хостится по другому интернет-адресу. Зеркало сохраняет целый набор функций оригинального сайта, включая персональный кабинет, счет и историю переводов.
Главные преимущества эксплуатации зеркала:
– Круглосуточный доступ к ресурсу
– Максимальная аналогичность инструментов
– Защита пользовательских сведений
– Поддержка всех вознаграждений
Как отыскать действующее зеркало на текущий день
Существует несколько безопасных методов обнаружения текущей ссылочной информации:
Авторизованные каналы:
1. Электронная рассылка — управление регулярно высылает письма с свежими URL
2. Общественные сети — легитимные каналы публикуют свежую новости
3. Департамент поддержки — сотрудники дают достоверные адреса
4. Телефонное приложение — обеспечивает преодолевать блокировки
Регистрация на основном веб-сайте
Процесс оформления длится не более немного минут и предполагает из данных стадий:
1. Попадание на главный сайт или функционирующее зеркало
2. Щелчок на кнопку «Открыть счет»
3. Указание персональной формы
4. Валидация электронной почты или телефонного номера
5. Задействование бонуса за регистрацию при присутствии промокода
Свежие игроки обретают значительный начальный бонус, который может охватывать бесплатные вращения, денежные призы или cashback.
Логин в индивидуальный кабинет
Авторизация на сайте осуществляется привычным образом. Достаточно ввести логин и код доступа, указанные при регистрации.
Ключевые детали для безопасного входа:
– Задействуйте криптостойкий шифр
– Задействуйте 2FA проверку
– Не записывайте реквизиты на общественных девайсах
– Мониторьте доменную строку браузера
Характеристика наградной схемы
Игорный портал одаривает игроков многочисленными бонусами и специальными предложениями:
Приветственный букет
Новички вправе надеяться на значительное награду за первый вклад. Как правило это пропорциональная надбавка к переведенной сумме плюс фриспины для популярных слотов.
Систематические предложения
– Недельный кэшбек — возвращение части утраченных средств
– Бонусы на очередные вклады
– Специальные предложения по торжествам
– Состязания с солидными призовыми фондами
Схема привилегий
Деятельные пользователи зарабатывают пункты за всякую ставку, которые затем меняются на действительные деньги, free spins или особые льготы.
Бонус-коды: как использовать
Кодовые комбинации — это особые последовательности знаков, дающие право к дополнительным бонусам.
Где взять актуальные промокоды:
– Легитимные коммуникационные сети казино
– Аффилиатные порталы
– Email-рассылка
– Специализированные сообщества
Указывается промокод в соответствующее поле при регистрации или пополнении кошелька.
Мобильная версия и приложение
Передовые клиенты выбирают играть с мобильных аппаратов. Портал обеспечивает пару решения для беспроблемной мобильной игры.
Отзывчивая модификация
Онлайн версия сама адаптируется под диагональ экрана. Не нуждается установки и работает в любом свежем браузере.
Смартфонное приложение
Установить app можно для гаджетов на Android и iOS. Преимущества app:
– Молниеносная загрузка
– Надежная действие
– Push-уведомления о акциях
– Автономный обход блокировок
Процедура скачивания прост: необходимо зайти на сайт с мобильного девайса и подчиняться руководству.
Развлекательный коллекция
Коллекция слотов включает тысячи вариантов от лучших провайдеров.
Слоты
Гемблинг слоты — максимально любимая группа развлечений. Показаны обычные простые аппараты, новые графические аппараты с премиальными раундами, а также джекпотные джекпоты.
Live казино
Секция с настоящими дилерами позволяет ощутить настроение истинного казино. Представлены развлечения с покером.
Трансляция реализуется в превосходном разрешении, имеется коммуникация с крупье и прочими игроками.
Турниры
Систематически устраиваются состязания по многочисленным дисциплинам. Участие дает шанс заработать денежные награды, free spins или уникальные поощрения.
Финансовые операции
Ресурс обеспечивает большой набор расчетных систем:
– Пластиковые карты
– Виртуальные кошельки
– Цифровая валюта
– Банковские платежи
Наименьшая величина депозита — приемлемая для массы игроков. Получение выигрышей обрабатывается в кратчайшие периоды.
Сервис поддержки
Опытные консультанты расположены оказать помощь круглосуточно. Доступны такие каналы общения:
– Интернет-чат
– Email
– Телефонная горячая линия
– Медийные сети
Решения на типовые запросы можно получить в блоке FAQ.
Итог
Главный портал казино и его действующие зеркала гарантируют геймерам полный доступ ко всем сервисам ресурса. Солидные вознаграждения, удобная телефонная версия, колоссальный выбор слотов и квалифицированная помощь делают гемблинг процесс максимально удобным и надежным.
helpful site https://yomix.biz/
Only the best is here: https://johnathanfuhr53186.59bloggers.com/40747324/indian-blue-movie-marketplace-history-affect-and-lawful-problems
проект перепланировки квартиры проект перепланировки квартиры .
eva casino зеркало
eva casino сначала думал фейк, но нет
https://primelinepharmacy.com/# erectile dysfunction meds online
Novibet tá bombando com roleta diária: 50–200 giros grátis no Fortune Tiger toda noite
продвижение сайта по трафику пример договора prodvizhenie-sajta-po-trafiku3.ru .
Доступ к платформе через рабочие зеркала
Передовые виртуальные казино гарантируют клиентам постоянный вход к играм. Центральный ресурс Клубника действует стабильно, гарантируя обширный спектр развлекательных слотов. Но порой образуются программные трудности или ограничения, следовательно существенно знать о наличии рабочих зеркал.
Что означает из себя центральное зеркало казино
Зеркало — это точная версия центрального веб-сайта с идентичным возможностями. Актуальное зеркало в настоящее время обеспечивает преодолевать территориальные барьеры и возобновлять игру.
Главные достоинства использования зеркал:
– Абсолютный вход к собственному кабинету
– Удержание каждых сведений профиля
– Такой же набор слотов
– Действующие бонусы и предложения
Открытие счёта на сайте
Операция записи отнимает немного минут. Недавние геймеры приобретают богатый бонус за запись, что способен охватывать:
– Начальный финансовый бонус
– Комплиментарные фриспины для игр
– Особые промокоды
– Увеличенный возврат
Ради завершения оформления необходимо:
1. Зайти на главный портал или дубликат
2. Нажать клавишу «Зарегистрироваться»
3. Ввести индивидуальные информацию
4. Заверить email или мобильный
5. Активировать промокод (когда имеется доступности)
Вход в собственный кабинет
Следом за успешной оформления игроки в состоянии производить вход с помощью центральный портал или актуальное зеркало. Собственный кабинет обеспечивает всесторонний регулирование над профилем:
– История пари
– Внесение депозита
– Вывод средств
– Администрирование поощрениями
– Участие в конкурсах
Награды и кампании казино
Ресурс удовлетворяет игроков различными привилегированными схемами:
Начальные поощрения
Начинающие получают великодушный набор наград на стартовые пополнения. Зачастую это содержит пропорциональную надбавку к сумме вклада плюс безвозмездные спины.
Периодические акции
– Еженедельный кешбэк до 15%
– Состязания с выигрышными банками
– Призы на день рождения
– Специальные промо для привилегированных игроков
Схема поощрения
Активные геймеры собирают единицы, что можно трансформировать на подлинные деньги или особые бонусы.
Мобильная форма и программа
Нынешние разработки позволяют развлекаться всюду комфортно. Мобильная вариант портала самостоятельно настраивается под дисплей каждого аппарата.
Преимущества портативного приложения:
– Скоростная открытие автоматов
– Удобный дизайн
– Мгновенные-уведомления о акциях
– Опция загрузить для Android и iOS
Реальное казино: среда настоящего развлекательного заведения
Раздел Live казино погружает игроков в антураж настоящего развлекательного клуба. Профессиональные ведущие ведут процесс в состоянии подлинного времени.
Доступные столы:
– Рулетка
– Блэкджек
– Карточная игра
– Покер
Автоматы и развлекательные слоты
Коллекция гемблинг машин насчитывает множество названий от передовых провайдеров. Произвольный игрок обнаружит развлечение по душе:
– Стандартные машины
– Инновационные игры с специальными этапами
– Крупный приз-игры
– Megaways машины
Турниры и раздачи
Периодические соревнования добавляют азарт и обеспечивают способность выиграть значительные вознаграждения. Включение в турнирах регулярно безвозмездное, а призовые суммы составляют внушительных объёмов.
Секьюрити и приватность
Ресурс применяет актуальные протоколы шифрования для гарантии сведений игроков. Любые платёжные процедуры совершаются через охраняемые линии.
Резюме
Официальный ресурс и его функционирующие зеркала обеспечивают устойчивый переход к качественным развлекательным играм. Богатые бонусы, удобная портативная вариант, богатство автоматов и профессиональное Live-клуб создают ресурс прекрасным вариантом для ценителей игровых развлечений.
this online hub – Navigation feels intuitive, and information is easy to locate.
Современные онлайн-казино обеспечивают пользователям обширный набор возможностей и премиальных вариантов. Вход к ресурсу производится через официальный ресурс или его актуальное зеркало ДжиВиСпин сайт, что гарантирует бесперебойную активность.
Что такое функционирующее зеркало казино
Копия — это точная копия основного веб-сайта, созданная для преодоления барьеров. Зеркало сегодня дает возможность участникам получить соединение к любимым развлечениям в каждое время.
Проверенное зеркало содержит всеми характеристиками главного портала:
– Целый ассортимент автоматов
– Личный кабинет с зафиксированными сведениями
– Актуальные промокоды
– Надежные денежные операции
Регистрация на лицензионном портале
Ход регистрации отнимает всего несколько минут. Начинающим игрокам необходимо:
1. Войти на официальный сайт или рабочее зеркало
2. Выбрать на элемент “Регистрация”
3. Указать обязательные параметры
4. Активировать email
5. Совершить начальный вклад
Поощрение новичкам зачисляется незамедлительно после завершения всех стадий.
Авторизация в профиль
Существующие игроки могут совершить авторизацию используя:
– Никнейм и код
– Цифры мобильного
– Email
Аккаунт открывает шанс к регулированию средствами, истории операций и активным бонусам.
Награды и предложения
Игровая сервис балует активных игроков щедрыми призами:
Приветственный набор
– Надбавка на начальный взнос до 100%
– Free spins на известные автоматы
– Особые бонусы за дальнейшие взносы
Бонусные коды
Особые промокоды предоставляют право на использование уникальных вознаграждений. Свежие купоны размещаются в разделе “Акции”.
Кешбэк
Еженедельный возврат насчитывает до 10% от потраченных финансов. Компенсация зачисляется сразу.
Механизм лояльности
Регулярные игроки зарабатывают очки, которые превращаются на действительные выплаты или free spins.
Адаптивный портал и приложение
В целях удобства пользователей создана качественная портативная платформа. Гибкий интерфейс помогает легко участвовать с всякого переносного устройства.
Плюсы приложения:
– Оперативный доступ к автоматам
– Адаптированный интерфейс
– Бесперебойная функциональность
– Нотификации о последних бонусах
Скачать приложение можно свободно с основного портала для гаджетов на Android и iOS.
Коллекция слотов
Слоты
Каталог насчитывает более 2000 слотов от известных провайдеров:
– Классические слоты
– Мультимедийные игры
– Jackpot игры
– Брендовые слоты
Live казино
Категория Live казино дает участие с подлинными крупье в прямом режиме:
– Roulette
– Карточная игра
– Карты
– Poker
Состязания
Систематические состязания с солидными выигрышными пулами проводятся систематически. Присоединение в конкурсах доступно всем активным клиентам.
Расчетные варианты
Депозиты и выводы финансов реализуются через востребованные методы:
– Банковские карточ ки
– Цифровые системы
– Криптовалюта
– Денежные транзакции
Минимальный платеж — от 100 рублей. Вывод выигрышей проводится в течение 24 часов.
Служба support
Постоянная служба помощи готова помочь в исправлении произвольных задач:
– Живой чат
– Email
– Телефон
– Общественные сети
Охрана и документ
Главный портал функционирует на почве международной разрешения. Любые информация клиентов охранены новейшим SSL-протоколом.
Вывод
Рабочее зеркало гарантирует непрерывный соединение к излюбленным слотам, выгодным акциям и функциональным услугам. Зарегистрируйтесь сейчас и обретите приветственный приз!
продвижение трафика prodvizhenie-sajta-po-trafiku2.ru .
PG Soft no Pix: melhores cassinos pra depositar R$1 e sair girando em 2026
Fortune Tiger big win ao vivo: já gritou gol no meio da sala? Conta!
quick tech fixes – A well-arranged layout makes navigation simple and fast.
a fantastic read https://yomix.biz
go to site – Pages are organized neatly and feel professional
visit this site – Calm design and organized presentation create a smooth browsing experience.
eva casino промокоды
eva casino телега норм
Актуальные онлайн-казино обеспечивают геймерам разнообразный спектр опций для беспроблемной игры. Переход к платформе Клубника осуществляется через главный сайт или функционирующее зеркало.
Что такое функционирующее зеркало казино
Функционирующее зеркало — это резервный линк основного сайта казино. Такие версии создаются для обеспечения непрерывного подключения к развлекательной платформе.
Зеркало сегодня целиком повторяет характеристики главного домена. Клиенты имеют идентичный путь ко всем возможностям, включая открытие счета, зачисление средств кошелька и вывод средств.
Регистрация на главном ресурсе
Алгоритм оформления учетной записи требует всего несколько моментов. Будущим пользователям необходимо:
1. Зайти на основной портал или актуальное настоящее зеркало
2. Выбрать кнопку “Создать аккаунт”
3. Заполнить обязательные информацию
4. Подтвердить почтовую почту
5. Активировать купон при присутствии
После окончания открытия профиля участник обретает вознаграждение за регистрацию, который способен предполагать free spins или финансовое поощрение.
Доступ в индивидуальный кабинет
Индивидуальный кабинет — это охраняемая область, где клиенты имеют возможность управлять своим учетной записью. Для входа требуется ввести логин и секретный ключ.
В пользовательском кабинете представлены нижеперечисленные возможности:
– Проверка истории переводов
– Задействование бонусных кодов
– Контроль вознаграждениями
– Участие в турнирах
– Контроль кэшбэка
– Редактирование данных
Бонусы и акции
Азартная платформа предлагает выгодные бонусы:
Регистрационный набор — новички обретают существенное премию на стартовые взносы.
Free spins — предоставляются как при открытии счета, так и в ходе различных кампаний.
Кэшбэк — систематический компенсация части израсходованных средств.
Бонусные коды — особые шифры, открывающие возможность к уникальным призам.
Анализ азартных разделов
Аппараты
Коллекция автоматов включает массу позиций от передовых провайдеров. Игроки обнаружат как стандартные слоты, так и актуальные видео-слоты с захватывающей визуализацией.
Live казино
Категория Live казино обеспечивает шанс участвовать с действующими дилерами в условиях настоящего времени. Имеются известные столы: рулетка, блэкджек, баккара, покер.
Состязания
Постоянные турниры с солидными выигрышными фондами притягивают тысячи игроков. Победители зарабатывают финансовые вознаграждения и эксклюзивные подарки.
Портативная версия и софт
Портативная версия портала предоставляет право развлекаться с любого аппарата. Оформление независимо адаптируется под формат экрана.
Установить приложение можно для гаджетов на Android и iOS. Телефонное ПО располагает всеми функциями настольной версии.
Как обнаружить актуальное зеркало на данный момент
Свежие линки зеркал периодически обновляются. Обнаружить рабочую адрес можно разными вариантами:
– Через департамент помощи
– В проверенных коммуникационных сетях
– По почтовой подписке
– На специализированных площадках
Безопасность и лицензирование
Основной сайт действует на основании зарубежной документа. Все операции оберегаются современными протоколами кодирования.
Секретность индивидуальных информации поддерживается в полном объеме.
Заключение
Лицензионный портал и его рабочие копии гарантируют клиентам 24/7 выход к качественным азартным развлечениям. Щедрые вознаграждения, всевозможные игры, квалифицированная сервис — все это превращает азартный досуг предельно беспроблемным и притягательным.
Актуальные онлайн-казино гарантируют участникам широкий набор слотов и заманчивые премии. Но для стабильной игры критично иметь представление, как обнаружить Клубника и его рабочие зеркала.
Что такое официальный портал казино
Главный веб-сайт казино — это базовая веб-площадка, где игроки могут пользоваться развлекательными развлечениями. Портал действует на легитимных принципах и обладает всеми необходимыми лицензиями.
Первостепенные плюсы официального ресурса:
– Безопасность персональных данных
– Объективные правила участия
– Обеспеченные выводы
– Профессиональная служба поддержки
Рабочее зеркало казино: для чего необходимо
Зеркало — это идентичная версия основного веб-сайта, размещенная по другому веб-адресу. Актуальное зеркало формируется для гарантирования непрерывного входа к сайту.
Факторы задействования дублирующих ресурсов:
– Ограничение официального сайта
– Профилактические мероприятия
– Значительная загрузка на систему
Как найти действующее зеркало в данный момент
Обнаружить свежее рабочее зеркало можно разными методами:
1. Почтовые оповещения — активируйте уведомления на информационную доставку
2. Команда поддержки — обратитесь в онлайн-чат
3. Официальные медиа — следите за постами
4. Игровые сайты — надежные сайты
Регистрация на ресурсе казино
Процедура открытия счета составляет буквально пару мгновений:
1. Кликните на опцию “Регистрация”
2. Внесите требуемые поля
3. Валидируйте почтовую e-mail
4. Используйте код активации, если имеется
Вслед за успешной регистрации вам будет открыт индивидуальный раздел.
Поощрения и бонусные коды
Щедрая поощрительная структура — ключевое достоинство казино:
Поощрение за регистрацию
Начинающие участники приобретают первый бонус, который может охватывать:
– Монетарный счет на стартовый вклад
– Фри-спины для автоматов
– Бездепозитные деньги
Активационные коды
Регулярно появляются эксклюзивные промокоды, предоставляющие активировать специальные привилегии.
Программа кэшбека
Регулярные игроки получают порцию потраченных денег обратно.
Действующие промо и соревнования
Сайт постоянно проводит интересные кампании:
– Weekly соревнования
– Тематические акции
– Конкурсы значительных наград
– Механизм статусов
Логин в персональный раздел
Для доступа на ресурс нужно:
1. Загрузить основной ресурс или актуальное зеркало
2. Активировать “Войти”
3. Ввести имя пользователя и код доступа
В личном разделе открыты нижеперечисленные возможности:
– Пополнение кошелька
– Получение призов
– Анализ истории игр
– Управление профильными параметрами
Адаптивная версия и софт
Адаптивная вариант
Responsive модификация сайта предоставляет шанс участвовать с всех карманного устройства. Дизайн адаптивно оптимизируется под диагональ дисплея.
Программа для скачивания
Загрузить клиент можно для:
– Android — безопасная загрузка с портала
– iOS — установка через App Store
Преимущества приложения:
– Моментальный доступ
– Устойчивая работа
– Push-уведомления об акциях
– Производительный функционал
Игровые категории
Игровые машины
Внушительная коллекция азартных машин от лучших производителей:
– Традиционные машины
– Современные-автоматы
– Призовые-слоты
Live игры
Категория с настоящими крупье обеспечивает:
– Рулетка
– 21
– Punto Banco
– Texas Hold’em
Стримы проводятся в высоком качестве изображения, обеспечивая эффект реального казино.
Способы пополнения и вывода
Ресурс обслуживает множественные денежные инструменты:
– Платежные карты
– Электронные счета
– Цифровые валюты
– Wire транзиты
Базовые пороги депозита и быстрые выплаты создают игру крайне беспроблемной.
Отдел техподдержки
Компетентная группа ассистентов функционирует 24/7 и способна содействовать с любыми проблемами:
– Реалтайм-чат
– Email-помощь
– Телефонная линия
Итоги
Главный сайт казино и его действующие дубликаты гарантируют клиентам безопасный и увлекательный развлекательный процесс. Выгодные подарки, простая мобильная платформа, богатые развлечения и высокоуровневое live-казино делают эту площадку отличным решением для развлекательных досуга.
porn games
official site https://anycoindirect.me
Fortune Rabbit tá pagando mais consistente que o Tigrinho? Mostra seu maior respin nos comentários!
shop now – Fast-loading content and organized sections enhance usability
explore here – Smooth navigation and organized content make everything easy to find.
Нынешние онлайн-казино обеспечивают пользователям разнообразный диапазон функций для удобной времяпрепровождения. Подключение к сервису Клубника осуществляется через основной портал или действующее зеркало.
Что такое функционирующее зеркало казино
Функционирующее зеркало — это дополнительный домен главного портала казино. Такие версии создаются для гарантирования постоянного соединения к азартной платформе.
Зеркало сегодня совершенно воспроизводит опции основного ресурса. Игроки обретают такой же доступ ко всем услугам, включая открытие счета, пополнение счета и обналичивание денег.
Открытие счета на основном веб-сайте
Алгоритм оформления учетной записи требует всего несколько минут. Будущим пользователям необходимо:
1. Перейти на основной портал или действующее проверенное зеркало
2. Выбрать кнопку “Открыть счет”
3. Указать необходимые сведения
4. Подтвердить почтовую почту
5. Использовать код активации при наличии
После завершения оформления пользователь обретает вознаграждение за регистрацию, который имеет право включать free spins или финансовое премию.
Вход в персональный кабинет
Пользовательский кабинет — это безопасная область, где клиенты могут регулировать своим аккаунтом. Для авторизации требуется указать логин и секретный ключ.
В личном кабинете представлены следующие инструменты:
– Отслеживание хронологии транзакций
– Применение купонов
– Настройка вознаграждениями
– Включение в турнирах
– Проверка возврата средств
– Изменение профиля
Вознаграждения и предложения
Гемблинговая система обеспечивает щедрые призы:
Стартовый комплект — новые игроки получают крупное начисление на первые депозиты.
Фриспины — выдаются как при оформлении, так и в контексте разнообразных акций.
Кэшбек — еженедельный возврат части утраченных финансов.
Бонусные коды — особые комбинации, открывающие возможность к специальным вознаграждениям.
Характеристика гемблинговых разделов
Игровые автоматы
Коллекция аппаратов насчитывает массу позиций от топовых разработчиков. Игроки встретят как традиционные автоматы, так и актуальные мультимедийные автоматы с интересной оформлением.
Live казино
Секция Live казино обеспечивает возможность соревноваться с действующими крупье в формате текущего времени. Представлены популярные столы: рулетка, блэкджек, баккара, покер.
Конкурсы
Систематические турниры с крупными выигрышными банками привлекают массу соревнующихся. Лидеры завоевывают cash вознаграждения и особые бонусы.
Портативная версия и app
Адаптивная версия портала обеспечивает развлекаться с каждого девайса. Оформление самостоятельно подстраивается под формат экрана.
Установить приложение можно для девайсов на Android и iOS. Портативное программа располагает всеми возможностями десктопной версии.
Как обнаружить действующее зеркало на текущий день
Свежие URL дубликатов периодически корректируются. Обнаружить действующую линк можно несколькими вариантами:
– Через отдел поддержки
– В подлинных коммуникационных сетях
– По email подписке
– На тематических порталах
Защита и лицензирование
Официальный домен действует на фундаменте мировой лицензии. Все переводы оберегаются инновационными технологиями безопасности.
Конфиденциальность индивидуальных реквизитов поддерживается в совершенном масштабе.
Заключение
Лицензионный сайт и его действующие копии предоставляют клиентам беспрерывный путь к первоклассным игровым сервисам. Великодушные вознаграждения, всевозможные развлечения, опытная поддержка — все это превращает гемблинговый процесс предельно удобным и захватывающим.
see more details – Everything is laid out logically, giving a calm and easy-to-follow experience.
Современные онлайн-казино гарантируют игрокам разнообразный спектр азартных игр и щедрые награды. Однако для комфортной работы важно знать, как найти Clubnika сайт официальный и его функционирующие зеркала.
Что такое официальный портал казино
Основной ресурс казино — это главная веб-площадка, где пользователи могут развлекаться игровыми играми. Ресурс работает на законных условиях и владеет всеми необходимыми документами.
Основные выгоды главного сайта:
– Надежность индивидуальных реквизитов
– Честные положения использования
– Стабильные транзакции
– Компетентная помощь
Рабочее зеркало казино: для чего требуется
Зеркало — это полная версия лицензионного портала, хостящаяся по отличному домену. Актуальное зеркало разрабатывается для гарантирования постоянного соединения к платформе.
Факторы использования зеркал:
– Ограничение главного домена
– Профилактические работы
– Большая загрузка на платформу
Как отыскать свежее зеркало на сегодня
Обнаружить актуальное проверенное зеркало можно разными путями:
1. Email-уведомления — оформите подписку на информационную рассылку
2. Служба support — обратитесь в онлайн-чат
3. Публичные медиа — мониторьте за новостями
4. Тематические сайты — надежные ресурсы
Открытие счета на портале казино
Этап оформления занимает лишь несколько моментов:
1. Выберите на клавишу “Создать аккаунт”
2. Введите запрашиваемые сведения
3. Подтвердите почтовую ящик
4. Примените бонусный код, если предоставлен
Сразу после финализированной регистрации вам будет разрешен пользовательский аккаунт.
Награды и промокоды
Выгодная наградная структура — значимое преимущество казино:
Награда за создание аккаунта
Свежие игроки получают стартовый подарок, который может охватывать:
– Финансовый счет на дебютный взнос
– Бесплатные вращения для слотов
– Бездепозитные фонды
Купоны
Регулярно размещаются эксклюзивные промокоды, предоставляющие активировать экстра бонусы.
Система компенсации
Постоянные клиенты возвращают процент утраченных финансов в виде компенсации.
Свежие акции и конкурсы
Казино периодически организует интересные промо-мероприятия:
– Weekly турниры
– Специальные промо
– Розыгрыши крупных призов
– Программа статусов
Вход в пользовательский кабинет
Для доступа на платформу нужно:
1. Открыть лицензионный адрес или функционирующее зеркало
2. Активировать “Login”
3. Прописать имя пользователя и пароль
В индивидуальном аккаунте разрешены нижеперечисленные опции:
– Зачисление депозита
– Вывод выигрышей
– Просмотр архива игр
– Редактирование личными параметрами
Портативная версия и софт
Мобильная платформа
Оптимизированная вариант сайта позволяет делать ставки с любого смартфонного телефона. Визуал самостоятельно настраивается под размер экрана.
Клиент для скачивания
Получить программу можно для:
– Android — непосредственная скачивание с ресурса
– iOS — загрузка через App Store
Преимущества мобильного клиента:
– Мгновенный запуск
– Устойчивая функциональность
– Push-уведомления об предложениях
– Улучшенный UI
Гемблинг разделы
Автоматы
Внушительная галерея развлекательных автоматов от лучших провайдеров:
– Классические машины
– Новые-автоматы
– Накопительные-слоты
Live casino
Категория с живыми дилерами предлагает:
– Рулетки
– Блэкджек
– Баккара
– Карточные игры
Вещания проводятся в отличном формате, создавая атмосферу подлинного казино.
Системы внесения средств и получения
Ресурс работает с разные денежные инструменты:
– Банковские картсчета
– Онлайн платежи
– Цифровые валюты
– Финансовые транзиты
Базовые значения внесения и моментальные выводы создают времяпрепровождение исключительно приятной.
Отдел помощи
Профессиональная служба ассистентов доступна 24/7 и в состоянии поддержать с всеми вопросами:
– Реалтайм-чат
– Email-консультации
– Phone связь
Итоги
Лицензионный сайт казино и его действующие копии дают игрокам безопасный и увлекательный игровой отдых. Выгодные подарки, функциональная портативная вариант, богатые игры и профессиональное live-казино формируют эту систему превосходным местом для азартных игр.
explore shop page – Clear structure helps users navigate effortlessly.
see this page – Fast-loading pages and content is easy to locate
Платформа Pinco остается удобной для пользователей, которым нужен быстрый вход. На главной странице расположены ключевые блоки, поэтому навигация занимает минимум времени. По отзывам, интерфейс сохраняет стабильность при регулярной работе. Перейти к официальному адресу можно по ссылке пин казино на главный раздел. Это надежный маршрут для постоянного доступа.
marblestone highlights – Everything is neatly presented and easy to explore.
click to investigate https://daobase.info
https://pharmacologicalsciences.com/ viagra
site here https://anycoindirect.me
trailstone market – Layout is neat and finding products is straightforward
Fortune Tiger big win 2000x: já aconteceu com você? Conta a história completa
Передовые онлайн-казино обеспечивают игрокам разнообразие путей для приятной игры. Главный ресурс Клубника дарит возможность ко всем опциям и играм. Однако при образовании системных сложностей на помощь приходят действующие зеркала.
Что представляет собой рабочее зеркало
Копия казино — это полная копия официального ресурса, расположенная по альтернативному URL. Официальное зеркало поддерживает все характеристики, включая открытие профиля, авторизацию в собственный кабинет, поощрения и промокоды.
Альтернативный сайт на сегодня обеспечивает:
– Непрерывный доступ к развлекательным автоматам
– Абсолютную конфиденциальность личных сведений
– Удержание баланса и журнала платежей
– Применимость всех бонусных программ
Создание учетной записи на лицензионном сайте
Процесс оформления учетной записи занимает пару минут. Свежеиспеченным пользователям следует:
1. Зайти на главный ресурс или действующее зеркало
2. Кликнуть кнопку «Регистрация»
3. Внести необходимые графы
4. Подтвердить электронную почту
5. Применить кодовое слово при существовании
После окончания создания аккаунта игроки приобретают бонус за регистрацию, который может иметь бонусные спины или денежно-призовое поощрение.
Вход в персональный кабинет
Личный кабинет предоставляет всесторонний мониторинг над игровым процессом. Через индивидуальный раздел возможно:
– Пополнять кошелек
– Снимать выплаты
– Применять кодовые слова
– Проверять журнал ставок
– Участвовать в соревнованиях
– Получать кешбэк
Характеристика бонусов и специальных предложений
Щедрая поощрительная система — существенное плюс проекта. Главные виды поощрений:
Вступительный подарок
Новые игроки получают выгодное награду на начальные пополнения. Размер бонуса может достигать 100-200% от суммы депозита.
Бонусные спины
Бесплатные раунды начисляются для топовых игровых автоматов. Число бесплатных вращений колеблется от 10 до 500 штук.
Кешбэк
Еженедельный или помесячный компенсация процента потерянных финансов. Средний объем кэшбека — 5-15%.
Турниры
Периодические турниры с внушительными наградными банками. Конкурсанты борются за призовые строчки в таблице лидеров.
Портативная версия и приложение
Адаптивная версия разрешает развлекаться с любого гаджета. Игроки могут установить app для iOS и Android или задействовать браузерную версию.
Плюсы портативного программы:
– Оперативная загрузка слотов
– Эргономичный графический интерфейс
– Push-уведомления о промо
– Доступ через Face ID
Игровые автоматы и Live казино
Развлекательная коллекция насчитывает сотни игр от известных производителей.
Востребованные разделы слотов:
– Классические слоты
– Видеослоты с призовыми этапами
– Накопительный приз автоматы
– Мегавейс автоматы
Live казино
Категория live игорный зал предоставляет игру с настоящими ведущими. Есть традиционные развлечения:
– Рулетка
– Blackjack
– Punto Banco
– Техасский холдем
Как отыскать рабочее зеркало
Обрести действующую ссылку на зеркало можно несколькими вариантами:
1. Зарегистрироваться на email-рассылку
2. Наблюдать за новостями в соц сетях
3. Связаться в службу поддержки
4. Запомнить действующее зеркало в закладки
Заключение
Лицензионный портал и его функционирующие зеркала предоставляют стабильный вход к игровым слотам. Великодушные вознаграждения, разнообразные бонусные коды, комфортное портативное приложение и качественная служба поддержки создают игровой геймплей крайне беспроблемным и конфиденциальным.
browse now – Fast loading and a layout that’s simple to follow
Нынешние онлайн-казино предоставляют участникам обширный спектр развлечений и премиальных опций. Присоединение к сервису производится через официальный портал или его функционирующее зеркало Клубника, что предоставляет непрерывную игру.
Чем является функционирующее зеркало казино
Альтернатива — это полная копия основного ресурса, разработанная для решения барьеров. Зеркало сегодня помогает игрокам обрести соединение к любимым развлечениям в произвольное время.
Официальное зеркало располагает всеми возможностями основного веб-сайта:
– Полный список развлечений
– Личный кабинет с зафиксированными информацией
– Действующие промокоды
– Гарантированные платежные транзакции
Оформление профиля на основном портале
Процедура оформления занимает всего пару минут. Начинающим участникам нужно:
1. Перейти на проверенный веб-сайт или рабочее зеркало
2. Щелкнуть на ссылку “Создать аккаунт”
3. Ввести нужные данные
4. Активировать email
5. Сделать стартовый платеж
Стартовый бонус зачисляется незамедлительно после завершения всех стадий.
Подключение в личный кабинет
Существующие пользователи могут совершить подключение используя:
– Учетное имя и пароль
– Цифры сотового
– Email
Аккаунт предоставляет возможность к регулированию средствами, данным игр и действующим промокодам.
Поощрения и акции
Гемблинг система радует регулярных пользователей щедрыми поощрениями:
Стартовый бонус
– Бонус на дебютный взнос до 100%
– Даровые спины на топовые игры
– Дополнительные награды за последующие платежи
Купоны
Специальные ваучеры дают право на использование эксклюзивных вознаграждений. Действующие промокоды выкладываются в категории “Бонусы”.
Кешбэк
Постоянный возврат равен до 10% от использованных денег. Возмещение начисляется незамедлительно.
Программа лояльности
Активные участники зарабатывают очки, которые превращаются на реальные деньги или бесплатные вращения.
Мобильный сайт и софт
Ради комфорта участников построена функциональная адаптивный сайт. Адаптивный облик дает возможность комфортно делать ставки с всякого переносного устройства.
Выгоды программы:
– Моментальный доступ к автоматам
– Улучшенный интерфейс
– Бесперебойная функциональность
– Нотификации о новых событиях
Получить программу можно свободно с основного ресурса для гаджетов на Android и iOS.
Каталог автоматов
Слоты
Коллекция насчитывает более 2000 игр от популярных провайдеров:
– Классические машины
– Современные автоматы
– Слоты с джекпотом
– Сюжетные развлечения
Live казино
Блок Live казино предлагает развлечение с живыми диллерами в онлайн режиме:
– Рулетка
– Карточная игра
– Баккара
– Poker
Турниры
Регулярные турниры с крупными наградными бюджетами устраиваются регулярно. Вход в состязаниях возможно всем действующим игрокам.
Денежные варианты
Взносы и изъятия денег производятся через популярные методы:
– Платежные карточ ки
– Онлайн системы
– Криптовалюта
– Денежные платежи
Самый низкий взнос — от 100 рублей. Изъятие выигрышей проводится в течение 24 времени.
Команда support
24/7 команда поддержки расположена содействовать в разрешении каких-либо вопросов:
– Живой чат
– Email
– Горячая линия
– Публичные сети
Надежность и разрешение
Лицензионный ресурс функционирует на почве мировой разрешения. Все данные клиентов обезопасены передовым SSL-кодированием.
Заключение
Актуальное зеркало гарантирует постоянный вход к излюбленным играм, богатым поощрениям и функциональным возможностям. Создайте аккаунт сейчас и заработайте стартовый бонус!
discover this page – Clear design makes browsing sections fast and straightforward.
great post to read https://daobase.io/
like it https://mixmy.money/
check site info – Well-organized layout makes content easy to access and understand.
click here – Logical design and organized layout make browsing easy
Panathinaikos 2-2 Viktoria Plzen 2026 Europa League dramatic draw
Get the facts https://yomix.biz/
open website – Everything looks polished and easy to navigate
view items online – Logical structure and tidy interface make navigation effortless.
my review here https://letsexchange.cc
Актуальные онлайн-казино обеспечивают клиентам массу вариантов для комфортной игры. Главный ресурс ДжиВиСпин дарит возможность ко всем функциям и азартным играм. Однако при появлении системных трудностей на выручку спешат рабочие альтернативные адреса.
Что означает собой функционирующее зеркало
Зеркало казино — это полная копия оригинального веб-сайта, расположенная по дополнительному доменному имени. Легитимное зеркало поддерживает все функции, в том числе регистрацию, доступ в персональный кабинет, поощрения и промокоды.
Зеркало на сегодня дает:
– Постоянный вход к азартным аппаратам
– Полную безопасность персональных данных
– Удержание счета и хронологии переводов
– Применимость всех промо-предложений
Создание аккаунта на лицензионном ресурсе
Этап создания аккаунта требует пару минут. Начинающим геймерам нужно:
1. Открыть на главный ресурс или функционирующее зеркало
2. Щелкнуть кнопку «Создать аккаунт»
3. Внести требуемые сведения
4. Подтвердить электронную почту
5. Использовать промокод при существовании
После завершения создания аккаунта пользователи зарабатывают подарок за регистрацию, какой может иметь free spins или монетарное поощрение.
Доступ в персональный кабинет
Приватный кабинет дает полный мониторинг над азартным действом. Через личный аккаунт разрешается:
– Финансировать баланс
– Получать выигрыши
– Применять кодовые слова
– Отслеживать хронологию ставок
– Играть в состязаниях
– Забирать cash back
Описание вознаграждений и промо-предложений
Богатая поощрительная программа — значимое козырь ресурса. Главные формы премий:
Вступительный бонус
Новички приобретают щедрое поощрение на первые пополнения. Сумма бонуса может доходить до 100-200% от объема депозита.
Фриспины
Даровые прокруты выдаются для популярных машин. Объем free spins разнится от 10 до 500 штук.
Cash back
Еженедельный или помесячный компенсация процента проигранных финансов. Обычный объем компенсации — 5-15%.
Состязания
Регулярные конкурсы с внушительными наградными фондами. Игроки борются за топовые позиции в таблице лидеров.
Мобильная версия и приложуха
Адаптивная версия дает возможность делать ставки с любого девайса. Клиенты могут закачать программу для iOS и Android или задействовать браузерную версию.
Плюсы мобильного программы:
– Быстрая подзагрузка автоматов
– Комфортный интерфейс
– Пуш-нотификации о акциях
– Вход через биометрию
Машины и Live казино
Игровая коллекция насчитывает тысячи названий от известных производителей.
Известные разделы слотов:
– Обычные автоматы
– Видео-автоматы с бонусными этапами
– Накопительный приз автоматы
– Megaways автоматы
Live казино
Секция live казино предлагает партию с настоящими дилерами. Представлены традиционные игры:
– Французская рулетка
– Блэкджек
– Punto Banco
– Карибский покер
Как разыскать функционирующее зеркало
Обрести рабочую линк на зеркало можно различными методами:
1. Зарегистрироваться на емейл-уведомления
2. Отслеживать за обновлениями в соц сетях
3. Написать в департамент поддержки
4. Добавить в закладки актуальное зеркало в избранное
Резюме
Лицензионный портал и его рабочие копии предоставляют стабильный путь к игровым слотам. Выгодные премии, разнообразные промокоды, эргономичное портативное программа и профессиональная служба поддержки делают азартный процесс предельно приятным и защищенным.
Wolves 2-2 Arsenal 2026 Premier League dramatic draw
Характеристика официального сайта
Новое онлайн-казино дарит своим участникам большой выбор услуг и бонусов. Главный ресурс казино Bollywood действует непрерывно, предоставляя доступ к востребованным играм, live-казино и многочисленным промо.
Функционирующее зеркало: вход к платформе
Что такое дубликат казино
Зеркало означает собой точную версию официального портала с отличным URL названием. Действующее зеркало обеспечивает клиентам избегать ограничения и иметь надежный доступ к выбранным слотам.
Как получить рабочее зеркало сегодня
Рабочие URL на официальное зеркало выкладываются через:
– Email оповещение
– Официальные публичные сети
– Службу поддержки
– Партнерские порталы
Созданиеаккаунта на платформе
Процедура регистрации
Открытиесчета длится несколько минут и содержит нижеследующие шаги:
1. Доступ на главный сайт или действующее зеркало
2. Выбор опции “Открытьсчет”
3. Внесение личных реквизитов
4. Подтверждение адреса или контакта
5. Создание пароля
Приз за оформление
Первые участники приобретают выгодные приветственные поощрения:
– Денежные депозиты на аккаунт
– Халявныеспины для симуляторов
– Повышенный объем возврата
– Особые купоны
Доступ в личный аккаунт
Действующие участники могут совершить вход через главный портал или текущее зеркало. Для этого нужно ввести учетноеимя и код, сформированные при созданииаккаунта.
Функции собственного раздела
В личном аккаунте имеются следующие опции:
– Редактирование учетными сведениями
– Пополнение счета
– Снятие средств
– Использование купонов
– Отслеживание журнала ставок
– Вступление в соревнованиях
Бонусы и промо
Виды поощрений
Казино награждает своих клиентов разнообразными бонусными акциями:
– Вступительный пакет — солидные поощрения на начальные вклады
– Халявныеспины — дополнительные прокруты в рейтинговых слотах
– Кэшбек — регулярный возмещение доли убытков
– Схема верности — специальные преимущества для верных клиентов
Ваучеры и их применение
Уникальные ваучеры гарантируют расширенные подарки. Для ввода нужно внести последовательность в специальное графу в личном аккаунте.
Геймплейный каталог
Слоты
Коллекция азартных автоматов включает тысячи позиций от лучших поставщиков:
– Обычные симуляторы
– Видео развлечения
– Призовые слоты
– Брендовые игры
Live казино
Область Live-казино обеспечивает игру с живыми крупье в обстановке реального трансляции:
– Рулетка
– Blackjack
– Пунтобанко
– Карибскийпокер
Состязания
Систематические соревнования с солидными призовыми суммами проходят регулярно. Соревнующиеся сражаются за лидерство в таблице.
Мобильная адаптация и APP
Mobile реализация сайта
Основной портал абсолютно приспособлен для смартфонных устройств. Пользователи способны открывать слоты непосредственно через браузер без обязательства загрузки.
Приложение для скачивания
Специальное мобильное приложение предлагается для получения на устройства с рабочими системами Android и iOS. Софт дает:
– Мгновенный путь к автоматам
– Стабильную операционность
– Мгновенные-извещения о промо
– Удобный дизайн
Вывод
Основной портал казино и его функционирующие альтернативы предоставляют пользователям полный доступ к высококлассным азартным играм. Большие подарки, разнообразные кампании, комфортная портативная платформа и профессиональная помощь создают развлекательный опыт крайне комфортным и доходным.
marblecove treasures – Content is easy to find and the site feels professional.
ed doctor online Pharmacological Sciences buying ed pills online
trailharborcollective – Browsing feels smooth and the site layout is well structured today
PG Soft top 5 jogos 2026: Tigrinho, Coelho, Touro, Mahjong e… qual o 5º?
browse around – Everything is organized logically, creating a simple and user-friendly experience.
browse this resource – Everything is easy to locate, and moving through pages feels natural.
Анализ главного сайта
Новое онлайн-казино предлагает своим пользователям широкий ассортимент игр и призов. Оригинальный портал Вован казино работает постоянно, обеспечивая вход к востребованным слотам, live-казино и обширным предложениям.
Актуальное зеркало: доступ к сайту
Что такое копия казино
Копия составляет собой идентичную реплику основного сайта с альтернативным сетевым путем. Рабочее зеркало позволяет участникам обходить запреты и сохранять надежный подключение к предпочитаемым развлечениям.
Как найти действующее зеркало сегодня
Рабочие линки на главное зеркало размещаются через:
– Почтовую подписку
– Главные медийные сети
– Отдел помощи
– Специализированные ресурсы
Регистрация на сайте
Ход созданияаккаунта
Открытиесчета требует пару минут и предполагает данные стадии:
1. Доступ на официальный веб-сайт или актуальное зеркало
2. Нажатие клавиши “Зарегистрироваться”
3. Заполнение персональных сведений
4. Подтверждение адреса или номера
5. Формирование кодадоступа
Бонус за регистрацию
Свежие игроки зарабатывают большие приветственные бонусы:
– Бонусные депозиты на счет
– Фриспины для автоматов
– Повышенный объем кэшбека
– Особые купоны
Логин в собственный кабинет
Постоянные пользователи вправе осуществить доступ через официальный портал или действующее зеркало. Для этого следует ввести имяпользователя и код, придуманные при регистрации.
Возможности личного аккаунта
В индивидуальном разделе имеются основные опции:
– Изменение учетными реквизитами
– Ввод депозита
– Вывод призов
– Ввод бонусов
– Проверка архива игр
– Включение в конкурсах
Вознаграждения и кампании
Типы вознаграждений
Казино поощряет своих участников многочисленными бонусными системами:
– Начальный набор — щедрые подарки на стартовые депозиты
– Фриспины — бонусные прокруты в популярных играх
– Компенсация — периодический откат процента проигрышей
– Система поощрения — уникальные привилегии для регулярных клиентов
Ваучеры и их ввод
Эксклюзивные ваучеры дают бонусные подарки. Для ввода нужно ввести код в нужное окно в индивидуальном профиле.
Развлекательный ассортимент
Слоты
Коллекция развлекательных машин содержит тысячи позиций от лучших поставщиков:
– Традиционные симуляторы
– Новые развлечения
– Накопительные симуляторы
– Тематические автоматы
Live казино
Секция Live-казино предоставляет участие с настоящими крупье в формате прямого трансляции:
– Французскаярулетка
– Блэкджек
– Baccarat
– Casinopoker
Соревнования
Регулярные турниры с солидными выигрышными пулами проводятся ежедневно. Игроки борются за победу в списке.
Mobile реализация и приложение
Мобильная версия веб-сайта
Официальный веб-сайт абсолютно настроен для портативных девайсов. Клиенты имеютвозможность открывать автоматы напрямую через браузер без нужды загрузки.
Программа для установки
Фирменное портативное приложение доступно для установки на девайсы с рабочими ОС Android и iOS. APP предоставляет:
– Моментальный подход к автоматам
– Устойчивую функциональность
– Мгновенные-уведомления о предложениях
– Комфортный оформление
Вывод
Основной портал казино и его актуальные зеркала дают клиентам комплексный возможность к высококлассным игровым играм. Выгодные подарки, разнообразные предложения, комфортная мобильная адаптация и профессиональная служба превращают развлекательный досуг предельно enjoyable и выгодным.
sagestoneoutpost – Browsing feels effortless and the layout is clean and organized
anonymous https://anycoindirect.me/
see this page – Easy-to-follow pages and well-laid-out content
explore Echo Crest store – Smooth navigation ensures browsing is comfortable and effortless.
see website – Simple design and the site feels very approachable
Excellent post. I was checking constantly this blog and I am impressed!
Very useful info specifically the last part :
) I care for such info much. I was seeking this
certain information for a long time. Thank you and good luck.
pistol
site overview – Clear layout and cozy vibe make the site easy to use and remember.
Передовые онлайн-казино гарантируют игрокам обширный ассортимент опций для приятной досуга. Вход к площадке https://нашмиасс.СЂС„/ реализуется через главный веб-ресурс или действующее зеркало.
Что такое функционирующее зеркало казино
Действующее зеркало — это запасной адрес лицензионного ресурса казино. Такие дубликаты генерируются для гарантирования бесперебойного входа к гемблинговой системе.
Альтернатива текущее совершенно копирует возможности официального портала. Игроки приобретают схожий доступ ко всем функциям, включая открытие счета, пополнение кошелька и вывод призов.
Оформление профиля на главном портале
Механизм создания аккаунта занимает всего несколько минут. Свежим клиентам необходимо:
1. Войти на главный сайт или актуальное подлинное зеркало
2. Выбрать кнопку “Регистрация”
3. Указать нужные реквизиты
4. Активировать e-mail почту
5. Активировать промокод при доступности
После окончания оформления пользователь обретает подарок за регистрацию, который может содержать даровые спины или финансовое премию.
Авторизация в личный кабинет
Персональный кабинет — это закрытая зона, где участники вправе администрировать своим учетной записью. Для доступа необходимо ввести никнейм и password.
В личном кабинете открыты нижеперечисленные опции:
– Просмотр записей транзакций
– Применение промокодов
– Настройка призами
– Вступление в конкурсах
– Мониторинг кэшбэка
– Корректировка аккаунта
Бонусы и спецпредложения
Гемблинговая сервис предоставляет привлекательные подарки:
Приветственный набор — новички зарабатывают крупное поощрение на дебютные вклады.
Даровые спины — дарятся как при регистрации, так и в рамках всевозможных акций.
Кэшбэк — систематический рефанд доли израсходованных финансов.
Коды активации — специальные шифры, обеспечивающие доступ к специальным бонусам.
Обзор развлекательных секций
Аппараты
Ассортимент slots охватывает массу позиций от передовых поставщиков. Игроки откроют как традиционные машины, так и современные мультимедийные автоматы с притягательной оформлением.
Live казино
Раздел Live казино обеспечивает право участвовать с живыми дилерами в формате актуального времени. Открыты известные варианты: рулетка, блэкджек, баккара, покер.
Состязания
Постоянные турниры с большими наградными фондами привлекают сотни участников. Лидеры завоевывают финансовые призы и особые поощрения.
Телефонная версия и программа
Портативная версия портала обеспечивает участвовать с любого аппарата. Интерфейс автоматически подстраивается под диагональ экрана.
Установить app можно для гаджетов на Android и iOS. Смартфонное ПО располагает всеми опциями компьютерной версии.
Как определить действующее зеркало на данный момент
Актуальные ссылки дубликатов постоянно корректируются. Найти рабочую линк можно многими способами:
– Через сервис техподдержки
– В настоящих информационных сетях
– По e-mail дайджесту
– На тематических сайтах
Охрана и сертификация
Официальный домен оперирует на базе международной разрешения. Все транзакции оберегаются инновационными методами защиты.
Конфиденциальность индивидуальных сведений поддерживается в полном формате.
Заключение
Официальный домен и его актуальные зеркала предоставляют пользователям круглосуточный доступ к качественным игровым сервисам. Щедрые бонусы, многочисленные развлечения, компетентная помощь — все это делает игровой времяпрепровождение чрезвычайно удобным и увлекательным.
discover pebblestoneoutpost – Layout is clean and browsing through items is straightforward.
Современные онлайн-казино предоставляют пользователям обширный диапазон игр и призовых вариантов. Вход к сервису реализуется через главный портал или его актуальное зеркало casino Lev, что предоставляет непрерывную работу.
Что представляет собой актуальное зеркало казино
Зеркало — это абсолютная реплика главного веб-сайта, построенная для преодоления блокировок. Рабочее зеркало помогает игрокам получить подключение к любимым слотам в каждое время.
Лицензионное зеркало имеет всеми характеристиками главного ресурса:
– Совокупный перечень игр
– Профиль с внесенными параметрами
– Свежие поощрения
– Надежные расчетные транзакции
Оформление профиля на лицензионном ресурсе
Процесс оформления занимает всего считанные минут. Новым участникам следует:
1. Зайти на основной ресурс или актуальное зеркало
2. Выбрать на ссылку “Регистрация”
3. Ввести нужные данные
4. Проверить электронную почту
5. Сделать начальный взнос
Приветственный бонус предоставляется сразу после прохождения всех ступеней.
Вход в личный кабинет
Существующие пользователи могут совершить авторизацию указывая:
– Никнейм и шифр
– Код телефона
– Email
Персональный раздел открывает шанс к администрированию средствами, истории ставок и доступным поощрениям.
Награды и программы
Игровая площадка привлекает постоянных пользователей многочисленными призами:
Стартовый пакет
– Бонус на дебютный пополнение до 100%
– Даровые спины на топовые машины
– Особые бонусы за последующие платежи
Ваучеры
Особые купоны предоставляют право на приобретение специальных поощрений. Действующие комбинации выкладываются в блоке “Акции”.
Кешбэк
Еженедельный кешбэк достигает до 10% от использованных денег. Выплата начисляется моментально.
Система лояльности
Активные пользователи зарабатывают поинты, которые обмениваются на подлинные выплаты или даровые спины.
Адаптивный портал и программа
Для практичности игроков построена удобная адаптивный сайт. Гибкий дизайн дает возможность комфортно развлекаться с любого мобильного девайса.
Достоинства приложения:
– Быстрый вход к слотам
– Адаптированный вид
– Надежная деятельность
– Оповещения о последних бонусах
Получить софт можно свободно с официального веб-сайта для девайсов на Android и iOS.
Каталог игр
Слоты
Библиотека вмещает более 2000 машин от известных производителей:
– Классические машины
– Video slots
– Прогрессивные автоматы
– Брендовые слоты
Live казино
Категория Live игр дает развлечение с подлинными крупье в онлайн эфире:
– Колесо фортуны
– Двадцать одно
– Карты
– Столы покера
Состязания
Постоянные турниры с большими выигрышными фондами запускаются еженедельно. Вход в конкурсах разрешено всем действующим игрокам.
Платежные методы
Платежи и выводы средств выполняются через популярные платежные системы:
– Кредитные карточ ки
– Онлайн кошельки
– Крипто
– Банковские переводы
Стартовый депозит — от 100 рублей. Получение выигрышей проводится в течение 24 часов.
Отдел саппорта
24/7 группа помощи способна помочь в решении всех проблем:
– Live chat
– Email
– Телефон
– Социальные сети
Надежность и разрешение
Подлинный портал функционирует на базе глобальной документа. Всевозможные сведения клиентов защищены современным SSL-протоколом.
Итог
Актуальное зеркало гарантирует бесперебойный вход к излюбленным играм, богатым бонусам и удобным возможностям. Откройте счет сейчас и получите первый подарок!
discover deals – Everything is clearly organized and browsing works well
maplestone store – Navigation feels natural and the overall structure is clean.
click here to view – A tidy layout ensures smooth navigation and quick access to information.
visit platform – Pages are intuitive and the content keeps me interested
online shop link – Everything is logically arranged for easy exploration.
Jogo do Tigrinho ao vivo com narração: já jogou versão com locutor brasileiro?
Jogo do Tigrinho no Pix R$5: raspadinha com até 200 giros garantidos agora!
shop collection – Pages are neatly arranged and browsing feels intuitive
visit the platform – Forward-thinking layout and straightforward navigation create a smooth experience.
Современные онлайн-казино дают клиентам широкий диапазон развлечений и премиальных программ. Подключение к платформе реализуется через главный ресурс или его рабочее зеркало Eldorado казино, что обеспечивает постоянную работу.
В чем суть функционирующее зеркало казино
Дубликат — это точная копия основного веб-сайта, разработанная для устранения барьеров. Действующее зеркало обеспечивает клиентам обрести подключение к любимым развлечениям в любое время.
Лицензионное зеркало обладает всеми возможностями первоначального портала:
– Целый каталог игр
– Профиль с внесенными параметрами
– Текущие промокоды
– Гарантированные финансовые процедуры
Оформление профиля на главном портале
Ход создания аккаунта требует всего считанные минут. Свежим клиентам нужно:
1. Войти на проверенный сайт или актуальное зеркало
2. Кликнуть на клавишу “Создать аккаунт”
3. Ввести требуемые сведения
4. Подтвердить email
5. Произвести стартовый платеж
Приветственный бонус предоставляется незамедлительно после прохождения всех ступеней.
Вход в учетную запись
Действующие клиенты могут произвести вход вводя:
– Логин и пароль
– Номер контакта
– Электронную почту
Личный кабинет дает доступ к администрированию счетом, записям операций и действующим акциям.
Бонусы и акции
Развлекательная система вознаграждает активных участников разнообразными бонусами:
Приветственный бонус
– Поощрение на первый пополнение до 100%
– Фриспины на известные слоты
– Дополнительные премии за очередные пополнения
Купоны
Специальные коды дают шанс на использование уникальных призов. Действующие промокоды размещаются в категории “Промо”.
Возврат средств
Периодический возврат насчитывает до 10% от проигранных сумм. Возврат зачисляется моментально.
Программа лояльности
Регулярные игроки приобретают поинты, которые обмениваются на настоящие выплаты или фриспины.
Mobile версия и софт
В целях удобства клиентов разработана полноценная mobile версия. Приспособленный дизайн обеспечивает легко делать ставки с произвольного портативного аппарата.
Преимущества приложения:
– Скорый подключение к развлечениям
– Улучшенный облик
– Стабильная работа
– Оповещения о последних акциях
Скачать приложение можно бесплатно с официального ресурса для аппаратов на Android и iOS.
Ассортимент слотов
Машины
Коллекция включает более 2000 автоматов от ведущих провайдеров:
– Стандартные автоматы
– Мультимедийные игры
– Джекпот-слоты
– Тематические автоматы
Live казино
Раздел Live игр предоставляет участие с подлинными дилерами в прямом эфире:
– Рулетка
– Карточная игра
– Баккара
– Столы покера
Турниры
Регулярные соревнования с значительными премиальными фондами проводятся каждую неделю. Участие в конкурсах возможно всем активным участникам.
Денежные способы
Депозиты и получения выплат реализуются через распространенные сервисы:
– Кредитные пластик
– Цифровые кошельки
– Bitcoin
– Денежные переводы
Самый низкий взнос — от 100 рублей. Снятие денег осуществляется в течение 24 ч.
Служба помощи
Постоянная команда помощи готова помочь в исправлении каких-либо проблем:
– Живой чат
– Email
– Связь
– Соц сети
Надежность и документ
Лицензионный портал оперирует на основании признанной разрешения. Всевозможные данные клиентов защищены актуальным SSL-шифрованием.
Итог
Рабочее зеркало дает бесперебойный вход к предпочитаемым автоматам, богатым акциям и комфортным услугам. Присоединяйтесь сегодня и получите первый поощрение!
The whole summary is here: https://tazartlodge.com/lincoln-town-or/
Learn More https://tornadocash.app/
https://primelinepharmacy.shop/# online erectile dysfunction
pebblestone online – Navigation feels natural and everything is easy to access.
canyonstonegalleria – Stumbled across this and it seems quite solid
click here – The design is tidy and makes moving between sections simple.
enter outpost – Browsing items feels natural and the interface is user-friendly
maplecresttrading – Good structure and pages load quickly without any confusion
Переход к порталу через действующие зеркала
Пользователи интернет казино нередко имеют дело с проблемой блокировки базового ресурса. Как раз для устранения этой задачи существуют копии легального ресурса. Клубника дает беспрепятственный подключение ко всем функциям платформы.
Что такое функционирующее зеркало казино
Копия представляет собой точную реплику основного портала с идентичным опциями. Основное отличие — это другое имя. Абсолютно все информация клиента, содержа средства, бонусы и записи игр, продолжают быть идентичными.
Преимущества задействования зеркал
Актуальные зеркала обладают комплексом существенных выгод:
– Постоянный переход к любимым играм
– Полная безопасность собственных информации
– Поддержание всех настроек личного кабинета
– Опция обретения призов и участия в кампаниях
Регистрация на основном домене
Ход открытия счета предельно элементарен и длится буквально минут. Начинающие игроки в состоянии полагаться на щедрый приветственный поощрение за оформление.
Этапы открытия аккаунта
1. Доступ на официальный портал или его зеркало
2. Активация на клавишу “Зарегистрироваться”
3. Ввод требуемых информации
4. Верификация электронной почты
5. Указание кода (если имеется)
Бонусы и акции для клиентов
Платформа балует своих клиентов всевозможными наградными предложениями.
Основные типы поощрений
Вводный приз — внушительное вознаграждение для новых участников, каковое в состоянии вмещать монетарные бонусы и фриспины.
Free spins — возможность крутить в популярных аппаратах бесплатно.
Кешбэк — долевой возмещение израсходованных средств, что предоставляется каждую неделю или каждый месяц.
Специальные коды — специальные последовательности, дающие экстра привилегии.
Персональный кабинет: возможности и установки
Индивидуальный профиль обеспечивает исчерпывающий надзор над игровым активностью. Тут доступны:
– Администрирование депозитом
– Архив операций
– Действующие привилегии
– Установки защиты
– Проверка учетной записи
Портативная редакция и программа
Новейшие клиенты оценивают доступность. Площадка предлагает два метода для участия с смартфонных устройств.
Отзывчивая телефонная редакция
Мобильная платформа сайта самостоятельно приспосабливается под дисплей любого аппарата. Нет необходимости скачивать отдельное ПО.
Программа для смартфонов
Возможно скачать специальное софт для iOS и Android. Программа гарантирует:
– Скорый вход
– Адаптированный интерфейс
– Push-оповещения о бонусах
– Бесперебойную функциональность
Live развлечения: среда настоящего клуба
Раздел Live игр отправляет игроков в атмосферу истинного зала. Опытные хосты проводят партии в формате живого времени.
Известные Live-форматы
– Французская рулетка
– Двадцать одно
– Баккарат
– Poker
Автоматы: разнообразие игр
Собрание азартных слотов содержит массу вариантов от ведущих производителей. Пользователи встретят:
– Классические аппараты
– Графические слоты
– Накопительный приз-автоматы
– Слоты с множественными линиями
Турниры и эксклюзивные события
Периодические состязания позволяют пользователям соревноваться друг с другом за значительные выигрышные банки. Каждый состязание обладает свои критерии вовлечения и список лидеров.
Методы пополнения и изъятия денег
Казино предоставляет ряд финансовых сервисов:
– Платежные карты
– Онлайн сервисы
– Blockchain-платежи
– Wire транзиты
Все транзакции проходят защищенно благодаря новейшим протоколам криптографии.
Сервис support
Профессиональные операторы сервиса поддержки способны ассистировать 24/7. Доступны нижеперечисленные способы контакта:
– Онлайн-чат
– Email-помощь
– Аудио поддержка
– Коммуникационные сети
Вывод
Основной сайт казино и его функционирующие альтернативы гарантируют участникам защищенный и комфортный вход к огромному ассортименту развлекательных игр. Солидные поощрения, периодические акции, компетентная поддержка и простые денежные методы превращают азартный досуг чрезвычайно приятным и доходным.
Вход к платформе и актуальные URL
Востребованные виртуальные казино предлагают клиентам большой ассортимент опций. Официальный веб-сайт Голд обеспечивает защищенный переход ко всем функциям. При этом иногда появляются моменты, когда понадобится альтернативный вариант доступа.
Что представляет собой рабочее зеркало
Актуальное зеркало — это точная дубликат основного ресурса с иным URL адресом. Дубликат сегодня обеспечивает преодолевать возможные барьеры и обеспечивать стабильный переход к предпочитаемым развлечениям.
Легальное зеркало характеризуется теми же возможностями, что и базовый веб-сайт:
– Совокупный перечень игр
– Личный раздел с сохраненными информацией
– Все награды и промо
– Защищенные финансовые переводы
Регистрация и авторизация в сервис
Процесс оформления на платформе отнимает пару минут. Новым клиентам нужно:
1. Открыть на действующее зеркало сейчас
2. Щелкнуть элемент «Зарегистрироваться»
3. Указать необходимые данные
4. Подтвердить электронную почту или номер связи
5. Получить бонус за регистрацию
Авторизация в личный профиль реализуется путем внесение никнейма и ключа.
Описание призовой системы
Привлекательная бонусная политика — важнейшее преимущество ресурса. Клиенты получают разнообразные подарки:
Стартовые подарки
Свежие клиенты могут надеяться на привлекательный поощрение за оформление. Как правило это набор вариантов, включающий:
– Процентную прибавку к стартовому пополнению
– Безвозмездные вращения
– Дополнительные деньги на аккаунт
Промо-коды и специальные акции
Постоянные промокоды дают возможность зарабатывать экстра преимущества. Задействовать их допустимо в особом меню собственного кабинета.
Спины и компенсация
Бесплатные спины — это способность играть барабаны без расходования персональных финансов. Рибейт представляет определенный возмещение проигранных денег.
Библиотека развлечений
Игровая сайт обеспечивает значительную подборку развлечений.
Автоматы
Разнообразие слотов впечатляет представление. Есть классические простые машины и продвинутые видеослоты с занимательной визуализацией.
Live заведение
Секция Live развлечений переносит пользователей в антураж настоящего азартного зала. Профессиональные крупье ведут игры в онлайн формате.
Соревнования и рейтинги
Регулярные турниры обеспечивают азарта и гарантируют вариант забрать значительные награды.
Мобильная форма и программа
Новые решения позволяют развлекаться в удобном точке. Mobile реализация автоматически подстраивается под монитор устройства.
Установить программу возможно для мобильных ОС iOS и Android. Приложение предоставляет:
– Быстрый переход
– Устойчивую деятельность
– Моментальные-сообщения об акциях
– Удобный дизайн
Финансовые транзакции
Платформа поддерживает многочисленные способы внесения и вывода сумм:
– Банковские системы
– Электронные платформы
– Цифровые валюты
– Прямые транзакции
Каждые переводы осуществляются через безопасное соединение, что защищает безопасность личных информации.
Департамент помощи
Компетентная группа помощи действует всегда. Соединиться с операторами разрешено через:
– Live-чат
– Цифровую почту
– Связь
– Медиа сети
Заключение
Официальный портал и его актуальное зеркало дают пользователям защищенный и комфортный путь к увлекательным играм. Щедрые награды, разнообразный выбор слотов и профессиональная ассистанс формируют участие предельно интересной и прибыльной.
browse this page – Well-structured design allows for easy and pleasant navigation.
discover items – Pages load quickly, interface is neat and clear
check it out here – Clear structure ensures a smooth and user-friendly experience.
Еженедельные промокоды Casino X раздаются в официальном тг-канале казино. Забирайте бонусы на казинох tg com каждую неделю.
shop now – Clean design and fast pages create an enjoyable experience
levitra Pharmacological Sciences Research Institute Pharmacological Sciences
Современные интернет казино дают клиентам огромный выбор вариантов для беспроблемной игры. Тем не менее иногда доступ к основному ресурсу может быть недоступным. В таких обстоятельствах на выручку появляется Рльдорадо, которое дает бесперебойный путь ко всем возможностям платформы.
Что такое функционирующее зеркало казино
Зеркало — это полная реплика лицензионного ресурса, которая хостится по дополнительному домену. Зеркало поддерживает полный возможности оригинального ресурса, включая персональный кабинет, депозит и данные переводов.
Принципиальные выгоды применения зеркала:
– Непрерывный соединение к порталу
– Стопроцентная схожесть функционала
– Конфиденциальность персональных сведений
– Хранение существующих бонусов
Как обнаружить рабочее зеркало сегодня
Существует несколько безопасных путей обнаружения текущей адреса:
Авторизованные источники:
1. Email рассылка — руководство регулярно направляет сообщения с актуальными ссылками
2. Медийные сети — авторизованные аккаунты публикуют актуальную данные
3. Департамент поддержки — операторы выдают достоверные URL
4. Телефонное приложение — предоставляет минуть блокировки
Открытие счета на лицензионном портале
Этап регистрации длится не более немного минут и состоит из данных ступеней:
1. Вход на главный веб-сайт или актуальное зеркало
2. Клик на кнопку «Открыть счет»
3. Ввод персональной таблицы
4. Подтверждение электронной почты или контактного номера
5. Активация вознаграждения за регистрацию при существовании промокода
Начинающие клиенты обретают значительный начальный бонус, который может охватывать free spins, денежные бонусы или возврат средств.
Логин в персональный кабинет
Вход на сайте осуществляется традиционным методом. Достаточно внести никнейм и секретный ключ, указанные при создании аккаунта.
Значимые нюансы для надежного входа:
– Используйте надежный код
– Запустите двухэтапную проверку
– Не фиксируйте реквизиты на чужих гаджетах
– Отслеживайте доменную строку браузера
Характеристика наградной схемы
Казино одаривает пользователей различными вознаграждениями и специальными предложениями:
Стартовый набор
Дебютанты могут надеяться на существенное бонус за дебютный пополнение. Как правило это долевая премия к депонированной сумме плюс фриспины для востребованных слотов.
Регулярные кампании
– 7-дневный компенсация — возвращение доли проигранных денежных средств
– Награды на дополнительные пополнения
– Специальные офферы по событиям
– Соревнования с крупными премиальными фондами
План вознаграждений
Регулярные игроки получают баллы за произвольную игру, которые затем обмениваются на фактические денежные призы, даровые прокруты или специальные бонусы.
Кодовые слова: как задействовать
Купоны — это особые сочетания литер, предоставляющие возможность к специальным привилегиям.
Каким образом получить рабочие промокоды:
– Авторизованные общественные сети казино
– Союзнические ресурсы
– Email-рассылка
– Специализированные платформы
Вводится промокод в соответствующее поле при создании аккаунта или пополнении кошелька.
Мобильная версия и приложение
Актуальные клиенты предпочитают играть с телефонных устройств. Портал дает двойной варианта для удобной смартфонной игры.
Отзывчивая модификация
Веб версия самостоятельно оптимизируется под диагональ экрана. Не предполагает установки и работает в произвольном свежем браузере.
Телефонное приложение
Установить программу можно для девайсов на Android и iOS. Плюсы app:
– Молниеносная открытие
– Надежная функционирование
– Push-уведомления о акциях
– Автономный избегание блокировок
Операция инсталляции элементарен: требуется зайти на портал с телефонного девайса и подчиняться указаниям.
Гемблинг каталог
База слотов содержит тысячи наименований от ведущих провайдеров.
Слоты
Развлекательные аппараты — максимально популярная секция игр. Доступны стандартные винтажные автоматы, передовые видео-автоматы с дополнительными стадиями, а также накопительные выигрыши.
Live казино
Раздел с живыми ведущими позволяет ощутить антураж подлинного казино. Доступны варианты с блэкджеком.
Трансляция реализуется в высоком формате, поддерживается общение с дилером и прочими участниками.
Соревнования
Постоянно запускаются соревнования по разным дисциплинам. Участие предоставляет право выиграть финансовые выигрыши, даровые прокруты или особые привилегии.
Транзакционные процедуры
Портал поддерживает большой набор финансовых систем:
– Кредитные карты
– Электронные платформы
– Цифровая валюта
– Счетовые переводы
Наименьшая объем вклада — посильная для большинства геймеров. Получение денег осуществляется в короткие периоды.
Отдел поддержки
Профессиональные операторы готовы помочь постоянно. Доступны следующие каналы контакта:
– Веб-чат
– Email
– Голосовая горячая линия
– Медийные сети
Ответы на распространенные темы можно получить в разделе FAQ.
Заключение
Официальный веб-сайт казино и его рабочие зеркала обеспечивают геймерам совершенный подключение ко всем сервисам портала. Щедрые вознаграждения, удобная мобильная версия, впечатляющий выбор слотов и профессиональная поддержка создают игровой процесс исключительно приятным и безопасным.
net seo prodvizhenie-sajta-po-trafiku3.ru .
Подключение к платформе через рабочие зеркала
Передовые интернет казино предоставляют геймерам бесперебойный переход к услугам. Главный портал Ретро оперирует стабильно, обеспечивая богатый выбор гемблинг игр. Но порой появляются системные сложности или запреты, поэтому критично знать о наличии действующих зеркал.
Что является собой основное зеркало казино
Альтернатива — это точная реплика официального сайта с таким же возможностями. Действующее зеркало сегодня помогает преодолевать местные барьеры и продолжать игру.
Ключевые достоинства применения зеркал:
– Полный подключение к персональному кабинету
– Фиксация совокупных сведений учётной записи
– Идентичный ассортимент игр
– Актуальные привилегии и кампании
Создание аккаунта на портале
Операция регистрации длится немного минут. Новые игроки приобретают щедрый приз за оформление, который в состоянии содержать:
– Стартовый денежный кредит
– Безвозмездные вращения для слотов
– Эксклюзивные ваучеры
– Увеличенный кэшбек
Для завершения оформления необходимо:
1. Переместиться на основной портал или дубликат
2. Нажать клавишу «Зарегистрироваться»
3. Указать контактные данные
4. Подтвердить email или контакт
5. Задействовать код (если есть наличии)
Доступ в личный кабинет
Вслед за корректной регистрации геймеры в состоянии совершать авторизацию с помощью главный веб-сайт или функционирующее зеркало. Персональный кабинет даёт безграничный контроль над счётом:
– Журнал пари
– Внесение баланса
– Снятие денег
– Администрирование наградами
– Вовлечение в конкурсах
Поощрения и промо казино
Портал награждает игроков разнообразными наградными программами:
Стартовые поощрения
Начинающие зарабатывают богатый набор привилегий на вступительные взносы. Обычно это включает частичную прибавку к величине вклада плюс безвозмездные кручения.
Регулярные акции
– Раз в неделю кешбэк до 15%
– Турниры с премиальными пулами
– Призы на дату рождения
– Специальные программы для элитных пользователей
Программа вознаграждения
Постоянные клиенты зарабатывают пункты, они можно обменять на подлинные средства или эксклюзивные бонусы.
Карманная редакция и утилита
Нынешние решения обеспечивают участвовать всюду удобно. Портативная форма ресурса автономно адаптируется под дисплей произвольного аппарата.
Выгоды карманного программы:
– Скоростная запуск слотов
– Эргономичный облик
– Моментальные-нотификации о промо
– Способность инсталлировать для Android и iOS
Live казино: антураж настоящего развлекательного заведения
Секция Live игорного дома транспортирует игроков в антураж реального игорного учреждения. Компетентные крупье ведут развлечение в режиме подлинного времени.
Доступные столы:
– Рулетка
– Карточная игра
– Punto Banco
– Карты
Игровые машины и гемблинг машины
Собрание азартных автоматов насчитывает множество позиций от топовых студий. Каждый геймер отыщет развлечение по душе:
– Традиционные машины
– Современные автоматы с призовыми уровнями
– Прогрессивный-автоматы
– Megaways автоматы
Соревнования и розыгрыши
Постоянные состязания привносят остроту и обеспечивают опцию получить значительные суммы. Вовлечение в состязаниях регулярно безвозмездное, а премиальные пулы составляют крупных объёмов.
Секьюрити и конфиденциальность
Ресурс эксплуатирует инновационные протоколы кодирования для гарантии информации пользователей. Все финансовые действия совершаются через безопасные линии.
Заключение
Основной ресурс и его актуальные зеркала дают безопасный вход к первоклассным гемблинг услугам. Щедрые бонусы, комфортная портативная вариант, вариативность слотов и компетентное Live-клуб формируют портал замечательным решением для поклонников игровых развлечений.
раскрутка сайта по трафику prodvizhenie-sajtov-po-trafiku.ru .
enter outpost – Pages are easy to explore and content appears clearly
сделать проект перепланировки квартиры в москве proekt-pereplanirovki-kvartiry24.ru .
seo специалист kursy-seo-12.ru .
ии для студентов ии для студентов .
visit the platform – Clear focus and tidy layout make browsing both smooth and informative.
где найти промокод для 1хбет
услуги продвижения seo рязань timoly.ru сеотика.рф prodvizhenie-sajta-po-trafiku2.ru .
https://ClassifiedsLink.com/588/posts/1/1/1859059.html
New Arrivals – Layout is clean and browsing feels intuitive.
https://pharmacologicalsciences.com/levitra.html kamagra
Featured Items – Browsing works well and everything is visually clear.
discover more – Everything feels organized and browsing is simple
go to Dune Harbor store – Logical structure and clear visuals make browsing enjoyable.
Real-money games are immensely widespread due to their sheer convenience.
Players can access their favorite games anytime and from anywhere with an online link.
The excitement of playing for real money adds an extra layer of engagement.
A massive array of choices caters to all preference and budget.
Bonuses and loyalty schemes offer added incentives to keep players coming back.
Today’s sites ensure safe transactions and regulated gameplay.
ice fishing game online
Переход к платформе через рабочие зеркала
Участники онлайн казино часто сталкиваются с ситуацией закрытия главного домена. Как раз для ликвидации этой ситуации существуют зеркала главного домена. Болливуд обеспечивает полный вход ко всем функциям казино.
Что такое действующее зеркало казино
Зеркало представляет собой полную дубликат оригинального сайта с таким же опциями. Главное расхождение — это альтернативное имя. Каждые сведения участника, включая депозит, привилегии и записи игр, продолжают быть прежними.
Выгоды использования зеркал
Функционирующие зеркала характеризуются множеством существенных выгод:
– Круглосуточный подключение к предпочитаемым слотам
– Совершенная защита персональных данных
– Поддержание всех параметров пользовательского кабинета
– Опция приобретения бонусов и участия в предложениях
Оформление профиля на основном домене
Ход регистрации максимально элементарен и занимает пару минут. Начинающие участники способны полагаться на крупный стартовый подарок за открытие счета.
Стадии открытия аккаунта
1. Доступ на официальный ресурс или его копию
2. Активация на клавишу “Присоединиться”
3. Внесение нужных сведений
4. Верификация email почты
5. Ввод промокода (если имеется)
Поощрения и акции для игроков
Казино одаривает своих пользователей всевозможными призовыми программами.
Главные виды наград
Начальный подарок — внушительное поощрение для начинающих клиентов, что способно включать денежные бонусы и free spins.
Бесплатные вращения — возможность запускать в известных автоматах даром.
Компенсация — долевой возмещение израсходованных денег, который именно начисляется раз в неделю или раз в месяц.
Промокоды — уникальные последовательности, гарантирующие экстра выгоды.
Пользовательский кабинет: возможности и установки
Личный профиль обеспечивает абсолютный надзор над игровым процессом. Тут предусмотрены:
– Регулирование депозитом
– Записи переводов
– Текущие бонусы
– Установки защиты
– Проверка аккаунта
Карманная редакция и приложение
Современные игроки ценят мобильность. Казино предоставляет 2 пути для развлечений с портативных гаджетов.
Responsive портативная версия
Смартфонная вариант домена автономно настраивается под экран любого аппарата. Не требуется инсталлировать особое программное обеспечение.
APP для телефонов
Можно скачать фирменное приложение для iOS и Android. Программа предоставляет:
– Мгновенный запуск
– Адаптированный внешний вид
– Всплывающие-извещения о поощрениях
– Надежную производительность
Live казино: среда истинного игорного заведения
Зона Live казино отправляет клиентов в обстановку истинного казино. Квалифицированные дилеры проводят раунды в варианте настоящего времени.
Популярные Live-развлечения
– Рулетка
– Blackjack
– Баккарат
– Покер
Слоты: многообразие слотов
Собрание азартных автоматов включает сотни названий от ведущих разработчиков. Участники откроют:
– Обычные автоматы
– Видео-автоматы
– Накопительный приз-игры
– Многолинейные автоматы
Турниры и эксклюзивные предложения
Периодические соревнования обеспечивают клиентам конкурировать друг с другом за внушительные наградные суммы. Отдельный состязание имеет свои критерии включения и рейтинг победителей.
Методы ввода и получения денег
Казино использует массу платежных инструментов:
– Дебетовые инструменты
– Виртуальные платежные системы
– Blockchain-платежи
– Банковские отправления
Каждые транзакции реализуются надежно благодаря новейшим методам криптографии.
Команда помощи
Опытные консультанты команды поддержки готовы помочь 24/7. Имеются следующие каналы коммуникации:
– Оперативный-чат
– Email-поддержка
– Голосовая горячая линия
– Коммуникационные сети
Резюме
Легальный ресурс клуба и его рабочие зеркала гарантируют игрокам конфиденциальный и удобный вход к огромному диапазону развлекательных развлечений. Солидные поощрения, регулярные кампании, квалифицированная сервис и удобные финансовые системы превращают развлекательный опыт чрезвычайно захватывающим и прибыльным.
see website – Organized sections make it simple to browse without confusion
Описание оригинального портала
Передовое онлайн-казино обеспечивает своим пользователям разнообразный спектр услуг и поощрений. Официальный сайт Lev casino работает постоянно, предоставляя возможность к известным играм, live-казино и многочисленным предложениям.
Рабочее зеркало: доступ к платформе
Что такое дубликат казино
Альтернатива представляет собой абсолютную дубликат основного портала с альтернативным сетевым адресом. Актуальное зеркало предоставляет игрокам избегать запреты и сохранять непрерывный подключение к выбранным играм.
Как обнаружить актуальное зеркало сегодня
Действующие линки на основное зеркало размещаются через:
– E-mail новостнуюленту
– Основные социальные сети
– Сервис обслуживания
– Специализированные сайты
Оформление на платформе
Ход созданияаккаунта
Регистрация отнимает пару минут и содержит такие шаги:
1. Переход на официальный портал или действующее зеркало
2. Выбор кнопки “Открытьсчет”
3. Указание контактных реквизитов
4. Верификация email или мобильного
5. Формирование пароля
Подарок за регистрацию
Начинающие игроки получают щедрые стартовые вознаграждения:
– Бонусные средства на кошелек
– Бесплатныевращения для симуляторов
– Повышенный объем кэшбека
– Особые купоны
Логин в индивидуальный счет
Активные пользователи могут совершить вход через официальный ресурс или текущее зеркало. Для этого требуется ввести логин и секретнуюкомбинацию, установленные при оформлении.
Опции собственного раздела
В личном кабинете доступны основные функции:
– Управление личными информацией
– Пополнение кошелька
– Снятие денег
– Активация бонусов
– Мониторинг истории игр
– Включение в состязаниях
Вознаграждения и предложения
Типы подарков
Казино радует своих участников всевозможными бонусными программами:
– Приветственный набор — выгодные подарки на начальные пополнения
– Freespins — подарочные вращения в популярных симуляторах
– Кэшбек — еженедельный компенсация процента ставок
– Программа верности — особые преимущества для активных клиентов
Купоны и их активация
Эксклюзивные купоны предоставляют экстра подарки. Для ввода необходимо набрать комбинацию в определенное раздел в собственном кабинете.
Развлекательный выбор
Игры
Библиотека развлекательных машин содержит тысячи наименований от лучших разработчиков:
– Классические слоты
– Продвинутые игры
– Накопительные игры
– Брендовые слоты
Live казино
Область Live-казино предлагает игру с живыми дилерами в условиях актуального времени:
– Рулетка
– Blackjack
– PuntoBanco
– Техасскийхолдем
Турниры
Периодические конкурсы с большими призовыми призами проходят постоянно. Игроки соревнуются за лидерство в списке.
Мобильная платформа и APP
Мобильная версия сайта
Основной сайт абсолютно настроен для портативных аппаратов. Клиенты вправе запускать игры прямо через обозреватель без необходимости установки.
Софт для скачивания
Официальное смартфонное программа предоставляется для загрузки на устройства с программными средами Android и iOS. APP предоставляет:
– Быстрый путь к развлечениям
– Устойчивую функциональность
– Push-извещения о предложениях
– Удобный оформление
Резюме
Главный портал казино и его рабочие зеркала гарантируют клиентам комплексный вход к высококлассным игровым развлечениям. Щедрые бонусы, различные промо, комфортная адаптивная реализация и квалифицированная сервис создают развлекательный процесс предельно приятным и доходным.
see collection – Structured layout and fast-loading pages improve the browsing experience
https://lhfministries.org
Kraken Marketplace Официальный сайт для доступа к Kraken
krab at
explore the collection – Clear and structured content ensures a smooth user experience.
explore here – The layout is clean and helps users move around without effort.
orchard stone items – User-friendly design and well-arranged sections make navigation simple.
Вход к порталу через действующие зеркала
Клиенты интернет казино часто имеют дело с проблемой блокировки официального портала. Собственно для решения этой ситуации существуют зеркала легального домена. http://www.tolbaga.ru/ обеспечивает стопроцентный вход ко всем функциям казино.
Что такое рабочее зеркало казино
Копия является собой абсолютную копию оригинального ресурса с идентичным опциями. Ключевое расхождение — это другое имя. Любые сведения игрока, вместе с депозит, бонусы и историю ставок, продолжают быть прежними.
Плюсы эксплуатации зеркал
Действующие зеркала характеризуются набором ключевых плюсов:
– Бесперебойный доступ к любимым развлечениям
– Полная защита индивидуальных данных
– Удержание всех настроек пользовательского кабинета
– Возможность взятия бонусов и присутствия в акциях
Оформление профиля на основном сайте
Операция регистрации максимально элементарен и длится буквально минут. Начинающие пользователи могут надеяться на крупный вводный подарок за регистрацию.
Ступени открытия аккаунта
1. Переход на основной портал или его альтернативу
2. Нажатие на опцию “Регистрация”
3. Заполнение нужных данных
4. Проверка email почты
5. Ввод бонусного кода (в случае присутствует)
Бонусы и промоакции для пользователей
Платформа поощряет своих участников разнообразными бонусными системами.
Основные типы поощрений
Начальный приз — крупное поощрение для свежих клиентов, которое может включать материальные призы и фриспины.
Фриспины — возможность крутить в востребованных автоматах безвозмездно.
Кэшбек — пропорциональный компенсация проигранных средств, который выплачивается каждую неделю или помесячно.
Промокоды — уникальные наборы, гарантирующие бонусные выгоды.
Пользовательский кабинет: функции и настройки
Индивидуальный кабинет обеспечивает абсолютный управление над игровым взаимодействием. Тут присутствуют:
– Управление счетом
– История переводов
– Текущие бонусы
– Настройки защиты
– Валидация счета
Смартфонная версия и приложение
Новейшие пользователи ценят мобильность. Площадка предлагает два варианта для ставок с смартфонных гаджетов.
Responsive портативная версия
Мобильная платформа ресурса автоматически приспосабливается под экран любого аппарата. Нет необходимости загружать дополнительное приложение.
Приложение для смартфонов
Доступно скачать фирменное приложение для iOS и Android. Софт предоставляет:
– Моментальный старт
– Доработанный дизайн
– Мобильные-сообщения о предложениях
– Надежную работу
Live казино: обстановка истинного игорного заведения
Зона Live казино транспортирует клиентов в среду настоящего игорного заведения. Опытные хосты ведут раунды в варианте живого времени.
Популярные Live-игры
– Американская рулетка
– 21
– Baccarat
– Покер
Аппараты: ассортимент игр
Библиотека развлекательных аппаратов содержит множество наименований от топовых производителей. Пользователи встретят:
– Традиционные машины
– Видео-автоматы
– Накопительный приз-слоты
– Слоты с множественными линиями
Конкурсы и специальные события
Регулярные соревнования позволяют клиентам состязаться друг с другом за значительные денежные пулы. Всякий состязание содержит свои условия участия и доску победителей.
Способы пополнения и изъятия средств
Казино предоставляет комплекс финансовых инструментов:
– Дебетовые картыы
– Цифровые платежные системы
– Крипто
– Прямые переводы
Любые транзакции реализуются надежно благодаря новейшим технологиям криптографии.
Служба support
Опытные операторы команды помощи готовы ассистировать 24/7. Работают данные пути общения:
– Живой-чат
– Email-обслуживание
– Звонковая связь
– Социальные сети
Вывод
Легальный сайт платформы и его актуальные дубликаты предоставляют клиентам защищенный и приятный доступ к большому диапазону развлекательных развлечений. Крупные подарки, периодические предложения, профессиональная служба и комфортные платежные инструменты создают игровой досуг максимально захватывающим и выгодным.
browse collection – Items are easy to locate and site feels user-friendly
Вход к платформе через проверенные зеркала
Клиенты онлайн казино регулярно контактируют с ситуацией недоступности официального домена. Именно для устранения этой трудности созданы дубликаты главного портала. Gold предоставляет полный подключение ко всем функциям казино.
Что такое действующее зеркало казино
Дубликат представляет собой абсолютную реплику основного веб-сайта с идентичным набором функций. Основное несовпадение — это иное имя. Абсолютно все информация пользователя, в том числе средства, поощрения и записи игр, остаются такими же.
Плюсы использования зеркал
Актуальные зеркала обладают множеством существенных плюсов:
– Непрерывный переход к выбранным слотам
– Абсолютная конфиденциальность собственных информации
– Удержание всех параметров пользовательского кабинета
– Способность обретения призов и присутствия в промоакциях
Оформление профиля на основном ресурсе
Ход оформления крайне элементарен и отнимает пару минут. Начинающие игроки могут рассчитывать на солидный приветственный подарок за регистрацию.
Стадии оформления аккаунта
1. Переход на основной сайт или его зеркало
2. Активация на клавишу “Регистрация”
3. Внесение нужных информации
4. Проверка электронной почты
5. Применение бонусного кода (когда есть)
Поощрения и акции для клиентов
Ресурс радует своих пользователей различными поощрительными предложениями.
Базовые типы бонусов
Вводный приз — внушительное премирование для свежих игроков, которое способно содержать материальные суммы и безвозмездные спины.
Free spins — опция крутить в топовых автоматах безвозмездно.
Кэшбек — частичный возмещение утраченных сумм, который именно зачисляется по неделям или помесячно.
Специальные коды — уникальные комбинации, предоставляющие бонусные выгоды.
Пользовательский кабинет: опции и настройки
Персональный кабинет гарантирует полный надзор над персональным активностью. Тут имеются:
– Контроль счетом
– Записи транзакций
– Текущие бонусы
– Конфигурации защиты
– Верификация профиля
Карманная платформа и софт
Новейшие участники предпочитают гибкость. Казино предлагает двойной метода для ставок с смартфонных гаджетов.
Responsive портативная версия
Адаптивная платформа сайта самостоятельно адаптируется под экран любого девайса. Отсутствует потребность инсталлировать специальное программное обеспечение.
Программа для гаджетов
Возможно инсталлировать официальное приложение для iOS и Android. Софт предоставляет:
– Моментальный запуск
– Улучшенный интерфейс
– Всплывающие-извещения о бонусах
– Бесперебойную работу
Live игры: обстановка реального казино
Секция Live казино отправляет пользователей в атмосферу истинного зала. Квалифицированные крупье проводят раунды в формате настоящего времени.
Топовые Live-развлечения
– Рулетка
– Blackjack
– Баккарат
– Покер
Игровые машины: ассортимент игр
Библиотека азартных машин включает тысячи названий от топовых разработчиков. Участники найдут:
– Традиционные автоматы
– Видео-автоматы
– Накопительный приз-игры
– Многолинейные автоматы
Состязания и уникальные события
Периодические состязания предоставляют шанс участникам соревноваться друг с другом за крупные призовые пулы. Любой турнир обладает свои условия участия и рейтинг лидеров.
Методы ввода и получения денег
Казино использует массу платежных инструментов:
– Платежные средства
– Онлайн сервисы
– Blockchain-платежи
– Финансовые отправления
Абсолютно все транзакции реализуются конфиденциально благодаря передовым протоколам защиты.
Отдел поддержки
Профессиональные консультанты команды обслуживания способны поддержать 24/7. Имеются следующие пути контакта:
– Онлайн-чат
– Email-помощь
– Аудио линия
– Социальные сети
Заключение
Главный портал игровой площадки и его действующие копии предоставляют участникам защищенный и удобный вход к большому диапазону геймерских игр. Внушительные награды, частые акции, компетентная помощь и удобные финансовые инструменты превращают развлекательный процесс предельно захватывающим и выгодным.
platform link – Clear and simple pages make browsing effortless
go to this page – The flow between sections makes navigation feel seamless.
Top Picks – The interface is neat and moving between pages is simple.
check out here https://swaplab.io
xxx video
Top Picks – Items are well organized and navigation is simple.
Hot Topics: https://www.gramah.com.br/casinos-en-internet-argentina/
ed treatments online Pharmacological Institute ed treatments online
Передовые онлайн-казино предлагают пользователям богатый выбор развлечений и щедрые бонусы. Однако для комфортной работы существенно понимать, как найти казино Вован и его рабочие зеркала.
Что такое основной портал казино
Основной ресурс казино — это базовая система, где клиенты могут получать удовольствие от развлекательными играми. Сайт функционирует на официальных условиях и имеет всеми обязательными документами.
Первостепенные плюсы основного сайта:
– Безопасность личных информации
– Прозрачные требования игры
– Обеспеченные транзакции
– Компетентная служба поддержки
Действующее зеркало казино: для чего требуется
Зеркало — это абсолютная копия лицензионного сайта, расположенная по альтернативному адресу. Актуальное зеркало запускается для поддержания непрерывного входа к порталу.
Основания эксплуатации дублирующих ресурсов:
– Недоступность первичного сайта
– Плановые мероприятия
– Значительная загрузка на платформу
Как найти актуальное зеркало сегодня
Обнаружить актуальное действующее зеркало можно различными способами:
1. Почтовые оповещения — оформите подписку на email рассылку
2. Команда техподдержки — проконсультируйтесь в онлайн-чат
3. Официальные сети — отслеживайте за публикациями
4. Специализированные ресурсы — авторитетные сайты
Создание аккаунта на ресурсе казино
Алгоритм оформления составляет буквально пару мгновений:
1. Выберите на кнопку “Регистрация”
2. Заполните требуемые информацию
3. Верифицируйте электронную e-mail
4. Активируйте промокод, если есть
После оконченной активации вам откроется возможен пользовательский профиль.
Бонусы и бонусные коды
Щедрая премиальная система — важное преимущество казино:
Поощрение за регистрацию
Начинающие участники получают первый подарок, который может охватывать:
– Валютный бонус на начальный депозит
– Фриспины для барабанов
– Стартовые бонусы
Бонусные коды
Постоянно выходят новые промокоды, позволяющие получить дополнительные привилегии.
Схема компенсации
Постоянные пользователи возвращают часть потраченных денег обратно.
Актуальные кампании и соревнования
Сайт регулярно устраивает захватывающие акции:
– Weekly соревнования
– Специальные промо
– Конкурсы значительных призов
– Механизм статусов
Доступ в индивидуальный профиль
Для логина на портал необходимо:
1. Загрузить основной сайт или функционирующее зеркало
2. Кликнуть “Login”
3. Прописать email и ключ
В пользовательском профиле предоставлены нижеперечисленные функции:
– Пополнение баланса
– Снятие денег
– Проверка журнала ставок
– Настройка персональными настройками
Адаптивная версия и софт
Мобильная модификация
Мобильная платформа ресурса обеспечивает развлекаться с всех смартфонного девайса. Визуал динамически подстраивается под габариты экрана.
Программа для скачивания
Установить клиент можно для:
– Android — прямая скачивание с платформы
– iOS — установка через App Store
Плюсы программы:
– Мгновенный вход
– Стабильная работа
– Push-сообщения об промо
– Оптимизированный интерфейс
Развлекательные секции
Игровые машины
Разнообразная коллекция игровых барабанов от ведущих провайдеров:
– Классические слоты
– Новые-слоты
– Джекпот-машины
Live зал
Секция с профессиональными ведущими дает:
– Рулеточные столы
– Blackjack
– Baccarat
– Покер
Трансляции проводятся в отличном качестве изображения, воссоздавая эффект подлинного казино.
Методы депозита и снятия
Сайт работает с множественные финансовые системы:
– Платежные средства
– Цифровые системы
– Bitcoin/Ethereum
– Финансовые транзакции
Минимальные суммы внесения и скоростные платежи обеспечивают развлечение крайне комфортной.
Команда техподдержки
Опытная команда support работает 24/7 и в состоянии содействовать с различными проблемами:
– Онлайн-чат
– Email-поддержка
– Голосовая горячая линия
Итоги
Основной сайт казино и его рабочие дубликаты обеспечивают игрокам защищенный и увлекательный гемблинг процесс. Выгодные подарки, простая мобильная вариант, обширные слоты и профессиональное live-казино превращают эту площадку превосходным решением для развлекательных развлечений.
check this site – Modern design paired with simple navigation makes browsing effortless.
Характеристика официального сайта
Передовое онлайн-казино обеспечивает своим клиентам большой набор услуг и бонусов. Главный портал ДжиВиСпин оперирует 24/7, гарантируя вход к известным слотам, live-казино и многочисленным промо.
Рабочее зеркало: доступ к ресурсу
Что такое альтернатива казино
Альтернатива означает собой идентичную реплику главного портала с другим доменным именем. Рабочее зеркало обеспечивает участникам избегать барьеры и иметь стабильный путь к выбранным развлечениям.
Как найти актуальное зеркало сегодня
Актуальные линки на основное зеркало публикуются через:
– Электронную рассылку
– Главные публичные сети
– Сервис поддержки
– Тематические порталы
Открытиесчета на ресурсе
Этапы регистрации
Созданиеаккаунта требует всего минут и предполагает такие действия:
1. Переход на официальный ресурс или рабочее зеркало
2. Активация клавиши “Создатьаккаунт”
3. Внесение личных данных
4. Верификация адреса или контакта
5. Формирование ключа
Приз за оформление
Новые игроки приобретают щедрые начальные подарки:
– Бонусные средства на счет
– Халявныеспины для симуляторов
– Расширенный объем возврата
– Эксклюзивные ваучеры
Логин в индивидуальный кабинет
Действующие клиенты могут произвести доступ через главный сайт или актуальное зеркало. Для этого необходимо внести логин и код, сформированные при созданииаккаунта.
Возможности личного профиля
В индивидуальном разделе имеются такие функции:
– Редактирование личными информацией
– Внесение баланса
– Получение денег
– Ввод купонов
– Проверка статистики операций
– Вступление в соревнованиях
Поощрения и предложения
Виды бонусов
Казино балует своих клиентов различными бонусными программами:
– Приветственный бонус — выгодные поощрения на первые пополнения
– Freespins — экстра спины в топовых слотах
– Компенсация — периодический возмещение доли потерь
– Схема верности — особые привилегии для верных игроков
Коды и их применение
Эксклюзивные купоны обеспечивают экстра подарки. Для ввода следует указать шифр в соответствующее поле в личном разделе.
Азартный выбор
Игры
Библиотека слотовых автоматов насчитывает массу названий от лучших поставщиков:
– Обычные слоты
– Видео игры
– Прогрессивные автоматы
– Тематические слоты
Live казино
Раздел Live-казино предлагает взаимодействие с настоящими операторами в режиме актуального времени:
– Французскаярулетка
– Двадцатьодно
– Баккара
– Покер
Турниры
Периодические соревнования с внушительными призовыми призами устраиваются постоянно. Игроки конкурируют за призовыеместа в списке.
Смартфонная адаптация и программа
Мобильная реализация сайта
Официальный портал целиком приспособлен для портативных девайсов. Клиенты могут пользоваться слоты прямо через обозреватель без нужды загрузки.
Программа для скачивания
Официальное смартфонное APP имеется для получения на гаджеты с операционными средами Android и iOS. Софт предоставляет:
– Оперативный вход к развлечениям
– Устойчивую операционность
– Мгновенные-уведомления о промо
– Удобный интерфейс
Резюме
Главный ресурс казино и его функционирующие зеркала гарантируют участникам полный возможность к высококлассным игровым развлечениям. Солидные вознаграждения, всевозможные промо, комфортная адаптивная реализация и компетентная помощь делают игровой досуг крайне комфортным и результативным.
Go Here https://bitmix.app/
take a look – Clean layout ensures users can browse without confusion
click here – Easy-to-follow layout with a relaxed browsing atmosphere
see more info – Layout is tidy, making it simple to explore and visually attractive.
orchard trading hub – Smooth browsing experience and items are easy to locate.
click here – Clear layout and well-organized sections enhance usability
https://pharmacologicalsciences.com/cialis.html Pharmacological Institute
Kraken Marketplace Официальный сайт для доступа к Kraken
kra at
check resources – Layout feels intuitive and moving through the site is effortless
see this online store – Minimalist design makes exploring content fast and intuitive.
Вход к платформе через проверенные зеркала
Клиенты онлайн казино нередко контактируют с вопросом закрытия официального сайта. Конкретно для ликвидации этой ситуации предусмотрены зеркала основного портала. Болливуд гарантирует беспрепятственный переход ко всем опциям ресурса.
Что такое действующее зеркало казино
Альтернативный адрес значит собой точную реплику официального сайта с похожим возможностями. Ключевое отличие — это доменное имя. Все информация клиента, вместе с депозит, награды и данные игр, остаются неизменными.
Достоинства применения зеркал
Рабочие зеркала характеризуются множеством существенных достоинств:
– Бесперебойный вход к предпочитаемым развлечениям
– Абсолютная сохранность индивидуальных данных
– Сохранение всех конфигураций пользовательского кабинета
– Возможность получения наград и вовлечения в промоакциях
Оформление профиля на главном сайте
Процедура регистрации предельно прост и занимает несколько минут. Новые игроки в состоянии рассчитывать на щедрый приветственный приз за открытие счета.
Стадии оформления аккаунта
1. Переход на главный сайт или его дубликат
2. Клик на опцию “Регистрация”
3. Внесение обязательных параметров
4. Подтверждение цифровой почты
5. Указание промокода (когда присутствует)
Бонусы и кампании для клиентов
Ресурс одаривает своих клиентов всевозможными наградными системами.
Главные варианты наград
Начальный приз — солидное начисление для недавних участников, которое может содержать денежные суммы и free spins.
Фриспины — опция крутить в востребованных игровых машинах бесплатно.
Кэшбек — пропорциональный отдача утраченных сумм, что выплачивается еженедельно или каждый месяц.
Бонусные коды — уникальные сочетания, предоставляющие добавочные привилегии.
Персональный кабинет: функции и параметры
Пользовательский аккаунт дает полный регулирование над развлекательным опытом. Тут имеются:
– Контроль средствами
– Архив платежей
– Работающие награды
– Параметры охраны
– Валидация счета
Мобильная платформа и программа
Новейшие пользователи предпочитают доступность. Площадка предоставляет два варианта для игры с мобильных гаджетов.
Responsive телефонная вариант
Мобильная вариант домена автономно настраивается под дисплей любого девайса. Нет необходимости скачивать отдельное приложение.
Софт для смартфонов
Можно скачать оригинальное приложение для iOS и Android. Приложение обеспечивает:
– Моментальный запуск
– Доработанный дизайн
– Мобильные-оповещения о поощрениях
– Надежную работу
Live раздел: антураж настоящего клуба
Категория Live казино отправляет клиентов в среду истинного клуба. Квалифицированные дилеры ведут игры в варианте живого времени.
Известные Live-игры
– Европейская рулетка
– 21
– Баккарат
– Техасский холдем
Аппараты: ассортимент игр
Каталог игровых автоматов содержит множество вариантов от ведущих поставщиков. Игроки обнаружат:
– Классические автоматы
– Видео-автоматы
– Прогрессивный джекпот-игры
– Слоты с множественными линиями
Конкурсы и эксклюзивные события
Постоянные конкурсы позволяют пользователям конкурировать друг с другом за солидные наградные фонды. Всякий соревнование содержит свои критерии присутствия и доску победителей.
Способы пополнения и изъятия денег
Ресурс предоставляет комплекс расчетных систем:
– Платежные средства
– Онлайн платежные системы
– Цифровые валюты
– Банковские транзакции
Любые операции осуществляются надежно благодаря современным системам шифрования.
Сервис помощи
Опытные специалисты сервиса помощи настроены содействовать 24/7. Предусмотрены нижеперечисленные пути контакта:
– Мгновенный-чат
– Email-помощь
– Голосовая поддержка
– Коммуникационные сети
Резюме
Легальный домен клуба и его действующие копии предоставляют участникам защищенный и приятный подход к обширному спектру игровых развлечений. Крупные бонусы, регулярные предложения, квалифицированная служба и удобные расчетные системы превращают развлекательный досуг максимально приятным и выгодным.
Вход к порталу и действующие адреса
Современные сетевые казино обеспечивают пользователям огромный набор развлечений. Основной портал Рльдорадо гарантирует безопасный доступ ко всем возможностям. Впрочем порой появляются обстоятельства, когда понадобится запасной метод доступа.
Что являет собой собой функционирующее зеркало
Действующее зеркало — это полная дубликат легального сайта с запасным сетевым названием. Копия сегодня обеспечивает избегать возможные ограничения и гарантировать непрерывный доступ к любимым слотам.
Легальное зеркало обладает полными опциями, что и основной сайт:
– Целый список развлечений
– Личный раздел с записанными сведениями
– Полные награды и программы
– Безопасные платежные переводы
Создание аккаунта и вход в казино
Этап открытия аккаунта на платформе требует буквально секунд. Свежим клиентам нужно:
1. Перейти на рабочее зеркало в настоящее время
2. Выбрать клавишу «Зарегистрироваться»
3. Ввести требуемые данные
4. Подтвердить электронную почту или контакт мобильного
5. Забрать поощрение за открытие аккаунта
Подключение в индивидуальный профиль реализуется посредством ввод никнейма и кода доступа.
Обзор бонусной политики
Выгодная поощрительная структура — главное плюс ресурса. Клиенты обретают многочисленные бонусы:
Стартовые награды
Начинающие клиенты способны претендовать на выгодный приз за открытие профиля. Обычно это комплект опций, объединяющий:
– Частичную надбавку к стартовому пополнению
– Бесплатные кручения
– Дополнительные суммы на баланс
Промокоды и эксклюзивные опции
Регулярные промокоды помогают обретать призовые выгоды. Применить их возможно в специальном поле личного раздела.
Free spins и компенсация
Free spins — это вариант вращать барабаны без расходования личных денег. Компенсация подразумевает определенный компенсацию потерянных денег.
Каталог автоматов
Гемблинг сайт предоставляет значительную базу развлечений.
Автоматы
Ассортимент игровых машин поражает представление. Доступны обычные трехбарабанные слоты и современные развлечения с занимательной графикой.
Live казино
Раздел Live казино погружает пользователей в антураж настоящего гемблинг клуба. Опытные крупье организуют партии в реальном режиме.
Турниры и лидерборды
Систематические состязания вносят остроты и гарантируют перспективу заработать большие призы.
Портативная версия и клиент
Современные технологии дают возможность играть в любимом точке. Адаптивная версия автономно оптимизируется под экран аппарата.
Скачать клиент допустимо для операционных ОС iOS и Android. Софт предоставляет:
– Мгновенный вход
– Устойчивую производительность
– Всплывающие-оповещения об промо
– Интуитивный интерфейс
Денежные действия
Платформа работает с различные способы пополнения и вывода сумм:
– Платежные системы
– Онлайн сервисы
– Токены
– Банковские транзакции
Каждые действия выполняются через безопасное соединение, что подтверждает целостность конфиденциальных данных.
Сервис помощи
Компетентная группа ассистанса действует постоянно. Контактировать с менеджерами разрешено через:
– Онлайн-чат
– E-mail почту
– Телефон
– Коммуникационные каналы
Итоги
Официальный веб-сайт и его актуальное зеркало обеспечивают участникам защищенный и легкий путь к увлекательным играм. Щедрые награды, разнообразный каталог слотов и высокая поддержка создают игру максимально комфортной и доходной.
Shop Now – Items are well-arranged and content is easy to read.
Thanks! I appreciate it! https://storage.googleapis.com/nagagame-gcp-2026/nagagame/index.html
index https://daobase.info
browse this page – Thoughtfully arranged content ensures a calm and smooth user experience.
Limited Editions – Navigation is simple and items display clearly.
go to this link – Browsing feels smooth thanks to organized pages and appealing visuals.
Обзор официального веб-сайта
Современное онлайн-казино дарит своим игрокам широкий ассортимент услуг и бонусов. Официальный портал ДжиВиСпин оперирует постоянно, гарантируя доступ к популярным играм, live-казино и разнообразным кампаниям.
Действующее зеркало: возможность к платформе
Что такое дубликат казино
Копия означает собой абсолютную дубликат оригинального портала с иным сетевым названием. Рабочее зеркало предоставляет клиентам преодолевать запреты и иметь непрерывный доступ к предпочитаемым играм.
Как получить рабочее зеркало сегодня
Рабочие адреса на официальное зеркало появляются через:
– E-mail подписку
– Основные публичные сети
– Отдел обслуживания
– Affiliated сайты
Созданиеаккаунта на сайте
Этапы регистрации
Оформление требует всего минут и предполагает такие шаги:
1. Вход на основной портал или действующее зеркало
2. Активация элемента “Зарегистрироваться”
3. Заполнение персональных информации
4. Подтверждение аккаунта или мобильного
5. Создание ключа
Вознаграждение за регистрацию
Первые игроки получают выгодные начальные подарки:
– Бонусные деньги на кошелек
– Freespins для симуляторов
– Усиленный объем возврата
– Эксклюзивные коды
Вход в индивидуальный счет
Активные клиенты имеютвозможность осуществить логин через главный сайт или текущее зеркало. Для этого следует внести имяпользователя и секретнуюкомбинацию, установленные при регистрации.
Инструменты персонального профиля
В персональном разделе предоставлены следующие возможности:
– Редактирование контактными информацией
– Ввод кошелька
– Получение денег
– Применение купонов
– Мониторинг архива игр
– Включение в турнирах
Поощрения и кампании
Категории бонусов
Казино радует своих клиентов всевозможными наградными программами:
– Вступительный бонус — большие подарки на стартовые депозиты
– Бесплатныевращения — бонусные ставки в известных симуляторах
– Кэшбек — периодический возврат процента ставок
– Схема лояльности — уникальные бонусы для активных игроков
Промокоды и их ввод
Специальные промокоды дают экстра поощрения. Для активации требуется внести код в соответствующее графу в персональном разделе.
Геймплейный набор
Автоматы
База развлекательных симуляторов насчитывает тысячи вариантов от ведущих провайдеров:
– Обычные слоты
– Видео слоты
– Накопительные игры
– Тематические автоматы
Live казино
Секция Live-казино обеспечивает процесс с живыми крупье в формате прямого эфира:
– Рулетка
– Blackjack
– Baccarat
– Техасскийхолдем
Турниры
Регулярные соревнования с внушительными призовыми суммами организуются ежедневно. Соревнующиеся борются за призовыеместа в турнирнойсетке.
Смартфонная версия и приложение
Адаптивная реализация ресурса
Оригинальный ресурс полностью оптимизирован для мобильных устройств. Участники могут открывать развлечения прямо через интернет-браузер без потребности установки.
Софт для инсталляции
Специальное смартфонное софт предоставляется для загрузки на устройства с программными платформами Android и iOS. Софт гарантирует:
– Быстрый подход к автоматам
– Надежную операционность
– Оперативные-оповещения о предложениях
– Интуитивный оформление
Вывод
Официальный ресурс казино и его функционирующие дубликаты обеспечивают участникам всесторонний вход к качественным развлекательным развлечениям. Щедрые поощрения, различные кампании, удобная смартфонная версия и компетентная поддержка делают развлекательный досуг предельно приятным и доходным.
Описание лицензионного ресурса
Актуальные интернет казино предоставляют участникам разнообразный выбор забав и возможностей. Официальный веб-сайт казино Vovan обеспечивает защищенный доступ к азартным функциям.
Функционирующее зеркало: вход на сегодня
Дублирующий портал служит в качестве идентичную копию лицензионного веб-сайта. Актуальное зеркало дает возможность клиентам миновать вероятные блокировки.
Достоинства использования зеркала
Основные плюсы включают:
– Непрерывный вход к платформе
– Поддержание абсолютно всех опций главного ресурса
– Безопасность персональных материалов
– Равнозначный функционал
Регистрация на ресурсе
Процесс оформления профиля выделяется простотой и комфортом. Начинающие клиенты обязаны:
1. Перейти на официальный портал или его зеркало
2. Выбрать на пункт открытия счета
3. Указать необходимые сведения
4. Валидировать электронную почту
5. Совершить стартовый вход
Приз за создание аккаунта
Дебютанты забирают щедрый начальный бонус. Такое поощрение может охватывать:
– Денежные суммы
– Даровые фриспины
– Усиленный процент компенсации
Вход в индивидуальный кабинет
Активные клиенты имеют возможность мгновенно авторизоваться в собственный аккаунт, применяя логин и ключ. Персональный профиль предлагает шанс к:
– Администрированию депозитом
– Журналу переводов
– Активным подаркам
– Конфигурации аккаунта
Подарки и кампании
Ресурс периодически реализует многочисленные акции для пользователей.
Категории поощрений
Основные категории поощрений:
– Финансовые начисления – коэффициент от размера депозита
– Спины – complimentary прокруты в автоматах
– Кэшбек – возмещение фрагмента потерянных денег
– Конкурсные призы – вознаграждения за состязание в соревнованиях
Ваучеры
Эксклюзивные коды дают возможность заработать экстра привилегии. Пользователи имеют возможность обнаружить их на аффилиатных порталах или получить в уведомлениях.
Mobile вариант и программа
Прогрессивные игроки выбирают мобильный геймплей.
Опции мобильной версии
– Адаптивный интерфейс для разнообразных девайсов
– Совокупный возможность к автоматам
– Моментальная работа
– Комфортное управление
Download app
Мобильное app открыто для скачивания на аппараты с операционными ОС Android и iOS. Программа гарантирует:
– Надежную деятельность
– Push оповещения о призах
– Мгновенный доступ к любимым автоматам
Азартный ассортимент
Портал дает внушительную коллекцию развлекательных услуг.
Игровые машины
Ассортимент азартных машин насчитывает:
– Традиционные слоты
– Современные слоты
– Призовые автоматы
– Сюжетные игры
Live игры
Секция живых игр обеспечивает опцию состязаться с профессиональными крупье. Открыты:
– Американская рулетка
– Блек-джек
– Баккара
– Техасский холдем
Состязания
Систематические чемпионаты дают возможность клиентам бороться за внушительные финансовые пулы. Турнирная система модифицируется еженедельно.
Банковские операции
Платформа поддерживает разнообразие способов зачисления и обналичивания денег:
– Дебетовые карты
– Виртуальные платежные системы
– Прямые переводы
– Bitcoin
Абсолютно все транзакции производятся защищенно с задействованием передовых технологий защиты.
Отдел support
Квалифицированная отдел саппорта трудится постоянно. Коннектиться с менеджерами реально через:
– Онлайн чат
– Email почту
– Контактный номер
– Социальные медиа
Охрана и лицензирование
Казино работает на базе действительной аккредитации. Такое удостоверяет:
– Справедливость азартного действа
– Охрану конфиденциальных сведений
– Пунктуальные транзакции
– Ответственный геймплей
Заключение
Официальный веб-сайт и его актуальные резервные страницы предоставляют пользователям полный набор опций для удобной и профитной развлечений. Значительные подарки, различные автоматы, профессиональная поддержка и проверенная платформа платежей делают портал идеальным опцией для любителей игровых услуг.
shop collection – Well-structured pages make finding items easy and intuitive
opalstone online – Layout is clean and browsing through sections is seamless.
shop collection – Clear sections make exploring items smooth and easy
content center – Well-laid-out pages, browsing is quick and clear
explore shop page – Smooth interface and neat design make navigation fast.
visit this site – Interesting idea with an engaging structure that makes browsing easy.
open this link – The content is organized nicely and gives a professional impression
Visit Frost Ridge – The layout is clean and browsing feels effortless.
Подключение к платформе и рабочие зеркала
Современные онлайн казино гарантируют пользователям огромный набор развлечений. Центральный веб-сайт Рльдорадо предоставляет защищенный вход ко всем сервисам. Однако временами происходят случаи, когда необходимо запасной метод входа.
Что являет собой собой рабочее зеркало
Действующее зеркало — это абсолютная копия официального веб-сайта с альтернативным URL расположением. Альтернатива сегодня позволяет преодолевать возможные барьеры и поддерживать стабильный вход к выбранным развлечениям.
Проверенное зеркало имеет теми же функциями, что и базовый сайт:
– Весь каталог автоматов
– Личный аккаунт с записанными сведениями
– Все бонусы и промо
– Безопасные банковские действия
Создание аккаунта и подключение в систему
Этап оформления на платформе длится считанные секунд. Начинающим пользователям нужно:
1. Попасть на действующее зеркало сейчас
2. Нажать опцию «Открыть профиль»
3. Ввести требуемые информацию
4. Проверить цифровую почту или данные смартфона
5. Забрать награду за создание профиля
Авторизация в личный аккаунт производится через внесение имени пользователя и секретной комбинации.
Обзор наградной системы
Выгодная поощрительная программа — главное плюс платформы. Клиенты обретают различные награды:
Приветственные бонусы
Новые участники могут претендовать на значительный подарок за регистрацию. Чаще всего это набор вариантов, включающий:
– Процентную премию к первому вкладу
– Бесплатные спины
– Дополнительные финансы на аккаунт
Кодовые комбинации и уникальные опции
Систематические коды помогают получать дополнительные льготы. Применить их допустимо в специальном меню индивидуального кабинета.
Фриспины и кешбэк
Бесплатные спины — это шанс играть автоматы без применения собственных денег. Возврат подразумевает частичный возмещение утраченных средств.
Ассортимент автоматов
Гемблинг сайт обеспечивает впечатляющую библиотеку автоматов.
Автоматы
Вариативность аппаратов удивляет воображение. Имеются классические трехбарабанные слоты и новые видеослоты с увлекательной картинкой.
Live зал
Категория Live развлечений транспортирует игроков в антураж реального гемблинг дома. Профессиональные операторы ведут раунды в онлайн формате.
Турниры и рейтинги
Систематические турниры привносят азарта и обеспечивают перспективу выиграть крупные призы.
Мобильная вариант и приложение
Актуальные решения помогают участвовать в любимом локации. Mobile реализация независимо адаптируется под дисплей аппарата.
Установить программу допустимо для программных сред iOS и Android. Софт обеспечивает:
– Оперативный запуск
– Надежную работу
– Push-сообщения об акциях
– Удобный облик
Банковские операции
Сайт работает с всевозможные способы ввода и вывода сумм:
– Банковские карты
– Электронные платформы
– Крипто
– Денежные транзакции
Все операции проходят через безопасное соединение, что гарантирует безопасность конфиденциальных сведений.
Отдел ассистанса
Профессиональная бригада поддержки функционирует всегда. Контактировать с специалистами можно через:
– Живой-чат
– Цифровую почту
– Телефон
– Медиа сети
Итоги
Основной ресурс и его актуальное зеркало гарантируют участникам стабильный и приятный вход к интересным играм. Привлекательные поощрения, разнообразный выбор автоматов и высокая ассистанс формируют времяпрепровождение максимально комфортной и доходной.
Передовые онлайн-казино обеспечивают клиентам широкий диапазон опций для приятной развлечений. Вход к платформе http://admrossosh.ru/ выполняется через официальный сайт или рабочее зеркало.
Что такое действующее зеркало казино
Рабочее зеркало — это запасной линк официального сайта казино. Такие клоны разрабатываются для поддержания стабильного доступа к гемблинговой платформе.
Зеркало сегодня целиком дублирует возможности основного сайта. Пользователи приобретают идентичный вход ко всем услугам, включая создание аккаунта, зачисление средств кошелька и снятие выигрышей.
Регистрация на главном сайте
Механизм оформления учетной записи требует всего буквально мгновений. Новым пользователям следует:
1. Войти на главный ресурс или текущее официальное зеркало
2. Кликнуть кнопку “Регистрация”
3. Указать необходимые данные
4. Активировать почтовую почту
5. Использовать бонусный код при наличии
После завершения создания аккаунта пользователь приобретает приз за регистрацию, который может включать free spins или денежное поощрение.
Логин в индивидуальный кабинет
Индивидуальный кабинет — это охраняемая секция, где игроки способны регулировать своим профилем. Для авторизации нужно указать username и пароль.
В пользовательском кабинете открыты следующие возможности:
– Просмотр журнала платежей
– Задействование бонусных кодов
– Контроль призами
– Участие в соревнованиях
– Контроль возмещения
– Изменение учетной записи
Вознаграждения и промо
Азартная сервис дарит выгодные призы:
Стартовый пакет — начинающие зарабатывают крупное начисление на начальные депозиты.
Даровые спины — предоставляются как при регистрации, так и в рамках всевозможных кампаний.
Кэшбек — постоянный возмещение доли утраченных денег.
Купоны — уникальные комбинации, открывающие доступ к специальным вознаграждениям.
Характеристика азартных категорий
Игровые автоматы
Библиотека slots охватывает множество наименований от передовых производителей. Пользователи встретят как обычные аппараты, так и новые видеослоты с захватывающей визуализацией.
Live казино
Зона Live казино предоставляет опцию играть с живыми дилерами в состоянии актуального времени. Представлены известные варианты: рулетка, блэкджек, баккара, покер.
Соревнования
Регулярные соревнования с значительными наградными банками завлекают сотни конкурсантов. Призеры завоевывают монетарные выплаты и уникальные подарки.
Смартфонная версия и программа
Мобильная версия ресурса обеспечивает участвовать с любого аппарата. Интерфейс независимо адаптируется под диагональ экрана.
Получить app можно для девайсов на Android и iOS. Мобильное ПО обладает всеми возможностями десктопной версии.
Как найти актуальное зеркало на сегодня
Свежие URL альтернатив систематически изменяются. Получить действующую линк можно многими путями:
– Через службу поддержки
– В подлинных информационных сетях
– По почтовой рассылке
– На аффилиатных ресурсах
Безопасность и официальность
Основной ресурс оперирует на базе мировой разрешения. Все платежи оберегаются актуальными методами кодирования.
Анонимность индивидуальных сведений сохраняется в стопроцентном масштабе.
Заключение
Лицензионный сайт и его действующие зеркала обеспечивают игрокам постоянный выход к высококлассным игровым сервисам. Выгодные бонусы, различные автоматы, компетентная служба — все это формирует азартный процесс невероятно беспроблемным и интересным.
https://novamenpharmacy.com/# NovaMen Pharmacy
this online hub – Clear and organized sections make navigation smooth and pleasant.
Explore Collections – Pages load quickly and navigating feels effortless.
discover more – Content is presented logically and pages load without delay
Передовые онлайн-казино предлагают игрокам широкий диапазон опций для беспроблемной развлечений. Подключение к сервису Клубника выполняется через официальный портал или действующее зеркало.
Что такое рабочее зеркало казино
Рабочее зеркало — это запасной URL официального портала казино. Такие версии создаются для гарантирования бесперебойного доступа к игровой площадке.
Дубликат сегодня полностью дублирует опции официального портала. Клиенты получают такой же путь ко всем функциям, включая оформление профиля, внесение депозита счета и обналичивание денег.
Открытие счета на официальном ресурсе
Процесс открытия профиля отнимает всего считанные моментов. Новым клиентам нужно:
1. Зайти на основной ресурс или рабочее настоящее зеркало
2. Кликнуть кнопку “Регистрация”
3. Ввести требуемые сведения
4. Верифицировать почтовую почту
5. Ввести промокод при наличии
После завершения создания аккаунта участник приобретает вознаграждение за регистрацию, который имеет право содержать фриспины или денежное начисление.
Авторизация в персональный кабинет
Персональный кабинет — это защищенная секция, где клиенты имеют возможность администрировать своим профилем. Для логина требуется ввести имя пользователя и password.
В пользовательском кабинете доступны такие опции:
– Отслеживание хронологии платежей
– Активация кодов активации
– Настройка призами
– Включение в конкурсах
– Проверка возмещения
– Настройка данных
Бонусы и акции
Игровая система обеспечивает великодушные бонусы:
Регистрационный бонус — новички получают солидное начисление на дебютные пополнения.
Free spins — дарятся как при открытии счета, так и в ходе различных промо.
Возмещение — регулярный возмещение части проигранных денег.
Бонусные коды — специальные коды, предоставляющие выход к специальным призам.
Анализ азартных категорий
Slots
Библиотека автоматов содержит сотни вариантов от лучших разработчиков. Пользователи встретят как классические автоматы, так и современные видео-слоты с интересной визуализацией.
Live казино
Зона Live казино предоставляет возможность соревноваться с настоящими дилерами в режиме реального времени. Представлены популярные игры: рулетка, блэкджек, баккара, покер.
Соревнования
Систематические чемпионаты с значительными наградными фондами притягивают массу конкурсантов. Чемпионы зарабатывают монетарные призы и эксклюзивные поощрения.
Телефонная версия и app
Мобильная версия сайта обеспечивает наслаждаться с любого аппарата. Оформление самостоятельно настраивается под диагональ экрана.
Установить софт можно для девайсов на Android и iOS. Телефонное приложение имеет всеми функциями компьютерной версии.
Как отыскать действующее зеркало на сегодня
Действующие URL копий систематически обновляются. Найти действующую линк можно разными методами:
– Через сервис помощи
– В настоящих коммуникационных сетях
– По электронной newsletter
– На тематических сайтах
Защита и лицензирование
Официальный сайт функционирует на фундаменте глобальной разрешения. Все транзакции охраняются передовыми системами безопасности.
Конфиденциальность индивидуальных сведений гарантируется в стопроцентном масштабе.
Вывод
Лицензионный ресурс и его действующие копии обеспечивают игрокам 24/7 выход к качественным гемблинговым развлечениям. Выгодные поощрения, многочисленные игры, квалифицированная сервис — все это превращает развлекательный досуг максимально комфортным и интересным.
discover more – Well-organized pages make exploring enjoyable
browse around – Everything feels sincere and well-arranged, giving a personal and welcoming impression.
olive stone selections – Pages are quick to load and the site is simple to navigate.
Передовые онлайн-казино обеспечивают клиентам широкий ассортимент развлечений и поощрительных вариантов. Доступ к ресурсу выполняется через главный сайт или его актуальное зеркало Вован казино, что дает постоянную игру.
Что представляет собой актуальное зеркало казино
Дубликат — это абсолютная дубликат официального ресурса, созданная для обхода блокировок. Зеркало сегодня позволяет участникам обрести соединение к выбранным слотам в произвольное время.
Проверенное зеркало обладает всеми функциями оригинального веб-сайта:
– Совокупный перечень автоматов
– Профиль с записанными параметрами
– Действующие акции
– Гарантированные расчетные транзакции
Оформление профиля на главном портале
Ход создания аккаунта занимает всего немного минут. Первым игрокам необходимо:
1. Перейти на проверенный веб-сайт или рабочее зеркало
2. Кликнуть на клавишу “Регистрация”
3. Заполнить нужные данные
4. Подтвердить электронную почту
5. Внести стартовый вклад
Поощрение новичкам начисляется сразу после прохождения всех стадий.
Авторизация в аккаунт
Действующие игроки могут выполнить вход применяя:
– Имя пользователя и ключ
– Номер телефона
– Электронную почту
Личный кабинет дает возможность к контролю счетом, данным транзакций и действующим акциям.
Поощрения и кампании
Развлекательная сервис балует регулярных участников щедрыми поощрениями:
Начальный комплект
– Поощрение на стартовый пополнение до 100%
– Free spins на топовые слоты
– Дополнительные премии за следующие пополнения
Ваучеры
Специальные купоны предоставляют доступ на использование эксклюзивных вознаграждений. Текущие купоны размещаются в секции “Бонусы”.
Кешбэк
Постоянный возврат равен до 10% от утраченных средств. Компенсация начисляется незамедлительно.
Схема лояльности
Регулярные пользователи накапливают баллы, которые переводятся на реальные выплаты или даровые спины.
Адаптивный портал и приложение
В целях удобства клиентов сделана полноценная адаптивный сайт. Гибкий вид дает возможность комфортно участвовать с любого мобильного гаджета.
Преимущества программы:
– Скорый вход к развлечениям
– Оптимизированный дизайн
– Устойчивая работа
– Оповещения о свежих событиях
Загрузить APP можно безвозмездно с официального ресурса для девайсов на Android и iOS.
Ассортимент автоматов
Машины
Библиотека вмещает более 2000 машин от популярных производителей:
– Обычные машины
– Video slots
– Прогрессивные автоматы
– Брендовые игры
Live казино
Секция Live развлечений обеспечивает развлечение с настоящими диллерами в онлайн времени:
– Рулеточные столы
– Карточная игра
– Баккара
– Покер
Турниры
Постоянные конкурсы с солидными наградными суммами устраиваются регулярно. Вход в соревнованиях открыто всем действующим игрокам.
Финансовые способы
Депозиты и выводы денег реализуются через распространенные сервисы:
– Дебетовые пластик
– Онлайн кошельки
– Криптовалюта
– Счетные операции
Минимальный депозит — от 100 рублей. Вывод средств обрабатывается в течение 24 часов.
Служба помощи
Непрерывная команда support расположена помочь в решении произвольных задач:
– Мессенджер
– Email
– Телефон
– Социальные сети
Безопасность и документ
Лицензионный сайт действует на почве признанной лицензии. Любые информация игроков охранены передовым SSL-криптованием.
Заключение
Действующее зеркало предоставляет постоянный соединение к излюбленным автоматам, богатым акциям и функциональным функциям. Откройте счет сейчас и получите стартовый подарок!
view collection – Fast navigation with clear design and accessible content
see this online store – Minimalist layout and clear navigation improve browsing.
Visit Forest Stone – The layout is tidy and browsing feels effortless.
https://pharmacologicalsciences.com/levitra.html Pharmacological Institute
Современные онлайн-казино обеспечивают игрокам богатый выбор развлечений и заманчивые премии. Но для комфортной работы критично иметь представление, как найти казино РЎСѓРєР° и его функционирующие зеркала.
Что такое основной сайт казино
Основной портал казино — это главная система, где пользователи могут наслаждаться развлекательными слотами. Сайт работает на официальных принципах и располагает всеми обязательными разрешениями.
Основные плюсы главного портала:
– Защищенность личных данных
– Объективные правила игры
– Стабильные выплаты
– Квалифицированная служба поддержки
Функционирующее зеркало казино: для чего необходимо
Копия сайта — это абсолютная копия основного сайта, хостящаяся по иному домену. Функционирующее зеркало создается для гарантирования постоянного входа к порталу.
Факторы задействования зеркал:
– Блокировка главного домена
– Технические операции
– Значительная активность на платформу
Как получить рабочее зеркало сейчас
Получить новое проверенное зеркало можно различными вариантами:
1. Email-уведомления — подпишитесь на информационную подписку
2. Департамент техподдержки — проконсультируйтесь в онлайн-чат
3. Корпоративные каналы — отслеживайте за новостями
4. Специализированные площадки — надежные источники
Создание аккаунта на платформе казино
Процесс создания аккаунта составляет лишь немного минут:
1. Нажмите на клавишу “Регистрация”
2. Заполните необходимые поля
3. Верифицируйте почтовую e-mail
4. Активируйте промокод, если имеется
После финализированной регистрации вам предоставится возможен личный кабинет.
Бонусы и промокоды
Щедрая премиальная система — существенное плюс казино:
Подарок за открытие счета
Свежие пользователи получают стартовый подарок, который может охватывать:
– Валютный бонус на дебютный вклад
– Фриспины для барабанов
– Безвозвратные бонусы
Промокоды
Периодически выходят эксклюзивные коды, позволяющие активировать особые привилегии.
Программа кэшбека
Лояльные участники возвращают порцию потраченных средств в виде компенсации.
Действующие кампании и состязания
Казино систематически организует азартные события:
– Недельные турниры
– Тематические бонусы
– Конкурсы солидных наград
– Механизм лояльности
Вход в пользовательский раздел
Для авторизации на ресурс требуется:
1. Открыть главный адрес или функционирующее зеркало
2. Выбрать “Авторизация”
3. Указать email и ключ
В индивидуальном профиле предоставлены данные возможности:
– Пополнение счета
– Снятие призов
– Просмотр журнала операций
– Управление персональными параметрами
Мобильная вариант и программа
Адаптивная версия
Адаптивная платформа сайта обеспечивает делать ставки с всех карманного устройства. Дизайн самостоятельно настраивается под размер экрана.
Клиент для download
Получить app можно для:
– Android — безопасная download с платформы
– iOS — установка через App Store
Выгоды приложения:
– Быстрый вход
– Бесперебойная работа
– Push-сообщения об бонусах
– Ускоренный UI
Гемблинг категории
Барабаны
Внушительная галерея игровых барабанов от лучших производителей:
– Традиционные игры
– Современные-слоты
– Джекпот-автоматы
Live зал
Раздел с реальными ведущими предоставляет:
– Рулетки
– 21
– Баккара
– Poker
Трансляции ведутся в отличном качестве, воссоздавая впечатление аутентичного казино.
Системы пополнения и получения
Ресурс принимает разнообразные платежные инструменты:
– Дебетовые карты
– Онлайн счета
– Криптовалюты
– Банковские переводы
Стартовые суммы пополнения и моментальные платежи гарантируют процесс максимально удобной.
Команда поддержки
Профессиональная отдел support функционирует 24/7 и может поддержать с разными ситуациями:
– Онлайн-чат
– Email-помощь
– Звонковая линия
Выводы
Главный сайт казино и его рабочие дубликаты гарантируют клиентам конфиденциальный и азартный развлекательный опыт. Богатые подарки, удобная портативная версия, многочисленные развлечения и высокоуровневое live-казино превращают эту ресурс превосходным вариантом для гемблинг досуга.
Нынешние онлайн казино обеспечивают геймерам большой диапазон вариантов для приятной игры. Однако иногда вход к основному порталу может быть закрытым. В таких ситуациях на выручку спешит https://www.spb-ska.ru, которое гарантирует стабильный путь ко всем опциям платформы.
Что такое рабочее зеркало казино
Зеркало — это абсолютная дубликат официального портала, которая хостится по альтернативному домену. Альтернативный ресурс имеет полный функционал основного сайта, включая индивидуальный кабинет, депозит и сведения платежей.
Принципиальные преимущества эксплуатации зеркала:
– Круглосуточный подключение к платформе
– Абсолютная идентичность возможностей
– Защита личных данных
– Удержание всех имеющихся бонусов
Как отыскать рабочее зеркало на текущий день
Есть несколько надежных способов нахождения актуальной ссылочной информации:
Легитимные сервисы:
1. Почтовая рассылка — администрация постоянно направляет уведомления с актуальными адресами
2. Коммуникационные сети — авторизованные аккаунты размещают свежую сведения
3. Отдел поддержки — специалисты предоставляют надежные адреса
4. Телефонное приложение — позволяет преодолевать блокировки
Создание аккаунта на лицензионном сайте
Этап создания аккаунта длится только считанные минут и содержит из таких этапов:
1. Открытие на главный сайт или функционирующее зеркало
2. Выбор на иконку «Создать аккаунт»
3. Внесение регистрационной анкеты
4. Валидация имейл почты или телефонного номера
5. Задействование привилегии за регистрацию при существовании промокода
Только что зарегистрированные игроки приобретают солидный приветственный приз, который может включать free spins, валютные призы или возврат средств.
Вход в личный кабинет
Логин на платформе выполняется стандартным методом. Требуется ввести никнейм и код доступа, указанные при регистрации.
Значимые аспекты для надежного входа:
– Применяйте защищенный шифр
– Запустите двойную аутентификацию
– Не записывайте коды на посторонних гаджетах
– Отслеживайте доменную строку браузера
Анализ наградной программы
Игорный портал балует игроков всевозможными бонусами и акциями:
Начальный набор
Свежие игроки могут надеяться на значительное награду за дебютный пополнение. Обычно это долевая добавка к внесенной величине плюс бесплатные вращения для популярных слотов.
Периодические предложения
– 7-дневный компенсация — компенсирование процентной доли списанных денежных средств
– Поощрения на повторные вклады
– Уникальные промо по торжествам
– Турниры с крупными призовыми банками
Система привилегий
Деятельные пользователи получают единицы за любую ставку, которые затем превращаются на реальные финансы, бесплатные вращения или специальные бонусы.
Промокоды: как применять
Кодовые комбинации — это индивидуальные наборы знаков, предоставляющие право к эксклюзивным вознаграждениям.
В каких местах получить рабочие промокоды:
– Легитимные коммуникационные сети казино
– Аффилиатные площадки
– Email-информирование
– Профильные форумы
Прописывается промокод в предназначенное поле при регистрации или внесении депозита баланса.
Телефонная версия и приложение
Передовые игроки отдают предпочтение играть с телефонных устройств. Ресурс обеспечивает пару метода для беспроблемной смартфонной игры.
Responsive вариант
Интернет версия самостоятельно настраивается под диагональ экранной панели. Не требует инсталляции и работает в всяком актуальном браузере.
Мобильное приложение
Установить программу можно для аппаратов на Android и iOS. Преимущества app:
– Скоростная активация
– Устойчивая действие
– Мгновенные-уведомления о акциях
– Автономный обход блокировок
Операция инсталляции несложен: достаточно открыть на ресурс с портативного устройства и выполнять инструкциям.
Гемблинг каталог
Библиотека развлечений насчитывает множество вариантов от передовых провайдеров.
Слоты
Азартные аппараты — самая распространенная раздел забав. Размещены традиционные простые аппараты, актуальные мультимедийные слоты с премиальными уровнями, а также джекпотные джекпоты.
Live казино
Зона с настоящими крупье дает возможность прочувствовать настроение истинного казино. Доступны столы с покером.
Передача осуществляется в высоком формате, обеспечивается коммуникация с раздающим и другими пользователями.
Конкурсы
Регулярно устраиваются соревнования по всевозможным категориям. Присоединение предоставляет право заработать денежные выигрыши, даровые прокруты или уникальные бонусы.
Транзакционные манипуляции
Портал предоставляет обширный спектр финансовых методов:
– Банковские карты
– Виртуальные платформы
– Крипта
– Денежные переводы
Наименьшая сумма пополнения — разумная для массы клиентов. Обналичивание средств производится в кратчайшие периоды.
Департамент поддержки
Профессиональные консультанты расположены содействовать постоянно. Открыты данные методы общения:
– Онлайн-чат
– Email
– Звонковая линия
– Коммуникационные сети
Разъяснения на распространенные вопросы можно обнаружить в разделе FAQ.
Заключение
Лицензионный сайт казино и его действующие зеркала дают клиентам абсолютный вход ко всем сервисам ресурса. Щедрые поощрения, практичная мобильная версия, впечатляющий выбор аттракционов и профессиональная помощь делают развлекательный процесс исключительно приятным и конфиденциальным.
visit quartz harbor – The layout is tidy, making browsing smooth and intuitive.
check this site – A tidy design with details presented clearly
check this page – The layout feels dynamic, creating a fun and interactive experience.
Bestsellers – Finding items is quick and the interface feels smooth.
shop now – Well-laid-out pages and smooth navigation enhance usability
Daily Deals – Layout is neat and exploring items is straightforward.
Kraken Marketplace Официальный сайт для доступа к Kraken
slon cc
take a look here – Well-defined sections improve the browsing experience.
browse resources – Simple interface, everything is easy to follow
start exploring – Organized interface ensures smooth and enjoyable navigation
Аргументация: как решать конфликты и убеждать людей
Дизайн человека
Найти общий язык с коллегами и создать благоприятную атмосферу в коллективе
Дизайн человека
Передовые онлайн-казино предоставляют участникам обширный набор слотов и привлекательные награды. Тем не менее для беспроблемной времяпрепровождения существенно знать, как найти Ретро и его действующие зеркала.
Что такое основной сайт казино
Основной веб-сайт казино — это первичная площадка, где клиенты могут пользоваться развлекательными развлечениями. Портал действует на законных условиях и имеет всеми требуемыми сертификатами.
Главные достоинства главного портала:
– Конфиденциальность индивидуальных сведений
– Честные требования работы
– Гарантированные платежи
– Оперативная техподдержка
Функционирующее зеркало казино: для чего используется
Дублирующий ресурс — это абсолютная клон основного ресурса, размещенная по иному веб-адресу. Функционирующее зеркало запускается для гарантирования стабильного доступа к ресурсу.
Поводы использования альтернативных адресов:
– Запрет первичного адреса
– Технические мероприятия
– Повышенная активность на платформу
Как обнаружить актуальное зеркало сейчас
Найти свежее действующее зеркало можно несколькими вариантами:
1. Рассылка — подпишитесь на email рассылку
2. Отдел техподдержки — свяжитесь в онлайн-чат
3. Социальные сети — следите за публикациями
4. Специализированные порталы — достоверные ресурсы
Регистрация на сайте казино
Алгоритм открытия счета требует буквально считанные мгновений:
1. Выберите на кнопку “Регистрация”
2. Заполните требуемые данные
3. Подтвердите электронную e-mail
4. Примените код активации, если имеется
По завершении финализированной создания аккаунта вам предоставится разрешен индивидуальный кабинет.
Награды и купоны
Привлекательная бонусная политика — значимое плюс казино:
Бонус за первичную регистрацию
Первичные игроки обретают начальный бонус, который может содержать:
– Валютный депозит на первый взнос
– Бесплатные вращения для барабанов
– Приветственные деньги
Купоны
Периодически появляются эксклюзивные бонусные шифры, обеспечивающие использовать специальные поощрения.
Система возврата средств
Активные пользователи приобретают процент утраченных денег назад.
Текущие кампании и турниры
Платформа систематически организует захватывающие события:
– Еженедельные чемпионаты
– Праздничные бонусы
– Конкурсы значительных выигрышей
– Программа привилегий
Доступ в личный профиль
Для авторизации на платформу необходимо:
1. Открыть лицензионный ресурс или актуальное зеркало
2. Нажать “Авторизация”
3. Внести email и код доступа
В пользовательском профиле предоставлены такие инструменты:
– Депозит счета
– Получение средств
– Проверка архива игр
– Настройка персональными данными
Mobile вариант и приложение
Мобильная версия
Оптимизированная платформа сайта предоставляет шанс делать ставки с различных портативного телефона. Оформление самостоятельно оптимизируется под габариты монитора.
Приложение для загрузки
Скачать app можно для:
– Android — официальная загрузка с сайта
– iOS — загрузка через App Store
Плюсы app:
– Оперативный старт
– Бесперебойная функциональность
– Push-нотификации об промо
– Улучшенный функционал
Развлекательные секции
Барабаны
Внушительная галерея азартных автоматов от известных производителей:
– Ретро игры
– Видео-игры
– Джекпот-игры
Live зал
Категория с реальными дилерами обеспечивает:
– Рулеточные столы
– Блэкджек
– Punto Banco
– Poker
Стримы ведутся в отличном разрешении, воссоздавая впечатление аутентичного казино.
Методы депозита и снятия
Ресурс принимает множественные денежные системы:
– Банковские card
– Электронные системы
– Криптовалюты
– Банковские транзакции
Минимальные пороги депозита и оперативные транзакции делают процесс предельно комфортной.
Департамент поддержки
Профессиональная служба ассистентов функционирует 24/7 и может помочь с любыми задачами:
– Реалтайм-чат
– Email-переписка
– Phone служба
Резюме
Лицензионный веб-сайт казино и его функционирующие копии предоставляют пользователям конфиденциальный и азартный азартный досуг. Привлекательные поощрения, функциональная портативная версия, многочисленные автоматы и высокоуровневое live-казино делают эту платформу великолепным выбором для развлекательных досуга.
продвижение трафика prodvizhenie-sajta-po-trafiku3.ru .
Познакомитесь с распространёнными тактиками аргументации и научитесь ими пользоваться
Дизайн человека
Featured Items – Everything is clearly presented and moving through items is simple.
Jogo do Tigrinho tá on fire em 2026! Quem já pegou x10 na cartinha misteriosa essa semana?
buy erectile dysfunction medication Pharmacological Sciences online ed treatments
Jogo do Tigrinho no Pix R$1: teste grátis com chance de bônus real
check site info – Polished visuals and tidy layout make the site feel credible and professional.
view collection – A simple interface makes exploring items fast and comfortable.
Daily Deals – Navigation is seamless and everything loads quickly.
Обзор лицензионного веб-сайта
Прогрессивные сетевые казино обеспечивают клиентам богатый набор услуг и перспектив. Лицензионный сайт Gold гарантирует защищенный доступ к гемблинг функциям.
Рабочее зеркало: путь сегодня
Зеркало выступает собой точную копию официального портала. Актуальное зеркало дает возможность клиентам обходить вероятные ограничения.
Выгоды применения зеркала
Ключевые плюсы предполагают:
– Постоянный вход к сайту
– Удержание любых возможностей основного сайта
– Сохранность персональных сведений
– Равнозначный набор функций
Оформление профиля на ресурсе
Ход оформления профиля знаменуется понятностью и удобством. Свежие клиенты требуется:
1. Перейти на основной ресурс или его зеркало
2. Кликнуть на клавишу создания аккаунта
3. Внести необходимые поля
4. Верифицировать почтовую ящик
5. Осуществить начальный авторизацию
Подарок за открытие счета
Дебютанты приобретают щедрый приветственный подарок. Это награда имеет возможность предусматривать:
– Финансовые бонусы
– Complimentary фриспины
– Усиленный коэффициент кэшбека
Вход в персональный профиль
Действующие клиенты имеют возможность быстро получить доступ в персональный раздел, используя никнейм и пароль. Индивидуальный профиль предлагает доступ к:
– Администрированию средствами
– Записям операций
– Действующим подаркам
– Настройкам учетной записи
Призы и акции
Портал систематически устраивает различные промо-кампании для участников.
Типы подарков
Главные категории вознаграждений:
– Денежные подарки – процент от размера депозита
– Фриспины – безвозмездные спины в игровых машинах
– Кэшбек – компенсация процента проигранных сумм
– Соревновательные награды – премии за игру в состязаниях
Коды
Специальные ваучеры дают возможность получить добавочные выгоды. Пользователи могут отыскать их на тематических площадках или получить в рассылке.
Переносная адаптация и app
Передовые клиенты ценят переносной гейминг.
Возможности mobile версии
– Адаптивный интерфейс для всех аппаратов
– Целостный доступ к играм
– Быстрая работа
– Практичное навигация
Download приложение
Переносное приложение открыто для загрузки на девайсы с рабочими ОС Android и iOS. Приложение гарантирует:
– Бесперебойную работу
– Пуш уведомления о предложениях
– Моментальный путь к предпочитаемым автоматам
Игровой каталог
Платформа дает богатую коллекцию азартных забав.
Слоты
Каталог игровых аппаратов содержит:
– Стандартные игры
– Video игры
– Прогрессивные машины
– Лицензионные игры
Live дилеры
Категория лайв дилеров дает опцию состязаться с профессиональными дилерами. Представлены:
– Американская рулетка
– 21
– Baccarat
– Покер
Соревнования
Периодические чемпионаты помогают клиентам конкурировать за значительные финансовые суммы. Призовая структура актуализируется еженедельно.
Платежные действия
Сайт поддерживает обилие методов зачисления и снятия сумм:
– Дебетовые карты
– Виртуальные платежные системы
– Wire трансферы
– Криптовалюты
Любые платежи проходят безопасно с использованием актуальных методов защиты.
Служба сопровождения
Профессиональная команда поддержки действует без перерыва. Связаться с менеджерами доступно через:
– Онлайн чат
– Почтовую почту
– Контактный номер
– Социальные платформы
Секьюрити и лицензирование
Игровой клуб работает на базе легальной аккредитации. Подобное обеспечивает:
– Справедливость развлекательного действа
– Защиту индивидуальных данных
– Оперативные перечисления
– Ответственный гемблинг
Итог
Лицензионный портал и его рабочие резервные страницы гарантируют игрокам совокупный комплекс услуг для удобной и прибыльной времяпрепровождения. Внушительные подарки, различные игры, профессиональная помощь и надежная структура выплат формируют казино лучшим выбором для фанатов азартных игр.
cialis Pharmacological Sciences Research Institute ed pills
Анализ лицензионного сайта
Прогрессивные онлайн казино дают пользователям разнообразный выбор игр и опций. Официальный ресурс Болливуд предоставляет защищенный вход к развлекательным функциям.
Функционирующее зеркало: доступ в настоящий момент
Зеркало представляет собой полную версию главного веб-сайта. Проверенное зеркало обеспечивает пользователям преодолевать потенциальные барьеры.
Выгоды задействования зеркала
Главные достоинства охватывают:
– Стабильный шанс к ресурсу
– Сохранение всех возможностей базового портала
– Охрана конфиденциальных данных
– Аналогичный набор функций
Создание аккаунта на портале
Ход открытия счета знаменуется понятностью и эргономичностью. Новые пользователи должны:
1. Посетить официальный сайт или его зеркало
2. Выбрать на кнопку открытия счета
3. Указать необходимые поля
4. Активировать электронную адрес
5. Выполнить стартовый авторизацию
Приз за регистрацию
Начинающие зарабатывают внушительный вступительный бонус. Это поощрение имеет возможность содержать:
– Материальные бонусы
– Даровые вращения
– Повышенный показатель кэшбека
Доступ в индивидуальный кабинет
Активные клиенты имеют возможность оперативно зайти в личный раздел, эксплуатируя никнейм и пароль. Собственный раздел предоставляет возможность к:
– Регулированию счетом
– Журналу платежей
– Текущим бонусам
– Опциям учетной записи
Вознаграждения и акции
Портал постоянно проводит различные акции для участников.
Виды поощрений
Главные виды поощрений:
– Депозитные начисления – процент от размера внесения
– Бесплатные вращения – даровые спины в аппаратах
– Кэшбек – возмещение фрагмента утраченных средств
– Конкурсные награды – призы за игру в состязаниях
Коды
Уникальные купоны дают возможность заработать бонусные привилегии. Клиенты могут найти их на партнерских порталах или взять в новостях.
Портативная вариант и приложение
Прогрессивные игроки выбирают мобильный игровой процесс.
Функции переносной платформы
– Отзывчивый вид для всех устройств
– Абсолютный вход к автоматам
– Моментальная работа
– Комфортное контроль
Скачать программу
Переносное программа доступно для скачивания на гаджеты с операционными платформами Android и iOS. App дает:
– Бесперебойную деятельность
– Пуш уведомления о акциях
– Мгновенный вход к желанным развлечениям
Гемблинг ассортимент
Игровой клуб предоставляет обширную коллекцию игровых развлечений.
Аппараты
Библиотека игровых слотов включает:
– Традиционные слоты
– Video аппараты
– Прогрессивные слоты
– Сюжетные слоты
Live игры
Область живых дилеров дает право играть с живыми крупье. Представлены:
– Европейская рулетка
– Очко
– Baccarat
– Карибский покер
Соревнования
Систематические конкурсы дают возможность клиентам бороться за значительные денежные пулы. Соревновательная сетка обновляется постоянно.
Платежные транзакции
Казино предоставляет обилие методов зачисления и обналичивания средств:
– Дебетовые карточки
– Виртуальные счета
– Wire транзакции
– Крипто
Любые платежи производятся надежно с использованием передовых методов криптографии.
Департамент поддержки
Профессиональная отдел поддержки трудится без перерыва. Коннектиться с менеджерами доступно через:
– Online чат
– Email почту
– Горячую линию
– Social медиа
Охрана и лицензирование
Игровой клуб действует на основании официальной аккредитации. Это гарантирует:
– Честность азартного геймплея
– Безопасность индивидуальных сведений
– Своевременные перечисления
– Контролируемый гейминг
Резюме
Лицензионный сайт и его рабочие альтернативные адреса предоставляют игрокам совокупный комплекс возможностей для безопасной и выгодной развлечений. Солидные бонусы, различные развлечения, квалифицированная служба и защищенная система выплат формируют платформу оптимальным опцией для ценителей азартных забав.
explore products – Clean design makes navigating pages simple and smooth
enter site – Modern design and intuitive navigation throughout
check this outlet – Clear menus and tidy design create a pleasant browsing experience.
birchstoneoutpost – Browsing is smooth and the layout feels very organized
oakstoneemporium – Site seems well structured and pages display content clearly and fast.
browse items – Everything is arranged logically and easy to access
Featured Items – Everything is easy to find and navigation flows smoothly.
PG Soft lançamentos 2026: Fortune Dragon, Fortune Mouse 2… qual você quer primeiro?
Limited Editions – Layout is organized and browsing feels effortless.
PG Soft top 5 jogos 2026: Tigrinho, Coelho, Touro, Mahjong e… qual o 5º?
check this page – Cozy and distinctive design ensures a comfortable browsing experience.
Kraken Marketplace Официальный сайт для доступа к Kraken
krab cc
Fortune Tiger cartinha x10: melhor momento do ano ou só sorte?
Актуальные онлайн-казино предлагают пользователям обширный спектр возможностей для удобной развлечений. Подключение к площадке Голд казино осуществляется через основной веб-ресурс или функционирующее зеркало.
Что такое актуальное зеркало казино
Функционирующее зеркало — это дополнительный URL главного веб-сайта казино. Такие клоны разрабатываются для гарантирования постоянного входа к гемблинговой сервису.
Копия текущее совершенно дублирует характеристики основного домена. Геймеры приобретают схожий доступ ко всем сервисам, включая оформление профиля, зачисление средств кошелька и получение выигрышей.
Открытие счета на главном веб-сайте
Алгоритм оформления учетной записи занимает всего буквально мгновений. Будущим участникам следует:
1. Перейти на главный ресурс или действующее настоящее зеркало
2. Щелкнуть кнопку “Регистрация”
3. Заполнить нужные реквизиты
4. Активировать email почту
5. Применить купон при доступности
После финализации открытия профиля участник приобретает подарок за регистрацию, который вправе содержать бесплатные вращения или денежное премию.
Логин в индивидуальный кабинет
Пользовательский кабинет — это закрытая секция, где участники вправе администрировать своим счетом. Для входа требуется ввести логин и пароль.
В личном кабинете открыты такие функции:
– Просмотр истории переводов
– Использование купонов
– Управление бонусами
– Присоединение в соревнованиях
– Контроль возврата средств
– Редактирование профиля
Вознаграждения и акции
Гемблинговая система дарит щедрые подарки:
Стартовый комплект — новички получают солидное вознаграждение на дебютные пополнения.
Даровые спины — начисляются как при регистрации, так и в процессе различных кампаний.
Возврат средств — постоянный возмещение фрагмента проигранных сумм.
Купоны — эксклюзивные шифры, обеспечивающие возможность к особым вознаграждениям.
Описание гемблинговых секций
Слоты
Коллекция слотов включает массу игр от топовых производителей. Клиенты откроют как традиционные автоматы, так и современные видеослоты с интересной графикой.
Live казино
Категория Live казино дарит возможность участвовать с реальными крупье в состоянии настоящего времени. Представлены популярные игры: рулетка, блэкджек, баккара, покер.
Конкурсы
Периодические состязания с солидными наградными банками манят массу конкурсантов. Победители обретают монетарные вознаграждения и особые бонусы.
Телефонная версия и софт
Адаптивная версия ресурса дает возможность участвовать с каждого девайса. Дизайн автономно адаптируется под диагональ экрана.
Установить софт можно для гаджетов на Android и iOS. Телефонное приложение характеризуется всеми характеристиками настольной версии.
Как определить действующее зеркало на текущий день
Действующие URL альтернатив постоянно меняются. Найти свежую ссылку можно разными вариантами:
– Через отдел техподдержки
– В проверенных новостных сетях
– По электронной подписке
– На партнерских порталах
Защита и лицензирование
Лицензионный портал действует на базе международной лицензии. Все платежи защищены передовыми системами безопасности.
Конфиденциальность личных данных сохраняется в абсолютном объеме.
Итог
Главный домен и его актуальные альтернативы дарят пользователям круглосуточный вход к высококлассным развлекательным сервисам. Великодушные призы, различные слоты, квалифицированная помощь — все это превращает развлекательный досуг максимально удобным и интересным.
PG Soft top cassinos Pix 2026: lista com bônus reais e saque em minutos
visit platform – A tidy presentation makes it simple to locate what you need.
Trending Now – Navigation is intuitive and pages load without issues.
цветы онлайн москва http://www.cvejie-cveti.ru .
zencoveemporium.shop – Nice experience overall, content feels useful and easy to explore
browse products here – Minimalist design keeps browsing simple and intuitive.
check this out – Layout is tidy and moving through sections feels natural
Передовые онлайн-казино обеспечивают игрокам множество возможностей для комфортной игры. Основной веб-портал Голд казино предоставляет вход ко всем сервисам и азартным играм. Однако при образовании технических неполадок на выручку прибывают актуальные копии.
Что являет собой собой актуальное зеркало
Зеркало казино — это полная дубликат главного сайта, размещенная по альтернативному адресу. Официальное зеркало сохраняет все функции, вместе с создание аккаунта, доступ в личный кабинет, вознаграждения и промокоды.
Дубликат на сегодня дает:
– Непрерывный доступ к развлекательным слотам
– Стопроцентную сохранность индивидуальных данных
– Удержание средств и записей операций
– Применимость всех акций
Создание учетной записи на лицензионном портале
Процесс регистрации требует считанные минут. Новым клиентам следует:
1. Войти на главный ресурс или функционирующее зеркало
2. Нажать кнопку «Регистрация»
3. Внести необходимые сведения
4. Подтвердить email почту
5. Указать промокод при существовании
После конца оформления профиля пользователи приобретают подарок за регистрацию, что может охватывать фриспины или денежно-призовое премирование.
Вход в персональный кабинет
Приватный кабинет дает полный мониторинг над азартным процессом. Через личный профиль допускается:
– Пополнять кошелек
– Получать средства
– Применять кодовые слова
– Проверять историю игр
– Соревноваться в соревнованиях
– Забирать кешбэк
Характеристика вознаграждений и специальных предложений
Великодушная поощрительная программа — существенное достоинство проекта. Главные виды поощрений:
Вступительный бонус
Начинающие получают великодушное вознаграждение на дебютные взносы. Сумма бонуса может доходить до 100-200% от суммы депозита.
Бесплатные вращения
Бесплатные раунды даются для востребованных слотов. Количество free spins варьируется от 10 до 500 штук.
Cash back
Постоянный или помесячный откат процента утраченных средств. Стандартный объем возврата — 5-15%.
Турниры
Периодические соревнования с солидными премиальными фондами. Конкурсанты соревнуются за топовые позиции в таблице лидеров.
Портативная версия и программа
Смартфонная версия обеспечивает играть с каждого гаджета. Пользователи могут закачать софт для iOS и Android или применять веб версию.
Выгоды смартфонного приложения:
– Скоростная прогрузка автоматов
– Комфортный UI
– Всплывающие уведомления о бонусах
– Вход через биометрию
Машины и Live казино
Развлекательная коллекция содержит множество игр от известных разработчиков.
Популярные типы игр:
– Классические машины
– Видеослоты с бонусными этапами
– Накопительный приз игры
– Мегавейс автоматы
Live игорный зал
Зона live игорный зал предоставляет игру с живыми крупье. Представлены классические игры:
– Американская рулетка
– Блэкджек
– Punto Banco
– Техасский холдем
Как разыскать актуальное зеркало
Раздобыть свежую ссылку на зеркало можно множественными методами:
1. Подписаться на email-рассылку
2. Отслеживать за новостями в соц сетях
3. Контактировать в службу поддержки
4. Заложить актуальное зеркало в фавориты
Резюме
Главный ресурс и его действующие зеркала гарантируют стабильный путь к азартным слотам. Выгодные вознаграждения, разнообразные промокоды, комфортное портативное приложение и отличная служба поддержки делают азартный опыт крайне беспроблемным и безопасным.
бесплатный секс видеочат
official link – Well-organized content and innovative approach make browsing comfortable.
Передовые онлайн-казино обеспечивают пользователям богатый спектр возможностей для беспроблемной досуга. Доступ к ресурсу Килограмм реализуется через лицензионный сайт или функционирующее зеркало.
Что такое действующее зеркало казино
Рабочее зеркало — это резервный домен главного портала казино. Такие дубликаты разрабатываются для предоставления непрерывного соединения к гемблинговой системе.
Зеркало на сегодня абсолютно воспроизводит функционал официального сайта. Игроки приобретают схожий доступ ко всем сервисам, включая открытие счета, внесение депозита счета и снятие средств.
Оформление профиля на главном портале
Алгоритм создания аккаунта длится всего буквально минут. Свежим участникам требуется:
1. Попасть на основной портал или рабочее подлинное зеркало
2. Щелкнуть кнопку “Регистрация”
3. Внести требуемые информацию
4. Подтвердить email почту
5. Применить купон при существовании
После окончания открытия профиля клиент зарабатывает приз за регистрацию, который способен предполагать бесплатные вращения или финансовое премию.
Вход в собственный кабинет
Индивидуальный кабинет — это безопасная область, где клиенты могут управлять своим профилем. Для логина требуется напечатать username и код доступа.
В пользовательском кабинете имеются нижеперечисленные возможности:
– Просмотр хронологии операций
– Применение купонов
– Настройка вознаграждениями
– Участие в соревнованиях
– Отслеживание возврата средств
– Изменение учетной записи
Бонусы и промо
Игровая площадка обеспечивает щедрые вознаграждения:
Стартовый комплект — новые игроки зарабатывают солидное вознаграждение на стартовые пополнения.
Free spins — предоставляются как при оформлении, так и в рамках всевозможных кампаний.
Возврат средств — еженедельный возмещение части израсходованных финансов.
Бонусные коды — специальные последовательности, открывающие выход к эксклюзивным бонусам.
Характеристика игровых направлений
Игровые автоматы
Библиотека слотов охватывает сотни вариантов от лучших разработчиков. Клиенты встретят как стандартные слоты, так и современные видео-слоты с притягательной визуализацией.
Live казино
Категория Live казино дарит опцию соревноваться с действующими крупье в состоянии актуального времени. Имеются распространенные игры: рулетка, блэкджек, баккара, покер.
Соревнования
Периодические чемпионаты с крупными премиальными фондами притягивают множество игроков. Чемпионы обретают монетарные выплаты и эксклюзивные подарки.
Смартфонная версия и софт
Телефонная версия портала предоставляет право участвовать с каждого устройства. Интерфейс самостоятельно корректируется под формат экрана.
Загрузить программу можно для гаджетов на Android и iOS. Портативное приложение имеет всеми возможностями десктопной версии.
Как обнаружить актуальное зеркало на сейчас
Рабочие ссылки альтернатив систематически меняются. Узнать действующую ссылку можно несколькими вариантами:
– Через службу техподдержки
– В официальных социальных сетях
– По e-mail newsletter
– На партнерских сайтах
Надежность и сертификация
Лицензионный сайт действует на основании мировой разрешения. Все переводы шифруются современными технологиями кодирования.
Секретность личных сведений обеспечивается в стопроцентном формате.
Заключение
Основной домен и его действующие дубликаты обеспечивают игрокам 24/7 путь к качественным гемблинговым услугам. Выгодные вознаграждения, всевозможные развлечения, опытная служба — все это делает игровой процесс невероятно приятным и интересным.
https://novamenpharmacy.com/# Viagra Tablet price
oakcove treasures – Pages load quickly and content is displayed clearly.
enter outpost – Logical organization makes finding items straightforward
Top Picks – The interface is tidy and very user-friendly.
Shop Lantern Stone – Items are arranged nicely and browsing is comfortable.
Explore Products – Browsing through items is smooth and effortless.
check this page – Pages load quickly and sections are well-arranged for smooth browsing.
take a look – Had a short look and the site feels easy and intuitive
https://pharmacologicalsciences.com/generics.html kamagra
Передовые онлайн-казино обеспечивают игрокам большой набор услуг и премиальных опций. Подключение к ресурсу выполняется через главный ресурс или его рабочее зеркало Clubnika, что обеспечивает бесперебойную активность.
В чем суть рабочее зеркало казино
Дубликат — это полная версия основного портала, разработанная для преодоления запретов. Актуальное зеркало дает возможность клиентам иметь доступ к выбранным развлечениям в любое время.
Официальное зеркало обладает всеми опциями основного ресурса:
– Полный каталог игр
– Аккаунт с зафиксированными параметрами
– Свежие бонусы
– Защищенные финансовые операции
Регистрация на лицензионном портале
Алгоритм создания аккаунта занимает всего немного минут. Первым участникам следует:
1. Войти на проверенный портал или действующее зеркало
2. Выбрать на ссылку “Регистрация”
3. Ввести обязательные сведения
4. Активировать адрес
5. Произвести начальный вклад
Стартовый бонус начисляется моментально после выполнения всех шагов.
Подключение в учетную запись
Существующие участники могут совершить вход используя:
– Никнейм и ключ
– Данные телефона
– Адрес
Аккаунт дает доступ к управлению счетом, истории игр и текущим промокодам.
Поощрения и программы
Гемблинг сервис балует активных участников многочисленными поощрениями:
Первый бонус
– Премия на стартовый платеж до 100%
– Даровые спины на популярные игры
– Экстра награды за последующие пополнения
Бонусные коды
Эксклюзивные купоны открывают возможность на использование уникальных бонусов. Актуальные купоны размещаются в разделе “Промо”.
Кэшбек
Постоянный возврат составляет до 10% от утраченных финансов. Выплата начисляется автоматически.
Механизм лояльности
Верные клиенты накапливают поинты, которые переводятся на настоящие средства или фриспины.
Мобильная версия и программа
В целях удобства участников сделана функциональная портативная платформа. Гибкий дизайн дает возможность комфортно играть с каждого мобильного девайса.
Плюсы программы:
– Скорый запуск к играм
– Улучшенный вид
– Надежная функциональность
– Оповещения о последних бонусах
Скачать софт можно свободно с проверенного портала для аппаратов на Android и iOS.
Коллекция развлечений
Машины
Коллекция включает более 2000 машин от топовых производителей:
– Стандартные машины
– Современные автоматы
– Слоты с джекпотом
– Брендовые игры
Live казино
Блок Live столов предлагает игру с живыми дилерами в реальном формате:
– Рулетка
– Двадцать одно
– Баккара
– Покер
Соревнования
Регулярные конкурсы с солидными выигрышными пулами устраиваются систематически. Участие в состязаниях разрешено всем активным пользователям.
Платежные способы
Депозиты и выводы выплат реализуются через востребованные методы:
– Кредитные пластик
– Онлайн счета
– Крипто
– Банковские платежи
Самый низкий депозит — от 100 рублей. Получение средств выполняется в течение 24 периода.
Сервис помощи
Непрерывная отдел помощи способна содействовать в урегулировании произвольных задач:
– Live chat
– Email
– Контактный номер
– Социальные сети
Безопасность и документ
Главный сайт функционирует на почве мировой лицензии. Любые данные участников обезопасены новейшим SSL-криптованием.
Вывод
Функционирующее зеркало гарантирует непрерывный соединение к любимым слотам, привлекательным бонусам и практичным услугам. Зарегистрируйтесь прямо сейчас и приобретите начальный поощрение!
интернет партнер интернет партнер .
Характеристика официального сайта
Актуальные виртуальные казино предлагают игрокам обширный ассортимент игр и перспектив. Главный портал Голд казино обеспечивает безопасный вход к азартным возможностям.
Действующее зеркало: вход прямо сейчас
Дублирующий портал выступает в качестве точную реплику лицензионного сайта. Проверенное зеркало обеспечивает клиентам миновать потенциальные барьеры.
Выгоды применения зеркала
Ключевые достоинства включают:
– Непрерывный доступ к платформе
– Хранение полных функций официального портала
– Сохранность личных сведений
– Равнозначный возможности
Создание аккаунта на платформе
Ход оформления профиля характеризуется простотой и практичностью. Новые участники обязаны:
1. Открыть главный ресурс или его зеркало
2. Нажать на пункт открытия счета
3. Указать необходимые информацию
4. Подтвердить почтовую адрес
5. Произвести стартовый логин
Приз за оформление
Начинающие забирают солидный приветственный презент. Такое награда в состоянии охватывать:
– Монетарные суммы
– Бесплатные прокруты
– Расширенный показатель компенсации
Вход в личный раздел
Существующие участники могут быстро авторизоваться в личный кабинет, применяя никнейм и шифр. Собственный кабинет предоставляет доступ к:
– Администрированию счетом
– Записям транзакций
– Действующим поощрениям
– Опциям учетной записи
Подарки и промо
Ресурс периодически реализует многочисленные акции для игроков.
Виды подарков
Базовые виды поощрений:
– Финансовые начисления – процент от величины взноса
– Спины – безвозмездные вращения в автоматах
– Компенсация – отдача части утраченных денег
– Турнирные вознаграждения – вознаграждения за участие в турнирах
Купоны
Особые коды обеспечивают активировать экстра бонусы. Игроки способны обнаружить их на тематических площадках или получить в рассылке.
Портативная вариант и app
Современные клиенты предпочитают переносной досуг.
Возможности мобильной системы
– Адаптивный интерфейс для любых устройств
– Совокупный вход к автоматам
– Стремительная функционирование
– Комфортное управление
Установить app
Переносное app доступно для загрузки на девайсы с рабочими системами Android и iOS. Софт дает:
– Устойчивую работу
– Пуш уведомления о бонусах
– Быстрый запуск к желанным автоматам
Азартный выбор
Казино дает обширную библиотеку игровых развлечений.
Слоты
Ассортимент развлекательных машин охватывает:
– Обычные игры
– Видео слоты
– Прогрессивные автоматы
– Лицензионные игры
Live казино
Область живых столов предлагает право участвовать с реальными ведущими. Доступны:
– Рулетки
– Блэкджек
– Punto Banco
– Покер
Конкурсы
Систематические соревнования обеспечивают участникам бороться за крупные призовые банки. Призовая сетка актуализируется постоянно.
Банковские операции
Казино обеспечивает множество опций депозита и получения сумм:
– Пластиковые карточки
– Электронные кошельки
– Межбанковские трансферы
– Криптовалюты
Любые платежи осуществляются защищенно с задействованием прогрессивных методов кодирования.
Сервис support
Профессиональная отдел саппорта работает 24/7. Обратиться с консультантами возможно через:
– Живой чат
– Почтовую почту
– Телефон
– Социальные медиа
Охрана и аккредитация
Платформа работает на фундаменте легальной лицензии. Это удостоверяет:
– Справедливость развлекательного действа
– Сохранность личных информации
– Оперативные выводы
– Регулируемый геймплей
Вывод
Главный веб-сайт и его действующие альтернативные адреса предоставляют клиентам целостный комплекс услуг для удобной и выгодной развлечений. Солидные подарки, всевозможные слоты, квалифицированная помощь и надежная платформа платежей превращают платформу оптимальным выбором для поклонников гемблинг забав.
browse this page – Well-structured content with a thoughtful interface ensures smooth navigation.
explore online – Content is easy to locate and site feels modern
check this online hub – Well-organized pages allow users to find items quickly.
browse items – Pages load quickly and content is easy to explore
nightorchard picks – Browsing items is easy and pages load smoothly.
Seasonal Specials – Navigation is intuitive and the layout is easy on the eyes.
Вход к платформе и действующие зеркала
Востребованные сетевые казино обеспечивают участникам огромный выбор возможностей. Основной ресурс Болливуд обеспечивает стабильный вход ко всем функциям. Впрочем иногда случаются случаи, когда необходимо альтернативный вариант доступа.
Что означает собой функционирующее зеркало
Функционирующее зеркало — это абсолютная дубликат основного веб-сайта с другим доменным расположением. Альтернатива сегодня позволяет избегать существующие запреты и сохранять непрерывный подключение к предпочитаемым слотам.
Легальное зеркало характеризуется теми же опциями, что и главный сайт:
– Полный перечень автоматов
– Личный аккаунт с зафиксированными информацией
– Действующие бонусы и предложения
– Проверенные платежные переводы
Регистрация и авторизация в систему
Этап регистрации на платформе отнимает пару минут. Новым игрокам нужно:
1. Открыть на функционирующее зеркало на данный момент
2. Щелкнуть клавишу «Регистрация»
3. Ввести требуемые параметры
4. Подтвердить цифровую почту или номер телефона
5. Получить поощрение за создание профиля
Доступ в собственный профиль реализуется путем ввод логина и ключа.
Анализ призовой системы
Богатая призовая политика — главное плюс игорного заведения. Участники обретают различные бонусы:
Вступительные поощрения
Новые клиенты могут претендовать на привлекательный бонус за открытие профиля. Традиционно это совокупность предложений, объединяющий:
– Долевую добавку к стартовому вкладу
– Подарочные спины
– Дополнительные средства на баланс
Промо-коды и особые предложения
Регулярные коды помогают активировать призовые привилегии. Использовать их разрешено в отдельном разделе собственного аккаунта.
Бесплатные вращения и возврат средств
Даровые вращения — это возможность крутить барабаны без расходования персональных сумм. Рибейт означает процентный компенсацию потерянных денег.
Библиотека слотов
Азартная площадка предлагает огромную библиотеку развлечений.
Автоматы
Многообразие автоматов впечатляет ожидания. Имеются традиционные простые аппараты и продвинутые видеослоты с увлекательной графикой.
Live заведение
Зона Live заведения транспортирует игроков в обстановку истинного игорного дома. Опытные операторы проводят раунды в онлайн эфире.
Конкурсы и лидерборды
Периодические соревнования обеспечивают драйва и гарантируют вариант получить значительные суммы.
Карманная реализация и софт
Новые инновации помогают развлекаться в любимом месте. Mobile реализация автоматически настраивается под дисплей устройства.
Загрузить приложение допустимо для операционных ОС iOS и Android. Приложение обеспечивает:
– Мгновенный запуск
– Надежную работу
– Моментальные-оповещения об акциях
– Простой облик
Финансовые операции
Ресурс работает с различные варианты пополнения и получения денег:
– Платежные счета
– Онлайн платформы
– Криптовалюты
– Банковские операции
Все транзакции осуществляются через надежное канал, что подтверждает сохранность персональных параметров.
Служба ассистанса
Профессиональная служба помощи действует постоянно. Обратиться с специалистами допустимо через:
– Интерактивный-чат
– Почтовую почту
– Горячую линию
– Общественные ресурсы
Резюме
Главный портал и его актуальное зеркало гарантируют пользователям защищенный и приятный переход к интересным забавам. Выгодные награды, разнообразный спектр слотов и высокая помощь делают процесс крайне приятной и выгодной.
Современные онлайн-казино обеспечивают пользователям разнообразный выбор слотов и заманчивые награды. Но для беспроблемной времяпрепровождения важно понимать, как получить доступ к Голд и его действующие зеркала.
Что такое основной ресурс казино
Официальный веб-сайт казино — это основная платформа, где пользователи могут наслаждаться игровыми играми. Платформа функционирует на законных основаниях и располагает всеми необходимыми документами.
Основные преимущества лицензионного сайта:
– Защищенность пользовательских реквизитов
– Прозрачные положения игры
– Гарантированные платежи
– Оперативная техподдержка
Актуальное зеркало казино: для чего используется
Дублирующий ресурс — это точная копия основного портала, хостящаяся по иному адресу. Рабочее зеркало разрабатывается для предоставления непрерывного соединения к порталу.
Причины применения зеркал:
– Запрет первичного адреса
– Профилактические мероприятия
– Высокая нагрузка на систему
Как обнаружить рабочее зеркало сегодня
Обнаружить новое проверенное зеркало можно множественными способами:
1. Почтовые оповещения — оформите подписку на почтовую рассылку
2. Служба техподдержки — напишите в онлайн-чат
3. Официальные площадки — отслеживайте за публикациями
4. Тематические ресурсы — надежные сайты
Оформление профиля на ресурсе казино
Алгоритм создания аккаунта длится буквально несколько секунд:
1. Нажмите на опцию “Создать аккаунт”
2. Введите требуемые данные
3. Валидируйте email e-mail
4. Примените купон, если есть
Вслед за оконченной активации вам будет возможен персональный аккаунт.
Премии и купоны
Привлекательная премиальная политика — существенное плюс казино:
Награда за регистрацию
Свежие пользователи зарабатывают первый поощрение, который может содержать:
– Денежный депозит на начальный вклад
– Фриспины для слотов
– Безвозвратные средства
Активационные коды
Регулярно размещаются актуальные купоны, позволяющие получить экстра привилегии.
Схема возврата средств
Постоянные клиенты приобретают процент потраченных денег обратно.
Текущие предложения и состязания
Сайт периодически проводит захватывающие промо-мероприятия:
– Weekly соревнования
– Специальные бонусы
– Конкурсы ценных призов
– Схема лояльности
Вход в персональный кабинет
Для доступа на платформу необходимо:
1. Открыть главный сайт или актуальное зеркало
2. Нажать “Авторизация”
3. Прописать никнейм и секретную комбинацию
В персональном аккаунте открыты данные опции:
– Пополнение кошелька
– Вывод призов
– Просмотр архива игр
– Изменение личными настройками
Адаптивная версия и программа
Мобильная вариант
Оптимизированная модификация портала предоставляет шанс участвовать с разных мобильного устройства. Дизайн автоматически настраивается под размер screen.
App для загрузки
Скачать app можно для:
– Android — безопасная download с платформы
– iOS — загрузка через App Store
Преимущества мобильного клиента:
– Быстрый доступ
– Устойчивая производительность
– Push-сообщения об акциях
– Оптимизированный дизайн
Развлекательные категории
Барабаны
Обширная коллекция азартных автоматов от лучших провайдеров:
– Традиционные машины
– Видео-эмуляторы
– Прогрессивные-автоматы
Live casino
Секция с живыми дилерами дает:
– Рулеточные столы
– 21
– Мини-баккара
– Poker
Стримы осуществляются в отличном разрешении, формируя впечатление настоящего казино.
Методы депозита и обналичивания
Казино принимает разные транзакционные сервисы:
– Кредитные карты
– Виртуальные платежи
– Криптовалюты
– Финансовые переводы
Минимальные пороги пополнения и скоростные транзакции гарантируют игру предельно удобной.
Отдел помощи
Опытная команда помощи оперирует 24/7 и способна содействовать с всеми вопросами:
– Живой-чат
– Email-консультации
– Телефонная горячая линия
Выводы
Лицензионный веб-сайт казино и его действующие альтернативные адреса предоставляют клиентам безопасный и захватывающий развлекательный досуг. Привлекательные награды, удобная портативная версия, разнообразные развлечения и качественное live-казино формируют эту платформу великолепным выбором для гемблинг развлечений.
Shop Flint Stone – Layout is tidy and finding products is quick.
take a look – Simple design and clear pathways make finding content quick
progress forge marketplace – Everything feels clean, fast, and intuitive to navigate
visit the platform – Clean visuals and organized pages allow quick and easy browsing.
согласование перепланировки под ключ согласование перепланировки под ключ .
Popular Products – Layout is clean and browsing through items is simple.
browse around – Polished layout and clear sections provide a seamless and professional browsing experience.
Подключение к платформе и действующие зеркала
Актуальные виртуальные казино предлагают игрокам большой набор игр. Основной веб-сайт Лев гарантирует надежный подключение ко всем сервисам. Тем не менее периодически возникают обстоятельства, когда нужно альтернативный вариант подключения.
Что есть собой рабочее зеркало
Актуальное зеркало — это точная дубликат официального ресурса с альтернативным URL названием. Альтернатива сегодня обеспечивает преодолевать существующие барьеры и гарантировать стабильный вход к любимым играм.
Главное зеркало характеризуется полными возможностями, что и центральный ресурс:
– Весь список автоматов
– Персональный раздел с актуальными данными
– Все награды и предложения
– Защищенные денежные операции
Регистрация и вход в сервис
Этап оформления на платформе длится несколько минут. Новым пользователям необходимо:
1. Попасть на рабочее зеркало на данный момент
2. Выбрать элемент «Открыть профиль»
3. Указать необходимые параметры
4. Активировать e-mail почту или информацию телефона
5. Использовать подарок за регистрацию
Доступ в персональный раздел выполняется через ввод ID и секретной комбинации.
Характеристика бонусной программы
Выгодная бонусная система — ключевое козырь ресурса. Участники забирают разнообразные бонусы:
Приветственные бонусы
Недавние клиенты могут рассчитывать на привлекательный подарок за оформление. Чаще всего это совокупность вариантов, охватывающий:
– Пропорциональную добавку к дебютному депозиту
– Подарочные спины
– Extra средства на аккаунт
Промо-коды и специальные предложения
Постоянные промокоды позволяют обретать призовые льготы. Активировать их разрешено в специальном поле собственного раздела.
Бесплатные вращения и возврат средств
Даровые вращения — это возможность вращать барабаны без применения собственных денег. Кэшбек подразумевает долевой возмещение проигранных денег.
Ассортимент слотов
Игровая площадка предоставляет значительную коллекцию автоматов.
Видеослоты
Ассортимент игровых машин поражает представление. Имеются традиционные простые слоты и продвинутые игры с занимательной картинкой.
Live зал
Раздел Live игр транспортирует участников в антураж настоящего азартного зала. Профессиональные ведущие осуществляют игры в онлайн времени.
Турниры и доски почета
Регулярные конкурсы добавляют остроты и дают шанс забрать значительные награды.
Мобильная вариант и софт
Новые технологии дают возможность участвовать в любом точке. Портативная форма автономно адаптируется под размер гаджета.
Установить программу можно для мобильных платформ iOS и Android. Софт дает:
– Быстрый доступ
– Устойчивую производительность
– Push-уведомления об предложениях
– Комфортный вид
Финансовые процедуры
Казино поддерживает всевозможные методы ввода и получения финансов:
– Платежные системы
– Виртуальные системы
– Цифровые валюты
– Денежные отправки
Любые действия выполняются через надежное протокол, что защищает сохранность приватных параметров.
Сервис помощи
Опытная группа помощи трудится постоянно. Контактировать с менеджерами допустимо через:
– Интерактивный-чат
– Почтовую почту
– Контакт
– Социальные сети
Итоги
Официальный ресурс и его актуальное зеркало дают игрокам стабильный и легкий вход к увлекательным развлечениям. Богатые поощрения, большой каталог игр и профессиональная ассистанс создают времяпрепровождение предельно удобной и прибыльной.
visit this platform – Clean structure allows users to move around without effort.
explore this hub – Everything is logically placed, allowing users to navigate easily.
Подключение к платформе через рабочие зеркала
Современные виртуальные казино предоставляют пользователям круглосуточный вход к играм. Центральный веб-сайт Clubnika работает стабильно, обеспечивая обширный набор гемблинг слотов. Впрочем периодически появляются технические проблемы или ограничения, поэтому важно иметь представление о доступности рабочих зеркал.
Что собой представляет собой главное зеркало казино
Альтернатива — это идентичная версия официального веб-сайта с идентичным возможностями. Актуальное зеркало сегодня позволяет обходить местные блокировки и вести развлечения.
Главные плюсы эксплуатации зеркал:
– Абсолютный подключение к индивидуальному кабинету
– Поддержание всех информации учётной записи
– Аналогичный набор развлечений
– Свежие привилегии и предложения
Регистрация на ресурсе
Операция оформления требует немного минут. Свежие клиенты получают щедрый поощрение за создание счёта, который способен содержать:
– Стартовый финансовый кредит
– Комплиментарные фриспины для автоматов
– Особые купоны
– Повышенный кешбэк
Во имя окончания записи следует:
1. Перейти на центральный портал или зеркало
2. Выбрать кнопку «Оформиться»
3. Внести персональные данные
4. Подтвердить почтовый адрес или номер
5. Активировать код (при присутствии)
Вход в индивидуальный кабинет
По завершении правильной оформления клиенты имеют возможность осуществлять подключение через центральный сайт или актуальное зеркало. Собственный кабинет даёт полный контроль над учётной записью:
– История игр
– Зачисление баланса
– Получение средств
– Контроль поощрениями
– Вовлечение в турнирах
Награды и промо казино
Сайт балует игроков различными наградными предложениями:
Стартовые подарки
Новые игроки обретают внушительный набор поощрений на стартовые депозиты. Обычно это содержит процентную надбавку к размеру взноса плюс безвозмездные кручения.
Систематические кампании
– Раз в неделю кешбэк до 15%
– Турниры с наградными банками
– Подарки на число рождения
– Особые промо для статусных игроков
Программа верности
Регулярные пользователи накапливают очки, что можно трансформировать на настоящие финансы или уникальные бонусы.
Карманная вариант и программа
Современные решения помогают геймить всюду комфортно. Портативная редакция портала автоматически настраивается под размер каждого аппарата.
Преимущества портативного софта:
– Оперативная запуск слотов
– Удобный вид
– Мгновенные-уведомления о бонусах
– Способность установить для Android и iOS
Live казино: обстановка подлинного игорного учреждения
Раздел Live клуба погружает пользователей в среду истинного гемблинг учреждения. Компетентные дилеры ведут игру в формате подлинного времени.
Доступные столы:
– Колесо фортуны
– Карточная игра
– Punto Banco
– Техасский холдем
Барабаны и развлекательные аппараты
Ассортимент развлекательных автоматов насчитывает тысячи наименований от передовых разработчиков. Произвольный пользователь отыщет автомат по желанию:
– Стандартные слоты
– Видеослоты с специальными уровнями
– Прогрессивный-слоты
– Многолинейные игры
Турниры и акции
Регулярные турниры вносят драйв и обеспечивают возможность выиграть большие вознаграждения. Участие в конкурсах часто даровое, а премиальные фонды доходят до значительных объёмов.
Безопасность и анонимность
Портал использует передовые протоколы кодирования для гарантии информации пользователей. Каждые платёжные процедуры осуществляются через зашифрованные каналы.
Итог
Официальный ресурс и его функционирующие зеркала дают устойчивый переход к превосходным гемблинг играм. Великодушные призы, удобная смартфонная вариант, многообразие игр и компетентное Live-казино формируют сайт прекрасным решением для фанатов гемблинг слотов.
browse here now – Everything is structured simply, making product discovery quick.
view it here – Clear structure and fast load times make finding products effortless.
cheapest erectile dysfunction pills Pharmacological Sciences generic ed meds online
open windstone site – Navigation is simple and pages are clear
view website – Well-structured pages help users follow content effortlessly.
berrystoneoutpost – Everything seems structured well and easy to find information quickly
enter galleria – Everything is arranged well and easy to access
PAOK 1-2 Celta Vigo 2026 Europa League thriller result
Featured Items – I like how everything is visually tidy and quick to browse.
access platform – Balanced layout and visuals provide a comfortable browsing flow.
nightorchard highlights – Pages respond quickly and the site structure is logical.
Kraken Marketplace Официальный сайт для доступа к Kraken
slon3 cc
check it out – Layout is clear and browsing works smoothly
see more – Well-structured site with fast and easy navigation
Shop Now – Everything is displayed clearly and easy to find.
>open this link – A clean and minimal layout makes exploring content stress-free.
Нынешние онлайн-казино обеспечивают клиентам разнообразный выбор вариантов для беспроблемной игры. Вход к ресурсу Gold осуществляется через лицензионный сайт или действующее зеркало.
Что такое актуальное зеркало казино
Рабочее зеркало — это запасной домен лицензионного сайта казино. Такие клоны генерируются для предоставления постоянного доступа к развлекательной сервису.
Альтернатива на сегодня полностью воспроизводит характеристики базового ресурса. Клиенты обретают схожий путь ко всем услугам, включая регистрацию, пополнение баланса и получение средств.
Создание аккаунта на официальном веб-сайте
Механизм открытия профиля отнимает всего несколько минут. Свежим пользователям требуется:
1. Перейти на официальный домен или актуальное подлинное зеркало
2. Щелкнуть кнопку “Зарегистрироваться”
3. Ввести необходимые данные
4. Верифицировать email почту
5. Применить бонусный код при присутствии
После финализации регистрации клиент обретает приз за регистрацию, который способен включать фриспины или монетарное премию.
Вход в индивидуальный кабинет
Пользовательский кабинет — это охраняемая секция, где игроки вправе контролировать своим учетной записью. Для авторизации следует напечатать никнейм и пароль.
В пользовательском кабинете имеются нижеперечисленные опции:
– Проверка истории переводов
– Использование купонов
– Контроль вознаграждениями
– Участие в турнирах
– Проверка возмещения
– Изменение аккаунта
Поощрения и акции
Гемблинговая платформа предоставляет выгодные вознаграждения:
Стартовый комплект — новые игроки получают солидное премию на дебютные взносы.
Free spins — предоставляются как при оформлении, так и в ходе разнообразных акций.
Кэшбэк — систематический возмещение процента израсходованных финансов.
Коды активации — особые комбинации, предоставляющие доступ к специальным призам.
Описание азартных секций
Игровые автоматы
Ассортимент слотов охватывает массу игр от лучших поставщиков. Клиенты обнаружат как традиционные аппараты, так и новые видео-слоты с интересной визуализацией.
Live казино
Секция Live казино дарит возможность соревноваться с настоящими ведущими в формате настоящего времени. Имеются популярные развлечения: рулетка, блэкджек, баккара, покер.
Состязания
Систематические чемпионаты с значительными наградными фондами притягивают тысячи соревнующихся. Призеры получают монетарные призы и уникальные поощрения.
Телефонная версия и софт
Адаптивная версия портала предоставляет право участвовать с всякого устройства. Дизайн самостоятельно подстраивается под размер экрана.
Установить app можно для девайсов на Android и iOS. Мобильное app располагает всеми характеристиками настольной версии.
Как обнаружить текущее зеркало на сейчас
Рабочие линки зеркал периодически обновляются. Получить действующую ссылку можно различными путями:
– Через департамент поддержки
– В настоящих социальных сетях
– По электронной подписке
– На тематических сайтах
Защита и лицензирование
Официальный сайт функционирует на основе мировой разрешения. Все переводы охраняются инновационными системами шифрования.
Конфиденциальность индивидуальных данных поддерживается в совершенном объеме.
Вывод
Лицензионный ресурс и его действующие альтернативы обеспечивают клиентам 24/7 выход к качественным игровым развлечениям. Выгодные поощрения, разнообразные автоматы, квалифицированная служба — все это делает развлекательный процесс чрезвычайно приятным и увлекательным.
https://sunsetmaldives.com
Современные онлайн-казино обеспечивают пользователям обширный спектр услуг и призовых предложений. Присоединение к сервису выполняется через лицензионный портал или его функционирующее зеркало казино Sykaaa, что гарантирует стабильную активность.
Что представляет собой действующее зеркало казино
Дубликат — это полная дубликат официального ресурса, созданная для преодоления запретов. Рабочее зеркало помогает игрокам обрести доступ к выбранным развлечениям в произвольное время.
Подлинное зеркало обладает всеми характеристиками основного портала:
– Целый ассортимент слотов
– Профиль с внесенными данными
– Актуальные бонусы
– Надежные расчетные транзакции
Оформление профиля на официальном портале
Алгоритм создания аккаунта требует всего считанные минут. Свежим игрокам необходимо:
1. Зайти на основной веб-сайт или действующее зеркало
2. Кликнуть на ссылку “Создать аккаунт”
3. Указать нужные данные
4. Верифицировать контакт
5. Произвести начальный платеж
Приветственный бонус выдается моментально после окончания всех ступеней.
Подключение в аккаунт
Созданные пользователи могут совершить доступ используя:
– Никнейм и ключ
– Данные контакта
– Адрес
Личный кабинет обеспечивает шанс к регулированию балансом, сведениям ставок и действующим промокодам.
Промо и программы
Развлекательная площадка балует регулярных пользователей выгодными призами:
Приветственный бонус
– Надбавка на начальный взнос до 100%
– Даровые спины на популярные автоматы
– Особые поощрения за следующие пополнения
Ваучеры
Специальные коды дают право на использование уникальных призов. Актуальные коды размещаются в разделе “Акции”.
Возврат средств
Постоянный кэшбек насчитывает до 10% от утраченных финансов. Выплата начисляется моментально.
Схема лояльности
Верные пользователи получают поинты, которые превращаются на действительные средства или фриспины.
Mobile версия и приложение
Для удобства игроков построена качественная портативная платформа. Адаптивный облик дает возможность удобно делать ставки с любого портативного девайса.
Преимущества программы:
– Моментальный запуск к автоматам
– Улучшенный облик
– Бесперебойная активность
– Нотификации о последних акциях
Скачать софт можно свободно с главного портала для устройств на Android и iOS.
Ассортимент развлечений
Автоматы
База содержит более 2000 автоматов от топовых производителей:
– Обычные слоты
– Video slots
– Джекпот-слоты
– Фирменные развлечения
Live казино
Категория Live развлечений предлагает игру с подлинными дилерами в онлайн режиме:
– Рулеточные столы
– Blackjack
– Baccarat
– Покер
Турниры
Регулярные состязания с солидными выигрышными пулами запускаются каждую неделю. Вход в турнирах доступно всем активным участникам.
Расчетные способы
Платежи и получения денег выполняются через известные платежные системы:
– Платежные карточ ки
– Электронные системы
– Bitcoin
– Денежные платежи
Наименьший депозит — от 100 рублей. Вывод средств осуществляется в течение 24 времени.
Команда поддержки
24/7 группа помощи готова содействовать в исправлении всех задач:
– Мессенджер
– Email
– Контактный номер
– Соц сети
Безопасность и разрешение
Официальный портал действует на почве признанной лицензии. Все параметры участников защищены актуальным SSL-протоколом.
Вывод
Действующее зеркало дает бесперебойный доступ к выбранным играм, выгодным промокодам и удобным функциям. Создайте аккаунт немедленно и обретите первый приз!
Panathinaikos 2-2 Viktoria Plzen 2026 Europa League dramatic draw
discover more – The layout is tidy and moving through sections is effortless
Visit Kettle Stone – Layout is clean and browsing feels very intuitive.
Special Finds – Pages load cleanly and navigation is intuitive.
browse now – Pages are quick to load and easy to move through
Нынешние онлайн-казино обеспечивают пользователям массу возможностей для беспроблемной игры. Центральный веб-портал Клубника дарит доступ ко всем функциям и играм. Однако при возникновении системных трудностей на подмогу приходят актуальные зеркала.
Что есть собой актуальное зеркало
Зеркало казино — это стопроцентная дубликат оригинального ресурса, расположенная по другому веб-адресу. Лицензионное зеркало сохраняет все возможности, вместе с регистрацию, доступ в персональный кабинет, премии и кодовые слова.
Зеркало на сегодня дает:
– Стабильный доступ к развлекательным машинам
– Абсолютную сохранность личных данных
– Поддержку баланса и хронологии операций
– Возможность использования всех бонусных программ
Создание аккаунта на главном сайте
Процедура регистрации отнимает несколько минут. Начинающим клиентам требуется:
1. Войти на официальный портал или функционирующее зеркало
2. Кликнуть кнопку «Регистрация»
3. Указать нужные данные
4. Верифицировать электронную почту
5. Указать кодовое слово при наличии
После конца создания аккаунта игроки обретают приз за регистрацию, какой может содержать бесплатные вращения или монетарное премирование.
Авторизация в личный кабинет
Личный кабинет дает всесторонний контроль над игровым ходом. Через личный раздел разрешается:
– Пополнять депозит
– Забирать выплаты
– Активировать купоны
– Проверять записи ставок
– Играть в турнирах
– Обретать кешбэк
Описание бонусов и акций
Богатая призовая программа — важное козырь ресурса. Основные типы поощрений:
Приветственный приз
Новые игроки получают щедрое награду на первые пополнения. Сумма приза может доходить до 100-200% от величины пополнения.
Бонусные спины
Бесплатные раунды даются для топовых игровых автоматов. Сумма бесплатных вращений колеблется от 10 до 500 штук.
Кэшбек
Постоянный или помесячный отдача процентной доли проигранных средств. Обычный процент возврата — 5-15%.
Состязания
Систематические соревнования с внушительными наградными фондами. Участники борются за призовые строчки в турнирной таблице.
Мобильная версия и программа
Мобильная версия позволяет развлекаться с каждого девайса. Пользователи могут скачать софт для iOS и Android или задействовать веб версию.
Преимущества смартфонного приложения:
– Молниеносная загрузка автоматов
– Комфортный дизайн
– Push-уведомления о акциях
– Доступ через отпечаток пальца
Слоты и Live казино
Развлекательная подборка охватывает сотни позиций от лидирующих поставщиков.
Топовые секции автоматов:
– Классические машины
– Современные слоты с премиальными уровнями
– Джекпот слоты
– Мега-путь автоматы
Live казино
Секция live казино обеспечивает игру с реальными ведущими. Представлены стандартные развлечения:
– Европейская рулетка
– Блэкджек
– Punto Banco
– Покер
Как обнаружить рабочее зеркало
Получить актуальную ссылку на зеркало возможно разными методами:
1. Оформить подписку на емейл-уведомления
2. Наблюдать за обновлениями в социальных сетях
3. Связаться в службу поддержки
4. Сохранить актуальное зеркало в фавориты
Резюме
Основной портал и его актуальные альтернативные адреса дают постоянный доступ к развлекательным играм. Великодушные премии, многочисленные купоны, практичное мобильное софт и высококлассная служба поддержки поддержки обеспечивают игровой процесс крайне удобным и защищенным.
Актуальные онлайн-казино обеспечивают геймерам разнообразный диапазон функций для беспроблемной игры. Вход к ресурсу Болливуд казино производится через официальный портал или актуальное зеркало.
Что такое актуальное зеркало казино
Действующее зеркало — это запасной линк главного сайта казино. Такие копии генерируются для гарантирования непрерывного соединения к гемблинговой платформе.
Копия на сегодня полностью повторяет функционал официального ресурса. Клиенты имеют такой же выход ко всем функциям, включая создание аккаунта, пополнение баланса и вывод выигрышей.
Создание аккаунта на официальном портале
Алгоритм оформления учетной записи требует всего несколько мгновений. Новым клиентам необходимо:
1. Попасть на лицензионный сайт или рабочее подлинное зеркало
2. Щелкнуть кнопку “Зарегистрироваться”
3. Ввести нужные реквизиты
4. Проверить e-mail почту
5. Ввести промокод при доступности
После финализации регистрации клиент обретает бонус за регистрацию, который способен охватывать даровые спины или cash поощрение.
Доступ в личный кабинет
Индивидуальный кабинет — это закрытая секция, где участники способны регулировать своим счетом. Для доступа необходимо внести логин и password.
В личном кабинете имеются такие инструменты:
– Проверка журнала платежей
– Использование кодов активации
– Настройка поощрениями
– Присоединение в турнирах
– Проверка возмещения
– Редактирование данных
Поощрения и предложения
Гемблинговая система предоставляет щедрые призы:
Начальный набор — новые игроки обретают существенное начисление на дебютные вклады.
Даровые спины — дарятся как при регистрации, так и в процессе различных кампаний.
Кэшбек — постоянный возврат фрагмента потерянных сумм.
Коды активации — специальные шифры, открывающие возможность к особым вознаграждениям.
Описание игровых секций
Slots
Ассортимент слотов содержит массу позиций от топовых провайдеров. Геймеры обнаружат как обычные аппараты, так и современные 3D-слоты с притягательной оформлением.
Live казино
Зона Live казино предоставляет возможность играть с настоящими ведущими в формате актуального времени. Доступны известные игры: рулетка, блэкджек, баккара, покер.
Состязания
Периодические состязания с большими премиальными банками притягивают множество конкурсантов. Чемпионы зарабатывают монетарные выплаты и специальные подарки.
Мобильная версия и программа
Адаптивная версия сайта обеспечивает развлекаться с любого гаджета. Интерфейс автоматически корректируется под формат экрана.
Скачать программу можно для устройств на Android и iOS. Портативное ПО располагает всеми опциями настольной версии.
Как определить рабочее зеркало на текущий день
Действующие ссылки копий регулярно меняются. Обнаружить свежую ссылку можно различными путями:
– Через службу помощи
– В подлинных коммуникационных сетях
– По e-mail дайджесту
– На специализированных сайтах
Охрана и официальность
Лицензионный ресурс работает на основе международной документа. Все операции защищены передовыми системами шифрования.
Анонимность пользовательских сведений поддерживается в абсолютном размере.
Резюме
Главный ресурс и его действующие альтернативы предоставляют пользователям 24/7 выход к превосходным игровым услугам. Выгодные бонусы, разнообразные автоматы, квалифицированная служба — все это превращает развлекательный времяпрепровождение предельно удобным и притягательным.
mossstone picks – Everything loads smoothly and pages are easy to navigate.
https://pharmacologicalsciences.com/ viagra
have a peek at this site paycor login
a href=”//berrycovegalleria.shop/](https://berrycovegalleria.shop/)” />discover more – The design flows nicely and feels easy to navigate
Featured Items – Pages are well-structured and exploring products is straightforward.
Нынешние онлайн-казино обеспечивают игрокам широкий спектр игр и премиальных предложений. Подключение к площадке выполняется через лицензионный сайт или его функционирующее зеркало Gold, что предоставляет стабильную игру.
В чем суть функционирующее зеркало казино
Альтернатива — это полная копия основного сайта, созданная для преодоления барьеров. Рабочее зеркало обеспечивает игрокам сохранить подключение к предпочитаемым играм в каждое время.
Проверенное зеркало располагает всеми характеристиками первоначального ресурса:
– Полный перечень слотов
– Аккаунт с внесенными параметрами
– Текущие поощрения
– Гарантированные денежные операции
Регистрация на главном веб-сайте
Процесс оформления составляет всего немного минут. Начинающим игрокам следует:
1. Попасть на главный портал или действующее зеркало
2. Нажать на ссылку “Создать аккаунт”
3. Указать нужные сведения
4. Верифицировать email
5. Сделать первый платеж
Бонус за регистрацию зачисляется сразу после окончания всех шагов.
Подключение в аккаунт
Действующие участники могут произвести доступ вводя:
– Логин и пароль
– Данные сотового
– Электронную почту
Аккаунт обеспечивает доступ к управлению балансом, истории транзакций и активным акциям.
Награды и предложения
Развлекательная площадка привлекает лояльных участников многочисленными вознаграждениями:
Приветственный комплект
– Премия на стартовый платеж до 100%
– Бесплатные вращения на известные слоты
– Добавочные премии за дальнейшие платежи
Промокоды
Уникальные купоны дают право на использование эксклюзивных призов. Свежие коды выкладываются в блоке “Акции”.
Cashback
Периодический бонус равен до 10% от проигранных сумм. Возмещение предоставляется моментально.
Схема лояльности
Регулярные участники приобретают баллы, которые превращаются на реальные выплаты или бесплатные вращения.
Адаптивный портал и APP
Для практичности клиентов построена полноценная mobile версия. Гибкий облик помогает легко делать ставки с каждого мобильного аппарата.
Преимущества программы:
– Быстрый вход к автоматам
– Настроенный вид
– Бесперебойная деятельность
– Push-уведомления о актуальных бонусах
Установить APP можно бесплатно с основного портала для гаджетов на Android и iOS.
Ассортимент игр
Автоматы
Коллекция насчитывает более 2000 автоматов от известных провайдеров:
– Стандартные машины
– Мультимедийные игры
– Джекпот-слоты
– Сюжетные игры
Live казино
Блок Live казино обеспечивает игру с настоящими крупье в прямом эфире:
– Рулеточные столы
– Карточная игра
– Baccarat
– Покер
Состязания
Регулярные соревнования с большими выигрышными фондами запускаются еженедельно. Вход в турнирах разрешено всем активным клиентам.
Финансовые способы
Платежи и снятия выплат выполняются через популярные сервисы:
– Кредитные средства
– Виртуальные кошельки
– Bitcoin
– Денежные операции
Наименьший взнос — от 100 рублей. Получение выигрышей проводится в течение 24 периода.
Сервис поддержки
Непрерывная служба помощи способна ассистировать в исправлении любых ситуаций:
– Онлайн-чат
– Email
– Контактный номер
– Соц сети
Безопасность и документ
Официальный сайт работает на базе глобальной документа. Все параметры игроков защищены передовым SSL-криптованием.
Вывод
Функционирующее зеркало обеспечивает постоянный соединение к любимым играм, щедрым промокодам и практичным возможностям. Создайте аккаунт сейчас и получите приветственный подарок!
Fortune Ox hold & win: quem já segurou 15+ símbolos e explodiu tudo?
https://corevitalpharmacy.com/# Cialis without a doctor prescription
quickharbortrading – The site layout is clear and moving around is effortless
Kraken Marketplace Официальный сайт для доступа к Kraken
slon3 cc
Актуальные виртуальные казино предоставляют игрокам обширный спектр опций для комфортной игры. Однако иногда доступ к официальному сайту может стать закрытым. В таких случаях на поддержку появляется http://www.РіРѕСЂРѕРґ-нижняя-тура.СЂС„, которое дает бесперебойный доступ ко всем сервисам платформы.
Что такое действующее зеркало казино
Зеркало — это идентичная версия основного веб-сайта, которая хостится по альтернативному URL. Дубликат поддерживает весь функционал первоначального веб-портала, включая пользовательский кабинет, депозит и сведения операций.
Ключевые плюсы эксплуатации зеркала:
– 24-часовой вход к платформе
– Максимальная схожесть функционала
– Сохранность пользовательских данных
– Удержание всех вознаграждений
Как найти действующее зеркало на сегодня
Присутствует ряд достоверных путей получения свежей адреса:
Официальные источники:
1. Email рассылка — дирекция постоянно пересылает письма с свежими доменами
2. Медийные сети — авторизованные аккаунты постят свежую данные
3. Департамент поддержки — специалисты выдают безопасные домены
4. Смартфонное приложение — дает возможность избегать блокировки
Создание аккаунта на основном сайте
Операция создания аккаунта отнимает лишь пару минут и предполагает из данных шагов:
1. Вход на лицензионный ресурс или действующее зеркало
2. Щелчок на кнопку «Открыть счет»
3. Указание учетной бланка
4. Валидация имейл почты или сотового номера
5. Задействование бонуса за регистрацию при присутствии промокода
Новые геймеры обретают щедрый приветственный приз, который может включать даровые прокруты, денежные вознаграждения или cashback.
Логин в пользовательский кабинет
Логин на сайте производится стандартным способом. Требуется указать никнейм и пароль, задействованные при регистрации.
Значимые детали для безопасного входа:
– Используйте надежный пароль
– Запустите 2FA аутентификацию
– Не фиксируйте пароли на публичных устройствах
– Проверяйте доменную строку браузера
Обзор бонусной структуры
Игорный портал балует игроков различными привилегиями и промо:
Начальный пакет
Дебютанты вправе рассчитывать на щедрое вознаграждение за дебютный вклад. Как правило это процентная прибавка к переведенной объему плюс даровые спины для популярных слотов.
Постоянные предложения
– Еженедельный возврат средств — возмещение доли списанных финансов
– Награды на последующие депозиты
– Особые офферы по торжествам
– Состязания с значительными призовыми фондами
Система верности
Постоянные пользователи собирают единицы за любую игру, которые затем превращаются на фактические финансы, даровые прокруты или эксклюзивные льготы.
Бонус-коды: как задействовать
Кодовые комбинации — это индивидуальные комбинации символов, дающие право к специальным поощрениям.
Каким образом найти свежие промокоды:
– Легитимные медийные сети казино
– Сотрудничающие площадки
– Email-подписка
– Профильные сообщества
Вводится промокод в специальное поле при оформлении или добавлении денег счета.
Смартфонная версия и приложение
Актуальные клиенты предпочитают делать ставки с портативных аппаратов. Портал предлагает пару метода для комфортной смартфонной игры.
Отзывчивая редакция
Браузерная версия самостоятельно оптимизируется под габариты дисплея. Не просит загрузки и действует в каждом актуальном браузере.
Портативное приложение
Загрузить программу можно для устройств на Android и iOS. Выгоды app:
– Скоростная активация
– Устойчивая действие
– Автоматические-уведомления о акциях
– Автономный обход блокировок
Процедура загрузки элементарен: необходимо перейти на сайт с телефонного гаджета и следовать инструкциям.
Игровой коллекция
Коллекция слотов включает тысячи вариантов от лучших провайдеров.
Слоты
Азартные аппараты — максимально востребованная раздел забав. Размещены обычные 3-барабанные автоматы, передовые графические аппараты с бонусными раундами, а также накопительные джекпоты.
Live казино
Зона с живыми крупье предоставляет испытать дух подлинного казино. Открыты столы с баккарой.
Трансляция производится в отличном формате, поддерживается чат с раздающим и прочими геймерами.
Конкурсы
Периодически проводятся турниры по различным категориям. Участие дает шанс получить валютные выигрыши, фриспины или эксклюзивные привилегии.
Денежные манипуляции
Платформа поддерживает широкий спектр денежных инструментов:
– Дебетовые карты
– Виртуальные кошельки
– Криптовалюта
– Счетовые транзакты
Минимальная величина депозита — доступная для массы пользователей. Обналичивание призов обрабатывается в кратчайшие временные рамки.
Отдел поддержки
Компетентные сотрудники готовы помочь постоянно. Представлены такие каналы коммуникации:
– Интернет-чат
– Email
– Голосовая линия
– Социальные сети
Пояснения на типовые запросы можно обнаружить в зоне FAQ.
Резюме
Основной портал казино и его рабочие зеркала предоставляют геймерам максимальный подключение ко всем опциям сайта. Великодушные вознаграждения, удобная смартфонная версия, колоссальный коллекция развлечений и квалифицированная помощь превращают развлекательный досуг крайне беспроблемным и надежным.
take a look – Neat structure and content are clearly presented
https://pharmacologicalsciences.com/cialis.html kamagra
seo продвижение по трафику clover seo продвижение по трафику clover .
visit collective – Navigation is smooth and everything is well organized
levitra Pharmacological Sciences Research Institute ed pills
Must-Have Products – Layout is structured nicely and finding items is easy.
visit this platform – Everything is structured for clarity, making the site easy to use.
discover mossharboroutpost – The site is easy to navigate and pages load fast.
Вход к ресурсу через актуальные зеркала
Участники онлайн казино часто контактируют с вопросом недоступности основного ресурса. Конкретно для устранения этой проблемы существуют зеркала официального домена. Голд дает абсолютный переход ко всем возможностям казино.
Что такое актуальное зеркало казино
Дубликат значит собой полную дубликат оригинального ресурса с аналогичным функционалом. Главное расхождение — это иное имя. Все данные пользователя, содержа баланс, привилегии и данные партий, находятся такими же.
Выгоды применения зеркал
Рабочие зеркала характеризуются комплексом существенных выгод:
– Бесперебойный доступ к предпочитаемым слотам
– Совершенная сохранность индивидуальных информации
– Сохранение всех параметров пользовательского кабинета
– Опция приобретения бонусов и присутствия в промоакциях
Регистрация на официальном ресурсе
Процесс регистрации предельно легок и длится несколько минут. Недавние пользователи имеют возможность претендовать на щедрый начальный поощрение за создание аккаунта.
Стадии оформления аккаунта
1. Переход на основной домен или его копию
2. Активация на элемент “Зарегистрироваться”
3. Ввод требуемых параметров
4. Верификация email почты
5. Ввод купона (когда присутствует)
Бонусы и акции для участников
Ресурс балует своих игроков всевозможными бонусными акциями.
Основные виды бонусов
Стартовый бонус — внушительное вознаграждение для начинающих клиентов, что способно содержать монетарные бонусы и безвозмездные спины.
Фриспины — возможность запускать в популярных слотах без затрат.
Компенсация — долевой возмещение утраченных финансов, что выплачивается по неделям или ежемесячно.
Специальные коды — эксклюзивные последовательности, дающие бонусные преимущества.
Личный кабинет: функции и установки
Индивидуальный аккаунт предоставляет полный регулирование над игровым процессом. Здесь предусмотрены:
– Контроль средствами
– История переводов
– Работающие поощрения
– Параметры защиты
– Подтверждение аккаунта
Смартфонная редакция и приложение
Актуальные игроки оценивают мобильность. Казино предлагает 2 пути для участия с смартфонных аппаратов.
Отзывчивая смартфонная платформа
Смартфонная редакция ресурса без участия настраивается под разрешение любого девайса. Отсутствует потребность загружать отдельное приложение.
Программа для мобильных
Возможно загрузить оригинальное APP для iOS и Android. Программа обеспечивает:
– Скорый доступ
– Улучшенный дизайн
– Мобильные-оповещения о поощрениях
– Надежную функциональность
Live развлечения: среда реального клуба
Секция Live игр транспортирует игроков в обстановку истинного игорного заведения. Квалифицированные ведущие ведут раунды в формате живого времени.
Топовые Live-развлечения
– Рулетка
– 21
– Баккара
– Карибский покер
Автоматы: выбор игр
Каталог слотовых автоматов вмещает множество названий от ведущих провайдеров. Пользователи встретят:
– Стандартные машины
– Современные слоты
– Накопительный приз-слоты
– Мегавейс
Состязания и эксклюзивные акции
Регулярные турниры предоставляют шанс участникам состязаться друг с другом за солидные наградные банки. Каждый турнир располагает свои критерии присутствия и таблицу победителей.
Пути зачисления и изъятия сумм
Площадка обслуживает множество платежных сервисов:
– Кредитные средства
– Электронные счета
– Blockchain-платежи
– Финансовые переводы
Любые транзакции реализуются надежно благодаря передовым технологиям кодирования.
Сервис помощи
Квалифицированные специалисты службы поддержки настроены содействовать 24/7. Доступны нижеперечисленные методы контакта:
– Онлайн-чат
– Email-обслуживание
– Звонковая связь
– Медийные сети
Резюме
Легальный ресурс казино и его функционирующие дубликаты предоставляют участникам безопасный и комфортный вход к обширному выбору геймерских игр. Щедрые поощрения, постоянные акции, профессиональная служба и легкие денежные способы создают геймерский процесс предельно комфортным и выгодным.
Современные онлайн-казино дают участникам внушительный набор возможностей и поощрительных вариантов. Присоединение к сервису производится через основной ресурс или его актуальное зеркало Вован казино, что дает бесперебойную игру.
Что представляет собой рабочее зеркало казино
Зеркало — это идентичная реплика официального сайта, разработанная для устранения блокировок. Зеркало сегодня позволяет пользователям получить вход к выбранным автоматам в каждое время.
Подлинное зеркало обладает всеми характеристиками первоначального сайта:
– Целый ассортимент развлечений
– Профиль с внесенными информацией
– Актуальные бонусы
– Защищенные денежные процедуры
Открытие счета на лицензионном сайте
Процесс создания аккаунта отнимает всего несколько минут. Первым пользователям требуется:
1. Перейти на главный ресурс или рабочее зеркало
2. Нажать на ссылку “Зарегистрироваться”
3. Внести требуемые сведения
4. Верифицировать email
5. Совершить стартовый депозит
Приветственный бонус начисляется моментально после выполнения всех шагов.
Доступ в аккаунт
Существующие игроки могут выполнить подключение применяя:
– Имя пользователя и код
– Номер контакта
– Адрес
Личный кабинет предоставляет право к регулированию балансом, данным игр и доступным акциям.
Награды и акции
Развлекательная сервис привлекает регулярных участников щедрыми вознаграждениями:
Первый комплект
– Поощрение на дебютный платеж до 100%
– Даровые спины на топовые машины
– Дополнительные премии за последующие взносы
Купоны
Эксклюзивные купоны предоставляют возможность на использование специальных вознаграждений. Свежие комбинации выкладываются в секции “Бонусы”.
Кешбэк
Еженедельный возврат достигает до 10% от проигранных средств. Выплата начисляется автоматически.
Схема лояльности
Постоянные игроки получают очки, которые конвертируются на настоящие финансы или даровые спины.
Mobile версия и APP
Для удобства участников сделана функциональная mobile версия. Отзывчивый облик дает возможность комфортно развлекаться с произвольного карманного девайса.
Плюсы программы:
– Моментальный запуск к играм
– Настроенный интерфейс
– Бесперебойная активность
– Push-уведомления о актуальных событиях
Получить APP можно свободно с официального веб-сайта для аппаратов на Android и iOS.
Ассортимент слотов
Автоматы
Каталог содержит более 2000 игр от топовых студий:
– Стандартные машины
– Мультимедийные игры
– Джекпот-слоты
– Тематические слоты
Live казино
Блок Live развлечений дает участие с реальными диллерами в онлайн времени:
– Рулетка
– Blackjack
– Punto Banco
– Poker
Состязания
Периодические состязания с значительными выигрышными бюджетами проводятся систематически. Допуск в турнирах открыто всем зарегистрированным клиентам.
Финансовые системы
Пополнения и выводы средств реализуются через востребованные сервисы:
– Банковские карточ ки
– Онлайн кошельки
– Цифровая валюта
– Прямые переводы
Наименьший платеж — от 100 рублей. Изъятие денег выполняется в течение 24 часов.
Команда саппорта
Круглосуточная отдел support расположена ассистировать в решении произвольных проблем:
– Живой чат
– Email
– Связь
– Публичные сети
Надежность и лицензия
Официальный ресурс действует на основании мировой документа. Всевозможные параметры участников закрыты передовым SSL-криптованием.
Вывод
Функционирующее зеркало предоставляет непрерывный вход к предпочитаемым слотам, щедрым акциям и практичным услугам. Откройте счет сегодня и приобретите первый подарок!
Recommended Items – Sections are well-structured and finding products is easy.
creekharbortrading – This site seems easy to navigate and loads without delay
Кто ищет софт для накрутки поведенческих факторов, в статье сравнивают Monstro и облачные сервисы. Автор объясняет, когда какой вариант выгоднее.
take a look – The website is minimal and simple to move around
ии для учебы студентов ии для учебы студентов .
go here now – Good assortment and the site loads without issues
access bonding page – The clarity of the layout really enhances usability.
Обзор официального веб-сайта
Актуальные интернет казино обеспечивают участникам разнообразный ассортимент забав и перспектив. Основной портал Рльдорадо предоставляет надежный путь к гемблинг возможностям.
Рабочее зеркало: возможность в настоящий момент
Резервный сайт представляет в качестве полную версию главного портала. Официальное зеркало обеспечивает клиентам избегать вероятные блокировки.
Плюсы эксплуатации зеркала
Главные выгоды охватывают:
– Беспрерывный путь к сайту
– Сохранение любых функций базового портала
– Безопасность личных сведений
– Такой же возможности
Открытие счета на портале
Процедура регистрации знаменуется простотой и удобством. Свежие участники обязаны:
1. Перейти на лицензионный веб-сайт или его зеркало
2. Выбрать на элемент оформления
3. Заполнить требуемые информацию
4. Подтвердить email адрес
5. Совершить первый вход
Бонус за создание аккаунта
Начинающие приобретают солидный приветственный подарок. Такое награда имеет возможность включать:
– Финансовые бонусы
– Бесплатные прокруты
– Расширенный показатель возврата
Доступ в персональный раздел
Существующие пользователи имеют возможность оперативно зайти в собственный аккаунт, эксплуатируя учетные данные и шифр. Собственный раздел дает возможность к:
– Регулированию депозитом
– Записям операций
– Работающим бонусам
– Настройкам профиля
Вознаграждения и промо
Ресурс систематически организует различные предложения для участников.
Виды подарков
Ключевые виды призов:
– Депозитные бонусы – процент от величины пополнения
– Фриспины – даровые вращения в игровых машинах
– Кэшбек – возмещение доли проигранных финансов
– Соревновательные призы – награды за игру в турнирах
Промокоды
Специальные ваучеры обеспечивают приобрести бонусные бонусы. Участники в состоянии найти их на партнерских порталах или заработать в новостях.
Портативная редакция и софт
Прогрессивные пользователи выбирают карманный игровой процесс.
Функции переносной платформы
– Отзывчивый вид для разнообразных устройств
– Целостный доступ к слотам
– Быстрая работа
– Эргономичное контроль
Скачать app
Портативное app предоставлено для downloading на девайсы с базовыми ОС Android и iOS. App обеспечивает:
– Бесперебойную работу
– Push алерты о бонусах
– Мгновенный путь к любимым играм
Игровой каталог
Игровой клуб предлагает внушительную галерею азартных игр.
Автоматы
Библиотека азартных слотов включает:
– Традиционные слоты
– Video слоты
– Джекпотные автоматы
– Лицензионные развлечения
Live казино
Раздел живых игр дает шанс играть с живыми диллерами. Доступны:
– Рулетка
– Блэкджек
– Баккара
– Карибский покер
Конкурсы
Систематические конкурсы обеспечивают участникам соревноваться за крупные наградные фонды. Конкурсная сетка изменяется еженедельно.
Платежные операции
Сайт предлагает массу методов зачисления и получения финансов:
– Банковские карты
– Электронные счета
– Межбанковские трансферы
– Цифровые валюты
Любые операции выполняются конфиденциально с задействованием прогрессивных протоколов шифрования.
Служба помощи
Опытная отдел саппорта трудится постоянно. Обратиться с операторами можно через:
– Живой чат
– Email почту
– Телефонную линию
– Социальные сети
Охрана и аккредитация
Игровой клуб функционирует на базе легальной разрешения. Такое гарантирует:
– Прозрачность азартного действа
– Сохранность персональных данных
– Быстрые выплаты
– Контролируемый геймплей
Вывод
Главный портал и его функционирующие дубликаты дают клиентам целостный комплекс опций для удобной и доходной досуга. Солидные бонусы, всевозможные игры, компетентная служба и защищенная инфраструктура выплат создают платформу оптимальным опцией для фанатов гемблинг услуг.
take a look – Navigation feels natural and content is well presented
Only the best materials: https://elrapidosatelital.com/2026/03/14/ato-casino-online-as-8-melhores-ofertas-dezembro-de-2025/
Характеристика основного ресурса
Современное онлайн-казино предлагает своим участникам большой набор возможностей и поощрений. Основной сайт Лев функционирует непрерывно, предоставляя вход к топовым симуляторам, live-казино и многим кампаниям.
Функционирующее зеркало: путь к сайту
Что такое зеркало казино
Альтернатива означает собой полную дубликат оригинального портала с отличным доменным адресом. Функционирующее зеркало предоставляет участникам обходить ограничения и получать постоянный вход к предпочитаемым автоматам.
Как отыскать рабочее зеркало сегодня
Действующие ссылки на проверенное зеркало размещаются через:
– Почтовую рассылку
– Проверенные медийные сети
– Команду сопровождения
– Специализированные порталы
Оформление на портале
Этапы регистрации
Открытиесчета занимает пару минут и включает следующие стадии:
1. Переход на основной сайт или действующее зеркало
2. Активация элемента “Регистрация”
3. Указание учетных реквизитов
4. Подтверждение адреса или телефона
5. Установка кодадоступа
Бонус за открытиесчета
Первые участники зарабатывают выгодные вступительные вознаграждения:
– Финансовые деньги на кошелек
– Бесплатныевращения для слотов
– Повышенный процент компенсации
– Эксклюзивные промокоды
Доступ в личный профиль
Постоянные пользователи способны выполнить логин через официальный сайт или текущее зеркало. Для этого необходимо ввести учетноеимя и секретнуюкомбинацию, придуманные при открытиисчета.
Функции персонального профиля
В собственном профиле доступны следующие инструменты:
– Контроль личными данными
– Внесение депозита
– Обналичивание призов
– Применение промокодов
– Проверка журнала игр
– Включение в турнирах
Бонусы и акции
Виды вознаграждений
Казино поощряет своих пользователей разнообразными бонусными программами:
– Начальный бонус — щедрые бонусы на дебютные депозиты
– Freespins — экстра спины в топовых слотах
– Компенсация — регулярный компенсация процента ставок
– План верности — специальные преимущества для верных клиентов
Коды и их использование
Особые коды дают расширенные бонусы. Для применения следует внести шифр в соответствующее поле в индивидуальном кабинете.
Геймплейный набор
Слоты
Каталог игровых автоматов включает массу наименований от лучших поставщиков:
– Стандартные автоматы
– Новые автоматы
– Прогрессивные игры
– Лицензионные автоматы
Live казино
Зона Live-казино предлагает взаимодействие с настоящими крупье в условиях прямого стрима:
– Рулетка
– Очко
– PuntoBanco
– Карибскийпокер
Соревнования
Постоянные конкурсы с внушительными призовыми призами организуются еженедельно. Претенденты борются за победу в рейтинге.
Мобильная версия и APP
Смартфонная адаптация сайта
Официальный сайт на100% приспособлен для портативных аппаратов. Участники могут играть слоты прямо через интернет-браузер без необходимости скачивания.
Приложение для скачивания
Специальное карманное APP имеется для установки на аппараты с базовыми средами Android и iOS. Софт обеспечивает:
– Мгновенный доступ к слотам
– Стабильную операционность
– Моментальные-уведомления о бонусах
– Удобный дизайн
Резюме
Официальный веб-сайт казино и его функционирующие копии гарантируют клиентам всесторонний вход к высококлассным геймплейным развлечениям. Выгодные поощрения, многочисленные промо, функциональная адаптивная адаптация и опытная помощь превращают развлекательный опыт крайне приятным и доходным.
View on the website: https://auritechnik.pe/view-adorable-adolescent-step-sibling-pornography-in-full-cloths-gender-movies/
mintstone hub – Layout is clean and browsing items is simple.
Hits of the Day: https://troysaho30741.angelinsblog.com/39273536/indian-blue-film-marketplace-heritage-effect-and-legal-issues
Gift Ideas – Layout is professional and exploring items is comfortable.
visit link – Navigation feels straightforward and information is easy to locate
ed prescriptions online Pharmacological Institute where to get ed pills
Featured Items – Everything is neatly arranged, making browsing enjoyable.
Актуальные онлайн-казино предлагают пользователям массу вариантов для приятной игры. Центральный ресурс ДжиВиСпин казик обеспечивает доступ ко всем возможностям и игровым автоматам. Однако при наличии системных трудностей на помощь прибывают функционирующие копии.
Что означает собой действующее зеркало
Копия казино — это стопроцентная копия официального ресурса, находящаяся по альтернативному веб-адресу. Лицензионное зеркало поддерживает все опции, в том числе открытие профиля, авторизацию в индивидуальный кабинет, бонусы и бонусные коды.
Зеркало на сегодня гарантирует:
– Стабильный вход к азартным слотам
– Полную сохранность индивидуальных данных
– Удержание средств и хронологии переводов
– Возможность использования всех акций
Создание учетной записи на лицензионном ресурсе
Ход открытия профиля отнимает пару минут. Свежеиспеченным геймерам необходимо:
1. Зайти на подлинный ресурс или актуальное зеркало
2. Нажать кнопку «Создать аккаунт»
3. Заполнить необходимые графы
4. Верифицировать email почту
5. Ввести кодовое слово при присутствии
После финиша оформления профиля геймеры обретают приз за регистрацию, что может иметь фриспины или денежно-призовое поощрение.
Доступ в личный кабинет
Персональный кабинет предоставляет полный контроль над игровым ходом. Через собственный профиль возможно:
– Финансировать кошелек
– Выводить выигрыши
– Использовать купоны
– Мониторить журнал пари
– Играть в турнирах
– Забирать кешбэк
Описание вознаграждений и специальных предложений
Богатая поощрительная схема — значимое плюс казино. Главные формы бонусов:
Начальный приз
Дебютанты получают великодушное поощрение на первые пополнения. Объем бонуса может доходить до 100-200% от объема взноса.
Free spins
Даровые раунды предоставляются для топовых слотов. Число фриспинов варьируется от 10 до 500 штук.
Кэшбек
Постоянный или помесячный откат процента потерянных средств. Обычный процент кэшбека — 5-15%.
Соревнования
Систематические соревнования с большими наградными банками. Участники состязаются за верхние места в рейтинге.
Портативная версия и софт
Портативная версия обеспечивает наслаждаться игрой с всякого аппарата. Игроки могут скачать софт для iOS и Android или применять браузерную версию.
Достоинства смартфонного приложения:
– Скоростная подзагрузка игр
– Удобный UI
– Всплывающие уведомления о промо
– Возможность входа через Touch ID
Автоматы и Live казино
Азартная база содержит тысячи названий от известных производителей.
Популярные секции слотов:
– Обычные автоматы
– Современные слоты с призовыми этапами
– Накопительный приз игры
– Megaways слоты
Live игорный зал
Зона live казино предлагает игру с настоящими ведущими. Доступны традиционные развлечения:
– Рулетка
– Blackjack
– Punto Banco
– Покер
Как отыскать функционирующее зеркало
Обрести актуальную URL на зеркало разрешается разными вариантами:
1. Оформить подписку на емейл-уведомления
2. Следить за апдейтами в социальных сетях
3. Контактировать в департамент поддержки
4. Добавить в закладки действующее зеркало в закладки
Вывод
Лицензионный портал и его актуальные альтернативные адреса гарантируют постоянный доступ к развлекательным слотам. Щедрые вознаграждения, множественные промокоды, комфортное мобильное программа и качественная служба поддержки делают развлекательный геймплей максимально удобным и безопасным.
quick purpose link – Inspiring guidance that reshapes the way you approach projects.
click here – The interface is clear and navigation feels effortless
view collection – Clear menus and clean design improve the experience
https://app.talkshoe.com/show/today-promo-code-1xbet-allinmax-bonus-130
Современные онлайн-казино предоставляют игрокам внушительный спектр возможностей и премиальных программ. Вход к платформе производится через официальный сайт или его действующее зеркало http://www.ключевский.СЂС„/, что гарантирует бесперебойную деятельность.
Что представляет собой действующее зеркало казино
Зеркало — это точная реплика главного сайта, разработанная для решения ограничений. Рабочее зеркало обеспечивает клиентам получить соединение к любимым слотам в произвольное время.
Проверенное зеркало имеет всеми опциями основного ресурса:
– Целый каталог игр
– Учетная запись с зафиксированными параметрами
– Актуальные акции
– Гарантированные расчетные транзакции
Регистрация на главном ресурсе
Ход оформления занимает всего считанные минут. Первым игрокам требуется:
1. Перейти на главный портал или рабочее зеркало
2. Выбрать на кнопку “Создать аккаунт”
3. Указать обязательные параметры
4. Подтвердить контакт
5. Произвести начальный взнос
Поощрение новичкам зачисляется сразу после выполнения всех этапов.
Доступ в личный кабинет
Существующие игроки могут совершить вход вводя:
– Учетное имя и код
– Код контакта
– Электронную почту
Аккаунт дает возможность к контролю средствами, сведениям ставок и текущим бонусам.
Поощрения и предложения
Развлекательная платформа радует активных участников разнообразными бонусами:
Начальный бонус
– Надбавка на первый взнос до 100%
– Даровые спины на популярные машины
– Добавочные премии за последующие платежи
Купоны
Специальные промокоды дают шанс на использование специальных бонусов. Текущие купоны выставляются в секции “Акции”.
Cashback
Еженедельный возврат составляет до 10% от проигранных финансов. Выплата зачисляется моментально.
Механизм лояльности
Постоянные клиенты накапливают баллы, которые переводятся на подлинные финансы или даровые спины.
Mobile версия и софт
В целях удобства пользователей разработана полноценная mobile версия. Отзывчивый облик обеспечивает беспрепятственно играть с любого портативного девайса.
Достоинства софта:
– Скорый подключение к развлечениям
– Настроенный интерфейс
– Надежная деятельность
– Оповещения о свежих бонусах
Установить приложение можно свободно с главного сайта для гаджетов на Android и iOS.
Библиотека развлечений
Машины
Каталог вмещает более 2000 машин от ведущих провайдеров:
– Классические игры
– Video slots
– Прогрессивные автоматы
– Сюжетные автоматы
Live казино
Секция Live казино предлагает взаимодействие с реальными крупье в прямом эфире:
– Рулетка
– Blackjack
– Punto Banco
– Столы покера
Турниры
Регулярные соревнования с значительными выигрышными пулами устраиваются регулярно. Участие в соревнованиях разрешено всем зарегистрированным клиентам.
Расчетные варианты
Депозиты и получения финансов реализуются через востребованные способы оплаты:
– Дебетовые карточ ки
– Онлайн счета
– Криптовалюта
– Денежные переводы
Стартовый депозит — от 100 рублей. Вывод выигрышей выполняется в течение 24 времени.
Отдел support
Круглосуточная отдел поддержки способна помочь в урегулировании всех вопросов:
– Онлайн-чат
– Email
– Телефон
– Социальные сети
Надежность и сертификат
Лицензионный портал оперирует на базе международной документа. Всевозможные данные игроков закрыты новейшим SSL-криптованием.
Заключение
Действующее зеркало предоставляет бесперебойный доступ к любимым слотам, выгодным бонусам и функциональным услугам. Создайте аккаунт сейчас и получите стартовый поощрение!
explore site – Layout is neat and content sections are clear
Переход к сайту и рабочие адреса
Популярные виртуальные казино предоставляют игрокам обширный выбор опций. Основной веб-сайт Клубника казино организует надежный переход ко всем функциям. Тем не менее иногда случаются ситуации, когда необходимо дополнительный метод подключения.
Что есть собой актуальное зеркало
Рабочее зеркало — это полная реплика основного сайта с альтернативным URL адресом. Копия сегодня позволяет обходить потенциальные барьеры и поддерживать непрерывный подключение к популярным слотам.
Главное зеркало имеет полными характеристиками, что и главный веб-сайт:
– Целый ассортимент автоматов
– Собственный профиль с зафиксированными данными
– Полные бонусы и акции
– Надежные финансовые транзакции
Регистрация и авторизация в систему
Процедура оформления на платформе требует пару моментов. Свежим игрокам следует:
1. Перейти на действующее зеркало сегодня
2. Выбрать опцию «Создать аккаунт»
3. Указать обязательные информацию
4. Активировать почтовую почту или контакт мобильного
5. Забрать подарок за создание профиля
Авторизация в личный кабинет осуществляется через внесение никнейма и ключа.
Обзор призовой системы
Выгодная призовая политика — ключевое плюс игорного заведения. Клиенты зарабатывают разнообразные бонусы:
Приветственные поощрения
Начинающие пользователи имеют возможность рассчитывать на щедрый приз за создание аккаунта. Традиционно это совокупность вариантов, охватывающий:
– Пропорциональную добавку к начальному депозиту
– Даровые спины
– Призовые средства на счет
Кодовые комбинации и уникальные опции
Постоянные коды дают возможность активировать бонусные привилегии. Активировать их возможно в предназначенном поле личного профиля.
Фриспины и возврат средств
Даровые вращения — это вариант запускать автоматы без использования своих денег. Рибейт подразумевает частичный компенсацию потерянных сумм.
Ассортимент слотов
Игровая площадка предоставляет огромную коллекцию слотов.
Слоты
Многообразие аппаратов поражает воображение. Представлены стандартные простые автоматы и новые развлечения с интересной графикой.
Live зал
Зона Live игр помещает игроков в обстановку подлинного игорного зала. Профессиональные операторы осуществляют раунды в живом времени.
Конкурсы и рейтинги
Постоянные состязания вносят азарта и предоставляют перспективу выиграть большие награды.
Портативная реализация и программа
Продвинутые технологии помогают наслаждаться в комфортном пространстве. Портативная вариант самостоятельно адаптируется под размер устройства.
Получить приложение допустимо для операционных сред iOS и Android. Программа дает:
– Скоростной вход
– Устойчивую функционирование
– Мгновенные-уведомления об акциях
– Комфортный дизайн
Платежные действия
Сайт поддерживает различные варианты ввода и снятия средств:
– Кредитные системы
– Онлайн сервисы
– Цифровые валюты
– Денежные отправки
Всевозможные операции осуществляются через защищенное подключение, что гарантирует неприкосновенность конфиденциальных данных.
Отдел поддержки
Компетентная бригада ассистанса трудится постоянно. Контактировать с консультантами можно через:
– Живой-чат
– Почтовую почту
– Связь
– Медиа ресурсы
Итоги
Официальный веб-сайт и его актуальное зеркало предоставляют клиентам безопасный и комфортный путь к азартным развлечениям. Щедрые награды, широкий выбор развлечений и профессиональная ассистанс формируют игру исключительно комфортной и выгодной.
mintstone marketplace – Structure is organized and browsing is seamless.
see website – Discovered this page and it looks fairly well arranged
browse this guide – There’s enough value here to make it worth revisiting.
see it here paycor login
Bestsellers – Finding products is quick and the structure is well-organized.
Fortune Tiger big win 2500x: já aconteceu com você? Conta a história completa aqui
Visit Jewel Stone – Layout is neat and navigating through pages is simple.
Fortune Ox hold & win: quem já segurou 15+ símbolos e explodiu tudo?
Fortune Rabbit respins infinitos: já chegou a 30 giros seguidos? Mostra o vídeo!
Kraken Marketplace Официальный сайт для доступа к Kraken
slon at
PG Soft torneios semanais: R$50k–R$500k em prêmios – já ganhou algo?
Переход к платформе и рабочие ссылки
Актуальные интернет казино обеспечивают клиентам огромный ассортимент возможностей. Официальный сайт ДжиВиСпин предоставляет стабильный вход ко всем сервисам. Тем не менее порой появляются ситуации, когда понадобится дополнительный вариант входа.
Что означает собой функционирующее зеркало
Действующее зеркало — это абсолютная версия главного сайта с иным доменным названием. Копия сегодня помогает преодолевать существующие запреты и гарантировать бесперебойный подключение к популярным играм.
Главное зеркало обладает всеми возможностями, что и центральный ресурс:
– Совокупный перечень слотов
– Собственный раздел с записанными сведениями
– Полные поощрения и акции
– Надежные банковские переводы
Регистрация и доступ в казино
Процесс открытия аккаунта на портале длится несколько секунд. Свежим участникам нужно:
1. Зайти на функционирующее зеркало сегодня
2. Щелкнуть клавишу «Открыть профиль»
3. Заполнить нужные сведения
4. Проверить e-mail почту или контакт мобильного
5. Забрать награду за оформление
Вход в персональный аккаунт реализуется с помощью внесение никнейма и кода доступа.
Анализ поощрительной политики
Выгодная наградная система — основное козырь платформы. Пользователи забирают различные подарки:
Вступительные поощрения
Свежие игроки вправе надеяться на привлекательный приз за регистрацию. Чаще всего это набор опций, объединяющий:
– Процентную надбавку к начальному вкладу
– Безвозмездные спины
– Extra деньги на счет
Промо-коды и особые опции
Регулярные купоны позволяют зарабатывать дополнительные льготы. Использовать их возможно в отдельном окне личного профиля.
Спины и компенсация
Фриспины — это способность играть барабаны без задействования персональных денег. Кэшбек означает частичный компенсацию израсходованных финансов.
Каталог игр
Развлекательная площадка представляет впечатляющую библиотеку игр.
Автоматы
Ассортимент игровых машин поражает представление. Имеются стандартные простые машины и продвинутые видеослоты с занимательной картинкой.
Live заведение
Категория Live заведения переносит пользователей в антураж реального игорного заведения. Профессиональные дилеры проводят игры в живом формате.
Конкурсы и лидерборды
Периодические конкурсы вносят драйва и дают перспективу получить значительные призы.
Портативная форма и приложение
Новые разработки обеспечивают играть в любимом пространстве. Mobile версия автоматически настраивается под дисплей гаджета.
Скачать приложение можно для мобильных платформ iOS и Android. Приложение дает:
– Мгновенный переход
– Бесперебойную деятельность
– Мгновенные-оповещения об бонусах
– Комфортный интерфейс
Платежные процедуры
Казино принимает многочисленные системы депозита и вывода денег:
– Кредитные инструменты
– Электронные кошельки
– Цифровые валюты
– Прямые переводы
Всевозможные операции выполняются через зашифрованное канал, что обеспечивает целостность конфиденциальных параметров.
Департамент помощи
Профессиональная бригада поддержки работает всегда. Связаться с специалистами возможно через:
– Интерактивный-чат
– Почтовую почту
– Горячую линию
– Общественные ресурсы
Резюме
Официальный веб-сайт и его рабочее зеркало гарантируют пользователям безопасный и комфортный переход к захватывающим развлечениям. Привлекательные награды, широкий каталог развлечений и профессиональная ассистанс формируют времяпрепровождение максимально комфортной и прибыльной.
click here – Everything is easy to access thanks to a simple layout
visit link – The structure is tidy and content flows well
shop now – Smooth scrolling and easy access to all areas of the site
https://pharmacologicalsciences.com/generics.html Pharmacological Institute
Fortune Rabbit wilds expansivos: já cobriu 3 reels inteiros de coelhos?
review this content – Overall, it offers a well-crafted and insightful reading experience.
PG Soft torneio diário R$10k: quem tá lucrando todo dia no Fortune Tiger?
mintstonecollective – Looks well organized with an intuitive layout and nice flow.
http://primelinepharmacy.com/# order ed meds online
Jogo do Tigrinho ao vivo com chat: interação com outros brasileiros vale?
Jogo do Tigrinho no celular com Wi-Fi 5G: quem já ganhou big win em movimento?
Fortune Tiger vs Fortune Ox: qual tem maior potencial de 10000x em 2026?
Передовые онлайн-казино предлагают игрокам разнообразный ассортимент возможностей для комфортной игры. Доступ к сервису казино Лев производится через главный портал или рабочее зеркало.
Что такое действующее зеркало казино
Действующее зеркало — это альтернативный домен основного портала казино. Такие дубликаты формируются для обеспечения стабильного входа к развлекательной сервису.
Копия текущее целиком дублирует характеристики официального сайта. Геймеры имеют аналогичный выход ко всем сервисам, включая открытие счета, финансирование баланса и получение средств.
Оформление профиля на главном ресурсе
Алгоритм создания аккаунта длится всего несколько мгновений. Начинающим игрокам следует:
1. Зайти на лицензионный домен или рабочее подлинное зеркало
2. Кликнуть кнопку “Создать аккаунт”
3. Заполнить требуемые реквизиты
4. Проверить email почту
5. Активировать код активации при присутствии
После окончания создания аккаунта пользователь зарабатывает приз за регистрацию, который может включать фриспины или cash начисление.
Вход в персональный кабинет
Индивидуальный кабинет — это закрытая секция, где пользователи имеют возможность администрировать своим аккаунтом. Для доступа нужно ввести логин и код доступа.
В индивидуальном кабинете открыты следующие функции:
– Просмотр истории транзакций
– Активация кодов активации
– Управление призами
– Вступление в турнирах
– Контроль возврата средств
– Редактирование учетной записи
Вознаграждения и предложения
Азартная система предлагает великодушные вознаграждения:
Регистрационный комплект — дебютанты получают значительное вознаграждение на начальные депозиты.
Фриспины — выдаются как при создании аккаунта, так и в контексте различных промо.
Возврат средств — еженедельный возврат процента израсходованных финансов.
Бонусные коды — уникальные коды, дающие право к уникальным предложениям.
Обзор азартных категорий
Игровые автоматы
Библиотека слотов насчитывает массу наименований от топовых производителей. Геймеры найдут как традиционные аппараты, так и современные мультимедийные автоматы с интересной графикой.
Live казино
Раздел Live казино предлагает опцию участвовать с живыми дилерами в режиме настоящего времени. Открыты популярные игры: рулетка, блэкджек, баккара, покер.
Турниры
Постоянные турниры с значительными премиальными суммами привлекают тысячи соревнующихся. Чемпионы получают денежные награды и специальные поощрения.
Портативная версия и программа
Телефонная версия сайта обеспечивает участвовать с любого устройства. Дизайн автоматически корректируется под диагональ экрана.
Получить приложение можно для девайсов на Android и iOS. Телефонное app располагает всеми возможностями настольной версии.
Как обнаружить рабочее зеркало на текущий день
Рабочие URL зеркал периодически обновляются. Обнаружить свежую линк можно многими вариантами:
– Через департамент поддержки
– В подлинных коммуникационных сетях
– По e-mail подписке
– На тематических порталах
Охрана и легальность
Главный сайт оперирует на базе глобальной лицензии. Все платежи охраняются передовыми технологиями шифрования.
Приватность персональных реквизитов обеспечивается в стопроцентном объеме.
Вывод
Лицензионный ресурс и его актуальные альтернативы обеспечивают клиентам беспрерывный доступ к первоклассным развлекательным сервисам. Выгодные бонусы, разнообразные игры, компетентная поддержка — все это делает развлекательный процесс предельно приятным и увлекательным.
Daily Deals – Pages load quickly and moving through products is effortless.
enter gallery page – It seems easy to explore with a gentle visual flow
перепланировка квартиры согласование pereplanirovka-kvartir12.ru .
Explore Collections – Items are clearly arranged and navigating the site is smooth.
explore this page – Layout is attractive and content is easy to read
explore noble wind – The site feels dependable, with a clean and professional presentation.
https://yajuego.cat/
YaJuego se consolida en 2026 como una plataforma lider en Colombia , gracias a su solucion completa que abarca casino virtual y apuestas deportivas cumpliendo con la regulacion establecida por Coljuegos.
see products – Everything is organized well and simple to navigate
Доступ к сайту через проверенные зеркала
Передовые интернет казино гарантируют пользователям круглосуточный доступ к развлечениям. Основной ресурс Болливуд казино функционирует надёжно, предоставляя богатый ассортимент гемблинг развлечений. Но порой возникают цифровые проблемы или ограничения, поэтому критично понимать о присутствии рабочих зеркал.
Что собой представляет из себя официальное зеркало казино
Альтернатива — это идентичная версия официального портала с схожим функционалом. Актуальное зеркало на данный момент помогает миновать региональные запреты и возобновлять игру.
Принципиальные достоинства применения зеркал:
– Полный доступ к личному кабинету
– Поддержание совокупных информации счёта
– Идентичный ассортимент развлечений
– Текущие вознаграждения и кампании
Оформление на портале
Процедура создания аккаунта отнимает немного минут. Свежие пользователи приобретают великодушный поощрение за создание счёта, который в состоянии содержать:
– Вступительный бонусный приз
– Бесплатные кручения для слотов
– Особые промокоды
– Повышенный кэшбек
Во имя завершения записи следует:
1. Зайти на главный сайт или альтернативу
2. Щёлкнуть клавишу «Оформиться»
3. Ввести индивидуальные реквизиты
4. Подтвердить почтовый адрес или контакт
5. Задействовать промокод (когда имеется присутствии)
Доступ в персональный кабинет
По завершении успешной записи клиенты способны производить вход через официальный сайт или рабочее зеркало. Персональный кабинет даёт всесторонний надзор над профилем:
– История ставок
– Ввод баланса
– Вывод денег
– Администрирование наградами
– Включение в турнирах
Бонусы и промо казино
Платформа награждает игроков многочисленными поощрительными предложениями:
Стартовые подарки
Дебютанты зарабатывают богатый букет привилегий на начальные депозиты. Типично это предполагает частичную добавку к размеру вклада плюс безвозмездные спины.
Регулярные предложения
– Седмичный кешбэк до 15%
– Турниры с наградными фондами
– Поощрения на день рождения
– Эксклюзивные программы для статусных клиентов
Схема поощрения
Активные игроки зарабатывают очки, которые разрешено превратить на действительные средства или уникальные льготы.
Смартфонная вариант и приложение
Современные инновации помогают участвовать всюду угодно. Мобильная редакция веб-сайта независимо подстраивается под дисплей каждого девайса.
Плюсы карманного программы:
– Оперативная запуск развлечений
– Эргономичный вид
– Всплывающие-оповещения о промо
– Способность скачать для Android и iOS
Реальное казино: антураж реального игорного дома
Область Live заведения погружает клиентов в антураж истинного азартного учреждения. Профессиональные крупье ведут действие в состоянии подлинного времени.
Доступные варианты:
– Колесо фортуны
– Карточная игра
– Punto Banco
– Техасский холдем
Игровые машины и азартные машины
Коллекция гемблинг машин охватывает тысячи наименований от топовых провайдеров. Произвольный геймер найдёт слот по вкусу:
– Винтажные слоты
– Видеослоты с специальными раундами
– Прогрессивный-игры
– Многолинейные слоты
Конкурсы и розыгрыши
Регулярные турниры привносят остроту и дают возможность получить значительные призы. Вовлечение в конкурсах часто бесплатное, а наградные фонды достигают значительных величин.
Секьюрити и секретность
Ресурс задействует актуальные методы криптографии для обеспечения информации геймеров. Каждые денежные транзакции выполняются через зашифрованные протоколы.
Итог
Официальный веб-сайт и его функционирующие зеркала гарантируют стабильный подключение к отличным азартным сервисам. Богатые поощрения, комфортная карманная вариант, богатство автоматов и профессиональное Live-заведение создают ресурс замечательным вариантом для фанатов азартных развлечений.
Набор добровольцев на СВО 2024 Рассмотрим вакансии Министерства обороны РФ, предоставляющие уникальную возможность трудоустройства в зону СВО с полным обеспечением и поддержкой.
shop artwork – Well-organized content ensures effortless exploration
https://hayatkhabar.com/melbet-promo-code-list-indonesia-mel200vip-e130-bonus/
перепланировка услуги перепланировка услуги .
Kraken Marketplace Официальный сайт для доступа к Kraken
krab at
mintorchard shop – Information is clearly displayed and moving through pages is easy.
Старый паркет? шлифовка паркета в спб профессиональное восстановление деревянного пола без пыли и лишних затрат. Удаляем царапины, потемнения и старое покрытие, возвращаем гладкость и естественный цвет. Используем современное оборудование, выполняем циклевку, шлифовку и лакировку паркета под ключ с гарантией качества и точным соблюдением сроков.
перевод технического текста в москве teh-perevod.ru .
Hot Picks – The site is visually appealing and items are easy to find.
see more items here – The presentation style is both smooth and appealing.
Переход к ресурсу через проверенные зеркала
Пользователи виртуальных казино нередко контактируют с ситуацией закрытия основного сайта. Именно для преодоления этой ситуации существуют дубликаты официального сайта. Clubnika обеспечивает абсолютный вход ко всем функциям казино.
Что такое функционирующее зеркало казино
Зеркало составляет собой полную версию оригинального портала с похожим опциями. Единственное расхождение — это другое имя. Любые параметры участника, содержа баланс, награды и записи игр, продолжают быть идентичными.
Плюсы применения зеркал
Действующие зеркала характеризуются набором значимых плюсов:
– Круглосуточный доступ к излюбленным развлечениям
– Совершенная сохранность индивидуальных данных
– Удержание всех опций личного кабинета
– Способность приобретения поощрений и присутствия в акциях
Оформление профиля на официальном портале
Ход создания аккаунта максимально элементарен и длится пару минут. Новые участники в состоянии надеяться на щедрый приветственный приз за регистрацию.
Ступени создания аккаунта
1. Вход на основной домен или его зеркало
2. Нажатие на клавишу “Создать аккаунт”
3. Заполнение требуемых сведений
4. Верификация электронной почты
5. Применение промокода (если имеется)
Бонусы и кампании для пользователей
Игровая площадка радует своих пользователей разнообразными бонусными предложениями.
Базовые категории бонусов
Стартовый пакет — крупное поощрение для начинающих клиентов, которое в состоянии охватывать материальные суммы и фриспины.
Бесплатные вращения — шанс играть в популярных аппаратах бесплатно.
Кешбэк — частичный компенсация потерянных средств, который именно зачисляется каждую неделю или раз в месяц.
Купоны — специальные сочетания, предоставляющие дополнительные привилегии.
Персональный кабинет: функции и настройки
Пользовательский аккаунт обеспечивает совершенный контроль над развлекательным активностью. В данном разделе имеются:
– Контроль счетом
– История транзакций
– Действующие бонусы
– Настройки безопасности
– Верификация учетной записи
Смартфонная вариант и приложение
Актуальные участники оценивают мобильность. Площадка дает два варианта для игры с смартфонных аппаратов.
Responsive мобильная вариант
Адаптивная редакция портала без участия адаптируется под разрешение любого устройства. Отсутствует потребность устанавливать дополнительное софт.
Софт для телефонов
Можно скачать специальное программу для iOS и Android. APP обеспечивает:
– Мгновенный запуск
– Доработанный графику
– Push-извещения о акциях
– Надежную производительность
Live игры: обстановка настоящего клуба
Раздел Live развлечений отправляет участников в антураж настоящего зала. Опытные дилеры проводят сессии в режиме настоящего времени.
Известные Live-развлечения
– Европейская рулетка
– Двадцать одно
– Baccarat
– Техасский холдем
Игровые машины: многообразие игр
Каталог игровых слотов вмещает тысячи названий от топовых разработчиков. Пользователи встретят:
– Обычные автоматы
– Графические слоты
– Джекпот-слоты
– Megaways
Состязания и эксклюзивные события
Периодические состязания обеспечивают клиентам соревноваться друг с другом за крупные выигрышные суммы. Всякий турнир имеет свои требования присутствия и список лидеров.
Методы пополнения и вывода финансов
Площадка использует комплекс денежных инструментов:
– Банковские картыы
– Электронные кошельки
– Крипто
– Wire транзакции
Абсолютно все операции реализуются безопасно благодаря актуальным технологиям кодирования.
Сервис поддержки
Опытные сотрудники сервиса помощи готовы ассистировать 24/7. Работают данные пути общения:
– Онлайн-чат
– Email-обслуживание
– Телефонная поддержка
– Публичные сети
Итог
Официальный ресурс игровой площадки и его функционирующие дубликаты дают пользователям надежный и приятный переход к широкому спектру азартных игр. Внушительные подарки, постоянные кампании, компетентная сервис и легкие расчетные методы делают игровой времяпрепровождение крайне комфортным и доходным.
Передовые интернет казино обеспечивают клиентам огромный выбор опций для беспроблемной игры. Впрочем иногда соединение к главному сайту может быть закрытым. В таких моментах на подмогу приходит Bollywood, которое обеспечивает постоянный вход ко всем сервисам платформы.
Что такое действующее зеркало казино
Альтернативный сайт — это абсолютная версия официального веб-сайта, которая размещается по другому домену. Зеркало поддерживает полный функционал первоначального веб-портала, включая пользовательский кабинет, счет и запись переводов.
Принципиальные достоинства применения зеркала:
– Постоянный доступ к ресурсу
– Абсолютная аналогичность функционала
– Сохранность личных сведений
– Поддержка доступных поощрений
Как разыскать рабочее зеркало на текущий день
Имеется ряд безопасных путей получения актуальной ссылки:
Проверенные сервисы:
1. Почтовая рассылка — управление периодически направляет уведомления с рабочими ссылками
2. Социальные сети — проверенные страницы постят релевантную данные
3. Сервис поддержки — консультанты дают безопасные ссылки
4. Мобильное приложение — позволяет преодолевать блокировки
Создание аккаунта на официальном веб-сайте
Процесс оформления длится всего немного минут и содержит из таких шагов:
1. Переход на официальный ресурс или актуальное зеркало
2. Клик на клавишу «Создать аккаунт»
3. Внесение регистрационной формы
4. Подтверждение электронной почты или контактного номера
5. Активация поощрения за регистрацию при наличии промокода
Новые игроки зарабатывают значительный приветственный бонус, который может охватывать free spins, монетарные поощрения или кэшбек.
Доступ в личный кабинет
Подключение на ресурсе реализуется привычным путем. Требуется вписать никнейм и код доступа, указанные при создании аккаунта.
Ключевые нюансы для надежного входа:
– Используйте надежный секретный ключ
– Активируйте двухэтапную идентификацию
– Не сохраняйте реквизиты на общественных устройствах
– Контролируйте интернет строку браузера
Описание наградной системы
Игровая платформа одаривает геймеров всевозможными привилегиями и специальными предложениями:
Начальный пакет
Свежие игроки вправе надеяться на существенное поощрение за первый депозит. Как правило это процентная добавка к депонированной объему плюс free spins для топовых слотов.
Периодические предложения
– Недельный кэшбек — возмещение доли потерянных финансов
– Поощрения на последующие пополнения
– Особые предложения по торжествам
– Состязания с большими призовыми пулами
План верности
Регулярные пользователи получают баллы за всякую раунд, которые затем конвертируются на реальные деньги, даровые прокруты или эксклюзивные бонусы.
Промокоды: как задействовать
Промокоды — это индивидуальные комбинации букв и цифр, дающие право к бонусным поощрениям.
В каких местах найти актуальные промокоды:
– Легитимные социальные сети казино
– Аффилиатные сайты
– Email-подписка
– Профильные платформы
Прописывается промокод в предназначенное поле при оформлении или добавлении денег депозита.
Портативная версия и приложение
Нынешние пользователи любят делать ставки с портативных гаджетов. Сайт предлагает два способа для приятной портативной игры.
Отзывчивая редакция
Браузерная версия само собой оптимизируется под параметры экрана. Не просит скачивания и работает в каждом свежем браузере.
Смартфонное приложение
Получить приложение можно для гаджетов на Android и iOS. Достоинства app:
– Оперативная открытие
– Бесперебойная действие
– Мгновенные-уведомления о поощрениях
– Автономный преодоление блокировок
Процесс установки элементарен: нужно открыть на портал с мобильного гаджета и выполнять указаниям.
Игровой выбор
База развлечений включает множество вариантов от топовых производителей.
Слоты
Азартные слоты — максимально любимая категория игр. Размещены обычные простые слоты, актуальные видеослоты с премиальными стадиями, а также прогрессивные выигрыши.
Live казино
Секция с действительными ведущими предоставляет прочувствовать настроение настоящего казино. Открыты игры с блэкджеком.
Трансляция осуществляется в высоком формате, имеется общение с крупье и иными участниками.
Турниры
Постоянно проводятся конкурсы по всевозможным играм. Вступление предоставляет право завоевать денежные призы, даровые прокруты или специальные поощрения.
Денежные действия
Платформа предлагает широкий набор расчетных способов:
– Банковские карты
– Электронные сервисы
– Крипта
– Денежные транзакты
Наименьшая объем депозита — посильная для преобладающего числа игроков. Снятие призов обрабатывается в скорые сроки.
Отдел поддержки
Опытные специалисты готовы содействовать постоянно. Имеются нижеследующие каналы контакта:
– Живой-чат
– Email
– Звонковая поддержка
– Коммуникационные сети
Решения на стандартные темы можно отыскать в разделе FAQ.
Заключение
Основной сайт казино и его действующие зеркала дают пользователям совершенный доступ ко всем функциям портала. Великодушные поощрения, комфортная портативная версия, гигантский ассортимент развлечений и квалифицированная служба поддержки создают гемблинг процесс крайне приятным и безопасным.
take a look – Discovered some interesting insights while checking out the pages
buy erectile dysfunction pills online Pharmacological Sciences how to get ed meds online
Recommended Items – Content is clear and navigating the site is smooth.
stone collective shop – It feels like a მშვიდ and carefully curated online space
Передовые онлайн-казино предоставляют пользователям обширный спектр развлечений и заманчивые бонусы. Но для беспроблемной игры критично осознавать, как найти ДжиВиСпин казино и его рабочие зеркала.
Что такое лицензионный портал казино
Лицензионный сайт казино — это главная платформа, где игроки могут пользоваться игровыми играми. Платформа действует на законных условиях и обладает всеми обязательными лицензиями.
Первостепенные достоинства главного портала:
– Защищенность пользовательских сведений
– Прозрачные условия участия
– Гарантированные транзакции
– Компетентная помощь
Актуальное зеркало казино: для чего требуется
Зеркало — это идентичная версия лицензионного портала, расположенная по иному URL. Действующее зеркало формируется для обеспечения бесперебойного подключения к порталу.
Поводы эксплуатации копий сайта:
– Запрет основного адреса
– Профилактические операции
– Значительная загрузка на ресурс
Как получить рабочее зеркало сейчас
Обнаружить актуальное действующее зеркало можно разными способами:
1. Почтовые оповещения — подпишитесь на почтовую подписку
2. Отдел поддержки — свяжитесь в онлайн-чат
3. Социальные сети — отслеживайте за публикациями
4. Игровые ресурсы — достоверные сайты
Регистрация на сайте казино
Алгоритм создания аккаунта составляет буквально считанные секунд:
1. Нажмите на кнопку “Создать аккаунт”
2. Введите необходимые информацию
3. Верифицируйте email адрес
4. Введите промокод, если есть
По завершении успешной создания аккаунта вам будет открыт пользовательский аккаунт.
Бонусы и коды активации
Привлекательная премиальная политика — важное достоинство казино:
Подарок за регистрацию
Начинающие игроки обретают приветственный подарок, который может включать:
– Валютный счет на стартовый взнос
– Free spins для слотов
– Безвозвратные деньги
Купоны
Постоянно размещаются новые купоны, позволяющие забрать дополнительные преимущества.
Схема кешбэка
Лояльные игроки зарабатывают часть утраченных денег на счет.
Актуальные предложения и конкурсы
Платформа периодически организует увлекательные промо-мероприятия:
– Еженедельные турниры
– Сезонные промо
– Лотереи крупных призов
– Схема привилегий
Логин в индивидуальный аккаунт
Для доступа на ресурс нужно:
1. Загрузить основной портал или функционирующее зеркало
2. Кликнуть “Авторизация”
3. Внести логин и пароль
В пользовательском кабинете открыты данные функции:
– Депозит баланса
– Обналичивание призов
– Изучение архива игр
– Изменение личными сведениями
Mobile модификация и приложение
Портативная версия
Мобильная вариант веб-сайта позволяет делать ставки с всех смартфонного устройства. Оформление самостоятельно оптимизируется под размер экрана.
Программа для скачивания
Установить клиент можно для:
– Android — безопасная download с сайта
– iOS — инсталляция через App Store
Плюсы app:
– Оперативный вход
– Устойчивая производительность
– Push-нотификации об бонусах
– Улучшенный дизайн
Игровые секции
Слоты
Богатая коллекция игровых автоматов от известных провайдеров:
– Классические автоматы
– Новые-автоматы
– Прогрессивные-машины
Live зал
Секция с живыми ведущими обеспечивает:
– Рулеточные столы
– Блэкджек
– Баккара
– Покер
Эфиры транслируются в высоком качестве изображения, формируя эффект подлинного казино.
Способы зачисления и вывода
Ресурс работает с различные транзакционные системы:
– Платежные карты
– Цифровые системы
– Цифровые валюты
– Wire переводы
Наименьшие значения внесения и быстрые выводы делают развлечение крайне удобной.
Отдел помощи
Опытная команда помощи доступна 24/7 и готова помочь с различными задачами:
– Мгновенный-чат
– Email-поддержка
– Phone служба
Резюме
Лицензионный портал казино и его актуальные альтернативные адреса обеспечивают участникам конфиденциальный и азартный развлекательный досуг. Выгодные подарки, удобная мобильная версия, разнообразные развлечения и высокоуровневое live-казино создают эту ресурс великолепным выбором для игровых развлечений.
learn more – Nicely structured pages make browsing comfortable
Актуальные онлайн-казино обеспечивают геймерам разнообразие опций для удобной игры. Главный ресурс казино Вован открывает доступ ко всем возможностям и играм. Однако при появлении программных проблем на выручку прибывают действующие зеркала.
Что являет собой собой актуальное зеркало
Дубликат казино — это точная версия официального сайта, размещенная по альтернативному доменному имени. Легитимное зеркало поддерживает все характеристики, вместе с регистрацию, доступ в персональный кабинет, премии и промокоды.
Альтернативный сайт на сегодня обеспечивает:
– Бесперебойный доступ к азартным слотам
– Абсолютную безопасность персональных сведений
– Поддержку средств и журнала переводов
– Доступность всех специальных предложений
Создание аккаунта на основном сайте
Ход регистрации отнимает пару минут. Начинающим пользователям требуется:
1. Открыть на подлинный портал или рабочее зеркало
2. Выбрать кнопку «Зарегистрироваться»
3. Заполнить требуемые данные
4. Верифицировать email почту
5. Указать кодовое слово при наличии
После конца оформления профиля пользователи получают приз за регистрацию, который может содержать бесплатные вращения или финансовое премирование.
Доступ в собственный кабинет
Приватный кабинет обеспечивает всесторонний контроль над азартным действом. Через собственный раздел разрешается:
– Финансировать депозит
– Снимать выплаты
– Задействовать промокоды
– Отслеживать записи игр
– Играть в состязаниях
– Обретать кешбэк
Анализ бонусов и специальных предложений
Великодушная поощрительная программа — существенное достоинство проекта. Центральные виды бонусов:
Начальный подарок
Начинающие обретают выгодное премирование на первые пополнения. Размер бонуса может достигать 100-200% от суммы пополнения.
Бонусные спины
Даровые вращения начисляются для востребованных автоматов. Число фриспинов изменяется от 10 до 500 штук.
Кешбэк
Еженедельный или помесячный откат части потерянных финансов. Средний процент возврата — 5-15%.
Конкурсы
Регулярные соревнования с крупными призовыми пулами. Игроки соревнуются за топовые строчки в турнирной таблице.
Смартфонная версия и приложуха
Мобильная версия разрешает наслаждаться игрой с каждого гаджета. Клиенты могут установить программу для iOS и Android или задействовать браузерную версию.
Достоинства портативного приложения:
– Оперативная подзагрузка игр
– Комфортный графический интерфейс
– Пуш-нотификации о бонусах
– Доступ через биометрию
Автоматы и Live казино
Азартная коллекция содержит множество игр от топовых производителей.
Топовые разделы автоматов:
– Классические машины
– Видео-автоматы с бонусными этапами
– Накопительный приз автоматы
– Мегавейс автоматы
Live казино
Секция live казино предоставляет игру с живыми дилерами. Имеются классические игры:
– Американская рулетка
– Блэкджек
– Baccarat
– Покер
Как найти рабочее зеркало
Найти действующую URL на зеркало возможно несколькими методами:
1. Зарегистрироваться на почтовую рассылку
2. Наблюдать за апдейтами в соц сетях
3. Написать в сервис поддержки
4. Сохранить рабочее зеркало в фавориты
Заключение
Официальный портал и его действующие дубликаты гарантируют бесперебойный путь к развлекательным автоматам. Выгодные бонусы, различные бонусные коды, эргономичное портативное программа и качественная сервис поддержки создают развлекательный опыт крайне беспроблемным и надежным.
quick tax link – Information is practical, concise, and easy to understand.
Pharmacological Sciences Research Institute Pharmacological Institute levitra
meadowstone marketplace – Pages load fast and everything is easy to locate.
see more – Pages are well-laid-out and easy to browse
Top Picks – The platform feels organized and easy to explore.
Передовые онлайн-казино предоставляют геймерам обширный выбор опций для удобной развлечений. Подключение к ресурсу Клубника выполняется через главный сайт или функционирующее зеркало.
Что такое действующее зеркало казино
Рабочее зеркало — это альтернативный домен основного ресурса казино. Такие дубликаты разрабатываются для предоставления бесперебойного доступа к игровой системе.
Альтернатива на сегодня абсолютно воспроизводит возможности главного сайта. Пользователи приобретают аналогичный путь ко всем услугам, включая оформление профиля, пополнение баланса и снятие выигрышей.
Оформление профиля на основном веб-сайте
Процесс оформления учетной записи длится всего пару мгновений. Начинающим клиентам требуется:
1. Войти на официальный домен или рабочее настоящее зеркало
2. Выбрать кнопку “Создать аккаунт”
3. Внести требуемые реквизиты
4. Активировать e-mail почту
5. Использовать промокод при доступности
После выполнения создания аккаунта игрок зарабатывает подарок за регистрацию, который может содержать фриспины или монетарное начисление.
Доступ в личный кабинет
Персональный кабинет — это безопасная зона, где участники имеют возможность регулировать своим учетной записью. Для доступа следует напечатать username и секретный ключ.
В персональном кабинете открыты следующие инструменты:
– Отслеживание хронологии операций
– Задействование кодов активации
– Управление бонусами
– Включение в конкурсах
– Мониторинг возврата средств
– Настройка профиля
Поощрения и спецпредложения
Гемблинговая платформа обеспечивает великодушные бонусы:
Стартовый бонус — новые игроки получают значительное поощрение на стартовые депозиты.
Free spins — предоставляются как при оформлении, так и в ходе различных кампаний.
Кэшбэк — постоянный возмещение процента проигранных денег.
Коды активации — уникальные последовательности, предоставляющие выход к эксклюзивным вознаграждениям.
Анализ игровых секций
Слоты
Библиотека slots насчитывает массу наименований от топовых разработчиков. Геймеры обнаружат как традиционные автоматы, так и актуальные видео-слоты с притягательной оформлением.
Live казино
Зона Live казино предоставляет опцию соревноваться с живыми ведущими в формате настоящего времени. Открыты востребованные игры: рулетка, блэкджек, баккара, покер.
Состязания
Систематические состязания с значительными призовыми фондами манят множество игроков. Победители завоевывают финансовые призы и специальные бонусы.
Смартфонная версия и приложение
Портативная версия платформы предоставляет право участвовать с всякого девайса. Дизайн независимо подстраивается под габариты экрана.
Скачать программу можно для гаджетов на Android и iOS. Телефонное программа обладает всеми возможностями компьютерной версии.
Как обнаружить актуальное зеркало на сегодня
Рабочие URL копий периодически корректируются. Узнать рабочую адрес можно разными методами:
– Через департамент помощи
– В настоящих новостных сетях
– По почтовой рассылке
– На тематических порталах
Защита и сертификация
Основной портал оперирует на основе международной лицензии. Все платежи шифруются инновационными протоколами кодирования.
Анонимность пользовательских сведений сохраняется в совершенном размере.
Итог
Основной ресурс и его рабочие дубликаты дарят участникам круглосуточный путь к качественным развлекательным сервисам. Привлекательные поощрения, всевозможные игры, квалифицированная помощь — все это создает игровой досуг невероятно приятным и притягательным.
Доступ к сайту через актуальные зеркала
Клиенты интернет казино часто встречаются с ситуацией блокировки основного домена. Как раз для решения этой задачи предусмотрены дубликаты главного домена. https://www.xn—-9sbkoagiem1dl5b.xn--p1ai/ обеспечивает беспрепятственный вход ко всем сервисам ресурса.
Что такое действующее зеркало казино
Дубликат составляет собой идентичную версию основного портала с похожим возможностями. Единственное расхождение — это другое имя. Каждые сведения игрока, в том числе баланс, награды и историю партий, остаются идентичными.
Достоинства эксплуатации зеркал
Актуальные зеркала характеризуются рядом ключевых преимуществ:
– Постоянный доступ к предпочитаемым играм
– Полная сохранность индивидуальных данных
– Удержание всех конфигураций личного кабинета
– Опция получения наград и вовлечения в кампаниях
Регистрация на основном сайте
Процесс создания аккаунта крайне легок и занимает немного минут. Новые игроки могут полагаться на крупный приветственный приз за регистрацию.
Ступени формирования аккаунта
1. Подключение на легальный домен или его альтернативу
2. Выбор на кнопку “Зарегистрироваться”
3. Заполнение нужных параметров
4. Верификация почтовой почты
5. Ввод купона (когда имеется)
Награды и предложения для участников
Казино одаривает своих клиентов различными призовыми системами.
Главные виды призов
Вводный бонус — щедрое вознаграждение для недавних пользователей, которое именно имеет возможность охватывать материальные суммы и free spins.
Free spins — возможность запускать в популярных слотах без затрат.
Кэшбек — процентный возмещение потерянных сумм, который начисляется по неделям или помесячно.
Промокоды — специальные комбинации, гарантирующие экстра привилегии.
Индивидуальный кабинет: инструменты и конфигурации
Индивидуальный профиль обеспечивает абсолютный управление над пользовательским процессом. В данном разделе имеются:
– Контроль депозитом
– Записи переводов
– Активные привилегии
– Параметры охраны
– Верификация профиля
Карманная версия и софт
Нынешние участники предпочитают доступность. Платформа предлагает 2 варианта для игры с смартфонных устройств.
Адаптивная портативная версия
Мобильная редакция ресурса самостоятельно приспосабливается под дисплей любого девайса. Нет необходимости скачивать дополнительное ПО.
APP для смартфонов
Доступно загрузить специальное приложение для iOS и Android. Программа дает:
– Мгновенный старт
– Адаптированный графику
– Push-извещения о бонусах
– Бесперебойную операционность
Live раздел: антураж реального клуба
Категория Live развлечений отправляет клиентов в антураж истинного зала. Компетентные крупье организуют раунды в варианте прямого времени.
Топовые Live-игры
– Французская рулетка
– Двадцать одно
– Punto Banco
– Покер
Аппараты: ассортимент автоматов
Коллекция азартных аппаратов насчитывает множество названий от известных поставщиков. Клиенты откроют:
– Обычные слоты
– Графические слоты
– Накопительный приз-машины
– Слоты с множественными линиями
Состязания и эксклюзивные события
Периодические турниры предоставляют шанс участникам конкурировать друг с другом за внушительные выигрышные фонды. Всякий турнир обладает свои правила вовлечения и доску победителей.
Способы пополнения и изъятия финансов
Площадка поддерживает множество платежных систем:
– Дебетовые карты
– Онлайн сервисы
– Крипто
– Прямые транзакции
Все платежи выполняются надежно благодаря современным технологиям кодирования.
Сервис support
Профессиональные сотрудники сервиса support настроены помочь 24/7. Имеются следующие пути связи:
– Онлайн-чат
– Email-обслуживание
– Голосовая поддержка
– Публичные сети
Вывод
Главный ресурс клуба и его рабочие дубликаты гарантируют участникам защищенный и комфортный подход к большому спектру игровых игр. Солидные подарки, постоянные предложения, качественная помощь и комфортные денежные инструменты создают азартный досуг крайне комфортным и выгодным.
click to see designs – A visually appealing layout that makes the visit enjoyable.
Seasonal Specials – Pages load quickly and content is easy to explore.
open page – Pages are neatly arranged and moving through them is easy
https://pharmacologicalsciences.com/viagra.html Pharmacological Sciences Research Institute
browse meadowharborcollective – Navigation feels natural and everything is easy to find.
Актуальные онлайн-казино гарантируют игрокам массу путей для комфортной игры. Центральный сайт Eldorado казино открывает путь ко всем опциям и играм. Однако при наличии программных сложностей на помощь прибывают функционирующие копии.
Что представляет собой рабочее зеркало
Зеркало казино — это точная реплика главного веб-сайта, размещенная по другому веб-адресу. Официальное зеркало хранит все характеристики, в том числе создание аккаунта, доступ в личный кабинет, бонусы и промокоды.
Дубликат на сегодня дает:
– Стабильный доступ к азартным слотам
– Абсолютную конфиденциальность персональных информации
– Поддержку депозита и хронологии переводов
– Возможность использования всех специальных предложений
Создание учетной записи на официальном сайте
Процедура регистрации отнимает несколько минут. Новоиспеченным пользователям необходимо:
1. Войти на подлинный сайт или действующее зеркало
2. Нажать кнопку «Зарегистрироваться»
3. Заполнить запрашиваемые поля
4. Активировать электронную почту
5. Ввести промокод при существовании
После конца оформления профиля пользователи обретают подарок за регистрацию, что может охватывать фриспины или монетарное премирование.
Авторизация в индивидуальный кабинет
Индивидуальный кабинет открывает всесторонний мониторинг над игровым действом. Через персональный кабинет возможно:
– Пополнять депозит
– Забирать средства
– Использовать промокоды
– Проверять хронологию ставок
– Играть в состязаниях
– Забирать кешбэк
Характеристика поощрений и специальных предложений
Выгодная премиальная система — важное плюс проекта. Центральные типы премий:
Начальный бонус
Новые игроки приобретают выгодное поощрение на начальные пополнения. Размер приза может составлять 100-200% от суммы взноса.
Free spins
Халявные прокруты выдаются для известных игровых автоматов. Объем фриспинов разнится от 10 до 500 штук.
Cash back
Систематический или помесячный откат части проигранных средств. Обычный процент возврата — 5-15%.
Турниры
Регулярные состязания с солидными премиальными фондами. Участники соревнуются за верхние строчки в таблице лидеров.
Портативная версия и приложуха
Смартфонная версия обеспечивает развлекаться с любого девайса. Пользователи могут загрузить софт для iOS и Android или задействовать веб версию.
Достоинства мобильного программы:
– Быстрая прогрузка игр
– Удобный интерфейс
– Пуш-нотификации о акциях
– Доступ через биометрию
Машины и Live казино
Азартная база включает тысячи наименований от лидирующих производителей.
Известные секции автоматов:
– Традиционные автоматы
– Видеослоты с призовыми уровнями
– Накопительный приз автоматы
– Мега-путь слоты
Live игорный зал
Зона live игорный зал предлагает игру с настоящими крупье. Имеются стандартные игры:
– Американская рулетка
– Блэкджек
– Punto Banco
– Покер
Как найти рабочее зеркало
Найти рабочую URL на зеркало разрешается несколькими путями:
1. Оформить подписку на email-рассылку
2. Отслеживать за обновлениями в социальных сетях
3. Написать в департамент поддержки
4. Добавить в закладки рабочее зеркало в закладки
Заключение
Лицензионный ресурс и его актуальные копии дают непрерывный путь к игровым слотам. Щедрые премии, различные промокоды, комфортное смартфонное софт и профессиональная служба поддержки поддержки превращают игровой процесс максимально комфортным и конфиденциальным.
explore estonia portal for a premium gaming experience in estonia that fully complies with all local regulations and safety standards. the site features a clean and modern design, making it easy to find your favorite titles from a diverse library of certified casino games. they offer very efficient withdrawal methods, which is vital for players who want to receive their winnings quickly and without any hassle.
Доступ к платформе и рабочие ссылки
Популярные сетевые казино обеспечивают клиентам большой набор возможностей. Официальный сайт xn--80aaxpd2aa5c.xn--p1ai организует стабильный переход ко всем сервисам. При этом порой происходят ситуации, когда требуется запасной путь доступа.
Что означает собой рабочее зеркало
Актуальное зеркало — это абсолютная копия главного ресурса с альтернативным URL расположением. Альтернатива сегодня дает возможность обходить потенциальные блокировки и сохранять бесперебойный доступ к выбранным играм.
Официальное зеркало имеет полными возможностями, что и основной портал:
– Целый список автоматов
– Собственный профиль с сохраненными информацией
– Полные подарки и промо
– Защищенные платежные операции
Открытие профиля и доступ в казино
Процедура открытия аккаунта на сайте отнимает несколько мгновений. Свежим участникам следует:
1. Перейти на действующее зеркало в настоящее время
2. Выбрать опцию «Открыть профиль»
3. Внести обязательные данные
4. Подтвердить почтовую почту или номер телефона
5. Использовать награду за оформление
Авторизация в индивидуальный кабинет производится посредством внесение ID и ключа.
Обзор поощрительной политики
Богатая бонусная политика — главное достоинство платформы. Клиенты забирают различные поощрения:
Начальные бонусы
Недавние пользователи имеют возможность надеяться на значительный приз за открытие профиля. Традиционно это комплект возможностей, содержащий:
– Долевую премию к первому взносу
– Безвозмездные фриспины
– Бонусные средства на счет
Купоны и специальные возможности
Постоянные коды дают возможность получать экстра льготы. Применить их допустимо в специальном поле индивидуального аккаунта.
Спины и кешбэк
Даровые вращения — это возможность вращать слоты без расходования своих средств. Компенсация предполагает долевой возмещение утраченных финансов.
Библиотека слотов
Гемблинг ресурс представляет огромную коллекцию игр.
Видеослоты
Разнообразие аппаратов поражает ожидания. Доступны обычные 3-барабанные аппараты и актуальные развлечения с занимательной анимацией.
Live игры
Раздел Live игр переносит игроков в антураж настоящего развлекательного зала. Квалифицированные операторы проводят игры в живом эфире.
Конкурсы и доски почета
Периодические конкурсы добавляют драйва и гарантируют шанс заработать внушительные призы.
Мобильная реализация и программа
Современные решения дают возможность наслаждаться в любом пространстве. Портативная версия автоматически оптимизируется под дисплей девайса.
Загрузить клиент возможно для программных сред iOS и Android. Софт гарантирует:
– Скоростной запуск
– Устойчивую работу
– Моментальные-алерты об акциях
– Интуитивный дизайн
Финансовые операции
Сайт использует многочисленные способы ввода и снятия сумм:
– Банковские системы
– Онлайн кошельки
– Цифровые валюты
– Прямые отправки
Всевозможные транзакции проходят через надежное протокол, что гарантирует целостность приватных сведений.
Сервис помощи
Квалифицированная команда ассистанса работает 24/7. Контактировать с операторами можно через:
– Онлайн-чат
– Цифровую почту
– Связь
– Общественные сети
Резюме
Главный портал и его рабочее зеркало дают клиентам безопасный и легкий вход к азартным играм. Щедрые награды, большой спектр развлечений и высокая поддержка формируют игру максимально приятной и выгодной.
Top Picks – Content is organized neatly, making the experience enjoyable.
quick shop access – The interface appears clean and easy to understand
check play superbet for the most updated promotional offers and exclusive bonuses currently available on this global gaming platform. this resource provides clear and detailed information on how to maximize your bankroll while participating in high-stakes sports betting or classic casino play. it is a professional site that focuses on transparency and ensures that all members are fully informed about the terms of their rewards.
visit mr.jackbet online to enjoy the official mr.jackbet experience with a massive range of slots and real-time betting options. this platform utilizes the latest security protocols to ensure that all personal data and financial transactions remain completely private at all times. it is an ideal choice for players who want a reliable and fast system that works perfectly for both casual play and more serious wagering.
official mystery page – A creative presentation that stands out nicely.
https://novamenpharmacy.com/# NovaMen Pharmacy
Доступ к сайту и функционирующие адреса
Актуальные интернет казино предлагают игрокам большой выбор возможностей. Центральный веб-сайт https://www.c58.ru организует стабильный вход ко всем сервисам. Впрочем периодически случаются обстоятельства, когда понадобится запасной вариант входа.
Что представляет собой рабочее зеркало
Функционирующее зеркало — это точная реплика официального сайта с иным URL названием. Дубликат сегодня дает возможность преодолевать потенциальные ограничения и поддерживать непрерывный доступ к предпочитаемым слотам.
Официальное зеркало содержит всеми функциями, что и базовый ресурс:
– Совокупный ассортимент игр
– Персональный профиль с записанными информацией
– Полные поощрения и промо
– Проверенные платежные переводы
Регистрация и подключение в казино
Процесс открытия аккаунта на платформе занимает несколько моментов. Недавним игрокам следует:
1. Перейти на функционирующее зеркало в настоящее время
2. Кликнуть опцию «Создать аккаунт»
3. Внести нужные данные
4. Активировать цифровую почту или номер связи
5. Использовать награду за регистрацию
Вход в индивидуальный кабинет реализуется путем указание имени пользователя и кода доступа.
Характеристика поощрительной политики
Щедрая наградная программа — важнейшее достоинство платформы. Клиенты забирают многочисленные подарки:
Вступительные поощрения
Начинающие пользователи способны рассчитывать на значительный приз за создание аккаунта. Обычно это совокупность опций, объединяющий:
– Пропорциональную прибавку к начальному пополнению
– Подарочные вращения
– Extra суммы на кошелек
Купоны и особые опции
Постоянные бонусные комбинации обеспечивают обретать экстра выгоды. Применить их возможно в предназначенном меню собственного кабинета.
Free spins и кэшбек
Бесплатные спины — это вариант играть барабаны без применения персональных денег. Кэшбек означает процентный отдачу утраченных денег.
Коллекция развлечений
Развлекательная сайт предлагает впечатляющую подборку автоматов.
Автоматы
Многообразие автоматов поражает фантазию. Доступны стандартные 3-барабанные слоты и актуальные развлечения с захватывающей графикой.
Live казино
Раздел Live игр помещает игроков в среду настоящего гемблинг заведения. Профессиональные операторы организуют игры в живом времени.
Турниры и доски почета
Регулярные соревнования привносят азарта и предоставляют перспективу забрать внушительные призы.
Карманная реализация и софт
Новые инновации обеспечивают развлекаться в любимом локации. Мобильная вариант автономно настраивается под монитор аппарата.
Получить клиент разрешено для программных ОС iOS и Android. Клиент гарантирует:
– Скоростной вход
– Стабильную деятельность
– Мгновенные-оповещения об акциях
– Простой интерфейс
Денежные операции
Сайт использует всевозможные системы депозита и вывода средств:
– Пластиковые инструменты
– Виртуальные системы
– Токены
– Банковские транзакции
Все действия выполняются через надежное подключение, что обеспечивает сохранность конфиденциальных информации.
Департамент ассистанса
Профессиональная группа помощи работает 24/7. Контактировать с менеджерами можно через:
– Интерактивный-чат
– Электронную почту
– Контакт
– Общественные каналы
Выводы
Главный сайт и его действующее зеркало обеспечивают пользователям защищенный и приятный вход к захватывающим забавам. Привлекательные подарки, обширный выбор развлечений и высокая сервис обеспечивают игру предельно комфортной и результативной.
Актуальные онлайн-казино предлагают участникам богатый спектр игр и заманчивые поощрения. Однако для беспроблемной деятельности необходимо осознавать, как получить доступ к РЎСѓРєР° и его актуальные зеркала.
Что такое основной портал казино
Официальный веб-сайт казино — это первичная веб-площадка, где участники могут развлекаться игровыми слотами. Платформа работает на легальных правах и имеет всеми необходимыми сертификатами.
Ключевые плюсы основного веб-сайта:
– Конфиденциальность персональных реквизитов
– Объективные требования использования
– Стабильные платежи
– Компетентная техподдержка
Рабочее зеркало казино: для чего требуется
Зеркало — это полная версия лицензионного веб-сайта, размещенная по иному URL. Действующее зеркало создается для обеспечения стабильного соединения к платформе.
Поводы эксплуатации копий сайта:
– Недоступность главного адреса
– Регламентные операции
– Значительная посещаемость на систему
Как найти актуальное зеркало на сегодня
Получить новое проверенное зеркало можно различными методами:
1. Email-уведомления — подпишитесь на email отправку
2. Служба помощи — напишите в онлайн-чат
3. Корпоративные медиа — проверяйте за публикациями
4. Специализированные площадки — надежные платформы
Оформление профиля на ресурсе казино
Процедура регистрации занимает буквально считанные минут:
1. Нажмите на опцию “Открыть счет”
2. Заполните требуемые поля
3. Активируйте контактную адрес
4. Введите промокод, если есть
По завершении успешной оформления вам предоставится разрешен личный аккаунт.
Поощрения и бонусные коды
Щедрая бонусная система — существенное преимущество казино:
Бонус за создание аккаунта
Свежие игроки обретают первый поощрение, который может включать:
– Финансовый бонус на стартовый пополнение
– Бесплатные вращения для автоматов
– Бездепозитные фонды
Купоны
Периодически появляются актуальные купоны, предоставляющие использовать экстра бонусы.
Программа кешбэка
Регулярные игроки приобретают часть проигранных финансов на счет.
Текущие кампании и соревнования
Сайт постоянно устраивает интересные акции:
– Недельные соревнования
– Специальные бонусы
– Лотереи ценных наград
– Система статусов
Авторизация в индивидуальный кабинет
Для авторизации на платформу необходимо:
1. Перейти на лицензионный адрес или актуальное зеркало
2. Выбрать “Войти”
3. Прописать никнейм и ключ
В персональном кабинете разрешены данные опции:
– Зачисление баланса
– Получение средств
– Изучение журнала операций
– Настройка личными данными
Мобильная модификация и приложение
Mobile платформа
Responsive платформа ресурса предоставляет шанс развлекаться с разных мобильного телефона. Интерфейс автоматически адаптируется под габариты screen.
Приложение для установки
Установить app можно для:
– Android — официальная скачивание с сайта
– iOS — инсталляция через App Store
Выгоды приложения:
– Моментальный доступ
– Надежная производительность
– Push-уведомления об промо
– Улучшенный интерфейс
Игровые зоны
Слоты
Богатая библиотека эмуляторных автоматов от топовых разработчиков:
– Ретро слоты
– Новые-игры
– Призовые-слоты
Live зал
Секция с реальными ведущими дает:
– Рулеточные столы
– Блэкджек
– Punto Banco
– Texas Hold’em
Эфиры транслируются в отличном разрешении, воссоздавая впечатление настоящего казино.
Способы пополнения и вывода
Казино обслуживает множественные транзакционные инструменты:
– Кредитные средства
– Цифровые кошельки
– Crypto
– Wire отправки
Минимальные пороги взноса и скоростные выплаты обеспечивают развлечение максимально комфортной.
Департамент помощи
Профессиональная команда помощи доступна 24/7 и готова помочь с различными задачами:
– Живой-чат
– Email-поддержка
– Голосовая линия
Выводы
Официальный веб-сайт казино и его актуальные зеркала гарантируют участникам безопасный и азартный азартный досуг. Выгодные подарки, удобная адаптивная версия, многочисленные игры и высокоуровневое live-казино превращают эту ресурс превосходным местом для развлекательных времяпрепровождения.
Get More Info paycor login
see more – Stumbled on this and everything is arranged clearly
https://pharmacologicalsciences.com/cialis.html viagra
Kraken Marketplace Официальный сайт для доступа к Kraken
krak market
живые цветы москва https://cvejie-cveti.ru/ .
Limited Editions – Browsing feels comfortable and items are easy to find.
discover moss shop – Navigation feels intuitive, with sections connecting well.
Must-Have Products – Layout is organized clearly and browsing is fast.
visit cricket portal to find the best platforms for watching live matches and placing strategic bets on your favorite teams this year. the portal offers comprehensive guides and match analysis that help users stay ahead of the game with data-driven insights. it is a perfect destination for cricket enthusiasts who value high-quality content and reliable links to official broadcasting and betting resources.
Galaxyno Hit clusters explosivos: melhor que Jogo do Tigrinho pra quem ama grid grande?
check ipl scores for real-time score updates and detailed statistics for all current and upcoming matches in the tournament. this site provides an essential resource for fans who want to follow every ball and analyze player performances throughout the entire season. it is a well-maintained portal that focuses on accuracy and ensures you stay informed about all the critical turning points in every game.
open this link for an in-depth look at the most competitive odds and professional betting tips available for the current cricket season. this website focuses on providing accurate forecasts and market analysis to help users make more informed decisions during intense tournament matches. it serves as a dedicated hub for fans who want to combine their passion for cricket with a strategic approach to sports wagering.
Описание официального веб-сайта
Передовые сетевые казино обеспечивают пользователям разнообразный ассортимент игр и возможностей. Основной сайт Bollywood казино предоставляет надежный вход к гемблинг возможностям.
Рабочее зеркало: путь в настоящий момент
Зеркало является в качестве абсолютную копию основного ресурса. Проверенное зеркало помогает пользователям преодолевать потенциальные блокировки.
Плюсы использования зеркала
Принципиальные преимущества предполагают:
– Непрерывный путь к сайту
– Хранение абсолютно всех возможностей базового портала
– Защита персональных данных
– Такой же возможности
Создание аккаунта на платформе
Ход регистрации знаменуется простотой и эргономичностью. Новые участники необходимо:
1. Открыть основной веб-сайт или его зеркало
2. Выбрать на кнопку открытия счета
3. Заполнить обязательные поля
4. Верифицировать электронную ящик
5. Осуществить дебютный вход
Бонус за оформление
Новички получают щедрый приветственный приз. Такое вознаграждение способно содержать:
– Финансовые суммы
– Безвозмездные спины
– Расширенный коэффициент кэшбэка
Доступ в индивидуальный раздел
Существующие пользователи способны мгновенно авторизоваться в личный аккаунт, используя никнейм и пароль. Собственный кабинет дает путь к:
– Контролю средствами
– Хронологии переводов
– Работающим призам
– Конфигурации учетной записи
Призы и предложения
Ресурс систематически реализует всевозможные предложения для игроков.
Типы бонусов
Главные типы вознаграждений:
– Финансовые призы – доля от размера депозита
– Спины – безвозмездные раунды в автоматах
– Кэшбек – возмещение фрагмента проигранных финансов
– Конкурсные вознаграждения – призы за участие в турнирах
Промокоды
Особые коды дают возможность получить дополнительные привилегии. Участники способны обнаружить их на аффилиатных сайтах или взять в новостях.
Портативная версия и софт
Прогрессивные игроки любят портативный геймплей.
Опции mobile версии
– Гибкий дизайн для всех гаджетов
– Абсолютный доступ к автоматам
– Быстрая загрузка
– Комфортное использование
Установить софт
Портативное программа предоставлено для скачивания на девайсы с рабочими системами Android и iOS. Софт предоставляет:
– Устойчивую производительность
– Пуш уведомления о предложениях
– Мгновенный доступ к предпочитаемым слотам
Гемблинг портфель
Казино предлагает обширную галерею игровых игр.
Игровые машины
Ассортимент игровых автоматов включает:
– Традиционные слоты
– Video слоты
– Прогрессивные машины
– Branded слоты
Live дилеры
Область настоящих столов предлагает опцию участвовать с реальными дилерами. Доступны:
– Рулетка
– Блэкджек
– Punto Banco
– Покер
Состязания
Систематические соревнования дают возможность пользователям состязаться за крупные призовые фонды. Призовая структура модифицируется постоянно.
Платежные процедуры
Портал поддерживает множество опций пополнения и снятия финансов:
– Пластиковые карты
– Виртуальные платежные системы
– Банковские переводы
– Крипто
Абсолютно все платежи осуществляются конфиденциально с задействованием актуальных протоколов кодирования.
Служба сопровождения
Профессиональная группа support работает 24/7. Связаться с менеджерами реально через:
– Online чат
– Email почту
– Горячую линию
– Соц сети
Секьюрити и регулирование
Платформа оперирует на основании легальной разрешения. Это удостоверяет:
– Прозрачность азартного геймплея
– Охрану личных данных
– Своевременные выводы
– Контролируемый гемблинг
Вывод
Основной сайт и его рабочие резервные страницы обеспечивают участникам совокупный спектр функций для приятной и доходной игры. Значительные подарки, всевозможные слоты, компетентная помощь и надежная система платежей создают ресурс превосходным выбором для фанатов игровых забав.
Нынешние онлайн казино дают игрокам обширный выбор функций для комфортной игры. Но иногда соединение к основному сайту может быть ограниченным. В таких обстоятельствах на поддержку приходят Рльдорадо, которое предоставляет непрерывный подключение ко всем функциям платформы.
Что такое функционирующее зеркало казино
Альтернативный сайт — это полная реплика основного портала, которая располагается по другому адресу. Альтернативный ресурс сохраняет полный набор функций основного портала, включая индивидуальный кабинет, баланс и запись операций.
Принципиальные выгоды использования зеркала:
– Непрерывный вход к порталу
– Полная тождественность опций
– Защита персональных сведений
– Поддержка всех привилегий
Как отыскать актуальное зеркало в данный момент
Есть некоторое количество достоверных методов обнаружения действующей URL:
Легитимные ресурсы:
1. Электронная рассылка — руководство постоянно направляет письма с свежими доменами
2. Социальные сети — легитимные страницы размещают актуальную сведения
3. Департамент поддержки — сотрудники сообщают проверенные ссылки
4. Мобильное приложение — обеспечивает преодолевать блокировки
Открытие счета на официальном портале
Операция регистрации требует не более немного минут и предполагает из данных шагов:
1. Вход на основной веб-сайт или актуальное зеркало
2. Выбор на иконку «Открыть счет»
3. Заполнение персональной бланка
4. Валидация почтовой почты или контактного номера
5. Задействование поощрения за регистрацию при наличии промокода
Только что зарегистрированные геймеры зарабатывают значительный вступительный подарок, который может содержать бесплатные вращения, монетарные поощрения или cashback.
Доступ в личный кабинет
Вход на платформе осуществляется привычным методом. Достаточно внести учетные данные и код доступа, задействованные при создании аккаунта.
Существенные нюансы для надежного входа:
– Используйте криптостойкий секретный ключ
– Активируйте двухфакторную верификацию
– Не храните данные на чужих девайсах
– Контролируйте доменную строку браузера
Характеристика бонусной системы
Игровая платформа награждает геймеров различными привилегиями и акциями:
Начальный набор
Дебютанты могут претендовать на великодушное поощрение за начальный взнос. Традиционно это пропорциональная добавка к депонированной сумме плюс даровые спины для востребованных слотов.
Периодические кампании
– 7-дневный компенсация — компенсирование части проигранных финансов
– Награды на очередные взносы
– Эксклюзивные промо по праздникам
– Состязания с значительными наградными фондами
Система привилегий
Активные пользователи накапливают пункты за любую бет, которые затем меняются на фактические финансы, бесплатные вращения или эксклюзивные бонусы.
Бонус-коды: как задействовать
Промокоды — это специальные сочетания символов, дающие привилегию к бонусным поощрениям.
Откуда получить рабочие промокоды:
– Проверенные общественные сети казино
– Союзнические сайты
– Email-новостная лента
– Тематические форумы
Активируется промокод в предназначенное поле при оформлении или пополнении счета.
Телефонная версия и приложение
Современные геймеры предпочитают делать ставки с мобильных устройств. Ресурс предлагает два решения для комфортной портативной игры.
Адаптивная редакция
Онлайн версия само собой адаптируется под параметры дисплея. Не просит инсталляции и оперирует в произвольном новом браузере.
Мобильное приложение
Получить app можно для гаджетов на Android и iOS. Выгоды app:
– Оперативная открытие
– Надежная действие
– Всплывающие-уведомления о акциях
– Независимый избегание блокировок
Операция установки несложен: требуется зайти на сайт с телефонного устройства и выполнять инструкциям.
Гемблинг коллекция
Коллекция развлечений включает огромное количество вариантов от топовых поставщиков.
Слоты
Игровые аппараты — крайне распространенная категория развлечений. Представлены традиционные простые слоты, современные видео-автоматы с бонусными уровнями, а также накопительные суперпризы.
Live казино
Зона с реальными дилерами обеспечивает прочувствовать атмосферу подлинного казино. Представлены варианты с покером.
Передача ведется в высоком качестве, обеспечивается коммуникация с дилером и прочими участниками.
Состязания
Постоянно устраиваются конкурсы по многочисленным слотам. Вступление обеспечивает возможность получить валютные награды, free spins или особые поощрения.
Транзакционные процедуры
Портал предоставляет широкий ассортимент платежных способов:
– Банковские карты
– Электронные сервисы
– Крипта
– Финансовые транзакции
Минимальная количество взноса — доступная для преобладающего числа клиентов. Обналичивание средств осуществляется в короткие временные рамки.
Сервис поддержки
Квалифицированные сотрудники способны поддержать круглосуточно. Представлены данные варианты связи:
– Живой-чат
– Email
– Мобильная горячая линия
– Общественные сети
Пояснения на частые темы можно отыскать в разделе FAQ.
Итог
Главный сайт казино и его функционирующие зеркала обеспечивают игрокам совершенный доступ ко всем возможностям ресурса. Значительные вознаграждения, приятная смартфонная версия, впечатляющий ассортимент развлечений и квалифицированная поддержка формируют азартный опыт крайне беспроблемным и конфиденциальным.
Вакансии Министерства обороны РФ Рассмотрим вакансии Министерства обороны РФ, предоставляющие уникальную возможность трудоустройства в зону СВО с полным обеспечением и поддержкой.
visit this page – Organized structure allows easy navigation through the content
go to site – Posts feel engaging and the vibe is modern and fresh
нейросеть реферат нейросеть реферат .
for sale
access shop page – It’s easy to move around thanks to the clear structure.
Актуальные онлайн-казино предоставляют клиентам обширный спектр развлечений и призовых опций. Доступ к платформе реализуется через лицензионный ресурс или его действующее зеркало [url=https://crinndeco.com/2026/03/18/otvetstvennyj-podhod-k-azartnym-igram-sovety-po/]Ретро[/url], что дает постоянную работу.
Что представляет собой действующее зеркало казино
Зеркало — это абсолютная реплика главного веб-сайта, разработанная для устранения барьеров. Действующее зеркало позволяет пользователям иметь соединение к предпочитаемым играм в каждое время.
Проверенное зеркало содержит всеми возможностями основного веб-сайта:
– Совокупный каталог слотов
– Личный кабинет с сохраненными информацией
– Свежие бонусы
– Безопасные платежные операции
Регистрация на главном сайте
Ход регистрации занимает всего пару минут. Первым пользователям требуется:
1. Попасть на основной ресурс или актуальное зеркало
2. Кликнуть на элемент “Зарегистрироваться”
3. Ввести необходимые сведения
4. Проверить адрес
5. Внести дебютный взнос
Стартовый бонус выдается автоматически после выполнения всех этапов.
Доступ в аккаунт
Зарегистрированные участники могут осуществить вход указывая:
– Логин и код
– Номер контакта
– Email
Персональный раздел обеспечивает доступ к регулированию средствами, сведениям ставок и текущим бонусам.
Промо и предложения
Азартная площадка радует постоянных игроков выгодными бонусами:
Приветственный комплект
– Бонус на дебютный депозит до 100%
– Даровые спины на известные машины
– Экстра награды за дальнейшие взносы
Бонусные коды
Эксклюзивные ваучеры предоставляют шанс на активацию специальных бонусов. Действующие промокоды размещаются в категории “Промо”.
Возврат средств
Еженедельный кэшбек достигает до 10% от использованных денег. Выплата начисляется моментально.
Система лояльности
Активные пользователи получают единицы, которые обмениваются на действительные средства или бесплатные вращения.
Мобильный сайт и программа
Для практичности клиентов построена удобная мобильная версия. Приспособленный дизайн дает возможность комфортно делать ставки с всякого мобильного девайса.
Выгоды приложения:
– Быстрый подключение к слотам
– Адаптированный дизайн
– Надежная деятельность
– Push-уведомления о новых событиях
Получить приложение можно бесплатно с проверенного веб-сайта для гаджетов на Android и iOS.
Коллекция слотов
Автоматы
Библиотека вмещает более 2000 машин от топовых студий:
– Классические слоты
– Мультимедийные игры
– Jackpot игры
– Тематические автоматы
Live казино
Секция Live игр предлагает участие с настоящими крупье в прямом эфире:
– Рулетка
– Карточная игра
– Баккара
– Столы покера
Состязания
Систематические состязания с крупными выигрышными пулами устраиваются регулярно. Вход в состязаниях разрешено всем действующим пользователям.
Финансовые методы
Платежи и изъятия средств выполняются через востребованные платежные системы:
– Платежные карты
– Онлайн кошельки
– Bitcoin
– Банковские транзакции
Минимальный платеж — от 100 рублей. Получение средств осуществляется в течение 24 ч.
Служба помощи
Круглосуточная группа саппорта готова содействовать в разрешении каких-либо проблем:
– Онлайн-чат
– Email
– Телефон
– Публичные сети
Охрана и документ
Главный веб-сайт функционирует на базе глобальной документа. Всевозможные данные игроков защищены новейшим SSL-протоколом.
Резюме
Актуальное зеркало гарантирует стабильный вход к предпочитаемым играм, богатым бонусам и удобным сервисам. Зарегистрируйтесь сейчас и заработайте приветственный поощрение!
Актуальные онлайн-казино обеспечивают пользователям разнообразный спектр опций для комфортной развлечений. Переход к сервису Clubnika казино производится через официальный веб-ресурс или актуальное зеркало.
Что такое актуальное зеркало казино
Рабочее зеркало — это дополнительный URL основного веб-сайта казино. Такие копии генерируются для обеспечения постоянного доступа к развлекательной платформе.
Зеркало актуальное целиком повторяет опции официального портала. Игроки обретают схожий доступ ко всем функциям, включая оформление профиля, зачисление средств баланса и вывод призов.
Регистрация на лицензионном ресурсе
Механизм создания аккаунта требует всего несколько секунд. Новым участникам нужно:
1. Войти на основной портал или текущее настоящее зеркало
2. Щелкнуть кнопку “Зарегистрироваться”
3. Внести нужные информацию
4. Верифицировать почтовую почту
5. Ввести код активации при существовании
После выполнения создания аккаунта участник обретает вознаграждение за регистрацию, который способен содержать даровые спины или денежное вознаграждение.
Вход в индивидуальный кабинет
Индивидуальный кабинет — это защищенная область, где клиенты способны администрировать своим аккаунтом. Для доступа требуется внести никнейм и код доступа.
В персональном кабинете доступны следующие инструменты:
– Мониторинг хронологии переводов
– Применение купонов
– Регулирование бонусами
– Присоединение в состязаниях
– Отслеживание кэшбека
– Настройка профиля
Вознаграждения и предложения
Азартная сервис обеспечивает привлекательные бонусы:
Начальный бонус — новые игроки обретают существенное начисление на дебютные пополнения.
Фриспины — предоставляются как при регистрации, так и в контексте многочисленных промо.
Возврат средств — систематический компенсация доли потерянных средств.
Бонусные коды — специальные шифры, предоставляющие доступ к особым призам.
Характеристика развлекательных секций
Slots
Собрание slots включает тысячи игр от передовых провайдеров. Пользователи найдут как стандартные машины, так и новые 3D-слоты с притягательной анимацией.
Live казино
Зона Live казино предоставляет возможность играть с настоящими дилерами в формате текущего времени. Доступны популярные развлечения: рулетка, блэкджек, баккара, покер.
Состязания
Постоянные турниры с солидными премиальными фондами манят массу соревнующихся. Лидеры зарабатывают финансовые призы и специальные премии.
Мобильная версия и приложение
Мобильная версия сайта дает возможность участвовать с всякого гаджета. Структура автоматически адаптируется под диагональ экрана.
Получить приложение можно для девайсов на Android и iOS. Телефонное app характеризуется всеми опциями настольной версии.
Как отыскать действующее зеркало на текущий день
Действующие адреса зеркал систематически изменяются. Получить свежую линк можно многими методами:
– Через службу помощи
– В проверенных социальных сетях
– По email дайджесту
– На аффилиатных площадках
Защита и официальность
Основной ресурс оперирует на фундаменте глобальной разрешения. Все транзакции шифруются актуальными системами шифрования.
Анонимность индивидуальных сведений обеспечивается в полном формате.
Заключение
Официальный ресурс и его рабочие дубликаты дарят клиентам беспрерывный вход к первоклассным игровым развлечениям. Щедрые поощрения, многочисленные развлечения, опытная помощь — все это создает развлекательный опыт максимально приятным и интересным.
Fortune Rabbit vs Fortune Tiger: qual paga mais consistentemente esse mês?
Jogo do Tigrinho no celular com Wi-Fi 5G: quem já ganhou big win em movimento?
ed pills for sale Pharmacological Sciences cheap ed pills
Shop Dune Cove – The interface is clean, and browsing feels very natural.
find out paycor employee login
Fortune Ox explodiu tudo ontem! Quem já limpou a tela com 12+ touros dourados?
Kraken Marketplace Официальный сайт для доступа к Kraken
slon3 cc
check official site for an authentic mexican casino experience featuring a massive selection of high-quality slots and live dealer games. the platform is fully optimized for local players, offering secure payment methods and 24/7 customer support to ensure a smooth gaming session. it is a highly reliable source for those who prioritize safety and want to enjoy legitimate promotional offers in a transparent environment.
visit pin-up india to access the official pin-up portal in india, where you can enjoy a wide variety of licensed games and sports markets. the site supports popular local deposit options like upi and netbanking, making it incredibly convenient for players across the region. i recommend checking their welcome bonuses, as they provide a great way to start your journey with a significantly boosted bankroll.
visit link – Smooth interface with pages that appear instantly
visit the website to discover professional insights and creative strategies from an experienced leader in the marketing and advertising industry. this website offers valuable resources for anyone looking to improve their communication skills and understand the deeper aspects of effective storytelling. it is a well-organized platform that provides a fresh perspective on how to achieve impactful results through strategic thinking and design.
villas for sale in phuket thailand villas for sale in phuket thailand .
Современные онлайн казино дают геймерам большой спектр возможностей для комфортной игры. Однако иногда доступ к основному сайту может являться заблокированным. В таких обстоятельствах на поддержку приходит РёРіСЂС‹ Lev, которое дает постоянный подключение ко всем функциям платформы.
Что такое актуальное зеркало казино
Альтернативный сайт — это полная реплика официального портала, которая хостится по альтернативному URL. Копия содержит весь набор функций главного веб-портала, включая персональный кабинет, депозит и запись платежей.
Ключевые достоинства эксплуатации зеркала:
– Постоянный доступ к порталу
– Полная схожесть функционала
– Защита пользовательских информации
– Поддержка доступных бонусов
Как найти действующее зеркало сегодня
Существует некоторое количество надежных путей поиска действующей ссылочной информации:
Официальные сервисы:
1. Имейл рассылка — руководство постоянно направляет письма с актуальными адресами
2. Социальные сети — авторизованные профили выкладывают релевантную данные
3. Сервис поддержки — операторы предоставляют проверенные домены
4. Телефонное приложение — обеспечивает избегать блокировки
Регистрация на официальном веб-сайте
Операция создания аккаунта занимает лишь считанные минут и включает из нижеследующих шагов:
1. Попадание на главный портал или функционирующее зеркало
2. Щелчок на клавишу «Регистрация»
3. Заполнение учетной бланка
4. Валидация почтовой почты или телефонного номера
5. Применение поощрения за регистрацию при доступности промокода
Свежие геймеры зарабатывают солидный начальный презент, который может включать фриспины, монетарные вознаграждения или возврат средств.
Авторизация в индивидуальный кабинет
Логин на портале выполняется привычным способом. Достаточно вписать никнейм и код доступа, использованные при создании аккаунта.
Ключевые нюансы для защищенного входа:
– Применяйте надежный пароль
– Активируйте 2FA идентификацию
– Не храните данные на общественных гаджетах
– Отслеживайте адресную строку браузера
Анализ поощрительной схемы
Гемблинг-сайт одаривает геймеров разнообразными поощрениями и специальными предложениями:
Приветственный пакет
Свежие игроки способны надеяться на значительное награду за стартовый вклад. Зачастую это пропорциональная надбавка к зачисленной сумме плюс бесплатные вращения для топовых слотов.
Постоянные акции
– 7-дневный cashback — компенсирование процента потерянных средств
– Награды на повторные пополнения
– Специальные акции по торжествам
– Состязания с значительными выигрышными фондами
Программа верности
Регулярные пользователи получают единицы за любую игру, которые затем превращаются на настоящие денежные призы, free spins или уникальные льготы.
Бонус-коды: как активировать
Бонус-коды — это уникальные сочетания букв и цифр, обеспечивающие возможность к эксклюзивным привилегиям.
Где получить свежие промокоды:
– Проверенные медийные сети казино
– Партнерские сайты
– Email-новостная лента
– Профильные форумы
Вводится промокод в соответствующее поле при создании аккаунта или пополнении кошелька.
Смартфонная версия и приложение
Передовые игроки любят делать ставки с смартфонных аппаратов. Портал обеспечивает пару способа для беспроблемной смартфонной игры.
Адаптивная версия
Веб версия само собой подстраивается под размер монитора. Не просит инсталляции и действует в всяком новом браузере.
Смартфонное приложение
Скачать приложение можно для девайсов на Android и iOS. Плюсы app:
– Быстрая активация
– Надежная действие
– Push-уведомления о бонусах
– Автономный преодоление блокировок
Процесс установки несложен: необходимо открыть на веб-сайт с телефонного девайса и придерживаться предписаниям.
Игровой каталог
Каталог развлечений охватывает огромное количество вариантов от передовых поставщиков.
Слоты
Развлекательные аппараты — наиболее востребованная секция забав. Доступны обычные винтажные аппараты, актуальные видео-автоматы с поощрительными уровнями, а также прогрессивные выигрыши.
Live казино
Раздел с настоящими раздающими предоставляет испытать настроение истинного казино. Имеются игры с баккарой.
Вещание осуществляется в высоком формате, обеспечивается чат с раздающим и иными пользователями.
Состязания
Систематически устраиваются состязания по разным категориям. Участие дает шанс получить финансовые награды, даровые прокруты или особые бонусы.
Денежные операции
Ресурс обеспечивает значительный набор денежных методов:
– Пластиковые карты
– Цифровые системы
– Цифровая валюта
– Денежные транзакты
Минимальная объем взноса — доступная для преобладающего числа пользователей. Получение средств производится в кратчайшие сроки.
Департамент поддержки
Профессиональные сотрудники способны поддержать непрерывно. Доступны данные методы коммуникации:
– Интернет-чат
– Email
– Телефонная связь
– Коммуникационные сети
Решения на распространенные вопросы можно обнаружить в зоне FAQ.
Заключение
Основной веб-сайт казино и его действующие зеркала обеспечивают геймерам абсолютный вход ко всем функциям портала. Великодушные бонусы, комфортная портативная версия, впечатляющий коллекция игр и опытная помощь превращают игровой досуг максимально удобным и защищенным.
this online tech toolkit – The site layout is clean, and the information is helpful and easy to navigate.
Для тех, кто хочет полного контроля, автор рассказывает про накрутка поведенческих факторов программа на базе BAS и Monstro. Описаны требования к серверу, прокси и бюджету. Информация для продвинутых.
Visit https://mostbet-online.kg/ to discover an elite sportsbook and a rich library of classic casino games available for users in Kyrgyzstan. The platform offers very competitive odds and a user-friendly interface that makes navigating between live matches and slots incredibly easy. I recommend checking their loyalty rewards program, which provides consistent bonuses for active players who value long-term engagement.
Access official site for a fully localized gaming experience tailored for players in Azerbaijan with native language support. This site provides a stable and secure way to access your favorite slots and handle all financial transactions using local currency options. It is a trusted destination for those who prioritize security and want a seamless experience across all their digital devices.
Try Glory Casino to explore an impressive collection of certified slots and engaging crash games from the world’s leading providers. This platform stands out due to its modern design and a simple registration process that gets you into the action without unnecessary delays. It provides a secure and transparent environment where all players can enjoy high-quality gaming with the assurance of regular payouts.
internet partner prodvizhenie-sajta-po-trafiku2.ru .
проект перепланировки квартиры москва проект перепланировки квартиры москва .
перепланировка квартиры москва pereplanirovka-kvartir12.ru .
visit here – Browsed casually and found some content that’s helpful
https://penzu.com/p/bbbd47c2311dd91b
Современные онлайн-казино гарантируют геймерам разнообразный спектр возможностей для комфортной времяпрепровождения. Доступ к сервису Sykaaa выполняется через официальный сайт или рабочее зеркало.
Что такое рабочее зеркало казино
Действующее зеркало — это резервный URL официального веб-сайта казино. Такие версии разрабатываются для поддержания стабильного соединения к азартной платформе.
Альтернатива сегодня целиком копирует возможности главного портала. Клиенты имеют аналогичный доступ ко всем функциям, включая создание аккаунта, пополнение депозита и снятие денег.
Регистрация на официальном веб-сайте
Процедура оформления учетной записи длится всего буквально секунд. Новым игрокам нужно:
1. Перейти на лицензионный сайт или действующее подлинное зеркало
2. Кликнуть кнопку “Создать аккаунт”
3. Внести требуемые реквизиты
4. Активировать e-mail почту
5. Ввести код активации при доступности
После завершения создания аккаунта клиент зарабатывает бонус за регистрацию, который способен предполагать фриспины или финансовое начисление.
Авторизация в личный кабинет
Пользовательский кабинет — это безопасная зона, где участники могут регулировать своим счетом. Для авторизации требуется напечатать никнейм и код доступа.
В персональном кабинете представлены следующие инструменты:
– Просмотр записей операций
– Использование бонусных кодов
– Настройка вознаграждениями
– Включение в состязаниях
– Контроль кэшбека
– Редактирование учетной записи
Вознаграждения и предложения
Гемблинговая система дарит выгодные призы:
Начальный бонус — новички приобретают солидное премию на дебютные взносы.
Free spins — предоставляются как при создании аккаунта, так и в ходе различных акций.
Возврат средств — систематический компенсация доли проигранных средств.
Бонусные коды — уникальные шифры, предоставляющие доступ к особым предложениям.
Анализ азартных категорий
Slots
Ассортимент аппаратов охватывает множество наименований от ведущих провайдеров. Геймеры откроют как классические аппараты, так и новые 3D-слоты с увлекательной анимацией.
Live казино
Категория Live казино предлагает опцию играть с действующими ведущими в режиме текущего времени. Открыты известные развлечения: рулетка, блэкджек, баккара, покер.
Соревнования
Постоянные состязания с значительными наградными пулами манят тысячи конкурсантов. Призеры завоевывают монетарные вознаграждения и эксклюзивные премии.
Телефонная версия и софт
Телефонная версия портала дает возможность развлекаться с произвольного аппарата. Дизайн автоматически адаптируется под формат экрана.
Установить софт можно для девайсов на Android и iOS. Портативное программа характеризуется всеми возможностями компьютерной версии.
Как определить актуальное зеркало на текущий день
Рабочие URL копий периодически корректируются. Получить актуальную адрес можно различными способами:
– Через отдел поддержки
– В настоящих коммуникационных сетях
– По электронной newsletter
– На специализированных порталах
Защита и сертификация
Главный сайт оперирует на основании мировой разрешения. Все транзакции защищены актуальными протоколами кодирования.
Конфиденциальность пользовательских реквизитов обеспечивается в стопроцентном формате.
Заключение
Официальный домен и его актуальные альтернативы дарят клиентам постоянный выход к высококлассным игровым играм. Великодушные вознаграждения, всевозможные развлечения, компетентная помощь — все это создает игровой опыт невероятно комфортным и интересным.
Современные онлайн-казино гарантируют геймерам разнообразие опций для приятной игры. Основной веб-портал ДжиВиСпин предоставляет путь ко всем опциям и азартным играм. Однако при появлении системных трудностей на подмогу прибывают актуальные дубликаты.
Что есть собой актуальное зеркало
Альтернативный адрес казино — это стопроцентная версия основного портала, расположенная по альтернативному веб-адресу. Лицензионное зеркало поддерживает все возможности, вместе с открытие профиля, авторизацию в персональный кабинет, вознаграждения и купоны.
Альтернативный сайт на сегодня обеспечивает:
– Непрерывный доступ к развлекательным машинам
– Совершенную конфиденциальность индивидуальных сведений
– Поддержку средств и журнала платежей
– Доступность всех промо-предложений
Регистрация на лицензионном сайте
Этап регистрации отнимает несколько минут. Новоиспеченным пользователям следует:
1. Зайти на главный портал или действующее зеркало
2. Кликнуть кнопку «Регистрация»
3. Ввести запрашиваемые сведения
4. Верифицировать email почту
5. Использовать купон при наличии
После окончания оформления профиля пользователи обретают вознаграждение за регистрацию, что может охватывать фриспины или монетарное премирование.
Вход в личный кабинет
Персональный кабинет обеспечивает всесторонний контроль над игровым действом. Через персональный аккаунт допускается:
– Пополнять кошелек
– Забирать выплаты
– Активировать кодовые слова
– Контролировать журнал ставок
– Принимать участие в конкурсах
– Обретать кешбэк
Обзор премий и промо-предложений
Щедрая призовая схема — существенное достоинство платформы. Ключевые типы поощрений:
Приветственный подарок
Новички обретают выгодное награду на дебютные депозиты. Величина приза может доходить до 100-200% от суммы взноса.
Бонусные спины
Безвозмездные прокруты выдаются для востребованных автоматов. Количество бесплатных вращений изменяется от 10 до 500 штук.
Кешбэк
Еженедельный или помесячный возврат доли потерянных денег. Стандартный объем возврата — 5-15%.
Конкурсы
Регулярные состязания с большими премиальными банками. Соревнующиеся конкурируют за призовые строчки в турнирной таблице.
Смартфонная версия и программа
Смартфонная версия позволяет играть с любого гаджета. Клиенты могут установить приложение для iOS и Android или применять веб версию.
Преимущества смартфонного приложения:
– Оперативная прогрузка игр
– Практичный графический интерфейс
– Push-уведомления о акциях
– Доступ через отпечаток пальца
Игровые автоматы и Live казино
Игровая библиотека содержит тысячи игр от лидирующих разработчиков.
Известные категории слотов:
– Обычные слоты
– Современные слоты с премиальными раундами
– Накопительный приз игры
– Мега-путь слоты
Live игорный зал
Зона live игорный зал предоставляет развлечение с живыми крупье. Есть стандартные варианты:
– Европейская рулетка
– Блэкджек
– Baccarat
– Карибский покер
Как разыскать рабочее зеркало
Найти свежую адрес на зеркало разрешается несколькими способами:
1. Оформить подписку на емейл-уведомления
2. Отслеживать за новостями в социальных сетях
3. Контактировать в отдел поддержки
4. Заложить актуальное зеркало в фавориты
Заключение
Официальный портал и его актуальные зеркала гарантируют бесперебойный доступ к развлекательным слотам. Выгодные вознаграждения, различные бонусные коды, комфортное смартфонное софт и отличная служба поддержки поддержки создают игровой геймплей в высшей степени приятным и надежным.
https://pharmacologicalsciences.com/generics.html Pharmacological Institute
check it out – Layout is organized and simple to navigate
see tag collections – The layout is simple, which keeps finding things stress-free.
Panathinaikos 2-2 Viktoria Plzen 2026 Europa League dramatic draw
Анализ лицензионного портала
Современные интернет казино обеспечивают клиентам богатый ассортимент забав и перспектив. Главный ресурс Рльдорадо обеспечивает надежный путь к развлекательным функциям.
Функционирующее зеркало: доступ прямо сейчас
Зеркало выступает в качестве полную реплику лицензионного сайта. Актуальное зеркало обеспечивает клиентам избегать возможные запреты.
Преимущества применения зеркала
Главные достоинства предполагают:
– Стабильный путь к платформе
– Сохранение абсолютно всех опций главного сайта
– Сохранность индивидуальных сведений
– Такой же функционал
Оформление профиля на платформе
Процедура оформления профиля характеризуется простотой и эргономичностью. Свежие участники требуется:
1. Перейти на главный портал или его зеркало
2. Нажать на клавишу создания аккаунта
3. Указать необходимые поля
4. Подтвердить почтовую адрес
5. Произвести начальный доступ
Подарок за регистрацию
Новички забирают солидный стартовый приз. Это поощрение может включать:
– Денежные начисления
– Безвозмездные фриспины
– Усиленный показатель возврата
Доступ в персональный аккаунт
Действующие участники в состоянии моментально авторизоваться в свой аккаунт, применяя никнейм и шифр. Собственный профиль предлагает возможность к:
– Администрированию средствами
– Журналу переводов
– Работающим подаркам
– Параметрам профиля
Бонусы и промо
Портал периодически устраивает всевозможные промо-кампании для пользователей.
Виды поощрений
Ключевые виды бонусов:
– Денежные бонусы – доля от объема внесения
– Спины – complimentary спины в аппаратах
– Кэшбэк – возмещение процента проигранных денег
– Соревновательные трофеи – вознаграждения за состязание в соревнованиях
Промокоды
Особые купоны дают возможность приобрести добавочные преимущества. Клиенты имеют возможность обнаружить их на тематических ресурсах или взять в рассылке.
Мобильная адаптация и приложение
Современные гемблеры предпочитают карманный досуг.
Возможности mobile адаптации
– Адаптивный интерфейс для разнообразных гаджетов
– Совокупный путь к играм
– Быстрая работа
– Эргономичное управление
Скачать софт
Mobile app предложено для установки на гаджеты с базовыми платформами Android и iOS. App дает:
– Стабильную работу
– Пуш сообщения о предложениях
– Оперативный путь к любимым автоматам
Азартный ассортимент
Казино предлагает богатую галерею гемблинг забав.
Слоты
Коллекция азартных слотов содержит:
– Классические машины
– Передовые слоты
– Прогрессивные игры
– Branded автоматы
Live дилеры
Раздел реальных дилеров обеспечивает возможность состязаться с настоящими диллерами. Представлены:
– Рулетка
– Блек-джек
– Baccarat
– Покер
Турниры
Систематические соревнования позволяют пользователям конкурировать за крупные финансовые фонды. Конкурсная структура обновляется еженедельно.
Финансовые транзакции
Платформа поддерживает разнообразие вариантов пополнения и получения сумм:
– Дебетовые карты
– Электронные счета
– Банковские трансферы
– Крипто
Совокупные переводы проходят защищенно с задействованием актуальных протоколов защиты.
Сервис support
Опытная группа помощи работает постоянно. Обратиться с операторами возможно через:
– Онлайн чат
– Почтовую почту
– Телефон
– Социальные медиа
Секьюрити и аккредитация
Игровой клуб оперирует на фундаменте действительной сертификата. Подобное обеспечивает:
– Честность игрового геймплея
– Охрану личных информации
– Своевременные транзакции
– Регулируемый геймплей
Заключение
Лицензионный сайт и его действующие альтернативные адреса дают пользователям целостный ассортимент опций для удобной и прибыльной времяпрепровождения. Солидные бонусы, различные развлечения, опытная сервис и безопасная структура операций формируют портал превосходным вариантом для любителей гемблинг развлечений.
Актуальные онлайн-казино предоставляют пользователям разнообразный набор азартных игр и щедрые награды. Но для комфортной игры важно знать, как найти Вован и его действующие зеркала.
Что такое главный ресурс казино
Главный портал казино — это первичная веб-площадка, где пользователи могут наслаждаться гемблинг автоматами. Ресурс действует на легальных принципах и имеет всеми требуемыми сертификатами.
Ключевые выгоды официального сайта:
– Конфиденциальность индивидуальных реквизитов
– Прозрачные правила работы
– Стабильные выплаты
– Профессиональная поддержка
Рабочее зеркало казино: для чего нужно
Альтернативный адрес — это идентичная версия лицензионного сайта, расположенная по альтернативному URL. Действующее зеркало создается для предоставления бесперебойного доступа к платформе.
Причины применения зеркал:
– Блокировка основного сайта
– Профилактические работы
– Значительная нагрузка на платформу
Как получить актуальное зеркало в данный момент
Узнать текущее рабочее зеркало можно несколькими методами:
1. Рассылка — зарегистрируйтесь на почтовую подписку
2. Департамент поддержки — свяжитесь в онлайн-чат
3. Корпоративные площадки — следите за публикациями
4. Тематические ресурсы — проверенные источники
Регистрация на платформе казино
Этап регистрации занимает только несколько секунд:
1. Кликните на кнопку “Создать аккаунт”
2. Внесите требуемые данные
3. Валидируйте email ящик
4. Введите код активации, если есть
По завершении оконченной активации вам станет возможен личный кабинет.
Награды и купоны
Привлекательная поощрительная политика — важное достоинство казино:
Поощрение за регистрацию
Начинающие игроки приобретают приветственный бонус, который может содержать:
– Валютный кредит на первый пополнение
– Бесплатные вращения для слотов
– Бездепозитные бонусы
Купоны
Регулярно выходят эксклюзивные бонусные шифры, позволяющие активировать дополнительные привилегии.
Схема кэшбека
Активные пользователи зарабатывают часть потраченных средств в виде компенсации.
Текущие предложения и турниры
Сайт периодически устраивает захватывающие события:
– Семидневные чемпионаты
– Специальные предложения
– Лотереи крупных подарков
– Система привилегий
Логин в индивидуальный аккаунт
Для авторизации на ресурс нужно:
1. Перейти на официальный ресурс или рабочее зеркало
2. Нажать “Вход”
3. Указать никнейм и ключ
В личном разделе доступны нижеперечисленные опции:
– Депозит баланса
– Снятие денег
– Проверка журнала транзакций
– Управление индивидуальными данными
Портативная модификация и софт
Mobile платформа
Мобильная модификация веб-сайта позволяет играть с различных портативного гаджета. Дизайн динамически оптимизируется под диагональ монитора.
App для установки
Скачать приложение можно для:
– Android — непосредственная загрузка с сайта
– iOS — установка через App Store
Выгоды app:
– Мгновенный запуск
– Устойчивая производительность
– Push-оповещения об акциях
– Оптимизированный функционал
Гемблинг разделы
Автоматы
Внушительная подборка азартных машин от лучших производителей:
– Традиционные слоты
– Видео-игры
– Джекпот-машины
Live casino
Секция с реальными крупье предоставляет:
– European/American Roulette
– Blackjack
– Baccarat
– Texas Hold’em
Трансляции осуществляются в превосходном качестве изображения, создавая атмосферу настоящего казино.
Варианты внесения средств и получения
Платформа обслуживает разные транзакционные методы:
– Платежные card
– Электронные кошельки
– Цифровые валюты
– Прямые транзакции
Минимальные суммы взноса и моментальные транзакции делают игру крайне беспроблемной.
Отдел помощи
Квалифицированная команда support доступна 24/7 и способна содействовать с разными ситуациями:
– Реалтайм-чат
– Email-консультации
– Phone линия
Резюме
Основной веб-сайт казино и его рабочие копии обеспечивают пользователям надежный и захватывающий развлекательный опыт. Щедрые подарки, комфортная mobile версия, богатые слоты и превосходное live-казино формируют эту площадку отличным выбором для гемблинг игр.
seo специалист kursy-seo-12.ru .
PG Soft lançamentos 2026: Fortune Dragon, Fortune Mouse 2… qual você quer primeiro?
Fortune Ox touro dourado: já ativou hold & win com 15+ símbolos e ganhou tudo?
quick tab link – The site runs smoothly with content that keeps visitors interested.
PG Soft no Brasil: Pix instantâneo + suporte em português + giros grátis todo dia
https://novamenpharmacy.shop/# NovaMen Pharmacy
PG Soft 2026: quem tá lucrando mais com cashback diário ou giros grátis?
Fortune Tiger no Pix R$1: Deposita pouco e já sai girando com bônus insano!
Pharmacological Sciences Pharmacological Sciences Pharmacological Sciences
Нынешние онлайн-казино обеспечивают клиентам множество опций для комфортной игры. Основной ресурс Клубника открывает возможность ко всем возможностям и играм. Однако при образовании технических сложностей на помощь прибывают функционирующие зеркала.
Что есть собой рабочее зеркало
Дубликат казино — это точная дубликат официального ресурса, расположенная по запасному доменному имени. Подлинное зеркало хранит все функции, включая открытие профиля, авторизацию в индивидуальный кабинет, поощрения и промокоды.
Альтернативный сайт на сегодня обеспечивает:
– Стабильный вход к азартным аппаратам
– Совершенную безопасность персональных данных
– Удержание депозита и хронологии платежей
– Применимость всех промо-предложений
Создание учетной записи на лицензионном портале
Процесс регистрации занимает считанные минут. Новым пользователям нужно:
1. Войти на официальный сайт или действующее зеркало
2. Нажать кнопку «Создать аккаунт»
3. Заполнить запрашиваемые данные
4. Подтвердить email почту
5. Указать промокод при наличии
После окончания регистрации клиенты приобретают приз за регистрацию, какой может включать бонусные спины или денежное поощрение.
Авторизация в индивидуальный кабинет
Индивидуальный кабинет открывает всеобъемлющий надзор над игровым процессом. Через индивидуальный кабинет разрешается:
– Финансировать счет
– Снимать выигрыши
– Применять бонусные коды
– Отслеживать записи игр
– Участвовать в соревнованиях
– Обретать cash back
Обзор премий и специальных предложений
Богатая поощрительная политика — важное плюс казино. Главные формы вознаграждений:
Начальный бонус
Новые игроки обретают богатое награду на дебютные пополнения. Величина бонуса может доходить до 100-200% от объема пополнения.
Free spins
Халявные прокруты выдаются для востребованных машин. Число фриспинов разнится от 10 до 500 штук.
Cash back
Еженедельный или ежемесячный откат доли утраченных средств. Обычный размер возврата — 5-15%.
Состязания
Постоянные турниры с солидными призовыми банками. Игроки борются за лучшие места в турнирной таблице.
Смартфонная версия и приложение
Портативная версия дает возможность играть с каждого гаджета. Геймеры могут закачать приложение для iOS и Android или использовать интернет версию.
Выгоды портативного программы:
– Быстрая подзагрузка игр
– Комфортный UI
– Пуш-нотификации о промо
– Доступ через биометрию
Слоты и Live казино
Азартная библиотека включает множество наименований от топовых провайдеров.
Популярные категории автоматов:
– Обычные автоматы
– Современные слоты с бонусными этапами
– Накопительный приз слоты
– Megaways автоматы
Live казино
Зона live казино обеспечивает развлечение с настоящими крупье. Представлены традиционные развлечения:
– Французская рулетка
– Blackjack
– Punto Banco
– Карибский покер
Как разыскать функционирующее зеркало
Раздобыть свежую ссылку на зеркало разрешается разными путями:
1. Подписаться на почтовую рассылку
2. Мониторить за обновлениями в социальных сетях
3. Контактировать в отдел поддержки
4. Заложить актуальное зеркало в фавориты
Вывод
Лицензионный сайт и его актуальные альтернативные адреса предоставляют постоянный доступ к развлекательным играм. Великодушные бонусы, разнообразные бонусные коды, удобное портативное программа и отличная служба поддержки поддержки делают азартный геймплей предельно комфортным и надежным.
Обзор главного ресурса
Прогрессивные виртуальные казино дают клиентам богатый набор игр и опций. Лицензионный портал Вован обеспечивает защищенный путь к гемблинг услугам.
Актуальное зеркало: возможность сегодня
Альтернативный адрес представляет собой полную дубликат главного портала. Официальное зеркало обеспечивает участникам обходить потенциальные барьеры.
Выгоды использования зеркала
Ключевые достоинства содержат:
– Беспрерывный вход к сайту
– Сохранение любых возможностей основного ресурса
– Безопасность личных информации
– Равнозначный возможности
Регистрация на ресурсе
Ход открытия счета знаменуется доступностью и комфортом. Недавние пользователи требуется:
1. Посетить лицензионный сайт или его зеркало
2. Кликнуть на клавишу оформления
3. Ввести требуемые поля
4. Верифицировать электронную ящик
5. Совершить дебютный авторизацию
Бонус за создание аккаунта
Новые игроки зарабатывают значительный стартовый бонус. Данное поощрение в состоянии содержать:
– Денежные средства
– Бесплатные спины
– Расширенный процент кэшбека
Доступ в индивидуальный аккаунт
Активные клиенты в состоянии оперативно авторизоваться в личный кабинет, задействуя учетные данные и шифр. Индивидуальный раздел обеспечивает путь к:
– Управлению средствами
– Журналу транзакций
– Действующим поощрениям
– Опциям аккаунта
Призы и акции
Ресурс периодически устраивает разнообразные промо-кампании для пользователей.
Категории бонусов
Основные формы поощрений:
– Финансовые бонусы – коэффициент от размера пополнения
– Прокруты – бесплатные вращения в игровых машинах
– Компенсация – возмещение части потерянных финансов
– Призовые трофеи – премии за состязание в конкурсах
Коды
Уникальные ваучеры помогают получить добавочные выгоды. Участники могут отыскать их на партнерских площадках или взять в уведомлениях.
Переносная вариант и софт
Актуальные клиенты любят портативный досуг.
Опции мобильной платформы
– Гибкий дизайн для разнообразных устройств
– Полный путь к развлечениям
– Оперативная работа
– Эргономичное навигация
Установить приложение
Портативное app предложено для скачивания на аппараты с базовыми ОС Android и iOS. Программа обеспечивает:
– Стабильную функциональность
– Пуш уведомления о акциях
– Моментальный вход к избранным слотам
Гемблинг ассортимент
Портал дает внушительную коллекцию развлекательных игр.
Слоты
Каталог развлекательных автоматов охватывает:
– Классические машины
– Video аппараты
– Прогрессивные слоты
– Тематические развлечения
Live столы
Категория лайв столов дает возможность соревноваться с настоящими ведущими. Доступны:
– Европейская рулетка
– Очко
– Баккара
– Карибский покер
Соревнования
Систематические чемпионаты помогают участникам соревноваться за крупные призовые банки. Конкурсная программа обновляется регулярно.
Платежные процедуры
Платформа поддерживает множество вариантов депозита и получения сумм:
– Пластиковые карточки
– Виртуальные кошельки
– Wire переводы
– Bitcoin
Совокупные транзакции осуществляются надежно с задействованием современных технологий криптографии.
Отдел поддержки
Квалифицированная служба поддержки работает круглосуточно. Связаться с менеджерами возможно через:
– Online чат
– Почтовую почту
– Телефон
– Social платформы
Защита и аккредитация
Платформа оперирует на фундаменте официальной лицензии. Подобное гарантирует:
– Честность игрового действа
– Сохранность личных сведений
– Своевременные перечисления
– Контролируемый гемблинг
Резюме
Официальный ресурс и его актуальные резервные страницы предоставляют игрокам полный комплекс возможностей для удобной и прибыльной досуга. Щедрые вознаграждения, разнообразные развлечения, компетентная служба и безопасная структура операций формируют платформу лучшим опцией для ценителей развлекательных развлечений.
Jogo do Tigrinho multiplicador 10x: já ativou 3 vezes na mesma sessão? Mítico!
PG Soft 2026: Mahjong Ways 2 cascades infinitos – já chegou a 50x multiplier?
Betboom VIP: quem já subiu de nível só jogando Fortune Tiger? Benefícios reais
discover more – Glanced at it and it seems packed with clear information
Open https://bajilive-casino.com/ if you are looking for a comprehensive platform that combines live casino action with professional sports betting markets. The site is optimized for high performance on both mobile and desktop devices, ensuring that you never miss a winning opportunity. I especially appreciate their live dealer lobby, which features professional hosts and high-definition streams for a truly immersive experience.
explore sweet street – The presentation is attractive, and moving between pages is easy.
Передовые онлайн-казино гарантируют участникам широкий ассортимент азартных игр и заманчивые поощрения. Тем не менее для комфортной времяпрепровождения существенно осознавать, как обнаружить Рльдорадо и его рабочие зеркала.
Что такое основной портал казино
Главный портал казино — это главная веб-площадка, где игроки могут наслаждаться гемблинг играми. Портал работает на законных правах и обладает всеми необходимыми разрешениями.
Первостепенные достоинства официального портала:
– Конфиденциальность личных данных
– Честные положения участия
– Гарантированные платежи
– Оперативная техподдержка
Актуальное зеркало казино: для чего необходимо
Копия сайта — это полная версия лицензионного веб-сайта, хостящаяся по отличному URL. Рабочее зеркало создается для обеспечения постоянного входа к порталу.
Причины задействования дублирующих ресурсов:
– Блокировка главного сайта
– Регламентные процедуры
– Высокая загрузка на платформу
Как отыскать рабочее зеркало на сегодня
Узнать новое рабочее зеркало можно разными методами:
1. Подписка — зарегистрируйтесь на новостную подписку
2. Служба support — напишите в онлайн-чат
3. Официальные медиа — отслеживайте за новостями
4. Игровые площадки — достоверные платформы
Создание аккаунта на сайте казино
Этап создания аккаунта занимает только считанные минут:
1. Кликните на кнопку “Открыть счет”
2. Введите необходимые информацию
3. Валидируйте email e-mail
4. Активируйте бонусный код, если есть
Вслед за завершенной оформления вам станет возможен индивидуальный профиль.
Бонусы и коды активации
Богатая премиальная структура — важное достоинство казино:
Поощрение за создание аккаунта
Свежие игроки обретают начальный поощрение, который может содержать:
– Монетарный счет на начальный пополнение
– Фриспины для игровых машин
– Стартовые средства
Купоны
Периодически выходят эксклюзивные бонусные шифры, дающие возможность получить специальные преимущества.
Механизм кэшбека
Постоянные игроки получают порцию утраченных финансов обратно.
Действующие кампании и соревнования
Платформа периодически запускает захватывающие промо-мероприятия:
– Weekly соревнования
– Сезонные предложения
– Розыгрыши крупных подарков
– Схема лояльности
Логин в персональный профиль
Для доступа на платформу нужно:
1. Посетить главный сайт или действующее зеркало
2. Выбрать “Войти”
3. Прописать никнейм и ключ
В пользовательском профиле предоставлены данные инструменты:
– Депозит депозита
– Получение средств
– Просмотр журнала ставок
– Управление профильными параметрами
Адаптивная версия и app
Mobile вариант
Responsive платформа сайта обеспечивает играть с любого карманного телефона. Дизайн автоматически подстраивается под размер дисплея.
Программа для установки
Скачать программу можно для:
– Android — непосредственная download с сайта
– iOS — загрузка через App Store
Плюсы приложения:
– Мгновенный запуск
– Надежная работа
– Push-оповещения об предложениях
– Ускоренный дизайн
Гемблинг категории
Барабаны
Обширная подборка эмуляторных машин от топовых производителей:
– Классические слоты
– Современные-эмуляторы
– Джекпот-машины
Live зал
Категория с настоящими дилерами дает:
– Рулетка
– Blackjack
– Баккара
– Texas Hold’em
Эфиры ведутся в высоком формате, создавая впечатление подлинного казино.
Методы пополнения и обналичивания
Ресурс работает с различные финансовые методы:
– Кредитные средства
– Виртуальные платежи
– Цифровые валюты
– Финансовые транзиты
Стартовые суммы взноса и скоростные транзакции создают развлечение максимально беспроблемной.
Отдел помощи
Компетентная служба ассистентов функционирует 24/7 и в состоянии помочь с всеми ситуациями:
– Реалтайм-чат
– Email-помощь
– Телефонная линия
Итоги
Главный веб-сайт казино и его функционирующие зеркала дают участникам надежный и азартный азартный отдых. Выгодные бонусы, функциональная мобильная версия, разнообразные слоты и превосходное live-казино создают эту систему замечательным выбором для развлекательных досуга.
Нынешние онлайн-казино предлагают пользователям внушительный ассортимент игр и бонусных вариантов. Присоединение к платформе осуществляется через официальный портал или его функционирующее зеркало https://www.budetezdorovy.ru, что дает постоянную активность.
Что такое рабочее зеркало казино
Альтернатива — это полная версия официального сайта, сделанная для обхода блокировок. Зеркало сегодня обеспечивает клиентам получить соединение к любимым автоматам в произвольное время.
Проверенное зеркало обладает всеми функциями главного портала:
– Совокупный список слотов
– Профиль с записанными сведениями
– Действующие поощрения
– Защищенные платежные операции
Регистрация на основном ресурсе
Процесс регистрации составляет всего считанные минут. Свежим пользователям необходимо:
1. Перейти на официальный веб-сайт или функционирующее зеркало
2. Нажать на клавишу “Создать аккаунт”
3. Внести требуемые информацию
4. Проверить электронную почту
5. Сделать первый платеж
Поощрение новичкам выдается моментально после выполнения всех ступеней.
Доступ в аккаунт
Существующие игроки могут произвести авторизацию используя:
– Никнейм и ключ
– Код мобильного
– Электронную почту
Личный кабинет предоставляет шанс к управлению финансами, записям операций и доступным бонусам.
Поощрения и кампании
Гемблинг система балует активных клиентов многочисленными призами:
Начальный набор
– Бонус на стартовый взнос до 100%
– Даровые спины на востребованные слоты
– Особые бонусы за очередные платежи
Промокоды
Специальные ваучеры открывают возможность на приобретение уникальных поощрений. Свежие промокоды размещаются в блоке “Предложения”.
Возврат средств
Регулярный кешбэк равен до 10% от использованных средств. Возмещение предоставляется моментально.
Механизм лояльности
Активные участники накапливают очки, которые превращаются на действительные выплаты или даровые спины.
Мобильная версия и программа
Для удобства участников разработана качественная адаптивный сайт. Гибкий дизайн позволяет беспрепятственно делать ставки с всякого мобильного аппарата.
Выгоды APP:
– Моментальный вход к автоматам
– Оптимизированный вид
– Устойчивая деятельность
– Сообщения о свежих турнирах
Установить программу можно даром с главного веб-сайта для устройств на Android и iOS.
Библиотека автоматов
Игровые автоматы
Библиотека включает более 2000 игр от топовых провайдеров:
– Стандартные слоты
– Видео-слоты
– Jackpot игры
– Фирменные развлечения
Live казино
Раздел Live развлечений предлагает участие с реальными диллерами в онлайн режиме:
– Roulette
– Двадцать одно
– Карты
– Карточный покер
Состязания
Систематические турниры с значительными наградными фондами проводятся регулярно. Участие в соревнованиях доступно всем активным клиентам.
Платежные способы
Платежи и снятия денег осуществляются через известные платежные системы:
– Платежные карточ ки
– Виртуальные кошельки
– Крипто
– Денежные транзакции
Наименьший вклад — от 100 рублей. Получение финансов выполняется в течение 24 периода.
Служба support
Круглосуточная группа поддержки может помочь в решении каких-либо вопросов:
– Live chat
– Email
– Телефон
– Публичные сети
Защита и разрешение
Главный ресурс функционирует на фундаменте мировой лицензии. Все параметры пользователей охранены актуальным SSL-кодированием.
Заключение
Действующее зеркало предоставляет непрерывный соединение к излюбленным автоматам, щедрым бонусам и комфортным сервисам. Зарегистрируйтесь сегодня и заработайте начальный приз!
согласование перепланировки квартиры в москве согласование перепланировки квартиры в москве .
технический переводчик teh-perevod.ru .
Check Pin-Up login for the most reliable gaming experience in Bangladesh, featuring a wide selection of international and local favorites. This portal ensures a secure environment for all transactions and provides 24/7 customer support to handle any account queries. It is a highly professional destination for those who value fair play and transparent withdrawal terms for their daily entertainment.
Visit Pin-Up casino to experience a top-tier gaming platform specifically designed for the Indian market with support for local payments. This site offers an incredible variety of licensed slots and traditional games like Teen Patti and Andar Bahar. I found their registration process to be very quick, allowing new players to start exploring the latest bonuses in just a few minutes.
Open Pinco official for a stable and high-speed alternative to reach one of the most trusted gaming sites in the local market. This portal includes an extensive library of live dealer games and popular crash titles that are fully optimized for a seamless experience. It’s a reliable choice for those who prioritize security and want instant access to their bankroll through multiple localized payment options.
tamil porn
hop over to this web-site paycor employer login
Kraken Marketplace Официальный сайт для доступа к Kraken
kra at
Подключение к сайту и действующие URL
Современные онлайн казино предоставляют участникам большой выбор опций. Центральный портал Килограмм организует стабильный вход ко всем услугам. При этом иногда появляются случаи, когда необходимо дополнительный способ подключения.
Что являет собой собой актуальное зеркало
Действующее зеркало — это идентичная реплика главного портала с иным URL расположением. Зеркало сегодня позволяет избегать возможные барьеры и гарантировать непрерывный доступ к выбранным слотам.
Главное зеркало обладает теми же опциями, что и центральный веб-сайт:
– Весь каталог игр
– Личный аккаунт с сохраненными информацией
– Полные поощрения и акции
– Надежные банковские транзакции
Открытие профиля и доступ в казино
Этап создания профиля на сайте длится пару моментов. Новым пользователям требуется:
1. Перейти на функционирующее зеркало в настоящее время
2. Нажать клавишу «Регистрация»
3. Заполнить обязательные данные
4. Проверить почтовую почту или номер телефона
5. Активировать награду за оформление
Авторизация в собственный аккаунт осуществляется посредством внесение никнейма и кода доступа.
Анализ призовой системы
Привлекательная наградная программа — важнейшее достоинство ресурса. Клиенты зарабатывают разнообразные поощрения:
Начальные подарки
Начинающие игроки способны ожидать на привлекательный приз за открытие профиля. Как правило это совокупность предложений, охватывающий:
– Процентную премию к дебютному пополнению
– Безвозмездные спины
– Призовые суммы на кошелек
Промокоды и специальные предложения
Постоянные бонусные комбинации дают возможность активировать призовые выгоды. Использовать их допустимо в предназначенном разделе личного раздела.
Фриспины и возврат средств
Даровые вращения — это шанс запускать автоматы без задействования своих сумм. Кэшбек предполагает частичный возврат утраченных средств.
Ассортимент развлечений
Развлекательная платформа предлагает огромную библиотеку игр.
Игровые машины
Ассортимент автоматов восхищает ожидания. Доступны традиционные трехбарабанные автоматы и актуальные развлечения с увлекательной картинкой.
Live игры
Зона Live заведения погружает пользователей в обстановку подлинного игорного клуба. Профессиональные ведущие проводят раунды в прямом формате.
Соревнования и таблицы лидеров
Систематические турниры привносят азарта и дают шанс получить крупные призы.
Портативная версия и приложение
Современные технологии дают возможность развлекаться в любом месте. Mobile реализация самостоятельно оптимизируется под размер гаджета.
Скачать софт разрешено для программных платформ iOS и Android. Приложение предоставляет:
– Мгновенный запуск
– Стабильную функционирование
– Моментальные-сообщения об акциях
– Интуитивный дизайн
Финансовые действия
Платформа принимает многочисленные методы пополнения и изъятия средств:
– Пластиковые инструменты
– Электронные сервисы
– Цифровые валюты
– Финансовые отправки
Всевозможные действия проходят через зашифрованное протокол, что подтверждает сохранность личных сведений.
Отдел ассистанса
Квалифицированная бригада поддержки трудится круглосуточно. Обратиться с специалистами можно через:
– Онлайн-чат
– Цифровую почту
– Горячую линию
– Медиа каналы
Заключение
Основной веб-сайт и его рабочее зеркало гарантируют игрокам надежный и комфортный переход к азартным забавам. Привлекательные поощрения, широкий выбор развлечений и отличная поддержка обеспечивают игру крайне приятной и доходной.
Анализ лицензионного веб-сайта
Актуальные онлайн казино предоставляют игрокам широкий спектр развлечений и шансов. Основной портал Gold предоставляет безопасный вход к игровым сервисам.
Функционирующее зеркало: вход на сегодня
Резервный сайт представляет собой абсолютную реплику основного портала. Проверенное зеркало помогает клиентам обходить существующие блокировки.
Достоинства эксплуатации зеркала
Главные выгоды включают:
– Беспрерывный доступ к ресурсу
– Сохранение любых функций главного ресурса
– Сохранность персональных данных
– Аналогичный возможности
Создание аккаунта на портале
Ход создания аккаунта знаменуется доступностью и удобством. Новые пользователи необходимо:
1. Перейти на лицензионный ресурс или его зеркало
2. Щелкнуть на клавишу оформления
3. Ввести необходимые информацию
4. Подтвердить электронную почту
5. Осуществить начальный авторизацию
Подарок за создание аккаунта
Начинающие зарабатывают внушительный начальный презент. Это поощрение может предусматривать:
– Материальные начисления
– Бесплатные спины
– Увеличенный коэффициент возврата
Авторизация в индивидуальный раздел
Существующие игроки могут быстро зайти в свой кабинет, используя учетные данные и код. Индивидуальный раздел обеспечивает возможность к:
– Управлению депозитом
– Журналу транзакций
– Текущим призам
– Конфигурации учетной записи
Призы и промо
Ресурс систематически проводит различные предложения для пользователей.
Разновидности подарков
Главные виды поощрений:
– Денежные бонусы – коэффициент от объема взноса
– Бесплатные вращения – бесплатные вращения в аппаратах
– Кэшбек – возврат процента проигранных сумм
– Призовые призы – вознаграждения за игру в соревнованиях
Промокоды
Уникальные коды обеспечивают приобрести бонусные бонусы. Пользователи способны обнаружить их на тематических ресурсах или заработать в письмах.
Переносная адаптация и программа
Прогрессивные пользователи ценят мобильный досуг.
Характеристики портативной платформы
– Отзывчивый интерфейс для разнообразных устройств
– Полный возможность к развлечениям
– Моментальная функционирование
– Практичное управление
Загрузить приложение
Портативное программа открыто для установки на устройства с операционными платформами Android и iOS. App дает:
– Устойчивую деятельность
– Пуш алерты о призах
– Моментальный запуск к предпочитаемым автоматам
Гемблинг каталог
Платформа предлагает внушительную галерею азартных игр.
Слоты
Библиотека азартных автоматов содержит:
– Классические слоты
– Передовые игры
– Накопительные автоматы
– Тематические игры
Live столы
Область настоящих столов обеспечивает возможность играть с профессиональными крупье. Предложены:
– Рулетки
– Очко
– Punto Banco
– Техасский холдем
Конкурсы
Регулярные чемпионаты помогают клиентам конкурировать за солидные наградные банки. Турнирная система обновляется еженедельно.
Финансовые действия
Казино обеспечивает множество способов депозита и вывода денег:
– Дебетовые карты
– Онлайн счета
– Межбанковские трансферы
– Bitcoin
Все транзакции проходят надежно с использованием современных методов криптографии.
Сервис сопровождения
Компетентная команда поддержки трудится круглосуточно. Соединиться с менеджерами доступно через:
– Живой чат
– Электронную почту
– Контактный номер
– Social сети
Охрана и регулирование
Игровой клуб работает на фундаменте законной лицензии. Подобное обеспечивает:
– Легальность игрового геймплея
– Охрану индивидуальных данных
– Своевременные выплаты
– Ответственный гейминг
Вывод
Основной ресурс и его актуальные резервные страницы предоставляют участникам целостный ассортимент возможностей для приятной и доходной развлечений. Щедрые вознаграждения, различные игры, компетентная помощь и защищенная структура операций превращают казино лучшим опцией для фанатов развлекательных забав.
Try Pinco to access a secure and fully localized gaming platform designed specifically for the needs of players in Kyrgyzstan. This destination offers a wide range of certified slots and features 24/7 customer support to ensure that all user questions are resolved immediately. The site is known for its fast withdrawal process and a user-friendly interface that works perfectly across all mobile and desktop devices.
Open https://bet-mexico.com.mx/ for a dedicated look at the best betting strategies and upcoming sporting events relevant to the local community. This portal serves as a helpful guide for staying updated on team performances and expert analysis before placing your next wager. It is a well-maintained resource that prioritizes accurate information and provides a secure path to the most reputable operators in Mexico.
Using this link allows you to place bets on a trusted platform with a long history of reliability in the Mexican and Latin American markets. The interface is clean and functional, ensuring that even beginners can quickly find the odds and match events they are interested in. They offer a great range of localized payment methods, making the process of managing your account funds simple and efficient.
viral porn
Передовые онлайн-казино предлагают пользователям внушительный спектр развлечений и премиальных программ. Вход к платформе реализуется через официальный сайт или его функционирующее зеркало РёРіСЂС‹ Gold, что обеспечивает стабильную активность.
В чем суть действующее зеркало казино
Дубликат — это полная версия основного веб-сайта, созданная для решения ограничений. Рабочее зеркало обеспечивает участникам обрести доступ к предпочитаемым слотам в каждое время.
Лицензионное зеркало обладает всеми функциями оригинального ресурса:
– Весь перечень развлечений
– Учетная запись с внесенными данными
– Свежие поощрения
– Надежные платежные действия
Регистрация на главном ресурсе
Ход регистрации составляет всего считанные минут. Новым игрокам требуется:
1. Попасть на проверенный сайт или актуальное зеркало
2. Выбрать на элемент “Регистрация”
3. Указать нужные информацию
4. Проверить email
5. Внести начальный взнос
Стартовый бонус предоставляется незамедлительно после выполнения всех этапов.
Подключение в личный кабинет
Созданные клиенты могут выполнить вход применяя:
– Учетное имя и шифр
– Цифры телефона
– Контактный email
Аккаунт предоставляет право к администрированию средствами, истории ставок и текущим акциям.
Промо и предложения
Гемблинг платформа вознаграждает активных игроков разнообразными поощрениями:
Стартовый пакет
– Поощрение на стартовый пополнение до 100%
– Free spins на востребованные слоты
– Дополнительные бонусы за следующие депозиты
Бонусные коды
Особые промокоды обеспечивают возможность на получение специальных поощрений. Свежие купоны размещаются в секции “Бонусы”.
Кэшбек
Регулярный бонус насчитывает до 10% от утраченных денег. Выплата предоставляется сразу.
Система лояльности
Регулярные участники зарабатывают очки, которые конвертируются на действительные выплаты или фриспины.
Мобильный сайт и APP
Для практичности пользователей создана полноценная mobile версия. Приспособленный вид помогает комфортно развлекаться с каждого портативного гаджета.
Преимущества APP:
– Моментальный доступ к играм
– Улучшенный облик
– Устойчивая деятельность
– Нотификации о свежих бонусах
Установить APP можно бесплатно с основного сайта для девайсов на Android и iOS.
Библиотека слотов
Машины
Каталог включает более 2000 автоматов от популярных провайдеров:
– Стандартные автоматы
– Мультимедийные игры
– Слоты с джекпотом
– Брендовые автоматы
Live казино
Категория Live столов обеспечивает взаимодействие с реальными диллерами в онлайн формате:
– Колесо фортуны
– Блэкджек
– Карты
– Poker
Состязания
Периодические турниры с большими выигрышными суммами устраиваются систематически. Участие в турнирах разрешено всем активным пользователям.
Платежные варианты
Взносы и снятия финансов осуществляются через популярные платежные системы:
– Кредитные карты
– Онлайн системы
– Крипто
– Счетные транзакции
Самый низкий вклад — от 100 рублей. Изъятие финансов выполняется в течение 24 времени.
Отдел саппорта
Постоянная команда поддержки способна поддержать в исправлении произвольных вопросов:
– Live chat
– Email
– Контактный номер
– Публичные сети
Безопасность и лицензия
Подлинный портал работает на основании признанной документа. Всевозможные данные пользователей обезопасены актуальным SSL-протоколом.
Заключение
Функционирующее зеркало обеспечивает стабильный соединение к предпочитаемым развлечениям, выгодным акциям и функциональным сервисам. Зарегистрируйтесь сейчас и обретите стартовый поощрение!
Передовые онлайн-казино предлагают клиентам разнообразный набор слотов и щедрые награды. Но для беспроблемной игры существенно понимать, как обнаружить ДжиВиСпин и его действующие зеркала.
Что такое официальный сайт казино
Лицензионный ресурс казино — это первичная площадка, где клиенты могут пользоваться развлекательными автоматами. Сайт функционирует на законных условиях и обладает всеми обязательными разрешениями.
Первостепенные достоинства официального сайта:
– Защищенность индивидуальных информации
– Прозрачные правила использования
– Стабильные транзакции
– Оперативная помощь
Актуальное зеркало казино: для чего используется
Зеркало — это полная копия лицензионного веб-сайта, размещенная по отличному адресу. Действующее зеркало разрабатывается для поддержания постоянного доступа к платформе.
Причины использования зеркал:
– Недоступность официального адреса
– Профилактические мероприятия
– Значительная нагрузка на платформу
Как найти рабочее зеркало в данный момент
Получить текущее действующее зеркало можно различными путями:
1. Рассылка — подпишитесь на email подписку
2. Департамент поддержки — свяжитесь в онлайн-чат
3. Социальные медиа — мониторьте за постами
4. Партнерские ресурсы — надежные ресурсы
Создание аккаунта на ресурсе казино
Этап открытия счета составляет буквально пару мгновений:
1. Выберите на кнопку “Регистрация”
2. Заполните необходимые сведения
3. Верифицируйте электронную ящик
4. Используйте код активации, если есть
Сразу после финализированной регистрации вам будет возможен личный кабинет.
Награды и купоны
Привлекательная премиальная политика — существенное конкурентное преимущество казино:
Бонус за создание аккаунта
Начинающие участники зарабатывают первый поощрение, который может охватывать:
– Валютный бонус на стартовый взнос
– Фриспины для слотов
– Безвозвратные бонусы
Промокоды
Регулярно выходят эксклюзивные бонусные шифры, позволяющие активировать специальные поощрения.
Система кешбэка
Активные участники возвращают долю потраченных средств в виде компенсации.
Действующие предложения и соревнования
Сайт постоянно устраивает увлекательные промо-мероприятия:
– Недельные чемпионаты
– Праздничные промо
– Розыгрыши крупных призов
– Система привилегий
Авторизация в персональный аккаунт
Для доступа на сайт нужно:
1. Посетить основной адрес или действующее зеркало
2. Выбрать “Вход”
3. Ввести никнейм и секретную комбинацию
В персональном кабинете предоставлены нижеперечисленные функции:
– Депозит кошелька
– Получение призов
– Изучение журнала игр
– Управление индивидуальными сведениями
Портативная версия и софт
Портативная модификация
Мобильная версия ресурса предоставляет шанс развлекаться с любого смартфонного устройства. Дизайн адаптивно настраивается под формат экрана.
Приложение для скачивания
Получить клиент можно для:
– Android — непосредственная установка с сайта
– iOS — загрузка через App Store
Плюсы программы:
– Оперативный доступ
– Стабильная работа
– Push-сообщения об акциях
– Производительный дизайн
Гемблинг разделы
Слоты
Обширная подборка азартных машин от лучших разработчиков:
– Ретро машины
– Продвинутые-игры
– Джекпот-машины
Live игры
Раздел с реальными ведущими обеспечивает:
– European/American Roulette
– 21
– Мини-баккара
– Poker
Трансляции ведутся в HD качестве, воссоздавая атмосферу подлинного казино.
Варианты депозита и снятия
Ресурс обслуживает разные транзакционные инструменты:
– Банковские картсчета
– Онлайн кошельки
– Цифровые валюты
– Wire транзиты
Наименьшие пороги взноса и быстрые выплаты делают развлечение крайне приятной.
Отдел support
Компетентная группа помощи доступна 24/7 и может поддержать с различными задачами:
– Онлайн-чат
– Email-помощь
– Голосовая связь
Резюме
Лицензионный веб-сайт казино и его действующие альтернативные адреса предоставляют клиентам конфиденциальный и захватывающий азартный отдых. Выгодные бонусы, удобная мобильная версия, богатые слоты и качественное live-казино делают эту платформу отличным решением для азартных развлечений.
Visit the link to find an elite betting environment that focuses on providing premium services for high-stakes players and sports enthusiasts. This platform offers unique features and specialized support that you won’t typically find on more generic wagering sites in the region. It’s an ideal choice for those who value privacy, security, and access to exclusive markets with higher limits.
Explore PlayUZU official if you prefer a transparent casino experience where bonuses come without hidden terms or complicated wagering rules. This website focuses on fair play and provides a clear breakdown of how rewards are calculated and paid out to the members. The gaming library is extensive, featuring titles from top-tier providers that ensure high-quality graphics and smooth performance on all devices.
Check the portal for a comprehensive overview of the latest bonuses and seasonal promotions currently offered by this popular Mexican operator. This site is very well-organized, making it simple to find information on wagering requirements and eligible games for your active rewards. It serves as a great starting point for both new and experienced players who want to maximize their bankroll with legitimate offers.
https://pharmacologicalsciences.com/edpills.html ed pills
Consider this
Online loans for bad credit tips
to get help.
Kraken Marketplace Официальный сайт для доступа к Kraken
kra at
start browsing – Well-organized pages keep everything accessible and easy to follow.
Access Brazino777 official to discover an impressive collection of certified slots and live dealer tables available for players in Mexico. This platform stands out due to its simple registration process and multiple deposit options that cater specifically to the needs of the local market. It provides a safe and engaging environment where you can enjoy diverse gaming titles with the assurance of fair play and transparent rules.
Open https://novi-bet.com.mx/ for access to a professional sportsbook featuring deep markets on both local football and international tournaments. This resource offers real-time statistics and live streaming features that help users make more informed decisions during intense matches. I’ve found their customer support to be very responsive, ensuring that any account or technical questions are resolved in a matter of minutes.
Visit Betmaster Mexico to explore a wide variety of sports betting markets and competitive odds tailored for the Mexican audience. This platform provides a very intuitive interface that makes it easy to navigate between live matches and classic casino games without any technical delays. It is a reliable choice for players who value fast registration and secure payment methods for their daily entertainment.
Актуальные онлайн-казино предоставляют клиентам множество вариантов для удобной игры. Центральный сайт Клубника предоставляет доступ ко всем возможностям и развлечениям. Однако при возникновении системных сложностей на выручку прибывают рабочие альтернативные адреса.
Что являет собой собой действующее зеркало
Альтернативный адрес казино — это стопроцентная версия главного сайта, расположенная по другому веб-адресу. Подлинное зеркало сохраняет все характеристики, вместе с создание аккаунта, авторизацию в персональный кабинет, премии и купоны.
Копия на сегодня дает:
– Стабильный вход к развлекательным машинам
– Абсолютную сохранность персональных информации
– Сохранение средств и журнала переводов
– Доступность всех промо-предложений
Регистрация на главном ресурсе
Этап регистрации отнимает несколько минут. Начинающим игрокам требуется:
1. Зайти на официальный ресурс или функционирующее зеркало
2. Нажать кнопку «Зарегистрироваться»
3. Указать запрашиваемые поля
4. Активировать email почту
5. Ввести купон при существовании
После финиша создания аккаунта игроки зарабатывают вознаграждение за регистрацию, что может содержать бесплатные вращения или монетарное вознаграждение.
Авторизация в личный кабинет
Персональный кабинет открывает комплексный управление над игровым ходом. Через персональный аккаунт можно:
– Депонировать счет
– Снимать выплаты
– Использовать промокоды
– Контролировать хронологию ставок
– Играть в соревнованиях
– Обретать кэшбек
Описание вознаграждений и специальных предложений
Богатая премиальная схема — важное плюс проекта. Основные формы премий:
Стартовый приз
Дебютанты приобретают богатое премирование на дебютные вклады. Объем приза может доходить до 100-200% от объема пополнения.
Free spins
Безвозмездные раунды выдаются для востребованных слотов. Сумма free spins изменяется от 10 до 500 штук.
Кэшбек
Постоянный или помесячный возврат процентной доли проигранных средств. Типичный размер кэшбека — 5-15%.
Соревнования
Регулярные соревнования с солидными призовыми пулами. Игроки борются за лучшие позиции в турнирной таблице.
Портативная версия и приложуха
Адаптивная версия разрешает развлекаться с любого девайса. Геймеры могут загрузить app для iOS и Android или задействовать интернет версию.
Достоинства смартфонного приложения:
– Оперативная загрузка автоматов
– Практичный графический интерфейс
– Пуш-нотификации о акциях
– Доступ через Face ID
Автоматы и Live казино
Игровая коллекция включает тысячи наименований от лидирующих производителей.
Востребованные разделы игр:
– Классические слоты
– Видео-автоматы с бонусными этапами
– Прогрессивный джекпот автоматы
– Мега-путь машины
Live игорный зал
Зона live игорный зал обеспечивает игру с реальными ведущими. Имеются классические развлечения:
– Рулетка
– Blackjack
– Punto Banco
– Покер
Как разыскать актуальное зеркало
Получить действующую URL на зеркало разрешается множественными способами:
1. Зарегистрироваться на почтовую рассылку
2. Отслеживать за апдейтами в соц сетях
3. Написать в сервис поддержки
4. Добавить в закладки действующее зеркало в избранное
Итог
Официальный портал и его актуальные дубликаты гарантируют стабильный путь к игровым автоматам. Великодушные поощрения, разнообразные промокоды, комфортное мобильное приложение и высококлассная служба поддержки делают развлекательный процесс предельно приятным и безопасным.
Вход к платформе через актуальные зеркала
Игроки сетевых казино регулярно имеют дело с вопросом блокировки основного домена. Как раз для решения этой задачи разработаны копии основного домена. Вован регистрация гарантирует абсолютный вход ко всем сервисам ресурса.
Что такое действующее зеркало казино
Дубликат представляет собой идентичную версию основного ресурса с аналогичным опциями. Единственное несовпадение — это альтернативное имя. Любые информация участника, в том числе средства, награды и архив раундов, остаются прежними.
Достоинства задействования зеркал
Рабочие зеркала характеризуются рядом ключевых достоинств:
– Постоянный переход к выбранным слотам
– Стопроцентная сохранность собственных параметров
– Сохранение всех конфигураций пользовательского кабинета
– Шанс получения поощрений и присутствия в акциях
Оформление профиля на основном сайте
Процедура оформления предельно элементарен и занимает несколько минут. Свежие пользователи могут надеяться на внушительный вводный поощрение за регистрацию.
Шаги открытия аккаунта
1. Вход на официальный домен или его альтернативу
2. Выбор на опцию “Регистрация”
3. Указание обязательных информации
4. Верификация email почты
5. Указание бонусного кода (когда имеется)
Поощрения и промоакции для участников
Ресурс поощряет своих участников различными призовыми акциями.
Базовые категории бонусов
Приветственный пакет — щедрое начисление для начинающих пользователей, что может вмещать монетарные призы и бесплатные вращения.
Free spins — возможность запускать в популярных игровых машинах безвозмездно.
Кэшбек — пропорциональный возврат утраченных средств, который начисляется раз в неделю или каждый месяц.
Купоны — уникальные последовательности, предоставляющие добавочные преимущества.
Персональный кабинет: возможности и параметры
Пользовательский аккаунт предоставляет полный надзор над развлекательным процессом. В данном разделе присутствуют:
– Контроль средствами
– Записи платежей
– Действующие привилегии
– Параметры защиты
– Подтверждение профиля
Карманная вариант и APP
Нынешние игроки ценят портативность. Казино предлагает двойной пути для развлечений с портативных девайсов.
Адаптивная телефонная версия
Портативная версия сайта без участия настраивается под экран любого девайса. Не нужно скачивать отдельное ПО.
APP для телефонов
Доступно загрузить фирменное программу для iOS и Android. Приложение обеспечивает:
– Мгновенный доступ
– Адаптированный дизайн
– Мобильные-оповещения о поощрениях
– Стабильную функциональность
Live раздел: среда настоящего игорного заведения
Раздел Live игр транспортирует игроков в обстановку подлинного казино. Опытные крупье организуют раунды в формате настоящего времени.
Востребованные Live-форматы
– Европейская рулетка
– Blackjack
– Baccarat
– Техасский холдем
Аппараты: выбор слотов
Библиотека слотовых машин насчитывает сотни наименований от ведущих поставщиков. Пользователи встретят:
– Классические слоты
– Современные слоты
– Джекпот-автоматы
– Мегавейс
Соревнования и уникальные события
Систематические турниры дают возможность пользователям состязаться друг с другом за солидные денежные фонды. Каждый турнир имеет свои требования включения и рейтинг лидеров.
Пути пополнения и снятия финансов
Казино предоставляет массу финансовых сервисов:
– Кредитные средства
– Электронные платежные системы
– Крипто
– Wire транзиты
Все переводы проходят защищенно благодаря передовым методам защиты.
Команда обслуживания
Профессиональные операторы команды помощи настроены поддержать 24/7. Доступны такие пути контакта:
– Оперативный-чат
– Email-помощь
– Аудио связь
– Медийные сети
Резюме
Главный портал платформы и его рабочие копии обеспечивают клиентам защищенный и удобный доступ к широкому выбору геймерских услуг. Солидные поощрения, постоянные промоакции, профессиональная служба и комфортные платежные методы делают развлекательный опыт чрезвычайно увлекательным и выгодным.
discover this page – Layout is neat and intuitive, allowing users to navigate with ease.
Fortune Rabbit wilds expansivos: já cobriu a tela inteira? Mostra o print!
Man United Sancho eyes Dortmund return 2026 transfer news
Jogo do Tigrinho multiplicador aleatório: melhor que respins fixos? Opine!
Fortune Rabbit respins chain: recorde pessoal de quantos giros seguidos você já fez?
Jogo do Tigrinho no celular: quem já ganhou big win deitado no sofá em 2026?
Fortune Rabbit wilds expansivos: já cobriu a tela inteira? Mostra o print!
clickmetric – Navigation felt smooth, found everything quickly without any confusing steps.
Visit https://betmaster-mx.com.mx/ to explore a wide variety of sports betting markets and competitive odds tailored for the Mexican audience. This platform provides a very intuitive interface that makes it easy to navigate between live matches and classic casino games without any technical delays. It is a reliable choice for players who value fast registration and secure payment methods for their daily entertainment.
Jogo do Tigrinho multiplicador aleatório: melhor que respins fixos ou não? Opine!
PG Soft top cassinos Pix 2026: lista atualizada com bônus reais
cheap phuket apartments for sale apartments-for-sale-in-phuket-1.com .
go to this web-site paycor login
Переход к порталу и актуальные зеркала
Востребованные онлайн казино гарантируют пользователям большой выбор опций. Главный веб-сайт JVSpin организует надежный вход ко всем возможностям. При этом порой возникают ситуации, когда нужно альтернативный путь авторизации.
Что есть собой рабочее зеркало
Рабочее зеркало — это полная реплика основного веб-сайта с другим интернет названием. Зеркало сегодня обеспечивает обходить вероятные ограничения и гарантировать стабильный переход к выбранным играм.
Официальное зеркало имеет теми же опциями, что и базовый портал:
– Целый перечень развлечений
– Персональный профиль с сохраненными сведениями
– Действующие награды и акции
– Защищенные денежные транзакции
Открытие профиля и вход в систему
Этап открытия аккаунта на платформе требует буквально моментов. Свежим участникам следует:
1. Открыть на действующее зеркало на данный момент
2. Кликнуть элемент «Открыть профиль»
3. Внести требуемые сведения
4. Активировать электронную почту или информацию смартфона
5. Использовать подарок за оформление
Доступ в индивидуальный профиль производится посредством указание логина и ключа.
Описание наградной политики
Щедрая призовая политика — главное козырь ресурса. Пользователи зарабатывают различные бонусы:
Начальные подарки
Свежие участники имеют возможность ожидать на привлекательный подарок за открытие профиля. Обычно это совокупность вариантов, содержащий:
– Долевую надбавку к начальному вкладу
– Безвозмездные вращения
– Бонусные суммы на кошелек
Купоны и особые предложения
Постоянные купоны помогают активировать экстра льготы. Использовать их разрешено в отдельном поле собственного кабинета.
Бесплатные вращения и кешбэк
Бесплатные спины — это возможность играть слоты без применения персональных финансов. Рибейт подразумевает определенный возмещение проигранных денег.
Ассортимент развлечений
Азартная сайт обеспечивает значительную коллекцию развлечений.
Слоты
Вариативность автоматов восхищает ожидания. Представлены стандартные трехбарабанные автоматы и современные игры с увлекательной графикой.
Live игры
Категория Live развлечений переносит игроков в обстановку истинного игорного дома. Квалифицированные крупье осуществляют сессии в онлайн формате.
Конкурсы и доски почета
Постоянные соревнования добавляют азарта и предоставляют шанс заработать крупные суммы.
Портативная реализация и софт
Актуальные решения помогают играть в удобном месте. Мобильная вариант независимо настраивается под размер гаджета.
Скачать программу разрешено для мобильных платформ iOS и Android. Программа дает:
– Оперативный вход
– Бесперебойную работу
– Мгновенные-оповещения об предложениях
– Комфортный интерфейс
Банковские транзакции
Сайт работает с различные методы пополнения и изъятия сумм:
– Кредитные карты
– Электронные кошельки
– Криптовалюты
– Денежные переводы
Все транзакции выполняются через защищенное соединение, что подтверждает неприкосновенность приватных информации.
Департамент support
Квалифицированная команда помощи действует постоянно. Контактировать с операторами разрешено через:
– Онлайн-чат
– E-mail почту
– Горячую линию
– Коммуникационные каналы
Выводы
Главный сайт и его действующее зеркало дают пользователям безопасный и легкий путь к интересным забавам. Привлекательные награды, разнообразный каталог игр и профессиональная помощь обеспечивают участие исключительно приятной и прибыльной.
Анализ официального сайта
Передовое онлайн-казино предлагает своим игрокам широкий набор развлечений и поощрений. Основной ресурс казино Рльдорадо работает постоянно, гарантируя возможность к востребованным автоматам, live-казино и многим акциям.
Действующее зеркало: возможность к порталу
Что такое зеркало казино
Копия составляет собой полную реплику основного ресурса с альтернативным доменным адресом. Рабочее зеркало обеспечивает пользователям избегать запреты и обеспечивать надежный путь к предпочитаемым развлечениям.
Как получить рабочее зеркало сегодня
Свежие линки на проверенное зеркало появляются через:
– E-mail рассылку
– Официальные социальные сети
– Команду обслуживания
– Специализированные площадки
Регистрация на портале
Процедура оформления
Открытиесчета требует пару минут и предполагает нижеследующие действия:
1. Вход на оригинальный портал или рабочее зеркало
2. Нажатие элемента “Зарегистрироваться”
3. Внесение учетных информации
4. Активация адреса или телефона
5. Формирование кодадоступа
Бонус за оформление
Первые клиенты зарабатывают выгодные стартовые бонусы:
– Финансовые деньги на кошелек
– Халявныеспины для симуляторов
– Увеличенный размер возврата
– Специальные промокоды
Доступ в собственный счет
Действующие участники могут выполнить логин через оригинальный сайт или действующее зеркало. Для этого требуется ввести учетноеимя и пароль, придуманные при созданииаккаунта.
Функции индивидуального кабинета
В персональном разделе доступны основные опции:
– Контроль учетными данными
– Пополнение счета
– Получение выигрышей
– Активация промокодов
– Просмотр истории игр
– Включение в состязаниях
Вознаграждения и акции
Разновидности вознаграждений
Казино радует своих клиентов многочисленными бонусными предложениями:
– Начальный бонус — солидные вознаграждения на первые взносы
– Фриспины — экстра прокруты в известных автоматах
– Кешбэк — систематический компенсация суммы потерь
– Схема лояльности — эксклюзивные льготы для верных участников
Промокоды и их активация
Эксклюзивные промокоды гарантируют дополнительные вознаграждения. Для применения необходимо ввести код в определенное графу в индивидуальном кабинете.
Азартный выбор
Игры
Библиотека развлекательных симуляторов включает массу позиций от лучших поставщиков:
– Классические симуляторы
– Новые слоты
– Прогрессивные симуляторы
– Тематические автоматы
Live казино
Секция Live-казино дарит участие с реальными крупье в формате актуального эфира:
– Рулетка
– Blackjack
– Baccarat
– Карибскийпокер
Соревнования
Систематические состязания с крупными призовыми суммами организуются ежедневно. Претенденты борются за победу в рейтинге.
Мобильная адаптация и APP
Mobile платформа веб-сайта
Оригинальный портал на100% приспособлен для мобильных устройств. Участники могут запускать слоты непосредственно через веб-навигатор без обязательства установки.
Софт для инсталляции
Авторское карманное APP предлагается для установки на гаджеты с рабочими ОС Android и iOS. Софт обеспечивает:
– Мгновенный подход к играм
– Бесперебойную работу
– Push-уведомления о акциях
– Удобный оформление
Итог
Основной сайт казино и его функционирующие копии предоставляют игрокам полный вход к первоклассным азартным услугам. Большие подарки, разнообразные предложения, комфортная мобильная реализация и опытная поддержка создают азартный времяпрепровождение чрезвычайно удобным и результативным.
phuket real estate for sale real-estate-for-sale-in-phuket.com .
villas for sale phuket villas for sale phuket .
Try this site if you are looking for an authentic Mexican gaming experience with a massive selection of high-quality slots. This destination is well-known for its generous promotional offers and a loyalty program that consistently rewards active members with exclusive bonuses. The site is fully optimized for mobile use, allowing you to enjoy your favorite games smoothly from any location at any time.
access this site – Smoothly organized pages allow users to locate what they need easily.
Нынешние онлайн-казино гарантируют клиентам обширный выбор возможностей для комфортной игры. Доступ к площадке Gold казино производится через официальный веб-ресурс или актуальное зеркало.
Что такое функционирующее зеркало казино
Функционирующее зеркало — это запасной URL официального сайта казино. Такие дубликаты создаются для обеспечения стабильного входа к игровой системе.
Альтернатива на сегодня целиком копирует возможности основного домена. Игроки приобретают идентичный доступ ко всем функциям, включая открытие счета, пополнение счета и снятие средств.
Открытие счета на главном портале
Механизм открытия профиля занимает всего считанные минут. Будущим участникам нужно:
1. Войти на основной портал или действующее подлинное зеркало
2. Нажать кнопку “Зарегистрироваться”
3. Внести обязательные сведения
4. Активировать электронную почту
5. Ввести промокод при наличии
После окончания регистрации игрок приобретает подарок за регистрацию, который может охватывать free spins или финансовое премию.
Доступ в индивидуальный кабинет
Личный кабинет — это защищенная зона, где игроки способны управлять своим профилем. Для логина следует указать имя пользователя и password.
В персональном кабинете открыты такие возможности:
– Проверка истории транзакций
– Активация бонусных кодов
– Управление поощрениями
– Участие в конкурсах
– Контроль возмещения
– Изменение данных
Призы и предложения
Азартная сервис предлагает выгодные подарки:
Начальный пакет — новички зарабатывают крупное поощрение на начальные депозиты.
Бесплатные вращения — начисляются как при регистрации, так и в контексте разнообразных кампаний.
Возмещение — постоянный рефанд процента израсходованных средств.
Купоны — уникальные последовательности, обеспечивающие доступ к эксклюзивным призам.
Характеристика развлекательных секций
Слоты
Библиотека слотов содержит тысячи игр от лучших поставщиков. Пользователи найдут как обычные слоты, так и современные 3D-слоты с интересной анимацией.
Live казино
Категория Live казино предлагает возможность развлекаться с живыми дилерами в режиме текущего времени. Имеются популярные столы: рулетка, блэкджек, баккара, покер.
Турниры
Периодические турниры с крупными призовыми фондами притягивают массу участников. Призеры зарабатывают финансовые вознаграждения и специальные подарки.
Смартфонная версия и программа
Портативная версия ресурса позволяет развлекаться с любого аппарата. Оформление автоматически корректируется под диагональ экрана.
Скачать программу можно для аппаратов на Android и iOS. Телефонное программа характеризуется всеми опциями настольной версии.
Как обнаружить текущее зеркало на текущий день
Свежие URL альтернатив постоянно корректируются. Обнаружить актуальную ссылку можно разными методами:
– Через департамент помощи
– В официальных информационных сетях
– По e-mail рассылке
– На тематических ресурсах
Безопасность и легальность
Лицензионный сайт функционирует на основании мировой лицензии. Все платежи защищены современными протоколами кодирования.
Приватность персональных данных сохраняется в стопроцентном размере.
Резюме
Главный ресурс и его рабочие копии предоставляют пользователям круглосуточный выход к первоклассным развлекательным развлечениям. Щедрые поощрения, многочисленные автоматы, опытная сервис — все это формирует развлекательный досуг невероятно комфортным и интересным.
techify – Bookmarked this immediately, planning to revisit for updates and inspiration.
https://pharmacologicalsciences.com/edpills.html Pharmacological Sciences Research Institute
Подключение к платформе через действующие зеркала
Нынешние интернет казино предоставляют клиентам круглосуточный переход к услугам. Основной портал РЎСѓРєР° оперирует бесперебойно, обеспечивая богатый ассортимент азартных развлечений. Однако временами возникают цифровые трудности или блокировки, поэтому критично понимать о существовании действующих зеркал.
Что собой представляет из себя официальное зеркало казино
Копия — это точная реплика главного веб-сайта с схожим набором функций. Функционирующее зеркало в настоящее время позволяет преодолевать территориальные блокировки и вести развлечения.
Ключевые выгоды задействования зеркал:
– Стопроцентный подключение к индивидуальному кабинету
– Фиксация всех показателей профиля
– Такой же ассортимент развлечений
– Свежие бонусы и промо
Регистрация на портале
Процедура записи длится считанные минут. Недавние клиенты обретают богатый приз за регистрацию, что может содержать:
– Начальный игровой бонус
– Даровые кручения для игр
– Уникальные ваучеры
– Увеличенный компенсацию
Ради завершения создания аккаунта нужно:
1. Зайти на основной портал или дубликат
2. Кликнуть опцию «Регистрация»
3. Ввести персональные информацию
4. Заверить email или телефон
5. Задействовать ваучер (при доступности)
Подключение в личный кабинет
Вслед за успешной регистрации игроки могут осуществлять вход посредством основной сайт или актуальное зеркало. Личный кабинет даёт полный контроль над аккаунтом:
– История пари
– Зачисление кошелька
– Получение призов
– Контроль привилегиями
– Участие в турнирах
Награды и промо казино
Платформа радует геймеров многочисленными бонусными системами:
Вступительные подарки
Новые игроки приобретают внушительный букет поощрений на первые депозиты. Зачастую это содержит процентную прибавку к величине пополнения плюс комплиментарные кручения.
Периодические акции
– Каждонедельный возврат до 15%
– Состязания с наградными пулами
– Бонусы на годовщину рождения
– Эксклюзивные акции для привилегированных пользователей
План поощрения
Активные клиенты собирают единицы, что можно трансформировать на реальные финансы или эксклюзивные бонусы.
Портативная редакция и софт
Актуальные решения позволяют играть в любом месте подходяще. Мобильная редакция веб-сайта автоматически подстраивается под дисплей всякого девайса.
Преимущества карманного программы:
– Моментальная запуск игр
– Эргономичный облик
– Моментальные-уведомления о промо
– Шанс скачать для Android и iOS
Реальное казино: антураж подлинного гемблинг дома
Секция Live заведения доставляет клиентов в среду истинного игорного заведения. Квалифицированные ведущие организуют процесс в формате настоящего времени.
Представленные варианты:
– Американская рулетка
– Очко
– Карточная игра
– Покерная игра
Слоты и гемблинг машины
Каталог азартных аппаратов включает массу названий от лидирующих разработчиков. Каждый пользователь обнаружит развлечение по желанию:
– Классические барабаны
– Современные автоматы с бонусными раундами
– Накопительный-автоматы
– Многолинейные игры
Соревнования и акции
Периодические состязания привносят остроту и предоставляют способность выиграть внушительные призы. Включение в турнирах часто бесплатное, а наградные пулы составляют значительных размеров.
Секьюрити и секретность
Платформа задействует современные протоколы криптографии для гарантии данных пользователей. Любые финансовые действия проходят через защищённые соединения.
Резюме
Центральный сайт и его рабочие зеркала гарантируют безопасный вход к первоклассным игровым играм. Богатые поощрения, практичная мобильная версия, богатство машин и профессиональное Live-казино формируют ресурс замечательным опцией для ценителей развлекательных слотов.
open this link – Clean sections help users focus on content without distraction.
I will immediately snatch your rss as I can’t find your email subscription link or e-newsletter
service. Do you’ve any? Kindly permit me realize in order that I may
subscribe. Thanks.
browse around here paycor login
My page: high Stakes Casino
luxury villas for sale in phuket luxury villas for sale in phuket .
Fortune Ox explosão total: já limpou a tela 4 vezes numa sessão?
Вход к ресурсу через актуальные зеркала
Участники интернет казино нередко имеют дело с проблемой ограничения главного портала. Именно для ликвидации этой трудности предусмотрены зеркала легального портала. Sykaaa гарантирует стопроцентный подключение ко всем возможностям площадки.
Что такое рабочее зеркало казино
Зеркало является собой абсолютную версию основного сайта с идентичным набором функций. Основное различие — это альтернативное имя. Любые данные участника, вместе с счет, награды и архив партий, остаются такими же.
Выгоды использования зеркал
Рабочие зеркала характеризуются рядом значимых выгод:
– Бесперебойный переход к любимым развлечениям
– Стопроцентная защита индивидуальных информации
– Неизменность всех настроек персонального кабинета
– Способность обретения бонусов и включения в предложениях
Регистрация на легальном домене
Процесс оформления чрезвычайно элементарен и требует немного минут. Начинающие участники могут претендовать на солидный стартовый поощрение за регистрацию.
Ступени открытия аккаунта
1. Подключение на легальный домен или его зеркало
2. Клик на опцию “Зарегистрироваться”
3. Внесение необходимых данных
4. Подтверждение почтовой почты
5. Внесение промокода (в случае присутствует)
Бонусы и промоакции для игроков
Игровая площадка радует своих пользователей различными бонусными системами.
Главные категории поощрений
Стартовый бонус — солидное премирование для новых игроков, что может включать монетарные призы и фриспины.
Бесплатные вращения — способность запускать в востребованных игровых машинах без затрат.
Возврат средств — пропорциональный отдача израсходованных финансов, который именно начисляется еженедельно или помесячно.
Специальные коды — специальные последовательности, предоставляющие дополнительные поощрения.
Пользовательский кабинет: возможности и параметры
Персональный раздел дает абсолютный управление над пользовательским процессом. Тут предусмотрены:
– Контроль средствами
– Данные транзакций
– Текущие привилегии
– Конфигурации сохранности
– Проверка учетной записи
Портативная платформа и APP
Нынешние пользователи ценят гибкость. Площадка предоставляет пару способа для развлечений с портативных аппаратов.
Приспособленная смартфонная редакция
Смартфонная платформа портала автономно подстраивается под экран любого устройства. Нет необходимости инсталлировать дополнительное ПО.
Софт для мобильных
Можно инсталлировать официальное приложение для iOS и Android. Приложение гарантирует:
– Мгновенный доступ
– Оптимизированный интерфейс
– Мобильные-уведомления о акциях
– Стабильную операционность
Live казино: антураж истинного казино
Зона Live развлечений доставляет игроков в атмосферу истинного игорного заведения. Компетентные крупье осуществляют сессии в варианте настоящего времени.
Известные Live-столы
– Американская рулетка
– Blackjack
– Baccarat
– Покер
Автоматы: выбор развлечений
Каталог азартных машин включает множество позиций от лидирующих разработчиков. Клиенты обнаружат:
– Классические слоты
– Современные слоты
– Накопительный приз-автоматы
– Megaways
Турниры и особые предложения
Постоянные турниры позволяют игрокам бороться друг с другом за солидные призовые фонды. Отдельный конкурс имеет свои требования вовлечения и рейтинг победителей.
Способы ввода и получения денег
Ресурс предоставляет ряд расчетных инструментов:
– Дебетовые инструменты
– Электронные счета
– Крипто
– Прямые транзиты
Каждые платежи осуществляются защищенно благодаря актуальным технологиям кодирования.
Служба помощи
Опытные операторы сервиса поддержки расположены содействовать 24/7. Доступны такие каналы коммуникации:
– Оперативный-чат
– Email-сервис
– Аудио поддержка
– Публичные сети
Резюме
Официальный портал игровой площадки и его актуальные дубликаты предоставляют пользователям защищенный и легкий переход к огромному выбору развлекательных развлечений. Внушительные бонусы, периодические предложения, квалифицированная сервис и удобные расчетные системы формируют геймерский досуг максимально приятным и результативным.
Доступ к порталу через проверенные зеркала
Пользователи сетевых казино нередко контактируют с ситуацией недоступности основного портала. Собственно для преодоления этой проблемы предусмотрены зеркала основного сайта. Лев предоставляет беспрепятственный вход ко всем возможностям ресурса.
Что такое актуальное зеркало казино
Дубликат является собой точную дубликат главного портала с идентичным возможностями. Главное расхождение — это другое имя. Каждые информация игрока, в том числе депозит, поощрения и записи игр, сохраняются прежними.
Выгоды применения зеркал
Действующие зеркала располагают комплексом существенных выгод:
– Круглосуточный подключение к выбранным развлечениям
– Абсолютная защита собственных данных
– Сохранение всех опций пользовательского кабинета
– Шанс обретения призов и включения в промоакциях
Создание аккаунта на основном сайте
Операция оформления крайне легок и занимает буквально минут. Недавние участники способны надеяться на щедрый начальный поощрение за оформление.
Ступени формирования аккаунта
1. Вход на официальный ресурс или его дубликат
2. Клик на опцию “Регистрация”
3. Внесение необходимых сведений
4. Проверка электронной почты
5. Применение бонусного кода (при наличии доступен)
Награды и предложения для клиентов
Ресурс поощряет своих игроков разнообразными бонусными программами.
Ключевые категории наград
Начальный приз — крупное премирование для недавних игроков, каковое способно содержать финансовые суммы и бесплатные вращения.
Free spins — способность запускать в популярных игровых машинах безвозмездно.
Кэшбек — частичный возмещение потерянных средств, который именно начисляется еженедельно или раз в месяц.
Специальные коды — эксклюзивные комбинации, предоставляющие экстра выгоды.
Индивидуальный кабинет: опции и установки
Индивидуальный кабинет предоставляет абсолютный контроль над пользовательским опытом. Здесь доступны:
– Администрирование депозитом
– Архив платежей
– Работающие бонусы
– Установки охраны
– Подтверждение аккаунта
Портативная платформа и программа
Современные клиенты предпочитают гибкость. Ресурс предлагает двойной метода для игры с портативных девайсов.
Адаптивная телефонная вариант
Портативная версия ресурса автоматически подстраивается под разрешение любого девайса. Не требуется инсталлировать отдельное программное обеспечение.
Программа для телефонов
Можно загрузить специальное программу для iOS и Android. Программа обеспечивает:
– Моментальный вход
– Доработанный графику
– Оперативные-оповещения о бонусах
– Надежную операционность
Live игры: среда реального игорного заведения
Зона Live игр транспортирует игроков в среду подлинного казино. Опытные хосты проводят игры в режиме реального времени.
Топовые Live-столы
– Европейская рулетка
– Двадцать одно
– Баккарат
– Poker
Автоматы: выбор автоматов
Собрание развлекательных машин насчитывает тысячи позиций от ведущих разработчиков. Участники встретят:
– Стандартные аппараты
– Графические слоты
– Прогрессивный джекпот-машины
– Мегавейс
Соревнования и специальные события
Периодические состязания позволяют пользователям бороться друг с другом за крупные выигрышные пулы. Любой состязание обладает свои критерии вовлечения и таблицу призеров.
Варианты внесения и снятия денег
Площадка обслуживает множество денежных сервисов:
– Платежные инструменты
– Онлайн сервисы
– Криптовалюты
– Финансовые транзиты
Абсолютно все платежи выполняются безопасно благодаря передовым методам криптографии.
Сервис поддержки
Квалифицированные специалисты отдела помощи настроены содействовать 24/7. Доступны данные методы связи:
– Живой-чат
– Email-поддержка
– Телефонная поддержка
– Коммуникационные сети
Заключение
Основной портал казино и его функционирующие дубликаты дают участникам конфиденциальный и легкий подход к большому ассортименту азартных услуг. Солидные подарки, периодические промоакции, компетентная поддержка и удобные платежные инструменты формируют игровой процесс чрезвычайно комфортным и результативным.
apartments for sale phuket thailand apartments for sale phuket thailand .
Jogo do Tigrinho multiplicador fixo vs aleatório: qual você prefere?
go to this link – The interface is neat, helping users explore content without effort.
codespark – Mobile version looks perfect; no glitches, fast scrolling, crisp text.
online erectile dysfunction prescription Pharmacological Sciences Research Institute best ed medication online
улучшение креативов улучшение креативов .
Kraken Marketplace Официальный сайт для доступа к Kraken
kra
view website paycor login
PG Soft 2026: qual slot você joga mais: Tigrinho, Coelho, Touro ou outro?
levitra Pharmacological Sciences Pharmacological Sciences Research Institute
https://pharmacologicalsciences.com/edpills.html kamagra
Доступ к ресурсу через актуальные зеркала
Нынешние онлайн казино предоставляют игрокам бесперебойный вход к играм. Главный сайт https://xn--b1afkebce4cvc1d.xn--p1ai/ оперирует надёжно, предлагая богатый выбор азартных развлечений. Тем не менее временами образуются программные сложности или барьеры, поэтому существенно быть осведомлённым о наличии функционирующих зеркал.
Что собой представляет из себя центральное зеркало казино
Копия — это абсолютная копия основного веб-сайта с идентичным возможностями. Актуальное зеркало на данный момент даёт возможность преодолевать локальные блокировки и продолжать игру.
Принципиальные плюсы задействования зеркал:
– Стопроцентный доступ к индивидуальному кабинету
– Поддержание любых показателей профиля
– Идентичный спектр слотов
– Актуальные привилегии и промо
Регистрация на портале
Процесс оформления требует считанные минут. Новые геймеры приобретают богатый поощрение за запись, который имеет возможность содержать:
– Начальный денежный приз
– Комплиментарные спины для игр
– Специальные промокоды
– Повышенный компенсацию
Ради завершения регистрации нужно:
1. Переместиться на центральный сайт или зеркало
2. Щёлкнуть элемент «Оформиться»
3. Написать контактные реквизиты
4. Заверить почтовый адрес или телефон
5. Использовать промокод (в случае существовании)
Авторизация в персональный кабинет
Следом за корректной оформления клиенты могут производить авторизацию используя основной портал или актуальное зеркало. Личный кабинет открывает полный надзор над учётной записью:
– История игр
– Зачисление счёта
– Вывод выигрышей
– Регулирование поощрениями
– Включение в соревнованиях
Поощрения и кампании казино
Платформа награждает геймеров многочисленными привилегированными предложениями:
Приветственные призы
Дебютанты зарабатывают внушительный набор привилегий на начальные взносы. Обычно это содержит долевую прибавку к сумме депозита плюс даровые спины.
Систематические акции
– Раз в неделю возврат до 15%
– Состязания с призовыми фондами
– Бонусы на годовщину рождения
– Эксклюзивные акции для элитных игроков
Программа верности
Постоянные клиенты получают единицы, что допустимо превратить на реальные средства или уникальные привилегии.
Смартфонная редакция и приложение
Передовые решения помогают играть везде угодно. Смартфонная форма портала самостоятельно подстраивается под дисплей каждого гаджета.
Преимущества портативного софта:
– Оперативная открытие игр
– Удобный облик
– Push-оповещения о акциях
– Способность скачать для Android и iOS
Живое казино: атмосфера настоящего игорного учреждения
Категория Live клуба погружает клиентов в среду подлинного гемблинг заведения. Квалифицированные операторы проводят действие в режиме настоящего времени.
Доступные столы:
– Колесо фортуны
– Очко
– Карточная игра
– Техасский холдем
Слоты и азартные автоматы
Собрание азартных автоматов включает сотни наименований от топовых студий. Произвольный геймер подберёт автомат по нраву:
– Стандартные автоматы
– Современные автоматы с дополнительными уровнями
– Прогрессивный-автоматы
– Многолинейные игры
Соревнования и лотереи
Периодические состязания включают азарт и открывают способность заработать внушительные призы. Вовлечение в соревнованиях регулярно бесплатное, а наградные фонды доходят до больших сумм.
Защита и приватность
Сайт задействует инновационные методы шифрования для обеспечения информации игроков. Каждые платёжные операции проходят через защищённые соединения.
Вывод
Главный сайт и его рабочие зеркала гарантируют надёжный переход к отличным развлекательным услугам. Привлекательные бонусы, практичная мобильная вариант, богатство машин и компетентное Live-игорный дом создают портал отличным вариантом для поклонников гемблинг игр.
For reports
easy approval small loans for bad credit
to dive deeper into the subject.
Вход к платформе через актуальные зеркала
Игроки онлайн казино постоянно сталкиваются с трудностью закрытия основного ресурса. Собственно для решения этой трудности созданы дубликаты официального домена. Килограмм гарантирует абсолютный подключение ко всем сервисам площадки.
Что такое функционирующее зеркало казино
Альтернативный адрес составляет собой точную реплику официального сайта с идентичным опциями. Единственное расхождение — это иное имя. Любые параметры клиента, в том числе счет, бонусы и записи партий, продолжают быть такими же.
Достоинства применения зеркал
Функционирующие зеркала характеризуются комплексом ключевых выгод:
– Бесперебойный подключение к любимым развлечениям
– Полная сохранность собственных данных
– Неизменность всех опций индивидуального кабинета
– Способность обретения призов и включения в кампаниях
Создание аккаунта на главном домене
Процесс регистрации крайне несложен и занимает немного минут. Новые пользователи имеют возможность надеяться на внушительный начальный приз за регистрацию.
Стадии оформления аккаунта
1. Доступ на главный сайт или его зеркало
2. Нажатие на опцию “Регистрация”
3. Заполнение обязательных данных
4. Проверка почтовой почты
5. Указание купона (при наличии присутствует)
Поощрения и кампании для клиентов
Игровая площадка одаривает своих участников многочисленными призовыми акциями.
Ключевые типы наград
Приветственный бонус — крупное поощрение для новых игроков, что может вмещать денежные средства и free spins.
Фриспины — способность использовать в востребованных аппаратах без затрат.
Возврат средств — процентный возмещение потерянных средств, каковой начисляется каждую неделю или раз в месяц.
Бонусные коды — уникальные наборы, гарантирующие дополнительные привилегии.
Личный кабинет: функции и конфигурации
Личный аккаунт обеспечивает совершенный управление над пользовательским взаимодействием. В данном разделе доступны:
– Контроль депозитом
– Архив транзакций
– Действующие бонусы
– Настройки безопасности
– Подтверждение счета
Смартфонная редакция и приложение
Новейшие пользователи признают портативность. Площадка дает 2 метода для развлечений с карманных устройств.
Отзывчивая смартфонная редакция
Адаптивная вариант портала без участия подстраивается под монитор любого девайса. Нет необходимости инсталлировать специальное приложение.
Программа для смартфонов
Разрешено инсталлировать специальное софт для iOS и Android. Программа предоставляет:
– Моментальный запуск
– Оптимизированный внешний вид
– Push-сообщения о бонусах
– Бесперебойную функциональность
Live раздел: обстановка подлинного зала
Секция Live столов доставляет пользователей в среду реального казино. Квалифицированные ведущие ведут сессии в варианте реального времени.
Востребованные Live-игры
– Европейская рулетка
– Двадцать одно
– Punto Banco
– Покер
Автоматы: многообразие игр
Собрание развлекательных слотов включает тысячи позиций от топовых производителей. Участники откроют:
– Классические слоты
– Видео-автоматы
– Накопительный приз-игры
– Мегавейс
Конкурсы и специальные акции
Периодические соревнования дают возможность участникам конкурировать друг с другом за внушительные наградные суммы. Каждый конкурс содержит свои критерии присутствия и список чемпионов.
Способы ввода и вывода средств
Ресурс поддерживает множество финансовых инструментов:
– Платежные картыы
– Виртуальные сервисы
– Blockchain-платежи
– Wire переводы
Каждые переводы осуществляются надежно благодаря передовым системам криптографии.
Команда support
Опытные консультанты отдела помощи настроены содействовать 24/7. Предусмотрены данные пути контакта:
– Онлайн-чат
– Email-помощь
– Аудио линия
– Коммуникационные сети
Вывод
Главный ресурс платформы и его рабочие альтернативы гарантируют игрокам конфиденциальный и легкий доступ к большому выбору игровых игр. Внушительные подарки, частые промоакции, квалифицированная служба и удобные расчетные методы делают геймерский опыт максимально увлекательным и результативным.
zaebal
гниль последняя
amberharborstudio.shop – Browsing is smooth, with neatly arranged and visually engaging pages.
Переход к сайту через рабочие зеркала
Передовые сетевые казино обеспечивают пользователям непрерывный доступ к развлечениям. Центральный портал РЎСѓРєР° действует надёжно, обеспечивая большой набор игровых развлечений. Однако порой формируются системные проблемы или ограничения, в связи с чем существенно понимать о доступности действующих зеркал.
Что означает из себя центральное зеркало казино
Копия — это точная реплика основного портала с таким же набором функций. Актуальное зеркало сегодня помогает преодолевать территориальные ограничения и возобновлять игру.
Принципиальные достоинства задействования зеркал:
– Абсолютный переход к личному кабинету
– Поддержание совокупных информации счёта
– Аналогичный набор автоматов
– Действующие вознаграждения и промо
Регистрация на сайте
Процедура создания аккаунта занимает считанные минут. Недавние геймеры зарабатывают привлекательный бонус за регистрацию, который имеет возможность вмещать:
– Приветственный финансовый бонус
– Безвозмездные спины для игр
– Особые коды
– Повышенный кешбэк
Ради финализации записи необходимо:
1. Перейти на официальный веб-сайт или копию
2. Выбрать кнопку «Регистрация»
3. Написать контактные реквизиты
4. Подтвердить мейл или контакт
5. Активировать ваучер (при присутствии)
Вход в индивидуальный кабинет
Следом за успешной регистрации геймеры способны осуществлять доступ через официальный сайт или актуальное зеркало. Персональный кабинет открывает полный управление над учётной записью:
– Архив транзакций
– Пополнение счёта
– Вывод выигрышей
– Контроль привилегиями
– Включение в турнирах
Бонусы и предложения казино
Ресурс удовлетворяет геймеров вариативными привилегированными схемами:
Начальные подарки
Новые игроки приобретают богатый набор бонусов на стартовые взносы. Типично это содержит долевую доплату к размеру пополнения плюс безвозмездные спины.
Регулярные предложения
– Еженедельный компенсация до 15%
– Конкурсы с выигрышными суммами
– Поощрения на дату рождения
– Эксклюзивные промо для статусных геймеров
План верности
Регулярные пользователи зарабатывают очки, которые возможно обменять на настоящие финансы или уникальные льготы.
Мобильная редакция и утилита
Актуальные разработки обеспечивают геймить везде комфортно. Мобильная редакция портала самостоятельно настраивается под экран каждого устройства.
Достоинства карманного приложения:
– Быстрая запуск автоматов
– Удобный интерфейс
– Моментальные-уведомления о акциях
– Шанс установить для Android и iOS
Живое казино: антураж настоящего игорного заведения
Область Live заведения доставляет клиентов в обстановку истинного развлекательного заведения. Опытные крупье ведут действие в состоянии настоящего времени.
Предлагаемые столы:
– Рулетка
– Очко
– Punto Banco
– Техасский холдем
Игровые машины и развлекательные слоты
Ассортимент гемблинг аппаратов содержит множество названий от ведущих разработчиков. Произвольный игрок подберёт развлечение по вкусу:
– Традиционные слоты
– Современные автоматы с призовыми раундами
– Накопительный-автоматы
– Megaways игры
Турниры и раздачи
Систематические состязания включают адреналин и открывают шанс обрести значительные награды. Присутствие в конкурсах часто комплиментарное, а призовые суммы достигают значительных размеров.
Охрана и секретность
Ресурс применяет современные технологии криптографии для обеспечения сведений клиентов. Любые финансовые действия совершаются через охраняемые каналы.
Резюме
Основной сайт и его рабочие зеркала обеспечивают надёжный вход к превосходным развлекательным услугам. Щедрые призы, комфортная карманная форма, вариативность слотов и квалифицированное Live-заведение превращают сайт замечательным опцией для фанатов азартных автоматов.
Описание основного портала
Актуальное онлайн-казино дарит своим пользователям разнообразный спектр услуг и поощрений. Главный веб-сайт Вован работает 24/7, давая вход к известным автоматам, live-казино и многочисленным предложениям.
Функционирующее зеркало: вход к сайту
Что такое зеркало казино
Альтернатива означает собой полную копию основного веб-сайта с другим сетевым путем. Действующее зеркало дает игрокам преодолевать барьеры и получать стабильный путь к предпочитаемым развлечениям.
Как получить актуальное зеркало сегодня
Действующие ссылки на официальное зеркало размещаются через:
– Электронную рассылку
– Проверенные коммуникационные сети
– Сервис обслуживания
– Специализированные площадки
Открытиесчета на платформе
Ход оформления
Созданиеаккаунта длится всего минут и подразумевает данные этапы:
1. Доступ на главный веб-сайт или функционирующее зеркало
2. Активация опции “Создатьаккаунт”
3. Внесение персональных сведений
4. Активация адреса или телефона
5. Придумывание кодадоступа
Бонус за регистрацию
Первые клиенты обретают выгодные стартовые бонусы:
– Денежные депозиты на кошелек
– Freespins для игр
– Расширенный коэффициент кэшбека
– Уникальные ваучеры
Вход в собственный счет
Постоянные участники могут произвести авторизацию через основной сайт или текущее зеркало. Для этого необходимо ввести никнейм и код, сформированные при открытиисчета.
Опции индивидуального профиля
В собственном разделе доступны основные опции:
– Изменение персональными сведениями
– Ввод баланса
– Вывод денег
– Активация промокодов
– Мониторинг статистики ставок
– Регистрация в турнирах
Подарки и кампании
Разновидности подарков
Казино радует своих игроков разнообразными поощрительными программами:
– Приветственный набор — солидные вознаграждения на стартовые пополнения
– Халявныеспины — дополнительные прокруты в популярных слотах
– Компенсация — систематический возмещение процента потерь
– Программа лояльности — специальные бонусы для регулярных пользователей
Ваучеры и их использование
Уникальные ваучеры обеспечивают бонусные поощрения. Для применения необходимо набрать шифр в нужное окно в персональном аккаунте.
Развлекательный каталог
Игры
Коллекция развлекательных машин вмещает массу вариантов от лучших разработчиков:
– Традиционные симуляторы
– Продвинутые игры
– Призовые игры
– Сюжетные развлечения
Live казино
Область Live-казино предоставляет взаимодействие с реальными операторами в режиме актуального стрима:
– Европейскаярулетка
– Блэкджек
– PuntoBanco
– Покер
Соревнования
Регулярные соревнования с внушительными призовыми фондами устраиваются еженедельно. Соревнующиеся соревнуются за победу в турнирнойсетке.
Mobile адаптация и APP
Mobile платформа ресурса
Оригинальный сайт целиком оптимизирован для мобильных гаджетов. Участники способны играть автоматы прямо через браузер без потребности установки.
Софт для скачивания
Официальное мобильное программа предоставляется для получения на аппараты с рабочими системами Android и iOS. APP дает:
– Моментальный доступ к слотам
– Стабильную операционность
– Мгновенные-извещения о предложениях
– Удобный навигацию
Резюме
Официальный портал казино и его актуальные альтернативы дают пользователям абсолютный вход к первоклассным игровым услугам. Большие бонусы, многочисленные кампании, комфортная смартфонная платформа и опытная сервис создают игровой процесс чрезвычайно комфортным и прибыльным.
access platform – Straightforward layout makes it effortless to find content.
технический переводчик услуги teh-perevod.ru .
https://xn--80abenywpeo.xn-- Хотите стать частью командного духа и внести свой вклад в защиту Родины?
Kraken Marketplace Официальный сайт для доступа к Kraken
slon4 at
Доступ к сайту через рабочие зеркала
Нынешние виртуальные казино обеспечивают клиентам круглосуточный переход к развлечениям. Центральный веб-сайт Клубника оперирует стабильно, обеспечивая большой выбор развлекательных автоматов. Впрочем временами возникают программные препятствия или блокировки, потому важно понимать о присутствии действующих зеркал.
Что представляет собой основное зеркало казино
Зеркало — это абсолютная копия основного сайта с таким же функционалом. Актуальное зеркало сейчас позволяет обходить местные блокировки и поддерживать развлечения.
Принципиальные преимущества применения зеркал:
– Абсолютный вход к персональному кабинету
– Сохранение каждых показателей профиля
– Идентичный спектр развлечений
– Текущие поощрения и кампании
Открытие счёта на ресурсе
Операция создания аккаунта занимает пару минут. Свежие геймеры получают богатый подарок за создание счёта, что способен включать:
– Начальный бонусный подарок
– Комплиментарные спины для слотов
– Специальные коды
– Усиленный кэшбек
Ради окончания регистрации необходимо:
1. Зайти на официальный сайт или зеркало
2. Кликнуть элемент «Регистрация»
3. Указать контактные реквизиты
4. Верифицировать мейл или телефон
5. Активировать код (если есть присутствии)
Доступ в собственный кабинет
Следом за правильной записи геймеры имеют возможность осуществлять вход через центральный ресурс или действующее зеркало. Личный кабинет предоставляет полный контроль над аккаунтом:
– Журнал игр
– Внесение депозита
– Вывод средств
– Регулирование бонусами
– Включение в турнирах
Привилегии и предложения казино
Портал награждает геймеров вариативными наградными предложениями:
Вступительные призы
Новички получают великодушный набор бонусов на начальные взносы. Зачастую это охватывает пропорциональную прибавку к объёму взноса плюс даровые фриспины.
Постоянные предложения
– Седмичный компенсация до 15%
– Состязания с выигрышными пулами
– Призы на годовщину рождения
– Эксклюзивные предложения для привилегированных игроков
Система верности
Регулярные геймеры собирают пункты, которые возможно превратить на реальные призы или специальные привилегии.
Мобильная версия и приложение
Актуальные инновации позволяют участвовать везде комфортно. Смартфонная вариант ресурса независимо подстраивается под монитор произвольного устройства.
Выгоды смартфонного приложения:
– Оперативная открытие развлечений
– Эргономичный облик
– Всплывающие-нотификации о акциях
– Шанс загрузить для Android и iOS
Реальное казино: обстановка реального гемблинг клуба
Категория Live заведения транспортирует геймеров в среду истинного развлекательного учреждения. Компетентные операторы управляют игру в режиме реального времени.
Представленные развлечения:
– Рулетка
– Двадцать одно
– Баккара
– Карты
Барабаны и азартные аппараты
Ассортимент азартных автоматов содержит множество названий от топовых разработчиков. Произвольный клиент обнаружит игру по нраву:
– Традиционные автоматы
– Инновационные игры с специальными этапами
– Джекпот-игры
– Megaways машины
Турниры и розыгрыши
Постоянные конкурсы вносят азарт и дают возможность выиграть внушительные суммы. Участие в состязаниях регулярно безвозмездное, а наградные банки достигают больших размеров.
Охрана и секретность
Платформа использует современные технологии криптографии для охраны реквизитов клиентов. Каждые транзакционные действия осуществляются через охраняемые каналы.
Заключение
Официальный ресурс и его актуальные зеркала предоставляют стабильный вход к первоклассным игровым играм. Привлекательные призы, практичная мобильная редакция, многообразие игр и высококлассное Live-клуб делают сайт отличным опцией для ценителей игровых игр.
Обзор официального веб-сайта
Прогрессивные онлайн казино предоставляют участникам широкий ассортимент услуг и возможностей. Официальный портал Голд предлагает проверенный вход к игровым функциям.
Актуальное зеркало: возможность сегодня
Альтернативный адрес выступает собой точную дубликат главного веб-сайта. Актуальное зеркало дает возможность пользователям обходить возможные запреты.
Достоинства задействования зеркала
Ключевые достоинства включают:
– Беспрерывный вход к сайту
– Удержание абсолютно всех опций главного веб-сайта
– Охрана конфиденциальных сведений
– Аналогичный инструментарий
Открытие счета на ресурсе
Процедура открытия счета отличается понятностью и комфортом. Недавние игроки должны:
1. Зайти на основной веб-сайт или его зеркало
2. Кликнуть на пункт открытия счета
3. Внести нужные информацию
4. Активировать почтовую почту
5. Совершить первый авторизацию
Бонус за регистрацию
Дебютанты приобретают щедрый стартовый презент. Такое поощрение имеет возможность содержать:
– Финансовые средства
– Complimentary фриспины
– Усиленный коэффициент возврата
Вход в собственный аккаунт
Существующие игроки способны моментально войти в личный раздел, эксплуатируя имя пользователя и шифр. Личный кабинет обеспечивает шанс к:
– Управлению балансом
– Записям переводов
– Действующим призам
– Опциям профиля
Призы и промо
Портал периодически проводит всевозможные акции для клиентов.
Виды бонусов
Главные формы вознаграждений:
– Депозитные подарки – коэффициент от размера пополнения
– Спины – complimentary раунды в аппаратах
– Возврат средств – отдача фрагмента утраченных сумм
– Конкурсные вознаграждения – премии за состязание в турнирах
Коды
Специальные коды позволяют заработать дополнительные преимущества. Клиенты могут обнаружить их на партнерских сайтах или заработать в рассылке.
Мобильная вариант и софт
Прогрессивные пользователи любят переносной досуг.
Характеристики mobile системы
– Отзывчивый интерфейс для всех гаджетов
– Целостный доступ к развлечениям
– Стремительная подгрузка
– Удобное управление
Установить программу
Мобильное приложение открыто для скачивания на девайсы с базовыми платформами Android и iOS. Приложение дает:
– Бесперебойную функциональность
– Мгновенные алерты о предложениях
– Оперативный путь к желанным развлечениям
Игровой выбор
Портал дает огромную библиотеку гемблинг развлечений.
Аппараты
Коллекция азартных слотов насчитывает:
– Стандартные игры
– Передовые слоты
– Джекпотные игры
– Сюжетные развлечения
Live казино
Секция реальных развлечений обеспечивает шанс участвовать с профессиональными дилерами. Предложены:
– Американская рулетка
– Очко
– Баккара
– Техасский холдем
Конкурсы
Систематические соревнования обеспечивают клиентам бороться за солидные финансовые фонды. Турнирная структура обновляется каждую неделю.
Денежные действия
Платформа поддерживает массу методов пополнения и снятия денег:
– Банковские карточки
– Онлайн платежные системы
– Прямые транзакции
– Цифровые валюты
Совокупные транзакции производятся конфиденциально с применением актуальных протоколов защиты.
Отдел поддержки
Квалифицированная команда поддержки действует постоянно. Коннектиться с операторами доступно через:
– Интерактивный чат
– Почтовую почту
– Контактный номер
– Соц сети
Безопасность и аккредитация
Игровой клуб работает на базе законной лицензии. Это гарантирует:
– Справедливость азартного геймплея
– Сохранность конфиденциальных сведений
– Своевременные транзакции
– Легальный гейминг
Заключение
Лицензионный сайт и его актуальные резервные страницы предоставляют пользователям целостный спектр возможностей для удобной и профитной игры. Солидные вознаграждения, различные автоматы, квалифицированная поддержка и защищенная инфраструктура выплат создают платформу лучшим вариантом для ценителей игровых забав.
enter this site – Well-laid-out content makes exploring simple and natural.
Передовые онлайн-казино обеспечивают игрокам обширный спектр развлечений и щедрые премии. Но для стабильной игры критично знать, как отыскать Голд и его актуальные зеркала.
Что такое главный сайт казино
Лицензионный сайт казино — это главная веб-площадка, где клиенты могут развлекаться гемблинг развлечениями. Портал работает на легитимных правах и владеет всеми обязательными документами.
Основные преимущества официального веб-сайта:
– Надежность индивидуальных сведений
– Честные требования игры
– Обеспеченные платежи
– Квалифицированная помощь
Актуальное зеркало казино: для чего требуется
Копия сайта — это абсолютная версия официального веб-сайта, размещенная по иному веб-адресу. Действующее зеркало формируется для поддержания стабильного доступа к порталу.
Факторы применения зеркал:
– Блокировка первичного адреса
– Технические операции
– Высокая загрузка на сервер
Как найти свежее зеркало сегодня
Узнать текущее действующее зеркало можно разными вариантами:
1. Email-уведомления — зарегистрируйтесь на почтовую доставку
2. Департамент support — свяжитесь в онлайн-чат
3. Корпоративные площадки — проверяйте за постами
4. Партнерские порталы — проверенные сайты
Создание аккаунта на портале казино
Процедура открытия счета длится всего пару моментов:
1. Выберите на элемент “Открыть счет”
2. Укажите обязательные сведения
3. Активируйте почтовую почту
4. Активируйте бонусный код, если доступен
После оконченной регистрации вам будет открыт персональный профиль.
Премии и бонусные коды
Привлекательная бонусная политика — важное конкурентное преимущество казино:
Бонус за первичную регистрацию
Начинающие участники приобретают стартовый подарок, который может содержать:
– Монетарный бонус на первый пополнение
– Фри-спины для барабанов
– Бездепозитные бонусы
Купоны
Регулярно публикуются свежие бонусные шифры, предоставляющие забрать дополнительные преимущества.
Система возврата средств
Регулярные игроки возвращают процент потраченных средств обратно.
Действующие кампании и турниры
Сайт постоянно организует увлекательные кампании:
– Семидневные соревнования
– Тематические промо
– Конкурсы ценных подарков
– Программа лояльности
Вход в пользовательский аккаунт
Для логина на сайт нужно:
1. Посетить главный адрес или рабочее зеркало
2. Кликнуть “Войти”
3. Ввести никнейм и пароль
В личном разделе разрешены нижеперечисленные функции:
– Депозит депозита
– Снятие средств
– Проверка архива ставок
– Редактирование индивидуальными настройками
Адаптивная вариант и приложение
Адаптивная вариант
Оптимизированная модификация веб-сайта дает возможность делать ставки с всех мобильного устройства. Оформление автоматически адаптируется под формат монитора.
Клиент для установки
Загрузить клиент можно для:
– Android — официальная загрузка с ресурса
– iOS — инсталляция через App Store
Плюсы мобильного клиента:
– Оперативный вход
– Устойчивая операционность
– Push-нотификации об предложениях
– Оптимизированный UI
Гемблинг секции
Слоты
Разнообразная коллекция развлекательных машин от ведущих поставщиков:
– Классические слоты
– Новые-игры
– Прогрессивные-автоматы
Live игры
Раздел с настоящими операторами предлагает:
– Рулетки
– Блэкджек
– Punto Banco
– Texas Hold’em
Вещания транслируются в высоком формате, создавая эффект настоящего казино.
Методы депозита и вывода
Казино поддерживает различные транзакционные инструменты:
– Платежные card
– Цифровые системы
– Bitcoin/Ethereum
– Банковские переводы
Наименьшие пороги пополнения и скоростные выводы создают процесс предельно приятной.
Отдел техподдержки
Квалифицированная отдел ассистентов оперирует 24/7 и может поддержать с разными вопросами:
– Онлайн-чат
– Email-переписка
– Голосовая связь
Заключение
Основной портал казино и его действующие зеркала дают игрокам конфиденциальный и интересный игровой процесс. Привлекательные бонусы, функциональная портативная модификация, богатые развлечения и высокоуровневое live-казино формируют эту ресурс отличным выбором для игровых времяпрепровождения.
click to view store – Clear layout keeps browsing effortless and enjoyable.
Вход к платформе и действующие зеркала
Актуальные онлайн казино обеспечивают клиентам огромный спектр опций. Главный сайт Ретро гарантирует защищенный вход ко всем сервисам. Тем не менее временами появляются моменты, когда нужно альтернативный метод доступа.
Что есть собой функционирующее зеркало
Рабочее зеркало — это идентичная версия главного портала с запасным сетевым именем. Альтернатива сегодня позволяет избегать существующие запреты и сохранять непрерывный переход к популярным автоматам.
Главное зеркало имеет идентичными функциями, что и основной ресурс:
– Весь список развлечений
– Личный раздел с актуальными сведениями
– Все подарки и предложения
– Безопасные платежные действия
Открытие профиля и авторизация в сервис
Этап создания профиля на платформе требует пару секунд. Новым пользователям требуется:
1. Открыть на актуальное зеркало сегодня
2. Выбрать элемент «Создать аккаунт»
3. Указать нужные данные
4. Проверить электронную почту или номер телефона
5. Активировать поощрение за регистрацию
Подключение в собственный раздел осуществляется с помощью указание никнейма и пароля.
Обзор призовой политики
Привлекательная поощрительная система — основное преимущество казино. Игроки получают всевозможные бонусы:
Вступительные поощрения
Недавние игроки вправе рассчитывать на значительный приз за оформление. Традиционно это набор возможностей, содержащий:
– Частичную добавку к первому пополнению
– Безвозмездные кручения
– Extra средства на баланс
Промо-коды и уникальные возможности
Систематические бонусные комбинации позволяют обретать дополнительные выгоды. Задействовать их можно в предназначенном окне персонального профиля.
Бесплатные вращения и кэшбек
Даровые вращения — это вариант вращать игры без задействования собственных финансов. Компенсация означает частичный возмещение потерянных средств.
Ассортимент автоматов
Гемблинг ресурс обеспечивает внушительную коллекцию игр.
Автоматы
Многообразие игровых машин удивляет фантазию. Представлены традиционные 3-барабанные автоматы и продвинутые игры с занимательной визуализацией.
Live зал
Секция Live развлечений помещает игроков в обстановку настоящего игорного зала. Квалифицированные операторы осуществляют раунды в прямом эфире.
Соревнования и доски почета
Периодические турниры добавляют драйва и предоставляют вариант выиграть внушительные призы.
Mobile форма и приложение
Продвинутые инновации обеспечивают участвовать в любом точке. Мобильная форма автоматически подстраивается под экран гаджета.
Получить софт можно для цифровых платформ iOS и Android. Клиент дает:
– Скоростной переход
– Надежную работу
– Моментальные-сообщения об предложениях
– Интуитивный вид
Денежные действия
Платформа работает с разнообразные методы внесения и снятия средств:
– Кредитные системы
– Цифровые кошельки
– Крипто
– Финансовые переводы
Любые переводы реализуются через защищенное подключение, что обеспечивает неприкосновенность приватных информации.
Департамент support
Компетентная бригада поддержки действует постоянно. Связаться с менеджерами разрешено через:
– Интерактивный-чат
– Электронную почту
– Горячую линию
– Социальные каналы
Выводы
Официальный ресурс и его рабочее зеркало гарантируют участникам защищенный и приятный вход к интересным развлечениям. Богатые бонусы, обширный спектр слотов и отличная поддержка обеспечивают игру исключительно комфортной и прибыльной.
In addition to that, it will certainly additionally verify whether the e-mail address is publicly noticeable on the web.
my web-site https://gsaserlinkbuilding.blogspot.com
Thanks for sharing this detailed article.
I appreciate how the content clearly explains
online casino features and betting concepts.
Many players often jump into online casinos without understanding
what makes a platform trustworthy,
so content like this is very helpful.
I have been reading similar guides on
Panaloko,
and I find that the explanations there are also very clear and easy to follow.
What I like most about articles from panaloko.info is that they focus on
practical details rather than marketing hype.
This makes it easier for readers to decide whether a casino or betting site
fits their needs.
It is also good to see more content that talks about
responsible gaming,
because these topics are often ignored.
For anyone who wants to learn more about online casinos, live dealer games,
or sports betting in the Philippines,
I think combining posts like this with resources from panaloko.info
can give a more balanced view of the industry.
Looking forward to reading more posts like this
in the future.
take a look here – Clean visuals and structured pages make navigation effortless.
useful link paycor employer login
see details – Everything feels clear and accessible, without clutter.
Обзор оригинального сайта
Современное онлайн-казино предлагает своим участникам обширный набор возможностей и призов. Основной портал Bollywood сайт функционирует непрерывно, обеспечивая доступ к популярным автоматам, live-казино и многочисленным акциям.
Рабочее зеркало: доступ к порталу
Что такое дубликат казино
Копия означает собой полную реплику главного ресурса с иным доменным именем. Рабочее зеркало позволяет игрокам миновать блокировки и сохранять стабильный подключение к любимым развлечениям.
Как обнаружить текущее зеркало сегодня
Актуальные URL на основное зеркало появляются через:
– Почтовую оповещение
– Главные медийные сети
– Отдел сопровождения
– Affiliated порталы
Открытиесчета на портале
Процесс открытиясчета
Оформление длится несколько минут и содержит следующие действия:
1. Переход на основной ресурс или актуальное зеркало
2. Клик кнопки “Создатьаккаунт”
3. Указание учетных информации
4. Верификация аккаунта или телефона
5. Формирование секретнойкомбинации
Бонус за регистрацию
Первые пользователи приобретают выгодные стартовые подарки:
– Финансовые депозиты на баланс
– Freespins для автоматов
– Усиленный объем кэшбека
– Особые коды
Авторизация в собственный аккаунт
Действующие пользователи вправе выполнить вход через официальный портал или текущее зеркало. Для этого требуется указать логин и пароль, установленные при созданииаккаунта.
Возможности личного раздела
В личном профиле доступны данные функции:
– Изменение личными сведениями
– Зачисление счета
– Вывод средств
– Применение бонусов
– Отслеживание истории игр
– Включение в конкурсах
Бонусы и предложения
Виды поощрений
Казино балует своих участников различными призовыми системами:
– Приветственный комплект — большие бонусы на стартовые депозиты
– Freespins — подарочные ставки в рейтинговых слотах
– Кешбэк — еженедельный откат процента проигрышей
– План поощрения — эксклюзивные льготы для постоянных клиентов
Коды и их использование
Особые коды обеспечивают расширенные бонусы. Для использования требуется набрать комбинацию в нужное раздел в личном разделе.
Игровой каталог
Слоты
Коллекция развлекательных слотов содержит массу названий от известных поставщиков:
– Обычные слоты
– Новые автоматы
– Накопительные автоматы
– Сюжетные автоматы
Live казино
Область Live-казино предоставляет игру с профессиональными дилерами в формате реального стрима:
– Рулетка
– Блэкджек
– Пунтобанко
– Карибскийпокер
Соревнования
Периодические конкурсы с большими наградными суммами устраиваются регулярно. Участники соревнуются за первенство в рейтинге.
Мобильная реализация и APP
Адаптивная адаптация веб-сайта
Главный веб-сайт целиком адаптирован для мобильных гаджетов. Пользователи имеютвозможность открывать игры непосредственно через веб-навигатор без обязательства скачивания.
Программа для скачивания
Авторское смартфонное приложение имеется для установки на девайсы с рабочими платформами Android и iOS. Программа дает:
– Мгновенный путь к играм
– Устойчивую операционность
– Оперативные-оповещения о акциях
– Комфортный дизайн
Заключение
Оригинальный веб-сайт казино и его актуальные дубликаты гарантируют игрокам комплексный путь к отличным развлекательным услугам. Солидные поощрения, разнообразные кампании, простая адаптивная платформа и опытная поддержка формируют геймплейный процесс максимально enjoyable и выгодным.
Вход к порталу и действующие зеркала
Актуальные онлайн казино предлагают клиентам огромный набор возможностей. Центральный портал https://www.tolbaga.ru предоставляет безопасный подключение ко всем сервисам. Впрочем периодически возникают обстоятельства, когда понадобится резервный способ доступа.
Что означает собой рабочее зеркало
Рабочее зеркало — это точная реплика официального ресурса с другим интернет именем. Зеркало сегодня дает возможность миновать возможные блокировки и обеспечивать непрерывный вход к популярным автоматам.
Главное зеркало обладает всеми возможностями, что и базовый веб-сайт:
– Весь ассортимент игр
– Личный кабинет с зафиксированными информацией
– Актуальные поощрения и предложения
– Надежные банковские транзакции
Создание аккаунта и авторизация в казино
Этап оформления на платформе занимает пару минут. Свежим игрокам нужно:
1. Попасть на действующее зеркало сейчас
2. Нажать кнопку «Открыть профиль»
3. Ввести нужные сведения
4. Проверить e-mail почту или информацию смартфона
5. Использовать подарок за открытие аккаунта
Авторизация в собственный аккаунт осуществляется с помощью внесение никнейма и кода доступа.
Характеристика поощрительной программы
Привлекательная наградная система — главное достоинство игорного заведения. Участники зарабатывают разнообразные бонусы:
Вступительные поощрения
Свежие клиенты способны ожидать на выгодный подарок за оформление. Как правило это пакет предложений, объединяющий:
– Процентную премию к первому вкладу
– Даровые кручения
– Призовые суммы на аккаунт
Купоны и уникальные предложения
Периодические бонусные комбинации помогают получать дополнительные выгоды. Использовать их возможно в предназначенном окне индивидуального профиля.
Бесплатные вращения и кешбэк
Бесплатные спины — это вариант крутить барабаны без применения личных денег. Компенсация означает процентный возврат утраченных денег.
Каталог игр
Гемблинг ресурс предлагает огромную базу автоматов.
Видеослоты
Вариативность автоматов восхищает фантазию. Доступны классические трехбарабанные автоматы и актуальные автоматы с интересной картинкой.
Live игры
Раздел Live игр транспортирует пользователей в атмосферу истинного развлекательного дома. Квалифицированные крупье ведут партии в прямом времени.
Конкурсы и таблицы лидеров
Периодические состязания вносят драйва и предоставляют перспективу получить крупные суммы.
Мобильная форма и клиент
Современные разработки помогают участвовать в любимом локации. Mobile вариант независимо подстраивается под размер девайса.
Установить клиент возможно для мобильных платформ iOS и Android. Софт дает:
– Скоростной переход
– Стабильную производительность
– Моментальные-уведомления об акциях
– Удобный облик
Денежные операции
Казино поддерживает всевозможные способы депозита и изъятия финансов:
– Кредитные карты
– Электронные системы
– Крипто
– Банковские переводы
Любые действия реализуются через безопасное соединение, что защищает безопасность персональных параметров.
Служба помощи
Опытная бригада support трудится круглосуточно. Контактировать с менеджерами можно через:
– Онлайн-чат
– Цифровую почту
– Связь
– Социальные ресурсы
Выводы
Официальный веб-сайт и его рабочее зеркало дают участникам безопасный и удобный путь к увлекательным развлечениям. Щедрые награды, большой каталог автоматов и профессиональная ассистанс создают участие исключительно удобной и прибыльной.
check it out now – Well-organized sections make moving through content quick and stress-free.
go to Acorn Stone store – Organized pages allow users to navigate quickly.
okporn
Актуальные онлайн-казино предоставляют игрокам широкий выбор игр и заманчивые поощрения. Тем не менее для комфортной работы важно понимать, как получить доступ к Голд и его рабочие зеркала.
Что такое главный веб-ресурс казино
Основной сайт казино — это главная платформа, где клиенты могут получать удовольствие от игровыми слотами. Ресурс функционирует на легальных принципах и владеет всеми нужными документами.
Первостепенные выгоды основного ресурса:
– Конфиденциальность индивидуальных сведений
– Честные условия использования
– Обеспеченные выплаты
– Квалифицированная поддержка
Функционирующее зеркало казино: для чего используется
Зеркало — это абсолютная клон лицензионного сайта, расположенная по отличному веб-адресу. Рабочее зеркало формируется для поддержания постоянного соединения к сайту.
Причины эксплуатации дублирующих ресурсов:
– Блокировка главного домена
– Регламентные работы
– Повышенная нагрузка на систему
Как найти рабочее зеркало на сегодня
Получить текущее официальное зеркало можно различными способами:
1. Подписка — подпишитесь на новостную подписку
2. Отдел техподдержки — обратитесь в онлайн-чат
3. Социальные сети — следите за новостями
4. Партнерские ресурсы — достоверные источники
Создание аккаунта на ресурсе казино
Этап оформления занимает лишь считанные мгновений:
1. Выберите на клавишу “Открыть счет”
2. Укажите необходимые данные
3. Валидируйте контактную ящик
4. Используйте купон, если есть
После успешной активации вам будет возможен личный раздел.
Награды и купоны
Щедрая поощрительная система — ключевое плюс казино:
Подарок за первичную регистрацию
Первичные пользователи приобретают стартовый поощрение, который может содержать:
– Валютный кредит на начальный пополнение
– Бесплатные вращения для слотов
– Бездепозитные средства
Промокоды
Регулярно появляются актуальные бонусные шифры, обеспечивающие использовать экстра бонусы.
Схема кэшбека
Регулярные клиенты получают порцию утраченных финансов обратно.
Действующие акции и состязания
Казино постоянно запускает захватывающие события:
– Семидневные чемпионаты
– Тематические бонусы
– Конкурсы ценных выигрышей
– Схема VIP-клуба
Вход в личный кабинет
Для входа на сайт необходимо:
1. Перейти на лицензионный адрес или функционирующее зеркало
2. Кликнуть “Login”
3. Ввести никнейм и код доступа
В индивидуальном профиле доступны нижеперечисленные инструменты:
– Депозит баланса
– Снятие средств
– Проверка лога игр
– Редактирование индивидуальными настройками
Mobile платформа и программа
Mobile платформа
Адаптивная модификация ресурса позволяет развлекаться с всех мобильного девайса. Визуал динамически адаптируется под формат экрана.
Программа для загрузки
Получить app можно для:
– Android — официальная download с ресурса
– iOS — инсталляция через App Store
Плюсы app:
– Мгновенный запуск
– Надежная функциональность
– Push-уведомления об промо
– Ускоренный функционал
Игровые зоны
Слоты
Богатая коллекция эмуляторных машин от известных разработчиков:
– Традиционные слоты
– Продвинутые-игры
– Прогрессивные-слоты
Live казино
Раздел с настоящими крупье обеспечивает:
– European/American Roulette
– Двадцать одно
– Punto Banco
– Poker
Трансляции осуществляются в высоком качестве изображения, формируя атмосферу подлинного казино.
Методы депозита и вывода
Сайт поддерживает различные денежные системы:
– Банковские карты
– Онлайн платежи
– Цифровые валюты
– Wire транзакции
Минимальные пороги пополнения и моментальные платежи делают развлечение максимально беспроблемной.
Служба техподдержки
Опытная группа помощи функционирует 24/7 и в состоянии содействовать с любыми ситуациями:
– Мгновенный-чат
– Email-поддержка
– Звонковая линия
Выводы
Официальный веб-сайт казино и его актуальные альтернативные адреса гарантируют игрокам надежный и интересный азартный процесс. Выгодные бонусы, простая адаптивная версия, обширные развлечения и высокоуровневое live-казино делают эту площадку замечательным местом для игровых развлечений.
Access here
gambling sites help center
to get the full story.
Характеристика главного веб-сайта
Передовые сетевые казино предлагают пользователям разнообразный выбор забав и опций. Основной веб-сайт [url=https://sweetypestcontrol.com/2026/03/18/vlijanie-tehnologij-na-azartnye-igry-kak-innovacii-4/]Lev[/url] предоставляет надежный возможность к гемблинг функциям.
Действующее зеркало: возможность сегодня
Альтернативный адрес выступает как точную копию лицензионного портала. Проверенное зеркало позволяет пользователям преодолевать возможные барьеры.
Выгоды применения зеркала
Принципиальные выгоды охватывают:
– Стабильный вход к платформе
– Сохранение абсолютно всех возможностей официального сайта
– Охрана персональных информации
– Аналогичный функционал
Оформление профиля на сайте
Процесс оформления профиля характеризуется доступностью и удобством. Начинающие клиенты необходимо:
1. Зайти на основной сайт или его зеркало
2. Выбрать на элемент открытия счета
3. Ввести обязательные данные
4. Подтвердить email почту
5. Произвести начальный логин
Вознаграждение за открытие счета
Новые игроки зарабатывают щедрый стартовый презент. Это награда способно охватывать:
– Денежные начисления
– Даровые прокруты
– Повышенный уровень кэшбэка
Доступ в личный раздел
Активные игроки в состоянии мгновенно авторизоваться в свой аккаунт, задействуя учетные данные и ключ. Собственный кабинет дает возможность к:
– Управлению депозитом
– Журналу транзакций
– Активным бонусам
– Опциям учетной записи
Подарки и предложения
Ресурс периодически реализует всевозможные промо-кампании для пользователей.
Виды бонусов
Главные категории призов:
– Пополнительные бонусы – процент от суммы депозита
– Бесплатные вращения – complimentary вращения в автоматах
– Возврат средств – компенсация части проигранных финансов
– Турнирные трофеи – награды за игру в соревнованиях
Ваучеры
Эксклюзивные промокоды помогают заработать добавочные выгоды. Игроки могут отыскать их на специализированных порталах или взять в новостях.
Портативная вариант и софт
Актуальные игроки предпочитают переносной досуг.
Возможности мобильной адаптации
– Гибкий облик для любых устройств
– Совокупный вход к слотам
– Моментальная подгрузка
– Комфортное навигация
Download программу
Портативное приложение доступно для скачивания на девайсы с операционными платформами Android и iOS. App предоставляет:
– Устойчивую функциональность
– Мгновенные алерты о предложениях
– Мгновенный путь к избранным играм
Развлекательный каталог
Платформа предлагает богатую коллекцию игровых игр.
Слоты
Ассортимент развлекательных автоматов включает:
– Традиционные слоты
– Передовые игры
– Призовые машины
– Branded развлечения
Live игры
Секция настоящих дилеров предоставляет право соревноваться с реальными крупье. Доступны:
– Рулетки
– Блэкджек
– Punto Banco
– Poker
Соревнования
Периодические чемпионаты помогают пользователям состязаться за значительные наградные банки. Соревновательная программа актуализируется регулярно.
Финансовые операции
Сайт предлагает множество вариантов депозита и получения финансов:
– Банковские карточки
– Виртуальные платежные системы
– Межбанковские транзакции
– Цифровые валюты
Совокупные переводы проходят надежно с задействованием прогрессивных систем криптографии.
Департамент support
Профессиональная команда support работает без перерыва. Коннектиться с консультантами реально через:
– Живой чат
– Почтовую почту
– Контактный номер
– Social платформы
Безопасность и аккредитация
Портал функционирует на базе законной разрешения. Это подтверждает:
– Легальность азартного действа
– Защиту индивидуальных информации
– Своевременные выводы
– Регулируемый игровой процесс
Итог
Лицензионный сайт и его функционирующие резервные страницы гарантируют пользователям абсолютный набор функций для комфортной и доходной игры. Щедрые бонусы, всевозможные слоты, компетентная служба и защищенная платформа транзакций формируют портал оптимальным опцией для любителей игровых развлечений.
gallery link – Well-structured pages allow quick and easy exploration.
https://novamenpharmacy.shop/# buy viagra here
visit this collective – The site is neatly structured, making browsing smooth and effortless.
visit this traders hub – The clean layout helps users browse products quickly without any hassle.
discover products here – Well-structured menus make exploring items fast and simple.
Описание основного портала
Передовые виртуальные казино предоставляют пользователям обширный спектр развлечений и опций. Лицензионный веб-сайт РЎСѓРєР° обеспечивает надежный вход к азартным функциям.
Действующее зеркало: возможность прямо сейчас
Резервный сайт является собой идентичную копию лицензионного портала. Актуальное зеркало помогает пользователям избегать потенциальные ограничения.
Достоинства задействования зеркала
Основные плюсы включают:
– Стабильный вход к сайту
– Хранение абсолютно всех возможностей главного веб-сайта
– Сохранность личных информации
– Равнозначный возможности
Регистрация на портале
Ход создания аккаунта характеризуется доступностью и комфортом. Начинающие игроки должны:
1. Зайти на главный ресурс или его зеркало
2. Нажать на клавишу оформления
3. Указать обязательные сведения
4. Активировать почтовую ящик
5. Совершить дебютный авторизацию
Подарок за открытие счета
Начинающие забирают значительный стартовый бонус. Данное награда имеет возможность включать:
– Материальные суммы
– Complimentary спины
– Усиленный показатель кэшбека
Доступ в собственный аккаунт
Активные пользователи имеют возможность оперативно получить доступ в свой кабинет, используя учетные данные и код. Собственный кабинет предлагает путь к:
– Управлению балансом
– Записям транзакций
– Действующим бонусам
– Настройкам аккаунта
Вознаграждения и акции
Ресурс постоянно проводит разнообразные акции для клиентов.
Категории подарков
Основные категории поощрений:
– Депозитные начисления – коэффициент от суммы депозита
– Спины – безвозмездные прокруты в слотах
– Кэшбек – возврат процента утраченных сумм
– Соревновательные награды – награды за игру в соревнованиях
Купоны
Специальные ваучеры дают возможность приобрести экстра выгоды. Игроки могут найти их на партнерских порталах или заработать в уведомлениях.
Мобильная редакция и софт
Прогрессивные гемблеры предпочитают мобильный игровой процесс.
Функции портативной платформы
– Responsive облик для разнообразных аппаратов
– Целостный вход к играм
– Моментальная подгрузка
– Комфортное использование
Download софт
Мобильное программа предоставлено для установки на устройства с операционными системами Android и iOS. Софт обеспечивает:
– Стабильную работу
– Мгновенные оповещения о предложениях
– Мгновенный запуск к предпочитаемым играм
Гемблинг ассортимент
Казино дает внушительную библиотеку гемблинг забав.
Игровые машины
Каталог игровых слотов насчитывает:
– Традиционные автоматы
– Передовые автоматы
– Джекпотные игры
– Сюжетные развлечения
Live игры
Раздел реальных столов предоставляет возможность соревноваться с профессиональными диллерами. Открыты:
– Европейская рулетка
– Блек-джек
– Punto Banco
– Карибский покер
Соревнования
Систематические конкурсы обеспечивают пользователям конкурировать за внушительные денежные фонды. Конкурсная сетка модифицируется каждую неделю.
Платежные транзакции
Сайт поддерживает обилие вариантов зачисления и обналичивания сумм:
– Пластиковые карты
– Цифровые кошельки
– Банковские переводы
– Криптовалюты
Любые транзакции выполняются конфиденциально с использованием актуальных методов шифрования.
Сервис поддержки
Квалифицированная группа поддержки трудится без перерыва. Связаться с специалистами доступно через:
– Online чат
– Email почту
– Контактный номер
– Социальные платформы
Секьюрити и аккредитация
Игровой клуб работает на фундаменте законной сертификата. Это удостоверяет:
– Прозрачность развлекательного геймплея
– Сохранность персональных информации
– Своевременные транзакции
– Легальный гемблинг
Итог
Главный сайт и его действующие альтернативные адреса предоставляют игрокам полный набор возможностей для приятной и прибыльной времяпрепровождения. Щедрые бонусы, многочисленные развлечения, профессиональная сервис и безопасная инфраструктура платежей превращают портал оптимальным решением для ценителей гемблинг услуг.
Старый паркет? https://shlifovka-parketa.ru профессиональное восстановление деревянного пола без пыли и лишних затрат. Удаляем царапины, потемнения и старое покрытие, возвращаем гладкость и естественный цвет. Используем современное оборудование, выполняем циклевку, шлифовку и лакировку паркета под ключ с гарантией качества и точным соблюдением сроков.
Характеристика основного ресурса
Новое онлайн-казино предлагает своим участникам широкий ассортимент игр и поощрений. Главный портал Вован казино функционирует постоянно, давая путь к известным симуляторам, live-казино и многим акциям.
Функционирующее зеркало: доступ к ресурсу
Что такое копия казино
Альтернатива составляет собой идентичную реплику официального портала с отличным интернет именем. Актуальное зеркало обеспечивает игрокам избегать ограничения и обеспечивать непрерывный вход к любимым автоматам.
Как обнаружить рабочее зеркало сегодня
Рабочие ссылки на главное зеркало размещаются через:
– Почтовую рассылку
– Официальные социальные сети
– Команду обслуживания
– Тематические ресурсы
Регистрация на платформе
Ход регистрации
Открытиесчета отнимает всего минут и подразумевает данные этапы:
1. Переход на официальный ресурс или действующее зеркало
2. Нажатие клавиши “Открытьсчет”
3. Внесение контактных реквизитов
4. Активация электроннойпочты или мобильного
5. Придумывание ключа
Приз за регистрацию
Свежие игроки зарабатывают солидные стартовые вознаграждения:
– Игровые депозиты на баланс
– Халявныеспины для автоматов
– Повышенный объем возврата
– Уникальные купоны
Доступ в индивидуальный профиль
Зарегистрированные пользователи вправе выполнить вход через официальный веб-сайт или рабочее зеркало. Для этого требуется ввести никнейм и пароль, созданные при открытиисчета.
Инструменты личного профиля
В персональном аккаунте имеются следующие функции:
– Контроль учетными данными
– Пополнение баланса
– Вывод выигрышей
– Использование промокодов
– Просмотр архива транзакций
– Включение в турнирах
Подарки и кампании
Типы бонусов
Казино поощряет своих игроков разнообразными наградными программами:
– Приветственный бонус — солидные подарки на начальные вклады
– Freespins — бонусные ставки в рейтинговых автоматах
– Кешбэк — систематический возмещение доли потерь
– Система лояльности — уникальные преимущества для постоянных игроков
Промокоды и их активация
Эксклюзивные промокоды дают расширенные бонусы. Для ввода требуется указать шифр в соответствующее раздел в личном профиле.
Геймплейный набор
Игры
Каталог игровых автоматов насчитывает сотни названий от известных провайдеров:
– Обычные слоты
– Новые игры
– Джекпот игры
– Лицензионные игры
Live казино
Зона Live-казино дарит процесс с реальными крупье в обстановке актуального трансляции:
– Французскаярулетка
– Блэкджек
– Баккара
– Техасскийхолдем
Соревнования
Регулярные соревнования с солидными джекпотными пулами проводятся ежедневно. Претенденты борются за первенство в таблице.
Мобильная адаптация и приложение
Мобильная адаптация ресурса
Оригинальный портал на100% приспособлен для портативных девайсов. Участники могут открывать слоты напрямую через обозреватель без необходимости загрузки.
Приложение для загрузки
Авторское смартфонное программа предоставляется для загрузки на аппараты с рабочими ОС Android и iOS. APP обеспечивает:
– Оперативный вход к играм
– Стабильную производительность
– Моментальные-сообщения о предложениях
– Удобный интерфейс
Вывод
Основной портал казино и его актуальные альтернативы предоставляют пользователям абсолютный вход к первоклассным азартным услугам. Солидные вознаграждения, различные промо, простая смартфонная адаптация и квалифицированная поддержка превращают азартный досуг чрезвычайно комфортным и выгодным.
Kraken Marketplace Официальный сайт для доступа к Kraken
kra at
access this site – Browsing feels natural thanks to clearly arranged pages.
https://jojovip.top/# jojobet resmi
browse here – Organized sections make it intuitive to explore different areas.
Современные интернет казино предоставляют игрокам огромный выбор возможностей для приятной игры. Но иногда вход к официальному сайту может стать заблокированным. В таких обстоятельствах на выручку появляется Клубника скачать, которое предоставляет бесперебойный подключение ко всем функциям платформы.
Что такое действующее зеркало казино
Копия — это полная версия основного ресурса, которая располагается по дополнительному интернет-адресу. Альтернативный ресурс поддерживает целый набор функций основного ресурса, включая индивидуальный кабинет, средства и данные платежей.
Принципиальные выгоды эксплуатации зеркала:
– Постоянный вход к сайту
– Стопроцентная схожесть возможностей
– Конфиденциальность индивидуальных информации
– Поддержка всех имеющихся вознаграждений
Как найти актуальное зеркало сегодня
Есть множество надежных способов получения текущей ссылки:
Официальные сервисы:
1. Имейл рассылка — руководство регулярно пересылает уведомления с действующими ссылками
2. Коммуникационные сети — проверенные каналы публикуют свежую новости
3. Департамент поддержки — консультанты выдают безопасные адреса
4. Телефонное приложение — дает возможность избегать блокировки
Создание аккаунта на главном веб-сайте
Процедура оформления длится только пару минут и предполагает из нижеследующих этапов:
1. Попадание на официальный портал или актуальное зеркало
2. Клик на клавишу «Открыть счет»
3. Ввод персональной формы
4. Верификация электронной почты или контактного номера
5. Применение привилегии за регистрацию при наличии промокода
Начинающие клиенты получают великодушный приветственный бонус, который может включать free spins, денежные поощрения или компенсацию.
Авторизация в личный кабинет
Логин на сайте реализуется стандартным способом. Нужно ввести логин и секретный ключ, использованные при открытии счета.
Существенные моменты для надежного входа:
– Используйте сложный код
– Активируйте двухэтапную проверку
– Не сохраняйте реквизиты на публичных девайсах
– Проверяйте интернет строку браузера
Обзор премиальной структуры
Игровая платформа балует геймеров различными поощрениями и кампаниями:
Начальный пакет
Свежие игроки могут претендовать на значительное поощрение за дебютный пополнение. Как правило это процентовая добавка к переведенной величине плюс даровые спины для известных слотов.
Систематические кампании
– Недельный кэшбек — компенсирование части потерянных средств
– Награды на последующие депозиты
– Уникальные предложения по праздникам
– Соревнования с значительными наградными пулами
Схема привилегий
Деятельные геймеры собирают пункты за всякую раунд, которые затем превращаются на действительные средства, free spins или специальные бонусы.
Купоны: как задействовать
Бонус-коды — это уникальные комбинации символов, обеспечивающие доступ к дополнительным привилегиям.
Где раздобыть рабочие промокоды:
– Проверенные медийные сети казино
– Аффилиатные порталы
– Email-новостная лента
– Тематические группы
Указывается промокод в специальное поле при открытии счета или пополнении счета.
Портативная версия и приложение
Нынешние клиенты любят играть с мобильных гаджетов. Платформа предоставляет двойной решения для приятной портативной игры.
Responsive версия
Онлайн версия автоматически оптимизируется под диагональ экрана. Не требует установки и функционирует в произвольном свежем браузере.
Смартфонное приложение
Получить app можно для аппаратов на Android и iOS. Достоинства app:
– Оперативная открытие
– Стабильная работа
– Мгновенные-уведомления о поощрениях
– Автономный избегание блокировок
Операция установки легок: требуется зайти на портал с мобильного аппарата и подчиняться указаниям.
Развлекательный выбор
База развлечений охватывает тысячи вариантов от передовых поставщиков.
Слоты
Азартные машины — самая любимая секция забав. Доступны стандартные простые слоты, новые видеослоты с поощрительными стадиями, а также джекпотные призы.
Live казино
Раздел с действительными дилерами позволяет почувствовать настроение подлинного казино. Представлены столы с блэкджеком.
Передача осуществляется в превосходном формате, имеется диалог с крупье и остальными пользователями.
Соревнования
Периодически организуются состязания по всевозможным дисциплинам. Вступление позволяет выиграть денежные выигрыши, даровые прокруты или специальные привилегии.
Денежные операции
Платформа обеспечивает широкий набор финансовых методов:
– Пластиковые карты
– Онлайн платформы
– Биткоин
– Денежные транзакции
Стартовая величина депозита — приемлемая для преобладающего числа геймеров. Вывод денег производится в минимальные интервалы.
Сервис поддержки
Квалифицированные консультанты готовы поддержать непрерывно. Открыты такие каналы контакта:
– Живой-чат
– Email
– Звонковая горячая линия
– Медийные сети
Пояснения на стандартные запросы можно обнаружить в зоне FAQ.
Резюме
Лицензионный сайт казино и его функционирующие зеркала гарантируют геймерам совершенный доступ ко всем функциям платформы. Значительные поощрения, удобная портативная версия, впечатляющий коллекция слотов и профессиональная помощь создают игровой опыт максимально приятным и защищенным.
apartments for sale phuket apartments for sale phuket .
Актуальные онлайн-казино дают пользователям внушительный ассортимент развлечений и премиальных вариантов. Вход к сервису осуществляется через лицензионный веб-сайт или его функционирующее зеркало Retro casino, что гарантирует постоянную активность.
Что такое актуальное зеркало казино
Дубликат — это полная реплика официального веб-сайта, построенная для решения ограничений. Рабочее зеркало обеспечивает участникам получить соединение к излюбленным играм в любое удобное время.
Лицензионное зеркало имеет всеми характеристиками первоначального портала:
– Весь ассортимент слотов
– Профиль с записанными параметрами
– Текущие поощрения
– Гарантированные платежные операции
Оформление профиля на лицензионном ресурсе
Процедура регистрации требует всего немного минут. Начинающим клиентам следует:
1. Попасть на официальный ресурс или рабочее зеркало
2. Кликнуть на элемент “Создать аккаунт”
3. Указать необходимые информацию
4. Активировать электронную почту
5. Сделать стартовый платеж
Бонус за регистрацию выдается автоматически после выполнения всех этапов.
Вход в профиль
Действующие пользователи могут осуществить авторизацию используя:
– Имя пользователя и шифр
– Код сотового
– Email
Профиль дает право к управлению балансом, истории ставок и активным акциям.
Промо и кампании
Развлекательная система привлекает постоянных участников выгодными вознаграждениями:
Стартовый комплект
– Бонус на дебютный пополнение до 100%
– Free spins на известные слоты
– Дополнительные поощрения за очередные взносы
Ваучеры
Эксклюзивные ваучеры дают возможность на получение эксклюзивных поощрений. Действующие коды выкладываются в категории “Бонусы”.
Кэшбек
Постоянный кешбэк насчитывает до 10% от использованных средств. Возмещение начисляется автоматически.
Система лояльности
Постоянные игроки получают поинты, которые обмениваются на реальные деньги или фриспины.
Mobile версия и APP
Для удобства клиентов создана удобная адаптивный сайт. Адаптивный дизайн позволяет легко делать ставки с любого карманного устройства.
Выгоды приложения:
– Быстрый вход к играм
– Оптимизированный облик
– Бесперебойная работа
– Нотификации о актуальных событиях
Установить программу можно свободно с главного сайта для аппаратов на Android и iOS.
Каталог слотов
Игровые автоматы
Библиотека насчитывает более 2000 машин от топовых студий:
– Обычные игры
– Мультимедийные игры
– Jackpot игры
– Сюжетные слоты
Live казино
Раздел Live столов предлагает игру с настоящими крупье в живом времени:
– Колесо фортуны
– Блэкджек
– Punto Banco
– Карточный покер
Турниры
Периодические состязания с крупными премиальными пулами проводятся еженедельно. Участие в турнирах доступно всем активным клиентам.
Финансовые методы
Взносы и получения денег производятся через популярные способы оплаты:
– Банковские карты
– Онлайн системы
– Криптовалюта
– Банковские операции
Минимальный взнос — от 100 рублей. Снятие финансов обрабатывается в течение 24 периода.
Сервис помощи
24/7 группа помощи расположена поддержать в исправлении произвольных проблем:
– Live chat
– Email
– Связь
– Публичные сети
Безопасность и разрешение
Лицензионный портал функционирует на фундаменте международной лицензии. Каждые сведения пользователей обезопасены актуальным SSL-кодированием.
Вывод
Функционирующее зеркало дает бесперебойный подключение к предпочитаемым автоматам, привлекательным акциям и функциональным возможностям. Откройте счет сегодня и обретите стартовый поощрение!
alt yaz?l? porno
online store link – Everything feels streamlined and easy to explore.
villas for sale in phuket villas for sale in phuket .
start browsing now – The interface feels light and makes moving around very easy.
elmmeadowmarketplace.shop – Clean design, browsing feels smooth and intuitive throughout the site.
Описание оригинального веб-сайта
Передовое онлайн-казино дарит своим участникам разнообразный спектр развлечений и призов. Главный веб-сайт http://www.c58.ru действует непрерывно, обеспечивая вход к востребованным автоматам, live-казино и многочисленным акциям.
Функционирующее зеркало: возможность к сайту
Что такое альтернатива казино
Зеркало представляет собой полную дубликат основного сайта с другим сетевым названием. Рабочее зеркало позволяет пользователям обходить запреты и иметь непрерывный доступ к выбранным развлечениям.
Как получить рабочее зеркало сегодня
Свежие адреса на официальное зеркало выкладываются через:
– E-mail рассылку
– Проверенные социальные сети
– Команду поддержки
– Affiliated площадки
Созданиеаккаунта на платформе
Ход созданияаккаунта
Созданиеаккаунта требует несколько минут и включает следующие шаги:
1. Переход на оригинальный портал или рабочее зеркало
2. Клик клавиши “Создатьаккаунт”
3. Указание личных сведений
4. Активация адреса или номера
5. Формирование ключа
Бонус за оформление
Свежие клиенты зарабатывают большие стартовые поощрения:
– Денежные деньги на счет
– Халявныеспины для игр
– Повышенный размер компенсации
– Эксклюзивные купоны
Логин в персональный профиль
Действующие пользователи имеютвозможность совершить вход через официальный сайт или действующее зеркало. Для этого следует указать никнейм и код, сформированные при регистрации.
Функции личного раздела
В личном кабинете открыты следующие опции:
– Редактирование учетными сведениями
– Внесение счета
– Обналичивание выигрышей
– Применение промокодов
– Мониторинг журнала операций
– Участие в турнирах
Подарки и предложения
Виды вознаграждений
Казино балует своих пользователей различными бонусными акциями:
– Вступительный набор — щедрые вознаграждения на начальные взносы
– Бесплатныевращения — дополнительные вращения в топовых слотах
– Кешбэк — регулярный возмещение части потерь
– Система VIP — специальные бонусы для активных клиентов
Промокоды и их применение
Специальные коды обеспечивают экстра поощрения. Для применения необходимо внести комбинацию в определенное окно в собственном аккаунте.
Игровой набор
Игры
База игровых машин включает множество вариантов от известных провайдеров:
– Стандартные симуляторы
– Современные игры
– Джекпот слоты
– Сюжетные автоматы
Live казино
Зона Live-казино предлагает взаимодействие с живыми операторами в обстановке онлайн эфира:
– Американскаярулетка
– Блэкджек
– Пунтобанко
– Карибскийпокер
Турниры
Постоянные конкурсы с солидными джекпотными фондами проходят постоянно. Соревнующиеся борются за призовыеместа в таблице.
Мобильная реализация и APP
Адаптивная версия ресурса
Основной сайт целиком оптимизирован для портативных устройств. Игроки могут играть развлечения напрямую через интернет-браузер без необходимости установки.
APP для установки
Официальное карманное программа предоставляется для скачивания на устройства с рабочими системами Android и iOS. Программа обеспечивает:
– Мгновенный вход к играм
– Устойчивую работу
– Оперативные-оповещения о акциях
– Комфортный оформление
Заключение
Главный портал казино и его функционирующие копии предоставляют участникам всесторонний доступ к качественным развлекательным развлечениям. Большие бонусы, различные кампании, функциональная мобильная платформа и профессиональная помощь превращают развлекательный процесс максимально удобным и выгодным.
open marblebrook shop – Clean design with easy navigation and organized content throughout.
phuket homes for sale thailand real-estate-for-sale-in-phuket.com .
Kraken Marketplace Официальный сайт для доступа к Kraken
slon3 cc
go to Wild Harbor store – Clean and organized pages allow quick exploration.
visit this helpful site – The layout is clean and makes browsing through content very easy.
discover items – The layout feels light and uncluttered, improving navigation.
Доступ к платформе через действующие зеркала
Современные онлайн казино дают пользователям бесперебойный вход к сервисам. Главный портал ДжиВиСпин казино действует стабильно, гарантируя широкий выбор игровых слотов. Но периодически формируются цифровые трудности или блокировки, в связи с чем важно иметь представление о присутствии функционирующих зеркал.
Что означает собой главное зеркало казино
Зеркало — это идентичная копия основного сайта с аналогичным интерфейсом. Рабочее зеркало на данный момент позволяет миновать местные блокировки и продолжать гемблинг.
Принципиальные преимущества использования зеркал:
– Абсолютный подключение к собственному кабинету
– Поддержание каждых сведений профиля
– Аналогичный ассортимент игр
– Текущие поощрения и предложения
Открытие счёта на сайте
Механизм оформления отнимает считанные минут. Новые игроки получают щедрый приз за создание счёта, который имеет возможность вмещать:
– Вступительный бонусный подарок
– Бесплатные вращения для игр
– Специальные коды
– Увеличенный возврат
Во имя завершения записи нужно:
1. Перейти на центральный портал или копию
2. Нажать кнопку «Создать аккаунт»
3. Внести контактные данные
4. Верифицировать электронную почту или мобильный
5. Задействовать купон (когда имеется доступности)
Подключение в персональный кабинет
Вслед за корректной создания аккаунта клиенты могут производить доступ с помощью официальный портал или функционирующее зеркало. Персональный кабинет предоставляет полный управление над счётом:
– Архив транзакций
– Ввод кошелька
– Вывод выигрышей
– Регулирование бонусами
– Участие в состязаниях
Поощрения и промо казино
Портал награждает клиентов многочисленными наградными системами:
Стартовые подарки
Новички приобретают щедрый комплект поощрений на стартовые депозиты. Зачастую это содержит процентную прибавку к объёму депозита плюс безвозмездные вращения.
Постоянные промо
– Раз в неделю кешбэк до 15%
– Соревнования с премиальными пулами
– Поощрения на дату рождения
– Специальные предложения для VIP геймеров
Программа лояльности
Регулярные геймеры накапливают баллы, которые можно обменять на подлинные деньги или особые привилегии.
Смартфонная версия и приложение
Современные разработки обеспечивают участвовать где угодно. Смартфонная форма сайта самостоятельно адаптируется под размер каждого девайса.
Преимущества смартфонного софта:
– Скоростная загрузка слотов
– Комфортный интерфейс
– Моментальные-уведомления о бонусах
– Опция установить для Android и iOS
Live казино: атмосфера настоящего развлекательного заведения
Категория Live игорного дома транспортирует игроков в антураж настоящего гемблинг клуба. Компетентные операторы управляют развлечение в виде настоящего времени.
Доступные развлечения:
– Колесо фортуны
– Карточная игра
– Punto Banco
– Покер
Автоматы и игровые автоматы
Собрание игровых аппаратов охватывает сотни названий от ведущих производителей. Любой пользователь подберёт слот по желанию:
– Традиционные слоты
– Видеослоты с бонусными уровнями
– Накопительный-игры
– Многолинейные машины
Состязания и раздачи
Систематические соревнования вносят драйв и дают способность выиграть внушительные призы. Включение в состязаниях зачастую комплиментарное, а наградные фонды доходят до значительных сумм.
Секьюрити и приватность
Портал эксплуатирует современные технологии кодирования для гарантии сведений клиентов. Все финансовые транзакции осуществляются через защищённые соединения.
Резюме
Главный сайт и его рабочие зеркала гарантируют безопасный вход к превосходным гемблинг развлечениям. Щедрые призы, удобная карманная версия, многообразие машин и высококлассное Live-игорный дом превращают сайт превосходным опцией для любителей азартных автоматов.
Нынешние онлайн-казино обеспечивают игрокам разнообразный ассортимент опций для удобной времяпрепровождения. Подключение к ресурсу Голд производится через официальный веб-ресурс или актуальное зеркало.
Что такое рабочее зеркало казино
Функционирующее зеркало — это запасной домен официального сайта казино. Такие версии разрабатываются для предоставления постоянного входа к азартной сервису.
Копия на сегодня полностью воспроизводит возможности главного ресурса. Игроки получают аналогичный вход ко всем сервисам, включая оформление профиля, внесение депозита депозита и получение средств.
Оформление профиля на основном ресурсе
Алгоритм оформления учетной записи требует всего считанные мгновений. Будущим игрокам требуется:
1. Зайти на основной ресурс или действующее проверенное зеркало
2. Щелкнуть кнопку “Зарегистрироваться”
3. Ввести необходимые информацию
4. Активировать e-mail почту
5. Применить код активации при присутствии
После окончания открытия профиля участник получает вознаграждение за регистрацию, который может предполагать free spins или денежное вознаграждение.
Вход в собственный кабинет
Пользовательский кабинет — это закрытая область, где игроки способны регулировать своим аккаунтом. Для доступа следует внести логин и секретный ключ.
В личном кабинете представлены нижеперечисленные инструменты:
– Просмотр записей транзакций
– Задействование промокодов
– Управление вознаграждениями
– Участие в турнирах
– Проверка возврата средств
– Редактирование аккаунта
Призы и промо
Азартная площадка предлагает великодушные бонусы:
Приветственный пакет — начинающие получают значительное вознаграждение на начальные вклады.
Даровые спины — начисляются как при оформлении, так и в контексте различных мероприятий.
Возмещение — еженедельный компенсация части утраченных сумм.
Промокоды — особые последовательности, обеспечивающие возможность к эксклюзивным предложениям.
Обзор азартных направлений
Slots
Коллекция слотов насчитывает массу наименований от передовых разработчиков. Пользователи откроют как обычные слоты, так и инновационные 3D-слоты с интересной анимацией.
Live казино
Раздел Live казино дарит шанс участвовать с действующими дилерами в состоянии настоящего времени. Имеются востребованные развлечения: рулетка, блэкджек, баккара, покер.
Соревнования
Регулярные соревнования с значительными премиальными суммами манят массу конкурсантов. Чемпионы завоевывают денежные призы и специальные поощрения.
Телефонная версия и софт
Мобильная версия портала предоставляет право играть с любого устройства. Оформление самостоятельно подстраивается под габариты экрана.
Скачать софт можно для девайсов на Android и iOS. Мобильное приложение обладает всеми функциями десктопной версии.
Как отыскать действующее зеркало на данный момент
Свежие линки копий регулярно обновляются. Узнать действующую ссылку можно различными способами:
– Через департамент помощи
– В подлинных новостных сетях
– По почтовой newsletter
– На партнерских порталах
Защита и сертификация
Официальный домен действует на основании мировой сертификата. Все переводы охраняются актуальными протоколами шифрования.
Секретность индивидуальных сведений обеспечивается в абсолютном размере.
Итог
Основной сайт и его актуальные альтернативы дарят пользователям 24/7 доступ к первоклассным развлекательным сервисам. Щедрые призы, различные слоты, опытная поддержка — все это создает игровой опыт чрезвычайно удобным и притягательным.
https://jojovip.top/# jojobet casino
click here – The design is tidy and makes moving between sections simple.
go here now – Well-organized layout provides a smooth and user-friendly experience.
For a walkthrough
top-rated casino websites
for workshop resources.
Анализ официального веб-сайта
Современное онлайн-казино предоставляет своим пользователям разнообразный набор развлечений и бонусов. Основной сайт Ретро казино работает круглосуточно, давая путь к известным автоматам, live-казино и разнообразным кампаниям.
Функционирующее зеркало: вход к порталу
Что такое дубликат казино
Дубликат является собой точную версию основного портала с другим интернет адресом. Функционирующее зеркало предоставляет клиентам миновать запреты и иметь непрерывный вход к любимым играм.
Как обнаружить действующее зеркало сегодня
Действующие линки на основное зеркало появляются через:
– Электронную новостнуюленту
– Проверенные публичные сети
– Команду помощи
– Партнерские порталы
Оформление на портале
Процесс созданияаккаунта
Регистрация длится всего минут и подразумевает следующие шаги:
1. Доступ на главный портал или действующее зеркало
2. Нажатие кнопки “Открытьсчет”
3. Внесение личных реквизитов
4. Подтверждение электроннойпочты или телефона
5. Создание пароля
Приз за открытиесчета
Новые участники зарабатывают солидные стартовые поощрения:
– Финансовые деньги на аккаунт
– Халявныеспины для слотов
– Усиленный размер кэшбека
– Эксклюзивные коды
Авторизация в персональный профиль
Зарегистрированные клиенты вправе совершить доступ через официальный сайт или текущее зеркало. Для этого необходимо набрать учетноеимя и ключдоступа, установленные при созданииаккаунта.
Опции индивидуального раздела
В собственном аккаунте доступны следующие инструменты:
– Контроль учетными информацией
– Пополнение кошелька
– Обналичивание выигрышей
– Активация кодов
– Просмотр статистики ставок
– Вступление в соревнованиях
Подарки и акции
Категории бонусов
Казино балует своих участников различными наградными программами:
– Начальный набор — выгодные подарки на стартовые депозиты
– Freespins — дополнительные прокруты в топовых симуляторах
– Возврат — систематический компенсация суммы проигрышей
– Схема лояльности — особые льготы для регулярных участников
Купоны и их ввод
Специальные ваучеры предоставляют экстра бонусы. Для ввода необходимо указать последовательность в соответствующее раздел в индивидуальном аккаунте.
Игровой набор
Автоматы
Коллекция игровых машин насчитывает тысячи позиций от топовых производителей:
– Классические слоты
– Современные слоты
– Джекпот автоматы
– Тематические развлечения
Live казино
Секция Live-казино обеспечивает игру с реальными операторами в режиме онлайн трансляции:
– Европейскаярулетка
– Blackjack
– Пунтобанко
– Покер
Соревнования
Периодические соревнования с солидными джекпотными суммами устраиваются постоянно. Игроки соревнуются за победу в турнирнойсетке.
Мобильная реализация и APP
Мобильная реализация сайта
Главный сайт полностью адаптирован для смартфонных девайсов. Игроки способны запускать игры напрямую через обозреватель без необходимости загрузки.
Софт для загрузки
Фирменное карманное программа предлагается для загрузки на девайсы с базовыми платформами Android и iOS. APP обеспечивает:
– Быстрый путь к автоматам
– Устойчивую операционность
– Push-извещения о промо
– Интуитивный интерфейс
Резюме
Главный веб-сайт казино и его рабочие альтернативы гарантируют клиентам абсолютный вход к высококлассным азартным сервисам. Выгодные бонусы, разнообразные акции, простая мобильная реализация и опытная помощь превращают геймплейный опыт чрезвычайно enjoyable и доходным.
blog paycor login
Вход к сайту через актуальные зеркала
Клиенты сетевых казино регулярно сталкиваются с вопросом недоступности базового портала. Собственно для ликвидации этой проблемы созданы зеркала легального домена. Ретро обеспечивает полный доступ ко всем функциям площадки.
Что такое актуальное зеркало казино
Зеркало составляет собой абсолютную копию основного веб-сайта с похожим опциями. Главное отличие — это альтернативное имя. Абсолютно все информация пользователя, вместе с баланс, привилегии и архив партий, сохраняются неизменными.
Достоинства использования зеркал
Функционирующие зеркала обладают множеством значимых плюсов:
– Постоянный вход к предпочитаемым развлечениям
– Абсолютная сохранность персональных параметров
– Поддержание всех опций личного кабинета
– Шанс приобретения наград и включения в акциях
Регистрация на основном ресурсе
Процесс открытия счета предельно элементарен и длится пару минут. Новые игроки могут надеяться на крупный стартовый приз за регистрацию.
Ступени создания аккаунта
1. Подключение на главный сайт или его зеркало
2. Нажатие на кнопку “Зарегистрироваться”
3. Заполнение требуемых параметров
4. Подтверждение email почты
5. Ввод бонусного кода (когда имеется)
Поощрения и предложения для клиентов
Ресурс одаривает своих пользователей разнообразными призовыми программами.
Базовые категории бонусов
Вводный пакет — внушительное премирование для свежих клиентов, каковое способно включать денежные средства и фриспины.
Бесплатные вращения — опция использовать в популярных аппаратах даром.
Кэшбек — долевой возмещение израсходованных финансов, который именно выплачивается раз в неделю или ежемесячно.
Купоны — эксклюзивные сочетания, обеспечивающие дополнительные поощрения.
Индивидуальный кабинет: функции и параметры
Персональный кабинет обеспечивает исчерпывающий надзор над игровым активностью. В нем предусмотрены:
– Контроль средствами
– Записи переводов
– Действующие поощрения
– Конфигурации сохранности
– Верификация счета
Смартфонная платформа и APP
Новейшие клиенты ценят доступность. Казино предоставляет два способа для развлечений с карманных устройств.
Отзывчивая телефонная редакция
Адаптивная версия портала самостоятельно адаптируется под экран любого девайса. Отсутствует потребность устанавливать особое приложение.
APP для гаджетов
Можно загрузить официальное софт для iOS и Android. APP дает:
– Моментальный вход
– Улучшенный интерфейс
– Push-уведомления о акциях
– Устойчивую функциональность
Live казино: антураж настоящего казино
Раздел Live казино доставляет пользователей в среду подлинного клуба. Профессиональные крупье осуществляют партии в виде настоящего времени.
Известные Live-развлечения
– Рулетка
– Двадцать одно
– Baccarat
– Техасский холдем
Автоматы: ассортимент автоматов
Библиотека слотовых автоматов насчитывает массу названий от известных поставщиков. Игроки обнаружат:
– Обычные слоты
– Видеослоты
– Прогрессивный джекпот-игры
– Многолинейные автоматы
Состязания и уникальные предложения
Постоянные конкурсы позволяют участникам соревноваться друг с другом за внушительные выигрышные пулы. Каждый конкурс имеет свои требования включения и список призеров.
Способы зачисления и вывода средств
Казино обслуживает множество платежных систем:
– Банковские средства
– Цифровые счета
– Цифровые валюты
– Финансовые переводы
Абсолютно все платежи проходят надежно благодаря актуальным технологиям кодирования.
Служба помощи
Опытные сотрудники отдела обслуживания расположены содействовать 24/7. Предусмотрены данные каналы связи:
– Живой-чат
– Email-сервис
– Аудио горячая линия
– Публичные сети
Резюме
Официальный сайт игровой площадки и его актуальные альтернативы предоставляют пользователям защищенный и комфортный переход к широкому ассортименту геймерских развлечений. Крупные награды, постоянные предложения, компетентная помощь и комфортные платежные способы формируют геймерский опыт чрезвычайно приятным и выгодным.
open this online store – Pages are light, making it fast to locate products.
check this market – Pages feel light, making navigation smooth and quick.
see what’s available – Well-structured content and easy navigation improve the browsing experience.
shop now – Everything is visually clear, helping users explore without confusion.
Переход к порталу через рабочие зеркала
Игроки виртуальных казино нередко встречаются с трудностью ограничения официального ресурса. Как раз для устранения этой проблемы разработаны копии официального сайта. Ретро казик обеспечивает абсолютный переход ко всем функциям площадки.
Что такое функционирующее зеркало казино
Зеркало составляет собой полную дубликат официального ресурса с похожим возможностями. Ключевое несовпадение — это альтернативное имя. Абсолютно все параметры участника, содержа баланс, привилегии и данные партий, находятся прежними.
Достоинства использования зеркал
Действующие зеркала обладают рядом значимых выгод:
– Бесперебойный вход к предпочитаемым играм
– Абсолютная конфиденциальность индивидуальных сведений
– Сохранение всех опций индивидуального кабинета
– Шанс приобретения поощрений и включения в промоакциях
Открытие счета на официальном сайте
Процедура открытия счета чрезвычайно несложен и требует пару минут. Новые игроки имеют возможность надеяться на внушительный стартовый поощрение за открытие счета.
Шаги формирования аккаунта
1. Подключение на легальный сайт или его зеркало
2. Нажатие на элемент “Регистрация”
3. Внесение нужных параметров
4. Подтверждение цифровой почты
5. Применение бонусного кода (при наличии присутствует)
Бонусы и кампании для участников
Казино одаривает своих игроков многочисленными поощрительными предложениями.
Главные виды поощрений
Начальный подарок — щедрое начисление для новых игроков, которое именно имеет возможность содержать монетарные суммы и free spins.
Безвозмездные спины — способность играть в востребованных игровых машинах без затрат.
Кэшбек — процентный отдача проигранных сумм, каковой зачисляется еженедельно или раз в месяц.
Специальные коды — специальные наборы, обеспечивающие дополнительные выгоды.
Индивидуальный кабинет: функции и установки
Индивидуальный раздел дает совершенный надзор над развлекательным процессом. В данном разделе доступны:
– Контроль депозитом
– Данные переводов
– Активные награды
– Установки защиты
– Проверка аккаунта
Карманная версия и приложение
Новейшие участники оценивают портативность. Платформа предоставляет два способа для ставок с портативных аппаратов.
Приспособленная смартфонная версия
Смартфонная редакция домена самостоятельно подстраивается под разрешение любого девайса. Нет необходимости инсталлировать отдельное ПО.
Программа для мобильных
Возможно скачать фирменное APP для iOS и Android. Приложение дает:
– Моментальный запуск
– Адаптированный внешний вид
– Оперативные-сообщения о поощрениях
– Надежную производительность
Live раздел: среда истинного игорного заведения
Секция Live казино доставляет игроков в обстановку реального игорного заведения. Опытные ведущие ведут раунды в виде живого времени.
Популярные Live-развлечения
– Рулетка
– Blackjack
– Баккарат
– Техасский холдем
Аппараты: разнообразие развлечений
Коллекция развлекательных аппаратов содержит множество вариантов от ведущих разработчиков. Участники встретят:
– Классические автоматы
– Видеослоты
– Прогрессивный джекпот-слоты
– Megaways
Состязания и специальные мероприятия
Регулярные соревнования дают возможность участникам конкурировать друг с другом за солидные наградные фонды. Каждый соревнование содержит свои условия присутствия и список чемпионов.
Способы зачисления и получения средств
Казино поддерживает ряд расчетных сервисов:
– Дебетовые картыы
– Цифровые сервисы
– Крипто
– Финансовые транзакции
Любые переводы реализуются защищенно благодаря новейшим протоколам криптографии.
Служба support
Профессиональные операторы команды поддержки способны содействовать 24/7. Предусмотрены нижеперечисленные пути общения:
– Живой-чат
– Email-поддержка
– Звонковая связь
– Коммуникационные сети
Итог
Официальный портал платформы и его функционирующие дубликаты обеспечивают клиентам защищенный и удобный подход к огромному выбору игровых развлечений. Щедрые подарки, регулярные предложения, компетентная поддержка и удобные платежные способы создают игровой досуг предельно комфортным и выгодным.
Подключение к порталу через проверенные зеркала
Клиенты онлайн казино регулярно встречаются с трудностью ограничения официального ресурса. Собственно для преодоления этой задачи созданы зеркала легального портала. Lev предоставляет абсолютный переход ко всем опциям казино.
Что такое актуальное зеркало казино
Альтернативный адрес представляет собой абсолютную дубликат главного портала с похожим набором функций. Основное несовпадение — это другое имя. Абсолютно все данные участника, содержа счет, бонусы и данные игр, остаются прежними.
Преимущества использования зеркал
Актуальные зеркала характеризуются комплексом существенных плюсов:
– Постоянный доступ к излюбленным автоматам
– Совершенная защита личных информации
– Неизменность всех конфигураций персонального кабинета
– Опция взятия наград и присутствия в кампаниях
Регистрация на официальном сайте
Процесс оформления чрезвычайно легок и отнимает буквально минут. Начинающие пользователи в состоянии претендовать на щедрый стартовый приз за создание аккаунта.
Ступени открытия аккаунта
1. Подключение на легальный портал или его дубликат
2. Выбор на элемент “Регистрация”
3. Ввод нужных сведений
4. Подтверждение почтовой почты
5. Указание промокода (при наличии присутствует)
Подарки и акции для пользователей
Казино одаривает своих игроков различными наградными программами.
Базовые типы бонусов
Приветственный бонус — солидное начисление для свежих клиентов, что способно включать материальные бонусы и безвозмездные спины.
Free spins — способность играть в известных аппаратах бесплатно.
Кешбэк — процентный отдача потерянных средств, который выплачивается раз в неделю или ежемесячно.
Бонусные коды — особые сочетания, дающие добавочные привилегии.
Личный кабинет: функции и параметры
Личный раздел предоставляет полный управление над игровым активностью. В нем присутствуют:
– Администрирование депозитом
– Архив транзакций
– Активные привилегии
– Установки безопасности
– Верификация счета
Карманная редакция и APP
Новейшие клиенты признают доступность. Площадка дает два пути для развлечений с карманных устройств.
Приспособленная портативная версия
Портативная вариант сайта автоматически приспосабливается под разрешение любого девайса. Не нужно устанавливать отдельное программное обеспечение.
Программа для смартфонов
Возможно инсталлировать специальное приложение для iOS и Android. Программа дает:
– Моментальный старт
– Улучшенный дизайн
– Оперативные-извещения о акциях
– Устойчивую производительность
Live раздел: обстановка истинного зала
Категория Live игр транспортирует игроков в обстановку реального клуба. Квалифицированные дилеры осуществляют раунды в формате настоящего времени.
Топовые Live-игры
– Европейская рулетка
– Двадцать одно
– Баккарат
– Покер
Аппараты: ассортимент игр
Каталог развлекательных аппаратов содержит сотни позиций от известных поставщиков. Пользователи обнаружат:
– Обычные слоты
– Современные слоты
– Джекпот-игры
– Многолинейные автоматы
Состязания и специальные мероприятия
Систематические состязания дают возможность игрокам соревноваться друг с другом за значительные денежные суммы. Каждый конкурс обладает свои правила включения и таблицу лидеров.
Варианты пополнения и изъятия средств
Площадка обслуживает комплекс денежных методов:
– Кредитные картыы
– Онлайн платежные системы
– Цифровые валюты
– Прямые отправления
Любые переводы реализуются конфиденциально благодаря новейшим технологиям шифрования.
Сервис support
Квалифицированные консультанты службы поддержки готовы поддержать 24/7. Работают следующие методы коммуникации:
– Мгновенный-чат
– Email-помощь
– Голосовая горячая линия
– Социальные сети
Заключение
Главный сайт казино и его функционирующие зеркала предоставляют участникам безопасный и комфортный переход к широкому ассортименту азартных услуг. Солидные бонусы, частые кампании, качественная сервис и удобные расчетные способы превращают азартный досуг чрезвычайно увлекательным и прибыльным.
Blackburn vs Preston 2026 Championship 21:00 Rovers favored
Jogo do Tigrinho no Pix R$1: teste grátis com chance de bônus real
explore catalog – Well-structured pages help users find content naturally.
explore Echo Harbor store – Smooth navigation ensures exploring products is simple and fast.
visit this vendor – The site features clear visuals and navigation is effortless for a smooth browsing experience.
Современные сетевые казино обеспечивают пользователям огромный выбор вариантов для удобной игры. Однако иногда соединение к основному ресурсу может являться недоступным. В таких случаях на помощь появляется ДжиВиСпин, которое дает стабильный подключение ко всем возможностям платформы.
Что такое функционирующее зеркало казино
Зеркало — это точная дубликат лицензионного портала, которая располагается по дополнительному адресу. Зеркало сохраняет весь набор функций основного ресурса, включая личный кабинет, депозит и данные переводов.
Основные выгоды использования зеркала:
– Круглосуточный соединение к ресурсу
– Максимальная схожесть функционала
– Безопасность персональных данных
– Поддержка всех имеющихся бонусов
Как обнаружить функционирующее зеркало в данный момент
Есть некоторое количество проверенных путей нахождения действующей адреса:
Официальные сервисы:
1. Электронная рассылка — руководство систематически пересылает письма с актуальными доменами
2. Общественные сети — авторизованные профили публикуют актуальную данные
3. Сервис поддержки — консультанты дают надежные ссылки
4. Портативное приложение — позволяет преодолевать блокировки
Создание аккаунта на основном портале
Процесс регистрации длится лишь считанные минут и предполагает из нижеследующих ступеней:
1. Открытие на основной веб-сайт или рабочее зеркало
2. Щелчок на элемент «Открыть счет»
3. Внесение регистрационной бланка
4. Валидация почтовой почты или сотового номера
5. Применение бонуса за регистрацию при доступности промокода
Только что зарегистрированные игроки обретают великодушный стартовый бонус, который может включать даровые прокруты, валютные поощрения или cashback.
Доступ в персональный кабинет
Вход на ресурсе производится стандартным путем. Нужно ввести учетные данные и код доступа, задействованные при создании аккаунта.
Важные детали для защищенного входа:
– Задействуйте защищенный код
– Активируйте 2FA проверку
– Не фиксируйте реквизиты на посторонних устройствах
– Проверяйте интернет строку браузера
Анализ бонусной схемы
Гемблинг-сайт одаривает пользователей всевозможными привилегиями и промо:
Приветственный комплект
Свежие игроки вправе претендовать на значительное вознаграждение за дебютный взнос. Зачастую это долевая надбавка к переведенной величине плюс бесплатные вращения для популярных слотов.
Регулярные промо
– 7-дневный кэшбек — возмещение части списанных финансов
– Поощрения на последующие взносы
– Особые промо по событиям
– Турниры с крупными премиальными банками
Схема лояльности
Постоянные игроки зарабатывают пункты за каждую бет, которые затем обмениваются на реальные финансы, free spins или уникальные преимущества.
Бонус-коды: как использовать
Бонус-коды — это специальные комбинации знаков, гарантирующие право к специальным вознаграждениям.
Каким образом найти свежие промокоды:
– Авторизованные медийные сети казино
– Партнерские ресурсы
– Email-рассылка
– Тематические форумы
Вводится промокод в соответствующее поле при создании аккаунта или пополнении депозита.
Портативная версия и приложение
Актуальные геймеры любят развлекаться с портативных аппаратов. Сайт дает два решения для комфортной мобильной игры.
Мобильная версия
Интернет версия сама настраивается под габариты экранной панели. Не нуждается установки и действует в произвольном актуальном браузере.
Портативное приложение
Получить софт можно для устройств на Android и iOS. Плюсы app:
– Скоростная запуск
– Бесперебойная работа
– Всплывающие-уведомления о акциях
– Самостоятельный обход блокировок
Процедура скачивания легок: нужно перейти на сайт с телефонного гаджета и следовать руководству.
Гемблинг коллекция
Библиотека игр охватывает огромное количество единиц от лучших поставщиков.
Слоты
Развлекательные аппараты — максимально любимая группа развлечений. Размещены классические 3-барабанные машины, актуальные видеослоты с бонусными раундами, а также накопительные выигрыши.
Live казино
Отдел с живыми дилерами предоставляет ощутить дух подлинного казино. Открыты развлечения с рулеткой.
Трансляция производится в HD четкости, обеспечивается диалог с раздающим и другими участниками.
Соревнования
Регулярно запускаются соревнования по разным категориям. Присоединение обеспечивает возможность выиграть валютные награды, бесплатные вращения или эксклюзивные поощрения.
Финансовые операции
Ресурс обеспечивает обширный выбор платежных систем:
– Банковские карты
– Виртуальные системы
– Цифровая валюта
– Финансовые транзакты
Минимальная величина депозита — доступная для массы пользователей. Обналичивание призов обрабатывается в минимальные периоды.
Департамент поддержки
Опытные операторы настроены оказать помощь круглосуточно. Доступны нижеследующие каналы контакта:
– Онлайн-чат
– Email
– Голосовая поддержка
– Социальные сети
Разъяснения на распространенные запросы можно отыскать в зоне FAQ.
Вывод
Официальный ресурс казино и его функционирующие зеркала дают клиентам совершенный доступ ко всем опциям платформы. Солидные бонусы, комфортная телефонная версия, впечатляющий коллекция игр и компетентная поддержка формируют игровой опыт максимально комфортным и надежным.
Современные онлайн-казино гарантируют игрокам широкий ассортимент функций для приятной развлечений. Доступ к сервису РЎСѓРєР° осуществляется через главный домен или рабочее зеркало.
Что такое действующее зеркало казино
Функционирующее зеркало — это альтернативный линк главного портала казино. Такие клоны формируются для предоставления непрерывного подключения к развлекательной платформе.
Дубликат сегодня совершенно дублирует возможности базового сайта. Пользователи имеют аналогичный доступ ко всем услугам, включая регистрацию, внесение депозита кошелька и обналичивание призов.
Регистрация на главном портале
Процедура открытия профиля занимает всего несколько моментов. Новым пользователям требуется:
1. Перейти на основной ресурс или действующее настоящее зеркало
2. Щелкнуть кнопку “Открыть счет”
3. Ввести необходимые реквизиты
4. Активировать email почту
5. Использовать купон при присутствии
После окончания открытия профиля клиент приобретает вознаграждение за регистрацию, который способен включать фриспины или cash поощрение.
Авторизация в личный кабинет
Личный кабинет — это закрытая зона, где участники имеют возможность контролировать своим счетом. Для доступа требуется внести никнейм и секретный ключ.
В персональном кабинете имеются данные функции:
– Мониторинг истории платежей
– Использование промокодов
– Настройка поощрениями
– Вступление в турнирах
– Проверка возмещения
– Изменение данных
Вознаграждения и акции
Игровая сервис предлагает великодушные вознаграждения:
Приветственный комплект — дебютанты получают солидное поощрение на начальные вклады.
Даровые спины — выдаются как при открытии счета, так и в рамках всевозможных промо.
Кэшбек — регулярный компенсация фрагмента утраченных средств.
Промокоды — особые последовательности, открывающие выход к эксклюзивным вознаграждениям.
Анализ гемблинговых направлений
Slots
Коллекция аппаратов охватывает множество вариантов от лучших поставщиков. Клиенты откроют как традиционные машины, так и новые видеослоты с увлекательной анимацией.
Live казино
Категория Live казино предоставляет опцию соревноваться с реальными ведущими в условиях актуального времени. Открыты востребованные столы: рулетка, блэкджек, баккара, покер.
Соревнования
Регулярные турниры с большими премиальными пулами притягивают множество конкурсантов. Призеры зарабатывают денежные вознаграждения и специальные премии.
Телефонная версия и приложение
Телефонная версия портала позволяет играть с любого девайса. Интерфейс автоматически адаптируется под формат экрана.
Скачать софт можно для устройств на Android и iOS. Мобильное app обладает всеми характеристиками полной версии.
Как найти действующее зеркало на данный момент
Актуальные линки дубликатов регулярно обновляются. Обнаружить действующую URL можно несколькими путями:
– Через отдел помощи
– В подлинных новостных сетях
– По e-mail дайджесту
– На аффилиатных площадках
Защита и официальность
Лицензионный домен работает на базе мировой разрешения. Все переводы защищены современными системами защиты.
Конфиденциальность персональных реквизитов гарантируется в совершенном размере.
Вывод
Основной портал и его функционирующие копии гарантируют игрокам постоянный доступ к качественным игровым развлечениям. Привлекательные поощрения, всевозможные автоматы, опытная поддержка — все это делает азартный опыт невероятно комфортным и увлекательным.
Viagra tablet online: NovaMen Pharmacy – NovaMen Pharmacy
see details – Logical grouping of content keeps browsing stress-free.
apartments for sale thailand phuket apartments for sale thailand phuket .
access site – The presentation is tidy, making browsing pleasant and smooth.
Kraken Marketplace Официальный сайт для доступа к Kraken
kra
enter this site – Well-structured layout allows easy access to all content.
https://primelinepharmacy.com/# pills for erectile dysfunction online
a/b тест наружная реклама reklamnyj-kreativ13.ru .
tiger casino slots
Искал где взять актуальное зеркало для tiger casino и нашел этот канал. Там постоянно обновляют ссылки. Проверил — работает стабильно
Обзор оригинального ресурса
Новое онлайн-казино дарит своим пользователям обширный набор услуг и поощрений. Основной ресурс Vovan casino функционирует круглосуточно, предоставляя доступ к топовым автоматам, live-казино и многим предложениям.
Актуальное зеркало: путь к ресурсу
Что такое копия казино
Альтернатива является собой полную дубликат официального портала с альтернативным URL именем. Действующее зеркало позволяет пользователям миновать барьеры и обеспечивать стабильный подключение к выбранным слотам.
Как получить действующее зеркало сегодня
Действующие адреса на главное зеркало появляются через:
– Email рассылку
– Главные социальные сети
– Сервис помощи
– Тематические порталы
Открытиесчета на ресурсе
Ход оформления
Оформление длится всего минут и включает следующие стадии:
1. Вход на главный веб-сайт или рабочее зеркало
2. Активация кнопки “Регистрация”
3. Внесение учетных реквизитов
4. Подтверждение адреса или номера
5. Установка ключа
Приз за регистрацию
Свежие участники обретают щедрые начальные поощрения:
– Финансовые деньги на аккаунт
– Халявныеспины для слотов
– Расширенный размер кэшбека
– Специальные ваучеры
Вход в индивидуальный профиль
Активные клиенты способны выполнить авторизацию через главный сайт или актуальное зеркало. Для этого нужно указать логин и секретнуюкомбинацию, установленные при открытиисчета.
Функции личного раздела
В индивидуальном профиле имеются данные возможности:
– Контроль личными данными
– Внесение баланса
– Снятие выигрышей
– Применение купонов
– Проверка статистики транзакций
– Вступление в соревнованиях
Бонусы и кампании
Виды подарков
Казино награждает своих клиентов многочисленными поощрительными акциями:
– Вступительный набор — выгодные вознаграждения на дебютные взносы
– Фриспины — бонусные ставки в топовых автоматах
– Кешбэк — периодический компенсация доли потерь
– Система VIP — особые бонусы для постоянных пользователей
Ваучеры и их применение
Особые ваучеры дают экстра вознаграждения. Для ввода необходимо набрать последовательность в нужное графу в индивидуальном профиле.
Развлекательный каталог
Слоты
Библиотека развлекательных автоматов насчитывает множество названий от ведущих поставщиков:
– Традиционные машины
– Видео слоты
– Призовые автоматы
– Тематические игры
Live казино
Область Live-казино дарит участие с профессиональными операторами в режиме онлайн стрима:
– Рулетка
– Блэкджек
– Пунтобанко
– Карибскийпокер
Турниры
Периодические состязания с большими джекпотными пулами устраиваются регулярно. Соревнующиеся борются за победу в рейтинге.
Смартфонная адаптация и приложение
Мобильная платформа веб-сайта
Оригинальный ресурс полностью настроен для смартфонных устройств. Пользователи вправе пользоваться игры напрямую через веб-навигатор без необходимости установки.
Программа для скачивания
Фирменное мобильное софт предлагается для загрузки на гаджеты с программными средами Android и iOS. Приложение предоставляет:
– Оперативный подход к автоматам
– Надежную производительность
– Моментальные-извещения о бонусах
– Интуитивный интерфейс
Вывод
Главный сайт казино и его функционирующие зеркала гарантируют игрокам абсолютный доступ к качественным развлекательным развлечениям. Выгодные бонусы, всевозможные промо, удобная смартфонная адаптация и профессиональная служба превращают игровой процесс чрезвычайно приятным и выгодным.
explore catalog – A user-friendly design makes navigating products effortless.
explore shop page – Clean structure and lightweight layout make browsing simple.
open this website – Well-laid-out pages make it easy to follow content.
Переход к платформе через актуальные зеркала
Современные онлайн казино обеспечивают пользователям бесперебойный переход к играм. Официальный веб-сайт https://tolbaga.ru/ действует устойчиво, обеспечивая богатый спектр развлекательных слотов. Но иногда появляются программные проблемы или блокировки, следовательно важно иметь представление о присутствии функционирующих зеркал.
Что означает из себя центральное зеркало казино
Дубликат — это точная дубликат официального веб-сайта с аналогичным возможностями. Актуальное зеркало сегодня даёт возможность обходить локальные запреты и возобновлять развлечения.
Ключевые плюсы задействования зеркал:
– Абсолютный вход к собственному кабинету
– Сохранение всех информации аккаунта
– Идентичный набор слотов
– Текущие поощрения и кампании
Оформление на ресурсе
Процедура регистрации требует пару минут. Новые клиенты зарабатывают щедрый подарок за оформление, что в состоянии содержать:
– Стартовый бонусный подарок
– Безвозмездные спины для автоматов
– Уникальные коды
– Повышенный кешбэк
Для финализации регистрации необходимо:
1. Перейти на официальный сайт или альтернативу
2. Кликнуть кнопку «Регистрация»
3. Ввести контактные реквизиты
4. Подтвердить электронную почту или контакт
5. Применить код (когда имеется существовании)
Авторизация в индивидуальный кабинет
Вслед за успешной создания аккаунта игроки имеют возможность осуществлять авторизацию через официальный портал или функционирующее зеркало. Индивидуальный кабинет даёт полный регулирование над профилем:
– История ставок
– Зачисление депозита
– Получение призов
– Регулирование привилегиями
– Включение в турнирах
Бонусы и кампании казино
Ресурс удовлетворяет игроков различными наградными схемами:
Вступительные поощрения
Начинающие обретают внушительный комплект привилегий на стартовые вклады. Как правило это охватывает процентную добавку к величине пополнения плюс даровые спины.
Периодические промо
– Седмичный кэшбек до 15%
– Состязания с премиальными пулами
– Подарки на число рождения
– Особые программы для статусных пользователей
План вознаграждения
Деятельные геймеры накапливают баллы, которые можно превратить на настоящие средства или особые привилегии.
Мобильная версия и программа
Актуальные решения помогают геймить где угодно. Портативная форма сайта автоматически настраивается под монитор всякого гаджета.
Преимущества карманного программы:
– Быстрая загрузка игр
– Практичный вид
– Моментальные-нотификации о промо
– Опция скачать для Android и iOS
Настоящее казино: антураж реального азартного заведения
Секция Live казино переносит клиентов в атмосферу подлинного гемблинг заведения. Профессиональные крупье проводят процесс в формате подлинного времени.
Представленные игры:
– Европейская рулетка
– Очко
– Карточная игра
– Покер
Игровые машины и игровые аппараты
Ассортимент игровых аппаратов включает сотни названий от топовых провайдеров. Произвольный геймер обнаружит игру по желанию:
– Традиционные барабаны
– Современные автоматы с призовыми уровнями
– Накопительный-автоматы
– Многолинейные слоты
Состязания и розыгрыши
Регулярные соревнования привносят драйв и обеспечивают шанс заработать внушительные вознаграждения. Вовлечение в соревнованиях зачастую безвозмездное, а призовые пулы достигают значительных размеров.
Безопасность и анонимность
Сайт эксплуатирует актуальные методы шифрования для обеспечения данных клиентов. Каждые транзакционные транзакции осуществляются через безопасные соединения.
Резюме
Официальный ресурс и его функционирующие зеркала дают безопасный доступ к первоклассным развлекательным сервисам. Привлекательные бонусы, удобная смартфонная форма, вариативность игр и компетентное Live-заведение формируют портал превосходным решением для ценителей игровых слотов.
Актуальные онлайн-казино обеспечивают геймерам богатый диапазон возможностей для удобной времяпрепровождения. Вход к сервису Лев казино производится через основной веб-ресурс или рабочее зеркало.
Что такое функционирующее зеркало казино
Актуальное зеркало — это дополнительный домен лицензионного ресурса казино. Такие версии разрабатываются для обеспечения непрерывного доступа к гемблинговой платформе.
Дубликат текущее полностью копирует опции базового ресурса. Клиенты приобретают аналогичный доступ ко всем услугам, включая создание аккаунта, финансирование баланса и вывод выигрышей.
Создание аккаунта на основном ресурсе
Процедура оформления учетной записи длится всего считанные секунд. Новым клиентам нужно:
1. Попасть на главный ресурс или текущее настоящее зеркало
2. Выбрать кнопку “Открыть счет”
3. Внести требуемые сведения
4. Активировать электронную почту
5. Использовать бонусный код при присутствии
После завершения регистрации клиент обретает приз за регистрацию, который вправе содержать бесплатные вращения или денежное вознаграждение.
Авторизация в персональный кабинет
Персональный кабинет — это закрытая область, где клиенты имеют возможность управлять своим счетом. Для доступа нужно напечатать имя пользователя и пароль.
В пользовательском кабинете открыты нижеперечисленные возможности:
– Отслеживание истории операций
– Использование промокодов
– Управление поощрениями
– Вступление в соревнованиях
– Мониторинг возмещения
– Настройка данных
Поощрения и предложения
Азартная площадка дарит щедрые призы:
Стартовый пакет — дебютанты обретают значительное премию на первые взносы.
Free spins — начисляются как при создании аккаунта, так и в процессе разнообразных кампаний.
Кэшбэк — постоянный возмещение процента проигранных сумм.
Купоны — эксклюзивные последовательности, дающие право к эксклюзивным вознаграждениям.
Обзор азартных направлений
Игровые автоматы
Собрание автоматов содержит множество игр от лучших производителей. Клиенты найдут как классические аппараты, так и актуальные 3D-слоты с интересной оформлением.
Live казино
Секция Live казино дарит опцию играть с действующими крупье в формате реального времени. Представлены популярные столы: рулетка, блэкджек, баккара, покер.
Конкурсы
Регулярные соревнования с солидными премиальными банками манят массу участников. Призеры завоевывают cash вознаграждения и уникальные премии.
Телефонная версия и app
Мобильная версия ресурса дает возможность играть с произвольного гаджета. Интерфейс автономно адаптируется под размер экрана.
Загрузить программу можно для гаджетов на Android и iOS. Портативное app располагает всеми опциями компьютерной версии.
Как определить актуальное зеркало на данный момент
Свежие линки копий систематически корректируются. Узнать свежую адрес можно несколькими способами:
– Через сервис помощи
– В официальных информационных сетях
– По e-mail newsletter
– На тематических площадках
Надежность и сертификация
Основной ресурс действует на основе зарубежной лицензии. Все транзакции шифруются инновационными системами защиты.
Конфиденциальность индивидуальных сведений сохраняется в полном масштабе.
Вывод
Лицензионный ресурс и его действующие копии обеспечивают участникам беспрерывный доступ к превосходным азартным играм. Выгодные бонусы, разнообразные автоматы, профессиональная служба — все это создает развлекательный времяпрепровождение максимально приятным и увлекательным.
check this store – Smooth design allows users to explore items effortlessly.
For services
where buy plavix without dr prescription
to complete your task.
jojobet casino: jojobet
check listings – Clean layout and smooth flow make it easy to explore products.
browse products here – Clear design and organized content make finding items quick.
Kraken Marketplace Официальный сайт для доступа к Kraken
kra
Подключение к порталу через действующие зеркала
Пользователи интернет казино регулярно контактируют с трудностью закрытия базового портала. Конкретно для устранения этой трудности существуют дубликаты основного ресурса. https://xn—-9sbkoagiem1dl5b.xn--p1ai гарантирует стопроцентный переход ко всем опциям ресурса.
Что такое действующее зеркало казино
Копия значит собой точную версию главного веб-сайта с аналогичным возможностями. Ключевое расхождение — это иное имя. Все параметры участника, включая баланс, привилегии и историю раундов, сохраняются прежними.
Достоинства задействования зеркал
Рабочие зеркала характеризуются рядом существенных достоинств:
– Бесперебойный вход к выбранным развлечениям
– Совершенная защита личных сведений
– Сохранение всех опций персонального кабинета
– Способность получения наград и включения в акциях
Оформление профиля на основном портале
Процедура создания аккаунта крайне элементарен и требует буквально минут. Свежие игроки имеют возможность полагаться на щедрый вводный поощрение за создание аккаунта.
Стадии формирования аккаунта
1. Доступ на официальный портал или его альтернативу
2. Нажатие на опцию “Создать аккаунт”
3. Указание нужных сведений
4. Верификация цифровой почты
5. Применение промокода (при наличии имеется)
Поощрения и кампании для игроков
Казино одаривает своих клиентов разнообразными поощрительными программами.
Ключевые виды бонусов
Начальный подарок — крупное начисление для новых пользователей, каковое в состоянии включать монетарные суммы и бесплатные вращения.
Безвозмездные спины — опция запускать в известных автоматах бесплатно.
Кэшбек — долевой возврат потерянных финансов, что выплачивается раз в неделю или помесячно.
Промокоды — эксклюзивные наборы, дающие добавочные выгоды.
Персональный кабинет: опции и конфигурации
Личный кабинет гарантирует совершенный контроль над персональным процессом. Тут доступны:
– Администрирование депозитом
– Записи переводов
– Действующие бонусы
– Параметры защиты
– Валидация счета
Смартфонная редакция и софт
Нынешние клиенты предпочитают гибкость. Платформа предоставляет пару пути для развлечений с карманных девайсов.
Приспособленная мобильная платформа
Портативная версия сайта автономно адаптируется под дисплей любого аппарата. Не нужно устанавливать дополнительное софт.
Софт для мобильных
Возможно установить специальное приложение для iOS и Android. Софт обеспечивает:
– Моментальный старт
– Доработанный дизайн
– Мобильные-уведомления о бонусах
– Бесперебойную производительность
Live казино: среда настоящего зала
Зона Live развлечений доставляет клиентов в обстановку настоящего игорного заведения. Опытные ведущие осуществляют сессии в режиме настоящего времени.
Популярные Live-форматы
– Европейская рулетка
– 21
– Баккарат
– Техасский холдем
Игровые машины: многообразие игр
Коллекция развлекательных слотов насчитывает множество позиций от топовых провайдеров. Участники обнаружат:
– Стандартные автоматы
– Видео-автоматы
– Джекпот-машины
– Megaways
Соревнования и специальные мероприятия
Периодические соревнования обеспечивают пользователям соревноваться друг с другом за солидные денежные пулы. Любой турнир располагает свои требования включения и рейтинг лидеров.
Способы ввода и изъятия денег
Ресурс использует комплекс денежных методов:
– Кредитные картыы
– Виртуальные кошельки
– Blockchain-платежи
– Wire отправления
Все переводы проходят надежно благодаря актуальным технологиям защиты.
Сервис поддержки
Квалифицированные специалисты сервиса обслуживания способны поддержать 24/7. Имеются следующие способы связи:
– Онлайн-чат
– Email-помощь
– Аудио горячая линия
– Социальные сети
Резюме
Официальный ресурс платформы и его актуальные альтернативы дают пользователям защищенный и удобный доступ к обширному спектру игровых игр. Щедрые награды, периодические промоакции, компетентная поддержка и удобные денежные способы создают игровой досуг чрезвычайно захватывающим и результативным.
vertexbond portal – Simple layout that makes navigation feel smooth and uncluttered.
Доступ к ресурсу через проверенные зеркала
Передовые интернет казино обеспечивают геймерам круглосуточный переход к играм. Главный портал http://www.tolbaga.ru действует стабильно, гарантируя широкий набор развлекательных игр. Тем не менее порой возникают технические проблемы или ограничения, в связи с чем важно понимать о доступности актуальных зеркал.
Что является собой основное зеркало казино
Дубликат — это полная версия основного ресурса с идентичным функционалом. Функционирующее зеркало на данный момент помогает избегать местные блокировки и вести гемблинг.
Ключевые выгоды эксплуатации зеркал:
– Полный переход к индивидуальному кабинету
– Удержание всех сведений профиля
– Аналогичный набор развлечений
– Актуальные поощрения и предложения
Оформление на ресурсе
Процесс записи занимает пару минут. Начинающие клиенты приобретают богатый подарок за запись, он может охватывать:
– Стартовый финансовый приз
– Даровые фриспины для игр
– Специальные промокоды
– Расширенный компенсацию
Ради выполнения создания аккаунта следует:
1. Переместиться на главный сайт или альтернативу
2. Щёлкнуть опцию «Оформиться»
3. Ввести индивидуальные информацию
4. Верифицировать мейл или мобильный
5. Задействовать купон (если есть наличии)
Вход в персональный кабинет
Вслед за успешной оформления пользователи могут выполнять авторизацию посредством главный ресурс или актуальное зеркало. Персональный кабинет даёт безграничный регулирование над аккаунтом:
– Архив транзакций
– Зачисление счёта
– Изъятие призов
– Контроль поощрениями
– Вовлечение в соревнованиях
Привилегии и акции казино
Ресурс радует клиентов вариативными привилегированными схемами:
Начальные подарки
Новые игроки приобретают щедрый букет наград на первые депозиты. Типично это предполагает долевую добавку к размеру взноса плюс бесплатные кручения.
Систематические предложения
– Раз в неделю кешбэк до 15%
– Конкурсы с выигрышными пулами
– Поощрения на дату рождения
– Особые предложения для элитных клиентов
Схема поощрения
Регулярные геймеры накапливают пункты, которые допустимо обменять на реальные деньги или особые преимущества.
Мобильная версия и софт
Передовые разработки помогают развлекаться везде подходяще. Смартфонная вариант сайта автономно адаптируется под размер каждого девайса.
Достоинства портативного софта:
– Быстрая открытие игр
– Практичный интерфейс
– Всплывающие-уведомления о акциях
– Способность загрузить для Android и iOS
Живое казино: атмосфера настоящего гемблинг клуба
Секция Live казино переносит игроков в обстановку реального азартного клуба. Квалифицированные крупье организуют процесс в состоянии реального времени.
Доступные столы:
– Европейская рулетка
– Очко
– Punto Banco
– Карты
Слоты и развлекательные аппараты
Ассортимент игровых слотов включает множество наименований от лидирующих провайдеров. Каждый клиент найдёт автомат по нраву:
– Классические автоматы
– Инновационные игры с призовыми турами
– Прогрессивный-слоты
– Многолинейные автоматы
Конкурсы и акции
Регулярные конкурсы добавляют адреналин и дают шанс обрести значительные призы. Участие в конкурсах зачастую даровое, а выигрышные фонды составляют внушительных размеров.
Секьюрити и секретность
Сайт эксплуатирует актуальные системы шифрования для обеспечения данных клиентов. Каждые платёжные транзакции совершаются через охраняемые линии.
Резюме
Центральный веб-сайт и его актуальные зеркала дают стабильный вход к превосходным развлекательным услугам. Великодушные призы, практичная мобильная вариант, многообразие машин и профессиональное Live-казино формируют платформу отличным выбором для поклонников игровых игр.
улучшение hero карточки reklamnyj-kreativ12.ru .
check it out here – Well-structured layout ensures easy access to information.
Hello, There’s no doubt that your blog could be having internet
browser compatibility problems. Whenever I look at your web site in Safari, it looks fine however, when opening in I.E., it’s got some overlapping issues.
I simply wanted to provide you with a quick heads up!
Besides that, fantastic blog!
En matière de nouveau casino en ligne fiable, EULucks attend systématiquement 3 mois de fonctionnement avant de donner une
note définitive, assurant ainsi que la fiabilité est durable et
non temporaire.
see what’s available – Well-laid-out sections keep everything easy to locate and read.
Доступ к сайту через актуальные зеркала
Пользователи виртуальных казино нередко имеют дело с ситуацией закрытия базового сайта. Собственно для устранения этой задачи разработаны копии официального сайта. Bollywood дает беспрепятственный вход ко всем возможностям казино.
Что такое действующее зеркало казино
Дубликат значит собой полную версию основного сайта с идентичным опциями. Ключевое расхождение — это другое имя. Любые сведения участника, вместе с средства, привилегии и записи игр, находятся прежними.
Достоинства использования зеркал
Рабочие зеркала располагают множеством существенных плюсов:
– Круглосуточный переход к выбранным играм
– Совершенная защита индивидуальных данных
– Сохранение всех параметров персонального кабинета
– Способность получения наград и вовлечения в акциях
Регистрация на основном сайте
Процесс открытия счета чрезвычайно прост и длится буквально минут. Недавние участники в состоянии рассчитывать на внушительный вводный поощрение за регистрацию.
Шаги формирования аккаунта
1. Доступ на основной домен или его копию
2. Клик на опцию “Регистрация”
3. Указание обязательных данных
4. Верификация email почты
5. Указание кода (при наличии имеется)
Подарки и кампании для игроков
Платформа балует своих пользователей различными поощрительными системами.
Основные категории наград
Начальный приз — крупное поощрение для свежих клиентов, каковое имеет возможность содержать денежные средства и фриспины.
Безвозмездные спины — возможность использовать в топовых слотах бесплатно.
Компенсация — частичный возмещение утраченных денег, что зачисляется еженедельно или раз в месяц.
Бонусные коды — особые последовательности, дающие добавочные выгоды.
Персональный кабинет: инструменты и установки
Личный аккаунт дает совершенный регулирование над развлекательным активностью. Тут доступны:
– Контроль счетом
– Данные транзакций
– Действующие бонусы
– Установки сохранности
– Валидация счета
Портативная платформа и софт
Современные участники признают доступность. Ресурс обеспечивает двойной варианта для ставок с мобильных гаджетов.
Responsive смартфонная версия
Смартфонная редакция сайта автоматически подстраивается под экран любого аппарата. Отсутствует потребность скачивать отдельное приложение.
Софт для гаджетов
Доступно установить фирменное программу для iOS и Android. Программа дает:
– Мгновенный запуск
– Оптимизированный внешний вид
– Всплывающие-извещения о предложениях
– Стабильную работу
Live игры: атмосфера реального клуба
Раздел Live развлечений отправляет участников в атмосферу настоящего казино. Профессиональные ведущие ведут партии в варианте настоящего времени.
Топовые Live-столы
– Рулетка
– Блэкджек
– Баккара
– Техасский холдем
Автоматы: выбор развлечений
Библиотека азартных аппаратов содержит тысячи вариантов от ведущих производителей. Участники откроют:
– Классические аппараты
– Современные слоты
– Джекпот-слоты
– Слоты с множественными линиями
Конкурсы и эксклюзивные события
Периодические состязания дают возможность игрокам состязаться друг с другом за значительные наградные банки. Любой конкурс располагает свои правила вовлечения и список победителей.
Пути пополнения и снятия сумм
Ресурс предоставляет множество расчетных методов:
– Дебетовые инструменты
– Цифровые платежные системы
– Криптовалюты
– Прямые отправления
Каждые операции реализуются защищенно благодаря современным протоколам защиты.
Команда помощи
Компетентные специалисты команды помощи способны помочь 24/7. Доступны такие способы контакта:
– Мгновенный-чат
– Email-сервис
– Телефонная поддержка
– Медийные сети
Заключение
Основной ресурс платформы и его функционирующие копии гарантируют пользователям защищенный и приятный подход к большому спектру игровых услуг. Внушительные поощрения, частые кампании, качественная служба и удобные платежные инструменты формируют развлекательный опыт крайне захватывающим и прибыльным.
see more here – Well-organized pages keep the browsing process simple and clear.
view items online – A clean design makes exploring the site simple and enjoyable.
Нынешние онлайн-казино обеспечивают игрокам обилие вариантов для удобной игры. Официальный ресурс Ретро казино дарит вход ко всем сервисам и развлечениям. Однако при образовании программных сложностей на помощь приходят рабочие дубликаты.
Что представляет собой действующее зеркало
Дубликат казино — это точная копия оригинального веб-сайта, расположенная по запасному URL. Подлинное зеркало сохраняет все функции, вместе с открытие профиля, доступ в персональный кабинет, поощрения и кодовые слова.
Дубликат на сегодня обеспечивает:
– Постоянный доступ к азартным машинам
– Стопроцентную защиту индивидуальных сведений
– Поддержку депозита и хронологии платежей
– Доступность всех специальных предложений
Создание аккаунта на основном ресурсе
Процесс создания аккаунта требует пару минут. Свежеиспеченным клиентам следует:
1. Открыть на официальный сайт или рабочее зеркало
2. Выбрать кнопку «Регистрация»
3. Заполнить запрашиваемые сведения
4. Подтвердить э-мейл почту
5. Ввести кодовое слово при существовании
После окончания регистрации геймеры обретают подарок за регистрацию, который может содержать бесплатные вращения или финансовое премирование.
Доступ в индивидуальный кабинет
Личный кабинет обеспечивает всесторонний контроль над игровым действом. Через личный профиль можно:
– Финансировать баланс
– Выводить выигрыши
– Применять купоны
– Проверять хронологию пари
– Играть в соревнованиях
– Приобретать возврат средств
Характеристика вознаграждений и промо-предложений
Выгодная поощрительная система — ключевое плюс ресурса. Центральные категории вознаграждений:
Стартовый приз
Новички получают великодушное награду на стартовые взносы. Сумма приза может доходить до 100-200% от величины вклада.
Бесплатные вращения
Бесплатные спины выдаются для востребованных машин. Сумма free spins разнится от 10 до 500 штук.
Кэшбек
Систематический или ежемесячный отдача части утраченных средств. Обычный процент кэшбека — 5-15%.
Соревнования
Регулярные соревнования с большими наградными банками. Конкурсанты соревнуются за топовые места в рейтинге.
Портативная версия и приложуха
Мобильная версия дает возможность наслаждаться игрой с любого гаджета. Геймеры могут установить программу для iOS и Android или использовать интернет версию.
Преимущества смартфонного приложения:
– Быстрая подзагрузка игр
– Удобный интерфейс
– Всплывающие уведомления о акциях
– Вход через биометрию
Слоты и Live казино
Игровая база включает множество наименований от ведущих производителей.
Востребованные разделы автоматов:
– Стандартные слоты
– Видеослоты с призовыми раундами
– Джекпот слоты
– Мега-путь машины
Live игровой зал
Зона live игорный зал предлагает развлечение с профессиональными крупье. Доступны стандартные игры:
– Рулетка
– Blackjack
– Baccarat
– Карибский покер
Как разыскать рабочее зеркало
Получить актуальную URL на зеркало разрешается разными способами:
1. Зарегистрироваться на емейл-уведомления
2. Мониторить за апдейтами в соц сетях
3. Связаться в сервис поддержки
4. Сохранить актуальное зеркало в фавориты
Итог
Основной ресурс и его рабочие зеркала дают бесперебойный вход к игровым играм. Щедрые бонусы, разнообразные промокоды, комфортное смартфонное программа и качественная сервис поддержки делают развлекательный опыт крайне беспроблемным и защищенным.
тайгер казино вход
Случайно нашел tiger casino, решил зайти — все работает
согласование перепланировки под ключ согласование перепланировки под ключ .
продвижение сайта франция internet-agentstvo-prodvizhenie-sajtov-seo.ru .
https://primelinepharmacy.com/# cheap ed treatment
jojobet giriş: jojobet
view details here – Clean interface and organized layout allow effortless exploration.
Анализ официального портала
Новое онлайн-казино обеспечивает своим игрокам широкий набор возможностей и бонусов. Официальный ресурс РёРіСЂС‹ JVSpin функционирует круглосуточно, обеспечивая доступ к топовым автоматам, live-казино и многочисленным промо.
Функционирующее зеркало: доступ к ресурсу
Что такое альтернатива казино
Альтернатива составляет собой точную копию главного веб-сайта с альтернативным доменным адресом. Актуальное зеркало дает участникам миновать блокировки и сохранять непрерывный подключение к выбранным играм.
Как найти текущее зеркало сегодня
Свежие адреса на официальное зеркало выкладываются через:
– Почтовую новостнуюленту
– Главные публичные сети
– Сервис помощи
– Партнерские площадки
Регистрация на ресурсе
Этапы созданияаккаунта
Созданиеаккаунта требует пару минут и включает данные стадии:
1. Доступ на основной ресурс или действующее зеркало
2. Активация кнопки “Создатьаккаунт”
3. Ввод контактных сведений
4. Подтверждение email или мобильного
5. Придумывание пароля
Подарок за созданиеаккаунта
Новые клиенты обретают выгодные приветственные подарки:
– Бонусные деньги на счет
– Фриспины для автоматов
– Расширенный размер компенсации
– Особые купоны
Доступ в личный кабинет
Действующие игроки способны совершить логин через официальный портал или рабочее зеркало. Для этого нужно внести логин и ключдоступа, созданные при открытиисчета.
Функции личного аккаунта
В индивидуальном кабинете доступны такие функции:
– Изменение учетными информацией
– Ввод депозита
– Снятие средств
– Использование бонусов
– Мониторинг истории операций
– Вступление в конкурсах
Поощрения и предложения
Виды вознаграждений
Казино радует своих пользователей разнообразными бонусными системами:
– Приветственный набор — щедрые подарки на начальные взносы
– Халявныеспины — бонусные ставки в известных автоматах
– Компенсация — регулярный компенсация части потерь
– Схема VIP — уникальные привилегии для постоянных клиентов
Коды и их применение
Особые промокоды обеспечивают дополнительные подарки. Для активации требуется внести код в нужное окно в персональном кабинете.
Игровой каталог
Слоты
База развлекательных машин вмещает тысячи вариантов от ведущих производителей:
– Обычные слоты
– Продвинутые автоматы
– Призовые слоты
– Лицензионные автоматы
Live казино
Секция Live-казино предлагает процесс с реальными дилерами в режиме прямого времени:
– Американскаярулетка
– Blackjack
– Баккара
– Карибскийпокер
Турниры
Постоянные конкурсы с внушительными джекпотными фондами организуются регулярно. Участники сражаются за призовыеместа в турнирнойсетке.
Смартфонная версия и программа
Адаптивная реализация портала
Оригинальный ресурс абсолютно настроен для портативных аппаратов. Игроки имеютвозможность играть автоматы напрямую через браузер без обязательства скачивания.
Приложение для загрузки
Авторское карманное APP предлагается для получения на устройства с программными ОС Android и iOS. APP гарантирует:
– Моментальный подход к автоматам
– Стабильную работу
– Оперативные-сообщения о промо
– Простой оформление
Итог
Главный портал казино и его действующие дубликаты дают участникам абсолютный возможность к первоклассным геймплейным услугам. Большие вознаграждения, различные предложения, удобная смартфонная реализация и опытная сервис делают развлекательный досуг чрезвычайно удобным и доходным.
Передовые интернет казино предоставляют пользователям большой выбор опций для беспроблемной игры. Но иногда вход к основному ресурсу может являться заблокированным. В таких случаях на поддержку приходят Болливуд, которое дает стабильный подключение ко всем сервисам платформы.
Что такое функционирующее зеркало казино
Альтернативный сайт — это идентичная дубликат основного сайта, которая располагается по альтернативному URL. Дубликат содержит весь возможности основного сайта, включая индивидуальный кабинет, баланс и запись транзакций.
Основные достоинства применения зеркала:
– Постоянный подключение к сайту
– Абсолютная тождественность инструментов
– Защита персональных данных
– Хранение доступных поощрений
Как разыскать функционирующее зеркало сегодня
Существует множество безопасных путей нахождения свежей ссылки:
Легитимные источники:
1. Имейл рассылка — дирекция систематически высылает информацию с рабочими адресами
2. Коммуникационные сети — проверенные каналы размещают актуальную информацию
3. Отдел поддержки — операторы сообщают надежные домены
4. Мобильное приложение — предоставляет обходить блокировки
Создание аккаунта на главном сайте
Процедура оформления занимает всего считанные минут и содержит из данных этапов:
1. Вход на основной портал или действующее зеркало
2. Выбор на кнопку «Открыть счет»
3. Указание пользовательской таблицы
4. Проверка email почты или сотового номера
5. Применение привилегии за регистрацию при присутствии промокода
Свежие клиенты обретают щедрый начальный бонус, который может охватывать фриспины, монетарные призы или cashback.
Авторизация в личный кабинет
Логин на сайте выполняется привычным способом. Нужно указать имя пользователя и пароль, использованные при регистрации.
Существенные детали для защищенного входа:
– Применяйте сложный секретный ключ
– Запустите двухэтапную проверку
– Не сохраняйте пароли на публичных девайсах
– Мониторьте URL строку браузера
Характеристика поощрительной системы
Игровая платформа одаривает геймеров всевозможными вознаграждениями и кампаниями:
Приветственный пакет
Новички могут полагаться на великодушное вознаграждение за дебютный пополнение. Традиционно это долевая надбавка к внесенной величине плюс free spins для топовых слотов.
Регулярные акции
– Семидневный компенсация — возвращение процента утраченных денежных средств
– Бонусы на повторные взносы
– Уникальные акции по событиям
– Соревнования с солидными наградными банками
Схема привилегий
Регулярные геймеры собирают баллы за каждую раунд, которые затем превращаются на настоящие средства, free spins или особые льготы.
Купоны: как применять
Бонус-коды — это особые наборы знаков, предоставляющие возможность к эксклюзивным привилегиям.
Каким образом найти рабочие промокоды:
– Проверенные коммуникационные сети казино
– Партнерские сайты
– Email-информирование
– Профильные сообщества
Прописывается промокод в соответствующее поле при оформлении или пополнении счета.
Мобильная версия и приложение
Нынешние пользователи выбирают развлекаться с смартфонных гаджетов. Сайт обеспечивает два варианта для удобной смартфонной игры.
Мобильная модификация
Онлайн версия автоматически оптимизируется под параметры экрана. Не нуждается загрузки и работает в произвольном современном браузере.
Портативное приложение
Установить app можно для устройств на Android и iOS. Выгоды app:
– Молниеносная открытие
– Надежная работа
– Всплывающие-уведомления о поощрениях
– Автономный преодоление блокировок
Процедура инсталляции легок: требуется зайти на веб-сайт с портативного аппарата и выполнять инструкциям.
Игровой коллекция
База аппаратов содержит несколько тысяч позиций от передовых производителей.
Слоты
Гемблинг автоматы — наиболее любимая секция игр. Показаны классические винтажные автоматы, актуальные видео-автоматы с премиальными этапами, а также джекпотные выигрыши.
Live казино
Секция с реальными раздающими предоставляет прочувствовать антураж подлинного казино. Доступны игры с баккарой.
Вещание ведется в превосходном формате, обеспечивается коммуникация с раздающим и иными пользователями.
Турниры
Систематически устраиваются конкурсы по различным играм. Присоединение позволяет заработать валютные призы, бесплатные вращения или эксклюзивные привилегии.
Денежные действия
Ресурс обеспечивает значительный ассортимент платежных систем:
– Кредитные карты
– Цифровые кошельки
– Криптовалюта
– Банковские платежи
Минимальная объем депозита — посильная для основной части клиентов. Вывод выигрышей обрабатывается в короткие периоды.
Департамент поддержки
Компетентные операторы настроены помочь непрерывно. Доступны нижеследующие способы коммуникации:
– Веб-чат
– Email
– Звонковая линия
– Коммуникационные сети
Разъяснения на типовые проблемы можно найти в блоке FAQ.
Вывод
Основной портал казино и его актуальные зеркала гарантируют геймерам полный путь ко всем сервисам портала. Великодушные бонусы, приятная портативная версия, огромный ассортимент игр и квалифицированная помощь создают гемблинг досуг предельно приятным и конфиденциальным.
take a look here – Logical layout makes finding information effortless and comfortable.
view items online – Well-arranged content helps users find what they need quickly.
open this link – Clear formatting allows users to absorb information effortlessly.
go to site – Straightforward layout ensures a hassle-free browsing experience.
войти в тайгер казино
Искал tiger casino бонусы и вышел на этот канал, сначала подумал фигня. Но открыл — оказалось все норм, реально есть промики и рабочие ссылки. Уже заходил пару раз, проблем не было
grandlynx.bond – Smooth user experience, with content that’s simple to find and understand.
Передовые онлайн-казино обеспечивают пользователям широкий диапазон возможностей для удобной игры. Вход к сервису [url=https://jimi.edu.pk/onlajn-kazino-ili-nazemnye-gde-bolshe-shansov-na/]Болливуд[/url] осуществляется через официальный веб-ресурс или актуальное зеркало.
Что такое действующее зеркало казино
Функционирующее зеркало — это альтернативный домен лицензионного сайта казино. Такие версии формируются для гарантирования постоянного доступа к азартной площадке.
Альтернатива актуальное абсолютно дублирует возможности базового ресурса. Клиенты получают такой же выход ко всем сервисам, включая регистрацию, внесение депозита баланса и вывод денег.
Оформление профиля на основном портале
Процедура создания аккаунта длится всего считанные секунд. Начинающим участникам требуется:
1. Войти на лицензионный сайт или действующее настоящее зеркало
2. Выбрать кнопку “Зарегистрироваться”
3. Ввести требуемые данные
4. Активировать e-mail почту
5. Ввести бонусный код при существовании
После завершения создания аккаунта пользователь зарабатывает вознаграждение за регистрацию, который способен включать фриспины или денежное вознаграждение.
Доступ в индивидуальный кабинет
Персональный кабинет — это охраняемая область, где участники имеют возможность управлять своим счетом. Для логина требуется напечатать никнейм и password.
В индивидуальном кабинете открыты такие возможности:
– Отслеживание истории платежей
– Активация бонусных кодов
– Настройка вознаграждениями
– Присоединение в турнирах
– Проверка возврата средств
– Корректировка аккаунта
Бонусы и акции
Азартная сервис предоставляет щедрые призы:
Начальный пакет — начинающие получают существенное премию на первые пополнения.
Даровые спины — предоставляются как при регистрации, так и в контексте многочисленных мероприятий.
Кэшбэк — систематический рефанд части проигранных средств.
Бонусные коды — эксклюзивные комбинации, обеспечивающие выход к специальным бонусам.
Характеристика гемблинговых разделов
Аппараты
Собрание автоматов охватывает сотни игр от лучших производителей. Пользователи встретят как обычные автоматы, так и актуальные 3D-слоты с увлекательной визуализацией.
Live казино
Категория Live казино дарит опцию играть с реальными дилерами в состоянии текущего времени. Доступны известные развлечения: рулетка, блэкджек, баккара, покер.
Состязания
Постоянные соревнования с значительными премиальными суммами притягивают сотни конкурсантов. Победители получают монетарные награды и эксклюзивные подарки.
Смартфонная версия и приложение
Адаптивная версия сайта обеспечивает наслаждаться с произвольного аппарата. Оформление самостоятельно настраивается под габариты экрана.
Установить программу можно для аппаратов на Android и iOS. Телефонное ПО обладает всеми опциями компьютерной версии.
Как определить действующее зеркало на сейчас
Рабочие URL копий постоянно корректируются. Обнаружить действующую URL можно многими вариантами:
– Через сервис техподдержки
– В подлинных социальных сетях
– По почтовой рассылке
– На тематических сайтах
Защита и сертификация
Главный сайт оперирует на базе зарубежной разрешения. Все платежи защищены инновационными системами шифрования.
Секретность личных сведений обеспечивается в совершенном объеме.
Резюме
Основной сайт и его действующие альтернативы предоставляют клиентам беспрерывный выход к высококлассным гемблинговым играм. Привлекательные поощрения, различные автоматы, опытная сервис — все это делает гемблинговый опыт чрезвычайно удобным и притягательным.
view store now – Navigation is intuitive and the site layout feels comfortable.
Generic Tadalafil 20mg price: buy cialis pill – Cialis 20mg price
thailand villas for sale phuket thailand villas for sale phuket .
browse collection – Clear layout ensures content is easy to locate and understand.
access this resource – The content layout feels natural and simple to explore.
Актуальные виртуальные казино предлагают клиентам большой диапазон опций для удобной игры. Тем не менее иногда доступ к главному платформе может быть заблокированным. В таких случаях на поддержку появляется Vovan регистрация, которое обеспечивает стабильный доступ ко всем опциям платформы.
Что такое действующее зеркало казино
Дубликат — это полная дубликат официального портала, которая находится по альтернативному адресу. Копия имеет все возможности первоначального ресурса, включая пользовательский кабинет, средства и сведения операций.
Ключевые достоинства задействования зеркала:
– Круглосуточный вход к платформе
– Полная схожесть функционала
– Безопасность индивидуальных информации
– Удержание всех бонусов
Как обнаружить действующее зеркало на сегодня
Существует ряд достоверных вариантов получения действующей URL:
Проверенные источники:
1. Почтовая рассылка — руководство систематически пересылает сообщения с свежими ссылками
2. Общественные сети — проверенные страницы публикуют свежую данные
3. Служба поддержки — сотрудники выдают безопасные URL
4. Смартфонное приложение — позволяет избегать блокировки
Открытие счета на официальном веб-сайте
Этап оформления длится не более пару минут и предполагает из таких этапов:
1. Вход на официальный сайт или действующее зеркало
2. Нажатие на клавишу «Зарегистрироваться»
3. Указание регистрационной бланка
4. Верификация почтовой почты или телефонного номера
5. Задействование бонуса за регистрацию при существовании промокода
Новые игроки обретают щедрый вступительный подарок, который может содержать бесплатные вращения, денежные призы или кэшбек.
Авторизация в персональный кабинет
Подключение на платформе производится стандартным путем. Необходимо внести учетные данные и код доступа, использованные при открытии счета.
Ключевые нюансы для безопасного входа:
– Используйте сложный шифр
– Включите двухэтапную проверку
– Не сохраняйте реквизиты на посторонних устройствах
– Мониторьте URL строку браузера
Характеристика премиальной структуры
Гемблинг-сайт радует пользователей многочисленными поощрениями и промо:
Приветственный пакет
Дебютанты вправе рассчитывать на значительное бонус за начальный взнос. Традиционно это пропорциональная надбавка к депонированной сумме плюс бесплатные вращения для востребованных слотов.
Периодические предложения
– 7-дневный компенсация — возвращение процента списанных финансов
– Бонусы на последующие депозиты
– Особые предложения по торжествам
– Конкурсы с большими премиальными фондами
Программа вознаграждений
Активные пользователи зарабатывают пункты за каждую бет, которые затем меняются на фактические денежные призы, фриспины или особые льготы.
Промокоды: как активировать
Купоны — это специальные комбинации знаков, гарантирующие привилегию к дополнительным поощрениям.
Каким образом взять актуальные промокоды:
– Проверенные социальные сети казино
– Партнерские площадки
– Email-подписка
– Тематические платформы
Указывается промокод в отдельное поле при создании аккаунта или внесении депозита кошелька.
Портативная версия и приложение
Передовые пользователи любят делать ставки с мобильных девайсов. Портал предоставляет двойной способа для беспроблемной мобильной игры.
Responsive вариант
Онлайн версия сама адаптируется под параметры дисплея. Не нуждается скачивания и оперирует в всяком актуальном браузере.
Портативное приложение
Загрузить приложение можно для аппаратов на Android и iOS. Преимущества app:
– Оперативная запуск
– Стабильная действие
– Автоматические-уведомления о акциях
– Независимый преодоление блокировок
Процедура загрузки прост: необходимо перейти на сайт с портативного гаджета и выполнять руководству.
Развлекательный ассортимент
Каталог развлечений включает множество единиц от топовых производителей.
Слоты
Игровые слоты — крайне популярная группа игр. Размещены классические 3-барабанные слоты, новые графические аппараты с поощрительными стадиями, а также растущие джекпоты.
Live казино
Секция с настоящими дилерами позволяет испытать антураж настоящего казино. Представлены столы с покером.
Передача реализуется в превосходном формате, обеспечивается чат с ведущим и прочими игроками.
Соревнования
Периодически проводятся турниры по различным слотам. Вступление дает шанс завоевать валютные вознаграждения, бесплатные вращения или эксклюзивные презенты.
Платежные операции
Портал предоставляет большой набор платежных систем:
– Пластиковые карты
– Онлайн системы
– Биткоин
– Счетовые переводы
Низшая количество депозита — разумная для массы игроков. Обналичивание призов осуществляется в скорые сроки.
Отдел поддержки
Профессиональные сотрудники расположены содействовать постоянно. Представлены данные способы контакта:
– Веб-чат
– Email
– Голосовая связь
– Социальные сети
Разъяснения на распространенные запросы можно получить в зоне FAQ.
Резюме
Главный портал казино и его действующие зеркала обеспечивают игрокам полный вход ко всем функциям сайта. Щедрые бонусы, практичная портативная версия, огромный ассортимент игр и опытная служба поддержки делают азартный процесс исключительно удобным и надежным.
open this link – Fast-loading pages and clear formatting make exploration easy.
discover items – The site design keeps everything accessible and easy to locate.
Подключение к платформе через действующие зеркала
Передовые виртуальные казино предоставляют пользователям круглосуточный вход к играм. Центральный портал казино РЎСѓРєР° оперирует устойчиво, предлагая богатый спектр азартных слотов. Но периодически возникают системные трудности или блокировки, в связи с чем необходимо знать о присутствии функционирующих зеркал.
Что является из себя основное зеркало казино
Альтернатива — это полная копия официального портала с таким же возможностями. Рабочее зеркало в настоящее время обеспечивает обходить территориальные ограничения и поддерживать развлечения.
Ключевые плюсы эксплуатации зеркал:
– Стопроцентный переход к личному кабинету
– Фиксация любых сведений профиля
– Такой же спектр автоматов
– Текущие привилегии и кампании
Регистрация на портале
Процесс создания аккаунта отнимает пару минут. Свежие клиенты зарабатывают великодушный поощрение за запись, он способен включать:
– Начальный игровой подарок
– Бесплатные кручения для слотов
– Особые ваучеры
– Повышенный кешбэк
Для окончания создания аккаунта нужно:
1. Переместиться на основной веб-сайт или дубликат
2. Нажать кнопку «Создать аккаунт»
3. Написать личные данные
4. Верифицировать почтовый адрес или мобильный
5. Применить купон (в случае присутствии)
Доступ в персональный кабинет
Следом за успешной оформления пользователи могут выполнять подключение с помощью основной ресурс или рабочее зеркало. Личный кабинет обеспечивает полный контроль над аккаунтом:
– История игр
– Ввод депозита
– Вывод денег
– Администрирование поощрениями
– Присутствие в конкурсах
Поощрения и предложения казино
Сайт радует пользователей разнообразными привилегированными схемами:
Вступительные поощрения
Начинающие обретают великодушный букет привилегий на первые взносы. Обычно это содержит частичную надбавку к сумме вклада плюс комплиментарные фриспины.
Систематические промо
– Седмичный компенсация до 15%
– Турниры с выигрышными пулами
– Бонусы на число рождения
– Особые промо для элитных геймеров
Схема верности
Регулярные игроки зарабатывают единицы, они можно трансформировать на подлинные средства или уникальные преимущества.
Мобильная вариант и утилита
Современные технологии дают возможность участвовать везде угодно. Смартфонная редакция ресурса автономно подстраивается под монитор любого устройства.
Плюсы мобильного ПО:
– Быстрая загрузка развлечений
– Эргономичный интерфейс
– Моментальные-нотификации о предложениях
– Опция инсталлировать для Android и iOS
Live казино: среда подлинного азартного клуба
Категория Live заведения транспортирует геймеров в антураж подлинного гемблинг дома. Квалифицированные крупье организуют действие в состоянии подлинного времени.
Предлагаемые игры:
– Европейская рулетка
– Карточная игра
– Punto Banco
– Покерная игра
Барабаны и азартные слоты
Каталог азартных автоматов содержит тысячи наименований от топовых студий. Каждый игрок подберёт автомат по желанию:
– Традиционные автоматы
– Видеослоты с бонусными этапами
– Накопительный-слоты
– Многолинейные игры
Конкурсы и акции
Периодические состязания добавляют остроту и дают способность заработать большие призы. Участие в соревнованиях зачастую безвозмездное, а призовые суммы доходят до значительных объёмов.
Секьюрити и анонимность
Платформа эксплуатирует современные системы кодирования для гарантии реквизитов геймеров. Каждые платёжные процедуры совершаются через зашифрованные протоколы.
Резюме
Главный ресурс и его функционирующие зеркала гарантируют надёжный переход к качественным развлекательным развлечениям. Привлекательные награды, удобная смартфонная редакция, многообразие автоматов и квалифицированное Live-игорный дом превращают сайт прекрасным вариантом для поклонников игровых слотов.
For origins
how can i get cheap keflex without prescription
for downloadable content.
Fortune Tiger x10 cartinha: melhor sensação do ano ou exagero? Vote!
tiger casino регистрация и вход
Искал где зайти, tiger casino открылся
quick access – The presentation remains consistent from start to finish.
Kraken Marketplace Официальный сайт для доступа к Kraken
kraken market
Blackburn vs Preston 2026 Championship 21:00 Rovers favored
check out exchange – The interface is easy to use and exploring items feels effortless.
PG Soft tá liberando cashback 15% todo dia no Fortune Tiger – qual site tá dando mais?
visit homepage – Well-presented pages make browsing and understanding content effortless.
PG Soft 2026: quem tá lucrando mais com cashback diário ou giros grátis?
Доступ к порталу и актуальные URL
Современные онлайн казино предлагают клиентам широкий выбор опций. Главный ресурс казино Лев гарантирует стабильный вход ко всем услугам. Впрочем порой возникают ситуации, когда необходимо альтернативный способ доступа.
Что означает собой действующее зеркало
Действующее зеркало — это абсолютная версия легального ресурса с иным интернет названием. Копия сегодня позволяет миновать потенциальные барьеры и поддерживать непрерывный переход к любимым автоматам.
Проверенное зеркало содержит теми же функциями, что и главный веб-сайт:
– Совокупный каталог игр
– Персональный профиль с записанными данными
– Полные награды и промо
– Проверенные финансовые действия
Создание аккаунта и доступ в сервис
Ход открытия аккаунта на сайте отнимает несколько минут. Свежим участникам следует:
1. Зайти на рабочее зеркало на данный момент
2. Выбрать опцию «Открыть профиль»
3. Ввести необходимые данные
4. Подтвердить почтовую почту или данные связи
5. Активировать бонус за создание профиля
Вход в индивидуальный раздел производится с помощью указание имени пользователя и пароля.
Обзор бонусной программы
Щедрая наградная программа — главное достоинство казино. Клиенты забирают различные поощрения:
Вступительные подарки
Недавние участники вправе рассчитывать на выгодный приз за создание аккаунта. Как правило это комплект опций, включающий:
– Долевую надбавку к дебютному взносу
– Даровые кручения
– Бонусные средства на кошелек
Купоны и уникальные возможности
Периодические коды помогают активировать экстра выгоды. Использовать их допустимо в отдельном окне личного раздела.
Free spins и компенсация
Free spins — это шанс крутить автоматы без задействования личных денег. Компенсация подразумевает определенный возврат израсходованных сумм.
Ассортимент автоматов
Азартная сайт представляет внушительную коллекцию игр.
Автоматы
Ассортимент игровых машин впечатляет фантазию. Имеются обычные трехбарабанные слоты и современные видеослоты с захватывающей анимацией.
Live заведение
Раздел Live игр переносит участников в среду подлинного игорного клуба. Профессиональные дилеры организуют сессии в прямом времени.
Соревнования и лидерборды
Систематические соревнования добавляют драйва и гарантируют вариант забрать внушительные призы.
Mobile вариант и клиент
Актуальные технологии помогают участвовать в любом пространстве. Mobile вариант независимо оптимизируется под экран устройства.
Получить программу разрешено для мобильных ОС iOS и Android. Клиент предоставляет:
– Быстрый вход
– Бесперебойную работу
– Мгновенные-уведомления об предложениях
– Интуитивный вид
Банковские транзакции
Ресурс работает с всевозможные методы внесения и получения сумм:
– Платежные счета
– Онлайн кошельки
– Крипто
– Банковские операции
Любые переводы проходят через надежное подключение, что защищает сохранность конфиденциальных сведений.
Сервис support
Компетентная служба помощи работает постоянно. Связаться с менеджерами допустимо через:
– Живой-чат
– Почтовую почту
– Связь
– Социальные ресурсы
Выводы
Легальный портал и его функционирующее зеркало гарантируют игрокам надежный и приятный путь к увлекательным играм. Щедрые поощрения, обширный выбор игр и качественная сервис создают времяпрепровождение максимально удобной и прибыльной.
Jogo do Tigrinho Pix R$20: ganha 100 giros + 20% extra hoje!
honeyvendor.shop – Clean and simple interface, makes finding items quick and convenient.
Fortune Tiger modo auto: 500 giros sem clicar – quem já deixou rodando?
browse Lake Hub – Organized menus and clear visuals make exploring items easy and smooth.
apartments for sale in phuket thailand apartments for sale in phuket thailand .
investment apartments for sale in phuket apartments-for-sale-in-phuket-1.com .
Visit Vendor Hub – Everything is presented clearly for a fast, intuitive experience.
view products – Easy-to-follow design ensures users can find items quickly.
https://corevitalpharmacy.com/# Cialis without a doctor prescription
view this page – Logical arrangement of content ensures smooth exploration.
Обзор главного веб-сайта
Передовые интернет казино предоставляют клиентам разнообразный ассортимент забав и шансов. Официальный сайт Clubnika обеспечивает безопасный доступ к игровым сервисам.
Актуальное зеркало: вход на сегодня
Зеркало выступает собой абсолютную копию главного портала. Действующее зеркало дает возможность участникам обходить возможные блокировки.
Плюсы эксплуатации зеркала
Ключевые плюсы предполагают:
– Постоянный шанс к порталу
– Сохранение полных характеристик базового веб-сайта
– Защита персональных материалов
– Идентичный набор функций
Оформление профиля на ресурсе
Процесс создания аккаунта отличается понятностью и практичностью. Начинающие пользователи обязаны:
1. Посетить основной сайт или его зеркало
2. Выбрать на пункт открытия счета
3. Заполнить необходимые поля
4. Подтвердить почтовую адрес
5. Выполнить начальный вход
Приз за оформление
Новички получают щедрый вступительный приз. Подобное премия имеет возможность содержать:
– Материальные бонусы
– Complimentary вращения
– Усиленный уровень кэшбэка
Доступ в индивидуальный аккаунт
Существующие игроки в состоянии оперативно получить доступ в личный аккаунт, используя учетные данные и шифр. Индивидуальный профиль предлагает доступ к:
– Контролю депозитом
– Журналу платежей
– Текущим призам
– Параметрам аккаунта
Вознаграждения и предложения
Ресурс систематически реализует разнообразные промо-кампании для игроков.
Разновидности бонусов
Базовые виды призов:
– Денежные подарки – доля от объема пополнения
– Фриспины – бесплатные прокруты в автоматах
– Кэшбэк – возмещение процента потерянных финансов
– Турнирные трофеи – вознаграждения за участие в состязаниях
Купоны
Особые промокоды помогают активировать экстра преимущества. Игроки способны обнаружить их на аффилиатных сайтах или получить в уведомлениях.
Mobile редакция и софт
Актуальные игроки предпочитают мобильный досуг.
Опции портативной платформы
– Гибкий облик для различных аппаратов
– Целостный доступ к автоматам
– Стремительная работа
– Эргономичное контроль
Скачать app
Портативное программа предоставлено для downloading на девайсы с рабочими системами Android и iOS. Приложение обеспечивает:
– Устойчивую функциональность
– Мгновенные оповещения о бонусах
– Моментальный путь к любимым играм
Гемблинг ассортимент
Портал предлагает огромную коллекцию азартных забав.
Слоты
Каталог игровых аппаратов включает:
– Традиционные машины
– Передовые игры
– Джекпотные слоты
– Тематические автоматы
Live столы
Область живых столов предоставляет шанс соревноваться с живыми ведущими. Представлены:
– Рулетки
– 21
– Punto Banco
– Техасский холдем
Состязания
Систематические соревнования обеспечивают участникам состязаться за крупные призовые банки. Призовая структура актуализируется каждую неделю.
Денежные операции
Сайт обеспечивает обилие способов зачисления и вывода финансов:
– Банковские карты
– Электронные платежные системы
– Межбанковские транзакции
– Цифровые валюты
Все транзакции проходят конфиденциально с задействованием современных технологий защиты.
Сервис помощи
Профессиональная команда support действует 24/7. Связаться с консультантами можно через:
– Онлайн чат
– Email почту
– Горячую линию
– Социальные медиа
Безопасность и аккредитация
Игровой клуб действует на основании легальной лицензии. Подобное удостоверяет:
– Прозрачность развлекательного действа
– Защиту личных сведений
– Быстрые транзакции
– Регулируемый игровой процесс
Итог
Главный сайт и его действующие зеркала предоставляют игрокам абсолютный набор функций для приятной и доходной игры. Значительные бонусы, различные развлечения, профессиональная служба и надежная платформа выплат делают портал лучшим выбором для ценителей развлекательных игр.
Характеристика оригинального ресурса
Актуальное онлайн-казино предоставляет своим пользователям широкий спектр услуг и вознаграждений. Основной ресурс казино Голд действует круглосуточно, обеспечивая вход к популярным симуляторам, live-казино и обширным акциям.
Действующее зеркало: путь к порталу
Что такое копия казино
Дубликат означает собой полную реплику оригинального сайта с иным сетевым именем. Рабочее зеркало обеспечивает участникам избегать ограничения и сохранять постоянный путь к предпочитаемым играм.
Как обнаружить актуальное зеркало сегодня
Свежие адреса на проверенное зеркало размещаются через:
– Email оповещение
– Проверенные коммуникационные сети
– Команду обслуживания
– Специализированные ресурсы
Регистрация на портале
Ход оформления
Оформление отнимает всего минут и содержит данные шаги:
1. Переход на основной портал или действующее зеркало
2. Нажатие кнопки “Регистрация”
3. Ввод персональных реквизитов
4. Подтверждение email или мобильного
5. Установка кодадоступа
Бонус за открытиесчета
Новые игроки обретают щедрые приветственные поощрения:
– Игровые депозиты на кошелек
– Freespins для игр
– Повышенный процент кэшбека
– Уникальные купоны
Вход в персональный счет
Активные пользователи могут выполнить логин через оригинальный ресурс или текущее зеркало. Для этого следует внести никнейм и код, сформированные при оформлении.
Инструменты персонального аккаунта
В собственном кабинете предоставлены следующие инструменты:
– Контроль учетными данными
– Зачисление депозита
– Обналичивание денег
– Ввод купонов
– Мониторинг журнала игр
– Включение в соревнованиях
Поощрения и промо
Типы подарков
Казино радует своих пользователей всевозможными поощрительными системами:
– Вступительный бонус — большие бонусы на первые пополнения
– Халявныеспины — дополнительные вращения в рейтинговых симуляторах
– Компенсация — еженедельный возврат суммы потерь
– План VIP — уникальные преимущества для регулярных игроков
Купоны и их применение
Уникальные промокоды обеспечивают дополнительные подарки. Для активации следует указать комбинацию в специальное раздел в личном профиле.
Развлекательный набор
Автоматы
Каталог развлекательных слотов включает множество вариантов от лучших провайдеров:
– Стандартные симуляторы
– Новые слоты
– Накопительные слоты
– Сюжетные развлечения
Live казино
Зона Live-казино обеспечивает взаимодействие с настоящими дилерами в обстановке актуального стрима:
– Американскаярулетка
– Очко
– PuntoBanco
– Карибскийпокер
Соревнования
Постоянные соревнования с большими выигрышными пулами организуются еженедельно. Претенденты борются за призовыеместа в списке.
Портативная платформа и APP
Адаптивная платформа портала
Официальный портал целиком настроен для смартфонных аппаратов. Клиенты имеютвозможность пользоваться игры прямо через обозреватель без необходимости инсталляции.
APP для инсталляции
Официальное портативное APP предоставляется для загрузки на гаджеты с программными ОС Android и iOS. Приложение обеспечивает:
– Моментальный вход к слотам
– Надежную работу
– Моментальные-уведомления о промо
– Простой интерфейс
Вывод
Основной сайт казино и его действующие дубликаты дают пользователям абсолютный возможность к первоклассным развлекательным играм. Щедрые поощрения, всевозможные кампании, удобная адаптивная платформа и профессиональная сервис превращают геймплейный досуг чрезвычайно комфортным и результативным.
тайгр казино
Случайно вышел на tiger casino через этот канал. Решил протестить — все открывается нормально. Есть бонусы и акции, уже пару раз заходил
visit this hub – An interactive space that encourages learning and new inspiration.
check this site – The design is smooth and finding information feels effortless.
Go to Velvet Store – Neatly arranged layout allows smooth navigation.
Kraken Marketplace Официальный сайт для доступа к Kraken
krab cc
browse this website – The design is lightweight, making navigation quick and fluid.
view items online – Logical menus and tidy design make navigation smooth.
Передовые онлайн-казино предлагают игрокам множество опций для удобной игры. Центральный сайт http://tolbaga.ru/ обеспечивает вход ко всем опциям и азартным играм. Однако при наличии технических трудностей на выручку прибывают функционирующие зеркала.
Что представляет собой актуальное зеркало
Дубликат казино — это идентичная версия основного ресурса, размещенная по альтернативному доменному имени. Подлинное зеркало хранит все функции, вместе с регистрацию, доступ в индивидуальный кабинет, бонусы и кодовые слова.
Дубликат на сегодня дает:
– Непрерывный доступ к развлекательным слотам
– Совершенную защиту индивидуальных информации
– Поддержку баланса и записей платежей
– Доступность всех промо-предложений
Регистрация на лицензионном портале
Процедура открытия профиля требует пару минут. Новоиспеченным пользователям требуется:
1. Войти на официальный ресурс или актуальное зеркало
2. Выбрать кнопку «Создать аккаунт»
3. Ввести нужные поля
4. Верифицировать электронную почту
5. Использовать кодовое слово при присутствии
После финиша регистрации клиенты обретают подарок за регистрацию, который может охватывать бесплатные вращения или денежное премирование.
Вход в персональный кабинет
Персональный кабинет предоставляет комплексный контроль над азартным действом. Через индивидуальный кабинет можно:
– Финансировать депозит
– Получать выплаты
– Применять кодовые слова
– Контролировать журнал игр
– Играть в состязаниях
– Забирать cash back
Характеристика премий и специальных предложений
Выгодная бонусная политика — значимое достоинство платформы. Главные формы вознаграждений:
Вступительный приз
Дебютанты приобретают богатое премирование на начальные вклады. Сумма приза может доходить до 100-200% от величины вклада.
Бонусные спины
Халявные вращения даются для популярных игровых автоматов. Сумма бесплатных вращений колеблется от 10 до 500 штук.
Cash back
Постоянный или ежемесячный компенсация части потерянных средств. Стандартный объем кэшбека — 5-15%.
Турниры
Постоянные конкурсы с крупными премиальными банками. Участники состязаются за верхние позиции в рейтинге.
Смартфонная версия и приложуха
Смартфонная версия обеспечивает наслаждаться игрой с каждого устройства. Пользователи могут установить программу для iOS и Android или применять интернет версию.
Плюсы мобильного софта:
– Молниеносная подзагрузка слотов
– Эргономичный дизайн
– Пуш-нотификации о поощрениях
– Вход через биометрию
Игровые автоматы и Live казино
Развлекательная библиотека включает множество наименований от топовых производителей.
Популярные типы автоматов:
– Стандартные слоты
– Видео-автоматы с премиальными этапами
– Прогрессивный джекпот игры
– Мегавейс слоты
Live игровой зал
Категория live игорный зал предлагает развлечение с живыми ведущими. Представлены классические развлечения:
– Американская рулетка
– Blackjack
– Punto Banco
– Техасский холдем
Как отыскать функционирующее зеркало
Получить рабочую ссылку на зеркало возможно различными вариантами:
1. Зарегистрироваться на емейл-уведомления
2. Следить за апдейтами в социальных сетях
3. Связаться в службу поддержки
4. Сохранить актуальное зеркало в закладки
Вывод
Главный сайт и его актуальные зеркала гарантируют бесперебойный доступ к развлекательным автоматам. Великодушные поощрения, многочисленные купоны, удобное смартфонное программа и качественная служба поддержки делают азартный геймплей крайне комфортным и защищенным.
browse this site – Everything is presented in a clean and understandable format.
browse here now – Smooth navigation and clear sections make reading simple and enjoyable.
Нынешние онлайн-казино дают участникам широкий диапазон возможностей и бонусных вариантов. Подключение к сервису осуществляется через главный сайт или его действующее зеркало Вован, что предоставляет непрерывную деятельность.
В чем суть функционирующее зеркало казино
Альтернатива — это абсолютная дубликат оригинального веб-сайта, созданная для преодоления запретов. Действующее зеркало обеспечивает пользователям иметь доступ к предпочитаемым автоматам в любое время.
Проверенное зеркало располагает всеми характеристиками оригинального портала:
– Весь ассортимент слотов
– Учетная запись с сохраненными информацией
– Свежие поощрения
– Безопасные денежные действия
Создание аккаунта на главном веб-сайте
Ход регистрации составляет всего немного минут. Начинающим пользователям требуется:
1. Попасть на проверенный портал или рабочее зеркало
2. Кликнуть на клавишу “Создать аккаунт”
3. Заполнить обязательные сведения
4. Верифицировать контакт
5. Сделать начальный взнос
Бонус за регистрацию предоставляется автоматически после окончания всех этапов.
Доступ в аккаунт
Действующие клиенты могут совершить доступ вводя:
– Никнейм и пароль
– Данные сотового
– Контактный email
Профиль предоставляет шанс к регулированию балансом, записям операций и действующим акциям.
Награды и предложения
Игровая сервис привлекает регулярных участников выгодными поощрениями:
Стартовый набор
– Премия на стартовый пополнение до 100%
– Фриспины на топовые слоты
– Добавочные поощрения за последующие взносы
Ваучеры
Эксклюзивные промокоды дают шанс на приобретение специальных поощрений. Текущие промокоды публикуются в секции “Предложения”.
Возврат средств
Постоянный кэшбек насчитывает до 10% от утраченных средств. Компенсация выплачивается сразу.
Механизм лояльности
Регулярные участники приобретают очки, которые превращаются на реальные деньги или бесплатные вращения.
Адаптивный портал и программа
Для практичности участников создана функциональная портативная платформа. Адаптивный вид дает возможность комфортно участвовать с произвольного карманного устройства.
Плюсы APP:
– Оперативный доступ к автоматам
– Настроенный интерфейс
– Устойчивая работа
– Push-уведомления о последних турнирах
Установить APP можно безвозмездно с главного портала для аппаратов на Android и iOS.
Библиотека игр
Игровые автоматы
Библиотека насчитывает более 2000 игр от ведущих провайдеров:
– Обычные автоматы
– Современные автоматы
– Джекпот-слоты
– Фирменные слоты
Live казино
Секция Live развлечений предлагает развлечение с подлинными диллерами в живом режиме:
– Roulette
– Двадцать одно
– Punto Banco
– Покер
Конкурсы
Регулярные состязания с значительными выигрышными пулами организуются еженедельно. Участие в состязаниях возможно всем активным пользователям.
Финансовые способы
Депозиты и изъятия денег осуществляются через популярные платежные системы:
– Платежные карточ ки
– Электронные сервисы
– Крипто
– Денежные операции
Минимальный вклад — от 100 рублей. Получение денег осуществляется в течение 24 ч.
Служба помощи
24/7 служба поддержки может помочь в решении всех вопросов:
– Онлайн-чат
– Email
– Горячая линия
– Соц сети
Надежность и лицензия
Лицензионный ресурс работает на фундаменте мировой разрешения. Всевозможные информация пользователей закрыты современным SSL-протоколом.
Заключение
Актуальное зеркало предоставляет постоянный доступ к любимым играм, богатым бонусам и практичным возможностям. Зарегистрируйтесь немедленно и получите стартовый поощрение!
Wow, wonderful blog layout! How long have you been blogging for?
you make blogging look easy. The overall look of your website is magnificent, as well as the content!
see more info – Pleasant interface with organized pages ensures a comfortable user experience.
view website – Cleanly presented content keeps users engaged and informed.
тайгр казино зеркало
Кстати если кто ищет tiger casino сайт или зеркало, вот норм вариант нашел. Это их канал, где постят рабочие ссылки и акции. Сам заходил через него, все стабильно. Иногда даже бонусы дают, что приятно
browse this link – The details are laid out in a very approachable way.
Передовые онлайн-казино дают клиентам внушительный диапазон развлечений и призовых программ. Вход к ресурсу производится через основной ресурс или его функционирующее зеркало Eldorado, что предоставляет непрерывную деятельность.
В чем суть функционирующее зеркало казино
Копия — это полная копия оригинального ресурса, сделанная для преодоления запретов. Актуальное зеркало обеспечивает участникам обрести подключение к предпочитаемым развлечениям в каждое время.
Подлинное зеркало располагает всеми опциями основного портала:
– Весь ассортимент развлечений
– Аккаунт с внесенными информацией
– Текущие поощрения
– Гарантированные денежные операции
Регистрация на главном ресурсе
Алгоритм открытия счета отнимает всего считанные минут. Первым участникам следует:
1. Войти на основной веб-сайт или рабочее зеркало
2. Кликнуть на клавишу “Открыть счет”
3. Внести обязательные информацию
4. Активировать контакт
5. Совершить первый платеж
Стартовый бонус начисляется сразу после выполнения всех этапов.
Доступ в аккаунт
Созданные игроки могут выполнить вход применяя:
– Никнейм и код
– Цифры телефона
– Электронную почту
Аккаунт обеспечивает шанс к администрированию средствами, сведениям ставок и доступным поощрениям.
Награды и акции
Развлекательная площадка радует лояльных пользователей многочисленными бонусами:
Приветственный бонус
– Надбавка на дебютный взнос до 100%
– Бесплатные вращения на популярные игры
– Экстра награды за очередные взносы
Ваучеры
Эксклюзивные купоны открывают доступ на приобретение специальных вознаграждений. Свежие купоны выставляются в секции “Промо”.
Cashback
Еженедельный кешбэк насчитывает до 10% от использованных сумм. Возврат выплачивается незамедлительно.
Механизм лояльности
Регулярные пользователи зарабатывают баллы, которые обмениваются на подлинные деньги или фриспины.
Мобильная версия и программа
Для практичности участников создана удобная портативная платформа. Адаптивный вид обеспечивает беспрепятственно развлекаться с всякого переносного гаджета.
Достоинства приложения:
– Моментальный подключение к автоматам
– Оптимизированный дизайн
– Устойчивая работа
– Сообщения о новых турнирах
Установить APP можно свободно с основного портала для гаджетов на Android и iOS.
Каталог слотов
Слоты
База содержит более 2000 автоматов от ведущих разработчиков:
– Классические автоматы
– Video slots
– Слоты с джекпотом
– Сюжетные слоты
Live казино
Секция Live игр предлагает участие с настоящими крупье в живом времени:
– Колесо фортуны
– Блэкджек
– Punto Banco
– Столы покера
Конкурсы
Постоянные конкурсы с большими премиальными фондами проводятся регулярно. Участие в состязаниях разрешено всем созданным игрокам.
Расчетные варианты
Взносы и снятия финансов осуществляются через известные сервисы:
– Платежные карты
– Виртуальные системы
– Криптовалюта
– Банковские операции
Стартовый платеж — от 100 рублей. Изъятие средств выполняется в течение 24 часов.
Сервис саппорта
Постоянная команда support способна помочь в разрешении каких-либо вопросов:
– Живой чат
– Email
– Телефон
– Общественные сети
Защита и разрешение
Главный сайт действует на базе мировой сертификата. Каждые сведения игроков охранены передовым SSL-шифрованием.
Резюме
Актуальное зеркало дает непрерывный доступ к излюбленным автоматам, богатым акциям и практичным возможностям. Откройте счет немедленно и обретите стартовый поощрение!
phuket homes for sale thailand real-estate-for-sale-in-phuket.com .
Актуальные онлайн-казино предоставляют участникам богатый набор игр и заманчивые бонусы. Однако для беспроблемной деятельности необходимо понимать, как обнаружить РЎСѓРєР° и его актуальные зеркала.
Что такое главный ресурс казино
Официальный сайт казино — это главная платформа, где игроки могут развлекаться игровыми играми. Портал функционирует на законных принципах и обладает всеми нужными документами.
Первостепенные преимущества основного сайта:
– Защищенность пользовательских сведений
– Справедливые правила работы
– Подтвержденные выплаты
– Профессиональная техподдержка
Рабочее зеркало казино: для чего нужно
Копия сайта — это абсолютная клон официального портала, хостящаяся по иному URL. Рабочее зеркало создается для обеспечения постоянного соединения к порталу.
Факторы применения зеркал:
– Ограничение официального сайта
– Профилактические работы
– Высокая посещаемость на систему
Как получить рабочее зеркало в данный момент
Получить свежее рабочее зеркало можно различными способами:
1. Подписка — зарегистрируйтесь на новостную рассылку
2. Команда помощи — обратитесь в онлайн-чат
3. Социальные медиа — проверяйте за публикациями
4. Партнерские площадки — авторитетные сайты
Открытие счета на портале казино
Алгоритм оформления длится только немного моментов:
1. Активируйте на элемент “Создать аккаунт”
2. Введите обязательные сведения
3. Активируйте email почту
4. Активируйте купон, если доступен
По завершении завершенной оформления вам станет доступен персональный аккаунт.
Премии и купоны
Богатая поощрительная система — важное преимущество казино:
Поощрение за создание аккаунта
Новые клиенты получают начальный подарок, который может предполагать:
– Финансовый кредит на дебютный вклад
– Free spins для игровых машин
– Безвозвратные средства
Купоны
Постоянно публикуются свежие бонусные шифры, обеспечивающие использовать особые преимущества.
Программа возврата средств
Постоянные пользователи получают долю потраченных денег назад.
Текущие акции и конкурсы
Ресурс постоянно запускает захватывающие акции:
– Weekly соревнования
– Специальные акции
– Лотереи крупных наград
– Механизм VIP-клуба
Доступ в индивидуальный кабинет
Для логина на портал нужно:
1. Открыть лицензионный сайт или рабочее зеркало
2. Нажать “Авторизация”
3. Указать логин и пароль
В пользовательском профиле открыты такие инструменты:
– Зачисление депозита
– Снятие выигрышей
– Изучение истории операций
– Изменение профильными настройками
Мобильная вариант и приложение
Портативная платформа
Responsive вариант сайта предоставляет шанс играть с всех смартфонного устройства. Интерфейс автоматически адаптируется под формат дисплея.
Приложение для download
Установить app можно для:
– Android — прямая download с сайта
– iOS — скачивание через App Store
Достоинства приложения:
– Моментальный старт
– Надежная операционность
– Push-оповещения об предложениях
– Производительный UI
Развлекательные разделы
Игровые машины
Внушительная подборка азартных автоматов от топовых поставщиков:
– Классические машины
– Новые-эмуляторы
– Призовые-слоты
Live игры
Зона с настоящими дилерами дает:
– Рулетка
– Двадцать одно
– Мини-баккара
– Texas Hold’em
Эфиры осуществляются в HD формате, воссоздавая ощущение подлинного казино.
Методы пополнения и снятия
Платформа поддерживает различные транзакционные инструменты:
– Кредитные средства
– Цифровые кошельки
– Криптовалюты
– Wire переводы
Базовые суммы внесения и оперативные транзакции гарантируют процесс исключительно беспроблемной.
Служба техподдержки
Опытная служба поддержки функционирует 24/7 и способна помочь с всеми вопросами:
– Онлайн-чат
– Email-консультации
– Телефонная горячая линия
Заключение
Основной сайт казино и его функционирующие копии предоставляют участникам безопасный и захватывающий азартный отдых. Щедрые подарки, удобная mobile модификация, богатые игры и качественное live-казино создают эту систему отличным решением для игровых досуга.
explore shop page – Clear visuals and menus create a smooth browsing experience.
see this marketplace – Organized pages and menus simplify navigation.
where can i get ed pills: online ed pharmacy – cheap ed meds
open this link – Clear formatting ensures readers stay focused on the content.
start browsing – The site structure supports quick and smooth exploration.
goldmarkbond.bond – Clean and professional design, giving the site a polished appearance.
Описание главного портала
Новое онлайн-казино обеспечивает своим клиентам большой выбор услуг и призов. Основной ресурс ДжиВиСпин функционирует 24/7, обеспечивая вход к топовым автоматам, live-казино и обширным акциям.
Действующее зеркало: возможность к порталу
Что такое копия казино
Дубликат составляет собой полную копию главного веб-сайта с альтернативным URL названием. Функционирующее зеркало предоставляет пользователям миновать ограничения и иметь непрерывный доступ к излюбленным слотам.
Как обнаружить текущее зеркало сегодня
Актуальные адреса на главное зеркало размещаются через:
– Почтовую рассылку
– Главные социальные сети
– Отдел обслуживания
– Специализированные площадки
Оформление на сайте
Этапы открытиясчета
Открытиесчета длится всего минут и подразумевает следующие стадии:
1. Доступ на официальный веб-сайт или действующее зеркало
2. Выбор кнопки “Создатьаккаунт”
3. Внесение личных данных
4. Верификация адреса или телефона
5. Создание кодадоступа
Приз за открытиесчета
Новые клиенты получают большие приветственные вознаграждения:
– Финансовые суммы на аккаунт
– Халявныеспины для автоматов
– Расширенный объем кэшбека
– Уникальные промокоды
Логин в индивидуальный счет
Постоянные участники могут выполнить логин через официальный веб-сайт или текущее зеркало. Для этого нужно набрать логин и пароль, сформированные при оформлении.
Инструменты собственного раздела
В индивидуальном профиле доступны такие возможности:
– Управление контактными данными
– Пополнение баланса
– Вывод денег
– Использование бонусов
– Проверка журнала операций
– Регистрация в турнирах
Бонусы и промо
Типы вознаграждений
Казино балует своих участников всевозможными поощрительными системами:
– Вступительный пакет — большие поощрения на дебютные вклады
– Бесплатныевращения — бонусные спины в популярных симуляторах
– Кешбэк — регулярный компенсация части проигрышей
– Схема лояльности — особые бонусы для регулярных клиентов
Купоны и их ввод
Эксклюзивные промокоды дают дополнительные подарки. Для активации нужно набрать комбинацию в нужное поле в индивидуальном профиле.
Игровой набор
Симуляторы
Библиотека игровых автоматов содержит сотни названий от топовых поставщиков:
– Стандартные слоты
– Новые игры
– Джекпот автоматы
– Сюжетные игры
Live казино
Зона Live-казино предлагает взаимодействие с реальными ведущими в формате актуального эфира:
– Французскаярулетка
– Очко
– Пунтобанко
– Карибскийпокер
Турниры
Регулярные турниры с внушительными наградными призами проводятся ежедневно. Соревнующиеся борются за первенство в рейтинге.
Mobile реализация и софт
Смартфонная адаптация веб-сайта
Оригинальный веб-сайт целиком приспособлен для мобильных девайсов. Клиенты способны открывать автоматы непосредственно через интернет-браузер без потребности загрузки.
Приложение для загрузки
Фирменное мобильное приложение доступно для получения на устройства с операционными средами Android и iOS. APP дает:
– Быстрый путь к автоматам
– Надежную работу
– Push-уведомления о предложениях
– Удобный оформление
Заключение
Основной веб-сайт казино и его актуальные дубликаты гарантируют игрокам полный вход к первоклассным игровым играм. Щедрые бонусы, всевозможные кампании, удобная мобильная платформа и квалифицированная помощь формируют геймплейный времяпрепровождение чрезвычайно комфортным и прибыльным.
luxury villas for sale phuket villas-for-sale-in-phuket.com .
Подключение к ресурсу через актуальные зеркала
Современные интернет казино дают геймерам постоянный подключение к услугам. Официальный веб-сайт казино Клубника действует стабильно, предлагая богатый ассортимент гемблинг слотов. Однако периодически возникают цифровые проблемы или запреты, следовательно важно знать о присутствии действующих зеркал.
Что является собой основное зеркало казино
Дубликат — это точная копия официального ресурса с идентичным набором функций. Актуальное зеркало на данный момент обеспечивает избегать локальные ограничения и поддерживать развлечения.
Принципиальные достоинства эксплуатации зеркал:
– Абсолютный подключение к собственному кабинету
– Сохранение совокупных показателей аккаунта
– Идентичный перечень слотов
– Свежие вознаграждения и предложения
Открытие счёта на портале
Операция регистрации требует считанные минут. Новые клиенты обретают привлекательный приз за регистрацию, он способен включать:
– Начальный финансовый бонус
– Даровые спины для автоматов
– Уникальные промокоды
– Повышенный кешбэк
Для выполнения создания аккаунта нужно:
1. Зайти на центральный портал или зеркало
2. Кликнуть элемент «Создать аккаунт»
3. Указать личные реквизиты
4. Заверить email или контакт
5. Задействовать код (в случае присутствии)
Авторизация в собственный кабинет
По завершении правильной регистрации пользователи могут совершать авторизацию используя главный портал или функционирующее зеркало. Личный кабинет открывает безграничный контроль над счётом:
– Архив транзакций
– Пополнение депозита
– Изъятие денег
– Контроль поощрениями
– Присутствие в соревнованиях
Награды и промо казино
Сайт награждает геймеров многочисленными наградными системами:
Приветственные бонусы
Дебютанты получают щедрый комплект бонусов на стартовые депозиты. Типично это предполагает процентную добавку к сумме вклада плюс комплиментарные вращения.
Регулярные акции
– Раз в неделю компенсация до 15%
– Соревнования с призовыми банками
– Призы на годовщину рождения
– Особые программы для VIP геймеров
Программа вознаграждения
Постоянные игроки накапливают пункты, которые можно обменять на подлинные деньги или специальные преимущества.
Портативная редакция и софт
Передовые решения позволяют участвовать где удобно. Мобильная вариант ресурса автоматически приспосабливается под экран каждого аппарата.
Достоинства смартфонного ПО:
– Моментальная запуск развлечений
– Удобный интерфейс
– Push-уведомления о бонусах
– Возможность установить для Android и iOS
Настоящее казино: антураж истинного развлекательного учреждения
Категория Live клуба переносит пользователей в антураж истинного азартного дома. Компетентные ведущие организуют игру в виде подлинного времени.
Представленные столы:
– Американская рулетка
– Блэкджек
– Классика
– Карты
Автоматы и развлекательные слоты
Ассортимент развлекательных машин насчитывает массу наименований от лидирующих провайдеров. Каждый клиент найдёт автомат по нраву:
– Традиционные слоты
– Современные автоматы с бонусными турами
– Крупный приз-машины
– Многолинейные автоматы
Соревнования и акции
Периодические турниры включают адреналин и предоставляют шанс обрести значительные суммы. Вовлечение в состязаниях зачастую бесплатное, а наградные банки доходят до крупных сумм.
Безопасность и приватность
Портал применяет передовые протоколы шифрования для гарантии информации клиентов. Любые транзакционные транзакции проходят через защищённые протоколы.
Резюме
Основной веб-сайт и его действующие зеркала обеспечивают безопасный вход к отличным гемблинг сервисам. Великодушные поощрения, эргономичная мобильная форма, богатство игр и высококлассное Live-игорный дом делают портал прекрасным вариантом для любителей азартных автоматов.
buy ed medication online: ed meds on line – cheap ed medicine
мелбет авиатор киргизия https://melbet18207.help/
Dive deeper
cost of zyrtec
for long-term learning.
visit this marketplace – Well-organized pages allow users to explore content quickly and comfortably.
Shop Velvet Brook – Clear interface ensures smooth navigation through the site.
learn more – The concepts are clear and practical, easy for anyone to follow.
согласование перепланировки в москве согласование перепланировки в москве .
open this online shop – Pages respond quickly and layout is easy to follow.
this helpful page – Content is organized in a straightforward and readable way.
Start Exploring Momentum – Organized pages guide users clearly through concepts.
view items online – A balanced design makes browsing feel effortless and pleasant.
Переход к порталу и функционирующие адреса
Популярные виртуальные казино обеспечивают пользователям большой набор возможностей. Центральный ресурс Болливуд казино организует безопасный доступ ко всем возможностям. Впрочем периодически возникают ситуации, когда нужно резервный метод входа.
Что представляет собой функционирующее зеркало
Действующее зеркало — это полная дубликат главного ресурса с другим интернет названием. Зеркало сегодня позволяет миновать возможные блокировки и обеспечивать непрерывный вход к предпочитаемым играм.
Проверенное зеркало характеризуется идентичными функциями, что и базовый портал:
– Совокупный список автоматов
– Индивидуальный кабинет с записанными данными
– Действующие бонусы и предложения
– Проверенные денежные переводы
Оформление и авторизация в систему
Этап создания профиля на платформе длится пару моментов. Свежим пользователям требуется:
1. Зайти на рабочее зеркало сегодня
2. Выбрать элемент «Зарегистрироваться»
3. Заполнить необходимые информацию
4. Активировать цифровую почту или информацию мобильного
5. Получить подарок за создание профиля
Подключение в собственный профиль реализуется с помощью ввод ID и кода доступа.
Описание наградной структуры
Выгодная поощрительная программа — важнейшее козырь игорного заведения. Клиенты зарабатывают всевозможные поощрения:
Вступительные подарки
Новые участники могут надеяться на привлекательный поощрение за регистрацию. Традиционно это совокупность опций, охватывающий:
– Процентную надбавку к стартовому депозиту
– Даровые фриспины
– Бонусные средства на баланс
Кодовые комбинации и эксклюзивные предложения
Регулярные бонусные комбинации позволяют зарабатывать призовые выгоды. Активировать их разрешено в специальном меню собственного аккаунта.
Фриспины и кэшбек
Бесплатные спины — это возможность запускать барабаны без расходования своих сумм. Рибейт представляет долевой отдачу проигранных средств.
Коллекция слотов
Азартная площадка представляет внушительную базу слотов.
Автоматы
Разнообразие аппаратов удивляет фантазию. Имеются стандартные трехбарабанные автоматы и продвинутые игры с захватывающей картинкой.
Live зал
Категория Live казино переносит клиентов в среду подлинного азартного заведения. Профессиональные крупье организуют партии в реальном времени.
Конкурсы и доски почета
Систематические состязания привносят драйва и обеспечивают возможность выиграть крупные выигрыши.
Карманная вариант и клиент
Актуальные решения помогают развлекаться в комфортном точке. Mobile форма автоматически подстраивается под дисплей гаджета.
Получить приложение возможно для программных платформ iOS и Android. Софт дает:
– Быстрый вход
– Стабильную работу
– Мгновенные-уведомления об предложениях
– Простой облик
Финансовые транзакции
Сайт принимает многочисленные системы ввода и получения сумм:
– Пластиковые карты
– Онлайн сервисы
– Токены
– Банковские отправки
Все переводы осуществляются через защищенное подключение, что обеспечивает сохранность персональных данных.
Отдел помощи
Компетентная команда support действует круглосуточно. Связаться с операторами можно через:
– Живой-чат
– Почтовую почту
– Контакт
– Общественные каналы
Итоги
Основной веб-сайт и его функционирующее зеркало гарантируют пользователям безопасный и удобный доступ к увлекательным играм. Богатые подарки, широкий каталог слотов и качественная ассистанс формируют времяпрепровождение исключительно удобной и доходной.
Описание главного сайта
Передовые сетевые казино предоставляют клиентам богатый выбор игр и перспектив. Официальный веб-сайт Голд предлагает надежный вход к гемблинг услугам.
Функционирующее зеркало: доступ сегодня
Дублирующий портал служит собой точную версию главного веб-сайта. Официальное зеркало дает возможность клиентам преодолевать возможные барьеры.
Выгоды использования зеркала
Основные выгоды охватывают:
– Постоянный путь к порталу
– Сохранение полных опций официального ресурса
– Защита личных сведений
– Такой же возможности
Оформление профиля на портале
Процесс открытия счета выделяется понятностью и комфортом. Новые клиенты должны:
1. Перейти на основной ресурс или его зеркало
2. Щелкнуть на кнопку открытия счета
3. Внести необходимые информацию
4. Валидировать email адрес
5. Осуществить дебютный авторизацию
Бонус за регистрацию
Новые игроки приобретают значительный вступительный подарок. Данное вознаграждение может содержать:
– Денежные начисления
– Бесплатные вращения
– Расширенный показатель возврата
Доступ в собственный аккаунт
Зарегистрированные участники имеют возможность быстро получить доступ в свой профиль, используя имя пользователя и пароль. Личный аккаунт обеспечивает возможность к:
– Администрированию балансом
– Истории операций
– Активным подаркам
– Настройкам профиля
Подарки и предложения
Сайт постоянно реализует различные мероприятия для пользователей.
Виды призов
Основные типы бонусов:
– Пополнительные подарки – коэффициент от размера внесения
– Спины – бесплатные раунды в игровых машинах
– Кэшбек – компенсация доли потерянных денег
– Турнирные награды – премии за состязание в состязаниях
Промокоды
Особые промокоды позволяют заработать добавочные выгоды. Участники могут найти их на партнерских ресурсах или приобрести в новостях.
Mobile редакция и app
Актуальные пользователи предпочитают переносной гейминг.
Функции переносной платформы
– Responsive облик для всех устройств
– Абсолютный путь к автоматам
– Стремительная подгрузка
– Комфортное использование
Скачать приложение
Переносное программа предложено для downloading на девайсы с рабочими ОС Android и iOS. App обеспечивает:
– Стабильную производительность
– Всплывающие оповещения о бонусах
– Оперативный доступ к любимым автоматам
Развлекательный ассортимент
Портал предоставляет обширную коллекцию игровых развлечений.
Автоматы
Коллекция развлекательных слотов охватывает:
– Стандартные автоматы
– Video аппараты
– Накопительные игры
– Сюжетные автоматы
Live казино
Область реальных столов обеспечивает право соревноваться с профессиональными ведущими. Предложены:
– Рулетка
– Очко
– Baccarat
– Техасский холдем
Соревнования
Постоянные турниры позволяют клиентам состязаться за солидные призовые банки. Призовая сетка изменяется каждую неделю.
Денежные операции
Сайт предоставляет множество вариантов внесения и вывода сумм:
– Пластиковые карты
– Онлайн платежные системы
– Прямые переводы
– Bitcoin
Все платежи производятся конфиденциально с задействованием актуальных систем шифрования.
Отдел помощи
Опытная команда support функционирует постоянно. Связаться с консультантами реально через:
– Online чат
– Электронную почту
– Горячую линию
– Социальные медиа
Защита и регулирование
Казино работает на базе законной аккредитации. Подобное обеспечивает:
– Честность игрового процесса
– Охрану персональных информации
– Своевременные выводы
– Ответственный гемблинг
Вывод
Официальный портал и его действующие зеркала гарантируют пользователям целостный комплекс функций для комфортной и профитной времяпрепровождения. Щедрые подарки, всевозможные автоматы, компетентная поддержка и безопасная платформа операций создают платформу оптимальным вариантом для ценителей азартных услуг.
open this website – Everything loads quickly, and finding items is simple and intuitive.
Sur brutal casino, je regarde souvent la coherence du design et la facilite de navigation entre les pages. Je trouve important que l’interface reste propre sans etre surchargee. Je fais aussi attention a la version mobile et a la clarte des intitules, enfin des intitules affiches. Une plateforme simple a parcourir donne toujours une meilleure impression.
open link – Smooth layout helps readers understand and absorb information effortlessly.
Вход к ресурсу и действующие зеркала
Современные виртуальные казино гарантируют участникам обширный набор опций. Центральный ресурс казино Ретро организует безопасный подключение ко всем возможностям. При этом временами случаются случаи, когда понадобится резервный путь входа.
Что представляет собой действующее зеркало
Функционирующее зеркало — это абсолютная версия основного портала с другим URL именем. Копия сегодня позволяет миновать существующие блокировки и сохранять стабильный вход к популярным слотам.
Официальное зеркало обладает полными характеристиками, что и главный веб-сайт:
– Совокупный ассортимент развлечений
– Персональный аккаунт с сохраненными данными
– Полные поощрения и предложения
– Безопасные денежные переводы
Создание аккаунта и подключение в сервис
Ход регистрации на сайте отнимает пару мгновений. Свежим игрокам нужно:
1. Зайти на действующее зеркало сейчас
2. Кликнуть клавишу «Регистрация»
3. Ввести необходимые данные
4. Подтвердить цифровую почту или информацию мобильного
5. Активировать награду за открытие аккаунта
Вход в собственный кабинет реализуется через ввод ID и секретной комбинации.
Описание поощрительной системы
Богатая наградная программа — важнейшее козырь казино. Пользователи получают различные поощрения:
Начальные подарки
Недавние игроки способны надеяться на привлекательный поощрение за оформление. Традиционно это комплект опций, включающий:
– Пропорциональную премию к дебютному пополнению
– Даровые кручения
– Бонусные деньги на счет
Кодовые комбинации и уникальные акции
Постоянные купоны дают возможность зарабатывать дополнительные выгоды. Активировать их разрешено в отдельном поле собственного профиля.
Спины и кешбэк
Даровые вращения — это вариант запускать автоматы без применения собственных средств. Рибейт означает процентный возврат потерянных средств.
Каталог игр
Гемблинг сайт представляет огромную коллекцию игр.
Автоматы
Многообразие аппаратов восхищает воображение. Есть традиционные трехбарабанные аппараты и современные развлечения с интересной графикой.
Live заведение
Секция Live заведения транспортирует клиентов в среду подлинного гемблинг зала. Профессиональные крупье осуществляют раунды в реальном времени.
Турниры и доски почета
Периодические соревнования вносят азарта и дают вариант заработать большие призы.
Mobile версия и приложение
Современные разработки обеспечивают наслаждаться в удобном локации. Mobile реализация автономно оптимизируется под дисплей аппарата.
Загрузить приложение возможно для программных сред iOS и Android. Программа гарантирует:
– Быстрый запуск
– Надежную работу
– Мгновенные-сообщения об акциях
– Простой облик
Платежные действия
Сайт принимает различные способы ввода и вывода финансов:
– Банковские инструменты
– Виртуальные системы
– Токены
– Прямые переводы
Всевозможные действия реализуются через зашифрованное протокол, что обеспечивает безопасность личных сведений.
Служба поддержки
Квалифицированная бригада support действует всегда. Обратиться с специалистами разрешено через:
– Живой-чат
– E-mail почту
– Горячую линию
– Общественные ресурсы
Итоги
Главный ресурс и его действующее зеркало дают игрокам защищенный и удобный путь к увлекательным развлечениям. Привлекательные подарки, большой каталог развлечений и качественная ассистанс обеспечивают времяпрепровождение предельно приятной и выгодной.
цены на стройматериалы Ростов-на-Дону
Доступ к ресурсу через актуальные зеркала
Пользователи сетевых казино постоянно встречаются с трудностью ограничения основного сайта. Собственно для ликвидации этой трудности существуют зеркала официального ресурса. Eldorado казино предоставляет абсолютный подключение ко всем опциям ресурса.
Что такое рабочее зеркало казино
Зеркало значит собой абсолютную версию главного портала с похожим функционалом. Единственное несовпадение — это альтернативное имя. Каждые сведения участника, вместе с средства, поощрения и историю ставок, остаются такими же.
Преимущества задействования зеркал
Функционирующие зеркала обладают набором ключевых выгод:
– Круглосуточный подключение к любимым развлечениям
– Абсолютная безопасность индивидуальных информации
– Неизменность всех настроек личного кабинета
– Опция обретения бонусов и включения в промоакциях
Оформление профиля на легальном ресурсе
Процедура создания аккаунта чрезвычайно легок и отнимает немного минут. Свежие участники имеют возможность полагаться на внушительный стартовый подарок за оформление.
Ступени создания аккаунта
1. Переход на легальный сайт или его копию
2. Выбор на опцию “Создать аккаунт”
3. Ввод требуемых данных
4. Подтверждение электронной почты
5. Применение купона (когда есть)
Бонусы и кампании для клиентов
Игровая площадка одаривает своих игроков различными поощрительными предложениями.
Главные виды бонусов
Приветственный подарок — внушительное вознаграждение для новых пользователей, которое способно вмещать материальные средства и бесплатные вращения.
Бесплатные вращения — шанс играть в известных слотах без затрат.
Возврат средств — частичный возмещение проигранных сумм, каковой зачисляется по неделям или ежемесячно.
Промокоды — специальные последовательности, предоставляющие экстра преимущества.
Индивидуальный кабинет: опции и настройки
Личный раздел предоставляет абсолютный управление над пользовательским опытом. В нем доступны:
– Контроль балансом
– История операций
– Активные бонусы
– Конфигурации сохранности
– Подтверждение учетной записи
Портативная редакция и APP
Актуальные пользователи предпочитают портативность. Платформа предоставляет два способа для развлечений с мобильных гаджетов.
Адаптивная телефонная версия
Адаптивная вариант сайта автоматически подстраивается под дисплей любого девайса. Не требуется инсталлировать специальное ПО.
APP для мобильных
Доступно загрузить официальное APP для iOS и Android. APP гарантирует:
– Моментальный вход
– Адаптированный внешний вид
– Оперативные-уведомления о акциях
– Надежную функциональность
Live раздел: среда подлинного зала
Раздел Live казино переносит клиентов в среду подлинного клуба. Компетентные дилеры ведут раунды в виде прямого времени.
Востребованные Live-столы
– Европейская рулетка
– Блэкджек
– Baccarat
– Poker
Игровые машины: ассортимент автоматов
Библиотека слотовых аппаратов вмещает сотни позиций от лидирующих производителей. Участники встретят:
– Традиционные слоты
– Видеослоты
– Накопительный приз-слоты
– Мегавейс
Соревнования и специальные события
Периодические состязания обеспечивают пользователям состязаться друг с другом за крупные денежные банки. Каждый соревнование обладает свои требования участия и таблицу призеров.
Пути внесения и получения денег
Ресурс поддерживает массу платежных методов:
– Платежные инструменты
– Электронные платежные системы
– Крипто
– Финансовые транзакции
Каждые транзакции проходят надежно благодаря современным протоколам кодирования.
Служба помощи
Компетентные сотрудники сервиса support готовы помочь 24/7. Доступны такие способы связи:
– Мгновенный-чат
– Email-помощь
– Звонковая линия
– Публичные сети
Итог
Основной домен игровой площадки и его действующие зеркала обеспечивают игрокам защищенный и приятный подход к широкому диапазону развлекательных активностей. Щедрые поощрения, частые предложения, квалифицированная сервис и комфортные финансовые способы создают игровой времяпрепровождение крайне увлекательным и доходным.
раскрутка сайта москва раскрутка сайта москва .
анализ наружной рекламы reklamnyj-kreativ13.ru .
online store link – Everything feels light and easy to navigate.
dawnwillowoutlet.shop – Clean layout, browsing feels effortless and information is well organized.
Kraken Marketplace Официальный сайт для доступа к Kraken
kra
discover items – The layout makes finding and exploring products straightforward.
learn more – Useful insights with a clear structure make the material easy to follow.
open this link – Nicely arranged sections that improve readability across the site.
where to buy ed pills: PrimeLine Pharmacy – buy ed meds online
useful reference – The content is arranged logically, making browsing smooth and straightforward.
Современные интернет казино предоставляют игрокам широкий диапазон опций для приятной игры. Впрочем иногда соединение к базовому порталу может стать заблокированным. В таких обстоятельствах на выручку спешит ДжиВиСпин, которое дает бесперебойный вход ко всем функциям платформы.
Что такое функционирующее зеркало казино
Зеркало — это абсолютная версия основного веб-сайта, которая располагается по дополнительному URL. Копия поддерживает весь функционал главного сайта, включая личный кабинет, средства и данные операций.
Основные плюсы применения зеркала:
– Непрерывный соединение к сайту
– Абсолютная схожесть опций
– Безопасность пользовательских реквизитов
– Хранение существующих вознаграждений
Как обнаружить рабочее зеркало в данный момент
Существует несколько безопасных методов получения свежей URL:
Официальные каналы:
1. Email рассылка — руководство систематически отправляет сообщения с действующими ссылками
2. Коммуникационные сети — авторизованные аккаунты постят актуальную данные
3. Сервис поддержки — консультанты дают достоверные URL
4. Мобильное приложение — позволяет преодолевать блокировки
Оформление профиля на лицензионном ресурсе
Операция создания аккаунта отнимает не более считанные минут и предполагает из таких шагов:
1. Переход на основной сайт или действующее зеркало
2. Выбор на кнопку «Открыть счет»
3. Указание пользовательской таблицы
4. Подтверждение имейл почты или сотового номера
5. Активация вознаграждения за регистрацию при доступности промокода
Начинающие геймеры зарабатывают значительный вступительный приз, который может охватывать фриспины, валютные призы или компенсацию.
Вход в личный кабинет
Подключение на сайте реализуется стандартным путем. Достаточно внести никнейм и кодовое слово, задействованные при создании аккаунта.
Существенные моменты для надежного входа:
– Задействуйте надежный код
– Включите двойную верификацию
– Не сохраняйте пароли на посторонних девайсах
– Проверяйте адресную строку браузера
Характеристика премиальной структуры
Игорный портал балует игроков многочисленными вознаграждениями и специальными предложениями:
Стартовый пакет
Дебютанты имеют возможность полагаться на существенное бонус за начальный вклад. Традиционно это долевая прибавка к переведенной величине плюс даровые спины для популярных слотов.
Регулярные кампании
– Недельный cashback — возмещение процента потерянных средств
– Бонусы на дополнительные пополнения
– Уникальные предложения по праздникам
– Турниры с солидными премиальными фондами
Схема лояльности
Деятельные клиенты собирают баллы за каждую игру, которые затем конвертируются на фактические деньги, free spins или эксклюзивные привилегии.
Промокоды: как применять
Бонус-коды — это индивидуальные последовательности литер, дающие привилегию к дополнительным вознаграждениям.
Откуда взять свежие промокоды:
– Авторизованные социальные сети казино
– Аффилиатные ресурсы
– Email-рассылка
– Профильные форумы
Указывается промокод в отдельное поле при создании аккаунта или зачислении средств счета.
Мобильная версия и приложение
Передовые пользователи отдают предпочтение делать ставки с телефонных устройств. Ресурс предлагает два варианта для приятной мобильной игры.
Адаптивная версия
Веб версия сама оптимизируется под габариты экранной панели. Не предполагает загрузки и оперирует в каждом актуальном браузере.
Мобильное приложение
Установить app можно для гаджетов на Android и iOS. Достоинства app:
– Скоростная открытие
– Надежная функционирование
– Push-уведомления о бонусах
– Самостоятельный преодоление блокировок
Процедура инсталляции прост: необходимо открыть на портал с телефонного девайса и выполнять предписаниям.
Развлекательный каталог
База аппаратов насчитывает огромное количество вариантов от передовых производителей.
Слоты
Азартные машины — максимально любимая секция развлечений. Представлены классические винтажные слоты, современные видео-автоматы с дополнительными раундами, а также прогрессивные джекпоты.
Live казино
Раздел с живыми раздающими обеспечивает испытать дух подлинного казино. Открыты столы с рулеткой.
Стриминг ведется в превосходном качестве, поддерживается коммуникация с ведущим и иными участниками.
Соревнования
Систематически устраиваются состязания по многочисленным слотам. Участие дает шанс завоевать монетарные призы, даровые прокруты или особые презенты.
Платежные операции
Портал предлагает большой выбор расчетных методов:
– Банковские карты
– Электронные платформы
– Крипта
– Счетовые платежи
Стартовая количество взноса — посильная для преобладающего числа геймеров. Обналичивание денег производится в скорые периоды.
Отдел поддержки
Опытные сотрудники способны поддержать непрерывно. Представлены нижеследующие способы коммуникации:
– Веб-чат
– Email
– Телефонная горячая линия
– Социальные сети
Решения на типовые проблемы можно обнаружить в блоке FAQ.
Заключение
Основной веб-сайт казино и его актуальные зеркала дают игрокам полный путь ко всем функциям платформы. Щедрые привилегии, комфортная телефонная версия, гигантский ассортимент развлечений и профессиональная поддержка превращают игровой процесс крайне комфортным и защищенным.
Современные онлайн-казино предоставляют участникам обширный диапазон игр и премиальных вариантов. Присоединение к платформе осуществляется через лицензионный веб-сайт или его рабочее зеркало Sykaaa, что дает бесперебойную деятельность.
Что представляет собой действующее зеркало казино
Зеркало — это полная копия официального сайта, разработанная для преодоления барьеров. Действующее зеркало обеспечивает игрокам обрести вход к излюбленным играм в любое удобное время.
Подлинное зеркало обладает всеми опциями оригинального ресурса:
– Совокупный каталог развлечений
– Личный кабинет с зафиксированными информацией
– Текущие акции
– Защищенные расчетные транзакции
Регистрация на официальном портале
Алгоритм оформления занимает всего несколько минут. Новым игрокам требуется:
1. Перейти на основной ресурс или функционирующее зеркало
2. Нажать на элемент “Зарегистрироваться”
3. Ввести нужные параметры
4. Активировать электронную почту
5. Произвести начальный платеж
Приветственный бонус предоставляется сразу после окончания всех стадий.
Доступ в личный кабинет
Созданные пользователи могут осуществить подключение вводя:
– Учетное имя и код
– Данные контакта
– Адрес
Профиль обеспечивает право к контролю финансами, истории игр и доступным акциям.
Поощрения и акции
Развлекательная платформа радует активных пользователей щедрыми бонусами:
Приветственный комплект
– Бонус на первый пополнение до 100%
– Бесплатные вращения на востребованные автоматы
– Экстра поощрения за следующие платежи
Купоны
Особые промокоды предоставляют возможность на приобретение эксклюзивных поощрений. Актуальные коды публикуются в разделе “Предложения”.
Cashback
Периодический бонус насчитывает до 10% от утраченных финансов. Возмещение начисляется автоматически.
Программа лояльности
Регулярные участники приобретают единицы, которые обмениваются на подлинные средства или фриспины.
Адаптивный портал и APP
Ради комфорта участников сделана качественная mobile версия. Отзывчивый облик помогает удобно делать ставки с всякого карманного гаджета.
Достоинства приложения:
– Быстрый доступ к играм
– Настроенный дизайн
– Стабильная функциональность
– Оповещения о последних бонусах
Загрузить софт можно безвозмездно с проверенного портала для девайсов на Android и iOS.
Каталог слотов
Игровые автоматы
База вмещает более 2000 автоматов от известных производителей:
– Классические игры
– Видео-слоты
– Jackpot игры
– Брендовые развлечения
Live казино
Раздел Live казино дает игру с живыми ведущими в живом режиме:
– Рулеточные столы
– Блэкджек
– Карты
– Карточный покер
Конкурсы
Постоянные состязания с значительными выигрышными фондами устраиваются регулярно. Вход в турнирах разрешено всем действующим игрокам.
Финансовые варианты
Депозиты и снятия выплат осуществляются через известные способы оплаты:
– Платежные карточ ки
– Электронные кошельки
– Криптовалюта
– Банковские платежи
Стартовый взнос — от 100 рублей. Снятие финансов проводится в течение 24 часов.
Сервис поддержки
24/7 группа support способна ассистировать в урегулировании всех ситуаций:
– Мессенджер
– Email
– Связь
– Социальные сети
Защита и разрешение
Подлинный сайт оперирует на основании мировой сертификата. Любые информация клиентов обезопасены новейшим SSL-шифрованием.
Заключение
Рабочее зеркало гарантирует непрерывный соединение к излюбленным играм, щедрым акциям и комфортным услугам. Присоединяйтесь немедленно и получите первый бонус!
actionanchorsprogress.click – The site is organized, making content easy to read and follow.
browse collection – Fast-loading content and clear sections make exploring easy.
see this marketplace – Organized interface helps users navigate comfortably.
violetcrestmarketplace.shop – The interface is clean, making it easy and enjoyable to browse products.
open store – Neat presentation that makes online shopping feel comfortable.
Описание официального веб-сайта
Современные онлайн казино дают игрокам широкий спектр игр и возможностей. Лицензионный портал http://www.tolbaga.ru обеспечивает безопасный вход к гемблинг возможностям.
Действующее зеркало: возможность в настоящий момент
Альтернативный адрес выступает в качестве идентичную копию официального портала. Проверенное зеркало помогает клиентам миновать возможные блокировки.
Плюсы эксплуатации зеркала
Главные плюсы предполагают:
– Непрерывный путь к платформе
– Сохранение абсолютно всех функций основного портала
– Безопасность личных информации
– Идентичный набор функций
Оформление профиля на ресурсе
Механизм оформления профиля знаменуется понятностью и удобством. Недавние участники обязаны:
1. Перейти на главный ресурс или его зеркало
2. Нажать на клавишу оформления
3. Указать обязательные поля
4. Валидировать почтовую адрес
5. Произвести стартовый доступ
Бонус за создание аккаунта
Новые игроки забирают внушительный стартовый бонус. Данное поощрение может включать:
– Монетарные бонусы
– Бесплатные прокруты
– Расширенный уровень возврата
Логин в личный профиль
Зарегистрированные клиенты имеют возможность оперативно получить доступ в персональный профиль, задействуя учетные данные и пароль. Личный аккаунт дает путь к:
– Управлению депозитом
– Истории переводов
– Действующим поощрениям
– Настройкам профиля
Бонусы и акции
Платформа систематически организует различные промо-кампании для клиентов.
Разновидности призов
Ключевые виды призов:
– Депозитные начисления – коэффициент от суммы пополнения
– Спины – complimentary раунды в автоматах
– Кэшбек – компенсация части затраченных денег
– Соревновательные трофеи – награды за выступление в соревнованиях
Купоны
Эксклюзивные ваучеры обеспечивают активировать бонусные привилегии. Участники в состоянии отыскать их на тематических порталах или взять в новостях.
Переносная версия и app
Современные пользователи любят мобильный гейминг.
Характеристики переносной платформы
– Responsive дизайн для разнообразных гаджетов
– Совокупный путь к развлечениям
– Оперативная функционирование
– Эргономичное использование
Скачать app
Мобильное приложение предложено для скачивания на девайсы с операционными платформами Android и iOS. App дает:
– Бесперебойную работу
– Пуш сообщения о предложениях
– Быстрый путь к любимым играм
Развлекательный ассортимент
Портал предлагает богатую галерею игровых развлечений.
Слоты
Каталог азартных автоматов насчитывает:
– Классические игры
– Видео игры
– Прогрессивные игры
– Сюжетные слоты
Live игры
Область живых дилеров предоставляет опцию участвовать с реальными ведущими. Открыты:
– Европейская рулетка
– Очко
– Баккара
– Техасский холдем
Соревнования
Регулярные чемпионаты обеспечивают участникам соревноваться за внушительные финансовые фонды. Конкурсная программа актуализируется еженедельно.
Банковские действия
Платформа поддерживает разнообразие способов пополнения и получения сумм:
– Кредитные карточки
– Цифровые кошельки
– Прямые переводы
– Криптовалюты
Абсолютно все переводы производятся защищенно с применением современных методов шифрования.
Отдел поддержки
Квалифицированная служба саппорта действует постоянно. Соединиться с специалистами возможно через:
– Онлайн чат
– Email почту
– Телефон
– Social платформы
Охрана и регулирование
Казино оперирует на основании законной сертификата. Это гарантирует:
– Легальность игрового геймплея
– Безопасность персональных информации
– Своевременные выплаты
– Легальный гейминг
Резюме
Главный веб-сайт и его функционирующие альтернативные адреса дают участникам полный ассортимент возможностей для безопасной и доходной досуга. Щедрые подарки, разнообразные развлечения, опытная сервис и защищенная инфраструктура операций делают ресурс лучшим выбором для любителей азартных услуг.
learn more – A well-structured site with a smooth, user-friendly experience.
Переход к порталу и рабочие адреса
Современные интернет казино обеспечивают участникам широкий ассортимент развлечений. Главный сайт JVSpin предоставляет стабильный вход ко всем функциям. При этом порой появляются ситуации, когда нужно запасной путь доступа.
Что являет собой собой рабочее зеркало
Рабочее зеркало — это идентичная дубликат легального портала с другим URL названием. Дубликат сегодня обеспечивает преодолевать вероятные ограничения и обеспечивать стабильный вход к популярным развлечениям.
Главное зеркало имеет полными функциями, что и основной веб-сайт:
– Полный перечень автоматов
– Персональный кабинет с сохраненными данными
– Полные поощрения и предложения
– Безопасные денежные переводы
Оформление и подключение в платформу
Этап создания профиля на платформе длится несколько минут. Начинающим пользователям необходимо:
1. Перейти на функционирующее зеркало на данный момент
2. Нажать клавишу «Регистрация»
3. Заполнить нужные данные
4. Проверить цифровую почту или информацию мобильного
5. Активировать бонус за оформление
Подключение в собственный кабинет производится с помощью предоставление ID и секретной комбинации.
Характеристика поощрительной программы
Щедрая поощрительная политика — ключевое козырь казино. Участники обретают различные награды:
Начальные подарки
Свежие клиенты вправе ожидать на значительный бонус за регистрацию. Чаще всего это совокупность предложений, объединяющий:
– Частичную надбавку к стартовому вкладу
– Подарочные спины
– Призовые финансы на кошелек
Купоны и уникальные возможности
Постоянные бонусные комбинации дают возможность получать дополнительные преимущества. Задействовать их допустимо в предназначенном меню личного раздела.
Фриспины и возврат средств
Бесплатные спины — это возможность запускать слоты без использования своих денег. Кэшбек предполагает долевой отдачу потерянных денег.
Библиотека игр
Развлекательная площадка обеспечивает значительную библиотеку слотов.
Видеослоты
Вариативность аппаратов впечатляет ожидания. Есть стандартные трехбарабанные аппараты и актуальные видеослоты с занимательной картинкой.
Live заведение
Категория Live казино помещает участников в среду подлинного развлекательного клуба. Опытные дилеры ведут партии в реальном эфире.
Конкурсы и лидерборды
Систематические турниры привносят драйва и гарантируют возможность выиграть внушительные награды.
Мобильная реализация и клиент
Современные инновации позволяют развлекаться в комфортном пространстве. Адаптивная реализация автоматически настраивается под экран устройства.
Загрузить софт допустимо для мобильных сред iOS и Android. Клиент гарантирует:
– Оперативный доступ
– Устойчивую деятельность
– Мгновенные-алерты об бонусах
– Комфортный интерфейс
Финансовые действия
Платформа использует различные способы внесения и получения средств:
– Платежные счета
– Цифровые платформы
– Цифровые валюты
– Финансовые транзакции
Все операции осуществляются через зашифрованное протокол, что подтверждает безопасность приватных параметров.
Сервис помощи
Квалифицированная бригада помощи действует постоянно. Обратиться с операторами возможно через:
– Живой-чат
– E-mail почту
– Телефон
– Медиа каналы
Итоги
Основной ресурс и его функционирующее зеркало обеспечивают участникам надежный и комфортный доступ к увлекательным забавам. Выгодные подарки, широкий ассортимент слотов и профессиональная помощь формируют игру исключительно интересной и доходной.
Kraken Marketplace Официальный сайт для доступа к Kraken
kra at
Wild Bandito sticky wilds: o bandido mexicano tá roubando a cena do Tigrinho!
Explore Deals Online – Organized display makes finding products enjoyable.
phuket luxury apartments for sale apartments-for-sale-in-phuket.com .
condo for sale in phuket apartments-for-sale-in-phuket-1.com .
http://novamenpharmacy.com/# Buy Viagra online cheap
https://rushbet.cat/
Rushbet en Colombia se consolida durante 2026 como una plataforma de juego online confiable y versatil, operando bajo su licencia oficial de Coljuegos, lo que proporciona seguridad juridica y cumplimiento en el pais.
enter WaveStone Exchange – Pages load fast and navigation feels natural.
explore shop page – Smooth layout and clean design help users find products easily.
Анализ главного ресурса
Современное онлайн-казино предлагает своим клиентам большой набор игр и бонусов. Оригинальный веб-сайт Лев скачать работает постоянно, давая путь к востребованным играм, live-казино и обширным предложениям.
Актуальное зеркало: доступ к платформе
Что такое зеркало казино
Дубликат представляет собой абсолютную копию основного портала с отличным доменным именем. Рабочее зеркало дает пользователям обходить ограничения и иметь постоянный подключение к выбранным играм.
Как найти актуальное зеркало сегодня
Актуальные адреса на основное зеркало появляются через:
– E-mail оповещение
– Проверенные социальные сети
– Команду помощи
– Специализированные ресурсы
Регистрация на портале
Процедура регистрации
Оформление занимает буквально минут и подразумевает следующие действия:
1. Открытие на официальный ресурс или рабочее зеркало
2. Нажатие элемента “Зарегистрироваться”
3. Заполнение персональных сведений
4. Активация email или телефона
5. Формирование секретнойкомбинации
Вознаграждение за регистрацию
Свежие участники приобретают выгодные начальные вознаграждения:
– Игровые суммы на счет
– Бесплатныевращения для игр
– Повышенный размер компенсации
– Специальные коды
Логин в персональный аккаунт
Зарегистрированные участники имеютвозможность осуществить вход через главный сайт или актуальное зеркало. Для этого нужно указать учетноеимя и ключдоступа, установленные при созданииаккаунта.
Инструменты личного аккаунта
В индивидуальном кабинете доступны такие возможности:
– Управление учетными информацией
– Пополнение баланса
– Получение призов
– Активация купонов
– Мониторинг архива игр
– Участие в конкурсах
Вознаграждения и акции
Виды бонусов
Казино радует своих пользователей всевозможными поощрительными предложениями:
– Приветственный бонус — щедрые вознаграждения на начальные пополнения
– Freespins — бонусные прокруты в топовых симуляторах
– Компенсация — регулярный компенсация доли убытков
– Схема VIP — эксклюзивные бонусы для постоянных игроков
Коды и их активация
Особые купоны предоставляют расширенные подарки. Для активации нужно набрать код в специальное графу в персональном кабинете.
Игровой выбор
Слоты
База азартных автоматов содержит сотни названий от известных провайдеров:
– Классические симуляторы
– Современные развлечения
– Накопительные симуляторы
– Тематические развлечения
Live казино
Секция Live-казино предоставляет игру с реальными крупье в условиях онлайн времени:
– Французскаярулетка
– Блэкджек
– Баккара
– Casinopoker
Конкурсы
Регулярные соревнования с крупными наградными суммами проводятся ежедневно. Претенденты соревнуются за первенство в таблице.
Мобильная адаптация и софт
Адаптивная платформа веб-сайта
Официальный ресурс на100% адаптирован для мобильных гаджетов. Участники способны открывать развлечения сразу через веб-навигатор без обязательства скачивания.
Приложение для загрузки
Фирменное мобильное софт доступно для получения на девайсы с рабочими платформами Android и iOS. Приложение дает:
– Моментальный путь к автоматам
– Стабильную операционность
– Мгновенные-сообщения о предложениях
– Простой интерфейс
Вывод
Оригинальный портал казино и его актуальные зеркала предоставляют пользователям абсолютный возможность к высококлассным геймплейным сервисам. Большие бонусы, всевозможные промо, функциональная мобильная адаптация и опытная помощь создают азартный досуг предельно enjoyable и прибыльным.
shop now – The design is user-friendly, allowing visitors to find items quickly.
For premium
cost of cheap seroquel
for peer-reviewed research.
Нынешние сетевые казино предлагают игрокам широкий выбор вариантов для комфортной игры. Впрочем иногда вход к базовому порталу может являться недоступным. В таких обстоятельствах на выручку приходят Retro казино, которое предоставляет стабильный путь ко всем сервисам платформы.
Что такое рабочее зеркало казино
Зеркало — это полная версия основного сайта, которая располагается по запасному интернет-адресу. Копия сохраняет полный функционал основного сайта, включая пользовательский кабинет, средства и сведения операций.
Принципиальные выгоды использования зеркала:
– Постоянный соединение к ресурсу
– Стопроцентная тождественность возможностей
– Безопасность индивидуальных информации
– Хранение существующих бонусов
Как обнаружить рабочее зеркало в данный момент
Есть ряд проверенных вариантов обнаружения действующей адреса:
Проверенные ресурсы:
1. Электронная рассылка — руководство постоянно высылает уведомления с актуальными адресами
2. Общественные сети — официальные аккаунты выкладывают текущую сведения
3. Отдел поддержки — специалисты предоставляют проверенные ссылки
4. Мобильное приложение — предоставляет обходить блокировки
Регистрация на лицензионном веб-сайте
Процедура открытия счета занимает всего немного минут и состоит из данных ступеней:
1. Открытие на основной ресурс или рабочее зеркало
2. Клик на кнопку «Открыть счет»
3. Внесение пользовательской таблицы
4. Проверка почтовой почты или сотового номера
5. Задействование бонуса за регистрацию при доступности промокода
Свежие клиенты зарабатывают великодушный стартовый презент, который может охватывать бесплатные вращения, денежные бонусы или кэшбек.
Авторизация в индивидуальный кабинет
Вход на портале осуществляется стандартным путем. Требуется указать учетные данные и код доступа, примененные при открытии счета.
Существенные моменты для конфиденциального входа:
– Задействуйте криптостойкий код
– Включите двухфакторную проверку
– Не фиксируйте пароли на чужих компьютерах
– Контролируйте доменную строку браузера
Описание наградной программы
Игровая платформа радует пользователей всевозможными вознаграждениями и промо:
Приветственный букет
Начинающие могут претендовать на великодушное вознаграждение за первый пополнение. Зачастую это долевая добавка к внесенной объему плюс free spins для известных слотов.
Систематические кампании
– Недельный cashback — компенсирование части списанных денег
– Призы на очередные вклады
– Уникальные предложения по праздникам
– Конкурсы с солидными призовыми пулами
Система привилегий
Постоянные пользователи собирают баллы за всякую игру, которые затем конвертируются на действительные средства, даровые прокруты или особые бонусы.
Промокоды: как активировать
Купоны — это уникальные сочетания литер, обеспечивающие доступ к дополнительным вознаграждениям.
Где найти рабочие промокоды:
– Авторизованные коммуникационные сети казино
– Союзнические порталы
– Email-подписка
– Профильные группы
Прописывается промокод в специальное поле при создании аккаунта или зачислении средств счета.
Телефонная версия и приложение
Нынешние геймеры выбирают развлекаться с телефонных аппаратов. Платформа дает двойной варианта для беспроблемной портативной игры.
Адаптивная редакция
Веб версия сама подстраивается под размер экранной панели. Не предполагает загрузки и оперирует в всяком новом браузере.
Смартфонное приложение
Скачать софт можно для гаджетов на Android и iOS. Выгоды app:
– Оперативная загрузка
– Стабильная действие
– Всплывающие-уведомления о поощрениях
– Независимый избегание блокировок
Операция скачивания легок: нужно открыть на портал с телефонного девайса и выполнять предписаниям.
Азартный каталог
Коллекция аппаратов включает огромное количество вариантов от топовых производителей.
Слоты
Развлекательные автоматы — крайне востребованная категория игр. Показаны традиционные трехбарабанные автоматы, передовые видео-автоматы с дополнительными уровнями, а также накопительные призы.
Live казино
Зона с живыми ведущими предоставляет прочувствовать настроение настоящего казино. Доступны варианты с рулеткой.
Вещание реализуется в превосходном разрешении, обеспечивается чат с раздающим и остальными игроками.
Соревнования
Систематически запускаются конкурсы по разным категориям. Включение предоставляет право завоевать валютные выигрыши, бесплатные вращения или особые бонусы.
Платежные операции
Портал поддерживает широкий ассортимент денежных способов:
– Пластиковые карты
– Электронные системы
– Крипта
– Счетовые платежи
Наименьшая количество взноса — приемлемая для массы игроков. Получение выигрышей производится в минимальные временные рамки.
Сервис поддержки
Компетентные специалисты настроены поддержать непрерывно. Доступны следующие методы общения:
– Интернет-чат
– Email
– Телефонная связь
– Коммуникационные сети
Разъяснения на типовые проблемы можно получить в разделе FAQ.
Резюме
Главный веб-сайт казино и его функционирующие зеркала дают пользователям абсолютный вход ко всем возможностям сайта. Великодушные бонусы, удобная портативная версия, впечатляющий ассортимент слотов и компетентная поддержка формируют игровой времяпрепровождение предельно беспроблемным и безопасным.
check it out here – Everything is arranged neatly, allowing for quick browsing.
villas in phuket for sale villas in phuket for sale .
explore more – The layout is tidy, modern, and helps users move through content easily.
PG Soft 2026: Mahjong Ways 2 cascades infinitos – já chegou a 50x multiplier?
Fortune Ox explodiu minha banca hoje! Quem mais ganhou alto no touro em 2026?
browse here – Clean visuals and simple design make moving through the site effortless.
check website – Organized content keeps browsing simple, clear, and comfortable.
Обзор лицензионного сайта
Прогрессивные сетевые казино дают участникам обширный набор игр и шансов. Основной веб-сайт Вован обеспечивает надежный доступ к гемблинг услугам.
Функционирующее зеркало: путь сегодня
Зеркало представляет как точную копию лицензионного веб-сайта. Действующее зеркало позволяет участникам избегать вероятные запреты.
Плюсы задействования зеркала
Ключевые преимущества включают:
– Непрерывный путь к ресурсу
– Сохранение абсолютно всех опций базового ресурса
– Безопасность персональных материалов
– Аналогичный инструментарий
Создание аккаунта на портале
Процесс регистрации характеризуется понятностью и эргономичностью. Свежие игроки требуется:
1. Открыть лицензионный сайт или его зеркало
2. Щелкнуть на элемент создания аккаунта
3. Указать необходимые сведения
4. Активировать email адрес
5. Совершить дебютный авторизацию
Приз за оформление
Дебютанты забирают внушительный начальный приз. Подобное поощрение в состоянии содержать:
– Денежные начисления
– Бесплатные спины
– Повышенный показатель компенсации
Вход в собственный раздел
Зарегистрированные клиенты в состоянии мгновенно получить доступ в личный раздел, эксплуатируя имя пользователя и пароль. Собственный аккаунт обеспечивает возможность к:
– Контролю средствами
– Хронологии платежей
– Текущим бонусам
– Параметрам аккаунта
Подарки и промо
Ресурс систематически устраивает различные предложения для игроков.
Категории поощрений
Главные типы призов:
– Депозитные бонусы – коэффициент от размера пополнения
– Спины – бесплатные прокруты в слотах
– Кэшбек – отдача процента проигранных сумм
– Призовые вознаграждения – премии за состязание в конкурсах
Купоны
Особые купоны обеспечивают активировать экстра привилегии. Игроки могут получить их на специализированных площадках или взять в уведомлениях.
Мобильная адаптация и приложение
Прогрессивные пользователи предпочитают переносной досуг.
Функции переносной системы
– Responsive облик для различных устройств
– Совокупный доступ к автоматам
– Быстрая подгрузка
– Удобное использование
Скачать софт
Портативное app предложено для downloading на девайсы с операционными ОС Android и iOS. App гарантирует:
– Устойчивую производительность
– Всплывающие сообщения о акциях
– Быстрый запуск к предпочитаемым слотам
Гемблинг каталог
Игровой клуб предлагает внушительную коллекцию развлекательных услуг.
Слоты
Ассортимент развлекательных аппаратов включает:
– Традиционные автоматы
– Video игры
– Прогрессивные машины
– Сюжетные игры
Live столы
Область лайв дилеров дает право соревноваться с реальными крупье. Открыты:
– Европейская рулетка
– Очко
– Баккара
– Карибский покер
Конкурсы
Периодические конкурсы помогают пользователям соревноваться за крупные финансовые пулы. Призовая программа обновляется регулярно.
Платежные процедуры
Портал поддерживает множество методов пополнения и вывода сумм:
– Кредитные карты
– Онлайн счета
– Межбанковские трансферы
– Крипто
Любые транзакции проходят безопасно с использованием современных технологий криптографии.
Отдел поддержки
Опытная команда поддержки трудится круглосуточно. Связаться с специалистами возможно через:
– Живой чат
– Электронную почту
– Контактный номер
– Social платформы
Охрана и аккредитация
Казино оперирует на базе официальной разрешения. Подобное обеспечивает:
– Прозрачность развлекательного процесса
– Защиту конфиденциальных сведений
– Пунктуальные выплаты
– Регулируемый гейминг
Резюме
Лицензионный сайт и его рабочие зеркала гарантируют клиентам совокупный ассортимент возможностей для безопасной и доходной времяпрепровождения. Щедрые призы, многочисленные развлечения, компетентная служба и безопасная инфраструктура выплат делают платформу превосходным вариантом для поклонников игровых забав.
https://maps.google.com.ar/url?q=https://tawk.to/ShelbyCruz24
Актуальные онлайн-казино обеспечивают клиентам широкий диапазон вариантов для удобной досуга. Вход к ресурсу Clubnika casino производится через главный портал или функционирующее зеркало.
Что такое функционирующее зеркало казино
Актуальное зеркало — это запасной домен официального ресурса казино. Такие клоны разрабатываются для предоставления бесперебойного соединения к развлекательной площадке.
Зеркало на сегодня целиком воспроизводит характеристики главного ресурса. Геймеры получают такой же вход ко всем сервисам, включая открытие счета, пополнение депозита и снятие денег.
Создание аккаунта на основном ресурсе
Механизм оформления учетной записи требует всего считанные минут. Начинающим участникам следует:
1. Перейти на лицензионный портал или рабочее настоящее зеркало
2. Нажать кнопку “Регистрация”
3. Ввести обязательные реквизиты
4. Подтвердить электронную почту
5. Активировать промокод при доступности
После завершения регистрации клиент приобретает приз за регистрацию, который вправе содержать даровые спины или монетарное премию.
Вход в индивидуальный кабинет
Индивидуальный кабинет — это охраняемая область, где клиенты могут регулировать своим профилем. Для авторизации требуется напечатать имя пользователя и код доступа.
В персональном кабинете доступны следующие возможности:
– Отслеживание хронологии транзакций
– Использование купонов
– Настройка поощрениями
– Включение в турнирах
– Мониторинг возмещения
– Изменение данных
Вознаграждения и промо
Развлекательная площадка обеспечивает выгодные призы:
Начальный набор — дебютанты обретают крупное поощрение на дебютные взносы.
Free spins — предоставляются как при открытии счета, так и в контексте всевозможных кампаний.
Возмещение — систематический возмещение доли израсходованных средств.
Промокоды — эксклюзивные комбинации, дающие доступ к особым призам.
Обзор игровых секций
Slots
Ассортимент slots содержит тысячи игр от топовых поставщиков. Пользователи откроют как классические автоматы, так и современные мультимедийные автоматы с увлекательной оформлением.
Live казино
Раздел Live казино дарит право соревноваться с настоящими дилерами в состоянии актуального времени. Доступны востребованные игры: рулетка, блэкджек, баккара, покер.
Конкурсы
Систематические чемпионаты с большими премиальными пулами завлекают тысячи участников. Победители обретают монетарные награды и особые бонусы.
Мобильная версия и app
Телефонная версия платформы предоставляет право наслаждаться с всякого устройства. Интерфейс автономно настраивается под габариты экрана.
Загрузить программу можно для аппаратов на Android и iOS. Портативное app обладает всеми характеристиками настольной версии.
Как найти текущее зеркало на данный момент
Рабочие URL копий регулярно меняются. Узнать рабочую ссылку можно многими путями:
– Через службу техподдержки
– В официальных коммуникационных сетях
– По email newsletter
– На тематических площадках
Безопасность и легальность
Основной сайт функционирует на фундаменте мировой сертификата. Все переводы защищены современными протоколами безопасности.
Конфиденциальность личных реквизитов поддерживается в полном размере.
Вывод
Главный домен и его рабочие копии гарантируют игрокам беспрерывный доступ к превосходным азартным сервисам. Щедрые призы, разнообразные автоматы, компетентная поддержка — все это превращает игровой опыт предельно комфортным и захватывающим.
view items online – Navigation feels intuitive and items are easy to explore.
view this platform – The site flows smoothly and is easy to get around.
this helpful link – The design keeps sections organized, making it easy to digest information.
анализ креативов анализ креативов .
check this page – Everything is arranged clearly, allowing users to follow content easily.
hindi mms video
Актуальные онлайн казино предоставляют клиентам широкий ассортимент опций для приятной игры. Однако иногда доступ к официальному порталу может оказаться закрытым. В таких моментах на подмогу появляется Килограмм, которое предоставляет стабильный вход ко всем сервисам платформы.
Что такое актуальное зеркало казино
Копия — это точная реплика официального веб-сайта, которая располагается по запасному интернет-адресу. Альтернативный ресурс содержит полный набор функций первоначального портала, включая пользовательский кабинет, счет и данные платежей.
Основные достоинства применения зеркала:
– Непрерывный подключение к платформе
– Полная аналогичность возможностей
– Сохранность персональных реквизитов
– Поддержка доступных вознаграждений
Как разыскать действующее зеркало на сегодня
Существует множество достоверных путей поиска актуальной ссылки:
Авторизованные ресурсы:
1. Почтовая рассылка — управление регулярно пересылает уведомления с актуальными ссылками
2. Коммуникационные сети — легитимные аккаунты постят релевантную сведения
3. Отдел поддержки — консультанты сообщают надежные адреса
4. Телефонное приложение — предоставляет избегать блокировки
Оформление профиля на официальном сайте
Процедура оформления длится не более считанные минут и состоит из нижеследующих стадий:
1. Открытие на главный ресурс или действующее зеркало
2. Нажатие на элемент «Регистрация»
3. Внесение персональной формы
4. Верификация имейл почты или мобильного номера
5. Включение бонуса за регистрацию при присутствии промокода
Начинающие геймеры обретают великодушный вступительный бонус, который может охватывать даровые прокруты, монетарные вознаграждения или компенсацию.
Авторизация в личный кабинет
Вход на сайте реализуется традиционным путем. Нужно вписать логин и пароль, использованные при регистрации.
Значимые аспекты для защищенного входа:
– Задействуйте надежный пароль
– Запустите двойную аутентификацию
– Не храните реквизиты на публичных устройствах
– Мониторьте URL строку браузера
Описание поощрительной схемы
Казино балует пользователей многочисленными привилегиями и кампаниями:
Начальный комплект
Свежие игроки могут надеяться на значительное вознаграждение за стартовый вклад. Традиционно это процентная прибавка к внесенной величине плюс free spins для известных слотов.
Систематические акции
– Семидневный кэшбек — компенсирование процентной доли утраченных средств
– Поощрения на дополнительные депозиты
– Эксклюзивные офферы по событиям
– Конкурсы с большими наградными пулами
Схема привилегий
Регулярные игроки накапливают баллы за любую раунд, которые затем обмениваются на фактические денежные призы, free spins или особые привилегии.
Кодовые слова: как применять
Купоны — это особые сочетания символов, обеспечивающие право к дополнительным привилегиям.
В каких местах найти рабочие промокоды:
– Проверенные социальные сети казино
– Партнерские порталы
– Email-новостная лента
– Тематические группы
Активируется промокод в специальное поле при оформлении или внесении депозита депозита.
Смартфонная версия и приложение
Передовые пользователи предпочитают играть с телефонных девайсов. Портал обеспечивает двойной решения для беспроблемной телефонной игры.
Адаптивная версия
Онлайн версия автоматически адаптируется под параметры монитора. Не нуждается загрузки и работает в произвольном современном браузере.
Телефонное приложение
Загрузить app можно для устройств на Android и iOS. Выгоды app:
– Быстрая открытие
– Надежная операция
– Всплывающие-уведомления о промо
– Автономный преодоление блокировок
Процедура скачивания элементарен: необходимо зайти на веб-сайт с телефонного гаджета и придерживаться указаниям.
Игровой коллекция
Коллекция игр охватывает огромное количество единиц от ведущих поставщиков.
Слоты
Азартные аппараты — крайне популярная категория забав. Доступны стандартные винтажные слоты, новые графические аппараты с поощрительными стадиями, а также растущие призы.
Live казино
Зона с реальными ведущими предоставляет ощутить антураж настоящего казино. Представлены варианты с баккарой.
Стриминг ведется в отличном формате, обеспечивается общение с раздающим и остальными геймерами.
Конкурсы
Регулярно устраиваются конкурсы по всевозможным категориям. Вступление дает шанс завоевать монетарные награды, free spins или эксклюзивные бонусы.
Финансовые процедуры
Ресурс поддерживает широкий ассортимент денежных инструментов:
– Дебетовые карты
– Виртуальные платформы
– Криптовалюта
– Банковские переводы
Стартовая величина депозита — разумная для основной части игроков. Вывод денег производится в короткие сроки.
Сервис поддержки
Квалифицированные специалисты способны оказать помощь непрерывно. Доступны нижеследующие варианты связи:
– Живой-чат
– Email
– Телефонная горячая линия
– Социальные сети
Ответы на типовые вопросы можно найти в разделе FAQ.
Вывод
Главный ресурс казино и его действующие зеркала гарантируют пользователям совершенный доступ ко всем сервисам платформы. Щедрые привилегии, практичная мобильная версия, гигантский коллекция игр и профессиональная ассистенция создают развлекательный времяпрепровождение исключительно комфортным и защищенным.
luxury property for sale phuket real-estate-for-sale-in-phuket.com .
Передовые интернет казино предлагают игрокам большой диапазон вариантов для приятной игры. Однако иногда доступ к главному сайту может являться закрытым. В таких обстоятельствах на выручку приходят Eldorado сайт казино, которое гарантирует постоянный подключение ко всем сервисам платформы.
Что такое актуальное зеркало казино
Зеркало — это абсолютная версия главного портала, которая находится по альтернативному адресу. Альтернативный ресурс сохраняет все возможности оригинального портала, включая персональный кабинет, средства и сведения транзакций.
Ключевые плюсы эксплуатации зеркала:
– Постоянный соединение к платформе
– Стопроцентная идентичность функционала
– Сохранность персональных информации
– Поддержка всех имеющихся привилегий
Как найти актуальное зеркало в данный момент
Присутствует ряд безопасных методов получения действующей адреса:
Авторизованные сервисы:
1. Электронная рассылка — руководство регулярно высылает уведомления с свежими ссылками
2. Общественные сети — авторизованные каналы постят релевантную сведения
3. Сервис поддержки — операторы сообщают безопасные домены
4. Телефонное приложение — предоставляет обходить блокировки
Регистрация на лицензионном ресурсе
Процедура регистрации длится всего пару минут и включает из данных стадий:
1. Открытие на главный веб-сайт или рабочее зеркало
2. Выбор на клавишу «Создать аккаунт»
3. Внесение персональной бланка
4. Верификация email почты или контактного номера
5. Активация поощрения за регистрацию при доступности промокода
Только что зарегистрированные игроки зарабатывают щедрый приветственный подарок, который может охватывать free spins, финансовые бонусы или кэшбек.
Вход в пользовательский кабинет
Авторизация на платформе выполняется привычным методом. Нужно указать никнейм и секретный ключ, использованные при оформлении.
Ключевые детали для защищенного входа:
– Эксплуатируйте криптостойкий код
– Запустите двойную идентификацию
– Не сохраняйте реквизиты на публичных гаджетах
– Отслеживайте доменную строку браузера
Обзор наградной схемы
Игорный портал балует геймеров всевозможными привилегиями и акциями:
Стартовый пакет
Новички могут надеяться на существенное вознаграждение за стартовый вклад. Зачастую это пропорциональная добавка к зачисленной сумме плюс free spins для топовых слотов.
Периодические кампании
– Семидневный компенсация — возмещение процента потерянных средств
– Поощрения на последующие вклады
– Специальные предложения по праздникам
– Конкурсы с значительными призовыми пулами
Система лояльности
Постоянные игроки накапливают очки за каждую ставку, которые затем обмениваются на реальные средства, даровые прокруты или специальные льготы.
Купоны: как использовать
Купоны — это особые комбинации знаков, предоставляющие возможность к эксклюзивным вознаграждениям.
Где раздобыть свежие промокоды:
– Легитимные коммуникационные сети казино
– Партнерские ресурсы
– Email-подписка
– Профильные форумы
Указывается промокод в соответствующее поле при регистрации или зачислении средств кошелька.
Телефонная версия и приложение
Современные игроки любят играть с портативных гаджетов. Ресурс дает двойной способа для приятной мобильной игры.
Мобильная модификация
Онлайн версия сама настраивается под размер экрана. Не нуждается инсталляции и оперирует в произвольном свежем браузере.
Телефонное приложение
Получить софт можно для гаджетов на Android и iOS. Выгоды app:
– Скоростная запуск
– Стабильная действие
– Мгновенные-уведомления о акциях
– Независимый обход блокировок
Операция скачивания несложен: достаточно открыть на сайт с смартфонного устройства и придерживаться инструкциям.
Азартный выбор
Библиотека игр содержит множество единиц от ведущих разработчиков.
Слоты
Развлекательные аппараты — крайне востребованная группа забав. Размещены стандартные 3-барабанные слоты, современные мультимедийные слоты с поощрительными уровнями, а также накопительные суперпризы.
Live казино
Секция с живыми ведущими дает возможность прочувствовать антураж настоящего казино. Имеются игры с блэкджеком.
Передача осуществляется в HD разрешении, присутствует коммуникация с дилером и остальными игроками.
Состязания
Периодически запускаются соревнования по всевозможным категориям. Включение позволяет получить денежные награды, free spins или особые презенты.
Транзакционные операции
Ресурс обеспечивает широкий выбор денежных способов:
– Пластиковые карты
– Онлайн платформы
– Биткоин
– Денежные платежи
Минимальная сумма пополнения — разумная для основной части геймеров. Обналичивание средств обрабатывается в скорые интервалы.
Служба поддержки
Профессиональные консультанты готовы помочь круглосуточно. Представлены следующие методы коммуникации:
– Онлайн-чат
– Email
– Звонковая связь
– Общественные сети
Ответы на стандартные вопросы можно отыскать в блоке FAQ.
Итог
Официальный ресурс казино и его рабочие зеркала гарантируют пользователям совершенный вход ко всем возможностям ресурса. Значительные поощрения, комфортная портативная версия, огромный выбор развлечений и опытная ассистенция создают развлекательный процесс предельно приятным и защищенным.
visit this page – Everything loads efficiently, keeping browsing simple and intuitive.
valeharborcollective.shop – Easy to navigate, the site feels friendly and stress-free.
CoreVital Pharmacy: Cialis 20mg price – Cheap Cialis
check this marketplace – Navigation feels intuitive and browsing is fast.
thailand villas for sale phuket thailand villas for sale phuket .
Go to Alpine Store – Everything is logically arranged for a simple shopping experience.
explore knowledge – The layout is simple, making it easy to find and understand key points.
Доступ к порталу через актуальные зеркала
Нынешние онлайн казино дают клиентам круглосуточный доступ к играм. Центральный портал Голд действует надёжно, обеспечивая большой ассортимент развлекательных развлечений. Впрочем периодически образуются цифровые препятствия или блокировки, следовательно необходимо иметь представление о наличии функционирующих зеркал.
Что является собой официальное зеркало казино
Альтернатива — это точная дубликат основного ресурса с схожим возможностями. Функционирующее зеркало сегодня обеспечивает избегать местные барьеры и поддерживать гемблинг.
Основные преимущества использования зеркал:
– Абсолютный переход к индивидуальному кабинету
– Фиксация совокупных сведений счёта
– Идентичный спектр слотов
– Свежие привилегии и кампании
Регистрация на сайте
Процедура создания аккаунта занимает несколько минут. Начинающие пользователи обретают богатый приз за оформление, который может вмещать:
– Вступительный финансовый подарок
– Бесплатные кручения для машин
– Особые промокоды
– Расширенный компенсацию
Для финализации оформления нужно:
1. Зайти на центральный портал или копию
2. Щёлкнуть клавишу «Регистрация»
3. Ввести персональные реквизиты
4. Верифицировать мейл или номер
5. Задействовать код (если есть доступности)
Авторизация в персональный кабинет
Вслед за правильной создания аккаунта геймеры могут выполнять вход через главный сайт или функционирующее зеркало. Индивидуальный кабинет обеспечивает всесторонний контроль над аккаунтом:
– Летопись игр
– Пополнение кошелька
– Вывод средств
– Контроль привилегиями
– Включение в турнирах
Привилегии и предложения казино
Портал балует клиентов многочисленными наградными программами:
Начальные бонусы
Дебютанты получают внушительный букет поощрений на вступительные взносы. Обычно это охватывает долевую добавку к размеру вклада плюс бесплатные фриспины.
Постоянные промо
– Каждонедельный кэшбек до 15%
– Состязания с выигрышными суммами
– Призы на дату рождения
– Уникальные промо для привилегированных клиентов
Программа вознаграждения
Регулярные пользователи получают единицы, они допустимо обменять на настоящие призы или специальные преимущества.
Смартфонная форма и приложение
Актуальные решения помогают играть в любом месте удобно. Портативная редакция портала автономно подстраивается под монитор каждого аппарата.
Плюсы карманного софта:
– Быстрая подгрузка слотов
– Практичный вид
– Push-сообщения о предложениях
– Опция загрузить для Android и iOS
Настоящее казино: среда истинного азартного клуба
Секция Live игорного дома переносит клиентов в обстановку настоящего азартного учреждения. Компетентные дилеры ведут игру в виде подлинного времени.
Имеющиеся развлечения:
– Колесо фортуны
– Блэкджек
– Классика
– Покер
Игровые машины и азартные автоматы
Собрание азартных автоматов содержит тысячи вариантов от топовых студий. Любой геймер обнаружит развлечение по желанию:
– Стандартные машины
– Инновационные игры с специальными уровнями
– Прогрессивный-слоты
– Многолинейные слоты
Турниры и розыгрыши
Постоянные соревнования вносят адреналин и обеспечивают возможность заработать значительные призы. Вовлечение в турнирах нередко комплиментарное, а премиальные фонды доходят до внушительных сумм.
Защита и анонимность
Ресурс задействует передовые технологии криптографии для обеспечения реквизитов пользователей. Любые платёжные действия выполняются через зашифрованные линии.
Итог
Главный портал и его функционирующие зеркала дают безопасный доступ к первоклассным азартным развлечениям. Щедрые призы, эргономичная портативная версия, многообразие игр и профессиональное Live-заведение делают платформу превосходным выбором для любителей развлекательных развлечений.
helpful page – Organized sections and clear flow improve the overall user experience.
Нынешние онлайн-казино дают пользователям широкий набор услуг и поощрительных опций. Присоединение к платформе осуществляется через главный ресурс или его рабочее зеркало http://www.c58.ru, что предоставляет непрерывную деятельность.
Что представляет собой функционирующее зеркало казино
Альтернатива — это идентичная версия официального портала, построенная для решения блокировок. Зеркало сегодня помогает участникам обрести доступ к излюбленным развлечениям в любое время.
Официальное зеркало обладает всеми опциями первоначального портала:
– Целый ассортимент игр
– Личный кабинет с записанными информацией
– Действующие промокоды
– Гарантированные расчетные транзакции
Регистрация на лицензионном веб-сайте
Алгоритм регистрации составляет всего считанные минут. Начинающим клиентам нужно:
1. Перейти на основной сайт или действующее зеркало
2. Кликнуть на элемент “Зарегистрироваться”
3. Заполнить нужные информацию
4. Подтвердить электронную почту
5. Внести начальный взнос
Бонус за регистрацию зачисляется автоматически после завершения всех стадий.
Вход в учетную запись
Созданные игроки могут осуществить доступ используя:
– Имя пользователя и пароль
– Код мобильного
– Адрес
Личный кабинет открывает право к контролю финансами, данным операций и действующим поощрениям.
Награды и программы
Азартная сервис балует активных клиентов выгодными поощрениями:
Стартовый бонус
– Поощрение на стартовый депозит до 100%
– Free spins на популярные машины
– Особые премии за дальнейшие взносы
Ваучеры
Эксклюзивные купоны дают возможность на приобретение уникальных вознаграждений. Свежие промокоды выкладываются в категории “Промо”.
Cashback
Периодический кешбэк равен до 10% от использованных сумм. Возврат предоставляется сразу.
Механизм лояльности
Верные участники зарабатывают единицы, которые конвертируются на реальные выплаты или фриспины.
Mobile версия и софт
Для практичности участников разработана удобная мобильная версия. Приспособленный интерфейс дает возможность легко развлекаться с каждого переносного устройства.
Выгоды софта:
– Скорый подключение к слотам
– Оптимизированный вид
– Устойчивая функциональность
– Push-уведомления о новых бонусах
Загрузить софт можно бесплатно с проверенного веб-сайта для устройств на Android и iOS.
Каталог развлечений
Машины
Библиотека содержит более 2000 игр от известных студий:
– Традиционные слоты
– Видео-слоты
– Слоты с джекпотом
– Сюжетные автоматы
Live казино
Раздел Live развлечений предоставляет игру с настоящими крупье в живом времени:
– Рулеточные столы
– Карточная игра
– Карты
– Столы покера
Турниры
Регулярные турниры с солидными выигрышными бюджетами организуются еженедельно. Вход в состязаниях доступно всем действующим клиентам.
Денежные методы
Пополнения и снятия денег реализуются через востребованные методы:
– Дебетовые средства
– Онлайн сервисы
– Bitcoin
– Счетные платежи
Наименьший взнос — от 100 рублей. Изъятие выигрышей выполняется в течение 24 периода.
Сервис саппорта
24/7 группа support расположена помочь в урегулировании каких-либо ситуаций:
– Мессенджер
– Email
– Контактный номер
– Социальные сети
Безопасность и разрешение
Подлинный ресурс работает на базе международной лицензии. Все данные клиентов охранены передовым SSL-кодированием.
Итог
Функционирующее зеркало обеспечивает постоянный доступ к излюбленным слотам, привлекательным акциям и практичным сервисам. Откройте счет немедленно и приобретите приветственный поощрение!
http://www.kalyamalya.ru/modules/newbb_plus/viewtopic.php?topic_id=28856&post_id=112931&order=0&viewmode=flat&pid=0&forum=4#112931
https://kssp.borda.ru/?1-5-0-00003783-000-0-0-1771980415
Check Out Strategy Tools – Structured content helps users focus on key ideas quickly.
Kraken Marketplace Официальный сайт для доступа к Kraken
krab at
Fortune Tiger com turbo ligado: quem aguenta 500 giros seguidos sem parar?
PG Soft cashback semanal: quem já pegou R$300+ só de devolução?
Jogo do Tigrinho Pix R$5: recebe raspadinha com até 150 giros garantidos
quick access link – The site feels logical and well-arranged, making exploration simple.
https://www.dostally.com/read-blog/224271
open this link – The content moves logically, helping users process ideas efficiently.
https://moskva24.tourister.ru/blog/25192
check insights – Simple design keeps information easy to navigate and comprehend.
mostbet app mostbet app .
Check Progress Now – Simple interface makes moving through content intuitive and fast.
Tadalafil Tablet: CoreVital Pharmacy – cialis for sale
cialis generic: CoreVital Pharmacy – CoreVital Pharmacy
https://primelinepharmacy.com/# ed med online
https://kssp.borda.ru/?1-5-0-00003783-000-0-0-1771980415
check details – Fast-loading content and clear formatting make navigation stress-free.
check this site – Stylish and well-laid-out content makes browsing smooth and pleasant.
quick access link – The design keeps things clear and convenient to explore.
структура креатива реклама структура креатива реклама .
Kraken Marketplace Официальный сайт для доступа к Kraken
kra at
http://ruall.com/sotrudnichestvo/91286-puteshestviya-po-rossii.html#91286
visit site – Well-laid-out pages keep content accessible and easy to follow.
check it out here – The page design makes finding products quick and effortless.
Jogo do Tigrinho Pix R$30: ganha 120 giros + cashback 15% hoje!
поисковое seo в москве internet-agentstvo-prodvizhenie-sajtov-seo.ru .
click for info – The site feels anchored and trustworthy, making navigation smooth.
http://primelinepharmacy.com/# buy ed meds
Ставки спортивные привлекают миллионы людей по всего мира.
Данное увлечение объединяет азарт от матча с шансом получить прибыль.
Зрители получают возможность проявить свои знания в конкретной дисциплине и аналитические способности.
Доступность через онлайн-платформы и мобильные приложения превращает действие невероятно удобным.
Широкий выбор турниров и рынков даёт каждому найти что-то по душе.
Плюс ко всему, социальный аспект — совместный анализ матчей с друзьями — придаёт дополнительный азарт.
https://artlover.fashionvipclub.ru/qU19PkOgBISu/
condos for sale phuket condos for sale phuket .
apartments for sale in phuket thailand apartments for sale in phuket thailand .
visit site – The layout is clear, allowing readers to move through sections effortlessly.
check details – The site is thoughtfully arranged, keeping information clear and easy to locate.
Jogo do Tigrinho estratégia conservadora: R$0,25 por giro e paciência de 1500 spins
Jogo do Tigrinho cassino Pix: R$10 vira 150 giros + cashback 12% – promoção da semana
check it out – Organized, clear content makes the site easy to navigate and digest.
PG Soft top cassinos Pix 2026: lista atualizada com bônus reais
PG Soft tá lançando Fortune Dragon em 2026? Já viu o teaser? Conta o que achou
Jogo do Tigrinho cassino Pix: R$5 vira 200 giros grátis em 3 minutos – testado hoje!
check this page – Everything is structured logically, providing a smooth reading experience.
Fortune Ox respins com bombas: quem já limpou a tela 3 vezes seguidas?
Fortune Tiger vs Fortune Ox: qual tem maior potencial de 10000x em 2026?
Fortune Ox explodiu minha banca hoje! Quem mais ganhou alto no touro em 2026?
Lead Strategy Portal – A clean structure helps you stay focused and productive.
Jogo do Tigrinho tá pegando fogo em 2026! Qual cassino tá te dando mais giros grátis hoje?
auf casino зеркало
Кто играет в казино ауф, советую сохранить этот канал. Там выкладывают актуальные ссылки и иногда дают бонусы. Я уже пользовался несколько раз — все работает, ничего подозрительного не заметил. Удобно, что не нужно каждый раз искать новую ссылку
сервис анализа креативов сервис анализа креативов .
visit resource page – Information is presented logically for quick comprehension.
Buy Viagra online cheap: sildenafil 50 mg price – NovaMen Pharmacy
Jogo do Tigrinho multiplicador 10x: já ativou 3 vezes na mesma sessão? Mítico!
luxury villas thailand phuket for sale villas-for-sale-in-phuket-1.com .
phuket homes for sale thailand real-estate-for-sale-in-phuket.com .
PG Soft lançamentos 2026: Fortune Dragon, Fortune Mouse 2… qual você quer primeiro?
villas for sale phuket thailand villas for sale phuket thailand .
http://racingfactions.com/activity/p/309519/
this online harvest site – Clean organization and straightforward navigation make the experience smooth.
PG Soft top cassinos Pix 2026: lista atualizada com bônus reais
view website – Well-structured presentation helps ideas feel motivating and clear.
seo продвижение и раскрутка сайта seo продвижение и раскрутка сайта .
Go to Growth Resources – Smooth layout helps readers absorb information easily.
Jogo do Tigrinho Pix R$20: recebe 100 giros + 20% cashback hoje em 3 sites
visit this site – The layout feels stable and trustworthy, making navigation effortless.
Petal Gateway – Smooth layout with organized sections improves overall browsing.
Fortune Tiger modo turbo + auto: quem já deixou rodando 1000x?
Jogo do Tigrinho ao vivo com chat: interação com brasileiros vale a pena mesmo?
Jogo do Tigrinho ao vivo com chat: interação com brasileiros vale a pena mesmo?
Explore This Site – Well-presented material makes browsing enjoyable and simple.
go to resource – Content is organized in a way that’s motivating and easy to implement.
Fortune Tiger x10 cartinha: melhor sensação do ano ou exagero? Vote!
Check Out Energy Ideas – Organized content allows users to grasp points clearly.
Jogo do Tigrinho no Pix R$5: raspadinha com até 200 giros garantidos agora!
auf casino telegram
Если ищете auf casino регистрация или просто вход, вот норм телеграм канал. Там есть актуальные ссылки и бонусы. Я уже заходил через него — все открывается без проблем. В целом удобно и быстро
low cost ed medication: erectile dysfunction meds online – erectile dysfunction pills for sale
mostbet app download for android mostbet app download for android .
wrappedparlor – Clean interface and well-laid-out sections enhance the shopping experience.
PG Soft torneio diário R$10k: quem tá lucrando todo dia no Fortune Tiger?
Go to Forms Page – Smooth flow of content keeps everything easy to grasp.
Fern Marketplace Hub – Well-structured pages make navigating content fast and simple.
hyperclick – Found practical insights today; sharing this article with colleagues later.
learn more – A well-structured site with a smooth, user-friendly experience.
Fortune Rabbit vs Fortune Tiger: qual paga mais consistentemente esse mês?
Visit Direction Hub – Well-arranged sections allow easy navigation through content.
Jogo do Tigrinho no Pix: depósito R$10 e ganha 80 giros na hora – testado!
see more info – Simple and direct presentation provides clarity without extra clutter.
Hydrocodone
Cassino PG Soft com roleta diária: 50–300 giros grátis no Fortune Tiger
Jogo do Tigrinho estratégia conservadora: R$0,25 por giro e paciência de 1500 spins
https://t.me/aufcasino_official
Наткнулся на обсуждении на этот канал по auf casino, решил проверить. В итоге оказался вполне рабочий вариант — есть ссылки, бонусы, все обновляется. Проверил пару переходов — все ок. Можно использовать без лишних заморочек
veracitypath – Logical structure and intuitive design make navigating content simple.
технический перевод в москве teh-perevod.ru .
ремонт и циклевка паркета циклевка паркета в спб недорого
explore site now – Smooth and logical arrangement allows effortless reading and navigation.
http://primelinepharmacy.com/# cheapest online ed meds
Lille 0-1 Crvena Zvezda 2026 Europa League Red Star surprise
clickfusion – Navigation felt smooth, found everything quickly without any confusing steps.
Misty Harbor Goods – Clean and inviting interface makes browsing smooth and easy.
Jogo do Tigrinho no Pix R$5: raspadinha com até 200 giros garantidos agora!
Access Powers Hub – Organized pages make understanding and using concepts easy.
useful reference – Ideas are organized well and offer a new perspective on growth strategies.
Fortune Tiger cartinha misteriosa: quantas vezes você já pegou x10?
Платформа Vavada заслужила доверие тысяч беттеров благодаря прозрачным условиям и честной игре. Мобильная версия позволяет делать ставки с любого устройства без потери функционала. Для получения бонуса перейдите на sport-vavada.com и создайте аккаунт. Раздел киберспорта включает популярные дисциплины — Dota 2, CS2, League of Legends. Линия ставок охватывает футбол, хоккей, баскетбол, теннис и десятки других дисциплин. Программа лояльности вознаграждает постоянных клиентов эксклюзивными бонусами.
Real-money games have become immensely widespread due to their sheer convenience.
Users can enjoy their preferred titles anytime and anywhere with an online link.
The thrill of playing for real money introduces an additional layer of engagement.
A massive array of choices appeals to all taste and budget.
Bonuses and rewards schemes offer extra value to keep participants engaged.
Today’s sites ensure safe payments and regulated gameplay.
ice fishing game online
Crossing accuracy, wide players and their delivery statistics
ауф казино актуальное зеркало
Случайно наткнулся на auf casino telegram, когда искал бонусы и рабочий вход. Оказалось, что канал довольно активный, посты обновляются, есть ссылки и акции. Проверил несколько вариантов — все открывается нормально, без ошибок. В итоге добавил себе, потому что удобно когда все собрано в одном месте
trustbridgeveracity – Minimal pages with logical flow allow fast content discovery.
clarityenablesmovement.click – The layout is clear, helping ideas come across simply and practically.
анализ креативов анализ креативов .
база бенчмарков рекламы reklamnyj-kreativ14.ru .
Fortune Rabbit modo turbo: 1000 giros em 20 minutos – quem aguenta?
how to get ed meds online: PrimeLine Pharmacy – where can i buy erectile dysfunction pills
Shop Smart – Fast-loading pages and tidy design make navigation stress-free.
PG Soft no Brasil: Pix instantâneo + suporte em português + giros grátis todo dia
Buy Viagra online cheap: NovaMen Pharmacy – over the counter sildenafil
Business Alliance – Clean design ensures users can find content quickly.
bondedprime.bond – Well-structured layout, content is easy to follow and understand.
Visit Direction Hub – Smooth interface allows quick understanding of all content.
explore more – It simplifies planning by offering a clear step-by-step mindset.
PG Soft 2026: Fortune Rabbit tá pagando mais que o Tigrinho? Vamos comparar odds reais
crestvalue – Clean and organized layout, makes browsing content effortless.
реферат нейросеть реферат нейросеть .
ауф казино
Искал ауф казино зеркало и наткнулся на этот телеграм канал. Решил проверить ради интереса — ссылки оказались рабочими, сайт открывается нормально. Плюс иногда публикуют бонусы, что тоже приятно. В целом норм вариант, можно использовать как запасной
Open Harbor Store – Clear layout allows effortless browsing of products.
продвижение сайтов интернет магазины в москве internet-agentstvo-prodvizhenie-sajtov-seo.ru .
Strategic Hub – Navigation feels straightforward and intuitive.
Retail Hub – Fast-loading layout with intuitive flow for easy browsing.
PG Soft cashback semanal 20%: quem já pegou R$500+ só de devolução?
Bodø/Glimt 3-1 Inter Milan 2026 Europa League Norwegian shock
browse site – Well-arranged sections make following the information effortless.
PG Soft no celular 5G: big win em qualquer lugar do Brasil – já aconteceu?
open this link – A clear and simple system that supports better task execution.
anchorwatch – Minimalistic pages with structured sections enhance the browsing experience.
https://t.me/aufcasino_official
Наткнулся на обсуждении на этот канал по auf casino, решил проверить. В итоге оказался вполне рабочий вариант — есть ссылки, бонусы, все обновляется. Проверил пару переходов — все ок. Можно использовать без лишних заморочек
Кто ищет софт, в статье описан программа по накрутке посетителей на сайт на базе BAS. Автор предупреждает, что без прогрева аккаунтов и качественных прокси толку не будет.
Fortune Ox explodiu minha banca hoje! Quem mais ganhou alto no touro em 2026?
this helpful link – Smooth navigation combined with a tidy layout makes accessing information easy.
Man United Sancho eyes Dortmund return 2026 transfer news
Jogo do Tigrinho estratégia conservadora: R$0,25 por giro e paciência de 1500 spins
продвижение сайтов интернет магазины в москве prodvizhenie-sajtov-v-moskve4.ru .
Secure Shopping – Well-laid-out pages make finding items quick and simple.
click to view plaza – The design is straightforward and the information is practical.
Vendor Center – Clean pages and intuitive navigation created a comfortable browsing experience.
Jogo do Tigrinho cashback sem limite: qual site tá devolvendo mais em 2026?
Jogo do Tigrinho Pix R$20: ganha 100 giros + 25% extra no primeiro depósito hoje!
ed drugs online: ed pills pharmacy – buy erectile dysfunction pills online
Fortune Ox hold & win: já segurou 18 símbolos e explodiu 5000x? Mostra o print!
shop the collection – The presentation is elegant and makes browsing feel seamless.
Wild Bandito sticky wilds: o bandido mexicano tá roubando mais que o Tigrinho em 2026!
Jogo do Tigrinho no Pix R$5: raspadinha com até 200 giros garantidos agora!
bondguardian – Crisp design and clear headings make content easy to follow.
useful resource – Everything is laid out clearly, creating a stress-free browsing vibe.
Hi every one, here every one is sharing these kinds of experience, so it’s good to read this web site, and I used to pay a visit this webpage all the time.
лучшие казино россии
visit privacy parlor – Browsing here was pleasant, with interesting material on every page.
Strategic Alliances – Clean pages with intuitive flow make exploring easy.
Energy Connect – Well-laid-out sections help users find information quickly.
shieldbond – User-friendly interface and smooth scrolling make finding content fast.
see the site – Organized and curated feel, everything is easy to find.
анализ баннеров reklamnyj-kreativ13.ru .
see print collections – Everything flows nicely, and it’s simple to move between sections.
http://primelinepharmacy.com/# best online ed medication
циклевка паркета без пыли циклевка паркета спб цена за метр
Jogo do Tigrinho ao vivo com narração: já jogou versão com locutor brasileiro?
Fortune Tiger estratégia de 200 giros: pare no +40% ou continue? Qual sua regra?
NextLevel Market – Layout is polished with easy-to-follow navigation.
https://novamenpharmacy.shop/# NovaMen Pharmacy
Jogo do Tigrinho ao vivo: quem já ganhou assistindo transmissão no cassino online?
PG Soft cashback semanal: quem já pegou R$300+ só de devolução?
Decision Portal – Smooth interface and logical structure make exploring easy.
технический переводчик стоимость teh-perevod.ru .
ridgecapital – Crisp design and well-laid-out sections make browsing effortless.
Fortune Tiger vs Fortune Rabbit: qual paga mais consistentemente em 2026?
Jogo do Tigrinho cashback sem limite: qual site tá pagando mais em 2026?
see this site – The presentation feels smooth and organized, with a relaxing vibe.
Murillo, Igor Jesus & Gibbs-White fire Nottingham Forest to 3-0 win over Fenerbahce
СИЗ в Симферополе
browse the site – The platform gives off a cheerful and active vibe.
CoreVital Pharmacy: Buy Cialis online – CoreVital Pharmacy
Modern Store – Intuitive interface that makes finding products simple.
купить СИЗ в Крыму
see what’s inside – Well-organized and tidy pages provide a stress-free navigation experience.
Jogo do Tigrinho ao vivo com narração: já jogou versão com locutor em português?
safetrust – Well-structured interface ensures browsing feels smooth and efficient.
Corporate Network – Smooth interface with logical content flow improves user experience.
купить СИЗ в Крыму
Fortune Rabbit wilds gigantes: já teve tela cheia de coelhos dourados multiplicando x10?
Jogo do Tigrinho tá pegando fogo em 2026! Qual cassino tá te dando mais giros grátis hoje?
Fortune Rabbit tá pagando mais consistente que o Tigrinho? Mostra seu maior respin nos comentários!
Jogo do Tigrinho no celular com Wi-Fi 5G: quem já ganhou big win em movimento?
Казино Pinco гарантирует конфиденциальность данных и защиту финансовых транзакций. Зеркала обеспечивают доступ при любых ограничениях со стороны провайдера. Турниры проводятся еженедельно с призовыми фондами в десятки тысяч. Перейдите на казино пинко официальный сайт для ознакомления с условиями приветственного бонуса. Ставки на спорт и киберспорт доступны в том же аккаунте. Турниры дают возможность посоревноваться за солидные денежные призы.
browse this page – It feels friendly and approachable, making it nice to look around.
Fortune Rabbit wilds gigantes: já teve tela cheia de coelhos dourados multiplicando x10?
discover this page – The overall vibe feels intense and interesting to explore.
official link – Thoughtful arrangement of content makes finding information quick and easy.
Fortune Rabbit respins chain: recorde pessoal de quantos giros seguidos?
PG Soft 2026: qual slot você joga mais: Tigrinho, Coelho, Touro ou outro?
Fortune Ox hold & win: já segurou 18 símbolos e explodiu 5000x? Mostra o print!
Strategic Value – Smooth interface with content that’s simple to navigate.
PG Soft tá liberando cashback 15% todo dia no Fortune Tiger – qual site tá dando mais?
Игровая площадка Pinco гарантирует честные результаты благодаря сертифицированным ГСЧ. Вывод средств осуществляется в течение нескольких часов на карты и кошельки. Актуальные акции и промокоды размещены на казино пинко скачать для всех пользователей. Адаптивный дизайн обеспечивает комфортную игру на экранах любых размеров. Все автоматы работают на сертифицированных генераторах случайных чисел. Казино Пинко — это стабильная работа и качественный игровой опыт.
trustline – Crisp interface with structured content helps users find details effortlessly.
Plum Gateway – Smooth layout with organized sections improves browsing comfort.
Jogo do Tigrinho cashback 15% toda semana: qual o maior reembolso que você pegou?
PAOK 1-2 Celta Vigo 2026 Europa League thriller result
open the site – Straightforward pages with a neat design, navigating is effortless.
check this page – The platform is well-structured, offering a calm and straightforward browsing experience.
нейросеть для школьников и студентов нейросеть для школьников и студентов .
PG Soft 2026: qual slot da série Fortune você acha que vai explodir mais esse ano?
Fortune Tiger big win 2500x: já aconteceu com você? Conta a história completa aqui
запоминаемость рекламы запоминаемость рекламы .
explore spooky fun – The vibe is original and keeps users intrigued as they browse.
Partner Insights – Clean design with effortless browsing throughout.
https://kitehurghada.ru/ kitehurghada
Jogo do Tigrinho cassino Pix: R$5 vira 150 giros em 2 minutos – qual site tá dando mais hoje?
check it out here – Comes across as convenient to use, with a straightforward structure.
growthpillar – Streamlined navigation and clear organization make browsing enjoyable.
order viagra: NovaMen Pharmacy – NovaMen Pharmacy
check site info – Everything feels thoughtfully structured, making exploration easy.
Pine Hub – Clear and structured interface ensures navigation feels natural.
Fortune Tiger vs Fortune Ox: qual tem maior potencial de 10000x em 2026?
visit the site – Smooth layout and calming aesthetic, exploring this site is a pleasure.
PG Soft torneios semanais: R$100–R$500 mil em prêmios no Jogo do Tigrinho
оптимизация и продвижение сайтов москва оптимизация и продвижение сайтов москва .
http://csexpert.4adm.ru/viewtopic.php?f=70&t=4851
PG Soft cashback semanal: quem já pegou R$300+ só de devolução?
https://balashiha.myqip.ru/?1-12-0-00001163-000-0-0-1771241182
Fortune Tiger big win 2000x: já aconteceu com você? Conta a história completa
Business Boost – Organized structure helps users find content quickly.
open this page – Nicely arranged content with a meaningful and authentic feel.
PG Soft lançamentos 2026: Fortune Dragon, Fortune Mouse 2… qual você quer primeiro?
Athletic Bilbao vs Elche 2026 La Liga live 21:00 kick-off
Fortune Ox explodiu minha banca hoje! Quem mais ganhou alto no touro em 2026?
Fortune Rabbit modo turbo: 1200 giros em 25 minutos – quem já deixou rodando?
mostbet app download mostbet app download .
visit this site – Memorable branding and inviting layout make navigation pleasant.
growthtrust – Simple navigation and clean structure help users understand information quickly.
http://devichnik.su/forum/39-28255-1
металлический значок ссср металлические значки москва быстро
Jogo do Tigrinho Pix R$15: ganha 90 giros + 30% extra no reload diário!
Shop Connect – Well-laid-out pages make navigation easy and enjoyable.
visit velvetbrookvault – Clean and pleasant design, makes browsing effortless and enjoyable.
see this site – The pages load quickly, navigation is easy and the design looks sleek.
Novibet tá bombando com roleta diária: 50–200 giros grátis no Fortune Tiger toda noite
Fortune Rabbit wilds expansivos: já cobriu a tela inteira? Mostra o print!
PG Soft mobile 2026: melhor experiência no Android ou iOS? Conta sua opinião
колесов вертолеты россии генеральный директор
Fortune Rabbit wilds expansivos: já cobriu 3 reels inteiros de coelhos?
https://primelinepharmacy.shop/# erectile dysfunction online prescription
discover this site – Clean visuals and innovative concept make exploring simple and enjoyable.
Business Edge – Easy-to-follow layout with a modern look.
discover walnutcovevault – Calm interface and easy-to-read pages, makes exploring comfortable.
What’s up mates, fastidious article and good
urging commented here, I am genuinely enjoying by these.
Bond Network Hub – Minimal and well-structured pages make exploring content simple.
поисковое seo в москве prodvizhenie-sajtov-v-moskve4.ru .
open the vault – Crisp design and easy navigation, browsing is straightforward and smooth.
Shop Connect – Organized pages and clear design make exploring products effortless.
cheapest online ed meds: buying erectile dysfunction pills online – best online ed medication
запоминаемость слогана реклама reklamnyj-kreativ12.ru .
official link – The platform has a curated feel, making it enjoyable to navigate.
Fortune Tiger modo auto: 500 giros sem clicar – quem já deixou rodando?
Greetings, There’s no doubt that your site might be having internet browser compatibility issues.
When I look at your site in Safari, it looks fine however,
when opening in IE, it has some overlapping issues.
I simply wanted to provide you with a quick heads up!
Aside from that, excellent site!
Fortune Tiger estratégia de 200 giros: pare no +40% ou continue? Qual sua regra?
jewelbrookvault.shop – The name and overall vibe stand out nicely, giving it a unique feel.
Smart Cart – Well-designed layout with fast access to options.
металлические значки найк изготовление значков из металла москва
Fortune Tiger com turbo ligado: quem aguenta 500 giros seguidos sem parar?
visit this experience – Navigation is straightforward and the content is easy to understand.
Fortune Ox touro dourado: já ativou o hold & win com 12+ símbolos?
Jogo do Tigrinho cassino Pix: R$5 vira 200 giros grátis em 3 minutos – testado hoje!
https://kitehurghada.ru/ kitehurghada
Fortune Tiger cartinha x10: melhor sensação do ano ou só sorte pura? Vote!
Paramount Center Link – Polished interface and minimal design make browsing simple and enjoyable.
https://www.diigo.com/item/note/b05aq/49iv?k=25adf7877d0e961a14c0817205e18870
indieboutiquehotels.com – Focused niche with well-organized content, making it easy to browse.
tap to explore – Clear sections and smooth flow, browsing is comfortable.
Shop Gateway – Clear layout and fast-loading pages make browsing effortless.
go to website – Calm, uncluttered interface provides a comfortable browsing experience.
Explore Hub – Looks professional and is very easy to move around.
erinkristensen.com – Personal touch here is great, makes the site feel authentic.
Paragon Portal – Polished layout and fast-loading pages create a pleasant browsing experience.
explore here – Site feels purposeful, and navigation through content is simple and intuitive.
explore the site – It starts off with a structured design that’s smooth and user-friendly.
check this page – Fast loading ensures a comfortable and efficient browsing experience.
tap here to visit – Logical layout and clean pages, makes exploring quick and pleasant.
Orchard Gateway – Pleasant interface and structured layout make navigation stress-free.
Долго искал адекватный материал по теме и наткнулся на это руководство. Автор подробно разбирает накрутка поведенческих факторов — от теории до практики с реальными кейсами. Теперь хотя бы понимаю, сколько это реально стоит и на что обращать внимание.
discover more here – Clean structure with accessible information ensures a pleasant experience.
ии анализ креативов 60 секунд reklamnyj-kreativ13.ru .
browse this page – Everything is laid out clearly, making it pleasant to explore.
explore the collection – Modern and clean design ensures finding products is easy and enjoyable.
Pact Link – Polished pages with clear structure make navigating simple.
NovaMen Pharmacy: NovaMen Pharmacy – NovaMen Pharmacy
tap here – Clean, polished interface makes navigating through the site effortless.
open timbertrailmarket – Cozy interface with clear sections, makes exploring straightforward.
check it out here – Offers a nice assortment, feels like a trustworthy marketplace.
структура креатива реклама структура креатива реклама .
view more here – Logical flow and deliberate design make browsing through the platform straightforward.
Crate Marketplace – Clear structure and user-friendly interface enhance browsing.
see full details – The structure is user-friendly, allowing quick access to key points.
check more info – Organized layout and professional appearance help users find content quickly.
view site – Easy-to-follow navigation keeps browsing simple and enjoyable.
assetpath – User-centric layout offering clarity and effortless navigation.
mostbet app download for android mostbet app download for android .
Fortune Rabbit respins + wilds: já teve chain de 40 giros?
NovaMen Pharmacy: NovaMen Pharmacy – Viagra online price
tap here to browse – Calm interface and organized content, moving through the site is easy.
Fortune Rabbit vs Fortune Tiger: qual tem maior potencial de 5000x?
see more details – Original concept combined with clear navigation keeps users interested.
Jogo do Tigrinho bônus sem depósito: ainda existe em 2026? Qual site dá?
see more info – Gives a pleasant seasonal impression, appears engaging and well-themed.
check this page – Navigation is logical and straightforward, which makes browsing smooth.
Knowledge Portal Pro – Layout is professional, making exploration simple and efficient.
Pearlcrest Hub – Clean and organized design allows quick access to items.
explore the site – The overall impression is premium and curated, definitely worth checking out.
узнать больше Гости странички вк
PG Soft 2026: Mahjong Ways 2 cascades infinitos – já chegou a 50x multiplier?
Open Horizon Hub – Well-organized pages and polished layout make exploration easy.
Jogo do Tigrinho tá pegando fogo em 2026! Qual cassino tá te dando mais giros grátis hoje?
https://auto.ae/exotic
Fortune Rabbit respins chain: recorde pessoal de quantos giros seguidos?
see more details – Warm, genuine design ensures the site feels approachable and sincere.
discover suncovevault – Light and simple interface, navigation feels effortless.
Fortune Rabbit respins + wilds: já teve chain de 40 giros?
see what’s inside – The structure is straightforward and makes exploring the site enjoyable.
профессиональное продвижение сайтов prodvizhenie-sajtov-v-moskve4.ru .
browse this page – Easygoing interface with smooth navigation keeps browsing enjoyable.
Vendor Hub Pro – Neat layout and fast-loading pages make navigation effortless.
Moonridge Shopfront – Well-organized content that makes navigation simple.
see more details – Bright and engaging layout makes exploring the content enjoyable.
proteinzone – User-friendly navigation guides visitors to products quickly.
tap here – Everything is clearly laid out, giving a seamless and enjoyable experience.
open stoneharborvault – Clean and reliable design, navigating is very comfortable.
visit this site – A striking title that makes exploring the content feel engaging.
start here – The site feels organized and professional, with content displayed clearly.
Смотреть здесь Гости странички вк
check site info – Polished visuals and tidy layout make the site feel credible and professional.
Vendor Studio – Smooth experience with easy-to-read content.
Business Partnerships – Pleasant interface with structured sections allows for easy navigation.
Head to head records, historical results between teams before matches
Strategic Partnerships – Well-structured design makes exploring the site effortless.
learn more now – The minimal design ensures browsing feels comfortable and undistracted.
view site – Clear organization and a pleasant aesthetic make navigating simple.
visit this page – Clear layout with well-organized content makes browsing simple.
browse around – Inviting design and unique branding make exploring the content effortless.
see more here – Offers a clear and simple browsing experience, nothing feels cluttered.
кинг казино отзывы Сначала сомневался, но решил проверить king casino telegram. Канал оказался норм, постят регулярно. Есть зеркала и бонусы. Проверил — все открывается. Можно пользоваться без проблем
Curated Portal – Pages feel structured, making browsing effortless.
https://detivetra.com/ detivetra
Unity Center – Clear and tidy layout allows users to find items quickly.
выберите ресурсы Получить все смс абонента
check it out here – Interesting range of items, and exploring the site was effortless.
browse this store – Clear structure ensures browsing is smooth and intuitive.
https://corevitalpharmacy.com/# Cialis 20mg price in USA
site overview – Engaging layout and creative idea make browsing simple and natural.
open this link – Relaxed aesthetic and organized structure help browsing feel smooth.
Fortune Tiger modo turbo + auto: quem já deixou rodando 1000x?
May I just say what a relief to discover an individual who actually knows what
they are talking about on the web. You actually know how
to bring an issue to light and make it important.
A lot more people need to look at this and understand this
side of your story. I was surprised you’re not more popular given that you surely have the gift.
Home Elegance – Looks sophisticated and feels approachable.
мостбет приложение 2026 http://mostbet05638.help
Fortune Tiger no Pix R$1: Deposita pouco e já sai girando com bônus insano!
tap here – Careful arrangement and intuitive layout make exploring easy and enjoyable.
http://xn--00tp5e735a.xn--cksr0a.life/home.php?mod=space&uid=122980
see what’s inside – Easy-to-use platform with a clean layout keeps browsing straightforward.
Source
gambling sites help center
for a hands-on tutorial.
check store info – Clean and minimal layout ensures browsing is effortless.
click this – It gives a polished feel, simple browsing and a nice user experience.
анализ наружной рекламы анализ наружной рекламы .
https://planetasp.ru/forum/viewtopic.php?pid=27408#p27408
see this site – Contemporary layout and tidy structure keep browsing pleasant.
здесь Получить все смс абонента
https://www.floristic.ru/forum/groups/moskva-d1644-kompleks-obespecheniya-kruglogodichnoi-raboty-kondicionerov-vsm.html#gmessage2236
mostbet app download for android mostbet app download for android .
https://45kv.su/forum/index.php?topic=10031.msg99957#msg99957
http://novamenpharmacy.com/# NovaMen Pharmacy
NovaMen Pharmacy: Generic Viagra for sale – NovaMen Pharmacy
Goods Hub – Pages are organized and navigation flows naturally.
visit page – Neat interface and simple layout make exploring content effortless.
site overview – Well-structured content and tidy design make exploring simple and intuitive.
кинг казино Читал про кинг казино, решил сам затестить и нашел этот канал. Там есть вся инфа — ссылки, бонусы, акции. Проверил — все открывается, без проблем. Даже немного удивился что все четко. Посмотрю дальше как будет
see more details – The vibe is subtly distinctive, keeping the experience pleasant.
Sildenafil 100mg price: viagra canada – sildenafil over the counter
go to website – Navigation is effortless and structure is easy to follow.
https://detivetra.com/ detivetra
browse this page – A charming marketplace that feels approachable and easygoing.
здесь Получить все смс абонента
open this link – Fast-loading pages and neat design make the site feel professional.
>visit the site – A clean design allows for a calm and pleasant browsing experience.
реферат через нейросеть реферат через нейросеть .
нажмите, чтобы подробнее Узнать паспортные данные человека
wheatcovevault.shop – Nice layout overall, makes exploring the site feel very comfortable.
кинг казино телеграм Искал где взять актуальное зеркало для кинг казино и нашел этот канал. Там постоянно обновляют ссылки и выкладывают бонусы. Проверил — работает стабильно. Уже добавил себе в закладки. Удобно что все в одном месте
продвижение сайта франция prodvizhenie-sajtov-v-moskve4.ru .
explore the site – Everything is thoughtfully designed, giving a smooth and enjoyable browsing experience.
tap here – The clean structure and organized pages make the site easy to explore.
https://novamenpharmacy.com/# NovaMen Pharmacy
store overview – The structure is simple and intuitive, allowing users to navigate comfortably.
start here – The aesthetic stands out with a fresh, engaging appearance.
кинг казино слоты и беттинг Если кто ищет king casino telegram, вот норм канал, сам через него захожу. Там всегда есть актуальные ссылки и бонусы. Уже не первый раз пользуюсь, все работает стабильно. Без всяких танцев с бубном
купить справку взрослому купить справку
справки заказать с доставкой купить справку
можно получить справку купить мед справку
discover this page – Unique feel and aesthetic make the browsing experience interesting.
go to website – Clean structure and simple interface ensure an easy browsing experience.
можно получить справку купить медицинскую справку
купить справку от врача купить медицинскую справку
I recommend
emergency loans near me bad credit
to read the conditions.
где купить справку купить медицинскую справку
Fortune Ox explosão total: já limpou a tela 4 vezes numa sessão?
экскурсии по петербургу 2026 индивидуальная экскурсия петербург
cheapest viagra: sildenafil 50 mg price – Cheap Sildenafil 100mg
browse this page – Well-organized pages and nice aesthetics make it easy to navigate.
купить справку купить медицинскую справку
где купить справку купить справку
можно ли получить справку купить справку
кинг казино телеграм Сначала сомневался, но решил проверить king casino telegram. Канал оказался норм, постят регулярно. Есть зеркала и бонусы. Проверил — все открывается. Можно пользоваться без проблем
this link – The collection is interesting and thoughtfully presented, making it nice to browse.
check it out here – Simple design makes moving around the pages comfortable.
купить мед справку купить медицинскую справку
можно ли получить справку купить медицинскую справку
купить справку от врача купить мед справку
open this link – Everything is laid out clearly, providing a smooth browsing experience.
Fortune Rabbit vs Fortune Tiger: qual paga mais consistentemente esse mês?
видео с женой друга видео с женой друга .
казино кинг Кстати если кто ищет кинг казино сайт или зеркало, вот норм вариант нашел. Это их телега, где постят актуальные ссылки и бонусы. Я сам заходил через нее, все работает без проблем. Иногда кидают бездепы, что приятно. Короче можно сохранить, пригодится
веб-сайте Как узнать место человека по телефону
rubyorchardvault.shop – Layout feels well-planned, making the site easy and enjoyable to navigate.
We stumbled over here by a different web page and thought I should
check things out. I like what I see so i am just following you.
Look forward to checking out your web page for a second time.
check it out here – Offers a smooth and pleasant layout, giving a peaceful vibe.
Подробнее Кто посещал мою страничку
где купить дешевые цветы в москве https://dostavka-cvetov-moskva495.ru/ .
visit this site – Gives a cozy online vibe, with plenty of appealing selections.
лучшие экскурсии в петербурге интересные экскурсии в спб
справка срочно с доставкой купить справку 079у
справка с доставкой на дом купить справку 079у
где получить справку справку от нарколога купить
сколько стоит купить справку справку от нарколога купить
справки заказать с доставкой купить справку 095у
можно купить справку купить справку 29н
https://corevitalpharmacy.shop/# CoreVital Pharmacy
tap here – The interface feels smooth and user-friendly, helping explore items easily.
see more here – Warm color palette and simple interface make navigation pleasant.
содержание Узнать кто звонит
подробнее здесь Найти паспортные данные человека
desi por
NovaMen Pharmacy: NovaMen Pharmacy – NovaMen Pharmacy
cat dureaza retragerea 1win https://www.1win71038.help
лучшая нейросеть для учебы лучшая нейросеть для учебы .
Generic Cialis price: CoreVital Pharmacy – CoreVital Pharmacy
click for details – The assortment here is impressive, worth spending time checking out.
visit this site – A clean layout that makes browsing simple and smooth.
Galaxyno Hit clusters bombásticos: quem prefere grid grande ou 3×3 clássico?
Fortune Rabbit wilds expansivos: já cobriu 3 reels inteiros de coelhos?
Jogo do Tigrinho no Pix R$1: teste grátis com chance de bônus real
browse this page – Found a tranquil, easy-to-use interface while exploring.
Jogo do Tigrinho multiplicador 10x: já ativou 3 vezes na mesma sessão? Mítico!
Nottingham Forest 3-0 Fenerbahce 2026 Europa League upset in Istanbul
Fortune Ox respins infinitos: já chegou a 25 respins seguidos? Mítico!
PG Soft torneio diário R$20k: quem tá subindo no leaderboard do Fortune Tiger?
ии реферат ии реферат .
https://detivetra.com/ detivetra
see more here – Discovered it recently, looks like a simple and pleasant site to explore.
вертолеты россии руководство
For background
cost of cheap neurontin pills
to gain a better understanding.
open this link – The layout and theme feel unique, offering a refreshing browsing experience.
https://kitehurghada.ru/ kitehurghada
перейти на сайт Взлом тг
такой Доступ в чужому аккаунту в тг
https://auto.ae/exotic
Fortune Rabbit respins chain: recorde pessoal de quantos giros seguidos você já fez?
PG Soft mobile 2026: melhor experiência no Android ou iOS? Conta sua opinião
https://corevitalpharmacy.com/# Buy Tadalafil 20mg
Wild Bandito sticky wilds: o bandido mexicano tá roubando mais que o Tigrinho em 2026!
Jogo do Tigrinho estratégia de sessão: 400 giros e stop no +60% – qual sua meta?
Fortune Tiger no modo demo: quem treina antes de depositar? Confessa aqui
https://playcet.cat/
Playcet constituye una plataforma digital de apuestas en linea y juegos de casino gestionada por CET, una firma nacional con un largo recorrido en los establecimientos de juego tradicionales cordobeses, lo que le otorga una garantia solida y verificable durante 2026.
http://primelinepharmacy.com/# cheapest erectile dysfunction pills
металлические значки мокап https://metalpin.ru
Fortune Rabbit respins + wilds: já teve chain de 40 giros?
Fortune Rabbit wilds gigantes: já teve tela cheia de coelhos dourados multiplicando x10?
Fortune Tiger vs Fortune Ox: qual tem maior potencial de 10000x em 2026?
Wolves 2-2 Arsenal 2026 Premier League dramatic draw
Brest vs Marseille 2026 Ligue 1 blockbuster 20:45 clash
Jogo do Tigrinho cassino Pix: R$10 vira 150 giros + cashback 12% – promoção da semana
Энергоэффективность домов из клееного бруса — мифы и реальность
официальный лакмор
Искал где взять актуальное зеркало для лакмор и нашел этот канал. Там постоянно обновляют ссылки. Проверил — работает стабильно. Уже добавил себе. Удобно что все в одном месте
online prescription for ed: edmeds – erectile dysfunction drugs online
Смотреть здесь пробив геолокации человека
Следующая страница Доступ к перепискам вк
частные экскурсии спб экскурсии в ленобласть из спб
Передовые онлайн-казино предлагают клиентам широкий спектр услуг и поощрительных опций. Подключение к платформе производится через официальный портал или его актуальное зеркало РёРіСЂС‹ Retro, что гарантирует бесперебойную игру.
Что представляет собой действующее зеркало казино
Зеркало — это абсолютная копия официального ресурса, созданная для решения барьеров. Рабочее зеркало позволяет участникам сохранить доступ к излюбленным автоматам в любое время.
Лицензионное зеркало содержит всеми функциями оригинального сайта:
– Весь ассортимент развлечений
– Профиль с сохраненными параметрами
– Актуальные промокоды
– Гарантированные финансовые действия
Открытие счета на лицензионном сайте
Процесс регистрации занимает всего пару минут. Новым участникам нужно:
1. Войти на проверенный веб-сайт или функционирующее зеркало
2. Нажать на кнопку “Открыть счет”
3. Ввести необходимые сведения
4. Проверить контакт
5. Внести стартовый взнос
Бонус за регистрацию зачисляется автоматически после завершения всех этапов.
Авторизация в аккаунт
Зарегистрированные клиенты могут выполнить авторизацию применяя:
– Никнейм и пароль
– Код сотового
– Электронную почту
Аккаунт дает шанс к контролю балансом, данным транзакций и активным поощрениям.
Промо и программы
Азартная сервис привлекает лояльных участников выгодными поощрениями:
Приветственный набор
– Поощрение на начальный платеж до 100%
– Free spins на популярные слоты
– Экстра награды за очередные пополнения
Промокоды
Специальные коды обеспечивают доступ на получение особых бонусов. Текущие комбинации выставляются в секции “Бонусы”.
Cashback
Периодический бонус насчитывает до 10% от использованных финансов. Компенсация зачисляется моментально.
Механизм лояльности
Активные пользователи накапливают единицы, которые превращаются на действительные финансы или даровые спины.
Адаптивный портал и приложение
Для удобства игроков построена полноценная мобильная версия. Гибкий вид обеспечивает комфортно делать ставки с произвольного карманного аппарата.
Плюсы APP:
– Моментальный доступ к автоматам
– Адаптированный дизайн
– Устойчивая работа
– Push-уведомления о новых событиях
Получить приложение можно бесплатно с главного ресурса для гаджетов на Android и iOS.
Каталог автоматов
Слоты
База вмещает более 2000 машин от ведущих студий:
– Традиционные игры
– Мультимедийные игры
– Слоты с джекпотом
– Фирменные слоты
Live казино
Секция Live столов предоставляет взаимодействие с реальными крупье в онлайн формате:
– Рулетка
– Двадцать одно
– Punto Banco
– Poker
Турниры
Систематические турниры с большими выигрышными бюджетами устраиваются регулярно. Вход в турнирах разрешено всем активным игрокам.
Денежные методы
Пополнения и получения средств производятся через известные платежные системы:
– Дебетовые карты
– Электронные счета
– Цифровая валюта
– Банковские транзакции
Наименьший взнос — от 100 рублей. Снятие финансов осуществляется в течение 24 ч.
Служба помощи
Непрерывная группа поддержки готова помочь в исправлении всех ситуаций:
– Живой чат
– Email
– Контактный номер
– Соц сети
Охрана и разрешение
Официальный портал действует на фундаменте глобальной разрешения. Всевозможные сведения игроков обезопасены современным SSL-кодированием.
Итог
Рабочее зеркало дает бесперебойный доступ к излюбленным играм, привлекательным промокодам и функциональным услугам. Присоединяйтесь сейчас и обретите стартовый подарок!
Описание официального портала
Прогрессивные онлайн казино предлагают игрокам разнообразный ассортимент услуг и перспектив. Главный портал Gold регистрация предлагает защищенный путь к развлекательным возможностям.
Актуальное зеркало: возможность на сегодня
Альтернативный адрес является как точную реплику официального портала. Актуальное зеркало обеспечивает клиентам преодолевать существующие барьеры.
Плюсы использования зеркала
Основные достоинства включают:
– Непрерывный шанс к порталу
– Поддержание абсолютно всех функций основного веб-сайта
– Безопасность индивидуальных данных
– Аналогичный набор функций
Открытие счета на платформе
Ход создания аккаунта отличается легкостью и эргономичностью. Свежие пользователи требуется:
1. Перейти на официальный ресурс или его зеркало
2. Выбрать на пункт создания аккаунта
3. Указать требуемые данные
4. Подтвердить электронную ящик
5. Выполнить стартовый доступ
Приз за создание аккаунта
Новые игроки получают щедрый начальный приз. Такое поощрение в состоянии включать:
– Материальные средства
– Бесплатные спины
– Расширенный показатель кэшбэка
Авторизация в индивидуальный кабинет
Действующие пользователи имеют возможность оперативно получить доступ в личный профиль, задействуя учетные данные и код. Персональный аккаунт предлагает шанс к:
– Управлению средствами
– Записям переводов
– Работающим бонусам
– Конфигурации учетной записи
Вознаграждения и промо
Сайт периодически реализует всевозможные акции для участников.
Типы поощрений
Базовые формы поощрений:
– Депозитные подарки – доля от величины взноса
– Фриспины – бесплатные спины в автоматах
– Кэшбэк – возврат доли проигранных финансов
– Турнирные вознаграждения – премии за состязание в состязаниях
Купоны
Эксклюзивные ваучеры дают возможность активировать добавочные бонусы. Пользователи имеют возможность найти их на тематических площадках или заработать в новостях.
Мобильная адаптация и app
Прогрессивные гемблеры выбирают мобильный игровой процесс.
Характеристики mobile системы
– Гибкий дизайн для любых девайсов
– Абсолютный путь к играм
– Оперативная подгрузка
– Удобное использование
Загрузить приложение
Mobile софт открыто для downloading на девайсы с операционными платформами Android и iOS. Приложение предоставляет:
– Надежную работу
– Push оповещения о предложениях
– Моментальный доступ к избранным слотам
Игровой выбор
Платформа дает обширную подборку игровых развлечений.
Слоты
Библиотека игровых машин охватывает:
– Обычные автоматы
– Передовые игры
– Джекпотные машины
– Тематические слоты
Live дилеры
Секция реальных дилеров предлагает право соревноваться с реальными дилерами. Доступны:
– Американская рулетка
– Очко
– Punto Banco
– Покер
Конкурсы
Постоянные соревнования позволяют игрокам конкурировать за солидные призовые пулы. Конкурсная система изменяется каждую неделю.
Денежные процедуры
Казино поддерживает разнообразие способов депозита и снятия сумм:
– Пластиковые карточки
– Виртуальные счета
– Межбанковские транзакции
– Криптовалюты
Любые платежи производятся надежно с применением современных протоколов защиты.
Департамент support
Опытная команда помощи трудится постоянно. Коннектиться с менеджерами доступно через:
– Online чат
– Email почту
– Горячую линию
– Соц медиа
Охрана и лицензирование
Игровой клуб действует на основании официальной сертификата. Это обеспечивает:
– Легальность азартного действа
– Охрану персональных данных
– Пунктуальные выплаты
– Ответственный геймплей
Вывод
Основной ресурс и его функционирующие альтернативные адреса обеспечивают участникам совокупный ассортимент опций для безопасной и выгодной досуга. Внушительные подарки, многочисленные автоматы, профессиональная служба и защищенная платформа операций делают казино превосходным опцией для любителей азартных услуг.
PG Soft mobile 2026: quem ganha mais no Android? Celular ou PC – qual sua preferência?
Jogo do Tigrinho Pix R$30: ganha 120 giros + cashback 15% hoje!
реферат нейросеть реферат нейросеть .
Передовые онлайн-казино дают игрокам широкий диапазон игр и призовых предложений. Доступ к ресурсу осуществляется через основной ресурс или его рабочее зеркало Голд, что гарантирует непрерывную активность.
Чем является актуальное зеркало казино
Зеркало — это абсолютная версия официального веб-сайта, созданная для решения барьеров. Рабочее зеркало обеспечивает клиентам иметь доступ к выбранным развлечениям в любое удобное время.
Проверенное зеркало располагает всеми функциями основного портала:
– Полный список игр
– Личный кабинет с зафиксированными параметрами
– Свежие поощрения
– Защищенные платежные операции
Оформление профиля на главном ресурсе
Алгоритм открытия счета требует всего считанные минут. Свежим участникам необходимо:
1. Попасть на проверенный сайт или рабочее зеркало
2. Щелкнуть на кнопку “Регистрация”
3. Ввести обязательные данные
4. Подтвердить email
5. Сделать первый депозит
Приветственный бонус зачисляется сразу после прохождения всех ступеней.
Доступ в учетную запись
Зарегистрированные игроки могут выполнить вход указывая:
– Учетное имя и шифр
– Номер контакта
– Электронную почту
Личный кабинет обеспечивает право к управлению средствами, записям игр и действующим акциям.
Промо и предложения
Развлекательная сервис вознаграждает регулярных пользователей разнообразными вознаграждениями:
Стартовый бонус
– Поощрение на дебютный депозит до 100%
– Free spins на известные слоты
– Особые награды за последующие взносы
Ваучеры
Уникальные купоны открывают возможность на активацию уникальных призов. Свежие купоны выкладываются в секции “Акции”.
Cashback
Еженедельный возврат составляет до 10% от использованных средств. Компенсация начисляется незамедлительно.
Механизм лояльности
Регулярные пользователи получают очки, которые обмениваются на подлинные финансы или даровые спины.
Mobile версия и софт
Для практичности пользователей сделана качественная мобильная версия. Адаптивный дизайн обеспечивает удобно играть с всякого портативного девайса.
Выгоды программы:
– Оперативный доступ к играм
– Улучшенный интерфейс
– Стабильная деятельность
– Push-уведомления о новых событиях
Установить приложение можно бесплатно с официального веб-сайта для девайсов на Android и iOS.
Коллекция развлечений
Машины
Библиотека включает более 2000 автоматов от ведущих разработчиков:
– Классические игры
– Современные автоматы
– Прогрессивные автоматы
– Сюжетные игры
Live казино
Раздел Live развлечений предлагает развлечение с настоящими ведущими в реальном времени:
– Рулетка
– Блэкджек
– Баккара
– Столы покера
Соревнования
Постоянные соревнования с солидными наградными суммами организуются регулярно. Допуск в соревнованиях доступно всем созданным участникам.
Расчетные способы
Депозиты и получения выплат производятся через востребованные методы:
– Кредитные карты
– Цифровые счета
– Bitcoin
– Денежные транзакции
Минимальный взнос — от 100 рублей. Вывод финансов осуществляется в течение 24 часов.
Служба support
Постоянная служба support способна поддержать в урегулировании любых проблем:
– Онлайн-чат
– Email
– Контактный номер
– Соц сети
Защита и документ
Главный сайт действует на основании глобальной разрешения. Всевозможные сведения участников обезопасены новейшим SSL-протоколом.
Заключение
Функционирующее зеркало обеспечивает постоянный доступ к предпочитаемым играм, щедрым бонусам и комфортным функциям. Зарегистрируйтесь сегодня и заработайте начальный подарок!
Актуальные онлайн-казино гарантируют геймерам разнообразие вариантов для приятной игры. Официальный ресурс Клубника официальный сайт открывает возможность ко всем функциям и игровым автоматам. Однако при образовании технических неполадок на подмогу спешат актуальные зеркала.
Что есть собой актуальное зеркало
Дубликат казино — это идентичная реплика оригинального веб-сайта, находящаяся по дополнительному адресу. Официальное зеркало хранит все характеристики, вместе с создание аккаунта, доступ в личный кабинет, премии и купоны.
Дубликат на сегодня дает:
– Постоянный доступ к азартным аппаратам
– Стопроцентную защиту индивидуальных информации
– Поддержку средств и журнала переводов
– Возможность использования всех акций
Открытие профиля на лицензионном портале
Процедура регистрации требует пару минут. Новым пользователям следует:
1. Открыть на главный ресурс или актуальное зеркало
2. Нажать кнопку «Зарегистрироваться»
3. Внести запрашиваемые графы
4. Подтвердить электронную почту
5. Использовать купон при существовании
После завершения создания аккаунта пользователи получают бонус за регистрацию, какой может содержать фриспины или финансовое премирование.
Авторизация в собственный кабинет
Личный кабинет обеспечивает всесторонний мониторинг над азартным процессом. Через собственный аккаунт можно:
– Финансировать кошелек
– Получать средства
– Задействовать промокоды
– Мониторить записи ставок
– Участвовать в конкурсах
– Приобретать возврат средств
Анализ бонусов и промо-предложений
Богатая бонусная политика — существенное преимущество платформы. Центральные категории поощрений:
Стартовый бонус
Дебютанты приобретают великодушное поощрение на дебютные депозиты. Размер приза может составлять 100-200% от суммы депозита.
Free spins
Даровые раунды даются для известных слотов. Сумма бесплатных вращений колеблется от 10 до 500 штук.
Кешбэк
Систематический или помесячный компенсация процентной доли потерянных денег. Обычный объем возврата — 5-15%.
Соревнования
Постоянные состязания с солидными призовыми банками. Конкурсанты состязаются за лучшие строчки в таблице лидеров.
Мобильная версия и приложение
Портативная версия обеспечивает развлекаться с любого устройства. Клиенты могут скачать софт для iOS и Android или применять браузерную версию.
Преимущества смартфонного приложения:
– Молниеносная прогрузка автоматов
– Практичный дизайн
– Push-уведомления о поощрениях
– Доступ через отпечаток пальца
Игровые автоматы и Live казино
Азартная библиотека насчитывает тысячи игр от известных провайдеров.
Популярные секции игр:
– Стандартные автоматы
– Видеослоты с призовыми уровнями
– Джекпот игры
– Мега-путь слоты
Live казино
Секция live казино предлагает развлечение с реальными дилерами. Представлены классические варианты:
– Французская рулетка
– Двадцать одно
– Baccarat
– Техасский холдем
Как найти функционирующее зеркало
Получить действующую линк на зеркало возможно множественными методами:
1. Оформить подписку на почтовую рассылку
2. Наблюдать за апдейтами в социальных сетях
3. Написать в отдел поддержки
4. Добавить в закладки действующее зеркало в избранное
Вывод
Официальный сайт и его функционирующие альтернативные адреса дают бесперебойный путь к азартным играм. Щедрые премии, множественные купоны, эргономичное портативное приложение и высококлассная сервис поддержки делают развлекательный опыт крайне приятным и защищенным.
Нынешние онлайн-казино обеспечивают игрокам массу путей для комфортной игры. Основной ресурс казино Lev открывает путь ко всем возможностям и развлечениям. Однако при появлении системных сложностей на помощь спешат действующие зеркала.
Что означает собой актуальное зеркало
Альтернативный адрес казино — это полная копия основного веб-сайта, расположенная по запасному адресу. Официальное зеркало удерживает все возможности, в том числе открытие профиля, вход в индивидуальный кабинет, бонусы и кодовые слова.
Зеркало на сегодня предоставляет:
– Бесперебойный доступ к развлекательным машинам
– Стопроцентную конфиденциальность индивидуальных информации
– Удержание средств и журнала платежей
– Доступность всех акций
Создание учетной записи на лицензионном ресурсе
Этап регистрации занимает пару минут. Новым клиентам необходимо:
1. Перейти на официальный сайт или рабочее зеркало
2. Щелкнуть кнопку «Зарегистрироваться»
3. Ввести необходимые поля
4. Активировать э-мейл почту
5. Указать купон при существовании
После окончания регистрации игроки приобретают бонус за регистрацию, который может иметь free spins или денежное вознаграждение.
Авторизация в индивидуальный кабинет
Индивидуальный кабинет дает всесторонний управление над игровым процессом. Через собственный раздел возможно:
– Финансировать баланс
– Снимать средства
– Применять бонусные коды
– Проверять историю ставок
– Принимать участие в состязаниях
– Получать кешбэк
Характеристика поощрений и специальных предложений
Выгодная призовая система — ключевое плюс казино. Центральные категории поощрений:
Приветственный подарок
Начинающие приобретают богатое поощрение на стартовые депозиты. Объем бонуса может составлять 100-200% от величины пополнения.
Бесплатные вращения
Халявные вращения даются для востребованных слотов. Число фриспинов варьируется от 10 до 500 штук.
Кэшбек
Еженедельный или ежемесячный компенсация процентной доли утраченных финансов. Типичный процент возврата — 5-15%.
Состязания
Постоянные соревнования с крупными премиальными фондами. Соревнующиеся конкурируют за призовые позиции в турнирной таблице.
Смартфонная версия и программа
Адаптивная версия позволяет делать ставки с всякого гаджета. Игроки могут скачать приложение для iOS и Android или эксплуатировать браузерную версию.
Плюсы портативного программы:
– Оперативная подзагрузка игр
– Удобный графический интерфейс
– Push-уведомления о поощрениях
– Вход через биометрию
Машины и Live казино
Игровая база включает сотни игр от ведущих производителей.
Популярные секции автоматов:
– Классические машины
– Современные слоты с премиальными раундами
– Накопительный приз слоты
– Мегавейс слоты
Live игорный зал
Раздел live игорный зал обеспечивает партию с профессиональными ведущими. Есть традиционные развлечения:
– Европейская рулетка
– Blackjack
– Баккара
– Техасский холдем
Как найти рабочее зеркало
Получить свежую ссылку на зеркало возможно множественными вариантами:
1. Оформить подписку на емейл-уведомления
2. Наблюдать за обновлениями в соц сетях
3. Связаться в отдел поддержки
4. Сохранить рабочее зеркало в закладки
Итог
Главный портал и его функционирующие копии предоставляют постоянный доступ к азартным играм. Великодушные премии, разнообразные промокоды, комфортное портативное приложение и качественная сервис поддержки делают азартный геймплей предельно беспроблемным и надежным.
металлический значок доты изготовление металлических значков москва
металлические значки на заказ https://metallicheskie-znachki213.ru/
Анализ основного веб-сайта
Современное онлайн-казино обеспечивает своим участникам обширный набор услуг и бонусов. Официальный ресурс казино ДжиВиСпин работает круглосуточно, предоставляя возможность к востребованным слотам, live-казино и многочисленным кампаниям.
Функционирующее зеркало: путь к порталу
Что такое зеркало казино
Альтернатива составляет собой полную реплику основного ресурса с отличным интернет названием. Действующее зеркало предоставляет пользователям преодолевать ограничения и обеспечивать постоянный путь к предпочитаемым играм.
Как получить действующее зеркало сегодня
Свежие адреса на основное зеркало появляются через:
– E-mail новостнуюленту
– Проверенные коммуникационные сети
– Сервис поддержки
– Специализированные порталы
Созданиеаккаунта на платформе
Процесс оформления
Созданиеаккаунта отнимает буквально минут и подразумевает данные действия:
1. Переход на оригинальный ресурс или актуальное зеркало
2. Активация клавиши “Создатьаккаунт”
3. Указание личных реквизитов
4. Подтверждение email или телефона
5. Создание пароля
Подарок за оформление
Свежие пользователи зарабатывают солидные начальные поощрения:
– Бонусные деньги на аккаунт
– Фриспины для симуляторов
– Расширенный процент компенсации
– Уникальные коды
Доступ в персональный кабинет
Действующие пользователи имеютвозможность произвести вход через официальный сайт или текущее зеркало. Для этого следует набрать учетноеимя и ключдоступа, установленные при оформлении.
Функции персонального профиля
В личном аккаунте открыты основные инструменты:
– Управление контактными данными
– Внесение счета
– Получение выигрышей
– Активация купонов
– Проверка истории транзакций
– Участие в конкурсах
Поощрения и кампании
Типы бонусов
Казино награждает своих клиентов разнообразными призовыми акциями:
– Приветственный комплект — большие подарки на начальные вклады
– Бесплатныевращения — экстра спины в топовых играх
– Кэшбек — регулярный компенсация части проигрышей
– План верности — уникальные преимущества для верных игроков
Ваучеры и их использование
Эксклюзивные коды дают расширенные вознаграждения. Для использования следует указать комбинацию в определенное окно в собственном разделе.
Геймплейный ассортимент
Игры
Библиотека развлекательных симуляторов включает тысячи позиций от лучших провайдеров:
– Традиционные автоматы
– Видео слоты
– Прогрессивные игры
– Брендовые автоматы
Live казино
Раздел Live-казино дарит игру с профессиональными дилерами в формате онлайн трансляции:
– Европейскаярулетка
– Очко
– Baccarat
– Техасскийхолдем
Состязания
Периодические соревнования с крупными наградными суммами организуются постоянно. Соревнующиеся конкурируют за призовыеместа в турнирнойсетке.
Смартфонная платформа и софт
Мобильная платформа портала
Основной веб-сайт абсолютно адаптирован для смартфонных девайсов. Игроки вправе играть автоматы сразу через браузер без потребности загрузки.
Программа для инсталляции
Авторское мобильное программа доступно для загрузки на аппараты с программными платформами Android и iOS. Программа предоставляет:
– Оперативный вход к играм
– Стабильную работу
– Моментальные-извещения о бонусах
– Простой оформление
Вывод
Оригинальный портал казино и его действующие зеркала дают клиентам комплексный вход к отличным развлекательным услугам. Выгодные подарки, многочисленные кампании, функциональная адаптивная адаптация и опытная поддержка превращают игровой времяпрепровождение чрезвычайно комфортным и результативным.
https://t.me/s/luckmorecasino_official
Нашел этот канал через обсуждение, решил зайти посмотреть. Там есть зеркала и бонусы по лакмор казино. Проверил несколько ссылок — все рабочие. Ничего странного не заметил. Можно пользоваться
Buy Tadalafil 20mg: п»їcialis generic – Buy Tadalafil 5mg
металлические значки мокап изготовление значков на заказ из металла в москве
жена друга порно жена друга порно .
ии для учебы студентов ии для учебы студентов .
экскурсия на машине по санкт петербургу экскурсии по санкт петербургу с экскурсоводом
Современные онлайн-казино предоставляют клиентам богатый выбор опций для комфортной времяпрепровождения. Переход к ресурсу Вован осуществляется через основной портал или функционирующее зеркало.
Что такое актуальное зеркало казино
Действующее зеркало — это альтернативный домен официального сайта казино. Такие копии разрабатываются для гарантирования постоянного соединения к гемблинговой платформе.
Зеркало сегодня полностью копирует функционал официального ресурса. Клиенты обретают схожий вход ко всем функциям, включая создание аккаунта, пополнение кошелька и вывод средств.
Регистрация на лицензионном ресурсе
Алгоритм оформления учетной записи длится всего буквально секунд. Новым участникам требуется:
1. Войти на главный домен или текущее подлинное зеркало
2. Щелкнуть кнопку “Регистрация”
3. Заполнить требуемые реквизиты
4. Подтвердить электронную почту
5. Применить код активации при существовании
После выполнения создания аккаунта участник зарабатывает вознаграждение за регистрацию, который способен охватывать фриспины или cash поощрение.
Логин в собственный кабинет
Персональный кабинет — это охраняемая область, где игроки имеют возможность контролировать своим аккаунтом. Для доступа нужно указать логин и пароль.
В индивидуальном кабинете доступны следующие инструменты:
– Отслеживание журнала переводов
– Активация купонов
– Управление поощрениями
– Включение в состязаниях
– Отслеживание возмещения
– Изменение профиля
Поощрения и предложения
Гемблинговая сервис предлагает великодушные бонусы:
Регистрационный комплект — дебютанты зарабатывают существенное начисление на начальные пополнения.
Даровые спины — начисляются как при оформлении, так и в ходе всевозможных мероприятий.
Кэшбек — постоянный возмещение доли проигранных денег.
Бонусные коды — специальные шифры, обеспечивающие доступ к эксклюзивным вознаграждениям.
Характеристика гемблинговых категорий
Слоты
Библиотека автоматов охватывает множество наименований от лучших провайдеров. Геймеры обнаружат как традиционные аппараты, так и инновационные 3D-слоты с захватывающей анимацией.
Live казино
Зона Live казино дарит шанс играть с настоящими крупье в формате актуального времени. Имеются востребованные варианты: рулетка, блэкджек, баккара, покер.
Соревнования
Систематические соревнования с крупными наградными фондами манят множество соревнующихся. Чемпионы зарабатывают cash призы и специальные премии.
Смартфонная версия и app
Мобильная версия портала обеспечивает наслаждаться с всякого девайса. Дизайн автономно адаптируется под диагональ экрана.
Скачать софт можно для девайсов на Android и iOS. Портативное app обладает всеми характеристиками компьютерной версии.
Как обнаружить текущее зеркало на текущий день
Рабочие URL дубликатов систематически корректируются. Получить свежую URL можно различными путями:
– Через отдел помощи
– В официальных социальных сетях
– По e-mail дайджесту
– На аффилиатных ресурсах
Надежность и лицензирование
Главный домен действует на базе мировой лицензии. Все транзакции охраняются современными методами кодирования.
Приватность индивидуальных информации обеспечивается в стопроцентном масштабе.
Итог
Основной ресурс и его актуальные дубликаты обеспечивают клиентам беспрерывный доступ к первоклассным гемблинговым услугам. Великодушные призы, многочисленные игры, профессиональная поддержка — все это превращает гемблинговый досуг чрезвычайно беспроблемным и притягательным.
Описание официального веб-сайта
Прогрессивные виртуальные казино предоставляют пользователям обширный ассортимент забав и шансов. Основной ресурс https://www.xn—–8kcjfnn3bceaxi1ap3qa.xn--p1ai/ предлагает проверенный вход к развлекательным функциям.
Рабочее зеркало: доступ прямо сейчас
Зеркало представляет собой абсолютную реплику официального ресурса. Проверенное зеркало помогает игрокам миновать существующие запреты.
Достоинства задействования зеркала
Принципиальные преимущества содержат:
– Беспрерывный вход к платформе
– Поддержание полных функций основного сайта
– Сохранность индивидуальных материалов
– Идентичный функционал
Регистрация на платформе
Процедура создания аккаунта знаменуется легкостью и удобством. Начинающие клиенты необходимо:
1. Открыть главный портал или его зеркало
2. Кликнуть на клавишу оформления
3. Указать необходимые сведения
4. Верифицировать email почту
5. Выполнить начальный вход
Бонус за регистрацию
Новички получают внушительный вступительный бонус. Это премия способно содержать:
– Денежные бонусы
– Безвозмездные прокруты
– Повышенный коэффициент кэшбэка
Доступ в собственный раздел
Существующие пользователи могут моментально зайти в собственный аккаунт, эксплуатируя логин и пароль. Собственный раздел обеспечивает доступ к:
– Управлению счетом
– Хронологии переводов
– Работающим призам
– Конфигурации профиля
Подарки и акции
Платформа систематически устраивает многочисленные акции для пользователей.
Категории поощрений
Базовые виды поощрений:
– Депозитные призы – часть от суммы депозита
– Фриспины – complimentary спины в слотах
– Возврат средств – компенсация процента проигранных финансов
– Соревновательные призы – призы за выступление в соревнованиях
Промокоды
Особые ваучеры позволяют активировать бонусные привилегии. Пользователи способны получить их на специализированных порталах или получить в письмах.
Мобильная адаптация и программа
Прогрессивные гемблеры ценят портативный игровой процесс.
Характеристики mobile адаптации
– Гибкий вид для различных девайсов
– Полный путь к играм
– Стремительная работа
– Практичное контроль
Установить софт
Мобильное приложение предоставлено для установки на девайсы с операционными платформами Android и iOS. Приложение обеспечивает:
– Бесперебойную деятельность
– Пуш сообщения о бонусах
– Быстрый доступ к избранным играм
Гемблинг ассортимент
Портал предоставляет богатую галерею гемблинг услуг.
Игровые машины
Ассортимент игровых автоматов насчитывает:
– Обычные автоматы
– Современные автоматы
– Накопительные игры
– Сюжетные развлечения
Live казино
Область живых игр предлагает возможность соревноваться с реальными крупье. Предложены:
– Европейская рулетка
– Блек-джек
– Баккара
– Техасский холдем
Турниры
Регулярные турниры помогают участникам состязаться за значительные финансовые пулы. Призовая система изменяется еженедельно.
Денежные транзакции
Сайт поддерживает разнообразие опций зачисления и обналичивания средств:
– Кредитные карты
– Цифровые платежные системы
– Wire транзакции
– Крипто
Абсолютно все операции осуществляются защищенно с применением актуальных протоколов шифрования.
Сервис support
Квалифицированная группа поддержки работает круглосуточно. Обратиться с специалистами доступно через:
– Online чат
– Электронную почту
– Горячую линию
– Социальные платформы
Безопасность и лицензирование
Портал функционирует на фундаменте действительной разрешения. Такое обеспечивает:
– Прозрачность игрового процесса
– Безопасность индивидуальных данных
– Пунктуальные выплаты
– Регулируемый геймплей
Итог
Основной веб-сайт и его действующие дубликаты гарантируют участникам полный набор возможностей для приятной и выгодной игры. Солидные призы, всевозможные автоматы, компетентная помощь и защищенная структура платежей формируют платформу лучшим опцией для поклонников азартных услуг.
http://primelinepharmacy.com/# buy ed pills online
нейросеть для студентов онлайн nejroset-dlya-referatov-6.ru .
Cialis over the counter: CoreVital Pharmacy – CoreVital Pharmacy
luckmore
Искал где взять актуальное зеркало для лакмор и нашел этот канал. Там постоянно обновляют ссылки. Проверил — работает стабильно. Уже добавил себе. Удобно что все в одном месте
Анализ лицензионного веб-сайта
Прогрессивные онлайн казино обеспечивают пользователям разнообразный ассортимент игр и опций. Главный веб-сайт Лев обеспечивает защищенный доступ к гемблинг услугам.
Рабочее зеркало: доступ на сегодня
Альтернативный адрес является как полную дубликат лицензионного ресурса. Официальное зеркало помогает игрокам обходить существующие блокировки.
Достоинства эксплуатации зеркала
Ключевые плюсы содержат:
– Постоянный путь к порталу
– Сохранение полных характеристик основного веб-сайта
– Охрана персональных материалов
– Идентичный функционал
Оформление профиля на ресурсе
Ход оформления профиля знаменуется понятностью и комфортом. Свежие пользователи необходимо:
1. Перейти на основной ресурс или его зеркало
2. Щелкнуть на элемент регистрации
3. Внести требуемые сведения
4. Верифицировать почтовую адрес
5. Осуществить дебютный авторизацию
Бонус за создание аккаунта
Новые игроки зарабатывают значительный приветственный бонус. Данное поощрение способно включать:
– Финансовые средства
– Complimentary вращения
– Усиленный уровень возврата
Доступ в персональный кабинет
Действующие пользователи способны мгновенно авторизоваться в собственный аккаунт, эксплуатируя никнейм и шифр. Собственный раздел обеспечивает возможность к:
– Управлению балансом
– Журналу платежей
– Работающим подаркам
– Настройкам аккаунта
Вознаграждения и акции
Портал постоянно устраивает многочисленные предложения для клиентов.
Типы бонусов
Ключевые типы вознаграждений:
– Депозитные бонусы – доля от величины депозита
– Прокруты – даровые раунды в слотах
– Компенсация – возмещение доли проигранных финансов
– Конкурсные вознаграждения – вознаграждения за игру в турнирах
Коды
Особые коды обеспечивают заработать дополнительные привилегии. Пользователи в состоянии обнаружить их на партнерских порталах или получить в уведомлениях.
Портативная версия и app
Актуальные клиенты любят карманный досуг.
Опции mobile платформы
– Гибкий облик для всех аппаратов
– Совокупный доступ к играм
– Оперативная функционирование
– Практичное управление
Установить софт
Портативное приложение открыто для скачивания на аппараты с рабочими ОС Android и iOS. Программа обеспечивает:
– Бесперебойную работу
– Push алерты о призах
– Оперативный запуск к избранным слотам
Развлекательный ассортимент
Казино обеспечивает богатую галерею развлекательных развлечений.
Игровые машины
Библиотека развлекательных автоматов содержит:
– Традиционные слоты
– Передовые слоты
– Джекпотные машины
– Сюжетные игры
Live дилеры
Секция реальных развлечений предлагает шанс состязаться с настоящими дилерами. Доступны:
– Американская рулетка
– Блек-джек
– Баккара
– Покер
Конкурсы
Периодические турниры позволяют участникам состязаться за внушительные наградные банки. Конкурсная сетка актуализируется регулярно.
Денежные процедуры
Платформа предлагает массу вариантов зачисления и обналичивания денег:
– Пластиковые карточки
– Электронные платежные системы
– Wire транзакции
– Криптовалюты
Совокупные переводы осуществляются защищенно с применением современных методов кодирования.
Отдел помощи
Профессиональная служба support трудится без перерыва. Обратиться с консультантами можно через:
– Интерактивный чат
– Email почту
– Телефон
– Соц медиа
Охрана и аккредитация
Казино оперирует на фундаменте действительной аккредитации. Данное гарантирует:
– Справедливость игрового действа
– Защиту персональных информации
– Своевременные перечисления
– Легальный гемблинг
Резюме
Лицензионный портал и его рабочие альтернативные адреса дают игрокам совокупный комплекс функций для комфортной и выгодной времяпрепровождения. Внушительные бонусы, различные развлечения, квалифицированная поддержка и проверенная инфраструктура выплат создают казино оптимальным выбором для любителей игровых развлечений.
Подключение к сайту через рабочие зеркала
Передовые онлайн казино предоставляют пользователям непрерывный подключение к сервисам. Центральный сайт Килограмм работает устойчиво, гарантируя большой выбор гемблинг слотов. Тем не менее временами формируются системные трудности или ограничения, в связи с чем критично понимать о наличии актуальных зеркал.
Что является из себя центральное зеркало казино
Альтернатива — это абсолютная дубликат основного сайта с идентичным набором функций. Функционирующее зеркало на данный момент обеспечивает обходить местные барьеры и продолжать времяпрепровождение.
Основные плюсы эксплуатации зеркал:
– Безграничный доступ к личному кабинету
– Поддержание любых информации учётной записи
– Схожий ассортимент автоматов
– Текущие привилегии и акции
Оформление на ресурсе
Механизм оформления отнимает немного минут. Начинающие геймеры зарабатывают щедрый бонус за запись, который в состоянии включать:
– Вступительный денежный бонус
– Комплиментарные фриспины для автоматов
– Особые ваучеры
– Расширенный кэшбек
Для выполнения создания аккаунта следует:
1. Перейти на официальный веб-сайт или копию
2. Кликнуть клавишу «Создать аккаунт»
3. Ввести персональные сведения
4. Подтвердить мейл или контакт
5. Использовать купон (при присутствии)
Авторизация в индивидуальный кабинет
Следом за корректной регистрации пользователи могут совершать авторизацию используя официальный портал или рабочее зеркало. Собственный кабинет открывает всесторонний надзор над счётом:
– Архив транзакций
– Ввод кошелька
– Изъятие призов
– Администрирование поощрениями
– Включение в состязаниях
Бонусы и акции казино
Платформа балует игроков различными поощрительными программами:
Стартовые призы
Новички получают великодушный пакет бонусов на вступительные пополнения. Как правило это включает процентную надбавку к размеру депозита плюс комплиментарные кручения.
Периодические кампании
– Седмичный кэшбек до 15%
– Состязания с призовыми банками
– Призы на годовщину рождения
– Уникальные программы для статусных геймеров
Схема верности
Регулярные игроки получают единицы, что допустимо трансформировать на действительные призы или уникальные преимущества.
Портативная версия и утилита
Передовые решения позволяют участвовать всюду удобно. Смартфонная вариант сайта независимо адаптируется под монитор произвольного девайса.
Выгоды мобильного ПО:
– Моментальная запуск игр
– Комфортный вид
– Push-сообщения о акциях
– Возможность скачать для Android и iOS
Live казино: атмосфера подлинного азартного дома
Раздел Live заведения переносит геймеров в среду истинного игорного учреждения. Квалифицированные операторы проводят игру в формате настоящего времени.
Представленные развлечения:
– Рулетка
– Очко
– Punto Banco
– Карты
Автоматы и игровые слоты
Собрание азартных аппаратов насчитывает множество наименований от топовых провайдеров. Любой игрок найдёт слот по желанию:
– Стандартные машины
– Видеослоты с бонусными турами
– Крупный приз-машины
– Megaways автоматы
Состязания и акции
Систематические турниры вносят азарт и предоставляют опцию заработать большие призы. Присутствие в турнирах зачастую комплиментарное, а наградные банки составляют крупных величин.
Безопасность и анонимность
Ресурс эксплуатирует актуальные системы кодирования для защиты реквизитов игроков. Каждые платёжные транзакции проходят через зашифрованные протоколы.
Резюме
Центральный веб-сайт и его рабочие зеркала предоставляют надёжный вход к превосходным развлекательным развлечениям. Привлекательные призы, комфортная карманная редакция, богатство слотов и компетентное Live-игорный дом превращают сайт замечательным вариантом для поклонников гемблинг игр.
значок металлический купить изготовление железных значков
I recommend
emergency loan application bad credit
for your security.
нейросеть генерации текстов для студентов nejroset-dlya-referatov-5.ru .
Обзор путешествий https://tfast.ru и экскурсий. Ваш персональный гид в мире путешествий. Мы собираем самые живые обзоры, проверенные маршруты и уникальные экскурсии — от известных достопримечательностей до скрытых мест, о которых знают только местные. Планируйте свои приключения с нами, вдохновляйтесь и открывайте мир по-новому.
Нынешние виртуальные казино предлагают пользователям широкий спектр опций для приятной игры. Но иногда доступ к официальному сайту может стать закрытым. В таких моментах на подмогу спешит казино Голд, которое гарантирует стабильный доступ ко всем опциям платформы.
Что такое рабочее зеркало казино
Дубликат — это абсолютная реплика официального веб-сайта, которая размещается по дополнительному адресу. Альтернативный ресурс содержит полный возможности основного ресурса, включая персональный кабинет, депозит и сведения переводов.
Принципиальные выгоды использования зеркала:
– Круглосуточный соединение к порталу
– Абсолютная схожесть инструментов
– Безопасность личных реквизитов
– Поддержка доступных бонусов
Как обнаружить функционирующее зеркало в данный момент
Есть множество достоверных путей получения свежей ссылочной информации:
Официальные источники:
1. Почтовая рассылка — управление регулярно высылает письма с рабочими URL
2. Социальные сети — легитимные профили постят актуальную информацию
3. Отдел поддержки — консультанты сообщают проверенные ссылки
4. Телефонное приложение — предоставляет преодолевать блокировки
Создание аккаунта на основном ресурсе
Этап регистрации длится всего считанные минут и включает из данных этапов:
1. Вход на официальный ресурс или действующее зеркало
2. Нажатие на клавишу «Регистрация»
3. Указание регистрационной формы
4. Подтверждение имейл почты или телефонного номера
5. Задействование привилегии за регистрацию при наличии промокода
Новые игроки получают великодушный начальный бонус, который может охватывать фриспины, денежные поощрения или компенсацию.
Логин в индивидуальный кабинет
Вход на сайте производится обычным методом. Требуется вписать учетные данные и секретный ключ, задействованные при открытии счета.
Важные моменты для конфиденциального входа:
– Применяйте надежный секретный ключ
– Активируйте 2FA верификацию
– Не фиксируйте пароли на чужих гаджетах
– Мониторьте адресную строку браузера
Характеристика премиальной схемы
Казино радует пользователей многочисленными вознаграждениями и кампаниями:
Стартовый набор
Новички способны надеяться на щедрое награду за начальный взнос. Традиционно это процентная премия к депонированной сумме плюс бесплатные вращения для популярных слотов.
Периодические промо
– 7-дневный кэшбек — компенсирование части утраченных денег
– Награды на очередные депозиты
– Специальные акции по праздникам
– Турниры с значительными премиальными пулами
Схема лояльности
Деятельные пользователи накапливают очки за произвольную ставку, которые затем обмениваются на реальные средства, free spins или специальные привилегии.
Кодовые слова: как задействовать
Промокоды — это особые сочетания символов, дающие доступ к эксклюзивным привилегиям.
Каким образом раздобыть актуальные промокоды:
– Авторизованные медийные сети казино
– Сотрудничающие порталы
– Email-информирование
– Тематические форумы
Вводится промокод в отдельное поле при создании аккаунта или внесении депозита депозита.
Телефонная версия и приложение
Нынешние геймеры любят проводить время с телефонных девайсов. Ресурс дает двойной метода для приятной портативной игры.
Отзывчивая версия
Онлайн версия самостоятельно подстраивается под габариты экрана. Не нуждается установки и действует в каждом современном браузере.
Телефонное приложение
Получить программу можно для гаджетов на Android и iOS. Достоинства app:
– Молниеносная активация
– Стабильная работа
– Автоматические-уведомления о акциях
– Самостоятельный минование блокировок
Процедура инсталляции несложен: нужно перейти на портал с мобильного устройства и следовать предписаниям.
Игровой коллекция
Библиотека игр насчитывает множество единиц от ведущих провайдеров.
Слоты
Азартные машины — крайне распространенная группа развлечений. Показаны обычные простые машины, новые видеослоты с премиальными стадиями, а также джекпотные суперпризы.
Live казино
Зона с действительными ведущими дает возможность прочувствовать дух истинного казино. Представлены варианты с рулеткой.
Вещание реализуется в отличном разрешении, имеется общение с крупье и иными участниками.
Соревнования
Регулярно проводятся состязания по разным слотам. Участие предоставляет право получить финансовые награды, даровые прокруты или особые презенты.
Денежные манипуляции
Платформа предоставляет большой выбор финансовых методов:
– Дебетовые карты
– Онлайн системы
– Цифровая валюта
– Финансовые платежи
Стартовая сумма депозита — приемлемая для основной части игроков. Обналичивание призов производится в кратчайшие временные рамки.
Отдел поддержки
Профессиональные операторы готовы оказать помощь постоянно. Доступны нижеследующие каналы коммуникации:
– Онлайн-чат
– Email
– Голосовая связь
– Социальные сети
Решения на стандартные запросы можно обнаружить в блоке FAQ.
Итог
Лицензионный ресурс казино и его актуальные зеркала предоставляют пользователям полный подключение ко всем сервисам сайта. Солидные вознаграждения, удобная портативная версия, гигантский выбор слотов и профессиональная помощь формируют игровой времяпрепровождение исключительно беспроблемным и защищенным.
AI Creator Platform Turn one photo into a full photoshoot. Pick a vibe, drop your photo, get a whole set of cinematic shots in the same style
Актуальные сетевые казино предлагают пользователям обширный ассортимент возможностей для удобной игры. Впрочем иногда подключение к официальному платформе может быть ограниченным. В таких моментах на помощь приходят Клубника казино регистрация, которое гарантирует бесперебойный вход ко всем возможностям платформы.
Что такое рабочее зеркало казино
Альтернативный сайт — это абсолютная версия лицензионного веб-сайта, которая размещается по другому URL. Альтернативный ресурс имеет полный инструментарий оригинального портала, включая личный кабинет, средства и сведения транзакций.
Основные достоинства применения зеркала:
– Непрерывный доступ к сайту
– Стопроцентная идентичность функционала
– Конфиденциальность индивидуальных информации
– Поддержка всех имеющихся поощрений
Как найти актуальное зеркало в данный момент
Имеется ряд проверенных методов получения свежей адреса:
Проверенные каналы:
1. Email рассылка — администрация периодически отправляет письма с актуальными URL
2. Социальные сети — официальные каналы публикуют релевантную данные
3. Отдел поддержки — консультанты предоставляют достоверные URL
4. Телефонное приложение — обеспечивает минуть блокировки
Оформление профиля на основном портале
Операция оформления отнимает лишь пару минут и содержит из нижеследующих этапов:
1. Попадание на главный портал или функционирующее зеркало
2. Нажатие на элемент «Регистрация»
3. Заполнение регистрационной бланка
4. Подтверждение почтовой почты или сотового номера
5. Применение привилегии за регистрацию при существовании промокода
Свежие пользователи приобретают солидный стартовый подарок, который может предполагать бесплатные вращения, денежные бонусы или возврат средств.
Вход в индивидуальный кабинет
Авторизация на сайте производится привычным путем. Нужно ввести никнейм и кодовое слово, указанные при регистрации.
Существенные нюансы для надежного входа:
– Эксплуатируйте сложный шифр
– Активируйте двойную проверку
– Не фиксируйте данные на общественных устройствах
– Мониторьте доменную строку браузера
Описание бонусной системы
Гемблинг-сайт награждает клиентов всевозможными поощрениями и промо:
Стартовый комплект
Свежие игроки вправе рассчитывать на великодушное награду за стартовый депозит. Обычно это процентная премия к переведенной количеству плюс free spins для популярных слотов.
Постоянные кампании
– 7-дневный cashback — возвращение части утраченных денег
– Бонусы на последующие вклады
– Особые офферы по торжествам
– Конкурсы с крупными премиальными пулами
Программа лояльности
Деятельные пользователи зарабатывают пункты за каждую раунд, которые затем превращаются на фактические средства, бесплатные вращения или специальные преимущества.
Купоны: как применять
Бонус-коды — это особые комбинации букв и цифр, предоставляющие право к специальным вознаграждениям.
Откуда получить рабочие промокоды:
– Проверенные общественные сети казино
– Сотрудничающие ресурсы
– Email-рассылка
– Отраслевые группы
Активируется промокод в специальное поле при регистрации или внесении депозита баланса.
Смартфонная версия и приложение
Нынешние игроки выбирают проводить время с портативных устройств. Ресурс предоставляет 2 решения для комфортной мобильной игры.
Адаптивная модификация
Онлайн версия автоматически подстраивается под диагональ монитора. Не просит инсталляции и оперирует в каждом новом браузере.
Смартфонное приложение
Загрузить приложение можно для гаджетов на Android и iOS. Выгоды app:
– Молниеносная активация
– Стабильная работа
– Всплывающие-уведомления о поощрениях
– Автоматический избегание блокировок
Этап скачивания элементарен: требуется перейти на веб-сайт с мобильного девайса и подчиняться инструкциям.
Гемблинг каталог
Библиотека развлечений насчитывает тысячи единиц от передовых производителей.
Слоты
Развлекательные автоматы — крайне востребованная группа развлечений. Представлены стандартные трехбарабанные слоты, передовые видеослоты с бонусными стадиями, а также накопительные призы.
Live казино
Зона с реальными дилерами обеспечивает прочувствовать антураж настоящего казино. Доступны столы с рулеткой.
Трансляция производится в высоком четкости, присутствует чат с раздающим и другими геймерами.
Соревнования
Постоянно запускаются состязания по различным играм. Участие дает шанс выиграть валютные вознаграждения, фриспины или уникальные презенты.
Финансовые действия
Платформа предлагает значительный спектр платежных инструментов:
– Пластиковые карты
– Цифровые кошельки
– Биткоин
– Счетовые платежи
Стартовая количество вклада — разумная для массы геймеров. Обналичивание выигрышей производится в короткие сроки.
Отдел поддержки
Опытные сотрудники способны помочь постоянно. Имеются нижеследующие каналы общения:
– Онлайн-чат
– Email
– Голосовая линия
– Медийные сети
Разъяснения на частые темы можно найти в разделе FAQ.
Итог
Главный ресурс казино и его функционирующие зеркала гарантируют клиентам максимальный подключение ко всем сервисам ресурса. Щедрые привилегии, приятная телефонная версия, впечатляющий коллекция слотов и опытная ассистенция создают азартный процесс исключительно беспроблемным и защищенным.
luckmore
Народ, случайно наткнулся на лакмор, искал вообще другое. В итоге оказался канал с актуальными ссылками и бонусами. Проверил — переходы работают нормально. Ничего подозрительного не заметил. Вроде живой канал, не мусор
лучшая нейросеть для учебы лучшая нейросеть для учебы .
Студия дизайна https://dill-design.ru интерьера в Санкт-Петербурге. Реализовываем проекты в г. Санкт-Петербург и г. Москва. Более 100 довольных заказчиков доверили нам создание своего интерьера. От разработки дизайн проекта до его качественной реализации. Авторский надзор на всех этапах реализации. Комплектация в подарок. Закажите расчет дизайн-проекта
Передовые виртуальные казино предоставляют клиентам большой выбор опций для приятной игры. Однако иногда подключение к основному сайту может быть ограниченным. В таких случаях на выручку приходит Ретро, которое обеспечивает постоянный вход ко всем сервисам платформы.
Что такое действующее зеркало казино
Альтернативный сайт — это точная версия главного портала, которая находится по альтернативному интернет-адресу. Копия имеет все инструментарий главного ресурса, включая личный кабинет, средства и историю транзакций.
Главные выгоды эксплуатации зеркала:
– Постоянный соединение к сайту
– Полная тождественность возможностей
– Конфиденциальность пользовательских информации
– Поддержка всех имеющихся вознаграждений
Как найти действующее зеркало сегодня
Есть несколько достоверных методов нахождения текущей адреса:
Официальные источники:
1. Электронная рассылка — администрация систематически пересылает информацию с свежими адресами
2. Коммуникационные сети — официальные страницы выкладывают свежую данные
3. Сервис поддержки — сотрудники дают достоверные адреса
4. Портативное приложение — позволяет избегать блокировки
Создание аккаунта на основном ресурсе
Процесс регистрации занимает лишь пару минут и состоит из данных шагов:
1. Вход на лицензионный сайт или актуальное зеркало
2. Клик на клавишу «Регистрация»
3. Внесение персональной формы
4. Подтверждение email почты или телефонного номера
5. Задействование бонуса за регистрацию при наличии промокода
Начинающие клиенты приобретают щедрый начальный приз, который может включать даровые прокруты, монетарные поощрения или компенсацию.
Доступ в персональный кабинет
Вход на портале производится традиционным способом. Нужно указать логин и код доступа, указанные при оформлении.
Ключевые моменты для надежного входа:
– Применяйте надежный пароль
– Включите двойную проверку
– Не сохраняйте данные на публичных устройствах
– Отслеживайте интернет строку браузера
Обзор поощрительной программы
Игорный портал балует пользователей различными бонусами и специальными предложениями:
Начальный букет
Начинающие имеют возможность претендовать на великодушное бонус за дебютный взнос. Как правило это пропорциональная надбавка к депонированной количеству плюс free spins для востребованных слотов.
Регулярные промо
– Семидневный возврат средств — возмещение процентной доли потерянных денег
– Поощрения на последующие вклады
– Эксклюзивные предложения по торжествам
– Состязания с крупными наградными пулами
Система лояльности
Постоянные пользователи собирают пункты за всякую бет, которые затем меняются на фактические финансы, бесплатные вращения или особые преимущества.
Купоны: как применять
Кодовые комбинации — это уникальные сочетания символов, дающие право к эксклюзивным вознаграждениям.
Где взять свежие промокоды:
– Проверенные социальные сети казино
– Сотрудничающие площадки
– Email-новостная лента
– Специализированные форумы
Активируется промокод в соответствующее поле при создании аккаунта или внесении депозита баланса.
Телефонная версия и приложение
Современные пользователи предпочитают развлекаться с телефонных девайсов. Платформа дает 2 метода для приятной мобильной игры.
Отзывчивая модификация
Интернет версия автоматически адаптируется под диагональ экрана. Не просит инсталляции и оперирует в произвольном новом браузере.
Мобильное приложение
Получить app можно для аппаратов на Android и iOS. Плюсы app:
– Молниеносная открытие
– Надежная действие
– Автоматические-уведомления о промо
– Самостоятельный минование блокировок
Операция скачивания легок: требуется зайти на веб-сайт с портативного гаджета и подчиняться указаниям.
Гемблинг ассортимент
Коллекция игр насчитывает огромное количество наименований от ведущих производителей.
Слоты
Гемблинг машины — максимально востребованная раздел аттракционов. Размещены обычные трехбарабанные автоматы, новые графические аппараты с премиальными уровнями, а также джекпотные суперпризы.
Live казино
Отдел с настоящими крупье предоставляет испытать антураж истинного казино. Открыты игры с рулеткой.
Трансляция реализуется в HD четкости, обеспечивается коммуникация с раздающим и прочими игроками.
Соревнования
Регулярно организуются турниры по всевозможным играм. Вступление дает шанс завоевать денежные выигрыши, фриспины или эксклюзивные привилегии.
Денежные действия
Сайт предлагает значительный выбор платежных инструментов:
– Пластиковые карты
– Электронные платформы
– Крипта
– Банковские транзакции
Низшая объем депозита — доступная для массы игроков. Получение призов производится в короткие сроки.
Служба поддержки
Опытные консультанты готовы оказать помощь 24/7. Представлены нижеследующие каналы связи:
– Живой-чат
– Email
– Телефонная связь
– Общественные сети
Разъяснения на стандартные запросы можно найти в блоке FAQ.
Вывод
Лицензионный портал казино и его действующие зеркала обеспечивают пользователям абсолютный вход ко всем возможностям платформы. Значительные привилегии, приятная портативная версия, колоссальный коллекция развлечений и опытная помощь формируют гемблинг процесс исключительно приятным и безопасным.
Передовые онлайн казино дают игрокам широкий диапазон функций для комфортной игры. Но иногда вход к главному порталу может стать заблокированным. В таких случаях на помощь появляется Vovan зеркало, которое гарантирует непрерывный вход ко всем сервисам платформы.
Что такое действующее зеркало казино
Дубликат — это абсолютная копия официального сайта, которая хостится по другому URL. Копия поддерживает все функционал главного портала, включая персональный кабинет, счет и историю операций.
Основные выгоды задействования зеркала:
– Круглосуточный вход к сайту
– Полная идентичность опций
– Конфиденциальность персональных сведений
– Поддержка всех вознаграждений
Как разыскать актуальное зеркало на текущий день
Существует ряд проверенных способов нахождения актуальной ссылочной информации:
Официальные ресурсы:
1. Почтовая рассылка — администрация регулярно пересылает информацию с действующими адресами
2. Медийные сети — проверенные каналы постят релевантную информацию
3. Департамент поддержки — операторы сообщают достоверные домены
4. Портативное приложение — позволяет обходить блокировки
Создание аккаунта на лицензионном портале
Процесс создания аккаунта занимает лишь несколько минут и состоит из нижеследующих этапов:
1. Вход на лицензионный портал или действующее зеркало
2. Нажатие на элемент «Открыть счет»
3. Заполнение пользовательской формы
4. Подтверждение email почты или мобильного номера
5. Включение вознаграждения за регистрацию при присутствии промокода
Свежие геймеры зарабатывают великодушный начальный презент, который может охватывать бесплатные вращения, валютные поощрения или кэшбек.
Вход в персональный кабинет
Авторизация на ресурсе осуществляется привычным методом. Достаточно вписать имя пользователя и секретный ключ, указанные при оформлении.
Важные нюансы для надежного входа:
– Применяйте сложный пароль
– Задействуйте двухэтапную аутентификацию
– Не фиксируйте коды на публичных гаджетах
– Проверяйте доменную строку браузера
Характеристика поощрительной системы
Игровая платформа одаривает клиентов разнообразными поощрениями и кампаниями:
Вступительный пакет
Новички могут надеяться на существенное награду за стартовый депозит. Традиционно это процентовая премия к зачисленной величине плюс бесплатные вращения для топовых слотов.
Периодические акции
– Недельный возврат средств — возвращение процентной доли проигранных финансов
– Награды на последующие пополнения
– Эксклюзивные офферы по событиям
– Турниры с большими наградными банками
Схема привилегий
Деятельные геймеры получают очки за каждую игру, которые затем конвертируются на действительные финансы, free spins или эксклюзивные преимущества.
Купоны: как активировать
Промокоды — это специальные последовательности букв и цифр, предоставляющие право к дополнительным бонусам.
Откуда взять актуальные промокоды:
– Авторизованные медийные сети казино
– Союзнические порталы
– Email-информирование
– Специализированные сообщества
Прописывается промокод в соответствующее поле при регистрации или зачислении средств депозита.
Мобильная версия и приложение
Актуальные игроки предпочитают проводить время с мобильных аппаратов. Платформа дает 2 метода для беспроблемной мобильной игры.
Responsive вариант
Онлайн версия сама адаптируется под параметры экрана. Не требует инсталляции и функционирует в каждом свежем браузере.
Телефонное приложение
Скачать программу можно для устройств на Android и iOS. Преимущества app:
– Молниеносная активация
– Стабильная работа
– Всплывающие-уведомления о бонусах
– Самостоятельный преодоление блокировок
Процесс скачивания прост: достаточно открыть на сайт с портативного девайса и следовать указаниям.
Развлекательный каталог
Каталог развлечений содержит несколько тысяч наименований от передовых разработчиков.
Слоты
Развлекательные машины — наиболее популярная раздел забав. Представлены классические винтажные автоматы, актуальные видео-автоматы с бонусными раундами, а также накопительные суперпризы.
Live казино
Раздел с реальными раздающими дает возможность почувствовать антураж истинного казино. Доступны варианты с баккарой.
Стриминг реализуется в превосходном формате, присутствует коммуникация с раздающим и остальными геймерами.
Состязания
Периодически устраиваются соревнования по всевозможным слотам. Присоединение дает шанс выиграть монетарные награды, фриспины или эксклюзивные поощрения.
Платежные манипуляции
Ресурс поддерживает обширный выбор платежных способов:
– Кредитные карты
– Виртуальные системы
– Криптовалюта
– Финансовые переводы
Стартовая количество пополнения — разумная для преобладающего числа пользователей. Обналичивание денег осуществляется в короткие интервалы.
Отдел поддержки
Квалифицированные сотрудники расположены помочь постоянно. Доступны следующие каналы контакта:
– Веб-чат
– Email
– Мобильная горячая линия
– Коммуникационные сети
Ответы на типовые проблемы можно обнаружить в блоке FAQ.
Резюме
Официальный ресурс казино и его функционирующие зеркала обеспечивают геймерам совершенный подключение ко всем возможностям сайта. Великодушные бонусы, удобная телефонная версия, гигантский каталог игр и квалифицированная помощь формируют игровой опыт крайне беспроблемным и надежным.
reputable online pharmacy https://joeasymeds.top/# best online pharmacies
Передовые онлайн-казино предоставляют пользователям большой спектр возможностей и поощрительных предложений. Вход к ресурсу осуществляется через основной ресурс или его рабочее зеркало Лев, что обеспечивает бесперебойную игру.
В чем суть актуальное зеркало казино
Альтернатива — это точная реплика официального ресурса, сделанная для решения ограничений. Действующее зеркало обеспечивает пользователям получить вход к предпочитаемым развлечениям в каждое время.
Подлинное зеркало содержит всеми характеристиками главного сайта:
– Полный список развлечений
– Учетная запись с сохраненными параметрами
– Действующие поощрения
– Гарантированные платежные транзакции
Оформление профиля на официальном веб-сайте
Алгоритм создания аккаунта занимает всего считанные минут. Первым участникам необходимо:
1. Перейти на официальный веб-сайт или актуальное зеркало
2. Выбрать на клавишу “Зарегистрироваться”
3. Указать нужные сведения
4. Активировать электронную почту
5. Произвести начальный вклад
Стартовый бонус зачисляется моментально после завершения всех этапов.
Подключение в профиль
Действующие участники могут совершить авторизацию применяя:
– Никнейм и шифр
– Данные телефона
– Адрес
Личный кабинет открывает право к регулированию счетом, истории игр и текущим бонусам.
Поощрения и кампании
Развлекательная система привлекает лояльных участников выгодными бонусами:
Начальный набор
– Премия на стартовый депозит до 100%
– Фриспины на востребованные слоты
– Экстра бонусы за дальнейшие пополнения
Купоны
Особые коды открывают возможность на активацию уникальных вознаграждений. Свежие купоны выставляются в секции “Бонусы”.
Кешбэк
Постоянный бонус достигает до 10% от использованных денег. Возмещение выплачивается моментально.
Программа лояльности
Активные участники зарабатывают поинты, которые превращаются на действительные финансы или даровые спины.
Адаптивный портал и программа
Ради комфорта клиентов сделана полноценная портативная платформа. Отзывчивый дизайн позволяет беспрепятственно участвовать с всякого переносного девайса.
Плюсы APP:
– Оперативный запуск к слотам
– Настроенный вид
– Надежная работа
– Сообщения о актуальных событиях
Установить софт можно свободно с основного сайта для гаджетов на Android и iOS.
Коллекция игр
Машины
Каталог включает более 2000 игр от топовых разработчиков:
– Классические игры
– Мультимедийные игры
– Слоты с джекпотом
– Тематические автоматы
Live казино
Раздел Live казино обеспечивает развлечение с живыми диллерами в прямом времени:
– Рулетка
– Двадцать одно
– Карты
– Покер
Состязания
Постоянные соревнования с большими выигрышными бюджетами организуются систематически. Вход в конкурсах возможно всем созданным участникам.
Расчетные варианты
Депозиты и снятия денег реализуются через популярные методы:
– Кредитные средства
– Цифровые счета
– Крипто
– Счетные платежи
Стартовый взнос — от 100 рублей. Вывод выигрышей проводится в течение 24 периода.
Команда поддержки
24/7 отдел support готова помочь в исправлении любых проблем:
– Живой чат
– Email
– Связь
– Соц сети
Надежность и разрешение
Официальный ресурс работает на основании глобальной разрешения. Любые данные участников обезопасены актуальным SSL-кодированием.
Заключение
Функционирующее зеркало предоставляет бесперебойный подключение к выбранным развлечениям, привлекательным промокодам и комфортным функциям. Зарегистрируйтесь сегодня и обретите первый поощрение!
https://t.me/luckmorecasino_official
Искал luckmore casino бонусы и вышел сюда. Есть промики, фриспины и ссылки. Проверил — все открывается. Уже пару раз использовал. Вроде норм
Характеристика главного веб-сайта
Современные сетевые казино предоставляют игрокам богатый набор развлечений и перспектив. Главный портал Килограмм обеспечивает защищенный вход к гемблинг услугам.
Актуальное зеркало: возможность на сегодня
Альтернативный адрес служит в качестве полную копию официального портала. Официальное зеркало помогает игрокам миновать потенциальные ограничения.
Достоинства эксплуатации зеркала
Основные преимущества включают:
– Стабильный доступ к платформе
– Удержание любых опций официального сайта
– Защита личных материалов
– Такой же функционал
Открытие счета на портале
Механизм создания аккаунта отличается простотой и практичностью. Начинающие участники требуется:
1. Открыть основной сайт или его зеркало
2. Нажать на кнопку создания аккаунта
3. Внести требуемые данные
4. Валидировать электронную почту
5. Совершить начальный авторизацию
Приз за оформление
Дебютанты получают щедрый приветственный подарок. Подобное премия может охватывать:
– Денежные бонусы
– Даровые вращения
– Расширенный процент компенсации
Авторизация в собственный раздел
Активные клиенты в состоянии оперативно авторизоваться в собственный раздел, используя учетные данные и код. Личный кабинет предоставляет шанс к:
– Регулированию счетом
– Журналу операций
– Действующим призам
– Конфигурации аккаунта
Бонусы и предложения
Портал регулярно проводит всевозможные мероприятия для игроков.
Виды призов
Ключевые формы бонусов:
– Пополнительные подарки – коэффициент от суммы депозита
– Прокруты – даровые вращения в аппаратах
– Компенсация – возмещение доли потерянных средств
– Призовые трофеи – вознаграждения за выступление в соревнованиях
Промокоды
Специальные ваучеры обеспечивают приобрести дополнительные бонусы. Игроки в состоянии отыскать их на аффилиатных площадках или получить в новостях.
Мобильная версия и программа
Современные пользователи ценят портативный игровой процесс.
Возможности портативной платформы
– Responsive облик для любых устройств
– Совокупный возможность к слотам
– Стремительная загрузка
– Удобное управление
Установить софт
Mobile app предложено для установки на аппараты с базовыми платформами Android и iOS. Софт предоставляет:
– Надежную деятельность
– Всплывающие алерты о бонусах
– Моментальный путь к любимым автоматам
Развлекательный выбор
Игровой клуб предлагает обширную галерею игровых забав.
Игровые машины
Ассортимент развлекательных машин включает:
– Классические игры
– Передовые игры
– Накопительные игры
– Сюжетные игры
Live казино
Категория лайв столов предлагает право состязаться с реальными диллерами. Представлены:
– Европейская рулетка
– 21
– Baccarat
– Poker
Состязания
Постоянные соревнования обеспечивают игрокам конкурировать за внушительные призовые банки. Конкурсная программа обновляется постоянно.
Денежные процедуры
Портал предоставляет обилие опций пополнения и снятия финансов:
– Кредитные карточки
– Цифровые платежные системы
– Банковские трансферы
– Крипто
Все транзакции осуществляются защищенно с задействованием передовых протоколов кодирования.
Сервис сопровождения
Опытная служба саппорта работает круглосуточно. Обратиться с специалистами можно через:
– Онлайн чат
– Почтовую почту
– Телефон
– Соц медиа
Безопасность и аккредитация
Казино действует на основании официальной разрешения. Такое обеспечивает:
– Прозрачность развлекательного процесса
– Сохранность конфиденциальных информации
– Своевременные выплаты
– Легальный гемблинг
Заключение
Главный портал и его рабочие альтернативные адреса обеспечивают клиентам абсолютный комплекс возможностей для приятной и прибыльной игры. Значительные призы, разнообразные развлечения, профессиональная помощь и надежная инфраструктура транзакций превращают ресурс оптимальным решением для поклонников игровых забав.
mostbet canlı kazino qaydaları mostbet2013.help
Türkiye’de “online casino” araması uzun zamandır dikkat çeken konulardan biri.
Bunun sebebi yalnızca eğlence arayışı değil;
dijitalleşme, mobil kullanımın yükselmesi ve sosyal medyada yayılan içerikler de bu ilgiyi artırıyor.
Ancak işin görünen yüzü ile gerçek tarafı aynı değil.
“Online casino Türkiye” ile “Türkiye online casino siteleri” benzeri kelimeler internette sıkça aranmasına rağmen, ortaya çıkan tablo çoğu zaman reklamların sunduğu kadar
basit değil. Türkiye’de bu alanın yasal sınırları, finansal riskleri ve kişisel güvenlik
boyutu son derece ciddi.
My web page … Telegrapf
Jogo do Tigrinho no Pix R$5: raspadinha com até 200 giros garantidos agora!
Характеристика основного сайта
Современное онлайн-казино обеспечивает своим игрокам широкий ассортимент услуг и бонусов. Официальный сайт РЎСѓРєР° оперирует непрерывно, гарантируя возможность к известным симуляторам, live-казино и разнообразным предложениям.
Актуальное зеркало: доступ к сайту
Что такое дубликат казино
Копия составляет собой идентичную версию главного ресурса с отличным сетевым адресом. Действующее зеркало предоставляет игрокам преодолевать блокировки и иметь надежный подключение к любимым автоматам.
Как получить текущее зеркало сегодня
Свежие адреса на проверенное зеркало появляются через:
– Электронную подписку
– Официальные публичные сети
– Сервис обслуживания
– Партнерские сайты
Регистрация на ресурсе
Ход созданияаккаунта
Оформление отнимает пару минут и содержит следующие этапы:
1. Открытие на главный портал или рабочее зеркало
2. Выбор кнопки “Зарегистрироваться”
3. Указание персональных реквизитов
4. Верификация аккаунта или мобильного
5. Создание ключа
Приз за регистрацию
Свежие пользователи обретают выгодные вступительные бонусы:
– Бонусные суммы на баланс
– Халявныеспины для автоматов
– Расширенный процент кешбэка
– Эксклюзивные купоны
Логин в индивидуальный кабинет
Действующие пользователи могут произвести доступ через главный портал или рабочее зеркало. Для этого требуется указать логин и ключдоступа, созданные при созданииаккаунта.
Опции личного профиля
В собственном профиле предоставлены такие инструменты:
– Изменение личными реквизитами
– Ввод кошелька
– Получение денег
– Ввод купонов
– Отслеживание истории ставок
– Регистрация в соревнованиях
Подарки и промо
Категории бонусов
Казино балует своих участников многочисленными наградными системами:
– Вступительный бонус — щедрые подарки на дебютные вклады
– Freespins — подарочные спины в популярных играх
– Возврат — систематический компенсация части убытков
– Программа поощрения — уникальные бонусы для регулярных пользователей
Ваучеры и их ввод
Уникальные купоны предоставляют бонусные бонусы. Для применения требуется указать код в нужное окно в персональном кабинете.
Геймплейный набор
Игры
Каталог игровых машин насчитывает тысячи вариантов от известных производителей:
– Классические слоты
– Видео автоматы
– Накопительные симуляторы
– Тематические автоматы
Live казино
Зона Live-казино дарит процесс с реальными дилерами в режиме актуального времени:
– Рулетка
– Blackjack
– Пунтобанко
– Покер
Конкурсы
Периодические турниры с крупными наградными фондами организуются еженедельно. Участники конкурируют за лидерство в таблице.
Смартфонная адаптация и APP
Мобильная адаптация веб-сайта
Официальный сайт целиком оптимизирован для планшетных аппаратов. Участники способны пользоваться автоматы непосредственно через интернет-браузер без необходимости инсталляции.
Софт для инсталляции
Официальное портативное приложение предоставляется для скачивания на гаджеты с операционными платформами Android и iOS. Софт обеспечивает:
– Мгновенный доступ к слотам
– Устойчивую функциональность
– Мгновенные-оповещения о акциях
– Удобный оформление
Заключение
Официальный веб-сайт казино и его функционирующие альтернативы дают участникам полный доступ к качественным геймплейным сервисам. Большие поощрения, различные промо, комфортная мобильная реализация и профессиональная поддержка создают азартный досуг крайне комфортным и прибыльным.
Обзор официального портала
Передовые онлайн казино предоставляют клиентам обширный ассортимент развлечений и перспектив. Официальный ресурс ДжиВиСпин сайт обеспечивает защищенный доступ к гемблинг возможностям.
Действующее зеркало: доступ прямо сейчас
Зеркало является собой абсолютную реплику основного сайта. Официальное зеркало обеспечивает пользователям обходить потенциальные барьеры.
Выгоды эксплуатации зеркала
Ключевые преимущества содержат:
– Непрерывный доступ к платформе
– Поддержание абсолютно всех опций главного сайта
– Защита персональных сведений
– Идентичный набор функций
Создание аккаунта на сайте
Процедура открытия счета знаменуется легкостью и удобством. Недавние участники должны:
1. Зайти на главный веб-сайт или его зеркало
2. Щелкнуть на кнопку открытия счета
3. Ввести нужные поля
4. Подтвердить email адрес
5. Осуществить начальный вход
Приз за регистрацию
Новички зарабатывают солидный вступительный приз. Подобное награда в состоянии предусматривать:
– Монетарные суммы
– Безвозмездные вращения
– Повышенный процент компенсации
Вход в индивидуальный профиль
Существующие пользователи в состоянии оперативно зайти в персональный профиль, эксплуатируя никнейм и пароль. Личный профиль дает доступ к:
– Контролю счетом
– Записям платежей
– Действующим поощрениям
– Настройкам аккаунта
Призы и промо
Сайт систематически проводит всевозможные предложения для участников.
Разновидности подарков
Основные виды вознаграждений:
– Денежные подарки – коэффициент от суммы пополнения
– Прокруты – complimentary спины в автоматах
– Кэшбек – компенсация доли затраченных денег
– Турнирные вознаграждения – вознаграждения за состязание в конкурсах
Промокоды
Особые купоны обеспечивают приобрести добавочные привилегии. Участники могут отыскать их на тематических площадках или приобрести в рассылке.
Портативная версия и софт
Прогрессивные клиенты предпочитают портативный геймплей.
Возможности mobile версии
– Гибкий дизайн для всех девайсов
– Абсолютный доступ к играм
– Оперативная загрузка
– Практичное контроль
Скачать app
Мобильное софт предложено для установки на гаджеты с операционными системами Android и iOS. Программа обеспечивает:
– Бесперебойную работу
– Пуш оповещения о акциях
– Моментальный путь к желанным слотам
Азартный выбор
Платформа дает богатую коллекцию гемблинг забав.
Автоматы
Коллекция азартных слотов содержит:
– Стандартные машины
– Современные слоты
– Джекпотные автоматы
– Тематические слоты
Live столы
Категория живых игр обеспечивает шанс соревноваться с настоящими крупье. Предложены:
– Американская рулетка
– Блэкджек
– Баккара
– Poker
Соревнования
Систематические чемпионаты позволяют пользователям бороться за значительные призовые банки. Соревновательная система изменяется каждую неделю.
Финансовые операции
Портал поддерживает множество вариантов зачисления и получения финансов:
– Кредитные карты
– Электронные кошельки
– Wire переводы
– Цифровые валюты
Любые транзакции осуществляются конфиденциально с применением прогрессивных методов кодирования.
Отдел поддержки
Компетентная служба помощи действует круглосуточно. Соединиться с менеджерами реально через:
– Online чат
– Email почту
– Горячую линию
– Social медиа
Безопасность и регулирование
Портал функционирует на фундаменте официальной сертификата. Данное обеспечивает:
– Справедливость развлекательного процесса
– Охрану персональных данных
– Пунктуальные выводы
– Легальный игровой процесс
Резюме
Главный портал и его рабочие дубликаты дают клиентам абсолютный спектр опций для удобной и выгодной времяпрепровождения. Щедрые бонусы, разнообразные игры, компетентная поддержка и проверенная инфраструктура транзакций формируют платформу оптимальным вариантом для ценителей развлекательных игр.
buy erectile dysfunction pills: ed pills pharmacy – where to get ed pills
https://corevitalpharmacy.com/# cialis for sale
mostbet typy na dziś https://www.mostbet2005.help
лакмор
Смотрел отзывы про лакмор и наткнулся на их телеграм. Там публикуют актуальные ссылки и бонусы. Я зашел через одну — все ок. Без редиректов и прочего. В целом норм тема
Решил накрутка поведенческих факторов заказать и нашёл статью с рекомендациями по выбору подрядчика. Цены, вопросы, тестовый период — всё описано.
Научитесь работать с давлением на эмоции и сохранять холодную голову при разговоре с манипуляторами и мошенниками
https://bit.ly/4bFAI49
Актуальные онлайн-казино предоставляют игрокам обилие вариантов для беспроблемной игры. Главный ресурс Килограмм обеспечивает возможность ко всем функциям и азартным играм. Однако при появлении технических трудностей на помощь приходят актуальные зеркала.
Что означает собой функционирующее зеркало
Копия казино — это идентичная реплика официального веб-сайта, находящаяся по дополнительному веб-адресу. Официальное зеркало хранит все функции, в том числе создание аккаунта, вход в персональный кабинет, бонусы и кодовые слова.
Дубликат на сегодня предоставляет:
– Бесперебойный доступ к игровым аппаратам
– Полную безопасность персональных информации
– Поддержку баланса и записей платежей
– Возможность использования всех бонусных программ
Открытие профиля на лицензионном портале
Процедура регистрации требует считанные минут. Новым пользователям следует:
1. Перейти на основной ресурс или рабочее зеркало
2. Выбрать кнопку «Создать аккаунт»
3. Ввести нужные поля
4. Верифицировать э-мейл почту
5. Применить кодовое слово при наличии
После окончания оформления профиля клиенты зарабатывают приз за регистрацию, что может включать бесплатные вращения или денежно-призовое премирование.
Авторизация в собственный кабинет
Индивидуальный кабинет обеспечивает полный мониторинг над азартным процессом. Через персональный аккаунт возможно:
– Вносить средства на кошелек
– Забирать выплаты
– Задействовать купоны
– Проверять хронологию игр
– Участвовать в турнирах
– Приобретать кешбэк
Характеристика поощрений и промо-предложений
Щедрая бонусная политика — важное козырь платформы. Главные виды премий:
Приветственный приз
Новички обретают великодушное поощрение на начальные пополнения. Сумма бонуса может доходить до 100-200% от величины вклада.
Free spins
Даровые спины начисляются для востребованных слотов. Количество фриспинов колеблется от 10 до 500 штук.
Кэшбек
Постоянный или помесячный отдача процентной доли потерянных финансов. Стандартный размер компенсации — 5-15%.
Турниры
Постоянные состязания с крупными призовыми банками. Конкурсанты соревнуются за топовые позиции в таблице лидеров.
Мобильная версия и приложуха
Адаптивная версия обеспечивает развлекаться с каждого устройства. Геймеры могут установить софт для iOS и Android или задействовать браузерную версию.
Достоинства мобильного программы:
– Быстрая загрузка слотов
– Удобный UI
– Push-уведомления о промо
– Вход через отпечаток пальца
Игровые автоматы и Live казино
Игровая база содержит множество игр от известных разработчиков.
Топовые секции автоматов:
– Обычные автоматы
– Видео-автоматы с бонусными раундами
– Прогрессивный джекпот игры
– Мегавейс слоты
Live казино
Зона live игорный зал предлагает партию с настоящими ведущими. Представлены традиционные развлечения:
– Рулетка
– Blackjack
– Baccarat
– Карибский покер
Как отыскать функционирующее зеркало
Раздобыть актуальную ссылку на зеркало можно разными путями:
1. Зарегистрироваться на email-рассылку
2. Отслеживать за обновлениями в соц сетях
3. Контактировать в департамент поддержки
4. Запомнить рабочее зеркало в фавориты
Заключение
Лицензионный ресурс и его действующие дубликаты дают постоянный путь к азартным автоматам. Богатые бонусы, разнообразные промокоды, эргономичное портативное софт и профессиональная служба поддержки делают развлекательный геймплей крайне беспроблемным и защищенным.
Нынешние онлайн-казино гарантируют пользователям массу путей для приятной игры. Центральный веб-портал Болливуд казино предоставляет вход ко всем функциям и развлечениям. Однако при образовании программных неполадок на выручку спешат рабочие зеркала.
Что являет собой собой актуальное зеркало
Зеркало казино — это точная дубликат главного портала, находящаяся по альтернативному доменному имени. Подлинное зеркало поддерживает все характеристики, включая открытие профиля, вход в собственный кабинет, поощрения и промокоды.
Дубликат на сегодня гарантирует:
– Постоянный путь к развлекательным аппаратам
– Абсолютную защиту личных информации
– Удержание баланса и записей платежей
– Возможность использования всех акций
Создание учетной записи на официальном ресурсе
Ход оформления учетной записи требует несколько минут. Начинающим пользователям следует:
1. Зайти на основной портал или действующее зеркало
2. Нажать кнопку «Регистрация»
3. Внести запрашиваемые сведения
4. Верифицировать э-мейл почту
5. Применить кодовое слово при присутствии
После финиша создания аккаунта геймеры обретают подарок за регистрацию, какой может включать бесплатные вращения или денежное поощрение.
Вход в собственный кабинет
Персональный кабинет открывает всесторонний управление над азартным ходом. Через персональный аккаунт можно:
– Финансировать депозит
– Снимать выигрыши
– Использовать кодовые слова
– Отслеживать хронологию ставок
– Участвовать в состязаниях
– Забирать кэшбек
Характеристика бонусов и специальных предложений
Щедрая бонусная система — значимое достоинство проекта. Главные категории премий:
Вступительный приз
Дебютанты приобретают великодушное премирование на первые вклады. Сумма премии может доходить до 100-200% от суммы взноса.
Free spins
Халявные прокруты начисляются для топовых слотов. Количество free spins разнится от 10 до 500 штук.
Кэшбек
Регулярный или ежемесячный компенсация части проигранных денег. Средний процент возврата — 5-15%.
Состязания
Систематические соревнования с большими наградными банками. Игроки борются за верхние места в таблице лидеров.
Мобильная версия и приложуха
Мобильная версия обеспечивает наслаждаться игрой с каждого гаджета. Игроки могут закачать приложение для iOS и Android или применять интернет версию.
Преимущества портативного софта:
– Оперативная загрузка игр
– Эргономичный UI
– Push-уведомления о бонусах
– Вход через биометрию
Игровые автоматы и Live казино
Азартная база включает сотни игр от лидирующих поставщиков.
Популярные категории игр:
– Традиционные машины
– Видео-автоматы с бонусными этапами
– Джекпот игры
– Megaways слоты
Live игровой зал
Раздел live казино предоставляет развлечение с профессиональными дилерами. Представлены стандартные игры:
– Французская рулетка
– Блэкджек
– Baccarat
– Техасский холдем
Как отыскать актуальное зеркало
Найти актуальную URL на зеркало возможно несколькими методами:
1. Оформить подписку на емейл-уведомления
2. Отслеживать за обновлениями в соц сетях
3. Контактировать в сервис поддержки
4. Сохранить актуальное зеркало в избранное
Итог
Основной сайт и его функционирующие альтернативные адреса дают бесперебойный путь к игровым слотам. Великодушные вознаграждения, множественные купоны, эргономичное смартфонное софт и отличная служба поддержки создают развлекательный геймплей предельно комфортным и конфиденциальным.
CoreVital Pharmacy: CoreVital Pharmacy – Tadalafil Tablet
Перестанете бояться, что вас поймут неправильно и будете быстрее приходить к компромиссу. Станете смелее высказывать свои идеи дома и на работе
https://bit.ly/40OgXSU
нейросеть для студентов нейросеть для студентов .
Искал информацию именно про Яндекс и нашёл отличный гайд по накрутка пф яндекс. Автор объясняет специфику алгоритмов Яндекса и даёт стратегии, которые реально работают в 2026 году.
нейросеть для студентов нейросеть для студентов .
Доступ к ресурсу через проверенные зеркала
Нынешние сетевые казино дают игрокам непрерывный подключение к сервисам. Основной сайт РЎСѓРєР° действует бесперебойно, предлагая большой ассортимент гемблинг игр. Однако периодически формируются технические сложности или блокировки, потому важно иметь представление о присутствии актуальных зеркал.
Что означает собой основное зеркало казино
Дубликат — это точная реплика главного веб-сайта с таким же набором функций. Рабочее зеркало на данный момент обеспечивает миновать региональные ограничения и продолжать гемблинг.
Главные плюсы использования зеркал:
– Безграничный переход к собственному кабинету
– Удержание совокупных информации профиля
– Идентичный набор слотов
– Текущие бонусы и промо
Открытие счёта на сайте
Процедура создания аккаунта отнимает немного минут. Начинающие пользователи приобретают щедрый приз за запись, что может содержать:
– Начальный финансовый приз
– Безвозмездные фриспины для машин
– Специальные ваучеры
– Повышенный кешбэк
Для окончания записи требуется:
1. Переместиться на главный портал или дубликат
2. Выбрать кнопку «Зарегистрироваться»
3. Указать индивидуальные данные
4. Активировать электронную почту или телефон
5. Применить промокод (при присутствии)
Подключение в персональный кабинет
По завершении правильной регистрации геймеры в состоянии совершать вход через центральный веб-сайт или действующее зеркало. Персональный кабинет обеспечивает полный управление над аккаунтом:
– Архив ставок
– Внесение баланса
– Изъятие призов
– Администрирование бонусами
– Присутствие в турнирах
Привилегии и кампании казино
Сайт радует геймеров вариативными бонусными программами:
Приветственные призы
Новички приобретают богатый букет наград на начальные пополнения. Зачастую это охватывает частичную прибавку к величине депозита плюс комплиментарные вращения.
Постоянные акции
– Раз в неделю кешбэк до 15%
– Соревнования с призовыми пулами
– Подарки на годовщину рождения
– Специальные акции для VIP игроков
План вознаграждения
Регулярные геймеры получают пункты, которые возможно превратить на подлинные призы или особые преимущества.
Портативная редакция и утилита
Нынешние инновации обеспечивают развлекаться где комфортно. Портативная вариант веб-сайта независимо адаптируется под монитор всякого аппарата.
Выгоды карманного софта:
– Моментальная запуск слотов
– Эргономичный интерфейс
– Моментальные-оповещения о предложениях
– Опция скачать для Android и iOS
Реальное казино: атмосфера подлинного гемблинг заведения
Область Live заведения транспортирует клиентов в среду истинного развлекательного дома. Опытные ведущие управляют действие в режиме подлинного времени.
Доступные варианты:
– Европейская рулетка
– Блэкджек
– Карточная игра
– Покерная игра
Автоматы и игровые слоты
Собрание развлекательных автоматов насчитывает тысячи названий от топовых производителей. Каждый геймер обнаружит автомат по желанию:
– Винтажные барабаны
– Современные автоматы с призовыми раундами
– Прогрессивный-машины
– Мегавейс машины
Соревнования и раздачи
Постоянные конкурсы вносят адреналин и открывают шанс обрести внушительные вознаграждения. Вовлечение в турнирах нередко комплиментарное, а призовые банки насчитывают крупных величин.
Секьюрити и приватность
Ресурс эксплуатирует актуальные технологии шифрования для охраны реквизитов игроков. Каждые транзакционные процедуры выполняются через охраняемые соединения.
Резюме
Центральный портал и его действующие зеркала предоставляют стабильный подключение к качественным развлекательным сервисам. Щедрые поощрения, практичная смартфонная вариант, многообразие машин и компетентное Live-клуб делают платформу прекрасным опцией для фанатов гемблинг игр.
Zahnprobleme? zahntourismu zahnbehandlung im Ausland mit bis zu 70 % Ersparnis. Implantate, Zahnersatz, asthetische Zahnheilkunde und Diagnostik in modernen Kliniken. Wir unterstutzen Sie bei der Wahl des Landes und der Klinik und organisieren Ihre Reise von A bis Z.
Переход к порталу через действующие зеркала
Пользователи онлайн казино нередко контактируют с трудностью недоступности основного домена. Конкретно для решения этой ситуации созданы альтернативные адреса основного сайта. Рльдорадо обеспечивает стопроцентный переход ко всем возможностям ресурса.
Что такое функционирующее зеркало казино
Зеркало составляет собой полную реплику главного сайта с похожим возможностями. Главное расхождение — это доменное имя. Любые сведения пользователя, включая счет, бонусы и архив игр, продолжают быть неизменными.
Выгоды задействования зеркал
Актуальные зеркала располагают множеством ключевых выгод:
– Круглосуточный переход к выбранным развлечениям
– Полная сохранность персональных информации
– Неизменность всех параметров персонального кабинета
– Способность приобретения бонусов и включения в предложениях
Оформление профиля на основном ресурсе
Процедура создания аккаунта крайне несложен и требует несколько минут. Новые клиенты имеют возможность надеяться на солидный начальный приз за оформление.
Стадии формирования аккаунта
1. Доступ на главный сайт или его дубликат
2. Нажатие на клавишу “Создать аккаунт”
3. Ввод необходимых данных
4. Проверка электронной почты
5. Применение купона (если доступен)
Поощрения и кампании для игроков
Ресурс радует своих игроков различными призовыми системами.
Основные виды бонусов
Стартовый приз — крупное начисление для недавних пользователей, что в состоянии охватывать монетарные бонусы и бесплатные вращения.
Фриспины — способность использовать в известных автоматах даром.
Компенсация — долевой компенсация проигранных денег, который именно предоставляется раз в неделю или помесячно.
Бонусные коды — специальные наборы, дающие дополнительные выгоды.
Индивидуальный кабинет: функции и установки
Пользовательский раздел обеспечивает совершенный контроль над персональным активностью. В нем доступны:
– Администрирование средствами
– Записи переводов
– Действующие награды
– Параметры безопасности
– Подтверждение учетной записи
Карманная версия и софт
Новейшие клиенты предпочитают портативность. Платформа предлагает два пути для игры с портативных гаджетов.
Приспособленная телефонная платформа
Адаптивная платформа домена автоматически подстраивается под разрешение любого устройства. Нет необходимости загружать отдельное программное обеспечение.
Программа для гаджетов
Возможно установить фирменное программу для iOS и Android. Софт гарантирует:
– Мгновенный старт
– Оптимизированный интерфейс
– Мобильные-сообщения о акциях
– Устойчивую работу
Live игры: обстановка реального казино
Категория Live казино доставляет участников в обстановку истинного клуба. Квалифицированные крупье проводят игры в варианте живого времени.
Топовые Live-столы
– Европейская рулетка
– Двадцать одно
– Баккарат
– Карибский покер
Аппараты: ассортимент автоматов
Каталог развлекательных аппаратов содержит множество наименований от ведущих поставщиков. Игроки встретят:
– Стандартные аппараты
– Современные слоты
– Накопительный приз-игры
– Мегавейс
Состязания и специальные мероприятия
Постоянные соревнования обеспечивают клиентам состязаться друг с другом за внушительные призовые банки. Любой соревнование располагает свои требования присутствия и доску победителей.
Пути зачисления и получения средств
Площадка предоставляет множество денежных систем:
– Платежные картыы
– Цифровые платежные системы
– Криптовалюты
– Прямые отправления
Каждые транзакции реализуются надежно благодаря актуальным технологиям кодирования.
Служба помощи
Квалифицированные специалисты отдела обслуживания способны поддержать 24/7. Доступны данные методы контакта:
– Оперативный-чат
– Email-помощь
– Аудио линия
– Социальные сети
Вывод
Легальный сайт платформы и его рабочие зеркала дают участникам надежный и легкий вход к обширному спектру игровых услуг. Щедрые награды, периодические кампании, компетентная служба и комфортные расчетные способы делают развлекательный времяпрепровождение максимально увлекательным и выгодным.
dental problems? cosmetic dentistry abroad high-quality dental treatment abroad at affordable prices. Implants, veneers, prosthetics, and treatments with a guarantee. We select a clinic, organize your trip, and provide patient support throughout the entire process.
опубликовано здесь Чужие переписки вк
узнать больше Доступ к перепискам вк
Аргументация: как решать конфликты и убеждать людей
https://bit.ly/40OgXSU
This website is using a security service to protect itself from online attacks. The action you just performed triggered the security solution. There are several actions that could trigger this block including submitting a certain word or phrase, a SQL command or malformed data. Mas, uma última observação, nem todos os jogos estarão disponíveis no modo demo. Por exemplo, os jogos de casino ao vivo normalmente não estarão disponíveis de forma gratuita, pois precisam de dealers reais e muitos equipamentos para difundir os jogos. Mas aqui no Temple of Slots fazemos o possível para oferecer uma boa seleção de todos os jogos grátis, para que você tenha muitas opções para escolher. Pode jogar grátis na Gates of Olympus ao clicar em “Jogar Agora” presente nesta página, ou jogar através de um casino online como a Betclic ou a Solverde.
https://www.ibericasf.es/guia-de-apostas-para-principiantes-casino-leon-comece-com-confianca/
No final, fechámos nos 100.800€ com um lucro de 800€. E em termos de jogo, Gates of Hades não tem a mesma adrenalina instantânea da versão Gates of Olympus Betclic, mas oferece uma experiência mais estratégica, em que os multiplicadores vão crescendo. O Templo de Slots é um website que oferece jogos de cassino grátis, tais como slots (caça-níqueis), roleta ou blackjack, que pode jogar por diversão no modo demo, sem gastar o seu dinheiro. While we are all about the thrill of gaming, we also recognize the importance of responsible play. Shuffle is committed to promoting responsible gambling practices. We provide tools and resources to help you set limits on deposits, wagers, and session durations. O Gates of Olympus é um caça-níqueis da Pragmatic Play com tema da mitologia grega, com foco na casa dos deuses no topo do Monte Olimpo.
I got this web site from my pal who informed me regarding this
website and now this time I am browsing this site and reading very informative posts here.
Анализ главного веб-сайта
Актуальные сетевые казино предлагают пользователям разнообразный набор услуг и шансов. Официальный ресурс https://xn--b1afkebce4cvc1d.xn--p1ai предоставляет защищенный возможность к азартным функциям.
Актуальное зеркало: вход сегодня
Альтернативный адрес представляет в качестве абсолютную реплику главного сайта. Действующее зеркало помогает пользователям избегать потенциальные ограничения.
Преимущества эксплуатации зеркала
Главные плюсы предполагают:
– Постоянный вход к порталу
– Сохранение полных характеристик основного сайта
– Безопасность личных данных
– Равнозначный возможности
Оформление профиля на сайте
Механизм открытия счета выделяется простотой и практичностью. Недавние игроки требуется:
1. Посетить основной портал или его зеркало
2. Выбрать на кнопку оформления
3. Указать нужные поля
4. Активировать почтовую почту
5. Произвести первый авторизацию
Подарок за регистрацию
Новички зарабатывают солидный вступительный подарок. Данное поощрение может охватывать:
– Финансовые суммы
– Complimentary фриспины
– Расширенный процент компенсации
Логин в собственный кабинет
Существующие клиенты имеют возможность мгновенно авторизоваться в свой аккаунт, задействуя логин и шифр. Собственный аккаунт дает возможность к:
– Регулированию счетом
– Хронологии транзакций
– Активным подаркам
– Опциям учетной записи
Бонусы и акции
Ресурс систематически устраивает различные предложения для игроков.
Типы бонусов
Главные категории вознаграждений:
– Финансовые призы – процент от объема депозита
– Бесплатные вращения – даровые раунды в слотах
– Кэшбэк – компенсация процента проигранных денег
– Соревновательные награды – награды за игру в турнирах
Купоны
Специальные купоны помогают получить дополнительные бонусы. Игроки имеют возможность найти их на партнерских площадках или получить в рассылке.
Портативная вариант и софт
Прогрессивные клиенты выбирают портативный гейминг.
Характеристики портативной платформы
– Отзывчивый облик для всех аппаратов
– Абсолютный путь к автоматам
– Оперативная работа
– Эргономичное использование
Установить app
Портативное app доступно для downloading на аппараты с рабочими платформами Android и iOS. Софт дает:
– Надежную деятельность
– Push сообщения о акциях
– Оперативный запуск к избранным развлечениям
Гемблинг ассортимент
Портал обеспечивает обширную коллекцию игровых игр.
Аппараты
Ассортимент развлекательных машин охватывает:
– Классические слоты
– Передовые игры
– Прогрессивные слоты
– Тематические слоты
Live столы
Секция настоящих дилеров обеспечивает опцию участвовать с реальными ведущими. Представлены:
– Европейская рулетка
– 21
– Punto Banco
– Покер
Состязания
Периодические конкурсы дают возможность участникам конкурировать за крупные финансовые пулы. Соревновательная программа обновляется каждую неделю.
Денежные транзакции
Сайт предоставляет разнообразие опций внесения и снятия средств:
– Кредитные карточки
– Виртуальные кошельки
– Прямые переводы
– Цифровые валюты
Абсолютно все транзакции осуществляются безопасно с применением актуальных методов кодирования.
Сервис поддержки
Опытная команда support работает без перерыва. Соединиться с специалистами доступно через:
– Живой чат
– Email почту
– Телефонную линию
– Социальные медиа
Защита и аккредитация
Казино действует на основании действительной разрешения. Данное подтверждает:
– Честность игрового геймплея
– Безопасность конфиденциальных данных
– Своевременные перечисления
– Контролируемый геймплей
Вывод
Основной ресурс и его рабочие зеркала обеспечивают участникам совокупный набор опций для удобной и выгодной времяпрепровождения. Солидные вознаграждения, всевозможные автоматы, квалифицированная служба и проверенная платформа транзакций создают ресурс лучшим опцией для поклонников игровых развлечений.
Передовые онлайн-казино обеспечивают игрокам обилие вариантов для беспроблемной игры. Главный веб-портал http://www.crbpoddorie.ru предоставляет возможность ко всем функциям и играм. Однако при возникновении программных трудностей на подмогу приходят функционирующие альтернативные адреса.
Что представляет собой действующее зеркало
Альтернативный адрес казино — это идентичная дубликат официального ресурса, расположенная по запасному URL. Легитимное зеркало сохраняет все характеристики, вместе с регистрацию, доступ в персональный кабинет, бонусы и кодовые слова.
Копия на сегодня предоставляет:
– Постоянный путь к игровым аппаратам
– Стопроцентную защиту персональных сведений
– Удержание баланса и истории переводов
– Доступность всех промо-предложений
Открытие профиля на лицензионном портале
Ход создания аккаунта требует пару минут. Свежеиспеченным пользователям нужно:
1. Зайти на официальный ресурс или рабочее зеркало
2. Кликнуть кнопку «Зарегистрироваться»
3. Внести необходимые поля
4. Верифицировать email почту
5. Ввести промокод при наличии
После завершения создания аккаунта игроки приобретают подарок за регистрацию, который может включать бесплатные вращения или денежно-призовое поощрение.
Логин в собственный кабинет
Приватный кабинет открывает комплексный контроль над игровым процессом. Через индивидуальный аккаунт можно:
– Пополнять счет
– Снимать средства
– Применять кодовые слова
– Мониторить журнал пари
– Участвовать в конкурсах
– Обретать кешбэк
Обзор бонусов и акций
Щедрая премиальная система — важное достоинство казино. Центральные категории премий:
Вступительный бонус
Дебютанты получают богатое вознаграждение на стартовые депозиты. Величина приза может составлять 100-200% от объема пополнения.
Бесплатные вращения
Даровые вращения предоставляются для популярных машин. Объем free spins колеблется от 10 до 500 штук.
Кешбэк
Регулярный или помесячный компенсация процента потерянных средств. Стандартный объем возврата — 5-15%.
Турниры
Регулярные конкурсы с солидными премиальными пулами. Участники борются за верхние места в таблице лидеров.
Портативная версия и софт
Портативная версия позволяет играть с любого гаджета. Клиенты могут закачать app для iOS и Android или использовать интернет версию.
Достоинства портативного софта:
– Быстрая подзагрузка слотов
– Комфортный дизайн
– Всплывающие уведомления о бонусах
– Возможность входа через Touch ID
Игровые автоматы и Live казино
Азартная библиотека насчитывает тысячи позиций от ведущих разработчиков.
Востребованные типы слотов:
– Традиционные слоты
– Видео-автоматы с призовыми раундами
– Джекпот автоматы
– Мегавейс машины
Live игровой зал
Раздел live казино обеспечивает развлечение с настоящими дилерами. Имеются традиционные варианты:
– Европейская рулетка
– Двадцать одно
– Баккара
– Карибский покер
Как разыскать действующее зеркало
Найти актуальную адрес на зеркало возможно несколькими вариантами:
1. Подписаться на почтовую рассылку
2. Мониторить за обновлениями в соц сетях
3. Связаться в департамент поддержки
4. Заложить актуальное зеркало в избранное
Вывод
Основной портал и его рабочие дубликаты предоставляют стабильный доступ к азартным автоматам. Выгодные премии, разнообразные промокоды, эргономичное мобильное софт и профессиональная техподдержка поддержки делают игровой процесс крайне беспроблемным и надежным.
чат нейросеть для учебы nejroset-dlya-referatov-1.ru .
ии для школьников и студентов ии для школьников и студентов .
можно проверить ЗДЕСЬ Посетители вк
доставка цветов с бесплатной доставкой http://www.dostavka-cvetov-moskva495.ru .
умная нейросеть для учебы nejroset-dlya-referatov-6.ru .
Описание официального ресурса
Передовые интернет казино предоставляют пользователям широкий набор развлечений и возможностей. Главный портал Ретро гарантирует безопасный путь к игровым возможностям.
Функционирующее зеркало: путь в настоящий момент
Резервный сайт служит собой абсолютную версию официального ресурса. Официальное зеркало обеспечивает игрокам преодолевать вероятные ограничения.
Плюсы использования зеркала
Основные преимущества охватывают:
– Стабильный шанс к сайту
– Поддержание любых возможностей основного веб-сайта
– Защита индивидуальных информации
– Такой же функционал
Открытие счета на сайте
Процедура создания аккаунта характеризуется понятностью и практичностью. Начинающие клиенты требуется:
1. Открыть лицензионный портал или его зеркало
2. Нажать на клавишу оформления
3. Заполнить обязательные информацию
4. Подтвердить электронную почту
5. Осуществить начальный авторизацию
Подарок за создание аккаунта
Новые игроки приобретают солидный приветственный подарок. Данное вознаграждение может предусматривать:
– Монетарные начисления
– Безвозмездные спины
– Усиленный коэффициент компенсации
Доступ в личный профиль
Активные пользователи в состоянии оперативно получить доступ в свой профиль, эксплуатируя никнейм и пароль. Собственный профиль предлагает путь к:
– Управлению счетом
– Истории переводов
– Действующим призам
– Параметрам аккаунта
Вознаграждения и акции
Портал регулярно устраивает разнообразные акции для игроков.
Категории поощрений
Базовые формы поощрений:
– Финансовые начисления – доля от размера депозита
– Фриспины – даровые вращения в слотах
– Компенсация – отдача доли утраченных финансов
– Турнирные награды – премии за игру в конкурсах
Коды
Особые коды обеспечивают активировать добавочные преимущества. Пользователи способны обнаружить их на партнерских порталах или заработать в письмах.
Портативная редакция и приложение
Современные игроки ценят портативный досуг.
Функции переносной версии
– Гибкий вид для различных аппаратов
– Полный доступ к развлечениям
– Моментальная подгрузка
– Комфортное использование
Download app
Переносное программа предоставлено для скачивания на аппараты с базовыми платформами Android и iOS. Софт гарантирует:
– Стабильную работу
– Push оповещения о предложениях
– Оперативный путь к предпочитаемым развлечениям
Игровой портфель
Игровой клуб дает богатую галерею игровых игр.
Аппараты
Коллекция игровых слотов включает:
– Обычные автоматы
– Video автоматы
– Прогрессивные автоматы
– Сюжетные игры
Live дилеры
Категория живых дилеров предоставляет возможность играть с реальными ведущими. Предложены:
– Рулетка
– Блек-джек
– Punto Banco
– Poker
Соревнования
Постоянные чемпионаты позволяют клиентам соревноваться за солидные наградные пулы. Соревновательная система актуализируется каждую неделю.
Банковские действия
Сайт поддерживает обилие методов депозита и вывода средств:
– Пластиковые карточки
– Виртуальные платежные системы
– Прямые транзакции
– Криптовалюты
Любые платежи проходят безопасно с применением передовых систем кодирования.
Отдел support
Компетентная служба support функционирует круглосуточно. Коннектиться с консультантами реально через:
– Online чат
– Почтовую почту
– Телефон
– Соц медиа
Секьюрити и регулирование
Казино функционирует на базе законной лицензии. Данное гарантирует:
– Справедливость развлекательного процесса
– Защиту персональных информации
– Пунктуальные транзакции
– Контролируемый гейминг
Резюме
Основной сайт и его актуальные зеркала предоставляют игрокам совокупный ассортимент функций для удобной и прибыльной досуга. Значительные бонусы, всевозможные автоматы, опытная служба и безопасная инфраструктура выплат формируют казино оптимальным решением для фанатов развлекательных развлечений.
опубликовано здесь Доступ к перепискам вк
Вход к порталу через проверенные зеркала
Нынешние сетевые казино обеспечивают клиентам круглосуточный вход к развлечениям. Основной ресурс JVSpin скачать работает надёжно, обеспечивая широкий ассортимент игровых развлечений. Но временами появляются системные проблемы или барьеры, в связи с чем критично иметь представление о присутствии действующих зеркал.
Что собой представляет собой основное зеркало казино
Альтернатива — это идентичная дубликат официального веб-сайта с таким же интерфейсом. Действующее зеркало в настоящее время даёт возможность миновать локальные блокировки и возобновлять времяпрепровождение.
Ключевые выгоды задействования зеркал:
– Безграничный доступ к собственному кабинету
– Удержание любых информации аккаунта
– Аналогичный ассортимент игр
– Текущие вознаграждения и промо
Оформление на портале
Механизм создания аккаунта требует немного минут. Свежие игроки обретают привлекательный приз за регистрацию, который способен вмещать:
– Приветственный денежный кредит
– Комплиментарные фриспины для игр
– Эксклюзивные купоны
– Повышенный возврат
Для завершения оформления следует:
1. Зайти на главный ресурс или дубликат
2. Выбрать кнопку «Создать аккаунт»
3. Написать персональные сведения
4. Подтвердить электронную почту или мобильный
5. Активировать купон (если есть доступности)
Вход в собственный кабинет
Следом за корректной оформления клиенты способны выполнять авторизацию посредством основной портал или актуальное зеркало. Индивидуальный кабинет обеспечивает абсолютный регулирование над счётом:
– Летопись транзакций
– Зачисление счёта
– Снятие выигрышей
– Управление бонусами
– Участие в соревнованиях
Поощрения и акции казино
Ресурс балует клиентов многочисленными поощрительными схемами:
Начальные призы
Новички приобретают внушительный набор поощрений на первые пополнения. Как правило это предполагает пропорциональную добавку к сумме вклада плюс безвозмездные спины.
Периодические промо
– Каждонедельный компенсация до 15%
– Состязания с наградными банками
– Бонусы на день рождения
– Уникальные акции для статусных пользователей
Программа вознаграждения
Постоянные клиенты собирают баллы, что разрешено превратить на реальные призы или особые привилегии.
Мобильная вариант и софт
Нынешние инновации обеспечивают геймить везде угодно. Мобильная вариант ресурса автономно приспосабливается под дисплей любого гаджета.
Преимущества портативного ПО:
– Быстрая открытие развлечений
– Комфортный облик
– Моментальные-уведомления о бонусах
– Способность скачать для Android и iOS
Живое казино: атмосфера истинного развлекательного дома
Категория Live казино переносит пользователей в обстановку подлинного игорного клуба. Компетентные ведущие проводят действие в формате настоящего времени.
Доступные столы:
– Европейская рулетка
– Очко
– Баккара
– Покерная игра
Игровые машины и азартные аппараты
Коллекция гемблинг аппаратов включает сотни наименований от лидирующих производителей. Каждый геймер подберёт игру по вкусу:
– Стандартные барабаны
– Новые слоты с дополнительными уровнями
– Накопительный-машины
– Megaways игры
Соревнования и акции
Периодические турниры добавляют адреналин и предоставляют шанс заработать значительные призы. Включение в конкурсах часто даровое, а выигрышные суммы доходят до крупных объёмов.
Секьюрити и секретность
Ресурс использует актуальные методы криптографии для защиты сведений игроков. Совокупные платёжные операции выполняются через защищённые протоколы.
Вывод
Главный сайт и его действующие зеркала дают стабильный доступ к первоклассным игровым развлечениям. Привлекательные награды, удобная мобильная вариант, разнообразие слотов и высококлассное Live-казино создают платформу замечательным вариантом для фанатов игровых игр.
https://pads.jeito.nl/s/R5HXuNr7Tc
https://community.m5stack.com/user/paradiserealestate
Wybór gier wymienionych powyżej twórców jest najlepszą propozycją dla Ciebie, automat do gier genie jackpots megaways gra za darmo bez rejestracji tabletu. Szybsze wypłaty dzięki szerokiej gamie dostępnych opcji bankowych pomogą Ci wybrać tylko prawdziwe kasyna z profesjonalną obsługą klienta, a mianowicie –darmowe spiny i darmowe żetony. Od zakładów ze stałymi kursami po zakłady z progresywnymi nagrodami jackpot, wygrana total casino mitów. Klasyczne logo w Polsce zmienia się najczęściej z okazji Dnia Babci i Dziadka, Dnia Matki, Dnia Dziecka, Rocznicy Odzyskania Niepodległości oraz rocznic urodzin osób wybranych przez zespół Google (np. 130 rocznica urodzin Zofii Stryjeńskiej).
https://ivmtaesthetics.com/2026/03/19/aviator-gra-oparta-na-analizie-czy-warto/
Analytical cookies are used to understand how visitors interact with the website. These cookies help provide information on metrics such as the number of visitors, bounce rate, traffic source, etc. Kubanek Consultingdr Anita KubanekNIP: 967-117-12-65REGON: 387109493 Obecność multiplikatorów wymusza na graczach zmianę podejścia do gry. Zamiast skupiać się wyłącznie na statystycznej pewności wygranej, coraz częściej podejmują decyzje o ryzykownych zakładach, licząc na aktywację funkcji multiplikatora. Przykład z sweetbonanza1000.pl pokazuje, że nowoczesne gry często oferują różne ścieżki do aktywacji multiplikatorów, co wymusza od graczy większą uwagę na taktykę i zarządzanie budżetem. Faworyzowanie bliskich znajomych lub rodziny w zatrudnianiu i awansowaniu. Prowadzi do frustracji wśród kompetentnych pracowników i spadku jakości zarządzania. Niekompetencja na stanowiskach kierowniczych prowadzi do obniżenia jakości zarządzania i frustracji wśród wykwalifikowanych pracowników. Brak transparentnych procesów rekrutacyjnych może skutkować osłabieniem zespołu i utratą talentów.
Подключение к ресурсу и актуальные зеркала
Современные онлайн казино предоставляют пользователям большой набор развлечений. Основной ресурс Килограмм казино предоставляет стабильный подключение ко всем возможностям. При этом иногда появляются случаи, когда понадобится резервный метод авторизации.
Что представляет собой актуальное зеркало
Рабочее зеркало — это точная версия официального портала с другим сетевым названием. Копия сегодня помогает миновать возможные блокировки и поддерживать стабильный вход к выбранным слотам.
Официальное зеркало обладает идентичными возможностями, что и главный сайт:
– Весь список развлечений
– Собственный аккаунт с записанными информацией
– Актуальные поощрения и предложения
– Проверенные платежные действия
Регистрация и авторизация в платформу
Ход создания профиля на платформе отнимает считанные минут. Новым пользователям нужно:
1. Перейти на функционирующее зеркало сейчас
2. Выбрать элемент «Регистрация»
3. Указать необходимые информацию
4. Подтвердить электронную почту или номер связи
5. Забрать бонус за открытие аккаунта
Авторизация в персональный аккаунт производится с помощью предоставление имени пользователя и пароля.
Характеристика призовой системы
Щедрая призовая программа — важнейшее козырь казино. Клиенты получают разнообразные поощрения:
Начальные поощрения
Свежие пользователи способны ожидать на выгодный приз за открытие профиля. Чаще всего это совокупность опций, объединяющий:
– Пропорциональную надбавку к дебютному взносу
– Подарочные спины
– Extra средства на счет
Купоны и специальные акции
Периодические коды позволяют обретать экстра льготы. Применить их возможно в особом разделе индивидуального профиля.
Free spins и кэшбек
Бесплатные спины — это возможность вращать слоты без задействования личных средств. Кэшбек представляет частичный компенсацию утраченных средств.
Каталог игр
Игровая сайт обеспечивает впечатляющую коллекцию слотов.
Слоты
Ассортимент аппаратов впечатляет представление. Есть обычные простые машины и актуальные автоматы с занимательной анимацией.
Live заведение
Зона Live игр переносит пользователей в среду подлинного развлекательного клуба. Умелые операторы ведут партии в реальном эфире.
Турниры и рейтинги
Постоянные конкурсы привносят драйва и дают возможность заработать крупные призы.
Карманная реализация и программа
Современные инновации дают возможность наслаждаться в любимом месте. Портативная версия автоматически подстраивается под экран аппарата.
Получить софт можно для операционных систем iOS и Android. Софт дает:
– Оперативный переход
– Стабильную производительность
– Push-уведомления об акциях
– Простой дизайн
Банковские транзакции
Платформа поддерживает различные методы внесения и получения сумм:
– Пластиковые карты
– Цифровые платформы
– Крипто
– Прямые отправки
Любые действия реализуются через зашифрованное соединение, что обеспечивает целостность личных сведений.
Служба поддержки
Опытная бригада support работает круглосуточно. Обратиться с операторами можно через:
– Живой-чат
– Цифровую почту
– Горячую линию
– Общественные платформы
Заключение
Официальный ресурс и его функционирующее зеркало предоставляют игрокам надежный и легкий переход к интересным занятиям. Привлекательные бонусы, разнообразный спектр автоматов и отличная помощь делают времяпрепровождение крайне приятной и доходной.
жена друга порно жена друга порно .
Подключение к порталу через рабочие зеркала
Актуальные интернет казино дают геймерам постоянный подключение к услугам. Главный ресурс Retro функционирует надёжно, гарантируя обширный набор гемблинг игр. Однако порой появляются технические препятствия или ограничения, в связи с чем критично быть осведомлённым о существовании функционирующих зеркал.
Что собой представляет собой основное зеркало казино
Копия — это точная реплика главного сайта с таким же функционалом. Функционирующее зеркало в настоящее время помогает избегать территориальные блокировки и продолжать гемблинг.
Принципиальные преимущества эксплуатации зеркал:
– Безграничный вход к индивидуальному кабинету
– Сохранение каждых информации учётной записи
– Такой же спектр слотов
– Свежие бонусы и кампании
Создание аккаунта на сайте
Механизм записи требует несколько минут. Свежие игроки зарабатывают богатый подарок за оформление, он может включать:
– Стартовый денежный приз
– Бесплатные спины для слотов
– Уникальные промокоды
– Увеличенный компенсацию
С целью окончания записи необходимо:
1. Переместиться на официальный портал или копию
2. Нажать кнопку «Зарегистрироваться»
3. Внести индивидуальные сведения
4. Подтвердить почтовый адрес или мобильный
5. Активировать код (когда имеется присутствии)
Авторизация в индивидуальный кабинет
Следом за успешной оформления пользователи в состоянии производить вход используя главный сайт или действующее зеркало. Собственный кабинет даёт безграничный надзор над аккаунтом:
– Летопись игр
– Пополнение счёта
– Изъятие призов
– Контроль поощрениями
– Участие в состязаниях
Привилегии и предложения казино
Платформа награждает клиентов вариативными привилегированными системами:
Вступительные подарки
Начинающие получают внушительный набор поощрений на стартовые вклады. Зачастую это содержит частичную добавку к величине взноса плюс комплиментарные фриспины.
Систематические кампании
– Раз в неделю кешбэк до 15%
– Конкурсы с премиальными пулами
– Подарки на число рождения
– Особые предложения для VIP геймеров
Программа вознаграждения
Постоянные клиенты получают баллы, что допустимо превратить на подлинные средства или уникальные привилегии.
Мобильная вариант и утилита
Современные разработки дают возможность участвовать везде комфортно. Портативная версия веб-сайта автономно приспосабливается под экран произвольного гаджета.
Достоинства карманного программы:
– Оперативная запуск автоматов
– Практичный интерфейс
– Моментальные-нотификации о предложениях
– Опция скачать для Android и iOS
Реальное казино: обстановка подлинного игорного клуба
Секция Live заведения транспортирует игроков в антураж подлинного развлекательного учреждения. Профессиональные операторы проводят процесс в формате настоящего времени.
Доступные игры:
– Европейская рулетка
– Двадцать одно
– Карточная игра
– Покер
Игровые машины и развлекательные слоты
Коллекция игровых аппаратов включает сотни названий от передовых разработчиков. Любой игрок обнаружит слот по желанию:
– Традиционные машины
– Видеослоты с бонусными турами
– Накопительный-слоты
– Многолинейные автоматы
Турниры и лотереи
Постоянные конкурсы добавляют остроту и обеспечивают возможность выиграть крупные суммы. Включение в соревнованиях нередко даровое, а выигрышные банки насчитывают внушительных объёмов.
Защита и секретность
Сайт эксплуатирует передовые методы кодирования для охраны реквизитов игроков. Совокупные денежные транзакции совершаются через охраняемые соединения.
Вывод
Центральный сайт и его рабочие зеркала обеспечивают надёжный доступ к первоклассным развлекательным услугам. Щедрые поощрения, комфортная карманная версия, разнообразие машин и компетентное Live-заведение превращают платформу отличным вариантом для любителей азартных игр.
https://triumph.srivenkateshwaraa.edu.in/profile/promvalide
CoreVital Pharmacy: CoreVital Pharmacy – CoreVital Pharmacy
For papers
online casino canada english language
for troubleshooting.
нейросеть реферат онлайн nejroset-dlya-referatov-5.ru .
mostbet sovga mostbet sovga
melbet schimbare email https://melbet63048.help/
Передовые онлайн-казино гарантируют пользователям массу вариантов для беспроблемной игры. Центральный ресурс ДжиВиСпин предоставляет доступ ко всем сервисам и игровым автоматам. Однако при появлении системных сложностей на подмогу спешат актуальные альтернативные адреса.
Что представляет собой актуальное зеркало
Зеркало казино — это точная версия основного портала, находящаяся по запасному адресу. Легитимное зеркало поддерживает все опции, в том числе открытие профиля, доступ в персональный кабинет, бонусы и бонусные коды.
Альтернативный сайт на сегодня обеспечивает:
– Постоянный путь к игровым аппаратам
– Абсолютную защиту индивидуальных информации
– Сохранение счета и хронологии переводов
– Доступность всех бонусных программ
Создание аккаунта на основном ресурсе
Процедура создания аккаунта отнимает пару минут. Новым пользователям необходимо:
1. Зайти на подлинный портал или функционирующее зеркало
2. Кликнуть кнопку «Создать аккаунт»
3. Заполнить запрашиваемые поля
4. Верифицировать э-мейл почту
5. Использовать кодовое слово при существовании
После финиша регистрации пользователи получают бонус за регистрацию, какой может содержать бесплатные вращения или финансовое вознаграждение.
Логин в персональный кабинет
Персональный кабинет дает всеобъемлющий мониторинг над игровым ходом. Через собственный кабинет можно:
– Вносить средства на счет
– Снимать выигрыши
– Применять бонусные коды
– Контролировать историю пари
– Участвовать в турнирах
– Получать кэшбек
Анализ премий и акций
Выгодная бонусная политика — важное козырь проекта. Ключевые формы поощрений:
Начальный бонус
Дебютанты получают великодушное вознаграждение на первые взносы. Объем бонуса может доходить до 100-200% от размера взноса.
Бесплатные вращения
Бесплатные прокруты выдаются для популярных игровых автоматов. Число бесплатных вращений разнится от 10 до 500 штук.
Cash back
Постоянный или помесячный откат доли потерянных средств. Средний объем кэшбека — 5-15%.
Конкурсы
Регулярные состязания с солидными наградными банками. Конкурсанты соревнуются за топовые позиции в турнирной таблице.
Смартфонная версия и приложение
Мобильная версия позволяет играть с каждого устройства. Геймеры могут закачать app для iOS и Android или использовать интернет версию.
Плюсы мобильного приложения:
– Молниеносная прогрузка автоматов
– Удобный дизайн
– Push-уведомления о акциях
– Вход через Face ID
Автоматы и Live казино
Игровая подборка насчитывает сотни названий от лидирующих разработчиков.
Топовые типы автоматов:
– Традиционные автоматы
– Видео-автоматы с бонусными раундами
– Джекпот слоты
– Мега-путь машины
Live игорный зал
Раздел live игорный зал предоставляет развлечение с настоящими ведущими. Доступны традиционные игры:
– Американская рулетка
– Блэкджек
– Baccarat
– Карибский покер
Как отыскать действующее зеркало
Получить действующую URL на зеркало можно несколькими способами:
1. Зарегистрироваться на email-рассылку
2. Наблюдать за апдейтами в социальных сетях
3. Контактировать в службу поддержки
4. Запомнить действующее зеркало в фавориты
Заключение
Основной ресурс и его функционирующие копии предоставляют непрерывный путь к игровым играм. Великодушные премии, многочисленные промокоды, удобное смартфонное приложение и высококлассная служба поддержки поддержки обеспечивают азартный геймплей предельно приятным и конфиденциальным.
This slot is known for its advantageous feature offers. First, players like to receive Big Bass Bonanza free spins. They can be re-triggered and multiplied in victories. Then there is the symbol of money – a fish. With any possible rotation, it can take a randomized value for money. If you manage to land a few of them during the bonus round with the Wilds, the latter can collect them and multiply your profits again. The excitement of Big Bass Bonanza is amplified by its unique features: The Bigger Bass Bonanza Demo is enriched with several unique big bass bonanza features that elevate the gameplay experience: Big Bass Bonanza is available to play now on mobile on the MrQ app. When you sign up, you can play over 900 real money mobile slots and casino games. Cast your line for big wins on a virtual fishing trip with the Big Bass Bonanza slot! This iconic 2020 release from Pragmatic Play’s Reel Kingdom took the online casino world by storm with its simple yet thrilling gameplay. While it might share some inspiration with the classic Fishin’ Frenzy in terms of theme, Big Bass Bonanza arguably ups the ante with its extended free spins feature.
https://takeoffps.com/casiny-legit-or-not-the-truth-for-australian-gamblers/
The Gates of Olympus return to player is 96.50% – this is your expected return over a long period of play. For every £10 bet, you could win up to £9.65. Lets not forget either that the game has two really nice features, Sofort has managed to sustain without charging any hidden fees. Basically, unlike other platforms. Players can start playing with a single line and opt for discounts such as signing up for a subscription or opting for a multi-draw purchase, features of slot machines gates of olympus as each time you land on an animal symbol it transforms similar symbols into a grade above it. Leon S. Kennedy is one of the most beloved characters in the Resident Evil franchise, playing major roles in Resident Evil 2 and Resident Evil 4; arguably two of the greatest horror games of all time. Although nothing has been officially confirmed, rumours suggest that Leon will be a playable character in the ninth instalment.
нейросеть для студентов онлайн нейросеть для студентов онлайн .
нажмите Кто посещал мою страничку
Подключение к ресурсу через рабочие зеркала
Клиенты интернет казино постоянно имеют дело с проблемой закрытия официального ресурса. Собственно для ликвидации этой трудности созданы зеркала официального сайта. РёРіСЂС‹ Eldorado предоставляет полный доступ ко всем сервисам площадки.
Что такое функционирующее зеркало казино
Копия представляет собой абсолютную версию официального сайта с таким же опциями. Главное расхождение — это другое имя. Любые сведения пользователя, содержа средства, бонусы и историю партий, остаются идентичными.
Выгоды применения зеркал
Действующие зеркала характеризуются набором ключевых выгод:
– Непрерывный переход к любимым играм
– Полная конфиденциальность персональных данных
– Сохранение всех настроек личного кабинета
– Способность взятия призов и присутствия в промоакциях
Оформление профиля на главном сайте
Операция создания аккаунта предельно прост и длится буквально минут. Новые клиенты способны надеяться на внушительный начальный подарок за регистрацию.
Стадии формирования аккаунта
1. Доступ на официальный ресурс или его копию
2. Активация на кнопку “Регистрация”
3. Внесение обязательных параметров
4. Подтверждение цифровой почты
5. Ввод кода (когда есть)
Бонусы и кампании для пользователей
Платформа балует своих клиентов многочисленными наградными предложениями.
Базовые виды призов
Стартовый бонус — солидное начисление для новых игроков, которое именно может содержать финансовые призы и free spins.
Бесплатные вращения — способность крутить в популярных автоматах без затрат.
Кешбэк — процентный отдача потерянных средств, который именно начисляется еженедельно или ежемесячно.
Специальные коды — эксклюзивные наборы, обеспечивающие бонусные поощрения.
Индивидуальный кабинет: опции и настройки
Личный профиль предоставляет полный регулирование над игровым взаимодействием. Тут присутствуют:
– Контроль средствами
– Архив переводов
– Работающие бонусы
– Конфигурации защиты
– Проверка счета
Карманная платформа и софт
Нынешние пользователи признают мобильность. Казино предоставляет 2 метода для развлечений с мобильных аппаратов.
Приспособленная мобильная редакция
Мобильная версия домена автономно адаптируется под экран любого девайса. Не требуется скачивать дополнительное приложение.
Софт для смартфонов
Можно скачать оригинальное программу для iOS и Android. Приложение гарантирует:
– Мгновенный доступ
– Оптимизированный графику
– Push-уведомления о поощрениях
– Стабильную работу
Live игры: антураж подлинного клуба
Секция Live столов отправляет игроков в обстановку настоящего казино. Компетентные ведущие проводят партии в варианте прямого времени.
Топовые Live-столы
– Рулетка
– 21
– Баккарат
– Техасский холдем
Автоматы: многообразие автоматов
Библиотека развлекательных автоматов содержит множество названий от ведущих производителей. Игроки откроют:
– Стандартные машины
– Видео-автоматы
– Прогрессивный джекпот-автоматы
– Megaways
Состязания и эксклюзивные акции
Регулярные конкурсы позволяют игрокам состязаться друг с другом за солидные призовые банки. Каждый конкурс имеет свои правила присутствия и доску чемпионов.
Варианты внесения и вывода сумм
Ресурс использует множество денежных систем:
– Кредитные картыы
– Онлайн кошельки
– Цифровые валюты
– Банковские переводы
Все транзакции осуществляются конфиденциально благодаря современным методам кодирования.
Сервис support
Квалифицированные специалисты отдела помощи настроены ассистировать 24/7. Предусмотрены такие каналы общения:
– Живой-чат
– Email-помощь
– Аудио линия
– Медийные сети
Заключение
Основной ресурс платформы и его актуальные дубликаты дают игрокам безопасный и приятный доступ к обширному спектру геймерских развлечений. Крупные подарки, частые кампании, профессиональная сервис и удобные расчетные инструменты делают развлекательный досуг чрезвычайно комфортным и доходным.
Передовые онлайн-казино предлагают клиентам широкий спектр развлечений и поощрительных предложений. Подключение к платформе производится через официальный веб-сайт или его актуальное зеркало Голд, что гарантирует бесперебойную игру.
В чем суть рабочее зеркало казино
Дубликат — это абсолютная копия оригинального сайта, созданная для преодоления блокировок. Актуальное зеркало позволяет участникам получить соединение к выбранным слотам в любое время.
Лицензионное зеркало имеет всеми функциями основного портала:
– Полный список слотов
– Аккаунт с внесенными данными
– Свежие промокоды
– Гарантированные расчетные операции
Оформление профиля на основном портале
Ход регистрации занимает всего несколько минут. Начинающим игрокам нужно:
1. Зайти на основной веб-сайт или рабочее зеркало
2. Выбрать на элемент “Зарегистрироваться”
3. Внести обязательные сведения
4. Подтвердить адрес
5. Внести дебютный платеж
Бонус за регистрацию начисляется моментально после прохождения всех ступеней.
Вход в аккаунт
Действующие пользователи могут выполнить подключение используя:
– Логин и код
– Данные мобильного
– Электронную почту
Персональный раздел предоставляет возможность к управлению балансом, данным операций и доступным поощрениям.
Бонусы и предложения
Игровая площадка радует активных участников разнообразными поощрениями:
Первый пакет
– Поощрение на первый взнос до 100%
– Free spins на топовые игры
– Особые награды за следующие платежи
Ваучеры
Эксклюзивные промокоды обеспечивают право на использование эксклюзивных призов. Действующие комбинации публикуются в блоке “Бонусы”.
Cashback
Периодический бонус составляет до 10% от утраченных сумм. Возврат зачисляется незамедлительно.
Система лояльности
Регулярные пользователи получают единицы, которые превращаются на реальные средства или фриспины.
Мобильный сайт и APP
Ради комфорта клиентов разработана удобная адаптивный сайт. Приспособленный облик позволяет легко развлекаться с всякого мобильного аппарата.
Преимущества приложения:
– Оперативный запуск к развлечениям
– Оптимизированный вид
– Бесперебойная функциональность
– Оповещения о последних акциях
Загрузить программу можно безвозмездно с главного сайта для гаджетов на Android и iOS.
Библиотека игр
Игровые автоматы
База содержит более 2000 слотов от популярных разработчиков:
– Стандартные машины
– Мультимедийные игры
– Джекпот-слоты
– Сюжетные игры
Live казино
Блок Live казино дает развлечение с настоящими крупье в реальном эфире:
– Колесо фортуны
– Блэкджек
– Баккара
– Столы покера
Состязания
Постоянные турниры с значительными премиальными бюджетами организуются еженедельно. Присоединение в соревнованиях открыто всем созданным пользователям.
Платежные системы
Пополнения и выводы денег реализуются через популярные способы оплаты:
– Банковские пластик
– Онлайн счета
– Крипто
– Счетные платежи
Самый низкий депозит — от 100 рублей. Снятие выигрышей осуществляется в течение 24 периода.
Сервис support
Непрерывная служба поддержки готова ассистировать в урегулировании любых проблем:
– Живой чат
– Email
– Телефон
– Публичные сети
Безопасность и документ
Официальный сайт функционирует на базе глобальной лицензии. Все данные участников охранены актуальным SSL-криптованием.
Заключение
Рабочее зеркало обеспечивает постоянный соединение к любимым автоматам, богатым промокодам и удобным услугам. Зарегистрируйтесь сейчас и обретите приветственный поощрение!
выберите ресурсы Гости странички вк
Перейти на сайт Статистика посетители вк
Современные онлайн-казино обеспечивают клиентам множество опций для приятной игры. Главный ресурс Болливуд предоставляет возможность ко всем сервисам и игровым автоматам. Однако при наличии технических проблем на выручку спешат действующие альтернативные адреса.
Что есть собой актуальное зеркало
Дубликат казино — это стопроцентная версия оригинального веб-сайта, размещенная по дополнительному адресу. Лицензионное зеркало удерживает все функции, в том числе создание аккаунта, вход в собственный кабинет, поощрения и купоны.
Зеркало на сегодня предоставляет:
– Стабильный доступ к игровым слотам
– Стопроцентную конфиденциальность личных информации
– Поддержку средств и записей транзакций
– Доступность всех специальных предложений
Создание аккаунта на основном сайте
Этап оформления учетной записи отнимает несколько минут. Новым клиентам нужно:
1. Зайти на главный сайт или актуальное зеркало
2. Выбрать кнопку «Зарегистрироваться»
3. Ввести запрашиваемые поля
4. Активировать э-мейл почту
5. Применить бонусный код при наличии
После окончания создания аккаунта геймеры получают подарок за регистрацию, который может включать бесплатные вращения или монетарное премирование.
Вход в персональный кабинет
Личный кабинет обеспечивает комплексный надзор над игровым действом. Через персональный кабинет можно:
– Финансировать счет
– Забирать призы
– Активировать бонусные коды
– Мониторить историю игр
– Играть в конкурсах
– Приобретать кешбэк
Характеристика вознаграждений и специальных предложений
Щедрая премиальная политика — важное плюс проекта. Основные формы бонусов:
Начальный подарок
Начинающие получают щедрое награду на первые пополнения. Размер бонуса может доходить до 100-200% от размера пополнения.
Бонусные спины
Халявные спины предоставляются для популярных игровых автоматов. Количество фриспинов колеблется от 10 до 500 штук.
Cash back
Регулярный или ежемесячный откат доли потерянных средств. Стандартный процент кэшбека — 5-15%.
Конкурсы
Постоянные конкурсы с крупными премиальными банками. Конкурсанты соревнуются за верхние места в таблице лидеров.
Мобильная версия и софт
Портативная версия позволяет развлекаться с всякого девайса. Пользователи могут закачать софт для iOS и Android или использовать браузерную версию.
Преимущества смартфонного программы:
– Быстрая подзагрузка слотов
– Практичный интерфейс
– Push-уведомления о промо
– Возможность входа через отпечаток пальца
Машины и Live казино
Игровая база включает множество позиций от ведущих производителей.
Популярные секции слотов:
– Обычные автоматы
– Современные слоты с премиальными этапами
– Накопительный приз автоматы
– Мегавейс слоты
Live игровой зал
Категория live казино обеспечивает игру с профессиональными крупье. Представлены стандартные варианты:
– Американская рулетка
– Двадцать одно
– Баккара
– Карибский покер
Как отыскать действующее зеркало
Обрести актуальную URL на зеркало возможно множественными вариантами:
1. Подписаться на email-рассылку
2. Отслеживать за новостями в соц сетях
3. Связаться в департамент поддержки
4. Запомнить действующее зеркало в закладки
Итог
Основной сайт и его функционирующие зеркала дают стабильный доступ к развлекательным слотам. Выгодные премии, различные промокоды, комфортное портативное приложение и профессиональная техподдержка поддержки делают азартный геймплей крайне приятным и защищенным.
1x giri? 1xbet-giris-45.com .
Переход к сайту через действующие зеркала
Клиенты виртуальных казино часто сталкиваются с трудностью недоступности главного домена. Конкретно для преодоления этой задачи предусмотрены зеркала главного портала. Голд казино обеспечивает полный доступ ко всем возможностям платформы.
Что такое рабочее зеркало казино
Дубликат значит собой идентичную копию главного веб-сайта с аналогичным опциями. Основное несовпадение — это иное имя. Все информация участника, вместе с баланс, привилегии и данные партий, продолжают быть такими же.
Преимущества использования зеркал
Функционирующие зеркала обладают рядом существенных преимуществ:
– Постоянный переход к любимым развлечениям
– Стопроцентная защита персональных информации
– Поддержание всех опций пользовательского кабинета
– Опция взятия поощрений и присутствия в акциях
Оформление профиля на легальном сайте
Процесс открытия счета крайне прост и длится пару минут. Свежие участники способны претендовать на щедрый начальный приз за регистрацию.
Стадии формирования аккаунта
1. Доступ на официальный ресурс или его альтернативу
2. Выбор на клавишу “Создать аккаунт”
3. Заполнение требуемых данных
4. Активация email почты
5. Указание купона (в случае присутствует)
Бонусы и промоакции для клиентов
Казино поощряет своих клиентов разнообразными поощрительными акциями.
Ключевые категории призов
Вводный приз — внушительное начисление для недавних пользователей, которое именно может охватывать материальные призы и бесплатные вращения.
Безвозмездные спины — опция крутить в востребованных игровых машинах бесплатно.
Кешбэк — пропорциональный компенсация проигранных финансов, который выплачивается раз в неделю или каждый месяц.
Промокоды — специальные комбинации, предоставляющие дополнительные поощрения.
Индивидуальный кабинет: возможности и конфигурации
Пользовательский кабинет дает исчерпывающий регулирование над развлекательным опытом. В нем предусмотрены:
– Управление средствами
– Архив транзакций
– Работающие поощрения
– Конфигурации безопасности
– Верификация аккаунта
Смартфонная редакция и софт
Новейшие участники предпочитают портативность. Ресурс предлагает два пути для развлечений с портативных устройств.
Отзывчивая мобильная платформа
Мобильная вариант сайта автоматически приспосабливается под разрешение любого гаджета. Не требуется устанавливать особое ПО.
Софт для гаджетов
Возможно инсталлировать оригинальное APP для iOS и Android. Приложение обеспечивает:
– Быстрый старт
– Доработанный внешний вид
– Push-уведомления о акциях
– Стабильную производительность
Live раздел: антураж настоящего клуба
Раздел Live игр переносит игроков в обстановку подлинного казино. Профессиональные крупье организуют раунды в формате реального времени.
Востребованные Live-развлечения
– Французская рулетка
– Двадцать одно
– Баккара
– Техасский холдем
Игровые машины: разнообразие слотов
Библиотека игровых автоматов включает множество позиций от ведущих провайдеров. Пользователи найдут:
– Классические аппараты
– Графические слоты
– Джекпот-игры
– Megaways
Соревнования и особые мероприятия
Периодические турниры предоставляют шанс клиентам конкурировать друг с другом за солидные наградные пулы. Каждый конкурс обладает свои условия вовлечения и таблицу лидеров.
Методы пополнения и вывода денег
Ресурс поддерживает ряд финансовых инструментов:
– Дебетовые картыы
– Виртуальные кошельки
– Криптовалюты
– Прямые транзакции
Любые платежи выполняются надежно благодаря новейшим методам кодирования.
Отдел support
Компетентные операторы команды support готовы содействовать 24/7. Доступны нижеперечисленные каналы общения:
– Оперативный-чат
– Email-помощь
– Аудио линия
– Медийные сети
Итог
Основной сайт клуба и его действующие альтернативы предоставляют игрокам защищенный и комфортный доступ к большому спектру геймерских активностей. Крупные поощрения, постоянные кампании, квалифицированная поддержка и легкие финансовые инструменты превращают геймерский досуг максимально приятным и прибыльным.
посетить веб-сайт Узнать замужем ли
Вход к платформе и функционирующие URL
Современные сетевые казино обеспечивают пользователям большой спектр опций. Основной портал РЎСѓРєР° гарантирует стабильный переход ко всем сервисам. При этом периодически появляются моменты, когда понадобится дополнительный способ подключения.
Что есть собой функционирующее зеркало
Действующее зеркало — это точная копия основного веб-сайта с альтернативным интернет именем. Копия сегодня дает возможность миновать существующие барьеры и сохранять бесперебойный вход к выбранным автоматам.
Легальное зеркало характеризуется идентичными характеристиками, что и основной ресурс:
– Целый перечень развлечений
– Личный кабинет с актуальными параметрами
– Все награды и акции
– Проверенные финансовые транзакции
Открытие профиля и доступ в систему
Процедура регистрации на платформе требует несколько минут. Свежим клиентам нужно:
1. Попасть на актуальное зеркало на данный момент
2. Кликнуть опцию «Открыть профиль»
3. Заполнить обязательные параметры
4. Активировать e-mail почту или информацию телефона
5. Использовать поощрение за оформление
Авторизация в собственный профиль выполняется посредством ввод ID и ключа.
Анализ призовой структуры
Привлекательная наградная структура — главное плюс казино. Пользователи обретают всевозможные награды:
Стартовые поощрения
Новые игроки могут рассчитывать на щедрый бонус за регистрацию. Обычно это пакет предложений, охватывающий:
– Пропорциональную прибавку к дебютному пополнению
– Подарочные вращения
– Extra деньги на счет
Промокоды и эксклюзивные акции
Постоянные коды помогают получать бонусные выгоды. Применить их допустимо в особом окне собственного раздела.
Free spins и кэшбек
Free spins — это способность вращать слоты без применения персональных сумм. Кэшбек представляет процентный компенсацию проигранных средств.
Коллекция слотов
Развлекательная платформа представляет значительную подборку слотов.
Видеослоты
Многообразие слотов удивляет воображение. Доступны традиционные 3-барабанные машины и современные видеослоты с занимательной анимацией.
Live игры
Секция Live казино погружает участников в атмосферу реального игорного клуба. Профессиональные операторы организуют партии в прямом формате.
Конкурсы и таблицы лидеров
Периодические конкурсы обеспечивают азарта и предоставляют возможность получить внушительные суммы.
Мобильная форма и клиент
Продвинутые решения дают возможность развлекаться в любимом месте. Адаптивная вариант независимо настраивается под размер устройства.
Получить приложение возможно для мобильных систем iOS и Android. Софт гарантирует:
– Оперативный вход
– Устойчивую функционирование
– Мгновенные-алерты об промо
– Простой облик
Платежные процедуры
Сайт использует всевозможные системы ввода и получения денег:
– Пластиковые инструменты
– Электронные кошельки
– Крипто
– Финансовые отправки
Все действия проходят через зашифрованное подключение, что защищает сохранность приватных параметров.
Сервис поддержки
Опытная бригада помощи работает постоянно. Обратиться с консультантами можно через:
– Онлайн-чат
– Электронную почту
– Горячую линию
– Медиа ресурсы
Резюме
Основной ресурс и его действующее зеркало дают игрокам защищенный и удобный вход к азартным играм. Богатые бонусы, обширный спектр игр и высокая сервис создают процесс максимально интересной и результативной.
Нынешние онлайн-казино предоставляют геймерам массу опций для комфортной игры. Основной портал Bollywood сайт казино дарит путь ко всем функциям и развлечениям. Однако при наличии программных проблем на выручку приходят рабочие копии.
Что представляет собой актуальное зеркало
Зеркало казино — это полная копия официального сайта, расположенная по дополнительному URL. Легитимное зеркало сохраняет все опции, включая открытие профиля, вход в личный кабинет, поощрения и промокоды.
Дубликат на сегодня гарантирует:
– Непрерывный вход к азартным машинам
– Абсолютную защиту индивидуальных сведений
– Поддержку средств и записей транзакций
– Доступность всех акций
Регистрация на главном портале
Процедура создания аккаунта занимает несколько минут. Свежеиспеченным геймерам требуется:
1. Открыть на главный сайт или функционирующее зеркало
2. Нажать кнопку «Создать аккаунт»
3. Ввести требуемые графы
4. Активировать электронную почту
5. Применить купон при присутствии
После конца регистрации геймеры получают вознаграждение за регистрацию, что может включать free spins или финансовое премирование.
Доступ в персональный кабинет
Личный кабинет обеспечивает полный надзор над игровым ходом. Через собственный кабинет разрешается:
– Депонировать счет
– Получать средства
– Активировать кодовые слова
– Отслеживать записи пари
– Играть в состязаниях
– Получать cash back
Обзор вознаграждений и специальных предложений
Великодушная премиальная программа — важное преимущество проекта. Основные категории премий:
Стартовый приз
Новички получают щедрое вознаграждение на дебютные взносы. Размер премии может составлять 100-200% от суммы вклада.
Free spins
Бесплатные раунды выдаются для топовых игровых автоматов. Объем бесплатных вращений разнится от 10 до 500 штук.
Возврат средств
Еженедельный или помесячный откат процента утраченных денег. Обычный процент возврата — 5-15%.
Турниры
Периодические состязания с крупными наградными пулами. Игроки соревнуются за призовые места в турнирной таблице.
Мобильная версия и приложуха
Мобильная версия позволяет делать ставки с каждого гаджета. Игроки могут установить программу для iOS и Android или эксплуатировать браузерную версию.
Плюсы смартфонного приложения:
– Скоростная прогрузка игр
– Комфортный UI
– Пуш-нотификации о бонусах
– Доступ через Face ID
Машины и Live казино
Азартная подборка охватывает тысячи наименований от ведущих разработчиков.
Известные типы автоматов:
– Традиционные автоматы
– Видео-автоматы с призовыми уровнями
– Джекпот автоматы
– Мегавейс машины
Live игорный зал
Зона live игорный зал предлагает игру с живыми дилерами. Доступны стандартные развлечения:
– Европейская рулетка
– Blackjack
– Baccarat
– Карибский покер
Как найти действующее зеркало
Обрести свежую URL на зеркало возможно различными вариантами:
1. Оформить подписку на email-рассылку
2. Следить за новостями в соц сетях
3. Связаться в службу поддержки
4. Добавить в закладки действующее зеркало в фавориты
Заключение
Лицензионный сайт и его актуальные зеркала обеспечивают стабильный путь к игровым слотам. Выгодные премии, разнообразные бонусные коды, комфортное портативное софт и профессиональная служба поддержки делают игровой опыт крайне удобным и конфиденциальным.
MedicoBridge RX: MedicoBridge RX – mexico pharmacy
Актуальные онлайн-казино обеспечивают клиентам разнообразие путей для комфортной игры. Центральный ресурс Вован открывает доступ ко всем опциям и развлечениям. Однако при появлении системных сложностей на подмогу приходят действующие копии.
Что есть собой актуальное зеркало
Дубликат казино — это идентичная дубликат основного ресурса, размещенная по запасному URL. Официальное зеркало поддерживает все характеристики, вместе с регистрацию, доступ в личный кабинет, поощрения и бонусные коды.
Альтернативный сайт на сегодня обеспечивает:
– Стабильный путь к игровым аппаратам
– Стопроцентную безопасность персональных сведений
– Сохранение депозита и хронологии операций
– Применимость всех бонусных программ
Создание аккаунта на официальном портале
Ход регистрации требует считанные минут. Начинающим геймерам необходимо:
1. Войти на подлинный сайт или действующее зеркало
2. Нажать кнопку «Регистрация»
3. Указать запрашиваемые графы
4. Верифицировать электронную почту
5. Использовать промокод при наличии
После конца регистрации пользователи зарабатывают приз за регистрацию, какой может иметь бесплатные вращения или монетарное вознаграждение.
Вход в личный кабинет
Персональный кабинет предоставляет всеобъемлющий контроль над азартным действом. Через персональный раздел допускается:
– Пополнять счет
– Получать выигрыши
– Применять кодовые слова
– Мониторить записи игр
– Принимать участие в конкурсах
– Забирать cash back
Анализ бонусов и акций
Выгодная бонусная система — важное преимущество проекта. Основные категории бонусов:
Стартовый подарок
Новые игроки обретают великодушное награду на начальные взносы. Размер премии может достигать 100-200% от величины вклада.
Free spins
Даровые вращения даются для популярных машин. Число фриспинов колеблется от 10 до 500 штук.
Возврат средств
Регулярный или помесячный компенсация доли утраченных финансов. Типичный объем компенсации — 5-15%.
Турниры
Периодические состязания с крупными премиальными фондами. Конкурсанты борются за призовые позиции в таблице лидеров.
Мобильная версия и приложение
Мобильная версия позволяет делать ставки с всякого аппарата. Игроки могут скачать app для iOS и Android или задействовать веб версию.
Достоинства смартфонного приложения:
– Молниеносная загрузка игр
– Удобный дизайн
– Всплывающие уведомления о бонусах
– Возможность входа через Touch ID
Автоматы и Live казино
Игровая коллекция содержит сотни игр от известных производителей.
Известные секции игр:
– Классические автоматы
– Видео-автоматы с бонусными уровнями
– Прогрессивный джекпот слоты
– Megaways машины
Live игровой зал
Категория live игорный зал предлагает развлечение с реальными крупье. Представлены традиционные варианты:
– Рулетка
– Двадцать одно
– Punto Banco
– Техасский холдем
Как отыскать рабочее зеркало
Обрести рабочую адрес на зеркало возможно разными путями:
1. Подписаться на email-рассылку
2. Мониторить за обновлениями в соц сетях
3. Обратиться в сервис поддержки
4. Заложить рабочее зеркало в фавориты
Заключение
Лицензионный сайт и его функционирующие дубликаты дают постоянный доступ к азартным слотам. Щедрые премии, различные купоны, комфортное мобильное приложение и отличная служба поддержки поддержки превращают азартный геймплей в высшей степени беспроблемным и защищенным.
Переход к платформе и актуальные адреса
Современные онлайн казино предлагают пользователям обширный ассортимент игр. Официальный портал xn--80aaxpd2aa5c.xn--p1ai предоставляет защищенный доступ ко всем сервисам. Впрочем временами возникают моменты, когда необходимо резервный метод доступа.
Что означает собой действующее зеркало
Функционирующее зеркало — это идентичная версия легального портала с запасным доменным расположением. Копия сегодня дает возможность миновать вероятные барьеры и гарантировать стабильный вход к любимым автоматам.
Легальное зеркало имеет полными функциями, что и главный портал:
– Целый перечень игр
– Собственный раздел с сохраненными сведениями
– Полные награды и акции
– Защищенные банковские действия
Оформление и доступ в сервис
Процедура открытия аккаунта на ресурсе занимает считанные мгновений. Недавним участникам требуется:
1. Открыть на актуальное зеркало сейчас
2. Щелкнуть элемент «Создать аккаунт»
3. Внести обязательные параметры
4. Активировать e-mail почту или данные мобильного
5. Активировать поощрение за оформление
Авторизация в персональный аккаунт осуществляется с помощью предоставление логина и ключа.
Характеристика поощрительной системы
Выгодная наградная система — главное преимущество игорного заведения. Пользователи получают разнообразные бонусы:
Приветственные бонусы
Недавние пользователи вправе ожидать на щедрый поощрение за оформление. Как правило это совокупность возможностей, объединяющий:
– Частичную надбавку к стартовому депозиту
– Бесплатные фриспины
– Бонусные финансы на аккаунт
Кодовые комбинации и уникальные акции
Регулярные промокоды обеспечивают получать бонусные льготы. Активировать их допустимо в специальном меню персонального аккаунта.
Спины и компенсация
Фриспины — это шанс крутить слоты без расходования собственных средств. Рибейт представляет определенный возмещение утраченных средств.
Библиотека слотов
Азартная площадка предоставляет впечатляющую коллекцию автоматов.
Автоматы
Вариативность автоматов удивляет воображение. Доступны обычные простые слоты и современные игры с занимательной картинкой.
Live игры
Секция Live развлечений переносит клиентов в атмосферу подлинного гемблинг клуба. Опытные ведущие организуют раунды в онлайн формате.
Состязания и лидерборды
Регулярные состязания обеспечивают азарта и дают вариант забрать значительные призы.
Портативная версия и приложение
Актуальные инновации позволяют развлекаться в любом пространстве. Mobile реализация автономно адаптируется под монитор устройства.
Скачать софт можно для операционных платформ iOS и Android. Приложение гарантирует:
– Оперативный доступ
– Устойчивую деятельность
– Всплывающие-оповещения об акциях
– Интуитивный интерфейс
Платежные транзакции
Сайт принимает многочисленные варианты пополнения и вывода сумм:
– Банковские карты
– Онлайн системы
– Криптовалюты
– Финансовые транзакции
Любые переводы проходят через надежное соединение, что подтверждает целостность персональных параметров.
Департамент помощи
Квалифицированная служба поддержки функционирует постоянно. Обратиться с консультантами возможно через:
– Живой-чат
– E-mail почту
– Горячую линию
– Общественные ресурсы
Выводы
Официальный портал и его действующее зеркало предоставляют клиентам защищенный и комфортный путь к увлекательным играм. Щедрые поощрения, разнообразный спектр развлечений и качественная помощь делают игру исключительно интересной и прибыльной.
http://medbridgepharmacy.com/# MedBridge Pharmacy
Are you into rafting? http://www.tara-montenegro-rafting.me exciting rafting trips down mountain rivers with experienced instructors. A tour of the Tara Canyon offers scenic routes, safety, and unforgettable experiences. Book a rafting tour and discover an active holiday.
ТОП лучших МФО https://mfo-finance.github.io проверенные компании с высоким уровнем одобрения займов. Актуальные предложения, прозрачные условия, быстрые выплаты и онлайн оформление. Сравнивайте и выбирайте надежные МФО для получения денег.
мировые новости современные актуальные Читать важные новости мира сегодня – значит быть в курсе глобальных вызовов, а срочные новости международные читать – значит быть готовым к любым поворотам событий.
Нынешние онлайн-казино предоставляют участникам широкий диапазон развлечений и премиальных опций. Подключение к сервису выполняется через лицензионный веб-сайт или его функционирующее зеркало https://www.xn—–8kcjfnn3bceaxi1ap3qa.xn--p1ai/, что дает бесперебойную деятельность.
В чем суть рабочее зеркало казино
Альтернатива — это абсолютная копия оригинального портала, созданная для устранения запретов. Рабочее зеркало позволяет участникам иметь соединение к излюбленным автоматам в каждое время.
Официальное зеркало обладает всеми возможностями основного сайта:
– Весь ассортимент слотов
– Аккаунт с сохраненными сведениями
– Действующие промокоды
– Безопасные расчетные процедуры
Регистрация на главном ресурсе
Ход создания аккаунта отнимает всего считанные минут. Свежим участникам требуется:
1. Перейти на главный сайт или функционирующее зеркало
2. Выбрать на кнопку “Создать аккаунт”
3. Ввести требуемые данные
4. Подтвердить электронную почту
5. Сделать дебютный вклад
Поощрение новичкам начисляется незамедлительно после завершения всех этапов.
Вход в учетную запись
Существующие участники могут произвести подключение используя:
– Имя пользователя и пароль
– Номер контакта
– Электронную почту
Профиль обеспечивает шанс к регулированию счетом, сведениям игр и текущим поощрениям.
Бонусы и кампании
Гемблинг сервис вознаграждает регулярных участников разнообразными призами:
Приветственный пакет
– Бонус на первый платеж до 100%
– Бесплатные вращения на востребованные машины
– Дополнительные поощрения за последующие платежи
Промокоды
Уникальные ваучеры открывают доступ на приобретение эксклюзивных призов. Текущие промокоды выкладываются в секции “Бонусы”.
Cashback
Еженедельный кешбэк составляет до 10% от утраченных денег. Возмещение зачисляется моментально.
Схема лояльности
Регулярные участники зарабатывают единицы, которые переводятся на действительные финансы или даровые спины.
Mobile версия и софт
Для практичности клиентов разработана функциональная mobile версия. Приспособленный дизайн обеспечивает удобно развлекаться с любого мобильного девайса.
Плюсы программы:
– Оперативный вход к развлечениям
– Улучшенный дизайн
– Устойчивая функциональность
– Push-уведомления о последних событиях
Получить APP можно безвозмездно с проверенного веб-сайта для девайсов на Android и iOS.
Коллекция развлечений
Автоматы
Каталог включает более 2000 машин от ведущих студий:
– Обычные слоты
– Современные автоматы
– Слоты с джекпотом
– Брендовые игры
Live казино
Секция Live развлечений предоставляет развлечение с живыми дилерами в прямом формате:
– Рулеточные столы
– Блэкджек
– Карты
– Столы покера
Состязания
Постоянные конкурсы с значительными призовыми пулами организуются систематически. Вход в состязаниях доступно всем зарегистрированным участникам.
Денежные варианты
Взносы и получения денег производятся через востребованные способы оплаты:
– Дебетовые пластик
– Электронные сервисы
– Криптовалюта
– Счетные транзакции
Самый низкий вклад — от 100 рублей. Снятие выигрышей проводится в течение 24 ч.
Отдел поддержки
Круглосуточная команда саппорта расположена помочь в разрешении любых задач:
– Онлайн-чат
– Email
– Связь
– Общественные сети
Защита и разрешение
Главный веб-сайт функционирует на почве глобальной документа. Все параметры пользователей закрыты передовым SSL-кодированием.
Заключение
Действующее зеркало предоставляет стабильный подключение к излюбленным автоматам, богатым промокодам и практичным функциям. Присоединяйтесь прямо сейчас и приобретите начальный приз!
Описание основного ресурса
Актуальное онлайн-казино предоставляет своим участникам большой спектр развлечений и вознаграждений. Официальный ресурс Клубника действует круглосуточно, обеспечивая доступ к популярным играм, live-казино и многим кампаниям.
Функционирующее зеркало: доступ к сайту
Что такое дубликат казино
Дубликат является собой точную реплику главного ресурса с другим URL путем. Действующее зеркало позволяет игрокам преодолевать запреты и иметь надежный подключение к выбранным автоматам.
Как найти актуальное зеркало сегодня
Действующие ссылки на официальное зеркало появляются через:
– Email новостнуюленту
– Официальные коммуникационные сети
– Сервис помощи
– Партнерские площадки
Созданиеаккаунта на платформе
Ход оформления
Регистрация занимает всего минут и подразумевает такие действия:
1. Переход на основной портал или рабочее зеркало
2. Выбор опции “Регистрация”
3. Ввод контактных сведений
4. Активация аккаунта или мобильного
5. Придумывание кодадоступа
Подарок за регистрацию
Первые участники приобретают большие вступительные поощрения:
– Финансовые суммы на аккаунт
– Халявныеспины для слотов
– Повышенный размер кешбэка
– Специальные ваучеры
Логин в индивидуальный счет
Постоянные клиенты могут осуществить авторизацию через главный ресурс или актуальное зеркало. Для этого следует ввести учетноеимя и секретнуюкомбинацию, созданные при созданииаккаунта.
Инструменты собственного раздела
В личном разделе открыты следующие опции:
– Управление контактными данными
– Ввод баланса
– Обналичивание выигрышей
– Применение кодов
– Мониторинг истории операций
– Вступление в конкурсах
Бонусы и акции
Виды бонусов
Казино радует своих пользователей различными призовыми предложениями:
– Вступительный набор — выгодные бонусы на первые вклады
– Халявныеспины — дополнительные вращения в рейтинговых слотах
– Кэшбек — регулярный компенсация суммы убытков
– Программа VIP — особые бонусы для постоянных клиентов
Ваучеры и их ввод
Особые купоны гарантируют дополнительные бонусы. Для использования нужно внести код в специальное графу в индивидуальном кабинете.
Развлекательный набор
Игры
Коллекция развлекательных слотов содержит тысячи названий от лучших разработчиков:
– Обычные симуляторы
– Современные игры
– Призовые автоматы
– Тематические автоматы
Live казино
Зона Live-казино предоставляет участие с реальными крупье в формате прямого эфира:
– Рулетка
– Blackjack
– Пунтобанко
– Карибскийпокер
Конкурсы
Постоянные турниры с крупными наградными фондами проводятся еженедельно. Соревнующиеся конкурируют за победу в списке.
Смартфонная адаптация и приложение
Адаптивная версия портала
Оригинальный сайт абсолютно настроен для планшетных гаджетов. Клиенты имеютвозможность открывать игры непосредственно через браузер без необходимости установки.
Софт для установки
Авторское портативное программа предлагается для установки на девайсы с операционными платформами Android и iOS. Софт обеспечивает:
– Быстрый вход к автоматам
– Устойчивую функциональность
– Оперативные-оповещения о бонусах
– Удобный навигацию
Вывод
Официальный ресурс казино и его рабочие дубликаты предоставляют игрокам комплексный путь к отличным азартным сервисам. Большие поощрения, многочисленные кампании, функциональная смартфонная версия и опытная служба превращают развлекательный времяпрепровождение максимально комфортным и результативным.
no prescription online pharmacy
For quick
can i get neurontin for sale
to access the resource.
Современные онлайн-казино обеспечивают клиентам обилие возможностей для беспроблемной игры. Основной ресурс Gold обеспечивает доступ ко всем возможностям и игровым автоматам. Однако при появлении программных сложностей на помощь приходят актуальные дубликаты.
Что есть собой действующее зеркало
Зеркало казино — это точная дубликат основного ресурса, находящаяся по альтернативному URL. Лицензионное зеркало удерживает все возможности, вместе с создание аккаунта, авторизацию в собственный кабинет, поощрения и бонусные коды.
Копия на сегодня гарантирует:
– Постоянный путь к азартным слотам
– Полную конфиденциальность персональных информации
– Сохранение средств и хронологии переводов
– Возможность использования всех бонусных программ
Создание аккаунта на основном сайте
Процедура оформления учетной записи требует считанные минут. Новоиспеченным пользователям необходимо:
1. Войти на основной ресурс или действующее зеркало
2. Нажать кнопку «Создать аккаунт»
3. Внести требуемые сведения
4. Верифицировать электронную почту
5. Использовать бонусный код при наличии
После окончания регистрации пользователи зарабатывают вознаграждение за регистрацию, который может иметь бонусные спины или денежное поощрение.
Логин в личный кабинет
Личный кабинет предоставляет комплексный управление над азартным процессом. Через индивидуальный аккаунт разрешается:
– Пополнять баланс
– Выводить средства
– Использовать промокоды
– Мониторить историю ставок
– Принимать участие в состязаниях
– Забирать возврат средств
Анализ поощрений и акций
Выгодная поощрительная политика — ключевое преимущество ресурса. Центральные типы бонусов:
Вступительный подарок
Дебютанты обретают выгодное награду на стартовые вклады. Сумма приза может достигать 100-200% от объема пополнения.
Free spins
Бесплатные вращения предоставляются для топовых слотов. Сумма бесплатных вращений колеблется от 10 до 500 штук.
Кэшбек
Постоянный или ежемесячный компенсация доли проигранных финансов. Типичный размер компенсации — 5-15%.
Состязания
Периодические состязания с внушительными премиальными фондами. Участники борются за призовые строчки в рейтинге.
Мобильная версия и приложение
Портативная версия дает возможность делать ставки с каждого гаджета. Клиенты могут закачать программу для iOS и Android или применять интернет версию.
Достоинства мобильного приложения:
– Быстрая подзагрузка слотов
– Эргономичный интерфейс
– Пуш-нотификации о поощрениях
– Доступ через биометрию
Слоты и Live казино
Развлекательная библиотека насчитывает сотни названий от ведущих провайдеров.
Популярные секции слотов:
– Обычные машины
– Видео-автоматы с призовыми этапами
– Джекпот игры
– Мега-путь машины
Live казино
Секция live игорный зал обеспечивает партию с живыми крупье. Имеются стандартные развлечения:
– Европейская рулетка
– Blackjack
– Punto Banco
– Техасский холдем
Как найти функционирующее зеркало
Раздобыть актуальную линк на зеркало можно разными методами:
1. Зарегистрироваться на емейл-уведомления
2. Отслеживать за новостями в соц сетях
3. Контактировать в отдел поддержки
4. Запомнить рабочее зеркало в закладки
Вывод
Главный сайт и его функционирующие копии предоставляют бесперебойный вход к игровым автоматам. Великодушные поощрения, многочисленные промокоды, практичное портативное софт и качественная техподдержка поддержки делают азартный геймплей крайне беспроблемным и надежным.
Актуальные онлайн-казино предлагают клиентам обширный диапазон возможностей для приятной развлечений. Подключение к платформе Вован осуществляется через лицензионный веб-ресурс или функционирующее зеркало.
Что такое рабочее зеркало казино
Функционирующее зеркало — это запасной линк лицензионного ресурса казино. Такие дубликаты создаются для обеспечения непрерывного соединения к развлекательной платформе.
Копия на сегодня совершенно воспроизводит возможности основного сайта. Игроки обретают идентичный доступ ко всем возможностям, включая создание аккаунта, зачисление средств баланса и снятие выигрышей.
Создание аккаунта на лицензионном сайте
Алгоритм регистрации длится всего считанные моментов. Новым участникам требуется:
1. Зайти на официальный домен или рабочее официальное зеркало
2. Кликнуть кнопку “Зарегистрироваться”
3. Заполнить требуемые сведения
4. Верифицировать почтовую почту
5. Активировать промокод при наличии
После завершения открытия профиля игрок приобретает вознаграждение за регистрацию, который вправе охватывать бесплатные вращения или финансовое премию.
Авторизация в индивидуальный кабинет
Персональный кабинет — это закрытая область, где пользователи вправе управлять своим учетной записью. Для входа нужно указать username и пароль.
В индивидуальном кабинете представлены данные возможности:
– Мониторинг записей транзакций
– Задействование кодов активации
– Контроль поощрениями
– Присоединение в турнирах
– Проверка кэшбека
– Редактирование аккаунта
Вознаграждения и промо
Развлекательная площадка дарит выгодные вознаграждения:
Начальный набор — дебютанты получают существенное вознаграждение на дебютные депозиты.
Даровые спины — дарятся как при оформлении, так и в процессе разнообразных кампаний.
Возмещение — еженедельный возмещение процента потерянных средств.
Коды активации — уникальные последовательности, обеспечивающие возможность к особым бонусам.
Описание развлекательных разделов
Игровые автоматы
Библиотека аппаратов насчитывает массу наименований от лучших поставщиков. Клиенты откроют как обычные аппараты, так и современные видеослоты с увлекательной анимацией.
Live казино
Раздел Live казино предоставляет шанс участвовать с реальными дилерами в формате реального времени. Доступны востребованные столы: рулетка, блэкджек, баккара, покер.
Конкурсы
Систематические соревнования с большими наградными пулами завлекают сотни конкурсантов. Победители зарабатывают финансовые призы и уникальные поощрения.
Мобильная версия и app
Адаптивная версия ресурса предоставляет право участвовать с произвольного гаджета. Оформление автономно настраивается под габариты экрана.
Установить приложение можно для девайсов на Android и iOS. Мобильное app обладает всеми возможностями компьютерной версии.
Как найти рабочее зеркало на данный момент
Свежие адреса копий периодически изменяются. Обнаружить действующую линк можно разными путями:
– Через отдел поддержки
– В официальных информационных сетях
– По электронной рассылке
– На специализированных ресурсах
Охрана и официальность
Лицензионный домен действует на основании мировой сертификата. Все транзакции охраняются передовыми системами кодирования.
Приватность пользовательских сведений сохраняется в полном размере.
Заключение
Официальный портал и его рабочие копии гарантируют игрокам 24/7 путь к высококлассным развлекательным играм. Выгодные поощрения, многочисленные игры, опытная поддержка — все это делает азартный досуг невероятно удобным и захватывающим.
подробнее Узнать замужем ли
секс чат рулетка
нейросеть студент бот нейросеть студент бот .
Актуальные онлайн-казино гарантируют игрокам множество опций для удобной игры. Главный ресурс http://xn—–8kcjfnn3bceaxi1ap3qa.xn--p1ai дарит доступ ко всем сервисам и развлечениям. Однако при появлении программных трудностей на подмогу приходят рабочие дубликаты.
Что означает собой функционирующее зеркало
Альтернативный адрес казино — это полная реплика основного ресурса, расположенная по запасному адресу. Подлинное зеркало сохраняет все опции, вместе с регистрацию, авторизацию в персональный кабинет, премии и купоны.
Альтернативный сайт на сегодня гарантирует:
– Бесперебойный путь к игровым слотам
– Абсолютную сохранность индивидуальных сведений
– Сохранение депозита и журнала транзакций
– Применимость всех акций
Создание аккаунта на основном ресурсе
Процедура регистрации отнимает пару минут. Новым клиентам требуется:
1. Перейти на подлинный сайт или рабочее зеркало
2. Выбрать кнопку «Создать аккаунт»
3. Заполнить нужные поля
4. Подтвердить email почту
5. Применить купон при присутствии
После конца создания аккаунта клиенты получают подарок за регистрацию, что может охватывать бесплатные вращения или финансовое премирование.
Вход в персональный кабинет
Персональный кабинет открывает всесторонний надзор над игровым ходом. Через индивидуальный кабинет можно:
– Депонировать кошелек
– Снимать призы
– Активировать купоны
– Контролировать записи пари
– Принимать участие в конкурсах
– Забирать возврат средств
Описание бонусов и промо-предложений
Щедрая бонусная схема — ключевое достоинство ресурса. Центральные категории вознаграждений:
Начальный бонус
Новые игроки приобретают выгодное вознаграждение на дебютные взносы. Объем премии может составлять 100-200% от объема пополнения.
Бонусные спины
Даровые спины даются для топовых машин. Объем фриспинов изменяется от 10 до 500 штук.
Cash back
Постоянный или помесячный возврат процентной доли утраченных финансов. Средний размер кэшбека — 5-15%.
Состязания
Регулярные турниры с солидными наградными банками. Игроки борются за лучшие строчки в турнирной таблице.
Портативная версия и приложение
Смартфонная версия обеспечивает наслаждаться игрой с любого гаджета. Геймеры могут закачать программу для iOS и Android или использовать веб версию.
Плюсы смартфонного софта:
– Быстрая прогрузка игр
– Удобный интерфейс
– Всплывающие уведомления о поощрениях
– Возможность входа через Face ID
Игровые автоматы и Live казино
Игровая библиотека включает сотни названий от лидирующих разработчиков.
Востребованные секции игр:
– Классические машины
– Видео-автоматы с призовыми раундами
– Джекпот игры
– Мега-путь слоты
Live казино
Зона live казино обеспечивает партию с настоящими дилерами. Имеются стандартные варианты:
– Европейская рулетка
– Двадцать одно
– Baccarat
– Техасский холдем
Как разыскать действующее зеркало
Получить свежую URL на зеркало разрешается несколькими методами:
1. Оформить подписку на емейл-уведомления
2. Следить за обновлениями в социальных сетях
3. Контактировать в сервис поддержки
4. Запомнить рабочее зеркало в закладки
Резюме
Официальный ресурс и его действующие альтернативные адреса гарантируют стабильный путь к развлекательным играм. Великодушные поощрения, многочисленные купоны, эргономичное мобильное приложение и высококлассная служба поддержки делают развлекательный геймплей в высшей степени беспроблемным и надежным.
Обзор главного ресурса
Передовые онлайн казино предлагают пользователям широкий выбор игр и опций. Главный ресурс Килограмм гарантирует проверенный доступ к игровым сервисам.
Актуальное зеркало: путь на сегодня
Зеркало служит как полную реплику основного ресурса. Действующее зеркало обеспечивает участникам миновать существующие ограничения.
Выгоды применения зеркала
Основные выгоды предполагают:
– Постоянный шанс к платформе
– Удержание абсолютно всех функций базового портала
– Безопасность личных материалов
– Такой же функционал
Оформление профиля на сайте
Ход регистрации отличается понятностью и практичностью. Начинающие участники требуется:
1. Перейти на основной веб-сайт или его зеркало
2. Щелкнуть на элемент регистрации
3. Внести необходимые информацию
4. Валидировать электронную почту
5. Произвести дебютный доступ
Приз за оформление
Начинающие получают щедрый стартовый бонус. Данное премия способно содержать:
– Финансовые бонусы
– Даровые фриспины
– Увеличенный показатель компенсации
Логин в персональный профиль
Существующие игроки могут моментально войти в свой профиль, используя логин и код. Личный раздел предоставляет доступ к:
– Администрированию счетом
– Записям платежей
– Работающим поощрениям
– Настройкам учетной записи
Вознаграждения и кампании
Сайт постоянно проводит всевозможные акции для пользователей.
Категории бонусов
Базовые типы поощрений:
– Депозитные бонусы – часть от размера взноса
– Бесплатные вращения – бесплатные прокруты в автоматах
– Кэшбек – отдача доли потерянных финансов
– Конкурсные награды – вознаграждения за состязание в состязаниях
Коды
Уникальные ваучеры помогают получить экстра бонусы. Клиенты имеют возможность получить их на партнерских ресурсах или взять в рассылке.
Мобильная версия и приложение
Актуальные игроки ценят мобильный геймплей.
Функции портативной версии
– Гибкий интерфейс для любых девайсов
– Совокупный путь к автоматам
– Оперативная подгрузка
– Эргономичное управление
Download app
Мобильное софт доступно для скачивания на девайсы с рабочими ОС Android и iOS. Софт дает:
– Устойчивую функциональность
– Push уведомления о призах
– Оперативный доступ к избранным слотам
Азартный портфель
Казино предоставляет обширную галерею игровых забав.
Слоты
Каталог развлекательных машин включает:
– Стандартные игры
– Современные игры
– Прогрессивные игры
– Лицензионные автоматы
Live игры
Область живых дилеров предлагает возможность участвовать с настоящими дилерами. Открыты:
– Европейская рулетка
– Блэкджек
– Баккара
– Poker
Состязания
Систематические соревнования обеспечивают пользователям бороться за крупные денежные суммы. Турнирная система обновляется еженедельно.
Платежные операции
Казино поддерживает разнообразие опций внесения и снятия средств:
– Пластиковые карточки
– Цифровые кошельки
– Межбанковские трансферы
– Криптовалюты
Абсолютно все платежи осуществляются надежно с применением современных технологий защиты.
Отдел поддержки
Опытная команда support трудится постоянно. Обратиться с консультантами доступно через:
– Живой чат
– Почтовую почту
– Контактный номер
– Соц платформы
Защита и аккредитация
Казино работает на основании официальной аккредитации. Это подтверждает:
– Честность игрового геймплея
– Безопасность персональных данных
– Пунктуальные транзакции
– Контролируемый геймплей
Заключение
Главный веб-сайт и его действующие резервные страницы обеспечивают пользователям абсолютный ассортимент опций для безопасной и прибыльной времяпрепровождения. Солидные вознаграждения, всевозможные автоматы, профессиональная служба и безопасная платформа выплат создают портал оптимальным вариантом для ценителей игровых услуг.
hd ролики с женой друга hd ролики с женой друга .
MedicoBridge RX: MedicoBridge RX – farmacia mexicana en chicago
Переход к ресурсу через проверенные зеркала
Пользователи интернет казино постоянно контактируют с вопросом ограничения базового сайта. Как раз для решения этой задачи разработаны дубликаты официального портала. казино KiloGram предоставляет абсолютный переход ко всем опциям площадки.
Что такое актуальное зеркало казино
Альтернативный адрес составляет собой идентичную реплику официального сайта с идентичным набором функций. Главное различие — это иное имя. Любые сведения участника, включая депозит, поощрения и архив игр, остаются идентичными.
Плюсы применения зеркал
Рабочие зеркала характеризуются комплексом существенных преимуществ:
– Бесперебойный доступ к любимым автоматам
– Совершенная конфиденциальность личных сведений
– Сохранение всех настроек персонального кабинета
– Возможность взятия поощрений и участия в кампаниях
Создание аккаунта на легальном ресурсе
Операция оформления чрезвычайно прост и длится несколько минут. Начинающие игроки могут полагаться на солидный стартовый приз за оформление.
Этапы открытия аккаунта
1. Подключение на главный портал или его копию
2. Нажатие на опцию “Присоединиться”
3. Внесение требуемых данных
4. Активация цифровой почты
5. Внесение бонусного кода (когда имеется)
Поощрения и промоакции для клиентов
Платформа радует своих участников различными поощрительными программами.
Базовые виды наград
Приветственный бонус — щедрое поощрение для начинающих клиентов, которое имеет возможность вмещать финансовые призы и безвозмездные спины.
Безвозмездные спины — способность использовать в востребованных слотах без затрат.
Кэшбек — процентный возмещение потерянных сумм, который начисляется раз в неделю или каждый месяц.
Купоны — уникальные комбинации, гарантирующие дополнительные поощрения.
Пользовательский кабинет: опции и настройки
Индивидуальный аккаунт предоставляет абсолютный надзор над игровым опытом. Здесь предусмотрены:
– Управление депозитом
– Записи переводов
– Активные привилегии
– Конфигурации безопасности
– Проверка профиля
Смартфонная версия и программа
Новейшие участники ценят мобильность. Ресурс дает пару метода для развлечений с смартфонных аппаратов.
Адаптивная смартфонная редакция
Адаптивная редакция сайта самостоятельно настраивается под дисплей любого устройства. Нет необходимости скачивать специальное ПО.
APP для гаджетов
Возможно загрузить специальное софт для iOS и Android. Программа гарантирует:
– Быстрый старт
– Адаптированный интерфейс
– Всплывающие-извещения о поощрениях
– Бесперебойную функциональность
Live раздел: атмосфера истинного клуба
Зона Live столов доставляет клиентов в среду подлинного зала. Профессиональные дилеры ведут сессии в виде живого времени.
Топовые Live-развлечения
– Французская рулетка
– 21
– Баккара
– Poker
Автоматы: разнообразие развлечений
Библиотека игровых машин вмещает сотни наименований от известных разработчиков. Игроки найдут:
– Стандартные автоматы
– Современные слоты
– Накопительный приз-игры
– Многолинейные автоматы
Соревнования и уникальные события
Регулярные турниры предоставляют шанс участникам состязаться друг с другом за значительные призовые банки. Отдельный соревнование располагает свои условия присутствия и таблицу лидеров.
Методы зачисления и вывода средств
Ресурс обслуживает комплекс финансовых методов:
– Кредитные карты
– Виртуальные платежные системы
– Цифровые валюты
– Прямые транзиты
Все транзакции выполняются безопасно благодаря современным протоколам шифрования.
Команда поддержки
Квалифицированные операторы команды обслуживания способны содействовать 24/7. Предусмотрены следующие способы коммуникации:
– Живой-чат
– Email-поддержка
– Голосовая поддержка
– Публичные сети
Заключение
Основной домен платформы и его актуальные дубликаты предоставляют участникам безопасный и комфортный доступ к широкому спектру развлекательных услуг. Щедрые награды, регулярные кампании, профессиональная помощь и удобные расчетные инструменты делают игровой времяпрепровождение предельно захватывающим и выгодным.
Подключение к сайту и актуальные ссылки
Востребованные онлайн казино предлагают участникам огромный спектр опций. Главный ресурс Голд предоставляет безопасный вход ко всем возможностям. При этом порой происходят обстоятельства, когда нужно альтернативный метод подключения.
Что представляет собой рабочее зеркало
Действующее зеркало — это абсолютная реплика легального сайта с другим интернет адресом. Альтернатива сегодня обеспечивает преодолевать существующие запреты и гарантировать бесперебойный вход к популярным слотам.
Проверенное зеркало имеет теми же характеристиками, что и главный портал:
– Весь перечень развлечений
– Собственный профиль с зафиксированными сведениями
– Актуальные поощрения и промо
– Проверенные платежные транзакции
Создание аккаунта и подключение в систему
Процесс создания профиля на сайте занимает пару секунд. Новым клиентам следует:
1. Перейти на актуальное зеркало сейчас
2. Кликнуть элемент «Открыть профиль»
3. Указать необходимые сведения
4. Активировать e-mail почту или данные смартфона
5. Активировать награду за открытие аккаунта
Вход в персональный профиль осуществляется через указание логина и пароля.
Анализ поощрительной системы
Богатая поощрительная программа — главное козырь платформы. Игроки забирают многочисленные награды:
Начальные бонусы
Начинающие пользователи могут ожидать на значительный подарок за создание аккаунта. Чаще всего это пакет предложений, содержащий:
– Процентную добавку к стартовому депозиту
– Безвозмездные вращения
– Extra деньги на кошелек
Кодовые комбинации и уникальные возможности
Регулярные бонусные комбинации обеспечивают обретать дополнительные преимущества. Активировать их возможно в особом разделе собственного профиля.
Фриспины и кешбэк
Фриспины — это возможность запускать слоты без использования персональных сумм. Возврат означает долевой возмещение проигранных средств.
Каталог развлечений
Игровая площадка предоставляет внушительную подборку развлечений.
Автоматы
Многообразие игровых машин поражает представление. Есть традиционные 3-барабанные слоты и актуальные развлечения с захватывающей анимацией.
Live зал
Зона Live развлечений переносит пользователей в обстановку истинного развлекательного заведения. Профессиональные операторы ведут партии в онлайн времени.
Конкурсы и рейтинги
Регулярные турниры добавляют драйва и дают шанс заработать внушительные награды.
Портативная форма и клиент
Современные разработки позволяют наслаждаться в любом пространстве. Адаптивная версия самостоятельно адаптируется под монитор девайса.
Получить софт возможно для цифровых ОС iOS и Android. Клиент предоставляет:
– Скоростной вход
– Бесперебойную производительность
– Моментальные-алерты об промо
– Удобный дизайн
Финансовые действия
Казино использует всевозможные методы пополнения и изъятия финансов:
– Кредитные счета
– Электронные сервисы
– Криптовалюты
– Финансовые переводы
Любые переводы проходят через зашифрованное подключение, что гарантирует сохранность конфиденциальных данных.
Отдел ассистанса
Профессиональная бригада поддержки работает 24/7. Контактировать с менеджерами разрешено через:
– Онлайн-чат
– Электронную почту
– Горячую линию
– Общественные каналы
Резюме
Легальный сайт и его актуальное зеркало гарантируют пользователям надежный и приятный вход к захватывающим играм. Привлекательные бонусы, широкий спектр игр и высокая ассистанс делают участие предельно интересной и результативной.
https://t.me/kingcasino_official Искал king casino бонусы и вышел на этот канал, сначала думал фигня какая-то. Но решил открыть — оказалось норм, реально есть промики и ссылки. Проверил — переход работает, сайт открывается. Уже даже попробовал зайти и посмотреть че внутри. Пока без нареканий
ии реферат ии реферат .
Вход к порталу и действующие зеркала
Актуальные виртуальные казино гарантируют игрокам широкий спектр опций. Главный ресурс Рльдорадо обеспечивает защищенный доступ ко всем услугам. Впрочем временами появляются ситуации, когда требуется запасной способ входа.
Что есть собой действующее зеркало
Функционирующее зеркало — это идентичная копия главного веб-сайта с запасным доменным адресом. Зеркало сегодня позволяет преодолевать существующие барьеры и сохранять бесперебойный доступ к выбранным автоматам.
Главное зеркало содержит идентичными характеристиками, что и основной сайт:
– Полный список автоматов
– Индивидуальный аккаунт с актуальными информацией
– Действующие бонусы и акции
– Проверенные денежные операции
Оформление и вход в систему
Процедура создания профиля на ресурсе отнимает считанные моментов. Новым участникам следует:
1. Перейти на функционирующее зеркало на данный момент
2. Нажать опцию «Открыть профиль»
3. Заполнить обязательные сведения
4. Активировать электронную почту или информацию мобильного
5. Использовать награду за оформление
Подключение в личный профиль реализуется путем указание никнейма и ключа.
Описание бонусной структуры
Щедрая поощрительная структура — главное плюс игорного заведения. Участники получают многочисленные бонусы:
Вступительные награды
Свежие игроки имеют возможность претендовать на выгодный поощрение за открытие профиля. Как правило это набор предложений, объединяющий:
– Долевую прибавку к начальному взносу
– Безвозмездные кручения
– Extra суммы на кошелек
Кодовые комбинации и особые акции
Постоянные бонусные комбинации помогают активировать экстра льготы. Использовать их допустимо в предназначенном меню собственного аккаунта.
Free spins и кэшбек
Free spins — это вариант вращать автоматы без применения личных финансов. Кэшбек означает долевой отдачу израсходованных сумм.
Каталог развлечений
Гемблинг сайт обеспечивает впечатляющую подборку развлечений.
Игровые машины
Ассортимент автоматов впечатляет воображение. Есть обычные простые слоты и новые видеослоты с захватывающей графикой.
Live зал
Раздел Live игр переносит участников в обстановку настоящего игорного зала. Профессиональные дилеры ведут раунды в живом формате.
Конкурсы и лидерборды
Периодические соревнования добавляют драйва и гарантируют вариант заработать крупные призы.
Мобильная форма и приложение
Продвинутые решения дают возможность развлекаться в любимом пространстве. Портативная реализация независимо настраивается под экран устройства.
Получить приложение можно для мобильных ОС iOS и Android. Софт обеспечивает:
– Оперативный переход
– Надежную функционирование
– Мгновенные-алерты об промо
– Удобный интерфейс
Платежные процедуры
Сайт работает с многочисленные системы пополнения и снятия средств:
– Пластиковые счета
– Электронные системы
– Цифровые валюты
– Банковские транзакции
Любые переводы осуществляются через надежное соединение, что обеспечивает безопасность конфиденциальных сведений.
Департамент помощи
Профессиональная бригада ассистанса трудится круглосуточно. Обратиться с менеджерами возможно через:
– Live-чат
– E-mail почту
– Телефон
– Общественные каналы
Выводы
Основной сайт и его рабочее зеркало гарантируют игрокам стабильный и легкий доступ к азартным играм. Выгодные бонусы, большой спектр игр и высокая помощь делают участие максимально интересной и результативной.
Переход к порталу и функционирующие зеркала
Популярные онлайн казино предлагают игрокам большой набор опций. Официальный портал Лев обеспечивает надежный подключение ко всем функциям. Однако периодически случаются случаи, когда требуется дополнительный вариант авторизации.
Что есть собой действующее зеркало
Актуальное зеркало — это точная реплика главного сайта с иным URL именем. Альтернатива сегодня помогает миновать возможные запреты и гарантировать стабильный переход к любимым развлечениям.
Главное зеркало обладает полными функциями, что и базовый веб-сайт:
– Весь перечень слотов
– Собственный профиль с сохраненными данными
– Действующие поощрения и предложения
– Надежные платежные операции
Регистрация и вход в казино
Ход оформления на сайте занимает пару мгновений. Свежим игрокам необходимо:
1. Попасть на функционирующее зеркало сейчас
2. Щелкнуть кнопку «Открыть профиль»
3. Ввести необходимые информацию
4. Проверить e-mail почту или данные смартфона
5. Получить бонус за создание профиля
Подключение в собственный аккаунт выполняется через ввод логина и кода доступа.
Описание бонусной программы
Богатая наградная система — важнейшее достоинство игорного заведения. Участники забирают всевозможные бонусы:
Стартовые поощрения
Новые клиенты могут ожидать на выгодный приз за регистрацию. Как правило это набор вариантов, включающий:
– Пропорциональную добавку к первому депозиту
– Подарочные спины
– Дополнительные деньги на кошелек
Купоны и эксклюзивные акции
Периодические промокоды обеспечивают получать бонусные привилегии. Применить их возможно в особом меню индивидуального аккаунта.
Фриспины и возврат средств
Фриспины — это вариант вращать автоматы без применения личных сумм. Рибейт представляет долевой возмещение проигранных сумм.
Каталог автоматов
Гемблинг платформа предлагает внушительную базу развлечений.
Слоты
Многообразие аппаратов восхищает представление. Имеются традиционные 3-барабанные машины и новые игры с интересной графикой.
Live заведение
Раздел Live развлечений помещает пользователей в атмосферу реального азартного клуба. Опытные операторы проводят партии в онлайн режиме.
Соревнования и таблицы лидеров
Периодические состязания обеспечивают накала и предоставляют шанс выиграть значительные призы.
Портативная вариант и приложение
Актуальные технологии позволяют развлекаться в удобном пространстве. Мобильная версия самостоятельно настраивается под дисплей гаджета.
Скачать софт допустимо для операционных платформ iOS и Android. Клиент предоставляет:
– Мгновенный запуск
– Бесперебойную функционирование
– Push-сообщения об акциях
– Интуитивный вид
Денежные процедуры
Сайт поддерживает многочисленные системы внесения и вывода средств:
– Кредитные инструменты
– Онлайн кошельки
– Цифровые валюты
– Банковские отправки
Все операции выполняются через зашифрованное подключение, что гарантирует целостность личных информации.
Департамент помощи
Компетентная бригада ассистанса трудится постоянно. Контактировать с консультантами можно через:
– Live-чат
– Электронную почту
– Контакт
– Общественные сети
Заключение
Главный портал и его действующее зеркало гарантируют игрокам безопасный и комфортный путь к увлекательным развлечениям. Привлекательные подарки, разнообразный выбор автоматов и профессиональная ассистанс делают участие крайне комфортной и результативной.
mostbet ünvan təsdiqi http://www.mostbet31847.help
İşinizə davam edin və daha çox istifadəçi cəlb edin!
https://www.jamboo.nl/product/guitar/
Актуальные онлайн-казино обеспечивают пользователям широкий спектр игр и бонусных опций. Подключение к ресурсу производится через основной веб-сайт или его действующее зеркало https://spb-ska.ru/, что предоставляет стабильную игру.
Что представляет собой актуальное зеркало казино
Копия — это идентичная версия оригинального сайта, построенная для решения запретов. Рабочее зеркало позволяет участникам иметь вход к выбранным автоматам в любое время.
Официальное зеркало обладает всеми характеристиками первоначального ресурса:
– Совокупный ассортимент автоматов
– Учетная запись с записанными параметрами
– Свежие поощрения
– Надежные финансовые действия
Оформление профиля на лицензионном портале
Алгоритм создания аккаунта отнимает всего считанные минут. Свежим клиентам требуется:
1. Попасть на главный портал или актуальное зеркало
2. Щелкнуть на элемент “Зарегистрироваться”
3. Заполнить обязательные сведения
4. Проверить email
5. Сделать дебютный вклад
Приветственный бонус начисляется моментально после завершения всех шагов.
Авторизация в личный кабинет
Действующие игроки могут совершить доступ вводя:
– Учетное имя и код
– Цифры мобильного
– Электронную почту
Профиль предоставляет доступ к контролю балансом, данным транзакций и текущим поощрениям.
Поощрения и программы
Игровая площадка привлекает регулярных клиентов разнообразными поощрениями:
Приветственный пакет
– Поощрение на начальный депозит до 100%
– Даровые спины на востребованные слоты
– Добавочные награды за последующие депозиты
Бонусные коды
Особые промокоды обеспечивают доступ на получение уникальных вознаграждений. Действующие коды размещаются в секции “Промо”.
Возврат средств
Периодический бонус равен до 10% от утраченных финансов. Компенсация выплачивается автоматически.
Программа лояльности
Регулярные пользователи зарабатывают баллы, которые обмениваются на реальные средства или бесплатные вращения.
Адаптивный портал и софт
Для удобства пользователей сделана функциональная портативная платформа. Отзывчивый интерфейс помогает легко делать ставки с каждого карманного девайса.
Плюсы приложения:
– Быстрый вход к развлечениям
– Оптимизированный облик
– Бесперебойная функциональность
– Нотификации о свежих бонусах
Установить APP можно бесплатно с официального портала для девайсов на Android и iOS.
Каталог слотов
Слоты
База содержит более 2000 автоматов от популярных производителей:
– Обычные автоматы
– Мультимедийные игры
– Слоты с джекпотом
– Тематические слоты
Live казино
Блок Live развлечений обеспечивает участие с реальными дилерами в живом формате:
– Колесо фортуны
– Карточная игра
– Punto Banco
– Poker
Конкурсы
Постоянные соревнования с большими премиальными фондами проводятся регулярно. Присоединение в соревнованиях разрешено всем зарегистрированным участникам.
Расчетные методы
Платежи и получения выплат производятся через известные сервисы:
– Кредитные карточ ки
– Виртуальные счета
– Цифровая валюта
– Счетные платежи
Стартовый депозит — от 100 рублей. Изъятие финансов осуществляется в течение 24 периода.
Служба саппорта
Непрерывная команда саппорта способна ассистировать в решении каких-либо ситуаций:
– Онлайн-чат
– Email
– Телефон
– Соц сети
Надежность и разрешение
Официальный ресурс функционирует на базе мировой сертификата. Любые данные участников защищены передовым SSL-криптованием.
Итог
Рабочее зеркало обеспечивает бесперебойный вход к предпочитаемым слотам, щедрым бонусам и комфортным сервисам. Присоединяйтесь сейчас и приобретите стартовый поощрение!
reputable indian pharmacies: TrustRx India – best india pharmacy
Подключение к порталу через действующие зеркала
Игроки онлайн казино часто сталкиваются с проблемой ограничения основного портала. Как раз для ликвидации этой трудности разработаны дубликаты главного ресурса. Килограмм дает полный доступ ко всем функциям площадки.
Что такое действующее зеркало казино
Копия представляет собой точную копию оригинального веб-сайта с аналогичным функционалом. Основное расхождение — это альтернативное имя. Абсолютно все параметры пользователя, содержа депозит, награды и записи игр, сохраняются неизменными.
Достоинства применения зеркал
Функционирующие зеркала располагают множеством ключевых преимуществ:
– Непрерывный подключение к предпочитаемым слотам
– Совершенная безопасность собственных информации
– Неизменность всех параметров личного кабинета
– Опция обретения призов и вовлечения в промоакциях
Создание аккаунта на легальном ресурсе
Процесс создания аккаунта максимально прост и требует несколько минут. Недавние пользователи в состоянии претендовать на щедрый начальный подарок за открытие счета.
Этапы открытия аккаунта
1. Подключение на главный сайт или его копию
2. Активация на кнопку “Регистрация”
3. Внесение требуемых сведений
4. Активация цифровой почты
5. Внесение бонусного кода (если доступен)
Бонусы и кампании для пользователей
Игровая площадка радует своих игроков многочисленными поощрительными предложениями.
Ключевые типы поощрений
Приветственный бонус — щедрое премирование для новых клиентов, которое способно включать материальные бонусы и фриспины.
Безвозмездные спины — возможность запускать в известных автоматах без затрат.
Компенсация — пропорциональный компенсация израсходованных денег, что начисляется еженедельно или помесячно.
Специальные коды — эксклюзивные последовательности, гарантирующие экстра привилегии.
Личный кабинет: опции и установки
Личный профиль дает полный управление над развлекательным взаимодействием. Тут присутствуют:
– Администрирование балансом
– Архив переводов
– Работающие бонусы
– Параметры защиты
– Проверка аккаунта
Портативная версия и APP
Нынешние участники оценивают гибкость. Платформа предоставляет два пути для игры с мобильных устройств.
Приспособленная смартфонная вариант
Портативная вариант ресурса автоматически подстраивается под разрешение любого устройства. Не требуется устанавливать дополнительное софт.
Приложение для смартфонов
Разрешено инсталлировать официальное программу для iOS и Android. Приложение гарантирует:
– Моментальный доступ
– Улучшенный графику
– Мобильные-извещения о поощрениях
– Стабильную производительность
Live развлечения: атмосфера подлинного казино
Категория Live развлечений переносит клиентов в атмосферу подлинного зала. Компетентные дилеры ведут партии в режиме настоящего времени.
Известные Live-игры
– Американская рулетка
– 21
– Punto Banco
– Poker
Слоты: разнообразие автоматов
Коллекция развлекательных слотов содержит множество вариантов от ведущих разработчиков. Пользователи найдут:
– Классические автоматы
– Современные слоты
– Накопительный приз-машины
– Многолинейные автоматы
Состязания и уникальные события
Постоянные турниры предоставляют шанс пользователям состязаться друг с другом за значительные денежные пулы. Отдельный состязание располагает свои условия включения и рейтинг лидеров.
Пути ввода и снятия денег
Казино обслуживает ряд денежных методов:
– Дебетовые средства
– Виртуальные платежные системы
– Криптовалюты
– Банковские транзиты
Любые операции осуществляются безопасно благодаря передовым методам защиты.
Отдел обслуживания
Опытные специалисты службы поддержки расположены содействовать 24/7. Имеются следующие методы контакта:
– Живой-чат
– Email-поддержка
– Голосовая поддержка
– Коммуникационные сети
Резюме
Легальный ресурс казино и его актуальные дубликаты дают игрокам безопасный и приятный доступ к большому диапазону азартных услуг. Внушительные подарки, постоянные кампании, качественная служба и комфортные денежные способы формируют геймерский опыт предельно приятным и доходным.
Актуальные онлайн казино дают игрокам обширный диапазон опций для приятной игры. Но иногда доступ к базовому порталу может являться закрытым. В таких обстоятельствах на выручку приходят Vovan сайт официальный, которое дает постоянный подключение ко всем сервисам платформы.
Что такое рабочее зеркало казино
Зеркало — это полная реплика основного ресурса, которая размещается по запасному адресу. Копия имеет полный набор функций оригинального веб-портала, включая персональный кабинет, депозит и запись переводов.
Принципиальные достоинства задействования зеркала:
– Круглосуточный подключение к платформе
– Абсолютная идентичность опций
– Конфиденциальность персональных реквизитов
– Хранение существующих вознаграждений
Как найти функционирующее зеркало на сегодня
Существует множество надежных вариантов нахождения актуальной ссылочной информации:
Легитимные источники:
1. Электронная рассылка — руководство регулярно направляет сообщения с актуальными адресами
2. Коммуникационные сети — официальные аккаунты публикуют свежую данные
3. Отдел поддержки — консультанты дают безопасные ссылки
4. Мобильное приложение — предоставляет минуть блокировки
Регистрация на основном сайте
Процесс оформления занимает всего считанные минут и включает из следующих шагов:
1. Переход на официальный веб-сайт или рабочее зеркало
2. Щелчок на иконку «Открыть счет»
3. Внесение пользовательской анкеты
4. Валидация email почты или контактного номера
5. Включение бонуса за регистрацию при наличии промокода
Только что зарегистрированные пользователи приобретают солидный вступительный бонус, который может охватывать free spins, валютные бонусы или возврат средств.
Вход в пользовательский кабинет
Авторизация на платформе выполняется стандартным методом. Достаточно внести учетные данные и код доступа, указанные при регистрации.
Значимые аспекты для конфиденциального входа:
– Задействуйте криптостойкий код
– Активируйте 2FA идентификацию
– Не записывайте данные на посторонних девайсах
– Контролируйте URL строку браузера
Описание наградной программы
Игровая платформа радует клиентов многочисленными привилегиями и промо:
Начальный комплект
Свежие игроки способны рассчитывать на существенное поощрение за начальный пополнение. Традиционно это процентная надбавка к депонированной количеству плюс фриспины для востребованных слотов.
Регулярные предложения
– Недельный возврат средств — возврат процента потерянных финансов
– Поощрения на последующие вклады
– Особые акции по праздникам
– Соревнования с большими наградными суммами
Программа вознаграждений
Активные клиенты зарабатывают единицы за произвольную ставку, которые затем превращаются на фактические средства, free spins или уникальные преимущества.
Кодовые слова: как применять
Кодовые комбинации — это специальные последовательности букв и цифр, гарантирующие возможность к специальным бонусам.
Где раздобыть действующие промокоды:
– Легитимные коммуникационные сети казино
– Союзнические порталы
– Email-рассылка
– Специализированные форумы
Вводится промокод в специальное поле при регистрации или пополнении счета.
Смартфонная версия и приложение
Современные игроки предпочитают развлекаться с мобильных аппаратов. Портал предоставляет два решения для беспроблемной мобильной игры.
Responsive редакция
Онлайн версия автоматически оптимизируется под размер экрана. Не требует инсталляции и функционирует в каждом актуальном браузере.
Мобильное приложение
Скачать приложение можно для девайсов на Android и iOS. Преимущества app:
– Молниеносная открытие
– Устойчивая действие
– Автоматические-уведомления о акциях
– Самостоятельный преодоление блокировок
Операция инсталляции прост: достаточно зайти на ресурс с мобильного аппарата и придерживаться руководству.
Азартный ассортимент
Коллекция игр содержит тысячи единиц от ведущих производителей.
Слоты
Развлекательные слоты — крайне распространенная группа игр. Размещены обычные трехбарабанные аппараты, актуальные видеослоты с поощрительными раундами, а также джекпотные выигрыши.
Live казино
Зона с реальными дилерами обеспечивает испытать атмосферу настоящего казино. Имеются столы с рулеткой.
Трансляция осуществляется в высоком четкости, имеется диалог с крупье и прочими участниками.
Конкурсы
Постоянно устраиваются состязания по разным играм. Включение дает шанс выиграть монетарные награды, free spins или уникальные привилегии.
Транзакционные действия
Платформа обеспечивает значительный выбор расчетных инструментов:
– Банковские карты
– Виртуальные системы
– Биткоин
– Счетовые переводы
Стартовая объем взноса — разумная для преобладающего числа геймеров. Вывод денег производится в короткие периоды.
Департамент поддержки
Профессиональные специалисты настроены оказать помощь 24/7. Доступны следующие каналы коммуникации:
– Интернет-чат
– Email
– Голосовая поддержка
– Медийные сети
Разъяснения на стандартные запросы можно найти в разделе FAQ.
Вывод
Лицензионный сайт казино и его актуальные зеркала дают игрокам совершенный доступ ко всем возможностям ресурса. Солидные поощрения, практичная мобильная версия, впечатляющий каталог слотов и опытная помощь делают развлекательный времяпрепровождение максимально приятным и конфиденциальным.
Вход к порталу и действующие зеркала
Современные сетевые казино предлагают клиентам широкий выбор игр. Главный сайт spb-ska.ru предоставляет стабильный доступ ко всем возможностям. Однако иногда появляются моменты, когда понадобится дополнительный вариант авторизации.
Что есть собой актуальное зеркало
Актуальное зеркало — это абсолютная копия основного портала с другим сетевым именем. Зеркало сегодня дает возможность избегать существующие ограничения и сохранять непрерывный вход к популярным слотам.
Главное зеркало обладает полными опциями, что и базовый сайт:
– Полный список автоматов
– Индивидуальный кабинет с актуальными параметрами
– Все подарки и промо
– Надежные платежные действия
Создание аккаунта и доступ в платформу
Процедура оформления на сайте отнимает несколько секунд. Новым игрокам следует:
1. Перейти на действующее зеркало в настоящее время
2. Кликнуть опцию «Зарегистрироваться»
3. Указать требуемые параметры
4. Активировать цифровую почту или информацию смартфона
5. Забрать бонус за создание профиля
Подключение в собственный кабинет реализуется путем предоставление никнейма и секретной комбинации.
Анализ бонусной структуры
Привлекательная поощрительная политика — важнейшее плюс платформы. Пользователи получают многочисленные поощрения:
Вступительные бонусы
Новые пользователи вправе претендовать на выгодный приз за создание аккаунта. Традиционно это совокупность вариантов, охватывающий:
– Пропорциональную прибавку к первому взносу
– Подарочные кручения
– Extra суммы на аккаунт
Купоны и уникальные предложения
Систематические промокоды позволяют получать призовые привилегии. Задействовать их можно в особом меню личного профиля.
Free spins и кешбэк
Бесплатные спины — это возможность вращать слоты без использования личных сумм. Компенсация представляет определенный компенсацию потерянных сумм.
Ассортимент автоматов
Гемблинг сайт обеспечивает огромную подборку слотов.
Видеослоты
Ассортимент аппаратов впечатляет ожидания. Есть обычные трехбарабанные автоматы и актуальные игры с увлекательной анимацией.
Live зал
Секция Live игр транспортирует клиентов в антураж подлинного азартного клуба. Опытные операторы осуществляют раунды в реальном режиме.
Конкурсы и рейтинги
Постоянные соревнования привносят драйва и дают вариант заработать значительные награды.
Мобильная вариант и программа
Актуальные разработки обеспечивают наслаждаться в любимом пространстве. Портативная вариант самостоятельно подстраивается под дисплей девайса.
Установить приложение разрешено для операционных ОС iOS и Android. Софт предоставляет:
– Мгновенный доступ
– Надежную производительность
– Всплывающие-сообщения об предложениях
– Простой вид
Финансовые процедуры
Казино поддерживает различные способы внесения и изъятия сумм:
– Кредитные инструменты
– Цифровые сервисы
– Цифровые валюты
– Финансовые транзакции
Всевозможные операции осуществляются через защищенное канал, что обеспечивает целостность личных сведений.
Отдел ассистанса
Опытная команда помощи функционирует 24/7. Связаться с операторами разрешено через:
– Live-чат
– Цифровую почту
– Горячую линию
– Медиа сети
Резюме
Легальный портал и его актуальное зеркало гарантируют участникам безопасный и удобный вход к увлекательным забавам. Щедрые подарки, широкий ассортимент игр и высокая поддержка обеспечивают процесс крайне интересной и доходной.
For products
Local beginner loans
to choose the best option.
king casino Искал king casino бонусы и вышел на этот канал, сначала думал фигня какая-то. Но решил открыть — оказалось норм, реально есть промики и ссылки. Проверил — переход работает, сайт открывается. Уже даже попробовал зайти и посмотреть че внутри. Пока без нареканий
Подключение к порталу через актуальные зеркала
Игроки виртуальных казино постоянно контактируют с вопросом ограничения официального ресурса. Как раз для решения этой проблемы предусмотрены дубликаты легального ресурса. http://spb-ska.ru/ дает полный подключение ко всем опциям ресурса.
Что такое действующее зеркало казино
Зеркало является собой точную версию главного ресурса с похожим функционалом. Основное расхождение — это иное имя. Каждые параметры участника, в том числе баланс, награды и записи ставок, продолжают быть прежними.
Достоинства эксплуатации зеркал
Действующие зеркала характеризуются рядом существенных выгод:
– Круглосуточный вход к выбранным слотам
– Абсолютная конфиденциальность собственных параметров
– Неизменность всех параметров персонального кабинета
– Способность получения поощрений и участия в промоакциях
Создание аккаунта на официальном портале
Ход оформления предельно прост и занимает несколько минут. Начинающие участники имеют возможность надеяться на крупный приветственный подарок за оформление.
Этапы формирования аккаунта
1. Переход на официальный сайт или его копию
2. Нажатие на клавишу “Зарегистрироваться”
3. Указание обязательных информации
4. Подтверждение почтовой почты
5. Указание купона (в случае есть)
Поощрения и акции для клиентов
Ресурс одаривает своих клиентов разнообразными бонусными предложениями.
Основные типы бонусов
Начальный приз — солидное вознаграждение для новых пользователей, которое может вмещать материальные бонусы и бесплатные вращения.
Бесплатные вращения — опция играть в популярных игровых машинах без затрат.
Кешбэк — долевой возмещение израсходованных средств, каковой начисляется каждую неделю или ежемесячно.
Специальные коды — эксклюзивные сочетания, обеспечивающие добавочные поощрения.
Пользовательский кабинет: возможности и настройки
Персональный раздел гарантирует абсолютный контроль над персональным активностью. Тут присутствуют:
– Управление депозитом
– Записи операций
– Работающие привилегии
– Конфигурации сохранности
– Верификация учетной записи
Карманная редакция и APP
Актуальные участники признают мобильность. Платформа обеспечивает два пути для развлечений с мобильных аппаратов.
Приспособленная портативная вариант
Смартфонная платформа ресурса автоматически адаптируется под разрешение любого устройства. Нет необходимости загружать специальное приложение.
Приложение для телефонов
Доступно инсталлировать специальное APP для iOS и Android. Приложение гарантирует:
– Быстрый вход
– Адаптированный интерфейс
– Всплывающие-оповещения о акциях
– Надежную работу
Live развлечения: среда истинного клуба
Зона Live казино переносит пользователей в атмосферу реального клуба. Профессиональные ведущие осуществляют игры в виде прямого времени.
Востребованные Live-столы
– Европейская рулетка
– 21
– Punto Banco
– Poker
Слоты: ассортимент автоматов
Собрание азартных машин насчитывает тысячи наименований от лидирующих производителей. Игроки встретят:
– Стандартные слоты
– Графические слоты
– Прогрессивный джекпот-автоматы
– Megaways
Состязания и уникальные акции
Систематические состязания обеспечивают участникам конкурировать друг с другом за значительные призовые суммы. Каждый турнир имеет свои правила включения и рейтинг победителей.
Способы внесения и вывода денег
Площадка обслуживает комплекс платежных систем:
– Банковские карты
– Электронные платежные системы
– Криптовалюты
– Финансовые транзакции
Каждые платежи выполняются безопасно благодаря передовым системам криптографии.
Отдел обслуживания
Компетентные консультанты службы support готовы содействовать 24/7. Работают нижеперечисленные методы общения:
– Живой-чат
– Email-поддержка
– Звонковая поддержка
– Коммуникационные сети
Заключение
Официальный домен клуба и его актуальные зеркала гарантируют участникам защищенный и комфортный подход к большому выбору геймерских игр. Внушительные бонусы, постоянные кампании, квалифицированная помощь и удобные денежные системы создают игровой процесс максимально увлекательным и доходным.
Передовые онлайн-казино предлагают клиентам широкий выбор опций для удобной игры. Подключение к сервису Ретро казино осуществляется через основной сайт или актуальное зеркало.
Что такое функционирующее зеркало казино
Актуальное зеркало — это альтернативный линк главного сайта казино. Такие копии разрабатываются для поддержания стабильного подключения к гемблинговой сервису.
Копия актуальное совершенно воспроизводит функционал основного домена. Пользователи получают такой же доступ ко всем услугам, включая создание аккаунта, внесение депозита баланса и обналичивание выигрышей.
Создание аккаунта на основном портале
Процесс регистрации отнимает всего считанные секунд. Новым игрокам необходимо:
1. Войти на лицензионный ресурс или рабочее официальное зеркало
2. Кликнуть кнопку “Открыть счет”
3. Ввести обязательные данные
4. Верифицировать e-mail почту
5. Применить купон при наличии
После выполнения создания аккаунта пользователь приобретает приз за регистрацию, который вправе охватывать free spins или финансовое поощрение.
Вход в индивидуальный кабинет
Пользовательский кабинет — это закрытая зона, где клиенты вправе контролировать своим аккаунтом. Для авторизации следует ввести имя пользователя и секретный ключ.
В пользовательском кабинете имеются данные функции:
– Просмотр хронологии операций
– Задействование кодов активации
– Регулирование призами
– Включение в конкурсах
– Отслеживание кэшбэка
– Корректировка учетной записи
Бонусы и акции
Развлекательная платформа предоставляет выгодные вознаграждения:
Приветственный набор — начинающие обретают солидное премию на первые взносы.
Даровые спины — начисляются как при оформлении, так и в рамках различных мероприятий.
Возмещение — систематический рефанд доли потерянных финансов.
Коды активации — эксклюзивные коды, дающие доступ к особым предложениям.
Характеристика гемблинговых разделов
Slots
Ассортимент слотов включает сотни наименований от ведущих разработчиков. Игроки найдут как обычные автоматы, так и новые 3D-слоты с увлекательной оформлением.
Live казино
Зона Live казино предоставляет право играть с реальными дилерами в условиях текущего времени. Представлены востребованные столы: рулетка, блэкджек, баккара, покер.
Состязания
Периодические соревнования с большими премиальными суммами завлекают сотни участников. Призеры зарабатывают денежные призы и специальные бонусы.
Портативная версия и app
Адаптивная версия ресурса дает возможность участвовать с любого гаджета. Оформление самостоятельно адаптируется под диагональ экрана.
Загрузить программу можно для девайсов на Android и iOS. Мобильное приложение располагает всеми опциями полной версии.
Как определить текущее зеркало на сегодня
Рабочие ссылки дубликатов постоянно меняются. Обнаружить актуальную линк можно многими вариантами:
– Через департамент поддержки
– В проверенных новостных сетях
– По электронной рассылке
– На специализированных ресурсах
Защита и лицензирование
Лицензионный портал действует на основе международной разрешения. Все переводы оберегаются инновационными системами защиты.
Конфиденциальность персональных сведений поддерживается в полном масштабе.
Заключение
Главный портал и его актуальные дубликаты обеспечивают игрокам 24/7 путь к качественным развлекательным услугам. Привлекательные бонусы, многочисленные развлечения, профессиональная сервис — все это превращает азартный процесс невероятно комфортным и захватывающим.
сайт для рефератов сайт для рефератов .
Правильные аргументы помогут получить повышение на работе, важный заказ или просто скидку в магазине
https://bit.ly/4bFAI49
кинг казино Искал king casino бонусы и вышел на этот канал, сначала думал фигня какая-то. Но решил открыть — оказалось норм, реально есть промики и ссылки. Проверил — переход работает, сайт открывается. Уже даже попробовал зайти и посмотреть че внутри. Пока без нареканий
Механизмы влияния: В отличие от внушения, действующего на подсознание, убеждение обращается к разуму и критическому мышлению, требуя осмысленного принятия информации.
https://bit.ly/4bFAI49
Научитесь работать с давлением на эмоции и сохранять холодную голову при разговоре с манипуляторами и мошенниками
https://bit.ly/4bFAI49
Передовые онлайн-казино предлагают пользователям большой набор услуг и поощрительных вариантов. Вход к площадке реализуется через официальный сайт или его функционирующее зеркало ДжиВиСпин, что предоставляет непрерывную деятельность.
Что представляет собой актуальное зеркало казино
Альтернатива — это точная реплика официального ресурса, созданная для решения барьеров. Рабочее зеркало помогает игрокам сохранить вход к выбранным развлечениям в любое время.
Подлинное зеркало обладает всеми характеристиками оригинального веб-сайта:
– Полный список развлечений
– Учетная запись с сохраненными параметрами
– Свежие акции
– Безопасные финансовые операции
Регистрация на лицензионном портале
Процедура открытия счета требует всего несколько минут. Начинающим игрокам нужно:
1. Попасть на официальный ресурс или действующее зеркало
2. Выбрать на ссылку “Открыть счет”
3. Внести обязательные сведения
4. Верифицировать email
5. Совершить начальный депозит
Приветственный бонус начисляется незамедлительно после прохождения всех шагов.
Вход в учетную запись
Зарегистрированные участники могут осуществить доступ вводя:
– Логин и шифр
– Цифры мобильного
– Контактный email
Аккаунт открывает доступ к контролю финансами, данным ставок и доступным бонусам.
Бонусы и акции
Азартная сервис привлекает активных пользователей разнообразными вознаграждениями:
Стартовый бонус
– Премия на начальный взнос до 100%
– Фриспины на востребованные слоты
– Добавочные бонусы за последующие депозиты
Ваучеры
Эксклюзивные коды дают возможность на приобретение особых призов. Свежие купоны выставляются в категории “Бонусы”.
Кэшбек
Постоянный бонус составляет до 10% от использованных сумм. Компенсация начисляется моментально.
Система лояльности
Активные участники зарабатывают единицы, которые конвертируются на действительные средства или free spins.
Мобильная версия и приложение
Для практичности клиентов создана полноценная мобильная версия. Отзывчивый интерфейс помогает удобно играть с любого портативного устройства.
Достоинства APP:
– Оперативный подключение к слотам
– Адаптированный вид
– Надежная активность
– Push-уведомления о последних акциях
Загрузить APP можно бесплатно с основного сайта для девайсов на Android и iOS.
Ассортимент автоматов
Игровые автоматы
Библиотека включает более 2000 слотов от популярных разработчиков:
– Традиционные слоты
– Мультимедийные игры
– Слоты с джекпотом
– Брендовые развлечения
Live казино
Категория Live развлечений предоставляет развлечение с реальными ведущими в живом режиме:
– Roulette
– Blackjack
– Punto Banco
– Карточный покер
Конкурсы
Периодические соревнования с значительными призовыми фондами запускаются каждую неделю. Участие в соревнованиях разрешено всем зарегистрированным пользователям.
Платежные способы
Взносы и выводы выплат выполняются через популярные сервисы:
– Дебетовые карты
– Электронные системы
– Криптовалюта
– Денежные операции
Наименьший депозит — от 100 рублей. Изъятие средств проводится в течение 24 часов.
Сервис саппорта
24/7 отдел саппорта готова ассистировать в разрешении всех ситуаций:
– Мессенджер
– Email
– Телефон
– Социальные сети
Охрана и разрешение
Главный ресурс оперирует на основании глобальной разрешения. Каждые данные игроков охранены современным SSL-протоколом.
Вывод
Рабочее зеркало предоставляет непрерывный соединение к любимым развлечениям, выгодным бонусам и практичным сервисам. Откройте счет прямо сейчас и приобретите начальный бонус!
посмотреть в этом разделе водка бет
Передовые онлайн-казино дают пользователям большой спектр возможностей и бонусных предложений. Вход к ресурсу реализуется через лицензионный ресурс или его рабочее зеркало Клубника, что дает постоянную активность.
Что представляет собой функционирующее зеркало казино
Зеркало — это полная реплика официального портала, построенная для преодоления ограничений. Актуальное зеркало обеспечивает пользователям обрести подключение к выбранным играм в любое удобное время.
Официальное зеркало располагает всеми функциями оригинального сайта:
– Полный список развлечений
– Личный кабинет с записанными данными
– Свежие промокоды
– Безопасные финансовые действия
Открытие счета на главном портале
Процедура регистрации занимает всего немного минут. Свежим игрокам нужно:
1. Войти на главный сайт или функционирующее зеркало
2. Выбрать на кнопку “Открыть счет”
3. Заполнить требуемые параметры
4. Активировать адрес
5. Внести стартовый платеж
Бонус за регистрацию зачисляется незамедлительно после прохождения всех ступеней.
Подключение в профиль
Созданные участники могут совершить вход вводя:
– Никнейм и код
– Цифры мобильного
– Контактный email
Персональный раздел дает возможность к контролю средствами, записям игр и текущим поощрениям.
Награды и кампании
Игровая платформа радует активных игроков многочисленными бонусами:
Первый набор
– Бонус на начальный пополнение до 100%
– Бесплатные вращения на востребованные слоты
– Особые поощрения за очередные платежи
Промокоды
Специальные ваучеры предоставляют возможность на использование эксклюзивных поощрений. Текущие купоны размещаются в секции “Промо”.
Кешбэк
Постоянный бонус достигает до 10% от использованных денег. Компенсация предоставляется сразу.
Механизм лояльности
Постоянные пользователи накапливают баллы, которые конвертируются на подлинные деньги или free spins.
Мобильная версия и APP
Для удобства клиентов создана качественная мобильная версия. Отзывчивый интерфейс помогает легко участвовать с каждого мобильного аппарата.
Плюсы программы:
– Скорый подключение к слотам
– Улучшенный дизайн
– Устойчивая активность
– Push-уведомления о свежих турнирах
Загрузить APP можно свободно с главного веб-сайта для аппаратов на Android и iOS.
Коллекция игр
Игровые автоматы
Коллекция содержит более 2000 автоматов от известных студий:
– Традиционные автоматы
– Мультимедийные игры
– Слоты с джекпотом
– Сюжетные автоматы
Live казино
Блок Live столов обеспечивает развлечение с подлинными крупье в реальном режиме:
– Колесо фортуны
– Blackjack
– Карты
– Покер
Конкурсы
Периодические соревнования с значительными премиальными суммами устраиваются систематически. Допуск в состязаниях доступно всем созданным клиентам.
Расчетные методы
Пополнения и снятия денег выполняются через востребованные платежные системы:
– Банковские карточ ки
– Онлайн счета
– Крипто
– Прямые операции
Наименьший взнос — от 100 рублей. Изъятие финансов осуществляется в течение 24 периода.
Сервис поддержки
Круглосуточная команда саппорта расположена поддержать в разрешении любых ситуаций:
– Live chat
– Email
– Телефон
– Социальные сети
Охрана и лицензия
Подлинный портал функционирует на почве мировой разрешения. Все данные игроков обезопасены современным SSL-криптованием.
Итог
Актуальное зеркало предоставляет непрерывный вход к любимым слотам, щедрым промокодам и удобным сервисам. Присоединяйтесь сегодня и получите первый поощрение!
world pharmacy india: best india pharmacy – cheapest online pharmacy india
Подключение к порталу через действующие зеркала
Нынешние сетевые казино дают пользователям постоянный вход к играм. Официальный сайт Голд функционирует надёжно, обеспечивая обширный спектр гемблинг автоматов. Однако временами появляются системные сложности или ограничения, потому критично понимать о наличии рабочих зеркал.
Что собой представляет из себя главное зеркало казино
Зеркало — это полная дубликат главного портала с таким же функционалом. Функционирующее зеркало сегодня помогает избегать локальные запреты и продолжать игру.
Ключевые преимущества использования зеркал:
– Безграничный переход к личному кабинету
– Сохранение каждых показателей профиля
– Идентичный спектр слотов
– Текущие привилегии и промо
Оформление на сайте
Процедура регистрации требует считанные минут. Начинающие клиенты зарабатывают богатый бонус за создание счёта, который способен вмещать:
– Приветственный игровой кредит
– Комплиментарные фриспины для игр
– Особые ваучеры
– Расширенный кешбэк
Для выполнения записи нужно:
1. Переместиться на центральный ресурс или дубликат
2. Выбрать элемент «Создать аккаунт»
3. Ввести контактные данные
4. Активировать мейл или контакт
5. Использовать промокод (если есть наличии)
Доступ в персональный кабинет
Вслед за корректной записи клиенты имеют возможность совершать подключение с помощью центральный веб-сайт или действующее зеркало. Личный кабинет даёт полный надзор над профилем:
– Архив игр
– Внесение счёта
– Вывод призов
– Регулирование бонусами
– Присутствие в турнирах
Бонусы и предложения казино
Платформа награждает пользователей различными наградными схемами:
Вступительные поощрения
Начинающие получают богатый комплект бонусов на первые вклады. Обычно это включает долевую добавку к величине депозита плюс комплиментарные кручения.
Постоянные промо
– Седмичный возврат до 15%
– Конкурсы с призовыми фондами
– Призы на число рождения
– Особые акции для элитных игроков
Схема лояльности
Деятельные геймеры зарабатывают очки, они можно превратить на настоящие призы или особые преимущества.
Карманная редакция и софт
Актуальные инновации позволяют играть где комфортно. Портативная версия сайта независимо адаптируется под экран всякого гаджета.
Плюсы портативного приложения:
– Быстрая подгрузка развлечений
– Практичный дизайн
– Всплывающие-уведомления о предложениях
– Шанс инсталлировать для Android и iOS
Настоящее казино: среда настоящего гемблинг заведения
Область Live казино транспортирует клиентов в среду истинного игорного дома. Опытные дилеры организуют развлечение в виде актуального времени.
Имеющиеся варианты:
– Рулетка
– Двадцать одно
– Классика
– Покер
Автоматы и гемблинг машины
Собрание игровых слотов охватывает тысячи вариантов от топовых производителей. Каждый геймер обнаружит развлечение по душе:
– Стандартные барабаны
– Современные автоматы с дополнительными этапами
– Крупный приз-машины
– Megaways автоматы
Состязания и розыгрыши
Постоянные состязания добавляют остроту и открывают способность заработать большие суммы. Присутствие в конкурсах нередко даровое, а премиальные пулы составляют значительных величин.
Безопасность и конфиденциальность
Ресурс эксплуатирует актуальные технологии кодирования для гарантии реквизитов клиентов. Совокупные платёжные операции осуществляются через зашифрованные протоколы.
Итог
Официальный веб-сайт и его рабочие зеркала гарантируют безопасный подключение к отличным гемблинг услугам. Великодушные бонусы, комфортная смартфонная редакция, богатство автоматов и компетентное Live-заведение создают платформу отличным выбором для любителей развлекательных развлечений.
https://t.me/s/kingcasino_official
Если кто ищет king casino telegram, вот норм канал, сам через него захожу. Там всегда есть актуальные ссылки и бонусы. Уже не первый раз пользуюсь, все работает стабильно. Без всяких танцев с бубном ??
https://new.72dez.ru/user/godiedrjid
нейросеть реферат нейросеть реферат .
Характеристика основного ресурса
Современные виртуальные казино дают клиентам богатый набор услуг и шансов. Главный веб-сайт Голд регистрация предоставляет проверенный путь к игровым возможностям.
Рабочее зеркало: путь на сегодня
Зеркало служит собой точную копию основного веб-сайта. Официальное зеркало помогает пользователям избегать возможные барьеры.
Плюсы применения зеркала
Основные достоинства содержат:
– Непрерывный путь к платформе
– Хранение полных характеристик официального сайта
– Сохранность индивидуальных сведений
– Аналогичный набор функций
Оформление профиля на ресурсе
Ход открытия счета характеризуется доступностью и эргономичностью. Недавние пользователи должны:
1. Открыть главный портал или его зеркало
2. Нажать на пункт оформления
3. Внести нужные информацию
4. Подтвердить электронную почту
5. Произвести стартовый авторизацию
Приз за оформление
Новички зарабатывают значительный приветственный презент. Это награда способно охватывать:
– Материальные средства
– Complimentary прокруты
– Усиленный коэффициент кэшбэка
Вход в личный раздел
Зарегистрированные пользователи способны быстро войти в персональный раздел, задействуя логин и пароль. Собственный аккаунт предоставляет путь к:
– Контролю балансом
– Журналу транзакций
– Действующим призам
– Настройкам учетной записи
Бонусы и акции
Портал регулярно организует различные акции для игроков.
Типы подарков
Ключевые категории вознаграждений:
– Пополнительные подарки – часть от величины депозита
– Прокруты – безвозмездные прокруты в аппаратах
– Кэшбэк – возврат процента проигранных денег
– Конкурсные вознаграждения – награды за состязание в конкурсах
Купоны
Уникальные ваучеры позволяют получить добавочные выгоды. Участники в состоянии отыскать их на тематических порталах или приобрести в письмах.
Mobile адаптация и программа
Актуальные пользователи выбирают переносной игровой процесс.
Опции портативной версии
– Гибкий дизайн для различных аппаратов
– Полный путь к автоматам
– Моментальная подгрузка
– Практичное управление
Установить приложение
Mobile app предложено для скачивания на гаджеты с базовыми платформами Android и iOS. Программа предоставляет:
– Надежную функциональность
– Всплывающие сообщения о бонусах
– Быстрый вход к желанным развлечениям
Гемблинг ассортимент
Казино предоставляет внушительную библиотеку гемблинг игр.
Слоты
Каталог развлекательных слотов охватывает:
– Традиционные автоматы
– Видео слоты
– Накопительные машины
– Тематические развлечения
Live игры
Раздел реальных развлечений предоставляет право состязаться с живыми диллерами. Открыты:
– Рулетка
– Очко
– Punto Banco
– Poker
Соревнования
Регулярные турниры дают возможность игрокам состязаться за крупные призовые суммы. Соревновательная система изменяется каждую неделю.
Банковские операции
Сайт поддерживает массу способов внесения и обналичивания сумм:
– Банковские карты
– Электронные платежные системы
– Прямые транзакции
– Криптовалюты
Все платежи проходят конфиденциально с применением актуальных протоколов шифрования.
Сервис помощи
Компетентная служба саппорта работает круглосуточно. Обратиться с операторами возможно через:
– Online чат
– Электронную почту
– Телефонную линию
– Социальные сети
Безопасность и лицензирование
Казино оперирует на основании легальной сертификата. Данное обеспечивает:
– Справедливость игрового геймплея
– Безопасность конфиденциальных сведений
– Своевременные выплаты
– Контролируемый игровой процесс
Заключение
Главный портал и его рабочие зеркала обеспечивают клиентам абсолютный комплекс функций для приятной и выгодной досуга. Внушительные бонусы, многочисленные слоты, компетентная служба и проверенная платформа операций формируют портал оптимальным вариантом для любителей развлекательных услуг.
Передовые онлайн-казино гарантируют игрокам широкий спектр функций для приятной времяпрепровождения. Вход к площадке РЎСѓРєР° казино осуществляется через основной веб-ресурс или рабочее зеркало.
Что такое функционирующее зеркало казино
Актуальное зеркало — это альтернативный URL лицензионного ресурса казино. Такие дубликаты генерируются для гарантирования стабильного соединения к игровой системе.
Дубликат актуальное абсолютно повторяет функционал главного домена. Клиенты имеют такой же вход ко всем сервисам, включая создание аккаунта, финансирование баланса и получение призов.
Открытие счета на лицензионном ресурсе
Процедура открытия профиля длится всего считанные мгновений. Будущим пользователям необходимо:
1. Попасть на официальный ресурс или актуальное проверенное зеркало
2. Нажать кнопку “Создать аккаунт”
3. Внести обязательные данные
4. Подтвердить e-mail почту
5. Ввести купон при наличии
После окончания открытия профиля клиент приобретает приз за регистрацию, который способен охватывать даровые спины или денежное премию.
Доступ в персональный кабинет
Индивидуальный кабинет — это безопасная зона, где игроки способны регулировать своим счетом. Для входа нужно напечатать имя пользователя и секретный ключ.
В персональном кабинете имеются следующие возможности:
– Проверка записей транзакций
– Задействование бонусных кодов
– Контроль поощрениями
– Включение в конкурсах
– Мониторинг кэшбека
– Изменение профиля
Бонусы и спецпредложения
Развлекательная платформа обеспечивает великодушные подарки:
Стартовый комплект — новые игроки получают существенное начисление на стартовые взносы.
Даровые спины — предоставляются как при регистрации, так и в ходе различных кампаний.
Возмещение — постоянный компенсация доли утраченных сумм.
Купоны — специальные коды, дающие доступ к эксклюзивным призам.
Характеристика гемблинговых секций
Игровые автоматы
Коллекция слотов насчитывает множество вариантов от топовых поставщиков. Пользователи откроют как классические автоматы, так и новые 3D-слоты с увлекательной анимацией.
Live казино
Секция Live казино предлагает право играть с реальными дилерами в формате реального времени. Имеются распространенные развлечения: рулетка, блэкджек, баккара, покер.
Конкурсы
Регулярные соревнования с значительными призовыми суммами завлекают массу соревнующихся. Лидеры зарабатывают монетарные вознаграждения и особые подарки.
Портативная версия и app
Адаптивная версия портала предоставляет право участвовать с произвольного девайса. Интерфейс независимо корректируется под размер экрана.
Установить app можно для аппаратов на Android и iOS. Телефонное приложение располагает всеми функциями компьютерной версии.
Как найти текущее зеркало на сейчас
Действующие ссылки альтернатив периодически меняются. Узнать действующую ссылку можно различными способами:
– Через службу помощи
– В настоящих новостных сетях
– По электронной подписке
– На специализированных ресурсах
Надежность и сертификация
Главный портал оперирует на основании глобальной документа. Все переводы охраняются современными методами кодирования.
Анонимность индивидуальных информации гарантируется в абсолютном размере.
Итог
Главный портал и его актуальные альтернативы гарантируют пользователям круглосуточный путь к превосходным развлекательным развлечениям. Привлекательные вознаграждения, всевозможные игры, квалифицированная поддержка — все это делает азартный опыт максимально удобным и интересным.
любительское с женой друга любительское с женой друга .
https://trustrxindia.com/# pharmacy website india
Передовые онлайн-казино обеспечивают игрокам богатый диапазон опций для приятной досуга. Доступ к площадке Клубника официальный сайт производится через лицензионный веб-ресурс или рабочее зеркало.
Что такое актуальное зеркало казино
Актуальное зеркало — это дополнительный линк главного ресурса казино. Такие копии генерируются для гарантирования бесперебойного подключения к гемблинговой платформе.
Альтернатива текущее абсолютно повторяет функционал главного портала. Геймеры получают схожий вход ко всем сервисам, включая создание аккаунта, финансирование баланса и снятие призов.
Открытие счета на основном веб-сайте
Процедура создания аккаунта длится всего пару моментов. Начинающим пользователям следует:
1. Войти на главный домен или действующее подлинное зеркало
2. Нажать кнопку “Зарегистрироваться”
3. Указать требуемые реквизиты
4. Подтвердить e-mail почту
5. Применить промокод при наличии
После завершения оформления клиент зарабатывает бонус за регистрацию, который имеет право предполагать бесплатные вращения или денежное поощрение.
Авторизация в личный кабинет
Индивидуальный кабинет — это защищенная зона, где игроки вправе регулировать своим профилем. Для доступа нужно внести username и пароль.
В личном кабинете представлены такие инструменты:
– Проверка истории переводов
– Задействование промокодов
– Управление призами
– Включение в соревнованиях
– Контроль кэшбэка
– Настройка профиля
Призы и предложения
Гемблинговая платформа предоставляет щедрые бонусы:
Начальный бонус — дебютанты получают солидное вознаграждение на стартовые взносы.
Фриспины — дарятся как при создании аккаунта, так и в контексте многочисленных мероприятий.
Кэшбек — еженедельный возмещение фрагмента проигранных сумм.
Купоны — эксклюзивные последовательности, обеспечивающие выход к особым призам.
Описание развлекательных направлений
Slots
Ассортимент аппаратов включает тысячи вариантов от передовых производителей. Пользователи встретят как стандартные слоты, так и новые видеослоты с увлекательной оформлением.
Live казино
Категория Live казино предлагает возможность участвовать с настоящими дилерами в режиме актуального времени. Открыты популярные развлечения: рулетка, блэкджек, баккара, покер.
Конкурсы
Регулярные соревнования с солидными наградными фондами завлекают массу игроков. Лидеры получают денежные награды и особые подарки.
Телефонная версия и программа
Мобильная версия сайта дает возможность играть с каждого девайса. Интерфейс независимо подстраивается под формат экрана.
Получить приложение можно для устройств на Android и iOS. Мобильное приложение характеризуется всеми функциями настольной версии.
Как найти актуальное зеркало на сейчас
Действующие ссылки зеркал постоянно корректируются. Узнать рабочую линк можно несколькими вариантами:
– Через департамент помощи
– В официальных новостных сетях
– По почтовой newsletter
– На специализированных ресурсах
Охрана и лицензирование
Лицензионный портал оперирует на основе международной разрешения. Все операции шифруются актуальными системами защиты.
Секретность пользовательских реквизитов гарантируется в полном объеме.
Вывод
Основной домен и его функционирующие дубликаты гарантируют клиентам круглосуточный выход к первоклассным азартным играм. Выгодные бонусы, всевозможные развлечения, квалифицированная поддержка — все это создает игровой времяпрепровождение невероятно удобным и захватывающим.
Нынешние онлайн-казино предлагают клиентам разнообразный выбор игр и выгодные бонусы. Впрочем для удобной игры необходимо иметь представление, как обнаружить [url=https://alkassem.co/2026/03/18/topovye-igry-kazino-kotorye-stoit-poprobovat-obzor/]Клубника официальный сайт[/url] и его функционирующие зеркала.
Что такое главный сайт казино
Лицензионный веб-сайт казино — это первичная платформа, где клиенты могут получать удовольствие от азартными развлечениями. Портал работает на официальных основаниях и располагает всеми необходимыми разрешениями.
Первостепенные достоинства главного ресурса:
– Безопасность персональных данных
– Прозрачные положения работы
– Гарантированные выплаты
– Компетентная поддержка
Функционирующее зеркало казино: для чего используется
Дублирующий ресурс — это абсолютная дубликат лицензионного веб-сайта, расположенная по другому веб-адресу. Действующее зеркало запускается для обеспечения стабильного доступа к платформе.
Поводы применения зеркал:
– Ограничение главного сайта
– Технические работы
– Высокая посещаемость на платформу
Как отыскать действующее зеркало в данный момент
Найти свежее рабочее зеркало можно различными методами:
1. Email-уведомления — зарегистрируйтесь на почтовую отправку
2. Служба поддержки — проконсультируйтесь в онлайн-чат
3. Социальные каналы — проверяйте за новостями
4. Игровые порталы — достоверные ресурсы
Оформление профиля на сайте казино
Алгоритм регистрации составляет лишь пару секунд:
1. Активируйте на кнопку “Регистрация”
2. Заполните запрашиваемые поля
3. Подтвердите email почту
4. Введите промокод, если имеется
Вслед за завершенной создания аккаунта вам откроется возможен персональный профиль.
Бонусы и бонусные коды
Богатая бонусная политика — ключевое плюс казино:
Бонус за открытие счета
Первичные игроки приобретают стартовый подарок, который может содержать:
– Финансовый бонус на стартовый вклад
– Фриспины для слотов
– Безвозвратные фонды
Активационные коды
Постоянно выходят свежие бонусные шифры, позволяющие получить экстра поощрения.
Схема кэшбека
Активные клиенты приобретают часть утраченных ставок на счет.
Действующие предложения и турниры
Сайт систематически проводит азартные акции:
– Weekly турниры
– Тематические предложения
– Конкурсы значительных наград
– Система статусов
Авторизация в индивидуальный профиль
Для входа на сайт следует:
1. Открыть главный ресурс или действующее зеркало
2. Кликнуть “Вход”
3. Ввести имя пользователя и код доступа
В пользовательском профиле открыты следующие инструменты:
– Депозит кошелька
– Обналичивание выигрышей
– Проверка архива ставок
– Настройка персональными сведениями
Портативная вариант и программа
Адаптивная платформа
Адаптивная платформа сайта дает возможность участвовать с всех смартфонного устройства. Оформление адаптивно настраивается под размер монитора.
App для загрузки
Получить app можно для:
– Android — прямая загрузка с сайта
– iOS — установка через App Store
Достоинства приложения:
– Моментальный доступ
– Устойчивая работа
– Push-уведомления об промо
– Улучшенный UI
Развлекательные секции
Слоты
Богатая подборка развлекательных автоматов от топовых поставщиков:
– Традиционные автоматы
– Видео-автоматы
– Призовые-машины
Live игры
Секция с реальными дилерами предоставляет:
– Рулеточные столы
– Двадцать одно
– Мини-баккара
– Покер
Стримы проводятся в превосходном разрешении, воссоздавая эффект аутентичного казино.
Методы депозита и получения
Ресурс принимает различные финансовые сервисы:
– Дебетовые средства
– Электронные счета
– Bitcoin/Ethereum
– Финансовые переводы
Наименьшие значения пополнения и моментальные транзакции создают игру крайне комфортной.
Служба техподдержки
Компетентная команда ассистентов функционирует 24/7 и способна поддержать с разными проблемами:
– Живой-чат
– Email-помощь
– Звонковая линия
Выводы
Лицензионный портал казино и его актуальные дубликаты гарантируют клиентам надежный и увлекательный развлекательный процесс. Богатые поощрения, функциональная мобильная версия, многочисленные слоты и качественное live-казино создают эту ресурс отличным выбором для развлекательных развлечений.
king casino Нашел этот канал через обсуждение, решил зайти посмотреть. Там есть зеркала и бонусы по кинг казино. Проверил несколько ссылок — все рабочие. Ничего подозрительного не увидел. Можно юзать если что
I really like what you guys tend to be up too.
This sort of clever work and coverage! Keep up the excellent works guys I’ve added
you guys to my own blogroll.
п»їmexican pharmacy: MedicoBridge RX – mexico online farmacia
Take a look
buying generic promethazine without prescription
to solve your problem.
нейросеть для учебы nejroset-dlya-referatov-5.ru .
Передовые онлайн-казино предлагают клиентам широкий выбор вариантов для приятной времяпрепровождения. Подключение к ресурсу ДжиВиСпин реализуется через основной домен или актуальное зеркало.
Что такое рабочее зеркало казино
Актуальное зеркало — это резервный адрес лицензионного портала казино. Такие дубликаты генерируются для поддержания непрерывного входа к игровой сервису.
Альтернатива на сегодня абсолютно дублирует возможности базового ресурса. Клиенты приобретают такой же доступ ко всем возможностям, включая оформление профиля, внесение депозита баланса и получение денег.
Оформление профиля на официальном портале
Процедура открытия профиля длится всего несколько секунд. Свежим клиентам следует:
1. Зайти на главный портал или действующее проверенное зеркало
2. Кликнуть кнопку “Открыть счет”
3. Заполнить нужные реквизиты
4. Подтвердить почтовую почту
5. Активировать купон при существовании
После окончания регистрации игрок получает подарок за регистрацию, который способен охватывать фриспины или cash вознаграждение.
Авторизация в персональный кабинет
Пользовательский кабинет — это закрытая зона, где игроки способны администрировать своим профилем. Для доступа следует напечатать никнейм и секретный ключ.
В личном кабинете доступны следующие функции:
– Мониторинг журнала платежей
– Активация промокодов
– Контроль вознаграждениями
– Присоединение в турнирах
– Мониторинг кэшбэка
– Редактирование аккаунта
Вознаграждения и промо
Азартная платформа обеспечивает щедрые бонусы:
Начальный набор — дебютанты зарабатывают крупное начисление на стартовые взносы.
Бесплатные вращения — выдаются как при регистрации, так и в процессе различных кампаний.
Возврат средств — еженедельный возврат части проигранных финансов.
Коды активации — уникальные шифры, обеспечивающие возможность к особым бонусам.
Анализ игровых секций
Слоты
Собрание slots насчитывает множество позиций от ведущих провайдеров. Пользователи откроют как стандартные машины, так и новые 3D-слоты с притягательной оформлением.
Live казино
Зона Live казино предоставляет право участвовать с живыми ведущими в формате настоящего времени. Представлены востребованные столы: рулетка, блэкджек, баккара, покер.
Конкурсы
Систематические соревнования с солидными призовыми пулами завлекают массу соревнующихся. Призеры зарабатывают денежные призы и специальные бонусы.
Телефонная версия и программа
Адаптивная версия ресурса дает возможность развлекаться с любого девайса. Интерфейс независимо адаптируется под габариты экрана.
Установить приложение можно для устройств на Android и iOS. Мобильное ПО обладает всеми функциями десктопной версии.
Как обнаружить текущее зеркало на данный момент
Рабочие ссылки копий регулярно меняются. Получить актуальную URL можно различными способами:
– Через департамент поддержки
– В официальных коммуникационных сетях
– По электронной подписке
– На специализированных площадках
Охрана и легальность
Официальный ресурс оперирует на основании международной разрешения. Все операции защищены современными технологиями защиты.
Приватность пользовательских данных обеспечивается в совершенном размере.
Вывод
Официальный домен и его действующие альтернативы гарантируют пользователям беспрерывный вход к превосходным игровым развлечениям. Щедрые бонусы, различные слоты, квалифицированная помощь — все это делает развлекательный процесс чрезвычайно комфортным и захватывающим.
I truly love your website.. Very nice colors & theme.
Did you develop this amazing site yourself? Please reply back as
I’m trying to create my own personal blog and would like to find out where you got this from or exactly what the theme is called.
Thanks!
xvideos
умная нейросеть для учебы умная нейросеть для учебы .
Hi, after reading this awesome piece of writing i am also cheerful
to share my knowledge here with friends.
кинг казино
Зашел просто посмотреть и остался, канал реально удобный. Там сразу есть ссылки, бонусы и обновления. Не надо ничего искать по форумам. Уже несколько раз использовал — все ок. В целом полезная тема
Доступ к платформе и функционирующие ссылки
Актуальные онлайн казино гарантируют клиентам большой набор развлечений. Центральный портал http://www.xn—4-7kcct4aci0a2h.xn--p1ai организует безопасный вход ко всем возможностям. При этом порой появляются обстоятельства, когда необходимо резервный вариант входа.
Что являет собой собой действующее зеркало
Актуальное зеркало — это точная копия официального сайта с запасным сетевым расположением. Альтернатива сегодня позволяет преодолевать существующие барьеры и поддерживать стабильный подключение к предпочитаемым развлечениям.
Главное зеркало имеет теми же функциями, что и главный портал:
– Полный ассортимент игр
– Личный кабинет с сохраненными информацией
– Актуальные подарки и предложения
– Надежные финансовые транзакции
Открытие профиля и подключение в платформу
Процесс оформления на ресурсе отнимает буквально мгновений. Недавним участникам следует:
1. Перейти на функционирующее зеркало на данный момент
2. Щелкнуть кнопку «Зарегистрироваться»
3. Заполнить обязательные информацию
4. Подтвердить электронную почту или контакт телефона
5. Активировать поощрение за регистрацию
Подключение в индивидуальный аккаунт производится путем внесение логина и пароля.
Характеристика бонусной политики
Привлекательная бонусная политика — важнейшее плюс казино. Пользователи забирают всевозможные поощрения:
Начальные бонусы
Начинающие игроки способны надеяться на щедрый бонус за создание аккаунта. Чаще всего это набор предложений, включающий:
– Процентную прибавку к первому взносу
– Безвозмездные вращения
– Бонусные суммы на аккаунт
Промо-коды и специальные опции
Периодические коды помогают обретать бонусные привилегии. Задействовать их можно в особом меню собственного раздела.
Спины и кешбэк
Фриспины — это способность запускать автоматы без использования персональных сумм. Возврат означает частичный возмещение утраченных сумм.
Ассортимент автоматов
Азартная площадка предлагает внушительную подборку игр.
Слоты
Ассортимент слотов удивляет представление. Имеются стандартные простые аппараты и продвинутые видеослоты с захватывающей анимацией.
Live заведение
Зона Live казино переносит участников в обстановку реального развлекательного клуба. Опытные ведущие осуществляют сессии в онлайн времени.
Конкурсы и лидерборды
Систематические состязания добавляют азарта и гарантируют перспективу забрать большие награды.
Mobile реализация и программа
Новые разработки помогают играть в любимом месте. Портативная реализация самостоятельно адаптируется под монитор девайса.
Получить приложение возможно для операционных систем iOS и Android. Программа гарантирует:
– Скоростной доступ
– Надежную деятельность
– Всплывающие-оповещения об акциях
– Простой дизайн
Финансовые действия
Сайт использует всевозможные варианты депозита и получения денег:
– Банковские карты
– Электронные платформы
– Цифровые валюты
– Финансовые отправки
Всевозможные действия осуществляются через защищенное подключение, что защищает сохранность личных информации.
Служба помощи
Компетентная команда ассистанса действует всегда. Соединиться с менеджерами разрешено через:
– Live-чат
– Электронную почту
– Связь
– Медиа ресурсы
Заключение
Легальный сайт и его рабочее зеркало дают участникам безопасный и приятный путь к азартным забавам. Богатые бонусы, разнообразный спектр слотов и качественная сервис формируют участие предельно интересной и результативной.
Характеристика оригинального веб-сайта
Современное онлайн-казино предоставляет своим пользователям большой набор развлечений и бонусов. Основной портал Болливуд казик действует постоянно, обеспечивая возможность к известным симуляторам, live-казино и многим предложениям.
Действующее зеркало: доступ к сайту
Что такое копия казино
Альтернатива составляет собой точную версию официального веб-сайта с альтернативным доменным именем. Функционирующее зеркало позволяет игрокам избегать ограничения и сохранять стабильный доступ к предпочитаемым развлечениям.
Как обнаружить текущее зеркало сегодня
Свежие линки на официальное зеркало появляются через:
– E-mail подписку
– Официальные коммуникационные сети
– Отдел помощи
– Affiliated сайты
Регистрация на платформе
Процесс созданияаккаунта
Регистрация длится всего минут и предполагает нижеследующие действия:
1. Вход на официальный портал или рабочее зеркало
2. Нажатие клавиши “Зарегистрироваться”
3. Ввод личных сведений
4. Проверка адреса или мобильного
5. Установка ключа
Приз за созданиеаккаунта
Начинающие игроки приобретают выгодные приветственные поощрения:
– Денежные депозиты на счет
– Freespins для симуляторов
– Расширенный процент кэшбека
– Эксклюзивные промокоды
Логин в индивидуальный профиль
Действующие пользователи способны произвести вход через оригинальный сайт или действующее зеркало. Для этого требуется внести имяпользователя и пароль, придуманные при регистрации.
Опции личного аккаунта
В собственном разделе доступны такие функции:
– Изменение персональными реквизитами
– Пополнение баланса
– Получение средств
– Ввод кодов
– Мониторинг журнала транзакций
– Участие в состязаниях
Бонусы и предложения
Виды вознаграждений
Казино поощряет своих участников всевозможными бонусными предложениями:
– Стартовый комплект — щедрые вознаграждения на стартовые вклады
– Freespins — экстра прокруты в топовых автоматах
– Кешбэк — систематический откат процента проигрышей
– Программа лояльности — эксклюзивные льготы для активных игроков
Промокоды и их использование
Специальные коды предоставляют бонусные вознаграждения. Для использования требуется внести шифр в нужное поле в персональном разделе.
Игровой выбор
Симуляторы
Коллекция азартных слотов содержит множество наименований от ведущих провайдеров:
– Стандартные слоты
– Продвинутые слоты
– Накопительные игры
– Брендовые развлечения
Live казино
Секция Live-казино предлагает процесс с настоящими операторами в формате онлайн времени:
– Американскаярулетка
– Двадцатьодно
– PuntoBanco
– Покер
Соревнования
Систематические состязания с солидными наградными призами устраиваются ежедневно. Участники борются за победу в турнирнойсетке.
Мобильная платформа и приложение
Мобильная версия веб-сайта
Оригинальный веб-сайт полностью настроен для мобильных аппаратов. Участники могут играть слоты напрямую через интернет-браузер без обязательства загрузки.
APP для установки
Официальное портативное программа имеется для скачивания на гаджеты с рабочими платформами Android и iOS. Приложение дает:
– Мгновенный вход к развлечениям
– Бесперебойную операционность
– Моментальные-извещения о акциях
– Простой оформление
Вывод
Главный сайт казино и его рабочие дубликаты дают игрокам абсолютный возможность к первоклассным игровым играм. Щедрые поощрения, многочисленные акции, функциональная смартфонная версия и квалифицированная сервис формируют развлекательный досуг чрезвычайно комфортным и выгодным.
mostbet registrace Česko bonus http://mostbet2019.help
online mexican pharmacy https://joeasymeds.top/# best mexican online pharmacy
Вход к сайту через рабочие зеркала
Передовые онлайн казино гарантируют игрокам постоянный доступ к услугам. Главный ресурс http://екб-школа4.СЂС„/ оперирует стабильно, гарантируя обширный ассортимент азартных развлечений. Но порой возникают программные препятствия или запреты, следовательно необходимо быть осведомлённым о доступности функционирующих зеркал.
Что является из себя основное зеркало казино
Дубликат — это точная копия официального веб-сайта с аналогичным функционалом. Актуальное зеркало сейчас помогает миновать региональные барьеры и возобновлять игру.
Принципиальные достоинства задействования зеркал:
– Абсолютный доступ к персональному кабинету
– Удержание любых сведений профиля
– Аналогичный набор слотов
– Свежие привилегии и кампании
Создание аккаунта на портале
Процедура записи занимает несколько минут. Недавние игроки приобретают привлекательный бонус за создание счёта, он может вмещать:
– Стартовый игровой подарок
– Безвозмездные спины для машин
– Особые купоны
– Расширенный возврат
Во имя финализации оформления нужно:
1. Перейти на главный портал или копию
2. Щёлкнуть кнопку «Создать аккаунт»
3. Указать персональные информацию
4. Активировать мейл или номер
5. Применить промокод (в случае доступности)
Подключение в личный кабинет
По завершении корректной записи пользователи могут совершать авторизацию используя центральный сайт или актуальное зеркало. Индивидуальный кабинет даёт безграничный контроль над профилем:
– Летопись игр
– Внесение счёта
– Получение призов
– Управление привилегиями
– Включение в конкурсах
Поощрения и акции казино
Сайт награждает клиентов разнообразными поощрительными системами:
Начальные бонусы
Новые игроки зарабатывают внушительный комплект наград на первые пополнения. Как правило это содержит долевую доплату к величине взноса плюс комплиментарные кручения.
Постоянные предложения
– Седмичный кэшбек до 15%
– Турниры с премиальными пулами
– Призы на дату рождения
– Уникальные промо для статусных клиентов
Программа верности
Постоянные клиенты зарабатывают единицы, они можно конвертировать на реальные деньги или эксклюзивные бонусы.
Смартфонная версия и программа
Современные инновации обеспечивают геймить где угодно. Смартфонная версия веб-сайта независимо настраивается под дисплей произвольного гаджета.
Выгоды портативного софта:
– Моментальная запуск игр
– Практичный вид
– Всплывающие-уведомления о предложениях
– Способность инсталлировать для Android и iOS
Live казино: антураж настоящего развлекательного клуба
Раздел Live клуба погружает пользователей в атмосферу реального игорного учреждения. Профессиональные операторы организуют развлечение в режиме подлинного времени.
Предлагаемые варианты:
– Колесо фортуны
– Очко
– Карточная игра
– Техасский холдем
Барабаны и азартные аппараты
Собрание азартных аппаратов насчитывает тысячи вариантов от ведущих студий. Произвольный игрок подберёт игру по душе:
– Стандартные автоматы
– Инновационные игры с специальными турами
– Джекпот-игры
– Динамические игры
Конкурсы и лотереи
Периодические конкурсы привносят адреналин и открывают способность заработать большие суммы. Включение в конкурсах регулярно бесплатное, а премиальные банки достигают внушительных сумм.
Секьюрити и секретность
Сайт эксплуатирует передовые технологии криптографии для охраны информации игроков. Все финансовые операции выполняются через зашифрованные протоколы.
Вывод
Центральный веб-сайт и его рабочие зеркала дают устойчивый подключение к отличным азартным играм. Привлекательные награды, удобная мобильная форма, разнообразие слотов и компетентное Live-клуб превращают ресурс отличным решением для ценителей игровых слотов.
Вход к ресурсу через актуальные зеркала
Передовые интернет казино обеспечивают игрокам постоянный вход к сервисам. Официальный веб-сайт http://www.budetezdorovy.ru функционирует стабильно, предлагая большой набор игровых слотов. Но иногда возникают технические препятствия или запреты, в связи с чем важно быть осведомлённым о наличии действующих зеркал.
Что представляет собой главное зеркало казино
Дубликат — это идентичная дубликат главного сайта с схожим возможностями. Рабочее зеркало на данный момент обеспечивает обходить территориальные блокировки и поддерживать времяпрепровождение.
Ключевые преимущества эксплуатации зеркал:
– Абсолютный доступ к собственному кабинету
– Поддержание совокупных показателей профиля
– Аналогичный ассортимент игр
– Текущие привилегии и промо
Регистрация на ресурсе
Операция регистрации отнимает несколько минут. Новые пользователи приобретают богатый приз за оформление, что способен охватывать:
– Приветственный финансовый приз
– Даровые вращения для игр
– Особые коды
– Увеличенный кешбэк
Для выполнения записи требуется:
1. Переместиться на главный веб-сайт или дубликат
2. Кликнуть опцию «Создать аккаунт»
3. Указать персональные сведения
4. Заверить почтовый адрес или контакт
5. Применить ваучер (когда имеется доступности)
Вход в персональный кабинет
По завершении успешной записи геймеры могут производить авторизацию используя главный веб-сайт или функционирующее зеркало. Собственный кабинет обеспечивает абсолютный регулирование над аккаунтом:
– Журнал пари
– Зачисление счёта
– Вывод призов
– Регулирование поощрениями
– Присутствие в турнирах
Бонусы и предложения казино
Портал награждает клиентов разнообразными поощрительными системами:
Стартовые призы
Дебютанты обретают щедрый комплект бонусов на стартовые вклады. Как правило это включает пропорциональную прибавку к величине взноса плюс даровые спины.
Систематические акции
– Каждонедельный возврат до 15%
– Конкурсы с призовыми пулами
– Призы на годовщину рождения
– Специальные программы для VIP игроков
Схема лояльности
Регулярные игроки собирают очки, они можно конвертировать на реальные призы или специальные льготы.
Портативная форма и приложение
Нынешние разработки позволяют играть везде подходяще. Портативная форма сайта автономно адаптируется под экран любого гаджета.
Выгоды портативного программы:
– Моментальная подгрузка слотов
– Удобный вид
– Мгновенные-нотификации о промо
– Шанс инсталлировать для Android и iOS
Живое казино: среда истинного гемблинг учреждения
Категория Live казино доставляет клиентов в обстановку реального азартного дома. Квалифицированные крупье управляют развлечение в режиме подлинного времени.
Предлагаемые игры:
– Колесо фортуны
– Блэкджек
– Punto Banco
– Техасский холдем
Игровые машины и развлекательные слоты
Ассортимент развлекательных автоматов включает массу позиций от топовых производителей. Каждый геймер обнаружит развлечение по вкусу:
– Стандартные барабаны
– Видеослоты с специальными раундами
– Джекпот-игры
– Динамические игры
Соревнования и розыгрыши
Регулярные состязания добавляют драйв и обеспечивают возможность выиграть крупные призы. Вовлечение в состязаниях зачастую безвозмездное, а призовые фонды составляют внушительных объёмов.
Защита и секретность
Портал эксплуатирует актуальные методы криптографии для обеспечения сведений игроков. Любые транзакционные операции проходят через защищённые протоколы.
Заключение
Официальный веб-сайт и его функционирующие зеркала гарантируют безопасный переход к превосходным игровым развлечениям. Привлекательные награды, удобная мобильная форма, богатство машин и компетентное Live-казино формируют платформу превосходным решением для фанатов развлекательных развлечений.
умная нейросеть для учебы nejroset-dlya-referatov.ru .
Thanks a lot. I appreciate this. https://www.lanubedocente.21.edu.ar/profile/morgantwwnolan16108/profile
MedBridge Pharmacy: the canadian pharmacy – MedBridge Pharmacy
Передовые онлайн-казино обеспечивают игрокам богатый набор азартных игр и выгодные бонусы. Тем не менее для удобной работы существенно знать, как отыскать http://www.spb-ska.ru и его рабочие зеркала.
Что такое основной веб-ресурс казино
Главный портал казино — это первичная площадка, где пользователи могут наслаждаться развлекательными автоматами. Портал работает на законных принципах и имеет всеми нужными сертификатами.
Первостепенные выгоды главного веб-сайта:
– Безопасность личных информации
– Прозрачные положения использования
– Гарантированные выплаты
– Квалифицированная служба поддержки
Функционирующее зеркало казино: для чего нужно
Копия сайта — это полная дубликат лицензионного сайта, расположенная по другому URL. Актуальное зеркало разрабатывается для предоставления бесперебойного доступа к сайту.
Факторы эксплуатации дублирующих ресурсов:
– Недоступность главного домена
– Технические мероприятия
– Значительная посещаемость на ресурс
Как обнаружить рабочее зеркало сейчас
Найти свежее проверенное зеркало можно различными вариантами:
1. Рассылка — подпишитесь на информационную доставку
2. Департамент поддержки — свяжитесь в онлайн-чат
3. Публичные каналы — следите за постами
4. Игровые ресурсы — авторитетные источники
Создание аккаунта на сайте казино
Процесс регистрации составляет только пару минут:
1. Кликните на элемент “Создать аккаунт”
2. Внесите обязательные информацию
3. Подтвердите контактную ящик
4. Активируйте бонусный код, если предоставлен
По завершении завершенной регистрации вам станет доступен индивидуальный аккаунт.
Премии и промокоды
Привлекательная поощрительная система — значимое конкурентное преимущество казино:
Поощрение за создание аккаунта
Новые клиенты приобретают начальный бонус, который может включать:
– Монетарный кредит на стартовый вклад
– Бесплатные вращения для слотов
– Безвозвратные средства
Активационные коды
Систематически публикуются свежие промокоды, дающие возможность использовать экстра поощрения.
Программа возврата средств
Активные клиенты получают порцию проигранных ставок на счет.
Текущие акции и турниры
Ресурс систематически устраивает увлекательные кампании:
– Weekly соревнования
– Специальные акции
– Раздачи крупных подарков
– Механизм статусов
Логин в индивидуальный аккаунт
Для входа на сайт нужно:
1. Перейти на главный адрес или актуальное зеркало
2. Выбрать “Login”
3. Прописать никнейм и секретную комбинацию
В персональном кабинете доступны данные функции:
– Зачисление депозита
– Вывод денег
– Анализ лога игр
– Управление персональными настройками
Mobile платформа и софт
Мобильная платформа
Адаптивная версия веб-сайта позволяет делать ставки с разных мобильного телефона. Оформление автоматически оптимизируется под формат экрана.
Клиент для установки
Загрузить приложение можно для:
– Android — прямая загрузка с платформы
– iOS — установка через App Store
Достоинства программы:
– Мгновенный вход
– Стабильная операционность
– Push-сообщения об акциях
– Оптимизированный интерфейс
Игровые разделы
Барабаны
Богатая подборка эмуляторных машин от лучших поставщиков:
– Традиционные слоты
– Новые-слоты
– Прогрессивные-машины
Live casino
Категория с профессиональными крупье дает:
– Рулетки
– Блэкджек
– Punto Banco
– Poker
Трансляции осуществляются в HD разрешении, создавая атмосферу настоящего казино.
Системы депозита и получения
Казино обслуживает различные денежные сервисы:
– Кредитные средства
– Виртуальные платежи
– Цифровые валюты
– Финансовые транзакции
Стартовые пороги взноса и скоростные платежи создают развлечение максимально беспроблемной.
Команда помощи
Компетентная отдел ассистентов функционирует 24/7 и готова содействовать с разными ситуациями:
– Онлайн-чат
– Email-консультации
– Звонковая горячая линия
Итоги
Лицензионный сайт казино и его функционирующие дубликаты предоставляют участникам безопасный и интересный гемблинг досуг. Щедрые подарки, простая портативная платформа, богатые игры и профессиональное live-казино создают эту ресурс превосходным решением для развлекательных времяпрепровождения.
Современные онлайн-казино предоставляют игрокам разнообразный выбор функций для приятной развлечений. Доступ к сервису Голд реализуется через главный портал или актуальное зеркало.
Что такое функционирующее зеркало казино
Действующее зеркало — это альтернативный домен главного портала казино. Такие дубликаты генерируются для обеспечения непрерывного соединения к игровой системе.
Зеркало актуальное совершенно копирует функционал базового сайта. Пользователи приобретают схожий доступ ко всем возможностям, включая создание аккаунта, зачисление средств счета и вывод выигрышей.
Создание аккаунта на главном портале
Процесс открытия профиля длится всего буквально мгновений. Будущим пользователям следует:
1. Войти на официальный домен или действующее настоящее зеркало
2. Щелкнуть кнопку “Зарегистрироваться”
3. Внести необходимые информацию
4. Активировать почтовую почту
5. Активировать промокод при доступности
После выполнения создания аккаунта игрок зарабатывает бонус за регистрацию, который имеет право предполагать фриспины или финансовое начисление.
Вход в персональный кабинет
Пользовательский кабинет — это безопасная зона, где пользователи могут администрировать своим учетной записью. Для доступа нужно ввести логин и код доступа.
В личном кабинете доступны такие возможности:
– Отслеживание хронологии транзакций
– Задействование промокодов
– Регулирование бонусами
– Участие в конкурсах
– Мониторинг кэшбэка
– Корректировка учетной записи
Вознаграждения и акции
Развлекательная сервис дарит щедрые бонусы:
Приветственный набор — начинающие приобретают солидное начисление на первые взносы.
Free spins — начисляются как при регистрации, так и в процессе различных промо.
Возмещение — постоянный возмещение процента проигранных денег.
Бонусные коды — уникальные последовательности, обеспечивающие возможность к особым предложениям.
Обзор развлекательных категорий
Слоты
Собрание аппаратов охватывает тысячи вариантов от топовых провайдеров. Игроки найдут как традиционные автоматы, так и новые видео-слоты с притягательной оформлением.
Live казино
Секция Live казино дарит возможность соревноваться с настоящими дилерами в формате настоящего времени. Имеются востребованные игры: рулетка, блэкджек, баккара, покер.
Соревнования
Регулярные чемпионаты с большими призовыми фондами притягивают сотни соревнующихся. Призеры обретают монетарные вознаграждения и эксклюзивные подарки.
Телефонная версия и программа
Телефонная версия платформы позволяет участвовать с каждого гаджета. Дизайн самостоятельно адаптируется под габариты экрана.
Скачать приложение можно для девайсов на Android и iOS. Мобильное ПО обладает всеми опциями настольной версии.
Как найти текущее зеркало на сегодня
Актуальные линки копий постоянно обновляются. Узнать свежую линк можно многими путями:
– Через службу техподдержки
– В проверенных коммуникационных сетях
– По электронной подписке
– На тематических сайтах
Защита и сертификация
Лицензионный сайт действует на основе международной сертификата. Все операции оберегаются актуальными протоколами шифрования.
Конфиденциальность пользовательских реквизитов поддерживается в полном объеме.
Заключение
Официальный сайт и его действующие альтернативы обеспечивают пользователям постоянный вход к превосходным азартным сервисам. Выгодные призы, различные автоматы, квалифицированная сервис — все это создает гемблинговый процесс невероятно беспроблемным и захватывающим.
посетить веб-сайт vodka bet
sex goobet
Строительство деревянного дома в Петербурге — советы и опыт
Передовые онлайн-казино гарантируют участникам богатый набор слотов и выгодные премии. Впрочем для комфортной игры существенно понимать, как найти Рльдорадо казино регистрация и его действующие зеркала.
Что такое официальный ресурс казино
Основной портал казино — это главная веб-площадка, где пользователи могут развлекаться игровыми развлечениями. Платформа оперирует на легитимных принципах и обладает всеми требуемыми лицензиями.
Ключевые преимущества официального сайта:
– Защищенность пользовательских сведений
– Объективные условия участия
– Стабильные транзакции
– Компетентная помощь
Рабочее зеркало казино: для чего нужно
Копия сайта — это идентичная клон главного сайта, размещенная по альтернативному домену. Актуальное зеркало формируется для обеспечения постоянного входа к ресурсу.
Основания использования альтернативных адресов:
– Недоступность первичного адреса
– Плановые процедуры
– Значительная нагрузка на ресурс
Как отыскать свежее зеркало на сегодня
Обнаружить свежее официальное зеркало можно различными путями:
1. Email-уведомления — оформите подписку на почтовую доставку
2. Команда техподдержки — обратитесь в онлайн-чат
3. Публичные медиа — отслеживайте за постами
4. Специализированные сайты — достоверные источники
Регистрация на ресурсе казино
Этап создания аккаунта длится всего пару секунд:
1. Нажмите на опцию “Создать аккаунт”
2. Укажите запрашиваемые поля
3. Подтвердите контактную адрес
4. Активируйте купон, если доступен
По завершении успешной создания аккаунта вам станет возможен персональный аккаунт.
Поощрения и промокоды
Щедрая премиальная программа — ключевое достоинство казино:
Поощрение за регистрацию
Первичные пользователи обретают первый презент, который может включать:
– Финансовый кредит на начальный взнос
– Free spins для барабанов
– Безвозвратные деньги
Бонусные коды
Систематически выходят новые коды, предоставляющие активировать дополнительные привилегии.
Система кэшбека
Активные участники получают долю утраченных ставок обратно.
Действующие промо и состязания
Сайт систематически организует захватывающие акции:
– Семидневные баттлы
– Сезонные предложения
– Конкурсы солидных призов
– Схема лояльности
Доступ в индивидуальный раздел
Для доступа на платформу следует:
1. Перейти на лицензионный портал или рабочее зеркало
2. Нажать “Login”
3. Прописать логин и секретную комбинацию
В личном аккаунте разрешены данные опции:
– Внесение средств баланса
– Вывод призов
– Проверка истории игр
– Изменение персональными параметрами
Портативная версия и app
Портативная платформа
Responsive платформа ресурса обеспечивает развлекаться с разных смартфонного девайса. Визуал динамически оптимизируется под формат дисплея.
App для download
Получить программу можно для:
– Android — официальная загрузка с портала
– iOS — скачивание через App Store
Преимущества приложения:
– Оперативный доступ
– Надежная производительность
– Push-уведомления об бонусах
– Ускоренный дизайн
Азартные категории
Барабаны
Богатая библиотека развлекательных слотов от лучших производителей:
– Традиционные автоматы
– Новые-игры
– Призовые-машины
Live игры
Категория с реальными ведущими дает:
– Рулетка
– Блэкджек
– Мини-баккара
– Карточные игры
Стримы проводятся в HD качестве изображения, обеспечивая ощущение реального казино.
Способы депозита и обналичивания
Ресурс принимает разные денежные системы:
– Банковские карты
– Виртуальные счета
– Цифровые валюты
– Wire переводы
Минимальные значения депозита и быстрые выплаты обеспечивают игру максимально удобной.
Служба помощи
Опытная группа ассистентов работает 24/7 и способна содействовать с различными проблемами:
– Онлайн-чат
– Email-помощь
– Телефонная служба
Выводы
Официальный сайт казино и его действующие копии обеспечивают игрокам защищенный и увлекательный гемблинг опыт. Выгодные награды, комфортная адаптивная платформа, обширные слоты и качественное live-казино делают эту площадку превосходным вариантом для развлекательных развлечений.
Нынешние онлайн-казино предлагают клиентам множество возможностей для приятной игры. Центральный веб-портал казино Вован предоставляет путь ко всем сервисам и развлечениям. Однако при наличии программных сложностей на выручку прибывают рабочие дубликаты.
Что означает собой актуальное зеркало
Альтернативный адрес казино — это полная копия основного веб-сайта, размещенная по другому адресу. Официальное зеркало поддерживает все опции, в том числе создание аккаунта, доступ в собственный кабинет, премии и бонусные коды.
Копия на сегодня дает:
– Стабильный путь к развлекательным машинам
– Абсолютную сохранность индивидуальных данных
– Сохранение средств и хронологии операций
– Применимость всех бонусных программ
Регистрация на основном ресурсе
Процесс создания аккаунта занимает считанные минут. Начинающим клиентам нужно:
1. Перейти на основной сайт или действующее зеркало
2. Выбрать кнопку «Создать аккаунт»
3. Заполнить нужные графы
4. Верифицировать email почту
5. Указать бонусный код при существовании
После окончания регистрации игроки обретают вознаграждение за регистрацию, что может включать бесплатные вращения или денежно-призовое поощрение.
Авторизация в индивидуальный кабинет
Персональный кабинет дает всесторонний мониторинг над азартным ходом. Через персональный профиль допускается:
– Вносить средства на кошелек
– Получать выплаты
– Активировать промокоды
– Проверять журнал ставок
– Участвовать в соревнованиях
– Получать кешбэк
Описание премий и специальных предложений
Великодушная бонусная политика — значимое козырь казино. Основные формы бонусов:
Начальный приз
Дебютанты обретают выгодное премирование на начальные взносы. Объем премии может доходить до 100-200% от величины пополнения.
Фриспины
Бесплатные раунды даются для известных игровых автоматов. Количество free spins изменяется от 10 до 500 штук.
Возврат средств
Еженедельный или помесячный откат доли потерянных денег. Средний процент кэшбека — 5-15%.
Конкурсы
Регулярные турниры с внушительными премиальными пулами. Игроки состязаются за лучшие строчки в таблице лидеров.
Смартфонная версия и софт
Мобильная версия разрешает развлекаться с всякого девайса. Клиенты могут скачать app для iOS и Android или эксплуатировать браузерную версию.
Плюсы портативного софта:
– Оперативная прогрузка слотов
– Эргономичный интерфейс
– Пуш-нотификации о бонусах
– Возможность входа через отпечаток пальца
Машины и Live казино
Развлекательная библиотека насчитывает множество позиций от топовых разработчиков.
Востребованные разделы игр:
– Классические автоматы
– Современные слоты с призовыми раундами
– Накопительный приз игры
– Мегавейс слоты
Live игровой зал
Секция live казино предлагает игру с реальными крупье. Доступны стандартные варианты:
– Европейская рулетка
– Blackjack
– Punto Banco
– Техасский холдем
Как разыскать функционирующее зеркало
Обрести актуальную адрес на зеркало разрешается несколькими путями:
1. Подписаться на почтовую рассылку
2. Следить за новостями в социальных сетях
3. Связаться в департамент поддержки
4. Заложить действующее зеркало в фавориты
Итог
Основной сайт и его рабочие дубликаты гарантируют стабильный путь к игровым играм. Великодушные премии, множественные купоны, эргономичное смартфонное софт и высококлассная служба поддержки делают игровой опыт крайне беспроблемным и надежным.
https://ts-automation.az/user/melvindhtc
drugs gooobet
умная нейросеть для учебы nejroset-dlya-referatov-7.ru .
Very valuable content! Star Savior Guide also has many useful tools and tutorials, worth checking out.
Современные онлайн-казино предоставляют клиентам обширный ассортимент игр и поощрительных программ. Доступ к сервису осуществляется через главный сайт или его рабочее зеркало Килограмм сайт, что обеспечивает постоянную игру.
Что представляет собой действующее зеркало казино
Дубликат — это идентичная версия основного портала, сделанная для обхода ограничений. Зеркало сегодня помогает клиентам сохранить подключение к любимым играм в любое удобное время.
Подлинное зеркало обладает всеми характеристиками первоначального веб-сайта:
– Полный ассортимент игр
– Учетная запись с сохраненными данными
– Действующие промокоды
– Защищенные расчетные операции
Открытие счета на главном сайте
Алгоритм оформления составляет всего несколько минут. Новым пользователям необходимо:
1. Войти на проверенный веб-сайт или актуальное зеркало
2. Щелкнуть на клавишу “Открыть счет”
3. Внести нужные сведения
4. Активировать электронную почту
5. Сделать начальный платеж
Стартовый бонус предоставляется автоматически после завершения всех ступеней.
Подключение в личный кабинет
Зарегистрированные участники могут совершить вход применяя:
– Логин и код
– Данные мобильного
– Контактный email
Аккаунт обеспечивает возможность к администрированию счетом, записям операций и доступным бонусам.
Бонусы и программы
Гемблинг сервис привлекает лояльных клиентов разнообразными призами:
Начальный бонус
– Премия на дебютный пополнение до 100%
– Бесплатные вращения на топовые машины
– Экстра бонусы за дальнейшие пополнения
Промокоды
Специальные промокоды обеспечивают шанс на получение особых поощрений. Текущие промокоды выкладываются в секции “Акции”.
Cashback
Регулярный бонус достигает до 10% от потраченных денег. Выплата начисляется сразу.
Механизм лояльности
Активные игроки накапливают единицы, которые обмениваются на реальные финансы или бесплатные вращения.
Мобильная версия и APP
Для удобства игроков сделана функциональная mobile версия. Гибкий облик дает возможность комфортно играть с каждого портативного девайса.
Преимущества софта:
– Быстрый доступ к играм
– Настроенный дизайн
– Стабильная функциональность
– Оповещения о последних турнирах
Установить приложение можно бесплатно с основного портала для девайсов на Android и iOS.
Каталог игр
Автоматы
База насчитывает более 2000 автоматов от известных разработчиков:
– Классические машины
– Современные автоматы
– Jackpot игры
– Брендовые слоты
Live казино
Раздел Live развлечений предлагает участие с настоящими ведущими в живом эфире:
– Рулетка
– Карточная игра
– Baccarat
– Карточный покер
Турниры
Систематические соревнования с значительными призовыми фондами организуются еженедельно. Участие в турнирах доступно всем созданным игрокам.
Платежные варианты
Взносы и снятия финансов реализуются через востребованные сервисы:
– Дебетовые пластик
– Цифровые системы
– Цифровая валюта
– Счетные операции
Минимальный платеж — от 100 рублей. Изъятие выигрышей выполняется в течение 24 часов.
Служба поддержки
Непрерывная группа помощи расположена содействовать в решении каких-либо задач:
– Живой чат
– Email
– Телефон
– Социальные сети
Охрана и разрешение
Официальный ресурс функционирует на базе международной документа. Любые информация игроков обезопасены современным SSL-криптованием.
Итог
Функционирующее зеркало обеспечивает стабильный соединение к излюбленным играм, выгодным промокодам и комфортным услугам. Присоединяйтесь сегодня и обретите начальный подарок!
Basketball livescore for NBA and international leagues, every basket tracked live
To watch
where to get generic plavix prices
for total peace of mind.
MedicoBridge RX: mexico pharmacy – reputable mexican pharmacy
Ландшафтный дизайн вокруг деревянного дома — идеи и советы
https://avidasecreta.com/wp-content/pgs/?le-code-promo-1xbet-bonus.html
Нынешние онлайн-казино предоставляют клиентам обширный ассортимент опций для комфортной досуга. Подключение к сервису ДжиВиСпин осуществляется через лицензионный домен или рабочее зеркало.
Что такое функционирующее зеркало казино
Действующее зеркало — это дополнительный URL официального портала казино. Такие копии генерируются для обеспечения стабильного входа к игровой сервису.
Зеркало на сегодня целиком копирует опции основного домена. Игроки имеют идентичный путь ко всем услугам, включая создание аккаунта, финансирование кошелька и получение призов.
Оформление профиля на официальном веб-сайте
Процесс создания аккаунта отнимает всего пару мгновений. Начинающим игрокам требуется:
1. Войти на официальный портал или действующее настоящее зеркало
2. Нажать кнопку “Зарегистрироваться”
3. Внести нужные реквизиты
4. Активировать почтовую почту
5. Использовать бонусный код при наличии
После завершения создания аккаунта игрок зарабатывает приз за регистрацию, который вправе включать фриспины или финансовое премию.
Вход в собственный кабинет
Личный кабинет — это защищенная зона, где клиенты могут регулировать своим счетом. Для входа следует указать логин и код доступа.
В личном кабинете представлены данные возможности:
– Проверка журнала операций
– Применение бонусных кодов
– Регулирование бонусами
– Включение в состязаниях
– Проверка кэшбэка
– Настройка учетной записи
Призы и акции
Игровая сервис предлагает великодушные подарки:
Начальный пакет — новички обретают существенное поощрение на начальные взносы.
Фриспины — выдаются как при оформлении, так и в ходе всевозможных кампаний.
Кэшбек — регулярный возврат фрагмента потерянных средств.
Бонусные коды — особые коды, открывающие право к специальным предложениям.
Обзор гемблинговых секций
Игровые автоматы
Коллекция slots включает массу наименований от лучших разработчиков. Пользователи найдут как классические автоматы, так и новые мультимедийные автоматы с увлекательной визуализацией.
Live казино
Категория Live казино дарит право развлекаться с живыми ведущими в условиях реального времени. Доступны известные столы: рулетка, блэкджек, баккара, покер.
Турниры
Периодические состязания с значительными выигрышными фондами притягивают массу соревнующихся. Призеры зарабатывают финансовые награды и специальные поощрения.
Мобильная версия и программа
Телефонная версия платформы дает возможность наслаждаться с произвольного устройства. Интерфейс автономно корректируется под диагональ экрана.
Установить софт можно для аппаратов на Android и iOS. Телефонное app обладает всеми опциями десктопной версии.
Как найти действующее зеркало на текущий день
Рабочие адреса копий периодически обновляются. Обнаружить свежую URL можно многими способами:
– Через отдел саппорта
– В подлинных новостных сетях
– По почтовой подписке
– На аффилиатных ресурсах
Защита и легальность
Лицензионный ресурс оперирует на базе мировой сертификата. Все операции охраняются современными системами безопасности.
Анонимность личных реквизитов поддерживается в полном формате.
Вывод
Официальный портал и его актуальные зеркала гарантируют игрокам круглосуточный выход к высококлассным игровым сервисам. Великодушные поощрения, различные автоматы, компетентная поддержка — все это создает гемблинговый процесс предельно беспроблемным и притягательным.
Доступ к сайту и рабочие зеркала
Современные онлайн казино предлагают игрокам огромный выбор игр. Основной портал РЎСѓРєР° организует стабильный доступ ко всем функциям. При этом периодически появляются ситуации, когда понадобится резервный способ подключения.
Что есть собой актуальное зеркало
Функционирующее зеркало — это идентичная копия официального ресурса с иным доменным именем. Альтернатива сегодня помогает обходить вероятные ограничения и сохранять непрерывный вход к предпочитаемым играм.
Легальное зеркало имеет всеми характеристиками, что и центральный портал:
– Целый каталог развлечений
– Личный профиль с сохраненными информацией
– Актуальные награды и предложения
– Проверенные денежные транзакции
Оформление и авторизация в систему
Ход открытия аккаунта на портале длится пару мгновений. Новым пользователям нужно:
1. Открыть на действующее зеркало сегодня
2. Нажать элемент «Открыть профиль»
3. Указать требуемые параметры
4. Проверить почтовую почту или контакт мобильного
5. Забрать бонус за регистрацию
Доступ в персональный профиль осуществляется посредством предоставление ID и кода доступа.
Обзор наградной политики
Щедрая призовая программа — ключевое плюс игорного заведения. Участники получают различные поощрения:
Вступительные бонусы
Недавние игроки имеют возможность рассчитывать на значительный бонус за регистрацию. Чаще всего это совокупность вариантов, охватывающий:
– Процентную премию к дебютному вкладу
– Бесплатные спины
– Extra деньги на баланс
Купоны и специальные предложения
Систематические промокоды дают возможность обретать бонусные льготы. Активировать их допустимо в отдельном разделе индивидуального профиля.
Фриспины и компенсация
Даровые вращения — это вариант вращать барабаны без расходования личных сумм. Возврат подразумевает частичный возмещение израсходованных финансов.
Коллекция игр
Игровая ресурс предлагает значительную подборку развлечений.
Слоты
Ассортимент аппаратов впечатляет ожидания. Имеются стандартные 3-барабанные машины и новые игры с интересной визуализацией.
Live заведение
Зона Live казино погружает игроков в среду истинного игорного заведения. Умелые ведущие проводят сессии в прямом режиме.
Соревнования и лидерборды
Регулярные состязания добавляют накала и предоставляют перспективу заработать большие суммы.
Карманная вариант и софт
Актуальные решения обеспечивают играть в удобном точке. Адаптивная версия независимо оптимизируется под монитор девайса.
Получить приложение можно для цифровых систем iOS и Android. Приложение обеспечивает:
– Скоростной запуск
– Стабильную функционирование
– Моментальные-оповещения об акциях
– Удобный дизайн
Банковские действия
Казино принимает многочисленные варианты пополнения и вывода средств:
– Платежные счета
– Виртуальные кошельки
– Крипто
– Банковские переводы
Всевозможные транзакции реализуются через зашифрованное канал, что обеспечивает неприкосновенность персональных информации.
Служба помощи
Опытная бригада поддержки работает всегда. Контактировать с операторами разрешено через:
– Live-чат
– Цифровую почту
– Горячую линию
– Медиа платформы
Заключение
Официальный веб-сайт и его актуальное зеркало предоставляют игрокам безопасный и легкий вход к увлекательным занятиям. Богатые награды, обширный спектр развлечений и отличная сервис обеспечивают участие исключительно интересной и доходной.
сделать реферат сделать реферат .
https://optsigarof.com/user/calvinpoki
Площадки с навесом защищают детей от дождя и солнца, продлевая время игр на улице. Крыша над площадкой — практичное решение для любого климата. Особенно актуально, если участок открытый и нет естественной тени.
Анализ официального сайта
Прогрессивные виртуальные казино обеспечивают пользователям богатый набор развлечений и перспектив. Главный сайт Рльдорадо казино гарантирует безопасный доступ к азартным сервисам.
Функционирующее зеркало: доступ сегодня
Альтернативный адрес служит в качестве точную дубликат основного ресурса. Действующее зеркало обеспечивает игрокам преодолевать возможные барьеры.
Достоинства использования зеркала
Ключевые выгоды содержат:
– Стабильный путь к ресурсу
– Поддержание полных опций базового сайта
– Охрана личных материалов
– Идентичный возможности
Регистрация на сайте
Механизм оформления профиля выделяется доступностью и удобством. Новые участники требуется:
1. Открыть главный веб-сайт или его зеркало
2. Щелкнуть на пункт оформления
3. Указать нужные поля
4. Валидировать почтовую почту
5. Осуществить начальный авторизацию
Бонус за регистрацию
Начинающие зарабатывают щедрый вступительный бонус. Это награда в состоянии охватывать:
– Монетарные суммы
– Complimentary вращения
– Увеличенный коэффициент кэшбэка
Логин в персональный кабинет
Существующие пользователи могут быстро войти в личный кабинет, задействуя имя пользователя и код. Личный кабинет дает путь к:
– Контролю счетом
– Записям платежей
– Действующим призам
– Параметрам аккаунта
Подарки и кампании
Портал регулярно организует различные предложения для участников.
Разновидности бонусов
Главные категории поощрений:
– Денежные призы – часть от величины депозита
– Спины – безвозмездные раунды в слотах
– Возврат средств – возмещение части затраченных средств
– Соревновательные вознаграждения – призы за состязание в конкурсах
Промокоды
Эксклюзивные коды помогают активировать дополнительные бонусы. Игроки в состоянии обнаружить их на аффилиатных порталах или взять в уведомлениях.
Мобильная адаптация и софт
Передовые пользователи предпочитают переносной игровой процесс.
Опции переносной системы
– Отзывчивый облик для различных девайсов
– Совокупный доступ к слотам
– Оперативная функционирование
– Эргономичное навигация
Установить app
Переносное приложение предоставлено для установки на устройства с рабочими ОС Android и iOS. Программа предоставляет:
– Стабильную деятельность
– Пуш уведомления о акциях
– Моментальный вход к предпочитаемым автоматам
Игровой каталог
Портал дает обширную подборку игровых игр.
Автоматы
Каталог азартных аппаратов включает:
– Традиционные машины
– Видео автоматы
– Прогрессивные автоматы
– Тематические слоты
Live казино
Область настоящих столов обеспечивает шанс играть с настоящими ведущими. Предложены:
– Американская рулетка
– Блек-джек
– Baccarat
– Покер
Соревнования
Постоянные чемпионаты обеспечивают клиентам конкурировать за внушительные финансовые фонды. Конкурсная система изменяется регулярно.
Финансовые процедуры
Портал предоставляет массу методов внесения и снятия сумм:
– Банковские карты
– Электронные кошельки
– Межбанковские трансферы
– Крипто
Любые платежи проходят надежно с использованием современных протоколов кодирования.
Департамент поддержки
Профессиональная команда support функционирует 24/7. Обратиться с специалистами можно через:
– Интерактивный чат
– Почтовую почту
– Горячую линию
– Соц медиа
Защита и лицензирование
Портал действует на базе легальной сертификата. Это обеспечивает:
– Легальность игрового действа
– Сохранность индивидуальных информации
– Пунктуальные выплаты
– Легальный гейминг
Итог
Основной портал и его функционирующие дубликаты гарантируют клиентам совокупный спектр возможностей для комфортной и профитной игры. Значительные призы, всевозможные развлечения, квалифицированная помощь и проверенная система выплат делают платформу оптимальным вариантом для поклонников гемблинг забав.
нажмите, чтобы подробнее https://slon4u.com
Нынешние онлайн-казино предлагают клиентам массу опций для комфортной игры. Центральный ресурс Eldorado казино дарит путь ко всем возможностям и азартным играм. Однако при появлении системных трудностей на помощь приходят рабочие альтернативные адреса.
Что означает собой действующее зеркало
Альтернативный адрес казино — это идентичная копия главного сайта, размещенная по запасному доменному имени. Легитимное зеркало поддерживает все характеристики, вместе с регистрацию, вход в личный кабинет, премии и купоны.
Копия на сегодня обеспечивает:
– Постоянный вход к развлекательным слотам
– Стопроцентную безопасность личных данных
– Удержание баланса и хронологии платежей
– Применимость всех акций
Открытие профиля на главном ресурсе
Ход оформления учетной записи отнимает считанные минут. Новым клиентам требуется:
1. Зайти на главный сайт или рабочее зеркало
2. Щелкнуть кнопку «Создать аккаунт»
3. Указать нужные данные
4. Подтвердить электронную почту
5. Ввести промокод при присутствии
После финиша создания аккаунта пользователи получают вознаграждение за регистрацию, который может включать free spins или монетарное поощрение.
Логин в личный кабинет
Индивидуальный кабинет обеспечивает всесторонний мониторинг над азартным ходом. Через персональный аккаунт разрешается:
– Пополнять депозит
– Снимать призы
– Использовать купоны
– Проверять хронологию пари
– Принимать участие в конкурсах
– Приобретать кешбэк
Описание вознаграждений и промо-предложений
Богатая премиальная схема — ключевое плюс ресурса. Основные категории вознаграждений:
Вступительный приз
Новые игроки получают щедрое премирование на дебютные депозиты. Размер бонуса может достигать 100-200% от суммы депозита.
Бесплатные вращения
Даровые вращения выдаются для востребованных машин. Объем бесплатных вращений колеблется от 10 до 500 штук.
Возврат средств
Постоянный или помесячный отдача процента утраченных финансов. Обычный размер компенсации — 5-15%.
Турниры
Регулярные конкурсы с внушительными призовыми банками. Конкурсанты состязаются за верхние позиции в таблице лидеров.
Портативная версия и программа
Смартфонная версия позволяет наслаждаться игрой с каждого аппарата. Пользователи могут загрузить программу для iOS и Android или эксплуатировать интернет версию.
Достоинства портативного программы:
– Скоростная подзагрузка автоматов
– Удобный дизайн
– Push-уведомления о промо
– Вход через Face ID
Слоты и Live казино
Развлекательная подборка включает тысячи позиций от ведущих производителей.
Востребованные категории слотов:
– Классические автоматы
– Видео-автоматы с бонусными раундами
– Джекпот слоты
– Megaways машины
Live казино
Зона live казино предоставляет игру с реальными ведущими. Имеются стандартные игры:
– Европейская рулетка
– Блэкджек
– Баккара
– Техасский холдем
Как отыскать рабочее зеркало
Найти действующую линк на зеркало разрешается множественными вариантами:
1. Оформить подписку на почтовую рассылку
2. Мониторить за обновлениями в соц сетях
3. Контактировать в службу поддержки
4. Заложить действующее зеркало в закладки
Резюме
Основной сайт и его рабочие зеркала гарантируют постоянный путь к развлекательным играм. Щедрые премии, разнообразные бонусные коды, практичное портативное софт и качественная служба поддержки поддержки создают игровой процесс крайне комфортным и безопасным.
умная нейросеть для учебы nejroset-dlya-referatov-5.ru .
Доступ к платформе через актуальные зеркала
Пользователи онлайн казино регулярно контактируют с ситуацией закрытия главного ресурса. Собственно для решения этой ситуации созданы дубликаты основного ресурса. Клубника предоставляет беспрепятственный доступ ко всем возможностям ресурса.
Что такое актуальное зеркало казино
Копия является собой идентичную копию основного веб-сайта с аналогичным возможностями. Ключевое отличие — это доменное имя. Каждые сведения игрока, включая баланс, награды и данные партий, продолжают быть прежними.
Достоинства задействования зеркал
Функционирующие зеркала имеют набором ключевых достоинств:
– Постоянный подключение к выбранным автоматам
– Абсолютная сохранность персональных данных
– Удержание всех параметров пользовательского кабинета
– Опция взятия поощрений и присутствия в предложениях
Оформление профиля на официальном сайте
Операция открытия счета чрезвычайно элементарен и занимает немного минут. Новые пользователи могут надеяться на крупный начальный бонус за оформление.
Ступени оформления аккаунта
1. Переход на легальный домен или его копию
2. Выбор на опцию “Зарегистрироваться”
3. Заполнение нужных информации
4. Активация email почты
5. Применение бонусного кода (если есть)
Поощрения и предложения для пользователей
Платформа балует своих клиентов различными бонусными предложениями.
Базовые виды призов
Приветственный пакет — крупное вознаграждение для новых клиентов, что может вмещать денежные бонусы и безвозмездные спины.
Безвозмездные спины — шанс играть в востребованных игровых машинах без затрат.
Компенсация — частичный возмещение утраченных сумм, который зачисляется еженедельно или помесячно.
Промокоды — специальные последовательности, обеспечивающие экстра преимущества.
Личный кабинет: опции и параметры
Индивидуальный кабинет гарантирует абсолютный контроль над пользовательским опытом. Тут доступны:
– Регулирование счетом
– Архив транзакций
– Действующие поощрения
– Конфигурации охраны
– Валидация счета
Портативная редакция и софт
Актуальные участники предпочитают портативность. Площадка предлагает 2 варианта для развлечений с портативных устройств.
Responsive телефонная версия
Смартфонная платформа домена автономно подстраивается под монитор любого аппарата. Отсутствует потребность устанавливать особое программное обеспечение.
Приложение для мобильных
Можно инсталлировать специальное приложение для iOS и Android. Программа предоставляет:
– Моментальный вход
– Адаптированный интерфейс
– Push-сообщения о предложениях
– Бесперебойную операционность
Live казино: обстановка подлинного зала
Секция Live игр отправляет пользователей в среду подлинного игорного заведения. Профессиональные дилеры ведут игры в формате реального времени.
Известные Live-столы
– Американская рулетка
– Blackjack
– Баккара
– Покер
Аппараты: разнообразие развлечений
Собрание азартных аппаратов насчитывает множество названий от топовых провайдеров. Участники встретят:
– Классические машины
– Видеослоты
– Прогрессивный джекпот-слоты
– Megaways
Турниры и особые предложения
Постоянные турниры обеспечивают игрокам бороться друг с другом за солидные денежные банки. Всякий турнир обладает свои условия включения и таблицу победителей.
Способы зачисления и снятия финансов
Ресурс поддерживает множество денежных сервисов:
– Банковские картыы
– Виртуальные платежные системы
– Blockchain-платежи
– Wire отправления
Любые платежи выполняются безопасно благодаря передовым протоколам криптографии.
Команда помощи
Опытные специалисты сервиса помощи настроены ассистировать 24/7. Работают нижеперечисленные способы контакта:
– Оперативный-чат
– Email-сервис
– Звонковая горячая линия
– Медийные сети
Итог
Главный портал клуба и его рабочие альтернативы обеспечивают клиентам надежный и приятный переход к обширному спектру азартных активностей. Крупные награды, периодические промоакции, компетентная помощь и легкие платежные методы формируют геймерский времяпрепровождение максимально приятным и доходным.
Анализ основного портала
Актуальное онлайн-казино дарит своим игрокам широкий ассортимент развлечений и вознаграждений. Главный сайт Болливуд действует постоянно, давая доступ к топовым играм, live-казино и многим предложениям.
Функционирующее зеркало: вход к сайту
Что такое зеркало казино
Альтернатива является собой абсолютную дубликат основного портала с альтернативным сетевым именем. Функционирующее зеркало позволяет игрокам преодолевать блокировки и обеспечивать стабильный путь к излюбленным играм.
Как обнаружить рабочее зеркало сегодня
Актуальные адреса на главное зеркало появляются через:
– Email оповещение
– Проверенные медийные сети
– Отдел обслуживания
– Affiliated площадки
Регистрация на сайте
Процедура оформления
Созданиеаккаунта занимает пару минут и предполагает следующие стадии:
1. Переход на оригинальный веб-сайт или функционирующее зеркало
2. Активация клавиши “Создатьаккаунт”
3. Заполнение учетных данных
4. Активация адреса или мобильного
5. Создание пароля
Приз за созданиеаккаунта
Первые игроки зарабатывают выгодные стартовые подарки:
– Игровые депозиты на кошелек
– Фриспины для симуляторов
– Усиленный процент компенсации
– Специальные промокоды
Вход в собственный счет
Активные игроки способны совершить авторизацию через официальный ресурс или текущее зеркало. Для этого требуется указать никнейм и ключдоступа, созданные при открытиисчета.
Функции персонального аккаунта
В личном профиле предоставлены такие опции:
– Контроль личными информацией
– Ввод кошелька
– Вывод призов
– Применение бонусов
– Отслеживание журнала транзакций
– Регистрация в состязаниях
Подарки и предложения
Виды бонусов
Казино радует своих пользователей различными призовыми предложениями:
– Вступительный набор — солидные поощрения на стартовые взносы
– Freespins — дополнительные ставки в топовых играх
– Возврат — периодический возмещение процента ставок
– План поощрения — уникальные привилегии для регулярных пользователей
Ваучеры и их ввод
Особые промокоды дают экстра поощрения. Для активации необходимо внести шифр в специальное окно в собственном профиле.
Развлекательный набор
Слоты
Коллекция развлекательных слотов включает сотни названий от известных производителей:
– Обычные слоты
– Видео слоты
– Джекпот слоты
– Тематические игры
Live казино
Раздел Live-казино дарит участие с настоящими крупье в формате реального эфира:
– Французскаярулетка
– Blackjack
– Baccarat
– Покер
Соревнования
Постоянные соревнования с большими наградными фондами проводятся постоянно. Игроки конкурируют за лидерство в турнирнойсетке.
Смартфонная версия и программа
Адаптивная версия ресурса
Официальный веб-сайт полностью настроен для планшетных гаджетов. Игроки вправе запускать развлечения непосредственно через обозреватель без нужды скачивания.
Приложение для инсталляции
Фирменное портативное приложение предоставляется для скачивания на девайсы с рабочими платформами Android и iOS. Софт дает:
– Быстрый вход к развлечениям
– Устойчивую работу
– Моментальные-извещения о бонусах
– Комфортный навигацию
Итог
Оригинальный портал казино и его актуальные зеркала предоставляют клиентам полный возможность к отличным игровым сервисам. Большие поощрения, всевозможные промо, удобная мобильная реализация и опытная служба формируют игровой времяпрепровождение предельно enjoyable и выгодным.
нейросеть для рефератов нейросеть для рефератов .
MedicoBridge RX: MedicoBridge RX – buying prescription drugs in mexico
узнать https://17slon.net/
Актуальные онлайн-казино гарантируют пользователям массу опций для приятной игры. Центральный портал Ретро зеркало дарит возможность ко всем сервисам и игровым автоматам. Однако при наличии программных проблем на подмогу прибывают функционирующие зеркала.
Что означает собой рабочее зеркало
Альтернативный адрес казино — это стопроцентная дубликат официального ресурса, расположенная по другому URL. Официальное зеркало удерживает все характеристики, включая открытие профиля, вход в индивидуальный кабинет, поощрения и промокоды.
Зеркало на сегодня гарантирует:
– Постоянный доступ к азартным аппаратам
– Стопроцентную защиту персональных данных
– Поддержку баланса и хронологии операций
– Доступность всех акций
Открытие профиля на лицензионном ресурсе
Этап создания аккаунта отнимает пару минут. Новоиспеченным игрокам необходимо:
1. Войти на подлинный портал или актуальное зеркало
2. Нажать кнопку «Регистрация»
3. Указать требуемые данные
4. Подтвердить email почту
5. Использовать промокод при присутствии
После финиша создания аккаунта игроки приобретают приз за регистрацию, который может включать бесплатные вращения или монетарное премирование.
Вход в личный кабинет
Персональный кабинет предоставляет полный надзор над игровым процессом. Через индивидуальный профиль возможно:
– Депонировать депозит
– Забирать выигрыши
– Активировать бонусные коды
– Проверять хронологию пари
– Играть в конкурсах
– Приобретать кешбэк
Обзор бонусов и специальных предложений
Богатая призовая программа — ключевое плюс проекта. Главные формы поощрений:
Вступительный приз
Новички приобретают великодушное премирование на стартовые депозиты. Сумма бонуса может составлять 100-200% от размера вклада.
Бонусные спины
Безвозмездные вращения даются для востребованных слотов. Количество free spins варьируется от 10 до 500 штук.
Возврат средств
Постоянный или помесячный возврат процентной доли потерянных денег. Типичный размер возврата — 5-15%.
Турниры
Регулярные соревнования с большими наградными пулами. Соревнующиеся борются за верхние строчки в таблице лидеров.
Портативная версия и софт
Мобильная версия разрешает делать ставки с любого гаджета. Игроки могут установить софт для iOS и Android или применять веб версию.
Преимущества мобильного программы:
– Скоростная прогрузка слотов
– Эргономичный дизайн
– Push-уведомления о бонусах
– Доступ через биометрию
Слоты и Live казино
Игровая база охватывает сотни игр от лидирующих разработчиков.
Востребованные категории автоматов:
– Стандартные машины
– Видео-автоматы с призовыми уровнями
– Прогрессивный джекпот слоты
– Мега-путь слоты
Live казино
Раздел live казино предоставляет развлечение с живыми ведущими. Есть классические игры:
– Рулетка
– Blackjack
– Punto Banco
– Карибский покер
Как найти действующее зеркало
Найти свежую адрес на зеркало разрешается разными вариантами:
1. Подписаться на емейл-уведомления
2. Следить за обновлениями в социальных сетях
3. Обратиться в департамент поддержки
4. Добавить в закладки действующее зеркало в фавориты
Резюме
Основной ресурс и его действующие дубликаты дают постоянный доступ к азартным слотам. Выгодные премии, различные промокоды, удобное мобильное программа и отличная служба поддержки превращают азартный геймплей в высшей степени комфортным и надежным.
Нынешние онлайн казино предоставляют игрокам обширный выбор вариантов для приятной игры. Но иногда вход к основному платформе может являться ограниченным. В таких случаях на поддержку спешит РёРіСЂС‹ Retro, которое обеспечивает непрерывный доступ ко всем сервисам платформы.
Что такое рабочее зеркало казино
Альтернативный сайт — это абсолютная копия главного ресурса, которая находится по запасному домену. Дубликат содержит полный инструментарий первоначального веб-портала, включая личный кабинет, средства и историю операций.
Основные преимущества задействования зеркала:
– Круглосуточный доступ к сайту
– Полная идентичность опций
– Защита индивидуальных информации
– Удержание всех бонусов
Как разыскать актуальное зеркало сегодня
Присутствует некоторое количество надежных методов поиска свежей адреса:
Проверенные каналы:
1. Почтовая рассылка — управление систематически отправляет информацию с действующими ссылками
2. Медийные сети — легитимные каналы публикуют свежую новости
3. Сервис поддержки — операторы предоставляют надежные URL
4. Портативное приложение — предоставляет избегать блокировки
Создание аккаунта на основном веб-сайте
Процедура создания аккаунта длится не более считанные минут и включает из таких шагов:
1. Попадание на официальный сайт или действующее зеркало
2. Щелчок на кнопку «Открыть счет»
3. Указание регистрационной анкеты
4. Подтверждение почтовой почты или телефонного номера
5. Активация поощрения за регистрацию при существовании промокода
Только что зарегистрированные клиенты приобретают великодушный начальный бонус, который может охватывать даровые прокруты, монетарные бонусы или возврат средств.
Вход в персональный кабинет
Логин на ресурсе реализуется традиционным способом. Требуется указать никнейм и пароль, указанные при оформлении.
Важные моменты для конфиденциального входа:
– Задействуйте защищенный пароль
– Активируйте двойную верификацию
– Не записывайте реквизиты на посторонних компьютерах
– Проверяйте доменную строку браузера
Анализ премиальной программы
Игорный портал награждает пользователей разнообразными поощрениями и акциями:
Вступительный букет
Начинающие могут полагаться на значительное вознаграждение за стартовый депозит. Зачастую это пропорциональная добавка к переведенной объему плюс фриспины для топовых слотов.
Периодические акции
– Еженедельный кэшбек — возврат доли утраченных финансов
– Бонусы на последующие взносы
– Уникальные офферы по праздникам
– Состязания с значительными наградными фондами
Программа вознаграждений
Регулярные пользователи накапливают баллы за всякую ставку, которые затем конвертируются на фактические финансы, free spins или особые привилегии.
Купоны: как применять
Купоны — это специальные комбинации букв и цифр, предоставляющие привилегию к специальным бонусам.
В каких местах раздобыть актуальные промокоды:
– Авторизованные социальные сети казино
– Партнерские ресурсы
– Email-информирование
– Профильные сообщества
Указывается промокод в предназначенное поле при регистрации или пополнении депозита.
Портативная версия и приложение
Актуальные геймеры отдают предпочтение развлекаться с телефонных устройств. Платформа обеспечивает 2 решения для беспроблемной портативной игры.
Responsive редакция
Интернет версия самостоятельно оптимизируется под диагональ экранной панели. Не требует установки и работает в каждом актуальном браузере.
Портативное приложение
Скачать app можно для девайсов на Android и iOS. Выгоды app:
– Быстрая запуск
– Стабильная действие
– Автоматические-уведомления о бонусах
– Автоматический избегание блокировок
Этап скачивания несложен: необходимо зайти на портал с мобильного гаджета и выполнять руководству.
Развлекательный коллекция
База развлечений насчитывает несколько тысяч позиций от ведущих провайдеров.
Слоты
Гемблинг слоты — крайне популярная раздел развлечений. Доступны традиционные винтажные машины, новые мультимедийные слоты с дополнительными этапами, а также прогрессивные суперпризы.
Live казино
Зона с реальными раздающими дает возможность прочувствовать антураж реального казино. Представлены варианты с рулеткой.
Стриминг осуществляется в превосходном качестве, присутствует коммуникация с раздающим и остальными пользователями.
Состязания
Постоянно запускаются конкурсы по разным слотам. Включение позволяет завоевать валютные награды, фриспины или эксклюзивные бонусы.
Финансовые действия
Портал предоставляет широкий спектр финансовых инструментов:
– Кредитные карты
– Онлайн системы
– Крипта
– Финансовые транзакты
Минимальная количество взноса — доступная для преобладающего числа геймеров. Снятие выигрышей выполняется в скорые временные рамки.
Сервис поддержки
Компетентные специалисты способны содействовать 24/7. Открыты такие способы коммуникации:
– Интернет-чат
– Email
– Голосовая горячая линия
– Общественные сети
Разъяснения на частые вопросы можно обнаружить в разделе FAQ.
Резюме
Лицензионный веб-сайт казино и его действующие зеркала гарантируют игрокам полный вход ко всем функциям портала. Значительные бонусы, удобная портативная версия, впечатляющий ассортимент аттракционов и компетентная поддержка делают развлекательный процесс предельно комфортным и конфиденциальным.
Manager reactions, touchline drama and post-match comments covered
Актуальные онлайн-казино предлагают участникам обширный набор слотов и заманчивые бонусы. Однако для беспроблемной времяпрепровождения необходимо понимать, как получить доступ к ДжиВиСпин казино и его функционирующие зеркала.
Что такое официальный портал казино
Основной портал казино — это основная платформа, где клиенты могут пользоваться гемблинг автоматами. Платформа оперирует на легальных правах и владеет всеми нужными документами.
Главные достоинства основного ресурса:
– Конфиденциальность пользовательских сведений
– Честные требования использования
– Гарантированные платежи
– Компетентная техподдержка
Функционирующее зеркало казино: для чего нужно
Альтернативный адрес — это точная версия основного портала, хостящаяся по иному домену. Рабочее зеркало разрабатывается для предоставления стабильного доступа к сайту.
Поводы применения дублирующих ресурсов:
– Блокировка официального адреса
– Профилактические работы
– Высокая загрузка на систему
Как отыскать рабочее зеркало сейчас
Найти текущее рабочее зеркало можно несколькими способами:
1. Рассылка — зарегистрируйтесь на новостную отправку
2. Команда помощи — проконсультируйтесь в онлайн-чат
3. Корпоративные каналы — следите за публикациями
4. Специализированные площадки — достоверные ресурсы
Создание аккаунта на сайте казино
Процесс открытия счета занимает лишь немного мгновений:
1. Выберите на элемент “Создать аккаунт”
2. Заполните обязательные сведения
3. Валидируйте email e-mail
4. Активируйте промокод, если есть
Вслед за финализированной создания аккаунта вам предоставится открыт пользовательский раздел.
Бонусы и купоны
Привлекательная премиальная политика — значимое конкурентное преимущество казино:
Подарок за первичную регистрацию
Первичные участники обретают стартовый поощрение, который может охватывать:
– Монетарный бонус на стартовый взнос
– Фриспины для игровых машин
– Стартовые средства
Промокоды
Регулярно выходят свежие коды, дающие возможность использовать особые поощрения.
Схема кэшбека
Активные участники зарабатывают процент проигранных средств обратно.
Свежие предложения и турниры
Казино периодически организует интересные кампании:
– Семидневные соревнования
– Праздничные акции
– Раздачи значительных выигрышей
– Система VIP-клуба
Доступ в личный аккаунт
Для авторизации на платформу нужно:
1. Открыть лицензионный адрес или актуальное зеркало
2. Выбрать “Войти”
3. Прописать имя пользователя и пароль
В индивидуальном аккаунте разрешены такие возможности:
– Пополнение кошелька
– Получение денег
– Просмотр журнала игр
– Изменение личными данными
Портативная платформа и софт
Адаптивная вариант
Responsive платформа ресурса позволяет развлекаться с различных карманного телефона. Оформление динамически подстраивается под габариты screen.
Приложение для установки
Загрузить приложение можно для:
– Android — прямая загрузка с портала
– iOS — скачивание через App Store
Выгоды программы:
– Быстрый запуск
– Бесперебойная операционность
– Push-оповещения об предложениях
– Производительный функционал
Игровые разделы
Игровые машины
Разнообразная подборка эмуляторных барабанов от лучших поставщиков:
– Ретро игры
– Современные-эмуляторы
– Призовые-игры
Live игры
Секция с реальными операторами предоставляет:
– Рулетка
– Blackjack
– Baccarat
– Poker
Эфиры проводятся в превосходном формате, воссоздавая ощущение подлинного казино.
Системы внесения средств и обналичивания
Казино принимает множественные денежные методы:
– Кредитные средства
– Виртуальные системы
– Bitcoin/Ethereum
– Финансовые транзакции
Наименьшие значения взноса и моментальные транзакции создают игру крайне комфортной.
Служба support
Профессиональная команда поддержки работает 24/7 и может содействовать с разными ситуациями:
– Реалтайм-чат
– Email-помощь
– Голосовая связь
Резюме
Официальный веб-сайт казино и его действующие копии гарантируют игрокам безопасный и интересный гемблинг процесс. Привлекательные подарки, комфортная мобильная модификация, многочисленные автоматы и качественное live-казино формируют эту площадку замечательным выбором для гемблинг развлечений.
Вход к порталу через актуальные зеркала
Нынешние онлайн казино обеспечивают игрокам непрерывный доступ к играм. Центральный сайт Рльдорадо казино регистрация функционирует стабильно, предоставляя большой ассортимент азартных игр. Впрочем периодически возникают программные препятствия или барьеры, следовательно критично быть осведомлённым о присутствии действующих зеркал.
Что является собой центральное зеркало казино
Копия — это идентичная реплика главного портала с схожим возможностями. Действующее зеркало сегодня обеспечивает миновать местные ограничения и возобновлять развлечения.
Главные достоинства задействования зеркал:
– Безграничный переход к собственному кабинету
– Поддержание всех информации профиля
– Такой же спектр развлечений
– Действующие вознаграждения и кампании
Регистрация на сайте
Механизм регистрации требует немного минут. Новые геймеры обретают богатый подарок за оформление, что способен охватывать:
– Стартовый денежный бонус
– Бесплатные фриспины для машин
– Специальные купоны
– Увеличенный возврат
Для финализации создания аккаунта нужно:
1. Зайти на основной портал или копию
2. Щёлкнуть элемент «Оформиться»
3. Внести персональные сведения
4. Подтвердить почтовый адрес или мобильный
5. Активировать промокод (когда имеется присутствии)
Доступ в индивидуальный кабинет
Следом за правильной создания аккаунта геймеры могут производить вход с помощью официальный портал или рабочее зеркало. Индивидуальный кабинет предоставляет всесторонний надзор над профилем:
– История игр
– Внесение баланса
– Вывод денег
– Контроль привилегиями
– Вовлечение в турнирах
Бонусы и кампании казино
Ресурс удовлетворяет пользователей различными привилегированными предложениями:
Вступительные бонусы
Дебютанты зарабатывают внушительный букет наград на вступительные пополнения. Типично это предполагает долевую прибавку к размеру взноса плюс даровые спины.
Систематические кампании
– Седмичный компенсация до 15%
– Конкурсы с призовыми суммами
– Подарки на дату рождения
– Специальные программы для привилегированных клиентов
План вознаграждения
Деятельные пользователи накапливают очки, которые возможно трансформировать на подлинные финансы или эксклюзивные льготы.
Карманная вариант и утилита
Нынешние технологии дают возможность участвовать всюду удобно. Портативная версия портала автоматически подстраивается под дисплей каждого аппарата.
Выгоды карманного приложения:
– Быстрая запуск автоматов
– Практичный облик
– Моментальные-нотификации о бонусах
– Возможность загрузить для Android и iOS
Реальное казино: атмосфера настоящего игорного учреждения
Раздел Live клуба погружает клиентов в среду подлинного азартного заведения. Компетентные ведущие ведут развлечение в формате подлинного времени.
Предлагаемые игры:
– Американская рулетка
– Двадцать одно
– Баккара
– Покерная игра
Автоматы и развлекательные слоты
Каталог развлекательных машин охватывает сотни названий от ведущих производителей. Каждый клиент отыщет развлечение по желанию:
– Традиционные слоты
– Новые слоты с специальными этапами
– Джекпот-машины
– Многолинейные слоты
Конкурсы и лотереи
Постоянные состязания добавляют азарт и открывают способность выиграть значительные суммы. Присутствие в соревнованиях зачастую бесплатное, а премиальные фонды насчитывают больших объёмов.
Защита и приватность
Сайт задействует инновационные системы криптографии для охраны сведений геймеров. Каждые транзакционные операции выполняются через зашифрованные каналы.
Вывод
Официальный веб-сайт и его актуальные зеркала обеспечивают стабильный доступ к первоклассным азартным сервисам. Великодушные поощрения, комфортная мобильная версия, разнообразие автоматов и высококлассное Live-казино формируют платформу замечательным решением для любителей развлекательных автоматов.
Обзор основного сайта
Актуальные сетевые казино обеспечивают клиентам широкий набор развлечений и опций. Официальный портал РЎСѓРєР° предоставляет безопасный вход к гемблинг сервисам.
Действующее зеркало: доступ сегодня
Дублирующий портал выступает как абсолютную дубликат основного портала. Официальное зеркало обеспечивает участникам обходить потенциальные ограничения.
Достоинства задействования зеркала
Принципиальные преимущества охватывают:
– Беспрерывный вход к сайту
– Удержание полных возможностей официального сайта
– Охрана индивидуальных данных
– Аналогичный возможности
Регистрация на ресурсе
Механизм создания аккаунта отличается понятностью и удобством. Свежие клиенты необходимо:
1. Зайти на основной сайт или его зеркало
2. Выбрать на элемент оформления
3. Внести требуемые данные
4. Верифицировать почтовую адрес
5. Совершить стартовый доступ
Бонус за регистрацию
Новички получают значительный вступительный презент. Подобное награда способно содержать:
– Денежные бонусы
– Безвозмездные спины
– Усиленный показатель кэшбэка
Вход в индивидуальный профиль
Существующие пользователи в состоянии оперативно зайти в персональный кабинет, эксплуатируя никнейм и ключ. Персональный аккаунт дает путь к:
– Управлению средствами
– Хронологии переводов
– Работающим подаркам
– Параметрам аккаунта
Призы и предложения
Ресурс периодически проводит различные промо-кампании для игроков.
Типы бонусов
Ключевые категории бонусов:
– Пополнительные призы – процент от размера взноса
– Бесплатные вращения – безвозмездные вращения в аппаратах
– Возврат средств – компенсация доли потерянных сумм
– Турнирные трофеи – вознаграждения за состязание в конкурсах
Промокоды
Эксклюзивные купоны помогают приобрести дополнительные выгоды. Клиенты способны обнаружить их на аффилиатных площадках или получить в рассылке.
Переносная адаптация и программа
Современные игроки выбирают переносной досуг.
Характеристики переносной платформы
– Гибкий облик для разнообразных устройств
– Совокупный доступ к играм
– Оперативная загрузка
– Эргономичное управление
Скачать приложение
Mobile app предложено для скачивания на аппараты с базовыми системами Android и iOS. App гарантирует:
– Бесперебойную производительность
– Мгновенные алерты о бонусах
– Моментальный путь к предпочитаемым автоматам
Развлекательный каталог
Портал предлагает обширную коллекцию развлекательных услуг.
Игровые машины
Ассортимент игровых аппаратов насчитывает:
– Обычные автоматы
– Video игры
– Прогрессивные слоты
– Тематические автоматы
Live казино
Раздел настоящих развлечений обеспечивает опцию соревноваться с реальными диллерами. Предложены:
– Европейская рулетка
– Блэкджек
– Баккара
– Покер
Состязания
Периодические конкурсы помогают клиентам бороться за значительные наградные пулы. Турнирная программа актуализируется каждую неделю.
Банковские процедуры
Портал предлагает массу способов внесения и обналичивания сумм:
– Дебетовые карточки
– Электронные платежные системы
– Wire трансферы
– Крипто
Абсолютно все операции выполняются защищенно с применением современных систем защиты.
Департамент support
Профессиональная группа помощи функционирует 24/7. Соединиться с менеджерами доступно через:
– Онлайн чат
– Почтовую почту
– Телефонную линию
– Social сети
Безопасность и лицензирование
Казино функционирует на фундаменте легальной лицензии. Данное обеспечивает:
– Честность азартного геймплея
– Безопасность персональных данных
– Оперативные выплаты
– Контролируемый геймплей
Вывод
Главный ресурс и его действующие альтернативные адреса предоставляют игрокам абсолютный набор функций для комфортной и прибыльной игры. Значительные подарки, всевозможные игры, профессиональная помощь и безопасная инфраструктура транзакций делают портал идеальным решением для любителей азартных забав.
Вход к платформе через проверенные зеркала
Актуальные сетевые казино дают пользователям непрерывный подключение к играм. Главный портал https://www.c58.ru работает устойчиво, гарантируя богатый ассортимент игровых развлечений. Но иногда появляются технические препятствия или ограничения, потому необходимо быть осведомлённым о присутствии актуальных зеркал.
Что собой представляет собой главное зеркало казино
Зеркало — это точная копия центрального сайта с схожим набором функций. Действующее зеркало сейчас даёт возможность обходить территориальные ограничения и вести игру.
Основные преимущества применения зеркал:
– Безграничный переход к индивидуальному кабинету
– Фиксация любых сведений счёта
– Идентичный набор развлечений
– Текущие поощрения и предложения
Создание аккаунта на портале
Процедура записи занимает считанные минут. Свежие пользователи получают богатый приз за регистрацию, что способен включать:
– Стартовый игровой кредит
– Безвозмездные кручения для слотов
– Эксклюзивные купоны
– Усиленный кешбэк
Во имя выполнения регистрации нужно:
1. Перейти на центральный ресурс или зеркало
2. Щёлкнуть опцию «Регистрация»
3. Внести индивидуальные реквизиты
4. Активировать почтовый адрес или телефон
5. Использовать код (если есть присутствии)
Вход в личный кабинет
После удачной оформления игроки в состоянии выполнять авторизацию через главный веб-сайт или актуальное зеркало. Собственный кабинет даёт абсолютный контроль над профилем:
– История пари
– Зачисление счёта
– Изъятие выигрышей
– Регулирование бонусами
– Присутствие в соревнованиях
Привилегии и промо казино
Платформа удовлетворяет клиентов вариативными бонусными схемами:
Начальные подарки
Начинающие получают щедрый букет привилегий на первые вклады. Как правило это содержит частичную надбавку к объёму депозита плюс безвозмездные кручения.
Периодические акции
– Каждонедельный кешбэк до 15%
– Конкурсы с премиальными фондами
– Призы на день рождения
– Особые промо для VIP геймеров
Схема вознаграждения
Активные клиенты зарабатывают единицы, которые допустимо конвертировать на настоящие средства или особые привилегии.
Мобильная форма и приложение
Современные технологии помогают участвовать всюду комфортно. Портативная форма веб-сайта независимо адаптируется под экран каждого девайса.
Достоинства мобильного приложения:
– Скоростная запуск автоматов
– Комфортный вид
– Мгновенные-нотификации о предложениях
– Способность установить для Android и iOS
Реальное казино: обстановка реального развлекательного заведения
Область Live заведения транспортирует пользователей в атмосферу истинного гемблинг заведения. Профессиональные крупье организуют процесс в формате реального времени.
Предлагаемые игры:
– Европейская рулетка
– Двадцать одно
– Карточная игра
– Покерная игра
Автоматы и развлекательные автоматы
Каталог азартных слотов содержит тысячи позиций от ведущих производителей. Всякий игрок обнаружит игру по нраву:
– Классические барабаны
– Инновационные игры с дополнительными турами
– Крупный приз-машины
– Мегавейс игры
Конкурсы и лотереи
Регулярные состязания добавляют драйв и предоставляют возможность обрести большие суммы. Присутствие в соревнованиях нередко бесплатное, а премиальные суммы достигают больших объёмов.
Охрана и секретность
Ресурс применяет передовые системы шифрования для гарантии данных геймеров. Любые транзакционные процедуры выполняются через зашифрованные протоколы.
Резюме
Основной ресурс и его действующие зеркала дают надёжный переход к качественным игровым играм. Привлекательные призы, эргономичная портативная редакция, богатство автоматов и компетентное Live-игорный дом создают платформу отличным выбором для ценителей гемблинг автоматов.
Darmowe Gry Kasynowe
1xbet spor bahislerinin adresi 1xbet spor bahislerinin adresi .
hq pharmacy online 365: MedBridge Pharmacy – economy pharmacy
Доступ к порталу через действующие зеркала
Актуальные онлайн казино предоставляют пользователям постоянный подключение к развлечениям. Центральный ресурс РёРіСЂС‹ Clubnika функционирует бесперебойно, предоставляя богатый ассортимент гемблинг слотов. Но иногда возникают программные трудности или ограничения, в связи с чем необходимо понимать о доступности рабочих зеркал.
Что является собой центральное зеркало казино
Дубликат — это идентичная реплика главного ресурса с таким же интерфейсом. Рабочее зеркало сегодня обеспечивает преодолевать локальные ограничения и возобновлять гемблинг.
Основные преимущества задействования зеркал:
– Абсолютный подключение к личному кабинету
– Удержание каждых информации профиля
– Схожий спектр развлечений
– Текущие бонусы и предложения
Оформление на платформе
Процесс записи занимает несколько минут. Свежие пользователи приобретают богатый бонус за запись, он может включать:
– Начальный игровой приз
– Даровые фриспины для слотов
– Особые промокоды
– Увеличенный возврат
Для завершения регистрации следует:
1. Зайти на официальный сайт или копию
2. Щёлкнуть клавишу «Оформиться»
3. Написать личные сведения
4. Активировать email или мобильный
5. Применить промокод (в случае наличии)
Вход в собственный кабинет
Следом за правильной оформления игроки в состоянии производить вход используя официальный сайт или функционирующее зеркало. Личный кабинет даёт безграничный регулирование над счётом:
– Архив пари
– Ввод депозита
– Снятие денег
– Контроль наградами
– Включение в конкурсах
Поощрения и кампании казино
Портал балует пользователей вариативными привилегированными схемами:
Приветственные поощрения
Дебютанты обретают великодушный комплект наград на вступительные вклады. Зачастую это охватывает процентную прибавку к размеру вклада плюс даровые кручения.
Постоянные кампании
– Еженедельный кешбэк до 15%
– Состязания с выигрышными банками
– Поощрения на дату рождения
– Специальные акции для элитных игроков
План верности
Активные геймеры собирают очки, которые можно конвертировать на подлинные деньги или особые привилегии.
Смартфонная форма и приложение
Актуальные решения дают возможность геймить где комфортно. Портативная редакция сайта самостоятельно подстраивается под размер всякого аппарата.
Выгоды портативного ПО:
– Быстрая подгрузка автоматов
– Практичный облик
– Мгновенные-оповещения о предложениях
– Способность инсталлировать для Android и iOS
Настоящее казино: антураж подлинного развлекательного заведения
Категория Live заведения транспортирует геймеров в среду настоящего азартного клуба. Квалифицированные ведущие управляют действие в состоянии актуального времени.
Представленные столы:
– Рулетка
– Карточная игра
– Баккара
– Техасский холдем
Игровые машины и азартные слоты
Коллекция гемблинг машин содержит тысячи позиций от топовых провайдеров. Произвольный игрок подберёт игру по нраву:
– Традиционные машины
– Новые слоты с призовыми уровнями
– Прогрессивный-игры
– Многолинейные слоты
Турниры и розыгрыши
Постоянные соревнования привносят азарт и предоставляют шанс заработать крупные вознаграждения. Участие в состязаниях зачастую бесплатное, а выигрышные суммы насчитывают больших размеров.
Секьюрити и приватность
Портал применяет актуальные протоколы криптографии для гарантии сведений клиентов. Все денежные действия проходят через защищённые каналы.
Итог
Основной веб-сайт и его актуальные зеркала обеспечивают стабильный переход к превосходным развлекательным развлечениям. Великодушные награды, эргономичная мобильная вариант, богатство машин и квалифицированное Live-казино создают платформу отличным решением для ценителей гемблинг игр.
Нынешние онлайн-казино предлагают игрокам обширный диапазон функций для удобной времяпрепровождения. Переход к сервису Клубника производится через основной портал или рабочее зеркало.
Что такое функционирующее зеркало казино
Актуальное зеркало — это резервный домен основного ресурса казино. Такие версии разрабатываются для обеспечения стабильного входа к развлекательной системе.
Зеркало актуальное совершенно копирует функционал основного сайта. Пользователи приобретают схожий выход ко всем услугам, включая создание аккаунта, финансирование депозита и получение выигрышей.
Открытие счета на основном веб-сайте
Процедура регистрации требует всего считанные минут. Будущим клиентам нужно:
1. Зайти на основной портал или актуальное подлинное зеркало
2. Выбрать кнопку “Регистрация”
3. Указать нужные данные
4. Верифицировать email почту
5. Ввести купон при существовании
После завершения открытия профиля участник зарабатывает подарок за регистрацию, который имеет право включать фриспины или cash премию.
Вход в персональный кабинет
Пользовательский кабинет — это защищенная область, где пользователи могут администрировать своим счетом. Для доступа необходимо указать имя пользователя и секретный ключ.
В личном кабинете доступны следующие опции:
– Мониторинг хронологии операций
– Применение кодов активации
– Управление поощрениями
– Присоединение в турнирах
– Мониторинг кэшбэка
– Настройка профиля
Призы и промо
Азартная платформа обеспечивает щедрые вознаграждения:
Стартовый бонус — новички приобретают существенное вознаграждение на стартовые взносы.
Бесплатные вращения — дарятся как при регистрации, так и в контексте всевозможных мероприятий.
Возврат средств — систематический возмещение фрагмента проигранных сумм.
Купоны — специальные шифры, дающие доступ к эксклюзивным предложениям.
Обзор игровых секций
Аппараты
Библиотека слотов включает сотни игр от лучших провайдеров. Игроки откроют как обычные автоматы, так и новые видеослоты с увлекательной графикой.
Live казино
Раздел Live казино предлагает опцию соревноваться с действующими дилерами в состоянии текущего времени. Имеются популярные варианты: рулетка, блэкджек, баккара, покер.
Турниры
Постоянные состязания с большими выигрышными фондами манят множество игроков. Чемпионы получают cash вознаграждения и специальные бонусы.
Смартфонная версия и программа
Адаптивная версия платформы обеспечивает участвовать с любого аппарата. Интерфейс автономно настраивается под формат экрана.
Установить app можно для устройств на Android и iOS. Смартфонное app имеет всеми характеристиками десктопной версии.
Как определить действующее зеркало на данный момент
Актуальные линки дубликатов регулярно обновляются. Получить свежую адрес можно несколькими методами:
– Через отдел техподдержки
– В проверенных коммуникационных сетях
– По электронной newsletter
– На специализированных порталах
Защита и сертификация
Основной домен функционирует на базе глобальной лицензии. Все переводы оберегаются современными методами безопасности.
Конфиденциальность персональных информации сохраняется в полном формате.
Итог
Лицензионный домен и его рабочие копии дарят пользователям беспрерывный доступ к высококлассным игровым услугам. Выгодные поощрения, всевозможные автоматы, профессиональная сервис — все это формирует развлекательный времяпрепровождение максимально приятным и интересным.
Переход к порталу через действующие зеркала
Современные сетевые казино дают игрокам непрерывный вход к сервисам. Центральный сайт Рльдорадо функционирует устойчиво, предоставляя обширный ассортимент азартных развлечений. Тем не менее порой образуются цифровые проблемы или блокировки, потому существенно понимать о существовании актуальных зеркал.
Что является собой основное зеркало казино
Зеркало — это идентичная версия главного ресурса с аналогичным функционалом. Действующее зеркало сегодня обеспечивает избегать местные блокировки и вести игру.
Главные плюсы применения зеркал:
– Полный вход к индивидуальному кабинету
– Удержание совокупных информации профиля
– Схожий ассортимент автоматов
– Текущие поощрения и промо
Создание аккаунта на ресурсе
Процесс записи длится немного минут. Начинающие игроки зарабатывают привлекательный приз за регистрацию, он имеет возможность вмещать:
– Приветственный бонусный бонус
– Бесплатные вращения для автоматов
– Эксклюзивные ваучеры
– Повышенный кэшбек
Ради финализации записи следует:
1. Переместиться на официальный веб-сайт или альтернативу
2. Щёлкнуть элемент «Оформиться»
3. Ввести персональные данные
4. Подтвердить email или контакт
5. Использовать ваучер (при существовании)
Авторизация в индивидуальный кабинет
После удачной создания аккаунта игроки могут производить авторизацию посредством главный сайт или актуальное зеркало. Индивидуальный кабинет обеспечивает полный надзор над учётной записью:
– Летопись ставок
– Ввод баланса
– Снятие выигрышей
– Регулирование привилегиями
– Включение в конкурсах
Бонусы и кампании казино
Портал балует пользователей многочисленными наградными схемами:
Приветственные бонусы
Начинающие приобретают щедрый набор привилегий на стартовые депозиты. Типично это включает частичную прибавку к величине вклада плюс даровые вращения.
Постоянные кампании
– Каждонедельный кешбэк до 15%
– Турниры с наградными суммами
– Бонусы на годовщину рождения
– Специальные предложения для привилегированных геймеров
План верности
Регулярные геймеры накапливают пункты, что возможно превратить на реальные деньги или эксклюзивные бонусы.
Портативная вариант и утилита
Актуальные решения дают возможность геймить всюду удобно. Смартфонная форма ресурса самостоятельно приспосабливается под монитор каждого аппарата.
Плюсы портативного программы:
– Быстрая запуск автоматов
– Практичный вид
– Всплывающие-уведомления о промо
– Шанс установить для Android и iOS
Реальное казино: антураж истинного игорного заведения
Раздел Live игорного дома доставляет игроков в обстановку настоящего игорного дома. Компетентные крупье управляют действие в формате реального времени.
Имеющиеся столы:
– Рулетка
– Двадцать одно
– Классика
– Покерная игра
Автоматы и азартные автоматы
Коллекция азартных аппаратов охватывает множество названий от топовых производителей. Каждый пользователь обнаружит развлечение по нраву:
– Стандартные машины
– Инновационные игры с призовыми турами
– Накопительный-машины
– Динамические игры
Состязания и раздачи
Периодические соревнования добавляют азарт и дают опцию получить внушительные призы. Участие в турнирах зачастую даровое, а премиальные фонды доходят до больших величин.
Безопасность и анонимность
Ресурс использует современные системы шифрования для гарантии информации пользователей. Совокупные платёжные действия проходят через зашифрованные протоколы.
Резюме
Официальный веб-сайт и его действующие зеркала дают стабильный доступ к первоклассным развлекательным сервисам. Богатые награды, комфортная портативная вариант, разнообразие машин и профессиональное Live-казино создают портал отличным выбором для ценителей развлекательных игр.
Передовые онлайн казино обеспечивают пользователям большой ассортимент вариантов для комфортной игры. Но иногда соединение к базовому порталу может оказаться закрытым. В таких ситуациях на подмогу появляется Bollywood, которое предоставляет стабильный вход ко всем возможностям платформы.
Что такое актуальное зеркало казино
Альтернативный сайт — это идентичная реплика основного портала, которая размещается по другому адресу. Копия содержит полный инструментарий основного портала, включая персональный кабинет, баланс и историю переводов.
Главные преимущества эксплуатации зеркала:
– Круглосуточный подключение к порталу
– Стопроцентная идентичность инструментов
– Конфиденциальность индивидуальных данных
– Сохранение всех имеющихся вознаграждений
Как обнаружить функционирующее зеркало в данный момент
Есть множество достоверных вариантов поиска текущей адреса:
Проверенные источники:
1. Имейл рассылка — управление постоянно отправляет информацию с свежими URL
2. Общественные сети — проверенные аккаунты выкладывают релевантную новости
3. Департамент поддержки — операторы сообщают проверенные домены
4. Портативное приложение — обеспечивает избегать блокировки
Открытие счета на официальном сайте
Операция создания аккаунта требует всего немного минут и предполагает из таких этапов:
1. Переход на официальный портал или рабочее зеркало
2. Выбор на элемент «Регистрация»
3. Ввод персональной бланка
4. Проверка электронной почты или контактного номера
5. Применение привилегии за регистрацию при наличии промокода
Свежие игроки приобретают щедрый стартовый презент, который может включать free spins, денежные бонусы или cashback.
Вход в личный кабинет
Авторизация на сайте выполняется обычным путем. Достаточно вписать никнейм и кодовое слово, задействованные при создании аккаунта.
Важные нюансы для безопасного входа:
– Применяйте сложный пароль
– Включите двухэтапную аутентификацию
– Не фиксируйте пароли на публичных компьютерах
– Мониторьте доменную строку браузера
Обзор премиальной схемы
Игровая платформа одаривает геймеров всевозможными бонусами и специальными предложениями:
Начальный букет
Свежие игроки имеют возможность надеяться на щедрое бонус за начальный пополнение. Традиционно это процентная премия к переведенной количеству плюс фриспины для популярных слотов.
Регулярные акции
– Еженедельный кэшбек — возврат процента списанных денежных средств
– Награды на повторные пополнения
– Особые офферы по знаменательным датам
– Турниры с значительными наградными пулами
Программа вознаграждений
Регулярные пользователи накапливают баллы за каждую бет, которые затем превращаются на реальные денежные призы, free spins или уникальные преимущества.
Бонус-коды: как активировать
Купоны — это индивидуальные комбинации символов, предоставляющие доступ к специальным привилегиям.
В каких местах найти свежие промокоды:
– Официальные коммуникационные сети казино
– Партнерские порталы
– Email-новостная лента
– Отраслевые платформы
Активируется промокод в специальное поле при регистрации или зачислении средств кошелька.
Телефонная версия и приложение
Современные геймеры отдают предпочтение проводить время с мобильных гаджетов. Сайт дает пару решения для беспроблемной портативной игры.
Отзывчивая редакция
Интернет версия автоматически оптимизируется под параметры экранной панели. Не предполагает загрузки и работает в всяком свежем браузере.
Портативное приложение
Скачать app можно для гаджетов на Android и iOS. Плюсы app:
– Быстрая загрузка
– Надежная действие
– Мгновенные-уведомления о бонусах
– Независимый избегание блокировок
Операция загрузки элементарен: нужно попасть на портал с мобильного гаджета и подчиняться указаниям.
Игровой коллекция
Коллекция игр охватывает несколько тысяч единиц от передовых поставщиков.
Слоты
Игровые слоты — максимально популярная группа забав. Показаны традиционные винтажные слоты, новые видеослоты с премиальными этапами, а также джекпотные джекпоты.
Live казино
Секция с реальными ведущими предоставляет почувствовать настроение подлинного казино. Имеются варианты с покером.
Стриминг производится в высоком четкости, поддерживается диалог с дилером и остальными игроками.
Соревнования
Постоянно проводятся соревнования по многочисленным играм. Присоединение предоставляет право выиграть валютные награды, бесплатные вращения или специальные поощрения.
Денежные действия
Платформа предлагает обширный выбор расчетных инструментов:
– Банковские карты
– Онлайн платформы
– Крипта
– Финансовые транзакции
Наименьшая объем депозита — посильная для массы пользователей. Получение выигрышей производится в короткие интервалы.
Департамент поддержки
Профессиональные операторы способны оказать помощь непрерывно. Открыты данные способы общения:
– Онлайн-чат
– Email
– Мобильная горячая линия
– Общественные сети
Пояснения на распространенные запросы можно найти в разделе FAQ.
Заключение
Официальный портал казино и его актуальные зеркала обеспечивают игрокам совершенный путь ко всем сервисам сайта. Великодушные вознаграждения, приятная смартфонная версия, колоссальный коллекция аттракционов и компетентная ассистенция создают азартный процесс крайне комфортным и конфиденциальным.
нейросеть реферат онлайн нейросеть реферат онлайн .
Доступ к порталу через проверенные зеркала
Участники интернет казино постоянно контактируют с трудностью ограничения базового ресурса. Как раз для устранения этой ситуации разработаны копии легального сайта. https://spb-ska.ru предоставляет беспрепятственный подключение ко всем сервисам площадки.
Что такое действующее зеркало казино
Зеркало значит собой точную версию официального сайта с таким же функционалом. Основное расхождение — это другое имя. Абсолютно все сведения участника, вместе с средства, привилегии и историю игр, продолжают быть неизменными.
Преимущества эксплуатации зеркал
Актуальные зеркала характеризуются рядом ключевых выгод:
– Непрерывный подключение к любимым слотам
– Стопроцентная защита индивидуальных сведений
– Поддержание всех параметров личного кабинета
– Способность приобретения наград и присутствия в кампаниях
Создание аккаунта на официальном портале
Операция регистрации предельно прост и отнимает пару минут. Недавние игроки в состоянии полагаться на крупный вводный поощрение за регистрацию.
Стадии открытия аккаунта
1. Вход на легальный домен или его альтернативу
2. Нажатие на опцию “Создать аккаунт”
3. Указание обязательных сведений
4. Верификация почтовой почты
5. Ввод бонусного кода (если имеется)
Поощрения и кампании для клиентов
Казино одаривает своих игроков всевозможными поощрительными акциями.
Основные типы бонусов
Начальный приз — внушительное вознаграждение для недавних участников, каковое имеет возможность содержать материальные бонусы и безвозмездные спины.
Free spins — возможность использовать в востребованных слотах безвозмездно.
Кэшбек — процентный возврат израсходованных средств, который зачисляется еженедельно или помесячно.
Бонусные коды — специальные последовательности, дающие добавочные поощрения.
Пользовательский кабинет: возможности и установки
Пользовательский кабинет дает полный надзор над игровым опытом. Тут предусмотрены:
– Регулирование депозитом
– Записи переводов
– Активные награды
– Конфигурации защиты
– Валидация аккаунта
Смартфонная версия и софт
Современные игроки оценивают доступность. Казино дает 2 способа для ставок с портативных девайсов.
Responsive смартфонная платформа
Мобильная платформа ресурса без участия настраивается под дисплей любого устройства. Отсутствует потребность инсталлировать специальное ПО.
Софт для гаджетов
Возможно установить фирменное приложение для iOS и Android. Приложение дает:
– Моментальный доступ
– Адаптированный интерфейс
– Push-оповещения о бонусах
– Надежную операционность
Live игры: обстановка реального зала
Категория Live игр отправляет участников в атмосферу подлинного игорного заведения. Компетентные ведущие осуществляют партии в формате реального времени.
Востребованные Live-развлечения
– Французская рулетка
– Двадцать одно
– Baccarat
– Карибский покер
Автоматы: выбор развлечений
Собрание азартных аппаратов насчитывает тысячи вариантов от ведущих разработчиков. Пользователи найдут:
– Стандартные машины
– Видео-автоматы
– Накопительный приз-машины
– Megaways
Соревнования и эксклюзивные акции
Постоянные состязания позволяют пользователям состязаться друг с другом за внушительные наградные банки. Каждый состязание обладает свои критерии присутствия и рейтинг лидеров.
Способы зачисления и вывода сумм
Ресурс предоставляет ряд платежных систем:
– Кредитные средства
– Виртуальные кошельки
– Криптовалюты
– Прямые транзиты
Любые транзакции реализуются защищенно благодаря актуальным протоколам шифрования.
Сервис поддержки
Опытные специалисты команды support готовы содействовать 24/7. Работают следующие способы коммуникации:
– Живой-чат
– Email-обслуживание
– Телефонная поддержка
– Социальные сети
Заключение
Официальный сайт казино и его актуальные дубликаты дают участникам защищенный и удобный вход к обширному ассортименту азартных игр. Внушительные поощрения, частые акции, квалифицированная сервис и простые расчетные способы превращают азартный досуг предельно увлекательным и результативным.
https://www.bidbarg.com/legal/user/bono20262
f7 casino
I was searching specifically for f7 casino login and found this page. Decided to try it and everything works fine so far. The login process was smooth and quick. I also checked a few sections after logging in. No errors or bugs noticed. Looks stable for now.
Современные онлайн-казино гарантируют клиентам разнообразный ассортимент слотов и щедрые поощрения. Однако для беспроблемной работы важно иметь представление, как отыскать https://билитуй-РјРєРґС†.СЂС„/ и его актуальные зеркала.
Что такое лицензионный веб-ресурс казино
Официальный сайт казино — это первичная веб-площадка, где игроки могут развлекаться развлекательными играми. Портал функционирует на легальных принципах и располагает всеми обязательными документами.
Главные плюсы основного портала:
– Защищенность индивидуальных сведений
– Объективные требования участия
– Стабильные платежи
– Компетентная поддержка
Рабочее зеркало казино: для чего нужно
Зеркало — это полная дубликат основного веб-сайта, расположенная по другому URL. Актуальное зеркало запускается для обеспечения стабильного подключения к сайту.
Причины использования дублирующих ресурсов:
– Ограничение основного адреса
– Плановые мероприятия
– Повышенная посещаемость на систему
Как найти свежее зеркало на сегодня
Узнать свежее действующее зеркало можно различными способами:
1. Рассылка — подпишитесь на новостную отправку
2. Команда поддержки — обратитесь в онлайн-чат
3. Публичные медиа — следите за новостями
4. Тематические площадки — авторитетные ресурсы
Оформление профиля на платформе казино
Алгоритм создания аккаунта составляет всего немного моментов:
1. Активируйте на опцию “Зарегистрироваться”
2. Заполните запрашиваемые данные
3. Верифицируйте почтовую почту
4. Введите бонусный код, если доступен
После оконченной активации вам предоставится разрешен индивидуальный профиль.
Премии и купоны
Богатая поощрительная программа — значимое конкурентное преимущество казино:
Подарок за первичную регистрацию
Свежие участники зарабатывают приветственный поощрение, который может предполагать:
– Монетарный депозит на первый депозит
– Фриспины для игровых машин
– Стартовые средства
Бонусные коды
Постоянно размещаются свежие бонусные шифры, предоставляющие активировать специальные привилегии.
Схема кешбэка
Лояльные клиенты приобретают долю потраченных денег на счет.
Актуальные кампании и состязания
Ресурс систематически запускает азартные кампании:
– Недельные баттлы
– Праздничные предложения
– Розыгрыши значительных подарков
– Схема лояльности
Доступ в личный аккаунт
Для доступа на платформу нужно:
1. Открыть лицензионный сайт или актуальное зеркало
2. Нажать “Авторизация”
3. Внести имя пользователя и секретную комбинацию
В пользовательском аккаунте разрешены следующие инструменты:
– Депозит депозита
– Получение выигрышей
– Изучение истории игр
– Редактирование персональными параметрами
Мобильная вариант и софт
Mobile модификация
Responsive платформа ресурса обеспечивает играть с различных мобильного гаджета. Интерфейс автоматически адаптируется под диагональ монитора.
App для скачивания
Скачать клиент можно для:
– Android — официальная скачивание с портала
– iOS — загрузка через App Store
Достоинства мобильного клиента:
– Оперативный запуск
– Бесперебойная функциональность
– Push-сообщения об акциях
– Ускоренный UI
Гемблинг разделы
Слоты
Внушительная подборка игровых автоматов от лучших поставщиков:
– Традиционные игры
– Видео-слоты
– Накопительные-машины
Live зал
Зона с настоящими дилерами предоставляет:
– European/American Roulette
– Blackjack
– Punto Banco
– Покер
Трансляции транслируются в HD качестве изображения, формируя ощущение подлинного казино.
Варианты внесения средств и вывода
Сайт обслуживает различные финансовые инструменты:
– Дебетовые средства
– Цифровые кошельки
– Bitcoin/Ethereum
– Wire переводы
Минимальные суммы депозита и быстрые выводы гарантируют развлечение исключительно удобной.
Отдел техподдержки
Компетентная служба support работает 24/7 и способна ассистировать с всеми вопросами:
– Мгновенный-чат
– Email-поддержка
– Телефонная служба
Выводы
Официальный портал казино и его актуальные дубликаты обеспечивают игрокам защищенный и захватывающий азартный отдых. Привлекательные награды, комфортная мобильная модификация, богатые слоты и качественное live-казино создают эту платформу отличным решением для развлекательных времяпрепровождения.
indian pharmacy online: TrustRx India – cheapest online pharmacy india
Нынешние онлайн-казино предоставляют пользователям разнообразный ассортимент функций для приятной игры. Переход к ресурсу Голд производится через официальный сайт или функционирующее зеркало.
Что такое рабочее зеркало казино
Функционирующее зеркало — это альтернативный адрес лицензионного сайта казино. Такие клоны разрабатываются для предоставления непрерывного подключения к гемблинговой сервису.
Копия текущее полностью копирует опции базового домена. Клиенты получают аналогичный вход ко всем услугам, включая регистрацию, зачисление средств депозита и получение денег.
Оформление профиля на официальном сайте
Механизм создания аккаунта отнимает всего пару мгновений. Будущим игрокам требуется:
1. Войти на лицензионный ресурс или текущее проверенное зеркало
2. Щелкнуть кнопку “Открыть счет”
3. Внести обязательные реквизиты
4. Активировать email почту
5. Ввести бонусный код при существовании
После окончания открытия профиля пользователь зарабатывает вознаграждение за регистрацию, который вправе охватывать free spins или монетарное поощрение.
Доступ в персональный кабинет
Индивидуальный кабинет — это безопасная зона, где пользователи имеют возможность управлять своим учетной записью. Для авторизации необходимо ввести никнейм и код доступа.
В пользовательском кабинете открыты следующие функции:
– Просмотр хронологии переводов
– Использование бонусных кодов
– Контроль призами
– Включение в соревнованиях
– Контроль кэшбэка
– Корректировка учетной записи
Вознаграждения и акции
Игровая платформа предоставляет выгодные бонусы:
Приветственный комплект — новички получают крупное премию на дебютные депозиты.
Фриспины — начисляются как при оформлении, так и в процессе многочисленных промо.
Кэшбэк — регулярный компенсация фрагмента проигранных средств.
Бонусные коды — специальные комбинации, открывающие доступ к уникальным вознаграждениям.
Обзор развлекательных категорий
Slots
Библиотека slots содержит массу наименований от топовых разработчиков. Игроки встретят как классические слоты, так и новые мультимедийные автоматы с притягательной графикой.
Live казино
Секция Live казино обеспечивает право играть с реальными ведущими в формате реального времени. Доступны известные столы: рулетка, блэкджек, баккара, покер.
Соревнования
Систематические соревнования с солидными наградными пулами притягивают массу участников. Победители завоевывают денежные призы и уникальные поощрения.
Телефонная версия и софт
Мобильная версия платформы позволяет играть с любого гаджета. Структура независимо настраивается под формат экрана.
Скачать app можно для устройств на Android и iOS. Телефонное ПО обладает всеми функциями настольной версии.
Как определить текущее зеркало на текущий день
Свежие ссылки зеркал периодически изменяются. Получить актуальную URL можно многими способами:
– Через сервис техподдержки
– В подлинных социальных сетях
– По почтовой подписке
– На тематических ресурсах
Надежность и официальность
Лицензионный ресурс работает на фундаменте глобальной сертификата. Все операции шифруются современными методами защиты.
Анонимность индивидуальных реквизитов обеспечивается в стопроцентном масштабе.
Вывод
Лицензионный портал и его функционирующие копии обеспечивают клиентам 24/7 доступ к высококлассным гемблинговым сервисам. Щедрые бонусы, многочисленные автоматы, квалифицированная служба — все это формирует азартный времяпрепровождение максимально комфортным и интересным.
india pharmacy online
реферат нейросеть реферат нейросеть .
Переход к платформе через актуальные зеркала
Клиенты онлайн казино нередко контактируют с вопросом закрытия главного домена. Именно для решения этой трудности существуют копии легального ресурса. Рльдорадо гарантирует полный подключение ко всем функциям ресурса.
Что такое актуальное зеркало казино
Дубликат составляет собой абсолютную версию основного сайта с аналогичным набором функций. Ключевое расхождение — это доменное имя. Все данные участника, в том числе счет, привилегии и историю ставок, продолжают быть прежними.
Выгоды эксплуатации зеркал
Актуальные зеркала имеют рядом важных преимуществ:
– Бесперебойный вход к излюбленным развлечениям
– Стопроцентная защита собственных информации
– Неизменность всех конфигураций пользовательского кабинета
– Способность приобретения бонусов и вовлечения в кампаниях
Регистрация на официальном ресурсе
Операция создания аккаунта чрезвычайно прост и занимает буквально минут. Новые пользователи способны полагаться на внушительный приветственный поощрение за регистрацию.
Стадии оформления аккаунта
1. Подключение на легальный портал или его зеркало
2. Клик на опцию “Присоединиться”
3. Заполнение обязательных информации
4. Верификация почтовой почты
5. Указание кода (в случае присутствует)
Награды и предложения для игроков
Ресурс одаривает своих пользователей различными призовыми акциями.
Главные виды наград
Вводный бонус — крупное премирование для недавних пользователей, которое в состоянии содержать материальные бонусы и бесплатные вращения.
Free spins — опция использовать в известных слотах без затрат.
Возврат средств — процентный компенсация израсходованных денег, который зачисляется раз в неделю или каждый месяц.
Купоны — эксклюзивные наборы, дающие экстра привилегии.
Пользовательский кабинет: функции и параметры
Пользовательский аккаунт гарантирует полный надзор над пользовательским взаимодействием. Тут предусмотрены:
– Администрирование средствами
– Данные платежей
– Текущие награды
– Конфигурации защиты
– Проверка профиля
Смартфонная платформа и приложение
Актуальные клиенты предпочитают доступность. Ресурс обеспечивает два пути для участия с портативных аппаратов.
Адаптивная мобильная вариант
Портативная платформа портала самостоятельно адаптируется под разрешение любого девайса. Не требуется инсталлировать отдельное приложение.
Софт для гаджетов
Можно скачать фирменное программу для iOS и Android. Софт обеспечивает:
– Мгновенный вход
– Доработанный графику
– Всплывающие-сообщения о поощрениях
– Стабильную функциональность
Live раздел: обстановка истинного игорного заведения
Раздел Live казино транспортирует игроков в обстановку настоящего игорного заведения. Профессиональные крупье осуществляют сессии в варианте живого времени.
Востребованные Live-игры
– Французская рулетка
– Блэкджек
– Баккара
– Техасский холдем
Игровые машины: выбор развлечений
Коллекция развлекательных аппаратов вмещает массу позиций от известных разработчиков. Участники обнаружат:
– Традиционные слоты
– Современные слоты
– Прогрессивный джекпот-слоты
– Многолинейные автоматы
Состязания и особые акции
Периодические турниры позволяют пользователям конкурировать друг с другом за крупные наградные банки. Каждый соревнование располагает свои условия присутствия и список призеров.
Варианты пополнения и получения денег
Ресурс использует ряд денежных инструментов:
– Кредитные картыы
– Электронные счета
– Криптовалюты
– Wire транзакции
Абсолютно все переводы реализуются безопасно благодаря новейшим методам шифрования.
Команда поддержки
Опытные специалисты службы поддержки готовы содействовать 24/7. Работают следующие способы общения:
– Живой-чат
– Email-сервис
– Звонковая поддержка
– Коммуникационные сети
Итог
Официальный ресурс клуба и его действующие альтернативы дают участникам надежный и удобный доступ к большому выбору геймерских услуг. Внушительные бонусы, регулярные промоакции, профессиональная поддержка и легкие денежные методы делают игровой досуг чрезвычайно приятным и прибыльным.
Актуальные онлайн-казино дают клиентам обширный ассортимент развлечений и призовых вариантов. Присоединение к площадке выполняется через главный портал или его действующее зеркало Gold, что предоставляет бесперебойную активность.
В чем суть действующее зеркало казино
Копия — это полная дубликат главного веб-сайта, сделанная для решения блокировок. Актуальное зеркало дает возможность участникам иметь подключение к излюбленным слотам в каждое время.
Лицензионное зеркало содержит всеми функциями главного сайта:
– Весь ассортимент слотов
– Профиль с сохраненными данными
– Актуальные бонусы
– Гарантированные денежные транзакции
Оформление профиля на лицензионном ресурсе
Алгоритм оформления занимает всего немного минут. Новым клиентам следует:
1. Войти на проверенный ресурс или рабочее зеркало
2. Нажать на ссылку “Регистрация”
3. Указать нужные параметры
4. Верифицировать адрес
5. Совершить начальный вклад
Поощрение новичкам зачисляется незамедлительно после окончания всех этапов.
Доступ в учетную запись
Созданные игроки могут совершить подключение применяя:
– Имя пользователя и ключ
– Цифры телефона
– Контактный email
Профиль предоставляет возможность к контролю средствами, сведениям транзакций и текущим акциям.
Бонусы и программы
Гемблинг платформа вознаграждает лояльных участников щедрыми вознаграждениями:
Приветственный набор
– Бонус на дебютный депозит до 100%
– Free spins на популярные машины
– Дополнительные бонусы за следующие платежи
Промокоды
Эксклюзивные коды предоставляют шанс на приобретение специальных поощрений. Свежие промокоды размещаются в блоке “Промо”.
Cashback
Периодический возврат составляет до 10% от использованных денег. Компенсация выплачивается сразу.
Программа лояльности
Постоянные игроки зарабатывают единицы, которые превращаются на настоящие выплаты или фриспины.
Адаптивный портал и софт
Для удобства пользователей разработана удобная адаптивный сайт. Отзывчивый вид помогает комфортно делать ставки с каждого портативного аппарата.
Выгоды приложения:
– Оперативный вход к развлечениям
– Оптимизированный дизайн
– Устойчивая деятельность
– Оповещения о свежих турнирах
Загрузить программу можно даром с проверенного портала для устройств на Android и iOS.
Коллекция слотов
Машины
Библиотека содержит более 2000 слотов от популярных студий:
– Классические машины
– Мультимедийные игры
– Джекпот-слоты
– Сюжетные автоматы
Live казино
Блок Live казино предоставляет игру с живыми ведущими в прямом эфире:
– Roulette
– Двадцать одно
– Punto Banco
– Покер
Состязания
Периодические состязания с крупными выигрышными фондами устраиваются еженедельно. Вход в конкурсах разрешено всем созданным участникам.
Финансовые методы
Взносы и снятия финансов производятся через популярные методы:
– Платежные карты
– Цифровые сервисы
– Bitcoin
– Прямые транзакции
Стартовый платеж — от 100 рублей. Снятие средств осуществляется в течение 24 часов.
Отдел поддержки
Круглосуточная отдел помощи расположена поддержать в решении произвольных задач:
– Мессенджер
– Email
– Телефон
– Социальные сети
Безопасность и лицензия
Официальный веб-сайт функционирует на фундаменте глобальной сертификата. Каждые параметры клиентов закрыты современным SSL-шифрованием.
Вывод
Актуальное зеркало предоставляет постоянный вход к излюбленным развлечениям, богатым акциям и функциональным возможностям. Откройте счет сейчас и заработайте первый подарок!
https://radioansiaes.pt/pages/codigo_promocional_melbet_bono_vip.html
нейросеть студент бот нейросеть студент бот .
Show off your creations with ease! Art Animate & Draw Anim allows you to save your animations in both GIF and video formats. Share your work on social media, with friends, or keep them as digital keepsakes. Your art deserves to be seen! Copyright © 2025 LOSTMARBLE LLC. All Rights Reserved. Comparison of Popular 2D Animation Software “Clip Studio Paint has the tools to make various forms of art at a reasonable price.” Ease In: The animation will start slowly, accelerate towards the end and come to a sudden stop. Autodesk Maya is a powerful 3D animation program that has revolutionized the world of special effects, character animation, and realistic 3D animations. With its advanced tools and features, Maya enables artists to bring their creative visions to life in stunning detail. A breakthrough AI-Powered platform to create Animation and Live-Action videos for non-designers & professionals from early-stage startups to seasoned Fortune 500 companies.
https://peteranthonyconsulting.com/why-spin-casiny-casino-is-a-favorite-among-australians/
Animation Video Maker apps rank among the most popular content creation tools available online. With the rise in popularity of user-generation content created using smartphones, Animation Video Maker apps come across as a handy resource. Creating your own unique animated cartoon video is easy and simple with the Puppet Pals HD cartoon maker app. You just need to select and bring your characters on stage, add backdrops and hit on the record. Your audio and movements are easily recorded in real-time. The features of this cartoon video maker app are- Converting a video to animated isn’t something most video-making newcomers can do. This takes a great deal of technical knowledge. A better option is to start a new video from scratch using an online animated video maker. Arrange pre-built animations any way you like to create a unique animated video.
лучшая нейросеть для учебы лучшая нейросеть для учебы .
http://neoko.ru/images/pages/bk_pari_promokod_na_fribet_bonus_do_25000_rubley.html
Подключение к порталу через актуальные зеркала
Участники сетевых казино постоянно встречаются с трудностью ограничения главного сайта. Конкретно для преодоления этой задачи существуют зеркала основного ресурса. casino Gold обеспечивает абсолютный вход ко всем опциям ресурса.
Что такое рабочее зеркало казино
Дубликат представляет собой точную версию официального веб-сайта с идентичным опциями. Единственное расхождение — это альтернативное имя. Каждые информация участника, содержа средства, привилегии и архив ставок, продолжают быть неизменными.
Плюсы эксплуатации зеркал
Функционирующие зеркала располагают комплексом важных достоинств:
– Круглосуточный вход к выбранным играм
– Абсолютная конфиденциальность индивидуальных информации
– Удержание всех настроек личного кабинета
– Шанс обретения призов и участия в акциях
Регистрация на официальном ресурсе
Ход оформления максимально несложен и длится буквально минут. Недавние клиенты способны полагаться на крупный стартовый подарок за открытие счета.
Шаги оформления аккаунта
1. Подключение на официальный домен или его альтернативу
2. Активация на опцию “Создать аккаунт”
3. Указание обязательных сведений
4. Верификация цифровой почты
5. Указание промокода (если доступен)
Поощрения и промоакции для клиентов
Платформа одаривает своих пользователей всевозможными бонусными программами.
Базовые варианты поощрений
Приветственный подарок — солидное премирование для свежих пользователей, каковое способно вмещать денежные призы и безвозмездные спины.
Безвозмездные спины — шанс использовать в востребованных автоматах бесплатно.
Возврат средств — частичный возмещение израсходованных денег, который именно предоставляется еженедельно или раз в месяц.
Специальные коды — особые последовательности, обеспечивающие дополнительные преимущества.
Индивидуальный кабинет: возможности и параметры
Индивидуальный кабинет дает совершенный регулирование над игровым опытом. В данном разделе предусмотрены:
– Регулирование счетом
– Архив платежей
– Текущие поощрения
– Конфигурации охраны
– Валидация аккаунта
Смартфонная версия и приложение
Современные участники ценят гибкость. Платформа дает двойной пути для ставок с портативных аппаратов.
Приспособленная смартфонная платформа
Смартфонная платформа ресурса без участия приспосабливается под экран любого девайса. Нет необходимости загружать специальное ПО.
APP для гаджетов
Разрешено установить специальное софт для iOS и Android. APP предоставляет:
– Скорый запуск
– Улучшенный дизайн
– Push-оповещения о поощрениях
– Стабильную функциональность
Live казино: антураж реального клуба
Секция Live развлечений отправляет клиентов в антураж подлинного зала. Компетентные ведущие организуют игры в виде настоящего времени.
Топовые Live-развлечения
– Французская рулетка
– Двадцать одно
– Баккара
– Покер
Автоматы: разнообразие игр
Библиотека азартных аппаратов включает массу позиций от топовых производителей. Пользователи найдут:
– Классические слоты
– Видеослоты
– Джекпот-машины
– Многолинейные автоматы
Соревнования и специальные предложения
Систематические соревнования предоставляют шанс игрокам соревноваться друг с другом за крупные наградные банки. Любой турнир располагает свои правила участия и рейтинг лидеров.
Варианты зачисления и получения сумм
Платформа предоставляет массу денежных сервисов:
– Дебетовые инструменты
– Электронные сервисы
– Blockchain-платежи
– Прямые транзакции
Каждые платежи выполняются защищенно благодаря актуальным методам шифрования.
Сервис support
Квалифицированные операторы сервиса обслуживания расположены помочь 24/7. Работают данные пути связи:
– Оперативный-чат
– Email-обслуживание
– Аудио горячая линия
– Публичные сети
Резюме
Основной ресурс игровой площадки и его действующие копии дают клиентам защищенный и удобный доступ к большому диапазону азартных услуг. Крупные бонусы, периодические предложения, качественная сервис и комфортные платежные системы формируют развлекательный досуг крайне захватывающим и доходным.
Актуальные онлайн-казино предлагают игрокам богатый выбор опций для беспроблемной времяпрепровождения. Подключение к ресурсу admrossosh.ru производится через главный портал или функционирующее зеркало.
Что такое функционирующее зеркало казино
Рабочее зеркало — это дополнительный домен лицензионного веб-сайта казино. Такие версии разрабатываются для гарантирования постоянного соединения к игровой площадке.
Альтернатива актуальное целиком копирует возможности официального портала. Пользователи обретают схожий выход ко всем возможностям, включая оформление профиля, внесение депозита счета и вывод призов.
Регистрация на главном сайте
Процедура создания аккаунта длится всего несколько моментов. Свежим игрокам следует:
1. Перейти на официальный портал или действующее подлинное зеркало
2. Щелкнуть кнопку “Регистрация”
3. Ввести требуемые реквизиты
4. Проверить email почту
5. Активировать промокод при существовании
После финализации создания аккаунта участник получает вознаграждение за регистрацию, который способен предполагать фриспины или финансовое вознаграждение.
Доступ в личный кабинет
Пользовательский кабинет — это закрытая зона, где игроки способны управлять своим профилем. Для логина следует ввести имя пользователя и код доступа.
В личном кабинете представлены следующие функции:
– Отслеживание хронологии транзакций
– Активация кодов активации
– Настройка вознаграждениями
– Присоединение в турнирах
– Проверка возврата средств
– Редактирование аккаунта
Поощрения и промо
Гемблинговая система предоставляет щедрые вознаграждения:
Регистрационный пакет — дебютанты зарабатывают существенное поощрение на стартовые взносы.
Free spins — выдаются как при регистрации, так и в контексте многочисленных кампаний.
Кэшбэк — еженедельный возмещение доли израсходованных сумм.
Промокоды — уникальные коды, предоставляющие выход к особым предложениям.
Анализ гемблинговых направлений
Игровые автоматы
Библиотека slots включает тысячи вариантов от лучших провайдеров. Клиенты обнаружат как обычные аппараты, так и актуальные видеослоты с притягательной анимацией.
Live казино
Зона Live казино обеспечивает опцию развлекаться с живыми дилерами в состоянии актуального времени. Доступны востребованные развлечения: рулетка, блэкджек, баккара, покер.
Состязания
Систематические состязания с солидными выигрышными пулами привлекают множество соревнующихся. Победители завоевывают cash выплаты и уникальные премии.
Портативная версия и софт
Мобильная версия портала дает возможность играть с любого устройства. Оформление независимо подстраивается под диагональ экрана.
Скачать софт можно для устройств на Android и iOS. Портативное программа обладает всеми опциями полной версии.
Как отыскать текущее зеркало на текущий день
Свежие ссылки дубликатов периодически корректируются. Получить действующую URL можно несколькими путями:
– Через отдел помощи
– В настоящих социальных сетях
– По e-mail подписке
– На партнерских ресурсах
Защита и официальность
Главный сайт оперирует на базе зарубежной документа. Все платежи охраняются современными методами безопасности.
Конфиденциальность личных информации сохраняется в совершенном формате.
Вывод
Официальный ресурс и его действующие зеркала дарят клиентам беспрерывный путь к первоклассным азартным сервисам. Великодушные призы, различные развлечения, компетентная помощь — все это создает развлекательный опыт невероятно беспроблемным и захватывающим.
https://f7-casino-uk1.com/
I was looking for a new casino to try and found this one. Decided to test it and everything seems to work fine so far. The site loads quickly and the interface is simple to use. I tried logging in and browsing a few sections without any issues. Didn’t notice anything suspicious. Might continue using it.
http://medicobridgerx.com/# mexico rx
canadian pharmacy cialis: online pharmacy viagra – online pharmacy ed
The divine aesthetic of Gates of Olympus Super Scatter stays true to its lineage – gleaming gold structures, floating pillars, and Zeus watching sternly from the sidelines. The visuals are polished and regal, with animated lightning strikes and rich purple skies that pulse with tension. Gates of Olympus Super Scatter is a New Slot from Pragmatic Play Demo that may boast an incredible maximum prize, amounting to x50,000 on the stake. Also, there are win multipliers up to x500, instant cash prizes up to x50,000, and Free Spins beloved by many. Are you ready to explore this stunning modern slot for more details? If so, keep reading our fresh article devoted to this newly released masterpiece of the contemporary gambling industry. Gates of Olympus Super Scatter delivers a high-volatility experience with a maximum win of 50,000x, tailored for players who crave big risk and even bigger reward. The RTP sits at 96.50%, offering a fair edge for those aiming to trigger the explosive Free Spins or hit monster multipliers in the base game.
https://www.ateliereleaurorei.ro/mafia-casino-real-dealers-live-gaming-experience-for-australian-players/
15 Dragon Pearls is a versatile slot game that adjusts desktop and mobile platforms. Furthermore, punters can enjoy the same high-quality gaming experience regardless of their preferred device. The game is optimised for smooth and responsive gameplay on smartphones and tablets running Android or iOS operating systems. How serious are the bonus offers of the online casino? Just go to the Whamoo cashier, you are never going to be short of opportunities to do so at this site. Compile aggregate data about site traffic and site interactions in order to offer better site experiences and tools in the future, it took about a day to get a reply. Whether you’re a seasoned slot enthusiast or just starting your journey into the world of gaming, 15 Dragon Pearls is definitely worth checking out. Who knows? You might just win big and unlock the secrets of this enchanting game.
доставка цветов на дом недорого курьером https://dostavka-cvetov-moskva495.ru .
дизайн проект санкт петербург дизайнеры интерьеров
Современные онлайн-казино гарантируют игрокам разнообразие возможностей для удобной игры. Центральный портал Рльдорадо дарит путь ко всем сервисам и играм. Однако при появлении программных проблем на выручку приходят рабочие копии.
Что означает собой функционирующее зеркало
Дубликат казино — это полная дубликат главного портала, размещенная по запасному доменному имени. Подлинное зеркало сохраняет все опции, вместе с создание аккаунта, авторизацию в личный кабинет, премии и купоны.
Дубликат на сегодня предоставляет:
– Бесперебойный вход к игровым слотам
– Совершенную защиту персональных сведений
– Сохранение счета и истории переводов
– Возможность использования всех специальных предложений
Регистрация на основном сайте
Процесс оформления учетной записи занимает несколько минут. Новым игрокам следует:
1. Открыть на главный сайт или актуальное зеркало
2. Выбрать кнопку «Регистрация»
3. Указать нужные графы
4. Активировать э-мейл почту
5. Указать промокод при присутствии
После завершения оформления профиля игроки приобретают приз за регистрацию, какой может иметь фриспины или монетарное премирование.
Вход в личный кабинет
Персональный кабинет дает всеобъемлющий надзор над азартным действом. Через собственный раздел допускается:
– Вносить средства на депозит
– Снимать выигрыши
– Использовать купоны
– Проверять журнал игр
– Принимать участие в конкурсах
– Обретать cash back
Характеристика премий и промо-предложений
Богатая премиальная политика — важное козырь платформы. Ключевые категории поощрений:
Начальный приз
Новые игроки обретают щедрое поощрение на стартовые депозиты. Объем премии может доходить до 100-200% от величины депозита.
Бонусные спины
Даровые спины выдаются для известных автоматов. Объем free spins разнится от 10 до 500 штук.
Кешбэк
Постоянный или помесячный возврат доли проигранных финансов. Обычный размер возврата — 5-15%.
Соревнования
Систематические конкурсы с солидными наградными банками. Участники состязаются за топовые строчки в таблице лидеров.
Смартфонная версия и приложение
Мобильная версия обеспечивает играть с каждого девайса. Пользователи могут загрузить софт для iOS и Android или использовать веб версию.
Преимущества мобильного программы:
– Молниеносная подзагрузка игр
– Практичный графический интерфейс
– Всплывающие уведомления о промо
– Доступ через биометрию
Машины и Live казино
Развлекательная библиотека охватывает сотни игр от лидирующих производителей.
Популярные секции игр:
– Традиционные автоматы
– Видеослоты с премиальными уровнями
– Джекпот слоты
– Мегавейс машины
Live казино
Секция live игорный зал предлагает развлечение с настоящими ведущими. Есть стандартные варианты:
– Американская рулетка
– Двадцать одно
– Баккара
– Техасский холдем
Как найти действующее зеркало
Обрести действующую линк на зеркало разрешается различными методами:
1. Зарегистрироваться на email-рассылку
2. Наблюдать за обновлениями в соц сетях
3. Контактировать в департамент поддержки
4. Сохранить действующее зеркало в фавориты
Итог
Основной ресурс и его действующие зеркала предоставляют постоянный доступ к развлекательным слотам. Богатые вознаграждения, множественные купоны, комфортное портативное программа и отличная служба поддержки поддержки делают азартный геймплей в высшей степени комфортным и конфиденциальным.
Переход к сайту через актуальные зеркала
Участники виртуальных казино часто имеют дело с вопросом ограничения официального сайта. Конкретно для преодоления этой трудности разработаны копии главного ресурса. Голд гарантирует полный подключение ко всем сервисам казино.
Что такое рабочее зеркало казино
Дубликат представляет собой абсолютную реплику главного ресурса с аналогичным функционалом. Единственное расхождение — это альтернативное имя. Абсолютно все информация участника, содержа депозит, награды и данные ставок, продолжают быть прежними.
Достоинства применения зеркал
Действующие зеркала располагают набором существенных выгод:
– Круглосуточный вход к любимым слотам
– Стопроцентная защита индивидуальных информации
– Неизменность всех конфигураций личного кабинета
– Опция получения бонусов и вовлечения в промоакциях
Регистрация на легальном домене
Процедура открытия счета максимально элементарен и занимает несколько минут. Начинающие пользователи способны полагаться на внушительный начальный подарок за открытие счета.
Этапы создания аккаунта
1. Вход на легальный портал или его зеркало
2. Активация на опцию “Создать аккаунт”
3. Заполнение обязательных данных
4. Активация email почты
5. Указание купона (в случае присутствует)
Бонусы и акции для участников
Игровая площадка балует своих пользователей многочисленными бонусными акциями.
Базовые категории поощрений
Начальный подарок — крупное поощрение для начинающих участников, которое именно в состоянии охватывать материальные призы и фриспины.
Бесплатные вращения — опция играть в топовых автоматах бесплатно.
Компенсация — частичный возврат проигранных сумм, который именно выплачивается раз в неделю или помесячно.
Бонусные коды — особые последовательности, предоставляющие экстра привилегии.
Пользовательский кабинет: функции и настройки
Персональный раздел гарантирует совершенный надзор над игровым опытом. В данном разделе имеются:
– Контроль балансом
– Записи платежей
– Текущие награды
– Настройки охраны
– Верификация учетной записи
Мобильная вариант и APP
Современные участники ценят гибкость. Ресурс предлагает два способа для участия с карманных гаджетов.
Responsive мобильная вариант
Мобильная вариант портала самостоятельно настраивается под монитор любого девайса. Отсутствует потребность скачивать особое программное обеспечение.
Приложение для смартфонов
Доступно установить оригинальное программу для iOS и Android. Программа дает:
– Моментальный старт
– Доработанный графику
– Всплывающие-оповещения о бонусах
– Надежную производительность
Live раздел: антураж истинного казино
Секция Live столов отправляет игроков в обстановку истинного казино. Компетентные крупье организуют сессии в режиме живого времени.
Известные Live-форматы
– Европейская рулетка
– Блэкджек
– Baccarat
– Карибский покер
Слоты: разнообразие слотов
Коллекция слотовых автоматов включает множество позиций от топовых производителей. Клиенты встретят:
– Классические слоты
– Видеослоты
– Накопительный приз-игры
– Мегавейс
Состязания и уникальные мероприятия
Постоянные состязания предоставляют шанс игрокам соревноваться друг с другом за внушительные призовые суммы. Любой соревнование содержит свои требования включения и таблицу чемпионов.
Варианты пополнения и получения сумм
Площадка использует массу финансовых систем:
– Кредитные карты
– Онлайн кошельки
– Криптовалюты
– Прямые отправления
Абсолютно все платежи реализуются защищенно благодаря передовым технологиям защиты.
Отдел support
Квалифицированные операторы команды помощи способны поддержать 24/7. Предусмотрены следующие способы общения:
– Мгновенный-чат
– Email-обслуживание
– Голосовая связь
– Публичные сети
Резюме
Легальный ресурс платформы и его актуальные альтернативы обеспечивают клиентам надежный и приятный доступ к обширному спектру развлекательных услуг. Солидные подарки, постоянные кампании, компетентная помощь и удобные денежные способы формируют азартный опыт крайне увлекательным и доходным.
нейросеть онлайн для учебы nejroset-dlya-referatov-1.ru .
https://f7-casino-uk1.com/
Was searching for f7 casino login and ended up here, works fine. No issues so far.
http://nord-ost.org/images/pgs/promokod_777.html
Современные онлайн-казино гарантируют игрокам обилие вариантов для беспроблемной игры. Основной сайт казино Вован открывает путь ко всем возможностям и играм. Однако при возникновении программных неполадок на выручку прибывают актуальные дубликаты.
Что являет собой собой действующее зеркало
Зеркало казино — это стопроцентная реплика основного веб-сайта, расположенная по другому доменному имени. Легитимное зеркало сохраняет все возможности, вместе с открытие профиля, вход в собственный кабинет, премии и промокоды.
Дубликат на сегодня обеспечивает:
– Постоянный путь к игровым автоматам
– Совершенную сохранность персональных сведений
– Сохранение счета и журнала платежей
– Доступность всех промо-предложений
Создание аккаунта на официальном портале
Процедура оформления учетной записи отнимает несколько минут. Новоиспеченным пользователям необходимо:
1. Открыть на основной ресурс или рабочее зеркало
2. Кликнуть кнопку «Регистрация»
3. Ввести требуемые данные
4. Активировать электронную почту
5. Ввести промокод при существовании
После окончания регистрации игроки приобретают бонус за регистрацию, какой может иметь free spins или монетарное премирование.
Доступ в персональный кабинет
Приватный кабинет открывает всесторонний надзор над игровым ходом. Через персональный профиль можно:
– Депонировать кошелек
– Снимать призы
– Использовать бонусные коды
– Отслеживать историю пари
– Играть в соревнованиях
– Приобретать cash back
Описание бонусов и промо-предложений
Щедрая премиальная схема — важное достоинство казино. Ключевые категории премий:
Вступительный приз
Новые игроки обретают богатое премирование на первые вклады. Сумма бонуса может доходить до 100-200% от суммы депозита.
Бонусные спины
Бесплатные спины даются для известных автоматов. Количество бесплатных вращений колеблется от 10 до 500 штук.
Возврат средств
Регулярный или ежемесячный отдача доли потерянных финансов. Типичный размер возврата — 5-15%.
Турниры
Периодические соревнования с крупными премиальными фондами. Конкурсанты конкурируют за топовые места в рейтинге.
Портативная версия и софт
Смартфонная версия разрешает играть с любого гаджета. Клиенты могут установить программу для iOS и Android или применять интернет версию.
Выгоды мобильного приложения:
– Скоростная подзагрузка автоматов
– Комфортный дизайн
– Всплывающие уведомления о бонусах
– Возможность входа через Touch ID
Слоты и Live казино
Азартная подборка включает множество наименований от ведущих поставщиков.
Востребованные разделы слотов:
– Традиционные машины
– Видеослоты с призовыми раундами
– Накопительный приз игры
– Megaways автоматы
Live казино
Раздел live игорный зал обеспечивает партию с настоящими дилерами. Доступны классические игры:
– Американская рулетка
– Двадцать одно
– Baccarat
– Карибский покер
Как отыскать актуальное зеркало
Обрести свежую URL на зеркало возможно различными вариантами:
1. Подписаться на почтовую рассылку
2. Мониторить за обновлениями в соц сетях
3. Контактировать в сервис поддержки
4. Заложить актуальное зеркало в фавориты
Заключение
Официальный сайт и его действующие альтернативные адреса гарантируют стабильный путь к развлекательным слотам. Великодушные поощрения, многочисленные купоны, комфортное мобильное программа и качественная сервис поддержки создают азартный опыт предельно беспроблемным и защищенным.
Нынешние онлайн-казино обеспечивают пользователям богатый ассортимент функций для беспроблемной игры. Переход к ресурсу https://www.xn—–8kcjfnn3bceaxi1ap3qa.xn--p1ai осуществляется через лицензионный домен или рабочее зеркало.
Что такое функционирующее зеркало казино
Действующее зеркало — это резервный линк основного ресурса казино. Такие версии генерируются для гарантирования непрерывного доступа к гемблинговой площадке.
Зеркало актуальное абсолютно повторяет возможности основного ресурса. Игроки получают идентичный путь ко всем сервисам, включая открытие счета, зачисление средств кошелька и снятие призов.
Открытие счета на основном портале
Алгоритм открытия профиля занимает всего считанные моментов. Начинающим пользователям следует:
1. Перейти на основной домен или действующее официальное зеркало
2. Кликнуть кнопку “Регистрация”
3. Ввести необходимые сведения
4. Проверить e-mail почту
5. Ввести промокод при доступности
После окончания создания аккаунта клиент обретает бонус за регистрацию, который имеет право содержать даровые спины или монетарное начисление.
Логин в собственный кабинет
Индивидуальный кабинет — это безопасная область, где пользователи имеют возможность администрировать своим учетной записью. Для доступа требуется указать никнейм и пароль.
В пользовательском кабинете имеются данные инструменты:
– Мониторинг хронологии платежей
– Использование бонусных кодов
– Настройка вознаграждениями
– Вступление в соревнованиях
– Контроль возмещения
– Редактирование данных
Вознаграждения и промо
Гемблинговая площадка предлагает выгодные вознаграждения:
Приветственный набор — начинающие приобретают крупное вознаграждение на начальные депозиты.
Фриспины — предоставляются как при регистрации, так и в рамках разнообразных мероприятий.
Возврат средств — еженедельный компенсация части потерянных средств.
Купоны — уникальные шифры, дающие возможность к уникальным предложениям.
Обзор игровых категорий
Slots
Коллекция slots насчитывает множество наименований от ведущих производителей. Клиенты откроют как обычные слоты, так и современные видео-слоты с притягательной анимацией.
Live казино
Раздел Live казино предлагает возможность развлекаться с настоящими ведущими в условиях настоящего времени. Имеются распространенные столы: рулетка, блэкджек, баккара, покер.
Соревнования
Периодические соревнования с крупными выигрышными банками завлекают множество игроков. Призеры обретают денежные выплаты и уникальные премии.
Телефонная версия и app
Портативная версия портала дает возможность играть с любого девайса. Структура независимо настраивается под формат экрана.
Получить приложение можно для гаджетов на Android и iOS. Мобильное app располагает всеми функциями настольной версии.
Как определить актуальное зеркало на данный момент
Свежие URL дубликатов периодически меняются. Узнать актуальную ссылку можно несколькими путями:
– Через службу саппорта
– В официальных коммуникационных сетях
– По e-mail рассылке
– На специализированных площадках
Охрана и сертификация
Главный портал функционирует на базе зарубежной разрешения. Все операции защищены современными технологиями кодирования.
Секретность пользовательских реквизитов обеспечивается в полном размере.
Итог
Официальный ресурс и его действующие альтернативы гарантируют участникам 24/7 путь к высококлассным гемблинговым сервисам. Щедрые бонусы, всевозможные слоты, квалифицированная поддержка — все это превращает азартный досуг максимально беспроблемным и интересным.
дизайн интерьера квартиры 30 кв нужен дизайнер квартиры
canada drugs coupon code: MedBridge Pharmacy – MedBridge Pharmacy
Описание главного ресурса
Передовые виртуальные казино предлагают игрокам обширный спектр услуг и шансов. Основной ресурс Болливуд обеспечивает защищенный возможность к игровым сервисам.
Действующее зеркало: путь прямо сейчас
Альтернативный адрес выступает как точную дубликат лицензионного сайта. Действующее зеркало дает возможность участникам миновать возможные барьеры.
Преимущества задействования зеркала
Принципиальные достоинства содержат:
– Непрерывный доступ к ресурсу
– Хранение любых характеристик официального ресурса
– Безопасность личных информации
– Идентичный инструментарий
Создание аккаунта на портале
Механизм открытия счета выделяется понятностью и удобством. Начинающие пользователи должны:
1. Посетить лицензионный портал или его зеркало
2. Выбрать на элемент регистрации
3. Указать требуемые поля
4. Верифицировать email ящик
5. Выполнить стартовый доступ
Подарок за регистрацию
Начинающие получают внушительный стартовый презент. Данное премия в состоянии охватывать:
– Финансовые начисления
– Complimentary вращения
– Повышенный показатель компенсации
Вход в индивидуальный раздел
Действующие клиенты имеют возможность быстро получить доступ в персональный профиль, применяя никнейм и пароль. Собственный аккаунт предоставляет шанс к:
– Управлению счетом
– Записям переводов
– Текущим подаркам
– Параметрам профиля
Вознаграждения и кампании
Платформа периодически устраивает различные предложения для клиентов.
Типы бонусов
Главные типы призов:
– Пополнительные бонусы – часть от размера депозита
– Спины – даровые раунды в аппаратах
– Кэшбек – возврат фрагмента затраченных финансов
– Призовые вознаграждения – премии за выступление в соревнованиях
Ваучеры
Специальные промокоды помогают получить экстра выгоды. Клиенты могут обнаружить их на партнерских площадках или получить в письмах.
Портативная адаптация и приложение
Прогрессивные пользователи выбирают карманный гейминг.
Характеристики мобильной версии
– Адаптивный дизайн для всех устройств
– Совокупный возможность к слотам
– Оперативная работа
– Эргономичное использование
Загрузить программу
Mobile программа открыто для downloading на устройства с базовыми ОС Android и iOS. Софт обеспечивает:
– Надежную деятельность
– Всплывающие сообщения о предложениях
– Быстрый доступ к любимым слотам
Гемблинг выбор
Игровой клуб обеспечивает богатую коллекцию азартных забав.
Аппараты
Ассортимент развлекательных машин охватывает:
– Стандартные слоты
– Видео игры
– Призовые игры
– Лицензионные автоматы
Live дилеры
Область лайв игр дает шанс состязаться с реальными ведущими. Представлены:
– Рулетки
– Очко
– Баккара
– Poker
Соревнования
Постоянные чемпионаты обеспечивают участникам состязаться за значительные наградные суммы. Соревновательная система изменяется каждую неделю.
Денежные действия
Сайт обеспечивает множество способов зачисления и обналичивания сумм:
– Пластиковые карточки
– Электронные счета
– Прямые транзакции
– Цифровые валюты
Любые операции осуществляются конфиденциально с задействованием передовых систем защиты.
Департамент поддержки
Опытная служба support работает постоянно. Связаться с операторами можно через:
– Интерактивный чат
– Email почту
– Горячую линию
– Social сети
Защита и аккредитация
Платформа действует на основании официальной аккредитации. Такое обеспечивает:
– Справедливость игрового геймплея
– Охрану личных сведений
– Быстрые выводы
– Ответственный геймплей
Заключение
Главный сайт и его актуальные зеркала предоставляют игрокам абсолютный ассортимент услуг для безопасной и профитной времяпрепровождения. Щедрые призы, различные игры, опытная поддержка и надежная платформа транзакций делают казино идеальным вариантом для фанатов азартных услуг.
Современные онлайн-казино гарантируют участникам обширный набор слотов и привлекательные бонусы. Тем не менее для комфортной игры необходимо осознавать, как найти Vovan и его функционирующие зеркала.
Что такое основной веб-ресурс казино
Лицензионный ресурс казино — это главная площадка, где клиенты могут развлекаться игровыми автоматами. Ресурс работает на законных правах и обладает всеми необходимыми лицензиями.
Основные плюсы лицензионного портала:
– Конфиденциальность индивидуальных реквизитов
– Справедливые условия работы
– Подтвержденные выводы
– Компетентная служба поддержки
Действующее зеркало казино: для чего необходимо
Копия сайта — это идентичная клон лицензионного ресурса, хостящаяся по другому URL. Функционирующее зеркало запускается для поддержания бесперебойного входа к ресурсу.
Причины эксплуатации зеркал:
– Ограничение главного домена
– Технические мероприятия
– Повышенная загрузка на сервер
Как найти рабочее зеркало сегодня
Найти свежее действующее зеркало можно разными вариантами:
1. Подписка — зарегистрируйтесь на информационную подписку
2. Департамент support — напишите в онлайн-чат
3. Социальные каналы — мониторьте за новостями
4. Игровые сайты — проверенные источники
Оформление профиля на сайте казино
Процесс создания аккаунта составляет всего считанные минут:
1. Нажмите на клавишу “Открыть счет”
2. Внесите запрашиваемые данные
3. Подтвердите контактную e-mail
4. Используйте код активации, если предоставлен
По завершении завершенной активации вам откроется открыт индивидуальный кабинет.
Поощрения и бонусные коды
Богатая премиальная политика — существенное конкурентное преимущество казино:
Поощрение за создание аккаунта
Начинающие игроки получают первый подарок, который может предполагать:
– Монетарный депозит на дебютный взнос
– Фриспины для игровых машин
– Стартовые деньги
Купоны
Постоянно размещаются новые купоны, позволяющие забрать особые поощрения.
Программа возврата средств
Активные клиенты возвращают долю утраченных финансов назад.
Свежие промо и состязания
Платформа систематически организует азартные кампании:
– Weekly чемпионаты
– Специальные предложения
– Конкурсы крупных подарков
– Программа привилегий
Логин в персональный профиль
Для авторизации на платформу нужно:
1. Посетить главный адрес или функционирующее зеркало
2. Активировать “Login”
3. Указать email и секретную комбинацию
В индивидуальном разделе доступны нижеперечисленные функции:
– Зачисление депозита
– Обналичивание денег
– Анализ журнала игр
– Настройка персональными сведениями
Портативная вариант и приложение
Mobile платформа
Адаптивная платформа ресурса предоставляет шанс играть с разных мобильного девайса. Оформление адаптивно подстраивается под формат дисплея.
Приложение для загрузки
Скачать app можно для:
– Android — прямая скачивание с ресурса
– iOS — скачивание через App Store
Выгоды мобильного клиента:
– Быстрый вход
– Устойчивая работа
– Push-уведомления об промо
– Ускоренный интерфейс
Гемблинг разделы
Игровые машины
Богатая галерея игровых автоматов от топовых поставщиков:
– Ретро машины
– Продвинутые-игры
– Накопительные-слоты
Live зал
Секция с настоящими ведущими обеспечивает:
– Рулетка
– Двадцать одно
– Baccarat
– Покер
Вещания осуществляются в отличном качестве изображения, формируя эффект подлинного казино.
Системы внесения средств и снятия
Ресурс обслуживает разнообразные транзакционные сервисы:
– Кредитные карты
– Электронные кошельки
– Цифровые валюты
– Банковские транзиты
Минимальные лимиты взноса и скоростные выплаты создают развлечение максимально беспроблемной.
Команда техподдержки
Профессиональная отдел ассистентов работает 24/7 и способна поддержать с различными проблемами:
– Реалтайм-чат
– Email-переписка
– Телефонная линия
Заключение
Лицензионный сайт казино и его рабочие дубликаты гарантируют клиентам безопасный и увлекательный игровой процесс. Богатые бонусы, функциональная портативная вариант, многочисленные слоты и качественное live-казино формируют эту систему великолепным вариантом для азартных развлечений.
https://f7-casino-uk1.com/ nothing weird so far.
1xbet yeni adresi 1xbet yeni adresi .
https://rodina-lenobl.ru/
Подключение к порталу и рабочие зеркала
Популярные виртуальные казино обеспечивают пользователям огромный спектр возможностей. Главный веб-сайт казино KiloGram предоставляет стабильный подключение ко всем сервисам. Тем не менее порой происходят обстоятельства, когда требуется резервный путь входа.
Что представляет собой рабочее зеркало
Актуальное зеркало — это полная версия легального ресурса с иным URL именем. Дубликат сегодня обеспечивает избегать потенциальные блокировки и сохранять стабильный переход к популярным слотам.
Главное зеркало обладает идентичными возможностями, что и главный ресурс:
– Полный ассортимент слотов
– Личный кабинет с зафиксированными данными
– Действующие подарки и промо
– Надежные финансовые транзакции
Регистрация и доступ в казино
Ход создания профиля на платформе требует несколько моментов. Недавним клиентам необходимо:
1. Открыть на действующее зеркало на данный момент
2. Кликнуть клавишу «Зарегистрироваться»
3. Указать необходимые параметры
4. Верифицировать e-mail почту или номер связи
5. Забрать бонус за регистрацию
Авторизация в индивидуальный профиль производится посредством указание никнейма и секретной комбинации.
Характеристика призовой структуры
Привлекательная призовая система — главное козырь платформы. Участники забирают разнообразные награды:
Приветственные награды
Новые участники вправе надеяться на щедрый поощрение за создание аккаунта. Чаще всего это комплект вариантов, охватывающий:
– Процентную прибавку к дебютному пополнению
– Подарочные спины
– Призовые финансы на баланс
Кодовые комбинации и особые возможности
Систематические промокоды позволяют получать экстра привилегии. Применить их разрешено в особом окне индивидуального профиля.
Спины и кешбэк
Фриспины — это способность крутить автоматы без задействования личных финансов. Возврат означает частичный отдачу проигранных средств.
Библиотека автоматов
Гемблинг сайт обеспечивает впечатляющую библиотеку развлечений.
Видеослоты
Ассортимент игровых машин удивляет воображение. Есть стандартные 3-барабанные автоматы и современные автоматы с захватывающей графикой.
Live заведение
Зона Live заведения транспортирует клиентов в обстановку настоящего гемблинг зала. Умелые ведущие осуществляют партии в живом режиме.
Турниры и лидерборды
Постоянные состязания добавляют азарта и предоставляют вариант заработать значительные выигрыши.
Мобильная вариант и клиент
Современные технологии обеспечивают играть в любимом пространстве. Адаптивная реализация самостоятельно настраивается под размер устройства.
Скачать программу можно для операционных ОС iOS и Android. Клиент предоставляет:
– Скоростной доступ
– Устойчивую работу
– Мгновенные-алерты об акциях
– Комфортный интерфейс
Денежные процедуры
Платформа принимает всевозможные методы депозита и вывода средств:
– Платежные карты
– Онлайн платформы
– Крипто
– Прямые транзакции
Всевозможные транзакции реализуются через защищенное канал, что подтверждает целостность конфиденциальных данных.
Отдел поддержки
Опытная служба помощи действует круглосуточно. Обратиться с консультантами допустимо через:
– Live-чат
– Почтовую почту
– Контакт
– Медиа ресурсы
Итоги
Легальный портал и его рабочее зеркало предоставляют пользователям защищенный и легкий доступ к азартным играм. Привлекательные награды, разнообразный выбор развлечений и высокая поддержка формируют процесс предельно комфортной и результативной.
Продолжение https://17slon.net/
xbet xbet .
https://f7-casino-uk1.com/ Site loads fast, no bugs so far.
Вход к платформе через проверенные зеркала
Клиенты сетевых казино постоянно встречаются с ситуацией ограничения главного домена. Именно для ликвидации этой ситуации разработаны зеркала главного ресурса. Лев гарантирует стопроцентный вход ко всем возможностям казино.
Что такое функционирующее зеркало казино
Альтернативный адрес представляет собой точную дубликат оригинального веб-сайта с таким же опциями. Главное несовпадение — это другое имя. Абсолютно все информация клиента, содержа счет, бонусы и историю раундов, остаются такими же.
Достоинства эксплуатации зеркал
Действующие зеркала характеризуются комплексом важных выгод:
– Бесперебойный вход к предпочитаемым слотам
– Совершенная конфиденциальность индивидуальных информации
– Сохранение всех параметров персонального кабинета
– Шанс обретения наград и включения в промоакциях
Регистрация на основном сайте
Операция создания аккаунта крайне несложен и длится пару минут. Недавние участники способны рассчитывать на крупный приветственный подарок за открытие счета.
Стадии создания аккаунта
1. Доступ на официальный портал или его дубликат
2. Активация на опцию “Создать аккаунт”
3. Внесение необходимых информации
4. Активация почтовой почты
5. Внесение кода (при наличии присутствует)
Подарки и предложения для пользователей
Игровая площадка балует своих клиентов различными поощрительными предложениями.
Ключевые варианты поощрений
Приветственный приз — щедрое вознаграждение для недавних пользователей, каковое может содержать денежные призы и фриспины.
Бесплатные вращения — шанс играть в популярных аппаратах даром.
Кешбэк — долевой возврат проигранных средств, каковой предоставляется раз в неделю или раз в месяц.
Промокоды — особые сочетания, гарантирующие добавочные преимущества.
Индивидуальный кабинет: инструменты и конфигурации
Индивидуальный профиль гарантирует абсолютный контроль над игровым взаимодействием. В нем доступны:
– Контроль счетом
– Данные платежей
– Активные поощрения
– Параметры безопасности
– Проверка профиля
Портативная платформа и программа
Нынешние пользователи ценят доступность. Ресурс дает 2 варианта для развлечений с карманных гаджетов.
Адаптивная портативная редакция
Адаптивная платформа сайта автономно подстраивается под разрешение любого гаджета. Отсутствует потребность скачивать особое софт.
Приложение для телефонов
Можно инсталлировать официальное APP для iOS и Android. Программа гарантирует:
– Моментальный доступ
– Адаптированный внешний вид
– Push-сообщения о поощрениях
– Стабильную функциональность
Live раздел: антураж истинного казино
Раздел Live игр переносит клиентов в обстановку истинного казино. Компетентные хосты проводят сессии в виде живого времени.
Востребованные Live-игры
– Европейская рулетка
– Блэкджек
– Punto Banco
– Карибский покер
Игровые машины: многообразие слотов
Каталог азартных автоматов содержит тысячи позиций от известных провайдеров. Пользователи откроют:
– Классические аппараты
– Видео-автоматы
– Мега-выигрыш-слоты
– Многолинейные автоматы
Турниры и уникальные предложения
Периодические турниры позволяют игрокам конкурировать друг с другом за внушительные выигрышные суммы. Каждый состязание располагает свои критерии включения и рейтинг чемпионов.
Варианты пополнения и снятия финансов
Ресурс использует массу финансовых методов:
– Банковские картыы
– Онлайн платежные системы
– Цифровые валюты
– Финансовые транзиты
Все переводы осуществляются защищенно благодаря современным системам криптографии.
Отдел помощи
Профессиональные консультанты команды support готовы помочь 24/7. Доступны следующие каналы связи:
– Живой-чат
– Email-поддержка
– Голосовая поддержка
– Коммуникационные сети
Итог
Легальный ресурс игровой площадки и его функционирующие зеркала дают участникам безопасный и удобный подход к обширному диапазону азартных развлечений. Внушительные бонусы, периодические предложения, профессиональная служба и простые расчетные системы превращают геймерский досуг чрезвычайно захватывающим и выгодным.
подробнее здесь https://slon58.com
выберите ресурсы https://slon4u.com/
нейросеть онлайн для учебы nejroset-dlya-referatov-2.ru .
нейросеть онлайн для учебы nejroset-dlya-referatov-3.ru .
Gioca responsabilmente | Questo sito compara quote e o offerte degli operatori autorizzati in Italia esclusivamente a scopo informativo e non pubblicitario Caricata la slot, dovrai impostare il numero di coin per linea, ma anche il numero di linee di vincita con le quali giocare e il valore di ciascuna coin. Slot Online in Italia CandySpinz è un casinò online lanciato nel novembre 2024, affiliato a Terdersoft B.V. (proprietario di BDM Bet). Offre oltre 5.000 giochi, tra cui slot machine di Pragmatic Play, Evolution e NetEnt. Con un design colorato a tema caramelle, offre un bonus di benvenuto fino a 1.500 € + 300 giri gratuiti e accetta criptovalute. Licenza Curaçao (GCB) e assistenza clienti 24 ore su 24. Slot Online in Italia È sorprendentemente imprevedibile per i giocatori che cercano più emozioni, riscattare il codice bonus EMERALD300 presso la sezione coupon della cassa e depositare almeno USD 30. Detto questo, usciti direttamente dal grande schermo. Questo non vuol dire che la colonna sonora sia il principale vantaggio del gioco, così come interessanti pacchetti accoglienti. Avrete bisogno di atterrare tre o più di loro ovunque sui rulli e avrete vinto voi stessi un bel piccolo premio, sono elementari in ciò che rende i giocatori in Canada scegliere un servizio di casinò online rispetto ad un altro.
http://www.greeitaly.com/1362/pirots-2-elk-studios-recensione-per-giocatori-in-italia/
La musica in pieno stile egiziano antico ricrea l’atmosfera adeguata dal momento in cui si accede a questa slot e si entra nello scenario del tempio su cui vengono visualizzati i rulli: i pilastri classici incorniciano lo schermo e i rulli 5×3 sono divisi da storiche colonne con colori tradizionali. Partiamo subito a parlare di simboli, dopotutto se decidete di giocare alla Slot Machine Book of Dead è bene conoscere i simboli. La Slot presenta simboli il cui valore è basato sulle carte da gioco, quindi 9, 10, J, Q, K e Asso. Con ogni combinazione vincente sulla Book of Dead è possibile scegliere quale strategia di gioco applicare perciò abbiamo pensato bene di elencare una serie di dritte e consigli in modo da sfruttare al meglio questa funzione: Giocare a qualsiasi slot contribuisce 100% verso i requisiti di scommessa, giusto. Se formano tre di un genere o meglio, un’innovazione di NOVOMATIC Interactive.
MedBridge Pharmacy: MedBridge Pharmacy – MedBridge Pharmacy
Нынешние онлайн-казино дают пользователям широкий спектр развлечений и призовых опций. Присоединение к ресурсу реализуется через лицензионный веб-сайт или его функционирующее зеркало Голд, что гарантирует постоянную деятельность.
Что представляет собой функционирующее зеркало казино
Зеркало — это идентичная реплика главного ресурса, созданная для устранения блокировок. Действующее зеркало дает возможность участникам получить подключение к любимым автоматам в любое удобное время.
Лицензионное зеркало содержит всеми функциями первоначального портала:
– Весь каталог слотов
– Личный кабинет с записанными данными
– Актуальные бонусы
– Надежные финансовые транзакции
Оформление профиля на официальном ресурсе
Процесс оформления составляет всего считанные минут. Первым игрокам нужно:
1. Перейти на проверенный ресурс или актуальное зеркало
2. Выбрать на кнопку “Регистрация”
3. Указать нужные сведения
4. Верифицировать контакт
5. Внести стартовый взнос
Стартовый бонус выдается незамедлительно после прохождения всех шагов.
Подключение в профиль
Зарегистрированные пользователи могут выполнить вход используя:
– Учетное имя и пароль
– Данные мобильного
– Адрес
Личный кабинет дает шанс к регулированию средствами, истории игр и активным промокодам.
Награды и программы
Гемблинг платформа привлекает постоянных пользователей выгодными поощрениями:
Приветственный комплект
– Надбавка на начальный депозит до 100%
– Фриспины на топовые автоматы
– Особые бонусы за следующие депозиты
Ваучеры
Особые коды предоставляют доступ на активацию специальных призов. Актуальные купоны публикуются в блоке “Промо”.
Кешбэк
Еженедельный кешбэк достигает до 10% от утраченных сумм. Возмещение предоставляется незамедлительно.
Программа лояльности
Верные клиенты зарабатывают поинты, которые переводятся на действительные финансы или бесплатные вращения.
Мобильный сайт и программа
В целях удобства участников разработана функциональная mobile версия. Адаптивный интерфейс позволяет беспрепятственно развлекаться с любого мобильного девайса.
Преимущества APP:
– Оперативный вход к слотам
– Настроенный облик
– Стабильная работа
– Нотификации о новых акциях
Загрузить APP можно безвозмездно с основного веб-сайта для девайсов на Android и iOS.
Коллекция развлечений
Игровые автоматы
Коллекция содержит более 2000 автоматов от топовых разработчиков:
– Традиционные машины
– Мультимедийные игры
– Прогрессивные автоматы
– Сюжетные слоты
Live казино
Раздел Live столов предлагает развлечение с живыми ведущими в онлайн формате:
– Roulette
– Blackjack
– Карты
– Столы покера
Состязания
Систематические конкурсы с солидными наградными фондами проводятся еженедельно. Участие в турнирах открыто всем зарегистрированным игрокам.
Расчетные системы
Пополнения и выводы финансов реализуются через востребованные способы оплаты:
– Платежные карточ ки
– Электронные сервисы
– Криптовалюта
– Прямые операции
Самый низкий депозит — от 100 рублей. Изъятие средств проводится в течение 24 ч.
Сервис поддержки
24/7 отдел поддержки может содействовать в исправлении произвольных проблем:
– Live chat
– Email
– Связь
– Социальные сети
Защита и разрешение
Официальный веб-сайт действует на базе международной документа. Каждые данные клиентов защищены актуальным SSL-шифрованием.
Вывод
Рабочее зеркало гарантирует постоянный вход к предпочитаемым развлечениям, щедрым промокодам и функциональным сервисам. Зарегистрируйтесь прямо сейчас и получите стартовый бонус!
Описание лицензионного портала
Прогрессивные интернет казино предоставляют пользователям обширный ассортимент забав и перспектив. Официальный сайт Sykaaa казино обеспечивает безопасный путь к развлекательным услугам.
Функционирующее зеркало: вход в настоящий момент
Резервный сайт выступает как абсолютную копию лицензионного сайта. Действующее зеркало помогает пользователям миновать существующие запреты.
Выгоды эксплуатации зеркала
Принципиальные выгоды охватывают:
– Стабильный путь к сайту
– Хранение абсолютно всех функций основного ресурса
– Защита личных материалов
– Идентичный набор функций
Оформление профиля на платформе
Процедура регистрации знаменуется простотой и удобством. Новые клиенты требуется:
1. Зайти на основной ресурс или его зеркало
2. Нажать на кнопку регистрации
3. Ввести требуемые сведения
4. Верифицировать email адрес
5. Выполнить стартовый логин
Приз за регистрацию
Дебютанты забирают щедрый начальный бонус. Такое вознаграждение имеет возможность включать:
– Материальные бонусы
– Безвозмездные фриспины
– Увеличенный коэффициент возврата
Доступ в личный раздел
Зарегистрированные участники способны моментально авторизоваться в свой раздел, задействуя логин и пароль. Индивидуальный раздел предоставляет шанс к:
– Администрированию счетом
– Хронологии транзакций
– Действующим призам
– Конфигурации профиля
Вознаграждения и предложения
Платформа периодически реализует всевозможные промо-кампании для клиентов.
Типы бонусов
Главные формы вознаграждений:
– Финансовые подарки – коэффициент от объема внесения
– Прокруты – complimentary прокруты в аппаратах
– Кэшбек – возмещение фрагмента утраченных средств
– Соревновательные вознаграждения – призы за участие в турнирах
Ваучеры
Уникальные купоны обеспечивают получить экстра преимущества. Пользователи имеют возможность получить их на аффилиатных ресурсах или приобрести в новостях.
Переносная версия и программа
Актуальные клиенты ценят мобильный игровой процесс.
Возможности мобильной платформы
– Responsive дизайн для всех девайсов
– Абсолютный вход к развлечениям
– Быстрая функционирование
– Удобное контроль
Download app
Мобильное app доступно для установки на аппараты с базовыми системами Android и iOS. Софт дает:
– Устойчивую работу
– Пуш сообщения о бонусах
– Моментальный вход к предпочитаемым автоматам
Гемблинг выбор
Портал предоставляет обширную подборку развлекательных услуг.
Автоматы
Ассортимент азартных слотов содержит:
– Стандартные слоты
– Передовые слоты
– Джекпотные машины
– Лицензионные игры
Live дилеры
Секция реальных развлечений предлагает возможность играть с настоящими крупье. Представлены:
– Рулетки
– Блэкджек
– Punto Banco
– Poker
Конкурсы
Периодические конкурсы помогают клиентам конкурировать за значительные наградные фонды. Конкурсная сетка модифицируется каждую неделю.
Банковские транзакции
Сайт предлагает обилие способов зачисления и обналичивания финансов:
– Пластиковые карты
– Электронные платежные системы
– Банковские трансферы
– Криптовалюты
Совокупные платежи производятся надежно с задействованием актуальных методов криптографии.
Сервис сопровождения
Квалифицированная команда помощи функционирует без перерыва. Обратиться с операторами можно через:
– Интерактивный чат
– Почтовую почту
– Телефон
– Соц сети
Охрана и лицензирование
Казино функционирует на фундаменте легальной лицензии. Данное удостоверяет:
– Легальность азартного действа
– Охрану индивидуальных сведений
– Оперативные транзакции
– Ответственный игровой процесс
Заключение
Главный веб-сайт и его действующие альтернативные адреса обеспечивают пользователям целостный спектр услуг для приятной и профитной времяпрепровождения. Солидные подарки, всевозможные развлечения, квалифицированная поддержка и защищенная структура платежей превращают платформу оптимальным выбором для любителей развлекательных услуг.
https://f7-casino-uk1.com/ Tried a few games and login, everything works. Feels stable.
посетить сайт https://slon56.com
Анализ лицензионного веб-сайта
Актуальные виртуальные казино предоставляют клиентам широкий спектр услуг и перспектив. Основной ресурс ДжиВиСпин гарантирует безопасный вход к азартным функциям.
Действующее зеркало: вход в настоящий момент
Резервный сайт выступает собой абсолютную дубликат основного портала. Проверенное зеркало дает возможность пользователям миновать потенциальные запреты.
Достоинства применения зеркала
Ключевые преимущества содержат:
– Непрерывный шанс к сайту
– Хранение абсолютно всех возможностей официального портала
– Сохранность персональных сведений
– Идентичный инструментарий
Оформление профиля на платформе
Процедура открытия счета знаменуется понятностью и комфортом. Недавние игроки обязаны:
1. Перейти на основной ресурс или его зеркало
2. Нажать на кнопку оформления
3. Внести обязательные сведения
4. Валидировать электронную почту
5. Произвести дебютный авторизацию
Подарок за регистрацию
Дебютанты зарабатывают внушительный приветственный бонус. Подобное награда имеет возможность предусматривать:
– Материальные суммы
– Безвозмездные вращения
– Усиленный показатель возврата
Логин в собственный аккаунт
Существующие пользователи в состоянии мгновенно авторизоваться в свой профиль, используя никнейм и код. Индивидуальный аккаунт дает возможность к:
– Администрированию средствами
– Записям операций
– Текущим призам
– Параметрам аккаунта
Подарки и промо
Платформа регулярно реализует многочисленные акции для клиентов.
Типы призов
Ключевые виды бонусов:
– Пополнительные бонусы – процент от суммы взноса
– Спины – даровые спины в игровых машинах
– Кэшбэк – компенсация фрагмента утраченных финансов
– Соревновательные призы – премии за участие в состязаниях
Промокоды
Специальные промокоды помогают заработать добавочные привилегии. Клиенты способны отыскать их на партнерских ресурсах или приобрести в рассылке.
Мобильная редакция и софт
Актуальные клиенты выбирают мобильный досуг.
Функции mobile системы
– Адаптивный облик для разнообразных устройств
– Абсолютный возможность к развлечениям
– Стремительная загрузка
– Эргономичное управление
Download app
Переносное программа доступно для установки на аппараты с рабочими системами Android и iOS. Приложение предоставляет:
– Устойчивую функциональность
– Всплывающие алерты о бонусах
– Оперативный запуск к предпочитаемым слотам
Азартный ассортимент
Платформа обеспечивает обширную галерею азартных забав.
Аппараты
Библиотека игровых слотов содержит:
– Стандартные игры
– Передовые игры
– Джекпотные слоты
– Тематические автоматы
Live столы
Область настоящих столов обеспечивает шанс соревноваться с профессиональными крупье. Доступны:
– Рулетки
– 21
– Baccarat
– Техасский холдем
Соревнования
Периодические соревнования обеспечивают клиентам конкурировать за крупные наградные банки. Соревновательная система изменяется каждую неделю.
Финансовые транзакции
Сайт предоставляет массу методов депозита и вывода сумм:
– Банковские карты
– Цифровые кошельки
– Межбанковские переводы
– Крипто
Абсолютно все операции выполняются конфиденциально с использованием актуальных систем шифрования.
Сервис support
Профессиональная отдел поддержки трудится постоянно. Обратиться с специалистами можно через:
– Интерактивный чат
– Электронную почту
– Телефонную линию
– Social сети
Секьюрити и аккредитация
Платформа действует на основании легальной разрешения. Данное гарантирует:
– Прозрачность азартного геймплея
– Сохранность конфиденциальных сведений
– Быстрые транзакции
– Контролируемый гемблинг
Вывод
Главный сайт и его действующие дубликаты обеспечивают пользователям полный набор услуг для безопасной и выгодной досуга. Значительные вознаграждения, всевозможные слоты, компетентная помощь и защищенная система операций делают ресурс идеальным вариантом для фанатов гемблинг услуг.
Характеристика главного сайта
Новое онлайн-казино предлагает своим участникам обширный выбор игр и бонусов. Главный веб-сайт http://xn--b1afkebce4cvc1d.xn--p1ai оперирует постоянно, давая путь к популярным автоматам, live-казино и многочисленным акциям.
Функционирующее зеркало: возможность к ресурсу
Что такое альтернатива казино
Дубликат означает собой абсолютную реплику официального сайта с отличным доменным названием. Действующее зеркало обеспечивает участникам преодолевать блокировки и сохранять стабильный путь к любимым автоматам.
Как отыскать рабочее зеркало сегодня
Свежие URL на основное зеркало размещаются через:
– Email оповещение
– Главные социальные сети
– Сервис помощи
– Affiliated ресурсы
Созданиеаккаунта на платформе
Процесс регистрации
Созданиеаккаунта требует пару минут и предполагает данные шаги:
1. Вход на главный веб-сайт или функционирующее зеркало
2. Выбор опции “Зарегистрироваться”
3. Заполнение персональных реквизитов
4. Активация адреса или телефона
5. Формирование секретнойкомбинации
Подарок за оформление
Новые игроки приобретают большие приветственные вознаграждения:
– Денежные суммы на аккаунт
– Халявныеспины для автоматов
– Увеличенный процент возврата
– Специальные промокоды
Доступ в персональный профиль
Постоянные клиенты вправе совершить авторизацию через главный сайт или актуальное зеркало. Для этого требуется указать имяпользователя и пароль, придуманные при открытиисчета.
Функции собственного раздела
В индивидуальном аккаунте открыты основные возможности:
– Изменение учетными информацией
– Внесение кошелька
– Снятие средств
– Использование промокодов
– Просмотр журнала операций
– Включение в конкурсах
Вознаграждения и промо
Типы подарков
Казино поощряет своих клиентов всевозможными бонусными предложениями:
– Вступительный комплект — солидные подарки на начальные пополнения
– Фриспины — бонусные прокруты в рейтинговых автоматах
– Кешбэк — систематический возврат доли проигрышей
– Система VIP — эксклюзивные бонусы для регулярных игроков
Ваучеры и их использование
Уникальные ваучеры предоставляют дополнительные бонусы. Для активации нужно набрать комбинацию в нужное графу в индивидуальном разделе.
Азартный набор
Слоты
Коллекция развлекательных машин насчитывает тысячи вариантов от ведущих провайдеров:
– Традиционные автоматы
– Видео игры
– Накопительные симуляторы
– Брендовые слоты
Live казино
Зона Live-казино дарит процесс с реальными дилерами в условиях реального трансляции:
– Французскаярулетка
– Blackjack
– Баккара
– Карибскийпокер
Соревнования
Регулярные конкурсы с крупными выигрышными фондами устраиваются постоянно. Соревнующиеся соревнуются за первенство в турнирнойсетке.
Мобильная адаптация и программа
Адаптивная версия веб-сайта
Оригинальный портал абсолютно оптимизирован для планшетных гаджетов. Игроки могут играть игры прямо через обозреватель без потребности инсталляции.
Программа для загрузки
Авторское мобильное программа предоставляется для получения на устройства с рабочими платформами Android и iOS. Софт гарантирует:
– Моментальный вход к развлечениям
– Бесперебойную производительность
– Мгновенные-оповещения о акциях
– Комфортный дизайн
Резюме
Главный портал казино и его рабочие альтернативы предоставляют пользователям комплексный доступ к первоклассным геймплейным услугам. Щедрые подарки, разнообразные кампании, функциональная мобильная реализация и компетентная сервис создают геймплейный досуг предельно комфортным и результативным.
Great write ups, Thanks a lot.
Fantastic goods from you, man. I’ve take into accout your stuff
prior to and you’re just extremely great. I really like what you’ve got right here, certainly like what you’re saying and the way during which you are
saying it. You are making it enjoyable and you continue to take care of
to stay it wise. I can not wait to read far more from you.
This is actually a wonderful website.
Подключение к сайту через действующие зеркала
Передовые виртуальные казино дают клиентам бесперебойный подключение к услугам. Основной сайт Голд зеркало действует надёжно, предлагая обширный выбор азартных игр. Однако иногда возникают технические проблемы или запреты, потому важно быть осведомлённым о существовании действующих зеркал.
Что означает из себя центральное зеркало казино
Зеркало — это полная дубликат центрального веб-сайта с схожим интерфейсом. Рабочее зеркало на данный момент помогает избегать территориальные барьеры и поддерживать развлечения.
Главные выгоды использования зеркал:
– Абсолютный подключение к личному кабинету
– Поддержание совокупных данных профиля
– Схожий перечень автоматов
– Действующие поощрения и акции
Открытие счёта на сайте
Операция регистрации требует несколько минут. Свежие клиенты зарабатывают богатый подарок за создание счёта, который способен включать:
– Вступительный финансовый приз
– Безвозмездные вращения для машин
– Особые ваучеры
– Расширенный компенсацию
Ради финализации записи нужно:
1. Зайти на центральный ресурс или копию
2. Щёлкнуть опцию «Оформиться»
3. Указать индивидуальные реквизиты
4. Подтвердить почтовый адрес или мобильный
5. Активировать промокод (когда имеется существовании)
Авторизация в персональный кабинет
После правильной записи пользователи имеют возможность производить авторизацию через основной ресурс или действующее зеркало. Персональный кабинет обеспечивает абсолютный управление над счётом:
– Журнал пари
– Зачисление баланса
– Изъятие средств
– Управление привилегиями
– Включение в конкурсах
Бонусы и кампании казино
Портал удовлетворяет пользователей многочисленными поощрительными программами:
Стартовые призы
Начинающие получают щедрый комплект наград на первые взносы. Обычно это предполагает пропорциональную доплату к объёму вклада плюс бесплатные спины.
Периодические акции
– Еженедельный возврат до 15%
– Состязания с наградными пулами
– Подарки на число рождения
– Особые промо для привилегированных игроков
Схема поощрения
Деятельные пользователи зарабатывают единицы, которые возможно трансформировать на реальные деньги или особые льготы.
Мобильная версия и софт
Нынешние разработки обеспечивают геймить везде угодно. Смартфонная версия веб-сайта автоматически приспосабливается под экран каждого гаджета.
Преимущества портативного приложения:
– Моментальная подгрузка слотов
– Комфортный интерфейс
– Всплывающие-сообщения о предложениях
– Шанс загрузить для Android и iOS
Живое казино: атмосфера подлинного развлекательного клуба
Категория Live клуба транспортирует геймеров в обстановку реального гемблинг заведения. Квалифицированные дилеры проводят действие в режиме подлинного времени.
Имеющиеся столы:
– Колесо фортуны
– Блэкджек
– Классика
– Техасский холдем
Игровые машины и игровые машины
Собрание гемблинг автоматов охватывает массу наименований от ведущих студий. Каждый клиент отыщет игру по вкусу:
– Винтажные машины
– Видеослоты с специальными раундами
– Накопительный-автоматы
– Мегавейс игры
Состязания и раздачи
Систематические состязания включают азарт и обеспечивают возможность выиграть крупные вознаграждения. Вовлечение в соревнованиях нередко бесплатное, а выигрышные банки достигают крупных величин.
Безопасность и анонимность
Портал эксплуатирует инновационные системы защиты для охраны сведений геймеров. Любые платёжные процедуры проходят через зашифрованные каналы.
Заключение
Официальный портал и его актуальные зеркала предоставляют стабильный вход к качественным гемблинг развлечениям. Щедрые бонусы, комфортная мобильная форма, разнообразие слотов и компетентное Live-казино создают ресурс прекрасным решением для ценителей развлекательных развлечений.
дизайн интерьера студии дизайн проект ремонта квартиры
Современные онлайн-казино гарантируют игрокам широкий спектр развлечений и привлекательные поощрения. Но для удобной времяпрепровождения критично знать, как найти http://www.билитуй-РјРєРґС†.СЂС„/ и его актуальные зеркала.
Что такое главный портал казино
Лицензионный веб-сайт казино — это основная веб-площадка, где клиенты могут наслаждаться игровыми автоматами. Ресурс работает на официальных основаниях и владеет всеми необходимыми лицензиями.
Первостепенные достоинства лицензионного ресурса:
– Надежность личных реквизитов
– Прозрачные требования игры
– Обеспеченные транзакции
– Компетентная поддержка
Рабочее зеркало казино: для чего нужно
Копия сайта — это абсолютная копия официального ресурса, размещенная по иному домену. Действующее зеркало разрабатывается для обеспечения бесперебойного доступа к сайту.
Поводы использования копий сайта:
– Ограничение основного домена
– Регламентные мероприятия
– Высокая активность на ресурс
Как отыскать рабочее зеркало сейчас
Получить актуальное официальное зеркало можно множественными путями:
1. Подписка — подпишитесь на почтовую доставку
2. Команда техподдержки — напишите в онлайн-чат
3. Социальные каналы — мониторьте за постами
4. Специализированные сайты — авторитетные ресурсы
Создание аккаунта на портале казино
Процедура создания аккаунта длится только пару минут:
1. Выберите на кнопку “Создать аккаунт”
2. Укажите требуемые сведения
3. Активируйте контактную ящик
4. Введите бонусный код, если предоставлен
По завершении успешной создания аккаунта вам предоставится доступен пользовательский кабинет.
Награды и купоны
Щедрая бонусная система — важное преимущество казино:
Поощрение за регистрацию
Новые клиенты зарабатывают приветственный бонус, который может предполагать:
– Валютный бонус на дебютный депозит
– Free spins для игровых машин
– Приветственные средства
Промокоды
Регулярно размещаются свежие купоны, предоставляющие забрать экстра бонусы.
Схема возврата средств
Лояльные клиенты приобретают порцию проигранных ставок на счет.
Свежие кампании и соревнования
Ресурс периодически проводит азартные акции:
– Еженедельные турниры
– Специальные бонусы
– Раздачи крупных выигрышей
– Система VIP-клуба
Авторизация в персональный кабинет
Для авторизации на портал необходимо:
1. Посетить официальный сайт или актуальное зеркало
2. Кликнуть “Вход”
3. Прописать никнейм и секретную комбинацию
В индивидуальном профиле предоставлены следующие возможности:
– Зачисление баланса
– Обналичивание денег
– Просмотр лога ставок
– Редактирование личными сведениями
Адаптивная модификация и программа
Адаптивная платформа
Оптимизированная модификация сайта предоставляет шанс играть с разных смартфонного телефона. Визуал динамически адаптируется под диагональ дисплея.
Программа для download
Получить клиент можно для:
– Android — прямая загрузка с ресурса
– iOS — установка через App Store
Достоинства программы:
– Мгновенный запуск
– Бесперебойная функциональность
– Push-уведомления об акциях
– Ускоренный интерфейс
Азартные зоны
Слоты
Обширная галерея азартных слотов от ведущих поставщиков:
– Классические игры
– Видео-автоматы
– Накопительные-игры
Live casino
Раздел с профессиональными операторами предоставляет:
– Рулетка
– 21
– Мини-баккара
– Texas Hold’em
Трансляции осуществляются в HD качестве изображения, обеспечивая атмосферу настоящего казино.
Системы пополнения и вывода
Сайт обслуживает разные денежные системы:
– Платежные card
– Виртуальные системы
– Bitcoin/Ethereum
– Прямые транзакции
Базовые лимиты пополнения и оперативные выплаты обеспечивают игру максимально удобной.
Департамент техподдержки
Компетентная отдел помощи функционирует 24/7 и в состоянии содействовать с различными вопросами:
– Живой-чат
– Email-помощь
– Голосовая связь
Итоги
Основной ресурс казино и его актуальные альтернативные адреса гарантируют игрокам конфиденциальный и увлекательный гемблинг процесс. Привлекательные бонусы, удобная адаптивная вариант, многочисленные слоты и высокоуровневое live-казино создают эту платформу превосходным местом для азартных развлечений.
world pharmacy india: indian pharmacy – mail order pharmacy india
здесь https://slon58.com
взгляните на сайте здесь https://slon4u.com
нейросеть пишет реферат nejroset-dlya-referatov.ru .
Нынешние онлайн-казино дают пользователям широкий диапазон игр и призовых предложений. Подключение к площадке выполняется через лицензионный сайт или его действующее зеркало Голд зеркало, что гарантирует постоянную работу.
Чем является рабочее зеркало казино
Дубликат — это идентичная реплика основного сайта, созданная для устранения барьеров. Актуальное зеркало позволяет пользователям иметь соединение к предпочитаемым автоматам в любое время.
Проверенное зеркало имеет всеми опциями главного ресурса:
– Целый перечень игр
– Личный кабинет с сохраненными параметрами
– Свежие промокоды
– Защищенные финансовые действия
Создание аккаунта на основном портале
Процедура создания аккаунта занимает всего немного минут. Новым клиентам нужно:
1. Перейти на главный веб-сайт или действующее зеркало
2. Щелкнуть на кнопку “Регистрация”
3. Внести требуемые сведения
4. Активировать электронную почту
5. Совершить первый платеж
Приветственный бонус предоставляется сразу после завершения всех ступеней.
Вход в учетную запись
Зарегистрированные участники могут совершить вход применяя:
– Никнейм и шифр
– Номер сотового
– Контактный email
Профиль открывает право к администрированию счетом, истории транзакций и текущим акциям.
Промо и акции
Гемблинг площадка балует лояльных участников многочисленными бонусами:
Стартовый набор
– Поощрение на первый депозит до 100%
– Фриспины на топовые автоматы
– Экстра премии за очередные взносы
Промокоды
Уникальные промокоды дают возможность на получение специальных вознаграждений. Актуальные купоны выставляются в блоке “Предложения”.
Кэшбек
Регулярный возврат насчитывает до 10% от утраченных средств. Возмещение предоставляется моментально.
Программа лояльности
Постоянные пользователи зарабатывают поинты, которые конвертируются на настоящие средства или фриспины.
Мобильная версия и APP
Ради комфорта игроков создана удобная адаптивный сайт. Гибкий дизайн дает возможность легко делать ставки с каждого мобильного аппарата.
Достоинства софта:
– Быстрый вход к слотам
– Адаптированный облик
– Бесперебойная активность
– Сообщения о новых акциях
Загрузить приложение можно бесплатно с главного веб-сайта для устройств на Android и iOS.
Ассортимент развлечений
Машины
Коллекция вмещает более 2000 автоматов от известных производителей:
– Классические автоматы
– Мультимедийные игры
– Прогрессивные автоматы
– Сюжетные игры
Live казино
Блок Live столов предлагает участие с реальными дилерами в живом формате:
– Рулетка
– Blackjack
– Baccarat
– Покер
Конкурсы
Систематические состязания с значительными призовыми суммами проводятся каждую неделю. Присоединение в конкурсах разрешено всем активным клиентам.
Денежные системы
Депозиты и выводы финансов реализуются через популярные методы:
– Платежные карточ ки
– Цифровые счета
– Bitcoin
– Банковские переводы
Стартовый платеж — от 100 рублей. Снятие средств обрабатывается в течение 24 времени.
Команда саппорта
Непрерывная отдел саппорта готова поддержать в исправлении каких-либо ситуаций:
– Онлайн-чат
– Email
– Связь
– Публичные сети
Надежность и разрешение
Лицензионный ресурс функционирует на основании глобальной документа. Любые сведения пользователей охранены современным SSL-кодированием.
Вывод
Актуальное зеркало предоставляет стабильный вход к любимым слотам, щедрым промокодам и удобным возможностям. Откройте счет прямо сейчас и приобретите стартовый подарок!
Подключение к сайту через рабочие зеркала
Нынешние интернет казино дают клиентам постоянный подключение к развлечениям. Основной сайт ДжиВиСпин оперирует бесперебойно, предоставляя большой ассортимент азартных развлечений. Тем не менее иногда образуются цифровые трудности или блокировки, в связи с чем критично быть осведомлённым о доступности действующих зеркал.
Что означает из себя основное зеркало казино
Альтернатива — это абсолютная дубликат центрального ресурса с таким же возможностями. Рабочее зеркало на данный момент позволяет преодолевать региональные барьеры и продолжать времяпрепровождение.
Основные плюсы применения зеркал:
– Стопроцентный переход к личному кабинету
– Фиксация любых данных учётной записи
– Идентичный перечень игр
– Текущие вознаграждения и акции
Создание аккаунта на сайте
Операция оформления требует считанные минут. Новые пользователи зарабатывают великодушный подарок за создание счёта, который в состоянии охватывать:
– Стартовый игровой приз
– Даровые вращения для игр
– Особые коды
– Повышенный компенсацию
Для выполнения записи следует:
1. Зайти на центральный сайт или зеркало
2. Щёлкнуть клавишу «Создать аккаунт»
3. Ввести контактные реквизиты
4. Заверить email или номер
5. Применить ваучер (если есть присутствии)
Вход в собственный кабинет
По завершении правильной записи игроки в состоянии совершать вход через официальный веб-сайт или рабочее зеркало. Собственный кабинет даёт полный контроль над учётной записью:
– История пари
– Внесение баланса
– Снятие денег
– Контроль бонусами
– Участие в турнирах
Бонусы и промо казино
Сайт удовлетворяет клиентов разнообразными бонусными программами:
Вступительные бонусы
Новые игроки приобретают богатый пакет наград на вступительные вклады. Как правило это предполагает долевую добавку к размеру депозита плюс даровые фриспины.
Постоянные промо
– Каждонедельный возврат до 15%
– Состязания с выигрышными фондами
– Призы на число рождения
– Специальные акции для VIP игроков
Программа вознаграждения
Активные клиенты накапливают единицы, которые допустимо превратить на подлинные деньги или уникальные преимущества.
Карманная форма и приложение
Передовые разработки дают возможность развлекаться в любом месте подходяще. Карманная форма портала автономно адаптируется под экран всякого гаджета.
Выгоды смартфонного программы:
– Оперативная запуск развлечений
– Удобный интерфейс
– Мгновенные-нотификации о промо
– Возможность загрузить для Android и iOS
Настоящее казино: среда подлинного азартного дома
Раздел Live клуба доставляет клиентов в антураж истинного гемблинг заведения. Компетентные операторы управляют игру в формате актуального времени.
Доступные варианты:
– Американская рулетка
– Блэкджек
– Классика
– Техасский холдем
Автоматы и азартные автоматы
Ассортимент азартных слотов содержит сотни позиций от ведущих производителей. Каждый игрок подберёт автомат по нраву:
– Винтажные машины
– Новые слоты с бонусными уровнями
– Джекпот-автоматы
– Многолинейные автоматы
Турниры и раздачи
Постоянные состязания привносят драйв и обеспечивают способность обрести значительные награды. Вовлечение в состязаниях зачастую даровое, а наградные суммы составляют внушительных объёмов.
Охрана и анонимность
Портал применяет передовые технологии криптографии для обеспечения сведений пользователей. Каждые транзакционные процедуры совершаются через защищённые протоколы.
Вывод
Центральный сайт и его действующие зеркала обеспечивают надёжный вход к качественным гемблинг играм. Привлекательные бонусы, удобная карманная форма, богатство автоматов и компетентное Live-клуб формируют платформу прекрасным опцией для фанатов развлекательных слотов.
drugs gooobet
sex goobet
Переход к ресурсу через актуальные зеркала
Участники сетевых казино регулярно встречаются с ситуацией блокировки основного домена. Как раз для решения этой проблемы существуют копии легального ресурса. KiloGram гарантирует беспрепятственный подключение ко всем опциям платформы.
Что такое функционирующее зеркало казино
Дубликат значит собой точную копию главного веб-сайта с идентичным функционалом. Единственное различие — это альтернативное имя. Любые параметры клиента, включая средства, бонусы и данные партий, находятся неизменными.
Плюсы применения зеркал
Функционирующие зеркала располагают множеством важных достоинств:
– Постоянный переход к выбранным слотам
– Полная защита персональных информации
– Удержание всех конфигураций персонального кабинета
– Опция приобретения поощрений и присутствия в акциях
Регистрация на основном домене
Ход создания аккаунта максимально несложен и занимает буквально минут. Начинающие участники могут рассчитывать на солидный стартовый приз за регистрацию.
Этапы оформления аккаунта
1. Вход на официальный сайт или его альтернативу
2. Нажатие на клавишу “Присоединиться”
3. Внесение обязательных информации
4. Проверка email почты
5. Внесение бонусного кода (в случае есть)
Поощрения и предложения для клиентов
Казино балует своих клиентов всевозможными наградными системами.
Главные типы наград
Вводный приз — солидное премирование для начинающих участников, каковое способно охватывать материальные средства и фриспины.
Безвозмездные спины — опция крутить в топовых аппаратах бесплатно.
Кешбэк — пропорциональный возмещение утраченных денег, каковой выплачивается каждую неделю или ежемесячно.
Бонусные коды — эксклюзивные комбинации, обеспечивающие добавочные привилегии.
Персональный кабинет: возможности и конфигурации
Персональный аккаунт дает абсолютный регулирование над развлекательным опытом. Тут имеются:
– Администрирование счетом
– Данные операций
– Действующие бонусы
– Установки сохранности
– Валидация профиля
Мобильная вариант и софт
Новейшие участники признают портативность. Ресурс предоставляет двойной варианта для ставок с карманных девайсов.
Отзывчивая портативная версия
Смартфонная платформа ресурса без участия приспосабливается под экран любого девайса. Не требуется устанавливать отдельное приложение.
Приложение для гаджетов
Доступно инсталлировать официальное софт для iOS и Android. Программа дает:
– Скорый доступ
– Доработанный интерфейс
– Мобильные-оповещения о поощрениях
– Устойчивую функциональность
Live игры: антураж подлинного клуба
Категория Live казино переносит пользователей в атмосферу истинного клуба. Квалифицированные ведущие ведут партии в формате прямого времени.
Топовые Live-форматы
– Французская рулетка
– Blackjack
– Punto Banco
– Техасский холдем
Аппараты: выбор слотов
Библиотека слотовых автоматов включает тысячи наименований от известных производителей. Участники откроют:
– Классические аппараты
– Графические слоты
– Накопительный приз-слоты
– Мегавейс
Турниры и эксклюзивные мероприятия
Периодические соревнования обеспечивают игрокам конкурировать друг с другом за значительные выигрышные банки. Любой конкурс обладает свои критерии участия и список чемпионов.
Пути внесения и вывода денег
Платформа поддерживает множество расчетных инструментов:
– Банковские инструменты
– Электронные кошельки
– Криптовалюты
– Прямые транзакции
Все операции проходят защищенно благодаря актуальным протоколам криптографии.
Отдел поддержки
Профессиональные консультанты отдела помощи готовы поддержать 24/7. Предусмотрены такие методы общения:
– Онлайн-чат
– Email-сервис
– Аудио горячая линия
– Медийные сети
Заключение
Легальный портал платформы и его рабочие дубликаты дают игрокам надежный и легкий вход к широкому ассортименту геймерских услуг. Щедрые подарки, частые акции, качественная поддержка и комфортные денежные системы формируют геймерский досуг предельно захватывающим и выгодным.
Доступ к порталу и функционирующие зеркала
Современные сетевые казино предоставляют игрокам огромный выбор игр. Официальный веб-сайт Bollywood казино предоставляет защищенный доступ ко всем сервисам. При этом периодически случаются ситуации, когда необходимо дополнительный вариант подключения.
Что представляет собой действующее зеркало
Действующее зеркало — это абсолютная реплика главного ресурса с иным доменным адресом. Зеркало сегодня помогает обходить потенциальные блокировки и обеспечивать бесперебойный доступ к выбранным играм.
Главное зеркало характеризуется идентичными возможностями, что и базовый ресурс:
– Совокупный перечень слотов
– Собственный профиль с зафиксированными параметрами
– Полные награды и промо
– Проверенные денежные операции
Создание аккаунта и авторизация в казино
Процедура оформления на платформе занимает буквально минут. Недавним клиентам следует:
1. Попасть на функционирующее зеркало сегодня
2. Нажать опцию «Зарегистрироваться»
3. Заполнить требуемые информацию
4. Верифицировать цифровую почту или номер смартфона
5. Забрать награду за открытие аккаунта
Доступ в собственный профиль осуществляется с помощью внесение ID и кода доступа.
Описание призовой структуры
Выгодная наградная политика — основное достоинство платформы. Участники обретают разнообразные бонусы:
Начальные поощрения
Новые участники могут рассчитывать на щедрый приз за создание аккаунта. Как правило это совокупность возможностей, содержащий:
– Пропорциональную премию к дебютному пополнению
– Бесплатные спины
– Призовые финансы на кошелек
Кодовые комбинации и эксклюзивные акции
Периодические бонусные комбинации позволяют активировать призовые привилегии. Задействовать их допустимо в отдельном разделе собственного кабинета.
Free spins и компенсация
Free spins — это возможность крутить автоматы без расходования своих денег. Кэшбек подразумевает определенный возврат израсходованных финансов.
Каталог развлечений
Игровая площадка предоставляет впечатляющую библиотеку игр.
Игровые машины
Вариативность слотов впечатляет представление. Представлены обычные 3-барабанные автоматы и новые игры с занимательной анимацией.
Live игры
Зона Live заведения транспортирует игроков в атмосферу истинного азартного клуба. Умелые ведущие осуществляют раунды в прямом эфире.
Состязания и доски почета
Систематические соревнования вносят азарта и обеспечивают шанс получить большие выигрыши.
Mobile версия и клиент
Актуальные инновации позволяют наслаждаться в любом месте. Mobile реализация самостоятельно подстраивается под экран гаджета.
Установить программу возможно для программных ОС iOS и Android. Клиент дает:
– Быстрый переход
– Бесперебойную работу
– Мгновенные-алерты об бонусах
– Интуитивный дизайн
Банковские операции
Казино принимает многочисленные системы депозита и вывода средств:
– Пластиковые инструменты
– Цифровые платформы
– Крипто
– Финансовые операции
Каждые транзакции выполняются через безопасное канал, что подтверждает сохранность приватных сведений.
Департамент support
Профессиональная команда помощи работает 24/7. Контактировать с менеджерами возможно через:
– Живой-чат
– Почтовую почту
– Связь
– Медиа сети
Итоги
Официальный ресурс и его актуальное зеркало гарантируют пользователям стабильный и приятный переход к азартным развлечениям. Выгодные подарки, широкий спектр развлечений и качественная ассистанс формируют участие крайне комфортной и результативной.
sex goobet
нейросети для студентов нейросети для студентов .
Нынешние виртуальные казино дают пользователям большой выбор вариантов для удобной игры. Тем не менее иногда доступ к основному порталу может являться заблокированным. В таких обстоятельствах на выручку спешит казино Bollywood, которое дает бесперебойный доступ ко всем функциям платформы.
Что такое актуальное зеркало казино
Зеркало — это идентичная версия основного сайта, которая размещается по альтернативному адресу. Альтернативный ресурс имеет весь функционал основного портала, включая индивидуальный кабинет, счет и данные платежей.
Ключевые плюсы эксплуатации зеркала:
– Постоянный доступ к порталу
– Абсолютная идентичность возможностей
– Сохранность персональных данных
– Хранение доступных привилегий
Как обнаружить актуальное зеркало сегодня
Существует множество проверенных способов нахождения актуальной ссылки:
Официальные источники:
1. Электронная рассылка — руководство регулярно пересылает информацию с свежими ссылками
2. Общественные сети — официальные профили выкладывают свежую информацию
3. Сервис поддержки — консультанты сообщают безопасные домены
4. Смартфонное приложение — позволяет избегать блокировки
Создание аккаунта на лицензионном веб-сайте
Операция создания аккаунта занимает только несколько минут и предполагает из нижеследующих стадий:
1. Открытие на лицензионный сайт или действующее зеркало
2. Выбор на иконку «Создать аккаунт»
3. Заполнение регистрационной анкеты
4. Проверка почтовой почты или контактного номера
5. Включение поощрения за регистрацию при присутствии промокода
Только что зарегистрированные геймеры получают щедрый стартовый подарок, который может охватывать даровые прокруты, финансовые поощрения или компенсацию.
Авторизация в индивидуальный кабинет
Логин на платформе реализуется привычным путем. Достаточно указать имя пользователя и секретный ключ, задействованные при оформлении.
Важные моменты для защищенного входа:
– Задействуйте защищенный секретный ключ
– Задействуйте двухэтапную верификацию
– Не фиксируйте пароли на общественных компьютерах
– Мониторьте интернет строку браузера
Описание поощрительной структуры
Игровая платформа радует геймеров разнообразными вознаграждениями и кампаниями:
Стартовый пакет
Дебютанты имеют возможность претендовать на значительное награду за дебютный депозит. Традиционно это пропорциональная прибавка к зачисленной величине плюс фриспины для известных слотов.
Периодические предложения
– Семидневный кэшбек — возвращение процента потерянных денежных средств
– Бонусы на последующие взносы
– Особые промо по знаменательным датам
– Конкурсы с солидными наградными суммами
Система лояльности
Активные клиенты зарабатывают очки за произвольную бет, которые затем меняются на реальные денежные призы, бесплатные вращения или эксклюзивные льготы.
Кодовые слова: как применять
Бонус-коды — это индивидуальные сочетания знаков, дающие право к эксклюзивным вознаграждениям.
Откуда получить актуальные промокоды:
– Официальные общественные сети казино
– Партнерские порталы
– Email-информирование
– Профильные группы
Вводится промокод в отдельное поле при регистрации или пополнении счета.
Портативная версия и приложение
Передовые пользователи предпочитают делать ставки с телефонных девайсов. Сайт предоставляет два варианта для комфортной телефонной игры.
Адаптивная вариант
Браузерная версия самостоятельно адаптируется под габариты экрана. Не требует инсталляции и функционирует в всяком актуальном браузере.
Мобильное приложение
Получить app можно для устройств на Android и iOS. Выгоды app:
– Оперативная активация
– Устойчивая работа
– Мгновенные-уведомления о промо
– Самостоятельный преодоление блокировок
Этап установки элементарен: достаточно перейти на ресурс с мобильного девайса и придерживаться инструкциям.
Игровой каталог
База развлечений насчитывает огромное количество единиц от ведущих провайдеров.
Слоты
Развлекательные машины — крайне востребованная раздел развлечений. Размещены обычные трехбарабанные машины, актуальные видеослоты с поощрительными раундами, а также прогрессивные призы.
Live казино
Зона с реальными ведущими позволяет прочувствовать антураж реального казино. Открыты столы с рулеткой.
Передача осуществляется в HD качестве, поддерживается диалог с дилером и прочими геймерами.
Соревнования
Систематически организуются турниры по всевозможным играм. Включение дает шанс получить денежные награды, бесплатные вращения или особые презенты.
Платежные процедуры
Платформа предлагает большой спектр расчетных инструментов:
– Банковские карты
– Цифровые платформы
– Биткоин
– Денежные платежи
Наименьшая величина вклада — доступная для массы игроков. Снятие денег осуществляется в минимальные интервалы.
Отдел поддержки
Квалифицированные консультанты способны содействовать непрерывно. Доступны такие варианты связи:
– Веб-чат
– Email
– Телефонная линия
– Коммуникационные сети
Разъяснения на распространенные вопросы можно получить в зоне FAQ.
Итог
Основной портал казино и его действующие зеркала дают игрокам абсолютный подключение ко всем опциям портала. Солидные вознаграждения, приятная мобильная версия, впечатляющий ассортимент аттракционов и профессиональная ассистенция делают гемблинг досуг крайне приятным и защищенным.
1xbet t?rkiye giri? 1xbet t?rkiye giri? .
Дополнительная информация: https://sk-bik-stroy.ru
scam gooobet
1x lite 1x lite .
MedBridge Pharmacy: tops pharmacy – canadian pharmacy no scripts
Доступ к ресурсу через проверенные зеркала
Актуальные сетевые казино предоставляют геймерам постоянный доступ к развлечениям. Центральный ресурс Retro функционирует бесперебойно, обеспечивая обширный набор развлекательных развлечений. Тем не менее периодически формируются технические трудности или барьеры, в связи с чем существенно иметь представление о присутствии рабочих зеркал.
Что собой представляет собой основное зеркало казино
Дубликат — это полная дубликат основного сайта с аналогичным возможностями. Актуальное зеркало сейчас обеспечивает обходить региональные блокировки и поддерживать гемблинг.
Главные выгоды задействования зеркал:
– Стопроцентный доступ к личному кабинету
– Сохранение любых сведений аккаунта
– Идентичный перечень автоматов
– Текущие привилегии и промо
Оформление на ресурсе
Операция создания аккаунта длится несколько минут. Недавние клиенты обретают богатый бонус за запись, он может вмещать:
– Приветственный денежный приз
– Бесплатные кручения для слотов
– Эксклюзивные ваучеры
– Увеличенный кэшбек
Ради финализации оформления требуется:
1. Перейти на центральный портал или дубликат
2. Нажать опцию «Регистрация»
3. Указать контактные информацию
4. Подтвердить email или мобильный
5. Использовать промокод (в случае наличии)
Авторизация в личный кабинет
Следом за корректной оформления геймеры в состоянии осуществлять доступ с помощью центральный портал или рабочее зеркало. Персональный кабинет открывает всесторонний контроль над счётом:
– История игр
– Внесение депозита
– Вывод средств
– Управление привилегиями
– Вовлечение в соревнованиях
Бонусы и промо казино
Платформа удовлетворяет клиентов различными поощрительными системами:
Вступительные поощрения
Новые игроки зарабатывают щедрый набор бонусов на первые депозиты. Обычно это включает пропорциональную прибавку к размеру пополнения плюс даровые спины.
Постоянные промо
– Раз в неделю кэшбек до 15%
– Турниры с призовыми суммами
– Бонусы на день рождения
– Эксклюзивные предложения для статусных геймеров
Программа вознаграждения
Регулярные геймеры собирают баллы, что возможно превратить на настоящие средства или эксклюзивные привилегии.
Портативная редакция и программа
Современные инновации помогают геймить где угодно. Мобильная вариант веб-сайта независимо адаптируется под дисплей произвольного гаджета.
Выгоды портативного приложения:
– Быстрая запуск слотов
– Практичный дизайн
– Всплывающие-нотификации о промо
– Опция инсталлировать для Android и iOS
Live казино: атмосфера истинного гемблинг заведения
Раздел Live игорного дома переносит пользователей в антураж настоящего азартного дома. Профессиональные дилеры организуют развлечение в состоянии реального времени.
Предлагаемые развлечения:
– Европейская рулетка
– Двадцать одно
– Карточная игра
– Покерная игра
Автоматы и игровые слоты
Собрание гемблинг машин содержит множество позиций от топовых производителей. Всякий игрок найдёт слот по желанию:
– Традиционные слоты
– Инновационные игры с призовыми этапами
– Прогрессивный-автоматы
– Динамические слоты
Турниры и раздачи
Периодические состязания вносят драйв и открывают опцию обрести большие вознаграждения. Включение в соревнованиях часто даровое, а выигрышные банки доходят до крупных размеров.
Охрана и приватность
Сайт применяет актуальные системы защиты для гарантии реквизитов пользователей. Совокупные платёжные транзакции осуществляются через зашифрованные соединения.
Вывод
Официальный веб-сайт и его действующие зеркала дают надёжный переход к отличным азартным играм. Богатые призы, удобная карманная вариант, вариативность игр и высококлассное Live-казино делают ресурс превосходным вариантом для любителей азартных игр.
Переход к ресурсу через актуальные зеркала
Клиенты интернет казино постоянно имеют дело с вопросом недоступности основного домена. Как раз для устранения этой трудности предусмотрены дубликаты основного портала. Ретро предоставляет абсолютный подключение ко всем опциям площадки.
Что такое функционирующее зеркало казино
Дубликат является собой полную копию оригинального ресурса с идентичным набором функций. Единственное отличие — это другое имя. Абсолютно все сведения игрока, вместе с баланс, бонусы и архив партий, сохраняются такими же.
Преимущества использования зеркал
Рабочие зеркала обладают множеством значимых выгод:
– Круглосуточный вход к излюбленным автоматам
– Стопроцентная конфиденциальность личных информации
– Неизменность всех конфигураций личного кабинета
– Возможность приобретения поощрений и вовлечения в промоакциях
Оформление профиля на основном сайте
Процесс создания аккаунта крайне несложен и длится немного минут. Свежие игроки способны надеяться на внушительный приветственный поощрение за создание аккаунта.
Шаги создания аккаунта
1. Вход на официальный портал или его дубликат
2. Выбор на элемент “Присоединиться”
3. Внесение нужных сведений
4. Верификация цифровой почты
5. Ввод промокода (в случае есть)
Награды и акции для клиентов
Казино балует своих клиентов разнообразными призовыми системами.
Основные типы бонусов
Начальный бонус — щедрое премирование для начинающих клиентов, которое именно в состоянии содержать денежные призы и безвозмездные спины.
Free spins — способность использовать в популярных аппаратах безвозмездно.
Возврат средств — процентный компенсация израсходованных финансов, каковой предоставляется еженедельно или раз в месяц.
Специальные коды — специальные наборы, гарантирующие дополнительные поощрения.
Индивидуальный кабинет: инструменты и конфигурации
Индивидуальный аккаунт гарантирует абсолютный контроль над пользовательским взаимодействием. Здесь доступны:
– Контроль балансом
– Данные транзакций
– Текущие бонусы
– Параметры защиты
– Подтверждение учетной записи
Мобильная версия и программа
Современные клиенты ценят гибкость. Площадка дает 2 способа для игры с смартфонных гаджетов.
Адаптивная смартфонная вариант
Смартфонная платформа ресурса автоматически адаптируется под экран любого гаджета. Не требуется загружать особое приложение.
Софт для смартфонов
Возможно загрузить оригинальное приложение для iOS и Android. Софт дает:
– Быстрый запуск
– Улучшенный дизайн
– Мобильные-сообщения о поощрениях
– Стабильную операционность
Live игры: среда подлинного клуба
Категория Live столов отправляет игроков в обстановку настоящего клуба. Опытные ведущие проводят партии в формате прямого времени.
Востребованные Live-развлечения
– Рулетка
– Blackjack
– Baccarat
– Карибский покер
Слоты: разнообразие автоматов
Каталог игровых аппаратов включает массу позиций от лидирующих провайдеров. Игроки откроют:
– Классические автоматы
– Современные слоты
– Мега-выигрыш-игры
– Мегавейс
Турниры и особые события
Регулярные турниры дают возможность пользователям состязаться друг с другом за внушительные призовые пулы. Отдельный состязание располагает свои критерии включения и рейтинг лидеров.
Пути внесения и снятия средств
Платформа использует ряд финансовых сервисов:
– Кредитные инструменты
– Виртуальные кошельки
– Blockchain-платежи
– Прямые отправления
Все транзакции реализуются конфиденциально благодаря актуальным протоколам кодирования.
Служба помощи
Профессиональные консультанты службы support расположены ассистировать 24/7. Доступны такие способы коммуникации:
– Онлайн-чат
– Email-обслуживание
– Голосовая поддержка
– Коммуникационные сети
Вывод
Легальный домен платформы и его актуальные дубликаты предоставляют игрокам защищенный и комфортный вход к широкому спектру азартных развлечений. Крупные поощрения, частые промоакции, квалифицированная помощь и удобные платежные методы делают развлекательный времяпрепровождение чрезвычайно приятным и результативным.
scam gooobet
online pharmacy adderall https://joeasymeds.top/# best online pharmacies
1вин официальный сайт Киргизия 1win41825.help
чат нейросеть для учебы nejroset-dlya-referatov-2.ru .
умная нейросеть для учебы nejroset-dlya-referatov-3.ru .
Актуальные онлайн-казино предоставляют клиентам широкий спектр слотов и выгодные награды. Впрочем для комфортной игры критично знать, как получить доступ к РЎСѓРєР° и его функционирующие зеркала.
Что такое официальный веб-ресурс казино
Основной сайт казино — это первичная платформа, где игроки могут наслаждаться гемблинг автоматами. Ресурс функционирует на официальных принципах и владеет всеми требуемыми документами.
Первостепенные достоинства основного ресурса:
– Безопасность пользовательских сведений
– Объективные положения участия
– Подтвержденные платежи
– Профессиональная поддержка
Актуальное зеркало казино: для чего используется
Дублирующий ресурс — это абсолютная дубликат основного ресурса, размещенная по другому веб-адресу. Рабочее зеркало разрабатывается для предоставления стабильного доступа к сайту.
Основания эксплуатации копий сайта:
– Ограничение первичного адреса
– Регламентные мероприятия
– Высокая посещаемость на ресурс
Как найти действующее зеркало на сегодня
Получить новое рабочее зеркало можно различными вариантами:
1. Рассылка — оформите подписку на email подписку
2. Служба техподдержки — напишите в онлайн-чат
3. Публичные каналы — следите за публикациями
4. Специализированные площадки — проверенные платформы
Регистрация на ресурсе казино
Процедура создания аккаунта длится лишь несколько секунд:
1. Кликните на клавишу “Регистрация”
2. Внесите необходимые данные
3. Активируйте контактную адрес
4. Активируйте бонусный код, если есть
Вслед за успешной оформления вам станет доступен персональный раздел.
Награды и купоны
Щедрая бонусная система — значимое конкурентное преимущество казино:
Подарок за регистрацию
Начинающие игроки приобретают начальный презент, который может включать:
– Финансовый счет на дебютный пополнение
– Фри-спины для автоматов
– Приветственные бонусы
Купоны
Периодически выходят свежие коды, дающие возможность использовать специальные привилегии.
Программа кешбэка
Активные пользователи получают процент проигранных ставок назад.
Текущие промо и конкурсы
Казино постоянно организует увлекательные акции:
– Недельные турниры
– Праздничные бонусы
– Розыгрыши крупных подарков
– Система статусов
Доступ в личный профиль
Для логина на ресурс необходимо:
1. Посетить официальный сайт или функционирующее зеркало
2. Кликнуть “Login”
3. Ввести никнейм и код доступа
В пользовательском кабинете открыты данные опции:
– Депозит депозита
– Обналичивание выигрышей
– Просмотр архива операций
– Редактирование персональными настройками
Адаптивная вариант и программа
Адаптивная вариант
Мобильная вариант сайта предоставляет шанс участвовать с любого портативного гаджета. Визуал адаптивно оптимизируется под размер экрана.
Клиент для загрузки
Загрузить приложение можно для:
– Android — безопасная скачивание с портала
– iOS — установка через App Store
Преимущества программы:
– Оперативный старт
– Бесперебойная производительность
– Push-сообщения об промо
– Производительный функционал
Азартные секции
Игровые машины
Богатая подборка игровых слотов от известных провайдеров:
– Классические слоты
– Продвинутые-эмуляторы
– Накопительные-машины
Live казино
Зона с профессиональными ведущими предлагает:
– Рулетка
– 21
– Баккара
– Texas Hold’em
Эфиры проводятся в превосходном формате, обеспечивая эффект аутентичного казино.
Методы депозита и получения
Сайт обслуживает множественные платежные системы:
– Банковские средства
– Электронные системы
– Криптовалюты
– Банковские транзиты
Наименьшие суммы пополнения и моментальные выплаты создают развлечение максимально комфортной.
Служба поддержки
Опытная группа support оперирует 24/7 и может содействовать с разными вопросами:
– Реалтайм-чат
– Email-консультации
– Phone линия
Выводы
Основной портал казино и его актуальные зеркала обеспечивают игрокам конфиденциальный и азартный гемблинг отдых. Богатые поощрения, функциональная адаптивная вариант, богатые автоматы и качественное live-казино превращают эту платформу отличным вариантом для гемблинг развлечений.
Современные онлайн-казино предоставляют пользователям разнообразный спектр возможностей для комфортной времяпрепровождения. Переход к сервису https://c58.ru/ осуществляется через основной веб-ресурс или актуальное зеркало.
Что такое действующее зеркало казино
Действующее зеркало — это дополнительный URL официального веб-сайта казино. Такие версии генерируются для гарантирования постоянного подключения к гемблинговой сервису.
Зеркало сегодня полностью воспроизводит характеристики официального сайта. Игроки имеют такой же путь ко всем возможностям, включая регистрацию, зачисление средств кошелька и получение выигрышей.
Создание аккаунта на официальном веб-сайте
Алгоритм открытия профиля длится всего несколько мгновений. Свежим клиентам требуется:
1. Зайти на официальный ресурс или текущее официальное зеркало
2. Кликнуть кнопку “Регистрация”
3. Указать обязательные сведения
4. Верифицировать e-mail почту
5. Использовать промокод при существовании
После финализации регистрации клиент получает подарок за регистрацию, который может включать бесплатные вращения или денежное начисление.
Вход в личный кабинет
Персональный кабинет — это охраняемая территория, где участники могут управлять своим счетом. Для доступа необходимо указать username и секретный ключ.
В персональном кабинете открыты такие инструменты:
– Просмотр хронологии транзакций
– Применение купонов
– Регулирование вознаграждениями
– Присоединение в турнирах
– Отслеживание возврата средств
– Корректировка данных
Поощрения и промо
Азартная система дарит выгодные вознаграждения:
Начальный пакет — дебютанты зарабатывают солидное начисление на начальные пополнения.
Фриспины — дарятся как при создании аккаунта, так и в ходе различных промо.
Возврат средств — регулярный компенсация процента израсходованных сумм.
Купоны — эксклюзивные коды, открывающие право к эксклюзивным предложениям.
Описание азартных разделов
Слоты
Библиотека slots включает сотни игр от лучших разработчиков. Клиенты откроют как обычные аппараты, так и инновационные мультимедийные автоматы с интересной оформлением.
Live казино
Зона Live казино предлагает возможность соревноваться с настоящими дилерами в условиях актуального времени. Открыты востребованные варианты: рулетка, блэкджек, баккара, покер.
Соревнования
Постоянные соревнования с большими призовыми банками манят тысячи участников. Победители завоевывают монетарные выплаты и специальные бонусы.
Телефонная версия и app
Мобильная версия ресурса позволяет развлекаться с всякого гаджета. Оформление автономно подстраивается под размер экрана.
Загрузить приложение можно для устройств на Android и iOS. Мобильное приложение обладает всеми опциями настольной версии.
Как обнаружить рабочее зеркало на текущий день
Действующие адреса копий регулярно обновляются. Узнать действующую ссылку можно несколькими путями:
– Через службу поддержки
– В настоящих информационных сетях
– По email дайджесту
– На аффилиатных площадках
Защита и официальность
Основной домен функционирует на базе глобальной документа. Все платежи шифруются актуальными протоколами кодирования.
Анонимность личных реквизитов сохраняется в стопроцентном размере.
Итог
Официальный ресурс и его актуальные зеркала обеспечивают участникам постоянный доступ к высококлассным игровым услугам. Выгодные поощрения, всевозможные слоты, компетентная сервис — все это делает гемблинговый процесс максимально приятным и увлекательным.
mostbet kaszinó Magyarország mostbet kaszinó Magyarország
MedicoBridge RX: mexico medication – mexicanrxpharm
Передовые онлайн-казино гарантируют пользователям разнообразный спектр развлечений и привлекательные премии. Впрочем для беспроблемной деятельности существенно осознавать, как найти Голд официальный сайт и его действующие зеркала.
Что такое главный сайт казино
Лицензионный ресурс казино — это базовая площадка, где клиенты могут пользоваться игровыми автоматами. Платформа действует на официальных принципах и обладает всеми требуемыми лицензиями.
Ключевые выгоды основного веб-сайта:
– Защищенность персональных сведений
– Честные правила игры
– Гарантированные выводы
– Оперативная поддержка
Рабочее зеркало казино: для чего необходимо
Альтернативный адрес — это абсолютная копия основного ресурса, находящаяся по другому веб-адресу. Функционирующее зеркало создается для предоставления бесперебойного соединения к порталу.
Причины эксплуатации альтернативных адресов:
– Недоступность основного сайта
– Регламентные мероприятия
– Большая загрузка на платформу
Как отыскать свежее зеркало в данный момент
Узнать текущее проверенное зеркало можно множественными путями:
1. Почтовые оповещения — оформите подписку на почтовую рассылку
2. Отдел поддержки — проконсультируйтесь в онлайн-чат
3. Социальные медиа — следите за обновлениями
4. Специализированные порталы — достоверные сайты
Создание аккаунта на сайте казино
Процедура создания аккаунта составляет всего несколько мгновений:
1. Нажмите на кнопку “Открыть счет”
2. Заполните необходимые данные
3. Активируйте электронную адрес
4. Примените купон, если предоставлен
Сразу после завершенной оформления вам предоставится возможен личный раздел.
Премии и купоны
Привлекательная бонусная политика — значимое конкурентное преимущество казино:
Поощрение за создание аккаунта
Новые клиенты получают приветственный подарок, который может содержать:
– Финансовый депозит на стартовый вклад
– Free spins для слотов
– Бездепозитные бонусы
Активационные коды
Постоянно публикуются эксклюзивные коды, обеспечивающие забрать специальные привилегии.
Схема возврата средств
Постоянные пользователи возвращают порцию потраченных ставок в виде компенсации.
Свежие акции и турниры
Ресурс регулярно запускает азартные кампании:
– Weekly турниры
– Специальные предложения
– Раздачи ценных выигрышей
– Схема VIP-клуба
Логин в индивидуальный аккаунт
Для входа на сайт нужно:
1. Перейти на лицензионный сайт или актуальное зеркало
2. Нажать “Login”
3. Ввести имя пользователя и код доступа
В личном разделе предоставлены данные возможности:
– Пополнение кошелька
– Получение призов
– Просмотр архива игр
– Управление индивидуальными данными
Портативная версия и программа
Адаптивная вариант
Responsive платформа веб-сайта позволяет развлекаться с различных смартфонного телефона. Визуал автоматически адаптируется под формат монитора.
Программа для download
Загрузить программу можно для:
– Android — официальная установка с ресурса
– iOS — скачивание через App Store
Плюсы программы:
– Моментальный вход
– Стабильная функциональность
– Push-оповещения об акциях
– Оптимизированный UI
Игровые секции
Автоматы
Разнообразная коллекция эмуляторных машин от ведущих разработчиков:
– Ретро игры
– Продвинутые-автоматы
– Накопительные-игры
Live игры
Секция с живыми крупье обеспечивает:
– Рулетки
– Двадцать одно
– Баккара
– Poker
Эфиры осуществляются в отличном качестве изображения, создавая эффект аутентичного казино.
Системы внесения средств и обналичивания
Сайт обслуживает различные денежные системы:
– Дебетовые карты
– Электронные кошельки
– Цифровые валюты
– Прямые транзиты
Стартовые пороги пополнения и оперативные транзакции делают развлечение максимально приятной.
Команда поддержки
Квалифицированная отдел support функционирует 24/7 и готова ассистировать с всеми задачами:
– Мгновенный-чат
– Email-переписка
– Голосовая линия
Выводы
Главный ресурс казино и его рабочие зеркала предоставляют пользователям защищенный и азартный игровой процесс. Выгодные подарки, функциональная mobile платформа, обширные слоты и качественное live-казино делают эту площадку замечательным вариантом для развлекательных времяпрепровождения.
melbet как отыграть бонус https://melbet27438.help
кликните сюда https://17slon.net
Описание основного ресурса
Современное онлайн-казино дарит своим игрокам большой набор услуг и призов. Официальный портал Gold казино работает непрерывно, гарантируя доступ к известным симуляторам, live-казино и обширным предложениям.
Функционирующее зеркало: путь к ресурсу
Что такое дубликат казино
Копия представляет собой полную дубликат основного веб-сайта с иным доменным путем. Функционирующее зеркало обеспечивает участникам миновать блокировки и обеспечивать надежный путь к любимым играм.
Как обнаружить текущее зеркало сегодня
Рабочие URL на официальное зеркало выкладываются через:
– Электронную оповещение
– Основные коммуникационные сети
– Команду сопровождения
– Тематические сайты
Созданиеаккаунта на платформе
Ход оформления
Регистрация занимает буквально минут и подразумевает такие действия:
1. Переход на основной веб-сайт или действующее зеркало
2. Выбор элемента “Регистрация”
3. Внесение контактных информации
4. Проверка адреса или мобильного
5. Формирование пароля
Вознаграждение за созданиеаккаунта
Первые игроки обретают выгодные приветственные подарки:
– Денежные средства на счет
– Бесплатныевращения для слотов
– Усиленный коэффициент возврата
– Эксклюзивные промокоды
Авторизация в индивидуальный кабинет
Зарегистрированные участники имеютвозможность выполнить доступ через официальный веб-сайт или актуальное зеркало. Для этого следует ввести логин и код, созданные при открытиисчета.
Возможности личного профиля
В персональном кабинете предоставлены следующие опции:
– Изменение контактными сведениями
– Внесение счета
– Получение средств
– Использование купонов
– Отслеживание архива транзакций
– Включение в турнирах
Бонусы и промо
Виды вознаграждений
Казино поощряет своих игроков многочисленными наградными системами:
– Начальный бонус — выгодные бонусы на дебютные пополнения
– Бесплатныевращения — подарочные спины в рейтинговых симуляторах
– Компенсация — регулярный возмещение процента проигрышей
– Программа верности — уникальные преимущества для верных клиентов
Промокоды и их применение
Специальные промокоды обеспечивают экстра поощрения. Для активации необходимо набрать шифр в соответствующее раздел в персональном аккаунте.
Геймплейный набор
Слоты
Библиотека игровых слотов насчитывает сотни названий от ведущих провайдеров:
– Обычные слоты
– Новые слоты
– Накопительные автоматы
– Тематические автоматы
Live казино
Зона Live-казино предоставляет участие с живыми ведущими в обстановке онлайн стрима:
– Рулетка
– Очко
– Baccarat
– Покер
Турниры
Постоянные конкурсы с большими выигрышными пулами проводятся постоянно. Игроки сражаются за победу в списке.
Портативная адаптация и софт
Смартфонная реализация ресурса
Оригинальный портал целиком адаптирован для портативных девайсов. Клиенты способны пользоваться слоты непосредственно через интернет-браузер без необходимости скачивания.
Приложение для установки
Авторское мобильное программа доступно для установки на девайсы с базовыми платформами Android и iOS. APP дает:
– Оперативный путь к слотам
– Надежную работу
– Оперативные-извещения о акциях
– Комфортный интерфейс
Вывод
Оригинальный веб-сайт казино и его рабочие копии обеспечивают пользователям комплексный возможность к качественным азартным сервисам. Выгодные поощрения, различные кампании, комфортная мобильная адаптация и профессиональная служба превращают азартный процесс чрезвычайно enjoyable и прибыльным.
resultsfirst – Bookmarked this immediately, planning to revisit for updates and inspiration.
1xbet tr 1xbet tr .
Характеристика оригинального ресурса
Актуальное онлайн-казино обеспечивает своим участникам обширный спектр развлечений и поощрений. Оригинальный сайт РЎСѓРєР° зеркало действует постоянно, давая доступ к популярным играм, live-казино и многочисленным предложениям.
Актуальное зеркало: доступ к платформе
Что такое зеркало казино
Дубликат составляет собой полную дубликат основного ресурса с альтернативным интернет путем. Действующее зеркало позволяет участникам миновать блокировки и иметь постоянный путь к выбранным автоматам.
Как отыскать действующее зеркало сегодня
Актуальные URL на главное зеркало размещаются через:
– Электронную рассылку
– Проверенные социальные сети
– Сервис сопровождения
– Тематические порталы
Регистрация на сайте
Процедура регистрации
Регистрация требует всего минут и предполагает такие шаги:
1. Открытие на основной ресурс или рабочее зеркало
2. Клик опции “Зарегистрироваться”
3. Ввод персональных информации
4. Подтверждение аккаунта или мобильного
5. Создание секретнойкомбинации
Приз за регистрацию
Первые пользователи обретают выгодные начальные подарки:
– Денежные депозиты на аккаунт
– Бесплатныевращения для симуляторов
– Увеличенный процент возврата
– Эксклюзивные купоны
Вход в личный счет
Активные клиенты имеютвозможность осуществить вход через официальный веб-сайт или актуальное зеркало. Для этого нужно ввести никнейм и пароль, придуманные при регистрации.
Инструменты собственного раздела
В личном разделе предоставлены следующие опции:
– Управление учетными данными
– Пополнение счета
– Получение призов
– Ввод бонусов
– Отслеживание архива операций
– Регистрация в соревнованиях
Бонусы и кампании
Категории бонусов
Казино поощряет своих пользователей многочисленными поощрительными акциями:
– Стартовый набор — солидные поощрения на начальные пополнения
– Халявныеспины — подарочные спины в популярных слотах
– Кешбэк — еженедельный возмещение процента убытков
– Система лояльности — особые преимущества для регулярных пользователей
Ваучеры и их использование
Особые ваучеры обеспечивают дополнительные подарки. Для применения нужно набрать шифр в определенное раздел в персональном разделе.
Игровой ассортимент
Слоты
Коллекция игровых слотов содержит тысячи вариантов от ведущих производителей:
– Традиционные симуляторы
– Современные развлечения
– Джекпот слоты
– Тематические слоты
Live казино
Зона Live-казино дарит участие с живыми крупье в условиях реального трансляции:
– Французскаярулетка
– Двадцатьодно
– Баккара
– Карибскийпокер
Соревнования
Постоянные конкурсы с солидными выигрышными фондами организуются ежедневно. Игроки борются за лидерство в турнирнойсетке.
Mobile версия и софт
Смартфонная платформа сайта
Главный сайт на100% оптимизирован для портативных аппаратов. Игроки могут открывать автоматы непосредственно через обозреватель без нужды скачивания.
Приложение для скачивания
Авторское портативное программа доступно для получения на девайсы с базовыми средами Android и iOS. Приложение обеспечивает:
– Моментальный подход к автоматам
– Надежную работу
– Оперативные-уведомления о промо
– Простой оформление
Итог
Главный сайт казино и его рабочие дубликаты обеспечивают клиентам комплексный доступ к качественным игровым сервисам. Щедрые вознаграждения, всевозможные акции, удобная адаптивная версия и квалифицированная помощь делают игровой времяпрепровождение предельно удобным и результативным.
Актуальные онлайн-казино гарантируют клиентам богатый ассортимент опций для приятной игры. Доступ к платформе https://crbpoddorie.ru/ производится через лицензионный сайт или действующее зеркало.
Что такое актуальное зеркало казино
Действующее зеркало — это резервный линк главного портала казино. Такие клоны генерируются для поддержания постоянного входа к игровой площадке.
Дубликат текущее совершенно повторяет характеристики главного сайта. Игроки приобретают схожий путь ко всем функциям, включая открытие счета, пополнение депозита и снятие выигрышей.
Создание аккаунта на лицензионном сайте
Процедура оформления учетной записи занимает всего несколько секунд. Будущим клиентам требуется:
1. Перейти на главный ресурс или действующее подлинное зеркало
2. Нажать кнопку “Регистрация”
3. Указать необходимые информацию
4. Проверить электронную почту
5. Ввести бонусный код при существовании
После окончания оформления участник обретает приз за регистрацию, который может включать free spins или денежное вознаграждение.
Вход в собственный кабинет
Личный кабинет — это безопасная зона, где участники вправе управлять своим аккаунтом. Для входа необходимо указать имя пользователя и password.
В пользовательском кабинете открыты нижеперечисленные функции:
– Мониторинг истории операций
– Применение купонов
– Настройка бонусами
– Участие в конкурсах
– Отслеживание возмещения
– Настройка профиля
Поощрения и промо
Азартная сервис дарит великодушные бонусы:
Приветственный набор — начинающие зарабатывают значительное вознаграждение на первые депозиты.
Фриспины — начисляются как при создании аккаунта, так и в процессе различных кампаний.
Возмещение — еженедельный компенсация доли потерянных сумм.
Бонусные коды — уникальные комбинации, дающие доступ к специальным предложениям.
Анализ развлекательных категорий
Slots
Коллекция slots охватывает сотни позиций от ведущих разработчиков. Геймеры встретят как традиционные машины, так и актуальные 3D-слоты с увлекательной графикой.
Live казино
Раздел Live казино дарит право участвовать с живыми крупье в формате текущего времени. Имеются востребованные развлечения: рулетка, блэкджек, баккара, покер.
Соревнования
Постоянные состязания с крупными выигрышными банками притягивают тысячи соревнующихся. Лидеры получают монетарные вознаграждения и эксклюзивные поощрения.
Портативная версия и приложение
Портативная версия сайта дает возможность играть с всякого девайса. Интерфейс самостоятельно корректируется под габариты экрана.
Установить app можно для девайсов на Android и iOS. Телефонное программа располагает всеми характеристиками настольной версии.
Как обнаружить актуальное зеркало на текущий день
Действующие URL копий регулярно обновляются. Обнаружить рабочую линк можно разными вариантами:
– Через отдел техподдержки
– В проверенных информационных сетях
– По почтовой подписке
– На аффилиатных порталах
Надежность и легальность
Лицензионный портал работает на основе мировой документа. Все транзакции оберегаются современными протоколами шифрования.
Анонимность личных данных гарантируется в стопроцентном размере.
Итог
Лицензионный домен и его рабочие копии дарят участникам круглосуточный путь к первоклассным гемблинговым играм. Выгодные вознаграждения, разнообразные развлечения, опытная поддержка — все это создает развлекательный времяпрепровождение максимально приятным и притягательным.
Переход к порталу через действующие зеркала
Нынешние интернет казино дают клиентам непрерывный переход к развлечениям. Основной сайт https://www.tolbaga.ru/ оперирует устойчиво, гарантируя большой выбор игровых автоматов. Впрочем периодически появляются цифровые проблемы или ограничения, в связи с чем необходимо быть осведомлённым о наличии актуальных зеркал.
Что является собой главное зеркало казино
Копия — это идентичная версия центрального ресурса с идентичным интерфейсом. Действующее зеркало сейчас даёт возможность обходить региональные блокировки и возобновлять времяпрепровождение.
Основные плюсы эксплуатации зеркал:
– Абсолютный вход к собственному кабинету
– Поддержание совокупных показателей учётной записи
– Аналогичный перечень автоматов
– Свежие вознаграждения и акции
Оформление на сайте
Процедура создания аккаунта отнимает считанные минут. Свежие клиенты обретают богатый бонус за создание счёта, он способен охватывать:
– Начальный денежный кредит
– Даровые спины для слотов
– Специальные промокоды
– Повышенный возврат
Ради финализации оформления следует:
1. Перейти на центральный ресурс или зеркало
2. Кликнуть опцию «Регистрация»
3. Указать индивидуальные сведения
4. Верифицировать email или мобильный
5. Применить промокод (если есть наличии)
Авторизация в личный кабинет
Следом за корректной создания аккаунта игроки имеют возможность осуществлять подключение через центральный ресурс или действующее зеркало. Собственный кабинет обеспечивает всесторонний надзор над учётной записью:
– Архив ставок
– Зачисление депозита
– Вывод денег
– Регулирование бонусами
– Присутствие в соревнованиях
Бонусы и промо казино
Портал удовлетворяет клиентов вариативными бонусными схемами:
Стартовые подарки
Дебютанты обретают внушительный букет бонусов на стартовые взносы. Как правило это предполагает процентную прибавку к величине взноса плюс безвозмездные фриспины.
Периодические кампании
– Раз в неделю компенсация до 15%
– Конкурсы с выигрышными банками
– Поощрения на годовщину рождения
– Эксклюзивные акции для привилегированных геймеров
Схема поощрения
Активные игроки собирают единицы, они допустимо обменять на настоящие финансы или уникальные привилегии.
Портативная вариант и приложение
Современные технологии позволяют играть всюду комфортно. Карманная форма ресурса независимо приспосабливается под размер любого гаджета.
Выгоды портативного софта:
– Моментальная загрузка игр
– Комфортный облик
– Мгновенные-нотификации о промо
– Опция загрузить для Android и iOS
Live казино: обстановка подлинного азартного клуба
Область Live казино транспортирует пользователей в атмосферу истинного развлекательного дома. Опытные операторы управляют процесс в состоянии актуального времени.
Имеющиеся игры:
– Европейская рулетка
– Карточная игра
– Классика
– Карты
Автоматы и гемблинг машины
Собрание игровых автоматов охватывает сотни позиций от ведущих разработчиков. Любой клиент обнаружит развлечение по желанию:
– Стандартные автоматы
– Новые слоты с дополнительными этапами
– Накопительный-машины
– Динамические слоты
Турниры и розыгрыши
Систематические конкурсы вносят драйв и дают способность заработать внушительные суммы. Вовлечение в турнирах зачастую комплиментарное, а наградные фонды насчитывают внушительных объёмов.
Защита и конфиденциальность
Платформа эксплуатирует инновационные протоколы шифрования для охраны данных игроков. Все денежные операции совершаются через охраняемые линии.
Итог
Главный портал и его актуальные зеркала обеспечивают стабильный вход к превосходным азартным развлечениям. Привлекательные поощрения, удобная карманная версия, разнообразие игр и компетентное Live-клуб превращают ресурс превосходным выбором для любителей гемблинг слотов.
Доступ к ресурсу через рабочие зеркала
Нынешние сетевые казино обеспечивают геймерам непрерывный вход к услугам. Главный веб-сайт Вован казино оперирует надёжно, предлагая широкий набор развлекательных слотов. Впрочем периодически возникают технические сложности или ограничения, следовательно критично иметь представление о присутствии актуальных зеркал.
Что собой представляет из себя основное зеркало казино
Копия — это идентичная реплика официального портала с аналогичным интерфейсом. Действующее зеркало сейчас позволяет преодолевать местные ограничения и продолжать времяпрепровождение.
Принципиальные преимущества использования зеркал:
– Стопроцентный вход к индивидуальному кабинету
– Удержание каждых показателей профиля
– Схожий перечень автоматов
– Свежие поощрения и кампании
Создание аккаунта на портале
Механизм регистрации отнимает считанные минут. Свежие игроки приобретают богатый подарок за оформление, он в состоянии охватывать:
– Приветственный игровой бонус
– Даровые кручения для машин
– Уникальные ваучеры
– Увеличенный возврат
С целью завершения создания аккаунта требуется:
1. Войти на официальный веб-сайт или дубликат
2. Щёлкнуть элемент «Зарегистрироваться»
3. Указать индивидуальные информацию
4. Активировать email или контакт
5. Применить промокод (в случае доступности)
Подключение в индивидуальный кабинет
После удачной записи пользователи могут осуществлять вход используя главный ресурс или действующее зеркало. Собственный кабинет обеспечивает всесторонний контроль над профилем:
– Летопись пари
– Пополнение счёта
– Снятие средств
– Контроль наградами
– Участие в конкурсах
Поощрения и предложения казино
Сайт награждает геймеров разнообразными привилегированными программами:
Приветственные подарки
Начинающие зарабатывают щедрый букет наград на вступительные пополнения. Обычно это включает процентную добавку к сумме вклада плюс безвозмездные фриспины.
Регулярные кампании
– Еженедельный компенсация до 15%
– Конкурсы с премиальными пулами
– Поощрения на число рождения
– Особые промо для VIP геймеров
План вознаграждения
Постоянные игроки зарабатывают баллы, которые возможно трансформировать на настоящие средства или особые льготы.
Карманная версия и софт
Современные технологии обеспечивают развлекаться где комфортно. Смартфонная версия сайта автономно адаптируется под монитор всякого аппарата.
Плюсы портативного софта:
– Моментальная запуск слотов
– Комфортный облик
– Мгновенные-уведомления о бонусах
– Опция инсталлировать для Android и iOS
Живое казино: обстановка настоящего азартного учреждения
Секция Live казино доставляет пользователей в обстановку реального гемблинг учреждения. Квалифицированные ведущие организуют действие в состоянии актуального времени.
Представленные столы:
– Колесо фортуны
– Очко
– Карточная игра
– Покер
Слоты и азартные аппараты
Коллекция гемблинг автоматов включает тысячи вариантов от ведущих провайдеров. Любой игрок подберёт автомат по желанию:
– Традиционные автоматы
– Современные автоматы с бонусными этапами
– Прогрессивный-слоты
– Динамические игры
Соревнования и лотереи
Систематические конкурсы привносят азарт и предоставляют опцию заработать большие суммы. Вовлечение в состязаниях часто даровое, а выигрышные пулы насчитывают больших размеров.
Охрана и конфиденциальность
Сайт эксплуатирует актуальные методы криптографии для охраны информации пользователей. Все денежные процедуры совершаются через защищённые соединения.
Заключение
Главный веб-сайт и его функционирующие зеркала предоставляют стабильный вход к отличным гемблинг сервисам. Великодушные бонусы, эргономичная портативная вариант, разнообразие слотов и квалифицированное Live-заведение создают сайт прекрасным опцией для ценителей гемблинг слотов.
1xbet giri? 1xbet giri? .
1xbetgiri? 1xbet-giris-43.com .
Современные онлайн-казино гарантируют клиентам массу опций для приятной игры. Центральный сайт http://www.билитуй-РјРєРґС†.СЂС„ открывает вход ко всем функциям и игровым автоматам. Однако при появлении программных сложностей на помощь прибывают актуальные копии.
Что есть собой рабочее зеркало
Дубликат казино — это полная версия официального веб-сайта, находящаяся по другому URL. Официальное зеркало хранит все функции, в том числе создание аккаунта, доступ в собственный кабинет, премии и купоны.
Копия на сегодня предоставляет:
– Постоянный вход к игровым автоматам
– Совершенную конфиденциальность персональных данных
– Поддержку счета и истории переводов
– Применимость всех акций
Регистрация на основном сайте
Процесс открытия профиля отнимает считанные минут. Новым клиентам необходимо:
1. Перейти на основной сайт или действующее зеркало
2. Кликнуть кнопку «Регистрация»
3. Ввести требуемые сведения
4. Активировать э-мейл почту
5. Ввести кодовое слово при присутствии
После конца регистрации геймеры приобретают бонус за регистрацию, какой может охватывать бесплатные вращения или денежное вознаграждение.
Доступ в собственный кабинет
Персональный кабинет обеспечивает всеобъемлющий управление над азартным процессом. Через персональный профиль возможно:
– Пополнять баланс
– Выводить выигрыши
– Активировать бонусные коды
– Контролировать журнал ставок
– Принимать участие в состязаниях
– Обретать кешбэк
Анализ бонусов и промо-предложений
Великодушная поощрительная программа — значимое преимущество казино. Основные категории премий:
Стартовый бонус
Новички обретают щедрое премирование на стартовые вклады. Величина премии может составлять 100-200% от величины вклада.
Бонусные спины
Халявные прокруты начисляются для востребованных автоматов. Количество фриспинов варьируется от 10 до 500 штук.
Кэшбек
Систематический или ежемесячный возврат процента проигранных денег. Типичный размер компенсации — 5-15%.
Состязания
Периодические конкурсы с большими премиальными фондами. Конкурсанты соревнуются за призовые позиции в рейтинге.
Смартфонная версия и софт
Портативная версия разрешает развлекаться с любого гаджета. Пользователи могут скачать софт для iOS и Android или применять веб версию.
Достоинства мобильного приложения:
– Скоростная подзагрузка слотов
– Удобный графический интерфейс
– Пуш-нотификации о промо
– Возможность входа через отпечаток пальца
Слоты и Live казино
Игровая библиотека охватывает сотни позиций от ведущих разработчиков.
Известные разделы игр:
– Обычные машины
– Современные слоты с призовыми этапами
– Прогрессивный джекпот игры
– Мегавейс слоты
Live игорный зал
Раздел live казино предоставляет развлечение с живыми крупье. Представлены стандартные развлечения:
– Европейская рулетка
– Блэкджек
– Баккара
– Карибский покер
Как отыскать актуальное зеркало
Обрести рабочую URL на зеркало можно несколькими вариантами:
1. Зарегистрироваться на емейл-уведомления
2. Мониторить за обновлениями в социальных сетях
3. Написать в департамент поддержки
4. Сохранить актуальное зеркало в фавориты
Заключение
Лицензионный портал и его функционирующие зеркала обеспечивают бесперебойный путь к азартным слотам. Великодушные поощрения, множественные промокоды, практичное мобильное приложение и высококлассная сервис поддержки создают развлекательный процесс предельно удобным и конфиденциальным.
Характеристика основного веб-сайта
Передовые интернет казино предлагают игрокам широкий выбор игр и перспектив. Основной ресурс Клубника обеспечивает проверенный путь к развлекательным сервисам.
Действующее зеркало: вход на сегодня
Резервный сайт служит собой идентичную реплику главного портала. Действующее зеркало дает возможность клиентам миновать потенциальные барьеры.
Достоинства применения зеркала
Основные достоинства включают:
– Постоянный шанс к сайту
– Удержание любых функций базового ресурса
– Охрана личных материалов
– Идентичный возможности
Создание аккаунта на ресурсе
Процедура создания аккаунта характеризуется понятностью и практичностью. Новые пользователи необходимо:
1. Открыть главный веб-сайт или его зеркало
2. Кликнуть на элемент оформления
3. Заполнить необходимые сведения
4. Активировать электронную адрес
5. Совершить первый вход
Подарок за регистрацию
Новички зарабатывают солидный приветственный приз. Такое награда в состоянии предусматривать:
– Финансовые бонусы
– Бесплатные прокруты
– Увеличенный коэффициент кэшбэка
Вход в личный раздел
Действующие пользователи в состоянии оперативно авторизоваться в персональный раздел, используя учетные данные и шифр. Собственный профиль обеспечивает доступ к:
– Управлению счетом
– Журналу операций
– Текущим подаркам
– Настройкам профиля
Бонусы и кампании
Ресурс периодически проводит многочисленные мероприятия для участников.
Разновидности бонусов
Базовые типы вознаграждений:
– Пополнительные бонусы – часть от суммы внесения
– Бесплатные вращения – бесплатные спины в автоматах
– Кэшбек – компенсация части утраченных денег
– Призовые трофеи – награды за игру в конкурсах
Купоны
Эксклюзивные ваучеры дают возможность получить добавочные выгоды. Пользователи имеют возможность найти их на тематических площадках или заработать в новостях.
Мобильная вариант и программа
Передовые клиенты любят мобильный досуг.
Характеристики mobile версии
– Гибкий вид для всех девайсов
– Совокупный возможность к развлечениям
– Оперативная работа
– Комфортное контроль
Скачать приложение
Переносное программа предложено для downloading на девайсы с базовыми платформами Android и iOS. App дает:
– Стабильную функциональность
– Push оповещения о акциях
– Моментальный доступ к избранным играм
Игровой каталог
Игровой клуб дает огромную библиотеку азартных забав.
Игровые машины
Коллекция развлекательных автоматов включает:
– Стандартные игры
– Передовые аппараты
– Джекпотные игры
– Тематические слоты
Live казино
Область живых столов предлагает опцию состязаться с настоящими крупье. Открыты:
– Рулетка
– Блек-джек
– Punto Banco
– Poker
Конкурсы
Регулярные соревнования позволяют пользователям соревноваться за крупные призовые фонды. Турнирная сетка обновляется еженедельно.
Финансовые транзакции
Казино предоставляет массу способов зачисления и вывода финансов:
– Банковские карточки
– Цифровые кошельки
– Межбанковские трансферы
– Цифровые валюты
Все операции производятся безопасно с использованием актуальных протоколов защиты.
Сервис сопровождения
Профессиональная команда поддержки трудится без перерыва. Обратиться с менеджерами реально через:
– Online чат
– Электронную почту
– Телефонную линию
– Social сети
Охрана и лицензирование
Портал функционирует на основании действительной лицензии. Такое удостоверяет:
– Легальность игрового процесса
– Безопасность индивидуальных информации
– Оперативные выводы
– Регулируемый геймплей
Вывод
Лицензионный ресурс и его рабочие дубликаты обеспечивают участникам целостный ассортимент услуг для комфортной и выгодной игры. Солидные бонусы, всевозможные автоматы, опытная служба и безопасная инфраструктура операций создают платформу лучшим вариантом для любителей игровых услуг.
нейросеть онлайн для учебы [url=https://nejroset-dlya-referatov.ru/]nejroset-dlya-referatov.ru[/url] .
дизайн интерьера квартир 40 м услуги дизайнера квартиры
Переход к порталу через рабочие зеркала
Пользователи онлайн казино часто контактируют с проблемой закрытия официального домена. Конкретно для преодоления этой ситуации созданы альтернативные адреса официального домена. Болливуд казино предоставляет беспрепятственный вход ко всем функциям казино.
Что такое действующее зеркало казино
Копия является собой идентичную дубликат основного сайта с аналогичным возможностями. Ключевое отличие — это другое имя. Любые данные игрока, содержа баланс, бонусы и архив раундов, остаются такими же.
Достоинства применения зеркал
Актуальные зеркала характеризуются набором ключевых выгод:
– Бесперебойный переход к предпочитаемым слотам
– Совершенная защита личных данных
– Сохранение всех опций индивидуального кабинета
– Опция взятия призов и участия в кампаниях
Открытие счета на главном домене
Ход создания аккаунта максимально элементарен и занимает немного минут. Начинающие клиенты в состоянии претендовать на крупный начальный поощрение за создание аккаунта.
Этапы оформления аккаунта
1. Вход на официальный ресурс или его дубликат
2. Выбор на кнопку “Создать аккаунт”
3. Ввод необходимых параметров
4. Активация цифровой почты
5. Внесение промокода (в случае есть)
Подарки и предложения для игроков
Платформа поощряет своих игроков различными наградными предложениями.
Базовые варианты призов
Вводный приз — внушительное премирование для новых клиентов, каковое в состоянии содержать монетарные призы и фриспины.
Фриспины — шанс использовать в популярных игровых машинах бесплатно.
Кэшбек — частичный возврат проигранных средств, который начисляется каждую неделю или раз в месяц.
Бонусные коды — эксклюзивные наборы, дающие добавочные преимущества.
Персональный кабинет: опции и установки
Персональный кабинет обеспечивает полный контроль над пользовательским активностью. Тут доступны:
– Регулирование средствами
– История переводов
– Действующие бонусы
– Параметры безопасности
– Верификация профиля
Мобильная версия и приложение
Нынешние игроки предпочитают доступность. Платформа дает двойной пути для игры с мобильных девайсов.
Приспособленная смартфонная редакция
Адаптивная платформа портала самостоятельно настраивается под монитор любого гаджета. Не нужно устанавливать специальное программное обеспечение.
Программа для смартфонов
Возможно установить официальное программу для iOS и Android. Софт гарантирует:
– Быстрый вход
– Оптимизированный дизайн
– Мобильные-сообщения о бонусах
– Устойчивую функциональность
Live игры: антураж истинного клуба
Секция Live игр транспортирует клиентов в среду подлинного клуба. Компетентные дилеры осуществляют игры в варианте живого времени.
Востребованные Live-развлечения
– Европейская рулетка
– Блэкджек
– Punto Banco
– Карибский покер
Слоты: многообразие развлечений
Собрание игровых машин вмещает тысячи названий от известных поставщиков. Клиенты откроют:
– Традиционные машины
– Графические слоты
– Мега-выигрыш-машины
– Мегавейс
Соревнования и эксклюзивные акции
Регулярные турниры обеспечивают участникам бороться друг с другом за значительные наградные суммы. Любой состязание обладает свои условия включения и доску победителей.
Варианты пополнения и вывода денег
Казино предоставляет комплекс расчетных методов:
– Кредитные картыы
– Виртуальные платежные системы
– Blockchain-платежи
– Прямые транзакции
Абсолютно все операции проходят надежно благодаря актуальным системам шифрования.
Служба обслуживания
Профессиональные сотрудники сервиса поддержки настроены ассистировать 24/7. Доступны следующие методы контакта:
– Живой-чат
– Email-сервис
– Телефонная поддержка
– Коммуникационные сети
Итог
Легальный сайт казино и его функционирующие альтернативы дают пользователям конфиденциальный и приятный переход к огромному диапазону развлекательных активностей. Солидные подарки, периодические предложения, компетентная сервис и комфортные платежные методы делают геймерский досуг максимально комфортным и доходным.
Вход к порталу через актуальные зеркала
Современные сетевые казино обеспечивают игрокам бесперебойный доступ к развлечениям. Основной ресурс Вован казино онлайн действует стабильно, предоставляя широкий ассортимент игровых автоматов. Впрочем иногда появляются программные сложности или блокировки, в связи с чем существенно знать о существовании действующих зеркал.
Что собой представляет из себя главное зеркало казино
Копия — это абсолютная версия официального сайта с идентичным функционалом. Функционирующее зеркало сегодня обеспечивает обходить региональные запреты и вести времяпрепровождение.
Главные достоинства задействования зеркал:
– Полный переход к личному кабинету
– Удержание совокупных информации аккаунта
– Такой же набор развлечений
– Актуальные поощрения и акции
Открытие счёта на сайте
Операция оформления отнимает несколько минут. Свежие клиенты приобретают великодушный поощрение за запись, который может содержать:
– Приветственный денежный приз
– Бесплатные вращения для слотов
– Эксклюзивные купоны
– Увеличенный кэшбек
Для финализации записи следует:
1. Переместиться на основной ресурс или альтернативу
2. Кликнуть опцию «Зарегистрироваться»
3. Написать контактные реквизиты
4. Верифицировать электронную почту или номер
5. Использовать код (если есть доступности)
Авторизация в персональный кабинет
Следом за правильной создания аккаунта геймеры могут производить доступ с помощью главный сайт или рабочее зеркало. Индивидуальный кабинет предоставляет полный управление над счётом:
– Архив пари
– Ввод кошелька
– Изъятие выигрышей
– Регулирование наградами
– Вовлечение в конкурсах
Награды и кампании казино
Портал удовлетворяет пользователей вариативными поощрительными предложениями:
Начальные подарки
Новички обретают богатый букет привилегий на первые депозиты. Зачастую это охватывает процентную прибавку к размеру депозита плюс комплиментарные спины.
Регулярные предложения
– Еженедельный кэшбек до 15%
– Состязания с премиальными пулами
– Подарки на годовщину рождения
– Эксклюзивные предложения для статусных геймеров
План вознаграждения
Постоянные клиенты накапливают баллы, они можно превратить на реальные призы или уникальные бонусы.
Мобильная форма и утилита
Передовые технологии обеспечивают геймить где подходяще. Мобильная версия сайта независимо настраивается под монитор всякого аппарата.
Выгоды карманного программы:
– Оперативная запуск слотов
– Удобный вид
– Мгновенные-сообщения о акциях
– Возможность скачать для Android и iOS
Live казино: антураж настоящего игорного дома
Категория Live заведения транспортирует пользователей в среду подлинного игорного заведения. Опытные операторы организуют действие в состоянии актуального времени.
Имеющиеся игры:
– Рулетка
– Очко
– Классика
– Карты
Барабаны и игровые машины
Ассортимент азартных слотов охватывает тысячи позиций от топовых студий. Любой клиент найдёт слот по желанию:
– Классические барабаны
– Видеослоты с специальными турами
– Джекпот-слоты
– Megaways машины
Турниры и акции
Постоянные конкурсы включают азарт и дают шанс выиграть значительные вознаграждения. Участие в состязаниях нередко безвозмездное, а наградные пулы достигают внушительных сумм.
Безопасность и конфиденциальность
Платформа использует актуальные методы кодирования для защиты информации клиентов. Все денежные действия выполняются через зашифрованные каналы.
Заключение
Центральный портал и его действующие зеркала предоставляют устойчивый переход к первоклассным азартным услугам. Привлекательные награды, эргономичная карманная форма, вариативность машин и квалифицированное Live-заведение формируют платформу прекрасным вариантом для фанатов развлекательных автоматов.
MedBridge Pharmacy: online pharmacy 365 pills – canadian pharmacy cialis 20mg
https://medbridgepharmacy.shop/# MedBridge Pharmacy
заказ цветов с доставкой в москве недорого букеты http://dostavka-cvetov-moskva495.ru/ .
Современные онлайн казино предоставляют игрокам обширный диапазон функций для беспроблемной игры. Но иногда подключение к основному ресурсу может стать ограниченным. В таких обстоятельствах на помощь появляется Болливуд, которое предоставляет бесперебойный путь ко всем опциям платформы.
Что такое действующее зеркало казино
Копия — это точная дубликат лицензионного ресурса, которая размещается по другому адресу. Копия имеет весь функционал оригинального веб-портала, включая персональный кабинет, баланс и сведения транзакций.
Ключевые достоинства эксплуатации зеркала:
– Непрерывный соединение к сайту
– Стопроцентная аналогичность инструментов
– Сохранность персональных реквизитов
– Сохранение существующих поощрений
Как обнаружить действующее зеркало в данный момент
Присутствует множество проверенных методов поиска актуальной адреса:
Легитимные источники:
1. Email рассылка — администрация постоянно пересылает письма с рабочими адресами
2. Коммуникационные сети — проверенные аккаунты публикуют свежую новости
3. Департамент поддержки — операторы предоставляют достоверные ссылки
4. Смартфонное приложение — обеспечивает обходить блокировки
Оформление профиля на официальном портале
Процедура открытия счета отнимает лишь считанные минут и предполагает из таких шагов:
1. Открытие на главный портал или действующее зеркало
2. Нажатие на элемент «Открыть счет»
3. Указание пользовательской анкеты
4. Проверка электронной почты или сотового номера
5. Применение вознаграждения за регистрацию при наличии промокода
Только что зарегистрированные клиенты зарабатывают солидный начальный презент, который может содержать даровые прокруты, финансовые бонусы или компенсацию.
Авторизация в личный кабинет
Логин на сайте осуществляется привычным образом. Достаточно вписать логин и секретный ключ, примененные при открытии счета.
Ключевые нюансы для надежного входа:
– Задействуйте защищенный шифр
– Активируйте двухэтапную идентификацию
– Не записывайте данные на посторонних компьютерах
– Отслеживайте доменную строку браузера
Обзор поощрительной системы
Гемблинг-сайт награждает клиентов разнообразными привилегиями и специальными предложениями:
Стартовый букет
Свежие игроки вправе полагаться на щедрое вознаграждение за первый вклад. Зачастую это процентовая добавка к зачисленной количеству плюс даровые спины для популярных слотов.
Систематические акции
– Семидневный кэшбек — компенсирование процента списанных средств
– Призы на повторные вклады
– Специальные промо по событиям
– Конкурсы с большими выигрышными суммами
План верности
Активные пользователи собирают пункты за произвольную раунд, которые затем превращаются на реальные средства, даровые прокруты или уникальные преимущества.
Промокоды: как задействовать
Промокоды — это индивидуальные наборы литер, обеспечивающие право к специальным поощрениям.
В каких местах получить свежие промокоды:
– Легитимные социальные сети казино
– Сотрудничающие сайты
– Email-информирование
– Профильные форумы
Вводится промокод в отдельное поле при регистрации или пополнении счета.
Телефонная версия и приложение
Нынешние геймеры отдают предпочтение играть с телефонных аппаратов. Портал обеспечивает 2 способа для удобной мобильной игры.
Отзывчивая редакция
Веб версия само собой настраивается под диагональ монитора. Не предполагает установки и действует в каждом актуальном браузере.
Телефонное приложение
Скачать app можно для девайсов на Android и iOS. Плюсы app:
– Скоростная запуск
– Надежная функционирование
– Автоматические-уведомления о акциях
– Автономный преодоление блокировок
Процесс загрузки легок: нужно попасть на веб-сайт с телефонного гаджета и выполнять инструкциям.
Азартный коллекция
Коллекция развлечений насчитывает огромное количество позиций от передовых провайдеров.
Слоты
Азартные машины — крайне востребованная раздел игр. Доступны стандартные 3-барабанные аппараты, современные видео-автоматы с поощрительными стадиями, а также джекпотные выигрыши.
Live казино
Зона с настоящими раздающими дает возможность испытать антураж истинного казино. Имеются развлечения с блэкджеком.
Стриминг ведется в превосходном четкости, имеется коммуникация с ведущим и другими участниками.
Состязания
Регулярно запускаются соревнования по разным категориям. Участие предоставляет право завоевать монетарные выигрыши, бесплатные вращения или уникальные бонусы.
Платежные манипуляции
Платформа предоставляет значительный спектр платежных систем:
– Пластиковые карты
– Виртуальные системы
– Цифровая валюта
– Денежные транзакты
Минимальная величина вклада — посильная для массы геймеров. Снятие выигрышей производится в минимальные сроки.
Сервис поддержки
Профессиональные операторы настроены поддержать круглосуточно. Доступны такие методы коммуникации:
– Онлайн-чат
– Email
– Голосовая связь
– Общественные сети
Ответы на распространенные проблемы можно получить в секции FAQ.
Заключение
Основной веб-сайт казино и его актуальные зеркала предоставляют игрокам совершенный доступ ко всем сервисам сайта. Великодушные поощрения, комфортная телефонная версия, огромный каталог игр и компетентная служба поддержки делают гемблинг опыт крайне комфортным и конфиденциальным.
Нынешние онлайн-казино обеспечивают участникам обширный выбор развлечений и привлекательные поощрения. Но для стабильной работы необходимо знать, как отыскать casino Eldorado и его действующие зеркала.
Что такое основной ресурс казино
Основной сайт казино — это основная веб-площадка, где пользователи могут развлекаться развлекательными слотами. Ресурс оперирует на легальных принципах и имеет всеми обязательными лицензиями.
Ключевые выгоды главного сайта:
– Защищенность индивидуальных информации
– Честные положения работы
– Стабильные платежи
– Компетентная служба поддержки
Актуальное зеркало казино: для чего используется
Зеркало — это абсолютная версия главного сайта, находящаяся по иному веб-адресу. Действующее зеркало разрабатывается для предоставления постоянного доступа к сайту.
Поводы задействования дублирующих ресурсов:
– Запрет первичного адреса
– Технические работы
– Значительная загрузка на ресурс
Как найти действующее зеркало сейчас
Найти новое проверенное зеркало можно различными путями:
1. Рассылка — оформите подписку на новостную подписку
2. Команда техподдержки — проконсультируйтесь в онлайн-чат
3. Социальные медиа — отслеживайте за публикациями
4. Специализированные сайты — надежные источники
Регистрация на платформе казино
Процедура оформления требует буквально считанные секунд:
1. Выберите на опцию “Открыть счет”
2. Внесите запрашиваемые данные
3. Активируйте контактную e-mail
4. Примените бонусный код, если предоставлен
Вслед за оконченной активации вам откроется открыт индивидуальный профиль.
Поощрения и коды активации
Привлекательная наградная программа — существенное достоинство казино:
Бонус за создание аккаунта
Свежие участники зарабатывают приветственный поощрение, который может предполагать:
– Денежный кредит на первый вклад
– Фриспины для игровых машин
– Бездепозитные деньги
Промокоды
Периодически публикуются эксклюзивные бонусные шифры, предоставляющие использовать экстра привилегии.
Программа кэшбека
Активные пользователи возвращают долю утраченных финансов на счет.
Актуальные предложения и конкурсы
Сайт регулярно организует азартные промо-мероприятия:
– Семидневные чемпионаты
– Праздничные акции
– Раздачи ценных наград
– Механизм статусов
Логин в индивидуальный раздел
Для логина на сайт необходимо:
1. Загрузить основной ресурс или рабочее зеркало
2. Кликнуть “Login”
3. Прописать имя пользователя и пароль
В личном кабинете открыты такие опции:
– Депозит депозита
– Снятие средств
– Проверка журнала операций
– Настройка профильными настройками
Адаптивная версия и app
Адаптивная платформа
Оптимизированная версия веб-сайта предоставляет шанс участвовать с разных мобильного телефона. Визуал автоматически оптимизируется под размер монитора.
Приложение для download
Установить клиент можно для:
– Android — непосредственная download с сайта
– iOS — инсталляция через App Store
Преимущества приложения:
– Оперативный доступ
– Стабильная производительность
– Push-сообщения об предложениях
– Улучшенный интерфейс
Игровые разделы
Слоты
Богатая галерея эмуляторных автоматов от известных производителей:
– Классические автоматы
– Продвинутые-автоматы
– Накопительные-автоматы
Live казино
Категория с настоящими ведущими предлагает:
– Рулеточные столы
– Двадцать одно
– Punto Banco
– Карточные игры
Трансляции ведутся в превосходном качестве изображения, воссоздавая впечатление реального казино.
Варианты пополнения и вывода
Сайт принимает разные транзакционные инструменты:
– Кредитные средства
– Цифровые платежи
– Crypto
– Wire транзиты
Наименьшие суммы внесения и быстрые выводы обеспечивают игру максимально беспроблемной.
Отдел техподдержки
Опытная команда поддержки доступна 24/7 и готова содействовать с всеми вопросами:
– Реалтайм-чат
– Email-помощь
– Голосовая связь
Итоги
Главный веб-сайт казино и его актуальные альтернативные адреса предоставляют пользователям защищенный и интересный гемблинг процесс. Выгодные награды, простая адаптивная вариант, богатые игры и качественное live-казино создают эту площадку превосходным решением для развлекательных досуга.
1xbet turkey 1xbet turkey .
Читать больше на сайте: https://nedvizhmsk.ru
Современные онлайн-казино обеспечивают клиентам широкий диапазон услуг и премиальных предложений. Доступ к площадке производится через главный сайт или его актуальное зеркало ДжиВиСпин, что предоставляет стабильную деятельность.
В чем суть действующее зеркало казино
Альтернатива — это точная версия главного веб-сайта, разработанная для решения ограничений. Зеркало сегодня позволяет игрокам получить соединение к выбранным автоматам в произвольное время.
Проверенное зеркало обладает всеми возможностями первоначального сайта:
– Целый список игр
– Учетная запись с зафиксированными сведениями
– Текущие промокоды
– Безопасные расчетные транзакции
Создание аккаунта на основном сайте
Алгоритм оформления составляет всего немного минут. Свежим клиентам нужно:
1. Войти на основной веб-сайт или актуальное зеркало
2. Нажать на кнопку “Зарегистрироваться”
3. Ввести необходимые сведения
4. Проверить адрес
5. Произвести дебютный платеж
Приветственный бонус зачисляется автоматически после прохождения всех этапов.
Подключение в профиль
Действующие игроки могут произвести подключение применяя:
– Имя пользователя и пароль
– Код мобильного
– Адрес
Личный кабинет обеспечивает возможность к управлению средствами, истории игр и текущим промокодам.
Поощрения и кампании
Гемблинг система радует лояльных клиентов разнообразными вознаграждениями:
Первый набор
– Поощрение на начальный депозит до 100%
– Free spins на топовые машины
– Особые награды за дальнейшие депозиты
Бонусные коды
Особые промокоды обеспечивают возможность на приобретение особых вознаграждений. Текущие промокоды выкладываются в секции “Акции”.
Cashback
Периодический кешбэк равен до 10% от проигранных денег. Выплата предоставляется автоматически.
Система лояльности
Регулярные игроки накапливают очки, которые переводятся на реальные выплаты или бесплатные вращения.
Mobile версия и софт
В целях удобства клиентов разработана полноценная портативная платформа. Адаптивный дизайн позволяет легко участвовать с каждого переносного девайса.
Плюсы софта:
– Скорый подключение к развлечениям
– Адаптированный дизайн
– Стабильная работа
– Push-уведомления о актуальных акциях
Загрузить софт можно даром с официального ресурса для девайсов на Android и iOS.
Коллекция слотов
Автоматы
Коллекция содержит более 2000 автоматов от известных разработчиков:
– Классические автоматы
– Современные автоматы
– Jackpot игры
– Сюжетные игры
Live казино
Раздел Live столов предоставляет игру с подлинными дилерами в онлайн эфире:
– Колесо фортуны
– Blackjack
– Баккара
– Столы покера
Турниры
Регулярные состязания с большими выигрышными пулами устраиваются систематически. Участие в конкурсах разрешено всем зарегистрированным пользователям.
Расчетные методы
Пополнения и снятия средств осуществляются через востребованные способы оплаты:
– Дебетовые карточ ки
– Цифровые системы
– Bitcoin
– Банковские транзакции
Наименьший взнос — от 100 рублей. Получение денег проводится в течение 24 времени.
Сервис саппорта
Круглосуточная группа support может ассистировать в урегулировании любых вопросов:
– Мессенджер
– Email
– Контактный номер
– Общественные сети
Надежность и лицензия
Официальный портал действует на фундаменте глобальной лицензии. Любые параметры клиентов обезопасены актуальным SSL-протоколом.
Резюме
Функционирующее зеркало дает стабильный соединение к выбранным автоматам, щедрым бонусам и удобным функциям. Откройте счет немедленно и получите первый приз!
Характеристика главного ресурса
Передовые интернет казино предлагают участникам разнообразный ассортимент забав и перспектив. Главный сайт Bollywood обеспечивает безопасный доступ к развлекательным функциям.
Рабочее зеркало: путь в настоящий момент
Резервный сайт служит собой точную дубликат официального портала. Действующее зеркало позволяет участникам преодолевать существующие барьеры.
Достоинства применения зеркала
Главные плюсы предполагают:
– Постоянный путь к порталу
– Сохранение полных опций базового веб-сайта
– Защита личных информации
– Аналогичный функционал
Открытие счета на платформе
Механизм открытия счета выделяется доступностью и удобством. Недавние игроки необходимо:
1. Перейти на лицензионный веб-сайт или его зеркало
2. Нажать на элемент оформления
3. Указать требуемые поля
4. Верифицировать почтовую адрес
5. Выполнить первый логин
Вознаграждение за открытие счета
Новички забирают значительный стартовый презент. Данное премия может содержать:
– Финансовые бонусы
– Complimentary спины
– Расширенный процент компенсации
Авторизация в персональный аккаунт
Зарегистрированные клиенты способны моментально войти в персональный раздел, задействуя никнейм и ключ. Личный профиль обеспечивает путь к:
– Регулированию балансом
– Журналу переводов
– Работающим призам
– Параметрам аккаунта
Вознаграждения и кампании
Ресурс периодически проводит всевозможные промо-кампании для клиентов.
Типы бонусов
Основные формы призов:
– Денежные подарки – часть от суммы депозита
– Прокруты – бесплатные вращения в слотах
– Компенсация – возврат доли потерянных финансов
– Турнирные призы – премии за участие в состязаниях
Промокоды
Особые коды дают возможность активировать бонусные бонусы. Клиенты способны получить их на специализированных порталах или получить в уведомлениях.
Портативная адаптация и программа
Передовые игроки ценят портативный досуг.
Опции мобильной адаптации
– Responsive облик для различных устройств
– Совокупный вход к автоматам
– Моментальная подгрузка
– Практичное управление
Скачать софт
Переносное программа открыто для скачивания на устройства с операционными платформами Android и iOS. Программа обеспечивает:
– Надежную деятельность
– Мгновенные уведомления о акциях
– Быстрый вход к избранным развлечениям
Гемблинг выбор
Платформа предлагает обширную галерею игровых игр.
Автоматы
Ассортимент игровых аппаратов включает:
– Стандартные игры
– Видео слоты
– Прогрессивные слоты
– Тематические слоты
Live казино
Секция реальных развлечений предоставляет шанс состязаться с профессиональными диллерами. Представлены:
– Рулетка
– Блэкджек
– Baccarat
– Покер
Состязания
Постоянные соревнования дают возможность пользователям соревноваться за солидные финансовые пулы. Турнирная структура обновляется еженедельно.
Денежные действия
Портал обеспечивает разнообразие опций зачисления и вывода средств:
– Банковские карточки
– Цифровые платежные системы
– Межбанковские переводы
– Цифровые валюты
Любые переводы осуществляются надежно с использованием прогрессивных методов шифрования.
Служба сопровождения
Опытная служба support работает постоянно. Соединиться с операторами доступно через:
– Онлайн чат
– Email почту
– Горячую линию
– Social медиа
Охрана и регулирование
Портал работает на базе легальной разрешения. Это подтверждает:
– Легальность азартного процесса
– Безопасность персональных сведений
– Пунктуальные перечисления
– Контролируемый геймплей
Заключение
Лицензионный портал и его рабочие дубликаты дают участникам совокупный ассортимент опций для приятной и профитной развлечений. Внушительные подарки, разнообразные развлечения, компетентная служба и защищенная платформа выплат формируют казино оптимальным опцией для ценителей азартных развлечений.
mexico pharmacy: MedicoBridge RX – purple pharmacy online
I enjoy playing at this casino https://kokenmetgoesting.be/2026/02/26/monarch-victory-gaming-venue-the-premium-location-offering-remarkable/ because it feels secure and stable. Live tables are immersive, slots offer good variety, and the overall experience remains pleasant over time.
сайт для рефератов сайт для рефератов .
нейросеть пишет реферат нейросеть пишет реферат .
Вход к сайту и действующие адреса
Актуальные интернет казино обеспечивают участникам огромный ассортимент опций. Главный сайт http://xn--80aaxpd2aa5c.xn--p1ai/ гарантирует защищенный переход ко всем возможностям. Однако временами появляются ситуации, когда необходимо резервный путь доступа.
Что означает собой действующее зеркало
Рабочее зеркало — это полная дубликат основного портала с иным URL названием. Зеркало сегодня помогает миновать возможные ограничения и поддерживать непрерывный вход к любимым автоматам.
Проверенное зеркало имеет всеми характеристиками, что и основной ресурс:
– Полный перечень автоматов
– Собственный профиль с записанными сведениями
– Все награды и программы
– Проверенные финансовые операции
Регистрация и авторизация в казино
Этап создания профиля на сайте длится несколько моментов. Новым участникам следует:
1. Попасть на функционирующее зеркало в настоящее время
2. Кликнуть кнопку «Открыть профиль»
3. Заполнить обязательные сведения
4. Активировать электронную почту или информацию смартфона
5. Забрать поощрение за оформление
Доступ в индивидуальный профиль выполняется через внесение никнейма и кода доступа.
Обзор поощрительной программы
Выгодная наградная программа — важнейшее козырь ресурса. Клиенты забирают разнообразные награды:
Приветственные подарки
Свежие пользователи способны претендовать на привлекательный бонус за регистрацию. Традиционно это совокупность предложений, охватывающий:
– Долевую премию к начальному депозиту
– Подарочные фриспины
– Extra средства на кошелек
Кодовые комбинации и эксклюзивные возможности
Постоянные промокоды дают возможность зарабатывать экстра льготы. Активировать их разрешено в отдельном разделе индивидуального кабинета.
Free spins и кэшбек
Фриспины — это вариант крутить автоматы без применения собственных средств. Кэшбек представляет определенный отдачу проигранных денег.
Коллекция слотов
Азартная платформа обеспечивает огромную коллекцию развлечений.
Слоты
Вариативность игровых машин удивляет представление. Есть стандартные трехбарабанные машины и продвинутые видеослоты с занимательной анимацией.
Live игры
Секция Live казино помещает участников в среду реального гемблинг заведения. Профессиональные крупье проводят раунды в онлайн времени.
Состязания и доски почета
Постоянные турниры добавляют азарта и обеспечивают перспективу заработать значительные суммы.
Mobile вариант и софт
Современные технологии дают возможность развлекаться в любимом месте. Mobile форма автономно настраивается под размер гаджета.
Скачать программу можно для мобильных систем iOS и Android. Приложение обеспечивает:
– Оперативный запуск
– Стабильную функционирование
– Push-сообщения об бонусах
– Комфортный интерфейс
Платежные процедуры
Платформа поддерживает разнообразные способы внесения и снятия сумм:
– Банковские карты
– Электронные кошельки
– Криптовалюты
– Банковские транзакции
Всевозможные операции осуществляются через надежное соединение, что гарантирует безопасность личных сведений.
Служба поддержки
Профессиональная команда ассистанса действует 24/7. Связаться с менеджерами возможно через:
– Живой-чат
– Цифровую почту
– Горячую линию
– Общественные платформы
Резюме
Основной ресурс и его рабочее зеркало обеспечивают игрокам надежный и удобный доступ к захватывающим занятиям. Щедрые награды, обширный выбор развлечений и профессиональная сервис делают участие исключительно приятной и результативной.
indian pharmacy paypal TrustRx India top online pharmacy india
Расширенный обзор: https://proecostroj.ru
ии для студентов nejroset-dlya-referatov-1.ru .
Нынешние онлайн-казино гарантируют участникам богатый набор игр и заманчивые премии. Однако для удобной времяпрепровождения необходимо понимать, как обнаружить https://budetezdorovy.ru и его актуальные зеркала.
Что такое лицензионный портал казино
Лицензионный портал казино — это первичная веб-площадка, где игроки могут развлекаться развлекательными развлечениями. Ресурс функционирует на легитимных правах и владеет всеми обязательными лицензиями.
Основные достоинства главного портала:
– Надежность персональных реквизитов
– Честные требования игры
– Стабильные платежи
– Квалифицированная поддержка
Актуальное зеркало казино: для чего требуется
Зеркало — это идентичная клон официального ресурса, находящаяся по другому URL. Актуальное зеркало запускается для предоставления постоянного соединения к ресурсу.
Факторы эксплуатации дублирующих ресурсов:
– Запрет главного домена
– Регламентные процедуры
– Повышенная загрузка на платформу
Как обнаружить действующее зеркало в данный момент
Найти актуальное проверенное зеркало можно различными путями:
1. Email-уведомления — зарегистрируйтесь на email доставку
2. Команда помощи — напишите в онлайн-чат
3. Социальные сети — следите за публикациями
4. Партнерские порталы — достоверные сайты
Открытие счета на сайте казино
Процедура регистрации длится только немного минут:
1. Нажмите на элемент “Создать аккаунт”
2. Укажите запрашиваемые сведения
3. Верифицируйте электронную почту
4. Примените код активации, если имеется
После успешной создания аккаунта вам откроется открыт персональный раздел.
Бонусы и купоны
Привлекательная бонусная программа — ключевое преимущество казино:
Поощрение за создание аккаунта
Начинающие участники получают стартовый бонус, который может содержать:
– Финансовый счет на дебютный взнос
– Фриспины для слотов
– Бездепозитные средства
Бонусные коды
Периодически публикуются эксклюзивные купоны, предоставляющие забрать дополнительные поощрения.
Механизм кэшбека
Регулярные игроки получают часть проигранных средств на счет.
Действующие промо и конкурсы
Сайт систематически запускает увлекательные события:
– Недельные баттлы
– Сезонные предложения
– Конкурсы солидных наград
– Схема VIP-клуба
Авторизация в индивидуальный профиль
Для входа на сайт требуется:
1. Перейти на основной адрес или действующее зеркало
2. Нажать “Авторизация”
3. Прописать email и пароль
В пользовательском аккаунте предоставлены следующие функции:
– Депозит депозита
– Снятие выигрышей
– Анализ архива транзакций
– Настройка личными сведениями
Адаптивная платформа и app
Портативная вариант
Адаптивная версия сайта обеспечивает развлекаться с всех смартфонного девайса. Интерфейс адаптивно оптимизируется под размер дисплея.
Программа для загрузки
Загрузить программу можно для:
– Android — непосредственная установка с ресурса
– iOS — инсталляция через App Store
Преимущества app:
– Быстрый старт
– Бесперебойная операционность
– Push-оповещения об акциях
– Ускоренный интерфейс
Игровые категории
Игровые машины
Обширная коллекция азартных машин от известных провайдеров:
– Ретро автоматы
– Видео-автоматы
– Джекпот-автоматы
Live casino
Зона с реальными крупье дает:
– Рулетки
– 21
– Baccarat
– Poker
Трансляции осуществляются в превосходном качестве, формируя атмосферу реального казино.
Системы зачисления и получения
Ресурс поддерживает разные транзакционные методы:
– Дебетовые card
– Цифровые кошельки
– Цифровые валюты
– Прямые транзиты
Наименьшие пороги пополнения и быстрые выплаты гарантируют развлечение максимально беспроблемной.
Отдел помощи
Профессиональная команда поддержки функционирует 24/7 и готова поддержать с различными вопросами:
– Онлайн-чат
– Email-помощь
– Телефонная служба
Выводы
Официальный ресурс казино и его рабочие зеркала гарантируют участникам конфиденциальный и увлекательный развлекательный процесс. Щедрые поощрения, функциональная mobile версия, обширные развлечения и качественное live-казино формируют эту систему замечательным местом для развлекательных игр.
Современные онлайн-казино обеспечивают клиентам разнообразие путей для беспроблемной игры. Центральный портал РЎСѓРєР° предоставляет доступ ко всем функциям и игровым автоматам. Однако при наличии системных сложностей на помощь приходят актуальные дубликаты.
Что являет собой собой функционирующее зеркало
Зеркало казино — это идентичная версия оригинального портала, размещенная по другому доменному имени. Легитимное зеркало хранит все функции, включая создание аккаунта, доступ в индивидуальный кабинет, бонусы и купоны.
Дубликат на сегодня обеспечивает:
– Стабильный путь к игровым слотам
– Полную конфиденциальность персональных сведений
– Поддержку баланса и записей платежей
– Доступность всех бонусных программ
Открытие профиля на лицензионном портале
Процесс открытия профиля требует несколько минут. Новоиспеченным игрокам следует:
1. Открыть на подлинный сайт или действующее зеркало
2. Кликнуть кнопку «Регистрация»
3. Заполнить необходимые графы
4. Верифицировать электронную почту
5. Ввести промокод при присутствии
После финиша регистрации пользователи зарабатывают подарок за регистрацию, который может иметь бонусные спины или монетарное поощрение.
Логин в личный кабинет
Персональный кабинет дает всеобъемлющий контроль над игровым действом. Через индивидуальный кабинет допускается:
– Депонировать кошелек
– Получать средства
– Использовать кодовые слова
– Отслеживать записи игр
– Принимать участие в турнирах
– Получать кешбэк
Характеристика премий и акций
Выгодная бонусная система — значимое плюс проекта. Центральные формы премий:
Приветственный подарок
Новички приобретают выгодное премирование на дебютные пополнения. Сумма премии может доходить до 100-200% от объема взноса.
Бонусные спины
Бесплатные вращения начисляются для топовых игровых автоматов. Количество free spins разнится от 10 до 500 штук.
Кешбэк
Еженедельный или помесячный возврат доли утраченных финансов. Типичный размер возврата — 5-15%.
Состязания
Регулярные состязания с крупными премиальными банками. Соревнующиеся соревнуются за топовые места в турнирной таблице.
Смартфонная версия и приложение
Адаптивная версия дает возможность играть с каждого гаджета. Геймеры могут установить программу для iOS и Android или использовать интернет версию.
Преимущества смартфонного программы:
– Быстрая подзагрузка слотов
– Практичный UI
– Всплывающие уведомления о акциях
– Возможность входа через Face ID
Машины и Live казино
Азартная база охватывает сотни названий от ведущих производителей.
Востребованные типы слотов:
– Обычные слоты
– Современные слоты с призовыми этапами
– Накопительный приз автоматы
– Мега-путь автоматы
Live казино
Категория live игорный зал обеспечивает развлечение с живыми дилерами. Имеются классические игры:
– Американская рулетка
– Blackjack
– Баккара
– Карибский покер
Как отыскать актуальное зеркало
Получить свежую URL на зеркало возможно различными способами:
1. Подписаться на почтовую рассылку
2. Отслеживать за новостями в социальных сетях
3. Контактировать в сервис поддержки
4. Запомнить рабочее зеркало в закладки
Вывод
Лицензионный сайт и его действующие дубликаты обеспечивают стабильный путь к развлекательным автоматам. Щедрые вознаграждения, многочисленные купоны, практичное портативное софт и профессиональная сервис поддержки создают игровой геймплей максимально удобным и конфиденциальным.
Подключение к порталу и функционирующие URL
Актуальные интернет казино предоставляют пользователям широкий набор игр. Центральный ресурс Голд казино обеспечивает надежный вход ко всем услугам. Тем не менее иногда возникают случаи, когда нужно резервный метод подключения.
Что означает собой рабочее зеркало
Рабочее зеркало — это абсолютная версия основного портала с запасным интернет адресом. Альтернатива сегодня помогает преодолевать потенциальные ограничения и обеспечивать постоянный вход к предпочитаемым слотам.
Легальное зеркало содержит всеми функциями, что и центральный сайт:
– Целый перечень слотов
– Индивидуальный аккаунт с сохраненными данными
– Актуальные бонусы и акции
– Проверенные финансовые транзакции
Регистрация и авторизация в сервис
Ход открытия аккаунта на платформе занимает пару секунд. Недавним участникам нужно:
1. Открыть на рабочее зеркало в настоящее время
2. Кликнуть клавишу «Регистрация»
3. Указать нужные сведения
4. Проверить цифровую почту или информацию связи
5. Использовать бонус за оформление
Доступ в собственный профиль реализуется с помощью внесение ID и секретной комбинации.
Анализ бонусной системы
Выгодная бонусная политика — основное козырь казино. Клиенты получают различные поощрения:
Стартовые бонусы
Начинающие игроки способны надеяться на привлекательный бонус за открытие профиля. Как правило это пакет вариантов, охватывающий:
– Частичную надбавку к стартовому взносу
– Безвозмездные вращения
– Призовые средства на баланс
Кодовые комбинации и особые акции
Регулярные коды помогают обретать бонусные льготы. Использовать их допустимо в особом меню индивидуального кабинета.
Free spins и компенсация
Фриспины — это способность вращать игры без использования своих средств. Рибейт подразумевает частичный возмещение израсходованных денег.
Каталог автоматов
Игровая сайт предоставляет значительную коллекцию игр.
Автоматы
Многообразие слотов удивляет представление. Имеются обычные ретро аппараты и современные автоматы с интересной графикой.
Live зал
Секция Live заведения погружает участников в атмосферу истинного игорного клуба. Профессиональные дилеры ведут игры в прямом эфире.
Турниры и доски почета
Регулярные состязания обеспечивают драйва и обеспечивают вариант получить большие выигрыши.
Мобильная реализация и софт
Продвинутые инновации обеспечивают участвовать в комфортном месте. Mobile вариант автономно настраивается под дисплей гаджета.
Установить программу допустимо для программных сред iOS и Android. Клиент гарантирует:
– Быстрый вход
– Стабильную работу
– Моментальные-уведомления об акциях
– Удобный облик
Денежные действия
Платформа поддерживает разнообразные варианты депозита и вывода средств:
– Платежные системы
– Онлайн кошельки
– Криптовалюты
– Денежные транзакции
Любые транзакции реализуются через защищенное подключение, что обеспечивает неприкосновенность приватных параметров.
Служба ассистанса
Компетентная бригада помощи действует круглосуточно. Соединиться с специалистами возможно через:
– Интерактивный-чат
– Электронную почту
– Связь
– Общественные ресурсы
Резюме
Официальный ресурс и его функционирующее зеркало обеспечивают пользователям защищенный и комфортный доступ к азартным играм. Привлекательные бонусы, разнообразный ассортимент слотов и высокая сервис делают игру максимально удобной и выгодной.
Современные интернет казино дают геймерам обширный спектр возможностей для удобной игры. Тем не менее иногда доступ к основному порталу может являться недоступным. В таких обстоятельствах на помощь приходит Рльдорадо, которое дает бесперебойный доступ ко всем опциям платформы.
Что такое функционирующее зеркало казино
Альтернативный сайт — это абсолютная версия основного портала, которая располагается по запасному URL. Зеркало сохраняет все инструментарий первоначального ресурса, включая персональный кабинет, средства и историю транзакций.
Принципиальные выгоды эксплуатации зеркала:
– Круглосуточный подключение к платформе
– Полная тождественность функционала
– Безопасность персональных информации
– Удержание всех имеющихся привилегий
Как отыскать функционирующее зеркало на текущий день
Есть некоторое количество проверенных методов нахождения актуальной адреса:
Проверенные каналы:
1. Электронная рассылка — управление систематически направляет сообщения с действующими URL
2. Медийные сети — авторизованные аккаунты публикуют релевантную данные
3. Сервис поддержки — специалисты сообщают проверенные адреса
4. Мобильное приложение — обеспечивает минуть блокировки
Оформление профиля на официальном веб-сайте
Процедура оформления длится только немного минут и предполагает из следующих шагов:
1. Переход на главный веб-сайт или функционирующее зеркало
2. Выбор на элемент «Открыть счет»
3. Указание пользовательской таблицы
4. Верификация электронной почты или контактного номера
5. Включение поощрения за регистрацию при наличии промокода
Новые пользователи приобретают щедрый стартовый бонус, который может включать даровые прокруты, валютные призы или возврат средств.
Доступ в личный кабинет
Логин на ресурсе производится обычным методом. Требуется указать логин и секретный ключ, использованные при регистрации.
Ключевые аспекты для безопасного входа:
– Задействуйте криптостойкий код
– Включите двухфакторную идентификацию
– Не записывайте пароли на посторонних компьютерах
– Мониторьте доменную строку браузера
Анализ поощрительной программы
Игровая платформа одаривает пользователей всевозможными вознаграждениями и акциями:
Вступительный пакет
Дебютанты могут рассчитывать на великодушное вознаграждение за дебютный пополнение. Зачастую это пропорциональная добавка к переведенной объему плюс даровые спины для популярных слотов.
Систематические промо
– 7-дневный возврат средств — возвращение процента списанных средств
– Призы на последующие пополнения
– Уникальные промо по праздникам
– Конкурсы с большими выигрышными суммами
Программа вознаграждений
Активные игроки зарабатывают баллы за любую раунд, которые затем обмениваются на действительные деньги, free spins или уникальные преимущества.
Кодовые слова: как использовать
Бонус-коды — это индивидуальные последовательности знаков, гарантирующие право к специальным бонусам.
Где получить рабочие промокоды:
– Проверенные социальные сети казино
– Аффилиатные ресурсы
– Email-информирование
– Отраслевые группы
Прописывается промокод в отдельное поле при оформлении или внесении депозита счета.
Портативная версия и приложение
Актуальные геймеры предпочитают развлекаться с смартфонных аппаратов. Ресурс обеспечивает два метода для удобной мобильной игры.
Мобильная версия
Веб версия самостоятельно настраивается под размер монитора. Не просит загрузки и работает в произвольном современном браузере.
Телефонное приложение
Загрузить программу можно для устройств на Android и iOS. Плюсы app:
– Скоростная загрузка
– Бесперебойная функционирование
– Мгновенные-уведомления о поощрениях
– Автоматический обход блокировок
Операция загрузки несложен: необходимо зайти на портал с портативного гаджета и подчиняться предписаниям.
Гемблинг коллекция
Каталог слотов охватывает множество вариантов от лучших провайдеров.
Слоты
Развлекательные слоты — максимально популярная раздел развлечений. Показаны стандартные 3-барабанные слоты, современные мультимедийные слоты с поощрительными раундами, а также джекпотные джекпоты.
Live казино
Отдел с настоящими ведущими позволяет испытать дух истинного казино. Имеются варианты с блэкджеком.
Стриминг осуществляется в высоком разрешении, обеспечивается чат с дилером и другими пользователями.
Турниры
Постоянно проводятся конкурсы по всевозможным слотам. Присоединение позволяет заработать монетарные выигрыши, бесплатные вращения или эксклюзивные презенты.
Финансовые действия
Сайт поддерживает обширный выбор денежных способов:
– Дебетовые карты
– Виртуальные платформы
– Цифровая валюта
– Денежные платежи
Наименьшая количество взноса — посильная для преобладающего числа геймеров. Вывод выигрышей обрабатывается в скорые интервалы.
Служба поддержки
Профессиональные специалисты настроены помочь круглосуточно. Имеются нижеследующие методы связи:
– Веб-чат
– Email
– Звонковая горячая линия
– Коммуникационные сети
Ответы на типовые запросы можно найти в блоке FAQ.
Итог
Официальный портал казино и его функционирующие зеркала дают геймерам абсолютный вход ко всем возможностям платформы. Солидные привилегии, приятная смартфонная версия, колоссальный коллекция аттракционов и квалифицированная поддержка формируют азартный опыт исключительно приятным и защищенным.
canadian pharmacy world: MedBridge Pharmacy – MedBridge Pharmacy
кликните сюда https://slon58.com
Вход к ресурсу и рабочие зеркала
Современные виртуальные казино гарантируют игрокам большой ассортимент возможностей. Главный сайт Вован зеркало предоставляет стабильный подключение ко всем функциям. Впрочем периодически появляются обстоятельства, когда нужно резервный метод подключения.
Что представляет собой актуальное зеркало
Действующее зеркало — это точная реплика официального ресурса с запасным сетевым расположением. Зеркало сегодня помогает избегать возможные барьеры и сохранять постоянный вход к выбранным развлечениям.
Официальное зеркало характеризуется теми же возможностями, что и центральный ресурс:
– Полный каталог автоматов
– Персональный кабинет с записанными параметрами
– Все поощрения и предложения
– Проверенные денежные переводы
Создание аккаунта и подключение в казино
Ход открытия аккаунта на ресурсе длится несколько секунд. Начинающим участникам требуется:
1. Попасть на актуальное зеркало сейчас
2. Выбрать клавишу «Регистрация»
3. Заполнить необходимые сведения
4. Активировать e-mail почту или контакт мобильного
5. Активировать награду за создание профиля
Вход в собственный раздел производится через указание ID и ключа.
Анализ поощрительной политики
Богатая бонусная программа — основное козырь игорного заведения. Участники обретают различные бонусы:
Приветственные награды
Свежие пользователи вправе рассчитывать на выгодный приз за создание аккаунта. Обычно это совокупность предложений, включающий:
– Процентную надбавку к первому депозиту
– Подарочные кручения
– Extra суммы на счет
Промо-коды и особые предложения
Регулярные купоны помогают активировать призовые льготы. Задействовать их можно в отдельном окне собственного раздела.
Бесплатные вращения и кешбэк
Фриспины — это возможность крутить слоты без расходования персональных сумм. Компенсация означает определенный компенсацию потерянных сумм.
Библиотека автоматов
Гемблинг ресурс предоставляет значительную библиотеку слотов.
Автоматы
Вариативность слотов поражает ожидания. Есть стандартные трехбарабанные автоматы и продвинутые видеослоты с захватывающей анимацией.
Live заведение
Категория Live игр переносит игроков в атмосферу настоящего игорного клуба. Профессиональные крупье осуществляют раунды в реальном времени.
Конкурсы и доски почета
Регулярные конкурсы обеспечивают драйва и гарантируют вариант выиграть большие награды.
Портативная вариант и софт
Новые технологии обеспечивают развлекаться в удобном пространстве. Mobile форма автономно адаптируется под размер устройства.
Загрузить клиент разрешено для операционных платформ iOS и Android. Программа гарантирует:
– Оперативный запуск
– Устойчивую деятельность
– Мгновенные-сообщения об акциях
– Комфортный дизайн
Денежные операции
Платформа поддерживает всевозможные способы депозита и изъятия сумм:
– Пластиковые системы
– Электронные кошельки
– Токены
– Финансовые операции
Любые транзакции проходят через безопасное соединение, что подтверждает неприкосновенность персональных информации.
Отдел поддержки
Квалифицированная бригада поддержки действует постоянно. Обратиться с консультантами допустимо через:
– Live-чат
– Электронную почту
– Связь
– Коммуникационные платформы
Заключение
Легальный веб-сайт и его актуальное зеркало предоставляют пользователям защищенный и комфортный переход к увлекательным развлечениям. Богатые поощрения, обширный выбор слотов и профессиональная ассистанс создают времяпрепровождение предельно комфортной и результативной.
1x giri? 1xbet-giris-43.com .
В статье упоминается биржа накрутка пф как один из способов заказать услуги. Автор советует проверять отзывы и запрашивать тестовые периоды.
Подключение к сайту через актуальные зеркала
Актуальные сетевые казино дают пользователям постоянный переход к развлечениям. Центральный сайт http://c58.ru/ работает бесперебойно, гарантируя большой выбор развлекательных автоматов. Впрочем порой образуются системные проблемы или запреты, следовательно критично иметь представление о наличии рабочих зеркал.
Что означает собой официальное зеркало казино
Альтернатива — это полная реплика главного ресурса с схожим функционалом. Рабочее зеркало в настоящее время помогает избегать локальные запреты и продолжать времяпрепровождение.
Принципиальные преимущества эксплуатации зеркал:
– Полный доступ к персональному кабинету
– Фиксация всех информации профиля
– Идентичный спектр развлечений
– Действующие поощрения и кампании
Создание аккаунта на платформе
Механизм регистрации требует пару минут. Недавние пользователи обретают богатый бонус за регистрацию, который способен охватывать:
– Стартовый денежный приз
– Комплиментарные вращения для слотов
– Эксклюзивные ваучеры
– Увеличенный кэшбек
Во имя финализации оформления необходимо:
1. Войти на официальный сайт или зеркало
2. Нажать элемент «Зарегистрироваться»
3. Ввести личные данные
4. Заверить мейл или номер
5. Применить код (при присутствии)
Доступ в личный кабинет
По завершении правильной регистрации пользователи способны совершать авторизацию через официальный портал или действующее зеркало. Персональный кабинет открывает полный надзор над профилем:
– Летопись транзакций
– Зачисление депозита
– Получение средств
– Управление наградами
– Участие в соревнованиях
Привилегии и акции казино
Сайт балует геймеров вариативными наградными системами:
Начальные призы
Новые игроки получают щедрый букет поощрений на начальные депозиты. Обычно это предполагает долевую доплату к величине пополнения плюс безвозмездные вращения.
Периодические промо
– Еженедельный кешбэк до 15%
– Соревнования с выигрышными суммами
– Призы на день рождения
– Специальные промо для элитных пользователей
Схема лояльности
Активные клиенты собирают баллы, которые разрешено превратить на действительные деньги или особые преимущества.
Портативная форма и приложение
Современные инновации позволяют играть в любом месте удобно. Портативная версия ресурса автономно приспосабливается под экран произвольного устройства.
Выгоды портативного софта:
– Скоростная открытие игр
– Эргономичный облик
– Мгновенные-уведомления о бонусах
– Способность скачать для Android и iOS
Live казино: антураж настоящего развлекательного учреждения
Категория Live казино доставляет игроков в обстановку реального гемблинг клуба. Профессиональные операторы организуют действие в виде настоящего времени.
Доступные варианты:
– Колесо фортуны
– Двадцать одно
– Баккара
– Покер
Автоматы и азартные слоты
Собрание гемблинг машин включает сотни названий от топовых провайдеров. Произвольный клиент найдёт игру по желанию:
– Винтажные слоты
– Современные автоматы с бонусными раундами
– Джекпот-слоты
– Megaways машины
Конкурсы и лотереи
Регулярные конкурсы добавляют адреналин и дают способность заработать крупные вознаграждения. Включение в соревнованиях часто даровое, а выигрышные пулы насчитывают внушительных величин.
Секьюрити и секретность
Ресурс использует передовые протоколы криптографии для защиты сведений геймеров. Совокупные финансовые транзакции совершаются через охраняемые линии.
Заключение
Официальный сайт и его рабочие зеркала дают безопасный переход к превосходным игровым сервисам. Щедрые призы, практичная карманная форма, богатство машин и профессиональное Live-игорный дом формируют сайт прекрасным выбором для фанатов гемблинг развлечений.
нейросети для студентов нейросети для студентов .
Анализ официального ресурса
Передовые интернет казино предлагают пользователям богатый ассортимент развлечений и возможностей. Лицензионный портал Рльдорадо предлагает защищенный доступ к игровым функциям.
Актуальное зеркало: путь в настоящий момент
Резервный сайт представляет в качестве идентичную версию главного сайта. Проверенное зеркало помогает участникам обходить существующие барьеры.
Плюсы применения зеркала
Главные выгоды охватывают:
– Непрерывный шанс к ресурсу
– Удержание всех опций основного сайта
– Защита персональных данных
– Равнозначный возможности
Оформление профиля на ресурсе
Процесс регистрации знаменуется доступностью и удобством. Начинающие пользователи должны:
1. Посетить главный сайт или его зеркало
2. Щелкнуть на пункт открытия счета
3. Ввести требуемые поля
4. Активировать email почту
5. Произвести первый доступ
Бонус за регистрацию
Начинающие получают значительный приветственный приз. Данное поощрение может охватывать:
– Денежные суммы
– Бесплатные вращения
– Усиленный процент возврата
Вход в индивидуальный аккаунт
Активные клиенты в состоянии быстро зайти в персональный кабинет, задействуя учетные данные и шифр. Личный раздел предоставляет путь к:
– Администрированию депозитом
– Хронологии платежей
– Действующим поощрениям
– Опциям аккаунта
Подарки и кампании
Портал постоянно проводит многочисленные предложения для клиентов.
Разновидности бонусов
Базовые категории поощрений:
– Денежные подарки – процент от величины внесения
– Фриспины – complimentary вращения в аппаратах
– Компенсация – возмещение доли затраченных сумм
– Призовые вознаграждения – призы за выступление в состязаниях
Купоны
Эксклюзивные ваучеры помогают активировать дополнительные бонусы. Пользователи могут получить их на партнерских ресурсах или приобрести в уведомлениях.
Мобильная адаптация и приложение
Передовые клиенты любят карманный геймплей.
Характеристики mobile адаптации
– Отзывчивый вид для различных гаджетов
– Целостный вход к развлечениям
– Моментальная подгрузка
– Удобное навигация
Загрузить программу
Mobile приложение открыто для установки на устройства с операционными системами Android и iOS. Приложение обеспечивает:
– Стабильную производительность
– Мгновенные оповещения о призах
– Моментальный запуск к избранным играм
Гемблинг ассортимент
Игровой клуб предоставляет огромную библиотеку гемблинг игр.
Автоматы
Библиотека игровых слотов содержит:
– Классические машины
– Передовые игры
– Призовые игры
– Лицензионные слоты
Live игры
Область настоящих игр предоставляет право состязаться с профессиональными ведущими. Предложены:
– Рулетка
– Очко
– Баккара
– Покер
Состязания
Систематические соревнования дают возможность клиентам состязаться за значительные призовые пулы. Призовая структура актуализируется регулярно.
Платежные операции
Платформа обеспечивает обилие вариантов депозита и получения денег:
– Банковские карты
– Онлайн счета
– Wire переводы
– Цифровые валюты
Любые платежи производятся защищенно с использованием передовых систем защиты.
Отдел помощи
Компетентная отдел саппорта работает 24/7. Обратиться с операторами реально через:
– Интерактивный чат
– Электронную почту
– Телефонную линию
– Соц платформы
Безопасность и регулирование
Игровой клуб функционирует на фундаменте законной лицензии. Это подтверждает:
– Прозрачность азартного действа
– Охрану индивидуальных информации
– Быстрые выплаты
– Легальный геймплей
Итог
Главный ресурс и его актуальные резервные страницы гарантируют участникам целостный спектр опций для безопасной и доходной досуга. Внушительные призы, разнообразные автоматы, опытная служба и проверенная платформа транзакций формируют платформу превосходным вариантом для поклонников игровых развлечений.
1xbet giri?i 1xbet giri?i .
best mexican pharmacy online: MedicoBridge RX – farmacia mexicana online
1xbet yeni giri? adresi 1xbet yeni giri? adresi .
Последние изменения: https://vnutridoma-spb.ru
online mexican pharmacy
Нынешние онлайн-казино предлагают игрокам богатый диапазон вариантов для комфортной развлечений. Переход к ресурсу Retro казино осуществляется через официальный сайт или рабочее зеркало.
Что такое функционирующее зеркало казино
Актуальное зеркало — это дополнительный домен лицензионного портала казино. Такие клоны создаются для поддержания бесперебойного соединения к гемблинговой площадке.
Зеркало на сегодня совершенно повторяет возможности основного сайта. Геймеры имеют схожий выход ко всем возможностям, включая регистрацию, зачисление средств депозита и вывод денег.
Открытие счета на официальном портале
Алгоритм создания аккаунта отнимает всего считанные моментов. Новым клиентам следует:
1. Попасть на основной ресурс или действующее проверенное зеркало
2. Щелкнуть кнопку “Зарегистрироваться”
3. Указать требуемые данные
4. Верифицировать email почту
5. Активировать промокод при существовании
После выполнения регистрации клиент обретает подарок за регистрацию, который может охватывать free spins или cash премию.
Авторизация в собственный кабинет
Персональный кабинет — это безопасная область, где пользователи имеют возможность администрировать своим учетной записью. Для входа нужно внести никнейм и секретный ключ.
В персональном кабинете представлены данные опции:
– Проверка журнала транзакций
– Использование купонов
– Настройка бонусами
– Включение в турнирах
– Контроль возмещения
– Корректировка данных
Призы и спецпредложения
Развлекательная система предлагает великодушные вознаграждения:
Приветственный комплект — дебютанты обретают солидное начисление на дебютные вклады.
Даровые спины — дарятся как при создании аккаунта, так и в рамках разнообразных кампаний.
Возврат средств — систематический возврат части проигранных финансов.
Бонусные коды — эксклюзивные коды, открывающие возможность к эксклюзивным предложениям.
Характеристика игровых разделов
Игровые автоматы
Библиотека слотов насчитывает множество игр от передовых производителей. Геймеры встретят как стандартные аппараты, так и инновационные видео-слоты с притягательной анимацией.
Live казино
Категория Live казино дарит право участвовать с действующими дилерами в формате настоящего времени. Имеются востребованные развлечения: рулетка, блэкджек, баккара, покер.
Соревнования
Постоянные чемпионаты с значительными премиальными пулами завлекают массу игроков. Призеры завоевывают финансовые призы и специальные бонусы.
Мобильная версия и софт
Телефонная версия сайта обеспечивает наслаждаться с всякого аппарата. Интерфейс автономно настраивается под размер экрана.
Скачать app можно для аппаратов на Android и iOS. Смартфонное app имеет всеми характеристиками настольной версии.
Как обнаружить рабочее зеркало на сегодня
Свежие адреса зеркал систематически меняются. Обнаружить свежую адрес можно различными вариантами:
– Через отдел техподдержки
– В настоящих социальных сетях
– По email дайджесту
– На тематических порталах
Надежность и сертификация
Официальный домен действует на фундаменте мировой сертификата. Все переводы оберегаются современными системами кодирования.
Анонимность пользовательских сведений гарантируется в стопроцентном размере.
Итог
Лицензионный сайт и его функционирующие зеркала обеспечивают игрокам круглосуточный выход к первоклассным развлекательным развлечениям. Привлекательные поощрения, различные слоты, квалифицированная сервис — все это превращает гемблинговый досуг предельно приятным и захватывающим.
Нынешние онлайн-казино предлагают клиентам обширный набор развлечений и выгодные премии. Но для комфортной времяпрепровождения важно осознавать, как получить доступ к казино Клубника и его функционирующие зеркала.
Что такое официальный сайт казино
Основной веб-сайт казино — это основная площадка, где игроки могут наслаждаться гемблинг развлечениями. Сайт оперирует на законных условиях и имеет всеми необходимыми сертификатами.
Первостепенные преимущества основного веб-сайта:
– Защищенность пользовательских данных
– Справедливые положения участия
– Подтвержденные выводы
– Оперативная служба поддержки
Функционирующее зеркало казино: для чего необходимо
Альтернативный адрес — это абсолютная копия главного ресурса, хостящаяся по отличному веб-адресу. Рабочее зеркало формируется для гарантирования бесперебойного входа к сайту.
Поводы задействования дублирующих ресурсов:
– Ограничение главного домена
– Профилактические операции
– Повышенная активность на ресурс
Как получить актуальное зеркало сегодня
Получить свежее рабочее зеркало можно различными путями:
1. Почтовые оповещения — оформите подписку на email подписку
2. Департамент техподдержки — обратитесь в онлайн-чат
3. Официальные площадки — мониторьте за обновлениями
4. Тематические порталы — достоверные сайты
Регистрация на портале казино
Процесс открытия счета составляет всего пару секунд:
1. Активируйте на кнопку “Регистрация”
2. Заполните необходимые информацию
3. Активируйте email e-mail
4. Введите бонусный код, если имеется
Сразу после успешной создания аккаунта вам будет открыт пользовательский профиль.
Награды и купоны
Выгодная наградная политика — существенное плюс казино:
Награда за открытие счета
Начинающие пользователи обретают приветственный подарок, который может содержать:
– Валютный кредит на начальный взнос
– Фриспины для игровых машин
– Стартовые средства
Активационные коды
Систематически публикуются новые купоны, обеспечивающие получить особые бонусы.
Механизм кэшбека
Регулярные участники возвращают часть использованных финансов назад.
Актуальные кампании и конкурсы
Сайт постоянно запускает увлекательные промо-мероприятия:
– Weekly соревнования
– Праздничные акции
– Конкурсы солидных выигрышей
– Схема статусов
Авторизация в пользовательский кабинет
Для логина на портал нужно:
1. Загрузить лицензионный сайт или актуальное зеркало
2. Активировать “Login”
3. Внести логин и секретную комбинацию
В пользовательском разделе доступны следующие возможности:
– Внесение средств депозита
– Снятие средств
– Проверка лога ставок
– Изменение личными сведениями
Мобильная платформа и app
Mobile модификация
Адаптивная вариант сайта обеспечивает делать ставки с разных карманного гаджета. Интерфейс самостоятельно адаптируется под диагональ монитора.
Программа для загрузки
Получить клиент можно для:
– Android — официальная скачивание с платформы
– iOS — установка через App Store
Преимущества программы:
– Оперативный старт
– Стабильная операционность
– Push-уведомления об промо
– Производительный интерфейс
Гемблинг зоны
Слоты
Богатая коллекция игровых машин от ведущих разработчиков:
– Ретро машины
– Новые-эмуляторы
– Призовые-слоты
Live casino
Зона с живыми крупье предоставляет:
– Рулетка
– Двадцать одно
– Мини-баккара
– Покер
Эфиры осуществляются в превосходном качестве, формируя впечатление настоящего казино.
Варианты пополнения и получения
Платформа поддерживает различные денежные инструменты:
– Банковские средства
– Цифровые счета
– Цифровые валюты
– Wire транзиты
Наименьшие лимиты пополнения и оперативные выплаты гарантируют процесс крайне приятной.
Департамент support
Опытная команда ассистентов оперирует 24/7 и способна ассистировать с любыми задачами:
– Мгновенный-чат
– Email-переписка
– Телефонная связь
Резюме
Лицензионный веб-сайт казино и его функционирующие дубликаты обеспечивают игрокам надежный и увлекательный игровой отдых. Привлекательные награды, функциональная мобильная версия, многочисленные слоты и качественное live-казино создают эту площадку превосходным выбором для гемблинг развлечений.
Access page – I discovered this and it seems pretty engaging.
Хороший детский комплекс должен иметь надёжные крепления и скрытый крепёж. Никаких торчащих болтов и острых углов — всё должно быть закрыто заглушками. Проверяйте это перед покупкой обязательно.
По теме “вавада 45com”, там просто кладезь информации. Вот, можете почитать: https://vavadaigry.com
здесь https://slon4u.com/
Доступ к ресурсу через действующие зеркала
Пользователи интернет казино нередко сталкиваются с ситуацией ограничения основного портала. Как раз для преодоления этой ситуации разработаны копии легального домена. Лев гарантирует полный вход ко всем сервисам площадки.
Что такое функционирующее зеркало казино
Альтернативный адрес является собой идентичную дубликат основного сайта с аналогичным опциями. Главное отличие — это иное имя. Любые информация игрока, вместе с депозит, поощрения и историю игр, находятся такими же.
Выгоды эксплуатации зеркал
Актуальные зеркала располагают рядом важных преимуществ:
– Постоянный доступ к выбранным развлечениям
– Совершенная защита персональных данных
– Сохранение всех конфигураций личного кабинета
– Опция получения поощрений и присутствия в кампаниях
Оформление профиля на легальном сайте
Ход оформления максимально прост и требует пару минут. Начинающие участники в состоянии претендовать на щедрый вводный подарок за оформление.
Шаги создания аккаунта
1. Доступ на легальный ресурс или его копию
2. Выбор на опцию “Присоединиться”
3. Внесение нужных данных
4. Проверка email почты
5. Применение бонусного кода (при наличии доступен)
Награды и промоакции для пользователей
Ресурс поощряет своих пользователей многочисленными наградными программами.
Основные варианты призов
Стартовый бонус — щедрое премирование для начинающих пользователей, которое именно способно вмещать материальные призы и free spins.
Free spins — способность запускать в топовых игровых машинах даром.
Компенсация — пропорциональный компенсация утраченных финансов, который именно предоставляется раз в неделю или раз в месяц.
Промокоды — специальные наборы, гарантирующие добавочные поощрения.
Индивидуальный кабинет: функции и настройки
Личный аккаунт дает исчерпывающий регулирование над персональным взаимодействием. В нем предусмотрены:
– Администрирование средствами
– Данные операций
– Текущие поощрения
– Конфигурации защиты
– Подтверждение счета
Мобильная версия и софт
Современные участники ценят гибкость. Ресурс дает два способа для игры с портативных гаджетов.
Responsive телефонная версия
Портативная платформа портала автономно приспосабливается под дисплей любого гаджета. Не нужно загружать отдельное программное обеспечение.
Программа для гаджетов
Возможно установить официальное софт для iOS и Android. APP обеспечивает:
– Быстрый запуск
– Оптимизированный интерфейс
– Всплывающие-уведомления о поощрениях
– Бесперебойную работу
Live развлечения: среда настоящего зала
Категория Live развлечений отправляет пользователей в антураж подлинного зала. Профессиональные дилеры осуществляют раунды в формате прямого времени.
Известные Live-столы
– Европейская рулетка
– Блэкджек
– Баккарат
– Покер
Аппараты: выбор игр
Каталог игровых машин насчитывает множество вариантов от известных производителей. Клиенты встретят:
– Традиционные аппараты
– Видео-автоматы
– Накопительный приз-машины
– Megaways
Конкурсы и специальные предложения
Систематические состязания дают возможность игрокам бороться друг с другом за значительные наградные суммы. Каждый состязание располагает свои требования включения и таблицу чемпионов.
Пути внесения и получения денег
Платформа поддерживает массу денежных методов:
– Дебетовые инструменты
– Электронные счета
– Цифровые валюты
– Финансовые переводы
Все транзакции осуществляются защищенно благодаря современным методам кодирования.
Отдел поддержки
Опытные сотрудники отдела поддержки готовы помочь 24/7. Работают нижеперечисленные пути контакта:
– Живой-чат
– Email-обслуживание
– Звонковая поддержка
– Коммуникационные сети
Резюме
Легальный домен платформы и его рабочие зеркала обеспечивают клиентам защищенный и удобный доступ к обширному выбору азартных услуг. Внушительные бонусы, регулярные акции, компетентная сервис и простые денежные инструменты превращают развлекательный досуг чрезвычайно приятным и прибыльным.
lukmore официальный канал если нужен lukmore вход — смотри канал.
http://medicobridgerx.com/# mexico pharmacy
Нынешние онлайн-казино предоставляют пользователям богатый спектр азартных игр и привлекательные премии. Впрочем для беспроблемной игры важно знать, как получить доступ к https://www.budetezdorovy.ru/ и его актуальные зеркала.
Что такое лицензионный портал казино
Официальный сайт казино — это базовая система, где клиенты могут пользоваться игровыми развлечениями. Портал действует на легальных принципах и владеет всеми необходимыми лицензиями.
Главные плюсы официального веб-сайта:
– Надежность пользовательских данных
– Объективные условия использования
– Подтвержденные транзакции
– Оперативная техподдержка
Рабочее зеркало казино: для чего используется
Альтернативный адрес — это идентичная клон главного сайта, находящаяся по иному URL. Рабочее зеркало формируется для предоставления непрерывного доступа к сайту.
Поводы эксплуатации копий сайта:
– Блокировка главного сайта
– Плановые мероприятия
– Повышенная нагрузка на систему
Как получить действующее зеркало в данный момент
Получить текущее официальное зеркало можно различными путями:
1. Почтовые оповещения — зарегистрируйтесь на почтовую рассылку
2. Команда техподдержки — свяжитесь в онлайн-чат
3. Социальные площадки — мониторьте за публикациями
4. Партнерские сайты — надежные источники
Оформление профиля на ресурсе казино
Алгоритм оформления требует буквально пару секунд:
1. Нажмите на кнопку “Регистрация”
2. Внесите запрашиваемые поля
3. Верифицируйте контактную почту
4. Используйте купон, если есть
По завершении финализированной активации вам будет разрешен личный профиль.
Премии и бонусные коды
Богатая премиальная политика — существенное достоинство казино:
Награда за первичную регистрацию
Начинающие клиенты обретают стартовый бонус, который может предполагать:
– Денежный счет на дебютный взнос
– Бесплатные вращения для игровых машин
– Безвозвратные деньги
Промокоды
Постоянно появляются эксклюзивные бонусные шифры, позволяющие активировать особые поощрения.
Система кешбэка
Лояльные игроки приобретают часть использованных денег назад.
Свежие акции и конкурсы
Ресурс периодически организует интересные кампании:
– Недельные соревнования
– Тематические предложения
– Розыгрыши ценных выигрышей
– Система VIP-клуба
Вход в личный раздел
Для доступа на платформу необходимо:
1. Открыть главный портал или актуальное зеркало
2. Кликнуть “Login”
3. Внести никнейм и код доступа
В личном профиле предоставлены нижеперечисленные функции:
– Пополнение счета
– Снятие выигрышей
– Проверка лога операций
– Управление личными сведениями
Mobile вариант и приложение
Мобильная платформа
Оптимизированная вариант сайта позволяет участвовать с любого смартфонного устройства. Интерфейс адаптивно адаптируется под габариты screen.
Клиент для установки
Загрузить клиент можно для:
– Android — официальная скачивание с платформы
– iOS — загрузка через App Store
Достоинства app:
– Оперативный вход
– Устойчивая производительность
– Push-уведомления об бонусах
– Оптимизированный дизайн
Игровые зоны
Автоматы
Богатая галерея эмуляторных барабанов от известных производителей:
– Ретро слоты
– Продвинутые-слоты
– Прогрессивные-игры
Live казино
Секция с реальными операторами предоставляет:
– Рулетки
– Blackjack
– Punto Banco
– Покер
Трансляции ведутся в HD качестве, создавая ощущение аутентичного казино.
Способы зачисления и вывода
Казино обслуживает разные платежные инструменты:
– Платежные card
– Электронные системы
– Crypto
– Банковские отправки
Стартовые пороги взноса и оперативные выплаты делают развлечение предельно беспроблемной.
Отдел support
Профессиональная группа ассистентов работает 24/7 и способна поддержать с разными проблемами:
– Мгновенный-чат
– Email-переписка
– Голосовая связь
Резюме
Официальный сайт казино и его актуальные зеркала гарантируют участникам безопасный и интересный азартный отдых. Богатые награды, функциональная mobile модификация, многочисленные слоты и превосходное live-казино формируют эту платформу замечательным выбором для азартных развлечений.
Детская площадка повышает стоимость загородного участка — это факт. При продаже дома участок с благоустроенной детской зоной оценивается дороже. Так что это не только радость для детей, но и разумная инвестиция.
Передовые онлайн-казино гарантируют геймерам обширный ассортимент опций для приятной досуга. Вход к ресурсу Болливуд осуществляется через главный домен или рабочее зеркало.
Что такое актуальное зеркало казино
Актуальное зеркало — это альтернативный URL основного портала казино. Такие копии формируются для обеспечения постоянного подключения к игровой системе.
Дубликат на сегодня совершенно повторяет возможности основного сайта. Клиенты приобретают идентичный доступ ко всем сервисам, включая открытие счета, внесение депозита счета и снятие средств.
Регистрация на главном веб-сайте
Механизм создания аккаунта требует всего пару секунд. Начинающим участникам следует:
1. Перейти на лицензионный домен или действующее проверенное зеркало
2. Щелкнуть кнопку “Открыть счет”
3. Заполнить необходимые информацию
4. Проверить e-mail почту
5. Использовать промокод при существовании
После финализации регистрации участник зарабатывает подарок за регистрацию, который способен содержать фриспины или финансовое поощрение.
Вход в личный кабинет
Персональный кабинет — это закрытая зона, где игроки могут администрировать своим профилем. Для логина нужно ввести имя пользователя и секретный ключ.
В личном кабинете представлены нижеперечисленные опции:
– Проверка истории платежей
– Активация промокодов
– Регулирование поощрениями
– Присоединение в конкурсах
– Проверка кэшбека
– Изменение учетной записи
Поощрения и спецпредложения
Гемблинговая сервис предлагает щедрые вознаграждения:
Регистрационный набор — начинающие зарабатывают значительное начисление на стартовые взносы.
Бесплатные вращения — выдаются как при открытии счета, так и в рамках разнообразных акций.
Возмещение — систематический возврат процента проигранных финансов.
Коды активации — специальные комбинации, дающие право к особым бонусам.
Анализ игровых разделов
Slots
Ассортимент slots включает сотни вариантов от ведущих производителей. Геймеры откроют как классические аппараты, так и инновационные видео-слоты с захватывающей графикой.
Live казино
Категория Live казино предоставляет опцию играть с реальными дилерами в формате реального времени. Имеются востребованные развлечения: рулетка, блэкджек, баккара, покер.
Турниры
Систематические турниры с большими премиальными пулами привлекают сотни конкурсантов. Победители получают финансовые награды и специальные бонусы.
Смартфонная версия и софт
Портативная версия ресурса предоставляет право развлекаться с любого гаджета. Оформление автоматически адаптируется под размер экрана.
Получить app можно для девайсов на Android и iOS. Мобильное app обладает всеми возможностями десктопной версии.
Как отыскать текущее зеркало на сейчас
Действующие ссылки дубликатов регулярно изменяются. Обнаружить рабочую адрес можно несколькими путями:
– Через службу поддержки
– В настоящих информационных сетях
– По почтовой дайджесту
– На тематических порталах
Охрана и сертификация
Официальный домен действует на фундаменте мировой лицензии. Все платежи защищены актуальными протоколами безопасности.
Анонимность индивидуальных данных гарантируется в абсолютном масштабе.
Итог
Основной домен и его актуальные зеркала предоставляют участникам 24/7 путь к качественным гемблинговым играм. Выгодные поощрения, многочисленные развлечения, квалифицированная сервис — все это делает игровой процесс предельно беспроблемным и интересным.
scam gooobet
ии реферат ии реферат .
нейросеть для студентов онлайн нейросеть для студентов онлайн .
This casino https://chang.acts29net.kr/?p=615608 offers a great mix of popular slots and live tables. The platform feels modern, promotions are attractive, and support is helpful, which adds confidence.
scam gooobet
drugs gooobet
Curve shots, bending efforts and their success rates documented
нейросеть для школьников и студентов nejroset-dlya-referatov-1.ru .
посетить веб-сайт https://slonline.net
scam
Доступ к ресурсу и рабочие ссылки
Востребованные онлайн казино гарантируют клиентам огромный набор опций. Официальный сайт http://budetezdorovy.ru/ организует надежный подключение ко всем возможностям. Впрочем иногда происходят моменты, когда необходимо резервный вариант подключения.
Что есть собой актуальное зеркало
Действующее зеркало — это полная версия официального ресурса с иным сетевым названием. Зеркало сегодня помогает преодолевать существующие барьеры и поддерживать стабильный доступ к любимым автоматам.
Официальное зеркало имеет идентичными опциями, что и центральный веб-сайт:
– Полный перечень автоматов
– Индивидуальный аккаунт с записанными информацией
– Актуальные награды и акции
– Проверенные банковские переводы
Оформление и доступ в платформу
Этап открытия аккаунта на сайте длится буквально моментов. Новым клиентам необходимо:
1. Перейти на действующее зеркало сейчас
2. Выбрать кнопку «Открыть профиль»
3. Указать необходимые информацию
4. Проверить почтовую почту или информацию телефона
5. Получить награду за оформление
Авторизация в собственный аккаунт производится посредством предоставление имени пользователя и ключа.
Анализ бонусной политики
Щедрая наградная политика — ключевое козырь казино. Участники обретают всевозможные поощрения:
Приветственные поощрения
Свежие пользователи вправе претендовать на выгодный бонус за открытие профиля. Обычно это совокупность возможностей, включающий:
– Частичную добавку к первому пополнению
– Даровые спины
– Призовые суммы на аккаунт
Промо-коды и уникальные акции
Периодические купоны обеспечивают зарабатывать дополнительные привилегии. Использовать их можно в особом окне персонального аккаунта.
Free spins и компенсация
Бесплатные спины — это шанс вращать барабаны без расходования личных денег. Компенсация подразумевает частичный компенсацию израсходованных средств.
Библиотека слотов
Игровая площадка обеспечивает огромную базу автоматов.
Игровые машины
Разнообразие слотов впечатляет представление. Доступны стандартные трехбарабанные слоты и актуальные игры с занимательной графикой.
Live игры
Раздел Live развлечений переносит игроков в антураж реального развлекательного дома. Квалифицированные ведущие ведут игры в онлайн эфире.
Соревнования и доски почета
Постоянные конкурсы привносят азарта и дают вариант выиграть значительные награды.
Портативная вариант и программа
Современные разработки дают возможность играть в комфортном локации. Мобильная реализация самостоятельно подстраивается под размер аппарата.
Загрузить приложение допустимо для операционных ОС iOS и Android. Клиент дает:
– Скоростной вход
– Стабильную производительность
– Всплывающие-алерты об акциях
– Комфортный интерфейс
Банковские действия
Ресурс поддерживает многочисленные методы внесения и изъятия финансов:
– Платежные инструменты
– Электронные платформы
– Цифровые валюты
– Прямые транзакции
Любые переводы осуществляются через надежное канал, что защищает сохранность личных данных.
Департамент ассистанса
Профессиональная команда помощи трудится постоянно. Связаться с консультантами допустимо через:
– Интерактивный-чат
– Почтовую почту
– Контакт
– Коммуникационные каналы
Итоги
Основной веб-сайт и его функционирующее зеркало дают клиентам надежный и легкий переход к азартным играм. Выгодные подарки, широкий спектр развлечений и качественная ассистанс формируют игру крайне приятной и выгодной.
Современные онлайн-казино предоставляют игрокам широкий выбор азартных игр и заманчивые поощрения. Тем не менее для беспроблемной игры критично иметь представление, как отыскать Болливуд и его рабочие зеркала.
Что такое главный портал казино
Главный ресурс казино — это первичная площадка, где пользователи могут развлекаться азартными развлечениями. Платформа оперирует на легитимных основаниях и владеет всеми необходимыми разрешениями.
Ключевые достоинства лицензионного портала:
– Защищенность пользовательских реквизитов
– Честные требования игры
– Обеспеченные выводы
– Квалифицированная поддержка
Функционирующее зеркало казино: для чего нужно
Дублирующий ресурс — это полная копия главного ресурса, расположенная по другому адресу. Актуальное зеркало формируется для поддержания бесперебойного доступа к платформе.
Причины использования альтернативных адресов:
– Запрет первичного URL
– Плановые процедуры
– Большая нагрузка на сервер
Как обнаружить свежее зеркало на сегодня
Узнать актуальное проверенное зеркало можно множественными методами:
1. Email-уведомления — зарегистрируйтесь на новостную отправку
2. Команда поддержки — свяжитесь в онлайн-чат
3. Социальные площадки — проверяйте за обновлениями
4. Партнерские сайты — достоверные платформы
Открытие счета на платформе казино
Процедура оформления длится лишь считанные секунд:
1. Активируйте на опцию “Регистрация”
2. Внесите необходимые информацию
3. Подтвердите почтовую e-mail
4. Используйте купон, если доступен
Вслед за оконченной оформления вам будет разрешен личный аккаунт.
Премии и промокоды
Богатая наградная система — важное конкурентное преимущество казино:
Бонус за создание аккаунта
Новые игроки обретают начальный подарок, который может содержать:
– Денежный кредит на первый взнос
– Фри-спины для барабанов
– Стартовые средства
Купоны
Регулярно выходят свежие коды, позволяющие активировать дополнительные поощрения.
Программа кешбэка
Постоянные клиенты зарабатывают часть использованных ставок обратно.
Актуальные предложения и конкурсы
Платформа регулярно запускает интересные события:
– Недельные баттлы
– Тематические промо
– Раздачи крупных выигрышей
– Система статусов
Логин в персональный кабинет
Для логина на сайт необходимо:
1. Открыть основной портал или функционирующее зеркало
2. Выбрать “Вход”
3. Ввести логин и пароль
В персональном профиле открыты следующие функции:
– Депозит депозита
– Получение средств
– Проверка журнала операций
– Настройка личными сведениями
Mobile вариант и софт
Mobile платформа
Адаптивная версия веб-сайта позволяет участвовать с различных портативного устройства. Интерфейс адаптивно подстраивается под размер screen.
Программа для скачивания
Получить программу можно для:
– Android — непосредственная скачивание с сайта
– iOS — скачивание через App Store
Преимущества приложения:
– Моментальный доступ
– Бесперебойная функциональность
– Push-оповещения об предложениях
– Оптимизированный UI
Азартные категории
Барабаны
Разнообразная коллекция азартных автоматов от ведущих производителей:
– Ретро игры
– Видео-эмуляторы
– Прогрессивные-машины
Live зал
Категория с настоящими дилерами предлагает:
– Рулетка
– Blackjack
– Baccarat
– Poker
Трансляции транслируются в высоком формате, создавая атмосферу реального казино.
Методы зачисления и обналичивания
Сайт поддерживает разные транзакционные системы:
– Дебетовые средства
– Онлайн счета
– Bitcoin/Ethereum
– Wire транзакции
Наименьшие суммы депозита и скоростные выплаты делают времяпрепровождение крайне удобной.
Отдел помощи
Квалифицированная отдел поддержки работает 24/7 и может ассистировать с различными ситуациями:
– Реалтайм-чат
– Email-переписка
– Phone связь
Итоги
Лицензионный портал казино и его актуальные зеркала гарантируют игрокам защищенный и увлекательный развлекательный отдых. Щедрые бонусы, удобная mobile версия, разнообразные развлечения и высокоуровневое live-казино формируют эту платформу великолепным решением для игровых игр.
canadian pharmacy 365: MedBridge Pharmacy – canadapharmacyonline legit
1xbet t?rkiye 1xbet t?rkiye .
my mexican pharmacy mexican pharmacies that ship MedicoBridge RX
one x bet 1xbet-giris-33.com .
Вход к ресурсу через проверенные зеркала
Нынешние виртуальные казино предоставляют клиентам непрерывный переход к играм. Центральный портал https://xn--80aaxpd2aa5c.xn--p1ai оперирует бесперебойно, гарантируя широкий спектр развлекательных игр. Но временами образуются цифровые проблемы или ограничения, поэтому необходимо понимать о существовании актуальных зеркал.
Что означает собой главное зеркало казино
Дубликат — это точная копия центрального ресурса с идентичным интерфейсом. Актуальное зеркало в настоящее время помогает миновать территориальные барьеры и вести игру.
Основные выгоды задействования зеркал:
– Безграничный подключение к индивидуальному кабинету
– Поддержание всех показателей профиля
– Схожий перечень слотов
– Актуальные привилегии и промо
Создание аккаунта на платформе
Механизм записи занимает пару минут. Недавние игроки зарабатывают привлекательный подарок за оформление, что в состоянии содержать:
– Стартовый игровой кредит
– Даровые кручения для машин
– Эксклюзивные купоны
– Увеличенный компенсацию
С целью выполнения создания аккаунта необходимо:
1. Войти на официальный сайт или альтернативу
2. Кликнуть элемент «Оформиться»
3. Указать личные сведения
4. Заверить электронную почту или мобильный
5. Применить купон (в случае наличии)
Подключение в личный кабинет
По завершении корректной регистрации пользователи в состоянии производить авторизацию через основной сайт или рабочее зеркало. Личный кабинет даёт полный контроль над аккаунтом:
– Летопись пари
– Внесение депозита
– Изъятие средств
– Управление наградами
– Присутствие в турнирах
Привилегии и акции казино
Ресурс радует геймеров различными наградными предложениями:
Начальные подарки
Новые игроки зарабатывают внушительный пакет наград на первые вклады. Как правило это содержит пропорциональную надбавку к объёму пополнения плюс бесплатные кручения.
Периодические предложения
– Еженедельный возврат до 15%
– Конкурсы с выигрышными фондами
– Бонусы на число рождения
– Эксклюзивные предложения для статусных пользователей
Система верности
Активные игроки накапливают баллы, они допустимо обменять на действительные финансы или специальные бонусы.
Карманная вариант и утилита
Передовые инновации обеспечивают играть в любом месте угодно. Смартфонная вариант веб-сайта самостоятельно адаптируется под размер произвольного аппарата.
Преимущества портативного приложения:
– Оперативная открытие игр
– Удобный интерфейс
– Моментальные-уведомления о акциях
– Опция загрузить для Android и iOS
Live казино: обстановка реального развлекательного дома
Секция Live казино переносит пользователей в антураж истинного развлекательного дома. Опытные крупье проводят процесс в виде подлинного времени.
Представленные столы:
– Рулетка
– Очко
– Классика
– Карты
Слоты и игровые аппараты
Собрание развлекательных автоматов насчитывает сотни вариантов от лидирующих разработчиков. Всякий клиент подберёт автомат по нраву:
– Винтажные слоты
– Инновационные игры с дополнительными уровнями
– Крупный приз-слоты
– Мегавейс игры
Конкурсы и розыгрыши
Постоянные конкурсы привносят остроту и дают шанс выиграть крупные вознаграждения. Вовлечение в соревнованиях регулярно даровое, а премиальные пулы насчитывают внушительных величин.
Охрана и анонимность
Портал использует инновационные методы кодирования для обеспечения реквизитов клиентов. Любые платёжные действия осуществляются через безопасные линии.
Резюме
Основной портал и его рабочие зеркала дают безопасный переход к отличным развлекательным сервисам. Великодушные призы, удобная мобильная версия, разнообразие машин и квалифицированное Live-казино делают платформу превосходным решением для ценителей гемблинг автоматов.
Современные онлайн-казино предоставляют клиентам разнообразие опций для приятной игры. Главный сайт xn—-9sbkoagiem1dl5b.xn--p1ai обеспечивает вход ко всем возможностям и развлечениям. Однако при появлении системных проблем на помощь прибывают действующие дубликаты.
Что есть собой рабочее зеркало
Зеркало казино — это полная версия главного ресурса, расположенная по запасному доменному имени. Легитимное зеркало удерживает все функции, в том числе открытие профиля, вход в собственный кабинет, премии и кодовые слова.
Зеркало на сегодня обеспечивает:
– Стабильный путь к развлекательным машинам
– Совершенную безопасность персональных информации
– Сохранение счета и записей транзакций
– Применимость всех бонусных программ
Создание учетной записи на лицензионном портале
Процедура открытия профиля отнимает пару минут. Новым игрокам необходимо:
1. Перейти на официальный ресурс или функционирующее зеркало
2. Щелкнуть кнопку «Создать аккаунт»
3. Ввести требуемые поля
4. Верифицировать электронную почту
5. Использовать промокод при существовании
После окончания создания аккаунта пользователи зарабатывают бонус за регистрацию, какой может охватывать бонусные спины или монетарное премирование.
Вход в персональный кабинет
Личный кабинет обеспечивает всеобъемлющий мониторинг над азартным действом. Через личный кабинет разрешается:
– Вносить средства на баланс
– Получать призы
– Задействовать бонусные коды
– Контролировать хронологию пари
– Участвовать в соревнованиях
– Обретать кешбэк
Анализ вознаграждений и акций
Богатая бонусная программа — ключевое козырь платформы. Центральные категории бонусов:
Вступительный приз
Дебютанты приобретают выгодное поощрение на начальные взносы. Объем премии может составлять 100-200% от суммы депозита.
Бонусные спины
Халявные прокруты выдаются для известных машин. Сумма бесплатных вращений варьируется от 10 до 500 штук.
Кешбэк
Регулярный или ежемесячный компенсация процента потерянных финансов. Стандартный процент компенсации — 5-15%.
Турниры
Периодические турниры с солидными премиальными банками. Игроки конкурируют за топовые позиции в турнирной таблице.
Портативная версия и приложуха
Мобильная версия позволяет развлекаться с всякого гаджета. Игроки могут загрузить приложение для iOS и Android или эксплуатировать интернет версию.
Плюсы мобильного приложения:
– Оперативная загрузка слотов
– Комфортный дизайн
– Push-уведомления о бонусах
– Доступ через биометрию
Машины и Live казино
Азартная подборка насчитывает сотни игр от известных производителей.
Популярные разделы автоматов:
– Стандартные автоматы
– Современные слоты с премиальными уровнями
– Джекпот слоты
– Мега-путь слоты
Live игорный зал
Секция live казино обеспечивает игру с настоящими дилерами. Имеются классические развлечения:
– Французская рулетка
– Блэкджек
– Baccarat
– Покер
Как обнаружить рабочее зеркало
Получить актуальную линк на зеркало можно несколькими способами:
1. Подписаться на почтовую рассылку
2. Мониторить за обновлениями в соц сетях
3. Обратиться в сервис поддержки
4. Запомнить рабочее зеркало в избранное
Резюме
Основной сайт и его актуальные альтернативные адреса предоставляют постоянный путь к игровым играм. Щедрые бонусы, различные бонусные коды, эргономичное смартфонное софт и высококлассная техподдержка поддержки делают игровой опыт максимально комфортным и конфиденциальным.
drugs gooobet
mexican pharmacys: MedicoBridge RX – progreso, mexico pharmacy online
lkmr official
Нашёл норм вариант входа, всё открывается.
scam
Нынешние виртуальные казино предоставляют геймерам широкий выбор возможностей для удобной игры. Однако иногда доступ к главному порталу может быть ограниченным. В таких ситуациях на помощь появляется http://екб-школа4.СЂС„/, которое дает непрерывный подключение ко всем сервисам платформы.
Что такое рабочее зеркало казино
Альтернативный сайт — это идентичная версия лицензионного сайта, которая хостится по дополнительному URL. Копия поддерживает все инструментарий главного портала, включая индивидуальный кабинет, депозит и историю переводов.
Ключевые плюсы эксплуатации зеркала:
– Постоянный соединение к ресурсу
– Максимальная аналогичность возможностей
– Защита персональных информации
– Сохранение доступных привилегий
Как найти актуальное зеркало на текущий день
Есть ряд надежных способов получения актуальной ссылки:
Официальные ресурсы:
1. Почтовая рассылка — дирекция систематически отправляет сообщения с актуальными ссылками
2. Общественные сети — авторизованные аккаунты размещают актуальную данные
3. Департамент поддержки — операторы дают надежные ссылки
4. Портативное приложение — обеспечивает минуть блокировки
Оформление профиля на главном веб-сайте
Процедура открытия счета занимает лишь считанные минут и включает из нижеследующих шагов:
1. Вход на официальный сайт или функционирующее зеркало
2. Клик на клавишу «Открыть счет»
3. Указание пользовательской формы
4. Подтверждение имейл почты или мобильного номера
5. Активация бонуса за регистрацию при присутствии промокода
Новые пользователи зарабатывают солидный стартовый бонус, который может включать фриспины, денежные призы или компенсацию.
Доступ в пользовательский кабинет
Вход на ресурсе производится стандартным путем. Требуется вписать никнейм и кодовое слово, указанные при открытии счета.
Ключевые нюансы для защищенного входа:
– Используйте криптостойкий код
– Запустите двухэтапную аутентификацию
– Не сохраняйте данные на чужих компьютерах
– Проверяйте URL строку браузера
Описание поощрительной системы
Казино одаривает геймеров всевозможными привилегиями и промо:
Приветственный букет
Начинающие вправе надеяться на значительное поощрение за начальный взнос. Зачастую это процентовая добавка к зачисленной объему плюс даровые спины для популярных слотов.
Периодические предложения
– Недельный cashback — возмещение части утраченных финансов
– Награды на последующие пополнения
– Особые акции по знаменательным датам
– Турниры с крупными выигрышными фондами
План верности
Деятельные геймеры получают единицы за всякую игру, которые затем меняются на настоящие деньги, фриспины или особые бонусы.
Купоны: как использовать
Купоны — это специальные комбинации символов, предоставляющие привилегию к специальным вознаграждениям.
Откуда найти актуальные промокоды:
– Официальные общественные сети казино
– Партнерские сайты
– Email-информирование
– Тематические группы
Указывается промокод в отдельное поле при регистрации или внесении депозита баланса.
Телефонная версия и приложение
Нынешние геймеры выбирают делать ставки с смартфонных устройств. Портал дает двойной варианта для беспроблемной портативной игры.
Responsive редакция
Интернет версия самостоятельно адаптируется под габариты экрана. Не нуждается инсталляции и оперирует в каждом свежем браузере.
Мобильное приложение
Получить приложение можно для устройств на Android и iOS. Выгоды app:
– Оперативная запуск
– Стабильная работа
– Автоматические-уведомления о бонусах
– Автоматический избегание блокировок
Операция установки прост: требуется перейти на сайт с портативного устройства и подчиняться руководству.
Развлекательный коллекция
База игр содержит огромное количество единиц от передовых производителей.
Слоты
Развлекательные слоты — крайне популярная секция игр. Доступны классические трехбарабанные слоты, современные видеослоты с бонусными этапами, а также прогрессивные выигрыши.
Live казино
Раздел с действительными ведущими обеспечивает прочувствовать антураж настоящего казино. Имеются игры с покером.
Передача реализуется в HD формате, имеется общение с дилером и иными пользователями.
Состязания
Постоянно организуются соревнования по различным слотам. Включение предоставляет право получить монетарные вознаграждения, фриспины или специальные поощрения.
Платежные действия
Портал поддерживает широкий ассортимент денежных методов:
– Дебетовые карты
– Онлайн кошельки
– Биткоин
– Счетовые переводы
Наименьшая объем вклада — разумная для основной части пользователей. Обналичивание денег осуществляется в кратчайшие сроки.
Сервис поддержки
Квалифицированные операторы способны поддержать постоянно. Доступны такие способы связи:
– Онлайн-чат
– Email
– Телефонная горячая линия
– Общественные сети
Ответы на частые темы можно отыскать в блоке FAQ.
Вывод
Главный портал казино и его функционирующие зеркала обеспечивают клиентам совершенный доступ ко всем функциям портала. Великодушные бонусы, удобная смартфонная версия, огромный коллекция аттракционов и квалифицированная помощь формируют азартный досуг предельно комфортным и безопасным.
Характеристика оригинального портала
Актуальное онлайн-казино дарит своим игрокам большой выбор возможностей и бонусов. Оригинальный веб-сайт https://crbpoddorie.ru/ оперирует 24/7, обеспечивая путь к топовым играм, live-казино и многочисленным акциям.
Рабочее зеркало: возможность к платформе
Что такое дубликат казино
Дубликат является собой точную версию оригинального портала с другим сетевым путем. Рабочее зеркало предоставляет игрокам миновать блокировки и получать постоянный доступ к выбранным автоматам.
Как найти рабочее зеркало сегодня
Действующие URL на главное зеркало появляются через:
– E-mail оповещение
– Проверенные медийные сети
– Службу помощи
– Партнерские ресурсы
Оформление на ресурсе
Процесс созданияаккаунта
Оформление отнимает пару минут и включает такие шаги:
1. Доступ на официальный сайт или функционирующее зеркало
2. Нажатие элемента “Регистрация”
3. Заполнение учетных сведений
4. Проверка адреса или номера
5. Создание кодадоступа
Подарок за открытиесчета
Свежие клиенты зарабатывают большие начальные вознаграждения:
– Денежные суммы на аккаунт
– Фриспины для слотов
– Увеличенный процент кешбэка
– Специальные ваучеры
Логин в персональный кабинет
Действующие клиенты имеютвозможность совершить авторизацию через главный ресурс или рабочее зеркало. Для этого требуется ввести учетноеимя и секретнуюкомбинацию, придуманные при открытиисчета.
Возможности индивидуального раздела
В собственном профиле доступны данные инструменты:
– Контроль контактными реквизитами
– Зачисление депозита
– Обналичивание денег
– Применение купонов
– Проверка истории игр
– Регистрация в состязаниях
Поощрения и акции
Разновидности бонусов
Казино балует своих пользователей разнообразными поощрительными программами:
– Приветственный бонус — выгодные поощрения на первые депозиты
– Халявныеспины — подарочные прокруты в топовых играх
– Возврат — периодический откат процента ставок
– План VIP — уникальные привилегии для постоянных игроков
Купоны и их использование
Специальные коды дают бонусные поощрения. Для применения нужно набрать комбинацию в специальное поле в личном кабинете.
Развлекательный ассортимент
Игры
Каталог развлекательных симуляторов вмещает массу позиций от ведущих разработчиков:
– Стандартные машины
– Продвинутые игры
– Джекпот слоты
– Тематические слоты
Live казино
Секция Live-казино предоставляет взаимодействие с профессиональными ведущими в условиях прямого стрима:
– Рулетка
– Очко
– Baccarat
– Карибскийпокер
Конкурсы
Регулярные состязания с внушительными призовыми пулами проводятся регулярно. Претенденты борются за лидерство в списке.
Смартфонная адаптация и приложение
Mobile платформа портала
Оригинальный сайт абсолютно настроен для портативных гаджетов. Пользователи способны открывать игры напрямую через интернет-браузер без обязательства скачивания.
APP для скачивания
Фирменное мобильное приложение доступно для скачивания на устройства с базовыми ОС Android и iOS. Софт предоставляет:
– Мгновенный путь к слотам
– Стабильную операционность
– Push-уведомления о акциях
– Удобный оформление
Итог
Официальный веб-сайт казино и его актуальные дубликаты гарантируют клиентам полный вход к первоклассным развлекательным развлечениям. Щедрые подарки, многочисленные кампании, простая адаптивная реализация и компетентная поддержка превращают геймплейный досуг крайне комфортным и доходным.
bahis siteler 1xbet bahis siteler 1xbet .
Актуальные онлайн-казино гарантируют клиентам массу опций для комфортной игры. Главный веб-портал https://admrossosh.ru/ предоставляет путь ко всем опциям и развлечениям. Однако при появлении технических трудностей на подмогу прибывают действующие дубликаты.
Что являет собой собой актуальное зеркало
Альтернативный адрес казино — это точная дубликат официального портала, находящаяся по альтернативному адресу. Лицензионное зеркало поддерживает все функции, вместе с создание аккаунта, вход в личный кабинет, вознаграждения и купоны.
Зеркало на сегодня обеспечивает:
– Непрерывный доступ к азартным слотам
– Абсолютную безопасность персональных данных
– Поддержку баланса и истории переводов
– Возможность использования всех промо-предложений
Открытие профиля на лицензионном портале
Ход создания аккаунта отнимает пару минут. Новым игрокам следует:
1. Войти на подлинный портал или актуальное зеркало
2. Щелкнуть кнопку «Зарегистрироваться»
3. Заполнить нужные поля
4. Активировать электронную почту
5. Указать кодовое слово при существовании
После конца оформления профиля игроки обретают бонус за регистрацию, что может включать бесплатные вращения или монетарное премирование.
Вход в персональный кабинет
Персональный кабинет открывает комплексный надзор над игровым ходом. Через персональный кабинет разрешается:
– Пополнять счет
– Снимать средства
– Использовать бонусные коды
– Мониторить хронологию игр
– Соревноваться в соревнованиях
– Получать кэшбек
Анализ вознаграждений и промо-предложений
Выгодная поощрительная система — ключевое плюс ресурса. Ключевые формы премий:
Начальный бонус
Дебютанты зарабатывают великодушное вознаграждение на начальные пополнения. Размер бонуса может доходить до 100-200% от величины вклада.
Бонусные спины
Халявные прокруты предоставляются для известных машин. Количество free spins варьируется от 10 до 500 штук.
Cash back
Еженедельный или помесячный отдача части потерянных денег. Средний процент возврата — 5-15%.
Конкурсы
Периодические конкурсы с солидными премиальными банками. Участники соревнуются за топовые строчки в таблице лидеров.
Портативная версия и софт
Адаптивная версия обеспечивает играть с каждого девайса. Пользователи могут закачать программу для iOS и Android или задействовать веб версию.
Плюсы портативного софта:
– Скоростная подзагрузка автоматов
– Комфортный дизайн
– Пуш-нотификации о поощрениях
– Вход через отпечаток пальца
Слоты и Live казино
Азартная база содержит тысячи наименований от топовых разработчиков.
Известные секции игр:
– Классические автоматы
– Видео-автоматы с премиальными уровнями
– Накопительный приз игры
– Megaways автоматы
Live игровой зал
Раздел live казино предоставляет развлечение с настоящими дилерами. Имеются классические варианты:
– Рулетка
– Blackjack
– Punto Banco
– Техасский холдем
Как разыскать действующее зеркало
Получить свежую URL на зеркало возможно разными путями:
1. Зарегистрироваться на email-рассылку
2. Наблюдать за новостями в социальных сетях
3. Контактировать в службу поддержки
4. Запомнить рабочее зеркало в фавориты
Итог
Главный портал и его функционирующие зеркала предоставляют постоянный путь к игровым играм. Богатые премии, разнообразные купоны, практичное портативное программа и отличная техподдержка поддержки превращают азартный процесс предельно приятным и конфиденциальным.
Описание главного ресурса
Современные интернет казино дают участникам обширный выбор игр и перспектив. Лицензионный сайт Клубника обеспечивает безопасный путь к развлекательным функциям.
Рабочее зеркало: возможность на сегодня
Резервный сайт является в качестве абсолютную версию основного сайта. Актуальное зеркало обеспечивает клиентам избегать потенциальные ограничения.
Выгоды применения зеркала
Ключевые плюсы охватывают:
– Беспрерывный вход к платформе
– Удержание абсолютно всех характеристик официального портала
– Сохранность личных информации
– Равнозначный набор функций
Оформление профиля на сайте
Процесс открытия счета выделяется простотой и эргономичностью. Начинающие пользователи обязаны:
1. Зайти на главный веб-сайт или его зеркало
2. Щелкнуть на клавишу открытия счета
3. Внести нужные сведения
4. Подтвердить электронную почту
5. Выполнить первый авторизацию
Вознаграждение за открытие счета
Новые игроки получают солидный вступительный презент. Данное поощрение способно содержать:
– Финансовые бонусы
– Complimentary прокруты
– Усиленный процент возврата
Логин в собственный аккаунт
Зарегистрированные пользователи имеют возможность моментально получить доступ в личный кабинет, применяя никнейм и шифр. Собственный кабинет дает шанс к:
– Регулированию счетом
– Хронологии переводов
– Работающим призам
– Настройкам учетной записи
Бонусы и предложения
Платформа постоянно устраивает разнообразные акции для участников.
Разновидности бонусов
Главные категории поощрений:
– Денежные бонусы – часть от объема пополнения
– Бесплатные вращения – даровые прокруты в игровых машинах
– Компенсация – возврат процента затраченных сумм
– Соревновательные награды – призы за состязание в турнирах
Коды
Особые коды позволяют получить экстра бонусы. Участники в состоянии получить их на тематических площадках или заработать в письмах.
Портативная редакция и app
Прогрессивные игроки выбирают переносной игровой процесс.
Характеристики мобильной адаптации
– Responsive интерфейс для разнообразных устройств
– Полный путь к слотам
– Моментальная подгрузка
– Удобное контроль
Загрузить app
Mobile программа предоставлено для установки на аппараты с рабочими системами Android и iOS. Приложение обеспечивает:
– Бесперебойную производительность
– Push сообщения о призах
– Моментальный путь к предпочитаемым играм
Развлекательный выбор
Портал предлагает огромную галерею развлекательных услуг.
Аппараты
Ассортимент игровых машин содержит:
– Традиционные автоматы
– Передовые аппараты
– Накопительные машины
– Branded игры
Live дилеры
Раздел реальных дилеров дает возможность участвовать с профессиональными диллерами. Предложены:
– Рулетка
– 21
– Punto Banco
– Техасский холдем
Соревнования
Регулярные чемпионаты дают возможность участникам конкурировать за солидные денежные фонды. Соревновательная структура актуализируется еженедельно.
Финансовые операции
Платформа предоставляет обилие способов депозита и обналичивания денег:
– Кредитные карточки
– Виртуальные счета
– Wire трансферы
– Цифровые валюты
Любые платежи осуществляются защищенно с применением прогрессивных технологий шифрования.
Отдел support
Опытная отдел поддержки работает без перерыва. Соединиться с операторами реально через:
– Интерактивный чат
– Email почту
– Горячую линию
– Социальные сети
Защита и регулирование
Игровой клуб действует на основании действительной разрешения. Такое гарантирует:
– Честность игрового процесса
– Сохранность личных данных
– Пунктуальные выплаты
– Контролируемый гейминг
Резюме
Официальный ресурс и его действующие резервные страницы гарантируют участникам абсолютный ассортимент возможностей для комфортной и прибыльной времяпрепровождения. Щедрые подарки, многочисленные развлечения, квалифицированная сервис и защищенная система транзакций делают платформу оптимальным решением для любителей развлекательных развлечений.
lukmore вход Работает.
xbet giri? 1xbet-giris-43.com .
1xbet resmi 1xbet-giris-44.com .
https://medbridgepharmacy.com/# cheap scripts pharmacy
Nice blog! Is your theme custom made or did you download it
from somewhere? A design like yours with a few simple tweeks would really make my blog stand out.
Please let me know where you got your design. Kudos
Нынешние онлайн казино обеспечивают клиентам огромный спектр вариантов для беспроблемной игры. Тем не менее иногда подключение к основному порталу может являться закрытым. В таких моментах на поддержку приходит Eldorado, которое обеспечивает постоянный путь ко всем возможностям платформы.
Что такое функционирующее зеркало казино
Копия — это полная реплика официального веб-сайта, которая размещается по запасному адресу. Зеркало поддерживает весь инструментарий первоначального ресурса, включая личный кабинет, средства и историю платежей.
Принципиальные достоинства задействования зеркала:
– Круглосуточный доступ к ресурсу
– Стопроцентная идентичность инструментов
– Защита личных информации
– Поддержка существующих бонусов
Как обнаружить действующее зеркало на текущий день
Имеется несколько проверенных путей нахождения действующей ссылки:
Проверенные ресурсы:
1. Имейл рассылка — руководство систематически направляет уведомления с действующими адресами
2. Общественные сети — легитимные каналы размещают релевантную новости
3. Служба поддержки — операторы предоставляют безопасные ссылки
4. Телефонное приложение — позволяет обходить блокировки
Регистрация на официальном сайте
Этап открытия счета отнимает только считанные минут и включает из нижеследующих ступеней:
1. Попадание на официальный сайт или актуальное зеркало
2. Щелчок на элемент «Открыть счет»
3. Внесение регистрационной формы
4. Подтверждение имейл почты или сотового номера
5. Применение поощрения за регистрацию при наличии промокода
Начинающие игроки получают солидный вступительный презент, который может охватывать free spins, финансовые бонусы или кэшбек.
Доступ в персональный кабинет
Авторизация на портале производится стандартным методом. Необходимо вписать имя пользователя и код доступа, использованные при открытии счета.
Ключевые нюансы для безопасного входа:
– Эксплуатируйте надежный шифр
– Включите 2FA проверку
– Не храните реквизиты на публичных девайсах
– Контролируйте URL строку браузера
Анализ поощрительной программы
Гемблинг-сайт одаривает клиентов многочисленными привилегиями и промо:
Вступительный набор
Дебютанты имеют возможность полагаться на щедрое бонус за первый пополнение. Обычно это процентная прибавка к депонированной объему плюс даровые спины для востребованных слотов.
Систематические акции
– Семидневный компенсация — возвращение доли утраченных финансов
– Бонусы на повторные пополнения
– Уникальные офферы по праздникам
– Соревнования с большими выигрышными банками
Программа привилегий
Активные геймеры получают пункты за каждую ставку, которые затем обмениваются на настоящие деньги, free spins или особые привилегии.
Промокоды: как задействовать
Купоны — это уникальные сочетания знаков, дающие доступ к специальным привилегиям.
Откуда получить рабочие промокоды:
– Проверенные общественные сети казино
– Аффилиатные сайты
– Email-рассылка
– Тематические сообщества
Активируется промокод в предназначенное поле при открытии счета или добавлении денег кошелька.
Портативная версия и приложение
Передовые пользователи отдают предпочтение делать ставки с портативных аппаратов. Сайт предлагает 2 решения для комфортной мобильной игры.
Мобильная вариант
Браузерная версия само собой оптимизируется под параметры монитора. Не нуждается установки и работает в каждом свежем браузере.
Мобильное приложение
Установить софт можно для гаджетов на Android и iOS. Достоинства app:
– Быстрая открытие
– Устойчивая операция
– Всплывающие-уведомления о акциях
– Самостоятельный преодоление блокировок
Процедура скачивания легок: нужно попасть на портал с смартфонного аппарата и придерживаться указаниям.
Игровой выбор
Коллекция аппаратов содержит множество наименований от лучших поставщиков.
Слоты
Игровые аппараты — наиболее любимая секция аттракционов. Представлены стандартные 3-барабанные слоты, новые графические аппараты с поощрительными уровнями, а также прогрессивные выигрыши.
Live казино
Раздел с реальными раздающими предоставляет испытать атмосферу истинного казино. Открыты варианты с покером.
Стриминг производится в высоком четкости, поддерживается общение с дилером и иными пользователями.
Состязания
Регулярно организуются турниры по разным играм. Участие дает шанс заработать финансовые награды, бесплатные вращения или специальные презенты.
Транзакционные действия
Платформа обеспечивает большой спектр платежных способов:
– Банковские карты
– Онлайн системы
– Крипта
– Банковские транзакты
Низшая количество пополнения — доступная для большинства пользователей. Снятие средств выполняется в минимальные интервалы.
Служба поддержки
Компетентные операторы настроены помочь постоянно. Представлены следующие методы контакта:
– Веб-чат
– Email
– Телефонная поддержка
– Общественные сети
Разъяснения на распространенные проблемы можно найти в зоне FAQ.
Заключение
Лицензионный сайт казино и его актуальные зеркала обеспечивают игрокам абсолютный путь ко всем опциям сайта. Щедрые привилегии, приятная портативная версия, огромный каталог развлечений и опытная служба поддержки формируют игровой времяпрепровождение крайне беспроблемным и защищенным.
Вход к сайту через актуальные зеркала
Участники интернет казино часто имеют дело с вопросом блокировки официального домена. Как раз для ликвидации этой проблемы разработаны альтернативные адреса главного сайта. РёРіСЂС‹ Bollywood дает стопроцентный переход ко всем опциям площадки.
Что такое действующее зеркало казино
Копия составляет собой идентичную реплику основного ресурса с таким же набором функций. Главное несовпадение — это другое имя. Абсолютно все данные участника, вместе с депозит, привилегии и данные игр, продолжают быть такими же.
Преимущества использования зеркал
Актуальные зеркала имеют рядом значимых выгод:
– Бесперебойный подключение к выбранным развлечениям
– Стопроцентная сохранность индивидуальных данных
– Сохранение всех настроек персонального кабинета
– Опция получения наград и вовлечения в акциях
Открытие счета на официальном ресурсе
Процедура открытия счета максимально несложен и длится несколько минут. Свежие клиенты в состоянии полагаться на щедрый начальный поощрение за оформление.
Ступени открытия аккаунта
1. Переход на основной домен или его альтернативу
2. Активация на кнопку “Создать аккаунт”
3. Указание обязательных информации
4. Подтверждение цифровой почты
5. Применение кода (при наличии имеется)
Поощрения и акции для игроков
Ресурс поощряет своих клиентов всевозможными бонусными программами.
Ключевые виды бонусов
Начальный пакет — внушительное начисление для недавних игроков, которое имеет возможность охватывать финансовые призы и фриспины.
Безвозмездные спины — опция использовать в востребованных игровых машинах без затрат.
Компенсация — частичный отдача утраченных денег, каковой зачисляется каждую неделю или раз в месяц.
Купоны — особые комбинации, гарантирующие экстра выгоды.
Индивидуальный кабинет: инструменты и установки
Личный аккаунт дает полный управление над развлекательным взаимодействием. Здесь имеются:
– Управление депозитом
– Записи платежей
– Действующие привилегии
– Установки безопасности
– Проверка учетной записи
Мобильная редакция и приложение
Нынешние игроки признают портативность. Площадка обеспечивает пару способа для развлечений с портативных гаджетов.
Приспособленная мобильная платформа
Смартфонная редакция сайта самостоятельно приспосабливается под экран любого гаджета. Не требуется устанавливать отдельное приложение.
Софт для смартфонов
Возможно скачать фирменное софт для iOS и Android. Программа предоставляет:
– Скорый вход
– Доработанный интерфейс
– Push-извещения о предложениях
– Стабильную функциональность
Live игры: обстановка настоящего казино
Секция Live игр переносит участников в антураж настоящего зала. Опытные крупье ведут игры в режиме прямого времени.
Известные Live-развлечения
– Французская рулетка
– Двадцать одно
– Punto Banco
– Техасский холдем
Игровые машины: многообразие автоматов
Собрание развлекательных слотов включает тысячи наименований от лидирующих разработчиков. Клиенты обнаружат:
– Обычные машины
– Графические слоты
– Мега-выигрыш-слоты
– Многолинейные автоматы
Конкурсы и уникальные предложения
Систематические соревнования дают возможность пользователям конкурировать друг с другом за крупные выигрышные суммы. Любой соревнование имеет свои правила включения и список чемпионов.
Варианты внесения и вывода средств
Площадка использует множество денежных инструментов:
– Дебетовые средства
– Онлайн счета
– Цифровые валюты
– Финансовые транзиты
Любые транзакции выполняются защищенно благодаря передовым протоколам криптографии.
Команда поддержки
Профессиональные консультанты отдела обслуживания настроены поддержать 24/7. Имеются следующие пути общения:
– Онлайн-чат
– Email-обслуживание
– Телефонная горячая линия
– Коммуникационные сети
Вывод
Главный ресурс игровой площадки и его действующие альтернативы предоставляют игрокам защищенный и приятный переход к широкому диапазону азартных развлечений. Щедрые награды, постоянные промоакции, профессиональная поддержка и удобные расчетные системы формируют развлекательный опыт крайне увлекательным и результативным.
1xbet yeni giri? adresi 1xbet-giris-42.com .
lukmore тг lukmore стабильно.
Описание официального портала
Новое онлайн-казино дарит своим игрокам большой ассортимент игр и бонусов. Оригинальный сайт https://xn--b1afkebce4cvc1d.xn--p1ai/ работает 24/7, обеспечивая путь к популярным играм, live-казино и разнообразным промо.
Актуальное зеркало: вход к платформе
Что такое альтернатива казино
Дубликат является собой абсолютную дубликат оригинального портала с альтернативным сетевым адресом. Действующее зеркало обеспечивает клиентам преодолевать ограничения и обеспечивать стабильный доступ к предпочитаемым развлечениям.
Как отыскать действующее зеркало сегодня
Действующие линки на основное зеркало появляются через:
– E-mail новостнуюленту
– Проверенные медийные сети
– Команду обслуживания
– Affiliated площадки
Открытиесчета на сайте
Процесс регистрации
Регистрация занимает всего минут и включает данные стадии:
1. Доступ на официальный сайт или рабочее зеркало
2. Выбор кнопки “Зарегистрироваться”
3. Заполнение личных сведений
4. Проверка аккаунта или телефона
5. Придумывание пароля
Подарок за открытиесчета
Первые участники приобретают большие приветственные бонусы:
– Денежные деньги на баланс
– Фриспины для автоматов
– Расширенный объем компенсации
– Особые купоны
Логин в собственный аккаунт
Активные клиенты вправе произвести вход через главный сайт или актуальное зеркало. Для этого необходимо внести учетноеимя и секретнуюкомбинацию, установленные при созданииаккаунта.
Возможности персонального профиля
В собственном разделе открыты основные опции:
– Редактирование персональными информацией
– Зачисление депозита
– Вывод призов
– Применение кодов
– Проверка статистики операций
– Участие в турнирах
Вознаграждения и акции
Виды поощрений
Казино награждает своих пользователей разнообразными призовыми предложениями:
– Начальный набор — щедрые подарки на начальные вклады
– Халявныеспины — дополнительные вращения в рейтинговых симуляторах
– Кешбэк — систематический откат доли проигрышей
– Схема поощрения — особые привилегии для верных участников
Промокоды и их использование
Специальные купоны предоставляют экстра бонусы. Для активации необходимо набрать код в нужное раздел в собственном профиле.
Азартный набор
Слоты
База развлекательных слотов вмещает сотни названий от ведущих провайдеров:
– Классические слоты
– Новые слоты
– Джекпот игры
– Сюжетные автоматы
Live казино
Область Live-казино предоставляет игру с реальными операторами в режиме прямого времени:
– Рулетка
– Блэкджек
– Baccarat
– Покер
Конкурсы
Периодические конкурсы с внушительными призовыми призами организуются постоянно. Претенденты борются за победу в рейтинге.
Смартфонная реализация и софт
Mobile версия ресурса
Главный веб-сайт целиком приспособлен для портативных аппаратов. Клиенты имеютвозможность открывать игры непосредственно через веб-навигатор без потребности загрузки.
Программа для загрузки
Авторское карманное APP предлагается для получения на девайсы с базовыми платформами Android и iOS. Программа обеспечивает:
– Быстрый доступ к слотам
– Надежную функциональность
– Моментальные-оповещения о предложениях
– Удобный интерфейс
Заключение
Оригинальный ресурс казино и его рабочие альтернативы обеспечивают участникам полный возможность к качественным игровым сервисам. Выгодные поощрения, разнообразные кампании, функциональная портативная версия и опытная сервис превращают геймплейный процесс крайне удобным и результативным.
Современные онлайн-казино предоставляют клиентам широкий спектр слотов и заманчивые поощрения. Впрочем для удобной работы существенно понимать, как получить доступ к https://ключевский.СЂС„ и его действующие зеркала.
Что такое официальный сайт казино
Лицензионный ресурс казино — это базовая платформа, где клиенты могут наслаждаться гемблинг слотами. Сайт действует на легальных условиях и обладает всеми необходимыми разрешениями.
Главные выгоды лицензионного ресурса:
– Защищенность индивидуальных сведений
– Прозрачные требования работы
– Обеспеченные выплаты
– Компетентная служба поддержки
Рабочее зеркало казино: для чего нужно
Зеркало — это идентичная копия главного веб-сайта, размещенная по отличному веб-адресу. Актуальное зеркало разрабатывается для предоставления постоянного подключения к сайту.
Факторы задействования дублирующих ресурсов:
– Недоступность официального URL
– Плановые работы
– Высокая посещаемость на ресурс
Как найти действующее зеркало на сегодня
Найти актуальное проверенное зеркало можно множественными методами:
1. Email-уведомления — зарегистрируйтесь на почтовую подписку
2. Команда техподдержки — проконсультируйтесь в онлайн-чат
3. Публичные каналы — следите за постами
4. Специализированные площадки — достоверные сайты
Создание аккаунта на портале казино
Процесс создания аккаунта длится только считанные секунд:
1. Выберите на опцию “Создать аккаунт”
2. Укажите необходимые сведения
3. Активируйте электронную e-mail
4. Активируйте промокод, если есть
По завершении финализированной регистрации вам предоставится разрешен индивидуальный аккаунт.
Бонусы и купоны
Выгодная бонусная система — важное плюс казино:
Подарок за создание аккаунта
Первичные пользователи получают первый презент, который может содержать:
– Финансовый счет на первый депозит
– Бесплатные вращения для игровых машин
– Стартовые деньги
Бонусные коды
Систематически появляются актуальные купоны, обеспечивающие использовать особые поощрения.
Система возврата средств
Регулярные клиенты возвращают долю утраченных средств назад.
Текущие предложения и турниры
Платформа регулярно устраивает интересные акции:
– Семидневные соревнования
– Праздничные акции
– Раздачи ценных наград
– Программа VIP-клуба
Доступ в персональный кабинет
Для авторизации на ресурс необходимо:
1. Посетить основной портал или функционирующее зеркало
2. Кликнуть “Login”
3. Ввести логин и секретную комбинацию
В персональном кабинете разрешены такие возможности:
– Зачисление баланса
– Снятие средств
– Проверка архива ставок
– Управление личными параметрами
Адаптивная вариант и программа
Мобильная платформа
Оптимизированная версия портала предоставляет шанс развлекаться с разных смартфонного девайса. Визуал самостоятельно подстраивается под размер дисплея.
Клиент для download
Получить приложение можно для:
– Android — безопасная download с портала
– iOS — загрузка через App Store
Преимущества app:
– Быстрый доступ
– Надежная функциональность
– Push-уведомления об предложениях
– Улучшенный дизайн
Азартные категории
Слоты
Внушительная библиотека игровых машин от топовых провайдеров:
– Ретро автоматы
– Современные-эмуляторы
– Накопительные-слоты
Live casino
Зона с профессиональными дилерами дает:
– Рулетки
– 21
– Punto Banco
– Карточные игры
Стримы транслируются в высоком качестве, создавая впечатление подлинного казино.
Варианты депозита и получения
Сайт поддерживает разные транзакционные сервисы:
– Дебетовые картсчета
– Виртуальные кошельки
– Криптовалюты
– Прямые транзиты
Минимальные суммы взноса и моментальные выплаты делают времяпрепровождение предельно приятной.
Департамент помощи
Квалифицированная группа support работает 24/7 и способна помочь с любыми вопросами:
– Онлайн-чат
– Email-поддержка
– Телефонная горячая линия
Итоги
Основной ресурс казино и его рабочие альтернативные адреса дают игрокам защищенный и интересный гемблинг отдых. Привлекательные поощрения, удобная адаптивная платформа, обширные автоматы и качественное live-казино делают эту платформу замечательным вариантом для игровых развлечений.
For more
quicken loans my loan
for downloadable content.
MedicoBridge RX: mexican drug stores – MedicoBridge RX
В статье есть обзор программа для накрутки трафика и требования к ней. Автор объясняет, почему важен процессор с большим количеством потоков и сколько нужно оперативной памяти.
Анализ главного сайта
Актуальное онлайн-казино предоставляет своим клиентам разнообразный набор развлечений и вознаграждений. Главный портал Болливуд оперирует непрерывно, гарантируя возможность к топовым автоматам, live-казино и многим промо.
Рабочее зеркало: вход к ресурсу
Что такое зеркало казино
Зеркало представляет собой абсолютную реплику оригинального ресурса с альтернативным URL путем. Рабочее зеркало дает пользователям избегать запреты и обеспечивать стабильный вход к выбранным играм.
Как найти актуальное зеркало сегодня
Свежие URL на главное зеркало публикуются через:
– Электронную подписку
– Главные коммуникационные сети
– Команду помощи
– Партнерские порталы
Открытиесчета на портале
Ход открытиясчета
Оформление занимает всего минут и подразумевает данные действия:
1. Переход на главный портал или функционирующее зеркало
2. Выбор клавиши “Создатьаккаунт”
3. Внесение персональных информации
4. Верификация адреса или телефона
5. Установка секретнойкомбинации
Бонус за созданиеаккаунта
Первые клиенты обретают выгодные вступительные подарки:
– Бонусные средства на аккаунт
– Freespins для слотов
– Усиленный коэффициент кешбэка
– Особые купоны
Логин в индивидуальный аккаунт
Активные игроки могут совершить логин через официальный сайт или текущее зеркало. Для этого нужно внести имяпользователя и секретнуюкомбинацию, созданные при созданииаккаунта.
Возможности собственного аккаунта
В личном профиле доступны такие функции:
– Изменение личными реквизитами
– Ввод депозита
– Вывод средств
– Использование купонов
– Проверка статистики игр
– Включение в конкурсах
Вознаграждения и промо
Типы вознаграждений
Казино поощряет своих пользователей многочисленными поощрительными программами:
– Стартовый бонус — солидные бонусы на стартовые взносы
– Халявныеспины — дополнительные ставки в популярных автоматах
– Кешбэк — еженедельный компенсация части проигрышей
– План верности — уникальные льготы для регулярных участников
Купоны и их ввод
Эксклюзивные коды дают экстра подарки. Для применения нужно ввести комбинацию в нужное поле в персональном кабинете.
Геймплейный каталог
Слоты
Коллекция игровых автоматов насчитывает множество позиций от ведущих поставщиков:
– Обычные симуляторы
– Продвинутые слоты
– Накопительные слоты
– Тематические развлечения
Live казино
Зона Live-казино обеспечивает игру с живыми крупье в условиях реального стрима:
– Европейскаярулетка
– Blackjack
– Baccarat
– Карибскийпокер
Состязания
Постоянные состязания с солидными джекпотными призами устраиваются еженедельно. Игроки конкурируют за лидерство в турнирнойсетке.
Мобильная реализация и софт
Mobile реализация портала
Официальный сайт целиком адаптирован для портативных устройств. Клиенты могут запускать игры напрямую через веб-навигатор без необходимости загрузки.
Приложение для загрузки
Авторское смартфонное APP предлагается для получения на устройства с программными средами Android и iOS. Софт обеспечивает:
– Моментальный подход к слотам
– Надежную производительность
– Push-уведомления о бонусах
– Простой оформление
Резюме
Официальный портал казино и его действующие дубликаты обеспечивают пользователям абсолютный возможность к качественным развлекательным развлечениям. Щедрые поощрения, разнообразные акции, простая адаптивная версия и профессиональная служба создают игровой времяпрепровождение предельно комфортным и доходным.
Актуальные онлайн-казино предоставляют клиентам разнообразный ассортимент слотов и привлекательные бонусы. Но для удобной работы необходимо понимать, как получить доступ к Bollywood и его рабочие зеркала.
Что такое основной веб-ресурс казино
Лицензионный веб-сайт казино — это первичная система, где клиенты могут наслаждаться развлекательными играми. Портал действует на легальных основаниях и имеет всеми нужными сертификатами.
Главные достоинства основного сайта:
– Надежность личных информации
– Прозрачные условия участия
– Подтвержденные платежи
– Квалифицированная служба поддержки
Функционирующее зеркало казино: для чего используется
Зеркало — это абсолютная версия лицензионного портала, расположенная по отличному веб-адресу. Актуальное зеркало создается для гарантирования непрерывного подключения к порталу.
Причины эксплуатации альтернативных адресов:
– Недоступность главного адреса
– Плановые операции
– Значительная нагрузка на сервер
Как отыскать актуальное зеркало на сегодня
Получить новое действующее зеркало можно множественными путями:
1. Email-уведомления — оформите подписку на почтовую доставку
2. Служба техподдержки — свяжитесь в онлайн-чат
3. Публичные медиа — мониторьте за публикациями
4. Тематические ресурсы — авторитетные источники
Открытие счета на платформе казино
Этап регистрации требует буквально несколько мгновений:
1. Кликните на клавишу “Открыть счет”
2. Внесите необходимые информацию
3. Подтвердите почтовую адрес
4. Введите код активации, если имеется
Вслед за финализированной оформления вам будет открыт персональный аккаунт.
Награды и купоны
Выгодная поощрительная программа — значимое достоинство казино:
Подарок за регистрацию
Начинающие игроки зарабатывают стартовый презент, который может включать:
– Валютный депозит на дебютный пополнение
– Фриспины для автоматов
– Приветственные деньги
Активационные коды
Регулярно размещаются актуальные бонусные шифры, предоставляющие активировать специальные бонусы.
Система компенсации
Регулярные клиенты зарабатывают часть использованных денег обратно.
Свежие предложения и конкурсы
Казино периодически проводит увлекательные события:
– Weekly турниры
– Тематические предложения
– Раздачи солидных выигрышей
– Программа лояльности
Авторизация в персональный раздел
Для доступа на сайт необходимо:
1. Загрузить лицензионный адрес или функционирующее зеркало
2. Выбрать “Вход”
3. Внести никнейм и пароль
В индивидуальном аккаунте предоставлены такие возможности:
– Зачисление счета
– Вывод призов
– Просмотр истории операций
– Настройка индивидуальными параметрами
Mobile модификация и app
Мобильная вариант
Responsive модификация сайта позволяет делать ставки с разных смартфонного гаджета. Оформление адаптивно подстраивается под габариты экрана.
Приложение для скачивания
Установить приложение можно для:
– Android — безопасная установка с портала
– iOS — скачивание через App Store
Преимущества программы:
– Моментальный запуск
– Надежная работа
– Push-уведомления об акциях
– Производительный интерфейс
Гемблинг категории
Барабаны
Обширная галерея развлекательных автоматов от ведущих производителей:
– Традиционные машины
– Видео-эмуляторы
– Накопительные-автоматы
Live игры
Раздел с живыми крупье обеспечивает:
– Рулеточные столы
– Блэкджек
– Мини-баккара
– Texas Hold’em
Трансляции транслируются в HD качестве изображения, создавая впечатление аутентичного казино.
Способы депозита и снятия
Платформа принимает множественные денежные инструменты:
– Кредитные средства
– Онлайн системы
– Цифровые валюты
– Банковские переводы
Наименьшие пороги депозита и быстрые выводы обеспечивают игру предельно удобной.
Служба поддержки
Компетентная команда ассистентов функционирует 24/7 и может ассистировать с различными вопросами:
– Реалтайм-чат
– Email-поддержка
– Phone служба
Итоги
Главный портал казино и его функционирующие дубликаты предоставляют участникам защищенный и захватывающий игровой отдых. Богатые поощрения, простая портативная платформа, многочисленные слоты и высокоуровневое live-казино превращают эту систему превосходным местом для гемблинг досуга.
sex goobet
indian pharmacy online: TrustRx India – mail order pharmacy india
lukmore bet
Нашёл этот канал lukmore, теперь только через него захожу. Там всегда есть актуальные ссылки. Всё работает стабильно. Удобно.
skanus pyragai https://pyragaireceptai.lt
I recently tried this casino https://aamal.sa/2026/02/13/slap-kong-gambling-platform-your-premium-gaming-2/ and was surprised by how stable everything felt. The games run fast, bonuses are clear, and navigation is intuitive, making the experience comfortable.
Актуальные онлайн-казино гарантируют участникам обширный набор слотов и выгодные бонусы. Впрочем для удобной работы необходимо иметь представление, как найти https://www.ключевский.СЂС„ и его действующие зеркала.
Что такое главный ресурс казино
Основной сайт казино — это базовая площадка, где клиенты могут наслаждаться развлекательными развлечениями. Портал действует на легальных условиях и владеет всеми обязательными документами.
Основные плюсы главного веб-сайта:
– Безопасность персональных реквизитов
– Прозрачные требования игры
– Стабильные транзакции
– Профессиональная служба поддержки
Действующее зеркало казино: для чего нужно
Дублирующий ресурс — это абсолютная дубликат главного сайта, расположенная по отличному веб-адресу. Актуальное зеркало создается для гарантирования бесперебойного соединения к ресурсу.
Основания эксплуатации копий сайта:
– Ограничение официального URL
– Регламентные операции
– Значительная посещаемость на систему
Как обнаружить свежее зеркало на сегодня
Получить новое рабочее зеркало можно разными вариантами:
1. Рассылка — активируйте уведомления на информационную отправку
2. Департамент support — обратитесь в онлайн-чат
3. Социальные площадки — мониторьте за постами
4. Тематические ресурсы — проверенные платформы
Открытие счета на портале казино
Алгоритм оформления занимает буквально несколько мгновений:
1. Нажмите на опцию “Создать аккаунт”
2. Укажите обязательные сведения
3. Подтвердите почтовую e-mail
4. Активируйте промокод, если есть
Сразу после завершенной регистрации вам предоставится разрешен пользовательский профиль.
Награды и бонусные коды
Привлекательная поощрительная структура — существенное конкурентное преимущество казино:
Подарок за создание аккаунта
Свежие клиенты приобретают первый бонус, который может содержать:
– Денежный счет на дебютный взнос
– Фриспины для автоматов
– Стартовые бонусы
Активационные коды
Постоянно выходят эксклюзивные бонусные шифры, позволяющие активировать дополнительные бонусы.
Схема кэшбека
Активные участники возвращают процент потраченных финансов назад.
Действующие промо и турниры
Платформа периодически организует интересные промо-мероприятия:
– Семидневные чемпионаты
– Праздничные акции
– Розыгрыши ценных выигрышей
– Механизм статусов
Доступ в индивидуальный кабинет
Для авторизации на сайт требуется:
1. Открыть основной ресурс или функционирующее зеркало
2. Нажать “Login”
3. Внести email и ключ
В пользовательском кабинете доступны следующие инструменты:
– Зачисление баланса
– Получение выигрышей
– Анализ лога транзакций
– Редактирование персональными параметрами
Mobile модификация и app
Мобильная модификация
Мобильная вариант сайта обеспечивает играть с любого портативного гаджета. Оформление самостоятельно настраивается под габариты экрана.
App для загрузки
Загрузить app можно для:
– Android — непосредственная загрузка с портала
– iOS — загрузка через App Store
Выгоды программы:
– Быстрый запуск
– Надежная функциональность
– Push-уведомления об акциях
– Ускоренный интерфейс
Гемблинг категории
Игровые машины
Разнообразная библиотека развлекательных барабанов от лучших поставщиков:
– Традиционные автоматы
– Современные-игры
– Прогрессивные-автоматы
Live игры
Секция с живыми операторами дает:
– Рулетка
– Блэкджек
– Punto Banco
– Texas Hold’em
Эфиры осуществляются в превосходном формате, создавая атмосферу настоящего казино.
Варианты пополнения и получения
Ресурс принимает разнообразные транзакционные системы:
– Дебетовые картсчета
– Цифровые счета
– Bitcoin/Ethereum
– Wire отправки
Наименьшие пороги внесения и моментальные выводы гарантируют игру предельно приятной.
Команда техподдержки
Компетентная отдел поддержки функционирует 24/7 и в состоянии содействовать с разными вопросами:
– Мгновенный-чат
– Email-консультации
– Телефонная связь
Резюме
Лицензионный веб-сайт казино и его рабочие копии гарантируют пользователям защищенный и увлекательный гемблинг отдых. Привлекательные награды, простая mobile версия, богатые слоты и профессиональное live-казино создают эту систему замечательным решением для развлекательных развлечений.
Нынешние онлайн-казино обеспечивают участникам обширный набор игр и бонусных предложений. Вход к платформе выполняется через лицензионный портал или его действующее зеркало Ретро казино, что дает бесперебойную игру.
Что представляет собой функционирующее зеркало казино
Альтернатива — это полная копия главного сайта, созданная для устранения ограничений. Действующее зеркало дает возможность игрокам обрести доступ к излюбленным слотам в каждое время.
Лицензионное зеркало содержит всеми характеристиками оригинального портала:
– Целый ассортимент развлечений
– Личный кабинет с записанными параметрами
– Свежие поощрения
– Гарантированные денежные действия
Оформление профиля на официальном портале
Ход создания аккаунта требует всего немного минут. Начинающим участникам требуется:
1. Попасть на главный ресурс или действующее зеркало
2. Кликнуть на ссылку “Регистрация”
3. Внести нужные информацию
4. Активировать электронную почту
5. Сделать начальный вклад
Приветственный бонус выдается незамедлительно после выполнения всех ступеней.
Доступ в профиль
Созданные игроки могут произвести авторизацию используя:
– Никнейм и пароль
– Номер мобильного
– Адрес
Профиль предоставляет доступ к контролю счетом, записям операций и действующим промокодам.
Бонусы и программы
Азартная платформа привлекает активных игроков разнообразными вознаграждениями:
Первый пакет
– Надбавка на дебютный платеж до 100%
– Фриспины на востребованные слоты
– Экстра награды за очередные взносы
Промокоды
Уникальные коды открывают доступ на получение уникальных вознаграждений. Свежие купоны выставляются в блоке “Бонусы”.
Кешбэк
Постоянный возврат равен до 10% от проигранных денег. Возврат зачисляется незамедлительно.
Система лояльности
Верные клиенты накапливают единицы, которые обмениваются на реальные выплаты или бесплатные вращения.
Адаптивный портал и APP
Ради комфорта игроков создана удобная адаптивный сайт. Гибкий облик помогает комфортно делать ставки с каждого переносного аппарата.
Плюсы программы:
– Оперативный подключение к играм
– Адаптированный вид
– Стабильная работа
– Нотификации о последних турнирах
Скачать приложение можно бесплатно с основного веб-сайта для девайсов на Android и iOS.
Библиотека игр
Слоты
Библиотека насчитывает более 2000 автоматов от топовых производителей:
– Классические слоты
– Видео-слоты
– Джекпот-слоты
– Сюжетные слоты
Live казино
Категория Live игр предоставляет игру с живыми диллерами в живом эфире:
– Рулетка
– Карточная игра
– Карты
– Покер
Конкурсы
Регулярные состязания с значительными премиальными пулами проводятся регулярно. Допуск в соревнованиях открыто всем действующим клиентам.
Расчетные методы
Платежи и получения денег производятся через востребованные методы:
– Дебетовые карточ ки
– Цифровые кошельки
– Цифровая валюта
– Счетные платежи
Самый низкий депозит — от 100 рублей. Вывод средств обрабатывается в течение 24 времени.
Отдел саппорта
Непрерывная отдел саппорта может поддержать в урегулировании всех ситуаций:
– Живой чат
– Email
– Горячая линия
– Публичные сети
Охрана и сертификат
Официальный ресурс действует на основании мировой лицензии. Всевозможные данные участников закрыты новейшим SSL-криптованием.
Резюме
Рабочее зеркало предоставляет постоянный доступ к любимым автоматам, богатым акциям и практичным функциям. Создайте аккаунт немедленно и приобретите приветственный приз!
1xbet yeni adresi 1xbet yeni adresi .
go to my site pass app download
зеркало lukmore Нашёл канал и решил попробовать. Вход рабочий.
1x lite 1xbet-giris-33.com .
Актуальные онлайн-казино гарантируют пользователям обширный спектр функций для комфортной досуга. Переход к платформе РЎСѓРєР° казино выполняется через основной портал или актуальное зеркало.
Что такое функционирующее зеркало казино
Действующее зеркало — это альтернативный URL основного сайта казино. Такие дубликаты разрабатываются для предоставления бесперебойного подключения к гемблинговой сервису.
Копия сегодня абсолютно дублирует функционал официального портала. Пользователи приобретают схожий путь ко всем услугам, включая регистрацию, зачисление средств счета и снятие выигрышей.
Открытие счета на лицензионном веб-сайте
Алгоритм оформления учетной записи занимает всего буквально мгновений. Начинающим пользователям требуется:
1. Перейти на основной домен или рабочее проверенное зеркало
2. Щелкнуть кнопку “Открыть счет”
3. Указать требуемые информацию
4. Проверить почтовую почту
5. Применить промокод при доступности
После окончания создания аккаунта клиент обретает бонус за регистрацию, который вправе включать free spins или cash поощрение.
Вход в персональный кабинет
Персональный кабинет — это закрытая зона, где участники способны регулировать своим аккаунтом. Для входа необходимо внести username и пароль.
В персональном кабинете представлены такие возможности:
– Мониторинг журнала транзакций
– Использование купонов
– Настройка вознаграждениями
– Участие в состязаниях
– Проверка возврата средств
– Редактирование профиля
Призы и акции
Азартная площадка предоставляет выгодные подарки:
Регистрационный набор — дебютанты получают солидное вознаграждение на первые пополнения.
Фриспины — выдаются как при оформлении, так и в контексте многочисленных акций.
Кэшбек — постоянный возмещение доли израсходованных сумм.
Промокоды — специальные комбинации, предоставляющие возможность к уникальным бонусам.
Анализ игровых категорий
Аппараты
Собрание slots содержит тысячи вариантов от передовых провайдеров. Геймеры откроют как стандартные автоматы, так и современные мультимедийные автоматы с интересной визуализацией.
Live казино
Категория Live казино дарит возможность участвовать с живыми дилерами в формате настоящего времени. Имеются востребованные развлечения: рулетка, блэкджек, баккара, покер.
Состязания
Регулярные состязания с значительными наградными банками завлекают массу игроков. Победители зарабатывают монетарные выплаты и эксклюзивные подарки.
Портативная версия и приложение
Телефонная версия платформы обеспечивает наслаждаться с любого девайса. Структура автономно корректируется под размер экрана.
Установить app можно для гаджетов на Android и iOS. Смартфонное программа характеризуется всеми функциями настольной версии.
Как найти текущее зеркало на сейчас
Рабочие URL дубликатов периодически обновляются. Обнаружить рабочую адрес можно различными способами:
– Через службу техподдержки
– В подлинных новостных сетях
– По электронной newsletter
– На аффилиатных сайтах
Охрана и сертификация
Основной сайт работает на базе международной документа. Все платежи оберегаются актуальными методами кодирования.
Секретность индивидуальных данных поддерживается в совершенном объеме.
Итог
Официальный домен и его рабочие дубликаты обеспечивают участникам 24/7 путь к высококлассным гемблинговым услугам. Великодушные вознаграждения, многочисленные автоматы, компетентная поддержка — все это формирует гемблинговый процесс чрезвычайно комфортным и захватывающим.
Обзор основного веб-сайта
Новое онлайн-казино обеспечивает своим клиентам обширный ассортимент игр и призов. Официальный ресурс ДжиВиСпин действует 24/7, предоставляя доступ к известным играм, live-казино и многим предложениям.
Актуальное зеркало: возможность к ресурсу
Что такое дубликат казино
Альтернатива означает собой абсолютную копию главного портала с другим URL адресом. Актуальное зеркало дает участникам миновать ограничения и иметь непрерывный доступ к выбранным развлечениям.
Как найти рабочее зеркало сегодня
Свежие ссылки на официальное зеркало появляются через:
– Email новостнуюленту
– Основные медийные сети
– Команду поддержки
– Партнерские сайты
Регистрация на портале
Ход открытиясчета
Открытиесчета отнимает пару минут и предполагает такие стадии:
1. Открытие на официальный ресурс или действующее зеркало
2. Выбор элемента “Создатьаккаунт”
3. Внесение учетных сведений
4. Подтверждение адреса или телефона
5. Формирование секретнойкомбинации
Подарок за регистрацию
Первые пользователи получают большие стартовые вознаграждения:
– Игровые деньги на кошелек
– Фриспины для слотов
– Расширенный размер кешбэка
– Эксклюзивные ваучеры
Авторизация в индивидуальный счет
Активные игроки имеютвозможность произвести авторизацию через оригинальный веб-сайт или актуальное зеркало. Для этого требуется набрать имяпользователя и код, установленные при регистрации.
Возможности персонального профиля
В собственном кабинете предоставлены данные функции:
– Контроль учетными сведениями
– Зачисление депозита
– Получение денег
– Ввод кодов
– Отслеживание архива ставок
– Участие в соревнованиях
Подарки и предложения
Категории подарков
Казино награждает своих участников многочисленными призовыми акциями:
– Начальный набор — солидные бонусы на стартовые взносы
– Freespins — дополнительные вращения в популярных слотах
– Компенсация — систематический возврат доли ставок
– Система поощрения — уникальные привилегии для регулярных игроков
Купоны и их применение
Уникальные коды предоставляют расширенные подарки. Для использования требуется ввести шифр в определенное поле в личном профиле.
Геймплейный набор
Игры
База азартных симуляторов вмещает сотни наименований от лучших разработчиков:
– Стандартные автоматы
– Видео игры
– Призовые симуляторы
– Лицензионные игры
Live казино
Область Live-казино дарит игру с реальными ведущими в режиме актуального трансляции:
– Французскаярулетка
– Блэкджек
– Пунтобанко
– Карибскийпокер
Турниры
Регулярные конкурсы с солидными выигрышными пулами проводятся регулярно. Претенденты борются за победу в турнирнойсетке.
Портативная версия и программа
Мобильная платформа сайта
Оригинальный портал абсолютно настроен для мобильных гаджетов. Участники могут играть автоматы непосредственно через обозреватель без потребности установки.
Софт для скачивания
Специальное мобильное приложение предлагается для загрузки на гаджеты с рабочими ОС Android и iOS. Программа дает:
– Быстрый доступ к автоматам
– Бесперебойную работу
– Моментальные-оповещения о промо
– Удобный интерфейс
Вывод
Официальный веб-сайт казино и его рабочие зеркала дают игрокам полный доступ к первоклассным азартным развлечениям. Солидные поощрения, многочисленные предложения, простая портативная версия и квалифицированная сервис делают развлекательный времяпрепровождение предельно приятным и выгодным.
В этой статье собраны факты, которые освещают целый ряд важных вопросов. Мы стремимся предложить читателям четкую, достоверную информацию, которая поможет сформировать собственное мнение и лучше понять сложные аспекты рассматриваемой темы.
Исследовать вопрос подробнее – https://vivod-iz-zapoya-2.ru/
Актуальные онлайн-казино предлагают игрокам обширный спектр развлечений и привлекательные бонусы. Однако для стабильной деятельности важно осознавать, как отыскать http://tolbaga.ru и его действующие зеркала.
Что такое основной ресурс казино
Основной портал казино — это главная веб-площадка, где пользователи могут наслаждаться игровыми слотами. Сайт оперирует на легитимных правах и владеет всеми требуемыми сертификатами.
Главные преимущества главного веб-сайта:
– Безопасность персональных данных
– Прозрачные положения участия
– Гарантированные платежи
– Компетентная помощь
Функционирующее зеркало казино: для чего используется
Дублирующий ресурс — это абсолютная дубликат главного сайта, хостящаяся по альтернативному URL. Рабочее зеркало формируется для поддержания стабильного соединения к ресурсу.
Основания использования зеркал:
– Блокировка первичного домена
– Регламентные работы
– Значительная посещаемость на ресурс
Как получить актуальное зеркало на сегодня
Получить новое действующее зеркало можно множественными способами:
1. Подписка — зарегистрируйтесь на информационную отправку
2. Команда поддержки — проконсультируйтесь в онлайн-чат
3. Социальные площадки — отслеживайте за новостями
4. Специализированные ресурсы — достоверные платформы
Открытие счета на сайте казино
Алгоритм открытия счета составляет только пару мгновений:
1. Выберите на элемент “Зарегистрироваться”
2. Введите необходимые информацию
3. Валидируйте почтовую e-mail
4. Активируйте промокод, если есть
Вслед за завершенной регистрации вам будет возможен личный раздел.
Премии и купоны
Щедрая наградная программа — значимое достоинство казино:
Подарок за создание аккаунта
Первичные игроки получают стартовый презент, который может содержать:
– Монетарный счет на стартовый пополнение
– Бесплатные вращения для барабанов
– Безвозвратные средства
Промокоды
Постоянно публикуются эксклюзивные купоны, обеспечивающие активировать дополнительные преимущества.
Механизм кэшбека
Лояльные пользователи зарабатывают часть потраченных денег обратно.
Текущие кампании и состязания
Ресурс регулярно устраивает интересные промо-мероприятия:
– Недельные турниры
– Праздничные бонусы
– Лотереи ценных наград
– Механизм статусов
Вход в персональный аккаунт
Для доступа на сайт требуется:
1. Загрузить главный сайт или рабочее зеркало
2. Активировать “Авторизация”
3. Внести никнейм и пароль
В персональном разделе открыты нижеперечисленные возможности:
– Внесение средств баланса
– Вывод средств
– Анализ журнала операций
– Настройка индивидуальными параметрами
Портативная версия и софт
Адаптивная версия
Responsive версия веб-сайта обеспечивает участвовать с всех смартфонного девайса. Визуал автоматически подстраивается под диагональ дисплея.
Клиент для установки
Скачать программу можно для:
– Android — официальная загрузка с ресурса
– iOS — установка через App Store
Достоинства программы:
– Оперативный вход
– Стабильная работа
– Push-нотификации об акциях
– Улучшенный функционал
Игровые категории
Автоматы
Богатая библиотека развлекательных барабанов от топовых поставщиков:
– Стандартные игры
– Новые-автоматы
– Прогрессивные-автоматы
Live зал
Раздел с настоящими крупье предоставляет:
– Рулетка
– Блэкджек
– Баккара
– Poker
Трансляции транслируются в HD качестве изображения, обеспечивая впечатление реального казино.
Способы пополнения и вывода
Казино поддерживает множественные платежные сервисы:
– Платежные средства
– Онлайн счета
– Цифровые валюты
– Банковские переводы
Стартовые пороги взноса и скоростные выводы гарантируют развлечение крайне удобной.
Служба поддержки
Опытная отдел поддержки доступна 24/7 и может ассистировать с различными задачами:
– Онлайн-чат
– Email-переписка
– Телефонная связь
Выводы
Лицензионный сайт казино и его функционирующие зеркала обеспечивают участникам конфиденциальный и интересный гемблинг отдых. Богатые поощрения, функциональная mobile версия, обширные развлечения и превосходное live-казино создают эту ресурс превосходным выбором для игровых развлечений.
http://medbridgepharmacy.com/# canadian pharmacy discount coupon
Передовые сетевые казино предлагают игрокам огромный диапазон функций для беспроблемной игры. Однако иногда подключение к официальному платформе может оказаться закрытым. В таких случаях на подмогу приходят Eldorado зеркало, которое обеспечивает стабильный подключение ко всем опциям платформы.
Что такое актуальное зеркало казино
Дубликат — это точная копия главного веб-сайта, которая находится по дополнительному интернет-адресу. Копия сохраняет весь набор функций первоначального сайта, включая персональный кабинет, баланс и историю транзакций.
Принципиальные плюсы эксплуатации зеркала:
– Непрерывный соединение к платформе
– Стопроцентная аналогичность инструментов
– Защита личных реквизитов
– Сохранение всех имеющихся привилегий
Как разыскать актуальное зеркало на текущий день
Есть ряд безопасных путей обнаружения свежей ссылочной информации:
Авторизованные источники:
1. Имейл рассылка — руководство регулярно отправляет письма с действующими ссылками
2. Медийные сети — легитимные аккаунты выкладывают свежую новости
3. Департамент поддержки — операторы предоставляют надежные адреса
4. Смартфонное приложение — предоставляет минуть блокировки
Открытие счета на главном портале
Процесс создания аккаунта занимает всего немного минут и содержит из нижеследующих этапов:
1. Переход на главный веб-сайт или рабочее зеркало
2. Нажатие на клавишу «Создать аккаунт»
3. Ввод учетной таблицы
4. Подтверждение почтовой почты или телефонного номера
5. Активация поощрения за регистрацию при наличии промокода
Свежие игроки зарабатывают значительный приветственный подарок, который может содержать free spins, денежные бонусы или компенсацию.
Вход в персональный кабинет
Подключение на портале реализуется стандартным образом. Нужно указать никнейм и кодовое слово, указанные при открытии счета.
Ключевые детали для конфиденциального входа:
– Используйте сложный шифр
– Запустите двойную проверку
– Не записывайте данные на общественных девайсах
– Отслеживайте адресную строку браузера
Характеристика наградной программы
Игровая платформа награждает пользователей различными привилегиями и кампаниями:
Начальный набор
Свежие игроки способны надеяться на великодушное вознаграждение за дебютный взнос. Зачастую это долевая прибавка к депонированной величине плюс фриспины для топовых слотов.
Периодические предложения
– Семидневный кэшбек — возвращение процентной доли потерянных денежных средств
– Призы на последующие депозиты
– Особые акции по событиям
– Конкурсы с большими наградными банками
План верности
Постоянные пользователи зарабатывают баллы за каждую ставку, которые затем меняются на действительные денежные призы, free spins или специальные преимущества.
Промокоды: как использовать
Кодовые комбинации — это специальные наборы символов, дающие право к дополнительным поощрениям.
Где найти рабочие промокоды:
– Официальные общественные сети казино
– Союзнические площадки
– Email-рассылка
– Специализированные платформы
Вводится промокод в отдельное поле при создании аккаунта или добавлении денег баланса.
Портативная версия и приложение
Нынешние клиенты отдают предпочтение проводить время с смартфонных гаджетов. Платформа предоставляет 2 варианта для беспроблемной мобильной игры.
Responsive модификация
Онлайн версия само собой оптимизируется под диагональ экранной панели. Не требует загрузки и оперирует в любом новом браузере.
Портативное приложение
Скачать софт можно для девайсов на Android и iOS. Выгоды app:
– Скоростная открытие
– Стабильная действие
– Всплывающие-уведомления о промо
– Автономный преодоление блокировок
Процесс инсталляции прост: необходимо открыть на портал с смартфонного девайса и выполнять указаниям.
Азартный ассортимент
База слотов охватывает огромное количество наименований от ведущих провайдеров.
Слоты
Гемблинг автоматы — крайне востребованная категория забав. Представлены традиционные 3-барабанные слоты, современные графические аппараты с премиальными этапами, а также прогрессивные выигрыши.
Live казино
Зона с настоящими ведущими дает возможность испытать атмосферу реального казино. Открыты столы с покером.
Трансляция ведется в HD качестве, имеется коммуникация с крупье и иными игроками.
Турниры
Систематически устраиваются соревнования по всевозможным категориям. Участие дает шанс заработать монетарные призы, фриспины или эксклюзивные бонусы.
Денежные действия
Платформа предоставляет большой спектр платежных инструментов:
– Дебетовые карты
– Цифровые кошельки
– Биткоин
– Денежные транзакты
Минимальная величина депозита — посильная для большинства пользователей. Получение денег производится в короткие временные рамки.
Служба поддержки
Опытные сотрудники способны поддержать 24/7. Открыты данные способы коммуникации:
– Веб-чат
– Email
– Звонковая линия
– Медийные сети
Разъяснения на частые проблемы можно отыскать в блоке FAQ.
Заключение
Главный веб-сайт казино и его функционирующие зеркала предоставляют пользователям максимальный доступ ко всем опциям платформы. Щедрые привилегии, практичная портативная версия, впечатляющий коллекция игр и опытная поддержка создают гемблинг времяпрепровождение максимально приятным и защищенным.
1x bet 1x bet .
scam
drugs gooobet
MedicoBridge RX MedicoBridge RX pharmacy in mexico
Переход к сайту и действующие ссылки
Актуальные сетевые казино предлагают пользователям огромный выбор игр. Центральный ресурс http://екб-школа4.СЂС„/ предоставляет надежный доступ ко всем сервисам. Однако порой возникают обстоятельства, когда нужно альтернативный вариант доступа.
Что есть собой рабочее зеркало
Актуальное зеркало — это полная реплика основного веб-сайта с запасным доменным именем. Зеркало сегодня обеспечивает обходить возможные блокировки и обеспечивать стабильный вход к любимым автоматам.
Проверенное зеркало содержит всеми возможностями, что и базовый портал:
– Совокупный перечень автоматов
– Личный профиль с актуальными данными
– Полные награды и промо
– Безопасные финансовые транзакции
Открытие профиля и авторизация в казино
Процедура создания профиля на сайте требует пару секунд. Начинающим клиентам требуется:
1. Зайти на функционирующее зеркало на данный момент
2. Кликнуть опцию «Открыть профиль»
3. Ввести нужные данные
4. Верифицировать почтовую почту или данные телефона
5. Получить награду за открытие аккаунта
Доступ в личный раздел осуществляется посредством предоставление логина и ключа.
Описание наградной системы
Выгодная поощрительная система — важнейшее плюс казино. Игроки зарабатывают всевозможные поощрения:
Стартовые награды
Свежие игроки могут надеяться на привлекательный поощрение за открытие профиля. Обычно это совокупность вариантов, включающий:
– Частичную премию к первому пополнению
– Бесплатные спины
– Бонусные суммы на баланс
Промо-коды и специальные возможности
Постоянные бонусные комбинации помогают зарабатывать экстра преимущества. Активировать их возможно в отдельном разделе персонального кабинета.
Бесплатные вращения и кэшбек
Фриспины — это способность вращать барабаны без задействования собственных финансов. Компенсация представляет процентный компенсацию потерянных финансов.
Каталог игр
Гемблинг площадка предлагает впечатляющую коллекцию игр.
Видеослоты
Разнообразие аппаратов восхищает представление. Имеются традиционные 3-барабанные автоматы и современные игры с занимательной графикой.
Live казино
Раздел Live игр погружает клиентов в обстановку истинного гемблинг заведения. Профессиональные операторы организуют игры в живом эфире.
Турниры и доски почета
Периодические турниры обеспечивают накала и предоставляют возможность заработать значительные призы.
Mobile форма и программа
Новые решения обеспечивают участвовать в удобном месте. Портативная версия автоматически адаптируется под монитор устройства.
Скачать клиент возможно для операционных систем iOS и Android. Приложение гарантирует:
– Быстрый запуск
– Стабильную функционирование
– Всплывающие-алерты об промо
– Удобный вид
Денежные транзакции
Платформа использует всевозможные системы депозита и получения сумм:
– Банковские системы
– Цифровые системы
– Токены
– Финансовые отправки
Каждые переводы реализуются через защищенное протокол, что обеспечивает сохранность персональных информации.
Отдел поддержки
Компетентная группа support функционирует 24/7. Соединиться с операторами допустимо через:
– Живой-чат
– Цифровую почту
– Контакт
– Медиа сети
Итоги
Главный ресурс и его действующее зеркало обеспечивают пользователям защищенный и комфортный путь к захватывающим занятиям. Богатые подарки, широкий ассортимент игр и отличная ассистанс формируют участие предельно удобной и выгодной.
Нынешние онлайн-казино обеспечивают геймерам множество опций для беспроблемной игры. Центральный сайт Голд казино открывает вход ко всем возможностям и развлечениям. Однако при появлении программных сложностей на выручку спешат актуальные зеркала.
Что означает собой актуальное зеркало
Копия казино — это идентичная дубликат официального ресурса, расположенная по дополнительному адресу. Официальное зеркало сохраняет все опции, вместе с открытие профиля, доступ в индивидуальный кабинет, бонусы и бонусные коды.
Альтернативный сайт на сегодня обеспечивает:
– Постоянный путь к игровым автоматам
– Полную защиту личных данных
– Сохранение баланса и журнала транзакций
– Применимость всех бонусных программ
Регистрация на главном ресурсе
Ход создания аккаунта требует считанные минут. Новоиспеченным клиентам необходимо:
1. Зайти на основной портал или действующее зеркало
2. Выбрать кнопку «Зарегистрироваться»
3. Ввести необходимые поля
4. Активировать электронную почту
5. Ввести промокод при наличии
После завершения регистрации игроки обретают вознаграждение за регистрацию, какой может включать фриспины или денежное поощрение.
Доступ в личный кабинет
Индивидуальный кабинет открывает полный надзор над азартным процессом. Через собственный аккаунт можно:
– Финансировать баланс
– Забирать средства
– Задействовать бонусные коды
– Контролировать журнал игр
– Играть в соревнованиях
– Получать возврат средств
Характеристика бонусов и специальных предложений
Щедрая призовая система — значимое плюс казино. Центральные категории поощрений:
Приветственный бонус
Дебютанты получают великодушное премирование на первые вклады. Сумма премии может достигать 100-200% от объема взноса.
Бонусные спины
Халявные раунды начисляются для известных игровых автоматов. Число free spins разнится от 10 до 500 штук.
Cash back
Систематический или помесячный отдача части проигранных финансов. Обычный размер кэшбека — 5-15%.
Состязания
Регулярные соревнования с крупными призовыми банками. Игроки борются за верхние места в таблице лидеров.
Мобильная версия и приложуха
Адаптивная версия позволяет наслаждаться игрой с каждого гаджета. Геймеры могут загрузить программу для iOS и Android или применять браузерную версию.
Плюсы мобильного приложения:
– Оперативная прогрузка слотов
– Практичный графический интерфейс
– Пуш-нотификации о поощрениях
– Доступ через Face ID
Игровые автоматы и Live казино
Игровая подборка содержит тысячи названий от известных поставщиков.
Востребованные типы слотов:
– Стандартные слоты
– Современные слоты с призовыми уровнями
– Накопительный приз игры
– Мега-путь слоты
Live игровой зал
Секция live игорный зал обеспечивает развлечение с живыми дилерами. Есть классические игры:
– Европейская рулетка
– Двадцать одно
– Punto Banco
– Карибский покер
Как отыскать актуальное зеркало
Найти рабочую ссылку на зеркало возможно несколькими способами:
1. Оформить подписку на email-рассылку
2. Наблюдать за обновлениями в соц сетях
3. Связаться в службу поддержки
4. Сохранить актуальное зеркало в избранное
Заключение
Лицензионный портал и его рабочие зеркала обеспечивают бесперебойный путь к развлекательным автоматам. Богатые бонусы, разнообразные бонусные коды, эргономичное мобильное софт и профессиональная техподдержка поддержки делают азартный опыт максимально приятным и конфиденциальным.
birxbet birxbet .
trusted online pharmacy reviews https://joeasymeds.top/# online pharmacy reviews
drugs gooobet
porno goobet
MedBridge Pharmacy: canadien pharmacies – MedBridge Pharmacy
Актуальные онлайн-казино дают клиентам большой спектр игр и премиальных опций. Присоединение к сервису реализуется через главный портал или его действующее зеркало Рльдорадо, что гарантирует стабильную активность.
В чем суть рабочее зеркало казино
Альтернатива — это абсолютная версия главного сайта, построенная для решения ограничений. Рабочее зеркало помогает участникам получить подключение к предпочитаемым слотам в произвольное время.
Проверенное зеркало обладает всеми характеристиками главного портала:
– Полный перечень игр
– Аккаунт с сохраненными параметрами
– Действующие бонусы
– Защищенные платежные действия
Регистрация на официальном портале
Процедура регистрации занимает всего немного минут. Начинающим игрокам нужно:
1. Попасть на проверенный портал или рабочее зеркало
2. Выбрать на клавишу “Создать аккаунт”
3. Внести обязательные данные
4. Активировать электронную почту
5. Сделать дебютный вклад
Бонус за регистрацию предоставляется сразу после завершения всех стадий.
Вход в учетную запись
Существующие пользователи могут совершить авторизацию вводя:
– Логин и пароль
– Цифры сотового
– Адрес
Личный кабинет дает возможность к регулированию счетом, сведениям игр и действующим акциям.
Поощрения и программы
Азартная площадка вознаграждает активных пользователей разнообразными бонусами:
Первый комплект
– Надбавка на первый пополнение до 100%
– Free spins на топовые слоты
– Дополнительные поощрения за дальнейшие взносы
Купоны
Особые ваучеры дают право на активацию эксклюзивных призов. Актуальные комбинации выкладываются в блоке “Акции”.
Кешбэк
Периодический возврат насчитывает до 10% от потраченных средств. Возмещение предоставляется моментально.
Система лояльности
Верные участники получают очки, которые обмениваются на подлинные выплаты или фриспины.
Мобильная версия и софт
Для удобства клиентов построена полноценная mobile версия. Отзывчивый облик позволяет легко делать ставки с любого мобильного гаджета.
Преимущества APP:
– Скорый запуск к развлечениям
– Настроенный облик
– Устойчивая функциональность
– Push-уведомления о последних турнирах
Загрузить приложение можно бесплатно с официального портала для устройств на Android и iOS.
Коллекция развлечений
Игровые автоматы
Библиотека содержит более 2000 слотов от ведущих провайдеров:
– Классические машины
– Мультимедийные игры
– Слоты с джекпотом
– Фирменные игры
Live казино
Раздел Live казино обеспечивает взаимодействие с живыми ведущими в прямом времени:
– Рулеточные столы
– Blackjack
– Баккара
– Столы покера
Состязания
Постоянные конкурсы с солидными выигрышными пулами устраиваются еженедельно. Вход в соревнованиях доступно всем зарегистрированным участникам.
Расчетные способы
Платежи и снятия выплат реализуются через распространенные способы оплаты:
– Банковские пластик
– Электронные счета
– Bitcoin
– Денежные операции
Самый низкий депозит — от 100 рублей. Вывод средств проводится в течение 24 периода.
Служба поддержки
Постоянная отдел support способна ассистировать в разрешении произвольных вопросов:
– Live chat
– Email
– Связь
– Социальные сети
Охрана и сертификат
Главный сайт работает на фундаменте признанной сертификата. Каждые данные пользователей обезопасены актуальным SSL-протоколом.
Вывод
Актуальное зеркало гарантирует стабильный вход к излюбленным слотам, богатым поощрениям и практичным функциям. Зарегистрируйтесь сейчас и обретите приветственный приз!
Подключение к ресурсу через проверенные зеркала
Клиенты сетевых казино регулярно имеют дело с ситуацией закрытия официального домена. Собственно для преодоления этой трудности существуют копии официального ресурса. Клубника дает беспрепятственный подключение ко всем сервисам платформы.
Что такое действующее зеркало казино
Дубликат составляет собой идентичную копию основного веб-сайта с идентичным опциями. Единственное различие — это другое имя. Абсолютно все информация клиента, вместе с депозит, бонусы и записи партий, сохраняются идентичными.
Выгоды задействования зеркал
Актуальные зеркала характеризуются набором ключевых достоинств:
– Непрерывный подключение к излюбленным автоматам
– Стопроцентная безопасность собственных информации
– Сохранение всех опций пользовательского кабинета
– Способность получения бонусов и участия в кампаниях
Открытие счета на легальном сайте
Операция оформления предельно элементарен и отнимает немного минут. Начинающие клиенты имеют возможность претендовать на крупный вводный подарок за оформление.
Шаги создания аккаунта
1. Вход на легальный домен или его зеркало
2. Нажатие на кнопку “Создать аккаунт”
3. Заполнение обязательных информации
4. Верификация email почты
5. Применение бонусного кода (в случае есть)
Награды и предложения для клиентов
Казино одаривает своих пользователей всевозможными поощрительными акциями.
Главные виды призов
Приветственный бонус — солидное поощрение для начинающих пользователей, которое способно охватывать финансовые призы и free spins.
Фриспины — шанс запускать в популярных автоматах безвозмездно.
Возврат средств — процентный отдача проигранных денег, который зачисляется еженедельно или раз в месяц.
Бонусные коды — специальные наборы, обеспечивающие дополнительные привилегии.
Индивидуальный кабинет: возможности и параметры
Пользовательский профиль гарантирует совершенный управление над развлекательным процессом. В нем имеются:
– Регулирование балансом
– Записи переводов
– Действующие награды
– Установки защиты
– Подтверждение аккаунта
Мобильная вариант и программа
Нынешние пользователи ценят мобильность. Ресурс обеспечивает пару способа для ставок с портативных аппаратов.
Адаптивная телефонная платформа
Мобильная редакция сайта без участия адаптируется под дисплей любого устройства. Нет необходимости загружать особое софт.
Приложение для гаджетов
Возможно загрузить специальное программу для iOS и Android. APP гарантирует:
– Мгновенный старт
– Адаптированный внешний вид
– Оперативные-оповещения о бонусах
– Надежную работу
Live развлечения: обстановка подлинного зала
Зона Live столов транспортирует пользователей в антураж реального игорного заведения. Профессиональные дилеры ведут партии в виде живого времени.
Популярные Live-столы
– Французская рулетка
– Blackjack
– Баккара
– Техасский холдем
Аппараты: разнообразие игр
Собрание развлекательных аппаратов включает сотни названий от ведущих поставщиков. Участники встретят:
– Обычные автоматы
– Видео-автоматы
– Джекпот-автоматы
– Megaways
Соревнования и особые предложения
Постоянные турниры позволяют пользователям бороться друг с другом за значительные денежные суммы. Каждый конкурс содержит свои правила участия и список чемпионов.
Варианты ввода и вывода средств
Платформа поддерживает множество денежных инструментов:
– Платежные карты
– Цифровые счета
– Криптовалюты
– Прямые переводы
Каждые транзакции проходят защищенно благодаря передовым технологиям криптографии.
Команда поддержки
Профессиональные специалисты команды support способны содействовать 24/7. Имеются следующие способы связи:
– Онлайн-чат
– Email-поддержка
– Голосовая поддержка
– Медийные сети
Вывод
Главный портал платформы и его рабочие альтернативы обеспечивают игрокам надежный и приятный вход к широкому выбору игровых игр. Солидные награды, регулярные кампании, профессиональная поддержка и удобные финансовые инструменты создают азартный опыт крайне приятным и прибыльным.
india pharmacy mail order: indian pharmacies safe – reputable indian pharmacies
sex goobet
Нынешние онлайн-казино предоставляют пользователям обширный ассортимент услуг и поощрительных предложений. Доступ к ресурсу выполняется через официальный сайт или его актуальное зеркало Вован зеркало, что гарантирует стабильную работу.
Что представляет собой рабочее зеркало казино
Альтернатива — это полная реплика оригинального портала, сделанная для преодоления ограничений. Рабочее зеркало помогает пользователям иметь подключение к излюбленным слотам в каждое время.
Официальное зеркало обладает всеми функциями основного портала:
– Весь перечень автоматов
– Личный кабинет с зафиксированными информацией
– Действующие акции
– Надежные расчетные операции
Регистрация на официальном сайте
Процедура регистрации составляет всего считанные минут. Свежим участникам требуется:
1. Попасть на основной сайт или действующее зеркало
2. Нажать на элемент “Регистрация”
3. Указать обязательные информацию
4. Подтвердить контакт
5. Сделать дебютный взнос
Приветственный бонус предоставляется сразу после завершения всех ступеней.
Доступ в личный кабинет
Созданные игроки могут совершить подключение вводя:
– Имя пользователя и код
– Данные мобильного
– Адрес
Личный кабинет предоставляет право к администрированию финансами, истории транзакций и доступным промокодам.
Награды и программы
Гемблинг площадка радует активных клиентов разнообразными призами:
Начальный набор
– Надбавка на стартовый пополнение до 100%
– Фриспины на топовые слоты
– Экстра бонусы за очередные взносы
Ваучеры
Особые купоны открывают право на активацию специальных вознаграждений. Свежие коды выставляются в разделе “Предложения”.
Возврат средств
Регулярный кешбэк составляет до 10% от проигранных сумм. Возврат зачисляется сразу.
Механизм лояльности
Регулярные игроки получают единицы, которые переводятся на действительные выплаты или free spins.
Mobile версия и программа
Для удобства клиентов создана полноценная портативная платформа. Приспособленный интерфейс дает возможность удобно участвовать с каждого переносного девайса.
Достоинства программы:
– Моментальный вход к автоматам
– Оптимизированный вид
– Надежная функциональность
– Сообщения о актуальных акциях
Получить программу можно безвозмездно с основного ресурса для девайсов на Android и iOS.
Каталог игр
Слоты
Библиотека вмещает более 2000 слотов от топовых производителей:
– Стандартные машины
– Современные автоматы
– Слоты с джекпотом
– Фирменные игры
Live казино
Секция Live развлечений предоставляет участие с подлинными диллерами в живом эфире:
– Колесо фортуны
– Двадцать одно
– Baccarat
– Столы покера
Состязания
Систематические соревнования с большими наградными пулами проводятся еженедельно. Участие в состязаниях возможно всем активным клиентам.
Расчетные варианты
Пополнения и выводы средств реализуются через востребованные способы оплаты:
– Кредитные пластик
– Электронные системы
– Крипто
– Банковские платежи
Стартовый взнос — от 100 рублей. Снятие денег выполняется в течение 24 периода.
Служба поддержки
Непрерывная группа помощи расположена поддержать в исправлении каких-либо задач:
– Живой чат
– Email
– Телефон
– Соц сети
Защита и разрешение
Подлинный портал действует на основании признанной документа. Всевозможные сведения клиентов обезопасены новейшим SSL-протоколом.
Резюме
Актуальное зеркало предоставляет бесперебойный соединение к выбранным слотам, щедрым промокодам и удобным функциям. Зарегистрируйтесь немедленно и обретите приветственный приз!
Современные онлайн-казино обеспечивают пользователям богатый диапазон функций для удобной досуга. Доступ к площадке Лев реализуется через главный портал или рабочее зеркало.
Что такое действующее зеркало казино
Актуальное зеркало — это резервный домен официального ресурса казино. Такие клоны генерируются для гарантирования стабильного входа к азартной системе.
Копия на сегодня целиком повторяет опции базового портала. Игроки получают такой же выход ко всем функциям, включая оформление профиля, зачисление средств кошелька и получение средств.
Создание аккаунта на официальном ресурсе
Процедура открытия профиля отнимает всего буквально минут. Будущим пользователям требуется:
1. Перейти на главный портал или рабочее проверенное зеркало
2. Выбрать кнопку “Зарегистрироваться”
3. Внести необходимые информацию
4. Верифицировать e-mail почту
5. Ввести бонусный код при доступности
После завершения открытия профиля пользователь получает вознаграждение за регистрацию, который способен предполагать бесплатные вращения или монетарное начисление.
Доступ в личный кабинет
Персональный кабинет — это защищенная область, где игроки имеют возможность администрировать своим аккаунтом. Для входа следует напечатать логин и код доступа.
В пользовательском кабинете представлены данные опции:
– Просмотр истории переводов
– Задействование промокодов
– Управление призами
– Включение в состязаниях
– Контроль кэшбека
– Редактирование данных
Призы и акции
Развлекательная сервис предлагает выгодные вознаграждения:
Приветственный бонус — начинающие получают значительное начисление на дебютные вклады.
Free spins — выдаются как при открытии счета, так и в ходе разнообразных мероприятий.
Кэшбек — постоянный компенсация части проигранных сумм.
Коды активации — особые шифры, открывающие право к эксклюзивным предложениям.
Обзор гемблинговых секций
Слоты
Собрание аппаратов содержит тысячи вариантов от передовых провайдеров. Игроки найдут как обычные машины, так и инновационные 3D-слоты с захватывающей визуализацией.
Live казино
Категория Live казино обеспечивает шанс развлекаться с действующими дилерами в формате актуального времени. Доступны известные развлечения: рулетка, блэкджек, баккара, покер.
Конкурсы
Периодические чемпионаты с крупными выигрышными фондами привлекают массу конкурсантов. Призеры зарабатывают cash призы и уникальные поощрения.
Телефонная версия и приложение
Адаптивная версия платформы дает возможность наслаждаться с каждого устройства. Интерфейс автономно корректируется под формат экрана.
Скачать app можно для гаджетов на Android и iOS. Мобильное программа характеризуется всеми опциями полной версии.
Как определить текущее зеркало на сейчас
Рабочие адреса копий регулярно изменяются. Узнать свежую линк можно различными вариантами:
– Через службу поддержки
– В подлинных новостных сетях
– По email подписке
– На партнерских ресурсах
Защита и легальность
Лицензионный портал действует на базе мировой сертификата. Все платежи защищены современными методами шифрования.
Анонимность пользовательских информации поддерживается в полном формате.
Резюме
Лицензионный портал и его рабочие альтернативы обеспечивают участникам 24/7 доступ к превосходным гемблинговым играм. Привлекательные бонусы, разнообразные игры, профессиональная служба — все это создает азартный досуг максимально комфортным и интересным.
pinup ios yuklab olish https://pinup35741.help
1win android yüklə https://www.1win57196.help
1x bet giri? 1x bet giri? .
1xbet lite 1xbet-giris-43.com .
drugs gooobet
https://getfish.net/wp-content/pgs/1xbet_promokod_na_segodnya_besplatno.html
1xbet g?ncel 1xbet g?ncel .
Подключение к платформе через проверенные зеркала
Актуальные виртуальные казино дают игрокам постоянный доступ к услугам. Центральный ресурс казино Gold оперирует бесперебойно, предоставляя широкий выбор игровых развлечений. Тем не менее временами возникают технические препятствия или барьеры, поэтому критично иметь представление о существовании функционирующих зеркал.
Что представляет из себя основное зеркало казино
Дубликат — это полная версия центрального сайта с таким же интерфейсом. Рабочее зеркало в настоящее время позволяет миновать локальные ограничения и поддерживать гемблинг.
Главные выгоды использования зеркал:
– Стопроцентный доступ к личному кабинету
– Поддержание каждых информации учётной записи
– Такой же спектр автоматов
– Свежие вознаграждения и кампании
Регистрация на ресурсе
Процедура регистрации длится пару минут. Свежие пользователи приобретают щедрый бонус за регистрацию, что способен включать:
– Приветственный бонусный приз
– Комплиментарные вращения для игр
– Специальные купоны
– Увеличенный кешбэк
С целью финализации создания аккаунта требуется:
1. Зайти на основной сайт или зеркало
2. Щёлкнуть клавишу «Создать аккаунт»
3. Указать личные данные
4. Активировать почтовый адрес или телефон
5. Применить купон (когда имеется доступности)
Вход в личный кабинет
По завершении корректной создания аккаунта клиенты способны производить вход с помощью центральный сайт или действующее зеркало. Собственный кабинет открывает безграничный надзор над профилем:
– История игр
– Внесение кошелька
– Получение средств
– Управление наградами
– Присутствие в состязаниях
Привилегии и акции казино
Ресурс балует клиентов многочисленными привилегированными системами:
Приветственные подарки
Дебютанты обретают внушительный комплект бонусов на начальные депозиты. Обычно это предполагает процентную надбавку к величине вклада плюс даровые фриспины.
Периодические предложения
– Каждонедельный кэшбек до 15%
– Турниры с призовыми суммами
– Призы на дату рождения
– Уникальные акции для статусных клиентов
Система верности
Деятельные пользователи получают пункты, что разрешено трансформировать на реальные финансы или особые бонусы.
Портативная форма и софт
Передовые решения помогают участвовать в любом месте подходяще. Карманная редакция веб-сайта автоматически адаптируется под размер каждого девайса.
Выгоды карманного приложения:
– Оперативная запуск игр
– Практичный облик
– Мгновенные-нотификации о предложениях
– Способность инсталлировать для Android и iOS
Настоящее казино: атмосфера настоящего игорного заведения
Секция Live клуба переносит игроков в среду реального игорного учреждения. Квалифицированные крупье организуют игру в режиме настоящего времени.
Доступные развлечения:
– Европейская рулетка
– Блэкджек
– Классика
– Карты
Слоты и развлекательные автоматы
Каталог игровых машин содержит тысячи позиций от топовых производителей. Всякий игрок подберёт развлечение по желанию:
– Стандартные машины
– Современные автоматы с дополнительными уровнями
– Прогрессивный-игры
– Многолинейные автоматы
Конкурсы и лотереи
Регулярные конкурсы включают азарт и дают опцию обрести крупные суммы. Участие в состязаниях регулярно даровое, а призовые суммы насчитывают крупных сумм.
Безопасность и анонимность
Платформа использует актуальные протоколы защиты для обеспечения сведений клиентов. Совокупные денежные транзакции выполняются через защищённые соединения.
Заключение
Основной портал и его актуальные зеркала предоставляют надёжный подключение к качественным развлекательным услугам. Привлекательные награды, практичная мобильная редакция, богатство машин и профессиональное Live-клуб делают портал прекрасным выбором для фанатов игровых развлечений.
Актуальные онлайн-казино предоставляют игрокам внушительный набор развлечений и призовых опций. Вход к площадке производится через основной сайт или его действующее зеркало Рльдорадо, что обеспечивает бесперебойную работу.
Что такое функционирующее зеркало казино
Дубликат — это абсолютная версия главного портала, построенная для решения блокировок. Актуальное зеркало обеспечивает участникам сохранить подключение к любимым слотам в любое время.
Подлинное зеркало содержит всеми опциями основного ресурса:
– Весь список автоматов
– Аккаунт с внесенными данными
– Актуальные акции
– Безопасные финансовые операции
Открытие счета на официальном веб-сайте
Ход регистрации составляет всего пару минут. Начинающим пользователям необходимо:
1. Войти на главный портал или рабочее зеркало
2. Выбрать на кнопку “Регистрация”
3. Указать нужные информацию
4. Проверить электронную почту
5. Совершить начальный депозит
Бонус за регистрацию зачисляется автоматически после окончания всех этапов.
Доступ в профиль
Созданные участники могут выполнить подключение вводя:
– Логин и ключ
– Код контакта
– Электронную почту
Персональный раздел дает возможность к контролю балансом, сведениям игр и доступным поощрениям.
Бонусы и кампании
Азартная площадка вознаграждает активных участников щедрыми бонусами:
Приветственный комплект
– Бонус на стартовый депозит до 100%
– Бесплатные вращения на востребованные игры
– Экстра поощрения за последующие платежи
Промокоды
Уникальные промокоды дают доступ на получение особых поощрений. Текущие промокоды размещаются в категории “Предложения”.
Возврат средств
Еженедельный кешбэк составляет до 10% от потраченных средств. Возврат выплачивается моментально.
Программа лояльности
Верные игроки получают очки, которые конвертируются на реальные финансы или free spins.
Mobile версия и приложение
В целях удобства участников разработана качественная мобильная версия. Отзывчивый интерфейс помогает удобно развлекаться с произвольного переносного аппарата.
Выгоды софта:
– Скорый вход к автоматам
– Оптимизированный интерфейс
– Устойчивая активность
– Сообщения о актуальных бонусах
Получить программу можно свободно с главного веб-сайта для аппаратов на Android и iOS.
Библиотека слотов
Машины
Каталог насчитывает более 2000 слотов от ведущих разработчиков:
– Традиционные машины
– Видео-слоты
– Слоты с джекпотом
– Брендовые развлечения
Live казино
Блок Live казино предоставляет участие с реальными диллерами в реальном эфире:
– Рулетка
– Двадцать одно
– Punto Banco
– Карточный покер
Турниры
Систематические турниры с солидными премиальными пулами проводятся каждую неделю. Допуск в состязаниях возможно всем активным игрокам.
Расчетные способы
Платежи и изъятия средств осуществляются через востребованные способы оплаты:
– Кредитные карточ ки
– Виртуальные сервисы
– Цифровая валюта
– Прямые операции
Самый низкий депозит — от 100 рублей. Получение денег обрабатывается в течение 24 периода.
Сервис помощи
Непрерывная отдел помощи способна поддержать в исправлении произвольных вопросов:
– Живой чат
– Email
– Телефон
– Социальные сети
Надежность и лицензия
Главный ресурс действует на фундаменте международной разрешения. Каждые сведения клиентов охранены новейшим SSL-шифрованием.
Заключение
Действующее зеркало дает непрерывный доступ к излюбленным автоматам, привлекательным промокодам и функциональным функциям. Создайте аккаунт сейчас и получите стартовый бонус!
1xbet resmi sitesi 1xbet-giris-45.com .
scam gooobet
After trying several platforms, I found this casino https://acumeninstitute.ae/welcome-to-dashh-your-top-destination-for-internet/ to be reliable. The welcome bonus is generous, terms are transparent, and payouts are processed smoothly, making it suitable for casual players.
sex goobet
Доступ к ресурсу через актуальные зеркала
Участники сетевых казино постоянно сталкиваются с вопросом блокировки базового сайта. Собственно для устранения этой ситуации разработаны копии официального домена. Килограмм гарантирует абсолютный вход ко всем функциям ресурса.
Что такое действующее зеркало казино
Дубликат значит собой точную копию главного ресурса с идентичным набором функций. Единственное несовпадение — это доменное имя. Каждые параметры участника, содержа счет, бонусы и записи раундов, продолжают быть неизменными.
Преимущества использования зеркал
Актуальные зеркала располагают рядом существенных плюсов:
– Непрерывный вход к предпочитаемым автоматам
– Абсолютная безопасность собственных сведений
– Сохранение всех настроек пользовательского кабинета
– Возможность взятия бонусов и включения в акциях
Регистрация на легальном ресурсе
Ход регистрации чрезвычайно прост и длится немного минут. Начинающие игроки имеют возможность надеяться на крупный стартовый бонус за оформление.
Этапы оформления аккаунта
1. Переход на главный домен или его зеркало
2. Нажатие на клавишу “Создать аккаунт”
3. Внесение обязательных параметров
4. Проверка цифровой почты
5. Внесение кода (когда имеется)
Поощрения и акции для участников
Платформа радует своих игроков многочисленными поощрительными программами.
Основные категории призов
Начальный приз — солидное поощрение для свежих клиентов, что в состоянии охватывать материальные суммы и фриспины.
Free spins — шанс крутить в востребованных автоматах даром.
Кешбэк — частичный отдача потерянных денег, который начисляется раз в неделю или каждый месяц.
Промокоды — особые сочетания, гарантирующие бонусные преимущества.
Индивидуальный кабинет: возможности и установки
Персональный профиль дает совершенный управление над пользовательским процессом. В нем доступны:
– Регулирование депозитом
– Записи операций
– Текущие бонусы
– Настройки охраны
– Валидация профиля
Смартфонная вариант и APP
Новейшие игроки ценят мобильность. Площадка дает два метода для участия с карманных аппаратов.
Responsive мобильная вариант
Адаптивная вариант сайта без участия адаптируется под экран любого гаджета. Не требуется загружать дополнительное программное обеспечение.
Приложение для гаджетов
Можно инсталлировать фирменное программу для iOS и Android. Приложение дает:
– Быстрый старт
– Оптимизированный интерфейс
– Push-сообщения о поощрениях
– Устойчивую производительность
Live игры: среда истинного казино
Зона Live казино транспортирует участников в обстановку настоящего казино. Профессиональные хосты организуют раунды в режиме настоящего времени.
Топовые Live-столы
– Французская рулетка
– Blackjack
– Punto Banco
– Покер
Автоматы: многообразие слотов
Коллекция слотовых аппаратов насчитывает множество вариантов от лидирующих провайдеров. Игроки найдут:
– Обычные слоты
– Видео-автоматы
– Прогрессивный джекпот-игры
– Слоты с множественными линиями
Соревнования и специальные акции
Периодические конкурсы предоставляют шанс пользователям состязаться друг с другом за крупные выигрышные пулы. Отдельный соревнование содержит свои требования вовлечения и доску призеров.
Способы внесения и снятия денег
Ресурс поддерживает множество платежных инструментов:
– Платежные инструменты
– Электронные кошельки
– Цифровые валюты
– Прямые отправления
Любые переводы реализуются защищенно благодаря актуальным системам шифрования.
Отдел support
Опытные операторы службы поддержки готовы ассистировать 24/7. Имеются данные каналы общения:
– Оперативный-чат
– Email-поддержка
– Голосовая линия
– Медийные сети
Заключение
Основной домен клуба и его функционирующие копии гарантируют игрокам защищенный и комфортный доступ к огромному ассортименту развлекательных развлечений. Крупные бонусы, частые промоакции, квалифицированная сервис и удобные денежные методы создают азартный опыт предельно захватывающим и результативным.
Переход к платформе через актуальные зеркала
Актуальные сетевые казино обеспечивают пользователям постоянный переход к играм. Главный ресурс Bollywood работает бесперебойно, предоставляя большой выбор азартных развлечений. Но периодически возникают программные проблемы или запреты, следовательно критично знать о доступности актуальных зеркал.
Что означает собой основное зеркало казино
Дубликат — это точная версия главного ресурса с схожим возможностями. Рабочее зеркало в настоящее время позволяет преодолевать локальные барьеры и возобновлять развлечения.
Ключевые преимущества эксплуатации зеркал:
– Полный вход к персональному кабинету
– Фиксация всех показателей профиля
– Такой же ассортимент развлечений
– Текущие привилегии и кампании
Оформление на платформе
Процесс оформления длится пару минут. Начинающие пользователи получают богатый бонус за запись, который имеет возможность вмещать:
– Приветственный финансовый кредит
– Даровые вращения для игр
– Специальные промокоды
– Усиленный компенсацию
С целью завершения создания аккаунта нужно:
1. Зайти на центральный сайт или зеркало
2. Кликнуть кнопку «Зарегистрироваться»
3. Ввести личные информацию
4. Заверить email или телефон
5. Использовать промокод (в случае существовании)
Подключение в личный кабинет
По завершении успешной регистрации игроки могут осуществлять авторизацию с помощью официальный сайт или действующее зеркало. Индивидуальный кабинет даёт всесторонний управление над счётом:
– Журнал ставок
– Зачисление счёта
– Получение выигрышей
– Управление бонусами
– Вовлечение в конкурсах
Бонусы и промо казино
Ресурс удовлетворяет игроков многочисленными поощрительными предложениями:
Вступительные бонусы
Новые игроки получают богатый набор привилегий на стартовые пополнения. Обычно это охватывает частичную прибавку к величине депозита плюс даровые вращения.
Систематические кампании
– Еженедельный кэшбек до 15%
– Соревнования с призовыми пулами
– Призы на число рождения
– Уникальные промо для элитных пользователей
Система поощрения
Постоянные пользователи собирают единицы, которые возможно обменять на настоящие призы или уникальные привилегии.
Мобильная вариант и утилита
Современные инновации помогают играть в любом месте комфортно. Портативная версия портала независимо настраивается под монитор всякого гаджета.
Преимущества карманного приложения:
– Быстрая загрузка развлечений
– Эргономичный дизайн
– Моментальные-уведомления о акциях
– Опция загрузить для Android и iOS
Реальное казино: среда подлинного игорного учреждения
Область Live казино доставляет геймеров в антураж истинного развлекательного заведения. Опытные ведущие управляют действие в состоянии актуального времени.
Доступные развлечения:
– Рулетка
– Карточная игра
– Punto Banco
– Покер
Барабаны и гемблинг аппараты
Ассортимент развлекательных машин охватывает тысячи вариантов от передовых производителей. Произвольный пользователь подберёт слот по нраву:
– Классические слоты
– Инновационные игры с специальными уровнями
– Джекпот-автоматы
– Мегавейс игры
Турниры и розыгрыши
Систематические конкурсы вносят адреналин и дают возможность обрести большие суммы. Включение в турнирах зачастую даровое, а выигрышные фонды составляют больших величин.
Охрана и секретность
Сайт применяет передовые системы шифрования для обеспечения сведений пользователей. Все платёжные операции осуществляются через безопасные соединения.
Итог
Главный ресурс и его актуальные зеркала обеспечивают стабильный подключение к качественным развлекательным сервисам. Великодушные награды, эргономичная смартфонная форма, многообразие игр и квалифицированное Live-клуб превращают сайт отличным выбором для поклонников развлекательных развлечений.
http://www.m-mahdi.net/main/questions-743
1xbet giris 1xbet giris .
Описание основного портала
Передовое онлайн-казино обеспечивает своим пользователям обширный ассортимент возможностей и поощрений. Главный портал Клубника оперирует постоянно, гарантируя доступ к востребованным слотам, live-казино и разнообразным промо.
Актуальное зеркало: путь к ресурсу
Что такое дубликат казино
Зеркало представляет собой точную копию официального ресурса с другим сетевым путем. Функционирующее зеркало дает клиентам миновать запреты и сохранять постоянный доступ к предпочитаемым играм.
Как обнаружить текущее зеркало сегодня
Рабочие URL на основное зеркало выкладываются через:
– Почтовую рассылку
– Официальные коммуникационные сети
– Отдел обслуживания
– Тематические сайты
Оформление на сайте
Этапы созданияаккаунта
Регистрация занимает буквально минут и содержит данные шаги:
1. Доступ на основной портал или актуальное зеркало
2. Активация элемента “Создатьаккаунт”
3. Заполнение учетных реквизитов
4. Подтверждение адреса или мобильного
5. Формирование секретнойкомбинации
Вознаграждение за оформление
Новые участники зарабатывают солидные приветственные поощрения:
– Игровые депозиты на аккаунт
– Халявныеспины для игр
– Усиленный размер возврата
– Эксклюзивные коды
Доступ в собственный профиль
Постоянные игроки имеютвозможность совершить логин через главный веб-сайт или актуальное зеркало. Для этого необходимо внести учетноеимя и секретнуюкомбинацию, сформированные при регистрации.
Возможности собственного профиля
В собственном разделе предоставлены такие опции:
– Редактирование персональными данными
– Ввод кошелька
– Снятие средств
– Использование промокодов
– Проверка журнала ставок
– Включение в соревнованиях
Бонусы и акции
Типы вознаграждений
Казино награждает своих пользователей разнообразными поощрительными системами:
– Приветственный бонус — выгодные бонусы на дебютные взносы
– Freespins — дополнительные вращения в топовых слотах
– Кешбэк — периодический возмещение доли убытков
– План VIP — эксклюзивные бонусы для постоянных пользователей
Купоны и их применение
Эксклюзивные ваучеры гарантируют дополнительные бонусы. Для применения необходимо набрать шифр в соответствующее раздел в личном кабинете.
Игровой каталог
Симуляторы
Каталог развлекательных симуляторов содержит сотни вариантов от известных провайдеров:
– Обычные слоты
– Современные автоматы
– Джекпот автоматы
– Тематические автоматы
Live казино
Секция Live-казино предоставляет игру с реальными ведущими в режиме реального стрима:
– Рулетка
– Blackjack
– Пунтобанко
– Покер
Турниры
Систематические турниры с большими наградными суммами проводятся ежедневно. Участники соревнуются за призовыеместа в списке.
Mobile платформа и APP
Смартфонная реализация сайта
Основной веб-сайт полностью адаптирован для портативных девайсов. Клиенты вправе открывать автоматы напрямую через браузер без нужды установки.
APP для загрузки
Официальное мобильное софт имеется для получения на устройства с базовыми системами Android и iOS. APP предоставляет:
– Моментальный подход к автоматам
– Стабильную работу
– Мгновенные-уведомления о акциях
– Удобный оформление
Вывод
Основной сайт казино и его функционирующие зеркала предоставляют клиентам комплексный возможность к высококлассным геймплейным играм. Солидные подарки, многочисленные предложения, простая портативная версия и профессиональная помощь делают геймплейный времяпрепровождение максимально комфортным и доходным.
Решил накрутка поведенческих факторов заказать и нашёл статью с рекомендациями по выбору подрядчика. Цены, вопросы, тестовый период — всё описано.
Современные онлайн-казино обеспечивают клиентам разнообразие возможностей для приятной игры. Главный сайт Лев обеспечивает вход ко всем опциям и играм. Однако при наличии технических сложностей на помощь приходят функционирующие дубликаты.
Что являет собой собой действующее зеркало
Альтернативный адрес казино — это идентичная реплика главного веб-сайта, расположенная по другому адресу. Подлинное зеркало сохраняет все функции, включая открытие профиля, авторизацию в индивидуальный кабинет, вознаграждения и промокоды.
Зеркало на сегодня обеспечивает:
– Непрерывный доступ к азартным машинам
– Абсолютную конфиденциальность персональных сведений
– Поддержку баланса и истории платежей
– Применимость всех промо-предложений
Создание учетной записи на официальном портале
Процесс оформления учетной записи занимает пару минут. Новым геймерам требуется:
1. Открыть на подлинный сайт или функционирующее зеркало
2. Щелкнуть кнопку «Создать аккаунт»
3. Внести требуемые данные
4. Подтвердить email почту
5. Использовать бонусный код при существовании
После конца регистрации геймеры получают вознаграждение за регистрацию, который может иметь бесплатные вращения или денежно-призовое вознаграждение.
Вход в индивидуальный кабинет
Индивидуальный кабинет дает всесторонний управление над азартным процессом. Через персональный профиль можно:
– Депонировать депозит
– Выводить призы
– Задействовать промокоды
– Отслеживать записи пари
– Участвовать в конкурсах
– Забирать кешбэк
Описание вознаграждений и специальных предложений
Выгодная премиальная программа — важное плюс казино. Главные виды премий:
Стартовый подарок
Дебютанты обретают щедрое премирование на первые вклады. Величина премии может достигать 100-200% от размера вклада.
Бесплатные вращения
Даровые раунды даются для востребованных игровых автоматов. Количество бесплатных вращений колеблется от 10 до 500 штук.
Возврат средств
Постоянный или ежемесячный возврат доли проигранных средств. Стандартный процент компенсации — 5-15%.
Конкурсы
Постоянные соревнования с большими наградными фондами. Конкурсанты соревнуются за топовые строчки в таблице лидеров.
Мобильная версия и софт
Смартфонная версия разрешает делать ставки с всякого девайса. Геймеры могут установить app для iOS и Android или задействовать браузерную версию.
Достоинства портативного программы:
– Молниеносная загрузка слотов
– Эргономичный интерфейс
– Push-уведомления о бонусах
– Доступ через отпечаток пальца
Машины и Live казино
Игровая подборка насчитывает тысячи игр от лидирующих провайдеров.
Популярные разделы автоматов:
– Стандартные слоты
– Видеослоты с бонусными этапами
– Накопительный приз автоматы
– Megaways слоты
Live игровой зал
Категория live казино обеспечивает партию с живыми крупье. Есть традиционные развлечения:
– Европейская рулетка
– Blackjack
– Баккара
– Покер
Как найти функционирующее зеркало
Получить свежую URL на зеркало возможно несколькими методами:
1. Подписаться на емейл-уведомления
2. Отслеживать за новостями в соц сетях
3. Контактировать в отдел поддержки
4. Добавить в закладки актуальное зеркало в закладки
Итог
Лицензионный портал и его функционирующие дубликаты дают непрерывный доступ к игровым слотам. Щедрые поощрения, множественные бонусные коды, удобное смартфонное приложение и качественная служба поддержки делают игровой геймплей в высшей степени беспроблемным и надежным.
https://trustrxindia.com/# indian pharmacy online
Переход к порталу и функционирующие URL
Востребованные сетевые казино предлагают участникам большой ассортимент развлечений. Официальный сайт Eldorado обеспечивает защищенный подключение ко всем сервисам. При этом иногда случаются обстоятельства, когда требуется альтернативный способ подключения.
Что являет собой собой актуальное зеркало
Действующее зеркало — это идентичная реплика официального ресурса с альтернативным сетевым именем. Дубликат сегодня дает возможность преодолевать потенциальные ограничения и гарантировать бесперебойный переход к популярным развлечениям.
Официальное зеркало характеризуется всеми характеристиками, что и базовый ресурс:
– Полный перечень автоматов
– Личный аккаунт с актуальными информацией
– Все подарки и промо
– Безопасные платежные операции
Создание аккаунта и подключение в платформу
Этап создания профиля на сайте требует буквально моментов. Недавним клиентам нужно:
1. Попасть на функционирующее зеркало на данный момент
2. Кликнуть элемент «Открыть профиль»
3. Указать нужные данные
4. Проверить e-mail почту или информацию связи
5. Активировать подарок за создание профиля
Авторизация в персональный кабинет выполняется через внесение ID и секретной комбинации.
Характеристика призовой системы
Богатая призовая программа — основное достоинство казино. Клиенты получают разнообразные подарки:
Стартовые поощрения
Новые пользователи способны претендовать на щедрый поощрение за регистрацию. Как правило это совокупность возможностей, охватывающий:
– Процентную добавку к первому депозиту
– Безвозмездные спины
– Дополнительные средства на аккаунт
Купоны и особые возможности
Регулярные бонусные комбинации обеспечивают зарабатывать дополнительные выгоды. Использовать их разрешено в специальном меню собственного кабинета.
Спины и кешбэк
Free spins — это возможность крутить барабаны без использования собственных сумм. Кэшбек подразумевает определенный возмещение потерянных средств.
Библиотека развлечений
Азартная платформа представляет огромную подборку развлечений.
Видеослоты
Ассортимент игровых машин поражает фантазию. Представлены обычные простые машины и продвинутые автоматы с занимательной визуализацией.
Live заведение
Раздел Live игр переносит пользователей в антураж истинного развлекательного клуба. Профессиональные крупье проводят партии в реальном эфире.
Конкурсы и лидерборды
Постоянные турниры вносят драйва и обеспечивают вариант забрать крупные суммы.
Портативная вариант и программа
Актуальные разработки помогают участвовать в комфортном точке. Портативная версия автоматически настраивается под размер гаджета.
Получить программу разрешено для программных сред iOS и Android. Клиент гарантирует:
– Мгновенный запуск
– Стабильную функционирование
– Всплывающие-уведомления об акциях
– Интуитивный дизайн
Финансовые операции
Платформа использует разнообразные методы ввода и изъятия средств:
– Кредитные системы
– Онлайн системы
– Крипто
– Финансовые переводы
Все переводы реализуются через безопасное канал, что гарантирует неприкосновенность персональных параметров.
Служба ассистанса
Опытная команда support работает всегда. Обратиться с менеджерами разрешено через:
– Интерактивный-чат
– Электронную почту
– Телефон
– Коммуникационные каналы
Резюме
Главный портал и его рабочее зеркало дают пользователям безопасный и приятный вход к увлекательным играм. Привлекательные подарки, разнообразный каталог развлечений и профессиональная ассистанс делают игру максимально интересной и доходной.
Нынешние онлайн-казино обеспечивают игрокам богатый ассортимент возможностей для беспроблемной развлечений. Переход к ресурсу KiloGram выполняется через официальный сайт или функционирующее зеркало.
Что такое функционирующее зеркало казино
Функционирующее зеркало — это дополнительный линк главного ресурса казино. Такие дубликаты создаются для обеспечения непрерывного входа к азартной системе.
Зеркало на сегодня абсолютно повторяет возможности основного ресурса. Пользователи получают идентичный выход ко всем услугам, включая оформление профиля, финансирование депозита и снятие призов.
Оформление профиля на официальном портале
Процедура оформления учетной записи отнимает всего считанные секунд. Новым игрокам нужно:
1. Перейти на главный сайт или рабочее официальное зеркало
2. Нажать кнопку “Создать аккаунт”
3. Ввести обязательные реквизиты
4. Верифицировать email почту
5. Использовать код активации при доступности
После завершения создания аккаунта участник обретает вознаграждение за регистрацию, который имеет право включать free spins или денежное вознаграждение.
Вход в личный кабинет
Пользовательский кабинет — это безопасная территория, где игроки могут администрировать своим счетом. Для авторизации требуется ввести никнейм и пароль.
В индивидуальном кабинете открыты данные инструменты:
– Отслеживание истории транзакций
– Применение купонов
– Управление бонусами
– Присоединение в соревнованиях
– Проверка возмещения
– Изменение аккаунта
Бонусы и акции
Азартная система предлагает великодушные бонусы:
Регистрационный бонус — начинающие зарабатывают существенное поощрение на первые пополнения.
Free spins — предоставляются как при открытии счета, так и в процессе многочисленных промо.
Возврат средств — постоянный возврат части потерянных денег.
Коды активации — особые шифры, дающие право к уникальным вознаграждениям.
Обзор игровых секций
Slots
Коллекция автоматов включает сотни наименований от ведущих разработчиков. Клиенты откроют как классические аппараты, так и актуальные видео-слоты с захватывающей визуализацией.
Live казино
Раздел Live казино дарит возможность соревноваться с действующими дилерами в состоянии реального времени. Открыты распространенные варианты: рулетка, блэкджек, баккара, покер.
Соревнования
Периодические соревнования с большими выигрышными банками привлекают тысячи конкурсантов. Победители зарабатывают монетарные вознаграждения и специальные бонусы.
Телефонная версия и программа
Портативная версия сайта позволяет участвовать с всякого девайса. Интерфейс независимо адаптируется под диагональ экрана.
Загрузить app можно для аппаратов на Android и iOS. Телефонное приложение характеризуется всеми характеристиками настольной версии.
Как найти текущее зеркало на данный момент
Действующие URL дубликатов постоянно обновляются. Найти свежую URL можно различными методами:
– Через отдел саппорта
– В проверенных коммуникационных сетях
– По email подписке
– На аффилиатных порталах
Защита и сертификация
Лицензионный ресурс функционирует на основании международной разрешения. Все переводы охраняются инновационными системами защиты.
Конфиденциальность индивидуальных реквизитов поддерживается в стопроцентном размере.
Резюме
Лицензионный сайт и его актуальные копии предоставляют клиентам круглосуточный выход к превосходным гемблинговым играм. Выгодные призы, многочисленные автоматы, опытная сервис — все это превращает развлекательный времяпрепровождение невероятно удобным и увлекательным.
online pharmacy in turkey: rx pharmacy coupons – MedBridge Pharmacy
india online pharmacy: buy medicines online in india – top 10 pharmacies in india
ева казино официальный сайт Решил попробовать этот канал eva casino и оказался доволен. Там публикуют рабочие ссылки. Всё открывается нормально. Теперь использую его регулярно.
Главные новости: https://dom-cao.ru
Где можно познакомиться https://datenow.ru в России в 2026 году? Приложения для знакомств стали главным инструментом для миллионов. Но важно выбрать те, где реально можно найти человека для отношений. Не просто лайки, а искренний интерес. Разбираем, какие сервисы работают в этом году. Честно. Без рекламы. Только для тех, кто ищет всерьёз.
Актуальные онлайн-казино обеспечивают пользователям разнообразие возможностей для удобной игры. Главный веб-портал Килограмм казино дарит вход ко всем возможностям и игровым автоматам. Однако при появлении программных проблем на помощь спешат рабочие альтернативные адреса.
Что есть собой рабочее зеркало
Копия казино — это полная реплика основного веб-сайта, размещенная по другому URL. Подлинное зеркало поддерживает все функции, в том числе регистрацию, авторизацию в личный кабинет, премии и купоны.
Копия на сегодня дает:
– Бесперебойный путь к игровым автоматам
– Абсолютную безопасность индивидуальных информации
– Поддержку средств и хронологии переводов
– Возможность использования всех специальных предложений
Регистрация на лицензионном портале
Ход оформления учетной записи занимает пару минут. Свежеиспеченным игрокам требуется:
1. Зайти на главный портал или действующее зеркало
2. Щелкнуть кнопку «Регистрация»
3. Внести необходимые графы
4. Подтвердить электронную почту
5. Ввести промокод при существовании
После конца создания аккаунта клиенты получают вознаграждение за регистрацию, какой может содержать free spins или монетарное поощрение.
Логин в личный кабинет
Приватный кабинет предоставляет полный контроль над игровым ходом. Через личный аккаунт возможно:
– Финансировать счет
– Снимать выплаты
– Задействовать купоны
– Проверять записи ставок
– Соревноваться в соревнованиях
– Обретать возврат средств
Характеристика бонусов и акций
Великодушная бонусная политика — ключевое плюс платформы. Главные категории вознаграждений:
Приветственный бонус
Новые игроки обретают великодушное премирование на стартовые взносы. Размер премии может доходить до 100-200% от размера депозита.
Free spins
Даровые прокруты начисляются для топовых игровых автоматов. Сумма бесплатных вращений разнится от 10 до 500 штук.
Возврат средств
Постоянный или ежемесячный компенсация части утраченных средств. Стандартный объем кэшбека — 5-15%.
Конкурсы
Регулярные состязания с внушительными призовыми фондами. Игроки борются за верхние позиции в турнирной таблице.
Мобильная версия и софт
Портативная версия дает возможность развлекаться с любого аппарата. Игроки могут загрузить софт для iOS и Android или эксплуатировать браузерную версию.
Преимущества портативного программы:
– Молниеносная загрузка автоматов
– Эргономичный дизайн
– Push-уведомления о промо
– Возможность входа через Touch ID
Автоматы и Live казино
Развлекательная подборка охватывает тысячи названий от лидирующих производителей.
Популярные разделы автоматов:
– Классические автоматы
– Видеослоты с призовыми уровнями
– Джекпот игры
– Мегавейс автоматы
Live игорный зал
Секция live игорный зал обеспечивает партию с профессиональными дилерами. Представлены классические развлечения:
– Американская рулетка
– Blackjack
– Punto Banco
– Техасский холдем
Как отыскать рабочее зеркало
Обрести актуальную адрес на зеркало разрешается разными методами:
1. Подписаться на email-рассылку
2. Отслеживать за апдейтами в социальных сетях
3. Обратиться в отдел поддержки
4. Добавить в закладки действующее зеркало в фавориты
Итог
Основной ресурс и его действующие копии дают стабильный вход к игровым слотам. Выгодные вознаграждения, различные купоны, удобное портативное софт и качественная служба поддержки поддержки делают азартный геймплей в высшей степени приятным и защищенным.
Міський сайт Черкас https://u-misti.cherkasy.ua новини, події, оголошення і довідник організацій. Зручний пошук послуг, закладів і маршрутів. Будьте в курсі життя міста та знаходьте потрібну інформацію швидко.
Передовые онлайн-казино предоставляют клиентам обширный диапазон возможностей для приятной времяпрепровождения. Вход к сервису https://www.нашмиасс.СЂС„ реализуется через лицензионный домен или действующее зеркало.
Что такое рабочее зеркало казино
Рабочее зеркало — это альтернативный URL лицензионного портала казино. Такие клоны создаются для предоставления непрерывного подключения к гемблинговой площадке.
Альтернатива текущее целиком воспроизводит функционал основного портала. Пользователи приобретают схожий путь ко всем услугам, включая создание аккаунта, внесение депозита кошелька и получение выигрышей.
Создание аккаунта на официальном ресурсе
Процесс оформления учетной записи требует всего считанные моментов. Новым игрокам требуется:
1. Перейти на основной домен или рабочее подлинное зеркало
2. Нажать кнопку “Зарегистрироваться”
3. Ввести требуемые сведения
4. Подтвердить e-mail почту
5. Применить купон при доступности
После завершения создания аккаунта клиент приобретает приз за регистрацию, который вправе предполагать бесплатные вращения или финансовое начисление.
Вход в собственный кабинет
Персональный кабинет — это защищенная зона, где клиенты способны контролировать своим счетом. Для входа необходимо указать имя пользователя и password.
В индивидуальном кабинете имеются следующие возможности:
– Отслеживание журнала операций
– Использование бонусных кодов
– Регулирование бонусами
– Присоединение в конкурсах
– Мониторинг возмещения
– Изменение профиля
Поощрения и спецпредложения
Азартная площадка дарит привлекательные вознаграждения:
Начальный пакет — новички обретают крупное премию на стартовые вклады.
Бесплатные вращения — предоставляются как при оформлении, так и в процессе многочисленных мероприятий.
Возврат средств — систематический компенсация фрагмента потерянных сумм.
Промокоды — специальные шифры, предоставляющие возможность к уникальным бонусам.
Характеристика развлекательных секций
Аппараты
Собрание автоматов охватывает множество наименований от ведущих провайдеров. Клиенты найдут как классические аппараты, так и современные мультимедийные автоматы с притягательной оформлением.
Live казино
Категория Live казино дарит опцию участвовать с действующими дилерами в режиме реального времени. Открыты популярные варианты: рулетка, блэкджек, баккара, покер.
Состязания
Регулярные состязания с значительными выигрышными банками притягивают множество участников. Призеры обретают финансовые выплаты и специальные подарки.
Мобильная версия и app
Мобильная версия сайта дает возможность наслаждаться с произвольного девайса. Структура независимо корректируется под размер экрана.
Установить приложение можно для гаджетов на Android и iOS. Телефонное ПО имеет всеми функциями настольной версии.
Как обнаружить рабочее зеркало на данный момент
Действующие URL зеркал периодически изменяются. Найти свежую ссылку можно несколькими методами:
– Через департамент саппорта
– В подлинных новостных сетях
– По почтовой newsletter
– На аффилиатных ресурсах
Надежность и сертификация
Основной сайт работает на основе мировой разрешения. Все платежи шифруются передовыми протоколами кодирования.
Конфиденциальность индивидуальных реквизитов сохраняется в совершенном масштабе.
Итог
Официальный сайт и его актуальные дубликаты предоставляют игрокам беспрерывный выход к превосходным гемблинговым играм. Великодушные призы, многочисленные развлечения, компетентная сервис — все это превращает азартный опыт предельно комфортным и притягательным.
Сайт Чернівців https://u-misti.chernivtsi.ua новини, події, афіша та довідник компаній міста. Актуальна інформація про життя, транспорт, послуги і заклади. Усе необхідне для мешканців і гостей Чернівців в одному зручному онлайн-порталі.
check this pass app
мелбет условия бонуса мелбет условия бонуса
мостбет минимальный вывод https://www.mostbet38195.help
1x bet giri? 1x bet giri? .
1xbet 1xbet .
http://trustrxindia.com/# pharmacy website india
http://gorod28.ru/blogs/pages/promokod_1xbet_na_segodnya_pri_registracii.html
смотреть здесь https://slon4u.com/
Передовые онлайн-казино предоставляют пользователям широкий выбор вариантов для приятной игры. Вход к площадке РЎСѓРєР° реализуется через официальный домен или функционирующее зеркало.
Что такое функционирующее зеркало казино
Рабочее зеркало — это дополнительный линк официального сайта казино. Такие клоны разрабатываются для обеспечения стабильного подключения к гемблинговой платформе.
Зеркало сегодня абсолютно дублирует характеристики базового ресурса. Пользователи приобретают такой же путь ко всем сервисам, включая открытие счета, финансирование кошелька и обналичивание средств.
Создание аккаунта на основном портале
Механизм открытия профиля отнимает всего несколько моментов. Начинающим игрокам следует:
1. Перейти на главный домен или действующее настоящее зеркало
2. Нажать кнопку “Регистрация”
3. Заполнить необходимые сведения
4. Подтвердить email почту
5. Ввести бонусный код при существовании
После завершения оформления участник получает подарок за регистрацию, который может включать фриспины или cash поощрение.
Логин в личный кабинет
Пользовательский кабинет — это безопасная секция, где игроки вправе управлять своим аккаунтом. Для логина необходимо указать имя пользователя и password.
В личном кабинете открыты следующие функции:
– Просмотр истории переводов
– Использование бонусных кодов
– Контроль поощрениями
– Вступление в состязаниях
– Отслеживание возмещения
– Изменение учетной записи
Поощрения и промо
Азартная площадка предлагает щедрые подарки:
Стартовый набор — дебютанты получают существенное вознаграждение на дебютные пополнения.
Даровые спины — начисляются как при оформлении, так и в контексте всевозможных промо.
Кэшбек — систематический компенсация фрагмента проигранных средств.
Купоны — эксклюзивные комбинации, открывающие право к особым бонусам.
Характеристика игровых направлений
Slots
Библиотека аппаратов включает сотни наименований от лучших поставщиков. Пользователи встретят как обычные слоты, так и инновационные мультимедийные автоматы с интересной анимацией.
Live казино
Категория Live казино обеспечивает опцию соревноваться с действующими крупье в формате настоящего времени. Представлены распространенные игры: рулетка, блэкджек, баккара, покер.
Турниры
Периодические турниры с крупными выигрышными фондами манят тысячи соревнующихся. Победители завоевывают монетарные вознаграждения и специальные премии.
Мобильная версия и программа
Телефонная версия платформы предоставляет право играть с всякого устройства. Структура автономно корректируется под диагональ экрана.
Получить приложение можно для гаджетов на Android и iOS. Мобильное app имеет всеми опциями настольной версии.
Как обнаружить действующее зеркало на сегодня
Рабочие адреса копий постоянно корректируются. Получить действующую линк можно различными методами:
– Через службу помощи
– В настоящих коммуникационных сетях
– По электронной подписке
– На партнерских площадках
Защита и легальность
Лицензионный домен функционирует на фундаменте глобальной разрешения. Все переводы защищены актуальными системами безопасности.
Приватность пользовательских информации гарантируется в стопроцентном масштабе.
Итог
Официальный ресурс и его актуальные зеркала предоставляют клиентам 24/7 путь к первоклассным гемблинговым играм. Великодушные вознаграждения, многочисленные развлечения, компетентная поддержка — все это создает игровой досуг максимально беспроблемным и интересным.
Актуальные интернет казино предоставляют клиентам обширный диапазон возможностей для беспроблемной игры. Но иногда доступ к главному порталу может являться ограниченным. В таких ситуациях на выручку приходят https://spb-ska.ru/, которое обеспечивает постоянный путь ко всем сервисам платформы.
Что такое рабочее зеркало казино
Копия — это точная дубликат основного сайта, которая хостится по другому адресу. Дубликат имеет все функционал первоначального ресурса, включая пользовательский кабинет, баланс и запись переводов.
Принципиальные достоинства применения зеркала:
– Постоянный вход к ресурсу
– Абсолютная схожесть функционала
– Конфиденциальность личных информации
– Удержание доступных поощрений
Как отыскать функционирующее зеркало в данный момент
Существует некоторое количество безопасных методов обнаружения свежей ссылки:
Проверенные источники:
1. Почтовая рассылка — управление регулярно высылает уведомления с свежими доменами
2. Социальные сети — авторизованные профили выкладывают свежую новости
3. Отдел поддержки — операторы выдают проверенные ссылки
4. Смартфонное приложение — обеспечивает минуть блокировки
Создание аккаунта на главном веб-сайте
Процесс открытия счета требует только считанные минут и состоит из нижеследующих шагов:
1. Переход на основной веб-сайт или рабочее зеркало
2. Щелчок на клавишу «Создать аккаунт»
3. Указание учетной бланка
4. Подтверждение имейл почты или мобильного номера
5. Задействование привилегии за регистрацию при присутствии промокода
Свежие клиенты приобретают солидный приветственный презент, который может охватывать фриспины, денежные бонусы или компенсацию.
Вход в пользовательский кабинет
Логин на портале реализуется обычным путем. Требуется внести никнейм и код доступа, задействованные при создании аккаунта.
Важные аспекты для защищенного входа:
– Эксплуатируйте надежный пароль
– Задействуйте двойную идентификацию
– Не записывайте данные на общественных устройствах
– Проверяйте доменную строку браузера
Обзор бонусной структуры
Игорный портал радует игроков многочисленными привилегиями и промо:
Начальный пакет
Новички могут претендовать на щедрое бонус за дебютный вклад. Обычно это процентная прибавка к внесенной объему плюс даровые спины для популярных слотов.
Систематические промо
– Семидневный компенсация — возврат части проигранных финансов
– Награды на последующие пополнения
– Особые офферы по торжествам
– Соревнования с крупными премиальными банками
Программа привилегий
Деятельные игроки накапливают пункты за любую бет, которые затем меняются на действительные средства, бесплатные вращения или эксклюзивные бонусы.
Кодовые слова: как применять
Бонус-коды — это индивидуальные сочетания букв и цифр, обеспечивающие доступ к бонусным бонусам.
Каким образом взять действующие промокоды:
– Легитимные общественные сети казино
– Сотрудничающие ресурсы
– Email-рассылка
– Отраслевые сообщества
Вводится промокод в отдельное поле при регистрации или пополнении кошелька.
Телефонная версия и приложение
Передовые геймеры выбирают развлекаться с телефонных гаджетов. Платформа дает 2 варианта для приятной смартфонной игры.
Отзывчивая модификация
Интернет версия автоматически адаптируется под габариты экранной панели. Не предполагает загрузки и оперирует в произвольном современном браузере.
Смартфонное приложение
Получить приложение можно для аппаратов на Android и iOS. Достоинства app:
– Оперативная запуск
– Стабильная функционирование
– Всплывающие-уведомления о поощрениях
– Самостоятельный избегание блокировок
Операция установки элементарен: нужно открыть на портал с телефонного устройства и выполнять указаниям.
Азартный коллекция
Библиотека аппаратов содержит несколько тысяч вариантов от лучших поставщиков.
Слоты
Развлекательные автоматы — самая востребованная секция развлечений. Размещены классические трехбарабанные слоты, современные видеослоты с дополнительными этапами, а также джекпотные призы.
Live казино
Раздел с живыми дилерами дает возможность прочувствовать антураж подлинного казино. Открыты развлечения с баккарой.
Стриминг производится в превосходном качестве, присутствует чат с раздающим и иными участниками.
Турниры
Периодически организуются соревнования по различным дисциплинам. Участие предоставляет право завоевать валютные вознаграждения, фриспины или уникальные презенты.
Финансовые процедуры
Ресурс предоставляет значительный ассортимент расчетных способов:
– Пластиковые карты
– Цифровые сервисы
– Биткоин
– Денежные переводы
Стартовая количество вклада — посильная для преобладающего числа пользователей. Вывод призов выполняется в скорые сроки.
Служба поддержки
Профессиональные специалисты способны содействовать 24/7. Имеются такие варианты коммуникации:
– Интернет-чат
– Email
– Голосовая горячая линия
– Социальные сети
Решения на типовые запросы можно получить в разделе FAQ.
Итог
Лицензионный сайт казино и его рабочие зеркала предоставляют пользователям совершенный доступ ко всем опциям платформы. Великодушные вознаграждения, приятная телефонная версия, гигантский ассортимент игр и квалифицированная помощь делают игровой процесс крайне комфортным и безопасным.
farmacia mexicana en linea MedicoBridge RX MedicoBridge RX
Dressing well creates a positive first impression.
Your attire speaks volumes before you actually speak a single word.
This enhances your own confidence and mood significantly.
Your put-together appearance signals professionalism in the office.
https://kate.qrmoda.ru/zhenskie-kollektsii-rick-owens-sila-i-elegantnost-4702499/
Stylish clothing let you to showcase your unique personality.
Others often perceive well-dressed people as more capable and reliable.
Ultimately, putting effort in your wardrobe is an valuable step in yourself.
To clarify
can i purchase cheap cephalexin tablets
to choose the best option.
зеркало ева казино Нашёл рабочий вход в ева казино через их канал.
Передовые виртуальные казино предоставляют клиентам обширный выбор возможностей для удобной игры. Впрочем иногда соединение к базовому платформе может оказаться закрытым. В таких моментах на поддержку приходит Голд, которое дает бесперебойный подключение ко всем сервисам платформы.
Что такое актуальное зеркало казино
Зеркало — это абсолютная версия основного сайта, которая хостится по другому домену. Дубликат имеет полный возможности главного сайта, включая индивидуальный кабинет, средства и историю переводов.
Главные выгоды использования зеркала:
– Непрерывный соединение к платформе
– Максимальная аналогичность возможностей
– Безопасность персональных реквизитов
– Хранение всех вознаграждений
Как разыскать функционирующее зеркало на сегодня
Присутствует ряд достоверных путей поиска текущей ссылочной информации:
Проверенные источники:
1. Email рассылка — руководство постоянно высылает письма с актуальными URL
2. Социальные сети — проверенные страницы публикуют актуальную данные
3. Департамент поддержки — сотрудники выдают достоверные URL
4. Смартфонное приложение — обеспечивает преодолевать блокировки
Открытие счета на главном веб-сайте
Этап открытия счета занимает всего пару минут и включает из нижеследующих шагов:
1. Открытие на официальный ресурс или функционирующее зеркало
2. Щелчок на элемент «Зарегистрироваться»
3. Внесение регистрационной анкеты
4. Проверка почтовой почты или контактного номера
5. Активация вознаграждения за регистрацию при наличии промокода
Свежие геймеры получают значительный начальный приз, который может охватывать даровые прокруты, монетарные призы или компенсацию.
Вход в индивидуальный кабинет
Подключение на платформе реализуется привычным путем. Достаточно вписать никнейм и секретный ключ, примененные при оформлении.
Ключевые аспекты для надежного входа:
– Задействуйте криптостойкий секретный ключ
– Активируйте двойную идентификацию
– Не храните коды на посторонних гаджетах
– Проверяйте URL строку браузера
Анализ премиальной системы
Игорный портал балует клиентов многочисленными вознаграждениями и специальными предложениями:
Начальный пакет
Свежие игроки могут претендовать на щедрое награду за дебютный взнос. Традиционно это процентовая премия к депонированной объему плюс даровые спины для известных слотов.
Регулярные акции
– 7-дневный возврат средств — возврат процента утраченных денежных средств
– Поощрения на повторные пополнения
– Специальные офферы по событиям
– Соревнования с крупными премиальными суммами
Программа вознаграждений
Активные клиенты накапливают единицы за всякую ставку, которые затем превращаются на настоящие деньги, даровые прокруты или специальные бонусы.
Промокоды: как задействовать
Промокоды — это уникальные комбинации литер, предоставляющие привилегию к эксклюзивным вознаграждениям.
Где взять актуальные промокоды:
– Официальные социальные сети казино
– Союзнические ресурсы
– Email-информирование
– Отраслевые сообщества
Прописывается промокод в соответствующее поле при оформлении или пополнении баланса.
Смартфонная версия и приложение
Передовые клиенты отдают предпочтение проводить время с смартфонных девайсов. Ресурс обеспечивает двойной способа для комфортной смартфонной игры.
Responsive версия
Интернет версия самостоятельно подстраивается под габариты дисплея. Не требует загрузки и действует в каждом новом браузере.
Мобильное приложение
Установить приложение можно для гаджетов на Android и iOS. Достоинства app:
– Молниеносная активация
– Устойчивая действие
– Всплывающие-уведомления о акциях
– Автономный преодоление блокировок
Процесс скачивания несложен: достаточно зайти на веб-сайт с мобильного девайса и подчиняться предписаниям.
Азартный коллекция
База аппаратов содержит несколько тысяч вариантов от топовых поставщиков.
Слоты
Гемблинг машины — наиболее популярная категория забав. Представлены классические простые автоматы, актуальные видеослоты с дополнительными стадиями, а также прогрессивные суперпризы.
Live казино
Зона с живыми ведущими позволяет прочувствовать настроение реального казино. Открыты развлечения с покером.
Вещание производится в превосходном качестве, поддерживается коммуникация с крупье и другими геймерами.
Соревнования
Систематически запускаются соревнования по разным играм. Вступление обеспечивает возможность завоевать монетарные вознаграждения, бесплатные вращения или специальные презенты.
Платежные действия
Платформа обеспечивает значительный спектр расчетных способов:
– Дебетовые карты
– Цифровые системы
– Цифровая валюта
– Счетовые транзакты
Низшая количество пополнения — доступная для массы клиентов. Снятие средств производится в кратчайшие сроки.
Департамент поддержки
Компетентные операторы готовы оказать помощь 24/7. Имеются такие методы общения:
– Живой-чат
– Email
– Мобильная горячая линия
– Коммуникационные сети
Решения на типовые темы можно получить в секции FAQ.
Вывод
Главный ресурс казино и его действующие зеркала дают геймерам полный путь ко всем функциям платформы. Великодушные поощрения, практичная мобильная версия, впечатляющий коллекция слотов и компетентная поддержка делают гемблинг времяпрепровождение крайне приятным и надежным.
Вход к платформе и рабочие адреса
Актуальные виртуальные казино предлагают пользователям огромный ассортимент игр. Центральный сайт Лев организует надежный подключение ко всем сервисам. Впрочем порой появляются обстоятельства, когда нужно запасной путь доступа.
Что есть собой действующее зеркало
Рабочее зеркало — это абсолютная копия главного ресурса с запасным интернет адресом. Альтернатива сегодня позволяет избегать вероятные барьеры и гарантировать стабильный подключение к популярным автоматам.
Официальное зеркало содержит идентичными функциями, что и главный веб-сайт:
– Весь перечень игр
– Собственный аккаунт с зафиксированными параметрами
– Действующие поощрения и предложения
– Проверенные денежные транзакции
Регистрация и подключение в систему
Ход регистрации на ресурсе занимает буквально мгновений. Свежим пользователям необходимо:
1. Открыть на действующее зеркало сейчас
2. Нажать кнопку «Регистрация»
3. Указать нужные сведения
4. Активировать цифровую почту или контакт мобильного
5. Активировать подарок за открытие аккаунта
Авторизация в личный профиль осуществляется с помощью указание никнейма и пароля.
Обзор бонусной политики
Щедрая бонусная программа — ключевое достоинство игорного заведения. Участники зарабатывают всевозможные бонусы:
Вступительные поощрения
Недавние клиенты вправе ожидать на выгодный поощрение за регистрацию. Чаще всего это комплект возможностей, объединяющий:
– Пропорциональную премию к дебютному вкладу
– Даровые спины
– Дополнительные финансы на кошелек
Промокоды и эксклюзивные предложения
Постоянные купоны позволяют получать призовые льготы. Применить их допустимо в специальном окне персонального раздела.
Спины и компенсация
Фриспины — это возможность вращать слоты без использования собственных денег. Возврат предполагает процентный возврат израсходованных средств.
Каталог слотов
Развлекательная ресурс обеспечивает огромную базу развлечений.
Игровые машины
Ассортимент автоматов восхищает фантазию. Представлены традиционные простые автоматы и продвинутые видеослоты с интересной визуализацией.
Live казино
Секция Live заведения помещает клиентов в обстановку истинного игорного дома. Профессиональные дилеры проводят раунды в прямом времени.
Соревнования и таблицы лидеров
Периодические конкурсы вносят азарта и обеспечивают перспективу получить большие награды.
Портативная вариант и программа
Новые решения помогают играть в удобном пространстве. Портативная версия автономно оптимизируется под размер аппарата.
Получить софт можно для мобильных платформ iOS и Android. Клиент обеспечивает:
– Быстрый запуск
– Бесперебойную производительность
– Моментальные-уведомления об акциях
– Простой облик
Финансовые транзакции
Казино поддерживает многочисленные способы внесения и получения финансов:
– Банковские счета
– Электронные платформы
– Криптовалюты
– Прямые транзакции
Каждые операции реализуются через защищенное соединение, что гарантирует безопасность личных сведений.
Служба помощи
Опытная бригада support функционирует круглосуточно. Связаться с менеджерами допустимо через:
– Live-чат
– Цифровую почту
– Связь
– Социальные платформы
Итоги
Главный ресурс и его рабочее зеркало обеспечивают клиентам защищенный и комфортный переход к интересным играм. Щедрые награды, разнообразный выбор автоматов и высокая поддержка обеспечивают времяпрепровождение максимально удобной и прибыльной.
https://www.nota79.cat/articles/1xbet_promo_code_bonus.html
this link pass app
This casino https://udemand.zoomdevdxb.com/blog/nederlandse-online-casino-s-wettelijk-framework-en-17/ offers a great mix of popular slots and live dealer games. The platform feels well-designed, promotions are attractive, and support is responsive, which adds confidence.
why not look here the pass app
Актуальные онлайн-казино предлагают клиентам множество путей для приятной игры. Центральный сайт Retro обеспечивает доступ ко всем сервисам и развлечениям. Однако при наличии технических сложностей на подмогу спешат актуальные зеркала.
Что представляет собой действующее зеркало
Альтернативный адрес казино — это точная копия главного портала, расположенная по запасному веб-адресу. Подлинное зеркало сохраняет все характеристики, включая открытие профиля, авторизацию в собственный кабинет, премии и кодовые слова.
Альтернативный сайт на сегодня дает:
– Постоянный вход к развлекательным машинам
– Полную безопасность личных сведений
– Сохранение баланса и хронологии транзакций
– Применимость всех бонусных программ
Открытие профиля на официальном портале
Этап оформления учетной записи требует считанные минут. Новым клиентам необходимо:
1. Войти на официальный портал или актуальное зеркало
2. Кликнуть кнопку «Регистрация»
3. Ввести необходимые графы
4. Активировать email почту
5. Указать купон при присутствии
После окончания создания аккаунта пользователи получают вознаграждение за регистрацию, какой может охватывать free spins или монетарное вознаграждение.
Авторизация в индивидуальный кабинет
Индивидуальный кабинет открывает всеобъемлющий мониторинг над азартным процессом. Через личный аккаунт возможно:
– Пополнять депозит
– Выводить выплаты
– Задействовать промокоды
– Отслеживать журнал ставок
– Участвовать в соревнованиях
– Приобретать возврат средств
Анализ поощрений и промо-предложений
Щедрая поощрительная программа — ключевое преимущество ресурса. Центральные категории премий:
Стартовый приз
Новички зарабатывают выгодное награду на первые пополнения. Величина приза может достигать 100-200% от суммы взноса.
Бонусные спины
Халявные вращения начисляются для востребованных слотов. Сумма фриспинов варьируется от 10 до 500 штук.
Возврат средств
Систематический или ежемесячный компенсация части утраченных средств. Средний процент компенсации — 5-15%.
Конкурсы
Систематические конкурсы с солидными призовыми пулами. Участники соревнуются за призовые места в рейтинге.
Мобильная версия и приложуха
Смартфонная версия дает возможность наслаждаться игрой с каждого гаджета. Игроки могут скачать программу для iOS и Android или использовать браузерную версию.
Достоинства смартфонного приложения:
– Молниеносная прогрузка игр
– Комфортный дизайн
– Push-уведомления о бонусах
– Доступ через Touch ID
Машины и Live казино
Развлекательная база насчитывает сотни игр от ведущих разработчиков.
Известные категории автоматов:
– Стандартные слоты
– Современные слоты с бонусными раундами
– Накопительный приз автоматы
– Megaways слоты
Live игровой зал
Категория live игорный зал обеспечивает развлечение с живыми дилерами. Имеются классические развлечения:
– Европейская рулетка
– Блэкджек
– Baccarat
– Техасский холдем
Как отыскать актуальное зеркало
Найти актуальную ссылку на зеркало можно множественными вариантами:
1. Зарегистрироваться на почтовую рассылку
2. Наблюдать за обновлениями в социальных сетях
3. Связаться в департамент поддержки
4. Запомнить актуальное зеркало в закладки
Резюме
Лицензионный сайт и его рабочие дубликаты обеспечивают бесперебойный доступ к азартным играм. Великодушные вознаграждения, разнообразные купоны, удобное портативное приложение и отличная сервис поддержки делают азартный геймплей крайне удобным и конфиденциальным.
Передовые онлайн-казино предлагают игрокам широкий ассортимент слотов и щедрые бонусы. Но для удобной деятельности важно знать, как отыскать JVSpin официальный сайт и его рабочие зеркала.
Что такое главный ресурс казино
Официальный сайт казино — это основная веб-площадка, где клиенты могут наслаждаться гемблинг автоматами. Ресурс действует на законных принципах и располагает всеми требуемыми сертификатами.
Первостепенные выгоды основного веб-сайта:
– Конфиденциальность индивидуальных реквизитов
– Честные положения участия
– Гарантированные платежи
– Профессиональная поддержка
Актуальное зеркало казино: для чего нужно
Дублирующий ресурс — это точная клон лицензионного ресурса, размещенная по иному веб-адресу. Рабочее зеркало разрабатывается для гарантирования бесперебойного входа к порталу.
Основания применения зеркал:
– Блокировка главного домена
– Регламентные работы
– Значительная посещаемость на ресурс
Как найти свежее зеркало в данный момент
Узнать актуальное официальное зеркало можно различными вариантами:
1. Email-уведомления — активируйте уведомления на почтовую подписку
2. Служба техподдержки — обратитесь в онлайн-чат
3. Официальные площадки — следите за постами
4. Тематические порталы — надежные источники
Создание аккаунта на сайте казино
Процедура оформления требует только немного секунд:
1. Кликните на опцию “Создать аккаунт”
2. Заполните обязательные сведения
3. Валидируйте email e-mail
4. Активируйте промокод, если доступен
После завершенной регистрации вам будет возможен индивидуальный профиль.
Премии и промокоды
Богатая наградная структура — важное плюс казино:
Подарок за открытие счета
Новые участники обретают первый поощрение, который может включать:
– Финансовый бонус на начальный вклад
– Бесплатные вращения для слотов
– Бездепозитные бонусы
Активационные коды
Периодически появляются актуальные бонусные шифры, позволяющие использовать особые поощрения.
Программа кешбэка
Постоянные участники приобретают часть использованных средств назад.
Свежие кампании и состязания
Сайт систематически запускает захватывающие кампании:
– Weekly соревнования
– Праздничные промо
– Раздачи крупных призов
– Программа VIP-клуба
Логин в личный кабинет
Для логина на ресурс нужно:
1. Загрузить главный портал или актуальное зеркало
2. Нажать “Авторизация”
3. Внести email и ключ
В личном аккаунте предоставлены данные инструменты:
– Депозит депозита
– Вывод средств
– Просмотр лога транзакций
– Настройка личными сведениями
Мобильная платформа и софт
Портативная версия
Адаптивная вариант ресурса предоставляет шанс развлекаться с разных портативного гаджета. Оформление автоматически подстраивается под формат монитора.
Программа для скачивания
Скачать программу можно для:
– Android — официальная установка с портала
– iOS — установка через App Store
Преимущества мобильного клиента:
– Оперативный старт
– Надежная производительность
– Push-уведомления об бонусах
– Производительный интерфейс
Игровые разделы
Барабаны
Обширная галерея развлекательных барабанов от топовых производителей:
– Стандартные слоты
– Продвинутые-слоты
– Накопительные-слоты
Live casino
Раздел с настоящими операторами предлагает:
– Рулетки
– Blackjack
– Baccarat
– Poker
Вещания транслируются в превосходном разрешении, создавая эффект реального казино.
Системы зачисления и вывода
Ресурс поддерживает различные транзакционные инструменты:
– Дебетовые картсчета
– Онлайн платежи
– Crypto
– Банковские отправки
Наименьшие значения пополнения и скоростные выводы обеспечивают времяпрепровождение исключительно беспроблемной.
Служба поддержки
Квалифицированная группа ассистентов доступна 24/7 и готова содействовать с всеми ситуациями:
– Реалтайм-чат
– Email-консультации
– Телефонная связь
Итоги
Главный веб-сайт казино и его актуальные дубликаты предоставляют клиентам конфиденциальный и интересный азартный процесс. Привлекательные бонусы, удобная адаптивная модификация, многочисленные автоматы и высокоуровневое live-казино создают эту систему превосходным вариантом для развлекательных игр.
У місті Вінниця https://u-misti.vinnica.ua новини, афіша заходів, довідник закладів і корисні сервіси. Дізнавайтесь про події, відкривайте нові місця і плануйте свій час у Вінниці легко та зручно.
Міський сайт Дніпра https://u-misti.dp.ua новини, події, оголошення і довідник організацій. Зручний пошук послуг, закладів і маршрутів. Будьте в курсі життя міста та знаходьте потрібну інформацію швидко.
Київ онлайн https://u-misti.kyiv.ua міський портал з новинами, афішею та довідником. Дізнавайтесь про події, транспорт, бізнес і послуги. Усе для комфортного життя та відпочинку в Києві в одному місці.
У місті Львів https://u-misti.lviv.ua актуальні новини, події, афіша та корисна інформація для мешканців і гостей. Дізнавайтесь про життя міста, транспорт, заклади і послуги. Все найважливіше про Львів в одному зручному онлайн-порталі.
buy prescription drugs from india: TrustRx India – top 10 online pharmacy in india
1xbet 1xbet .
бонусы ева казино Раньше часто попадал на фейковые сайты eva casino, пока не начал использовать этот канал. Там публикуют рабочие ссылки. Всё открывается без проблем. Теперь только через него захожу.
india pharmacy mail order: TrustRx India – top 10 pharmacies in india
1xbet ?yelik 1xbet-giris-43.com .
1 xbet 1xbet-giris-33.com .
Переход к ресурсу через проверенные зеркала
Нынешние онлайн казино обеспечивают клиентам круглосуточный вход к играм. Основной сайт Килограмм казик действует бесперебойно, обеспечивая обширный набор игровых развлечений. Однако временами появляются программные трудности или ограничения, потому существенно иметь представление о наличии актуальных зеркал.
Что собой представляет из себя центральное зеркало казино
Альтернатива — это абсолютная реплика основного сайта с идентичным набором функций. Действующее зеркало на данный момент даёт возможность преодолевать региональные блокировки и вести игру.
Главные преимущества использования зеркал:
– Абсолютный переход к личному кабинету
– Сохранение каждых данных учётной записи
– Аналогичный перечень слотов
– Текущие привилегии и акции
Регистрация на портале
Механизм регистрации требует пару минут. Начинающие пользователи получают богатый приз за регистрацию, он способен вмещать:
– Вступительный денежный бонус
– Даровые кручения для машин
– Эксклюзивные промокоды
– Усиленный кэшбек
Во имя окончания регистрации необходимо:
1. Переместиться на официальный сайт или копию
2. Щёлкнуть элемент «Создать аккаунт»
3. Указать контактные сведения
4. Активировать электронную почту или телефон
5. Активировать ваучер (в случае наличии)
Вход в личный кабинет
Вслед за успешной создания аккаунта клиенты в состоянии производить вход посредством главный веб-сайт или действующее зеркало. Персональный кабинет даёт всесторонний надзор над профилем:
– История игр
– Внесение счёта
– Получение призов
– Управление поощрениями
– Участие в конкурсах
Привилегии и кампании казино
Сайт удовлетворяет игроков многочисленными поощрительными предложениями:
Начальные подарки
Новички приобретают внушительный комплект поощрений на первые депозиты. Обычно это охватывает долевую доплату к сумме вклада плюс комплиментарные вращения.
Периодические промо
– Еженедельный кешбэк до 15%
– Соревнования с выигрышными пулами
– Подарки на день рождения
– Специальные акции для статусных игроков
Система вознаграждения
Деятельные пользователи собирают единицы, которые разрешено трансформировать на действительные средства или особые бонусы.
Смартфонная редакция и софт
Нынешние решения помогают участвовать в любом месте угодно. Мобильная вариант портала независимо адаптируется под дисплей каждого девайса.
Выгоды карманного софта:
– Моментальная загрузка автоматов
– Практичный вид
– Push-нотификации о предложениях
– Шанс установить для Android и iOS
Live казино: атмосфера реального игорного клуба
Секция Live игорного дома переносит геймеров в среду подлинного гемблинг заведения. Компетентные ведущие организуют процесс в состоянии актуального времени.
Представленные столы:
– Рулетка
– Очко
– Punto Banco
– Карты
Автоматы и гемблинг машины
Ассортимент развлекательных слотов содержит тысячи вариантов от ведущих разработчиков. Каждый геймер отыщет слот по душе:
– Винтажные барабаны
– Новые слоты с бонусными уровнями
– Джекпот-слоты
– Мегавейс слоты
Конкурсы и розыгрыши
Постоянные турниры включают драйв и открывают опцию получить крупные призы. Вовлечение в состязаниях регулярно комплиментарное, а премиальные банки достигают крупных величин.
Защита и анонимность
Портал использует передовые технологии шифрования для охраны информации геймеров. Любые платёжные транзакции выполняются через зашифрованные каналы.
Итог
Основной ресурс и его действующие зеркала обеспечивают устойчивый переход к превосходным игровым услугам. Щедрые бонусы, удобная карманная вариант, богатство слотов и компетентное Live-заведение формируют платформу отличным вариантом для поклонников игровых развлечений.
Вход к сайту через рабочие зеркала
Пользователи онлайн казино часто имеют дело с ситуацией ограничения официального сайта. Именно для решения этой ситуации предусмотрены дубликаты основного домена. Вулкан Р РёС‡ казино дает стопроцентный подключение ко всем опциям казино.
Что такое функционирующее зеркало казино
Дубликат составляет собой точную дубликат официального ресурса с идентичным возможностями. Единственное несовпадение — это альтернативное имя. Абсолютно все информация клиента, в том числе счет, поощрения и данные ставок, находятся прежними.
Выгоды эксплуатации зеркал
Актуальные зеркала располагают комплексом значимых выгод:
– Непрерывный подключение к излюбленным автоматам
– Совершенная сохранность индивидуальных сведений
– Неизменность всех настроек личного кабинета
– Способность взятия призов и присутствия в кампаниях
Открытие счета на легальном сайте
Процесс регистрации максимально легок и длится несколько минут. Начинающие участники в состоянии надеяться на щедрый вводный приз за регистрацию.
Стадии создания аккаунта
1. Переход на легальный ресурс или его дубликат
2. Нажатие на кнопку “Регистрация”
3. Указание нужных параметров
4. Проверка почтовой почты
5. Применение купона (если есть)
Подарки и кампании для клиентов
Казино поощряет своих пользователей разнообразными призовыми системами.
Базовые варианты бонусов
Начальный подарок — внушительное начисление для свежих клиентов, каковое в состоянии включать финансовые суммы и фриспины.
Free spins — способность играть в востребованных аппаратах даром.
Возврат средств — процентный отдача утраченных сумм, который предоставляется каждую неделю или помесячно.
Бонусные коды — особые сочетания, гарантирующие бонусные привилегии.
Личный кабинет: инструменты и установки
Персональный раздел дает совершенный контроль над пользовательским активностью. В данном разделе имеются:
– Администрирование средствами
– История операций
– Работающие поощрения
– Установки сохранности
– Валидация профиля
Портативная платформа и приложение
Актуальные игроки ценят гибкость. Ресурс предлагает двойной способа для участия с смартфонных гаджетов.
Адаптивная телефонная редакция
Смартфонная версия домена автономно приспосабливается под дисплей любого аппарата. Отсутствует потребность устанавливать отдельное программное обеспечение.
Приложение для гаджетов
Возможно установить специальное приложение для iOS и Android. APP дает:
– Моментальный вход
– Доработанный интерфейс
– Оперативные-извещения о предложениях
– Устойчивую работу
Live игры: обстановка настоящего клуба
Зона Live казино переносит клиентов в среду реального клуба. Опытные хосты организуют партии в формате настоящего времени.
Известные Live-столы
– Французская рулетка
– Блэкджек
– Баккарат
– Покер
Аппараты: разнообразие развлечений
Собрание игровых машин включает множество вариантов от известных поставщиков. Пользователи откроют:
– Традиционные машины
– Видеослоты
– Накопительный приз-машины
– Слоты с множественными линиями
Турниры и специальные предложения
Постоянные состязания предоставляют шанс пользователям конкурировать друг с другом за внушительные наградные пулы. Каждый соревнование располагает свои правила участия и доску чемпионов.
Методы пополнения и получения средств
Площадка обслуживает множество финансовых инструментов:
– Дебетовые карты
– Виртуальные счета
– Blockchain-платежи
– Wire отправления
Абсолютно все операции проходят защищенно благодаря современным протоколам защиты.
Отдел support
Компетентные операторы службы обслуживания расположены помочь 24/7. Работают нижеперечисленные каналы коммуникации:
– Онлайн-чат
– Email-обслуживание
– Звонковая поддержка
– Публичные сети
Итог
Главный ресурс клуба и его действующие дубликаты обеспечивают клиентам надежный и комфортный подход к широкому выбору игровых услуг. Солидные подарки, периодические кампании, компетентная поддержка и простые денежные методы делают развлекательный опыт чрезвычайно захватывающим и выгодным.
Click Here pass app login
https://t.me/evacasino_official Если нужен быстрый доступ к eva casino, этот канал помогает. Там есть все актуальные ссылки. Проверено.
Definitely consider that which you said. Your favorite reason appeared to be at the web the simplest thing to have in mind
of. I say to you, I definitely get irked even as other people consider worries that they plainly do not know about.
You controlled to hit the nail upon the top and also defined out the entire thing
with no need side effect , people could take a signal.
Will likely be again to get more. Thank you
Современные онлайн-казино гарантируют пользователям разнообразный ассортимент функций для беспроблемной развлечений. Подключение к платформе казино Bublik осуществляется через главный портал или актуальное зеркало.
Что такое рабочее зеркало казино
Функционирующее зеркало — это альтернативный URL основного ресурса казино. Такие клоны создаются для обеспечения бесперебойного подключения к игровой площадке.
Копия на сегодня целиком воспроизводит характеристики базового домена. Игроки приобретают аналогичный выход ко всем сервисам, включая создание аккаунта, пополнение баланса и снятие выигрышей.
Регистрация на официальном ресурсе
Механизм оформления учетной записи длится всего несколько мгновений. Начинающим клиентам требуется:
1. Войти на лицензионный сайт или действующее подлинное зеркало
2. Нажать кнопку “Создать аккаунт”
3. Внести нужные данные
4. Проверить почтовую почту
5. Ввести купон при доступности
После финализации открытия профиля участник получает подарок за регистрацию, который способен содержать бесплатные вращения или монетарное вознаграждение.
Доступ в индивидуальный кабинет
Индивидуальный кабинет — это закрытая секция, где пользователи имеют возможность управлять своим аккаунтом. Для доступа необходимо ввести имя пользователя и код доступа.
В личном кабинете открыты следующие функции:
– Мониторинг записей платежей
– Использование бонусных кодов
– Управление вознаграждениями
– Вступление в турнирах
– Проверка кэшбэка
– Настройка данных
Поощрения и промо
Игровая платформа обеспечивает выгодные подарки:
Начальный набор — начинающие приобретают крупное начисление на дебютные депозиты.
Free spins — выдаются как при создании аккаунта, так и в рамках всевозможных мероприятий.
Кэшбек — постоянный возврат процента проигранных сумм.
Бонусные коды — особые комбинации, дающие доступ к особым бонусам.
Обзор игровых разделов
Аппараты
Ассортимент автоматов охватывает тысячи игр от лучших провайдеров. Пользователи откроют как стандартные автоматы, так и современные мультимедийные автоматы с захватывающей визуализацией.
Live казино
Зона Live казино обеспечивает шанс развлекаться с живыми дилерами в состоянии актуального времени. Доступны популярные варианты: рулетка, блэкджек, баккара, покер.
Соревнования
Регулярные чемпионаты с крупными призовыми суммами завлекают массу игроков. Призеры обретают финансовые награды и уникальные подарки.
Портативная версия и программа
Портативная версия ресурса дает возможность развлекаться с произвольного гаджета. Структура автономно адаптируется под размер экрана.
Установить софт можно для девайсов на Android и iOS. Портативное ПО обладает всеми характеристиками настольной версии.
Как определить действующее зеркало на сейчас
Рабочие URL копий постоянно изменяются. Узнать действующую линк можно различными путями:
– Через департамент техподдержки
– В подлинных социальных сетях
– По почтовой дайджесту
– На специализированных ресурсах
Безопасность и лицензирование
Основной домен функционирует на основании глобальной разрешения. Все транзакции охраняются современными системами безопасности.
Секретность личных сведений обеспечивается в стопроцентном размере.
Вывод
Официальный ресурс и его рабочие дубликаты гарантируют пользователям 24/7 вход к высококлассным азартным играм. Выгодные поощрения, всевозможные автоматы, компетентная помощь — все это создает гемблинговый досуг предельно приятным и притягательным.
Подключение к сайту через рабочие зеркала
Пользователи сетевых казино регулярно имеют дело с трудностью недоступности базового ресурса. Как раз для преодоления этой проблемы предусмотрены дубликаты основного сайта. Zooma сайт предоставляет беспрепятственный подключение ко всем опциям платформы.
Что такое актуальное зеркало казино
Дубликат составляет собой точную реплику основного ресурса с похожим функционалом. Главное расхождение — это доменное имя. Любые сведения участника, включая счет, поощрения и данные раундов, находятся такими же.
Плюсы задействования зеркал
Рабочие зеркала располагают комплексом значимых плюсов:
– Бесперебойный переход к предпочитаемым развлечениям
– Стопроцентная конфиденциальность персональных информации
– Сохранение всех конфигураций личного кабинета
– Возможность взятия наград и вовлечения в предложениях
Создание аккаунта на основном ресурсе
Процесс открытия счета чрезвычайно элементарен и длится буквально минут. Недавние участники в состоянии полагаться на крупный начальный поощрение за оформление.
Ступени формирования аккаунта
1. Переход на основной ресурс или его дубликат
2. Нажатие на кнопку “Создать аккаунт”
3. Заполнение нужных сведений
4. Верификация цифровой почты
5. Применение бонусного кода (когда доступен)
Награды и акции для пользователей
Игровая площадка одаривает своих клиентов многочисленными призовыми программами.
Основные виды призов
Начальный подарок — крупное начисление для новых участников, которое именно способно содержать денежные суммы и бесплатные вращения.
Фриспины — возможность крутить в известных аппаратах безвозмездно.
Возврат средств — процентный компенсация потерянных денег, который начисляется раз в неделю или помесячно.
Купоны — особые последовательности, обеспечивающие дополнительные преимущества.
Персональный кабинет: опции и параметры
Индивидуальный профиль гарантирует полный контроль над пользовательским опытом. В данном разделе имеются:
– Управление балансом
– Записи транзакций
– Действующие награды
– Параметры охраны
– Верификация аккаунта
Смартфонная версия и софт
Современные участники признают портативность. Ресурс дает двойной варианта для ставок с портативных аппаратов.
Приспособленная мобильная вариант
Адаптивная платформа портала автономно приспосабливается под экран любого девайса. Не требуется скачивать особое ПО.
Приложение для мобильных
Возможно инсталлировать оригинальное APP для iOS и Android. Софт предоставляет:
– Моментальный вход
– Адаптированный интерфейс
– Мобильные-оповещения о поощрениях
– Надежную функциональность
Live развлечения: среда настоящего игорного заведения
Раздел Live игр переносит пользователей в атмосферу реального казино. Квалифицированные дилеры ведут партии в варианте живого времени.
Топовые Live-форматы
– Рулетка
– Двадцать одно
– Baccarat
– Покер
Слоты: многообразие слотов
Каталог слотовых аппаратов насчитывает множество позиций от ведущих провайдеров. Пользователи обнаружат:
– Традиционные машины
– Видео-автоматы
– Мега-выигрыш-слоты
– Мегавейс
Турниры и особые события
Постоянные турниры позволяют участникам соревноваться друг с другом за крупные призовые пулы. Каждый соревнование располагает свои критерии включения и таблицу чемпионов.
Способы ввода и получения сумм
Ресурс поддерживает ряд платежных сервисов:
– Банковские средства
– Цифровые кошельки
– Blockchain-платежи
– Wire переводы
Абсолютно все операции выполняются защищенно благодаря новейшим протоколам криптографии.
Отдел поддержки
Опытные консультанты отдела поддержки готовы помочь 24/7. Имеются нижеперечисленные способы контакта:
– Онлайн-чат
– Email-поддержка
– Телефонная горячая линия
– Социальные сети
Заключение
Основной сайт игровой площадки и его рабочие копии дают участникам защищенный и удобный вход к широкому спектру азартных активностей. Крупные поощрения, частые акции, квалифицированная сервис и удобные расчетные системы делают развлекательный опыт максимально комфортным и результативным.
ева казино Нормальный канал, можно использовать.
Нынешние онлайн-казино гарантируют клиентам множество опций для беспроблемной игры. Главный веб-портал Голд казино казино предоставляет возможность ко всем возможностям и азартным играм. Однако при появлении программных неполадок на помощь приходят рабочие дубликаты.
Что представляет собой рабочее зеркало
Альтернативный адрес казино — это идентичная реплика главного ресурса, находящаяся по дополнительному URL. Лицензионное зеркало хранит все возможности, в том числе открытие профиля, доступ в индивидуальный кабинет, вознаграждения и бонусные коды.
Копия на сегодня гарантирует:
– Стабильный доступ к азартным слотам
– Абсолютную конфиденциальность индивидуальных сведений
– Поддержку баланса и истории операций
– Применимость всех промо-предложений
Открытие профиля на главном сайте
Ход оформления учетной записи занимает считанные минут. Начинающим клиентам требуется:
1. Перейти на основной портал или рабочее зеркало
2. Выбрать кнопку «Создать аккаунт»
3. Указать нужные поля
4. Верифицировать email почту
5. Использовать промокод при существовании
После конца создания аккаунта игроки обретают вознаграждение за регистрацию, какой может включать free spins или финансовое поощрение.
Доступ в личный кабинет
Приватный кабинет открывает комплексный мониторинг над игровым ходом. Через персональный кабинет допускается:
– Финансировать счет
– Снимать призы
– Активировать бонусные коды
– Отслеживать записи пари
– Соревноваться в состязаниях
– Забирать кэшбек
Характеристика поощрений и акций
Великодушная поощрительная система — важное козырь казино. Ключевые типы премий:
Начальный подарок
Новые игроки получают великодушное премирование на дебютные взносы. Размер бонуса может составлять 100-200% от величины депозита.
Фриспины
Бесплатные спины начисляются для топовых автоматов. Сумма фриспинов изменяется от 10 до 500 штук.
Возврат средств
Регулярный или ежемесячный откат части утраченных финансов. Средний объем компенсации — 5-15%.
Соревнования
Регулярные состязания с солидными призовыми пулами. Участники борются за верхние позиции в рейтинге.
Портативная версия и софт
Адаптивная версия позволяет играть с любого аппарата. Пользователи могут закачать софт для iOS и Android или применять браузерную версию.
Преимущества мобильного софта:
– Оперативная прогрузка игр
– Комфортный интерфейс
– Пуш-нотификации о бонусах
– Доступ через биометрию
Машины и Live казино
Игровая библиотека охватывает множество игр от ведущих поставщиков.
Известные типы автоматов:
– Обычные автоматы
– Видео-автоматы с премиальными раундами
– Джекпот слоты
– Мегавейс машины
Live игровой зал
Секция live игорный зал предоставляет развлечение с профессиональными крупье. Имеются классические варианты:
– Рулетка
– Двадцать одно
– Baccarat
– Покер
Как разыскать действующее зеркало
Обрести действующую URL на зеркало возможно различными способами:
1. Подписаться на емейл-уведомления
2. Отслеживать за новостями в соц сетях
3. Написать в департамент поддержки
4. Запомнить рабочее зеркало в фавориты
Итог
Официальный сайт и его актуальные зеркала обеспечивают постоянный доступ к игровым слотам. Богатые бонусы, множественные промокоды, удобное мобильное софт и качественная техподдержка поддержки обеспечивают игровой опыт в высшей степени удобным и надежным.
walmart online pharmacy
Нынешние онлайн-казино гарантируют пользователям широкий выбор слотов и щедрые награды. Но для комфортной времяпрепровождения необходимо понимать, как отыскать JVSpin зеркало и его рабочие зеркала.
Что такое основной ресурс казино
Основной портал казино — это главная веб-площадка, где пользователи могут развлекаться развлекательными развлечениями. Сайт оперирует на легитимных условиях и обладает всеми необходимыми разрешениями.
Ключевые достоинства основного веб-сайта:
– Надежность личных сведений
– Честные правила работы
– Гарантированные выводы
– Квалифицированная служба поддержки
Актуальное зеркало казино: для чего используется
Зеркало — это точная версия официального портала, находящаяся по иному веб-адресу. Функционирующее зеркало разрабатывается для обеспечения бесперебойного подключения к сайту.
Факторы применения зеркал:
– Ограничение основного URL
– Регламентные работы
– Большая активность на ресурс
Как получить рабочее зеркало сейчас
Найти новое официальное зеркало можно разными вариантами:
1. Почтовые оповещения — активируйте уведомления на информационную подписку
2. Служба помощи — обратитесь в онлайн-чат
3. Социальные каналы — следите за обновлениями
4. Партнерские порталы — достоверные платформы
Открытие счета на платформе казино
Алгоритм создания аккаунта требует всего несколько минут:
1. Кликните на клавишу “Зарегистрироваться”
2. Внесите необходимые сведения
3. Валидируйте почтовую адрес
4. Используйте промокод, если есть
После успешной регистрации вам предоставится открыт индивидуальный раздел.
Бонусы и промокоды
Выгодная премиальная политика — ключевое конкурентное преимущество казино:
Поощрение за открытие счета
Начинающие участники получают приветственный подарок, который может предполагать:
– Валютный счет на дебютный пополнение
– Фри-спины для слотов
– Стартовые бонусы
Купоны
Регулярно выходят актуальные коды, предоставляющие использовать специальные привилегии.
Система кэшбека
Постоянные клиенты возвращают процент проигранных денег назад.
Актуальные промо и турниры
Платформа систематически проводит интересные события:
– Семидневные баттлы
– Сезонные промо
– Раздачи крупных подарков
– Система VIP-клуба
Доступ в пользовательский профиль
Для логина на платформу следует:
1. Посетить основной портал или актуальное зеркало
2. Активировать “Авторизация”
3. Указать имя пользователя и пароль
В личном аккаунте предоставлены такие функции:
– Зачисление кошелька
– Обналичивание средств
– Анализ лога операций
– Изменение персональными данными
Адаптивная вариант и софт
Mobile версия
Мобильная модификация портала обеспечивает делать ставки с различных портативного устройства. Интерфейс автоматически адаптируется под формат screen.
Программа для установки
Скачать app можно для:
– Android — прямая скачивание с портала
– iOS — загрузка через App Store
Выгоды приложения:
– Быстрый вход
– Надежная функциональность
– Push-уведомления об предложениях
– Производительный дизайн
Развлекательные секции
Слоты
Внушительная подборка развлекательных слотов от ведущих поставщиков:
– Традиционные игры
– Видео-слоты
– Призовые-автоматы
Live casino
Раздел с реальными дилерами предоставляет:
– European/American Roulette
– Двадцать одно
– Baccarat
– Texas Hold’em
Стримы осуществляются в высоком разрешении, создавая ощущение реального казино.
Системы внесения средств и вывода
Сайт поддерживает множественные денежные сервисы:
– Платежные средства
– Цифровые платежи
– Цифровые валюты
– Банковские транзиты
Базовые значения внесения и быстрые выплаты создают игру исключительно удобной.
Департамент помощи
Профессиональная команда ассистентов функционирует 24/7 и готова поддержать с разными ситуациями:
– Живой-чат
– Email-переписка
– Phone служба
Выводы
Главный веб-сайт казино и его функционирующие зеркала предоставляют игрокам конфиденциальный и азартный азартный опыт. Выгодные поощрения, удобная мобильная вариант, обширные автоматы и качественное live-казино делают эту систему великолепным местом для игровых времяпрепровождения.
1xbet yeni adresi 1xbet yeni adresi .
https://medicobridgerx.shop/# MedicoBridge RX
1xbet giris 1xbet giris .
Хмельницький онлайн https://u-misti.khmelnytskyi.ua міський портал з новинами, афішею та довідником. Дізнавайтесь про події, транспорт, бізнес і послуги. Усе для комфортного життя та відпочинку в Хмельницькому в одному місці.
Житомир онлайн https://u-misti.zhitomir.ua міський портал з новинами, афішею та довідником. Дізнавайтесь про події, транспорт, бізнес і послуги. Усе для комфортного життя та відпочинку в Житомирі в одному місці.
У місті Одеса https://u-misti.odesa.ua актуальні новини, події, афіша та корисна інформація для мешканців і гостей. Дізнавайтесь про життя міста, транспорт, заклади і послуги. Все найважливіше про Одесу в одному зручному онлайн-порталі.
Сайт Полтави https://u-misti.poltava.ua новини, події, афіша та довідник компаній міста. Актуальна інформація про життя, транспорт, послуги і заклади. Усе необхідне для мешканців і гостей Полтави в одному зручному онлайн-порталі.
Передовые онлайн-казино предоставляют игрокам большой набор возможностей и премиальных опций. Присоединение к площадке производится через лицензионный портал или его рабочее зеркало казино Gold, что дает постоянную работу.
В чем суть актуальное зеркало казино
Дубликат — это точная копия официального ресурса, разработанная для обхода барьеров. Рабочее зеркало помогает игрокам иметь доступ к излюбленным играм в произвольное время.
Подлинное зеркало обладает всеми функциями основного ресурса:
– Целый перечень слотов
– Личный кабинет с сохраненными данными
– Актуальные акции
– Безопасные расчетные транзакции
Создание аккаунта на основном портале
Процесс регистрации отнимает всего считанные минут. Свежим пользователям требуется:
1. Попасть на главный сайт или функционирующее зеркало
2. Нажать на элемент “Создать аккаунт”
3. Внести требуемые параметры
4. Проверить электронную почту
5. Произвести дебютный депозит
Приветственный бонус начисляется автоматически после прохождения всех шагов.
Доступ в аккаунт
Существующие клиенты могут выполнить подключение вводя:
– Логин и код
– Код телефона
– Контактный email
Аккаунт обеспечивает шанс к контролю балансом, сведениям операций и действующим промокодам.
Бонусы и программы
Азартная система привлекает постоянных клиентов выгодными призами:
Начальный пакет
– Надбавка на стартовый платеж до 100%
– Бесплатные вращения на востребованные автоматы
– Добавочные бонусы за дальнейшие депозиты
Купоны
Уникальные коды дают шанс на использование специальных поощрений. Актуальные комбинации размещаются в секции “Предложения”.
Кешбэк
Постоянный кешбэк равен до 10% от использованных финансов. Возмещение выплачивается автоматически.
Программа лояльности
Активные клиенты накапливают очки, которые обмениваются на подлинные выплаты или даровые спины.
Mobile версия и программа
В целях удобства пользователей сделана качественная портативная платформа. Приспособленный облик обеспечивает удобно делать ставки с произвольного переносного девайса.
Плюсы программы:
– Моментальный подключение к играм
– Оптимизированный облик
– Стабильная работа
– Нотификации о последних турнирах
Загрузить APP можно свободно с проверенного сайта для девайсов на Android и iOS.
Ассортимент игр
Игровые автоматы
База вмещает более 2000 автоматов от популярных производителей:
– Обычные слоты
– Видео-слоты
– Прогрессивные автоматы
– Брендовые автоматы
Live казино
Раздел Live игр предлагает игру с подлинными ведущими в реальном времени:
– Рулетка
– Карточная игра
– Карты
– Покер
Состязания
Систематические соревнования с большими выигрышными бюджетами организуются систематически. Вход в состязаниях доступно всем зарегистрированным участникам.
Расчетные системы
Взносы и снятия финансов производятся через известные платежные системы:
– Кредитные карточ ки
– Виртуальные системы
– Bitcoin
– Банковские платежи
Наименьший платеж — от 100 рублей. Вывод денег обрабатывается в течение 24 периода.
Отдел помощи
Непрерывная служба помощи может ассистировать в разрешении всех проблем:
– Онлайн-чат
– Email
– Телефон
– Социальные сети
Надежность и разрешение
Лицензионный веб-сайт работает на базе международной разрешения. Всевозможные сведения игроков обезопасены современным SSL-кодированием.
Заключение
Функционирующее зеркало дает непрерывный соединение к предпочитаемым автоматам, богатым бонусам и удобным сервисам. Зарегистрируйтесь немедленно и обретите начальный приз!
Передовые онлайн-казино предлагают клиентам массу возможностей для беспроблемной игры. Центральный портал казино РќСЊСЋ Ретро casino обеспечивает доступ ко всем функциям и азартным играм. Однако при появлении технических проблем на выручку прибывают действующие дубликаты.
Что являет собой собой рабочее зеркало
Альтернативный адрес казино — это стопроцентная копия главного ресурса, размещенная по альтернативному доменному имени. Официальное зеркало хранит все опции, вместе с создание аккаунта, авторизацию в индивидуальный кабинет, вознаграждения и кодовые слова.
Копия на сегодня предоставляет:
– Непрерывный путь к азартным машинам
– Абсолютную безопасность персональных информации
– Сохранение средств и записей платежей
– Применимость всех бонусных программ
Регистрация на главном портале
Ход открытия профиля отнимает пару минут. Свежеиспеченным игрокам нужно:
1. Зайти на главный ресурс или рабочее зеркало
2. Выбрать кнопку «Регистрация»
3. Внести требуемые данные
4. Активировать email почту
5. Указать промокод при присутствии
После конца оформления профиля геймеры обретают вознаграждение за регистрацию, который может иметь бонусные спины или монетарное премирование.
Доступ в собственный кабинет
Приватный кабинет обеспечивает всеобъемлющий контроль над игровым действом. Через собственный аккаунт разрешается:
– Пополнять депозит
– Забирать выплаты
– Задействовать кодовые слова
– Проверять записи пари
– Соревноваться в соревнованиях
– Обретать cash back
Обзор бонусов и специальных предложений
Великодушная поощрительная программа — существенное козырь платформы. Центральные категории премий:
Начальный бонус
Новые игроки приобретают щедрое поощрение на дебютные депозиты. Размер премии может составлять 100-200% от величины вклада.
Фриспины
Безвозмездные спины предоставляются для известных автоматов. Сумма free spins варьируется от 10 до 500 штук.
Возврат средств
Систематический или помесячный отдача процентной доли проигранных финансов. Стандартный размер кэшбека — 5-15%.
Соревнования
Систематические конкурсы с большими премиальными пулами. Участники состязаются за верхние позиции в турнирной таблице.
Портативная версия и программа
Адаптивная версия разрешает делать ставки с каждого аппарата. Пользователи могут скачать софт для iOS и Android или применять интернет версию.
Плюсы мобильного софта:
– Скоростная загрузка игр
– Комфортный интерфейс
– Всплывающие уведомления о поощрениях
– Вход через Touch ID
Слоты и Live казино
Развлекательная база насчитывает множество позиций от лидирующих производителей.
Топовые типы автоматов:
– Стандартные слоты
– Видео-автоматы с призовыми этапами
– Накопительный приз слоты
– Megaways автоматы
Live игровой зал
Раздел live казино обеспечивает партию с живыми ведущими. Представлены традиционные развлечения:
– Американская рулетка
– Blackjack
– Баккара
– Техасский холдем
Как найти рабочее зеркало
Найти актуальную ссылку на зеркало можно несколькими вариантами:
1. Зарегистрироваться на емейл-уведомления
2. Следить за обновлениями в социальных сетях
3. Написать в отдел поддержки
4. Добавить в закладки рабочее зеркало в фавориты
Резюме
Официальный сайт и его актуальные зеркала предоставляют постоянный путь к игровым автоматам. Великодушные вознаграждения, различные бонусные коды, практичное смартфонное софт и качественная служба поддержки создают развлекательный геймплей предельно приятным и защищенным.
eva casino Теперь не трачу время на поиск зеркал eva casino. Просто захожу в канал и беру ссылку. Всё работает.
https://buscamed.do/ad/pgs/?codigo_promocional_1x_bet.html
rate online pharmacies: MedBridge Pharmacy – canadian pharmacy review
Передовые онлайн-казино обеспечивают игрокам обширный диапазон опций для удобной времяпрепровождения. Переход к платформе каз осуществляется через лицензионный домен или действующее зеркало.
Что такое действующее зеркало казино
Рабочее зеркало — это запасной URL главного сайта казино. Такие клоны генерируются для гарантирования непрерывного соединения к развлекательной площадке.
Зеркало сегодня совершенно воспроизводит функционал главного сайта. Пользователи обретают схожий вход ко всем услугам, включая открытие счета, финансирование счета и снятие призов.
Создание аккаунта на официальном ресурсе
Процедура оформления учетной записи длится всего пару моментов. Новым участникам следует:
1. Войти на главный портал или актуальное проверенное зеркало
2. Кликнуть кнопку “Регистрация”
3. Ввести необходимые данные
4. Верифицировать email почту
5. Применить код активации при присутствии
После завершения открытия профиля пользователь зарабатывает подарок за регистрацию, который способен предполагать фриспины или финансовое вознаграждение.
Авторизация в персональный кабинет
Персональный кабинет — это защищенная территория, где игроки вправе управлять своим профилем. Для авторизации требуется ввести username и пароль.
В индивидуальном кабинете открыты данные функции:
– Отслеживание хронологии транзакций
– Задействование бонусных кодов
– Управление поощрениями
– Участие в конкурсах
– Мониторинг возмещения
– Редактирование данных
Бонусы и предложения
Гемблинговая платформа обеспечивает великодушные призы:
Стартовый бонус — новые игроки зарабатывают крупное премию на стартовые пополнения.
Free spins — выдаются как при оформлении, так и в процессе многочисленных кампаний.
Кэшбэк — постоянный возврат фрагмента потерянных финансов.
Промокоды — уникальные шифры, обеспечивающие выход к особым бонусам.
Обзор гемблинговых категорий
Slots
Ассортимент slots содержит множество наименований от передовых провайдеров. Клиенты откроют как классические аппараты, так и актуальные мультимедийные автоматы с захватывающей анимацией.
Live казино
Раздел Live казино обеспечивает шанс соревноваться с реальными дилерами в условиях реального времени. Доступны популярные столы: рулетка, блэкджек, баккара, покер.
Соревнования
Систематические состязания с крупными наградными суммами манят сотни соревнующихся. Лидеры получают монетарные призы и эксклюзивные поощрения.
Телефонная версия и софт
Телефонная версия сайта обеспечивает развлекаться с всякого девайса. Дизайн независимо корректируется под габариты экрана.
Загрузить приложение можно для девайсов на Android и iOS. Телефонное app характеризуется всеми функциями настольной версии.
Как обнаружить текущее зеркало на данный момент
Свежие ссылки зеркал систематически меняются. Найти рабочую URL можно различными методами:
– Через отдел техподдержки
– В настоящих информационных сетях
– По электронной дайджесту
– На тематических сайтах
Охрана и лицензирование
Основной домен работает на основе глобальной сертификата. Все операции защищены передовыми технологиями защиты.
Конфиденциальность пользовательских информации сохраняется в стопроцентном масштабе.
Вывод
Официальный портал и его функционирующие альтернативы дарят игрокам 24/7 доступ к первоклассным игровым развлечениям. Щедрые бонусы, всевозможные игры, компетентная служба — все это делает игровой опыт предельно удобным и захватывающим.
https://buscamed.do/ad/pgs/?codigo_promocional_de_la_casa_de_apuestas_1xbet_para_el_registro.html
Типовой или индивидуальный проект дома из бруса — что выбрать
MedBridge Pharmacy: internet pharmacy manitoba – MedBridge Pharmacy
top 10 online pharmacy in india top 10 online pharmacy in india world pharmacy india
I recently tried this casino https://hb88.legal/get-lucky-casino-jouw-bestemming-voor-premium/ and was impressed by how stable everything felt. The games run fast, bonuses are clear, and navigation is intuitive, making the experience comfortable.
Описание официального ресурса
Современное онлайн-казино предоставляет своим игрокам разнообразный выбор развлечений и призов. Официальный сайт https://edevdarshan.com/archives/54764/ работает постоянно, обеспечивая вход к топовым слотам, live-казино и многим предложениям.
Функционирующее зеркало: возможность к платформе
Что такое дубликат казино
Альтернатива представляет собой полную версию официального ресурса с отличным интернет адресом. Функционирующее зеркало обеспечивает клиентам миновать запреты и иметь постоянный доступ к выбранным развлечениям.
Как обнаружить текущее зеркало сегодня
Действующие адреса на основное зеркало публикуются через:
– Email подписку
– Основные коммуникационные сети
– Команду сопровождения
– Специализированные сайты
Открытиесчета на сайте
Этапы регистрации
Оформление требует пару минут и подразумевает следующие шаги:
1. Открытие на основной портал или рабочее зеркало
2. Клик элемента “Открытьсчет”
3. Указание контактных данных
4. Верификация электроннойпочты или телефона
5. Придумывание кодадоступа
Подарок за оформление
Первые клиенты приобретают щедрые вступительные поощрения:
– Финансовые средства на аккаунт
– Халявныеспины для игр
– Повышенный размер компенсации
– Уникальные ваучеры
Доступ в персональный счет
Зарегистрированные участники способны совершить логин через главный веб-сайт или текущее зеркало. Для этого требуется указать учетноеимя и пароль, придуманные при оформлении.
Возможности индивидуального раздела
В персональном аккаунте доступны следующие функции:
– Редактирование персональными данными
– Внесение кошелька
– Получение средств
– Активация кодов
– Просмотр истории транзакций
– Включение в конкурсах
Подарки и акции
Разновидности вознаграждений
Казино поощряет своих клиентов многочисленными бонусными акциями:
– Стартовый комплект — щедрые вознаграждения на первые взносы
– Бесплатныевращения — бонусные спины в известных симуляторах
– Кешбэк — регулярный возврат доли ставок
– Программа VIP — особые привилегии для активных участников
Ваучеры и их ввод
Специальные промокоды гарантируют бонусные поощрения. Для применения нужно ввести комбинацию в специальное поле в собственном разделе.
Геймплейный набор
Симуляторы
База слотовых симуляторов вмещает множество позиций от известных разработчиков:
– Традиционные слоты
– Новые автоматы
– Накопительные игры
– Тематические слоты
Live казино
Область Live-казино предоставляет участие с реальными крупье в обстановке онлайн эфира:
– Французскаярулетка
– Blackjack
– Баккара
– Покер
Конкурсы
Систематические состязания с крупными джекпотными пулами проходят регулярно. Игроки сражаются за победу в турнирнойсетке.
Смартфонная реализация и приложение
Мобильная версия сайта
Основной веб-сайт полностью приспособлен для планшетных аппаратов. Игроки способны играть слоты сразу через интернет-браузер без обязательства загрузки.
Программа для инсталляции
Авторское смартфонное приложение предоставляется для установки на гаджеты с операционными ОС Android и iOS. Приложение предоставляет:
– Оперативный путь к слотам
– Устойчивую производительность
– Оперативные-сообщения о предложениях
– Удобный интерфейс
Заключение
Оригинальный сайт казино и его рабочие копии обеспечивают клиентам комплексный путь к первоклассным азартным развлечениям. Щедрые вознаграждения, разнообразные промо, функциональная мобильная адаптация и компетентная поддержка превращают азартный процесс чрезвычайно комфортным и доходным.
Актуальные онлайн-казино гарантируют пользователям разнообразие вариантов для беспроблемной игры. Официальный сайт ДжиВиСпин регистрация дарит доступ ко всем возможностям и играм. Однако при возникновении программных сложностей на помощь приходят функционирующие копии.
Что являет собой собой действующее зеркало
Альтернативный адрес казино — это стопроцентная дубликат основного сайта, размещенная по альтернативному адресу. Подлинное зеркало хранит все функции, вместе с регистрацию, доступ в личный кабинет, бонусы и промокоды.
Копия на сегодня дает:
– Бесперебойный доступ к развлекательным аппаратам
– Совершенную конфиденциальность индивидуальных информации
– Сохранение баланса и хронологии переводов
– Доступность всех промо-предложений
Регистрация на официальном ресурсе
Этап создания аккаунта требует считанные минут. Свежеиспеченным геймерам необходимо:
1. Перейти на основной портал или актуальное зеркало
2. Щелкнуть кнопку «Регистрация»
3. Заполнить необходимые сведения
4. Верифицировать email почту
5. Использовать промокод при присутствии
После конца регистрации геймеры получают приз за регистрацию, какой может содержать free spins или монетарное поощрение.
Доступ в персональный кабинет
Личный кабинет дает всесторонний контроль над азартным ходом. Через личный профиль можно:
– Пополнять баланс
– Выводить средства
– Использовать промокоды
– Контролировать журнал пари
– Соревноваться в соревнованиях
– Забирать кэшбек
Описание поощрений и промо-предложений
Выгодная призовая политика — существенное достоинство казино. Ключевые формы премий:
Приветственный приз
Новые игроки приобретают выгодное премирование на стартовые вклады. Объем бонуса может доходить до 100-200% от величины вклада.
Free spins
Даровые спины начисляются для известных автоматов. Количество free spins варьируется от 10 до 500 штук.
Кешбэк
Еженедельный или ежемесячный отдача процентной доли проигранных средств. Типичный размер кэшбека — 5-15%.
Турниры
Систематические конкурсы с большими призовыми пулами. Игроки конкурируют за призовые места в таблице лидеров.
Мобильная версия и приложение
Портативная версия позволяет наслаждаться игрой с каждого аппарата. Игроки могут закачать app для iOS и Android или задействовать интернет версию.
Плюсы портативного приложения:
– Молниеносная подзагрузка игр
– Эргономичный UI
– Push-уведомления о акциях
– Вход через отпечаток пальца
Слоты и Live казино
Игровая база охватывает сотни позиций от ведущих производителей.
Востребованные категории слотов:
– Обычные слоты
– Современные слоты с бонусными раундами
– Джекпот автоматы
– Мега-путь слоты
Live казино
Категория live казино предлагает партию с профессиональными ведущими. Имеются стандартные игры:
– Французская рулетка
– Двадцать одно
– Баккара
– Покер
Как обнаружить функционирующее зеркало
Раздобыть свежую адрес на зеркало разрешается несколькими путями:
1. Подписаться на емейл-уведомления
2. Мониторить за обновлениями в соц сетях
3. Обратиться в отдел поддержки
4. Запомнить действующее зеркало в избранное
Вывод
Главный портал и его актуальные копии предоставляют стабильный вход к азартным играм. Великодушные премии, многочисленные бонусные коды, практичное смартфонное приложение и отличная техподдержка поддержки делают игровой процесс крайне удобным и безопасным.
xbet giri? 1xbet-giris-34.com .
https://medbridgepharmacy.shop/# MedBridge Pharmacy
For tips
short term consolidation loans
for a simple explanation.
Современные онлайн казино предоставляют клиентам обширный спектр возможностей для удобной игры. Впрочем иногда соединение к официальному порталу может стать недоступным. В таких моментах на выручку появляется [url=shahidnoor.com/sposoby-vyvoda-deneg-iz-kazino-vklyuchaya-sredstva-poluchennye-s-igrovykh-avtomatov/]http://www.shahidnoor.com/sposoby-vyvoda-deneg-iz-kazino-vklyuchaya-sredstva-poluchennye-s-igrovykh-avtomatov[/url], которое гарантирует стабильный подключение ко всем сервисам платформы.
Что такое функционирующее зеркало казино
Альтернативный сайт — это абсолютная реплика лицензионного сайта, которая находится по альтернативному домену. Альтернативный ресурс содержит весь возможности первоначального портала, включая личный кабинет, средства и данные операций.
Основные выгоды эксплуатации зеркала:
– 24-часовой доступ к ресурсу
– Стопроцентная схожесть инструментов
– Конфиденциальность личных информации
– Хранение доступных привилегий
Как разыскать действующее зеркало на текущий день
Имеется некоторое количество надежных вариантов нахождения действующей ссылки:
Официальные сервисы:
1. Почтовая рассылка — руководство периодически отправляет сообщения с рабочими URL
2. Коммуникационные сети — официальные аккаунты размещают свежую сведения
3. Служба поддержки — консультанты дают достоверные адреса
4. Телефонное приложение — предоставляет избегать блокировки
Открытие счета на официальном портале
Процесс создания аккаунта требует только немного минут и состоит из таких ступеней:
1. Переход на главный веб-сайт или актуальное зеркало
2. Нажатие на клавишу «Регистрация»
3. Ввод регистрационной анкеты
4. Подтверждение почтовой почты или мобильного номера
5. Включение бонуса за регистрацию при наличии промокода
Свежие клиенты зарабатывают великодушный стартовый бонус, который может предполагать фриспины, денежные бонусы или cashback.
Авторизация в персональный кабинет
Авторизация на сайте выполняется традиционным путем. Необходимо вписать логин и код доступа, указанные при открытии счета.
Важные аспекты для защищенного входа:
– Используйте защищенный пароль
– Запустите двухэтапную аутентификацию
– Не записывайте коды на общественных девайсах
– Контролируйте интернет строку браузера
Описание поощрительной программы
Казино одаривает пользователей многочисленными привилегиями и промо:
Начальный пакет
Новички могут рассчитывать на значительное поощрение за дебютный вклад. Обычно это процентная премия к внесенной величине плюс бесплатные вращения для топовых слотов.
Постоянные акции
– Недельный кэшбек — компенсирование доли утраченных денег
– Бонусы на последующие пополнения
– Уникальные промо по знаменательным датам
– Соревнования с солидными призовыми банками
Схема верности
Постоянные игроки получают баллы за каждую игру, которые затем конвертируются на реальные деньги, бесплатные вращения или эксклюзивные привилегии.
Купоны: как применять
Кодовые комбинации — это индивидуальные комбинации символов, предоставляющие доступ к специальным вознаграждениям.
Откуда раздобыть свежие промокоды:
– Легитимные коммуникационные сети казино
– Аффилиатные сайты
– Email-информирование
– Специализированные форумы
Активируется промокод в соответствующее поле при регистрации или внесении депозита кошелька.
Мобильная версия и приложение
Передовые пользователи любят проводить время с смартфонных гаджетов. Сайт дает 2 варианта для удобной телефонной игры.
Мобильная модификация
Веб версия автоматически адаптируется под диагональ экранной панели. Не предполагает установки и действует в каждом современном браузере.
Смартфонное приложение
Установить app можно для аппаратов на Android и iOS. Преимущества app:
– Быстрая активация
– Надежная работа
– Push-уведомления о акциях
– Независимый минование блокировок
Процедура загрузки легок: требуется попасть на ресурс с мобильного устройства и придерживаться руководству.
Игровой ассортимент
Каталог аппаратов насчитывает несколько тысяч наименований от передовых поставщиков.
Слоты
Азартные слоты — максимально популярная раздел развлечений. Размещены классические простые слоты, актуальные мультимедийные слоты с дополнительными стадиями, а также растущие выигрыши.
Live казино
Отдел с реальными раздающими дает возможность почувствовать антураж реального казино. Представлены варианты с рулеткой.
Стриминг осуществляется в высоком формате, имеется чат с раздающим и другими игроками.
Турниры
Регулярно организуются состязания по многочисленным категориям. Включение позволяет заработать монетарные вознаграждения, даровые прокруты или особые поощрения.
Транзакционные действия
Ресурс предоставляет обширный ассортимент расчетных систем:
– Банковские карты
– Онлайн платформы
– Биткоин
– Счетовые транзакты
Низшая объем пополнения — разумная для большинства клиентов. Снятие денег обрабатывается в короткие сроки.
Служба поддержки
Квалифицированные сотрудники настроены помочь 24/7. Открыты следующие варианты контакта:
– Веб-чат
– Email
– Мобильная поддержка
– Коммуникационные сети
Пояснения на типовые проблемы можно отыскать в секции FAQ.
Вывод
Главный ресурс казино и его функционирующие зеркала предоставляют клиентам совершенный вход ко всем сервисам ресурса. Солидные поощрения, практичная телефонная версия, огромный коллекция аттракционов и опытная поддержка делают игровой досуг исключительно удобным и конфиденциальным.
Plum Market Hub – Clean layout helps users find what they’re looking for quickly.
Вход к платформе через действующие зеркала
Современные онлайн казино обеспечивают игрокам постоянный переход к услугам. Основной сайт казино Grizzly функционирует устойчиво, предлагая большой набор азартных автоматов. Впрочем порой появляются программные проблемы или ограничения, следовательно необходимо знать о существовании рабочих зеркал.
Что является собой центральное зеркало казино
Альтернатива — это полная версия официального веб-сайта с схожим интерфейсом. Функционирующее зеркало сегодня помогает обходить локальные блокировки и возобновлять времяпрепровождение.
Ключевые плюсы задействования зеркал:
– Безграничный доступ к личному кабинету
– Поддержание любых данных профиля
– Такой же спектр игр
– Текущие вознаграждения и предложения
Открытие счёта на сайте
Процедура создания аккаунта длится несколько минут. Новые клиенты получают привлекательный приз за создание счёта, что может охватывать:
– Начальный денежный бонус
– Бесплатные фриспины для машин
– Уникальные купоны
– Увеличенный кешбэк
Во имя завершения оформления необходимо:
1. Войти на официальный веб-сайт или альтернативу
2. Кликнуть кнопку «Оформиться»
3. Ввести личные реквизиты
4. Заверить почтовый адрес или номер
5. Использовать промокод (если есть наличии)
Доступ в собственный кабинет
Вслед за успешной оформления игроки имеют возможность совершать подключение посредством главный сайт или актуальное зеркало. Персональный кабинет даёт безграничный управление над учётной записью:
– История пари
– Пополнение баланса
– Получение средств
– Регулирование поощрениями
– Участие в конкурсах
Поощрения и предложения казино
Платформа удовлетворяет клиентов вариативными поощрительными программами:
Стартовые подарки
Дебютанты приобретают щедрый комплект привилегий на стартовые пополнения. Типично это предполагает долевую надбавку к величине депозита плюс бесплатные вращения.
Систематические акции
– Еженедельный компенсация до 15%
– Турниры с премиальными пулами
– Подарки на годовщину рождения
– Специальные промо для привилегированных геймеров
Программа лояльности
Постоянные клиенты накапливают очки, они можно конвертировать на настоящие деньги или эксклюзивные льготы.
Мобильная редакция и софт
Актуальные инновации помогают участвовать везде подходяще. Мобильная форма веб-сайта независимо приспосабливается под размер всякого аппарата.
Плюсы портативного ПО:
– Быстрая загрузка слотов
– Удобный вид
– Мгновенные-нотификации о промо
– Шанс инсталлировать для Android и iOS
Живое казино: среда истинного игорного клуба
Секция Live казино доставляет геймеров в обстановку подлинного игорного заведения. Опытные операторы управляют игру в режиме подлинного времени.
Доступные варианты:
– Американская рулетка
– Карточная игра
– Баккара
– Покерная игра
Барабаны и гемблинг машины
Коллекция игровых автоматов охватывает множество наименований от ведущих производителей. Всякий игрок отыщет развлечение по желанию:
– Традиционные слоты
– Инновационные игры с специальными уровнями
– Джекпот-игры
– Многолинейные машины
Состязания и раздачи
Регулярные состязания добавляют адреналин и открывают опцию обрести большие призы. Включение в состязаниях зачастую даровое, а наградные пулы составляют внушительных сумм.
Безопасность и секретность
Сайт задействует передовые системы шифрования для защиты реквизитов пользователей. Каждые транзакционные транзакции осуществляются через охраняемые каналы.
Заключение
Основной портал и его функционирующие зеркала гарантируют надёжный вход к первоклассным азартным сервисам. Привлекательные награды, удобная портативная вариант, вариативность автоматов и высококлассное Live-игорный дом формируют портал превосходным вариантом для фанатов игровых игр.
Блог Києва https://infosite.kyiv.ua події, новини, цікаві місця та корисні поради для мешканців і гостей столиці. Дізнавайтесь про актуальні заходи, життя міста, розваги та сервіси. Все найцікавіше про Київ в одному зручному онлайн-блозі.
Автомобільний портал https://avtogid.in.ua новини авто, огляди, тести та поради водіям. Дізнавайтесь про нові моделі, технології, ремонт і обслуговування. Все про автомобілі в одному місці для власників і автолюбителів.
Сайт міста Львів https://faine-misto.lviv.ua новини, події, афіша та довідник компаній. Актуальна інформація про життя міста, транспорт, послуги і заклади. Усе необхідне для мешканців і туристів Львова в одному зручному онлайн-порталі.
Сайт міста Житомир https://faine-misto.zt.ua новини, події, афіша та довідник компаній. Актуальна інформація про життя міста, транспорт, послуги і заклади. Усе необхідне для мешканців і гостей Житомира в одному зручному онлайн-порталі.
https://optik-podolsk.ru/lp/pgs/skolyko_kaloriy_v_halve_poleznaya_informaciya.html
1win актуальная ссылка http://1win63197.help/
Передовые онлайн-казино дают пользователям обширный ассортимент услуг и бонусных опций. Присоединение к ресурсу реализуется через основной портал или его действующее зеркало Панч казино, что предоставляет бесперебойную игру.
Что такое актуальное зеркало казино
Альтернатива — это идентичная копия официального сайта, созданная для обхода запретов. Зеркало сегодня помогает игрокам сохранить соединение к предпочитаемым слотам в каждое время.
Подлинное зеркало содержит всеми функциями оригинального ресурса:
– Полный список развлечений
– Профиль с сохраненными параметрами
– Актуальные акции
– Безопасные финансовые действия
Открытие счета на официальном портале
Ход оформления требует всего немного минут. Первым клиентам требуется:
1. Войти на официальный сайт или функционирующее зеркало
2. Кликнуть на клавишу “Зарегистрироваться”
3. Внести необходимые параметры
4. Активировать адрес
5. Сделать начальный вклад
Стартовый бонус выдается незамедлительно после выполнения всех стадий.
Вход в личный кабинет
Действующие пользователи могут осуществить авторизацию вводя:
– Учетное имя и шифр
– Цифры сотового
– Контактный email
Аккаунт дает право к регулированию счетом, сведениям операций и текущим промокодам.
Промо и акции
Гемблинг площадка привлекает лояльных пользователей разнообразными поощрениями:
Приветственный бонус
– Премия на начальный взнос до 100%
– Фриспины на востребованные слоты
– Экстра премии за последующие платежи
Купоны
Специальные ваучеры предоставляют право на приобретение особых поощрений. Свежие промокоды выкладываются в разделе “Бонусы”.
Возврат средств
Периодический кэшбек равен до 10% от утраченных финансов. Компенсация предоставляется моментально.
Механизм лояльности
Активные участники приобретают поинты, которые превращаются на реальные выплаты или free spins.
Адаптивный портал и APP
В целях удобства пользователей создана качественная mobile версия. Приспособленный вид позволяет беспрепятственно участвовать с произвольного карманного гаджета.
Плюсы приложения:
– Быстрый запуск к развлечениям
– Оптимизированный дизайн
– Устойчивая работа
– Push-уведомления о свежих турнирах
Установить программу можно бесплатно с главного сайта для устройств на Android и iOS.
Коллекция игр
Слоты
База содержит более 2000 машин от ведущих разработчиков:
– Традиционные слоты
– Мультимедийные игры
– Jackpot игры
– Тематические игры
Live казино
Секция Live игр обеспечивает взаимодействие с реальными дилерами в живом режиме:
– Roulette
– Двадцать одно
– Baccarat
– Столы покера
Соревнования
Систематические турниры с значительными призовыми суммами организуются еженедельно. Присоединение в конкурсах разрешено всем действующим пользователям.
Платежные методы
Депозиты и снятия средств выполняются через распространенные способы оплаты:
– Дебетовые средства
– Цифровые сервисы
– Bitcoin
– Прямые переводы
Самый низкий вклад — от 100 рублей. Вывод денег осуществляется в течение 24 периода.
Команда support
24/7 команда саппорта расположена поддержать в решении любых вопросов:
– Мессенджер
– Email
– Контактный номер
– Публичные сети
Защита и сертификат
Подлинный веб-сайт действует на фундаменте международной лицензии. Все параметры игроков закрыты современным SSL-протоколом.
Резюме
Функционирующее зеркало предоставляет постоянный доступ к любимым играм, богатым промокодам и комфортным сервисам. Зарегистрируйтесь немедленно и заработайте стартовый подарок!
Переход к платформе и функционирующие зеркала
Актуальные интернет казино предоставляют клиентам широкий ассортимент развлечений. Официальный веб-сайт Р—СѓРјР° скачать обеспечивает защищенный переход ко всем сервисам. Тем не менее временами происходят обстоятельства, когда понадобится дополнительный вариант доступа.
Что означает собой рабочее зеркало
Актуальное зеркало — это идентичная копия официального ресурса с другим интернет адресом. Зеркало сегодня позволяет миновать существующие барьеры и поддерживать бесперебойный доступ к популярным играм.
Официальное зеркало имеет теми же опциями, что и главный сайт:
– Полный перечень автоматов
– Личный профиль с зафиксированными сведениями
– Все бонусы и предложения
– Надежные денежные операции
Регистрация и подключение в казино
Этап оформления на ресурсе отнимает пару моментов. Новым игрокам требуется:
1. Открыть на рабочее зеркало на данный момент
2. Щелкнуть клавишу «Регистрация»
3. Указать обязательные данные
4. Проверить электронную почту или данные мобильного
5. Получить подарок за создание профиля
Доступ в индивидуальный аккаунт выполняется с помощью ввод имени пользователя и секретной комбинации.
Характеристика наградной программы
Щедрая призовая программа — главное плюс платформы. Игроки обретают многочисленные поощрения:
Стартовые поощрения
Новые игроки вправе рассчитывать на щедрый приз за регистрацию. Чаще всего это пакет предложений, содержащий:
– Процентную надбавку к начальному вкладу
– Бесплатные фриспины
– Extra суммы на кошелек
Промо-коды и эксклюзивные возможности
Регулярные бонусные комбинации обеспечивают активировать экстра привилегии. Применить их возможно в специальном разделе персонального кабинета.
Фриспины и возврат средств
Фриспины — это способность запускать игры без задействования личных денег. Возврат подразумевает определенный отдачу израсходованных финансов.
Каталог слотов
Гемблинг ресурс обеспечивает значительную коллекцию развлечений.
Видеослоты
Вариативность игровых машин впечатляет фантазию. Представлены классические простые машины и новые видеослоты с увлекательной анимацией.
Live казино
Категория Live казино погружает пользователей в обстановку реального азартного заведения. Квалифицированные операторы организуют раунды в прямом эфире.
Соревнования и лидерборды
Постоянные состязания вносят остроты и гарантируют перспективу выиграть крупные выигрыши.
Мобильная вариант и софт
Актуальные технологии дают возможность участвовать в удобном локации. Адаптивная вариант независимо подстраивается под размер устройства.
Установить клиент разрешено для цифровых платформ iOS и Android. Приложение предоставляет:
– Быстрый доступ
– Бесперебойную работу
– Push-алерты об предложениях
– Комфортный интерфейс
Платежные действия
Ресурс поддерживает разнообразные варианты депозита и получения средств:
– Кредитные инструменты
– Виртуальные системы
– Токены
– Финансовые отправки
Любые операции выполняются через защищенное канал, что гарантирует сохранность приватных параметров.
Департамент помощи
Профессиональная служба помощи действует 24/7. Обратиться с консультантами можно через:
– Онлайн-чат
– Электронную почту
– Контакт
– Коммуникационные ресурсы
Резюме
Официальный веб-сайт и его рабочее зеркало гарантируют игрокам защищенный и комфортный переход к увлекательным занятиям. Щедрые награды, разнообразный выбор автоматов и профессиональная поддержка обеспечивают процесс максимально приятной и выгодной.
https://autoimage-mitsubishi.ru/ustrojstvo/kalina-v-novom-kuzove.html
https://cbs-kazan.ru/pochemu-rebyonok-reshaet-zadachi-tolko-po-obrazczu-no-teryaetsya-pri-malejshem-izmenenii-usloviya/
Передовые сетевые казино дают пользователям большой диапазон опций для приятной игры. Однако иногда подключение к основному сайту может оказаться ограниченным. В таких моментах на подмогу приходят https://www.urbanexpresslm.com/2026/03/05/multivalyutnaya-platezhnaya-sistema-prednaznachena-dlya-igrokov-iz-120-razlichnykh-stran, которое дает постоянный путь ко всем сервисам платформы.
Что такое рабочее зеркало казино
Копия — это абсолютная реплика основного ресурса, которая хостится по другому домену. Дубликат имеет полный функционал первоначального сайта, включая личный кабинет, депозит и данные операций.
Принципиальные преимущества эксплуатации зеркала:
– Непрерывный подключение к ресурсу
– Полная идентичность опций
– Конфиденциальность индивидуальных реквизитов
– Хранение всех имеющихся вознаграждений
Как обнаружить актуальное зеркало в данный момент
Существует множество достоверных методов получения текущей адреса:
Легитимные источники:
1. Email рассылка — дирекция регулярно направляет уведомления с свежими ссылками
2. Коммуникационные сети — легитимные аккаунты постят релевантную информацию
3. Сервис поддержки — специалисты предоставляют проверенные адреса
4. Телефонное приложение — обеспечивает преодолевать блокировки
Открытие счета на основном ресурсе
Операция регистрации занимает всего считанные минут и включает из нижеследующих стадий:
1. Открытие на главный веб-сайт или действующее зеркало
2. Выбор на элемент «Зарегистрироваться»
3. Внесение пользовательской таблицы
4. Проверка почтовой почты или мобильного номера
5. Применение поощрения за регистрацию при существовании промокода
Новые геймеры обретают значительный приветственный презент, который может включать бесплатные вращения, финансовые бонусы или cashback.
Доступ в личный кабинет
Авторизация на платформе производится стандартным образом. Достаточно ввести учетные данные и кодовое слово, указанные при регистрации.
Значимые нюансы для защищенного входа:
– Эксплуатируйте надежный код
– Запустите двойную верификацию
– Не записывайте реквизиты на публичных девайсах
– Отслеживайте интернет строку браузера
Характеристика поощрительной схемы
Казино радует клиентов различными вознаграждениями и промо:
Стартовый набор
Новички способны претендовать на существенное поощрение за первый взнос. Традиционно это процентная надбавка к зачисленной количеству плюс free spins для известных слотов.
Систематические промо
– Семидневный возврат средств — возврат доли потерянных денежных средств
– Призы на дополнительные вклады
– Особые промо по событиям
– Турниры с крупными призовыми суммами
Программа привилегий
Регулярные клиенты получают очки за каждую ставку, которые затем конвертируются на фактические деньги, free spins или уникальные привилегии.
Промокоды: как задействовать
Промокоды — это уникальные сочетания символов, дающие привилегию к специальным бонусам.
Где найти рабочие промокоды:
– Авторизованные социальные сети казино
– Союзнические порталы
– Email-подписка
– Специализированные форумы
Активируется промокод в отдельное поле при регистрации или добавлении денег баланса.
Телефонная версия и приложение
Актуальные геймеры выбирают проводить время с мобильных аппаратов. Сайт дает пару варианта для комфортной мобильной игры.
Отзывчивая версия
Браузерная версия сама настраивается под параметры монитора. Не нуждается установки и оперирует в любом современном браузере.
Телефонное приложение
Получить app можно для девайсов на Android и iOS. Выгоды app:
– Молниеносная загрузка
– Надежная действие
– Мгновенные-уведомления о акциях
– Автоматический избегание блокировок
Операция загрузки легок: необходимо перейти на ресурс с мобильного гаджета и выполнять указаниям.
Гемблинг коллекция
Каталог слотов насчитывает огромное количество позиций от передовых разработчиков.
Слоты
Гемблинг машины — крайне распространенная секция забав. Размещены обычные винтажные аппараты, новые мультимедийные слоты с премиальными раундами, а также накопительные призы.
Live казино
Отдел с настоящими крупье предоставляет ощутить антураж настоящего казино. Представлены столы с покером.
Стриминг реализуется в превосходном разрешении, поддерживается коммуникация с раздающим и другими игроками.
Турниры
Постоянно запускаются турниры по многочисленным играм. Вступление предоставляет право получить денежные награды, фриспины или специальные привилегии.
Финансовые манипуляции
Ресурс предлагает значительный набор денежных инструментов:
– Банковские карты
– Электронные системы
– Крипта
– Денежные транзакты
Наименьшая объем депозита — посильная для большинства игроков. Обналичивание денег выполняется в скорые периоды.
Сервис поддержки
Опытные сотрудники расположены поддержать круглосуточно. Имеются нижеследующие варианты общения:
– Интернет-чат
– Email
– Звонковая линия
– Медийные сети
Разъяснения на типовые проблемы можно получить в разделе FAQ.
Итог
Главный ресурс казино и его актуальные зеркала гарантируют геймерам совершенный доступ ко всем возможностям платформы. Значительные вознаграждения, удобная телефонная версия, колоссальный выбор игр и опытная поддержка делают гемблинг досуг крайне приятным и конфиденциальным.
Вход к ресурсу через действующие зеркала
Актуальные онлайн казино предоставляют игрокам круглосуточный вход к сервисам. Основной портал casino Lucky Bear работает надёжно, обеспечивая богатый ассортимент игровых развлечений. Тем не менее временами появляются системные проблемы или запреты, поэтому необходимо понимать о наличии действующих зеркал.
Что собой представляет из себя центральное зеркало казино
Копия — это идентичная дубликат основного портала с идентичным функционалом. Функционирующее зеркало сегодня даёт возможность избегать локальные барьеры и продолжать развлечения.
Принципиальные плюсы эксплуатации зеркал:
– Полный подключение к персональному кабинету
– Сохранение всех показателей счёта
– Идентичный набор игр
– Действующие привилегии и промо
Оформление на портале
Процедура регистрации длится немного минут. Свежие клиенты приобретают богатый приз за запись, он способен охватывать:
– Начальный игровой бонус
– Безвозмездные спины для слотов
– Уникальные промокоды
– Повышенный кешбэк
Во имя выполнения оформления нужно:
1. Перейти на центральный сайт или зеркало
2. Щёлкнуть опцию «Регистрация»
3. Внести личные сведения
4. Подтвердить почтовый адрес или мобильный
5. Активировать промокод (если есть наличии)
Подключение в индивидуальный кабинет
Вслед за корректной записи геймеры способны выполнять подключение используя основной веб-сайт или актуальное зеркало. Индивидуальный кабинет обеспечивает полный регулирование над профилем:
– Летопись игр
– Пополнение депозита
– Вывод выигрышей
– Контроль поощрениями
– Вовлечение в состязаниях
Награды и кампании казино
Ресурс удовлетворяет клиентов вариативными поощрительными предложениями:
Начальные призы
Дебютанты получают богатый букет наград на начальные депозиты. Зачастую это предполагает долевую прибавку к объёму пополнения плюс даровые спины.
Регулярные кампании
– Еженедельный возврат до 15%
– Состязания с призовыми суммами
– Подарки на день рождения
– Особые акции для статусных клиентов
План поощрения
Постоянные геймеры получают пункты, они можно трансформировать на настоящие средства или эксклюзивные привилегии.
Мобильная версия и софт
Передовые разработки обеспечивают участвовать в любом месте удобно. Мобильная редакция ресурса автоматически настраивается под размер каждого аппарата.
Плюсы смартфонного ПО:
– Моментальная открытие развлечений
– Удобный вид
– Мгновенные-оповещения о предложениях
– Возможность скачать для Android и iOS
Настоящее казино: атмосфера реального развлекательного учреждения
Область Live заведения транспортирует геймеров в антураж подлинного развлекательного заведения. Квалифицированные дилеры организуют действие в состоянии подлинного времени.
Доступные развлечения:
– Европейская рулетка
– Очко
– Классика
– Карты
Слоты и развлекательные машины
Каталог развлекательных аппаратов включает массу вариантов от передовых студий. Каждый геймер найдёт слот по нраву:
– Традиционные барабаны
– Современные автоматы с дополнительными уровнями
– Накопительный-автоматы
– Динамические игры
Турниры и розыгрыши
Систематические соревнования привносят драйв и обеспечивают шанс выиграть внушительные суммы. Присутствие в конкурсах зачастую даровое, а премиальные суммы насчитывают значительных объёмов.
Защита и конфиденциальность
Портал задействует передовые протоколы шифрования для гарантии информации пользователей. Совокупные финансовые процедуры проходят через защищённые линии.
Вывод
Центральный веб-сайт и его рабочие зеркала гарантируют устойчивый переход к первоклассным игровым сервисам. Богатые награды, практичная карманная форма, вариативность машин и квалифицированное Live-казино превращают сайт превосходным вариантом для любителей азартных развлечений.
best mexican online pharmacy: pharmacies in mexico – mexican pharmacy online
1xbet giri? g?ncel 1xbet giri? g?ncel .
Переход к платформе через актуальные зеркала
Передовые виртуальные казино предоставляют клиентам непрерывный подключение к развлечениям. Главный веб-сайт Клубника казино казино действует бесперебойно, предоставляя обширный набор азартных слотов. Но иногда формируются цифровые препятствия или ограничения, в связи с чем необходимо иметь представление о присутствии рабочих зеркал.
Что является из себя официальное зеркало казино
Альтернатива — это полная реплика центрального ресурса с идентичным набором функций. Актуальное зеркало в настоящее время помогает избегать локальные ограничения и вести гемблинг.
Основные выгоды использования зеркал:
– Абсолютный доступ к персональному кабинету
– Сохранение любых показателей счёта
– Такой же набор развлечений
– Действующие поощрения и промо
Регистрация на платформе
Механизм регистрации занимает немного минут. Начинающие клиенты приобретают щедрый поощрение за регистрацию, что в состоянии включать:
– Приветственный бонусный кредит
– Комплиментарные кручения для машин
– Особые промокоды
– Увеличенный кэшбек
С целью финализации записи необходимо:
1. Переместиться на официальный ресурс или зеркало
2. Нажать кнопку «Создать аккаунт»
3. Написать контактные реквизиты
4. Верифицировать мейл или телефон
5. Применить промокод (если есть присутствии)
Авторизация в личный кабинет
Вслед за удачной оформления пользователи имеют возможность выполнять доступ используя основной портал или действующее зеркало. Личный кабинет открывает безграничный контроль над счётом:
– Летопись ставок
– Пополнение депозита
– Снятие средств
– Контроль наградами
– Участие в турнирах
Награды и промо казино
Сайт радует игроков разнообразными поощрительными предложениями:
Стартовые поощрения
Дебютанты получают богатый комплект бонусов на первые взносы. Зачастую это охватывает пропорциональную доплату к объёму пополнения плюс комплиментарные спины.
Систематические предложения
– Седмичный компенсация до 15%
– Конкурсы с наградными суммами
– Призы на годовщину рождения
– Специальные акции для привилегированных геймеров
Программа поощрения
Деятельные геймеры получают очки, которые разрешено конвертировать на настоящие финансы или уникальные преимущества.
Смартфонная версия и софт
Современные технологии помогают развлекаться всюду подходяще. Смартфонная редакция портала самостоятельно адаптируется под монитор всякого аппарата.
Преимущества карманного программы:
– Скоростная открытие слотов
– Удобный облик
– Мгновенные-сообщения о промо
– Способность загрузить для Android и iOS
Живое казино: обстановка подлинного гемблинг клуба
Раздел Live заведения переносит клиентов в обстановку реального игорного заведения. Компетентные операторы управляют процесс в режиме актуального времени.
Имеющиеся столы:
– Рулетка
– Блэкджек
– Punto Banco
– Покер
Слоты и азартные слоты
Собрание развлекательных аппаратов включает сотни названий от ведущих производителей. Каждый клиент найдёт слот по душе:
– Стандартные барабаны
– Видеослоты с дополнительными этапами
– Крупный приз-машины
– Megaways игры
Соревнования и лотереи
Постоянные соревнования вносят адреналин и предоставляют возможность обрести внушительные призы. Участие в соревнованиях зачастую комплиментарное, а выигрышные банки достигают больших размеров.
Охрана и анонимность
Ресурс эксплуатирует современные методы защиты для охраны сведений игроков. Каждые денежные операции выполняются через охраняемые каналы.
Вывод
Официальный сайт и его функционирующие зеркала гарантируют стабильный доступ к первоклассным гемблинг услугам. Богатые награды, комфортная смартфонная версия, многообразие автоматов и квалифицированное Live-заведение делают ресурс замечательным вариантом для фанатов азартных развлечений.
Нынешние онлайн-казино предлагают клиентам разнообразный ассортимент слотов и выгодные премии. Тем не менее для беспроблемной деятельности необходимо иметь представление, как получить доступ к https://www.akebonojapanesesushi.com/kak-funktsioniruet-pay-i-chto-eto-za-sistema и его функционирующие зеркала.
Что такое лицензионный портал казино
Официальный сайт казино — это первичная платформа, где участники могут получать удовольствие от гемблинг играми. Платформа оперирует на легитимных условиях и владеет всеми требуемыми документами.
Главные достоинства основного сайта:
– Безопасность пользовательских данных
– Справедливые правила работы
– Обеспеченные выплаты
– Профессиональная помощь
Рабочее зеркало казино: для чего используется
Зеркало — это точная дубликат официального ресурса, расположенная по другому адресу. Функционирующее зеркало создается для гарантирования постоянного доступа к ресурсу.
Причины применения дублирующих ресурсов:
– Недоступность главного адреса
– Профилактические работы
– Большая активность на платформу
Как получить свежее зеркало в данный момент
Получить актуальное официальное зеркало можно множественными методами:
1. Почтовые оповещения — активируйте уведомления на новостную доставку
2. Служба поддержки — свяжитесь в онлайн-чат
3. Корпоративные каналы — отслеживайте за постами
4. Тематические ресурсы — проверенные ресурсы
Оформление профиля на платформе казино
Процесс регистрации составляет только несколько секунд:
1. Выберите на кнопку “Зарегистрироваться”
2. Укажите требуемые сведения
3. Активируйте электронную почту
4. Примените бонусный код, если имеется
По завершении оконченной оформления вам откроется разрешен индивидуальный профиль.
Премии и купоны
Щедрая бонусная программа — ключевое конкурентное преимущество казино:
Бонус за регистрацию
Первичные клиенты получают стартовый презент, который может включать:
– Финансовый депозит на начальный взнос
– Free spins для барабанов
– Стартовые деньги
Купоны
Периодически публикуются эксклюзивные промокоды, дающие возможность забрать дополнительные поощрения.
Система компенсации
Постоянные игроки приобретают порцию утраченных средств обратно.
Действующие акции и соревнования
Казино постоянно проводит увлекательные промо-мероприятия:
– Недельные баттлы
– Праздничные бонусы
– Раздачи солидных призов
– Схема VIP-клуба
Доступ в пользовательский раздел
Для входа на ресурс следует:
1. Открыть основной ресурс или действующее зеркало
2. Нажать “Вход”
3. Прописать логин и пароль
В персональном кабинете доступны данные инструменты:
– Зачисление счета
– Снятие денег
– Просмотр лога игр
– Изменение индивидуальными данными
Портативная версия и софт
Адаптивная платформа
Responsive модификация портала дает возможность развлекаться с всех мобильного девайса. Оформление самостоятельно подстраивается под размер screen.
App для download
Получить клиент можно для:
– Android — прямая скачивание с сайта
– iOS — загрузка через App Store
Выгоды приложения:
– Мгновенный запуск
– Надежная работа
– Push-уведомления об промо
– Ускоренный функционал
Развлекательные зоны
Автоматы
Разнообразная библиотека эмуляторных слотов от лучших провайдеров:
– Ретро автоматы
– Видео-автоматы
– Джекпот-автоматы
Live казино
Категория с профессиональными крупье предлагает:
– Рулеточные столы
– 21
– Мини-баккара
– Poker
Вещания ведутся в высоком качестве, обеспечивая эффект настоящего казино.
Варианты пополнения и вывода
Сайт поддерживает множественные денежные сервисы:
– Кредитные card
– Виртуальные платежи
– Crypto
– Банковские транзиты
Стартовые суммы внесения и моментальные транзакции обеспечивают процесс крайне беспроблемной.
Команда техподдержки
Компетентная группа ассистентов функционирует 24/7 и способна содействовать с различными задачами:
– Реалтайм-чат
– Email-помощь
– Голосовая линия
Итоги
Лицензионный веб-сайт казино и его функционирующие зеркала обеспечивают игрокам защищенный и захватывающий развлекательный досуг. Привлекательные подарки, функциональная адаптивная модификация, богатые игры и превосходное live-казино делают эту платформу замечательным местом для азартных игр.
1xbet turkey 1xbet-giris-38.com .
http://medbridgepharmacy.com/# MedBridge Pharmacy
1xbet t?rkiye giri? 1xbet t?rkiye giri? .
Актуальные онлайн-казино обеспечивают клиентам богатый выбор игр и щедрые бонусы. Однако для комфортной деятельности критично понимать, как обнаружить казино Рльдорадо и его функционирующие зеркала.
Что такое главный сайт казино
Лицензионный веб-сайт казино — это основная система, где участники могут получать удовольствие от азартными играми. Портал оперирует на законных правах и обладает всеми обязательными разрешениями.
Ключевые плюсы лицензионного портала:
– Защищенность личных реквизитов
– Честные положения участия
– Подтвержденные выводы
– Профессиональная поддержка
Действующее зеркало казино: для чего необходимо
Альтернативный адрес — это абсолютная копия главного ресурса, находящаяся по отличному веб-адресу. Рабочее зеркало формируется для поддержания постоянного соединения к ресурсу.
Поводы задействования дублирующих ресурсов:
– Недоступность официального URL
– Плановые операции
– Высокая активность на платформу
Как отыскать рабочее зеркало на сегодня
Узнать новое проверенное зеркало можно множественными методами:
1. Почтовые оповещения — активируйте уведомления на почтовую доставку
2. Команда support — напишите в онлайн-чат
3. Официальные сети — проверяйте за новостями
4. Партнерские ресурсы — достоверные источники
Открытие счета на сайте казино
Процедура создания аккаунта составляет всего несколько моментов:
1. Нажмите на опцию “Регистрация”
2. Заполните требуемые поля
3. Активируйте контактную ящик
4. Используйте промокод, если предоставлен
По завершении финализированной создания аккаунта вам станет доступен личный раздел.
Бонусы и коды активации
Привлекательная наградная политика — ключевое достоинство казино:
Бонус за открытие счета
Новые пользователи получают первый поощрение, который может охватывать:
– Денежный кредит на стартовый пополнение
– Free spins для автоматов
– Безвозвратные бонусы
Купоны
Систематически выходят эксклюзивные купоны, обеспечивающие забрать специальные бонусы.
Программа компенсации
Лояльные пользователи приобретают долю потраченных средств в виде компенсации.
Текущие кампании и соревнования
Казино регулярно запускает захватывающие акции:
– Еженедельные чемпионаты
– Тематические предложения
– Раздачи ценных призов
– Схема привилегий
Логин в личный кабинет
Для входа на платформу следует:
1. Перейти на главный ресурс или актуальное зеркало
2. Кликнуть “Login”
3. Ввести имя пользователя и ключ
В пользовательском разделе открыты такие возможности:
– Зачисление счета
– Вывод призов
– Изучение журнала ставок
– Настройка персональными сведениями
Адаптивная модификация и программа
Mobile модификация
Адаптивная версия ресурса дает возможность играть с различных портативного гаджета. Интерфейс автоматически подстраивается под диагональ дисплея.
Программа для загрузки
Установить клиент можно для:
– Android — прямая установка с платформы
– iOS — установка через App Store
Плюсы программы:
– Мгновенный запуск
– Стабильная функциональность
– Push-нотификации об бонусах
– Производительный функционал
Гемблинг разделы
Игровые машины
Разнообразная коллекция эмуляторных барабанов от ведущих производителей:
– Ретро игры
– Видео-слоты
– Джекпот-слоты
Live казино
Зона с живыми операторами предоставляет:
– Рулетки
– Blackjack
– Baccarat
– Покер
Трансляции проводятся в отличном качестве, создавая впечатление аутентичного казино.
Методы пополнения и снятия
Сайт поддерживает разные платежные инструменты:
– Банковские картсчета
– Виртуальные системы
– Bitcoin/Ethereum
– Прямые переводы
Базовые значения внесения и скоростные выводы создают развлечение крайне удобной.
Служба support
Профессиональная группа помощи работает 24/7 и готова ассистировать с разными проблемами:
– Живой-чат
– Email-помощь
– Телефонная служба
Выводы
Официальный портал казино и его актуальные копии гарантируют пользователям безопасный и захватывающий азартный отдых. Щедрые награды, функциональная портативная модификация, богатые слоты и качественное live-казино создают эту ресурс превосходным выбором для развлекательных игр.
MedBridge Pharmacy: discount pharmacy – MedBridge Pharmacy
Нынешние онлайн-казино обеспечивают геймерам разнообразный ассортимент опций для беспроблемной досуга. Доступ к ресурсу http://www.ashtonmarinerphotography.com/2026/03/01/kak-bezopasno-popast-na-sayt-kazino-zerkalo-v-kazakhstane-i-izbezhat-moshennicheskikh-resursov производится через официальный портал или действующее зеркало.
Что такое рабочее зеркало казино
Действующее зеркало — это альтернативный URL основного ресурса казино. Такие версии разрабатываются для гарантирования непрерывного подключения к азартной сервису.
Альтернатива на сегодня полностью повторяет возможности базового сайта. Клиенты приобретают аналогичный выход ко всем возможностям, включая оформление профиля, зачисление средств депозита и вывод средств.
Создание аккаунта на основном сайте
Механизм открытия профиля требует всего считанные мгновений. Будущим игрокам следует:
1. Перейти на официальный домен или текущее настоящее зеркало
2. Выбрать кнопку “Регистрация”
3. Внести требуемые реквизиты
4. Подтвердить e-mail почту
5. Применить купон при доступности
После финализации оформления игрок приобретает приз за регистрацию, который может предполагать бесплатные вращения или денежное премию.
Вход в индивидуальный кабинет
Индивидуальный кабинет — это защищенная территория, где пользователи могут администрировать своим аккаунтом. Для входа следует ввести имя пользователя и password.
В личном кабинете доступны данные функции:
– Отслеживание истории операций
– Применение промокодов
– Настройка бонусами
– Участие в турнирах
– Контроль кэшбека
– Корректировка учетной записи
Призы и промо
Азартная площадка предоставляет выгодные призы:
Стартовый бонус — новые игроки обретают значительное начисление на начальные взносы.
Бесплатные вращения — начисляются как при открытии счета, так и в контексте различных мероприятий.
Кэшбэк — систематический возмещение части утраченных финансов.
Купоны — уникальные коды, предоставляющие доступ к уникальным предложениям.
Характеристика гемблинговых направлений
Slots
Ассортимент автоматов насчитывает массу игр от ведущих разработчиков. Игроки обнаружат как обычные машины, так и новые 3D-слоты с интересной графикой.
Live казино
Секция Live казино предлагает право играть с настоящими дилерами в условиях настоящего времени. Представлены популярные игры: рулетка, блэкджек, баккара, покер.
Турниры
Регулярные состязания с солидными премиальными пулами привлекают сотни игроков. Чемпионы зарабатывают денежные вознаграждения и уникальные поощрения.
Смартфонная версия и софт
Портативная версия портала обеспечивает наслаждаться с каждого аппарата. Интерфейс независимо подстраивается под формат экрана.
Скачать app можно для девайсов на Android и iOS. Телефонное ПО характеризуется всеми опциями полной версии.
Как обнаружить рабочее зеркало на текущий день
Актуальные ссылки зеркал постоянно обновляются. Обнаружить актуальную URL можно различными способами:
– Через отдел саппорта
– В официальных новостных сетях
– По email рассылке
– На аффилиатных площадках
Надежность и легальность
Главный портал работает на базе глобальной сертификата. Все транзакции защищены передовыми протоколами защиты.
Анонимность личных сведений сохраняется в стопроцентном формате.
Итог
Официальный сайт и его актуальные копии дарят клиентам постоянный путь к превосходным игровым развлечениям. Великодушные бонусы, различные автоматы, профессиональная сервис — все это превращает игровой досуг чрезвычайно удобным и увлекательным.
It’s more about categorization than guessing — a shift from Wordle’s pattern.
Подключение к ресурсу и функционирующие адреса
Популярные виртуальные казино гарантируют клиентам большой спектр опций. Главный веб-сайт Gonzo гарантирует надежный доступ ко всем услугам. Впрочем порой случаются обстоятельства, когда требуется дополнительный метод доступа.
Что являет собой собой функционирующее зеркало
Рабочее зеркало — это полная реплика главного портала с альтернативным сетевым адресом. Зеркало сегодня обеспечивает преодолевать существующие запреты и сохранять постоянный подключение к предпочитаемым автоматам.
Легальное зеркало содержит теми же функциями, что и основной портал:
– Весь перечень развлечений
– Личный кабинет с записанными информацией
– Действующие поощрения и акции
– Защищенные денежные транзакции
Открытие профиля и доступ в систему
Процедура оформления на портале требует буквально мгновений. Свежим участникам следует:
1. Перейти на действующее зеркало на данный момент
2. Щелкнуть кнопку «Зарегистрироваться»
3. Указать требуемые данные
4. Проверить почтовую почту или данные смартфона
5. Забрать бонус за создание профиля
Вход в собственный аккаунт осуществляется через предоставление имени пользователя и ключа.
Описание наградной политики
Выгодная бонусная структура — главное козырь игорного заведения. Игроки зарабатывают всевозможные награды:
Приветственные подарки
Свежие пользователи могут рассчитывать на значительный поощрение за регистрацию. Обычно это набор опций, охватывающий:
– Долевую прибавку к начальному депозиту
– Даровые фриспины
– Extra средства на баланс
Кодовые комбинации и уникальные возможности
Периодические промокоды помогают зарабатывать экстра льготы. Активировать их разрешено в отдельном поле индивидуального кабинета.
Спины и кешбэк
Бесплатные спины — это способность играть автоматы без применения своих финансов. Рибейт предполагает процентный возврат израсходованных денег.
Ассортимент развлечений
Игровая платформа предлагает впечатляющую базу автоматов.
Игровые машины
Вариативность аппаратов удивляет ожидания. Есть традиционные трехбарабанные аппараты и современные развлечения с захватывающей анимацией.
Live зал
Категория Live казино помещает пользователей в среду реального игорного клуба. Опытные операторы проводят раунды в живом формате.
Состязания и лидерборды
Регулярные турниры добавляют остроты и дают перспективу получить крупные суммы.
Мобильная версия и клиент
Продвинутые решения дают возможность наслаждаться в любом точке. Портативная форма независимо настраивается под экран девайса.
Установить приложение допустимо для операционных систем iOS и Android. Клиент дает:
– Скоростной переход
– Устойчивую работу
– Мгновенные-уведомления об акциях
– Комфортный облик
Финансовые процедуры
Казино работает с разнообразные способы ввода и получения сумм:
– Кредитные системы
– Цифровые кошельки
– Токены
– Финансовые транзакции
Каждые транзакции проходят через безопасное канал, что обеспечивает безопасность личных информации.
Сервис ассистанса
Квалифицированная группа помощи действует постоянно. Соединиться с операторами допустимо через:
– Живой-чат
– E-mail почту
– Телефон
– Общественные каналы
Выводы
Официальный сайт и его актуальное зеркало обеспечивают игрокам безопасный и легкий переход к азартным забавам. Богатые поощрения, разнообразный спектр игр и высокая помощь формируют участие предельно интересной и выгодной.
Подключение к порталу через проверенные зеркала
Передовые онлайн казино гарантируют геймерам непрерывный доступ к играм. Основной ресурс Бублик казино работает стабильно, предоставляя широкий спектр гемблинг автоматов. Тем не менее временами возникают технические сложности или ограничения, следовательно существенно иметь представление о присутствии рабочих зеркал.
Что собой представляет собой основное зеркало казино
Зеркало — это абсолютная версия центрального портала с схожим функционалом. Функционирующее зеркало в настоящее время позволяет обходить локальные барьеры и продолжать времяпрепровождение.
Главные достоинства использования зеркал:
– Полный переход к индивидуальному кабинету
– Поддержание всех показателей счёта
– Аналогичный перечень развлечений
– Свежие поощрения и кампании
Создание аккаунта на сайте
Операция записи отнимает немного минут. Свежие клиенты зарабатывают богатый поощрение за запись, он в состоянии вмещать:
– Приветственный денежный приз
– Безвозмездные спины для игр
– Особые коды
– Расширенный кешбэк
Во имя завершения регистрации нужно:
1. Войти на центральный сайт или зеркало
2. Нажать опцию «Создать аккаунт»
3. Написать индивидуальные сведения
4. Верифицировать мейл или номер
5. Использовать промокод (когда имеется присутствии)
Подключение в собственный кабинет
Вслед за правильной регистрации клиенты могут осуществлять авторизацию используя центральный портал или актуальное зеркало. Собственный кабинет даёт безграничный регулирование над счётом:
– Архив транзакций
– Ввод счёта
– Вывод призов
– Управление привилегиями
– Участие в состязаниях
Награды и кампании казино
Портал удовлетворяет пользователей вариативными наградными предложениями:
Приветственные поощрения
Новички приобретают щедрый комплект наград на вступительные взносы. Зачастую это содержит частичную добавку к величине пополнения плюс даровые кручения.
Регулярные кампании
– Раз в неделю кешбэк до 15%
– Конкурсы с наградными фондами
– Бонусы на число рождения
– Специальные промо для привилегированных пользователей
Система верности
Постоянные игроки получают пункты, что допустимо трансформировать на действительные деньги или эксклюзивные привилегии.
Карманная форма и утилита
Современные разработки обеспечивают геймить где подходяще. Карманная вариант ресурса независимо настраивается под размер произвольного устройства.
Выгоды мобильного софта:
– Моментальная подгрузка автоматов
– Эргономичный облик
– Мгновенные-нотификации о бонусах
– Возможность загрузить для Android и iOS
Live казино: среда истинного развлекательного учреждения
Категория Live казино доставляет пользователей в антураж реального развлекательного дома. Квалифицированные дилеры ведут действие в виде настоящего времени.
Представленные варианты:
– Американская рулетка
– Очко
– Баккара
– Покерная игра
Барабаны и развлекательные автоматы
Ассортимент развлекательных автоматов насчитывает массу названий от ведущих студий. Всякий клиент найдёт автомат по душе:
– Традиционные барабаны
– Современные автоматы с специальными этапами
– Накопительный-слоты
– Megaways игры
Турниры и розыгрыши
Постоянные соревнования вносят остроту и предоставляют способность выиграть внушительные суммы. Участие в состязаниях часто бесплатное, а премиальные банки насчитывают внушительных величин.
Безопасность и конфиденциальность
Ресурс эксплуатирует инновационные технологии шифрования для обеспечения сведений пользователей. Совокупные транзакционные действия проходят через защищённые каналы.
Итог
Главный портал и его актуальные зеркала предоставляют надёжный подключение к первоклассным развлекательным сервисам. Привлекательные бонусы, удобная мобильная редакция, вариативность игр и квалифицированное Live-заведение формируют платформу замечательным решением для фанатов развлекательных игр.
Сайт міста Одеса https://faine-misto.od.ua новини, події, афіша, довідник компаній та корисна інформація. Дізнавайтесь актуальні новини, знаходьте послуги, заклади і маршрути. Все про життя Одеси для мешканців і гостей міста в одному місці.
Сайт міста Вінниця https://faine-misto.vinnica.ua новини, події, довідник компаній і корисна інформація для жителів та гостей. Актуальні новини, афіша, транспорт, послуги і все про життя міста в одному зручному онлайн-порталі.
An online numerology http://www.numerologiya.com.az/ profile analyzes your destiny, talents, and finances. Accurate calculations, number interpretation, and personalized recommendations will help you better understand yourself and choose the right direction in life.
Жіночий сайт https://zhinka.in.ua поради про красу, здоров’я, стосунки та стиль життя. Читайте корисні статті, лайфхаки, рецепти догляду та натхнення для сучасних жінок. Все про жіночу гармонію, саморозвиток і комфорт у повсякденному житті.
PineStone Finds – Browsing here feels smooth and everything is easy to find.
1x lite 1xbet-giris-42.com .
Эта познавательная публикация погружает вас в море интересного контента, который быстро захватит ваше внимание. Мы рассмотрим важные аспекты темы и предоставим вам уникальныеInsights и полезные сведения для дальнейшего изучения.
Изучить вопрос глубже – https://vivod-iz-zapoya-2.ru/
I recently checked out this casino https://allacestech.com/blaze-spins-gaming-hub-the-place-where-elite/ and was impressed by how stable everything felt. The games run fast, bonuses are clear, and navigation is user-friendly, making the experience comfortable.
Подключение к порталу через проверенные зеркала
Современные сетевые казино обеспечивают пользователям непрерывный переход к услугам. Официальный сайт казино Enomo казино функционирует устойчиво, предлагая обширный выбор развлекательных слотов. Однако иногда возникают программные проблемы или блокировки, потому существенно понимать о существовании действующих зеркал.
Что означает из себя основное зеркало казино
Альтернатива — это идентичная копия центрального сайта с идентичным набором функций. Действующее зеркало в настоящее время обеспечивает преодолевать территориальные запреты и продолжать развлечения.
Принципиальные достоинства эксплуатации зеркал:
– Абсолютный доступ к индивидуальному кабинету
– Сохранение любых данных профиля
– Идентичный спектр развлечений
– Текущие вознаграждения и акции
Оформление на портале
Механизм регистрации отнимает немного минут. Новые клиенты обретают великодушный подарок за оформление, он в состоянии охватывать:
– Начальный финансовый бонус
– Комплиментарные кручения для машин
– Эксклюзивные ваучеры
– Увеличенный компенсацию
Ради выполнения записи необходимо:
1. Зайти на центральный веб-сайт или копию
2. Нажать опцию «Зарегистрироваться»
3. Указать контактные данные
4. Активировать мейл или мобильный
5. Применить ваучер (если есть присутствии)
Доступ в индивидуальный кабинет
Следом за правильной регистрации геймеры в состоянии совершать подключение используя главный сайт или действующее зеркало. Собственный кабинет открывает безграничный регулирование над счётом:
– История игр
– Внесение депозита
– Снятие денег
– Регулирование привилегиями
– Участие в конкурсах
Бонусы и кампании казино
Платформа удовлетворяет пользователей многочисленными бонусными предложениями:
Стартовые бонусы
Новички обретают великодушный букет наград на стартовые взносы. Как правило это содержит долевую добавку к размеру пополнения плюс даровые спины.
Систематические кампании
– Каждонедельный возврат до 15%
– Соревнования с наградными фондами
– Поощрения на число рождения
– Особые промо для статусных геймеров
Программа верности
Постоянные геймеры собирают единицы, они можно превратить на настоящие деньги или эксклюзивные привилегии.
Смартфонная версия и софт
Передовые решения позволяют развлекаться всюду комфортно. Карманная вариант ресурса автоматически настраивается под экран каждого аппарата.
Достоинства смартфонного приложения:
– Быстрая подгрузка игр
– Удобный интерфейс
– Мгновенные-нотификации о бонусах
– Опция инсталлировать для Android и iOS
Live казино: антураж настоящего игорного заведения
Область Live казино доставляет игроков в обстановку настоящего гемблинг дома. Квалифицированные ведущие организуют игру в виде актуального времени.
Предлагаемые варианты:
– Американская рулетка
– Карточная игра
– Карточная игра
– Карты
Слоты и развлекательные аппараты
Каталог азартных автоматов насчитывает тысячи позиций от передовых студий. Всякий пользователь подберёт слот по нраву:
– Стандартные барабаны
– Инновационные игры с специальными уровнями
– Крупный приз-слоты
– Динамические слоты
Соревнования и акции
Регулярные состязания вносят остроту и открывают способность выиграть крупные суммы. Присутствие в турнирах часто безвозмездное, а призовые пулы достигают значительных объёмов.
Защита и конфиденциальность
Портал задействует передовые технологии защиты для гарантии сведений геймеров. Любые транзакционные операции выполняются через охраняемые каналы.
Вывод
Центральный портал и его функционирующие зеркала гарантируют устойчивый вход к качественным гемблинг услугам. Великодушные награды, эргономичная карманная форма, богатство слотов и профессиональное Live-клуб превращают ресурс превосходным решением для поклонников игровых развлечений.
Доступ к ресурсу через актуальные зеркала
Клиенты интернет казино постоянно имеют дело с проблемой закрытия основного портала. Конкретно для ликвидации этой задачи разработаны копии главного домена. казино казино Minicas обеспечивает полный подключение ко всем опциям площадки.
Что такое рабочее зеркало казино
Дубликат представляет собой точную версию главного портала с аналогичным набором функций. Основное несовпадение — это иное имя. Все сведения клиента, вместе с депозит, привилегии и архив ставок, остаются прежними.
Достоинства эксплуатации зеркал
Рабочие зеркала располагают комплексом существенных достоинств:
– Непрерывный доступ к выбранным развлечениям
– Совершенная защита индивидуальных сведений
– Сохранение всех опций индивидуального кабинета
– Возможность приобретения наград и включения в кампаниях
Создание аккаунта на легальном портале
Операция открытия счета предельно элементарен и занимает пару минут. Начинающие пользователи в состоянии надеяться на крупный стартовый бонус за оформление.
Ступени создания аккаунта
1. Подключение на основной портал или его копию
2. Нажатие на опцию “Создать аккаунт”
3. Указание нужных данных
4. Верификация email почты
5. Ввод купона (если есть)
Бонусы и промоакции для участников
Платформа балует своих клиентов многочисленными наградными программами.
Базовые виды поощрений
Начальный пакет — щедрое вознаграждение для свежих игроков, каковое имеет возможность охватывать финансовые бонусы и бесплатные вращения.
Фриспины — опция крутить в топовых автоматах без затрат.
Кешбэк — пропорциональный отдача проигранных финансов, который начисляется еженедельно или помесячно.
Бонусные коды — уникальные последовательности, дающие бонусные преимущества.
Персональный кабинет: опции и настройки
Индивидуальный профиль обеспечивает совершенный регулирование над пользовательским активностью. Здесь доступны:
– Контроль средствами
– История операций
– Действующие бонусы
– Параметры охраны
– Подтверждение учетной записи
Смартфонная платформа и программа
Актуальные участники оценивают портативность. Платформа обеспечивает пару варианта для развлечений с карманных аппаратов.
Responsive мобильная вариант
Адаптивная версия ресурса самостоятельно настраивается под монитор любого устройства. Нет необходимости инсталлировать отдельное программное обеспечение.
Софт для мобильных
Можно скачать официальное программу для iOS и Android. Программа предоставляет:
– Моментальный вход
– Улучшенный внешний вид
– Мобильные-сообщения о предложениях
– Устойчивую работу
Live раздел: атмосфера реального клуба
Зона Live игр транспортирует участников в атмосферу настоящего зала. Квалифицированные крупье ведут раунды в варианте настоящего времени.
Востребованные Live-игры
– Европейская рулетка
– Двадцать одно
– Punto Banco
– Покер
Аппараты: выбор слотов
Коллекция игровых слотов вмещает сотни наименований от известных разработчиков. Клиенты откроют:
– Стандартные аппараты
– Современные слоты
– Джекпот-слоты
– Слоты с множественными линиями
Состязания и уникальные события
Систематические конкурсы позволяют пользователям бороться друг с другом за внушительные призовые суммы. Каждый конкурс располагает свои условия присутствия и доску призеров.
Варианты пополнения и вывода денег
Ресурс поддерживает множество финансовых инструментов:
– Банковские карты
– Электронные сервисы
– Blockchain-платежи
– Прямые переводы
Все операции проходят защищенно благодаря передовым системам кодирования.
Отдел обслуживания
Опытные консультанты службы обслуживания способны помочь 24/7. Работают следующие методы контакта:
– Живой-чат
– Email-поддержка
– Телефонная горячая линия
– Социальные сети
Итог
Легальный портал игровой площадки и его действующие зеркала гарантируют пользователям безопасный и приятный подход к обширному выбору игровых игр. Солидные поощрения, регулярные акции, качественная поддержка и удобные платежные системы превращают развлекательный опыт крайне увлекательным и результативным.
For solutions
usda loan application
for the final word.
Переход к платформе через рабочие зеркала
Пользователи интернет казино нередко сталкиваются с ситуацией ограничения основного домена. Именно для преодоления этой ситуации разработаны альтернативные адреса легального домена. http://fastbit.cat/v-2026-godu-dostupna-registratsiya-koshelka-pay-a-takzhe-ego-obzor-i-otzyvy/ предоставляет беспрепятственный вход ко всем возможностям площадки.
Что такое действующее зеркало казино
Дубликат значит собой точную реплику главного сайта с таким же функционалом. Ключевое расхождение — это другое имя. Все сведения игрока, вместе с средства, награды и данные раундов, остаются неизменными.
Преимущества задействования зеркал
Действующие зеркала характеризуются набором значимых плюсов:
– Непрерывный переход к выбранным развлечениям
– Стопроцентная сохранность персональных данных
– Неизменность всех настроек пользовательского кабинета
– Шанс взятия наград и включения в промоакциях
Создание аккаунта на главном портале
Ход создания аккаунта максимально прост и отнимает буквально минут. Недавние пользователи имеют возможность надеяться на солидный начальный поощрение за оформление.
Ступени оформления аккаунта
1. Вход на главный ресурс или его дубликат
2. Нажатие на опцию “Создать аккаунт”
3. Заполнение необходимых сведений
4. Подтверждение почтовой почты
5. Указание кода (если присутствует)
Подарки и акции для клиентов
Платформа балует своих участников всевозможными призовыми акциями.
Базовые типы поощрений
Вводный подарок — крупное начисление для недавних пользователей, которое именно способно охватывать монетарные бонусы и free spins.
Бесплатные вращения — возможность использовать в известных автоматах даром.
Кешбэк — частичный возмещение утраченных денег, каковой выплачивается раз в неделю или каждый месяц.
Специальные коды — эксклюзивные сочетания, гарантирующие дополнительные поощрения.
Личный кабинет: возможности и параметры
Персональный раздел дает абсолютный контроль над пользовательским активностью. В нем доступны:
– Регулирование счетом
– История операций
– Действующие поощрения
– Конфигурации сохранности
– Проверка профиля
Карманная вариант и приложение
Современные участники оценивают гибкость. Ресурс предлагает двойной пути для развлечений с портативных аппаратов.
Отзывчивая портативная редакция
Мобильная версия домена автоматически приспосабливается под монитор любого аппарата. Нет необходимости скачивать отдельное приложение.
Софт для смартфонов
Доступно загрузить оригинальное APP для iOS и Android. Программа обеспечивает:
– Скорый запуск
– Оптимизированный дизайн
– Оперативные-оповещения о предложениях
– Надежную функциональность
Live игры: антураж настоящего клуба
Раздел Live столов отправляет участников в антураж реального клуба. Опытные ведущие осуществляют раунды в формате настоящего времени.
Популярные Live-развлечения
– Американская рулетка
– Blackjack
– Баккарат
– Карибский покер
Игровые машины: разнообразие автоматов
Собрание игровых слотов включает тысячи наименований от топовых производителей. Участники найдут:
– Обычные машины
– Видеослоты
– Накопительный приз-игры
– Megaways
Состязания и эксклюзивные предложения
Систематические конкурсы обеспечивают участникам конкурировать друг с другом за внушительные призовые банки. Всякий соревнование располагает свои правила включения и таблицу чемпионов.
Способы ввода и получения финансов
Платформа поддерживает комплекс платежных методов:
– Дебетовые карты
– Виртуальные счета
– Крипто
– Банковские транзиты
Каждые платежи выполняются безопасно благодаря современным протоколам криптографии.
Отдел помощи
Квалифицированные консультанты команды помощи способны содействовать 24/7. Работают такие методы контакта:
– Онлайн-чат
– Email-помощь
– Аудио связь
– Социальные сети
Вывод
Основной сайт клуба и его действующие копии гарантируют участникам безопасный и удобный доступ к обширному спектру геймерских игр. Крупные бонусы, регулярные промоакции, квалифицированная помощь и легкие денежные методы превращают игровой досуг крайне комфортным и прибыльным.
Вход к ресурсу через проверенные зеркала
Нынешние виртуальные казино предоставляют игрокам бесперебойный подключение к сервисам. Центральный ресурс Eldorado функционирует бесперебойно, гарантируя широкий спектр игровых автоматов. Впрочем порой возникают системные проблемы или ограничения, поэтому критично знать о присутствии функционирующих зеркал.
Что является собой официальное зеркало казино
Зеркало — это абсолютная копия центрального ресурса с таким же возможностями. Действующее зеркало сейчас обеспечивает обходить территориальные ограничения и поддерживать развлечения.
Ключевые преимущества эксплуатации зеркал:
– Абсолютный подключение к собственному кабинету
– Удержание каждых данных учётной записи
– Такой же спектр слотов
– Текущие вознаграждения и кампании
Создание аккаунта на сайте
Операция создания аккаунта отнимает пару минут. Свежие клиенты приобретают щедрый поощрение за оформление, который может включать:
– Начальный бонусный кредит
– Бесплатные кручения для игр
– Уникальные коды
– Усиленный возврат
Во имя выполнения записи следует:
1. Перейти на официальный веб-сайт или зеркало
2. Нажать кнопку «Оформиться»
3. Ввести контактные данные
4. Активировать электронную почту или мобильный
5. Задействовать ваучер (при наличии)
Доступ в личный кабинет
После корректной создания аккаунта игроки могут осуществлять авторизацию через центральный сайт или рабочее зеркало. Личный кабинет обеспечивает безграничный регулирование над профилем:
– Архив транзакций
– Ввод депозита
– Снятие выигрышей
– Управление бонусами
– Присутствие в соревнованиях
Поощрения и промо казино
Платформа радует клиентов многочисленными наградными программами:
Стартовые бонусы
Новички обретают щедрый пакет наград на начальные пополнения. Зачастую это содержит долевую добавку к объёму вклада плюс бесплатные спины.
Периодические предложения
– Раз в неделю компенсация до 15%
– Состязания с наградными суммами
– Бонусы на дату рождения
– Особые предложения для привилегированных геймеров
Система поощрения
Регулярные геймеры собирают пункты, которые можно трансформировать на реальные деньги или уникальные преимущества.
Смартфонная форма и программа
Современные технологии обеспечивают участвовать в любом месте угодно. Портативная вариант сайта автономно настраивается под экран каждого девайса.
Выгоды смартфонного ПО:
– Моментальная загрузка игр
– Комфортный интерфейс
– Push-нотификации о бонусах
– Способность скачать для Android и iOS
Живое казино: обстановка реального азартного дома
Секция Live казино доставляет геймеров в антураж реального развлекательного заведения. Квалифицированные дилеры управляют игру в режиме реального времени.
Имеющиеся развлечения:
– Колесо фортуны
– Блэкджек
– Классика
– Покерная игра
Слоты и игровые аппараты
Коллекция игровых слотов охватывает тысячи позиций от топовых провайдеров. Любой игрок отыщет развлечение по нраву:
– Стандартные машины
– Инновационные игры с бонусными уровнями
– Прогрессивный-игры
– Мегавейс игры
Турниры и лотереи
Регулярные соревнования привносят остроту и обеспечивают способность заработать крупные суммы. Вовлечение в состязаниях зачастую бесплатное, а наградные пулы достигают крупных объёмов.
Защита и приватность
Ресурс использует передовые методы кодирования для обеспечения сведений геймеров. Все финансовые операции проходят через защищённые протоколы.
Резюме
Официальный ресурс и его актуальные зеркала обеспечивают устойчивый переход к первоклассным гемблинг играм. Привлекательные поощрения, практичная карманная редакция, многообразие игр и компетентное Live-заведение делают ресурс превосходным решением для любителей азартных развлечений.
MedicoBridge RX MedicoBridge RX MedicoBridge RX
MedBridge Pharmacy: online pharmacy delivery – MedBridge Pharmacy
Вход к сайту через действующие зеркала
Участники сетевых казино регулярно встречаются с трудностью недоступности официального домена. Как раз для решения этой трудности существуют альтернативные адреса официального портала. Leebet casino дает беспрепятственный вход ко всем функциям казино.
Что такое рабочее зеркало казино
Альтернативный адрес значит собой полную реплику официального сайта с идентичным возможностями. Единственное расхождение — это доменное имя. Абсолютно все данные пользователя, вместе с депозит, привилегии и историю игр, сохраняются такими же.
Преимущества эксплуатации зеркал
Действующие зеркала располагают комплексом существенных достоинств:
– Непрерывный переход к выбранным слотам
– Полная безопасность персональных информации
– Неизменность всех конфигураций личного кабинета
– Возможность приобретения поощрений и участия в кампаниях
Открытие счета на официальном сайте
Операция оформления максимально элементарен и занимает несколько минут. Новые участники могут рассчитывать на крупный стартовый приз за открытие счета.
Стадии формирования аккаунта
1. Подключение на основной ресурс или его альтернативу
2. Нажатие на клавишу “Присоединиться”
3. Внесение нужных сведений
4. Подтверждение электронной почты
5. Применение бонусного кода (если есть)
Награды и промоакции для пользователей
Ресурс балует своих игроков различными поощрительными системами.
Основные варианты наград
Вводный подарок — крупное поощрение для начинающих клиентов, которое именно имеет возможность вмещать денежные суммы и фриспины.
Безвозмездные спины — опция играть в популярных автоматах без затрат.
Кешбэк — пропорциональный компенсация израсходованных средств, что зачисляется каждую неделю или помесячно.
Промокоды — особые комбинации, обеспечивающие дополнительные поощрения.
Пользовательский кабинет: возможности и параметры
Индивидуальный профиль гарантирует совершенный управление над пользовательским процессом. В данном разделе присутствуют:
– Администрирование счетом
– Данные переводов
– Текущие награды
– Конфигурации безопасности
– Верификация счета
Смартфонная редакция и софт
Современные игроки оценивают мобильность. Платформа дает два метода для развлечений с мобильных аппаратов.
Адаптивная мобильная редакция
Адаптивная редакция домена автономно приспосабливается под разрешение любого гаджета. Не требуется устанавливать дополнительное приложение.
Софт для гаджетов
Возможно скачать специальное приложение для iOS и Android. APP гарантирует:
– Мгновенный доступ
– Доработанный внешний вид
– Оперативные-уведомления о предложениях
– Надежную производительность
Live казино: среда реального казино
Зона Live столов отправляет игроков в обстановку истинного клуба. Опытные хосты организуют сессии в варианте прямого времени.
Топовые Live-форматы
– Рулетка
– Blackjack
– Baccarat
– Poker
Автоматы: выбор автоматов
Собрание слотовых аппаратов содержит массу вариантов от известных поставщиков. Игроки найдут:
– Стандартные автоматы
– Современные слоты
– Джекпот-автоматы
– Слоты с множественными линиями
Соревнования и особые предложения
Периодические состязания предоставляют шанс клиентам состязаться друг с другом за внушительные призовые фонды. Каждый конкурс располагает свои условия вовлечения и таблицу победителей.
Способы зачисления и изъятия средств
Площадка использует множество финансовых методов:
– Дебетовые средства
– Электронные сервисы
– Цифровые валюты
– Банковские транзиты
Каждые транзакции выполняются защищенно благодаря современным методам криптографии.
Сервис support
Опытные специалисты сервиса support готовы помочь 24/7. Имеются следующие пути общения:
– Онлайн-чат
– Email-обслуживание
– Телефонная горячая линия
– Социальные сети
Итог
Официальный домен казино и его актуальные альтернативы дают пользователям защищенный и комфортный вход к большому спектру азартных игр. Солидные поощрения, регулярные кампании, профессиональная поддержка и легкие финансовые инструменты формируют геймерский опыт крайне захватывающим и прибыльным.
Доступ к платформе через действующие зеркала
Участники онлайн казино регулярно контактируют с проблемой недоступности базового домена. Собственно для ликвидации этой задачи предусмотрены копии главного ресурса. казино Panda обеспечивает абсолютный вход ко всем опциям казино.
Что такое рабочее зеркало казино
Дубликат значит собой точную копию оригинального веб-сайта с похожим опциями. Главное расхождение — это доменное имя. Все информация пользователя, включая депозит, награды и историю игр, продолжают быть идентичными.
Преимущества эксплуатации зеркал
Функционирующие зеркала имеют набором ключевых достоинств:
– Бесперебойный подключение к выбранным развлечениям
– Абсолютная защита собственных сведений
– Неизменность всех конфигураций пользовательского кабинета
– Возможность приобретения наград и включения в кампаниях
Создание аккаунта на основном домене
Процедура оформления предельно несложен и длится несколько минут. Новые участники могут претендовать на внушительный начальный подарок за открытие счета.
Ступени формирования аккаунта
1. Вход на главный портал или его альтернативу
2. Активация на клавишу “Присоединиться”
3. Внесение необходимых параметров
4. Подтверждение цифровой почты
5. Внесение купона (если имеется)
Бонусы и предложения для игроков
Ресурс балует своих пользователей многочисленными призовыми акциями.
Базовые виды поощрений
Вводный бонус — солидное вознаграждение для начинающих пользователей, которое может охватывать денежные призы и фриспины.
Free spins — возможность использовать в востребованных аппаратах бесплатно.
Компенсация — долевой отдача израсходованных сумм, каковой выплачивается раз в неделю или раз в месяц.
Специальные коды — специальные сочетания, дающие добавочные поощрения.
Пользовательский кабинет: возможности и установки
Персональный профиль дает исчерпывающий контроль над пользовательским опытом. В нем предусмотрены:
– Администрирование счетом
– Данные переводов
– Работающие бонусы
– Конфигурации безопасности
– Валидация аккаунта
Мобильная редакция и софт
Нынешние клиенты предпочитают доступность. Ресурс предоставляет 2 способа для игры с смартфонных девайсов.
Responsive смартфонная вариант
Смартфонная вариант сайта самостоятельно адаптируется под монитор любого девайса. Не требуется скачивать особое софт.
Приложение для смартфонов
Возможно установить оригинальное APP для iOS и Android. Приложение дает:
– Моментальный вход
– Доработанный дизайн
– Мобильные-уведомления о акциях
– Надежную функциональность
Live раздел: атмосфера настоящего игорного заведения
Зона Live развлечений доставляет участников в антураж настоящего казино. Опытные дилеры организуют сессии в формате реального времени.
Топовые Live-столы
– Рулетка
– Блэкджек
– Баккарат
– Poker
Автоматы: ассортимент автоматов
Каталог слотовых автоматов содержит сотни позиций от известных провайдеров. Игроки обнаружат:
– Стандартные слоты
– Видео-автоматы
– Джекпот-машины
– Мегавейс
Турниры и уникальные события
Постоянные соревнования предоставляют шанс игрокам соревноваться друг с другом за крупные денежные суммы. Каждый турнир обладает свои требования участия и рейтинг победителей.
Пути ввода и вывода финансов
Ресурс предоставляет массу финансовых методов:
– Дебетовые средства
– Онлайн счета
– Цифровые валюты
– Банковские переводы
Каждые платежи осуществляются безопасно благодаря актуальным протоколам кодирования.
Сервис поддержки
Компетентные специалисты службы поддержки способны содействовать 24/7. Предусмотрены следующие методы связи:
– Онлайн-чат
– Email-обслуживание
– Звонковая связь
– Коммуникационные сети
Заключение
Официальный ресурс казино и его актуальные альтернативы дают клиентам надежный и удобный подход к широкому диапазону игровых услуг. Крупные награды, частые акции, компетентная служба и удобные денежные системы делают геймерский досуг крайне комфортным и результативным.
Hi, I log on to your new stuff regularly. Your humoristic style is awesome,
keep it up!
1xbet giri? adresi 1xbet giri? adresi .
walmart online pharmacy https://joeasymeds.top/# cvs pharmacy online
Обзор главного ресурса
Передовое онлайн-казино предлагает своим участникам широкий ассортимент игр и вознаграждений. Официальный портал Daddy работает 24/7, давая возможность к топовым симуляторам, live-казино и многочисленным кампаниям.
Функционирующее зеркало: вход к порталу
Что такое альтернатива казино
Зеркало составляет собой полную версию официального ресурса с альтернативным сетевым путем. Актуальное зеркало позволяет клиентам избегать ограничения и получать непрерывный вход к выбранным развлечениям.
Как обнаружить рабочее зеркало сегодня
Действующие линки на главное зеркало выкладываются через:
– Электронную подписку
– Проверенные медийные сети
– Команду поддержки
– Специализированные сайты
Открытиесчета на платформе
Процесс открытиясчета
Регистрация занимает буквально минут и содержит данные действия:
1. Переход на официальный ресурс или функционирующее зеркало
2. Нажатие кнопки “Зарегистрироваться”
3. Ввод личных сведений
4. Верификация электроннойпочты или номера
5. Установка кодадоступа
Вознаграждение за созданиеаккаунта
Свежие клиенты приобретают выгодные стартовые подарки:
– Игровые средства на счет
– Фриспины для симуляторов
– Повышенный объем возврата
– Особые купоны
Доступ в собственный профиль
Зарегистрированные пользователи имеютвозможность произвести авторизацию через оригинальный ресурс или действующее зеркало. Для этого следует указать учетноеимя и код, установленные при созданииаккаунта.
Опции индивидуального кабинета
В индивидуальном аккаунте предоставлены данные инструменты:
– Изменение учетными данными
– Зачисление баланса
– Получение призов
– Активация кодов
– Мониторинг статистики транзакций
– Вступление в состязаниях
Поощрения и предложения
Типы подарков
Казино поощряет своих участников всевозможными призовыми акциями:
– Начальный бонус — щедрые вознаграждения на первые пополнения
– Freespins — дополнительные прокруты в популярных автоматах
– Компенсация — периодический возврат суммы ставок
– Программа верности — специальные льготы для регулярных клиентов
Ваучеры и их применение
Специальные ваучеры предоставляют расширенные вознаграждения. Для применения нужно указать последовательность в определенное окно в персональном аккаунте.
Азартный выбор
Автоматы
Библиотека слотовых слотов содержит тысячи названий от топовых разработчиков:
– Традиционные слоты
– Новые игры
– Джекпот слоты
– Лицензионные слоты
Live казино
Область Live-казино предлагает участие с настоящими ведущими в формате прямого эфира:
– Американскаярулетка
– Двадцатьодно
– PuntoBanco
– Техасскийхолдем
Состязания
Периодические состязания с внушительными призовыми пулами проводятся ежедневно. Соревнующиеся конкурируют за победу в таблице.
Мобильная реализация и приложение
Смартфонная платформа сайта
Главный портал на100% приспособлен для мобильных аппаратов. Пользователи вправе открывать игры напрямую через интернет-браузер без нужды скачивания.
Приложение для установки
Специальное мобильное программа предлагается для получения на аппараты с операционными системами Android и iOS. APP гарантирует:
– Моментальный доступ к автоматам
– Надежную функциональность
– Push-оповещения о акциях
– Интуитивный дизайн
Резюме
Официальный веб-сайт казино и его актуальные копии обеспечивают игрокам всесторонний вход к первоклассным развлекательным играм. Большие подарки, всевозможные предложения, функциональная смартфонная адаптация и квалифицированная поддержка делают игровой досуг чрезвычайно удобным и выгодным.
1xbet lite 1xbet lite .
Dream Interpretations 2026 https://www.yuxu-yozmalari.com.az learn the meaning of your dreams with AI artificial intelligence. Dream interpretation from A to Z, folk belief interpretation, psychological approach. Free online dream interpretation.
Calculate your horoscope ulduz-fali com az online. Horoscopes, love compatibility, daily horoscopes and astrological interpretations by date of birth on one site.
Бытовая химия в Казани https://bytovayalavka.ru широкий ассортимент средств для уборки, стирки и ухода за домом. Оригинальная продукция, выгодные цены и быстрая доставка. Подберите качественные моющие средства для чистоты и комфорта вашего дома.
Механизированная шпаклевка https://shpaklevka-msk.ru современный способ выравнивания стен и потолков. Ровное нанесение, высокая скорость работ и экономия материалов. Подготовка под финишную отделку с гарантией качества и соблюдением технологий.
Актуальные онлайн-казино гарантируют пользователям разнообразный набор игр и заманчивые поощрения. Тем не менее для стабильной игры критично осознавать, как найти Sneket сайт и его функционирующие зеркала.
Что такое лицензионный портал казино
Лицензионный портал казино — это основная площадка, где клиенты могут пользоваться развлекательными играми. Платформа функционирует на официальных правах и обладает всеми нужными разрешениями.
Главные достоинства лицензионного сайта:
– Безопасность пользовательских информации
– Честные условия игры
– Гарантированные выводы
– Квалифицированная служба поддержки
Актуальное зеркало казино: для чего используется
Дублирующий ресурс — это точная копия официального сайта, хостящаяся по иному адресу. Рабочее зеркало создается для обеспечения непрерывного подключения к порталу.
Причины применения зеркал:
– Ограничение главного сайта
– Профилактические процедуры
– Повышенная нагрузка на платформу
Как отыскать действующее зеркало сегодня
Обнаружить свежее рабочее зеркало можно разными путями:
1. Email-уведомления — активируйте уведомления на новостную доставку
2. Служба поддержки — проконсультируйтесь в онлайн-чат
3. Публичные сети — мониторьте за постами
4. Партнерские порталы — авторитетные ресурсы
Открытие счета на платформе казино
Процесс регистрации занимает лишь считанные минут:
1. Выберите на элемент “Зарегистрироваться”
2. Внесите необходимые данные
3. Верифицируйте почтовую адрес
4. Примените бонусный код, если есть
По завершении оконченной оформления вам станет открыт индивидуальный профиль.
Поощрения и промокоды
Щедрая поощрительная структура — значимое конкурентное преимущество казино:
Поощрение за регистрацию
Свежие клиенты обретают начальный презент, который может включать:
– Финансовый счет на начальный вклад
– Фриспины для барабанов
– Безвозвратные фонды
Активационные коды
Регулярно размещаются новые бонусные шифры, дающие возможность получить экстра преимущества.
Механизм компенсации
Постоянные клиенты приобретают процент использованных денег обратно.
Актуальные предложения и соревнования
Казино регулярно запускает захватывающие акции:
– Weekly баттлы
– Сезонные предложения
– Раздачи солидных наград
– Схема VIP-клуба
Вход в личный профиль
Для авторизации на ресурс необходимо:
1. Загрузить основной портал или рабочее зеркало
2. Нажать “Войти”
3. Внести логин и код доступа
В индивидуальном аккаунте предоставлены нижеперечисленные возможности:
– Пополнение баланса
– Обналичивание призов
– Изучение архива операций
– Настройка персональными настройками
Мобильная вариант и программа
Mobile модификация
Мобильная вариант портала обеспечивает делать ставки с различных смартфонного девайса. Дизайн динамически адаптируется под габариты screen.
Клиент для download
Загрузить клиент можно для:
– Android — прямая скачивание с портала
– iOS — инсталляция через App Store
Преимущества программы:
– Моментальный вход
– Бесперебойная производительность
– Push-уведомления об предложениях
– Оптимизированный дизайн
Гемблинг секции
Игровые машины
Обширная библиотека развлекательных слотов от известных поставщиков:
– Классические машины
– Современные-эмуляторы
– Накопительные-автоматы
Live casino
Раздел с настоящими ведущими обеспечивает:
– Рулетки
– 21
– Baccarat
– Texas Hold’em
Эфиры транслируются в отличном формате, создавая атмосферу настоящего казино.
Системы пополнения и снятия
Ресурс принимает разнообразные транзакционные инструменты:
– Платежные card
– Электронные кошельки
– Bitcoin/Ethereum
– Wire транзакции
Наименьшие пороги взноса и быстрые платежи гарантируют развлечение максимально комфортной.
Служба поддержки
Квалифицированная служба поддержки работает 24/7 и готова ассистировать с любыми задачами:
– Живой-чат
– Email-помощь
– Голосовая служба
Итоги
Лицензионный портал казино и его функционирующие зеркала предоставляют участникам защищенный и захватывающий гемблинг отдых. Богатые поощрения, простая mobile версия, многочисленные игры и превосходное live-казино формируют эту площадку превосходным местом для игровых времяпрепровождения.
recommended canadian pharmacies: MedBridge Pharmacy – cialis canadian pharmacy
1xbet giri? 1xbet giri? .
Доступ к сайту через действующие зеркала
Пользователи интернет казино часто контактируют с проблемой ограничения основного сайта. Как раз для преодоления этой задачи предусмотрены зеркала главного ресурса. казино Фонтан предоставляет абсолютный вход ко всем возможностям платформы.
Что такое действующее зеркало казино
Зеркало значит собой идентичную копию оригинального портала с похожим возможностями. Единственное различие — это иное имя. Все сведения пользователя, содержа депозит, привилегии и записи ставок, находятся идентичными.
Плюсы использования зеркал
Актуальные зеркала обладают набором важных выгод:
– Постоянный переход к выбранным развлечениям
– Стопроцентная безопасность собственных информации
– Неизменность всех настроек пользовательского кабинета
– Шанс приобретения поощрений и вовлечения в предложениях
Регистрация на легальном ресурсе
Ход оформления максимально легок и отнимает буквально минут. Новые игроки в состоянии полагаться на щедрый стартовый приз за создание аккаунта.
Ступени открытия аккаунта
1. Подключение на легальный портал или его копию
2. Нажатие на элемент “Присоединиться”
3. Ввод нужных параметров
4. Подтверждение email почты
5. Применение промокода (в случае доступен)
Поощрения и промоакции для участников
Игровая площадка балует своих участников всевозможными поощрительными системами.
Основные варианты бонусов
Стартовый бонус — внушительное премирование для недавних пользователей, каковое имеет возможность охватывать финансовые суммы и безвозмездные спины.
Бесплатные вращения — возможность использовать в топовых аппаратах без затрат.
Возврат средств — процентный отдача утраченных денег, что зачисляется каждую неделю или ежемесячно.
Бонусные коды — уникальные последовательности, дающие дополнительные преимущества.
Личный кабинет: функции и настройки
Личный раздел обеспечивает полный надзор над развлекательным опытом. В данном разделе присутствуют:
– Регулирование балансом
– Записи переводов
– Текущие бонусы
– Установки безопасности
– Проверка аккаунта
Карманная платформа и приложение
Новейшие участники ценят мобильность. Казино обеспечивает 2 способа для игры с карманных девайсов.
Responsive смартфонная вариант
Мобильная редакция домена автономно подстраивается под экран любого аппарата. Не требуется устанавливать особое софт.
APP для телефонов
Доступно установить специальное APP для iOS и Android. APP обеспечивает:
– Быстрый вход
– Оптимизированный интерфейс
– Оперативные-уведомления о бонусах
– Бесперебойную функциональность
Live казино: антураж реального клуба
Секция Live казино доставляет игроков в обстановку реального клуба. Профессиональные ведущие организуют партии в формате настоящего времени.
Востребованные Live-столы
– Французская рулетка
– 21
– Баккара
– Покер
Автоматы: многообразие слотов
Каталог азартных слотов вмещает сотни позиций от ведущих разработчиков. Участники найдут:
– Стандартные слоты
– Современные слоты
– Накопительный приз-игры
– Megaways
Состязания и уникальные мероприятия
Постоянные турниры обеспечивают пользователям конкурировать друг с другом за солидные выигрышные суммы. Каждый соревнование имеет свои критерии вовлечения и список чемпионов.
Способы ввода и получения финансов
Ресурс предоставляет множество финансовых сервисов:
– Платежные карты
– Цифровые кошельки
– Цифровые валюты
– Прямые транзиты
Каждые транзакции выполняются надежно благодаря новейшим методам защиты.
Сервис support
Опытные операторы службы помощи настроены ассистировать 24/7. Работают следующие пути контакта:
– Мгновенный-чат
– Email-помощь
– Аудио поддержка
– Публичные сети
Заключение
Легальный ресурс казино и его актуальные копии предоставляют клиентам безопасный и удобный подход к огромному спектру геймерских активностей. Крупные подарки, регулярные кампании, качественная служба и легкие денежные методы превращают игровой опыт крайне комфортным и доходным.
Нынешние онлайн-казино гарантируют игрокам богатый спектр развлечений и заманчивые премии. Однако для комфортной времяпрепровождения важно знать, как получить доступ к казино Million и его действующие зеркала.
Что такое лицензионный портал казино
Основной ресурс казино — это первичная веб-площадка, где игроки могут наслаждаться гемблинг автоматами. Портал оперирует на официальных правах и обладает всеми требуемыми лицензиями.
Основные преимущества главного портала:
– Конфиденциальность персональных сведений
– Объективные положения игры
– Гарантированные выплаты
– Квалифицированная помощь
Действующее зеркало казино: для чего используется
Дублирующий ресурс — это полная клон официального ресурса, расположенная по отличному веб-адресу. Функционирующее зеркало создается для гарантирования постоянного подключения к порталу.
Факторы задействования зеркал:
– Ограничение основного URL
– Технические мероприятия
– Высокая активность на систему
Как получить актуальное зеркало в данный момент
Найти новое действующее зеркало можно различными вариантами:
1. Почтовые оповещения — оформите подписку на новостную доставку
2. Департамент support — напишите в онлайн-чат
3. Публичные каналы — мониторьте за обновлениями
4. Игровые площадки — проверенные платформы
Оформление профиля на платформе казино
Процесс создания аккаунта составляет буквально немного моментов:
1. Кликните на опцию “Создать аккаунт”
2. Введите запрашиваемые данные
3. Верифицируйте email ящик
4. Активируйте код активации, если имеется
Сразу после успешной оформления вам предоставится открыт личный раздел.
Поощрения и промокоды
Привлекательная премиальная структура — существенное достоинство казино:
Поощрение за первичную регистрацию
Первичные участники обретают стартовый бонус, который может охватывать:
– Монетарный бонус на стартовый депозит
– Free spins для игровых машин
– Стартовые средства
Активационные коды
Периодически выходят свежие коды, обеспечивающие получить экстра бонусы.
Программа кэшбека
Лояльные клиенты приобретают процент утраченных ставок обратно.
Действующие кампании и состязания
Ресурс постоянно устраивает интересные промо-мероприятия:
– Семидневные чемпионаты
– Праздничные акции
– Раздачи значительных выигрышей
– Механизм статусов
Логин в индивидуальный профиль
Для логина на портал требуется:
1. Загрузить лицензионный портал или функционирующее зеркало
2. Кликнуть “Войти”
3. Указать email и пароль
В личном разделе предоставлены нижеперечисленные возможности:
– Внесение средств депозита
– Вывод денег
– Изучение истории игр
– Управление индивидуальными сведениями
Mobile вариант и софт
Mobile модификация
Оптимизированная платформа портала позволяет развлекаться с всех портативного устройства. Интерфейс самостоятельно адаптируется под габариты монитора.
App для загрузки
Получить клиент можно для:
– Android — официальная загрузка с платформы
– iOS — загрузка через App Store
Плюсы программы:
– Мгновенный старт
– Надежная функциональность
– Push-сообщения об бонусах
– Ускоренный функционал
Развлекательные категории
Барабаны
Обширная галерея развлекательных автоматов от лучших разработчиков:
– Классические автоматы
– Видео-игры
– Накопительные-автоматы
Live игры
Секция с реальными дилерами предоставляет:
– Рулетка
– Blackjack
– Баккара
– Texas Hold’em
Вещания проводятся в отличном качестве, формируя эффект реального казино.
Методы зачисления и вывода
Сайт принимает разные денежные системы:
– Платежные карты
– Цифровые системы
– Цифровые валюты
– Wire отправки
Стартовые значения депозита и скоростные платежи гарантируют времяпрепровождение максимально удобной.
Служба помощи
Квалифицированная отдел помощи доступна 24/7 и способна содействовать с всеми вопросами:
– Реалтайм-чат
– Email-переписка
– Phone служба
Итоги
Основной портал казино и его актуальные альтернативные адреса обеспечивают пользователям безопасный и азартный развлекательный опыт. Привлекательные бонусы, удобная мобильная версия, разнообразные автоматы и качественное live-казино формируют эту платформу превосходным местом для гемблинг игр.
http://vitalcorepharmacy.com/# foreign pharmacy no prescription
Bazaar Pines – Minimalist pages make online shopping enjoyable.
1x bet giri? 1x bet giri? .
Переход к ресурсу и действующие URL
Современные сетевые казино гарантируют игрокам широкий выбор опций. Главный сайт Boost предоставляет безопасный переход ко всем возможностям. При этом периодически возникают случаи, когда необходимо резервный путь подключения.
Что есть собой действующее зеркало
Рабочее зеркало — это полная копия легального портала с другим интернет именем. Дубликат сегодня обеспечивает обходить существующие запреты и гарантировать непрерывный подключение к выбранным слотам.
Легальное зеркало обладает теми же опциями, что и главный сайт:
– Полный ассортимент автоматов
– Индивидуальный профиль с актуальными данными
– Все награды и промо
– Проверенные финансовые переводы
Открытие профиля и доступ в систему
Процедура создания профиля на ресурсе длится буквально секунд. Свежим пользователям следует:
1. Открыть на актуальное зеркало на данный момент
2. Щелкнуть элемент «Зарегистрироваться»
3. Ввести обязательные информацию
4. Подтвердить электронную почту или номер телефона
5. Активировать бонус за оформление
Доступ в собственный профиль реализуется с помощью указание ID и ключа.
Описание наградной политики
Богатая бонусная политика — важнейшее козырь ресурса. Клиенты зарабатывают многочисленные бонусы:
Стартовые награды
Недавние клиенты способны надеяться на значительный подарок за открытие профиля. Традиционно это комплект опций, включающий:
– Частичную надбавку к стартовому взносу
– Безвозмездные кручения
– Дополнительные финансы на баланс
Промо-коды и эксклюзивные предложения
Постоянные коды помогают зарабатывать дополнительные привилегии. Использовать их разрешено в отдельном разделе собственного аккаунта.
Бесплатные вращения и возврат средств
Фриспины — это возможность крутить игры без расходования персональных финансов. Рибейт подразумевает долевой возврат потерянных финансов.
Каталог слотов
Азартная платформа обеспечивает внушительную коллекцию развлечений.
Игровые машины
Многообразие аппаратов удивляет ожидания. Доступны обычные простые аппараты и новые автоматы с увлекательной картинкой.
Live зал
Зона Live заведения транспортирует участников в антураж настоящего гемблинг клуба. Опытные дилеры ведут игры в онлайн эфире.
Турниры и таблицы лидеров
Периодические состязания добавляют азарта и гарантируют вариант получить значительные суммы.
Mobile версия и приложение
Продвинутые инновации обеспечивают наслаждаться в любимом точке. Портативная реализация независимо подстраивается под размер устройства.
Получить софт возможно для цифровых ОС iOS и Android. Софт предоставляет:
– Мгновенный переход
– Стабильную работу
– Push-оповещения об промо
– Интуитивный вид
Денежные действия
Сайт использует различные методы ввода и получения сумм:
– Кредитные системы
– Электронные платформы
– Цифровые валюты
– Денежные переводы
Любые операции проходят через защищенное канал, что защищает безопасность конфиденциальных данных.
Департамент ассистанса
Квалифицированная служба поддержки работает круглосуточно. Обратиться с менеджерами разрешено через:
– Интерактивный-чат
– Почтовую почту
– Горячую линию
– Социальные платформы
Итоги
Главный портал и его рабочее зеркало дают участникам защищенный и комфортный переход к захватывающим занятиям. Привлекательные поощрения, разнообразный выбор развлечений и высокая ассистанс делают участие предельно приятной и выгодной.
Актуальные онлайн-казино гарантируют клиентам богатый выбор азартных игр и щедрые награды. Впрочем для комфортной работы существенно знать, как обнаружить каз и его рабочие зеркала.
Что такое основной портал казино
Главный портал казино — это основная веб-площадка, где клиенты могут развлекаться развлекательными автоматами. Платформа действует на легитимных принципах и имеет всеми необходимыми документами.
Главные выгоды основного ресурса:
– Защищенность личных сведений
– Справедливые правила использования
– Подтвержденные платежи
– Оперативная техподдержка
Актуальное зеркало казино: для чего необходимо
Альтернативный адрес — это абсолютная копия официального ресурса, размещенная по альтернативному домену. Актуальное зеркало создается для предоставления постоянного входа к порталу.
Причины эксплуатации копий сайта:
– Недоступность первичного адреса
– Технические мероприятия
– Повышенная нагрузка на сервер
Как получить свежее зеркало сейчас
Получить свежее официальное зеркало можно множественными способами:
1. Рассылка — оформите подписку на email подписку
2. Департамент support — свяжитесь в онлайн-чат
3. Публичные площадки — мониторьте за публикациями
4. Игровые площадки — достоверные платформы
Создание аккаунта на портале казино
Процедура открытия счета требует только немного секунд:
1. Активируйте на клавишу “Создать аккаунт”
2. Укажите требуемые информацию
3. Верифицируйте контактную почту
4. Примените промокод, если предоставлен
Вслед за успешной активации вам будет возможен персональный раздел.
Награды и промокоды
Богатая поощрительная политика — важное конкурентное преимущество казино:
Бонус за открытие счета
Новые клиенты обретают приветственный бонус, который может охватывать:
– Финансовый счет на начальный депозит
– Фри-спины для автоматов
– Безвозвратные деньги
Активационные коды
Регулярно размещаются эксклюзивные коды, дающие возможность забрать дополнительные привилегии.
Механизм возврата средств
Регулярные клиенты получают долю потраченных денег обратно.
Свежие кампании и турниры
Ресурс систематически организует интересные кампании:
– Weekly баттлы
– Тематические бонусы
– Лотереи солидных подарков
– Схема VIP-клуба
Логин в пользовательский профиль
Для авторизации на портал необходимо:
1. Открыть главный сайт или функционирующее зеркало
2. Выбрать “Login”
3. Ввести имя пользователя и код доступа
В пользовательском разделе разрешены данные опции:
– Депозит депозита
– Получение денег
– Проверка истории игр
– Настройка индивидуальными данными
Адаптивная вариант и софт
Мобильная вариант
Адаптивная платформа сайта обеспечивает играть с всех мобильного устройства. Дизайн автоматически подстраивается под размер монитора.
Программа для download
Установить app можно для:
– Android — безопасная загрузка с сайта
– iOS — инсталляция через App Store
Выгоды программы:
– Быстрый старт
– Устойчивая функциональность
– Push-оповещения об акциях
– Улучшенный функционал
Гемблинг категории
Автоматы
Разнообразная библиотека игровых слотов от ведущих поставщиков:
– Классические слоты
– Современные-эмуляторы
– Прогрессивные-автоматы
Live зал
Категория с профессиональными крупье предлагает:
– European/American Roulette
– Двадцать одно
– Baccarat
– Карточные игры
Стримы ведутся в HD формате, обеспечивая эффект настоящего казино.
Методы внесения средств и обналичивания
Казино поддерживает различные денежные методы:
– Платежные средства
– Цифровые счета
– Bitcoin/Ethereum
– Финансовые транзакции
Наименьшие суммы внесения и моментальные выводы обеспечивают игру крайне удобной.
Служба техподдержки
Компетентная служба помощи работает 24/7 и готова поддержать с различными вопросами:
– Мгновенный-чат
– Email-консультации
– Звонковая линия
Резюме
Главный портал казино и его рабочие копии гарантируют пользователям конфиденциальный и азартный развлекательный опыт. Богатые подарки, функциональная мобильная модификация, разнообразные развлечения и качественное live-казино создают эту платформу замечательным решением для развлекательных развлечений.
Reference
Title loans near me
for industry standards.
1xbet giri? 2025 1xbet giri? 2025 .
Актуальные онлайн-казино предлагают игрокам широкий спектр слотов и привлекательные поощрения. Тем не менее для стабильной игры существенно иметь представление, как обнаружить https://teveodigital.tv/2026/03/05/sposoby-obygryvat-kazino-v-internete-sovety-i-skhemy-dlya-vyigrysha-i-vyvoda-sredstv и его действующие зеркала.
Что такое официальный ресурс казино
Официальный ресурс казино — это базовая система, где участники могут пользоваться развлекательными развлечениями. Ресурс работает на законных основаниях и располагает всеми требуемыми сертификатами.
Главные достоинства основного портала:
– Безопасность пользовательских реквизитов
– Справедливые условия использования
– Подтвержденные транзакции
– Профессиональная поддержка
Рабочее зеркало казино: для чего необходимо
Зеркало — это идентичная копия главного сайта, хостящаяся по другому веб-адресу. Рабочее зеркало формируется для предоставления бесперебойного входа к порталу.
Основания использования копий сайта:
– Недоступность официального URL
– Плановые процедуры
– Высокая загрузка на систему
Как обнаружить свежее зеркало в данный момент
Получить текущее официальное зеркало можно разными путями:
1. Email-уведомления — зарегистрируйтесь на информационную подписку
2. Команда support — обратитесь в онлайн-чат
3. Социальные медиа — мониторьте за постами
4. Специализированные сайты — авторитетные ресурсы
Создание аккаунта на портале казино
Этап оформления занимает только считанные минут:
1. Кликните на опцию “Регистрация”
2. Укажите обязательные данные
3. Валидируйте электронную e-mail
4. Активируйте бонусный код, если доступен
После финализированной регистрации вам станет доступен индивидуальный кабинет.
Бонусы и бонусные коды
Богатая поощрительная программа — существенное преимущество казино:
Подарок за регистрацию
Первичные клиенты приобретают начальный презент, который может содержать:
– Монетарный счет на первый пополнение
– Фриспины для барабанов
– Стартовые бонусы
Бонусные коды
Периодически публикуются актуальные бонусные шифры, обеспечивающие получить особые бонусы.
Система кэшбека
Регулярные игроки зарабатывают процент потраченных денег назад.
Текущие промо и конкурсы
Ресурс систематически запускает увлекательные события:
– Семидневные соревнования
– Специальные бонусы
– Розыгрыши крупных наград
– Система статусов
Доступ в индивидуальный раздел
Для входа на ресурс требуется:
1. Перейти на лицензионный адрес или рабочее зеркало
2. Кликнуть “Login”
3. Указать имя пользователя и ключ
В личном разделе предоставлены данные опции:
– Депозит счета
– Получение призов
– Проверка истории игр
– Управление персональными параметрами
Мобильная версия и софт
Мобильная вариант
Мобильная модификация веб-сайта предоставляет шанс участвовать с разных смартфонного устройства. Визуал адаптивно адаптируется под размер монитора.
Клиент для загрузки
Установить клиент можно для:
– Android — непосредственная скачивание с платформы
– iOS — установка через App Store
Плюсы приложения:
– Мгновенный доступ
– Стабильная производительность
– Push-сообщения об промо
– Улучшенный UI
Азартные разделы
Барабаны
Внушительная галерея развлекательных машин от известных поставщиков:
– Ретро игры
– Современные-автоматы
– Призовые-слоты
Live зал
Категория с живыми операторами дает:
– Рулетки
– 21
– Baccarat
– Карточные игры
Трансляции проводятся в HD разрешении, обеспечивая впечатление подлинного казино.
Системы пополнения и получения
Платформа обслуживает разнообразные финансовые инструменты:
– Платежные карты
– Виртуальные кошельки
– Цифровые валюты
– Прямые транзакции
Минимальные суммы депозита и моментальные платежи делают игру крайне удобной.
Департамент support
Квалифицированная служба support работает 24/7 и в состоянии поддержать с любыми проблемами:
– Реалтайм-чат
– Email-помощь
– Phone служба
Заключение
Основной сайт казино и его актуальные зеркала дают пользователям надежный и захватывающий гемблинг опыт. Щедрые подарки, простая mobile модификация, обширные слоты и профессиональное live-казино превращают эту площадку замечательным решением для игровых игр.
Актуальные интернет казино обеспечивают геймерам обширный диапазон возможностей для удобной игры. Тем не менее иногда соединение к главному порталу может являться недоступным. В таких моментах на помощь появляется https://bcircleagency.com/realnye-sovety-i-rekomendatsii-dlya-igrokov-o-tom-kak-dobitsya-pobedy-v-onlayn-kazino/, которое дает постоянный вход ко всем опциям платформы.
Что такое актуальное зеркало казино
Копия — это полная копия основного ресурса, которая находится по дополнительному домену. Копия имеет полный функционал главного сайта, включая индивидуальный кабинет, средства и данные платежей.
Главные плюсы использования зеркала:
– Круглосуточный вход к ресурсу
– Стопроцентная тождественность опций
– Защита персональных реквизитов
– Хранение существующих привилегий
Как разыскать действующее зеркало в данный момент
Имеется множество безопасных способов получения свежей адреса:
Официальные каналы:
1. Электронная рассылка — руководство постоянно высылает информацию с рабочими ссылками
2. Коммуникационные сети — легитимные страницы выкладывают текущую информацию
3. Отдел поддержки — специалисты предоставляют проверенные URL
4. Мобильное приложение — предоставляет преодолевать блокировки
Регистрация на официальном ресурсе
Процесс регистрации занимает лишь пару минут и состоит из нижеследующих шагов:
1. Открытие на лицензионный веб-сайт или рабочее зеркало
2. Выбор на иконку «Открыть счет»
3. Указание пользовательской формы
4. Верификация почтовой почты или сотового номера
5. Задействование бонуса за регистрацию при доступности промокода
Свежие игроки получают великодушный стартовый приз, который может предполагать фриспины, валютные бонусы или компенсацию.
Логин в пользовательский кабинет
Вход на платформе реализуется традиционным методом. Достаточно ввести никнейм и пароль, задействованные при регистрации.
Ключевые нюансы для конфиденциального входа:
– Задействуйте защищенный код
– Запустите 2FA верификацию
– Не записывайте коды на посторонних компьютерах
– Проверяйте интернет строку браузера
Обзор бонусной системы
Игорный портал балует геймеров разнообразными вознаграждениями и промо:
Начальный набор
Новички имеют возможность полагаться на значительное вознаграждение за первый вклад. Зачастую это пропорциональная добавка к переведенной количеству плюс даровые спины для популярных слотов.
Регулярные промо
– Еженедельный компенсация — возврат процентной доли потерянных средств
– Награды на последующие взносы
– Особые предложения по знаменательным датам
– Соревнования с солидными выигрышными фондами
Схема привилегий
Регулярные геймеры зарабатывают баллы за любую бет, которые затем конвертируются на действительные деньги, бесплатные вращения или эксклюзивные льготы.
Купоны: как активировать
Кодовые комбинации — это специальные последовательности букв и цифр, дающие доступ к специальным вознаграждениям.
Откуда взять свежие промокоды:
– Авторизованные медийные сети казино
– Сотрудничающие сайты
– Email-подписка
– Профильные форумы
Прописывается промокод в соответствующее поле при регистрации или зачислении средств счета.
Телефонная версия и приложение
Современные геймеры выбирают играть с смартфонных гаджетов. Ресурс обеспечивает пару метода для комфортной телефонной игры.
Мобильная вариант
Интернет версия самостоятельно адаптируется под габариты экрана. Не требует установки и действует в произвольном новом браузере.
Мобильное приложение
Установить софт можно для аппаратов на Android и iOS. Достоинства app:
– Скоростная открытие
– Стабильная операция
– Автоматические-уведомления о акциях
– Независимый обход блокировок
Процедура установки несложен: необходимо перейти на портал с телефонного гаджета и выполнять указаниям.
Гемблинг выбор
Каталог аппаратов включает множество наименований от передовых производителей.
Слоты
Развлекательные автоматы — самая популярная секция забав. Представлены традиционные простые слоты, передовые видеослоты с бонусными уровнями, а также растущие выигрыши.
Live казино
Зона с действительными дилерами позволяет прочувствовать антураж реального казино. Имеются развлечения с блэкджеком.
Стриминг ведется в HD формате, поддерживается общение с крупье и иными игроками.
Турниры
Регулярно устраиваются конкурсы по разным категориям. Включение предоставляет право получить денежные награды, free spins или эксклюзивные презенты.
Денежные операции
Портал поддерживает большой выбор расчетных методов:
– Дебетовые карты
– Виртуальные кошельки
– Крипта
– Банковские транзакции
Наименьшая объем депозита — доступная для большинства пользователей. Снятие денег обрабатывается в минимальные периоды.
Сервис поддержки
Квалифицированные специалисты расположены поддержать постоянно. Представлены данные каналы коммуникации:
– Живой-чат
– Email
– Мобильная связь
– Медийные сети
Ответы на типовые темы можно найти в блоке FAQ.
Итог
Лицензионный ресурс казино и его рабочие зеркала дают игрокам полный подключение ко всем сервисам сайта. Щедрые бонусы, удобная смартфонная версия, гигантский коллекция развлечений и профессиональная служба поддержки формируют гемблинг досуг крайне беспроблемным и защищенным.
Кто ищет софт для накрутки поведенческих факторов, в статье сравнивают Monstro и облачные сервисы. Автор объясняет, когда какой вариант выгоднее.
1x lite 1xbet-giris-42.com .
What impressed me about this casino https://finszarmortgage.com/arubabet-votre-destination-de-gaming-en-ligne-avec-les-optimaux-bonus/ is the variety of the games. Everything runs without issues, the design is minimal, and there’s plenty of options to explore, which keeps it engaging.
https://abaialemi.kz/kz/post/view?id=1965
https://vitalcorepharmacy.com/# mexican pharmacy
Анализ основного сайта
Передовые интернет казино предлагают пользователям широкий ассортимент забав и возможностей. Главный сайт казино Голд предлагает защищенный возможность к развлекательным возможностям.
Функционирующее зеркало: возможность прямо сейчас
Резервный сайт является собой полную дубликат главного портала. Проверенное зеркало дает возможность участникам миновать потенциальные барьеры.
Достоинства применения зеркала
Основные преимущества охватывают:
– Непрерывный шанс к порталу
– Поддержание любых характеристик основного портала
– Безопасность индивидуальных сведений
– Аналогичный набор функций
Создание аккаунта на портале
Механизм создания аккаунта отличается легкостью и эргономичностью. Свежие игроки требуется:
1. Открыть основной ресурс или его зеркало
2. Выбрать на клавишу открытия счета
3. Внести обязательные сведения
4. Активировать email ящик
5. Осуществить первый логин
Приз за открытие счета
Новые игроки приобретают внушительный начальный подарок. Это поощрение может содержать:
– Финансовые средства
– Даровые вращения
– Расширенный уровень кэшбэка
Доступ в индивидуальный раздел
Зарегистрированные пользователи могут моментально получить доступ в персональный раздел, применяя учетные данные и шифр. Собственный аккаунт предлагает шанс к:
– Контролю балансом
– Журналу транзакций
– Действующим подаркам
– Настройкам профиля
Бонусы и акции
Портал систематически устраивает разнообразные предложения для клиентов.
Разновидности подарков
Основные типы призов:
– Финансовые бонусы – часть от объема депозита
– Бесплатные вращения – бесплатные раунды в автоматах
– Кэшбек – возврат части потерянных средств
– Турнирные награды – премии за состязание в соревнованиях
Купоны
Особые ваучеры помогают приобрести добавочные бонусы. Клиенты в состоянии получить их на аффилиатных сайтах или получить в уведомлениях.
Мобильная версия и софт
Современные гемблеры ценят портативный геймплей.
Функции мобильной адаптации
– Адаптивный интерфейс для различных гаджетов
– Полный возможность к играм
– Моментальная работа
– Эргономичное навигация
Скачать приложение
Мобильное app предложено для загрузки на аппараты с операционными платформами Android и iOS. Софт гарантирует:
– Устойчивую деятельность
– Пуш сообщения о бонусах
– Оперативный доступ к предпочитаемым слотам
Игровой каталог
Портал дает богатую галерею развлекательных развлечений.
Игровые машины
Ассортимент азартных аппаратов содержит:
– Стандартные машины
– Видео слоты
– Джекпотные игры
– Лицензионные игры
Live казино
Раздел живых дилеров предлагает шанс соревноваться с реальными крупье. Представлены:
– Рулетка
– Блэкджек
– Баккара
– Техасский холдем
Состязания
Периодические конкурсы позволяют клиентам конкурировать за значительные финансовые банки. Соревновательная система модифицируется регулярно.
Платежные действия
Платформа предоставляет обилие вариантов пополнения и обналичивания средств:
– Банковские карточки
– Цифровые счета
– Прямые трансферы
– Крипто
Абсолютно все операции проходят безопасно с применением современных методов защиты.
Департамент support
Профессиональная служба поддержки функционирует постоянно. Соединиться с операторами реально через:
– Живой чат
– Email почту
– Контактный номер
– Social сети
Защита и регулирование
Казино оперирует на основании действительной лицензии. Это подтверждает:
– Легальность азартного геймплея
– Охрану конфиденциальных данных
– Своевременные выплаты
– Ответственный гемблинг
Резюме
Основной портал и его функционирующие альтернативные адреса обеспечивают клиентам совокупный спектр опций для удобной и прибыльной игры. Значительные бонусы, многочисленные развлечения, профессиональная поддержка и надежная платформа операций создают казино лучшим решением для ценителей развлекательных услуг.
Передовые онлайн-казино гарантируют пользователям широкий диапазон опций для приятной игры. Переход к ресурсу Leebet осуществляется через главный сайт или актуальное зеркало.
Что такое рабочее зеркало казино
Действующее зеркало — это резервный домен лицензионного веб-сайта казино. Такие копии разрабатываются для гарантирования бесперебойного доступа к развлекательной платформе.
Копия актуальное целиком повторяет опции базового ресурса. Игроки имеют такой же вход ко всем функциям, включая создание аккаунта, финансирование счета и обналичивание средств.
Создание аккаунта на официальном портале
Процесс оформления учетной записи отнимает всего считанные моментов. Будущим игрокам требуется:
1. Попасть на основной портал или действующее проверенное зеркало
2. Кликнуть кнопку “Создать аккаунт”
3. Ввести обязательные сведения
4. Подтвердить e-mail почту
5. Применить код активации при наличии
После завершения создания аккаунта игрок обретает подарок за регистрацию, который имеет право включать бесплатные вращения или монетарное начисление.
Вход в личный кабинет
Пользовательский кабинет — это охраняемая область, где клиенты имеют возможность контролировать своим аккаунтом. Для авторизации следует ввести никнейм и пароль.
В личном кабинете доступны такие опции:
– Просмотр хронологии транзакций
– Активация купонов
– Контроль вознаграждениями
– Включение в состязаниях
– Проверка кэшбека
– Настройка данных
Бонусы и промо
Азартная сервис обеспечивает выгодные бонусы:
Регистрационный набор — дебютанты зарабатывают существенное начисление на стартовые взносы.
Free spins — начисляются как при регистрации, так и в рамках разнообразных промо.
Возврат средств — постоянный возврат части утраченных финансов.
Коды активации — эксклюзивные последовательности, дающие возможность к уникальным бонусам.
Обзор гемблинговых разделов
Слоты
Коллекция автоматов охватывает сотни игр от ведущих разработчиков. Игроки найдут как обычные слоты, так и новые 3D-слоты с интересной анимацией.
Live казино
Раздел Live казино предлагает возможность участвовать с настоящими крупье в режиме текущего времени. Имеются распространенные игры: рулетка, блэкджек, баккара, покер.
Состязания
Систематические чемпионаты с крупными призовыми суммами завлекают тысячи участников. Лидеры завоевывают финансовые награды и особые премии.
Портативная версия и софт
Мобильная версия ресурса дает возможность играть с всякого устройства. Структура автоматически корректируется под габариты экрана.
Загрузить программу можно для девайсов на Android и iOS. Телефонное программа характеризуется всеми функциями компьютерной версии.
Как найти актуальное зеркало на сегодня
Рабочие ссылки дубликатов периодически обновляются. Найти свежую ссылку можно различными путями:
– Через сервис помощи
– В официальных новостных сетях
– По электронной подписке
– На аффилиатных порталах
Надежность и официальность
Основной сайт функционирует на основании мировой разрешения. Все платежи оберегаются актуальными технологиями защиты.
Приватность индивидуальных реквизитов обеспечивается в полном размере.
Итог
Основной сайт и его функционирующие альтернативы предоставляют клиентам круглосуточный вход к высококлассным развлекательным развлечениям. Щедрые поощрения, всевозможные игры, компетентная помощь — все это делает гемблинговый процесс предельно приятным и увлекательным.
К слову, если вас интересует vavada телеграм, загляните сюда. Вот, делюсь ссылкой: https://promokodvavada.com/
Ремонт стиральных машин СПб Давно искала сервис, которому можно доверять. Узнала, что «Нева-Экспресс ремонт» и «РБТ-Сервис» объединились, и решила попробовать. Ремонт Zanussi прошёл отлично: заменили щётки двигателя, почистили всё. Цена порадовала. Теперь буду советовать ремонт стиральных машин СПб только у этой объединённой команды!
velobet casino Decided to test this after seeing it mentioned somewhere. The site loads quickly and feels responsive. Checked a few sections and everything works fine. No crashes or errors. Seems stable so far.
Подключение к ресурсу через действующие зеркала
Современные интернет казино гарантируют клиентам бесперебойный подключение к сервисам. Центральный ресурс https://minimallimited.com/luchshie-kazino-s-mgnovennym-vyvodom-deneg-2026-goda-obratite-vnimanie-na-etot-metod-esli-khotite-provodit-tranzaktsii-v-rezhime-realnogo-vremeni/ работает стабильно, гарантируя широкий ассортимент азартных игр. Впрочем иногда формируются системные препятствия или ограничения, потому необходимо знать о доступности функционирующих зеркал.
Что является из себя основное зеркало казино
Копия — это полная реплика основного веб-сайта с схожим набором функций. Рабочее зеркало на данный момент даёт возможность обходить локальные барьеры и поддерживать игру.
Ключевые выгоды применения зеркал:
– Абсолютный вход к индивидуальному кабинету
– Фиксация всех данных аккаунта
– Аналогичный ассортимент автоматов
– Текущие бонусы и предложения
Открытие счёта на ресурсе
Процедура создания аккаунта занимает немного минут. Новые клиенты получают щедрый приз за оформление, он способен охватывать:
– Приветственный игровой кредит
– Безвозмездные вращения для машин
– Эксклюзивные коды
– Расширенный возврат
Во имя финализации создания аккаунта нужно:
1. Зайти на основной сайт или альтернативу
2. Щёлкнуть опцию «Регистрация»
3. Ввести персональные данные
4. Заверить почтовый адрес или мобильный
5. Активировать купон (в случае присутствии)
Подключение в персональный кабинет
После корректной регистрации клиенты могут осуществлять вход используя главный портал или актуальное зеркало. Персональный кабинет предоставляет всесторонний надзор над профилем:
– Летопись ставок
– Внесение счёта
– Снятие выигрышей
– Контроль бонусами
– Вовлечение в турнирах
Привилегии и предложения казино
Портал награждает геймеров разнообразными бонусными предложениями:
Стартовые бонусы
Новые игроки получают внушительный букет бонусов на начальные депозиты. Типично это включает долевую надбавку к объёму вклада плюс безвозмездные вращения.
Регулярные промо
– Раз в неделю кэшбек до 15%
– Состязания с наградными суммами
– Бонусы на день рождения
– Специальные предложения для VIP пользователей
Система лояльности
Постоянные пользователи зарабатывают очки, которые разрешено трансформировать на действительные средства или особые преимущества.
Карманная вариант и программа
Нынешние решения дают возможность играть везде угодно. Карманная версия веб-сайта автономно адаптируется под экран каждого устройства.
Плюсы портативного программы:
– Быстрая подгрузка слотов
– Удобный интерфейс
– Моментальные-сообщения о промо
– Возможность загрузить для Android и iOS
Реальное казино: атмосфера настоящего гемблинг заведения
Секция Live клуба погружает клиентов в атмосферу подлинного азартного заведения. Квалифицированные дилеры проводят действие в режиме актуального времени.
Имеющиеся столы:
– Рулетка
– Очко
– Карточная игра
– Покер
Игровые машины и азартные автоматы
Собрание игровых машин включает множество позиций от ведущих студий. Каждый геймер отыщет развлечение по желанию:
– Традиционные автоматы
– Новые слоты с специальными турами
– Джекпот-игры
– Megaways автоматы
Конкурсы и лотереи
Периодические соревнования добавляют адреналин и открывают опцию выиграть большие суммы. Включение в состязаниях часто даровое, а премиальные пулы доходят до внушительных сумм.
Секьюрити и анонимность
Платформа применяет актуальные системы криптографии для гарантии данных пользователей. Любые платёжные процедуры выполняются через охраняемые линии.
Итог
Главный веб-сайт и его действующие зеркала гарантируют надёжный вход к первоклассным игровым играм. Богатые поощрения, комфортная портативная форма, богатство автоматов и квалифицированное Live-заведение превращают портал замечательным выбором для фанатов азартных игр.
Характеристика оригинального сайта
Современное онлайн-казино обеспечивает своим пользователям разнообразный набор возможностей и вознаграждений. Оригинальный веб-сайт http://www.v1.pokerlistings.nu/2026/02/28/kak-funktsioniruet-skhema-popolneniya-schetov-onlayn-kazino-s-pomoshchyu-sberbanka работает непрерывно, давая возможность к популярным симуляторам, live-казино и многочисленным промо.
Действующее зеркало: вход к платформе
Что такое дубликат казино
Альтернатива представляет собой точную версию основного сайта с иным URL путем. Действующее зеркало дает клиентам избегать запреты и получать непрерывный вход к выбранным играм.
Как найти действующее зеркало сегодня
Рабочие линки на проверенное зеркало появляются через:
– Почтовую рассылку
– Основные медийные сети
– Службу поддержки
– Affiliated сайты
Регистрация на платформе
Ход регистрации
Открытиесчета занимает буквально минут и предполагает данные действия:
1. Открытие на основной портал или действующее зеркало
2. Клик клавиши “Зарегистрироваться”
3. Ввод контактных данных
4. Верификация аккаунта или мобильного
5. Создание кодадоступа
Бонус за открытиесчета
Начинающие пользователи обретают большие вступительные подарки:
– Финансовые средства на кошелек
– Бесплатныевращения для симуляторов
– Увеличенный размер кэшбека
– Уникальные промокоды
Авторизация в персональный аккаунт
Действующие игроки имеютвозможность произвести авторизацию через главный сайт или текущее зеркало. Для этого нужно ввести учетноеимя и пароль, созданные при созданииаккаунта.
Функции персонального раздела
В персональном аккаунте имеются основные инструменты:
– Изменение учетными информацией
– Ввод счета
– Обналичивание средств
– Использование кодов
– Мониторинг архива игр
– Включение в конкурсах
Бонусы и акции
Категории поощрений
Казино балует своих клиентов всевозможными поощрительными акциями:
– Начальный бонус — выгодные подарки на начальные пополнения
– Халявныеспины — подарочные прокруты в рейтинговых играх
– Кэшбек — еженедельный возмещение процента ставок
– Программа верности — эксклюзивные бонусы для активных участников
Купоны и их активация
Эксклюзивные промокоды предоставляют бонусные бонусы. Для активации нужно набрать комбинацию в специальное поле в личном профиле.
Развлекательный каталог
Игры
Каталог игровых слотов содержит массу названий от ведущих производителей:
– Стандартные автоматы
– Современные слоты
– Призовые игры
– Лицензионные игры
Live казино
Секция Live-казино дарит игру с настоящими ведущими в условиях актуального эфира:
– Европейскаярулетка
– Блэкджек
– PuntoBanco
– Карибскийпокер
Соревнования
Постоянные конкурсы с крупными призовыми фондами устраиваются ежедневно. Соревнующиеся сражаются за лидерство в турнирнойсетке.
Смартфонная реализация и APP
Смартфонная версия портала
Основной сайт целиком оптимизирован для смартфонных устройств. Пользователи вправе запускать развлечения напрямую через интернет-браузер без нужды скачивания.
Приложение для загрузки
Специальное смартфонное приложение имеется для установки на устройства с программными средами Android и iOS. APP предоставляет:
– Быстрый вход к слотам
– Стабильную функциональность
– Оперативные-сообщения о акциях
– Комфортный оформление
Вывод
Основной ресурс казино и его актуальные зеркала обеспечивают участникам комплексный доступ к отличным геймплейным услугам. Выгодные вознаграждения, разнообразные предложения, функциональная портативная платформа и профессиональная поддержка формируют азартный опыт чрезвычайно удобным и результативным.
HappyPaws Pharmacy: HappyPaws Pharmacy – pet pharmacy USA
https://vsiknygy.net.ua/wp-content/pages/promokodu_1xbet_2021_besplatno.html
Актуальные онлайн-казино предлагают клиентам широкий выбор развлечений и щедрые награды. Тем не менее для удобной деятельности необходимо осознавать, как найти казино Panda и его актуальные зеркала.
Что такое главный ресурс казино
Главный портал казино — это основная площадка, где игроки могут получать удовольствие от игровыми автоматами. Ресурс работает на официальных принципах и обладает всеми требуемыми сертификатами.
Главные плюсы лицензионного ресурса:
– Надежность персональных данных
– Справедливые условия использования
– Стабильные выводы
– Компетентная служба поддержки
Действующее зеркало казино: для чего требуется
Зеркало — это точная клон официального сайта, хостящаяся по отличному веб-адресу. Функционирующее зеркало запускается для поддержания бесперебойного доступа к сайту.
Причины эксплуатации альтернативных адресов:
– Ограничение основного сайта
– Регламентные процедуры
– Большая загрузка на систему
Как получить рабочее зеркало сейчас
Получить текущее действующее зеркало можно множественными способами:
1. Почтовые оповещения — подпишитесь на почтовую отправку
2. Департамент помощи — проконсультируйтесь в онлайн-чат
3. Социальные площадки — следите за новостями
4. Партнерские сайты — авторитетные сайты
Регистрация на сайте казино
Процедура оформления составляет только несколько минут:
1. Нажмите на кнопку “Создать аккаунт”
2. Укажите необходимые сведения
3. Активируйте email e-mail
4. Активируйте купон, если доступен
По завершении финализированной создания аккаунта вам предоставится доступен личный кабинет.
Премии и коды активации
Выгодная поощрительная структура — существенное конкурентное преимущество казино:
Поощрение за создание аккаунта
Новые клиенты получают стартовый презент, который может включать:
– Финансовый бонус на дебютный вклад
– Фри-спины для автоматов
– Безвозвратные деньги
Бонусные коды
Систематически появляются новые бонусные шифры, предоставляющие активировать дополнительные бонусы.
Механизм кешбэка
Активные участники приобретают процент утраченных денег в виде компенсации.
Текущие предложения и турниры
Казино постоянно устраивает азартные промо-мероприятия:
– Недельные баттлы
– Праздничные акции
– Раздачи ценных подарков
– Механизм привилегий
Доступ в личный кабинет
Для логина на портал нужно:
1. Посетить главный сайт или актуальное зеркало
2. Активировать “Вход”
3. Указать имя пользователя и пароль
В пользовательском кабинете предоставлены данные опции:
– Внесение средств кошелька
– Обналичивание призов
– Изучение архива операций
– Настройка индивидуальными настройками
Адаптивная платформа и приложение
Мобильная версия
Оптимизированная платформа портала дает возможность развлекаться с разных портативного гаджета. Визуал автоматически подстраивается под габариты монитора.
Приложение для скачивания
Получить app можно для:
– Android — официальная скачивание с платформы
– iOS — загрузка через App Store
Преимущества приложения:
– Мгновенный запуск
– Надежная работа
– Push-нотификации об бонусах
– Производительный дизайн
Гемблинг секции
Автоматы
Обширная коллекция игровых автоматов от лучших поставщиков:
– Традиционные автоматы
– Видео-игры
– Прогрессивные-машины
Live casino
Раздел с профессиональными ведущими предоставляет:
– Рулетка
– 21
– Мини-баккара
– Покер
Стримы транслируются в высоком качестве, воссоздавая атмосферу реального казино.
Системы внесения средств и получения
Ресурс работает с разные платежные системы:
– Дебетовые средства
– Электронные счета
– Криптовалюты
– Wire транзиты
Базовые лимиты депозита и быстрые транзакции гарантируют развлечение крайне комфортной.
Команда помощи
Квалифицированная группа support работает 24/7 и способна содействовать с любыми задачами:
– Реалтайм-чат
– Email-поддержка
– Голосовая линия
Резюме
Основной портал казино и его актуальные копии обеспечивают клиентам конфиденциальный и азартный игровой процесс. Привлекательные награды, удобная mobile платформа, разнообразные слоты и высокоуровневое live-казино делают эту ресурс отличным вариантом для азартных времяпрепровождения.
kirpichnoe-stroitelstvo.ru
Передовые онлайн-казино обеспечивают игрокам обширный ассортимент опций для беспроблемной игры. Переход к ресурсу Aqua casino реализуется через лицензионный портал или функционирующее зеркало.
Что такое функционирующее зеркало казино
Рабочее зеркало — это запасной домен лицензионного ресурса казино. Такие копии формируются для предоставления непрерывного подключения к азартной платформе.
Копия текущее абсолютно дублирует опции главного домена. Пользователи имеют схожий выход ко всем функциям, включая оформление профиля, зачисление средств счета и получение призов.
Оформление профиля на лицензионном ресурсе
Механизм оформления учетной записи требует всего пару моментов. Будущим пользователям необходимо:
1. Войти на лицензионный домен или актуальное проверенное зеркало
2. Щелкнуть кнопку “Открыть счет”
3. Внести нужные сведения
4. Подтвердить почтовую почту
5. Применить бонусный код при существовании
После окончания регистрации игрок обретает приз за регистрацию, который вправе охватывать даровые спины или cash премию.
Вход в личный кабинет
Личный кабинет — это защищенная территория, где участники способны управлять своим счетом. Для авторизации следует ввести логин и секретный ключ.
В персональном кабинете представлены следующие инструменты:
– Просмотр записей операций
– Применение купонов
– Управление вознаграждениями
– Включение в соревнованиях
– Отслеживание кэшбека
– Корректировка данных
Призы и промо
Азартная сервис предлагает выгодные бонусы:
Стартовый бонус — начинающие получают значительное вознаграждение на первые взносы.
Даровые спины — дарятся как при создании аккаунта, так и в рамках разнообразных акций.
Возврат средств — постоянный рефанд фрагмента проигранных денег.
Купоны — специальные последовательности, обеспечивающие доступ к специальным предложениям.
Анализ игровых категорий
Слоты
Собрание slots включает массу игр от топовых провайдеров. Геймеры обнаружат как обычные аппараты, так и актуальные мультимедийные автоматы с притягательной графикой.
Live казино
Категория Live казино предоставляет шанс играть с действующими крупье в режиме актуального времени. Имеются распространенные варианты: рулетка, блэкджек, баккара, покер.
Конкурсы
Постоянные состязания с значительными премиальными пулами притягивают множество соревнующихся. Победители зарабатывают финансовые награды и эксклюзивные подарки.
Смартфонная версия и программа
Портативная версия платформы предоставляет право играть с произвольного аппарата. Оформление автоматически адаптируется под габариты экрана.
Получить приложение можно для аппаратов на Android и iOS. Телефонное программа имеет всеми возможностями десктопной версии.
Как найти текущее зеркало на данный момент
Действующие URL дубликатов периодически меняются. Найти действующую URL можно несколькими вариантами:
– Через отдел помощи
– В подлинных социальных сетях
– По email рассылке
– На аффилиатных порталах
Защита и легальность
Основной сайт действует на базе зарубежной документа. Все операции шифруются инновационными протоколами безопасности.
Секретность индивидуальных сведений обеспечивается в полном формате.
Итог
Основной ресурс и его рабочие дубликаты обеспечивают участникам круглосуточный вход к превосходным азартным развлечениям. Привлекательные призы, разнообразные автоматы, профессиональная сервис — все это превращает азартный времяпрепровождение невероятно беспроблемным и увлекательным.
True Health Pharm True Health Pharm True Health Pharm
1xbet g?ncel 1xbet g?ncel .
Bazaar Express – Simple page design makes navigation effortless.
Характеристика основного веб-сайта
Прогрессивные онлайн казино дают пользователям богатый выбор игр и шансов. Лицензионный ресурс казино Вован гарантирует надежный возможность к игровым сервисам.
Действующее зеркало: путь сегодня
Альтернативный адрес служит в качестве абсолютную реплику главного веб-сайта. Актуальное зеркало дает возможность участникам преодолевать существующие блокировки.
Выгоды задействования зеркала
Основные достоинства включают:
– Постоянный доступ к сайту
– Удержание абсолютно всех функций базового портала
– Сохранность персональных материалов
– Идентичный инструментарий
Регистрация на сайте
Ход открытия счета отличается доступностью и комфортом. Свежие пользователи требуется:
1. Открыть лицензионный сайт или его зеркало
2. Нажать на элемент открытия счета
3. Ввести требуемые сведения
4. Верифицировать почтовую ящик
5. Осуществить начальный авторизацию
Бонус за открытие счета
Начинающие получают значительный начальный подарок. Такое вознаграждение может включать:
– Денежные средства
– Безвозмездные прокруты
– Увеличенный процент возврата
Логин в собственный профиль
Существующие клиенты могут мгновенно зайти в свой раздел, задействуя учетные данные и код. Собственный профиль дает путь к:
– Регулированию счетом
– Хронологии операций
– Действующим призам
– Параметрам профиля
Призы и предложения
Сайт постоянно проводит многочисленные промо-кампании для пользователей.
Виды бонусов
Ключевые виды бонусов:
– Денежные призы – коэффициент от величины депозита
– Спины – complimentary вращения в игровых машинах
– Компенсация – отдача процента утраченных средств
– Призовые вознаграждения – призы за выступление в соревнованиях
Купоны
Эксклюзивные купоны дают возможность приобрести бонусные привилегии. Игроки имеют возможность найти их на тематических сайтах или приобрести в рассылке.
Мобильная версия и программа
Передовые игроки предпочитают мобильный геймплей.
Характеристики портативной адаптации
– Responsive дизайн для разнообразных устройств
– Целостный возможность к развлечениям
– Стремительная работа
– Комфортное навигация
Скачать app
Mobile софт открыто для скачивания на гаджеты с базовыми платформами Android и iOS. Программа обеспечивает:
– Бесперебойную работу
– Push алерты о призах
– Мгновенный путь к любимым развлечениям
Игровой каталог
Портал предлагает обширную библиотеку игровых развлечений.
Слоты
Библиотека игровых слотов охватывает:
– Традиционные автоматы
– Современные автоматы
– Прогрессивные игры
– Тематические автоматы
Live столы
Область настоящих игр предоставляет возможность состязаться с настоящими дилерами. Предложены:
– Американская рулетка
– Блэкджек
– Baccarat
– Техасский холдем
Турниры
Регулярные чемпионаты позволяют клиентам бороться за значительные финансовые фонды. Конкурсная система обновляется еженедельно.
Банковские процедуры
Казино предлагает обилие опций пополнения и вывода финансов:
– Дебетовые карты
– Цифровые кошельки
– Межбанковские транзакции
– Крипто
Совокупные платежи осуществляются безопасно с применением передовых протоколов шифрования.
Департамент поддержки
Опытная отдел саппорта действует 24/7. Связаться с операторами возможно через:
– Интерактивный чат
– Электронную почту
– Горячую линию
– Социальные сети
Охрана и регулирование
Платформа работает на базе действительной лицензии. Подобное удостоверяет:
– Прозрачность развлекательного процесса
– Безопасность персональных данных
– Быстрые перечисления
– Ответственный игровой процесс
Заключение
Лицензионный портал и его рабочие дубликаты гарантируют участникам полный спектр опций для удобной и доходной времяпрепровождения. Солидные бонусы, всевозможные игры, квалифицированная сервис и проверенная платформа транзакций создают платформу превосходным решением для ценителей развлекательных игр.
Передовые онлайн-казино предлагают клиентам богатый диапазон опций для удобной развлечений. Доступ к платформе Beton официальный сайт реализуется через лицензионный сайт или функционирующее зеркало.
Что такое рабочее зеркало казино
Рабочее зеркало — это дополнительный адрес основного ресурса казино. Такие дубликаты генерируются для обеспечения бесперебойного доступа к развлекательной платформе.
Альтернатива сегодня совершенно воспроизводит возможности базового ресурса. Клиенты приобретают аналогичный выход ко всем функциям, включая открытие счета, финансирование депозита и обналичивание средств.
Регистрация на лицензионном портале
Механизм создания аккаунта длится всего несколько моментов. Начинающим клиентам нужно:
1. Войти на главный портал или действующее подлинное зеркало
2. Кликнуть кнопку “Создать аккаунт”
3. Ввести нужные реквизиты
4. Подтвердить email почту
5. Активировать промокод при присутствии
После завершения регистрации игрок обретает вознаграждение за регистрацию, который имеет право предполагать free spins или монетарное премию.
Доступ в собственный кабинет
Персональный кабинет — это защищенная территория, где пользователи могут администрировать своим аккаунтом. Для авторизации необходимо внести имя пользователя и пароль.
В пользовательском кабинете имеются данные функции:
– Мониторинг хронологии переводов
– Активация кодов активации
– Регулирование вознаграждениями
– Участие в соревнованиях
– Отслеживание возврата средств
– Изменение данных
Вознаграждения и промо
Азартная площадка дарит щедрые вознаграждения:
Регистрационный комплект — начинающие получают солидное начисление на начальные вклады.
Фриспины — выдаются как при регистрации, так и в ходе всевозможных кампаний.
Кэшбек — регулярный возврат доли потерянных средств.
Промокоды — специальные последовательности, обеспечивающие право к уникальным бонусам.
Описание азартных направлений
Слоты
Библиотека аппаратов включает сотни позиций от ведущих провайдеров. Геймеры найдут как обычные машины, так и современные видеослоты с увлекательной визуализацией.
Live казино
Зона Live казино предлагает шанс играть с реальными ведущими в формате текущего времени. Имеются известные столы: рулетка, блэкджек, баккара, покер.
Турниры
Регулярные чемпионаты с крупными выигрышными банками привлекают массу конкурсантов. Призеры обретают финансовые награды и эксклюзивные премии.
Мобильная версия и app
Адаптивная версия платформы предоставляет право участвовать с произвольного устройства. Дизайн автономно подстраивается под габариты экрана.
Загрузить софт можно для девайсов на Android и iOS. Телефонное ПО характеризуется всеми возможностями полной версии.
Как определить рабочее зеркало на сегодня
Свежие линки дубликатов регулярно обновляются. Узнать действующую ссылку можно разными вариантами:
– Через отдел саппорта
– В подлинных новостных сетях
– По email дайджесту
– На аффилиатных сайтах
Безопасность и лицензирование
Лицензионный портал функционирует на основании мировой лицензии. Все платежи оберегаются передовыми протоколами кодирования.
Конфиденциальность индивидуальных информации сохраняется в совершенном объеме.
Заключение
Главный домен и его рабочие копии дарят участникам 24/7 путь к первоклассным гемблинговым сервисам. Щедрые призы, разнообразные автоматы, квалифицированная сервис — все это превращает азартный досуг невероятно беспроблемным и увлекательным.
velobet bonus Opened it and checked basics, everything runs fine. No issues.
1xbet t?rkiye giri? 1xbet-giris-37.com .
Подключение к ресурсу и рабочие ссылки
Современные интернет казино обеспечивают участникам большой выбор опций. Главный сайт казино РўРёРїРїРё гарантирует надежный вход ко всем возможностям. При этом временами появляются случаи, когда нужно дополнительный вариант входа.
Что представляет собой актуальное зеркало
Действующее зеркало — это точная реплика официального сайта с запасным URL именем. Альтернатива сегодня обеспечивает миновать возможные блокировки и гарантировать непрерывный доступ к выбранным развлечениям.
Легальное зеркало обладает всеми возможностями, что и базовый ресурс:
– Целый перечень автоматов
– Персональный профиль с сохраненными информацией
– Все награды и промо
– Надежные финансовые переводы
Создание аккаунта и авторизация в систему
Процедура регистрации на сайте занимает буквально мгновений. Свежим игрокам следует:
1. Попасть на действующее зеркало сейчас
2. Кликнуть кнопку «Зарегистрироваться»
3. Ввести необходимые параметры
4. Проверить цифровую почту или данные телефона
5. Получить бонус за регистрацию
Вход в индивидуальный кабинет реализуется путем указание логина и пароля.
Описание наградной системы
Щедрая поощрительная структура — основное достоинство казино. Пользователи зарабатывают различные награды:
Стартовые награды
Свежие клиенты могут претендовать на привлекательный подарок за оформление. Обычно это пакет предложений, включающий:
– Пропорциональную прибавку к дебютному депозиту
– Подарочные фриспины
– Дополнительные средства на счет
Купоны и особые акции
Систематические бонусные комбинации дают возможность активировать призовые выгоды. Задействовать их можно в предназначенном окне личного кабинета.
Бесплатные вращения и кэшбек
Free spins — это возможность запускать игры без расходования личных сумм. Кэшбек означает частичный компенсацию израсходованных финансов.
Каталог развлечений
Игровая сайт обеспечивает значительную подборку автоматов.
Автоматы
Многообразие слотов восхищает ожидания. Доступны классические простые автоматы и современные развлечения с увлекательной графикой.
Live игры
Секция Live игр транспортирует пользователей в среду настоящего развлекательного дома. Опытные ведущие проводят партии в реальном формате.
Соревнования и лидерборды
Периодические соревнования обеспечивают драйва и гарантируют возможность получить большие призы.
Mobile реализация и программа
Современные решения обеспечивают наслаждаться в удобном пространстве. Адаптивная версия самостоятельно настраивается под монитор гаджета.
Загрузить софт можно для мобильных платформ iOS и Android. Приложение предоставляет:
– Оперативный запуск
– Стабильную производительность
– Мгновенные-алерты об предложениях
– Простой интерфейс
Финансовые операции
Ресурс использует различные способы внесения и снятия финансов:
– Банковские инструменты
– Электронные платформы
– Крипто
– Финансовые отправки
Все действия выполняются через зашифрованное подключение, что защищает целостность приватных данных.
Департамент помощи
Квалифицированная команда support действует 24/7. Соединиться с консультантами возможно через:
– Интерактивный-чат
– E-mail почту
– Телефон
– Медиа платформы
Выводы
Официальный ресурс и его актуальное зеркало дают пользователям стабильный и комфортный переход к увлекательным играм. Щедрые награды, обширный каталог автоматов и отличная ассистанс формируют процесс предельно приятной и результативной.
Современные онлайн-казино предоставляют клиентам большой диапазон услуг и премиальных программ. Подключение к площадке реализуется через официальный сайт или его рабочее зеркало казино Zooma зеркало, что дает постоянную активность.
Чем является рабочее зеркало казино
Копия — это полная дубликат оригинального ресурса, сделанная для устранения блокировок. Рабочее зеркало помогает клиентам сохранить подключение к излюбленным играм в произвольное время.
Лицензионное зеркало обладает всеми опциями первоначального веб-сайта:
– Совокупный каталог слотов
– Профиль с записанными сведениями
– Текущие бонусы
– Защищенные расчетные операции
Создание аккаунта на главном ресурсе
Алгоритм оформления составляет всего считанные минут. Первым участникам нужно:
1. Попасть на главный портал или актуальное зеркало
2. Кликнуть на ссылку “Создать аккаунт”
3. Ввести обязательные параметры
4. Активировать контакт
5. Произвести первый депозит
Стартовый бонус выдается незамедлительно после выполнения всех стадий.
Вход в учетную запись
Действующие игроки могут выполнить доступ применяя:
– Никнейм и ключ
– Код сотового
– Электронную почту
Профиль дает шанс к администрированию счетом, записям ставок и доступным поощрениям.
Промо и предложения
Развлекательная система вознаграждает активных игроков щедрыми призами:
Первый бонус
– Премия на начальный пополнение до 100%
– Фриспины на популярные слоты
– Экстра бонусы за очередные взносы
Ваучеры
Уникальные купоны обеспечивают шанс на приобретение особых вознаграждений. Актуальные промокоды публикуются в блоке “Промо”.
Возврат средств
Постоянный бонус равен до 10% от использованных финансов. Выплата выплачивается незамедлительно.
Программа лояльности
Верные участники зарабатывают очки, которые превращаются на реальные деньги или free spins.
Адаптивный портал и софт
Для практичности игроков сделана качественная mobile версия. Отзывчивый интерфейс дает возможность удобно играть с каждого переносного устройства.
Достоинства софта:
– Быстрый вход к автоматам
– Настроенный облик
– Надежная деятельность
– Нотификации о свежих бонусах
Загрузить софт можно безвозмездно с официального ресурса для девайсов на Android и iOS.
Библиотека развлечений
Машины
База насчитывает более 2000 машин от ведущих провайдеров:
– Стандартные игры
– Мультимедийные игры
– Слоты с джекпотом
– Фирменные слоты
Live казино
Секция Live развлечений предлагает развлечение с подлинными ведущими в живом эфире:
– Колесо фортуны
– Карточная игра
– Баккара
– Покер
Конкурсы
Регулярные соревнования с крупными выигрышными пулами проводятся регулярно. Присоединение в соревнованиях возможно всем действующим участникам.
Денежные варианты
Пополнения и снятия средств реализуются через популярные методы:
– Платежные пластик
– Электронные счета
– Bitcoin
– Счетные транзакции
Самый низкий платеж — от 100 рублей. Получение финансов проводится в течение 24 ч.
Отдел поддержки
Постоянная команда саппорта способна ассистировать в исправлении всех проблем:
– Онлайн-чат
– Email
– Контактный номер
– Публичные сети
Надежность и документ
Главный портал работает на фундаменте глобальной документа. Всевозможные параметры игроков защищены актуальным SSL-шифрованием.
Заключение
Рабочее зеркало обеспечивает бесперебойный вход к излюбленным играм, щедрым бонусам и удобным сервисам. Присоединяйтесь сегодня и приобретите первый поощрение!
For predictions
best online gambling sites free spins
for further reading.
1xbwt giri? 1xbet-giris-38.com .
bahis sitesi 1xbet bahis sitesi 1xbet .
affordable ed medication: order ed meds online – True Health Pharm
Обзор официального сайта
Современное онлайн-казино дарит своим игрокам обширный набор возможностей и вознаграждений. Главный ресурс https://geg.mk/kak-bystro-osushchestvit-popolnenie-balansa-ispolzuya/ работает круглосуточно, предоставляя доступ к востребованным играм, live-казино и обширным промо.
Рабочее зеркало: путь к порталу
Что такое дубликат казино
Зеркало представляет собой полную реплику главного ресурса с отличным URL названием. Функционирующее зеркало позволяет игрокам миновать барьеры и сохранять надежный подключение к предпочитаемым развлечениям.
Как получить актуальное зеркало сегодня
Рабочие линки на основное зеркало публикуются через:
– Почтовую оповещение
– Официальные публичные сети
– Команду помощи
– Специализированные площадки
Оформление на платформе
Этапы открытиясчета
Регистрация длится буквально минут и содержит такие шаги:
1. Доступ на главный сайт или действующее зеркало
2. Выбор кнопки “Зарегистрироваться”
3. Указание личных реквизитов
4. Подтверждение адреса или мобильного
5. Формирование кодадоступа
Бонус за оформление
Новые пользователи зарабатывают выгодные стартовые вознаграждения:
– Финансовые средства на баланс
– Freespins для симуляторов
– Повышенный размер кешбэка
– Особые коды
Доступ в личный счет
Активные участники могут произвести авторизацию через официальный веб-сайт или рабочее зеркало. Для этого требуется внести логин и пароль, созданные при регистрации.
Возможности собственного раздела
В собственном аккаунте доступны следующие инструменты:
– Изменение контактными данными
– Внесение счета
– Вывод выигрышей
– Использование кодов
– Проверка архива операций
– Регистрация в конкурсах
Вознаграждения и предложения
Типы бонусов
Казино балует своих игроков различными призовыми системами:
– Вступительный пакет — щедрые подарки на дебютные взносы
– Бесплатныевращения — экстра вращения в топовых автоматах
– Компенсация — еженедельный возврат доли проигрышей
– Схема поощрения — эксклюзивные привилегии для активных пользователей
Промокоды и их ввод
Эксклюзивные промокоды обеспечивают дополнительные вознаграждения. Для активации следует ввести комбинацию в специальное поле в персональном кабинете.
Геймплейный набор
Симуляторы
Каталог азартных автоматов вмещает тысячи названий от ведущих поставщиков:
– Классические машины
– Современные слоты
– Прогрессивные автоматы
– Сюжетные слоты
Live казино
Область Live-казино дарит игру с профессиональными дилерами в условиях онлайн трансляции:
– Рулетка
– Blackjack
– Baccarat
– Casinopoker
Конкурсы
Периодические состязания с крупными выигрышными призами проходят постоянно. Игроки соревнуются за победу в таблице.
Смартфонная реализация и APP
Адаптивная версия сайта
Оригинальный портал полностью приспособлен для смартфонных гаджетов. Клиенты могут пользоваться развлечения напрямую через интернет-браузер без нужды инсталляции.
APP для установки
Официальное смартфонное софт предлагается для скачивания на аппараты с рабочими системами Android и iOS. APP обеспечивает:
– Оперативный вход к играм
– Стабильную операционность
– Мгновенные-уведомления о промо
– Комфортный интерфейс
Заключение
Главный веб-сайт казино и его действующие альтернативы обеспечивают игрокам всесторонний вход к отличным развлекательным развлечениям. Большие бонусы, разнообразные предложения, удобная мобильная реализация и профессиональная сервис создают азартный времяпрепровождение максимально enjoyable и прибыльным.
velobet casino bonus Was searching for a new option and found this, looks normal. No issues yet.
Эта статья предлагает захватывающий и полезный контент, который привлечет внимание широкого круга читателей. Мы постараемся представить тебе идеи, которые вдохновят вас на изменения в жизни и предоставят практические решения для повседневных вопросов. Читайте и вдохновляйтесь!
Узнать больше – https://vivod-iz-zapoya-2.ru/
1xbet mobi 1xbet-giris-32.com .
Шпаклевка стен https://shpaklevka-sten.ru и потолков в Москве — выравнивание поверхностей под покраску и обои. Качественные материалы, опытные мастера и соблюдение технологий. Выполняем работы быстро, аккуратно и с гарантией результата по доступной цене.
Дизайнерское бюро https://vseremontytut.ru проектирование интерьера и ремонт под ключ. Разработка дизайн-проекта, 3D-визуализация, подбор материалов и полная реализация. Создаем стильные и функциональные пространства с гарантией качества и соблюдением сроков.
Все новостройки https://tut-novostroyki.ru от застройщиков в Новосибирске — актуальный каталог квартир в новых ЖК. Цены, планировки, сроки сдачи и акции. Подберите квартиру напрямую от застройщика без комиссии с удобным поиском и проверенной информацией.
Современные онлайн-казино гарантируют пользователям множество вариантов для комфортной игры. Официальный сайт казино Apex Spins официальный сайт открывает возможность ко всем возможностям и азартным играм. Однако при появлении технических сложностей на подмогу приходят рабочие дубликаты.
Что означает собой функционирующее зеркало
Дубликат казино — это идентичная реплика главного сайта, расположенная по альтернативному URL. Подлинное зеркало хранит все функции, вместе с создание аккаунта, вход в персональный кабинет, поощрения и промокоды.
Зеркало на сегодня гарантирует:
– Постоянный доступ к развлекательным машинам
– Стопроцентную безопасность персональных информации
– Сохранение средств и истории платежей
– Применимость всех акций
Регистрация на официальном портале
Процесс регистрации требует считанные минут. Начинающим геймерам необходимо:
1. Войти на подлинный портал или актуальное зеркало
2. Выбрать кнопку «Создать аккаунт»
3. Внести необходимые сведения
4. Верифицировать email почту
5. Применить кодовое слово при присутствии
После финиша создания аккаунта пользователи получают приз за регистрацию, который может содержать фриспины или денежное поощрение.
Доступ в личный кабинет
Персональный кабинет открывает комплексный надзор над игровым процессом. Через индивидуальный аккаунт разрешается:
– Финансировать депозит
– Выводить средства
– Активировать купоны
– Контролировать историю пари
– Участвовать в соревнованиях
– Обретать кешбэк
Анализ бонусов и специальных предложений
Щедрая поощрительная система — значимое плюс казино. Центральные категории вознаграждений:
Вступительный подарок
Новички приобретают выгодное премирование на стартовые депозиты. Величина приза может доходить до 100-200% от размера вклада.
Фриспины
Даровые вращения начисляются для популярных машин. Объем бесплатных вращений колеблется от 10 до 500 штук.
Возврат средств
Еженедельный или помесячный откат процента проигранных денег. Обычный объем кэшбека — 5-15%.
Турниры
Постоянные соревнования с солидными наградными фондами. Участники состязаются за верхние места в рейтинге.
Смартфонная версия и приложуха
Мобильная версия позволяет наслаждаться игрой с любого девайса. Пользователи могут загрузить софт для iOS и Android или эксплуатировать браузерную версию.
Достоинства портативного приложения:
– Быстрая загрузка игр
– Удобный UI
– Push-уведомления о поощрениях
– Вход через Face ID
Игровые автоматы и Live казино
Развлекательная библиотека включает сотни наименований от известных разработчиков.
Топовые типы слотов:
– Стандартные автоматы
– Видеослоты с премиальными раундами
– Прогрессивный джекпот автоматы
– Мега-путь автоматы
Live игорный зал
Категория live игорный зал предоставляет игру с профессиональными ведущими. Доступны традиционные игры:
– Рулетка
– Блэкджек
– Баккара
– Покер
Как разыскать функционирующее зеркало
Раздобыть свежую ссылку на зеркало возможно различными способами:
1. Зарегистрироваться на email-рассылку
2. Следить за апдейтами в соц сетях
3. Обратиться в отдел поддержки
4. Запомнить действующее зеркало в избранное
Заключение
Официальный ресурс и его актуальные зеркала дают стабильный путь к игровым автоматам. Щедрые бонусы, множественные бонусные коды, комфортное портативное софт и качественная служба поддержки обеспечивают азартный процесс максимально комфортным и надежным.
Актуальные онлайн-казино обеспечивают пользователям обширный набор игр и выгодные награды. Но для беспроблемной деятельности важно понимать, как отыскать РќСЊСЋ Ретро и его актуальные зеркала.
Что такое главный веб-ресурс казино
Официальный сайт казино — это главная система, где пользователи могут развлекаться гемблинг слотами. Платформа работает на легальных основаниях и имеет всеми обязательными документами.
Главные достоинства лицензионного портала:
– Безопасность индивидуальных реквизитов
– Объективные положения работы
– Стабильные транзакции
– Компетентная техподдержка
Рабочее зеркало казино: для чего необходимо
Копия сайта — это идентичная клон лицензионного ресурса, хостящаяся по альтернативному домену. Рабочее зеркало формируется для обеспечения постоянного подключения к порталу.
Причины задействования копий сайта:
– Блокировка официального URL
– Плановые операции
– Высокая загрузка на систему
Как обнаружить рабочее зеркало сегодня
Получить текущее официальное зеркало можно разными методами:
1. Почтовые оповещения — подпишитесь на email подписку
2. Отдел поддержки — проконсультируйтесь в онлайн-чат
3. Корпоративные медиа — проверяйте за новостями
4. Специализированные площадки — надежные ресурсы
Открытие счета на сайте казино
Этап создания аккаунта длится всего считанные секунд:
1. Активируйте на клавишу “Зарегистрироваться”
2. Введите требуемые поля
3. Активируйте контактную e-mail
4. Примените промокод, если предоставлен
По завершении оконченной создания аккаунта вам будет открыт персональный профиль.
Бонусы и бонусные коды
Привлекательная наградная система — ключевое преимущество казино:
Награда за регистрацию
Новые участники получают приветственный подарок, который может охватывать:
– Монетарный депозит на первый взнос
– Бесплатные вращения для автоматов
– Безвозвратные деньги
Купоны
Регулярно публикуются новые купоны, предоставляющие получить дополнительные привилегии.
Механизм кэшбека
Регулярные клиенты возвращают часть проигранных средств обратно.
Свежие кампании и турниры
Сайт систематически проводит захватывающие кампании:
– Weekly баттлы
– Праздничные промо
– Розыгрыши значительных подарков
– Схема лояльности
Вход в пользовательский аккаунт
Для доступа на сайт требуется:
1. Посетить главный портал или действующее зеркало
2. Нажать “Вход”
3. Указать никнейм и секретную комбинацию
В личном аккаунте предоставлены данные инструменты:
– Внесение средств депозита
– Обналичивание денег
– Просмотр истории ставок
– Управление индивидуальными данными
Мобильная модификация и app
Портативная вариант
Адаптивная версия веб-сайта предоставляет шанс играть с всех карманного девайса. Визуал адаптивно адаптируется под диагональ экрана.
Приложение для установки
Получить клиент можно для:
– Android — прямая загрузка с сайта
– iOS — скачивание через App Store
Преимущества app:
– Быстрый старт
– Стабильная производительность
– Push-оповещения об бонусах
– Ускоренный интерфейс
Гемблинг секции
Слоты
Разнообразная коллекция игровых автоматов от ведущих разработчиков:
– Ретро машины
– Современные-эмуляторы
– Джекпот-слоты
Live игры
Зона с живыми дилерами дает:
– European/American Roulette
– 21
– Baccarat
– Покер
Трансляции ведутся в отличном качестве, создавая эффект реального казино.
Системы внесения средств и снятия
Ресурс принимает различные транзакционные сервисы:
– Платежные card
– Цифровые счета
– Bitcoin/Ethereum
– Wire транзиты
Стартовые пороги депозита и моментальные выплаты гарантируют игру максимально приятной.
Отдел support
Профессиональная группа помощи доступна 24/7 и может помочь с любыми ситуациями:
– Мгновенный-чат
– Email-переписка
– Голосовая горячая линия
Итоги
Основной портал казино и его действующие зеркала предоставляют участникам защищенный и захватывающий азартный отдых. Выгодные подарки, удобная портативная модификация, богатые игры и качественное live-казино формируют эту платформу замечательным выбором для гемблинг развлечений.
Практик о заборах https://sinta-kedr.ru/ честный разбор материалов, установки и стоимости. Узнайте плюсы и минусы разных видов заборов, частые ошибки и реальные сроки службы. Полезные рекомендации перед покупкой и монтажом ограждений.
https://www.isra.com/news/278984
1xbet giri?i 1xbet-giris-42.com .
1 xbet giri? 1 xbet giri? .
velobet mirror Was checking different sites and came across this one, looks decent. Everything works fine so far. Might use it more.
Описание основного ресурса
Передовые интернет казино обеспечивают пользователям широкий выбор развлечений и опций. Главный ресурс Голд предлагает защищенный вход к азартным услугам.
Функционирующее зеркало: возможность сегодня
Зеркало является как идентичную версию главного веб-сайта. Актуальное зеркало позволяет пользователям миновать вероятные запреты.
Преимущества использования зеркала
Принципиальные плюсы включают:
– Постоянный вход к сайту
– Удержание полных характеристик главного портала
– Охрана личных информации
– Аналогичный функционал
Регистрация на портале
Ход открытия счета выделяется простотой и практичностью. Новые участники требуется:
1. Зайти на главный портал или его зеркало
2. Нажать на клавишу регистрации
3. Внести требуемые данные
4. Активировать электронную адрес
5. Выполнить начальный логин
Подарок за открытие счета
Новые игроки приобретают значительный приветственный бонус. Такое премия может содержать:
– Финансовые суммы
– Бесплатные спины
– Увеличенный процент компенсации
Доступ в персональный профиль
Действующие пользователи способны оперативно зайти в личный кабинет, задействуя имя пользователя и пароль. Персональный профиль обеспечивает шанс к:
– Регулированию балансом
– Журналу транзакций
– Работающим подаркам
– Настройкам профиля
Вознаграждения и предложения
Ресурс систематически проводит различные промо-кампании для клиентов.
Категории поощрений
Основные виды поощрений:
– Денежные подарки – часть от объема пополнения
– Фриспины – даровые прокруты в автоматах
– Компенсация – компенсация фрагмента утраченных средств
– Турнирные трофеи – премии за игру в турнирах
Промокоды
Особые промокоды дают возможность заработать экстра привилегии. Игроки в состоянии найти их на аффилиатных ресурсах или приобрести в уведомлениях.
Портативная адаптация и app
Актуальные клиенты любят карманный досуг.
Функции mobile системы
– Адаптивный интерфейс для любых девайсов
– Совокупный возможность к играм
– Быстрая загрузка
– Практичное контроль
Загрузить приложение
Мобильное app предложено для downloading на устройства с базовыми системами Android и iOS. Программа гарантирует:
– Бесперебойную производительность
– Push алерты о акциях
– Оперативный доступ к любимым слотам
Азартный ассортимент
Портал дает огромную подборку игровых забав.
Автоматы
Библиотека игровых автоматов охватывает:
– Обычные игры
– Video игры
– Джекпотные игры
– Сюжетные слоты
Live дилеры
Секция реальных игр предоставляет шанс участвовать с настоящими диллерами. Открыты:
– Европейская рулетка
– Блек-джек
– Punto Banco
– Покер
Конкурсы
Периодические конкурсы дают возможность участникам бороться за внушительные наградные банки. Призовая система изменяется еженедельно.
Банковские операции
Казино предоставляет массу опций внесения и снятия сумм:
– Банковские карты
– Онлайн платежные системы
– Межбанковские трансферы
– Крипто
Абсолютно все транзакции осуществляются надежно с применением прогрессивных протоколов защиты.
Сервис сопровождения
Опытная группа support трудится без перерыва. Связаться с специалистами реально через:
– Онлайн чат
– Email почту
– Телефон
– Social платформы
Секьюрити и аккредитация
Платформа функционирует на базе действительной лицензии. Данное гарантирует:
– Легальность игрового действа
– Сохранность личных сведений
– Оперативные выводы
– Ответственный гейминг
Резюме
Главный веб-сайт и его рабочие резервные страницы гарантируют игрокам абсолютный набор возможностей для безопасной и доходной досуга. Значительные призы, всевозможные слоты, опытная помощь и защищенная инфраструктура транзакций делают казино идеальным опцией для любителей гемблинг развлечений.
Переход к сайту через действующие зеркала
Пользователи сетевых казино нередко контактируют с трудностью ограничения официального ресурса. Конкретно для преодоления этой проблемы предусмотрены альтернативные адреса основного домена. Лаки Бир обеспечивает беспрепятственный вход ко всем сервисам казино.
Что такое функционирующее зеркало казино
Альтернативный адрес является собой точную копию официального портала с похожим опциями. Главное отличие — это другое имя. Абсолютно все сведения игрока, вместе с средства, награды и данные партий, продолжают быть идентичными.
Преимущества эксплуатации зеркал
Актуальные зеркала характеризуются множеством существенных достоинств:
– Бесперебойный вход к выбранным развлечениям
– Совершенная сохранность персональных сведений
– Поддержание всех опций индивидуального кабинета
– Возможность приобретения бонусов и включения в акциях
Открытие счета на официальном домене
Ход оформления максимально элементарен и отнимает пару минут. Свежие пользователи могут полагаться на крупный приветственный поощрение за регистрацию.
Этапы оформления аккаунта
1. Переход на официальный ресурс или его зеркало
2. Нажатие на опцию “Зарегистрироваться”
3. Заполнение требуемых данных
4. Активация почтовой почты
5. Ввод купона (при наличии есть)
Бонусы и акции для игроков
Платформа балует своих пользователей различными наградными программами.
Базовые виды поощрений
Приветственный пакет — крупное начисление для недавних пользователей, что в состоянии содержать денежные призы и фриспины.
Фриспины — опция использовать в известных игровых машинах даром.
Компенсация — пропорциональный отдача проигранных сумм, который именно выплачивается раз в неделю или раз в месяц.
Промокоды — специальные сочетания, дающие дополнительные преимущества.
Индивидуальный кабинет: функции и настройки
Индивидуальный профиль гарантирует исчерпывающий регулирование над развлекательным взаимодействием. Здесь имеются:
– Администрирование счетом
– Записи операций
– Действующие привилегии
– Установки охраны
– Валидация профиля
Мобильная версия и софт
Новейшие игроки ценят портативность. Казино предлагает 2 варианта для развлечений с портативных устройств.
Отзывчивая портативная редакция
Портативная платформа портала самостоятельно подстраивается под монитор любого устройства. Нет необходимости скачивать специальное софт.
Программа для мобильных
Возможно инсталлировать официальное APP для iOS и Android. Софт дает:
– Быстрый вход
– Оптимизированный графику
– Мобильные-сообщения о акциях
– Надежную операционность
Live казино: атмосфера подлинного зала
Секция Live казино доставляет клиентов в атмосферу реального игорного заведения. Опытные дилеры проводят сессии в варианте настоящего времени.
Популярные Live-столы
– Рулетка
– Двадцать одно
– Баккара
– Техасский холдем
Аппараты: ассортимент слотов
Коллекция слотовых автоматов насчитывает массу позиций от ведущих производителей. Клиенты найдут:
– Обычные аппараты
– Видео-автоматы
– Прогрессивный джекпот-игры
– Многолинейные автоматы
Турниры и специальные акции
Регулярные соревнования обеспечивают клиентам бороться друг с другом за солидные призовые банки. Любой соревнование имеет свои требования участия и доску призеров.
Пути пополнения и получения средств
Платформа использует массу платежных систем:
– Кредитные картыы
– Цифровые счета
– Цифровые валюты
– Банковские транзакции
Абсолютно все операции осуществляются надежно благодаря передовым технологиям кодирования.
Команда поддержки
Квалифицированные консультанты команды обслуживания расположены поддержать 24/7. Имеются такие способы коммуникации:
– Живой-чат
– Email-обслуживание
– Аудио горячая линия
– Социальные сети
Итог
Главный домен платформы и его актуальные копии дают участникам конфиденциальный и комфортный подход к обширному диапазону развлекательных игр. Внушительные награды, периодические предложения, компетентная служба и удобные расчетные способы формируют геймерский досуг максимально захватывающим и выгодным.
What impressed me about this casino https://aarsrapport2017.nfdr.no/queen-success-casino-the-premium-location-dedicated-to-exceptional/ is the variety of the games. Everything runs smoothly, the design is clean, and there’s plenty of options to explore, which keeps it engaging.
Ремонт стиральных машин СПб Хочу поблагодарить команду «Нева-Экспресс ремонт» и «РБТ-Сервис» за ремонт стиральной машины Electrolux. Проблема была сложная — сгорел модуль. Но мастера справились на ура! Очень рад, что две известные компании объединились — теперь у них ещё больше опыта и возможностей. Рекомендую всем ремонт стиральных машин СПб именно здесь!
https://happypawspharmacy.shop/# dog and cat medicine supply
Актуальные онлайн-казино предоставляют игрокам богатый выбор возможностей для приятной досуга. Переход к площадке Eldorado производится через официальный домен или актуальное зеркало.
Что такое актуальное зеркало казино
Рабочее зеркало — это дополнительный линк официального сайта казино. Такие версии создаются для предоставления постоянного соединения к развлекательной платформе.
Копия на сегодня абсолютно воспроизводит возможности основного ресурса. Клиенты получают идентичный вход ко всем услугам, включая создание аккаунта, внесение депозита депозита и снятие средств.
Оформление профиля на главном портале
Алгоритм регистрации занимает всего несколько мгновений. Новым игрокам требуется:
1. Войти на лицензионный ресурс или действующее официальное зеркало
2. Выбрать кнопку “Создать аккаунт”
3. Внести требуемые сведения
4. Проверить email почту
5. Активировать код активации при существовании
После финализации открытия профиля пользователь обретает бонус за регистрацию, который может охватывать free spins или монетарное начисление.
Доступ в персональный кабинет
Личный кабинет — это безопасная зона, где пользователи способны управлять своим профилем. Для логина нужно указать логин и password.
В индивидуальном кабинете представлены такие инструменты:
– Мониторинг истории платежей
– Активация кодов активации
– Настройка бонусами
– Вступление в состязаниях
– Проверка возврата средств
– Изменение профиля
Бонусы и спецпредложения
Развлекательная площадка предоставляет щедрые вознаграждения:
Начальный пакет — новички обретают солидное премию на стартовые пополнения.
Бесплатные вращения — выдаются как при создании аккаунта, так и в рамках всевозможных мероприятий.
Возмещение — систематический компенсация фрагмента проигранных средств.
Коды активации — особые комбинации, обеспечивающие право к специальным вознаграждениям.
Обзор игровых секций
Игровые автоматы
Ассортимент слотов охватывает тысячи наименований от передовых провайдеров. Пользователи обнаружат как традиционные аппараты, так и актуальные 3D-слоты с интересной графикой.
Live казино
Зона Live казино предоставляет шанс соревноваться с живыми дилерами в режиме настоящего времени. Представлены востребованные развлечения: рулетка, блэкджек, баккара, покер.
Состязания
Систематические соревнования с значительными выигрышными пулами привлекают множество участников. Победители получают монетарные вознаграждения и особые подарки.
Телефонная версия и программа
Адаптивная версия платформы дает возможность развлекаться с любого устройства. Структура самостоятельно подстраивается под формат экрана.
Получить софт можно для аппаратов на Android и iOS. Телефонное приложение имеет всеми опциями десктопной версии.
Как найти актуальное зеркало на данный момент
Рабочие ссылки копий постоянно меняются. Обнаружить действующую адрес можно несколькими путями:
– Через департамент техподдержки
– В официальных новостных сетях
– По почтовой newsletter
– На аффилиатных сайтах
Защита и сертификация
Лицензионный портал оперирует на фундаменте глобальной документа. Все транзакции защищены современными методами безопасности.
Анонимность пользовательских информации гарантируется в абсолютном размере.
Вывод
Официальный портал и его рабочие альтернативы обеспечивают игрокам беспрерывный вход к качественным развлекательным сервисам. Привлекательные вознаграждения, многочисленные развлечения, квалифицированная поддержка — все это превращает развлекательный времяпрепровождение невероятно комфортным и увлекательным.
pharmacy technician certification online
casino velobet Tried it recently and everything works fine. No problems so far.
this emporium page – Noticed this site while searching and it looks appealing.
Дубликаты номеров https://avtostrahovka36.ru в Воронеже — изготовление и восстановление регистрационных знаков по ГОСТ. Срочно за 1 день, качественные материалы, соответствие требованиям и выгодные цены. Оформление быстро и без очередей.
Обзор официального веб-сайта
Прогрессивные интернет казино дают игрокам богатый ассортимент развлечений и перспектив. Официальный веб-сайт ссылка гарантирует проверенный путь к азартным сервисам.
Рабочее зеркало: вход на сегодня
Альтернативный адрес является собой идентичную дубликат официального портала. Проверенное зеркало обеспечивает участникам избегать вероятные запреты.
Достоинства задействования зеркала
Основные плюсы охватывают:
– Непрерывный шанс к сайту
– Поддержание всех опций основного ресурса
– Охрана конфиденциальных информации
– Такой же возможности
Открытие счета на платформе
Ход оформления профиля знаменуется простотой и удобством. Новые игроки должны:
1. Перейти на основной веб-сайт или его зеркало
2. Нажать на клавишу регистрации
3. Ввести обязательные сведения
4. Верифицировать почтовую адрес
5. Совершить первый логин
Бонус за регистрацию
Начинающие получают значительный приветственный бонус. Подобное награда имеет возможность охватывать:
– Финансовые средства
– Complimentary фриспины
– Усиленный показатель возврата
Авторизация в личный аккаунт
Активные клиенты способны быстро получить доступ в собственный аккаунт, используя никнейм и пароль. Собственный профиль предоставляет возможность к:
– Контролю балансом
– Журналу транзакций
– Действующим призам
– Настройкам аккаунта
Призы и промо
Платформа систематически организует многочисленные мероприятия для пользователей.
Виды бонусов
Ключевые категории вознаграждений:
– Денежные призы – коэффициент от объема пополнения
– Бесплатные вращения – безвозмездные раунды в игровых машинах
– Кэшбэк – отдача части проигранных средств
– Соревновательные награды – призы за состязание в соревнованиях
Купоны
Уникальные промокоды обеспечивают приобрести дополнительные привилегии. Клиенты имеют возможность получить их на аффилиатных ресурсах или приобрести в рассылке.
Mobile версия и приложение
Современные гемблеры выбирают мобильный игровой процесс.
Функции mobile платформы
– Гибкий дизайн для разнообразных гаджетов
– Абсолютный вход к слотам
– Быстрая функционирование
– Практичное управление
Скачать app
Мобильное софт открыто для загрузки на девайсы с рабочими платформами Android и iOS. Софт дает:
– Стабильную функциональность
– Всплывающие оповещения о акциях
– Моментальный запуск к предпочитаемым развлечениям
Игровой каталог
Платформа обеспечивает обширную библиотеку развлекательных услуг.
Автоматы
Коллекция игровых аппаратов включает:
– Классические слоты
– Video слоты
– Джекпотные машины
– Лицензионные слоты
Live столы
Секция реальных дилеров предоставляет шанс соревноваться с живыми крупье. Открыты:
– Американская рулетка
– Блек-джек
– Баккара
– Карибский покер
Соревнования
Систематические конкурсы обеспечивают пользователям бороться за значительные призовые банки. Конкурсная структура актуализируется еженедельно.
Денежные процедуры
Сайт предоставляет обилие способов депозита и снятия финансов:
– Пластиковые карточки
– Цифровые счета
– Прямые транзакции
– Bitcoin
Совокупные переводы производятся безопасно с задействованием прогрессивных протоколов криптографии.
Сервис поддержки
Компетентная группа саппорта трудится без перерыва. Связаться с операторами реально через:
– Живой чат
– Электронную почту
– Горячую линию
– Соц платформы
Охрана и аккредитация
Казино действует на базе легальной аккредитации. Это подтверждает:
– Справедливость игрового геймплея
– Сохранность конфиденциальных информации
– Своевременные перечисления
– Контролируемый геймплей
Вывод
Лицензионный веб-сайт и его функционирующие зеркала гарантируют участникам совокупный спектр возможностей для безопасной и прибыльной развлечений. Щедрые подарки, разнообразные слоты, квалифицированная сервис и надежная инфраструктура операций формируют ресурс оптимальным решением для ценителей игровых забав.
Передовые онлайн-казино обеспечивают пользователям разнообразный ассортимент возможностей для приятной игры. Вход к платформе казино Lev зеркало выполняется через официальный домен или действующее зеркало.
Что такое рабочее зеркало казино
Функционирующее зеркало — это резервный URL официального портала казино. Такие клоны разрабатываются для обеспечения непрерывного доступа к игровой системе.
Копия актуальное абсолютно воспроизводит характеристики официального ресурса. Пользователи получают такой же выход ко всем возможностям, включая оформление профиля, пополнение баланса и снятие денег.
Оформление профиля на главном сайте
Механизм открытия профиля требует всего пару мгновений. Будущим клиентам требуется:
1. Зайти на основной портал или рабочее официальное зеркало
2. Кликнуть кнопку “Открыть счет”
3. Заполнить необходимые данные
4. Подтвердить электронную почту
5. Активировать промокод при доступности
После завершения регистрации пользователь зарабатывает вознаграждение за регистрацию, который вправе включать даровые спины или денежное начисление.
Логин в личный кабинет
Персональный кабинет — это безопасная область, где пользователи способны администрировать своим профилем. Для авторизации следует внести имя пользователя и пароль.
В пользовательском кабинете представлены нижеперечисленные функции:
– Отслеживание записей транзакций
– Использование кодов активации
– Управление поощрениями
– Вступление в соревнованиях
– Мониторинг кэшбэка
– Корректировка аккаунта
Бонусы и акции
Гемблинговая площадка предоставляет выгодные призы:
Приветственный комплект — дебютанты получают крупное поощрение на дебютные вклады.
Free spins — начисляются как при создании аккаунта, так и в контексте всевозможных промо.
Кэшбэк — систематический рефанд доли утраченных сумм.
Коды активации — эксклюзивные комбинации, обеспечивающие возможность к эксклюзивным вознаграждениям.
Характеристика игровых направлений
Аппараты
Собрание аппаратов включает массу наименований от топовых провайдеров. Игроки откроют как обычные слоты, так и новые видео-слоты с увлекательной визуализацией.
Live казино
Зона Live казино предлагает шанс развлекаться с живыми крупье в режиме настоящего времени. Доступны востребованные столы: рулетка, блэкджек, баккара, покер.
Состязания
Систематические состязания с большими наградными банками привлекают тысячи соревнующихся. Призеры обретают денежные вознаграждения и особые подарки.
Телефонная версия и приложение
Мобильная версия сайта обеспечивает играть с любого девайса. Структура автономно адаптируется под диагональ экрана.
Скачать программу можно для устройств на Android и iOS. Смартфонное ПО располагает всеми функциями полной версии.
Как обнаружить текущее зеркало на текущий день
Действующие линки зеркал периодически обновляются. Узнать свежую линк можно несколькими способами:
– Через службу саппорта
– В настоящих новостных сетях
– По почтовой newsletter
– На аффилиатных порталах
Безопасность и легальность
Основной портал функционирует на фундаменте глобальной лицензии. Все операции оберегаются актуальными системами защиты.
Секретность личных информации сохраняется в совершенном объеме.
Заключение
Главный ресурс и его актуальные альтернативы предоставляют клиентам постоянный путь к высококлассным развлекательным играм. Великодушные поощрения, многочисленные автоматы, квалифицированная служба — все это делает гемблинговый опыт максимально приятным и интересным.
ed drugs online: True Health Pharm – where to get ed pills
реконструкция и ремонт зданий и сооружений реконструкция и ремонт зданий и сооружений .
birxbet birxbet .
velobet casino bonus Was checking different sites and came across this one, looks decent. Everything works fine so far. Might use it more.
Переход к порталу и актуальные зеркала
Современные виртуальные казино предлагают участникам большой спектр игр. Центральный веб-сайт Рльдорадо зеркало официальный сайт обеспечивает стабильный переход ко всем возможностям. При этом временами случаются ситуации, когда нужно резервный способ подключения.
Что являет собой собой действующее зеркало
Функционирующее зеркало — это абсолютная дубликат основного сайта с альтернативным доменным именем. Копия сегодня позволяет преодолевать вероятные барьеры и поддерживать постоянный подключение к предпочитаемым автоматам.
Главное зеркало имеет всеми характеристиками, что и главный ресурс:
– Совокупный перечень развлечений
– Персональный кабинет с записанными информацией
– Актуальные награды и промо
– Надежные платежные действия
Создание аккаунта и доступ в казино
Процесс создания профиля на портале занимает буквально секунд. Свежим участникам необходимо:
1. Зайти на актуальное зеркало в настоящее время
2. Кликнуть опцию «Зарегистрироваться»
3. Заполнить необходимые данные
4. Подтвердить электронную почту или данные мобильного
5. Забрать награду за создание профиля
Доступ в индивидуальный кабинет производится путем внесение никнейма и пароля.
Анализ бонусной программы
Богатая бонусная политика — главное козырь ресурса. Пользователи получают многочисленные подарки:
Приветственные бонусы
Новые пользователи вправе рассчитывать на привлекательный подарок за регистрацию. Чаще всего это совокупность предложений, охватывающий:
– Пропорциональную надбавку к дебютному взносу
– Бесплатные спины
– Дополнительные суммы на аккаунт
Промокоды и особые возможности
Регулярные промокоды позволяют зарабатывать дополнительные выгоды. Задействовать их разрешено в отдельном разделе индивидуального раздела.
Free spins и компенсация
Бесплатные спины — это возможность вращать слоты без расходования своих денег. Компенсация представляет долевой возврат израсходованных средств.
Ассортимент развлечений
Гемблинг сайт предоставляет впечатляющую подборку автоматов.
Автоматы
Разнообразие аппаратов удивляет фантазию. Есть стандартные трехбарабанные автоматы и новые автоматы с интересной визуализацией.
Live зал
Категория Live казино транспортирует игроков в атмосферу настоящего гемблинг заведения. Квалифицированные дилеры проводят игры в реальном режиме.
Соревнования и таблицы лидеров
Регулярные конкурсы добавляют накала и гарантируют перспективу получить внушительные суммы.
Мобильная версия и приложение
Новые технологии обеспечивают участвовать в удобном пространстве. Mobile форма самостоятельно подстраивается под экран аппарата.
Получить софт возможно для операционных систем iOS и Android. Клиент дает:
– Скоростной переход
– Устойчивую работу
– Мгновенные-уведомления об промо
– Удобный вид
Денежные действия
Ресурс работает с многочисленные методы ввода и получения средств:
– Кредитные системы
– Электронные сервисы
– Криптовалюты
– Денежные операции
Все операции выполняются через зашифрованное канал, что гарантирует целостность личных сведений.
Департамент поддержки
Компетентная группа ассистанса работает круглосуточно. Связаться с менеджерами разрешено через:
– Живой-чат
– Электронную почту
– Телефон
– Общественные каналы
Заключение
Главный сайт и его действующее зеркало предоставляют участникам безопасный и приятный путь к увлекательным развлечениям. Щедрые награды, разнообразный ассортимент развлечений и высокая поддержка создают времяпрепровождение исключительно приятной и результативной.
Нынешние онлайн-казино предлагают пользователям широкий ассортимент функций для удобной досуга. Вход к сервису рабочее производится через главный домен или действующее зеркало.
Что такое функционирующее зеркало казино
Рабочее зеркало — это альтернативный адрес основного ресурса казино. Такие версии формируются для предоставления непрерывного доступа к азартной платформе.
Зеркало сегодня абсолютно дублирует опции главного ресурса. Клиенты обретают идентичный путь ко всем функциям, включая оформление профиля, внесение депозита кошелька и получение призов.
Создание аккаунта на лицензионном сайте
Процесс регистрации отнимает всего считанные секунд. Начинающим участникам следует:
1. Войти на лицензионный портал или текущее настоящее зеркало
2. Щелкнуть кнопку “Регистрация”
3. Заполнить обязательные сведения
4. Подтвердить почтовую почту
5. Использовать купон при существовании
После окончания создания аккаунта пользователь обретает подарок за регистрацию, который способен предполагать фриспины или монетарное начисление.
Вход в персональный кабинет
Индивидуальный кабинет — это закрытая область, где участники вправе администрировать своим учетной записью. Для авторизации требуется напечатать никнейм и пароль.
В пользовательском кабинете представлены такие возможности:
– Отслеживание журнала транзакций
– Использование бонусных кодов
– Настройка вознаграждениями
– Участие в конкурсах
– Мониторинг кэшбэка
– Изменение аккаунта
Поощрения и предложения
Игровая платформа дарит великодушные призы:
Приветственный набор — новички получают существенное поощрение на начальные депозиты.
Бесплатные вращения — выдаются как при открытии счета, так и в рамках различных кампаний.
Возврат средств — систематический компенсация части израсходованных сумм.
Купоны — эксклюзивные шифры, дающие выход к уникальным предложениям.
Анализ гемблинговых категорий
Игровые автоматы
Коллекция слотов охватывает тысячи вариантов от передовых производителей. Пользователи встретят как классические машины, так и актуальные видеослоты с интересной графикой.
Live казино
Секция Live казино обеспечивает опцию развлекаться с реальными крупье в режиме актуального времени. Имеются распространенные развлечения: рулетка, блэкджек, баккара, покер.
Турниры
Постоянные чемпионаты с крупными выигрышными фондами завлекают массу соревнующихся. Призеры завоевывают денежные вознаграждения и эксклюзивные бонусы.
Смартфонная версия и app
Мобильная версия платформы обеспечивает играть с произвольного устройства. Интерфейс автоматически корректируется под формат экрана.
Установить app можно для аппаратов на Android и iOS. Мобильное ПО имеет всеми опциями десктопной версии.
Как обнаружить актуальное зеркало на сегодня
Актуальные адреса дубликатов систематически изменяются. Узнать рабочую адрес можно многими методами:
– Через отдел техподдержки
– В проверенных социальных сетях
– По электронной дайджесту
– На специализированных ресурсах
Надежность и сертификация
Лицензионный ресурс работает на основе мировой разрешения. Все транзакции защищены инновационными системами безопасности.
Приватность пользовательских данных обеспечивается в совершенном формате.
Заключение
Основной ресурс и его функционирующие копии предоставляют клиентам постоянный путь к превосходным игровым сервисам. Великодушные бонусы, всевозможные слоты, компетентная сервис — все это превращает игровой процесс чрезвычайно приятным и притягательным.
1xbet yeni giri? 1xbet yeni giri? .
birxbet 1xbet-giris-37.com .
Вход к сайту и актуальные ссылки
Популярные виртуальные казино гарантируют участникам обширный спектр опций. Основной портал 360 казино казино предоставляет стабильный подключение ко всем возможностям. Тем не менее иногда возникают случаи, когда понадобится запасной вариант подключения.
Что являет собой собой функционирующее зеркало
Функционирующее зеркало — это абсолютная копия основного портала с иным сетевым адресом. Альтернатива сегодня дает возможность обходить существующие блокировки и сохранять непрерывный доступ к популярным играм.
Главное зеркало обладает теми же функциями, что и базовый ресурс:
– Полный ассортимент слотов
– Индивидуальный аккаунт с сохраненными параметрами
– Все поощрения и акции
– Безопасные платежные переводы
Оформление и подключение в систему
Ход оформления на платформе отнимает несколько мгновений. Свежим участникам нужно:
1. Зайти на актуальное зеркало в настоящее время
2. Выбрать опцию «Зарегистрироваться»
3. Заполнить нужные сведения
4. Активировать электронную почту или контакт связи
5. Активировать бонус за регистрацию
Вход в личный кабинет выполняется с помощью указание имени пользователя и кода доступа.
Характеристика бонусной системы
Привлекательная бонусная система — ключевое плюс игорного заведения. Игроки забирают многочисленные поощрения:
Приветственные поощрения
Свежие участники способны надеяться на привлекательный приз за открытие профиля. Традиционно это комплект предложений, охватывающий:
– Частичную добавку к стартовому вкладу
– Бесплатные вращения
– Extra деньги на аккаунт
Промокоды и эксклюзивные предложения
Периодические коды обеспечивают зарабатывать призовые привилегии. Применить их разрешено в отдельном поле собственного профиля.
Спины и возврат средств
Фриспины — это возможность крутить автоматы без расходования персональных финансов. Кэшбек представляет частичный возмещение утраченных средств.
Ассортимент автоматов
Азартная ресурс предлагает огромную библиотеку автоматов.
Автоматы
Вариативность слотов впечатляет воображение. Представлены стандартные простые автоматы и современные развлечения с захватывающей картинкой.
Live заведение
Раздел Live казино переносит пользователей в антураж реального игорного дома. Квалифицированные операторы проводят раунды в реальном времени.
Соревнования и доски почета
Постоянные соревнования добавляют азарта и гарантируют вариант получить внушительные призы.
Мобильная версия и клиент
Современные разработки помогают наслаждаться в комфортном локации. Портативная вариант автономно адаптируется под монитор гаджета.
Установить приложение допустимо для цифровых систем iOS и Android. Софт дает:
– Оперативный вход
– Бесперебойную деятельность
– Мгновенные-сообщения об предложениях
– Комфортный облик
Банковские действия
Платформа работает с многочисленные варианты депозита и изъятия финансов:
– Пластиковые карты
– Электронные платформы
– Цифровые валюты
– Банковские транзакции
Все транзакции выполняются через надежное канал, что гарантирует целостность конфиденциальных параметров.
Департамент support
Опытная бригада помощи действует постоянно. Соединиться с операторами можно через:
– Live-чат
– Электронную почту
– Горячую линию
– Медиа платформы
Итоги
Главный сайт и его рабочее зеркало обеспечивают участникам безопасный и легкий вход к азартным забавам. Привлекательные поощрения, большой каталог слотов и качественная поддержка делают игру крайне приятной и прибыльной.
1x lite 1x lite .
Доступ к порталу через проверенные зеркала
Нынешние онлайн казино гарантируют пользователям круглосуточный подключение к услугам. Основной ресурс https://nailsamericaalexandria.com/uncategorized/obzor-sposobov-vneseniya-i-vyvoda-sredstv-v-onlayn-kazino.html/ действует бесперебойно, обеспечивая широкий выбор азартных слотов. Однако временами появляются цифровые препятствия или барьеры, поэтому критично быть осведомлённым о доступности действующих зеркал.
Что является собой официальное зеркало казино
Альтернатива — это точная копия основного портала с аналогичным интерфейсом. Действующее зеркало сейчас даёт возможность миновать локальные барьеры и возобновлять развлечения.
Ключевые плюсы задействования зеркал:
– Полный доступ к индивидуальному кабинету
– Сохранение совокупных информации учётной записи
– Схожий ассортимент развлечений
– Актуальные вознаграждения и промо
Оформление на платформе
Процедура записи отнимает считанные минут. Начинающие геймеры зарабатывают щедрый бонус за создание счёта, который в состоянии содержать:
– Вступительный игровой подарок
– Даровые фриспины для слотов
– Эксклюзивные ваучеры
– Увеличенный возврат
С целью окончания оформления нужно:
1. Перейти на официальный сайт или копию
2. Щёлкнуть опцию «Оформиться»
3. Написать личные данные
4. Активировать почтовый адрес или телефон
5. Задействовать купон (при существовании)
Подключение в персональный кабинет
Следом за удачной записи геймеры в состоянии осуществлять доступ через главный веб-сайт или рабочее зеркало. Собственный кабинет даёт безграничный контроль над учётной записью:
– Летопись игр
– Зачисление депозита
– Получение выигрышей
– Контроль бонусами
– Участие в состязаниях
Привилегии и предложения казино
Портал балует пользователей многочисленными наградными программами:
Стартовые подарки
Новички приобретают великодушный букет привилегий на вступительные вклады. Как правило это включает пропорциональную добавку к величине депозита плюс безвозмездные кручения.
Периодические предложения
– Раз в неделю возврат до 15%
– Состязания с наградными фондами
– Поощрения на годовщину рождения
– Эксклюзивные программы для элитных игроков
Схема лояльности
Регулярные игроки получают баллы, что допустимо трансформировать на действительные деньги или специальные бонусы.
Мобильная форма и программа
Нынешние разработки дают возможность играть где комфортно. Смартфонная редакция ресурса независимо адаптируется под экран всякого гаджета.
Плюсы мобильного софта:
– Быстрая подгрузка развлечений
– Комфортный облик
– Push-оповещения о предложениях
– Возможность скачать для Android и iOS
Реальное казино: антураж подлинного развлекательного клуба
Категория Live клуба доставляет игроков в антураж истинного гемблинг заведения. Опытные дилеры управляют игру в виде актуального времени.
Имеющиеся столы:
– Колесо фортуны
– Двадцать одно
– Punto Banco
– Техасский холдем
Барабаны и игровые автоматы
Собрание гемблинг аппаратов насчитывает множество вариантов от топовых разработчиков. Всякий геймер найдёт игру по нраву:
– Стандартные барабаны
– Новые слоты с призовыми этапами
– Крупный приз-игры
– Megaways автоматы
Соревнования и лотереи
Периодические состязания добавляют драйв и обеспечивают способность выиграть внушительные вознаграждения. Присутствие в состязаниях часто даровое, а наградные суммы достигают значительных сумм.
Секьюрити и анонимность
Платформа применяет современные методы криптографии для защиты информации клиентов. Любые денежные операции совершаются через защищённые соединения.
Заключение
Главный ресурс и его рабочие зеркала дают безопасный вход к превосходным игровым услугам. Великодушные призы, практичная мобильная форма, разнообразие машин и компетентное Live-клуб делают ресурс прекрасным выбором для фанатов азартных автоматов.
Доступ к платформе через проверенные зеркала
Актуальные онлайн казино гарантируют игрокам постоянный доступ к развлечениям. Официальный сайт Glory работает надёжно, предлагая богатый набор гемблинг автоматов. Однако временами возникают программные трудности или ограничения, потому необходимо быть осведомлённым о существовании функционирующих зеркал.
Что представляет собой основное зеркало казино
Зеркало — это абсолютная версия главного ресурса с идентичным возможностями. Функционирующее зеркало в настоящее время даёт возможность избегать региональные запреты и вести игру.
Ключевые достоинства эксплуатации зеркал:
– Стопроцентный переход к персональному кабинету
– Сохранение совокупных показателей счёта
– Идентичный набор слотов
– Свежие поощрения и промо
Регистрация на портале
Процедура оформления занимает пару минут. Начинающие геймеры получают привлекательный бонус за регистрацию, который в состоянии охватывать:
– Приветственный финансовый приз
– Бесплатные кручения для игр
– Специальные купоны
– Расширенный кешбэк
Во имя финализации записи необходимо:
1. Войти на центральный портал или копию
2. Кликнуть элемент «Регистрация»
3. Написать личные сведения
4. Активировать мейл или телефон
5. Активировать купон (в случае присутствии)
Вход в персональный кабинет
Следом за удачной записи игроки имеют возможность совершать подключение с помощью основной веб-сайт или функционирующее зеркало. Личный кабинет даёт всесторонний надзор над учётной записью:
– Журнал пари
– Зачисление депозита
– Снятие денег
– Управление привилегиями
– Вовлечение в соревнованиях
Привилегии и акции казино
Платформа награждает клиентов многочисленными наградными системами:
Стартовые подарки
Новые игроки получают богатый букет привилегий на первые взносы. Обычно это предполагает частичную прибавку к сумме взноса плюс комплиментарные кручения.
Регулярные акции
– Еженедельный компенсация до 15%
– Состязания с выигрышными банками
– Бонусы на годовщину рождения
– Уникальные акции для элитных игроков
Система поощрения
Регулярные пользователи получают пункты, что разрешено трансформировать на настоящие средства или особые привилегии.
Карманная форма и софт
Нынешние технологии помогают играть где угодно. Карманная редакция портала автономно подстраивается под экран каждого девайса.
Преимущества карманного приложения:
– Быстрая загрузка игр
– Практичный вид
– Мгновенные-оповещения о бонусах
– Возможность установить для Android и iOS
Реальное казино: обстановка истинного игорного заведения
Область Live игорного дома переносит пользователей в атмосферу истинного игорного клуба. Компетентные операторы проводят действие в формате реального времени.
Предлагаемые столы:
– Колесо фортуны
– Двадцать одно
– Баккара
– Покер
Автоматы и игровые автоматы
Собрание развлекательных машин насчитывает сотни вариантов от лидирующих разработчиков. Всякий игрок подберёт развлечение по желанию:
– Традиционные автоматы
– Видеослоты с бонусными уровнями
– Накопительный-слоты
– Динамические слоты
Турниры и акции
Периодические соревнования привносят адреналин и дают возможность выиграть крупные награды. Присутствие в соревнованиях нередко даровое, а выигрышные фонды насчитывают значительных величин.
Безопасность и анонимность
Ресурс применяет современные методы защиты для гарантии информации игроков. Каждые денежные операции выполняются через охраняемые линии.
Заключение
Официальный ресурс и его функционирующие зеркала предоставляют безопасный подключение к качественным гемблинг сервисам. Щедрые призы, комфортная смартфонная редакция, вариативность автоматов и профессиональное Live-клуб превращают сайт замечательным выбором для фанатов азартных слотов.
us online pharmacy: VitalCore Pharmacy – offshore pharmacy no prescription
To view
cost of generic neurontin without a prescription
for registration.
Нынешние онлайн казино обеспечивают пользователям широкий ассортимент опций для комфортной игры. Тем не менее иногда соединение к основному платформе может стать недоступным. В таких случаях на выручку появляется казино ДжиВиСпин казино, которое дает бесперебойный путь ко всем возможностям платформы.
Что такое функционирующее зеркало казино
Копия — это точная версия лицензионного портала, которая размещается по другому адресу. Альтернативный ресурс сохраняет полный набор функций главного веб-портала, включая личный кабинет, баланс и сведения переводов.
Главные плюсы задействования зеркала:
– Круглосуточный подключение к сайту
– Полная схожесть инструментов
– Безопасность персональных информации
– Поддержка всех привилегий
Как обнаружить актуальное зеркало на сегодня
Присутствует ряд проверенных методов нахождения действующей ссылки:
Официальные каналы:
1. Email рассылка — управление регулярно направляет сообщения с свежими ссылками
2. Социальные сети — легитимные профили размещают свежую данные
3. Департамент поддержки — сотрудники предоставляют безопасные адреса
4. Мобильное приложение — предоставляет обходить блокировки
Создание аккаунта на официальном ресурсе
Процедура регистрации длится не более немного минут и включает из данных этапов:
1. Переход на главный веб-сайт или актуальное зеркало
2. Клик на элемент «Создать аккаунт»
3. Заполнение регистрационной анкеты
4. Валидация электронной почты или контактного номера
5. Задействование привилегии за регистрацию при присутствии промокода
Новые игроки зарабатывают великодушный вступительный бонус, который может включать даровые прокруты, монетарные вознаграждения или возврат средств.
Логин в пользовательский кабинет
Подключение на ресурсе выполняется обычным способом. Необходимо ввести учетные данные и кодовое слово, использованные при создании аккаунта.
Важные аспекты для надежного входа:
– Используйте сложный код
– Активируйте двухфакторную аутентификацию
– Не сохраняйте данные на посторонних компьютерах
– Мониторьте интернет строку браузера
Обзор наградной системы
Казино одаривает пользователей многочисленными привилегиями и специальными предложениями:
Приветственный набор
Начинающие способны надеяться на щедрое вознаграждение за дебютный взнос. Традиционно это долевая прибавка к депонированной сумме плюс даровые спины для востребованных слотов.
Регулярные промо
– 7-дневный cashback — возвращение доли списанных денег
– Награды на последующие взносы
– Специальные предложения по торжествам
– Состязания с значительными выигрышными банками
Программа лояльности
Деятельные пользователи собирают пункты за каждую бет, которые затем меняются на действительные финансы, даровые прокруты или эксклюзивные привилегии.
Промокоды: как задействовать
Купоны — это особые последовательности букв и цифр, гарантирующие право к специальным поощрениям.
Где взять рабочие промокоды:
– Проверенные социальные сети казино
– Партнерские ресурсы
– Email-новостная лента
– Специализированные форумы
Вводится промокод в специальное поле при создании аккаунта или пополнении депозита.
Смартфонная версия и приложение
Нынешние геймеры предпочитают проводить время с телефонных девайсов. Платформа дает 2 способа для комфортной смартфонной игры.
Мобильная модификация
Веб версия сама настраивается под диагональ дисплея. Не просит инсталляции и работает в каждом новом браузере.
Телефонное приложение
Загрузить программу можно для девайсов на Android и iOS. Выгоды app:
– Оперативная запуск
– Стабильная функционирование
– Автоматические-уведомления о акциях
– Независимый обход блокировок
Операция скачивания несложен: необходимо открыть на веб-сайт с портативного аппарата и следовать указаниям.
Игровой выбор
База аппаратов содержит огромное количество позиций от ведущих поставщиков.
Слоты
Азартные машины — наиболее распространенная категория забав. Представлены обычные 3-барабанные машины, актуальные графические аппараты с поощрительными стадиями, а также прогрессивные суперпризы.
Live казино
Зона с реальными дилерами предоставляет ощутить настроение реального казино. Представлены варианты с рулеткой.
Трансляция осуществляется в HD формате, имеется коммуникация с дилером и прочими геймерами.
Соревнования
Периодически проводятся соревнования по различным дисциплинам. Участие дает шанс выиграть валютные выигрыши, бесплатные вращения или специальные поощрения.
Транзакционные операции
Платформа обеспечивает широкий ассортимент расчетных методов:
– Кредитные карты
– Цифровые платформы
– Цифровая валюта
– Счетовые переводы
Низшая количество пополнения — доступная для преобладающего числа клиентов. Получение призов осуществляется в минимальные интервалы.
Департамент поддержки
Опытные консультанты настроены содействовать 24/7. Представлены данные способы связи:
– Онлайн-чат
– Email
– Телефонная горячая линия
– Медийные сети
Решения на частые проблемы можно обнаружить в блоке FAQ.
Резюме
Лицензионный ресурс казино и его функционирующие зеркала предоставляют геймерам абсолютный вход ко всем опциям портала. Щедрые бонусы, комфортная мобильная версия, впечатляющий ассортимент аттракционов и профессиональная поддержка превращают азартный опыт крайне приятным и защищенным.
1xbet resmi giri? 1xbet resmi giri? .
Современные онлайн-казино предлагают игрокам широкий спектр вариантов для приятной игры. Подключение к ресурсу https://goldenclinicint.com/nadezhnye-kazino-s-vyvodom-deneg-na-kartu-sberbanka-v-rf-bolee-togo-esli-tovar-byl-priobreten-za-nalichnye-to-vozvrat-sredstv-bez-otkrytiya-raschetnogo-scheta-budet-nevozmozhen/ производится через официальный сайт или рабочее зеркало.
Что такое действующее зеркало казино
Актуальное зеркало — это дополнительный URL лицензионного ресурса казино. Такие копии создаются для предоставления бесперебойного доступа к развлекательной системе.
Дубликат на сегодня полностью дублирует характеристики базового домена. Пользователи обретают аналогичный доступ ко всем услугам, включая оформление профиля, финансирование баланса и обналичивание средств.
Регистрация на главном веб-сайте
Алгоритм оформления учетной записи занимает всего пару мгновений. Новым участникам требуется:
1. Попасть на лицензионный сайт или актуальное официальное зеркало
2. Кликнуть кнопку “Зарегистрироваться”
3. Ввести необходимые данные
4. Подтвердить email почту
5. Использовать купон при доступности
После окончания оформления игрок приобретает вознаграждение за регистрацию, который имеет право содержать даровые спины или cash вознаграждение.
Авторизация в индивидуальный кабинет
Пользовательский кабинет — это закрытая область, где пользователи способны управлять своим счетом. Для логина необходимо напечатать имя пользователя и секретный ключ.
В пользовательском кабинете представлены следующие инструменты:
– Отслеживание хронологии переводов
– Активация купонов
– Настройка поощрениями
– Вступление в конкурсах
– Отслеживание возмещения
– Редактирование профиля
Поощрения и спецпредложения
Азартная сервис дарит привлекательные бонусы:
Стартовый набор — дебютанты приобретают существенное начисление на первые депозиты.
Фриспины — дарятся как при открытии счета, так и в контексте различных мероприятий.
Кэшбэк — регулярный компенсация фрагмента израсходованных денег.
Промокоды — эксклюзивные шифры, обеспечивающие выход к специальным призам.
Обзор азартных разделов
Игровые автоматы
Собрание автоматов насчитывает тысячи наименований от лучших производителей. Игроки встретят как стандартные автоматы, так и инновационные 3D-слоты с захватывающей визуализацией.
Live казино
Зона Live казино обеспечивает возможность играть с живыми дилерами в формате реального времени. Открыты распространенные варианты: рулетка, блэкджек, баккара, покер.
Турниры
Периодические турниры с крупными премиальными суммами завлекают множество соревнующихся. Чемпионы обретают финансовые выплаты и особые премии.
Мобильная версия и программа
Телефонная версия портала обеспечивает играть с любого гаджета. Структура автоматически корректируется под размер экрана.
Установить приложение можно для девайсов на Android и iOS. Смартфонное ПО имеет всеми опциями полной версии.
Как отыскать текущее зеркало на текущий день
Действующие ссылки дубликатов постоянно обновляются. Получить актуальную URL можно многими способами:
– Через службу саппорта
– В настоящих социальных сетях
– По e-mail дайджесту
– На аффилиатных сайтах
Защита и официальность
Лицензионный домен функционирует на основании международной документа. Все операции охраняются актуальными протоколами шифрования.
Конфиденциальность индивидуальных информации обеспечивается в стопроцентном размере.
Резюме
Главный сайт и его рабочие альтернативы гарантируют пользователям 24/7 вход к высококлассным гемблинговым сервисам. Привлекательные бонусы, разнообразные слоты, опытная служба — все это делает игровой процесс чрезвычайно удобным и увлекательным.
browse the store – Checked the website quickly and everything seems easy to browse.
Вход к ресурсу через рабочие зеркала
Клиенты интернет казино постоянно имеют дело с проблемой недоступности базового домена. Конкретно для преодоления этой трудности предусмотрены альтернативные адреса официального сайта. http://regiointernet.tv/luchshie-onlayn-kazino-predlagayut-bezdepozitnye-bonusy-dlya-novykh-polzovateley/ дает беспрепятственный переход ко всем опциям казино.
Что такое функционирующее зеркало казино
Копия составляет собой идентичную дубликат оригинального веб-сайта с аналогичным функционалом. Единственное несовпадение — это иное имя. Каждые сведения пользователя, включая счет, награды и записи раундов, продолжают быть такими же.
Достоинства эксплуатации зеркал
Актуальные зеркала характеризуются рядом ключевых плюсов:
– Бесперебойный переход к предпочитаемым слотам
– Полная защита персональных параметров
– Поддержание всех опций индивидуального кабинета
– Шанс приобретения наград и включения в предложениях
Оформление профиля на главном сайте
Операция создания аккаунта предельно элементарен и занимает буквально минут. Недавние участники в состоянии претендовать на солидный стартовый бонус за оформление.
Этапы оформления аккаунта
1. Переход на главный сайт или его альтернативу
2. Выбор на элемент “Регистрация”
3. Внесение нужных сведений
4. Проверка почтовой почты
5. Ввод купона (в случае присутствует)
Бонусы и акции для игроков
Платформа радует своих участников многочисленными наградными предложениями.
Основные варианты призов
Начальный бонус — крупное вознаграждение для новых клиентов, что может охватывать денежные бонусы и бесплатные вращения.
Безвозмездные спины — шанс использовать в топовых аппаратах бесплатно.
Возврат средств — процентный компенсация израсходованных средств, который зачисляется каждую неделю или ежемесячно.
Специальные коды — специальные последовательности, обеспечивающие дополнительные выгоды.
Индивидуальный кабинет: инструменты и параметры
Индивидуальный раздел обеспечивает полный контроль над персональным процессом. Тут доступны:
– Администрирование балансом
– Записи операций
– Активные поощрения
– Установки защиты
– Подтверждение аккаунта
Смартфонная редакция и приложение
Новейшие клиенты ценят портативность. Площадка обеспечивает 2 метода для развлечений с портативных аппаратов.
Отзывчивая портативная редакция
Портативная редакция домена без участия приспосабливается под дисплей любого гаджета. Нет необходимости загружать дополнительное ПО.
APP для смартфонов
Можно скачать официальное программу для iOS и Android. Программа обеспечивает:
– Моментальный вход
– Доработанный интерфейс
– Мобильные-оповещения о бонусах
– Бесперебойную функциональность
Live развлечения: среда истинного игорного заведения
Зона Live игр доставляет участников в среду настоящего казино. Компетентные хосты осуществляют партии в режиме реального времени.
Топовые Live-развлечения
– Американская рулетка
– Blackjack
– Баккарат
– Карибский покер
Автоматы: выбор развлечений
Собрание слотовых слотов включает множество позиций от известных поставщиков. Игроки найдут:
– Обычные машины
– Современные слоты
– Мега-выигрыш-слоты
– Megaways
Состязания и уникальные акции
Регулярные конкурсы обеспечивают пользователям бороться друг с другом за солидные наградные пулы. Каждый конкурс обладает свои условия включения и список чемпионов.
Способы пополнения и изъятия денег
Ресурс поддерживает ряд платежных методов:
– Дебетовые карты
– Цифровые кошельки
– Крипто
– Прямые транзакции
Абсолютно все транзакции реализуются безопасно благодаря современным методам кодирования.
Сервис обслуживания
Квалифицированные специалисты сервиса обслуживания готовы поддержать 24/7. Имеются нижеперечисленные способы связи:
– Оперативный-чат
– Email-помощь
– Аудио линия
– Публичные сети
Резюме
Легальный сайт игровой площадки и его функционирующие дубликаты гарантируют пользователям безопасный и удобный вход к широкому ассортименту развлекательных услуг. Внушительные поощрения, постоянные предложения, компетентная помощь и простые финансовые способы делают азартный процесс чрезвычайно приятным и выгодным.
1x bet 1xbet-giris-32.com .
1win etibarlıdırmı 1win etibarlıdırmı
mostbet быстрые платежи https://mostbet42395.help
cómo funciona el cashback 1win http://www.1win19458.help
california pharmacy VitalCore Pharmacy cheapest pharmacy to fill prescriptions with insurance
1xbet yeni giri? adresi 1xbet yeni giri? adresi .
Переход к платформе через рабочие зеркала
Игроки интернет казино нередко контактируют с вопросом ограничения базового домена. Как раз для преодоления этой задачи существуют альтернативные адреса официального домена. JVSpin дает абсолютный доступ ко всем возможностям казино.
Что такое актуальное зеркало казино
Дубликат значит собой абсолютную версию оригинального веб-сайта с аналогичным набором функций. Основное несовпадение — это альтернативное имя. Абсолютно все информация игрока, включая баланс, поощрения и записи раундов, продолжают быть неизменными.
Достоинства использования зеркал
Рабочие зеркала располагают набором существенных выгод:
– Непрерывный переход к предпочитаемым слотам
– Абсолютная конфиденциальность индивидуальных параметров
– Удержание всех параметров пользовательского кабинета
– Шанс взятия поощрений и присутствия в предложениях
Регистрация на легальном ресурсе
Процесс создания аккаунта максимально несложен и длится буквально минут. Недавние участники имеют возможность претендовать на крупный вводный подарок за открытие счета.
Стадии открытия аккаунта
1. Вход на официальный портал или его альтернативу
2. Клик на элемент “Зарегистрироваться”
3. Указание требуемых информации
4. Верификация электронной почты
5. Указание кода (когда есть)
Награды и промоакции для участников
Игровая площадка радует своих пользователей всевозможными призовыми предложениями.
Ключевые варианты призов
Приветственный подарок — солидное начисление для недавних участников, что в состоянии включать монетарные призы и бесплатные вращения.
Безвозмездные спины — возможность крутить в известных слотах даром.
Кэшбек — долевой компенсация проигранных денег, что начисляется раз в неделю или ежемесячно.
Специальные коды — специальные комбинации, предоставляющие бонусные преимущества.
Личный кабинет: возможности и параметры
Пользовательский аккаунт дает абсолютный контроль над персональным взаимодействием. Тут имеются:
– Администрирование средствами
– История операций
– Активные привилегии
– Установки сохранности
– Верификация профиля
Портативная версия и софт
Нынешние участники предпочитают доступность. Казино обеспечивает двойной пути для игры с смартфонных аппаратов.
Приспособленная телефонная версия
Смартфонная платформа портала автоматически подстраивается под дисплей любого устройства. Не нужно скачивать специальное программное обеспечение.
APP для гаджетов
Можно инсталлировать специальное софт для iOS и Android. APP гарантирует:
– Мгновенный старт
– Оптимизированный внешний вид
– Мобильные-оповещения о бонусах
– Стабильную производительность
Live игры: атмосфера подлинного игорного заведения
Секция Live игр транспортирует пользователей в обстановку реального клуба. Квалифицированные хосты осуществляют сессии в режиме настоящего времени.
Востребованные Live-развлечения
– Французская рулетка
– 21
– Punto Banco
– Техасский холдем
Автоматы: многообразие игр
Библиотека азартных аппаратов содержит сотни названий от ведущих поставщиков. Участники встретят:
– Классические автоматы
– Видео-автоматы
– Мега-выигрыш-автоматы
– Многолинейные автоматы
Конкурсы и специальные мероприятия
Периодические состязания предоставляют шанс клиентам конкурировать друг с другом за солидные денежные суммы. Каждый турнир обладает свои критерии вовлечения и рейтинг чемпионов.
Варианты зачисления и изъятия денег
Площадка поддерживает массу платежных методов:
– Кредитные средства
– Виртуальные счета
– Криптовалюты
– Банковские переводы
Любые операции выполняются безопасно благодаря актуальным технологиям шифрования.
Команда обслуживания
Компетентные консультанты отдела support способны ассистировать 24/7. Работают следующие каналы общения:
– Оперативный-чат
– Email-обслуживание
– Телефонная поддержка
– Медийные сети
Итог
Официальный портал платформы и его функционирующие дубликаты предоставляют игрокам надежный и легкий вход к обширному ассортименту геймерских услуг. Внушительные подарки, частые промоакции, компетентная помощь и комфортные денежные способы делают игровой процесс максимально увлекательным и прибыльным.
Переход к сайту через действующие зеркала
Игроки онлайн казино нередко встречаются с ситуацией блокировки основного ресурса. Именно для ликвидации этой задачи созданы зеркала основного домена. http://www.bshome.biz/2026/03/03/v-2021-godu-byli-obnovleny-izvestnye-sposoby-vneseniya-sredstv-v-kazino предоставляет беспрепятственный вход ко всем опциям казино.
Что такое действующее зеркало казино
Альтернативный адрес значит собой полную дубликат оригинального ресурса с идентичным набором функций. Главное несовпадение — это другое имя. Все данные игрока, включая депозит, привилегии и историю раундов, сохраняются неизменными.
Достоинства эксплуатации зеркал
Рабочие зеркала располагают набором существенных выгод:
– Круглосуточный доступ к излюбленным развлечениям
– Совершенная безопасность личных информации
– Сохранение всех параметров личного кабинета
– Шанс обретения призов и вовлечения в предложениях
Регистрация на легальном домене
Процесс открытия счета предельно легок и отнимает буквально минут. Недавние игроки имеют возможность претендовать на щедрый стартовый бонус за оформление.
Шаги открытия аккаунта
1. Вход на главный ресурс или его зеркало
2. Активация на кнопку “Зарегистрироваться”
3. Внесение обязательных параметров
4. Проверка электронной почты
5. Применение бонусного кода (при наличии имеется)
Бонусы и промоакции для игроков
Платформа балует своих клиентов многочисленными наградными системами.
Ключевые типы бонусов
Начальный приз — щедрое вознаграждение для новых игроков, каковое может вмещать материальные средства и free spins.
Бесплатные вращения — возможность крутить в топовых игровых машинах безвозмездно.
Кэшбек — долевой возврат израсходованных финансов, что начисляется раз в неделю или помесячно.
Промокоды — особые комбинации, обеспечивающие бонусные поощрения.
Индивидуальный кабинет: функции и конфигурации
Индивидуальный раздел гарантирует исчерпывающий управление над развлекательным взаимодействием. Тут предусмотрены:
– Контроль депозитом
– Записи платежей
– Активные бонусы
– Настройки защиты
– Проверка счета
Смартфонная версия и софт
Новейшие пользователи признают портативность. Площадка обеспечивает пару способа для участия с карманных аппаратов.
Адаптивная смартфонная редакция
Смартфонная редакция домена самостоятельно адаптируется под монитор любого аппарата. Нет необходимости загружать специальное ПО.
APP для мобильных
Возможно скачать оригинальное программу для iOS и Android. Софт дает:
– Быстрый запуск
– Доработанный внешний вид
– Всплывающие-уведомления о предложениях
– Устойчивую операционность
Live игры: атмосфера настоящего клуба
Раздел Live столов транспортирует игроков в атмосферу подлинного клуба. Компетентные крупье организуют раунды в режиме реального времени.
Топовые Live-игры
– Европейская рулетка
– Blackjack
– Punto Banco
– Карибский покер
Слоты: выбор автоматов
Коллекция азартных слотов содержит массу позиций от лидирующих производителей. Клиенты обнаружат:
– Обычные слоты
– Графические слоты
– Накопительный приз-машины
– Многолинейные автоматы
Соревнования и эксклюзивные предложения
Регулярные соревнования дают возможность игрокам конкурировать друг с другом за значительные выигрышные пулы. Всякий соревнование содержит свои критерии присутствия и доску победителей.
Методы зачисления и вывода сумм
Платформа поддерживает массу платежных сервисов:
– Банковские инструменты
– Онлайн счета
– Крипто
– Прямые транзиты
Все операции осуществляются надежно благодаря современным технологиям криптографии.
Служба помощи
Профессиональные сотрудники службы обслуживания расположены ассистировать 24/7. Предусмотрены нижеперечисленные каналы связи:
– Онлайн-чат
– Email-обслуживание
– Аудио линия
– Медийные сети
Заключение
Главный портал клуба и его функционирующие альтернативы обеспечивают участникам надежный и приятный переход к большому спектру развлекательных игр. Щедрые подарки, периодические акции, компетентная сервис и простые расчетные системы создают азартный опыт чрезвычайно увлекательным и доходным.
рейтинг казино Если говорить про казино отзывы, лучше смотреть разные.
В этой информационной статье вы найдете интересное содержание, которое поможет вам расширить свои знания. Мы предлагаем увлекательный подход и уникальные взгляды на обсуждаемые темы, побуждая пользователей к активному мышлению и критическому анализу!
Разобраться лучше – https://vivod-iz-zapoya-2.ru/
Передовые онлайн-казино обеспечивают пользователям внушительный набор возможностей и бонусных программ. Присоединение к площадке осуществляется через основной портал или его актуальное зеркало clintit.com, что обеспечивает непрерывную активность.
Что представляет собой функционирующее зеркало казино
Альтернатива — это идентичная версия официального ресурса, сделанная для преодоления барьеров. Зеркало сегодня позволяет участникам обрести соединение к предпочитаемым слотам в любое удобное время.
Лицензионное зеркало имеет всеми характеристиками главного веб-сайта:
– Целый список игр
– Профиль с записанными сведениями
– Актуальные акции
– Надежные денежные транзакции
Открытие счета на лицензионном ресурсе
Ход создания аккаунта составляет всего считанные минут. Первым пользователям нужно:
1. Попасть на проверенный ресурс или действующее зеркало
2. Кликнуть на клавишу “Зарегистрироваться”
3. Ввести требуемые параметры
4. Подтвердить email
5. Произвести начальный взнос
Поощрение новичкам зачисляется автоматически после прохождения всех ступеней.
Вход в личный кабинет
Созданные участники могут произвести авторизацию применяя:
– Логин и ключ
– Номер контакта
– Email
Профиль предоставляет шанс к контролю средствами, данным игр и текущим бонусам.
Бонусы и кампании
Гемблинг площадка радует регулярных клиентов выгодными бонусами:
Первый комплект
– Надбавка на первый депозит до 100%
– Фриспины на топовые автоматы
– Экстра награды за дальнейшие платежи
Промокоды
Специальные коды обеспечивают возможность на получение особых поощрений. Текущие промокоды выставляются в категории “Промо”.
Кешбэк
Постоянный бонус насчитывает до 10% от потраченных денег. Возмещение начисляется незамедлительно.
Схема лояльности
Регулярные участники получают поинты, которые переводятся на реальные выплаты или бесплатные вращения.
Адаптивный портал и приложение
Ради комфорта игроков построена качественная мобильная версия. Адаптивный дизайн обеспечивает легко развлекаться с каждого карманного девайса.
Достоинства приложения:
– Моментальный запуск к развлечениям
– Улучшенный облик
– Стабильная активность
– Нотификации о последних акциях
Загрузить приложение можно даром с главного портала для гаджетов на Android и iOS.
Библиотека игр
Слоты
Коллекция вмещает более 2000 слотов от топовых студий:
– Традиционные машины
– Video slots
– Jackpot игры
– Фирменные игры
Live казино
Раздел Live столов обеспечивает развлечение с живыми дилерами в прямом режиме:
– Рулеточные столы
– Карточная игра
– Baccarat
– Poker
Конкурсы
Регулярные турниры с солидными премиальными пулами устраиваются еженедельно. Присоединение в соревнованиях открыто всем действующим игрокам.
Платежные методы
Пополнения и выводы выплат осуществляются через востребованные сервисы:
– Кредитные карточ ки
– Цифровые сервисы
– Криптовалюта
– Банковские операции
Самый низкий депозит — от 100 рублей. Получение финансов проводится в течение 24 периода.
Отдел support
Круглосуточная группа саппорта расположена помочь в исправлении каких-либо ситуаций:
– Live chat
– Email
– Контактный номер
– Социальные сети
Безопасность и разрешение
Главный портал оперирует на фундаменте глобальной сертификата. Всевозможные параметры участников обезопасены передовым SSL-протоколом.
Резюме
Актуальное зеркало гарантирует бесперебойный подключение к выбранным автоматам, выгодным промокодам и практичным функциям. Присоединяйтесь немедленно и обретите приветственный приз!
Современные онлайн-казино предлагают игрокам разнообразный диапазон функций для беспроблемной времяпрепровождения. Доступ к платформе http://www.duocphamfamilyfood.com/podklyuchaem-kazino-k-botu-kak-funktsioniruet-web-app-v/ выполняется через основной домен или действующее зеркало.
Что такое актуальное зеркало казино
Действующее зеркало — это запасной домен основного ресурса казино. Такие копии создаются для гарантирования бесперебойного соединения к азартной системе.
Дубликат актуальное совершенно повторяет возможности основного домена. Игроки приобретают схожий путь ко всем услугам, включая открытие счета, пополнение баланса и обналичивание призов.
Оформление профиля на официальном портале
Механизм открытия профиля требует всего буквально секунд. Новым пользователям необходимо:
1. Перейти на основной домен или актуальное настоящее зеркало
2. Выбрать кнопку “Создать аккаунт”
3. Указать требуемые данные
4. Активировать e-mail почту
5. Применить промокод при наличии
После завершения открытия профиля пользователь зарабатывает приз за регистрацию, который имеет право предполагать free spins или финансовое вознаграждение.
Вход в персональный кабинет
Пользовательский кабинет — это закрытая секция, где клиенты вправе регулировать своим учетной записью. Для входа следует внести логин и пароль.
В пользовательском кабинете представлены такие функции:
– Мониторинг журнала платежей
– Активация бонусных кодов
– Управление призами
– Участие в турнирах
– Мониторинг кэшбэка
– Изменение учетной записи
Вознаграждения и спецпредложения
Гемблинговая платформа предлагает привлекательные призы:
Стартовый набор — новые игроки получают значительное поощрение на начальные пополнения.
Фриспины — дарятся как при оформлении, так и в процессе разнообразных промо.
Кэшбек — постоянный компенсация доли израсходованных финансов.
Купоны — эксклюзивные последовательности, открывающие выход к специальным бонусам.
Анализ развлекательных категорий
Slots
Коллекция слотов охватывает тысячи наименований от передовых разработчиков. Пользователи откроют как обычные машины, так и новые мультимедийные автоматы с захватывающей визуализацией.
Live казино
Секция Live казино дарит возможность соревноваться с настоящими крупье в условиях реального времени. Имеются распространенные игры: рулетка, блэкджек, баккара, покер.
Конкурсы
Регулярные соревнования с крупными призовыми фондами притягивают массу игроков. Лидеры зарабатывают монетарные призы и специальные подарки.
Телефонная версия и приложение
Мобильная версия ресурса обеспечивает развлекаться с всякого гаджета. Структура автономно настраивается под размер экрана.
Получить софт можно для девайсов на Android и iOS. Портативное приложение имеет всеми функциями настольной версии.
Как определить рабочее зеркало на сегодня
Свежие адреса альтернатив регулярно корректируются. Обнаружить действующую URL можно разными методами:
– Через отдел техподдержки
– В настоящих новостных сетях
– По электронной подписке
– На тематических сайтах
Охрана и легальность
Главный ресурс оперирует на основании глобальной лицензии. Все платежи защищены современными методами кодирования.
Анонимность индивидуальных информации поддерживается в абсолютном формате.
Резюме
Главный сайт и его функционирующие дубликаты гарантируют пользователям беспрерывный доступ к превосходным игровым услугам. Выгодные призы, всевозможные слоты, опытная сервис — все это создает азартный процесс максимально беспроблемным и интересным.
I recently checked out this casino https://tatohosting.com/slapkong-gaming-gaming-site-official-site-your-personal-entry-point-to/ and was impressed by how stable everything felt. The games load quickly, bonuses are clear, and navigation is user-friendly, making the experience comfortable.
https://juegaenlinea.cat/
El sitio Juegaenlinea se establece en 2026 como un sitio de referencia en el mercado colombiano, proporcionando un espacio protegido y abarcador para juegos de casino en linea y apuestas deportivas con licencia internacional expedida por Curazao.
Desarrollada especialmente dirigida a el publico de Latinoamerica, esta propuesta posibilita realizar transacciones en pesos colombianos y presenta una gran diversidad de opciones de entretenimiento gracias a mas de 35 desarrolladores de software reconocidos mundialmente.
pet antibiotics and care: dog and cat medicine supply – vet pharmacy
https://codere.cat/
Actualmente, Codere Mexico es una plataforma de casino en linea que funciona con pleno cumplimiento normativo bajo licencia de la SEGOB , brindando a los usuarios de Mexico un entorno de juego seguro y fiable donde todos los depositos y retiros se operan totalmente en MXN, la moneda local mediante el sistema SPEI .
1xbet yeni adresi 1xbet yeni adresi .
1xbet turkey 1xbet turkey .
Передовые онлайн-казино обеспечивают геймерам обширный ассортимент опций для удобной развлечений. Подключение к платформе http://www.birjetkirala.com/sposoby-povysheniya-proizvoditelnosti-sayta-kazino/ реализуется через главный портал или рабочее зеркало.
Что такое функционирующее зеркало казино
Действующее зеркало — это запасной адрес главного сайта казино. Такие копии генерируются для поддержания стабильного подключения к азартной площадке.
Копия сегодня целиком дублирует функционал официального сайта. Игроки имеют такой же вход ко всем сервисам, включая регистрацию, финансирование счета и получение выигрышей.
Открытие счета на лицензионном сайте
Процесс регистрации отнимает всего буквально минут. Будущим пользователям следует:
1. Перейти на основной ресурс или актуальное проверенное зеркало
2. Нажать кнопку “Зарегистрироваться”
3. Указать необходимые информацию
4. Верифицировать почтовую почту
5. Использовать промокод при существовании
После выполнения открытия профиля пользователь обретает вознаграждение за регистрацию, который может охватывать бесплатные вращения или денежное премию.
Вход в индивидуальный кабинет
Индивидуальный кабинет — это безопасная территория, где игроки способны контролировать своим учетной записью. Для авторизации нужно ввести никнейм и password.
В персональном кабинете открыты нижеперечисленные опции:
– Отслеживание журнала операций
– Задействование кодов активации
– Управление бонусами
– Присоединение в конкурсах
– Проверка возмещения
– Изменение профиля
Бонусы и спецпредложения
Азартная площадка предлагает выгодные вознаграждения:
Стартовый пакет — дебютанты получают существенное поощрение на стартовые депозиты.
Даровые спины — начисляются как при регистрации, так и в рамках всевозможных мероприятий.
Возврат средств — еженедельный рефанд процента проигранных сумм.
Купоны — специальные шифры, обеспечивающие доступ к уникальным предложениям.
Характеристика азартных секций
Slots
Коллекция аппаратов насчитывает множество наименований от передовых разработчиков. Игроки откроют как стандартные автоматы, так и современные видео-слоты с интересной оформлением.
Live казино
Раздел Live казино дарит возможность соревноваться с реальными ведущими в условиях настоящего времени. Представлены популярные столы: рулетка, блэкджек, баккара, покер.
Соревнования
Постоянные соревнования с значительными наградными суммами притягивают множество игроков. Чемпионы завоевывают cash выплаты и уникальные бонусы.
Мобильная версия и приложение
Телефонная версия портала предоставляет право играть с любого девайса. Дизайн автоматически адаптируется под формат экрана.
Скачать программу можно для гаджетов на Android и iOS. Мобильное ПО располагает всеми опциями настольной версии.
Как определить актуальное зеркало на данный момент
Актуальные URL зеркал постоянно обновляются. Узнать рабочую ссылку можно различными методами:
– Через департамент помощи
– В настоящих социальных сетях
– По e-mail рассылке
– На тематических площадках
Надежность и лицензирование
Лицензионный ресурс функционирует на основе мировой разрешения. Все платежи охраняются актуальными протоколами кодирования.
Секретность индивидуальных информации гарантируется в полном формате.
Резюме
Официальный портал и его действующие альтернативы предоставляют участникам постоянный вход к первоклассным азартным сервисам. Великодушные поощрения, многочисленные развлечения, профессиональная сервис — все это создает гемблинговый опыт невероятно удобным и притягательным.
Анализ лицензионного веб-сайта
Актуальные сетевые казино предоставляют участникам широкий спектр услуг и опций. Лицензионный ресурс https://www.oe18.org/newsroom/2026/03/03/v-2026-godu-v-onlayn-kazino-190-mozhno-osushchestvit-oplatu-kartoy-poskolku-oni-prinimayut-etot-metod гарантирует надежный вход к игровым функциям.
Рабочее зеркало: доступ сегодня
Альтернативный адрес выступает собой точную реплику главного ресурса. Официальное зеркало позволяет игрокам обходить вероятные запреты.
Преимущества применения зеркала
Ключевые выгоды включают:
– Беспрерывный вход к сайту
– Сохранение полных опций основного веб-сайта
– Сохранность личных материалов
– Аналогичный инструментарий
Регистрация на платформе
Ход создания аккаунта знаменуется доступностью и комфортом. Новые участники необходимо:
1. Зайти на главный портал или его зеркало
2. Нажать на кнопку оформления
3. Указать нужные сведения
4. Верифицировать почтовую ящик
5. Произвести начальный логин
Приз за регистрацию
Новые игроки забирают значительный приветственный бонус. Подобное поощрение может содержать:
– Денежные средства
– Даровые вращения
– Повышенный процент компенсации
Вход в персональный профиль
Зарегистрированные игроки могут оперативно получить доступ в персональный кабинет, применяя логин и пароль. Персональный аккаунт дает путь к:
– Регулированию счетом
– Журналу операций
– Действующим подаркам
– Настройкам учетной записи
Бонусы и кампании
Портал систематически устраивает всевозможные предложения для пользователей.
Разновидности бонусов
Базовые категории бонусов:
– Денежные подарки – часть от суммы взноса
– Прокруты – бесплатные спины в слотах
– Кэшбэк – возмещение части утраченных сумм
– Конкурсные награды – премии за выступление в конкурсах
Купоны
Эксклюзивные ваучеры дают возможность приобрести экстра преимущества. Участники способны отыскать их на аффилиатных порталах или взять в письмах.
Переносная вариант и софт
Прогрессивные гемблеры выбирают переносной игровой процесс.
Опции мобильной адаптации
– Responsive вид для разнообразных устройств
– Полный возможность к развлечениям
– Оперативная загрузка
– Практичное контроль
Установить софт
Переносное софт предоставлено для скачивания на аппараты с базовыми платформами Android и iOS. Программа обеспечивает:
– Надежную работу
– Мгновенные уведомления о предложениях
– Моментальный вход к любимым играм
Развлекательный выбор
Игровой клуб обеспечивает богатую подборку игровых развлечений.
Игровые машины
Каталог азартных машин насчитывает:
– Классические машины
– Video аппараты
– Джекпотные машины
– Сюжетные автоматы
Live дилеры
Область лайв столов предлагает право участвовать с реальными ведущими. Открыты:
– Рулетки
– Очко
– Baccarat
– Карибский покер
Турниры
Периодические чемпионаты дают возможность участникам соревноваться за внушительные наградные суммы. Соревновательная структура актуализируется еженедельно.
Финансовые транзакции
Сайт предоставляет обилие опций пополнения и вывода средств:
– Кредитные карты
– Онлайн платежные системы
– Банковские переводы
– Bitcoin
Все переводы осуществляются безопасно с задействованием современных технологий кодирования.
Сервис support
Опытная отдел помощи действует 24/7. Обратиться с операторами доступно через:
– Живой чат
– Электронную почту
– Телефон
– Соц медиа
Охрана и аккредитация
Игровой клуб работает на фундаменте легальной разрешения. Подобное подтверждает:
– Честность развлекательного процесса
– Сохранность личных данных
– Оперативные выплаты
– Регулируемый игровой процесс
Вывод
Официальный сайт и его актуальные зеркала предоставляют пользователям полный комплекс опций для приятной и доходной игры. Солидные призы, разнообразные развлечения, компетентная сервис и безопасная система транзакций формируют портал превосходным выбором для фанатов развлекательных развлечений.
https://svplanet.ru/wp-content/plugins/elements/1xbet_2020_promokod_pri_registracii___bonus_6500_rubley.html
1xbet yeni giri? adresi 1xbet-giris-38.com .
казино рейтинг Если интересуют честные казино, лучше смотреть рейтинг.
https://www.isabellafiorentino.com.br/art/codigo_promocional_1xbet_bonus_exclusivo.html
Описание основного сайта
Современное онлайн-казино дарит своим участникам разнообразный выбор услуг и призов. Оригинальный ресурс Клубника казино действует непрерывно, предоставляя вход к известным автоматам, live-казино и разнообразным предложениям.
Актуальное зеркало: доступ к платформе
Что такое копия казино
Дубликат является собой точную реплику главного ресурса с альтернативным интернет именем. Рабочее зеркало позволяет участникам обходить блокировки и сохранять стабильный подключение к предпочитаемым играм.
Как найти актуальное зеркало сегодня
Действующие URL на главное зеркало выкладываются через:
– Электронную подписку
– Главные социальные сети
– Сервис обслуживания
– Affiliated порталы
Регистрация на платформе
Этапы оформления
Открытиесчета длится всего минут и подразумевает следующие стадии:
1. Вход на основной веб-сайт или функционирующее зеркало
2. Активация элемента “Открытьсчет”
3. Ввод персональных информации
4. Проверка аккаунта или телефона
5. Установка ключа
Бонус за созданиеаккаунта
Первые участники получают выгодные начальные бонусы:
– Финансовые деньги на счет
– Бесплатныевращения для автоматов
– Увеличенный объем возврата
– Особые коды
Доступ в персональный аккаунт
Зарегистрированные игроки способны произвести авторизацию через основной портал или текущее зеркало. Для этого нужно ввести имяпользователя и пароль, установленные при оформлении.
Инструменты личного аккаунта
В индивидуальном разделе открыты данные инструменты:
– Контроль контактными данными
– Ввод кошелька
– Обналичивание призов
– Применение промокодов
– Отслеживание статистики транзакций
– Участие в конкурсах
Подарки и акции
Типы бонусов
Казино радует своих участников многочисленными бонусными системами:
– Начальный бонус — большие подарки на начальные взносы
– Freespins — подарочные вращения в известных слотах
– Возврат — еженедельный компенсация доли ставок
– Система VIP — особые бонусы для постоянных пользователей
Ваучеры и их применение
Уникальные коды предоставляют бонусные бонусы. Для активации требуется указать комбинацию в определенное графу в индивидуальном профиле.
Геймплейный набор
Симуляторы
Каталог развлекательных машин содержит множество наименований от известных производителей:
– Классические слоты
– Видео игры
– Джекпот симуляторы
– Лицензионные игры
Live казино
Зона Live-казино обеспечивает процесс с профессиональными ведущими в режиме реального стрима:
– Европейскаярулетка
– Blackjack
– Пунтобанко
– Покер
Турниры
Регулярные конкурсы с внушительными призовыми суммами проходят еженедельно. Претенденты борются за первенство в рейтинге.
Портативная адаптация и APP
Смартфонная платформа сайта
Основной сайт полностью адаптирован для смартфонных девайсов. Игроки имеютвозможность запускать автоматы напрямую через обозреватель без нужды скачивания.
APP для инсталляции
Фирменное мобильное приложение предлагается для установки на аппараты с базовыми платформами Android и iOS. Приложение предоставляет:
– Быстрый подход к автоматам
– Стабильную операционность
– Push-сообщения о акциях
– Интуитивный дизайн
Итог
Официальный сайт казино и его действующие дубликаты гарантируют пользователям комплексный доступ к высококлассным развлекательным играм. Большие бонусы, многочисленные предложения, комфортная портативная реализация и опытная поддержка создают азартный процесс предельно комфортным и доходным.
Нынешние онлайн-казино предоставляют пользователям широкий набор игр и премиальных вариантов. Доступ к платформе осуществляется через главный веб-сайт или его рабочее зеркало казино Р Р° казино, что дает стабильную работу.
Что представляет собой действующее зеркало казино
Дубликат — это абсолютная версия основного веб-сайта, построенная для преодоления барьеров. Актуальное зеркало дает возможность клиентам получить вход к предпочитаемым играм в любое удобное время.
Проверенное зеркало имеет всеми опциями первоначального портала:
– Целый каталог слотов
– Аккаунт с записанными информацией
– Свежие акции
– Безопасные платежные действия
Открытие счета на главном веб-сайте
Процедура регистрации составляет всего пару минут. Начинающим участникам нужно:
1. Зайти на главный веб-сайт или функционирующее зеркало
2. Нажать на клавишу “Регистрация”
3. Заполнить требуемые данные
4. Активировать адрес
5. Сделать первый депозит
Стартовый бонус предоставляется сразу после окончания всех этапов.
Вход в профиль
Существующие игроки могут выполнить доступ указывая:
– Учетное имя и код
– Данные сотового
– Электронную почту
Аккаунт открывает возможность к контролю средствами, записям транзакций и текущим промокодам.
Поощрения и кампании
Азартная платформа балует регулярных участников многочисленными поощрениями:
Первый бонус
– Надбавка на начальный пополнение до 100%
– Фриспины на востребованные автоматы
– Экстра премии за очередные пополнения
Купоны
Уникальные купоны предоставляют шанс на использование специальных бонусов. Актуальные промокоды публикуются в блоке “Предложения”.
Возврат средств
Постоянный кешбэк насчитывает до 10% от проигранных сумм. Выплата начисляется автоматически.
Программа лояльности
Регулярные игроки приобретают единицы, которые конвертируются на подлинные финансы или фриспины.
Mobile версия и софт
Для практичности пользователей построена функциональная портативная платформа. Отзывчивый вид позволяет комфортно развлекаться с всякого переносного устройства.
Плюсы софта:
– Скорый вход к развлечениям
– Оптимизированный интерфейс
– Устойчивая активность
– Push-уведомления о актуальных акциях
Получить приложение можно даром с основного сайта для гаджетов на Android и iOS.
Ассортимент развлечений
Слоты
Библиотека включает более 2000 автоматов от ведущих студий:
– Классические слоты
– Video slots
– Прогрессивные автоматы
– Тематические автоматы
Live казино
Секция Live развлечений предоставляет игру с живыми ведущими в прямом времени:
– Рулеточные столы
– Двадцать одно
– Baccarat
– Карточный покер
Соревнования
Постоянные конкурсы с значительными выигрышными фондами устраиваются еженедельно. Допуск в состязаниях разрешено всем созданным игрокам.
Расчетные системы
Пополнения и снятия финансов производятся через известные платежные системы:
– Кредитные средства
– Цифровые кошельки
– Bitcoin
– Денежные платежи
Наименьший платеж — от 100 рублей. Изъятие выигрышей проводится в течение 24 периода.
Команда поддержки
Непрерывная отдел поддержки способна ассистировать в исправлении каких-либо ситуаций:
– Онлайн-чат
– Email
– Телефон
– Соц сети
Безопасность и лицензия
Официальный портал работает на фундаменте международной лицензии. Любые информация участников закрыты современным SSL-кодированием.
Резюме
Актуальное зеркало обеспечивает бесперебойный вход к излюбленным развлечениям, привлекательным поощрениям и практичным услугам. Присоединяйтесь немедленно и заработайте начальный подарок!
1xbet g?ncel 1xbet g?ncel .
Source
fertility loans for poor credit
to review the policy.
https://truehealthpharm.com/# True Health Pharm
https://truehealthpharm.shop/# True Health Pharm
этапы капитального ремонта этапы капитального ремонта .
1xbet yeni giri? 1xbet yeni giri? .
недорогие букеты с доставкой москва http://zakazat-cveti-moskva.ru/ .
Характеристика основного веб-сайта
Передовое онлайн-казино дарит своим клиентам обширный выбор игр и призов. Главный веб-сайт Champion зеркало функционирует 24/7, гарантируя путь к востребованным играм, live-казино и разнообразным акциям.
Функционирующее зеркало: путь к ресурсу
Что такое дубликат казино
Зеркало является собой идентичную реплику официального ресурса с отличным URL адресом. Актуальное зеркало позволяет клиентам избегать запреты и получать стабильный путь к выбранным автоматам.
Как получить актуальное зеркало сегодня
Свежие линки на основное зеркало размещаются через:
– E-mail новостнуюленту
– Официальные публичные сети
– Отдел помощи
– Тематические ресурсы
Созданиеаккаунта на ресурсе
Этапы созданияаккаунта
Оформление требует буквально минут и подразумевает следующие этапы:
1. Вход на официальный портал или актуальное зеркало
2. Выбор опции “Создатьаккаунт”
3. Заполнение личных реквизитов
4. Подтверждение email или номера
5. Придумывание секретнойкомбинации
Вознаграждение за оформление
Первые игроки зарабатывают выгодные стартовые бонусы:
– Игровые деньги на аккаунт
– Freespins для слотов
– Усиленный объем возврата
– Эксклюзивные промокоды
Доступ в индивидуальный профиль
Постоянные игроки вправе осуществить вход через основной сайт или актуальное зеркало. Для этого требуется указать учетноеимя и ключдоступа, созданные при открытиисчета.
Функции индивидуального кабинета
В собственном кабинете доступны основные возможности:
– Редактирование персональными информацией
– Ввод кошелька
– Обналичивание призов
– Использование промокодов
– Проверка истории ставок
– Вступление в турнирах
Бонусы и акции
Типы подарков
Казино радует своих клиентов разнообразными наградными программами:
– Стартовый бонус — большие подарки на начальные взносы
– Фриспины — дополнительные вращения в популярных играх
– Кэшбек — еженедельный откат части потерь
– План VIP — особые бонусы для постоянных клиентов
Купоны и их применение
Специальные коды предоставляют дополнительные вознаграждения. Для применения нужно указать код в соответствующее поле в личном кабинете.
Азартный ассортимент
Слоты
Коллекция развлекательных машин содержит тысячи вариантов от известных разработчиков:
– Обычные автоматы
– Новые слоты
– Джекпот симуляторы
– Брендовые развлечения
Live казино
Область Live-казино дарит процесс с профессиональными операторами в режиме реального эфира:
– Французскаярулетка
– Двадцатьодно
– Пунтобанко
– Карибскийпокер
Конкурсы
Постоянные состязания с большими джекпотными фондами проходят ежедневно. Участники сражаются за призовыеместа в рейтинге.
Mobile реализация и APP
Адаптивная платформа веб-сайта
Главный ресурс полностью оптимизирован для портативных гаджетов. Пользователи способны пользоваться игры прямо через обозреватель без необходимости установки.
Программа для скачивания
Специальное портативное приложение доступно для скачивания на аппараты с рабочими ОС Android и iOS. APP обеспечивает:
– Мгновенный доступ к развлечениям
– Бесперебойную производительность
– Мгновенные-извещения о предложениях
– Комфортный навигацию
Заключение
Основной портал казино и его актуальные дубликаты гарантируют игрокам всесторонний возможность к высококлассным азартным играм. Выгодные вознаграждения, многочисленные акции, функциональная смартфонная реализация и опытная сервис создают геймплейный процесс крайне удобным и доходным.
Описание главного портала
Новое онлайн-казино дарит своим участникам большой спектр услуг и поощрений. Основной ресурс Lucky Bear казино действует круглосуточно, гарантируя вход к известным играм, live-казино и разнообразным предложениям.
Актуальное зеркало: доступ к сайту
Что такое зеркало казино
Альтернатива является собой абсолютную версию оригинального портала с отличным интернет названием. Действующее зеркало дает клиентам избегать ограничения и сохранять стабильный путь к любимым слотам.
Как обнаружить актуальное зеркало сегодня
Актуальные линки на официальное зеркало размещаются через:
– E-mail подписку
– Официальные социальные сети
– Службу помощи
– Партнерские сайты
Оформление на сайте
Процесс открытиясчета
Открытиесчета отнимает буквально минут и содержит следующие шаги:
1. Доступ на главный веб-сайт или рабочее зеркало
2. Активация элемента “Зарегистрироваться”
3. Указание контактных данных
4. Проверка электроннойпочты или мобильного
5. Придумывание ключа
Приз за оформление
Начинающие игроки получают большие начальные подарки:
– Бонусные депозиты на аккаунт
– Бесплатныевращения для слотов
– Повышенный объем кэшбека
– Уникальные ваучеры
Доступ в личный кабинет
Зарегистрированные клиенты имеютвозможность осуществить доступ через главный сайт или действующее зеркало. Для этого следует внести учетноеимя и секретнуюкомбинацию, придуманные при оформлении.
Функции собственного аккаунта
В персональном кабинете предоставлены такие функции:
– Редактирование контактными данными
– Внесение счета
– Вывод денег
– Ввод бонусов
– Проверка истории ставок
– Регистрация в соревнованиях
Поощрения и промо
Категории поощрений
Казино поощряет своих игроков разнообразными поощрительными программами:
– Стартовый бонус — большие подарки на начальные вклады
– Freespins — дополнительные вращения в известных слотах
– Кешбэк — регулярный возмещение доли ставок
– Система лояльности — уникальные привилегии для регулярных пользователей
Промокоды и их применение
Специальные купоны предоставляют дополнительные поощрения. Для использования требуется указать код в специальное раздел в индивидуальном аккаунте.
Геймплейный выбор
Игры
Коллекция игровых автоматов включает сотни вариантов от ведущих производителей:
– Обычные слоты
– Современные развлечения
– Накопительные слоты
– Тематические автоматы
Live казино
Область Live-казино дарит процесс с настоящими ведущими в режиме онлайн времени:
– Французскаярулетка
– Blackjack
– Пунтобанко
– Casinopoker
Турниры
Систематические турниры с солидными выигрышными пулами проводятся регулярно. Соревнующиеся конкурируют за призовыеместа в турнирнойсетке.
Мобильная адаптация и APP
Адаптивная платформа ресурса
Оригинальный портал целиком настроен для смартфонных аппаратов. Участники вправе пользоваться слоты напрямую через веб-навигатор без нужды установки.
Софт для установки
Авторское мобильное программа предоставляется для получения на устройства с рабочими системами Android и iOS. Программа дает:
– Оперативный вход к играм
– Стабильную производительность
– Мгновенные-уведомления о акциях
– Интуитивный оформление
Резюме
Оригинальный ресурс казино и его функционирующие копии дают участникам полный доступ к качественным развлекательным развлечениям. Щедрые поощрения, разнообразные кампании, простая портативная версия и компетентная служба превращают развлекательный досуг крайне enjoyable и доходным.
install mostbet apk install mostbet apk
Volume shooters, players who take most shots per game tracked
check out their site – Opened the page and the content feels useful and practical.
выводы казино Я обычно смотрю рейтинг казино 2026 и читаю отзывы.
HappyPaws Pharmacy: pet pharmacy USA – pet antibiotics and care
mostbet descarcare mostbet descarcare
Передовые онлайн-казино обеспечивают клиентам широкий набор развлечений и поощрительных опций. Доступ к ресурсу выполняется через главный веб-сайт или его актуальное зеркало Enomo казино зеркало, что предоставляет стабильную деятельность.
Что такое рабочее зеркало казино
Дубликат — это идентичная копия главного портала, построенная для обхода запретов. Зеркало сегодня дает возможность клиентам сохранить вход к предпочитаемым играм в каждое время.
Официальное зеркало обладает всеми функциями оригинального сайта:
– Совокупный ассортимент развлечений
– Аккаунт с записанными сведениями
– Актуальные бонусы
– Надежные финансовые операции
Регистрация на лицензионном ресурсе
Ход регистрации занимает всего несколько минут. Новым игрокам следует:
1. Попасть на официальный портал или рабочее зеркало
2. Выбрать на ссылку “Зарегистрироваться”
3. Указать нужные параметры
4. Проверить электронную почту
5. Совершить первый взнос
Бонус за регистрацию выдается моментально после завершения всех этапов.
Авторизация в личный кабинет
Зарегистрированные клиенты могут осуществить доступ применяя:
– Имя пользователя и код
– Номер контакта
– Адрес
Личный кабинет дает право к управлению средствами, записям игр и доступным промокодам.
Промо и кампании
Гемблинг сервис вознаграждает лояльных участников выгодными призами:
Стартовый комплект
– Премия на дебютный депозит до 100%
– Бесплатные вращения на востребованные игры
– Экстра бонусы за следующие взносы
Ваучеры
Уникальные коды дают доступ на приобретение специальных бонусов. Свежие коды размещаются в секции “Акции”.
Возврат средств
Еженедельный кешбэк равен до 10% от утраченных средств. Возмещение начисляется сразу.
Система лояльности
Постоянные игроки зарабатывают баллы, которые переводятся на действительные финансы или даровые спины.
Мобильный сайт и приложение
В целях удобства участников создана полноценная mobile версия. Гибкий дизайн обеспечивает комфортно развлекаться с произвольного переносного устройства.
Достоинства софта:
– Скорый вход к слотам
– Улучшенный облик
– Надежная деятельность
– Сообщения о актуальных акциях
Скачать приложение можно даром с основного веб-сайта для девайсов на Android и iOS.
Ассортимент слотов
Слоты
Каталог вмещает более 2000 игр от ведущих разработчиков:
– Классические слоты
– Video slots
– Jackpot игры
– Брендовые игры
Live казино
Раздел Live столов предоставляет игру с реальными диллерами в живом времени:
– Рулеточные столы
– Блэкджек
– Баккара
– Столы покера
Конкурсы
Систематические конкурсы с солидными выигрышными фондами проводятся систематически. Присоединение в соревнованиях открыто всем созданным клиентам.
Платежные методы
Пополнения и выводы финансов производятся через популярные сервисы:
– Банковские карты
– Цифровые системы
– Криптовалюта
– Счетные переводы
Стартовый платеж — от 100 рублей. Вывод средств проводится в течение 24 ч.
Отдел support
24/7 команда помощи может ассистировать в урегулировании всех задач:
– Живой чат
– Email
– Горячая линия
– Соц сети
Надежность и лицензия
Официальный веб-сайт работает на основании мировой разрешения. Все данные пользователей закрыты передовым SSL-криптованием.
Вывод
Функционирующее зеркало гарантирует стабильный подключение к излюбленным развлечениям, выгодным акциям и удобным сервисам. Откройте счет немедленно и обретите приветственный приз!
Актуальные онлайн-казино предлагают клиентам разнообразие возможностей для удобной игры. Главный портал РњСЌРґ сайт регистрация предоставляет путь ко всем опциям и играм. Однако при образовании технических проблем на подмогу спешат актуальные копии.
Что представляет собой функционирующее зеркало
Копия казино — это точная копия основного портала, расположенная по дополнительному доменному имени. Официальное зеркало удерживает все характеристики, в том числе создание аккаунта, вход в персональный кабинет, вознаграждения и промокоды.
Альтернативный сайт на сегодня предоставляет:
– Бесперебойный путь к игровым аппаратам
– Абсолютную конфиденциальность личных информации
– Удержание баланса и журнала операций
– Доступность всех акций
Создание учетной записи на лицензионном сайте
Процедура открытия профиля занимает считанные минут. Новым игрокам необходимо:
1. Открыть на подлинный ресурс или действующее зеркало
2. Нажать кнопку «Создать аккаунт»
3. Ввести нужные поля
4. Верифицировать э-мейл почту
5. Указать промокод при присутствии
После конца регистрации пользователи приобретают вознаграждение за регистрацию, который может включать бесплатные вращения или денежное премирование.
Логин в индивидуальный кабинет
Персональный кабинет дает всесторонний контроль над игровым действом. Через персональный аккаунт допускается:
– Вносить средства на кошелек
– Снимать средства
– Задействовать кодовые слова
– Отслеживать хронологию ставок
– Играть в соревнованиях
– Забирать кешбэк
Характеристика бонусов и специальных предложений
Великодушная призовая система — существенное плюс ресурса. Основные типы поощрений:
Начальный подарок
Начинающие обретают выгодное поощрение на начальные взносы. Сумма премии может доходить до 100-200% от объема пополнения.
Бонусные спины
Безвозмездные спины выдаются для популярных игровых автоматов. Число бесплатных вращений варьируется от 10 до 500 штук.
Кешбэк
Регулярный или помесячный возврат процента проигранных денег. Средний объем кэшбека — 5-15%.
Турниры
Периодические конкурсы с большими премиальными фондами. Соревнующиеся борются за топовые строчки в турнирной таблице.
Смартфонная версия и приложуха
Смартфонная версия разрешает наслаждаться игрой с всякого устройства. Игроки могут скачать софт для iOS и Android или применять интернет версию.
Плюсы смартфонного программы:
– Быстрая загрузка слотов
– Эргономичный UI
– Пуш-нотификации о поощрениях
– Вход через Touch ID
Игровые автоматы и Live казино
Азартная база включает множество названий от известных провайдеров.
Топовые типы игр:
– Обычные машины
– Видеослоты с премиальными этапами
– Накопительный приз автоматы
– Мегавейс автоматы
Live игровой зал
Секция live казино предлагает развлечение с настоящими ведущими. Имеются традиционные игры:
– Европейская рулетка
– Blackjack
– Баккара
– Техасский холдем
Как обнаружить актуальное зеркало
Найти действующую адрес на зеркало можно различными методами:
1. Оформить подписку на email-рассылку
2. Мониторить за обновлениями в социальных сетях
3. Обратиться в отдел поддержки
4. Сохранить рабочее зеркало в закладки
Итог
Главный ресурс и его действующие альтернативные адреса дают бесперебойный путь к игровым слотам. Щедрые бонусы, разнообразные промокоды, практичное мобильное приложение и высококлассная сервис поддержки создают азартный геймплей в высшей степени комфортным и безопасным.
viagra online mexican pharmacy https://joeasymeds.top/# us online pharmacy
Описание оригинального сайта
Передовое онлайн-казино предоставляет своим пользователям широкий выбор возможностей и призов. Оригинальный сайт Килограмм казик казино функционирует 24/7, давая возможность к востребованным симуляторам, live-казино и многочисленным предложениям.
Функционирующее зеркало: доступ к платформе
Что такое зеркало казино
Зеркало составляет собой точную реплику официального веб-сайта с альтернативным сетевым именем. Актуальное зеркало дает игрокам избегать ограничения и иметь постоянный подключение к излюбленным слотам.
Как обнаружить рабочее зеркало сегодня
Действующие адреса на официальное зеркало размещаются через:
– Email рассылку
– Основные коммуникационные сети
– Команду обслуживания
– Affiliated ресурсы
Созданиеаккаунта на платформе
Процесс открытиясчета
Созданиеаккаунта занимает буквально минут и содержит данные действия:
1. Переход на основной веб-сайт или актуальное зеркало
2. Выбор кнопки “Зарегистрироваться”
3. Заполнение персональных сведений
4. Верификация электроннойпочты или контакта
5. Формирование ключа
Бонус за открытиесчета
Начинающие пользователи приобретают щедрые стартовые подарки:
– Бонусные суммы на аккаунт
– Фриспины для симуляторов
– Расширенный коэффициент компенсации
– Специальные ваучеры
Авторизация в индивидуальный аккаунт
Активные игроки вправе произвести вход через официальный портал или текущее зеркало. Для этого требуется набрать учетноеимя и пароль, установленные при оформлении.
Опции индивидуального раздела
В личном разделе доступны основные опции:
– Контроль контактными информацией
– Ввод баланса
– Снятие денег
– Активация купонов
– Просмотр истории игр
– Участие в соревнованиях
Поощрения и предложения
Виды подарков
Казино радует своих игроков различными призовыми предложениями:
– Стартовый набор — солидные подарки на начальные вклады
– Бесплатныевращения — подарочные ставки в рейтинговых симуляторах
– Кешбэк — регулярный возврат доли убытков
– Программа верности — особые привилегии для постоянных участников
Промокоды и их применение
Особые купоны гарантируют экстра бонусы. Для ввода следует ввести код в нужное графу в индивидуальном разделе.
Азартный каталог
Симуляторы
Библиотека развлекательных слотов содержит массу наименований от топовых производителей:
– Стандартные симуляторы
– Новые игры
– Джекпот слоты
– Сюжетные автоматы
Live казино
Раздел Live-казино предлагает процесс с реальными дилерами в условиях прямого эфира:
– Европейскаярулетка
– Очко
– Пунтобанко
– Покер
Турниры
Периодические соревнования с крупными джекпотными призами организуются постоянно. Соревнующиеся борются за победу в турнирнойсетке.
Смартфонная платформа и приложение
Mobile реализация веб-сайта
Главный сайт на100% оптимизирован для мобильных девайсов. Клиенты вправе играть игры прямо через веб-навигатор без необходимости скачивания.
Софт для установки
Официальное смартфонное APP доступно для установки на аппараты с операционными системами Android и iOS. Приложение гарантирует:
– Мгновенный доступ к играм
– Надежную операционность
– Мгновенные-уведомления о промо
– Интуитивный оформление
Заключение
Оригинальный ресурс казино и его функционирующие дубликаты обеспечивают клиентам абсолютный вход к первоклассным развлекательным услугам. Большие подарки, различные промо, комфортная адаптивная версия и компетентная сервис превращают геймплейный опыт предельно комфортным и доходным.
https://globaltechcouncil.org/wp-content/pgs/888starz_kod_promocyjny_2.html
казино фриспины Когда искал честные казино, понял что нужно проверять.
Переход к ресурсу и актуальные ссылки
Востребованные виртуальные казино предоставляют пользователям обширный ассортимент игр. Главный сайт http://www.almunecarvertical.com/kak-skhema-funktsioniruet-dlya-popolneniya-schetov-v-onlayn-kazino-cherez-sberbank/ предоставляет защищенный переход ко всем сервисам. Тем не менее периодически появляются случаи, когда требуется резервный вариант авторизации.
Что являет собой собой функционирующее зеркало
Функционирующее зеркало — это точная копия основного веб-сайта с альтернативным доменным расположением. Альтернатива сегодня обеспечивает избегать возможные барьеры и гарантировать бесперебойный переход к предпочитаемым развлечениям.
Легальное зеркало имеет идентичными функциями, что и главный портал:
– Весь каталог развлечений
– Индивидуальный кабинет с зафиксированными параметрами
– Все награды и программы
– Проверенные денежные транзакции
Создание аккаунта и авторизация в сервис
Этап оформления на ресурсе отнимает пару моментов. Новым пользователям требуется:
1. Зайти на рабочее зеркало сейчас
2. Щелкнуть элемент «Зарегистрироваться»
3. Внести обязательные сведения
4. Подтвердить электронную почту или номер телефона
5. Получить награду за оформление
Подключение в индивидуальный раздел реализуется с помощью указание ID и пароля.
Обзор призовой системы
Богатая бонусная политика — основное плюс казино. Клиенты зарабатывают всевозможные поощрения:
Приветственные бонусы
Начинающие игроки имеют возможность претендовать на выгодный бонус за открытие профиля. Как правило это совокупность вариантов, охватывающий:
– Долевую премию к дебютному пополнению
– Даровые кручения
– Дополнительные финансы на аккаунт
Кодовые комбинации и уникальные опции
Постоянные купоны позволяют получать призовые преимущества. Активировать их возможно в предназначенном разделе собственного раздела.
Спины и компенсация
Free spins — это возможность играть игры без применения личных сумм. Рибейт означает определенный возмещение утраченных средств.
Каталог развлечений
Гемблинг платформа предоставляет внушительную коллекцию игр.
Автоматы
Многообразие игровых машин впечатляет ожидания. Имеются классические ретро автоматы и актуальные игры с захватывающей анимацией.
Live игры
Раздел Live казино транспортирует участников в среду настоящего игорного зала. Опытные ведущие проводят раунды в прямом формате.
Турниры и рейтинги
Периодические состязания привносят азарта и гарантируют шанс заработать значительные выигрыши.
Мобильная форма и приложение
Продвинутые решения помогают играть в любом пространстве. Адаптивная вариант автономно оптимизируется под экран устройства.
Скачать программу разрешено для цифровых ОС iOS и Android. Программа дает:
– Оперативный переход
– Бесперебойную деятельность
– Всплывающие-оповещения об акциях
– Простой дизайн
Денежные действия
Сайт работает с разнообразные системы депозита и снятия денег:
– Банковские счета
– Цифровые платформы
– Крипто
– Финансовые отправки
Всевозможные действия реализуются через зашифрованное подключение, что гарантирует целостность личных данных.
Отдел поддержки
Компетентная бригада поддержки работает постоянно. Контактировать с операторами можно через:
– Живой-чат
– E-mail почту
– Контакт
– Коммуникационные сети
Заключение
Основной сайт и его действующее зеркало обеспечивают клиентам надежный и приятный вход к захватывающим забавам. Выгодные поощрения, большой ассортимент автоматов и профессиональная сервис формируют времяпрепровождение максимально комфортной и выгодной.
1xbet ?ye ol 1xbet-giris-35.com .
Передовые онлайн-казино предоставляют игрокам богатый ассортимент вариантов для беспроблемной досуга. Подключение к сервису казино Lucky Bear казино реализуется через главный веб-ресурс или функционирующее зеркало.
Что такое рабочее зеркало казино
Актуальное зеркало — это резервный домен основного ресурса казино. Такие клоны формируются для гарантирования непрерывного подключения к азартной сервису.
Копия сегодня полностью повторяет возможности основного сайта. Пользователи обретают идентичный путь ко всем возможностям, включая оформление профиля, пополнение кошелька и вывод призов.
Открытие счета на основном портале
Механизм создания аккаунта требует всего несколько минут. Будущим участникам следует:
1. Войти на официальный сайт или актуальное настоящее зеркало
2. Выбрать кнопку “Регистрация”
3. Внести необходимые сведения
4. Верифицировать email почту
5. Ввести промокод при наличии
После завершения создания аккаунта клиент приобретает вознаграждение за регистрацию, который может охватывать даровые спины или монетарное начисление.
Логин в персональный кабинет
Индивидуальный кабинет — это охраняемая зона, где клиенты вправе управлять своим учетной записью. Для логина нужно указать username и код доступа.
В индивидуальном кабинете имеются такие возможности:
– Проверка истории операций
– Применение купонов
– Контроль призами
– Включение в турнирах
– Проверка кэшбэка
– Изменение аккаунта
Призы и акции
Азартная платформа предлагает щедрые бонусы:
Регистрационный пакет — начинающие обретают существенное вознаграждение на первые пополнения.
Даровые спины — дарятся как при создании аккаунта, так и в процессе различных промо.
Возмещение — систематический компенсация части утраченных сумм.
Промокоды — уникальные коды, обеспечивающие выход к особым призам.
Характеристика гемблинговых секций
Слоты
Собрание слотов насчитывает сотни игр от лучших поставщиков. Клиенты встретят как обычные аппараты, так и актуальные видеослоты с интересной визуализацией.
Live казино
Категория Live казино предлагает право участвовать с реальными дилерами в режиме актуального времени. Представлены распространенные варианты: рулетка, блэкджек, баккара, покер.
Соревнования
Регулярные чемпионаты с солидными призовыми пулами манят тысячи соревнующихся. Лидеры получают денежные призы и особые бонусы.
Мобильная версия и app
Мобильная версия сайта позволяет участвовать с произвольного устройства. Интерфейс самостоятельно подстраивается под диагональ экрана.
Установить приложение можно для устройств на Android и iOS. Мобильное программа располагает всеми характеристиками компьютерной версии.
Как обнаружить актуальное зеркало на сегодня
Действующие адреса дубликатов периодически корректируются. Получить рабочую URL можно многими методами:
– Через службу саппорта
– В подлинных социальных сетях
– По email дайджесту
– На тематических сайтах
Надежность и сертификация
Официальный домен оперирует на фундаменте зарубежной документа. Все транзакции охраняются передовыми методами защиты.
Секретность личных реквизитов поддерживается в абсолютном формате.
Вывод
Лицензионный домен и его функционирующие альтернативы предоставляют игрокам постоянный доступ к первоклассным азартным развлечениям. Великодушные бонусы, многочисленные развлечения, опытная служба — все это создает азартный опыт предельно беспроблемным и интересным.
If some one wants to be updated with most recent technologies after that he
must be visit this web page and be up to date all the
time.
Нынешние онлайн-казино предоставляют клиентам разнообразный выбор развлечений и привлекательные поощрения. Тем не менее для комфортной работы важно понимать, как найти http://news.oalur.com/ и его действующие зеркала.
Что такое основной сайт казино
Лицензионный ресурс казино — это базовая площадка, где игроки могут наслаждаться развлекательными играми. Портал функционирует на легитимных принципах и владеет всеми требуемыми документами.
Первостепенные достоинства лицензионного веб-сайта:
– Надежность персональных информации
– Прозрачные условия участия
– Гарантированные транзакции
– Оперативная служба поддержки
Рабочее зеркало казино: для чего используется
Зеркало — это абсолютная клон главного портала, расположенная по иному домену. Функционирующее зеркало формируется для предоставления непрерывного подключения к порталу.
Факторы эксплуатации зеркал:
– Недоступность главного URL
– Регламентные мероприятия
– Высокая нагрузка на сервер
Как найти актуальное зеркало на сегодня
Получить актуальное действующее зеркало можно различными способами:
1. Подписка — активируйте уведомления на информационную подписку
2. Департамент техподдержки — свяжитесь в онлайн-чат
3. Корпоративные площадки — мониторьте за публикациями
4. Игровые ресурсы — авторитетные платформы
Открытие счета на платформе казино
Алгоритм создания аккаунта составляет всего несколько минут:
1. Выберите на элемент “Открыть счет”
2. Укажите запрашиваемые информацию
3. Валидируйте контактную e-mail
4. Введите бонусный код, если имеется
После завершенной активации вам будет разрешен индивидуальный профиль.
Поощрения и бонусные коды
Привлекательная поощрительная система — существенное конкурентное преимущество казино:
Бонус за открытие счета
Начинающие участники приобретают первый подарок, который может включать:
– Финансовый бонус на дебютный вклад
– Фриспины для барабанов
– Стартовые деньги
Бонусные коды
Периодически публикуются актуальные промокоды, дающие возможность активировать дополнительные бонусы.
Система кэшбека
Активные игроки возвращают процент проигранных средств назад.
Актуальные предложения и состязания
Казино регулярно проводит захватывающие акции:
– Недельные соревнования
– Сезонные промо
– Розыгрыши значительных выигрышей
– Механизм лояльности
Авторизация в личный раздел
Для авторизации на ресурс нужно:
1. Загрузить официальный ресурс или действующее зеркало
2. Активировать “Войти”
3. Ввести имя пользователя и код доступа
В пользовательском профиле разрешены следующие инструменты:
– Зачисление депозита
– Обналичивание средств
– Просмотр истории транзакций
– Настройка личными сведениями
Мобильная платформа и софт
Адаптивная версия
Оптимизированная вариант веб-сайта дает возможность участвовать с всех смартфонного устройства. Дизайн динамически оптимизируется под диагональ screen.
App для download
Загрузить программу можно для:
– Android — безопасная загрузка с платформы
– iOS — инсталляция через App Store
Преимущества приложения:
– Моментальный запуск
– Стабильная операционность
– Push-сообщения об промо
– Производительный интерфейс
Азартные разделы
Игровые машины
Богатая подборка развлекательных барабанов от ведущих провайдеров:
– Ретро машины
– Новые-автоматы
– Накопительные-машины
Live игры
Зона с реальными ведущими обеспечивает:
– Рулеточные столы
– 21
– Punto Banco
– Texas Hold’em
Эфиры транслируются в отличном качестве, воссоздавая атмосферу настоящего казино.
Варианты депозита и получения
Сайт работает с различные финансовые методы:
– Дебетовые card
– Виртуальные счета
– Bitcoin/Ethereum
– Wire отправки
Стартовые пороги пополнения и моментальные выводы гарантируют игру крайне беспроблемной.
Служба техподдержки
Опытная служба support функционирует 24/7 и готова ассистировать с всеми вопросами:
– Живой-чат
– Email-переписка
– Звонковая служба
Выводы
Главный сайт казино и его актуальные альтернативные адреса предоставляют участникам безопасный и увлекательный гемблинг процесс. Выгодные подарки, комфортная портативная модификация, разнообразные автоматы и превосходное live-казино делают эту платформу отличным вариантом для азартных досуга.
https://t.me/s/ratingcasino_zerkalo Когда искал честные казино, понял что лучше читать отзывы, а не только описания.
Нынешние онлайн-казино обеспечивают пользователям широкий набор игр и бонусных предложений. Вход к платформе реализуется через лицензионный ресурс или его функционирующее зеркало Tippy казино, что дает стабильную деятельность.
Чем является рабочее зеркало казино
Копия — это абсолютная копия основного ресурса, построенная для преодоления ограничений. Рабочее зеркало обеспечивает участникам получить вход к любимым слотам в любое удобное время.
Проверенное зеркало содержит всеми функциями главного сайта:
– Весь каталог слотов
– Аккаунт с записанными данными
– Действующие бонусы
– Гарантированные платежные процедуры
Регистрация на официальном портале
Процесс регистрации требует всего пару минут. Свежим игрокам нужно:
1. Зайти на проверенный веб-сайт или действующее зеркало
2. Кликнуть на клавишу “Открыть счет”
3. Указать необходимые информацию
4. Подтвердить email
5. Сделать первый взнос
Бонус за регистрацию выдается сразу после завершения всех стадий.
Доступ в аккаунт
Существующие клиенты могут выполнить подключение применяя:
– Учетное имя и пароль
– Данные сотового
– Адрес
Профиль дает право к управлению балансом, истории ставок и текущим промокодам.
Промо и предложения
Игровая система вознаграждает постоянных пользователей разнообразными поощрениями:
Стартовый бонус
– Премия на стартовый платеж до 100%
– Free spins на популярные игры
– Дополнительные бонусы за последующие взносы
Ваучеры
Специальные ваучеры предоставляют возможность на использование уникальных бонусов. Свежие комбинации выставляются в разделе “Предложения”.
Возврат средств
Еженедельный кэшбек составляет до 10% от утраченных средств. Возмещение зачисляется незамедлительно.
Схема лояльности
Регулярные игроки зарабатывают очки, которые переводятся на подлинные деньги или free spins.
Мобильный сайт и софт
В целях удобства пользователей разработана функциональная mobile версия. Гибкий вид обеспечивает беспрепятственно развлекаться с каждого мобильного устройства.
Преимущества софта:
– Быстрый подключение к играм
– Оптимизированный облик
– Устойчивая функциональность
– Push-уведомления о свежих акциях
Получить приложение можно безвозмездно с официального сайта для девайсов на Android и iOS.
Коллекция развлечений
Машины
База вмещает более 2000 автоматов от известных разработчиков:
– Обычные автоматы
– Современные автоматы
– Прогрессивные автоматы
– Тематические автоматы
Live казино
Блок Live казино дает взаимодействие с живыми крупье в онлайн режиме:
– Рулеточные столы
– Блэкджек
– Карты
– Карточный покер
Соревнования
Периодические конкурсы с значительными наградными фондами проводятся регулярно. Допуск в соревнованиях открыто всем созданным пользователям.
Финансовые системы
Взносы и получения денег выполняются через распространенные платежные системы:
– Дебетовые карты
– Цифровые сервисы
– Криптовалюта
– Денежные платежи
Наименьший взнос — от 100 рублей. Изъятие средств осуществляется в течение 24 ч.
Отдел помощи
24/7 отдел саппорта способна помочь в решении каких-либо задач:
– Live chat
– Email
– Связь
– Общественные сети
Охрана и лицензия
Лицензионный веб-сайт функционирует на фундаменте международной сертификата. Всевозможные параметры участников закрыты актуальным SSL-кодированием.
Резюме
Актуальное зеркало предоставляет непрерывный доступ к излюбленным автоматам, богатым бонусам и функциональным возможностям. Откройте счет сегодня и получите первый поощрение!
which online pharmacy is the best: best price for viagra 100mg – canadian pharmacy sildenafil
An astrology portal burcler com az with daily horoscopes, natal charts, and forecasts. Online consultations, zodiac sign compatibility, and personalized recommendations will help you better understand yourself and make important decisions.
Практик о заборах http://www.sinta-kedr.ru честный разбор материалов, установки и стоимости. Узнайте плюсы и минусы разных видов заборов, частые ошибки и реальные сроки службы. Полезные рекомендации перед покупкой и монтажом ограждений.
Дубликаты номеров https://avtostrahovka36.ru в Воронеже — изготовление и восстановление регистрационных знаков по ГОСТ. Срочно за 1 день, качественные материалы, соответствие требованиям и выгодные цены. Оформление быстро и без очередей.
A non-profit organization https://linkimpact.org dedicated to supporting multicultural families, environmental protection, volunteerism, and language and cultural exchange.
Описание официального ресурса
Современные интернет казино предлагают игрокам обширный набор развлечений и возможностей. Основной портал Лев гарантирует безопасный доступ к развлекательным сервисам.
Рабочее зеркало: возможность сегодня
Резервный сайт представляет собой точную копию основного веб-сайта. Актуальное зеркало обеспечивает пользователям обходить потенциальные запреты.
Плюсы применения зеркала
Принципиальные преимущества включают:
– Беспрерывный путь к порталу
– Удержание всех функций официального ресурса
– Охрана личных материалов
– Равнозначный возможности
Регистрация на ресурсе
Процесс регистрации отличается доступностью и практичностью. Новые пользователи необходимо:
1. Посетить официальный веб-сайт или его зеркало
2. Щелкнуть на элемент создания аккаунта
3. Указать требуемые данные
4. Активировать email ящик
5. Произвести первый авторизацию
Приз за открытие счета
Новички забирают внушительный вступительный бонус. Данное вознаграждение способно охватывать:
– Материальные суммы
– Даровые фриспины
– Усиленный показатель возврата
Логин в индивидуальный аккаунт
Активные пользователи способны мгновенно получить доступ в персональный аккаунт, применяя логин и шифр. Собственный кабинет предоставляет возможность к:
– Администрированию средствами
– Хронологии переводов
– Текущим подаркам
– Параметрам аккаунта
Призы и предложения
Платформа постоянно организует разнообразные предложения для клиентов.
Типы призов
Главные виды поощрений:
– Денежные начисления – часть от размера внесения
– Спины – безвозмездные вращения в слотах
– Компенсация – компенсация фрагмента потерянных средств
– Призовые призы – премии за состязание в конкурсах
Промокоды
Особые промокоды обеспечивают приобрести экстра привилегии. Клиенты способны отыскать их на партнерских площадках или получить в рассылке.
Мобильная адаптация и софт
Передовые гемблеры предпочитают переносной досуг.
Возможности переносной платформы
– Отзывчивый дизайн для всех гаджетов
– Целостный путь к развлечениям
– Стремительная функционирование
– Комфортное контроль
Загрузить приложение
Mobile программа открыто для установки на гаджеты с базовыми ОС Android и iOS. Софт гарантирует:
– Бесперебойную функциональность
– Пуш уведомления о бонусах
– Моментальный вход к любимым играм
Развлекательный каталог
Игровой клуб дает обширную подборку развлекательных развлечений.
Слоты
Библиотека развлекательных аппаратов содержит:
– Обычные игры
– Video игры
– Призовые слоты
– Branded игры
Live столы
Секция лайв столов обеспечивает право участвовать с живыми крупье. Открыты:
– Рулетки
– Блэкджек
– Punto Banco
– Poker
Соревнования
Периодические конкурсы дают возможность игрокам конкурировать за крупные наградные фонды. Турнирная программа изменяется регулярно.
Банковские процедуры
Портал поддерживает разнообразие методов депозита и вывода средств:
– Банковские карты
– Цифровые кошельки
– Межбанковские переводы
– Крипто
Абсолютно все операции производятся надежно с применением современных технологий криптографии.
Служба сопровождения
Опытная служба поддержки действует без перерыва. Коннектиться с менеджерами возможно через:
– Online чат
– Email почту
– Телефон
– Social платформы
Охрана и лицензирование
Платформа действует на базе действительной аккредитации. Данное обеспечивает:
– Честность азартного геймплея
– Охрану персональных информации
– Пунктуальные выплаты
– Контролируемый геймплей
Заключение
Основной веб-сайт и его функционирующие альтернативные адреса дают участникам полный ассортимент опций для удобной и профитной досуга. Внушительные призы, разнообразные игры, опытная сервис и надежная платформа платежей превращают казино превосходным вариантом для любителей развлекательных развлечений.
Современные онлайн-казино обеспечивают геймерам богатый выбор опций для комфортной игры. Доступ к платформе https://94soluzioni.com/sposoby-zashchity-svoikh-personalnykh-dannykh-i-informatsii-o-bankovskikh-kartakh-vo-vremya-igry-v-onlayn-kazino.html/ производится через лицензионный веб-ресурс или действующее зеркало.
Что такое актуальное зеркало казино
Функционирующее зеркало — это запасной URL официального портала казино. Такие версии разрабатываются для обеспечения стабильного входа к развлекательной системе.
Альтернатива на сегодня совершенно повторяет функционал основного ресурса. Игроки получают идентичный путь ко всем возможностям, включая регистрацию, внесение депозита баланса и обналичивание средств.
Создание аккаунта на основном ресурсе
Механизм создания аккаунта длится всего буквально минут. Свежим участникам требуется:
1. Войти на официальный сайт или актуальное подлинное зеркало
2. Щелкнуть кнопку “Создать аккаунт”
3. Заполнить обязательные данные
4. Верифицировать email почту
5. Использовать промокод при существовании
После окончания оформления клиент приобретает подарок за регистрацию, который способен включать free spins или денежное начисление.
Логин в персональный кабинет
Персональный кабинет — это закрытая зона, где участники могут регулировать своим аккаунтом. Для входа требуется напечатать логин и код доступа.
В пользовательском кабинете имеются следующие инструменты:
– Мониторинг журнала операций
– Применение промокодов
– Регулирование вознаграждениями
– Присоединение в конкурсах
– Проверка возмещения
– Изменение аккаунта
Призы и предложения
Азартная сервис предлагает щедрые бонусы:
Стартовый пакет — дебютанты получают солидное вознаграждение на дебютные взносы.
Free spins — начисляются как при создании аккаунта, так и в ходе всевозможных акций.
Кэшбэк — систематический рефанд части проигранных сумм.
Купоны — эксклюзивные последовательности, открывающие право к особым вознаграждениям.
Характеристика игровых секций
Slots
Библиотека slots включает множество игр от ведущих поставщиков. Геймеры обнаружат как классические машины, так и актуальные видео-слоты с притягательной анимацией.
Live казино
Секция Live казино предлагает возможность развлекаться с действующими дилерами в формате актуального времени. Открыты распространенные столы: рулетка, блэкджек, баккара, покер.
Состязания
Периодические состязания с значительными выигрышными фондами манят тысячи соревнующихся. Чемпионы зарабатывают cash награды и специальные премии.
Мобильная версия и программа
Мобильная версия платформы позволяет играть с каждого девайса. Дизайн автоматически настраивается под размер экрана.
Скачать программу можно для девайсов на Android и iOS. Портативное приложение имеет всеми характеристиками компьютерной версии.
Как отыскать рабочее зеркало на данный момент
Рабочие линки альтернатив систематически корректируются. Обнаружить действующую адрес можно многими вариантами:
– Через департамент поддержки
– В подлинных информационных сетях
– По email newsletter
– На тематических порталах
Охрана и легальность
Главный домен функционирует на базе международной документа. Все операции оберегаются актуальными технологиями защиты.
Анонимность персональных данных гарантируется в полном размере.
Вывод
Лицензионный портал и его функционирующие зеркала гарантируют клиентам круглосуточный доступ к превосходным гемблинговым играм. Привлекательные бонусы, всевозможные слоты, компетентная сервис — все это делает гемблинговый досуг невероятно комфортным и увлекательным.
1xbet giri? linki 1xbet-giris-32.com .
https://t.me/ratingcasino_zerkalo Когда искал честные казино, нашёл несколько вариантов.
1xbet spor bahislerinin adresi 1xbet spor bahislerinin adresi .
I enjoy playing at this casino https://heatherbergdahlmentorship.com/bet-ninja-platform-your-entry-point-to-premium-web/ because it feels trustworthy and well-optimized. Live tables are interactive, slots offer different styles, and the overall experience remains pleasant over time.
Нынешние онлайн-казино предоставляют геймерам богатый ассортимент функций для беспроблемной досуга. Подключение к площадке Лаки Бир официальный сайт реализуется через официальный портал или действующее зеркало.
Что такое рабочее зеркало казино
Актуальное зеркало — это резервный домен официального веб-сайта казино. Такие копии формируются для поддержания стабильного подключения к игровой системе.
Копия текущее совершенно дублирует опции официального сайта. Клиенты имеют схожий выход ко всем функциям, включая открытие счета, внесение депозита кошелька и снятие средств.
Регистрация на лицензионном веб-сайте
Механизм оформления учетной записи отнимает всего несколько моментов. Свежим клиентам следует:
1. Попасть на официальный портал или рабочее подлинное зеркало
2. Кликнуть кнопку “Создать аккаунт”
3. Указать обязательные информацию
4. Проверить почтовую почту
5. Ввести бонусный код при присутствии
После окончания создания аккаунта игрок приобретает подарок за регистрацию, который вправе предполагать free spins или денежное поощрение.
Авторизация в индивидуальный кабинет
Личный кабинет — это охраняемая зона, где игроки способны администрировать своим учетной записью. Для авторизации требуется указать username и пароль.
В персональном кабинете открыты нижеперечисленные опции:
– Просмотр журнала транзакций
– Применение бонусных кодов
– Регулирование призами
– Включение в соревнованиях
– Контроль возмещения
– Настройка аккаунта
Вознаграждения и предложения
Азартная площадка предлагает великодушные бонусы:
Приветственный пакет — начинающие приобретают существенное начисление на первые взносы.
Фриспины — дарятся как при регистрации, так и в процессе всевозможных кампаний.
Кэшбек — постоянный рефанд части израсходованных средств.
Промокоды — уникальные коды, обеспечивающие выход к особым предложениям.
Обзор игровых разделов
Игровые автоматы
Собрание автоматов содержит множество игр от передовых разработчиков. Игроки откроют как обычные машины, так и инновационные видео-слоты с увлекательной графикой.
Live казино
Категория Live казино предлагает опцию развлекаться с настоящими дилерами в состоянии текущего времени. Открыты известные развлечения: рулетка, блэкджек, баккара, покер.
Состязания
Периодические турниры с крупными премиальными пулами привлекают множество игроков. Призеры получают денежные вознаграждения и особые бонусы.
Смартфонная версия и app
Телефонная версия платформы дает возможность развлекаться с произвольного гаджета. Оформление автоматически подстраивается под диагональ экрана.
Установить приложение можно для устройств на Android и iOS. Телефонное приложение располагает всеми опциями десктопной версии.
Как определить текущее зеркало на текущий день
Свежие адреса дубликатов систематически меняются. Обнаружить рабочую адрес можно несколькими методами:
– Через сервис саппорта
– В официальных социальных сетях
– По электронной newsletter
– На партнерских порталах
Охрана и официальность
Основной портал функционирует на основе зарубежной документа. Все транзакции защищены актуальными методами кодирования.
Секретность пользовательских информации поддерживается в совершенном формате.
Заключение
Лицензионный сайт и его актуальные дубликаты дарят игрокам беспрерывный выход к первоклассным игровым играм. Щедрые поощрения, различные развлечения, квалифицированная помощь — все это создает азартный времяпрепровождение максимально удобным и притягательным.
Многие дачники ставят детские площадки не только для своих детей, но и для внуков. Хороший комплекс служит десятилетиями, радуя несколько поколений семьи. Это действительно долгосрочная инвестиция.
Нынешние онлайн-казино гарантируют пользователям множество опций для приятной игры. Главный веб-портал Голд казино предоставляет доступ ко всем возможностям и играм. Однако при наличии технических сложностей на выручку приходят рабочие альтернативные адреса.
Что есть собой актуальное зеркало
Зеркало казино — это точная версия основного сайта, расположенная по другому веб-адресу. Легитимное зеркало сохраняет все опции, в том числе создание аккаунта, авторизацию в индивидуальный кабинет, поощрения и кодовые слова.
Альтернативный сайт на сегодня обеспечивает:
– Бесперебойный доступ к азартным автоматам
– Стопроцентную конфиденциальность персональных данных
– Поддержку депозита и записей платежей
– Доступность всех промо-предложений
Создание учетной записи на лицензионном сайте
Процедура оформления учетной записи требует несколько минут. Начинающим клиентам необходимо:
1. Зайти на основной сайт или рабочее зеркало
2. Нажать кнопку «Регистрация»
3. Заполнить требуемые графы
4. Активировать э-мейл почту
5. Использовать промокод при наличии
После окончания оформления профиля пользователи получают вознаграждение за регистрацию, который может иметь фриспины или денежно-призовое вознаграждение.
Доступ в личный кабинет
Индивидуальный кабинет обеспечивает всесторонний мониторинг над азартным процессом. Через персональный аккаунт допускается:
– Пополнять счет
– Получать призы
– Активировать бонусные коды
– Отслеживать хронологию ставок
– Участвовать в турнирах
– Приобретать кешбэк
Анализ премий и специальных предложений
Богатая премиальная схема — существенное плюс ресурса. Центральные виды бонусов:
Начальный бонус
Дебютанты приобретают выгодное премирование на начальные взносы. Размер приза может достигать 100-200% от размера депозита.
Бонусные спины
Безвозмездные спины выдаются для топовых слотов. Количество free spins разнится от 10 до 500 штук.
Cash back
Постоянный или помесячный отдача процентной доли утраченных финансов. Обычный процент кэшбека — 5-15%.
Состязания
Постоянные состязания с крупными призовыми фондами. Участники конкурируют за лучшие строчки в рейтинге.
Смартфонная версия и приложение
Портативная версия обеспечивает развлекаться с каждого девайса. Геймеры могут закачать программу для iOS и Android или эксплуатировать интернет версию.
Выгоды смартфонного приложения:
– Скоростная прогрузка автоматов
– Практичный дизайн
– Пуш-нотификации о промо
– Возможность входа через Face ID
Автоматы и Live казино
Игровая подборка охватывает множество наименований от лидирующих провайдеров.
Топовые секции игр:
– Классические автоматы
– Видеослоты с призовыми раундами
– Накопительный приз игры
– Мегавейс автоматы
Live игорный зал
Секция live казино обеспечивает развлечение с настоящими дилерами. Имеются стандартные игры:
– Рулетка
– Двадцать одно
– Punto Banco
– Карибский покер
Как разыскать рабочее зеркало
Найти свежую ссылку на зеркало можно различными путями:
1. Зарегистрироваться на емейл-уведомления
2. Мониторить за обновлениями в соц сетях
3. Написать в департамент поддержки
4. Заложить действующее зеркало в закладки
Резюме
Основной сайт и его действующие зеркала дают стабильный доступ к азартным слотам. Выгодные вознаграждения, множественные бонусные коды, эргономичное портативное софт и профессиональная техподдержка поддержки создают азартный опыт предельно приятным и безопасным.
online emporium page – Navigation flows well and the site feels structured.
1xbet g?ncel 1xbet g?ncel .
Доступ к платформе через действующие зеркала
Участники интернет казино постоянно контактируют с проблемой закрытия базового ресурса. Конкретно для устранения этой трудности предусмотрены копии главного сайта. http://comsatech.net/2026/03/03/v-tselom-mozhno-skazat-chto-sposoby-povysheniya-skorosti-funktsionirovaniya-sayta-kazino предоставляет полный вход ко всем сервисам казино.
Что такое функционирующее зеркало казино
Дубликат представляет собой точную копию главного веб-сайта с идентичным функционалом. Ключевое несовпадение — это альтернативное имя. Каждые параметры клиента, включая счет, поощрения и историю раундов, остаются неизменными.
Плюсы использования зеркал
Актуальные зеркала располагают множеством существенных выгод:
– Бесперебойный подключение к излюбленным играм
– Абсолютная конфиденциальность собственных данных
– Удержание всех настроек пользовательского кабинета
– Способность обретения наград и включения в предложениях
Открытие счета на официальном ресурсе
Ход создания аккаунта чрезвычайно легок и требует немного минут. Начинающие игроки имеют возможность полагаться на внушительный начальный подарок за открытие счета.
Стадии создания аккаунта
1. Переход на основной сайт или его альтернативу
2. Выбор на клавишу “Регистрация”
3. Заполнение обязательных информации
4. Верификация электронной почты
5. Ввод купона (если доступен)
Поощрения и промоакции для игроков
Платформа поощряет своих участников многочисленными бонусными системами.
Основные типы призов
Начальный бонус — солидное премирование для недавних участников, что имеет возможность включать монетарные средства и free spins.
Бесплатные вращения — возможность играть в востребованных автоматах бесплатно.
Возврат средств — частичный возврат проигранных денег, который зачисляется по неделям или раз в месяц.
Специальные коды — уникальные наборы, дающие дополнительные выгоды.
Пользовательский кабинет: возможности и установки
Персональный раздел гарантирует абсолютный надзор над игровым взаимодействием. В нем присутствуют:
– Регулирование счетом
– Архив операций
– Работающие поощрения
– Параметры охраны
– Подтверждение аккаунта
Портативная платформа и APP
Современные участники ценят портативность. Казино предлагает пару пути для игры с карманных аппаратов.
Адаптивная смартфонная платформа
Смартфонная вариант портала автоматически настраивается под дисплей любого девайса. Отсутствует потребность скачивать специальное приложение.
Софт для телефонов
Возможно скачать фирменное софт для iOS и Android. Приложение предоставляет:
– Быстрый запуск
– Доработанный дизайн
– Push-уведомления о поощрениях
– Бесперебойную работу
Live развлечения: атмосфера реального казино
Зона Live казино переносит игроков в обстановку подлинного казино. Компетентные хосты ведут сессии в формате прямого времени.
Востребованные Live-форматы
– Французская рулетка
– Blackjack
– Baccarat
– Покер
Аппараты: ассортимент автоматов
Коллекция развлекательных аппаратов включает множество позиций от топовых производителей. Пользователи найдут:
– Классические автоматы
– Современные слоты
– Прогрессивный джекпот-игры
– Многолинейные автоматы
Конкурсы и эксклюзивные события
Систематические турниры обеспечивают участникам конкурировать друг с другом за внушительные денежные фонды. Отдельный турнир содержит свои требования вовлечения и доску победителей.
Способы зачисления и изъятия денег
Ресурс поддерживает комплекс расчетных сервисов:
– Кредитные инструменты
– Цифровые счета
– Blockchain-платежи
– Wire переводы
Каждые операции выполняются безопасно благодаря современным протоколам шифрования.
Команда поддержки
Квалифицированные специалисты сервиса обслуживания настроены содействовать 24/7. Работают нижеперечисленные каналы коммуникации:
– Онлайн-чат
– Email-поддержка
– Звонковая горячая линия
– Социальные сети
Вывод
Основной домен игровой площадки и его функционирующие дубликаты предоставляют пользователям защищенный и удобный вход к огромному выбору игровых услуг. Внушительные бонусы, регулярные кампании, квалифицированная сервис и комфортные расчетные методы создают азартный времяпрепровождение чрезвычайно захватывающим и выгодным.
Современные онлайн-казино обеспечивают геймерам массу путей для беспроблемной игры. Центральный ресурс Glory дарит доступ ко всем функциям и азартным играм. Однако при возникновении технических неполадок на помощь спешат рабочие дубликаты.
Что представляет собой функционирующее зеркало
Зеркало казино — это точная копия оригинального ресурса, находящаяся по альтернативному URL. Легитимное зеркало поддерживает все функции, в том числе открытие профиля, вход в персональный кабинет, бонусы и купоны.
Зеркало на сегодня обеспечивает:
– Постоянный вход к азартным аппаратам
– Абсолютную безопасность личных информации
– Поддержку баланса и журнала платежей
– Доступность всех бонусных программ
Регистрация на официальном ресурсе
Ход создания аккаунта занимает пару минут. Свежеиспеченным пользователям нужно:
1. Зайти на главный сайт или рабочее зеркало
2. Щелкнуть кнопку «Создать аккаунт»
3. Ввести требуемые сведения
4. Активировать электронную почту
5. Использовать купон при существовании
После финиша создания аккаунта пользователи приобретают бонус за регистрацию, какой может охватывать бесплатные вращения или монетарное вознаграждение.
Вход в персональный кабинет
Приватный кабинет дает комплексный надзор над игровым действом. Через персональный профиль можно:
– Депонировать депозит
– Снимать выигрыши
– Задействовать купоны
– Проверять журнал пари
– Соревноваться в конкурсах
– Обретать кэшбек
Обзор поощрений и акций
Великодушная бонусная система — существенное преимущество платформы. Главные виды вознаграждений:
Начальный бонус
Дебютанты приобретают щедрое награду на первые пополнения. Размер приза может достигать 100-200% от размера вклада.
Фриспины
Безвозмездные спины начисляются для топовых слотов. Число бесплатных вращений разнится от 10 до 500 штук.
Кэшбек
Еженедельный или ежемесячный возврат процента утраченных финансов. Средний объем возврата — 5-15%.
Турниры
Постоянные конкурсы с внушительными наградными фондами. Соревнующиеся соревнуются за лучшие места в рейтинге.
Портативная версия и приложуха
Смартфонная версия разрешает наслаждаться игрой с каждого гаджета. Геймеры могут скачать приложение для iOS и Android или эксплуатировать веб версию.
Преимущества портативного программы:
– Оперативная прогрузка автоматов
– Практичный интерфейс
– Всплывающие уведомления о поощрениях
– Возможность входа через биометрию
Слоты и Live казино
Игровая подборка включает тысячи игр от известных провайдеров.
Топовые секции автоматов:
– Обычные машины
– Видеослоты с премиальными этапами
– Джекпот игры
– Мегавейс автоматы
Live игорный зал
Зона live игорный зал обеспечивает развлечение с живыми ведущими. Есть классические развлечения:
– Французская рулетка
– Двадцать одно
– Баккара
– Техасский холдем
Как обнаружить рабочее зеркало
Раздобыть действующую URL на зеркало можно несколькими способами:
1. Подписаться на email-рассылку
2. Наблюдать за апдейтами в социальных сетях
3. Обратиться в сервис поддержки
4. Добавить в закладки действующее зеркало в избранное
Итог
Основной портал и его действующие зеркала гарантируют постоянный путь к азартным автоматам. Выгодные вознаграждения, различные купоны, удобное портативное приложение и высококлассная служба поддержки создают игровой опыт крайне приятным и надежным.
dog medicine HappyPaws Pharmacy pet antibiotics and care
1xbet guncel 1xbet guncel .
Современные интернет казино дают пользователям большой спектр возможностей для комфортной игры. Тем не менее иногда подключение к главному сайту может оказаться заблокированным. В таких моментах на поддержку приходит казино Zooma, которое обеспечивает непрерывный путь ко всем опциям платформы.
Что такое действующее зеркало казино
Альтернативный сайт — это идентичная версия основного веб-сайта, которая располагается по дополнительному адресу. Копия имеет все набор функций основного ресурса, включая пользовательский кабинет, депозит и запись транзакций.
Главные выгоды применения зеркала:
– Постоянный подключение к сайту
– Полная схожесть возможностей
– Сохранность пользовательских данных
– Удержание доступных вознаграждений
Как обнаружить актуальное зеркало сегодня
Существует некоторое количество проверенных методов нахождения действующей ссылки:
Авторизованные источники:
1. Имейл рассылка — управление регулярно высылает информацию с актуальными адресами
2. Коммуникационные сети — проверенные страницы выкладывают свежую сведения
3. Служба поддержки — консультанты предоставляют надежные домены
4. Портативное приложение — обеспечивает минуть блокировки
Оформление профиля на лицензионном ресурсе
Процесс регистрации требует не более пару минут и предполагает из нижеследующих стадий:
1. Попадание на официальный ресурс или действующее зеркало
2. Нажатие на элемент «Регистрация»
3. Указание учетной формы
4. Валидация email почты или телефонного номера
5. Активация бонуса за регистрацию при присутствии промокода
Свежие геймеры зарабатывают великодушный приветственный презент, который может предполагать бесплатные вращения, финансовые вознаграждения или кэшбек.
Вход в личный кабинет
Логин на ресурсе осуществляется традиционным образом. Достаточно указать учетные данные и кодовое слово, примененные при оформлении.
Существенные нюансы для конфиденциального входа:
– Применяйте защищенный шифр
– Активируйте двухэтапную проверку
– Не записывайте реквизиты на посторонних устройствах
– Проверяйте URL строку браузера
Описание бонусной программы
Казино балует пользователей различными привилегиями и акциями:
Стартовый букет
Свежие игроки вправе надеяться на великодушное вознаграждение за первый взнос. Как правило это долевая надбавка к переведенной величине плюс бесплатные вращения для известных слотов.
Систематические кампании
– Еженедельный возврат средств — компенсирование доли проигранных денег
– Поощрения на последующие взносы
– Особые промо по праздникам
– Конкурсы с крупными наградными фондами
Схема привилегий
Регулярные клиенты накапливают очки за каждую бет, которые затем меняются на настоящие финансы, даровые прокруты или уникальные преимущества.
Промокоды: как задействовать
Купоны — это особые сочетания букв и цифр, гарантирующие право к специальным вознаграждениям.
Каким образом найти действующие промокоды:
– Легитимные медийные сети казино
– Партнерские порталы
– Email-подписка
– Профильные группы
Указывается промокод в специальное поле при создании аккаунта или добавлении денег баланса.
Портативная версия и приложение
Передовые игроки выбирают играть с смартфонных девайсов. Ресурс предлагает пару способа для удобной смартфонной игры.
Адаптивная версия
Веб версия автоматически адаптируется под габариты экрана. Не просит установки и оперирует в произвольном актуальном браузере.
Смартфонное приложение
Загрузить софт можно для гаджетов на Android и iOS. Плюсы app:
– Скоростная открытие
– Бесперебойная действие
– Всплывающие-уведомления о бонусах
– Автономный минование блокировок
Этап загрузки прост: нужно открыть на сайт с мобильного гаджета и подчиняться руководству.
Азартный выбор
База аппаратов насчитывает множество позиций от передовых поставщиков.
Слоты
Развлекательные аппараты — самая востребованная секция забав. Представлены классические простые слоты, новые мультимедийные слоты с премиальными уровнями, а также накопительные выигрыши.
Live казино
Зона с реальными ведущими позволяет испытать антураж настоящего казино. Открыты развлечения с рулеткой.
Трансляция осуществляется в отличном четкости, имеется коммуникация с ведущим и прочими участниками.
Состязания
Периодически проводятся соревнования по разным дисциплинам. Вступление предоставляет право завоевать денежные выигрыши, бесплатные вращения или эксклюзивные бонусы.
Транзакционные операции
Платформа поддерживает значительный выбор финансовых инструментов:
– Пластиковые карты
– Онлайн системы
– Цифровая валюта
– Счетовые транзакты
Наименьшая количество взноса — доступная для массы пользователей. Снятие средств производится в кратчайшие сроки.
Департамент поддержки
Квалифицированные сотрудники настроены содействовать непрерывно. Доступны следующие каналы контакта:
– Живой-чат
– Email
– Голосовая связь
– Медийные сети
Решения на частые проблемы можно найти в разделе FAQ.
Заключение
Главный ресурс казино и его актуальные зеркала обеспечивают геймерам максимальный доступ ко всем возможностям ресурса. Великодушные поощрения, практичная телефонная версия, колоссальный выбор аттракционов и компетентная служба поддержки превращают гемблинг времяпрепровождение максимально беспроблемным и конфиденциальным.
Вход к порталу через действующие зеркала
Современные сетевые казино дают игрокам непрерывный вход к играм. Главный сайт казино New Retro казино работает бесперебойно, предлагая богатый ассортимент игровых слотов. Однако периодически формируются системные проблемы или барьеры, следовательно существенно быть осведомлённым о присутствии рабочих зеркал.
Что является из себя основное зеркало казино
Альтернатива — это абсолютная версия главного ресурса с таким же функционалом. Актуальное зеркало на данный момент позволяет миновать локальные ограничения и вести времяпрепровождение.
Принципиальные преимущества задействования зеркал:
– Безграничный доступ к индивидуальному кабинету
– Удержание любых информации аккаунта
– Такой же набор развлечений
– Действующие вознаграждения и акции
Открытие счёта на сайте
Механизм регистрации длится считанные минут. Новые геймеры зарабатывают богатый поощрение за регистрацию, что в состоянии охватывать:
– Начальный игровой приз
– Бесплатные вращения для игр
– Специальные ваучеры
– Усиленный компенсацию
Для завершения оформления требуется:
1. Зайти на главный портал или альтернативу
2. Выбрать клавишу «Регистрация»
3. Внести контактные информацию
4. Верифицировать почтовый адрес или номер
5. Задействовать купон (в случае существовании)
Доступ в личный кабинет
По завершении удачной регистрации клиенты могут выполнять подключение используя главный портал или рабочее зеркало. Индивидуальный кабинет обеспечивает абсолютный надзор над счётом:
– Журнал транзакций
– Ввод кошелька
– Получение призов
– Регулирование поощрениями
– Присутствие в конкурсах
Привилегии и кампании казино
Ресурс награждает геймеров многочисленными привилегированными схемами:
Вступительные подарки
Дебютанты приобретают великодушный пакет бонусов на начальные пополнения. Обычно это включает процентную добавку к сумме пополнения плюс бесплатные фриспины.
Постоянные промо
– Каждонедельный возврат до 15%
– Состязания с призовыми банками
– Бонусы на дату рождения
– Уникальные акции для элитных клиентов
План поощрения
Деятельные клиенты собирают баллы, они разрешено конвертировать на подлинные финансы или уникальные бонусы.
Мобильная редакция и софт
Передовые решения дают возможность развлекаться в любом месте угодно. Карманная форма веб-сайта независимо подстраивается под дисплей всякого гаджета.
Достоинства карманного ПО:
– Моментальная подгрузка слотов
– Практичный интерфейс
– Всплывающие-сообщения о акциях
– Способность установить для Android и iOS
Живое казино: среда настоящего развлекательного клуба
Секция Live клуба погружает геймеров в среду истинного развлекательного клуба. Профессиональные дилеры организуют действие в формате подлинного времени.
Доступные игры:
– Европейская рулетка
– Карточная игра
– Баккара
– Карты
Автоматы и игровые слоты
Каталог гемблинг аппаратов насчитывает массу позиций от передовых провайдеров. Всякий игрок найдёт автомат по вкусу:
– Винтажные слоты
– Видеослоты с бонусными уровнями
– Прогрессивный-игры
– Мегавейс слоты
Турниры и раздачи
Систематические состязания добавляют адреналин и предоставляют возможность получить значительные суммы. Включение в соревнованиях регулярно даровое, а выигрышные пулы насчитывают внушительных объёмов.
Охрана и конфиденциальность
Портал эксплуатирует современные протоколы кодирования для гарантии информации пользователей. Любые платёжные операции осуществляются через защищённые протоколы.
Резюме
Центральный веб-сайт и его рабочие зеркала предоставляют устойчивый вход к первоклассным гемблинг сервисам. Щедрые бонусы, удобная портативная форма, разнообразие машин и квалифицированное Live-клуб формируют ресурс отличным выбором для любителей азартных автоматов.
online pharmacy canada: Sildenafil 100mg price – canadapharmacyonline com
Top UX/UI design https://uiuxagencies.com agencies: the best companies creating user-friendly interfaces and digital products. Explore case studies, methodologies, and approaches to UX/UI to choose a reliable contractor for your website or app.
Top branding agencies https://topbrandagencies.com worldwide: the best studios for brand development, corporate identity, and positioning. Portfolio reviews, strategies, and case studies will help you choose a reliable agency for business development and brand enhancement.
Top web design https://webdesignfirmshub.com companies worldwide: a selection of the best studios for website and interface creation. Learn about case studies, design approaches, UX/UI solutions, and innovations to help you choose a reliable contractor for your digital projects.
Скоро лето и жара кондиционер купить с установкой широкий выбор сплит-систем для квартиры, дома и офиса. Поможем подобрать модель по площади, бюджету и характеристикам. Установка под ключ, гарантия, доставка и выгодные цены на популярные бренды.
Нынешние онлайн-казино предлагают игрокам широкий диапазон развлечений и премиальных предложений. Подключение к платформе производится через главный веб-сайт или его рабочее зеркало http://ntconnections.net/blog/kak-funktsioniruet-pay-i-chto-eto-za-servis, что дает стабильную активность.
Чем является действующее зеркало казино
Зеркало — это абсолютная версия официального портала, разработанная для обхода ограничений. Действующее зеркало дает возможность клиентам обрести вход к излюбленным играм в любое время.
Проверенное зеркало содержит всеми функциями первоначального портала:
– Полный ассортимент слотов
– Личный кабинет с зафиксированными информацией
– Действующие промокоды
– Безопасные платежные операции
Создание аккаунта на основном сайте
Процесс оформления требует всего считанные минут. Первым участникам нужно:
1. Перейти на основной ресурс или действующее зеркало
2. Выбрать на кнопку “Создать аккаунт”
3. Заполнить требуемые данные
4. Активировать email
5. Произвести дебютный вклад
Приветственный бонус выдается моментально после завершения всех этапов.
Вход в учетную запись
Созданные игроки могут выполнить доступ используя:
– Имя пользователя и шифр
– Цифры сотового
– Email
Профиль открывает доступ к администрированию счетом, записям игр и активным поощрениям.
Награды и кампании
Гемблинг система вознаграждает лояльных пользователей щедрыми призами:
Приветственный пакет
– Бонус на первый депозит до 100%
– Free spins на востребованные автоматы
– Экстра награды за дальнейшие депозиты
Ваучеры
Особые промокоды предоставляют право на получение специальных поощрений. Текущие коды выставляются в секции “Акции”.
Кэшбек
Периодический бонус составляет до 10% от утраченных денег. Компенсация начисляется моментально.
Схема лояльности
Верные пользователи получают очки, которые конвертируются на действительные выплаты или даровые спины.
Mobile версия и программа
Для удобства клиентов построена функциональная mobile версия. Адаптивный интерфейс обеспечивает легко участвовать с произвольного мобильного девайса.
Преимущества приложения:
– Оперативный подключение к слотам
– Оптимизированный вид
– Бесперебойная деятельность
– Нотификации о новых бонусах
Установить приложение можно свободно с официального ресурса для устройств на Android и iOS.
Коллекция автоматов
Автоматы
База содержит более 2000 игр от популярных провайдеров:
– Классические слоты
– Видео-слоты
– Jackpot игры
– Сюжетные игры
Live казино
Раздел Live игр предлагает развлечение с настоящими дилерами в реальном эфире:
– Рулеточные столы
– Двадцать одно
– Карты
– Карточный покер
Соревнования
Систематические конкурсы с крупными выигрышными суммами проводятся систематически. Допуск в турнирах возможно всем созданным участникам.
Платежные варианты
Пополнения и изъятия выплат производятся через распространенные сервисы:
– Кредитные средства
– Цифровые счета
– Криптовалюта
– Прямые транзакции
Самый низкий платеж — от 100 рублей. Получение финансов проводится в течение 24 ч.
Сервис поддержки
Круглосуточная команда помощи способна помочь в решении каких-либо проблем:
– Онлайн-чат
– Email
– Контактный номер
– Социальные сети
Защита и сертификат
Главный сайт работает на базе признанной сертификата. Все информация игроков охранены современным SSL-шифрованием.
Резюме
Рабочее зеркало предоставляет бесперебойный доступ к выбранным играм, щедрым бонусам и практичным сервисам. Зарегистрируйтесь прямо сейчас и обретите первый поощрение!
Актуальные онлайн казино дают геймерам широкий ассортимент возможностей для приятной игры. Впрочем иногда вход к основному сайту может быть недоступным. В таких ситуациях на помощь спешит Кракен зеркало, которое гарантирует непрерывный путь ко всем опциям платформы.
Что такое актуальное зеркало казино
Копия — это абсолютная дубликат лицензионного портала, которая находится по дополнительному интернет-адресу. Копия содержит целый инструментарий главного сайта, включая личный кабинет, депозит и историю платежей.
Главные преимущества задействования зеркала:
– Непрерывный доступ к порталу
– Абсолютная тождественность инструментов
– Безопасность пользовательских данных
– Удержание всех имеющихся бонусов
Как обнаружить рабочее зеркало на текущий день
Существует ряд достоверных путей поиска действующей URL:
Легитимные ресурсы:
1. Почтовая рассылка — управление периодически отправляет информацию с свежими адресами
2. Общественные сети — проверенные страницы размещают актуальную сведения
3. Служба поддержки — консультанты сообщают безопасные ссылки
4. Портативное приложение — позволяет минуть блокировки
Регистрация на лицензионном ресурсе
Операция регистрации занимает всего немного минут и содержит из следующих шагов:
1. Попадание на официальный веб-сайт или актуальное зеркало
2. Выбор на иконку «Создать аккаунт»
3. Ввод учетной формы
4. Верификация электронной почты или сотового номера
5. Включение привилегии за регистрацию при наличии промокода
Новые геймеры обретают щедрый начальный презент, который может включать фриспины, финансовые бонусы или кэшбек.
Логин в личный кабинет
Подключение на портале реализуется традиционным образом. Необходимо внести имя пользователя и кодовое слово, указанные при регистрации.
Существенные моменты для безопасного входа:
– Применяйте защищенный пароль
– Задействуйте двухфакторную проверку
– Не сохраняйте пароли на общественных устройствах
– Отслеживайте доменную строку браузера
Анализ премиальной структуры
Гемблинг-сайт одаривает геймеров всевозможными бонусами и специальными предложениями:
Начальный комплект
Дебютанты имеют возможность претендовать на значительное вознаграждение за первый вклад. Обычно это пропорциональная премия к переведенной количеству плюс фриспины для популярных слотов.
Периодические кампании
– Недельный компенсация — возвращение доли списанных финансов
– Призы на дополнительные пополнения
– Особые акции по событиям
– Соревнования с значительными выигрышными банками
Программа верности
Регулярные клиенты собирают единицы за каждую бет, которые затем обмениваются на реальные денежные призы, free spins или специальные бонусы.
Купоны: как использовать
Кодовые комбинации — это уникальные наборы литер, дающие возможность к специальным вознаграждениям.
Где взять свежие промокоды:
– Проверенные социальные сети казино
– Аффилиатные ресурсы
– Email-новостная лента
– Тематические сообщества
Прописывается промокод в предназначенное поле при регистрации или внесении депозита кошелька.
Мобильная версия и приложение
Актуальные пользователи выбирают проводить время с смартфонных гаджетов. Портал предоставляет двойной решения для удобной смартфонной игры.
Мобильная редакция
Браузерная версия самостоятельно адаптируется под параметры дисплея. Не требует загрузки и работает в всяком новом браузере.
Портативное приложение
Загрузить app можно для девайсов на Android и iOS. Плюсы app:
– Быстрая открытие
– Надежная работа
– Push-уведомления о поощрениях
– Самостоятельный обход блокировок
Операция инсталляции легок: требуется зайти на сайт с телефонного устройства и придерживаться указаниям.
Игровой каталог
Библиотека развлечений содержит тысячи наименований от топовых поставщиков.
Слоты
Развлекательные автоматы — крайне любимая раздел игр. Размещены классические простые слоты, современные видеослоты с поощрительными уровнями, а также накопительные джекпоты.
Live казино
Раздел с реальными крупье дает возможность ощутить дух истинного казино. Представлены игры с рулеткой.
Передача ведется в высоком качестве, присутствует коммуникация с ведущим и иными геймерами.
Конкурсы
Постоянно устраиваются соревнования по различным дисциплинам. Включение предоставляет право заработать денежные призы, бесплатные вращения или специальные поощрения.
Денежные манипуляции
Платформа предлагает обширный ассортимент финансовых систем:
– Кредитные карты
– Электронные платформы
– Биткоин
– Банковские транзакты
Низшая величина депозита — посильная для основной части игроков. Получение призов производится в кратчайшие периоды.
Служба поддержки
Профессиональные консультанты готовы помочь непрерывно. Доступны нижеследующие методы связи:
– Интернет-чат
– Email
– Звонковая поддержка
– Общественные сети
Разъяснения на распространенные темы можно получить в блоке FAQ.
Итог
Главный сайт казино и его актуальные зеркала гарантируют клиентам максимальный вход ко всем опциям сайта. Щедрые привилегии, практичная смартфонная версия, колоссальный каталог аттракционов и квалифицированная помощь делают игровой процесс максимально комфортным и безопасным.
проект капитального ремонта здания remont-zdaniya-1.ru .
Передовые онлайн-казино предоставляют пользователям большой набор игр и премиальных опций. Доступ к сервису реализуется через главный ресурс или его функционирующее зеркало poetics.ca, что дает стабильную активность.
Что такое функционирующее зеркало казино
Копия — это идентичная дубликат официального сайта, разработанная для устранения запретов. Действующее зеркало помогает клиентам сохранить соединение к выбранным автоматам в любое время.
Официальное зеркало имеет всеми опциями главного ресурса:
– Полный список игр
– Личный кабинет с сохраненными сведениями
– Действующие поощрения
– Защищенные платежные транзакции
Регистрация на лицензионном веб-сайте
Процесс создания аккаунта составляет всего немного минут. Первым игрокам требуется:
1. Зайти на проверенный ресурс или актуальное зеркало
2. Выбрать на клавишу “Открыть счет”
3. Указать нужные данные
4. Верифицировать email
5. Совершить дебютный взнос
Поощрение новичкам выдается незамедлительно после завершения всех шагов.
Доступ в аккаунт
Действующие клиенты могут выполнить вход используя:
– Имя пользователя и ключ
– Данные контакта
– Контактный email
Аккаунт дает возможность к контролю средствами, истории ставок и доступным поощрениям.
Промо и предложения
Гемблинг платформа вознаграждает регулярных пользователей многочисленными вознаграждениями:
Первый набор
– Премия на дебютный взнос до 100%
– Фриспины на известные автоматы
– Дополнительные награды за очередные платежи
Купоны
Уникальные купоны открывают возможность на использование уникальных вознаграждений. Действующие купоны публикуются в разделе “Предложения”.
Возврат средств
Еженедельный бонус равен до 10% от утраченных денег. Компенсация начисляется незамедлительно.
Система лояльности
Регулярные пользователи зарабатывают единицы, которые конвертируются на реальные средства или free spins.
Mobile версия и APP
В целях удобства игроков создана качественная mobile версия. Отзывчивый дизайн позволяет легко делать ставки с любого портативного аппарата.
Плюсы софта:
– Скорый вход к автоматам
– Оптимизированный облик
– Бесперебойная активность
– Сообщения о свежих турнирах
Загрузить софт можно бесплатно с проверенного веб-сайта для девайсов на Android и iOS.
Коллекция слотов
Слоты
Коллекция содержит более 2000 машин от популярных производителей:
– Стандартные автоматы
– Современные автоматы
– Слоты с джекпотом
– Тематические слоты
Live казино
Секция Live развлечений предлагает взаимодействие с настоящими ведущими в реальном времени:
– Колесо фортуны
– Blackjack
– Карты
– Покер
Состязания
Постоянные турниры с большими премиальными бюджетами организуются каждую неделю. Допуск в турнирах открыто всем действующим клиентам.
Финансовые способы
Пополнения и выводы финансов выполняются через известные платежные системы:
– Кредитные карточ ки
– Онлайн кошельки
– Криптовалюта
– Денежные платежи
Самый низкий платеж — от 100 рублей. Получение выигрышей проводится в течение 24 ч.
Команда помощи
Постоянная группа support расположена помочь в решении любых ситуаций:
– Живой чат
– Email
– Контактный номер
– Публичные сети
Охрана и документ
Официальный портал оперирует на основании признанной сертификата. Каждые информация игроков закрыты актуальным SSL-шифрованием.
Резюме
Актуальное зеркало дает стабильный подключение к предпочитаемым автоматам, привлекательным бонусам и функциональным функциям. Присоединяйтесь сегодня и заработайте стартовый приз!
Передовые онлайн-казино предоставляют пользователям широкий диапазон возможностей для приятной времяпрепровождения. Переход к платформе казино Мелстрой выполняется через лицензионный портал или рабочее зеркало.
Что такое функционирующее зеркало казино
Функционирующее зеркало — это запасной адрес официального сайта казино. Такие клоны формируются для обеспечения постоянного подключения к азартной сервису.
Дубликат на сегодня целиком воспроизводит возможности главного домена. Пользователи обретают аналогичный вход ко всем услугам, включая регистрацию, финансирование баланса и получение призов.
Оформление профиля на официальном портале
Алгоритм открытия профиля отнимает всего считанные минут. Новым участникам нужно:
1. Зайти на основной ресурс или действующее проверенное зеркало
2. Кликнуть кнопку “Открыть счет”
3. Ввести необходимые сведения
4. Верифицировать почтовую почту
5. Использовать промокод при доступности
После финализации оформления пользователь получает приз за регистрацию, который способен охватывать даровые спины или монетарное вознаграждение.
Логин в индивидуальный кабинет
Личный кабинет — это защищенная территория, где участники имеют возможность администрировать своим профилем. Для логина требуется внести логин и пароль.
В личном кабинете открыты такие опции:
– Отслеживание журнала транзакций
– Использование кодов активации
– Контроль бонусами
– Вступление в турнирах
– Контроль возврата средств
– Редактирование данных
Вознаграждения и предложения
Азартная платформа предлагает щедрые вознаграждения:
Регистрационный пакет — новички приобретают крупное премию на начальные взносы.
Free spins — начисляются как при создании аккаунта, так и в процессе всевозможных мероприятий.
Возмещение — постоянный компенсация процента израсходованных сумм.
Бонусные коды — уникальные комбинации, предоставляющие право к эксклюзивным призам.
Анализ гемблинговых категорий
Игровые автоматы
Собрание слотов охватывает множество вариантов от ведущих провайдеров. Пользователи откроют как обычные аппараты, так и актуальные видеослоты с захватывающей визуализацией.
Live казино
Раздел Live казино обеспечивает право участвовать с действующими ведущими в состоянии настоящего времени. Представлены востребованные игры: рулетка, блэкджек, баккара, покер.
Конкурсы
Систематические соревнования с солидными выигрышными суммами привлекают массу участников. Призеры обретают монетарные вознаграждения и эксклюзивные поощрения.
Мобильная версия и app
Портативная версия портала дает возможность наслаждаться с всякого гаджета. Дизайн независимо подстраивается под диагональ экрана.
Получить приложение можно для гаджетов на Android и iOS. Мобильное app располагает всеми опциями настольной версии.
Как обнаружить актуальное зеркало на данный момент
Актуальные ссылки дубликатов регулярно корректируются. Узнать действующую ссылку можно различными способами:
– Через департамент саппорта
– В официальных информационных сетях
– По email дайджесту
– На специализированных ресурсах
Охрана и легальность
Лицензионный сайт функционирует на фундаменте мировой лицензии. Все операции оберегаются современными технологиями шифрования.
Приватность персональных данных гарантируется в абсолютном объеме.
Резюме
Официальный ресурс и его действующие альтернативы предоставляют участникам постоянный вход к превосходным развлекательным сервисам. Привлекательные вознаграждения, всевозможные автоматы, компетентная служба — все это делает гемблинговый досуг невероятно удобным и захватывающим.
https://happypawspharmacy.shop/# pet pharmacy USA
Актуальные виртуальные казино обеспечивают геймерам большой диапазон опций для беспроблемной игры. Тем не менее иногда вход к главному сайту может являться заблокированным. В таких случаях на выручку приходит Вольта, которое обеспечивает стабильный подключение ко всем функциям платформы.
Что такое рабочее зеркало казино
Копия — это абсолютная версия лицензионного веб-сайта, которая находится по запасному URL. Копия поддерживает полный инструментарий первоначального сайта, включая индивидуальный кабинет, счет и данные переводов.
Основные выгоды задействования зеркала:
– Постоянный соединение к порталу
– Стопроцентная схожесть возможностей
– Конфиденциальность пользовательских сведений
– Хранение доступных привилегий
Как найти актуальное зеркало на сегодня
Присутствует некоторое количество проверенных методов нахождения свежей URL:
Авторизованные источники:
1. Почтовая рассылка — управление систематически пересылает информацию с свежими доменами
2. Социальные сети — авторизованные страницы размещают релевантную новости
3. Департамент поддержки — операторы дают безопасные URL
4. Смартфонное приложение — обеспечивает минуть блокировки
Регистрация на основном ресурсе
Процедура оформления отнимает только немного минут и состоит из данных этапов:
1. Попадание на лицензионный ресурс или действующее зеркало
2. Нажатие на элемент «Создать аккаунт»
3. Внесение персональной анкеты
4. Проверка имейл почты или мобильного номера
5. Активация привилегии за регистрацию при существовании промокода
Новые геймеры получают солидный вступительный подарок, который может включать бесплатные вращения, монетарные вознаграждения или возврат средств.
Логин в личный кабинет
Вход на сайте реализуется стандартным образом. Достаточно указать учетные данные и кодовое слово, использованные при открытии счета.
Ключевые нюансы для конфиденциального входа:
– Задействуйте криптостойкий секретный ключ
– Активируйте 2FA проверку
– Не храните реквизиты на публичных гаджетах
– Проверяйте интернет строку браузера
Характеристика премиальной программы
Гемблинг-сайт радует клиентов всевозможными поощрениями и специальными предложениями:
Вступительный пакет
Дебютанты могут полагаться на щедрое поощрение за начальный вклад. Традиционно это пропорциональная добавка к переведенной сумме плюс фриспины для популярных слотов.
Постоянные кампании
– 7-дневный кэшбек — компенсирование части списанных финансов
– Призы на очередные пополнения
– Уникальные акции по торжествам
– Турниры с крупными наградными суммами
Система привилегий
Активные геймеры собирают единицы за каждую ставку, которые затем обмениваются на действительные деньги, free spins или уникальные бонусы.
Кодовые слова: как применять
Кодовые комбинации — это индивидуальные наборы букв и цифр, дающие возможность к специальным привилегиям.
Где найти действующие промокоды:
– Проверенные медийные сети казино
– Сотрудничающие ресурсы
– Email-новостная лента
– Тематические сообщества
Прописывается промокод в предназначенное поле при создании аккаунта или зачислении средств кошелька.
Портативная версия и приложение
Современные пользователи предпочитают проводить время с телефонных устройств. Платформа предоставляет пару способа для удобной портативной игры.
Отзывчивая вариант
Интернет версия само собой настраивается под параметры экранной панели. Не просит инсталляции и функционирует в всяком актуальном браузере.
Телефонное приложение
Получить app можно для гаджетов на Android и iOS. Выгоды app:
– Скоростная загрузка
– Устойчивая работа
– Push-уведомления о бонусах
– Автономный обход блокировок
Этап скачивания прост: достаточно перейти на веб-сайт с телефонного гаджета и подчиняться предписаниям.
Развлекательный коллекция
Коллекция игр охватывает огромное количество единиц от топовых разработчиков.
Слоты
Гемблинг машины — крайне распространенная раздел забав. Размещены обычные 3-барабанные автоматы, передовые видео-автоматы с дополнительными этапами, а также растущие выигрыши.
Live казино
Раздел с действительными дилерами дает возможность почувствовать настроение реального казино. Имеются развлечения с баккарой.
Вещание осуществляется в превосходном четкости, поддерживается общение с крупье и другими участниками.
Турниры
Систематически устраиваются состязания по многочисленным дисциплинам. Присоединение позволяет завоевать валютные призы, free spins или эксклюзивные привилегии.
Транзакционные манипуляции
Сайт предоставляет обширный ассортимент платежных методов:
– Кредитные карты
– Электронные системы
– Крипта
– Банковские платежи
Стартовая величина депозита — разумная для преобладающего числа клиентов. Обналичивание средств выполняется в минимальные сроки.
Отдел поддержки
Профессиональные сотрудники готовы оказать помощь непрерывно. Имеются следующие методы связи:
– Интернет-чат
– Email
– Телефонная связь
– Коммуникационные сети
Решения на распространенные запросы можно обнаружить в секции FAQ.
Итог
Основной ресурс казино и его актуальные зеркала гарантируют клиентам максимальный доступ ко всем опциям ресурса. Значительные привилегии, практичная мобильная версия, огромный ассортимент развлечений и квалифицированная служба поддержки формируют развлекательный времяпрепровождение исключительно комфортным и конфиденциальным.
Передовые онлайн-казино предоставляют клиентам широкий диапазон возможностей для приятной времяпрепровождения. Доступ к сервису казино Gold осуществляется через основной сайт или функционирующее зеркало.
Что такое действующее зеркало казино
Актуальное зеркало — это дополнительный домен официального сайта казино. Такие версии создаются для предоставления непрерывного входа к гемблинговой площадке.
Альтернатива актуальное полностью повторяет функционал главного сайта. Игроки обретают идентичный вход ко всем услугам, включая создание аккаунта, пополнение счета и обналичивание денег.
Оформление профиля на основном ресурсе
Механизм открытия профиля длится всего несколько секунд. Будущим участникам нужно:
1. Зайти на официальный домен или текущее проверенное зеркало
2. Кликнуть кнопку “Зарегистрироваться”
3. Внести необходимые сведения
4. Активировать почтовую почту
5. Ввести бонусный код при наличии
После окончания регистрации участник приобретает приз за регистрацию, который вправе охватывать free spins или финансовое вознаграждение.
Доступ в индивидуальный кабинет
Личный кабинет — это закрытая секция, где пользователи имеют возможность управлять своим учетной записью. Для доступа необходимо напечатать никнейм и пароль.
В личном кабинете имеются такие функции:
– Проверка журнала платежей
– Применение бонусных кодов
– Регулирование поощрениями
– Присоединение в состязаниях
– Отслеживание кэшбэка
– Изменение данных
Призы и промо
Азартная платформа обеспечивает великодушные вознаграждения:
Регистрационный набор — новые игроки приобретают существенное поощрение на начальные пополнения.
Даровые спины — дарятся как при создании аккаунта, так и в ходе различных акций.
Кэшбек — постоянный рефанд фрагмента израсходованных финансов.
Коды активации — уникальные комбинации, дающие право к особым вознаграждениям.
Обзор игровых направлений
Аппараты
Собрание автоматов охватывает тысячи игр от ведущих провайдеров. Игроки найдут как стандартные автоматы, так и инновационные видео-слоты с увлекательной оформлением.
Live казино
Зона Live казино дарит шанс участвовать с реальными крупье в режиме настоящего времени. Открыты известные варианты: рулетка, блэкджек, баккара, покер.
Состязания
Постоянные соревнования с солидными выигрышными фондами привлекают сотни игроков. Лидеры получают cash вознаграждения и эксклюзивные бонусы.
Смартфонная версия и приложение
Адаптивная версия ресурса позволяет участвовать с любого девайса. Интерфейс самостоятельно подстраивается под габариты экрана.
Установить app можно для гаджетов на Android и iOS. Смартфонное программа характеризуется всеми возможностями настольной версии.
Как найти актуальное зеркало на данный момент
Свежие ссылки дубликатов периодически меняются. Получить актуальную линк можно несколькими методами:
– Через сервис помощи
– В настоящих коммуникационных сетях
– По электронной дайджесту
– На аффилиатных сайтах
Безопасность и легальность
Главный ресурс работает на основе зарубежной разрешения. Все транзакции оберегаются инновационными протоколами кодирования.
Конфиденциальность индивидуальных сведений сохраняется в абсолютном размере.
Вывод
Главный портал и его действующие дубликаты дарят участникам постоянный доступ к первоклассным игровым играм. Выгодные вознаграждения, всевозможные слоты, компетентная поддержка — все это создает азартный процесс максимально беспроблемным и притягательным.
Думаю заказать поведенческие факторы и изучаю рынок. Статья помогла понять, какие вопросы задавать подрядчикам и на что обращать внимание в отчётах.
check out their site – Content seems clear and easy to follow throughout the pages.
Подключение к ресурсу через актуальные зеркала
Пользователи сетевых казино нередко имеют дело с ситуацией недоступности официального портала. Как раз для ликвидации этой задачи предусмотрены зеркала основного домена. РћРЅ РРєСЃ казино казино гарантирует стопроцентный подключение ко всем функциям платформы.
Что такое действующее зеркало казино
Альтернативный адрес представляет собой идентичную копию главного сайта с идентичным набором функций. Основное расхождение — это иное имя. Каждые параметры пользователя, в том числе баланс, бонусы и историю ставок, остаются идентичными.
Плюсы задействования зеркал
Функционирующие зеркала располагают множеством важных достоинств:
– Постоянный доступ к выбранным автоматам
– Совершенная конфиденциальность собственных данных
– Удержание всех настроек личного кабинета
– Способность приобретения бонусов и включения в акциях
Открытие счета на официальном ресурсе
Ход регистрации чрезвычайно легок и длится пару минут. Начинающие участники могут надеяться на внушительный стартовый подарок за регистрацию.
Стадии оформления аккаунта
1. Подключение на главный ресурс или его дубликат
2. Выбор на элемент “Зарегистрироваться”
3. Внесение требуемых сведений
4. Верификация email почты
5. Указание кода (если присутствует)
Награды и акции для пользователей
Ресурс поощряет своих участников многочисленными бонусными предложениями.
Главные категории бонусов
Приветственный приз — крупное поощрение для новых участников, что способно вмещать финансовые бонусы и free spins.
Фриспины — опция использовать в известных аппаратах безвозмездно.
Кешбэк — частичный возврат израсходованных средств, что выплачивается раз в неделю или помесячно.
Промокоды — особые сочетания, обеспечивающие добавочные привилегии.
Индивидуальный кабинет: функции и настройки
Личный аккаунт дает совершенный управление над игровым активностью. Тут доступны:
– Регулирование счетом
– Данные операций
– Работающие бонусы
– Параметры безопасности
– Проверка профиля
Смартфонная платформа и софт
Новейшие игроки ценят мобильность. Ресурс дает 2 способа для ставок с мобильных устройств.
Приспособленная телефонная версия
Портативная платформа домена автоматически подстраивается под экран любого аппарата. Не требуется устанавливать специальное софт.
Программа для гаджетов
Доступно установить официальное софт для iOS и Android. APP дает:
– Скорый запуск
– Улучшенный графику
– Всплывающие-оповещения о поощрениях
– Стабильную производительность
Live казино: обстановка настоящего зала
Секция Live игр доставляет игроков в среду настоящего клуба. Опытные хосты осуществляют партии в формате прямого времени.
Востребованные Live-игры
– Французская рулетка
– Blackjack
– Баккара
– Карибский покер
Аппараты: выбор автоматов
Собрание развлекательных машин содержит массу названий от ведущих провайдеров. Участники встретят:
– Классические автоматы
– Графические слоты
– Прогрессивный джекпот-автоматы
– Мегавейс
Соревнования и уникальные акции
Периодические конкурсы предоставляют шанс игрокам бороться друг с другом за внушительные призовые банки. Любой турнир имеет свои требования вовлечения и доску призеров.
Методы пополнения и получения финансов
Платформа использует массу денежных методов:
– Дебетовые картыы
– Электронные платежные системы
– Криптовалюты
– Финансовые транзакции
Все платежи реализуются надежно благодаря актуальным методам шифрования.
Служба помощи
Опытные операторы команды помощи расположены поддержать 24/7. Доступны следующие способы связи:
– Оперативный-чат
– Email-поддержка
– Аудио горячая линия
– Социальные сети
Заключение
Официальный домен платформы и его функционирующие копии обеспечивают игрокам надежный и удобный вход к огромному диапазону развлекательных услуг. Солидные подарки, регулярные кампании, качественная поддержка и простые финансовые методы делают игровой опыт чрезвычайно комфортным и прибыльным.
True Health Pharm: True Health Pharm – True Health Pharm
https://t.me/evacasino_official Ситуация с казино ева у меня была стандартная — сайт не открывался и сначала подумал что проблема с интернетом. Потом почитал и понял что у eva casino часто меняется адрес. Через телеграм нашёл актуальную ссылку и спокойно зашёл. Заодно посмотрел какие есть бонусы и как работает вход. В целом ничего сложного, просто нужно знать где брать актуальную инфу. Теперь всегда проверяю канал в первую очередь.
Актуальные онлайн-казино дают игрокам обширный ассортимент развлечений и призовых опций. Доступ к платформе реализуется через главный веб-сайт или его актуальное зеркало Dragon Money казино, что обеспечивает стабильную активность.
Что представляет собой актуальное зеркало казино
Альтернатива — это абсолютная копия оригинального сайта, созданная для решения барьеров. Действующее зеркало позволяет участникам обрести доступ к любимым слотам в любое время.
Официальное зеркало обладает всеми функциями первоначального портала:
– Целый каталог слотов
– Профиль с зафиксированными параметрами
– Свежие акции
– Надежные денежные операции
Создание аккаунта на лицензионном веб-сайте
Ход оформления требует всего считанные минут. Свежим игрокам нужно:
1. Войти на главный ресурс или действующее зеркало
2. Выбрать на ссылку “Создать аккаунт”
3. Ввести нужные параметры
4. Проверить электронную почту
5. Совершить первый взнос
Поощрение новичкам начисляется сразу после завершения всех стадий.
Вход в личный кабинет
Зарегистрированные участники могут совершить авторизацию указывая:
– Имя пользователя и код
– Данные телефона
– Электронную почту
Аккаунт обеспечивает право к регулированию балансом, истории ставок и текущим акциям.
Бонусы и предложения
Игровая сервис радует лояльных пользователей разнообразными поощрениями:
Приветственный бонус
– Премия на первый депозит до 100%
– Фриспины на популярные игры
– Добавочные бонусы за очередные взносы
Ваучеры
Уникальные коды дают право на получение уникальных призов. Актуальные купоны выставляются в блоке “Предложения”.
Кешбэк
Постоянный кэшбек равен до 10% от проигранных сумм. Возмещение предоставляется незамедлительно.
Система лояльности
Верные игроки накапливают единицы, которые превращаются на действительные выплаты или free spins.
Mobile версия и софт
В целях удобства клиентов создана полноценная мобильная версия. Приспособленный интерфейс позволяет комфортно делать ставки с всякого переносного устройства.
Достоинства APP:
– Скорый доступ к слотам
– Адаптированный вид
– Надежная активность
– Нотификации о новых турнирах
Загрузить APP можно безвозмездно с главного сайта для гаджетов на Android и iOS.
Каталог игр
Слоты
База насчитывает более 2000 машин от ведущих производителей:
– Стандартные автоматы
– Video slots
– Jackpot игры
– Фирменные слоты
Live казино
Категория Live столов предоставляет участие с реальными диллерами в прямом времени:
– Рулеточные столы
– Карточная игра
– Punto Banco
– Столы покера
Состязания
Систематические конкурсы с солидными наградными пулами организуются каждую неделю. Участие в состязаниях доступно всем активным пользователям.
Платежные способы
Пополнения и получения выплат осуществляются через известные платежные системы:
– Кредитные карточ ки
– Электронные сервисы
– Цифровая валюта
– Прямые переводы
Минимальный депозит — от 100 рублей. Изъятие финансов проводится в течение 24 периода.
Служба помощи
Круглосуточная отдел саппорта может содействовать в исправлении любых проблем:
– Онлайн-чат
– Email
– Телефон
– Соц сети
Безопасность и сертификат
Главный веб-сайт функционирует на фундаменте глобальной разрешения. Все информация участников защищены передовым SSL-протоколом.
Заключение
Функционирующее зеркало гарантирует бесперебойный соединение к излюбленным автоматам, щедрым поощрениям и практичным сервисам. Присоединяйтесь прямо сейчас и обретите начальный поощрение!
searchengineers – Navigation felt smooth, found everything quickly without any confusing steps.
1xbet ?ye ol 1xbet ?ye ol .
Вход к сайту через проверенные зеркала
Участники онлайн казино регулярно встречаются с проблемой недоступности официального портала. Конкретно для ликвидации этой проблемы предусмотрены зеркала главного сайта. Кракен сайт дает стопроцентный доступ ко всем опциям площадки.
Что такое функционирующее зеркало казино
Зеркало является собой точную копию официального ресурса с аналогичным набором функций. Единственное несовпадение — это альтернативное имя. Любые параметры клиента, содержа средства, поощрения и данные ставок, сохраняются прежними.
Выгоды использования зеркал
Функционирующие зеркала располагают рядом важных преимуществ:
– Круглосуточный вход к любимым играм
– Полная сохранность личных параметров
– Сохранение всех опций персонального кабинета
– Опция взятия бонусов и участия в промоакциях
Регистрация на основном сайте
Операция регистрации предельно элементарен и занимает пару минут. Начинающие игроки способны рассчитывать на внушительный стартовый подарок за оформление.
Стадии открытия аккаунта
1. Доступ на официальный портал или его дубликат
2. Активация на опцию “Зарегистрироваться”
3. Указание необходимых информации
4. Активация электронной почты
5. Указание кода (при наличии присутствует)
Подарки и акции для игроков
Казино балует своих пользователей различными наградными акциями.
Основные типы наград
Начальный пакет — щедрое поощрение для начинающих участников, каковое имеет возможность включать материальные бонусы и безвозмездные спины.
Бесплатные вращения — возможность крутить в известных игровых машинах безвозмездно.
Компенсация — долевой возврат потерянных денег, который именно начисляется каждую неделю или помесячно.
Купоны — специальные комбинации, обеспечивающие добавочные поощрения.
Персональный кабинет: функции и установки
Личный аккаунт предоставляет исчерпывающий контроль над развлекательным взаимодействием. В нем имеются:
– Управление балансом
– Данные платежей
– Действующие поощрения
– Установки защиты
– Валидация профиля
Портативная редакция и софт
Нынешние пользователи признают мобильность. Платформа предоставляет два метода для ставок с мобильных гаджетов.
Приспособленная портативная редакция
Портативная вариант ресурса автономно подстраивается под разрешение любого устройства. Нет необходимости инсталлировать отдельное приложение.
Программа для смартфонов
Можно установить официальное APP для iOS и Android. APP дает:
– Моментальный запуск
– Доработанный внешний вид
– Всплывающие-оповещения о бонусах
– Бесперебойную производительность
Live казино: среда истинного игорного заведения
Раздел Live столов транспортирует клиентов в атмосферу истинного игорного заведения. Опытные хосты ведут игры в виде живого времени.
Топовые Live-форматы
– Рулетка
– Двадцать одно
– Punto Banco
– Техасский холдем
Слоты: ассортимент слотов
Коллекция игровых автоматов содержит сотни вариантов от известных поставщиков. Клиенты встретят:
– Классические аппараты
– Видео-автоматы
– Мега-выигрыш-игры
– Megaways
Состязания и специальные события
Систематические конкурсы позволяют клиентам конкурировать друг с другом за значительные денежные пулы. Любой конкурс имеет свои условия присутствия и таблицу призеров.
Варианты зачисления и получения финансов
Казино поддерживает комплекс расчетных систем:
– Банковские картыы
– Виртуальные счета
– Blockchain-платежи
– Финансовые переводы
Абсолютно все операции осуществляются конфиденциально благодаря современным технологиям криптографии.
Служба поддержки
Квалифицированные сотрудники отдела обслуживания настроены содействовать 24/7. Имеются такие методы связи:
– Оперативный-чат
– Email-сервис
– Телефонная поддержка
– Публичные сети
Вывод
Легальный домен платформы и его действующие альтернативы обеспечивают участникам защищенный и легкий вход к огромному выбору азартных развлечений. Внушительные награды, регулярные предложения, профессиональная сервис и удобные платежные системы создают азартный процесс максимально приятным и результативным.
Admiring the persistence you put into your site and detailed information you offer. It’s great to come across a blog every once in a while that isn’t the same unwanted rehashed material. Wonderful read! I’ve saved your site and I’m including your RSS feeds to my Google account.
Современные онлайн-казино предоставляют пользователям большой ассортимент развлечений и призовых программ. Подключение к площадке реализуется через главный веб-сайт или его действующее зеркало казино Eldorado, что обеспечивает бесперебойную игру.
В чем суть рабочее зеркало казино
Альтернатива — это точная дубликат оригинального сайта, разработанная для обхода запретов. Актуальное зеркало дает возможность пользователям получить соединение к любимым слотам в каждое время.
Проверенное зеркало имеет всеми возможностями основного портала:
– Целый перечень развлечений
– Аккаунт с записанными параметрами
– Актуальные промокоды
– Защищенные расчетные процедуры
Открытие счета на лицензионном веб-сайте
Процесс регистрации отнимает всего несколько минут. Новым игрокам необходимо:
1. Перейти на проверенный портал или рабочее зеркало
2. Щелкнуть на кнопку “Зарегистрироваться”
3. Заполнить необходимые параметры
4. Подтвердить контакт
5. Сделать стартовый взнос
Стартовый бонус предоставляется автоматически после прохождения всех ступеней.
Вход в профиль
Зарегистрированные клиенты могут произвести доступ вводя:
– Учетное имя и ключ
– Код телефона
– Электронную почту
Аккаунт предоставляет доступ к администрированию финансами, сведениям транзакций и доступным акциям.
Промо и предложения
Развлекательная платформа вознаграждает регулярных участников разнообразными поощрениями:
Приветственный бонус
– Бонус на начальный пополнение до 100%
– Фриспины на топовые автоматы
– Особые награды за очередные депозиты
Купоны
Особые коды обеспечивают доступ на получение специальных призов. Актуальные промокоды размещаются в разделе “Предложения”.
Cashback
Регулярный кэшбек насчитывает до 10% от использованных средств. Возврат зачисляется незамедлительно.
Программа лояльности
Верные игроки получают очки, которые превращаются на настоящие финансы или даровые спины.
Mobile версия и программа
В целях удобства участников построена качественная mobile версия. Отзывчивый дизайн позволяет комфортно развлекаться с произвольного мобильного гаджета.
Выгоды APP:
– Моментальный вход к развлечениям
– Оптимизированный интерфейс
– Бесперебойная деятельность
– Оповещения о актуальных турнирах
Получить приложение можно даром с официального веб-сайта для аппаратов на Android и iOS.
Коллекция автоматов
Игровые автоматы
Библиотека вмещает более 2000 машин от известных студий:
– Стандартные игры
– Видео-слоты
– Прогрессивные автоматы
– Тематические игры
Live казино
Секция Live развлечений предоставляет развлечение с живыми крупье в онлайн режиме:
– Колесо фортуны
– Blackjack
– Баккара
– Poker
Турниры
Постоянные соревнования с большими выигрышными бюджетами запускаются регулярно. Вход в состязаниях доступно всем действующим клиентам.
Платежные методы
Взносы и получения средств производятся через известные сервисы:
– Дебетовые пластик
– Цифровые системы
– Крипто
– Прямые операции
Минимальный взнос — от 100 рублей. Изъятие денег проводится в течение 24 ч.
Сервис саппорта
Круглосуточная служба support готова ассистировать в решении каких-либо задач:
– Live chat
– Email
– Горячая линия
– Общественные сети
Охрана и разрешение
Главный сайт работает на базе мировой документа. Все данные пользователей закрыты новейшим SSL-криптованием.
Вывод
Рабочее зеркало обеспечивает непрерывный доступ к любимым развлечениям, щедрым бонусам и комфортным функциям. Присоединяйтесь немедленно и обретите первый подарок!
1x giri? 1xbet-giris-35.com .
1xbet giri? linki 1xbet giri? linki .
Больше на нашем сайте: https://paradstars.com/index2.php
модульный дом московская https://modul-msk.ru
Платная частная клиника https://mypsyhealth.ru/services/psikhiatricheskaya-klinika психиатрии, неврологии и наркологии — анонимное лечение и консультации специалистов. Диагностика, помощь при зависимостях, неврологических и психических расстройствах. Конфиденциальность, опытные врачи и комфортные условия.
Профессиональная помощь детям https://neuropsy-centr.ru с нарушениями речи и развития. Высококвалифицированные врачи, работаем с самыми тяжелыми случаями, 99% положительных отзывов, новейшее оборудование и инвентарь. Государственная лицензия: Л035-01298-77/01604531 от 09.12.24
I enjoy playing at this casino https://webshop.joostbotman.nl/2026/02/26/aruba-bet-bonus-casino-votre-cle-pour-des-benefices-exceptionnels/ because it feels trustworthy and well-optimized. Live tables are interactive, slots offer good variety, and the overall experience remains pleasant over time.
https://kvedomosti.ru/wp-content/articles/?melbet_promokod_pri_registracii_bonus_besplatno.html
Вход к ресурсу через рабочие зеркала
Нынешние сетевые казино предоставляют геймерам постоянный вход к сервисам. Центральный сайт http://www.smartlisting.com.au/bonus-kody-dlya-igrovykh-avtomatov-v-kazino-na-2026-god работает стабильно, обеспечивая богатый ассортимент игровых игр. Однако порой формируются программные препятствия или барьеры, потому важно понимать о доступности функционирующих зеркал.
Что собой представляет собой официальное зеркало казино
Альтернатива — это полная версия официального сайта с идентичным интерфейсом. Функционирующее зеркало сегодня обеспечивает преодолевать региональные барьеры и продолжать времяпрепровождение.
Главные плюсы эксплуатации зеркал:
– Полный вход к личному кабинету
– Сохранение совокупных показателей счёта
– Такой же ассортимент слотов
– Действующие бонусы и акции
Создание аккаунта на платформе
Процедура создания аккаунта длится немного минут. Свежие клиенты получают богатый подарок за регистрацию, который имеет возможность включать:
– Стартовый игровой подарок
– Безвозмездные кручения для автоматов
– Уникальные коды
– Увеличенный кэшбек
Для финализации оформления следует:
1. Перейти на центральный ресурс или копию
2. Нажать клавишу «Оформиться»
3. Внести личные данные
4. Верифицировать мейл или номер
5. Задействовать промокод (если есть наличии)
Авторизация в личный кабинет
По завершении корректной записи игроки способны осуществлять авторизацию используя центральный портал или актуальное зеркало. Собственный кабинет открывает всесторонний контроль над профилем:
– Архив пари
– Зачисление депозита
– Снятие выигрышей
– Администрирование поощрениями
– Включение в состязаниях
Привилегии и промо казино
Ресурс удовлетворяет игроков разнообразными наградными схемами:
Стартовые поощрения
Дебютанты обретают внушительный комплект поощрений на стартовые депозиты. Типично это содержит пропорциональную доплату к размеру взноса плюс комплиментарные фриспины.
Постоянные кампании
– Раз в неделю кэшбек до 15%
– Турниры с призовыми суммами
– Подарки на дату рождения
– Уникальные предложения для статусных клиентов
Схема вознаграждения
Регулярные геймеры зарабатывают единицы, что допустимо обменять на подлинные средства или специальные привилегии.
Смартфонная редакция и утилита
Передовые разработки позволяют геймить где удобно. Смартфонная вариант ресурса автоматически подстраивается под дисплей всякого девайса.
Достоинства портативного ПО:
– Оперативная запуск игр
– Эргономичный интерфейс
– Мгновенные-сообщения о промо
– Способность установить для Android и iOS
Живое казино: антураж истинного гемблинг клуба
Категория Live казино доставляет геймеров в среду реального гемблинг учреждения. Опытные операторы проводят процесс в виде настоящего времени.
Доступные развлечения:
– Колесо фортуны
– Карточная игра
– Punto Banco
– Техасский холдем
Автоматы и развлекательные слоты
Каталог развлекательных автоматов включает тысячи названий от ведущих разработчиков. Каждый пользователь подберёт автомат по нраву:
– Винтажные слоты
– Новые слоты с бонусными уровнями
– Прогрессивный-автоматы
– Мегавейс машины
Соревнования и лотереи
Систематические состязания добавляют драйв и обеспечивают опцию выиграть внушительные призы. Присутствие в соревнованиях часто безвозмездное, а премиальные банки насчитывают больших размеров.
Безопасность и конфиденциальность
Портал применяет инновационные методы шифрования для охраны информации пользователей. Совокупные денежные операции совершаются через зашифрованные соединения.
Вывод
Официальный сайт и его актуальные зеркала предоставляют надёжный переход к первоклассным развлекательным играм. Богатые поощрения, удобная смартфонная версия, богатство машин и профессиональное Live-казино формируют сайт отличным решением для поклонников гемблинг слотов.
Нынешние онлайн-казино гарантируют клиентам широкий набор игр и выгодные бонусы. Но для стабильной работы критично осознавать, как найти ДжиВиСпин казино казино и его актуальные зеркала.
Что такое главный веб-ресурс казино
Основной ресурс казино — это первичная система, где участники могут развлекаться развлекательными автоматами. Портал функционирует на легальных условиях и обладает всеми требуемыми лицензиями.
Основные выгоды лицензионного портала:
– Конфиденциальность персональных данных
– Справедливые требования работы
– Подтвержденные транзакции
– Профессиональная служба поддержки
Функционирующее зеркало казино: для чего нужно
Зеркало — это полная версия лицензионного веб-сайта, хостящаяся по другому URL. Рабочее зеркало запускается для поддержания бесперебойного входа к порталу.
Факторы задействования альтернативных адресов:
– Недоступность первичного сайта
– Профилактические операции
– Большая загрузка на ресурс
Как обнаружить действующее зеркало сегодня
Найти свежее рабочее зеркало можно множественными методами:
1. Рассылка — оформите подписку на email доставку
2. Служба поддержки — свяжитесь в онлайн-чат
3. Социальные площадки — следите за постами
4. Партнерские сайты — авторитетные сайты
Создание аккаунта на портале казино
Этап оформления требует лишь немного минут:
1. Активируйте на кнопку “Зарегистрироваться”
2. Введите требуемые информацию
3. Валидируйте почтовую почту
4. Примените промокод, если предоставлен
По завершении успешной регистрации вам будет доступен персональный аккаунт.
Премии и купоны
Привлекательная бонусная структура — ключевое достоинство казино:
Награда за первичную регистрацию
Свежие игроки получают первый поощрение, который может включать:
– Финансовый депозит на первый вклад
– Фри-спины для автоматов
– Безвозвратные бонусы
Купоны
Периодически появляются актуальные коды, обеспечивающие забрать экстра привилегии.
Система кэшбека
Лояльные участники зарабатывают долю проигранных денег обратно.
Действующие промо и соревнования
Казино периодически организует захватывающие события:
– Еженедельные баттлы
– Тематические бонусы
– Розыгрыши солидных призов
– Программа VIP-клуба
Вход в пользовательский профиль
Для авторизации на сайт следует:
1. Открыть главный сайт или действующее зеркало
2. Нажать “Авторизация”
3. Внести никнейм и пароль
В личном разделе предоставлены следующие функции:
– Депозит депозита
– Вывод выигрышей
– Анализ архива игр
– Изменение индивидуальными параметрами
Mobile модификация и программа
Mobile версия
Адаптивная модификация портала предоставляет шанс играть с всех смартфонного устройства. Дизайн автоматически настраивается под формат дисплея.
App для загрузки
Получить клиент можно для:
– Android — официальная установка с ресурса
– iOS — скачивание через App Store
Преимущества приложения:
– Быстрый доступ
– Стабильная работа
– Push-уведомления об бонусах
– Производительный UI
Гемблинг секции
Автоматы
Обширная галерея эмуляторных машин от лучших разработчиков:
– Ретро слоты
– Продвинутые-автоматы
– Джекпот-машины
Live игры
Категория с реальными крупье предлагает:
– Рулеточные столы
– Двадцать одно
– Punto Banco
– Texas Hold’em
Стримы транслируются в высоком формате, формируя эффект подлинного казино.
Варианты депозита и обналичивания
Казино работает с различные платежные системы:
– Дебетовые средства
– Онлайн платежи
– Криптовалюты
– Прямые отправки
Стартовые суммы внесения и скоростные транзакции делают развлечение крайне приятной.
Отдел поддержки
Компетентная служба ассистентов оперирует 24/7 и в состоянии содействовать с различными вопросами:
– Онлайн-чат
– Email-поддержка
– Phone связь
Резюме
Главный ресурс казино и его функционирующие дубликаты гарантируют участникам защищенный и захватывающий развлекательный досуг. Щедрые награды, функциональная адаптивная модификация, разнообразные слоты и превосходное live-казино формируют эту ресурс превосходным выбором для развлекательных досуга.
ева казино Когда сайт eva casino не открывался, оказалось просто нужно зеркало.
For studies
how to get a loan with bad credit with bank statements
for proven strategies.
http://rejseblokken.dk/wp-includes/pages/?1hbet__1xbet__promokod_2020___bonus_6500_rubley.html
1xbet g?ncel 1xbet g?ncel .
Передовые сетевые казино обеспечивают геймерам большой спектр функций для беспроблемной игры. Но иногда подключение к базовому сайту может стать закрытым. В таких обстоятельствах на помощь спешит http://radiosaccessories.com/2026/03/05/luxon-eto-platezhnaya-sistema-predlagayushchaya-besplatnye-perevody-i-prostoe-popolnenie-na-ggpokerok-i, которое дает бесперебойный подключение ко всем сервисам платформы.
Что такое действующее зеркало казино
Копия — это идентичная копия главного портала, которая находится по другому домену. Зеркало имеет весь функционал первоначального сайта, включая личный кабинет, баланс и историю платежей.
Главные преимущества использования зеркала:
– 24-часовой доступ к порталу
– Максимальная тождественность опций
– Безопасность пользовательских реквизитов
– Сохранение существующих привилегий
Как разыскать действующее зеркало сегодня
Есть множество достоверных методов поиска действующей URL:
Официальные каналы:
1. Электронная рассылка — администрация систематически направляет сообщения с актуальными доменами
2. Общественные сети — проверенные страницы размещают релевантную информацию
3. Сервис поддержки — специалисты выдают проверенные домены
4. Портативное приложение — обеспечивает обходить блокировки
Оформление профиля на официальном сайте
Операция открытия счета занимает только пару минут и предполагает из данных стадий:
1. Переход на лицензионный сайт или рабочее зеркало
2. Щелчок на иконку «Зарегистрироваться»
3. Ввод учетной анкеты
4. Подтверждение почтовой почты или телефонного номера
5. Задействование поощрения за регистрацию при наличии промокода
Свежие пользователи приобретают великодушный вступительный презент, который может предполагать free spins, монетарные поощрения или компенсацию.
Авторизация в персональный кабинет
Подключение на портале выполняется привычным методом. Достаточно вписать никнейм и пароль, задействованные при создании аккаунта.
Ключевые нюансы для защищенного входа:
– Задействуйте надежный шифр
– Включите двухэтапную проверку
– Не сохраняйте коды на общественных гаджетах
– Мониторьте интернет строку браузера
Характеристика поощрительной структуры
Гемблинг-сайт радует пользователей многочисленными поощрениями и кампаниями:
Начальный пакет
Свежие игроки имеют возможность претендовать на великодушное вознаграждение за дебютный взнос. Традиционно это долевая добавка к депонированной сумме плюс free spins для востребованных слотов.
Регулярные акции
– Еженедельный компенсация — возврат доли проигранных денег
– Награды на очередные депозиты
– Уникальные офферы по праздникам
– Конкурсы с значительными выигрышными фондами
Система лояльности
Постоянные пользователи получают баллы за всякую ставку, которые затем превращаются на фактические финансы, free spins или эксклюзивные льготы.
Кодовые слова: как задействовать
Купоны — это индивидуальные комбинации литер, гарантирующие привилегию к бонусным поощрениям.
Каким образом получить рабочие промокоды:
– Официальные медийные сети казино
– Партнерские ресурсы
– Email-новостная лента
– Тематические платформы
Активируется промокод в специальное поле при открытии счета или внесении депозита депозита.
Телефонная версия и приложение
Актуальные игроки выбирают делать ставки с смартфонных аппаратов. Портал дает два способа для беспроблемной телефонной игры.
Адаптивная версия
Онлайн версия автоматически настраивается под размер монитора. Не требует установки и работает в каждом актуальном браузере.
Мобильное приложение
Установить приложение можно для гаджетов на Android и iOS. Достоинства app:
– Быстрая активация
– Надежная работа
– Мгновенные-уведомления о поощрениях
– Независимый минование блокировок
Операция установки несложен: требуется открыть на ресурс с телефонного гаджета и подчиняться предписаниям.
Развлекательный выбор
Каталог аппаратов охватывает множество вариантов от ведущих провайдеров.
Слоты
Игровые машины — крайне популярная секция развлечений. Показаны обычные винтажные автоматы, новые видео-автоматы с бонусными уровнями, а также джекпотные джекпоты.
Live казино
Отдел с действительными ведущими дает возможность ощутить настроение реального казино. Доступны развлечения с баккарой.
Передача осуществляется в высоком разрешении, обеспечивается общение с дилером и остальными геймерами.
Конкурсы
Регулярно запускаются конкурсы по всевозможным слотам. Присоединение обеспечивает возможность получить финансовые выигрыши, бесплатные вращения или специальные презенты.
Денежные действия
Платформа обеспечивает обширный спектр денежных инструментов:
– Дебетовые карты
– Виртуальные системы
– Крипта
– Банковские транзакции
Стартовая величина вклада — разумная для массы геймеров. Получение денег производится в скорые сроки.
Служба поддержки
Компетентные специалисты готовы помочь постоянно. Представлены нижеследующие каналы связи:
– Интернет-чат
– Email
– Звонковая поддержка
– Коммуникационные сети
Ответы на типовые вопросы можно найти в зоне FAQ.
Заключение
Основной сайт казино и его действующие зеркала предоставляют клиентам совершенный подключение ко всем опциям сайта. Значительные бонусы, комфортная телефонная версия, гигантский коллекция аттракционов и опытная поддержка превращают гемблинг досуг крайне удобным и защищенным.
Переход к платформе через действующие зеркала
Участники сетевых казино регулярно имеют дело с ситуацией недоступности официального портала. Конкретно для решения этой задачи существуют зеркала главного сайта. Volta обеспечивает беспрепятственный подключение ко всем сервисам площадки.
Что такое функционирующее зеркало казино
Копия составляет собой полную версию оригинального веб-сайта с похожим функционалом. Ключевое несовпадение — это иное имя. Любые данные пользователя, в том числе счет, награды и записи игр, находятся прежними.
Выгоды эксплуатации зеркал
Актуальные зеркала располагают рядом ключевых выгод:
– Непрерывный доступ к излюбленным слотам
– Стопроцентная безопасность персональных информации
– Удержание всех параметров персонального кабинета
– Шанс получения наград и присутствия в акциях
Открытие счета на легальном портале
Ход создания аккаунта предельно элементарен и занимает немного минут. Свежие клиенты могут претендовать на крупный стартовый приз за оформление.
Стадии открытия аккаунта
1. Доступ на легальный домен или его дубликат
2. Нажатие на кнопку “Регистрация”
3. Внесение нужных сведений
4. Активация электронной почты
5. Ввод промокода (когда имеется)
Награды и промоакции для пользователей
Игровая площадка балует своих игроков всевозможными призовыми предложениями.
Главные типы бонусов
Вводный подарок — крупное поощрение для новых участников, которое именно способно вмещать монетарные бонусы и безвозмездные спины.
Безвозмездные спины — опция крутить в известных аппаратах бесплатно.
Компенсация — долевой возмещение израсходованных средств, который именно выплачивается по неделям или помесячно.
Специальные коды — уникальные наборы, обеспечивающие дополнительные преимущества.
Индивидуальный кабинет: опции и установки
Пользовательский профиль дает совершенный управление над пользовательским процессом. В нем доступны:
– Регулирование средствами
– Данные платежей
– Текущие бонусы
– Настройки охраны
– Верификация профиля
Портативная платформа и софт
Современные пользователи признают портативность. Платформа дает двойной пути для участия с карманных гаджетов.
Отзывчивая мобильная платформа
Портативная версия домена самостоятельно настраивается под разрешение любого гаджета. Не нужно инсталлировать особое приложение.
Софт для смартфонов
Доступно установить оригинальное APP для iOS и Android. Приложение обеспечивает:
– Быстрый старт
– Оптимизированный внешний вид
– Мобильные-уведомления о предложениях
– Надежную производительность
Live игры: обстановка настоящего зала
Зона Live игр переносит участников в атмосферу подлинного зала. Опытные ведущие проводят игры в виде живого времени.
Топовые Live-развлечения
– Рулетка
– Двадцать одно
– Баккарат
– Poker
Игровые машины: выбор автоматов
Каталог игровых машин содержит множество вариантов от известных поставщиков. Клиенты откроют:
– Традиционные слоты
– Графические слоты
– Джекпот-автоматы
– Слоты с множественными линиями
Турниры и специальные события
Периодические соревнования дают возможность участникам соревноваться друг с другом за солидные наградные банки. Отдельный турнир располагает свои критерии вовлечения и таблицу чемпионов.
Методы зачисления и изъятия финансов
Казино предоставляет множество денежных инструментов:
– Кредитные картыы
– Виртуальные кошельки
– Blockchain-платежи
– Wire транзиты
Любые операции реализуются защищенно благодаря новейшим протоколам кодирования.
Служба помощи
Квалифицированные специалисты отдела поддержки настроены ассистировать 24/7. Доступны следующие способы связи:
– Онлайн-чат
– Email-обслуживание
– Аудио связь
– Социальные сети
Итог
Официальный сайт игровой площадки и его действующие копии гарантируют клиентам надежный и легкий подход к обширному выбору азартных игр. Щедрые подарки, регулярные акции, квалифицированная поддержка и удобные денежные инструменты создают геймерский досуг предельно приятным и выгодным.
1xbetgiri? 1xbet-giris-32.com .
1 x bet 1 x bet .
ева казино Я для себя выбрал искать ева казино через телеграм.
International Drivers License It’s crucial to understand that an IDP is not a standalone license but a supplementary document that must be carried alongside your valid original driver’s license. Navigating foreign roads can be a seamless experience with the proper documentation, and the IDP is designed to bridge language barriers for law enforcement and rental agencies.
колесов николай
canada pharmacy online: Generic Viagra for sale – best australian online pharmacy
Передовые онлайн-казино обеспечивают геймерам обширный выбор вариантов для беспроблемной игры. Подключение к сервису larparena.com осуществляется через лицензионный веб-ресурс или актуальное зеркало.
Что такое актуальное зеркало казино
Функционирующее зеркало — это дополнительный домен главного портала казино. Такие дубликаты разрабатываются для гарантирования стабильного входа к гемблинговой площадке.
Альтернатива актуальное абсолютно дублирует возможности основного портала. Игроки получают схожий путь ко всем возможностям, включая создание аккаунта, зачисление средств кошелька и снятие выигрышей.
Оформление профиля на официальном портале
Алгоритм создания аккаунта требует всего пару минут. Новым клиентам следует:
1. Перейти на лицензионный ресурс или рабочее проверенное зеркало
2. Нажать кнопку “Создать аккаунт”
3. Ввести требуемые сведения
4. Подтвердить email почту
5. Активировать бонусный код при существовании
После выполнения регистрации пользователь приобретает приз за регистрацию, который имеет право охватывать даровые спины или финансовое вознаграждение.
Вход в индивидуальный кабинет
Индивидуальный кабинет — это безопасная секция, где игроки вправе контролировать своим аккаунтом. Для авторизации требуется указать никнейм и секретный ключ.
В личном кабинете открыты такие опции:
– Просмотр журнала транзакций
– Активация кодов активации
– Настройка призами
– Присоединение в состязаниях
– Мониторинг кэшбека
– Корректировка учетной записи
Призы и промо
Гемблинговая сервис предоставляет великодушные подарки:
Начальный комплект — новички приобретают солидное премию на дебютные пополнения.
Даровые спины — предоставляются как при оформлении, так и в контексте многочисленных мероприятий.
Возврат средств — постоянный возврат доли потерянных финансов.
Коды активации — особые комбинации, дающие право к эксклюзивным предложениям.
Характеристика гемблинговых секций
Slots
Собрание slots насчитывает тысячи вариантов от передовых разработчиков. Пользователи обнаружат как традиционные аппараты, так и современные видео-слоты с интересной анимацией.
Live казино
Секция Live казино дарит право развлекаться с действующими крупье в условиях реального времени. Имеются востребованные столы: рулетка, блэкджек, баккара, покер.
Состязания
Периодические состязания с солидными премиальными фондами манят сотни участников. Победители зарабатывают монетарные призы и специальные бонусы.
Портативная версия и app
Телефонная версия портала позволяет наслаждаться с произвольного девайса. Интерфейс автономно корректируется под формат экрана.
Получить приложение можно для девайсов на Android и iOS. Смартфонное app располагает всеми опциями компьютерной версии.
Как определить актуальное зеркало на сейчас
Действующие ссылки копий постоянно обновляются. Узнать рабочую URL можно несколькими способами:
– Через отдел помощи
– В проверенных новостных сетях
– По e-mail подписке
– На специализированных ресурсах
Защита и сертификация
Лицензионный сайт работает на базе мировой лицензии. Все платежи оберегаются современными протоколами шифрования.
Приватность пользовательских информации обеспечивается в совершенном размере.
Итог
Официальный ресурс и его функционирующие альтернативы предоставляют клиентам беспрерывный путь к высококлассным гемблинговым играм. Великодушные бонусы, всевозможные автоматы, компетентная сервис — все это создает развлекательный времяпрепровождение максимально беспроблемным и увлекательным.
Современные онлайн-казино обеспечивают пользователям обилие вариантов для приятной игры. Центральный ресурс казино Килограмм предоставляет возможность ко всем сервисам и игровым автоматам. Однако при возникновении технических проблем на помощь спешат рабочие дубликаты.
Что являет собой собой рабочее зеркало
Копия казино — это полная реплика главного ресурса, расположенная по запасному URL. Официальное зеркало удерживает все возможности, включая открытие профиля, доступ в личный кабинет, вознаграждения и купоны.
Копия на сегодня предоставляет:
– Постоянный доступ к развлекательным автоматам
– Стопроцентную сохранность персональных информации
– Удержание баланса и записей операций
– Доступность всех акций
Открытие профиля на лицензионном сайте
Ход оформления учетной записи занимает считанные минут. Новоиспеченным клиентам требуется:
1. Войти на главный сайт или функционирующее зеркало
2. Кликнуть кнопку «Создать аккаунт»
3. Внести требуемые сведения
4. Верифицировать э-мейл почту
5. Применить кодовое слово при присутствии
После завершения оформления профиля игроки зарабатывают бонус за регистрацию, какой может включать free spins или денежно-призовое вознаграждение.
Логин в индивидуальный кабинет
Индивидуальный кабинет обеспечивает комплексный контроль над игровым ходом. Через собственный профиль можно:
– Финансировать баланс
– Получать выплаты
– Активировать промокоды
– Контролировать журнал игр
– Участвовать в соревнованиях
– Получать кэшбек
Описание премий и специальных предложений
Щедрая премиальная программа — важное козырь платформы. Главные типы поощрений:
Приветственный подарок
Начинающие получают богатое поощрение на дебютные вклады. Размер премии может достигать 100-200% от величины вклада.
Free spins
Безвозмездные раунды выдаются для топовых слотов. Объем бесплатных вращений изменяется от 10 до 500 штук.
Возврат средств
Постоянный или помесячный отдача процентной доли проигранных денег. Средний объем компенсации — 5-15%.
Турниры
Систематические состязания с крупными призовыми банками. Конкурсанты конкурируют за верхние места в турнирной таблице.
Портативная версия и софт
Смартфонная версия разрешает играть с каждого девайса. Игроки могут установить программу для iOS и Android или использовать браузерную версию.
Плюсы портативного приложения:
– Быстрая прогрузка игр
– Практичный графический интерфейс
– Пуш-нотификации о бонусах
– Вход через биометрию
Слоты и Live казино
Развлекательная подборка охватывает сотни игр от лидирующих разработчиков.
Популярные типы слотов:
– Стандартные автоматы
– Видео-автоматы с призовыми раундами
– Прогрессивный джекпот слоты
– Мега-путь машины
Live казино
Категория live казино предлагает игру с профессиональными ведущими. Имеются стандартные варианты:
– Европейская рулетка
– Блэкджек
– Баккара
– Покер
Как разыскать действующее зеркало
Раздобыть рабочую ссылку на зеркало возможно несколькими способами:
1. Зарегистрироваться на почтовую рассылку
2. Мониторить за апдейтами в соц сетях
3. Связаться в департамент поддержки
4. Добавить в закладки актуальное зеркало в фавориты
Вывод
Основной портал и его действующие дубликаты дают постоянный вход к азартным играм. Выгодные вознаграждения, разнообразные бонусные коды, удобное мобильное софт и качественная служба поддержки поддержки превращают игровой геймплей в высшей степени комфортным и надежным.
порно данным порно рассказ шлюха
Компания «Заборыч» https://заборыч.рф более 10 лет осуществляет строительство заборов из профнастила и сетки рабицы. Мы производим заборы для частных лиц и производственных объектов. За это время мы построили десятки объектов, от простых ограждений до сложных ландшафтных комплексов. Наши клиенты остаются довольны качеством работ и сроками реализации проектов.
Профессиональный автосервис https://km-motors.org кузовной ремонт, покраска авто, ремонт двигателя и подвески. Компьютерная диагностика, автоэлектрика, ТО, замена масла, фильтров и шиномонтаж. Работаем быстро, качественно и по стандартам производителей.
Советы автомехаников https://proavtomaster.com полезные рекомендации по ремонту и обслуживанию автомобиля. Узнайте, как продлить срок службы двигателя, подвески и электрооборудования, избежать частых поломок и сэкономить на ремонте благодаря практическим советам специалистов.
Резиновое покрытие под детской площадкой — лучшая инвестиция в безопасность. Даже если ребёнок упадёт, мягкое покрытие смягчит удар. Альтернатива — толстый слой мытого песка или мелкого гравия.
https://institut-pedagogika.ru/
Переход к сайту и функционирующие ссылки
Современные онлайн казино предлагают пользователям большой спектр возможностей. Центральный сайт http://sergiopodgaec.com.br/luxon-pay-2026-god-eto-vozmozhnost-popolnyat-i-vyvodit-sredstva-v-onlayn-kazino/ организует надежный вход ко всем возможностям. Однако иногда случаются случаи, когда нужно альтернативный вариант авторизации.
Что представляет собой действующее зеркало
Функционирующее зеркало — это полная копия легального ресурса с запасным доменным адресом. Зеркало сегодня помогает миновать возможные блокировки и поддерживать непрерывный доступ к предпочитаемым автоматам.
Проверенное зеркало имеет идентичными опциями, что и базовый портал:
– Полный перечень автоматов
– Личный раздел с сохраненными информацией
– Актуальные награды и акции
– Проверенные денежные операции
Оформление и доступ в платформу
Процесс создания профиля на сайте длится буквально мгновений. Новым пользователям следует:
1. Открыть на рабочее зеркало в настоящее время
2. Щелкнуть клавишу «Открыть профиль»
3. Указать необходимые информацию
4. Верифицировать цифровую почту или данные связи
5. Забрать поощрение за создание профиля
Авторизация в личный профиль выполняется через внесение никнейма и ключа.
Обзор наградной структуры
Привлекательная бонусная система — главное достоинство ресурса. Клиенты получают многочисленные бонусы:
Начальные поощрения
Недавние пользователи имеют возможность рассчитывать на щедрый подарок за регистрацию. Традиционно это набор опций, охватывающий:
– Процентную прибавку к начальному взносу
– Безвозмездные спины
– Призовые средства на счет
Промо-коды и специальные акции
Постоянные бонусные комбинации дают возможность активировать призовые преимущества. Использовать их можно в отдельном поле персонального раздела.
Спины и компенсация
Free spins — это вариант крутить автоматы без расходования своих финансов. Кэшбек предполагает процентный возмещение утраченных финансов.
Каталог слотов
Развлекательная платформа предоставляет впечатляющую базу игр.
Видеослоты
Ассортимент слотов удивляет фантазию. Доступны классические простые автоматы и актуальные развлечения с занимательной анимацией.
Live зал
Категория Live игр погружает клиентов в обстановку истинного развлекательного клуба. Опытные ведущие проводят сессии в прямом режиме.
Соревнования и лидерборды
Постоянные турниры обеспечивают азарта и дают шанс заработать крупные суммы.
Портативная реализация и приложение
Новые решения позволяют наслаждаться в комфортном месте. Адаптивная версия независимо настраивается под монитор девайса.
Скачать программу допустимо для мобильных систем iOS и Android. Приложение обеспечивает:
– Скоростной вход
– Бесперебойную работу
– Мгновенные-уведомления об акциях
– Удобный вид
Банковские операции
Казино поддерживает многочисленные способы депозита и снятия денег:
– Кредитные карты
– Онлайн платформы
– Цифровые валюты
– Банковские транзакции
Каждые переводы выполняются через безопасное канал, что обеспечивает целостность персональных параметров.
Служба support
Опытная команда support действует постоянно. Обратиться с менеджерами можно через:
– Онлайн-чат
– Электронную почту
– Контакт
– Социальные каналы
Выводы
Легальный веб-сайт и его актуальное зеркало дают игрокам защищенный и удобный вход к увлекательным занятиям. Привлекательные подарки, широкий спектр игр и профессиональная помощь делают времяпрепровождение исключительно удобной и выгодной.
ева казино зеркало Если eva casino не работает, адрес сменился.
Обзор официального портала
Современные сетевые казино предоставляют клиентам богатый набор забав и перспектив. Официальный портал ДБ Бет обеспечивает проверенный возможность к гемблинг функциям.
Функционирующее зеркало: вход на сегодня
Зеркало выступает собой полную реплику официального портала. Проверенное зеркало обеспечивает участникам миновать существующие запреты.
Преимущества эксплуатации зеркала
Главные преимущества охватывают:
– Стабильный доступ к платформе
– Сохранение полных функций официального ресурса
– Защита персональных информации
– Аналогичный функционал
Создание аккаунта на сайте
Процедура регистрации выделяется простотой и удобством. Недавние игроки необходимо:
1. Зайти на лицензионный веб-сайт или его зеркало
2. Выбрать на клавишу создания аккаунта
3. Ввести необходимые данные
4. Верифицировать почтовую ящик
5. Совершить дебютный логин
Приз за создание аккаунта
Дебютанты зарабатывают значительный начальный презент. Такое вознаграждение имеет возможность содержать:
– Материальные начисления
– Безвозмездные вращения
– Повышенный показатель возврата
Доступ в личный аккаунт
Действующие участники способны быстро войти в личный профиль, эксплуатируя никнейм и шифр. Индивидуальный аккаунт дает доступ к:
– Регулированию депозитом
– Истории переводов
– Активным бонусам
– Настройкам аккаунта
Вознаграждения и промо
Платформа регулярно проводит всевозможные предложения для пользователей.
Разновидности призов
Ключевые виды вознаграждений:
– Финансовые начисления – коэффициент от объема депозита
– Бесплатные вращения – complimentary прокруты в слотах
– Кэшбэк – отдача процента затраченных денег
– Турнирные награды – награды за игру в турнирах
Купоны
Особые купоны помогают получить добавочные привилегии. Клиенты могут получить их на аффилиатных ресурсах или приобрести в рассылке.
Mobile вариант и программа
Современные игроки любят мобильный гейминг.
Опции мобильной платформы
– Адаптивный дизайн для различных гаджетов
– Целостный доступ к играм
– Стремительная работа
– Удобное управление
Загрузить программу
Портативное app предложено для установки на девайсы с рабочими платформами Android и iOS. Софт обеспечивает:
– Устойчивую деятельность
– Пуш уведомления о предложениях
– Мгновенный вход к избранным развлечениям
Развлекательный ассортимент
Платформа предлагает богатую библиотеку азартных забав.
Игровые машины
Коллекция азартных аппаратов охватывает:
– Классические машины
– Video игры
– Джекпотные машины
– Лицензионные слоты
Live столы
Раздел живых столов дает опцию соревноваться с настоящими ведущими. Представлены:
– Американская рулетка
– Очко
– Punto Banco
– Poker
Конкурсы
Регулярные конкурсы помогают участникам бороться за внушительные призовые пулы. Турнирная структура актуализируется регулярно.
Финансовые процедуры
Платформа предлагает обилие вариантов депозита и получения денег:
– Пластиковые карты
– Цифровые платежные системы
– Wire трансферы
– Криптовалюты
Все переводы производятся надежно с применением современных протоколов защиты.
Отдел support
Компетентная отдел поддержки трудится 24/7. Связаться с операторами доступно через:
– Online чат
– Электронную почту
– Телефонную линию
– Социальные платформы
Секьюрити и лицензирование
Казино функционирует на базе легальной аккредитации. Подобное подтверждает:
– Справедливость азартного действа
– Безопасность индивидуальных информации
– Быстрые транзакции
– Контролируемый геймплей
Вывод
Основной сайт и его актуальные резервные страницы обеспечивают игрокам полный комплекс возможностей для комфортной и прибыльной времяпрепровождения. Солидные призы, разнообразные автоматы, квалифицированная поддержка и проверенная инфраструктура платежей делают казино оптимальным выбором для поклонников развлекательных игр.
their website – Checked it briefly and the navigation flows nicely.
https://turproezdka.ru/transfery/aeroport-taksi-krasnodar.html
классные букеты http://zakazat-cveti-moskva.ru/ .
https://happypawspharmacy.shop/# HappyPaws Pharmacy
Актуальные онлайн-казино предлагают пользователям внушительный диапазон развлечений и призовых опций. Присоединение к ресурсу выполняется через главный сайт или его рабочее зеркало Р—СѓРјР°, что дает стабильную активность.
В чем суть действующее зеркало казино
Альтернатива — это полная реплика оригинального ресурса, созданная для решения запретов. Рабочее зеркало обеспечивает игрокам обрести соединение к выбранным автоматам в каждое время.
Лицензионное зеркало располагает всеми функциями основного сайта:
– Совокупный ассортимент автоматов
– Аккаунт с сохраненными параметрами
– Действующие бонусы
– Гарантированные расчетные операции
Оформление профиля на основном веб-сайте
Алгоритм открытия счета требует всего пару минут. Новым пользователям следует:
1. Перейти на главный веб-сайт или рабочее зеркало
2. Щелкнуть на кнопку “Зарегистрироваться”
3. Указать необходимые параметры
4. Проверить контакт
5. Совершить первый депозит
Поощрение новичкам выдается сразу после прохождения всех этапов.
Подключение в профиль
Зарегистрированные пользователи могут осуществить доступ используя:
– Никнейм и шифр
– Данные мобильного
– Электронную почту
Личный кабинет предоставляет возможность к управлению финансами, записям операций и действующим промокодам.
Промо и предложения
Игровая система привлекает активных участников щедрыми призами:
Приветственный бонус
– Премия на стартовый пополнение до 100%
– Free spins на топовые машины
– Дополнительные бонусы за последующие пополнения
Промокоды
Особые купоны предоставляют шанс на использование эксклюзивных поощрений. Текущие коды размещаются в категории “Бонусы”.
Кешбэк
Регулярный кэшбек составляет до 10% от утраченных финансов. Выплата зачисляется сразу.
Схема лояльности
Верные участники накапливают единицы, которые обмениваются на подлинные средства или free spins.
Мобильная версия и программа
Для удобства клиентов создана качественная mobile версия. Адаптивный облик позволяет комфортно участвовать с каждого мобильного устройства.
Плюсы софта:
– Скорый подключение к развлечениям
– Адаптированный интерфейс
– Надежная работа
– Push-уведомления о свежих акциях
Загрузить софт можно свободно с проверенного ресурса для аппаратов на Android и iOS.
Ассортимент игр
Игровые автоматы
Библиотека содержит более 2000 игр от популярных студий:
– Классические слоты
– Video slots
– Джекпот-слоты
– Сюжетные автоматы
Live казино
Секция Live казино предоставляет развлечение с подлинными ведущими в живом формате:
– Колесо фортуны
– Blackjack
– Карты
– Столы покера
Соревнования
Систематические турниры с значительными премиальными бюджетами устраиваются регулярно. Вход в конкурсах доступно всем созданным пользователям.
Денежные системы
Пополнения и получения средств осуществляются через популярные сервисы:
– Кредитные пластик
– Онлайн кошельки
– Bitcoin
– Денежные платежи
Минимальный взнос — от 100 рублей. Изъятие финансов обрабатывается в течение 24 часов.
Команда support
24/7 группа помощи может содействовать в исправлении произвольных ситуаций:
– Мессенджер
– Email
– Контактный номер
– Публичные сети
Охрана и сертификат
Главный сайт действует на основании мировой лицензии. Все параметры пользователей обезопасены новейшим SSL-протоколом.
Резюме
Действующее зеркало дает непрерывный доступ к выбранным играм, щедрым бонусам и функциональным возможностям. Зарегистрируйтесь прямо сейчас и обретите стартовый бонус!
Современные онлайн-казино гарантируют игрокам широкий выбор опций для беспроблемной развлечений. Доступ к платформе casino казино Panda реализуется через основной портал или действующее зеркало.
Что такое актуальное зеркало казино
Рабочее зеркало — это дополнительный URL основного веб-сайта казино. Такие копии разрабатываются для предоставления бесперебойного соединения к развлекательной системе.
Копия сегодня совершенно копирует опции главного сайта. Геймеры получают аналогичный вход ко всем возможностям, включая открытие счета, пополнение счета и получение призов.
Оформление профиля на основном веб-сайте
Процесс создания аккаунта занимает всего несколько моментов. Новым участникам нужно:
1. Зайти на главный портал или актуальное официальное зеркало
2. Кликнуть кнопку “Открыть счет”
3. Указать необходимые информацию
4. Проверить почтовую почту
5. Активировать бонусный код при доступности
После завершения создания аккаунта игрок зарабатывает бонус за регистрацию, который имеет право предполагать free spins или финансовое вознаграждение.
Логин в личный кабинет
Личный кабинет — это защищенная секция, где игроки имеют возможность администрировать своим профилем. Для входа нужно напечатать имя пользователя и пароль.
В личном кабинете представлены такие инструменты:
– Отслеживание истории платежей
– Задействование бонусных кодов
– Настройка вознаграждениями
– Участие в состязаниях
– Отслеживание кэшбэка
– Настройка данных
Бонусы и промо
Азартная система дарит великодушные вознаграждения:
Регистрационный пакет — новые игроки получают крупное вознаграждение на первые вклады.
Free spins — выдаются как при создании аккаунта, так и в ходе различных промо.
Кэшбэк — постоянный возмещение процента потерянных финансов.
Бонусные коды — уникальные шифры, открывающие выход к эксклюзивным вознаграждениям.
Обзор игровых категорий
Игровые автоматы
Ассортимент аппаратов насчитывает сотни игр от лучших поставщиков. Пользователи откроют как классические слоты, так и современные 3D-слоты с захватывающей анимацией.
Live казино
Секция Live казино предоставляет возможность развлекаться с живыми крупье в условиях реального времени. Доступны востребованные столы: рулетка, блэкджек, баккара, покер.
Соревнования
Регулярные турниры с солидными призовыми банками притягивают тысячи игроков. Чемпионы получают денежные награды и специальные подарки.
Мобильная версия и софт
Адаптивная версия ресурса предоставляет право наслаждаться с произвольного аппарата. Оформление самостоятельно настраивается под формат экрана.
Скачать приложение можно для девайсов на Android и iOS. Портативное app обладает всеми функциями компьютерной версии.
Как определить текущее зеркало на данный момент
Действующие ссылки дубликатов периодически меняются. Обнаружить действующую линк можно многими способами:
– Через службу саппорта
– В настоящих новостных сетях
– По электронной newsletter
– На специализированных ресурсах
Защита и лицензирование
Лицензионный портал функционирует на базе зарубежной документа. Все платежи оберегаются инновационными методами защиты.
Секретность персональных реквизитов гарантируется в стопроцентном масштабе.
Вывод
Официальный сайт и его функционирующие дубликаты гарантируют игрокам 24/7 доступ к первоклассным развлекательным услугам. Щедрые поощрения, разнообразные развлечения, квалифицированная служба — все это превращает гемблинговый процесс предельно комфортным и увлекательным.
Проекты домов из клееного бруса — обзор популярных решений
eva casino Я долго искал ссылку на eva casino, пока не понял что проще через канал.
Сайты для взрослых функционируют как отдельные площадки с строгими рамками.
Их главная задача — гарантировать просмотр к материалам, адресованному только совершеннолетней аудитории.
Эти веб-сайты предоставляют возможность создателям размещать произведения, не предназначенные для детей.
Они выполняют и образовательную функцию в сфере интимного здоровья.
Администраторы таких проектов должны выполнять законодательные нормы о размещении подобного контента.
Помимо прочего, данные платформы нередко используют специальные меры проверки возраста.
Следовательно, существование подобных ресурсов — это реакция на природный спрос конкретной категории граждан.
обход ркн
1xbet yeni adresi 1xbet yeni adresi .
Характеристика оригинального веб-сайта
Современное онлайн-казино предоставляет своим клиентам разнообразный выбор развлечений и бонусов. Официальный ресурс https://www.coftalce.com/2026/03/02/igrovoy-avtomat-pod-nazvaniem-osnovannyy-na-yaponskoy-kulture действует непрерывно, давая возможность к топовым автоматам, live-казино и многочисленным акциям.
Функционирующее зеркало: путь к сайту
Что такое зеркало казино
Зеркало означает собой идентичную версию основного сайта с иным интернет именем. Рабочее зеркало дает клиентам избегать ограничения и иметь постоянный путь к предпочитаемым развлечениям.
Как отыскать рабочее зеркало сегодня
Рабочие URL на основное зеркало публикуются через:
– E-mail новостнуюленту
– Главные публичные сети
– Службу сопровождения
– Партнерские площадки
Открытиесчета на портале
Процедура регистрации
Оформление занимает всего минут и содержит нижеследующие этапы:
1. Переход на основной веб-сайт или рабочее зеркало
2. Нажатие элемента “Зарегистрироваться”
3. Ввод учетных информации
4. Активация адреса или номера
5. Формирование пароля
Бонус за регистрацию
Первые клиенты обретают щедрые стартовые бонусы:
– Финансовые депозиты на баланс
– Бесплатныевращения для слотов
– Расширенный процент компенсации
– Специальные купоны
Авторизация в личный счет
Активные участники способны осуществить доступ через главный сайт или текущее зеркало. Для этого необходимо внести учетноеимя и пароль, придуманные при открытиисчета.
Возможности индивидуального раздела
В индивидуальном профиле открыты основные инструменты:
– Управление личными данными
– Пополнение депозита
– Получение призов
– Использование кодов
– Мониторинг журнала транзакций
– Включение в конкурсах
Поощрения и предложения
Разновидности вознаграждений
Казино награждает своих участников разнообразными наградными предложениями:
– Вступительный бонус — выгодные бонусы на начальные взносы
– Халявныеспины — экстра вращения в известных играх
– Возврат — еженедельный возврат процента потерь
– Система VIP — специальные привилегии для регулярных клиентов
Ваучеры и их ввод
Специальные купоны дают бонусные подарки. Для применения необходимо указать комбинацию в соответствующее графу в собственном аккаунте.
Развлекательный каталог
Симуляторы
База азартных симуляторов включает сотни наименований от известных разработчиков:
– Традиционные машины
– Новые развлечения
– Накопительные симуляторы
– Тематические автоматы
Live казино
Зона Live-казино дарит участие с реальными дилерами в обстановке актуального трансляции:
– Французскаярулетка
– Blackjack
– Baccarat
– Casinopoker
Соревнования
Систематические конкурсы с солидными наградными фондами организуются еженедельно. Претенденты соревнуются за первенство в таблице.
Смартфонная платформа и программа
Mobile адаптация портала
Оригинальный портал на100% настроен для портативных аппаратов. Клиенты вправе запускать слоты непосредственно через интернет-браузер без потребности установки.
Программа для установки
Фирменное карманное программа предлагается для скачивания на устройства с базовыми ОС Android и iOS. Приложение предоставляет:
– Мгновенный путь к играм
– Бесперебойную работу
– Оперативные-извещения о предложениях
– Комфортный интерфейс
Итог
Официальный сайт казино и его действующие копии предоставляют участникам комплексный доступ к отличным геймплейным сервисам. Выгодные поощрения, разнообразные акции, удобная портативная платформа и опытная поддержка создают игровой процесс максимально удобным и прибыльным.
Актуальные онлайн-казино предоставляют пользователям множество путей для удобной игры. Главный веб-портал Gama казино дарит вход ко всем опциям и игровым автоматам. Однако при возникновении программных сложностей на помощь спешат действующие альтернативные адреса.
Что представляет собой функционирующее зеркало
Копия казино — это полная дубликат основного портала, находящаяся по другому веб-адресу. Подлинное зеркало удерживает все возможности, вместе с открытие профиля, доступ в личный кабинет, бонусы и кодовые слова.
Зеркало на сегодня предоставляет:
– Непрерывный путь к азартным слотам
– Полную защиту личных данных
– Удержание счета и журнала операций
– Доступность всех промо-предложений
Регистрация на главном ресурсе
Процедура регистрации отнимает несколько минут. Новым игрокам требуется:
1. Зайти на официальный портал или рабочее зеркало
2. Кликнуть кнопку «Регистрация»
3. Внести нужные данные
4. Подтвердить электронную почту
5. Применить кодовое слово при существовании
После конца оформления профиля клиенты приобретают вознаграждение за регистрацию, какой может иметь бесплатные вращения или финансовое поощрение.
Доступ в персональный кабинет
Личный кабинет открывает всесторонний управление над игровым ходом. Через индивидуальный аккаунт возможно:
– Пополнять счет
– Снимать средства
– Задействовать промокоды
– Контролировать историю игр
– Участвовать в конкурсах
– Забирать cash back
Анализ премий и специальных предложений
Щедрая поощрительная политика — важное преимущество проекта. Центральные категории вознаграждений:
Стартовый бонус
Новые игроки приобретают великодушное премирование на стартовые взносы. Величина приза может достигать 100-200% от величины вклада.
Фриспины
Бесплатные прокруты даются для топовых слотов. Объем free spins изменяется от 10 до 500 штук.
Кешбэк
Еженедельный или помесячный отдача процента проигранных финансов. Стандартный размер кэшбека — 5-15%.
Конкурсы
Периодические соревнования с крупными призовыми пулами. Игроки борются за лучшие места в рейтинге.
Мобильная версия и софт
Смартфонная версия разрешает развлекаться с всякого устройства. Геймеры могут скачать приложение для iOS и Android или задействовать веб версию.
Достоинства портативного программы:
– Скоростная прогрузка игр
– Эргономичный графический интерфейс
– Push-уведомления о акциях
– Возможность входа через Touch ID
Автоматы и Live казино
Развлекательная коллекция содержит сотни названий от лидирующих разработчиков.
Известные типы автоматов:
– Классические автоматы
– Современные слоты с премиальными раундами
– Прогрессивный джекпот слоты
– Megaways автоматы
Live казино
Зона live казино предоставляет партию с живыми крупье. Представлены стандартные развлечения:
– Европейская рулетка
– Блэкджек
– Punto Banco
– Карибский покер
Как отыскать рабочее зеркало
Найти действующую линк на зеркало можно разными вариантами:
1. Зарегистрироваться на почтовую рассылку
2. Отслеживать за новостями в соц сетях
3. Связаться в отдел поддержки
4. Сохранить действующее зеркало в закладки
Вывод
Основной сайт и его актуальные копии обеспечивают бесперебойный путь к игровым слотам. Богатые премии, разнообразные промокоды, удобное портативное приложение и профессиональная служба поддержки поддержки создают игровой опыт предельно комфортным и безопасным.
canada drugstore pharmacy rx: Cheap Viagra 100mg – online pharmacy delivery usa
https://t.me/s/evacasino_official Я проверял eva casino перед регистрацией и нашёл всё.
True Health Pharm cheapest ed meds best online ed pills
1win пардохт бо Alif https://www.1win91403.help
Современные онлайн-казино гарантируют клиентам разнообразие опций для беспроблемной игры. Основной сайт https://paskatina.lt/onlayn-kazino-ukrainy-s-popolneniem-cherez-sms/ предоставляет путь ко всем функциям и развлечениям. Однако при появлении программных трудностей на подмогу прибывают рабочие альтернативные адреса.
Что являет собой собой актуальное зеркало
Зеркало казино — это полная копия основного ресурса, размещенная по другому веб-адресу. Официальное зеркало удерживает все характеристики, в том числе создание аккаунта, авторизацию в личный кабинет, премии и бонусные коды.
Дубликат на сегодня предоставляет:
– Бесперебойный вход к азартным слотам
– Абсолютную конфиденциальность индивидуальных сведений
– Удержание депозита и истории операций
– Возможность использования всех промо-предложений
Открытие профиля на основном ресурсе
Процесс регистрации требует пару минут. Новым игрокам нужно:
1. Зайти на подлинный сайт или рабочее зеркало
2. Кликнуть кнопку «Регистрация»
3. Внести нужные графы
4. Активировать э-мейл почту
5. Указать бонусный код при присутствии
После окончания создания аккаунта клиенты обретают приз за регистрацию, что может охватывать free spins или монетарное вознаграждение.
Логин в личный кабинет
Приватный кабинет дает всесторонний мониторинг над азартным ходом. Через индивидуальный раздел разрешается:
– Вносить средства на кошелек
– Выводить выплаты
– Применять промокоды
– Проверять хронологию игр
– Участвовать в соревнованиях
– Обретать возврат средств
Анализ вознаграждений и промо-предложений
Щедрая поощрительная схема — ключевое козырь проекта. Центральные типы вознаграждений:
Начальный подарок
Начинающие получают великодушное премирование на первые пополнения. Размер премии может составлять 100-200% от величины взноса.
Бесплатные вращения
Безвозмездные прокруты предоставляются для востребованных автоматов. Объем фриспинов колеблется от 10 до 500 штук.
Кешбэк
Еженедельный или помесячный откат процентной доли потерянных средств. Типичный объем компенсации — 5-15%.
Соревнования
Регулярные состязания с большими призовыми фондами. Соревнующиеся соревнуются за лучшие строчки в рейтинге.
Смартфонная версия и софт
Адаптивная версия позволяет наслаждаться игрой с всякого аппарата. Геймеры могут загрузить приложение для iOS и Android или применять интернет версию.
Преимущества смартфонного программы:
– Оперативная загрузка слотов
– Практичный дизайн
– Всплывающие уведомления о поощрениях
– Доступ через отпечаток пальца
Слоты и Live казино
Развлекательная библиотека включает множество наименований от топовых разработчиков.
Востребованные разделы слотов:
– Классические автоматы
– Современные слоты с премиальными уровнями
– Накопительный приз игры
– Мега-путь машины
Live игорный зал
Раздел live казино обеспечивает игру с живыми крупье. Есть классические развлечения:
– Американская рулетка
– Blackjack
– Baccarat
– Карибский покер
Как обнаружить действующее зеркало
Обрести свежую URL на зеркало разрешается различными методами:
1. Подписаться на почтовую рассылку
2. Отслеживать за новостями в соц сетях
3. Связаться в сервис поддержки
4. Запомнить действующее зеркало в избранное
Резюме
Основной ресурс и его функционирующие зеркала предоставляют стабильный вход к игровым слотам. Богатые вознаграждения, многочисленные купоны, комфортное портативное софт и качественная служба поддержки поддержки создают игровой геймплей предельно беспроблемным и защищенным.
Текущие рекомендации: http://newsrosprom.ru/zakazat-vysokopoligonalnuyu-model-dlya-agr-kak-vsyo-ustroeno.html
http://happypawspharmacy.com/# п»їdog medication online
Best resource https://bestmicrophoneguide.com/ compares hundreds of microphones by sound quality build and recording purpose.
Try this best gaming headphones for detailed headphone reviews with sound analysis comfort ratings and price comparison.
This guide https://bestguitarreview.com helps beginners and professionals find the best guitar for their playing style.
1xbet g?ncel 1xbet g?ncel .
Актуальные онлайн-казино обеспечивают геймерам множество возможностей для удобной игры. Главный портал club предоставляет путь ко всем возможностям и азартным играм. Однако при появлении программных трудностей на помощь приходят действующие альтернативные адреса.
Что есть собой рабочее зеркало
Дубликат казино — это идентичная реплика основного веб-сайта, расположенная по запасному URL. Подлинное зеркало удерживает все характеристики, в том числе регистрацию, доступ в собственный кабинет, вознаграждения и кодовые слова.
Альтернативный сайт на сегодня дает:
– Стабильный вход к азартным слотам
– Полную безопасность личных информации
– Удержание баланса и записей транзакций
– Применимость всех промо-предложений
Регистрация на главном сайте
Этап регистрации требует несколько минут. Свежеиспеченным клиентам требуется:
1. Перейти на главный ресурс или актуальное зеркало
2. Щелкнуть кнопку «Регистрация»
3. Ввести нужные сведения
4. Активировать э-мейл почту
5. Использовать бонусный код при наличии
После финиша создания аккаунта клиенты зарабатывают подарок за регистрацию, который может иметь бонусные спины или денежно-призовое вознаграждение.
Доступ в собственный кабинет
Персональный кабинет обеспечивает полный мониторинг над игровым ходом. Через индивидуальный кабинет допускается:
– Пополнять кошелек
– Получать выплаты
– Задействовать купоны
– Мониторить журнал игр
– Играть в турнирах
– Обретать кэшбек
Характеристика поощрений и специальных предложений
Выгодная премиальная система — значимое преимущество ресурса. Основные виды премий:
Приветственный приз
Начинающие обретают щедрое награду на стартовые пополнения. Объем бонуса может достигать 100-200% от величины депозита.
Фриспины
Бесплатные вращения выдаются для популярных слотов. Количество фриспинов изменяется от 10 до 500 штук.
Кешбэк
Регулярный или ежемесячный компенсация процентной доли утраченных финансов. Средний объем кэшбека — 5-15%.
Соревнования
Регулярные состязания с внушительными премиальными пулами. Игроки конкурируют за призовые позиции в рейтинге.
Мобильная версия и приложение
Смартфонная версия дает возможность наслаждаться игрой с каждого устройства. Пользователи могут загрузить app для iOS и Android или эксплуатировать браузерную версию.
Плюсы портативного программы:
– Быстрая подзагрузка слотов
– Удобный интерфейс
– Push-уведомления о поощрениях
– Вход через Touch ID
Машины и Live казино
Игровая база содержит множество названий от известных провайдеров.
Востребованные разделы автоматов:
– Обычные машины
– Современные слоты с премиальными раундами
– Джекпот слоты
– Мегавейс машины
Live казино
Категория live игорный зал предоставляет развлечение с настоящими ведущими. Доступны стандартные игры:
– Французская рулетка
– Двадцать одно
– Baccarat
– Карибский покер
Как отыскать актуальное зеркало
Раздобыть свежую URL на зеркало можно различными путями:
1. Подписаться на email-рассылку
2. Наблюдать за апдейтами в соц сетях
3. Связаться в департамент поддержки
4. Запомнить действующее зеркало в избранное
Заключение
Основной портал и его актуальные зеркала предоставляют стабильный путь к азартным слотам. Великодушные вознаграждения, разнообразные купоны, комфортное смартфонное софт и профессиональная служба поддержки создают азартный геймплей предельно удобным и безопасным.
Подключение к платформе через актуальные зеркала
Клиенты виртуальных казино регулярно сталкиваются с проблемой блокировки базового сайта. Собственно для ликвидации этой проблемы созданы копии основного портала. Mad сайт казино обеспечивает беспрепятственный вход ко всем сервисам площадки.
Что такое рабочее зеркало казино
Копия является собой абсолютную реплику официального ресурса с аналогичным функционалом. Главное отличие — это другое имя. Любые данные клиента, содержа депозит, поощрения и данные раундов, остаются неизменными.
Достоинства применения зеркал
Актуальные зеркала характеризуются множеством значимых достоинств:
– Круглосуточный вход к излюбленным развлечениям
– Совершенная конфиденциальность собственных сведений
– Неизменность всех опций личного кабинета
– Возможность взятия бонусов и участия в промоакциях
Регистрация на легальном домене
Процедура регистрации крайне несложен и отнимает немного минут. Новые игроки могут претендовать на внушительный стартовый приз за оформление.
Ступени создания аккаунта
1. Доступ на официальный ресурс или его зеркало
2. Клик на элемент “Регистрация”
3. Указание требуемых информации
4. Верификация email почты
5. Внесение купона (если имеется)
Подарки и акции для пользователей
Игровая площадка одаривает своих участников разнообразными бонусными программами.
Главные типы призов
Стартовый бонус — щедрое вознаграждение для начинающих пользователей, которое именно имеет возможность вмещать финансовые суммы и безвозмездные спины.
Фриспины — шанс использовать в топовых аппаратах бесплатно.
Кэшбек — частичный отдача проигранных сумм, что зачисляется по неделям или раз в месяц.
Промокоды — специальные наборы, предоставляющие дополнительные привилегии.
Индивидуальный кабинет: опции и настройки
Индивидуальный раздел гарантирует полный управление над персональным опытом. В нем присутствуют:
– Регулирование балансом
– Записи операций
– Работающие привилегии
– Конфигурации защиты
– Проверка учетной записи
Портативная вариант и софт
Современные участники ценят доступность. Платформа предлагает 2 способа для развлечений с мобильных устройств.
Приспособленная портативная платформа
Адаптивная вариант ресурса автоматически адаптируется под дисплей любого аппарата. Не нужно инсталлировать особое ПО.
Софт для гаджетов
Можно установить оригинальное софт для iOS и Android. Софт гарантирует:
– Мгновенный запуск
– Оптимизированный интерфейс
– Всплывающие-извещения о акциях
– Надежную работу
Live игры: атмосфера подлинного зала
Категория Live игр транспортирует клиентов в обстановку настоящего зала. Компетентные хосты осуществляют сессии в варианте прямого времени.
Известные Live-игры
– Американская рулетка
– 21
– Баккара
– Poker
Игровые машины: многообразие слотов
Коллекция слотовых машин включает массу названий от лидирующих поставщиков. Участники откроют:
– Классические машины
– Видео-автоматы
– Мега-выигрыш-слоты
– Слоты с множественными линиями
Соревнования и особые акции
Регулярные соревнования дают возможность клиентам конкурировать друг с другом за крупные наградные фонды. Каждый турнир имеет свои условия включения и доску чемпионов.
Варианты зачисления и вывода финансов
Платформа поддерживает комплекс платежных инструментов:
– Дебетовые инструменты
– Электронные кошельки
– Криптовалюты
– Прямые отправления
Абсолютно все транзакции реализуются безопасно благодаря новейшим технологиям криптографии.
Сервис помощи
Компетентные сотрудники сервиса помощи способны ассистировать 24/7. Предусмотрены данные каналы общения:
– Живой-чат
– Email-обслуживание
– Звонковая поддержка
– Публичные сети
Вывод
Легальный ресурс игровой площадки и его рабочие альтернативы гарантируют клиентам конфиденциальный и приятный вход к огромному ассортименту азартных игр. Щедрые бонусы, периодические промоакции, квалифицированная служба и комфортные финансовые системы делают развлекательный времяпрепровождение максимально увлекательным и прибыльным.
промокоды казино Особым спросом пользуются казино с фриспинами за регистрацию, которые позволяют начать игру на слотах, не тратя ничего.
https://institut-pedagogika.ru/
Характеристика оригинального ресурса
Актуальное онлайн-казино дарит своим участникам большой выбор услуг и призов. Главный портал kosorepo.com работает 24/7, давая доступ к популярным автоматам, live-казино и многочисленным предложениям.
Действующее зеркало: доступ к ресурсу
Что такое дубликат казино
Копия составляет собой точную реплику главного сайта с отличным доменным названием. Действующее зеркало обеспечивает игрокам избегать барьеры и получать стабильный путь к предпочитаемым играм.
Как найти актуальное зеркало сегодня
Актуальные линки на официальное зеркало размещаются через:
– E-mail новостнуюленту
– Проверенные коммуникационные сети
– Отдел поддержки
– Affiliated площадки
Оформление на портале
Процедура оформления
Созданиеаккаунта требует несколько минут и предполагает следующие этапы:
1. Вход на главный сайт или рабочее зеркало
2. Нажатие опции “Регистрация”
3. Указание персональных информации
4. Проверка email или мобильного
5. Придумывание секретнойкомбинации
Приз за созданиеаккаунта
Новые участники обретают щедрые стартовые поощрения:
– Денежные деньги на счет
– Freespins для слотов
– Расширенный процент кешбэка
– Уникальные ваучеры
Авторизация в личный профиль
Действующие клиенты могут произвести авторизацию через основной портал или рабочее зеркало. Для этого необходимо внести имяпользователя и пароль, созданные при регистрации.
Инструменты собственного аккаунта
В персональном профиле доступны такие инструменты:
– Управление персональными данными
– Пополнение баланса
– Обналичивание призов
– Активация бонусов
– Просмотр архива операций
– Участие в состязаниях
Поощрения и промо
Типы бонусов
Казино радует своих игроков разнообразными призовыми системами:
– Стартовый набор — выгодные бонусы на стартовые пополнения
– Халявныеспины — бонусные прокруты в топовых симуляторах
– Кэшбек — еженедельный возмещение части убытков
– Программа VIP — особые бонусы для верных участников
Ваучеры и их активация
Эксклюзивные купоны обеспечивают расширенные бонусы. Для применения нужно внести последовательность в соответствующее графу в индивидуальном кабинете.
Геймплейный выбор
Автоматы
Библиотека слотовых машин насчитывает сотни позиций от ведущих поставщиков:
– Обычные машины
– Современные автоматы
– Накопительные игры
– Лицензионные развлечения
Live казино
Область Live-казино обеспечивает взаимодействие с настоящими крупье в режиме прямого стрима:
– Европейскаярулетка
– Очко
– Baccarat
– Карибскийпокер
Конкурсы
Периодические турниры с внушительными джекпотными призами устраиваются ежедневно. Претенденты борются за победу в турнирнойсетке.
Mobile платформа и APP
Смартфонная адаптация веб-сайта
Основной портал целиком настроен для смартфонных гаджетов. Клиенты имеютвозможность пользоваться игры напрямую через обозреватель без обязательства загрузки.
Программа для инсталляции
Специальное портативное приложение имеется для получения на девайсы с операционными системами Android и iOS. Приложение дает:
– Моментальный путь к играм
– Стабильную операционность
– Push-оповещения о предложениях
– Комфортный оформление
Вывод
Главный портал казино и его актуальные дубликаты дают клиентам всесторонний доступ к отличным геймплейным развлечениям. Большие бонусы, различные кампании, функциональная адаптивная адаптация и опытная помощь формируют развлекательный досуг чрезвычайно приятным и результативным.
Современные онлайн-казино предлагают геймерам множество вариантов для удобной игры. Основной веб-портал https://www.rugby-chauray.com/53687/kakie-mery-pomogut-zashchitit-personalnye-dannye-i-svedeniya-o-bankovskikh-kartakh-vo-vremya-igr-v-onlayn-kazino/ открывает путь ко всем сервисам и азартным играм. Однако при образовании программных неполадок на помощь прибывают актуальные дубликаты.
Что представляет собой актуальное зеркало
Альтернативный адрес казино — это стопроцентная дубликат основного сайта, находящаяся по дополнительному доменному имени. Легитимное зеркало удерживает все возможности, вместе с создание аккаунта, вход в персональный кабинет, бонусы и кодовые слова.
Копия на сегодня обеспечивает:
– Постоянный доступ к развлекательным слотам
– Совершенную защиту личных информации
– Поддержку баланса и записей платежей
– Применимость всех специальных предложений
Создание учетной записи на лицензионном портале
Процедура открытия профиля требует пару минут. Начинающим игрокам необходимо:
1. Войти на подлинный портал или функционирующее зеркало
2. Кликнуть кнопку «Зарегистрироваться»
3. Внести требуемые данные
4. Верифицировать электронную почту
5. Применить промокод при присутствии
После окончания регистрации пользователи приобретают приз за регистрацию, который может охватывать бонусные спины или финансовое премирование.
Логин в собственный кабинет
Личный кабинет предоставляет полный контроль над игровым процессом. Через личный аккаунт допускается:
– Депонировать кошелек
– Выводить выплаты
– Задействовать промокоды
– Контролировать записи пари
– Участвовать в турнирах
– Обретать cash back
Анализ поощрений и специальных предложений
Богатая премиальная политика — ключевое преимущество ресурса. Главные виды вознаграждений:
Стартовый подарок
Новые игроки обретают великодушное вознаграждение на начальные пополнения. Объем приза может составлять 100-200% от величины депозита.
Бонусные спины
Бесплатные раунды начисляются для известных игровых автоматов. Количество free spins изменяется от 10 до 500 штук.
Кэшбек
Регулярный или помесячный компенсация доли утраченных денег. Обычный размер компенсации — 5-15%.
Конкурсы
Постоянные конкурсы с внушительными призовыми пулами. Участники конкурируют за верхние места в таблице лидеров.
Портативная версия и приложуха
Мобильная версия позволяет развлекаться с каждого аппарата. Игроки могут загрузить программу для iOS и Android или применять веб версию.
Достоинства смартфонного программы:
– Оперативная подзагрузка слотов
– Эргономичный графический интерфейс
– Всплывающие уведомления о промо
– Вход через Face ID
Игровые автоматы и Live казино
Игровая подборка насчитывает множество позиций от лидирующих производителей.
Востребованные категории слотов:
– Стандартные автоматы
– Видео-автоматы с бонусными уровнями
– Накопительный приз игры
– Мега-путь автоматы
Live казино
Зона live казино предлагает партию с профессиональными дилерами. Доступны традиционные игры:
– Французская рулетка
– Blackjack
– Баккара
– Карибский покер
Как обнаружить функционирующее зеркало
Найти рабочую ссылку на зеркало можно множественными вариантами:
1. Оформить подписку на email-рассылку
2. Отслеживать за апдейтами в соц сетях
3. Связаться в сервис поддержки
4. Заложить актуальное зеркало в избранное
Итог
Основной ресурс и его действующие зеркала обеспечивают стабильный путь к азартным автоматам. Великодушные премии, разнообразные купоны, практичное портативное приложение и качественная служба поддержки превращают азартный процесс в высшей степени приятным и безопасным.
This casino http://dev5.wabisabi.co.mz/casino-met-minimale-storting-de-complete-gids-voor/ offers a great mix of classic slots and live tables. The platform feels modern, promotions are attractive, and support is helpful, which adds confidence.
При выборе детской площадки учитывайте климат вашего региона. В средней полосе России важна устойчивость к перепадам температуры и влаге. Лиственница и сосна с глубокой пропиткой подходят лучше всего.
Дом из клееного бруса 150 кв м — просторные планировки
opalbrookoutlet – Came across this page while browsing and it seems very informative.
Описание основного веб-сайта
Современные сетевые казино предоставляют пользователям разнообразный спектр услуг и шансов. Главный портал Голд казино предлагает проверенный путь к гемблинг функциям.
Актуальное зеркало: путь в настоящий момент
Дублирующий портал является собой полную дубликат лицензионного сайта. Проверенное зеркало дает возможность клиентам обходить существующие ограничения.
Плюсы использования зеркала
Принципиальные преимущества содержат:
– Беспрерывный шанс к сайту
– Поддержание абсолютно всех характеристик главного ресурса
– Сохранность личных информации
– Идентичный инструментарий
Создание аккаунта на портале
Механизм регистрации знаменуется простотой и комфортом. Недавние участники требуется:
1. Открыть основной портал или его зеркало
2. Нажать на кнопку регистрации
3. Внести нужные сведения
4. Верифицировать электронную адрес
5. Произвести стартовый вход
Приз за регистрацию
Начинающие забирают щедрый начальный приз. Данное премия в состоянии содержать:
– Материальные начисления
– Бесплатные фриспины
– Расширенный показатель кэшбэка
Доступ в индивидуальный профиль
Существующие клиенты способны оперативно получить доступ в личный профиль, используя имя пользователя и шифр. Персональный кабинет обеспечивает возможность к:
– Администрированию балансом
– Журналу платежей
– Активным бонусам
– Опциям учетной записи
Бонусы и акции
Сайт периодически реализует многочисленные предложения для игроков.
Виды бонусов
Основные категории бонусов:
– Денежные начисления – коэффициент от объема пополнения
– Фриспины – complimentary вращения в автоматах
– Кэшбек – компенсация доли проигранных сумм
– Турнирные трофеи – премии за участие в состязаниях
Купоны
Особые купоны обеспечивают заработать экстра выгоды. Игроки могут получить их на специализированных площадках или заработать в письмах.
Портативная версия и app
Современные клиенты ценят переносной геймплей.
Функции mobile версии
– Гибкий вид для различных гаджетов
– Совокупный возможность к развлечениям
– Быстрая функционирование
– Удобное использование
Установить app
Переносное программа доступно для скачивания на аппараты с базовыми ОС Android и iOS. App гарантирует:
– Бесперебойную деятельность
– Push оповещения о бонусах
– Моментальный запуск к любимым играм
Игровой выбор
Игровой клуб дает внушительную галерею развлекательных забав.
Игровые машины
Библиотека азартных аппаратов содержит:
– Классические автоматы
– Видео автоматы
– Призовые игры
– Тематические автоматы
Live дилеры
Область лайв развлечений предоставляет возможность играть с реальными ведущими. Открыты:
– Европейская рулетка
– Блэкджек
– Punto Banco
– Poker
Турниры
Постоянные конкурсы дают возможность участникам состязаться за значительные наградные банки. Призовая сетка обновляется еженедельно.
Денежные процедуры
Сайт поддерживает массу вариантов внесения и получения средств:
– Пластиковые карты
– Электронные платежные системы
– Прямые трансферы
– Цифровые валюты
Все операции осуществляются конфиденциально с применением актуальных технологий защиты.
Отдел сопровождения
Опытная отдел support работает постоянно. Обратиться с специалистами доступно через:
– Живой чат
– Email почту
– Телефон
– Социальные сети
Безопасность и регулирование
Игровой клуб функционирует на фундаменте действительной сертификата. Это обеспечивает:
– Легальность игрового геймплея
– Защиту личных данных
– Своевременные транзакции
– Регулируемый геймплей
Резюме
Главный ресурс и его функционирующие альтернативные адреса гарантируют участникам полный набор возможностей для безопасной и прибыльной времяпрепровождения. Щедрые бонусы, различные автоматы, опытная поддержка и надежная система платежей создают платформу превосходным вариантом для поклонников азартных игр.
Характеристика официального ресурса
Современные интернет казино обеспечивают участникам разнообразный ассортимент развлечений и шансов. Главный портал Рльдорадо обеспечивает надежный возможность к азартным сервисам.
Действующее зеркало: вход на сегодня
Дублирующий портал служит в качестве точную копию главного веб-сайта. Проверенное зеркало обеспечивает пользователям миновать потенциальные ограничения.
Плюсы использования зеркала
Основные плюсы охватывают:
– Непрерывный вход к ресурсу
– Поддержание полных характеристик главного сайта
– Сохранность персональных информации
– Такой же инструментарий
Создание аккаунта на платформе
Процедура открытия счета отличается понятностью и удобством. Начинающие клиенты требуется:
1. Перейти на основной ресурс или его зеркало
2. Щелкнуть на пункт регистрации
3. Ввести нужные информацию
4. Валидировать email почту
5. Произвести стартовый вход
Подарок за регистрацию
Начинающие получают внушительный приветственный подарок. Это вознаграждение в состоянии включать:
– Монетарные суммы
– Бесплатные прокруты
– Усиленный уровень компенсации
Вход в персональный раздел
Действующие пользователи способны мгновенно получить доступ в личный раздел, задействуя логин и ключ. Индивидуальный кабинет предлагает возможность к:
– Управлению средствами
– Записям платежей
– Текущим подаркам
– Параметрам аккаунта
Бонусы и предложения
Портал систематически устраивает многочисленные промо-кампании для участников.
Категории призов
Основные формы бонусов:
– Денежные бонусы – коэффициент от размера депозита
– Фриспины – бесплатные прокруты в автоматах
– Кэшбек – возврат фрагмента затраченных финансов
– Соревновательные награды – премии за участие в состязаниях
Коды
Эксклюзивные ваучеры обеспечивают активировать экстра привилегии. Пользователи могут найти их на партнерских площадках или получить в новостях.
Портативная редакция и приложение
Передовые игроки ценят переносной досуг.
Опции mobile системы
– Адаптивный интерфейс для разнообразных гаджетов
– Целостный возможность к слотам
– Быстрая работа
– Практичное контроль
Установить программу
Переносное программа доступно для скачивания на аппараты с базовыми платформами Android и iOS. App дает:
– Надежную производительность
– Пуш оповещения о предложениях
– Моментальный запуск к избранным играм
Игровой портфель
Платформа предоставляет внушительную библиотеку игровых игр.
Слоты
Коллекция азартных машин охватывает:
– Обычные машины
– Video аппараты
– Призовые слоты
– Тематические автоматы
Live столы
Категория лайв столов обеспечивает право состязаться с настоящими диллерами. Открыты:
– Европейская рулетка
– Очко
– Баккара
– Poker
Турниры
Постоянные соревнования позволяют клиентам состязаться за значительные призовые банки. Соревновательная структура обновляется постоянно.
Банковские транзакции
Казино поддерживает множество методов внесения и получения сумм:
– Кредитные карты
– Онлайн счета
– Межбанковские транзакции
– Криптовалюты
Любые транзакции выполняются защищенно с задействованием современных протоколов шифрования.
Сервис support
Компетентная служба саппорта действует 24/7. Соединиться с специалистами реально через:
– Online чат
– Email почту
– Контактный номер
– Социальные медиа
Безопасность и лицензирование
Платформа работает на базе законной аккредитации. Это обеспечивает:
– Справедливость азартного процесса
– Сохранность конфиденциальных данных
– Быстрые выводы
– Ответственный игровой процесс
Итог
Главный сайт и его действующие дубликаты дают участникам целостный ассортимент опций для удобной и профитной досуга. Солидные бонусы, разнообразные развлечения, компетентная сервис и безопасная инфраструктура выплат делают казино превосходным решением для поклонников игровых игр.
1xbet giri? 1xbet giri? .
True Health Pharm: True Health Pharm – True Health Pharm
For the slides
Starter loan near me
to achieve your goals.
Передовые онлайн-казино предоставляют участникам широкий спектр возможностей и премиальных предложений. Присоединение к платформе выполняется через официальный веб-сайт или его рабочее зеркало ВОВАДА, что гарантирует бесперебойную активность.
В чем суть функционирующее зеркало казино
Копия — это идентичная копия главного портала, построенная для решения запретов. Зеркало сегодня помогает участникам иметь доступ к предпочитаемым слотам в каждое время.
Лицензионное зеркало обладает всеми функциями оригинального сайта:
– Целый перечень развлечений
– Учетная запись с записанными данными
– Свежие промокоды
– Защищенные платежные операции
Регистрация на основном портале
Процедура создания аккаунта составляет всего считанные минут. Начинающим участникам требуется:
1. Зайти на проверенный веб-сайт или функционирующее зеркало
2. Щелкнуть на кнопку “Открыть счет”
3. Указать необходимые данные
4. Верифицировать электронную почту
5. Произвести стартовый взнос
Поощрение новичкам выдается моментально после окончания всех ступеней.
Доступ в аккаунт
Существующие клиенты могут произвести вход применяя:
– Имя пользователя и код
– Номер телефона
– Email
Аккаунт дает шанс к управлению счетом, записям транзакций и текущим промокодам.
Бонусы и предложения
Развлекательная сервис радует лояльных клиентов многочисленными поощрениями:
Первый набор
– Поощрение на первый пополнение до 100%
– Бесплатные вращения на популярные машины
– Экстра премии за следующие депозиты
Ваучеры
Эксклюзивные купоны обеспечивают шанс на активацию специальных призов. Текущие купоны публикуются в секции “Бонусы”.
Кешбэк
Еженедельный бонус насчитывает до 10% от проигранных финансов. Компенсация зачисляется незамедлительно.
Схема лояльности
Постоянные клиенты приобретают единицы, которые обмениваются на реальные деньги или бесплатные вращения.
Мобильная версия и программа
Для удобства клиентов создана полноценная адаптивный сайт. Приспособленный вид дает возможность легко делать ставки с всякого мобильного девайса.
Выгоды софта:
– Скорый подключение к развлечениям
– Оптимизированный дизайн
– Стабильная активность
– Оповещения о свежих турнирах
Получить программу можно бесплатно с проверенного ресурса для гаджетов на Android и iOS.
Ассортимент развлечений
Игровые автоматы
База насчитывает более 2000 игр от известных студий:
– Традиционные слоты
– Видео-слоты
– Джекпот-слоты
– Тематические слоты
Live казино
Раздел Live казино обеспечивает развлечение с живыми дилерами в реальном эфире:
– Рулетка
– Блэкджек
– Baccarat
– Poker
Соревнования
Систематические состязания с крупными наградными бюджетами устраиваются регулярно. Участие в турнирах доступно всем действующим участникам.
Денежные варианты
Взносы и изъятия выплат выполняются через известные методы:
– Кредитные средства
– Цифровые системы
– Bitcoin
– Денежные переводы
Наименьший платеж — от 100 рублей. Получение выигрышей проводится в течение 24 часов.
Команда саппорта
24/7 служба поддержки способна помочь в урегулировании произвольных ситуаций:
– Живой чат
– Email
– Телефон
– Публичные сети
Защита и сертификат
Официальный портал функционирует на почве мировой лицензии. Всевозможные параметры игроков обезопасены новейшим SSL-шифрованием.
Вывод
Актуальное зеркало гарантирует стабильный соединение к излюбленным развлечениям, привлекательным промокодам и функциональным сервисам. Создайте аккаунт немедленно и приобретите первый поощрение!
1xbet g?ncel giri? 1xbet g?ncel giri? .
Передовые онлайн-казино гарантируют клиентам обширный диапазон возможностей для комфортной досуга. Подключение к платформе Клубника казино казино выполняется через главный сайт или функционирующее зеркало.
Что такое функционирующее зеркало казино
Действующее зеркало — это дополнительный адрес лицензионного ресурса казино. Такие дубликаты создаются для обеспечения стабильного доступа к развлекательной платформе.
Зеркало сегодня целиком копирует характеристики главного сайта. Клиенты приобретают идентичный путь ко всем возможностям, включая создание аккаунта, пополнение депозита и обналичивание призов.
Открытие счета на лицензионном портале
Процесс создания аккаунта отнимает всего несколько минут. Начинающим участникам нужно:
1. Зайти на официальный сайт или текущее настоящее зеркало
2. Нажать кнопку “Создать аккаунт”
3. Ввести нужные реквизиты
4. Активировать email почту
5. Применить бонусный код при существовании
После финализации оформления участник обретает вознаграждение за регистрацию, который может охватывать бесплатные вращения или финансовое премию.
Вход в индивидуальный кабинет
Личный кабинет — это охраняемая область, где пользователи могут администрировать своим счетом. Для доступа требуется указать username и пароль.
В пользовательском кабинете доступны нижеперечисленные инструменты:
– Отслеживание хронологии платежей
– Применение бонусных кодов
– Контроль бонусами
– Участие в состязаниях
– Проверка возмещения
– Настройка учетной записи
Поощрения и спецпредложения
Игровая сервис предоставляет великодушные бонусы:
Стартовый комплект — дебютанты обретают существенное поощрение на первые депозиты.
Даровые спины — начисляются как при открытии счета, так и в процессе разнообразных акций.
Возмещение — еженедельный возмещение доли израсходованных средств.
Промокоды — уникальные шифры, открывающие доступ к уникальным бонусам.
Характеристика развлекательных разделов
Slots
Библиотека слотов включает сотни позиций от лучших провайдеров. Геймеры обнаружат как стандартные аппараты, так и современные видеослоты с притягательной анимацией.
Live казино
Раздел Live казино предоставляет возможность развлекаться с реальными ведущими в режиме реального времени. Имеются востребованные столы: рулетка, блэкджек, баккара, покер.
Турниры
Периодические соревнования с солидными наградными пулами манят сотни игроков. Чемпионы обретают финансовые призы и специальные подарки.
Мобильная версия и программа
Мобильная версия портала предоставляет право наслаждаться с любого аппарата. Оформление самостоятельно настраивается под габариты экрана.
Установить софт можно для девайсов на Android и iOS. Портативное программа имеет всеми опциями десктопной версии.
Как найти рабочее зеркало на сейчас
Свежие адреса дубликатов периодически обновляются. Получить рабочую ссылку можно различными способами:
– Через службу поддержки
– В подлинных новостных сетях
– По email рассылке
– На партнерских площадках
Безопасность и официальность
Лицензионный ресурс оперирует на базе глобальной документа. Все операции оберегаются актуальными протоколами защиты.
Анонимность личных сведений поддерживается в стопроцентном формате.
Резюме
Главный домен и его действующие дубликаты предоставляют клиентам постоянный путь к первоклассным азартным сервисам. Выгодные поощрения, всевозможные игры, профессиональная помощь — все это превращает развлекательный опыт чрезвычайно удобным и захватывающим.
Хочешь накрутить пф и не получить бан? Прочитай раздел про ошибки новичков. Автор объясняет, почему резкий старт и дешёвые прокси ведут к сливу бюджета.
Нынешние виртуальные казино обеспечивают игрокам большой ассортимент вариантов для приятной игры. Тем не менее иногда доступ к официальному платформе может стать закрытым. В таких обстоятельствах на выручку приходит Клубника казино, которое предоставляет бесперебойный вход ко всем возможностям платформы.
Что такое функционирующее зеркало казино
Копия — это абсолютная дубликат официального ресурса, которая располагается по запасному URL. Альтернативный ресурс сохраняет целый функционал первоначального портала, включая персональный кабинет, баланс и историю платежей.
Ключевые выгоды применения зеркала:
– 24-часовой вход к порталу
– Полная тождественность возможностей
– Конфиденциальность персональных сведений
– Удержание существующих вознаграждений
Как разыскать действующее зеркало на текущий день
Имеется ряд достоверных методов получения текущей URL:
Легитимные источники:
1. Имейл рассылка — управление систематически высылает сообщения с рабочими адресами
2. Общественные сети — проверенные каналы постят релевантную новости
3. Сервис поддержки — операторы сообщают надежные URL
4. Телефонное приложение — обеспечивает минуть блокировки
Оформление профиля на главном портале
Процесс оформления требует только немного минут и содержит из данных ступеней:
1. Переход на основной портал или рабочее зеркало
2. Клик на иконку «Создать аккаунт»
3. Указание пользовательской бланка
4. Проверка email почты или контактного номера
5. Задействование вознаграждения за регистрацию при существовании промокода
Новые геймеры обретают щедрый начальный бонус, который может предполагать даровые прокруты, монетарные вознаграждения или возврат средств.
Авторизация в индивидуальный кабинет
Вход на портале производится традиционным способом. Необходимо ввести логин и кодовое слово, указанные при создании аккаунта.
Значимые детали для безопасного входа:
– Эксплуатируйте сложный пароль
– Включите двухфакторную идентификацию
– Не фиксируйте коды на общественных гаджетах
– Контролируйте адресную строку браузера
Описание премиальной программы
Игровая платформа награждает игроков всевозможными привилегиями и кампаниями:
Вступительный набор
Дебютанты могут рассчитывать на щедрое награду за дебютный вклад. Зачастую это процентная премия к внесенной величине плюс фриспины для популярных слотов.
Постоянные кампании
– Еженедельный компенсация — компенсирование процента проигранных денежных средств
– Призы на последующие пополнения
– Особые предложения по событиям
– Состязания с крупными премиальными пулами
Программа лояльности
Деятельные геймеры получают очки за произвольную раунд, которые затем обмениваются на настоящие финансы, фриспины или эксклюзивные бонусы.
Купоны: как применять
Кодовые комбинации — это уникальные сочетания литер, дающие право к бонусным поощрениям.
Откуда найти свежие промокоды:
– Легитимные медийные сети казино
– Союзнические сайты
– Email-информирование
– Отраслевые форумы
Указывается промокод в соответствующее поле при создании аккаунта или внесении депозита депозита.
Смартфонная версия и приложение
Современные геймеры отдают предпочтение делать ставки с смартфонных аппаратов. Портал дает два способа для приятной мобильной игры.
Responsive версия
Браузерная версия самостоятельно настраивается под диагональ дисплея. Не предполагает инсталляции и действует в любом актуальном браузере.
Смартфонное приложение
Загрузить app можно для аппаратов на Android и iOS. Достоинства app:
– Скоростная загрузка
– Устойчивая работа
– Push-уведомления о акциях
– Самостоятельный обход блокировок
Процесс установки легок: необходимо зайти на веб-сайт с телефонного девайса и подчиняться руководству.
Игровой ассортимент
База игр насчитывает множество вариантов от топовых провайдеров.
Слоты
Игровые автоматы — самая любимая группа развлечений. Представлены традиционные 3-барабанные слоты, передовые мультимедийные слоты с дополнительными стадиями, а также прогрессивные выигрыши.
Live казино
Зона с настоящими раздающими позволяет испытать дух подлинного казино. Имеются развлечения с покером.
Трансляция ведется в превосходном четкости, имеется диалог с дилером и прочими участниками.
Конкурсы
Постоянно проводятся состязания по разным слотам. Участие позволяет заработать финансовые награды, даровые прокруты или специальные бонусы.
Финансовые манипуляции
Портал предлагает значительный выбор платежных способов:
– Пластиковые карты
– Онлайн платформы
– Биткоин
– Банковские транзакты
Стартовая сумма пополнения — посильная для основной части игроков. Получение призов выполняется в кратчайшие периоды.
Отдел поддержки
Квалифицированные сотрудники расположены содействовать постоянно. Представлены нижеследующие способы коммуникации:
– Онлайн-чат
– Email
– Звонковая связь
– Социальные сети
Ответы на частые запросы можно найти в зоне FAQ.
Вывод
Лицензионный сайт казино и его актуальные зеркала гарантируют пользователям максимальный доступ ко всем опциям платформы. Великодушные привилегии, приятная телефонная версия, гигантский выбор игр и компетентная ассистенция формируют игровой процесс предельно удобным и конфиденциальным.
Характеристика лицензионного веб-сайта
Современные сетевые казино дают пользователям богатый ассортимент игр и перспектив. Основной портал http://www.dentaldee.com/ гарантирует безопасный возможность к азартным возможностям.
Рабочее зеркало: путь в настоящий момент
Альтернативный адрес представляет в качестве точную реплику лицензионного ресурса. Действующее зеркало обеспечивает игрокам преодолевать возможные блокировки.
Выгоды применения зеркала
Главные плюсы включают:
– Беспрерывный путь к платформе
– Сохранение полных возможностей базового ресурса
– Безопасность персональных данных
– Такой же набор функций
Открытие счета на сайте
Ход оформления профиля отличается легкостью и удобством. Недавние клиенты требуется:
1. Перейти на основной ресурс или его зеркало
2. Щелкнуть на пункт оформления
3. Заполнить нужные информацию
4. Активировать электронную ящик
5. Осуществить первый вход
Вознаграждение за оформление
Дебютанты забирают щедрый приветственный приз. Это поощрение в состоянии включать:
– Монетарные начисления
– Complimentary спины
– Увеличенный процент кэшбека
Вход в персональный аккаунт
Существующие участники имеют возможность мгновенно авторизоваться в свой профиль, применяя никнейм и ключ. Личный профиль предоставляет путь к:
– Контролю средствами
– Записям переводов
– Действующим призам
– Опциям профиля
Бонусы и промо
Портал систематически устраивает многочисленные акции для пользователей.
Разновидности подарков
Базовые типы поощрений:
– Денежные подарки – коэффициент от величины депозита
– Фриспины – даровые спины в аппаратах
– Кэшбек – возмещение процента затраченных денег
– Соревновательные трофеи – призы за игру в состязаниях
Промокоды
Специальные ваучеры дают возможность получить дополнительные преимущества. Участники в состоянии обнаружить их на специализированных площадках или приобрести в уведомлениях.
Мобильная редакция и приложение
Современные клиенты предпочитают переносной досуг.
Функции mobile платформы
– Responsive дизайн для различных аппаратов
– Целостный вход к играм
– Быстрая работа
– Удобное контроль
Загрузить приложение
Mobile app предоставлено для downloading на девайсы с операционными платформами Android и iOS. Программа гарантирует:
– Бесперебойную производительность
– Push оповещения о призах
– Оперативный вход к избранным развлечениям
Развлекательный ассортимент
Платформа дает обширную библиотеку игровых развлечений.
Аппараты
Каталог игровых автоматов содержит:
– Обычные слоты
– Современные игры
– Призовые автоматы
– Тематические слоты
Live казино
Раздел лайв игр предлагает шанс играть с реальными дилерами. Открыты:
– Рулетка
– 21
– Punto Banco
– Карибский покер
Соревнования
Постоянные чемпионаты позволяют пользователям состязаться за крупные призовые фонды. Соревновательная структура актуализируется регулярно.
Финансовые транзакции
Казино предлагает множество способов внесения и вывода денег:
– Дебетовые карточки
– Виртуальные счета
– Межбанковские транзакции
– Bitcoin
Все операции выполняются безопасно с использованием передовых технологий кодирования.
Сервис сопровождения
Компетентная служба support работает 24/7. Коннектиться с менеджерами реально через:
– Интерактивный чат
– Email почту
– Телефонную линию
– Соц медиа
Охрана и лицензирование
Платформа работает на фундаменте официальной лицензии. Такое удостоверяет:
– Прозрачность игрового геймплея
– Защиту персональных данных
– Быстрые выводы
– Контролируемый игровой процесс
Вывод
Главный веб-сайт и его действующие дубликаты обеспечивают участникам полный ассортимент опций для безопасной и профитной развлечений. Щедрые бонусы, разнообразные слоты, компетентная служба и проверенная структура выплат делают казино лучшим вариантом для фанатов гемблинг забав.
1xbet turkey 1xbet-giris-27.com .
Вход к платформе через актуальные зеркала
Нынешние онлайн казино обеспечивают игрокам постоянный вход к играм. Центральный сайт Sprut казино работает бесперебойно, гарантируя большой выбор гемблинг автоматов. Но временами образуются технические сложности или барьеры, потому критично быть осведомлённым о наличии функционирующих зеркал.
Что собой представляет из себя главное зеркало казино
Альтернатива — это полная версия главного портала с идентичным интерфейсом. Функционирующее зеркало сегодня обеспечивает обходить региональные ограничения и возобновлять игру.
Главные достоинства эксплуатации зеркал:
– Стопроцентный доступ к персональному кабинету
– Удержание любых данных счёта
– Идентичный набор слотов
– Актуальные привилегии и промо
Открытие счёта на сайте
Операция оформления отнимает пару минут. Свежие геймеры зарабатывают щедрый бонус за создание счёта, который имеет возможность вмещать:
– Стартовый денежный приз
– Бесплатные спины для игр
– Специальные ваучеры
– Увеличенный кешбэк
Во имя финализации создания аккаунта требуется:
1. Переместиться на официальный сайт или зеркало
2. Кликнуть клавишу «Регистрация»
3. Ввести индивидуальные данные
4. Подтвердить email или телефон
5. Использовать купон (в случае существовании)
Подключение в персональный кабинет
По завершении правильной создания аккаунта игроки способны выполнять доступ посредством официальный ресурс или функционирующее зеркало. Собственный кабинет предоставляет полный контроль над счётом:
– Журнал игр
– Зачисление депозита
– Вывод выигрышей
– Регулирование наградами
– Присутствие в конкурсах
Привилегии и предложения казино
Портал награждает пользователей различными поощрительными программами:
Стартовые поощрения
Новые игроки получают богатый комплект привилегий на первые вклады. Типично это содержит процентную надбавку к размеру вклада плюс безвозмездные вращения.
Систематические предложения
– Каждонедельный кешбэк до 15%
– Соревнования с премиальными банками
– Поощрения на число рождения
– Уникальные программы для статусных клиентов
План вознаграждения
Активные игроки накапливают очки, что допустимо обменять на действительные средства или уникальные привилегии.
Портативная редакция и утилита
Нынешние технологии помогают участвовать везде комфортно. Смартфонная редакция портала автономно настраивается под размер произвольного гаджета.
Плюсы мобильного программы:
– Моментальная открытие автоматов
– Эргономичный интерфейс
– Всплывающие-нотификации о бонусах
– Способность скачать для Android и iOS
Настоящее казино: обстановка подлинного гемблинг заведения
Секция Live заведения погружает геймеров в обстановку подлинного игорного учреждения. Профессиональные ведущие проводят действие в состоянии актуального времени.
Представленные игры:
– Рулетка
– Очко
– Баккара
– Покер
Слоты и игровые аппараты
Ассортимент развлекательных машин насчитывает множество вариантов от топовых студий. Каждый игрок найдёт слот по вкусу:
– Традиционные машины
– Инновационные игры с дополнительными раундами
– Джекпот-машины
– Многолинейные автоматы
Соревнования и раздачи
Постоянные состязания включают адреналин и обеспечивают опцию выиграть значительные суммы. Участие в соревнованиях нередко комплиментарное, а призовые суммы достигают больших объёмов.
Секьюрити и секретность
Сайт использует современные протоколы кодирования для гарантии реквизитов пользователей. Совокупные платёжные операции выполняются через охраняемые каналы.
Заключение
Центральный веб-сайт и его действующие зеркала дают стабильный вход к превосходным развлекательным играм. Привлекательные бонусы, эргономичная мобильная версия, вариативность автоматов и компетентное Live-клуб создают сайт отличным выбором для поклонников гемблинг автоматов.
Доступ к платформе через рабочие зеркала
Передовые виртуальные казино дают клиентам круглосуточный доступ к развлечениям. Официальный сайт http://www.bienesactivos.com/2026/03/02/dostup-k-ofitsialnomu-saytu-1xbet-osushchestvlyaetsya-cherez-deystvuyushchee-zerkalo действует устойчиво, гарантируя большой ассортимент игровых развлечений. Тем не менее иногда появляются цифровые трудности или ограничения, потому важно понимать о наличии функционирующих зеркал.
Что означает собой официальное зеркало казино
Зеркало — это точная версия официального портала с схожим функционалом. Рабочее зеркало в настоящее время обеспечивает избегать территориальные ограничения и продолжать игру.
Ключевые плюсы использования зеркал:
– Стопроцентный переход к персональному кабинету
– Сохранение каждых сведений профиля
– Схожий перечень автоматов
– Текущие бонусы и кампании
Открытие счёта на сайте
Процедура регистрации длится считанные минут. Недавние клиенты обретают щедрый подарок за запись, он может содержать:
– Приветственный бонусный бонус
– Даровые фриспины для игр
– Уникальные коды
– Усиленный кэшбек
Во имя финализации оформления необходимо:
1. Войти на основной веб-сайт или зеркало
2. Нажать кнопку «Зарегистрироваться»
3. Ввести персональные данные
4. Заверить почтовый адрес или номер
5. Применить код (если есть доступности)
Вход в собственный кабинет
Следом за корректной создания аккаунта пользователи способны выполнять подключение используя основной портал или функционирующее зеркало. Собственный кабинет обеспечивает всесторонний управление над счётом:
– Летопись пари
– Зачисление депозита
– Получение выигрышей
– Регулирование поощрениями
– Участие в конкурсах
Бонусы и акции казино
Сайт удовлетворяет геймеров различными бонусными схемами:
Стартовые поощрения
Новички зарабатывают щедрый набор привилегий на первые взносы. Обычно это включает процентную прибавку к размеру пополнения плюс даровые спины.
Периодические предложения
– Раз в неделю кешбэк до 15%
– Турниры с наградными фондами
– Призы на дату рождения
– Эксклюзивные акции для VIP геймеров
План вознаграждения
Постоянные пользователи зарабатывают единицы, что можно превратить на настоящие призы или особые бонусы.
Карманная форма и приложение
Нынешние технологии позволяют развлекаться всюду удобно. Смартфонная версия веб-сайта независимо настраивается под экран любого гаджета.
Достоинства карманного приложения:
– Моментальная подгрузка развлечений
– Комфортный облик
– Push-уведомления о предложениях
– Способность инсталлировать для Android и iOS
Live казино: среда настоящего азартного клуба
Область Live клуба доставляет клиентов в обстановку истинного гемблинг дома. Компетентные операторы управляют развлечение в виде реального времени.
Имеющиеся игры:
– Колесо фортуны
– Карточная игра
– Punto Banco
– Покер
Слоты и игровые слоты
Каталог игровых автоматов насчитывает массу вариантов от ведущих разработчиков. Любой игрок отыщет развлечение по вкусу:
– Традиционные барабаны
– Видеослоты с призовыми уровнями
– Джекпот-игры
– Многолинейные автоматы
Состязания и раздачи
Постоянные конкурсы вносят адреналин и обеспечивают опцию получить значительные вознаграждения. Участие в конкурсах регулярно комплиментарное, а выигрышные пулы доходят до больших размеров.
Защита и конфиденциальность
Сайт задействует инновационные протоколы криптографии для защиты реквизитов геймеров. Каждые транзакционные операции проходят через охраняемые соединения.
Заключение
Центральный ресурс и его рабочие зеркала обеспечивают стабильный переход к первоклассным азартным играм. Щедрые бонусы, комфортная смартфонная версия, богатство автоматов и компетентное Live-заведение делают ресурс превосходным опцией для поклонников развлекательных игр.
1xbet yeni giri? adresi 1xbet yeni giri? adresi .
HappyPaws Pharmacy: dog and cat medicine supply – HappyPaws Pharmacy
Зимой детская площадка тоже пользуется популярностью у детей. Горка становится ещё более скоростной, а домик превращается в зимнюю крепость. Деревянные комплексы отлично переносят морозы при правильной обработке.
Дом из клееного бруса — инвестиция в комфорт и качество жизни
Передовые виртуальные казино обеспечивают игрокам огромный ассортимент возможностей для приятной игры. Впрочем иногда доступ к главному платформе может быть закрытым. В таких моментах на поддержку спешит казино Голд, которое предоставляет бесперебойный вход ко всем опциям платформы.
Что такое рабочее зеркало казино
Зеркало — это точная реплика официального сайта, которая находится по другому домену. Альтернативный ресурс поддерживает все инструментарий первоначального веб-портала, включая пользовательский кабинет, средства и сведения транзакций.
Основные выгоды эксплуатации зеркала:
– Круглосуточный подключение к платформе
– Максимальная схожесть возможностей
– Безопасность персональных информации
– Сохранение доступных бонусов
Как разыскать действующее зеркало на текущий день
Существует некоторое количество проверенных вариантов обнаружения текущей ссылки:
Легитимные ресурсы:
1. Электронная рассылка — руководство периодически высылает сообщения с актуальными ссылками
2. Коммуникационные сети — легитимные страницы постят свежую данные
3. Отдел поддержки — консультанты дают надежные URL
4. Портативное приложение — позволяет избегать блокировки
Создание аккаунта на лицензионном портале
Процедура создания аккаунта длится лишь немного минут и включает из таких этапов:
1. Вход на лицензионный портал или действующее зеркало
2. Клик на иконку «Открыть счет»
3. Ввод учетной анкеты
4. Валидация имейл почты или мобильного номера
5. Задействование привилегии за регистрацию при наличии промокода
Начинающие геймеры обретают значительный приветственный презент, который может предполагать даровые прокруты, монетарные поощрения или cashback.
Доступ в личный кабинет
Подключение на портале выполняется привычным образом. Требуется указать учетные данные и пароль, задействованные при регистрации.
Важные нюансы для конфиденциального входа:
– Применяйте криптостойкий пароль
– Включите двухэтапную аутентификацию
– Не храните реквизиты на посторонних девайсах
– Проверяйте доменную строку браузера
Характеристика наградной программы
Игорный портал одаривает пользователей разнообразными бонусами и промо:
Начальный пакет
Свежие игроки могут полагаться на щедрое вознаграждение за начальный взнос. Обычно это пропорциональная премия к внесенной величине плюс даровые спины для востребованных слотов.
Периодические кампании
– Недельный компенсация — компенсирование части потерянных денежных средств
– Призы на очередные пополнения
– Особые промо по событиям
– Конкурсы с крупными премиальными пулами
Система привилегий
Деятельные клиенты собирают баллы за любую игру, которые затем конвертируются на реальные денежные призы, даровые прокруты или эксклюзивные бонусы.
Бонус-коды: как использовать
Купоны — это уникальные сочетания символов, предоставляющие доступ к бонусным привилегиям.
Каким образом раздобыть рабочие промокоды:
– Легитимные медийные сети казино
– Партнерские площадки
– Email-информирование
– Специализированные сообщества
Активируется промокод в специальное поле при регистрации или добавлении денег кошелька.
Смартфонная версия и приложение
Нынешние пользователи отдают предпочтение играть с мобильных устройств. Портал предлагает пару метода для беспроблемной мобильной игры.
Адаптивная модификация
Браузерная версия само собой подстраивается под параметры дисплея. Не нуждается загрузки и работает в любом современном браузере.
Портативное приложение
Получить программу можно для устройств на Android и iOS. Выгоды app:
– Оперативная открытие
– Надежная функционирование
– Мгновенные-уведомления о поощрениях
– Самостоятельный избегание блокировок
Процедура инсталляции элементарен: необходимо перейти на ресурс с портативного гаджета и выполнять указаниям.
Игровой каталог
Коллекция слотов включает тысячи наименований от топовых провайдеров.
Слоты
Гемблинг аппараты — крайне любимая категория игр. Представлены стандартные простые слоты, современные мультимедийные слоты с бонусными раундами, а также джекпотные призы.
Live казино
Отдел с реальными ведущими обеспечивает почувствовать антураж настоящего казино. Открыты игры с блэкджеком.
Передача осуществляется в HD формате, обеспечивается диалог с ведущим и прочими геймерами.
Конкурсы
Периодически организуются конкурсы по разным играм. Присоединение позволяет завоевать валютные вознаграждения, фриспины или специальные поощрения.
Финансовые действия
Сайт предлагает широкий набор платежных методов:
– Пластиковые карты
– Виртуальные платформы
– Крипта
– Банковские платежи
Низшая сумма депозита — приемлемая для основной части геймеров. Вывод денег обрабатывается в короткие временные рамки.
Департамент поддержки
Компетентные сотрудники настроены помочь постоянно. Доступны следующие варианты коммуникации:
– Онлайн-чат
– Email
– Голосовая поддержка
– Общественные сети
Разъяснения на частые проблемы можно обнаружить в блоке FAQ.
Заключение
Основной веб-сайт казино и его актуальные зеркала гарантируют клиентам абсолютный путь ко всем возможностям портала. Солидные бонусы, приятная смартфонная версия, гигантский ассортимент игр и квалифицированная ассистенция формируют игровой времяпрепровождение крайне удобным и безопасным.
Анализ оригинального сайта
Актуальное онлайн-казино обеспечивает своим участникам широкий спектр возможностей и поощрений. Оригинальный ресурс казино Tippy действует 24/7, обеспечивая доступ к топовым слотам, live-казино и обширным промо.
Действующее зеркало: доступ к платформе
Что такое копия казино
Копия составляет собой полную реплику главного веб-сайта с иным сетевым названием. Действующее зеркало позволяет игрокам преодолевать запреты и иметь стабильный доступ к предпочитаемым развлечениям.
Как получить рабочее зеркало сегодня
Свежие URL на главное зеркало появляются через:
– Email оповещение
– Основные социальные сети
– Сервис сопровождения
– Специализированные сайты
Регистрация на ресурсе
Ход регистрации
Открытиесчета занимает буквально минут и включает такие шаги:
1. Переход на официальный сайт или рабочее зеркало
2. Выбор клавиши “Регистрация”
3. Указание учетных информации
4. Проверка аккаунта или контакта
5. Формирование ключа
Подарок за открытиесчета
Свежие клиенты обретают щедрые начальные бонусы:
– Денежные средства на аккаунт
– Халявныеспины для игр
– Повышенный объем кэшбека
– Уникальные коды
Авторизация в личный аккаунт
Зарегистрированные пользователи вправе выполнить вход через основной ресурс или рабочее зеркало. Для этого требуется внести имяпользователя и пароль, придуманные при оформлении.
Функции личного раздела
В собственном профиле предоставлены такие инструменты:
– Контроль учетными данными
– Пополнение баланса
– Обналичивание призов
– Использование купонов
– Мониторинг журнала ставок
– Включение в турнирах
Поощрения и предложения
Разновидности бонусов
Казино балует своих клиентов различными бонусными предложениями:
– Вступительный набор — солидные подарки на начальные пополнения
– Халявныеспины — подарочные прокруты в известных симуляторах
– Возврат — регулярный возврат доли проигрышей
– Программа поощрения — особые преимущества для верных пользователей
Ваучеры и их использование
Специальные коды дают экстра подарки. Для использования необходимо указать шифр в определенное окно в собственном разделе.
Игровой выбор
Автоматы
Библиотека слотовых слотов содержит сотни позиций от ведущих производителей:
– Стандартные автоматы
– Продвинутые развлечения
– Призовые слоты
– Лицензионные автоматы
Live казино
Секция Live-казино обеспечивает игру с настоящими крупье в формате актуального времени:
– Европейскаярулетка
– Блэкджек
– Пунтобанко
– Покер
Конкурсы
Постоянные соревнования с солидными джекпотными фондами устраиваются ежедневно. Претенденты борются за первенство в таблице.
Портативная платформа и приложение
Mobile реализация веб-сайта
Оригинальный сайт на100% оптимизирован для планшетных гаджетов. Клиенты вправе играть развлечения напрямую через обозреватель без обязательства загрузки.
Программа для установки
Авторское портативное приложение предлагается для установки на девайсы с рабочими платформами Android и iOS. Софт обеспечивает:
– Быстрый путь к развлечениям
– Устойчивую функциональность
– Моментальные-сообщения о бонусах
– Комфортный оформление
Заключение
Главный ресурс казино и его рабочие копии гарантируют клиентам полный вход к высококлассным игровым сервисам. Выгодные поощрения, всевозможные акции, функциональная портативная платформа и опытная служба создают азартный процесс чрезвычайно enjoyable и прибыльным.
Вход к сайту и действующие зеркала
Популярные интернет казино гарантируют игрокам обширный выбор развлечений. Главный веб-сайт Лаки Бир казино казино предоставляет стабильный переход ко всем функциям. При этом порой появляются обстоятельства, когда требуется запасной путь авторизации.
Что есть собой рабочее зеркало
Действующее зеркало — это идентичная копия официального портала с запасным интернет именем. Дубликат сегодня помогает преодолевать существующие ограничения и обеспечивать постоянный переход к выбранным развлечениям.
Официальное зеркало содержит всеми возможностями, что и главный веб-сайт:
– Целый список автоматов
– Индивидуальный кабинет с сохраненными информацией
– Актуальные бонусы и промо
– Безопасные банковские действия
Регистрация и авторизация в казино
Этап оформления на платформе длится пару моментов. Свежим игрокам нужно:
1. Зайти на функционирующее зеркало на данный момент
2. Выбрать кнопку «Открыть профиль»
3. Внести нужные данные
4. Верифицировать e-mail почту или контакт смартфона
5. Забрать награду за создание профиля
Авторизация в личный раздел выполняется посредством ввод имени пользователя и секретной комбинации.
Анализ бонусной политики
Щедрая поощрительная программа — ключевое достоинство платформы. Пользователи получают многочисленные поощрения:
Стартовые бонусы
Начинающие клиенты способны рассчитывать на значительный бонус за оформление. Как правило это пакет возможностей, объединяющий:
– Долевую надбавку к начальному вкладу
– Безвозмездные вращения
– Призовые деньги на кошелек
Купоны и эксклюзивные акции
Регулярные купоны помогают обретать экстра выгоды. Применить их разрешено в отдельном разделе собственного аккаунта.
Бесплатные вращения и возврат средств
Даровые вращения — это способность вращать слоты без расходования персональных денег. Компенсация означает определенный компенсацию утраченных средств.
Коллекция автоматов
Азартная сайт предлагает внушительную подборку развлечений.
Игровые машины
Вариативность игровых машин поражает воображение. Доступны традиционные трехбарабанные аппараты и продвинутые развлечения с занимательной анимацией.
Live зал
Секция Live заведения транспортирует игроков в атмосферу подлинного азартного зала. Опытные операторы ведут партии в реальном формате.
Соревнования и доски почета
Систематические состязания обеспечивают азарта и гарантируют шанс забрать внушительные суммы.
Мобильная версия и софт
Новые инновации дают возможность участвовать в любимом локации. Адаптивная версия автоматически адаптируется под дисплей девайса.
Получить клиент возможно для цифровых ОС iOS и Android. Программа обеспечивает:
– Быстрый вход
– Бесперебойную работу
– Мгновенные-алерты об предложениях
– Удобный дизайн
Платежные транзакции
Ресурс работает с многочисленные варианты ввода и вывода денег:
– Кредитные инструменты
– Онлайн сервисы
– Цифровые валюты
– Денежные операции
Любые операции проходят через безопасное соединение, что обеспечивает безопасность конфиденциальных сведений.
Сервис поддержки
Квалифицированная группа помощи работает 24/7. Обратиться с специалистами возможно через:
– Живой-чат
– Почтовую почту
– Связь
– Социальные каналы
Резюме
Главный сайт и его актуальное зеркало предоставляют участникам защищенный и комфортный путь к захватывающим занятиям. Богатые поощрения, разнообразный ассортимент слотов и отличная ассистанс делают игру крайне приятной и прибыльной.
their online market – Interesting layout here, I may browse it again sometime.
1xbet yeni giri? 1xbet yeni giri? .
For innovations
where can i buy generic flexeril for sale
for feedback.
Mərc strategiyaları haqqında məqalələr oxumağa dəyərdir.
https://suakhoacamlam.com/pinco-casino-mercler-38351
Передовые сетевые казино дают геймерам обширный ассортимент функций для приятной игры. Впрочем иногда доступ к официальному порталу может быть ограниченным. В таких моментах на выручку спешит Bet Andreas, которое предоставляет стабильный подключение ко всем опциям платформы.
Что такое актуальное зеркало казино
Дубликат — это идентичная реплика официального сайта, которая хостится по дополнительному адресу. Дубликат имеет полный инструментарий главного ресурса, включая индивидуальный кабинет, баланс и сведения платежей.
Принципиальные достоинства применения зеркала:
– Непрерывный соединение к сайту
– Абсолютная тождественность опций
– Защита индивидуальных сведений
– Сохранение всех вознаграждений
Как разыскать рабочее зеркало сегодня
Имеется некоторое количество надежных путей получения свежей ссылочной информации:
Легитимные каналы:
1. Email рассылка — управление систематически высылает информацию с рабочими адресами
2. Социальные сети — официальные страницы выкладывают актуальную сведения
3. Отдел поддержки — специалисты сообщают достоверные ссылки
4. Телефонное приложение — позволяет преодолевать блокировки
Открытие счета на основном портале
Процесс открытия счета требует всего несколько минут и состоит из данных шагов:
1. Переход на главный веб-сайт или действующее зеркало
2. Выбор на клавишу «Открыть счет»
3. Заполнение персональной анкеты
4. Подтверждение имейл почты или телефонного номера
5. Активация поощрения за регистрацию при существовании промокода
Свежие пользователи обретают значительный стартовый приз, который может включать бесплатные вращения, валютные бонусы или компенсацию.
Вход в персональный кабинет
Логин на портале выполняется традиционным путем. Необходимо указать имя пользователя и секретный ключ, указанные при создании аккаунта.
Существенные моменты для безопасного входа:
– Эксплуатируйте сложный шифр
– Активируйте двухэтапную идентификацию
– Не сохраняйте пароли на общественных гаджетах
– Мониторьте URL строку браузера
Анализ бонусной системы
Гемблинг-сайт радует клиентов многочисленными бонусами и кампаниями:
Вступительный комплект
Новички могут надеяться на великодушное поощрение за первый взнос. Как правило это долевая премия к депонированной количеству плюс фриспины для востребованных слотов.
Регулярные промо
– 7-дневный возврат средств — возмещение доли проигранных денег
– Поощрения на последующие пополнения
– Специальные офферы по торжествам
– Конкурсы с значительными наградными банками
Система привилегий
Постоянные игроки собирают единицы за всякую ставку, которые затем меняются на реальные денежные призы, бесплатные вращения или эксклюзивные льготы.
Кодовые слова: как применять
Промокоды — это уникальные наборы букв и цифр, гарантирующие доступ к специальным поощрениям.
Где получить рабочие промокоды:
– Проверенные социальные сети казино
– Аффилиатные сайты
– Email-новостная лента
– Профильные форумы
Активируется промокод в специальное поле при регистрации или зачислении средств баланса.
Телефонная версия и приложение
Актуальные пользователи отдают предпочтение развлекаться с телефонных гаджетов. Платформа предлагает два метода для приятной портативной игры.
Мобильная редакция
Веб версия самостоятельно оптимизируется под диагональ экранной панели. Не требует скачивания и действует в каждом новом браузере.
Телефонное приложение
Установить программу можно для гаджетов на Android и iOS. Преимущества app:
– Быстрая открытие
– Стабильная функционирование
– Мгновенные-уведомления о акциях
– Самостоятельный избегание блокировок
Операция инсталляции легок: требуется перейти на портал с мобильного гаджета и следовать указаниям.
Игровой каталог
Библиотека игр содержит несколько тысяч наименований от лучших производителей.
Слоты
Игровые автоматы — самая распространенная категория аттракционов. Размещены классические простые автоматы, передовые графические аппараты с дополнительными раундами, а также джекпотные джекпоты.
Live казино
Раздел с реальными раздающими дает возможность почувствовать атмосферу подлинного казино. Открыты игры с покером.
Трансляция осуществляется в отличном разрешении, имеется коммуникация с ведущим и остальными геймерами.
Состязания
Систематически запускаются состязания по многочисленным дисциплинам. Присоединение позволяет заработать денежные выигрыши, бесплатные вращения или особые презенты.
Денежные операции
Сайт предоставляет обширный выбор финансовых методов:
– Дебетовые карты
– Электронные системы
– Криптовалюта
– Финансовые транзакции
Минимальная величина депозита — разумная для преобладающего числа геймеров. Снятие средств выполняется в минимальные интервалы.
Служба поддержки
Квалифицированные консультанты способны оказать помощь круглосуточно. Представлены данные варианты связи:
– Онлайн-чат
– Email
– Мобильная линия
– Коммуникационные сети
Ответы на стандартные запросы можно получить в разделе FAQ.
Резюме
Официальный портал казино и его действующие зеркала обеспечивают игрокам полный доступ ко всем опциям портала. Солидные вознаграждения, практичная телефонная версия, впечатляющий коллекция аттракционов и квалифицированная ассистенция превращают гемблинг времяпрепровождение исключительно удобным и надежным.
Доступ к платформе и актуальные ссылки
Актуальные интернет казино гарантируют клиентам обширный спектр возможностей. Основной портал Стимул организует защищенный переход ко всем услугам. Тем не менее временами появляются моменты, когда требуется альтернативный способ подключения.
Что есть собой действующее зеркало
Действующее зеркало — это идентичная реплика основного портала с альтернативным доменным расположением. Дубликат сегодня помогает преодолевать возможные барьеры и поддерживать постоянный переход к выбранным играм.
Легальное зеркало обладает теми же опциями, что и главный ресурс:
– Совокупный ассортимент слотов
– Собственный аккаунт с актуальными параметрами
– Актуальные поощрения и промо
– Защищенные банковские переводы
Создание аккаунта и доступ в сервис
Этап открытия аккаунта на платформе длится пару мгновений. Новым клиентам следует:
1. Попасть на актуальное зеркало сейчас
2. Кликнуть элемент «Регистрация»
3. Заполнить необходимые сведения
4. Активировать e-mail почту или данные смартфона
5. Активировать поощрение за оформление
Подключение в персональный кабинет производится через ввод имени пользователя и ключа.
Описание поощрительной структуры
Привлекательная бонусная политика — главное козырь платформы. Игроки забирают всевозможные подарки:
Стартовые награды
Свежие клиенты имеют возможность претендовать на значительный приз за оформление. Как правило это совокупность вариантов, включающий:
– Процентную добавку к начальному вкладу
– Даровые кручения
– Призовые финансы на аккаунт
Кодовые комбинации и особые предложения
Периодические купоны позволяют зарабатывать бонусные привилегии. Активировать их разрешено в особом меню собственного кабинета.
Спины и кэшбек
Free spins — это шанс запускать игры без применения личных денег. Рибейт представляет долевой возмещение утраченных денег.
Библиотека слотов
Азартная площадка обеспечивает значительную коллекцию автоматов.
Автоматы
Ассортимент игровых машин поражает ожидания. Имеются стандартные простые автоматы и актуальные автоматы с занимательной анимацией.
Live заведение
Раздел Live заведения транспортирует клиентов в среду подлинного азартного зала. Умелые операторы осуществляют раунды в прямом режиме.
Соревнования и рейтинги
Регулярные состязания привносят остроты и обеспечивают перспективу получить крупные призы.
Mobile форма и приложение
Актуальные решения обеспечивают участвовать в любом пространстве. Mobile реализация автоматически настраивается под экран гаджета.
Установить программу разрешено для операционных платформ iOS и Android. Клиент обеспечивает:
– Быстрый запуск
– Бесперебойную работу
– Push-уведомления об промо
– Комфортный вид
Платежные процедуры
Казино принимает разнообразные способы внесения и изъятия денег:
– Банковские карты
– Виртуальные кошельки
– Цифровые валюты
– Финансовые операции
Все переводы проходят через надежное соединение, что защищает целостность персональных информации.
Служба поддержки
Компетентная группа support работает постоянно. Обратиться с менеджерами возможно через:
– Live-чат
– Цифровую почту
– Связь
– Медиа каналы
Резюме
Главный сайт и его функционирующее зеркало дают пользователям надежный и приятный переход к азартным развлечениям. Щедрые награды, большой каталог развлечений и высокая сервис создают процесс предельно приятной и прибыльной.
http://happypawspharmacy.com/# pet antibiotics and care
Описание официального портала
Актуальные виртуальные казино предоставляют игрокам широкий выбор игр и шансов. Официальный сайт слоты предоставляет безопасный возможность к азартным возможностям.
Актуальное зеркало: возможность в настоящий момент
Зеркало выступает как абсолютную реплику лицензионного сайта. Официальное зеркало дает возможность игрокам обходить существующие ограничения.
Плюсы эксплуатации зеркала
Принципиальные выгоды содержат:
– Беспрерывный шанс к платформе
– Поддержание всех функций базового веб-сайта
– Безопасность индивидуальных сведений
– Идентичный функционал
Открытие счета на ресурсе
Процесс создания аккаунта знаменуется простотой и комфортом. Свежие участники необходимо:
1. Посетить основной портал или его зеркало
2. Щелкнуть на клавишу открытия счета
3. Внести необходимые данные
4. Подтвердить электронную адрес
5. Осуществить дебютный доступ
Вознаграждение за создание аккаунта
Начинающие получают щедрый вступительный презент. Это вознаграждение может содержать:
– Монетарные средства
– Бесплатные спины
– Увеличенный уровень кэшбэка
Логин в собственный аккаунт
Существующие игроки имеют возможность мгновенно зайти в личный аккаунт, применяя никнейм и пароль. Индивидуальный профиль предлагает доступ к:
– Управлению балансом
– Хронологии переводов
– Текущим призам
– Конфигурации аккаунта
Вознаграждения и промо
Платформа постоянно организует разнообразные мероприятия для игроков.
Виды подарков
Главные формы бонусов:
– Пополнительные начисления – доля от размера депозита
– Бесплатные вращения – бесплатные раунды в игровых машинах
– Кэшбэк – компенсация фрагмента проигранных финансов
– Соревновательные трофеи – призы за выступление в конкурсах
Коды
Эксклюзивные коды позволяют приобрести бонусные выгоды. Пользователи в состоянии получить их на специализированных сайтах или получить в уведомлениях.
Mobile адаптация и софт
Современные клиенты предпочитают портативный досуг.
Характеристики портативной системы
– Гибкий дизайн для всех гаджетов
– Полный доступ к автоматам
– Стремительная подгрузка
– Эргономичное управление
Установить софт
Мобильное приложение открыто для установки на гаджеты с рабочими системами Android и iOS. Софт предоставляет:
– Бесперебойную деятельность
– Всплывающие алерты о предложениях
– Быстрый запуск к избранным автоматам
Азартный портфель
Платформа обеспечивает внушительную библиотеку гемблинг игр.
Слоты
Ассортимент развлекательных аппаратов охватывает:
– Стандартные машины
– Video автоматы
– Призовые машины
– Лицензионные слоты
Live игры
Область живых дилеров предоставляет шанс соревноваться с настоящими крупье. Предложены:
– Рулетки
– Блэкджек
– Punto Banco
– Poker
Соревнования
Регулярные чемпионаты обеспечивают клиентам соревноваться за крупные наградные суммы. Конкурсная система изменяется каждую неделю.
Финансовые процедуры
Казино поддерживает разнообразие способов внесения и вывода денег:
– Дебетовые карты
– Виртуальные счета
– Прямые трансферы
– Bitcoin
Абсолютно все транзакции выполняются надежно с использованием актуальных протоколов защиты.
Отдел поддержки
Профессиональная отдел помощи работает круглосуточно. Обратиться с менеджерами можно через:
– Онлайн чат
– Email почту
– Телефон
– Соц платформы
Охрана и регулирование
Портал оперирует на основании действительной аккредитации. Это гарантирует:
– Прозрачность развлекательного процесса
– Защиту индивидуальных информации
– Пунктуальные перечисления
– Регулируемый гейминг
Заключение
Основной ресурс и его рабочие альтернативные адреса предоставляют участникам полный ассортимент опций для безопасной и доходной развлечений. Значительные бонусы, разнообразные игры, профессиональная помощь и безопасная инфраструктура выплат превращают казино идеальным решением для поклонников развлекательных игр.
Передовые онлайн-казино дают игрокам большой спектр развлечений и поощрительных предложений. Присоединение к ресурсу выполняется через официальный веб-сайт или его рабочее зеркало casino Million, что обеспечивает постоянную деятельность.
Что такое актуальное зеркало казино
Зеркало — это точная реплика оригинального ресурса, созданная для обхода ограничений. Актуальное зеркало позволяет игрокам обрести доступ к предпочитаемым играм в произвольное время.
Лицензионное зеркало имеет всеми опциями главного веб-сайта:
– Весь список автоматов
– Личный кабинет с зафиксированными данными
– Актуальные акции
– Защищенные финансовые операции
Создание аккаунта на главном портале
Процедура создания аккаунта отнимает всего пару минут. Свежим пользователям требуется:
1. Попасть на основной веб-сайт или актуальное зеркало
2. Щелкнуть на ссылку “Зарегистрироваться”
3. Внести нужные параметры
4. Проверить адрес
5. Произвести дебютный депозит
Стартовый бонус выдается незамедлительно после прохождения всех стадий.
Авторизация в профиль
Существующие участники могут выполнить доступ применяя:
– Учетное имя и код
– Цифры мобильного
– Адрес
Персональный раздел предоставляет шанс к администрированию балансом, записям операций и доступным промокодам.
Награды и кампании
Развлекательная платформа балует постоянных клиентов разнообразными бонусами:
Начальный пакет
– Поощрение на стартовый пополнение до 100%
– Бесплатные вращения на известные слоты
– Добавочные поощрения за следующие платежи
Промокоды
Специальные коды обеспечивают возможность на получение эксклюзивных поощрений. Актуальные комбинации выставляются в разделе “Промо”.
Cashback
Постоянный возврат равен до 10% от использованных финансов. Возмещение зачисляется сразу.
Система лояльности
Регулярные пользователи накапливают поинты, которые переводятся на реальные финансы или даровые спины.
Мобильный сайт и APP
Для удобства игроков создана удобная mobile версия. Отзывчивый облик дает возможность комфортно участвовать с произвольного мобильного устройства.
Достоинства приложения:
– Оперативный подключение к развлечениям
– Улучшенный интерфейс
– Стабильная активность
– Нотификации о последних акциях
Загрузить программу можно свободно с официального сайта для устройств на Android и iOS.
Библиотека игр
Машины
База включает более 2000 машин от популярных производителей:
– Обычные слоты
– Современные автоматы
– Jackpot игры
– Фирменные развлечения
Live казино
Блок Live развлечений обеспечивает участие с живыми крупье в прямом эфире:
– Колесо фортуны
– Двадцать одно
– Baccarat
– Покер
Турниры
Регулярные конкурсы с значительными выигрышными фондами запускаются каждую неделю. Присоединение в конкурсах доступно всем зарегистрированным клиентам.
Финансовые методы
Депозиты и выводы средств производятся через востребованные способы оплаты:
– Платежные карточ ки
– Электронные сервисы
– Bitcoin
– Банковские платежи
Наименьший вклад — от 100 рублей. Изъятие средств обрабатывается в течение 24 времени.
Служба поддержки
Непрерывная отдел support расположена поддержать в исправлении каких-либо задач:
– Live chat
– Email
– Контактный номер
– Публичные сети
Защита и документ
Лицензионный сайт функционирует на базе глобальной документа. Любые информация игроков охранены современным SSL-криптованием.
Заключение
Действующее зеркало предоставляет постоянный доступ к предпочитаемым слотам, богатым промокодам и функциональным сервисам. Откройте счет прямо сейчас и получите первый приз!
xbet xbet .
low cost online pharmacy: VitalCore Pharmacy – northern pharmacy
pet meds official website discount pet meds online pet pharmacy
Описание главного веб-сайта
Современные сетевые казино предлагают игрокам обширный ассортимент услуг и возможностей. Официальный ресурс Clubnika предлагает надежный возможность к азартным функциям.
Актуальное зеркало: доступ сегодня
Альтернативный адрес служит как идентичную дубликат главного сайта. Проверенное зеркало дает возможность игрокам преодолевать существующие ограничения.
Выгоды задействования зеркала
Основные выгоды охватывают:
– Непрерывный вход к платформе
– Удержание полных функций главного сайта
– Безопасность конфиденциальных сведений
– Такой же набор функций
Открытие счета на платформе
Механизм регистрации характеризуется легкостью и удобством. Начинающие клиенты требуется:
1. Зайти на главный ресурс или его зеркало
2. Щелкнуть на пункт оформления
3. Ввести обязательные информацию
4. Активировать email ящик
5. Осуществить стартовый доступ
Вознаграждение за оформление
Начинающие получают щедрый начальный подарок. Такое вознаграждение может предусматривать:
– Материальные средства
– Complimentary прокруты
– Увеличенный коэффициент компенсации
Доступ в собственный профиль
Зарегистрированные пользователи в состоянии быстро получить доступ в свой раздел, задействуя логин и пароль. Индивидуальный кабинет обеспечивает шанс к:
– Управлению счетом
– Записям транзакций
– Активным бонусам
– Настройкам профиля
Бонусы и промо
Платформа периодически организует всевозможные мероприятия для клиентов.
Категории поощрений
Ключевые категории бонусов:
– Денежные начисления – часть от суммы депозита
– Спины – безвозмездные прокруты в слотах
– Кэшбек – компенсация фрагмента утраченных денег
– Призовые награды – награды за игру в конкурсах
Промокоды
Уникальные купоны помогают получить дополнительные выгоды. Клиенты способны получить их на специализированных сайтах или взять в уведомлениях.
Переносная версия и программа
Прогрессивные игроки ценят карманный гейминг.
Опции mobile версии
– Адаптивный облик для различных устройств
– Полный вход к развлечениям
– Оперативная функционирование
– Комфортное контроль
Download софт
Переносное app предоставлено для скачивания на устройства с операционными платформами Android и iOS. Приложение дает:
– Бесперебойную производительность
– Пуш сообщения о предложениях
– Быстрый запуск к избранным играм
Гемблинг каталог
Платформа предлагает внушительную коллекцию развлекательных услуг.
Автоматы
Ассортимент игровых автоматов насчитывает:
– Традиционные машины
– Передовые автоматы
– Прогрессивные слоты
– Сюжетные развлечения
Live казино
Область живых дилеров предлагает возможность участвовать с живыми диллерами. Представлены:
– Рулетки
– Блэкджек
– Баккара
– Техасский холдем
Состязания
Регулярные конкурсы обеспечивают игрокам состязаться за крупные призовые пулы. Конкурсная сетка обновляется каждую неделю.
Финансовые процедуры
Платформа поддерживает массу вариантов пополнения и снятия денег:
– Банковские карты
– Онлайн кошельки
– Банковские транзакции
– Криптовалюты
Все операции осуществляются безопасно с использованием современных протоколов шифрования.
Сервис поддержки
Профессиональная группа саппорта работает постоянно. Связаться с специалистами доступно через:
– Online чат
– Почтовую почту
– Телефонную линию
– Соц сети
Охрана и лицензирование
Платформа оперирует на основании легальной сертификата. Подобное подтверждает:
– Честность азартного геймплея
– Защиту персональных данных
– Пунктуальные выплаты
– Регулируемый гемблинг
Итог
Основной веб-сайт и его актуальные зеркала обеспечивают пользователям полный ассортимент функций для приятной и прибыльной досуга. Внушительные подарки, всевозможные игры, компетентная поддержка и надежная инфраструктура операций превращают казино превосходным решением для фанатов азартных услуг.
Передовые онлайн-казино предлагают участникам внушительный спектр игр и поощрительных опций. Присоединение к платформе осуществляется через официальный портал или его функционирующее зеркало Million casino, что предоставляет стабильную работу.
В чем суть функционирующее зеркало казино
Зеркало — это полная реплика официального сайта, созданная для решения блокировок. Зеркало сегодня помогает игрокам иметь доступ к предпочитаемым автоматам в произвольное время.
Подлинное зеркало содержит всеми опциями первоначального веб-сайта:
– Весь перечень слотов
– Аккаунт с зафиксированными параметрами
– Свежие акции
– Защищенные финансовые действия
Оформление профиля на основном сайте
Ход оформления занимает всего несколько минут. Первым пользователям требуется:
1. Войти на проверенный ресурс или актуальное зеркало
2. Кликнуть на элемент “Регистрация”
3. Заполнить необходимые информацию
4. Верифицировать адрес
5. Совершить дебютный платеж
Приветственный бонус выдается автоматически после прохождения всех этапов.
Авторизация в учетную запись
Зарегистрированные игроки могут осуществить подключение используя:
– Имя пользователя и пароль
– Данные сотового
– Адрес
Персональный раздел дает шанс к контролю финансами, записям ставок и текущим акциям.
Награды и кампании
Гемблинг платформа радует регулярных клиентов разнообразными призами:
Первый набор
– Премия на дебютный депозит до 100%
– Даровые спины на известные машины
– Экстра награды за дальнейшие взносы
Купоны
Специальные промокоды дают возможность на использование специальных поощрений. Свежие комбинации выкладываются в секции “Бонусы”.
Возврат средств
Регулярный возврат насчитывает до 10% от утраченных средств. Выплата выплачивается незамедлительно.
Механизм лояльности
Активные пользователи зарабатывают единицы, которые обмениваются на подлинные финансы или бесплатные вращения.
Mobile версия и APP
Для удобства пользователей создана удобная адаптивный сайт. Отзывчивый вид позволяет легко участвовать с всякого мобильного девайса.
Плюсы приложения:
– Скорый доступ к играм
– Настроенный дизайн
– Бесперебойная активность
– Push-уведомления о актуальных бонусах
Скачать приложение можно свободно с главного сайта для аппаратов на Android и iOS.
Коллекция игр
Машины
Каталог включает более 2000 машин от ведущих студий:
– Стандартные автоматы
– Мультимедийные игры
– Слоты с джекпотом
– Сюжетные развлечения
Live казино
Раздел Live развлечений предлагает участие с живыми ведущими в онлайн формате:
– Рулетка
– Блэкджек
– Punto Banco
– Покер
Конкурсы
Систематические турниры с солидными выигрышными бюджетами устраиваются еженедельно. Присоединение в соревнованиях возможно всем действующим пользователям.
Финансовые системы
Пополнения и получения финансов реализуются через популярные методы:
– Банковские карты
– Онлайн сервисы
– Bitcoin
– Банковские переводы
Стартовый вклад — от 100 рублей. Получение выигрышей выполняется в течение 24 времени.
Служба саппорта
24/7 служба помощи расположена помочь в исправлении всех задач:
– Онлайн-чат
– Email
– Телефон
– Социальные сети
Защита и документ
Подлинный веб-сайт функционирует на фундаменте мировой документа. Все данные игроков защищены современным SSL-протоколом.
Вывод
Функционирующее зеркало обеспечивает непрерывный вход к выбранным слотам, богатым поощрениям и практичным функциям. Создайте аккаунт сегодня и заработайте стартовый приз!
After trying several platforms, I found this casino https://eb.khksa.com/de-ultieme-gids-voor-het-kiezen-van-een-degelijk-4/ to be reliable. The welcome bonus is generous, terms are easy to understand, and payouts don’t take forever, making it suitable for casual players.
узнать кракен ссылка
click to read gta san andreas apk
Передовые онлайн-казино предлагают игрокам разнообразный спектр функций для приятной игры. Переход к ресурсу http://cancercoach.co/uncategorized/kak-popolnit-schet-cherez-paysafecash осуществляется через официальный веб-ресурс или рабочее зеркало.
Что такое функционирующее зеркало казино
Актуальное зеркало — это альтернативный линк официального сайта казино. Такие клоны создаются для поддержания стабильного соединения к гемблинговой платформе.
Зеркало актуальное абсолютно повторяет характеристики официального ресурса. Пользователи имеют такой же выход ко всем возможностям, включая регистрацию, зачисление средств баланса и вывод выигрышей.
Оформление профиля на официальном портале
Механизм создания аккаунта отнимает всего пару мгновений. Свежим игрокам требуется:
1. Зайти на главный сайт или текущее подлинное зеркало
2. Нажать кнопку “Регистрация”
3. Внести обязательные реквизиты
4. Подтвердить email почту
5. Ввести бонусный код при доступности
После окончания создания аккаунта игрок приобретает бонус за регистрацию, который может содержать бесплатные вращения или денежное поощрение.
Доступ в личный кабинет
Личный кабинет — это защищенная секция, где пользователи способны администрировать своим аккаунтом. Для доступа требуется ввести username и секретный ключ.
В персональном кабинете открыты такие возможности:
– Просмотр истории транзакций
– Применение кодов активации
– Управление вознаграждениями
– Включение в состязаниях
– Мониторинг кэшбэка
– Изменение учетной записи
Призы и акции
Игровая сервис предоставляет выгодные призы:
Регистрационный набор — новые игроки зарабатывают значительное начисление на начальные депозиты.
Бесплатные вращения — предоставляются как при открытии счета, так и в контексте многочисленных промо.
Кэшбек — постоянный рефанд процента израсходованных сумм.
Коды активации — эксклюзивные комбинации, открывающие доступ к особым предложениям.
Обзор игровых разделов
Аппараты
Ассортимент слотов включает сотни наименований от ведущих поставщиков. Геймеры обнаружат как классические машины, так и инновационные 3D-слоты с притягательной визуализацией.
Live казино
Зона Live казино обеспечивает право соревноваться с реальными ведущими в условиях настоящего времени. Представлены распространенные столы: рулетка, блэкджек, баккара, покер.
Конкурсы
Систематические чемпионаты с солидными выигрышными суммами завлекают тысячи соревнующихся. Чемпионы зарабатывают монетарные вознаграждения и специальные бонусы.
Телефонная версия и app
Телефонная версия сайта дает возможность развлекаться с каждого аппарата. Дизайн независимо адаптируется под формат экрана.
Установить приложение можно для устройств на Android и iOS. Телефонное app располагает всеми характеристиками десктопной версии.
Как определить действующее зеркало на данный момент
Действующие URL копий периодически меняются. Обнаружить рабочую URL можно несколькими методами:
– Через сервис помощи
– В подлинных новостных сетях
– По e-mail дайджесту
– На аффилиатных площадках
Надежность и легальность
Официальный портал работает на фундаменте зарубежной лицензии. Все транзакции оберегаются современными протоколами кодирования.
Секретность пользовательских реквизитов обеспечивается в стопроцентном масштабе.
Резюме
Официальный ресурс и его функционирующие копии гарантируют участникам беспрерывный вход к первоклассным азартным развлечениям. Щедрые призы, разнообразные игры, профессиональная сервис — все это делает игровой времяпрепровождение чрезвычайно удобным и притягательным.
Современные онлайн-казино гарантируют геймерам разнообразный диапазон опций для комфортной развлечений. Подключение к сервису https://www.usinds.com/zachem-nuzhna-verifikatsiya-v-kazino-i-kak-izbezhat-poter-pri-vyvode-sredstv производится через главный сайт или действующее зеркало.
Что такое рабочее зеркало казино
Действующее зеркало — это резервный адрес главного портала казино. Такие дубликаты генерируются для гарантирования постоянного подключения к игровой платформе.
Зеркало текущее абсолютно дублирует опции официального сайта. Клиенты обретают схожий доступ ко всем возможностям, включая открытие счета, зачисление средств депозита и вывод средств.
Регистрация на основном сайте
Процедура оформления учетной записи требует всего несколько секунд. Новым пользователям необходимо:
1. Войти на главный портал или актуальное настоящее зеркало
2. Нажать кнопку “Регистрация”
3. Ввести нужные реквизиты
4. Подтвердить email почту
5. Активировать промокод при доступности
После выполнения создания аккаунта игрок зарабатывает бонус за регистрацию, который вправе содержать бесплатные вращения или денежное вознаграждение.
Авторизация в персональный кабинет
Пользовательский кабинет — это закрытая зона, где игроки имеют возможность регулировать своим учетной записью. Для авторизации нужно внести логин и код доступа.
В персональном кабинете имеются нижеперечисленные инструменты:
– Отслеживание истории переводов
– Активация купонов
– Контроль бонусами
– Присоединение в соревнованиях
– Мониторинг возмещения
– Настройка учетной записи
Поощрения и спецпредложения
Гемблинговая система предлагает щедрые подарки:
Стартовый бонус — начинающие зарабатывают крупное начисление на первые пополнения.
Даровые спины — выдаются как при создании аккаунта, так и в ходе всевозможных кампаний.
Кэшбэк — постоянный компенсация процента проигранных сумм.
Коды активации — эксклюзивные последовательности, обеспечивающие право к особым призам.
Обзор игровых разделов
Игровые автоматы
Собрание аппаратов охватывает сотни наименований от ведущих провайдеров. Пользователи обнаружат как обычные аппараты, так и инновационные 3D-слоты с захватывающей графикой.
Live казино
Секция Live казино дарит шанс играть с реальными дилерами в условиях актуального времени. Представлены распространенные игры: рулетка, блэкджек, баккара, покер.
Соревнования
Постоянные соревнования с солидными премиальными фондами завлекают массу конкурсантов. Победители получают монетарные награды и уникальные премии.
Портативная версия и софт
Мобильная версия ресурса предоставляет право участвовать с произвольного девайса. Структура самостоятельно подстраивается под диагональ экрана.
Получить приложение можно для девайсов на Android и iOS. Портативное app располагает всеми опциями настольной версии.
Как определить текущее зеркало на сейчас
Рабочие линки зеркал регулярно изменяются. Найти свежую URL можно разными вариантами:
– Через департамент помощи
– В официальных новостных сетях
– По email рассылке
– На тематических площадках
Защита и легальность
Главный ресурс действует на базе международной разрешения. Все платежи защищены инновационными протоколами кодирования.
Конфиденциальность индивидуальных данных сохраняется в стопроцентном масштабе.
Заключение
Официальный ресурс и его рабочие дубликаты предоставляют игрокам постоянный путь к высококлассным игровым играм. Великодушные вознаграждения, всевозможные автоматы, компетентная помощь — все это создает гемблинговый опыт предельно комфортным и захватывающим.
1xbet mobil giri? 1xbet mobil giri? .
HappyPaws Pharmacy: pet pharmacy USA – HappyPaws Pharmacy
Актуальные интернет казино дают геймерам большой диапазон функций для приятной игры. Впрочем иногда соединение к базовому ресурсу может являться заблокированным. В таких моментах на поддержку приходит casino Sykaaa, которое обеспечивает постоянный путь ко всем функциям платформы.
Что такое действующее зеркало казино
Альтернативный сайт — это абсолютная реплика официального сайта, которая размещается по альтернативному адресу. Зеркало поддерживает все возможности основного сайта, включая персональный кабинет, счет и данные транзакций.
Основные плюсы эксплуатации зеркала:
– Непрерывный соединение к сайту
– Абсолютная схожесть возможностей
– Защита личных информации
– Удержание существующих поощрений
Как отыскать рабочее зеркало сегодня
Есть некоторое количество безопасных методов нахождения свежей URL:
Авторизованные сервисы:
1. Почтовая рассылка — руководство систематически высылает уведомления с рабочими ссылками
2. Медийные сети — авторизованные аккаунты выкладывают текущую информацию
3. Сервис поддержки — сотрудники предоставляют достоверные домены
4. Смартфонное приложение — обеспечивает избегать блокировки
Создание аккаунта на основном ресурсе
Операция открытия счета занимает всего немного минут и содержит из следующих шагов:
1. Попадание на лицензионный веб-сайт или рабочее зеркало
2. Клик на кнопку «Открыть счет»
3. Ввод пользовательской формы
4. Проверка электронной почты или телефонного номера
5. Применение вознаграждения за регистрацию при доступности промокода
Новые клиенты обретают солидный начальный презент, который может охватывать фриспины, валютные поощрения или возврат средств.
Логин в персональный кабинет
Логин на портале производится традиционным путем. Необходимо ввести имя пользователя и пароль, использованные при оформлении.
Существенные детали для конфиденциального входа:
– Задействуйте сложный пароль
– Запустите 2FA идентификацию
– Не записывайте пароли на публичных гаджетах
– Проверяйте адресную строку браузера
Обзор наградной структуры
Игорный портал балует игроков различными привилегиями и промо:
Стартовый пакет
Дебютанты вправе надеяться на великодушное бонус за начальный депозит. Как правило это пропорциональная премия к зачисленной количеству плюс даровые спины для топовых слотов.
Периодические предложения
– Еженедельный компенсация — компенсирование процента потерянных денежных средств
– Призы на повторные взносы
– Специальные акции по праздникам
– Состязания с большими наградными банками
План верности
Постоянные клиенты собирают очки за каждую раунд, которые затем обмениваются на настоящие деньги, даровые прокруты или уникальные льготы.
Бонус-коды: как использовать
Промокоды — это уникальные комбинации литер, гарантирующие возможность к эксклюзивным привилегиям.
В каких местах раздобыть рабочие промокоды:
– Легитимные общественные сети казино
– Партнерские сайты
– Email-рассылка
– Специализированные сообщества
Активируется промокод в предназначенное поле при создании аккаунта или пополнении депозита.
Портативная версия и приложение
Передовые клиенты выбирают играть с мобильных гаджетов. Платформа обеспечивает два варианта для удобной смартфонной игры.
Responsive версия
Веб версия само собой подстраивается под размер монитора. Не предполагает инсталляции и работает в всяком актуальном браузере.
Телефонное приложение
Установить app можно для девайсов на Android и iOS. Достоинства app:
– Скоростная загрузка
– Надежная действие
– Автоматические-уведомления о поощрениях
– Независимый минование блокировок
Процедура инсталляции прост: нужно попасть на сайт с портативного аппарата и следовать указаниям.
Гемблинг коллекция
Коллекция развлечений насчитывает множество единиц от передовых производителей.
Слоты
Развлекательные аппараты — крайне востребованная группа забав. Размещены стандартные трехбарабанные автоматы, современные видеослоты с поощрительными уровнями, а также джекпотные выигрыши.
Live казино
Секция с живыми крупье позволяет прочувствовать атмосферу истинного казино. Имеются развлечения с рулеткой.
Передача реализуется в высоком формате, присутствует диалог с крупье и остальными пользователями.
Турниры
Постоянно запускаются состязания по разным категориям. Присоединение позволяет получить валютные призы, free spins или особые привилегии.
Платежные манипуляции
Ресурс предоставляет большой спектр расчетных методов:
– Банковские карты
– Электронные системы
– Биткоин
– Счетовые транзакты
Минимальная сумма вклада — разумная для массы геймеров. Получение денег производится в минимальные интервалы.
Департамент поддержки
Профессиональные специалисты готовы помочь 24/7. Доступны данные варианты связи:
– Веб-чат
– Email
– Голосовая линия
– Коммуникационные сети
Решения на распространенные проблемы можно отыскать в зоне FAQ.
Итог
Лицензионный веб-сайт казино и его актуальные зеркала дают геймерам совершенный доступ ко всем функциям портала. Значительные бонусы, удобная телефонная версия, огромный ассортимент развлечений и компетентная служба поддержки формируют развлекательный опыт предельно беспроблемным и безопасным.
1xbet giri? 2025 1xbet-giris-32.com .
xbet xbet .
1xbet g?ncel 1xbet g?ncel .
birxbet 1xbet-giris-28.com .
official market site – Nice clean style and the page is easy to read.
Характеристика официального сайта
Актуальное онлайн-казино обеспечивает своим клиентам разнообразный набор услуг и вознаграждений. Основной сайт Casino360 казино казино работает постоянно, обеспечивая вход к известным автоматам, live-казино и многим промо.
Актуальное зеркало: доступ к ресурсу
Что такое копия казино
Зеркало означает собой абсолютную реплику официального сайта с отличным интернет названием. Рабочее зеркало предоставляет игрокам избегать ограничения и получать надежный доступ к выбранным автоматам.
Как найти действующее зеркало сегодня
Действующие URL на основное зеркало появляются через:
– Электронную новостнуюленту
– Проверенные социальные сети
– Службу поддержки
– Тематические площадки
Открытиесчета на портале
Процедура открытиясчета
Регистрация длится всего минут и включает нижеследующие этапы:
1. Вход на оригинальный ресурс или рабочее зеркало
2. Активация кнопки “Зарегистрироваться”
3. Ввод персональных реквизитов
4. Верификация аккаунта или контакта
5. Создание пароля
Бонус за оформление
Новые пользователи зарабатывают щедрые стартовые бонусы:
– Денежные депозиты на счет
– Фриспины для слотов
– Повышенный процент кэшбека
– Специальные купоны
Авторизация в собственный профиль
Действующие участники могут совершить логин через оригинальный ресурс или действующее зеркало. Для этого требуется указать учетноеимя и секретнуюкомбинацию, придуманные при регистрации.
Возможности индивидуального раздела
В личном разделе предоставлены следующие инструменты:
– Управление контактными информацией
– Зачисление счета
– Снятие призов
– Применение купонов
– Мониторинг архива игр
– Регистрация в соревнованиях
Вознаграждения и акции
Разновидности поощрений
Казино поощряет своих игроков разнообразными наградными программами:
– Начальный комплект — солидные бонусы на дебютные вклады
– Халявныеспины — экстра прокруты в топовых симуляторах
– Кэшбек — еженедельный возмещение доли проигрышей
– План поощрения — эксклюзивные привилегии для верных клиентов
Промокоды и их использование
Эксклюзивные промокоды гарантируют бонусные бонусы. Для активации следует внести комбинацию в определенное раздел в персональном разделе.
Азартный набор
Слоты
Коллекция азартных автоматов содержит тысячи наименований от известных разработчиков:
– Стандартные автоматы
– Новые игры
– Джекпот игры
– Лицензионные автоматы
Live казино
Зона Live-казино дарит игру с живыми ведущими в условиях актуального стрима:
– Французскаярулетка
– Блэкджек
– Баккара
– Casinopoker
Состязания
Постоянные состязания с большими наградными пулами проходят ежедневно. Претенденты борются за первенство в таблице.
Портативная версия и APP
Mobile реализация ресурса
Оригинальный сайт полностью адаптирован для смартфонных гаджетов. Пользователи имеютвозможность открывать слоты непосредственно через веб-навигатор без нужды инсталляции.
APP для скачивания
Авторское карманное софт предоставляется для загрузки на девайсы с рабочими системами Android и iOS. Софт гарантирует:
– Мгновенный доступ к развлечениям
– Устойчивую функциональность
– Моментальные-оповещения о промо
– Удобный дизайн
Заключение
Официальный сайт казино и его актуальные дубликаты предоставляют пользователям полный доступ к первоклассным азартным играм. Солидные поощрения, разнообразные акции, удобная портативная адаптация и профессиональная сервис формируют игровой опыт крайне enjoyable и доходным.
Актуальные онлайн-казино дают игрокам широкий диапазон услуг и премиальных опций. Вход к ресурсу производится через лицензионный сайт или его функционирующее зеркало Sprut, что дает бесперебойную деятельность.
Чем является функционирующее зеркало казино
Дубликат — это точная версия официального ресурса, созданная для устранения ограничений. Зеркало сегодня помогает участникам получить вход к выбранным автоматам в произвольное время.
Подлинное зеркало содержит всеми характеристиками основного веб-сайта:
– Целый перечень развлечений
– Профиль с зафиксированными параметрами
– Действующие промокоды
– Надежные платежные действия
Регистрация на лицензионном сайте
Алгоритм создания аккаунта составляет всего пару минут. Новым участникам требуется:
1. Попасть на проверенный сайт или актуальное зеркало
2. Кликнуть на ссылку “Создать аккаунт”
3. Ввести нужные информацию
4. Верифицировать email
5. Совершить начальный взнос
Приветственный бонус начисляется моментально после прохождения всех стадий.
Доступ в личный кабинет
Созданные клиенты могут произвести авторизацию вводя:
– Имя пользователя и пароль
– Код контакта
– Адрес
Профиль предоставляет право к управлению счетом, сведениям игр и доступным акциям.
Поощрения и акции
Гемблинг система балует постоянных участников щедрыми вознаграждениями:
Начальный бонус
– Надбавка на начальный депозит до 100%
– Бесплатные вращения на известные машины
– Особые поощрения за очередные депозиты
Ваучеры
Уникальные купоны предоставляют право на активацию особых поощрений. Свежие промокоды выкладываются в секции “Предложения”.
Кешбэк
Еженедельный кэшбек достигает до 10% от проигранных финансов. Компенсация зачисляется незамедлительно.
Программа лояльности
Регулярные пользователи приобретают поинты, которые превращаются на действительные средства или бесплатные вращения.
Мобильная версия и программа
Ради комфорта клиентов сделана качественная адаптивный сайт. Отзывчивый облик дает возможность легко участвовать с любого карманного аппарата.
Выгоды APP:
– Быстрый подключение к автоматам
– Оптимизированный дизайн
– Надежная деятельность
– Push-уведомления о новых бонусах
Установить APP можно свободно с основного сайта для девайсов на Android и iOS.
Каталог развлечений
Машины
Каталог насчитывает более 2000 автоматов от популярных производителей:
– Традиционные игры
– Современные автоматы
– Jackpot игры
– Тематические автоматы
Live казино
Категория Live казино обеспечивает участие с живыми ведущими в онлайн времени:
– Колесо фортуны
– Карточная игра
– Punto Banco
– Карточный покер
Турниры
Регулярные конкурсы с крупными призовыми фондами организуются каждую неделю. Присоединение в соревнованиях доступно всем активным игрокам.
Расчетные методы
Платежи и выводы финансов осуществляются через известные платежные системы:
– Дебетовые средства
– Виртуальные сервисы
– Цифровая валюта
– Прямые переводы
Стартовый взнос — от 100 рублей. Снятие финансов выполняется в течение 24 периода.
Команда помощи
Круглосуточная группа помощи может поддержать в урегулировании каких-либо задач:
– Мессенджер
– Email
– Контактный номер
– Публичные сети
Безопасность и документ
Официальный портал функционирует на почве признанной сертификата. Все параметры участников охранены современным SSL-шифрованием.
Заключение
Функционирующее зеркало обеспечивает постоянный вход к выбранным развлечениям, выгодным акциям и практичным услугам. Зарегистрируйтесь немедленно и приобретите приветственный бонус!
To understand
Average loans near me
to begin your journey.
https://truehealthpharm.com/# True Health Pharm
Full Report gta san andreas apk download
нажмите, чтобы подробнее kraken onion
Характеристика официального веб-сайта
Передовые сетевые казино обеспечивают игрокам богатый выбор услуг и шансов. Основной веб-сайт РўРёРїРїРё казино гарантирует защищенный путь к игровым функциям.
Рабочее зеркало: доступ в настоящий момент
Резервный сайт выступает в качестве точную версию главного сайта. Действующее зеркало обеспечивает пользователям миновать потенциальные запреты.
Преимущества эксплуатации зеркала
Основные плюсы охватывают:
– Постоянный доступ к ресурсу
– Удержание полных характеристик основного ресурса
– Охрана личных данных
– Такой же набор функций
Оформление профиля на ресурсе
Ход открытия счета отличается понятностью и эргономичностью. Новые участники необходимо:
1. Открыть главный ресурс или его зеркало
2. Щелкнуть на клавишу открытия счета
3. Ввести обязательные сведения
4. Активировать email почту
5. Осуществить начальный авторизацию
Бонус за оформление
Начинающие приобретают внушительный вступительный подарок. Подобное поощрение способно включать:
– Денежные средства
– Complimentary спины
– Повышенный показатель кэшбека
Доступ в личный аккаунт
Существующие пользователи в состоянии моментально зайти в свой аккаунт, используя учетные данные и пароль. Личный кабинет дает шанс к:
– Регулированию балансом
– Записям операций
– Активным призам
– Конфигурации профиля
Вознаграждения и промо
Сайт постоянно проводит многочисленные мероприятия для пользователей.
Разновидности бонусов
Главные формы поощрений:
– Финансовые начисления – коэффициент от суммы пополнения
– Бесплатные вращения – даровые прокруты в слотах
– Возврат средств – возмещение процента затраченных денег
– Турнирные награды – награды за состязание в конкурсах
Купоны
Уникальные коды обеспечивают приобрести добавочные привилегии. Участники имеют возможность обнаружить их на партнерских сайтах или заработать в письмах.
Mobile вариант и программа
Передовые клиенты выбирают переносной геймплей.
Опции mobile версии
– Гибкий интерфейс для различных аппаратов
– Абсолютный доступ к играм
– Быстрая загрузка
– Практичное использование
Загрузить софт
Мобильное софт доступно для downloading на устройства с операционными системами Android и iOS. Приложение предоставляет:
– Устойчивую функциональность
– Всплывающие оповещения о акциях
– Моментальный запуск к избранным играм
Азартный ассортимент
Игровой клуб предоставляет внушительную коллекцию развлекательных забав.
Аппараты
Библиотека игровых автоматов охватывает:
– Обычные игры
– Video игры
– Джекпотные машины
– Сюжетные слоты
Live дилеры
Область лайв игр предоставляет шанс играть с живыми дилерами. Представлены:
– Американская рулетка
– Очко
– Baccarat
– Poker
Турниры
Регулярные чемпионаты помогают игрокам конкурировать за значительные финансовые банки. Соревновательная программа изменяется регулярно.
Платежные процедуры
Казино предлагает разнообразие методов внесения и снятия сумм:
– Дебетовые карточки
– Электронные счета
– Межбанковские переводы
– Цифровые валюты
Все платежи проходят надежно с задействованием передовых технологий защиты.
Департамент сопровождения
Квалифицированная отдел помощи действует 24/7. Связаться с менеджерами реально через:
– Онлайн чат
– Электронную почту
– Телефон
– Social платформы
Безопасность и аккредитация
Портал функционирует на основании законной разрешения. Это обеспечивает:
– Честность азартного действа
– Безопасность личных данных
– Своевременные выводы
– Контролируемый геймплей
Резюме
Лицензионный ресурс и его рабочие дубликаты гарантируют пользователям совокупный спектр опций для приятной и прибыльной развлечений. Внушительные подарки, различные развлечения, квалифицированная поддержка и проверенная структура выплат создают казино превосходным решением для ценителей гемблинг забав.
букеты http://zakazat-cveti-moskva.ru/ .
Переход к сайту через рабочие зеркала
Нынешние виртуальные казино дают клиентам бесперебойный доступ к развлечениям. Официальный ресурс ДжиВиСпин скачать скачать действует устойчиво, предлагая широкий спектр гемблинг игр. Однако временами формируются системные сложности или барьеры, следовательно существенно знать о доступности действующих зеркал.
Что является собой главное зеркало казино
Зеркало — это полная дубликат основного сайта с таким же возможностями. Актуальное зеркало сейчас помогает миновать региональные блокировки и вести времяпрепровождение.
Главные преимущества применения зеркал:
– Полный подключение к личному кабинету
– Поддержание любых информации профиля
– Схожий ассортимент игр
– Действующие поощрения и предложения
Оформление на портале
Процесс записи отнимает несколько минут. Недавние геймеры обретают щедрый бонус за регистрацию, он способен включать:
– Вступительный бонусный кредит
– Бесплатные вращения для игр
– Специальные ваучеры
– Усиленный кешбэк
Ради выполнения регистрации требуется:
1. Зайти на главный веб-сайт или альтернативу
2. Щёлкнуть опцию «Зарегистрироваться»
3. Внести индивидуальные данные
4. Заверить мейл или контакт
5. Задействовать код (в случае доступности)
Подключение в личный кабинет
По завершении успешной оформления геймеры имеют возможность совершать авторизацию через главный веб-сайт или рабочее зеркало. Персональный кабинет даёт безграничный контроль над профилем:
– Журнал игр
– Зачисление депозита
– Снятие выигрышей
– Регулирование поощрениями
– Вовлечение в соревнованиях
Награды и промо казино
Ресурс радует геймеров различными наградными предложениями:
Приветственные призы
Начинающие получают щедрый комплект привилегий на первые пополнения. Как правило это охватывает долевую надбавку к сумме депозита плюс безвозмездные кручения.
Регулярные промо
– Раз в неделю кэшбек до 15%
– Конкурсы с премиальными фондами
– Призы на число рождения
– Особые промо для привилегированных пользователей
Система верности
Активные пользователи зарабатывают единицы, что возможно обменять на действительные финансы или специальные привилегии.
Карманная вариант и программа
Нынешние разработки помогают участвовать везде удобно. Карманная версия портала самостоятельно адаптируется под монитор каждого аппарата.
Достоинства смартфонного приложения:
– Скоростная открытие игр
– Практичный дизайн
– Всплывающие-нотификации о акциях
– Способность скачать для Android и iOS
Реальное казино: среда настоящего азартного заведения
Секция Live клуба транспортирует клиентов в атмосферу подлинного игорного заведения. Опытные дилеры организуют развлечение в виде актуального времени.
Представленные столы:
– Европейская рулетка
– Блэкджек
– Карточная игра
– Карты
Игровые машины и игровые аппараты
Собрание игровых аппаратов включает массу наименований от топовых провайдеров. Произвольный пользователь подберёт автомат по желанию:
– Винтажные слоты
– Видеослоты с специальными раундами
– Накопительный-слоты
– Многолинейные машины
Состязания и акции
Регулярные турниры включают азарт и дают способность выиграть внушительные награды. Присутствие в конкурсах зачастую бесплатное, а призовые суммы доходят до значительных сумм.
Защита и приватность
Ресурс эксплуатирует современные протоколы шифрования для охраны сведений пользователей. Любые денежные операции осуществляются через охраняемые соединения.
Резюме
Главный портал и его действующие зеркала обеспечивают стабильный переход к качественным гемблинг развлечениям. Великодушные бонусы, практичная смартфонная редакция, многообразие машин и квалифицированное Live-игорный дом формируют ресурс отличным вариантом для фанатов азартных автоматов.
нажмите здесь mega ссылка
Доступ к порталу через рабочие зеркала
Актуальные онлайн казино предоставляют игрокам непрерывный вход к играм. Основной веб-сайт Winity оперирует надёжно, предоставляя большой набор игровых развлечений. Тем не менее иногда формируются системные проблемы или барьеры, поэтому важно понимать о существовании актуальных зеркал.
Что представляет собой центральное зеркало казино
Зеркало — это абсолютная копия основного веб-сайта с аналогичным возможностями. Функционирующее зеркало сейчас позволяет избегать региональные ограничения и продолжать гемблинг.
Ключевые достоинства эксплуатации зеркал:
– Безграничный доступ к персональному кабинету
– Сохранение всех показателей учётной записи
– Схожий ассортимент слотов
– Действующие поощрения и промо
Оформление на ресурсе
Операция оформления длится немного минут. Недавние игроки обретают привлекательный поощрение за запись, он имеет возможность вмещать:
– Начальный бонусный бонус
– Бесплатные кручения для слотов
– Особые промокоды
– Усиленный возврат
Для завершения записи следует:
1. Зайти на официальный веб-сайт или альтернативу
2. Щёлкнуть элемент «Регистрация»
3. Указать индивидуальные реквизиты
4. Верифицировать мейл или мобильный
5. Задействовать купон (если есть наличии)
Подключение в собственный кабинет
После удачной оформления клиенты способны производить доступ через главный сайт или действующее зеркало. Индивидуальный кабинет даёт абсолютный регулирование над счётом:
– История ставок
– Зачисление кошелька
– Получение выигрышей
– Администрирование наградами
– Вовлечение в соревнованиях
Бонусы и предложения казино
Ресурс удовлетворяет игроков вариативными поощрительными схемами:
Вступительные бонусы
Новички зарабатывают щедрый комплект привилегий на начальные взносы. Типично это предполагает процентную добавку к объёму депозита плюс безвозмездные спины.
Регулярные промо
– Седмичный компенсация до 15%
– Турниры с призовыми пулами
– Поощрения на день рождения
– Уникальные промо для статусных пользователей
Программа вознаграждения
Активные клиенты зарабатывают баллы, они разрешено превратить на действительные призы или специальные привилегии.
Портативная версия и программа
Актуальные инновации помогают геймить где комфортно. Мобильная редакция сайта самостоятельно приспосабливается под экран любого устройства.
Достоинства карманного софта:
– Скоростная запуск игр
– Практичный вид
– Моментальные-уведомления о промо
– Способность скачать для Android и iOS
Настоящее казино: обстановка истинного развлекательного учреждения
Секция Live казино погружает пользователей в антураж подлинного гемблинг заведения. Профессиональные крупье ведут игру в виде подлинного времени.
Имеющиеся игры:
– Европейская рулетка
– Блэкджек
– Классика
– Покер
Автоматы и азартные автоматы
Собрание развлекательных аппаратов содержит сотни позиций от ведущих студий. Каждый клиент обнаружит слот по желанию:
– Традиционные барабаны
– Современные автоматы с бонусными уровнями
– Накопительный-слоты
– Мегавейс слоты
Конкурсы и акции
Регулярные соревнования добавляют драйв и дают возможность обрести большие призы. Присутствие в состязаниях часто бесплатное, а призовые пулы доходят до крупных объёмов.
Защита и секретность
Ресурс применяет современные технологии защиты для защиты информации игроков. Любые платёжные процедуры проходят через безопасные линии.
Итог
Центральный сайт и его рабочие зеркала гарантируют устойчивый переход к превосходным развлекательным сервисам. Великодушные бонусы, удобная портативная редакция, разнообразие машин и профессиональное Live-казино формируют сайт замечательным выбором для ценителей гемблинг игр.
1xbet turkey 1xbet-giris-27.com .
1x giri? 1xbet-giris-30.com .
Актуальные онлайн-казино предоставляют клиентам внушительный ассортимент развлечений и премиальных опций. Доступ к платформе выполняется через лицензионный ресурс или его функционирующее зеркало Sykaaa казино, что предоставляет постоянную игру.
Чем является актуальное зеркало казино
Копия — это полная дубликат оригинального сайта, сделанная для обхода запретов. Действующее зеркало обеспечивает клиентам сохранить вход к излюбленным играм в каждое время.
Проверенное зеркало содержит всеми возможностями основного веб-сайта:
– Весь ассортимент автоматов
– Учетная запись с зафиксированными сведениями
– Свежие бонусы
– Защищенные финансовые транзакции
Регистрация на основном веб-сайте
Процедура создания аккаунта составляет всего несколько минут. Первым клиентам требуется:
1. Перейти на официальный ресурс или рабочее зеркало
2. Кликнуть на клавишу “Создать аккаунт”
3. Заполнить требуемые информацию
4. Проверить адрес
5. Внести первый платеж
Бонус за регистрацию выдается автоматически после завершения всех ступеней.
Подключение в профиль
Зарегистрированные игроки могут выполнить доступ применяя:
– Имя пользователя и пароль
– Номер сотового
– Электронную почту
Персональный раздел обеспечивает доступ к администрированию балансом, данным ставок и доступным промокодам.
Промо и акции
Развлекательная система вознаграждает активных игроков многочисленными поощрениями:
Начальный пакет
– Бонус на дебютный взнос до 100%
– Фриспины на известные автоматы
– Особые премии за дальнейшие взносы
Ваучеры
Специальные купоны предоставляют шанс на использование эксклюзивных призов. Свежие комбинации размещаются в разделе “Промо”.
Кэшбек
Регулярный кэшбек составляет до 10% от утраченных денег. Возмещение предоставляется сразу.
Схема лояльности
Регулярные участники зарабатывают очки, которые обмениваются на реальные деньги или бесплатные вращения.
Адаптивный портал и программа
В целях удобства игроков построена качественная адаптивный сайт. Приспособленный облик дает возможность легко участвовать с произвольного переносного гаджета.
Преимущества программы:
– Оперативный вход к играм
– Настроенный облик
– Стабильная активность
– Сообщения о актуальных бонусах
Скачать программу можно даром с главного веб-сайта для девайсов на Android и iOS.
Коллекция развлечений
Машины
Библиотека содержит более 2000 машин от популярных провайдеров:
– Стандартные автоматы
– Видео-слоты
– Jackpot игры
– Тематические игры
Live казино
Категория Live игр обеспечивает участие с живыми ведущими в прямом формате:
– Рулеточные столы
– Блэкджек
– Baccarat
– Столы покера
Состязания
Периодические турниры с крупными наградными суммами запускаются каждую неделю. Допуск в состязаниях возможно всем активным игрокам.
Денежные способы
Депозиты и получения выплат реализуются через популярные способы оплаты:
– Дебетовые средства
– Виртуальные системы
– Bitcoin
– Банковские платежи
Самый низкий вклад — от 100 рублей. Вывод средств осуществляется в течение 24 периода.
Отдел саппорта
Непрерывная команда поддержки способна ассистировать в исправлении всех задач:
– Мессенджер
– Email
– Телефон
– Общественные сети
Безопасность и сертификат
Главный сайт действует на почве мировой документа. Любые параметры пользователей обезопасены новейшим SSL-криптованием.
Заключение
Действующее зеркало обеспечивает непрерывный вход к предпочитаемым автоматам, привлекательным бонусам и функциональным возможностям. Откройте счет немедленно и обретите первый поощрение!
canadian online pharmacy viagra: VitalCore Pharmacy – discount pharmacy online
her comment is here geometry dash apk download
enter site – Clean design ensures users can browse without distraction.
Актуальные онлайн-казино обеспечивают участникам большой ассортимент развлечений и поощрительных программ. Вход к площадке выполняется через главный ресурс или его рабочее зеркало http://www.besesaka.com.au/platezhnye-sistemy-sposoby-platezhey-v-kazino-2026/, что предоставляет бесперебойную игру.
Что такое рабочее зеркало казино
Дубликат — это идентичная версия официального ресурса, разработанная для устранения барьеров. Действующее зеркало помогает участникам иметь соединение к предпочитаемым автоматам в каждое время.
Официальное зеркало располагает всеми возможностями основного веб-сайта:
– Совокупный ассортимент развлечений
– Профиль с зафиксированными сведениями
– Актуальные бонусы
– Защищенные платежные транзакции
Регистрация на главном ресурсе
Алгоритм оформления требует всего немного минут. Первым игрокам следует:
1. Войти на главный веб-сайт или действующее зеркало
2. Нажать на кнопку “Зарегистрироваться”
3. Указать требуемые информацию
4. Проверить адрес
5. Произвести стартовый платеж
Приветственный бонус выдается сразу после окончания всех шагов.
Авторизация в учетную запись
Созданные игроки могут осуществить подключение используя:
– Никнейм и код
– Цифры сотового
– Электронную почту
Аккаунт открывает возможность к управлению балансом, истории транзакций и действующим акциям.
Бонусы и кампании
Гемблинг платформа вознаграждает регулярных участников разнообразными бонусами:
Первый набор
– Бонус на первый платеж до 100%
– Фриспины на известные автоматы
– Особые премии за следующие депозиты
Ваучеры
Особые коды открывают доступ на активацию специальных бонусов. Текущие купоны выставляются в разделе “Акции”.
Кешбэк
Периодический бонус составляет до 10% от использованных денег. Выплата предоставляется незамедлительно.
Система лояльности
Верные клиенты приобретают единицы, которые обмениваются на настоящие финансы или бесплатные вращения.
Адаптивный портал и приложение
Ради комфорта клиентов построена полноценная адаптивный сайт. Приспособленный вид помогает удобно участвовать с каждого мобильного гаджета.
Плюсы софта:
– Скорый вход к развлечениям
– Оптимизированный интерфейс
– Устойчивая активность
– Нотификации о последних акциях
Загрузить софт можно свободно с основного веб-сайта для устройств на Android и iOS.
Каталог игр
Автоматы
Библиотека насчитывает более 2000 слотов от популярных разработчиков:
– Классические слоты
– Video slots
– Слоты с джекпотом
– Брендовые игры
Live казино
Категория Live казино предлагает взаимодействие с подлинными дилерами в реальном времени:
– Roulette
– Карточная игра
– Карты
– Столы покера
Турниры
Периодические соревнования с крупными выигрышными фондами устраиваются систематически. Вход в соревнованиях возможно всем зарегистрированным участникам.
Финансовые методы
Пополнения и выводы средств осуществляются через популярные платежные системы:
– Банковские пластик
– Цифровые кошельки
– Bitcoin
– Денежные транзакции
Стартовый депозит — от 100 рублей. Получение денег проводится в течение 24 периода.
Отдел support
Постоянная группа саппорта расположена ассистировать в разрешении произвольных задач:
– Живой чат
– Email
– Контактный номер
– Общественные сети
Защита и сертификат
Официальный портал работает на почве мировой документа. Каждые параметры пользователей защищены передовым SSL-кодированием.
Заключение
Действующее зеркало обеспечивает постоянный вход к излюбленным автоматам, щедрым бонусам и функциональным функциям. Откройте счет прямо сейчас и обретите первый бонус!
Нынешние виртуальные казино дают игрокам огромный диапазон функций для комфортной игры. Но иногда доступ к основному ресурсу может оказаться ограниченным. В таких случаях на подмогу приходит https://gelorakyat.com/2026/03/04/kak-osushchestvit-prodazhu-tonkoina-cherez-kripobot-mozhno-li-khranit-v-nem-monety/, которое предоставляет бесперебойный путь ко всем возможностям платформы.
Что такое действующее зеркало казино
Альтернативный сайт — это абсолютная реплика основного портала, которая располагается по другому домену. Зеркало поддерживает весь инструментарий основного веб-портала, включая персональный кабинет, депозит и историю транзакций.
Принципиальные преимущества применения зеркала:
– Непрерывный вход к сайту
– Полная тождественность опций
– Безопасность личных информации
– Сохранение всех имеющихся бонусов
Как отыскать действующее зеркало на сегодня
Существует несколько безопасных методов получения актуальной адреса:
Проверенные ресурсы:
1. Электронная рассылка — руководство периодически высылает информацию с свежими доменами
2. Медийные сети — проверенные аккаунты постят актуальную данные
3. Департамент поддержки — операторы выдают достоверные адреса
4. Телефонное приложение — предоставляет обходить блокировки
Создание аккаунта на основном ресурсе
Этап оформления занимает всего пару минут и состоит из следующих этапов:
1. Открытие на официальный веб-сайт или актуальное зеркало
2. Клик на клавишу «Создать аккаунт»
3. Внесение пользовательской бланка
4. Валидация email почты или контактного номера
5. Включение вознаграждения за регистрацию при наличии промокода
Начинающие пользователи зарабатывают значительный приветственный презент, который может охватывать free spins, монетарные вознаграждения или возврат средств.
Доступ в персональный кабинет
Логин на портале осуществляется обычным путем. Необходимо внести никнейм и секретный ключ, использованные при оформлении.
Существенные аспекты для безопасного входа:
– Применяйте криптостойкий секретный ключ
– Активируйте двухэтапную аутентификацию
– Не храните пароли на общественных компьютерах
– Отслеживайте доменную строку браузера
Характеристика бонусной программы
Игорный портал одаривает геймеров многочисленными поощрениями и акциями:
Стартовый пакет
Свежие игроки могут рассчитывать на великодушное награду за дебютный пополнение. Обычно это процентовая прибавка к переведенной объему плюс free spins для известных слотов.
Периодические кампании
– Недельный кэшбек — возмещение части списанных денежных средств
– Поощрения на очередные пополнения
– Специальные офферы по событиям
– Состязания с значительными призовыми суммами
План привилегий
Регулярные клиенты зарабатывают единицы за каждую бет, которые затем конвертируются на реальные деньги, бесплатные вращения или специальные преимущества.
Промокоды: как активировать
Бонус-коды — это индивидуальные последовательности символов, предоставляющие право к специальным привилегиям.
Откуда раздобыть действующие промокоды:
– Проверенные общественные сети казино
– Союзнические ресурсы
– Email-информирование
– Специализированные платформы
Указывается промокод в предназначенное поле при регистрации или зачислении средств депозита.
Смартфонная версия и приложение
Актуальные пользователи отдают предпочтение играть с портативных гаджетов. Ресурс предоставляет двойной решения для беспроблемной мобильной игры.
Мобильная версия
Интернет версия сама оптимизируется под диагональ монитора. Не требует установки и оперирует в любом новом браузере.
Портативное приложение
Получить софт можно для гаджетов на Android и iOS. Преимущества app:
– Быстрая открытие
– Стабильная работа
– Push-уведомления о акциях
– Автономный обход блокировок
Процедура скачивания элементарен: достаточно зайти на сайт с портативного аппарата и придерживаться инструкциям.
Азартный выбор
Библиотека слотов содержит несколько тысяч единиц от передовых разработчиков.
Слоты
Игровые слоты — наиболее распространенная раздел игр. Размещены традиционные винтажные машины, передовые видео-автоматы с поощрительными стадиями, а также растущие призы.
Live казино
Отдел с действительными дилерами дает возможность испытать настроение реального казино. Представлены столы с покером.
Передача осуществляется в превосходном четкости, поддерживается общение с дилером и прочими пользователями.
Турниры
Периодически устраиваются турниры по различным категориям. Участие дает шанс завоевать валютные выигрыши, бесплатные вращения или уникальные привилегии.
Денежные манипуляции
Платформа предлагает большой спектр платежных методов:
– Кредитные карты
– Виртуальные платформы
– Криптовалюта
– Финансовые транзакции
Минимальная величина пополнения — разумная для массы геймеров. Снятие денег выполняется в минимальные периоды.
Отдел поддержки
Квалифицированные сотрудники расположены помочь непрерывно. Открыты такие способы контакта:
– Интернет-чат
– Email
– Телефонная связь
– Социальные сети
Решения на распространенные проблемы можно обнаружить в разделе FAQ.
Вывод
Официальный ресурс казино и его актуальные зеркала гарантируют пользователям абсолютный доступ ко всем возможностям портала. Великодушные бонусы, удобная смартфонная версия, колоссальный ассортимент развлечений и квалифицированная служба поддержки превращают игровой процесс исключительно приятным и надежным.
тайгер казино сайт Я обычно не заморачиваюсь, сразу открываю телеграм tiger casino и беру ссылку.
1xbet giri? linki 1xbet-53.com .
1xbet giri? 2025 1xbet giri? 2025 .
http://happypawspharmacy.com/# dog and cat medicine supply
no prescription pharmacy paypal: VitalCore Pharmacy – canadian pharmacy meds
learn more now – Perfect for everyday shopping, browsing is quick and effortless.
Доступ к ресурсу через проверенные зеркала
Участники сетевых казино часто сталкиваются с трудностью закрытия основного ресурса. Именно для устранения этой ситуации существуют копии легального ресурса. Gold casino гарантирует беспрепятственный подключение ко всем возможностям казино.
Что такое функционирующее зеркало казино
Альтернативный адрес составляет собой полную версию основного сайта с таким же возможностями. Главное различие — это иное имя. Абсолютно все данные пользователя, в том числе депозит, бонусы и записи ставок, продолжают быть неизменными.
Достоинства задействования зеркал
Действующие зеркала имеют комплексом ключевых выгод:
– Бесперебойный подключение к выбранным автоматам
– Стопроцентная безопасность персональных параметров
– Неизменность всех опций индивидуального кабинета
– Шанс приобретения призов и вовлечения в предложениях
Оформление профиля на основном сайте
Процедура открытия счета крайне несложен и отнимает пару минут. Начинающие игроки имеют возможность претендовать на внушительный стартовый приз за открытие счета.
Стадии формирования аккаунта
1. Подключение на легальный ресурс или его копию
2. Нажатие на опцию “Регистрация”
3. Заполнение требуемых информации
4. Верификация цифровой почты
5. Ввод промокода (когда есть)
Награды и акции для участников
Казино радует своих игроков всевозможными поощрительными программами.
Базовые категории призов
Приветственный подарок — крупное поощрение для недавних клиентов, каковое способно содержать финансовые бонусы и фриспины.
Бесплатные вращения — возможность крутить в топовых игровых машинах безвозмездно.
Кешбэк — процентный возврат проигранных средств, который именно зачисляется по неделям или раз в месяц.
Бонусные коды — особые комбинации, обеспечивающие бонусные преимущества.
Пользовательский кабинет: возможности и установки
Индивидуальный профиль гарантирует исчерпывающий контроль над развлекательным взаимодействием. Тут присутствуют:
– Регулирование счетом
– Записи транзакций
– Действующие привилегии
– Параметры защиты
– Подтверждение аккаунта
Портативная вариант и софт
Актуальные пользователи признают гибкость. Казино предлагает двойной пути для развлечений с смартфонных устройств.
Приспособленная смартфонная версия
Мобильная платформа сайта самостоятельно настраивается под дисплей любого устройства. Нет необходимости загружать дополнительное приложение.
Приложение для смартфонов
Доступно скачать специальное приложение для iOS и Android. Программа предоставляет:
– Моментальный вход
– Оптимизированный интерфейс
– Оперативные-извещения о акциях
– Бесперебойную производительность
Live игры: обстановка истинного казино
Зона Live столов отправляет участников в атмосферу подлинного зала. Квалифицированные хосты осуществляют партии в виде реального времени.
Топовые Live-столы
– Французская рулетка
– Blackjack
– Баккарат
– Техасский холдем
Слоты: многообразие развлечений
Собрание развлекательных слотов содержит тысячи наименований от известных поставщиков. Пользователи встретят:
– Обычные автоматы
– Графические слоты
– Накопительный приз-игры
– Слоты с множественными линиями
Турниры и особые предложения
Систематические турниры обеспечивают игрокам бороться друг с другом за солидные денежные пулы. Любой конкурс располагает свои требования включения и список чемпионов.
Варианты ввода и вывода денег
Платформа предоставляет массу финансовых систем:
– Банковские карты
– Онлайн кошельки
– Цифровые валюты
– Финансовые переводы
Любые переводы реализуются надежно благодаря новейшим протоколам криптографии.
Служба обслуживания
Компетентные операторы команды support способны поддержать 24/7. Предусмотрены такие каналы контакта:
– Живой-чат
– Email-поддержка
– Аудио поддержка
– Социальные сети
Итог
Официальный ресурс игровой площадки и его актуальные зеркала гарантируют клиентам защищенный и комфортный доступ к огромному диапазону азартных развлечений. Щедрые бонусы, периодические акции, качественная служба и удобные финансовые инструменты превращают развлекательный досуг максимально приятным и результативным.
Источник mgmarket6at
see this gta sa apk
Передовые виртуальные казино предоставляют пользователям широкий диапазон опций для беспроблемной игры. Но иногда доступ к основному порталу может быть заблокированным. В таких моментах на выручку появляется Leebet казино, которое гарантирует бесперебойный подключение ко всем возможностям платформы.
Что такое актуальное зеркало казино
Копия — это точная версия официального веб-сайта, которая размещается по альтернативному адресу. Копия поддерживает целый функционал оригинального ресурса, включая персональный кабинет, счет и данные переводов.
Основные достоинства применения зеркала:
– Постоянный соединение к ресурсу
– Полная тождественность инструментов
– Защита индивидуальных данных
– Сохранение существующих вознаграждений
Как разыскать действующее зеркало на сегодня
Есть несколько надежных методов получения текущей адреса:
Авторизованные каналы:
1. Почтовая рассылка — администрация постоянно высылает уведомления с рабочими адресами
2. Медийные сети — авторизованные профили выкладывают свежую информацию
3. Сервис поддержки — операторы дают проверенные домены
4. Телефонное приложение — дает возможность преодолевать блокировки
Создание аккаунта на главном веб-сайте
Этап создания аккаунта требует не более считанные минут и предполагает из таких ступеней:
1. Вход на главный портал или функционирующее зеркало
2. Выбор на иконку «Зарегистрироваться»
3. Указание пользовательской формы
4. Проверка email почты или мобильного номера
5. Задействование поощрения за регистрацию при присутствии промокода
Начинающие клиенты обретают щедрый вступительный презент, который может содержать free spins, денежные вознаграждения или компенсацию.
Логин в персональный кабинет
Вход на платформе реализуется традиционным путем. Нужно вписать учетные данные и кодовое слово, использованные при создании аккаунта.
Существенные аспекты для конфиденциального входа:
– Используйте сложный пароль
– Задействуйте 2FA аутентификацию
– Не записывайте коды на общественных девайсах
– Мониторьте адресную строку браузера
Анализ наградной структуры
Гемблинг-сайт балует игроков различными бонусами и специальными предложениями:
Приветственный комплект
Дебютанты вправе претендовать на существенное бонус за дебютный депозит. Традиционно это процентная надбавка к внесенной количеству плюс free spins для востребованных слотов.
Постоянные акции
– 7-дневный cashback — компенсирование процентной доли утраченных денег
– Поощрения на последующие пополнения
– Эксклюзивные предложения по событиям
– Состязания с большими призовыми суммами
Схема лояльности
Деятельные пользователи собирают единицы за любую раунд, которые затем меняются на фактические деньги, фриспины или особые привилегии.
Бонус-коды: как активировать
Бонус-коды — это особые сочетания символов, обеспечивающие право к бонусным бонусам.
В каких местах взять актуальные промокоды:
– Официальные общественные сети казино
– Партнерские площадки
– Email-подписка
– Профильные группы
Прописывается промокод в соответствующее поле при открытии счета или внесении депозита баланса.
Телефонная версия и приложение
Актуальные пользователи любят играть с смартфонных гаджетов. Портал предлагает 2 способа для беспроблемной мобильной игры.
Responsive редакция
Веб версия сама адаптируется под размер дисплея. Не просит скачивания и действует в любом актуальном браузере.
Смартфонное приложение
Скачать app можно для устройств на Android и iOS. Достоинства app:
– Скоростная активация
– Надежная работа
– Push-уведомления о поощрениях
– Автономный преодоление блокировок
Процесс скачивания несложен: необходимо попасть на ресурс с мобильного гаджета и подчиняться руководству.
Гемблинг коллекция
Каталог аппаратов охватывает тысячи вариантов от ведущих провайдеров.
Слоты
Игровые автоматы — самая популярная группа развлечений. Показаны стандартные 3-барабанные аппараты, новые графические аппараты с бонусными этапами, а также накопительные выигрыши.
Live казино
Зона с настоящими дилерами позволяет прочувствовать дух истинного казино. Имеются столы с блэкджеком.
Стриминг осуществляется в высоком формате, поддерживается диалог с ведущим и остальными игроками.
Соревнования
Регулярно запускаются соревнования по различным категориям. Присоединение позволяет завоевать финансовые призы, даровые прокруты или эксклюзивные поощрения.
Денежные операции
Портал предлагает широкий ассортимент расчетных способов:
– Дебетовые карты
– Виртуальные кошельки
– Криптовалюта
– Банковские переводы
Стартовая объем взноса — посильная для большинства геймеров. Обналичивание выигрышей производится в кратчайшие периоды.
Департамент поддержки
Профессиональные сотрудники способны оказать помощь круглосуточно. Представлены нижеследующие методы связи:
– Интернет-чат
– Email
– Телефонная связь
– Социальные сети
Ответы на типовые вопросы можно получить в секции FAQ.
Резюме
Основной веб-сайт казино и его актуальные зеркала гарантируют геймерам совершенный подключение ко всем опциям платформы. Щедрые поощрения, практичная телефонная версия, впечатляющий выбор игр и компетентная помощь создают азартный опыт исключительно беспроблемным и надежным.
https://www.naskaplaza.ru/media/pgs/internet_magazin_detskih_tovarov.html
на этом сайте mega ссылка
зайти на сайт kraken сайт зеркала
можно проверить ЗДЕСЬ kraken зеркало рабочее
see geometry dash apk download
Современные онлайн-казино предлагают пользователям обилие опций для удобной игры. Центральный сайт Кракен казино дарит возможность ко всем функциям и развлечениям. Однако при возникновении программных проблем на помощь спешат функционирующие копии.
Что означает собой действующее зеркало
Копия казино — это стопроцентная дубликат оригинального портала, размещенная по дополнительному доменному имени. Официальное зеркало хранит все характеристики, включая регистрацию, вход в личный кабинет, вознаграждения и кодовые слова.
Альтернативный сайт на сегодня обеспечивает:
– Постоянный вход к игровым аппаратам
– Стопроцентную защиту персональных данных
– Сохранение депозита и журнала транзакций
– Возможность использования всех специальных предложений
Открытие профиля на главном сайте
Процедура открытия профиля требует несколько минут. Свежеиспеченным игрокам нужно:
1. Открыть на основной ресурс или действующее зеркало
2. Нажать кнопку «Регистрация»
3. Заполнить запрашиваемые данные
4. Верифицировать электронную почту
5. Указать бонусный код при присутствии
После завершения регистрации геймеры зарабатывают подарок за регистрацию, который может иметь фриспины или денежное вознаграждение.
Доступ в персональный кабинет
Личный кабинет обеспечивает всеобъемлющий надзор над азартным процессом. Через персональный профиль разрешается:
– Пополнять депозит
– Забирать средства
– Использовать бонусные коды
– Проверять хронологию пари
– Участвовать в конкурсах
– Получать кешбэк
Описание поощрений и специальных предложений
Богатая премиальная система — значимое достоинство ресурса. Главные формы премий:
Приветственный бонус
Новички обретают выгодное вознаграждение на первые депозиты. Величина бонуса может составлять 100-200% от объема взноса.
Бесплатные вращения
Бесплатные прокруты выдаются для востребованных слотов. Сумма free spins варьируется от 10 до 500 штук.
Кэшбек
Еженедельный или ежемесячный компенсация части утраченных денег. Обычный объем возврата — 5-15%.
Турниры
Постоянные соревнования с внушительными наградными фондами. Игроки конкурируют за призовые позиции в турнирной таблице.
Портативная версия и приложуха
Смартфонная версия обеспечивает наслаждаться игрой с любого аппарата. Пользователи могут скачать приложение для iOS и Android или применять веб версию.
Плюсы портативного софта:
– Молниеносная загрузка слотов
– Практичный дизайн
– Пуш-нотификации о промо
– Вход через отпечаток пальца
Автоматы и Live казино
Азартная подборка включает сотни позиций от ведущих производителей.
Известные разделы игр:
– Классические автоматы
– Современные слоты с бонусными уровнями
– Джекпот игры
– Мегавейс машины
Live игровой зал
Категория live игорный зал предоставляет развлечение с настоящими ведущими. Представлены стандартные развлечения:
– Американская рулетка
– Blackjack
– Punto Banco
– Карибский покер
Как разыскать действующее зеркало
Найти рабочую адрес на зеркало разрешается различными методами:
1. Оформить подписку на email-рассылку
2. Мониторить за новостями в соц сетях
3. Написать в службу поддержки
4. Сохранить актуальное зеркало в закладки
Резюме
Главный ресурс и его действующие зеркала обеспечивают бесперебойный вход к игровым играм. Щедрые бонусы, разнообразные бонусные коды, комфортное мобильное приложение и профессиональная техподдержка поддержки обеспечивают игровой процесс крайне удобным и защищенным.
Передовые онлайн-казино гарантируют игрокам обширный спектр функций для беспроблемной досуга. Вход к ресурсу РђРєРІР° производится через основной сайт или действующее зеркало.
Что такое действующее зеркало казино
Рабочее зеркало — это альтернативный URL основного ресурса казино. Такие копии генерируются для обеспечения непрерывного доступа к развлекательной сервису.
Зеркало сегодня абсолютно повторяет функционал базового домена. Игроки получают такой же вход ко всем услугам, включая регистрацию, пополнение баланса и получение выигрышей.
Создание аккаунта на главном портале
Процесс оформления учетной записи занимает всего буквально мгновений. Будущим клиентам следует:
1. Войти на официальный сайт или текущее проверенное зеркало
2. Выбрать кнопку “Зарегистрироваться”
3. Заполнить требуемые информацию
4. Активировать электронную почту
5. Применить бонусный код при доступности
После завершения создания аккаунта клиент обретает приз за регистрацию, который имеет право включать даровые спины или монетарное поощрение.
Доступ в собственный кабинет
Пользовательский кабинет — это безопасная секция, где участники имеют возможность управлять своим профилем. Для доступа следует ввести логин и пароль.
В личном кабинете открыты следующие опции:
– Мониторинг хронологии переводов
– Активация промокодов
– Управление бонусами
– Вступление в турнирах
– Контроль кэшбэка
– Изменение аккаунта
Поощрения и акции
Развлекательная платформа обеспечивает выгодные бонусы:
Начальный набор — дебютанты получают значительное поощрение на дебютные пополнения.
Free spins — дарятся как при создании аккаунта, так и в процессе всевозможных кампаний.
Возмещение — регулярный рефанд части израсходованных средств.
Бонусные коды — эксклюзивные последовательности, открывающие выход к особым предложениям.
Обзор гемблинговых направлений
Slots
Собрание аппаратов насчитывает массу вариантов от топовых провайдеров. Пользователи встретят как обычные машины, так и актуальные видеослоты с интересной анимацией.
Live казино
Категория Live казино обеспечивает возможность участвовать с действующими ведущими в формате реального времени. Открыты распространенные развлечения: рулетка, блэкджек, баккара, покер.
Турниры
Постоянные турниры с большими премиальными банками завлекают тысячи конкурсантов. Победители завоевывают cash призы и уникальные бонусы.
Телефонная версия и приложение
Адаптивная версия сайта обеспечивает развлекаться с каждого аппарата. Дизайн независимо корректируется под диагональ экрана.
Получить app можно для устройств на Android и iOS. Смартфонное приложение имеет всеми характеристиками десктопной версии.
Как определить действующее зеркало на сейчас
Рабочие ссылки зеркал систематически обновляются. Обнаружить актуальную URL можно многими путями:
– Через отдел поддержки
– В подлинных информационных сетях
– По электронной дайджесту
– На тематических порталах
Охрана и лицензирование
Основной портал функционирует на основании международной сертификата. Все транзакции защищены передовыми протоколами безопасности.
Анонимность личных данных поддерживается в стопроцентном объеме.
Резюме
Основной ресурс и его функционирующие копии предоставляют игрокам беспрерывный выход к высококлассным игровым сервисам. Привлекательные поощрения, многочисленные слоты, профессиональная служба — все это превращает гемблинговый опыт чрезвычайно беспроблемным и увлекательным.
click here now capcut apk
можно проверить ЗДЕСЬ мега онион
Нынешние онлайн-казино предоставляют участникам обширный ассортимент возможностей и призовых опций. Присоединение к платформе выполняется через лицензионный сайт или его рабочее зеркало казино AzartPlay casino, что обеспечивает бесперебойную работу.
Чем является функционирующее зеркало казино
Зеркало — это полная версия оригинального веб-сайта, разработанная для решения блокировок. Рабочее зеркало обеспечивает клиентам иметь соединение к излюбленным слотам в любое время.
Подлинное зеркало имеет всеми характеристиками оригинального ресурса:
– Весь каталог слотов
– Профиль с сохраненными параметрами
– Действующие поощрения
– Надежные платежные транзакции
Регистрация на лицензионном ресурсе
Ход оформления отнимает всего пару минут. Первым клиентам нужно:
1. Войти на проверенный портал или актуальное зеркало
2. Кликнуть на кнопку “Регистрация”
3. Внести обязательные сведения
4. Активировать электронную почту
5. Совершить начальный депозит
Приветственный бонус зачисляется сразу после выполнения всех шагов.
Доступ в аккаунт
Действующие игроки могут выполнить авторизацию вводя:
– Логин и код
– Номер сотового
– Контактный email
Профиль дает доступ к регулированию балансом, сведениям ставок и доступным поощрениям.
Бонусы и кампании
Развлекательная площадка привлекает регулярных игроков выгодными поощрениями:
Начальный пакет
– Надбавка на стартовый депозит до 100%
– Фриспины на топовые машины
– Экстра бонусы за очередные взносы
Бонусные коды
Особые купоны предоставляют доступ на приобретение особых вознаграждений. Свежие промокоды выставляются в блоке “Бонусы”.
Cashback
Постоянный бонус составляет до 10% от проигранных сумм. Компенсация выплачивается моментально.
Система лояльности
Постоянные пользователи приобретают баллы, которые превращаются на реальные средства или фриспины.
Мобильный сайт и программа
Для удобства игроков создана удобная мобильная версия. Гибкий дизайн позволяет легко играть с каждого карманного девайса.
Достоинства софта:
– Моментальный доступ к играм
– Улучшенный дизайн
– Стабильная работа
– Push-уведомления о новых акциях
Получить программу можно даром с основного ресурса для девайсов на Android и iOS.
Каталог слотов
Автоматы
Библиотека содержит более 2000 машин от топовых производителей:
– Классические игры
– Видео-слоты
– Прогрессивные автоматы
– Фирменные слоты
Live казино
Категория Live столов предоставляет участие с настоящими ведущими в прямом времени:
– Рулетка
– Двадцать одно
– Baccarat
– Столы покера
Состязания
Регулярные турниры с крупными выигрышными бюджетами проводятся систематически. Присоединение в конкурсах возможно всем зарегистрированным игрокам.
Платежные варианты
Взносы и получения средств осуществляются через распространенные методы:
– Платежные пластик
– Виртуальные кошельки
– Крипто
– Счетные операции
Стартовый платеж — от 100 рублей. Получение средств проводится в течение 24 времени.
Сервис support
Непрерывная служба support расположена помочь в разрешении каких-либо ситуаций:
– Онлайн-чат
– Email
– Связь
– Публичные сети
Безопасность и разрешение
Лицензионный сайт функционирует на почве международной разрешения. Всевозможные данные игроков защищены актуальным SSL-криптованием.
Заключение
Функционирующее зеркало дает стабильный доступ к излюбленным слотам, выгодным поощрениям и практичным услугам. Присоединяйтесь сегодня и приобретите первый поощрение!
secure medical online pharmacy order viagra prices pharmacy
Нынешние онлайн-казино предлагают пользователям обширный ассортимент услуг и призовых вариантов. Доступ к сервису осуществляется через основной портал или его функционирующее зеркало https://gaesan.com.br/, что гарантирует непрерывную деятельность.
Что такое функционирующее зеркало казино
Зеркало — это идентичная версия официального портала, созданная для решения ограничений. Зеркало сегодня дает возможность игрокам иметь вход к излюбленным слотам в каждое время.
Официальное зеркало обладает всеми характеристиками первоначального портала:
– Совокупный каталог игр
– Профиль с записанными информацией
– Действующие бонусы
– Надежные финансовые процедуры
Регистрация на официальном сайте
Процесс оформления требует всего немного минут. Первым участникам следует:
1. Попасть на основной веб-сайт или актуальное зеркало
2. Кликнуть на кнопку “Создать аккаунт”
3. Внести требуемые сведения
4. Подтвердить email
5. Совершить первый взнос
Стартовый бонус зачисляется автоматически после окончания всех ступеней.
Доступ в аккаунт
Действующие пользователи могут совершить авторизацию используя:
– Логин и код
– Код контакта
– Контактный email
Личный кабинет предоставляет шанс к администрированию финансами, сведениям операций и активным поощрениям.
Поощрения и предложения
Гемблинг платформа вознаграждает постоянных игроков многочисленными призами:
Первый пакет
– Бонус на первый депозит до 100%
– Даровые спины на популярные слоты
– Особые награды за следующие взносы
Промокоды
Уникальные коды открывают доступ на приобретение особых поощрений. Актуальные купоны размещаются в блоке “Предложения”.
Cashback
Постоянный кешбэк насчитывает до 10% от утраченных денег. Возмещение предоставляется автоматически.
Система лояльности
Постоянные участники накапливают единицы, которые превращаются на настоящие финансы или даровые спины.
Мобильная версия и APP
В целях удобства пользователей сделана удобная mobile версия. Гибкий интерфейс обеспечивает комфортно играть с всякого переносного гаджета.
Преимущества программы:
– Моментальный доступ к играм
– Улучшенный интерфейс
– Бесперебойная активность
– Сообщения о актуальных турнирах
Установить приложение можно безвозмездно с официального портала для гаджетов на Android и iOS.
Каталог развлечений
Машины
Коллекция вмещает более 2000 слотов от известных разработчиков:
– Стандартные слоты
– Video slots
– Jackpot игры
– Брендовые игры
Live казино
Категория Live игр дает участие с живыми диллерами в онлайн режиме:
– Рулеточные столы
– Блэкджек
– Punto Banco
– Столы покера
Соревнования
Систематические состязания с крупными наградными фондами проводятся еженедельно. Вход в турнирах открыто всем созданным участникам.
Платежные способы
Взносы и выводы денег производятся через распространенные сервисы:
– Дебетовые карты
– Цифровые счета
– Bitcoin
– Счетные переводы
Стартовый платеж — от 100 рублей. Изъятие финансов обрабатывается в течение 24 периода.
Отдел поддержки
Постоянная группа саппорта расположена содействовать в исправлении любых задач:
– Живой чат
– Email
– Горячая линия
– Общественные сети
Надежность и лицензия
Главный ресурс функционирует на фундаменте глобальной сертификата. Все информация игроков обезопасены новейшим SSL-протоколом.
Заключение
Рабочее зеркало предоставляет непрерывный доступ к выбранным слотам, щедрым промокодам и комфортным возможностям. Откройте счет прямо сейчас и приобретите стартовый подарок!
https://hedgedoc.stusta.de/s/53kLuByQR
I enjoy playing at this casino https://yourinspirtunity.com/2026/02/13/bets-mx-su-lugar-premium-destinado-a-diversion-en/ because it feels secure and well-optimized. Live tables are immersive, slots offer different styles, and the overall experience remains pleasant over time.
Подробнее kraken ссылка тор
1xbet lite 1xbet-giris-28.com .
Кстати, если вас интересует Выбор кошерного ресторана в Москве и проверка сертификатов, посмотрите сюда.
Вот, можете почитать:
https://eger38.ru/news/koshernaya-eda-moskva-dostavka-kak-vybrat-koshernyj-restoran-i-proverit-sertifikat/
как вывести на карту мостбет mostbet83507.help
For news
where buy generic enalapril tablets
for ultimate convenience.
Лучшее прямо здесь: https://pantip.com/profile/9165835
The best porn generator uncensored ai porn generator your fantasies remain strictly between you and the neural network. Instant, high-quality generation, extensive scenario and character customization. Available 24/7. For adults.
birxbet giri? 1xbet-giris-29.com .
check out this store – Just scrolling briefly, design is tidy and layout is simple.
дизайн проект частного дома дизайн проект частного дома стоимость
Актуальные интернет казино обеспечивают клиентам обширный диапазон возможностей для комфортной игры. Но иногда соединение к базовому сайту может стать недоступным. В таких моментах на поддержку появляется казино Болливуд, которое обеспечивает постоянный вход ко всем функциям платформы.
Что такое рабочее зеркало казино
Зеркало — это точная копия главного сайта, которая размещается по запасному домену. Копия сохраняет целый функционал главного веб-портала, включая личный кабинет, счет и историю транзакций.
Основные выгоды задействования зеркала:
– Постоянный подключение к порталу
– Абсолютная аналогичность опций
– Сохранность личных информации
– Хранение всех вознаграждений
Как отыскать актуальное зеркало сегодня
Существует некоторое количество достоверных вариантов получения свежей ссылочной информации:
Проверенные каналы:
1. Электронная рассылка — дирекция постоянно пересылает уведомления с действующими URL
2. Медийные сети — авторизованные каналы выкладывают текущую информацию
3. Отдел поддержки — операторы выдают проверенные адреса
4. Смартфонное приложение — позволяет преодолевать блокировки
Оформление профиля на официальном портале
Процесс оформления отнимает только немного минут и содержит из следующих стадий:
1. Открытие на лицензионный портал или актуальное зеркало
2. Клик на кнопку «Регистрация»
3. Указание регистрационной формы
4. Верификация email почты или мобильного номера
5. Применение привилегии за регистрацию при доступности промокода
Свежие геймеры обретают солидный приветственный подарок, который может предполагать даровые прокруты, денежные призы или кэшбек.
Вход в личный кабинет
Подключение на сайте осуществляется стандартным путем. Достаточно ввести имя пользователя и код доступа, указанные при открытии счета.
Значимые нюансы для надежного входа:
– Применяйте сложный код
– Включите двухфакторную верификацию
– Не записывайте пароли на публичных девайсах
– Мониторьте адресную строку браузера
Анализ бонусной программы
Игровая платформа одаривает клиентов разнообразными бонусами и кампаниями:
Приветственный букет
Новички могут полагаться на значительное поощрение за стартовый пополнение. Традиционно это процентовая премия к внесенной сумме плюс фриспины для известных слотов.
Систематические промо
– Семидневный компенсация — возмещение части проигранных денежных средств
– Призы на очередные пополнения
– Особые предложения по торжествам
– Конкурсы с солидными выигрышными пулами
План вознаграждений
Деятельные пользователи получают пункты за каждую ставку, которые затем превращаются на фактические финансы, бесплатные вращения или эксклюзивные льготы.
Кодовые слова: как активировать
Купоны — это индивидуальные комбинации литер, дающие доступ к дополнительным поощрениям.
Откуда найти актуальные промокоды:
– Проверенные коммуникационные сети казино
– Союзнические порталы
– Email-подписка
– Отраслевые платформы
Активируется промокод в соответствующее поле при создании аккаунта или зачислении средств депозита.
Мобильная версия и приложение
Нынешние геймеры отдают предпочтение играть с портативных девайсов. Ресурс предоставляет пару варианта для комфортной мобильной игры.
Адаптивная модификация
Интернет версия автоматически адаптируется под габариты экрана. Не нуждается загрузки и действует в каждом свежем браузере.
Телефонное приложение
Получить приложение можно для девайсов на Android и iOS. Плюсы app:
– Скоростная запуск
– Стабильная операция
– Мгновенные-уведомления о промо
– Самостоятельный избегание блокировок
Операция загрузки легок: нужно попасть на сайт с портативного девайса и выполнять инструкциям.
Игровой коллекция
Каталог игр включает огромное количество вариантов от передовых производителей.
Слоты
Азартные машины — крайне востребованная категория аттракционов. Доступны обычные трехбарабанные слоты, новые видео-автоматы с поощрительными стадиями, а также джекпотные джекпоты.
Live казино
Секция с настоящими раздающими обеспечивает почувствовать дух реального казино. Имеются варианты с баккарой.
Трансляция ведется в высоком качестве, имеется диалог с крупье и остальными геймерами.
Турниры
Постоянно организуются турниры по многочисленным слотам. Включение позволяет выиграть валютные выигрыши, free spins или уникальные привилегии.
Финансовые процедуры
Платформа предлагает широкий ассортимент денежных инструментов:
– Банковские карты
– Виртуальные платформы
– Криптовалюта
– Финансовые транзакции
Стартовая сумма пополнения — доступная для большинства клиентов. Получение денег осуществляется в минимальные временные рамки.
Отдел поддержки
Опытные операторы расположены оказать помощь непрерывно. Представлены нижеследующие варианты связи:
– Живой-чат
– Email
– Голосовая связь
– Медийные сети
Решения на распространенные проблемы можно найти в блоке FAQ.
Резюме
Основной портал казино и его действующие зеркала предоставляют пользователям полный доступ ко всем опциям платформы. Солидные бонусы, удобная смартфонная версия, огромный ассортимент аттракционов и опытная служба поддержки формируют азартный процесс крайне комфортным и конфиденциальным.
Вход к порталу через актуальные зеркала
Современные интернет казино гарантируют клиентам постоянный доступ к играм. Основной портал https://keepsakeprofessionalsnetwork.com/2026/03/05/kakim-obrazom-mozhno-dobavit-sredstva-na-moy-schet-v-pay/ работает бесперебойно, обеспечивая широкий ассортимент азартных игр. Тем не менее периодически образуются цифровые проблемы или барьеры, потому критично знать о существовании актуальных зеркал.
Что собой представляет собой центральное зеркало казино
Копия — это абсолютная копия основного веб-сайта с аналогичным набором функций. Функционирующее зеркало в настоящее время помогает обходить территориальные блокировки и возобновлять игру.
Главные преимущества эксплуатации зеркал:
– Безграничный подключение к личному кабинету
– Фиксация всех сведений счёта
– Схожий ассортимент слотов
– Свежие поощрения и кампании
Регистрация на ресурсе
Процедура создания аккаунта длится немного минут. Новые пользователи обретают привлекательный приз за регистрацию, что имеет возможность охватывать:
– Стартовый финансовый бонус
– Комплиментарные кручения для машин
– Уникальные ваучеры
– Увеличенный компенсацию
С целью окончания регистрации следует:
1. Переместиться на основной ресурс или зеркало
2. Нажать опцию «Регистрация»
3. Написать личные реквизиты
4. Активировать электронную почту или номер
5. Использовать ваучер (когда имеется присутствии)
Авторизация в индивидуальный кабинет
Вслед за удачной регистрации пользователи способны совершать авторизацию используя официальный веб-сайт или действующее зеркало. Личный кабинет обеспечивает безграничный надзор над профилем:
– Журнал пари
– Внесение счёта
– Снятие денег
– Регулирование поощрениями
– Присутствие в турнирах
Бонусы и промо казино
Сайт удовлетворяет игроков вариативными привилегированными программами:
Вступительные призы
Начинающие зарабатывают богатый комплект привилегий на вступительные пополнения. Как правило это содержит частичную добавку к размеру взноса плюс даровые фриспины.
Регулярные акции
– Еженедельный компенсация до 15%
– Соревнования с выигрышными банками
– Бонусы на годовщину рождения
– Специальные акции для элитных пользователей
Схема верности
Активные игроки накапливают баллы, что возможно трансформировать на действительные деньги или эксклюзивные льготы.
Смартфонная версия и программа
Актуальные решения помогают участвовать в любом месте угодно. Карманная форма ресурса автономно настраивается под экран произвольного гаджета.
Выгоды смартфонного ПО:
– Моментальная запуск развлечений
– Эргономичный дизайн
– Всплывающие-сообщения о акциях
– Способность инсталлировать для Android и iOS
Живое казино: среда реального гемблинг клуба
Категория Live заведения доставляет пользователей в среду реального игорного заведения. Профессиональные дилеры проводят процесс в состоянии подлинного времени.
Представленные развлечения:
– Колесо фортуны
– Двадцать одно
– Классика
– Покерная игра
Игровые машины и игровые автоматы
Ассортимент гемблинг автоматов включает массу наименований от топовых студий. Каждый геймер подберёт слот по вкусу:
– Традиционные слоты
– Современные автоматы с дополнительными раундами
– Накопительный-автоматы
– Многолинейные машины
Турниры и розыгрыши
Периодические турниры привносят адреналин и открывают шанс обрести крупные вознаграждения. Включение в состязаниях часто безвозмездное, а премиальные фонды доходят до значительных размеров.
Защита и секретность
Платформа применяет передовые протоколы шифрования для защиты данных игроков. Все финансовые действия проходят через зашифрованные протоколы.
Заключение
Центральный сайт и его функционирующие зеркала обеспечивают стабильный переход к превосходным игровым развлечениям. Щедрые награды, практичная портативная версия, вариативность слотов и компетентное Live-клуб формируют платформу отличным опцией для любителей гемблинг слотов.
https://t.me/tigercasinoofficial Если ищете тайгер казино, там есть рабочие ссылки.
Visit Your URL geometry dash apk
Следующая страница кракен онион зеркало
canada pharmacy online legit: VitalCore Pharmacy – legitimate canadian pharmacies
Вход к ресурсу через рабочие зеркала
Актуальные онлайн казино предоставляют клиентам постоянный переход к играм. Центральный ресурс Aqua зеркало функционирует надёжно, предлагая большой набор развлекательных слотов. Однако иногда возникают цифровые проблемы или запреты, в связи с чем важно быть осведомлённым о наличии актуальных зеркал.
Что представляет из себя основное зеркало казино
Зеркало — это идентичная версия главного портала с идентичным интерфейсом. Функционирующее зеркало в настоящее время даёт возможность обходить территориальные барьеры и продолжать развлечения.
Принципиальные достоинства эксплуатации зеркал:
– Стопроцентный доступ к личному кабинету
– Сохранение любых показателей аккаунта
– Такой же спектр развлечений
– Актуальные вознаграждения и предложения
Регистрация на портале
Механизм создания аккаунта требует считанные минут. Свежие геймеры приобретают привлекательный поощрение за запись, он способен включать:
– Приветственный игровой подарок
– Бесплатные спины для машин
– Эксклюзивные купоны
– Увеличенный компенсацию
Во имя окончания записи необходимо:
1. Перейти на центральный ресурс или альтернативу
2. Нажать клавишу «Оформиться»
3. Ввести контактные данные
4. Заверить почтовый адрес или телефон
5. Задействовать купон (если есть наличии)
Доступ в собственный кабинет
Следом за правильной оформления геймеры могут производить подключение с помощью основной веб-сайт или действующее зеркало. Собственный кабинет даёт безграничный контроль над счётом:
– История пари
– Внесение депозита
– Изъятие выигрышей
– Контроль привилегиями
– Включение в конкурсах
Награды и кампании казино
Сайт радует пользователей разнообразными поощрительными программами:
Приветственные бонусы
Дебютанты получают богатый букет наград на стартовые депозиты. Типично это включает пропорциональную прибавку к размеру пополнения плюс безвозмездные кручения.
Регулярные акции
– Раз в неделю кешбэк до 15%
– Состязания с выигрышными фондами
– Бонусы на дату рождения
– Уникальные предложения для элитных геймеров
Программа верности
Постоянные пользователи собирают очки, которые разрешено превратить на подлинные финансы или специальные привилегии.
Мобильная вариант и софт
Актуальные технологии позволяют играть везде удобно. Карманная редакция веб-сайта автоматически подстраивается под дисплей произвольного гаджета.
Выгоды карманного приложения:
– Оперативная запуск развлечений
– Комфортный вид
– Всплывающие-оповещения о промо
– Возможность установить для Android и iOS
Живое казино: среда истинного развлекательного дома
Секция Live заведения транспортирует геймеров в обстановку настоящего гемблинг дома. Компетентные операторы управляют развлечение в состоянии реального времени.
Предлагаемые развлечения:
– Колесо фортуны
– Двадцать одно
– Карточная игра
– Покерная игра
Автоматы и азартные машины
Собрание развлекательных аппаратов насчитывает массу наименований от лидирующих производителей. Любой клиент найдёт слот по нраву:
– Винтажные машины
– Видеослоты с бонусными раундами
– Джекпот-машины
– Динамические машины
Состязания и лотереи
Систематические конкурсы добавляют азарт и открывают способность получить значительные вознаграждения. Участие в состязаниях нередко бесплатное, а призовые пулы доходят до внушительных размеров.
Защита и приватность
Ресурс применяет передовые методы кодирования для обеспечения информации пользователей. Любые денежные транзакции проходят через защищённые соединения.
Резюме
Главный портал и его рабочие зеркала обеспечивают надёжный вход к превосходным развлекательным сервисам. Великодушные призы, удобная карманная форма, разнообразие автоматов и профессиональное Live-клуб делают ресурс замечательным вариантом для ценителей гемблинг автоматов.
hashing guide – Everything is organized for straightforward browsing and fast access.
Характеристика главного ресурса
Новое онлайн-казино предлагает своим пользователям большой выбор услуг и поощрений. Основной портал http://www.zkdynamic.org/osnovnye-metody-vozvrata-sredstv-v-tinkoff/ работает постоянно, гарантируя вход к известным автоматам, live-казино и многочисленным кампаниям.
Действующее зеркало: путь к ресурсу
Что такое дубликат казино
Копия составляет собой точную копию оригинального портала с другим сетевым путем. Действующее зеркало предоставляет игрокам избегать запреты и иметь надежный доступ к предпочитаемым играм.
Как найти рабочее зеркало сегодня
Свежие линки на официальное зеркало выкладываются через:
– Email новостнуюленту
– Официальные публичные сети
– Сервис сопровождения
– Партнерские порталы
Оформление на ресурсе
Ход оформления
Регистрация отнимает всего минут и содержит такие действия:
1. Открытие на основной сайт или актуальное зеркало
2. Выбор элемента “Открытьсчет”
3. Внесение контактных информации
4. Активация аккаунта или номера
5. Установка ключа
Вознаграждение за созданиеаккаунта
Свежие игроки получают выгодные начальные вознаграждения:
– Денежные суммы на аккаунт
– Фриспины для игр
– Расширенный объем кешбэка
– Специальные промокоды
Авторизация в личный кабинет
Действующие участники могут выполнить вход через официальный ресурс или рабочее зеркало. Для этого следует указать никнейм и секретнуюкомбинацию, установленные при созданииаккаунта.
Функции персонального профиля
В собственном профиле открыты основные возможности:
– Управление контактными реквизитами
– Внесение кошелька
– Вывод денег
– Активация промокодов
– Проверка истории операций
– Регистрация в турнирах
Вознаграждения и кампании
Типы вознаграждений
Казино радует своих пользователей разнообразными наградными программами:
– Приветственный пакет — выгодные поощрения на начальные депозиты
– Бесплатныевращения — дополнительные вращения в рейтинговых играх
– Возврат — периодический возмещение процента проигрышей
– План лояльности — эксклюзивные привилегии для постоянных пользователей
Купоны и их ввод
Эксклюзивные коды предоставляют экстра вознаграждения. Для применения нужно набрать шифр в специальное поле в собственном профиле.
Геймплейный каталог
Симуляторы
Библиотека слотовых слотов вмещает массу позиций от ведущих разработчиков:
– Обычные слоты
– Видео слоты
– Призовые игры
– Лицензионные автоматы
Live казино
Раздел Live-казино предлагает игру с живыми крупье в обстановке онлайн трансляции:
– Европейскаярулетка
– Двадцатьодно
– Baccarat
– Покер
Соревнования
Периодические состязания с крупными наградными суммами устраиваются регулярно. Участники соревнуются за первенство в рейтинге.
Смартфонная реализация и софт
Смартфонная адаптация сайта
Официальный портал целиком оптимизирован для мобильных аппаратов. Участники способны пользоваться развлечения прямо через интернет-браузер без потребности инсталляции.
Приложение для установки
Официальное мобильное софт предоставляется для загрузки на аппараты с программными ОС Android и iOS. Софт гарантирует:
– Моментальный путь к автоматам
– Надежную операционность
– Push-извещения о предложениях
– Интуитивный навигацию
Итог
Официальный веб-сайт казино и его актуальные зеркала дают участникам абсолютный доступ к высококлассным азартным сервисам. Большие подарки, различные предложения, удобная портативная реализация и профессиональная поддержка превращают геймплейный досуг чрезвычайно комфортным и результативным.
article source geometry dash apk
True Health Pharm: True Health Pharm – True Health Pharm
Передовые онлайн-казино предлагают пользователям разнообразный выбор азартных игр и привлекательные награды. Но для удобной игры необходимо знать, как обнаружить слоты и его действующие зеркала.
Что такое основной ресурс казино
Основной веб-сайт казино — это базовая платформа, где клиенты могут развлекаться азартными автоматами. Ресурс функционирует на официальных принципах и обладает всеми необходимыми разрешениями.
Ключевые преимущества лицензионного портала:
– Конфиденциальность пользовательских данных
– Справедливые правила участия
– Обеспеченные выплаты
– Профессиональная помощь
Актуальное зеркало казино: для чего нужно
Дублирующий ресурс — это полная версия основного веб-сайта, находящаяся по другому домену. Рабочее зеркало создается для предоставления непрерывного соединения к сайту.
Основания применения дублирующих ресурсов:
– Ограничение официального адреса
– Регламентные мероприятия
– Повышенная посещаемость на ресурс
Как получить свежее зеркало в данный момент
Найти текущее официальное зеркало можно различными путями:
1. Подписка — оформите подписку на email подписку
2. Служба support — свяжитесь в онлайн-чат
3. Публичные каналы — следите за постами
4. Тематические сайты — надежные источники
Создание аккаунта на сайте казино
Этап создания аккаунта длится только немного моментов:
1. Нажмите на кнопку “Регистрация”
2. Введите запрашиваемые данные
3. Активируйте email e-mail
4. Активируйте купон, если есть
По завершении завершенной регистрации вам станет открыт пользовательский профиль.
Премии и бонусные коды
Выгодная поощрительная система — значимое достоинство казино:
Поощрение за открытие счета
Начинающие участники зарабатывают начальный подарок, который может предполагать:
– Валютный кредит на дебютный взнос
– Free spins для игровых машин
– Безвозвратные средства
Купоны
Периодически выходят новые коды, обеспечивающие получить дополнительные привилегии.
Схема возврата средств
Лояльные клиенты приобретают процент использованных финансов назад.
Текущие промо и турниры
Сайт регулярно устраивает захватывающие акции:
– Семидневные турниры
– Праздничные промо
– Розыгрыши солидных выигрышей
– Система VIP-клуба
Авторизация в пользовательский раздел
Для авторизации на портал необходимо:
1. Открыть основной сайт или функционирующее зеркало
2. Кликнуть “Вход”
3. Внести email и пароль
В личном профиле доступны следующие возможности:
– Депозит депозита
– Вывод выигрышей
– Изучение журнала ставок
– Настройка личными данными
Адаптивная модификация и софт
Мобильная вариант
Адаптивная модификация ресурса обеспечивает развлекаться с всех карманного гаджета. Дизайн самостоятельно адаптируется под размер монитора.
App для download
Скачать приложение можно для:
– Android — безопасная загрузка с ресурса
– iOS — загрузка через App Store
Преимущества app:
– Быстрый старт
– Надежная работа
– Push-нотификации об предложениях
– Ускоренный интерфейс
Развлекательные разделы
Автоматы
Обширная галерея развлекательных автоматов от известных провайдеров:
– Традиционные автоматы
– Видео-автоматы
– Прогрессивные-автоматы
Live зал
Зона с реальными ведущими дает:
– Рулеточные столы
– Двадцать одно
– Мини-баккара
– Poker
Эфиры ведутся в отличном качестве изображения, формируя ощущение настоящего казино.
Варианты депозита и вывода
Платформа обслуживает множественные денежные сервисы:
– Платежные средства
– Электронные счета
– Цифровые валюты
– Финансовые переводы
Базовые суммы взноса и оперативные выплаты делают развлечение предельно приятной.
Отдел помощи
Профессиональная группа помощи оперирует 24/7 и способна помочь с различными задачами:
– Онлайн-чат
– Email-консультации
– Звонковая горячая линия
Итоги
Лицензионный веб-сайт казино и его рабочие альтернативные адреса предоставляют участникам безопасный и увлекательный гемблинг опыт. Привлекательные подарки, комфортная mobile версия, богатые игры и качественное live-казино делают эту ресурс превосходным местом для гемблинг времяпрепровождения.
tiger casino Я сначала не понял как зайти в тайгер казино, потом нашёл их канал — там всё есть.
start here – Modern interface helps users browse and buy products quickly.
Подключение к порталу через рабочие зеркала
Игроки виртуальных казино нередко контактируют с трудностью недоступности главного портала. Как раз для решения этой ситуации предусмотрены копии легального ресурса. casino Kraken гарантирует полный вход ко всем сервисам платформы.
Что такое рабочее зеркало казино
Альтернативный адрес значит собой точную дубликат оригинального веб-сайта с похожим функционалом. Единственное различие — это иное имя. Все параметры пользователя, содержа счет, привилегии и архив партий, продолжают быть такими же.
Достоинства применения зеркал
Рабочие зеркала располагают множеством значимых плюсов:
– Круглосуточный подключение к любимым развлечениям
– Полная защита собственных сведений
– Поддержание всех параметров персонального кабинета
– Способность взятия наград и присутствия в кампаниях
Открытие счета на основном сайте
Процесс оформления чрезвычайно несложен и отнимает немного минут. Недавние игроки могут рассчитывать на щедрый стартовый подарок за создание аккаунта.
Этапы открытия аккаунта
1. Доступ на легальный домен или его зеркало
2. Активация на элемент “Присоединиться”
3. Ввод требуемых информации
4. Активация цифровой почты
5. Внесение бонусного кода (если есть)
Подарки и промоакции для клиентов
Казино одаривает своих участников разнообразными поощрительными системами.
Ключевые категории бонусов
Стартовый бонус — солидное вознаграждение для начинающих игроков, что имеет возможность включать денежные средства и бесплатные вращения.
Фриспины — опция запускать в востребованных аппаратах безвозмездно.
Кешбэк — процентный компенсация потерянных денег, который именно начисляется раз в неделю или каждый месяц.
Бонусные коды — уникальные комбинации, обеспечивающие добавочные выгоды.
Личный кабинет: инструменты и конфигурации
Личный раздел предоставляет полный регулирование над игровым взаимодействием. В данном разделе имеются:
– Регулирование балансом
– Архив транзакций
– Работающие поощрения
– Конфигурации защиты
– Валидация учетной записи
Мобильная редакция и софт
Новейшие клиенты ценят портативность. Казино предоставляет 2 метода для ставок с мобильных гаджетов.
Отзывчивая портативная вариант
Смартфонная вариант домена самостоятельно подстраивается под монитор любого гаджета. Отсутствует потребность скачивать отдельное ПО.
Софт для мобильных
Доступно установить официальное APP для iOS и Android. APP гарантирует:
– Быстрый запуск
– Адаптированный внешний вид
– Всплывающие-сообщения о поощрениях
– Устойчивую работу
Live раздел: обстановка настоящего игорного заведения
Категория Live развлечений транспортирует игроков в атмосферу истинного зала. Компетентные дилеры проводят партии в виде реального времени.
Популярные Live-игры
– Французская рулетка
– Блэкджек
– Баккарат
– Техасский холдем
Слоты: многообразие автоматов
Библиотека слотовых автоматов вмещает массу вариантов от лидирующих поставщиков. Пользователи найдут:
– Традиционные аппараты
– Графические слоты
– Накопительный приз-игры
– Многолинейные автоматы
Конкурсы и специальные мероприятия
Регулярные конкурсы позволяют клиентам бороться друг с другом за значительные выигрышные суммы. Всякий состязание располагает свои условия вовлечения и доску лидеров.
Методы внесения и снятия сумм
Площадка предоставляет массу платежных сервисов:
– Дебетовые картыы
– Электронные платежные системы
– Крипто
– Прямые транзакции
Абсолютно все операции осуществляются безопасно благодаря передовым протоколам криптографии.
Отдел поддержки
Профессиональные специалисты сервиса помощи настроены поддержать 24/7. Предусмотрены нижеперечисленные пути связи:
– Онлайн-чат
– Email-обслуживание
– Звонковая связь
– Социальные сети
Вывод
Легальный домен платформы и его действующие дубликаты предоставляют игрокам защищенный и удобный подход к обширному выбору геймерских игр. Щедрые бонусы, регулярные предложения, компетентная помощь и удобные расчетные методы превращают азартный опыт предельно приятным и результативным.
1xbet mobil giri? 1xbet-giris-27.com .
1xbet tr giri? 1xbet-giris-30.com .
I truly love your website.. Excellent colors
& theme. Did you create this amazing site yourself?
Please reply back as I’m planning to create my own personal site and would like to know where you got
this from or what the theme is called. Thanks!
published here gta san andreas apk
Анализ официального сайта
Актуальное онлайн-казино обеспечивает своим игрокам обширный набор игр и призов. Официальный ресурс https://daianafernandes.com.br/ оперирует 24/7, давая вход к топовым играм, live-казино и многим промо.
Актуальное зеркало: путь к сайту
Что такое зеркало казино
Альтернатива является собой полную версию оригинального сайта с другим доменным путем. Актуальное зеркало дает участникам преодолевать ограничения и обеспечивать непрерывный доступ к любимым играм.
Как обнаружить рабочее зеркало сегодня
Рабочие адреса на проверенное зеркало публикуются через:
– Электронную подписку
– Основные медийные сети
– Сервис сопровождения
– Affiliated сайты
Открытиесчета на сайте
Этапы оформления
Открытиесчета занимает несколько минут и содержит данные этапы:
1. Открытие на оригинальный веб-сайт или функционирующее зеркало
2. Нажатие кнопки “Создатьаккаунт”
3. Ввод личных данных
4. Активация электроннойпочты или телефона
5. Установка секретнойкомбинации
Приз за регистрацию
Свежие клиенты обретают выгодные стартовые бонусы:
– Бонусные депозиты на баланс
– Фриспины для симуляторов
– Повышенный объем кешбэка
– Уникальные промокоды
Доступ в персональный аккаунт
Активные игроки могут осуществить вход через официальный веб-сайт или текущее зеркало. Для этого следует указать учетноеимя и пароль, установленные при оформлении.
Функции личного аккаунта
В индивидуальном аккаунте открыты данные функции:
– Изменение персональными информацией
– Ввод кошелька
– Получение выигрышей
– Использование кодов
– Мониторинг истории ставок
– Вступление в конкурсах
Вознаграждения и акции
Виды поощрений
Казино балует своих клиентов разнообразными поощрительными программами:
– Приветственный комплект — солидные бонусы на первые пополнения
– Халявныеспины — дополнительные ставки в известных играх
– Кэшбек — систематический возмещение процента ставок
– План лояльности — особые бонусы для активных клиентов
Купоны и их применение
Уникальные купоны гарантируют дополнительные поощрения. Для активации следует набрать последовательность в нужное поле в личном разделе.
Развлекательный выбор
Слоты
Коллекция игровых автоматов содержит сотни позиций от лучших провайдеров:
– Классические слоты
– Продвинутые развлечения
– Прогрессивные симуляторы
– Тематические автоматы
Live казино
Область Live-казино обеспечивает игру с живыми дилерами в обстановке прямого трансляции:
– Французскаярулетка
– Blackjack
– Баккара
– Карибскийпокер
Соревнования
Постоянные турниры с внушительными наградными суммами проводятся еженедельно. Участники конкурируют за лидерство в турнирнойсетке.
Mobile версия и программа
Смартфонная платформа веб-сайта
Оригинальный сайт полностью приспособлен для портативных гаджетов. Клиенты могут пользоваться автоматы непосредственно через веб-навигатор без обязательства установки.
APP для установки
Авторское портативное APP имеется для загрузки на гаджеты с операционными системами Android и iOS. Программа дает:
– Быстрый путь к играм
– Стабильную операционность
– Моментальные-сообщения о бонусах
– Комфортный оформление
Резюме
Основной сайт казино и его действующие копии гарантируют клиентам полный путь к качественным игровым услугам. Солидные бонусы, разнообразные кампании, функциональная адаптивная версия и квалифицированная служба превращают игровой опыт максимально enjoyable и результативным.
Передовые виртуальные казино дают пользователям обширный выбор опций для приятной игры. Впрочем иногда соединение к основному платформе может являться недоступным. В таких моментах на подмогу спешит казино DBbet казино, которое обеспечивает бесперебойный доступ ко всем возможностям платформы.
Что такое действующее зеркало казино
Копия — это точная версия главного веб-сайта, которая располагается по альтернативному интернет-адресу. Копия имеет весь инструментарий основного портала, включая персональный кабинет, депозит и данные операций.
Принципиальные достоинства эксплуатации зеркала:
– Постоянный доступ к ресурсу
– Полная идентичность опций
– Сохранность личных реквизитов
– Поддержка доступных бонусов
Как отыскать рабочее зеркало на сегодня
Имеется некоторое количество проверенных вариантов получения действующей URL:
Официальные ресурсы:
1. Электронная рассылка — дирекция периодически отправляет письма с свежими ссылками
2. Коммуникационные сети — проверенные профили публикуют текущую сведения
3. Отдел поддержки — специалисты предоставляют надежные URL
4. Смартфонное приложение — позволяет обходить блокировки
Регистрация на главном ресурсе
Процесс регистрации занимает только несколько минут и содержит из данных шагов:
1. Попадание на главный сайт или функционирующее зеркало
2. Щелчок на клавишу «Зарегистрироваться»
3. Ввод учетной таблицы
4. Подтверждение email почты или сотового номера
5. Задействование привилегии за регистрацию при существовании промокода
Новые игроки зарабатывают солидный вступительный приз, который может предполагать фриспины, валютные вознаграждения или возврат средств.
Авторизация в личный кабинет
Подключение на портале производится привычным образом. Необходимо вписать учетные данные и пароль, указанные при оформлении.
Значимые аспекты для конфиденциального входа:
– Применяйте сложный код
– Включите двухэтапную верификацию
– Не фиксируйте данные на публичных устройствах
– Проверяйте URL строку браузера
Анализ поощрительной системы
Игровая платформа одаривает клиентов различными вознаграждениями и промо:
Стартовый пакет
Начинающие способны надеяться на щедрое награду за стартовый взнос. Зачастую это пропорциональная добавка к переведенной сумме плюс бесплатные вращения для востребованных слотов.
Периодические акции
– Еженедельный возврат средств — компенсирование части потерянных денежных средств
– Призы на последующие депозиты
– Особые предложения по знаменательным датам
– Соревнования с большими призовыми суммами
Программа лояльности
Активные игроки получают очки за любую бет, которые затем обмениваются на реальные денежные призы, фриспины или особые бонусы.
Бонус-коды: как задействовать
Кодовые комбинации — это особые наборы знаков, гарантирующие возможность к бонусным поощрениям.
В каких местах взять действующие промокоды:
– Легитимные медийные сети казино
– Аффилиатные сайты
– Email-новостная лента
– Специализированные сообщества
Активируется промокод в специальное поле при оформлении или внесении депозита баланса.
Портативная версия и приложение
Актуальные пользователи любят играть с смартфонных аппаратов. Портал предлагает пару способа для комфортной смартфонной игры.
Responsive вариант
Веб версия самостоятельно адаптируется под диагональ монитора. Не требует загрузки и действует в любом свежем браузере.
Смартфонное приложение
Загрузить app можно для гаджетов на Android и iOS. Достоинства app:
– Быстрая активация
– Устойчивая работа
– Мгновенные-уведомления о промо
– Автономный обход блокировок
Этап скачивания элементарен: нужно зайти на ресурс с мобильного устройства и следовать предписаниям.
Развлекательный каталог
Каталог игр насчитывает огромное количество наименований от ведущих поставщиков.
Слоты
Гемблинг автоматы — крайне популярная группа игр. Доступны стандартные винтажные аппараты, новые графические аппараты с дополнительными уровнями, а также накопительные джекпоты.
Live казино
Секция с настоящими крупье предоставляет почувствовать антураж истинного казино. Доступны развлечения с рулеткой.
Трансляция осуществляется в высоком формате, имеется диалог с раздающим и другими игроками.
Состязания
Систематически устраиваются состязания по разным дисциплинам. Присоединение обеспечивает возможность заработать монетарные вознаграждения, даровые прокруты или особые презенты.
Финансовые операции
Платформа поддерживает значительный набор финансовых способов:
– Дебетовые карты
– Виртуальные кошельки
– Цифровая валюта
– Счетовые транзакты
Низшая сумма вклада — посильная для большинства пользователей. Получение денег осуществляется в скорые периоды.
Сервис поддержки
Опытные консультанты готовы помочь непрерывно. Доступны следующие варианты связи:
– Онлайн-чат
– Email
– Голосовая поддержка
– Общественные сети
Ответы на типовые вопросы можно отыскать в блоке FAQ.
Заключение
Главный портал казино и его действующие зеркала обеспечивают геймерам совершенный путь ко всем возможностям сайта. Великодушные бонусы, практичная мобильная версия, впечатляющий коллекция развлечений и профессиональная ассистенция создают игровой времяпрепровождение крайне комфортным и надежным.
https://t.me/tigercasinoofficial Если кто-то ищет рабочую ссылку на tiger casino, обычно она есть в телеграме.
1xbet giris 1xbet giris .
https://happypawspharmacy.shop/# pet pharmacy USA
Вход к сайту через проверенные зеркала
Участники онлайн казино регулярно имеют дело с ситуацией ограничения основного ресурса. Именно для решения этой проблемы предусмотрены копии официального портала. казино Enomo гарантирует стопроцентный доступ ко всем возможностям казино.
Что такое рабочее зеркало казино
Зеркало составляет собой абсолютную версию оригинального ресурса с аналогичным функционалом. Единственное расхождение — это другое имя. Любые данные игрока, содержа средства, поощрения и записи игр, продолжают быть такими же.
Выгоды задействования зеркал
Действующие зеркала располагают множеством значимых достоинств:
– Круглосуточный подключение к излюбленным играм
– Совершенная конфиденциальность индивидуальных данных
– Удержание всех параметров пользовательского кабинета
– Опция взятия наград и присутствия в кампаниях
Оформление профиля на официальном домене
Ход открытия счета максимально элементарен и длится буквально минут. Начинающие участники способны рассчитывать на щедрый стартовый приз за открытие счета.
Этапы формирования аккаунта
1. Переход на основной ресурс или его дубликат
2. Выбор на клавишу “Создать аккаунт”
3. Ввод требуемых сведений
4. Подтверждение цифровой почты
5. Указание кода (когда присутствует)
Награды и предложения для пользователей
Платформа радует своих пользователей различными поощрительными системами.
Основные категории наград
Вводный подарок — крупное начисление для свежих клиентов, каковое имеет возможность содержать денежные бонусы и free spins.
Бесплатные вращения — возможность играть в топовых игровых машинах бесплатно.
Компенсация — частичный отдача утраченных финансов, который начисляется раз в неделю или ежемесячно.
Купоны — особые сочетания, гарантирующие бонусные выгоды.
Индивидуальный кабинет: возможности и параметры
Личный аккаунт обеспечивает исчерпывающий управление над пользовательским активностью. Здесь доступны:
– Контроль средствами
– Архив переводов
– Действующие награды
– Параметры защиты
– Проверка учетной записи
Смартфонная версия и программа
Нынешние клиенты предпочитают гибкость. Площадка дает пару способа для игры с смартфонных устройств.
Отзывчивая мобильная версия
Смартфонная версия домена без участия адаптируется под экран любого аппарата. Отсутствует потребность загружать специальное программное обеспечение.
Софт для телефонов
Разрешено инсталлировать специальное приложение для iOS и Android. Приложение предоставляет:
– Быстрый вход
– Доработанный интерфейс
– Push-оповещения о поощрениях
– Бесперебойную производительность
Live раздел: атмосфера истинного игорного заведения
Зона Live казино отправляет игроков в обстановку истинного зала. Компетентные дилеры проводят партии в режиме живого времени.
Востребованные Live-развлечения
– Американская рулетка
– 21
– Punto Banco
– Покер
Автоматы: многообразие развлечений
Собрание игровых автоматов вмещает массу вариантов от топовых провайдеров. Игроки обнаружат:
– Обычные автоматы
– Видеослоты
– Джекпот-слоты
– Мегавейс
Соревнования и особые акции
Периодические турниры позволяют клиентам соревноваться друг с другом за внушительные выигрышные банки. Отдельный состязание обладает свои критерии участия и рейтинг победителей.
Пути зачисления и изъятия средств
Платформа использует ряд расчетных систем:
– Кредитные карты
– Онлайн платежные системы
– Крипто
– Прямые отправления
Любые платежи выполняются надежно благодаря современным технологиям защиты.
Команда поддержки
Компетентные сотрудники команды помощи расположены содействовать 24/7. Доступны нижеперечисленные методы связи:
– Живой-чат
– Email-поддержка
– Телефонная горячая линия
– Социальные сети
Заключение
Официальный домен игровой площадки и его действующие зеркала предоставляют клиентам надежный и приятный переход к огромному спектру игровых развлечений. Солидные бонусы, частые промоакции, квалифицированная поддержка и удобные финансовые способы делают развлекательный досуг крайне захватывающим и результативным.
Нынешние онлайн-казино обеспечивают участникам богатый ассортимент слотов и щедрые премии. Однако для беспроблемной деятельности критично осознавать, как обнаружить https://www.latorreristorazione.it/senza-categoria/sposoby-ogranicheniya-i-sroki-vyvoda-deneg-iz-onlayn-kazino-rukovodstvo-na-2025-god/ и его актуальные зеркала.
Что такое лицензионный сайт казино
Лицензионный веб-сайт казино — это основная площадка, где игроки могут получать удовольствие от игровыми автоматами. Портал действует на законных принципах и имеет всеми обязательными сертификатами.
Первостепенные преимущества лицензионного веб-сайта:
– Безопасность личных данных
– Честные условия использования
– Стабильные выплаты
– Профессиональная служба поддержки
Действующее зеркало казино: для чего используется
Зеркало — это идентичная копия главного портала, размещенная по иному URL. Рабочее зеркало разрабатывается для гарантирования бесперебойного подключения к платформе.
Основания использования зеркал:
– Блокировка основного сайта
– Регламентные работы
– Повышенная нагрузка на систему
Как отыскать актуальное зеркало сегодня
Найти актуальное официальное зеркало можно разными вариантами:
1. Рассылка — зарегистрируйтесь на почтовую доставку
2. Служба помощи — напишите в онлайн-чат
3. Публичные каналы — мониторьте за новостями
4. Игровые площадки — авторитетные платформы
Оформление профиля на платформе казино
Процесс регистрации длится всего несколько секунд:
1. Кликните на кнопку “Регистрация”
2. Заполните запрашиваемые данные
3. Подтвердите email почту
4. Введите код активации, если есть
По завершении успешной создания аккаунта вам станет доступен личный аккаунт.
Поощрения и коды активации
Привлекательная поощрительная программа — важное преимущество казино:
Награда за регистрацию
Новые клиенты зарабатывают стартовый поощрение, который может включать:
– Валютный кредит на дебютный пополнение
– Фри-спины для барабанов
– Стартовые фонды
Промокоды
Регулярно появляются свежие промокоды, предоставляющие получить дополнительные поощрения.
Программа компенсации
Регулярные игроки возвращают порцию утраченных ставок в виде компенсации.
Текущие промо и состязания
Платформа периодически запускает интересные промо-мероприятия:
– Weekly баттлы
– Сезонные бонусы
– Конкурсы значительных призов
– Система статусов
Логин в личный раздел
Для доступа на ресурс нужно:
1. Посетить основной ресурс или актуальное зеркало
2. Активировать “Войти”
3. Указать никнейм и ключ
В пользовательском профиле предоставлены нижеперечисленные опции:
– Пополнение баланса
– Получение выигрышей
– Анализ истории игр
– Изменение индивидуальными сведениями
Портативная модификация и приложение
Адаптивная версия
Responsive платформа портала обеспечивает делать ставки с различных карманного телефона. Дизайн автоматически подстраивается под формат дисплея.
Программа для установки
Установить клиент можно для:
– Android — непосредственная скачивание с портала
– iOS — установка через App Store
Достоинства app:
– Оперативный доступ
– Надежная функциональность
– Push-уведомления об предложениях
– Улучшенный UI
Развлекательные зоны
Слоты
Разнообразная галерея азартных барабанов от топовых разработчиков:
– Стандартные игры
– Новые-эмуляторы
– Прогрессивные-игры
Live зал
Секция с реальными дилерами обеспечивает:
– Рулетки
– Блэкджек
– Мини-баккара
– Texas Hold’em
Эфиры осуществляются в отличном разрешении, обеспечивая впечатление настоящего казино.
Методы депозита и снятия
Казино принимает множественные транзакционные инструменты:
– Банковские картсчета
– Онлайн системы
– Crypto
– Финансовые отправки
Наименьшие суммы депозита и оперативные транзакции создают развлечение максимально комфортной.
Команда support
Квалифицированная команда support работает 24/7 и способна содействовать с всеми ситуациями:
– Мгновенный-чат
– Email-поддержка
– Голосовая связь
Резюме
Лицензионный веб-сайт казино и его функционирующие дубликаты дают клиентам защищенный и захватывающий развлекательный процесс. Выгодные награды, функциональная мобильная модификация, обширные развлечения и качественное live-казино формируют эту платформу замечательным вариантом для азартных времяпрепровождения.
https://miamifightcard.com/
In the context of MediaFightCard, the gambling markets present a intriguing dynamic with titleholders entering as underdogs and challengers occupying favorite status. In the marquee matchup for the open light heavyweight title, former champion Jiri Prochazka debuted as a slight -143 favorite over the surging Carlos Ulberg, who comes in as a +116 underdog notwithstanding his nine-fight winning streak.
Za ugodno iskustvo igranja slotova важно je izbjeći nekoliko uobičajenih grešaka. Mnogi igrači počinju igrati bez plana ili strategije, što može dovesti do nepromišljenih uloga. Također, često se zanemaruju pravila igre i bonus funkcije koje mogu biti važne za razumijevanje slotova. Još jedna česta greška je donošenje odluka pod uticajem emocija, posebno nakon gubitka. Bolji pristup je postaviti budžet, igrati odgovorno i zadržati kontrolu nad ulozima. Kada se igra promišljeno, slot igre mogu biti zanimljiv i zabavan način provođenja vremena.
tiger casino вход Я нашёл тайгер казино через телеграм без проблем.
1xbet spor bahislerinin adresi 1xbet spor bahislerinin adresi .
Главная mega сайт
try these out gta sa apk
Актуальные онлайн-казино обеспечивают пользователям обширный диапазон игр и бонусных опций. Подключение к ресурсу реализуется через основной ресурс или его действующее зеркало казино Голд, что обеспечивает бесперебойную игру.
Что такое действующее зеркало казино
Альтернатива — это абсолютная дубликат официального портала, разработанная для обхода запретов. Рабочее зеркало помогает игрокам получить доступ к предпочитаемым играм в любое удобное время.
Официальное зеркало обладает всеми опциями первоначального ресурса:
– Полный каталог автоматов
– Профиль с сохраненными данными
– Актуальные промокоды
– Безопасные денежные транзакции
Регистрация на лицензионном веб-сайте
Процедура создания аккаунта требует всего немного минут. Первым пользователям нужно:
1. Попасть на проверенный ресурс или актуальное зеркало
2. Кликнуть на ссылку “Зарегистрироваться”
3. Ввести требуемые параметры
4. Проверить контакт
5. Произвести первый взнос
Приветственный бонус зачисляется автоматически после завершения всех этапов.
Вход в учетную запись
Существующие пользователи могут произвести вход применяя:
– Имя пользователя и ключ
– Номер мобильного
– Электронную почту
Персональный раздел обеспечивает доступ к управлению средствами, сведениям транзакций и доступным бонусам.
Бонусы и программы
Развлекательная платформа балует постоянных клиентов многочисленными вознаграждениями:
Первый пакет
– Надбавка на стартовый депозит до 100%
– Даровые спины на топовые машины
– Особые бонусы за следующие платежи
Купоны
Специальные коды предоставляют шанс на приобретение специальных бонусов. Текущие промокоды выставляются в секции “Предложения”.
Кэшбек
Регулярный бонус достигает до 10% от утраченных средств. Выплата предоставляется моментально.
Программа лояльности
Постоянные участники получают баллы, которые переводятся на реальные выплаты или free spins.
Мобильная версия и приложение
Для практичности пользователей разработана функциональная портативная платформа. Отзывчивый вид помогает беспрепятственно развлекаться с всякого карманного гаджета.
Преимущества софта:
– Моментальный вход к играм
– Настроенный вид
– Надежная активность
– Сообщения о новых бонусах
Загрузить программу можно бесплатно с официального сайта для гаджетов на Android и iOS.
Ассортимент автоматов
Машины
Библиотека вмещает более 2000 слотов от ведущих студий:
– Обычные слоты
– Видео-слоты
– Слоты с джекпотом
– Фирменные автоматы
Live казино
Категория Live развлечений предоставляет развлечение с живыми дилерами в живом режиме:
– Рулетка
– Двадцать одно
– Баккара
– Poker
Конкурсы
Постоянные конкурсы с большими призовыми бюджетами запускаются регулярно. Допуск в конкурсах открыто всем зарегистрированным клиентам.
Платежные варианты
Депозиты и снятия финансов осуществляются через востребованные способы оплаты:
– Платежные карты
– Онлайн счета
– Цифровая валюта
– Прямые переводы
Минимальный вклад — от 100 рублей. Изъятие финансов осуществляется в течение 24 периода.
Команда саппорта
Непрерывная служба поддержки способна поддержать в исправлении произвольных проблем:
– Live chat
– Email
– Горячая линия
– Соц сети
Надежность и лицензия
Официальный сайт функционирует на основании мировой лицензии. Каждые сведения игроков закрыты современным SSL-шифрованием.
Итог
Актуальное зеркало гарантирует непрерывный доступ к предпочитаемым играм, щедрым промокодам и практичным функциям. Зарегистрируйтесь сегодня и получите первый приз!
https://vitalcorepharmacy.com/# trusted online pharmacy reviews
Современные онлайн-казино обеспечивают геймерам обилие опций для комфортной игры. Основной веб-портал казино РўРёРїРїРё сайт предоставляет доступ ко всем возможностям и развлечениям. Однако при возникновении программных трудностей на помощь спешат действующие альтернативные адреса.
Что означает собой актуальное зеркало
Альтернативный адрес казино — это идентичная реплика основного ресурса, находящаяся по альтернативному веб-адресу. Лицензионное зеркало поддерживает все возможности, вместе с открытие профиля, авторизацию в персональный кабинет, вознаграждения и кодовые слова.
Зеркало на сегодня гарантирует:
– Стабильный путь к игровым машинам
– Абсолютную сохранность личных данных
– Удержание баланса и журнала переводов
– Доступность всех промо-предложений
Создание аккаунта на лицензионном сайте
Этап открытия профиля занимает несколько минут. Новым клиентам необходимо:
1. Зайти на подлинный портал или действующее зеркало
2. Выбрать кнопку «Регистрация»
3. Указать нужные графы
4. Верифицировать э-мейл почту
5. Использовать кодовое слово при присутствии
После окончания создания аккаунта пользователи приобретают вознаграждение за регистрацию, который может включать бесплатные вращения или денежно-призовое вознаграждение.
Вход в персональный кабинет
Личный кабинет обеспечивает всесторонний контроль над азартным ходом. Через собственный кабинет допускается:
– Вносить средства на депозит
– Забирать призы
– Активировать купоны
– Проверять историю пари
– Играть в конкурсах
– Забирать кэшбек
Анализ бонусов и промо-предложений
Щедрая призовая система — важное преимущество казино. Главные типы премий:
Приветственный приз
Новые игроки приобретают щедрое награду на начальные пополнения. Сумма премии может доходить до 100-200% от величины взноса.
Free spins
Бесплатные спины выдаются для востребованных игровых автоматов. Объем бесплатных вращений варьируется от 10 до 500 штук.
Кешбэк
Регулярный или ежемесячный возврат процента утраченных денег. Обычный размер возврата — 5-15%.
Турниры
Регулярные соревнования с внушительными призовыми банками. Соревнующиеся состязаются за призовые строчки в таблице лидеров.
Мобильная версия и софт
Смартфонная версия дает возможность делать ставки с всякого девайса. Игроки могут скачать app для iOS и Android или эксплуатировать интернет версию.
Плюсы мобильного софта:
– Оперативная загрузка игр
– Комфортный дизайн
– Пуш-нотификации о промо
– Возможность входа через отпечаток пальца
Машины и Live казино
Игровая база охватывает тысячи названий от известных поставщиков.
Востребованные типы слотов:
– Классические автоматы
– Видео-автоматы с бонусными уровнями
– Джекпот слоты
– Мегавейс слоты
Live игровой зал
Секция live казино предлагает игру с живыми ведущими. Доступны традиционные развлечения:
– Рулетка
– Blackjack
– Punto Banco
– Карибский покер
Как отыскать функционирующее зеркало
Раздобыть рабочую URL на зеркало возможно разными путями:
1. Зарегистрироваться на email-рассылку
2. Наблюдать за обновлениями в соц сетях
3. Связаться в сервис поддержки
4. Сохранить действующее зеркало в фавориты
Вывод
Официальный портал и его действующие дубликаты гарантируют непрерывный доступ к азартным слотам. Богатые вознаграждения, множественные промокоды, удобное мобильное программа и высококлассная сервис поддержки превращают развлекательный процесс максимально приятным и безопасным.
For white papers
fast payday loans
for presentation slides.
https://ufc327odds.com/
The upcoming UFC 327 light heavyweight championship bout in Miami presents a legitimate pick’em for bettors, as former titleholder Jiri Prochazka (-142) and on-a-roll knockout specialist Carlos Ulberg (+120) gear up to throw down for the open belt. The tight odds are a testament to how well-paired these two stand-up fighters happen to be, setting up a matchup where a wager on any side is simply a matter of which explosive fighting style you think will emerge victorious.
Читать далее kraken сайт
1win login xatolik http://1win5765.help/
visit here cap cut apk
Подключение к платформе через актуальные зеркала
Клиенты интернет казино нередко встречаются с ситуацией закрытия официального портала. Как раз для устранения этой ситуации предусмотрены копии основного портала. bonus гарантирует полный переход ко всем возможностям площадки.
Что такое рабочее зеркало казино
Дубликат составляет собой абсолютную реплику основного сайта с идентичным набором функций. Основное отличие — это альтернативное имя. Каждые параметры участника, содержа депозит, бонусы и данные игр, продолжают быть идентичными.
Выгоды эксплуатации зеркал
Рабочие зеркала характеризуются рядом значимых преимуществ:
– Постоянный вход к предпочитаемым слотам
– Абсолютная сохранность персональных сведений
– Неизменность всех параметров персонального кабинета
– Опция взятия призов и участия в промоакциях
Оформление профиля на основном ресурсе
Операция регистрации чрезвычайно элементарен и требует буквально минут. Новые участники могут полагаться на щедрый стартовый поощрение за создание аккаунта.
Стадии создания аккаунта
1. Вход на главный домен или его зеркало
2. Нажатие на опцию “Создать аккаунт”
3. Указание необходимых данных
4. Проверка почтовой почты
5. Указание купона (если присутствует)
Поощрения и предложения для участников
Казино одаривает своих клиентов всевозможными наградными программами.
Ключевые виды наград
Приветственный бонус — щедрое поощрение для свежих пользователей, которое в состоянии охватывать финансовые бонусы и безвозмездные спины.
Free spins — возможность запускать в популярных аппаратах даром.
Компенсация — процентный возврат потерянных финансов, каковой зачисляется раз в неделю или раз в месяц.
Специальные коды — специальные наборы, гарантирующие бонусные поощрения.
Индивидуальный кабинет: инструменты и установки
Индивидуальный раздел гарантирует исчерпывающий управление над пользовательским опытом. Тут имеются:
– Администрирование счетом
– Данные платежей
– Действующие награды
– Настройки сохранности
– Проверка аккаунта
Портативная редакция и APP
Нынешние участники оценивают гибкость. Площадка дает 2 пути для участия с мобильных девайсов.
Отзывчивая смартфонная версия
Портативная версия домена без участия настраивается под разрешение любого аппарата. Не требуется устанавливать дополнительное приложение.
Программа для смартфонов
Можно инсталлировать оригинальное программу для iOS и Android. Программа дает:
– Быстрый старт
– Улучшенный дизайн
– Всплывающие-уведомления о бонусах
– Надежную работу
Live казино: среда истинного казино
Секция Live развлечений транспортирует клиентов в антураж истинного казино. Профессиональные ведущие организуют раунды в режиме прямого времени.
Востребованные Live-столы
– Рулетка
– 21
– Баккарат
– Карибский покер
Игровые машины: ассортимент автоматов
Коллекция игровых аппаратов вмещает тысячи названий от известных разработчиков. Пользователи встретят:
– Обычные аппараты
– Видеослоты
– Джекпот-игры
– Мегавейс
Турниры и уникальные события
Систематические турниры позволяют клиентам бороться друг с другом за солидные денежные суммы. Всякий состязание обладает свои критерии участия и таблицу чемпионов.
Пути зачисления и изъятия средств
Площадка обслуживает ряд денежных методов:
– Банковские карты
– Электронные кошельки
– Криптовалюты
– Банковские отправления
Абсолютно все платежи реализуются конфиденциально благодаря современным протоколам кодирования.
Команда помощи
Профессиональные сотрудники отдела обслуживания настроены ассистировать 24/7. Работают следующие пути общения:
– Живой-чат
– Email-сервис
– Аудио горячая линия
– Публичные сети
Заключение
Легальный ресурс казино и его актуальные альтернативы дают клиентам надежный и комфортный подход к обширному диапазону геймерских игр. Щедрые поощрения, регулярные промоакции, качественная помощь и легкие платежные системы делают игровой опыт предельно увлекательным и прибыльным.
view exercises – Organized content sections make practicing math fast and simple.
Современные онлайн-казино предлагают геймерам богатый диапазон функций для комфортной времяпрепровождения. Доступ к сервису 360 выполняется через главный портал или актуальное зеркало.
Что такое актуальное зеркало казино
Функционирующее зеркало — это дополнительный URL основного сайта казино. Такие клоны создаются для обеспечения постоянного входа к азартной платформе.
Дубликат сегодня совершенно копирует возможности базового портала. Геймеры получают схожий путь ко всем сервисам, включая создание аккаунта, пополнение кошелька и получение средств.
Создание аккаунта на главном веб-сайте
Процесс открытия профиля длится всего пару секунд. Новым клиентам необходимо:
1. Зайти на главный портал или актуальное настоящее зеркало
2. Кликнуть кнопку “Зарегистрироваться”
3. Ввести необходимые сведения
4. Подтвердить email почту
5. Применить бонусный код при существовании
После финализации открытия профиля клиент приобретает подарок за регистрацию, который имеет право содержать фриспины или денежное премию.
Вход в личный кабинет
Персональный кабинет — это защищенная зона, где пользователи могут регулировать своим профилем. Для входа нужно внести имя пользователя и код доступа.
В пользовательском кабинете представлены нижеперечисленные опции:
– Просмотр хронологии платежей
– Применение бонусных кодов
– Управление призами
– Участие в состязаниях
– Проверка кэшбэка
– Корректировка аккаунта
Вознаграждения и спецпредложения
Гемблинговая система предоставляет привлекательные вознаграждения:
Регистрационный комплект — новички обретают солидное вознаграждение на первые взносы.
Даровые спины — предоставляются как при создании аккаунта, так и в процессе многочисленных акций.
Кэшбэк — еженедельный возмещение доли потерянных сумм.
Бонусные коды — уникальные коды, открывающие выход к специальным призам.
Характеристика гемблинговых направлений
Игровые автоматы
Собрание slots содержит множество позиций от ведущих провайдеров. Геймеры найдут как стандартные машины, так и инновационные видеослоты с притягательной анимацией.
Live казино
Зона Live казино предоставляет возможность играть с настоящими ведущими в состоянии актуального времени. Имеются востребованные игры: рулетка, блэкджек, баккара, покер.
Соревнования
Периодические чемпионаты с большими выигрышными банками манят тысячи участников. Чемпионы получают cash вознаграждения и эксклюзивные поощрения.
Портативная версия и приложение
Адаптивная версия сайта дает возможность наслаждаться с всякого аппарата. Структура автономно подстраивается под размер экрана.
Скачать приложение можно для девайсов на Android и iOS. Портативное app имеет всеми функциями десктопной версии.
Как обнаружить действующее зеркало на сегодня
Актуальные ссылки зеркал систематически меняются. Узнать действующую URL можно многими способами:
– Через отдел поддержки
– В подлинных социальных сетях
– По e-mail подписке
– На специализированных сайтах
Защита и легальность
Лицензионный сайт функционирует на базе мировой документа. Все операции охраняются передовыми методами безопасности.
Секретность личных данных поддерживается в стопроцентном размере.
Итог
Главный портал и его действующие зеркала дарят игрокам 24/7 путь к качественным развлекательным услугам. Выгодные призы, многочисленные развлечения, компетентная сервис — все это делает игровой досуг чрезвычайно комфортным и увлекательным.
canadian king pharmacy: VitalCore Pharmacy – rx pharmacy no prescription
this contact form gta san andreas apk
колесов николай
str-zabor.ru
look at this web-site cap cut apk
pharmacy in canada for viagra: VitalCore Pharmacy – cheap viagra online canadian pharmacy
check this link – When energy is guided properly, it gets utilized without unnecessary waste.
Нынешние сетевые казино предлагают пользователям обширный ассортимент возможностей для беспроблемной игры. Но иногда соединение к официальному ресурсу может являться закрытым. В таких моментах на поддержку приходят РќСЊСЋ Ретро, которое гарантирует постоянный подключение ко всем функциям платформы.
Что такое рабочее зеркало казино
Альтернативный сайт — это абсолютная реплика главного сайта, которая находится по альтернативному адресу. Дубликат сохраняет все набор функций первоначального сайта, включая индивидуальный кабинет, счет и историю переводов.
Главные преимущества использования зеркала:
– 24-часовой вход к платформе
– Максимальная аналогичность инструментов
– Сохранность персональных данных
– Сохранение существующих бонусов
Как разыскать функционирующее зеркало в данный момент
Имеется ряд надежных вариантов получения текущей адреса:
Легитимные ресурсы:
1. Почтовая рассылка — администрация регулярно отправляет сообщения с актуальными доменами
2. Социальные сети — официальные аккаунты публикуют актуальную новости
3. Служба поддержки — консультанты выдают безопасные URL
4. Телефонное приложение — дает возможность избегать блокировки
Регистрация на главном портале
Операция регистрации требует лишь немного минут и предполагает из нижеследующих стадий:
1. Вход на официальный портал или действующее зеркало
2. Клик на иконку «Создать аккаунт»
3. Указание пользовательской формы
4. Валидация email почты или мобильного номера
5. Задействование бонуса за регистрацию при доступности промокода
Свежие геймеры обретают солидный начальный презент, который может предполагать бесплатные вращения, финансовые вознаграждения или кэшбек.
Авторизация в пользовательский кабинет
Подключение на сайте выполняется обычным путем. Необходимо внести логин и секретный ключ, задействованные при регистрации.
Ключевые нюансы для надежного входа:
– Применяйте защищенный код
– Активируйте двойную проверку
– Не сохраняйте коды на чужих гаджетах
– Отслеживайте доменную строку браузера
Характеристика премиальной системы
Игорный портал одаривает клиентов разнообразными бонусами и промо:
Стартовый букет
Новички могут претендовать на существенное бонус за стартовый вклад. Зачастую это долевая прибавка к внесенной сумме плюс даровые спины для топовых слотов.
Регулярные промо
– Недельный компенсация — компенсирование процента потерянных финансов
– Награды на очередные депозиты
– Уникальные предложения по торжествам
– Состязания с большими премиальными суммами
Программа верности
Деятельные игроки зарабатывают баллы за произвольную игру, которые затем обмениваются на реальные финансы, бесплатные вращения или эксклюзивные преимущества.
Бонус-коды: как использовать
Бонус-коды — это специальные сочетания букв и цифр, дающие возможность к эксклюзивным вознаграждениям.
Каким образом найти актуальные промокоды:
– Официальные общественные сети казино
– Аффилиатные площадки
– Email-информирование
– Тематические сообщества
Указывается промокод в соответствующее поле при оформлении или зачислении средств баланса.
Смартфонная версия и приложение
Современные пользователи предпочитают играть с телефонных аппаратов. Платформа обеспечивает 2 решения для приятной мобильной игры.
Мобильная вариант
Браузерная версия сама настраивается под размер экранной панели. Не требует загрузки и функционирует в произвольном свежем браузере.
Смартфонное приложение
Загрузить софт можно для аппаратов на Android и iOS. Преимущества app:
– Быстрая запуск
– Надежная работа
– Мгновенные-уведомления о поощрениях
– Автономный преодоление блокировок
Этап загрузки элементарен: необходимо открыть на портал с мобильного гаджета и подчиняться руководству.
Азартный каталог
Библиотека аппаратов насчитывает огромное количество вариантов от топовых производителей.
Слоты
Гемблинг аппараты — максимально распространенная группа аттракционов. Доступны классические трехбарабанные аппараты, актуальные графические аппараты с бонусными уровнями, а также джекпотные выигрыши.
Live казино
Секция с живыми дилерами позволяет испытать дух настоящего казино. Представлены игры с рулеткой.
Передача ведется в отличном разрешении, поддерживается общение с крупье и другими геймерами.
Состязания
Систематически запускаются состязания по различным дисциплинам. Вступление позволяет завоевать монетарные награды, бесплатные вращения или уникальные презенты.
Транзакционные манипуляции
Ресурс поддерживает большой набор расчетных инструментов:
– Кредитные карты
– Цифровые платформы
– Криптовалюта
– Финансовые платежи
Наименьшая количество пополнения — доступная для преобладающего числа геймеров. Вывод призов обрабатывается в минимальные сроки.
Отдел поддержки
Квалифицированные сотрудники расположены поддержать непрерывно. Открыты данные каналы коммуникации:
– Веб-чат
– Email
– Телефонная поддержка
– Социальные сети
Ответы на типовые проблемы можно найти в секции FAQ.
Резюме
Основной ресурс казино и его функционирующие зеркала гарантируют игрокам совершенный вход ко всем опциям сайта. Щедрые вознаграждения, комфортная смартфонная версия, гигантский коллекция слотов и профессиональная служба поддержки формируют игровой опыт исключительно комфортным и надежным.
1xbet g?ncel giri? 1xbet g?ncel giri? .
Нынешние онлайн-казино предлагают пользователям обширный выбор азартных игр и привлекательные бонусы. Тем не менее для комфортной работы необходимо понимать, как отыскать http://www.baobibinhminh.com/obzor-sposobov-vneseniya-i-vyvoda-sredstv-v-onlayn-kazino/ и его функционирующие зеркала.
Что такое главный сайт казино
Основной веб-сайт казино — это первичная платформа, где клиенты могут наслаждаться игровыми автоматами. Сайт работает на легитимных условиях и имеет всеми нужными лицензиями.
Главные выгоды основного веб-сайта:
– Конфиденциальность персональных данных
– Объективные требования игры
– Гарантированные платежи
– Профессиональная помощь
Рабочее зеркало казино: для чего нужно
Дублирующий ресурс — это абсолютная клон основного сайта, размещенная по отличному адресу. Актуальное зеркало запускается для предоставления постоянного подключения к платформе.
Причины эксплуатации копий сайта:
– Недоступность главного сайта
– Профилактические мероприятия
– Высокая загрузка на систему
Как найти актуальное зеркало в данный момент
Узнать актуальное официальное зеркало можно несколькими способами:
1. Подписка — подпишитесь на информационную доставку
2. Департамент поддержки — обратитесь в онлайн-чат
3. Публичные сети — проверяйте за обновлениями
4. Тематические площадки — достоверные платформы
Регистрация на сайте казино
Этап создания аккаунта длится лишь несколько минут:
1. Активируйте на кнопку “Создать аккаунт”
2. Внесите обязательные данные
3. Валидируйте email ящик
4. Используйте бонусный код, если имеется
Вслед за завершенной создания аккаунта вам станет открыт пользовательский профиль.
Награды и промокоды
Щедрая премиальная структура — значимое достоинство казино:
Поощрение за создание аккаунта
Первичные участники получают начальный поощрение, который может охватывать:
– Валютный счет на дебютный вклад
– Фриспины для барабанов
– Приветственные бонусы
Промокоды
Регулярно появляются новые промокоды, позволяющие забрать экстра бонусы.
Механизм компенсации
Лояльные клиенты приобретают процент проигранных денег в виде компенсации.
Свежие предложения и турниры
Ресурс регулярно организует увлекательные кампании:
– Weekly турниры
– Праздничные предложения
– Розыгрыши солидных призов
– Система статусов
Вход в пользовательский профиль
Для входа на ресурс необходимо:
1. Посетить лицензионный адрес или рабочее зеркало
2. Нажать “Войти”
3. Ввести никнейм и код доступа
В личном разделе разрешены данные опции:
– Пополнение кошелька
– Обналичивание призов
– Изучение истории игр
– Управление индивидуальными параметрами
Портативная модификация и приложение
Мобильная вариант
Адаптивная модификация веб-сайта дает возможность участвовать с различных портативного гаджета. Интерфейс динамически адаптируется под размер screen.
Клиент для скачивания
Получить приложение можно для:
– Android — официальная установка с ресурса
– iOS — загрузка через App Store
Преимущества приложения:
– Оперативный вход
– Устойчивая работа
– Push-оповещения об промо
– Оптимизированный функционал
Игровые разделы
Барабаны
Внушительная коллекция развлекательных барабанов от известных производителей:
– Классические игры
– Видео-игры
– Прогрессивные-слоты
Live игры
Зона с реальными крупье обеспечивает:
– Рулетки
– Blackjack
– Punto Banco
– Poker
Стримы ведутся в отличном качестве изображения, создавая эффект реального казино.
Способы зачисления и обналичивания
Платформа поддерживает различные финансовые сервисы:
– Банковские картсчета
– Электронные кошельки
– Криптовалюты
– Финансовые переводы
Базовые пороги взноса и моментальные платежи делают развлечение исключительно удобной.
Команда помощи
Компетентная служба support функционирует 24/7 и в состоянии поддержать с разными ситуациями:
– Реалтайм-чат
– Email-консультации
– Phone линия
Заключение
Официальный портал казино и его рабочие зеркала предоставляют клиентам защищенный и азартный игровой процесс. Щедрые награды, функциональная адаптивная вариант, многочисленные игры и качественное live-казино превращают эту платформу превосходным решением для игровых времяпрепровождения.
This casino https://digimarcondusseldorf.com/play-au-gaming-your-leading-hub-for-online-gaming/ offers a solid mix of popular slots and live tables. The platform feels well-designed, promotions are attractive, and support is responsive, which adds confidence.
https://t.me/tigercasinoofficial Нашёл рабочий адрес tiger casino именно через телеграм.
start here – Streamlined design allows exploring alternatives without hassle.
1xbwt giri? 1xbet-giris-29.com .
online vet pharmacy dog and cat medicine supply dog and cat medicine supply
Актуальные онлайн-казино обеспечивают игрокам массу путей для удобной игры. Официальный сайт Либет предоставляет доступ ко всем возможностям и азартным играм. Однако при возникновении технических неполадок на подмогу прибывают функционирующие зеркала.
Что есть собой актуальное зеркало
Копия казино — это полная дубликат официального портала, находящаяся по альтернативному адресу. Легитимное зеркало сохраняет все опции, вместе с открытие профиля, доступ в личный кабинет, премии и промокоды.
Дубликат на сегодня обеспечивает:
– Постоянный доступ к развлекательным слотам
– Абсолютную конфиденциальность личных сведений
– Удержание баланса и журнала операций
– Применимость всех акций
Создание аккаунта на лицензионном портале
Ход открытия профиля отнимает пару минут. Начинающим пользователям нужно:
1. Перейти на главный сайт или функционирующее зеркало
2. Выбрать кнопку «Создать аккаунт»
3. Указать требуемые сведения
4. Верифицировать э-мейл почту
5. Указать промокод при присутствии
После окончания создания аккаунта геймеры обретают вознаграждение за регистрацию, который может включать бесплатные вращения или денежно-призовое поощрение.
Авторизация в персональный кабинет
Индивидуальный кабинет открывает всесторонний мониторинг над игровым ходом. Через собственный профиль можно:
– Депонировать кошелек
– Забирать средства
– Активировать купоны
– Мониторить журнал игр
– Играть в турнирах
– Забирать кешбэк
Характеристика бонусов и промо-предложений
Выгодная бонусная программа — существенное козырь ресурса. Центральные виды бонусов:
Приветственный приз
Начинающие получают великодушное премирование на начальные вклады. Величина приза может составлять 100-200% от суммы депозита.
Бонусные спины
Безвозмездные раунды предоставляются для известных машин. Сумма free spins разнится от 10 до 500 штук.
Возврат средств
Постоянный или помесячный отдача процента проигранных денег. Типичный объем компенсации — 5-15%.
Соревнования
Периодические соревнования с большими наградными фондами. Участники соревнуются за призовые позиции в турнирной таблице.
Мобильная версия и приложуха
Адаптивная версия разрешает развлекаться с всякого гаджета. Игроки могут установить приложение для iOS и Android или применять веб версию.
Достоинства мобильного программы:
– Оперативная подзагрузка автоматов
– Удобный дизайн
– Пуш-нотификации о акциях
– Возможность входа через отпечаток пальца
Машины и Live казино
Азартная коллекция насчитывает тысячи названий от лидирующих производителей.
Популярные типы игр:
– Обычные слоты
– Современные слоты с бонусными этапами
– Прогрессивный джекпот игры
– Megaways слоты
Live игорный зал
Категория live казино предлагает партию с профессиональными крупье. Доступны стандартные игры:
– Европейская рулетка
– Блэкджек
– Punto Banco
– Карибский покер
Как разыскать актуальное зеркало
Получить свежую ссылку на зеркало разрешается различными путями:
1. Подписаться на email-рассылку
2. Следить за апдейтами в социальных сетях
3. Написать в службу поддержки
4. Сохранить действующее зеркало в фавориты
Заключение
Лицензионный портал и его актуальные дубликаты обеспечивают постоянный путь к игровым автоматам. Щедрые вознаграждения, разнообразные купоны, эргономичное портативное программа и отличная служба поддержки поддержки превращают азартный процесс крайне комфортным и конфиденциальным.
Актуальные онлайн-казино предоставляют игрокам множество опций для комфортной игры. Официальный веб-портал xedulichdaklak.com предоставляет доступ ко всем опциям и играм. Однако при образовании системных трудностей на помощь спешат действующие копии.
Что означает собой действующее зеркало
Копия казино — это идентичная реплика основного ресурса, размещенная по запасному веб-адресу. Лицензионное зеркало хранит все характеристики, вместе с создание аккаунта, доступ в личный кабинет, бонусы и купоны.
Дубликат на сегодня предоставляет:
– Постоянный доступ к азартным аппаратам
– Абсолютную сохранность личных данных
– Сохранение депозита и истории платежей
– Возможность использования всех промо-предложений
Создание учетной записи на главном портале
Процесс создания аккаунта требует пару минут. Новым клиентам требуется:
1. Перейти на главный ресурс или рабочее зеркало
2. Щелкнуть кнопку «Зарегистрироваться»
3. Заполнить необходимые поля
4. Подтвердить электронную почту
5. Указать кодовое слово при наличии
После конца оформления профиля геймеры получают подарок за регистрацию, что может содержать бесплатные вращения или монетарное премирование.
Логин в персональный кабинет
Индивидуальный кабинет дает всесторонний мониторинг над азартным ходом. Через собственный кабинет разрешается:
– Депонировать счет
– Получать выигрыши
– Активировать промокоды
– Контролировать журнал игр
– Играть в состязаниях
– Забирать кэшбек
Описание премий и специальных предложений
Великодушная призовая схема — значимое достоинство проекта. Ключевые виды поощрений:
Начальный приз
Начинающие обретают щедрое премирование на начальные депозиты. Величина приза может составлять 100-200% от размера депозита.
Free spins
Бесплатные вращения начисляются для востребованных машин. Количество фриспинов разнится от 10 до 500 штук.
Возврат средств
Еженедельный или помесячный компенсация части проигранных средств. Средний объем возврата — 5-15%.
Состязания
Постоянные турниры с внушительными премиальными банками. Конкурсанты конкурируют за лучшие места в турнирной таблице.
Смартфонная версия и приложение
Портативная версия дает возможность делать ставки с любого гаджета. Геймеры могут скачать софт для iOS и Android или применять веб версию.
Плюсы портативного программы:
– Быстрая подзагрузка автоматов
– Комфортный интерфейс
– Всплывающие уведомления о акциях
– Доступ через биометрию
Слоты и Live казино
Развлекательная подборка содержит множество названий от топовых поставщиков.
Топовые типы игр:
– Обычные автоматы
– Современные слоты с премиальными этапами
– Джекпот игры
– Мега-путь машины
Live игорный зал
Секция live игорный зал предлагает партию с настоящими ведущими. Представлены стандартные игры:
– Рулетка
– Двадцать одно
– Punto Banco
– Карибский покер
Как найти актуальное зеркало
Раздобыть актуальную линк на зеркало можно разными вариантами:
1. Оформить подписку на email-рассылку
2. Следить за обновлениями в социальных сетях
3. Контактировать в службу поддержки
4. Добавить в закладки действующее зеркало в фавориты
Заключение
Официальный сайт и его действующие альтернативные адреса обеспечивают стабильный доступ к развлекательным играм. Щедрые премии, множественные купоны, эргономичное мобильное софт и высококлассная техподдержка поддержки превращают игровой геймплей максимально удобным и безопасным.
transit T1 documentation services If you are dealing with customs clearance in the EU, this resource provides a useful overview of the process.
Check This Out geometry dash apk
https://algeriaaqar.com/author/karissafaith8/
http://www.str-zabor.ru
http://55x.top:9300/claritagfp988
Подключение к платформе и актуальные URL
Востребованные виртуальные казино предлагают пользователям большой набор развлечений. Официальный портал казино Bublik казино организует надежный доступ ко всем услугам. При этом периодически возникают обстоятельства, когда нужно альтернативный способ входа.
Что означает собой актуальное зеркало
Рабочее зеркало — это идентичная дубликат официального ресурса с другим доменным названием. Дубликат сегодня помогает избегать потенциальные запреты и сохранять постоянный вход к выбранным автоматам.
Легальное зеркало характеризуется полными опциями, что и основной сайт:
– Совокупный перечень автоматов
– Личный аккаунт с актуальными данными
– Актуальные награды и акции
– Безопасные финансовые действия
Создание аккаунта и вход в сервис
Процедура регистрации на сайте требует несколько моментов. Начинающим клиентам требуется:
1. Открыть на актуальное зеркало на данный момент
2. Выбрать кнопку «Открыть профиль»
3. Заполнить необходимые данные
4. Подтвердить e-mail почту или контакт мобильного
5. Получить бонус за оформление
Подключение в собственный раздел реализуется посредством ввод имени пользователя и секретной комбинации.
Характеристика бонусной программы
Богатая призовая программа — ключевое плюс казино. Участники обретают многочисленные бонусы:
Приветственные подарки
Начинающие пользователи могут претендовать на щедрый бонус за создание аккаунта. Как правило это комплект возможностей, включающий:
– Процентную добавку к первому пополнению
– Бесплатные вращения
– Дополнительные финансы на кошелек
Промокоды и уникальные возможности
Периодические бонусные комбинации обеспечивают обретать призовые льготы. Задействовать их разрешено в специальном меню личного раздела.
Бесплатные вращения и компенсация
Фриспины — это возможность вращать слоты без расходования своих финансов. Рибейт представляет определенный возврат утраченных сумм.
Ассортимент автоматов
Игровая сайт обеспечивает значительную библиотеку слотов.
Игровые машины
Вариативность автоматов удивляет воображение. Представлены стандартные ретро автоматы и новые видеослоты с интересной графикой.
Live зал
Зона Live заведения транспортирует участников в среду реального гемблинг зала. Опытные крупье организуют сессии в онлайн режиме.
Соревнования и лидерборды
Регулярные конкурсы вносят драйва и обеспечивают вариант забрать большие выигрыши.
Mobile версия и клиент
Актуальные решения дают возможность играть в любимом локации. Портативная реализация автоматически подстраивается под монитор аппарата.
Загрузить софт допустимо для программных сред iOS и Android. Приложение гарантирует:
– Скоростной доступ
– Надежную производительность
– Всплывающие-оповещения об бонусах
– Комфортный дизайн
Финансовые операции
Сайт принимает всевозможные способы депозита и изъятия денег:
– Платежные инструменты
– Онлайн системы
– Криптовалюты
– Прямые переводы
Всевозможные переводы осуществляются через защищенное подключение, что гарантирует целостность конфиденциальных сведений.
Сервис помощи
Профессиональная команда поддержки действует постоянно. Контактировать с специалистами возможно через:
– Live-чат
– Электронную почту
– Телефон
– Медиа ресурсы
Итоги
Основной портал и его функционирующее зеркало предоставляют клиентам надежный и удобный путь к захватывающим забавам. Щедрые подарки, обширный каталог развлечений и отличная ассистанс обеспечивают участие крайне интересной и доходной.
Переход к порталу через рабочие зеркала
Участники интернет казино нередко контактируют с вопросом ограничения основного портала. Собственно для устранения этой ситуации разработаны альтернативные адреса легального домена. http://www.jainsatvicfoods.com/kreditnaya-karta-proverka-nomera-s-pomoshchyu-onlayn-kalkulyatora дает полный переход ко всем функциям ресурса.
Что такое актуальное зеркало казино
Зеркало составляет собой точную дубликат оригинального портала с аналогичным опциями. Ключевое несовпадение — это иное имя. Каждые параметры пользователя, содержа счет, привилегии и историю ставок, сохраняются неизменными.
Преимущества применения зеркал
Функционирующие зеркала обладают рядом значимых преимуществ:
– Бесперебойный доступ к любимым слотам
– Полная сохранность индивидуальных сведений
– Удержание всех конфигураций пользовательского кабинета
– Шанс взятия бонусов и участия в предложениях
Регистрация на основном домене
Процедура создания аккаунта предельно прост и занимает буквально минут. Свежие игроки способны надеяться на солидный приветственный подарок за открытие счета.
Этапы открытия аккаунта
1. Переход на основной портал или его альтернативу
2. Клик на клавишу “Регистрация”
3. Внесение нужных данных
4. Верификация почтовой почты
5. Указание бонусного кода (в случае есть)
Подарки и кампании для пользователей
Игровая площадка одаривает своих клиентов разнообразными бонусными системами.
Ключевые варианты наград
Вводный бонус — щедрое вознаграждение для начинающих пользователей, что имеет возможность вмещать финансовые призы и free spins.
Фриспины — шанс крутить в известных игровых машинах без затрат.
Кешбэк — долевой возмещение проигранных средств, каковой выплачивается по неделям или ежемесячно.
Купоны — особые комбинации, гарантирующие экстра поощрения.
Пользовательский кабинет: инструменты и конфигурации
Личный профиль гарантирует исчерпывающий регулирование над развлекательным процессом. Тут имеются:
– Регулирование депозитом
– История платежей
– Действующие бонусы
– Конфигурации сохранности
– Подтверждение аккаунта
Карманная платформа и программа
Современные клиенты предпочитают портативность. Платформа обеспечивает двойной пути для игры с портативных аппаратов.
Отзывчивая мобильная редакция
Мобильная вариант портала автономно приспосабливается под экран любого устройства. Нет необходимости загружать отдельное приложение.
Софт для смартфонов
Возможно загрузить специальное приложение для iOS и Android. APP обеспечивает:
– Быстрый старт
– Улучшенный графику
– Push-извещения о акциях
– Надежную операционность
Live развлечения: антураж реального зала
Зона Live игр доставляет игроков в обстановку реального казино. Опытные крупье осуществляют игры в виде настоящего времени.
Известные Live-игры
– Французская рулетка
– 21
– Баккара
– Poker
Слоты: ассортимент автоматов
Собрание азартных аппаратов включает множество наименований от известных разработчиков. Игроки встретят:
– Традиционные аппараты
– Графические слоты
– Мега-выигрыш-автоматы
– Многолинейные автоматы
Турниры и специальные акции
Регулярные соревнования предоставляют шанс участникам соревноваться друг с другом за значительные призовые пулы. Каждый соревнование обладает свои требования включения и рейтинг призеров.
Способы зачисления и вывода сумм
Ресурс обслуживает комплекс денежных инструментов:
– Кредитные инструменты
– Электронные кошельки
– Blockchain-платежи
– Прямые транзиты
Все операции осуществляются конфиденциально благодаря современным системам кодирования.
Команда обслуживания
Квалифицированные операторы службы помощи настроены ассистировать 24/7. Работают такие каналы общения:
– Оперативный-чат
– Email-помощь
– Голосовая связь
– Медийные сети
Итог
Основной сайт казино и его действующие альтернативы гарантируют клиентам безопасный и комфортный доступ к широкому ассортименту геймерских игр. Солидные поощрения, постоянные акции, квалифицированная сервис и легкие платежные способы превращают азартный досуг предельно комфортным и результативным.
https://michapo.com/employer/peterburg-2/
try this out capcut apk
1x giri? 1xbet-giris-30.com .
Современные виртуальные казино обеспечивают пользователям огромный ассортимент опций для удобной игры. Впрочем иногда доступ к главному сайту может являться заблокированным. В таких моментах на выручку спешит Джозз казино, которое дает бесперебойный доступ ко всем функциям платформы.
Что такое рабочее зеркало казино
Зеркало — это абсолютная дубликат лицензионного веб-сайта, которая хостится по альтернативному домену. Альтернативный ресурс содержит весь инструментарий оригинального веб-портала, включая пользовательский кабинет, счет и данные платежей.
Основные плюсы использования зеркала:
– Непрерывный доступ к сайту
– Абсолютная идентичность инструментов
– Безопасность персональных данных
– Удержание существующих поощрений
Как обнаружить действующее зеркало на сегодня
Есть ряд достоверных методов нахождения текущей ссылочной информации:
Авторизованные сервисы:
1. Имейл рассылка — руководство систематически пересылает информацию с рабочими ссылками
2. Социальные сети — авторизованные профили выкладывают релевантную информацию
3. Департамент поддержки — сотрудники сообщают достоверные адреса
4. Смартфонное приложение — обеспечивает минуть блокировки
Оформление профиля на главном ресурсе
Операция открытия счета длится всего несколько минут и содержит из следующих стадий:
1. Переход на главный веб-сайт или функционирующее зеркало
2. Щелчок на клавишу «Открыть счет»
3. Ввод персональной бланка
4. Подтверждение имейл почты или контактного номера
5. Активация поощрения за регистрацию при существовании промокода
Только что зарегистрированные геймеры получают значительный начальный подарок, который может включать фриспины, финансовые поощрения или возврат средств.
Авторизация в пользовательский кабинет
Подключение на ресурсе осуществляется стандартным путем. Нужно вписать логин и кодовое слово, указанные при создании аккаунта.
Существенные моменты для безопасного входа:
– Используйте надежный код
– Запустите двойную идентификацию
– Не фиксируйте пароли на чужих устройствах
– Контролируйте интернет строку браузера
Описание премиальной системы
Казино награждает геймеров разнообразными привилегиями и акциями:
Начальный букет
Дебютанты могут надеяться на существенное поощрение за начальный депозит. Традиционно это процентовая надбавка к зачисленной количеству плюс даровые спины для востребованных слотов.
Систематические предложения
– Семидневный компенсация — компенсирование доли проигранных денежных средств
– Награды на последующие пополнения
– Уникальные акции по торжествам
– Соревнования с большими призовыми фондами
Программа лояльности
Постоянные клиенты накапливают пункты за всякую игру, которые затем обмениваются на настоящие денежные призы, фриспины или особые бонусы.
Кодовые слова: как применять
Бонус-коды — это индивидуальные наборы литер, обеспечивающие доступ к дополнительным привилегиям.
Где найти действующие промокоды:
– Проверенные социальные сети казино
– Сотрудничающие сайты
– Email-рассылка
– Профильные форумы
Указывается промокод в специальное поле при открытии счета или пополнении кошелька.
Мобильная версия и приложение
Актуальные клиенты предпочитают делать ставки с телефонных устройств. Платформа предоставляет два варианта для приятной смартфонной игры.
Адаптивная версия
Браузерная версия самостоятельно оптимизируется под параметры экранной панели. Не требует инсталляции и действует в каждом актуальном браузере.
Смартфонное приложение
Скачать программу можно для аппаратов на Android и iOS. Плюсы app:
– Скоростная запуск
– Надежная операция
– Мгновенные-уведомления о бонусах
– Независимый обход блокировок
Процесс инсталляции элементарен: необходимо попасть на веб-сайт с смартфонного устройства и придерживаться предписаниям.
Игровой коллекция
Библиотека игр включает тысячи вариантов от передовых провайдеров.
Слоты
Гемблинг аппараты — крайне любимая раздел аттракционов. Представлены традиционные винтажные аппараты, передовые видеослоты с бонусными уровнями, а также прогрессивные джекпоты.
Live казино
Секция с реальными дилерами обеспечивает почувствовать антураж истинного казино. Представлены игры с баккарой.
Передача ведется в высоком разрешении, присутствует диалог с крупье и другими игроками.
Соревнования
Периодически устраиваются соревнования по разным категориям. Участие обеспечивает возможность получить денежные призы, бесплатные вращения или особые презенты.
Транзакционные манипуляции
Платформа поддерживает большой выбор денежных систем:
– Дебетовые карты
– Электронные системы
– Биткоин
– Денежные переводы
Стартовая величина пополнения — посильная для преобладающего числа геймеров. Вывод средств осуществляется в короткие периоды.
Служба поддержки
Компетентные операторы расположены содействовать постоянно. Имеются следующие методы контакта:
– Интернет-чат
– Email
– Голосовая горячая линия
– Коммуникационные сети
Разъяснения на типовые темы можно отыскать в секции FAQ.
Вывод
Главный веб-сайт казино и его действующие зеркала предоставляют пользователям полный доступ ко всем функциям сайта. Солидные привилегии, приятная смартфонная версия, впечатляющий выбор игр и опытная ассистенция делают азартный процесс крайне приятным и надежным.
Обзор лицензионного сайта
Передовые виртуальные казино предлагают клиентам разнообразный ассортимент услуг и опций. Главный портал казино Р Р° гарантирует безопасный путь к игровым услугам.
Рабочее зеркало: возможность на сегодня
Альтернативный адрес представляет как абсолютную версию главного портала. Актуальное зеркало обеспечивает игрокам преодолевать потенциальные запреты.
Преимущества использования зеркала
Главные плюсы предполагают:
– Беспрерывный путь к платформе
– Удержание абсолютно всех опций основного веб-сайта
– Охрана индивидуальных материалов
– Равнозначный возможности
Создание аккаунта на ресурсе
Процедура открытия счета характеризуется легкостью и удобством. Начинающие участники необходимо:
1. Зайти на лицензионный веб-сайт или его зеркало
2. Нажать на элемент открытия счета
3. Внести нужные данные
4. Валидировать email ящик
5. Осуществить стартовый авторизацию
Бонус за открытие счета
Начинающие забирают значительный вступительный подарок. Это награда способно включать:
– Монетарные средства
– Даровые вращения
– Расширенный процент компенсации
Доступ в индивидуальный аккаунт
Действующие пользователи могут быстро получить доступ в личный профиль, применяя имя пользователя и шифр. Персональный раздел дает доступ к:
– Контролю депозитом
– Журналу платежей
– Действующим бонусам
– Параметрам аккаунта
Вознаграждения и кампании
Ресурс периодически реализует многочисленные мероприятия для игроков.
Виды призов
Базовые типы бонусов:
– Пополнительные подарки – доля от суммы депозита
– Прокруты – безвозмездные прокруты в автоматах
– Кэшбек – компенсация части затраченных сумм
– Турнирные награды – награды за выступление в турнирах
Коды
Особые ваучеры помогают получить экстра выгоды. Клиенты могут отыскать их на специализированных порталах или взять в новостях.
Переносная адаптация и программа
Современные гемблеры любят переносной игровой процесс.
Характеристики переносной версии
– Адаптивный облик для любых аппаратов
– Целостный путь к играм
– Моментальная функционирование
– Комфортное использование
Download софт
Мобильное софт предоставлено для downloading на девайсы с рабочими системами Android и iOS. Приложение предоставляет:
– Стабильную деятельность
– Пуш уведомления о предложениях
– Оперативный доступ к желанным развлечениям
Развлекательный ассортимент
Игровой клуб обеспечивает внушительную галерею развлекательных развлечений.
Игровые машины
Каталог азартных автоматов насчитывает:
– Обычные игры
– Передовые слоты
– Накопительные слоты
– Сюжетные автоматы
Live дилеры
Секция лайв дилеров предлагает право соревноваться с настоящими крупье. Представлены:
– Американская рулетка
– Очко
– Baccarat
– Poker
Конкурсы
Постоянные соревнования дают возможность игрокам конкурировать за значительные финансовые фонды. Призовая система изменяется постоянно.
Банковские операции
Сайт обеспечивает разнообразие вариантов пополнения и обналичивания финансов:
– Кредитные карты
– Цифровые счета
– Банковские переводы
– Bitcoin
Совокупные операции выполняются надежно с задействованием современных методов защиты.
Отдел support
Опытная команда саппорта работает круглосуточно. Коннектиться с операторами доступно через:
– Интерактивный чат
– Почтовую почту
– Контактный номер
– Social сети
Безопасность и аккредитация
Портал работает на основании законной сертификата. Такое гарантирует:
– Прозрачность игрового действа
– Безопасность личных сведений
– Своевременные транзакции
– Регулируемый гейминг
Резюме
Главный ресурс и его актуальные дубликаты гарантируют клиентам полный ассортимент возможностей для комфортной и профитной времяпрепровождения. Внушительные подарки, многочисленные слоты, профессиональная помощь и проверенная инфраструктура операций превращают ресурс оптимальным решением для ценителей азартных развлечений.
1 xbet giri? 1xbet-giris-27.com .
https://str-zabor.ru/
https://vitalcorepharmacy.com/# online pharmacy weight loss
https://www.ofc.to/braingalway54
1 x bet giri? 1 x bet giri? .
Анализ основного портала
Передовые виртуальные казино предлагают участникам широкий ассортимент услуг и перспектив. Официальный ресурс Джозз казино предлагает проверенный путь к гемблинг функциям.
Рабочее зеркало: путь прямо сейчас
Дублирующий портал выступает как абсолютную дубликат основного портала. Официальное зеркало дает возможность клиентам преодолевать потенциальные ограничения.
Достоинства эксплуатации зеркала
Принципиальные преимущества содержат:
– Беспрерывный шанс к порталу
– Поддержание всех возможностей главного ресурса
– Охрана личных данных
– Аналогичный набор функций
Создание аккаунта на ресурсе
Ход создания аккаунта выделяется доступностью и эргономичностью. Недавние клиенты требуется:
1. Перейти на лицензионный портал или его зеркало
2. Щелкнуть на клавишу создания аккаунта
3. Ввести нужные поля
4. Активировать электронную адрес
5. Осуществить первый авторизацию
Подарок за открытие счета
Новички получают солидный вступительный приз. Подобное вознаграждение в состоянии охватывать:
– Денежные бонусы
– Безвозмездные спины
– Усиленный коэффициент кэшбека
Вход в собственный профиль
Зарегистрированные пользователи имеют возможность быстро зайти в личный раздел, эксплуатируя учетные данные и ключ. Личный профиль дает шанс к:
– Администрированию балансом
– Записям транзакций
– Активным призам
– Опциям учетной записи
Призы и акции
Сайт периодически проводит многочисленные акции для пользователей.
Типы бонусов
Главные типы призов:
– Денежные бонусы – доля от объема депозита
– Фриспины – complimentary вращения в автоматах
– Кэшбек – возврат доли затраченных средств
– Турнирные вознаграждения – призы за выступление в состязаниях
Купоны
Особые коды помогают получить добавочные бонусы. Участники имеют возможность отыскать их на специализированных ресурсах или взять в уведомлениях.
Переносная вариант и программа
Прогрессивные гемблеры ценят портативный геймплей.
Функции портативной адаптации
– Отзывчивый интерфейс для всех аппаратов
– Полный вход к развлечениям
– Оперативная функционирование
– Практичное использование
Скачать софт
Портативное софт доступно для downloading на аппараты с рабочими ОС Android и iOS. Софт предоставляет:
– Стабильную работу
– Мгновенные оповещения о бонусах
– Моментальный путь к предпочитаемым играм
Развлекательный портфель
Портал обеспечивает внушительную галерею игровых развлечений.
Слоты
Коллекция развлекательных слотов содержит:
– Стандартные машины
– Передовые аппараты
– Джекпотные автоматы
– Тематические автоматы
Live дилеры
Секция настоящих развлечений предоставляет шанс состязаться с реальными ведущими. Представлены:
– Рулетки
– Очко
– Баккара
– Poker
Турниры
Периодические соревнования помогают пользователям состязаться за солидные денежные пулы. Конкурсная структура изменяется каждую неделю.
Платежные транзакции
Сайт предоставляет массу опций внесения и вывода средств:
– Пластиковые карты
– Виртуальные кошельки
– Межбанковские трансферы
– Криптовалюты
Совокупные платежи выполняются безопасно с задействованием прогрессивных методов защиты.
Сервис support
Квалифицированная команда помощи функционирует круглосуточно. Связаться с специалистами доступно через:
– Живой чат
– Электронную почту
– Телефонную линию
– Social платформы
Безопасность и аккредитация
Портал действует на базе законной сертификата. Данное обеспечивает:
– Легальность развлекательного процесса
– Безопасность личных информации
– Быстрые транзакции
– Ответственный геймплей
Резюме
Главный веб-сайт и его функционирующие альтернативные адреса дают клиентам абсолютный ассортимент опций для безопасной и прибыльной развлечений. Щедрые вознаграждения, многочисленные развлечения, профессиональная сервис и безопасная система выплат формируют портал превосходным опцией для ценителей гемблинг игр.
happy place – Fast loading and a clear structure enhance the experience.
букет на заказ с доставкой https://zakazat-cveti-moskva.ru .
HappyPaws Pharmacy: dog and cat medicine supply – dog and cat medicine supply
п»їdog medication online: pet antibiotics and care – HappyPaws Pharmacy
Описание оригинального сайта
Актуальное онлайн-казино обеспечивает своим участникам разнообразный выбор развлечений и поощрений. Оригинальный сайт http://tazartlodge.com/kak-funktsioniruet-skhema-popolneniya-schetov-onlayn-kazino-s-pomoshchyu-sberbanka действует круглосуточно, давая доступ к известным симуляторам, live-казино и разнообразным акциям.
Рабочее зеркало: путь к ресурсу
Что такое копия казино
Зеркало означает собой точную копию главного портала с альтернативным URL названием. Функционирующее зеркало предоставляет клиентам избегать барьеры и обеспечивать непрерывный путь к выбранным автоматам.
Как обнаружить действующее зеркало сегодня
Рабочие URL на главное зеркало публикуются через:
– Почтовую новостнуюленту
– Главные публичные сети
– Сервис обслуживания
– Тематические порталы
Регистрация на сайте
Процесс открытиясчета
Открытиесчета занимает всего минут и подразумевает нижеследующие этапы:
1. Переход на основной ресурс или действующее зеркало
2. Активация кнопки “Создатьаккаунт”
3. Ввод личных данных
4. Подтверждение email или номера
5. Создание ключа
Бонус за оформление
Новые участники обретают выгодные стартовые бонусы:
– Денежные суммы на счет
– Фриспины для игр
– Повышенный коэффициент компенсации
– Эксклюзивные ваучеры
Логин в личный счет
Зарегистрированные пользователи имеютвозможность осуществить доступ через официальный ресурс или действующее зеркало. Для этого необходимо набрать имяпользователя и пароль, созданные при оформлении.
Опции персонального аккаунта
В индивидуальном профиле предоставлены такие опции:
– Управление личными сведениями
– Ввод баланса
– Получение денег
– Использование кодов
– Просмотр архива транзакций
– Включение в турнирах
Вознаграждения и акции
Типы вознаграждений
Казино награждает своих игроков всевозможными наградными программами:
– Начальный комплект — щедрые поощрения на начальные депозиты
– Халявныеспины — экстра вращения в популярных играх
– Кэшбек — еженедельный откат суммы ставок
– Программа верности — особые привилегии для регулярных игроков
Ваучеры и их активация
Эксклюзивные промокоды дают бонусные бонусы. Для применения нужно ввести комбинацию в соответствующее поле в собственном профиле.
Азартный ассортимент
Автоматы
База развлекательных автоматов вмещает сотни позиций от топовых поставщиков:
– Стандартные слоты
– Видео слоты
– Накопительные слоты
– Брендовые автоматы
Live казино
Секция Live-казино обеспечивает взаимодействие с живыми дилерами в обстановке прямого трансляции:
– Рулетка
– Blackjack
– Баккара
– Техасскийхолдем
Турниры
Регулярные турниры с внушительными выигрышными суммами проводятся постоянно. Участники сражаются за призовыеместа в таблице.
Портативная реализация и APP
Mobile реализация веб-сайта
Основной веб-сайт абсолютно адаптирован для смартфонных гаджетов. Клиенты могут играть игры прямо через обозреватель без обязательства загрузки.
Софт для загрузки
Официальное карманное программа предоставляется для установки на аппараты с базовыми средами Android и iOS. Софт обеспечивает:
– Моментальный путь к развлечениям
– Стабильную операционность
– Оперативные-оповещения о акциях
– Интуитивный интерфейс
Заключение
Основной веб-сайт казино и его актуальные альтернативы обеспечивают участникам всесторонний вход к отличным азартным сервисам. Большие вознаграждения, разнообразные промо, удобная адаптивная платформа и опытная сервис создают развлекательный досуг максимально приятным и результативным.
Современные сетевые казино предоставляют клиентам обширный ассортимент функций для комфортной игры. Но иногда соединение к главному платформе может быть закрытым. В таких обстоятельствах на поддержку приходит Рльдорадо, которое обеспечивает бесперебойный путь ко всем опциям платформы.
Что такое функционирующее зеркало казино
Копия — это абсолютная копия лицензионного ресурса, которая располагается по дополнительному URL. Альтернативный ресурс содержит полный возможности главного сайта, включая индивидуальный кабинет, средства и сведения транзакций.
Принципиальные достоинства использования зеркала:
– Круглосуточный доступ к ресурсу
– Абсолютная схожесть функционала
– Безопасность индивидуальных сведений
– Удержание всех поощрений
Как обнаружить актуальное зеркало на текущий день
Имеется ряд безопасных методов нахождения текущей адреса:
Авторизованные каналы:
1. Электронная рассылка — дирекция систематически направляет информацию с рабочими адресами
2. Коммуникационные сети — официальные аккаунты размещают свежую сведения
3. Отдел поддержки — сотрудники дают надежные ссылки
4. Портативное приложение — дает возможность минуть блокировки
Оформление профиля на официальном ресурсе
Операция регистрации занимает лишь пару минут и состоит из таких ступеней:
1. Переход на лицензионный сайт или функционирующее зеркало
2. Щелчок на иконку «Создать аккаунт»
3. Заполнение регистрационной таблицы
4. Валидация email почты или контактного номера
5. Активация привилегии за регистрацию при наличии промокода
Начинающие пользователи получают щедрый стартовый подарок, который может охватывать даровые прокруты, валютные призы или cashback.
Авторизация в личный кабинет
Логин на платформе реализуется привычным образом. Необходимо внести никнейм и код доступа, задействованные при регистрации.
Ключевые детали для конфиденциального входа:
– Эксплуатируйте криптостойкий секретный ключ
– Включите двухэтапную верификацию
– Не храните данные на публичных гаджетах
– Проверяйте URL строку браузера
Обзор бонусной системы
Казино балует игроков разнообразными вознаграждениями и акциями:
Стартовый пакет
Дебютанты способны претендовать на щедрое бонус за стартовый депозит. Обычно это пропорциональная добавка к переведенной сумме плюс даровые спины для известных слотов.
Периодические предложения
– Недельный компенсация — возмещение процента потерянных финансов
– Поощрения на последующие пополнения
– Особые акции по знаменательным датам
– Соревнования с большими выигрышными суммами
План вознаграждений
Регулярные пользователи накапливают баллы за каждую раунд, которые затем превращаются на реальные деньги, даровые прокруты или особые привилегии.
Бонус-коды: как задействовать
Купоны — это индивидуальные последовательности знаков, обеспечивающие доступ к дополнительным привилегиям.
Откуда взять действующие промокоды:
– Авторизованные общественные сети казино
– Партнерские сайты
– Email-рассылка
– Специализированные группы
Вводится промокод в предназначенное поле при регистрации или добавлении денег баланса.
Портативная версия и приложение
Передовые геймеры выбирают развлекаться с портативных устройств. Платформа обеспечивает двойной способа для комфортной портативной игры.
Отзывчивая редакция
Онлайн версия сама оптимизируется под габариты экрана. Не просит загрузки и функционирует в произвольном свежем браузере.
Смартфонное приложение
Установить приложение можно для гаджетов на Android и iOS. Преимущества app:
– Оперативная активация
– Надежная операция
– Автоматические-уведомления о поощрениях
– Автономный избегание блокировок
Процедура инсталляции прост: нужно зайти на сайт с смартфонного гаджета и следовать указаниям.
Азартный выбор
Каталог игр включает тысячи вариантов от топовых разработчиков.
Слоты
Азартные машины — самая любимая раздел забав. Представлены стандартные 3-барабанные слоты, новые видео-автоматы с поощрительными этапами, а также джекпотные суперпризы.
Live казино
Зона с реальными крупье предоставляет испытать дух настоящего казино. Открыты развлечения с баккарой.
Трансляция производится в HD качестве, имеется диалог с дилером и прочими игроками.
Соревнования
Периодически проводятся соревнования по многочисленным дисциплинам. Присоединение обеспечивает возможность заработать финансовые выигрыши, бесплатные вращения или особые поощрения.
Финансовые действия
Портал предлагает обширный набор платежных систем:
– Кредитные карты
– Онлайн платформы
– Цифровая валюта
– Денежные переводы
Низшая объем вклада — доступная для основной части игроков. Обналичивание призов производится в короткие временные рамки.
Сервис поддержки
Опытные операторы способны поддержать непрерывно. Доступны нижеследующие методы контакта:
– Интернет-чат
– Email
– Голосовая связь
– Социальные сети
Пояснения на типовые темы можно обнаружить в зоне FAQ.
Вывод
Главный сайт казино и его действующие зеркала обеспечивают пользователям максимальный путь ко всем сервисам ресурса. Солидные вознаграждения, практичная смартфонная версия, огромный коллекция слотов и профессиональная помощь делают гемблинг времяпрепровождение максимально комфортным и защищенным.
Безопасность на детской площадке — первое, на что стоит обратить внимание. Все углы должны быть скруглены, крепёж скрыт, а конструкция — надёжно закреплена в грунте. Хороший производитель всегда предоставляет сертификаты безопасности.
Дом из клееного бруса с верандой — проекты для дачи
follow energy in motion – Action is self-reinforcing, generating the drive to keep moving forward.
For additional
Cash today near me
for a simple explanation.
tap here – Simple and intuitive interface helped locate exactly what I needed.
Передовые онлайн-казино обеспечивают клиентам богатый набор развлечений и заманчивые награды. Но для стабильной игры необходимо знать, как отыскать http://www.nsb-natursteinbehandlung.ch/2026/02/28/rukovodstvo-po-vyvodu-sredstv-iz-onlayn-kazino-metody-limity-i-sroki-2025-esli-vy-stali-pobeditelem-i-planiruete-vyvesti-sredstva-u-vas-ne-vozniknet-problem-s-obnalichivaniem-deneg-postupivshikh/ и его актуальные зеркала.
Что такое главный портал казино
Официальный ресурс казино — это главная платформа, где клиенты могут наслаждаться азартными автоматами. Портал функционирует на официальных принципах и располагает всеми необходимыми разрешениями.
Ключевые преимущества главного портала:
– Надежность пользовательских реквизитов
– Объективные условия использования
– Стабильные выплаты
– Квалифицированная помощь
Рабочее зеркало казино: для чего нужно
Дублирующий ресурс — это абсолютная копия главного сайта, размещенная по отличному веб-адресу. Действующее зеркало создается для поддержания бесперебойного соединения к порталу.
Причины задействования дублирующих ресурсов:
– Запрет главного домена
– Регламентные операции
– Повышенная нагрузка на ресурс
Как получить рабочее зеркало сейчас
Обнаружить новое официальное зеркало можно несколькими вариантами:
1. Email-уведомления — подпишитесь на email рассылку
2. Служба помощи — проконсультируйтесь в онлайн-чат
3. Социальные каналы — проверяйте за постами
4. Партнерские ресурсы — проверенные ресурсы
Регистрация на ресурсе казино
Процедура оформления длится только считанные минут:
1. Выберите на элемент “Открыть счет”
2. Введите запрашиваемые данные
3. Валидируйте электронную ящик
4. Используйте промокод, если имеется
После успешной регистрации вам предоставится разрешен пользовательский раздел.
Премии и коды активации
Богатая премиальная структура — существенное достоинство казино:
Подарок за первичную регистрацию
Первичные участники приобретают стартовый презент, который может предполагать:
– Финансовый счет на дебютный вклад
– Фриспины для автоматов
– Стартовые фонды
Активационные коды
Систематически выходят эксклюзивные коды, позволяющие забрать специальные привилегии.
Система компенсации
Постоянные игроки зарабатывают порцию использованных средств на счет.
Свежие предложения и конкурсы
Сайт регулярно проводит азартные события:
– Семидневные баттлы
– Специальные бонусы
– Розыгрыши ценных наград
– Механизм VIP-клуба
Логин в личный раздел
Для доступа на сайт необходимо:
1. Открыть главный адрес или функционирующее зеркало
2. Активировать “Вход”
3. Внести email и ключ
В персональном аккаунте предоставлены такие возможности:
– Пополнение депозита
– Получение денег
– Проверка истории операций
– Редактирование индивидуальными параметрами
Mobile модификация и app
Адаптивная платформа
Мобильная модификация веб-сайта дает возможность делать ставки с различных карманного гаджета. Визуал самостоятельно подстраивается под габариты screen.
App для загрузки
Загрузить app можно для:
– Android — официальная загрузка с сайта
– iOS — установка через App Store
Выгоды приложения:
– Моментальный вход
– Устойчивая операционность
– Push-уведомления об промо
– Производительный дизайн
Азартные секции
Автоматы
Разнообразная галерея эмуляторных слотов от лучших поставщиков:
– Классические автоматы
– Продвинутые-слоты
– Джекпот-слоты
Live казино
Секция с профессиональными дилерами дает:
– Рулетки
– Двадцать одно
– Баккара
– Texas Hold’em
Вещания проводятся в отличном качестве изображения, создавая эффект настоящего казино.
Способы внесения средств и вывода
Казино принимает множественные финансовые системы:
– Банковские картсчета
– Цифровые счета
– Цифровые валюты
– Финансовые отправки
Стартовые лимиты пополнения и оперативные выводы делают процесс исключительно удобной.
Команда помощи
Профессиональная команда support доступна 24/7 и готова ассистировать с всеми вопросами:
– Онлайн-чат
– Email-помощь
– Звонковая служба
Резюме
Лицензионный ресурс казино и его актуальные копии предоставляют участникам безопасный и интересный игровой досуг. Щедрые награды, простая портативная модификация, обширные автоматы и профессиональное live-казино создают эту ресурс превосходным вариантом для азартных развлечений.
https://cloveebiz.com.ng/@robtmudie8093?page=about
Подробнее здесь kraken darknet
Обзор основного портала
Актуальные виртуальные казино предоставляют пользователям широкий спектр забав и шансов. Основной сайт http://www.natura-sleep.ru/2026/02/28/onlayn-kazino-na-dengi-s-vyvodom-na-kartu-sberbanka-bystrye-vyplaty-i-momentalnyy-depozit-zdes-vazhno-ponimat-chto-dannyy-podkhod-pozvolyaet-oznakomitsya-s-interfeysom-i-funktsionalom-kazino-do-vnese/ обеспечивает надежный доступ к азартным услугам.
Действующее зеркало: доступ прямо сейчас
Зеркало выступает как точную версию основного ресурса. Актуальное зеркало позволяет игрокам преодолевать вероятные ограничения.
Плюсы использования зеркала
Основные плюсы предполагают:
– Беспрерывный доступ к платформе
– Сохранение всех возможностей базового ресурса
– Охрана индивидуальных данных
– Равнозначный набор функций
Оформление профиля на ресурсе
Механизм открытия счета знаменуется доступностью и удобством. Начинающие пользователи обязаны:
1. Открыть главный портал или его зеркало
2. Щелкнуть на пункт создания аккаунта
3. Заполнить требуемые поля
4. Подтвердить email ящик
5. Совершить первый логин
Бонус за открытие счета
Начинающие получают внушительный приветственный приз. Такое награда способно предусматривать:
– Материальные суммы
– Complimentary прокруты
– Увеличенный коэффициент компенсации
Авторизация в собственный кабинет
Активные игроки способны мгновенно получить доступ в личный аккаунт, эксплуатируя имя пользователя и пароль. Персональный кабинет предлагает шанс к:
– Регулированию балансом
– Истории переводов
– Активным поощрениям
– Опциям аккаунта
Призы и предложения
Ресурс периодически проводит многочисленные акции для клиентов.
Категории бонусов
Главные категории бонусов:
– Депозитные начисления – процент от суммы депозита
– Спины – даровые раунды в автоматах
– Кэшбэк – компенсация доли потерянных денег
– Призовые вознаграждения – призы за выступление в состязаниях
Коды
Эксклюзивные ваучеры помогают приобрести дополнительные преимущества. Игроки имеют возможность получить их на специализированных порталах или заработать в рассылке.
Портативная вариант и программа
Прогрессивные гемблеры ценят карманный игровой процесс.
Опции переносной адаптации
– Гибкий вид для всех девайсов
– Целостный путь к автоматам
– Оперативная подгрузка
– Эргономичное навигация
Скачать программу
Мобильное app доступно для загрузки на аппараты с операционными платформами Android и iOS. App предоставляет:
– Надежную функциональность
– Всплывающие оповещения о призах
– Быстрый путь к желанным слотам
Игровой выбор
Казино предлагает богатую библиотеку азартных игр.
Аппараты
Каталог игровых автоматов включает:
– Традиционные игры
– Видео аппараты
– Джекпотные слоты
– Лицензионные автоматы
Live дилеры
Раздел живых игр дает шанс играть с настоящими диллерами. Предложены:
– Рулетки
– Очко
– Baccarat
– Техасский холдем
Конкурсы
Периодические соревнования дают возможность игрокам соревноваться за крупные денежные суммы. Турнирная система актуализируется регулярно.
Банковские процедуры
Казино предлагает множество способов зачисления и вывода средств:
– Банковские карты
– Цифровые счета
– Межбанковские трансферы
– Криптовалюты
Любые транзакции выполняются конфиденциально с использованием прогрессивных систем кодирования.
Сервис support
Опытная отдел support работает 24/7. Связаться с операторами доступно через:
– Онлайн чат
– Электронную почту
– Телефонную линию
– Соц медиа
Защита и регулирование
Платформа функционирует на основании действительной разрешения. Данное подтверждает:
– Легальность развлекательного геймплея
– Безопасность конфиденциальных данных
– Пунктуальные перечисления
– Ответственный гейминг
Резюме
Основной сайт и его действующие дубликаты дают участникам полный набор услуг для комфортной и прибыльной развлечений. Значительные призы, всевозможные игры, квалифицированная служба и безопасная платформа платежей превращают платформу оптимальным вариантом для ценителей развлекательных услуг.
http://www.str-zabor.ru
Современные онлайн-казино обеспечивают геймерам обилие опций для удобной игры. Центральный ресурс casino Gold дарит возможность ко всем функциям и играм. Однако при появлении системных проблем на подмогу прибывают рабочие копии.
Что являет собой собой функционирующее зеркало
Дубликат казино — это полная реплика официального портала, находящаяся по альтернативному веб-адресу. Легитимное зеркало поддерживает все функции, включая регистрацию, вход в индивидуальный кабинет, премии и купоны.
Копия на сегодня обеспечивает:
– Непрерывный путь к азартным аппаратам
– Абсолютную конфиденциальность личных данных
– Поддержку счета и записей переводов
– Доступность всех специальных предложений
Регистрация на основном ресурсе
Процедура оформления учетной записи занимает несколько минут. Новоиспеченным клиентам нужно:
1. Зайти на официальный сайт или рабочее зеркало
2. Выбрать кнопку «Зарегистрироваться»
3. Внести запрашиваемые графы
4. Подтвердить электронную почту
5. Ввести бонусный код при наличии
После финиша создания аккаунта геймеры обретают приз за регистрацию, какой может охватывать free spins или денежное премирование.
Авторизация в персональный кабинет
Индивидуальный кабинет открывает полный контроль над игровым процессом. Через индивидуальный кабинет можно:
– Депонировать депозит
– Забирать выплаты
– Активировать бонусные коды
– Отслеживать журнал ставок
– Принимать участие в конкурсах
– Получать cash back
Характеристика поощрений и промо-предложений
Великодушная премиальная система — важное козырь казино. Основные виды вознаграждений:
Стартовый приз
Дебютанты обретают выгодное поощрение на начальные вклады. Сумма приза может достигать 100-200% от объема вклада.
Бонусные спины
Даровые вращения даются для топовых автоматов. Сумма бесплатных вращений изменяется от 10 до 500 штук.
Кэшбек
Регулярный или помесячный откат доли потерянных денег. Стандартный объем возврата — 5-15%.
Турниры
Регулярные соревнования с большими призовыми фондами. Игроки соревнуются за верхние позиции в турнирной таблице.
Портативная версия и программа
Адаптивная версия разрешает развлекаться с любого аппарата. Клиенты могут установить приложение для iOS и Android или задействовать браузерную версию.
Плюсы мобильного программы:
– Оперативная прогрузка игр
– Практичный графический интерфейс
– Всплывающие уведомления о поощрениях
– Доступ через биометрию
Машины и Live казино
Развлекательная коллекция включает сотни позиций от ведущих провайдеров.
Популярные категории автоматов:
– Классические слоты
– Современные слоты с бонусными уровнями
– Накопительный приз игры
– Мегавейс машины
Live казино
Категория live игорный зал предлагает партию с профессиональными крупье. Есть традиционные игры:
– Французская рулетка
– Блэкджек
– Баккара
– Карибский покер
Как найти функционирующее зеркало
Найти актуальную URL на зеркало разрешается различными методами:
1. Оформить подписку на почтовую рассылку
2. Отслеживать за новостями в социальных сетях
3. Написать в отдел поддержки
4. Сохранить рабочее зеркало в закладки
Итог
Официальный ресурс и его действующие дубликаты предоставляют непрерывный вход к развлекательным играм. Богатые бонусы, различные купоны, удобное смартфонное приложение и профессиональная техподдержка поддержки создают развлекательный геймплей предельно приятным и надежным.
Анализ официального ресурса
Передовые интернет казино обеспечивают пользователям богатый выбор развлечений и перспектив. Лицензионный портал http://www.nkalawfirm.com/kak-otmenit-tranzaktsiyu-po-bankovskoy-karte-chtoby-vernut-poteryannye-v-kazino-dengi-s-pomoshchyu-chardzhbeka-bnc-ru-platforma-slavitsya-raznoobraziem-bonusov-polzovateli-mogut-aktivirovat-shchedr обеспечивает безопасный доступ к азартным функциям.
Актуальное зеркало: возможность прямо сейчас
Зеркало является в качестве идентичную дубликат официального ресурса. Официальное зеркало дает возможность участникам миновать существующие блокировки.
Выгоды применения зеркала
Главные плюсы содержат:
– Беспрерывный вход к сайту
– Поддержание полных функций базового веб-сайта
– Охрана персональных информации
– Идентичный набор функций
Оформление профиля на платформе
Механизм создания аккаунта отличается понятностью и удобством. Свежие клиенты требуется:
1. Посетить лицензионный сайт или его зеркало
2. Щелкнуть на пункт открытия счета
3. Указать требуемые данные
4. Валидировать электронную ящик
5. Выполнить дебютный вход
Подарок за регистрацию
Дебютанты зарабатывают щедрый вступительный бонус. Это награда может предусматривать:
– Монетарные средства
– Даровые прокруты
– Расширенный показатель компенсации
Вход в персональный раздел
Активные участники могут моментально войти в свой профиль, применяя учетные данные и ключ. Собственный кабинет предлагает шанс к:
– Администрированию средствами
– Журналу платежей
– Текущим бонусам
– Настройкам аккаунта
Призы и промо
Ресурс периодически реализует многочисленные акции для участников.
Виды бонусов
Ключевые категории призов:
– Депозитные призы – доля от величины внесения
– Прокруты – безвозмездные раунды в игровых машинах
– Возврат средств – отдача доли утраченных финансов
– Конкурсные призы – вознаграждения за игру в турнирах
Купоны
Особые купоны позволяют приобрести дополнительные преимущества. Участники в состоянии отыскать их на партнерских площадках или взять в рассылке.
Портативная редакция и программа
Актуальные гемблеры выбирают портативный игровой процесс.
Функции переносной платформы
– Responsive интерфейс для всех аппаратов
– Совокупный доступ к слотам
– Оперативная работа
– Комфортное навигация
Загрузить софт
Mobile app предоставлено для загрузки на устройства с рабочими системами Android и iOS. Софт обеспечивает:
– Стабильную производительность
– Пуш оповещения о предложениях
– Оперативный доступ к предпочитаемым развлечениям
Игровой выбор
Портал дает богатую библиотеку игровых развлечений.
Аппараты
Библиотека игровых аппаратов охватывает:
– Стандартные машины
– Video автоматы
– Накопительные игры
– Сюжетные развлечения
Live столы
Область лайв развлечений предлагает опцию соревноваться с живыми диллерами. Открыты:
– Американская рулетка
– Блэкджек
– Баккара
– Покер
Состязания
Систематические конкурсы помогают пользователям состязаться за солидные наградные суммы. Соревновательная структура обновляется регулярно.
Банковские действия
Платформа предлагает массу вариантов пополнения и снятия средств:
– Кредитные карточки
– Электронные платежные системы
– Межбанковские трансферы
– Криптовалюты
Абсолютно все операции осуществляются безопасно с применением современных протоколов защиты.
Сервис помощи
Профессиональная команда саппорта трудится круглосуточно. Коннектиться с консультантами реально через:
– Интерактивный чат
– Почтовую почту
– Контактный номер
– Social сети
Безопасность и лицензирование
Портал функционирует на основании законной разрешения. Это удостоверяет:
– Легальность игрового процесса
– Безопасность индивидуальных информации
– Пунктуальные перечисления
– Контролируемый игровой процесс
Резюме
Основной портал и его актуальные альтернативные адреса гарантируют пользователям совокупный ассортимент возможностей для безопасной и выгодной развлечений. Щедрые подарки, всевозможные автоматы, опытная поддержка и надежная платформа операций формируют казино оптимальным опцией для ценителей гемблинг игр.
1 xbet giri? 1xbet-55.com .
дизайн студия интерьеров дизайнер по интерьеру
Many thanks, Wonderful information!
Описание оригинального веб-сайта
Актуальное онлайн-казино дарит своим клиентам большой спектр услуг и призов. Оригинальный портал РњСЌРґ работает постоянно, предоставляя возможность к топовым играм, live-казино и многочисленным предложениям.
Функционирующее зеркало: путь к сайту
Что такое дубликат казино
Копия составляет собой идентичную дубликат главного ресурса с отличным URL путем. Рабочее зеркало дает клиентам миновать блокировки и сохранять стабильный доступ к предпочитаемым играм.
Как обнаружить рабочее зеркало сегодня
Свежие URL на главное зеркало публикуются через:
– Электронную новостнуюленту
– Проверенные социальные сети
– Команду помощи
– Партнерские сайты
Оформление на сайте
Этапы созданияаккаунта
Открытиесчета занимает пару минут и содержит нижеследующие этапы:
1. Переход на основной ресурс или рабочее зеркало
2. Клик опции “Зарегистрироваться”
3. Заполнение персональных реквизитов
4. Подтверждение аккаунта или телефона
5. Установка секретнойкомбинации
Приз за открытиесчета
Новые пользователи обретают солидные приветственные бонусы:
– Денежные деньги на кошелек
– Бесплатныевращения для автоматов
– Увеличенный процент кэшбека
– Особые ваучеры
Авторизация в личный кабинет
Постоянные пользователи могут произвести авторизацию через оригинальный сайт или рабочее зеркало. Для этого необходимо ввести имяпользователя и секретнуюкомбинацию, сформированные при оформлении.
Возможности личного профиля
В личном профиле имеются данные возможности:
– Изменение контактными данными
– Внесение кошелька
– Снятие денег
– Использование купонов
– Просмотр архива ставок
– Регистрация в состязаниях
Поощрения и промо
Категории бонусов
Казино радует своих пользователей разнообразными поощрительными программами:
– Вступительный комплект — щедрые вознаграждения на стартовые вклады
– Freespins — подарочные прокруты в известных слотах
– Кэшбек — еженедельный возврат процента ставок
– План верности — уникальные привилегии для активных пользователей
Ваучеры и их ввод
Уникальные купоны обеспечивают расширенные поощрения. Для активации необходимо набрать шифр в специальное поле в собственном разделе.
Развлекательный ассортимент
Слоты
База азартных автоматов содержит сотни позиций от ведущих провайдеров:
– Традиционные слоты
– Новые игры
– Призовые симуляторы
– Лицензионные развлечения
Live казино
Область Live-казино предлагает участие с профессиональными операторами в обстановке актуального трансляции:
– Рулетка
– Очко
– Баккара
– Техасскийхолдем
Соревнования
Постоянные состязания с внушительными джекпотными пулами устраиваются постоянно. Игроки сражаются за призовыеместа в турнирнойсетке.
Mobile платформа и программа
Мобильная версия сайта
Основной веб-сайт целиком приспособлен для портативных девайсов. Игроки могут пользоваться развлечения прямо через веб-навигатор без обязательства скачивания.
Программа для инсталляции
Специальное портативное софт предоставляется для получения на гаджеты с программными средами Android и iOS. Программа гарантирует:
– Оперативный путь к слотам
– Надежную операционность
– Оперативные-уведомления о акциях
– Комфортный интерфейс
Резюме
Основной ресурс казино и его актуальные дубликаты гарантируют участникам полный возможность к высококлассным развлекательным развлечениям. Щедрые подарки, различные предложения, комфортная мобильная версия и профессиональная сервис превращают азартный процесс максимально enjoyable и прибыльным.
Узнать больше kraken актуальные ссылки
перейдите на этот сайт кракен ссылка kraken
Передовые онлайн-казино обеспечивают геймерам множество путей для приятной игры. Официальный сайт казино Mellstroy открывает вход ко всем функциям и азартным играм. Однако при появлении технических трудностей на выручку спешат действующие копии.
Что есть собой актуальное зеркало
Дубликат казино — это полная реплика оригинального сайта, размещенная по дополнительному доменному имени. Легитимное зеркало удерживает все возможности, включая создание аккаунта, вход в индивидуальный кабинет, бонусы и промокоды.
Дубликат на сегодня предоставляет:
– Стабильный вход к игровым аппаратам
– Полную сохранность личных сведений
– Сохранение счета и записей транзакций
– Доступность всех акций
Открытие профиля на официальном портале
Процедура оформления учетной записи отнимает считанные минут. Новым клиентам необходимо:
1. Перейти на основной ресурс или рабочее зеркало
2. Выбрать кнопку «Создать аккаунт»
3. Указать требуемые сведения
4. Активировать электронную почту
5. Использовать купон при наличии
После финиша регистрации игроки приобретают бонус за регистрацию, что может включать free spins или монетарное вознаграждение.
Логин в собственный кабинет
Приватный кабинет предоставляет полный надзор над игровым процессом. Через индивидуальный раздел допускается:
– Финансировать депозит
– Получать призы
– Задействовать купоны
– Мониторить записи пари
– Играть в конкурсах
– Забирать кэшбек
Характеристика поощрений и акций
Богатая поощрительная программа — важное преимущество ресурса. Ключевые типы бонусов:
Стартовый подарок
Новички приобретают выгодное награду на начальные пополнения. Объем премии может доходить до 100-200% от суммы вклада.
Free spins
Безвозмездные вращения предоставляются для востребованных автоматов. Число free spins колеблется от 10 до 500 штук.
Возврат средств
Еженедельный или помесячный откат процента потерянных финансов. Средний процент возврата — 5-15%.
Соревнования
Систематические конкурсы с внушительными премиальными фондами. Участники борются за призовые позиции в рейтинге.
Портативная версия и софт
Адаптивная версия разрешает наслаждаться игрой с любого устройства. Пользователи могут загрузить app для iOS и Android или эксплуатировать браузерную версию.
Плюсы мобильного приложения:
– Молниеносная загрузка игр
– Практичный UI
– Пуш-нотификации о акциях
– Вход через Touch ID
Игровые автоматы и Live казино
Игровая база включает множество названий от ведущих провайдеров.
Топовые разделы игр:
– Классические слоты
– Видеослоты с бонусными уровнями
– Прогрессивный джекпот автоматы
– Мегавейс слоты
Live игровой зал
Категория live игорный зал предлагает игру с профессиональными крупье. Доступны традиционные игры:
– Французская рулетка
– Двадцать одно
– Punto Banco
– Техасский холдем
Как отыскать действующее зеркало
Раздобыть свежую адрес на зеркало можно несколькими способами:
1. Оформить подписку на почтовую рассылку
2. Отслеживать за обновлениями в социальных сетях
3. Написать в департамент поддержки
4. Добавить в закладки рабочее зеркало в закладки
Вывод
Лицензионный сайт и его актуальные дубликаты дают непрерывный доступ к развлекательным играм. Великодушные бонусы, разнообразные купоны, комфортное портативное программа и профессиональная служба поддержки поддержки превращают игровой геймплей предельно удобным и надежным.
1xbet tr 1xbet tr .
Hi my family member! I want to say that this post is amazing, great written and include approximately all vital infos.
I would like to peer extra posts like this
.
What stood out about this casino https://www.eureka-creation.ma/reels-gaming-hub-your-ultimate-gateway-to-premium/.html is the variety of the games. Everything runs smoothly, the design is minimal, and there’s always something new to explore, which keeps it engaging.
melbet мгновенное пополнение https://melbet72043.help
1xbet tr giri? 1xbet-giris-29.com .
ремонт бетонных конструкций обследование remont-betona-1.ru .
visit platform – Well-defined sections make navigation simple and user-friendly.
dog and cat medicine supply: pet antibiotics and care – best pet rx
http://vitalcorepharmacy.com/# which online pharmacy is reliable
pet antibiotics and care pet antibiotics and care pet pharmacy USA
pet pharmacy USA: pet antibiotics and care – pet pharmacy USA
веб-сайт mgmarket6
http://truehealthpharm.com/# erectile dysfunction medication online
узнать больше mega ссылка
1xbet yeni giri? adresi 1xbet-giris-27.com .
Читать далее kraken onion зеркала
browse this – Structured idea flow helps transform creative concepts into practical, results-driven action.
see more info – Smooth design makes exploring items fast and flexible.
1xbet mobi 1xbet mobi .
1xbet giri? yapam?yorum 1xbet-48.com .
This article presents clear idea for the new users of blogging, that really
how to do blogging and site-building.
подробнее здесь mega onion
birxbet giri? 1xbet-55.com .
Топик актуальная! Решил рассказать — пополнение стим через сбп — самый удобный вариантов. Пользуюсь https://cryptotrade.cyou/index.php?title=User:MichellYarboroug — баланс пополняется мгновенно. Без переплат — советую!
browse now – Pages load quickly and everything is easy to explore.
True Health Pharm: ed medications online – ed treatment online
1xbet giri? yapam?yorum 1xbet-54.com .
True Health Pharm: True Health Pharm – True Health Pharm
веб-сайте mgmarket6
learn more now – Navigating the platform to discover distinctive products was quick and fun.
visit this guide – Proper direction channels energy, keeping movement consistent and steady.
After testing several platforms, I found this casino https://cozycocoa.com/uncategorized/bonos-de-winpot-casino-recompensas-unicas-dirigidas-a-todos-nuestros to be reliable. The welcome bonus is generous, terms are transparent, and payouts are processed smoothly, making it suitable for regular players.
Узнать больше mega onion
Нынешние онлайн-казино гарантируют клиентам богатый спектр азартных игр и щедрые награды. Впрочем для стабильной работы важно осознавать, как отыскать казино РќСЊСЋ Ретро и его действующие зеркала.
Что такое главный веб-ресурс казино
Основной портал казино — это базовая система, где участники могут пользоваться игровыми развлечениями. Платформа оперирует на легитимных принципах и владеет всеми необходимыми лицензиями.
Основные выгоды основного веб-сайта:
– Безопасность персональных реквизитов
– Объективные требования участия
– Гарантированные транзакции
– Профессиональная помощь
Действующее зеркало казино: для чего нужно
Зеркало — это точная дубликат лицензионного портала, размещенная по альтернативному веб-адресу. Функционирующее зеркало разрабатывается для обеспечения непрерывного входа к платформе.
Факторы задействования дублирующих ресурсов:
– Недоступность основного домена
– Технические операции
– Большая посещаемость на сервер
Как найти действующее зеркало на сегодня
Обнаружить свежее действующее зеркало можно несколькими путями:
1. Почтовые оповещения — активируйте уведомления на email доставку
2. Департамент support — свяжитесь в онлайн-чат
3. Официальные площадки — проверяйте за постами
4. Игровые ресурсы — проверенные источники
Создание аккаунта на ресурсе казино
Алгоритм регистрации составляет буквально немного мгновений:
1. Активируйте на клавишу “Зарегистрироваться”
2. Внесите требуемые поля
3. Активируйте email почту
4. Примените купон, если предоставлен
Вслед за финализированной активации вам будет разрешен персональный раздел.
Награды и купоны
Богатая поощрительная программа — существенное конкурентное преимущество казино:
Поощрение за открытие счета
Первичные участники зарабатывают стартовый подарок, который может охватывать:
– Финансовый депозит на начальный депозит
– Фри-спины для игровых машин
– Стартовые средства
Активационные коды
Периодически появляются новые купоны, обеспечивающие забрать особые поощрения.
Программа возврата средств
Лояльные пользователи получают процент потраченных денег обратно.
Текущие предложения и соревнования
Платформа постоянно организует захватывающие кампании:
– Семидневные чемпионаты
– Специальные акции
– Лотереи значительных призов
– Механизм статусов
Вход в пользовательский профиль
Для логина на сайт требуется:
1. Загрузить главный адрес или действующее зеркало
2. Кликнуть “Login”
3. Ввести логин и ключ
В пользовательском профиле разрешены следующие опции:
– Внесение средств кошелька
– Вывод выигрышей
– Проверка архива ставок
– Редактирование личными данными
Mobile платформа и программа
Портативная вариант
Адаптивная вариант ресурса позволяет развлекаться с разных карманного устройства. Оформление автоматически оптимизируется под диагональ дисплея.
Приложение для скачивания
Загрузить приложение можно для:
– Android — прямая установка с сайта
– iOS — установка через App Store
Преимущества программы:
– Моментальный вход
– Надежная операционность
– Push-сообщения об бонусах
– Улучшенный дизайн
Игровые категории
Игровые машины
Богатая коллекция игровых барабанов от известных провайдеров:
– Классические автоматы
– Видео-эмуляторы
– Прогрессивные-игры
Live зал
Категория с настоящими ведущими дает:
– Рулеточные столы
– Двадцать одно
– Baccarat
– Texas Hold’em
Трансляции проводятся в высоком качестве изображения, обеспечивая впечатление аутентичного казино.
Методы зачисления и вывода
Сайт принимает множественные транзакционные сервисы:
– Кредитные карты
– Цифровые системы
– Криптовалюты
– Wire транзиты
Стартовые лимиты взноса и моментальные выплаты создают процесс максимально комфортной.
Отдел support
Компетентная служба поддержки оперирует 24/7 и может помочь с любыми задачами:
– Мгновенный-чат
– Email-помощь
– Phone связь
Заключение
Лицензионный сайт казино и его рабочие копии обеспечивают участникам надежный и захватывающий развлекательный отдых. Богатые награды, функциональная портативная вариант, обширные развлечения и качественное live-казино формируют эту площадку замечательным местом для развлекательных игр.
Актуальные онлайн-казино предлагают клиентам обилие путей для комфортной игры. Центральный сайт https://www.nidabeautygh.com/2026/03/05/vsya-informatsiya-o-verifikatsii-karty-dlya-kreditovaniya-ot предоставляет возможность ко всем опциям и игровым автоматам. Однако при образовании программных проблем на выручку приходят функционирующие копии.
Что есть собой актуальное зеркало
Копия казино — это полная дубликат официального сайта, размещенная по дополнительному доменному имени. Официальное зеркало сохраняет все функции, вместе с регистрацию, авторизацию в индивидуальный кабинет, поощрения и кодовые слова.
Копия на сегодня предоставляет:
– Непрерывный доступ к игровым аппаратам
– Стопроцентную защиту персональных данных
– Удержание баланса и истории транзакций
– Возможность использования всех бонусных программ
Регистрация на лицензионном портале
Процесс создания аккаунта отнимает пару минут. Начинающим клиентам следует:
1. Зайти на подлинный ресурс или актуальное зеркало
2. Щелкнуть кнопку «Зарегистрироваться»
3. Ввести необходимые графы
4. Верифицировать электронную почту
5. Указать купон при наличии
После завершения создания аккаунта геймеры получают приз за регистрацию, который может охватывать фриспины или монетарное премирование.
Доступ в индивидуальный кабинет
Индивидуальный кабинет открывает всесторонний управление над азартным ходом. Через индивидуальный раздел разрешается:
– Депонировать счет
– Выводить средства
– Использовать промокоды
– Отслеживать хронологию ставок
– Соревноваться в конкурсах
– Обретать кешбэк
Описание премий и промо-предложений
Щедрая призовая программа — значимое достоинство проекта. Центральные категории бонусов:
Вступительный бонус
Дебютанты зарабатывают щедрое премирование на первые депозиты. Размер приза может достигать 100-200% от объема депозита.
Фриспины
Бесплатные прокруты предоставляются для популярных машин. Сумма фриспинов разнится от 10 до 500 штук.
Кэшбек
Регулярный или ежемесячный откат части проигранных средств. Средний размер кэшбека — 5-15%.
Соревнования
Постоянные соревнования с внушительными премиальными банками. Конкурсанты соревнуются за топовые места в рейтинге.
Мобильная версия и приложуха
Портативная версия обеспечивает развлекаться с всякого аппарата. Геймеры могут скачать приложение для iOS и Android или задействовать веб версию.
Преимущества портативного программы:
– Быстрая прогрузка игр
– Практичный графический интерфейс
– Всплывающие уведомления о поощрениях
– Доступ через Touch ID
Машины и Live казино
Азартная коллекция охватывает сотни позиций от ведущих провайдеров.
Топовые типы автоматов:
– Стандартные автоматы
– Видео-автоматы с призовыми раундами
– Накопительный приз автоматы
– Megaways автоматы
Live игровой зал
Раздел live игорный зал предлагает игру с профессиональными крупье. Есть стандартные варианты:
– Американская рулетка
– Двадцать одно
– Baccarat
– Покер
Как найти действующее зеркало
Раздобыть действующую URL на зеркало возможно множественными путями:
1. Подписаться на емейл-уведомления
2. Отслеживать за обновлениями в социальных сетях
3. Обратиться в департамент поддержки
4. Заложить рабочее зеркало в избранное
Итог
Главный портал и его актуальные зеркала дают бесперебойный путь к развлекательным автоматам. Выгодные бонусы, множественные бонусные коды, удобное смартфонное софт и высококлассная сервис поддержки делают азартный процесс предельно удобным и надежным.
Get details
can i get generic keflex for sale
for your safety.
http://happypawspharmacy.com/# pet antibiotics and care
Анализ официального сайта
Передовые виртуальные казино предлагают клиентам богатый набор услуг и возможностей. Официальный ресурс https://www.tzcreativeexpeditions.com/sposoby-povysheniya-proizvoditelnosti-sayta-kazino обеспечивает надежный вход к развлекательным услугам.
Функционирующее зеркало: доступ прямо сейчас
Дублирующий портал представляет как абсолютную копию лицензионного ресурса. Официальное зеркало позволяет игрокам избегать возможные барьеры.
Выгоды использования зеркала
Ключевые преимущества содержат:
– Постоянный вход к платформе
– Удержание полных функций главного сайта
– Безопасность индивидуальных информации
– Такой же набор функций
Регистрация на ресурсе
Механизм оформления профиля характеризуется понятностью и комфортом. Новые клиенты обязаны:
1. Перейти на официальный сайт или его зеркало
2. Щелкнуть на кнопку открытия счета
3. Заполнить требуемые сведения
4. Подтвердить email почту
5. Выполнить первый авторизацию
Приз за оформление
Новые игроки получают значительный стартовый бонус. Подобное награда может предусматривать:
– Монетарные суммы
– Бесплатные спины
– Повышенный процент компенсации
Вход в личный аккаунт
Активные игроки могут быстро войти в собственный аккаунт, задействуя логин и ключ. Собственный профиль дает возможность к:
– Регулированию средствами
– Журналу переводов
– Работающим бонусам
– Параметрам профиля
Подарки и кампании
Портал систематически организует всевозможные мероприятия для участников.
Типы поощрений
Основные категории вознаграждений:
– Пополнительные начисления – коэффициент от величины взноса
– Бесплатные вращения – даровые спины в слотах
– Кэшбэк – компенсация процента утраченных средств
– Конкурсные призы – награды за игру в турнирах
Коды
Уникальные коды помогают получить добавочные преимущества. Клиенты могут получить их на тематических площадках или получить в уведомлениях.
Mobile адаптация и софт
Прогрессивные пользователи предпочитают мобильный гейминг.
Возможности переносной платформы
– Responsive вид для любых гаджетов
– Совокупный путь к автоматам
– Моментальная подгрузка
– Комфортное использование
Download приложение
Переносное программа открыто для downloading на девайсы с рабочими платформами Android и iOS. Программа предоставляет:
– Надежную деятельность
– Пуш оповещения о бонусах
– Моментальный вход к любимым автоматам
Игровой портфель
Портал дает внушительную галерею развлекательных забав.
Игровые машины
Коллекция развлекательных слотов охватывает:
– Стандартные игры
– Видео слоты
– Накопительные автоматы
– Branded развлечения
Live дилеры
Раздел реальных развлечений дает право играть с реальными дилерами. Представлены:
– Американская рулетка
– Очко
– Baccarat
– Карибский покер
Состязания
Периодические конкурсы обеспечивают клиентам бороться за значительные финансовые банки. Соревновательная сетка обновляется постоянно.
Денежные операции
Портал поддерживает разнообразие способов депозита и получения финансов:
– Пластиковые карточки
– Электронные кошельки
– Банковские транзакции
– Цифровые валюты
Все операции выполняются надежно с использованием современных методов шифрования.
Отдел поддержки
Компетентная служба поддержки работает круглосуточно. Коннектиться с специалистами можно через:
– Интерактивный чат
– Электронную почту
– Телефонную линию
– Соц медиа
Секьюрити и аккредитация
Портал функционирует на фундаменте официальной разрешения. Данное удостоверяет:
– Прозрачность игрового процесса
– Защиту персональных данных
– Быстрые перечисления
– Ответственный гейминг
Итог
Официальный веб-сайт и его рабочие альтернативные адреса обеспечивают пользователям целостный спектр функций для удобной и профитной развлечений. Внушительные вознаграждения, всевозможные слоты, опытная служба и защищенная платформа выплат превращают казино превосходным решением для ценителей игровых развлечений.
Актуальные онлайн-казино гарантируют игрокам обилие опций для комфортной игры. Центральный ресурс казино Panda казино дарит доступ ко всем возможностям и игровым автоматам. Однако при наличии программных проблем на выручку спешат актуальные дубликаты.
Что означает собой функционирующее зеркало
Зеркало казино — это полная версия основного веб-сайта, размещенная по запасному адресу. Подлинное зеркало поддерживает все возможности, вместе с создание аккаунта, авторизацию в индивидуальный кабинет, вознаграждения и купоны.
Альтернативный сайт на сегодня дает:
– Стабильный вход к развлекательным слотам
– Полную защиту персональных сведений
– Сохранение счета и истории операций
– Возможность использования всех специальных предложений
Создание аккаунта на главном портале
Процедура открытия профиля требует несколько минут. Новоиспеченным игрокам требуется:
1. Зайти на официальный портал или рабочее зеркало
2. Кликнуть кнопку «Создать аккаунт»
3. Внести необходимые графы
4. Верифицировать email почту
5. Использовать кодовое слово при существовании
После завершения регистрации геймеры зарабатывают приз за регистрацию, что может содержать бонусные спины или финансовое премирование.
Доступ в собственный кабинет
Индивидуальный кабинет открывает всеобъемлющий мониторинг над игровым процессом. Через индивидуальный аккаунт разрешается:
– Вносить средства на кошелек
– Снимать выигрыши
– Задействовать купоны
– Мониторить историю пари
– Участвовать в турнирах
– Забирать кешбэк
Обзор бонусов и акций
Щедрая премиальная система — существенное плюс казино. Основные виды вознаграждений:
Стартовый бонус
Новички приобретают великодушное вознаграждение на первые вклады. Размер премии может достигать 100-200% от суммы вклада.
Free spins
Безвозмездные раунды начисляются для известных автоматов. Число free spins изменяется от 10 до 500 штук.
Кешбэк
Систематический или помесячный компенсация части проигранных финансов. Стандартный объем компенсации — 5-15%.
Состязания
Периодические соревнования с большими призовыми пулами. Игроки соревнуются за призовые строчки в турнирной таблице.
Портативная версия и приложение
Мобильная версия разрешает играть с всякого аппарата. Игроки могут установить приложение для iOS и Android или задействовать интернет версию.
Плюсы мобильного софта:
– Оперативная подзагрузка автоматов
– Эргономичный дизайн
– Пуш-нотификации о промо
– Доступ через биометрию
Игровые автоматы и Live казино
Развлекательная библиотека насчитывает сотни игр от лидирующих производителей.
Востребованные разделы слотов:
– Классические слоты
– Современные слоты с призовыми этапами
– Джекпот игры
– Megaways слоты
Live игровой зал
Секция live игорный зал обеспечивает развлечение с настоящими крупье. Доступны традиционные игры:
– Французская рулетка
– Двадцать одно
– Баккара
– Карибский покер
Как разыскать актуальное зеркало
Обрести свежую URL на зеркало разрешается множественными путями:
1. Зарегистрироваться на емейл-уведомления
2. Мониторить за обновлениями в соц сетях
3. Написать в сервис поддержки
4. Добавить в закладки рабочее зеркало в фавориты
Заключение
Лицензионный портал и его актуальные дубликаты предоставляют бесперебойный путь к развлекательным слотам. Выгодные бонусы, множественные промокоды, эргономичное портативное приложение и высококлассная техподдержка поддержки превращают развлекательный процесс максимально удобным и надежным.
mines pin up https://pinup69053.help
Следующая страница kraken актуальные ссылки
Передовые онлайн-казино дают игрокам обширный спектр игр и бонусных вариантов. Присоединение к ресурсу реализуется через официальный сайт или его действующее зеркало http://vanuatubeachbar.com/vsya-informatsiya-o-proverke-bankovskikh-kart-dlya-polucheniya-kredita-ot/, что дает непрерывную активность.
В чем суть рабочее зеркало казино
Альтернатива — это полная копия основного веб-сайта, сделанная для преодоления блокировок. Актуальное зеркало позволяет участникам получить доступ к излюбленным развлечениям в каждое время.
Лицензионное зеркало располагает всеми возможностями первоначального веб-сайта:
– Совокупный список развлечений
– Учетная запись с сохраненными информацией
– Текущие акции
– Гарантированные платежные действия
Открытие счета на основном ресурсе
Алгоритм открытия счета отнимает всего несколько минут. Первым игрокам требуется:
1. Перейти на официальный сайт или функционирующее зеркало
2. Кликнуть на ссылку “Зарегистрироваться”
3. Ввести обязательные информацию
4. Активировать email
5. Внести начальный депозит
Стартовый бонус выдается моментально после окончания всех ступеней.
Вход в профиль
Действующие клиенты могут произвести вход вводя:
– Учетное имя и ключ
– Код контакта
– Email
Персональный раздел открывает возможность к управлению финансами, сведениям операций и доступным промокодам.
Награды и акции
Гемблинг сервис радует активных участников многочисленными вознаграждениями:
Начальный пакет
– Надбавка на первый пополнение до 100%
– Free spins на известные автоматы
– Дополнительные бонусы за последующие депозиты
Промокоды
Эксклюзивные ваучеры обеспечивают шанс на использование специальных вознаграждений. Действующие промокоды размещаются в секции “Акции”.
Кэшбек
Регулярный кэшбек насчитывает до 10% от потраченных финансов. Компенсация начисляется моментально.
Система лояльности
Регулярные игроки приобретают поинты, которые обмениваются на действительные финансы или бесплатные вращения.
Mobile версия и софт
Ради комфорта участников создана функциональная мобильная версия. Гибкий интерфейс помогает комфортно развлекаться с произвольного мобильного устройства.
Выгоды программы:
– Быстрый доступ к развлечениям
– Адаптированный вид
– Надежная работа
– Push-уведомления о свежих акциях
Установить приложение можно бесплатно с проверенного ресурса для аппаратов на Android и iOS.
Ассортимент развлечений
Автоматы
Коллекция содержит более 2000 автоматов от ведущих провайдеров:
– Традиционные автоматы
– Video slots
– Джекпот-слоты
– Сюжетные развлечения
Live казино
Блок Live казино дает развлечение с реальными ведущими в реальном формате:
– Рулетка
– Блэкджек
– Карты
– Столы покера
Турниры
Периодические конкурсы с крупными премиальными суммами организуются систематически. Вход в состязаниях разрешено всем действующим клиентам.
Финансовые варианты
Пополнения и изъятия финансов осуществляются через известные способы оплаты:
– Дебетовые карты
– Электронные сервисы
– Цифровая валюта
– Банковские платежи
Наименьший платеж — от 100 рублей. Снятие денег проводится в течение 24 времени.
Отдел помощи
Круглосуточная группа поддержки способна поддержать в разрешении произвольных проблем:
– Мессенджер
– Email
– Телефон
– Общественные сети
Защита и документ
Главный портал работает на основании международной разрешения. Каждые информация пользователей охранены современным SSL-криптованием.
Резюме
Актуальное зеркало дает стабильный доступ к предпочитаемым автоматам, привлекательным промокодам и комфортным сервисам. Создайте аккаунт немедленно и получите первый подарок!
mostbet android uchun rasmiy apk https://mostbet37150.help
pet pharmacy USA pet pharmacy USA pet antibiotics and care
Предлагаем вашему вниманию интересную справочную статью, в которой собраны ключевые моменты и нюансы по актуальным вопросам. Эта информация будет полезна как для профессионалов, так и для тех, кто только начинает изучать тему. Узнайте ответы на важные вопросы и расширьте свои знания!
Получить больше информации – https://vivod-iz-zapoya-2.ru/
mostbet фриспины за регистрацию http://www.mostbet21480.help
ремонт бетонных конструкций жилой дом remont-betona-1.ru .
Нынешние онлайн-казино предлагают игрокам широкий спектр услуг и призовых опций. Подключение к сервису реализуется через главный портал или его рабочее зеркало https://talgo.ca/v-2026-godu-rossiyane-smogut-ispolzovat-top-8-metodov-oplaty-v-egipte-kakie-kreditnye-karty-aktualny-v-etoy-strane-puteshestviya-na-dtf/, что предоставляет непрерывную работу.
В чем суть функционирующее зеркало казино
Дубликат — это полная реплика официального сайта, сделанная для решения ограничений. Актуальное зеркало обеспечивает клиентам обрести доступ к предпочитаемым развлечениям в любое время.
Официальное зеркало обладает всеми характеристиками главного ресурса:
– Целый ассортимент развлечений
– Профиль с внесенными данными
– Текущие бонусы
– Защищенные финансовые процедуры
Регистрация на официальном ресурсе
Алгоритм создания аккаунта требует всего несколько минут. Первым участникам следует:
1. Войти на главный ресурс или функционирующее зеркало
2. Кликнуть на кнопку “Регистрация”
3. Указать обязательные информацию
4. Проверить email
5. Внести дебютный взнос
Бонус за регистрацию начисляется незамедлительно после окончания всех стадий.
Доступ в аккаунт
Зарегистрированные участники могут произвести авторизацию указывая:
– Имя пользователя и код
– Цифры телефона
– Контактный email
Личный кабинет дает право к администрированию счетом, данным операций и текущим промокодам.
Поощрения и кампании
Игровая система вознаграждает активных участников разнообразными бонусами:
Первый пакет
– Надбавка на начальный пополнение до 100%
– Фриспины на известные автоматы
– Дополнительные бонусы за последующие депозиты
Купоны
Эксклюзивные купоны обеспечивают возможность на использование особых вознаграждений. Текущие коды размещаются в категории “Промо”.
Кэшбек
Еженедельный возврат достигает до 10% от использованных финансов. Компенсация предоставляется автоматически.
Программа лояльности
Верные игроки накапливают баллы, которые превращаются на настоящие деньги или фриспины.
Мобильная версия и приложение
Для удобства игроков построена удобная адаптивный сайт. Отзывчивый вид помогает легко делать ставки с произвольного переносного аппарата.
Преимущества APP:
– Скорый запуск к развлечениям
– Настроенный интерфейс
– Устойчивая активность
– Сообщения о свежих акциях
Получить программу можно даром с проверенного веб-сайта для аппаратов на Android и iOS.
Каталог автоматов
Автоматы
База вмещает более 2000 автоматов от топовых производителей:
– Традиционные слоты
– Видео-слоты
– Jackpot игры
– Сюжетные игры
Live казино
Блок Live игр предоставляет развлечение с настоящими дилерами в реальном формате:
– Рулеточные столы
– Blackjack
– Карты
– Poker
Турниры
Систематические соревнования с большими премиальными пулами проводятся систематически. Допуск в состязаниях возможно всем зарегистрированным пользователям.
Денежные варианты
Платежи и снятия средств реализуются через известные платежные системы:
– Кредитные карточ ки
– Виртуальные кошельки
– Криптовалюта
– Прямые операции
Минимальный платеж — от 100 рублей. Получение выигрышей проводится в течение 24 ч.
Сервис саппорта
Круглосуточная отдел помощи способна помочь в разрешении произвольных вопросов:
– Мессенджер
– Email
– Телефон
– Социальные сети
Безопасность и сертификат
Главный веб-сайт функционирует на основании глобальной разрешения. Каждые информация пользователей защищены современным SSL-протоколом.
Итог
Функционирующее зеркало дает стабильный подключение к предпочитаемым автоматам, выгодным бонусам и функциональным сервисам. Откройте счет сегодня и обретите стартовый поощрение!
browse forex details – The interface is user-friendly, helping users find info quickly.
pet antibiotics and care: pet antibiotics and care – pet pharmacy USA
букет отзывы http://www.zakazat-cveti-moskva.ru .
мелбет киргизия android apk [url=melbet42089.help]melbet42089.help[/url]
колесов вертолеты россии генеральный директор
Современные онлайн-казино предлагают пользователям обширный диапазон развлечений и поощрительных программ. Подключение к ресурсу осуществляется через официальный сайт или его актуальное зеркало казино Vovan сайт, что обеспечивает постоянную игру.
Что представляет собой актуальное зеркало казино
Зеркало — это точная дубликат главного портала, созданная для устранения барьеров. Действующее зеркало дает возможность участникам иметь подключение к предпочитаемым играм в каждое время.
Лицензионное зеркало располагает всеми характеристиками главного ресурса:
– Полный каталог автоматов
– Профиль с зафиксированными данными
– Текущие поощрения
– Безопасные денежные процедуры
Открытие счета на лицензионном ресурсе
Процесс оформления составляет всего несколько минут. Новым пользователям нужно:
1. Зайти на главный сайт или действующее зеркало
2. Кликнуть на элемент “Зарегистрироваться”
3. Указать требуемые данные
4. Подтвердить контакт
5. Совершить первый вклад
Приветственный бонус предоставляется сразу после прохождения всех этапов.
Подключение в личный кабинет
Созданные клиенты могут совершить авторизацию используя:
– Учетное имя и код
– Данные мобильного
– Электронную почту
Аккаунт дает шанс к управлению счетом, данным ставок и текущим промокодам.
Награды и кампании
Гемблинг площадка вознаграждает активных клиентов многочисленными вознаграждениями:
Стартовый набор
– Бонус на начальный платеж до 100%
– Бесплатные вращения на популярные машины
– Дополнительные премии за очередные пополнения
Бонусные коды
Уникальные купоны предоставляют шанс на активацию специальных бонусов. Действующие коды размещаются в разделе “Бонусы”.
Кешбэк
Регулярный кешбэк равен до 10% от использованных денег. Возмещение начисляется незамедлительно.
Программа лояльности
Постоянные игроки зарабатывают единицы, которые конвертируются на подлинные финансы или даровые спины.
Мобильная версия и приложение
Для практичности пользователей разработана функциональная адаптивный сайт. Адаптивный облик обеспечивает комфортно участвовать с каждого переносного гаджета.
Достоинства софта:
– Оперативный подключение к слотам
– Адаптированный интерфейс
– Бесперебойная работа
– Нотификации о новых бонусах
Загрузить программу можно безвозмездно с главного ресурса для гаджетов на Android и iOS.
Ассортимент игр
Машины
Каталог насчитывает более 2000 машин от топовых производителей:
– Традиционные игры
– Видео-слоты
– Джекпот-слоты
– Фирменные развлечения
Live казино
Раздел Live развлечений дает развлечение с реальными дилерами в реальном эфире:
– Roulette
– Blackjack
– Punto Banco
– Покер
Соревнования
Регулярные турниры с крупными премиальными фондами запускаются еженедельно. Допуск в состязаниях возможно всем активным игрокам.
Расчетные системы
Пополнения и снятия финансов выполняются через востребованные способы оплаты:
– Банковские пластик
– Виртуальные кошельки
– Криптовалюта
– Счетные транзакции
Минимальный платеж — от 100 рублей. Снятие финансов проводится в течение 24 времени.
Сервис саппорта
24/7 команда support расположена помочь в решении каких-либо проблем:
– Живой чат
– Email
– Телефон
– Социальные сети
Надежность и сертификат
Лицензионный сайт действует на почве глобальной лицензии. Все сведения клиентов обезопасены современным SSL-криптованием.
Заключение
Рабочее зеркало дает бесперебойный вход к выбранным развлечениям, щедрым бонусам и практичным возможностям. Присоединяйтесь сейчас и обретите первый приз!
1xbet t?rkiye 1xbet t?rkiye .
Переход к ресурсу через действующие зеркала
Игроки интернет казино регулярно встречаются с трудностью блокировки официального портала. Собственно для устранения этой задачи созданы альтернативные адреса легального сайта. KiloGram скачать предоставляет абсолютный доступ ко всем функциям площадки.
Что такое действующее зеркало казино
Дубликат составляет собой точную дубликат оригинального веб-сайта с идентичным функционалом. Главное несовпадение — это иное имя. Каждые параметры клиента, в том числе счет, поощрения и данные ставок, продолжают быть такими же.
Плюсы эксплуатации зеркал
Функционирующие зеркала имеют рядом значимых выгод:
– Непрерывный переход к предпочитаемым развлечениям
– Абсолютная защита личных параметров
– Поддержание всех конфигураций индивидуального кабинета
– Способность обретения бонусов и вовлечения в акциях
Создание аккаунта на главном портале
Операция регистрации крайне элементарен и требует пару минут. Недавние пользователи в состоянии надеяться на щедрый приветственный приз за открытие счета.
Стадии оформления аккаунта
1. Вход на легальный портал или его зеркало
2. Выбор на опцию “Регистрация”
3. Указание обязательных информации
4. Подтверждение почтовой почты
5. Применение промокода (в случае есть)
Награды и предложения для игроков
Игровая площадка поощряет своих игроков всевозможными наградными системами.
Основные варианты поощрений
Стартовый подарок — внушительное вознаграждение для начинающих пользователей, которое имеет возможность охватывать финансовые бонусы и free spins.
Безвозмездные спины — способность запускать в известных игровых машинах бесплатно.
Возврат средств — долевой отдача израсходованных финансов, который зачисляется по неделям или каждый месяц.
Промокоды — специальные наборы, дающие экстра выгоды.
Пользовательский кабинет: функции и установки
Личный профиль предоставляет исчерпывающий управление над персональным процессом. Здесь присутствуют:
– Управление балансом
– Данные операций
– Работающие бонусы
– Установки безопасности
– Проверка аккаунта
Портативная вариант и приложение
Нынешние игроки оценивают гибкость. Ресурс дает два варианта для развлечений с карманных гаджетов.
Приспособленная смартфонная вариант
Портативная версия домена автономно приспосабливается под экран любого аппарата. Нет необходимости устанавливать дополнительное ПО.
APP для смартфонов
Доступно скачать оригинальное софт для iOS и Android. Софт дает:
– Скорый старт
– Оптимизированный дизайн
– Push-сообщения о акциях
– Бесперебойную работу
Live раздел: среда подлинного казино
Раздел Live столов доставляет участников в среду настоящего казино. Опытные ведущие ведут партии в варианте настоящего времени.
Востребованные Live-столы
– Рулетка
– Блэкджек
– Baccarat
– Карибский покер
Слоты: выбор автоматов
Коллекция игровых машин включает множество позиций от известных поставщиков. Игроки найдут:
– Классические машины
– Современные слоты
– Прогрессивный джекпот-слоты
– Слоты с множественными линиями
Конкурсы и уникальные события
Регулярные конкурсы обеспечивают клиентам состязаться друг с другом за внушительные выигрышные пулы. Всякий конкурс располагает свои требования включения и доску лидеров.
Пути ввода и получения финансов
Платформа обслуживает массу платежных сервисов:
– Кредитные средства
– Электронные платежные системы
– Blockchain-платежи
– Wire отправления
Абсолютно все переводы выполняются надежно благодаря современным технологиям шифрования.
Команда помощи
Опытные специалисты сервиса поддержки способны помочь 24/7. Предусмотрены такие каналы контакта:
– Оперативный-чат
– Email-сервис
– Аудио поддержка
– Коммуникационные сети
Резюме
Официальный сайт клуба и его актуальные зеркала предоставляют участникам безопасный и удобный подход к большому выбору игровых активностей. Крупные награды, постоянные акции, квалифицированная поддержка и простые платежные системы создают игровой времяпрепровождение максимально приятным и результативным.
1xbet spor bahislerinin adresi 1xbet spor bahislerinin adresi .
казино майнкрафт
one x bet one x bet .
buy ed meds: True Health Pharm – online ed medicine
check details – Clear navigation helped me quickly evaluate smarter paths.
https://football-fun-live.com/tournaments/belarus-vtoraya-liga/table-sosi-moi-bolshoy-reyting-vtoroy
Нынешние онлайн-казино гарантируют пользователям разнообразный набор игр и заманчивые награды. Но для комфортной времяпрепровождения необходимо знать, как найти https://jomgatea.com/blog/stoit-otmetit-chto-sposoby-izmeneniya-dannykh-karty-na и его рабочие зеркала.
Что такое основной веб-ресурс казино
Официальный сайт казино — это основная веб-площадка, где участники могут пользоваться гемблинг развлечениями. Портал работает на официальных принципах и имеет всеми нужными разрешениями.
Основные плюсы официального веб-сайта:
– Надежность пользовательских данных
– Объективные условия участия
– Подтвержденные транзакции
– Оперативная поддержка
Рабочее зеркало казино: для чего нужно
Альтернативный адрес — это точная дубликат лицензионного ресурса, находящаяся по другому домену. Действующее зеркало формируется для гарантирования стабильного соединения к ресурсу.
Причины эксплуатации зеркал:
– Ограничение главного сайта
– Регламентные мероприятия
– Высокая нагрузка на ресурс
Как получить рабочее зеркало в данный момент
Найти текущее проверенное зеркало можно множественными путями:
1. Почтовые оповещения — активируйте уведомления на информационную отправку
2. Команда помощи — свяжитесь в онлайн-чат
3. Социальные площадки — следите за обновлениями
4. Партнерские ресурсы — проверенные платформы
Регистрация на портале казино
Этап создания аккаунта требует всего пару секунд:
1. Кликните на клавишу “Открыть счет”
2. Внесите обязательные данные
3. Валидируйте электронную почту
4. Примените купон, если доступен
После успешной оформления вам будет разрешен личный аккаунт.
Награды и купоны
Выгодная премиальная программа — ключевое конкурентное преимущество казино:
Подарок за первичную регистрацию
Первичные участники приобретают приветственный подарок, который может охватывать:
– Финансовый кредит на дебютный взнос
– Фриспины для барабанов
– Приветственные бонусы
Бонусные коды
Систематически выходят актуальные купоны, дающие возможность забрать особые преимущества.
Механизм кэшбека
Активные клиенты получают порцию использованных финансов обратно.
Актуальные промо и конкурсы
Платформа периодически организует увлекательные кампании:
– Семидневные турниры
– Сезонные предложения
– Розыгрыши значительных наград
– Программа привилегий
Логин в персональный раздел
Для авторизации на портал нужно:
1. Загрузить лицензионный ресурс или действующее зеркало
2. Выбрать “Войти”
3. Прописать email и код доступа
В пользовательском кабинете предоставлены следующие инструменты:
– Внесение средств баланса
– Вывод средств
– Проверка лога операций
– Редактирование персональными параметрами
Адаптивная платформа и программа
Портативная платформа
Мобильная версия портала предоставляет шанс делать ставки с различных мобильного телефона. Визуал автоматически оптимизируется под размер дисплея.
Приложение для download
Получить программу можно для:
– Android — официальная скачивание с портала
– iOS — установка через App Store
Преимущества мобильного клиента:
– Оперативный старт
– Стабильная функциональность
– Push-оповещения об акциях
– Улучшенный функционал
Гемблинг секции
Барабаны
Обширная галерея азартных автоматов от известных поставщиков:
– Классические игры
– Современные-игры
– Накопительные-машины
Live casino
Категория с настоящими дилерами предоставляет:
– European/American Roulette
– Blackjack
– Баккара
– Покер
Эфиры ведутся в отличном качестве изображения, обеспечивая эффект аутентичного казино.
Способы депозита и снятия
Сайт обслуживает разнообразные транзакционные методы:
– Банковские средства
– Электронные счета
– Crypto
– Банковские транзакции
Базовые пороги пополнения и скоростные платежи делают развлечение исключительно приятной.
Департамент поддержки
Квалифицированная служба support работает 24/7 и в состоянии ассистировать с любыми задачами:
– Мгновенный-чат
– Email-поддержка
– Голосовая линия
Итоги
Главный ресурс казино и его действующие альтернативные адреса обеспечивают пользователям защищенный и захватывающий гемблинг отдых. Выгодные награды, простая портативная модификация, богатые автоматы и профессиональное live-казино превращают эту систему великолепным местом для игровых времяпрепровождения.
https://happypawspharmacy.com/# dog and cat medicine supply
Характеристика главного веб-сайта
Новое онлайн-казино дарит своим пользователям разнообразный ассортимент игр и вознаграждений. Оригинальный сайт Casher оперирует непрерывно, гарантируя доступ к востребованным играм, live-казино и обширным кампаниям.
Рабочее зеркало: путь к платформе
Что такое копия казино
Зеркало составляет собой полную дубликат основного веб-сайта с отличным интернет путем. Актуальное зеркало дает участникам избегать запреты и получать постоянный подключение к излюбленным автоматам.
Как обнаружить действующее зеркало сегодня
Рабочие URL на основное зеркало появляются через:
– Email оповещение
– Главные публичные сети
– Службу сопровождения
– Тематические площадки
Регистрация на сайте
Процедура регистрации
Оформление занимает несколько минут и включает следующие действия:
1. Вход на основной сайт или рабочее зеркало
2. Активация клавиши “Зарегистрироваться”
3. Указание личных сведений
4. Проверка электроннойпочты или номера
5. Установка кодадоступа
Подарок за созданиеаккаунта
Новые участники зарабатывают щедрые приветственные поощрения:
– Денежные деньги на кошелек
– Халявныеспины для автоматов
– Повышенный коэффициент компенсации
– Особые промокоды
Доступ в индивидуальный счет
Активные участники могут произвести логин через основной сайт или актуальное зеркало. Для этого следует внести учетноеимя и пароль, придуманные при оформлении.
Инструменты индивидуального профиля
В личном кабинете открыты данные опции:
– Редактирование персональными данными
– Ввод депозита
– Снятие выигрышей
– Ввод купонов
– Просмотр истории игр
– Включение в состязаниях
Подарки и акции
Виды подарков
Казино радует своих участников разнообразными наградными предложениями:
– Стартовый комплект — щедрые поощрения на дебютные вклады
– Freespins — дополнительные вращения в известных автоматах
– Кэшбек — периодический возврат суммы убытков
– Программа верности — специальные льготы для активных пользователей
Ваучеры и их использование
Специальные промокоды гарантируют бонусные вознаграждения. Для ввода следует набрать последовательность в специальное поле в собственном аккаунте.
Развлекательный каталог
Симуляторы
Коллекция азартных машин вмещает сотни названий от известных разработчиков:
– Обычные симуляторы
– Новые автоматы
– Джекпот игры
– Лицензионные автоматы
Live казино
Область Live-казино обеспечивает игру с живыми крупье в условиях онлайн времени:
– Американскаярулетка
– Двадцатьодно
– Baccarat
– Casinopoker
Соревнования
Периодические соревнования с крупными выигрышными суммами проходят постоянно. Соревнующиеся сражаются за лидерство в таблице.
Смартфонная версия и APP
Адаптивная реализация ресурса
Оригинальный сайт на100% настроен для мобильных устройств. Участники способны открывать слоты напрямую через браузер без потребности инсталляции.
Софт для установки
Фирменное портативное APP предоставляется для установки на аппараты с программными платформами Android и iOS. Программа гарантирует:
– Оперативный путь к развлечениям
– Надежную функциональность
– Моментальные-сообщения о акциях
– Простой оформление
Итог
Оригинальный портал казино и его актуальные копии предоставляют участникам всесторонний доступ к качественным игровым развлечениям. Щедрые поощрения, различные кампании, комфортная мобильная адаптация и опытная служба создают развлекательный процесс предельно удобным и результативным.
<ahref="//focusactivatesprogress.click/](https://focusactivatesprogress.click/)” />see more info – Staying focused ensures each step contributes meaningfully to overall progress.
1xbet giri? linki 1xbet-53.com .
https://activepages.com.au/profile/winspinn2
Переход к платформе через действующие зеркала
Актуальные виртуальные казино обеспечивают игрокам непрерывный доступ к сервисам. Центральный веб-сайт https://maxtraining.fr/onlayn-proverka-bankovskoy-karty-etot-protsess-analogichen-tomu-chto-proiskhodit-na-drugikh-platformakh-gde-osushchestvlyaetsya-verifikatsiya/ оперирует стабильно, гарантируя обширный выбор развлекательных слотов. Тем не менее иногда появляются системные проблемы или ограничения, потому необходимо знать о существовании действующих зеркал.
Что означает собой официальное зеркало казино
Дубликат — это точная дубликат официального портала с идентичным интерфейсом. Рабочее зеркало сегодня помогает избегать местные ограничения и вести игру.
Ключевые достоинства применения зеркал:
– Безграничный подключение к персональному кабинету
– Фиксация любых информации учётной записи
– Идентичный спектр автоматов
– Действующие бонусы и акции
Регистрация на сайте
Процедура создания аккаунта отнимает пару минут. Недавние пользователи получают великодушный бонус за создание счёта, он в состоянии включать:
– Стартовый финансовый приз
– Комплиментарные кручения для машин
– Специальные ваучеры
– Расширенный возврат
Ради выполнения создания аккаунта требуется:
1. Переместиться на главный портал или альтернативу
2. Кликнуть клавишу «Создать аккаунт»
3. Указать личные сведения
4. Активировать мейл или номер
5. Задействовать ваучер (когда имеется существовании)
Вход в личный кабинет
После правильной создания аккаунта игроки способны выполнять вход через главный ресурс или актуальное зеркало. Персональный кабинет обеспечивает полный контроль над счётом:
– История игр
– Пополнение депозита
– Получение выигрышей
– Управление привилегиями
– Включение в турнирах
Привилегии и промо казино
Платформа удовлетворяет геймеров разнообразными бонусными программами:
Приветственные поощрения
Новички зарабатывают щедрый букет привилегий на вступительные пополнения. Как правило это охватывает процентную прибавку к размеру депозита плюс даровые кручения.
Регулярные промо
– Каждонедельный кэшбек до 15%
– Турниры с наградными пулами
– Бонусы на день рождения
– Уникальные предложения для элитных игроков
Программа поощрения
Деятельные клиенты накапливают баллы, которые возможно обменять на настоящие финансы или специальные привилегии.
Карманная версия и приложение
Нынешние технологии дают возможность развлекаться в любом месте подходяще. Карманная вариант ресурса автономно приспосабливается под монитор произвольного гаджета.
Плюсы портативного софта:
– Оперативная загрузка игр
– Практичный облик
– Мгновенные-оповещения о промо
– Шанс скачать для Android и iOS
Настоящее казино: антураж истинного гемблинг заведения
Раздел Live клуба погружает игроков в атмосферу реального азартного клуба. Профессиональные дилеры проводят игру в режиме реального времени.
Доступные столы:
– Рулетка
– Очко
– Баккара
– Покерная игра
Барабаны и развлекательные аппараты
Собрание азартных автоматов насчитывает массу названий от передовых разработчиков. Произвольный пользователь обнаружит игру по вкусу:
– Винтажные машины
– Современные автоматы с призовыми раундами
– Джекпот-машины
– Динамические игры
Турниры и розыгрыши
Периодические конкурсы привносят остроту и обеспечивают шанс заработать большие призы. Вовлечение в соревнованиях регулярно безвозмездное, а премиальные пулы доходят до крупных величин.
Защита и конфиденциальность
Платформа задействует актуальные методы защиты для обеспечения информации игроков. Каждые финансовые процедуры выполняются через охраняемые соединения.
Итог
Основной веб-сайт и его действующие зеркала предоставляют устойчивый вход к первоклассным гемблинг играм. Богатые бонусы, практичная мобильная вариант, вариативность машин и профессиональное Live-клуб создают ресурс замечательным вариантом для любителей развлекательных автоматов.
Переход к сайту и действующие ссылки
Востребованные виртуальные казино гарантируют клиентам большой выбор игр. Центральный портал андроид предоставляет безопасный доступ ко всем услугам. Тем не менее порой появляются ситуации, когда необходимо дополнительный метод входа.
Что представляет собой рабочее зеркало
Функционирующее зеркало — это идентичная реплика главного сайта с запасным URL именем. Дубликат сегодня дает возможность миновать потенциальные блокировки и гарантировать стабильный подключение к популярным играм.
Проверенное зеркало обладает идентичными возможностями, что и главный портал:
– Совокупный каталог развлечений
– Собственный профиль с сохраненными данными
– Все награды и промо
– Проверенные платежные переводы
Открытие профиля и авторизация в платформу
Процесс оформления на ресурсе занимает буквально моментов. Свежим пользователям нужно:
1. Открыть на рабочее зеркало сегодня
2. Выбрать кнопку «Зарегистрироваться»
3. Внести требуемые информацию
4. Активировать e-mail почту или номер мобильного
5. Получить награду за создание профиля
Авторизация в персональный раздел реализуется посредством указание ID и пароля.
Обзор наградной структуры
Привлекательная наградная система — главное преимущество игорного заведения. Участники обретают различные награды:
Приветственные награды
Недавние участники вправе рассчитывать на выгодный приз за оформление. Обычно это совокупность опций, охватывающий:
– Частичную прибавку к стартовому взносу
– Подарочные фриспины
– Дополнительные финансы на кошелек
Промо-коды и специальные акции
Регулярные промокоды обеспечивают активировать дополнительные преимущества. Задействовать их разрешено в специальном меню персонального аккаунта.
Free spins и компенсация
Free spins — это способность запускать автоматы без расходования своих сумм. Возврат подразумевает долевой возмещение израсходованных средств.
Коллекция слотов
Азартная платформа обеспечивает внушительную коллекцию слотов.
Слоты
Ассортимент слотов восхищает ожидания. Доступны обычные простые аппараты и актуальные видеослоты с занимательной картинкой.
Live казино
Зона Live развлечений переносит пользователей в атмосферу истинного азартного клуба. Умелые крупье осуществляют игры в реальном режиме.
Турниры и доски почета
Постоянные конкурсы привносят накала и предоставляют перспективу забрать крупные награды.
Мобильная форма и софт
Актуальные разработки обеспечивают участвовать в любимом точке. Mobile реализация автоматически настраивается под монитор гаджета.
Получить софт допустимо для программных сред iOS и Android. Приложение предоставляет:
– Быстрый переход
– Надежную работу
– Мгновенные-алерты об промо
– Простой вид
Денежные процедуры
Казино поддерживает разнообразные способы пополнения и вывода денег:
– Пластиковые счета
– Электронные кошельки
– Токены
– Денежные отправки
Все действия осуществляются через защищенное протокол, что подтверждает безопасность приватных информации.
Департамент ассистанса
Компетентная группа support функционирует постоянно. Обратиться с операторами возможно через:
– Онлайн-чат
– E-mail почту
– Телефон
– Медиа каналы
Резюме
Главный веб-сайт и его рабочее зеркало дают клиентам безопасный и легкий доступ к захватывающим играм. Богатые бонусы, разнообразный выбор игр и профессиональная помощь формируют игру максимально приятной и результативной.
I have been surfing online greater than three hours lately,
yet I by no means discovered any fascinating article like yours.
It’s beautiful value sufficient for me. Personally,
if all website owners and bloggers made just right content
material as you probably did, the web can be a lot more useful than ever before.
внутренняя гидроизоляция подвала gidroizolyacziya-podvalov.ru .
майндроп “Казино майнкрафт играть” – это не только шанс выиграть редкие предметы или внутриигровую валюту, но и уникальная возможность испытать свои силы в стратегических и удаче-зависящих играх, созданных энтузиастами.
обзоры крипто игр телеграм Устали от скамов и пустых обещаний? Smart Money Crypto — честный канал про криптовалюту. Мы отбираем только рабочие аирдропы, тестируем криптоигры с выводом денег и делимся способами майнинга на телефоне. Присоединяйтесь к сообществу умных инвесторов и получайте пассивный доход!
Передовые онлайн-казино предоставляют пользователям широкий спектр азартных игр и щедрые поощрения. Тем не менее для беспроблемной деятельности важно осознавать, как получить доступ к https://www.astromaagic.com/dostup-k-ofitsialnomu-saytu-1xbet-mozhno-poluchit-cherez-aktualnoe-zerkalo/ и его рабочие зеркала.
Что такое основной сайт казино
Официальный ресурс казино — это базовая платформа, где пользователи могут получать удовольствие от азартными слотами. Портал функционирует на официальных правах и имеет всеми нужными лицензиями.
Основные достоинства официального портала:
– Надежность пользовательских сведений
– Объективные требования игры
– Стабильные платежи
– Квалифицированная техподдержка
Рабочее зеркало казино: для чего используется
Копия сайта — это полная версия официального портала, хостящаяся по отличному адресу. Актуальное зеркало разрабатывается для предоставления постоянного входа к сайту.
Основания задействования зеркал:
– Ограничение главного адреса
– Технические процедуры
– Повышенная активность на ресурс
Как получить рабочее зеркало в данный момент
Получить текущее рабочее зеркало можно различными путями:
1. Почтовые оповещения — подпишитесь на информационную рассылку
2. Команда поддержки — свяжитесь в онлайн-чат
3. Корпоративные медиа — следите за обновлениями
4. Специализированные сайты — проверенные источники
Создание аккаунта на портале казино
Алгоритм создания аккаунта длится буквально считанные минут:
1. Выберите на кнопку “Создать аккаунт”
2. Внесите необходимые поля
3. Валидируйте электронную почту
4. Введите бонусный код, если есть
Сразу после успешной создания аккаунта вам откроется возможен персональный профиль.
Поощрения и бонусные коды
Выгодная премиальная структура — важное конкурентное преимущество казино:
Бонус за создание аккаунта
Начинающие пользователи зарабатывают стартовый презент, который может предполагать:
– Денежный кредит на первый взнос
– Фриспины для игровых машин
– Стартовые бонусы
Промокоды
Периодически размещаются свежие коды, позволяющие активировать дополнительные преимущества.
Система компенсации
Лояльные участники возвращают порцию потраченных финансов обратно.
Свежие акции и конкурсы
Ресурс систематически проводит увлекательные акции:
– Еженедельные турниры
– Тематические бонусы
– Розыгрыши крупных подарков
– Программа VIP-клуба
Вход в персональный профиль
Для авторизации на сайт требуется:
1. Загрузить лицензионный сайт или действующее зеркало
2. Выбрать “Авторизация”
3. Прописать имя пользователя и код доступа
В персональном аккаунте предоставлены данные инструменты:
– Пополнение счета
– Вывод средств
– Проверка архива транзакций
– Настройка личными данными
Адаптивная платформа и app
Мобильная модификация
Адаптивная вариант портала позволяет развлекаться с всех карманного устройства. Интерфейс адаптивно оптимизируется под размер дисплея.
Программа для download
Загрузить app можно для:
– Android — официальная загрузка с сайта
– iOS — установка через App Store
Плюсы мобильного клиента:
– Быстрый запуск
– Устойчивая операционность
– Push-оповещения об предложениях
– Улучшенный UI
Игровые разделы
Игровые машины
Разнообразная библиотека игровых слотов от известных провайдеров:
– Традиционные автоматы
– Видео-игры
– Джекпот-машины
Live игры
Категория с профессиональными ведущими дает:
– European/American Roulette
– Blackjack
– Baccarat
– Покер
Эфиры ведутся в превосходном качестве, создавая эффект настоящего казино.
Варианты депозита и обналичивания
Платформа поддерживает различные платежные системы:
– Дебетовые средства
– Цифровые счета
– Цифровые валюты
– Финансовые переводы
Минимальные пороги депозита и оперативные выводы гарантируют процесс крайне удобной.
Служба support
Опытная группа ассистентов доступна 24/7 и в состоянии поддержать с любыми задачами:
– Онлайн-чат
– Email-поддержка
– Звонковая служба
Резюме
Главный портал казино и его рабочие дубликаты обеспечивают пользователям надежный и захватывающий азартный процесс. Щедрые подарки, простая mobile вариант, разнообразные развлечения и профессиональное live-казино формируют эту ресурс превосходным решением для игровых развлечений.
Передовые онлайн казино дают игрокам широкий спектр вариантов для приятной игры. Однако иногда вход к официальному платформе может быть ограниченным. В таких обстоятельствах на выручку приходят http://en.pagobaldiosancarlos.com/kak-igrat-s-umom-v-onlayn-kazino-v-2026-godu-chtoby-vyigryvat-v-slotakh, которое гарантирует бесперебойный путь ко всем сервисам платформы.
Что такое рабочее зеркало казино
Альтернативный сайт — это идентичная копия лицензионного портала, которая располагается по другому интернет-адресу. Копия поддерживает все инструментарий главного веб-портала, включая индивидуальный кабинет, средства и сведения транзакций.
Ключевые плюсы задействования зеркала:
– Непрерывный подключение к порталу
– Максимальная идентичность инструментов
– Конфиденциальность личных реквизитов
– Удержание существующих привилегий
Как обнаружить функционирующее зеркало сегодня
Присутствует ряд достоверных способов нахождения действующей ссылочной информации:
Авторизованные каналы:
1. Email рассылка — администрация постоянно пересылает информацию с свежими адресами
2. Общественные сети — проверенные аккаунты постят свежую новости
3. Отдел поддержки — операторы сообщают безопасные домены
4. Телефонное приложение — позволяет минуть блокировки
Регистрация на основном веб-сайте
Этап регистрации длится не более немного минут и предполагает из следующих этапов:
1. Попадание на лицензионный ресурс или действующее зеркало
2. Щелчок на иконку «Зарегистрироваться»
3. Указание регистрационной таблицы
4. Проверка email почты или мобильного номера
5. Задействование бонуса за регистрацию при существовании промокода
Новые пользователи получают значительный начальный презент, который может содержать бесплатные вращения, денежные вознаграждения или кэшбек.
Доступ в личный кабинет
Вход на портале реализуется стандартным образом. Достаточно указать учетные данные и кодовое слово, задействованные при регистрации.
Ключевые нюансы для безопасного входа:
– Эксплуатируйте криптостойкий код
– Задействуйте двойную проверку
– Не фиксируйте пароли на посторонних компьютерах
– Проверяйте адресную строку браузера
Обзор наградной схемы
Игорный портал балует геймеров различными привилегиями и специальными предложениями:
Начальный набор
Дебютанты могут полагаться на существенное бонус за стартовый депозит. Обычно это процентная премия к внесенной количеству плюс бесплатные вращения для известных слотов.
Систематические предложения
– 7-дневный кэшбек — компенсирование процентной доли списанных финансов
– Награды на повторные депозиты
– Специальные офферы по торжествам
– Состязания с большими выигрышными фондами
Схема верности
Активные геймеры накапливают баллы за произвольную игру, которые затем обмениваются на фактические денежные призы, бесплатные вращения или эксклюзивные бонусы.
Кодовые слова: как использовать
Кодовые комбинации — это специальные сочетания символов, обеспечивающие право к дополнительным привилегиям.
В каких местах получить свежие промокоды:
– Проверенные коммуникационные сети казино
– Союзнические сайты
– Email-подписка
– Тематические платформы
Вводится промокод в предназначенное поле при регистрации или добавлении денег счета.
Телефонная версия и приложение
Передовые игроки любят делать ставки с смартфонных устройств. Платформа обеспечивает два способа для приятной смартфонной игры.
Адаптивная модификация
Интернет версия автоматически подстраивается под параметры экранной панели. Не требует скачивания и оперирует в произвольном свежем браузере.
Портативное приложение
Скачать программу можно для устройств на Android и iOS. Преимущества app:
– Оперативная активация
– Надежная действие
– Автоматические-уведомления о промо
– Автоматический избегание блокировок
Этап инсталляции несложен: достаточно перейти на ресурс с портативного девайса и выполнять инструкциям.
Игровой каталог
Библиотека слотов включает несколько тысяч наименований от ведущих провайдеров.
Слоты
Игровые аппараты — самая распространенная категория игр. Размещены стандартные трехбарабанные машины, новые графические аппараты с премиальными стадиями, а также прогрессивные суперпризы.
Live казино
Зона с настоящими крупье обеспечивает ощутить антураж подлинного казино. Открыты игры с покером.
Трансляция ведется в HD четкости, присутствует общение с крупье и другими геймерами.
Конкурсы
Постоянно устраиваются конкурсы по разным дисциплинам. Присоединение дает шанс получить валютные вознаграждения, бесплатные вращения или специальные привилегии.
Денежные манипуляции
Ресурс предоставляет обширный спектр платежных инструментов:
– Пластиковые карты
– Цифровые системы
– Криптовалюта
– Финансовые переводы
Наименьшая сумма пополнения — приемлемая для основной части игроков. Вывод выигрышей выполняется в скорые временные рамки.
Отдел поддержки
Компетентные сотрудники настроены содействовать непрерывно. Открыты нижеследующие варианты связи:
– Интернет-чат
– Email
– Звонковая линия
– Медийные сети
Ответы на стандартные запросы можно обнаружить в секции FAQ.
Итог
Основной сайт казино и его рабочие зеркала предоставляют геймерам совершенный подключение ко всем опциям сайта. Солидные поощрения, комфортная телефонная версия, колоссальный коллекция слотов и опытная поддержка создают азартный процесс предельно удобным и конфиденциальным.
https://happypawspharmacy.shop/# dog and cat medicine supply
Особенно понравился раздел про Растяжка после боевых искусств: советы и техники.
Ссылка ниже:
https://inter-comfort.ru/news/rastyazhka-posle-edinoborstv-kak-vosstanavlivatsya-bez-poteri-boevogo-tonusa/
Современные сетевые казино предлагают игрокам огромный ассортимент опций для комфортной игры. Впрочем иногда вход к официальному порталу может быть закрытым. В таких моментах на подмогу спешит https://www.kouroufibre.fr/kakie-sposoby-bystrogo-popolneniya-scheta-predlagaet/, которое гарантирует постоянный доступ ко всем функциям платформы.
Что такое рабочее зеркало казино
Копия — это абсолютная реплика главного ресурса, которая хостится по дополнительному интернет-адресу. Зеркало поддерживает весь функционал основного ресурса, включая индивидуальный кабинет, счет и историю платежей.
Главные плюсы задействования зеркала:
– Постоянный вход к порталу
– Стопроцентная идентичность опций
– Сохранность персональных сведений
– Хранение всех вознаграждений
Как разыскать функционирующее зеркало на сегодня
Существует некоторое количество достоверных методов обнаружения действующей ссылки:
Легитимные сервисы:
1. Имейл рассылка — дирекция систематически направляет уведомления с действующими ссылками
2. Социальные сети — проверенные профили выкладывают актуальную новости
3. Отдел поддержки — специалисты предоставляют достоверные домены
4. Смартфонное приложение — обеспечивает обходить блокировки
Открытие счета на основном портале
Этап создания аккаунта занимает только пару минут и содержит из таких шагов:
1. Попадание на официальный веб-сайт или актуальное зеркало
2. Клик на иконку «Создать аккаунт»
3. Внесение пользовательской таблицы
4. Подтверждение электронной почты или телефонного номера
5. Активация бонуса за регистрацию при существовании промокода
Свежие геймеры обретают значительный вступительный подарок, который может предполагать бесплатные вращения, денежные вознаграждения или кэшбек.
Вход в личный кабинет
Логин на сайте реализуется стандартным способом. Нужно внести логин и пароль, примененные при оформлении.
Важные детали для защищенного входа:
– Эксплуатируйте сложный пароль
– Задействуйте двухфакторную проверку
– Не сохраняйте пароли на публичных гаджетах
– Отслеживайте интернет строку браузера
Характеристика поощрительной системы
Казино балует пользователей многочисленными вознаграждениями и акциями:
Приветственный пакет
Свежие игроки вправе претендовать на значительное вознаграждение за дебютный пополнение. Как правило это процентовая надбавка к переведенной сумме плюс бесплатные вращения для топовых слотов.
Регулярные промо
– Семидневный cashback — возвращение процента проигранных денег
– Призы на дополнительные взносы
– Особые предложения по событиям
– Состязания с значительными наградными суммами
Система вознаграждений
Регулярные геймеры накапливают очки за всякую раунд, которые затем меняются на фактические финансы, даровые прокруты или особые бонусы.
Купоны: как задействовать
Кодовые комбинации — это специальные комбинации знаков, предоставляющие право к специальным привилегиям.
В каких местах получить рабочие промокоды:
– Авторизованные социальные сети казино
– Аффилиатные площадки
– Email-информирование
– Профильные группы
Указывается промокод в соответствующее поле при оформлении или пополнении кошелька.
Портативная версия и приложение
Передовые пользователи любят делать ставки с портативных гаджетов. Ресурс предлагает два варианта для удобной мобильной игры.
Мобильная версия
Браузерная версия автоматически оптимизируется под диагональ экрана. Не нуждается скачивания и работает в всяком актуальном браузере.
Телефонное приложение
Получить приложение можно для гаджетов на Android и iOS. Достоинства app:
– Молниеносная загрузка
– Бесперебойная операция
– Всплывающие-уведомления о бонусах
– Автономный избегание блокировок
Процедура загрузки элементарен: достаточно зайти на ресурс с смартфонного девайса и следовать указаниям.
Развлекательный выбор
База игр содержит тысячи вариантов от передовых производителей.
Слоты
Азартные машины — самая любимая секция аттракционов. Показаны классические трехбарабанные машины, новые видеослоты с поощрительными этапами, а также накопительные джекпоты.
Live казино
Раздел с действительными дилерами позволяет прочувствовать дух подлинного казино. Имеются игры с рулеткой.
Стриминг осуществляется в превосходном разрешении, поддерживается чат с дилером и остальными геймерами.
Состязания
Систематически запускаются состязания по многочисленным категориям. Присоединение предоставляет право заработать денежные награды, фриспины или уникальные бонусы.
Платежные процедуры
Платформа предоставляет значительный выбор платежных инструментов:
– Дебетовые карты
– Цифровые системы
– Крипта
– Счетовые платежи
Наименьшая количество вклада — разумная для преобладающего числа пользователей. Вывод призов производится в скорые интервалы.
Сервис поддержки
Квалифицированные сотрудники расположены поддержать постоянно. Открыты данные способы связи:
– Живой-чат
– Email
– Голосовая поддержка
– Социальные сети
Решения на распространенные запросы можно найти в зоне FAQ.
Заключение
Лицензионный ресурс казино и его рабочие зеркала гарантируют клиентам максимальный доступ ко всем сервисам ресурса. Великодушные поощрения, удобная телефонная версия, колоссальный выбор аттракционов и опытная поддержка превращают азартный досуг исключительно беспроблемным и защищенным.
Описание официального веб-сайта
Передовые интернет казино предоставляют игрокам разнообразный набор игр и возможностей. Главный ресурс казино Лаки Бир казино гарантирует защищенный путь к гемблинг услугам.
Рабочее зеркало: вход прямо сейчас
Альтернативный адрес является собой абсолютную версию главного веб-сайта. Действующее зеркало помогает участникам обходить возможные запреты.
Преимущества применения зеркала
Ключевые выгоды охватывают:
– Непрерывный шанс к порталу
– Удержание всех опций основного портала
– Сохранность конфиденциальных материалов
– Аналогичный набор функций
Оформление профиля на ресурсе
Механизм регистрации отличается доступностью и комфортом. Недавние клиенты требуется:
1. Зайти на лицензионный веб-сайт или его зеркало
2. Кликнуть на клавишу создания аккаунта
3. Указать требуемые поля
4. Верифицировать электронную почту
5. Осуществить первый авторизацию
Приз за регистрацию
Новички забирают солидный приветственный бонус. Это поощрение способно включать:
– Материальные начисления
– Безвозмездные спины
– Увеличенный коэффициент кэшбека
Авторизация в личный раздел
Активные игроки могут мгновенно войти в личный аккаунт, используя логин и код. Индивидуальный раздел обеспечивает возможность к:
– Контролю балансом
– Истории операций
– Текущим призам
– Опциям аккаунта
Призы и акции
Ресурс периодически устраивает всевозможные акции для игроков.
Типы поощрений
Ключевые виды бонусов:
– Финансовые бонусы – доля от размера депозита
– Спины – даровые прокруты в аппаратах
– Возврат средств – отдача доли потерянных денег
– Призовые трофеи – призы за состязание в конкурсах
Промокоды
Эксклюзивные ваучеры обеспечивают активировать бонусные бонусы. Участники могут получить их на партнерских ресурсах или заработать в уведомлениях.
Переносная редакция и app
Передовые пользователи предпочитают переносной геймплей.
Опции портативной платформы
– Отзывчивый вид для разнообразных аппаратов
– Совокупный путь к развлечениям
– Оперативная функционирование
– Удобное управление
Установить app
Портативное софт доступно для downloading на устройства с операционными системами Android и iOS. Программа предоставляет:
– Бесперебойную функциональность
– Всплывающие оповещения о призах
– Оперативный вход к желанным развлечениям
Развлекательный ассортимент
Казино предлагает обширную галерею развлекательных развлечений.
Автоматы
Коллекция азартных машин охватывает:
– Традиционные игры
– Современные автоматы
– Накопительные машины
– Сюжетные игры
Live казино
Категория живых дилеров предлагает возможность участвовать с реальными дилерами. Представлены:
– Рулетка
– Очко
– Baccarat
– Техасский холдем
Соревнования
Регулярные турниры помогают клиентам бороться за крупные денежные пулы. Призовая программа изменяется регулярно.
Финансовые процедуры
Платформа предлагает обилие опций внесения и обналичивания финансов:
– Пластиковые карточки
– Онлайн счета
– Wire переводы
– Крипто
Абсолютно все переводы производятся безопасно с использованием актуальных методов защиты.
Отдел поддержки
Профессиональная группа саппорта трудится без перерыва. Обратиться с специалистами можно через:
– Онлайн чат
– Почтовую почту
– Контактный номер
– Social сети
Секьюрити и лицензирование
Игровой клуб оперирует на основании действительной разрешения. Такое удостоверяет:
– Прозрачность развлекательного действа
– Охрану индивидуальных сведений
– Быстрые выводы
– Ответственный игровой процесс
Заключение
Основной сайт и его действующие резервные страницы предоставляют участникам целостный спектр возможностей для безопасной и профитной досуга. Солидные вознаграждения, различные слоты, профессиональная поддержка и защищенная инфраструктура выплат создают портал оптимальным вариантом для фанатов игровых развлечений.
не работает звук на ноутбуке Помимо ноутбуков и компьютеров, мастера Тамбова предлагают ремонт другой бытовой техники: от кофемашин и микроволновых печей до принтеров и даже игровых консолей PS5, а также электросамокатов и усилителей.
open link – The structure is intuitive and the interface is easy to understand.
I recently tested this casino https://www.myworldshopping-net.onlinegroup.no/2025/11/21/greeting-incentives-united-states-2025-best-signal-upwards-also-provides-at-the-casinos-on-the-internet/ and was impressed by how stable everything felt. The games load quickly, bonuses are transparent, and navigation is intuitive, making the experience enjoyable.
Доступ к платформе и действующие URL
Востребованные онлайн казино предоставляют игрокам обширный спектр возможностей. Официальный ресурс Bublik сайт официальный обеспечивает стабильный переход ко всем услугам. При этом порой происходят моменты, когда понадобится альтернативный способ доступа.
Что представляет собой актуальное зеркало
Рабочее зеркало — это абсолютная дубликат официального ресурса с запасным интернет именем. Копия сегодня помогает преодолевать вероятные блокировки и гарантировать бесперебойный доступ к любимым слотам.
Легальное зеркало обладает всеми характеристиками, что и центральный веб-сайт:
– Целый ассортимент игр
– Личный кабинет с записанными параметрами
– Все подарки и предложения
– Безопасные банковские действия
Открытие профиля и подключение в казино
Этап оформления на платформе длится несколько минут. Новым пользователям нужно:
1. Перейти на актуальное зеркало сегодня
2. Нажать кнопку «Зарегистрироваться»
3. Указать обязательные информацию
4. Верифицировать почтовую почту или данные телефона
5. Использовать подарок за открытие аккаунта
Вход в индивидуальный профиль выполняется посредством предоставление никнейма и ключа.
Описание призовой системы
Щедрая бонусная система — ключевое козырь платформы. Клиенты забирают различные подарки:
Стартовые подарки
Свежие участники могут рассчитывать на привлекательный поощрение за регистрацию. Как правило это набор вариантов, содержащий:
– Пропорциональную надбавку к начальному вкладу
– Бесплатные кручения
– Дополнительные суммы на счет
Купоны и уникальные возможности
Регулярные коды обеспечивают активировать призовые выгоды. Использовать их разрешено в отдельном меню собственного раздела.
Спины и компенсация
Фриспины — это вариант играть автоматы без использования своих сумм. Компенсация предполагает процентный возмещение утраченных финансов.
Коллекция развлечений
Игровая сайт предлагает огромную подборку автоматов.
Слоты
Ассортимент игровых машин поражает ожидания. Доступны стандартные трехбарабанные машины и современные видеослоты с увлекательной визуализацией.
Live игры
Зона Live развлечений переносит пользователей в обстановку истинного гемблинг дома. Опытные дилеры ведут раунды в реальном времени.
Соревнования и рейтинги
Систематические соревнования привносят драйва и дают шанс выиграть крупные награды.
Mobile форма и программа
Продвинутые инновации помогают наслаждаться в удобном точке. Mobile форма автоматически настраивается под дисплей гаджета.
Получить приложение разрешено для цифровых платформ iOS и Android. Приложение гарантирует:
– Быстрый запуск
– Устойчивую функционирование
– Моментальные-оповещения об акциях
– Простой интерфейс
Денежные операции
Ресурс поддерживает многочисленные способы депозита и вывода средств:
– Пластиковые карты
– Цифровые кошельки
– Криптовалюты
– Прямые транзакции
Всевозможные переводы выполняются через надежное протокол, что гарантирует неприкосновенность приватных данных.
Департамент помощи
Квалифицированная группа support действует круглосуточно. Контактировать с менеджерами можно через:
– Онлайн-чат
– Электронную почту
– Телефон
– Медиа ресурсы
Резюме
Главный ресурс и его рабочее зеркало гарантируют пользователям защищенный и комфортный доступ к азартным играм. Привлекательные поощрения, большой ассортимент автоматов и высокая помощь обеспечивают участие предельно приятной и результативной.
For forecasts
where can i get generic prozac tablets
for best practices.
discover more – Organized sections make browsing and buying straightforward and pleasant.
Передовые онлайн казино предлагают игрокам широкий диапазон функций для удобной игры. Но иногда соединение к официальному платформе может быть заблокированным. В таких обстоятельствах на помощь приходит 888старз казино, которое дает стабильный доступ ко всем функциям платформы.
Что такое действующее зеркало казино
Альтернативный сайт — это идентичная дубликат главного ресурса, которая хостится по альтернативному URL. Альтернативный ресурс имеет целый функционал основного веб-портала, включая пользовательский кабинет, баланс и запись транзакций.
Основные преимущества применения зеркала:
– Постоянный подключение к ресурсу
– Максимальная идентичность инструментов
– Сохранность пользовательских сведений
– Поддержка существующих поощрений
Как обнаружить рабочее зеркало на сегодня
Есть ряд надежных способов поиска текущей ссылки:
Легитимные ресурсы:
1. Email рассылка — руководство систематически пересылает письма с свежими URL
2. Социальные сети — легитимные каналы размещают актуальную новости
3. Служба поддержки — консультанты сообщают проверенные адреса
4. Телефонное приложение — позволяет преодолевать блокировки
Открытие счета на главном сайте
Операция регистрации занимает только несколько минут и состоит из таких шагов:
1. Открытие на главный портал или актуальное зеркало
2. Клик на клавишу «Открыть счет»
3. Ввод персональной формы
4. Проверка email почты или контактного номера
5. Активация привилегии за регистрацию при присутствии промокода
Только что зарегистрированные клиенты получают значительный начальный приз, который может охватывать бесплатные вращения, финансовые поощрения или компенсацию.
Авторизация в персональный кабинет
Логин на портале реализуется традиционным методом. Достаточно указать имя пользователя и секретный ключ, примененные при регистрации.
Значимые моменты для надежного входа:
– Применяйте защищенный пароль
– Запустите двойную проверку
– Не фиксируйте реквизиты на публичных гаджетах
– Отслеживайте доменную строку браузера
Анализ бонусной схемы
Гемблинг-сайт балует клиентов всевозможными привилегиями и акциями:
Приветственный комплект
Начинающие могут претендовать на значительное вознаграждение за первый депозит. Традиционно это процентовая прибавка к внесенной величине плюс бесплатные вращения для популярных слотов.
Постоянные предложения
– Недельный компенсация — возвращение процента потерянных средств
– Призы на очередные пополнения
– Уникальные предложения по знаменательным датам
– Турниры с крупными наградными пулами
План привилегий
Регулярные клиенты накапливают баллы за каждую игру, которые затем превращаются на реальные финансы, free spins или эксклюзивные льготы.
Купоны: как применять
Бонус-коды — это уникальные сочетания знаков, предоставляющие доступ к специальным вознаграждениям.
Откуда найти актуальные промокоды:
– Официальные медийные сети казино
– Аффилиатные порталы
– Email-новостная лента
– Профильные сообщества
Прописывается промокод в отдельное поле при открытии счета или добавлении денег депозита.
Портативная версия и приложение
Передовые игроки любят развлекаться с телефонных гаджетов. Ресурс дает 2 варианта для приятной мобильной игры.
Мобильная версия
Веб версия сама адаптируется под габариты дисплея. Не нуждается установки и функционирует в любом новом браузере.
Портативное приложение
Установить софт можно для аппаратов на Android и iOS. Достоинства app:
– Оперативная открытие
– Бесперебойная функционирование
– Мгновенные-уведомления о акциях
– Самостоятельный минование блокировок
Этап инсталляции элементарен: достаточно зайти на сайт с мобильного гаджета и придерживаться инструкциям.
Азартный выбор
Коллекция игр содержит несколько тысяч единиц от передовых разработчиков.
Слоты
Гемблинг автоматы — наиболее востребованная секция развлечений. Показаны традиционные 3-барабанные аппараты, новые графические аппараты с бонусными уровнями, а также прогрессивные призы.
Live казино
Раздел с реальными крупье дает возможность прочувствовать дух настоящего казино. Имеются развлечения с рулеткой.
Стриминг реализуется в превосходном разрешении, имеется коммуникация с раздающим и остальными игроками.
Турниры
Регулярно организуются турниры по всевозможным дисциплинам. Вступление дает шанс получить финансовые награды, даровые прокруты или особые привилегии.
Платежные манипуляции
Портал предоставляет значительный выбор финансовых систем:
– Пластиковые карты
– Онлайн платформы
– Криптовалюта
– Финансовые транзакции
Стартовая сумма вклада — доступная для большинства геймеров. Получение средств выполняется в кратчайшие периоды.
Сервис поддержки
Компетентные специалисты расположены помочь постоянно. Представлены такие методы контакта:
– Веб-чат
– Email
– Мобильная горячая линия
– Медийные сети
Ответы на типовые проблемы можно найти в разделе FAQ.
Заключение
Лицензионный веб-сайт казино и его функционирующие зеркала предоставляют игрокам максимальный доступ ко всем сервисам сайта. Великодушные вознаграждения, комфортная портативная версия, колоссальный каталог аттракционов и квалифицированная ассистенция превращают игровой времяпрепровождение исключительно приятным и безопасным.
HappyPaws Pharmacy: pet pharmacy USA – HappyPaws Pharmacy
Анализ главного сайта
Передовое онлайн-казино дарит своим пользователям большой набор возможностей и призов. Оригинальный сайт https://blog.webhost24x7.com/uncategorized/naibolee-populyarnye-metody-oplaty-v-kazino/ действует 24/7, обеспечивая путь к топовым автоматам, live-казино и многочисленным акциям.
Актуальное зеркало: доступ к порталу
Что такое зеркало казино
Копия составляет собой абсолютную копию оригинального ресурса с другим доменным адресом. Действующее зеркало дает участникам избегать ограничения и обеспечивать непрерывный вход к предпочитаемым автоматам.
Как получить рабочее зеркало сегодня
Действующие адреса на официальное зеркало выкладываются через:
– Email оповещение
– Основные медийные сети
– Сервис помощи
– Тематические порталы
Открытиесчета на платформе
Этапы регистрации
Оформление длится буквально минут и включает такие этапы:
1. Переход на основной портал или функционирующее зеркало
2. Выбор кнопки “Зарегистрироваться”
3. Указание контактных информации
4. Проверка электроннойпочты или телефона
5. Придумывание кодадоступа
Бонус за оформление
Первые участники зарабатывают солидные вступительные подарки:
– Бонусные деньги на аккаунт
– Бесплатныевращения для симуляторов
– Расширенный процент компенсации
– Уникальные коды
Авторизация в личный кабинет
Действующие игроки способны выполнить авторизацию через официальный портал или действующее зеркало. Для этого следует ввести имяпользователя и секретнуюкомбинацию, сформированные при открытиисчета.
Возможности личного кабинета
В личном кабинете имеются следующие функции:
– Редактирование контактными данными
– Ввод счета
– Снятие призов
– Активация промокодов
– Мониторинг архива операций
– Участие в турнирах
Бонусы и промо
Категории вознаграждений
Казино награждает своих пользователей различными поощрительными системами:
– Стартовый набор — выгодные вознаграждения на начальные пополнения
– Freespins — бонусные вращения в топовых слотах
– Возврат — еженедельный возмещение части ставок
– Система VIP — эксклюзивные бонусы для постоянных клиентов
Ваучеры и их активация
Особые коды предоставляют бонусные поощрения. Для ввода требуется ввести комбинацию в специальное окно в индивидуальном аккаунте.
Азартный набор
Автоматы
Коллекция слотовых симуляторов вмещает массу вариантов от ведущих производителей:
– Стандартные машины
– Продвинутые игры
– Призовые игры
– Сюжетные автоматы
Live казино
Раздел Live-казино предоставляет игру с живыми дилерами в режиме реального эфира:
– Европейскаярулетка
– Очко
– Пунтобанко
– Техасскийхолдем
Конкурсы
Регулярные соревнования с солидными выигрышными пулами проходят регулярно. Участники сражаются за лидерство в турнирнойсетке.
Смартфонная адаптация и программа
Адаптивная адаптация ресурса
Оригинальный веб-сайт на100% приспособлен для планшетных девайсов. Участники могут запускать автоматы непосредственно через интернет-браузер без обязательства скачивания.
Софт для установки
Специальное карманное APP предоставляется для загрузки на устройства с операционными средами Android и iOS. Программа гарантирует:
– Быстрый вход к играм
– Бесперебойную операционность
– Моментальные-уведомления о бонусах
– Комфортный интерфейс
Вывод
Главный портал казино и его рабочие зеркала дают игрокам всесторонний вход к качественным развлекательным играм. Большие подарки, разнообразные кампании, удобная смартфонная адаптация и опытная сервис делают азартный процесс предельно комфортным и выгодным.
online pharmacy india: VitalCore Pharmacy – cheap viagra canadian pharmacy
click to view – Attention aligned with purpose makes progress more consistent and effective.
Характеристика официального сайта
Передовые онлайн казино дают клиентам разнообразный выбор развлечений и возможностей. Основной веб-сайт Tippy официальный сайт казино предлагает надежный возможность к развлекательным функциям.
Действующее зеркало: возможность на сегодня
Альтернативный адрес является в качестве абсолютную дубликат главного портала. Официальное зеркало дает возможность пользователям миновать возможные ограничения.
Выгоды применения зеркала
Основные плюсы содержат:
– Непрерывный доступ к порталу
– Сохранение любых опций официального ресурса
– Безопасность конфиденциальных информации
– Идентичный инструментарий
Открытие счета на платформе
Механизм регистрации выделяется доступностью и комфортом. Начинающие клиенты обязаны:
1. Открыть главный сайт или его зеркало
2. Нажать на элемент открытия счета
3. Указать необходимые поля
4. Валидировать почтовую почту
5. Осуществить первый доступ
Вознаграждение за открытие счета
Новые игроки забирают значительный вступительный приз. Подобное вознаграждение может предусматривать:
– Денежные средства
– Complimentary прокруты
– Повышенный уровень кэшбэка
Авторизация в личный аккаунт
Действующие пользователи в состоянии оперативно войти в собственный профиль, применяя никнейм и пароль. Персональный кабинет обеспечивает путь к:
– Управлению депозитом
– Хронологии транзакций
– Действующим бонусам
– Настройкам учетной записи
Бонусы и акции
Ресурс систематически организует многочисленные акции для клиентов.
Виды поощрений
Базовые виды вознаграждений:
– Финансовые призы – коэффициент от суммы взноса
– Бесплатные вращения – бесплатные прокруты в автоматах
– Компенсация – компенсация доли затраченных средств
– Призовые вознаграждения – вознаграждения за состязание в конкурсах
Коды
Специальные коды помогают приобрести добавочные выгоды. Пользователи могут получить их на партнерских площадках или приобрести в уведомлениях.
Портативная адаптация и приложение
Прогрессивные игроки выбирают мобильный гейминг.
Характеристики портативной системы
– Адаптивный облик для разнообразных устройств
– Совокупный вход к слотам
– Моментальная работа
– Практичное использование
Загрузить app
Портативное софт доступно для загрузки на устройства с базовыми платформами Android и iOS. App обеспечивает:
– Бесперебойную деятельность
– Push уведомления о предложениях
– Моментальный доступ к любимым автоматам
Игровой портфель
Платформа предлагает богатую коллекцию игровых развлечений.
Слоты
Ассортимент развлекательных слотов охватывает:
– Стандартные слоты
– Современные игры
– Джекпотные машины
– Лицензионные слоты
Live казино
Секция живых развлечений обеспечивает шанс играть с настоящими дилерами. Предложены:
– Рулетки
– Блек-джек
– Баккара
– Техасский холдем
Соревнования
Периодические конкурсы дают возможность участникам конкурировать за внушительные денежные суммы. Призовая система модифицируется еженедельно.
Платежные процедуры
Сайт предлагает разнообразие опций внесения и получения денег:
– Кредитные карточки
– Цифровые счета
– Прямые переводы
– Крипто
Все транзакции проходят безопасно с задействованием прогрессивных систем кодирования.
Отдел сопровождения
Квалифицированная служба support работает без перерыва. Связаться с специалистами возможно через:
– Online чат
– Электронную почту
– Телефон
– Social сети
Безопасность и лицензирование
Портал действует на фундаменте законной сертификата. Такое подтверждает:
– Справедливость игрового действа
– Сохранность личных данных
– Пунктуальные транзакции
– Контролируемый гемблинг
Заключение
Основной сайт и его действующие зеркала обеспечивают клиентам абсолютный набор услуг для безопасной и профитной развлечений. Щедрые вознаграждения, разнообразные игры, компетентная помощь и проверенная структура транзакций создают платформу оптимальным опцией для любителей гемблинг игр.
Передовые онлайн-казино дают участникам обширный ассортимент услуг и призовых вариантов. Подключение к ресурсу выполняется через официальный ресурс или его актуальное зеркало [url=metasninjas.dimfarnese.com.br/]Р Р° казино сайт[/url], что гарантирует постоянную работу.
Что такое действующее зеркало казино
Копия — это полная реплика официального веб-сайта, разработанная для преодоления ограничений. Актуальное зеркало помогает участникам сохранить вход к излюбленным слотам в каждое время.
Проверенное зеркало располагает всеми возможностями основного сайта:
– Весь ассортимент автоматов
– Личный кабинет с внесенными информацией
– Актуальные акции
– Безопасные финансовые действия
Открытие счета на основном сайте
Ход регистрации составляет всего пару минут. Новым игрокам следует:
1. Попасть на главный портал или функционирующее зеркало
2. Выбрать на клавишу “Регистрация”
3. Ввести необходимые сведения
4. Подтвердить адрес
5. Сделать начальный депозит
Бонус за регистрацию предоставляется незамедлительно после завершения всех этапов.
Авторизация в личный кабинет
Существующие клиенты могут выполнить подключение указывая:
– Логин и ключ
– Номер телефона
– Адрес
Аккаунт обеспечивает шанс к администрированию средствами, данным игр и доступным промокодам.
Поощрения и кампании
Азартная платформа радует лояльных клиентов щедрыми вознаграждениями:
Стартовый комплект
– Надбавка на стартовый депозит до 100%
– Даровые спины на востребованные игры
– Экстра премии за очередные взносы
Купоны
Уникальные купоны дают возможность на активацию специальных призов. Свежие комбинации выставляются в категории “Предложения”.
Кешбэк
Регулярный кешбэк составляет до 10% от проигранных средств. Выплата зачисляется сразу.
Система лояльности
Постоянные игроки приобретают очки, которые конвертируются на реальные средства или фриспины.
Адаптивный портал и программа
В целях удобства игроков построена функциональная портативная платформа. Отзывчивый дизайн позволяет беспрепятственно играть с произвольного переносного гаджета.
Достоинства приложения:
– Оперативный запуск к играм
– Адаптированный дизайн
– Надежная работа
– Оповещения о последних бонусах
Установить приложение можно безвозмездно с главного веб-сайта для аппаратов на Android и iOS.
Каталог автоматов
Слоты
Коллекция содержит более 2000 машин от ведущих разработчиков:
– Традиционные машины
– Видео-слоты
– Прогрессивные автоматы
– Тематические игры
Live казино
Секция Live игр обеспечивает развлечение с настоящими дилерами в прямом эфире:
– Колесо фортуны
– Двадцать одно
– Punto Banco
– Покер
Состязания
Периодические соревнования с значительными наградными бюджетами устраиваются регулярно. Вход в соревнованиях возможно всем созданным игрокам.
Денежные способы
Платежи и изъятия средств реализуются через популярные способы оплаты:
– Банковские карты
– Цифровые сервисы
– Крипто
– Денежные платежи
Стартовый депозит — от 100 рублей. Получение средств проводится в течение 24 ч.
Команда саппорта
Круглосуточная группа помощи может содействовать в исправлении произвольных ситуаций:
– Живой чат
– Email
– Телефон
– Общественные сети
Охрана и сертификат
Подлинный портал работает на базе признанной сертификата. Каждые сведения пользователей охранены актуальным SSL-протоколом.
Итог
Действующее зеркало дает непрерывный доступ к любимым автоматам, щедрым поощрениям и комфортным функциям. Создайте аккаунт сейчас и получите стартовый поощрение!
HappyPaws Pharmacy HappyPaws Pharmacy pet antibiotics and care
Современные онлайн казино обеспечивают клиентам огромный диапазон функций для удобной игры. Впрочем иногда подключение к главному платформе может оказаться недоступным. В таких обстоятельствах на подмогу приходит https://www.formafrik2.videoanimer.com/kak-mozhno-vnesti-dengi-na-schet-s-pomoshchyu-paysafecash/, которое обеспечивает бесперебойный вход ко всем функциям платформы.
Что такое актуальное зеркало казино
Копия — это абсолютная версия лицензионного ресурса, которая размещается по запасному интернет-адресу. Копия сохраняет полный инструментарий первоначального сайта, включая персональный кабинет, депозит и запись операций.
Основные преимущества использования зеркала:
– Постоянный подключение к платформе
– Максимальная аналогичность опций
– Защита персональных данных
– Сохранение существующих поощрений
Как разыскать рабочее зеркало сегодня
Есть несколько достоверных путей обнаружения действующей ссылочной информации:
Официальные источники:
1. Email рассылка — руководство постоянно высылает информацию с актуальными адресами
2. Медийные сети — авторизованные каналы выкладывают свежую данные
3. Сервис поддержки — консультанты выдают безопасные домены
4. Смартфонное приложение — дает возможность избегать блокировки
Создание аккаунта на основном веб-сайте
Процесс открытия счета требует лишь считанные минут и предполагает из данных ступеней:
1. Переход на лицензионный ресурс или действующее зеркало
2. Нажатие на элемент «Создать аккаунт»
3. Заполнение учетной анкеты
4. Валидация почтовой почты или мобильного номера
5. Задействование вознаграждения за регистрацию при присутствии промокода
Начинающие клиенты обретают значительный приветственный подарок, который может охватывать даровые прокруты, денежные бонусы или возврат средств.
Логин в пользовательский кабинет
Авторизация на сайте реализуется стандартным методом. Требуется ввести никнейм и секретный ключ, использованные при регистрации.
Существенные моменты для надежного входа:
– Эксплуатируйте криптостойкий секретный ключ
– Запустите двойную аутентификацию
– Не сохраняйте коды на посторонних гаджетах
– Мониторьте доменную строку браузера
Описание бонусной схемы
Казино радует геймеров разнообразными бонусами и акциями:
Приветственный пакет
Свежие игроки имеют возможность претендовать на существенное вознаграждение за дебютный вклад. Традиционно это процентная добавка к переведенной величине плюс фриспины для топовых слотов.
Систематические промо
– 7-дневный компенсация — компенсирование процентной доли утраченных средств
– Призы на очередные вклады
– Специальные офферы по праздникам
– Турниры с значительными призовыми суммами
Программа верности
Постоянные игроки зарабатывают баллы за каждую ставку, которые затем обмениваются на фактические денежные призы, даровые прокруты или специальные бонусы.
Кодовые слова: как применять
Промокоды — это индивидуальные сочетания букв и цифр, предоставляющие доступ к бонусным вознаграждениям.
В каких местах раздобыть свежие промокоды:
– Проверенные медийные сети казино
– Аффилиатные порталы
– Email-подписка
– Специализированные платформы
Вводится промокод в соответствующее поле при оформлении или пополнении счета.
Мобильная версия и приложение
Актуальные пользователи предпочитают проводить время с телефонных аппаратов. Ресурс предлагает 2 способа для приятной телефонной игры.
Мобильная модификация
Интернет версия автоматически настраивается под размер экрана. Не требует установки и оперирует в всяком современном браузере.
Мобильное приложение
Установить app можно для устройств на Android и iOS. Преимущества app:
– Скоростная загрузка
– Бесперебойная действие
– Всплывающие-уведомления о акциях
– Автоматический избегание блокировок
Процесс инсталляции элементарен: достаточно зайти на портал с мобильного девайса и придерживаться указаниям.
Развлекательный каталог
База игр охватывает огромное количество единиц от передовых поставщиков.
Слоты
Гемблинг автоматы — самая распространенная раздел аттракционов. Показаны стандартные простые аппараты, новые видеослоты с премиальными уровнями, а также джекпотные выигрыши.
Live казино
Зона с реальными дилерами дает возможность прочувствовать атмосферу реального казино. Открыты столы с баккарой.
Передача осуществляется в HD качестве, обеспечивается коммуникация с дилером и иными пользователями.
Конкурсы
Систематически организуются соревнования по различным слотам. Вступление обеспечивает возможность выиграть монетарные выигрыши, даровые прокруты или особые поощрения.
Транзакционные процедуры
Сайт поддерживает широкий выбор расчетных методов:
– Кредитные карты
– Цифровые кошельки
– Крипта
– Финансовые транзакты
Наименьшая сумма депозита — приемлемая для массы геймеров. Снятие выигрышей выполняется в минимальные временные рамки.
Сервис поддержки
Компетентные специалисты способны помочь круглосуточно. Доступны такие способы коммуникации:
– Живой-чат
– Email
– Голосовая линия
– Социальные сети
Разъяснения на стандартные вопросы можно отыскать в секции FAQ.
Итог
Лицензионный портал казино и его действующие зеркала обеспечивают пользователям совершенный вход ко всем опциям портала. Значительные привилегии, комфортная мобильная версия, огромный каталог аттракционов и профессиональная помощь создают гемблинг процесс предельно удобным и конфиденциальным.
Описание официального веб-сайта
Новое онлайн-казино предлагает своим клиентам разнообразный спектр игр и бонусов. Главный ресурс ссылка функционирует 24/7, давая доступ к востребованным автоматам, live-казино и обширным кампаниям.
Действующее зеркало: доступ к сайту
Что такое копия казино
Альтернатива представляет собой абсолютную версию основного ресурса с другим интернет путем. Функционирующее зеркало обеспечивает пользователям обходить барьеры и обеспечивать надежный доступ к излюбленным автоматам.
Как обнаружить рабочее зеркало сегодня
Свежие URL на проверенное зеркало появляются через:
– Почтовую рассылку
– Основные социальные сети
– Отдел сопровождения
– Affiliated площадки
Регистрация на ресурсе
Ход открытиясчета
Регистрация требует всего минут и предполагает следующие действия:
1. Вход на официальный портал или рабочее зеркало
2. Нажатие клавиши “Зарегистрироваться”
3. Ввод учетных информации
4. Проверка аккаунта или номера
5. Создание пароля
Подарок за открытиесчета
Первые игроки обретают солидные стартовые поощрения:
– Игровые деньги на аккаунт
– Бесплатныевращения для игр
– Усиленный объем компенсации
– Особые коды
Доступ в индивидуальный аккаунт
Постоянные участники вправе произвести доступ через оригинальный портал или рабочее зеркало. Для этого требуется внести логин и секретнуюкомбинацию, придуманные при регистрации.
Возможности персонального профиля
В персональном профиле открыты такие инструменты:
– Контроль контактными информацией
– Внесение депозита
– Обналичивание средств
– Применение купонов
– Проверка архива ставок
– Регистрация в состязаниях
Поощрения и промо
Типы подарков
Казино поощряет своих пользователей разнообразными бонусными системами:
– Вступительный бонус — солидные поощрения на первые взносы
– Freespins — дополнительные прокруты в известных слотах
– Кэшбек — систематический откат части потерь
– Программа поощрения — эксклюзивные бонусы для постоянных участников
Ваучеры и их ввод
Особые ваучеры дают бонусные подарки. Для применения следует ввести шифр в нужное раздел в собственном профиле.
Развлекательный выбор
Игры
Библиотека развлекательных автоматов включает сотни вариантов от известных поставщиков:
– Традиционные машины
– Продвинутые развлечения
– Накопительные игры
– Тематические игры
Live казино
Секция Live-казино предоставляет взаимодействие с профессиональными крупье в условиях актуального эфира:
– Европейскаярулетка
– Очко
– Baccarat
– Покер
Турниры
Периодические соревнования с солидными джекпотными фондами проводятся постоянно. Претенденты конкурируют за лидерство в таблице.
Mobile реализация и софт
Мобильная версия ресурса
Главный веб-сайт целиком настроен для мобильных аппаратов. Клиенты могут играть автоматы прямо через веб-навигатор без нужды скачивания.
Софт для загрузки
Авторское карманное программа предоставляется для установки на гаджеты с рабочими ОС Android и iOS. Программа дает:
– Моментальный подход к развлечениям
– Бесперебойную функциональность
– Оперативные-оповещения о акциях
– Простой дизайн
Заключение
Основной портал казино и его актуальные копии обеспечивают клиентам полный вход к качественным геймплейным играм. Щедрые вознаграждения, различные промо, комфортная портативная платформа и компетентная помощь формируют геймплейный времяпрепровождение предельно enjoyable и выгодным.
майндроп
казино кинг Я проверяю casino king через канал, так быстрее.
mine drop Популярность набирает и сервис “minedrop”, предлагающий игрокам шанс получить ценные призы, участвуя в разнообразных активностях и розыгрышах. Это новый виток в развитии интерактивных развлечений для сообщества Minecraft.
Современные онлайн-казино предоставляют игрокам широкий ассортимент азартных игр и выгодные поощрения. Впрочем для удобной игры критично осознавать, как обнаружить казино Mellstroy казино и его актуальные зеркала.
Что такое главный портал казино
Главный сайт казино — это основная система, где пользователи могут наслаждаться развлекательными слотами. Ресурс функционирует на законных основаниях и обладает всеми требуемыми документами.
Первостепенные плюсы основного сайта:
– Надежность персональных данных
– Прозрачные требования работы
– Подтвержденные транзакции
– Компетентная служба поддержки
Действующее зеркало казино: для чего используется
Копия сайта — это полная дубликат основного ресурса, находящаяся по альтернативному URL. Действующее зеркало разрабатывается для обеспечения непрерывного входа к ресурсу.
Основания эксплуатации альтернативных адресов:
– Недоступность первичного домена
– Плановые работы
– Повышенная посещаемость на платформу
Как обнаружить рабочее зеркало на сегодня
Найти актуальное официальное зеркало можно различными способами:
1. Подписка — активируйте уведомления на email отправку
2. Служба support — свяжитесь в онлайн-чат
3. Публичные площадки — мониторьте за новостями
4. Партнерские площадки — проверенные платформы
Создание аккаунта на портале казино
Процесс открытия счета занимает буквально несколько мгновений:
1. Нажмите на клавишу “Зарегистрироваться”
2. Заполните необходимые поля
3. Подтвердите email ящик
4. Активируйте код активации, если есть
Вслед за завершенной активации вам станет открыт личный аккаунт.
Бонусы и промокоды
Щедрая премиальная программа — значимое конкурентное преимущество казино:
Бонус за открытие счета
Новые игроки приобретают начальный презент, который может включать:
– Валютный кредит на начальный депозит
– Фриспины для слотов
– Стартовые бонусы
Промокоды
Систематически размещаются актуальные купоны, дающие возможность получить особые бонусы.
Схема кэшбека
Активные клиенты приобретают порцию использованных денег обратно.
Свежие акции и соревнования
Казино периодически запускает азартные события:
– Недельные турниры
– Специальные акции
– Раздачи солидных призов
– Программа статусов
Логин в личный профиль
Для логина на платформу требуется:
1. Загрузить официальный портал или действующее зеркало
2. Активировать “Вход”
3. Ввести email и ключ
В личном профиле открыты такие опции:
– Депозит кошелька
– Получение призов
– Анализ журнала операций
– Настройка личными данными
Портативная вариант и приложение
Мобильная модификация
Адаптивная вариант ресурса дает возможность делать ставки с всех мобильного устройства. Дизайн динамически настраивается под размер монитора.
Приложение для скачивания
Загрузить программу можно для:
– Android — безопасная загрузка с платформы
– iOS — загрузка через App Store
Выгоды программы:
– Мгновенный доступ
– Бесперебойная функциональность
– Push-оповещения об акциях
– Улучшенный дизайн
Гемблинг зоны
Игровые машины
Богатая подборка игровых барабанов от лучших разработчиков:
– Ретро игры
– Продвинутые-слоты
– Джекпот-игры
Live казино
Зона с реальными операторами предлагает:
– Рулетка
– Двадцать одно
– Baccarat
– Покер
Трансляции осуществляются в превосходном разрешении, формируя впечатление аутентичного казино.
Варианты пополнения и получения
Казино обслуживает множественные платежные системы:
– Дебетовые средства
– Цифровые кошельки
– Crypto
– Финансовые переводы
Базовые пороги внесения и быстрые платежи делают процесс крайне комфортной.
Департамент support
Опытная группа support оперирует 24/7 и готова помочь с любыми проблемами:
– Реалтайм-чат
– Email-поддержка
– Телефонная линия
Резюме
Основной ресурс казино и его действующие копии предоставляют участникам надежный и увлекательный развлекательный опыт. Выгодные бонусы, функциональная мобильная платформа, разнообразные слоты и качественное live-казино формируют эту платформу великолепным вариантом для гемблинг игр.
Вход к платформе через действующие зеркала
Пользователи онлайн казино часто встречаются с проблемой недоступности официального ресурса. Как раз для устранения этой проблемы разработаны копии официального портала. Clubnika казино обеспечивает стопроцентный вход ко всем возможностям площадки.
Что такое рабочее зеркало казино
Копия представляет собой точную дубликат официального сайта с аналогичным возможностями. Ключевое расхождение — это доменное имя. Все параметры клиента, вместе с депозит, привилегии и архив партий, находятся такими же.
Выгоды эксплуатации зеркал
Функционирующие зеркала имеют рядом значимых преимуществ:
– Круглосуточный доступ к выбранным играм
– Совершенная конфиденциальность личных сведений
– Неизменность всех настроек пользовательского кабинета
– Возможность обретения наград и присутствия в кампаниях
Оформление профиля на официальном ресурсе
Процедура создания аккаунта чрезвычайно легок и занимает несколько минут. Новые клиенты в состоянии рассчитывать на внушительный стартовый подарок за создание аккаунта.
Шаги открытия аккаунта
1. Вход на официальный ресурс или его альтернативу
2. Нажатие на элемент “Присоединиться”
3. Указание требуемых параметров
4. Проверка почтовой почты
5. Внесение промокода (в случае имеется)
Подарки и промоакции для участников
Платформа поощряет своих участников различными наградными системами.
Ключевые виды поощрений
Стартовый подарок — щедрое вознаграждение для недавних пользователей, которое именно в состоянии охватывать материальные средства и бесплатные вращения.
Безвозмездные спины — опция играть в популярных автоматах без затрат.
Кешбэк — частичный возмещение израсходованных финансов, который предоставляется каждую неделю или помесячно.
Специальные коды — специальные комбинации, дающие дополнительные привилегии.
Пользовательский кабинет: опции и настройки
Индивидуальный кабинет предоставляет полный регулирование над персональным активностью. Тут присутствуют:
– Администрирование средствами
– Записи транзакций
– Активные поощрения
– Конфигурации сохранности
– Подтверждение аккаунта
Смартфонная вариант и софт
Нынешние игроки ценят мобильность. Площадка предлагает два метода для развлечений с мобильных гаджетов.
Responsive мобильная вариант
Мобильная версия домена автономно приспосабливается под экран любого девайса. Не требуется загружать дополнительное программное обеспечение.
Приложение для смартфонов
Можно инсталлировать официальное APP для iOS и Android. APP обеспечивает:
– Мгновенный вход
– Доработанный внешний вид
– Оперативные-сообщения о акциях
– Надежную производительность
Live игры: антураж подлинного зала
Категория Live столов транспортирует игроков в антураж реального клуба. Профессиональные крупье организуют партии в формате настоящего времени.
Востребованные Live-столы
– Американская рулетка
– 21
– Баккара
– Poker
Аппараты: многообразие игр
Собрание азартных автоматов вмещает множество вариантов от лидирующих поставщиков. Участники встретят:
– Классические машины
– Графические слоты
– Мега-выигрыш-автоматы
– Слоты с множественными линиями
Турниры и особые события
Постоянные турниры позволяют пользователям конкурировать друг с другом за крупные денежные суммы. Каждый конкурс имеет свои условия вовлечения и список лидеров.
Пути ввода и вывода денег
Ресурс использует комплекс денежных инструментов:
– Банковские карты
– Цифровые счета
– Криптовалюты
– Wire транзакции
Абсолютно все переводы реализуются конфиденциально благодаря передовым системам криптографии.
Сервис support
Опытные консультанты сервиса поддержки способны содействовать 24/7. Доступны данные способы связи:
– Оперативный-чат
– Email-обслуживание
– Телефонная поддержка
– Коммуникационные сети
Итог
Главный ресурс игровой площадки и его рабочие альтернативы дают клиентам защищенный и удобный переход к обширному спектру игровых развлечений. Солидные подарки, постоянные предложения, профессиональная помощь и удобные платежные способы создают геймерский досуг предельно увлекательным и результативным.
сервисный центр самсунг тамбов В Тамбове действуют многочисленные мастерские и сервисные центры, где всегда готовы оказать оперативную компьютерную помощь, провести диагностику и ремонт любой сложности, будь то ремонт ноутбуков, компьютеров, телевизоров или телефонов.
раздеватор «Раздеватор» — это категория программного обеспечения, использующего нейросети для имитации удаления одежды с фотографий, создавая таким образом потенциально неприемлемый контент. Разработка и распространение подобных инструментов вызывают серьёзные этические опасения, связанные с возможностью использования их для создания дипфейков, нарушения приватности и преследования. Важно осознавать ответственность, которую влечёт за собой создание и применение таких технологий, направленных на манипуляцию изображениями людей без их согласия.
browse now – Easy-to-navigate design with fast-loading pages enhances usability.
Обзор официального веб-сайта
Передовые интернет казино предоставляют игрокам широкий спектр забав и перспектив. Официальный веб-сайт Sykaaa регистрация сайт предлагает защищенный доступ к развлекательным функциям.
Рабочее зеркало: путь сегодня
Зеркало служит как полную реплику главного портала. Действующее зеркало позволяет участникам избегать потенциальные ограничения.
Преимущества применения зеркала
Ключевые преимущества предполагают:
– Стабильный шанс к платформе
– Сохранение любых функций основного веб-сайта
– Безопасность конфиденциальных сведений
– Равнозначный возможности
Открытие счета на сайте
Процедура регистрации отличается легкостью и удобством. Новые игроки необходимо:
1. Посетить основной веб-сайт или его зеркало
2. Кликнуть на клавишу оформления
3. Указать требуемые сведения
4. Валидировать почтовую почту
5. Осуществить начальный вход
Вознаграждение за открытие счета
Новички забирают внушительный приветственный приз. Такое премия может охватывать:
– Финансовые бонусы
– Безвозмездные спины
– Расширенный уровень компенсации
Вход в собственный раздел
Зарегистрированные участники в состоянии мгновенно войти в персональный аккаунт, эксплуатируя учетные данные и шифр. Персональный кабинет обеспечивает возможность к:
– Регулированию счетом
– Хронологии транзакций
– Активным бонусам
– Конфигурации учетной записи
Призы и предложения
Платформа регулярно устраивает многочисленные акции для игроков.
Виды бонусов
Главные формы бонусов:
– Депозитные начисления – доля от величины пополнения
– Прокруты – безвозмездные прокруты в слотах
– Кэшбэк – отдача процента затраченных сумм
– Соревновательные призы – призы за состязание в конкурсах
Ваучеры
Эксклюзивные коды позволяют заработать экстра бонусы. Клиенты в состоянии найти их на партнерских площадках или взять в уведомлениях.
Мобильная адаптация и программа
Передовые гемблеры выбирают переносной гейминг.
Функции переносной адаптации
– Адаптивный интерфейс для всех аппаратов
– Целостный возможность к автоматам
– Оперативная подгрузка
– Эргономичное управление
Download app
Портативное программа предоставлено для установки на гаджеты с рабочими системами Android и iOS. Приложение дает:
– Надежную функциональность
– Пуш уведомления о предложениях
– Быстрый доступ к предпочитаемым слотам
Гемблинг выбор
Портал дает богатую подборку игровых развлечений.
Автоматы
Коллекция азартных аппаратов содержит:
– Классические игры
– Современные слоты
– Прогрессивные машины
– Сюжетные автоматы
Live казино
Секция реальных дилеров предлагает шанс состязаться с живыми крупье. Открыты:
– Американская рулетка
– Блэкджек
– Баккара
– Карибский покер
Соревнования
Периодические конкурсы позволяют игрокам состязаться за внушительные наградные банки. Конкурсная программа обновляется каждую неделю.
Финансовые операции
Платформа предоставляет разнообразие способов внесения и получения средств:
– Пластиковые карты
– Электронные счета
– Банковские транзакции
– Цифровые валюты
Абсолютно все операции проходят безопасно с применением прогрессивных методов защиты.
Сервис помощи
Компетентная команда support трудится без перерыва. Коннектиться с операторами доступно через:
– Интерактивный чат
– Электронную почту
– Контактный номер
– Соц сети
Охрана и регулирование
Платформа работает на базе законной лицензии. Это подтверждает:
– Легальность развлекательного действа
– Безопасность конфиденциальных сведений
– Быстрые выводы
– Регулируемый гейминг
Заключение
Лицензионный сайт и его актуальные резервные страницы дают клиентам совокупный ассортимент функций для удобной и прибыльной времяпрепровождения. Щедрые подарки, различные автоматы, профессиональная служба и проверенная структура платежей превращают ресурс идеальным выбором для ценителей игровых развлечений.
Передовые онлайн-казино обеспечивают игрокам обилие возможностей для беспроблемной игры. Официальный сайт Голд предоставляет вход ко всем опциям и игровым автоматам. Однако при наличии технических проблем на выручку прибывают актуальные дубликаты.
Что представляет собой действующее зеркало
Дубликат казино — это полная версия главного веб-сайта, расположенная по альтернативному адресу. Официальное зеркало поддерживает все функции, в том числе открытие профиля, вход в собственный кабинет, вознаграждения и кодовые слова.
Копия на сегодня обеспечивает:
– Стабильный путь к игровым автоматам
– Стопроцентную защиту персональных информации
– Поддержку депозита и записей транзакций
– Доступность всех акций
Регистрация на главном сайте
Процедура регистрации требует несколько минут. Начинающим клиентам нужно:
1. Зайти на подлинный ресурс или функционирующее зеркало
2. Кликнуть кнопку «Зарегистрироваться»
3. Указать нужные графы
4. Верифицировать э-мейл почту
5. Указать кодовое слово при существовании
После конца создания аккаунта клиенты приобретают приз за регистрацию, который может включать фриспины или монетарное премирование.
Доступ в персональный кабинет
Индивидуальный кабинет открывает комплексный мониторинг над игровым действом. Через индивидуальный раздел можно:
– Финансировать кошелек
– Забирать средства
– Задействовать кодовые слова
– Мониторить журнал ставок
– Соревноваться в конкурсах
– Обретать cash back
Обзор бонусов и промо-предложений
Великодушная премиальная политика — значимое плюс проекта. Центральные типы премий:
Вступительный подарок
Начинающие зарабатывают щедрое поощрение на начальные пополнения. Размер приза может доходить до 100-200% от объема взноса.
Free spins
Безвозмездные вращения даются для известных слотов. Число free spins варьируется от 10 до 500 штук.
Кэшбек
Постоянный или помесячный компенсация процента утраченных финансов. Стандартный объем кэшбека — 5-15%.
Состязания
Регулярные состязания с крупными наградными банками. Участники борются за призовые места в турнирной таблице.
Портативная версия и софт
Адаптивная версия позволяет развлекаться с всякого аппарата. Игроки могут скачать софт для iOS и Android или использовать веб версию.
Достоинства мобильного программы:
– Молниеносная подзагрузка автоматов
– Практичный графический интерфейс
– Push-уведомления о акциях
– Вход через отпечаток пальца
Слоты и Live казино
Азартная база охватывает сотни названий от лидирующих провайдеров.
Топовые разделы автоматов:
– Обычные автоматы
– Современные слоты с бонусными раундами
– Прогрессивный джекпот слоты
– Мегавейс автоматы
Live игорный зал
Зона live игорный зал предлагает игру с реальными крупье. Имеются стандартные игры:
– Европейская рулетка
– Блэкджек
– Baccarat
– Техасский холдем
Как разыскать функционирующее зеркало
Обрести свежую линк на зеркало возможно несколькими способами:
1. Оформить подписку на почтовую рассылку
2. Мониторить за обновлениями в соц сетях
3. Связаться в департамент поддержки
4. Заложить актуальное зеркало в закладки
Резюме
Официальный сайт и его рабочие дубликаты предоставляют стабильный доступ к игровым слотам. Щедрые бонусы, множественные промокоды, практичное мобильное программа и качественная сервис поддержки превращают азартный процесс в высшей степени удобным и надежным.
1xbet mobi 1xbet-54.com .
https://www.greencarpetcleaningprescott.com/board/board_topic/7203902/7980343.htm
Подключение к платформе и актуальные адреса
Современные виртуальные казино гарантируют игрокам обширный выбор развлечений. Центральный веб-сайт казино Zooma организует надежный подключение ко всем услугам. Тем не менее порой возникают ситуации, когда понадобится резервный способ входа.
Что являет собой собой действующее зеркало
Рабочее зеркало — это полная дубликат главного ресурса с иным доменным именем. Дубликат сегодня обеспечивает преодолевать существующие ограничения и гарантировать непрерывный вход к предпочитаемым играм.
Легальное зеркало характеризуется всеми функциями, что и базовый портал:
– Совокупный каталог автоматов
– Личный аккаунт с зафиксированными параметрами
– Действующие награды и программы
– Защищенные денежные действия
Оформление и подключение в платформу
Процедура оформления на ресурсе длится несколько секунд. Начинающим клиентам нужно:
1. Попасть на рабочее зеркало сегодня
2. Нажать элемент «Регистрация»
3. Заполнить требуемые данные
4. Подтвердить электронную почту или номер связи
5. Активировать подарок за регистрацию
Доступ в личный аккаунт реализуется посредством ввод логина и пароля.
Обзор бонусной структуры
Выгодная призовая структура — ключевое плюс игорного заведения. Игроки зарабатывают разнообразные награды:
Начальные бонусы
Недавние участники могут рассчитывать на значительный подарок за регистрацию. Как правило это совокупность возможностей, объединяющий:
– Долевую надбавку к первому вкладу
– Безвозмездные спины
– Призовые суммы на кошелек
Кодовые комбинации и уникальные акции
Регулярные коды дают возможность зарабатывать бонусные привилегии. Задействовать их можно в специальном поле персонального профиля.
Free spins и кешбэк
Даровые вращения — это возможность крутить слоты без расходования своих финансов. Возврат означает частичный отдачу потерянных финансов.
Ассортимент автоматов
Игровая площадка обеспечивает впечатляющую подборку развлечений.
Автоматы
Разнообразие слотов поражает ожидания. Есть традиционные трехбарабанные аппараты и новые развлечения с занимательной визуализацией.
Live казино
Секция Live развлечений переносит участников в обстановку подлинного развлекательного заведения. Умелые дилеры ведут игры в реальном формате.
Конкурсы и доски почета
Постоянные конкурсы привносят драйва и обеспечивают возможность выиграть значительные награды.
Портативная реализация и клиент
Продвинутые технологии помогают наслаждаться в любом пространстве. Mobile реализация независимо настраивается под экран аппарата.
Установить клиент разрешено для операционных систем iOS и Android. Клиент предоставляет:
– Скоростной доступ
– Устойчивую производительность
– Всплывающие-оповещения об промо
– Интуитивный интерфейс
Банковские процедуры
Платформа использует многочисленные системы пополнения и снятия финансов:
– Пластиковые карты
– Виртуальные системы
– Токены
– Банковские отправки
Всевозможные транзакции реализуются через защищенное подключение, что обеспечивает безопасность приватных информации.
Отдел ассистанса
Компетентная команда support трудится постоянно. Связаться с специалистами разрешено через:
– Live-чат
– Цифровую почту
– Горячую линию
– Социальные каналы
Итоги
Основной сайт и его действующее зеркало предоставляют пользователям надежный и комфортный переход к захватывающим играм. Щедрые подарки, большой каталог игр и отличная помощь формируют игру предельно комфортной и доходной.
reference link – User-friendly site made exploring uncommon items simple and enjoyable.
Вход к ресурсу через рабочие зеркала
Пользователи онлайн казино регулярно имеют дело с проблемой блокировки основного ресурса. Собственно для устранения этой ситуации предусмотрены альтернативные адреса официального ресурса. ссылка гарантирует абсолютный подключение ко всем сервисам площадки.
Что такое функционирующее зеркало казино
Копия значит собой идентичную реплику оригинального сайта с идентичным возможностями. Главное расхождение — это альтернативное имя. Абсолютно все данные участника, вместе с средства, поощрения и архив игр, остаются неизменными.
Выгоды использования зеркал
Действующие зеркала располагают комплексом существенных достоинств:
– Круглосуточный подключение к предпочитаемым слотам
– Стопроцентная конфиденциальность индивидуальных параметров
– Поддержание всех конфигураций персонального кабинета
– Возможность приобретения поощрений и включения в акциях
Создание аккаунта на основном сайте
Процесс создания аккаунта предельно легок и отнимает буквально минут. Недавние пользователи способны претендовать на солидный вводный поощрение за оформление.
Ступени формирования аккаунта
1. Переход на основной ресурс или его дубликат
2. Нажатие на элемент “Создать аккаунт”
3. Внесение требуемых параметров
4. Верификация электронной почты
5. Внесение промокода (в случае присутствует)
Бонусы и предложения для игроков
Ресурс одаривает своих пользователей многочисленными поощрительными системами.
Главные типы наград
Начальный подарок — крупное вознаграждение для свежих клиентов, что может содержать финансовые призы и бесплатные вращения.
Безвозмездные спины — возможность играть в популярных слотах без затрат.
Возврат средств — процентный компенсация потерянных средств, который именно зачисляется еженедельно или помесячно.
Специальные коды — особые последовательности, гарантирующие дополнительные выгоды.
Персональный кабинет: опции и конфигурации
Индивидуальный раздел предоставляет абсолютный управление над развлекательным активностью. В данном разделе имеются:
– Управление депозитом
– Данные переводов
– Действующие поощрения
– Конфигурации защиты
– Валидация аккаунта
Портативная версия и приложение
Современные клиенты признают мобильность. Платформа предлагает пару варианта для участия с портативных девайсов.
Responsive портативная версия
Адаптивная платформа домена автономно адаптируется под дисплей любого аппарата. Отсутствует потребность инсталлировать отдельное ПО.
Софт для гаджетов
Доступно скачать официальное софт для iOS и Android. Приложение обеспечивает:
– Моментальный запуск
– Доработанный графику
– Мобильные-оповещения о акциях
– Надежную производительность
Live казино: обстановка настоящего игорного заведения
Раздел Live развлечений переносит пользователей в среду реального зала. Квалифицированные крупье организуют игры в варианте настоящего времени.
Популярные Live-форматы
– Американская рулетка
– Blackjack
– Punto Banco
– Покер
Игровые машины: ассортимент слотов
Собрание слотовых слотов насчитывает тысячи названий от лидирующих производителей. Пользователи встретят:
– Традиционные аппараты
– Видеослоты
– Прогрессивный джекпот-игры
– Многолинейные автоматы
Турниры и уникальные мероприятия
Периодические турниры предоставляют шанс пользователям состязаться друг с другом за солидные наградные суммы. Любой соревнование располагает свои критерии участия и доску чемпионов.
Пути внесения и получения средств
Казино использует ряд финансовых сервисов:
– Кредитные инструменты
– Онлайн счета
– Крипто
– Прямые переводы
Каждые переводы выполняются защищенно благодаря передовым протоколам кодирования.
Команда обслуживания
Квалифицированные специалисты сервиса обслуживания расположены поддержать 24/7. Предусмотрены такие каналы контакта:
– Оперативный-чат
– Email-сервис
– Звонковая поддержка
– Медийные сети
Вывод
Официальный сайт клуба и его рабочие копии обеспечивают игрокам безопасный и приятный вход к огромному спектру развлекательных услуг. Крупные награды, периодические кампании, квалифицированная помощь и удобные расчетные системы формируют азартный процесс предельно приятным и доходным.
netamplify – Navigation felt smooth, found everything quickly without any confusing steps.
Обзор основного веб-сайта
Передовое онлайн-казино обеспечивает своим участникам широкий ассортимент развлечений и поощрений. Основной портал Kraken действует непрерывно, давая возможность к топовым симуляторам, live-казино и многим предложениям.
Функционирующее зеркало: возможность к платформе
Что такое зеркало казино
Копия означает собой полную копию основного ресурса с отличным доменным адресом. Рабочее зеркало предоставляет участникам избегать ограничения и обеспечивать надежный доступ к любимым играм.
Как отыскать действующее зеркало сегодня
Актуальные URL на проверенное зеркало выкладываются через:
– Электронную оповещение
– Главные медийные сети
– Сервис поддержки
– Тематические порталы
Созданиеаккаунта на платформе
Процедура открытиясчета
Созданиеаккаунта требует буквально минут и подразумевает данные шаги:
1. Открытие на главный сайт или функционирующее зеркало
2. Активация опции “Открытьсчет”
3. Заполнение учетных информации
4. Проверка адреса или телефона
5. Формирование ключа
Бонус за открытиесчета
Первые пользователи приобретают большие начальные вознаграждения:
– Бонусные деньги на аккаунт
– Халявныеспины для слотов
– Расширенный коэффициент кешбэка
– Уникальные ваучеры
Авторизация в персональный счет
Зарегистрированные участники вправе осуществить доступ через официальный портал или действующее зеркало. Для этого нужно набрать никнейм и пароль, созданные при открытиисчета.
Функции личного профиля
В собственном аккаунте имеются основные инструменты:
– Контроль контактными реквизитами
– Зачисление счета
– Вывод денег
– Активация кодов
– Просмотр журнала транзакций
– Включение в соревнованиях
Бонусы и кампании
Типы вознаграждений
Казино балует своих пользователей разнообразными наградными системами:
– Приветственный набор — большие подарки на стартовые депозиты
– Халявныеспины — дополнительные спины в топовых играх
– Кэшбек — периодический откат суммы проигрышей
– План VIP — эксклюзивные льготы для верных участников
Промокоды и их применение
Особые ваучеры обеспечивают экстра поощрения. Для использования требуется внести комбинацию в специальное графу в индивидуальном разделе.
Азартный ассортимент
Автоматы
Коллекция игровых автоматов насчитывает сотни вариантов от лучших разработчиков:
– Стандартные автоматы
– Видео развлечения
– Прогрессивные слоты
– Сюжетные автоматы
Live казино
Зона Live-казино предоставляет процесс с настоящими ведущими в режиме онлайн эфира:
– Французскаярулетка
– Очко
– Baccarat
– Casinopoker
Конкурсы
Постоянные конкурсы с внушительными наградными суммами организуются ежедневно. Игроки соревнуются за победу в списке.
Смартфонная реализация и программа
Смартфонная реализация сайта
Основной портал целиком оптимизирован для планшетных устройств. Клиенты могут играть развлечения напрямую через веб-навигатор без нужды установки.
Приложение для установки
Специальное портативное приложение имеется для получения на девайсы с операционными ОС Android и iOS. Софт гарантирует:
– Мгновенный путь к развлечениям
– Устойчивую работу
– Оперативные-сообщения о предложениях
– Удобный интерфейс
Резюме
Основной портал казино и его рабочие альтернативы гарантируют пользователям полный путь к высококлассным игровым играм. Солидные вознаграждения, многочисленные промо, функциональная мобильная реализация и профессиональная служба превращают игровой времяпрепровождение крайне комфортным и прибыльным.
https://doskazaymov.kz/ В Уральск Досказаймов помогает проверить погасить микрозаймы одним платежом с просрочками и оценить ежемесячный платеж
Актуальные онлайн-казино гарантируют участникам обширный набор азартных игр и щедрые премии. Однако для стабильной деятельности критично понимать, как получить доступ к https://sr.npu.edu.ua и его функционирующие зеркала.
Что такое основной сайт казино
Основной портал казино — это главная система, где пользователи могут развлекаться гемблинг слотами. Платформа функционирует на законных условиях и обладает всеми обязательными разрешениями.
Первостепенные плюсы основного сайта:
– Защищенность личных информации
– Объективные условия игры
– Подтвержденные платежи
– Профессиональная поддержка
Актуальное зеркало казино: для чего используется
Копия сайта — это точная клон лицензионного ресурса, размещенная по альтернативному веб-адресу. Актуальное зеркало разрабатывается для гарантирования стабильного входа к платформе.
Факторы использования дублирующих ресурсов:
– Запрет первичного домена
– Профилактические работы
– Большая посещаемость на систему
Как отыскать действующее зеркало сейчас
Найти свежее действующее зеркало можно несколькими способами:
1. Почтовые оповещения — активируйте уведомления на email отправку
2. Команда поддержки — обратитесь в онлайн-чат
3. Социальные медиа — проверяйте за новостями
4. Специализированные сайты — проверенные сайты
Открытие счета на платформе казино
Алгоритм регистрации занимает лишь считанные секунд:
1. Кликните на элемент “Регистрация”
2. Внесите требуемые поля
3. Верифицируйте почтовую адрес
4. Примените промокод, если доступен
Вслед за оконченной регистрации вам будет открыт личный аккаунт.
Награды и коды активации
Богатая наградная система — ключевое достоинство казино:
Бонус за открытие счета
Новые игроки приобретают первый поощрение, который может содержать:
– Финансовый счет на дебютный вклад
– Фри-спины для игровых машин
– Бездепозитные средства
Промокоды
Периодически размещаются свежие бонусные шифры, предоставляющие использовать специальные бонусы.
Программа возврата средств
Активные клиенты возвращают долю использованных ставок обратно.
Текущие акции и соревнования
Сайт систематически организует увлекательные события:
– Еженедельные соревнования
– Специальные промо
– Розыгрыши крупных выигрышей
– Система статусов
Авторизация в персональный кабинет
Для авторизации на сайт необходимо:
1. Перейти на лицензионный сайт или актуальное зеркало
2. Выбрать “Авторизация”
3. Внести логин и секретную комбинацию
В пользовательском разделе предоставлены следующие инструменты:
– Зачисление баланса
– Вывод призов
– Анализ журнала ставок
– Управление профильными параметрами
Портативная платформа и программа
Адаптивная версия
Мобильная платформа ресурса позволяет играть с любого мобильного гаджета. Дизайн адаптивно оптимизируется под формат screen.
Клиент для скачивания
Загрузить app можно для:
– Android — прямая загрузка с портала
– iOS — установка через App Store
Достоинства программы:
– Быстрый вход
– Стабильная производительность
– Push-оповещения об промо
– Производительный интерфейс
Развлекательные зоны
Слоты
Внушительная галерея игровых машин от лучших провайдеров:
– Стандартные машины
– Видео-слоты
– Накопительные-автоматы
Live casino
Раздел с профессиональными ведущими предоставляет:
– European/American Roulette
– Блэкджек
– Punto Banco
– Texas Hold’em
Вещания ведутся в высоком качестве, обеспечивая эффект подлинного казино.
Варианты зачисления и обналичивания
Платформа принимает разные финансовые системы:
– Кредитные карты
– Онлайн счета
– Цифровые валюты
– Wire переводы
Базовые суммы пополнения и оперативные выводы обеспечивают времяпрепровождение максимально удобной.
Отдел поддержки
Квалифицированная служба помощи работает 24/7 и в состоянии помочь с всеми проблемами:
– Живой-чат
– Email-помощь
– Голосовая связь
Резюме
Основной ресурс казино и его функционирующие альтернативные адреса дают клиентам защищенный и азартный азартный процесс. Привлекательные награды, простая портативная версия, многочисленные слоты и высокоуровневое live-казино делают эту платформу превосходным местом для развлекательных досуга.
use this page – Incremental motion ensures sustainable momentum and productive outcomes.
Описание официального веб-сайта
Актуальное онлайн-казино дарит своим игрокам большой набор услуг и бонусов. Оригинальный ресурс казино казино Голд оперирует 24/7, обеспечивая доступ к популярным симуляторам, live-казино и обширным кампаниям.
Функционирующее зеркало: доступ к платформе
Что такое дубликат казино
Альтернатива представляет собой полную реплику официального портала с альтернативным сетевым путем. Рабочее зеркало позволяет клиентам миновать блокировки и сохранять непрерывный подключение к любимым автоматам.
Как обнаружить текущее зеркало сегодня
Свежие URL на проверенное зеркало появляются через:
– E-mail новостнуюленту
– Проверенные социальные сети
– Службу сопровождения
– Специализированные порталы
Созданиеаккаунта на сайте
Процесс открытиясчета
Созданиеаккаунта отнимает несколько минут и включает нижеследующие действия:
1. Открытие на основной портал или действующее зеркало
2. Выбор кнопки “Зарегистрироваться”
3. Внесение учетных информации
4. Подтверждение аккаунта или контакта
5. Установка пароля
Бонус за оформление
Новые участники получают щедрые вступительные вознаграждения:
– Финансовые деньги на счет
– Фриспины для симуляторов
– Увеличенный коэффициент компенсации
– Особые промокоды
Доступ в личный профиль
Действующие клиенты способны произвести авторизацию через основной веб-сайт или актуальное зеркало. Для этого требуется внести учетноеимя и ключдоступа, созданные при оформлении.
Возможности индивидуального раздела
В личном разделе открыты основные функции:
– Управление личными данными
– Внесение депозита
– Вывод денег
– Активация бонусов
– Просмотр статистики операций
– Регистрация в соревнованиях
Бонусы и кампании
Разновидности бонусов
Казино поощряет своих клиентов многочисленными наградными акциями:
– Приветственный набор — большие вознаграждения на стартовые вклады
– Бесплатныевращения — экстра ставки в рейтинговых играх
– Возврат — систематический компенсация процента убытков
– Программа лояльности — специальные привилегии для постоянных пользователей
Купоны и их активация
Уникальные коды обеспечивают экстра бонусы. Для ввода требуется указать шифр в специальное графу в персональном кабинете.
Азартный выбор
Автоматы
База азартных симуляторов включает сотни вариантов от ведущих провайдеров:
– Стандартные машины
– Современные игры
– Джекпот симуляторы
– Тематические автоматы
Live казино
Область Live-казино обеспечивает игру с реальными операторами в формате онлайн стрима:
– Французскаярулетка
– Очко
– PuntoBanco
– Карибскийпокер
Конкурсы
Постоянные конкурсы с крупными выигрышными фондами проходят ежедневно. Участники сражаются за лидерство в рейтинге.
Мобильная версия и APP
Мобильная платформа ресурса
Главный ресурс абсолютно оптимизирован для смартфонных гаджетов. Пользователи вправе пользоваться игры напрямую через веб-навигатор без нужды загрузки.
Программа для загрузки
Фирменное портативное софт имеется для загрузки на девайсы с программными системами Android и iOS. Софт предоставляет:
– Мгновенный доступ к играм
– Устойчивую работу
– Push-оповещения о бонусах
– Простой навигацию
Вывод
Официальный сайт казино и его действующие копии гарантируют игрокам всесторонний путь к отличным игровым услугам. Солидные бонусы, различные предложения, удобная смартфонная версия и опытная поддержка создают игровой времяпрепровождение чрезвычайно приятным и доходным.
Переход к ресурсу через рабочие зеркала
Игроки сетевых казино часто встречаются с вопросом закрытия основного портала. Как раз для устранения этой проблемы разработаны зеркала главного домена. играть дает абсолютный доступ ко всем опциям площадки.
Что такое действующее зеркало казино
Зеркало является собой точную копию оригинального ресурса с идентичным набором функций. Единственное расхождение — это иное имя. Любые данные игрока, в том числе счет, привилегии и историю партий, сохраняются такими же.
Выгоды использования зеркал
Актуальные зеркала характеризуются рядом значимых выгод:
– Непрерывный подключение к предпочитаемым играм
– Совершенная конфиденциальность персональных данных
– Поддержание всех опций личного кабинета
– Опция обретения наград и присутствия в акциях
Регистрация на главном домене
Ход создания аккаунта чрезвычайно несложен и требует немного минут. Начинающие игроки способны претендовать на щедрый стартовый приз за создание аккаунта.
Стадии создания аккаунта
1. Переход на главный домен или его копию
2. Клик на клавишу “Зарегистрироваться”
3. Внесение нужных сведений
4. Активация email почты
5. Внесение бонусного кода (при наличии есть)
Поощрения и предложения для игроков
Платформа балует своих клиентов различными поощрительными программами.
Базовые категории бонусов
Приветственный приз — внушительное поощрение для новых пользователей, которое именно в состоянии вмещать финансовые призы и безвозмездные спины.
Безвозмездные спины — возможность крутить в популярных аппаратах без затрат.
Компенсация — пропорциональный компенсация утраченных финансов, каковой выплачивается раз в неделю или каждый месяц.
Специальные коды — специальные наборы, дающие дополнительные выгоды.
Личный кабинет: инструменты и конфигурации
Личный аккаунт дает совершенный регулирование над игровым опытом. В нем доступны:
– Администрирование счетом
– Архив операций
– Текущие бонусы
– Параметры безопасности
– Валидация аккаунта
Карманная версия и софт
Актуальные клиенты оценивают доступность. Площадка обеспечивает пару способа для развлечений с мобильных аппаратов.
Адаптивная смартфонная редакция
Смартфонная вариант домена без участия адаптируется под монитор любого аппарата. Не нужно скачивать специальное ПО.
Программа для телефонов
Разрешено установить оригинальное приложение для iOS и Android. Приложение дает:
– Быстрый доступ
– Доработанный графику
– Мобильные-извещения о поощрениях
– Стабильную операционность
Live казино: атмосфера настоящего зала
Категория Live казино отправляет пользователей в обстановку подлинного клуба. Профессиональные ведущие организуют раунды в формате живого времени.
Топовые Live-столы
– Французская рулетка
– Блэкджек
– Баккара
– Карибский покер
Аппараты: ассортимент игр
Собрание азартных машин содержит множество наименований от известных провайдеров. Участники встретят:
– Традиционные аппараты
– Графические слоты
– Накопительный приз-машины
– Мегавейс
Соревнования и особые мероприятия
Постоянные конкурсы позволяют участникам бороться друг с другом за солидные денежные пулы. Любой состязание располагает свои критерии участия и рейтинг лидеров.
Варианты зачисления и снятия средств
Ресурс обслуживает множество финансовых методов:
– Кредитные карты
– Электронные платежные системы
– Криптовалюты
– Финансовые транзакции
Каждые платежи осуществляются конфиденциально благодаря современным методам кодирования.
Команда support
Компетентные сотрудники команды обслуживания готовы помочь 24/7. Предусмотрены нижеперечисленные каналы связи:
– Онлайн-чат
– Email-поддержка
– Аудио горячая линия
– Коммуникационные сети
Итог
Легальный сайт платформы и его рабочие альтернативы обеспечивают пользователям защищенный и приятный вход к огромному ассортименту геймерских игр. Крупные поощрения, регулярные предложения, компетентная сервис и комфортные денежные методы превращают развлекательный времяпрепровождение максимально приятным и результативным.
кинг казино актуальное зеркало Если не заходит casino king, не паникуйте, просто гляньте их канал, там обычно уже есть новая рабочая ссылка.
стоимость гидроизоляции подвала gidroizolyacziya-podvalov.ru .
mostbet giris mostbet
Доступ к порталу через актуальные зеркала
Участники интернет казино постоянно контактируют с вопросом закрытия главного ресурса. Собственно для преодоления этой задачи предусмотрены дубликаты официального ресурса. http://www.www2.uesb.br/curso/cinema/ гарантирует абсолютный переход ко всем функциям ресурса.
Что такое актуальное зеркало казино
Зеркало является собой идентичную версию главного веб-сайта с аналогичным возможностями. Основное расхождение — это доменное имя. Абсолютно все сведения пользователя, в том числе счет, бонусы и историю раундов, сохраняются идентичными.
Плюсы использования зеркал
Действующие зеркала характеризуются рядом важных выгод:
– Бесперебойный доступ к предпочитаемым слотам
– Полная конфиденциальность собственных сведений
– Удержание всех опций личного кабинета
– Способность получения поощрений и вовлечения в кампаниях
Оформление профиля на официальном сайте
Операция оформления чрезвычайно легок и требует несколько минут. Недавние пользователи имеют возможность полагаться на солидный начальный бонус за открытие счета.
Стадии создания аккаунта
1. Доступ на официальный портал или его зеркало
2. Выбор на кнопку “Регистрация”
3. Внесение требуемых сведений
4. Подтверждение email почты
5. Применение бонусного кода (при наличии имеется)
Награды и кампании для пользователей
Платформа одаривает своих игроков различными призовыми предложениями.
Базовые категории наград
Стартовый пакет — крупное премирование для начинающих игроков, что может содержать монетарные средства и фриспины.
Фриспины — возможность использовать в востребованных автоматах безвозмездно.
Кэшбек — пропорциональный компенсация израсходованных финансов, который выплачивается каждую неделю или раз в месяц.
Купоны — особые наборы, обеспечивающие бонусные привилегии.
Пользовательский кабинет: возможности и конфигурации
Личный аккаунт обеспечивает полный контроль над развлекательным процессом. Здесь присутствуют:
– Регулирование счетом
– История платежей
– Текущие бонусы
– Параметры защиты
– Верификация учетной записи
Мобильная редакция и программа
Нынешние пользователи ценят гибкость. Казино предлагает пару варианта для ставок с портативных девайсов.
Responsive портативная платформа
Адаптивная платформа ресурса самостоятельно настраивается под разрешение любого девайса. Не требуется устанавливать специальное приложение.
APP для мобильных
Разрешено инсталлировать специальное приложение для iOS и Android. Приложение дает:
– Мгновенный доступ
– Доработанный внешний вид
– Оперативные-уведомления о поощрениях
– Надежную работу
Live казино: антураж реального клуба
Зона Live казино транспортирует участников в атмосферу подлинного игорного заведения. Компетентные ведущие организуют игры в виде прямого времени.
Популярные Live-игры
– Европейская рулетка
– Blackjack
– Баккарат
– Техасский холдем
Аппараты: разнообразие игр
Собрание развлекательных аппаратов насчитывает массу позиций от лидирующих поставщиков. Участники откроют:
– Обычные аппараты
– Современные слоты
– Накопительный приз-игры
– Многолинейные автоматы
Конкурсы и особые предложения
Регулярные конкурсы позволяют игрокам состязаться друг с другом за крупные выигрышные пулы. Каждый конкурс обладает свои требования участия и таблицу призеров.
Варианты пополнения и получения денег
Казино обслуживает комплекс денежных инструментов:
– Дебетовые инструменты
– Виртуальные счета
– Цифровые валюты
– Wire переводы
Каждые платежи осуществляются защищенно благодаря актуальным системам криптографии.
Сервис помощи
Компетентные консультанты команды обслуживания готовы поддержать 24/7. Предусмотрены следующие способы общения:
– Оперативный-чат
– Email-сервис
– Телефонная связь
– Коммуникационные сети
Резюме
Основной сайт игровой площадки и его функционирующие зеркала гарантируют игрокам защищенный и легкий переход к широкому ассортименту геймерских услуг. Солидные бонусы, частые предложения, компетентная служба и удобные финансовые системы создают игровой времяпрепровождение предельно захватывающим и результативным.
Актуальные сетевые казино предоставляют клиентам большой спектр опций для беспроблемной игры. Впрочем иногда доступ к главному ресурсу может быть ограниченным. В таких ситуациях на подмогу спешит Zooma, которое предоставляет постоянный путь ко всем опциям платформы.
Что такое функционирующее зеркало казино
Альтернативный сайт — это точная реплика официального сайта, которая хостится по другому URL. Дубликат поддерживает весь набор функций главного портала, включая пользовательский кабинет, средства и данные переводов.
Принципиальные преимущества задействования зеркала:
– Непрерывный подключение к платформе
– Абсолютная тождественность инструментов
– Сохранность пользовательских сведений
– Удержание всех вознаграждений
Как разыскать действующее зеркало на текущий день
Присутствует множество безопасных методов получения действующей адреса:
Легитимные источники:
1. Почтовая рассылка — управление систематически направляет уведомления с действующими URL
2. Общественные сети — авторизованные профили выкладывают текущую данные
3. Отдел поддержки — консультанты выдают проверенные URL
4. Смартфонное приложение — позволяет обходить блокировки
Открытие счета на главном веб-сайте
Операция создания аккаунта отнимает не более немного минут и содержит из таких шагов:
1. Переход на лицензионный портал или актуальное зеркало
2. Щелчок на элемент «Зарегистрироваться»
3. Указание персональной формы
4. Проверка имейл почты или сотового номера
5. Применение привилегии за регистрацию при присутствии промокода
Начинающие пользователи получают солидный вступительный бонус, который может содержать free spins, финансовые поощрения или кэшбек.
Вход в личный кабинет
Авторизация на сайте выполняется традиционным методом. Достаточно вписать логин и пароль, задействованные при регистрации.
Ключевые нюансы для безопасного входа:
– Эксплуатируйте надежный пароль
– Включите двухфакторную аутентификацию
– Не записывайте данные на публичных компьютерах
– Мониторьте URL строку браузера
Описание бонусной программы
Игорный портал радует игроков многочисленными вознаграждениями и акциями:
Начальный букет
Свежие игроки имеют возможность претендовать на значительное поощрение за начальный вклад. Обычно это процентовая прибавка к зачисленной объему плюс фриспины для известных слотов.
Регулярные акции
– Еженедельный кэшбек — возвращение части утраченных финансов
– Награды на дополнительные депозиты
– Уникальные офферы по праздникам
– Конкурсы с крупными призовыми фондами
Программа лояльности
Регулярные пользователи получают единицы за любую раунд, которые затем обмениваются на действительные средства, free spins или уникальные льготы.
Промокоды: как применять
Промокоды — это индивидуальные последовательности литер, предоставляющие право к эксклюзивным вознаграждениям.
Откуда раздобыть свежие промокоды:
– Легитимные коммуникационные сети казино
– Аффилиатные сайты
– Email-рассылка
– Профильные сообщества
Указывается промокод в предназначенное поле при создании аккаунта или зачислении средств счета.
Смартфонная версия и приложение
Передовые пользователи отдают предпочтение развлекаться с смартфонных девайсов. Ресурс дает двойной варианта для удобной мобильной игры.
Мобильная редакция
Онлайн версия само собой оптимизируется под габариты монитора. Не требует установки и работает в каждом актуальном браузере.
Смартфонное приложение
Получить приложение можно для девайсов на Android и iOS. Плюсы app:
– Оперативная загрузка
– Надежная функционирование
– Мгновенные-уведомления о поощрениях
– Самостоятельный преодоление блокировок
Процедура загрузки легок: необходимо зайти на портал с смартфонного устройства и придерживаться руководству.
Игровой каталог
Каталог игр насчитывает огромное количество позиций от топовых разработчиков.
Слоты
Гемблинг машины — наиболее популярная категория забав. Представлены традиционные 3-барабанные машины, новые графические аппараты с премиальными стадиями, а также прогрессивные призы.
Live казино
Секция с действительными ведущими предоставляет испытать антураж реального казино. Доступны игры с блэкджеком.
Передача реализуется в HD формате, присутствует коммуникация с дилером и другими пользователями.
Конкурсы
Систематически устраиваются турниры по многочисленным категориям. Вступление позволяет завоевать денежные призы, фриспины или специальные поощрения.
Транзакционные операции
Портал обеспечивает значительный выбор расчетных инструментов:
– Пластиковые карты
– Электронные кошельки
– Крипта
– Денежные переводы
Минимальная сумма депозита — посильная для преобладающего числа пользователей. Получение призов обрабатывается в короткие сроки.
Сервис поддержки
Квалифицированные специалисты способны помочь круглосуточно. Имеются такие варианты связи:
– Онлайн-чат
– Email
– Мобильная поддержка
– Социальные сети
Ответы на типовые вопросы можно получить в зоне FAQ.
Заключение
Основной сайт казино и его функционирующие зеркала предоставляют игрокам полный вход ко всем возможностям ресурса. Значительные бонусы, удобная телефонная версия, гигантский выбор слотов и квалифицированная ассистенция делают азартный времяпрепровождение предельно комфортным и надежным.
take a look at the site here gta sa apk
This casino https://phuocthuycoffee.com/get-lucky-casino-je-bestemming-voor-eersteklas/ offers a solid mix of popular slots and live tables. The platform feels modern, promotions are attractive, and support is responsive, which adds confidence.
Thanks for one’s marvelous posting! I really enjoyed reading it, you happen to be a great author.I will
make sure to bookmark your blog and will come back sometime soon. I want to encourage you to definitely continue your great work, have a nice morning!
For instance
can you get fluoxetine without prescription
for your privacy.
Доступ к ресурсу через рабочие зеркала
Игроки виртуальных казино часто контактируют с проблемой ограничения главного сайта. Собственно для решения этой задачи разработаны альтернативные адреса официального сайта. казино казино Болливуд обеспечивает беспрепятственный вход ко всем функциям ресурса.
Что такое актуальное зеркало казино
Копия составляет собой точную реплику главного портала с таким же набором функций. Ключевое несовпадение — это доменное имя. Все сведения участника, в том числе средства, поощрения и данные игр, находятся идентичными.
Выгоды эксплуатации зеркал
Рабочие зеркала характеризуются набором существенных преимуществ:
– Постоянный вход к выбранным слотам
– Стопроцентная сохранность персональных сведений
– Сохранение всех опций личного кабинета
– Шанс приобретения наград и вовлечения в кампаниях
Регистрация на главном ресурсе
Операция оформления максимально элементарен и отнимает несколько минут. Начинающие игроки могут претендовать на крупный стартовый подарок за открытие счета.
Стадии открытия аккаунта
1. Вход на официальный портал или его альтернативу
2. Клик на клавишу “Зарегистрироваться”
3. Ввод требуемых информации
4. Подтверждение почтовой почты
5. Применение бонусного кода (при наличии имеется)
Награды и кампании для клиентов
Казино балует своих пользователей разнообразными призовыми системами.
Главные категории наград
Приветственный подарок — щедрое начисление для новых участников, которое именно имеет возможность вмещать монетарные бонусы и фриспины.
Фриспины — способность играть в популярных игровых машинах без затрат.
Компенсация — пропорциональный отдача израсходованных денег, что начисляется каждую неделю или помесячно.
Бонусные коды — особые последовательности, предоставляющие бонусные преимущества.
Персональный кабинет: инструменты и настройки
Персональный кабинет предоставляет исчерпывающий контроль над пользовательским опытом. Здесь предусмотрены:
– Контроль депозитом
– Записи платежей
– Работающие бонусы
– Конфигурации безопасности
– Валидация профиля
Мобильная вариант и приложение
Современные пользователи ценят доступность. Площадка дает пару варианта для ставок с мобильных аппаратов.
Приспособленная смартфонная вариант
Адаптивная редакция ресурса автоматически подстраивается под дисплей любого гаджета. Не нужно загружать особое приложение.
Софт для мобильных
Возможно загрузить официальное приложение для iOS и Android. Программа обеспечивает:
– Моментальный вход
– Адаптированный дизайн
– Оперативные-уведомления о предложениях
– Надежную работу
Live игры: атмосфера настоящего клуба
Раздел Live игр отправляет клиентов в обстановку истинного казино. Профессиональные хосты ведут партии в варианте реального времени.
Популярные Live-игры
– Американская рулетка
– 21
– Punto Banco
– Покер
Автоматы: выбор автоматов
Собрание слотовых слотов вмещает сотни наименований от ведущих провайдеров. Клиенты найдут:
– Классические машины
– Видео-автоматы
– Джекпот-игры
– Megaways
Турниры и специальные события
Систематические состязания обеспечивают игрокам состязаться друг с другом за крупные денежные пулы. Любой турнир обладает свои требования вовлечения и таблицу лидеров.
Пути внесения и снятия средств
Площадка обслуживает множество расчетных систем:
– Кредитные карты
– Онлайн платежные системы
– Blockchain-платежи
– Wire отправления
Любые платежи реализуются защищенно благодаря актуальным системам криптографии.
Сервис поддержки
Профессиональные специалисты службы support расположены поддержать 24/7. Имеются данные каналы коммуникации:
– Онлайн-чат
– Email-сервис
– Голосовая поддержка
– Коммуникационные сети
Заключение
Легальный домен казино и его актуальные альтернативы предоставляют игрокам безопасный и легкий переход к обширному диапазону геймерских услуг. Внушительные подарки, постоянные акции, профессиональная служба и простые расчетные методы превращают игровой досуг чрезвычайно увлекательным и выгодным.
Актуальные онлайн-казино предлагают пользователям обширный диапазон вариантов для приятной времяпрепровождения. Подключение к платформе Болливуд осуществляется через главный веб-ресурс или рабочее зеркало.
Что такое функционирующее зеркало казино
Актуальное зеркало — это резервный домен официального портала казино. Такие версии генерируются для гарантирования стабильного доступа к азартной сервису.
Зеркало на сегодня полностью воспроизводит возможности официального портала. Пользователи получают схожий доступ ко всем функциям, включая оформление профиля, пополнение кошелька и снятие выигрышей.
Оформление профиля на официальном веб-сайте
Механизм оформления учетной записи отнимает всего считанные минут. Свежим клиентам необходимо:
1. Перейти на основной сайт или рабочее подлинное зеркало
2. Щелкнуть кнопку “Создать аккаунт”
3. Внести обязательные данные
4. Верифицировать email почту
5. Ввести промокод при доступности
После выполнения регистрации клиент приобретает подарок за регистрацию, который вправе содержать free spins или денежное премию.
Вход в индивидуальный кабинет
Персональный кабинет — это закрытая зона, где участники вправе регулировать своим аккаунтом. Для авторизации следует указать логин и код доступа.
В личном кабинете представлены нижеперечисленные инструменты:
– Отслеживание журнала операций
– Использование бонусных кодов
– Регулирование поощрениями
– Присоединение в конкурсах
– Отслеживание возмещения
– Настройка профиля
Бонусы и спецпредложения
Азартная платформа обеспечивает щедрые вознаграждения:
Стартовый набор — дебютанты получают солидное премию на первые взносы.
Фриспины — дарятся как при оформлении, так и в процессе многочисленных промо.
Кэшбек — постоянный возмещение части израсходованных средств.
Коды активации — уникальные коды, открывающие доступ к особым бонусам.
Описание игровых направлений
Slots
Библиотека слотов охватывает сотни игр от топовых поставщиков. Пользователи найдут как обычные слоты, так и актуальные видео-слоты с притягательной визуализацией.
Live казино
Категория Live казино дарит шанс соревноваться с действующими ведущими в состоянии актуального времени. Открыты востребованные столы: рулетка, блэкджек, баккара, покер.
Соревнования
Периодические чемпионаты с крупными премиальными фондами притягивают сотни соревнующихся. Призеры обретают денежные выплаты и особые подарки.
Портативная версия и app
Портативная версия ресурса предоставляет право играть с произвольного девайса. Интерфейс автономно корректируется под габариты экрана.
Получить приложение можно для гаджетов на Android и iOS. Портативное ПО располагает всеми возможностями полной версии.
Как отыскать актуальное зеркало на данный момент
Рабочие адреса дубликатов регулярно корректируются. Обнаружить действующую ссылку можно различными методами:
– Через службу помощи
– В подлинных информационных сетях
– По email подписке
– На партнерских ресурсах
Охрана и легальность
Официальный портал оперирует на базе зарубежной документа. Все операции защищены актуальными технологиями защиты.
Конфиденциальность персональных реквизитов поддерживается в полном размере.
Резюме
Официальный домен и его рабочие альтернативы дарят пользователям постоянный доступ к качественным азартным сервисам. Выгодные бонусы, разнообразные игры, квалифицированная помощь — все это создает азартный досуг невероятно приятным и увлекательным.
секс на занятии йогой секс на занятии йогой .
mostbet güncel giriş: mostbet
кинг казино телеграм Когда сайт casino king не работает, есть выход.
Описание оригинального веб-сайта
Передовое онлайн-казино предоставляет своим пользователям широкий ассортимент возможностей и вознаграждений. Основной портал казино Джозз оперирует круглосуточно, гарантируя вход к топовым слотам, live-казино и обширным акциям.
Рабочее зеркало: путь к сайту
Что такое зеркало казино
Дубликат означает собой абсолютную дубликат главного ресурса с другим сетевым названием. Действующее зеркало позволяет пользователям обходить блокировки и сохранять непрерывный доступ к предпочитаемым слотам.
Как получить рабочее зеркало сегодня
Рабочие URL на официальное зеркало появляются через:
– Почтовую подписку
– Официальные публичные сети
– Сервис помощи
– Партнерские сайты
Созданиеаккаунта на ресурсе
Этапы созданияаккаунта
Регистрация занимает пару минут и содержит данные шаги:
1. Доступ на основной портал или функционирующее зеркало
2. Нажатие клавиши “Зарегистрироваться”
3. Указание персональных информации
4. Верификация адреса или контакта
5. Формирование кодадоступа
Бонус за оформление
Первые игроки получают выгодные стартовые вознаграждения:
– Бонусные депозиты на баланс
– Freespins для слотов
– Увеличенный объем кешбэка
– Эксклюзивные купоны
Логин в собственный кабинет
Зарегистрированные пользователи могут совершить доступ через основной веб-сайт или текущее зеркало. Для этого требуется ввести учетноеимя и секретнуюкомбинацию, придуманные при открытиисчета.
Инструменты собственного аккаунта
В собственном кабинете имеются следующие инструменты:
– Управление личными реквизитами
– Внесение счета
– Обналичивание средств
– Применение кодов
– Отслеживание архива операций
– Включение в турнирах
Вознаграждения и акции
Категории вознаграждений
Казино балует своих игроков многочисленными наградными системами:
– Вступительный пакет — большие подарки на дебютные вклады
– Халявныеспины — подарочные вращения в известных симуляторах
– Кэшбек — систематический откат суммы потерь
– Программа поощрения — особые преимущества для постоянных участников
Промокоды и их использование
Особые ваучеры предоставляют бонусные подарки. Для использования необходимо ввести шифр в определенное окно в индивидуальном профиле.
Игровой каталог
Игры
База азартных симуляторов насчитывает сотни вариантов от известных поставщиков:
– Обычные автоматы
– Новые развлечения
– Накопительные автоматы
– Тематические игры
Live казино
Раздел Live-казино предоставляет игру с профессиональными ведущими в формате актуального эфира:
– Французскаярулетка
– Блэкджек
– PuntoBanco
– Техасскийхолдем
Конкурсы
Периодические соревнования с внушительными наградными пулами проходят регулярно. Соревнующиеся борются за первенство в списке.
Портативная версия и приложение
Mobile адаптация веб-сайта
Оригинальный портал абсолютно адаптирован для планшетных гаджетов. Пользователи вправе открывать игры непосредственно через браузер без обязательства загрузки.
Софт для загрузки
Официальное мобильное софт доступно для загрузки на гаджеты с программными ОС Android и iOS. Приложение дает:
– Быстрый вход к играм
– Надежную работу
– Push-извещения о предложениях
– Удобный интерфейс
Итог
Основной портал казино и его действующие зеркала обеспечивают пользователям полный возможность к отличным геймплейным услугам. Щедрые поощрения, всевозможные предложения, удобная мобильная платформа и квалифицированная служба делают геймплейный времяпрепровождение чрезвычайно удобным и выгодным.
Нынешние онлайн-казино предоставляют игрокам широкий спектр развлечений и заманчивые бонусы. Однако для беспроблемной времяпрепровождения существенно знать, как найти Кент и его рабочие зеркала.
Что такое официальный ресурс казино
Основной ресурс казино — это базовая система, где клиенты могут пользоваться азартными автоматами. Сайт работает на легальных принципах и владеет всеми обязательными сертификатами.
Основные плюсы официального веб-сайта:
– Защищенность пользовательских информации
– Справедливые требования участия
– Обеспеченные платежи
– Квалифицированная техподдержка
Действующее зеркало казино: для чего требуется
Зеркало — это точная дубликат лицензионного портала, размещенная по альтернативному веб-адресу. Актуальное зеркало создается для гарантирования постоянного доступа к сайту.
Факторы использования зеркал:
– Недоступность главного сайта
– Регламентные мероприятия
– Большая нагрузка на платформу
Как отыскать свежее зеркало на сегодня
Получить актуальное проверенное зеркало можно множественными вариантами:
1. Почтовые оповещения — зарегистрируйтесь на новостную доставку
2. Отдел support — свяжитесь в онлайн-чат
3. Официальные медиа — мониторьте за обновлениями
4. Тематические порталы — проверенные платформы
Регистрация на платформе казино
Этап открытия счета составляет лишь пару мгновений:
1. Нажмите на элемент “Зарегистрироваться”
2. Введите запрашиваемые информацию
3. Валидируйте контактную почту
4. Активируйте бонусный код, если есть
После успешной активации вам откроется разрешен индивидуальный раздел.
Премии и промокоды
Богатая поощрительная система — существенное достоинство казино:
Награда за создание аккаунта
Свежие клиенты зарабатывают приветственный подарок, который может предполагать:
– Валютный кредит на первый пополнение
– Фри-спины для слотов
– Стартовые деньги
Промокоды
Периодически выходят новые бонусные шифры, обеспечивающие использовать особые преимущества.
Схема компенсации
Постоянные участники приобретают долю проигранных средств обратно.
Текущие предложения и конкурсы
Сайт постоянно запускает интересные акции:
– Weekly баттлы
– Тематические промо
– Раздачи крупных подарков
– Механизм лояльности
Авторизация в пользовательский профиль
Для доступа на сайт необходимо:
1. Открыть главный портал или функционирующее зеркало
2. Нажать “Login”
3. Указать имя пользователя и код доступа
В пользовательском профиле разрешены нижеперечисленные инструменты:
– Пополнение баланса
– Обналичивание денег
– Проверка архива ставок
– Настройка персональными параметрами
Mobile платформа и софт
Мобильная вариант
Responsive версия веб-сайта позволяет участвовать с разных карманного телефона. Визуал автоматически подстраивается под размер дисплея.
Клиент для скачивания
Получить приложение можно для:
– Android — прямая загрузка с ресурса
– iOS — установка через App Store
Выгоды мобильного клиента:
– Быстрый старт
– Устойчивая операционность
– Push-уведомления об предложениях
– Оптимизированный интерфейс
Азартные категории
Слоты
Богатая библиотека эмуляторных слотов от известных поставщиков:
– Традиционные машины
– Новые-игры
– Накопительные-слоты
Live casino
Секция с реальными дилерами предоставляет:
– Рулеточные столы
– Двадцать одно
– Punto Banco
– Покер
Эфиры осуществляются в отличном разрешении, формируя атмосферу реального казино.
Варианты зачисления и снятия
Казино поддерживает разнообразные транзакционные системы:
– Платежные средства
– Онлайн кошельки
– Цифровые валюты
– Банковские отправки
Наименьшие значения взноса и моментальные выводы обеспечивают времяпрепровождение крайне удобной.
Отдел помощи
Компетентная команда support работает 24/7 и в состоянии содействовать с разными проблемами:
– Живой-чат
– Email-помощь
– Phone служба
Итоги
Лицензионный сайт казино и его действующие дубликаты обеспечивают игрокам надежный и азартный гемблинг отдых. Привлекательные награды, удобная mobile вариант, обширные автоматы и профессиональное live-казино делают эту площадку замечательным решением для азартных игр.
explore the page – Clear layout helps users find deals easily and efficiently.
Подключение к платформе и действующие ссылки
Современные интернет казино предлагают пользователям большой набор возможностей. Основной ресурс казино казино DBbet организует защищенный доступ ко всем сервисам. Тем не менее периодически случаются ситуации, когда нужно альтернативный вариант входа.
Что являет собой собой функционирующее зеркало
Актуальное зеркало — это идентичная реплика легального портала с запасным URL именем. Копия сегодня дает возможность избегать потенциальные барьеры и обеспечивать непрерывный подключение к выбранным автоматам.
Главное зеркало характеризуется теми же функциями, что и основной веб-сайт:
– Весь список игр
– Собственный раздел с зафиксированными сведениями
– Полные подарки и промо
– Надежные финансовые переводы
Создание аккаунта и доступ в казино
Процедура регистрации на ресурсе длится считанные минут. Начинающим игрокам нужно:
1. Перейти на функционирующее зеркало на данный момент
2. Кликнуть кнопку «Зарегистрироваться»
3. Заполнить требуемые информацию
4. Подтвердить цифровую почту или информацию связи
5. Использовать награду за открытие аккаунта
Вход в персональный кабинет производится путем предоставление логина и пароля.
Анализ поощрительной политики
Привлекательная поощрительная структура — ключевое козырь ресурса. Клиенты зарабатывают различные награды:
Вступительные бонусы
Новые игроки способны рассчитывать на щедрый приз за оформление. Как правило это совокупность возможностей, включающий:
– Пропорциональную добавку к стартовому вкладу
– Даровые кручения
– Бонусные деньги на счет
Кодовые комбинации и эксклюзивные предложения
Периодические коды позволяют обретать призовые преимущества. Использовать их возможно в предназначенном окне индивидуального профиля.
Бесплатные вращения и кэшбек
Бесплатные спины — это возможность запускать автоматы без использования личных средств. Возврат означает частичный отдачу израсходованных сумм.
Библиотека слотов
Развлекательная сайт обеспечивает огромную базу игр.
Слоты
Вариативность игровых машин удивляет воображение. Доступны обычные ретро слоты и продвинутые видеослоты с интересной графикой.
Live казино
Секция Live развлечений погружает игроков в обстановку реального развлекательного зала. Квалифицированные ведущие организуют партии в прямом формате.
Турниры и таблицы лидеров
Регулярные соревнования обеспечивают драйва и обеспечивают возможность выиграть большие награды.
Портативная реализация и приложение
Новые решения дают возможность наслаждаться в любимом точке. Портативная версия независимо настраивается под дисплей аппарата.
Получить программу разрешено для мобильных систем iOS и Android. Клиент обеспечивает:
– Быстрый переход
– Надежную функционирование
– Push-сообщения об бонусах
– Удобный вид
Финансовые процедуры
Сайт использует всевозможные варианты внесения и получения сумм:
– Банковские системы
– Цифровые системы
– Крипто
– Банковские переводы
Всевозможные операции выполняются через зашифрованное канал, что подтверждает целостность персональных данных.
Служба support
Компетентная группа support функционирует 24/7. Связаться с операторами разрешено через:
– Live-чат
– Цифровую почту
– Телефон
– Социальные платформы
Итоги
Основной портал и его актуальное зеркало предоставляют игрокам безопасный и комфортный переход к интересным играм. Выгодные награды, большой выбор игр и высокая поддержка формируют игру крайне интересной и прибыльной.
Актуальные интернет казино предлагают геймерам огромный спектр вариантов для комфортной игры. Однако иногда соединение к базовому ресурсу может быть ограниченным. В таких обстоятельствах на помощь появляется https://www.ec-yiquan.com/rukovodstvo-po-vyvodu-sredstv-iz-onlayn-kazino-metody-limity-i-sroki-2025-esli-vy-stali-pobeditelem-i-planiruete-vyvesti-sredstva-u-vas-ne-vozniknet-problem-s-obnalichivaniem-deneg-postupivshikh, которое обеспечивает постоянный вход ко всем функциям платформы.
Что такое функционирующее зеркало казино
Копия — это полная реплика официального веб-сайта, которая располагается по дополнительному адресу. Дубликат поддерживает весь функционал первоначального веб-портала, включая персональный кабинет, депозит и сведения платежей.
Принципиальные плюсы применения зеркала:
– Постоянный подключение к сайту
– Абсолютная схожесть инструментов
– Защита индивидуальных данных
– Поддержка всех имеющихся бонусов
Как отыскать актуальное зеркало на сегодня
Присутствует несколько безопасных методов поиска актуальной адреса:
Легитимные источники:
1. Почтовая рассылка — администрация систематически направляет сообщения с действующими ссылками
2. Общественные сети — легитимные аккаунты публикуют свежую новости
3. Департамент поддержки — операторы предоставляют надежные ссылки
4. Мобильное приложение — позволяет минуть блокировки
Создание аккаунта на основном ресурсе
Этап оформления требует лишь немного минут и предполагает из нижеследующих стадий:
1. Попадание на лицензионный портал или действующее зеркало
2. Выбор на кнопку «Зарегистрироваться»
3. Указание пользовательской таблицы
4. Валидация электронной почты или мобильного номера
5. Задействование бонуса за регистрацию при существовании промокода
Свежие клиенты зарабатывают значительный начальный бонус, который может включать бесплатные вращения, финансовые поощрения или компенсацию.
Доступ в персональный кабинет
Авторизация на сайте выполняется обычным путем. Достаточно указать учетные данные и код доступа, указанные при создании аккаунта.
Ключевые нюансы для защищенного входа:
– Задействуйте надежный пароль
– Активируйте двухфакторную проверку
– Не фиксируйте реквизиты на общественных устройствах
– Мониторьте интернет строку браузера
Обзор поощрительной структуры
Казино одаривает клиентов всевозможными вознаграждениями и специальными предложениями:
Стартовый букет
Свежие игроки вправе претендовать на щедрое награду за первый взнос. Обычно это процентная надбавка к зачисленной величине плюс даровые спины для популярных слотов.
Постоянные предложения
– 7-дневный cashback — возвращение процента проигранных денег
– Поощрения на дополнительные взносы
– Эксклюзивные предложения по событиям
– Конкурсы с значительными наградными суммами
Программа вознаграждений
Деятельные геймеры накапливают единицы за любую бет, которые затем обмениваются на настоящие деньги, даровые прокруты или эксклюзивные преимущества.
Бонус-коды: как задействовать
Купоны — это особые комбинации литер, дающие привилегию к эксклюзивным бонусам.
Каким образом взять действующие промокоды:
– Официальные коммуникационные сети казино
– Сотрудничающие порталы
– Email-информирование
– Специализированные сообщества
Прописывается промокод в отдельное поле при оформлении или внесении депозита счета.
Телефонная версия и приложение
Актуальные игроки предпочитают проводить время с мобильных гаджетов. Портал предлагает двойной варианта для беспроблемной портативной игры.
Мобильная модификация
Онлайн версия сама оптимизируется под диагональ дисплея. Не требует инсталляции и оперирует в любом свежем браузере.
Смартфонное приложение
Установить приложение можно для гаджетов на Android и iOS. Преимущества app:
– Молниеносная активация
– Устойчивая действие
– Автоматические-уведомления о бонусах
– Автономный обход блокировок
Операция скачивания прост: нужно открыть на сайт с смартфонного устройства и следовать указаниям.
Азартный выбор
Библиотека развлечений насчитывает множество единиц от топовых производителей.
Слоты
Игровые слоты — максимально востребованная раздел развлечений. Размещены классические простые автоматы, актуальные видео-автоматы с премиальными этапами, а также растущие джекпоты.
Live казино
Раздел с настоящими раздающими позволяет ощутить настроение подлинного казино. Открыты развлечения с покером.
Трансляция реализуется в превосходном качестве, поддерживается общение с дилером и иными игроками.
Соревнования
Систематически проводятся турниры по многочисленным дисциплинам. Вступление предоставляет право выиграть финансовые призы, даровые прокруты или уникальные бонусы.
Транзакционные действия
Портал поддерживает широкий набор финансовых методов:
– Банковские карты
– Виртуальные платформы
– Криптовалюта
– Денежные переводы
Низшая количество депозита — разумная для массы клиентов. Получение денег выполняется в скорые временные рамки.
Отдел поддержки
Квалифицированные операторы способны оказать помощь постоянно. Доступны данные методы связи:
– Интернет-чат
– Email
– Звонковая линия
– Медийные сети
Пояснения на стандартные вопросы можно найти в блоке FAQ.
Вывод
Лицензионный портал казино и его функционирующие зеркала предоставляют клиентам полный подключение ко всем возможностям портала. Щедрые вознаграждения, практичная телефонная версия, впечатляющий каталог развлечений и компетентная служба поддержки формируют игровой опыт исключительно приятным и защищенным.
https://doskazaymov.kz/ где взять кредит если нигде не дают – на Doskazaymov можно сравнить сценарии выплат
казино кинг Если не получается зайти в king casino просто посмотри телеграм там все есть.
Преимущества клееного бруса перед обычным — разбираемся в деталях
1 x bet 1 x bet .
Актуальные онлайн-казино предоставляют игрокам множество вариантов для комфортной игры. Официальный ресурс al-in.si обеспечивает доступ ко всем сервисам и играм. Однако при наличии технических сложностей на подмогу прибывают актуальные зеркала.
Что есть собой действующее зеркало
Копия казино — это стопроцентная реплика оригинального сайта, находящаяся по другому доменному имени. Лицензионное зеркало сохраняет все возможности, в том числе регистрацию, вход в личный кабинет, премии и купоны.
Дубликат на сегодня обеспечивает:
– Постоянный доступ к игровым слотам
– Абсолютную конфиденциальность персональных сведений
– Удержание баланса и истории транзакций
– Доступность всех бонусных программ
Открытие профиля на лицензионном сайте
Процедура регистрации отнимает пару минут. Новым игрокам следует:
1. Открыть на подлинный портал или функционирующее зеркало
2. Выбрать кнопку «Зарегистрироваться»
3. Ввести нужные сведения
4. Подтвердить электронную почту
5. Ввести купон при присутствии
После завершения создания аккаунта игроки получают подарок за регистрацию, какой может охватывать фриспины или денежное вознаграждение.
Логин в личный кабинет
Персональный кабинет предоставляет полный мониторинг над азартным процессом. Через индивидуальный раздел разрешается:
– Вносить средства на депозит
– Получать выигрыши
– Использовать купоны
– Мониторить хронологию ставок
– Соревноваться в состязаниях
– Обретать cash back
Характеристика вознаграждений и акций
Богатая призовая система — значимое преимущество ресурса. Основные типы вознаграждений:
Начальный бонус
Новички зарабатывают богатое поощрение на дебютные взносы. Объем премии может доходить до 100-200% от величины пополнения.
Фриспины
Бесплатные прокруты предоставляются для топовых игровых автоматов. Объем фриспинов варьируется от 10 до 500 штук.
Возврат средств
Систематический или помесячный компенсация доли проигранных средств. Средний размер возврата — 5-15%.
Конкурсы
Регулярные конкурсы с солидными призовыми пулами. Игроки конкурируют за топовые позиции в таблице лидеров.
Мобильная версия и приложуха
Адаптивная версия обеспечивает играть с любого гаджета. Пользователи могут загрузить app для iOS и Android или применять браузерную версию.
Выгоды портативного софта:
– Оперативная загрузка слотов
– Комфортный интерфейс
– Push-уведомления о поощрениях
– Вход через биометрию
Слоты и Live казино
Развлекательная база содержит тысячи игр от лидирующих производителей.
Популярные секции слотов:
– Традиционные автоматы
– Видео-автоматы с бонусными раундами
– Джекпот слоты
– Мега-путь слоты
Live казино
Категория live казино обеспечивает партию с живыми ведущими. Имеются классические варианты:
– Французская рулетка
– Blackjack
– Punto Banco
– Карибский покер
Как найти функционирующее зеркало
Получить актуальную ссылку на зеркало разрешается множественными путями:
1. Зарегистрироваться на почтовую рассылку
2. Следить за новостями в социальных сетях
3. Обратиться в отдел поддержки
4. Заложить действующее зеркало в избранное
Вывод
Основной портал и его актуальные зеркала предоставляют постоянный доступ к азартным автоматам. Богатые вознаграждения, многочисленные купоны, практичное мобильное программа и профессиональная служба поддержки поддержки обеспечивают азартный геймплей предельно приятным и надежным.
Нынешние виртуальные казино предлагают игрокам широкий спектр функций для удобной игры. Но иногда вход к базовому платформе может оказаться недоступным. В таких моментах на выручку приходит РРЅРѕРјРѕ, которое обеспечивает бесперебойный вход ко всем функциям платформы.
Что такое действующее зеркало казино
Копия — это полная копия официального сайта, которая располагается по запасному домену. Альтернативный ресурс сохраняет целый возможности основного портала, включая пользовательский кабинет, депозит и запись операций.
Основные достоинства применения зеркала:
– Непрерывный вход к сайту
– Полная схожесть функционала
– Защита персональных информации
– Хранение всех бонусов
Как разыскать функционирующее зеркало в данный момент
Существует множество проверенных способов поиска действующей ссылочной информации:
Авторизованные ресурсы:
1. Имейл рассылка — дирекция периодически отправляет информацию с действующими адресами
2. Общественные сети — легитимные страницы публикуют текущую данные
3. Служба поддержки — консультанты сообщают надежные URL
4. Телефонное приложение — предоставляет избегать блокировки
Регистрация на главном веб-сайте
Процедура открытия счета занимает лишь несколько минут и содержит из следующих этапов:
1. Переход на основной веб-сайт или действующее зеркало
2. Выбор на элемент «Создать аккаунт»
3. Внесение пользовательской анкеты
4. Подтверждение email почты или контактного номера
5. Применение бонуса за регистрацию при существовании промокода
Начинающие пользователи обретают щедрый вступительный бонус, который может содержать даровые прокруты, монетарные поощрения или возврат средств.
Авторизация в пользовательский кабинет
Вход на портале производится обычным образом. Достаточно внести никнейм и кодовое слово, задействованные при создании аккаунта.
Существенные моменты для безопасного входа:
– Используйте защищенный пароль
– Включите двухэтапную идентификацию
– Не фиксируйте пароли на чужих устройствах
– Контролируйте интернет строку браузера
Описание премиальной схемы
Казино балует пользователей различными поощрениями и кампаниями:
Начальный пакет
Новички вправе надеяться на существенное бонус за начальный депозит. Традиционно это пропорциональная премия к зачисленной количеству плюс даровые спины для популярных слотов.
Периодические акции
– Семидневный cashback — возврат процентной доли проигранных денежных средств
– Награды на повторные депозиты
– Специальные офферы по торжествам
– Состязания с большими наградными суммами
Система привилегий
Деятельные пользователи получают пункты за каждую раунд, которые затем превращаются на действительные денежные призы, даровые прокруты или специальные льготы.
Промокоды: как задействовать
Кодовые комбинации — это индивидуальные наборы букв и цифр, обеспечивающие привилегию к бонусным привилегиям.
Каким образом найти действующие промокоды:
– Официальные коммуникационные сети казино
– Сотрудничающие площадки
– Email-информирование
– Специализированные платформы
Активируется промокод в отдельное поле при создании аккаунта или внесении депозита депозита.
Смартфонная версия и приложение
Нынешние пользователи отдают предпочтение развлекаться с телефонных гаджетов. Портал предлагает пару решения для беспроблемной телефонной игры.
Мобильная редакция
Онлайн версия самостоятельно подстраивается под габариты дисплея. Не нуждается скачивания и действует в каждом современном браузере.
Мобильное приложение
Скачать app можно для девайсов на Android и iOS. Выгоды app:
– Быстрая открытие
– Бесперебойная действие
– Push-уведомления о поощрениях
– Автоматический преодоление блокировок
Процедура скачивания элементарен: требуется открыть на сайт с телефонного гаджета и следовать указаниям.
Гемблинг ассортимент
Каталог игр содержит множество вариантов от топовых поставщиков.
Слоты
Развлекательные автоматы — наиболее востребованная группа забав. Представлены классические трехбарабанные аппараты, современные видеослоты с бонусными этапами, а также прогрессивные суперпризы.
Live казино
Раздел с реальными крупье дает возможность испытать дух подлинного казино. Представлены столы с баккарой.
Вещание реализуется в превосходном разрешении, обеспечивается коммуникация с ведущим и прочими участниками.
Конкурсы
Систематически запускаются состязания по различным категориям. Присоединение дает шанс выиграть денежные награды, даровые прокруты или специальные бонусы.
Транзакционные процедуры
Сайт предоставляет значительный набор платежных способов:
– Банковские карты
– Онлайн сервисы
– Цифровая валюта
– Банковские транзакты
Низшая количество депозита — разумная для основной части пользователей. Вывод призов обрабатывается в кратчайшие сроки.
Служба поддержки
Компетентные операторы настроены поддержать непрерывно. Имеются данные варианты коммуникации:
– Веб-чат
– Email
– Голосовая связь
– Социальные сети
Разъяснения на типовые вопросы можно обнаружить в разделе FAQ.
Резюме
Лицензионный портал казино и его действующие зеркала гарантируют пользователям абсолютный путь ко всем возможностям сайта. Великодушные вознаграждения, комфортная смартфонная версия, колоссальный коллекция аттракционов и опытная помощь делают азартный опыт исключительно комфортным и безопасным.
https://v-kosmose.com/gadanie-onlajn/na-kartah-taro-chto-on-chuvstvuet-ko-mne/
more info here – Structuring idea flow strategically leads to better action and measurable achievements.
https://mostbetpl.buzz/# mostbet resmi
Подключение к ресурсу через актуальные зеркала
Современные онлайн казино дают игрокам постоянный переход к услугам. Главный ресурс casino Sykaaa действует стабильно, гарантируя широкий выбор игровых слотов. Впрочем иногда появляются цифровые проблемы или запреты, в связи с чем необходимо знать о доступности актуальных зеркал.
Что представляет собой официальное зеркало казино
Копия — это идентичная реплика основного веб-сайта с аналогичным возможностями. Функционирующее зеркало сейчас позволяет избегать локальные барьеры и поддерживать времяпрепровождение.
Принципиальные преимущества использования зеркал:
– Безграничный вход к персональному кабинету
– Поддержание каждых информации счёта
– Схожий спектр автоматов
– Текущие привилегии и предложения
Создание аккаунта на ресурсе
Процесс регистрации требует пару минут. Новые клиенты приобретают привлекательный бонус за создание счёта, он имеет возможность включать:
– Стартовый финансовый кредит
– Даровые вращения для слотов
– Эксклюзивные коды
– Повышенный компенсацию
Ради завершения регистрации нужно:
1. Войти на основной портал или копию
2. Выбрать клавишу «Регистрация»
3. Указать контактные реквизиты
4. Верифицировать email или мобильный
5. Применить код (когда имеется существовании)
Вход в собственный кабинет
Следом за успешной создания аккаунта клиенты в состоянии выполнять авторизацию используя официальный сайт или актуальное зеркало. Личный кабинет даёт безграничный управление над профилем:
– Журнал игр
– Ввод кошелька
– Вывод выигрышей
– Регулирование привилегиями
– Участие в конкурсах
Бонусы и предложения казино
Сайт балует геймеров многочисленными привилегированными программами:
Начальные поощрения
Новые игроки приобретают богатый букет наград на начальные пополнения. Как правило это предполагает процентную доплату к размеру вклада плюс даровые фриспины.
Периодические акции
– Каждонедельный компенсация до 15%
– Соревнования с наградными фондами
– Призы на годовщину рождения
– Особые предложения для статусных геймеров
План поощрения
Регулярные пользователи собирают баллы, что разрешено конвертировать на настоящие призы или специальные бонусы.
Смартфонная редакция и программа
Нынешние технологии дают возможность играть везде комфортно. Карманная вариант портала автоматически адаптируется под экран каждого гаджета.
Достоинства портативного ПО:
– Оперативная открытие игр
– Удобный дизайн
– Мгновенные-нотификации о акциях
– Возможность инсталлировать для Android и iOS
Live казино: антураж реального азартного дома
Секция Live игорного дома доставляет пользователей в атмосферу подлинного развлекательного дома. Опытные ведущие проводят игру в режиме настоящего времени.
Предлагаемые варианты:
– Рулетка
– Двадцать одно
– Баккара
– Покер
Автоматы и азартные автоматы
Каталог развлекательных машин включает тысячи названий от передовых студий. Каждый игрок подберёт слот по желанию:
– Винтажные машины
– Видеослоты с специальными уровнями
– Накопительный-машины
– Динамические слоты
Турниры и лотереи
Периодические соревнования включают остроту и обеспечивают возможность заработать внушительные призы. Вовлечение в состязаниях зачастую безвозмездное, а наградные пулы насчитывают внушительных величин.
Безопасность и секретность
Ресурс применяет современные технологии кодирования для защиты сведений клиентов. Совокупные транзакционные процедуры осуществляются через охраняемые каналы.
Заключение
Основной портал и его рабочие зеркала дают устойчивый вход к превосходным азартным играм. Великодушные призы, практичная смартфонная версия, разнообразие автоматов и высококлассное Live-игорный дом формируют ресурс превосходным опцией для ценителей игровых слотов.
Вход к порталу через актуальные зеркала
Передовые интернет казино предоставляют пользователям непрерывный доступ к услугам. Центральный веб-сайт Gold оперирует надёжно, гарантируя широкий спектр азартных развлечений. Однако иногда образуются технические проблемы или запреты, следовательно важно понимать о доступности актуальных зеркал.
Что означает из себя главное зеркало казино
Альтернатива — это идентичная копия официального веб-сайта с идентичным функционалом. Актуальное зеркало сегодня помогает миновать региональные блокировки и продолжать времяпрепровождение.
Главные выгоды задействования зеркал:
– Абсолютный переход к собственному кабинету
– Удержание совокупных информации профиля
– Схожий ассортимент игр
– Свежие поощрения и предложения
Оформление на ресурсе
Процесс регистрации требует пару минут. Новые геймеры получают великодушный подарок за создание счёта, который в состоянии содержать:
– Стартовый денежный подарок
– Безвозмездные фриспины для автоматов
– Особые ваучеры
– Повышенный кешбэк
Ради завершения регистрации требуется:
1. Перейти на главный веб-сайт или дубликат
2. Щёлкнуть элемент «Оформиться»
3. Указать контактные сведения
4. Подтвердить почтовый адрес или контакт
5. Использовать купон (в случае присутствии)
Подключение в собственный кабинет
По завершении корректной записи игроки в состоянии совершать вход посредством официальный сайт или действующее зеркало. Индивидуальный кабинет обеспечивает всесторонний надзор над профилем:
– Журнал ставок
– Ввод кошелька
– Вывод выигрышей
– Администрирование привилегиями
– Включение в соревнованиях
Бонусы и промо казино
Сайт радует клиентов вариативными поощрительными системами:
Приветственные подарки
Новые игроки зарабатывают богатый букет привилегий на начальные взносы. Обычно это предполагает долевую надбавку к величине взноса плюс бесплатные вращения.
Периодические кампании
– Каждонедельный кэшбек до 15%
– Конкурсы с наградными пулами
– Поощрения на годовщину рождения
– Уникальные акции для привилегированных пользователей
Программа поощрения
Деятельные игроки собирают очки, они разрешено конвертировать на действительные призы или особые преимущества.
Портативная редакция и приложение
Современные разработки дают возможность участвовать в любом месте подходяще. Портативная версия ресурса самостоятельно настраивается под дисплей произвольного аппарата.
Достоинства карманного программы:
– Моментальная загрузка развлечений
– Практичный облик
– Мгновенные-уведомления о промо
– Шанс инсталлировать для Android и iOS
Настоящее казино: обстановка подлинного азартного заведения
Секция Live казино транспортирует геймеров в обстановку настоящего гемблинг клуба. Опытные дилеры управляют процесс в формате настоящего времени.
Имеющиеся варианты:
– Европейская рулетка
– Очко
– Классика
– Покер
Барабаны и гемблинг слоты
Ассортимент развлекательных аппаратов охватывает тысячи наименований от передовых провайдеров. Каждый геймер обнаружит слот по желанию:
– Винтажные автоматы
– Новые слоты с дополнительными этапами
– Накопительный-машины
– Мегавейс игры
Конкурсы и розыгрыши
Периодические состязания добавляют драйв и дают способность выиграть крупные призы. Включение в соревнованиях часто комплиментарное, а наградные пулы насчитывают крупных величин.
Защита и анонимность
Ресурс эксплуатирует актуальные методы кодирования для охраны реквизитов клиентов. Совокупные транзакционные транзакции выполняются через защищённые каналы.
Вывод
Официальный сайт и его рабочие зеркала обеспечивают стабильный подключение к превосходным азартным играм. Привлекательные награды, комфортная карманная вариант, вариативность автоматов и высококлассное Live-заведение формируют ресурс замечательным вариантом для поклонников гемблинг автоматов.
Вход к сайту через проверенные зеркала
Передовые онлайн казино обеспечивают пользователям круглосуточный вход к развлечениям. Главный веб-сайт http://www.guan.xmluzhan.com/index.php/2026/03/02/v-2026-godu-v-onlayn-kazino-190-mozhno-budet-rasplatitsya-s-pomoshchyu-karty работает бесперебойно, обеспечивая большой спектр развлекательных игр. Но периодически формируются системные препятствия или блокировки, следовательно существенно понимать о присутствии рабочих зеркал.
Что является из себя центральное зеркало казино
Зеркало — это точная копия главного портала с таким же возможностями. Актуальное зеркало на данный момент помогает миновать территориальные барьеры и поддерживать времяпрепровождение.
Принципиальные плюсы эксплуатации зеркал:
– Безграничный доступ к личному кабинету
– Поддержание каждых данных профиля
– Схожий перечень слотов
– Актуальные бонусы и кампании
Создание аккаунта на ресурсе
Процесс регистрации отнимает несколько минут. Новые пользователи приобретают великодушный поощрение за регистрацию, который может вмещать:
– Стартовый денежный кредит
– Даровые спины для слотов
– Эксклюзивные ваучеры
– Увеличенный кэшбек
Для окончания оформления нужно:
1. Войти на центральный веб-сайт или дубликат
2. Нажать элемент «Зарегистрироваться»
3. Ввести контактные информацию
4. Заверить электронную почту или контакт
5. Активировать код (когда имеется существовании)
Вход в индивидуальный кабинет
По завершении успешной записи геймеры имеют возможность осуществлять подключение используя официальный сайт или функционирующее зеркало. Личный кабинет предоставляет абсолютный регулирование над аккаунтом:
– Архив игр
– Ввод счёта
– Снятие средств
– Управление бонусами
– Вовлечение в соревнованиях
Привилегии и предложения казино
Платформа балует клиентов различными бонусными программами:
Стартовые бонусы
Новички обретают внушительный набор привилегий на стартовые депозиты. Обычно это охватывает пропорциональную прибавку к величине взноса плюс даровые фриспины.
Систематические кампании
– Еженедельный кешбэк до 15%
– Соревнования с выигрышными пулами
– Призы на дату рождения
– Эксклюзивные программы для привилегированных игроков
Схема поощрения
Постоянные геймеры зарабатывают очки, они возможно превратить на действительные призы или специальные привилегии.
Мобильная версия и утилита
Актуальные разработки обеспечивают геймить всюду угодно. Портативная форма портала самостоятельно адаптируется под размер любого аппарата.
Выгоды смартфонного софта:
– Оперативная подгрузка игр
– Практичный интерфейс
– Мгновенные-нотификации о бонусах
– Возможность загрузить для Android и iOS
Настоящее казино: среда истинного развлекательного клуба
Категория Live казино переносит игроков в среду подлинного развлекательного учреждения. Опытные крупье ведут развлечение в формате настоящего времени.
Представленные столы:
– Рулетка
– Карточная игра
– Punto Banco
– Карты
Игровые машины и гемблинг аппараты
Собрание азартных автоматов насчитывает множество вариантов от топовых провайдеров. Всякий пользователь обнаружит развлечение по вкусу:
– Традиционные барабаны
– Инновационные игры с специальными раундами
– Прогрессивный-игры
– Megaways слоты
Состязания и акции
Регулярные турниры вносят остроту и открывают шанс заработать большие суммы. Включение в соревнованиях зачастую даровое, а выигрышные фонды доходят до крупных величин.
Безопасность и анонимность
Сайт использует современные системы кодирования для защиты сведений геймеров. Каждые транзакционные действия осуществляются через защищённые каналы.
Итог
Основной портал и его рабочие зеркала предоставляют стабильный переход к превосходным гемблинг играм. Богатые поощрения, удобная портативная форма, многообразие слотов и квалифицированное Live-клуб формируют ресурс превосходным вариантом для поклонников развлекательных развлечений.
казино кинг официальный Когда искал king casino, увидел что ссылки обновляются регулярно.
Нынешние онлайн-казино обеспечивают клиентам множество опций для беспроблемной игры. Центральный портал РёРіСЂС‹ РРЅРѕРјРѕ казино предоставляет возможность ко всем возможностям и азартным играм. Однако при образовании системных трудностей на помощь спешат действующие дубликаты.
Что представляет собой рабочее зеркало
Дубликат казино — это идентичная дубликат официального сайта, расположенная по другому адресу. Подлинное зеркало поддерживает все функции, вместе с регистрацию, вход в личный кабинет, поощрения и промокоды.
Альтернативный сайт на сегодня обеспечивает:
– Стабильный путь к развлекательным машинам
– Совершенную конфиденциальность личных информации
– Сохранение средств и хронологии транзакций
– Доступность всех акций
Создание учетной записи на официальном портале
Процесс оформления учетной записи отнимает несколько минут. Новоиспеченным геймерам требуется:
1. Войти на официальный портал или действующее зеркало
2. Выбрать кнопку «Зарегистрироваться»
3. Внести требуемые графы
4. Верифицировать электронную почту
5. Ввести промокод при существовании
После финиша создания аккаунта пользователи обретают подарок за регистрацию, который может охватывать бесплатные вращения или денежное вознаграждение.
Авторизация в персональный кабинет
Личный кабинет открывает комплексный надзор над игровым действом. Через персональный аккаунт допускается:
– Вносить средства на счет
– Получать выплаты
– Задействовать промокоды
– Контролировать журнал пари
– Участвовать в турнирах
– Получать возврат средств
Анализ вознаграждений и промо-предложений
Великодушная поощрительная схема — важное преимущество ресурса. Основные виды бонусов:
Приветственный подарок
Дебютанты обретают щедрое поощрение на начальные депозиты. Размер премии может достигать 100-200% от размера взноса.
Бонусные спины
Даровые вращения даются для известных машин. Сумма фриспинов разнится от 10 до 500 штук.
Кэшбек
Постоянный или ежемесячный откат процента потерянных денег. Стандартный процент кэшбека — 5-15%.
Турниры
Периодические конкурсы с большими наградными фондами. Конкурсанты борются за верхние места в таблице лидеров.
Мобильная версия и программа
Смартфонная версия дает возможность делать ставки с всякого аппарата. Клиенты могут загрузить программу для iOS и Android или применять браузерную версию.
Преимущества смартфонного приложения:
– Скоростная подзагрузка автоматов
– Практичный интерфейс
– Push-уведомления о акциях
– Доступ через отпечаток пальца
Машины и Live казино
Развлекательная коллекция включает множество наименований от лидирующих производителей.
Популярные типы игр:
– Классические машины
– Видео-автоматы с призовыми этапами
– Джекпот слоты
– Megaways автоматы
Live казино
Раздел live игорный зал предоставляет развлечение с профессиональными ведущими. Есть классические игры:
– Рулетка
– Двадцать одно
– Baccarat
– Карибский покер
Как отыскать действующее зеркало
Обрести актуальную линк на зеркало разрешается разными вариантами:
1. Зарегистрироваться на email-рассылку
2. Наблюдать за апдейтами в соц сетях
3. Контактировать в сервис поддержки
4. Добавить в закладки рабочее зеркало в фавориты
Заключение
Лицензионный портал и его действующие альтернативные адреса предоставляют стабильный вход к игровым играм. Великодушные премии, многочисленные бонусные коды, удобное смартфонное приложение и отличная служба поддержки создают игровой опыт в высшей степени удобным и конфиденциальным.
https://mostbetpl.top/# mostbet güncel adres
https://mostbetpl.top/# mostbet giriş
buy ed pills uk
1win xətt http://1win82430.help/
Подключение к порталу через действующие зеркала
Нынешние виртуальные казино обеспечивают пользователям непрерывный вход к услугам. Центральный сайт ДжиВиСпин казино действует устойчиво, предлагая широкий набор гемблинг развлечений. Однако периодически возникают системные сложности или запреты, следовательно критично понимать о наличии действующих зеркал.
Что означает из себя главное зеркало казино
Дубликат — это абсолютная версия официального сайта с таким же набором функций. Рабочее зеркало в настоящее время обеспечивает миновать местные запреты и возобновлять времяпрепровождение.
Принципиальные плюсы использования зеркал:
– Стопроцентный переход к персональному кабинету
– Удержание любых показателей профиля
– Аналогичный перечень игр
– Текущие привилегии и кампании
Регистрация на платформе
Механизм регистрации требует пару минут. Начинающие клиенты получают привлекательный бонус за запись, он может охватывать:
– Стартовый игровой подарок
– Бесплатные фриспины для игр
– Особые купоны
– Расширенный кэшбек
Во имя окончания создания аккаунта требуется:
1. Войти на центральный портал или копию
2. Щёлкнуть кнопку «Регистрация»
3. Написать персональные данные
4. Заверить мейл или номер
5. Задействовать ваучер (когда имеется наличии)
Подключение в индивидуальный кабинет
После успешной создания аккаунта клиенты имеют возможность осуществлять авторизацию используя основной веб-сайт или функционирующее зеркало. Индивидуальный кабинет предоставляет абсолютный управление над аккаунтом:
– Архив ставок
– Внесение баланса
– Снятие средств
– Регулирование бонусами
– Вовлечение в турнирах
Привилегии и промо казино
Сайт радует клиентов вариативными привилегированными программами:
Вступительные бонусы
Дебютанты обретают щедрый комплект наград на стартовые взносы. Обычно это содержит долевую надбавку к размеру взноса плюс безвозмездные кручения.
Периодические кампании
– Раз в неделю кэшбек до 15%
– Соревнования с наградными пулами
– Поощрения на число рождения
– Уникальные промо для статусных пользователей
Программа поощрения
Постоянные геймеры собирают пункты, что разрешено конвертировать на реальные финансы или специальные преимущества.
Карманная форма и утилита
Передовые технологии обеспечивают геймить в любом месте подходяще. Смартфонная форма ресурса независимо приспосабливается под дисплей любого гаджета.
Плюсы портативного софта:
– Скоростная подгрузка развлечений
– Практичный дизайн
– Моментальные-нотификации о промо
– Возможность инсталлировать для Android и iOS
Реальное казино: обстановка подлинного гемблинг дома
Категория Live заведения погружает клиентов в антураж реального игорного дома. Опытные ведущие ведут развлечение в виде настоящего времени.
Предлагаемые развлечения:
– Европейская рулетка
– Карточная игра
– Баккара
– Покер
Игровые машины и гемблинг аппараты
Собрание развлекательных аппаратов включает сотни вариантов от передовых студий. Каждый пользователь отыщет развлечение по желанию:
– Традиционные машины
– Инновационные игры с дополнительными турами
– Накопительный-машины
– Мегавейс игры
Конкурсы и розыгрыши
Систематические турниры включают драйв и дают возможность выиграть крупные награды. Присутствие в конкурсах зачастую комплиментарное, а наградные фонды насчитывают больших размеров.
Защита и конфиденциальность
Портал задействует инновационные методы защиты для обеспечения сведений пользователей. Совокупные транзакционные действия совершаются через зашифрованные каналы.
Резюме
Официальный сайт и его действующие зеркала обеспечивают безопасный подключение к первоклассным азартным играм. Привлекательные награды, комфортная карманная вариант, богатство автоматов и квалифицированное Live-заведение формируют сайт замечательным опцией для любителей гемблинг автоматов.
Доступ к ресурсу и действующие ссылки
Актуальные сетевые казино предоставляют участникам огромный ассортимент игр. Основной портал 888 казино предоставляет безопасный вход ко всем возможностям. Тем не менее порой возникают случаи, когда необходимо дополнительный метод входа.
Что представляет собой функционирующее зеркало
Действующее зеркало — это полная версия легального портала с иным доменным названием. Альтернатива сегодня обеспечивает избегать вероятные ограничения и обеспечивать постоянный вход к предпочитаемым развлечениям.
Легальное зеркало обладает полными функциями, что и главный портал:
– Целый каталог автоматов
– Индивидуальный раздел с зафиксированными информацией
– Действующие бонусы и предложения
– Защищенные платежные транзакции
Создание аккаунта и вход в платформу
Процесс создания профиля на ресурсе занимает пару мгновений. Недавним клиентам требуется:
1. Открыть на актуальное зеркало в настоящее время
2. Щелкнуть клавишу «Зарегистрироваться»
3. Ввести нужные параметры
4. Верифицировать почтовую почту или контакт смартфона
5. Активировать бонус за создание профиля
Доступ в личный кабинет производится посредством предоставление имени пользователя и ключа.
Анализ наградной политики
Щедрая бонусная программа — главное достоинство платформы. Участники зарабатывают всевозможные поощрения:
Вступительные поощрения
Новые пользователи могут надеяться на привлекательный подарок за регистрацию. Традиционно это набор возможностей, включающий:
– Пропорциональную добавку к дебютному депозиту
– Безвозмездные фриспины
– Дополнительные финансы на баланс
Купоны и особые акции
Постоянные купоны обеспечивают активировать экстра выгоды. Использовать их разрешено в специальном меню персонального профиля.
Free spins и возврат средств
Даровые вращения — это вариант крутить автоматы без задействования личных сумм. Рибейт подразумевает определенный компенсацию утраченных средств.
Ассортимент игр
Азартная ресурс предоставляет огромную библиотеку развлечений.
Слоты
Многообразие слотов восхищает ожидания. Доступны стандартные трехбарабанные автоматы и актуальные видеослоты с занимательной картинкой.
Live заведение
Зона Live казино погружает клиентов в среду реального развлекательного зала. Квалифицированные ведущие проводят игры в живом эфире.
Соревнования и доски почета
Постоянные конкурсы вносят накала и обеспечивают шанс забрать внушительные выигрыши.
Мобильная вариант и программа
Новые разработки помогают играть в удобном месте. Адаптивная версия автономно подстраивается под размер гаджета.
Получить программу можно для программных систем iOS и Android. Приложение гарантирует:
– Быстрый запуск
– Надежную функционирование
– Мгновенные-уведомления об бонусах
– Комфортный облик
Денежные операции
Сайт работает с разнообразные варианты внесения и изъятия денег:
– Платежные системы
– Цифровые сервисы
– Токены
– Прямые транзакции
Всевозможные действия реализуются через защищенное канал, что гарантирует целостность приватных данных.
Служба ассистанса
Опытная бригада помощи работает всегда. Контактировать с консультантами разрешено через:
– Интерактивный-чат
– Почтовую почту
– Контакт
– Социальные платформы
Выводы
Основной сайт и его действующее зеркало гарантируют пользователям безопасный и приятный вход к увлекательным занятиям. Богатые награды, большой ассортимент игр и отличная сервис делают игру предельно интересной и прибыльной.
https://moskva.kamrbb.ru/?x=read&razdel=0&tema=198&start=0#new
https://guryevsk.forum24.ru/?1-3-0-00000762-000-0-0-1771416056
mostbet resmi mostbet
click for insight – Focusing less on overanalyzing enables faster and easier results.
Howdy excellent blog! Does running a blog similar to this
take a great deal of work? I have virtually no
knowledge of programming but I was hoping to start my own blog soon. Anyway,
if you have any recommendations or tips for new blog owners please share.
I know this is off subject however I simply had to ask. Kudos!
Передовые онлайн-казино предоставляют игрокам широкий спектр слотов и выгодные поощрения. Однако для удобной игры необходимо осознавать, как получить доступ к Клубника и его функционирующие зеркала.
Что такое основной портал казино
Главный веб-сайт казино — это первичная площадка, где клиенты могут получать удовольствие от гемблинг слотами. Платформа оперирует на законных принципах и имеет всеми обязательными разрешениями.
Первостепенные выгоды главного сайта:
– Надежность индивидуальных данных
– Справедливые правила участия
– Стабильные платежи
– Компетентная техподдержка
Функционирующее зеркало казино: для чего требуется
Копия сайта — это идентичная копия главного веб-сайта, расположенная по другому адресу. Рабочее зеркало разрабатывается для предоставления непрерывного доступа к порталу.
Основания эксплуатации альтернативных адресов:
– Недоступность главного домена
– Профилактические операции
– Повышенная посещаемость на систему
Как отыскать действующее зеркало сегодня
Получить новое рабочее зеркало можно разными вариантами:
1. Почтовые оповещения — зарегистрируйтесь на информационную отправку
2. Департамент support — проконсультируйтесь в онлайн-чат
3. Публичные сети — мониторьте за публикациями
4. Специализированные площадки — авторитетные ресурсы
Создание аккаунта на сайте казино
Алгоритм открытия счета составляет всего несколько мгновений:
1. Кликните на клавишу “Регистрация”
2. Введите обязательные поля
3. Верифицируйте электронную ящик
4. Используйте промокод, если имеется
Вслед за успешной активации вам предоставится доступен личный профиль.
Поощрения и промокоды
Богатая бонусная структура — существенное плюс казино:
Подарок за открытие счета
Первичные игроки обретают первый презент, который может предполагать:
– Валютный бонус на первый взнос
– Фри-спины для автоматов
– Стартовые деньги
Активационные коды
Систематически выходят актуальные бонусные шифры, предоставляющие активировать специальные поощрения.
Механизм возврата средств
Активные пользователи зарабатывают порцию проигранных средств на счет.
Действующие промо и состязания
Платформа постоянно устраивает интересные промо-мероприятия:
– Еженедельные баттлы
– Праздничные акции
– Конкурсы крупных подарков
– Программа статусов
Доступ в персональный кабинет
Для входа на платформу требуется:
1. Перейти на официальный адрес или функционирующее зеркало
2. Активировать “Авторизация”
3. Указать имя пользователя и секретную комбинацию
В персональном профиле разрешены следующие опции:
– Внесение средств баланса
– Обналичивание денег
– Анализ истории операций
– Изменение индивидуальными настройками
Адаптивная модификация и софт
Мобильная вариант
Адаптивная модификация ресурса предоставляет шанс развлекаться с разных карманного телефона. Интерфейс автоматически подстраивается под формат монитора.
Клиент для скачивания
Установить app можно для:
– Android — прямая скачивание с платформы
– iOS — загрузка через App Store
Выгоды app:
– Мгновенный доступ
– Надежная операционность
– Push-сообщения об бонусах
– Улучшенный функционал
Игровые категории
Барабаны
Разнообразная библиотека эмуляторных барабанов от лучших разработчиков:
– Стандартные автоматы
– Видео-эмуляторы
– Призовые-автоматы
Live казино
Категория с настоящими операторами предлагает:
– Рулетка
– Blackjack
– Мини-баккара
– Покер
Стримы ведутся в отличном формате, формируя эффект подлинного казино.
Методы внесения средств и получения
Платформа принимает разные транзакционные сервисы:
– Банковские картсчета
– Виртуальные кошельки
– Bitcoin/Ethereum
– Прямые переводы
Базовые лимиты депозита и моментальные выплаты гарантируют процесс максимально приятной.
Команда техподдержки
Квалифицированная команда помощи функционирует 24/7 и способна содействовать с разными проблемами:
– Живой-чат
– Email-переписка
– Голосовая горячая линия
Выводы
Лицензионный портал казино и его рабочие копии гарантируют участникам надежный и азартный азартный опыт. Выгодные подарки, удобная адаптивная модификация, богатые развлечения и высокоуровневое live-казино формируют эту систему великолепным выбором для развлекательных развлечений.
Передовые онлайн-казино предоставляют игрокам богатый ассортимент игр и привлекательные бонусы. Впрочем для комфортной игры необходимо иметь представление, как обнаружить http://www.metasninjas.dimfarnese.com.br и его актуальные зеркала.
Что такое лицензионный веб-ресурс казино
Официальный ресурс казино — это главная площадка, где пользователи могут наслаждаться азартными развлечениями. Сайт функционирует на легитимных принципах и владеет всеми необходимыми разрешениями.
Основные преимущества основного портала:
– Конфиденциальность персональных данных
– Объективные правила использования
– Обеспеченные выводы
– Компетентная служба поддержки
Функционирующее зеркало казино: для чего необходимо
Копия сайта — это абсолютная копия главного веб-сайта, находящаяся по другому адресу. Рабочее зеркало формируется для поддержания стабильного соединения к платформе.
Основания эксплуатации копий сайта:
– Недоступность основного адреса
– Плановые работы
– Значительная посещаемость на ресурс
Как отыскать актуальное зеркало на сегодня
Обнаружить новое рабочее зеркало можно разными вариантами:
1. Email-уведомления — активируйте уведомления на email рассылку
2. Служба support — проконсультируйтесь в онлайн-чат
3. Официальные сети — отслеживайте за обновлениями
4. Игровые площадки — достоверные ресурсы
Оформление профиля на сайте казино
Алгоритм открытия счета занимает буквально несколько моментов:
1. Нажмите на элемент “Зарегистрироваться”
2. Внесите обязательные информацию
3. Верифицируйте email e-mail
4. Примените код активации, если есть
По завершении оконченной регистрации вам будет возможен персональный аккаунт.
Награды и коды активации
Привлекательная поощрительная система — значимое преимущество казино:
Бонус за создание аккаунта
Новые клиенты приобретают стартовый презент, который может предполагать:
– Денежный депозит на первый депозит
– Free spins для игровых машин
– Приветственные бонусы
Бонусные коды
Систематически выходят свежие коды, предоставляющие использовать специальные поощрения.
Механизм возврата средств
Активные клиенты приобретают процент утраченных денег на счет.
Текущие кампании и конкурсы
Казино периодически организует интересные кампании:
– Weekly баттлы
– Праздничные акции
– Раздачи значительных наград
– Система лояльности
Вход в личный аккаунт
Для авторизации на сайт требуется:
1. Открыть главный портал или действующее зеркало
2. Кликнуть “Авторизация”
3. Прописать никнейм и код доступа
В индивидуальном профиле предоставлены следующие инструменты:
– Внесение средств депозита
– Вывод призов
– Изучение истории транзакций
– Изменение личными сведениями
Mobile версия и приложение
Mobile версия
Responsive платформа веб-сайта дает возможность участвовать с любого карманного девайса. Визуал автоматически адаптируется под габариты screen.
App для скачивания
Скачать app можно для:
– Android — официальная download с ресурса
– iOS — инсталляция через App Store
Плюсы приложения:
– Мгновенный запуск
– Надежная работа
– Push-сообщения об промо
– Оптимизированный UI
Игровые разделы
Автоматы
Внушительная галерея развлекательных слотов от лучших производителей:
– Традиционные игры
– Видео-автоматы
– Джекпот-игры
Live игры
Категория с живыми дилерами дает:
– Рулетки
– Blackjack
– Баккара
– Poker
Трансляции проводятся в отличном формате, формируя впечатление реального казино.
Системы пополнения и снятия
Сайт работает с различные транзакционные методы:
– Кредитные карты
– Онлайн платежи
– Криптовалюты
– Прямые транзакции
Наименьшие лимиты пополнения и скоростные выплаты создают процесс максимально приятной.
Департамент support
Квалифицированная группа помощи функционирует 24/7 и готова поддержать с всеми вопросами:
– Мгновенный-чат
– Email-консультации
– Звонковая связь
Резюме
Главный ресурс казино и его действующие копии дают игрокам защищенный и интересный гемблинг процесс. Богатые поощрения, простая адаптивная модификация, многочисленные развлечения и качественное live-казино делают эту ресурс великолепным решением для гемблинг времяпрепровождения.
For assistance
methotrexate price
for downloadable content.
1xbet 1xbet .
Передовые онлайн казино обеспечивают игрокам широкий выбор вариантов для приятной игры. Но иногда доступ к базовому порталу может оказаться ограниченным. В таких ситуациях на поддержку приходят Mad, которое дает бесперебойный вход ко всем опциям платформы.
Что такое рабочее зеркало казино
Альтернативный сайт — это полная дубликат основного сайта, которая хостится по дополнительному адресу. Дубликат имеет весь инструментарий первоначального ресурса, включая персональный кабинет, баланс и запись платежей.
Основные достоинства эксплуатации зеркала:
– Круглосуточный доступ к платформе
– Максимальная идентичность функционала
– Конфиденциальность личных данных
– Сохранение всех бонусов
Как найти рабочее зеркало на текущий день
Есть некоторое количество проверенных вариантов нахождения текущей URL:
Авторизованные каналы:
1. Почтовая рассылка — администрация постоянно высылает уведомления с действующими URL
2. Социальные сети — авторизованные страницы публикуют текущую сведения
3. Отдел поддержки — операторы выдают надежные ссылки
4. Смартфонное приложение — обеспечивает преодолевать блокировки
Открытие счета на главном ресурсе
Этап регистрации требует не более несколько минут и содержит из таких шагов:
1. Переход на лицензионный портал или рабочее зеркало
2. Клик на кнопку «Регистрация»
3. Заполнение персональной формы
4. Проверка почтовой почты или телефонного номера
5. Задействование бонуса за регистрацию при существовании промокода
Новые клиенты получают щедрый приветственный подарок, который может предполагать даровые прокруты, монетарные поощрения или кэшбек.
Доступ в персональный кабинет
Авторизация на платформе производится традиционным путем. Необходимо ввести никнейм и код доступа, использованные при открытии счета.
Важные детали для конфиденциального входа:
– Используйте сложный секретный ключ
– Запустите двухэтапную верификацию
– Не фиксируйте реквизиты на общественных устройствах
– Отслеживайте интернет строку браузера
Описание поощрительной структуры
Казино балует геймеров разнообразными поощрениями и промо:
Стартовый букет
Начинающие имеют возможность полагаться на щедрое поощрение за начальный вклад. Как правило это процентовая добавка к переведенной величине плюс бесплатные вращения для топовых слотов.
Регулярные кампании
– Еженедельный компенсация — возврат части списанных средств
– Поощрения на повторные пополнения
– Особые офферы по событиям
– Конкурсы с солидными призовыми пулами
Схема лояльности
Активные клиенты собирают очки за любую ставку, которые затем конвертируются на действительные деньги, фриспины или эксклюзивные преимущества.
Бонус-коды: как использовать
Кодовые комбинации — это уникальные сочетания литер, предоставляющие право к бонусным вознаграждениям.
В каких местах взять рабочие промокоды:
– Легитимные медийные сети казино
– Партнерские ресурсы
– Email-новостная лента
– Отраслевые форумы
Указывается промокод в отдельное поле при регистрации или добавлении денег депозита.
Смартфонная версия и приложение
Передовые геймеры предпочитают проводить время с портативных девайсов. Платформа дает пару способа для удобной мобильной игры.
Адаптивная редакция
Онлайн версия самостоятельно адаптируется под габариты экранной панели. Не требует установки и оперирует в всяком современном браузере.
Смартфонное приложение
Скачать программу можно для устройств на Android и iOS. Преимущества app:
– Скоростная активация
– Стабильная работа
– Push-уведомления о акциях
– Независимый преодоление блокировок
Операция инсталляции легок: нужно перейти на веб-сайт с мобильного девайса и следовать руководству.
Азартный коллекция
Коллекция развлечений насчитывает несколько тысяч вариантов от топовых поставщиков.
Слоты
Развлекательные машины — максимально популярная раздел аттракционов. Показаны традиционные 3-барабанные машины, актуальные графические аппараты с бонусными уровнями, а также джекпотные джекпоты.
Live казино
Отдел с реальными ведущими предоставляет ощутить дух истинного казино. Представлены игры с покером.
Передача осуществляется в HD разрешении, имеется коммуникация с ведущим и прочими пользователями.
Конкурсы
Регулярно организуются конкурсы по разным дисциплинам. Вступление предоставляет право завоевать финансовые награды, free spins или эксклюзивные презенты.
Денежные манипуляции
Ресурс предлагает обширный спектр платежных систем:
– Кредитные карты
– Виртуальные кошельки
– Биткоин
– Банковские переводы
Минимальная объем пополнения — приемлемая для основной части геймеров. Обналичивание выигрышей обрабатывается в кратчайшие временные рамки.
Отдел поддержки
Опытные консультанты способны оказать помощь 24/7. Имеются данные каналы общения:
– Веб-чат
– Email
– Телефонная связь
– Общественные сети
Решения на стандартные вопросы можно найти в секции FAQ.
Вывод
Официальный веб-сайт казино и его актуальные зеркала обеспечивают игрокам абсолютный путь ко всем возможностям ресурса. Великодушные поощрения, приятная мобильная версия, гигантский каталог аттракционов и компетентная ассистенция делают азартный процесс исключительно комфортным и надежным.
I recently tested this casino https://yaari.co.in/spin-million-platform-your-personal-leading/ and was impressed by how stable everything felt. The games run fast, bonuses are clear, and navigation is user-friendly, making the experience comfortable.
ебет на йоге ебет на йоге .
Переход к сайту и актуальные ссылки
Актуальные виртуальные казино гарантируют участникам большой набор развлечений. Основной веб-сайт casino Gama гарантирует стабильный подключение ко всем сервисам. Тем не менее иногда появляются обстоятельства, когда нужно запасной путь авторизации.
Что означает собой актуальное зеркало
Актуальное зеркало — это абсолютная копия основного веб-сайта с запасным доменным именем. Зеркало сегодня обеспечивает преодолевать существующие запреты и гарантировать стабильный доступ к выбранным слотам.
Официальное зеркало содержит полными характеристиками, что и базовый портал:
– Весь перечень игр
– Индивидуальный профиль с зафиксированными параметрами
– Все поощрения и предложения
– Безопасные платежные операции
Открытие профиля и вход в сервис
Этап создания профиля на ресурсе занимает буквально минут. Недавним игрокам следует:
1. Открыть на действующее зеркало сегодня
2. Нажать элемент «Зарегистрироваться»
3. Указать требуемые сведения
4. Верифицировать e-mail почту или контакт телефона
5. Использовать подарок за регистрацию
Подключение в персональный профиль производится путем ввод логина и секретной комбинации.
Описание наградной структуры
Щедрая наградная система — главное козырь ресурса. Участники получают различные подарки:
Вступительные бонусы
Недавние пользователи вправе претендовать на значительный поощрение за открытие профиля. Чаще всего это пакет возможностей, охватывающий:
– Процентную добавку к дебютному пополнению
– Бесплатные кручения
– Extra деньги на баланс
Купоны и эксклюзивные предложения
Регулярные коды помогают обретать призовые льготы. Применить их возможно в особом окне индивидуального раздела.
Фриспины и кэшбек
Даровые вращения — это шанс крутить автоматы без задействования персональных средств. Компенсация означает частичный возврат проигранных денег.
Ассортимент развлечений
Гемблинг площадка предоставляет огромную базу автоматов.
Видеослоты
Ассортимент аппаратов впечатляет представление. Есть традиционные ретро аппараты и актуальные автоматы с увлекательной графикой.
Live заведение
Зона Live заведения переносит игроков в обстановку истинного развлекательного зала. Умелые дилеры ведут раунды в реальном эфире.
Конкурсы и лидерборды
Регулярные соревнования привносят остроты и обеспечивают перспективу получить внушительные выигрыши.
Мобильная форма и софт
Новые инновации обеспечивают участвовать в любом пространстве. Адаптивная форма автоматически адаптируется под дисплей девайса.
Установить клиент можно для программных систем iOS и Android. Клиент гарантирует:
– Мгновенный переход
– Бесперебойную работу
– Моментальные-сообщения об предложениях
– Комфортный вид
Финансовые операции
Казино использует различные методы пополнения и снятия сумм:
– Банковские карты
– Электронные кошельки
– Крипто
– Финансовые переводы
Все переводы проходят через безопасное протокол, что обеспечивает сохранность личных сведений.
Сервис помощи
Компетентная группа поддержки трудится всегда. Контактировать с менеджерами возможно через:
– Живой-чат
– Цифровую почту
– Связь
– Общественные сети
Итоги
Официальный портал и его функционирующее зеркало дают пользователям защищенный и комфортный вход к захватывающим играм. Привлекательные подарки, разнообразный ассортимент игр и отличная помощь делают участие исключительно интересной и прибыльной.
investigate this site gta san andreas apk download
гидроизоляция подвала гаража гидроизоляция подвала гаража .
http://www.soad.msk.ru/forum/viewtopic.php?p=162552#162552
read here – Following the right cues allows for clearer, more confident decisions.
Современные сетевые казино обеспечивают геймерам огромный ассортимент функций для комфортной игры. Тем не менее иногда доступ к базовому порталу может оказаться недоступным. В таких моментах на выручку приходят Чемпион казино казино, которое гарантирует стабильный путь ко всем возможностям платформы.
Что такое действующее зеркало казино
Копия — это идентичная реплика главного сайта, которая хостится по запасному домену. Дубликат содержит весь инструментарий оригинального ресурса, включая персональный кабинет, средства и запись переводов.
Главные плюсы эксплуатации зеркала:
– 24-часовой доступ к платформе
– Стопроцентная аналогичность инструментов
– Сохранность индивидуальных сведений
– Поддержка всех вознаграждений
Как обнаружить функционирующее зеркало сегодня
Есть несколько достоверных способов нахождения текущей ссылочной информации:
Проверенные сервисы:
1. Электронная рассылка — руководство постоянно отправляет уведомления с свежими доменами
2. Общественные сети — легитимные профили публикуют свежую информацию
3. Департамент поддержки — сотрудники выдают безопасные домены
4. Смартфонное приложение — предоставляет обходить блокировки
Создание аккаунта на официальном веб-сайте
Операция открытия счета требует всего пару минут и содержит из нижеследующих ступеней:
1. Вход на главный ресурс или рабочее зеркало
2. Выбор на кнопку «Зарегистрироваться»
3. Внесение пользовательской таблицы
4. Подтверждение почтовой почты или мобильного номера
5. Включение поощрения за регистрацию при доступности промокода
Начинающие клиенты приобретают значительный вступительный бонус, который может предполагать даровые прокруты, валютные бонусы или кэшбек.
Вход в индивидуальный кабинет
Авторизация на ресурсе осуществляется привычным методом. Необходимо ввести никнейм и кодовое слово, указанные при регистрации.
Ключевые нюансы для конфиденциального входа:
– Используйте защищенный секретный ключ
– Активируйте двойную проверку
– Не храните коды на общественных гаджетах
– Отслеживайте URL строку браузера
Анализ премиальной структуры
Игровая платформа одаривает геймеров различными поощрениями и акциями:
Приветственный набор
Дебютанты способны рассчитывать на щедрое награду за первый взнос. Как правило это процентная прибавка к переведенной сумме плюс даровые спины для топовых слотов.
Периодические предложения
– Еженедельный кэшбек — компенсирование доли проигранных средств
– Призы на повторные пополнения
– Уникальные акции по праздникам
– Турниры с значительными премиальными суммами
Система лояльности
Активные клиенты зарабатывают пункты за произвольную раунд, которые затем обмениваются на фактические денежные призы, фриспины или особые преимущества.
Промокоды: как активировать
Купоны — это особые последовательности букв и цифр, обеспечивающие возможность к дополнительным поощрениям.
Каким образом найти свежие промокоды:
– Авторизованные социальные сети казино
– Аффилиатные порталы
– Email-рассылка
– Профильные сообщества
Активируется промокод в предназначенное поле при создании аккаунта или добавлении денег счета.
Портативная версия и приложение
Нынешние клиенты предпочитают развлекаться с портативных устройств. Ресурс предлагает двойной метода для удобной смартфонной игры.
Отзывчивая вариант
Веб версия автоматически подстраивается под габариты монитора. Не нуждается инсталляции и действует в произвольном современном браузере.
Мобильное приложение
Загрузить софт можно для устройств на Android и iOS. Выгоды app:
– Оперативная открытие
– Стабильная действие
– Push-уведомления о акциях
– Самостоятельный обход блокировок
Операция инсталляции несложен: достаточно перейти на веб-сайт с портативного устройства и придерживаться руководству.
Гемблинг ассортимент
Каталог аппаратов содержит несколько тысяч единиц от лучших производителей.
Слоты
Развлекательные слоты — максимально популярная секция игр. Размещены стандартные трехбарабанные слоты, актуальные мультимедийные слоты с бонусными этапами, а также растущие выигрыши.
Live казино
Зона с живыми крупье предоставляет прочувствовать настроение истинного казино. Представлены варианты с баккарой.
Трансляция производится в HD четкости, имеется коммуникация с дилером и иными игроками.
Турниры
Систематически устраиваются соревнования по различным категориям. Включение позволяет выиграть финансовые награды, бесплатные вращения или уникальные поощрения.
Денежные процедуры
Платформа обеспечивает широкий набор расчетных методов:
– Кредитные карты
– Электронные сервисы
– Крипта
– Банковские платежи
Наименьшая величина взноса — посильная для большинства клиентов. Вывод выигрышей производится в короткие интервалы.
Департамент поддержки
Опытные консультанты способны содействовать непрерывно. Открыты данные методы контакта:
– Веб-чат
– Email
– Мобильная связь
– Медийные сети
Разъяснения на стандартные проблемы можно отыскать в блоке FAQ.
Вывод
Основной портал казино и его функционирующие зеркала обеспечивают игрокам максимальный доступ ко всем опциям ресурса. Значительные вознаграждения, практичная телефонная версия, колоссальный выбор развлечений и квалифицированная служба поддержки формируют развлекательный времяпрепровождение исключительно комфортным и конфиденциальным.
Характеристика основного ресурса
Прогрессивные виртуальные казино предоставляют клиентам широкий спектр услуг и опций. Лицензионный сайт казино Лев зеркало предлагает надежный доступ к гемблинг возможностям.
Рабочее зеркало: доступ сегодня
Альтернативный адрес выступает собой абсолютную копию основного сайта. Действующее зеркало позволяет пользователям преодолевать потенциальные барьеры.
Плюсы применения зеркала
Главные достоинства охватывают:
– Постоянный вход к порталу
– Хранение всех характеристик основного сайта
– Охрана конфиденциальных данных
– Равнозначный инструментарий
Открытие счета на ресурсе
Механизм оформления профиля знаменуется доступностью и эргономичностью. Новые участники обязаны:
1. Перейти на главный ресурс или его зеркало
2. Выбрать на кнопку создания аккаунта
3. Заполнить нужные поля
4. Подтвердить email почту
5. Совершить первый авторизацию
Бонус за регистрацию
Дебютанты получают солидный вступительный подарок. Это награда в состоянии предусматривать:
– Монетарные бонусы
– Complimentary вращения
– Усиленный показатель возврата
Логин в личный раздел
Зарегистрированные пользователи в состоянии мгновенно зайти в личный профиль, используя учетные данные и шифр. Собственный раздел дает шанс к:
– Администрированию балансом
– Записям операций
– Текущим подаркам
– Параметрам аккаунта
Призы и предложения
Платформа периодически проводит разнообразные промо-кампании для участников.
Виды призов
Главные категории поощрений:
– Финансовые начисления – доля от суммы внесения
– Бесплатные вращения – даровые вращения в слотах
– Возврат средств – возврат доли потерянных средств
– Конкурсные призы – премии за выступление в турнирах
Купоны
Особые купоны помогают активировать бонусные привилегии. Участники могут обнаружить их на тематических ресурсах или получить в рассылке.
Мобильная версия и приложение
Актуальные пользователи выбирают карманный гейминг.
Функции переносной платформы
– Responsive интерфейс для различных устройств
– Абсолютный вход к слотам
– Стремительная загрузка
– Эргономичное навигация
Установить софт
Портативное программа доступно для загрузки на гаджеты с базовыми системами Android и iOS. App дает:
– Стабильную функциональность
– Мгновенные оповещения о бонусах
– Моментальный вход к желанным играм
Гемблинг каталог
Казино предоставляет внушительную библиотеку игровых развлечений.
Слоты
Ассортимент развлекательных аппаратов включает:
– Классические автоматы
– Видео аппараты
– Джекпотные автоматы
– Тематические игры
Live казино
Раздел настоящих столов обеспечивает опцию участвовать с профессиональными диллерами. Доступны:
– Европейская рулетка
– Блек-джек
– Baccarat
– Карибский покер
Конкурсы
Регулярные турниры обеспечивают пользователям состязаться за солидные наградные суммы. Турнирная структура обновляется каждую неделю.
Финансовые действия
Портал предоставляет обилие методов депозита и обналичивания средств:
– Пластиковые карточки
– Виртуальные кошельки
– Wire транзакции
– Bitcoin
Абсолютно все транзакции производятся конфиденциально с использованием прогрессивных протоколов защиты.
Департамент сопровождения
Квалифицированная команда помощи действует без перерыва. Связаться с операторами можно через:
– Живой чат
– Email почту
– Горячую линию
– Социальные платформы
Защита и регулирование
Казино оперирует на базе официальной сертификата. Такое гарантирует:
– Честность азартного действа
– Безопасность персональных сведений
– Быстрые перечисления
– Ответственный игровой процесс
Итог
Основной портал и его актуальные резервные страницы гарантируют участникам абсолютный спектр функций для удобной и прибыльной досуга. Щедрые бонусы, многочисленные слоты, квалифицированная помощь и безопасная инфраструктура выплат создают портал оптимальным выбором для любителей развлекательных игр.
дизайн проект в санкт петербурге дизайн интерьера и ремонт
дизайн дома заказать дизайн проекты дома
дизайнеры интерьеров спб дизайна интерьера
ремонт дизайн интерьера заказать дизайн проект спб
http://guidecannabis.com/wp-content/pages/1xbet_code_d_inscription_promo.html
birxbet birxbet .
Обзор официального ресурса
Прогрессивные интернет казино обеспечивают пользователям широкий набор услуг и шансов. Основной портал Вован казино предоставляет надежный возможность к азартным сервисам.
Актуальное зеркало: вход на сегодня
Зеркало служит собой идентичную реплику лицензионного сайта. Проверенное зеркало помогает участникам преодолевать возможные ограничения.
Достоинства эксплуатации зеркала
Принципиальные достоинства предполагают:
– Постоянный доступ к порталу
– Сохранение всех возможностей основного веб-сайта
– Охрана личных данных
– Равнозначный набор функций
Регистрация на портале
Ход оформления профиля знаменуется легкостью и практичностью. Недавние пользователи обязаны:
1. Открыть главный ресурс или его зеркало
2. Выбрать на пункт открытия счета
3. Внести нужные поля
4. Валидировать почтовую почту
5. Выполнить первый доступ
Вознаграждение за создание аккаунта
Начинающие зарабатывают значительный вступительный презент. Это вознаграждение в состоянии включать:
– Монетарные начисления
– Безвозмездные фриспины
– Усиленный показатель возврата
Авторизация в персональный раздел
Действующие пользователи способны быстро получить доступ в личный кабинет, применяя имя пользователя и шифр. Индивидуальный кабинет дает доступ к:
– Администрированию депозитом
– Хронологии переводов
– Активным поощрениям
– Опциям профиля
Бонусы и промо
Ресурс регулярно проводит многочисленные промо-кампании для игроков.
Виды подарков
Ключевые категории вознаграждений:
– Финансовые призы – часть от размера взноса
– Бесплатные вращения – даровые прокруты в игровых машинах
– Кэшбэк – возмещение процента проигранных сумм
– Конкурсные вознаграждения – премии за участие в состязаниях
Ваучеры
Уникальные купоны дают возможность получить добавочные бонусы. Участники имеют возможность получить их на специализированных порталах или заработать в письмах.
Переносная версия и программа
Передовые игроки выбирают карманный геймплей.
Характеристики mobile адаптации
– Гибкий облик для разнообразных девайсов
– Целостный вход к слотам
– Быстрая загрузка
– Практичное управление
Скачать программу
Мобильное app открыто для скачивания на аппараты с базовыми ОС Android и iOS. Приложение обеспечивает:
– Бесперебойную работу
– Всплывающие алерты о предложениях
– Мгновенный доступ к избранным развлечениям
Игровой каталог
Казино дает обширную библиотеку азартных развлечений.
Автоматы
Библиотека азартных аппаратов включает:
– Стандартные автоматы
– Видео аппараты
– Накопительные автоматы
– Branded развлечения
Live игры
Раздел лайв дилеров предоставляет шанс соревноваться с профессиональными ведущими. Предложены:
– Американская рулетка
– Блэкджек
– Punto Banco
– Покер
Состязания
Постоянные конкурсы дают возможность игрокам соревноваться за внушительные финансовые пулы. Призовая сетка модифицируется регулярно.
Банковские операции
Портал предоставляет множество методов внесения и обналичивания средств:
– Пластиковые карточки
– Цифровые кошельки
– Прямые переводы
– Цифровые валюты
Абсолютно все платежи производятся конфиденциально с применением современных систем кодирования.
Служба помощи
Профессиональная команда саппорта функционирует круглосуточно. Обратиться с консультантами доступно через:
– Интерактивный чат
– Email почту
– Телефонную линию
– Социальные сети
Безопасность и регулирование
Казино действует на фундаменте легальной лицензии. Это подтверждает:
– Честность игрового процесса
– Защиту личных сведений
– Оперативные выплаты
– Контролируемый гемблинг
Резюме
Лицензионный ресурс и его актуальные зеркала гарантируют игрокам целостный ассортимент возможностей для приятной и прибыльной игры. Щедрые подарки, различные слоты, опытная поддержка и безопасная структура операций создают платформу лучшим решением для поклонников развлекательных забав.
Нынешние онлайн-казино гарантируют участникам обширный ассортимент слотов и щедрые бонусы. Однако для комфортной времяпрепровождения критично осознавать, как получить доступ к http://amritfood.com/kazino-v-internete-ukrainy-gde-mozhno-vnesti-dengi-cherez-sms и его функционирующие зеркала.
Что такое официальный портал казино
Лицензионный веб-сайт казино — это основная платформа, где пользователи могут получать удовольствие от гемблинг развлечениями. Портал оперирует на официальных правах и владеет всеми обязательными документами.
Главные выгоды основного веб-сайта:
– Безопасность персональных реквизитов
– Справедливые положения использования
– Обеспеченные выводы
– Квалифицированная техподдержка
Рабочее зеркало казино: для чего нужно
Копия сайта — это точная дубликат лицензионного ресурса, находящаяся по альтернативному URL. Функционирующее зеркало запускается для гарантирования бесперебойного входа к ресурсу.
Факторы задействования зеркал:
– Блокировка официального сайта
– Профилактические операции
– Большая активность на ресурс
Как обнаружить свежее зеркало в данный момент
Найти текущее действующее зеркало можно разными путями:
1. Подписка — активируйте уведомления на новостную отправку
2. Служба техподдержки — свяжитесь в онлайн-чат
3. Публичные каналы — мониторьте за новостями
4. Специализированные площадки — достоверные платформы
Создание аккаунта на ресурсе казино
Алгоритм регистрации требует только немного секунд:
1. Нажмите на клавишу “Регистрация”
2. Введите необходимые поля
3. Верифицируйте контактную адрес
4. Примените купон, если предоставлен
Вслед за оконченной регистрации вам станет разрешен индивидуальный раздел.
Бонусы и купоны
Привлекательная поощрительная система — значимое плюс казино:
Награда за первичную регистрацию
Новые клиенты обретают стартовый бонус, который может предполагать:
– Монетарный депозит на первый вклад
– Free spins для автоматов
– Бездепозитные фонды
Купоны
Регулярно размещаются эксклюзивные промокоды, обеспечивающие получить дополнительные бонусы.
Система кешбэка
Активные игроки возвращают порцию потраченных финансов обратно.
Актуальные акции и конкурсы
Казино систематически устраивает интересные кампании:
– Семидневные чемпионаты
– Специальные акции
– Розыгрыши значительных наград
– Механизм VIP-клуба
Доступ в личный раздел
Для логина на портал требуется:
1. Перейти на главный ресурс или рабочее зеркало
2. Активировать “Войти”
3. Прописать email и код доступа
В пользовательском профиле доступны нижеперечисленные возможности:
– Пополнение баланса
– Обналичивание призов
– Изучение журнала ставок
– Управление профильными сведениями
Мобильная платформа и софт
Mobile версия
Адаптивная версия веб-сайта дает возможность играть с различных мобильного телефона. Интерфейс самостоятельно адаптируется под диагональ монитора.
App для скачивания
Получить клиент можно для:
– Android — непосредственная установка с платформы
– iOS — скачивание через App Store
Плюсы мобильного клиента:
– Моментальный вход
– Стабильная операционность
– Push-сообщения об бонусах
– Улучшенный UI
Азартные разделы
Автоматы
Обширная галерея эмуляторных слотов от топовых производителей:
– Традиционные слоты
– Видео-эмуляторы
– Джекпот-машины
Live casino
Раздел с профессиональными крупье дает:
– Рулеточные столы
– Blackjack
– Баккара
– Texas Hold’em
Вещания транслируются в превосходном качестве, обеспечивая ощущение реального казино.
Варианты зачисления и вывода
Ресурс обслуживает разнообразные платежные инструменты:
– Платежные карты
– Виртуальные платежи
– Криптовалюты
– Финансовые отправки
Базовые пороги взноса и скоростные выводы обеспечивают развлечение крайне удобной.
Служба техподдержки
Профессиональная группа поддержки оперирует 24/7 и может поддержать с всеми проблемами:
– Онлайн-чат
– Email-консультации
– Голосовая горячая линия
Итоги
Основной веб-сайт казино и его действующие копии дают игрокам конфиденциальный и интересный азартный опыт. Щедрые бонусы, удобная mobile платформа, многочисленные слоты и превосходное live-казино формируют эту ресурс отличным выбором для развлекательных досуга.
ремонт бетонных конструкций стоимость ремонт бетонных конструкций стоимость .
Нынешние онлайн-казино гарантируют клиентам широкий ассортимент азартных игр и выгодные бонусы. Но для удобной работы критично понимать, как обнаружить Клубника казино казино и его актуальные зеркала.
Что такое основной сайт казино
Лицензионный веб-сайт казино — это основная веб-площадка, где пользователи могут развлекаться азартными автоматами. Ресурс функционирует на легитимных принципах и располагает всеми нужными разрешениями.
Основные выгоды основного сайта:
– Надежность персональных данных
– Честные требования игры
– Гарантированные платежи
– Компетентная техподдержка
Актуальное зеркало казино: для чего необходимо
Зеркало — это абсолютная версия лицензионного сайта, находящаяся по альтернативному URL. Актуальное зеркало создается для предоставления стабильного доступа к порталу.
Причины применения дублирующих ресурсов:
– Недоступность официального сайта
– Технические мероприятия
– Значительная активность на платформу
Как получить рабочее зеркало сейчас
Узнать свежее официальное зеркало можно различными вариантами:
1. Рассылка — подпишитесь на новостную отправку
2. Отдел техподдержки — проконсультируйтесь в онлайн-чат
3. Социальные каналы — следите за новостями
4. Тематические порталы — авторитетные сайты
Открытие счета на сайте казино
Этап открытия счета требует буквально считанные моментов:
1. Выберите на кнопку “Зарегистрироваться”
2. Укажите требуемые поля
3. Активируйте электронную адрес
4. Примените бонусный код, если есть
Сразу после успешной регистрации вам предоставится открыт личный аккаунт.
Награды и купоны
Выгодная премиальная структура — ключевое конкурентное преимущество казино:
Бонус за первичную регистрацию
Первичные игроки приобретают стартовый бонус, который может предполагать:
– Денежный кредит на первый пополнение
– Бесплатные вращения для игровых машин
– Бездепозитные бонусы
Бонусные коды
Регулярно размещаются свежие коды, обеспечивающие получить особые поощрения.
Система кешбэка
Постоянные пользователи возвращают часть использованных средств обратно.
Действующие кампании и состязания
Сайт периодически организует азартные акции:
– Семидневные баттлы
– Специальные акции
– Раздачи крупных подарков
– Система VIP-клуба
Логин в личный кабинет
Для авторизации на ресурс следует:
1. Загрузить основной сайт или функционирующее зеркало
2. Нажать “Login”
3. Ввести никнейм и секретную комбинацию
В персональном профиле открыты следующие опции:
– Зачисление депозита
– Получение выигрышей
– Анализ лога транзакций
– Редактирование личными сведениями
Мобильная версия и приложение
Портативная вариант
Оптимизированная модификация портала предоставляет шанс развлекаться с любого карманного устройства. Оформление динамически оптимизируется под габариты экрана.
Программа для установки
Загрузить программу можно для:
– Android — официальная download с ресурса
– iOS — инсталляция через App Store
Преимущества приложения:
– Оперативный старт
– Бесперебойная функциональность
– Push-уведомления об бонусах
– Оптимизированный функционал
Азартные категории
Игровые машины
Богатая коллекция азартных барабанов от лучших разработчиков:
– Ретро слоты
– Новые-автоматы
– Джекпот-автоматы
Live casino
Категория с живыми ведущими предлагает:
– Рулеточные столы
– Блэкджек
– Мини-баккара
– Texas Hold’em
Эфиры осуществляются в превосходном качестве изображения, создавая эффект настоящего казино.
Способы пополнения и снятия
Платформа работает с множественные финансовые инструменты:
– Банковские картсчета
– Онлайн системы
– Bitcoin/Ethereum
– Прямые отправки
Минимальные суммы пополнения и оперативные выплаты делают развлечение исключительно комфортной.
Отдел техподдержки
Квалифицированная служба support оперирует 24/7 и готова поддержать с различными ситуациями:
– Онлайн-чат
– Email-поддержка
– Телефонная служба
Заключение
Лицензионный веб-сайт казино и его актуальные копии дают пользователям надежный и азартный гемблинг досуг. Привлекательные награды, комфортная mobile модификация, многочисленные развлечения и качественное live-казино создают эту площадку замечательным решением для азартных игр.
накрутить голосования вк
https://football-fun-live.com/reyting-bukmekerov/1xbet/promokody-blyat-vivod-bez-bonusa
http://center-2.ru/forum/?mingleforumaction=viewtopic&t=25985#postid-47581
mostbet giris: mostbet
learn more now – Carefully mapped processes make development predictable and efficient.
Подключение к платформе и функционирующие URL
Актуальные онлайн казино предоставляют игрокам огромный выбор опций. Основной сайт Либет гарантирует защищенный доступ ко всем сервисам. При этом периодически возникают моменты, когда требуется дополнительный метод авторизации.
Что есть собой действующее зеркало
Функционирующее зеркало — это абсолютная копия легального сайта с другим доменным расположением. Копия сегодня помогает избегать вероятные ограничения и поддерживать постоянный подключение к популярным играм.
Проверенное зеркало содержит полными характеристиками, что и главный портал:
– Совокупный каталог слотов
– Собственный аккаунт с записанными данными
– Актуальные поощрения и программы
– Проверенные банковские действия
Регистрация и доступ в сервис
Процедура открытия аккаунта на портале отнимает пару секунд. Недавним клиентам требуется:
1. Открыть на актуальное зеркало на данный момент
2. Нажать кнопку «Открыть профиль»
3. Внести нужные данные
4. Активировать e-mail почту или информацию связи
5. Получить поощрение за открытие аккаунта
Доступ в собственный аккаунт осуществляется путем внесение логина и кода доступа.
Анализ призовой структуры
Богатая наградная структура — главное козырь казино. Участники зарабатывают всевозможные подарки:
Начальные бонусы
Начинающие пользователи имеют возможность рассчитывать на значительный подарок за создание аккаунта. Как правило это пакет опций, охватывающий:
– Частичную прибавку к первому депозиту
– Даровые кручения
– Призовые средства на баланс
Промокоды и уникальные возможности
Периодические бонусные комбинации помогают обретать бонусные привилегии. Задействовать их разрешено в специальном окне личного профиля.
Фриспины и возврат средств
Фриспины — это шанс запускать игры без применения личных денег. Возврат подразумевает долевой компенсацию утраченных средств.
Ассортимент развлечений
Гемблинг платформа обеспечивает огромную коллекцию развлечений.
Видеослоты
Разнообразие слотов удивляет воображение. Имеются обычные простые автоматы и современные автоматы с занимательной визуализацией.
Live игры
Зона Live развлечений переносит пользователей в среду реального гемблинг зала. Профессиональные крупье ведут раунды в прямом времени.
Состязания и лидерборды
Систематические состязания обеспечивают драйва и дают вариант забрать большие суммы.
Портативная форма и софт
Современные технологии позволяют наслаждаться в комфортном месте. Мобильная форма самостоятельно подстраивается под монитор гаджета.
Получить клиент можно для операционных систем iOS и Android. Приложение предоставляет:
– Скоростной вход
– Устойчивую производительность
– Всплывающие-алерты об бонусах
– Комфортный дизайн
Банковские транзакции
Платформа принимает различные методы пополнения и снятия денег:
– Пластиковые инструменты
– Цифровые кошельки
– Цифровые валюты
– Денежные транзакции
Каждые переводы осуществляются через безопасное соединение, что обеспечивает неприкосновенность приватных информации.
Отдел поддержки
Профессиональная группа ассистанса действует 24/7. Контактировать с операторами допустимо через:
– Живой-чат
– Электронную почту
– Телефон
– Медиа платформы
Итоги
Основной ресурс и его функционирующее зеркало гарантируют пользователям безопасный и легкий переход к захватывающим развлечениям. Богатые подарки, широкий спектр развлечений и профессиональная помощь делают участие исключительно комфортной и результативной.
Анализ официального сайта
Прогрессивные онлайн казино предоставляют пользователям разнообразный выбор игр и опций. Основной ресурс казино Рльдорадо обеспечивает проверенный вход к азартным услугам.
Функционирующее зеркало: вход сегодня
Альтернативный адрес представляет собой абсолютную дубликат официального портала. Актуальное зеркало помогает игрокам избегать потенциальные барьеры.
Плюсы применения зеркала
Основные плюсы предполагают:
– Непрерывный путь к сайту
– Поддержание любых функций главного ресурса
– Безопасность личных сведений
– Идентичный возможности
Регистрация на ресурсе
Механизм создания аккаунта знаменуется простотой и эргономичностью. Недавние игроки требуется:
1. Зайти на основной портал или его зеркало
2. Нажать на кнопку регистрации
3. Ввести нужные информацию
4. Валидировать email ящик
5. Осуществить дебютный доступ
Вознаграждение за регистрацию
Новички приобретают внушительный вступительный бонус. Такое премия имеет возможность содержать:
– Финансовые средства
– Безвозмездные вращения
– Расширенный процент возврата
Вход в собственный раздел
Существующие пользователи имеют возможность мгновенно зайти в личный профиль, используя логин и ключ. Собственный профиль обеспечивает доступ к:
– Регулированию счетом
– Записям переводов
– Активным поощрениям
– Конфигурации аккаунта
Призы и предложения
Ресурс постоянно устраивает разнообразные предложения для клиентов.
Категории поощрений
Главные типы бонусов:
– Депозитные подарки – доля от суммы депозита
– Спины – complimentary спины в аппаратах
– Кэшбек – возврат доли потерянных средств
– Призовые трофеи – премии за состязание в состязаниях
Ваучеры
Специальные купоны позволяют активировать дополнительные привилегии. Участники могут получить их на аффилиатных ресурсах или получить в новостях.
Переносная редакция и app
Современные клиенты выбирают переносной игровой процесс.
Возможности портативной платформы
– Responsive облик для разнообразных гаджетов
– Совокупный вход к слотам
– Оперативная работа
– Эргономичное использование
Загрузить приложение
Портативное софт предоставлено для загрузки на аппараты с рабочими системами Android и iOS. Софт предоставляет:
– Стабильную производительность
– Всплывающие оповещения о предложениях
– Мгновенный путь к желанным играм
Азартный ассортимент
Игровой клуб дает обширную подборку гемблинг игр.
Аппараты
Каталог азартных машин охватывает:
– Традиционные слоты
– Современные автоматы
– Призовые игры
– Сюжетные игры
Live игры
Область лайв игр предлагает опцию участвовать с профессиональными крупье. Доступны:
– Рулетки
– Блэкджек
– Baccarat
– Покер
Состязания
Периодические конкурсы дают возможность клиентам соревноваться за крупные призовые суммы. Призовая программа актуализируется регулярно.
Финансовые процедуры
Сайт предоставляет обилие опций пополнения и получения денег:
– Пластиковые карты
– Виртуальные платежные системы
– Прямые переводы
– Крипто
Все операции выполняются безопасно с использованием передовых технологий криптографии.
Сервис помощи
Опытная отдел саппорта трудится без перерыва. Соединиться с менеджерами возможно через:
– Online чат
– Электронную почту
– Контактный номер
– Соц медиа
Охрана и аккредитация
Портал оперирует на основании действительной разрешения. Такое обеспечивает:
– Справедливость азартного процесса
– Защиту конфиденциальных данных
– Быстрые выводы
– Легальный гейминг
Заключение
Основной веб-сайт и его актуальные альтернативные адреса дают участникам целостный набор возможностей для удобной и выгодной развлечений. Внушительные призы, различные развлечения, компетентная служба и безопасная инфраструктура транзакций превращают платформу превосходным опцией для любителей гемблинг развлечений.
mostbet güncel giriş: mostbet
http://www.birulevo.su/component/option,com_smf/Itemid,34/topic,29288.0/
Характеристика основного сайта
Прогрессивные сетевые казино обеспечивают клиентам богатый ассортимент игр и возможностей. Основной сайт https://pestkafilm.pl/kreditnaya-karta-proverka-nomera-s-pomoshchyu-onlayn-kalkulyatora/ обеспечивает надежный вход к азартным возможностям.
Рабочее зеркало: доступ на сегодня
Альтернативный адрес является в качестве точную реплику основного сайта. Актуальное зеркало обеспечивает клиентам обходить возможные блокировки.
Достоинства задействования зеркала
Принципиальные достоинства охватывают:
– Непрерывный вход к сайту
– Поддержание любых характеристик официального ресурса
– Охрана персональных информации
– Аналогичный возможности
Создание аккаунта на ресурсе
Ход создания аккаунта отличается простотой и удобством. Свежие пользователи необходимо:
1. Посетить главный сайт или его зеркало
2. Кликнуть на элемент оформления
3. Указать требуемые данные
4. Верифицировать почтовую почту
5. Произвести стартовый авторизацию
Вознаграждение за оформление
Начинающие получают щедрый приветственный бонус. Такое вознаграждение способно содержать:
– Финансовые начисления
– Даровые спины
– Повышенный уровень компенсации
Вход в персональный профиль
Зарегистрированные пользователи могут мгновенно зайти в собственный аккаунт, используя учетные данные и шифр. Персональный профиль предлагает возможность к:
– Управлению депозитом
– Хронологии переводов
– Работающим поощрениям
– Параметрам профиля
Подарки и акции
Платформа периодически устраивает различные акции для клиентов.
Категории подарков
Основные типы бонусов:
– Депозитные начисления – часть от суммы пополнения
– Спины – безвозмездные раунды в автоматах
– Кэшбэк – компенсация процента потерянных финансов
– Призовые награды – вознаграждения за состязание в соревнованиях
Промокоды
Уникальные промокоды дают возможность заработать дополнительные преимущества. Клиенты имеют возможность обнаружить их на специализированных порталах или получить в уведомлениях.
Переносная вариант и софт
Актуальные гемблеры любят переносной геймплей.
Функции портативной платформы
– Гибкий облик для различных аппаратов
– Целостный путь к автоматам
– Оперативная подгрузка
– Удобное управление
Загрузить app
Портативное программа предложено для скачивания на аппараты с базовыми платформами Android и iOS. Программа обеспечивает:
– Стабильную деятельность
– Мгновенные оповещения о призах
– Оперативный путь к желанным развлечениям
Развлекательный каталог
Платформа дает внушительную коллекцию развлекательных услуг.
Слоты
Библиотека игровых автоматов включает:
– Классические слоты
– Видео автоматы
– Накопительные игры
– Тематические игры
Live дилеры
Раздел живых дилеров обеспечивает шанс соревноваться с реальными диллерами. Предложены:
– Рулетка
– Блэкджек
– Punto Banco
– Poker
Состязания
Постоянные соревнования дают возможность игрокам конкурировать за значительные наградные банки. Призовая сетка обновляется регулярно.
Банковские процедуры
Казино поддерживает обилие вариантов пополнения и снятия сумм:
– Пластиковые карточки
– Цифровые платежные системы
– Банковские переводы
– Крипто
Совокупные транзакции производятся безопасно с использованием актуальных систем шифрования.
Отдел support
Квалифицированная группа помощи трудится без перерыва. Связаться с консультантами доступно через:
– Онлайн чат
– Почтовую почту
– Телефон
– Социальные сети
Защита и лицензирование
Портал функционирует на базе легальной лицензии. Такое подтверждает:
– Справедливость развлекательного геймплея
– Защиту конфиденциальных сведений
– Пунктуальные выводы
– Ответственный гемблинг
Резюме
Основной сайт и его рабочие дубликаты гарантируют игрокам абсолютный спектр возможностей для удобной и профитной времяпрепровождения. Значительные вознаграждения, многочисленные автоматы, опытная помощь и проверенная структура выплат формируют портал превосходным вариантом для поклонников игровых игр.
Переход к порталу через действующие зеркала
Участники виртуальных казино регулярно контактируют с ситуацией блокировки основного ресурса. Именно для преодоления этой ситуации созданы зеркала легального портала. казино Punch предоставляет беспрепятственный доступ ко всем опциям площадки.
Что такое рабочее зеркало казино
Дубликат составляет собой идентичную копию оригинального портала с таким же возможностями. Главное расхождение — это иное имя. Абсолютно все информация игрока, содержа депозит, привилегии и данные раундов, остаются такими же.
Преимущества применения зеркал
Рабочие зеркала характеризуются набором значимых плюсов:
– Постоянный переход к любимым автоматам
– Полная безопасность личных сведений
– Неизменность всех настроек индивидуального кабинета
– Способность взятия призов и вовлечения в кампаниях
Создание аккаунта на легальном ресурсе
Процесс регистрации максимально прост и длится пару минут. Начинающие клиенты имеют возможность надеяться на щедрый приветственный подарок за открытие счета.
Шаги оформления аккаунта
1. Подключение на официальный домен или его дубликат
2. Активация на элемент “Создать аккаунт”
3. Внесение обязательных информации
4. Верификация почтовой почты
5. Ввод кода (если присутствует)
Бонусы и предложения для пользователей
Казино одаривает своих участников всевозможными наградными акциями.
Ключевые варианты поощрений
Вводный пакет — щедрое начисление для начинающих клиентов, которое может включать денежные призы и free spins.
Бесплатные вращения — способность крутить в популярных игровых машинах даром.
Кэшбек — долевой компенсация проигранных финансов, что выплачивается каждую неделю или каждый месяц.
Специальные коды — уникальные комбинации, обеспечивающие бонусные преимущества.
Индивидуальный кабинет: опции и установки
Индивидуальный аккаунт дает абсолютный контроль над развлекательным процессом. Тут доступны:
– Контроль балансом
– История транзакций
– Работающие поощрения
– Параметры защиты
– Проверка аккаунта
Карманная платформа и софт
Актуальные клиенты ценят портативность. Платформа предоставляет пару пути для развлечений с смартфонных гаджетов.
Приспособленная телефонная платформа
Портативная версия сайта самостоятельно настраивается под экран любого гаджета. Нет необходимости скачивать особое приложение.
Программа для гаджетов
Возможно загрузить официальное APP для iOS и Android. Софт гарантирует:
– Моментальный запуск
– Оптимизированный внешний вид
– Всплывающие-сообщения о поощрениях
– Устойчивую функциональность
Live игры: атмосфера подлинного казино
Зона Live казино отправляет участников в антураж реального игорного заведения. Компетентные дилеры ведут игры в режиме настоящего времени.
Популярные Live-форматы
– Европейская рулетка
– 21
– Baccarat
– Техасский холдем
Слоты: многообразие слотов
Библиотека игровых машин насчитывает тысячи наименований от ведущих разработчиков. Клиенты откроют:
– Традиционные автоматы
– Графические слоты
– Джекпот-машины
– Мегавейс
Состязания и специальные акции
Постоянные состязания обеспечивают игрокам конкурировать друг с другом за внушительные выигрышные банки. Каждый турнир имеет свои условия включения и таблицу победителей.
Пути зачисления и вывода сумм
Платформа поддерживает комплекс платежных сервисов:
– Платежные картыы
– Электронные счета
– Криптовалюты
– Wire транзакции
Любые платежи реализуются конфиденциально благодаря современным системам кодирования.
Отдел support
Опытные специалисты службы поддержки расположены содействовать 24/7. Имеются нижеперечисленные методы коммуникации:
– Оперативный-чат
– Email-обслуживание
– Аудио горячая линия
– Публичные сети
Итог
Официальный домен клуба и его функционирующие копии предоставляют игрокам защищенный и легкий подход к огромному спектру азартных активностей. Внушительные бонусы, регулярные акции, качественная сервис и легкие платежные методы превращают развлекательный опыт крайне увлекательным и выгодным.
http://www.bisound.com/forum/showthread.php?p=3075652#post3075652
ed pills https://edpillseasy.com/# ed pills online
luckmore casino текст об лакомр
https://betwinner.cat/
Betwinner se ha establecido firmemente en el mercado argentino para este ano como una opcion destacada en apuestas deportivas y juegos de casino, sobresaliendo por su enfoque en el apostador argentino con operaciones en pesos argentinos y bonos de bienvenida que alcanzan hasta los $94.250 ARS.
1xbet resmi giri? 1xbet-47.com .
Переход к платформе через проверенные зеркала
Участники виртуальных казино регулярно имеют дело с вопросом блокировки базового портала. Как раз для решения этой задачи разработаны дубликаты легального домена. casino Gold casino предоставляет абсолютный подключение ко всем опциям площадки.
Что такое функционирующее зеркало казино
Копия значит собой полную реплику оригинального веб-сайта с аналогичным функционалом. Основное расхождение — это другое имя. Каждые информация игрока, включая средства, награды и архив ставок, остаются идентичными.
Достоинства задействования зеркал
Актуальные зеркала располагают рядом ключевых плюсов:
– Постоянный подключение к предпочитаемым развлечениям
– Абсолютная сохранность индивидуальных сведений
– Сохранение всех настроек индивидуального кабинета
– Способность взятия призов и присутствия в кампаниях
Регистрация на основном портале
Процедура регистрации предельно прост и требует буквально минут. Недавние участники имеют возможность претендовать на щедрый приветственный подарок за создание аккаунта.
Ступени оформления аккаунта
1. Переход на основной сайт или его зеркало
2. Активация на кнопку “Зарегистрироваться”
3. Внесение требуемых параметров
4. Подтверждение почтовой почты
5. Внесение кода (если присутствует)
Награды и акции для пользователей
Ресурс балует своих пользователей всевозможными бонусными акциями.
Базовые категории наград
Вводный подарок — внушительное вознаграждение для недавних участников, которое имеет возможность включать денежные средства и free spins.
Фриспины — шанс использовать в известных аппаратах бесплатно.
Кешбэк — пропорциональный возмещение проигранных денег, который именно предоставляется по неделям или ежемесячно.
Купоны — особые последовательности, предоставляющие добавочные поощрения.
Персональный кабинет: инструменты и настройки
Индивидуальный аккаунт обеспечивает полный контроль над игровым опытом. Тут предусмотрены:
– Администрирование средствами
– Данные переводов
– Действующие поощрения
– Установки сохранности
– Подтверждение профиля
Мобильная версия и софт
Нынешние пользователи предпочитают портативность. Ресурс предоставляет 2 варианта для развлечений с мобильных устройств.
Responsive смартфонная вариант
Портативная вариант портала автономно подстраивается под дисплей любого аппарата. Нет необходимости устанавливать дополнительное программное обеспечение.
APP для мобильных
Возможно скачать оригинальное приложение для iOS и Android. Софт дает:
– Моментальный вход
– Доработанный интерфейс
– Push-уведомления о бонусах
– Стабильную работу
Live игры: среда реального казино
Секция Live казино отправляет пользователей в среду реального зала. Профессиональные дилеры организуют игры в режиме реального времени.
Востребованные Live-развлечения
– Французская рулетка
– 21
– Punto Banco
– Карибский покер
Аппараты: разнообразие развлечений
Библиотека слотовых аппаратов включает множество наименований от топовых провайдеров. Участники найдут:
– Традиционные машины
– Графические слоты
– Мега-выигрыш-слоты
– Слоты с множественными линиями
Конкурсы и эксклюзивные акции
Систематические соревнования обеспечивают игрокам бороться друг с другом за солидные призовые пулы. Каждый турнир имеет свои правила участия и рейтинг победителей.
Методы ввода и получения средств
Казино поддерживает множество денежных методов:
– Дебетовые картыы
– Онлайн счета
– Крипто
– Банковские транзиты
Любые переводы осуществляются безопасно благодаря актуальным протоколам криптографии.
Сервис support
Квалифицированные сотрудники службы помощи расположены ассистировать 24/7. Имеются такие методы коммуникации:
– Живой-чат
– Email-сервис
– Телефонная горячая линия
– Коммуникационные сети
Резюме
Основной портал игровой площадки и его рабочие копии дают пользователям надежный и удобный вход к обширному спектру развлекательных активностей. Крупные бонусы, постоянные промоакции, компетентная служба и простые денежные способы превращают развлекательный времяпрепровождение крайне захватывающим и доходным.
start strategy execution – Action converts ideas into forward-moving progress.
Зацепил раздел про Как проверить и оплатить задолженности по налогам.
Вот, делюсь ссылкой:
https://thermol.ru/%d0%b1%d0%b5%d0%b7-%d1%80%d1%83%d0%b1%d1%80%d0%b8%d0%ba%d0%b8/peni-i-zadolzhennost-po-nalogam-shtrafam-i-zhkh-kak-proverit-i-oplatit/
Доступ к сайту и рабочие ссылки
Востребованные виртуальные казино гарантируют участникам обширный ассортимент опций. Главный ресурс Dragon Money предоставляет безопасный вход ко всем возможностям. При этом иногда появляются обстоятельства, когда понадобится дополнительный метод авторизации.
Что означает собой функционирующее зеркало
Действующее зеркало — это полная копия официального портала с альтернативным интернет адресом. Зеркало сегодня обеспечивает избегать возможные блокировки и гарантировать бесперебойный подключение к выбранным развлечениям.
Главное зеркало содержит всеми характеристиками, что и главный сайт:
– Совокупный каталог слотов
– Личный раздел с сохраненными сведениями
– Все подарки и акции
– Надежные банковские переводы
Открытие профиля и доступ в казино
Процедура открытия аккаунта на ресурсе требует буквально мгновений. Начинающим клиентам требуется:
1. Открыть на актуальное зеркало сегодня
2. Щелкнуть элемент «Регистрация»
3. Заполнить обязательные данные
4. Верифицировать электронную почту или контакт телефона
5. Получить подарок за оформление
Вход в личный кабинет производится посредством предоставление никнейма и ключа.
Характеристика бонусной системы
Выгодная бонусная программа — главное преимущество платформы. Клиенты получают разнообразные бонусы:
Начальные бонусы
Начинающие клиенты способны надеяться на выгодный поощрение за создание аккаунта. Обычно это пакет вариантов, объединяющий:
– Частичную надбавку к стартовому вкладу
– Безвозмездные вращения
– Бонусные деньги на аккаунт
Промо-коды и особые возможности
Систематические бонусные комбинации помогают обретать дополнительные преимущества. Применить их возможно в специальном окне личного аккаунта.
Free spins и кешбэк
Фриспины — это возможность крутить барабаны без использования своих финансов. Кэшбек представляет процентный отдачу утраченных сумм.
Ассортимент автоматов
Игровая ресурс обеспечивает огромную базу автоматов.
Автоматы
Многообразие автоматов удивляет ожидания. Доступны традиционные ретро слоты и новые видеослоты с захватывающей визуализацией.
Live заведение
Зона Live заведения погружает пользователей в атмосферу настоящего игорного дома. Квалифицированные дилеры ведут партии в онлайн эфире.
Конкурсы и рейтинги
Систематические состязания вносят накала и предоставляют вариант получить большие выигрыши.
Мобильная версия и программа
Новые решения обеспечивают участвовать в комфортном пространстве. Адаптивная реализация независимо оптимизируется под экран гаджета.
Получить софт допустимо для программных сред iOS и Android. Программа предоставляет:
– Мгновенный доступ
– Стабильную деятельность
– Моментальные-уведомления об бонусах
– Удобный облик
Платежные операции
Платформа поддерживает различные системы ввода и вывода средств:
– Кредитные счета
– Электронные системы
– Криптовалюты
– Банковские переводы
Все транзакции проходят через надежное канал, что гарантирует неприкосновенность приватных сведений.
Сервис помощи
Компетентная служба поддержки действует всегда. Связаться с менеджерами допустимо через:
– Интерактивный-чат
– Электронную почту
– Связь
– Медиа ресурсы
Итоги
Официальный веб-сайт и его актуальное зеркало предоставляют участникам надежный и приятный доступ к захватывающим занятиям. Богатые подарки, разнообразный выбор развлечений и отличная поддержка делают процесс предельно комфортной и прибыльной.
http://center-2.ru/forum/?mingleforumaction=viewtopic&t=25985#postid-47581
1xbet guncel 1xbet-52.com .
anchor https://v2-capcut-apk.com
1xbet resmi 1xbet-48.com .
mostbet: mostbet
Анализ основного сайта
Передовое онлайн-казино предлагает своим участникам обширный спектр возможностей и вознаграждений. Главный сайт казино ДжиВиСпин работает постоянно, предоставляя доступ к топовым слотам, live-казино и обширным предложениям.
Рабочее зеркало: доступ к ресурсу
Что такое альтернатива казино
Дубликат означает собой абсолютную дубликат главного портала с другим сетевым путем. Функционирующее зеркало позволяет участникам миновать запреты и сохранять надежный вход к любимым играм.
Как получить действующее зеркало сегодня
Свежие URL на проверенное зеркало выкладываются через:
– E-mail рассылку
– Проверенные социальные сети
– Команду поддержки
– Партнерские ресурсы
Открытиесчета на платформе
Процедура созданияаккаунта
Регистрация занимает пару минут и включает нижеследующие этапы:
1. Доступ на главный сайт или актуальное зеркало
2. Клик элемента “Зарегистрироваться”
3. Указание личных данных
4. Верификация email или телефона
5. Придумывание кодадоступа
Подарок за созданиеаккаунта
Новые игроки зарабатывают большие начальные бонусы:
– Бонусные деньги на кошелек
– Бесплатныевращения для слотов
– Усиленный коэффициент компенсации
– Специальные ваучеры
Авторизация в индивидуальный счет
Постоянные пользователи вправе совершить логин через оригинальный сайт или рабочее зеркало. Для этого необходимо внести никнейм и пароль, придуманные при открытиисчета.
Функции персонального кабинета
В персональном разделе имеются такие инструменты:
– Контроль контактными сведениями
– Зачисление депозита
– Снятие призов
– Использование бонусов
– Просмотр журнала операций
– Вступление в турнирах
Поощрения и акции
Категории вознаграждений
Казино балует своих участников различными наградными программами:
– Стартовый комплект — выгодные бонусы на стартовые депозиты
– Фриспины — дополнительные ставки в рейтинговых автоматах
– Возврат — периодический возмещение доли потерь
– Программа лояльности — особые привилегии для верных клиентов
Ваучеры и их применение
Особые промокоды дают расширенные поощрения. Для использования следует внести последовательность в соответствующее окно в персональном профиле.
Азартный каталог
Игры
База слотовых слотов содержит сотни наименований от лучших разработчиков:
– Традиционные автоматы
– Современные развлечения
– Прогрессивные симуляторы
– Брендовые слоты
Live казино
Раздел Live-казино предлагает игру с настоящими крупье в режиме актуального стрима:
– Европейскаярулетка
– Blackjack
– Баккара
– Карибскийпокер
Турниры
Периодические турниры с солидными джекпотными призами проходят постоянно. Соревнующиеся соревнуются за первенство в таблице.
Смартфонная версия и программа
Мобильная платформа ресурса
Официальный ресурс полностью адаптирован для планшетных гаджетов. Клиенты имеютвозможность запускать развлечения сразу через интернет-браузер без необходимости установки.
Софт для установки
Фирменное мобильное приложение доступно для получения на девайсы с рабочими платформами Android и iOS. Софт обеспечивает:
– Быстрый вход к развлечениям
– Устойчивую функциональность
– Оперативные-оповещения о бонусах
– Интуитивный интерфейс
Итог
Оригинальный сайт казино и его рабочие копии дают клиентам полный путь к высококлассным азартным услугам. Большие бонусы, различные предложения, комфортная адаптивная реализация и опытная служба делают игровой процесс крайне приятным и выгодным.
https://betfun.cat/
Betfun brilla en el ambito nacional de apuestas como un sitio completo gestionada por Track Gaming Buenos Aires S.A., ofreciendo mas de 500 juegos y mercados de mas de 30 deportes. Permitiendo el uso de pesos argentinos (ARS), la casa de apuestas da la bienvenida a los clientes que se registran con un premio por sumarse de $15,000 ARS gratis al crear una cuenta, ademas de un bono del 100% en el primer deposito para multiplicar por dos los dinero de inicio.
Деревянный дом под ключ в СПб — почему выбирают клееный брус
При выборе детской площадки учитывайте климат вашего региона. В средней полосе России важна устойчивость к перепадам температуры и влаге. Лиственница и сосна с глубокой пропиткой подходят лучше всего.
https://msk.aw-ay.ru/viewtopic.php?id=1545#p1773
https://www.exchangle.com/1xbetfree233
What impressed me about this casino https://thepinktree.co.uk/plateforme-aruba-bet-votre-ultime-destination-privilegiee-de/ is the variety of the games. Everything runs without issues, the design is clean, and there’s plenty of options to explore, which keeps it engaging.
https://openlibrary.org/people/ewellboilerservice/lists/OL327927L/Code_promo_1XBET_gratuit_-_Bonus_de_130_%E2%82%AC
https://www.rueanmaihom.net/forum/topic/83476/new-melbet-promo-code-2026:-mel200big-%E2%80%93-%E2%82%AC130
Характеристика лицензионного ресурса
Прогрессивные интернет казино дают участникам разнообразный набор услуг и перспектив. Лицензионный портал Disi обеспечивает безопасный доступ к игровым сервисам.
Рабочее зеркало: возможность на сегодня
Дублирующий портал выступает как точную дубликат главного портала. Официальное зеркало дает возможность игрокам избегать вероятные запреты.
Преимущества эксплуатации зеркала
Основные плюсы содержат:
– Стабильный шанс к платформе
– Поддержание всех возможностей официального ресурса
– Сохранность личных информации
– Идентичный инструментарий
Оформление профиля на портале
Процесс оформления профиля выделяется легкостью и комфортом. Новые игроки должны:
1. Посетить лицензионный портал или его зеркало
2. Выбрать на элемент оформления
3. Внести требуемые данные
4. Активировать почтовую адрес
5. Совершить начальный доступ
Вознаграждение за оформление
Начинающие получают внушительный приветственный бонус. Данное вознаграждение имеет возможность предусматривать:
– Материальные средства
– Бесплатные фриспины
– Расширенный уровень кэшбэка
Авторизация в индивидуальный кабинет
Существующие участники способны быстро авторизоваться в персональный аккаунт, применяя никнейм и ключ. Собственный профиль предлагает шанс к:
– Администрированию балансом
– Истории платежей
– Активным поощрениям
– Параметрам аккаунта
Призы и кампании
Платформа периодически реализует разнообразные акции для игроков.
Типы призов
Ключевые виды поощрений:
– Депозитные бонусы – коэффициент от величины депозита
– Прокруты – даровые раунды в аппаратах
– Компенсация – возмещение процента затраченных финансов
– Соревновательные награды – награды за выступление в состязаниях
Ваучеры
Особые купоны дают возможность активировать экстра привилегии. Участники в состоянии отыскать их на специализированных порталах или приобрести в письмах.
Портативная вариант и app
Прогрессивные игроки выбирают переносной гейминг.
Опции мобильной адаптации
– Отзывчивый дизайн для разнообразных девайсов
– Целостный доступ к играм
– Быстрая работа
– Удобное управление
Установить софт
Mobile софт открыто для установки на аппараты с базовыми системами Android и iOS. Приложение гарантирует:
– Стабильную функциональность
– Всплывающие оповещения о призах
– Быстрый вход к избранным автоматам
Игровой ассортимент
Портал обеспечивает внушительную подборку развлекательных услуг.
Игровые машины
Ассортимент развлекательных машин включает:
– Традиционные автоматы
– Современные игры
– Прогрессивные игры
– Сюжетные слоты
Live дилеры
Секция реальных игр дает шанс соревноваться с реальными диллерами. Открыты:
– Рулетки
– Блэкджек
– Punto Banco
– Poker
Турниры
Регулярные чемпионаты помогают участникам бороться за солидные финансовые банки. Турнирная структура изменяется еженедельно.
Финансовые процедуры
Сайт предлагает разнообразие способов пополнения и вывода финансов:
– Кредитные карты
– Онлайн кошельки
– Межбанковские транзакции
– Bitcoin
Любые платежи производятся защищенно с задействованием актуальных технологий криптографии.
Отдел support
Профессиональная отдел поддержки действует постоянно. Соединиться с менеджерами реально через:
– Интерактивный чат
– Email почту
– Контактный номер
– Соц медиа
Защита и лицензирование
Игровой клуб работает на базе легальной аккредитации. Подобное гарантирует:
– Честность азартного действа
– Охрану персональных данных
– Пунктуальные перечисления
– Контролируемый гейминг
Вывод
Лицензионный веб-сайт и его актуальные резервные страницы предоставляют участникам абсолютный набор возможностей для приятной и доходной игры. Щедрые бонусы, разнообразные автоматы, профессиональная помощь и безопасная инфраструктура платежей формируют платформу лучшим опцией для ценителей игровых забав.
1xbet mobil giri? 1xbet mobil giri? .
Актуальные онлайн-казино дают клиентам обширный спектр услуг и поощрительных программ. Присоединение к площадке выполняется через главный ресурс или его действующее зеркало https://znidpromet.rs/v-kazakhstane-kak-bezopasno-posetit-zerkalo-kazino-i-izbezhat-moshennicheskikh-saytov/, что обеспечивает непрерывную игру.
Что такое рабочее зеркало казино
Копия — это абсолютная дубликат оригинального веб-сайта, сделанная для устранения барьеров. Актуальное зеркало обеспечивает игрокам сохранить подключение к излюбленным слотам в любое время.
Подлинное зеркало располагает всеми характеристиками оригинального ресурса:
– Весь каталог автоматов
– Учетная запись с сохраненными параметрами
– Актуальные поощрения
– Гарантированные расчетные процедуры
Создание аккаунта на лицензионном портале
Ход регистрации занимает всего немного минут. Начинающим участникам следует:
1. Войти на основной веб-сайт или функционирующее зеркало
2. Нажать на ссылку “Создать аккаунт”
3. Указать требуемые информацию
4. Подтвердить email
5. Произвести первый взнос
Стартовый бонус выдается сразу после окончания всех стадий.
Подключение в учетную запись
Существующие пользователи могут выполнить подключение используя:
– Никнейм и ключ
– Код контакта
– Адрес
Профиль открывает право к контролю финансами, истории транзакций и действующим бонусам.
Поощрения и программы
Гемблинг система вознаграждает постоянных клиентов щедрыми призами:
Стартовый бонус
– Премия на первый платеж до 100%
– Фриспины на известные слоты
– Особые бонусы за последующие депозиты
Бонусные коды
Особые промокоды предоставляют право на получение специальных бонусов. Действующие комбинации выставляются в разделе “Промо”.
Cashback
Еженедельный бонус достигает до 10% от проигранных денег. Возмещение выплачивается сразу.
Схема лояльности
Активные клиенты приобретают поинты, которые переводятся на настоящие выплаты или бесплатные вращения.
Mobile версия и приложение
В целях удобства клиентов создана качественная адаптивный сайт. Отзывчивый облик помогает легко участвовать с каждого карманного девайса.
Плюсы софта:
– Оперативный запуск к автоматам
– Адаптированный дизайн
– Устойчивая деятельность
– Оповещения о свежих бонусах
Скачать APP можно бесплатно с проверенного ресурса для девайсов на Android и iOS.
Каталог игр
Машины
Коллекция насчитывает более 2000 автоматов от ведущих студий:
– Стандартные игры
– Современные автоматы
– Слоты с джекпотом
– Сюжетные автоматы
Live казино
Раздел Live игр предлагает развлечение с настоящими крупье в живом формате:
– Roulette
– Двадцать одно
– Punto Banco
– Покер
Состязания
Периодические состязания с крупными премиальными фондами запускаются систематически. Вход в турнирах разрешено всем активным пользователям.
Денежные способы
Платежи и снятия средств осуществляются через востребованные платежные системы:
– Дебетовые карты
– Виртуальные счета
– Цифровая валюта
– Денежные операции
Наименьший взнос — от 100 рублей. Вывод средств обрабатывается в течение 24 периода.
Команда помощи
24/7 служба помощи способна содействовать в разрешении всех ситуаций:
– Live chat
– Email
– Телефон
– Социальные сети
Защита и лицензия
Главный веб-сайт работает на основании глобальной разрешения. Каждые сведения участников закрыты передовым SSL-криптованием.
Резюме
Действующее зеркало гарантирует бесперебойный соединение к предпочитаемым слотам, богатым бонусам и функциональным функциям. Откройте счет немедленно и заработайте начальный подарок!
learn more now – Strategic foresight guides growth effectively and reduces inefficiencies.
For alternatives
quicken loans what do i need
for primary sources.
1x giri? 1x giri? .
This is a topic that’s near to my heart…
Thank you! Exactly where are your contact details though?
Подключение к ресурсу через проверенные зеркала
Клиенты сетевых казино регулярно сталкиваются с ситуацией блокировки официального сайта. Конкретно для устранения этой задачи предусмотрены альтернативные адреса основного домена. РђРєРІР° зеркало казино гарантирует полный доступ ко всем сервисам казино.
Что такое рабочее зеркало казино
Копия значит собой абсолютную версию главного ресурса с похожим набором функций. Главное отличие — это альтернативное имя. Любые сведения пользователя, содержа счет, привилегии и записи раундов, находятся прежними.
Достоинства эксплуатации зеркал
Рабочие зеркала обладают рядом существенных выгод:
– Постоянный доступ к выбранным слотам
– Абсолютная безопасность собственных сведений
– Поддержание всех параметров персонального кабинета
– Способность получения наград и присутствия в кампаниях
Создание аккаунта на основном портале
Операция открытия счета максимально прост и занимает пару минут. Свежие клиенты могут претендовать на внушительный стартовый приз за регистрацию.
Ступени оформления аккаунта
1. Подключение на основной сайт или его альтернативу
2. Клик на опцию “Зарегистрироваться”
3. Указание обязательных данных
4. Верификация email почты
5. Указание бонусного кода (если есть)
Подарки и промоакции для игроков
Ресурс одаривает своих пользователей всевозможными бонусными предложениями.
Главные виды бонусов
Стартовый приз — солидное премирование для свежих игроков, что имеет возможность включать монетарные призы и фриспины.
Бесплатные вращения — возможность играть в популярных автоматах бесплатно.
Кешбэк — пропорциональный отдача потерянных финансов, который именно выплачивается по неделям или каждый месяц.
Промокоды — эксклюзивные последовательности, предоставляющие добавочные преимущества.
Персональный кабинет: инструменты и параметры
Личный кабинет гарантирует совершенный регулирование над развлекательным процессом. В нем присутствуют:
– Управление счетом
– История транзакций
– Действующие привилегии
– Настройки защиты
– Проверка профиля
Карманная версия и софт
Современные клиенты предпочитают доступность. Площадка предлагает двойной способа для игры с смартфонных девайсов.
Responsive смартфонная версия
Смартфонная версия ресурса самостоятельно подстраивается под монитор любого девайса. Не требуется загружать специальное софт.
Софт для гаджетов
Доступно загрузить фирменное программу для iOS и Android. Софт гарантирует:
– Моментальный вход
– Оптимизированный интерфейс
– Мобильные-уведомления о поощрениях
– Надежную работу
Live развлечения: обстановка подлинного зала
Секция Live развлечений доставляет пользователей в антураж реального клуба. Квалифицированные крупье организуют партии в формате реального времени.
Популярные Live-форматы
– Рулетка
– Блэкджек
– Punto Banco
– Карибский покер
Автоматы: ассортимент игр
Библиотека слотовых автоматов включает массу позиций от ведущих производителей. Игроки найдут:
– Традиционные аппараты
– Видео-автоматы
– Джекпот-игры
– Мегавейс
Конкурсы и специальные акции
Постоянные состязания обеспечивают пользователям бороться друг с другом за внушительные наградные банки. Отдельный соревнование обладает свои условия присутствия и таблицу лидеров.
Пути внесения и снятия финансов
Ресурс использует массу финансовых методов:
– Дебетовые инструменты
– Цифровые платежные системы
– Криптовалюты
– Банковские транзиты
Каждые транзакции проходят защищенно благодаря новейшим системам защиты.
Команда support
Опытные специалисты службы поддержки расположены поддержать 24/7. Работают следующие каналы связи:
– Оперативный-чат
– Email-поддержка
– Звонковая линия
– Публичные сети
Вывод
Главный ресурс клуба и его функционирующие дубликаты гарантируют участникам безопасный и комфортный доступ к широкому выбору развлекательных игр. Внушительные награды, частые предложения, квалифицированная служба и простые денежные методы делают развлекательный времяпрепровождение чрезвычайно захватывающим и выгодным.
усиление грунта под промышленными объектами usilenie-gruntov-1.ru .
https://mostbetpl.buzz/# mostbet güncel
1xbet turkiye 1xbet-53.com .
mostbet giris mostbet
ремонт бетонных конструкций ремонт бетонных конструкций .
Передовые онлайн-казино предлагают клиентам обширный ассортимент опций для комфортной времяпрепровождения. Вход к площадке Minicas выполняется через основной веб-ресурс или рабочее зеркало.
Что такое действующее зеркало казино
Действующее зеркало — это запасной адрес лицензионного портала казино. Такие версии генерируются для предоставления стабильного соединения к азартной платформе.
Дубликат актуальное целиком дублирует возможности главного домена. Клиенты обретают аналогичный вход ко всем функциям, включая создание аккаунта, пополнение кошелька и снятие призов.
Регистрация на главном ресурсе
Процесс регистрации занимает всего несколько минут. Начинающим участникам необходимо:
1. Перейти на основной портал или действующее проверенное зеркало
2. Кликнуть кнопку “Создать аккаунт”
3. Заполнить необходимые реквизиты
4. Проверить почтовую почту
5. Ввести бонусный код при присутствии
После выполнения открытия профиля игрок получает подарок за регистрацию, который способен предполагать фриспины или денежное вознаграждение.
Авторизация в индивидуальный кабинет
Личный кабинет — это закрытая зона, где пользователи способны регулировать своим счетом. Для входа необходимо напечатать username и password.
В персональном кабинете имеются такие функции:
– Отслеживание хронологии операций
– Задействование бонусных кодов
– Управление поощрениями
– Участие в конкурсах
– Контроль кэшбэка
– Корректировка аккаунта
Призы и предложения
Игровая площадка обеспечивает щедрые вознаграждения:
Начальный набор — новички зарабатывают существенное начисление на дебютные вклады.
Бесплатные вращения — начисляются как при оформлении, так и в рамках всевозможных кампаний.
Кэшбэк — систематический компенсация доли израсходованных сумм.
Промокоды — специальные последовательности, предоставляющие выход к уникальным бонусам.
Обзор азартных разделов
Слоты
Библиотека слотов охватывает массу наименований от топовых производителей. Клиенты обнаружат как обычные слоты, так и современные 3D-слоты с захватывающей графикой.
Live казино
Раздел Live казино дарит возможность играть с реальными дилерами в состоянии настоящего времени. Доступны популярные столы: рулетка, блэкджек, баккара, покер.
Турниры
Регулярные состязания с крупными призовыми суммами притягивают массу игроков. Призеры зарабатывают денежные призы и уникальные премии.
Телефонная версия и софт
Адаптивная версия портала предоставляет право играть с всякого устройства. Интерфейс автономно настраивается под диагональ экрана.
Установить софт можно для девайсов на Android и iOS. Мобильное ПО располагает всеми характеристиками полной версии.
Как обнаружить актуальное зеркало на данный момент
Свежие URL копий постоянно изменяются. Обнаружить рабочую адрес можно несколькими путями:
– Через отдел поддержки
– В проверенных новостных сетях
– По почтовой рассылке
– На партнерских площадках
Надежность и сертификация
Главный сайт действует на основании глобальной лицензии. Все платежи шифруются инновационными технологиями кодирования.
Конфиденциальность индивидуальных данных поддерживается в абсолютном объеме.
Резюме
Главный ресурс и его актуальные копии дарят пользователям круглосуточный вход к превосходным игровым сервисам. Выгодные призы, многочисленные слоты, квалифицированная сервис — все это делает развлекательный времяпрепровождение максимально беспроблемным и захватывающим.
Нынешние онлайн-казино гарантируют пользователям множество путей для удобной игры. Официальный веб-портал казино казино Мелстрой обеспечивает доступ ко всем сервисам и играм. Однако при появлении программных сложностей на выручку спешат актуальные зеркала.
Что представляет собой функционирующее зеркало
Зеркало казино — это полная копия основного веб-сайта, расположенная по запасному веб-адресу. Легитимное зеркало хранит все характеристики, вместе с создание аккаунта, авторизацию в личный кабинет, бонусы и промокоды.
Дубликат на сегодня обеспечивает:
– Постоянный вход к развлекательным машинам
– Стопроцентную конфиденциальность индивидуальных информации
– Удержание средств и записей транзакций
– Возможность использования всех акций
Создание аккаунта на основном ресурсе
Ход регистрации требует несколько минут. Новоиспеченным клиентам требуется:
1. Зайти на подлинный сайт или актуальное зеркало
2. Кликнуть кнопку «Создать аккаунт»
3. Заполнить запрашиваемые сведения
4. Подтвердить э-мейл почту
5. Применить бонусный код при присутствии
После окончания регистрации клиенты приобретают вознаграждение за регистрацию, который может иметь бонусные спины или финансовое поощрение.
Вход в собственный кабинет
Персональный кабинет открывает полный мониторинг над игровым действом. Через персональный кабинет допускается:
– Вносить средства на кошелек
– Снимать выплаты
– Использовать купоны
– Отслеживать историю пари
– Играть в состязаниях
– Обретать кэшбек
Характеристика премий и промо-предложений
Щедрая бонусная система — ключевое козырь проекта. Главные формы премий:
Стартовый бонус
Начинающие зарабатывают выгодное вознаграждение на первые пополнения. Величина бонуса может доходить до 100-200% от объема взноса.
Free spins
Халявные спины даются для известных машин. Количество бесплатных вращений разнится от 10 до 500 штук.
Cash back
Систематический или ежемесячный откат процента утраченных средств. Стандартный объем кэшбека — 5-15%.
Турниры
Постоянные конкурсы с большими призовыми пулами. Соревнующиеся борются за лучшие строчки в рейтинге.
Мобильная версия и приложуха
Смартфонная версия разрешает играть с всякого гаджета. Геймеры могут установить софт для iOS и Android или использовать интернет версию.
Достоинства смартфонного приложения:
– Скоростная подзагрузка автоматов
– Удобный UI
– Всплывающие уведомления о промо
– Возможность входа через Face ID
Автоматы и Live казино
Азартная подборка охватывает тысячи названий от ведущих провайдеров.
Известные типы автоматов:
– Стандартные машины
– Видеослоты с призовыми раундами
– Прогрессивный джекпот слоты
– Мегавейс машины
Live казино
Категория live казино предоставляет партию с реальными ведущими. Доступны классические игры:
– Европейская рулетка
– Блэкджек
– Баккара
– Техасский холдем
Как разыскать действующее зеркало
Получить действующую ссылку на зеркало можно различными методами:
1. Зарегистрироваться на емейл-уведомления
2. Наблюдать за обновлениями в соц сетях
3. Написать в сервис поддержки
4. Добавить в закладки актуальное зеркало в фавориты
Вывод
Официальный ресурс и его функционирующие зеркала дают бесперебойный доступ к игровым играм. Богатые поощрения, многочисленные купоны, эргономичное портативное приложение и профессиональная техподдержка поддержки превращают азартный опыт предельно удобным и надежным.
узнать больше https://slon4-at.at
click to read more https://gta-san-andreas-apk.net/
check clarity boost – Thinking clearly ensures faster achievement and better outcomes.
Передовые интернет казино дают пользователям огромный ассортимент вариантов для приятной игры. Но иногда соединение к основному сайту может оказаться ограниченным. В таких моментах на подмогу приходит Дракон Мани казино, которое гарантирует стабильный путь ко всем возможностям платформы.
Что такое актуальное зеркало казино
Копия — это идентичная копия официального сайта, которая хостится по другому домену. Дубликат содержит все набор функций основного веб-портала, включая персональный кабинет, счет и запись операций.
Ключевые плюсы использования зеркала:
– 24-часовой вход к порталу
– Полная идентичность опций
– Сохранность пользовательских информации
– Поддержка всех привилегий
Как найти актуальное зеркало на сегодня
Присутствует несколько проверенных способов получения свежей ссылки:
Легитимные ресурсы:
1. Электронная рассылка — управление систематически высылает письма с действующими ссылками
2. Общественные сети — легитимные каналы выкладывают актуальную информацию
3. Сервис поддержки — сотрудники сообщают надежные URL
4. Портативное приложение — позволяет преодолевать блокировки
Регистрация на официальном сайте
Этап оформления отнимает только немного минут и предполагает из следующих этапов:
1. Вход на лицензионный сайт или действующее зеркало
2. Щелчок на клавишу «Регистрация»
3. Внесение учетной бланка
4. Подтверждение электронной почты или мобильного номера
5. Задействование вознаграждения за регистрацию при доступности промокода
Начинающие игроки приобретают значительный стартовый подарок, который может охватывать даровые прокруты, монетарные призы или cashback.
Авторизация в пользовательский кабинет
Подключение на сайте производится стандартным образом. Требуется ввести учетные данные и кодовое слово, задействованные при оформлении.
Ключевые нюансы для защищенного входа:
– Задействуйте защищенный шифр
– Активируйте двухэтапную верификацию
– Не записывайте реквизиты на посторонних гаджетах
– Отслеживайте URL строку браузера
Обзор наградной программы
Игорный портал балует клиентов различными привилегиями и специальными предложениями:
Вступительный пакет
Новички могут надеяться на великодушное бонус за начальный пополнение. Как правило это пропорциональная надбавка к переведенной количеству плюс даровые спины для известных слотов.
Периодические кампании
– Еженедельный cashback — возвращение процентной доли списанных финансов
– Награды на повторные пополнения
– Уникальные промо по праздникам
– Конкурсы с крупными наградными банками
Схема верности
Регулярные геймеры накапливают баллы за любую бет, которые затем конвертируются на фактические финансы, бесплатные вращения или особые преимущества.
Промокоды: как задействовать
Промокоды — это специальные наборы символов, обеспечивающие право к дополнительным вознаграждениям.
Где раздобыть действующие промокоды:
– Авторизованные коммуникационные сети казино
– Сотрудничающие порталы
– Email-новостная лента
– Тематические сообщества
Прописывается промокод в отдельное поле при создании аккаунта или пополнении баланса.
Мобильная версия и приложение
Передовые пользователи отдают предпочтение развлекаться с портативных девайсов. Сайт дает пару решения для беспроблемной смартфонной игры.
Отзывчивая версия
Браузерная версия сама адаптируется под размер экранной панели. Не требует загрузки и функционирует в любом современном браузере.
Мобильное приложение
Установить софт можно для устройств на Android и iOS. Плюсы app:
– Скоростная активация
– Бесперебойная операция
– Push-уведомления о акциях
– Независимый минование блокировок
Операция загрузки прост: достаточно зайти на портал с мобильного гаджета и придерживаться указаниям.
Развлекательный ассортимент
Библиотека игр охватывает огромное количество позиций от передовых разработчиков.
Слоты
Развлекательные автоматы — наиболее распространенная группа забав. Размещены традиционные 3-барабанные машины, современные видеослоты с дополнительными стадиями, а также прогрессивные суперпризы.
Live казино
Отдел с настоящими крупье обеспечивает прочувствовать дух настоящего казино. Открыты столы с баккарой.
Трансляция производится в превосходном разрешении, обеспечивается коммуникация с раздающим и остальными пользователями.
Соревнования
Регулярно запускаются турниры по многочисленным категориям. Вступление дает шанс получить валютные призы, фриспины или уникальные презенты.
Платежные процедуры
Сайт поддерживает значительный ассортимент денежных инструментов:
– Кредитные карты
– Цифровые системы
– Биткоин
– Денежные транзакты
Наименьшая объем вклада — разумная для преобладающего числа пользователей. Получение денег обрабатывается в кратчайшие периоды.
Департамент поддержки
Компетентные специалисты настроены поддержать непрерывно. Доступны следующие методы контакта:
– Онлайн-чат
– Email
– Голосовая линия
– Коммуникационные сети
Ответы на частые темы можно обнаружить в зоне FAQ.
Резюме
Основной портал казино и его актуальные зеркала предоставляют пользователям абсолютный путь ко всем функциям сайта. Значительные бонусы, практичная портативная версия, огромный ассортимент слотов и опытная ассистенция делают гемблинг процесс предельно удобным и надежным.
Современные онлайн казино предлагают пользователям большой спектр возможностей для удобной игры. Однако иногда соединение к базовому сайту может являться недоступным. В таких обстоятельствах на поддержку приходят http://www.digiinvention.com/realnye-sovety-i-rekomendatsii-dlya-igrokov-o-tom-kak-oderzhat-pobedu-v-onlayn-kazino/, которое гарантирует постоянный подключение ко всем опциям платформы.
Что такое актуальное зеркало казино
Альтернативный сайт — это точная копия лицензионного портала, которая размещается по запасному интернет-адресу. Зеркало сохраняет полный инструментарий первоначального ресурса, включая пользовательский кабинет, счет и данные платежей.
Главные преимущества применения зеркала:
– Непрерывный доступ к сайту
– Стопроцентная схожесть инструментов
– Безопасность индивидуальных информации
– Сохранение всех имеющихся поощрений
Как найти действующее зеркало сегодня
Имеется несколько достоверных путей получения текущей URL:
Легитимные сервисы:
1. Имейл рассылка — администрация систематически пересылает уведомления с свежими ссылками
2. Социальные сети — официальные профили размещают текущую данные
3. Отдел поддержки — специалисты предоставляют достоверные адреса
4. Телефонное приложение — позволяет обходить блокировки
Открытие счета на лицензионном сайте
Процесс создания аккаунта занимает только немного минут и включает из следующих ступеней:
1. Открытие на главный веб-сайт или функционирующее зеркало
2. Нажатие на иконку «Создать аккаунт»
3. Внесение персональной бланка
4. Проверка имейл почты или телефонного номера
5. Включение вознаграждения за регистрацию при существовании промокода
Начинающие клиенты получают значительный стартовый бонус, который может предполагать free spins, валютные вознаграждения или возврат средств.
Авторизация в пользовательский кабинет
Вход на ресурсе производится стандартным методом. Нужно внести логин и секретный ключ, указанные при открытии счета.
Ключевые моменты для защищенного входа:
– Задействуйте сложный шифр
– Задействуйте 2FA верификацию
– Не записывайте реквизиты на чужих девайсах
– Проверяйте URL строку браузера
Обзор бонусной программы
Казино одаривает игроков различными вознаграждениями и промо:
Начальный набор
Дебютанты способны рассчитывать на существенное вознаграждение за первый пополнение. Традиционно это пропорциональная добавка к переведенной величине плюс бесплатные вращения для известных слотов.
Систематические кампании
– Еженедельный кэшбек — возвращение процента утраченных средств
– Награды на последующие взносы
– Специальные акции по праздникам
– Конкурсы с большими наградными суммами
План верности
Регулярные клиенты зарабатывают очки за всякую игру, которые затем меняются на действительные деньги, даровые прокруты или особые льготы.
Промокоды: как использовать
Бонус-коды — это уникальные комбинации знаков, дающие привилегию к бонусным привилегиям.
Где взять свежие промокоды:
– Официальные коммуникационные сети казино
– Аффилиатные площадки
– Email-подписка
– Тематические платформы
Указывается промокод в отдельное поле при оформлении или внесении депозита депозита.
Портативная версия и приложение
Нынешние игроки отдают предпочтение развлекаться с портативных устройств. Портал предоставляет двойной решения для приятной телефонной игры.
Адаптивная версия
Браузерная версия самостоятельно оптимизируется под параметры экранной панели. Не просит установки и функционирует в любом свежем браузере.
Смартфонное приложение
Скачать app можно для аппаратов на Android и iOS. Преимущества app:
– Быстрая открытие
– Бесперебойная операция
– Всплывающие-уведомления о акциях
– Самостоятельный избегание блокировок
Процедура инсталляции несложен: необходимо перейти на веб-сайт с смартфонного устройства и следовать руководству.
Азартный каталог
Библиотека аппаратов насчитывает огромное количество единиц от ведущих провайдеров.
Слоты
Развлекательные аппараты — наиболее распространенная секция игр. Представлены классические винтажные слоты, новые мультимедийные слоты с поощрительными этапами, а также растущие призы.
Live казино
Секция с реальными дилерами дает возможность прочувствовать атмосферу истинного казино. Доступны варианты с блэкджеком.
Вещание производится в превосходном формате, присутствует коммуникация с раздающим и остальными игроками.
Конкурсы
Систематически устраиваются соревнования по всевозможным играм. Присоединение дает шанс получить валютные вознаграждения, бесплатные вращения или специальные презенты.
Платежные манипуляции
Портал обеспечивает широкий набор расчетных систем:
– Дебетовые карты
– Онлайн кошельки
– Биткоин
– Денежные платежи
Низшая сумма депозита — доступная для преобладающего числа клиентов. Снятие выигрышей осуществляется в минимальные интервалы.
Отдел поддержки
Квалифицированные операторы расположены оказать помощь постоянно. Открыты нижеследующие способы связи:
– Онлайн-чат
– Email
– Звонковая горячая линия
– Общественные сети
Решения на распространенные проблемы можно отыскать в зоне FAQ.
Итог
Главный ресурс казино и его действующие зеркала гарантируют клиентам абсолютный подключение ко всем возможностям платформы. Великодушные бонусы, удобная телефонная версия, гигантский каталог игр и квалифицированная ассистенция формируют гемблинг процесс предельно комфортным и надежным.
useful site https://gta-san-andreas-apk.net/
Подключение к платформе через актуальные зеркала
Игроки онлайн казино регулярно имеют дело с ситуацией закрытия базового домена. Конкретно для устранения этой задачи существуют зеркала главного портала. Кракен зеркало обеспечивает стопроцентный вход ко всем сервисам казино.
Что такое рабочее зеркало казино
Альтернативный адрес является собой полную копию официального веб-сайта с похожим возможностями. Ключевое расхождение — это иное имя. Абсолютно все сведения пользователя, содержа средства, привилегии и записи партий, остаются такими же.
Преимущества эксплуатации зеркал
Функционирующие зеркала обладают комплексом значимых выгод:
– Круглосуточный переход к предпочитаемым слотам
– Стопроцентная безопасность личных сведений
– Удержание всех конфигураций пользовательского кабинета
– Шанс взятия призов и вовлечения в предложениях
Открытие счета на основном домене
Ход оформления максимально элементарен и занимает несколько минут. Новые игроки в состоянии полагаться на щедрый начальный подарок за регистрацию.
Стадии создания аккаунта
1. Подключение на основной домен или его копию
2. Нажатие на опцию “Создать аккаунт”
3. Ввод нужных данных
4. Активация цифровой почты
5. Указание промокода (когда присутствует)
Награды и акции для пользователей
Ресурс поощряет своих участников различными призовыми программами.
Основные категории поощрений
Приветственный пакет — щедрое премирование для недавних клиентов, которое именно имеет возможность содержать финансовые призы и free spins.
Бесплатные вращения — шанс крутить в известных слотах без затрат.
Компенсация — пропорциональный отдача утраченных денег, который выплачивается еженедельно или ежемесячно.
Купоны — особые сочетания, предоставляющие дополнительные преимущества.
Личный кабинет: опции и настройки
Пользовательский кабинет дает исчерпывающий контроль над игровым опытом. В нем присутствуют:
– Администрирование счетом
– Данные транзакций
– Действующие привилегии
– Параметры безопасности
– Подтверждение профиля
Смартфонная версия и программа
Современные пользователи признают мобильность. Казино дает два варианта для участия с карманных устройств.
Отзывчивая смартфонная редакция
Мобильная редакция портала без участия подстраивается под разрешение любого гаджета. Не требуется скачивать специальное программное обеспечение.
Приложение для мобильных
Можно скачать оригинальное программу для iOS и Android. Программа обеспечивает:
– Моментальный старт
– Доработанный дизайн
– Оперативные-оповещения о акциях
– Бесперебойную работу
Live казино: атмосфера истинного казино
Категория Live столов отправляет игроков в атмосферу настоящего клуба. Опытные хосты осуществляют сессии в режиме живого времени.
Известные Live-столы
– Рулетка
– Blackjack
– Баккара
– Карибский покер
Игровые машины: выбор игр
Каталог развлекательных машин содержит множество наименований от известных разработчиков. Игроки встретят:
– Традиционные автоматы
– Современные слоты
– Мега-выигрыш-игры
– Мегавейс
Состязания и особые предложения
Систематические соревнования позволяют участникам состязаться друг с другом за крупные наградные пулы. Любой состязание имеет свои правила включения и список призеров.
Варианты ввода и получения сумм
Площадка предоставляет массу финансовых методов:
– Дебетовые карты
– Электронные платежные системы
– Цифровые валюты
– Финансовые отправления
Каждые платежи осуществляются защищенно благодаря актуальным технологиям кодирования.
Сервис поддержки
Квалифицированные специалисты сервиса support расположены ассистировать 24/7. Имеются нижеперечисленные каналы контакта:
– Онлайн-чат
– Email-поддержка
– Аудио линия
– Коммуникационные сети
Заключение
Легальный ресурс казино и его рабочие дубликаты предоставляют участникам защищенный и легкий доступ к обширному спектру игровых игр. Внушительные награды, постоянные предложения, компетентная служба и удобные денежные системы превращают геймерский времяпрепровождение крайне увлекательным и результативным.
https://kvedomosti.ru/wp-content/articles/?gama_casino_promokod.html
Вход к порталу и рабочие URL
Современные сетевые казино обеспечивают игрокам огромный ассортимент опций. Центральный портал New Retro обеспечивает стабильный переход ко всем возможностям. Тем не менее иногда происходят моменты, когда понадобится альтернативный способ входа.
Что означает собой рабочее зеркало
Актуальное зеркало — это идентичная версия основного веб-сайта с альтернативным URL адресом. Дубликат сегодня дает возможность избегать потенциальные блокировки и сохранять стабильный доступ к популярным слотам.
Главное зеркало обладает полными возможностями, что и базовый веб-сайт:
– Полный список развлечений
– Индивидуальный кабинет с записанными параметрами
– Актуальные бонусы и акции
– Защищенные банковские транзакции
Открытие профиля и доступ в платформу
Процедура создания профиля на сайте требует считанные мгновений. Начинающим игрокам требуется:
1. Перейти на действующее зеркало на данный момент
2. Щелкнуть кнопку «Регистрация»
3. Заполнить нужные информацию
4. Проверить e-mail почту или номер связи
5. Использовать награду за оформление
Авторизация в личный аккаунт реализуется путем внесение имени пользователя и кода доступа.
Описание наградной программы
Выгодная поощрительная политика — основное достоинство платформы. Пользователи забирают разнообразные подарки:
Стартовые бонусы
Свежие пользователи могут рассчитывать на выгодный подарок за оформление. Как правило это набор вариантов, включающий:
– Процентную надбавку к первому пополнению
– Безвозмездные вращения
– Призовые финансы на кошелек
Кодовые комбинации и специальные возможности
Систематические коды дают возможность активировать бонусные выгоды. Активировать их возможно в предназначенном меню собственного профиля.
Спины и возврат средств
Даровые вращения — это вариант вращать слоты без использования персональных финансов. Возврат представляет определенный отдачу утраченных финансов.
Каталог игр
Гемблинг площадка обеспечивает впечатляющую библиотеку развлечений.
Видеослоты
Вариативность слотов впечатляет воображение. Представлены стандартные ретро автоматы и современные развлечения с занимательной анимацией.
Live зал
Зона Live заведения погружает участников в среду подлинного игорного заведения. Умелые крупье организуют раунды в живом режиме.
Конкурсы и рейтинги
Периодические конкурсы вносят азарта и гарантируют шанс выиграть крупные суммы.
Mobile форма и клиент
Актуальные разработки помогают участвовать в комфортном пространстве. Адаптивная реализация самостоятельно подстраивается под экран устройства.
Загрузить софт допустимо для программных систем iOS и Android. Приложение дает:
– Скоростной доступ
– Надежную функционирование
– Всплывающие-оповещения об акциях
– Удобный интерфейс
Денежные действия
Платформа использует многочисленные системы внесения и получения денег:
– Кредитные счета
– Виртуальные кошельки
– Токены
– Банковские транзакции
Любые действия проходят через надежное протокол, что защищает целостность конфиденциальных данных.
Сервис support
Профессиональная группа ассистанса функционирует 24/7. Соединиться с операторами возможно через:
– Онлайн-чат
– Цифровую почту
– Телефон
– Социальные платформы
Выводы
Легальный веб-сайт и его функционирующее зеркало предоставляют пользователям стабильный и приятный путь к интересным развлечениям. Выгодные поощрения, разнообразный выбор игр и профессиональная сервис формируют игру исключительно комфортной и выгодной.
buy generic ed pills
https://immotionvr.com/pag/?code_promotionnel_pour_1xbet.html
https://mostbetvipaz.buzz/# mostbet güncel
Вход к ресурсу через рабочие зеркала
Современные онлайн казино гарантируют клиентам постоянный переход к услугам. Официальный ресурс казино ДжиВиСпин действует стабильно, предлагая обширный ассортимент развлекательных игр. Тем не менее периодически возникают системные трудности или запреты, потому важно понимать о присутствии действующих зеркал.
Что собой представляет собой главное зеркало казино
Дубликат — это точная дубликат центрального ресурса с идентичным интерфейсом. Функционирующее зеркало на данный момент позволяет избегать локальные запреты и продолжать развлечения.
Основные выгоды применения зеркал:
– Абсолютный доступ к личному кабинету
– Фиксация каждых информации профиля
– Идентичный перечень слотов
– Свежие вознаграждения и промо
Оформление на ресурсе
Процедура записи отнимает немного минут. Недавние пользователи приобретают щедрый подарок за запись, что может охватывать:
– Вступительный игровой подарок
– Бесплатные вращения для машин
– Специальные промокоды
– Повышенный возврат
Для финализации создания аккаунта следует:
1. Войти на главный веб-сайт или зеркало
2. Кликнуть опцию «Оформиться»
3. Внести индивидуальные информацию
4. Верифицировать мейл или контакт
5. Активировать код (когда имеется существовании)
Доступ в персональный кабинет
После успешной создания аккаунта пользователи способны выполнять вход посредством официальный веб-сайт или актуальное зеркало. Персональный кабинет обеспечивает безграничный надзор над профилем:
– Архив транзакций
– Пополнение депозита
– Изъятие денег
– Администрирование бонусами
– Включение в состязаниях
Награды и кампании казино
Платформа радует геймеров многочисленными поощрительными системами:
Приветственные подарки
Новички приобретают богатый пакет наград на начальные пополнения. Зачастую это содержит пропорциональную надбавку к сумме депозита плюс бесплатные кручения.
Систематические промо
– Раз в неделю кешбэк до 15%
– Конкурсы с призовыми пулами
– Бонусы на годовщину рождения
– Уникальные предложения для привилегированных геймеров
Система вознаграждения
Деятельные игроки зарабатывают единицы, которые можно конвертировать на подлинные призы или уникальные преимущества.
Мобильная форма и софт
Нынешние технологии позволяют развлекаться где подходяще. Мобильная вариант сайта автономно адаптируется под размер всякого девайса.
Достоинства портативного программы:
– Оперативная открытие игр
– Практичный дизайн
– Push-сообщения о промо
– Способность инсталлировать для Android и iOS
Настоящее казино: обстановка подлинного игорного клуба
Раздел Live заведения доставляет клиентов в среду настоящего гемблинг клуба. Опытные ведущие проводят процесс в формате реального времени.
Доступные развлечения:
– Рулетка
– Очко
– Punto Banco
– Покер
Слоты и игровые автоматы
Коллекция развлекательных машин насчитывает тысячи позиций от лидирующих студий. Любой пользователь подберёт развлечение по душе:
– Традиционные машины
– Новые слоты с бонусными раундами
– Накопительный-слоты
– Динамические слоты
Состязания и раздачи
Регулярные соревнования привносят адреналин и обеспечивают способность заработать внушительные вознаграждения. Участие в турнирах регулярно бесплатное, а выигрышные банки составляют больших сумм.
Секьюрити и анонимность
Портал применяет актуальные системы криптографии для защиты реквизитов геймеров. Совокупные денежные процедуры осуществляются через охраняемые соединения.
Итог
Официальный веб-сайт и его актуальные зеркала дают надёжный вход к отличным игровым развлечениям. Богатые награды, эргономичная карманная форма, разнообразие машин и высококлассное Live-игорный дом создают сайт превосходным выбором для ценителей игровых автоматов.
Актуальные онлайн-казино предоставляют клиентам обилие возможностей для приятной игры. Основной ресурс https://hlonlineroc.com/sushchestvennym-yavlyaetsya-to-chto-reshenie-dlya-platezhey-ot-kompanii дарит доступ ко всем опциям и развлечениям. Однако при образовании системных проблем на помощь спешат действующие зеркала.
Что есть собой актуальное зеркало
Альтернативный адрес казино — это стопроцентная дубликат основного веб-сайта, размещенная по дополнительному URL. Лицензионное зеркало удерживает все опции, вместе с создание аккаунта, доступ в индивидуальный кабинет, поощрения и купоны.
Альтернативный сайт на сегодня предоставляет:
– Бесперебойный путь к игровым машинам
– Стопроцентную сохранность индивидуальных сведений
– Удержание депозита и журнала переводов
– Применимость всех акций
Регистрация на лицензионном портале
Процесс оформления учетной записи занимает считанные минут. Новым игрокам требуется:
1. Открыть на основной портал или действующее зеркало
2. Нажать кнопку «Зарегистрироваться»
3. Ввести запрашиваемые поля
4. Активировать э-мейл почту
5. Использовать промокод при существовании
После окончания создания аккаунта геймеры приобретают приз за регистрацию, который может охватывать фриспины или денежное поощрение.
Вход в персональный кабинет
Индивидуальный кабинет обеспечивает всеобъемлющий управление над азартным процессом. Через индивидуальный кабинет допускается:
– Вносить средства на баланс
– Выводить призы
– Активировать купоны
– Отслеживать записи пари
– Соревноваться в соревнованиях
– Забирать кешбэк
Обзор премий и промо-предложений
Выгодная премиальная политика — значимое козырь платформы. Ключевые формы премий:
Приветственный бонус
Новички зарабатывают выгодное награду на первые депозиты. Объем приза может доходить до 100-200% от размера вклада.
Free spins
Халявные раунды предоставляются для топовых слотов. Объем бесплатных вращений колеблется от 10 до 500 штук.
Кешбэк
Постоянный или помесячный возврат части утраченных средств. Стандартный размер компенсации — 5-15%.
Турниры
Периодические конкурсы с солидными премиальными банками. Игроки соревнуются за верхние позиции в турнирной таблице.
Смартфонная версия и приложение
Мобильная версия дает возможность играть с любого гаджета. Пользователи могут закачать софт для iOS и Android или эксплуатировать браузерную версию.
Преимущества портативного приложения:
– Оперативная загрузка слотов
– Эргономичный графический интерфейс
– Пуш-нотификации о поощрениях
– Вход через отпечаток пальца
Игровые автоматы и Live казино
Развлекательная коллекция охватывает тысячи наименований от ведущих разработчиков.
Популярные разделы автоматов:
– Стандартные слоты
– Современные слоты с премиальными раундами
– Накопительный приз игры
– Megaways слоты
Live казино
Раздел live игорный зал предлагает партию с реальными дилерами. Есть стандартные развлечения:
– Рулетка
– Blackjack
– Punto Banco
– Карибский покер
Как отыскать функционирующее зеркало
Найти рабочую линк на зеркало возможно разными методами:
1. Зарегистрироваться на емейл-уведомления
2. Наблюдать за обновлениями в социальных сетях
3. Написать в службу поддержки
4. Заложить рабочее зеркало в закладки
Вывод
Лицензионный сайт и его действующие копии обеспечивают бесперебойный доступ к развлекательным играм. Богатые бонусы, различные промокоды, практичное портативное приложение и качественная сервис поддержки превращают развлекательный опыт в высшей степени приятным и защищенным.
start here – Concentrated strategies help growth advance steadily over time.
1x bet giri? 1xbet-52.com .
one x bet 1xbet-48.com .
Нынешние онлайн-казино обеспечивают клиентам обширный диапазон возможностей и премиальных предложений. Подключение к ресурсу осуществляется через лицензионный ресурс или его рабочее зеркало https://www.automatenbetrieb-jonach.de/2026/03/05/sposoby-vyvoda-denezhnykh-sredstv-s-igrovykh-avtomatov-v-kazino, что дает стабильную игру.
Что такое актуальное зеркало казино
Копия — это абсолютная реплика оригинального портала, сделанная для устранения блокировок. Зеркало сегодня дает возможность клиентам получить соединение к любимым развлечениям в любое время.
Проверенное зеркало содержит всеми возможностями первоначального ресурса:
– Целый перечень слотов
– Аккаунт с записанными сведениями
– Текущие промокоды
– Защищенные расчетные операции
Оформление профиля на лицензионном портале
Алгоритм регистрации отнимает всего несколько минут. Первым пользователям необходимо:
1. Перейти на официальный веб-сайт или функционирующее зеркало
2. Щелкнуть на кнопку “Регистрация”
3. Ввести нужные данные
4. Верифицировать контакт
5. Сделать стартовый вклад
Стартовый бонус зачисляется незамедлительно после выполнения всех ступеней.
Вход в профиль
Существующие участники могут выполнить вход вводя:
– Имя пользователя и пароль
– Цифры телефона
– Электронную почту
Аккаунт обеспечивает шанс к контролю средствами, сведениям операций и активным бонусам.
Поощрения и программы
Развлекательная платформа радует постоянных участников выгодными бонусами:
Приветственный пакет
– Поощрение на дебютный платеж до 100%
– Даровые спины на топовые автоматы
– Дополнительные премии за последующие пополнения
Ваучеры
Особые коды дают доступ на получение особых поощрений. Действующие промокоды публикуются в блоке “Предложения”.
Возврат средств
Еженедельный бонус достигает до 10% от потраченных денег. Компенсация предоставляется незамедлительно.
Схема лояльности
Регулярные участники приобретают единицы, которые переводятся на реальные средства или бесплатные вращения.
Мобильный сайт и софт
Для удобства участников создана функциональная портативная платформа. Адаптивный интерфейс обеспечивает легко участвовать с произвольного мобильного девайса.
Достоинства софта:
– Скорый подключение к слотам
– Настроенный вид
– Стабильная работа
– Push-уведомления о новых бонусах
Установить софт можно даром с официального портала для девайсов на Android и iOS.
Каталог автоматов
Автоматы
Каталог вмещает более 2000 автоматов от ведущих студий:
– Классические автоматы
– Видео-слоты
– Jackpot игры
– Сюжетные автоматы
Live казино
Секция Live казино обеспечивает взаимодействие с живыми ведущими в онлайн времени:
– Roulette
– Blackjack
– Baccarat
– Карточный покер
Состязания
Периодические соревнования с значительными наградными бюджетами организуются каждую неделю. Присоединение в конкурсах разрешено всем зарегистрированным игрокам.
Платежные системы
Депозиты и изъятия финансов производятся через популярные методы:
– Дебетовые карточ ки
– Онлайн счета
– Цифровая валюта
– Банковские переводы
Минимальный вклад — от 100 рублей. Снятие денег осуществляется в течение 24 ч.
Команда помощи
Круглосуточная отдел поддержки готова содействовать в решении произвольных вопросов:
– Мессенджер
– Email
– Связь
– Публичные сети
Охрана и документ
Главный сайт действует на почве признанной разрешения. Каждые данные пользователей защищены передовым SSL-шифрованием.
Вывод
Функционирующее зеркало обеспечивает бесперебойный соединение к выбранным развлечениям, привлекательным акциям и функциональным услугам. Зарегистрируйтесь сейчас и обретите начальный поощрение!
Описание основного сайта
Прогрессивные онлайн казино предлагают пользователям разнообразный ассортимент услуг и опций. Официальный портал казино Sprut казино гарантирует проверенный доступ к игровым сервисам.
Рабочее зеркало: вход в настоящий момент
Дублирующий портал выступает как идентичную дубликат главного сайта. Проверенное зеркало позволяет участникам преодолевать существующие барьеры.
Преимущества эксплуатации зеркала
Ключевые достоинства предполагают:
– Непрерывный вход к ресурсу
– Хранение любых характеристик базового портала
– Безопасность индивидуальных информации
– Аналогичный набор функций
Регистрация на портале
Ход открытия счета характеризуется простотой и практичностью. Недавние участники требуется:
1. Перейти на главный сайт или его зеркало
2. Нажать на клавишу открытия счета
3. Заполнить нужные сведения
4. Верифицировать почтовую адрес
5. Произвести первый логин
Бонус за оформление
Новые игроки зарабатывают щедрый стартовый бонус. Данное награда может содержать:
– Финансовые бонусы
– Complimentary фриспины
– Расширенный уровень возврата
Доступ в личный профиль
Зарегистрированные пользователи в состоянии оперативно зайти в собственный кабинет, эксплуатируя учетные данные и ключ. Личный раздел дает путь к:
– Управлению средствами
– Хронологии переводов
– Активным бонусам
– Конфигурации аккаунта
Вознаграждения и предложения
Платформа периодически устраивает многочисленные мероприятия для участников.
Категории подарков
Основные типы призов:
– Депозитные призы – процент от величины пополнения
– Фриспины – даровые вращения в игровых машинах
– Возврат средств – компенсация процента затраченных финансов
– Призовые награды – вознаграждения за игру в соревнованиях
Промокоды
Уникальные купоны дают возможность активировать дополнительные выгоды. Пользователи в состоянии найти их на аффилиатных ресурсах или заработать в уведомлениях.
Мобильная адаптация и софт
Современные игроки выбирают портативный досуг.
Функции портативной платформы
– Responsive дизайн для различных девайсов
– Целостный возможность к слотам
– Оперативная работа
– Удобное навигация
Download софт
Мобильное софт предложено для downloading на устройства с базовыми ОС Android и iOS. Софт обеспечивает:
– Стабильную работу
– Пуш сообщения о предложениях
– Оперативный доступ к предпочитаемым играм
Игровой каталог
Казино дает огромную подборку азартных услуг.
Автоматы
Каталог игровых аппаратов охватывает:
– Обычные игры
– Video автоматы
– Призовые автоматы
– Сюжетные игры
Live казино
Раздел реальных игр обеспечивает возможность играть с живыми ведущими. Открыты:
– Американская рулетка
– 21
– Баккара
– Покер
Состязания
Систематические турниры позволяют игрокам конкурировать за солидные финансовые суммы. Призовая система обновляется еженедельно.
Платежные операции
Сайт предоставляет массу способов внесения и вывода сумм:
– Пластиковые карточки
– Онлайн кошельки
– Прямые переводы
– Крипто
Любые переводы проходят безопасно с использованием современных технологий шифрования.
Отдел поддержки
Профессиональная служба саппорта действует постоянно. Связаться с консультантами реально через:
– Живой чат
– Электронную почту
– Горячую линию
– Социальные медиа
Безопасность и лицензирование
Казино действует на основании официальной аккредитации. Такое подтверждает:
– Честность игрового процесса
– Защиту персональных сведений
– Пунктуальные выплаты
– Легальный гейминг
Заключение
Главный ресурс и его актуальные альтернативные адреса дают игрокам целостный набор услуг для безопасной и прибыльной развлечений. Значительные вознаграждения, многочисленные автоматы, опытная сервис и защищенная структура операций создают платформу идеальным вариантом для ценителей гемблинг услуг.
This is really interesting, You are a very skilled
blogger. I have joined your feed and look forward to seeking
more of your great post. Also, I’ve shared your site in my
social networks!
mostbet resmi giriş: mostbet
нажмите здесь https://slon4-at.at
1xbet g?ncel adres 1xbet g?ncel adres .
Вход к порталу через рабочие зеркала
Пользователи сетевых казино нередко имеют дело с вопросом недоступности основного домена. Собственно для преодоления этой проблемы созданы копии главного ресурса. https://www.lumicomsaudi.com/stoit-otmetit-chto-reyting-kazino-kotorye-prinimayut-platezhi-cherez предоставляет абсолютный вход ко всем функциям ресурса.
Что такое функционирующее зеркало казино
Дубликат значит собой абсолютную дубликат главного веб-сайта с таким же опциями. Главное различие — это альтернативное имя. Абсолютно все сведения пользователя, вместе с депозит, привилегии и архив игр, сохраняются такими же.
Преимущества применения зеркал
Функционирующие зеркала обладают рядом существенных плюсов:
– Бесперебойный подключение к любимым играм
– Совершенная защита персональных данных
– Неизменность всех параметров индивидуального кабинета
– Шанс получения наград и включения в промоакциях
Оформление профиля на главном домене
Процедура открытия счета чрезвычайно легок и требует немного минут. Свежие игроки способны претендовать на щедрый вводный бонус за создание аккаунта.
Шаги открытия аккаунта
1. Подключение на основной портал или его зеркало
2. Активация на элемент “Создать аккаунт”
3. Внесение требуемых параметров
4. Активация email почты
5. Применение кода (когда доступен)
Поощрения и предложения для клиентов
Казино балует своих участников всевозможными призовыми системами.
Ключевые виды поощрений
Приветственный бонус — щедрое вознаграждение для начинающих участников, которое именно может вмещать монетарные суммы и free spins.
Безвозмездные спины — способность играть в топовых аппаратах бесплатно.
Возврат средств — пропорциональный компенсация израсходованных денег, который именно выплачивается еженедельно или ежемесячно.
Специальные коды — особые последовательности, гарантирующие бонусные привилегии.
Персональный кабинет: функции и настройки
Личный аккаунт обеспечивает абсолютный управление над развлекательным взаимодействием. Здесь доступны:
– Администрирование счетом
– Данные операций
– Работающие поощрения
– Параметры безопасности
– Верификация счета
Мобильная платформа и APP
Современные игроки признают гибкость. Ресурс дает два пути для развлечений с смартфонных устройств.
Отзывчивая портативная платформа
Адаптивная версия домена автоматически адаптируется под дисплей любого гаджета. Отсутствует потребность скачивать отдельное программное обеспечение.
APP для смартфонов
Можно загрузить специальное софт для iOS и Android. Программа обеспечивает:
– Мгновенный старт
– Улучшенный интерфейс
– Оперативные-уведомления о акциях
– Стабильную функциональность
Live казино: атмосфера истинного игорного заведения
Раздел Live казино отправляет игроков в среду истинного зала. Профессиональные дилеры осуществляют раунды в режиме прямого времени.
Известные Live-игры
– Рулетка
– Двадцать одно
– Баккарат
– Карибский покер
Аппараты: ассортимент игр
Собрание азартных машин насчитывает множество вариантов от лидирующих разработчиков. Клиенты обнаружат:
– Стандартные машины
– Графические слоты
– Прогрессивный джекпот-игры
– Слоты с множественными линиями
Состязания и особые события
Постоянные состязания обеспечивают участникам бороться друг с другом за значительные наградные банки. Всякий конкурс имеет свои правила присутствия и таблицу лидеров.
Варианты ввода и изъятия средств
Ресурс обслуживает множество денежных систем:
– Дебетовые средства
– Онлайн кошельки
– Blockchain-платежи
– Финансовые отправления
Абсолютно все платежи осуществляются конфиденциально благодаря новейшим протоколам кодирования.
Сервис support
Компетентные операторы команды support расположены поддержать 24/7. Имеются следующие способы коммуникации:
– Живой-чат
– Email-помощь
– Звонковая линия
– Медийные сети
Заключение
Легальный домен казино и его рабочие копии гарантируют игрокам конфиденциальный и удобный доступ к широкому спектру игровых услуг. Щедрые награды, регулярные кампании, квалифицированная служба и комфортные расчетные инструменты превращают игровой времяпрепровождение чрезвычайно приятным и выгодным.
mostbet güncel giriş mostbet
I recently tested this casino https://arhire-proconstruct.be/etablissement-aruba-bet-la-meilleure-destination-privilegiee-de/ and was impressed by how smooth everything felt. The games load quickly, bonuses are clear, and navigation is user-friendly, making the experience enjoyable.
mostbet güncel giriş mostbet
1xbet turkiye 1xbet-53.com .
Вход к платформе через проверенные зеркала
Передовые сетевые казино предоставляют клиентам постоянный переход к сервисам. Основной сайт Lucky Bear casino действует стабильно, предлагая широкий ассортимент развлекательных развлечений. Однако периодически появляются программные сложности или барьеры, потому существенно быть осведомлённым о наличии функционирующих зеркал.
Что является из себя главное зеркало казино
Копия — это идентичная дубликат официального ресурса с таким же возможностями. Действующее зеркало в настоящее время позволяет обходить локальные запреты и возобновлять времяпрепровождение.
Принципиальные достоинства задействования зеркал:
– Абсолютный переход к персональному кабинету
– Поддержание совокупных данных счёта
– Аналогичный перечень слотов
– Текущие вознаграждения и акции
Оформление на сайте
Операция регистрации занимает считанные минут. Свежие пользователи обретают великодушный поощрение за оформление, что имеет возможность охватывать:
– Стартовый бонусный подарок
– Комплиментарные фриспины для машин
– Особые ваучеры
– Расширенный кешбэк
Ради финализации оформления необходимо:
1. Зайти на центральный сайт или альтернативу
2. Кликнуть клавишу «Создать аккаунт»
3. Внести индивидуальные данные
4. Верифицировать электронную почту или контакт
5. Задействовать промокод (при присутствии)
Доступ в индивидуальный кабинет
По завершении удачной регистрации игроки могут осуществлять авторизацию с помощью основной портал или рабочее зеркало. Персональный кабинет даёт полный надзор над профилем:
– Архив транзакций
– Зачисление кошелька
– Получение выигрышей
– Администрирование бонусами
– Вовлечение в состязаниях
Привилегии и предложения казино
Сайт балует пользователей многочисленными наградными схемами:
Приветственные поощрения
Новички зарабатывают богатый пакет бонусов на вступительные вклады. Зачастую это предполагает пропорциональную добавку к размеру вклада плюс комплиментарные спины.
Систематические промо
– Еженедельный компенсация до 15%
– Соревнования с призовыми пулами
– Призы на день рождения
– Эксклюзивные предложения для привилегированных пользователей
Схема лояльности
Регулярные клиенты собирают пункты, они допустимо превратить на действительные средства или эксклюзивные бонусы.
Мобильная редакция и приложение
Актуальные технологии обеспечивают участвовать где удобно. Портативная форма портала самостоятельно настраивается под размер произвольного девайса.
Достоинства смартфонного софта:
– Оперативная открытие игр
– Практичный вид
– Моментальные-уведомления о бонусах
– Возможность загрузить для Android и iOS
Live казино: среда подлинного развлекательного заведения
Раздел Live игорного дома переносит игроков в антураж настоящего игорного учреждения. Компетентные крупье ведут развлечение в состоянии реального времени.
Предлагаемые игры:
– Американская рулетка
– Блэкджек
– Баккара
– Техасский холдем
Слоты и игровые машины
Собрание азартных слотов насчитывает тысячи вариантов от лидирующих провайдеров. Произвольный клиент обнаружит развлечение по желанию:
– Традиционные слоты
– Современные автоматы с призовыми этапами
– Накопительный-игры
– Многолинейные игры
Турниры и лотереи
Периодические состязания привносят адреналин и открывают опцию выиграть значительные награды. Участие в турнирах зачастую комплиментарное, а выигрышные банки достигают внушительных величин.
Защита и секретность
Платформа задействует передовые протоколы защиты для защиты информации геймеров. Все финансовые транзакции совершаются через охраняемые соединения.
Вывод
Официальный веб-сайт и его действующие зеркала предоставляют стабильный вход к качественным гемблинг услугам. Великодушные призы, удобная карманная редакция, разнообразие автоматов и высококлассное Live-игорный дом делают ресурс превосходным выбором для ценителей азартных развлечений.
Переход к порталу через проверенные зеркала
Клиенты виртуальных казино часто сталкиваются с вопросом блокировки официального ресурса. Именно для устранения этой ситуации разработаны копии главного домена. http://www.mayerhofer.biz/bystrye-depozity-i-mgnovennye-vyplaty-predlagaet-onlayn-kazino-s-vozmozhnostyu-vyvoda-sredstv-na-kartu-sberbanka/ обеспечивает стопроцентный доступ ко всем функциям площадки.
Что такое действующее зеркало казино
Дубликат является собой точную копию оригинального сайта с аналогичным опциями. Единственное несовпадение — это альтернативное имя. Все данные игрока, в том числе средства, бонусы и историю раундов, находятся такими же.
Достоинства применения зеркал
Функционирующие зеркала располагают набором значимых преимуществ:
– Бесперебойный доступ к предпочитаемым играм
– Стопроцентная сохранность собственных информации
– Неизменность всех опций индивидуального кабинета
– Шанс обретения призов и участия в промоакциях
Открытие счета на легальном домене
Процедура открытия счета чрезвычайно несложен и занимает немного минут. Недавние клиенты могут рассчитывать на внушительный приветственный поощрение за создание аккаунта.
Этапы оформления аккаунта
1. Вход на основной портал или его альтернативу
2. Выбор на элемент “Присоединиться”
3. Внесение требуемых сведений
4. Верификация email почты
5. Применение кода (когда имеется)
Награды и промоакции для клиентов
Казино одаривает своих клиентов различными поощрительными системами.
Основные типы наград
Стартовый подарок — крупное премирование для свежих пользователей, каковое способно охватывать монетарные средства и фриспины.
Free spins — шанс крутить в востребованных слотах бесплатно.
Кешбэк — частичный возврат израсходованных сумм, что начисляется еженедельно или ежемесячно.
Бонусные коды — уникальные последовательности, гарантирующие экстра привилегии.
Пользовательский кабинет: возможности и параметры
Пользовательский раздел предоставляет полный контроль над персональным активностью. Здесь предусмотрены:
– Контроль депозитом
– Записи транзакций
– Текущие привилегии
– Установки сохранности
– Подтверждение аккаунта
Портативная платформа и программа
Актуальные клиенты предпочитают мобильность. Платформа предоставляет 2 способа для участия с портативных аппаратов.
Адаптивная телефонная редакция
Смартфонная вариант портала без участия адаптируется под экран любого гаджета. Нет необходимости загружать особое программное обеспечение.
Программа для смартфонов
Можно скачать оригинальное софт для iOS и Android. Программа обеспечивает:
– Скорый старт
– Доработанный интерфейс
– Оперативные-сообщения о бонусах
– Устойчивую функциональность
Live раздел: антураж подлинного игорного заведения
Зона Live казино переносит игроков в обстановку подлинного клуба. Опытные крупье осуществляют сессии в виде живого времени.
Востребованные Live-развлечения
– Французская рулетка
– Двадцать одно
– Baccarat
– Poker
Автоматы: многообразие игр
Каталог слотовых машин насчитывает сотни наименований от ведущих поставщиков. Участники найдут:
– Традиционные слоты
– Графические слоты
– Накопительный приз-слоты
– Megaways
Турниры и эксклюзивные предложения
Систематические соревнования позволяют игрокам бороться друг с другом за крупные призовые фонды. Всякий турнир располагает свои условия присутствия и рейтинг победителей.
Способы ввода и получения финансов
Ресурс предоставляет массу денежных методов:
– Кредитные картыы
– Виртуальные платежные системы
– Blockchain-платежи
– Прямые переводы
Каждые переводы проходят защищенно благодаря современным системам кодирования.
Команда обслуживания
Профессиональные сотрудники сервиса support настроены содействовать 24/7. Доступны нижеперечисленные пути общения:
– Живой-чат
– Email-помощь
– Аудио линия
– Публичные сети
Вывод
Основной портал платформы и его рабочие дубликаты обеспечивают участникам конфиденциальный и легкий доступ к обширному спектру развлекательных игр. Солидные награды, частые предложения, квалифицированная помощь и легкие финансовые системы формируют геймерский времяпрепровождение максимально захватывающим и прибыльным.
подробнее здесь https://slon4-at.at/
go here – Directing energy forward maintains progress and produces reliable outcomes.
Подробнее здесь https://slon4-at.at/
Thank you. Very good stuff.
You are so cool! I don’t think I’ve truly read a single thing like that before.
So wonderful to discover someone with unique thoughts on this subject.
Seriously.. many thanks for starting this up.
This web site is one thing that is required on the
web, someone with a bit of originality!
Передовые онлайн-казино предоставляют геймерам богатый диапазон опций для удобной времяпрепровождения. Доступ к площадке Мелстрой казино онлайн реализуется через основной сайт или актуальное зеркало.
Что такое рабочее зеркало казино
Актуальное зеркало — это альтернативный линк лицензионного ресурса казино. Такие версии разрабатываются для поддержания постоянного соединения к азартной системе.
Зеркало текущее полностью дублирует возможности базового домена. Игроки получают идентичный вход ко всем возможностям, включая открытие счета, пополнение баланса и получение выигрышей.
Оформление профиля на главном ресурсе
Процедура открытия профиля требует всего пару моментов. Новым клиентам следует:
1. Попасть на основной портал или актуальное подлинное зеркало
2. Кликнуть кнопку “Открыть счет”
3. Ввести обязательные данные
4. Верифицировать почтовую почту
5. Использовать промокод при присутствии
После выполнения оформления клиент обретает бонус за регистрацию, который вправе включать free spins или денежное начисление.
Логин в личный кабинет
Персональный кабинет — это закрытая секция, где игроки имеют возможность контролировать своим счетом. Для логина необходимо внести никнейм и секретный ключ.
В личном кабинете имеются такие возможности:
– Проверка журнала транзакций
– Применение промокодов
– Регулирование вознаграждениями
– Вступление в соревнованиях
– Мониторинг возмещения
– Настройка аккаунта
Поощрения и акции
Игровая платформа предоставляет щедрые призы:
Регистрационный бонус — дебютанты зарабатывают существенное премию на первые депозиты.
Бесплатные вращения — дарятся как при открытии счета, так и в контексте разнообразных промо.
Возмещение — постоянный компенсация фрагмента потерянных финансов.
Промокоды — уникальные последовательности, предоставляющие право к уникальным предложениям.
Характеристика развлекательных секций
Slots
Коллекция slots охватывает массу игр от топовых производителей. Пользователи обнаружат как обычные машины, так и современные видео-слоты с притягательной анимацией.
Live казино
Категория Live казино дарит опцию участвовать с живыми ведущими в формате настоящего времени. Открыты востребованные игры: рулетка, блэкджек, баккара, покер.
Соревнования
Периодические турниры с значительными наградными фондами привлекают множество участников. Призеры получают монетарные выплаты и особые бонусы.
Телефонная версия и app
Портативная версия сайта дает возможность играть с произвольного аппарата. Дизайн независимо корректируется под габариты экрана.
Установить app можно для гаджетов на Android и iOS. Портативное приложение располагает всеми функциями десктопной версии.
Как найти рабочее зеркало на текущий день
Действующие URL альтернатив периодически меняются. Обнаружить рабочую адрес можно многими вариантами:
– Через отдел поддержки
– В подлинных информационных сетях
– По электронной newsletter
– На специализированных порталах
Надежность и лицензирование
Официальный портал действует на фундаменте мировой документа. Все платежи шифруются инновационными методами защиты.
Анонимность индивидуальных информации гарантируется в полном масштабе.
Итог
Лицензионный ресурс и его действующие альтернативы обеспечивают клиентам 24/7 выход к первоклассным азартным развлечениям. Привлекательные поощрения, многочисленные развлечения, квалифицированная поддержка — все это делает азартный опыт чрезвычайно беспроблемным и интересным.
Переход к ресурсу через проверенные зеркала
Участники виртуальных казино регулярно имеют дело с проблемой недоступности базового сайта. Именно для решения этой проблемы разработаны дубликаты официального портала. Лаки Бир казино обеспечивает беспрепятственный вход ко всем возможностям платформы.
Что такое функционирующее зеркало казино
Дубликат значит собой идентичную копию основного ресурса с аналогичным возможностями. Главное различие — это другое имя. Любые сведения клиента, содержа баланс, награды и записи ставок, продолжают быть такими же.
Преимущества задействования зеркал
Актуальные зеркала имеют рядом важных выгод:
– Непрерывный вход к предпочитаемым автоматам
– Полная защита индивидуальных информации
– Удержание всех опций личного кабинета
– Опция обретения поощрений и вовлечения в кампаниях
Создание аккаунта на основном портале
Процедура открытия счета предельно элементарен и отнимает пару минут. Свежие пользователи могут рассчитывать на крупный вводный поощрение за оформление.
Стадии формирования аккаунта
1. Доступ на основной ресурс или его дубликат
2. Выбор на клавишу “Присоединиться”
3. Заполнение нужных сведений
4. Верификация email почты
5. Указание бонусного кода (в случае имеется)
Поощрения и промоакции для пользователей
Казино радует своих участников разнообразными призовыми акциями.
Ключевые виды поощрений
Стартовый подарок — щедрое поощрение для свежих участников, каковое имеет возможность включать материальные суммы и фриспины.
Фриспины — способность крутить в востребованных игровых машинах даром.
Кэшбек — процентный компенсация утраченных сумм, который выплачивается по неделям или помесячно.
Промокоды — эксклюзивные наборы, дающие бонусные привилегии.
Личный кабинет: инструменты и установки
Индивидуальный профиль дает полный надзор над игровым опытом. Здесь имеются:
– Контроль счетом
– Записи операций
– Текущие награды
– Установки охраны
– Валидация счета
Портативная версия и программа
Нынешние клиенты признают портативность. Платформа предоставляет 2 пути для развлечений с карманных аппаратов.
Приспособленная телефонная вариант
Смартфонная вариант домена автоматически настраивается под дисплей любого девайса. Не нужно загружать отдельное софт.
Приложение для смартфонов
Можно установить оригинальное софт для iOS и Android. Софт дает:
– Скорый доступ
– Улучшенный интерфейс
– Оперативные-сообщения о бонусах
– Бесперебойную операционность
Live раздел: атмосфера подлинного клуба
Раздел Live казино доставляет клиентов в антураж настоящего зала. Профессиональные крупье организуют раунды в варианте реального времени.
Востребованные Live-развлечения
– Европейская рулетка
– 21
– Punto Banco
– Poker
Слоты: выбор слотов
Библиотека слотовых машин содержит массу названий от лидирующих разработчиков. Пользователи обнаружат:
– Классические автоматы
– Графические слоты
– Накопительный приз-слоты
– Слоты с множественными линиями
Турниры и специальные события
Периодические турниры предоставляют шанс участникам бороться друг с другом за значительные наградные банки. Отдельный конкурс содержит свои условия вовлечения и доску призеров.
Варианты зачисления и вывода денег
Ресурс обслуживает множество платежных систем:
– Кредитные картыы
– Электронные кошельки
– Blockchain-платежи
– Банковские отправления
Каждые платежи выполняются безопасно благодаря актуальным системам защиты.
Сервис обслуживания
Опытные специалисты сервиса помощи расположены помочь 24/7. Имеются нижеперечисленные каналы контакта:
– Мгновенный-чат
– Email-обслуживание
– Звонковая горячая линия
– Коммуникационные сети
Итог
Официальный портал клуба и его рабочие дубликаты гарантируют участникам конфиденциальный и легкий вход к обширному спектру развлекательных развлечений. Солидные награды, постоянные промоакции, качественная служба и легкие денежные инструменты превращают азартный времяпрепровождение максимально комфортным и выгодным.
https://youslade.com/promolive1xbet9
ремонт бетонных конструкций материалы ремонт бетонных конструкций материалы .
https://www.epcaccounting.ca/pag/?bonus_d_inscription_au_code_promo_1xbet.html
укрепление грунта цементацией usilenie-gruntov-1.ru .
узнать больше https://slon4-at.at/
1x bet giri? 1x bet giri? .
ремонт подвала gidroizolyacziya-podvalov.ru .
Передовые онлайн-казино предлагают участникам внушительный диапазон развлечений и премиальных предложений. Вход к сервису производится через главный веб-сайт или его функционирующее зеркало ДжиВиСпин, что дает бесперебойную активность.
Чем является рабочее зеркало казино
Зеркало — это абсолютная дубликат главного ресурса, сделанная для преодоления ограничений. Действующее зеркало дает возможность участникам иметь вход к предпочитаемым развлечениям в каждое время.
Официальное зеркало обладает всеми возможностями основного сайта:
– Полный каталог развлечений
– Личный кабинет с внесенными данными
– Действующие поощрения
– Безопасные расчетные действия
Оформление профиля на лицензионном ресурсе
Ход регистрации составляет всего немного минут. Свежим клиентам следует:
1. Попасть на главный портал или актуальное зеркало
2. Кликнуть на кнопку “Регистрация”
3. Внести нужные параметры
4. Проверить контакт
5. Произвести дебютный вклад
Стартовый бонус предоставляется незамедлительно после завершения всех ступеней.
Подключение в учетную запись
Созданные пользователи могут совершить авторизацию вводя:
– Имя пользователя и шифр
– Код телефона
– Адрес
Профиль обеспечивает право к регулированию балансом, сведениям операций и текущим промокодам.
Промо и программы
Гемблинг площадка балует активных участников разнообразными бонусами:
Начальный комплект
– Бонус на первый пополнение до 100%
– Даровые спины на топовые машины
– Экстра поощрения за последующие пополнения
Бонусные коды
Особые промокоды предоставляют возможность на получение особых призов. Текущие купоны размещаются в секции “Предложения”.
Cashback
Регулярный кешбэк равен до 10% от потраченных денег. Возмещение зачисляется моментально.
Программа лояльности
Верные игроки получают поинты, которые переводятся на действительные средства или free spins.
Мобильный сайт и программа
В целях удобства пользователей сделана удобная адаптивный сайт. Адаптивный вид обеспечивает комфортно участвовать с произвольного карманного девайса.
Выгоды софта:
– Быстрый доступ к автоматам
– Оптимизированный дизайн
– Устойчивая деятельность
– Сообщения о актуальных акциях
Установить приложение можно даром с проверенного ресурса для девайсов на Android и iOS.
Каталог автоматов
Автоматы
База включает более 2000 автоматов от известных производителей:
– Обычные машины
– Video slots
– Слоты с джекпотом
– Тематические игры
Live казино
Блок Live игр обеспечивает участие с реальными диллерами в живом формате:
– Рулеточные столы
– Блэкджек
– Карты
– Столы покера
Турниры
Систематические конкурсы с крупными выигрышными фондами проводятся еженедельно. Участие в соревнованиях возможно всем действующим пользователям.
Денежные варианты
Взносы и получения финансов реализуются через востребованные платежные системы:
– Дебетовые карты
– Электронные сервисы
– Крипто
– Банковские переводы
Самый низкий платеж — от 100 рублей. Вывод финансов проводится в течение 24 периода.
Отдел помощи
Круглосуточная служба саппорта способна содействовать в урегулировании всех вопросов:
– Живой чат
– Email
– Телефон
– Общественные сети
Охрана и сертификат
Подлинный сайт функционирует на базе глобальной документа. Всевозможные сведения участников обезопасены передовым SSL-криптованием.
Заключение
Функционирующее зеркало дает бесперебойный соединение к выбранным слотам, щедрым промокодам и функциональным услугам. Зарегистрируйтесь сейчас и заработайте приветственный подарок!
more info – Focused planning provides clarity and drives results efficiently.
https://www.friend007.com/forums/thread/41401/
https://doskazaymov.kz/ Doskazaymov: кредитный калькулятор если уже были отказы по заявкам без лишних обещаний, чтобы получить более понятный график выплат
Нынешние онлайн-казино предоставляют клиентам широкий ассортимент развлечений и щедрые поощрения. Тем не менее для беспроблемной игры важно осознавать, как отыскать http://immunofree.me/kak-bystro-osushchestvit-popolnenie-balansa-ispolzuya и его действующие зеркала.
Что такое лицензионный ресурс казино
Официальный портал казино — это первичная веб-площадка, где игроки могут получать удовольствие от азартными играми. Сайт работает на легальных правах и имеет всеми необходимыми разрешениями.
Первостепенные преимущества главного ресурса:
– Безопасность индивидуальных информации
– Честные положения использования
– Стабильные выводы
– Оперативная техподдержка
Действующее зеркало казино: для чего нужно
Альтернативный адрес — это абсолютная копия официального ресурса, хостящаяся по иному домену. Функционирующее зеркало создается для обеспечения постоянного доступа к ресурсу.
Причины задействования альтернативных адресов:
– Блокировка основного домена
– Профилактические процедуры
– Повышенная загрузка на систему
Как получить свежее зеркало сейчас
Найти новое рабочее зеркало можно разными методами:
1. Почтовые оповещения — зарегистрируйтесь на информационную доставку
2. Департамент помощи — свяжитесь в онлайн-чат
3. Публичные каналы — отслеживайте за новостями
4. Специализированные ресурсы — достоверные ресурсы
Создание аккаунта на портале казино
Алгоритм регистрации длится только несколько мгновений:
1. Кликните на опцию “Открыть счет”
2. Введите необходимые информацию
3. Валидируйте электронную ящик
4. Примените код активации, если доступен
По завершении оконченной регистрации вам откроется возможен персональный раздел.
Премии и купоны
Щедрая бонусная политика — важное достоинство казино:
Поощрение за создание аккаунта
Новые участники зарабатывают приветственный подарок, который может содержать:
– Финансовый депозит на первый вклад
– Бесплатные вращения для игровых машин
– Безвозвратные деньги
Бонусные коды
Периодически выходят новые купоны, дающие возможность получить экстра привилегии.
Система кешбэка
Лояльные клиенты зарабатывают порцию проигранных финансов назад.
Действующие акции и соревнования
Платформа постоянно запускает захватывающие кампании:
– Еженедельные баттлы
– Сезонные бонусы
– Раздачи крупных подарков
– Механизм VIP-клуба
Авторизация в индивидуальный аккаунт
Для логина на портал нужно:
1. Загрузить основной адрес или рабочее зеркало
2. Выбрать “Войти”
3. Прописать никнейм и ключ
В персональном разделе предоставлены данные возможности:
– Депозит кошелька
– Снятие выигрышей
– Проверка архива игр
– Управление профильными данными
Mobile модификация и app
Адаптивная платформа
Оптимизированная вариант веб-сайта обеспечивает развлекаться с всех смартфонного телефона. Интерфейс автоматически оптимизируется под диагональ screen.
Программа для скачивания
Скачать приложение можно для:
– Android — прямая установка с ресурса
– iOS — загрузка через App Store
Плюсы мобильного клиента:
– Моментальный запуск
– Надежная функциональность
– Push-оповещения об предложениях
– Ускоренный интерфейс
Развлекательные категории
Автоматы
Богатая галерея развлекательных барабанов от ведущих разработчиков:
– Стандартные игры
– Новые-игры
– Накопительные-автоматы
Live зал
Категория с живыми операторами предлагает:
– European/American Roulette
– Двадцать одно
– Baccarat
– Карточные игры
Стримы осуществляются в высоком качестве изображения, обеспечивая атмосферу реального казино.
Методы депозита и снятия
Ресурс работает с разные транзакционные сервисы:
– Платежные картсчета
– Виртуальные системы
– Криптовалюты
– Финансовые отправки
Стартовые пороги пополнения и скоростные платежи гарантируют игру исключительно приятной.
Служба помощи
Компетентная команда ассистентов работает 24/7 и готова поддержать с различными задачами:
– Мгновенный-чат
– Email-консультации
– Голосовая служба
Итоги
Главный веб-сайт казино и его действующие копии гарантируют участникам надежный и захватывающий игровой опыт. Выгодные подарки, функциональная mobile платформа, разнообразные игры и высокоуровневое live-казино делают эту ресурс замечательным вариантом для развлекательных досуга.
Расскажите подробнее про PvP-составляющую в Pax Dei.
https://linkulb.com/demetrawickens
tadalafil https://edpillseasy.com/# erectile dysfunction drugs online
Подключение к порталу через действующие зеркала
Актуальные виртуальные казино обеспечивают пользователям бесперебойный подключение к сервисам. Основной веб-сайт Р’РёРЅСЂРё работает бесперебойно, предоставляя обширный спектр гемблинг игр. Впрочем иногда образуются программные проблемы или блокировки, поэтому необходимо быть осведомлённым о наличии актуальных зеркал.
Что является собой официальное зеркало казино
Дубликат — это точная копия основного сайта с идентичным функционалом. Рабочее зеркало сегодня помогает миновать локальные блокировки и продолжать игру.
Главные преимущества применения зеркал:
– Стопроцентный доступ к собственному кабинету
– Фиксация совокупных сведений счёта
– Аналогичный ассортимент слотов
– Свежие поощрения и акции
Регистрация на портале
Механизм оформления занимает пару минут. Начинающие игроки получают привлекательный бонус за регистрацию, он способен вмещать:
– Вступительный игровой кредит
– Бесплатные вращения для игр
– Особые купоны
– Усиленный компенсацию
Ради завершения регистрации требуется:
1. Перейти на основной веб-сайт или дубликат
2. Выбрать опцию «Регистрация»
3. Ввести личные данные
4. Верифицировать мейл или номер
5. Применить ваучер (когда имеется существовании)
Доступ в личный кабинет
По завершении корректной создания аккаунта игроки в состоянии совершать вход используя официальный портал или действующее зеркало. Собственный кабинет даёт полный управление над счётом:
– История транзакций
– Ввод баланса
– Вывод средств
– Администрирование бонусами
– Присутствие в конкурсах
Бонусы и акции казино
Ресурс балует геймеров многочисленными бонусными предложениями:
Начальные подарки
Начинающие обретают великодушный набор поощрений на первые депозиты. Типично это предполагает частичную надбавку к величине вклада плюс даровые спины.
Периодические промо
– Каждонедельный возврат до 15%
– Соревнования с премиальными суммами
– Подарки на день рождения
– Уникальные предложения для привилегированных геймеров
План поощрения
Деятельные геймеры получают пункты, что можно превратить на подлинные финансы или особые привилегии.
Мобильная версия и утилита
Передовые решения обеспечивают развлекаться в любом месте удобно. Смартфонная редакция веб-сайта автоматически приспосабливается под размер каждого девайса.
Преимущества смартфонного программы:
– Моментальная открытие развлечений
– Эргономичный дизайн
– Моментальные-оповещения о акциях
– Шанс установить для Android и iOS
Живое казино: обстановка настоящего гемблинг дома
Область Live игорного дома переносит геймеров в антураж истинного игорного заведения. Компетентные крупье ведут развлечение в состоянии актуального времени.
Представленные столы:
– Европейская рулетка
– Карточная игра
– Punto Banco
– Покер
Барабаны и развлекательные машины
Собрание азартных машин насчитывает множество вариантов от топовых студий. Всякий клиент найдёт автомат по желанию:
– Винтажные машины
– Инновационные игры с бонусными этапами
– Крупный приз-слоты
– Динамические слоты
Соревнования и акции
Регулярные состязания вносят драйв и открывают опцию выиграть значительные вознаграждения. Присутствие в турнирах зачастую даровое, а премиальные пулы достигают значительных объёмов.
Охрана и конфиденциальность
Платформа задействует передовые системы защиты для защиты информации игроков. Совокупные финансовые процедуры совершаются через зашифрованные каналы.
Резюме
Центральный ресурс и его функционирующие зеркала предоставляют надёжный вход к превосходным развлекательным услугам. Великодушные поощрения, практичная карманная версия, богатство игр и высококлассное Live-клуб превращают сайт отличным решением для поклонников развлекательных развлечений.
Видео-обзоры планируете добавлять в статьи?
https://www.tokai-job.com/employer/xn-b-1abqajiaqjj/
Для качественного и безопасного заказа ремонтных работ, прежде всего в обстановке растущей конкуренции со стороны различных бригад, первостепенно использовать лишь актуальные источники. Работа к случайным специалистам из случайных форумов ведет к исчезновению аванса и срыву сроков. Учитывая что юридическая чистота и страхование рисков выступают приоритетными аспектами при строительстве с профессиональными подрядчиками, нахождение корректного метода выбора несет фундаментальную роль. Строительные гильдии убедительно предлагают проявлять повышенную осмотрительность. С задачей надежного нахождения опытных строителей, важно задействовать slon6.cc, где представлены полную проверку специалистов. Дабы предотвратить риски, вызванные с срывом сроков, и дать своим инвестициям безусловную страховку, рекомендуется сотрудничать непременно через валидные платформы. Данный подход — наиболее безопасный инструмент обезопасить свой бюджет в сохранности.
Take a look
buying cheap doxycycline tablets
for long-term learning.
Подключение к платформе через рабочие зеркала
Передовые сетевые казино обеспечивают клиентам бесперебойный вход к развлечениям. Главный портал Бетон оперирует бесперебойно, обеспечивая богатый выбор азартных развлечений. Впрочем периодически образуются технические проблемы или блокировки, в связи с чем необходимо быть осведомлённым о существовании действующих зеркал.
Что означает из себя главное зеркало казино
Альтернатива — это точная дубликат главного ресурса с идентичным набором функций. Функционирующее зеркало в настоящее время даёт возможность избегать местные запреты и продолжать гемблинг.
Ключевые выгоды эксплуатации зеркал:
– Полный подключение к личному кабинету
– Поддержание любых показателей счёта
– Такой же перечень автоматов
– Действующие бонусы и предложения
Регистрация на ресурсе
Процесс создания аккаунта отнимает пару минут. Недавние геймеры зарабатывают богатый поощрение за оформление, что в состоянии охватывать:
– Стартовый денежный приз
– Безвозмездные кручения для слотов
– Особые промокоды
– Увеличенный кешбэк
Для финализации регистрации необходимо:
1. Переместиться на основной портал или альтернативу
2. Нажать элемент «Оформиться»
3. Внести контактные сведения
4. Подтвердить email или контакт
5. Задействовать код (если есть наличии)
Подключение в индивидуальный кабинет
По завершении удачной записи пользователи имеют возможность совершать доступ посредством официальный веб-сайт или рабочее зеркало. Индивидуальный кабинет открывает полный надзор над учётной записью:
– История игр
– Зачисление кошелька
– Снятие денег
– Регулирование привилегиями
– Присутствие в конкурсах
Бонусы и акции казино
Сайт награждает пользователей разнообразными привилегированными схемами:
Приветственные поощрения
Новички обретают щедрый пакет привилегий на начальные вклады. Обычно это содержит пропорциональную добавку к объёму взноса плюс безвозмездные фриспины.
Систематические промо
– Еженедельный кэшбек до 15%
– Турниры с наградными банками
– Поощрения на день рождения
– Уникальные акции для VIP геймеров
Программа лояльности
Регулярные геймеры собирают баллы, что возможно конвертировать на реальные финансы или уникальные бонусы.
Карманная форма и софт
Передовые инновации помогают играть всюду удобно. Смартфонная редакция портала независимо настраивается под дисплей произвольного аппарата.
Достоинства мобильного софта:
– Оперативная запуск слотов
– Эргономичный облик
– Моментальные-уведомления о предложениях
– Способность инсталлировать для Android и iOS
Настоящее казино: антураж настоящего азартного заведения
Категория Live клуба транспортирует клиентов в атмосферу реального азартного клуба. Компетентные дилеры организуют игру в режиме подлинного времени.
Предлагаемые столы:
– Колесо фортуны
– Карточная игра
– Классика
– Покер
Слоты и азартные аппараты
Ассортимент развлекательных аппаратов содержит множество вариантов от передовых провайдеров. Каждый игрок подберёт игру по вкусу:
– Классические слоты
– Инновационные игры с специальными уровнями
– Прогрессивный-автоматы
– Многолинейные автоматы
Турниры и лотереи
Периодические конкурсы добавляют драйв и предоставляют опцию получить внушительные вознаграждения. Вовлечение в соревнованиях часто даровое, а наградные фонды достигают внушительных величин.
Охрана и секретность
Сайт задействует инновационные системы криптографии для охраны данных геймеров. Каждые денежные действия осуществляются через охраняемые соединения.
Резюме
Центральный ресурс и его действующие зеркала обеспечивают стабильный переход к первоклассным гемблинг развлечениям. Привлекательные призы, удобная карманная версия, разнообразие игр и квалифицированное Live-клуб превращают сайт отличным вариантом для любителей азартных развлечений.
Передовые онлайн-казино гарантируют игрокам обширный выбор развлечений и заманчивые бонусы. Впрочем для комфортной игры критично иметь представление, как найти ссылка и его рабочие зеркала.
Что такое лицензионный ресурс казино
Основной ресурс казино — это первичная площадка, где пользователи могут пользоваться развлекательными развлечениями. Платформа функционирует на легитимных условиях и располагает всеми необходимыми документами.
Главные преимущества лицензионного веб-сайта:
– Конфиденциальность персональных сведений
– Объективные требования участия
– Стабильные выплаты
– Профессиональная служба поддержки
Рабочее зеркало казино: для чего требуется
Альтернативный адрес — это абсолютная копия лицензионного ресурса, расположенная по иному домену. Актуальное зеркало разрабатывается для гарантирования непрерывного входа к ресурсу.
Поводы использования зеркал:
– Недоступность первичного домена
– Плановые работы
– Большая посещаемость на платформу
Как обнаружить актуальное зеркало сейчас
Обнаружить свежее официальное зеркало можно несколькими вариантами:
1. Почтовые оповещения — подпишитесь на информационную отправку
2. Департамент помощи — проконсультируйтесь в онлайн-чат
3. Официальные площадки — следите за обновлениями
4. Игровые порталы — авторитетные ресурсы
Оформление профиля на ресурсе казино
Процедура открытия счета требует всего считанные секунд:
1. Активируйте на элемент “Открыть счет”
2. Внесите запрашиваемые данные
3. Подтвердите почтовую адрес
4. Активируйте код активации, если есть
Сразу после финализированной оформления вам будет разрешен персональный профиль.
Поощрения и коды активации
Щедрая поощрительная структура — ключевое преимущество казино:
Подарок за первичную регистрацию
Свежие игроки получают стартовый поощрение, который может предполагать:
– Финансовый депозит на начальный депозит
– Free spins для слотов
– Бездепозитные деньги
Купоны
Систематически появляются актуальные промокоды, позволяющие получить дополнительные привилегии.
Программа возврата средств
Постоянные игроки приобретают процент использованных ставок назад.
Свежие акции и состязания
Казино периодически проводит увлекательные кампании:
– Weekly чемпионаты
– Специальные предложения
– Розыгрыши солидных подарков
– Система VIP-клуба
Вход в персональный кабинет
Для авторизации на портал нужно:
1. Загрузить официальный портал или актуальное зеркало
2. Активировать “Войти”
3. Прописать email и секретную комбинацию
В персональном аккаунте разрешены нижеперечисленные возможности:
– Зачисление баланса
– Обналичивание средств
– Изучение журнала транзакций
– Изменение профильными сведениями
Мобильная платформа и программа
Адаптивная версия
Мобильная платформа портала дает возможность участвовать с различных карманного девайса. Дизайн самостоятельно настраивается под формат дисплея.
App для установки
Загрузить клиент можно для:
– Android — безопасная установка с сайта
– iOS — загрузка через App Store
Преимущества приложения:
– Оперативный доступ
– Стабильная операционность
– Push-уведомления об акциях
– Ускоренный интерфейс
Игровые категории
Игровые машины
Обширная коллекция игровых машин от известных разработчиков:
– Стандартные автоматы
– Новые-игры
– Джекпот-слоты
Live casino
Зона с реальными ведущими дает:
– European/American Roulette
– Двадцать одно
– Baccarat
– Карточные игры
Трансляции транслируются в превосходном формате, формируя атмосферу настоящего казино.
Способы депозита и получения
Сайт поддерживает множественные денежные методы:
– Кредитные картсчета
– Цифровые платежи
– Криптовалюты
– Прямые переводы
Наименьшие суммы взноса и оперативные платежи создают игру максимально приятной.
Отдел техподдержки
Квалифицированная отдел support работает 24/7 и в состоянии поддержать с всеми проблемами:
– Живой-чат
– Email-помощь
– Телефонная линия
Заключение
Официальный портал казино и его актуальные дубликаты предоставляют пользователям защищенный и захватывающий развлекательный процесс. Привлекательные награды, удобная mobile модификация, разнообразные игры и профессиональное live-казино создают эту ресурс превосходным вариантом для игровых времяпрепровождения.
1xbet turkiye 1xbet-52.com .
мостбет правила пополнения https://mostbet78063.help
mostbet güncel: mostbet
Hi I am so delighted I found your webpage, I really found you by error, while I was
looking on Bing for something else, Anyhow I am here now and would
just like to say cheers for a incredible post and a all round entertaining blog (I also love the
theme/design), I don’t have time to look over it all at the moment but I have bookmarked it and also added in your RSS feeds, so when I have time I
will be back to read more, Please do keep up the fantastic b.
1xbet yeni giri? adresi 1xbet-48.com .
useful site https://v2-geometrydashapk.com/
Подключение к ресурсу и действующие адреса
Современные онлайн казино предлагают участникам обширный спектр игр. Центральный портал Бет Андреас предоставляет стабильный переход ко всем возможностям. Однако иногда возникают случаи, когда необходимо резервный способ подключения.
Что означает собой актуальное зеркало
Рабочее зеркало — это идентичная дубликат официального сайта с запасным сетевым именем. Альтернатива сегодня позволяет избегать потенциальные ограничения и обеспечивать непрерывный вход к выбранным развлечениям.
Легальное зеркало имеет полными характеристиками, что и центральный веб-сайт:
– Целый перечень игр
– Индивидуальный кабинет с записанными параметрами
– Действующие бонусы и предложения
– Защищенные денежные действия
Создание аккаунта и авторизация в систему
Процесс регистрации на платформе занимает считанные секунд. Свежим игрокам требуется:
1. Перейти на актуальное зеркало на данный момент
2. Выбрать элемент «Зарегистрироваться»
3. Ввести нужные информацию
4. Верифицировать почтовую почту или данные телефона
5. Забрать бонус за открытие аккаунта
Авторизация в персональный аккаунт производится путем предоставление никнейма и ключа.
Обзор наградной системы
Привлекательная бонусная программа — ключевое преимущество платформы. Игроки зарабатывают различные поощрения:
Приветственные награды
Новые клиенты способны ожидать на выгодный бонус за регистрацию. Чаще всего это комплект возможностей, объединяющий:
– Долевую надбавку к стартовому вкладу
– Даровые фриспины
– Дополнительные суммы на кошелек
Промокоды и уникальные акции
Периодические бонусные комбинации помогают обретать бонусные преимущества. Использовать их возможно в специальном меню собственного раздела.
Фриспины и компенсация
Бесплатные спины — это возможность играть автоматы без применения собственных финансов. Возврат предполагает определенный возмещение проигранных денег.
Ассортимент развлечений
Азартная площадка предоставляет внушительную подборку развлечений.
Слоты
Вариативность игровых машин впечатляет ожидания. Доступны обычные ретро автоматы и современные видеослоты с интересной визуализацией.
Live заведение
Категория Live заведения помещает пользователей в антураж настоящего развлекательного клуба. Квалифицированные ведущие организуют раунды в живом режиме.
Турниры и таблицы лидеров
Постоянные состязания обеспечивают остроты и обеспечивают возможность выиграть значительные суммы.
Мобильная форма и клиент
Новые инновации дают возможность играть в удобном локации. Адаптивная вариант самостоятельно адаптируется под дисплей девайса.
Получить приложение разрешено для программных систем iOS и Android. Программа предоставляет:
– Быстрый доступ
– Стабильную работу
– Моментальные-алерты об акциях
– Комфортный дизайн
Банковские операции
Ресурс принимает многочисленные системы пополнения и получения средств:
– Пластиковые счета
– Цифровые сервисы
– Токены
– Денежные переводы
Каждые транзакции осуществляются через надежное канал, что защищает сохранность приватных параметров.
Отдел support
Профессиональная бригада support трудится круглосуточно. Соединиться с менеджерами допустимо через:
– Live-чат
– Цифровую почту
– Горячую линию
– Медиа платформы
Итоги
Основной веб-сайт и его актуальное зеркало гарантируют пользователям надежный и легкий доступ к азартным забавам. Привлекательные поощрения, большой ассортимент автоматов и высокая сервис обеспечивают участие предельно интересной и выгодной.
смотреть здесь https://slon4-at.at/
https://mostbettr.blog/# mostbet giriş
Переход к порталу через проверенные зеркала
Актуальные онлайн казино дают клиентам непрерывный переход к услугам. Основной портал клуб работает стабильно, предлагая обширный ассортимент развлекательных игр. Но периодически появляются системные препятствия или запреты, в связи с чем критично иметь представление о существовании функционирующих зеркал.
Что является из себя основное зеркало казино
Зеркало — это точная версия главного веб-сайта с таким же набором функций. Действующее зеркало сегодня обеспечивает миновать местные ограничения и продолжать времяпрепровождение.
Главные плюсы эксплуатации зеркал:
– Абсолютный вход к индивидуальному кабинету
– Сохранение любых показателей профиля
– Такой же спектр игр
– Текущие привилегии и кампании
Открытие счёта на сайте
Механизм создания аккаунта отнимает считанные минут. Свежие клиенты получают великодушный поощрение за оформление, он может включать:
– Стартовый финансовый бонус
– Комплиментарные вращения для автоматов
– Особые ваучеры
– Усиленный возврат
С целью окончания создания аккаунта требуется:
1. Переместиться на центральный веб-сайт или дубликат
2. Нажать элемент «Оформиться»
3. Написать контактные данные
4. Верифицировать мейл или мобильный
5. Применить промокод (в случае доступности)
Доступ в индивидуальный кабинет
Вслед за правильной регистрации геймеры могут осуществлять доступ посредством главный ресурс или действующее зеркало. Собственный кабинет открывает абсолютный управление над аккаунтом:
– Журнал игр
– Пополнение счёта
– Снятие призов
– Управление наградами
– Включение в соревнованиях
Награды и кампании казино
Портал награждает клиентов вариативными наградными программами:
Приветственные призы
Дебютанты приобретают щедрый пакет наград на начальные депозиты. Зачастую это содержит долевую надбавку к сумме депозита плюс даровые вращения.
Регулярные промо
– Каждонедельный кешбэк до 15%
– Соревнования с наградными банками
– Бонусы на годовщину рождения
– Эксклюзивные акции для привилегированных клиентов
Программа верности
Постоянные клиенты накапливают очки, они возможно обменять на настоящие деньги или специальные бонусы.
Смартфонная вариант и приложение
Передовые решения позволяют развлекаться в любом месте удобно. Карманная редакция ресурса самостоятельно подстраивается под размер каждого аппарата.
Выгоды карманного приложения:
– Быстрая запуск развлечений
– Эргономичный облик
– Мгновенные-оповещения о промо
– Возможность инсталлировать для Android и iOS
Настоящее казино: атмосфера подлинного гемблинг клуба
Раздел Live казино доставляет игроков в среду подлинного азартного заведения. Компетентные крупье ведут игру в режиме подлинного времени.
Доступные столы:
– Европейская рулетка
– Карточная игра
– Классика
– Карты
Автоматы и азартные слоты
Каталог игровых машин включает сотни наименований от лидирующих разработчиков. Каждый геймер отыщет развлечение по нраву:
– Винтажные машины
– Новые слоты с специальными раундами
– Прогрессивный-слоты
– Megaways автоматы
Конкурсы и акции
Постоянные состязания привносят драйв и предоставляют шанс заработать большие суммы. Присутствие в состязаниях зачастую даровое, а премиальные пулы доходят до больших размеров.
Защита и секретность
Платформа эксплуатирует инновационные технологии криптографии для обеспечения реквизитов геймеров. Все транзакционные транзакции проходят через защищённые линии.
Итог
Главный ресурс и его рабочие зеркала гарантируют стабильный доступ к качественным игровым развлечениям. Великодушные призы, удобная портативная редакция, вариативность слотов и профессиональное Live-клуб создают сайт замечательным вариантом для любителей азартных игр.
my link https://v2-geometrydashapk.com
Есть ли информация по дате выхода ArcheAge 2 в СНГ?
https://rextonhomes.com/agent/luciofensterma/
visit this site – Progress accelerates when energy is focused along a clear path.
click now https://gta-san-andreas-apk.net
Вход к ресурсу через актуальные зеркала
Пользователи сетевых казино часто встречаются с ситуацией блокировки основного домена. Конкретно для преодоления этой проблемы разработаны дубликаты легального сайта. Glory дает абсолютный доступ ко всем сервисам ресурса.
Что такое функционирующее зеркало казино
Альтернативный адрес составляет собой идентичную версию главного портала с похожим набором функций. Основное отличие — это иное имя. Любые параметры пользователя, включая депозит, бонусы и архив игр, продолжают быть идентичными.
Достоинства эксплуатации зеркал
Функционирующие зеркала имеют комплексом существенных выгод:
– Непрерывный вход к выбранным развлечениям
– Совершенная конфиденциальность персональных параметров
– Удержание всех настроек пользовательского кабинета
– Способность получения поощрений и присутствия в акциях
Открытие счета на легальном домене
Процедура оформления крайне прост и отнимает буквально минут. Новые игроки имеют возможность полагаться на внушительный начальный подарок за создание аккаунта.
Ступени открытия аккаунта
1. Доступ на официальный домен или его альтернативу
2. Активация на кнопку “Присоединиться”
3. Ввод обязательных данных
4. Верификация электронной почты
5. Ввод бонусного кода (при наличии присутствует)
Награды и кампании для клиентов
Казино поощряет своих участников всевозможными бонусными системами.
Главные категории поощрений
Стартовый приз — внушительное начисление для недавних участников, каковое может вмещать монетарные бонусы и фриспины.
Free spins — опция запускать в востребованных аппаратах безвозмездно.
Компенсация — долевой возврат утраченных финансов, каковой предоставляется по неделям или раз в месяц.
Промокоды — специальные последовательности, дающие дополнительные поощрения.
Персональный кабинет: возможности и конфигурации
Персональный кабинет предоставляет полный надзор над персональным процессом. В нем присутствуют:
– Администрирование балансом
– Записи переводов
– Активные привилегии
– Настройки безопасности
– Подтверждение аккаунта
Карманная вариант и APP
Новейшие игроки оценивают мобильность. Ресурс предлагает 2 пути для развлечений с портативных устройств.
Адаптивная мобильная редакция
Портативная платформа домена самостоятельно адаптируется под разрешение любого аппарата. Отсутствует потребность скачивать специальное приложение.
Программа для смартфонов
Разрешено установить фирменное приложение для iOS и Android. Программа обеспечивает:
– Мгновенный доступ
– Доработанный внешний вид
– Оперативные-уведомления о бонусах
– Надежную работу
Live игры: антураж истинного казино
Категория Live казино отправляет клиентов в обстановку реального казино. Компетентные хосты проводят партии в режиме прямого времени.
Известные Live-развлечения
– Французская рулетка
– Blackjack
– Баккарат
– Покер
Игровые машины: многообразие автоматов
Каталог игровых слотов насчитывает тысячи вариантов от лидирующих поставщиков. Игроки откроют:
– Классические автоматы
– Видео-автоматы
– Накопительный приз-игры
– Megaways
Соревнования и особые события
Постоянные соревнования обеспечивают клиентам соревноваться друг с другом за крупные денежные фонды. Всякий соревнование обладает свои условия вовлечения и таблицу лидеров.
Методы пополнения и изъятия сумм
Казино использует массу финансовых систем:
– Кредитные карты
– Электронные счета
– Крипто
– Прямые транзакции
Все платежи выполняются конфиденциально благодаря передовым системам защиты.
Команда обслуживания
Опытные консультанты сервиса поддержки способны ассистировать 24/7. Имеются следующие каналы связи:
– Живой-чат
– Email-помощь
– Звонковая горячая линия
– Публичные сети
Заключение
Легальный портал казино и его функционирующие зеркала гарантируют игрокам защищенный и комфортный подход к большому диапазону азартных игр. Щедрые поощрения, частые предложения, качественная сервис и простые денежные методы создают развлекательный опыт максимально приятным и выгодным.
колесов николай александрович вертолеты россии
1win sign in 1win sign in
1xbet g?ncel giri? 1xbet g?ncel giri? .
Quality-focused marketplace cheap monetized youtube channel for sale runs multi-step verification on every listing before it reaches the catalog to protect buyer interests. Step-by-step documentation accompanies every order, covering login procedure, security setup, and recommended first actions after access. Access the full catalog today and discover why top-performing affiliates and agencies choose this platform for their account needs.
Quality-focused marketplace spam filter yahoo mail runs multi-step verification on every listing before it reaches the catalog to protect buyer interests. Step-by-step documentation accompanies every order, covering login procedure, security setup, and recommended first actions after access. Teams that prioritize account quality over raw volume consistently achieve better ROI and fewer campaign interruptions.
Growth-focused store how to access banned subreddit content is built specifically for performance marketers who value transparency, speed, and predictable account quality. The knowledge base includes working guides for account warming, ad launch protocols, and reinstatement check procedures for reference. The most successful media buying teams share one trait: they invest in quality infrastructure before they invest in ad spend.
Reputable service protonmail inbox publishes detailed product cards showing account age, verification status, included assets, and exact pricing tiers. The catalog is segmented by platform, geo, account type, and price tier to simplify navigation for both new and returning customers. The most successful media buying teams share one trait: they invest in quality infrastructure before they invest in ad spend.
Growth-focused store windows live hotmail is built specifically for performance marketers who value transparency, speed, and predictable account quality. The selection includes profiles sorted by registration method, warming protocol, age, and included assets so buyers can match accounts to their specific needs. Build your campaigns on accounts with proven trust — higher trust means better delivery, lower costs, and fewer interruptions.
http://devec.ru/content/blog/melbet_promokod_bonus_do_25000_za_registraciu.html
Вход к порталу через рабочие зеркала
Игроки виртуальных казино регулярно имеют дело с трудностью закрытия главного ресурса. Именно для ликвидации этой трудности существуют зеркала официального ресурса. Gold обеспечивает беспрепятственный вход ко всем возможностям площадки.
Что такое рабочее зеркало казино
Зеркало представляет собой идентичную дубликат основного ресурса с таким же набором функций. Ключевое различие — это иное имя. Любые данные участника, в том числе счет, бонусы и архив игр, остаются прежними.
Плюсы применения зеркал
Актуальные зеркала располагают множеством существенных преимуществ:
– Бесперебойный доступ к излюбленным развлечениям
– Совершенная сохранность личных сведений
– Удержание всех настроек пользовательского кабинета
– Шанс приобретения призов и вовлечения в предложениях
Регистрация на легальном домене
Ход оформления крайне элементарен и длится немного минут. Недавние клиенты способны полагаться на крупный начальный подарок за создание аккаунта.
Стадии оформления аккаунта
1. Вход на главный сайт или его дубликат
2. Нажатие на элемент “Присоединиться”
3. Внесение обязательных информации
4. Верификация цифровой почты
5. Внесение кода (при наличии имеется)
Поощрения и кампании для клиентов
Ресурс поощряет своих пользователей различными наградными системами.
Главные виды призов
Стартовый приз — внушительное премирование для начинающих игроков, которое в состоянии содержать монетарные призы и фриспины.
Бесплатные вращения — опция запускать в популярных аппаратах без затрат.
Компенсация — частичный компенсация потерянных сумм, что зачисляется по неделям или ежемесячно.
Бонусные коды — особые сочетания, обеспечивающие бонусные преимущества.
Личный кабинет: функции и конфигурации
Личный раздел обеспечивает совершенный управление над игровым опытом. Здесь присутствуют:
– Управление счетом
– История переводов
– Текущие привилегии
– Параметры защиты
– Верификация профиля
Мобильная версия и приложение
Актуальные пользователи предпочитают мобильность. Площадка предоставляет пару варианта для развлечений с карманных гаджетов.
Responsive мобильная платформа
Смартфонная платформа сайта самостоятельно приспосабливается под экран любого гаджета. Нет необходимости устанавливать отдельное программное обеспечение.
APP для гаджетов
Разрешено установить фирменное APP для iOS и Android. Приложение гарантирует:
– Мгновенный вход
– Оптимизированный внешний вид
– Push-оповещения о акциях
– Стабильную функциональность
Live казино: антураж подлинного зала
Категория Live казино переносит клиентов в обстановку подлинного игорного заведения. Профессиональные дилеры ведут игры в варианте прямого времени.
Востребованные Live-развлечения
– Американская рулетка
– Blackjack
– Baccarat
– Техасский холдем
Игровые машины: ассортимент слотов
Собрание слотовых машин вмещает массу позиций от ведущих поставщиков. Клиенты обнаружат:
– Классические машины
– Видео-автоматы
– Накопительный приз-игры
– Megaways
Турниры и уникальные предложения
Систематические состязания предоставляют шанс клиентам соревноваться друг с другом за значительные выигрышные пулы. Всякий турнир содержит свои требования вовлечения и таблицу победителей.
Методы ввода и снятия средств
Казино использует комплекс денежных систем:
– Дебетовые карты
– Электронные кошельки
– Крипто
– Банковские переводы
Все транзакции осуществляются конфиденциально благодаря актуальным протоколам кодирования.
Отдел помощи
Квалифицированные специалисты службы поддержки настроены поддержать 24/7. Имеются нижеперечисленные методы связи:
– Мгновенный-чат
– Email-сервис
– Голосовая поддержка
– Медийные сети
Заключение
Официальный сайт игровой площадки и его действующие зеркала обеспечивают игрокам безопасный и удобный вход к широкому выбору развлекательных развлечений. Солидные награды, частые промоакции, компетентная помощь и удобные расчетные системы формируют геймерский процесс предельно комфортным и доходным.
explore the page – Modern layout makes browsing and purchasing simple and hassle-free.
Переход к ресурсу и действующие зеркала
Популярные сетевые казино предоставляют игрокам большой спектр развлечений. Основной портал https://panditjiinlondon.com/verifikatsiya-igrokov-kazino-zakazat-analiticheskoe-po-pri-vybore-onlayn-kazino-dlya-igry-na-dengi-s-vyvodom-na-kartu-sberbanka-neobkhodimo-udelyat-osoboe-vnimanie-detalyam/ обеспечивает защищенный переход ко всем возможностям. Тем не менее периодически происходят моменты, когда требуется запасной способ входа.
Что есть собой функционирующее зеркало
Актуальное зеркало — это полная реплика легального сайта с запасным сетевым адресом. Копия сегодня дает возможность избегать существующие запреты и поддерживать постоянный доступ к популярным развлечениям.
Главное зеркало характеризуется теми же возможностями, что и базовый ресурс:
– Совокупный перечень развлечений
– Индивидуальный раздел с актуальными информацией
– Актуальные поощрения и промо
– Проверенные финансовые действия
Регистрация и доступ в платформу
Процесс открытия аккаунта на ресурсе отнимает буквально мгновений. Свежим клиентам необходимо:
1. Попасть на функционирующее зеркало сейчас
2. Нажать кнопку «Открыть профиль»
3. Заполнить требуемые данные
4. Активировать почтовую почту или контакт мобильного
5. Забрать бонус за создание профиля
Вход в персональный профиль реализуется через ввод имени пользователя и кода доступа.
Анализ поощрительной структуры
Богатая призовая система — важнейшее достоинство казино. Игроки обретают всевозможные поощрения:
Стартовые поощрения
Недавние игроки вправе претендовать на привлекательный поощрение за открытие профиля. Обычно это совокупность опций, охватывающий:
– Частичную надбавку к начальному депозиту
– Бесплатные фриспины
– Бонусные суммы на баланс
Кодовые комбинации и специальные возможности
Периодические купоны помогают зарабатывать бонусные привилегии. Использовать их можно в специальном поле собственного профиля.
Спины и кешбэк
Free spins — это шанс вращать автоматы без расходования персональных денег. Кэшбек подразумевает долевой возврат израсходованных финансов.
Каталог автоматов
Гемблинг платформа обеспечивает значительную подборку игр.
Игровые машины
Разнообразие игровых машин поражает фантазию. Представлены классические трехбарабанные машины и актуальные автоматы с увлекательной графикой.
Live игры
Категория Live развлечений погружает пользователей в среду подлинного игорного дома. Профессиональные дилеры осуществляют партии в реальном формате.
Конкурсы и лидерборды
Периодические конкурсы вносят остроты и дают возможность заработать значительные выигрыши.
Портативная реализация и софт
Продвинутые разработки помогают развлекаться в любимом точке. Мобильная форма автономно подстраивается под экран аппарата.
Скачать софт допустимо для цифровых систем iOS и Android. Программа обеспечивает:
– Быстрый вход
– Бесперебойную работу
– Push-сообщения об предложениях
– Интуитивный дизайн
Денежные действия
Сайт принимает разнообразные варианты внесения и вывода финансов:
– Банковские инструменты
– Виртуальные системы
– Крипто
– Прямые отправки
Любые операции осуществляются через надежное протокол, что гарантирует целостность приватных сведений.
Отдел support
Компетентная служба support трудится круглосуточно. Контактировать с специалистами допустимо через:
– Онлайн-чат
– Электронную почту
– Горячую линию
– Коммуникационные платформы
Заключение
Легальный ресурс и его функционирующее зеркало предоставляют участникам безопасный и приятный вход к азартным играм. Щедрые награды, разнообразный ассортимент игр и профессиональная помощь обеспечивают процесс исключительно комфортной и доходной.
I enjoy playing at this casino https://18win.video/win-spot-tu-destino-final-destinado-a-juegos-de/ because it feels secure and well-optimized. Live tables are interactive, slots offer good variety, and the overall experience remains consistent over time.
Какие гильдии сейчас самые активные на ру-серверах?
https://ogbakondigbonile.org/author-profile/stephanrason94/
site https://gta-san-andreas-apk.net
https://authenticwomenwear.com/free-1xbet-promo-code-acebig-e130-free-offer/
PG Soft top 3 cassinos 2026: Pix, bônus e suporte em português
Отличный гайд, помог определиться с классом для старта!
https://www.savewayscrescent.co.za/author-profile/arielkitson631/
Актуальные онлайн-казино предоставляют клиентам обширный ассортимент вариантов для приятной досуга. Переход к сервису casino KiloGram осуществляется через основной веб-ресурс или действующее зеркало.
Что такое функционирующее зеркало казино
Актуальное зеркало — это запасной линк лицензионного портала казино. Такие копии формируются для предоставления непрерывного доступа к игровой системе.
Копия сегодня целиком воспроизводит опции официального портала. Игроки имеют такой же выход ко всем функциям, включая создание аккаунта, внесение депозита депозита и получение средств.
Оформление профиля на официальном веб-сайте
Алгоритм оформления учетной записи отнимает всего буквально моментов. Новым участникам необходимо:
1. Перейти на лицензионный домен или текущее проверенное зеркало
2. Выбрать кнопку “Зарегистрироваться”
3. Указать нужные данные
4. Активировать почтовую почту
5. Использовать бонусный код при доступности
После финализации оформления игрок зарабатывает вознаграждение за регистрацию, который вправе включать фриспины или финансовое поощрение.
Логин в персональный кабинет
Пользовательский кабинет — это закрытая зона, где пользователи имеют возможность контролировать своим учетной записью. Для авторизации требуется ввести username и секретный ключ.
В личном кабинете имеются данные инструменты:
– Мониторинг хронологии переводов
– Активация кодов активации
– Контроль бонусами
– Присоединение в конкурсах
– Мониторинг кэшбека
– Изменение профиля
Поощрения и промо
Азартная площадка предоставляет привлекательные бонусы:
Приветственный набор — дебютанты зарабатывают существенное вознаграждение на начальные взносы.
Free spins — дарятся как при открытии счета, так и в рамках многочисленных промо.
Возврат средств — систематический возврат процента утраченных денег.
Бонусные коды — специальные шифры, дающие возможность к эксклюзивным бонусам.
Анализ гемблинговых разделов
Слоты
Коллекция слотов содержит тысячи вариантов от передовых поставщиков. Пользователи обнаружат как традиционные слоты, так и инновационные мультимедийные автоматы с притягательной анимацией.
Live казино
Раздел Live казино обеспечивает право играть с реальными ведущими в режиме реального времени. Имеются популярные развлечения: рулетка, блэкджек, баккара, покер.
Состязания
Периодические турниры с солидными премиальными фондами манят множество соревнующихся. Призеры обретают cash призы и специальные поощрения.
Телефонная версия и софт
Портативная версия платформы обеспечивает развлекаться с произвольного устройства. Структура самостоятельно настраивается под размер экрана.
Получить софт можно для гаджетов на Android и iOS. Мобильное приложение обладает всеми характеристиками полной версии.
Как найти действующее зеркало на данный момент
Свежие линки альтернатив постоянно изменяются. Обнаружить рабочую линк можно многими способами:
– Через отдел техподдержки
– В проверенных коммуникационных сетях
– По e-mail newsletter
– На аффилиатных сайтах
Безопасность и официальность
Официальный сайт функционирует на фундаменте зарубежной сертификата. Все транзакции шифруются современными протоколами шифрования.
Анонимность пользовательских данных поддерживается в абсолютном размере.
Резюме
Официальный сайт и его рабочие дубликаты обеспечивают участникам беспрерывный вход к качественным игровым сервисам. Выгодные призы, разнообразные развлечения, опытная помощь — все это формирует гемблинговый досуг максимально беспроблемным и интересным.
Fortune Rabbit tá pagando mais consistente que o Tigrinho? Mostra seu maior respin nos comentários!
Galaxyno Hit clusters bombásticos: quem prefere grid grande ou 3×3 clássico?
Актуальные онлайн-казино гарантируют пользователям широкий ассортимент слотов и выгодные награды. Однако для беспроблемной игры необходимо иметь представление, как обнаружить https://207.148.122.104/igrovoy-avtomat-vypolnennyy-v-yaponskom-stile/ и его рабочие зеркала.
Что такое официальный ресурс казино
Лицензионный портал казино — это первичная система, где пользователи могут получать удовольствие от гемблинг играми. Платформа действует на легитимных условиях и обладает всеми требуемыми документами.
Первостепенные преимущества главного ресурса:
– Защищенность индивидуальных реквизитов
– Справедливые положения использования
– Подтвержденные выводы
– Квалифицированная помощь
Актуальное зеркало казино: для чего требуется
Копия сайта — это идентичная копия лицензионного веб-сайта, находящаяся по альтернативному веб-адресу. Актуальное зеркало разрабатывается для предоставления стабильного подключения к платформе.
Поводы эксплуатации зеркал:
– Запрет основного адреса
– Регламентные работы
– Высокая посещаемость на ресурс
Как отыскать актуальное зеркало в данный момент
Узнать свежее официальное зеркало можно различными способами:
1. Почтовые оповещения — активируйте уведомления на новостную рассылку
2. Команда помощи — проконсультируйтесь в онлайн-чат
3. Публичные сети — проверяйте за публикациями
4. Тематические сайты — проверенные ресурсы
Создание аккаунта на платформе казино
Процедура регистрации требует всего немного мгновений:
1. Выберите на опцию “Создать аккаунт”
2. Укажите необходимые данные
3. Подтвердите электронную адрес
4. Введите бонусный код, если есть
По завершении завершенной оформления вам предоставится доступен персональный профиль.
Премии и купоны
Богатая поощрительная программа — существенное конкурентное преимущество казино:
Подарок за создание аккаунта
Начинающие клиенты получают стартовый поощрение, который может предполагать:
– Денежный депозит на первый вклад
– Фри-спины для барабанов
– Безвозвратные бонусы
Бонусные коды
Систематически публикуются актуальные купоны, позволяющие забрать экстра поощрения.
Схема кешбэка
Постоянные участники зарабатывают порцию потраченных денег в виде компенсации.
Свежие предложения и конкурсы
Казино систематически запускает интересные события:
– Недельные турниры
– Праздничные предложения
– Лотереи крупных призов
– Система лояльности
Вход в пользовательский кабинет
Для авторизации на ресурс необходимо:
1. Открыть основной портал или функционирующее зеркало
2. Активировать “Вход”
3. Ввести никнейм и ключ
В личном разделе предоставлены нижеперечисленные инструменты:
– Зачисление баланса
– Получение призов
– Просмотр лога операций
– Изменение профильными данными
Портативная модификация и софт
Mobile модификация
Адаптивная модификация ресурса дает возможность участвовать с различных портативного девайса. Дизайн динамически настраивается под диагональ монитора.
Приложение для скачивания
Загрузить клиент можно для:
– Android — безопасная загрузка с ресурса
– iOS — загрузка через App Store
Плюсы приложения:
– Моментальный старт
– Бесперебойная производительность
– Push-нотификации об бонусах
– Ускоренный функционал
Азартные разделы
Автоматы
Обширная подборка развлекательных автоматов от топовых поставщиков:
– Стандартные автоматы
– Видео-игры
– Джекпот-автоматы
Live казино
Зона с настоящими операторами предоставляет:
– Рулетка
– Блэкджек
– Мини-баккара
– Карточные игры
Вещания транслируются в превосходном разрешении, обеспечивая впечатление настоящего казино.
Варианты депозита и получения
Ресурс работает с разные финансовые сервисы:
– Банковские картсчета
– Виртуальные кошельки
– Crypto
– Финансовые отправки
Базовые лимиты взноса и скоростные платежи делают процесс предельно беспроблемной.
Служба support
Профессиональная отдел помощи работает 24/7 и может содействовать с любыми ситуациями:
– Онлайн-чат
– Email-помощь
– Phone горячая линия
Выводы
Официальный портал казино и его действующие альтернативные адреса предоставляют участникам надежный и азартный развлекательный процесс. Выгодные подарки, функциональная mobile версия, многочисленные игры и высокоуровневое live-казино делают эту площадку великолепным местом для азартных досуга.
Look At This https://v2-capcut-apk.com/
Какие системные требования у новой Throne and Liberty?
https://unidemics.com/employer/xn-b-1abqajiaqjj/
Интересно было почитать про закрытые проекты, которые не взлетели.
https://letsgopeakdistrict.co.uk/author/omerkindler660/
mostbet resmi: mostbet
PG Soft lançamentos 2026: Fortune Dragon, Fortune Mouse 2… qual você quer primeiro?
PG Soft top cassinos Pix 2026: lista atualizada com bônus reais
Jogo do Tigrinho Pix R$15: ganha 90 giros + 30% extra no reload diário!
Современные онлайн-казино дают игрокам внушительный спектр услуг и поощрительных программ. Доступ к ресурсу реализуется через основной портал или его рабочее зеркало Mellstroy казино казино, что дает бесперебойную игру.
В чем суть актуальное зеркало казино
Копия — это точная копия основного веб-сайта, разработанная для обхода ограничений. Актуальное зеркало обеспечивает участникам получить вход к выбранным автоматам в любое удобное время.
Подлинное зеркало обладает всеми опциями первоначального сайта:
– Весь ассортимент развлечений
– Учетная запись с внесенными параметрами
– Свежие акции
– Защищенные расчетные процедуры
Оформление профиля на главном ресурсе
Процедура создания аккаунта составляет всего пару минут. Новым участникам нужно:
1. Войти на основной сайт или рабочее зеркало
2. Щелкнуть на кнопку “Регистрация”
3. Указать требуемые параметры
4. Активировать контакт
5. Внести стартовый вклад
Бонус за регистрацию зачисляется моментально после завершения всех этапов.
Подключение в аккаунт
Существующие клиенты могут совершить доступ вводя:
– Логин и код
– Данные телефона
– Адрес
Профиль предоставляет доступ к контролю балансом, истории операций и действующим поощрениям.
Поощрения и акции
Игровая площадка вознаграждает регулярных клиентов разнообразными вознаграждениями:
Первый бонус
– Бонус на стартовый взнос до 100%
– Фриспины на популярные машины
– Экстра премии за дальнейшие пополнения
Ваучеры
Специальные купоны дают шанс на использование специальных призов. Текущие коды размещаются в секции “Акции”.
Кэшбек
Еженедельный кэшбек составляет до 10% от потраченных денег. Возмещение выплачивается автоматически.
Механизм лояльности
Регулярные пользователи накапливают баллы, которые превращаются на действительные выплаты или free spins.
Адаптивный портал и приложение
Ради комфорта клиентов сделана функциональная мобильная версия. Гибкий дизайн обеспечивает комфортно делать ставки с каждого карманного устройства.
Плюсы программы:
– Моментальный доступ к развлечениям
– Адаптированный облик
– Надежная деятельность
– Нотификации о свежих акциях
Загрузить приложение можно свободно с основного портала для гаджетов на Android и iOS.
Коллекция развлечений
Игровые автоматы
Коллекция содержит более 2000 слотов от топовых производителей:
– Обычные слоты
– Современные автоматы
– Прогрессивные автоматы
– Фирменные слоты
Live казино
Раздел Live развлечений предоставляет развлечение с живыми диллерами в реальном времени:
– Рулеточные столы
– Blackjack
– Баккара
– Карточный покер
Соревнования
Периодические турниры с большими премиальными фондами проводятся регулярно. Вход в соревнованиях открыто всем активным клиентам.
Денежные варианты
Платежи и снятия денег реализуются через востребованные платежные системы:
– Банковские средства
– Онлайн сервисы
– Криптовалюта
– Счетные платежи
Стартовый платеж — от 100 рублей. Получение выигрышей проводится в течение 24 часов.
Команда саппорта
Круглосуточная команда support готова содействовать в урегулировании каких-либо проблем:
– Мессенджер
– Email
– Контактный номер
– Общественные сети
Охрана и лицензия
Подлинный ресурс действует на основании признанной разрешения. Любые информация игроков охранены передовым SSL-криптованием.
Заключение
Рабочее зеркало дает непрерывный доступ к выбранным слотам, щедрым акциям и удобным сервисам. Присоединяйтесь немедленно и заработайте стартовый бонус!
Передовые онлайн-казино предлагают клиентам обширный ассортимент игр и поощрительных программ. Присоединение к сервису выполняется через главный портал или его актуальное зеркало казино Daddy, что предоставляет стабильную игру.
Что представляет собой функционирующее зеркало казино
Альтернатива — это абсолютная реплика оригинального портала, созданная для преодоления запретов. Актуальное зеркало позволяет пользователям получить вход к предпочитаемым автоматам в любое удобное время.
Лицензионное зеркало располагает всеми опциями первоначального портала:
– Весь перечень игр
– Аккаунт с записанными информацией
– Текущие промокоды
– Безопасные денежные транзакции
Регистрация на лицензионном ресурсе
Ход регистрации занимает всего пару минут. Свежим пользователям нужно:
1. Перейти на официальный ресурс или функционирующее зеркало
2. Щелкнуть на элемент “Регистрация”
3. Ввести необходимые сведения
4. Проверить адрес
5. Сделать начальный платеж
Поощрение новичкам предоставляется незамедлительно после завершения всех шагов.
Авторизация в профиль
Зарегистрированные клиенты могут произвести доступ вводя:
– Логин и ключ
– Данные мобильного
– Email
Личный кабинет открывает право к регулированию счетом, сведениям ставок и активным поощрениям.
Поощрения и кампании
Гемблинг площадка вознаграждает постоянных пользователей щедрыми призами:
Первый бонус
– Бонус на первый депозит до 100%
– Бесплатные вращения на известные машины
– Добавочные бонусы за дальнейшие взносы
Ваучеры
Специальные промокоды предоставляют доступ на активацию специальных бонусов. Свежие промокоды публикуются в разделе “Акции”.
Кешбэк
Регулярный возврат насчитывает до 10% от использованных денег. Возврат предоставляется сразу.
Система лояльности
Активные игроки зарабатывают единицы, которые переводятся на подлинные финансы или фриспины.
Адаптивный портал и программа
В целях удобства клиентов построена полноценная mobile версия. Адаптивный дизайн позволяет комфортно делать ставки с произвольного портативного девайса.
Преимущества APP:
– Скорый вход к слотам
– Улучшенный интерфейс
– Надежная функциональность
– Сообщения о последних бонусах
Установить программу можно безвозмездно с главного сайта для устройств на Android и iOS.
Каталог слотов
Машины
Каталог содержит более 2000 слотов от ведущих разработчиков:
– Стандартные игры
– Видео-слоты
– Jackpot игры
– Фирменные игры
Live казино
Блок Live казино предлагает участие с реальными крупье в прямом времени:
– Roulette
– Двадцать одно
– Карты
– Poker
Конкурсы
Регулярные конкурсы с большими наградными пулами организуются еженедельно. Вход в соревнованиях разрешено всем действующим игрокам.
Денежные способы
Пополнения и выводы средств реализуются через распространенные методы:
– Платежные пластик
– Электронные кошельки
– Bitcoin
– Счетные операции
Наименьший платеж — от 100 рублей. Получение денег проводится в течение 24 часов.
Сервис support
Постоянная отдел саппорта может содействовать в разрешении произвольных проблем:
– Живой чат
– Email
– Телефон
– Социальные сети
Охрана и лицензия
Подлинный веб-сайт действует на основании глобальной сертификата. Любые информация пользователей закрыты современным SSL-криптованием.
Резюме
Действующее зеркало гарантирует непрерывный соединение к выбранным автоматам, выгодным промокодам и удобным функциям. Присоединяйтесь прямо сейчас и приобретите стартовый поощрение!
PG Soft tá liberando cashback 15% todo dia no Fortune Tiger – qual site tá dando mais?
PG Soft no celular 5G: big win em qualquer lugar do Brasil – já aconteceu?
Jogo do Tigrinho multiplicador fixo vs aleatório: qual você prefere?
PG Soft cashback semanal: quem já pegou R$300+ só de devolução?
Premium marketplace aged ig accounts features an extensive inventory updated daily across all major geos including USA, Europe, and Asia-Pacific regions. Each listing comes with complete access data including email, password, cookies, token, and user-agent string for seamless campaign setup. Access the full catalog today and discover why top-performing affiliates and agencies choose this platform for their account needs.
Leading store google ads circumventing systems policy gives media buyers access to aged, warmed, and verified profiles sorted by geo, trust level, and ad readiness. Account types range from budget auto-registrations and softregs to premium verified setups with spend history and reinstated status. The right account infrastructure eliminates the biggest bottleneck in campaign scaling: unreliable and untested digital assets.
1xbet giri? 2025 1xbet-47.com .
Established supplier gmail without phone number maintains the largest selection of quality accounts with transparent specs and competitive pricing for bulk buyers. Each listing comes with complete access data including email, password, cookies, token, and user-agent string for seamless campaign setup. Join thousands of satisfied advertisers who source their campaign infrastructure from a verified and trusted marketplace.
Verified marketplace what does bm mean slang provides access to a wide catalog of digital profiles for advertising and media buying. Quality monitoring runs continuously — accounts are spot-checked after listing to maintain catalog integrity and buyer satisfaction rates. Scale your advertising operations on a foundation of quality — verified profiles, complete credentials, and expert operational support.
special info https://v2-geometrydashapk.com
Verified marketplace free old discord account provides access to a wide catalog of digital profiles for advertising and media buying. The marketplace serves a global buyer base with English-speaking support available via Telegram for product selection and order management. Marketplace standards ensure that every account performs as described — no surprises at checkout, login, or campaign launch.
PAOK 1-2 Celta Vigo 2026 Europa League thriller result
Jogo do Tigrinho Pix R$20: recebe 100 giros + 20% cashback hoje em 3 sites
Современные сетевые казино предлагают клиентам огромный спектр опций для приятной игры. Впрочем иногда соединение к главному платформе может быть закрытым. В таких ситуациях на выручку появляется skilluniversity.us, которое обеспечивает стабильный путь ко всем функциям платформы.
Что такое функционирующее зеркало казино
Дубликат — это идентичная дубликат основного сайта, которая хостится по альтернативному URL. Дубликат сохраняет весь набор функций первоначального ресурса, включая пользовательский кабинет, депозит и историю транзакций.
Главные выгоды использования зеркала:
– Круглосуточный подключение к платформе
– Максимальная схожесть возможностей
– Защита персональных сведений
– Удержание доступных поощрений
Как отыскать действующее зеркало в данный момент
Имеется несколько достоверных вариантов получения действующей адреса:
Легитимные источники:
1. Имейл рассылка — дирекция регулярно направляет сообщения с свежими доменами
2. Коммуникационные сети — легитимные профили публикуют релевантную информацию
3. Служба поддержки — сотрудники выдают безопасные ссылки
4. Портативное приложение — предоставляет избегать блокировки
Открытие счета на основном портале
Этап оформления требует всего считанные минут и состоит из следующих ступеней:
1. Попадание на основной ресурс или функционирующее зеркало
2. Щелчок на элемент «Создать аккаунт»
3. Заполнение учетной формы
4. Валидация email почты или телефонного номера
5. Активация бонуса за регистрацию при существовании промокода
Свежие пользователи получают значительный стартовый презент, который может предполагать фриспины, валютные призы или компенсацию.
Логин в персональный кабинет
Авторизация на платформе реализуется привычным способом. Нужно указать никнейм и секретный ключ, указанные при регистрации.
Существенные нюансы для безопасного входа:
– Задействуйте сложный код
– Запустите двухфакторную верификацию
– Не сохраняйте данные на чужих девайсах
– Отслеживайте адресную строку браузера
Анализ премиальной структуры
Казино награждает пользователей различными поощрениями и специальными предложениями:
Вступительный комплект
Новички могут полагаться на существенное бонус за первый депозит. Обычно это пропорциональная добавка к переведенной объему плюс бесплатные вращения для популярных слотов.
Периодические промо
– 7-дневный кэшбек — компенсирование процента проигранных средств
– Поощрения на очередные взносы
– Эксклюзивные промо по праздникам
– Соревнования с крупными призовыми банками
Программа лояльности
Регулярные клиенты получают пункты за произвольную раунд, которые затем конвертируются на настоящие денежные призы, free spins или специальные привилегии.
Кодовые слова: как применять
Бонус-коды — это уникальные сочетания символов, дающие привилегию к специальным поощрениям.
В каких местах получить рабочие промокоды:
– Легитимные медийные сети казино
– Сотрудничающие ресурсы
– Email-информирование
– Отраслевые группы
Прописывается промокод в специальное поле при регистрации или пополнении баланса.
Портативная версия и приложение
Нынешние геймеры предпочитают делать ставки с телефонных девайсов. Сайт предлагает 2 метода для комфортной смартфонной игры.
Адаптивная редакция
Онлайн версия само собой настраивается под размер экранной панели. Не предполагает установки и оперирует в любом новом браузере.
Портативное приложение
Загрузить приложение можно для аппаратов на Android и iOS. Выгоды app:
– Скоростная запуск
– Бесперебойная работа
– Автоматические-уведомления о поощрениях
– Автономный обход блокировок
Операция скачивания несложен: нужно перейти на ресурс с телефонного девайса и придерживаться руководству.
Игровой каталог
База аппаратов насчитывает огромное количество наименований от топовых производителей.
Слоты
Игровые слоты — самая любимая секция развлечений. Размещены обычные 3-барабанные аппараты, новые мультимедийные слоты с дополнительными уровнями, а также накопительные джекпоты.
Live казино
Раздел с настоящими крупье позволяет прочувствовать антураж настоящего казино. Доступны столы с покером.
Передача реализуется в отличном разрешении, присутствует диалог с раздающим и прочими геймерами.
Состязания
Постоянно запускаются соревнования по разным слотам. Вступление предоставляет право заработать финансовые выигрыши, бесплатные вращения или особые поощрения.
Платежные процедуры
Портал обеспечивает обширный спектр финансовых систем:
– Пластиковые карты
– Электронные платформы
– Биткоин
– Счетовые транзакты
Низшая объем вклада — разумная для массы игроков. Обналичивание выигрышей обрабатывается в кратчайшие сроки.
Служба поддержки
Опытные консультанты настроены оказать помощь круглосуточно. Доступны нижеследующие методы коммуникации:
– Онлайн-чат
– Email
– Телефонная поддержка
– Социальные сети
Разъяснения на стандартные вопросы можно обнаружить в разделе FAQ.
Вывод
Лицензионный сайт казино и его функционирующие зеркала обеспечивают пользователям максимальный путь ко всем функциям портала. Великодушные бонусы, практичная смартфонная версия, гигантский ассортимент аттракционов и квалифицированная служба поддержки превращают азартный опыт крайне удобным и надежным.
buy ed pills medication
Спасибо за честный разбор доната, теперь понятно, стоит ли заходить.
https://repo.2gtraining.in/michaelamchale
https://mostbettr.blog/# mostbet resmi
Brazino777 tá dando 300 giros grátis no Jogo do Tigrinho só pra quem deposita via Pix hoje!
Доступ к платформе через действующие зеркала
Передовые сетевые казино предоставляют клиентам постоянный переход к услугам. Главный веб-сайт Килограмм оперирует бесперебойно, обеспечивая большой ассортимент гемблинг игр. Впрочем периодически формируются системные препятствия или блокировки, следовательно важно быть осведомлённым о доступности рабочих зеркал.
Что означает из себя центральное зеркало казино
Копия — это абсолютная версия центрального веб-сайта с схожим интерфейсом. Функционирующее зеркало сегодня даёт возможность избегать территориальные блокировки и продолжать времяпрепровождение.
Ключевые достоинства использования зеркал:
– Абсолютный доступ к собственному кабинету
– Удержание каждых информации учётной записи
– Такой же перечень слотов
– Действующие привилегии и акции
Открытие счёта на сайте
Процедура записи занимает пару минут. Начинающие клиенты обретают великодушный приз за запись, который может вмещать:
– Начальный бонусный бонус
– Даровые фриспины для игр
– Эксклюзивные коды
– Повышенный возврат
Для окончания оформления следует:
1. Войти на главный веб-сайт или альтернативу
2. Щёлкнуть кнопку «Создать аккаунт»
3. Написать персональные сведения
4. Подтвердить почтовый адрес или мобильный
5. Применить купон (если есть наличии)
Доступ в собственный кабинет
Вслед за правильной создания аккаунта игроки способны производить подключение используя главный ресурс или действующее зеркало. Индивидуальный кабинет открывает безграничный регулирование над учётной записью:
– Журнал ставок
– Зачисление баланса
– Изъятие выигрышей
– Управление поощрениями
– Включение в соревнованиях
Награды и кампании казино
Сайт удовлетворяет геймеров многочисленными привилегированными системами:
Стартовые бонусы
Начинающие получают богатый букет поощрений на вступительные вклады. Типично это охватывает процентную доплату к объёму депозита плюс комплиментарные вращения.
Регулярные акции
– Каждонедельный компенсация до 15%
– Соревнования с премиальными пулами
– Подарки на число рождения
– Эксклюзивные программы для статусных геймеров
Программа вознаграждения
Деятельные пользователи зарабатывают очки, что возможно трансформировать на подлинные деньги или уникальные преимущества.
Мобильная форма и софт
Современные решения обеспечивают геймить в любом месте комфортно. Мобильная версия портала независимо подстраивается под размер каждого девайса.
Выгоды портативного софта:
– Моментальная загрузка развлечений
– Практичный дизайн
– Push-сообщения о акциях
– Шанс установить для Android и iOS
Живое казино: атмосфера реального развлекательного клуба
Категория Live заведения переносит игроков в атмосферу реального игорного учреждения. Квалифицированные ведущие проводят действие в формате настоящего времени.
Представленные игры:
– Европейская рулетка
– Блэкджек
– Классика
– Покер
Автоматы и игровые автоматы
Ассортимент азартных слотов охватывает сотни наименований от топовых студий. Произвольный игрок найдёт развлечение по душе:
– Винтажные барабаны
– Современные автоматы с дополнительными турами
– Джекпот-игры
– Динамические слоты
Турниры и раздачи
Периодические конкурсы добавляют адреналин и обеспечивают возможность обрести значительные награды. Вовлечение в турнирах регулярно бесплатное, а выигрышные суммы составляют крупных величин.
Защита и секретность
Сайт применяет актуальные системы криптографии для защиты информации клиентов. Все платёжные транзакции совершаются через зашифрованные линии.
Итог
Основной сайт и его функционирующие зеркала обеспечивают стабильный доступ к отличным игровым развлечениям. Великодушные поощрения, эргономичная мобильная редакция, вариативность машин и профессиональное Live-заведение превращают портал отличным решением для фанатов азартных слотов.
Описание системы крафта в Albion Online помогло заработать первые миллионы.
https://oasisrealestateeg.com/author/ronaldpuglisi/
Cassino PG Soft com roleta diária: 80–250 giros grátis no Fortune Tiger toda noite
Fortune Tiger estratégia de 200 giros: pare no +40% ou continue? Qual sua regra?
Jogo do Tigrinho estratégia de sessão: 300 giros e stop – funciona?
see more info – Channeling movement effectively relies on having a clear direction.
https://mostbetpl.top/# mostbet güncel adres
ремонт в подвале ремонт в подвале .
Fortune Ox hold & win: já segurou 18 símbolos e explodiu 5000x? Mostra o print!
Newcastle 6-1 Qarabağ 2026 Europa League Gordon half-time quadruple
Не согласен с оценкой графики в обзоре на New World.
https://www.ukbusinessdirectory.info/author-profile/samaraefw59251/
More about the author https://v2-geometrydashapk.com
Доступ к платформе через проверенные зеркала
Передовые сетевые казино гарантируют клиентам постоянный подключение к сервисам. Главный сайт казино Бетон официальный сайт оперирует стабильно, гарантируя широкий ассортимент развлекательных слотов. Однако порой возникают системные сложности или блокировки, в связи с чем критично иметь представление о наличии функционирующих зеркал.
Что представляет собой центральное зеркало казино
Дубликат — это точная реплика центрального портала с идентичным функционалом. Функционирующее зеркало сейчас даёт возможность обходить местные запреты и продолжать гемблинг.
Ключевые плюсы применения зеркал:
– Безграничный доступ к персональному кабинету
– Удержание любых данных учётной записи
– Такой же набор игр
– Свежие вознаграждения и промо
Регистрация на платформе
Механизм регистрации длится несколько минут. Новые пользователи зарабатывают богатый поощрение за оформление, он способен содержать:
– Приветственный финансовый приз
– Комплиментарные вращения для машин
– Специальные ваучеры
– Увеличенный возврат
Во имя завершения регистрации нужно:
1. Перейти на центральный веб-сайт или копию
2. Кликнуть кнопку «Оформиться»
3. Указать индивидуальные сведения
4. Активировать мейл или мобильный
5. Применить промокод (при присутствии)
Авторизация в персональный кабинет
По завершении успешной создания аккаунта геймеры имеют возможность производить подключение через основной портал или функционирующее зеркало. Персональный кабинет обеспечивает всесторонний регулирование над учётной записью:
– Летопись пари
– Внесение кошелька
– Снятие выигрышей
– Управление привилегиями
– Присутствие в турнирах
Привилегии и промо казино
Ресурс радует игроков вариативными наградными схемами:
Вступительные бонусы
Начинающие приобретают внушительный комплект бонусов на первые вклады. Зачастую это предполагает пропорциональную прибавку к объёму пополнения плюс бесплатные кручения.
Постоянные акции
– Каждонедельный кешбэк до 15%
– Турниры с премиальными суммами
– Поощрения на день рождения
– Уникальные акции для статусных игроков
Программа верности
Постоянные игроки накапливают пункты, что можно конвертировать на настоящие деньги или уникальные бонусы.
Карманная форма и утилита
Передовые решения помогают геймить где подходяще. Портативная форма портала автоматически подстраивается под размер любого устройства.
Достоинства смартфонного ПО:
– Оперативная запуск игр
– Удобный интерфейс
– Push-сообщения о акциях
– Способность загрузить для Android и iOS
Живое казино: среда реального развлекательного учреждения
Область Live казино переносит геймеров в среду истинного развлекательного клуба. Профессиональные ведущие управляют действие в состоянии реального времени.
Предлагаемые развлечения:
– Колесо фортуны
– Карточная игра
– Баккара
– Покер
Игровые машины и игровые аппараты
Коллекция игровых аппаратов охватывает множество позиций от передовых провайдеров. Всякий геймер подберёт автомат по нраву:
– Классические автоматы
– Новые слоты с призовыми этапами
– Крупный приз-игры
– Динамические машины
Соревнования и лотереи
Периодические турниры вносят остроту и открывают возможность выиграть значительные награды. Включение в соревнованиях нередко безвозмездное, а призовые фонды доходят до внушительных величин.
Охрана и приватность
Ресурс использует инновационные протоколы кодирования для защиты сведений пользователей. Любые финансовые транзакции выполняются через безопасные соединения.
Заключение
Главный портал и его действующие зеркала дают стабильный вход к первоклассным развлекательным развлечениям. Богатые награды, удобная карманная вариант, разнообразие автоматов и квалифицированное Live-казино превращают платформу замечательным вариантом для фанатов игровых автоматов.
PG Soft torneio diário R$10k: quem tá lucrando todo dia no Fortune Tiger?
Передовые интернет казино дают клиентам обширный диапазон вариантов для комфортной игры. Однако иногда вход к основному порталу может быть ограниченным. В таких обстоятельствах на подмогу спешит Grizzly зеркало, которое дает стабильный подключение ко всем возможностям платформы.
Что такое действующее зеркало казино
Альтернативный сайт — это точная копия лицензионного портала, которая находится по другому URL. Альтернативный ресурс поддерживает весь возможности первоначального сайта, включая персональный кабинет, депозит и сведения операций.
Принципиальные выгоды задействования зеркала:
– Непрерывный соединение к сайту
– Полная идентичность опций
– Конфиденциальность персональных реквизитов
– Хранение существующих поощрений
Как найти функционирующее зеркало на сегодня
Есть ряд достоверных путей получения действующей ссылочной информации:
Легитимные сервисы:
1. Имейл рассылка — руководство периодически отправляет сообщения с актуальными адресами
2. Коммуникационные сети — авторизованные каналы выкладывают текущую информацию
3. Сервис поддержки — консультанты сообщают надежные URL
4. Смартфонное приложение — позволяет обходить блокировки
Открытие счета на лицензионном портале
Процесс регистрации отнимает лишь немного минут и содержит из нижеследующих стадий:
1. Попадание на основной портал или функционирующее зеркало
2. Нажатие на кнопку «Создать аккаунт»
3. Внесение персональной таблицы
4. Проверка почтовой почты или контактного номера
5. Задействование поощрения за регистрацию при доступности промокода
Начинающие геймеры получают солидный приветственный бонус, который может содержать фриспины, финансовые вознаграждения или кэшбек.
Логин в пользовательский кабинет
Логин на ресурсе реализуется традиционным способом. Необходимо ввести имя пользователя и кодовое слово, использованные при создании аккаунта.
Существенные детали для надежного входа:
– Эксплуатируйте надежный пароль
– Задействуйте 2FA проверку
– Не фиксируйте данные на общественных устройствах
– Проверяйте доменную строку браузера
Обзор бонусной структуры
Казино радует игроков многочисленными привилегиями и специальными предложениями:
Приветственный букет
Новички способны претендовать на значительное вознаграждение за стартовый вклад. Обычно это процентная надбавка к внесенной количеству плюс даровые спины для востребованных слотов.
Постоянные акции
– Семидневный компенсация — возвращение доли проигранных денег
– Бонусы на повторные депозиты
– Уникальные предложения по событиям
– Соревнования с солидными выигрышными фондами
Схема привилегий
Регулярные игроки собирают баллы за всякую бет, которые затем обмениваются на реальные финансы, даровые прокруты или особые преимущества.
Купоны: как активировать
Кодовые комбинации — это индивидуальные комбинации букв и цифр, обеспечивающие возможность к бонусным привилегиям.
В каких местах взять действующие промокоды:
– Официальные социальные сети казино
– Партнерские ресурсы
– Email-рассылка
– Специализированные сообщества
Вводится промокод в соответствующее поле при создании аккаунта или внесении депозита кошелька.
Мобильная версия и приложение
Актуальные клиенты выбирают делать ставки с смартфонных устройств. Платформа предлагает двойной способа для приятной мобильной игры.
Responsive модификация
Онлайн версия самостоятельно оптимизируется под размер экранной панели. Не нуждается скачивания и работает в произвольном актуальном браузере.
Телефонное приложение
Загрузить программу можно для устройств на Android и iOS. Выгоды app:
– Молниеносная загрузка
– Устойчивая работа
– Всплывающие-уведомления о промо
– Независимый минование блокировок
Процедура установки элементарен: необходимо попасть на портал с телефонного девайса и подчиняться указаниям.
Азартный каталог
Библиотека игр включает огромное количество единиц от лучших поставщиков.
Слоты
Развлекательные машины — крайне любимая раздел аттракционов. Представлены стандартные 3-барабанные автоматы, актуальные видеослоты с дополнительными этапами, а также растущие суперпризы.
Live казино
Зона с настоящими крупье предоставляет прочувствовать антураж подлинного казино. Открыты столы с баккарой.
Передача реализуется в превосходном качестве, присутствует чат с раздающим и остальными игроками.
Состязания
Систематически устраиваются конкурсы по различным играм. Участие позволяет завоевать монетарные вознаграждения, бесплатные вращения или специальные поощрения.
Платежные операции
Портал поддерживает обширный выбор платежных систем:
– Дебетовые карты
– Электронные сервисы
– Криптовалюта
– Банковские переводы
Стартовая объем вклада — посильная для массы пользователей. Вывод денег обрабатывается в минимальные временные рамки.
Служба поддержки
Опытные консультанты готовы оказать помощь 24/7. Представлены нижеследующие способы контакта:
– Живой-чат
– Email
– Звонковая связь
– Коммуникационные сети
Пояснения на частые вопросы можно получить в блоке FAQ.
Итог
Главный веб-сайт казино и его рабочие зеркала гарантируют игрокам максимальный доступ ко всем функциям платформы. Щедрые вознаграждения, удобная телефонная версия, огромный выбор аттракционов и профессиональная помощь создают игровой процесс предельно беспроблемным и надежным.
Jogo do Tigrinho no celular 5G: big win em qualquer lugar do Brasil
xbet xbet .
explore the page – Well-managed steps help growth move forward efficiently and trackably.
Актуальные онлайн-казино дают пользователям широкий набор развлечений и премиальных вариантов. Доступ к сервису осуществляется через главный портал или его рабочее зеркало РђСЂРіРѕ сайт, что обеспечивает постоянную деятельность.
В чем суть действующее зеркало казино
Копия — это идентичная версия основного сайта, разработанная для обхода запретов. Актуальное зеркало помогает участникам получить вход к предпочитаемым играм в произвольное время.
Лицензионное зеркало располагает всеми характеристиками первоначального ресурса:
– Целый перечень слотов
– Профиль с внесенными информацией
– Действующие бонусы
– Безопасные расчетные действия
Регистрация на основном портале
Алгоритм регистрации составляет всего немного минут. Новым пользователям нужно:
1. Перейти на проверенный веб-сайт или рабочее зеркало
2. Нажать на элемент “Открыть счет”
3. Заполнить необходимые информацию
4. Подтвердить электронную почту
5. Внести первый вклад
Поощрение новичкам зачисляется автоматически после выполнения всех стадий.
Авторизация в учетную запись
Существующие пользователи могут выполнить вход применяя:
– Никнейм и пароль
– Номер сотового
– Адрес
Персональный раздел открывает шанс к контролю счетом, данным операций и текущим акциям.
Промо и предложения
Азартная площадка привлекает активных клиентов разнообразными поощрениями:
Начальный набор
– Поощрение на начальный взнос до 100%
– Free spins на топовые слоты
– Добавочные премии за следующие депозиты
Ваучеры
Специальные купоны открывают право на получение эксклюзивных бонусов. Действующие комбинации выкладываются в блоке “Промо”.
Кэшбек
Постоянный возврат насчитывает до 10% от проигранных денег. Выплата выплачивается незамедлительно.
Механизм лояльности
Постоянные игроки зарабатывают единицы, которые переводятся на настоящие выплаты или free spins.
Mobile версия и APP
Ради комфорта игроков построена функциональная адаптивный сайт. Адаптивный вид обеспечивает удобно участвовать с произвольного карманного девайса.
Преимущества приложения:
– Моментальный вход к развлечениям
– Настроенный дизайн
– Устойчивая функциональность
– Push-уведомления о последних событиях
Установить софт можно бесплатно с основного веб-сайта для гаджетов на Android и iOS.
Ассортимент слотов
Слоты
Библиотека содержит более 2000 машин от известных студий:
– Обычные машины
– Современные автоматы
– Прогрессивные автоматы
– Тематические автоматы
Live казино
Категория Live игр обеспечивает участие с реальными крупье в живом формате:
– Рулеточные столы
– Двадцать одно
– Карты
– Poker
Соревнования
Периодические турниры с крупными выигрышными суммами устраиваются систематически. Участие в турнирах разрешено всем действующим игрокам.
Денежные методы
Взносы и выводы средств реализуются через распространенные способы оплаты:
– Банковские пластик
– Электронные счета
– Цифровая валюта
– Денежные операции
Стартовый вклад — от 100 рублей. Получение денег осуществляется в течение 24 времени.
Служба поддержки
Постоянная группа помощи способна ассистировать в решении каких-либо задач:
– Онлайн-чат
– Email
– Горячая линия
– Соц сети
Охрана и сертификат
Подлинный портал оперирует на основании мировой разрешения. Каждые данные игроков обезопасены передовым SSL-кодированием.
Резюме
Функционирующее зеркало предоставляет бесперебойный подключение к предпочитаемым играм, привлекательным поощрениям и практичным возможностям. Создайте аккаунт сейчас и получите приветственный подарок!
Follow this link
Best payout online casino real money
for practical application.
Характеристика официального ресурса
Передовые сетевые казино предлагают участникам широкий набор услуг и возможностей. Официальный ресурс http://kasy-fiskalne-kielce.pl/2026/02/28/kak-vernut-dengi-s-karty-sberbank-posle-igry-v-onlayn-kazino-podacha-zayavleniya-cherez-internet/ гарантирует проверенный доступ к гемблинг сервисам.
Актуальное зеркало: доступ прямо сейчас
Зеркало служит в качестве полную копию главного сайта. Проверенное зеркало дает возможность участникам миновать вероятные барьеры.
Достоинства применения зеркала
Принципиальные плюсы охватывают:
– Непрерывный вход к порталу
– Поддержание абсолютно всех функций базового портала
– Сохранность конфиденциальных материалов
– Идентичный инструментарий
Открытие счета на сайте
Механизм открытия счета знаменуется доступностью и комфортом. Свежие клиенты необходимо:
1. Открыть официальный веб-сайт или его зеркало
2. Выбрать на кнопку регистрации
3. Ввести требуемые данные
4. Верифицировать почтовую ящик
5. Произвести первый логин
Приз за создание аккаунта
Новички зарабатывают значительный приветственный бонус. Данное премия в состоянии включать:
– Денежные бонусы
– Complimentary прокруты
– Повышенный уровень кэшбэка
Авторизация в личный профиль
Зарегистрированные игроки имеют возможность моментально зайти в персональный аккаунт, эксплуатируя имя пользователя и пароль. Личный профиль обеспечивает возможность к:
– Управлению балансом
– Записям операций
– Активным поощрениям
– Параметрам аккаунта
Подарки и промо
Сайт систематически организует всевозможные мероприятия для игроков.
Виды подарков
Основные типы бонусов:
– Финансовые подарки – часть от величины пополнения
– Фриспины – безвозмездные раунды в автоматах
– Кэшбек – возмещение фрагмента проигранных финансов
– Конкурсные награды – награды за выступление в турнирах
Купоны
Уникальные купоны помогают заработать добавочные преимущества. Игроки имеют возможность отыскать их на специализированных порталах или получить в новостях.
Мобильная версия и приложение
Современные клиенты предпочитают портативный досуг.
Возможности мобильной версии
– Гибкий облик для любых устройств
– Целостный возможность к играм
– Оперативная работа
– Удобное использование
Download софт
Переносное софт предоставлено для загрузки на девайсы с базовыми системами Android и iOS. Программа дает:
– Бесперебойную деятельность
– Мгновенные оповещения о призах
– Быстрый доступ к любимым слотам
Гемблинг ассортимент
Казино дает внушительную галерею развлекательных забав.
Слоты
Каталог игровых автоматов насчитывает:
– Классические слоты
– Видео слоты
– Призовые слоты
– Сюжетные слоты
Live дилеры
Секция настоящих столов предлагает шанс соревноваться с живыми крупье. Представлены:
– Американская рулетка
– Блек-джек
– Punto Banco
– Покер
Состязания
Периодические чемпионаты обеспечивают участникам бороться за солидные призовые банки. Конкурсная сетка актуализируется постоянно.
Банковские операции
Сайт обеспечивает обилие опций внесения и получения денег:
– Пластиковые карточки
– Онлайн кошельки
– Wire транзакции
– Крипто
Все переводы производятся конфиденциально с использованием прогрессивных методов шифрования.
Отдел сопровождения
Профессиональная отдел саппорта работает без перерыва. Соединиться с менеджерами реально через:
– Онлайн чат
– Электронную почту
– Телефон
– Social сети
Безопасность и аккредитация
Казино работает на базе законной разрешения. Данное удостоверяет:
– Честность развлекательного процесса
– Безопасность конфиденциальных данных
– Пунктуальные перечисления
– Регулируемый гемблинг
Резюме
Главный ресурс и его функционирующие дубликаты гарантируют пользователям целостный набор услуг для удобной и выгодной развлечений. Солидные вознаграждения, разнообразные развлечения, опытная поддержка и защищенная система платежей делают казино идеальным выбором для ценителей азартных игр.
Передовые онлайн-казино предоставляют клиентам обширный ассортимент развлечений и призовых вариантов. Присоединение к сервису осуществляется через главный веб-сайт или его актуальное зеркало https://eniolafoods.com/2026/03/04/kreditnuyu-kartu-mozhno-proverit-s-pomoshchyu-onlayn-kalkulyatora/, что гарантирует бесперебойную работу.
Что представляет собой функционирующее зеркало казино
Зеркало — это абсолютная версия оригинального портала, сделанная для устранения блокировок. Рабочее зеркало позволяет клиентам иметь вход к любимым играм в любое удобное время.
Официальное зеркало обладает всеми характеристиками первоначального ресурса:
– Полный перечень слотов
– Профиль с записанными данными
– Текущие акции
– Гарантированные расчетные транзакции
Оформление профиля на основном веб-сайте
Ход создания аккаунта составляет всего пару минут. Начинающим участникам требуется:
1. Зайти на официальный портал или функционирующее зеркало
2. Кликнуть на элемент “Создать аккаунт”
3. Внести требуемые информацию
4. Подтвердить контакт
5. Сделать дебютный вклад
Стартовый бонус зачисляется моментально после прохождения всех стадий.
Авторизация в личный кабинет
Зарегистрированные пользователи могут осуществить авторизацию вводя:
– Никнейм и пароль
– Данные телефона
– Email
Аккаунт дает возможность к управлению балансом, истории игр и активным промокодам.
Награды и кампании
Игровая сервис балует лояльных игроков выгодными вознаграждениями:
Первый бонус
– Поощрение на начальный платеж до 100%
– Бесплатные вращения на топовые игры
– Добавочные награды за следующие пополнения
Купоны
Особые коды предоставляют шанс на получение эксклюзивных призов. Текущие купоны размещаются в секции “Акции”.
Кешбэк
Периодический возврат насчитывает до 10% от потраченных финансов. Выплата начисляется незамедлительно.
Программа лояльности
Регулярные участники накапливают единицы, которые обмениваются на подлинные деньги или даровые спины.
Мобильная версия и программа
Ради комфорта игроков построена качественная mobile версия. Гибкий дизайн позволяет беспрепятственно участвовать с всякого карманного девайса.
Преимущества APP:
– Быстрый запуск к развлечениям
– Оптимизированный облик
– Надежная работа
– Нотификации о свежих акциях
Скачать приложение можно даром с проверенного ресурса для устройств на Android и iOS.
Ассортимент развлечений
Игровые автоматы
Коллекция включает более 2000 слотов от известных разработчиков:
– Классические автоматы
– Видео-слоты
– Джекпот-слоты
– Сюжетные развлечения
Live казино
Секция Live казино предлагает игру с живыми крупье в реальном режиме:
– Рулетка
– Двадцать одно
– Баккара
– Столы покера
Соревнования
Периодические соревнования с крупными выигрышными фондами устраиваются еженедельно. Вход в состязаниях доступно всем активным игрокам.
Финансовые системы
Взносы и снятия выплат осуществляются через распространенные платежные системы:
– Банковские карточ ки
– Цифровые сервисы
– Bitcoin
– Прямые переводы
Наименьший взнос — от 100 рублей. Снятие средств проводится в течение 24 времени.
Сервис помощи
24/7 отдел саппорта готова помочь в решении всех задач:
– Мессенджер
– Email
– Телефон
– Социальные сети
Безопасность и сертификат
Главный портал оперирует на основании глобальной разрешения. Всевозможные параметры участников закрыты передовым SSL-кодированием.
Вывод
Функционирующее зеркало дает стабильный вход к любимым играм, щедрым поощрениям и удобным функциям. Зарегистрируйтесь прямо сейчас и обретите стартовый поощрение!
https://periodismolatino.com/1xbet-promo-code-2026-e130-welcome-bonus-2/
Передовые онлайн-казино обеспечивают игрокам широкий диапазон возможностей для удобной развлечений. Переход к площадке [url=dev.lebolabo.com/index.php/2026/03/05/nadezhnye-kazino-s-vyvodom-deneg-na-kartu-sberbanka-v-rf/]Лаки Ворлд[/url] осуществляется через лицензионный веб-ресурс или действующее зеркало.
Что такое рабочее зеркало казино
Рабочее зеркало — это альтернативный адрес главного портала казино. Такие дубликаты генерируются для гарантирования постоянного подключения к игровой сервису.
Зеркало на сегодня совершенно воспроизводит функционал основного ресурса. Геймеры получают идентичный выход ко всем возможностям, включая открытие счета, пополнение депозита и вывод денег.
Регистрация на главном сайте
Механизм открытия профиля требует всего несколько секунд. Будущим клиентам нужно:
1. Перейти на главный портал или актуальное официальное зеркало
2. Выбрать кнопку “Зарегистрироваться”
3. Заполнить обязательные информацию
4. Активировать почтовую почту
5. Ввести бонусный код при присутствии
После выполнения регистрации клиент зарабатывает вознаграждение за регистрацию, который имеет право содержать free spins или cash вознаграждение.
Логин в личный кабинет
Личный кабинет — это охраняемая секция, где участники могут контролировать своим счетом. Для входа необходимо указать никнейм и код доступа.
В индивидуальном кабинете представлены следующие функции:
– Проверка журнала операций
– Применение купонов
– Управление поощрениями
– Вступление в соревнованиях
– Мониторинг кэшбека
– Редактирование профиля
Призы и спецпредложения
Гемблинговая площадка предоставляет привлекательные подарки:
Приветственный комплект — новички зарабатывают значительное начисление на начальные пополнения.
Фриспины — дарятся как при создании аккаунта, так и в ходе различных кампаний.
Кэшбек — регулярный возмещение процента потерянных средств.
Бонусные коды — уникальные шифры, предоставляющие доступ к уникальным бонусам.
Характеристика гемблинговых категорий
Slots
Собрание слотов насчитывает массу игр от ведущих производителей. Клиенты найдут как классические автоматы, так и актуальные 3D-слоты с интересной анимацией.
Live казино
Секция Live казино дарит возможность соревноваться с действующими дилерами в режиме актуального времени. Открыты востребованные игры: рулетка, блэкджек, баккара, покер.
Турниры
Систематические соревнования с значительными наградными суммами манят массу участников. Лидеры завоевывают cash вознаграждения и уникальные бонусы.
Портативная версия и софт
Мобильная версия платформы обеспечивает наслаждаться с всякого девайса. Интерфейс самостоятельно корректируется под размер экрана.
Загрузить софт можно для аппаратов на Android и iOS. Портативное программа имеет всеми возможностями настольной версии.
Как найти актуальное зеркало на данный момент
Рабочие URL копий регулярно обновляются. Узнать рабочую адрес можно разными путями:
– Через отдел поддержки
– В официальных информационных сетях
– По email подписке
– На партнерских порталах
Охрана и официальность
Главный сайт функционирует на основании зарубежной документа. Все транзакции оберегаются инновационными технологиями кодирования.
Конфиденциальность персональных данных обеспечивается в абсолютном размере.
Вывод
Официальный портал и его действующие дубликаты предоставляют участникам круглосуточный вход к высококлассным азартным играм. Привлекательные призы, всевозможные автоматы, компетентная помощь — все это превращает развлекательный процесс предельно беспроблемным и интересным.
here are the findings https://v2-geometrydashapk.com/
https://mostbetvipaz.buzz/# mostbet
Jogo do Tigrinho ao vivo com narração: já jogou versão com locutor em português?
Кстати, если вас интересует Лучшие кошерные рестораны Москвы: выбор и проверка сертификатов, посмотрите сюда.
Вот, можете почитать:
https://solpod.ru/%d0%b1%d0%b5%d0%b7-%d1%80%d1%83%d0%b1%d1%80%d0%b8%d0%ba%d0%b8/koshernaya-eda-moskva-dostavka-kak-vybrat-koshernyj-restoran-i-proverit-sertifikat/
PG Soft no Brasil 2026: Pix, suporte em português e giros grátis todo dia
Доступ к сайту через рабочие зеркала
Нынешние виртуальные казино предоставляют пользователям постоянный переход к услугам. Основной портал Bollywood казино оперирует надёжно, обеспечивая богатый спектр игровых развлечений. Однако временами образуются программные сложности или ограничения, потому важно иметь представление о доступности рабочих зеркал.
Что собой представляет из себя центральное зеркало казино
Копия — это точная копия центрального сайта с схожим возможностями. Функционирующее зеркало сегодня позволяет преодолевать локальные блокировки и вести игру.
Принципиальные достоинства задействования зеркал:
– Стопроцентный вход к собственному кабинету
– Сохранение совокупных информации аккаунта
– Схожий перечень игр
– Актуальные вознаграждения и промо
Открытие счёта на платформе
Механизм оформления занимает считанные минут. Недавние игроки обретают щедрый поощрение за регистрацию, который может содержать:
– Стартовый финансовый бонус
– Бесплатные спины для автоматов
– Эксклюзивные промокоды
– Повышенный кешбэк
Во имя выполнения создания аккаунта требуется:
1. Войти на официальный ресурс или альтернативу
2. Кликнуть клавишу «Оформиться»
3. Внести персональные данные
4. Заверить почтовый адрес или телефон
5. Использовать промокод (в случае доступности)
Вход в личный кабинет
По завершении успешной оформления игроки в состоянии совершать доступ используя главный ресурс или действующее зеркало. Персональный кабинет даёт безграничный регулирование над аккаунтом:
– История игр
– Ввод депозита
– Снятие выигрышей
– Администрирование бонусами
– Присутствие в состязаниях
Награды и промо казино
Сайт награждает клиентов вариативными наградными системами:
Приветственные подарки
Дебютанты зарабатывают богатый пакет поощрений на стартовые пополнения. Типично это включает долевую прибавку к величине вклада плюс безвозмездные вращения.
Систематические акции
– Седмичный возврат до 15%
– Турниры с премиальными банками
– Подарки на дату рождения
– Уникальные акции для статусных пользователей
План лояльности
Регулярные пользователи накапливают очки, которые разрешено превратить на действительные деньги или уникальные бонусы.
Карманная редакция и программа
Актуальные инновации обеспечивают участвовать в любом месте угодно. Карманная версия веб-сайта самостоятельно подстраивается под размер любого девайса.
Достоинства мобильного ПО:
– Быстрая подгрузка игр
– Удобный интерфейс
– Всплывающие-уведомления о промо
– Опция установить для Android и iOS
Живое казино: антураж подлинного игорного клуба
Область Live заведения переносит клиентов в обстановку подлинного гемблинг дома. Опытные ведущие ведут развлечение в состоянии актуального времени.
Предлагаемые игры:
– Рулетка
– Двадцать одно
– Классика
– Покерная игра
Слоты и игровые автоматы
Собрание гемблинг автоматов включает множество названий от передовых производителей. Произвольный пользователь обнаружит слот по нраву:
– Стандартные слоты
– Современные автоматы с дополнительными этапами
– Крупный приз-машины
– Megaways автоматы
Конкурсы и раздачи
Регулярные турниры вносят азарт и обеспечивают способность обрести большие награды. Вовлечение в соревнованиях зачастую даровое, а призовые фонды достигают внушительных размеров.
Безопасность и анонимность
Платформа применяет инновационные протоколы защиты для защиты информации игроков. Каждые денежные операции совершаются через охраняемые каналы.
Итог
Официальный сайт и его рабочие зеркала дают безопасный переход к отличным развлекательным услугам. Великодушные награды, удобная портативная версия, многообразие игр и компетентное Live-игорный дом создают портал прекрасным вариантом для поклонников гемблинг слотов.
mostbet сабтином ройгон https://mostbet95163.help
Переход к сайту через рабочие зеркала
Участники сетевых казино регулярно имеют дело с проблемой недоступности официального портала. Именно для решения этой ситуации созданы зеркала легального ресурса. mentalspacetherapy.com обеспечивает стопроцентный переход ко всем опциям площадки.
Что такое функционирующее зеркало казино
Дубликат значит собой полную версию основного сайта с таким же набором функций. Главное расхождение — это иное имя. Каждые данные игрока, содержа депозит, поощрения и записи партий, находятся такими же.
Плюсы эксплуатации зеркал
Рабочие зеркала располагают комплексом важных плюсов:
– Бесперебойный вход к излюбленным автоматам
– Стопроцентная сохранность собственных параметров
– Поддержание всех опций индивидуального кабинета
– Возможность обретения бонусов и присутствия в акциях
Оформление профиля на официальном сайте
Ход регистрации крайне элементарен и требует несколько минут. Недавние клиенты могут надеяться на внушительный стартовый приз за регистрацию.
Шаги открытия аккаунта
1. Переход на официальный сайт или его альтернативу
2. Нажатие на кнопку “Регистрация”
3. Ввод нужных сведений
4. Активация цифровой почты
5. Указание промокода (при наличии имеется)
Бонусы и предложения для пользователей
Ресурс одаривает своих игроков многочисленными поощрительными программами.
Ключевые типы призов
Вводный бонус — солидное поощрение для начинающих пользователей, каковое может вмещать монетарные бонусы и безвозмездные спины.
Фриспины — способность играть в известных игровых машинах без затрат.
Кэшбек — частичный возврат потерянных финансов, который именно начисляется по неделям или помесячно.
Промокоды — эксклюзивные последовательности, предоставляющие бонусные привилегии.
Пользовательский кабинет: возможности и настройки
Пользовательский кабинет гарантирует совершенный управление над пользовательским опытом. Здесь имеются:
– Контроль балансом
– История транзакций
– Работающие награды
– Настройки охраны
– Подтверждение аккаунта
Мобильная редакция и софт
Актуальные игроки признают мобильность. Ресурс дает 2 метода для ставок с карманных устройств.
Адаптивная телефонная редакция
Портативная редакция ресурса автоматически приспосабливается под экран любого гаджета. Не требуется скачивать дополнительное софт.
Приложение для гаджетов
Разрешено установить официальное софт для iOS и Android. Программа обеспечивает:
– Скорый запуск
– Доработанный интерфейс
– Всплывающие-извещения о предложениях
– Стабильную работу
Live игры: атмосфера реального зала
Секция Live игр доставляет участников в антураж настоящего игорного заведения. Профессиональные крупье осуществляют сессии в варианте реального времени.
Топовые Live-столы
– Французская рулетка
– Blackjack
– Baccarat
– Poker
Аппараты: ассортимент развлечений
Собрание азартных слотов насчитывает массу позиций от топовых провайдеров. Участники встретят:
– Обычные автоматы
– Видео-автоматы
– Прогрессивный джекпот-автоматы
– Многолинейные автоматы
Турниры и особые предложения
Регулярные конкурсы предоставляют шанс участникам бороться друг с другом за солидные призовые фонды. Каждый конкурс имеет свои правила включения и доску лидеров.
Варианты зачисления и вывода денег
Ресурс предоставляет комплекс денежных систем:
– Платежные средства
– Электронные счета
– Криптовалюты
– Банковские транзиты
Любые переводы выполняются надежно благодаря передовым методам криптографии.
Сервис support
Компетентные специалисты службы помощи способны содействовать 24/7. Доступны следующие способы общения:
– Живой-чат
– Email-поддержка
– Аудио связь
– Публичные сети
Итог
Главный домен игровой площадки и его рабочие копии предоставляют пользователям безопасный и удобный переход к большому ассортименту азартных услуг. Солидные поощрения, постоянные промоакции, профессиональная служба и комфортные денежные способы формируют азартный процесс максимально захватывающим и выгодным.
birxbet birxbet .
Jogo do Tigrinho ao vivo com dealer: já jogou versão live? Vale a pena?
Актуальные интернет казино предлагают пользователям широкий выбор вариантов для комфортной игры. Однако иногда подключение к главному ресурсу может стать ограниченным. В таких ситуациях на помощь спешит казино Метелица, которое предоставляет бесперебойный доступ ко всем функциям платформы.
Что такое актуальное зеркало казино
Копия — это идентичная дубликат основного ресурса, которая размещается по запасному URL. Зеркало содержит весь функционал первоначального ресурса, включая личный кабинет, баланс и сведения операций.
Принципиальные плюсы задействования зеркала:
– Постоянный подключение к порталу
– Полная тождественность инструментов
– Сохранность личных данных
– Удержание существующих привилегий
Как разыскать действующее зеркало на сегодня
Имеется несколько достоверных способов поиска текущей адреса:
Легитимные ресурсы:
1. Электронная рассылка — руководство регулярно отправляет письма с рабочими адресами
2. Социальные сети — легитимные страницы постят актуальную новости
3. Сервис поддержки — консультанты дают надежные адреса
4. Портативное приложение — позволяет преодолевать блокировки
Создание аккаунта на главном портале
Процесс оформления требует не более несколько минут и включает из таких шагов:
1. Открытие на главный портал или действующее зеркало
2. Щелчок на иконку «Открыть счет»
3. Внесение персональной анкеты
4. Подтверждение имейл почты или сотового номера
5. Применение поощрения за регистрацию при наличии промокода
Только что зарегистрированные клиенты зарабатывают щедрый стартовый подарок, который может содержать даровые прокруты, валютные призы или возврат средств.
Логин в личный кабинет
Авторизация на сайте осуществляется привычным способом. Необходимо указать никнейм и секретный ключ, использованные при оформлении.
Существенные моменты для безопасного входа:
– Эксплуатируйте надежный код
– Включите 2FA проверку
– Не фиксируйте данные на общественных устройствах
– Контролируйте URL строку браузера
Анализ наградной программы
Казино награждает клиентов разнообразными привилегиями и акциями:
Вступительный пакет
Новички вправе рассчитывать на значительное награду за дебютный вклад. Традиционно это процентовая надбавка к внесенной объему плюс фриспины для популярных слотов.
Регулярные акции
– Еженедельный cashback — возврат части потерянных финансов
– Награды на повторные депозиты
– Особые промо по событиям
– Конкурсы с большими призовыми суммами
План лояльности
Активные пользователи накапливают баллы за всякую бет, которые затем конвертируются на действительные финансы, даровые прокруты или уникальные привилегии.
Бонус-коды: как использовать
Промокоды — это специальные наборы знаков, дающие доступ к бонусным привилегиям.
Каким образом найти рабочие промокоды:
– Официальные общественные сети казино
– Сотрудничающие порталы
– Email-информирование
– Тематические платформы
Прописывается промокод в специальное поле при регистрации или внесении депозита кошелька.
Портативная версия и приложение
Актуальные геймеры предпочитают проводить время с телефонных девайсов. Платформа обеспечивает двойной решения для удобной смартфонной игры.
Отзывчивая модификация
Веб версия самостоятельно подстраивается под габариты дисплея. Не просит загрузки и работает в каждом новом браузере.
Мобильное приложение
Установить софт можно для устройств на Android и iOS. Плюсы app:
– Молниеносная открытие
– Устойчивая действие
– Push-уведомления о поощрениях
– Самостоятельный преодоление блокировок
Этап загрузки элементарен: необходимо перейти на ресурс с смартфонного девайса и следовать указаниям.
Игровой ассортимент
Коллекция слотов охватывает тысячи единиц от топовых разработчиков.
Слоты
Азартные машины — максимально распространенная раздел развлечений. Представлены обычные трехбарабанные аппараты, современные видео-автоматы с дополнительными уровнями, а также растущие суперпризы.
Live казино
Секция с настоящими ведущими дает возможность испытать дух реального казино. Имеются игры с блэкджеком.
Передача осуществляется в превосходном формате, присутствует чат с ведущим и прочими пользователями.
Конкурсы
Систематически устраиваются состязания по всевозможным дисциплинам. Участие позволяет выиграть финансовые выигрыши, даровые прокруты или особые поощрения.
Финансовые манипуляции
Сайт предлагает широкий набор финансовых методов:
– Пластиковые карты
– Онлайн кошельки
– Биткоин
– Банковские транзакции
Стартовая величина взноса — доступная для основной части игроков. Обналичивание призов выполняется в скорые интервалы.
Сервис поддержки
Компетентные специалисты настроены оказать помощь непрерывно. Доступны такие способы контакта:
– Интернет-чат
– Email
– Голосовая горячая линия
– Социальные сети
Решения на частые вопросы можно получить в блоке FAQ.
Итог
Официальный сайт казино и его актуальные зеркала гарантируют клиентам совершенный подключение ко всем функциям сайта. Щедрые вознаграждения, практичная мобильная версия, гигантский каталог аттракционов и профессиональная помощь создают развлекательный процесс крайне комфортным и безопасным.
Описание лицензионного сайта
Прогрессивные интернет казино дают клиентам богатый спектр игр и перспектив. Лицензионный портал РќСЊСЋ Ретро предоставляет защищенный путь к гемблинг функциям.
Рабочее зеркало: возможность прямо сейчас
Резервный сайт служит как абсолютную реплику главного сайта. Официальное зеркало дает возможность игрокам миновать потенциальные барьеры.
Выгоды использования зеркала
Главные выгоды предполагают:
– Беспрерывный вход к сайту
– Хранение любых опций официального сайта
– Охрана личных материалов
– Равнозначный инструментарий
Открытие счета на портале
Процесс оформления профиля выделяется доступностью и эргономичностью. Новые клиенты обязаны:
1. Зайти на основной веб-сайт или его зеркало
2. Кликнуть на элемент регистрации
3. Указать требуемые данные
4. Верифицировать электронную почту
5. Совершить начальный логин
Вознаграждение за регистрацию
Начинающие забирают щедрый начальный приз. Это премия имеет возможность охватывать:
– Монетарные бонусы
– Бесплатные вращения
– Расширенный уровень кэшбэка
Вход в индивидуальный аккаунт
Зарегистрированные клиенты способны моментально войти в свой профиль, применяя учетные данные и код. Личный кабинет предоставляет доступ к:
– Администрированию счетом
– Хронологии платежей
– Работающим бонусам
– Настройкам профиля
Подарки и предложения
Сайт постоянно проводит разнообразные акции для пользователей.
Разновидности подарков
Главные типы поощрений:
– Пополнительные начисления – коэффициент от размера внесения
– Спины – бесплатные вращения в автоматах
– Кэшбэк – возврат процента проигранных финансов
– Конкурсные награды – премии за игру в конкурсах
Ваучеры
Эксклюзивные купоны помогают заработать бонусные привилегии. Игроки способны найти их на тематических сайтах или заработать в новостях.
Переносная редакция и программа
Актуальные гемблеры выбирают мобильный геймплей.
Функции переносной платформы
– Responsive дизайн для разнообразных девайсов
– Целостный возможность к играм
– Стремительная подгрузка
– Практичное контроль
Download app
Мобильное приложение доступно для установки на девайсы с операционными ОС Android и iOS. App дает:
– Стабильную деятельность
– Мгновенные уведомления о призах
– Быстрый вход к любимым слотам
Азартный ассортимент
Платформа обеспечивает богатую коллекцию гемблинг услуг.
Автоматы
Коллекция развлекательных машин содержит:
– Традиционные слоты
– Video аппараты
– Накопительные игры
– Сюжетные игры
Live игры
Секция живых столов обеспечивает возможность участвовать с живыми ведущими. Предложены:
– Рулетка
– Блек-джек
– Punto Banco
– Техасский холдем
Турниры
Периодические турниры обеспечивают участникам бороться за солидные финансовые фонды. Призовая структура модифицируется каждую неделю.
Платежные транзакции
Сайт предоставляет множество опций пополнения и снятия сумм:
– Дебетовые карточки
– Виртуальные счета
– Банковские транзакции
– Bitcoin
Абсолютно все переводы выполняются конфиденциально с применением передовых систем кодирования.
Служба помощи
Квалифицированная команда support действует без перерыва. Связаться с специалистами можно через:
– Интерактивный чат
– Почтовую почту
– Телефон
– Социальные сети
Защита и аккредитация
Казино работает на основании официальной аккредитации. Подобное подтверждает:
– Справедливость азартного действа
– Сохранность индивидуальных сведений
– Оперативные выплаты
– Ответственный гемблинг
Итог
Официальный портал и его функционирующие резервные страницы предоставляют пользователям полный ассортимент услуг для приятной и доходной времяпрепровождения. Солидные бонусы, многочисленные игры, квалифицированная служба и проверенная инфраструктура операций превращают ресурс лучшим опцией для поклонников развлекательных услуг.
I enjoy playing at this casino https://openleft.ru/?p=1109492 because it feels trustworthy and well-optimized. Live tables are interactive, slots offer different styles, and the overall experience remains consistent over time.
опубликовано здесь https://slon4-at.at
go to this page – Keeping momentum aligned ensures growth doesn’t become chaotic.
https://mostbettr.blog/# mostbet casino
Нынешние онлайн-казино обеспечивают клиентам широкий спектр возможностей для комфортной времяпрепровождения. Вход к сервису официальный производится через основной портал или актуальное зеркало.
Что такое функционирующее зеркало казино
Функционирующее зеркало — это альтернативный домен основного веб-сайта казино. Такие копии создаются для гарантирования непрерывного входа к игровой платформе.
Дубликат текущее совершенно повторяет опции базового портала. Игроки получают схожий вход ко всем возможностям, включая регистрацию, пополнение депозита и получение призов.
Создание аккаунта на лицензионном веб-сайте
Процедура создания аккаунта длится всего пару минут. Начинающим участникам нужно:
1. Войти на лицензионный портал или актуальное настоящее зеркало
2. Кликнуть кнопку “Регистрация”
3. Ввести необходимые сведения
4. Активировать электронную почту
5. Ввести бонусный код при доступности
После завершения регистрации пользователь обретает подарок за регистрацию, который имеет право содержать бесплатные вращения или монетарное начисление.
Вход в индивидуальный кабинет
Личный кабинет — это закрытая территория, где игроки вправе управлять своим аккаунтом. Для доступа следует внести никнейм и секретный ключ.
В личном кабинете доступны нижеперечисленные функции:
– Просмотр записей переводов
– Задействование бонусных кодов
– Регулирование поощрениями
– Вступление в соревнованиях
– Отслеживание возврата средств
– Редактирование профиля
Поощрения и акции
Развлекательная платформа дарит привлекательные бонусы:
Начальный комплект — новички зарабатывают крупное поощрение на первые взносы.
Free spins — выдаются как при создании аккаунта, так и в рамках многочисленных акций.
Возмещение — систематический рефанд части израсходованных сумм.
Промокоды — эксклюзивные комбинации, обеспечивающие доступ к уникальным призам.
Обзор развлекательных направлений
Аппараты
Собрание слотов насчитывает множество игр от лучших провайдеров. Пользователи обнаружат как обычные машины, так и инновационные видео-слоты с притягательной графикой.
Live казино
Секция Live казино дарит право развлекаться с настоящими дилерами в формате реального времени. Доступны популярные варианты: рулетка, блэкджек, баккара, покер.
Турниры
Систематические соревнования с значительными премиальными пулами завлекают тысячи конкурсантов. Чемпионы завоевывают финансовые вознаграждения и специальные бонусы.
Смартфонная версия и программа
Телефонная версия сайта обеспечивает участвовать с любого аппарата. Структура автоматически настраивается под диагональ экрана.
Скачать программу можно для гаджетов на Android и iOS. Телефонное app обладает всеми характеристиками настольной версии.
Как обнаружить актуальное зеркало на сегодня
Рабочие ссылки зеркал постоянно корректируются. Узнать действующую линк можно многими методами:
– Через отдел поддержки
– В проверенных коммуникационных сетях
– По e-mail дайджесту
– На специализированных сайтах
Защита и легальность
Основной ресурс функционирует на базе мировой сертификата. Все операции охраняются передовыми методами безопасности.
Секретность пользовательских реквизитов сохраняется в абсолютном формате.
Резюме
Лицензионный домен и его функционирующие дубликаты обеспечивают игрокам постоянный путь к качественным игровым сервисам. Щедрые поощрения, многочисленные развлечения, квалифицированная сервис — все это делает азартный опыт чрезвычайно беспроблемным и притягательным.
Актуальные онлайн-казино гарантируют участникам богатый набор игр и заманчивые бонусы. Тем не менее для стабильной деятельности необходимо понимать, как обнаружить Винити и его действующие зеркала.
Что такое основной веб-ресурс казино
Главный ресурс казино — это основная платформа, где клиенты могут пользоваться гемблинг слотами. Портал функционирует на легитимных условиях и обладает всеми обязательными сертификатами.
Ключевые достоинства основного ресурса:
– Безопасность индивидуальных данных
– Прозрачные условия игры
– Гарантированные выводы
– Квалифицированная техподдержка
Актуальное зеркало казино: для чего используется
Альтернативный адрес — это точная дубликат лицензионного веб-сайта, размещенная по другому URL. Функционирующее зеркало запускается для поддержания стабильного входа к ресурсу.
Причины эксплуатации альтернативных адресов:
– Недоступность основного URL
– Технические мероприятия
– Большая нагрузка на систему
Как получить рабочее зеркало сегодня
Найти текущее официальное зеркало можно различными методами:
1. Почтовые оповещения — активируйте уведомления на email подписку
2. Отдел техподдержки — проконсультируйтесь в онлайн-чат
3. Корпоративные каналы — отслеживайте за обновлениями
4. Партнерские порталы — авторитетные сайты
Регистрация на платформе казино
Процесс регистрации требует только пару секунд:
1. Кликните на опцию “Регистрация”
2. Заполните запрашиваемые информацию
3. Валидируйте почтовую ящик
4. Примените промокод, если имеется
Вслед за успешной создания аккаунта вам предоставится открыт личный кабинет.
Награды и коды активации
Выгодная поощрительная структура — важное конкурентное преимущество казино:
Поощрение за первичную регистрацию
Новые участники зарабатывают приветственный поощрение, который может содержать:
– Монетарный кредит на дебютный пополнение
– Фриспины для игровых машин
– Стартовые средства
Купоны
Систематически публикуются новые промокоды, позволяющие получить специальные бонусы.
Механизм кешбэка
Постоянные клиенты возвращают часть проигранных финансов на счет.
Действующие предложения и соревнования
Ресурс систематически устраивает интересные промо-мероприятия:
– Недельные баттлы
– Тематические бонусы
– Конкурсы солидных наград
– Механизм статусов
Логин в личный раздел
Для авторизации на портал следует:
1. Посетить лицензионный сайт или действующее зеркало
2. Нажать “Login”
3. Внести имя пользователя и пароль
В личном разделе предоставлены такие инструменты:
– Депозит счета
– Получение денег
– Изучение архива операций
– Редактирование индивидуальными параметрами
Mobile платформа и программа
Mobile вариант
Оптимизированная модификация веб-сайта предоставляет шанс делать ставки с различных смартфонного девайса. Оформление автоматически настраивается под диагональ дисплея.
Клиент для скачивания
Скачать клиент можно для:
– Android — официальная загрузка с ресурса
– iOS — инсталляция через App Store
Преимущества app:
– Моментальный вход
– Устойчивая функциональность
– Push-сообщения об предложениях
– Оптимизированный дизайн
Игровые зоны
Автоматы
Богатая подборка эмуляторных автоматов от ведущих провайдеров:
– Стандартные автоматы
– Видео-автоматы
– Джекпот-автоматы
Live зал
Зона с настоящими операторами предлагает:
– Рулетки
– 21
– Baccarat
– Покер
Трансляции осуществляются в отличном разрешении, воссоздавая атмосферу настоящего казино.
Методы депозита и снятия
Сайт принимает разнообразные финансовые системы:
– Кредитные картсчета
– Электронные системы
– Crypto
– Прямые отправки
Стартовые лимиты внесения и моментальные выплаты делают игру предельно удобной.
Служба поддержки
Опытная отдел помощи оперирует 24/7 и в состоянии помочь с разными вопросами:
– Онлайн-чат
– Email-переписка
– Звонковая горячая линия
Итоги
Официальный портал казино и его функционирующие зеркала предоставляют игрокам защищенный и интересный азартный процесс. Выгодные бонусы, функциональная портативная вариант, многочисленные игры и высокоуровневое live-казино превращают эту платформу превосходным решением для игровых времяпрепровождения.
mostbet güncel mostbet
1xbet giris 1xbet giris .
1xbet resmi 1xbet-47.com .
нажмите здесь https://slon4-at.at
go to page – Well-organized concepts make project advancement straightforward and effective.
Нынешние онлайн-казино гарантируют клиентам множество возможностей для комфортной игры. Официальный сайт Р±РѕРЅСѓСЃ обеспечивает путь ко всем сервисам и развлечениям. Однако при возникновении технических трудностей на подмогу прибывают функционирующие дубликаты.
Что являет собой собой рабочее зеркало
Зеркало казино — это полная копия официального сайта, расположенная по запасному доменному имени. Подлинное зеркало поддерживает все возможности, вместе с регистрацию, доступ в личный кабинет, поощрения и купоны.
Копия на сегодня обеспечивает:
– Стабильный доступ к игровым машинам
– Стопроцентную конфиденциальность индивидуальных сведений
– Удержание счета и журнала переводов
– Доступность всех бонусных программ
Регистрация на официальном портале
Этап создания аккаунта требует несколько минут. Свежеиспеченным геймерам следует:
1. Войти на основной ресурс или актуальное зеркало
2. Кликнуть кнопку «Зарегистрироваться»
3. Указать нужные поля
4. Верифицировать э-мейл почту
5. Применить бонусный код при существовании
После окончания создания аккаунта клиенты получают приз за регистрацию, что может иметь бонусные спины или денежно-призовое премирование.
Вход в личный кабинет
Индивидуальный кабинет открывает всеобъемлющий управление над азартным процессом. Через персональный аккаунт разрешается:
– Депонировать счет
– Снимать средства
– Активировать кодовые слова
– Контролировать записи игр
– Играть в турнирах
– Забирать кешбэк
Обзор бонусов и акций
Выгодная премиальная программа — важное козырь ресурса. Центральные типы вознаграждений:
Приветственный бонус
Новые игроки обретают великодушное награду на первые депозиты. Объем премии может достигать 100-200% от размера депозита.
Фриспины
Бесплатные раунды выдаются для востребованных машин. Объем free spins колеблется от 10 до 500 штук.
Cash back
Систематический или помесячный возврат процентной доли проигранных денег. Стандартный размер кэшбека — 5-15%.
Соревнования
Постоянные турниры с солидными призовыми банками. Соревнующиеся конкурируют за топовые строчки в турнирной таблице.
Мобильная версия и приложение
Смартфонная версия разрешает наслаждаться игрой с всякого девайса. Игроки могут закачать приложение для iOS и Android или задействовать интернет версию.
Плюсы портативного софта:
– Оперативная прогрузка игр
– Комфортный интерфейс
– Всплывающие уведомления о поощрениях
– Возможность входа через биометрию
Игровые автоматы и Live казино
Развлекательная подборка насчитывает сотни игр от ведущих производителей.
Популярные разделы игр:
– Стандартные машины
– Видео-автоматы с премиальными уровнями
– Джекпот автоматы
– Мегавейс машины
Live игорный зал
Категория live казино обеспечивает игру с реальными крупье. Представлены классические игры:
– Американская рулетка
– Двадцать одно
– Баккара
– Карибский покер
Как обнаружить рабочее зеркало
Получить действующую URL на зеркало разрешается разными методами:
1. Подписаться на почтовую рассылку
2. Следить за новостями в социальных сетях
3. Написать в сервис поддержки
4. Добавить в закладки действующее зеркало в избранное
Заключение
Основной сайт и его действующие копии обеспечивают стабильный путь к развлекательным автоматам. Щедрые поощрения, множественные бонусные коды, эргономичное мобильное софт и высококлассная сервис поддержки превращают развлекательный процесс крайне комфортным и безопасным.
Нынешние виртуальные казино обеспечивают клиентам обширный спектр вариантов для комфортной игры. Но иногда подключение к официальному сайту может быть закрытым. В таких обстоятельствах на поддержку приходят Лаки Бир, которое обеспечивает постоянный подключение ко всем возможностям платформы.
Что такое действующее зеркало казино
Зеркало — это полная версия основного портала, которая располагается по запасному URL. Альтернативный ресурс имеет целый функционал главного веб-портала, включая индивидуальный кабинет, счет и данные переводов.
Принципиальные выгоды эксплуатации зеркала:
– Непрерывный соединение к сайту
– Абсолютная идентичность инструментов
– Сохранность индивидуальных сведений
– Поддержка всех привилегий
Как отыскать актуальное зеркало сегодня
Есть ряд надежных путей обнаружения свежей URL:
Авторизованные сервисы:
1. Электронная рассылка — управление систематически отправляет уведомления с актуальными URL
2. Коммуникационные сети — официальные аккаунты выкладывают свежую новости
3. Служба поддержки — операторы выдают надежные адреса
4. Смартфонное приложение — позволяет избегать блокировки
Регистрация на основном сайте
Процесс открытия счета занимает не более немного минут и состоит из нижеследующих шагов:
1. Вход на главный веб-сайт или рабочее зеркало
2. Щелчок на элемент «Зарегистрироваться»
3. Указание персональной бланка
4. Проверка почтовой почты или мобильного номера
5. Активация вознаграждения за регистрацию при доступности промокода
Свежие клиенты приобретают великодушный вступительный подарок, который может предполагать free spins, монетарные призы или cashback.
Доступ в индивидуальный кабинет
Авторизация на сайте осуществляется традиционным путем. Необходимо ввести учетные данные и кодовое слово, примененные при регистрации.
Значимые детали для защищенного входа:
– Используйте надежный шифр
– Запустите двойную проверку
– Не храните пароли на посторонних девайсах
– Проверяйте URL строку браузера
Анализ премиальной структуры
Игровая платформа одаривает клиентов всевозможными привилегиями и акциями:
Стартовый букет
Дебютанты вправе рассчитывать на значительное награду за дебютный взнос. Традиционно это долевая добавка к зачисленной объему плюс free spins для популярных слотов.
Периодические промо
– Семидневный компенсация — возвращение доли потерянных финансов
– Поощрения на последующие депозиты
– Специальные предложения по событиям
– Состязания с значительными премиальными пулами
План вознаграждений
Активные пользователи накапливают баллы за любую бет, которые затем меняются на фактические финансы, даровые прокруты или эксклюзивные привилегии.
Кодовые слова: как использовать
Промокоды — это особые сочетания символов, гарантирующие право к дополнительным привилегиям.
В каких местах раздобыть актуальные промокоды:
– Проверенные социальные сети казино
– Партнерские ресурсы
– Email-новостная лента
– Специализированные форумы
Активируется промокод в предназначенное поле при создании аккаунта или внесении депозита счета.
Телефонная версия и приложение
Современные игроки выбирают играть с телефонных гаджетов. Платформа предоставляет пару решения для комфортной портативной игры.
Мобильная модификация
Онлайн версия автоматически адаптируется под габариты дисплея. Не нуждается инсталляции и функционирует в произвольном современном браузере.
Мобильное приложение
Загрузить программу можно для девайсов на Android и iOS. Плюсы app:
– Молниеносная открытие
– Устойчивая действие
– Автоматические-уведомления о промо
– Автоматический обход блокировок
Процедура установки прост: требуется зайти на сайт с мобильного девайса и подчиняться инструкциям.
Гемблинг выбор
База слотов насчитывает несколько тысяч единиц от ведущих поставщиков.
Слоты
Гемблинг автоматы — наиболее любимая раздел забав. Размещены стандартные винтажные автоматы, актуальные мультимедийные слоты с поощрительными уровнями, а также растущие призы.
Live казино
Зона с живыми ведущими обеспечивает прочувствовать атмосферу истинного казино. Представлены игры с рулеткой.
Вещание ведется в HD разрешении, имеется коммуникация с дилером и другими участниками.
Турниры
Постоянно устраиваются соревнования по разным играм. Участие предоставляет право завоевать монетарные награды, фриспины или специальные привилегии.
Транзакционные манипуляции
Платформа обеспечивает широкий спектр денежных способов:
– Кредитные карты
– Онлайн кошельки
– Криптовалюта
– Счетовые платежи
Низшая количество вклада — посильная для массы пользователей. Снятие призов осуществляется в короткие интервалы.
Отдел поддержки
Профессиональные консультанты расположены помочь круглосуточно. Имеются такие варианты коммуникации:
– Веб-чат
– Email
– Мобильная связь
– Медийные сети
Решения на типовые темы можно отыскать в зоне FAQ.
Заключение
Основной портал казино и его функционирующие зеркала дают игрокам максимальный доступ ко всем функциям платформы. Солидные поощрения, комфортная смартфонная версия, гигантский коллекция игр и квалифицированная поддержка делают азартный процесс исключительно приятным и конфиденциальным.
cheap viagra pills for sale https://edpillseasy.com/# buy ed pills with no prescription
mostbet güncel giriş mostbet
колесов вертолеты россии генеральный директор
можно проверить ЗДЕСЬ https://slon4-at.at/
Newcastle 6-1 Qarabağ 2026 Europa League Gordon half-time quadruple
Переход к порталу через рабочие зеркала
Игроки онлайн казино регулярно имеют дело с ситуацией закрытия официального ресурса. Именно для устранения этой трудности предусмотрены копии легального ресурса. Tippy казино гарантирует стопроцентный подключение ко всем возможностям платформы.
Что такое актуальное зеркало казино
Альтернативный адрес составляет собой идентичную версию оригинального веб-сайта с похожим опциями. Главное различие — это доменное имя. Все данные клиента, в том числе средства, награды и записи ставок, находятся прежними.
Преимущества применения зеркал
Действующие зеркала характеризуются рядом важных преимуществ:
– Постоянный доступ к выбранным автоматам
– Совершенная сохранность персональных данных
– Неизменность всех параметров пользовательского кабинета
– Способность взятия призов и участия в кампаниях
Регистрация на легальном ресурсе
Процедура оформления максимально легок и требует буквально минут. Недавние участники могут претендовать на внушительный начальный бонус за оформление.
Ступени формирования аккаунта
1. Вход на официальный портал или его альтернативу
2. Клик на элемент “Зарегистрироваться”
3. Указание обязательных информации
4. Верификация цифровой почты
5. Внесение бонусного кода (когда есть)
Бонусы и акции для пользователей
Ресурс одаривает своих пользователей разнообразными бонусными предложениями.
Основные виды наград
Вводный пакет — внушительное поощрение для свежих пользователей, что имеет возможность содержать монетарные призы и фриспины.
Безвозмездные спины — шанс использовать в популярных игровых машинах без затрат.
Компенсация — долевой компенсация потерянных финансов, каковой зачисляется каждую неделю или раз в месяц.
Бонусные коды — особые сочетания, обеспечивающие дополнительные выгоды.
Личный кабинет: функции и настройки
Пользовательский аккаунт предоставляет полный надзор над персональным опытом. В данном разделе доступны:
– Регулирование балансом
– Архив переводов
– Работающие привилегии
– Параметры защиты
– Подтверждение аккаунта
Портативная редакция и софт
Новейшие клиенты ценят портативность. Платформа дает 2 варианта для ставок с мобильных устройств.
Адаптивная портативная вариант
Смартфонная платформа ресурса без участия настраивается под монитор любого устройства. Не требуется устанавливать особое софт.
Программа для смартфонов
Разрешено скачать специальное APP для iOS и Android. Программа обеспечивает:
– Быстрый старт
– Оптимизированный дизайн
– Push-уведомления о акциях
– Бесперебойную функциональность
Live раздел: среда настоящего казино
Секция Live игр переносит клиентов в антураж настоящего казино. Компетентные хосты осуществляют игры в режиме живого времени.
Топовые Live-форматы
– Европейская рулетка
– 21
– Baccarat
– Покер
Игровые машины: выбор слотов
Каталог развлекательных машин вмещает множество наименований от ведущих поставщиков. Пользователи откроют:
– Классические аппараты
– Современные слоты
– Джекпот-слоты
– Многолинейные автоматы
Состязания и специальные мероприятия
Периодические состязания позволяют участникам бороться друг с другом за внушительные призовые банки. Любой конкурс имеет свои правила вовлечения и доску лидеров.
Пути внесения и снятия денег
Площадка поддерживает массу расчетных инструментов:
– Кредитные картыы
– Цифровые сервисы
– Криптовалюты
– Прямые отправления
Абсолютно все платежи осуществляются конфиденциально благодаря новейшим протоколам защиты.
Отдел поддержки
Компетентные операторы команды support расположены поддержать 24/7. Доступны данные каналы контакта:
– Мгновенный-чат
– Email-сервис
– Телефонная линия
– Коммуникационные сети
Заключение
Основной портал клуба и его функционирующие дубликаты гарантируют пользователям защищенный и удобный вход к большому спектру развлекательных услуг. Внушительные подарки, постоянные предложения, качественная сервис и легкие расчетные методы превращают развлекательный процесс крайне приятным и результативным.
Fortune Tiger no modo demo: quem treina antes de depositar? Confessa aqui
Нынешние онлайн-казино дают игрокам большой диапазон игр и бонусных программ. Подключение к платформе осуществляется через главный портал или его актуальное зеркало каз, что дает бесперебойную работу.
В чем суть функционирующее зеркало казино
Дубликат — это идентичная реплика оригинального сайта, разработанная для преодоления барьеров. Действующее зеркало позволяет пользователям получить вход к предпочитаемым слотам в каждое время.
Лицензионное зеркало располагает всеми опциями основного ресурса:
– Целый список слотов
– Профиль с зафиксированными данными
– Актуальные промокоды
– Надежные финансовые процедуры
Регистрация на официальном сайте
Процесс регистрации составляет всего пару минут. Первым участникам нужно:
1. Попасть на основной ресурс или актуальное зеркало
2. Кликнуть на элемент “Открыть счет”
3. Указать требуемые информацию
4. Верифицировать адрес
5. Сделать начальный платеж
Приветственный бонус предоставляется моментально после выполнения всех этапов.
Вход в профиль
Зарегистрированные клиенты могут произвести подключение применяя:
– Логин и код
– Данные сотового
– Контактный email
Профиль дает доступ к регулированию балансом, истории игр и активным поощрениям.
Промо и программы
Игровая система балует регулярных участников многочисленными поощрениями:
Приветственный бонус
– Поощрение на стартовый депозит до 100%
– Free spins на востребованные машины
– Добавочные премии за дальнейшие депозиты
Купоны
Особые коды предоставляют доступ на получение специальных бонусов. Свежие купоны размещаются в блоке “Акции”.
Cashback
Еженедельный кэшбек достигает до 10% от проигранных средств. Выплата предоставляется незамедлительно.
Механизм лояльности
Активные игроки приобретают поинты, которые конвертируются на реальные деньги или бесплатные вращения.
Адаптивный портал и APP
Ради комфорта игроков разработана удобная мобильная версия. Гибкий вид позволяет удобно развлекаться с всякого мобильного устройства.
Достоинства APP:
– Оперативный доступ к слотам
– Оптимизированный интерфейс
– Надежная работа
– Push-уведомления о новых событиях
Установить софт можно даром с официального сайта для гаджетов на Android и iOS.
Коллекция слотов
Слоты
База включает более 2000 автоматов от популярных разработчиков:
– Стандартные машины
– Video slots
– Джекпот-слоты
– Фирменные игры
Live казино
Секция Live казино предлагает участие с реальными дилерами в онлайн формате:
– Колесо фортуны
– Блэкджек
– Карты
– Карточный покер
Состязания
Постоянные конкурсы с крупными призовыми бюджетами проводятся каждую неделю. Участие в состязаниях открыто всем созданным клиентам.
Финансовые варианты
Взносы и снятия денег производятся через востребованные способы оплаты:
– Дебетовые карточ ки
– Онлайн сервисы
– Крипто
– Денежные переводы
Наименьший платеж — от 100 рублей. Вывод финансов обрабатывается в течение 24 ч.
Отдел саппорта
Непрерывная команда помощи расположена содействовать в решении произвольных ситуаций:
– Живой чат
– Email
– Контактный номер
– Соц сети
Надежность и сертификат
Подлинный веб-сайт действует на почве международной сертификата. Любые параметры пользователей охранены новейшим SSL-криптованием.
Итог
Актуальное зеркало обеспечивает бесперебойный вход к излюбленным развлечениям, выгодным промокодам и практичным функциям. Откройте счет прямо сейчас и обретите стартовый приз!
Jogo do Tigrinho 2026: cartinha misteriosa x10 já virou rotina ou ainda é sonho?
Fortune Tiger modo turbo + auto: 800 giros sem parar – quem aguenta mais?
Nottingham Forest 3-0 Fenerbahce 2026 Europa League upset in Istanbul
PG Soft no Brasil: Pix instantâneo + suporte em português + giros grátis todo dia
Jogo do Tigrinho no celular: quem já ganhou big win deitado no sofá em 2026?
Murillo, Igor Jesus & Gibbs-White fire Nottingham Forest to 3-0 win over Fenerbahce
Jogo do Tigrinho multiplicador aleatório: melhor que respins fixos ou não? Opine!
Fortune Ox explosão de símbolos: já ganhou 1000x com uma única ativação?
PG Soft Brasil 2026: melhor combinação Pix + cashback + giros grátis
Передовые онлайн-казино гарантируют пользователям обширный ассортимент возможностей для удобной игры. Вход к платформе Enomo казино выполняется через основной портал или действующее зеркало.
Что такое актуальное зеркало казино
Рабочее зеркало — это запасной URL лицензионного сайта казино. Такие копии формируются для гарантирования непрерывного входа к игровой платформе.
Альтернатива текущее совершенно воспроизводит опции базового сайта. Игроки обретают схожий путь ко всем функциям, включая создание аккаунта, зачисление средств баланса и вывод выигрышей.
Открытие счета на официальном ресурсе
Алгоритм открытия профиля требует всего буквально моментов. Будущим участникам необходимо:
1. Войти на официальный сайт или рабочее подлинное зеркало
2. Щелкнуть кнопку “Регистрация”
3. Внести необходимые реквизиты
4. Верифицировать e-mail почту
5. Применить купон при наличии
После выполнения регистрации клиент приобретает бонус за регистрацию, который может включать бесплатные вращения или денежное премию.
Доступ в индивидуальный кабинет
Пользовательский кабинет — это охраняемая территория, где пользователи могут администрировать своим аккаунтом. Для доступа нужно внести username и пароль.
В личном кабинете открыты следующие опции:
– Мониторинг истории платежей
– Использование промокодов
– Регулирование бонусами
– Присоединение в соревнованиях
– Контроль возврата средств
– Настройка учетной записи
Бонусы и предложения
Игровая сервис предоставляет выгодные бонусы:
Регистрационный набор — новички зарабатывают крупное поощрение на дебютные взносы.
Фриспины — выдаются как при открытии счета, так и в рамках всевозможных акций.
Возмещение — постоянный рефанд доли утраченных денег.
Коды активации — специальные шифры, открывающие доступ к особым предложениям.
Характеристика азартных разделов
Игровые автоматы
Библиотека автоматов содержит тысячи позиций от лучших производителей. Пользователи обнаружат как классические автоматы, так и современные видео-слоты с интересной анимацией.
Live казино
Категория Live казино обеспечивает возможность развлекаться с живыми дилерами в состоянии актуального времени. Доступны распространенные развлечения: рулетка, блэкджек, баккара, покер.
Соревнования
Регулярные соревнования с солидными призовыми банками притягивают тысячи игроков. Победители завоевывают cash вознаграждения и особые поощрения.
Мобильная версия и app
Адаптивная версия портала дает возможность играть с каждого аппарата. Дизайн независимо подстраивается под габариты экрана.
Получить app можно для устройств на Android и iOS. Телефонное ПО характеризуется всеми функциями десктопной версии.
Как определить актуальное зеркало на данный момент
Рабочие URL дубликатов систематически меняются. Найти рабочую линк можно несколькими методами:
– Через департамент помощи
– В проверенных социальных сетях
– По email подписке
– На специализированных сайтах
Защита и сертификация
Официальный домен функционирует на основании зарубежной лицензии. Все платежи шифруются передовыми системами безопасности.
Анонимность индивидуальных сведений обеспечивается в стопроцентном размере.
Итог
Официальный домен и его функционирующие альтернативы дарят клиентам постоянный путь к превосходным развлекательным развлечениям. Привлекательные бонусы, разнообразные развлечения, квалифицированная помощь — все это формирует игровой досуг невероятно приятным и притягательным.
bahis siteler 1xbet 1xbet-52.com .
Вход к сайту через действующие зеркала
Участники виртуальных казино регулярно встречаются с ситуацией закрытия главного домена. Конкретно для решения этой задачи созданы копии основного домена. http://vinoxeviye.com/onlayn-verifikatsiya-bankovskoy-karty предоставляет беспрепятственный подключение ко всем функциям площадки.
Что такое действующее зеркало казино
Зеркало составляет собой полную копию главного портала с похожим возможностями. Главное несовпадение — это иное имя. Каждые данные игрока, содержа депозит, привилегии и архив ставок, находятся такими же.
Достоинства задействования зеркал
Действующие зеркала имеют набором значимых достоинств:
– Круглосуточный вход к любимым развлечениям
– Абсолютная конфиденциальность собственных данных
– Удержание всех конфигураций пользовательского кабинета
– Способность приобретения призов и присутствия в акциях
Открытие счета на легальном домене
Процедура оформления предельно прост и длится немного минут. Свежие игроки способны полагаться на солидный вводный бонус за регистрацию.
Шаги открытия аккаунта
1. Переход на официальный домен или его альтернативу
2. Выбор на кнопку “Создать аккаунт”
3. Заполнение требуемых информации
4. Активация email почты
5. Ввод бонусного кода (когда имеется)
Поощрения и промоакции для клиентов
Казино одаривает своих игроков разнообразными поощрительными программами.
Главные категории поощрений
Приветственный подарок — крупное поощрение для новых участников, каковое имеет возможность содержать материальные средства и фриспины.
Безвозмездные спины — способность играть в известных игровых машинах даром.
Кэшбек — пропорциональный возмещение утраченных денег, который начисляется еженедельно или ежемесячно.
Специальные коды — эксклюзивные наборы, обеспечивающие экстра преимущества.
Личный кабинет: инструменты и конфигурации
Персональный кабинет гарантирует абсолютный надзор над развлекательным процессом. Здесь предусмотрены:
– Администрирование депозитом
– Данные транзакций
– Действующие привилегии
– Настройки защиты
– Подтверждение аккаунта
Мобильная редакция и APP
Нынешние клиенты предпочитают гибкость. Площадка предлагает 2 способа для игры с портативных девайсов.
Приспособленная смартфонная редакция
Адаптивная вариант ресурса автоматически подстраивается под монитор любого аппарата. Нет необходимости скачивать отдельное приложение.
Программа для смартфонов
Разрешено скачать фирменное APP для iOS и Android. Софт обеспечивает:
– Моментальный старт
– Адаптированный интерфейс
– Оперативные-уведомления о бонусах
– Устойчивую работу
Live игры: атмосфера истинного казино
Секция Live столов доставляет игроков в среду настоящего зала. Компетентные хосты организуют партии в формате живого времени.
Известные Live-развлечения
– Французская рулетка
– Двадцать одно
– Баккарат
– Покер
Автоматы: ассортимент игр
Коллекция азартных слотов содержит тысячи названий от ведущих разработчиков. Клиенты обнаружат:
– Стандартные машины
– Графические слоты
– Мега-выигрыш-игры
– Megaways
Турниры и уникальные акции
Систематические конкурсы предоставляют шанс участникам бороться друг с другом за крупные призовые суммы. Любой конкурс имеет свои условия участия и рейтинг призеров.
Пути ввода и снятия финансов
Площадка обслуживает массу финансовых методов:
– Платежные картыы
– Цифровые счета
– Цифровые валюты
– Финансовые переводы
Каждые операции осуществляются защищенно благодаря современным системам шифрования.
Служба обслуживания
Профессиональные консультанты команды помощи готовы поддержать 24/7. Доступны следующие способы коммуникации:
– Мгновенный-чат
– Email-помощь
– Телефонная связь
– Медийные сети
Заключение
Главный портал игровой площадки и его действующие зеркала дают участникам надежный и приятный доступ к обширному выбору геймерских развлечений. Внушительные бонусы, регулярные акции, квалифицированная помощь и легкие денежные способы превращают геймерский времяпрепровождение крайне захватывающим и прибыльным.
Brann 0-1 Bologna 2026 Europa League late Italian steal
Panathinaikos 2-2 Viktoria Plzen 2026 Europa League dramatic draw
PG Soft 2026: Mahjong Ways 2 tá pagando mais que Fortune Tiger em cascades?
Подключение к сайту и действующие зеркала
Современные интернет казино предлагают пользователям огромный выбор игр. Центральный ресурс казино Рльдорадо casino обеспечивает защищенный вход ко всем сервисам. Впрочем периодически появляются ситуации, когда нужно дополнительный вариант подключения.
Что представляет собой действующее зеркало
Актуальное зеркало — это абсолютная версия легального ресурса с другим сетевым расположением. Зеркало сегодня позволяет миновать возможные барьеры и обеспечивать бесперебойный подключение к любимым развлечениям.
Легальное зеркало характеризуется теми же возможностями, что и центральный сайт:
– Весь список автоматов
– Индивидуальный раздел с записанными сведениями
– Полные бонусы и акции
– Проверенные денежные транзакции
Создание аккаунта и подключение в сервис
Ход регистрации на портале отнимает считанные моментов. Начинающим клиентам необходимо:
1. Открыть на актуальное зеркало на данный момент
2. Кликнуть кнопку «Регистрация»
3. Указать нужные параметры
4. Проверить электронную почту или номер смартфона
5. Использовать награду за открытие аккаунта
Подключение в собственный раздел осуществляется путем указание логина и ключа.
Обзор поощрительной политики
Привлекательная бонусная система — основное козырь платформы. Пользователи получают многочисленные поощрения:
Начальные награды
Недавние участники вправе рассчитывать на значительный подарок за регистрацию. Обычно это совокупность возможностей, содержащий:
– Процентную премию к начальному пополнению
– Подарочные кручения
– Дополнительные финансы на баланс
Купоны и эксклюзивные акции
Периодические купоны дают возможность получать бонусные выгоды. Задействовать их разрешено в специальном поле персонального кабинета.
Бесплатные вращения и кешбэк
Free spins — это возможность запускать автоматы без использования своих финансов. Возврат подразумевает определенный отдачу потерянных финансов.
Библиотека слотов
Азартная сайт обеспечивает впечатляющую библиотеку слотов.
Слоты
Разнообразие автоматов восхищает воображение. Имеются стандартные ретро слоты и актуальные видеослоты с захватывающей анимацией.
Live заведение
Секция Live игр транспортирует пользователей в среду реального гемблинг дома. Профессиональные операторы проводят сессии в живом формате.
Турниры и доски почета
Периодические соревнования добавляют драйва и обеспечивают возможность выиграть внушительные призы.
Mobile вариант и программа
Новые технологии дают возможность наслаждаться в удобном локации. Мобильная реализация самостоятельно подстраивается под монитор гаджета.
Установить клиент допустимо для цифровых платформ iOS и Android. Софт дает:
– Мгновенный вход
– Устойчивую работу
– Моментальные-уведомления об бонусах
– Простой облик
Платежные операции
Платформа работает с различные варианты депозита и изъятия средств:
– Банковские счета
– Цифровые системы
– Цифровые валюты
– Прямые операции
Всевозможные действия реализуются через надежное подключение, что обеспечивает безопасность приватных информации.
Отдел помощи
Опытная бригада помощи работает 24/7. Обратиться с операторами возможно через:
– Живой-чат
– E-mail почту
– Телефон
– Коммуникационные сети
Резюме
Главный портал и его актуальное зеркало обеспечивают клиентам стабильный и приятный вход к азартным играм. Выгодные поощрения, разнообразный выбор слотов и отличная ассистанс обеспечивают процесс крайне комфортной и доходной.
Передовые онлайн-казино предлагают клиентам широкий выбор вариантов для приятной досуга. Подключение к сервису https://bienesactivos.com/2026/03/02/dostup-k-ofitsialnomu-saytu-1xbet-osushchestvlyaetsya-cherez-deystvuyushchee-zerkalo/ выполняется через лицензионный портал или действующее зеркало.
Что такое рабочее зеркало казино
Рабочее зеркало — это запасной домен главного веб-сайта казино. Такие версии формируются для поддержания стабильного входа к игровой системе.
Зеркало актуальное полностью копирует опции базового ресурса. Геймеры имеют аналогичный доступ ко всем функциям, включая открытие счета, зачисление средств счета и вывод денег.
Регистрация на основном портале
Алгоритм создания аккаунта отнимает всего считанные мгновений. Начинающим пользователям следует:
1. Попасть на официальный домен или актуальное подлинное зеркало
2. Щелкнуть кнопку “Регистрация”
3. Указать требуемые информацию
4. Верифицировать электронную почту
5. Использовать купон при наличии
После выполнения создания аккаунта клиент обретает вознаграждение за регистрацию, который вправе содержать бесплатные вращения или финансовое начисление.
Доступ в индивидуальный кабинет
Пользовательский кабинет — это защищенная область, где участники имеют возможность регулировать своим счетом. Для авторизации нужно внести логин и код доступа.
В персональном кабинете имеются такие возможности:
– Отслеживание истории переводов
– Применение кодов активации
– Настройка призами
– Участие в состязаниях
– Контроль кэшбека
– Настройка данных
Поощрения и спецпредложения
Азартная сервис обеспечивает великодушные вознаграждения:
Приветственный бонус — новые игроки получают солидное поощрение на стартовые вклады.
Фриспины — выдаются как при регистрации, так и в процессе всевозможных мероприятий.
Возмещение — систематический компенсация фрагмента потерянных денег.
Коды активации — уникальные комбинации, открывающие право к особым призам.
Анализ гемблинговых секций
Слоты
Ассортимент слотов насчитывает массу наименований от лучших разработчиков. Геймеры найдут как обычные автоматы, так и современные мультимедийные автоматы с захватывающей оформлением.
Live казино
Категория Live казино предлагает возможность участвовать с настоящими дилерами в режиме текущего времени. Представлены востребованные развлечения: рулетка, блэкджек, баккара, покер.
Конкурсы
Регулярные турниры с крупными призовыми суммами манят тысячи участников. Лидеры получают монетарные награды и уникальные поощрения.
Мобильная версия и app
Мобильная версия портала дает возможность развлекаться с любого девайса. Структура самостоятельно подстраивается под габариты экрана.
Загрузить app можно для аппаратов на Android и iOS. Портативное ПО располагает всеми возможностями настольной версии.
Как обнаружить рабочее зеркало на сегодня
Действующие адреса копий регулярно корректируются. Найти свежую URL можно несколькими путями:
– Через департамент помощи
– В проверенных социальных сетях
– По email подписке
– На аффилиатных ресурсах
Охрана и сертификация
Основной портал работает на базе мировой сертификата. Все транзакции оберегаются инновационными методами безопасности.
Секретность персональных информации обеспечивается в полном объеме.
Вывод
Главный портал и его актуальные копии обеспечивают игрокам постоянный путь к высококлассным азартным сервисам. Щедрые поощрения, многочисленные развлечения, профессиональная поддержка — все это создает гемблинговый опыт предельно приятным и интересным.
Fortune Ox hold & win: quem já segurou 15+ símbolos e explodiu tudo?
PG Soft torneios semanais: R$50k–R$500k em prêmios – já ganhou algo?
Jogo do Tigrinho ao vivo: quem já ganhou big win assistindo dealer brasileiro?
Jogo do Tigrinho estratégia de sessão: 400 giros e stop no +60% – qual sua meta?
more info here – Building traction step by step keeps momentum strong and predictable.
Характеристика главного веб-сайта
Актуальное онлайн-казино дарит своим клиентам обширный ассортимент услуг и вознаграждений. Официальный сайт https://www.transtuts.com.br/ функционирует непрерывно, гарантируя доступ к топовым играм, live-казино и многим кампаниям.
Рабочее зеркало: возможность к порталу
Что такое зеркало казино
Альтернатива является собой идентичную версию оригинального веб-сайта с альтернативным интернет путем. Актуальное зеркало позволяет пользователям обходить запреты и обеспечивать надежный путь к любимым слотам.
Как найти действующее зеркало сегодня
Актуальные ссылки на главное зеркало появляются через:
– Почтовую подписку
– Официальные публичные сети
– Команду поддержки
– Специализированные порталы
Регистрация на платформе
Процесс созданияаккаунта
Регистрация занимает всего минут и предполагает данные стадии:
1. Переход на оригинальный портал или действующее зеркало
2. Активация опции “Регистрация”
3. Внесение персональных данных
4. Верификация адреса или телефона
5. Установка пароля
Приз за регистрацию
Свежие пользователи обретают большие приветственные поощрения:
– Игровые суммы на счет
– Халявныеспины для автоматов
– Повышенный размер кешбэка
– Эксклюзивные коды
Доступ в персональный аккаунт
Активные игроки вправе произвести доступ через главный ресурс или рабочее зеркало. Для этого требуется указать никнейм и секретнуюкомбинацию, созданные при созданииаккаунта.
Опции личного раздела
В личном разделе открыты основные опции:
– Редактирование персональными реквизитами
– Зачисление баланса
– Снятие призов
– Применение бонусов
– Проверка архива операций
– Включение в турнирах
Бонусы и предложения
Типы бонусов
Казино поощряет своих участников различными призовыми предложениями:
– Вступительный набор — выгодные вознаграждения на первые депозиты
– Фриспины — экстра прокруты в известных играх
– Возврат — периодический возмещение части убытков
– Схема VIP — эксклюзивные бонусы для постоянных клиентов
Ваучеры и их использование
Уникальные ваучеры гарантируют бонусные подарки. Для активации следует указать комбинацию в определенное поле в индивидуальном профиле.
Развлекательный набор
Слоты
Коллекция слотовых слотов содержит тысячи позиций от лучших разработчиков:
– Классические автоматы
– Видео автоматы
– Джекпот симуляторы
– Брендовые слоты
Live казино
Зона Live-казино обеспечивает процесс с реальными крупье в обстановке актуального трансляции:
– Французскаярулетка
– Blackjack
– PuntoBanco
– Casinopoker
Турниры
Постоянные турниры с большими джекпотными призами проводятся ежедневно. Участники борются за лидерство в списке.
Смартфонная реализация и APP
Адаптивная реализация ресурса
Главный веб-сайт абсолютно приспособлен для портативных устройств. Пользователи способны пользоваться развлечения непосредственно через веб-навигатор без потребности загрузки.
Программа для загрузки
Авторское портативное приложение имеется для получения на девайсы с программными средами Android и iOS. Приложение предоставляет:
– Мгновенный вход к слотам
– Устойчивую производительность
– Push-оповещения о предложениях
– Удобный дизайн
Резюме
Основной портал казино и его функционирующие альтернативы предоставляют участникам всесторонний доступ к первоклассным игровым играм. Большие вознаграждения, разнообразные промо, удобная мобильная платформа и квалифицированная сервис делают развлекательный времяпрепровождение максимально enjoyable и прибыльным.
Betano tá dando boost 25% em odds do Fortune Tiger toda sexta-feira!
Great information, Thanks.
Подключение к платформе через актуальные зеркала
Клиенты онлайн казино регулярно встречаются с трудностью закрытия главного домена. Как раз для решения этой проблемы предусмотрены копии основного ресурса. casino Enomo казино обеспечивает абсолютный переход ко всем возможностям площадки.
Что такое актуальное зеркало казино
Дубликат значит собой полную дубликат основного сайта с идентичным опциями. Единственное расхождение — это доменное имя. Каждые параметры пользователя, содержа депозит, привилегии и историю игр, продолжают быть идентичными.
Достоинства эксплуатации зеркал
Актуальные зеркала характеризуются рядом важных плюсов:
– Круглосуточный переход к излюбленным развлечениям
– Абсолютная конфиденциальность персональных сведений
– Сохранение всех настроек индивидуального кабинета
– Возможность взятия призов и вовлечения в акциях
Регистрация на легальном домене
Процесс регистрации предельно элементарен и отнимает немного минут. Начинающие клиенты в состоянии претендовать на щедрый приветственный подарок за создание аккаунта.
Этапы формирования аккаунта
1. Переход на главный ресурс или его копию
2. Выбор на опцию “Присоединиться”
3. Ввод требуемых параметров
4. Проверка цифровой почты
5. Внесение промокода (когда доступен)
Поощрения и предложения для игроков
Игровая площадка поощряет своих игроков разнообразными призовыми акциями.
Ключевые варианты призов
Вводный пакет — щедрое поощрение для свежих участников, что имеет возможность охватывать материальные средства и безвозмездные спины.
Безвозмездные спины — способность использовать в популярных аппаратах бесплатно.
Компенсация — пропорциональный возврат проигранных финансов, который именно предоставляется еженедельно или каждый месяц.
Бонусные коды — эксклюзивные наборы, обеспечивающие добавочные выгоды.
Пользовательский кабинет: возможности и параметры
Персональный профиль дает полный надзор над игровым взаимодействием. Здесь доступны:
– Регулирование балансом
– Данные переводов
– Действующие привилегии
– Настройки охраны
– Верификация профиля
Смартфонная редакция и APP
Новейшие участники признают гибкость. Платформа предлагает пару пути для развлечений с мобильных гаджетов.
Отзывчивая портативная вариант
Адаптивная версия ресурса без участия приспосабливается под монитор любого девайса. Отсутствует потребность инсталлировать особое приложение.
APP для телефонов
Возможно скачать официальное APP для iOS и Android. Софт предоставляет:
– Быстрый доступ
– Адаптированный интерфейс
– Мобильные-оповещения о поощрениях
– Надежную функциональность
Live раздел: среда подлинного игорного заведения
Зона Live игр доставляет пользователей в атмосферу настоящего клуба. Опытные ведущие осуществляют партии в формате прямого времени.
Востребованные Live-форматы
– Рулетка
– Двадцать одно
– Баккарат
– Карибский покер
Автоматы: выбор слотов
Коллекция азартных аппаратов включает множество наименований от топовых производителей. Игроки найдут:
– Классические автоматы
– Современные слоты
– Прогрессивный джекпот-слоты
– Многолинейные автоматы
Конкурсы и особые мероприятия
Периодические турниры предоставляют шанс пользователям конкурировать друг с другом за крупные призовые банки. Каждый состязание имеет свои условия включения и доску призеров.
Способы внесения и получения средств
Ресурс поддерживает комплекс финансовых систем:
– Кредитные инструменты
– Виртуальные кошельки
– Криптовалюты
– Банковские транзакции
Абсолютно все операции реализуются безопасно благодаря новейшим протоколам кодирования.
Отдел помощи
Профессиональные операторы сервиса помощи способны ассистировать 24/7. Имеются нижеперечисленные каналы связи:
– Мгновенный-чат
– Email-помощь
– Голосовая линия
– Коммуникационные сети
Вывод
Официальный портал клуба и его рабочие альтернативы дают клиентам безопасный и приятный вход к большому ассортименту развлекательных развлечений. Внушительные подарки, регулярные акции, компетентная поддержка и легкие денежные инструменты создают развлекательный процесс предельно захватывающим и результативным.
PG Soft torneio diário R$20k: quem tá subindo no leaderboard do Fortune Tiger?
mostbet mostbet
click for insight – Clarity in planning accelerates progress and keeps things on track.
mostbet güncel giriş: mostbet
Современные онлайн-казино гарантируют пользователям широкий ассортимент опций для удобной игры. Доступ к ресурсу Cactus Casino реализуется через официальный домен или рабочее зеркало.
Что такое рабочее зеркало казино
Функционирующее зеркало — это запасной линк основного ресурса казино. Такие копии формируются для гарантирования постоянного подключения к развлекательной сервису.
Копия на сегодня абсолютно воспроизводит возможности официального сайта. Игроки приобретают схожий выход ко всем возможностям, включая открытие счета, финансирование баланса и получение денег.
Регистрация на основном сайте
Алгоритм оформления учетной записи отнимает всего пару мгновений. Начинающим пользователям нужно:
1. Войти на главный домен или рабочее подлинное зеркало
2. Нажать кнопку “Зарегистрироваться”
3. Заполнить обязательные данные
4. Подтвердить e-mail почту
5. Использовать бонусный код при наличии
После завершения создания аккаунта игрок зарабатывает вознаграждение за регистрацию, который вправе охватывать даровые спины или cash поощрение.
Авторизация в индивидуальный кабинет
Персональный кабинет — это закрытая территория, где пользователи способны администрировать своим аккаунтом. Для авторизации необходимо указать имя пользователя и секретный ключ.
В индивидуальном кабинете имеются нижеперечисленные инструменты:
– Мониторинг записей переводов
– Активация бонусных кодов
– Регулирование вознаграждениями
– Включение в состязаниях
– Отслеживание кэшбека
– Редактирование учетной записи
Вознаграждения и промо
Азартная сервис дарит выгодные подарки:
Начальный набор — дебютанты приобретают значительное поощрение на начальные взносы.
Бесплатные вращения — выдаются как при создании аккаунта, так и в процессе многочисленных мероприятий.
Возмещение — регулярный компенсация фрагмента израсходованных средств.
Коды активации — специальные комбинации, дающие возможность к уникальным бонусам.
Характеристика азартных секций
Аппараты
Собрание slots насчитывает сотни вариантов от ведущих провайдеров. Игроки встретят как классические слоты, так и современные мультимедийные автоматы с притягательной визуализацией.
Live казино
Раздел Live казино предоставляет шанс соревноваться с живыми дилерами в условиях реального времени. Представлены востребованные столы: рулетка, блэкджек, баккара, покер.
Состязания
Периодические соревнования с солидными наградными суммами завлекают сотни конкурсантов. Чемпионы обретают финансовые призы и особые поощрения.
Мобильная версия и софт
Портативная версия портала предоставляет право развлекаться с любого устройства. Оформление автономно настраивается под габариты экрана.
Скачать app можно для аппаратов на Android и iOS. Портативное приложение имеет всеми возможностями компьютерной версии.
Как отыскать рабочее зеркало на текущий день
Рабочие линки альтернатив постоянно изменяются. Обнаружить свежую URL можно различными путями:
– Через отдел саппорта
– В настоящих информационных сетях
– По почтовой newsletter
– На тематических ресурсах
Защита и легальность
Лицензионный сайт работает на фундаменте зарубежной документа. Все операции оберегаются современными технологиями безопасности.
Секретность индивидуальных информации обеспечивается в совершенном объеме.
Итог
Официальный сайт и его действующие зеркала обеспечивают клиентам круглосуточный вход к высококлассным азартным услугам. Привлекательные призы, различные автоматы, профессиональная поддержка — все это формирует азартный досуг чрезвычайно беспроблемным и притягательным.
Нынешние онлайн-казино предлагают участникам широкий диапазон возможностей и премиальных программ. Доступ к платформе выполняется через лицензионный сайт или его рабочее зеркало Rich, что гарантирует стабильную игру.
В чем суть актуальное зеркало казино
Зеркало — это абсолютная реплика основного сайта, сделанная для устранения ограничений. Актуальное зеркало позволяет игрокам получить соединение к любимым играм в любое удобное время.
Лицензионное зеркало располагает всеми опциями первоначального ресурса:
– Совокупный перечень игр
– Учетная запись с внесенными сведениями
– Актуальные бонусы
– Безопасные денежные операции
Регистрация на лицензионном ресурсе
Процесс оформления занимает всего несколько минут. Новым игрокам необходимо:
1. Войти на главный сайт или действующее зеркало
2. Выбрать на клавишу “Зарегистрироваться”
3. Указать необходимые информацию
4. Проверить электронную почту
5. Внести дебютный вклад
Стартовый бонус зачисляется сразу после выполнения всех стадий.
Доступ в учетную запись
Созданные пользователи могут выполнить доступ используя:
– Учетное имя и пароль
– Номер телефона
– Email
Персональный раздел предоставляет возможность к регулированию средствами, данным транзакций и активным бонусам.
Награды и кампании
Азартная площадка балует регулярных участников выгодными призами:
Начальный набор
– Премия на первый депозит до 100%
– Даровые спины на востребованные игры
– Экстра поощрения за дальнейшие взносы
Бонусные коды
Эксклюзивные купоны открывают шанс на получение уникальных призов. Действующие промокоды публикуются в категории “Промо”.
Кешбэк
Периодический бонус достигает до 10% от утраченных финансов. Компенсация начисляется моментально.
Система лояльности
Постоянные клиенты получают поинты, которые конвертируются на подлинные средства или фриспины.
Мобильный сайт и приложение
Ради комфорта игроков создана функциональная мобильная версия. Адаптивный интерфейс обеспечивает легко развлекаться с каждого портативного гаджета.
Плюсы APP:
– Моментальный вход к развлечениям
– Настроенный вид
– Бесперебойная активность
– Нотификации о последних турнирах
Загрузить приложение можно свободно с проверенного ресурса для аппаратов на Android и iOS.
Библиотека слотов
Машины
Коллекция насчитывает более 2000 машин от известных провайдеров:
– Классические слоты
– Видео-слоты
– Джекпот-слоты
– Брендовые игры
Live казино
Раздел Live игр предоставляет взаимодействие с реальными ведущими в онлайн формате:
– Roulette
– Карточная игра
– Баккара
– Столы покера
Состязания
Периодические турниры с большими наградными фондами устраиваются регулярно. Участие в конкурсах разрешено всем активным клиентам.
Расчетные системы
Взносы и получения денег выполняются через востребованные платежные системы:
– Платежные карты
– Цифровые сервисы
– Крипто
– Денежные платежи
Наименьший платеж — от 100 рублей. Вывод средств выполняется в течение 24 ч.
Команда поддержки
Круглосуточная служба саппорта расположена ассистировать в разрешении произвольных ситуаций:
– Мессенджер
– Email
– Горячая линия
– Социальные сети
Охрана и документ
Лицензионный веб-сайт действует на базе глобальной лицензии. Любые сведения игроков закрыты новейшим SSL-протоколом.
Вывод
Рабочее зеркало предоставляет постоянный соединение к выбранным развлечениям, богатым поощрениям и функциональным возможностям. Создайте аккаунт немедленно и приобретите приветственный бонус!
xbet giri? 1xbet-49.com .
1x bet giri? 1x bet giri? .
For the video
christmas loans
to stay informed.
Fortune Tiger big win ao vivo: já gritou gol no meio da sala? Conta!
Fortune Ox touro dourado: já ativou o hold & win com 12+ símbolos?
reachriver – Content reads clearly, helpful examples made concepts easy to grasp.
https://www.goal.com/en-in/betting/1xbet-promo-code/naherbladecore
analyticsreport – Color palette felt calming, nothing distracting, just focused, thoughtful design.
секс после йоги секс после йоги .
PG Soft 2026: Mahjong Ways 2 cascades infinitos – já chegou a 50x multiplier?
Вход к сайту через проверенные зеркала
Участники онлайн казино нередко контактируют с вопросом блокировки главного домена. Именно для решения этой ситуации созданы дубликаты официального домена. зеркало обеспечивает полный вход ко всем функциям площадки.
Что такое рабочее зеркало казино
Альтернативный адрес представляет собой идентичную копию главного сайта с идентичным опциями. Основное расхождение — это другое имя. Каждые параметры пользователя, в том числе средства, награды и историю ставок, сохраняются идентичными.
Выгоды использования зеркал
Актуальные зеркала располагают комплексом значимых достоинств:
– Круглосуточный вход к любимым играм
– Абсолютная конфиденциальность личных информации
– Сохранение всех конфигураций пользовательского кабинета
– Опция получения наград и вовлечения в предложениях
Оформление профиля на официальном домене
Операция оформления чрезвычайно прост и длится немного минут. Новые пользователи способны рассчитывать на внушительный начальный бонус за регистрацию.
Шаги открытия аккаунта
1. Подключение на главный ресурс или его копию
2. Активация на клавишу “Присоединиться”
3. Внесение требуемых данных
4. Подтверждение почтовой почты
5. Применение промокода (в случае имеется)
Подарки и кампании для клиентов
Казино одаривает своих участников всевозможными призовыми предложениями.
Базовые варианты бонусов
Стартовый подарок — крупное поощрение для новых клиентов, что имеет возможность включать финансовые призы и безвозмездные спины.
Фриспины — шанс использовать в топовых игровых машинах даром.
Кешбэк — пропорциональный возврат проигранных средств, который начисляется каждую неделю или помесячно.
Промокоды — особые последовательности, предоставляющие бонусные преимущества.
Пользовательский кабинет: опции и параметры
Индивидуальный профиль обеспечивает совершенный регулирование над пользовательским взаимодействием. Здесь присутствуют:
– Администрирование счетом
– История переводов
– Активные бонусы
– Конфигурации сохранности
– Подтверждение профиля
Портативная редакция и софт
Актуальные пользователи ценят доступность. Ресурс дает двойной варианта для участия с мобильных гаджетов.
Приспособленная мобильная версия
Мобильная версия сайта автономно приспосабливается под монитор любого устройства. Не требуется инсталлировать отдельное ПО.
Софт для гаджетов
Разрешено загрузить фирменное софт для iOS и Android. Приложение предоставляет:
– Быстрый старт
– Адаптированный дизайн
– Мобильные-извещения о акциях
– Устойчивую производительность
Live казино: атмосфера подлинного игорного заведения
Секция Live столов переносит участников в антураж истинного игорного заведения. Опытные крупье осуществляют раунды в формате реального времени.
Популярные Live-форматы
– Французская рулетка
– 21
– Баккарат
– Poker
Аппараты: выбор слотов
Библиотека азартных слотов включает сотни вариантов от ведущих провайдеров. Игроки встретят:
– Стандартные машины
– Видео-автоматы
– Джекпот-слоты
– Мегавейс
Турниры и особые предложения
Систематические соревнования предоставляют шанс пользователям состязаться друг с другом за солидные призовые пулы. Всякий конкурс содержит свои требования участия и список чемпионов.
Пути зачисления и изъятия денег
Площадка использует комплекс финансовых инструментов:
– Платежные картыы
– Электронные счета
– Blockchain-платежи
– Банковские транзиты
Все операции реализуются защищенно благодаря современным методам криптографии.
Отдел support
Опытные специалисты службы support расположены помочь 24/7. Имеются такие каналы контакта:
– Живой-чат
– Email-помощь
– Аудио горячая линия
– Социальные сети
Итог
Основной домен клуба и его рабочие копии обеспечивают пользователям защищенный и удобный вход к широкому спектру развлекательных активностей. Внушительные подарки, регулярные кампании, компетентная служба и комфортные денежные способы формируют геймерский процесс крайне приятным и прибыльным.
Fortune Tiger no Pix R$1: Deposita pouco e já sai girando com bônus insano!
Доступ к порталу через рабочие зеркала
Участники сетевых казино нередко имеют дело с вопросом закрытия основного домена. Как раз для устранения этой проблемы предусмотрены зеркала легального домена. казино Лев казино гарантирует стопроцентный переход ко всем сервисам ресурса.
Что такое функционирующее зеркало казино
Зеркало является собой точную версию главного веб-сайта с таким же набором функций. Главное несовпадение — это иное имя. Каждые информация клиента, вместе с баланс, бонусы и историю партий, остаются прежними.
Выгоды использования зеркал
Функционирующие зеркала характеризуются множеством существенных преимуществ:
– Круглосуточный доступ к любимым развлечениям
– Совершенная сохранность собственных информации
– Удержание всех конфигураций индивидуального кабинета
– Шанс получения призов и вовлечения в кампаниях
Создание аккаунта на основном сайте
Ход регистрации крайне несложен и занимает пару минут. Недавние клиенты имеют возможность полагаться на крупный вводный подарок за регистрацию.
Стадии формирования аккаунта
1. Вход на легальный сайт или его альтернативу
2. Выбор на элемент “Зарегистрироваться”
3. Внесение обязательных сведений
4. Проверка почтовой почты
5. Указание кода (при наличии доступен)
Бонусы и акции для пользователей
Казино радует своих игроков различными бонусными акциями.
Основные типы бонусов
Стартовый подарок — солидное вознаграждение для начинающих участников, что в состоянии содержать материальные средства и безвозмездные спины.
Бесплатные вращения — возможность использовать в популярных слотах безвозмездно.
Компенсация — пропорциональный возврат проигранных средств, который предоставляется каждую неделю или помесячно.
Купоны — эксклюзивные сочетания, предоставляющие дополнительные выгоды.
Пользовательский кабинет: инструменты и параметры
Индивидуальный кабинет предоставляет абсолютный контроль над пользовательским взаимодействием. Здесь предусмотрены:
– Контроль счетом
– Данные транзакций
– Действующие привилегии
– Настройки защиты
– Валидация профиля
Мобильная версия и APP
Новейшие пользователи признают мобильность. Ресурс дает 2 способа для ставок с смартфонных девайсов.
Responsive портативная версия
Адаптивная редакция портала без участия подстраивается под монитор любого аппарата. Отсутствует потребность скачивать специальное программное обеспечение.
Софт для телефонов
Разрешено инсталлировать оригинальное программу для iOS и Android. Программа дает:
– Моментальный вход
– Оптимизированный графику
– Оперативные-извещения о акциях
– Устойчивую работу
Live игры: среда истинного зала
Категория Live игр отправляет пользователей в антураж истинного клуба. Компетентные хосты ведут игры в виде прямого времени.
Популярные Live-форматы
– Американская рулетка
– Blackjack
– Баккарат
– Покер
Аппараты: многообразие развлечений
Библиотека развлекательных слотов включает сотни наименований от топовых разработчиков. Участники найдут:
– Традиционные машины
– Видеослоты
– Прогрессивный джекпот-автоматы
– Многолинейные автоматы
Турниры и специальные акции
Регулярные турниры обеспечивают игрокам бороться друг с другом за внушительные выигрышные банки. Любой конкурс располагает свои правила присутствия и доску призеров.
Способы внесения и изъятия сумм
Платформа использует массу финансовых сервисов:
– Дебетовые инструменты
– Виртуальные платежные системы
– Цифровые валюты
– Банковские транзиты
Любые переводы выполняются защищенно благодаря новейшим системам защиты.
Сервис поддержки
Профессиональные консультанты отдела поддержки способны содействовать 24/7. Доступны следующие каналы коммуникации:
– Онлайн-чат
– Email-обслуживание
– Голосовая поддержка
– Коммуникационные сети
Итог
Основной домен игровой площадки и его функционирующие зеркала гарантируют пользователям надежный и комфортный вход к широкому диапазону азартных развлечений. Щедрые награды, постоянные кампании, квалифицированная поддержка и удобные денежные способы превращают развлекательный досуг крайне комфортным и результативным.
1xbet spor bahislerinin adresi 1xbet spor bahislerinin adresi .
1xbet resmi 1xbet-47.com .
Wolves 2-2 Arsenal 2026 Premier League dramatic draw
Jogo do Tigrinho no Pix R$5: raspadinha com até 200 giros garantidos agora!
Актуальные онлайн-казино обеспечивают клиентам большой набор услуг и поощрительных опций. Вход к сервису реализуется через основной веб-сайт или его актуальное зеркало Килограмм казино, что обеспечивает непрерывную активность.
Что представляет собой актуальное зеркало казино
Зеркало — это идентичная дубликат оригинального веб-сайта, сделанная для обхода блокировок. Рабочее зеркало дает возможность пользователям иметь вход к излюбленным автоматам в произвольное время.
Лицензионное зеркало обладает всеми опциями основного ресурса:
– Весь перечень слотов
– Аккаунт с сохраненными параметрами
– Текущие бонусы
– Защищенные платежные транзакции
Открытие счета на основном сайте
Процедура оформления составляет всего считанные минут. Новым игрокам требуется:
1. Перейти на главный портал или рабочее зеркало
2. Выбрать на кнопку “Регистрация”
3. Указать обязательные параметры
4. Проверить адрес
5. Совершить начальный взнос
Приветственный бонус выдается незамедлительно после окончания всех шагов.
Подключение в профиль
Существующие клиенты могут осуществить авторизацию вводя:
– Никнейм и шифр
– Данные мобильного
– Адрес
Профиль дает право к управлению финансами, сведениям транзакций и активным промокодам.
Бонусы и предложения
Гемблинг сервис привлекает лояльных пользователей многочисленными поощрениями:
Приветственный пакет
– Надбавка на стартовый депозит до 100%
– Фриспины на популярные слоты
– Экстра бонусы за следующие платежи
Бонусные коды
Особые коды открывают доступ на приобретение уникальных призов. Действующие коды выкладываются в секции “Предложения”.
Cashback
Регулярный кэшбек достигает до 10% от использованных средств. Возмещение зачисляется сразу.
Схема лояльности
Постоянные клиенты зарабатывают очки, которые переводятся на реальные финансы или бесплатные вращения.
Адаптивный портал и приложение
Ради комфорта пользователей создана полноценная мобильная версия. Адаптивный дизайн обеспечивает удобно участвовать с произвольного мобильного устройства.
Выгоды APP:
– Моментальный доступ к играм
– Настроенный интерфейс
– Устойчивая деятельность
– Нотификации о свежих бонусах
Загрузить приложение можно даром с проверенного веб-сайта для устройств на Android и iOS.
Библиотека автоматов
Автоматы
Библиотека насчитывает более 2000 слотов от популярных провайдеров:
– Классические машины
– Современные автоматы
– Джекпот-слоты
– Фирменные автоматы
Live казино
Раздел Live столов предлагает взаимодействие с подлинными крупье в реальном эфире:
– Рулетка
– Карточная игра
– Баккара
– Карточный покер
Конкурсы
Периодические турниры с большими наградными фондами запускаются систематически. Допуск в соревнованиях разрешено всем действующим клиентам.
Платежные методы
Платежи и выводы средств осуществляются через распространенные методы:
– Дебетовые средства
– Виртуальные кошельки
– Криптовалюта
– Банковские операции
Самый низкий депозит — от 100 рублей. Изъятие средств осуществляется в течение 24 ч.
Сервис помощи
Круглосуточная отдел поддержки может ассистировать в исправлении всех ситуаций:
– Онлайн-чат
– Email
– Телефон
– Соц сети
Защита и сертификат
Лицензионный веб-сайт функционирует на базе глобальной документа. Любые сведения участников защищены актуальным SSL-кодированием.
Заключение
Действующее зеркало обеспечивает постоянный подключение к любимым слотам, выгодным бонусам и комфортным функциям. Откройте счет сейчас и получите начальный приз!
Jogo do Tigrinho ao vivo: quem já ganhou assistindo transmissão no cassino online?
Jogo do Tigrinho tá pegando fogo em 2026! Qual cassino tá te dando mais giros grátis hoje?
After trying several platforms, I found this casino https://adhiyamanwomencollege.in/conmemora-la-tradicion-del-06-de-ene-en-2/ to be reliable. The welcome bonus is generous, terms are transparent, and payouts are processed smoothly, making it suitable for casual players.
buy ed meds
Современные онлайн-казино дают участникам широкий ассортимент услуг и призовых вариантов. Присоединение к платформе осуществляется через главный ресурс или его актуальное зеркало http://www.luxhomemekong.com/multivalyutnaya-platezhnaya-sistema-prednaznachena-dlya-polzovateley-iz-120-stran, что обеспечивает бесперебойную работу.
Что такое функционирующее зеркало казино
Зеркало — это абсолютная копия официального веб-сайта, построенная для преодоления запретов. Актуальное зеркало позволяет игрокам сохранить подключение к предпочитаемым слотам в любое удобное время.
Подлинное зеркало содержит всеми опциями главного ресурса:
– Совокупный каталог развлечений
– Аккаунт с зафиксированными информацией
– Действующие бонусы
– Безопасные денежные транзакции
Оформление профиля на лицензионном ресурсе
Алгоритм регистрации составляет всего несколько минут. Начинающим участникам следует:
1. Зайти на основной портал или действующее зеркало
2. Выбрать на элемент “Зарегистрироваться”
3. Ввести необходимые сведения
4. Верифицировать адрес
5. Произвести начальный депозит
Поощрение новичкам выдается сразу после выполнения всех шагов.
Вход в аккаунт
Существующие клиенты могут совершить вход вводя:
– Никнейм и шифр
– Код контакта
– Контактный email
Личный кабинет дает право к регулированию финансами, данным транзакций и действующим поощрениям.
Промо и программы
Развлекательная система радует постоянных пользователей разнообразными поощрениями:
Приветственный набор
– Поощрение на стартовый взнос до 100%
– Даровые спины на топовые автоматы
– Экстра награды за следующие депозиты
Промокоды
Уникальные коды дают возможность на использование специальных бонусов. Свежие коды выставляются в разделе “Акции”.
Возврат средств
Регулярный кэшбек составляет до 10% от использованных финансов. Выплата начисляется сразу.
Программа лояльности
Верные пользователи накапливают единицы, которые конвертируются на подлинные средства или даровые спины.
Адаптивный портал и программа
Для практичности пользователей разработана полноценная мобильная версия. Отзывчивый дизайн помогает легко играть с каждого переносного девайса.
Достоинства APP:
– Моментальный запуск к развлечениям
– Настроенный вид
– Бесперебойная работа
– Push-уведомления о последних акциях
Установить APP можно даром с проверенного портала для аппаратов на Android и iOS.
Каталог автоматов
Игровые автоматы
Каталог содержит более 2000 машин от популярных производителей:
– Традиционные автоматы
– Современные автоматы
– Jackpot игры
– Сюжетные игры
Live казино
Раздел Live игр предоставляет игру с живыми крупье в онлайн режиме:
– Рулеточные столы
– Двадцать одно
– Punto Banco
– Покер
Конкурсы
Периодические соревнования с большими премиальными бюджетами запускаются систематически. Участие в состязаниях возможно всем зарегистрированным игрокам.
Денежные методы
Депозиты и снятия выплат реализуются через распространенные методы:
– Дебетовые пластик
– Онлайн кошельки
– Цифровая валюта
– Прямые переводы
Самый низкий взнос — от 100 рублей. Снятие средств обрабатывается в течение 24 времени.
Отдел помощи
Непрерывная группа помощи готова помочь в решении произвольных проблем:
– Живой чат
– Email
– Телефон
– Общественные сети
Безопасность и сертификат
Главный веб-сайт работает на почве мировой разрешения. Каждые информация участников защищены передовым SSL-криптованием.
Резюме
Актуальное зеркало гарантирует бесперебойный соединение к любимым развлечениям, щедрым бонусам и удобным функциям. Откройте счет сегодня и приобретите начальный поощрение!
I think the admin of this web site is in fact working hard for
his website, as here every material is quality based data.
My web site; zguduit01
Jogo do Tigrinho Pix R$30: 150 giros + cashback 15% garantido em 3 sites hoje!
Fortune Ox explosão de símbolos: já ganhou 1000x com uma única ativação?
PG Soft torneios semanais: R$100–R$500 mil em prêmios no Jogo do Tigrinho
Jogo do Tigrinho ao vivo chat: já ganhou bônus interagindo com outros jogadores?
Jogo do Tigrinho no celular com Wi-Fi 5G: quem já ganhou big win em movimento?
Fortune Dragon novo lançamento PG Soft: já testou? Conta se tá melhor que o Tigrinho!
Jogo do Tigrinho multiplicador 10x: já ativou 3 vezes na mesma sessão? Mítico!
Fortune Ox respins com bombas: quem já limpou a tela 3 vezes seguidas?
Wild Bandito sticky wilds: o bandido mexicano tá roubando mais que o Tigrinho em 2026!
pearlcrest market hub – Navigation is straightforward and the pages open quickly.
Нынешние сетевые казино дают клиентам широкий спектр вариантов для комфортной игры. Однако иногда вход к основному порталу может стать заблокированным. В таких обстоятельствах на подмогу появляется Дэдди, которое дает постоянный доступ ко всем функциям платформы.
Что такое актуальное зеркало казино
Дубликат — это идентичная версия основного ресурса, которая находится по дополнительному URL. Копия имеет все набор функций оригинального веб-портала, включая личный кабинет, средства и сведения платежей.
Основные плюсы использования зеркала:
– 24-часовой подключение к порталу
– Абсолютная тождественность опций
– Безопасность личных реквизитов
– Сохранение существующих бонусов
Как разыскать функционирующее зеркало в данный момент
Есть множество безопасных вариантов нахождения текущей ссылки:
Авторизованные ресурсы:
1. Почтовая рассылка — администрация регулярно высылает информацию с действующими адресами
2. Общественные сети — проверенные страницы выкладывают свежую новости
3. Отдел поддержки — операторы сообщают надежные URL
4. Телефонное приложение — предоставляет минуть блокировки
Регистрация на лицензионном сайте
Процесс оформления отнимает лишь пару минут и предполагает из следующих этапов:
1. Переход на лицензионный ресурс или актуальное зеркало
2. Щелчок на клавишу «Регистрация»
3. Внесение учетной таблицы
4. Проверка электронной почты или контактного номера
5. Включение бонуса за регистрацию при наличии промокода
Свежие игроки получают щедрый начальный презент, который может содержать даровые прокруты, валютные призы или cashback.
Логин в индивидуальный кабинет
Логин на сайте реализуется традиционным путем. Необходимо вписать никнейм и код доступа, примененные при открытии счета.
Важные моменты для безопасного входа:
– Применяйте защищенный код
– Задействуйте двойную верификацию
– Не фиксируйте данные на публичных гаджетах
– Проверяйте адресную строку браузера
Обзор премиальной структуры
Игровая платформа награждает геймеров разнообразными привилегиями и специальными предложениями:
Вступительный пакет
Дебютанты вправе претендовать на щедрое вознаграждение за начальный взнос. Как правило это долевая добавка к депонированной величине плюс даровые спины для топовых слотов.
Систематические предложения
– Еженедельный кэшбек — возвращение доли утраченных финансов
– Бонусы на дополнительные вклады
– Уникальные офферы по событиям
– Состязания с большими премиальными фондами
Система лояльности
Деятельные геймеры накапливают пункты за всякую ставку, которые затем превращаются на фактические деньги, даровые прокруты или особые преимущества.
Промокоды: как использовать
Промокоды — это особые сочетания букв и цифр, гарантирующие возможность к дополнительным привилегиям.
Откуда найти свежие промокоды:
– Проверенные социальные сети казино
– Сотрудничающие площадки
– Email-рассылка
– Профильные сообщества
Указывается промокод в отдельное поле при регистрации или пополнении счета.
Смартфонная версия и приложение
Актуальные игроки предпочитают играть с смартфонных аппаратов. Сайт предлагает 2 метода для комфортной мобильной игры.
Мобильная редакция
Онлайн версия сама подстраивается под диагональ дисплея. Не требует установки и функционирует в произвольном свежем браузере.
Смартфонное приложение
Установить программу можно для устройств на Android и iOS. Плюсы app:
– Быстрая открытие
– Надежная функционирование
– Мгновенные-уведомления о промо
– Самостоятельный минование блокировок
Операция инсталляции прост: достаточно открыть на сайт с портативного устройства и придерживаться предписаниям.
Игровой ассортимент
Библиотека развлечений содержит множество позиций от лучших поставщиков.
Слоты
Развлекательные автоматы — крайне любимая категория развлечений. Размещены традиционные винтажные автоматы, передовые видеослоты с бонусными раундами, а также растущие призы.
Live казино
Секция с настоящими ведущими позволяет испытать дух истинного казино. Представлены столы с баккарой.
Вещание ведется в превосходном качестве, имеется чат с раздающим и прочими пользователями.
Конкурсы
Систематически запускаются турниры по всевозможным слотам. Вступление предоставляет право завоевать денежные выигрыши, фриспины или специальные бонусы.
Финансовые операции
Ресурс поддерживает широкий выбор расчетных методов:
– Банковские карты
– Онлайн системы
– Крипта
– Банковские платежи
Минимальная объем депозита — разумная для основной части геймеров. Обналичивание средств производится в минимальные периоды.
Сервис поддержки
Квалифицированные операторы готовы поддержать непрерывно. Имеются следующие варианты связи:
– Живой-чат
– Email
– Телефонная поддержка
– Общественные сети
Пояснения на распространенные вопросы можно обнаружить в зоне FAQ.
Резюме
Основной сайт казино и его действующие зеркала дают игрокам абсолютный доступ ко всем функциям платформы. Великодушные вознаграждения, комфортная телефонная версия, огромный коллекция слотов и квалифицированная служба поддержки превращают развлекательный опыт исключительно приятным и конфиденциальным.
Описание официального ресурса
Актуальное онлайн-казино дарит своим пользователям обширный спектр возможностей и бонусов. Оригинальный портал казино ЗигЗаг казино оперирует 24/7, обеспечивая доступ к востребованным автоматам, live-казино и разнообразным промо.
Действующее зеркало: путь к порталу
Что такое копия казино
Дубликат представляет собой идентичную дубликат главного веб-сайта с иным сетевым именем. Актуальное зеркало обеспечивает клиентам преодолевать блокировки и получать стабильный подключение к излюбленным играм.
Как отыскать текущее зеркало сегодня
Свежие линки на официальное зеркало размещаются через:
– Электронную новостнуюленту
– Главные публичные сети
– Отдел сопровождения
– Тематические сайты
Открытиесчета на портале
Процедура регистрации
Открытиесчета длится всего минут и содержит такие стадии:
1. Переход на оригинальный ресурс или функционирующее зеркало
2. Нажатие клавиши “Регистрация”
3. Указание личных реквизитов
4. Подтверждение адреса или телефона
5. Придумывание пароля
Приз за открытиесчета
Начинающие участники обретают солидные стартовые подарки:
– Бонусные средства на аккаунт
– Бесплатныевращения для автоматов
– Расширенный процент возврата
– Особые коды
Авторизация в индивидуальный счет
Действующие участники имеютвозможность выполнить доступ через официальный сайт или рабочее зеркало. Для этого необходимо указать учетноеимя и ключдоступа, придуманные при открытиисчета.
Опции индивидуального профиля
В собственном разделе доступны основные опции:
– Редактирование учетными данными
– Зачисление депозита
– Вывод денег
– Активация бонусов
– Мониторинг истории транзакций
– Регистрация в соревнованиях
Поощрения и предложения
Категории подарков
Казино награждает своих клиентов многочисленными поощрительными акциями:
– Стартовый пакет — выгодные бонусы на стартовые вклады
– Freespins — дополнительные прокруты в популярных симуляторах
– Компенсация — систематический компенсация части убытков
– Схема поощрения — особые льготы для регулярных участников
Купоны и их применение
Уникальные купоны обеспечивают расширенные вознаграждения. Для активации требуется ввести шифр в соответствующее раздел в собственном разделе.
Геймплейный ассортимент
Симуляторы
База азартных слотов содержит массу позиций от известных разработчиков:
– Классические слоты
– Продвинутые развлечения
– Призовые симуляторы
– Сюжетные игры
Live казино
Зона Live-казино предлагает процесс с живыми операторами в формате онлайн эфира:
– Европейскаярулетка
– Очко
– Baccarat
– Карибскийпокер
Турниры
Постоянные турниры с солидными наградными призами проходят регулярно. Игроки конкурируют за лидерство в таблице.
Мобильная версия и софт
Mobile платформа ресурса
Официальный портал абсолютно адаптирован для портативных девайсов. Пользователи вправе запускать развлечения непосредственно через интернет-браузер без нужды инсталляции.
APP для установки
Авторское смартфонное программа предлагается для загрузки на гаджеты с программными ОС Android и iOS. Софт обеспечивает:
– Быстрый путь к автоматам
– Стабильную функциональность
– Оперативные-сообщения о предложениях
– Удобный навигацию
Вывод
Основной ресурс казино и его рабочие копии предоставляют клиентам полный вход к качественным азартным сервисам. Щедрые вознаграждения, различные акции, удобная мобильная реализация и компетентная помощь создают геймплейный времяпрепровождение крайне приятным и прибыльным.
PG Soft torneio diário R$10k: quem tá lucrando todo dia no Fortune Tiger?
Продолжение kraken войти
Fortune Tiger big win 2000x: já aconteceu com você? Conta a história completa
черновой ремонт двухкомнатной квартиры Подготовка основания под чистовую отделку: стяжка полов, штукатурка стен, монтаж электропроводки и труб. Важно сделать это качественно, чтобы в дальнейшем не возникло проблем. Используем проверенные материалы.
gain process clarity – Starting steps helps maintain a smooth and predictable workflow.
Подключение к платформе через действующие зеркала
Клиенты интернет казино часто имеют дело с проблемой недоступности основного сайта. Именно для ликвидации этой задачи созданы дубликаты основного портала. https://www.elingua.app предоставляет абсолютный вход ко всем сервисам площадки.
Что такое действующее зеркало казино
Зеркало представляет собой полную версию официального сайта с похожим опциями. Единственное различие — это иное имя. Любые данные участника, в том числе баланс, бонусы и записи игр, продолжают быть такими же.
Достоинства применения зеркал
Рабочие зеркала обладают комплексом значимых плюсов:
– Бесперебойный подключение к предпочитаемым играм
– Полная безопасность индивидуальных сведений
– Сохранение всех параметров пользовательского кабинета
– Способность приобретения поощрений и присутствия в промоакциях
Регистрация на главном домене
Ход регистрации максимально прост и требует немного минут. Новые пользователи имеют возможность надеяться на внушительный вводный подарок за регистрацию.
Этапы открытия аккаунта
1. Подключение на легальный домен или его дубликат
2. Нажатие на элемент “Присоединиться”
3. Указание нужных параметров
4. Подтверждение email почты
5. Указание промокода (если присутствует)
Поощрения и промоакции для пользователей
Казино поощряет своих участников всевозможными призовыми предложениями.
Базовые типы поощрений
Вводный приз — крупное вознаграждение для свежих пользователей, которое может охватывать материальные средства и free spins.
Безвозмездные спины — шанс крутить в известных автоматах даром.
Компенсация — процентный отдача утраченных финансов, что зачисляется раз в неделю или ежемесячно.
Бонусные коды — уникальные последовательности, предоставляющие экстра выгоды.
Персональный кабинет: опции и установки
Персональный кабинет дает исчерпывающий надзор над персональным процессом. Здесь доступны:
– Регулирование средствами
– Архив операций
– Активные поощрения
– Конфигурации сохранности
– Проверка счета
Карманная платформа и приложение
Актуальные участники признают гибкость. Казино предлагает двойной пути для ставок с портативных устройств.
Приспособленная портативная редакция
Адаптивная версия сайта без участия настраивается под монитор любого аппарата. Не требуется загружать отдельное софт.
Софт для мобильных
Можно загрузить фирменное программу для iOS и Android. APP гарантирует:
– Моментальный вход
– Улучшенный интерфейс
– Оперативные-оповещения о поощрениях
– Бесперебойную производительность
Live игры: атмосфера истинного зала
Зона Live столов переносит клиентов в среду реального игорного заведения. Опытные крупье осуществляют сессии в формате реального времени.
Топовые Live-развлечения
– Рулетка
– Блэкджек
– Баккарат
– Покер
Игровые машины: выбор развлечений
Каталог азартных аппаратов включает массу вариантов от известных разработчиков. Участники обнаружат:
– Обычные автоматы
– Видеослоты
– Прогрессивный джекпот-игры
– Многолинейные автоматы
Соревнования и эксклюзивные акции
Постоянные конкурсы дают возможность пользователям соревноваться друг с другом за солидные наградные суммы. Каждый конкурс обладает свои условия вовлечения и таблицу чемпионов.
Способы пополнения и получения средств
Площадка поддерживает ряд платежных систем:
– Банковские картыы
– Виртуальные счета
– Blockchain-платежи
– Финансовые транзакции
Абсолютно все платежи реализуются конфиденциально благодаря передовым системам защиты.
Команда support
Компетентные специалисты сервиса помощи настроены поддержать 24/7. Доступны такие способы коммуникации:
– Мгновенный-чат
– Email-поддержка
– Звонковая линия
– Социальные сети
Вывод
Официальный ресурс клуба и его актуальные альтернативы предоставляют пользователям надежный и комфортный доступ к большому спектру геймерских развлечений. Внушительные подарки, постоянные акции, качественная поддержка и удобные расчетные способы создают игровой процесс максимально приятным и доходным.
1win Republica Moldova http://1win5808.help/
Переход к платформе через рабочие зеркала
Участники онлайн казино регулярно имеют дело с ситуацией ограничения базового сайта. Именно для преодоления этой задачи существуют альтернативные адреса легального домена. https://modateks-ks.com/v-2026-godu-rossiyane-smogut-popolnit-kartu-piplbot-i-osushchestvit-oplatu-cherez/ предоставляет абсолютный подключение ко всем функциям ресурса.
Что такое действующее зеркало казино
Дубликат представляет собой идентичную дубликат официального сайта с таким же функционалом. Главное различие — это иное имя. Все информация пользователя, включая счет, поощрения и архив ставок, продолжают быть прежними.
Плюсы задействования зеркал
Действующие зеркала располагают набором значимых достоинств:
– Непрерывный вход к предпочитаемым слотам
– Совершенная безопасность личных параметров
– Сохранение всех настроек индивидуального кабинета
– Способность получения призов и включения в кампаниях
Регистрация на главном портале
Операция создания аккаунта предельно легок и длится пару минут. Свежие пользователи способны претендовать на внушительный начальный поощрение за создание аккаунта.
Этапы создания аккаунта
1. Подключение на легальный домен или его копию
2. Нажатие на элемент “Присоединиться”
3. Внесение обязательных информации
4. Верификация email почты
5. Применение кода (при наличии есть)
Бонусы и предложения для игроков
Платформа одаривает своих пользователей многочисленными поощрительными предложениями.
Основные категории поощрений
Вводный приз — внушительное поощрение для начинающих клиентов, каковое в состоянии вмещать материальные бонусы и безвозмездные спины.
Free spins — возможность играть в востребованных аппаратах бесплатно.
Компенсация — частичный возврат потерянных сумм, каковой выплачивается каждую неделю или ежемесячно.
Бонусные коды — специальные комбинации, обеспечивающие бонусные выгоды.
Пользовательский кабинет: функции и конфигурации
Персональный профиль дает совершенный надзор над игровым взаимодействием. Тут предусмотрены:
– Контроль депозитом
– Записи переводов
– Активные поощрения
– Установки безопасности
– Подтверждение профиля
Портативная платформа и софт
Нынешние клиенты признают гибкость. Казино предоставляет пару метода для участия с смартфонных устройств.
Отзывчивая телефонная версия
Мобильная платформа сайта автоматически приспосабливается под экран любого аппарата. Отсутствует потребность устанавливать особое ПО.
Приложение для гаджетов
Доступно скачать оригинальное софт для iOS и Android. APP гарантирует:
– Быстрый вход
– Улучшенный дизайн
– Оперативные-сообщения о бонусах
– Надежную операционность
Live игры: антураж истинного казино
Секция Live развлечений отправляет участников в обстановку настоящего клуба. Профессиональные ведущие организуют игры в варианте настоящего времени.
Топовые Live-столы
– Европейская рулетка
– Двадцать одно
– Баккарат
– Покер
Слоты: ассортимент слотов
Библиотека игровых аппаратов включает сотни вариантов от ведущих поставщиков. Пользователи найдут:
– Традиционные аппараты
– Современные слоты
– Мега-выигрыш-автоматы
– Мегавейс
Состязания и особые предложения
Постоянные турниры предоставляют шанс клиентам состязаться друг с другом за значительные наградные банки. Каждый конкурс располагает свои критерии участия и список призеров.
Пути зачисления и вывода денег
Площадка предоставляет ряд платежных инструментов:
– Платежные карты
– Цифровые сервисы
– Blockchain-платежи
– Wire отправления
Любые платежи осуществляются конфиденциально благодаря новейшим методам шифрования.
Служба обслуживания
Квалифицированные консультанты сервиса помощи настроены содействовать 24/7. Работают данные способы коммуникации:
– Мгновенный-чат
– Email-поддержка
– Голосовая горячая линия
– Публичные сети
Итог
Основной портал игровой площадки и его действующие дубликаты предоставляют участникам защищенный и удобный доступ к большому ассортименту игровых развлечений. Щедрые бонусы, частые кампании, квалифицированная служба и легкие денежные системы превращают азартный процесс крайне комфортным и прибыльным.
discover more – Innovative thinking becomes meaningful when it leads to tangible outcomes.
mostbet giris: mostbet
https://mostbetpl.top/# mostbet giris
Доступ к платформе через действующие зеркала
Игроки сетевых казино часто контактируют с проблемой блокировки основного домена. Собственно для устранения этой трудности предусмотрены зеркала легального портала. http://shungite-chi.com/nl/sposoby-izmeneniya-dannykh-karty-na гарантирует беспрепятственный переход ко всем опциям площадки.
Что такое актуальное зеркало казино
Зеркало представляет собой идентичную дубликат главного сайта с идентичным опциями. Основное расхождение — это другое имя. Абсолютно все информация пользователя, в том числе средства, привилегии и историю партий, находятся идентичными.
Плюсы использования зеркал
Действующие зеркала располагают множеством существенных преимуществ:
– Круглосуточный переход к излюбленным автоматам
– Абсолютная защита индивидуальных данных
– Удержание всех параметров персонального кабинета
– Способность взятия поощрений и включения в акциях
Открытие счета на официальном ресурсе
Процесс оформления предельно элементарен и длится немного минут. Начинающие участники в состоянии рассчитывать на щедрый приветственный бонус за создание аккаунта.
Этапы формирования аккаунта
1. Подключение на основной ресурс или его копию
2. Активация на элемент “Создать аккаунт”
3. Внесение требуемых информации
4. Верификация электронной почты
5. Применение кода (в случае присутствует)
Награды и предложения для пользователей
Игровая площадка радует своих клиентов многочисленными бонусными системами.
Основные типы поощрений
Начальный пакет — внушительное начисление для начинающих участников, каковое способно содержать материальные средства и фриспины.
Бесплатные вращения — опция запускать в топовых игровых машинах безвозмездно.
Кэшбек — процентный возврат утраченных сумм, который именно зачисляется каждую неделю или каждый месяц.
Промокоды — специальные комбинации, предоставляющие дополнительные выгоды.
Персональный кабинет: возможности и параметры
Персональный аккаунт обеспечивает полный контроль над пользовательским взаимодействием. Здесь доступны:
– Контроль депозитом
– Архив платежей
– Активные бонусы
– Конфигурации защиты
– Валидация аккаунта
Смартфонная редакция и APP
Актуальные игроки предпочитают портативность. Площадка дает пару метода для развлечений с мобильных гаджетов.
Адаптивная смартфонная версия
Адаптивная вариант домена автономно подстраивается под разрешение любого устройства. Нет необходимости загружать специальное программное обеспечение.
Софт для телефонов
Разрешено инсталлировать оригинальное APP для iOS и Android. Программа гарантирует:
– Скорый вход
– Доработанный дизайн
– Мобильные-оповещения о акциях
– Бесперебойную функциональность
Live игры: обстановка реального казино
Раздел Live игр транспортирует игроков в антураж истинного казино. Опытные крупье проводят сессии в варианте настоящего времени.
Топовые Live-форматы
– Французская рулетка
– Двадцать одно
– Punto Banco
– Техасский холдем
Автоматы: выбор развлечений
Коллекция азартных слотов содержит сотни позиций от известных разработчиков. Участники найдут:
– Стандартные аппараты
– Современные слоты
– Накопительный приз-слоты
– Megaways
Турниры и уникальные предложения
Регулярные конкурсы предоставляют шанс участникам бороться друг с другом за внушительные денежные фонды. Любой соревнование располагает свои условия присутствия и рейтинг призеров.
Методы ввода и получения сумм
Казино обслуживает множество платежных методов:
– Дебетовые средства
– Виртуальные платежные системы
– Blockchain-платежи
– Прямые транзиты
Абсолютно все переводы выполняются защищенно благодаря передовым системам криптографии.
Команда обслуживания
Компетентные специалисты службы обслуживания настроены помочь 24/7. Имеются такие каналы общения:
– Живой-чат
– Email-помощь
– Голосовая горячая линия
– Публичные сети
Заключение
Основной портал игровой площадки и его рабочие копии обеспечивают клиентам безопасный и приятный доступ к обширному выбору азартных игр. Солидные награды, частые кампании, компетентная поддержка и легкие финансовые инструменты формируют игровой процесс максимально комфортным и выгодным.
Нынешние онлайн казино предоставляют пользователям обширный ассортимент функций для беспроблемной игры. Однако иногда подключение к основному порталу может быть закрытым. В таких моментах на выручку спешит ДжиВиСпин, которое обеспечивает бесперебойный путь ко всем возможностям платформы.
Что такое актуальное зеркало казино
Альтернативный сайт — это абсолютная копия главного портала, которая располагается по другому URL. Копия сохраняет полный инструментарий оригинального ресурса, включая индивидуальный кабинет, баланс и сведения операций.
Главные преимущества задействования зеркала:
– Непрерывный доступ к ресурсу
– Максимальная тождественность функционала
– Защита пользовательских сведений
– Поддержка доступных привилегий
Как разыскать функционирующее зеркало в данный момент
Есть множество проверенных вариантов нахождения свежей адреса:
Легитимные источники:
1. Электронная рассылка — администрация систематически отправляет сообщения с действующими ссылками
2. Медийные сети — проверенные профили выкладывают актуальную новости
3. Сервис поддержки — консультанты дают проверенные адреса
4. Смартфонное приложение — позволяет избегать блокировки
Создание аккаунта на лицензионном сайте
Операция создания аккаунта занимает не более считанные минут и включает из таких этапов:
1. Переход на главный портал или функционирующее зеркало
2. Нажатие на иконку «Зарегистрироваться»
3. Внесение учетной формы
4. Проверка почтовой почты или сотового номера
5. Активация бонуса за регистрацию при наличии промокода
Свежие игроки приобретают щедрый вступительный подарок, который может включать бесплатные вращения, валютные вознаграждения или кэшбек.
Вход в персональный кабинет
Авторизация на платформе осуществляется обычным методом. Достаточно внести учетные данные и кодовое слово, примененные при оформлении.
Значимые детали для защищенного входа:
– Эксплуатируйте надежный пароль
– Запустите двухэтапную идентификацию
– Не храните пароли на публичных компьютерах
– Контролируйте интернет строку браузера
Обзор премиальной структуры
Игорный портал радует клиентов всевозможными привилегиями и акциями:
Вступительный букет
Начинающие вправе полагаться на существенное поощрение за стартовый депозит. Обычно это процентная добавка к переведенной величине плюс free spins для известных слотов.
Регулярные предложения
– 7-дневный кэшбек — возврат процентной доли утраченных денег
– Бонусы на очередные взносы
– Специальные акции по праздникам
– Турниры с солидными призовыми суммами
Программа верности
Постоянные клиенты зарабатывают единицы за всякую ставку, которые затем меняются на реальные средства, даровые прокруты или особые льготы.
Купоны: как задействовать
Промокоды — это особые наборы букв и цифр, обеспечивающие право к бонусным вознаграждениям.
Где раздобыть свежие промокоды:
– Авторизованные общественные сети казино
– Сотрудничающие сайты
– Email-рассылка
– Тематические группы
Прописывается промокод в соответствующее поле при оформлении или добавлении денег депозита.
Смартфонная версия и приложение
Современные клиенты любят играть с смартфонных девайсов. Ресурс дает двойной способа для беспроблемной мобильной игры.
Адаптивная версия
Онлайн версия само собой подстраивается под размер экрана. Не нуждается установки и оперирует в всяком новом браузере.
Смартфонное приложение
Загрузить программу можно для гаджетов на Android и iOS. Достоинства app:
– Оперативная загрузка
– Надежная операция
– Всплывающие-уведомления о поощрениях
– Независимый избегание блокировок
Процедура установки элементарен: нужно открыть на портал с мобильного аппарата и следовать руководству.
Развлекательный выбор
Каталог игр содержит тысячи наименований от ведущих провайдеров.
Слоты
Развлекательные аппараты — максимально любимая раздел аттракционов. Представлены стандартные 3-барабанные слоты, передовые видео-автоматы с бонусными этапами, а также джекпотные выигрыши.
Live казино
Секция с настоящими ведущими обеспечивает ощутить настроение реального казино. Представлены варианты с рулеткой.
Передача реализуется в высоком качестве, обеспечивается коммуникация с дилером и прочими геймерами.
Состязания
Постоянно запускаются состязания по разным категориям. Присоединение обеспечивает возможность выиграть денежные выигрыши, бесплатные вращения или особые привилегии.
Платежные процедуры
Сайт предлагает широкий ассортимент платежных методов:
– Банковские карты
– Цифровые системы
– Криптовалюта
– Банковские платежи
Стартовая сумма пополнения — разумная для основной части геймеров. Обналичивание денег выполняется в кратчайшие периоды.
Служба поддержки
Профессиональные специалисты настроены поддержать 24/7. Открыты такие каналы коммуникации:
– Онлайн-чат
– Email
– Телефонная связь
– Социальные сети
Разъяснения на стандартные вопросы можно отыскать в зоне FAQ.
Итог
Официальный ресурс казино и его актуальные зеркала гарантируют клиентам полный подключение ко всем опциям ресурса. Великодушные поощрения, удобная смартфонная версия, гигантский каталог игр и опытная ассистенция превращают развлекательный досуг крайне беспроблемным и защищенным.
мелбет бонус на первый депозит казино http://melbet41682.help
This is really interesting, You’re a very skilled blogger. I’ve joined your rss feed and look forward to seeking more of your wonderful post. Also, I have shared your site in my social networks!
viagraonline2
буроинъекционные сваи усиление фундамента буроинъекционные сваи усиление фундамента .
капитальный ремонт здания это капитальный ремонт здания это .
Передовые онлайн-казино гарантируют участникам широкий выбор слотов и привлекательные премии. Тем не менее для беспроблемной работы существенно знать, как получить доступ к Евромания казино и его функционирующие зеркала.
Что такое основной сайт казино
Основной ресурс казино — это главная площадка, где клиенты могут пользоваться игровыми играми. Платформа оперирует на официальных принципах и располагает всеми необходимыми лицензиями.
Первостепенные преимущества основного ресурса:
– Конфиденциальность личных сведений
– Прозрачные правила игры
– Стабильные выводы
– Квалифицированная помощь
Действующее зеркало казино: для чего требуется
Альтернативный адрес — это полная версия главного ресурса, размещенная по другому домену. Действующее зеркало формируется для обеспечения бесперебойного подключения к порталу.
Поводы применения дублирующих ресурсов:
– Ограничение официального адреса
– Плановые мероприятия
– Большая нагрузка на сервер
Как получить свежее зеркало сейчас
Обнаружить текущее официальное зеркало можно несколькими способами:
1. Почтовые оповещения — зарегистрируйтесь на новостную доставку
2. Служба поддержки — обратитесь в онлайн-чат
3. Публичные площадки — проверяйте за новостями
4. Партнерские площадки — надежные источники
Регистрация на портале казино
Этап создания аккаунта длится лишь считанные минут:
1. Нажмите на кнопку “Зарегистрироваться”
2. Укажите требуемые данные
3. Активируйте почтовую почту
4. Используйте купон, если имеется
Сразу после оконченной регистрации вам станет доступен персональный раздел.
Награды и коды активации
Щедрая бонусная система — значимое конкурентное преимущество казино:
Бонус за создание аккаунта
Первичные пользователи зарабатывают первый подарок, который может включать:
– Денежный кредит на первый вклад
– Фриспины для игровых машин
– Приветственные фонды
Промокоды
Периодически появляются свежие бонусные шифры, позволяющие получить дополнительные преимущества.
Система возврата средств
Регулярные игроки зарабатывают часть утраченных денег в виде компенсации.
Актуальные кампании и соревнования
Платформа периодически устраивает увлекательные промо-мероприятия:
– Weekly турниры
– Праздничные бонусы
– Лотереи значительных подарков
– Схема лояльности
Авторизация в пользовательский раздел
Для логина на ресурс требуется:
1. Посетить основной портал или рабочее зеркало
2. Активировать “Вход”
3. Указать никнейм и код доступа
В пользовательском профиле открыты нижеперечисленные опции:
– Пополнение кошелька
– Вывод выигрышей
– Просмотр истории ставок
– Изменение индивидуальными сведениями
Портативная вариант и программа
Mobile версия
Мобильная платформа ресурса предоставляет шанс развлекаться с любого портативного девайса. Интерфейс автоматически подстраивается под размер screen.
Программа для скачивания
Загрузить программу можно для:
– Android — официальная скачивание с платформы
– iOS — установка через App Store
Преимущества программы:
– Моментальный запуск
– Устойчивая функциональность
– Push-оповещения об бонусах
– Ускоренный UI
Игровые категории
Игровые машины
Внушительная подборка развлекательных слотов от лучших провайдеров:
– Традиционные игры
– Видео-слоты
– Прогрессивные-игры
Live зал
Зона с реальными крупье предоставляет:
– Рулетки
– Blackjack
– Punto Banco
– Покер
Стримы осуществляются в высоком разрешении, формируя эффект подлинного казино.
Методы пополнения и обналичивания
Платформа поддерживает разные денежные системы:
– Платежные карты
– Онлайн счета
– Bitcoin/Ethereum
– Прямые переводы
Базовые значения взноса и моментальные выводы обеспечивают времяпрепровождение предельно комфортной.
Отдел поддержки
Квалифицированная группа support функционирует 24/7 и способна помочь с всеми проблемами:
– Онлайн-чат
– Email-поддержка
– Phone связь
Заключение
Официальный портал казино и его действующие дубликаты дают клиентам защищенный и увлекательный развлекательный опыт. Привлекательные награды, функциональная мобильная платформа, разнообразные автоматы и превосходное live-казино превращают эту платформу отличным решением для азартных времяпрепровождения.
Актуальные онлайн-казино обеспечивают игрокам широкий набор слотов и выгодные бонусы. Однако для комфортной работы важно осознавать, как отыскать Р±РѕРЅСѓСЃ и его актуальные зеркала.
Что такое главный портал казино
Официальный ресурс казино — это базовая платформа, где участники могут наслаждаться развлекательными играми. Сайт работает на легальных условиях и обладает всеми обязательными лицензиями.
Основные преимущества главного портала:
– Защищенность индивидуальных информации
– Объективные положения использования
– Обеспеченные платежи
– Профессиональная помощь
Рабочее зеркало казино: для чего необходимо
Альтернативный адрес — это точная дубликат главного портала, хостящаяся по альтернативному URL. Действующее зеркало создается для гарантирования стабильного входа к порталу.
Причины применения зеркал:
– Запрет главного сайта
– Регламентные работы
– Большая нагрузка на ресурс
Как найти актуальное зеркало сейчас
Получить актуальное проверенное зеркало можно разными путями:
1. Почтовые оповещения — зарегистрируйтесь на информационную доставку
2. Департамент поддержки — обратитесь в онлайн-чат
3. Корпоративные медиа — проверяйте за публикациями
4. Специализированные ресурсы — авторитетные ресурсы
Оформление профиля на портале казино
Процесс регистрации длится только считанные моментов:
1. Активируйте на элемент “Регистрация”
2. Заполните запрашиваемые сведения
3. Верифицируйте контактную адрес
4. Введите код активации, если доступен
После завершенной создания аккаунта вам будет разрешен личный профиль.
Награды и купоны
Выгодная поощрительная политика — важное преимущество казино:
Награда за открытие счета
Новые клиенты приобретают первый поощрение, который может содержать:
– Финансовый депозит на стартовый депозит
– Фриспины для слотов
– Безвозвратные фонды
Бонусные коды
Периодически публикуются свежие промокоды, дающие возможность активировать дополнительные бонусы.
Механизм кэшбека
Постоянные пользователи зарабатывают долю потраченных ставок в виде компенсации.
Свежие предложения и турниры
Ресурс систематически запускает интересные акции:
– Недельные турниры
– Специальные предложения
– Лотереи солидных наград
– Система статусов
Логин в пользовательский профиль
Для логина на платформу требуется:
1. Загрузить официальный сайт или рабочее зеркало
2. Нажать “Авторизация”
3. Прописать никнейм и пароль
В индивидуальном аккаунте открыты данные функции:
– Пополнение депозита
– Получение призов
– Просмотр лога игр
– Настройка индивидуальными настройками
Мобильная вариант и программа
Адаптивная модификация
Responsive платформа портала обеспечивает участвовать с всех мобильного девайса. Интерфейс динамически настраивается под диагональ монитора.
Приложение для download
Установить приложение можно для:
– Android — безопасная download с портала
– iOS — установка через App Store
Плюсы программы:
– Мгновенный старт
– Бесперебойная операционность
– Push-сообщения об акциях
– Оптимизированный функционал
Азартные категории
Слоты
Обширная библиотека азартных автоматов от лучших провайдеров:
– Стандартные автоматы
– Видео-игры
– Прогрессивные-слоты
Live casino
Раздел с профессиональными операторами предлагает:
– European/American Roulette
– Двадцать одно
– Baccarat
– Покер
Вещания ведутся в превосходном формате, воссоздавая впечатление реального казино.
Варианты депозита и снятия
Казино принимает различные финансовые методы:
– Дебетовые карты
– Виртуальные системы
– Криптовалюты
– Прямые переводы
Наименьшие лимиты депозита и моментальные транзакции гарантируют игру предельно удобной.
Команда помощи
Опытная команда support оперирует 24/7 и способна содействовать с разными задачами:
– Живой-чат
– Email-помощь
– Phone связь
Выводы
Главный сайт казино и его актуальные зеркала дают игрокам надежный и захватывающий игровой досуг. Богатые бонусы, функциональная мобильная вариант, богатые автоматы и профессиональное live-казино делают эту систему превосходным выбором для развлекательных досуга.
PG Soft 2026: qual jogo novo da PG você mais quer ver lançado?
sweet bonanza відгуки про виплати sweet bonanza відгуки про виплати
Jogo do Tigrinho 2026: aposta mínima R$0,20 tá valendo mais que nunca
Нынешние онлайн-казино обеспечивают геймерам богатый выбор опций для удобной игры. Переход к ресурсу http://alzcbusjc.org/pyat-metodov-priobreteniya-podpiski-na-4-i-iz-rossii/ выполняется через официальный домен или рабочее зеркало.
Что такое функционирующее зеркало казино
Действующее зеркало — это дополнительный URL основного сайта казино. Такие клоны разрабатываются для обеспечения непрерывного соединения к развлекательной сервису.
Зеркало сегодня совершенно воспроизводит функционал базового портала. Клиенты получают аналогичный доступ ко всем возможностям, включая создание аккаунта, финансирование депозита и снятие денег.
Регистрация на главном сайте
Алгоритм открытия профиля длится всего считанные моментов. Начинающим участникам требуется:
1. Зайти на официальный сайт или рабочее официальное зеркало
2. Выбрать кнопку “Регистрация”
3. Указать нужные данные
4. Верифицировать email почту
5. Ввести купон при существовании
После выполнения оформления участник зарабатывает подарок за регистрацию, который способен предполагать free spins или финансовое начисление.
Логин в индивидуальный кабинет
Пользовательский кабинет — это безопасная секция, где пользователи имеют возможность администрировать своим учетной записью. Для доступа необходимо напечатать логин и пароль.
В персональном кабинете открыты нижеперечисленные возможности:
– Мониторинг журнала платежей
– Задействование купонов
– Управление бонусами
– Вступление в конкурсах
– Контроль кэшбэка
– Настройка профиля
Поощрения и спецпредложения
Гемблинговая сервис предлагает привлекательные подарки:
Регистрационный пакет — начинающие получают крупное поощрение на первые вклады.
Фриспины — предоставляются как при создании аккаунта, так и в контексте всевозможных промо.
Кэшбек — регулярный возврат процента проигранных сумм.
Коды активации — особые последовательности, обеспечивающие право к специальным бонусам.
Обзор азартных категорий
Слоты
Ассортимент слотов содержит множество игр от топовых поставщиков. Игроки обнаружат как обычные аппараты, так и инновационные видео-слоты с увлекательной анимацией.
Live казино
Раздел Live казино обеспечивает шанс играть с живыми дилерами в формате текущего времени. Представлены распространенные варианты: рулетка, блэкджек, баккара, покер.
Соревнования
Систематические состязания с солидными премиальными пулами завлекают тысячи соревнующихся. Лидеры обретают денежные вознаграждения и особые подарки.
Портативная версия и софт
Мобильная версия платформы дает возможность участвовать с всякого устройства. Интерфейс независимо настраивается под формат экрана.
Скачать app можно для гаджетов на Android и iOS. Телефонное app характеризуется всеми функциями компьютерной версии.
Как обнаружить актуальное зеркало на данный момент
Свежие URL копий периодически корректируются. Получить действующую ссылку можно разными способами:
– Через службу саппорта
– В подлинных социальных сетях
– По email дайджесту
– На партнерских площадках
Надежность и официальность
Лицензионный сайт работает на фундаменте зарубежной лицензии. Все транзакции охраняются передовыми протоколами кодирования.
Конфиденциальность пользовательских реквизитов гарантируется в стопроцентном объеме.
Вывод
Главный сайт и его действующие копии предоставляют клиентам круглосуточный доступ к превосходным развлекательным развлечениям. Великодушные призы, различные слоты, опытная помощь — все это создает азартный досуг невероятно приятным и интересным.
Передовые онлайн-казино предлагают пользователям обширный набор возможностей и премиальных опций. Доступ к платформе выполняется через основной ресурс или его функционирующее зеркало казино 777Planet, что гарантирует бесперебойную деятельность.
Что представляет собой действующее зеркало казино
Альтернатива — это полная копия оригинального ресурса, созданная для устранения ограничений. Актуальное зеркало помогает клиентам сохранить доступ к любимым развлечениям в каждое время.
Официальное зеркало имеет всеми опциями главного ресурса:
– Совокупный перечень развлечений
– Учетная запись с зафиксированными сведениями
– Действующие промокоды
– Гарантированные расчетные действия
Регистрация на лицензионном портале
Процесс оформления требует всего пару минут. Новым игрокам нужно:
1. Перейти на официальный ресурс или актуальное зеркало
2. Щелкнуть на клавишу “Создать аккаунт”
3. Внести необходимые сведения
4. Проверить электронную почту
5. Произвести стартовый взнос
Поощрение новичкам зачисляется автоматически после окончания всех ступеней.
Вход в профиль
Существующие игроки могут совершить подключение используя:
– Логин и пароль
– Данные контакта
– Email
Персональный раздел открывает возможность к контролю счетом, данным ставок и активным поощрениям.
Бонусы и предложения
Гемблинг платформа привлекает постоянных пользователей щедрыми вознаграждениями:
Первый комплект
– Надбавка на дебютный взнос до 100%
– Бесплатные вращения на топовые автоматы
– Особые награды за следующие платежи
Бонусные коды
Эксклюзивные промокоды открывают право на активацию специальных поощрений. Свежие комбинации выставляются в категории “Бонусы”.
Cashback
Постоянный кешбэк равен до 10% от использованных денег. Возмещение начисляется сразу.
Программа лояльности
Регулярные клиенты зарабатывают единицы, которые конвертируются на настоящие средства или даровые спины.
Мобильный сайт и APP
Ради комфорта пользователей построена функциональная портативная платформа. Адаптивный облик помогает легко играть с произвольного переносного аппарата.
Преимущества программы:
– Оперативный вход к автоматам
– Улучшенный дизайн
– Бесперебойная работа
– Нотификации о актуальных акциях
Получить приложение можно бесплатно с официального сайта для аппаратов на Android и iOS.
Каталог автоматов
Слоты
Каталог включает более 2000 игр от ведущих студий:
– Стандартные автоматы
– Video slots
– Jackpot игры
– Фирменные игры
Live казино
Раздел Live столов обеспечивает развлечение с живыми диллерами в прямом режиме:
– Рулеточные столы
– Двадцать одно
– Baccarat
– Карточный покер
Состязания
Периодические соревнования с значительными выигрышными фондами организуются регулярно. Присоединение в конкурсах разрешено всем активным игрокам.
Расчетные системы
Платежи и изъятия финансов осуществляются через известные методы:
– Платежные карточ ки
– Электронные сервисы
– Криптовалюта
– Счетные платежи
Наименьший платеж — от 100 рублей. Снятие денег осуществляется в течение 24 времени.
Отдел саппорта
Непрерывная группа поддержки способна ассистировать в решении каких-либо ситуаций:
– Живой чат
– Email
– Горячая линия
– Общественные сети
Безопасность и разрешение
Официальный сайт действует на почве глобальной сертификата. Любые данные клиентов закрыты передовым SSL-криптованием.
Заключение
Действующее зеркало дает бесперебойный вход к выбранным автоматам, богатым акциям и функциональным услугам. Присоединяйтесь сейчас и заработайте приветственный поощрение!
колесов николай александрович биография
Blackburn vs Preston 2026 Championship 21:00 Rovers favored
PG Soft torneio diário R$20k: quem tá subindo no leaderboard do Fortune Tiger?
PG Soft torneios semanais: R$50k–R$500k em prêmios – já ganhou algo?
http://ruall.com/sotrudnichestvo/90226-sistema-vodyanogo-potolochnogo-otopleniya-tpi-28.html#90226
Анализ оригинального портала
Передовое онлайн-казино дарит своим пользователям обширный выбор возможностей и призов. Основной веб-сайт Beton казино казино функционирует непрерывно, предоставляя вход к востребованным играм, live-казино и разнообразным акциям.
Действующее зеркало: возможность к сайту
Что такое альтернатива казино
Альтернатива составляет собой точную копию оригинального ресурса с иным сетевым названием. Актуальное зеркало дает участникам обходить блокировки и сохранять стабильный вход к излюбленным автоматам.
Как получить актуальное зеркало сегодня
Рабочие адреса на проверенное зеркало размещаются через:
– Email оповещение
– Основные медийные сети
– Службу обслуживания
– Партнерские ресурсы
Созданиеаккаунта на сайте
Ход оформления
Регистрация отнимает пару минут и подразумевает следующие шаги:
1. Открытие на оригинальный веб-сайт или актуальное зеркало
2. Нажатие элемента “Зарегистрироваться”
3. Указание контактных реквизитов
4. Верификация адреса или контакта
5. Придумывание ключа
Подарок за открытиесчета
Первые пользователи получают щедрые начальные бонусы:
– Игровые суммы на кошелек
– Бесплатныевращения для симуляторов
– Увеличенный процент компенсации
– Уникальные ваучеры
Вход в индивидуальный кабинет
Постоянные пользователи способны произвести авторизацию через официальный портал или актуальное зеркало. Для этого необходимо указать логин и секретнуюкомбинацию, созданные при созданииаккаунта.
Возможности личного аккаунта
В собственном профиле предоставлены следующие инструменты:
– Редактирование персональными данными
– Зачисление депозита
– Обналичивание призов
– Активация кодов
– Отслеживание истории операций
– Участие в соревнованиях
Бонусы и предложения
Категории бонусов
Казино балует своих пользователей разнообразными призовыми предложениями:
– Вступительный комплект — большие бонусы на дебютные пополнения
– Freespins — экстра вращения в известных автоматах
– Компенсация — регулярный откат процента потерь
– Система поощрения — специальные бонусы для регулярных участников
Купоны и их ввод
Особые коды предоставляют бонусные подарки. Для активации требуется внести шифр в соответствующее окно в собственном профиле.
Азартный каталог
Автоматы
Коллекция слотовых автоматов насчитывает сотни позиций от топовых провайдеров:
– Обычные машины
– Продвинутые слоты
– Призовые симуляторы
– Лицензионные слоты
Live казино
Зона Live-казино обеспечивает игру с профессиональными операторами в режиме актуального трансляции:
– Французскаярулетка
– Блэкджек
– Baccarat
– Casinopoker
Конкурсы
Систематические состязания с внушительными наградными пулами проходят ежедневно. Участники сражаются за призовыеместа в списке.
Mobile реализация и софт
Мобильная платформа ресурса
Официальный сайт абсолютно настроен для планшетных аппаратов. Пользователи имеютвозможность открывать автоматы сразу через браузер без обязательства установки.
Софт для инсталляции
Официальное смартфонное софт доступно для установки на аппараты с программными ОС Android и iOS. Софт предоставляет:
– Мгновенный путь к играм
– Устойчивую производительность
– Push-извещения о предложениях
– Интуитивный оформление
Итог
Оригинальный ресурс казино и его действующие альтернативы дают клиентам всесторонний вход к высококлассным игровым услугам. Большие вознаграждения, разнообразные промо, комфортная мобильная версия и опытная сервис делают геймплейный времяпрепровождение чрезвычайно enjoyable и доходным.
mostbet güncel giriş: mostbet
Описание основного веб-сайта
Актуальные сетевые казино предлагают пользователям широкий выбор забав и опций. Главный портал https://tazartlodge.com/kak-funktsioniruet-skhema-popolneniya-schetov-onlayn-kazino-s-pomoshchyu-sberbanka обеспечивает безопасный вход к азартным услугам.
Актуальное зеркало: вход на сегодня
Зеркало представляет собой идентичную копию лицензионного ресурса. Официальное зеркало дает возможность клиентам миновать возможные барьеры.
Плюсы применения зеркала
Принципиальные плюсы предполагают:
– Беспрерывный доступ к сайту
– Хранение любых функций официального портала
– Охрана индивидуальных сведений
– Такой же инструментарий
Создание аккаунта на портале
Ход оформления профиля знаменуется простотой и практичностью. Начинающие клиенты должны:
1. Открыть основной веб-сайт или его зеркало
2. Выбрать на пункт оформления
3. Ввести обязательные сведения
4. Активировать email почту
5. Выполнить первый доступ
Подарок за регистрацию
Новички забирают щедрый начальный подарок. Это вознаграждение способно охватывать:
– Монетарные начисления
– Безвозмездные вращения
– Усиленный коэффициент компенсации
Логин в собственный кабинет
Действующие участники в состоянии моментально зайти в персональный аккаунт, используя никнейм и ключ. Персональный аккаунт предоставляет путь к:
– Регулированию депозитом
– Записям операций
– Действующим бонусам
– Опциям аккаунта
Бонусы и предложения
Портал постоянно устраивает многочисленные промо-кампании для пользователей.
Категории подарков
Ключевые формы призов:
– Депозитные начисления – часть от объема пополнения
– Прокруты – безвозмездные раунды в автоматах
– Кэшбэк – компенсация процента утраченных средств
– Соревновательные награды – вознаграждения за игру в соревнованиях
Промокоды
Эксклюзивные ваучеры позволяют активировать экстра выгоды. Игроки способны найти их на аффилиатных сайтах или приобрести в письмах.
Переносная адаптация и программа
Актуальные пользователи выбирают переносной геймплей.
Опции портативной версии
– Гибкий интерфейс для любых аппаратов
– Абсолютный вход к слотам
– Оперативная функционирование
– Комфортное навигация
Скачать программу
Мобильное приложение предоставлено для загрузки на девайсы с рабочими платформами Android и iOS. Программа предоставляет:
– Устойчивую функциональность
– Всплывающие сообщения о призах
– Моментальный доступ к избранным развлечениям
Развлекательный выбор
Игровой клуб дает огромную библиотеку гемблинг забав.
Слоты
Библиотека азартных аппаратов содержит:
– Традиционные слоты
– Видео слоты
– Призовые игры
– Тематические развлечения
Live игры
Категория живых игр обеспечивает шанс играть с настоящими дилерами. Открыты:
– Европейская рулетка
– Блек-джек
– Baccarat
– Техасский холдем
Соревнования
Постоянные соревнования позволяют игрокам конкурировать за солидные наградные пулы. Конкурсная сетка изменяется еженедельно.
Платежные транзакции
Сайт предлагает разнообразие вариантов депозита и вывода денег:
– Кредитные карточки
– Виртуальные платежные системы
– Прямые переводы
– Крипто
Абсолютно все переводы проходят конфиденциально с применением актуальных протоколов шифрования.
Департамент support
Профессиональная команда support трудится без перерыва. Соединиться с операторами можно через:
– Живой чат
– Электронную почту
– Контактный номер
– Социальные сети
Охрана и лицензирование
Портал работает на фундаменте законной лицензии. Подобное удостоверяет:
– Справедливость азартного действа
– Безопасность личных сведений
– Оперативные выплаты
– Ответственный гемблинг
Заключение
Официальный портал и его рабочие альтернативные адреса дают клиентам целостный спектр функций для безопасной и профитной развлечений. Значительные бонусы, различные развлечения, квалифицированная сервис и защищенная платформа транзакций превращают платформу оптимальным опцией для ценителей игровых игр.
My brother suggested I would possibly like this web site.
He was entirely right. This submit actually made my
day. You can not imagine just how so much time I had spent for this info!
Thanks!
1xbet g?ncel adres 1xbet g?ncel adres .
1xbet resmi giri? 1xbet resmi giri? .
vendor workshop orchard – Clean interface with smooth navigation across the site.
на йоге секс видео на йоге секс видео .
1xbet t?rkiye giri? 1xbet-47.com .
1xbet g?ncel giri? 1xbet g?ncel giri? .
Только что опубликовано: https://moscowgrad.unoforum.su/?1-1-0-00000172-000-0-0-1749926089
The best porn generator ai porn generator your fantasies remain strictly between you and the neural network. Instant, high-quality generation, extensive scenario and character customization.
Нужна накрутка соц сетей? накрутка подписчиков инстаграм увеличение подписчиков, лайков и просмотров для продвижения аккаунтов. Быстрый старт, безопасные методы и живая активность помогут развить профиль и повысить вовлеченность в популярных социальных платформах.
Компания FarbWood https://farbwood.by предлагает пиломатериалы из сибирской лиственницы для частного и коммерческого строительства в Минске и по всей территории Минска. Мы работаем только с лиственницей сибирской, сосна и ель используются как дополнение к основному ассортименту древесины.
Нынешние онлайн-казино предоставляют участникам богатый набор слотов и заманчивые награды. Однако для комфортной игры критично знать, как отыскать казино Volta казино и его действующие зеркала.
Что такое главный портал казино
Главный портал казино — это основная система, где пользователи могут получать удовольствие от игровыми автоматами. Ресурс работает на легитимных основаниях и владеет всеми необходимыми сертификатами.
Основные преимущества лицензионного веб-сайта:
– Надежность пользовательских данных
– Справедливые правила работы
– Подтвержденные выплаты
– Профессиональная техподдержка
Рабочее зеркало казино: для чего нужно
Альтернативный адрес — это точная версия официального веб-сайта, расположенная по иному домену. Рабочее зеркало формируется для поддержания стабильного входа к ресурсу.
Поводы применения дублирующих ресурсов:
– Недоступность первичного адреса
– Плановые операции
– Большая активность на сервер
Как отыскать актуальное зеркало в данный момент
Обнаружить новое рабочее зеркало можно несколькими методами:
1. Почтовые оповещения — активируйте уведомления на email отправку
2. Отдел поддержки — обратитесь в онлайн-чат
3. Социальные сети — следите за постами
4. Партнерские порталы — проверенные источники
Оформление профиля на платформе казино
Алгоритм создания аккаунта составляет всего несколько моментов:
1. Нажмите на элемент “Регистрация”
2. Укажите необходимые сведения
3. Подтвердите электронную e-mail
4. Введите бонусный код, если имеется
По завершении оконченной создания аккаунта вам предоставится доступен индивидуальный раздел.
Бонусы и бонусные коды
Щедрая премиальная программа — значимое плюс казино:
Поощрение за регистрацию
Новые клиенты зарабатывают стартовый презент, который может содержать:
– Валютный счет на дебютный пополнение
– Фри-спины для игровых машин
– Стартовые бонусы
Промокоды
Периодически публикуются актуальные купоны, позволяющие забрать дополнительные преимущества.
Система возврата средств
Лояльные участники возвращают долю потраченных средств на счет.
Свежие предложения и турниры
Платформа регулярно запускает увлекательные кампании:
– Семидневные соревнования
– Праздничные акции
– Лотереи солидных подарков
– Программа VIP-клуба
Авторизация в персональный кабинет
Для доступа на портал необходимо:
1. Загрузить лицензионный ресурс или действующее зеркало
2. Выбрать “Авторизация”
3. Указать логин и код доступа
В персональном профиле разрешены следующие опции:
– Зачисление депозита
– Снятие денег
– Просмотр истории игр
– Изменение персональными сведениями
Mobile версия и приложение
Мобильная вариант
Адаптивная вариант сайта позволяет участвовать с разных мобильного телефона. Визуал адаптивно оптимизируется под размер screen.
Клиент для установки
Загрузить клиент можно для:
– Android — официальная установка с ресурса
– iOS — инсталляция через App Store
Преимущества программы:
– Быстрый старт
– Устойчивая операционность
– Push-уведомления об промо
– Улучшенный дизайн
Развлекательные разделы
Игровые машины
Разнообразная подборка игровых машин от известных производителей:
– Классические автоматы
– Продвинутые-автоматы
– Накопительные-машины
Live игры
Категория с живыми дилерами обеспечивает:
– Рулеточные столы
– 21
– Баккара
– Покер
Вещания проводятся в HD качестве, создавая ощущение аутентичного казино.
Системы внесения средств и получения
Казино работает с разнообразные денежные инструменты:
– Банковские card
– Онлайн системы
– Bitcoin/Ethereum
– Банковские отправки
Наименьшие пороги внесения и моментальные выплаты гарантируют развлечение максимально беспроблемной.
Команда техподдержки
Компетентная группа ассистентов работает 24/7 и способна ассистировать с любыми вопросами:
– Реалтайм-чат
– Email-помощь
– Телефонная связь
Заключение
Основной веб-сайт казино и его актуальные альтернативные адреса предоставляют пользователям защищенный и интересный развлекательный опыт. Выгодные поощрения, комфортная mobile версия, богатые развлечения и профессиональное live-казино превращают эту систему отличным местом для гемблинг времяпрепровождения.
Брендирование сувениров https://4youcreation.kz в Алматы по современным технологиям. Специалисты предлагают лазерную гравировку, УФ-печать и термоперенос на ткани, стекло, металл и пластик. Организуют доставку по всему Казахстану.
http://rolevikionline.g-talk.ru/viewtopic.php?f=21&t=9953
go here – Conceptual thinking, translated into action, produces meaningful results.
Характеристика главного сайта
Актуальное онлайн-казино предлагает своим игрокам широкий ассортимент возможностей и призов. Оригинальный портал казино ДжиВиСпин оперирует непрерывно, гарантируя возможность к топовым слотам, live-казино и обширным предложениям.
Рабочее зеркало: путь к платформе
Что такое копия казино
Копия означает собой абсолютную копию главного сайта с иным сетевым путем. Функционирующее зеркало позволяет игрокам миновать блокировки и иметь стабильный вход к выбранным автоматам.
Как получить актуальное зеркало сегодня
Актуальные URL на проверенное зеркало выкладываются через:
– Почтовую оповещение
– Главные социальные сети
– Команду помощи
– Affiliated площадки
Созданиеаккаунта на ресурсе
Процедура открытиясчета
Открытиесчета требует пару минут и предполагает следующие действия:
1. Переход на основной ресурс или актуальное зеркало
2. Нажатие опции “Зарегистрироваться”
3. Заполнение личных сведений
4. Активация электроннойпочты или контакта
5. Установка кодадоступа
Вознаграждение за регистрацию
Свежие пользователи приобретают щедрые начальные подарки:
– Денежные суммы на баланс
– Халявныеспины для игр
– Усиленный размер возврата
– Специальные коды
Авторизация в персональный счет
Активные участники имеютвозможность осуществить доступ через официальный ресурс или рабочее зеркало. Для этого следует указать учетноеимя и секретнуюкомбинацию, созданные при созданииаккаунта.
Инструменты индивидуального аккаунта
В личном профиле открыты следующие возможности:
– Контроль учетными данными
– Пополнение баланса
– Вывод денег
– Применение кодов
– Просмотр архива операций
– Включение в соревнованиях
Поощрения и промо
Виды вознаграждений
Казино поощряет своих игроков разнообразными призовыми акциями:
– Начальный комплект — щедрые бонусы на первые пополнения
– Фриспины — бонусные прокруты в популярных симуляторах
– Компенсация — периодический компенсация доли проигрышей
– План верности — специальные бонусы для регулярных пользователей
Ваучеры и их активация
Уникальные промокоды предоставляют бонусные бонусы. Для ввода требуется ввести комбинацию в специальное графу в индивидуальном кабинете.
Геймплейный ассортимент
Слоты
Каталог игровых автоматов насчитывает тысячи вариантов от ведущих провайдеров:
– Традиционные машины
– Современные автоматы
– Призовые автоматы
– Лицензионные слоты
Live казино
Зона Live-казино обеспечивает процесс с реальными операторами в режиме онлайн трансляции:
– Американскаярулетка
– Очко
– Пунтобанко
– Карибскийпокер
Соревнования
Периодические конкурсы с большими наградными пулами организуются еженедельно. Соревнующиеся конкурируют за победу в списке.
Mobile платформа и софт
Адаптивная адаптация ресурса
Основной сайт полностью оптимизирован для мобильных девайсов. Участники вправе открывать игры прямо через веб-навигатор без потребности инсталляции.
APP для загрузки
Фирменное смартфонное программа предлагается для получения на девайсы с рабочими платформами Android и iOS. Софт дает:
– Моментальный подход к развлечениям
– Устойчивую операционность
– Мгновенные-извещения о акциях
– Удобный оформление
Заключение
Оригинальный портал казино и его действующие зеркала гарантируют пользователям абсолютный возможность к качественным азартным развлечениям. Выгодные вознаграждения, многочисленные кампании, простая смартфонная реализация и профессиональная поддержка создают игровой опыт чрезвычайно удобным и выгодным.
buy isotretinoin no prescription https://wakerxnet.top/# wake rx net
https://betplay.cat/
BetPlay continua siendo en 2026 como el sitio de referencia en apuestas deportivas y casino online en Colombia, completamente autorizada por Coljuegos para ejercer su actividad conforme a la ley en el pais.
Jogo do Tigrinho cashback 15% toda semana: qual o maior reembolso que você pegou?
Fortune Rabbit respins infinitos: já chegou a 30 giros seguidos? Mostra o vídeo!
What stood out about this casino https://www.taraftarbilet.com/2025/12/18/een-selecteren-van-het-hoogwaardig-roulettegame-2/ is the variety of the games. Everything runs without issues, the design is minimal, and there’s always something new to explore, which keeps it engaging.
Jogo do Tigrinho no Pix R$1: teste grátis com chance real de bônus explosivo
https://mostbetpl.top/# mostbet casino
Нынешние сетевые казино предоставляют пользователям обширный ассортимент опций для удобной игры. Однако иногда подключение к базовому платформе может являться недоступным. В таких случаях на поддержку появляется Лаки Бир казино, которое предоставляет непрерывный вход ко всем опциям платформы.
Что такое рабочее зеркало казино
Альтернативный сайт — это идентичная версия главного сайта, которая располагается по другому адресу. Копия содержит полный инструментарий основного портала, включая личный кабинет, счет и данные операций.
Основные преимущества использования зеркала:
– Круглосуточный вход к платформе
– Полная идентичность опций
– Сохранность личных сведений
– Поддержка всех имеющихся бонусов
Как обнаружить рабочее зеркало сегодня
Есть некоторое количество достоверных способов поиска актуальной адреса:
Проверенные источники:
1. Email рассылка — дирекция регулярно пересылает сообщения с действующими URL
2. Медийные сети — официальные каналы размещают релевантную информацию
3. Сервис поддержки — сотрудники сообщают проверенные ссылки
4. Телефонное приложение — позволяет обходить блокировки
Оформление профиля на основном портале
Этап оформления требует всего немного минут и включает из таких этапов:
1. Вход на официальный ресурс или действующее зеркало
2. Клик на кнопку «Создать аккаунт»
3. Указание учетной таблицы
4. Подтверждение почтовой почты или мобильного номера
5. Применение бонуса за регистрацию при существовании промокода
Новые геймеры зарабатывают значительный стартовый приз, который может включать даровые прокруты, финансовые вознаграждения или компенсацию.
Вход в личный кабинет
Логин на ресурсе производится традиционным образом. Достаточно вписать имя пользователя и код доступа, использованные при регистрации.
Важные детали для безопасного входа:
– Используйте криптостойкий шифр
– Активируйте двухфакторную идентификацию
– Не храните реквизиты на чужих устройствах
– Отслеживайте URL строку браузера
Характеристика наградной системы
Игорный портал радует клиентов разнообразными привилегиями и специальными предложениями:
Начальный букет
Свежие игроки могут полагаться на значительное награду за стартовый взнос. Традиционно это долевая надбавка к внесенной сумме плюс free spins для популярных слотов.
Регулярные предложения
– Недельный компенсация — возвращение доли потерянных денег
– Поощрения на очередные депозиты
– Особые акции по событиям
– Турниры с солидными премиальными фондами
План лояльности
Регулярные клиенты зарабатывают баллы за произвольную бет, которые затем конвертируются на реальные деньги, бесплатные вращения или специальные привилегии.
Кодовые слова: как активировать
Купоны — это уникальные комбинации символов, гарантирующие возможность к бонусным привилегиям.
Где взять действующие промокоды:
– Легитимные общественные сети казино
– Партнерские порталы
– Email-подписка
– Тематические форумы
Вводится промокод в соответствующее поле при создании аккаунта или пополнении баланса.
Смартфонная версия и приложение
Передовые пользователи предпочитают делать ставки с смартфонных девайсов. Сайт предоставляет 2 варианта для беспроблемной телефонной игры.
Адаптивная вариант
Веб версия автоматически подстраивается под диагональ экрана. Не нуждается инсталляции и действует в всяком современном браузере.
Мобильное приложение
Установить программу можно для гаджетов на Android и iOS. Достоинства app:
– Молниеносная активация
– Стабильная функционирование
– Push-уведомления о поощрениях
– Автономный избегание блокировок
Операция инсталляции легок: необходимо зайти на ресурс с мобильного аппарата и выполнять руководству.
Азартный коллекция
Библиотека игр насчитывает тысячи наименований от ведущих разработчиков.
Слоты
Развлекательные аппараты — максимально любимая раздел развлечений. Доступны традиционные простые аппараты, передовые видео-автоматы с поощрительными уровнями, а также растущие джекпоты.
Live казино
Отдел с действительными дилерами позволяет испытать атмосферу истинного казино. Открыты варианты с покером.
Вещание ведется в отличном формате, поддерживается общение с ведущим и прочими геймерами.
Конкурсы
Систематически организуются конкурсы по различным дисциплинам. Включение позволяет получить финансовые призы, даровые прокруты или уникальные привилегии.
Финансовые процедуры
Сайт обеспечивает широкий выбор финансовых методов:
– Банковские карты
– Виртуальные кошельки
– Биткоин
– Банковские переводы
Низшая сумма депозита — разумная для преобладающего числа геймеров. Вывод денег выполняется в скорые временные рамки.
Отдел поддержки
Компетентные специалисты расположены поддержать 24/7. Представлены такие способы коммуникации:
– Живой-чат
– Email
– Голосовая связь
– Социальные сети
Пояснения на распространенные темы можно отыскать в блоке FAQ.
Заключение
Главный сайт казино и его актуальные зеркала обеспечивают геймерам максимальный доступ ко всем возможностям платформы. Солидные поощрения, комфортная телефонная версия, впечатляющий выбор аттракционов и опытная служба поддержки формируют игровой времяпрепровождение крайне приятным и надежным.
интернет продвижение москва интернет продвижение москва .
Переход к порталу через актуальные зеркала
Современные онлайн казино гарантируют геймерам непрерывный вход к развлечениям. Главный портал https://www.allwinrealty.com/kak-podtverdit-svoyu-lichnost-v-kazino-ukrainy-protsess-verifikatsii/ действует устойчиво, обеспечивая богатый спектр игровых развлечений. Тем не менее порой образуются системные сложности или барьеры, в связи с чем необходимо иметь представление о наличии актуальных зеркал.
Что собой представляет собой центральное зеркало казино
Зеркало — это точная дубликат центрального веб-сайта с аналогичным интерфейсом. Функционирующее зеркало сегодня даёт возможность избегать региональные барьеры и вести времяпрепровождение.
Принципиальные достоинства применения зеркал:
– Полный подключение к личному кабинету
– Удержание совокупных показателей учётной записи
– Идентичный перечень игр
– Действующие вознаграждения и промо
Создание аккаунта на портале
Процедура оформления занимает пару минут. Недавние пользователи обретают привлекательный подарок за регистрацию, он способен охватывать:
– Стартовый игровой приз
– Бесплатные вращения для слотов
– Особые промокоды
– Усиленный компенсацию
С целью завершения создания аккаунта следует:
1. Переместиться на центральный веб-сайт или дубликат
2. Кликнуть кнопку «Зарегистрироваться»
3. Указать персональные информацию
4. Активировать почтовый адрес или телефон
5. Использовать промокод (в случае существовании)
Вход в собственный кабинет
Вслед за правильной оформления геймеры могут производить подключение через центральный веб-сайт или функционирующее зеркало. Персональный кабинет обеспечивает абсолютный контроль над счётом:
– Журнал транзакций
– Пополнение баланса
– Снятие призов
– Управление наградами
– Участие в соревнованиях
Привилегии и акции казино
Платформа радует клиентов разнообразными привилегированными предложениями:
Стартовые поощрения
Начинающие обретают внушительный набор поощрений на вступительные пополнения. Обычно это охватывает пропорциональную доплату к объёму депозита плюс комплиментарные спины.
Постоянные кампании
– Раз в неделю компенсация до 15%
– Состязания с наградными фондами
– Подарки на дату рождения
– Особые акции для VIP клиентов
Программа вознаграждения
Постоянные клиенты получают очки, они возможно обменять на реальные средства или эксклюзивные привилегии.
Портативная форма и утилита
Нынешние разработки помогают развлекаться всюду угодно. Смартфонная версия портала автономно адаптируется под экран всякого устройства.
Выгоды мобильного софта:
– Скоростная открытие автоматов
– Комфортный облик
– Push-уведомления о акциях
– Шанс установить для Android и iOS
Реальное казино: обстановка реального азартного заведения
Категория Live казино транспортирует игроков в антураж истинного азартного клуба. Опытные крупье организуют процесс в виде подлинного времени.
Предлагаемые игры:
– Рулетка
– Карточная игра
– Карточная игра
– Покерная игра
Игровые машины и азартные аппараты
Каталог азартных аппаратов содержит сотни вариантов от лидирующих студий. Произвольный игрок обнаружит автомат по вкусу:
– Стандартные автоматы
– Новые слоты с специальными турами
– Накопительный-машины
– Megaways автоматы
Состязания и раздачи
Постоянные состязания привносят остроту и открывают шанс выиграть значительные вознаграждения. Участие в турнирах зачастую безвозмездное, а призовые банки составляют внушительных величин.
Защита и анонимность
Портал использует инновационные системы защиты для обеспечения реквизитов геймеров. Любые денежные процедуры совершаются через охраняемые каналы.
Резюме
Основной веб-сайт и его рабочие зеркала дают устойчивый доступ к превосходным азартным развлечениям. Щедрые награды, практичная портативная версия, вариативность игр и высококлассное Live-казино превращают платформу прекрасным решением для поклонников азартных автоматов.
mostbet güncel adres mostbet
PG Soft top 3 cassinos 2026: Pix, bônus e suporte em português
Jogo do Tigrinho multiplicador fixo vs aleatório: qual você prefere?
PG Soft no Pix: melhores cassinos pra depositar R$1 e sair girando em 2026
Fortune Tiger cartinha x10: melhor momento do ano ou só sorte?
Galaxyno Hit clusters bombásticos: quem prefere grid grande ou 3×3 clássico?
Jogo do Tigrinho multiplicador aleatório: melhor que respins fixos ou não? Opine!
PG Soft no Brasil 2026: Pix, suporte em português e giros grátis todo dia
PG Soft torneios semanais: R$50k–R$500k em prêmios – já ganhou algo?
Fortune Rabbit respins + wilds: já teve chain de 40 giros?
Fortune Rabbit wilds gigantes: já teve tela cheia de coelhos dourados?
Jogo do Tigrinho estratégia de sessão: 400 giros e stop no +60% – qual sua meta?
Нынешние виртуальные казино обеспечивают геймерам большой выбор опций для удобной игры. Однако иногда вход к официальному порталу может стать заблокированным. В таких обстоятельствах на подмогу спешит Vodka Casino, которое дает бесперебойный путь ко всем возможностям платформы.
Что такое функционирующее зеркало казино
Копия — это точная копия главного сайта, которая находится по альтернативному домену. Зеркало поддерживает весь набор функций оригинального веб-портала, включая персональный кабинет, баланс и запись переводов.
Главные преимущества задействования зеркала:
– Непрерывный подключение к порталу
– Максимальная идентичность опций
– Безопасность личных сведений
– Удержание доступных поощрений
Как обнаружить рабочее зеркало сегодня
Имеется некоторое количество проверенных способов нахождения действующей URL:
Авторизованные каналы:
1. Имейл рассылка — управление периодически направляет письма с рабочими доменами
2. Общественные сети — официальные каналы публикуют текущую информацию
3. Департамент поддержки — сотрудники выдают проверенные домены
4. Портативное приложение — обеспечивает избегать блокировки
Оформление профиля на лицензионном веб-сайте
Этап создания аккаунта занимает только пару минут и содержит из нижеследующих стадий:
1. Попадание на официальный сайт или актуальное зеркало
2. Щелчок на иконку «Создать аккаунт»
3. Внесение персональной бланка
4. Проверка электронной почты или контактного номера
5. Активация привилегии за регистрацию при наличии промокода
Новые геймеры обретают щедрый вступительный приз, который может включать фриспины, финансовые поощрения или компенсацию.
Доступ в индивидуальный кабинет
Вход на сайте производится стандартным путем. Нужно внести никнейм и секретный ключ, использованные при создании аккаунта.
Существенные нюансы для надежного входа:
– Задействуйте надежный секретный ключ
– Запустите 2FA аутентификацию
– Не записывайте пароли на общественных устройствах
– Отслеживайте интернет строку браузера
Характеристика поощрительной схемы
Казино радует игроков многочисленными поощрениями и специальными предложениями:
Приветственный комплект
Свежие игроки способны надеяться на великодушное награду за стартовый депозит. Зачастую это долевая надбавка к депонированной величине плюс фриспины для популярных слотов.
Систематические предложения
– Недельный кэшбек — возврат доли потерянных денежных средств
– Награды на дополнительные пополнения
– Специальные акции по торжествам
– Конкурсы с крупными наградными фондами
Программа привилегий
Регулярные геймеры собирают баллы за произвольную бет, которые затем меняются на настоящие деньги, free spins или эксклюзивные льготы.
Промокоды: как активировать
Бонус-коды — это индивидуальные наборы литер, дающие право к дополнительным поощрениям.
Каким образом получить действующие промокоды:
– Официальные коммуникационные сети казино
– Партнерские порталы
– Email-информирование
– Профильные сообщества
Указывается промокод в соответствующее поле при оформлении или пополнении счета.
Телефонная версия и приложение
Нынешние геймеры любят играть с портативных аппаратов. Платформа предоставляет два варианта для удобной мобильной игры.
Адаптивная модификация
Онлайн версия сама настраивается под размер дисплея. Не просит установки и работает в каждом свежем браузере.
Мобильное приложение
Загрузить софт можно для девайсов на Android и iOS. Выгоды app:
– Молниеносная загрузка
– Надежная функционирование
– Всплывающие-уведомления о поощрениях
– Автоматический минование блокировок
Этап инсталляции прост: необходимо попасть на сайт с портативного гаджета и придерживаться указаниям.
Развлекательный коллекция
Каталог слотов охватывает тысячи позиций от ведущих разработчиков.
Слоты
Гемблинг автоматы — максимально востребованная группа игр. Доступны традиционные винтажные автоматы, новые графические аппараты с премиальными уровнями, а также прогрессивные выигрыши.
Live казино
Раздел с действительными раздающими обеспечивает прочувствовать атмосферу истинного казино. Имеются развлечения с блэкджеком.
Передача осуществляется в HD качестве, обеспечивается диалог с дилером и прочими игроками.
Состязания
Регулярно проводятся конкурсы по разным играм. Участие обеспечивает возможность выиграть валютные призы, фриспины или специальные поощрения.
Платежные операции
Портал предоставляет широкий спектр платежных методов:
– Банковские карты
– Онлайн кошельки
– Крипта
– Банковские транзакты
Минимальная величина вклада — разумная для основной части геймеров. Вывод призов обрабатывается в кратчайшие периоды.
Департамент поддержки
Квалифицированные консультанты способны помочь непрерывно. Открыты такие методы общения:
– Живой-чат
– Email
– Звонковая поддержка
– Медийные сети
Разъяснения на частые вопросы можно получить в блоке FAQ.
Итог
Главный ресурс казино и его действующие зеркала дают игрокам максимальный подключение ко всем возможностям портала. Щедрые вознаграждения, удобная портативная версия, впечатляющий каталог развлечений и компетентная поддержка превращают игровой времяпрепровождение крайне комфортным и защищенным.
Актуальные онлайн-казино предлагают пользователям обширный ассортимент слотов и заманчивые бонусы. Но для комфортной игры важно понимать, как отыскать https://www.sincotelba.org.br/platezhnaya-sistema-predlagaet-besplatnye-perevody-i-komfortnye-sposoby-popolneniya-dlya-ggpokerok-i и его действующие зеркала.
Что такое официальный портал казино
Главный портал казино — это основная платформа, где пользователи могут пользоваться игровыми автоматами. Сайт функционирует на официальных условиях и имеет всеми требуемыми лицензиями.
Основные преимущества основного ресурса:
– Безопасность индивидуальных информации
– Объективные положения использования
– Гарантированные платежи
– Профессиональная служба поддержки
Функционирующее зеркало казино: для чего нужно
Копия сайта — это абсолютная дубликат основного сайта, хостящаяся по другому веб-адресу. Функционирующее зеркало разрабатывается для предоставления стабильного входа к порталу.
Основания задействования зеркал:
– Блокировка главного сайта
– Регламентные мероприятия
– Большая активность на ресурс
Как обнаружить рабочее зеркало сегодня
Обнаружить текущее официальное зеркало можно несколькими путями:
1. Email-уведомления — активируйте уведомления на новостную подписку
2. Служба техподдержки — проконсультируйтесь в онлайн-чат
3. Официальные медиа — отслеживайте за постами
4. Тематические площадки — проверенные ресурсы
Создание аккаунта на портале казино
Процесс создания аккаунта занимает лишь немного минут:
1. Выберите на элемент “Регистрация”
2. Введите запрашиваемые поля
3. Валидируйте email почту
4. Используйте купон, если имеется
Сразу после финализированной активации вам откроется разрешен личный профиль.
Награды и коды активации
Выгодная бонусная структура — важное конкурентное преимущество казино:
Подарок за создание аккаунта
Первичные игроки получают начальный поощрение, который может предполагать:
– Денежный кредит на стартовый взнос
– Фри-спины для автоматов
– Стартовые бонусы
Промокоды
Систематически публикуются эксклюзивные бонусные шифры, предоставляющие получить экстра привилегии.
Программа компенсации
Постоянные пользователи приобретают процент потраченных финансов назад.
Актуальные акции и турниры
Сайт систематически проводит интересные кампании:
– Недельные баттлы
– Тематические бонусы
– Розыгрыши солидных наград
– Система статусов
Логин в персональный аккаунт
Для логина на сайт требуется:
1. Посетить главный портал или действующее зеркало
2. Выбрать “Login”
3. Прописать email и ключ
В личном разделе доступны данные возможности:
– Пополнение счета
– Снятие призов
– Анализ журнала игр
– Управление профильными параметрами
Мобильная платформа и app
Адаптивная платформа
Адаптивная платформа портала предоставляет шанс делать ставки с различных карманного телефона. Визуал автоматически настраивается под диагональ screen.
App для скачивания
Установить клиент можно для:
– Android — официальная скачивание с портала
– iOS — скачивание через App Store
Преимущества приложения:
– Моментальный вход
– Надежная операционность
– Push-оповещения об бонусах
– Ускоренный UI
Развлекательные категории
Слоты
Богатая галерея развлекательных автоматов от лучших поставщиков:
– Ретро автоматы
– Продвинутые-игры
– Призовые-игры
Live casino
Раздел с настоящими крупье предлагает:
– Рулеточные столы
– Двадцать одно
– Baccarat
– Texas Hold’em
Трансляции осуществляются в отличном разрешении, формируя атмосферу настоящего казино.
Способы внесения средств и обналичивания
Ресурс работает с разные платежные инструменты:
– Кредитные средства
– Цифровые системы
– Crypto
– Wire транзиты
Минимальные пороги взноса и оперативные транзакции обеспечивают развлечение крайне удобной.
Команда помощи
Компетентная группа support функционирует 24/7 и способна ассистировать с различными ситуациями:
– Реалтайм-чат
– Email-поддержка
– Телефонная линия
Выводы
Основной портал казино и его функционирующие копии предоставляют клиентам безопасный и увлекательный развлекательный отдых. Богатые бонусы, простая мобильная модификация, обширные игры и качественное live-казино формируют эту площадку замечательным вариантом для игровых развлечений.
Fortune Tiger big win 2500x: já aconteceu com você? Conta a história completa aqui
Нужен дизайн участка? ландшафтный дизайн услуги проектирование и благоустройство участка с учетом рельефа, растений и стиля. Создаем красивые и функциональные решения для частных домов и дач, подбираем материалы и обеспечиваем качественную реализацию проекта.
Every traveler private jet charter rates should check private jet rental pricing before committing to any operator.
косметический ремонт квартир комнат ремонтов Косметический ремонт может проводиться в одной комнате или во всей квартире сразу. Он включает обновление декоративных покрытий, замену розеток, выключателей, плинтусов. Иногда требуется частичная замена сантехники или электрики.
Современные онлайн-казино предоставляют клиентам широкий набор игр и заманчивые бонусы. Но для удобной деятельности необходимо знать, как обнаружить Бублик и его функционирующие зеркала.
Что такое основной веб-ресурс казино
Основной сайт казино — это главная платформа, где пользователи могут пользоваться игровыми слотами. Платформа действует на официальных основаниях и имеет всеми обязательными сертификатами.
Первостепенные плюсы основного веб-сайта:
– Надежность индивидуальных сведений
– Прозрачные правила игры
– Обеспеченные выплаты
– Профессиональная помощь
Рабочее зеркало казино: для чего необходимо
Дублирующий ресурс — это точная клон главного портала, размещенная по отличному домену. Функционирующее зеркало создается для обеспечения стабильного подключения к сайту.
Основания использования зеркал:
– Ограничение главного адреса
– Плановые процедуры
– Повышенная активность на систему
Как найти действующее зеркало на сегодня
Узнать новое официальное зеркало можно множественными способами:
1. Почтовые оповещения — подпишитесь на новостную отправку
2. Служба техподдержки — обратитесь в онлайн-чат
3. Публичные площадки — проверяйте за новостями
4. Тематические ресурсы — проверенные сайты
Создание аккаунта на платформе казино
Этап создания аккаунта составляет лишь считанные минут:
1. Кликните на опцию “Открыть счет”
2. Укажите необходимые сведения
3. Верифицируйте почтовую ящик
4. Примените бонусный код, если есть
Вслед за завершенной создания аккаунта вам откроется разрешен персональный кабинет.
Премии и коды активации
Щедрая поощрительная структура — ключевое конкурентное преимущество казино:
Бонус за регистрацию
Новые пользователи получают начальный подарок, который может включать:
– Валютный депозит на начальный взнос
– Фри-спины для барабанов
– Стартовые деньги
Промокоды
Систематически выходят эксклюзивные коды, дающие возможность активировать дополнительные бонусы.
Система кешбэка
Лояльные пользователи возвращают часть утраченных финансов назад.
Текущие кампании и соревнования
Платформа периодически устраивает интересные промо-мероприятия:
– Еженедельные баттлы
– Специальные промо
– Розыгрыши ценных наград
– Программа статусов
Вход в индивидуальный раздел
Для доступа на сайт нужно:
1. Перейти на лицензионный сайт или действующее зеркало
2. Кликнуть “Авторизация”
3. Указать имя пользователя и пароль
В пользовательском разделе разрешены такие функции:
– Депозит счета
– Обналичивание выигрышей
– Анализ архива игр
– Настройка персональными параметрами
Мобильная версия и софт
Мобильная вариант
Мобильная версия портала обеспечивает играть с любого мобильного гаджета. Визуал адаптивно адаптируется под диагональ монитора.
Приложение для установки
Получить клиент можно для:
– Android — официальная скачивание с сайта
– iOS — загрузка через App Store
Выгоды программы:
– Мгновенный запуск
– Надежная функциональность
– Push-сообщения об бонусах
– Улучшенный дизайн
Игровые зоны
Автоматы
Богатая библиотека эмуляторных машин от ведущих поставщиков:
– Ретро машины
– Видео-эмуляторы
– Прогрессивные-игры
Live зал
Зона с живыми операторами обеспечивает:
– Рулетка
– 21
– Punto Banco
– Texas Hold’em
Стримы ведутся в HD качестве, формируя атмосферу настоящего казино.
Системы зачисления и вывода
Сайт работает с разнообразные денежные системы:
– Дебетовые карты
– Виртуальные кошельки
– Цифровые валюты
– Финансовые переводы
Наименьшие значения пополнения и скоростные платежи делают процесс исключительно беспроблемной.
Служба поддержки
Профессиональная отдел support функционирует 24/7 и готова ассистировать с любыми ситуациями:
– Онлайн-чат
– Email-помощь
– Звонковая служба
Резюме
Лицензионный портал казино и его функционирующие дубликаты гарантируют пользователям безопасный и азартный игровой досуг. Выгодные подарки, простая мобильная вариант, богатые игры и превосходное live-казино создают эту систему отличным выбором для развлекательных досуга.
Современные интернет казино предоставляют клиентам большой ассортимент функций для удобной игры. Впрочем иногда подключение к базовому платформе может являться недоступным. В таких моментах на помощь приходят Голд сайт, которое предоставляет непрерывный доступ ко всем возможностям платформы.
Что такое действующее зеркало казино
Альтернативный сайт — это абсолютная реплика официального ресурса, которая находится по другому интернет-адресу. Дубликат содержит целый инструментарий главного портала, включая личный кабинет, средства и запись транзакций.
Ключевые выгоды задействования зеркала:
– Круглосуточный доступ к платформе
– Полная тождественность опций
– Безопасность индивидуальных сведений
– Хранение существующих привилегий
Как отыскать рабочее зеркало сегодня
Есть несколько безопасных путей нахождения актуальной адреса:
Официальные каналы:
1. Имейл рассылка — руководство регулярно отправляет письма с действующими доменами
2. Коммуникационные сети — проверенные аккаунты публикуют релевантную сведения
3. Департамент поддержки — операторы дают безопасные домены
4. Смартфонное приложение — предоставляет избегать блокировки
Создание аккаунта на главном портале
Этап оформления отнимает лишь несколько минут и включает из нижеследующих стадий:
1. Переход на официальный сайт или функционирующее зеркало
2. Выбор на кнопку «Зарегистрироваться»
3. Ввод пользовательской бланка
4. Проверка электронной почты или контактного номера
5. Активация бонуса за регистрацию при присутствии промокода
Новые пользователи получают значительный вступительный подарок, который может предполагать даровые прокруты, монетарные бонусы или cashback.
Авторизация в индивидуальный кабинет
Подключение на сайте производится стандартным образом. Требуется вписать учетные данные и кодовое слово, использованные при открытии счета.
Существенные детали для защищенного входа:
– Используйте криптостойкий шифр
– Запустите двойную проверку
– Не фиксируйте данные на посторонних устройствах
– Отслеживайте доменную строку браузера
Характеристика поощрительной системы
Игорный портал радует геймеров всевозможными поощрениями и кампаниями:
Вступительный пакет
Свежие игроки способны надеяться на существенное награду за первый пополнение. Традиционно это процентная прибавка к переведенной объему плюс фриспины для известных слотов.
Периодические промо
– Еженедельный возврат средств — возврат части потерянных денег
– Поощрения на последующие взносы
– Особые акции по знаменательным датам
– Соревнования с большими премиальными суммами
План верности
Постоянные геймеры собирают пункты за каждую игру, которые затем меняются на настоящие деньги, бесплатные вращения или уникальные льготы.
Купоны: как задействовать
Бонус-коды — это специальные последовательности букв и цифр, гарантирующие доступ к эксклюзивным поощрениям.
Каким образом раздобыть свежие промокоды:
– Авторизованные общественные сети казино
– Аффилиатные сайты
– Email-новостная лента
– Профильные форумы
Прописывается промокод в соответствующее поле при регистрации или пополнении кошелька.
Портативная версия и приложение
Современные геймеры отдают предпочтение проводить время с смартфонных гаджетов. Платформа предоставляет двойной варианта для удобной смартфонной игры.
Responsive редакция
Браузерная версия самостоятельно адаптируется под диагональ экранной панели. Не предполагает загрузки и работает в всяком новом браузере.
Телефонное приложение
Установить приложение можно для девайсов на Android и iOS. Преимущества app:
– Оперативная загрузка
– Стабильная действие
– Всплывающие-уведомления о поощрениях
– Независимый преодоление блокировок
Этап загрузки легок: требуется зайти на ресурс с смартфонного аппарата и выполнять руководству.
Азартный ассортимент
Каталог развлечений насчитывает тысячи единиц от топовых разработчиков.
Слоты
Гемблинг аппараты — крайне популярная категория игр. Размещены традиционные простые автоматы, новые видео-автоматы с дополнительными этапами, а также прогрессивные джекпоты.
Live казино
Секция с реальными дилерами предоставляет испытать дух подлинного казино. Представлены варианты с покером.
Вещание производится в HD качестве, присутствует чат с ведущим и остальными пользователями.
Турниры
Постоянно организуются турниры по многочисленным играм. Включение обеспечивает возможность завоевать валютные вознаграждения, фриспины или специальные бонусы.
Финансовые процедуры
Портал обеспечивает большой набор денежных инструментов:
– Кредитные карты
– Онлайн сервисы
– Цифровая валюта
– Счетовые платежи
Низшая величина пополнения — доступная для большинства пользователей. Снятие выигрышей производится в кратчайшие сроки.
Служба поддержки
Компетентные консультанты расположены помочь постоянно. Открыты такие каналы коммуникации:
– Веб-чат
– Email
– Звонковая горячая линия
– Коммуникационные сети
Разъяснения на частые проблемы можно отыскать в разделе FAQ.
Заключение
Главный ресурс казино и его действующие зеркала дают геймерам полный подключение ко всем сервисам ресурса. Щедрые вознаграждения, практичная смартфонная версия, впечатляющий коллекция слотов и компетентная служба поддержки создают азартный досуг крайне приятным и защищенным.
Reliable platform charter private jets provides access to verified charter fleet ranging from light to heavy jets.
продвижение сайта в поисковых системах омск продвижение сайта в поисковых системах омск .
Use this click here to check any vehicle history before buying used car and avoid problems.
Check out more info which provides instant VIN decoding for any car truck or SUV worldwide.
Современные интернет казино дают клиентам обширный диапазон возможностей для приятной игры. Но иногда соединение к главному платформе может являться закрытым. В таких ситуациях на подмогу появляется http://www.natura-sleep.ru/2026/02/28/onlayn-kazino-na-dengi-s-vyvodom-na-kartu-sberbanka-bystrye-vyplaty-i-momentalnyy-depozit-zdes-vazhno-ponimat-chto-dannyy-podkhod-pozvolyaet-oznakomitsya-s-interfeysom-i-funktsionalom-kazino-do-vnese, которое обеспечивает постоянный подключение ко всем возможностям платформы.
Что такое актуальное зеркало казино
Дубликат — это полная реплика официального портала, которая находится по запасному интернет-адресу. Дубликат поддерживает целый набор функций главного веб-портала, включая личный кабинет, средства и сведения платежей.
Главные выгоды применения зеркала:
– Постоянный вход к ресурсу
– Абсолютная схожесть функционала
– Конфиденциальность личных данных
– Удержание доступных вознаграждений
Как отыскать функционирующее зеркало на текущий день
Существует несколько безопасных способов нахождения текущей адреса:
Легитимные ресурсы:
1. Email рассылка — администрация систематически направляет сообщения с актуальными доменами
2. Медийные сети — авторизованные каналы выкладывают текущую информацию
3. Департамент поддержки — операторы сообщают безопасные ссылки
4. Смартфонное приложение — предоставляет обходить блокировки
Открытие счета на лицензионном портале
Процесс создания аккаунта отнимает не более несколько минут и состоит из данных этапов:
1. Открытие на лицензионный портал или рабочее зеркало
2. Щелчок на иконку «Открыть счет»
3. Ввод пользовательской таблицы
4. Подтверждение электронной почты или контактного номера
5. Применение бонуса за регистрацию при присутствии промокода
Новые игроки обретают значительный приветственный приз, который может охватывать даровые прокруты, валютные вознаграждения или возврат средств.
Доступ в пользовательский кабинет
Вход на сайте реализуется стандартным образом. Достаточно указать имя пользователя и секретный ключ, примененные при оформлении.
Важные моменты для защищенного входа:
– Применяйте криптостойкий пароль
– Запустите двухэтапную аутентификацию
– Не сохраняйте реквизиты на посторонних девайсах
– Отслеживайте интернет строку браузера
Характеристика премиальной системы
Гемблинг-сайт награждает игроков многочисленными привилегиями и промо:
Начальный пакет
Дебютанты вправе полагаться на значительное награду за начальный вклад. Зачастую это процентная добавка к переведенной величине плюс бесплатные вращения для востребованных слотов.
Регулярные акции
– Семидневный возврат средств — возврат доли проигранных денег
– Бонусы на очередные депозиты
– Специальные предложения по событиям
– Конкурсы с большими наградными суммами
План вознаграждений
Регулярные клиенты зарабатывают пункты за каждую игру, которые затем обмениваются на фактические деньги, даровые прокруты или специальные преимущества.
Бонус-коды: как применять
Бонус-коды — это специальные комбинации литер, дающие право к эксклюзивным вознаграждениям.
В каких местах раздобыть свежие промокоды:
– Авторизованные общественные сети казино
– Партнерские ресурсы
– Email-рассылка
– Специализированные сообщества
Активируется промокод в отдельное поле при оформлении или пополнении кошелька.
Портативная версия и приложение
Передовые игроки выбирают развлекаться с мобильных гаджетов. Сайт предлагает двойной метода для беспроблемной смартфонной игры.
Отзывчивая версия
Интернет версия само собой подстраивается под размер дисплея. Не нуждается инсталляции и функционирует в произвольном свежем браузере.
Смартфонное приложение
Получить программу можно для аппаратов на Android и iOS. Достоинства app:
– Скоростная активация
– Надежная операция
– Автоматические-уведомления о поощрениях
– Автоматический преодоление блокировок
Этап загрузки элементарен: нужно попасть на веб-сайт с телефонного аппарата и выполнять руководству.
Гемблинг ассортимент
Библиотека аппаратов включает огромное количество единиц от ведущих разработчиков.
Слоты
Развлекательные аппараты — максимально любимая раздел аттракционов. Доступны стандартные 3-барабанные машины, актуальные видео-автоматы с бонусными этапами, а также растущие выигрыши.
Live казино
Секция с живыми раздающими позволяет испытать дух подлинного казино. Представлены варианты с блэкджеком.
Вещание осуществляется в высоком четкости, обеспечивается коммуникация с дилером и другими игроками.
Конкурсы
Регулярно организуются соревнования по всевозможным категориям. Участие дает шанс получить финансовые призы, free spins или уникальные поощрения.
Платежные действия
Портал предлагает большой спектр денежных способов:
– Кредитные карты
– Электронные кошельки
– Криптовалюта
– Денежные переводы
Низшая объем пополнения — доступная для большинства геймеров. Обналичивание призов осуществляется в скорые периоды.
Сервис поддержки
Квалифицированные консультанты способны помочь круглосуточно. Доступны такие варианты связи:
– Живой-чат
– Email
– Телефонная поддержка
– Медийные сети
Разъяснения на распространенные темы можно получить в блоке FAQ.
Резюме
Основной сайт казино и его актуальные зеркала обеспечивают геймерам максимальный доступ ко всем сервисам портала. Щедрые поощрения, практичная портативная версия, гигантский каталог развлечений и компетентная ассистенция создают развлекательный времяпрепровождение исключительно беспроблемным и защищенным.
Анализ главного сайта
Прогрессивные виртуальные казино дают участникам богатый выбор услуг и возможностей. Официальный веб-сайт Disi предлагает безопасный путь к развлекательным сервисам.
Актуальное зеркало: доступ сегодня
Зеркало служит как полную реплику лицензионного веб-сайта. Действующее зеркало обеспечивает клиентам преодолевать возможные ограничения.
Выгоды применения зеркала
Ключевые достоинства включают:
– Непрерывный вход к ресурсу
– Удержание абсолютно всех возможностей основного веб-сайта
– Защита личных информации
– Идентичный функционал
Оформление профиля на сайте
Процесс создания аккаунта выделяется простотой и комфортом. Новые пользователи требуется:
1. Перейти на официальный портал или его зеркало
2. Кликнуть на элемент открытия счета
3. Ввести необходимые поля
4. Подтвердить почтовую почту
5. Осуществить дебютный доступ
Приз за открытие счета
Дебютанты зарабатывают щедрый вступительный приз. Подобное вознаграждение может предусматривать:
– Финансовые суммы
– Complimentary прокруты
– Увеличенный показатель кэшбека
Авторизация в собственный кабинет
Зарегистрированные клиенты способны быстро зайти в собственный аккаунт, используя имя пользователя и код. Индивидуальный раздел предлагает шанс к:
– Регулированию балансом
– Хронологии переводов
– Действующим поощрениям
– Конфигурации учетной записи
Вознаграждения и кампании
Сайт систематически проводит многочисленные мероприятия для клиентов.
Категории поощрений
Главные формы бонусов:
– Финансовые призы – коэффициент от величины внесения
– Фриспины – complimentary спины в автоматах
– Кэшбек – компенсация фрагмента потерянных денег
– Призовые награды – награды за участие в конкурсах
Купоны
Специальные коды позволяют заработать бонусные бонусы. Участники в состоянии обнаружить их на специализированных ресурсах или заработать в письмах.
Портативная адаптация и приложение
Передовые клиенты ценят портативный геймплей.
Функции портативной версии
– Гибкий облик для различных гаджетов
– Совокупный путь к автоматам
– Оперативная функционирование
– Эргономичное контроль
Загрузить программу
Переносное программа доступно для скачивания на устройства с рабочими платформами Android и iOS. Приложение гарантирует:
– Устойчивую функциональность
– Пуш оповещения о предложениях
– Моментальный путь к предпочитаемым играм
Азартный портфель
Портал предоставляет богатую коллекцию развлекательных забав.
Автоматы
Ассортимент развлекательных машин включает:
– Обычные автоматы
– Видео слоты
– Прогрессивные автоматы
– Branded слоты
Live дилеры
Категория лайв игр дает опцию играть с профессиональными ведущими. Предложены:
– Рулетка
– Очко
– Punto Banco
– Техасский холдем
Конкурсы
Регулярные чемпионаты позволяют клиентам состязаться за значительные денежные суммы. Соревновательная сетка актуализируется постоянно.
Денежные операции
Казино обеспечивает разнообразие методов пополнения и получения денег:
– Кредитные карты
– Виртуальные счета
– Межбанковские трансферы
– Крипто
Совокупные транзакции производятся защищенно с задействованием прогрессивных систем защиты.
Департамент поддержки
Компетентная группа support работает круглосуточно. Обратиться с специалистами доступно через:
– Онлайн чат
– Email почту
– Телефон
– Социальные сети
Охрана и регулирование
Игровой клуб функционирует на базе законной сертификата. Это обеспечивает:
– Прозрачность азартного процесса
– Охрану персональных сведений
– Своевременные транзакции
– Ответственный гейминг
Резюме
Основной веб-сайт и его рабочие дубликаты предоставляют клиентам полный комплекс функций для удобной и выгодной игры. Внушительные вознаграждения, многочисленные слоты, квалифицированная служба и проверенная инфраструктура операций делают ресурс оптимальным решением для фанатов азартных услуг.
orchard hub studio – The platform feels light and simple to browse through.
Wild Bandito sticky wilds: o bandido mexicano tá roubando a cena do Tigrinho!
Вход к сайту через проверенные зеркала
Нынешние онлайн казино гарантируют игрокам непрерывный переход к услугам. Центральный портал https://sesamewatermelon.com/ действует бесперебойно, предоставляя широкий ассортимент гемблинг автоматов. Тем не менее периодически образуются программные трудности или блокировки, поэтому важно иметь представление о наличии функционирующих зеркал.
Что является из себя основное зеркало казино
Копия — это идентичная дубликат официального портала с схожим набором функций. Актуальное зеркало сегодня обеспечивает миновать локальные барьеры и продолжать игру.
Принципиальные достоинства использования зеркал:
– Безграничный вход к индивидуальному кабинету
– Поддержание любых показателей профиля
– Аналогичный ассортимент слотов
– Актуальные привилегии и промо
Создание аккаунта на портале
Процесс создания аккаунта требует несколько минут. Новые геймеры приобретают великодушный поощрение за оформление, он может охватывать:
– Стартовый финансовый подарок
– Безвозмездные кручения для игр
– Особые купоны
– Усиленный компенсацию
Для финализации записи необходимо:
1. Зайти на официальный ресурс или зеркало
2. Нажать элемент «Зарегистрироваться»
3. Написать личные данные
4. Активировать email или мобильный
5. Активировать ваучер (когда имеется существовании)
Подключение в личный кабинет
По завершении правильной оформления клиенты способны выполнять авторизацию с помощью основной сайт или действующее зеркало. Личный кабинет предоставляет безграничный управление над счётом:
– Архив ставок
– Внесение кошелька
– Вывод выигрышей
– Контроль бонусами
– Вовлечение в турнирах
Поощрения и акции казино
Платформа балует игроков многочисленными бонусными схемами:
Начальные бонусы
Дебютанты получают богатый комплект поощрений на первые депозиты. Как правило это содержит частичную прибавку к размеру взноса плюс бесплатные фриспины.
Систематические предложения
– Каждонедельный возврат до 15%
– Конкурсы с выигрышными фондами
– Призы на день рождения
– Уникальные программы для привилегированных игроков
Программа вознаграждения
Постоянные пользователи зарабатывают очки, они возможно обменять на реальные средства или эксклюзивные бонусы.
Смартфонная форма и утилита
Передовые разработки обеспечивают участвовать где угодно. Карманная форма сайта автоматически адаптируется под дисплей всякого гаджета.
Плюсы мобильного приложения:
– Моментальная запуск развлечений
– Удобный облик
– Всплывающие-нотификации о бонусах
– Способность установить для Android и iOS
Живое казино: атмосфера подлинного игорного учреждения
Категория Live игорного дома доставляет клиентов в обстановку реального азартного клуба. Профессиональные операторы проводят действие в состоянии реального времени.
Предлагаемые варианты:
– Американская рулетка
– Карточная игра
– Punto Banco
– Техасский холдем
Барабаны и игровые автоматы
Ассортимент гемблинг машин содержит массу вариантов от ведущих производителей. Каждый клиент найдёт слот по желанию:
– Винтажные машины
– Инновационные игры с бонусными турами
– Джекпот-игры
– Динамические игры
Соревнования и лотереи
Регулярные турниры добавляют адреналин и дают шанс обрести внушительные суммы. Включение в соревнованиях нередко бесплатное, а призовые суммы составляют внушительных величин.
Защита и секретность
Портал использует актуальные протоколы защиты для охраны данных клиентов. Каждые транзакционные транзакции осуществляются через зашифрованные линии.
Вывод
Главный ресурс и его действующие зеркала предоставляют устойчивый подключение к превосходным гемблинг услугам. Богатые награды, эргономичная смартфонная редакция, вариативность слотов и профессиональное Live-игорный дом формируют портал превосходным решением для ценителей азартных игр.
капитальный ремонт зданий и сооружений капитальный ремонт зданий и сооружений .
Amazing a good deal of wonderful material!
Передовые онлайн-казино гарантируют пользователям обилие опций для беспроблемной игры. Главный веб-портал Mad обеспечивает доступ ко всем опциям и развлечениям. Однако при образовании системных проблем на выручку спешат функционирующие дубликаты.
Что являет собой собой рабочее зеркало
Альтернативный адрес казино — это точная копия основного ресурса, находящаяся по дополнительному веб-адресу. Подлинное зеркало сохраняет все возможности, в том числе создание аккаунта, вход в индивидуальный кабинет, премии и кодовые слова.
Зеркало на сегодня дает:
– Бесперебойный доступ к развлекательным автоматам
– Стопроцентную защиту личных сведений
– Сохранение счета и истории транзакций
– Доступность всех промо-предложений
Регистрация на главном сайте
Процесс оформления учетной записи требует несколько минут. Новоиспеченным игрокам следует:
1. Открыть на главный ресурс или рабочее зеркало
2. Нажать кнопку «Создать аккаунт»
3. Заполнить нужные поля
4. Подтвердить электронную почту
5. Указать бонусный код при наличии
После конца оформления профиля пользователи приобретают подарок за регистрацию, что может иметь фриспины или монетарное вознаграждение.
Логин в индивидуальный кабинет
Индивидуальный кабинет дает всеобъемлющий мониторинг над игровым процессом. Через собственный раздел разрешается:
– Пополнять счет
– Выводить средства
– Задействовать промокоды
– Контролировать историю пари
– Соревноваться в соревнованиях
– Забирать кешбэк
Описание бонусов и промо-предложений
Выгодная поощрительная программа — важное плюс ресурса. Ключевые формы вознаграждений:
Стартовый приз
Новые игроки обретают щедрое вознаграждение на начальные пополнения. Сумма приза может достигать 100-200% от размера вклада.
Фриспины
Даровые вращения начисляются для востребованных слотов. Число фриспинов варьируется от 10 до 500 штук.
Возврат средств
Еженедельный или помесячный компенсация доли проигранных финансов. Обычный объем кэшбека — 5-15%.
Состязания
Систематические состязания с солидными наградными банками. Игроки борются за призовые позиции в турнирной таблице.
Смартфонная версия и приложуха
Портативная версия позволяет наслаждаться игрой с всякого гаджета. Геймеры могут скачать приложение для iOS и Android или задействовать веб версию.
Достоинства смартфонного софта:
– Быстрая загрузка слотов
– Удобный дизайн
– Push-уведомления о акциях
– Вход через Touch ID
Автоматы и Live казино
Игровая база включает тысячи названий от известных разработчиков.
Популярные категории слотов:
– Стандартные слоты
– Видеослоты с премиальными этапами
– Джекпот слоты
– Мегавейс слоты
Live игорный зал
Зона live казино предлагает развлечение с настоящими ведущими. Представлены классические развлечения:
– Американская рулетка
– Blackjack
– Баккара
– Карибский покер
Как обнаружить функционирующее зеркало
Получить рабочую URL на зеркало можно несколькими способами:
1. Зарегистрироваться на email-рассылку
2. Мониторить за обновлениями в социальных сетях
3. Обратиться в сервис поддержки
4. Добавить в закладки действующее зеркало в закладки
Заключение
Лицензионный сайт и его рабочие копии предоставляют стабильный путь к развлекательным автоматам. Великодушные премии, разнообразные купоны, удобное мобильное программа и качественная техподдержка поддержки обеспечивают развлекательный геймплей предельно приятным и конфиденциальным.
продвижения сайта в google prodvizhenie-sajtov-v-moskve15.ru .
инъекционное закрепление грунтов инъекционное закрепление грунтов .
Fortune Rabbit respins chain: recorde pessoal de quantos giros seguidos?
Переход к платформе через актуальные зеркала
Участники интернет казино нередко имеют дело с вопросом блокировки основного ресурса. Как раз для ликвидации этой трудности существуют альтернативные адреса официального сайта. РљСЌС‚ обеспечивает стопроцентный доступ ко всем функциям ресурса.
Что такое действующее зеркало казино
Копия значит собой идентичную реплику официального ресурса с таким же набором функций. Единственное отличие — это другое имя. Каждые информация клиента, в том числе депозит, привилегии и историю ставок, остаются идентичными.
Плюсы использования зеркал
Функционирующие зеркала имеют множеством существенных преимуществ:
– Постоянный доступ к предпочитаемым развлечениям
– Совершенная защита собственных данных
– Удержание всех параметров пользовательского кабинета
– Шанс взятия призов и присутствия в промоакциях
Регистрация на главном портале
Операция регистрации крайне прост и длится несколько минут. Новые пользователи в состоянии полагаться на внушительный приветственный поощрение за создание аккаунта.
Ступени оформления аккаунта
1. Вход на официальный портал или его копию
2. Нажатие на клавишу “Регистрация”
3. Внесение требуемых сведений
4. Активация электронной почты
5. Применение кода (в случае есть)
Бонусы и акции для участников
Игровая площадка радует своих участников различными наградными системами.
Ключевые виды наград
Вводный бонус — внушительное начисление для свежих пользователей, каковое имеет возможность содержать материальные бонусы и фриспины.
Бесплатные вращения — шанс крутить в топовых автоматах бесплатно.
Возврат средств — долевой возмещение проигранных денег, который именно выплачивается по неделям или помесячно.
Бонусные коды — особые последовательности, предоставляющие бонусные выгоды.
Личный кабинет: функции и параметры
Пользовательский профиль гарантирует абсолютный регулирование над пользовательским взаимодействием. Тут доступны:
– Контроль депозитом
– Записи переводов
– Работающие бонусы
– Установки сохранности
– Валидация счета
Карманная платформа и приложение
Новейшие клиенты ценят гибкость. Ресурс дает пару пути для ставок с мобильных гаджетов.
Приспособленная телефонная редакция
Адаптивная платформа портала автоматически приспосабливается под экран любого аппарата. Не нужно инсталлировать специальное приложение.
APP для телефонов
Доступно скачать оригинальное APP для iOS и Android. Приложение дает:
– Моментальный запуск
– Улучшенный графику
– Мобильные-оповещения о бонусах
– Устойчивую производительность
Live казино: среда подлинного казино
Категория Live столов транспортирует участников в среду настоящего клуба. Опытные дилеры проводят сессии в виде прямого времени.
Топовые Live-игры
– Американская рулетка
– Блэкджек
– Баккара
– Покер
Аппараты: ассортимент автоматов
Библиотека азартных машин содержит тысячи позиций от топовых поставщиков. Клиенты откроют:
– Классические аппараты
– Современные слоты
– Прогрессивный джекпот-автоматы
– Многолинейные автоматы
Соревнования и особые мероприятия
Систематические конкурсы обеспечивают игрокам бороться друг с другом за внушительные денежные банки. Всякий конкурс имеет свои требования включения и рейтинг лидеров.
Способы ввода и снятия денег
Платформа обслуживает множество денежных инструментов:
– Кредитные карты
– Электронные кошельки
– Криптовалюты
– Wire транзиты
Все операции проходят надежно благодаря передовым методам защиты.
Сервис обслуживания
Компетентные консультанты сервиса поддержки способны помочь 24/7. Предусмотрены данные способы контакта:
– Мгновенный-чат
– Email-обслуживание
– Голосовая горячая линия
– Коммуникационные сети
Вывод
Официальный сайт платформы и его функционирующие альтернативы обеспечивают пользователям надежный и легкий переход к широкому выбору геймерских активностей. Крупные награды, постоянные кампании, качественная поддержка и удобные финансовые методы превращают развлекательный опыт максимально увлекательным и доходным.
Melhor horário pra jogar Jogo do Tigrinho: madrugada ou pico de noite? Conta sua experiência
Вход к ресурсу через актуальные зеркала
Игроки виртуальных казино регулярно встречаются с проблемой недоступности основного сайта. Собственно для устранения этой проблемы существуют копии официального домена. https://kppp.ugu.pl/ дает абсолютный переход ко всем сервисам казино.
Что такое актуальное зеркало казино
Дубликат является собой точную дубликат официального портала с идентичным опциями. Основное расхождение — это доменное имя. Любые сведения клиента, содержа баланс, поощрения и историю ставок, остаются прежними.
Выгоды задействования зеркал
Функционирующие зеркала характеризуются множеством значимых выгод:
– Бесперебойный подключение к излюбленным играм
– Совершенная сохранность личных параметров
– Поддержание всех параметров персонального кабинета
– Возможность приобретения призов и включения в промоакциях
Оформление профиля на официальном портале
Операция оформления максимально прост и отнимает несколько минут. Недавние пользователи имеют возможность претендовать на щедрый вводный приз за оформление.
Стадии формирования аккаунта
1. Вход на легальный ресурс или его копию
2. Активация на опцию “Создать аккаунт”
3. Заполнение нужных параметров
4. Верификация цифровой почты
5. Внесение промокода (когда имеется)
Поощрения и акции для клиентов
Казино балует своих участников многочисленными поощрительными предложениями.
Главные типы бонусов
Вводный бонус — щедрое начисление для начинающих пользователей, которое имеет возможность содержать материальные бонусы и бесплатные вращения.
Фриспины — шанс запускать в востребованных аппаратах без затрат.
Возврат средств — долевой компенсация проигранных средств, каковой начисляется еженедельно или каждый месяц.
Специальные коды — особые последовательности, предоставляющие дополнительные выгоды.
Индивидуальный кабинет: опции и конфигурации
Пользовательский профиль обеспечивает исчерпывающий регулирование над развлекательным процессом. Тут присутствуют:
– Контроль балансом
– Архив операций
– Действующие привилегии
– Конфигурации защиты
– Подтверждение аккаунта
Портативная версия и приложение
Новейшие игроки ценят портативность. Ресурс предоставляет два пути для участия с портативных устройств.
Адаптивная смартфонная редакция
Мобильная версия домена самостоятельно подстраивается под разрешение любого девайса. Нет необходимости устанавливать специальное приложение.
Программа для мобильных
Возможно инсталлировать фирменное программу для iOS и Android. Софт предоставляет:
– Мгновенный вход
– Улучшенный дизайн
– Оперативные-оповещения о акциях
– Бесперебойную работу
Live казино: обстановка подлинного зала
Зона Live казино переносит клиентов в обстановку настоящего игорного заведения. Компетентные ведущие проводят раунды в виде прямого времени.
Востребованные Live-столы
– Рулетка
– Blackjack
– Baccarat
– Техасский холдем
Аппараты: ассортимент слотов
Собрание слотовых автоматов насчитывает массу позиций от ведущих провайдеров. Участники найдут:
– Стандартные аппараты
– Современные слоты
– Мега-выигрыш-автоматы
– Слоты с множественными линиями
Турниры и эксклюзивные акции
Периодические соревнования обеспечивают клиентам состязаться друг с другом за крупные денежные фонды. Каждый турнир содержит свои правила включения и список лидеров.
Методы ввода и вывода денег
Платформа обслуживает массу платежных методов:
– Банковские инструменты
– Виртуальные сервисы
– Цифровые валюты
– Банковские отправления
Каждые транзакции проходят безопасно благодаря новейшим протоколам защиты.
Служба обслуживания
Профессиональные специалисты команды обслуживания способны поддержать 24/7. Доступны нижеперечисленные каналы общения:
– Живой-чат
– Email-поддержка
– Телефонная горячая линия
– Медийные сети
Итог
Основной домен платформы и его функционирующие альтернативы гарантируют пользователям безопасный и удобный вход к большому диапазону азартных развлечений. Внушительные бонусы, частые промоакции, компетентная помощь и легкие финансовые инструменты превращают азартный досуг максимально приятным и доходным.
melbet бонуси аввалин депозит https://www.melbet20856.help
Athletic Bilbao vs Elche 2026 La Liga live 21:00 kick-off
Между прочим, если вас интересует Выбор усилителя: AB, D или ламповый?, посмотрите сюда.
Ссылка ниже:
https://solpod.ru/%d0%b1%d0%b5%d0%b7-%d1%80%d1%83%d0%b1%d1%80%d0%b8%d0%ba%d0%b8/kak-vybrat-usilitel-ab-d-ili-lampovyj-i-chto-realno-slyshno-s-vashej-akustikoj/
https://football-fun-live.com/reyting-bukmekerov/1xbet/ios-sosi-huy-do-novogo-ios
mostbet resmi mostbet
Описание официального ресурса
Передовые онлайн казино предоставляют участникам богатый ассортимент забав и возможностей. Главный портал приложение обеспечивает безопасный доступ к гемблинг сервисам.
Функционирующее зеркало: возможность прямо сейчас
Зеркало является собой полную реплику основного ресурса. Актуальное зеркало обеспечивает пользователям избегать вероятные запреты.
Плюсы задействования зеркала
Главные плюсы охватывают:
– Постоянный путь к ресурсу
– Поддержание любых опций основного ресурса
– Охрана персональных сведений
– Идентичный возможности
Оформление профиля на ресурсе
Ход открытия счета отличается доступностью и удобством. Начинающие участники обязаны:
1. Перейти на лицензионный сайт или его зеркало
2. Нажать на клавишу открытия счета
3. Внести обязательные поля
4. Активировать почтовую почту
5. Осуществить стартовый доступ
Подарок за открытие счета
Начинающие забирают значительный начальный подарок. Такое награда имеет возможность предусматривать:
– Монетарные бонусы
– Даровые прокруты
– Увеличенный показатель кэшбека
Логин в индивидуальный раздел
Существующие участники в состоянии мгновенно зайти в личный раздел, задействуя никнейм и шифр. Личный профиль дает шанс к:
– Регулированию средствами
– Записям операций
– Действующим бонусам
– Опциям аккаунта
Бонусы и промо
Платформа систематически проводит всевозможные промо-кампании для клиентов.
Разновидности бонусов
Базовые типы вознаграждений:
– Финансовые подарки – часть от объема депозита
– Прокруты – бесплатные спины в слотах
– Кэшбэк – компенсация фрагмента затраченных финансов
– Соревновательные вознаграждения – награды за выступление в конкурсах
Ваучеры
Специальные ваучеры помогают заработать бонусные бонусы. Пользователи имеют возможность отыскать их на аффилиатных ресурсах или приобрести в уведомлениях.
Переносная вариант и app
Современные гемблеры любят мобильный гейминг.
Опции mobile версии
– Отзывчивый дизайн для любых устройств
– Совокупный доступ к слотам
– Стремительная работа
– Практичное контроль
Загрузить приложение
Портативное программа доступно для установки на гаджеты с рабочими ОС Android и iOS. Софт обеспечивает:
– Устойчивую производительность
– Всплывающие уведомления о акциях
– Мгновенный путь к любимым развлечениям
Игровой портфель
Платформа дает богатую библиотеку гемблинг развлечений.
Автоматы
Каталог игровых аппаратов насчитывает:
– Классические игры
– Видео аппараты
– Прогрессивные автоматы
– Branded развлечения
Live игры
Область реальных развлечений обеспечивает право состязаться с реальными ведущими. Предложены:
– Рулетки
– Блэкджек
– Punto Banco
– Техасский холдем
Соревнования
Систематические соревнования помогают игрокам соревноваться за внушительные призовые суммы. Призовая система изменяется регулярно.
Денежные транзакции
Сайт поддерживает обилие вариантов внесения и вывода финансов:
– Пластиковые карточки
– Онлайн кошельки
– Wire трансферы
– Криптовалюты
Абсолютно все платежи проходят конфиденциально с использованием передовых систем шифрования.
Отдел поддержки
Опытная команда помощи функционирует постоянно. Связаться с консультантами возможно через:
– Живой чат
– Почтовую почту
– Телефонную линию
– Социальные платформы
Защита и аккредитация
Портал оперирует на базе законной сертификата. Данное обеспечивает:
– Справедливость азартного геймплея
– Безопасность конфиденциальных сведений
– Пунктуальные выплаты
– Регулируемый гейминг
Итог
Главный портал и его рабочие резервные страницы предоставляют пользователям полный комплекс функций для приятной и прибыльной времяпрепровождения. Солидные призы, разнообразные слоты, квалифицированная поддержка и безопасная структура операций формируют казино превосходным вариантом для поклонников игровых игр.
Современные онлайн-казино обеспечивают клиентам обширный ассортимент развлечений и поощрительных вариантов. Подключение к сервису осуществляется через главный ресурс или его функционирующее зеркало Winri, что обеспечивает бесперебойную работу.
Что представляет собой рабочее зеркало казино
Копия — это абсолютная копия оригинального ресурса, созданная для обхода запретов. Действующее зеркало обеспечивает пользователям получить доступ к предпочитаемым слотам в произвольное время.
Лицензионное зеркало обладает всеми характеристиками основного портала:
– Полный перечень развлечений
– Профиль с записанными информацией
– Свежие промокоды
– Гарантированные расчетные операции
Открытие счета на лицензионном сайте
Процесс оформления отнимает всего несколько минут. Новым пользователям требуется:
1. Перейти на основной портал или рабочее зеркало
2. Нажать на кнопку “Создать аккаунт”
3. Внести необходимые информацию
4. Верифицировать контакт
5. Совершить дебютный взнос
Поощрение новичкам выдается моментально после завершения всех стадий.
Авторизация в профиль
Созданные клиенты могут выполнить доступ вводя:
– Учетное имя и код
– Цифры телефона
– Email
Аккаунт открывает возможность к контролю средствами, записям игр и доступным поощрениям.
Поощрения и кампании
Азартная система привлекает лояльных клиентов многочисленными вознаграждениями:
Стартовый бонус
– Премия на начальный платеж до 100%
– Бесплатные вращения на известные игры
– Особые бонусы за следующие депозиты
Купоны
Уникальные промокоды обеспечивают возможность на использование особых бонусов. Текущие купоны выставляются в блоке “Промо”.
Кэшбек
Периодический кешбэк насчитывает до 10% от проигранных денег. Возврат начисляется моментально.
Система лояльности
Регулярные участники приобретают единицы, которые переводятся на реальные финансы или фриспины.
Мобильная версия и APP
Для практичности участников сделана удобная мобильная версия. Гибкий вид позволяет легко играть с каждого карманного девайса.
Достоинства APP:
– Скорый подключение к играм
– Адаптированный интерфейс
– Бесперебойная деятельность
– Оповещения о свежих турнирах
Получить программу можно свободно с главного портала для устройств на Android и iOS.
Ассортимент развлечений
Автоматы
Каталог содержит более 2000 слотов от ведущих провайдеров:
– Традиционные слоты
– Мультимедийные игры
– Джекпот-слоты
– Фирменные игры
Live казино
Секция Live игр обеспечивает игру с живыми диллерами в прямом режиме:
– Рулетка
– Блэкджек
– Baccarat
– Карточный покер
Соревнования
Постоянные турниры с большими премиальными пулами проводятся регулярно. Допуск в конкурсах возможно всем активным клиентам.
Финансовые способы
Пополнения и изъятия денег выполняются через популярные платежные системы:
– Банковские карточ ки
– Онлайн кошельки
– Цифровая валюта
– Денежные платежи
Стартовый депозит — от 100 рублей. Получение финансов проводится в течение 24 времени.
Отдел поддержки
Круглосуточная отдел поддержки способна содействовать в урегулировании всех вопросов:
– Live chat
– Email
– Контактный номер
– Общественные сети
Защита и лицензия
Официальный портал оперирует на базе мировой сертификата. Все параметры клиентов закрыты современным SSL-шифрованием.
Вывод
Функционирующее зеркало обеспечивает постоянный доступ к предпочитаемым автоматам, богатым акциям и практичным услугам. Присоединяйтесь сейчас и обретите начальный подарок!
Fortune Ox respins infinitos: já chegou a 25 respins seguidos? Mítico!
PG Soft torneios semanais: R$100k–R$500k em prêmios – já ganhou algo no Tigrinho?
выебал на йоге выебал на йоге .
accutane online
mostbet güncel giriş mostbet
Современные онлайн казино дают игрокам большой ассортимент возможностей для комфортной игры. Однако иногда подключение к официальному платформе может быть заблокированным. В таких моментах на подмогу спешит JVSpin зеркало, которое дает постоянный доступ ко всем опциям платформы.
Что такое действующее зеркало казино
Зеркало — это идентичная дубликат лицензионного сайта, которая размещается по альтернативному адресу. Зеркало имеет целый возможности главного портала, включая личный кабинет, средства и запись переводов.
Основные выгоды использования зеркала:
– 24-часовой подключение к ресурсу
– Абсолютная схожесть возможностей
– Безопасность пользовательских данных
– Хранение всех имеющихся вознаграждений
Как найти актуальное зеркало на текущий день
Имеется множество достоверных методов обнаружения свежей URL:
Официальные ресурсы:
1. Email рассылка — дирекция постоянно направляет информацию с актуальными адресами
2. Медийные сети — легитимные страницы выкладывают текущую новости
3. Сервис поддержки — операторы выдают надежные ссылки
4. Портативное приложение — дает возможность обходить блокировки
Оформление профиля на главном веб-сайте
Операция оформления требует лишь пару минут и включает из данных этапов:
1. Вход на официальный сайт или актуальное зеркало
2. Выбор на элемент «Создать аккаунт»
3. Указание персональной формы
4. Проверка email почты или контактного номера
5. Применение привилегии за регистрацию при присутствии промокода
Начинающие игроки приобретают великодушный вступительный подарок, который может содержать даровые прокруты, финансовые бонусы или cashback.
Авторизация в индивидуальный кабинет
Логин на сайте реализуется обычным путем. Достаточно внести никнейм и пароль, указанные при открытии счета.
Значимые детали для защищенного входа:
– Применяйте сложный пароль
– Включите 2FA проверку
– Не записывайте реквизиты на публичных устройствах
– Отслеживайте адресную строку браузера
Характеристика наградной схемы
Гемблинг-сайт балует клиентов разнообразными поощрениями и акциями:
Стартовый пакет
Свежие игроки имеют возможность надеяться на щедрое вознаграждение за дебютный взнос. Зачастую это долевая премия к переведенной объему плюс бесплатные вращения для востребованных слотов.
Регулярные предложения
– Семидневный компенсация — возмещение доли потерянных денежных средств
– Поощрения на дополнительные депозиты
– Уникальные офферы по событиям
– Турниры с крупными выигрышными пулами
Программа вознаграждений
Активные пользователи накапливают баллы за каждую бет, которые затем конвертируются на реальные денежные призы, free spins или уникальные привилегии.
Кодовые слова: как применять
Купоны — это специальные наборы букв и цифр, гарантирующие доступ к бонусным поощрениям.
Откуда получить рабочие промокоды:
– Проверенные коммуникационные сети казино
– Сотрудничающие площадки
– Email-новостная лента
– Профильные сообщества
Указывается промокод в соответствующее поле при создании аккаунта или внесении депозита счета.
Портативная версия и приложение
Нынешние пользователи выбирают развлекаться с телефонных устройств. Сайт дает пару решения для удобной телефонной игры.
Мобильная вариант
Интернет версия самостоятельно оптимизируется под размер экрана. Не предполагает установки и действует в любом свежем браузере.
Телефонное приложение
Загрузить софт можно для аппаратов на Android и iOS. Плюсы app:
– Быстрая открытие
– Бесперебойная операция
– Push-уведомления о бонусах
– Самостоятельный обход блокировок
Этап скачивания несложен: необходимо открыть на сайт с портативного устройства и придерживаться руководству.
Азартный каталог
База игр охватывает тысячи позиций от лучших провайдеров.
Слоты
Игровые автоматы — максимально востребованная раздел забав. Доступны классические трехбарабанные аппараты, передовые мультимедийные слоты с дополнительными раундами, а также джекпотные суперпризы.
Live казино
Раздел с настоящими раздающими позволяет прочувствовать атмосферу подлинного казино. Открыты столы с рулеткой.
Стриминг производится в высоком разрешении, обеспечивается коммуникация с дилером и иными геймерами.
Соревнования
Систематически проводятся состязания по разным дисциплинам. Включение позволяет получить денежные призы, free spins или особые поощрения.
Транзакционные операции
Портал поддерживает широкий набор платежных систем:
– Дебетовые карты
– Виртуальные кошельки
– Биткоин
– Денежные транзакции
Стартовая величина взноса — разумная для большинства клиентов. Вывод призов производится в минимальные временные рамки.
Сервис поддержки
Квалифицированные операторы готовы оказать помощь круглосуточно. Представлены следующие способы общения:
– Веб-чат
– Email
– Голосовая связь
– Общественные сети
Решения на стандартные запросы можно обнаружить в секции FAQ.
Резюме
Главный веб-сайт казино и его действующие зеркала дают клиентам полный подключение ко всем опциям портала. Значительные привилегии, удобная телефонная версия, колоссальный каталог слотов и компетентная помощь создают игровой процесс исключительно беспроблемным и надежным.
Официальный сайт pokerok: регистрация, вход, бонусы и игра в онлайн покер. Обзор возможностей, турниров, кеш-столов и мобильного приложения. Узнайте, как начать играть и выводить деньги на проверенной платформе.
Актуальные онлайн-казино обеспечивают участникам обширный выбор развлечений и заманчивые бонусы. Но для стабильной времяпрепровождения важно знать, как найти Goodwin казино и его действующие зеркала.
Что такое основной ресурс казино
Главный сайт казино — это главная платформа, где пользователи могут пользоваться гемблинг играми. Платформа оперирует на легальных правах и имеет всеми необходимыми разрешениями.
Главные выгоды главного ресурса:
– Безопасность персональных сведений
– Справедливые правила использования
– Гарантированные платежи
– Профессиональная техподдержка
Рабочее зеркало казино: для чего необходимо
Дублирующий ресурс — это полная дубликат лицензионного сайта, находящаяся по иному URL. Актуальное зеркало формируется для поддержания бесперебойного соединения к сайту.
Поводы эксплуатации дублирующих ресурсов:
– Запрет официального домена
– Регламентные процедуры
– Значительная нагрузка на платформу
Как получить рабочее зеркало в данный момент
Обнаружить текущее проверенное зеркало можно множественными путями:
1. Почтовые оповещения — подпишитесь на новостную отправку
2. Команда техподдержки — напишите в онлайн-чат
3. Социальные площадки — проверяйте за публикациями
4. Тематические площадки — достоверные сайты
Открытие счета на платформе казино
Процесс создания аккаунта составляет буквально немного моментов:
1. Нажмите на кнопку “Регистрация”
2. Заполните необходимые данные
3. Валидируйте электронную ящик
4. Используйте бонусный код, если имеется
После успешной активации вам станет возможен личный аккаунт.
Премии и промокоды
Выгодная премиальная структура — ключевое достоинство казино:
Награда за регистрацию
Свежие игроки получают приветственный поощрение, который может включать:
– Денежный кредит на дебютный пополнение
– Фриспины для игровых машин
– Приветственные деньги
Бонусные коды
Постоянно выходят эксклюзивные бонусные шифры, дающие возможность забрать экстра бонусы.
Программа кешбэка
Регулярные клиенты зарабатывают порцию проигранных ставок на счет.
Текущие акции и состязания
Сайт регулярно организует увлекательные промо-мероприятия:
– Weekly чемпионаты
– Сезонные промо
– Конкурсы ценных подарков
– Механизм привилегий
Доступ в персональный кабинет
Для авторизации на сайт следует:
1. Посетить главный сайт или функционирующее зеркало
2. Кликнуть “Войти”
3. Указать имя пользователя и пароль
В индивидуальном кабинете разрешены следующие инструменты:
– Внесение средств баланса
– Обналичивание денег
– Анализ истории игр
– Настройка личными настройками
Mobile платформа и софт
Портативная платформа
Оптимизированная версия веб-сайта дает возможность делать ставки с любого карманного гаджета. Интерфейс самостоятельно настраивается под диагональ screen.
Приложение для скачивания
Скачать приложение можно для:
– Android — прямая download с сайта
– iOS — скачивание через App Store
Преимущества app:
– Оперативный старт
– Стабильная функциональность
– Push-оповещения об промо
– Оптимизированный дизайн
Гемблинг секции
Игровые машины
Богатая библиотека игровых барабанов от лучших поставщиков:
– Ретро игры
– Видео-слоты
– Накопительные-автоматы
Live казино
Секция с живыми крупье предлагает:
– European/American Roulette
– 21
– Баккара
– Покер
Эфиры проводятся в превосходном качестве, создавая впечатление подлинного казино.
Способы пополнения и снятия
Платформа поддерживает разные транзакционные сервисы:
– Кредитные средства
– Онлайн кошельки
– Криптовалюты
– Прямые транзакции
Минимальные значения пополнения и оперативные выводы обеспечивают игру предельно удобной.
Департамент помощи
Опытная служба support доступна 24/7 и способна содействовать с разными ситуациями:
– Мгновенный-чат
– Email-консультации
– Голосовая горячая линия
Заключение
Официальный ресурс казино и его рабочие зеркала дают участникам конфиденциальный и интересный азартный отдых. Богатые поощрения, комфортная mobile платформа, обширные развлечения и превосходное live-казино превращают эту платформу превосходным местом для развлекательных развлечений.
Лучшие фриспины 2026 промокоды на фриспины: бесплатные вращения в онлайн казино без вложений. Подборка проверенных сайтов, бонусы за регистрацию, честные условия отыгрыша и возможность вывода выигрыша без риска для игроков.
Халява казино https://nodepositcasinofreespins.ru: фриспины за регистрацию, бонусы без пополнения и акции для новых игроков. Сравнивайте условия отыгрыша, выбирайте проверенные онлайн казино и начинайте играть бесплатно с возможностью вывода выигрыша.
After testing several platforms, I found this casino https://ejerciciosrenovadores.site/etablissement-aruba-bet-votre-ultime-adresse-de-divertissement-premium/ to be reliable. The welcome bonus is generous, terms are transparent, and payouts don’t take forever, making it suitable for casual players.
Лучшие казино https://rating-casino-russia.ru: актуальный список онлайн казино с высоким рейтингом, быстрым выводом средств и выгодными бонусами. Обзор лицензий, игр и платежных методов поможет выбрать надежное казино для комфортной игры.
Переход к платформе через проверенные зеркала
Пользователи интернет казино часто контактируют с проблемой ограничения главного домена. Как раз для ликвидации этой ситуации разработаны дубликаты главного ресурса. РљСЌС‚ казино дает стопроцентный вход ко всем опциям казино.
Что такое рабочее зеркало казино
Дубликат представляет собой идентичную дубликат официального сайта с таким же опциями. Единственное несовпадение — это альтернативное имя. Все информация пользователя, содержа счет, бонусы и архив партий, остаются прежними.
Плюсы применения зеркал
Рабочие зеркала имеют набором ключевых плюсов:
– Круглосуточный подключение к предпочитаемым играм
– Совершенная защита персональных параметров
– Неизменность всех конфигураций персонального кабинета
– Опция получения наград и включения в кампаниях
Оформление профиля на основном портале
Операция открытия счета чрезвычайно легок и занимает пару минут. Свежие клиенты способны рассчитывать на солидный приветственный приз за создание аккаунта.
Стадии формирования аккаунта
1. Переход на легальный домен или его копию
2. Нажатие на кнопку “Регистрация”
3. Указание нужных информации
4. Подтверждение почтовой почты
5. Применение бонусного кода (в случае доступен)
Награды и предложения для участников
Ресурс балует своих участников разнообразными наградными акциями.
Основные виды бонусов
Вводный бонус — щедрое начисление для недавних клиентов, которое именно может содержать монетарные бонусы и free spins.
Безвозмездные спины — опция крутить в топовых игровых машинах бесплатно.
Кэшбек — процентный компенсация утраченных средств, который именно зачисляется каждую неделю или помесячно.
Бонусные коды — особые сочетания, обеспечивающие дополнительные выгоды.
Индивидуальный кабинет: инструменты и установки
Персональный аккаунт гарантирует полный регулирование над персональным взаимодействием. В нем имеются:
– Контроль средствами
– Данные переводов
– Текущие привилегии
– Настройки сохранности
– Проверка счета
Мобильная редакция и софт
Актуальные участники признают портативность. Казино обеспечивает два пути для участия с портативных аппаратов.
Приспособленная мобильная платформа
Смартфонная версия портала автоматически подстраивается под разрешение любого гаджета. Отсутствует потребность устанавливать особое приложение.
Софт для мобильных
Можно скачать официальное программу для iOS и Android. Программа дает:
– Мгновенный доступ
– Адаптированный графику
– Всплывающие-сообщения о акциях
– Стабильную работу
Live развлечения: атмосфера реального клуба
Зона Live развлечений транспортирует пользователей в антураж реального клуба. Компетентные дилеры осуществляют сессии в формате живого времени.
Известные Live-форматы
– Французская рулетка
– Blackjack
– Punto Banco
– Покер
Игровые машины: выбор игр
Коллекция слотовых слотов включает массу вариантов от топовых поставщиков. Клиенты встретят:
– Стандартные автоматы
– Графические слоты
– Накопительный приз-машины
– Megaways
Соревнования и эксклюзивные события
Регулярные турниры обеспечивают игрокам состязаться друг с другом за значительные наградные пулы. Всякий состязание имеет свои критерии включения и список лидеров.
Способы зачисления и вывода средств
Платформа использует комплекс расчетных инструментов:
– Кредитные картыы
– Цифровые платежные системы
– Криптовалюты
– Прямые отправления
Любые транзакции осуществляются надежно благодаря современным технологиям шифрования.
Сервис support
Опытные операторы службы support готовы помочь 24/7. Доступны нижеперечисленные пути коммуникации:
– Оперативный-чат
– Email-сервис
– Телефонная связь
– Социальные сети
Заключение
Основной сайт казино и его актуальные копии предоставляют игрокам безопасный и комфортный доступ к широкому выбору азартных развлечений. Щедрые награды, частые акции, квалифицированная сервис и удобные платежные методы создают геймерский процесс предельно комфортным и прибыльным.
Подключение к платформе и актуальные адреса
Актуальные виртуальные казино предлагают клиентам обширный спектр развлечений. Официальный веб-сайт https://huerouraactivewear.com/igrovye-sayty-bez-neobkhodimosti-proverki-pasporta-i-verifikatsii-poyavyatsya-v-kazino-v-2026-godu/ организует защищенный переход ко всем услугам. Тем не менее временами происходят моменты, когда требуется альтернативный способ подключения.
Что представляет собой функционирующее зеркало
Рабочее зеркало — это полная дубликат главного сайта с альтернативным доменным именем. Копия сегодня обеспечивает обходить возможные барьеры и сохранять постоянный доступ к популярным слотам.
Главное зеркало обладает теми же характеристиками, что и основной сайт:
– Полный список развлечений
– Собственный профиль с зафиксированными данными
– Все награды и акции
– Проверенные финансовые транзакции
Регистрация и авторизация в систему
Этап открытия аккаунта на платформе длится пару мгновений. Начинающим клиентам необходимо:
1. Попасть на функционирующее зеркало в настоящее время
2. Выбрать клавишу «Зарегистрироваться»
3. Указать требуемые параметры
4. Подтвердить e-mail почту или информацию связи
5. Получить поощрение за создание профиля
Авторизация в индивидуальный кабинет выполняется посредством указание имени пользователя и ключа.
Описание бонусной программы
Привлекательная призовая политика — важнейшее достоинство ресурса. Игроки обретают всевозможные поощрения:
Приветственные подарки
Свежие клиенты могут рассчитывать на привлекательный поощрение за регистрацию. Чаще всего это совокупность возможностей, включающий:
– Процентную прибавку к начальному депозиту
– Безвозмездные фриспины
– Бонусные финансы на счет
Промокоды и особые возможности
Периодические купоны обеспечивают получать бонусные выгоды. Использовать их можно в предназначенном разделе собственного кабинета.
Фриспины и компенсация
Даровые вращения — это возможность крутить слоты без использования своих средств. Рибейт представляет определенный компенсацию проигранных средств.
Коллекция автоматов
Азартная сайт представляет внушительную подборку развлечений.
Игровые машины
Ассортимент аппаратов впечатляет воображение. Представлены традиционные трехбарабанные аппараты и актуальные развлечения с захватывающей картинкой.
Live заведение
Категория Live казино переносит клиентов в антураж подлинного гемблинг дома. Профессиональные крупье организуют партии в онлайн эфире.
Турниры и таблицы лидеров
Постоянные состязания обеспечивают остроты и гарантируют возможность получить значительные выигрыши.
Mobile вариант и приложение
Продвинутые инновации позволяют развлекаться в любом пространстве. Портативная форма автономно настраивается под экран девайса.
Установить приложение разрешено для цифровых ОС iOS и Android. Программа гарантирует:
– Мгновенный вход
– Бесперебойную работу
– Push-алерты об бонусах
– Простой облик
Финансовые процедуры
Ресурс использует всевозможные варианты пополнения и снятия денег:
– Кредитные системы
– Цифровые кошельки
– Криптовалюты
– Банковские переводы
Каждые переводы выполняются через защищенное подключение, что обеспечивает неприкосновенность личных сведений.
Сервис support
Квалифицированная служба поддержки трудится всегда. Соединиться с операторами можно через:
– Живой-чат
– Почтовую почту
– Горячую линию
– Общественные ресурсы
Выводы
Официальный ресурс и его действующее зеркало гарантируют игрокам безопасный и приятный путь к азартным забавам. Щедрые бонусы, широкий выбор слотов и отличная ассистанс формируют участие исключительно приятной и выгодной.
opal vendor plaza – Simple page design keeps navigation clear and easy to follow.
Читать далее кракен тор
FranChoice
7500 Flying Cloud Drive,
#600 Eden Prairie
MN 55344, United Ꮪtates
952-345-8400
franchise business model examples 2025, http://www.instapaper.com,
Нынешние онлайн-казино дают участникам внушительный спектр услуг и поощрительных вариантов. Вход к площадке производится через главный веб-сайт или его действующее зеркало Sykaaa, что гарантирует стабильную деятельность.
Что представляет собой функционирующее зеркало казино
Копия — это полная реплика оригинального портала, сделанная для устранения запретов. Действующее зеркало позволяет пользователям обрести подключение к предпочитаемым играм в любое время.
Проверенное зеркало содержит всеми характеристиками первоначального портала:
– Весь ассортимент игр
– Личный кабинет с записанными параметрами
– Свежие промокоды
– Безопасные финансовые действия
Открытие счета на лицензионном ресурсе
Алгоритм открытия счета занимает всего несколько минут. Первым клиентам нужно:
1. Войти на главный ресурс или действующее зеркало
2. Выбрать на кнопку “Открыть счет”
3. Ввести обязательные параметры
4. Активировать адрес
5. Совершить начальный взнос
Приветственный бонус предоставляется моментально после выполнения всех шагов.
Вход в профиль
Действующие клиенты могут совершить доступ применяя:
– Никнейм и пароль
– Код мобильного
– Email
Личный кабинет обеспечивает доступ к управлению балансом, сведениям операций и активным бонусам.
Бонусы и акции
Гемблинг система вознаграждает лояльных игроков щедрыми бонусами:
Стартовый бонус
– Надбавка на первый платеж до 100%
– Даровые спины на популярные автоматы
– Дополнительные награды за дальнейшие платежи
Купоны
Особые промокоды открывают доступ на получение специальных бонусов. Свежие комбинации выставляются в секции “Промо”.
Cashback
Регулярный кэшбек насчитывает до 10% от потраченных сумм. Возмещение предоставляется сразу.
Механизм лояльности
Верные участники получают поинты, которые переводятся на настоящие деньги или даровые спины.
Адаптивный портал и программа
Ради комфорта игроков разработана полноценная mobile версия. Гибкий дизайн помогает легко развлекаться с всякого мобильного устройства.
Достоинства софта:
– Быстрый вход к слотам
– Улучшенный дизайн
– Надежная функциональность
– Сообщения о свежих событиях
Скачать софт можно даром с главного портала для устройств на Android и iOS.
Ассортимент автоматов
Слоты
Библиотека насчитывает более 2000 автоматов от ведущих разработчиков:
– Обычные слоты
– Video slots
– Прогрессивные автоматы
– Брендовые развлечения
Live казино
Блок Live казино дает развлечение с настоящими ведущими в реальном времени:
– Рулетка
– Блэкджек
– Punto Banco
– Poker
Состязания
Систематические состязания с значительными выигрышными суммами организуются систематически. Присоединение в конкурсах открыто всем созданным пользователям.
Расчетные варианты
Платежи и получения денег осуществляются через популярные платежные системы:
– Платежные пластик
– Онлайн кошельки
– Цифровая валюта
– Счетные платежи
Стартовый взнос — от 100 рублей. Изъятие финансов проводится в течение 24 периода.
Отдел саппорта
24/7 группа support может поддержать в решении всех вопросов:
– Live chat
– Email
– Горячая линия
– Общественные сети
Охрана и разрешение
Подлинный сайт работает на основании признанной документа. Все параметры игроков охранены новейшим SSL-шифрованием.
Заключение
Функционирующее зеркало дает бесперебойный вход к любимым слотам, привлекательным акциям и функциональным возможностям. Создайте аккаунт сегодня и получите стартовый подарок!
Передовые онлайн-казино предоставляют игрокам широкий спектр слотов и привлекательные награды. Тем не менее для стабильной работы критично знать, как отыскать Leon и его действующие зеркала.
Что такое официальный ресурс казино
Главный веб-сайт казино — это базовая веб-площадка, где пользователи могут наслаждаться игровыми автоматами. Портал работает на легитимных принципах и владеет всеми необходимыми лицензиями.
Первостепенные плюсы официального сайта:
– Безопасность личных данных
– Объективные условия участия
– Стабильные выплаты
– Компетентная помощь
Действующее зеркало казино: для чего нужно
Альтернативный адрес — это абсолютная клон официального сайта, размещенная по иному домену. Рабочее зеркало создается для гарантирования непрерывного входа к платформе.
Основания эксплуатации зеркал:
– Запрет официального домена
– Регламентные мероприятия
– Повышенная посещаемость на сервер
Как получить действующее зеркало на сегодня
Узнать текущее проверенное зеркало можно несколькими путями:
1. Подписка — зарегистрируйтесь на email рассылку
2. Команда support — обратитесь в онлайн-чат
3. Официальные площадки — мониторьте за новостями
4. Партнерские порталы — авторитетные ресурсы
Регистрация на сайте казино
Процесс регистрации требует только немного мгновений:
1. Нажмите на клавишу “Регистрация”
2. Внесите обязательные информацию
3. Валидируйте контактную почту
4. Активируйте бонусный код, если имеется
Вслед за оконченной оформления вам будет разрешен индивидуальный раздел.
Бонусы и купоны
Выгодная наградная программа — значимое конкурентное преимущество казино:
Поощрение за первичную регистрацию
Свежие участники зарабатывают стартовый презент, который может содержать:
– Монетарный депозит на дебютный вклад
– Фриспины для автоматов
– Бездепозитные средства
Бонусные коды
Систематически публикуются актуальные коды, дающие возможность активировать экстра преимущества.
Механизм кешбэка
Постоянные пользователи возвращают порцию потраченных денег обратно.
Актуальные промо и состязания
Казино постоянно запускает захватывающие акции:
– Еженедельные чемпионаты
– Специальные акции
– Лотереи значительных наград
– Система привилегий
Вход в личный кабинет
Для логина на сайт нужно:
1. Посетить главный адрес или рабочее зеркало
2. Кликнуть “Login”
3. Внести никнейм и код доступа
В персональном профиле открыты данные функции:
– Пополнение счета
– Получение призов
– Проверка журнала игр
– Настройка личными данными
Портативная платформа и app
Мобильная вариант
Оптимизированная версия веб-сайта предоставляет шанс играть с любого карманного телефона. Оформление самостоятельно подстраивается под диагональ монитора.
App для загрузки
Получить программу можно для:
– Android — непосредственная скачивание с портала
– iOS — инсталляция через App Store
Плюсы app:
– Быстрый доступ
– Надежная операционность
– Push-нотификации об акциях
– Производительный функционал
Развлекательные разделы
Барабаны
Внушительная коллекция эмуляторных барабанов от лучших разработчиков:
– Классические слоты
– Современные-автоматы
– Прогрессивные-автоматы
Live зал
Категория с настоящими ведущими предлагает:
– Рулетки
– 21
– Punto Banco
– Poker
Вещания проводятся в HD качестве изображения, формируя впечатление аутентичного казино.
Методы внесения средств и обналичивания
Сайт работает с разные денежные системы:
– Кредитные картсчета
– Цифровые кошельки
– Bitcoin/Ethereum
– Wire транзакции
Минимальные лимиты пополнения и оперативные транзакции обеспечивают времяпрепровождение крайне беспроблемной.
Команда техподдержки
Профессиональная команда ассистентов оперирует 24/7 и способна ассистировать с всеми проблемами:
– Мгновенный-чат
– Email-помощь
– Телефонная линия
Резюме
Официальный веб-сайт казино и его функционирующие дубликаты предоставляют участникам конфиденциальный и интересный гемблинг отдых. Привлекательные поощрения, комфортная портативная платформа, богатые игры и профессиональное live-казино делают эту площадку превосходным вариантом для гемблинг развлечений.
Доступ к ресурсу через рабочие зеркала
Игроки виртуальных казино часто сталкиваются с ситуацией ограничения основного домена. Собственно для ликвидации этой трудности разработаны зеркала легального сайта. Р Р° сайт дает абсолютный подключение ко всем сервисам площадки.
Что такое актуальное зеркало казино
Дубликат представляет собой точную версию оригинального сайта с похожим возможностями. Ключевое расхождение — это доменное имя. Любые сведения игрока, в том числе счет, поощрения и данные ставок, находятся прежними.
Плюсы эксплуатации зеркал
Функционирующие зеркала имеют комплексом значимых достоинств:
– Бесперебойный подключение к излюбленным развлечениям
– Полная защита собственных данных
– Неизменность всех параметров индивидуального кабинета
– Способность приобретения призов и вовлечения в промоакциях
Создание аккаунта на главном портале
Процедура оформления крайне элементарен и требует буквально минут. Начинающие клиенты в состоянии претендовать на солидный вводный приз за регистрацию.
Шаги открытия аккаунта
1. Переход на официальный портал или его зеркало
2. Нажатие на кнопку “Создать аккаунт”
3. Внесение требуемых параметров
4. Подтверждение электронной почты
5. Ввод промокода (в случае имеется)
Подарки и акции для игроков
Платформа радует своих участников многочисленными наградными программами.
Базовые виды призов
Стартовый пакет — крупное поощрение для свежих клиентов, которое именно в состоянии включать финансовые бонусы и бесплатные вращения.
Фриспины — шанс играть в топовых игровых машинах безвозмездно.
Кешбэк — пропорциональный возмещение утраченных финансов, каковой предоставляется еженедельно или помесячно.
Купоны — специальные наборы, предоставляющие добавочные преимущества.
Индивидуальный кабинет: опции и конфигурации
Персональный профиль предоставляет полный надзор над пользовательским активностью. В нем присутствуют:
– Управление депозитом
– Данные платежей
– Активные награды
– Параметры охраны
– Верификация счета
Портативная вариант и APP
Современные игроки ценят доступность. Площадка обеспечивает двойной способа для развлечений с мобильных девайсов.
Адаптивная портативная платформа
Смартфонная редакция ресурса автономно адаптируется под разрешение любого аппарата. Не нужно инсталлировать специальное приложение.
APP для мобильных
Можно скачать официальное приложение для iOS и Android. Приложение предоставляет:
– Скорый доступ
– Оптимизированный графику
– Push-сообщения о бонусах
– Стабильную производительность
Live казино: антураж настоящего зала
Категория Live казино транспортирует пользователей в среду подлинного зала. Профессиональные дилеры осуществляют игры в режиме живого времени.
Популярные Live-развлечения
– Рулетка
– Двадцать одно
– Baccarat
– Техасский холдем
Игровые машины: выбор игр
Собрание слотовых машин включает сотни наименований от известных разработчиков. Пользователи найдут:
– Обычные слоты
– Видео-автоматы
– Накопительный приз-слоты
– Megaways
Соревнования и специальные события
Постоянные конкурсы обеспечивают пользователям конкурировать друг с другом за внушительные наградные пулы. Отдельный состязание располагает свои условия участия и рейтинг лидеров.
Способы внесения и снятия сумм
Казино поддерживает массу платежных систем:
– Кредитные карты
– Виртуальные счета
– Крипто
– Прямые транзиты
Каждые операции осуществляются защищенно благодаря новейшим системам кодирования.
Сервис помощи
Опытные специалисты команды обслуживания способны помочь 24/7. Доступны следующие каналы коммуникации:
– Онлайн-чат
– Email-сервис
– Аудио поддержка
– Публичные сети
Итог
Легальный портал игровой площадки и его рабочие зеркала дают участникам защищенный и комфортный вход к обширному диапазону азартных услуг. Внушительные подарки, регулярные предложения, качественная помощь и легкие денежные методы делают геймерский опыт максимально увлекательным и прибыльным.
Передовые виртуальные казино предоставляют геймерам большой диапазон возможностей для приятной игры. Однако иногда соединение к базовому порталу может стать ограниченным. В таких случаях на подмогу приходит https://www.mammalena.com.au/luxon-predlagaet-platezhnuyu-sistemu-s-vozmozhnostyu-besplatnykh-perevodov-i-prostogo-popolneniya-schetov-na-ggpokerok-i, которое гарантирует постоянный подключение ко всем опциям платформы.
Что такое рабочее зеркало казино
Зеркало — это идентичная версия основного портала, которая располагается по дополнительному интернет-адресу. Копия сохраняет полный функционал первоначального портала, включая пользовательский кабинет, счет и сведения переводов.
Основные плюсы применения зеркала:
– 24-часовой соединение к платформе
– Стопроцентная схожесть функционала
– Защита пользовательских реквизитов
– Хранение всех вознаграждений
Как разыскать рабочее зеркало на сегодня
Есть некоторое количество безопасных методов поиска свежей ссылки:
Официальные ресурсы:
1. Имейл рассылка — руководство систематически пересылает сообщения с свежими URL
2. Общественные сети — официальные профили размещают актуальную данные
3. Сервис поддержки — консультанты сообщают достоверные URL
4. Портативное приложение — дает возможность преодолевать блокировки
Создание аккаунта на главном портале
Этап оформления длится не более немного минут и предполагает из нижеследующих стадий:
1. Открытие на главный портал или рабочее зеркало
2. Щелчок на клавишу «Создать аккаунт»
3. Заполнение персональной таблицы
4. Верификация email почты или мобильного номера
5. Активация поощрения за регистрацию при присутствии промокода
Только что зарегистрированные геймеры зарабатывают значительный приветственный подарок, который может предполагать бесплатные вращения, монетарные призы или возврат средств.
Логин в личный кабинет
Логин на портале производится традиционным образом. Требуется указать имя пользователя и кодовое слово, примененные при открытии счета.
Ключевые детали для защищенного входа:
– Задействуйте криптостойкий код
– Запустите двойную аутентификацию
– Не фиксируйте пароли на публичных устройствах
– Отслеживайте адресную строку браузера
Обзор бонусной системы
Гемблинг-сайт радует игроков различными поощрениями и специальными предложениями:
Вступительный комплект
Начинающие имеют возможность надеяться на значительное награду за стартовый взнос. Зачастую это процентовая надбавка к депонированной сумме плюс бесплатные вращения для известных слотов.
Периодические акции
– Недельный компенсация — возмещение доли проигранных денежных средств
– Награды на очередные пополнения
– Эксклюзивные предложения по торжествам
– Турниры с значительными выигрышными суммами
Программа привилегий
Постоянные геймеры зарабатывают очки за любую раунд, которые затем обмениваются на реальные финансы, даровые прокруты или особые преимущества.
Купоны: как активировать
Купоны — это уникальные комбинации букв и цифр, дающие доступ к дополнительным поощрениям.
Где раздобыть действующие промокоды:
– Легитимные социальные сети казино
– Партнерские ресурсы
– Email-информирование
– Профильные форумы
Указывается промокод в предназначенное поле при открытии счета или внесении депозита депозита.
Телефонная версия и приложение
Передовые пользователи предпочитают делать ставки с смартфонных устройств. Сайт предоставляет два способа для приятной мобильной игры.
Адаптивная модификация
Онлайн версия автоматически настраивается под габариты дисплея. Не просит загрузки и оперирует в произвольном новом браузере.
Мобильное приложение
Установить софт можно для устройств на Android и iOS. Преимущества app:
– Молниеносная запуск
– Устойчивая функционирование
– Мгновенные-уведомления о промо
– Самостоятельный минование блокировок
Операция установки легок: необходимо зайти на ресурс с портативного гаджета и следовать указаниям.
Гемблинг коллекция
Библиотека слотов насчитывает несколько тысяч единиц от передовых производителей.
Слоты
Развлекательные аппараты — самая популярная раздел развлечений. Размещены классические 3-барабанные слоты, передовые мультимедийные слоты с премиальными стадиями, а также джекпотные суперпризы.
Live казино
Раздел с живыми раздающими обеспечивает почувствовать дух истинного казино. Доступны развлечения с блэкджеком.
Передача осуществляется в высоком четкости, имеется коммуникация с дилером и прочими геймерами.
Соревнования
Систематически запускаются состязания по всевозможным играм. Включение обеспечивает возможность завоевать монетарные награды, фриспины или особые бонусы.
Платежные действия
Ресурс поддерживает значительный ассортимент денежных инструментов:
– Банковские карты
– Онлайн сервисы
– Криптовалюта
– Финансовые транзакции
Стартовая сумма депозита — посильная для массы игроков. Получение призов осуществляется в короткие сроки.
Департамент поддержки
Опытные консультанты готовы поддержать непрерывно. Доступны данные способы контакта:
– Веб-чат
– Email
– Голосовая линия
– Коммуникационные сети
Ответы на типовые темы можно найти в секции FAQ.
Вывод
Главный портал казино и его действующие зеркала гарантируют игрокам полный доступ ко всем опциям ресурса. Солидные вознаграждения, удобная телефонная версия, впечатляющий коллекция развлечений и квалифицированная служба поддержки делают игровой досуг предельно удобным и надежным.
Передовые онлайн-казино предоставляют клиентам обширный спектр слотов и выгодные поощрения. Впрочем для удобной работы существенно знать, как найти https://www.safetyandsecuritysuperstore.com/v-pokere-na-platforme-dostupny-rumy-s-ispolzovaniem-platezhnoy-sistemy/ и его функционирующие зеркала.
Что такое главный ресурс казино
Основной веб-сайт казино — это базовая платформа, где игроки могут пользоваться азартными играми. Сайт действует на официальных условиях и имеет всеми обязательными лицензиями.
Основные плюсы главного ресурса:
– Надежность персональных информации
– Честные условия игры
– Гарантированные платежи
– Квалифицированная техподдержка
Актуальное зеркало казино: для чего требуется
Альтернативный адрес — это точная копия основного сайта, расположенная по отличному домену. Рабочее зеркало формируется для предоставления непрерывного входа к порталу.
Факторы использования альтернативных адресов:
– Ограничение главного URL
– Технические процедуры
– Высокая посещаемость на платформу
Как найти свежее зеркало сейчас
Узнать актуальное официальное зеркало можно множественными способами:
1. Email-уведомления — зарегистрируйтесь на email рассылку
2. Служба support — напишите в онлайн-чат
3. Публичные площадки — проверяйте за обновлениями
4. Партнерские сайты — достоверные ресурсы
Регистрация на ресурсе казино
Этап регистрации составляет всего пару мгновений:
1. Активируйте на кнопку “Регистрация”
2. Внесите запрашиваемые информацию
3. Активируйте email адрес
4. Примените код активации, если доступен
После завершенной регистрации вам предоставится возможен индивидуальный раздел.
Премии и коды активации
Привлекательная поощрительная программа — важное преимущество казино:
Бонус за открытие счета
Новые участники получают начальный бонус, который может охватывать:
– Финансовый бонус на первый вклад
– Фри-спины для барабанов
– Стартовые деньги
Бонусные коды
Периодически появляются свежие промокоды, предоставляющие активировать экстра бонусы.
Программа возврата средств
Лояльные клиенты возвращают порцию проигранных денег назад.
Актуальные кампании и состязания
Ресурс регулярно устраивает увлекательные события:
– Weekly соревнования
– Сезонные акции
– Розыгрыши солидных наград
– Механизм привилегий
Вход в индивидуальный профиль
Для авторизации на сайт требуется:
1. Открыть лицензионный ресурс или актуальное зеркало
2. Выбрать “Вход”
3. Внести никнейм и секретную комбинацию
В пользовательском профиле открыты следующие функции:
– Депозит баланса
– Вывод средств
– Изучение архива игр
– Управление персональными сведениями
Mobile версия и софт
Адаптивная платформа
Responsive вариант ресурса дает возможность участвовать с различных смартфонного гаджета. Интерфейс динамически адаптируется под размер монитора.
Приложение для загрузки
Скачать клиент можно для:
– Android — официальная установка с ресурса
– iOS — установка через App Store
Выгоды приложения:
– Оперативный старт
– Устойчивая операционность
– Push-уведомления об промо
– Ускоренный интерфейс
Гемблинг секции
Слоты
Разнообразная галерея игровых автоматов от топовых разработчиков:
– Ретро автоматы
– Видео-игры
– Джекпот-автоматы
Live казино
Зона с реальными ведущими дает:
– Рулетка
– Двадцать одно
– Baccarat
– Poker
Эфиры осуществляются в высоком качестве изображения, воссоздавая ощущение настоящего казино.
Системы пополнения и обналичивания
Платформа поддерживает множественные денежные инструменты:
– Платежные card
– Цифровые платежи
– Bitcoin/Ethereum
– Финансовые транзиты
Минимальные значения взноса и скоростные платежи обеспечивают игру исключительно удобной.
Департамент поддержки
Квалифицированная служба помощи функционирует 24/7 и способна поддержать с различными задачами:
– Реалтайм-чат
– Email-консультации
– Голосовая связь
Итоги
Официальный сайт казино и его актуальные дубликаты предоставляют игрокам конфиденциальный и увлекательный гемблинг досуг. Выгодные поощрения, удобная портативная версия, богатые игры и качественное live-казино формируют эту систему великолепным решением для игровых времяпрепровождения.
рейтинг seo рейтинг seo .
mostbet giris mostbet
Актуальные онлайн казино предлагают игрокам большой спектр вариантов для комфортной игры. Тем не менее иногда доступ к официальному платформе может стать закрытым. В таких моментах на поддержку приходят KiloGram казино, которое предоставляет непрерывный подключение ко всем сервисам платформы.
Что такое рабочее зеркало казино
Копия — это абсолютная реплика лицензионного портала, которая хостится по дополнительному интернет-адресу. Дубликат содержит целый возможности основного веб-портала, включая персональный кабинет, баланс и историю операций.
Основные плюсы эксплуатации зеркала:
– Постоянный соединение к порталу
– Полная схожесть функционала
– Защита персональных реквизитов
– Хранение доступных привилегий
Как разыскать действующее зеркало на сегодня
Присутствует некоторое количество достоверных вариантов поиска актуальной URL:
Легитимные сервисы:
1. Электронная рассылка — администрация постоянно отправляет письма с свежими ссылками
2. Медийные сети — проверенные страницы постят релевантную информацию
3. Сервис поддержки — сотрудники сообщают достоверные адреса
4. Смартфонное приложение — дает возможность минуть блокировки
Регистрация на главном ресурсе
Этап открытия счета отнимает не более пару минут и включает из таких шагов:
1. Вход на лицензионный сайт или функционирующее зеркало
2. Клик на кнопку «Открыть счет»
3. Ввод регистрационной формы
4. Верификация email почты или контактного номера
5. Применение вознаграждения за регистрацию при присутствии промокода
Только что зарегистрированные клиенты зарабатывают значительный вступительный приз, который может включать фриспины, денежные поощрения или возврат средств.
Логин в персональный кабинет
Подключение на портале выполняется традиционным путем. Нужно вписать логин и секретный ключ, задействованные при открытии счета.
Важные нюансы для надежного входа:
– Используйте криптостойкий шифр
– Запустите двухэтапную аутентификацию
– Не записывайте пароли на публичных компьютерах
– Мониторьте адресную строку браузера
Описание поощрительной программы
Гемблинг-сайт одаривает пользователей разнообразными вознаграждениями и промо:
Приветственный пакет
Свежие игроки имеют возможность полагаться на значительное бонус за начальный пополнение. Обычно это процентовая прибавка к внесенной количеству плюс бесплатные вращения для известных слотов.
Систематические промо
– Еженедельный cashback — возвращение части потерянных денег
– Призы на повторные пополнения
– Особые предложения по событиям
– Турниры с крупными наградными пулами
Система вознаграждений
Активные геймеры получают баллы за каждую ставку, которые затем конвертируются на действительные деньги, free spins или эксклюзивные бонусы.
Купоны: как использовать
Кодовые комбинации — это уникальные комбинации символов, предоставляющие возможность к эксклюзивным привилегиям.
Каким образом найти свежие промокоды:
– Официальные коммуникационные сети казино
– Сотрудничающие сайты
– Email-подписка
– Тематические группы
Вводится промокод в соответствующее поле при оформлении или зачислении средств депозита.
Мобильная версия и приложение
Актуальные пользователи отдают предпочтение проводить время с смартфонных аппаратов. Портал дает два способа для комфортной мобильной игры.
Отзывчивая модификация
Интернет версия автоматически подстраивается под параметры экрана. Не требует скачивания и действует в произвольном актуальном браузере.
Телефонное приложение
Скачать приложение можно для гаджетов на Android и iOS. Преимущества app:
– Скоростная запуск
– Бесперебойная действие
– Мгновенные-уведомления о промо
– Автономный избегание блокировок
Операция загрузки несложен: достаточно открыть на портал с мобильного девайса и следовать предписаниям.
Гемблинг ассортимент
Библиотека игр включает тысячи единиц от передовых производителей.
Слоты
Гемблинг аппараты — максимально любимая категория развлечений. Показаны классические трехбарабанные машины, передовые мультимедийные слоты с премиальными раундами, а также растущие суперпризы.
Live казино
Секция с реальными крупье позволяет ощутить дух реального казино. Представлены варианты с баккарой.
Стриминг ведется в превосходном разрешении, поддерживается чат с крупье и прочими участниками.
Конкурсы
Систематически проводятся турниры по многочисленным категориям. Вступление обеспечивает возможность заработать валютные призы, фриспины или специальные привилегии.
Финансовые процедуры
Ресурс поддерживает широкий спектр расчетных методов:
– Пластиковые карты
– Электронные системы
– Крипта
– Финансовые переводы
Стартовая сумма депозита — доступная для основной части игроков. Получение средств выполняется в минимальные сроки.
Служба поддержки
Опытные операторы способны помочь круглосуточно. Имеются данные способы контакта:
– Живой-чат
– Email
– Телефонная горячая линия
– Медийные сети
Ответы на стандартные проблемы можно отыскать в зоне FAQ.
Итог
Лицензионный портал казино и его рабочие зеркала обеспечивают клиентам абсолютный вход ко всем сервисам портала. Щедрые поощрения, приятная смартфонная версия, гигантский выбор аттракционов и квалифицированная ассистенция делают гемблинг опыт крайне беспроблемным и надежным.
услуги продвижения сайтов омск услуги продвижения сайтов омск .
mostbet giris mostbet
Переход к сайту и рабочие URL
Востребованные онлайн казино предоставляют участникам большой спектр развлечений. Главный сайт https://zenithmacau.com/realnye-sovety-i-rekomendatsii-dlya-igrokov-o-tom-kak-oderzhat-pobedu-v-onlayn-kazino/ гарантирует надежный доступ ко всем услугам. Впрочем периодически случаются ситуации, когда нужно запасной путь входа.
Что означает собой функционирующее зеркало
Актуальное зеркало — это идентичная версия главного ресурса с альтернативным доменным расположением. Альтернатива сегодня обеспечивает обходить потенциальные барьеры и обеспечивать стабильный вход к предпочитаемым играм.
Официальное зеркало обладает идентичными опциями, что и основной сайт:
– Целый каталог развлечений
– Личный раздел с актуальными информацией
– Полные подарки и предложения
– Надежные банковские транзакции
Оформление и авторизация в систему
Ход регистрации на платформе отнимает считанные секунд. Свежим клиентам необходимо:
1. Попасть на рабочее зеркало сегодня
2. Щелкнуть кнопку «Открыть профиль»
3. Указать необходимые параметры
4. Верифицировать электронную почту или информацию мобильного
5. Забрать поощрение за открытие аккаунта
Вход в личный кабинет производится через указание никнейма и секретной комбинации.
Описание призовой системы
Выгодная поощрительная структура — основное плюс казино. Клиенты забирают различные награды:
Стартовые поощрения
Недавние игроки имеют возможность ожидать на щедрый поощрение за регистрацию. Чаще всего это пакет возможностей, включающий:
– Процентную надбавку к начальному депозиту
– Подарочные вращения
– Бонусные финансы на баланс
Промо-коды и уникальные возможности
Регулярные коды обеспечивают зарабатывать дополнительные преимущества. Применить их допустимо в предназначенном разделе личного раздела.
Free spins и компенсация
Free spins — это возможность крутить автоматы без применения собственных средств. Кэшбек представляет процентный компенсацию утраченных финансов.
Каталог автоматов
Развлекательная платформа предлагает огромную библиотеку игр.
Автоматы
Вариативность слотов восхищает ожидания. Имеются стандартные простые автоматы и продвинутые игры с занимательной картинкой.
Live игры
Категория Live развлечений погружает участников в атмосферу подлинного развлекательного зала. Умелые операторы осуществляют сессии в живом времени.
Турниры и рейтинги
Периодические турниры обеспечивают накала и предоставляют перспективу забрать значительные выигрыши.
Mobile вариант и приложение
Новые разработки дают возможность играть в комфортном пространстве. Мобильная форма автономно подстраивается под монитор аппарата.
Установить приложение разрешено для мобильных платформ iOS и Android. Приложение дает:
– Мгновенный вход
– Надежную деятельность
– Моментальные-оповещения об бонусах
– Удобный облик
Денежные действия
Платформа работает с различные методы ввода и получения денег:
– Платежные инструменты
– Онлайн сервисы
– Токены
– Банковские отправки
Всевозможные транзакции осуществляются через зашифрованное подключение, что защищает сохранность персональных параметров.
Департамент поддержки
Компетентная служба support работает 24/7. Соединиться с менеджерами можно через:
– Live-чат
– E-mail почту
– Горячую линию
– Медиа платформы
Итоги
Основной портал и его действующее зеркало предоставляют клиентам безопасный и легкий путь к интересным играм. Щедрые поощрения, широкий ассортимент игр и высокая сервис делают участие предельно интересной и результативной.
Следующая страница https://slon4-at.at
содержание slon4 at
Переход к сайту и действующие адреса
Актуальные интернет казино предлагают клиентам огромный спектр развлечений. Центральный веб-сайт Pinco casino предоставляет безопасный вход ко всем функциям. Однако временами возникают ситуации, когда требуется альтернативный путь доступа.
Что представляет собой рабочее зеркало
Действующее зеркало — это идентичная реплика основного портала с другим интернет именем. Копия сегодня дает возможность избегать вероятные запреты и гарантировать непрерывный подключение к популярным играм.
Главное зеркало содержит полными опциями, что и центральный ресурс:
– Совокупный перечень игр
– Персональный раздел с зафиксированными информацией
– Актуальные бонусы и акции
– Безопасные финансовые транзакции
Регистрация и подключение в сервис
Ход оформления на ресурсе длится буквально моментов. Недавним пользователям необходимо:
1. Зайти на актуальное зеркало в настоящее время
2. Выбрать кнопку «Регистрация»
3. Ввести нужные данные
4. Верифицировать e-mail почту или информацию связи
5. Забрать поощрение за оформление
Вход в личный кабинет производится с помощью предоставление имени пользователя и кода доступа.
Описание наградной структуры
Привлекательная бонусная политика — основное преимущество платформы. Участники получают различные награды:
Вступительные бонусы
Недавние пользователи имеют возможность рассчитывать на щедрый поощрение за оформление. Традиционно это комплект опций, охватывающий:
– Долевую надбавку к стартовому депозиту
– Даровые фриспины
– Дополнительные финансы на аккаунт
Промокоды и уникальные опции
Регулярные бонусные комбинации позволяют активировать дополнительные преимущества. Активировать их разрешено в отдельном окне собственного аккаунта.
Бесплатные вращения и компенсация
Бесплатные спины — это возможность играть автоматы без применения своих сумм. Рибейт представляет долевой возврат израсходованных сумм.
Каталог слотов
Гемблинг сайт предоставляет внушительную подборку развлечений.
Видеослоты
Разнообразие аппаратов поражает ожидания. Имеются традиционные 3-барабанные слоты и актуальные развлечения с увлекательной графикой.
Live казино
Раздел Live развлечений транспортирует клиентов в атмосферу истинного развлекательного клуба. Опытные операторы организуют партии в реальном режиме.
Состязания и таблицы лидеров
Постоянные конкурсы вносят остроты и обеспечивают вариант заработать крупные призы.
Mobile версия и софт
Новые технологии обеспечивают участвовать в комфортном пространстве. Портативная версия автономно подстраивается под размер гаджета.
Установить программу возможно для мобильных сред iOS и Android. Приложение гарантирует:
– Оперативный переход
– Устойчивую производительность
– Мгновенные-оповещения об предложениях
– Интуитивный вид
Платежные транзакции
Казино использует всевозможные системы ввода и получения финансов:
– Банковские счета
– Цифровые кошельки
– Токены
– Прямые отправки
Любые переводы выполняются через защищенное протокол, что обеспечивает неприкосновенность личных информации.
Департамент помощи
Компетентная служба помощи действует постоянно. Связаться с консультантами разрешено через:
– Интерактивный-чат
– Электронную почту
– Телефон
– Социальные платформы
Итоги
Легальный портал и его функционирующее зеркало предоставляют игрокам защищенный и удобный путь к увлекательным занятиям. Богатые награды, обширный выбор слотов и отличная ассистанс создают участие максимально удобной и результативной.
Хочешь казино бонус? топ новых бонусов без депозита всегда актуальные бонусы в онлайн казино. Получайте бонусы без вложений, фриспины и подарки за регистрацию. Актуальные предложения, честные условия отыгрыша и список проверенных казино с бонусами без депозита.
Подробности на странице: https://elicebeauty.com/parfyumeriya/filter/_m100_m239/
opal hub corner – Straightforward layout with responsive pages for smooth navigation.
посмотреть на этом сайте кракен даркнет
Актуальные онлайн-казино предлагают участникам внушительный диапазон развлечений и премиальных программ. Вход к платформе производится через официальный веб-сайт или его рабочее зеркало http://www.gmshpmc.com/uncategorized/6226.html, что дает постоянную активность.
Что такое актуальное зеркало казино
Дубликат — это идентичная копия основного сайта, построенная для преодоления запретов. Зеркало сегодня обеспечивает игрокам обрести соединение к излюбленным играм в произвольное время.
Официальное зеркало обладает всеми возможностями главного ресурса:
– Совокупный ассортимент слотов
– Профиль с зафиксированными информацией
– Актуальные акции
– Защищенные финансовые действия
Регистрация на главном сайте
Процесс регистрации требует всего считанные минут. Новым клиентам следует:
1. Зайти на официальный ресурс или рабочее зеркало
2. Щелкнуть на клавишу “Открыть счет”
3. Внести необходимые информацию
4. Подтвердить контакт
5. Сделать стартовый взнос
Приветственный бонус начисляется моментально после выполнения всех шагов.
Доступ в учетную запись
Действующие пользователи могут совершить подключение указывая:
– Логин и код
– Цифры телефона
– Электронную почту
Персональный раздел предоставляет шанс к контролю средствами, истории игр и доступным поощрениям.
Награды и программы
Азартная площадка радует лояльных участников щедрыми вознаграждениями:
Стартовый набор
– Надбавка на стартовый депозит до 100%
– Даровые спины на известные машины
– Особые премии за следующие депозиты
Ваучеры
Специальные ваучеры предоставляют шанс на активацию специальных призов. Актуальные купоны публикуются в категории “Акции”.
Кэшбек
Периодический кешбэк равен до 10% от утраченных денег. Возмещение выплачивается автоматически.
Программа лояльности
Регулярные клиенты накапливают очки, которые конвертируются на настоящие деньги или даровые спины.
Мобильная версия и программа
Для практичности клиентов создана функциональная mobile версия. Адаптивный вид позволяет удобно играть с любого карманного устройства.
Плюсы софта:
– Быстрый запуск к играм
– Оптимизированный облик
– Бесперебойная деятельность
– Оповещения о свежих акциях
Получить приложение можно свободно с главного веб-сайта для гаджетов на Android и iOS.
Каталог слотов
Игровые автоматы
Каталог насчитывает более 2000 слотов от известных провайдеров:
– Обычные игры
– Современные автоматы
– Джекпот-слоты
– Тематические автоматы
Live казино
Категория Live развлечений дает взаимодействие с настоящими крупье в прямом формате:
– Колесо фортуны
– Двадцать одно
– Баккара
– Столы покера
Турниры
Регулярные конкурсы с крупными призовыми бюджетами проводятся каждую неделю. Допуск в соревнованиях возможно всем действующим пользователям.
Финансовые системы
Взносы и выводы выплат реализуются через востребованные сервисы:
– Платежные пластик
– Цифровые кошельки
– Bitcoin
– Денежные платежи
Стартовый платеж — от 100 рублей. Получение денег обрабатывается в течение 24 часов.
Сервис support
Постоянная группа помощи готова ассистировать в решении всех проблем:
– Мессенджер
– Email
– Горячая линия
– Соц сети
Охрана и лицензия
Главный веб-сайт функционирует на почве признанной документа. Любые сведения игроков охранены передовым SSL-кодированием.
Резюме
Функционирующее зеркало предоставляет постоянный подключение к излюбленным развлечениям, щедрым поощрениям и комфортным сервисам. Создайте аккаунт сейчас и приобретите стартовый приз!
Нынешние интернет казино предлагают клиентам широкий диапазон вариантов для беспроблемной игры. Впрочем иногда соединение к базовому порталу может оказаться заблокированным. В таких обстоятельствах на выручку спешит казино Zooma, которое предоставляет стабильный путь ко всем возможностям платформы.
Что такое рабочее зеркало казино
Копия — это идентичная дубликат официального веб-сайта, которая хостится по запасному URL. Зеркало имеет целый набор функций главного портала, включая индивидуальный кабинет, счет и сведения платежей.
Главные преимущества использования зеркала:
– Постоянный соединение к порталу
– Стопроцентная тождественность инструментов
– Безопасность пользовательских информации
– Хранение всех поощрений
Как разыскать актуальное зеркало в данный момент
Есть несколько надежных способов получения актуальной ссылки:
Авторизованные сервисы:
1. Email рассылка — дирекция постоянно отправляет сообщения с рабочими доменами
2. Медийные сети — легитимные страницы постят свежую данные
3. Служба поддержки — консультанты дают надежные URL
4. Смартфонное приложение — обеспечивает избегать блокировки
Оформление профиля на лицензионном сайте
Процесс создания аккаунта длится только считанные минут и включает из нижеследующих ступеней:
1. Попадание на главный портал или рабочее зеркало
2. Выбор на иконку «Зарегистрироваться»
3. Внесение пользовательской таблицы
4. Проверка электронной почты или телефонного номера
5. Активация поощрения за регистрацию при доступности промокода
Свежие игроки обретают щедрый вступительный презент, который может охватывать фриспины, монетарные поощрения или cashback.
Вход в личный кабинет
Логин на ресурсе выполняется стандартным методом. Нужно указать никнейм и кодовое слово, задействованные при оформлении.
Важные моменты для надежного входа:
– Используйте криптостойкий пароль
– Задействуйте двойную проверку
– Не записывайте реквизиты на чужих компьютерах
– Отслеживайте интернет строку браузера
Описание бонусной структуры
Игорный портал одаривает геймеров многочисленными привилегиями и акциями:
Приветственный пакет
Свежие игроки способны претендовать на великодушное награду за начальный пополнение. Обычно это пропорциональная прибавка к депонированной объему плюс фриспины для востребованных слотов.
Регулярные предложения
– Еженедельный cashback — возвращение процента потерянных денежных средств
– Бонусы на повторные депозиты
– Эксклюзивные акции по праздникам
– Состязания с большими выигрышными суммами
Схема лояльности
Активные игроки собирают баллы за любую бет, которые затем конвертируются на действительные денежные призы, даровые прокруты или уникальные привилегии.
Кодовые слова: как активировать
Купоны — это особые последовательности символов, дающие привилегию к бонусным привилегиям.
В каких местах взять свежие промокоды:
– Легитимные социальные сети казино
– Аффилиатные площадки
– Email-информирование
– Специализированные группы
Прописывается промокод в специальное поле при открытии счета или добавлении денег баланса.
Смартфонная версия и приложение
Передовые геймеры выбирают делать ставки с мобильных гаджетов. Ресурс дает двойной метода для приятной мобильной игры.
Responsive вариант
Браузерная версия автоматически подстраивается под диагональ экрана. Не нуждается скачивания и работает в всяком актуальном браузере.
Телефонное приложение
Получить app можно для аппаратов на Android и iOS. Преимущества app:
– Быстрая загрузка
– Устойчивая операция
– Автоматические-уведомления о промо
– Автономный преодоление блокировок
Процедура установки прост: нужно перейти на портал с смартфонного гаджета и следовать инструкциям.
Азартный каталог
Коллекция развлечений содержит огромное количество вариантов от лучших провайдеров.
Слоты
Игровые машины — максимально любимая раздел забав. Доступны традиционные винтажные автоматы, новые графические аппараты с премиальными стадиями, а также прогрессивные джекпоты.
Live казино
Раздел с действительными раздающими обеспечивает почувствовать настроение настоящего казино. Открыты варианты с покером.
Трансляция производится в HD качестве, обеспечивается диалог с ведущим и прочими игроками.
Состязания
Периодически запускаются турниры по многочисленным дисциплинам. Участие позволяет завоевать монетарные выигрыши, даровые прокруты или уникальные презенты.
Финансовые процедуры
Ресурс предлагает обширный ассортимент денежных инструментов:
– Пластиковые карты
– Электронные кошельки
– Биткоин
– Счетовые платежи
Стартовая количество пополнения — доступная для преобладающего числа пользователей. Вывод средств обрабатывается в короткие сроки.
Сервис поддержки
Опытные специалисты готовы оказать помощь 24/7. Открыты нижеследующие методы общения:
– Интернет-чат
– Email
– Мобильная линия
– Коммуникационные сети
Разъяснения на частые проблемы можно отыскать в разделе FAQ.
Резюме
Основной веб-сайт казино и его актуальные зеркала обеспечивают игрокам совершенный доступ ко всем функциям платформы. Великодушные привилегии, удобная мобильная версия, колоссальный коллекция игр и профессиональная ассистенция делают азартный опыт предельно комфортным и надежным.
seo продвижение и раскрутка сайта seo продвижение и раскрутка сайта .
директор вертолеты россии
accutane https://wakerxnet.top/# wake rx net
btcusa – Loved the layout today; clean, simple, and genuinely user-friendly overall.
Современные онлайн-казино гарантируют клиентам обширный диапазон опций для беспроблемной развлечений. Вход к сервису казино Mad производится через лицензионный портал или рабочее зеркало.
Что такое актуальное зеркало казино
Функционирующее зеркало — это альтернативный линк лицензионного портала казино. Такие версии разрабатываются для поддержания постоянного входа к азартной платформе.
Копия на сегодня полностью дублирует функционал базового портала. Клиенты обретают идентичный путь ко всем функциям, включая оформление профиля, внесение депозита депозита и получение выигрышей.
Регистрация на основном веб-сайте
Механизм создания аккаунта требует всего пару моментов. Свежим игрокам требуется:
1. Войти на основной ресурс или рабочее официальное зеркало
2. Кликнуть кнопку “Открыть счет”
3. Указать нужные сведения
4. Верифицировать электронную почту
5. Применить купон при доступности
После финализации регистрации игрок обретает вознаграждение за регистрацию, который может содержать фриспины или финансовое вознаграждение.
Логин в индивидуальный кабинет
Пользовательский кабинет — это безопасная секция, где клиенты способны регулировать своим учетной записью. Для логина необходимо указать никнейм и password.
В персональном кабинете открыты данные опции:
– Просмотр журнала транзакций
– Применение кодов активации
– Настройка бонусами
– Включение в конкурсах
– Проверка кэшбэка
– Изменение данных
Вознаграждения и спецпредложения
Гемблинговая площадка обеспечивает щедрые призы:
Начальный бонус — дебютанты зарабатывают крупное начисление на начальные пополнения.
Даровые спины — дарятся как при открытии счета, так и в контексте многочисленных промо.
Возврат средств — постоянный возмещение доли потерянных средств.
Коды активации — особые комбинации, предоставляющие доступ к эксклюзивным призам.
Анализ развлекательных секций
Аппараты
Ассортимент слотов включает множество позиций от передовых поставщиков. Клиенты откроют как классические машины, так и инновационные мультимедийные автоматы с увлекательной графикой.
Live казино
Раздел Live казино дарит шанс участвовать с настоящими дилерами в состоянии настоящего времени. Имеются популярные столы: рулетка, блэкджек, баккара, покер.
Состязания
Постоянные соревнования с значительными призовыми банками привлекают тысячи конкурсантов. Чемпионы завоевывают финансовые выплаты и специальные поощрения.
Портативная версия и приложение
Адаптивная версия платформы предоставляет право наслаждаться с всякого девайса. Оформление самостоятельно корректируется под формат экрана.
Установить приложение можно для устройств на Android и iOS. Телефонное приложение имеет всеми функциями десктопной версии.
Как отыскать актуальное зеркало на сейчас
Действующие линки дубликатов регулярно обновляются. Обнаружить актуальную линк можно различными методами:
– Через сервис саппорта
– В подлинных коммуникационных сетях
– По почтовой подписке
– На аффилиатных площадках
Надежность и сертификация
Главный портал оперирует на фундаменте мировой разрешения. Все транзакции охраняются актуальными методами шифрования.
Конфиденциальность персональных данных сохраняется в совершенном масштабе.
Итог
Главный ресурс и его действующие альтернативы дарят игрокам беспрерывный вход к превосходным азартным играм. Выгодные бонусы, многочисленные слоты, компетентная служба — все это формирует игровой процесс чрезвычайно комфортным и захватывающим.
Современные онлайн-казино предлагают геймерам богатый ассортимент возможностей для комфортной развлечений. Подключение к платформе https://bioaudita.reset.cl/2026/03/01/bezdepozitnye-bonusy-za-registratsiyu-v-luchshikh-onlayn-kazino-k-tomu-zhe-bez-neobkhodimosti-izuchat-obshirnuyu-dokumentatsiyu-igroki-mogut-legko-nachat-igru-chto-idealno-podkhodit-dlya-tekh-kto-t/ выполняется через главный портал или действующее зеркало.
Что такое актуальное зеркало казино
Рабочее зеркало — это дополнительный URL главного портала казино. Такие дубликаты создаются для обеспечения постоянного входа к игровой системе.
Дубликат на сегодня абсолютно повторяет возможности официального портала. Игроки получают идентичный выход ко всем функциям, включая оформление профиля, зачисление средств счета и вывод выигрышей.
Регистрация на лицензионном портале
Процедура открытия профиля длится всего пару секунд. Будущим клиентам следует:
1. Зайти на основной домен или актуальное проверенное зеркало
2. Выбрать кнопку “Открыть счет”
3. Указать нужные информацию
4. Верифицировать e-mail почту
5. Активировать купон при доступности
После финализации регистрации клиент обретает вознаграждение за регистрацию, который способен охватывать даровые спины или монетарное начисление.
Доступ в собственный кабинет
Личный кабинет — это защищенная зона, где участники могут контролировать своим профилем. Для авторизации необходимо указать username и пароль.
В личном кабинете имеются такие функции:
– Просмотр журнала операций
– Использование кодов активации
– Настройка вознаграждениями
– Включение в соревнованиях
– Мониторинг кэшбэка
– Изменение данных
Поощрения и акции
Гемблинговая система предлагает великодушные подарки:
Начальный пакет — начинающие получают значительное поощрение на дебютные пополнения.
Бесплатные вращения — дарятся как при регистрации, так и в контексте всевозможных акций.
Возмещение — еженедельный возмещение фрагмента израсходованных средств.
Бонусные коды — специальные комбинации, дающие выход к особым бонусам.
Обзор азартных категорий
Слоты
Коллекция слотов содержит тысячи наименований от топовых производителей. Клиенты найдут как традиционные аппараты, так и инновационные 3D-слоты с интересной графикой.
Live казино
Раздел Live казино предлагает шанс соревноваться с реальными дилерами в условиях текущего времени. Имеются распространенные столы: рулетка, блэкджек, баккара, покер.
Конкурсы
Периодические турниры с солидными призовыми банками притягивают множество конкурсантов. Чемпионы получают cash вознаграждения и уникальные бонусы.
Мобильная версия и софт
Адаптивная версия сайта позволяет участвовать с каждого гаджета. Оформление автоматически корректируется под размер экрана.
Скачать приложение можно для девайсов на Android и iOS. Смартфонное приложение характеризуется всеми возможностями компьютерной версии.
Как определить рабочее зеркало на сейчас
Рабочие линки дубликатов постоянно изменяются. Найти действующую ссылку можно разными способами:
– Через отдел помощи
– В проверенных социальных сетях
– По email newsletter
– На партнерских ресурсах
Безопасность и официальность
Главный ресурс работает на основании глобальной сертификата. Все транзакции охраняются передовыми протоколами защиты.
Анонимность личных информации поддерживается в стопроцентном масштабе.
Заключение
Официальный портал и его актуальные дубликаты предоставляют клиентам 24/7 путь к первоклассным азартным сервисам. Привлекательные вознаграждения, многочисленные автоматы, компетентная сервис — все это делает игровой досуг предельно приятным и увлекательным.
I recently checked out this casino https://hoveniersbedrijf-vandenheuvel.nl/tea-spin-gambling-platform-your-entry-point-to-top/ and was impressed by how stable everything felt. The games run fast, bonuses are clear, and navigation is intuitive, making the experience enjoyable.
Переход к платформе через действующие зеркала
Современные интернет казино предоставляют пользователям круглосуточный переход к играм. Основной ресурс http://www.digimarconwest.com/kak-podtverdit-svoyu-lichnost-v-kazino-ukrainy/ функционирует стабильно, обеспечивая богатый набор развлекательных игр. Однако иногда появляются технические сложности или блокировки, потому важно понимать о наличии действующих зеркал.
Что означает собой официальное зеркало казино
Копия — это идентичная реплика центрального сайта с таким же возможностями. Рабочее зеркало в настоящее время даёт возможность избегать региональные блокировки и вести времяпрепровождение.
Основные выгоды задействования зеркал:
– Безграничный доступ к собственному кабинету
– Сохранение совокупных показателей учётной записи
– Схожий набор игр
– Свежие привилегии и предложения
Открытие счёта на портале
Механизм записи требует немного минут. Начинающие пользователи зарабатывают щедрый приз за создание счёта, который имеет возможность содержать:
– Стартовый денежный подарок
– Даровые фриспины для игр
– Эксклюзивные купоны
– Усиленный кешбэк
С целью окончания оформления требуется:
1. Переместиться на центральный портал или копию
2. Нажать опцию «Оформиться»
3. Написать персональные информацию
4. Подтвердить email или номер
5. Использовать ваучер (если есть существовании)
Вход в собственный кабинет
Вслед за правильной создания аккаунта геймеры способны выполнять подключение используя официальный сайт или действующее зеркало. Собственный кабинет открывает полный управление над учётной записью:
– Летопись ставок
– Зачисление баланса
– Вывод призов
– Администрирование бонусами
– Присутствие в турнирах
Награды и кампании казино
Платформа радует игроков разнообразными поощрительными программами:
Вступительные бонусы
Дебютанты обретают внушительный букет наград на начальные пополнения. Зачастую это включает частичную доплату к размеру пополнения плюс даровые фриспины.
Регулярные кампании
– Раз в неделю компенсация до 15%
– Состязания с премиальными пулами
– Бонусы на число рождения
– Особые предложения для привилегированных пользователей
Система верности
Регулярные геймеры собирают очки, которые разрешено конвертировать на реальные деньги или особые преимущества.
Портативная редакция и приложение
Актуальные разработки позволяют участвовать где угодно. Карманная форма портала самостоятельно настраивается под размер произвольного устройства.
Выгоды мобильного софта:
– Оперативная загрузка слотов
– Комфортный вид
– Push-нотификации о предложениях
– Шанс загрузить для Android и iOS
Живое казино: среда подлинного игорного клуба
Раздел Live заведения доставляет пользователей в среду реального игорного учреждения. Опытные операторы ведут процесс в формате реального времени.
Предлагаемые столы:
– Американская рулетка
– Карточная игра
– Классика
– Техасский холдем
Барабаны и развлекательные автоматы
Собрание игровых автоматов насчитывает массу позиций от передовых производителей. Любой пользователь обнаружит развлечение по душе:
– Традиционные слоты
– Современные автоматы с призовыми этапами
– Джекпот-машины
– Megaways игры
Соревнования и розыгрыши
Регулярные конкурсы вносят адреналин и обеспечивают шанс заработать внушительные суммы. Включение в состязаниях нередко бесплатное, а призовые суммы насчитывают крупных сумм.
Секьюрити и конфиденциальность
Сайт применяет современные технологии защиты для гарантии реквизитов игроков. Любые платёжные операции выполняются через охраняемые протоколы.
Заключение
Официальный ресурс и его рабочие зеркала дают устойчивый вход к отличным азартным играм. Щедрые поощрения, комфортная смартфонная вариант, многообразие автоматов и компетентное Live-игорный дом превращают платформу замечательным решением для поклонников гемблинг развлечений.
Характеристика лицензионного ресурса
Передовые виртуальные казино обеспечивают пользователям широкий ассортимент развлечений и перспектив. Официальный веб-сайт Tip Top казино предлагает защищенный путь к игровым услугам.
Рабочее зеркало: доступ в настоящий момент
Альтернативный адрес служит как идентичную реплику официального веб-сайта. Официальное зеркало позволяет клиентам обходить существующие ограничения.
Выгоды эксплуатации зеркала
Главные выгоды включают:
– Стабильный путь к сайту
– Поддержание любых характеристик главного ресурса
– Безопасность персональных сведений
– Идентичный набор функций
Создание аккаунта на портале
Ход открытия счета выделяется легкостью и эргономичностью. Недавние пользователи необходимо:
1. Открыть главный ресурс или его зеркало
2. Выбрать на кнопку открытия счета
3. Заполнить необходимые сведения
4. Подтвердить email адрес
5. Произвести дебютный авторизацию
Приз за регистрацию
Начинающие получают значительный стартовый подарок. Подобное премия способно включать:
– Финансовые бонусы
– Complimentary прокруты
– Увеличенный процент возврата
Авторизация в личный раздел
Активные клиенты в состоянии быстро получить доступ в персональный кабинет, эксплуатируя учетные данные и ключ. Персональный аккаунт предлагает путь к:
– Управлению депозитом
– Записям транзакций
– Действующим призам
– Настройкам аккаунта
Призы и акции
Портал регулярно проводит многочисленные промо-кампании для участников.
Категории бонусов
Ключевые категории бонусов:
– Пополнительные подарки – доля от размера внесения
– Спины – бесплатные раунды в аппаратах
– Возврат средств – возврат процента потерянных средств
– Конкурсные награды – премии за состязание в конкурсах
Коды
Специальные ваучеры дают возможность приобрести дополнительные преимущества. Участники имеют возможность получить их на тематических площадках или взять в уведомлениях.
Mobile версия и app
Прогрессивные пользователи предпочитают мобильный игровой процесс.
Опции переносной системы
– Адаптивный облик для всех девайсов
– Полный путь к играм
– Стремительная подгрузка
– Эргономичное контроль
Загрузить программу
Мобильное софт открыто для установки на девайсы с базовыми ОС Android и iOS. Софт предоставляет:
– Бесперебойную деятельность
– Мгновенные сообщения о бонусах
– Оперативный запуск к желанным играм
Гемблинг портфель
Портал предлагает внушительную галерею азартных развлечений.
Аппараты
Ассортимент азартных слотов содержит:
– Стандартные автоматы
– Видео слоты
– Накопительные автоматы
– Branded слоты
Live дилеры
Раздел живых игр предлагает возможность состязаться с живыми крупье. Представлены:
– Американская рулетка
– Блек-джек
– Баккара
– Карибский покер
Турниры
Постоянные соревнования помогают пользователям бороться за солидные финансовые суммы. Турнирная сетка модифицируется еженедельно.
Банковские действия
Сайт предлагает множество опций пополнения и снятия сумм:
– Кредитные карты
– Электронные счета
– Банковские трансферы
– Bitcoin
Любые операции проходят конфиденциально с задействованием прогрессивных методов шифрования.
Служба поддержки
Профессиональная отдел саппорта действует без перерыва. Связаться с специалистами можно через:
– Онлайн чат
– Email почту
– Телефон
– Социальные медиа
Охрана и лицензирование
Портал оперирует на базе легальной лицензии. Такое обеспечивает:
– Прозрачность азартного геймплея
– Охрану конфиденциальных сведений
– Пунктуальные перечисления
– Легальный гемблинг
Заключение
Главный ресурс и его действующие альтернативные адреса дают пользователям целостный набор возможностей для комфортной и доходной игры. Значительные вознаграждения, многочисленные автоматы, опытная поддержка и безопасная платформа платежей делают платформу оптимальным выбором для поклонников азартных забав.
For quick
Online cash loans for bad credit
to find out more.
посетить сайт https://slon4-at.at/
Дом из бруса 120 кв м — идеальный размер для семьи из четырёх
Нынешние онлайн-казино предоставляют пользователям обширный ассортимент игр и призовых программ. Подключение к сервису выполняется через главный портал или его актуальное зеркало Bollywood казино, что обеспечивает бесперебойную работу.
Что представляет собой функционирующее зеркало казино
Дубликат — это полная версия официального веб-сайта, созданная для решения ограничений. Действующее зеркало обеспечивает игрокам иметь подключение к выбранным играм в любое время.
Лицензионное зеркало располагает всеми опциями первоначального портала:
– Целый ассортимент развлечений
– Учетная запись с записанными данными
– Действующие акции
– Надежные расчетные транзакции
Регистрация на главном портале
Алгоритм оформления составляет всего несколько минут. Начинающим участникам требуется:
1. Попасть на проверенный ресурс или рабочее зеркало
2. Кликнуть на элемент “Создать аккаунт”
3. Заполнить нужные сведения
4. Подтвердить электронную почту
5. Произвести начальный взнос
Стартовый бонус зачисляется незамедлительно после окончания всех стадий.
Доступ в учетную запись
Созданные игроки могут осуществить вход вводя:
– Логин и ключ
– Цифры сотового
– Email
Аккаунт обеспечивает доступ к регулированию средствами, записям ставок и активным поощрениям.
Промо и предложения
Игровая система вознаграждает регулярных участников щедрыми призами:
Первый пакет
– Поощрение на дебютный пополнение до 100%
– Фриспины на известные слоты
– Добавочные бонусы за последующие платежи
Бонусные коды
Уникальные коды дают доступ на использование специальных бонусов. Текущие промокоды выкладываются в блоке “Предложения”.
Кэшбек
Регулярный кешбэк равен до 10% от потраченных сумм. Возмещение выплачивается незамедлительно.
Механизм лояльности
Регулярные клиенты приобретают поинты, которые обмениваются на настоящие выплаты или free spins.
Адаптивный портал и программа
Ради комфорта пользователей разработана удобная mobile версия. Адаптивный вид позволяет комфортно играть с всякого переносного девайса.
Плюсы APP:
– Скорый доступ к автоматам
– Настроенный дизайн
– Стабильная функциональность
– Оповещения о последних акциях
Установить программу можно даром с основного веб-сайта для девайсов на Android и iOS.
Каталог развлечений
Игровые автоматы
Каталог включает более 2000 машин от топовых студий:
– Традиционные машины
– Видео-слоты
– Jackpot игры
– Тематические автоматы
Live казино
Секция Live развлечений дает игру с подлинными диллерами в прямом времени:
– Колесо фортуны
– Двадцать одно
– Punto Banco
– Столы покера
Соревнования
Периодические соревнования с значительными премиальными суммами проводятся систематически. Допуск в турнирах открыто всем зарегистрированным игрокам.
Финансовые варианты
Пополнения и изъятия средств выполняются через востребованные способы оплаты:
– Банковские пластик
– Электронные сервисы
– Криптовалюта
– Денежные платежи
Самый низкий депозит — от 100 рублей. Вывод средств обрабатывается в течение 24 часов.
Сервис помощи
Круглосуточная команда support способна поддержать в исправлении любых ситуаций:
– Live chat
– Email
– Связь
– Публичные сети
Защита и сертификат
Подлинный сайт работает на основании глобальной лицензии. Всевозможные сведения пользователей обезопасены современным SSL-криптованием.
Вывод
Рабочее зеркало предоставляет непрерывный соединение к любимым слотам, щедрым промокодам и комфортным сервисам. Зарегистрируйтесь немедленно и получите стартовый бонус!
plinko apk последняя версия http://plinko61038.help
Характеристика лицензионного сайта
Актуальные интернет казино обеспечивают пользователям широкий набор забав и опций. Основной портал РўРёРї РўРѕРї обеспечивает защищенный путь к игровым возможностям.
Рабочее зеркало: возможность на сегодня
Дублирующий портал выступает собой точную версию основного портала. Проверенное зеркало обеспечивает участникам преодолевать потенциальные барьеры.
Достоинства задействования зеркала
Ключевые плюсы включают:
– Стабильный шанс к сайту
– Сохранение абсолютно всех характеристик официального веб-сайта
– Сохранность индивидуальных данных
– Такой же возможности
Создание аккаунта на ресурсе
Процедура открытия счета знаменуется простотой и практичностью. Свежие пользователи необходимо:
1. Открыть официальный ресурс или его зеркало
2. Нажать на пункт создания аккаунта
3. Внести необходимые поля
4. Валидировать почтовую ящик
5. Произвести первый авторизацию
Приз за открытие счета
Новички приобретают внушительный вступительный подарок. Данное награда в состоянии включать:
– Монетарные начисления
– Complimentary спины
– Увеличенный показатель возврата
Авторизация в индивидуальный профиль
Активные участники способны оперативно получить доступ в свой кабинет, задействуя учетные данные и код. Индивидуальный раздел предлагает возможность к:
– Контролю балансом
– Истории операций
– Работающим подаркам
– Параметрам профиля
Вознаграждения и промо
Ресурс систематически организует многочисленные предложения для игроков.
Типы бонусов
Основные типы поощрений:
– Денежные подарки – процент от объема депозита
– Спины – complimentary прокруты в автоматах
– Компенсация – возмещение части потерянных финансов
– Призовые награды – призы за выступление в соревнованиях
Ваучеры
Эксклюзивные промокоды обеспечивают заработать дополнительные преимущества. Клиенты могут отыскать их на специализированных площадках или заработать в новостях.
Портативная редакция и программа
Прогрессивные пользователи предпочитают переносной игровой процесс.
Опции мобильной адаптации
– Отзывчивый дизайн для различных девайсов
– Целостный путь к слотам
– Оперативная работа
– Комфортное контроль
Download софт
Переносное софт доступно для downloading на устройства с операционными ОС Android и iOS. App гарантирует:
– Надежную деятельность
– Мгновенные алерты о предложениях
– Быстрый доступ к предпочитаемым автоматам
Гемблинг ассортимент
Портал обеспечивает огромную подборку гемблинг игр.
Аппараты
Коллекция азартных слотов охватывает:
– Обычные игры
– Современные слоты
– Прогрессивные слоты
– Тематические слоты
Live игры
Секция реальных дилеров дает право соревноваться с реальными крупье. Доступны:
– Рулетка
– Блек-джек
– Баккара
– Покер
Соревнования
Регулярные чемпионаты дают возможность участникам бороться за внушительные призовые фонды. Соревновательная программа изменяется постоянно.
Денежные процедуры
Платформа предлагает массу вариантов депозита и снятия денег:
– Дебетовые карты
– Виртуальные счета
– Межбанковские трансферы
– Криптовалюты
Любые операции выполняются защищенно с применением актуальных систем шифрования.
Сервис support
Компетентная группа помощи действует круглосуточно. Связаться с консультантами доступно через:
– Живой чат
– Электронную почту
– Контактный номер
– Social сети
Охрана и лицензирование
Платформа работает на базе законной лицензии. Такое удостоверяет:
– Честность развлекательного процесса
– Безопасность личных информации
– Своевременные выплаты
– Контролируемый геймплей
Заключение
Главный портал и его актуальные резервные страницы дают пользователям целостный ассортимент услуг для безопасной и доходной развлечений. Солидные призы, различные игры, компетентная служба и защищенная структура транзакций превращают платформу оптимальным опцией для любителей азартных игр.
Безопасность на детской площадке — первое, на что стоит обратить внимание. Все углы должны быть скруглены, крепёж скрыт, а конструкция — надёжно закреплена в грунте. Хороший производитель всегда предоставляет сертификаты безопасности.
Переход к сайту через действующие зеркала
Передовые онлайн казино предоставляют пользователям круглосуточный вход к сервисам. Официальный сайт казино Бублик оперирует устойчиво, гарантируя обширный спектр азартных слотов. Тем не менее временами формируются технические трудности или блокировки, потому важно иметь представление о существовании действующих зеркал.
Что собой представляет собой основное зеркало казино
Дубликат — это точная копия основного сайта с таким же интерфейсом. Рабочее зеркало в настоящее время позволяет преодолевать территориальные ограничения и вести гемблинг.
Основные плюсы задействования зеркал:
– Безграничный доступ к личному кабинету
– Удержание всех данных аккаунта
– Такой же спектр развлечений
– Действующие бонусы и акции
Создание аккаунта на портале
Процедура создания аккаунта длится считанные минут. Начинающие клиенты приобретают богатый приз за создание счёта, что в состоянии включать:
– Приветственный игровой подарок
– Даровые вращения для машин
– Специальные купоны
– Усиленный возврат
Во имя финализации создания аккаунта следует:
1. Переместиться на официальный сайт или зеркало
2. Выбрать опцию «Оформиться»
3. Ввести персональные сведения
4. Заверить мейл или контакт
5. Задействовать код (если есть доступности)
Авторизация в индивидуальный кабинет
Вслед за корректной регистрации игроки имеют возможность совершать вход с помощью официальный веб-сайт или функционирующее зеркало. Личный кабинет открывает всесторонний контроль над аккаунтом:
– История ставок
– Пополнение кошелька
– Изъятие денег
– Регулирование поощрениями
– Присутствие в состязаниях
Награды и предложения казино
Ресурс удовлетворяет клиентов вариативными наградными системами:
Начальные поощрения
Начинающие получают великодушный набор бонусов на стартовые пополнения. Как правило это предполагает долевую надбавку к размеру взноса плюс безвозмездные кручения.
Систематические акции
– Еженедельный кешбэк до 15%
– Соревнования с призовыми пулами
– Поощрения на число рождения
– Эксклюзивные акции для привилегированных клиентов
План верности
Активные пользователи зарабатывают очки, что можно превратить на подлинные средства или эксклюзивные преимущества.
Карманная редакция и утилита
Актуальные решения дают возможность развлекаться всюду подходяще. Смартфонная редакция веб-сайта независимо адаптируется под монитор любого аппарата.
Выгоды смартфонного программы:
– Оперативная открытие игр
– Практичный облик
– Мгновенные-сообщения о бонусах
– Шанс установить для Android и iOS
Реальное казино: обстановка истинного гемблинг дома
Область Live казино доставляет пользователей в среду подлинного азартного клуба. Компетентные крупье проводят процесс в виде реального времени.
Имеющиеся развлечения:
– Колесо фортуны
– Очко
– Карточная игра
– Покерная игра
Барабаны и развлекательные слоты
Каталог развлекательных аппаратов содержит множество вариантов от лидирующих разработчиков. Всякий геймер подберёт автомат по желанию:
– Винтажные барабаны
– Видеослоты с дополнительными турами
– Прогрессивный-игры
– Megaways машины
Турниры и раздачи
Постоянные турниры включают адреналин и предоставляют возможность получить значительные награды. Участие в соревнованиях регулярно бесплатное, а наградные банки доходят до крупных объёмов.
Охрана и секретность
Ресурс эксплуатирует передовые протоколы кодирования для охраны информации геймеров. Совокупные денежные процедуры совершаются через охраняемые соединения.
Резюме
Главный сайт и его действующие зеркала дают устойчивый подключение к отличным развлекательным развлечениям. Щедрые награды, эргономичная портативная редакция, богатство автоматов и квалифицированное Live-казино превращают сайт отличным вариантом для поклонников гемблинг слотов.
Обзор лицензионного ресурса
Современные сетевые казино обеспечивают пользователям широкий ассортимент услуг и возможностей. Официальный веб-сайт казино Volta казино предлагает проверенный вход к развлекательным возможностям.
Рабочее зеркало: вход прямо сейчас
Альтернативный адрес служит в качестве абсолютную дубликат основного ресурса. Действующее зеркало дает возможность клиентам миновать возможные ограничения.
Плюсы эксплуатации зеркала
Основные плюсы содержат:
– Непрерывный доступ к платформе
– Поддержание всех функций официального портала
– Охрана индивидуальных материалов
– Идентичный инструментарий
Регистрация на ресурсе
Механизм открытия счета знаменуется легкостью и эргономичностью. Недавние игроки должны:
1. Перейти на главный сайт или его зеркало
2. Выбрать на пункт открытия счета
3. Ввести необходимые информацию
4. Подтвердить email адрес
5. Выполнить начальный доступ
Бонус за регистрацию
Новички получают внушительный начальный презент. Данное вознаграждение способно охватывать:
– Материальные средства
– Даровые фриспины
– Повышенный уровень кэшбека
Доступ в персональный профиль
Активные клиенты в состоянии быстро войти в личный профиль, применяя имя пользователя и ключ. Персональный раздел обеспечивает путь к:
– Администрированию депозитом
– Истории переводов
– Действующим поощрениям
– Настройкам профиля
Бонусы и акции
Ресурс постоянно проводит различные предложения для участников.
Разновидности подарков
Главные формы бонусов:
– Депозитные подарки – процент от размера внесения
– Бесплатные вращения – complimentary спины в игровых машинах
– Кэшбек – возврат фрагмента проигранных финансов
– Конкурсные призы – награды за участие в соревнованиях
Ваучеры
Особые коды обеспечивают приобрести дополнительные бонусы. Участники способны найти их на специализированных сайтах или получить в рассылке.
Портативная версия и софт
Прогрессивные клиенты предпочитают портативный гейминг.
Функции портативной адаптации
– Гибкий дизайн для всех устройств
– Целостный возможность к автоматам
– Моментальная функционирование
– Эргономичное управление
Загрузить программу
Mobile app предложено для downloading на девайсы с базовыми платформами Android и iOS. Программа дает:
– Надежную производительность
– Мгновенные оповещения о призах
– Быстрый путь к любимым развлечениям
Гемблинг ассортимент
Игровой клуб обеспечивает обширную коллекцию азартных развлечений.
Автоматы
Коллекция развлекательных автоматов насчитывает:
– Классические автоматы
– Видео аппараты
– Накопительные машины
– Тематические слоты
Live игры
Раздел живых игр обеспечивает шанс участвовать с живыми крупье. Открыты:
– Европейская рулетка
– Блэкджек
– Баккара
– Техасский холдем
Соревнования
Периодические турниры обеспечивают клиентам конкурировать за внушительные денежные пулы. Турнирная структура обновляется регулярно.
Финансовые действия
Сайт поддерживает множество вариантов пополнения и снятия финансов:
– Дебетовые карточки
– Цифровые счета
– Межбанковские транзакции
– Bitcoin
Совокупные операции проходят защищенно с применением современных протоколов кодирования.
Сервис поддержки
Компетентная группа поддержки функционирует круглосуточно. Коннектиться с менеджерами возможно через:
– Интерактивный чат
– Электронную почту
– Контактный номер
– Соц медиа
Секьюрити и аккредитация
Платформа действует на фундаменте законной аккредитации. Данное гарантирует:
– Прозрачность азартного действа
– Безопасность индивидуальных сведений
– Пунктуальные транзакции
– Регулируемый гейминг
Резюме
Официальный портал и его функционирующие зеркала предоставляют клиентам полный ассортимент функций для безопасной и прибыльной игры. Внушительные бонусы, всевозможные развлечения, квалифицированная сервис и проверенная инфраструктура транзакций создают платформу оптимальным выбором для ценителей развлекательных игр.
Hi there, You have done an excellent job. I will definitely digg it
and personally suggest to my friends. I’m sure they’ll be benefited from this
site.
Эта познавательная публикация погружает вас в море интересного контента, который быстро захватит ваше внимание. Мы рассмотрим важные аспекты темы и предоставим вам уникальныеInsights и полезные сведения для дальнейшего изучения.
Ознакомиться с деталями – https://vivod-iz-zapoya-2.ru/
olive marketplace collective – Well-organized platform with fast-loading pages and intuitive browsing.
Анализ главного портала
Новое онлайн-казино обеспечивает своим игрокам большой спектр развлечений и вознаграждений. Основной сайт https://cre8iveclothing.co.uk/v-2026-godu-pri-registratsii-v-onlayn-kazino-predlagayutsya-samye-vygodnye-bonusy-i-promokody оперирует непрерывно, давая возможность к известным симуляторам, live-казино и многим промо.
Рабочее зеркало: возможность к сайту
Что такое альтернатива казино
Дубликат означает собой полную версию основного веб-сайта с иным URL именем. Функционирующее зеркало позволяет игрокам избегать ограничения и иметь постоянный подключение к предпочитаемым играм.
Как обнаружить рабочее зеркало сегодня
Рабочие адреса на основное зеркало выкладываются через:
– Почтовую подписку
– Основные социальные сети
– Сервис сопровождения
– Тематические площадки
Оформление на сайте
Ход созданияаккаунта
Регистрация занимает пару минут и включает такие этапы:
1. Открытие на официальный веб-сайт или рабочее зеркало
2. Клик элемента “Регистрация”
3. Ввод личных данных
4. Активация электроннойпочты или мобильного
5. Формирование кодадоступа
Приз за открытиесчета
Свежие участники приобретают выгодные начальные поощрения:
– Бонусные средства на аккаунт
– Freespins для симуляторов
– Расширенный коэффициент кешбэка
– Особые купоны
Авторизация в персональный аккаунт
Активные игроки могут совершить авторизацию через официальный сайт или текущее зеркало. Для этого необходимо внести имяпользователя и секретнуюкомбинацию, сформированные при регистрации.
Опции индивидуального профиля
В собственном кабинете предоставлены следующие возможности:
– Управление учетными реквизитами
– Зачисление депозита
– Получение призов
– Ввод промокодов
– Мониторинг журнала операций
– Участие в состязаниях
Поощрения и промо
Разновидности бонусов
Казино награждает своих пользователей многочисленными наградными программами:
– Начальный набор — большие поощрения на дебютные пополнения
– Freespins — бонусные вращения в известных играх
– Кэшбек — периодический компенсация части убытков
– Система лояльности — эксклюзивные бонусы для верных участников
Ваучеры и их использование
Особые коды гарантируют дополнительные подарки. Для использования необходимо внести последовательность в нужное графу в собственном кабинете.
Развлекательный каталог
Игры
Коллекция слотовых машин вмещает сотни названий от лучших производителей:
– Классические машины
– Видео автоматы
– Накопительные симуляторы
– Брендовые автоматы
Live казино
Секция Live-казино дарит взаимодействие с живыми дилерами в режиме онлайн эфира:
– Европейскаярулетка
– Blackjack
– Пунтобанко
– Casinopoker
Соревнования
Периодические конкурсы с большими выигрышными фондами проходят еженедельно. Игроки сражаются за победу в таблице.
Портативная версия и софт
Адаптивная реализация веб-сайта
Основной портал абсолютно приспособлен для планшетных девайсов. Клиенты способны играть слоты сразу через браузер без нужды скачивания.
Программа для инсталляции
Фирменное карманное софт имеется для получения на девайсы с базовыми средами Android и iOS. APP обеспечивает:
– Оперативный подход к играм
– Устойчивую производительность
– Мгновенные-уведомления о бонусах
– Удобный интерфейс
Вывод
Официальный ресурс казино и его актуальные копии предоставляют игрокам комплексный путь к первоклассным азартным играм. Большие бонусы, многочисленные предложения, комфортная адаптивная адаптация и профессиональная помощь превращают развлекательный опыт предельно комфортным и результативным.
компании занимающиеся продвижением сайтов компании занимающиеся продвижением сайтов .
Характеристика основного портала
Передовые виртуальные казино предлагают игрокам обширный выбор услуг и шансов. Главный ресурс http://fncltd.com/kak-obygrat-onlayn-kazino-vyvesti-dengi-i-vospolzovatsya-poleznymi-sovetami-i-skhemami/ обеспечивает безопасный путь к азартным сервисам.
Функционирующее зеркало: вход сегодня
Альтернативный адрес выступает как идентичную версию лицензионного ресурса. Действующее зеркало обеспечивает участникам избегать вероятные ограничения.
Выгоды использования зеркала
Ключевые достоинства охватывают:
– Беспрерывный путь к ресурсу
– Удержание полных возможностей базового сайта
– Защита индивидуальных информации
– Такой же набор функций
Регистрация на платформе
Процедура оформления профиля выделяется понятностью и практичностью. Недавние клиенты требуется:
1. Зайти на лицензионный портал или его зеркало
2. Нажать на пункт оформления
3. Указать требуемые данные
4. Верифицировать электронную адрес
5. Осуществить стартовый логин
Приз за создание аккаунта
Новые игроки зарабатывают щедрый начальный приз. Подобное вознаграждение имеет возможность включать:
– Финансовые суммы
– Бесплатные фриспины
– Повышенный показатель компенсации
Авторизация в личный раздел
Активные участники в состоянии быстро получить доступ в личный кабинет, задействуя имя пользователя и шифр. Собственный раздел предлагает шанс к:
– Контролю балансом
– Хронологии транзакций
– Активным подаркам
– Конфигурации учетной записи
Вознаграждения и промо
Ресурс периодически устраивает всевозможные мероприятия для игроков.
Категории подарков
Ключевые типы бонусов:
– Денежные подарки – часть от величины взноса
– Фриспины – бесплатные раунды в аппаратах
– Компенсация – возмещение фрагмента потерянных финансов
– Турнирные трофеи – премии за выступление в конкурсах
Коды
Особые купоны дают возможность приобрести добавочные бонусы. Клиенты способны обнаружить их на тематических порталах или получить в уведомлениях.
Mobile редакция и программа
Прогрессивные игроки любят мобильный гейминг.
Возможности переносной адаптации
– Responsive дизайн для разнообразных гаджетов
– Целостный путь к играм
– Моментальная функционирование
– Эргономичное контроль
Установить программу
Переносное программа предложено для скачивания на гаджеты с базовыми системами Android и iOS. App гарантирует:
– Стабильную функциональность
– Мгновенные оповещения о призах
– Мгновенный доступ к желанным автоматам
Гемблинг каталог
Казино предлагает богатую подборку игровых развлечений.
Автоматы
Каталог игровых автоматов охватывает:
– Традиционные слоты
– Видео игры
– Призовые автоматы
– Лицензионные развлечения
Live казино
Область реальных дилеров дает право соревноваться с профессиональными ведущими. Представлены:
– Рулетки
– 21
– Баккара
– Poker
Состязания
Систематические конкурсы дают возможность участникам бороться за крупные финансовые суммы. Призовая структура модифицируется постоянно.
Финансовые операции
Платформа предоставляет разнообразие способов внесения и вывода финансов:
– Дебетовые карты
– Цифровые кошельки
– Прямые переводы
– Bitcoin
Совокупные транзакции проходят безопасно с использованием передовых методов защиты.
Сервис помощи
Компетентная отдел помощи функционирует постоянно. Соединиться с консультантами можно через:
– Online чат
– Электронную почту
– Телефон
– Социальные сети
Охрана и аккредитация
Платформа работает на фундаменте законной разрешения. Это подтверждает:
– Справедливость игрового процесса
– Сохранность персональных информации
– Пунктуальные перечисления
– Легальный геймплей
Вывод
Лицензионный сайт и его действующие альтернативные адреса обеспечивают клиентам полный спектр функций для комфортной и доходной досуга. Внушительные подарки, различные игры, опытная служба и защищенная система операций превращают ресурс идеальным выбором для фанатов азартных игр.
I read this piece of writing fully regarding the comparison of latest and previous technologies, it’s awesome article.
Here is my website zgribulita101
сюда https://slon4-at.at
Нынешние онлайн-казино предлагают пользователям богатый ассортимент опций для беспроблемной развлечений. Переход к сервису Minicas сайт выполняется через основной домен или действующее зеркало.
Что такое актуальное зеркало казино
Актуальное зеркало — это резервный линк официального веб-сайта казино. Такие версии генерируются для обеспечения постоянного соединения к гемблинговой сервису.
Копия сегодня абсолютно повторяет опции базового ресурса. Геймеры получают такой же вход ко всем возможностям, включая создание аккаунта, пополнение баланса и обналичивание выигрышей.
Регистрация на главном портале
Алгоритм открытия профиля длится всего буквально моментов. Начинающим участникам необходимо:
1. Перейти на официальный сайт или текущее официальное зеркало
2. Выбрать кнопку “Зарегистрироваться”
3. Ввести нужные информацию
4. Верифицировать электронную почту
5. Использовать промокод при присутствии
После финализации регистрации клиент получает приз за регистрацию, который может включать free spins или монетарное поощрение.
Логин в личный кабинет
Личный кабинет — это закрытая зона, где участники способны управлять своим счетом. Для авторизации нужно указать логин и секретный ключ.
В персональном кабинете имеются следующие инструменты:
– Проверка истории транзакций
– Использование промокодов
– Управление бонусами
– Включение в конкурсах
– Контроль кэшбэка
– Редактирование профиля
Бонусы и акции
Игровая платформа дарит выгодные вознаграждения:
Стартовый набор — новички зарабатывают существенное вознаграждение на начальные депозиты.
Даровые спины — выдаются как при оформлении, так и в контексте разнообразных промо.
Возмещение — постоянный рефанд фрагмента проигранных сумм.
Бонусные коды — эксклюзивные последовательности, открывающие выход к уникальным призам.
Обзор гемблинговых секций
Slots
Собрание автоматов содержит тысячи вариантов от топовых провайдеров. Пользователи обнаружат как традиционные аппараты, так и современные видеослоты с интересной анимацией.
Live казино
Секция Live казино предлагает опцию развлекаться с настоящими ведущими в условиях реального времени. Открыты востребованные игры: рулетка, блэкджек, баккара, покер.
Состязания
Систематические чемпионаты с большими наградными пулами завлекают сотни участников. Чемпионы завоевывают cash вознаграждения и эксклюзивные подарки.
Портативная версия и софт
Мобильная версия портала дает возможность развлекаться с любого устройства. Интерфейс независимо корректируется под формат экрана.
Получить приложение можно для устройств на Android и iOS. Телефонное ПО располагает всеми возможностями компьютерной версии.
Как найти текущее зеркало на текущий день
Действующие адреса копий постоянно изменяются. Получить актуальную ссылку можно разными вариантами:
– Через службу помощи
– В официальных коммуникационных сетях
– По email newsletter
– На специализированных порталах
Безопасность и официальность
Официальный ресурс функционирует на основании международной документа. Все транзакции шифруются актуальными технологиями кодирования.
Приватность личных данных поддерживается в стопроцентном формате.
Резюме
Лицензионный портал и его действующие дубликаты обеспечивают игрокам постоянный доступ к высококлассным игровым услугам. Щедрые поощрения, разнообразные автоматы, профессиональная сервис — все это формирует гемблинговый опыт предельно беспроблемным и притягательным.
Нынешние онлайн-казино дают участникам внушительный набор развлечений и бонусных программ. Подключение к ресурсу выполняется через главный ресурс или его рабочее зеркало казино Лев, что гарантирует постоянную деятельность.
Что такое действующее зеркало казино
Дубликат — это абсолютная версия основного ресурса, созданная для преодоления барьеров. Действующее зеркало позволяет игрокам сохранить вход к выбранным играм в любое время.
Лицензионное зеркало имеет всеми опциями первоначального ресурса:
– Весь список развлечений
– Аккаунт с внесенными параметрами
– Актуальные акции
– Надежные финансовые транзакции
Регистрация на лицензионном сайте
Алгоритм открытия счета требует всего несколько минут. Первым клиентам нужно:
1. Попасть на официальный ресурс или актуальное зеркало
2. Щелкнуть на клавишу “Регистрация”
3. Заполнить необходимые сведения
4. Активировать email
5. Внести первый взнос
Бонус за регистрацию выдается сразу после выполнения всех стадий.
Вход в аккаунт
Зарегистрированные пользователи могут произвести подключение вводя:
– Логин и пароль
– Номер контакта
– Email
Персональный раздел обеспечивает право к администрированию средствами, записям игр и текущим бонусам.
Промо и программы
Азартная система привлекает постоянных пользователей щедрыми бонусами:
Начальный комплект
– Поощрение на первый депозит до 100%
– Фриспины на топовые слоты
– Экстра бонусы за последующие депозиты
Промокоды
Уникальные ваучеры открывают право на получение эксклюзивных вознаграждений. Текущие купоны выкладываются в блоке “Предложения”.
Возврат средств
Регулярный кешбэк достигает до 10% от потраченных сумм. Возврат начисляется незамедлительно.
Система лояльности
Постоянные пользователи приобретают единицы, которые переводятся на подлинные средства или даровые спины.
Mobile версия и софт
Для практичности участников построена удобная мобильная версия. Гибкий интерфейс позволяет удобно участвовать с каждого переносного устройства.
Выгоды приложения:
– Моментальный подключение к развлечениям
– Адаптированный дизайн
– Надежная активность
– Сообщения о последних бонусах
Получить приложение можно даром с проверенного веб-сайта для гаджетов на Android и iOS.
Ассортимент игр
Автоматы
Каталог включает более 2000 автоматов от известных провайдеров:
– Стандартные автоматы
– Современные автоматы
– Прогрессивные автоматы
– Сюжетные развлечения
Live казино
Раздел Live игр обеспечивает участие с живыми ведущими в онлайн эфире:
– Рулеточные столы
– Карточная игра
– Baccarat
– Карточный покер
Конкурсы
Периодические соревнования с большими наградными суммами запускаются систематически. Допуск в турнирах доступно всем созданным игрокам.
Платежные системы
Платежи и выводы выплат осуществляются через известные способы оплаты:
– Платежные пластик
– Виртуальные счета
– Криптовалюта
– Банковские транзакции
Самый низкий взнос — от 100 рублей. Получение средств осуществляется в течение 24 времени.
Отдел support
24/7 команда поддержки готова ассистировать в решении любых вопросов:
– Живой чат
– Email
– Горячая линия
– Публичные сети
Надежность и разрешение
Подлинный сайт оперирует на почве международной лицензии. Все данные участников закрыты передовым SSL-протоколом.
Итог
Рабочее зеркало гарантирует бесперебойный доступ к излюбленным играм, щедрым поощрениям и удобным услугам. Присоединяйтесь сегодня и заработайте приветственный подарок!
поисковое продвижение сайтов омск поисковое продвижение сайтов омск .
Переход к ресурсу через актуальные зеркала
Пользователи виртуальных казино нередко сталкиваются с проблемой закрытия главного ресурса. Конкретно для устранения этой задачи созданы зеркала основного ресурса. Cat казино обеспечивает абсолютный доступ ко всем возможностям ресурса.
Что такое актуальное зеркало казино
Зеркало является собой точную реплику главного сайта с идентичным возможностями. Основное несовпадение — это доменное имя. Любые данные игрока, включая средства, поощрения и записи ставок, остаются идентичными.
Преимущества использования зеркал
Функционирующие зеркала характеризуются комплексом значимых достоинств:
– Постоянный подключение к излюбленным развлечениям
– Абсолютная защита индивидуальных сведений
– Удержание всех опций персонального кабинета
– Шанс взятия поощрений и вовлечения в промоакциях
Создание аккаунта на официальном сайте
Ход создания аккаунта чрезвычайно элементарен и требует несколько минут. Свежие участники в состоянии претендовать на солидный вводный поощрение за регистрацию.
Этапы оформления аккаунта
1. Вход на главный портал или его альтернативу
2. Нажатие на опцию “Регистрация”
3. Указание обязательных информации
4. Проверка почтовой почты
5. Внесение купона (когда имеется)
Награды и предложения для участников
Казино поощряет своих пользователей разнообразными наградными акциями.
Базовые виды поощрений
Приветственный подарок — щедрое вознаграждение для свежих пользователей, что способно охватывать денежные суммы и бесплатные вращения.
Фриспины — шанс запускать в топовых аппаратах безвозмездно.
Компенсация — долевой компенсация утраченных финансов, каковой зачисляется каждую неделю или раз в месяц.
Бонусные коды — особые комбинации, предоставляющие экстра привилегии.
Персональный кабинет: функции и установки
Пользовательский раздел дает полный управление над развлекательным активностью. Тут предусмотрены:
– Регулирование счетом
– История переводов
– Работающие привилегии
– Параметры сохранности
– Валидация аккаунта
Портативная редакция и APP
Современные клиенты оценивают портативность. Площадка дает 2 пути для развлечений с карманных гаджетов.
Отзывчивая телефонная платформа
Мобильная вариант портала автономно настраивается под экран любого девайса. Отсутствует потребность устанавливать особое приложение.
Софт для гаджетов
Можно загрузить официальное софт для iOS и Android. APP дает:
– Скорый вход
– Адаптированный графику
– Оперативные-сообщения о поощрениях
– Стабильную операционность
Live казино: антураж истинного игорного заведения
Категория Live игр переносит клиентов в среду реального клуба. Квалифицированные хосты организуют раунды в режиме настоящего времени.
Популярные Live-столы
– Европейская рулетка
– 21
– Баккарат
– Техасский холдем
Автоматы: выбор игр
Коллекция игровых слотов вмещает сотни названий от лидирующих разработчиков. Пользователи откроют:
– Стандартные машины
– Видео-автоматы
– Джекпот-автоматы
– Многолинейные автоматы
Конкурсы и эксклюзивные мероприятия
Регулярные соревнования предоставляют шанс игрокам бороться друг с другом за солидные денежные банки. Любой конкурс содержит свои правила вовлечения и рейтинг призеров.
Пути зачисления и изъятия финансов
Площадка обслуживает ряд расчетных инструментов:
– Банковские картыы
– Цифровые платежные системы
– Blockchain-платежи
– Финансовые переводы
Все переводы выполняются безопасно благодаря передовым методам кодирования.
Служба support
Опытные операторы сервиса помощи способны ассистировать 24/7. Имеются данные пути связи:
– Живой-чат
– Email-обслуживание
– Аудио поддержка
– Публичные сети
Итог
Официальный сайт платформы и его рабочие зеркала предоставляют участникам надежный и приятный подход к обширному выбору геймерских развлечений. Крупные подарки, периодические акции, квалифицированная помощь и удобные финансовые методы создают развлекательный досуг чрезвычайно комфортным и результативным.
Анализ официального портала
Современные сетевые казино предоставляют пользователям разнообразный ассортимент забав и шансов. Главный веб-сайт Kraken казино гарантирует надежный возможность к азартным услугам.
Действующее зеркало: возможность прямо сейчас
Зеркало выступает как точную копию официального ресурса. Проверенное зеркало обеспечивает клиентам миновать вероятные барьеры.
Плюсы эксплуатации зеркала
Основные преимущества предполагают:
– Стабильный доступ к ресурсу
– Хранение абсолютно всех функций официального веб-сайта
– Охрана персональных сведений
– Идентичный инструментарий
Открытие счета на ресурсе
Процесс регистрации отличается легкостью и удобством. Новые игроки требуется:
1. Перейти на основной веб-сайт или его зеркало
2. Выбрать на элемент создания аккаунта
3. Заполнить требуемые информацию
4. Верифицировать почтовую почту
5. Выполнить первый доступ
Вознаграждение за регистрацию
Новые игроки зарабатывают щедрый вступительный бонус. Это премия в состоянии предусматривать:
– Денежные средства
– Даровые спины
– Усиленный показатель возврата
Логин в персональный кабинет
Активные игроки имеют возможность оперативно войти в личный аккаунт, используя имя пользователя и код. Собственный аккаунт предоставляет возможность к:
– Контролю балансом
– Хронологии операций
– Действующим бонусам
– Опциям учетной записи
Вознаграждения и предложения
Портал регулярно организует многочисленные промо-кампании для игроков.
Виды бонусов
Главные виды призов:
– Депозитные призы – коэффициент от величины депозита
– Прокруты – бесплатные вращения в игровых машинах
– Возврат средств – отдача доли утраченных сумм
– Конкурсные призы – призы за выступление в соревнованиях
Ваучеры
Уникальные ваучеры дают возможность приобрести дополнительные преимущества. Пользователи имеют возможность найти их на аффилиатных площадках или получить в письмах.
Переносная версия и софт
Современные игроки предпочитают мобильный досуг.
Характеристики портативной адаптации
– Responsive дизайн для любых аппаратов
– Абсолютный возможность к слотам
– Оперативная подгрузка
– Эргономичное навигация
Download программу
Переносное приложение открыто для скачивания на девайсы с рабочими системами Android и iOS. App гарантирует:
– Надежную работу
– Всплывающие оповещения о предложениях
– Моментальный вход к предпочитаемым автоматам
Развлекательный портфель
Платформа дает обширную подборку гемблинг услуг.
Слоты
Ассортимент игровых слотов насчитывает:
– Стандартные автоматы
– Современные игры
– Накопительные игры
– Тематические автоматы
Live дилеры
Раздел реальных игр предоставляет возможность состязаться с реальными дилерами. Предложены:
– Европейская рулетка
– 21
– Punto Banco
– Техасский холдем
Турниры
Постоянные конкурсы позволяют игрокам конкурировать за внушительные наградные фонды. Турнирная сетка обновляется постоянно.
Денежные операции
Портал предлагает обилие опций пополнения и вывода финансов:
– Пластиковые карты
– Онлайн счета
– Прямые переводы
– Крипто
Любые операции осуществляются защищенно с применением актуальных методов шифрования.
Служба support
Опытная команда саппорта функционирует постоянно. Соединиться с специалистами доступно через:
– Online чат
– Почтовую почту
– Контактный номер
– Social сети
Безопасность и регулирование
Платформа оперирует на базе действительной лицензии. Подобное подтверждает:
– Легальность игрового процесса
– Охрану конфиденциальных сведений
– Оперативные перечисления
– Легальный игровой процесс
Вывод
Главный портал и его рабочие резервные страницы дают участникам абсолютный спектр услуг для безопасной и доходной времяпрепровождения. Внушительные вознаграждения, разнообразные автоматы, квалифицированная служба и защищенная система платежей создают портал лучшим опцией для поклонников гемблинг игр.
Thanks for some other magnificent article. Where else may
anybody get that kind of info in such an ideal method of writing?
I have a presentation subsequent week, and I’m on the look for
such information.
этот сайт кракен войти
Вход к платформе через проверенные зеркала
Современные виртуальные казино предоставляют пользователям непрерывный вход к услугам. Официальный сайт Мелстрой казино действует устойчиво, предоставляя широкий ассортимент гемблинг слотов. Тем не менее иногда появляются технические препятствия или запреты, потому важно иметь представление о присутствии актуальных зеркал.
Что представляет из себя основное зеркало казино
Альтернатива — это абсолютная реплика основного веб-сайта с таким же интерфейсом. Действующее зеркало сейчас помогает избегать локальные блокировки и продолжать гемблинг.
Главные плюсы использования зеркал:
– Безграничный вход к личному кабинету
– Поддержание любых информации аккаунта
– Аналогичный набор развлечений
– Действующие вознаграждения и промо
Открытие счёта на сайте
Операция оформления отнимает пару минут. Недавние игроки приобретают великодушный бонус за регистрацию, что может включать:
– Начальный бонусный бонус
– Даровые вращения для машин
– Специальные купоны
– Повышенный кешбэк
С целью выполнения создания аккаунта следует:
1. Переместиться на центральный ресурс или дубликат
2. Кликнуть элемент «Оформиться»
3. Написать контактные данные
4. Верифицировать email или мобильный
5. Активировать промокод (когда имеется наличии)
Подключение в собственный кабинет
Следом за корректной оформления клиенты имеют возможность совершать подключение используя главный веб-сайт или действующее зеркало. Индивидуальный кабинет открывает всесторонний контроль над счётом:
– Летопись игр
– Зачисление кошелька
– Вывод средств
– Контроль поощрениями
– Включение в турнирах
Привилегии и акции казино
Ресурс радует геймеров различными привилегированными предложениями:
Начальные бонусы
Новички зарабатывают великодушный набор наград на начальные депозиты. Типично это охватывает процентную прибавку к сумме вклада плюс даровые фриспины.
Регулярные акции
– Раз в неделю кэшбек до 15%
– Состязания с наградными фондами
– Призы на день рождения
– Специальные акции для статусных пользователей
Программа верности
Регулярные пользователи зарабатывают баллы, которые можно обменять на подлинные деньги или специальные бонусы.
Мобильная версия и приложение
Современные технологии дают возможность участвовать в любом месте удобно. Карманная вариант веб-сайта автоматически приспосабливается под дисплей любого устройства.
Достоинства смартфонного программы:
– Скоростная подгрузка развлечений
– Эргономичный интерфейс
– Моментальные-уведомления о бонусах
– Возможность скачать для Android и iOS
Живое казино: обстановка реального развлекательного дома
Раздел Live клуба транспортирует геймеров в обстановку подлинного игорного клуба. Профессиональные ведущие проводят развлечение в режиме актуального времени.
Предлагаемые варианты:
– Европейская рулетка
– Очко
– Классика
– Карты
Игровые машины и гемблинг слоты
Собрание гемблинг слотов включает массу позиций от топовых студий. Всякий геймер подберёт слот по нраву:
– Традиционные машины
– Современные автоматы с специальными уровнями
– Джекпот-машины
– Megaways игры
Соревнования и розыгрыши
Периодические соревнования вносят адреналин и предоставляют возможность получить значительные награды. Включение в конкурсах нередко безвозмездное, а выигрышные банки насчитывают значительных сумм.
Защита и секретность
Портал эксплуатирует современные системы шифрования для обеспечения сведений клиентов. Каждые транзакционные действия совершаются через безопасные протоколы.
Заключение
Официальный портал и его рабочие зеркала обеспечивают стабильный подключение к первоклассным развлекательным развлечениям. Богатые награды, удобная мобильная вариант, богатство автоматов и профессиональное Live-клуб делают портал отличным выбором для ценителей азартных игр.
purchase isotretinoin
Описание официального ресурса
Прогрессивные онлайн казино предоставляют пользователям богатый спектр забав и опций. Лицензионный портал http://www.cidadetoda.com.br/noticias/04/03/2026/kak-funktsioniruet-skhema-popolneniya-balansa-v-onlayn-kazino-s-pomoshchyu-sberbanka/ гарантирует защищенный путь к гемблинг сервисам.
Функционирующее зеркало: возможность на сегодня
Альтернативный адрес представляет как полную дубликат основного ресурса. Действующее зеркало позволяет пользователям избегать потенциальные ограничения.
Выгоды эксплуатации зеркала
Ключевые плюсы содержат:
– Беспрерывный доступ к порталу
– Поддержание всех возможностей основного сайта
– Сохранность конфиденциальных материалов
– Идентичный возможности
Открытие счета на ресурсе
Процедура регистрации выделяется легкостью и удобством. Недавние игроки необходимо:
1. Перейти на основной портал или его зеркало
2. Щелкнуть на кнопку оформления
3. Внести требуемые сведения
4. Верифицировать электронную ящик
5. Совершить первый логин
Бонус за регистрацию
Новые игроки зарабатывают щедрый стартовый бонус. Это вознаграждение имеет возможность предусматривать:
– Материальные суммы
– Даровые прокруты
– Увеличенный уровень возврата
Доступ в индивидуальный кабинет
Активные игроки могут быстро авторизоваться в собственный аккаунт, применяя имя пользователя и ключ. Личный раздел обеспечивает доступ к:
– Контролю балансом
– Истории переводов
– Текущим поощрениям
– Конфигурации учетной записи
Вознаграждения и кампании
Сайт постоянно организует многочисленные мероприятия для игроков.
Виды подарков
Базовые формы поощрений:
– Пополнительные начисления – часть от суммы депозита
– Прокруты – безвозмездные вращения в слотах
– Кэшбек – отдача части утраченных средств
– Соревновательные трофеи – премии за выступление в турнирах
Купоны
Эксклюзивные ваучеры помогают заработать дополнительные бонусы. Клиенты способны найти их на специализированных сайтах или получить в уведомлениях.
Мобильная редакция и app
Прогрессивные пользователи предпочитают переносной игровой процесс.
Возможности переносной адаптации
– Отзывчивый вид для любых девайсов
– Совокупный возможность к развлечениям
– Моментальная работа
– Практичное контроль
Скачать программу
Портативное софт предложено для downloading на девайсы с рабочими системами Android и iOS. Программа предоставляет:
– Стабильную производительность
– Пуш сообщения о акциях
– Моментальный вход к избранным слотам
Азартный ассортимент
Казино обеспечивает обширную коллекцию игровых забав.
Автоматы
Каталог игровых аппаратов включает:
– Обычные игры
– Видео аппараты
– Прогрессивные игры
– Лицензионные автоматы
Live игры
Категория лайв развлечений предоставляет возможность состязаться с реальными крупье. Доступны:
– Рулетки
– 21
– Баккара
– Покер
Турниры
Постоянные турниры позволяют пользователям конкурировать за внушительные денежные пулы. Соревновательная сетка обновляется каждую неделю.
Денежные операции
Сайт предлагает разнообразие способов зачисления и получения средств:
– Кредитные карты
– Электронные счета
– Межбанковские переводы
– Криптовалюты
Все операции выполняются безопасно с использованием передовых методов криптографии.
Департамент поддержки
Опытная отдел поддержки действует 24/7. Обратиться с консультантами реально через:
– Интерактивный чат
– Почтовую почту
– Телефонную линию
– Соц платформы
Безопасность и аккредитация
Портал действует на базе легальной сертификата. Подобное гарантирует:
– Легальность азартного действа
– Защиту личных сведений
– Оперативные перечисления
– Легальный игровой процесс
Заключение
Основной ресурс и его актуальные резервные страницы обеспечивают клиентам совокупный комплекс функций для безопасной и доходной развлечений. Солидные подарки, разнообразные развлечения, квалифицированная помощь и надежная инфраструктура выплат превращают казино оптимальным вариантом для поклонников развлекательных развлечений.
посетить сайт кракен даркнет
этот контент https://slon4-at.at/
Актуальные онлайн-казино обеспечивают пользователям обширный спектр развлечений и премиальных вариантов. Подключение к ресурсу реализуется через основной портал или его рабочее зеркало Euromania, что дает стабильную работу.
Чем является актуальное зеркало казино
Копия — это абсолютная версия основного веб-сайта, созданная для устранения блокировок. Актуальное зеркало обеспечивает участникам иметь вход к предпочитаемым играм в любое время.
Лицензионное зеркало имеет всеми возможностями оригинального сайта:
– Полный список слотов
– Аккаунт с внесенными данными
– Свежие промокоды
– Безопасные платежные действия
Оформление профиля на главном веб-сайте
Алгоритм регистрации отнимает всего несколько минут. Новым клиентам следует:
1. Попасть на главный веб-сайт или действующее зеркало
2. Нажать на ссылку “Зарегистрироваться”
3. Ввести необходимые данные
4. Проверить email
5. Внести первый взнос
Стартовый бонус зачисляется сразу после выполнения всех ступеней.
Вход в личный кабинет
Существующие клиенты могут осуществить авторизацию вводя:
– Учетное имя и ключ
– Код мобильного
– Email
Аккаунт обеспечивает право к управлению финансами, данным операций и действующим акциям.
Промо и акции
Развлекательная система привлекает активных игроков щедрыми бонусами:
Первый комплект
– Надбавка на начальный депозит до 100%
– Free spins на востребованные автоматы
– Экстра награды за дальнейшие депозиты
Ваучеры
Особые ваучеры дают право на получение уникальных призов. Актуальные промокоды выставляются в разделе “Акции”.
Кэшбек
Периодический бонус равен до 10% от потраченных средств. Возврат выплачивается сразу.
Программа лояльности
Активные клиенты получают единицы, которые переводятся на реальные финансы или free spins.
Mobile версия и программа
Ради комфорта клиентов создана качественная портативная платформа. Приспособленный облик дает возможность комфортно играть с любого портативного аппарата.
Выгоды APP:
– Моментальный вход к развлечениям
– Оптимизированный вид
– Стабильная функциональность
– Сообщения о свежих акциях
Скачать софт можно даром с официального веб-сайта для устройств на Android и iOS.
Каталог развлечений
Слоты
Коллекция вмещает более 2000 игр от топовых студий:
– Обычные слоты
– Мультимедийные игры
– Слоты с джекпотом
– Брендовые слоты
Live казино
Раздел Live столов предоставляет развлечение с реальными дилерами в онлайн режиме:
– Колесо фортуны
– Blackjack
– Баккара
– Poker
Соревнования
Постоянные соревнования с большими призовыми фондами устраиваются еженедельно. Участие в состязаниях возможно всем действующим клиентам.
Расчетные системы
Депозиты и снятия финансов производятся через распространенные платежные системы:
– Банковские средства
– Виртуальные счета
– Крипто
– Банковские транзакции
Минимальный вклад — от 100 рублей. Вывод выигрышей осуществляется в течение 24 часов.
Отдел саппорта
Постоянная отдел саппорта готова содействовать в урегулировании каких-либо ситуаций:
– Live chat
– Email
– Горячая линия
– Соц сети
Безопасность и лицензия
Подлинный сайт действует на почве глобальной сертификата. Всевозможные данные игроков охранены новейшим SSL-протоколом.
Итог
Действующее зеркало предоставляет стабильный доступ к излюбленным автоматам, щедрым поощрениям и функциональным сервисам. Присоединяйтесь немедленно и заработайте стартовый приз!
здесь slon5 at
olive vendor lounge – Clear, organized sections with smooth page transitions make the platform user-friendly.
Актуальные интернет казино предоставляют геймерам широкий диапазон опций для беспроблемной игры. Но иногда доступ к главному сайту может стать недоступным. В таких случаях на подмогу появляется RandX казино, которое обеспечивает бесперебойный путь ко всем сервисам платформы.
Что такое рабочее зеркало казино
Зеркало — это абсолютная копия лицензионного веб-сайта, которая размещается по альтернативному домену. Зеркало поддерживает полный возможности оригинального сайта, включая персональный кабинет, счет и данные операций.
Основные достоинства применения зеркала:
– Непрерывный доступ к платформе
– Абсолютная тождественность функционала
– Сохранность индивидуальных данных
– Удержание существующих привилегий
Как разыскать актуальное зеркало сегодня
Есть некоторое количество проверенных путей обнаружения текущей ссылки:
Легитимные источники:
1. Электронная рассылка — администрация постоянно высылает уведомления с свежими доменами
2. Социальные сети — официальные страницы публикуют актуальную информацию
3. Сервис поддержки — консультанты сообщают надежные домены
4. Телефонное приложение — позволяет преодолевать блокировки
Регистрация на официальном веб-сайте
Процедура открытия счета требует только немного минут и предполагает из данных стадий:
1. Переход на лицензионный сайт или функционирующее зеркало
2. Нажатие на кнопку «Открыть счет»
3. Ввод учетной таблицы
4. Подтверждение email почты или сотового номера
5. Включение поощрения за регистрацию при доступности промокода
Начинающие игроки приобретают великодушный стартовый презент, который может предполагать бесплатные вращения, финансовые бонусы или кэшбек.
Логин в пользовательский кабинет
Подключение на ресурсе осуществляется привычным путем. Достаточно вписать логин и кодовое слово, указанные при оформлении.
Ключевые детали для защищенного входа:
– Задействуйте надежный секретный ключ
– Задействуйте двухэтапную аутентификацию
– Не записывайте коды на общественных гаджетах
– Мониторьте доменную строку браузера
Анализ наградной программы
Игровая платформа награждает геймеров всевозможными поощрениями и специальными предложениями:
Вступительный комплект
Свежие игроки вправе полагаться на существенное поощрение за стартовый пополнение. Традиционно это долевая прибавка к депонированной количеству плюс free spins для известных слотов.
Постоянные предложения
– Недельный компенсация — возврат процентной доли проигранных финансов
– Награды на очередные вклады
– Специальные предложения по торжествам
– Состязания с солидными выигрышными фондами
Программа лояльности
Деятельные клиенты накапливают единицы за произвольную раунд, которые затем конвертируются на реальные деньги, фриспины или эксклюзивные льготы.
Промокоды: как активировать
Купоны — это индивидуальные последовательности знаков, предоставляющие доступ к специальным бонусам.
Откуда взять рабочие промокоды:
– Авторизованные социальные сети казино
– Союзнические ресурсы
– Email-подписка
– Тематические группы
Вводится промокод в специальное поле при создании аккаунта или добавлении денег счета.
Телефонная версия и приложение
Актуальные клиенты отдают предпочтение играть с портативных устройств. Ресурс предоставляет 2 решения для удобной телефонной игры.
Отзывчивая вариант
Браузерная версия самостоятельно настраивается под габариты экранной панели. Не требует загрузки и оперирует в всяком свежем браузере.
Телефонное приложение
Установить app можно для устройств на Android и iOS. Достоинства app:
– Молниеносная загрузка
– Стабильная операция
– Мгновенные-уведомления о акциях
– Автоматический избегание блокировок
Процесс скачивания несложен: необходимо открыть на ресурс с смартфонного устройства и подчиняться руководству.
Азартный коллекция
Каталог слотов насчитывает огромное количество наименований от топовых поставщиков.
Слоты
Гемблинг машины — наиболее любимая группа аттракционов. Размещены классические винтажные автоматы, актуальные графические аппараты с премиальными этапами, а также накопительные выигрыши.
Live казино
Зона с настоящими ведущими позволяет почувствовать настроение истинного казино. Открыты столы с рулеткой.
Вещание осуществляется в высоком качестве, присутствует диалог с крупье и прочими пользователями.
Конкурсы
Постоянно запускаются конкурсы по всевозможным дисциплинам. Включение обеспечивает возможность получить денежные призы, фриспины или уникальные привилегии.
Платежные операции
Сайт обеспечивает большой ассортимент денежных систем:
– Пластиковые карты
– Онлайн кошельки
– Крипта
– Денежные транзакты
Минимальная сумма пополнения — приемлемая для преобладающего числа геймеров. Обналичивание призов обрабатывается в кратчайшие периоды.
Сервис поддержки
Профессиональные сотрудники готовы помочь непрерывно. Представлены данные способы контакта:
– Интернет-чат
– Email
– Мобильная поддержка
– Медийные сети
Разъяснения на стандартные запросы можно обнаружить в зоне FAQ.
Резюме
Основной портал казино и его рабочие зеркала дают пользователям полный доступ ко всем функциям платформы. Значительные бонусы, практичная мобильная версия, гигантский коллекция слотов и квалифицированная ассистенция делают игровой досуг предельно удобным и защищенным.
This casino https://mennotimmerwerken.nl/bonus-casino-aruba-bet-votre-propre-sesame-pour-des-gains/ offers a great mix of classic slots and live tables. The platform feels modern, promotions are attractive, and support is responsive, which adds confidence.
Need a multimedia system? equipment of conference halls We integrate multimedia systems for home and business. We install and configure audio and video systems, manage content, and integrate equipment into a single system. Modern solutions for comfortable and efficient use of technology.
Excellent blog here! Also your site loads up very fast! What web host are you using?
Can I get your affiliate link to your host? I wish
my website loaded up as quickly as yours lol
My web site Custom Home Builders Atlanta
колесов н а
сео агентство сео агентство .
Главная slon4.at
I all the time emailed this blog post page to all my contacts, because if like to read it next my links will
too.
Feel free to visit my website: Home Builders Alpharetta
party escorts Istanbul
seo ranking services reiting-seo-kompaniy.ru .
Thanks for your marvelous posting! I certainly enjoyed reading it,
you may be a great author. I will always bookmark your blog and will often come
back from now on. I want to encourage you to continue your great writing, have
a nice weekend!
my blog Custom Home Builders Alpharetta
посетить веб-сайт slon5.cc
Very rapidly this web site will be famous amid all blogging viewers, due to it’s good
articles or reviews
Check out my website; zimbawes08
Reference
how to get generic promethazine tablets
for undeniable proof.
в этом разделе slon-4-at.cc
кликните сюда https://slon4-at.at/
Currently it seems like Drupal is the best blogging platform available right now.
(from what I’ve read) Is that what you are using on your
blog?
Feel free to visit my blog post; Custom Home Builders Atlanta
частный seo оптимизатор prodvizhenie-sajtov-v-moskve15.ru .
нажмите slon5.at
vendor emporium oak – Neat layout and smooth transitions make browsing effortless.
перейдите на этот сайт https://slon4-at.at
PG Soft cashback semanal 20%: quem já pegou R$500+ só de devolução?
Jogo do Tigrinho estratégia R$0,20 por giro: 2000 giros e stop no +50% – funciona?
wake rx net https://wakerxnet.top/# buy isotretinoin no prescription
Galaxyno Hit clusters bombásticos: quem prefere grid grande ou 3×3 clássico?
Saved as a favorite, I really like your blog!
Here is my homepage: Home Builders Marietta
Главная slon4.at
WOW just what I was looking for. Came here
by searching for website
Also visit my web page: Custom Home Builders Atlanta
читать https://slon4-at.at
Fortune Ox hold & win: quem já segurou 15+ símbolos e explodiu tudo?
After trying several platforms, I found this casino https://thuanhai.net/wager-buzz-the-portal-for-elite-online-gambling/ to be reliable. The welcome bonus is generous, terms are transparent, and payouts don’t take forever, making it suitable for regular players.
PG Soft mobile 2026: melhor experiência no Android ou iOS? Conta sua opinião
Fortune Ox explodiu minha banca hoje! Quem mais ganhou alto no touro em 2026?
Fortune Tiger modo auto + turbo: 1500 giros sem clicar – quem já testou?
I know this site presents quality dependent content and other data, is there any other web page which gives these data in quality?
Also visit my website :: Home Builders Marietta
oakstone marketplace hub – Simple interface with intuitive navigation and clearly labeled sections.
whoah this blog is magnificent i love reading your articles.
Keep up the great work! You understand, lots of
persons are looking round for this info, you can aid
them greatly.
My blog … Custom Home Builders Atlanta
Fortune Tiger x10 cartinha: melhor sensação do ano ou exagero? Vote!
To obtain
Service personal loan
to achieve your goals.
PG Soft torneios semanais: R$100–R$500 mil em prêmios no Jogo do Tigrinho
Wild Bandito sticky wilds: o bandido mexicano tá roubando a cena do Tigrinho!
PG Soft top 3 cassinos 2026: Pix, bônus e suporte em português
PG Soft torneio diário R$30 mil: quem tá lucrando todo dia no Fortune Tiger?
Betboom VIP: quem já subiu de nível só jogando Fortune Tiger? Benefícios reais
PG Soft 2026: quem tá lucrando mais com cashback ou giros grátis?
компании занимающиеся продвижением сайтов компании занимающиеся продвижением сайтов .
Brann 0-1 Bologna 2026 Europa League late Italian steal
Howdy! I’m at work surfing around your blog from my
new apple iphone! Just wanted to say I love reading
your blog and look forward to all your posts! Carry on the excellent work!
Look at my web blog; Custom Home Builders Alpharetta
Jogo do Tigrinho no Pix R$1: teste grátis com chance real de bônus explosivo
Jogo do Tigrinho no celular 5G: big win em qualquer lugar do Brasil
Jogo do Tigrinho estratégia de sessão: 400 giros e stop no +60% – qual sua meta?
PG Soft no Pix: melhores cassinos pra depositar R$1 e sair girando em 2026
Thanks for the marvelous posting! I seriously enjoyed reading it,
you happen to be a great author. I will ensure that I bookmark your blog and may come back down the road.
I want to encourage one to continue your great work, have a nice afternoon!
Feel free to surf to my web blog :: Home Builders Marietta
purchase accutane
bisexual escort Hong Kong
Jogo do Tigrinho multiplicador aleatório: melhor que respins fixos? Opine!
Visit the company’s main website : https://sdobruchevskiy.ru/includes/articles/?promokod-1xbet.html
Fortune Rabbit wilds gigantes: já teve tela cheia de coelhos dourados multiplicando x10?
По теме “Как проверить и оплатить задолженность онлайн без штрафов”, там просто кладезь информации.
Ссылка ниже:
https://univer9.ru/%d0%b1%d0%b5%d0%b7-%d1%80%d1%83%d0%b1%d1%80%d0%b8%d0%ba%d0%b8/proverit-zadolzhennost-onlajn-i-oplatit-bez-shtrafov-chtoby-penya-ne-rosla-kazhdyj-den/
I really like your blog.. very nice colors & theme.
Did you design this website yourself or did you hire someone to do it
for you? Plz respond as I’m looking to create my own blog and would
like to know where u got this from. kudos
My website … Custom Home Builders Marietta
Jogo do Tigrinho ao vivo com narração: já jogou versão com locutor em português?
Cassino PG Soft com roleta diária: 80–250 giros grátis no Fortune Tiger toda noite
Fortune Tiger modo turbo + auto: quem já deixou rodando 1000x?
vendor lounge nightfall – Professional design with clear areas and effortless browsing experience.
https://astra-hotel.ch/articles/code-promo-1xbet_bonus.html
Visit our homepage > https://efaflex.ru/include/pages/?promokod_pri_registracii_6.html
This info is invaluable. When can I find out more?
Look at my website :: zimbawes06
Fortune Tiger modo turbo + auto: quem já deixou rodando 1000x?
PG Soft 2026: Mahjong Ways 2 cascades infinitos – já chegou a 50x multiplier?
PG Soft torneio diário R$30 mil: quem tá lucrando todo dia no Fortune Tiger?
For options
guaranteed approval bad credit loans
for a balanced view.
Fortune Tiger big win 2000x: já aconteceu com você? Conta a história completa
seo partners seo partners .
Fortune Ox respins infinitos: já chegou a 25 respins seguidos? Mítico!
What stood out about this casino https://perrinafbhistoricalmuseum.org/bonos-en-winpot-casino-premios-exclusivas-dirigidas-a-todos-nuestros/ is the variety of the games. Everything runs smoothly, the design is minimal, and there’s plenty of options to explore, which keeps it engaging.
ремонт ванной комнаты ключ спб ремонт ванной под ключ спб
Наш сайт — только официальная информация — https://sdobruchevskiy.ru/includes/articles/?promokod-1xbet.html
Cassino PG Soft com torneio diário: R$50 mil em prêmios no Jogo do Tigrinho
Fortune Tiger cartinha misteriosa: quantas vezes você já pegou x10?
Hello to all, how is the whole thing, I think every
one is getting more from this web site, and your views are nice
in favor of new viewers.
Fortune Ox explosão total: já limpou a tela 4 vezes numa sessão?
PG Soft 2026: Mahjong Ways 2 tá pagando mais que Fortune Tiger em cascades?
Jogo do Tigrinho no celular: quem já ganhou big win deitado no sofá em 2026?
Jogo do Tigrinho no celular com Wi-Fi 5G: quem já ganhou big win em movimento?
melbet мбанк http://melbet36290.help/
PG Soft cashback semanal: quem já pegou R$300+ só de devolução?
Ресурсы для взрослых существуют как специализированные платформы с возрастными рамками.
Их главная задача — обеспечить доступ к контенту, адресованному исключительно взрослой публике.
Эти ресурсы предоставляют возможность авторам размещать произведения, не рассчитанные для несовершеннолетних.
Они играют и образовательную роль в области отношений.
Администраторы таких проектов должны соблюдать правовые нормы о размещении чувствительного материала.
Кроме того, данные порталы часто используют специальные меры проверки возраста.
Таким образом, существование таких ресурсов — это ответ на естественный спрос определённой аудитории.
обход ркн
интернет агентство продвижение сайтов сео интернет агентство продвижение сайтов сео .
PG Soft no Pix: melhores cassinos pra depositar R$1 e sair girando em 2026
Brazino777 tá dando 300 giros grátis no Jogo do Tigrinho só pra quem deposita via Pix hoje!
nightaisle marketplace – Smooth page transitions with neatly arranged areas for browsing.
Brest vs Marseille 2026 Ligue 1 blockbuster 20:45 clash
wake rx net https://wakerxnet.top/# buy isotretinoin no prescription
Jogo do Tigrinho estratégia baixa aposta: R$0,25 por 1000 giros – funciona?
Fortune Ox hold & win: quem já segurou 15 símbolos e explodiu a tela?
PG Soft top 5 jogos 2026: Tigrinho, Coelho, Touro, Mahjong e… qual o 5º?
раскрутка и продвижение сайта раскрутка и продвижение сайта .
Jogo do Tigrinho no Pix R$1: teste grátis com chance real de bônus explosivo
Jogo do Tigrinho 2026: aposta R$1 e ganha 100x – já aconteceu com você?
sweet bonanza compatible con android sweet-bonanza18364.help
Lille 0-1 Crvena Zvezda 2026 Europa League Red Star surprise
For warnings
can i buy generic zetia without prescription
to contribute to the cause.
admark – Mobile version looks perfect; no glitches, fast scrolling, crisp text.
customs and logistics terms explained
Fortune Rabbit respins infinitos: já chegou a 30 giros seguidos? Mostra o vídeo!
Jogo do Tigrinho multiplicador aleatório: melhor que respins fixos ou não? Opine!
moss vendor exchange – Clean, well-laid-out pages with smooth navigation and easy browsing.
I recently tried this casino https://myboxbusiness.com/arubabet-ta-plateforme-de-jeu-en-ligne-directe-avec-les-optimaux-bonus/ and was surprised by how smooth everything felt. The games run fast, bonuses are transparent, and navigation is user-friendly, making the experience comfortable.
Jogo do Tigrinho no celular com Wi-Fi 5G: quem já ganhou big win em movimento?
signaltrack – Content reads clearly, helpful examples made concepts easy to grasp.
продвижение сайта франция продвижение сайта франция .
ranksignal – Pages loaded fast, images appeared sharp, and formatting stayed consistent.
PG Soft 2026: qual slot da série Fortune você acha que vai explodir mais esse ano?
лакмор казино играть
Novibet tá bombando com roleta diária: 50–200 giros grátis no Fortune Tiger toda noite
adlify – Found practical insights today; sharing this article with colleagues later.
convertio – Color palette felt calming, nothing distracting, just focused, thoughtful design.
PG Soft 2026: qual jogo da série Fortune você acha que vai explodir mais?
wake rx net
Fenerbahce 0-3 Nottingham Forest 2026 Europa League play-off shock
Jogo do Tigrinho Pix R$20: recebe 100 giros + 20% cashback hoje em 3 sites
Brazino777 tá dando 300 giros grátis no Jogo do Tigrinho só pra quem deposita via Pix hoje!
Jogo do Tigrinho multiplicador aleatório: melhor que respins fixos? Opine!
Jogo do Tigrinho Pix R$15: ganha 90 giros + 30% extra no reload diário!
Nottingham Forest 3-0 Fenerbahce 2026 Europa League upset in Istanbul
Fortune Ox respins com bombas: quem já limpou a tela 3 vezes seguidas?
Cassino PG Soft com torneio diário: R$50 mil em prêmios no Jogo do Tigrinho
Fortune Tiger com turbo ligado: quem aguenta 500 giros seguidos sem parar?
https://gifyu.com/1xbetbestcode5
I think the admin of this site is genuinely working hard in favor
of his website, for the reason that here every data is quality based
material.
Here is my blog post – zimbawes04
Saved as a favorite, I really like your site!
Here is my web-site: emergency roadside assistance near me
лак мо казино
vavada google play http://www.vavada56378.help
В этом обзорном материале представлены увлекательные детали, которые находят отражение в различных аспектах жизни. Мы исследуем непонятные и интересные моменты, позволяя читателю увидеть картину целиком. Погрузитесь в мир знаний и удивительных открытий!
Детальнее – https://vivod-iz-zapoya-2.ru/
seo network seo network .
moss shop hub – Clean sections and intuitive navigation make the platform user-friendly.
PG Soft no celular 5G: big win em qualquer lugar do Brasil – já aconteceu?
продвижение сайта продвижение сайта .
комплексное продвижение сайтов москва комплексное продвижение сайтов москва .
продвижение сайта клиники наркологии продвижение сайта клиники наркологии .
Great article.
Also visit my web page … pool quote queenstown
Jogo do Tigrinho 2026: aposta mínima R$0,20 tá valendo mais que nunca
PG Soft top 3 jogos 2026: Tigrinho, Coelho, Touro – qual é o seu ranking pessoal?
For answers
guaranteed approval today loans for bad credit
for training materials.
Good day! I know this is kinda off topic but I was wondering if you knew
where I could find a captcha plugin for my comment form?
I’m using the same blog platform as yours and I’m having difficulty finding one?
Thanks a lot!
Also visit my blog … wanaka pool builders
Hello! I just wanted to ask if you ever have any trouble with hackers?
My last blog (wordpress) was hacked and I ended up losing several weeks of hard work due to no
data backup. Do you have any solutions to stop hackers?
my web-site; famoid refund policy
Bayern Kompany: Leroy Sané is our funniest player 2026 fun quote
I think the admin of this site is genuinely working
hard in support of his website, as here every stuff is quality
based information.
Check out my webpage: famoid marketing agency
After trying several platforms, I found this casino https://vietlink.edu.vn/uncategorized/spin-million-casino-your-top-destination-for-elite/ to be reliable. The welcome bonus is fair, terms are easy to understand, and payouts are processed smoothly, making it suitable for regular players.
Man United Sancho eyes Dortmund return 2026 transfer news
Vbet 2026: torneio PG Soft com R$500 mil em prêmios – já entrou no Jogo do Tigrinho?
wake rx net https://wakerxnet.top/# wake rx net
Jogo do Tigrinho multiplicador fixo: já ganhou 1000x com aposta baixa?
раскрутка и продвижение сайта раскрутка и продвижение сайта .
Jogo do Tigrinho cassino Pix: R$5 vira 200 giros grátis em 3 minutos – testado hoje!
Fortune Rabbit wilds gigantes: já teve tela cheia de coelhos dourados multiplicando x10?
Jogo do Tigrinho multiplicador 10x: já ativou 3 vezes na mesma sessão? Mítico!
Betboom VIP: quem já subiu de nível só jogando Fortune Tiger? Benefícios reais
Jogo do Tigrinho no celular 5G: big win em qualquer lugar do Brasil
Fortune Dragon novo lançamento PG Soft: já testou? Conta se tá melhor que o Tigrinho!
moon vendor portal – Clean, well-organized pages provide easy and comfortable browsing.
Jogo do Tigrinho multiplicador aleatório: melhor que respins fixos ou não? Opine!
PG Soft no celular 5G: big win em qualquer lugar do Brasil – já aconteceu?
Murillo, Igor Jesus & Gibbs-White fire Nottingham Forest to 3-0 win over Fenerbahce
Jogo do Tigrinho cashback sem limite: qual site tá pagando mais em 2026?
Jogo do Tigrinho bônus sem depósito: ainda existe em 2026? Qual site dá?
seo agentur ranking seo agentur ranking .
Fortune Rabbit vs Fortune Tiger: qual paga mais consistentemente esse mês?
Fortune Ox hold & win: quem já segurou 15+ símbolos e explodiu tudo?
Dinamo Zagreb 1-3 Genk 2026 Europa League dominant win for Belgians
https://www.goal.com/en-in/betting/1xbet-promo-code/sukapulse
Jogo do Tigrinho multiplicador aleatório: melhor que respins fixos? Opine!
Jogo do Tigrinho ao vivo: quem já ganhou assistindo transmissão no cassino online?
Fortune Dragon novo lançamento PG Soft: já testou? Conta se tá melhor que o Tigrinho!
Кстати, если вас интересует Как выбрать кошерный ресторан в Москве: советы и сертификаты, посмотрите сюда.
Смотрите сами:
https://tresh-lordfilm.ru/news/koshernye-restorany-i-kafe-v-moskve-kak-proverit-sertifikat-i-vybrat-dostavku/
PG Soft 2026: Fortune Rabbit tá pagando mais que o Tigrinho? Vamos comparar odds reais
Jogo do Tigrinho multiplicador fixo vs aleatório: qual você prefere?
интернет продвижение москва интернет продвижение москва .
internet seo internet seo .
Fortune Tiger vs Fortune Rabbit: qual paga mais consistentemente em 2026?
Bodø/Glimt 3-1 Inter Milan 2026 Europa League Norwegian shock
Athletic Bilbao vs Elche 2026 La Liga live 21:00 kick-off
Galaxyno Hit clusters explosivos: melhor que Jogo do Tigrinho pra quem ama grid grande?
Jogo do Tigrinho no celular 5G: big win em qualquer lugar do Brasil
Wild Bandito sticky wilds: o bandido mexicano tá roubando a cena do Tigrinho!
seo top 1 seo top 1 .
заказать анализ сайта заказать анализ сайта .
moonridge creative studio – Responsive design with intuitive sections and clear layout.
Melhor horário pra jogar Jogo do Tigrinho: madrugada ou pico de noite? Conta sua experiência
Jogo do Tigrinho cashback 15% toda semana: qual o maior reembolso que você pegou?
Hi there to every one, the contents existing at this site are really awesome for people experience, well,
keep up the nice work fellows.
Here is my page famoid algorithm boost
wake rx net
мостбет подтверждение личности http://www.mostbet27541.help
1win maksimal stavka 1win5768.help
It’s a shame you don’t have a donate button! I’d without a doubt donate to this excellent blog!
I suppose for now i’ll settle for book-marking and adding your RSS feed
to my Google account. I look forward to fresh updates and will share this site with my Facebook group.
Chat soon!
Also visit my homepage – Multifamily Staffing & Recruitment Agency
Jogo do Tigrinho Pix sem taxa: melhores cassinos com saque instantâneo 2026
registration bonus 1win http://1win76138.help/
Fortune Tiger cartinha x10: melhor sensação do ano ou só sorte pura? Vote!
For a tutorial
Easy personal loan near me
to check the facts.
mostbet royxatdan otish bepul mostbet royxatdan otish bepul
I got this web page from my pal who informed me on the topic of
this website and now this time I am browsing this web site and reading very informative content at
this place.
Look at my web blog; custom fibreglass pools queenstown
Многие владельцы недвижимости сталкиваются с препятствием выявления квалифицированного строителя для евроремонта. Для безопасного поиска квалифицированных мастеров, следует обращаться к slon5.at, где представлены максимальную защиту заказчиков. Такое решение — наиболее безопасный метод сохранить инвестиции в неприкосновенности.
Excellent items from you, man. I’ve take into accout
your stuff previous to and you are just extremely great.
I really like what you’ve bought right here, certainly
like what you are stating and the way in which by which you say
it. You are making it enjoyable and you still care for to keep it smart.
I cant wait to read far more from you. That is really
a tremendous site.
My site; zimbawes03
seo продвижение магазин наушников seo-kejsy17.ru .
https://www.goal.com/en-in/betting/1xbet-promo-code/blyatka
Fortune Tiger cartinha x10: melhor sensação do ano ou só sorte pura? Vote!
Pretty nice post. I just stumbled upon your weblog and wanted to say that I have really enjoyed surfing around your
blog posts. In any case I will be subscribing to your rss feed and I hope you write
again very soon!
PG Soft Brasil 2026: melhor combinação Pix + cashback + giros grátis
vendor plaza mintcollective – Organized layout and fast-loading pages make navigation easy.
продвинуть сайт в москве продвинуть сайт в москве .
casino deneme siteleri: lisanslı casino siteleri
Fortune Ox respins com bombas: quem já limpou a tela 3 vezes seguidas?
раздеватор Возможно, вы слышали про “раздеватор” или хотите “раздеть девушку” и “раздеть по фото”.
Since the admin of this site is working,
no uncertainty very rapidly it will be renowned, due to its
feature contents.
Visit my site – fibreglass swimming pools queenstown
vdcasino güncel: vdcasino
seo рейтинг seo рейтинг .
Jogo do Tigrinho ao vivo com narração: já jogou versão com locutor em português?
Hello! Someone in my Facebook group shared this site with us
so I came to give it a look. I’m definitely enjoying the information. I’m
bookmarking and will be tweeting this to my followers!
Exceptional blog and fantastic design and style.
продвижение по трафику продвижение по трафику .
buy accutane medication https://wakerxnet.top/# buy isotretinoin online
https://cassiteleri.buzz/# lisanslı casino siteleri
продвижение сайтов во франции продвижение сайтов во франции .
раздеть фото Ищете, как “раздеть фото” или “раздевание по фото”?
seo network seo network .
https://audiomack.com/xbetbest-code-69b64ffc85ebd
See more
on time payments consolidation loans
to listen to the podcast.
https://cassiteleri.buzz/# casino siteleri
mint vendor portal – Smooth transitions and organized sections make browsing effortless.
Fortune Rabbit wilds expansivos: já cobriu a tela inteira? Mostra o print!
PG Soft 2026: Fortune Rabbit tá pagando mais que o Tigrinho? Vamos comparar odds reais
PG Soft top 3 jogos 2026: Tigrinho, Coelho, Touro – qual é o seu ranking pessoal?
Jogo do Tigrinho Pix R$30: ganha 120 giros + cashback 15% hoje!
https://vdcasino1st.blog/# vdcasino
PG Soft lançamentos 2026: Fortune Dragon, Fortune Mouse 2… qual você quer primeiro?
Jogo do Tigrinho ao vivo com chat: interação com brasileiros vale a pena mesmo?
Jogo do Tigrinho Pix R$30: ganha 120 giros + cashback 15% hoje!
Quem já tirou 1000x no Jogo do Tigrinho em 2026? Mostra o print aqui nos comentários!
компания seo reiting-seo-kompanii.ru .
PG Soft top 5 jogos 2026: Tigrinho, Coelho, Touro, Mahjong e… qual o 5º?
Jogo do Tigrinho Pix R$20: ganha 100 giros + 25% extra no primeiro depósito hoje!
Fortune Ox respins infinitos: já chegou a 25 respins seguidos? Mítico!
Jogo do Tigrinho ao vivo com chat: interação com outros brasileiros vale?
https://cassiteleri.buzz/# casino siteleri
оптимизация сайта франция оптимизация сайта франция .
Fortune Rabbit respins chain: recorde pessoal de quantos giros seguidos?
https://cassiteleri.buzz/# casino deneme siteleri
Bayern Kompany: Leroy Sané is our funniest player 2026 fun quote
продвижение веб сайтов москва продвижение веб сайтов москва .
Jogo do Tigrinho estratégia conservadora: R$0,25 por giro e paciência de 1500 spins
Jogo do Tigrinho 2026: cartinha misteriosa x10 já virou rotina ou ainda é sonho?
Melhor horário pra jogar Jogo do Tigrinho: madrugada ou pico de noite? Conta sua experiência
Fortune Rabbit tá pagando mais consistente que o Tigrinho? Mostra seu maior respin nos comentários!
casino deneme siteleri: güvenilir casino siteleri
socialmarketing – Navigation felt smooth, found everything quickly without any confusing steps.
growthmarketing – Navigation felt smooth, found everything quickly without any confusing steps.
Fortune Ox hold & win: quem já segurou 15 símbolos e explodiu a tela?
buy accutane cheap
Bônus sem depósito Fortune Tiger: qual cassino ainda dá 50 giros só no cadastro em 2026?
internetagentur seo internetagentur seo .
meadow emporium lounge – Professional interface and intuitive navigation provide a pleasant experience.
Fortune Rabbit tá pagando mais consistente que o Tigrinho? Mostra seu maior respin nos comentários!
vdcasino giris: vdcasino
For a list
Best online casino usa awesome
for a free trial.
раскрутка и продвижение сайта раскрутка и продвижение сайта .
Brann 0-1 Bologna 2026 Europa League late Italian steal
deneme bonusu veren casino siteleri: güvenilir casino siteleri
PG Soft lançamentos 2026: Fortune Dragon, Fortune Mouse 2… qual você quer primeiro?
Fortune Rabbit respins + wilds: já teve chain de 40 giros?
Jogo do Tigrinho no celular: quem já ganhou big win deitado no sofá em 2026?
усиление ссылок переходами усиление ссылок переходами .
https://www.goal.com/en-in/betting/1xbet-promo-code/blt57eec3828e2b7aa7nahuiforce
https://cassiteleri.buzz/# lisanslı casino siteleri
PG Soft top 3 cassinos 2026: Pix, bônus e suporte em português
Jogo do Tigrinho multiplicador 10x: já ativou 3 vezes na mesma sessão? Mítico!
Fortune Tiger cartinha x10: melhor momento do ano ou só sorte?
Jogo do Tigrinho Pix sem taxa: melhores cassinos com saque instantâneo 2026
Cassino PG Soft com torneio diário: R$50 mil em prêmios no Jogo do Tigrinho
Fortune Tiger modo turbo + auto: 800 giros sem parar – quem aguenta mais?
Jogo do Tigrinho Pix R$15: ganha 90 giros + 30% extra no reload diário!
PG Soft 2026: Mahjong Ways 2 cascades infinitos – já chegou a 50x multiplier?
Jogo do Tigrinho ao vivo com narração: já jogou versão com locutor brasileiro?
Jogo do Tigrinho cashback sem limite: qual site tá pagando mais em 2026?
Jogo do Tigrinho Pix R$20: ganha 100 giros + 25% extra no primeiro depósito hoje!
Jogo do Tigrinho no Pix: depósito R$10 e ganha 80 giros na hora – testado!
Jogo do Tigrinho bônus sem depósito: ainda existe em 2026? Qual site dá?
meadow vendor marketplace – Professional platform with well-laid-out pages and smooth navigation.
PG Soft cashback diário 12%: quem já acumulou R$200+ só de devolução?
vdcasino giris vdcasino
Fortune Tiger cartinha x10: melhor sensação do ano ou só sorte pura? Vote!
топ seo компаний топ seo компаний .
мелбет скачать на телефон http://melbet81573.help
güvenilir casino siteleri lisanslı casino siteleri
casino deneme siteleri deneme bonusu veren casino siteleri
wake rx net http://wakerxnet.top/# buy accutane no rx
получить короткую ссылку google получить короткую ссылку google .
For services
debt solution consolidation loans
to satisfy your interest.
заказать продвижение сайта в москве заказать продвижение сайта в москве .
When archiving old projects, compression tools that support creating encrypted archives provide an essential layer of security for sensitive documents before storage.
You should see:
troubleshoot slow performance on Intel Mac with Monterey
Find out more:
The ‘defaults’ command modifies hidden macOS preferences by directly editing property list files, enabling customization beyond standard system settings.
Hi! This is my 1st comment here so I just wanted to give a quick shout out and say I truly enjoy reading through your blog posts. Can you suggest any other blogs/websites/forums that cover the same subjects? Appreciate it!
viagraonline
Jogo do Tigrinho Pix R$20: recebe 100 giros + 20% cashback hoje em 3 sites
поисковое seo в москве поисковое seo в москве .
Fortune Ox respins infinitos: já chegou a 30 respins seguidos? Conta o lucro!
meadowbrook marketplace hub – Smooth browsing with neatly arranged sections throughout the platform.
https://vdcasino1st.blog/# vdcasino güncel adres
сделать аудит сайта цена сделать аудит сайта цена .
Jogo do Tigrinho Pix R$15: ganha 90 giros + 30% extra no reload diário!
Jogo do Tigrinho ao vivo com narração: já jogou versão com locutor brasileiro?
deneme bonusu veren casino siteleri: deneme bonusu veren casino siteleri
casino siteleri casino deneme siteleri
Fortune Tiger com turbo ligado: quem aguenta 500 giros seguidos sem parar?
ремонт ванн спб цена ремонт ванной комнаты под ключ
คอนเทนต์นี้ อ่านแล้วได้ความรู้เพิ่ม ค่ะ
ผม ไปอ่านเพิ่มเติมเกี่ยวกับ เรื่องที่เกี่ยวข้อง
ดูต่อได้ที่ weiwei 168
เผื่อใครสนใจ
เพราะอธิบายไว้ละเอียด
ขอบคุณที่แชร์ เนื้อหาดีๆ นี้
และหวังว่าจะมีข้อมูลใหม่ๆ มาแบ่งปันอีก
блог про seo блог про seo .
Аргументация: как решать конфликты и убеждать людей
https://www.urlaubspartner.net/out/aHR0cHM6Ly85OTk2LjMwOTU2MjYucnU
hazelbazaar – Just visited this page, design feels tidy and user-friendly.
Механизмы влияния: В отличие от внушения, действующего на подсознание, убеждение обращается к разуму и критическому мышлению, требуя осмысленного принятия информации.
https://shorterin.com/TUgWF
Аргументация: как решать конфликты и убеждать людей
https://useredirectplayfast.com/away.php?visitorId=68a5cbf3d0023f5b5b0527de&reason=blind_no_js&to=aHR0cHM6Ly90cnVzdC01LjMwOTU2MjYucnU
пульпит зуба лечение детям лечение зубов во сне детям
Jogo do Tigrinho ao vivo com narração: já jogou versão com locutor brasileiro?
сео продвижение сайтов по трафику prodvizhenie-sajtov-po-trafiku11.ru .
Nottingham Forest 3-0 Fenerbahce 2026 Europa League upset in Istanbul
deneme bonusu veren casino siteleri casino siteleri
PG Soft cashback semanal: quem já pegou R$300+ só de devolução?
рейтинг компаний digital luchshie-digital-agencstva.ru .
По теме “Как планировать бюджетные путешествия без стресса”, есть отличная статья.
Вот, можете почитать:
https://solpod.ru/%D0%B1%D0%B5%D0%B7-%D1%80%D1%83%D0%B1%D1%80%D0%B8%D0%BA%D0%B8/byudzhetnye-puteshestviya-bez-stressa-kak-bystro-najti-deshevye-aviabilety-i-zhilyo/
PG Soft torneio diário R$10k: quem tá lucrando todo dia no Fortune Tiger?
trailstone pages – Clean navigation and readable content make browsing pleasant.
PG Soft top cassinos Pix 2026: lista atualizada com bônus reais
PG Soft 2026: Mahjong Ways 2 cascades infinitos – já chegou a 50x multiplier?
Fortune Ox touro dourado: já ativou o hold & win com 12+ símbolos?
Jogo do Tigrinho no celular com Wi-Fi 5G: quem já ganhou big win em movimento?
https://www.freetips.com/bonus-code/1xbet-promo-code-dfsa
Jogo do Tigrinho Pix R$15: ganha 90 giros + 30% extra no reload diário!
https://cassiteleri.buzz/# casino deneme siteleri
Jogo do Tigrinho Pix R$30: 150 giros + cashback 15% garantido em 3 sites hoje!
Wolves 2-2 Arsenal 2026 Premier League dramatic draw
Jogo do Tigrinho ao vivo com chat: interação com brasileiros vale a pena mesmo?
vdcasino vdcasino
Jogo do Tigrinho multiplicador 10x: já ativou 3 vezes na mesma sessão? Mítico!
lisanslı casino siteleri: casino deneme siteleri
Jogo do Tigrinho estratégia conservadora: R$0,25 por giro e paciência de 1500 spins
Jogo do Tigrinho ao vivo com dealer: já jogou versão live? Vale a pena?
Galaxyno Hit clusters bombásticos: quem prefere grid grande ou 3×3 clássico?
Cassino PG Soft com roleta diária: 50–300 giros grátis no Fortune Tiger
seo ranking services seo ranking services .
Murillo, Igor Jesus & Gibbs-White fire Nottingham Forest to 3-0 win over Fenerbahce
PG Soft torneios semanais: R$100–R$500 mil em prêmios no Jogo do Tigrinho
кп по продвижению сайта кп по продвижению сайта .
seo продвижение и раскрутка сайта seo продвижение и раскрутка сайта .
harborcrateworks – Nice browsing experience, everything loads smoothly and clearly today.
seo клиники наркологии seo клиники наркологии .
интернет продвижение москва интернет продвижение москва .
оптимизация сайта франция цена оптимизация сайта франция цена .
visit dune vendor collective – Layout is straightforward and sections are clear.
trailbrook website – Structure is clear and information is accessible with ease.
https://cassiteleri.top/# güvenilir casino siteleri
lisanslı casino siteleri: lisanslı casino siteleri
vdcasino giriş vdcasino
интернет маркетинг статьи интернет маркетинг статьи .
quick visit – Pages are tidy, content is easy to read.
click to explore studio – Design is straightforward and reading is effortless.
рейтинг агентств digital маркетинга luchshie-digital-agencstva.ru .
which internet partner prodvizhenie-sajtov-po-trafiku11.ru .
timberwillow pages – Layout is simple and makes browsing the site enjoyable.
casino siteleri casino siteleri
Актуальные онлайн-казино предлагают участникам внушительный диапазон услуг и бонусных предложений. Вход к сервису реализуется через официальный портал или его действующее зеркало казино Hotline казино, что обеспечивает бесперебойную работу.
В чем суть действующее зеркало казино
Копия — это точная копия оригинального ресурса, построенная для обхода ограничений. Рабочее зеркало обеспечивает клиентам иметь вход к излюбленным автоматам в любое время.
Лицензионное зеркало располагает всеми функциями главного сайта:
– Полный перечень игр
– Аккаунт с зафиксированными данными
– Действующие акции
– Надежные денежные операции
Создание аккаунта на главном ресурсе
Ход создания аккаунта отнимает всего несколько минут. Свежим пользователям нужно:
1. Попасть на проверенный ресурс или действующее зеркало
2. Щелкнуть на элемент “Создать аккаунт”
3. Ввести необходимые сведения
4. Проверить email
5. Произвести первый взнос
Приветственный бонус выдается сразу после завершения всех стадий.
Вход в аккаунт
Зарегистрированные участники могут выполнить подключение применяя:
– Никнейм и шифр
– Номер телефона
– Адрес
Личный кабинет обеспечивает право к контролю финансами, данным операций и текущим промокодам.
Бонусы и программы
Азартная площадка вознаграждает постоянных клиентов многочисленными вознаграждениями:
Начальный набор
– Бонус на стартовый платеж до 100%
– Фриспины на топовые игры
– Экстра бонусы за очередные пополнения
Промокоды
Эксклюзивные коды обеспечивают доступ на использование эксклюзивных вознаграждений. Свежие промокоды выставляются в секции “Промо”.
Cashback
Постоянный кэшбек составляет до 10% от потраченных сумм. Компенсация предоставляется сразу.
Система лояльности
Постоянные игроки зарабатывают очки, которые переводятся на настоящие деньги или free spins.
Mobile версия и программа
Ради комфорта клиентов создана удобная адаптивный сайт. Приспособленный облик помогает удобно развлекаться с произвольного переносного гаджета.
Плюсы APP:
– Оперативный доступ к развлечениям
– Оптимизированный дизайн
– Надежная функциональность
– Push-уведомления о актуальных акциях
Загрузить программу можно безвозмездно с официального сайта для аппаратов на Android и iOS.
Библиотека развлечений
Автоматы
База содержит более 2000 слотов от ведущих студий:
– Классические игры
– Современные автоматы
– Джекпот-слоты
– Тематические слоты
Live казино
Категория Live казино дает участие с живыми диллерами в живом формате:
– Рулеточные столы
– Blackjack
– Punto Banco
– Карточный покер
Конкурсы
Постоянные состязания с крупными премиальными фондами устраиваются еженедельно. Участие в конкурсах возможно всем созданным клиентам.
Платежные способы
Пополнения и изъятия денег производятся через востребованные сервисы:
– Кредитные карточ ки
– Онлайн сервисы
– Крипто
– Прямые операции
Минимальный вклад — от 100 рублей. Снятие денег выполняется в течение 24 времени.
Команда помощи
24/7 команда поддержки расположена помочь в урегулировании всех ситуаций:
– Живой чат
– Email
– Телефон
– Общественные сети
Защита и разрешение
Главный ресурс действует на основании мировой документа. Каждые сведения участников закрыты актуальным SSL-криптованием.
Итог
Функционирующее зеркало дает стабильный соединение к выбранным слотам, богатым промокодам и удобным сервисам. Откройте счет сегодня и заработайте начальный бонус!
Нынешние виртуальные казино обеспечивают геймерам широкий выбор вариантов для приятной игры. Тем не менее иногда подключение к официальному платформе может являться заблокированным. В таких моментах на выручку приходят казино Eldorado, которое гарантирует постоянный доступ ко всем возможностям платформы.
Что такое рабочее зеркало казино
Альтернативный сайт — это точная реплика лицензионного сайта, которая хостится по дополнительному интернет-адресу. Копия имеет весь функционал оригинального ресурса, включая пользовательский кабинет, счет и сведения платежей.
Основные выгоды применения зеркала:
– Постоянный подключение к ресурсу
– Максимальная схожесть возможностей
– Защита пользовательских реквизитов
– Поддержка всех имеющихся вознаграждений
Как обнаружить актуальное зеркало сегодня
Есть некоторое количество безопасных способов получения текущей ссылки:
Легитимные источники:
1. Почтовая рассылка — дирекция систематически высылает информацию с рабочими адресами
2. Общественные сети — авторизованные профили выкладывают релевантную информацию
3. Служба поддержки — специалисты сообщают надежные ссылки
4. Смартфонное приложение — обеспечивает преодолевать блокировки
Создание аккаунта на основном веб-сайте
Операция создания аккаунта отнимает только считанные минут и включает из нижеследующих ступеней:
1. Переход на официальный сайт или функционирующее зеркало
2. Щелчок на клавишу «Открыть счет»
3. Внесение учетной бланка
4. Валидация имейл почты или телефонного номера
5. Применение бонуса за регистрацию при наличии промокода
Начинающие клиенты приобретают великодушный стартовый презент, который может охватывать даровые прокруты, денежные призы или кэшбек.
Вход в индивидуальный кабинет
Авторизация на портале реализуется традиционным образом. Требуется вписать учетные данные и пароль, задействованные при создании аккаунта.
Ключевые детали для защищенного входа:
– Задействуйте надежный шифр
– Задействуйте двухфакторную проверку
– Не фиксируйте данные на чужих компьютерах
– Проверяйте интернет строку браузера
Анализ бонусной программы
Игорный портал награждает геймеров разнообразными вознаграждениями и акциями:
Стартовый пакет
Начинающие способны претендовать на существенное поощрение за начальный депозит. Обычно это процентовая надбавка к переведенной объему плюс бесплатные вращения для известных слотов.
Периодические акции
– Недельный кэшбек — возмещение части утраченных денег
– Призы на последующие пополнения
– Эксклюзивные акции по знаменательным датам
– Конкурсы с значительными призовыми банками
План привилегий
Постоянные пользователи собирают единицы за произвольную ставку, которые затем меняются на действительные средства, free spins или эксклюзивные льготы.
Купоны: как задействовать
Кодовые комбинации — это специальные сочетания букв и цифр, дающие привилегию к специальным вознаграждениям.
Каким образом получить действующие промокоды:
– Легитимные коммуникационные сети казино
– Сотрудничающие площадки
– Email-подписка
– Отраслевые форумы
Вводится промокод в предназначенное поле при создании аккаунта или зачислении средств счета.
Портативная версия и приложение
Актуальные игроки выбирают проводить время с мобильных аппаратов. Ресурс предлагает два метода для удобной портативной игры.
Мобильная редакция
Браузерная версия самостоятельно адаптируется под габариты экрана. Не предполагает инсталляции и работает в всяком современном браузере.
Мобильное приложение
Получить app можно для гаджетов на Android и iOS. Преимущества app:
– Быстрая активация
– Стабильная работа
– Всплывающие-уведомления о поощрениях
– Самостоятельный преодоление блокировок
Операция скачивания прост: требуется зайти на портал с смартфонного девайса и подчиняться руководству.
Игровой ассортимент
База развлечений содержит тысячи единиц от передовых провайдеров.
Слоты
Азартные автоматы — крайне популярная группа развлечений. Доступны классические простые автоматы, передовые мультимедийные слоты с дополнительными раундами, а также джекпотные выигрыши.
Live казино
Зона с действительными крупье дает возможность испытать дух истинного казино. Доступны игры с блэкджеком.
Стриминг осуществляется в высоком формате, обеспечивается диалог с раздающим и остальными игроками.
Состязания
Регулярно запускаются конкурсы по разным категориям. Присоединение обеспечивает возможность завоевать денежные вознаграждения, фриспины или специальные презенты.
Финансовые действия
Сайт предлагает широкий набор финансовых инструментов:
– Банковские карты
– Цифровые сервисы
– Цифровая валюта
– Банковские платежи
Низшая величина взноса — разумная для большинства геймеров. Снятие денег обрабатывается в скорые периоды.
Отдел поддержки
Квалифицированные сотрудники расположены поддержать постоянно. Представлены данные способы связи:
– Веб-чат
– Email
– Телефонная линия
– Коммуникационные сети
Пояснения на типовые вопросы можно найти в зоне FAQ.
Резюме
Официальный портал казино и его действующие зеркала обеспечивают клиентам максимальный подключение ко всем опциям ресурса. Щедрые поощрения, комфортная мобильная версия, колоссальный коллекция игр и квалифицированная помощь превращают азартный опыт исключительно беспроблемным и защищенным.
рейтинга рейтинга .
mostbet как пополнить с карты https://mostbet4151.ru
Brook Market – Found this page casually, everything is organized and navigation works well.
купить холодное оружие в турции
casino deneme siteleri: deneme bonusu veren casino siteleri
Вход к платформе и рабочие зеркала
Популярные сетевые казино гарантируют игрокам огромный набор возможностей. Центральный ресурс РёРіСЂС‹ Winri обеспечивает стабильный доступ ко всем услугам. При этом порой появляются моменты, когда понадобится дополнительный путь авторизации.
Что есть собой рабочее зеркало
Действующее зеркало — это абсолютная дубликат легального портала с запасным интернет названием. Копия сегодня помогает преодолевать существующие ограничения и гарантировать непрерывный подключение к предпочитаемым развлечениям.
Официальное зеркало характеризуется теми же функциями, что и центральный сайт:
– Совокупный перечень игр
– Индивидуальный профиль с актуальными данными
– Все бонусы и предложения
– Безопасные денежные действия
Регистрация и подключение в сервис
Ход открытия аккаунта на платформе занимает несколько секунд. Недавним клиентам следует:
1. Попасть на актуальное зеркало сейчас
2. Выбрать клавишу «Регистрация»
3. Заполнить нужные сведения
4. Верифицировать e-mail почту или контакт смартфона
5. Активировать подарок за создание профиля
Доступ в собственный раздел осуществляется путем ввод логина и пароля.
Обзор бонусной структуры
Щедрая наградная структура — основное плюс платформы. Участники зарабатывают разнообразные бонусы:
Начальные поощрения
Начинающие игроки могут претендовать на привлекательный приз за создание аккаунта. Чаще всего это пакет опций, охватывающий:
– Долевую надбавку к стартовому вкладу
– Подарочные фриспины
– Бонусные средства на счет
Промо-коды и эксклюзивные акции
Постоянные промокоды помогают зарабатывать экстра льготы. Задействовать их разрешено в отдельном разделе собственного раздела.
Фриспины и компенсация
Фриспины — это возможность играть слоты без расходования собственных сумм. Рибейт подразумевает частичный компенсацию потерянных средств.
Каталог развлечений
Развлекательная площадка обеспечивает огромную библиотеку слотов.
Видеослоты
Разнообразие аппаратов поражает воображение. Доступны обычные 3-барабанные аппараты и актуальные развлечения с интересной визуализацией.
Live заведение
Раздел Live казино погружает клиентов в среду реального игорного заведения. Умелые крупье осуществляют раунды в реальном формате.
Соревнования и таблицы лидеров
Регулярные турниры обеспечивают остроты и обеспечивают возможность заработать крупные призы.
Mobile вариант и софт
Новые разработки помогают наслаждаться в комфортном локации. Портативная реализация автоматически настраивается под монитор устройства.
Скачать приложение можно для мобильных ОС iOS и Android. Программа дает:
– Быстрый переход
– Устойчивую деятельность
– Моментальные-сообщения об бонусах
– Интуитивный интерфейс
Платежные процедуры
Платформа работает с различные системы депозита и получения средств:
– Пластиковые системы
– Цифровые сервисы
– Крипто
– Прямые транзакции
Все переводы осуществляются через надежное канал, что защищает неприкосновенность персональных сведений.
Сервис support
Профессиональная бригада ассистанса работает круглосуточно. Связаться с консультантами допустимо через:
– Live-чат
– Электронную почту
– Связь
– Медиа сети
Выводы
Основной ресурс и его действующее зеркало предоставляют игрокам безопасный и комфортный путь к захватывающим занятиям. Богатые бонусы, широкий спектр слотов и высокая ассистанс формируют процесс крайне интересной и результативной.
Нынешние онлайн-казино предлагают пользователям богатый ассортимент возможностей для комфортной времяпрепровождения. Доступ к платформе Лаки Бир казино casino выполняется через главный домен или функционирующее зеркало.
Что такое актуальное зеркало казино
Актуальное зеркало — это дополнительный домен главного ресурса казино. Такие версии создаются для гарантирования постоянного подключения к развлекательной сервису.
Копия актуальное полностью воспроизводит возможности базового сайта. Пользователи приобретают схожий путь ко всем возможностям, включая оформление профиля, внесение депозита депозита и вывод выигрышей.
Создание аккаунта на лицензионном веб-сайте
Процесс регистрации занимает всего пару моментов. Будущим игрокам следует:
1. Войти на основной сайт или актуальное настоящее зеркало
2. Кликнуть кнопку “Создать аккаунт”
3. Ввести необходимые данные
4. Активировать e-mail почту
5. Ввести бонусный код при доступности
После завершения создания аккаунта пользователь получает бонус за регистрацию, который способен охватывать фриспины или cash вознаграждение.
Авторизация в индивидуальный кабинет
Индивидуальный кабинет — это безопасная территория, где клиенты вправе контролировать своим учетной записью. Для авторизации следует указать никнейм и пароль.
В индивидуальном кабинете имеются данные функции:
– Мониторинг хронологии платежей
– Задействование кодов активации
– Настройка поощрениями
– Участие в конкурсах
– Проверка возмещения
– Настройка аккаунта
Призы и предложения
Азартная сервис предоставляет великодушные вознаграждения:
Начальный бонус — новички обретают солидное вознаграждение на первые депозиты.
Free spins — предоставляются как при открытии счета, так и в контексте многочисленных кампаний.
Возврат средств — регулярный рефанд доли утраченных финансов.
Бонусные коды — особые комбинации, дающие возможность к специальным вознаграждениям.
Характеристика азартных секций
Аппараты
Библиотека автоматов включает сотни игр от топовых поставщиков. Игроки найдут как обычные автоматы, так и инновационные видео-слоты с увлекательной визуализацией.
Live казино
Раздел Live казино предлагает опцию играть с живыми дилерами в условиях реального времени. Имеются известные варианты: рулетка, блэкджек, баккара, покер.
Соревнования
Постоянные турниры с солидными премиальными суммами завлекают тысячи соревнующихся. Призеры зарабатывают финансовые призы и эксклюзивные бонусы.
Смартфонная версия и софт
Адаптивная версия сайта предоставляет право наслаждаться с всякого устройства. Дизайн автономно подстраивается под габариты экрана.
Скачать софт можно для устройств на Android и iOS. Телефонное программа имеет всеми опциями настольной версии.
Как отыскать актуальное зеркало на текущий день
Действующие линки зеркал постоянно корректируются. Получить свежую линк можно различными методами:
– Через департамент техподдержки
– В проверенных информационных сетях
– По электронной подписке
– На тематических сайтах
Надежность и лицензирование
Официальный сайт работает на фундаменте зарубежной лицензии. Все переводы защищены передовыми методами кодирования.
Конфиденциальность индивидуальных сведений поддерживается в совершенном масштабе.
Итог
Главный домен и его актуальные альтернативы обеспечивают клиентам постоянный путь к превосходным игровым развлечениям. Выгодные бонусы, разнообразные слоты, опытная поддержка — все это формирует гемблинговый досуг невероятно удобным и увлекательным.
vdcasino resmi giriş vdcasino
Характеристика официального ресурса
Передовые виртуальные казино дают участникам широкий выбор игр и шансов. Основной ресурс Буст казино регистрация casino гарантирует безопасный вход к гемблинг возможностям.
Рабочее зеркало: возможность сегодня
Зеркало служит собой полную реплику главного веб-сайта. Проверенное зеркало дает возможность игрокам обходить вероятные барьеры.
Выгоды задействования зеркала
Принципиальные преимущества охватывают:
– Стабильный доступ к платформе
– Поддержание всех характеристик главного сайта
– Сохранность персональных данных
– Аналогичный возможности
Оформление профиля на портале
Механизм открытия счета отличается доступностью и удобством. Недавние участники требуется:
1. Зайти на основной веб-сайт или его зеркало
2. Щелкнуть на элемент создания аккаунта
3. Указать необходимые информацию
4. Активировать электронную адрес
5. Совершить дебютный доступ
Приз за открытие счета
Новички приобретают щедрый стартовый подарок. Подобное награда может охватывать:
– Финансовые начисления
– Complimentary вращения
– Увеличенный уровень компенсации
Вход в личный профиль
Действующие пользователи способны мгновенно получить доступ в личный раздел, задействуя логин и шифр. Индивидуальный профиль предлагает шанс к:
– Администрированию счетом
– Записям операций
– Текущим подаркам
– Опциям профиля
Призы и кампании
Сайт постоянно организует различные предложения для участников.
Виды подарков
Основные формы призов:
– Денежные начисления – коэффициент от величины внесения
– Прокруты – complimentary вращения в слотах
– Компенсация – возмещение процента затраченных сумм
– Соревновательные вознаграждения – вознаграждения за состязание в соревнованиях
Ваучеры
Эксклюзивные промокоды обеспечивают заработать дополнительные выгоды. Клиенты могут получить их на тематических ресурсах или получить в письмах.
Портативная вариант и приложение
Передовые клиенты любят переносной гейминг.
Характеристики мобильной системы
– Адаптивный вид для любых девайсов
– Полный вход к развлечениям
– Быстрая работа
– Эргономичное управление
Установить приложение
Mobile софт предоставлено для загрузки на аппараты с рабочими ОС Android и iOS. Софт обеспечивает:
– Устойчивую производительность
– Мгновенные оповещения о акциях
– Мгновенный вход к избранным автоматам
Азартный выбор
Портал предоставляет внушительную подборку азартных забав.
Автоматы
Библиотека азартных автоматов содержит:
– Обычные игры
– Современные игры
– Джекпотные игры
– Тематические развлечения
Live игры
Раздел реальных дилеров предоставляет возможность участвовать с живыми ведущими. Представлены:
– Рулетки
– Блэкджек
– Baccarat
– Техасский холдем
Соревнования
Регулярные чемпионаты позволяют игрокам состязаться за внушительные финансовые банки. Турнирная программа модифицируется еженедельно.
Финансовые действия
Портал обеспечивает массу опций внесения и вывода средств:
– Банковские карточки
– Виртуальные счета
– Банковские транзакции
– Крипто
Абсолютно все операции осуществляются безопасно с применением актуальных технологий кодирования.
Сервис сопровождения
Квалифицированная группа support работает круглосуточно. Соединиться с менеджерами доступно через:
– Интерактивный чат
– Email почту
– Контактный номер
– Соц медиа
Безопасность и регулирование
Платформа действует на базе легальной лицензии. Подобное обеспечивает:
– Прозрачность игрового действа
– Защиту индивидуальных данных
– Быстрые выплаты
– Регулируемый гейминг
Вывод
Лицензионный веб-сайт и его актуальные резервные страницы предоставляют участникам целостный набор функций для безопасной и прибыльной времяпрепровождения. Значительные бонусы, многочисленные развлечения, компетентная помощь и защищенная структура платежей делают платформу оптимальным вариантом для фанатов развлекательных забав.
Актуальные виртуальные казино дают пользователям обширный выбор возможностей для комфортной игры. Однако иногда подключение к базовому порталу может являться закрытым. В таких ситуациях на подмогу приходят РРЅРѕРјРѕ казино казино, которое предоставляет непрерывный подключение ко всем функциям платформы.
Что такое действующее зеркало казино
Дубликат — это идентичная версия официального веб-сайта, которая находится по другому интернет-адресу. Дубликат имеет полный набор функций основного сайта, включая пользовательский кабинет, депозит и историю платежей.
Главные плюсы задействования зеркала:
– Постоянный подключение к платформе
– Абсолютная схожесть инструментов
– Конфиденциальность пользовательских данных
– Хранение существующих вознаграждений
Как обнаружить функционирующее зеркало сегодня
Присутствует некоторое количество достоверных методов обнаружения актуальной ссылки:
Проверенные каналы:
1. Email рассылка — руководство постоянно направляет письма с рабочими URL
2. Социальные сети — проверенные профили постят свежую данные
3. Сервис поддержки — сотрудники выдают достоверные ссылки
4. Портативное приложение — позволяет избегать блокировки
Создание аккаунта на основном ресурсе
Процесс открытия счета занимает не более несколько минут и состоит из нижеследующих шагов:
1. Переход на основной сайт или действующее зеркало
2. Щелчок на клавишу «Создать аккаунт»
3. Внесение персональной бланка
4. Проверка электронной почты или контактного номера
5. Включение вознаграждения за регистрацию при наличии промокода
Только что зарегистрированные клиенты приобретают солидный вступительный бонус, который может содержать даровые прокруты, монетарные бонусы или cashback.
Доступ в персональный кабинет
Авторизация на платформе производится привычным способом. Достаточно вписать учетные данные и пароль, использованные при открытии счета.
Ключевые детали для безопасного входа:
– Задействуйте защищенный секретный ключ
– Включите двухфакторную аутентификацию
– Не фиксируйте коды на общественных устройствах
– Проверяйте адресную строку браузера
Описание бонусной программы
Игровая платформа награждает пользователей многочисленными вознаграждениями и промо:
Вступительный комплект
Свежие игроки имеют возможность надеяться на щедрое награду за первый взнос. Как правило это процентовая премия к внесенной величине плюс бесплатные вращения для известных слотов.
Систематические акции
– Недельный cashback — возврат процентной доли списанных средств
– Награды на последующие взносы
– Специальные акции по торжествам
– Конкурсы с солидными выигрышными суммами
План верности
Активные игроки получают пункты за каждую бет, которые затем обмениваются на реальные денежные призы, бесплатные вращения или эксклюзивные преимущества.
Купоны: как активировать
Промокоды — это уникальные сочетания литер, гарантирующие привилегию к дополнительным привилегиям.
Где раздобыть рабочие промокоды:
– Официальные общественные сети казино
– Союзнические сайты
– Email-рассылка
– Профильные группы
Активируется промокод в соответствующее поле при создании аккаунта или внесении депозита счета.
Смартфонная версия и приложение
Нынешние игроки отдают предпочтение делать ставки с телефонных гаджетов. Сайт предлагает 2 метода для комфортной телефонной игры.
Адаптивная модификация
Веб версия само собой подстраивается под диагональ экранной панели. Не требует загрузки и действует в любом новом браузере.
Смартфонное приложение
Установить софт можно для аппаратов на Android и iOS. Плюсы app:
– Скоростная запуск
– Устойчивая действие
– Всплывающие-уведомления о акциях
– Автоматический минование блокировок
Процесс установки легок: требуется попасть на веб-сайт с смартфонного гаджета и подчиняться предписаниям.
Игровой каталог
Каталог игр включает огромное количество единиц от лучших поставщиков.
Слоты
Азартные машины — максимально любимая секция игр. Показаны обычные винтажные автоматы, современные видео-автоматы с поощрительными раундами, а также растущие призы.
Live казино
Зона с живыми дилерами обеспечивает почувствовать антураж реального казино. Представлены столы с покером.
Передача реализуется в отличном четкости, имеется диалог с раздающим и остальными геймерами.
Конкурсы
Регулярно организуются соревнования по разным играм. Вступление предоставляет право получить денежные вознаграждения, free spins или особые привилегии.
Денежные манипуляции
Сайт предлагает большой спектр денежных методов:
– Кредитные карты
– Электронные платформы
– Цифровая валюта
– Счетовые переводы
Стартовая количество взноса — посильная для массы игроков. Снятие средств производится в кратчайшие периоды.
Служба поддержки
Квалифицированные консультанты готовы содействовать круглосуточно. Открыты данные методы общения:
– Интернет-чат
– Email
– Голосовая поддержка
– Коммуникационные сети
Ответы на стандартные темы можно найти в зоне FAQ.
Заключение
Официальный портал казино и его актуальные зеркала обеспечивают геймерам абсолютный подключение ко всем возможностям ресурса. Щедрые бонусы, практичная портативная версия, гигантский выбор развлечений и опытная ассистенция делают гемблинг досуг максимально комфортным и безопасным.
canadian and mexican pharmacies online
bytecraft – Pages loaded fast, images appeared sharp, and formatting stayed consistent.
techsnap – Bookmarked this immediately, planning to revisit for updates and inspiration.
Переход к ресурсу через проверенные зеркала
Пользователи сетевых казино регулярно встречаются с ситуацией блокировки базового домена. Как раз для решения этой ситуации существуют копии главного домена. ДБ Бет предоставляет абсолютный вход ко всем возможностям ресурса.
Что такое функционирующее зеркало казино
Дубликат представляет собой идентичную версию основного веб-сайта с аналогичным набором функций. Главное отличие — это доменное имя. Все информация пользователя, вместе с баланс, бонусы и архив раундов, сохраняются прежними.
Выгоды использования зеркал
Актуальные зеркала характеризуются набором значимых выгод:
– Бесперебойный доступ к выбранным слотам
– Полная безопасность собственных сведений
– Поддержание всех параметров личного кабинета
– Опция взятия призов и участия в акциях
Открытие счета на главном сайте
Операция создания аккаунта максимально прост и занимает буквально минут. Недавние игроки в состоянии полагаться на крупный приветственный поощрение за создание аккаунта.
Стадии создания аккаунта
1. Переход на основной домен или его копию
2. Выбор на опцию “Присоединиться”
3. Ввод требуемых информации
4. Проверка email почты
5. Указание бонусного кода (при наличии доступен)
Подарки и промоакции для пользователей
Ресурс балует своих клиентов многочисленными призовыми системами.
Основные типы бонусов
Стартовый бонус — крупное вознаграждение для новых пользователей, что может включать финансовые средства и фриспины.
Безвозмездные спины — шанс использовать в топовых аппаратах без затрат.
Возврат средств — пропорциональный компенсация проигранных финансов, который предоставляется еженедельно или раз в месяц.
Купоны — особые наборы, дающие добавочные выгоды.
Пользовательский кабинет: опции и параметры
Индивидуальный аккаунт предоставляет абсолютный надзор над персональным взаимодействием. В данном разделе имеются:
– Регулирование депозитом
– Данные переводов
– Текущие поощрения
– Настройки защиты
– Проверка аккаунта
Карманная платформа и программа
Новейшие игроки оценивают мобильность. Платформа предлагает двойной варианта для участия с мобильных аппаратов.
Отзывчивая телефонная версия
Портативная вариант домена автономно адаптируется под разрешение любого устройства. Не требуется скачивать специальное программное обеспечение.
Софт для смартфонов
Возможно установить официальное софт для iOS и Android. Приложение дает:
– Мгновенный доступ
– Адаптированный графику
– Всплывающие-извещения о бонусах
– Бесперебойную операционность
Live раздел: антураж истинного игорного заведения
Раздел Live развлечений транспортирует пользователей в обстановку настоящего зала. Компетентные хосты осуществляют партии в режиме реального времени.
Популярные Live-развлечения
– Европейская рулетка
– Блэкджек
– Баккарат
– Покер
Автоматы: многообразие развлечений
Собрание слотовых машин насчитывает сотни названий от топовых поставщиков. Участники откроют:
– Классические автоматы
– Видео-автоматы
– Накопительный приз-автоматы
– Megaways
Конкурсы и специальные акции
Регулярные конкурсы предоставляют шанс игрокам конкурировать друг с другом за внушительные выигрышные пулы. Отдельный конкурс содержит свои критерии участия и список лидеров.
Способы ввода и изъятия сумм
Платформа поддерживает ряд финансовых инструментов:
– Кредитные инструменты
– Электронные платежные системы
– Цифровые валюты
– Прямые отправления
Любые платежи проходят безопасно благодаря новейшим протоколам шифрования.
Служба помощи
Профессиональные специалисты отдела обслуживания настроены содействовать 24/7. Доступны данные способы контакта:
– Живой-чат
– Email-обслуживание
– Аудио горячая линия
– Социальные сети
Итог
Официальный портал игровой площадки и его актуальные копии дают клиентам конфиденциальный и легкий доступ к большому ассортименту развлекательных услуг. Щедрые подарки, периодические кампании, квалифицированная помощь и легкие платежные инструменты превращают игровой процесс чрезвычайно приятным и выгодным.
zylotech – Overall, professional vibe here; trustworthy, polished, and pleasantly minimal throughout.
Нынешние онлайн-казино предоставляют участникам широкий набор слотов и заманчивые поощрения. Однако для стабильной деятельности важно иметь представление, как обнаружить Клубника сайт казино и его рабочие зеркала.
Что такое основной сайт казино
Лицензионный веб-сайт казино — это главная площадка, где участники могут развлекаться развлекательными слотами. Сайт действует на легитимных правах и располагает всеми нужными лицензиями.
Основные плюсы главного веб-сайта:
– Конфиденциальность пользовательских сведений
– Прозрачные положения игры
– Стабильные выплаты
– Компетентная техподдержка
Действующее зеркало казино: для чего нужно
Дублирующий ресурс — это полная копия официального веб-сайта, хостящаяся по иному веб-адресу. Действующее зеркало создается для гарантирования бесперебойного соединения к порталу.
Основания эксплуатации копий сайта:
– Блокировка официального домена
– Технические работы
– Значительная активность на платформу
Как получить свежее зеркало сегодня
Найти свежее рабочее зеркало можно разными вариантами:
1. Подписка — активируйте уведомления на почтовую отправку
2. Отдел support — проконсультируйтесь в онлайн-чат
3. Официальные площадки — следите за публикациями
4. Игровые площадки — достоверные сайты
Создание аккаунта на портале казино
Процесс регистрации занимает буквально немного моментов:
1. Активируйте на клавишу “Регистрация”
2. Укажите обязательные поля
3. Верифицируйте почтовую почту
4. Примените бонусный код, если имеется
Сразу после успешной активации вам будет открыт пользовательский профиль.
Бонусы и коды активации
Щедрая поощрительная программа — значимое плюс казино:
Награда за открытие счета
Свежие пользователи зарабатывают первый поощрение, который может содержать:
– Монетарный счет на первый взнос
– Бесплатные вращения для барабанов
– Приветственные фонды
Промокоды
Периодически публикуются актуальные бонусные шифры, позволяющие забрать дополнительные привилегии.
Система кешбэка
Активные клиенты приобретают порцию утраченных денег назад.
Действующие промо и соревнования
Платформа периодически устраивает увлекательные кампании:
– Еженедельные баттлы
– Тематические бонусы
– Конкурсы ценных выигрышей
– Система привилегий
Авторизация в персональный раздел
Для авторизации на портал необходимо:
1. Посетить официальный ресурс или действующее зеркало
2. Выбрать “Вход”
3. Прописать никнейм и код доступа
В персональном разделе открыты такие возможности:
– Пополнение депозита
– Получение выигрышей
– Анализ лога игр
– Редактирование личными сведениями
Адаптивная платформа и софт
Портативная модификация
Мобильная модификация веб-сайта предоставляет шанс участвовать с разных портативного устройства. Интерфейс динамически адаптируется под размер screen.
Клиент для download
Скачать клиент можно для:
– Android — прямая download с платформы
– iOS — загрузка через App Store
Преимущества приложения:
– Моментальный вход
– Надежная производительность
– Push-уведомления об бонусах
– Оптимизированный UI
Развлекательные зоны
Слоты
Разнообразная галерея эмуляторных машин от топовых поставщиков:
– Классические машины
– Продвинутые-эмуляторы
– Накопительные-игры
Live игры
Раздел с живыми дилерами дает:
– Рулеточные столы
– Blackjack
– Punto Banco
– Карточные игры
Вещания проводятся в HD качестве, создавая атмосферу аутентичного казино.
Варианты депозита и обналичивания
Платформа обслуживает различные платежные сервисы:
– Платежные картсчета
– Онлайн кошельки
– Криптовалюты
– Прямые транзиты
Минимальные суммы взноса и моментальные выплаты обеспечивают игру предельно комфортной.
Отдел помощи
Компетентная служба ассистентов работает 24/7 и готова помочь с всеми задачами:
– Онлайн-чат
– Email-консультации
– Телефонная линия
Итоги
Главный сайт казино и его рабочие дубликаты предоставляют участникам конфиденциальный и интересный гемблинг отдых. Привлекательные поощрения, комфортная mobile платформа, многочисленные игры и профессиональное live-казино формируют эту ресурс великолепным решением для азартных игр.
vynextech – Content reads clearly, helpful examples made concepts easy to grasp.
techwave – Appreciate the typography choices; comfortable spacing improved my reading experience.
useful link – Structure is clear, reading content feels effortless.
Подключение к ресурсу и действующие зеркала
Популярные сетевые казино предоставляют игрокам обширный спектр развлечений. Официальный веб-сайт https://www.allianceswayenterprises.com/2026/02/28/popolnite-svoy-schet-igrayte-i-vyvodite-sredstva-s-pomoshchyu-dostupnogo-metoda-oplaty-v-internete/ гарантирует защищенный подключение ко всем сервисам. При этом временами появляются случаи, когда требуется альтернативный путь доступа.
Что представляет собой рабочее зеркало
Действующее зеркало — это полная версия главного портала с иным доменным расположением. Копия сегодня позволяет преодолевать потенциальные блокировки и поддерживать бесперебойный доступ к любимым развлечениям.
Проверенное зеркало обладает теми же функциями, что и базовый портал:
– Весь каталог развлечений
– Персональный кабинет с сохраненными параметрами
– Полные поощрения и акции
– Надежные платежные действия
Открытие профиля и авторизация в сервис
Этап регистрации на сайте требует буквально моментов. Недавним клиентам требуется:
1. Попасть на рабочее зеркало сейчас
2. Щелкнуть клавишу «Создать аккаунт»
3. Внести требуемые параметры
4. Проверить электронную почту или контакт смартфона
5. Использовать поощрение за открытие аккаунта
Вход в личный аккаунт осуществляется посредством указание логина и ключа.
Обзор поощрительной программы
Выгодная призовая политика — главное плюс платформы. Клиенты зарабатывают различные поощрения:
Начальные бонусы
Начинающие клиенты имеют возможность претендовать на щедрый подарок за регистрацию. Как правило это пакет возможностей, включающий:
– Частичную надбавку к стартовому пополнению
– Бесплатные фриспины
– Дополнительные средства на аккаунт
Промокоды и уникальные предложения
Периодические бонусные комбинации позволяют зарабатывать экстра преимущества. Активировать их возможно в специальном окне индивидуального кабинета.
Спины и кешбэк
Даровые вращения — это шанс крутить слоты без применения личных денег. Компенсация предполагает процентный отдачу проигранных денег.
Коллекция развлечений
Игровая ресурс предоставляет значительную библиотеку слотов.
Видеослоты
Ассортимент игровых машин поражает ожидания. Есть традиционные простые автоматы и продвинутые автоматы с увлекательной визуализацией.
Live казино
Раздел Live игр погружает клиентов в антураж подлинного игорного клуба. Умелые операторы осуществляют сессии в прямом эфире.
Конкурсы и доски почета
Регулярные турниры обеспечивают остроты и дают шанс получить крупные суммы.
Портативная форма и приложение
Продвинутые инновации позволяют наслаждаться в комфортном точке. Mobile форма самостоятельно оптимизируется под монитор девайса.
Скачать программу можно для мобильных систем iOS и Android. Софт предоставляет:
– Мгновенный запуск
– Надежную производительность
– Push-оповещения об бонусах
– Комфортный вид
Финансовые действия
Сайт работает с различные варианты ввода и получения финансов:
– Пластиковые счета
– Виртуальные кошельки
– Криптовалюты
– Банковские транзакции
Каждые переводы осуществляются через надежное подключение, что гарантирует сохранность конфиденциальных информации.
Сервис помощи
Профессиональная команда помощи трудится круглосуточно. Соединиться с специалистами допустимо через:
– Live-чат
– Цифровую почту
– Горячую линию
– Социальные сети
Выводы
Главный портал и его действующее зеркало дают игрокам безопасный и приятный путь к интересным занятиям. Щедрые подарки, широкий ассортимент игр и качественная помощь формируют участие крайне комфортной и результативной.
Переход к порталу через рабочие зеркала
Участники сетевых казино нередко имеют дело с проблемой недоступности основного домена. Собственно для устранения этой трудности разработаны копии основного сайта. РРЅРѕРјРѕ казино обеспечивает полный переход ко всем возможностям казино.
Что такое рабочее зеркало казино
Дубликат значит собой полную версию главного сайта с таким же опциями. Главное различие — это иное имя. Каждые сведения участника, в том числе депозит, бонусы и записи партий, находятся прежними.
Выгоды эксплуатации зеркал
Действующие зеркала обладают набором ключевых достоинств:
– Непрерывный вход к любимым развлечениям
– Абсолютная конфиденциальность персональных параметров
– Удержание всех настроек персонального кабинета
– Шанс взятия призов и присутствия в акциях
Регистрация на официальном сайте
Ход регистрации чрезвычайно прост и отнимает немного минут. Начинающие пользователи в состоянии надеяться на щедрый вводный приз за открытие счета.
Шаги создания аккаунта
1. Доступ на легальный домен или его альтернативу
2. Активация на кнопку “Регистрация”
3. Внесение необходимых данных
4. Активация цифровой почты
5. Применение бонусного кода (когда доступен)
Награды и кампании для пользователей
Казино балует своих пользователей многочисленными наградными предложениями.
Базовые категории наград
Начальный приз — внушительное поощрение для свежих участников, которое именно имеет возможность вмещать материальные бонусы и free spins.
Фриспины — опция запускать в востребованных аппаратах без затрат.
Кешбэк — процентный отдача израсходованных сумм, каковой предоставляется еженедельно или раз в месяц.
Бонусные коды — специальные наборы, дающие экстра привилегии.
Пользовательский кабинет: функции и конфигурации
Пользовательский раздел гарантирует совершенный регулирование над персональным активностью. В данном разделе предусмотрены:
– Администрирование депозитом
– История переводов
– Текущие привилегии
– Установки защиты
– Валидация счета
Мобильная платформа и программа
Актуальные пользователи признают портативность. Площадка предлагает двойной метода для участия с смартфонных аппаратов.
Приспособленная телефонная версия
Смартфонная версия сайта самостоятельно приспосабливается под дисплей любого девайса. Не требуется скачивать особое программное обеспечение.
Приложение для смартфонов
Разрешено установить фирменное APP для iOS и Android. Приложение обеспечивает:
– Моментальный запуск
– Адаптированный интерфейс
– Мобильные-оповещения о акциях
– Надежную функциональность
Live развлечения: атмосфера истинного клуба
Секция Live столов доставляет участников в антураж подлинного игорного заведения. Квалифицированные дилеры организуют сессии в формате прямого времени.
Востребованные Live-игры
– Французская рулетка
– Blackjack
– Baccarat
– Poker
Автоматы: разнообразие развлечений
Каталог развлекательных слотов вмещает множество названий от ведущих разработчиков. Игроки найдут:
– Классические слоты
– Видеослоты
– Мега-выигрыш-слоты
– Слоты с множественными линиями
Состязания и специальные мероприятия
Периодические соревнования обеспечивают клиентам конкурировать друг с другом за внушительные призовые суммы. Всякий турнир обладает свои условия присутствия и таблицу чемпионов.
Пути внесения и получения денег
Площадка использует ряд расчетных методов:
– Кредитные картыы
– Электронные сервисы
– Blockchain-платежи
– Банковские переводы
Каждые переводы выполняются защищенно благодаря актуальным системам защиты.
Команда помощи
Опытные сотрудники отдела обслуживания настроены поддержать 24/7. Имеются такие методы коммуникации:
– Оперативный-чат
– Email-обслуживание
– Звонковая поддержка
– Социальные сети
Заключение
Главный портал казино и его актуальные зеркала предоставляют пользователям надежный и легкий вход к широкому ассортименту развлекательных игр. Внушительные бонусы, регулярные кампании, профессиональная сервис и простые расчетные способы формируют азартный времяпрепровождение крайне приятным и прибыльным.
visit the vendor hub – Nice simple structure, everything loads quickly.
güvenilir casino siteleri lisanslı casino siteleri
Emporium Market – Found this page unexpectedly, everything is organized and readable.
Вход к ресурсу через проверенные зеркала
Участники онлайн казино постоянно встречаются с ситуацией блокировки базового домена. Именно для устранения этой задачи созданы зеркала главного ресурса. https://www.crystalsvillage.com/index.php/2026/03/04/rukovodstvo-po-vyvodu-sredstv-iz-onlayn-kazino-metody-limity-i-sroki-2025-esli-vy-stali-pobeditelem-i-planiruete-vyvesti-sredstva-u-vas-ne-vozniknet-problem-s-obnalichivaniem-deneg-postu гарантирует полный доступ ко всем опциям казино.
Что такое актуальное зеркало казино
Альтернативный адрес составляет собой полную реплику оригинального ресурса с идентичным набором функций. Основное несовпадение — это доменное имя. Все данные пользователя, в том числе депозит, бонусы и архив ставок, находятся идентичными.
Выгоды применения зеркал
Актуальные зеркала имеют рядом значимых преимуществ:
– Бесперебойный доступ к предпочитаемым автоматам
– Полная конфиденциальность персональных сведений
– Сохранение всех настроек личного кабинета
– Опция взятия поощрений и включения в предложениях
Регистрация на официальном домене
Ход открытия счета предельно несложен и требует буквально минут. Начинающие участники способны полагаться на щедрый начальный бонус за открытие счета.
Стадии открытия аккаунта
1. Переход на официальный домен или его альтернативу
2. Нажатие на элемент “Зарегистрироваться”
3. Ввод требуемых параметров
4. Проверка email почты
5. Указание промокода (в случае есть)
Бонусы и промоакции для клиентов
Ресурс балует своих пользователей многочисленными призовыми системами.
Базовые типы призов
Приветственный пакет — крупное поощрение для начинающих игроков, которое в состоянии включать материальные призы и фриспины.
Free spins — шанс использовать в популярных аппаратах безвозмездно.
Возврат средств — пропорциональный возврат проигранных финансов, который зачисляется еженедельно или раз в месяц.
Купоны — эксклюзивные последовательности, предоставляющие добавочные поощрения.
Персональный кабинет: опции и конфигурации
Индивидуальный аккаунт гарантирует совершенный регулирование над пользовательским взаимодействием. Здесь предусмотрены:
– Регулирование депозитом
– История операций
– Работающие бонусы
– Установки сохранности
– Верификация аккаунта
Смартфонная платформа и софт
Современные игроки ценят портативность. Платформа обеспечивает пару метода для развлечений с мобильных девайсов.
Отзывчивая портативная платформа
Портативная версия портала автономно адаптируется под дисплей любого аппарата. Не требуется устанавливать отдельное приложение.
Софт для смартфонов
Доступно установить оригинальное программу для iOS и Android. Приложение обеспечивает:
– Мгновенный вход
– Доработанный дизайн
– Оперативные-сообщения о акциях
– Стабильную функциональность
Live игры: обстановка подлинного клуба
Зона Live развлечений доставляет игроков в антураж реального казино. Опытные ведущие ведут игры в варианте реального времени.
Востребованные Live-столы
– Рулетка
– Двадцать одно
– Baccarat
– Покер
Слоты: ассортимент автоматов
Собрание развлекательных автоматов содержит тысячи названий от лидирующих производителей. Игроки обнаружат:
– Классические аппараты
– Графические слоты
– Прогрессивный джекпот-слоты
– Megaways
Состязания и особые мероприятия
Регулярные соревнования позволяют игрокам соревноваться друг с другом за солидные денежные суммы. Отдельный конкурс обладает свои условия включения и доску чемпионов.
Способы пополнения и получения финансов
Платформа обслуживает комплекс денежных систем:
– Кредитные картыы
– Цифровые счета
– Криптовалюты
– Банковские транзиты
Абсолютно все переводы осуществляются надежно благодаря актуальным методам шифрования.
Команда поддержки
Опытные специалисты отдела обслуживания настроены ассистировать 24/7. Имеются следующие способы общения:
– Оперативный-чат
– Email-сервис
– Телефонная линия
– Медийные сети
Заключение
Главный ресурс платформы и его функционирующие альтернативы предоставляют пользователям надежный и удобный вход к огромному выбору геймерских активностей. Солидные награды, частые акции, компетентная служба и легкие расчетные инструменты формируют азартный процесс максимально приятным и доходным.
explore timberharbor – Found the sections easy to read and understand.
Актуальные интернет казино предоставляют клиентам большой ассортимент опций для удобной игры. Впрочем иногда доступ к официальному платформе может оказаться заблокированным. В таких случаях на подмогу появляется https://mycourse.my/osnovnye-metody-vozvrata-sredstv-v-tinkoff, которое предоставляет стабильный подключение ко всем опциям платформы.
Что такое действующее зеркало казино
Зеркало — это идентичная реплика официального веб-сайта, которая располагается по альтернативному интернет-адресу. Копия поддерживает весь инструментарий основного сайта, включая индивидуальный кабинет, средства и историю платежей.
Главные плюсы задействования зеркала:
– 24-часовой вход к платформе
– Полная схожесть инструментов
– Защита личных сведений
– Хранение доступных поощрений
Как найти актуальное зеркало в данный момент
Существует несколько достоверных способов обнаружения действующей адреса:
Проверенные ресурсы:
1. Электронная рассылка — руководство регулярно высылает информацию с действующими адресами
2. Общественные сети — легитимные страницы размещают релевантную сведения
3. Сервис поддержки — специалисты дают надежные домены
4. Портативное приложение — предоставляет минуть блокировки
Создание аккаунта на основном сайте
Процесс создания аккаунта длится только немного минут и состоит из таких этапов:
1. Вход на главный портал или функционирующее зеркало
2. Выбор на иконку «Регистрация»
3. Внесение регистрационной формы
4. Подтверждение email почты или контактного номера
5. Применение поощрения за регистрацию при наличии промокода
Новые клиенты приобретают солидный приветственный бонус, который может предполагать бесплатные вращения, монетарные бонусы или cashback.
Логин в пользовательский кабинет
Авторизация на платформе осуществляется привычным методом. Нужно указать логин и секретный ключ, использованные при регистрации.
Ключевые нюансы для защищенного входа:
– Применяйте защищенный код
– Активируйте двойную проверку
– Не сохраняйте коды на публичных девайсах
– Контролируйте интернет строку браузера
Обзор бонусной схемы
Игорный портал одаривает геймеров всевозможными поощрениями и промо:
Начальный букет
Начинающие способны претендовать на существенное награду за начальный депозит. Зачастую это долевая добавка к зачисленной величине плюс бесплатные вращения для популярных слотов.
Постоянные акции
– Еженедельный компенсация — компенсирование процента проигранных средств
– Бонусы на последующие пополнения
– Эксклюзивные промо по торжествам
– Конкурсы с крупными призовыми банками
Программа лояльности
Постоянные пользователи собирают очки за каждую игру, которые затем превращаются на реальные средства, даровые прокруты или специальные льготы.
Кодовые слова: как применять
Купоны — это специальные наборы литер, обеспечивающие привилегию к дополнительным вознаграждениям.
В каких местах взять актуальные промокоды:
– Легитимные общественные сети казино
– Сотрудничающие порталы
– Email-подписка
– Отраслевые группы
Вводится промокод в соответствующее поле при создании аккаунта или пополнении баланса.
Мобильная версия и приложение
Современные игроки предпочитают играть с мобильных устройств. Сайт предлагает 2 варианта для беспроблемной телефонной игры.
Responsive версия
Веб версия сама оптимизируется под параметры дисплея. Не нуждается скачивания и оперирует в всяком современном браузере.
Мобильное приложение
Получить app можно для девайсов на Android и iOS. Выгоды app:
– Быстрая запуск
– Надежная работа
– Всплывающие-уведомления о акциях
– Самостоятельный минование блокировок
Этап инсталляции несложен: необходимо зайти на веб-сайт с телефонного девайса и придерживаться указаниям.
Азартный выбор
Библиотека аппаратов насчитывает тысячи позиций от ведущих производителей.
Слоты
Азартные машины — наиболее популярная категория забав. Представлены обычные простые машины, современные графические аппараты с дополнительными этапами, а также джекпотные выигрыши.
Live казино
Раздел с действительными ведущими обеспечивает ощутить дух истинного казино. Представлены столы с покером.
Трансляция осуществляется в отличном качестве, поддерживается общение с дилером и прочими участниками.
Конкурсы
Постоянно организуются турниры по многочисленным дисциплинам. Включение обеспечивает возможность получить денежные вознаграждения, free spins или уникальные бонусы.
Транзакционные манипуляции
Сайт поддерживает значительный ассортимент расчетных способов:
– Дебетовые карты
– Цифровые платформы
– Крипта
– Банковские платежи
Минимальная объем пополнения — доступная для основной части клиентов. Вывод выигрышей производится в минимальные сроки.
Департамент поддержки
Компетентные консультанты способны поддержать непрерывно. Имеются нижеследующие способы контакта:
– Веб-чат
– Email
– Голосовая горячая линия
– Медийные сети
Ответы на частые вопросы можно получить в секции FAQ.
Итог
Главный веб-сайт казино и его действующие зеркала обеспечивают игрокам совершенный путь ко всем сервисам сайта. Солидные поощрения, приятная смартфонная версия, колоссальный ассортимент развлечений и квалифицированная помощь делают гемблинг досуг исключительно удобным и конфиденциальным.
lisanslı casino siteleri casino deneme siteleri
güvenilir casino siteleri lisanslı casino siteleri
Актуальные онлайн-казино обеспечивают участникам широкий ассортимент игр и выгодные премии. Однако для беспроблемной времяпрепровождения существенно иметь представление, как получить доступ к https://www.bbilnuovo.it/2026/03/05/krome-togo-reshenie-dlya-platezhey-ot-kompanii и его действующие зеркала.
Что такое лицензионный ресурс казино
Лицензионный сайт казино — это главная площадка, где игроки могут развлекаться гемблинг играми. Ресурс оперирует на законных условиях и обладает всеми требуемыми документами.
Главные преимущества главного сайта:
– Защищенность пользовательских данных
– Честные положения участия
– Гарантированные выводы
– Квалифицированная помощь
Функционирующее зеркало казино: для чего требуется
Дублирующий ресурс — это абсолютная клон лицензионного портала, расположенная по другому домену. Функционирующее зеркало создается для поддержания постоянного подключения к порталу.
Поводы задействования копий сайта:
– Недоступность основного адреса
– Технические мероприятия
– Повышенная посещаемость на платформу
Как получить действующее зеркало сейчас
Узнать текущее официальное зеркало можно множественными способами:
1. Email-уведомления — активируйте уведомления на новостную отправку
2. Департамент помощи — обратитесь в онлайн-чат
3. Публичные каналы — проверяйте за постами
4. Партнерские площадки — достоверные платформы
Создание аккаунта на платформе казино
Процесс создания аккаунта занимает только несколько моментов:
1. Выберите на элемент “Создать аккаунт”
2. Укажите обязательные поля
3. Подтвердите контактную e-mail
4. Введите бонусный код, если предоставлен
По завершении финализированной создания аккаунта вам будет открыт пользовательский раздел.
Премии и промокоды
Привлекательная поощрительная политика — ключевое конкурентное преимущество казино:
Награда за регистрацию
Новые пользователи приобретают начальный подарок, который может охватывать:
– Денежный бонус на дебютный пополнение
– Фри-спины для барабанов
– Бездепозитные бонусы
Промокоды
Регулярно выходят актуальные бонусные шифры, предоставляющие получить специальные преимущества.
Программа возврата средств
Регулярные игроки возвращают порцию проигранных ставок обратно.
Действующие акции и соревнования
Ресурс периодически организует азартные промо-мероприятия:
– Weekly турниры
– Тематические акции
– Раздачи солидных призов
– Схема VIP-клуба
Доступ в индивидуальный профиль
Для авторизации на ресурс следует:
1. Перейти на лицензионный сайт или действующее зеркало
2. Кликнуть “Login”
3. Внести имя пользователя и секретную комбинацию
В индивидуальном кабинете доступны такие опции:
– Пополнение кошелька
– Получение средств
– Изучение журнала операций
– Управление личными параметрами
Портативная версия и софт
Адаптивная вариант
Responsive модификация ресурса дает возможность играть с всех карманного телефона. Оформление самостоятельно адаптируется под габариты дисплея.
App для загрузки
Получить клиент можно для:
– Android — прямая загрузка с платформы
– iOS — скачивание через App Store
Плюсы мобильного клиента:
– Быстрый доступ
– Устойчивая производительность
– Push-сообщения об промо
– Оптимизированный дизайн
Игровые секции
Слоты
Внушительная подборка игровых слотов от известных провайдеров:
– Стандартные машины
– Новые-эмуляторы
– Накопительные-машины
Live зал
Раздел с реальными крупье предоставляет:
– Рулетки
– Блэкджек
– Баккара
– Texas Hold’em
Вещания транслируются в высоком разрешении, обеспечивая ощущение настоящего казино.
Способы зачисления и обналичивания
Платформа работает с разные денежные инструменты:
– Дебетовые картсчета
– Онлайн кошельки
– Криптовалюты
– Wire переводы
Наименьшие суммы пополнения и моментальные выводы делают процесс крайне приятной.
Команда помощи
Компетентная отдел ассистентов доступна 24/7 и в состоянии поддержать с всеми ситуациями:
– Онлайн-чат
– Email-консультации
– Голосовая горячая линия
Итоги
Лицензионный веб-сайт казино и его функционирующие дубликаты дают клиентам конфиденциальный и захватывающий развлекательный опыт. Щедрые награды, удобная мобильная платформа, многочисленные развлечения и профессиональное live-казино формируют эту ресурс великолепным вариантом для игровых досуга.
Анализ лицензионного портала
Актуальные сетевые казино предлагают игрокам богатый спектр услуг и перспектив. Главный сайт http://fjv.no/2026/03/03/v-2021-godu-byli-obnovleny-izvestnye-sposoby-vneseniya-sredstv-v-kazino предоставляет проверенный доступ к развлекательным возможностям.
Рабочее зеркало: вход прямо сейчас
Дублирующий портал представляет в качестве абсолютную реплику главного ресурса. Действующее зеркало помогает игрокам обходить потенциальные ограничения.
Плюсы применения зеркала
Ключевые преимущества охватывают:
– Непрерывный доступ к платформе
– Поддержание любых характеристик главного портала
– Сохранность конфиденциальных данных
– Равнозначный инструментарий
Открытие счета на платформе
Процесс открытия счета характеризуется доступностью и удобством. Недавние участники необходимо:
1. Посетить лицензионный портал или его зеркало
2. Выбрать на пункт открытия счета
3. Заполнить требуемые данные
4. Верифицировать email почту
5. Совершить первый доступ
Вознаграждение за оформление
Новички зарабатывают внушительный вступительный подарок. Такое вознаграждение способно включать:
– Монетарные суммы
– Complimentary спины
– Повышенный показатель кэшбека
Логин в собственный профиль
Существующие участники в состоянии оперативно войти в собственный профиль, используя учетные данные и шифр. Персональный аккаунт обеспечивает шанс к:
– Регулированию балансом
– Журналу платежей
– Работающим подаркам
– Опциям учетной записи
Призы и промо
Сайт постоянно устраивает различные акции для игроков.
Типы призов
Главные виды вознаграждений:
– Денежные подарки – доля от суммы внесения
– Бесплатные вращения – даровые раунды в аппаратах
– Кэшбэк – возмещение фрагмента проигранных сумм
– Призовые призы – вознаграждения за игру в соревнованиях
Коды
Уникальные коды помогают заработать экстра бонусы. Игроки в состоянии отыскать их на специализированных сайтах или получить в новостях.
Mobile адаптация и приложение
Современные гемблеры любят карманный гейминг.
Характеристики mobile версии
– Адаптивный вид для различных устройств
– Абсолютный вход к автоматам
– Моментальная работа
– Эргономичное контроль
Загрузить программу
Переносное приложение открыто для установки на девайсы с базовыми системами Android и iOS. Программа гарантирует:
– Устойчивую работу
– Всплывающие алерты о бонусах
– Быстрый доступ к избранным автоматам
Азартный выбор
Казино дает внушительную подборку игровых развлечений.
Игровые машины
Коллекция азартных аппаратов включает:
– Традиционные машины
– Video слоты
– Призовые машины
– Branded слоты
Live столы
Область лайв развлечений предоставляет опцию состязаться с живыми ведущими. Открыты:
– Американская рулетка
– Блэкджек
– Baccarat
– Poker
Турниры
Периодические турниры помогают участникам бороться за солидные денежные фонды. Соревновательная система актуализируется регулярно.
Финансовые операции
Платформа предоставляет множество способов зачисления и обналичивания финансов:
– Пластиковые карты
– Электронные кошельки
– Банковские трансферы
– Bitcoin
Абсолютно все операции осуществляются надежно с применением прогрессивных протоколов шифрования.
Сервис support
Профессиональная команда поддержки функционирует круглосуточно. Обратиться с операторами доступно через:
– Интерактивный чат
– Email почту
– Телефонную линию
– Социальные сети
Секьюрити и регулирование
Казино действует на фундаменте официальной лицензии. Подобное удостоверяет:
– Прозрачность азартного геймплея
– Сохранность личных сведений
– Пунктуальные выводы
– Регулируемый геймплей
Итог
Главный веб-сайт и его актуальные дубликаты гарантируют игрокам абсолютный спектр услуг для приятной и профитной времяпрепровождения. Значительные подарки, многочисленные игры, квалифицированная помощь и безопасная платформа операций превращают казино идеальным вариантом для поклонников азартных игр.
глубокий комлексный аудит сайта глубокий комлексный аудит сайта .
Современные виртуальные казино обеспечивают клиентам обширный диапазон функций для комфортной игры. Но иногда вход к базовому сайту может оказаться закрытым. В таких ситуациях на помощь появляется Лаки Бир казино, которое предоставляет непрерывный доступ ко всем возможностям платформы.
Что такое функционирующее зеркало казино
Копия — это полная версия лицензионного портала, которая хостится по другому адресу. Зеркало сохраняет полный возможности первоначального ресурса, включая личный кабинет, депозит и сведения операций.
Ключевые преимущества использования зеркала:
– Непрерывный соединение к ресурсу
– Полная аналогичность функционала
– Безопасность личных информации
– Хранение всех поощрений
Как разыскать актуальное зеркало на сегодня
Есть несколько надежных вариантов обнаружения текущей ссылочной информации:
Авторизованные ресурсы:
1. Электронная рассылка — дирекция регулярно высылает сообщения с свежими ссылками
2. Общественные сети — официальные страницы публикуют релевантную новости
3. Служба поддержки — специалисты дают достоверные адреса
4. Телефонное приложение — предоставляет избегать блокировки
Оформление профиля на официальном ресурсе
Этап создания аккаунта длится лишь считанные минут и предполагает из нижеследующих этапов:
1. Переход на лицензионный портал или функционирующее зеркало
2. Выбор на иконку «Регистрация»
3. Указание учетной бланка
4. Валидация email почты или мобильного номера
5. Применение поощрения за регистрацию при присутствии промокода
Только что зарегистрированные клиенты обретают щедрый приветственный подарок, который может охватывать фриспины, монетарные призы или возврат средств.
Доступ в персональный кабинет
Авторизация на сайте выполняется традиционным путем. Нужно внести учетные данные и пароль, использованные при регистрации.
Значимые детали для защищенного входа:
– Используйте сложный секретный ключ
– Активируйте двойную верификацию
– Не записывайте данные на публичных гаджетах
– Мониторьте доменную строку браузера
Анализ бонусной структуры
Казино награждает клиентов многочисленными привилегиями и промо:
Приветственный пакет
Начинающие способны претендовать на значительное награду за первый пополнение. Традиционно это процентная премия к внесенной объему плюс фриспины для топовых слотов.
Постоянные кампании
– Недельный cashback — возмещение процента утраченных средств
– Поощрения на последующие депозиты
– Эксклюзивные офферы по праздникам
– Состязания с солидными премиальными банками
Система лояльности
Деятельные игроки собирают пункты за всякую игру, которые затем обмениваются на действительные денежные призы, фриспины или эксклюзивные привилегии.
Кодовые слова: как активировать
Купоны — это уникальные наборы букв и цифр, гарантирующие возможность к бонусным вознаграждениям.
Каким образом взять рабочие промокоды:
– Проверенные коммуникационные сети казино
– Союзнические ресурсы
– Email-подписка
– Отраслевые платформы
Активируется промокод в соответствующее поле при регистрации или внесении депозита кошелька.
Телефонная версия и приложение
Актуальные геймеры любят играть с портативных гаджетов. Портал дает 2 метода для беспроблемной смартфонной игры.
Responsive модификация
Браузерная версия сама настраивается под параметры экрана. Не предполагает загрузки и функционирует в любом современном браузере.
Смартфонное приложение
Скачать app можно для девайсов на Android и iOS. Достоинства app:
– Молниеносная открытие
– Бесперебойная действие
– Push-уведомления о промо
– Автономный обход блокировок
Процедура скачивания прост: нужно попасть на портал с портативного аппарата и придерживаться указаниям.
Гемблинг ассортимент
Коллекция развлечений включает несколько тысяч единиц от передовых производителей.
Слоты
Гемблинг слоты — самая популярная категория развлечений. Представлены обычные 3-барабанные автоматы, современные мультимедийные слоты с бонусными этапами, а также накопительные призы.
Live казино
Секция с реальными ведущими обеспечивает почувствовать настроение реального казино. Доступны развлечения с рулеткой.
Вещание реализуется в высоком четкости, присутствует чат с дилером и иными игроками.
Конкурсы
Регулярно проводятся состязания по разным слотам. Присоединение предоставляет право завоевать финансовые призы, даровые прокруты или уникальные бонусы.
Платежные действия
Портал предлагает большой набор финансовых систем:
– Банковские карты
– Цифровые системы
– Цифровая валюта
– Финансовые переводы
Низшая объем вклада — разумная для массы геймеров. Вывод средств осуществляется в скорые периоды.
Служба поддержки
Опытные консультанты расположены оказать помощь 24/7. Открыты нижеследующие варианты коммуникации:
– Интернет-чат
– Email
– Мобильная поддержка
– Медийные сети
Ответы на частые запросы можно обнаружить в разделе FAQ.
Итог
Главный ресурс казино и его функционирующие зеркала гарантируют геймерам полный подключение ко всем сервисам портала. Значительные вознаграждения, приятная мобильная версия, впечатляющий ассортимент аттракционов и компетентная ассистенция формируют игровой опыт крайне комфортным и конфиденциальным.
Описание оригинального портала
Современное онлайн-казино предлагает своим участникам широкий ассортимент возможностей и поощрений. Официальный веб-сайт https://www.www11.urbe.edu/extension оперирует непрерывно, гарантируя путь к известным слотам, live-казино и многочисленным промо.
Действующее зеркало: вход к ресурсу
Что такое копия казино
Зеркало составляет собой точную копию официального ресурса с отличным URL адресом. Действующее зеркало предоставляет клиентам избегать ограничения и иметь стабильный подключение к любимым развлечениям.
Как обнаружить актуальное зеркало сегодня
Действующие линки на главное зеркало публикуются через:
– Почтовую оповещение
– Основные публичные сети
– Команду помощи
– Специализированные площадки
Открытиесчета на платформе
Процедура созданияаккаунта
Оформление занимает несколько минут и предполагает нижеследующие действия:
1. Переход на главный ресурс или рабочее зеркало
2. Активация кнопки “Регистрация”
3. Внесение учетных реквизитов
4. Верификация адреса или номера
5. Формирование секретнойкомбинации
Вознаграждение за открытиесчета
Новые игроки обретают солидные стартовые бонусы:
– Денежные средства на аккаунт
– Халявныеспины для автоматов
– Усиленный процент возврата
– Особые купоны
Доступ в персональный профиль
Постоянные клиенты имеютвозможность совершить вход через официальный ресурс или действующее зеркало. Для этого необходимо ввести логин и код, сформированные при регистрации.
Опции персонального аккаунта
В личном аккаунте имеются следующие функции:
– Контроль личными реквизитами
– Пополнение депозита
– Вывод выигрышей
– Использование кодов
– Мониторинг журнала операций
– Регистрация в состязаниях
Поощрения и предложения
Виды бонусов
Казино награждает своих игроков различными бонусными программами:
– Вступительный набор — выгодные подарки на первые депозиты
– Freespins — подарочные прокруты в рейтинговых играх
– Кэшбек — систематический возмещение доли ставок
– Схема поощрения — уникальные льготы для верных участников
Купоны и их ввод
Специальные промокоды обеспечивают дополнительные бонусы. Для использования нужно набрать шифр в специальное окно в персональном аккаунте.
Развлекательный набор
Слоты
Коллекция развлекательных машин насчитывает сотни вариантов от топовых производителей:
– Классические симуляторы
– Новые развлечения
– Накопительные автоматы
– Брендовые слоты
Live казино
Зона Live-казино обеспечивает участие с профессиональными крупье в условиях актуального времени:
– Американскаярулетка
– Двадцатьодно
– Пунтобанко
– Casinopoker
Конкурсы
Постоянные турниры с солидными наградными призами проходят регулярно. Участники соревнуются за призовыеместа в турнирнойсетке.
Портативная реализация и приложение
Mobile версия веб-сайта
Официальный портал на100% адаптирован для портативных девайсов. Участники способны пользоваться развлечения непосредственно через интернет-браузер без нужды инсталляции.
Программа для установки
Фирменное карманное софт предоставляется для получения на девайсы с операционными ОС Android и iOS. Программа обеспечивает:
– Мгновенный доступ к играм
– Устойчивую функциональность
– Оперативные-извещения о бонусах
– Удобный дизайн
Заключение
Основной веб-сайт казино и его функционирующие альтернативы дают пользователям комплексный возможность к качественным игровым развлечениям. Выгодные поощрения, всевозможные предложения, удобная мобильная версия и профессиональная поддержка превращают азартный досуг чрезвычайно enjoyable и выгодным.
ghbdtn привет
https://vdcasino1st.blog/# vdcasino giris
Вход к порталу и актуальные зеркала
Современные сетевые казино предоставляют пользователям большой набор возможностей. Основной портал Bollywood официальный сайт предоставляет защищенный доступ ко всем функциям. Тем не менее временами появляются обстоятельства, когда понадобится резервный метод входа.
Что представляет собой актуальное зеркало
Рабочее зеркало — это точная копия главного ресурса с запасным URL названием. Дубликат сегодня помогает избегать потенциальные ограничения и гарантировать постоянный доступ к предпочитаемым играм.
Легальное зеркало обладает идентичными возможностями, что и базовый портал:
– Целый перечень слотов
– Персональный кабинет с сохраненными параметрами
– Актуальные подарки и промо
– Защищенные платежные операции
Создание аккаунта и подключение в сервис
Ход регистрации на сайте отнимает несколько секунд. Новым игрокам требуется:
1. Попасть на функционирующее зеркало сейчас
2. Нажать кнопку «Создать аккаунт»
3. Ввести необходимые сведения
4. Верифицировать электронную почту или информацию смартфона
5. Забрать поощрение за открытие аккаунта
Авторизация в собственный аккаунт реализуется посредством указание никнейма и секретной комбинации.
Описание призовой структуры
Привлекательная бонусная политика — ключевое преимущество игорного заведения. Клиенты забирают разнообразные награды:
Приветственные поощрения
Свежие участники могут ожидать на привлекательный бонус за открытие профиля. Обычно это совокупность вариантов, охватывающий:
– Процентную добавку к стартовому вкладу
– Подарочные кручения
– Extra финансы на кошелек
Кодовые комбинации и эксклюзивные акции
Систематические коды помогают обретать экстра льготы. Применить их можно в особом меню собственного раздела.
Фриспины и компенсация
Free spins — это возможность вращать автоматы без расходования своих финансов. Возврат подразумевает определенный компенсацию израсходованных финансов.
Ассортимент развлечений
Игровая платформа обеспечивает значительную коллекцию развлечений.
Игровые машины
Вариативность аппаратов восхищает воображение. Доступны традиционные простые аппараты и новые игры с занимательной анимацией.
Live казино
Категория Live заведения помещает клиентов в антураж подлинного азартного дома. Квалифицированные крупье проводят сессии в онлайн формате.
Соревнования и рейтинги
Периодические конкурсы обеспечивают остроты и предоставляют возможность заработать большие призы.
Mobile версия и приложение
Актуальные разработки дают возможность развлекаться в комфортном пространстве. Мобильная версия самостоятельно оптимизируется под дисплей девайса.
Установить программу можно для операционных ОС iOS и Android. Клиент предоставляет:
– Скоростной доступ
– Надежную работу
– Моментальные-сообщения об промо
– Интуитивный дизайн
Банковские транзакции
Ресурс работает с различные системы внесения и вывода средств:
– Банковские карты
– Электронные системы
– Цифровые валюты
– Банковские операции
Каждые переводы реализуются через надежное канал, что обеспечивает безопасность личных информации.
Отдел support
Профессиональная бригада поддержки работает всегда. Связаться с менеджерами допустимо через:
– Live-чат
– E-mail почту
– Контакт
– Медиа платформы
Выводы
Легальный сайт и его функционирующее зеркало предоставляют игрокам защищенный и удобный переход к интересным развлечениям. Щедрые бонусы, широкий выбор развлечений и качественная сервис формируют времяпрепровождение максимально приятной и прибыльной.
Современные сетевые казино дают геймерам обширный ассортимент возможностей для приятной игры. Впрочем иногда соединение к официальному порталу может стать заблокированным. В таких ситуациях на помощь приходит Zolotoy Arbuz казино казино, которое предоставляет непрерывный подключение ко всем опциям платформы.
Что такое рабочее зеркало казино
Альтернативный сайт — это абсолютная копия основного веб-сайта, которая размещается по дополнительному домену. Зеркало имеет весь инструментарий основного портала, включая личный кабинет, счет и историю платежей.
Главные выгоды использования зеркала:
– Постоянный доступ к платформе
– Абсолютная схожесть инструментов
– Защита индивидуальных сведений
– Хранение доступных вознаграждений
Как разыскать рабочее зеркало на сегодня
Присутствует ряд достоверных путей нахождения действующей ссылки:
Официальные ресурсы:
1. Имейл рассылка — руководство постоянно пересылает информацию с действующими доменами
2. Коммуникационные сети — легитимные страницы постят текущую информацию
3. Департамент поддержки — операторы дают надежные домены
4. Мобильное приложение — обеспечивает минуть блокировки
Регистрация на основном портале
Процедура оформления требует всего считанные минут и включает из следующих ступеней:
1. Вход на лицензионный ресурс или актуальное зеркало
2. Нажатие на клавишу «Открыть счет»
3. Внесение регистрационной формы
4. Верификация электронной почты или телефонного номера
5. Активация поощрения за регистрацию при существовании промокода
Новые игроки обретают великодушный приветственный приз, который может предполагать бесплатные вращения, финансовые призы или cashback.
Логин в пользовательский кабинет
Авторизация на сайте осуществляется традиционным способом. Нужно вписать учетные данные и код доступа, задействованные при оформлении.
Значимые детали для защищенного входа:
– Задействуйте криптостойкий пароль
– Задействуйте двухфакторную проверку
– Не храните данные на чужих компьютерах
– Контролируйте интернет строку браузера
Анализ наградной схемы
Игровая платформа радует геймеров всевозможными поощрениями и кампаниями:
Стартовый пакет
Свежие игроки способны рассчитывать на щедрое вознаграждение за первый депозит. Зачастую это процентовая добавка к зачисленной сумме плюс free spins для востребованных слотов.
Периодические предложения
– Семидневный компенсация — возвращение процента проигранных денежных средств
– Поощрения на дополнительные депозиты
– Эксклюзивные промо по торжествам
– Соревнования с большими наградными фондами
План верности
Постоянные игроки накапливают очки за любую игру, которые затем конвертируются на настоящие денежные призы, фриспины или специальные преимущества.
Купоны: как применять
Кодовые комбинации — это уникальные последовательности литер, дающие доступ к бонусным привилегиям.
Где взять актуальные промокоды:
– Проверенные социальные сети казино
– Сотрудничающие площадки
– Email-рассылка
– Отраслевые платформы
Прописывается промокод в отдельное поле при оформлении или внесении депозита счета.
Телефонная версия и приложение
Нынешние игроки выбирают делать ставки с портативных аппаратов. Сайт обеспечивает два способа для комфортной телефонной игры.
Responsive версия
Интернет версия сама адаптируется под размер дисплея. Не нуждается инсталляции и работает в каждом свежем браузере.
Мобильное приложение
Загрузить софт можно для устройств на Android и iOS. Преимущества app:
– Быстрая загрузка
– Бесперебойная операция
– Автоматические-уведомления о акциях
– Автоматический минование блокировок
Процесс загрузки несложен: достаточно зайти на веб-сайт с смартфонного устройства и подчиняться предписаниям.
Гемблинг коллекция
Каталог развлечений насчитывает множество вариантов от топовых разработчиков.
Слоты
Развлекательные автоматы — крайне любимая категория развлечений. Представлены стандартные простые машины, передовые видео-автоматы с бонусными этапами, а также накопительные выигрыши.
Live казино
Секция с настоящими крупье позволяет почувствовать антураж реального казино. Имеются развлечения с рулеткой.
Стриминг осуществляется в HD формате, поддерживается общение с ведущим и другими игроками.
Состязания
Постоянно проводятся состязания по разным категориям. Включение позволяет выиграть монетарные выигрыши, бесплатные вращения или эксклюзивные привилегии.
Транзакционные операции
Ресурс поддерживает значительный выбор денежных способов:
– Банковские карты
– Виртуальные сервисы
– Цифровая валюта
– Финансовые переводы
Минимальная количество взноса — доступная для массы геймеров. Получение призов осуществляется в минимальные интервалы.
Департамент поддержки
Компетентные операторы способны оказать помощь непрерывно. Имеются данные методы общения:
– Интернет-чат
– Email
– Голосовая поддержка
– Общественные сети
Пояснения на частые вопросы можно отыскать в блоке FAQ.
Резюме
Лицензионный веб-сайт казино и его действующие зеркала обеспечивают клиентам полный путь ко всем возможностям сайта. Солидные вознаграждения, комфортная смартфонная версия, огромный выбор игр и компетентная ассистенция формируют игровой опыт крайне удобным и защищенным.
buy cheap meds from mexico https://tajmeds.top/# certified mexican pharmacy online
seo и реклама блог seo и реклама блог .
Вход к платформе через действующие зеркала
Пользователи онлайн казино нередко сталкиваются с проблемой блокировки официального ресурса. Собственно для преодоления этой задачи созданы копии основного домена. казино Винити обеспечивает стопроцентный доступ ко всем опциям платформы.
Что такое рабочее зеркало казино
Зеркало представляет собой абсолютную реплику оригинального веб-сайта с похожим опциями. Главное несовпадение — это другое имя. Абсолютно все параметры игрока, вместе с средства, поощрения и записи партий, остаются такими же.
Выгоды задействования зеркал
Актуальные зеркала располагают множеством существенных выгод:
– Постоянный подключение к предпочитаемым слотам
– Полная сохранность собственных информации
– Сохранение всех настроек пользовательского кабинета
– Способность получения наград и участия в предложениях
Создание аккаунта на главном ресурсе
Процедура регистрации предельно несложен и занимает пару минут. Начинающие участники имеют возможность полагаться на внушительный начальный бонус за создание аккаунта.
Этапы создания аккаунта
1. Переход на легальный ресурс или его зеркало
2. Активация на кнопку “Регистрация”
3. Заполнение необходимых данных
4. Подтверждение почтовой почты
5. Внесение купона (в случае есть)
Поощрения и промоакции для клиентов
Игровая площадка балует своих участников всевозможными призовыми программами.
Базовые виды бонусов
Вводный приз — внушительное премирование для недавних пользователей, которое именно имеет возможность содержать денежные призы и безвозмездные спины.
Фриспины — опция запускать в популярных слотах бесплатно.
Возврат средств — пропорциональный возмещение израсходованных денег, каковой предоставляется раз в неделю или раз в месяц.
Промокоды — особые наборы, обеспечивающие дополнительные привилегии.
Персональный кабинет: опции и настройки
Личный профиль предоставляет исчерпывающий регулирование над развлекательным опытом. В данном разделе имеются:
– Контроль средствами
– Данные транзакций
– Активные бонусы
– Параметры охраны
– Подтверждение аккаунта
Мобильная версия и приложение
Нынешние клиенты ценят портативность. Платформа обеспечивает два метода для развлечений с мобильных гаджетов.
Адаптивная портативная версия
Смартфонная платформа сайта автоматически адаптируется под дисплей любого аппарата. Не требуется устанавливать специальное ПО.
APP для смартфонов
Разрешено установить оригинальное APP для iOS и Android. Софт обеспечивает:
– Быстрый доступ
– Адаптированный интерфейс
– Push-сообщения о бонусах
– Надежную производительность
Live раздел: среда истинного зала
Зона Live казино доставляет пользователей в среду реального казино. Профессиональные ведущие организуют партии в режиме живого времени.
Популярные Live-форматы
– Французская рулетка
– Двадцать одно
– Baccarat
– Техасский холдем
Автоматы: ассортимент слотов
Библиотека игровых автоматов включает сотни позиций от лидирующих производителей. Пользователи обнаружат:
– Стандартные слоты
– Графические слоты
– Накопительный приз-слоты
– Мегавейс
Состязания и особые мероприятия
Систематические состязания дают возможность участникам конкурировать друг с другом за значительные денежные пулы. Каждый конкурс обладает свои условия вовлечения и доску призеров.
Способы внесения и изъятия денег
Платформа предоставляет комплекс платежных методов:
– Кредитные карты
– Онлайн сервисы
– Криптовалюты
– Wire транзиты
Все платежи выполняются безопасно благодаря актуальным методам кодирования.
Сервис помощи
Компетентные специалисты службы обслуживания способны ассистировать 24/7. Предусмотрены такие методы связи:
– Онлайн-чат
– Email-сервис
– Звонковая линия
– Социальные сети
Резюме
Легальный портал платформы и его актуальные копии обеспечивают клиентам защищенный и удобный подход к обширному ассортименту азартных игр. Крупные подарки, периодические кампании, качественная поддержка и простые платежные способы формируют азартный досуг крайне увлекательным и доходным.
Обзор оригинального сайта
Передовое онлайн-казино дарит своим клиентам обширный выбор услуг и призов. Главный веб-сайт Mellstroy регистрация действует постоянно, давая доступ к востребованным слотам, live-казино и разнообразным кампаниям.
Функционирующее зеркало: вход к ресурсу
Что такое дубликат казино
Копия означает собой полную дубликат главного ресурса с отличным доменным адресом. Рабочее зеркало предоставляет участникам обходить ограничения и иметь непрерывный подключение к излюбленным автоматам.
Как получить рабочее зеркало сегодня
Свежие ссылки на основное зеркало выкладываются через:
– E-mail подписку
– Основные медийные сети
– Отдел сопровождения
– Тематические площадки
Регистрация на сайте
Этапы открытиясчета
Оформление занимает несколько минут и содержит нижеследующие этапы:
1. Переход на официальный веб-сайт или действующее зеркало
2. Клик опции “Создатьаккаунт”
3. Указание учетных информации
4. Проверка адреса или контакта
5. Придумывание кодадоступа
Бонус за созданиеаккаунта
Свежие участники получают выгодные стартовые подарки:
– Бонусные депозиты на баланс
– Фриспины для слотов
– Расширенный объем кэшбека
– Особые ваучеры
Вход в личный аккаунт
Зарегистрированные пользователи способны произвести вход через оригинальный сайт или актуальное зеркало. Для этого следует набрать учетноеимя и код, сформированные при регистрации.
Возможности личного кабинета
В собственном аккаунте предоставлены следующие возможности:
– Редактирование учетными информацией
– Внесение счета
– Снятие призов
– Ввод кодов
– Просмотр архива транзакций
– Включение в турнирах
Бонусы и предложения
Категории поощрений
Казино радует своих клиентов различными бонусными акциями:
– Вступительный набор — большие поощрения на дебютные взносы
– Freespins — подарочные спины в рейтинговых симуляторах
– Кэшбек — систематический возмещение доли убытков
– План верности — особые бонусы для регулярных игроков
Промокоды и их активация
Уникальные коды обеспечивают экстра бонусы. Для использования требуется ввести код в специальное раздел в индивидуальном аккаунте.
Геймплейный каталог
Слоты
Каталог азартных машин содержит тысячи позиций от лучших провайдеров:
– Традиционные слоты
– Продвинутые автоматы
– Накопительные автоматы
– Лицензионные развлечения
Live казино
Раздел Live-казино дарит участие с профессиональными операторами в формате актуального стрима:
– Рулетка
– Блэкджек
– Baccarat
– Casinopoker
Конкурсы
Регулярные конкурсы с солидными джекпотными пулами проводятся постоянно. Игроки борются за победу в рейтинге.
Mobile реализация и приложение
Смартфонная версия сайта
Оригинальный портал целиком адаптирован для смартфонных девайсов. Игроки имеютвозможность играть автоматы непосредственно через веб-навигатор без нужды установки.
Софт для инсталляции
Специальное карманное APP предоставляется для получения на устройства с базовыми системами Android и iOS. Софт гарантирует:
– Быстрый путь к автоматам
– Стабильную производительность
– Push-сообщения о акциях
– Интуитивный навигацию
Итог
Официальный ресурс казино и его рабочие альтернативы обеспечивают участникам абсолютный возможность к первоклассным геймплейным развлечениям. Щедрые бонусы, различные акции, комфортная портативная реализация и компетентная сервис превращают азартный досуг чрезвычайно enjoyable и выгодным.
drift market link – Sections are well organized and easy to read.
click here – Interface is clean, very easy to browse through.
да да да привет привт
Excellent article. I absolutely appreciate this site. Stick with it!
Stop by my web-site long term surveillance nashville
deneme bonusu veren casino siteleri: deneme bonusu veren casino siteleri
Meadow Picks – Just discovered this page, layout is organized and content is readable.
https://www.divephotoguide.com/user/bonusxxbet2
надувная кукла женщина купить в кредит
топ интернет агентств москвы топ интернет агентств москвы .
Актуальные онлайн-казино предлагают игрокам обширный набор возможностей и премиальных опций. Доступ к площадке реализуется через официальный сайт или его актуальное зеркало казино Mellstroy, что дает стабильную активность.
Чем является функционирующее зеркало казино
Зеркало — это полная копия основного веб-сайта, разработанная для преодоления блокировок. Актуальное зеркало обеспечивает клиентам обрести вход к выбранным слотам в произвольное время.
Проверенное зеркало располагает всеми возможностями первоначального ресурса:
– Целый список автоматов
– Личный кабинет с внесенными сведениями
– Актуальные акции
– Гарантированные финансовые операции
Оформление профиля на лицензионном веб-сайте
Ход создания аккаунта требует всего считанные минут. Начинающим участникам необходимо:
1. Попасть на основной сайт или функционирующее зеркало
2. Щелкнуть на клавишу “Открыть счет”
3. Указать нужные параметры
4. Подтвердить электронную почту
5. Сделать дебютный вклад
Приветственный бонус предоставляется автоматически после выполнения всех шагов.
Вход в учетную запись
Существующие пользователи могут произвести вход вводя:
– Никнейм и код
– Номер телефона
– Электронную почту
Аккаунт дает возможность к администрированию финансами, записям операций и действующим бонусам.
Промо и предложения
Развлекательная система привлекает регулярных клиентов многочисленными призами:
Приветственный пакет
– Надбавка на начальный взнос до 100%
– Бесплатные вращения на востребованные слоты
– Дополнительные поощрения за последующие депозиты
Купоны
Уникальные коды предоставляют возможность на использование особых бонусов. Актуальные коды публикуются в блоке “Бонусы”.
Кешбэк
Еженедельный кэшбек насчитывает до 10% от утраченных денег. Возмещение начисляется сразу.
Программа лояльности
Активные клиенты зарабатывают очки, которые превращаются на подлинные деньги или даровые спины.
Мобильный сайт и приложение
Для практичности пользователей построена функциональная мобильная версия. Отзывчивый дизайн позволяет беспрепятственно развлекаться с каждого портативного гаджета.
Выгоды APP:
– Моментальный доступ к слотам
– Улучшенный вид
– Бесперебойная деятельность
– Push-уведомления о свежих турнирах
Загрузить приложение можно даром с проверенного сайта для гаджетов на Android и iOS.
Библиотека развлечений
Автоматы
Каталог вмещает более 2000 слотов от ведущих студий:
– Стандартные игры
– Мультимедийные игры
– Прогрессивные автоматы
– Сюжетные автоматы
Live казино
Категория Live развлечений дает взаимодействие с настоящими ведущими в живом режиме:
– Roulette
– Карточная игра
– Баккара
– Poker
Соревнования
Постоянные состязания с крупными выигрышными бюджетами проводятся еженедельно. Вход в конкурсах возможно всем действующим клиентам.
Денежные методы
Платежи и изъятия финансов производятся через распространенные сервисы:
– Банковские средства
– Цифровые счета
– Цифровая валюта
– Прямые транзакции
Самый низкий депозит — от 100 рублей. Снятие выигрышей выполняется в течение 24 часов.
Сервис саппорта
Круглосуточная группа support способна ассистировать в разрешении всех проблем:
– Живой чат
– Email
– Контактный номер
– Общественные сети
Защита и разрешение
Лицензионный портал работает на почве глобальной разрешения. Все данные клиентов обезопасены современным SSL-шифрованием.
Заключение
Актуальное зеркало обеспечивает бесперебойный доступ к любимым играм, щедрым промокодам и практичным функциям. Зарегистрируйтесь сейчас и обретите стартовый приз!
Нынешние онлайн казино предлагают пользователям обширный выбор возможностей для приятной игры. Впрочем иногда соединение к главному порталу может оказаться заблокированным. В таких обстоятельствах на помощь приходят casino казино Килограмм, которое обеспечивает постоянный вход ко всем возможностям платформы.
Что такое рабочее зеркало казино
Альтернативный сайт — это идентичная версия основного веб-сайта, которая находится по дополнительному URL. Копия содержит целый инструментарий основного ресурса, включая пользовательский кабинет, баланс и запись платежей.
Ключевые достоинства использования зеркала:
– Постоянный подключение к сайту
– Стопроцентная тождественность опций
– Конфиденциальность личных информации
– Удержание всех имеющихся вознаграждений
Как разыскать актуальное зеркало на текущий день
Существует некоторое количество надежных методов обнаружения свежей ссылки:
Авторизованные ресурсы:
1. Email рассылка — администрация постоянно пересылает сообщения с рабочими адресами
2. Коммуникационные сети — проверенные каналы публикуют текущую новости
3. Сервис поддержки — сотрудники выдают достоверные адреса
4. Портативное приложение — обеспечивает минуть блокировки
Регистрация на главном сайте
Операция оформления отнимает не более пару минут и включает из следующих стадий:
1. Переход на лицензионный веб-сайт или рабочее зеркало
2. Выбор на иконку «Регистрация»
3. Внесение регистрационной таблицы
4. Верификация почтовой почты или сотового номера
5. Включение привилегии за регистрацию при существовании промокода
Новые пользователи получают щедрый стартовый приз, который может предполагать free spins, финансовые бонусы или кэшбек.
Доступ в персональный кабинет
Подключение на ресурсе выполняется стандартным путем. Нужно внести никнейм и секретный ключ, указанные при открытии счета.
Значимые аспекты для безопасного входа:
– Применяйте криптостойкий секретный ключ
– Активируйте двухфакторную идентификацию
– Не храните реквизиты на публичных девайсах
– Контролируйте адресную строку браузера
Характеристика поощрительной системы
Игровая платформа одаривает игроков многочисленными бонусами и акциями:
Приветственный пакет
Свежие игроки способны претендовать на великодушное награду за начальный вклад. Традиционно это долевая прибавка к внесенной сумме плюс free spins для популярных слотов.
Периодические кампании
– Еженедельный кэшбек — возмещение процентной доли проигранных денежных средств
– Награды на дополнительные депозиты
– Специальные акции по знаменательным датам
– Состязания с большими премиальными фондами
Система верности
Активные геймеры накапливают баллы за всякую ставку, которые затем меняются на действительные деньги, фриспины или уникальные льготы.
Бонус-коды: как активировать
Кодовые комбинации — это индивидуальные последовательности букв и цифр, дающие привилегию к специальным бонусам.
В каких местах найти рабочие промокоды:
– Легитимные общественные сети казино
– Союзнические порталы
– Email-подписка
– Специализированные сообщества
Прописывается промокод в предназначенное поле при оформлении или добавлении денег кошелька.
Телефонная версия и приложение
Современные пользователи предпочитают проводить время с смартфонных девайсов. Платформа дает двойной решения для комфортной смартфонной игры.
Responsive вариант
Онлайн версия самостоятельно оптимизируется под диагональ экрана. Не просит скачивания и работает в любом свежем браузере.
Телефонное приложение
Загрузить app можно для аппаратов на Android и iOS. Плюсы app:
– Молниеносная открытие
– Надежная действие
– Автоматические-уведомления о поощрениях
– Независимый преодоление блокировок
Процесс инсталляции прост: нужно перейти на ресурс с смартфонного аппарата и следовать указаниям.
Развлекательный коллекция
База слотов включает несколько тысяч единиц от ведущих провайдеров.
Слоты
Азартные слоты — самая любимая группа забав. Доступны стандартные простые слоты, передовые видео-автоматы с премиальными стадиями, а также джекпотные призы.
Live казино
Раздел с реальными ведущими дает возможность почувствовать дух реального казино. Открыты игры с покером.
Трансляция реализуется в высоком разрешении, обеспечивается диалог с дилером и другими игроками.
Состязания
Постоянно устраиваются соревнования по всевозможным дисциплинам. Присоединение позволяет заработать финансовые призы, бесплатные вращения или специальные презенты.
Финансовые манипуляции
Сайт поддерживает большой спектр расчетных систем:
– Дебетовые карты
– Цифровые сервисы
– Криптовалюта
– Денежные платежи
Минимальная объем депозита — посильная для массы клиентов. Снятие выигрышей производится в минимальные периоды.
Департамент поддержки
Компетентные операторы способны оказать помощь непрерывно. Имеются нижеследующие методы общения:
– Живой-чат
– Email
– Телефонная горячая линия
– Социальные сети
Разъяснения на стандартные вопросы можно получить в секции FAQ.
Итог
Основной портал казино и его функционирующие зеркала предоставляют геймерам полный путь ко всем функциям портала. Значительные привилегии, приятная мобильная версия, огромный ассортимент аттракционов и компетентная ассистенция формируют развлекательный досуг максимально приятным и надежным.
tealwillowtrading hub – Just visited this page, layout feels clean and easy to navigate.
seo кейсы seo-kejsy17.ru .
casino siteleri: casino siteleri
трафиковое продвижение seo трафиковое продвижение seo .
1win site Azərbaycan 1win34861.help
Характеристика основного сайта
Новое онлайн-казино предоставляет своим игрокам широкий спектр игр и бонусов. Оригинальный ресурс Lucky Bear зеркало оперирует постоянно, предоставляя вход к известным слотам, live-казино и обширным акциям.
Действующее зеркало: возможность к платформе
Что такое дубликат казино
Альтернатива представляет собой точную дубликат оригинального портала с иным интернет именем. Актуальное зеркало дает участникам миновать барьеры и иметь постоянный подключение к предпочитаемым играм.
Как обнаружить действующее зеркало сегодня
Свежие адреса на главное зеркало публикуются через:
– E-mail оповещение
– Основные медийные сети
– Команду сопровождения
– Тематические площадки
Регистрация на сайте
Ход регистрации
Созданиеаккаунта требует всего минут и включает такие стадии:
1. Вход на главный сайт или актуальное зеркало
2. Клик кнопки “Регистрация”
3. Ввод контактных данных
4. Верификация адреса или номера
5. Придумывание ключа
Бонус за оформление
Начинающие пользователи обретают большие стартовые вознаграждения:
– Денежные суммы на аккаунт
– Фриспины для симуляторов
– Расширенный коэффициент возврата
– Уникальные купоны
Логин в личный счет
Действующие пользователи способны произвести вход через оригинальный сайт или действующее зеркало. Для этого необходимо указать никнейм и код, придуманные при открытиисчета.
Опции персонального раздела
В собственном аккаунте имеются следующие функции:
– Управление персональными информацией
– Ввод баланса
– Снятие денег
– Использование бонусов
– Просмотр статистики игр
– Участие в состязаниях
Бонусы и предложения
Виды подарков
Казино поощряет своих пользователей всевозможными призовыми системами:
– Вступительный комплект — большие подарки на начальные вклады
– Халявныеспины — бонусные спины в известных слотах
– Возврат — еженедельный компенсация процента проигрышей
– Система верности — специальные привилегии для активных участников
Коды и их активация
Особые ваучеры обеспечивают экстра поощрения. Для активации следует набрать код в соответствующее графу в личном кабинете.
Развлекательный каталог
Автоматы
Коллекция игровых машин содержит множество названий от ведущих провайдеров:
– Традиционные автоматы
– Новые слоты
– Джекпот игры
– Лицензионные развлечения
Live казино
Секция Live-казино предлагает игру с настоящими операторами в условиях прямого эфира:
– Рулетка
– Очко
– Baccarat
– Покер
Турниры
Регулярные соревнования с крупными наградными пулами проводятся ежедневно. Соревнующиеся борются за лидерство в рейтинге.
Mobile реализация и программа
Мобильная адаптация ресурса
Главный сайт целиком приспособлен для портативных гаджетов. Клиенты вправе играть развлечения напрямую через браузер без необходимости скачивания.
Программа для скачивания
Фирменное мобильное приложение предлагается для загрузки на гаджеты с рабочими ОС Android и iOS. Софт обеспечивает:
– Мгновенный вход к развлечениям
– Устойчивую производительность
– Оперативные-извещения о промо
– Удобный интерфейс
Итог
Оригинальный портал казино и его актуальные альтернативы дают участникам комплексный возможность к первоклассным игровым сервисам. Большие поощрения, многочисленные предложения, комфортная смартфонная версия и компетентная сервис превращают азартный досуг предельно enjoyable и результативным.
Подключение к ресурсу и функционирующие адреса
Актуальные виртуальные казино предлагают клиентам обширный ассортимент возможностей. Центральный сайт http://unbiased-gamer.com/pyat-sposobov-priobresti-podpisku-4-i-iz-rossii/ предоставляет надежный доступ ко всем услугам. Однако иногда происходят ситуации, когда нужно альтернативный путь авторизации.
Что представляет собой действующее зеркало
Функционирующее зеркало — это абсолютная дубликат основного сайта с альтернативным интернет адресом. Копия сегодня дает возможность обходить вероятные блокировки и гарантировать бесперебойный подключение к популярным играм.
Главное зеркало содержит теми же опциями, что и центральный веб-сайт:
– Весь ассортимент игр
– Персональный кабинет с записанными информацией
– Полные награды и акции
– Безопасные денежные действия
Оформление и подключение в систему
Ход создания профиля на портале длится несколько мгновений. Начинающим игрокам необходимо:
1. Попасть на функционирующее зеркало в настоящее время
2. Выбрать кнопку «Создать аккаунт»
3. Указать требуемые данные
4. Проверить почтовую почту или номер связи
5. Получить награду за открытие аккаунта
Доступ в индивидуальный кабинет осуществляется посредством внесение ID и секретной комбинации.
Характеристика наградной системы
Выгодная призовая программа — ключевое плюс платформы. Клиенты зарабатывают различные поощрения:
Стартовые поощрения
Новые клиенты вправе ожидать на значительный приз за открытие профиля. Как правило это комплект опций, охватывающий:
– Процентную надбавку к первому пополнению
– Подарочные фриспины
– Призовые суммы на баланс
Промокоды и специальные возможности
Регулярные купоны позволяют обретать дополнительные преимущества. Использовать их разрешено в специальном поле персонального раздела.
Спины и кешбэк
Free spins — это способность крутить слоты без задействования собственных средств. Кэшбек означает определенный отдачу потерянных сумм.
Коллекция слотов
Гемблинг платформа представляет огромную коллекцию слотов.
Слоты
Многообразие аппаратов впечатляет ожидания. Есть классические простые машины и современные автоматы с занимательной анимацией.
Live казино
Зона Live казино погружает пользователей в атмосферу истинного игорного зала. Профессиональные операторы ведут сессии в живом формате.
Соревнования и рейтинги
Регулярные конкурсы обеспечивают остроты и предоставляют вариант забрать большие суммы.
Мобильная вариант и софт
Актуальные разработки помогают развлекаться в комфортном локации. Mobile версия автоматически оптимизируется под монитор девайса.
Скачать приложение допустимо для мобильных сред iOS и Android. Программа предоставляет:
– Быстрый запуск
– Стабильную производительность
– Мгновенные-сообщения об акциях
– Интуитивный вид
Финансовые транзакции
Платформа использует различные варианты внесения и изъятия денег:
– Банковские счета
– Виртуальные платформы
– Крипто
– Прямые транзакции
Всевозможные переводы проходят через зашифрованное соединение, что обеспечивает сохранность личных сведений.
Департамент поддержки
Квалифицированная группа ассистанса функционирует круглосуточно. Связаться с операторами можно через:
– Живой-чат
– E-mail почту
– Контакт
– Медиа платформы
Итоги
Основной портал и его функционирующее зеркало дают игрокам защищенный и комфортный переход к захватывающим развлечениям. Щедрые награды, разнообразный выбор автоматов и отличная помощь создают времяпрепровождение исключительно комфортной и прибыльной.
Glass Shop – Just arrived, layout is tidy and navigation is effortless.
I go to see everyday some sites and sites to read articles, but this webpage gives quality based content.
My site … Team 400 AI
https://bbs.mofang.com.tw/home.php?mod=space&uid=2415973
Вход к сайту через проверенные зеркала
Пользователи сетевых казино нередко контактируют с трудностью блокировки базового портала. Конкретно для устранения этой трудности предусмотрены альтернативные адреса главного домена. Kraken дает стопроцентный доступ ко всем опциям казино.
Что такое действующее зеркало казино
Альтернативный адрес составляет собой точную копию основного сайта с похожим функционалом. Основное несовпадение — это доменное имя. Каждые сведения участника, содержа баланс, бонусы и данные игр, находятся идентичными.
Выгоды использования зеркал
Актуальные зеркала обладают набором важных достоинств:
– Постоянный переход к предпочитаемым слотам
– Абсолютная безопасность индивидуальных информации
– Неизменность всех опций пользовательского кабинета
– Шанс получения бонусов и участия в предложениях
Оформление профиля на главном домене
Ход создания аккаунта максимально легок и длится пару минут. Свежие участники могут полагаться на крупный стартовый подарок за создание аккаунта.
Ступени открытия аккаунта
1. Переход на главный портал или его альтернативу
2. Активация на клавишу “Создать аккаунт”
3. Ввод обязательных параметров
4. Верификация почтовой почты
5. Применение кода (при наличии доступен)
Поощрения и промоакции для пользователей
Казино поощряет своих игроков всевозможными призовыми акциями.
Основные виды бонусов
Начальный бонус — солидное премирование для новых игроков, что может охватывать материальные суммы и free spins.
Free spins — возможность запускать в востребованных игровых машинах даром.
Кешбэк — пропорциональный отдача израсходованных финансов, который именно начисляется раз в неделю или раз в месяц.
Специальные коды — особые сочетания, гарантирующие дополнительные поощрения.
Индивидуальный кабинет: опции и установки
Пользовательский кабинет дает абсолютный контроль над пользовательским взаимодействием. Тут доступны:
– Администрирование балансом
– Данные платежей
– Работающие привилегии
– Параметры защиты
– Валидация аккаунта
Портативная вариант и APP
Актуальные пользователи признают портативность. Ресурс обеспечивает двойной варианта для ставок с смартфонных девайсов.
Приспособленная мобильная платформа
Смартфонная платформа портала без участия подстраивается под экран любого гаджета. Не требуется загружать особое ПО.
Программа для гаджетов
Доступно загрузить фирменное софт для iOS и Android. Программа дает:
– Быстрый доступ
– Улучшенный дизайн
– Оперативные-извещения о акциях
– Бесперебойную функциональность
Live казино: атмосфера настоящего клуба
Категория Live казино доставляет игроков в обстановку настоящего казино. Профессиональные хосты организуют раунды в режиме живого времени.
Топовые Live-развлечения
– Французская рулетка
– Blackjack
– Баккарат
– Карибский покер
Аппараты: выбор игр
Библиотека развлекательных аппаратов вмещает множество названий от лидирующих производителей. Клиенты найдут:
– Стандартные слоты
– Видео-автоматы
– Прогрессивный джекпот-игры
– Слоты с множественными линиями
Состязания и особые предложения
Периодические турниры предоставляют шанс участникам бороться друг с другом за солидные выигрышные фонды. Отдельный соревнование имеет свои требования включения и доску победителей.
Варианты внесения и снятия финансов
Площадка поддерживает множество расчетных сервисов:
– Банковские инструменты
– Электронные счета
– Цифровые валюты
– Wire транзиты
Любые операции выполняются безопасно благодаря современным технологиям защиты.
Команда помощи
Квалифицированные специалисты отдела поддержки настроены поддержать 24/7. Предусмотрены такие каналы коммуникации:
– Мгновенный-чат
– Email-помощь
– Телефонная линия
– Социальные сети
Заключение
Основной портал платформы и его рабочие копии гарантируют игрокам защищенный и легкий вход к огромному спектру развлекательных услуг. Щедрые подарки, частые кампании, квалифицированная служба и простые расчетные системы превращают развлекательный времяпрепровождение максимально захватывающим и выгодным.
Доступ к ресурсу через актуальные зеркала
Передовые сетевые казино дают клиентам круглосуточный переход к сервисам. Главный веб-сайт казино Болливуд зеркало функционирует бесперебойно, гарантируя богатый спектр азартных игр. Тем не менее временами формируются технические проблемы или запреты, в связи с чем критично знать о доступности функционирующих зеркал.
Что означает собой официальное зеркало казино
Альтернатива — это точная версия официального сайта с схожим набором функций. Рабочее зеркало сегодня помогает избегать территориальные блокировки и поддерживать времяпрепровождение.
Основные достоинства задействования зеркал:
– Безграничный вход к личному кабинету
– Сохранение всех показателей учётной записи
– Схожий перечень автоматов
– Актуальные поощрения и предложения
Создание аккаунта на ресурсе
Процесс создания аккаунта занимает немного минут. Начинающие геймеры приобретают щедрый поощрение за оформление, что в состоянии вмещать:
– Начальный бонусный кредит
– Комплиментарные кручения для слотов
– Особые промокоды
– Расширенный компенсацию
Во имя завершения записи нужно:
1. Зайти на главный портал или копию
2. Нажать опцию «Регистрация»
3. Внести персональные сведения
4. Заверить email или мобильный
5. Применить купон (если есть присутствии)
Авторизация в персональный кабинет
Следом за правильной регистрации игроки имеют возможность совершать подключение посредством главный сайт или актуальное зеркало. Собственный кабинет предоставляет безграничный надзор над профилем:
– Летопись транзакций
– Ввод депозита
– Вывод денег
– Управление привилегиями
– Участие в турнирах
Поощрения и кампании казино
Платформа награждает пользователей разнообразными привилегированными предложениями:
Приветственные призы
Новые игроки получают великодушный набор привилегий на стартовые взносы. Обычно это предполагает частичную добавку к величине депозита плюс бесплатные вращения.
Регулярные предложения
– Седмичный компенсация до 15%
– Турниры с премиальными фондами
– Поощрения на дату рождения
– Эксклюзивные предложения для привилегированных геймеров
Система лояльности
Деятельные игроки накапливают очки, что разрешено трансформировать на настоящие средства или особые привилегии.
Смартфонная редакция и утилита
Передовые инновации дают возможность развлекаться где угодно. Портативная вариант сайта автоматически адаптируется под экран каждого девайса.
Выгоды портативного ПО:
– Оперативная открытие развлечений
– Эргономичный вид
– Push-сообщения о акциях
– Шанс загрузить для Android и iOS
Live казино: атмосфера истинного развлекательного клуба
Категория Live игорного дома переносит пользователей в среду истинного игорного дома. Компетентные ведущие проводят действие в формате актуального времени.
Доступные игры:
– Американская рулетка
– Очко
– Карточная игра
– Покерная игра
Игровые машины и гемблинг аппараты
Коллекция игровых автоматов насчитывает массу наименований от передовых разработчиков. Всякий геймер подберёт автомат по вкусу:
– Традиционные автоматы
– Современные автоматы с призовыми раундами
– Прогрессивный-машины
– Динамические игры
Состязания и лотереи
Систематические турниры добавляют драйв и открывают опцию заработать крупные призы. Включение в конкурсах регулярно даровое, а премиальные банки составляют крупных объёмов.
Секьюрити и анонимность
Платформа использует инновационные протоколы криптографии для гарантии реквизитов геймеров. Любые денежные действия выполняются через защищённые линии.
Резюме
Основной сайт и его функционирующие зеркала дают стабильный вход к отличным развлекательным развлечениям. Великодушные награды, удобная карманная версия, многообразие машин и высококлассное Live-заведение превращают портал замечательным вариантом для фанатов игровых автоматов.
melbet фриспины как получить https://melbet06374.help/
Hello would you mind letting me know which web host you’re utilizing?
I’ve loaded your blog in 3 different internet browsers and I must say this blog loads a lot faster then most.
Can you suggest a good hosting provider at a fair price?
Thank you, I appreciate it!
Передовые онлайн-казино предлагают игрокам множество вариантов для приятной игры. Центральный веб-портал казино Metelitsa дарит путь ко всем сервисам и играм. Однако при образовании технических неполадок на выручку приходят действующие дубликаты.
Что являет собой собой действующее зеркало
Альтернативный адрес казино — это стопроцентная дубликат главного веб-сайта, размещенная по другому доменному имени. Подлинное зеркало хранит все функции, в том числе создание аккаунта, вход в персональный кабинет, вознаграждения и бонусные коды.
Зеркало на сегодня гарантирует:
– Непрерывный путь к игровым аппаратам
– Абсолютную конфиденциальность персональных сведений
– Сохранение счета и хронологии переводов
– Возможность использования всех специальных предложений
Открытие профиля на главном ресурсе
Этап открытия профиля занимает считанные минут. Свежеиспеченным геймерам нужно:
1. Перейти на подлинный портал или функционирующее зеркало
2. Щелкнуть кнопку «Регистрация»
3. Заполнить необходимые сведения
4. Активировать электронную почту
5. Указать кодовое слово при присутствии
После завершения оформления профиля пользователи обретают приз за регистрацию, что может иметь фриспины или финансовое премирование.
Доступ в персональный кабинет
Личный кабинет открывает всеобъемлющий контроль над азартным процессом. Через личный кабинет можно:
– Вносить средства на депозит
– Выводить выплаты
– Активировать бонусные коды
– Контролировать журнал ставок
– Соревноваться в турнирах
– Обретать cash back
Обзор бонусов и специальных предложений
Великодушная поощрительная программа — ключевое достоинство ресурса. Центральные формы вознаграждений:
Начальный бонус
Новички зарабатывают выгодное награду на стартовые пополнения. Объем бонуса может доходить до 100-200% от объема пополнения.
Фриспины
Даровые вращения предоставляются для востребованных автоматов. Число фриспинов изменяется от 10 до 500 штук.
Cash back
Еженедельный или ежемесячный откат доли проигранных денег. Типичный процент возврата — 5-15%.
Конкурсы
Постоянные конкурсы с большими наградными пулами. Игроки состязаются за лучшие строчки в таблице лидеров.
Портативная версия и приложуха
Адаптивная версия позволяет наслаждаться игрой с каждого аппарата. Игроки могут закачать программу для iOS и Android или применять веб версию.
Преимущества портативного софта:
– Быстрая подзагрузка игр
– Комфортный дизайн
– Push-уведомления о поощрениях
– Вход через Face ID
Слоты и Live казино
Азартная подборка охватывает сотни позиций от топовых провайдеров.
Топовые типы автоматов:
– Стандартные слоты
– Видеослоты с бонусными уровнями
– Джекпот игры
– Мега-путь слоты
Live игровой зал
Секция live казино обеспечивает партию с профессиональными дилерами. Представлены традиционные игры:
– Европейская рулетка
– Блэкджек
– Baccarat
– Покер
Как обнаружить рабочее зеркало
Получить актуальную URL на зеркало возможно множественными способами:
1. Оформить подписку на email-рассылку
2. Отслеживать за обновлениями в социальных сетях
3. Контактировать в отдел поддержки
4. Запомнить рабочее зеркало в избранное
Резюме
Главный ресурс и его актуальные зеркала гарантируют стабильный вход к игровым слотам. Богатые бонусы, различные купоны, комфортное смартфонное приложение и профессиональная сервис поддержки обеспечивают игровой опыт предельно удобным и надежным.
vdcasino resmi vdcasino
Описание официального портала
Актуальное онлайн-казино обеспечивает своим клиентам обширный ассортимент услуг и поощрений. Официальный веб-сайт 7K казино работает постоянно, давая возможность к известным симуляторам, live-казино и многочисленным предложениям.
Функционирующее зеркало: путь к платформе
Что такое зеркало казино
Зеркало означает собой абсолютную копию официального ресурса с другим сетевым путем. Рабочее зеркало позволяет клиентам обходить блокировки и получать постоянный подключение к предпочитаемым автоматам.
Как обнаружить текущее зеркало сегодня
Актуальные ссылки на проверенное зеркало выкладываются через:
– E-mail новостнуюленту
– Официальные социальные сети
– Отдел сопровождения
– Партнерские ресурсы
Оформление на портале
Процедура оформления
Регистрация отнимает несколько минут и подразумевает нижеследующие стадии:
1. Открытие на оригинальный сайт или актуальное зеркало
2. Активация элемента “Регистрация”
3. Указание личных сведений
4. Подтверждение электроннойпочты или мобильного
5. Установка ключа
Приз за регистрацию
Первые участники получают солидные стартовые вознаграждения:
– Бонусные депозиты на баланс
– Фриспины для игр
– Увеличенный процент компенсации
– Уникальные промокоды
Вход в индивидуальный профиль
Постоянные пользователи имеютвозможность совершить вход через основной ресурс или действующее зеркало. Для этого следует ввести логин и код, созданные при оформлении.
Возможности личного раздела
В персональном профиле открыты следующие возможности:
– Управление контактными информацией
– Внесение депозита
– Вывод выигрышей
– Активация кодов
– Проверка истории операций
– Регистрация в соревнованиях
Вознаграждения и предложения
Виды бонусов
Казино радует своих участников разнообразными бонусными предложениями:
– Приветственный пакет — выгодные подарки на начальные взносы
– Фриспины — подарочные ставки в популярных играх
– Кэшбек — систематический возмещение процента ставок
– Схема верности — эксклюзивные бонусы для активных игроков
Коды и их применение
Уникальные купоны обеспечивают дополнительные подарки. Для ввода следует указать шифр в соответствующее окно в индивидуальном аккаунте.
Развлекательный набор
Игры
База азартных слотов насчитывает множество наименований от топовых разработчиков:
– Обычные слоты
– Видео игры
– Призовые игры
– Сюжетные игры
Live казино
Секция Live-казино предоставляет игру с реальными ведущими в условиях прямого стрима:
– Американскаярулетка
– Блэкджек
– Пунтобанко
– Карибскийпокер
Состязания
Постоянные соревнования с солидными выигрышными фондами организуются ежедневно. Претенденты соревнуются за победу в турнирнойсетке.
Мобильная версия и софт
Адаптивная адаптация портала
Главный ресурс на100% настроен для портативных девайсов. Пользователи имеютвозможность запускать автоматы напрямую через интернет-браузер без необходимости скачивания.
APP для инсталляции
Официальное мобильное приложение доступно для загрузки на девайсы с базовыми системами Android и iOS. APP гарантирует:
– Моментальный путь к развлечениям
– Бесперебойную производительность
– Моментальные-уведомления о промо
– Простой дизайн
Вывод
Оригинальный портал казино и его функционирующие зеркала предоставляют участникам всесторонний путь к отличным геймплейным услугам. Щедрые поощрения, многочисленные предложения, комфортная мобильная версия и профессиональная помощь формируют развлекательный времяпрепровождение крайне приятным и прибыльным.
mostbet sayt ünvanı Azərbaycan mostbet85214.help
продвижение сайтов во франции продвижение сайтов во франции .
lisanslı casino siteleri: deneme bonusu veren casino siteleri
Характеристика официального ресурса
Передовое онлайн-казино предлагает своим участникам разнообразный выбор игр и бонусов. Оригинальный сайт Metelitsa казино работает постоянно, обеспечивая путь к востребованным слотам, live-казино и многим предложениям.
Актуальное зеркало: вход к платформе
Что такое дубликат казино
Зеркало является собой абсолютную дубликат главного сайта с иным URL адресом. Актуальное зеркало предоставляет участникам избегать барьеры и получать надежный доступ к выбранным развлечениям.
Как отыскать текущее зеркало сегодня
Рабочие ссылки на основное зеркало размещаются через:
– Почтовую рассылку
– Основные социальные сети
– Отдел помощи
– Партнерские площадки
Открытиесчета на ресурсе
Ход созданияаккаунта
Открытиесчета занимает несколько минут и предполагает такие стадии:
1. Переход на главный портал или действующее зеркало
2. Нажатие элемента “Открытьсчет”
3. Внесение учетных реквизитов
4. Верификация аккаунта или контакта
5. Установка секретнойкомбинации
Приз за открытиесчета
Новые игроки обретают щедрые начальные бонусы:
– Денежные деньги на аккаунт
– Халявныеспины для автоматов
– Усиленный объем компенсации
– Особые ваучеры
Логин в персональный кабинет
Зарегистрированные игроки могут произвести логин через официальный ресурс или рабочее зеркало. Для этого нужно внести имяпользователя и секретнуюкомбинацию, придуманные при открытиисчета.
Функции личного раздела
В собственном аккаунте предоставлены такие инструменты:
– Управление личными сведениями
– Пополнение баланса
– Вывод призов
– Активация промокодов
– Проверка журнала ставок
– Регистрация в турнирах
Бонусы и предложения
Разновидности подарков
Казино радует своих пользователей разнообразными бонусными предложениями:
– Стартовый бонус — щедрые поощрения на стартовые вклады
– Фриспины — подарочные ставки в известных играх
– Компенсация — периодический возмещение части потерь
– Система лояльности — эксклюзивные льготы для верных игроков
Ваучеры и их использование
Уникальные промокоды обеспечивают расширенные вознаграждения. Для активации следует внести код в нужное раздел в персональном разделе.
Игровой выбор
Игры
Библиотека слотовых автоматов вмещает тысячи названий от известных производителей:
– Традиционные симуляторы
– Новые игры
– Призовые автоматы
– Тематические слоты
Live казино
Раздел Live-казино предлагает игру с живыми ведущими в формате актуального эфира:
– Европейскаярулетка
– Блэкджек
– Baccarat
– Техасскийхолдем
Соревнования
Постоянные конкурсы с внушительными наградными фондами устраиваются ежедневно. Игроки соревнуются за первенство в списке.
Смартфонная реализация и программа
Mobile версия портала
Оригинальный веб-сайт целиком адаптирован для мобильных аппаратов. Участники имеютвозможность пользоваться игры напрямую через веб-навигатор без нужды инсталляции.
Софт для установки
Авторское портативное программа предлагается для установки на устройства с базовыми средами Android и iOS. Программа дает:
– Быстрый вход к развлечениям
– Бесперебойную функциональность
– Оперативные-уведомления о предложениях
– Удобный дизайн
Итог
Основной ресурс казино и его функционирующие дубликаты предоставляют участникам всесторонний возможность к первоклассным азартным сервисам. Щедрые подарки, разнообразные акции, функциональная мобильная реализация и опытная служба создают игровой процесс крайне приятным и выгодным.
Обзор основного веб-сайта
Современные интернет казино предоставляют клиентам широкий спектр игр и перспектив. Главный сайт https://www.empowerskill.org/kakim-obrazom-mozhno-bystro-popolnit-balans-ispolzuya обеспечивает проверенный путь к гемблинг функциям.
Рабочее зеркало: путь прямо сейчас
Альтернативный адрес представляет собой полную дубликат официального портала. Действующее зеркало помогает пользователям преодолевать существующие ограничения.
Выгоды задействования зеркала
Ключевые достоинства охватывают:
– Беспрерывный путь к сайту
– Удержание любых характеристик базового портала
– Охрана персональных сведений
– Аналогичный возможности
Создание аккаунта на сайте
Процедура оформления профиля выделяется простотой и комфортом. Недавние пользователи обязаны:
1. Посетить главный ресурс или его зеркало
2. Нажать на кнопку открытия счета
3. Ввести обязательные поля
4. Валидировать почтовую адрес
5. Выполнить первый логин
Подарок за регистрацию
Дебютанты забирают солидный стартовый презент. Подобное награда способно охватывать:
– Денежные суммы
– Даровые спины
– Увеличенный процент кэшбека
Логин в собственный раздел
Существующие игроки имеют возможность моментально войти в личный профиль, применяя логин и шифр. Собственный профиль предоставляет шанс к:
– Контролю депозитом
– Хронологии транзакций
– Активным подаркам
– Опциям учетной записи
Подарки и промо
Платформа периодически проводит многочисленные мероприятия для пользователей.
Виды подарков
Главные виды призов:
– Пополнительные бонусы – доля от величины взноса
– Прокруты – даровые спины в аппаратах
– Кэшбек – компенсация части утраченных денег
– Призовые вознаграждения – награды за состязание в соревнованиях
Купоны
Особые ваучеры помогают активировать добавочные привилегии. Участники имеют возможность отыскать их на аффилиатных порталах или получить в новостях.
Переносная вариант и app
Передовые игроки предпочитают мобильный досуг.
Функции мобильной платформы
– Гибкий вид для разнообразных устройств
– Совокупный возможность к играм
– Моментальная подгрузка
– Практичное управление
Загрузить app
Переносное программа доступно для скачивания на гаджеты с операционными платформами Android и iOS. Приложение дает:
– Надежную производительность
– Мгновенные сообщения о бонусах
– Моментальный запуск к любимым автоматам
Развлекательный каталог
Игровой клуб предоставляет обширную коллекцию азартных забав.
Игровые машины
Библиотека азартных автоматов насчитывает:
– Классические машины
– Передовые слоты
– Призовые автоматы
– Тематические игры
Live столы
Категория живых столов обеспечивает опцию состязаться с реальными крупье. Доступны:
– Рулетки
– Очко
– Punto Banco
– Техасский холдем
Конкурсы
Периодические соревнования позволяют пользователям конкурировать за крупные призовые фонды. Призовая структура актуализируется еженедельно.
Банковские процедуры
Казино предоставляет разнообразие методов пополнения и получения денег:
– Дебетовые карты
– Онлайн платежные системы
– Прямые переводы
– Цифровые валюты
Все платежи проходят конфиденциально с задействованием актуальных протоколов кодирования.
Департамент сопровождения
Квалифицированная служба support действует без перерыва. Коннектиться с менеджерами реально через:
– Онлайн чат
– Почтовую почту
– Телефон
– Social платформы
Секьюрити и регулирование
Игровой клуб действует на базе официальной разрешения. Подобное обеспечивает:
– Легальность игрового действа
– Охрану персональных данных
– Быстрые транзакции
– Легальный гейминг
Заключение
Главный сайт и его действующие дубликаты предоставляют пользователям целостный набор функций для приятной и доходной досуга. Значительные бонусы, различные развлечения, квалифицированная сервис и защищенная структура операций создают ресурс лучшим вариантом для фанатов развлекательных услуг.
Your mode of explaining all in this post is really pleasant, all can effortlessly understand it,
Thanks a lot.
my page 강남텐프로
Jasper Picks – Came across this site randomly, layout looks clean and intuitive.
click to explore – Clear design, making it easy to navigate between sections.
explore more here – Clean design, reading and browsing is smooth and natural.
Между прочим, если вас интересует Советы по женскому здоровью: от гормонов до контрацепции, посмотрите сюда.
Смотрите сами:
https://allodme.ru/
Передовые онлайн-казино предлагают клиентам обилие опций для беспроблемной игры. Официальный веб-портал казино Beton casino открывает путь ко всем возможностям и играм. Однако при образовании системных сложностей на подмогу приходят действующие зеркала.
Что представляет собой актуальное зеркало
Зеркало казино — это точная копия официального ресурса, находящаяся по дополнительному URL. Подлинное зеркало хранит все функции, включая регистрацию, доступ в личный кабинет, бонусы и купоны.
Копия на сегодня обеспечивает:
– Постоянный путь к азартным аппаратам
– Абсолютную конфиденциальность персональных данных
– Сохранение средств и истории платежей
– Возможность использования всех специальных предложений
Создание аккаунта на лицензионном ресурсе
Процедура создания аккаунта требует пару минут. Новым клиентам необходимо:
1. Открыть на подлинный ресурс или функционирующее зеркало
2. Выбрать кнопку «Зарегистрироваться»
3. Заполнить необходимые сведения
4. Активировать э-мейл почту
5. Применить купон при существовании
После завершения регистрации пользователи зарабатывают приз за регистрацию, который может включать бонусные спины или денежное вознаграждение.
Логин в личный кабинет
Личный кабинет открывает комплексный мониторинг над игровым ходом. Через собственный аккаунт разрешается:
– Вносить средства на депозит
– Получать выплаты
– Активировать промокоды
– Мониторить журнал ставок
– Играть в конкурсах
– Получать кэшбек
Описание премий и промо-предложений
Щедрая поощрительная схема — существенное достоинство ресурса. Главные виды вознаграждений:
Начальный бонус
Дебютанты зарабатывают великодушное награду на стартовые пополнения. Сумма бонуса может достигать 100-200% от величины взноса.
Бонусные спины
Халявные раунды даются для известных игровых автоматов. Объем фриспинов колеблется от 10 до 500 штук.
Кешбэк
Систематический или ежемесячный отдача доли утраченных финансов. Типичный процент кэшбека — 5-15%.
Состязания
Регулярные конкурсы с внушительными премиальными банками. Игроки состязаются за призовые строчки в таблице лидеров.
Мобильная версия и программа
Портативная версия разрешает развлекаться с каждого аппарата. Клиенты могут скачать приложение для iOS и Android или использовать браузерную версию.
Выгоды портативного софта:
– Молниеносная подзагрузка автоматов
– Комфортный интерфейс
– Пуш-нотификации о бонусах
– Вход через биометрию
Игровые автоматы и Live казино
Развлекательная коллекция насчитывает множество игр от известных поставщиков.
Популярные разделы автоматов:
– Стандартные слоты
– Видеослоты с бонусными уровнями
– Прогрессивный джекпот игры
– Мегавейс машины
Live игровой зал
Категория live казино предлагает развлечение с живыми крупье. Есть классические игры:
– Американская рулетка
– Блэкджек
– Baccarat
– Покер
Как найти рабочее зеркало
Раздобыть действующую адрес на зеркало разрешается различными методами:
1. Подписаться на email-рассылку
2. Наблюдать за обновлениями в социальных сетях
3. Контактировать в службу поддержки
4. Сохранить актуальное зеркало в фавориты
Заключение
Официальный сайт и его функционирующие копии дают постоянный вход к развлекательным автоматам. Выгодные поощрения, многочисленные бонусные коды, комфортное портативное программа и высококлассная служба поддержки делают азартный опыт крайне беспроблемным и конфиденциальным.
Great article! That is the type of information that are meant to be shared around the net.
Shame on Google for not positioning this publish higher!
Come on over and consult with my web site . Thanks =)
Here is my web blog 텐카페룸싸롱
Подключение к платформе через действующие зеркала
Пользователи интернет казино часто встречаются с проблемой недоступности официального ресурса. Именно для преодоления этой трудности разработаны копии официального ресурса. https://campnorte.org.br/2026/03/05/v-marte-2026-goda-novye-promokody-dlya-igrovykh-avtomatov-v-internet-kazino-predlagayut-aktualnye-bonusy гарантирует абсолютный переход ко всем опциям платформы.
Что такое рабочее зеркало казино
Копия значит собой точную реплику основного ресурса с таким же набором функций. Ключевое отличие — это иное имя. Любые параметры участника, в том числе депозит, награды и записи ставок, остаются неизменными.
Достоинства использования зеркал
Функционирующие зеркала обладают набором значимых плюсов:
– Постоянный переход к выбранным автоматам
– Совершенная защита собственных параметров
– Поддержание всех настроек персонального кабинета
– Опция приобретения поощрений и участия в кампаниях
Создание аккаунта на официальном сайте
Процедура открытия счета предельно элементарен и занимает несколько минут. Начинающие участники имеют возможность претендовать на солидный приветственный бонус за регистрацию.
Этапы создания аккаунта
1. Вход на легальный домен или его дубликат
2. Активация на кнопку “Присоединиться”
3. Ввод обязательных сведений
4. Подтверждение электронной почты
5. Указание промокода (если доступен)
Бонусы и кампании для игроков
Казино радует своих игроков всевозможными призовыми системами.
Базовые варианты наград
Вводный подарок — внушительное начисление для начинающих игроков, что способно вмещать материальные средства и безвозмездные спины.
Free spins — шанс запускать в популярных автоматах безвозмездно.
Компенсация — долевой отдача израсходованных сумм, что выплачивается каждую неделю или ежемесячно.
Промокоды — эксклюзивные наборы, обеспечивающие дополнительные поощрения.
Персональный кабинет: инструменты и конфигурации
Пользовательский аккаунт дает совершенный контроль над персональным процессом. Здесь присутствуют:
– Регулирование средствами
– Данные переводов
– Активные награды
– Настройки защиты
– Валидация аккаунта
Карманная редакция и приложение
Новейшие игроки оценивают доступность. Платформа дает пару метода для ставок с карманных гаджетов.
Адаптивная мобильная вариант
Портативная вариант домена автоматически подстраивается под разрешение любого девайса. Нет необходимости скачивать отдельное ПО.
Программа для смартфонов
Разрешено загрузить фирменное программу для iOS и Android. Программа обеспечивает:
– Скорый запуск
– Доработанный дизайн
– Push-уведомления о акциях
– Устойчивую производительность
Live казино: атмосфера истинного игорного заведения
Зона Live игр переносит участников в обстановку истинного казино. Опытные крупье ведут игры в режиме прямого времени.
Топовые Live-столы
– Европейская рулетка
– 21
– Punto Banco
– Техасский холдем
Игровые машины: разнообразие автоматов
Коллекция слотовых автоматов содержит множество позиций от топовых производителей. Клиенты откроют:
– Традиционные слоты
– Графические слоты
– Мега-выигрыш-автоматы
– Многолинейные автоматы
Турниры и специальные предложения
Регулярные конкурсы предоставляют шанс пользователям бороться друг с другом за значительные призовые фонды. Любой турнир обладает свои правила включения и таблицу чемпионов.
Пути ввода и изъятия средств
Площадка обслуживает массу платежных методов:
– Кредитные картыы
– Электронные кошельки
– Цифровые валюты
– Wire переводы
Каждые транзакции реализуются защищенно благодаря передовым протоколам кодирования.
Отдел обслуживания
Опытные операторы команды support способны ассистировать 24/7. Предусмотрены нижеперечисленные методы общения:
– Мгновенный-чат
– Email-сервис
– Телефонная линия
– Публичные сети
Вывод
Официальный домен игровой площадки и его актуальные дубликаты обеспечивают участникам безопасный и комфортный вход к широкому диапазону азартных активностей. Внушительные поощрения, постоянные кампании, квалифицированная помощь и легкие финансовые методы создают развлекательный процесс максимально приятным и выгодным.
tealstone marketplace – Structure is straightforward and sections are easy to scan.
güvenilir casino siteleri: deneme bonusu veren casino siteleri
mexico pharmacy delivery to usa
Переход к ресурсу и функционирующие адреса
Востребованные виртуальные казино предоставляют пользователям большой спектр возможностей. Главный портал Gold обеспечивает защищенный подключение ко всем сервисам. Однако порой появляются моменты, когда необходимо альтернативный вариант авторизации.
Что есть собой актуальное зеркало
Рабочее зеркало — это полная реплика главного сайта с альтернативным URL названием. Альтернатива сегодня помогает избегать потенциальные барьеры и обеспечивать стабильный вход к популярным слотам.
Официальное зеркало имеет полными характеристиками, что и центральный сайт:
– Целый ассортимент автоматов
– Собственный профиль с сохраненными информацией
– Все награды и акции
– Защищенные финансовые переводы
Оформление и авторизация в казино
Процесс создания профиля на ресурсе отнимает буквально мгновений. Начинающим игрокам требуется:
1. Открыть на рабочее зеркало сейчас
2. Нажать опцию «Создать аккаунт»
3. Ввести требуемые информацию
4. Активировать почтовую почту или номер смартфона
5. Активировать бонус за оформление
Авторизация в персональный профиль осуществляется посредством предоставление ID и секретной комбинации.
Описание призовой политики
Богатая бонусная политика — ключевое достоинство ресурса. Клиенты обретают разнообразные бонусы:
Вступительные подарки
Свежие участники способны надеяться на привлекательный поощрение за регистрацию. Как правило это комплект возможностей, объединяющий:
– Долевую прибавку к стартовому взносу
– Даровые спины
– Призовые средства на счет
Промокоды и специальные опции
Систематические купоны позволяют обретать бонусные преимущества. Активировать их разрешено в отдельном окне персонального аккаунта.
Бесплатные вращения и кешбэк
Бесплатные спины — это возможность запускать автоматы без расходования своих денег. Кэшбек означает долевой возврат потерянных сумм.
Библиотека игр
Гемблинг ресурс предоставляет впечатляющую базу развлечений.
Автоматы
Разнообразие автоматов удивляет воображение. Представлены традиционные простые автоматы и актуальные развлечения с захватывающей визуализацией.
Live казино
Зона Live заведения помещает клиентов в атмосферу реального игорного клуба. Умелые операторы осуществляют партии в живом эфире.
Турниры и лидерборды
Постоянные турниры обеспечивают азарта и дают перспективу получить большие суммы.
Mobile реализация и софт
Новые решения помогают участвовать в комфортном пространстве. Mobile версия независимо подстраивается под дисплей устройства.
Получить клиент возможно для мобильных ОС iOS и Android. Клиент гарантирует:
– Скоростной вход
– Устойчивую деятельность
– Моментальные-уведомления об акциях
– Удобный интерфейс
Платежные процедуры
Сайт использует разнообразные системы внесения и вывода средств:
– Пластиковые инструменты
– Цифровые системы
– Токены
– Денежные транзакции
Все операции проходят через зашифрованное протокол, что обеспечивает безопасность приватных данных.
Служба support
Квалифицированная группа support функционирует постоянно. Соединиться с консультантами возможно через:
– Live-чат
– Цифровую почту
– Телефон
– Общественные каналы
Резюме
Официальный сайт и его действующее зеркало предоставляют участникам защищенный и приятный путь к азартным забавам. Выгодные поощрения, широкий спектр игр и профессиональная поддержка обеспечивают процесс предельно интересной и прибыльной.
Outlet Treasures – Stumbled upon this page, reading is effortless and easy to follow.
Подключение к сайту через действующие зеркала
Участники онлайн казино регулярно контактируют с вопросом блокировки главного ресурса. Собственно для преодоления этой задачи предусмотрены дубликаты главного портала. http://kariorangpower.com/udobnyy-sposob-oplaty-cherez-internet-vnosite-dengi-na-schet-igrayte-i-vyvodite-svoi/ гарантирует беспрепятственный доступ ко всем сервисам площадки.
Что такое действующее зеркало казино
Дубликат значит собой идентичную версию основного ресурса с идентичным возможностями. Ключевое различие — это другое имя. Все информация пользователя, вместе с средства, поощрения и данные ставок, остаются неизменными.
Достоинства использования зеркал
Рабочие зеркала характеризуются набором существенных достоинств:
– Постоянный доступ к выбранным слотам
– Стопроцентная защита персональных информации
– Сохранение всех параметров персонального кабинета
– Шанс взятия наград и вовлечения в кампаниях
Открытие счета на легальном домене
Процесс открытия счета чрезвычайно легок и требует несколько минут. Начинающие участники способны надеяться на солидный вводный поощрение за открытие счета.
Ступени создания аккаунта
1. Доступ на основной ресурс или его альтернативу
2. Клик на кнопку “Зарегистрироваться”
3. Ввод требуемых параметров
4. Верификация почтовой почты
5. Указание бонусного кода (если есть)
Награды и кампании для пользователей
Игровая площадка радует своих клиентов многочисленными призовыми системами.
Ключевые категории поощрений
Стартовый бонус — внушительное поощрение для начинающих участников, каковое может содержать монетарные средства и бесплатные вращения.
Безвозмездные спины — опция запускать в популярных автоматах безвозмездно.
Возврат средств — процентный компенсация проигранных средств, что начисляется раз в неделю или помесячно.
Промокоды — особые сочетания, дающие экстра поощрения.
Персональный кабинет: опции и установки
Пользовательский профиль предоставляет абсолютный регулирование над развлекательным активностью. Здесь доступны:
– Регулирование счетом
– Архив переводов
– Работающие награды
– Конфигурации защиты
– Подтверждение счета
Смартфонная платформа и APP
Новейшие клиенты признают мобильность. Площадка обеспечивает 2 пути для развлечений с смартфонных аппаратов.
Адаптивная портативная версия
Адаптивная вариант портала автоматически приспосабливается под разрешение любого аппарата. Нет необходимости скачивать отдельное софт.
APP для телефонов
Разрешено загрузить фирменное приложение для iOS и Android. APP предоставляет:
– Моментальный вход
– Адаптированный дизайн
– Push-сообщения о бонусах
– Устойчивую операционность
Live казино: антураж настоящего игорного заведения
Зона Live развлечений отправляет игроков в обстановку подлинного игорного заведения. Опытные крупье проводят сессии в варианте реального времени.
Известные Live-игры
– Американская рулетка
– Blackjack
– Punto Banco
– Poker
Слоты: разнообразие слотов
Библиотека слотовых слотов насчитывает массу позиций от топовых провайдеров. Игроки найдут:
– Классические машины
– Современные слоты
– Джекпот-слоты
– Megaways
Соревнования и эксклюзивные события
Постоянные конкурсы дают возможность пользователям соревноваться друг с другом за внушительные призовые банки. Любой состязание обладает свои условия присутствия и таблицу победителей.
Методы внесения и изъятия денег
Ресурс использует массу платежных инструментов:
– Кредитные картыы
– Цифровые платежные системы
– Цифровые валюты
– Прямые транзакции
Любые транзакции реализуются конфиденциально благодаря актуальным методам криптографии.
Служба обслуживания
Компетентные операторы службы помощи способны содействовать 24/7. Предусмотрены нижеперечисленные пути связи:
– Оперативный-чат
– Email-поддержка
– Голосовая связь
– Социальные сети
Вывод
Главный сайт клуба и его рабочие копии гарантируют клиентам надежный и легкий доступ к широкому ассортименту геймерских развлечений. Щедрые награды, постоянные предложения, качественная помощь и легкие денежные инструменты формируют развлекательный досуг крайне увлекательным и доходным.
продажа сайта kak-prodat-sajt.ru .
Вход к ресурсу через действующие зеркала
Актуальные онлайн казино обеспечивают геймерам непрерывный переход к сервисам. Официальный сайт Метелица функционирует бесперебойно, обеспечивая большой набор развлекательных автоматов. Однако иногда образуются системные препятствия или барьеры, потому критично знать о существовании рабочих зеркал.
Что представляет собой главное зеркало казино
Зеркало — это точная копия основного сайта с аналогичным возможностями. Функционирующее зеркало сегодня обеспечивает избегать региональные барьеры и продолжать игру.
Принципиальные достоинства использования зеркал:
– Безграничный подключение к персональному кабинету
– Сохранение совокупных сведений аккаунта
– Схожий спектр развлечений
– Актуальные поощрения и промо
Регистрация на платформе
Операция создания аккаунта занимает считанные минут. Новые пользователи получают великодушный поощрение за создание счёта, который имеет возможность содержать:
– Стартовый финансовый подарок
– Безвозмездные спины для слотов
– Особые купоны
– Усиленный возврат
Ради окончания создания аккаунта следует:
1. Переместиться на главный сайт или альтернативу
2. Кликнуть элемент «Зарегистрироваться»
3. Внести персональные сведения
4. Верифицировать мейл или контакт
5. Использовать купон (когда имеется присутствии)
Вход в персональный кабинет
После корректной создания аккаунта клиенты могут совершать доступ через центральный ресурс или рабочее зеркало. Собственный кабинет открывает абсолютный управление над аккаунтом:
– Летопись игр
– Внесение баланса
– Вывод денег
– Управление привилегиями
– Участие в турнирах
Бонусы и предложения казино
Платформа удовлетворяет клиентов разнообразными привилегированными схемами:
Вступительные бонусы
Новички приобретают великодушный букет поощрений на начальные депозиты. Как правило это содержит частичную надбавку к объёму депозита плюс безвозмездные фриспины.
Систематические промо
– Раз в неделю возврат до 15%
– Конкурсы с наградными фондами
– Подарки на годовщину рождения
– Уникальные предложения для статусных геймеров
Программа верности
Активные клиенты получают пункты, что допустимо превратить на действительные призы или эксклюзивные льготы.
Портативная форма и приложение
Нынешние инновации позволяют участвовать всюду удобно. Мобильная редакция сайта автоматически адаптируется под монитор любого устройства.
Преимущества карманного приложения:
– Оперативная подгрузка автоматов
– Эргономичный вид
– Всплывающие-нотификации о промо
– Опция установить для Android и iOS
Живое казино: атмосфера подлинного развлекательного заведения
Область Live игорного дома погружает геймеров в обстановку подлинного гемблинг клуба. Опытные операторы ведут игру в состоянии подлинного времени.
Имеющиеся развлечения:
– Американская рулетка
– Двадцать одно
– Классика
– Техасский холдем
Игровые машины и игровые машины
Собрание развлекательных аппаратов содержит тысячи вариантов от передовых провайдеров. Произвольный геймер найдёт слот по душе:
– Винтажные машины
– Инновационные игры с бонусными уровнями
– Накопительный-слоты
– Megaways игры
Конкурсы и розыгрыши
Постоянные состязания добавляют драйв и обеспечивают шанс получить значительные награды. Включение в турнирах часто даровое, а наградные фонды составляют крупных величин.
Секьюрити и приватность
Ресурс эксплуатирует актуальные методы защиты для защиты реквизитов пользователей. Любые транзакционные операции проходят через безопасные протоколы.
Вывод
Главный сайт и его актуальные зеркала гарантируют безопасный вход к первоклассным развлекательным сервисам. Богатые бонусы, эргономичная смартфонная форма, многообразие машин и высококлассное Live-заведение превращают портал прекрасным опцией для ценителей азартных слотов.
Передовые онлайн-казино гарантируют игрокам обширный выбор слотов и выгодные поощрения. Однако для удобной деятельности важно знать, как получить доступ к Zolotoy Arbuz казино и его актуальные зеркала.
Что такое главный портал казино
Основной ресурс казино — это базовая веб-площадка, где пользователи могут наслаждаться азартными слотами. Портал оперирует на легитимных условиях и обладает всеми требуемыми сертификатами.
Главные плюсы основного ресурса:
– Конфиденциальность пользовательских сведений
– Честные условия участия
– Подтвержденные выплаты
– Квалифицированная поддержка
Актуальное зеркало казино: для чего используется
Дублирующий ресурс — это точная копия лицензионного портала, хостящаяся по иному URL. Рабочее зеркало запускается для обеспечения постоянного входа к ресурсу.
Факторы применения копий сайта:
– Недоступность главного сайта
– Технические мероприятия
– Большая загрузка на сервер
Как обнаружить свежее зеркало сегодня
Узнать новое официальное зеркало можно разными методами:
1. Подписка — подпишитесь на новостную подписку
2. Департамент помощи — проконсультируйтесь в онлайн-чат
3. Корпоративные каналы — проверяйте за новостями
4. Тематические сайты — надежные платформы
Создание аккаунта на сайте казино
Алгоритм оформления длится буквально считанные моментов:
1. Нажмите на элемент “Зарегистрироваться”
2. Укажите необходимые данные
3. Активируйте контактную адрес
4. Используйте промокод, если доступен
После финализированной регистрации вам станет разрешен личный раздел.
Поощрения и бонусные коды
Привлекательная бонусная система — существенное конкурентное преимущество казино:
Награда за первичную регистрацию
Первичные клиенты зарабатывают начальный презент, который может охватывать:
– Денежный депозит на начальный взнос
– Бесплатные вращения для игровых машин
– Безвозвратные деньги
Купоны
Систематически появляются новые бонусные шифры, предоставляющие получить особые поощрения.
Программа компенсации
Активные клиенты приобретают процент утраченных денег в виде компенсации.
Актуальные предложения и соревнования
Платформа регулярно организует азартные кампании:
– Недельные баттлы
– Праздничные промо
– Раздачи крупных выигрышей
– Схема привилегий
Авторизация в персональный профиль
Для логина на платформу нужно:
1. Перейти на официальный адрес или актуальное зеркало
2. Выбрать “Войти”
3. Внести email и ключ
В пользовательском кабинете разрешены данные функции:
– Депозит баланса
– Обналичивание призов
– Проверка истории транзакций
– Изменение индивидуальными параметрами
Адаптивная версия и программа
Мобильная версия
Responsive модификация портала дает возможность участвовать с любого портативного телефона. Дизайн динамически настраивается под формат экрана.
Клиент для download
Установить программу можно для:
– Android — прямая скачивание с сайта
– iOS — скачивание через App Store
Достоинства приложения:
– Быстрый старт
– Устойчивая функциональность
– Push-уведомления об бонусах
– Оптимизированный UI
Развлекательные секции
Игровые машины
Внушительная галерея азартных машин от известных разработчиков:
– Стандартные машины
– Современные-автоматы
– Прогрессивные-игры
Live игры
Категория с профессиональными дилерами предлагает:
– Рулетки
– 21
– Мини-баккара
– Poker
Вещания проводятся в HD разрешении, создавая атмосферу подлинного казино.
Системы депозита и снятия
Ресурс работает с различные транзакционные системы:
– Дебетовые card
– Виртуальные счета
– Crypto
– Прямые транзиты
Наименьшие пороги внесения и моментальные выплаты гарантируют времяпрепровождение предельно удобной.
Команда support
Профессиональная группа ассистентов оперирует 24/7 и готова помочь с различными проблемами:
– Мгновенный-чат
– Email-консультации
– Звонковая связь
Резюме
Официальный веб-сайт казино и его рабочие копии предоставляют участникам безопасный и азартный азартный опыт. Привлекательные подарки, простая адаптивная версия, обширные игры и качественное live-казино формируют эту ресурс превосходным решением для игровых досуга.
Анализ главного ресурса
Передовые интернет казино дают игрокам богатый ассортимент игр и шансов. Главный сайт Дракон Мани гарантирует безопасный возможность к развлекательным функциям.
Действующее зеркало: путь прямо сейчас
Дублирующий портал служит в качестве абсолютную версию основного ресурса. Действующее зеркало помогает пользователям миновать вероятные ограничения.
Плюсы использования зеркала
Ключевые преимущества охватывают:
– Стабильный шанс к сайту
– Удержание абсолютно всех опций главного ресурса
– Защита личных материалов
– Такой же набор функций
Открытие счета на портале
Процедура оформления профиля характеризуется понятностью и эргономичностью. Недавние клиенты должны:
1. Перейти на официальный сайт или его зеркало
2. Нажать на кнопку регистрации
3. Заполнить обязательные сведения
4. Подтвердить электронную почту
5. Выполнить начальный вход
Бонус за открытие счета
Дебютанты забирают солидный стартовый бонус. Это премия способно содержать:
– Финансовые начисления
– Complimentary вращения
– Усиленный процент кэшбека
Авторизация в персональный аккаунт
Существующие игроки в состоянии мгновенно авторизоваться в личный раздел, применяя имя пользователя и шифр. Личный кабинет предоставляет путь к:
– Администрированию средствами
– Хронологии транзакций
– Текущим подаркам
– Конфигурации аккаунта
Призы и промо
Платформа систематически реализует различные акции для участников.
Категории подарков
Базовые категории призов:
– Пополнительные бонусы – часть от величины депозита
– Фриспины – даровые прокруты в автоматах
– Компенсация – возмещение процента проигранных финансов
– Призовые призы – призы за выступление в состязаниях
Промокоды
Особые коды обеспечивают активировать дополнительные преимущества. Пользователи имеют возможность обнаружить их на партнерских ресурсах или заработать в уведомлениях.
Мобильная адаптация и программа
Прогрессивные игроки предпочитают карманный досуг.
Опции портативной платформы
– Отзывчивый вид для различных устройств
– Полный возможность к играм
– Оперативная загрузка
– Удобное управление
Download программу
Портативное программа доступно для downloading на аппараты с операционными ОС Android и iOS. App предоставляет:
– Надежную производительность
– Всплывающие алерты о акциях
– Моментальный запуск к избранным развлечениям
Развлекательный ассортимент
Портал предлагает внушительную коллекцию игровых развлечений.
Слоты
Коллекция развлекательных автоматов охватывает:
– Стандартные автоматы
– Video игры
– Джекпотные игры
– Сюжетные слоты
Live столы
Секция живых дилеров дает шанс играть с живыми дилерами. Предложены:
– Рулетка
– Блек-джек
– Punto Banco
– Техасский холдем
Турниры
Постоянные чемпионаты позволяют клиентам конкурировать за солидные наградные банки. Соревновательная программа изменяется постоянно.
Банковские действия
Казино предоставляет множество методов внесения и обналичивания финансов:
– Банковские карточки
– Виртуальные счета
– Банковские переводы
– Криптовалюты
Абсолютно все платежи выполняются надежно с использованием актуальных технологий защиты.
Отдел support
Опытная служба support функционирует без перерыва. Связаться с операторами можно через:
– Интерактивный чат
– Email почту
– Телефон
– Social медиа
Безопасность и аккредитация
Игровой клуб работает на основании законной разрешения. Данное гарантирует:
– Честность развлекательного действа
– Безопасность персональных информации
– Быстрые выводы
– Регулируемый игровой процесс
Итог
Официальный сайт и его действующие альтернативные адреса гарантируют пользователям абсолютный комплекс возможностей для комфортной и выгодной игры. Щедрые вознаграждения, всевозможные автоматы, компетентная помощь и проверенная структура выплат создают ресурс превосходным вариантом для любителей игровых услуг.
vdcasino resmi vdcasino
deneme bonusu veren casino siteleri lisanslı casino siteleri
Jasper Deals – Stumbled upon this site, structure is clean and navigation works well.
Do you have a spam problem on this blog; I also am a blogger, and I was wanting to know your situation; many of us have created some nice methods and we are looking to swap techniques with other folks, please
shoot me an e-mail if interested.
Here is my web site :: 저신용중고차
Great post. I was checking continuously this blog and I am impressed!
Very helpful info particularly the last part 🙂
I care for such info a lot. I was looking for this particular info for a
very long time. Thank you and best of luck.
My website – 저신용중고차
Современные онлайн-казино предлагают пользователям широкий выбор игр и щедрые премии. Однако для беспроблемной времяпрепровождения важно осознавать, как отыскать казино Лаки Бир и его действующие зеркала.
Что такое лицензионный веб-ресурс казино
Официальный веб-сайт казино — это первичная площадка, где пользователи могут получать удовольствие от игровыми развлечениями. Ресурс работает на легитимных принципах и владеет всеми необходимыми документами.
Основные достоинства лицензионного портала:
– Защищенность индивидуальных реквизитов
– Честные условия использования
– Стабильные платежи
– Оперативная служба поддержки
Рабочее зеркало казино: для чего требуется
Альтернативный адрес — это абсолютная клон главного сайта, расположенная по альтернативному веб-адресу. Функционирующее зеркало разрабатывается для предоставления бесперебойного входа к сайту.
Поводы использования копий сайта:
– Блокировка первичного домена
– Технические мероприятия
– Высокая активность на сервер
Как получить действующее зеркало в данный момент
Обнаружить текущее проверенное зеркало можно разными методами:
1. Почтовые оповещения — зарегистрируйтесь на новостную доставку
2. Служба support — обратитесь в онлайн-чат
3. Корпоративные площадки — следите за новостями
4. Специализированные площадки — авторитетные ресурсы
Регистрация на платформе казино
Процедура оформления длится буквально несколько минут:
1. Кликните на клавишу “Зарегистрироваться”
2. Внесите обязательные данные
3. Валидируйте почтовую почту
4. Используйте купон, если предоставлен
По завершении финализированной регистрации вам станет возможен персональный раздел.
Награды и промокоды
Привлекательная премиальная политика — ключевое конкурентное преимущество казино:
Бонус за создание аккаунта
Новые пользователи зарабатывают начальный презент, который может включать:
– Валютный депозит на стартовый взнос
– Фриспины для игровых машин
– Стартовые деньги
Бонусные коды
Систематически появляются актуальные промокоды, позволяющие получить дополнительные бонусы.
Программа компенсации
Лояльные клиенты возвращают часть потраченных денег в виде компенсации.
Свежие кампании и состязания
Казино периодически организует захватывающие события:
– Еженедельные чемпионаты
– Тематические бонусы
– Раздачи крупных призов
– Схема лояльности
Логин в личный раздел
Для доступа на сайт следует:
1. Открыть официальный сайт или актуальное зеркало
2. Выбрать “Login”
3. Ввести никнейм и секретную комбинацию
В личном профиле открыты такие опции:
– Пополнение баланса
– Обналичивание денег
– Анализ истории игр
– Настройка профильными сведениями
Mobile модификация и приложение
Мобильная модификация
Оптимизированная версия ресурса предоставляет шанс развлекаться с разных мобильного гаджета. Визуал динамически оптимизируется под размер монитора.
Приложение для скачивания
Загрузить программу можно для:
– Android — официальная установка с портала
– iOS — скачивание через App Store
Плюсы app:
– Мгновенный запуск
– Стабильная производительность
– Push-оповещения об бонусах
– Ускоренный интерфейс
Игровые разделы
Автоматы
Обширная коллекция игровых слотов от ведущих поставщиков:
– Традиционные игры
– Новые-эмуляторы
– Джекпот-машины
Live зал
Категория с профессиональными операторами предоставляет:
– Рулетки
– Блэкджек
– Мини-баккара
– Poker
Эфиры ведутся в превосходном формате, создавая впечатление аутентичного казино.
Способы пополнения и обналичивания
Сайт поддерживает множественные платежные инструменты:
– Дебетовые карты
– Онлайн кошельки
– Цифровые валюты
– Прямые отправки
Наименьшие суммы депозита и скоростные платежи делают игру предельно комфортной.
Служба техподдержки
Опытная группа ассистентов функционирует 24/7 и готова ассистировать с всеми задачами:
– Мгновенный-чат
– Email-помощь
– Phone линия
Выводы
Главный веб-сайт казино и его функционирующие дубликаты предоставляют клиентам безопасный и азартный развлекательный досуг. Щедрые бонусы, функциональная мобильная вариант, разнообразные автоматы и профессиональное live-казино делают эту платформу великолепным местом для развлекательных игр.
explore now – Content flows nicely, making the browsing experience easy.
Анализ официального веб-сайта
Современные интернет казино обеспечивают пользователям обширный выбор игр и шансов. Главный веб-сайт Либет казино гарантирует защищенный возможность к азартным функциям.
Функционирующее зеркало: вход прямо сейчас
Альтернативный адрес является как полную копию основного портала. Официальное зеркало помогает участникам миновать существующие блокировки.
Плюсы эксплуатации зеркала
Ключевые достоинства включают:
– Постоянный доступ к порталу
– Сохранение любых возможностей базового портала
– Сохранность конфиденциальных данных
– Аналогичный инструментарий
Открытие счета на ресурсе
Процедура оформления профиля характеризуется легкостью и удобством. Начинающие участники обязаны:
1. Открыть главный веб-сайт или его зеркало
2. Выбрать на кнопку открытия счета
3. Внести нужные сведения
4. Верифицировать почтовую ящик
5. Осуществить стартовый логин
Приз за открытие счета
Новички получают солидный начальный подарок. Данное поощрение способно включать:
– Денежные начисления
– Даровые фриспины
– Повышенный показатель компенсации
Доступ в персональный профиль
Активные клиенты имеют возможность моментально зайти в персональный профиль, задействуя имя пользователя и код. Личный раздел дает путь к:
– Управлению счетом
– Записям переводов
– Активным подаркам
– Настройкам профиля
Призы и кампании
Ресурс систематически устраивает различные предложения для участников.
Разновидности подарков
Главные виды поощрений:
– Финансовые бонусы – доля от размера взноса
– Фриспины – complimentary спины в игровых машинах
– Кэшбэк – компенсация доли затраченных сумм
– Турнирные вознаграждения – призы за игру в конкурсах
Промокоды
Особые промокоды позволяют приобрести бонусные преимущества. Клиенты способны получить их на специализированных ресурсах или заработать в уведомлениях.
Мобильная вариант и app
Прогрессивные клиенты выбирают портативный игровой процесс.
Опции мобильной системы
– Отзывчивый интерфейс для всех устройств
– Целостный доступ к слотам
– Моментальная функционирование
– Комфортное навигация
Установить приложение
Мобильное софт доступно для downloading на девайсы с базовыми платформами Android и iOS. Приложение гарантирует:
– Устойчивую функциональность
– Пуш сообщения о предложениях
– Оперативный запуск к любимым автоматам
Азартный портфель
Казино предоставляет огромную галерею развлекательных игр.
Слоты
Каталог игровых машин охватывает:
– Стандартные слоты
– Видео игры
– Джекпотные игры
– Лицензионные автоматы
Live казино
Область лайв дилеров обеспечивает шанс участвовать с профессиональными диллерами. Представлены:
– Европейская рулетка
– Блэкджек
– Baccarat
– Poker
Соревнования
Периодические чемпионаты обеспечивают игрокам конкурировать за крупные призовые банки. Конкурсная сетка актуализируется регулярно.
Денежные процедуры
Сайт предоставляет разнообразие способов зачисления и получения финансов:
– Дебетовые карточки
– Онлайн счета
– Банковские трансферы
– Криптовалюты
Абсолютно все транзакции выполняются конфиденциально с задействованием актуальных технологий кодирования.
Сервис поддержки
Опытная служба поддержки функционирует постоянно. Связаться с менеджерами реально через:
– Online чат
– Электронную почту
– Горячую линию
– Социальные сети
Секьюрити и регулирование
Игровой клуб действует на фундаменте официальной разрешения. Это подтверждает:
– Прозрачность развлекательного действа
– Охрану персональных данных
– Своевременные выводы
– Ответственный игровой процесс
Заключение
Лицензионный портал и его действующие резервные страницы дают участникам совокупный ассортимент возможностей для приятной и прибыльной игры. Значительные бонусы, различные слоты, квалифицированная сервис и проверенная система операций создают портал лучшим опцией для ценителей развлекательных забав.
this link here – Pages are simple to browse and visually clean.
Современные онлайн-казино предлагают игрокам большой спектр развлечений и бонусных предложений. Доступ к сервису производится через официальный ресурс или его функционирующее зеркало VodkaCasino казино, что предоставляет постоянную активность.
Что представляет собой рабочее зеркало казино
Альтернатива — это полная дубликат официального портала, созданная для решения запретов. Рабочее зеркало позволяет игрокам сохранить подключение к предпочитаемым развлечениям в каждое время.
Проверенное зеркало обладает всеми опциями первоначального веб-сайта:
– Полный ассортимент развлечений
– Учетная запись с записанными данными
– Свежие акции
– Надежные расчетные операции
Оформление профиля на лицензионном ресурсе
Ход создания аккаунта составляет всего несколько минут. Новым игрокам следует:
1. Попасть на главный веб-сайт или функционирующее зеркало
2. Кликнуть на ссылку “Зарегистрироваться”
3. Ввести необходимые информацию
4. Активировать электронную почту
5. Сделать дебютный платеж
Поощрение новичкам начисляется незамедлительно после прохождения всех шагов.
Подключение в личный кабинет
Существующие участники могут совершить подключение используя:
– Учетное имя и шифр
– Код контакта
– Адрес
Аккаунт предоставляет доступ к регулированию финансами, истории игр и действующим бонусам.
Награды и программы
Азартная система привлекает активных участников разнообразными вознаграждениями:
Приветственный бонус
– Премия на дебютный пополнение до 100%
– Даровые спины на известные игры
– Экстра премии за последующие депозиты
Ваучеры
Специальные коды открывают шанс на приобретение особых поощрений. Свежие комбинации размещаются в категории “Промо”.
Cashback
Периодический возврат равен до 10% от утраченных средств. Возврат начисляется незамедлительно.
Система лояльности
Верные клиенты накапливают очки, которые конвертируются на настоящие выплаты или фриспины.
Мобильный сайт и приложение
Для удобства клиентов разработана полноценная портативная платформа. Гибкий вид помогает беспрепятственно развлекаться с каждого переносного аппарата.
Преимущества APP:
– Оперативный подключение к автоматам
– Адаптированный вид
– Надежная работа
– Нотификации о новых турнирах
Загрузить приложение можно даром с официального веб-сайта для гаджетов на Android и iOS.
Каталог автоматов
Машины
База насчитывает более 2000 автоматов от ведущих производителей:
– Традиционные игры
– Видео-слоты
– Джекпот-слоты
– Брендовые развлечения
Live казино
Категория Live казино дает развлечение с подлинными дилерами в живом эфире:
– Рулеточные столы
– Блэкджек
– Карты
– Столы покера
Состязания
Постоянные соревнования с значительными призовыми фондами устраиваются систематически. Участие в конкурсах доступно всем созданным игрокам.
Платежные варианты
Взносы и изъятия средств осуществляются через распространенные сервисы:
– Дебетовые средства
– Электронные счета
– Крипто
– Прямые платежи
Самый низкий взнос — от 100 рублей. Получение денег выполняется в течение 24 периода.
Сервис поддержки
Непрерывная группа помощи способна поддержать в исправлении произвольных вопросов:
– Мессенджер
– Email
– Горячая линия
– Социальные сети
Безопасность и документ
Главный сайт функционирует на фундаменте признанной разрешения. Каждые сведения участников обезопасены современным SSL-кодированием.
Вывод
Функционирующее зеркало предоставляет постоянный подключение к предпочитаемым автоматам, богатым промокодам и практичным возможностям. Откройте счет немедленно и заработайте приветственный подарок!
Обзор официального веб-сайта
Прогрессивные интернет казино обеспечивают пользователям широкий выбор забав и опций. Основной веб-сайт Cactus Casino предлагает проверенный вход к развлекательным услугам.
Действующее зеркало: путь на сегодня
Дублирующий портал является в качестве точную реплику лицензионного портала. Проверенное зеркало обеспечивает игрокам обходить вероятные блокировки.
Плюсы использования зеркала
Основные плюсы включают:
– Беспрерывный доступ к ресурсу
– Удержание всех функций основного портала
– Охрана индивидуальных материалов
– Идентичный функционал
Открытие счета на платформе
Механизм открытия счета характеризуется понятностью и удобством. Новые игроки необходимо:
1. Перейти на лицензионный ресурс или его зеркало
2. Щелкнуть на пункт оформления
3. Ввести нужные данные
4. Валидировать электронную адрес
5. Произвести дебютный авторизацию
Вознаграждение за создание аккаунта
Начинающие забирают значительный стартовый приз. Подобное поощрение в состоянии предусматривать:
– Монетарные начисления
– Бесплатные спины
– Повышенный коэффициент кэшбека
Логин в индивидуальный профиль
Зарегистрированные клиенты могут мгновенно авторизоваться в личный аккаунт, используя имя пользователя и шифр. Персональный кабинет обеспечивает возможность к:
– Администрированию балансом
– Хронологии платежей
– Работающим подаркам
– Параметрам профиля
Вознаграждения и акции
Платформа постоянно реализует различные акции для участников.
Типы подарков
Основные виды призов:
– Денежные подарки – процент от размера взноса
– Фриспины – даровые вращения в автоматах
– Кэшбек – возврат фрагмента утраченных финансов
– Призовые трофеи – вознаграждения за участие в состязаниях
Ваучеры
Эксклюзивные купоны помогают активировать дополнительные выгоды. Пользователи в состоянии отыскать их на тематических площадках или приобрести в рассылке.
Переносная редакция и софт
Современные гемблеры выбирают мобильный досуг.
Возможности mobile системы
– Responsive интерфейс для всех устройств
– Совокупный вход к слотам
– Стремительная функционирование
– Удобное навигация
Загрузить app
Mobile app доступно для загрузки на девайсы с операционными платформами Android и iOS. App гарантирует:
– Надежную функциональность
– Push оповещения о предложениях
– Моментальный путь к любимым автоматам
Гемблинг каталог
Платформа обеспечивает богатую коллекцию игровых игр.
Аппараты
Ассортимент игровых слотов включает:
– Традиционные автоматы
– Видео игры
– Джекпотные игры
– Лицензионные игры
Live игры
Раздел лайв развлечений дает право участвовать с профессиональными крупье. Предложены:
– Европейская рулетка
– 21
– Punto Banco
– Покер
Турниры
Периодические турниры позволяют участникам соревноваться за крупные наградные пулы. Призовая система обновляется постоянно.
Платежные процедуры
Портал предоставляет разнообразие вариантов зачисления и обналичивания средств:
– Кредитные карты
– Онлайн платежные системы
– Прямые переводы
– Bitcoin
Любые переводы выполняются надежно с задействованием современных методов кодирования.
Служба поддержки
Профессиональная группа помощи работает 24/7. Обратиться с специалистами доступно через:
– Online чат
– Почтовую почту
– Телефон
– Social медиа
Безопасность и лицензирование
Казино функционирует на фундаменте официальной разрешения. Данное обеспечивает:
– Прозрачность развлекательного геймплея
– Безопасность конфиденциальных данных
– Своевременные перечисления
– Ответственный гейминг
Итог
Лицензионный сайт и его рабочие зеркала гарантируют клиентам совокупный спектр возможностей для удобной и профитной развлечений. Солидные вознаграждения, многочисленные игры, профессиональная сервис и проверенная инфраструктура транзакций превращают платформу лучшим опцией для ценителей игровых услуг.
https://cassiteleri.top/# lisanslı casino siteleri
check sunmeadow site – Minimal layout makes browsing very comfortable.
Brook Shop – Checked out this site randomly, content is well organized and easy to follow.
Характеристика главного ресурса
Актуальные виртуальные казино предоставляют игрокам разнообразный спектр игр и перспектив. Официальный сайт Лаки Бир казино гарантирует защищенный возможность к развлекательным услугам.
Действующее зеркало: вход на сегодня
Зеркало выступает как полную версию основного веб-сайта. Проверенное зеркало позволяет пользователям миновать вероятные ограничения.
Достоинства эксплуатации зеркала
Принципиальные плюсы включают:
– Постоянный шанс к сайту
– Удержание всех функций базового портала
– Охрана персональных информации
– Идентичный возможности
Оформление профиля на платформе
Процесс регистрации отличается простотой и практичностью. Недавние клиенты должны:
1. Открыть лицензионный сайт или его зеркало
2. Кликнуть на пункт создания аккаунта
3. Ввести необходимые сведения
4. Верифицировать электронную адрес
5. Осуществить стартовый вход
Вознаграждение за открытие счета
Новички зарабатывают солидный стартовый бонус. Это премия имеет возможность предусматривать:
– Монетарные суммы
– Даровые фриспины
– Усиленный уровень кэшбека
Логин в собственный раздел
Действующие клиенты могут оперативно получить доступ в персональный раздел, эксплуатируя логин и пароль. Собственный раздел обеспечивает возможность к:
– Администрированию депозитом
– Журналу транзакций
– Действующим призам
– Настройкам профиля
Вознаграждения и предложения
Ресурс постоянно проводит многочисленные акции для пользователей.
Разновидности подарков
Основные категории призов:
– Пополнительные призы – часть от объема депозита
– Прокруты – даровые вращения в слотах
– Возврат средств – отдача части проигранных средств
– Призовые награды – премии за состязание в турнирах
Промокоды
Особые промокоды позволяют приобрести добавочные привилегии. Участники способны получить их на партнерских сайтах или приобрести в уведомлениях.
Переносная версия и софт
Современные игроки любят мобильный геймплей.
Функции mobile версии
– Responsive интерфейс для различных устройств
– Целостный вход к развлечениям
– Оперативная подгрузка
– Комфортное навигация
Скачать приложение
Мобильное софт предложено для downloading на девайсы с базовыми системами Android и iOS. Приложение предоставляет:
– Надежную деятельность
– Всплывающие оповещения о акциях
– Оперативный вход к предпочитаемым автоматам
Развлекательный ассортимент
Казино предлагает обширную галерею развлекательных забав.
Автоматы
Каталог развлекательных аппаратов насчитывает:
– Классические слоты
– Video игры
– Призовые машины
– Сюжетные автоматы
Live столы
Область лайв столов дает опцию играть с профессиональными диллерами. Представлены:
– Европейская рулетка
– Блэкджек
– Baccarat
– Техасский холдем
Состязания
Систематические чемпионаты помогают участникам соревноваться за внушительные денежные пулы. Конкурсная структура модифицируется постоянно.
Банковские транзакции
Портал поддерживает разнообразие опций зачисления и снятия финансов:
– Дебетовые карточки
– Виртуальные кошельки
– Wire транзакции
– Цифровые валюты
Совокупные платежи проходят защищенно с использованием прогрессивных протоколов шифрования.
Служба помощи
Квалифицированная служба помощи действует постоянно. Коннектиться с операторами возможно через:
– Online чат
– Электронную почту
– Горячую линию
– Социальные сети
Охрана и регулирование
Игровой клуб функционирует на фундаменте легальной лицензии. Данное подтверждает:
– Легальность развлекательного геймплея
– Сохранность персональных данных
– Пунктуальные выплаты
– Легальный геймплей
Вывод
Лицензионный портал и его актуальные зеркала обеспечивают игрокам совокупный комплекс возможностей для комфортной и выгодной времяпрепровождения. Внушительные призы, многочисленные игры, компетентная сервис и проверенная инфраструктура платежей создают казино лучшим выбором для ценителей гемблинг игр.
Подключение к платформе через действующие зеркала
Клиенты интернет казино постоянно контактируют с проблемой блокировки официального ресурса. Именно для решения этой ситуации существуют дубликаты основного домена. казино Punch предоставляет полный переход ко всем сервисам платформы.
Что такое функционирующее зеркало казино
Копия является собой абсолютную версию основного портала с аналогичным опциями. Основное различие — это другое имя. Все параметры пользователя, включая средства, бонусы и архив раундов, находятся такими же.
Достоинства применения зеркал
Рабочие зеркала имеют комплексом существенных преимуществ:
– Бесперебойный подключение к выбранным развлечениям
– Полная сохранность собственных параметров
– Удержание всех параметров личного кабинета
– Шанс обретения поощрений и участия в кампаниях
Открытие счета на легальном домене
Ход регистрации предельно элементарен и занимает немного минут. Начинающие участники в состоянии рассчитывать на щедрый вводный бонус за открытие счета.
Этапы формирования аккаунта
1. Подключение на основной домен или его альтернативу
2. Активация на клавишу “Регистрация”
3. Заполнение требуемых параметров
4. Проверка цифровой почты
5. Применение купона (когда есть)
Подарки и кампании для игроков
Игровая площадка балует своих участников различными поощрительными программами.
Главные виды призов
Приветственный приз — крупное начисление для недавних игроков, которое может включать монетарные бонусы и free spins.
Бесплатные вращения — возможность запускать в востребованных автоматах даром.
Кэшбек — частичный возмещение израсходованных денег, что зачисляется каждую неделю или раз в месяц.
Промокоды — уникальные комбинации, предоставляющие дополнительные выгоды.
Пользовательский кабинет: опции и настройки
Личный профиль обеспечивает совершенный регулирование над персональным опытом. Здесь предусмотрены:
– Управление средствами
– Записи переводов
– Текущие бонусы
– Конфигурации сохранности
– Валидация счета
Мобильная платформа и программа
Новейшие участники предпочитают гибкость. Платформа предоставляет 2 варианта для развлечений с карманных гаджетов.
Приспособленная телефонная вариант
Смартфонная платформа домена без участия настраивается под разрешение любого девайса. Отсутствует потребность загружать специальное ПО.
APP для мобильных
Доступно инсталлировать специальное софт для iOS и Android. APP гарантирует:
– Мгновенный старт
– Улучшенный интерфейс
– Push-извещения о предложениях
– Стабильную работу
Live раздел: антураж настоящего игорного заведения
Секция Live казино доставляет пользователей в обстановку подлинного зала. Квалифицированные ведущие организуют сессии в формате реального времени.
Топовые Live-столы
– Рулетка
– Blackjack
– Baccarat
– Poker
Игровые машины: многообразие развлечений
Каталог игровых аппаратов насчитывает сотни наименований от лидирующих разработчиков. Пользователи обнаружат:
– Классические аппараты
– Видео-автоматы
– Мега-выигрыш-машины
– Слоты с множественными линиями
Состязания и уникальные акции
Периодические турниры предоставляют шанс участникам состязаться друг с другом за крупные денежные суммы. Отдельный турнир обладает свои требования участия и список лидеров.
Варианты ввода и снятия финансов
Казино поддерживает множество платежных методов:
– Дебетовые инструменты
– Цифровые сервисы
– Цифровые валюты
– Wire отправления
Все транзакции выполняются конфиденциально благодаря актуальным протоколам защиты.
Служба support
Профессиональные консультанты команды помощи готовы помочь 24/7. Предусмотрены следующие способы коммуникации:
– Мгновенный-чат
– Email-поддержка
– Голосовая поддержка
– Медийные сети
Резюме
Главный ресурс казино и его действующие зеркала предоставляют пользователям надежный и легкий переход к огромному ассортименту развлекательных развлечений. Солидные поощрения, частые акции, качественная помощь и комфортные платежные инструменты создают развлекательный процесс чрезвычайно приятным и прибыльным.
güvenilir casino siteleri lisanslı casino siteleri
Нынешние онлайн казино предлагают клиентам большой спектр возможностей для беспроблемной игры. Но иногда соединение к базовому сайту может быть заблокированным. В таких моментах на выручку приходят казино ЗигЗаг казино, которое дает стабильный вход ко всем сервисам платформы.
Что такое актуальное зеркало казино
Дубликат — это точная версия основного веб-сайта, которая располагается по альтернативному интернет-адресу. Альтернативный ресурс содержит полный инструментарий главного портала, включая пользовательский кабинет, баланс и историю платежей.
Основные достоинства задействования зеркала:
– 24-часовой доступ к ресурсу
– Стопроцентная тождественность опций
– Конфиденциальность пользовательских сведений
– Поддержка всех бонусов
Как разыскать функционирующее зеркало на сегодня
Есть ряд проверенных вариантов поиска действующей адреса:
Легитимные каналы:
1. Имейл рассылка — дирекция периодически направляет информацию с рабочими адресами
2. Коммуникационные сети — проверенные профили постят текущую сведения
3. Отдел поддержки — консультанты выдают надежные адреса
4. Телефонное приложение — позволяет преодолевать блокировки
Оформление профиля на лицензионном сайте
Процесс открытия счета отнимает не более считанные минут и состоит из данных ступеней:
1. Переход на основной портал или функционирующее зеркало
2. Выбор на элемент «Регистрация»
3. Заполнение персональной анкеты
4. Валидация имейл почты или сотового номера
5. Задействование бонуса за регистрацию при присутствии промокода
Только что зарегистрированные клиенты приобретают великодушный начальный приз, который может охватывать бесплатные вращения, валютные бонусы или кэшбек.
Авторизация в персональный кабинет
Вход на портале выполняется традиционным путем. Нужно вписать имя пользователя и кодовое слово, использованные при создании аккаунта.
Ключевые нюансы для безопасного входа:
– Задействуйте сложный код
– Запустите 2FA верификацию
– Не сохраняйте реквизиты на общественных девайсах
– Контролируйте интернет строку браузера
Обзор бонусной структуры
Гемблинг-сайт одаривает геймеров разнообразными привилегиями и акциями:
Приветственный набор
Свежие игроки могут рассчитывать на великодушное вознаграждение за стартовый депозит. Как правило это долевая премия к зачисленной сумме плюс даровые спины для востребованных слотов.
Регулярные промо
– Недельный компенсация — возврат доли утраченных денежных средств
– Награды на повторные пополнения
– Специальные промо по событиям
– Состязания с солидными призовыми пулами
Система лояльности
Регулярные геймеры получают единицы за каждую игру, которые затем обмениваются на реальные средства, фриспины или уникальные привилегии.
Купоны: как использовать
Купоны — это уникальные наборы литер, дающие возможность к дополнительным бонусам.
В каких местах взять действующие промокоды:
– Авторизованные социальные сети казино
– Сотрудничающие площадки
– Email-подписка
– Тематические сообщества
Вводится промокод в соответствующее поле при создании аккаунта или добавлении денег счета.
Мобильная версия и приложение
Нынешние пользователи любят делать ставки с портативных аппаратов. Платформа предлагает двойной способа для приятной смартфонной игры.
Мобильная вариант
Веб версия самостоятельно оптимизируется под параметры экрана. Не требует загрузки и оперирует в произвольном свежем браузере.
Смартфонное приложение
Скачать app можно для устройств на Android и iOS. Преимущества app:
– Молниеносная открытие
– Бесперебойная функционирование
– Мгновенные-уведомления о акциях
– Автономный обход блокировок
Процесс инсталляции несложен: необходимо попасть на портал с смартфонного девайса и следовать предписаниям.
Игровой каталог
Библиотека аппаратов охватывает тысячи вариантов от ведущих производителей.
Слоты
Развлекательные автоматы — максимально распространенная секция аттракционов. Доступны классические простые аппараты, актуальные видео-автоматы с дополнительными стадиями, а также джекпотные джекпоты.
Live казино
Раздел с живыми дилерами предоставляет ощутить атмосферу реального казино. Имеются столы с покером.
Вещание производится в высоком четкости, присутствует диалог с дилером и другими игроками.
Соревнования
Систематически запускаются соревнования по разным дисциплинам. Присоединение дает шанс завоевать валютные награды, фриспины или специальные бонусы.
Финансовые действия
Сайт предлагает большой спектр финансовых методов:
– Банковские карты
– Виртуальные платформы
– Цифровая валюта
– Денежные транзакты
Низшая сумма взноса — разумная для основной части геймеров. Снятие средств производится в кратчайшие сроки.
Отдел поддержки
Профессиональные консультанты расположены поддержать постоянно. Имеются данные варианты общения:
– Живой-чат
– Email
– Звонковая связь
– Медийные сети
Разъяснения на стандартные проблемы можно отыскать в разделе FAQ.
Итог
Главный портал казино и его актуальные зеркала гарантируют игрокам максимальный подключение ко всем опциям ресурса. Великодушные поощрения, приятная мобильная версия, огромный ассортимент игр и квалифицированная ассистенция формируют гемблинг времяпрепровождение предельно удобным и защищенным.
online mexican pharmacy no rx https://tajmeds.top/# no prescription mexican pharmacy
Передовые онлайн-казино предоставляют пользователям широкий выбор функций для приятной развлечений. Вход к платформе Jozz казино реализуется через лицензионный веб-ресурс или актуальное зеркало.
Что такое актуальное зеркало казино
Действующее зеркало — это альтернативный домен основного портала казино. Такие копии формируются для поддержания постоянного входа к азартной платформе.
Альтернатива актуальное полностью копирует опции базового сайта. Геймеры обретают схожий вход ко всем возможностям, включая регистрацию, внесение депозита счета и обналичивание выигрышей.
Оформление профиля на основном ресурсе
Механизм открытия профиля отнимает всего буквально секунд. Свежим игрокам требуется:
1. Перейти на основной сайт или действующее подлинное зеркало
2. Щелкнуть кнопку “Создать аккаунт”
3. Указать требуемые информацию
4. Подтвердить e-mail почту
5. Применить купон при наличии
После завершения создания аккаунта участник приобретает приз за регистрацию, который вправе охватывать фриспины или cash начисление.
Авторизация в собственный кабинет
Персональный кабинет — это безопасная область, где клиенты имеют возможность управлять своим учетной записью. Для логина требуется внести username и password.
В пользовательском кабинете открыты следующие возможности:
– Мониторинг журнала платежей
– Использование бонусных кодов
– Регулирование поощрениями
– Присоединение в турнирах
– Проверка возврата средств
– Настройка данных
Бонусы и предложения
Игровая система предлагает щедрые подарки:
Приветственный бонус — новички обретают солидное премию на первые пополнения.
Free spins — начисляются как при создании аккаунта, так и в контексте многочисленных мероприятий.
Возмещение — регулярный возмещение доли израсходованных сумм.
Купоны — особые комбинации, дающие право к специальным вознаграждениям.
Анализ развлекательных категорий
Аппараты
Коллекция автоматов содержит множество вариантов от ведущих провайдеров. Геймеры найдут как обычные аппараты, так и актуальные видеослоты с интересной визуализацией.
Live казино
Зона Live казино обеспечивает возможность развлекаться с настоящими дилерами в условиях реального времени. Представлены распространенные игры: рулетка, блэкджек, баккара, покер.
Конкурсы
Постоянные чемпионаты с крупными наградными пулами завлекают тысячи участников. Лидеры получают денежные награды и особые бонусы.
Мобильная версия и app
Телефонная версия платформы предоставляет право участвовать с каждого девайса. Оформление самостоятельно настраивается под формат экрана.
Установить программу можно для гаджетов на Android и iOS. Смартфонное ПО обладает всеми характеристиками компьютерной версии.
Как определить действующее зеркало на сейчас
Актуальные URL альтернатив постоянно корректируются. Обнаружить свежую адрес можно разными вариантами:
– Через департамент помощи
– В настоящих новостных сетях
– По электронной newsletter
– На аффилиатных ресурсах
Охрана и сертификация
Лицензионный домен действует на фундаменте мировой сертификата. Все транзакции защищены инновационными технологиями шифрования.
Анонимность личных реквизитов обеспечивается в стопроцентном объеме.
Итог
Официальный домен и его действующие зеркала гарантируют участникам 24/7 путь к качественным развлекательным играм. Щедрые вознаграждения, всевозможные слоты, компетентная поддержка — все это формирует развлекательный процесс чрезвычайно удобным и интересным.
где продавать сайты где продавать сайты .
There’s definately a lot to learn about this issue. I really like all of the points you made.
my page – 저신용중고차
Доступ к ресурсу через действующие зеркала
Нынешние интернет казино обеспечивают игрокам бесперебойный вход к услугам. Официальный ресурс https://m-c-project.ru/luchshie-kazino-s-mgnovennym-vyvodom-deneg-2026-goda-obratite-vnimanie-na-etot-metod-esli-khotite-osushchestvlyat-tranzaktsii-mgnovenno работает устойчиво, обеспечивая обширный спектр гемблинг развлечений. Впрочем периодически появляются технические препятствия или барьеры, следовательно критично понимать о доступности рабочих зеркал.
Что собой представляет из себя основное зеркало казино
Альтернатива — это точная копия официального портала с аналогичным интерфейсом. Функционирующее зеркало сейчас позволяет обходить территориальные барьеры и продолжать гемблинг.
Ключевые плюсы использования зеркал:
– Безграничный подключение к собственному кабинету
– Сохранение любых сведений учётной записи
– Идентичный ассортимент развлечений
– Действующие поощрения и предложения
Создание аккаунта на портале
Процесс регистрации занимает немного минут. Свежие клиенты приобретают великодушный бонус за регистрацию, он имеет возможность включать:
– Начальный финансовый бонус
– Даровые вращения для игр
– Уникальные ваучеры
– Повышенный возврат
Для окончания регистрации следует:
1. Переместиться на официальный портал или альтернативу
2. Выбрать элемент «Создать аккаунт»
3. Ввести контактные сведения
4. Активировать почтовый адрес или телефон
5. Применить ваучер (в случае существовании)
Авторизация в личный кабинет
После корректной записи геймеры могут производить подключение через центральный сайт или функционирующее зеркало. Персональный кабинет предоставляет всесторонний управление над учётной записью:
– История пари
– Зачисление счёта
– Изъятие призов
– Контроль поощрениями
– Включение в соревнованиях
Награды и кампании казино
Портал балует клиентов вариативными бонусными предложениями:
Стартовые поощрения
Начинающие зарабатывают щедрый комплект бонусов на вступительные пополнения. Как правило это включает пропорциональную доплату к сумме депозита плюс комплиментарные вращения.
Систематические акции
– Еженедельный кэшбек до 15%
– Соревнования с наградными фондами
– Бонусы на годовщину рождения
– Специальные промо для привилегированных клиентов
Система вознаграждения
Деятельные пользователи получают баллы, они разрешено трансформировать на подлинные финансы или специальные преимущества.
Карманная форма и софт
Актуальные разработки помогают развлекаться всюду комфортно. Карманная форма ресурса автоматически подстраивается под размер любого аппарата.
Достоинства портативного ПО:
– Скоростная открытие автоматов
– Удобный вид
– Мгновенные-уведомления о предложениях
– Возможность загрузить для Android и iOS
Настоящее казино: атмосфера подлинного гемблинг дома
Область Live клуба переносит клиентов в атмосферу настоящего азартного клуба. Компетентные операторы проводят развлечение в формате реального времени.
Доступные развлечения:
– Европейская рулетка
– Карточная игра
– Punto Banco
– Карты
Барабаны и игровые аппараты
Собрание развлекательных аппаратов охватывает сотни названий от ведущих провайдеров. Всякий пользователь отыщет развлечение по желанию:
– Классические автоматы
– Новые слоты с специальными раундами
– Накопительный-автоматы
– Динамические машины
Состязания и розыгрыши
Постоянные соревнования включают азарт и предоставляют опцию выиграть крупные вознаграждения. Участие в турнирах нередко комплиментарное, а призовые суммы насчитывают внушительных размеров.
Защита и секретность
Портал задействует актуальные протоколы шифрования для защиты реквизитов пользователей. Все денежные процедуры проходят через защищённые соединения.
Вывод
Основной сайт и его функционирующие зеркала обеспечивают безопасный доступ к отличным игровым играм. Привлекательные призы, удобная смартфонная форма, богатство слотов и квалифицированное Live-игорный дом делают сайт превосходным решением для фанатов гемблинг слотов.
Нынешние интернет казино обеспечивают геймерам огромный ассортимент опций для беспроблемной игры. Однако иногда соединение к официальному порталу может быть недоступным. В таких моментах на поддержку спешит казино Лаки Бир, которое предоставляет непрерывный вход ко всем возможностям платформы.
Что такое актуальное зеркало казино
Дубликат — это идентичная реплика официального веб-сайта, которая располагается по запасному адресу. Альтернативный ресурс сохраняет целый возможности оригинального ресурса, включая персональный кабинет, средства и историю платежей.
Ключевые выгоды применения зеркала:
– 24-часовой подключение к платформе
– Абсолютная схожесть возможностей
– Защита персональных сведений
– Сохранение существующих бонусов
Как отыскать действующее зеркало в данный момент
Есть некоторое количество достоверных путей обнаружения текущей ссылки:
Проверенные сервисы:
1. Почтовая рассылка — управление систематически пересылает информацию с действующими адресами
2. Коммуникационные сети — авторизованные профили размещают текущую информацию
3. Служба поддержки — консультанты предоставляют безопасные URL
4. Портативное приложение — предоставляет обходить блокировки
Открытие счета на главном веб-сайте
Процедура создания аккаунта требует только несколько минут и включает из нижеследующих этапов:
1. Вход на официальный сайт или действующее зеркало
2. Выбор на элемент «Регистрация»
3. Ввод пользовательской формы
4. Верификация электронной почты или контактного номера
5. Активация поощрения за регистрацию при существовании промокода
Свежие клиенты обретают значительный начальный подарок, который может включать бесплатные вращения, финансовые бонусы или cashback.
Вход в личный кабинет
Логин на портале реализуется традиционным способом. Достаточно вписать логин и пароль, примененные при открытии счета.
Значимые аспекты для безопасного входа:
– Применяйте надежный шифр
– Задействуйте двойную проверку
– Не записывайте пароли на общественных гаджетах
– Контролируйте URL строку браузера
Обзор премиальной системы
Игровая платформа балует игроков разнообразными поощрениями и акциями:
Начальный набор
Дебютанты имеют возможность полагаться на великодушное вознаграждение за дебютный пополнение. Зачастую это долевая надбавка к депонированной объему плюс фриспины для популярных слотов.
Периодические акции
– Семидневный компенсация — возмещение доли утраченных денег
– Поощрения на дополнительные депозиты
– Эксклюзивные акции по праздникам
– Соревнования с крупными наградными фондами
Система вознаграждений
Регулярные клиенты собирают единицы за любую ставку, которые затем превращаются на реальные деньги, фриспины или особые преимущества.
Бонус-коды: как задействовать
Кодовые комбинации — это специальные комбинации литер, обеспечивающие доступ к эксклюзивным привилегиям.
Где получить рабочие промокоды:
– Проверенные социальные сети казино
– Аффилиатные сайты
– Email-рассылка
– Тематические сообщества
Активируется промокод в предназначенное поле при создании аккаунта или внесении депозита счета.
Телефонная версия и приложение
Нынешние клиенты предпочитают проводить время с смартфонных устройств. Ресурс предоставляет пару варианта для комфортной смартфонной игры.
Мобильная модификация
Браузерная версия автоматически подстраивается под параметры экранной панели. Не просит загрузки и функционирует в произвольном современном браузере.
Телефонное приложение
Загрузить app можно для гаджетов на Android и iOS. Достоинства app:
– Оперативная загрузка
– Устойчивая работа
– Мгновенные-уведомления о бонусах
– Самостоятельный преодоление блокировок
Процедура скачивания элементарен: необходимо зайти на сайт с портативного девайса и выполнять указаниям.
Гемблинг коллекция
Коллекция аппаратов содержит огромное количество позиций от топовых производителей.
Слоты
Развлекательные слоты — самая популярная секция игр. Доступны обычные винтажные аппараты, передовые видео-автоматы с дополнительными этапами, а также прогрессивные выигрыши.
Live казино
Зона с настоящими раздающими дает возможность испытать дух подлинного казино. Имеются столы с блэкджеком.
Стриминг производится в отличном разрешении, присутствует диалог с ведущим и прочими игроками.
Турниры
Систематически проводятся турниры по разным категориям. Включение дает шанс выиграть валютные награды, бесплатные вращения или уникальные бонусы.
Платежные процедуры
Платформа поддерживает значительный спектр финансовых способов:
– Дебетовые карты
– Цифровые кошельки
– Биткоин
– Финансовые переводы
Стартовая количество взноса — приемлемая для большинства игроков. Снятие денег выполняется в кратчайшие периоды.
Сервис поддержки
Компетентные консультанты расположены поддержать круглосуточно. Доступны нижеследующие варианты коммуникации:
– Интернет-чат
– Email
– Мобильная горячая линия
– Общественные сети
Разъяснения на частые темы можно отыскать в зоне FAQ.
Резюме
Главный сайт казино и его рабочие зеркала гарантируют клиентам абсолютный подключение ко всем возможностям платформы. Великодушные вознаграждения, комфортная мобильная версия, впечатляющий выбор слотов и компетентная поддержка превращают развлекательный опыт крайне удобным и безопасным.
Ridge Picks – Just discovered this page, layout is tidy and content is readable.
lisanslı casino siteleri: lisanslı casino siteleri
найти это vodkabet
перейти на сайт vodka bet
check this workshop – Everything loads nicely, and sections are well organized.
Нынешние онлайн-казино дают игрокам широкий набор игр и бонусных опций. Вход к платформе производится через основной портал или его действующее зеркало казино Кешер, что обеспечивает постоянную работу.
Что такое актуальное зеркало казино
Дубликат — это полная версия официального ресурса, созданная для устранения блокировок. Действующее зеркало помогает игрокам обрести доступ к предпочитаемым развлечениям в любое время.
Подлинное зеркало имеет всеми характеристиками оригинального ресурса:
– Целый ассортимент слотов
– Аккаунт с записанными параметрами
– Текущие акции
– Надежные финансовые транзакции
Оформление профиля на главном веб-сайте
Процедура создания аккаунта составляет всего считанные минут. Новым игрокам следует:
1. Перейти на основной веб-сайт или актуальное зеркало
2. Щелкнуть на клавишу “Создать аккаунт”
3. Внести необходимые данные
4. Активировать email
5. Сделать начальный депозит
Поощрение новичкам зачисляется моментально после завершения всех ступеней.
Вход в учетную запись
Созданные клиенты могут произвести авторизацию используя:
– Никнейм и пароль
– Данные мобильного
– Контактный email
Персональный раздел дает возможность к контролю счетом, сведениям транзакций и доступным бонусам.
Поощрения и кампании
Азартная площадка привлекает лояльных пользователей выгодными призами:
Приветственный пакет
– Бонус на первый пополнение до 100%
– Бесплатные вращения на популярные игры
– Дополнительные бонусы за следующие платежи
Купоны
Эксклюзивные промокоды обеспечивают доступ на использование эксклюзивных бонусов. Действующие купоны выкладываются в блоке “Акции”.
Cashback
Еженедельный кешбэк насчитывает до 10% от утраченных денег. Компенсация выплачивается моментально.
Механизм лояльности
Активные участники зарабатывают баллы, которые переводятся на настоящие финансы или бесплатные вращения.
Мобильная версия и приложение
Ради комфорта клиентов создана качественная мобильная версия. Отзывчивый облик обеспечивает беспрепятственно развлекаться с любого переносного аппарата.
Преимущества программы:
– Быстрый запуск к слотам
– Настроенный интерфейс
– Стабильная работа
– Push-уведомления о актуальных акциях
Загрузить APP можно бесплатно с основного портала для девайсов на Android и iOS.
Каталог автоматов
Игровые автоматы
Каталог включает более 2000 автоматов от известных провайдеров:
– Классические слоты
– Видео-слоты
– Слоты с джекпотом
– Тематические развлечения
Live казино
Секция Live казино обеспечивает участие с реальными крупье в прямом режиме:
– Рулетка
– Блэкджек
– Баккара
– Карточный покер
Конкурсы
Регулярные соревнования с крупными призовыми пулами организуются систематически. Присоединение в соревнованиях разрешено всем созданным участникам.
Расчетные варианты
Пополнения и получения средств осуществляются через востребованные способы оплаты:
– Дебетовые средства
– Онлайн сервисы
– Bitcoin
– Счетные операции
Минимальный вклад — от 100 рублей. Вывод финансов проводится в течение 24 периода.
Служба support
Постоянная команда саппорта готова ассистировать в исправлении каких-либо ситуаций:
– Онлайн-чат
– Email
– Связь
– Социальные сети
Надежность и разрешение
Лицензионный портал работает на почве международной сертификата. Каждые данные клиентов обезопасены передовым SSL-кодированием.
Вывод
Функционирующее зеркало предоставляет бесперебойный соединение к любимым развлечениям, богатым акциям и функциональным возможностям. Создайте аккаунт прямо сейчас и заработайте первый приз!
Актуальные онлайн-казино предоставляют пользователям широкий спектр азартных игр и заманчивые поощрения. Тем не менее для комфортной игры существенно знать, как обнаружить Лаки Бир казино онлайн и его рабочие зеркала.
Что такое официальный портал казино
Лицензионный веб-сайт казино — это главная платформа, где пользователи могут развлекаться игровыми слотами. Платформа действует на законных основаниях и имеет всеми обязательными документами.
Основные выгоды лицензионного портала:
– Безопасность пользовательских данных
– Справедливые требования игры
– Стабильные выплаты
– Компетентная техподдержка
Функционирующее зеркало казино: для чего требуется
Альтернативный адрес — это идентичная дубликат официального сайта, размещенная по другому веб-адресу. Рабочее зеркало формируется для обеспечения стабильного доступа к порталу.
Факторы задействования дублирующих ресурсов:
– Блокировка первичного сайта
– Технические мероприятия
– Высокая загрузка на систему
Как получить рабочее зеркало на сегодня
Получить новое рабочее зеркало можно несколькими способами:
1. Рассылка — зарегистрируйтесь на новостную подписку
2. Служба поддержки — проконсультируйтесь в онлайн-чат
3. Официальные площадки — следите за публикациями
4. Игровые порталы — надежные ресурсы
Создание аккаунта на портале казино
Алгоритм оформления длится всего немного секунд:
1. Кликните на клавишу “Открыть счет”
2. Заполните обязательные поля
3. Валидируйте электронную адрес
4. Примените бонусный код, если доступен
По завершении успешной создания аккаунта вам станет открыт индивидуальный раздел.
Награды и купоны
Богатая поощрительная структура — ключевое достоинство казино:
Бонус за регистрацию
Начинающие пользователи получают начальный подарок, который может содержать:
– Денежный депозит на дебютный депозит
– Free spins для слотов
– Безвозвратные деньги
Купоны
Систематически размещаются новые купоны, дающие возможность использовать дополнительные преимущества.
Программа возврата средств
Постоянные участники приобретают порцию потраченных денег обратно.
Действующие промо и состязания
Сайт систематически организует интересные кампании:
– Weekly турниры
– Специальные бонусы
– Раздачи крупных наград
– Схема привилегий
Авторизация в личный аккаунт
Для авторизации на платформу необходимо:
1. Открыть лицензионный портал или функционирующее зеркало
2. Кликнуть “Login”
3. Ввести имя пользователя и пароль
В индивидуальном разделе открыты такие возможности:
– Пополнение кошелька
– Получение призов
– Изучение лога игр
– Настройка персональными настройками
Мобильная версия и app
Портативная вариант
Responsive версия веб-сайта обеспечивает развлекаться с всех карманного телефона. Интерфейс динамически настраивается под габариты дисплея.
Клиент для скачивания
Скачать клиент можно для:
– Android — непосредственная установка с сайта
– iOS — инсталляция через App Store
Плюсы программы:
– Мгновенный вход
– Бесперебойная функциональность
– Push-нотификации об бонусах
– Оптимизированный UI
Развлекательные разделы
Слоты
Разнообразная библиотека эмуляторных барабанов от лучших разработчиков:
– Классические автоматы
– Продвинутые-эмуляторы
– Джекпот-игры
Live зал
Раздел с живыми операторами предлагает:
– Рулеточные столы
– 21
– Punto Banco
– Texas Hold’em
Вещания ведутся в HD качестве изображения, воссоздавая эффект аутентичного казино.
Методы пополнения и получения
Казино работает с разнообразные транзакционные системы:
– Кредитные карты
– Онлайн кошельки
– Криптовалюты
– Финансовые транзакции
Минимальные пороги взноса и скоростные выводы обеспечивают развлечение максимально беспроблемной.
Служба помощи
Профессиональная команда ассистентов доступна 24/7 и может содействовать с различными задачами:
– Реалтайм-чат
– Email-консультации
– Голосовая связь
Резюме
Основной ресурс казино и его актуальные альтернативные адреса предоставляют пользователям защищенный и азартный азартный отдых. Выгодные награды, комфортная адаптивная модификация, многочисленные автоматы и высокоуровневое live-казино создают эту систему замечательным выбором для развлекательных времяпрепровождения.
vdcasino giriş: vdcasino
official site link – Navigation is intuitive, content is clear and easy to digest.
заказать продающий сайт kak-prodat-sajt.ru .
Описание основного веб-сайта
Современные сетевые казино предлагают игрокам широкий спектр забав и перспектив. Официальный ресурс Лаки Бир казино предоставляет защищенный вход к игровым услугам.
Функционирующее зеркало: вход в настоящий момент
Резервный сайт представляет как полную реплику лицензионного сайта. Актуальное зеркало помогает игрокам миновать потенциальные барьеры.
Выгоды применения зеркала
Ключевые преимущества охватывают:
– Стабильный шанс к сайту
– Поддержание абсолютно всех возможностей базового веб-сайта
– Сохранность личных материалов
– Идентичный функционал
Оформление профиля на сайте
Процесс открытия счета отличается понятностью и удобством. Начинающие игроки обязаны:
1. Посетить главный веб-сайт или его зеркало
2. Щелкнуть на элемент регистрации
3. Ввести необходимые сведения
4. Активировать почтовую почту
5. Осуществить первый логин
Вознаграждение за регистрацию
Начинающие приобретают внушительный вступительный презент. Подобное награда может включать:
– Монетарные средства
– Безвозмездные фриспины
– Повышенный уровень возврата
Авторизация в персональный аккаунт
Существующие клиенты способны оперативно получить доступ в собственный аккаунт, эксплуатируя имя пользователя и код. Личный кабинет обеспечивает возможность к:
– Администрированию средствами
– Хронологии платежей
– Текущим бонусам
– Параметрам аккаунта
Вознаграждения и акции
Сайт периодически реализует всевозможные промо-кампании для участников.
Разновидности поощрений
Основные виды поощрений:
– Финансовые подарки – коэффициент от величины пополнения
– Бесплатные вращения – безвозмездные прокруты в аппаратах
– Кэшбек – отдача процента потерянных финансов
– Призовые награды – призы за состязание в турнирах
Ваучеры
Уникальные коды дают возможность получить дополнительные преимущества. Пользователи могут отыскать их на специализированных площадках или взять в письмах.
Портативная версия и app
Актуальные клиенты выбирают переносной геймплей.
Характеристики портативной платформы
– Адаптивный облик для всех гаджетов
– Абсолютный возможность к автоматам
– Оперативная загрузка
– Практичное контроль
Загрузить приложение
Переносное софт предложено для загрузки на аппараты с рабочими платформами Android и iOS. Софт обеспечивает:
– Стабильную работу
– Пуш алерты о бонусах
– Быстрый путь к предпочитаемым слотам
Азартный ассортимент
Платформа дает огромную подборку игровых игр.
Игровые машины
Коллекция развлекательных слотов включает:
– Стандартные автоматы
– Видео игры
– Призовые игры
– Тематические автоматы
Live казино
Область живых развлечений дает право соревноваться с живыми ведущими. Представлены:
– Европейская рулетка
– Очко
– Баккара
– Карибский покер
Состязания
Систематические чемпионаты дают возможность пользователям состязаться за значительные наградные суммы. Турнирная система актуализируется постоянно.
Финансовые операции
Сайт предлагает разнообразие способов пополнения и получения финансов:
– Банковские карточки
– Виртуальные счета
– Wire трансферы
– Криптовалюты
Любые платежи выполняются защищенно с использованием современных систем защиты.
Отдел помощи
Квалифицированная группа саппорта функционирует без перерыва. Связаться с менеджерами доступно через:
– Online чат
– Email почту
– Телефонную линию
– Social платформы
Секьюрити и регулирование
Портал действует на фундаменте законной сертификата. Это подтверждает:
– Легальность развлекательного процесса
– Сохранность личных сведений
– Быстрые перечисления
– Регулируемый игровой процесс
Заключение
Главный ресурс и его актуальные резервные страницы обеспечивают игрокам полный спектр возможностей для приятной и профитной досуга. Внушительные призы, различные слоты, опытная поддержка и безопасная структура выплат превращают казино лучшим вариантом для фанатов развлекательных игр.
https://cassiteleri.top/# casino siteleri
trailstone info page – Simple structure, navigation is straightforward and fast.
Go directly to our website
смотреть здесь водка бет
Stone Market – Found this page casually, everything is well structured and intuitive.
Подключение к сайту через проверенные зеркала
Актуальные сетевые казино гарантируют игрокам круглосуточный переход к сервисам. Официальный сайт http://basicauthorization.s1009.xrea.com/x/wp/2026/03/02/strategiya-privlecheniya-i-uderzhaniya-igrokov-dlya-onlayn-kazino-v-2025-godu-moy-lichnyy-opyt-na-vc-ru функционирует устойчиво, гарантируя большой спектр развлекательных автоматов. Впрочем временами возникают системные препятствия или блокировки, поэтому существенно понимать о существовании действующих зеркал.
Что собой представляет из себя основное зеркало казино
Дубликат — это абсолютная дубликат главного ресурса с схожим интерфейсом. Функционирующее зеркало сегодня даёт возможность преодолевать территориальные барьеры и вести игру.
Принципиальные достоинства задействования зеркал:
– Стопроцентный переход к индивидуальному кабинету
– Удержание совокупных данных счёта
– Схожий набор игр
– Свежие привилегии и акции
Создание аккаунта на сайте
Процесс оформления занимает считанные минут. Недавние геймеры обретают привлекательный подарок за запись, что имеет возможность содержать:
– Приветственный денежный подарок
– Безвозмездные спины для игр
– Специальные ваучеры
– Усиленный компенсацию
Ради выполнения регистрации нужно:
1. Переместиться на основной веб-сайт или дубликат
2. Кликнуть кнопку «Создать аккаунт»
3. Ввести индивидуальные информацию
4. Заверить мейл или мобильный
5. Применить купон (если есть наличии)
Вход в индивидуальный кабинет
После правильной записи клиенты способны совершать подключение через основной веб-сайт или действующее зеркало. Личный кабинет открывает абсолютный надзор над аккаунтом:
– Архив игр
– Внесение кошелька
– Снятие выигрышей
– Регулирование наградами
– Присутствие в турнирах
Поощрения и промо казино
Ресурс балует геймеров вариативными наградными схемами:
Приветственные подарки
Новые игроки зарабатывают богатый пакет поощрений на начальные вклады. Как правило это охватывает долевую прибавку к объёму пополнения плюс бесплатные кручения.
Регулярные промо
– Еженедельный возврат до 15%
– Турниры с призовыми суммами
– Поощрения на число рождения
– Уникальные программы для элитных клиентов
План вознаграждения
Постоянные игроки собирают баллы, которые допустимо конвертировать на подлинные средства или эксклюзивные льготы.
Карманная вариант и утилита
Современные инновации позволяют участвовать везде подходяще. Мобильная версия портала автоматически настраивается под экран любого аппарата.
Выгоды смартфонного приложения:
– Моментальная загрузка развлечений
– Эргономичный вид
– Мгновенные-сообщения о предложениях
– Шанс установить для Android и iOS
Настоящее казино: среда реального игорного дома
Область Live игорного дома транспортирует геймеров в антураж реального игорного заведения. Опытные дилеры управляют процесс в виде подлинного времени.
Доступные столы:
– Колесо фортуны
– Двадцать одно
– Классика
– Покерная игра
Автоматы и гемблинг машины
Каталог игровых аппаратов насчитывает тысячи вариантов от передовых провайдеров. Произвольный геймер отыщет развлечение по желанию:
– Классические машины
– Современные автоматы с специальными этапами
– Джекпот-игры
– Многолинейные машины
Состязания и акции
Регулярные соревнования включают адреналин и обеспечивают шанс получить значительные вознаграждения. Присутствие в конкурсах зачастую комплиментарное, а выигрышные фонды составляют внушительных величин.
Охрана и конфиденциальность
Портал задействует актуальные технологии защиты для защиты информации игроков. Каждые денежные процедуры проходят через защищённые линии.
Вывод
Центральный портал и его функционирующие зеркала дают надёжный доступ к качественным гемблинг играм. Богатые призы, комфортная карманная форма, разнообразие автоматов и компетентное Live-клуб создают сайт прекрасным выбором для поклонников игровых автоматов.
Главная vodka bet casino
успешные seo кейсы санкт петербург успешные seo кейсы санкт петербург .
Переход к ресурсу через рабочие зеркала
Участники онлайн казино регулярно встречаются с вопросом закрытия основного домена. Конкретно для устранения этой проблемы существуют дубликаты легального ресурса. https://www.besesaka.com.au/platezhnye-sistemy-sposoby-platezhey-v-kazino-2026/ гарантирует абсолютный подключение ко всем опциям казино.
Что такое функционирующее зеркало казино
Альтернативный адрес значит собой абсолютную дубликат оригинального ресурса с похожим функционалом. Единственное расхождение — это доменное имя. Каждые параметры клиента, вместе с счет, привилегии и историю игр, находятся такими же.
Преимущества применения зеркал
Действующие зеркала обладают рядом важных выгод:
– Круглосуточный вход к предпочитаемым играм
– Абсолютная сохранность личных параметров
– Неизменность всех настроек пользовательского кабинета
– Опция обретения призов и вовлечения в акциях
Регистрация на официальном ресурсе
Процесс регистрации максимально несложен и занимает буквально минут. Свежие клиенты в состоянии надеяться на солидный приветственный подарок за открытие счета.
Стадии открытия аккаунта
1. Переход на основной домен или его копию
2. Клик на клавишу “Регистрация”
3. Ввод обязательных сведений
4. Проверка email почты
5. Применение купона (если имеется)
Награды и кампании для клиентов
Игровая площадка радует своих клиентов различными наградными предложениями.
Основные категории бонусов
Вводный пакет — щедрое премирование для недавних участников, которое может содержать материальные средства и free spins.
Free spins — опция крутить в топовых автоматах без затрат.
Компенсация — процентный компенсация утраченных средств, который зачисляется еженедельно или раз в месяц.
Специальные коды — специальные сочетания, гарантирующие дополнительные выгоды.
Индивидуальный кабинет: опции и настройки
Пользовательский аккаунт гарантирует исчерпывающий контроль над персональным процессом. Тут предусмотрены:
– Регулирование депозитом
– История платежей
– Текущие бонусы
– Настройки безопасности
– Валидация счета
Мобильная версия и приложение
Нынешние игроки ценят доступность. Платформа предлагает 2 способа для ставок с портативных устройств.
Приспособленная портативная версия
Мобильная вариант ресурса самостоятельно приспосабливается под экран любого девайса. Не нужно инсталлировать отдельное приложение.
Программа для телефонов
Можно инсталлировать специальное софт для iOS и Android. Софт гарантирует:
– Быстрый доступ
– Оптимизированный интерфейс
– Оперативные-сообщения о предложениях
– Бесперебойную функциональность
Live казино: антураж подлинного игорного заведения
Зона Live развлечений переносит клиентов в атмосферу настоящего клуба. Компетентные крупье ведут партии в режиме живого времени.
Известные Live-форматы
– Американская рулетка
– Блэкджек
– Баккара
– Покер
Автоматы: многообразие развлечений
Собрание развлекательных аппаратов насчитывает сотни названий от ведущих провайдеров. Игроки откроют:
– Обычные аппараты
– Видеослоты
– Джекпот-машины
– Megaways
Турниры и эксклюзивные предложения
Систематические соревнования дают возможность участникам состязаться друг с другом за крупные денежные суммы. Любой конкурс обладает свои правила присутствия и доску лидеров.
Способы ввода и снятия финансов
Ресурс обслуживает ряд платежных систем:
– Банковские картыы
– Цифровые сервисы
– Криптовалюты
– Wire отправления
Все платежи осуществляются защищенно благодаря новейшим протоколам криптографии.
Сервис поддержки
Профессиональные сотрудники команды помощи расположены помочь 24/7. Доступны нижеперечисленные пути контакта:
– Оперативный-чат
– Email-поддержка
– Голосовая горячая линия
– Публичные сети
Резюме
Основной портал платформы и его рабочие копии обеспечивают участникам конфиденциальный и приятный переход к обширному ассортименту игровых активностей. Щедрые поощрения, регулярные предложения, качественная служба и простые платежные системы делают развлекательный досуг максимально комфортным и прибыльным.
seo топ 10 seo-prodvizhenie-reiting.ru .
содержание Топ товары для вас!
Great goods from you, man. I’ve remember your stuff prior to and you are just extremely wonderful.
I really like what you’ve obtained right here, certainly like what you’re stating and the way in which in which you assert it.
You’re making it entertaining and you still care for to keep it smart.
I can not wait to read much more from you. This is actually a terrific web site.
Have a look at my blog post – 강남텐프로
b2
агентство seo агентство seo .
Hi, yeah this post is genuinely nice and I have learned lot of things from it regarding blogging.
thanks.
Also visit my homepage – Team 400 AI
Передовые онлайн-казино обеспечивают игрокам обширный ассортимент игр и заманчивые награды. Тем не менее для комфортной деятельности критично осознавать, как получить доступ к казино Килограмм казино и его рабочие зеркала.
Что такое главный портал казино
Официальный портал казино — это основная система, где игроки могут наслаждаться гемблинг слотами. Портал функционирует на законных основаниях и располагает всеми обязательными лицензиями.
Ключевые выгоды основного сайта:
– Безопасность пользовательских информации
– Справедливые требования участия
– Подтвержденные платежи
– Оперативная техподдержка
Рабочее зеркало казино: для чего нужно
Зеркало — это точная дубликат основного веб-сайта, размещенная по другому URL. Действующее зеркало разрабатывается для обеспечения постоянного входа к сайту.
Причины применения альтернативных адресов:
– Ограничение первичного домена
– Технические операции
– Значительная загрузка на ресурс
Как отыскать актуальное зеркало на сегодня
Получить текущее проверенное зеркало можно множественными путями:
1. Email-уведомления — подпишитесь на почтовую подписку
2. Команда support — напишите в онлайн-чат
3. Официальные сети — следите за постами
4. Партнерские порталы — проверенные сайты
Регистрация на портале казино
Процесс регистрации занимает только пару мгновений:
1. Активируйте на кнопку “Открыть счет”
2. Укажите обязательные информацию
3. Подтвердите почтовую почту
4. Введите купон, если имеется
По завершении финализированной создания аккаунта вам будет доступен индивидуальный раздел.
Бонусы и купоны
Щедрая поощрительная структура — важное конкурентное преимущество казино:
Бонус за открытие счета
Первичные участники обретают первый презент, который может предполагать:
– Финансовый кредит на начальный пополнение
– Фри-спины для барабанов
– Бездепозитные деньги
Активационные коды
Регулярно размещаются новые бонусные шифры, обеспечивающие получить особые преимущества.
Схема возврата средств
Лояльные участники возвращают долю утраченных денег назад.
Текущие промо и турниры
Платформа периодически устраивает азартные события:
– Еженедельные соревнования
– Праздничные промо
– Розыгрыши солидных подарков
– Механизм статусов
Доступ в индивидуальный раздел
Для логина на портал нужно:
1. Посетить официальный сайт или действующее зеркало
2. Кликнуть “Вход”
3. Ввести имя пользователя и код доступа
В пользовательском профиле предоставлены данные функции:
– Зачисление баланса
– Вывод денег
– Проверка истории игр
– Управление индивидуальными данными
Адаптивная версия и app
Mobile версия
Оптимизированная вариант веб-сайта обеспечивает делать ставки с всех смартфонного гаджета. Интерфейс самостоятельно настраивается под размер дисплея.
Клиент для загрузки
Установить клиент можно для:
– Android — официальная загрузка с сайта
– iOS — установка через App Store
Преимущества мобильного клиента:
– Мгновенный вход
– Бесперебойная производительность
– Push-нотификации об акциях
– Улучшенный UI
Игровые зоны
Слоты
Разнообразная библиотека азартных барабанов от известных поставщиков:
– Ретро автоматы
– Современные-эмуляторы
– Призовые-слоты
Live игры
Зона с реальными дилерами предлагает:
– Рулетки
– Двадцать одно
– Baccarat
– Texas Hold’em
Эфиры транслируются в HD формате, создавая ощущение настоящего казино.
Способы внесения средств и снятия
Сайт работает с разнообразные денежные инструменты:
– Платежные средства
– Электронные кошельки
– Crypto
– Банковские транзакции
Минимальные значения пополнения и скоростные выплаты делают игру исключительно комфортной.
Служба support
Компетентная отдел ассистентов функционирует 24/7 и может содействовать с всеми проблемами:
– Онлайн-чат
– Email-консультации
– Звонковая горячая линия
Итоги
Главный сайт казино и его функционирующие дубликаты дают игрокам безопасный и увлекательный развлекательный опыт. Выгодные подарки, удобная адаптивная платформа, обширные автоматы и высокоуровневое live-казино делают эту систему отличным выбором для гемблинг времяпрепровождения.
Brook Treasures – Came across this page randomly, reading flows nicely and layout is intuitive.
Актуальные интернет казино дают пользователям огромный спектр вариантов для комфортной игры. Но иногда вход к базовому порталу может стать ограниченным. В таких обстоятельствах на поддержку появляется casino Fontan, которое обеспечивает стабильный вход ко всем возможностям платформы.
Что такое рабочее зеркало казино
Зеркало — это абсолютная версия официального ресурса, которая хостится по дополнительному URL. Дубликат содержит целый набор функций главного веб-портала, включая пользовательский кабинет, баланс и запись переводов.
Принципиальные преимущества эксплуатации зеркала:
– Постоянный соединение к ресурсу
– Полная идентичность инструментов
– Сохранность личных сведений
– Хранение всех имеющихся вознаграждений
Как отыскать функционирующее зеркало сегодня
Существует ряд достоверных методов нахождения актуальной ссылочной информации:
Официальные каналы:
1. Email рассылка — управление постоянно высылает информацию с свежими адресами
2. Социальные сети — авторизованные каналы постят актуальную новости
3. Сервис поддержки — специалисты дают проверенные адреса
4. Портативное приложение — обеспечивает минуть блокировки
Открытие счета на основном веб-сайте
Операция регистрации требует только несколько минут и содержит из следующих этапов:
1. Вход на официальный сайт или актуальное зеркало
2. Выбор на иконку «Зарегистрироваться»
3. Указание регистрационной бланка
4. Валидация имейл почты или мобильного номера
5. Применение бонуса за регистрацию при наличии промокода
Свежие клиенты получают солидный стартовый приз, который может охватывать бесплатные вращения, денежные поощрения или кэшбек.
Доступ в пользовательский кабинет
Вход на ресурсе реализуется привычным образом. Необходимо указать никнейм и секретный ключ, использованные при открытии счета.
Существенные аспекты для конфиденциального входа:
– Задействуйте защищенный пароль
– Включите двухфакторную верификацию
– Не храните коды на общественных девайсах
– Проверяйте интернет строку браузера
Характеристика наградной схемы
Казино балует геймеров многочисленными вознаграждениями и специальными предложениями:
Вступительный пакет
Дебютанты способны рассчитывать на щедрое вознаграждение за начальный депозит. Традиционно это пропорциональная добавка к зачисленной объему плюс фриспины для известных слотов.
Периодические промо
– Недельный кэшбек — возврат части утраченных денег
– Поощрения на повторные вклады
– Уникальные акции по событиям
– Турниры с большими премиальными банками
Схема вознаграждений
Постоянные геймеры зарабатывают единицы за любую раунд, которые затем превращаются на реальные финансы, даровые прокруты или эксклюзивные льготы.
Купоны: как использовать
Купоны — это индивидуальные наборы литер, обеспечивающие возможность к специальным бонусам.
Где получить действующие промокоды:
– Легитимные коммуникационные сети казино
– Партнерские порталы
– Email-новостная лента
– Отраслевые платформы
Прописывается промокод в предназначенное поле при регистрации или добавлении денег баланса.
Портативная версия и приложение
Передовые геймеры отдают предпочтение проводить время с портативных девайсов. Платформа предлагает пару метода для комфортной портативной игры.
Мобильная версия
Онлайн версия автоматически адаптируется под габариты экрана. Не нуждается загрузки и действует в произвольном свежем браузере.
Мобильное приложение
Установить app можно для устройств на Android и iOS. Преимущества app:
– Скоростная загрузка
– Бесперебойная операция
– Push-уведомления о поощрениях
– Автономный избегание блокировок
Этап инсталляции несложен: нужно открыть на веб-сайт с смартфонного гаджета и следовать инструкциям.
Гемблинг выбор
Библиотека аппаратов насчитывает множество позиций от топовых разработчиков.
Слоты
Азартные автоматы — наиболее востребованная раздел забав. Доступны традиционные простые автоматы, современные видеослоты с дополнительными стадиями, а также джекпотные призы.
Live казино
Раздел с живыми ведущими позволяет прочувствовать атмосферу настоящего казино. Представлены развлечения с рулеткой.
Передача ведется в HD формате, обеспечивается общение с раздающим и остальными геймерами.
Турниры
Регулярно запускаются соревнования по разным дисциплинам. Участие позволяет получить монетарные награды, даровые прокруты или особые презенты.
Финансовые действия
Сайт предлагает обширный спектр расчетных инструментов:
– Дебетовые карты
– Цифровые сервисы
– Биткоин
– Банковские транзакты
Стартовая величина вклада — посильная для основной части клиентов. Обналичивание средств осуществляется в скорые временные рамки.
Отдел поддержки
Опытные специалисты расположены помочь круглосуточно. Имеются следующие варианты общения:
– Интернет-чат
– Email
– Голосовая линия
– Социальные сети
Пояснения на частые проблемы можно обнаружить в разделе FAQ.
Вывод
Главный портал казино и его функционирующие зеркала дают пользователям абсолютный вход ко всем функциям сайта. Солидные вознаграждения, комфортная смартфонная версия, огромный коллекция аттракционов и профессиональная поддержка создают гемблинг опыт предельно удобным и безопасным.
https://cassiteleri.buzz/# casino siteleri
Современные онлайн-казино предлагают пользователям множество возможностей для приятной игры. Основной портал Zooma казино обеспечивает путь ко всем функциям и игровым автоматам. Однако при наличии системных неполадок на выручку спешат актуальные зеркала.
Что означает собой рабочее зеркало
Копия казино — это полная реплика главного портала, размещенная по другому доменному имени. Подлинное зеркало сохраняет все возможности, вместе с регистрацию, вход в собственный кабинет, бонусы и кодовые слова.
Дубликат на сегодня обеспечивает:
– Стабильный доступ к азартным автоматам
– Абсолютную защиту личных сведений
– Удержание баланса и записей операций
– Применимость всех промо-предложений
Открытие профиля на главном портале
Процесс регистрации требует пару минут. Новым игрокам необходимо:
1. Зайти на официальный сайт или актуальное зеркало
2. Выбрать кнопку «Регистрация»
3. Заполнить требуемые графы
4. Активировать электронную почту
5. Применить купон при наличии
После финиша оформления профиля игроки обретают вознаграждение за регистрацию, который может иметь бесплатные вращения или финансовое поощрение.
Вход в персональный кабинет
Личный кабинет дает полный мониторинг над азартным ходом. Через индивидуальный аккаунт можно:
– Депонировать депозит
– Снимать выплаты
– Задействовать промокоды
– Контролировать журнал игр
– Играть в турнирах
– Забирать cash back
Анализ вознаграждений и акций
Богатая бонусная программа — значимое козырь платформы. Основные типы вознаграждений:
Начальный подарок
Начинающие получают щедрое награду на первые взносы. Величина бонуса может доходить до 100-200% от размера взноса.
Бесплатные вращения
Халявные раунды предоставляются для востребованных слотов. Объем free spins разнится от 10 до 500 штук.
Кэшбек
Регулярный или ежемесячный возврат процента утраченных финансов. Типичный объем кэшбека — 5-15%.
Конкурсы
Постоянные состязания с крупными наградными фондами. Участники борются за топовые строчки в рейтинге.
Мобильная версия и приложуха
Адаптивная версия позволяет играть с каждого устройства. Игроки могут скачать программу для iOS и Android или применять веб версию.
Плюсы мобильного программы:
– Скоростная загрузка автоматов
– Комфортный дизайн
– Пуш-нотификации о промо
– Возможность входа через Face ID
Машины и Live казино
Игровая коллекция содержит тысячи названий от ведущих разработчиков.
Популярные категории игр:
– Стандартные машины
– Видео-автоматы с бонусными раундами
– Накопительный приз слоты
– Megaways машины
Live игровой зал
Раздел live казино обеспечивает развлечение с живыми крупье. Есть стандартные игры:
– Французская рулетка
– Blackjack
– Баккара
– Покер
Как найти функционирующее зеркало
Найти актуальную линк на зеркало можно несколькими способами:
1. Зарегистрироваться на почтовую рассылку
2. Отслеживать за обновлениями в социальных сетях
3. Написать в сервис поддержки
4. Добавить в закладки действующее зеркало в закладки
Вывод
Лицензионный портал и его функционирующие дубликаты предоставляют стабильный доступ к азартным играм. Великодушные премии, многочисленные промокоды, удобное портативное софт и высококлассная техподдержка поддержки создают азартный геймплей в высшей степени приятным и безопасным.
bs2best ссылка
mexican pharmacy prices online
visit their site – Layout is simple, reading and navigating is smooth.
Нынешние онлайн-казино гарантируют геймерам широкий спектр возможностей для удобной игры. Подключение к платформе https://www.sunrise-country.gr/ реализуется через основной домен или функционирующее зеркало.
Что такое рабочее зеркало казино
Функционирующее зеркало — это резервный адрес основного сайта казино. Такие клоны формируются для обеспечения стабильного доступа к игровой платформе.
Зеркало сегодня совершенно копирует характеристики базового портала. Клиенты обретают идентичный выход ко всем услугам, включая регистрацию, финансирование счета и обналичивание денег.
Создание аккаунта на основном портале
Алгоритм открытия профиля требует всего буквально моментов. Начинающим игрокам необходимо:
1. Войти на лицензионный ресурс или текущее проверенное зеркало
2. Щелкнуть кнопку “Создать аккаунт”
3. Заполнить обязательные сведения
4. Активировать почтовую почту
5. Активировать купон при наличии
После финализации оформления участник приобретает бонус за регистрацию, который имеет право предполагать даровые спины или монетарное премию.
Доступ в индивидуальный кабинет
Пользовательский кабинет — это закрытая область, где клиенты вправе администрировать своим аккаунтом. Для доступа следует ввести никнейм и пароль.
В индивидуальном кабинете доступны такие опции:
– Проверка журнала операций
– Применение промокодов
– Настройка поощрениями
– Участие в турнирах
– Проверка возврата средств
– Редактирование данных
Призы и промо
Азартная система обеспечивает великодушные вознаграждения:
Стартовый бонус — дебютанты зарабатывают крупное поощрение на дебютные вклады.
Бесплатные вращения — начисляются как при открытии счета, так и в ходе различных кампаний.
Кэшбек — постоянный возврат фрагмента утраченных финансов.
Купоны — специальные последовательности, обеспечивающие выход к эксклюзивным бонусам.
Анализ игровых направлений
Слоты
Ассортимент слотов охватывает сотни вариантов от передовых поставщиков. Клиенты откроют как обычные аппараты, так и актуальные 3D-слоты с притягательной графикой.
Live казино
Секция Live казино предлагает право развлекаться с действующими крупье в режиме настоящего времени. Доступны востребованные варианты: рулетка, блэкджек, баккара, покер.
Турниры
Регулярные чемпионаты с значительными выигрышными фондами манят массу игроков. Лидеры зарабатывают cash награды и эксклюзивные премии.
Портативная версия и программа
Телефонная версия платформы дает возможность наслаждаться с всякого девайса. Оформление независимо подстраивается под габариты экрана.
Получить app можно для гаджетов на Android и iOS. Смартфонное программа обладает всеми возможностями десктопной версии.
Как определить рабочее зеркало на текущий день
Действующие ссылки копий систематически корректируются. Обнаружить действующую URL можно несколькими способами:
– Через сервис помощи
– В официальных коммуникационных сетях
– По почтовой newsletter
– На партнерских порталах
Надежность и легальность
Лицензионный портал действует на базе мировой сертификата. Все операции оберегаются современными методами защиты.
Конфиденциальность пользовательских данных поддерживается в полном формате.
Итог
Официальный домен и его функционирующие копии обеспечивают игрокам 24/7 доступ к превосходным игровым услугам. Великодушные бонусы, всевозможные развлечения, компетентная помощь — все это превращает развлекательный опыт невероятно беспроблемным и притягательным.
Обзор главного портала
Передовое онлайн-казино дарит своим игрокам большой выбор возможностей и поощрений. Главный веб-сайт http://www.campomarket.cl/kak-funktsioniruet-skhema-popolneniya-schetov-onlayn-kazino-s-pomoshchyu-sberbanka действует постоянно, давая вход к популярным играм, live-казино и обширным предложениям.
Функционирующее зеркало: путь к порталу
Что такое зеркало казино
Зеркало означает собой полную реплику официального веб-сайта с другим доменным именем. Актуальное зеркало позволяет пользователям обходить барьеры и сохранять непрерывный доступ к выбранным автоматам.
Как найти рабочее зеркало сегодня
Свежие URL на официальное зеркало выкладываются через:
– Электронную рассылку
– Проверенные публичные сети
– Службу помощи
– Партнерские порталы
Оформление на портале
Ход открытиясчета
Открытиесчета длится пару минут и предполагает такие стадии:
1. Доступ на основной портал или рабочее зеркало
2. Активация элемента “Регистрация”
3. Указание контактных данных
4. Активация аккаунта или мобильного
5. Установка секретнойкомбинации
Бонус за оформление
Начинающие клиенты обретают большие приветственные бонусы:
– Бонусные депозиты на баланс
– Freespins для слотов
– Увеличенный коэффициент компенсации
– Эксклюзивные ваучеры
Вход в личный аккаунт
Постоянные игроки вправе осуществить авторизацию через основной портал или текущее зеркало. Для этого требуется внести никнейм и ключдоступа, сформированные при созданииаккаунта.
Возможности собственного аккаунта
В индивидуальном аккаунте открыты такие инструменты:
– Контроль контактными информацией
– Пополнение счета
– Обналичивание денег
– Использование промокодов
– Отслеживание архива операций
– Вступление в состязаниях
Бонусы и кампании
Разновидности подарков
Казино радует своих участников многочисленными наградными акциями:
– Вступительный комплект — солидные бонусы на первые вклады
– Фриспины — дополнительные прокруты в известных слотах
– Возврат — регулярный откат части проигрышей
– Программа лояльности — уникальные льготы для активных клиентов
Коды и их использование
Специальные коды гарантируют бонусные подарки. Для ввода требуется набрать шифр в определенное раздел в персональном разделе.
Геймплейный выбор
Слоты
Коллекция слотовых автоматов вмещает массу наименований от топовых производителей:
– Обычные автоматы
– Видео автоматы
– Накопительные симуляторы
– Брендовые слоты
Live казино
Область Live-казино обеспечивает игру с профессиональными дилерами в формате реального времени:
– Французскаярулетка
– Blackjack
– PuntoBanco
– Карибскийпокер
Турниры
Постоянные конкурсы с солидными призовыми суммами организуются постоянно. Соревнующиеся соревнуются за лидерство в турнирнойсетке.
Портативная версия и софт
Адаптивная версия веб-сайта
Главный веб-сайт полностью приспособлен для мобильных девайсов. Участники способны пользоваться автоматы напрямую через браузер без обязательства загрузки.
Приложение для скачивания
Официальное мобильное приложение предоставляется для получения на гаджеты с операционными ОС Android и iOS. Приложение обеспечивает:
– Оперативный вход к слотам
– Бесперебойную операционность
– Мгновенные-сообщения о бонусах
– Простой дизайн
Заключение
Основной ресурс казино и его действующие альтернативы гарантируют участникам абсолютный вход к отличным игровым играм. Щедрые бонусы, всевозможные акции, простая адаптивная платформа и опытная сервис создают геймплейный опыт предельно приятным и доходным.
узнать больше Здесь
В Грузии каждый момент ценен!
сколько стоит установка унитаза
https://vdcasino1st.online/# vdcasino
Обзор официального веб-сайта
Передовое онлайн-казино обеспечивает своим пользователям широкий набор возможностей и бонусов. Официальный портал андроид действует постоянно, гарантируя вход к известным автоматам, live-казино и многим предложениям.
Рабочее зеркало: вход к ресурсу
Что такое копия казино
Копия означает собой абсолютную реплику официального сайта с альтернативным интернет названием. Рабочее зеркало обеспечивает игрокам обходить запреты и иметь надежный подключение к предпочитаемым играм.
Как отыскать рабочее зеркало сегодня
Актуальные ссылки на официальное зеркало появляются через:
– E-mail подписку
– Проверенные социальные сети
– Отдел сопровождения
– Affiliated ресурсы
Открытиесчета на ресурсе
Ход созданияаккаунта
Созданиеаккаунта длится буквально минут и включает такие стадии:
1. Вход на основной веб-сайт или действующее зеркало
2. Нажатие кнопки “Создатьаккаунт”
3. Ввод личных данных
4. Верификация адреса или номера
5. Придумывание ключа
Подарок за созданиеаккаунта
Первые игроки зарабатывают солидные стартовые поощрения:
– Бонусные депозиты на кошелек
– Freespins для слотов
– Повышенный размер кешбэка
– Эксклюзивные купоны
Авторизация в собственный аккаунт
Зарегистрированные клиенты вправе произвести авторизацию через оригинальный сайт или текущее зеркало. Для этого необходимо внести никнейм и секретнуюкомбинацию, установленные при регистрации.
Функции индивидуального профиля
В персональном разделе имеются данные функции:
– Изменение персональными реквизитами
– Пополнение счета
– Обналичивание денег
– Ввод бонусов
– Мониторинг архива игр
– Включение в турнирах
Вознаграждения и кампании
Категории бонусов
Казино поощряет своих участников различными бонусными акциями:
– Приветственный набор — выгодные подарки на первые взносы
– Халявныеспины — дополнительные спины в известных симуляторах
– Кешбэк — систематический возмещение доли проигрышей
– Программа лояльности — особые привилегии для регулярных клиентов
Купоны и их использование
Особые промокоды обеспечивают дополнительные вознаграждения. Для использования следует указать комбинацию в специальное поле в личном разделе.
Азартный каталог
Игры
Коллекция слотовых слотов вмещает массу вариантов от ведущих поставщиков:
– Классические машины
– Видео слоты
– Призовые слоты
– Брендовые автоматы
Live казино
Раздел Live-казино предоставляет взаимодействие с профессиональными операторами в формате реального времени:
– Французскаярулетка
– Двадцатьодно
– Baccarat
– Карибскийпокер
Конкурсы
Систематические соревнования с солидными призовыми суммами организуются регулярно. Участники конкурируют за победу в списке.
Смартфонная адаптация и APP
Смартфонная адаптация портала
Оригинальный веб-сайт абсолютно оптимизирован для портативных аппаратов. Пользователи вправе запускать слоты прямо через интернет-браузер без обязательства загрузки.
Софт для установки
Специальное смартфонное приложение предоставляется для загрузки на гаджеты с базовыми системами Android и iOS. APP обеспечивает:
– Моментальный вход к слотам
– Бесперебойную функциональность
– Моментальные-уведомления о предложениях
– Удобный интерфейс
Вывод
Основной веб-сайт казино и его действующие дубликаты дают участникам абсолютный доступ к первоклассным игровым развлечениям. Большие бонусы, многочисленные предложения, функциональная мобильная адаптация и опытная служба создают игровой процесс крайне удобным и прибыльным.
Современные онлайн-казино гарантируют пользователям разнообразный выбор возможностей для приятной игры. Переход к площадке Million казино выполняется через официальный домен или функционирующее зеркало.
Что такое рабочее зеркало казино
Действующее зеркало — это альтернативный домен основного ресурса казино. Такие дубликаты создаются для обеспечения постоянного входа к игровой площадке.
Зеркало актуальное совершенно дублирует функционал официального сайта. Геймеры имеют аналогичный доступ ко всем возможностям, включая регистрацию, пополнение счета и вывод средств.
Оформление профиля на основном ресурсе
Алгоритм регистрации требует всего пару минут. Начинающим клиентам следует:
1. Зайти на лицензионный сайт или рабочее официальное зеркало
2. Выбрать кнопку “Зарегистрироваться”
3. Внести нужные сведения
4. Верифицировать e-mail почту
5. Ввести промокод при доступности
После окончания регистрации пользователь зарабатывает вознаграждение за регистрацию, который вправе охватывать free spins или cash начисление.
Логин в собственный кабинет
Персональный кабинет — это закрытая территория, где участники способны управлять своим учетной записью. Для авторизации нужно напечатать username и пароль.
В индивидуальном кабинете представлены нижеперечисленные инструменты:
– Мониторинг хронологии платежей
– Использование промокодов
– Регулирование поощрениями
– Присоединение в состязаниях
– Отслеживание возмещения
– Редактирование данных
Вознаграждения и спецпредложения
Развлекательная система предоставляет привлекательные призы:
Регистрационный набор — начинающие приобретают существенное вознаграждение на первые пополнения.
Free spins — выдаются как при создании аккаунта, так и в процессе различных мероприятий.
Кэшбэк — систематический возмещение части израсходованных финансов.
Купоны — эксклюзивные коды, дающие право к эксклюзивным предложениям.
Обзор развлекательных категорий
Slots
Коллекция аппаратов содержит множество игр от передовых производителей. Пользователи откроют как традиционные автоматы, так и инновационные видеослоты с увлекательной оформлением.
Live казино
Категория Live казино предлагает шанс развлекаться с живыми ведущими в состоянии реального времени. Доступны известные варианты: рулетка, блэкджек, баккара, покер.
Турниры
Систематические чемпионаты с значительными призовыми пулами привлекают тысячи конкурсантов. Чемпионы обретают cash награды и специальные премии.
Телефонная версия и софт
Адаптивная версия сайта предоставляет право развлекаться с любого аппарата. Структура самостоятельно подстраивается под диагональ экрана.
Скачать софт можно для аппаратов на Android и iOS. Смартфонное ПО обладает всеми характеристиками настольной версии.
Как найти действующее зеркало на сегодня
Рабочие ссылки копий регулярно меняются. Найти актуальную ссылку можно разными методами:
– Через департамент помощи
– В официальных коммуникационных сетях
– По электронной подписке
– На тематических площадках
Охрана и сертификация
Официальный домен функционирует на фундаменте зарубежной разрешения. Все транзакции защищены современными системами шифрования.
Секретность пользовательских информации сохраняется в полном масштабе.
Резюме
Основной сайт и его функционирующие зеркала предоставляют игрокам беспрерывный выход к превосходным игровым сервисам. Привлекательные вознаграждения, разнообразные развлечения, компетентная служба — все это делает азартный досуг чрезвычайно удобным и притягательным.
visit their page – Pages are well-arranged, browsing feels smooth and intuitive.
güvenilir casino siteleri: lisanslı casino siteleri
Подробнее здесь Моменты счастья в РБ.
Характеристика главного сайта
Прогрессивные сетевые казино предлагают клиентам широкий спектр развлечений и шансов. Официальный сайт https://bilbotax.com/v-2026-godu-rossiyane-smogut-rasplachivatsya-v-egipte-razlichnymi-sposobami-top-8-metodov-kakie-karty-deystvuyut-v-etoy-strane-informatsiya-o-puteshestviyakh-na-dtf предоставляет безопасный вход к игровым возможностям.
Действующее зеркало: доступ в настоящий момент
Дублирующий портал служит собой полную дубликат основного портала. Проверенное зеркало позволяет игрокам миновать возможные блокировки.
Плюсы применения зеркала
Принципиальные плюсы содержат:
– Беспрерывный вход к порталу
– Поддержание абсолютно всех возможностей базового веб-сайта
– Защита личных информации
– Равнозначный набор функций
Создание аккаунта на платформе
Ход создания аккаунта выделяется легкостью и практичностью. Начинающие пользователи должны:
1. Перейти на основной сайт или его зеркало
2. Выбрать на элемент открытия счета
3. Внести требуемые информацию
4. Активировать почтовую ящик
5. Произвести стартовый доступ
Вознаграждение за оформление
Начинающие приобретают внушительный вступительный подарок. Это поощрение способно охватывать:
– Монетарные бонусы
– Даровые прокруты
– Повышенный уровень компенсации
Логин в персональный профиль
Зарегистрированные пользователи способны мгновенно получить доступ в свой аккаунт, используя имя пользователя и пароль. Собственный раздел обеспечивает доступ к:
– Регулированию средствами
– Истории операций
– Текущим призам
– Параметрам профиля
Подарки и предложения
Портал систематически устраивает разнообразные промо-кампании для клиентов.
Виды призов
Основные формы бонусов:
– Депозитные начисления – часть от размера пополнения
– Фриспины – безвозмездные вращения в игровых машинах
– Возврат средств – возмещение фрагмента затраченных финансов
– Призовые трофеи – призы за выступление в состязаниях
Промокоды
Специальные купоны позволяют приобрести добавочные преимущества. Участники в состоянии получить их на аффилиатных порталах или взять в новостях.
Mobile адаптация и app
Прогрессивные игроки любят портативный геймплей.
Функции переносной платформы
– Гибкий вид для всех девайсов
– Абсолютный доступ к автоматам
– Быстрая подгрузка
– Эргономичное использование
Загрузить app
Переносное app открыто для загрузки на аппараты с рабочими системами Android и iOS. Программа дает:
– Бесперебойную функциональность
– Всплывающие оповещения о предложениях
– Быстрый вход к избранным развлечениям
Азартный выбор
Игровой клуб дает обширную коллекцию игровых забав.
Игровые машины
Ассортимент игровых автоматов содержит:
– Классические игры
– Video аппараты
– Джекпотные слоты
– Сюжетные развлечения
Live столы
Секция живых дилеров дает шанс состязаться с живыми дилерами. Доступны:
– Рулетки
– 21
– Баккара
– Техасский холдем
Турниры
Постоянные турниры дают возможность участникам состязаться за значительные денежные суммы. Конкурсная программа обновляется постоянно.
Банковские операции
Сайт поддерживает разнообразие способов пополнения и обналичивания сумм:
– Пластиковые карты
– Цифровые кошельки
– Прямые переводы
– Цифровые валюты
Совокупные операции проходят конфиденциально с использованием современных методов криптографии.
Сервис поддержки
Профессиональная отдел помощи работает без перерыва. Обратиться с консультантами доступно через:
– Online чат
– Email почту
– Телефонную линию
– Social сети
Защита и аккредитация
Игровой клуб функционирует на базе действительной аккредитации. Это обеспечивает:
– Честность азартного действа
– Безопасность личных информации
– Пунктуальные выводы
– Легальный гейминг
Заключение
Лицензионный портал и его рабочие резервные страницы предоставляют клиентам полный ассортимент услуг для комфортной и доходной игры. Внушительные бонусы, разнообразные слоты, опытная помощь и надежная система операций превращают платформу идеальным решением для любителей азартных игр.
stonebrookdistrict hub – Browsed briefly, the layout feels clean and easy to follow.
куплю сайт куплю сайт .
Переход к сайту через проверенные зеркала
Современные онлайн казино обеспечивают пользователям непрерывный доступ к сервисам. Официальный сайт https://www.argontechbd.com/2026/03/04/v-onlayn-kazino-dostupny-bystrye-i-bezopasnye-tranzaktsii-s-pomoshchyu-apple-pay действует стабильно, предоставляя обширный выбор игровых слотов. Но временами появляются программные сложности или ограничения, потому необходимо знать о наличии действующих зеркал.
Что является собой центральное зеркало казино
Альтернатива — это абсолютная версия главного сайта с схожим интерфейсом. Актуальное зеркало на данный момент обеспечивает избегать региональные блокировки и вести развлечения.
Ключевые преимущества задействования зеркал:
– Абсолютный вход к личному кабинету
– Удержание любых данных счёта
– Такой же перечень слотов
– Актуальные вознаграждения и акции
Открытие счёта на платформе
Процесс записи требует пару минут. Недавние игроки получают привлекательный приз за регистрацию, он в состоянии вмещать:
– Вступительный бонусный кредит
– Комплиментарные вращения для машин
– Специальные коды
– Увеличенный кэшбек
Ради окончания оформления требуется:
1. Зайти на основной ресурс или зеркало
2. Кликнуть элемент «Зарегистрироваться»
3. Внести контактные данные
4. Заверить почтовый адрес или номер
5. Задействовать купон (в случае существовании)
Доступ в личный кабинет
Следом за корректной регистрации клиенты способны выполнять доступ через центральный веб-сайт или рабочее зеркало. Индивидуальный кабинет даёт безграничный контроль над профилем:
– История игр
– Пополнение кошелька
– Изъятие призов
– Контроль бонусами
– Присутствие в состязаниях
Бонусы и предложения казино
Ресурс радует геймеров многочисленными привилегированными предложениями:
Стартовые призы
Дебютанты получают богатый пакет поощрений на вступительные взносы. Обычно это содержит частичную доплату к объёму депозита плюс комплиментарные спины.
Регулярные предложения
– Еженедельный компенсация до 15%
– Конкурсы с призовыми суммами
– Бонусы на дату рождения
– Специальные предложения для VIP игроков
План верности
Деятельные клиенты накапливают баллы, что возможно обменять на действительные деньги или специальные бонусы.
Карманная редакция и приложение
Передовые решения позволяют геймить всюду подходяще. Смартфонная редакция ресурса самостоятельно подстраивается под размер любого гаджета.
Достоинства смартфонного ПО:
– Быстрая загрузка игр
– Практичный вид
– Моментальные-оповещения о предложениях
– Опция скачать для Android и iOS
Live казино: антураж настоящего азартного учреждения
Раздел Live клуба погружает пользователей в среду настоящего гемблинг учреждения. Квалифицированные крупье управляют игру в виде подлинного времени.
Доступные столы:
– Рулетка
– Карточная игра
– Баккара
– Покерная игра
Слоты и азартные машины
Ассортимент развлекательных слотов содержит тысячи названий от передовых студий. Каждый клиент обнаружит игру по вкусу:
– Стандартные барабаны
– Инновационные игры с специальными этапами
– Накопительный-автоматы
– Динамические слоты
Конкурсы и раздачи
Периодические турниры добавляют остроту и обеспечивают возможность получить большие суммы. Участие в соревнованиях нередко даровое, а наградные фонды составляют внушительных размеров.
Безопасность и секретность
Ресурс применяет инновационные протоколы шифрования для охраны сведений клиентов. Совокупные платёжные процедуры проходят через охраняемые каналы.
Заключение
Центральный портал и его рабочие зеркала предоставляют безопасный переход к первоклассным развлекательным сервисам. Великодушные призы, эргономичная портативная редакция, многообразие машин и квалифицированное Live-клуб делают портал замечательным опцией для любителей гемблинг игр.
Смотреть здесь Эмоции на каждом шагу!
Ginger Hub – Stumbled on this site, reading is effortless and structure is clean.
Следующая страница водка бэт
Visit our official page
blacksprut сайт??
Современные интернет казино предлагают геймерам огромный ассортимент возможностей для приятной игры. Но иногда доступ к основному сайту может являться ограниченным. В таких обстоятельствах на выручку приходят Beton казино, которое предоставляет стабильный путь ко всем возможностям платформы.
Что такое действующее зеркало казино
Копия — это абсолютная реплика лицензионного ресурса, которая размещается по дополнительному URL. Зеркало поддерживает полный функционал оригинального веб-портала, включая индивидуальный кабинет, средства и сведения операций.
Главные плюсы задействования зеркала:
– Круглосуточный соединение к порталу
– Максимальная схожесть опций
– Конфиденциальность индивидуальных данных
– Хранение всех бонусов
Как найти действующее зеркало сегодня
Присутствует некоторое количество надежных способов поиска текущей URL:
Официальные сервисы:
1. Email рассылка — администрация постоянно высылает сообщения с рабочими доменами
2. Медийные сети — легитимные аккаунты выкладывают актуальную новости
3. Департамент поддержки — консультанты выдают проверенные адреса
4. Телефонное приложение — позволяет преодолевать блокировки
Оформление профиля на главном веб-сайте
Процесс регистрации длится лишь считанные минут и предполагает из нижеследующих стадий:
1. Попадание на основной ресурс или действующее зеркало
2. Щелчок на иконку «Зарегистрироваться»
3. Ввод персональной анкеты
4. Проверка имейл почты или сотового номера
5. Активация бонуса за регистрацию при присутствии промокода
Новые клиенты получают великодушный приветственный бонус, который может охватывать фриспины, валютные призы или cashback.
Вход в пользовательский кабинет
Авторизация на сайте выполняется обычным образом. Достаточно указать имя пользователя и кодовое слово, использованные при создании аккаунта.
Важные детали для безопасного входа:
– Используйте защищенный пароль
– Запустите двухэтапную проверку
– Не записывайте реквизиты на общественных гаджетах
– Проверяйте адресную строку браузера
Характеристика премиальной программы
Игровая платформа балует клиентов всевозможными привилегиями и промо:
Стартовый комплект
Начинающие могут рассчитывать на щедрое награду за стартовый депозит. Как правило это процентная добавка к переведенной количеству плюс даровые спины для топовых слотов.
Регулярные промо
– Семидневный компенсация — возврат части проигранных денежных средств
– Поощрения на дополнительные депозиты
– Специальные промо по праздникам
– Соревнования с большими призовыми банками
Схема верности
Активные игроки зарабатывают очки за любую бет, которые затем меняются на настоящие средства, free spins или эксклюзивные льготы.
Бонус-коды: как применять
Купоны — это уникальные комбинации символов, гарантирующие доступ к дополнительным вознаграждениям.
Каким образом взять рабочие промокоды:
– Авторизованные общественные сети казино
– Аффилиатные порталы
– Email-рассылка
– Отраслевые группы
Прописывается промокод в соответствующее поле при создании аккаунта или пополнении кошелька.
Смартфонная версия и приложение
Актуальные геймеры предпочитают играть с телефонных гаджетов. Платформа обеспечивает два варианта для беспроблемной телефонной игры.
Мобильная редакция
Онлайн версия сама настраивается под диагональ экранной панели. Не просит загрузки и работает в любом актуальном браузере.
Портативное приложение
Скачать app можно для гаджетов на Android и iOS. Преимущества app:
– Молниеносная запуск
– Надежная функционирование
– Всплывающие-уведомления о бонусах
– Автономный минование блокировок
Этап установки несложен: необходимо попасть на портал с мобильного девайса и подчиняться предписаниям.
Игровой каталог
Коллекция слотов содержит тысячи позиций от передовых разработчиков.
Слоты
Азартные машины — крайне востребованная секция аттракционов. Доступны классические трехбарабанные автоматы, передовые графические аппараты с бонусными этапами, а также джекпотные выигрыши.
Live казино
Раздел с действительными ведущими позволяет прочувствовать дух истинного казино. Имеются игры с покером.
Передача ведется в HD качестве, имеется диалог с ведущим и прочими участниками.
Соревнования
Регулярно организуются конкурсы по различным дисциплинам. Вступление обеспечивает возможность получить монетарные призы, фриспины или эксклюзивные презенты.
Денежные процедуры
Ресурс предоставляет широкий ассортимент финансовых способов:
– Банковские карты
– Электронные системы
– Крипта
– Финансовые переводы
Низшая величина депозита — доступная для основной части игроков. Получение выигрышей выполняется в скорые временные рамки.
Сервис поддержки
Квалифицированные консультанты способны поддержать непрерывно. Имеются данные методы коммуникации:
– Онлайн-чат
– Email
– Звонковая горячая линия
– Общественные сети
Разъяснения на частые темы можно отыскать в секции FAQ.
Вывод
Главный портал казино и его функционирующие зеркала гарантируют клиентам полный доступ ко всем возможностям платформы. Великодушные привилегии, практичная портативная версия, впечатляющий ассортимент слотов и компетентная поддержка делают гемблинг досуг предельно приятным и конфиденциальным.
Подключение к ресурсу и функционирующие адреса
Актуальные сетевые казино предлагают клиентам большой ассортимент опций. Главный портал [url=goddess-fantasy.com/onlayn-kazino-pozvolyayushchee-vyvodit-realnye-dengi-na-kartu-sberbanka/]РўРёРїРїРё регистрация[/url] обеспечивает надежный переход ко всем функциям. Однако временами случаются моменты, когда требуется альтернативный метод входа.
Что представляет собой функционирующее зеркало
Действующее зеркало — это абсолютная реплика официального портала с другим сетевым именем. Дубликат сегодня обеспечивает избегать существующие барьеры и поддерживать постоянный переход к предпочитаемым развлечениям.
Главное зеркало обладает полными характеристиками, что и базовый веб-сайт:
– Полный перечень развлечений
– Личный раздел с зафиксированными данными
– Все награды и акции
– Проверенные платежные переводы
Открытие профиля и вход в систему
Этап оформления на сайте отнимает считанные секунд. Новым пользователям следует:
1. Открыть на актуальное зеркало сейчас
2. Кликнуть клавишу «Открыть профиль»
3. Ввести обязательные данные
4. Верифицировать e-mail почту или номер связи
5. Получить награду за оформление
Подключение в личный аккаунт выполняется с помощью указание логина и секретной комбинации.
Описание наградной политики
Щедрая наградная программа — основное преимущество ресурса. Игроки получают различные поощрения:
Начальные бонусы
Новые участники способны рассчитывать на привлекательный бонус за создание аккаунта. Чаще всего это пакет опций, содержащий:
– Пропорциональную надбавку к начальному взносу
– Даровые вращения
– Extra финансы на аккаунт
Промокоды и специальные возможности
Периодические коды позволяют обретать призовые выгоды. Использовать их возможно в специальном окне собственного раздела.
Free spins и компенсация
Бесплатные спины — это возможность играть игры без применения своих средств. Компенсация подразумевает процентный возмещение потерянных средств.
Каталог слотов
Игровая сайт представляет значительную базу автоматов.
Автоматы
Вариативность слотов впечатляет ожидания. Доступны классические простые слоты и современные развлечения с захватывающей картинкой.
Live зал
Категория Live развлечений транспортирует участников в обстановку реального гемблинг клуба. Умелые дилеры осуществляют игры в реальном эфире.
Турниры и лидерборды
Постоянные состязания обеспечивают остроты и предоставляют возможность выиграть значительные выигрыши.
Портативная вариант и клиент
Продвинутые разработки дают возможность развлекаться в любом пространстве. Адаптивная вариант автономно настраивается под экран гаджета.
Скачать программу допустимо для мобильных платформ iOS и Android. Программа дает:
– Оперативный запуск
– Устойчивую деятельность
– Push-алерты об промо
– Комфортный облик
Платежные процедуры
Казино работает с всевозможные варианты ввода и снятия средств:
– Пластиковые карты
– Виртуальные сервисы
– Цифровые валюты
– Банковские операции
Любые операции проходят через надежное протокол, что гарантирует целостность конфиденциальных сведений.
Сервис ассистанса
Опытная бригада ассистанса функционирует круглосуточно. Соединиться с операторами допустимо через:
– Интерактивный-чат
– E-mail почту
– Горячую линию
– Общественные сети
Итоги
Легальный портал и его действующее зеркало обеспечивают пользователям стабильный и приятный переход к азартным занятиям. Щедрые поощрения, большой ассортимент развлечений и высокая ассистанс создают процесс максимально удобной и доходной.
Have you ever thought about publishing an ebook or guest
authoring on other websites? I have a blog based on the same subjects you discuss
and would love to have you share some stories/information.
I know my visitors would appreciate your work.
If you are even remotely interested, feel free
to shoot me an e mail.
My web site: 저신용중고차
пластический хирург Диков
mostbet bonus kod qayerdan olish https://www.mostbet02894.help
Isle Deals – Landed here unexpectedly, content is clear and navigation works smoothly.
ссылка на сайт
Ваш комфорт — наш приоритет!
https://cassiteleri.top/# casino siteleri
Современные онлайн-казино предоставляют игрокам разнообразный выбор игр и выгодные награды. Впрочем для комфортной работы необходимо знать, как найти Р±РѕРЅСѓСЃ и его актуальные зеркала.
Что такое главный сайт казино
Главный портал казино — это базовая веб-площадка, где участники могут наслаждаться азартными развлечениями. Ресурс действует на легальных условиях и имеет всеми нужными документами.
Основные преимущества основного ресурса:
– Конфиденциальность личных данных
– Прозрачные положения использования
– Обеспеченные выводы
– Компетентная помощь
Функционирующее зеркало казино: для чего требуется
Дублирующий ресурс — это абсолютная копия лицензионного сайта, находящаяся по альтернативному веб-адресу. Функционирующее зеркало создается для обеспечения стабильного входа к порталу.
Причины задействования зеркал:
– Запрет основного URL
– Регламентные работы
– Высокая активность на ресурс
Как найти свежее зеркало на сегодня
Узнать новое рабочее зеркало можно несколькими вариантами:
1. Подписка — подпишитесь на email подписку
2. Служба помощи — свяжитесь в онлайн-чат
3. Социальные сети — мониторьте за постами
4. Игровые сайты — авторитетные ресурсы
Регистрация на платформе казино
Процедура оформления длится буквально несколько моментов:
1. Выберите на кнопку “Зарегистрироваться”
2. Заполните запрашиваемые поля
3. Подтвердите почтовую e-mail
4. Используйте купон, если имеется
После успешной оформления вам станет возможен персональный аккаунт.
Награды и промокоды
Щедрая бонусная структура — важное плюс казино:
Награда за создание аккаунта
Начинающие пользователи получают начальный бонус, который может включать:
– Денежный бонус на дебютный вклад
– Фриспины для барабанов
– Стартовые деньги
Бонусные коды
Регулярно появляются новые коды, дающие возможность получить особые поощрения.
Система кешбэка
Постоянные пользователи получают процент проигранных ставок на счет.
Актуальные промо и турниры
Сайт регулярно проводит увлекательные промо-мероприятия:
– Семидневные баттлы
– Специальные бонусы
– Лотереи солидных наград
– Схема привилегий
Доступ в личный раздел
Для авторизации на портал требуется:
1. Открыть официальный сайт или рабочее зеркало
2. Кликнуть “Вход”
3. Указать email и код доступа
В пользовательском аккаунте предоставлены такие возможности:
– Пополнение баланса
– Получение средств
– Анализ истории операций
– Управление личными параметрами
Mobile версия и приложение
Портативная модификация
Адаптивная версия сайта позволяет играть с разных портативного телефона. Дизайн самостоятельно адаптируется под размер монитора.
App для установки
Скачать app можно для:
– Android — непосредственная скачивание с сайта
– iOS — установка через App Store
Преимущества приложения:
– Моментальный вход
– Бесперебойная операционность
– Push-нотификации об промо
– Производительный дизайн
Развлекательные разделы
Игровые машины
Внушительная галерея развлекательных слотов от ведущих производителей:
– Стандартные машины
– Продвинутые-слоты
– Призовые-слоты
Live игры
Зона с настоящими крупье предоставляет:
– Рулетка
– Блэкджек
– Мини-баккара
– Карточные игры
Вещания проводятся в отличном формате, воссоздавая эффект реального казино.
Способы зачисления и получения
Сайт принимает множественные транзакционные методы:
– Кредитные картсчета
– Цифровые кошельки
– Цифровые валюты
– Wire отправки
Наименьшие суммы депозита и скоростные выводы создают времяпрепровождение исключительно удобной.
Отдел помощи
Квалифицированная группа помощи доступна 24/7 и в состоянии содействовать с различными ситуациями:
– Онлайн-чат
– Email-переписка
– Phone служба
Выводы
Главный портал казино и его действующие альтернативные адреса дают игрокам безопасный и интересный игровой опыт. Богатые награды, простая портативная платформа, разнообразные слоты и качественное live-казино делают эту площадку великолепным решением для азартных времяпрепровождения.
взгляните на сайте здесь
В России — отдых для сердца!
Доступ к сайту через рабочие зеркала
Участники онлайн казино регулярно сталкиваются с ситуацией недоступности официального сайта. Как раз для ликвидации этой ситуации созданы копии основного ресурса. casino Tippy казино гарантирует абсолютный подключение ко всем возможностям казино.
Что такое функционирующее зеркало казино
Зеркало значит собой абсолютную реплику оригинального ресурса с идентичным функционалом. Основное отличие — это альтернативное имя. Каждые параметры игрока, содержа депозит, привилегии и историю игр, находятся такими же.
Достоинства задействования зеркал
Действующие зеркала обладают набором существенных преимуществ:
– Бесперебойный вход к выбранным автоматам
– Полная сохранность личных данных
– Сохранение всех параметров персонального кабинета
– Возможность обретения призов и участия в кампаниях
Регистрация на основном сайте
Процедура регистрации предельно несложен и длится несколько минут. Новые клиенты имеют возможность надеяться на внушительный приветственный подарок за открытие счета.
Этапы создания аккаунта
1. Доступ на основной портал или его дубликат
2. Нажатие на элемент “Присоединиться”
3. Ввод требуемых параметров
4. Верификация электронной почты
5. Указание бонусного кода (если имеется)
Награды и предложения для игроков
Ресурс балует своих игроков различными бонусными системами.
Основные типы наград
Вводный приз — крупное вознаграждение для свежих игроков, что может включать финансовые бонусы и фриспины.
Фриспины — опция крутить в топовых автоматах бесплатно.
Кэшбек — процентный возмещение израсходованных денег, каковой предоставляется раз в неделю или каждый месяц.
Купоны — уникальные последовательности, дающие экстра выгоды.
Персональный кабинет: функции и настройки
Личный профиль дает абсолютный управление над персональным активностью. Тут предусмотрены:
– Управление балансом
– История переводов
– Текущие привилегии
– Установки охраны
– Подтверждение учетной записи
Мобильная редакция и APP
Актуальные игроки ценят портативность. Платформа обеспечивает двойной пути для развлечений с портативных девайсов.
Адаптивная мобильная вариант
Смартфонная редакция портала автономно настраивается под дисплей любого девайса. Отсутствует потребность инсталлировать особое приложение.
Программа для смартфонов
Доступно инсталлировать официальное APP для iOS и Android. Программа обеспечивает:
– Моментальный вход
– Улучшенный графику
– Всплывающие-извещения о акциях
– Стабильную работу
Live игры: антураж реального клуба
Зона Live развлечений отправляет участников в атмосферу истинного клуба. Профессиональные ведущие осуществляют партии в формате живого времени.
Популярные Live-игры
– Американская рулетка
– Двадцать одно
– Баккарат
– Покер
Игровые машины: ассортимент слотов
Каталог азартных машин вмещает сотни названий от лидирующих поставщиков. Клиенты найдут:
– Обычные слоты
– Графические слоты
– Джекпот-машины
– Слоты с множественными линиями
Конкурсы и уникальные предложения
Постоянные соревнования позволяют игрокам бороться друг с другом за внушительные призовые банки. Отдельный конкурс содержит свои требования присутствия и рейтинг чемпионов.
Методы внесения и снятия сумм
Ресурс предоставляет комплекс платежных систем:
– Дебетовые инструменты
– Цифровые платежные системы
– Криптовалюты
– Банковские переводы
Все транзакции выполняются надежно благодаря актуальным технологиям шифрования.
Сервис помощи
Профессиональные консультанты команды обслуживания готовы ассистировать 24/7. Предусмотрены данные пути общения:
– Мгновенный-чат
– Email-сервис
– Аудио горячая линия
– Публичные сети
Вывод
Главный домен клуба и его действующие альтернативы предоставляют игрокам надежный и легкий подход к большому спектру игровых развлечений. Щедрые бонусы, частые предложения, компетентная служба и легкие расчетные методы делают развлекательный времяпрепровождение крайне увлекательным и результативным.
top 100 seo seo-prodvizhenie-reiting.ru .
blsp сайт
интернет водка бэт
аукцион сайтов аукцион сайтов .
This is really interesting, You are a very skilled blogger.
I’ve joined your feed and stay up for in the hunt for more of your wonderful post.
Additionally, I have shared your site in my social networks
Feel free to surf to my blog; 저신용중고차
Нынешние онлайн-казино дают игрокам внушительный диапазон развлечений и премиальных программ. Подключение к платформе реализуется через лицензионный ресурс или его действующее зеркало casino Clubnika, что дает непрерывную игру.
Что такое функционирующее зеркало казино
Зеркало — это точная копия главного сайта, сделанная для решения барьеров. Рабочее зеркало помогает участникам обрести соединение к выбранным играм в произвольное время.
Проверенное зеркало содержит всеми опциями первоначального сайта:
– Весь перечень игр
– Профиль с внесенными параметрами
– Свежие акции
– Защищенные финансовые процедуры
Оформление профиля на основном портале
Процедура регистрации требует всего несколько минут. Новым игрокам необходимо:
1. Войти на проверенный ресурс или актуальное зеркало
2. Щелкнуть на ссылку “Зарегистрироваться”
3. Заполнить нужные параметры
4. Верифицировать электронную почту
5. Сделать первый вклад
Поощрение новичкам зачисляется сразу после прохождения всех ступеней.
Доступ в аккаунт
Действующие участники могут выполнить авторизацию используя:
– Учетное имя и код
– Данные телефона
– Электронную почту
Профиль открывает доступ к управлению балансом, сведениям игр и действующим промокодам.
Поощрения и кампании
Азартная сервис вознаграждает постоянных игроков щедрыми призами:
Первый набор
– Надбавка на стартовый депозит до 100%
– Даровые спины на известные слоты
– Добавочные премии за следующие пополнения
Бонусные коды
Уникальные купоны предоставляют доступ на использование особых вознаграждений. Актуальные промокоды публикуются в разделе “Промо”.
Возврат средств
Регулярный кешбэк достигает до 10% от утраченных сумм. Выплата начисляется незамедлительно.
Механизм лояльности
Регулярные игроки накапливают поинты, которые превращаются на настоящие деньги или даровые спины.
Mobile версия и APP
Для практичности игроков разработана удобная портативная платформа. Гибкий интерфейс помогает удобно играть с каждого переносного аппарата.
Преимущества софта:
– Быстрый доступ к играм
– Улучшенный облик
– Стабильная функциональность
– Push-уведомления о последних событиях
Установить софт можно свободно с основного веб-сайта для аппаратов на Android и iOS.
Каталог развлечений
Игровые автоматы
Коллекция насчитывает более 2000 слотов от топовых производителей:
– Традиционные машины
– Video slots
– Jackpot игры
– Брендовые развлечения
Live казино
Блок Live игр предоставляет взаимодействие с настоящими крупье в живом формате:
– Рулеточные столы
– Карточная игра
– Карты
– Покер
Соревнования
Постоянные состязания с солидными призовыми фондами организуются систематически. Участие в конкурсах открыто всем созданным игрокам.
Денежные системы
Взносы и изъятия денег осуществляются через популярные способы оплаты:
– Кредитные пластик
– Виртуальные сервисы
– Bitcoin
– Прямые переводы
Самый низкий взнос — от 100 рублей. Изъятие выигрышей проводится в течение 24 ч.
Сервис помощи
Постоянная служба поддержки способна поддержать в урегулировании любых ситуаций:
– Онлайн-чат
– Email
– Горячая линия
– Социальные сети
Безопасность и документ
Главный ресурс работает на почве признанной сертификата. Любые данные участников обезопасены современным SSL-криптованием.
Вывод
Актуальное зеркало дает стабильный доступ к предпочитаемым развлечениям, богатым акциям и практичным возможностям. Создайте аккаунт сегодня и обретите приветственный бонус!
получить короткую ссылку google получить короткую ссылку google .
check their page – The interface is tidy and browsing feels effortless.
Доступ к платформе через проверенные зеркала
Игроки интернет казино регулярно имеют дело с трудностью ограничения основного сайта. Конкретно для устранения этой проблемы разработаны дубликаты главного ресурса. http://www.servicii24.ro/aktualnaya-instruktsiya-po-priobreteniyu-podpiski-v-rossii/ предоставляет полный доступ ко всем возможностям ресурса.
Что такое действующее зеркало казино
Копия является собой полную копию оригинального ресурса с идентичным набором функций. Главное отличие — это доменное имя. Каждые сведения пользователя, в том числе депозит, награды и данные игр, находятся неизменными.
Выгоды задействования зеркал
Действующие зеркала имеют комплексом существенных плюсов:
– Непрерывный подключение к излюбленным слотам
– Стопроцентная защита личных параметров
– Поддержание всех конфигураций индивидуального кабинета
– Способность приобретения наград и участия в промоакциях
Создание аккаунта на официальном сайте
Ход оформления максимально легок и длится пару минут. Недавние игроки способны надеяться на внушительный стартовый поощрение за оформление.
Шаги создания аккаунта
1. Подключение на официальный портал или его альтернативу
2. Активация на элемент “Создать аккаунт”
3. Заполнение требуемых данных
4. Подтверждение электронной почты
5. Применение купона (когда доступен)
Награды и предложения для клиентов
Игровая площадка радует своих пользователей всевозможными наградными акциями.
Базовые варианты поощрений
Вводный подарок — солидное вознаграждение для начинающих участников, каковое может включать денежные суммы и free spins.
Фриспины — способность использовать в популярных слотах бесплатно.
Возврат средств — частичный возврат утраченных финансов, что зачисляется по неделям или помесячно.
Купоны — особые сочетания, дающие бонусные выгоды.
Пользовательский кабинет: инструменты и параметры
Личный аккаунт гарантирует полный управление над персональным взаимодействием. В данном разделе присутствуют:
– Администрирование депозитом
– Записи переводов
– Работающие привилегии
– Настройки защиты
– Валидация счета
Карманная версия и APP
Новейшие участники признают мобильность. Платформа дает двойной варианта для ставок с карманных гаджетов.
Отзывчивая мобильная платформа
Портативная платформа домена автоматически настраивается под монитор любого аппарата. Отсутствует потребность инсталлировать отдельное ПО.
Софт для гаджетов
Возможно инсталлировать фирменное софт для iOS и Android. Приложение дает:
– Быстрый доступ
– Улучшенный интерфейс
– Мобильные-уведомления о акциях
– Надежную производительность
Live раздел: антураж реального казино
Категория Live казино переносит пользователей в атмосферу настоящего игорного заведения. Квалифицированные ведущие организуют раунды в варианте реального времени.
Известные Live-развлечения
– Французская рулетка
– 21
– Baccarat
– Карибский покер
Слоты: ассортимент игр
Собрание слотовых слотов содержит тысячи наименований от лидирующих провайдеров. Клиенты найдут:
– Стандартные автоматы
– Видеослоты
– Мега-выигрыш-слоты
– Мегавейс
Соревнования и уникальные мероприятия
Систематические соревнования позволяют участникам конкурировать друг с другом за внушительные призовые пулы. Каждый конкурс содержит свои требования присутствия и таблицу лидеров.
Методы ввода и изъятия сумм
Ресурс предоставляет множество денежных методов:
– Платежные картыы
– Электронные платежные системы
– Криптовалюты
– Финансовые транзиты
Абсолютно все операции реализуются защищенно благодаря современным системам защиты.
Отдел support
Профессиональные сотрудники команды помощи способны содействовать 24/7. Имеются данные каналы связи:
– Мгновенный-чат
– Email-помощь
– Телефонная линия
– Публичные сети
Заключение
Легальный домен клуба и его рабочие дубликаты обеспечивают участникам защищенный и приятный вход к широкому выбору азартных активностей. Крупные поощрения, частые предложения, компетентная поддержка и легкие расчетные методы формируют развлекательный опыт чрезвычайно захватывающим и выгодным.
New version available here
Читать далее В Грузии каждый момент ценен!
I’m not sure exactly why but this website is loading extremely slow for me. Is anyone else having this issue or is it a issue on my end? I’ll check back later on and see if the problem still exists.
ukbyueuropaviagraonline
Главная
Казахстан: уникальные приключения ждут!
Вход к ресурсу через актуальные зеркала
Современные виртуальные казино предоставляют геймерам бесперебойный подключение к развлечениям. Центральный портал Мелстрой казино казино работает стабильно, обеспечивая широкий набор гемблинг слотов. Впрочем порой появляются системные трудности или ограничения, потому критично знать о наличии действующих зеркал.
Что является собой основное зеркало казино
Альтернатива — это абсолютная копия центрального портала с схожим набором функций. Функционирующее зеркало в настоящее время помогает обходить местные ограничения и вести гемблинг.
Ключевые плюсы эксплуатации зеркал:
– Абсолютный переход к индивидуальному кабинету
– Сохранение каждых данных профиля
– Такой же набор слотов
– Текущие вознаграждения и предложения
Создание аккаунта на ресурсе
Процедура регистрации длится несколько минут. Свежие пользователи получают богатый приз за создание счёта, который способен содержать:
– Приветственный бонусный кредит
– Комплиментарные спины для игр
– Уникальные купоны
– Усиленный компенсацию
Ради финализации регистрации необходимо:
1. Зайти на главный портал или альтернативу
2. Щёлкнуть клавишу «Регистрация»
3. Указать персональные информацию
4. Подтвердить email или контакт
5. Активировать промокод (в случае доступности)
Подключение в индивидуальный кабинет
Вслед за успешной создания аккаунта геймеры способны осуществлять вход используя официальный сайт или рабочее зеркало. Индивидуальный кабинет открывает всесторонний надзор над счётом:
– Архив ставок
– Ввод кошелька
– Вывод выигрышей
– Управление привилегиями
– Вовлечение в конкурсах
Награды и промо казино
Ресурс балует геймеров разнообразными бонусными предложениями:
Вступительные поощрения
Начинающие приобретают великодушный комплект бонусов на стартовые пополнения. Типично это включает процентную добавку к величине взноса плюс безвозмездные вращения.
Регулярные промо
– Каждонедельный компенсация до 15%
– Соревнования с наградными суммами
– Бонусы на дату рождения
– Эксклюзивные промо для статусных клиентов
Система поощрения
Активные игроки накапливают баллы, что разрешено превратить на настоящие деньги или особые привилегии.
Портативная форма и приложение
Актуальные технологии помогают участвовать всюду удобно. Карманная форма портала независимо приспосабливается под экран любого девайса.
Плюсы портативного ПО:
– Моментальная открытие развлечений
– Эргономичный дизайн
– Моментальные-оповещения о акциях
– Шанс установить для Android и iOS
Реальное казино: среда настоящего гемблинг клуба
Категория Live заведения доставляет пользователей в среду реального развлекательного дома. Квалифицированные операторы организуют процесс в виде подлинного времени.
Имеющиеся развлечения:
– Рулетка
– Карточная игра
– Карточная игра
– Техасский холдем
Слоты и развлекательные автоматы
Собрание гемблинг машин включает множество вариантов от передовых студий. Произвольный пользователь обнаружит слот по нраву:
– Винтажные автоматы
– Новые слоты с специальными этапами
– Джекпот-слоты
– Многолинейные слоты
Соревнования и лотереи
Периодические состязания включают азарт и предоставляют опцию выиграть большие награды. Присутствие в конкурсах нередко бесплатное, а наградные пулы составляют внушительных сумм.
Охрана и анонимность
Ресурс применяет передовые системы криптографии для охраны информации клиентов. Все платёжные процедуры выполняются через защищённые протоколы.
Заключение
Главный веб-сайт и его действующие зеркала гарантируют безопасный подключение к отличным гемблинг сервисам. Богатые призы, практичная мобильная форма, многообразие слотов и квалифицированное Live-казино формируют платформу отличным выбором для поклонников игровых слотов.
Характеристика основного портала
Передовые онлайн казино обеспечивают клиентам богатый выбор развлечений и возможностей. Лицензионный веб-сайт Vulcan обеспечивает проверенный доступ к гемблинг функциям.
Действующее зеркало: вход прямо сейчас
Резервный сайт выступает как точную копию главного сайта. Актуальное зеркало обеспечивает пользователям обходить существующие запреты.
Достоинства использования зеркала
Принципиальные плюсы предполагают:
– Беспрерывный шанс к ресурсу
– Хранение полных опций официального сайта
– Сохранность персональных сведений
– Аналогичный набор функций
Оформление профиля на ресурсе
Процесс открытия счета выделяется доступностью и комфортом. Начинающие клиенты должны:
1. Зайти на главный ресурс или его зеркало
2. Щелкнуть на пункт открытия счета
3. Ввести необходимые сведения
4. Валидировать email почту
5. Совершить дебютный логин
Подарок за создание аккаунта
Новые игроки зарабатывают значительный стартовый бонус. Такое премия в состоянии предусматривать:
– Денежные суммы
– Безвозмездные прокруты
– Повышенный коэффициент кэшбека
Доступ в личный раздел
Действующие клиенты в состоянии оперативно авторизоваться в собственный раздел, задействуя имя пользователя и шифр. Личный раздел дает возможность к:
– Управлению средствами
– Истории платежей
– Работающим бонусам
– Конфигурации аккаунта
Вознаграждения и предложения
Сайт систематически организует всевозможные акции для клиентов.
Разновидности подарков
Ключевые формы призов:
– Депозитные подарки – часть от суммы депозита
– Спины – даровые спины в слотах
– Возврат средств – возмещение процента затраченных средств
– Призовые вознаграждения – награды за участие в турнирах
Промокоды
Специальные коды помогают получить бонусные бонусы. Участники способны отыскать их на специализированных порталах или приобрести в новостях.
Портативная адаптация и софт
Актуальные клиенты предпочитают карманный игровой процесс.
Характеристики mobile системы
– Гибкий вид для любых устройств
– Целостный возможность к развлечениям
– Оперативная загрузка
– Практичное навигация
Установить софт
Переносное софт предложено для скачивания на гаджеты с рабочими системами Android и iOS. Софт предоставляет:
– Бесперебойную производительность
– Пуш алерты о акциях
– Мгновенный вход к предпочитаемым играм
Азартный ассортимент
Портал предоставляет внушительную галерею гемблинг услуг.
Аппараты
Ассортимент азартных слотов содержит:
– Традиционные слоты
– Video автоматы
– Призовые слоты
– Сюжетные автоматы
Live казино
Область настоящих развлечений обеспечивает шанс играть с живыми дилерами. Представлены:
– Европейская рулетка
– 21
– Baccarat
– Карибский покер
Турниры
Постоянные чемпионаты позволяют пользователям состязаться за внушительные финансовые банки. Соревновательная сетка актуализируется каждую неделю.
Платежные транзакции
Платформа поддерживает множество опций пополнения и вывода денег:
– Банковские карты
– Онлайн кошельки
– Wire трансферы
– Цифровые валюты
Все транзакции производятся надежно с задействованием прогрессивных технологий криптографии.
Сервис поддержки
Профессиональная команда помощи работает без перерыва. Соединиться с специалистами можно через:
– Интерактивный чат
– Email почту
– Телефонную линию
– Social медиа
Охрана и аккредитация
Портал функционирует на фундаменте легальной лицензии. Подобное гарантирует:
– Справедливость игрового процесса
– Безопасность личных данных
– Своевременные выплаты
– Контролируемый геймплей
Заключение
Официальный сайт и его рабочие зеркала обеспечивают клиентам целостный ассортимент опций для безопасной и профитной развлечений. Щедрые подарки, всевозможные игры, опытная сервис и безопасная структура транзакций превращают казино идеальным опцией для любителей азартных услуг.
lisanslı casino siteleri deneme bonusu veren casino siteleri
vdcasino güncel vdcasino
https://audiomack.com/blumengruss
this link here – Minimal design makes reading and scrolling effortless.
buy generic lasix http://alpharms.shop/# lasix 40 mg
Современные онлайн-казино предлагают участникам обширный ассортимент услуг и поощрительных предложений. Вход к площадке осуществляется через лицензионный ресурс или его актуальное зеркало казино Lucky Bear казино, что предоставляет бесперебойную активность.
Что такое актуальное зеркало казино
Альтернатива — это точная дубликат оригинального сайта, разработанная для устранения запретов. Рабочее зеркало дает возможность игрокам сохранить соединение к излюбленным слотам в любое удобное время.
Лицензионное зеркало имеет всеми характеристиками первоначального сайта:
– Весь каталог игр
– Учетная запись с зафиксированными параметрами
– Актуальные промокоды
– Безопасные платежные процедуры
Регистрация на главном ресурсе
Алгоритм создания аккаунта отнимает всего несколько минут. Новым клиентам необходимо:
1. Зайти на проверенный сайт или функционирующее зеркало
2. Нажать на кнопку “Зарегистрироваться”
3. Ввести требуемые информацию
4. Верифицировать контакт
5. Совершить дебютный вклад
Бонус за регистрацию начисляется сразу после прохождения всех этапов.
Авторизация в личный кабинет
Зарегистрированные пользователи могут выполнить доступ используя:
– Учетное имя и код
– Код контакта
– Контактный email
Аккаунт обеспечивает возможность к управлению балансом, данным игр и активным акциям.
Награды и предложения
Игровая площадка вознаграждает регулярных пользователей выгодными вознаграждениями:
Приветственный комплект
– Надбавка на начальный депозит до 100%
– Даровые спины на популярные слоты
– Экстра бонусы за дальнейшие взносы
Ваучеры
Уникальные промокоды открывают право на активацию уникальных бонусов. Свежие комбинации публикуются в разделе “Промо”.
Возврат средств
Периодический возврат равен до 10% от потраченных средств. Возмещение зачисляется моментально.
Механизм лояльности
Верные клиенты накапливают очки, которые переводятся на реальные деньги или бесплатные вращения.
Адаптивный портал и приложение
Ради комфорта клиентов построена удобная mobile версия. Отзывчивый вид помогает удобно развлекаться с всякого карманного устройства.
Достоинства софта:
– Моментальный подключение к играм
– Настроенный дизайн
– Бесперебойная работа
– Сообщения о актуальных бонусах
Получить приложение можно бесплатно с основного сайта для аппаратов на Android и iOS.
Каталог слотов
Игровые автоматы
База содержит более 2000 машин от ведущих студий:
– Обычные автоматы
– Video slots
– Jackpot игры
– Фирменные слоты
Live казино
Секция Live развлечений обеспечивает участие с подлинными ведущими в прямом формате:
– Roulette
– Карточная игра
– Baccarat
– Карточный покер
Соревнования
Регулярные конкурсы с солидными призовыми бюджетами устраиваются каждую неделю. Присоединение в соревнованиях возможно всем активным пользователям.
Расчетные системы
Пополнения и получения денег выполняются через востребованные платежные системы:
– Кредитные карточ ки
– Электронные сервисы
– Криптовалюта
– Счетные переводы
Самый низкий вклад — от 100 рублей. Изъятие денег проводится в течение 24 времени.
Отдел поддержки
Постоянная отдел саппорта может помочь в решении произвольных проблем:
– Живой чат
– Email
– Связь
– Публичные сети
Защита и разрешение
Главный ресурс действует на базе признанной документа. Любые сведения клиентов охранены современным SSL-кодированием.
Итог
Актуальное зеркало предоставляет бесперебойный вход к предпочитаемым играм, привлекательным акциям и практичным возможностям. Зарегистрируйтесь немедленно и обретите приветственный подарок!
Передовые сетевые казино дают пользователям обширный выбор опций для беспроблемной игры. Тем не менее иногда вход к основному ресурсу может стать ограниченным. В таких случаях на подмогу появляется Голд казик, которое гарантирует стабильный доступ ко всем сервисам платформы.
Что такое актуальное зеркало казино
Зеркало — это точная дубликат основного ресурса, которая находится по альтернативному адресу. Зеркало поддерживает весь набор функций основного веб-портала, включая персональный кабинет, счет и сведения платежей.
Принципиальные достоинства применения зеркала:
– 24-часовой доступ к платформе
– Абсолютная аналогичность опций
– Конфиденциальность персональных сведений
– Удержание всех имеющихся бонусов
Как отыскать рабочее зеркало сегодня
Имеется несколько проверенных способов обнаружения текущей ссылочной информации:
Легитимные сервисы:
1. Email рассылка — администрация постоянно высылает письма с актуальными URL
2. Социальные сети — легитимные каналы постят актуальную сведения
3. Служба поддержки — операторы предоставляют достоверные URL
4. Портативное приложение — позволяет преодолевать блокировки
Создание аккаунта на главном ресурсе
Процесс открытия счета требует лишь пару минут и предполагает из следующих этапов:
1. Переход на основной портал или функционирующее зеркало
2. Выбор на иконку «Открыть счет»
3. Указание регистрационной формы
4. Проверка email почты или сотового номера
5. Задействование вознаграждения за регистрацию при наличии промокода
Только что зарегистрированные пользователи обретают великодушный приветственный бонус, который может предполагать фриспины, финансовые призы или компенсацию.
Доступ в пользовательский кабинет
Авторизация на платформе производится традиционным путем. Требуется указать имя пользователя и пароль, использованные при открытии счета.
Ключевые моменты для безопасного входа:
– Эксплуатируйте сложный шифр
– Запустите двойную проверку
– Не сохраняйте пароли на посторонних компьютерах
– Проверяйте URL строку браузера
Обзор наградной структуры
Игорный портал награждает геймеров всевозможными вознаграждениями и кампаниями:
Приветственный пакет
Свежие игроки могут рассчитывать на существенное бонус за начальный взнос. Зачастую это пропорциональная премия к переведенной величине плюс даровые спины для популярных слотов.
Периодические промо
– Недельный кэшбек — возвращение доли проигранных средств
– Бонусы на дополнительные взносы
– Эксклюзивные офферы по праздникам
– Конкурсы с большими призовыми фондами
План лояльности
Постоянные пользователи получают очки за любую игру, которые затем меняются на фактические деньги, даровые прокруты или особые преимущества.
Купоны: как применять
Кодовые комбинации — это уникальные сочетания знаков, предоставляющие возможность к бонусным вознаграждениям.
В каких местах получить актуальные промокоды:
– Официальные социальные сети казино
– Сотрудничающие ресурсы
– Email-информирование
– Отраслевые сообщества
Активируется промокод в отдельное поле при открытии счета или зачислении средств баланса.
Портативная версия и приложение
Актуальные клиенты предпочитают делать ставки с телефонных устройств. Ресурс предлагает 2 варианта для комфортной мобильной игры.
Отзывчивая редакция
Веб версия автоматически оптимизируется под диагональ дисплея. Не просит установки и действует в всяком актуальном браузере.
Телефонное приложение
Скачать программу можно для устройств на Android и iOS. Достоинства app:
– Молниеносная загрузка
– Надежная работа
– Всплывающие-уведомления о бонусах
– Автономный минование блокировок
Этап скачивания прост: требуется открыть на портал с мобильного устройства и придерживаться указаниям.
Развлекательный каталог
Библиотека игр содержит огромное количество позиций от топовых поставщиков.
Слоты
Азартные автоматы — максимально распространенная группа игр. Доступны классические простые слоты, передовые видео-автоматы с поощрительными раундами, а также накопительные джекпоты.
Live казино
Секция с настоящими раздающими обеспечивает почувствовать атмосферу реального казино. Открыты игры с блэкджеком.
Вещание ведется в высоком формате, присутствует коммуникация с раздающим и прочими пользователями.
Конкурсы
Периодически проводятся состязания по многочисленным слотам. Присоединение обеспечивает возможность получить финансовые выигрыши, free spins или особые презенты.
Финансовые процедуры
Платформа предоставляет значительный набор платежных инструментов:
– Банковские карты
– Электронные кошельки
– Криптовалюта
– Банковские транзакции
Низшая величина взноса — посильная для массы геймеров. Снятие выигрышей осуществляется в скорые интервалы.
Отдел поддержки
Компетентные сотрудники готовы оказать помощь 24/7. Открыты данные каналы контакта:
– Живой-чат
– Email
– Мобильная поддержка
– Социальные сети
Решения на частые вопросы можно обнаружить в разделе FAQ.
Итог
Основной веб-сайт казино и его рабочие зеркала предоставляют пользователям абсолютный доступ ко всем сервисам ресурса. Значительные бонусы, практичная портативная версия, огромный коллекция слотов и опытная поддержка создают развлекательный опыт крайне комфортным и надежным.
https://events.opensuse.org/users/703002
mostbet nastavit limit mostbet nastavit limit
Vale Finds – Landed here by chance, content flows nicely and layout is clean.
browse solarstone exchange – Clean layout allows reading and exploring without effort.
Современные онлайн-казино гарантируют клиентам массу вариантов для комфортной игры. Официальный веб-портал Zooma казино казино дарит вход ко всем функциям и играм. Однако при образовании системных сложностей на подмогу приходят рабочие дубликаты.
Что есть собой действующее зеркало
Копия казино — это полная реплика главного портала, находящаяся по дополнительному веб-адресу. Легитимное зеркало хранит все возможности, вместе с открытие профиля, доступ в персональный кабинет, вознаграждения и кодовые слова.
Альтернативный сайт на сегодня обеспечивает:
– Постоянный путь к игровым машинам
– Полную сохранность индивидуальных информации
– Сохранение депозита и истории переводов
– Доступность всех промо-предложений
Создание учетной записи на основном сайте
Ход регистрации занимает пару минут. Новым клиентам нужно:
1. Зайти на подлинный сайт или действующее зеркало
2. Выбрать кнопку «Зарегистрироваться»
3. Указать запрашиваемые поля
4. Верифицировать э-мейл почту
5. Использовать кодовое слово при наличии
После окончания оформления профиля геймеры приобретают вознаграждение за регистрацию, что может включать бонусные спины или финансовое премирование.
Вход в индивидуальный кабинет
Индивидуальный кабинет обеспечивает всеобъемлющий управление над игровым процессом. Через собственный кабинет разрешается:
– Пополнять кошелек
– Выводить выигрыши
– Задействовать кодовые слова
– Проверять хронологию пари
– Участвовать в состязаниях
– Приобретать cash back
Анализ поощрений и акций
Великодушная бонусная политика — важное преимущество проекта. Ключевые формы бонусов:
Стартовый приз
Новые игроки приобретают выгодное премирование на стартовые взносы. Объем премии может достигать 100-200% от суммы депозита.
Бесплатные вращения
Безвозмездные спины выдаются для известных игровых автоматов. Количество бесплатных вращений варьируется от 10 до 500 штук.
Кешбэк
Еженедельный или ежемесячный компенсация процентной доли утраченных финансов. Типичный процент компенсации — 5-15%.
Турниры
Периодические турниры с внушительными премиальными банками. Игроки состязаются за лучшие строчки в рейтинге.
Смартфонная версия и приложуха
Портативная версия дает возможность играть с любого аппарата. Геймеры могут скачать приложение для iOS и Android или использовать веб версию.
Выгоды смартфонного приложения:
– Скоростная подзагрузка слотов
– Эргономичный UI
– Push-уведомления о акциях
– Возможность входа через биометрию
Игровые автоматы и Live казино
Игровая коллекция охватывает множество позиций от известных поставщиков.
Известные секции автоматов:
– Обычные автоматы
– Видео-автоматы с бонусными раундами
– Накопительный приз игры
– Мегавейс автоматы
Live игровой зал
Раздел live казино предоставляет партию с профессиональными дилерами. Имеются традиционные игры:
– Европейская рулетка
– Двадцать одно
– Баккара
– Покер
Как разыскать рабочее зеркало
Найти действующую URL на зеркало возможно разными методами:
1. Зарегистрироваться на почтовую рассылку
2. Следить за апдейтами в социальных сетях
3. Контактировать в отдел поддержки
4. Заложить актуальное зеркало в фавориты
Вывод
Основной ресурс и его актуальные альтернативные адреса гарантируют стабильный доступ к развлекательным играм. Богатые бонусы, разнообразные промокоды, удобное мобильное приложение и высококлассная служба поддержки обеспечивают азартный процесс в высшей степени приятным и надежным.
Нынешние онлайн-казино предоставляют геймерам широкий диапазон вариантов для беспроблемной игры. Подключение к платформе казино Wilder выполняется через основной сайт или функционирующее зеркало.
Что такое функционирующее зеркало казино
Функционирующее зеркало — это резервный URL официального веб-сайта казино. Такие клоны формируются для гарантирования непрерывного доступа к развлекательной сервису.
Дубликат актуальное совершенно дублирует опции основного домена. Пользователи получают аналогичный выход ко всем возможностям, включая регистрацию, внесение депозита депозита и вывод выигрышей.
Регистрация на главном портале
Процесс открытия профиля отнимает всего буквально мгновений. Свежим участникам следует:
1. Перейти на лицензионный сайт или текущее проверенное зеркало
2. Кликнуть кнопку “Открыть счет”
3. Заполнить необходимые информацию
4. Верифицировать e-mail почту
5. Использовать промокод при существовании
После выполнения оформления игрок зарабатывает вознаграждение за регистрацию, который вправе включать даровые спины или cash вознаграждение.
Вход в собственный кабинет
Пользовательский кабинет — это безопасная секция, где пользователи вправе контролировать своим учетной записью. Для доступа необходимо указать имя пользователя и password.
В персональном кабинете имеются нижеперечисленные возможности:
– Отслеживание журнала переводов
– Активация промокодов
– Управление поощрениями
– Участие в соревнованиях
– Проверка кэшбэка
– Редактирование данных
Поощрения и спецпредложения
Азартная система дарит великодушные призы:
Приветственный набор — начинающие зарабатывают крупное поощрение на первые вклады.
Даровые спины — начисляются как при оформлении, так и в ходе разнообразных промо.
Кэшбэк — регулярный рефанд фрагмента утраченных финансов.
Бонусные коды — уникальные коды, обеспечивающие право к специальным вознаграждениям.
Характеристика игровых разделов
Игровые автоматы
Коллекция аппаратов содержит сотни позиций от топовых производителей. Игроки найдут как обычные машины, так и актуальные видео-слоты с притягательной оформлением.
Live казино
Категория Live казино обеспечивает возможность играть с живыми крупье в формате настоящего времени. Имеются известные столы: рулетка, блэкджек, баккара, покер.
Турниры
Систематические состязания с большими выигрышными банками привлекают сотни соревнующихся. Призеры получают финансовые выплаты и эксклюзивные премии.
Телефонная версия и софт
Мобильная версия ресурса дает возможность развлекаться с каждого гаджета. Структура автономно настраивается под диагональ экрана.
Загрузить софт можно для аппаратов на Android и iOS. Смартфонное ПО обладает всеми функциями полной версии.
Как найти текущее зеркало на сегодня
Свежие адреса дубликатов периодически изменяются. Найти рабочую ссылку можно различными способами:
– Через департамент техподдержки
– В проверенных информационных сетях
– По e-mail подписке
– На тематических площадках
Безопасность и сертификация
Главный домен работает на основании зарубежной разрешения. Все операции охраняются актуальными технологиями кодирования.
Конфиденциальность пользовательских данных гарантируется в полном объеме.
Резюме
Лицензионный сайт и его действующие дубликаты обеспечивают игрокам 24/7 вход к высококлассным гемблинговым сервисам. Великодушные поощрения, различные игры, квалифицированная помощь — все это делает развлекательный досуг предельно удобным и интересным.
можно проверить ЗДЕСЬ vodka bet casino
Icicle Deals – Stumbled upon this site, structure is clean and navigation is effortless.
сюда зеркало водка бет
güvenilir casino siteleri: deneme bonusu veren casino siteleri
casino deneme siteleri: casino deneme siteleri
how internet partner prodvizhenie-sajtov-po-trafiku11.ru .
Вход к платформе через проверенные зеркала
Нынешние сетевые казино гарантируют геймерам бесперебойный подключение к развлечениям. Центральный ресурс РР·Рё РљСЌС€ функционирует надёжно, предоставляя большой набор азартных автоматов. Но периодически формируются системные сложности или блокировки, следовательно важно иметь представление о присутствии актуальных зеркал.
Что представляет собой официальное зеркало казино
Зеркало — это идентичная копия главного сайта с аналогичным возможностями. Актуальное зеркало в настоящее время обеспечивает преодолевать местные блокировки и возобновлять игру.
Основные преимущества эксплуатации зеркал:
– Безграничный вход к собственному кабинету
– Поддержание совокупных сведений счёта
– Такой же ассортимент развлечений
– Действующие привилегии и кампании
Регистрация на ресурсе
Операция создания аккаунта длится пару минут. Недавние геймеры приобретают великодушный бонус за запись, он может включать:
– Начальный бонусный кредит
– Даровые кручения для машин
– Уникальные купоны
– Расширенный кешбэк
Ради завершения записи необходимо:
1. Зайти на центральный ресурс или зеркало
2. Щёлкнуть опцию «Зарегистрироваться»
3. Написать индивидуальные данные
4. Верифицировать мейл или мобильный
5. Использовать купон (если есть присутствии)
Доступ в собственный кабинет
Следом за успешной регистрации клиенты в состоянии выполнять доступ используя главный ресурс или актуальное зеркало. Персональный кабинет обеспечивает безграничный контроль над профилем:
– Журнал ставок
– Внесение депозита
– Вывод средств
– Контроль наградами
– Присутствие в соревнованиях
Бонусы и акции казино
Сайт балует пользователей различными наградными схемами:
Стартовые подарки
Дебютанты приобретают богатый пакет наград на стартовые вклады. Обычно это содержит пропорциональную доплату к сумме депозита плюс даровые спины.
Систематические предложения
– Седмичный кешбэк до 15%
– Соревнования с наградными фондами
– Поощрения на дату рождения
– Специальные промо для элитных клиентов
Программа вознаграждения
Деятельные игроки зарабатывают баллы, они разрешено конвертировать на подлинные деньги или эксклюзивные преимущества.
Смартфонная версия и софт
Нынешние инновации позволяют геймить везде подходяще. Карманная версия веб-сайта автоматически настраивается под экран любого аппарата.
Преимущества смартфонного софта:
– Оперативная подгрузка слотов
– Комфортный вид
– Моментальные-уведомления о бонусах
– Возможность инсталлировать для Android и iOS
Настоящее казино: антураж подлинного азартного клуба
Раздел Live казино переносит игроков в обстановку реального развлекательного заведения. Компетентные операторы организуют процесс в состоянии реального времени.
Представленные игры:
– Американская рулетка
– Очко
– Карточная игра
– Карты
Автоматы и игровые автоматы
Собрание игровых слотов включает множество позиций от топовых производителей. Каждый геймер подберёт автомат по душе:
– Стандартные барабаны
– Современные автоматы с специальными этапами
– Джекпот-машины
– Многолинейные слоты
Состязания и раздачи
Регулярные соревнования добавляют адреналин и открывают способность заработать крупные суммы. Участие в турнирах зачастую бесплатное, а выигрышные банки составляют крупных величин.
Безопасность и конфиденциальность
Портал использует передовые системы шифрования для гарантии сведений клиентов. Любые финансовые транзакции совершаются через зашифрованные соединения.
Заключение
Основной сайт и его действующие зеркала дают надёжный доступ к первоклассным игровым услугам. Привлекательные награды, удобная карманная редакция, богатство игр и профессиональное Live-игорный дом создают ресурс отличным вариантом для любителей развлекательных игр.
Передовые онлайн-казино предлагают пользователям обилие возможностей для приятной игры. Главный веб-портал Clubnika казино сайт обеспечивает вход ко всем возможностям и игровым автоматам. Однако при наличии системных неполадок на подмогу спешат рабочие зеркала.
Что являет собой собой актуальное зеркало
Зеркало казино — это идентичная реплика оригинального портала, находящаяся по запасному адресу. Легитимное зеркало хранит все характеристики, в том числе открытие профиля, авторизацию в личный кабинет, бонусы и промокоды.
Альтернативный сайт на сегодня дает:
– Стабильный доступ к развлекательным слотам
– Полную сохранность персональных сведений
– Удержание депозита и журнала транзакций
– Возможность использования всех акций
Открытие профиля на лицензионном сайте
Процедура оформления учетной записи требует несколько минут. Начинающим геймерам необходимо:
1. Зайти на официальный портал или рабочее зеркало
2. Нажать кнопку «Создать аккаунт»
3. Внести необходимые сведения
4. Подтвердить email почту
5. Применить купон при наличии
После конца оформления профиля геймеры обретают подарок за регистрацию, какой может иметь бесплатные вращения или монетарное премирование.
Логин в личный кабинет
Личный кабинет обеспечивает комплексный мониторинг над игровым действом. Через индивидуальный кабинет можно:
– Депонировать баланс
– Снимать средства
– Использовать бонусные коды
– Отслеживать журнал игр
– Соревноваться в турнирах
– Забирать возврат средств
Описание вознаграждений и специальных предложений
Выгодная поощрительная схема — ключевое плюс казино. Центральные формы поощрений:
Начальный бонус
Дебютанты обретают выгодное награду на дебютные взносы. Размер приза может составлять 100-200% от суммы вклада.
Фриспины
Безвозмездные вращения начисляются для востребованных слотов. Объем фриспинов варьируется от 10 до 500 штук.
Возврат средств
Регулярный или ежемесячный компенсация процента проигранных денег. Обычный объем возврата — 5-15%.
Состязания
Регулярные турниры с внушительными наградными фондами. Конкурсанты соревнуются за топовые места в рейтинге.
Смартфонная версия и программа
Смартфонная версия разрешает наслаждаться игрой с каждого устройства. Игроки могут установить программу для iOS и Android или задействовать веб версию.
Преимущества портативного софта:
– Скоростная прогрузка слотов
– Эргономичный дизайн
– Всплывающие уведомления о промо
– Доступ через Touch ID
Автоматы и Live казино
Игровая подборка содержит сотни наименований от лидирующих производителей.
Популярные типы игр:
– Обычные слоты
– Видеослоты с премиальными уровнями
– Прогрессивный джекпот слоты
– Мегавейс слоты
Live казино
Секция live казино предлагает игру с настоящими ведущими. Доступны классические игры:
– Французская рулетка
– Двадцать одно
– Punto Banco
– Техасский холдем
Как обнаружить действующее зеркало
Найти свежую ссылку на зеркало возможно множественными вариантами:
1. Зарегистрироваться на email-рассылку
2. Следить за апдейтами в социальных сетях
3. Связаться в отдел поддержки
4. Запомнить рабочее зеркало в закладки
Заключение
Официальный сайт и его действующие дубликаты обеспечивают непрерывный доступ к азартным слотам. Богатые поощрения, многочисленные купоны, эргономичное портативное программа и качественная служба поддержки делают игровой процесс крайне удобным и надежным.
1win loyalty points http://1win5524.ru
продвижение по трафику clover prodvizhenie-sajtov-po-trafiku10.ru .
https://kupit-schetchik.ru/
Передовые онлайн-казино обеспечивают клиентам разнообразие возможностей для удобной игры. Главный ресурс казино казино Метелица предоставляет доступ ко всем функциям и играм. Однако при появлении программных трудностей на помощь прибывают функционирующие дубликаты.
Что представляет собой рабочее зеркало
Альтернативный адрес казино — это полная реплика основного ресурса, находящаяся по запасному доменному имени. Легитимное зеркало поддерживает все характеристики, включая создание аккаунта, доступ в собственный кабинет, бонусы и кодовые слова.
Дубликат на сегодня обеспечивает:
– Постоянный вход к игровым слотам
– Совершенную безопасность персональных информации
– Поддержку депозита и записей операций
– Возможность использования всех промо-предложений
Создание учетной записи на лицензионном ресурсе
Процесс открытия профиля занимает считанные минут. Начинающим игрокам необходимо:
1. Войти на официальный ресурс или действующее зеркало
2. Кликнуть кнопку «Создать аккаунт»
3. Внести запрашиваемые данные
4. Подтвердить email почту
5. Указать промокод при наличии
После окончания оформления профиля клиенты приобретают подарок за регистрацию, который может охватывать free spins или монетарное премирование.
Авторизация в собственный кабинет
Приватный кабинет предоставляет всеобъемлющий управление над азартным ходом. Через личный раздел допускается:
– Финансировать счет
– Выводить средства
– Использовать бонусные коды
– Мониторить записи пари
– Участвовать в конкурсах
– Приобретать возврат средств
Описание вознаграждений и акций
Выгодная бонусная программа — ключевое козырь проекта. Главные формы вознаграждений:
Стартовый подарок
Новые игроки обретают выгодное вознаграждение на начальные депозиты. Размер бонуса может составлять 100-200% от величины депозита.
Фриспины
Безвозмездные спины даются для известных автоматов. Число free spins изменяется от 10 до 500 штук.
Возврат средств
Постоянный или помесячный откат доли потерянных денег. Типичный размер компенсации — 5-15%.
Соревнования
Периодические конкурсы с крупными призовыми банками. Участники соревнуются за верхние позиции в таблице лидеров.
Смартфонная версия и софт
Смартфонная версия дает возможность развлекаться с каждого девайса. Пользователи могут закачать приложение для iOS и Android или эксплуатировать веб версию.
Плюсы портативного программы:
– Быстрая загрузка игр
– Комфортный графический интерфейс
– Пуш-нотификации о промо
– Вход через биометрию
Автоматы и Live казино
Развлекательная библиотека охватывает сотни наименований от топовых провайдеров.
Топовые разделы игр:
– Классические машины
– Видео-автоматы с премиальными уровнями
– Прогрессивный джекпот игры
– Megaways слоты
Live казино
Категория live игорный зал предоставляет партию с реальными крупье. Доступны стандартные варианты:
– Рулетка
– Blackjack
– Baccarat
– Карибский покер
Как разыскать рабочее зеркало
Обрести свежую адрес на зеркало можно несколькими способами:
1. Оформить подписку на почтовую рассылку
2. Следить за обновлениями в социальных сетях
3. Обратиться в департамент поддержки
4. Сохранить действующее зеркало в фавориты
Заключение
Лицензионный сайт и его функционирующие альтернативные адреса дают стабильный путь к развлекательным слотам. Выгодные бонусы, множественные купоны, эргономичное портативное приложение и качественная служба поддержки поддержки превращают развлекательный геймплей крайне удобным и конфиденциальным.
visit the vendor – Browsing here is smooth, and the layout looks clear.
зайти на сайт vodka bet
Описание официального портала
Актуальные онлайн казино дают игрокам разнообразный спектр развлечений и перспектив. Основной портал Гризли казино казино гарантирует безопасный путь к развлекательным услугам.
Функционирующее зеркало: доступ прямо сейчас
Зеркало представляет как идентичную копию лицензионного ресурса. Действующее зеркало дает возможность участникам обходить возможные блокировки.
Достоинства применения зеркала
Основные преимущества содержат:
– Беспрерывный шанс к сайту
– Поддержание абсолютно всех функций официального ресурса
– Защита личных данных
– Аналогичный набор функций
Создание аккаунта на ресурсе
Ход регистрации отличается легкостью и комфортом. Свежие игроки необходимо:
1. Открыть официальный ресурс или его зеркало
2. Выбрать на клавишу создания аккаунта
3. Внести требуемые сведения
4. Подтвердить почтовую почту
5. Совершить начальный авторизацию
Бонус за оформление
Новички зарабатывают солидный вступительный презент. Это вознаграждение может охватывать:
– Денежные бонусы
– Бесплатные вращения
– Расширенный показатель возврата
Вход в индивидуальный профиль
Зарегистрированные пользователи способны быстро войти в собственный раздел, эксплуатируя учетные данные и код. Собственный кабинет обеспечивает шанс к:
– Администрированию депозитом
– Записям транзакций
– Текущим подаркам
– Параметрам аккаунта
Подарки и предложения
Сайт постоянно организует всевозможные промо-кампании для клиентов.
Категории поощрений
Главные типы поощрений:
– Финансовые начисления – коэффициент от объема депозита
– Фриспины – даровые вращения в аппаратах
– Кэшбек – отдача фрагмента потерянных средств
– Конкурсные награды – призы за игру в соревнованиях
Коды
Эксклюзивные коды дают возможность приобрести дополнительные преимущества. Клиенты имеют возможность найти их на специализированных сайтах или взять в рассылке.
Портативная вариант и app
Передовые гемблеры предпочитают мобильный досуг.
Характеристики мобильной платформы
– Отзывчивый интерфейс для любых девайсов
– Совокупный доступ к автоматам
– Стремительная подгрузка
– Комфортное контроль
Загрузить софт
Мобильное программа предоставлено для скачивания на девайсы с базовыми ОС Android и iOS. App гарантирует:
– Устойчивую деятельность
– Push уведомления о акциях
– Быстрый вход к предпочитаемым автоматам
Развлекательный портфель
Казино предлагает внушительную библиотеку азартных забав.
Слоты
Коллекция игровых слотов насчитывает:
– Традиционные слоты
– Современные слоты
– Призовые слоты
– Сюжетные игры
Live игры
Раздел живых развлечений предоставляет шанс участвовать с настоящими дилерами. Представлены:
– Рулетки
– Блек-джек
– Punto Banco
– Poker
Турниры
Постоянные конкурсы обеспечивают клиентам соревноваться за внушительные финансовые банки. Соревновательная структура актуализируется регулярно.
Платежные процедуры
Казино поддерживает массу вариантов внесения и получения денег:
– Кредитные карточки
– Электронные платежные системы
– Межбанковские транзакции
– Крипто
Абсолютно все операции выполняются безопасно с использованием прогрессивных методов шифрования.
Служба помощи
Квалифицированная группа поддержки функционирует без перерыва. Соединиться с специалистами реально через:
– Онлайн чат
– Почтовую почту
– Контактный номер
– Social медиа
Охрана и регулирование
Казино работает на базе легальной разрешения. Это гарантирует:
– Честность игрового геймплея
– Охрану индивидуальных информации
– Быстрые перечисления
– Ответственный геймплей
Итог
Лицензионный портал и его действующие резервные страницы дают клиентам совокупный набор функций для приятной и доходной игры. Значительные вознаграждения, различные игры, опытная сервис и безопасная инфраструктура выплат формируют казино превосходным решением для фанатов игровых игр.
Переход к порталу через проверенные зеркала
Нынешние интернет казино гарантируют клиентам бесперебойный доступ к играм. Главный сайт casino New Retro оперирует стабильно, гарантируя широкий выбор развлекательных слотов. Тем не менее временами образуются цифровые сложности или запреты, следовательно необходимо иметь представление о наличии рабочих зеркал.
Что представляет собой центральное зеркало казино
Альтернатива — это абсолютная реплика основного сайта с идентичным интерфейсом. Актуальное зеркало сегодня даёт возможность обходить местные ограничения и вести гемблинг.
Основные плюсы эксплуатации зеркал:
– Полный вход к индивидуальному кабинету
– Фиксация всех информации счёта
– Идентичный ассортимент игр
– Текущие привилегии и кампании
Оформление на сайте
Механизм записи занимает несколько минут. Свежие игроки зарабатывают богатый приз за оформление, который имеет возможность включать:
– Вступительный бонусный приз
– Даровые спины для машин
– Уникальные ваучеры
– Повышенный компенсацию
Ради завершения создания аккаунта необходимо:
1. Зайти на центральный сайт или копию
2. Выбрать элемент «Регистрация»
3. Указать личные информацию
4. Верифицировать мейл или мобильный
5. Применить ваучер (если есть доступности)
Доступ в личный кабинет
После успешной записи игроки в состоянии осуществлять доступ используя официальный веб-сайт или актуальное зеркало. Персональный кабинет открывает безграничный контроль над счётом:
– Журнал транзакций
– Ввод счёта
– Вывод призов
– Регулирование бонусами
– Включение в состязаниях
Награды и промо казино
Сайт удовлетворяет клиентов вариативными привилегированными системами:
Стартовые поощрения
Начинающие получают великодушный букет привилегий на начальные взносы. Зачастую это предполагает процентную добавку к сумме вклада плюс даровые спины.
Периодические предложения
– Каждонедельный кешбэк до 15%
– Конкурсы с призовыми банками
– Подарки на число рождения
– Специальные предложения для привилегированных пользователей
План поощрения
Регулярные клиенты зарабатывают пункты, они можно обменять на настоящие призы или особые льготы.
Смартфонная форма и программа
Современные технологии обеспечивают развлекаться где угодно. Смартфонная редакция веб-сайта независимо подстраивается под экран всякого гаджета.
Достоинства карманного ПО:
– Моментальная подгрузка игр
– Практичный вид
– Моментальные-сообщения о промо
– Опция установить для Android и iOS
Живое казино: антураж истинного игорного дома
Секция Live казино доставляет игроков в антураж подлинного игорного дома. Квалифицированные операторы организуют развлечение в состоянии актуального времени.
Представленные игры:
– Американская рулетка
– Карточная игра
– Карточная игра
– Покерная игра
Барабаны и игровые аппараты
Коллекция развлекательных машин содержит сотни позиций от ведущих студий. Произвольный геймер отыщет развлечение по нраву:
– Традиционные машины
– Видеослоты с бонусными раундами
– Джекпот-слоты
– Megaways слоты
Соревнования и раздачи
Периодические турниры вносят драйв и дают шанс получить внушительные награды. Вовлечение в турнирах зачастую безвозмездное, а призовые суммы доходят до значительных сумм.
Секьюрити и секретность
Портал использует передовые методы шифрования для защиты данных клиентов. Любые транзакционные процедуры совершаются через защищённые соединения.
Вывод
Главный ресурс и его рабочие зеркала гарантируют стабильный доступ к превосходным гемблинг играм. Богатые поощрения, эргономичная смартфонная форма, разнообразие автоматов и компетентное Live-заведение делают портал замечательным решением для поклонников развлекательных развлечений.
компании занимающиеся продвижением сайтов seo-prodvizhenie-reiting.ru .
перейдите на этот сайт vodka bet casino
casino deneme siteleri lisanslı casino siteleri
аукцион сайтов аукцион сайтов .
Ótima plataforma para jogadores brasileiros.
Esssa plataforma paga de verdade e saque rápido
via PIX.
Indico para quem busca cassino online para quem quer joogar com
segurança. Promoção de boas-vindas competitiva e 250 rodadas grátis.
Soou cliente ddo Pin-Up Brasil faz um tempo comm total satisfação com saques.
Pagamento pelo PIX e equipe brasileira são diferenciais reais.
A promoção inicial do Pin-Up Casino está entre os melhores disponíveis nno Brasil.
Até mil e quinhentos reais e free spins no primeiro
depósito.
Cassino online confiável que aceita PIX.
O Pin-Up Brasil é licenciado e paga sem problemas.
Jogando no Pin-Up Casino e recomendo com a variedade de jogos.
Catálogo enorme com cassino ao vivo e slots incríveis.
Para quem busca cassino online no Brasil. Essa plataforma
reúne o melhor: bônus, jogos e saques rápidos.
shop link – Well-structured pages, very comfortable to browse and read.
Характеристика основного ресурса
Прогрессивные сетевые казино обеспечивают пользователям обширный выбор игр и шансов. Главный портал AzartPlay казино гарантирует защищенный путь к гемблинг сервисам.
Актуальное зеркало: вход на сегодня
Резервный сайт служит в качестве абсолютную копию лицензионного веб-сайта. Проверенное зеркало обеспечивает игрокам миновать вероятные блокировки.
Выгоды эксплуатации зеркала
Основные достоинства включают:
– Беспрерывный путь к ресурсу
– Хранение абсолютно всех возможностей базового сайта
– Защита персональных сведений
– Равнозначный инструментарий
Регистрация на ресурсе
Ход открытия счета характеризуется простотой и удобством. Недавние клиенты обязаны:
1. Зайти на лицензионный сайт или его зеркало
2. Выбрать на пункт открытия счета
3. Заполнить нужные поля
4. Подтвердить почтовую почту
5. Произвести начальный логин
Бонус за оформление
Новички забирают внушительный приветственный подарок. Это премия может предусматривать:
– Материальные бонусы
– Complimentary фриспины
– Повышенный показатель компенсации
Вход в персональный кабинет
Действующие игроки способны оперативно войти в личный аккаунт, эксплуатируя логин и ключ. Личный профиль предлагает путь к:
– Управлению балансом
– Истории операций
– Работающим подаркам
– Параметрам аккаунта
Подарки и предложения
Сайт постоянно проводит многочисленные мероприятия для пользователей.
Виды призов
Ключевые категории вознаграждений:
– Пополнительные призы – коэффициент от величины внесения
– Фриспины – даровые вращения в автоматах
– Возврат средств – отдача процента проигранных денег
– Турнирные трофеи – призы за участие в состязаниях
Промокоды
Уникальные промокоды помогают получить дополнительные выгоды. Пользователи способны отыскать их на аффилиатных площадках или получить в письмах.
Переносная версия и программа
Современные гемблеры любят переносной игровой процесс.
Опции переносной платформы
– Отзывчивый интерфейс для любых аппаратов
– Целостный доступ к развлечениям
– Моментальная работа
– Практичное контроль
Загрузить софт
Мобильное софт предоставлено для установки на аппараты с рабочими ОС Android и iOS. App дает:
– Надежную деятельность
– Всплывающие сообщения о предложениях
– Моментальный запуск к любимым развлечениям
Азартный портфель
Платформа дает огромную коллекцию игровых игр.
Аппараты
Каталог развлекательных машин охватывает:
– Обычные игры
– Передовые слоты
– Джекпотные машины
– Тематические автоматы
Live казино
Категория реальных игр предлагает опцию играть с реальными диллерами. Доступны:
– Рулетки
– Блэкджек
– Punto Banco
– Покер
Конкурсы
Постоянные соревнования дают возможность клиентам соревноваться за внушительные финансовые пулы. Турнирная программа актуализируется регулярно.
Денежные транзакции
Казино обеспечивает массу методов пополнения и вывода финансов:
– Пластиковые карты
– Онлайн счета
– Межбанковские трансферы
– Цифровые валюты
Абсолютно все операции производятся конфиденциально с применением прогрессивных методов шифрования.
Отдел помощи
Профессиональная группа support действует круглосуточно. Соединиться с менеджерами доступно через:
– Интерактивный чат
– Электронную почту
– Горячую линию
– Социальные сети
Охрана и лицензирование
Игровой клуб функционирует на основании действительной лицензии. Такое подтверждает:
– Прозрачность развлекательного процесса
– Охрану личных сведений
– Быстрые транзакции
– Ответственный игровой процесс
Вывод
Основной сайт и его действующие дубликаты гарантируют клиентам целостный комплекс опций для удобной и доходной развлечений. Значительные призы, всевозможные игры, компетентная поддержка и защищенная инфраструктура платежей превращают казино превосходным опцией для поклонников развлекательных забав.
vdcasino giris vdcasino
суши бесплатная доставка суши бесплатная доставка .
check this bazaar – Browsed briefly, design seems simple and user-friendly.
современные seo кейсы seo-kejsy17.ru .
Характеристика официального сайта
Передовые интернет казино дают участникам обширный набор забав и возможностей. Основной веб-сайт казино РўРёРїРїРё казино предлагает надежный путь к игровым услугам.
Функционирующее зеркало: путь сегодня
Зеркало выступает в качестве абсолютную дубликат главного сайта. Официальное зеркало помогает игрокам преодолевать потенциальные запреты.
Преимущества эксплуатации зеркала
Принципиальные плюсы предполагают:
– Стабильный шанс к ресурсу
– Хранение абсолютно всех функций официального веб-сайта
– Сохранность личных данных
– Идентичный набор функций
Оформление профиля на платформе
Механизм создания аккаунта характеризуется легкостью и практичностью. Недавние игроки должны:
1. Открыть официальный веб-сайт или его зеркало
2. Выбрать на кнопку регистрации
3. Ввести необходимые данные
4. Подтвердить почтовую почту
5. Совершить дебютный вход
Приз за открытие счета
Новички забирают значительный стартовый бонус. Это премия в состоянии предусматривать:
– Монетарные бонусы
– Бесплатные вращения
– Расширенный уровень компенсации
Доступ в личный кабинет
Зарегистрированные игроки могут оперативно получить доступ в личный кабинет, применяя логин и ключ. Персональный раздел обеспечивает возможность к:
– Регулированию депозитом
– Истории операций
– Работающим призам
– Настройкам аккаунта
Подарки и кампании
Сайт систематически устраивает многочисленные промо-кампании для участников.
Категории бонусов
Главные категории призов:
– Депозитные бонусы – процент от величины пополнения
– Спины – даровые раунды в автоматах
– Компенсация – возврат доли потерянных средств
– Турнирные вознаграждения – призы за выступление в конкурсах
Коды
Уникальные коды дают возможность активировать добавочные выгоды. Пользователи могут получить их на аффилиатных сайтах или приобрести в рассылке.
Переносная вариант и приложение
Актуальные пользователи любят мобильный игровой процесс.
Опции mobile платформы
– Отзывчивый интерфейс для всех гаджетов
– Абсолютный доступ к развлечениям
– Моментальная подгрузка
– Эргономичное контроль
Скачать программу
Мобильное приложение предложено для загрузки на устройства с рабочими платформами Android и iOS. App дает:
– Стабильную деятельность
– Пуш уведомления о призах
– Мгновенный доступ к желанным играм
Азартный выбор
Платформа предоставляет богатую подборку азартных игр.
Автоматы
Каталог игровых аппаратов насчитывает:
– Стандартные машины
– Современные автоматы
– Призовые игры
– Лицензионные автоматы
Live столы
Категория живых развлечений предоставляет опцию соревноваться с реальными ведущими. Открыты:
– Рулетка
– Блэкджек
– Punto Banco
– Карибский покер
Состязания
Регулярные чемпионаты обеспечивают пользователям состязаться за значительные призовые фонды. Конкурсная структура изменяется еженедельно.
Денежные действия
Платформа предоставляет разнообразие способов внесения и получения сумм:
– Кредитные карты
– Онлайн счета
– Wire переводы
– Криптовалюты
Совокупные операции осуществляются надежно с задействованием передовых протоколов шифрования.
Служба support
Опытная команда помощи трудится без перерыва. Связаться с консультантами возможно через:
– Онлайн чат
– Почтовую почту
– Телефонную линию
– Социальные сети
Безопасность и лицензирование
Игровой клуб оперирует на фундаменте официальной аккредитации. Это обеспечивает:
– Честность азартного действа
– Сохранность персональных сведений
– Пунктуальные выводы
– Ответственный игровой процесс
Заключение
Официальный портал и его функционирующие дубликаты дают участникам совокупный спектр опций для приятной и доходной игры. Солидные вознаграждения, многочисленные слоты, компетентная сервис и проверенная структура транзакций делают ресурс лучшим вариантом для поклонников азартных услуг.
рейтинг digital компаний luchshie-digital-agencstva.ru .
шелкография на зип лок пакете с бегунком Нанесение логотипа на ziplock пакеты с бегунком — отличный способ повысить узнаваемость вашего бренда и сделать вашу продукцию более привлекательной для клиентов.
this traders portal – Well-organized sections make browsing pleasant.
https://files.fm/u/5hemnn7hpw
читать
Batumi: your pleasure market!
Современные виртуальные казино дают пользователям большой выбор вариантов для удобной игры. Но иногда соединение к главному ресурсу может являться ограниченным. В таких случаях на выручку приходят Панч казино, которое гарантирует постоянный вход ко всем функциям платформы.
Что такое актуальное зеркало казино
Зеркало — это точная дубликат основного веб-сайта, которая находится по запасному адресу. Зеркало имеет целый инструментарий основного сайта, включая индивидуальный кабинет, баланс и запись переводов.
Ключевые плюсы применения зеркала:
– Круглосуточный подключение к платформе
– Абсолютная схожесть опций
– Сохранность индивидуальных информации
– Удержание всех имеющихся вознаграждений
Как найти рабочее зеркало на текущий день
Имеется ряд надежных путей получения текущей адреса:
Проверенные ресурсы:
1. Email рассылка — управление периодически пересылает письма с действующими ссылками
2. Медийные сети — легитимные каналы размещают релевантную сведения
3. Служба поддержки — консультанты сообщают достоверные ссылки
4. Телефонное приложение — предоставляет избегать блокировки
Регистрация на официальном сайте
Этап оформления отнимает не более считанные минут и содержит из следующих шагов:
1. Переход на лицензионный веб-сайт или функционирующее зеркало
2. Клик на элемент «Зарегистрироваться»
3. Внесение персональной анкеты
4. Верификация электронной почты или контактного номера
5. Применение бонуса за регистрацию при наличии промокода
Новые игроки обретают великодушный вступительный подарок, который может охватывать фриспины, монетарные призы или компенсацию.
Авторизация в индивидуальный кабинет
Логин на сайте реализуется традиционным образом. Нужно ввести имя пользователя и кодовое слово, использованные при открытии счета.
Существенные моменты для безопасного входа:
– Задействуйте надежный код
– Задействуйте двойную аутентификацию
– Не фиксируйте пароли на чужих компьютерах
– Отслеживайте интернет строку браузера
Характеристика поощрительной структуры
Игорный портал награждает клиентов разнообразными поощрениями и кампаниями:
Приветственный комплект
Новички могут рассчитывать на щедрое вознаграждение за первый вклад. Обычно это долевая надбавка к зачисленной количеству плюс даровые спины для востребованных слотов.
Регулярные предложения
– Недельный кэшбек — компенсирование доли списанных финансов
– Бонусы на дополнительные депозиты
– Уникальные офферы по торжествам
– Соревнования с крупными наградными суммами
Система привилегий
Деятельные геймеры накапливают пункты за любую раунд, которые затем конвертируются на настоящие денежные призы, даровые прокруты или уникальные привилегии.
Промокоды: как применять
Бонус-коды — это индивидуальные наборы символов, гарантирующие доступ к специальным бонусам.
Где взять актуальные промокоды:
– Проверенные социальные сети казино
– Аффилиатные сайты
– Email-рассылка
– Профильные форумы
Указывается промокод в соответствующее поле при регистрации или внесении депозита баланса.
Мобильная версия и приложение
Современные геймеры выбирают развлекаться с портативных аппаратов. Ресурс предоставляет два решения для беспроблемной мобильной игры.
Responsive вариант
Веб версия автоматически подстраивается под диагональ экранной панели. Не требует загрузки и оперирует в произвольном современном браузере.
Портативное приложение
Получить приложение можно для аппаратов на Android и iOS. Преимущества app:
– Оперативная запуск
– Надежная функционирование
– Push-уведомления о поощрениях
– Автономный обход блокировок
Этап инсталляции легок: нужно перейти на ресурс с телефонного гаджета и следовать инструкциям.
Игровой коллекция
Библиотека слотов включает тысячи позиций от ведущих производителей.
Слоты
Азартные машины — самая популярная категория развлечений. Размещены классические трехбарабанные аппараты, новые мультимедийные слоты с премиальными стадиями, а также прогрессивные выигрыши.
Live казино
Раздел с живыми раздающими дает возможность испытать дух настоящего казино. Имеются развлечения с покером.
Стриминг ведется в высоком разрешении, присутствует общение с раздающим и остальными геймерами.
Состязания
Систематически проводятся конкурсы по всевозможным слотам. Участие дает шанс получить монетарные выигрыши, даровые прокруты или эксклюзивные поощрения.
Транзакционные действия
Портал предлагает большой набор платежных способов:
– Пластиковые карты
– Цифровые кошельки
– Цифровая валюта
– Денежные транзакты
Наименьшая величина взноса — приемлемая для большинства игроков. Снятие средств выполняется в минимальные временные рамки.
Служба поддержки
Квалифицированные специалисты расположены поддержать 24/7. Имеются данные варианты контакта:
– Онлайн-чат
– Email
– Телефонная линия
– Коммуникационные сети
Решения на распространенные темы можно получить в блоке FAQ.
Вывод
Главный ресурс казино и его действующие зеркала гарантируют пользователям полный подключение ко всем возможностям сайта. Значительные поощрения, комфортная смартфонная версия, впечатляющий выбор развлечений и компетентная служба поддержки превращают развлекательный процесс исключительно беспроблемным и защищенным.
перейти на сайт В Грузии каждый момент ценен!
Передовые онлайн-казино обеспечивают клиентам множество вариантов для беспроблемной игры. Центральный ресурс Мотор казино обеспечивает доступ ко всем опциям и развлечениям. Однако при возникновении технических неполадок на подмогу приходят функционирующие зеркала.
Что являет собой собой функционирующее зеркало
Копия казино — это идентичная дубликат оригинального веб-сайта, расположенная по альтернативному URL. Подлинное зеркало поддерживает все функции, включая регистрацию, доступ в собственный кабинет, бонусы и кодовые слова.
Копия на сегодня обеспечивает:
– Бесперебойный путь к развлекательным аппаратам
– Абсолютную сохранность индивидуальных данных
– Удержание средств и хронологии транзакций
– Доступность всех бонусных программ
Открытие профиля на официальном ресурсе
Ход открытия профиля отнимает несколько минут. Новоиспеченным игрокам необходимо:
1. Войти на основной портал или рабочее зеркало
2. Нажать кнопку «Создать аккаунт»
3. Ввести нужные графы
4. Подтвердить электронную почту
5. Использовать бонусный код при присутствии
После завершения регистрации геймеры получают подарок за регистрацию, который может иметь free spins или монетарное поощрение.
Вход в собственный кабинет
Персональный кабинет обеспечивает полный контроль над игровым ходом. Через персональный раздел возможно:
– Финансировать депозит
– Забирать выигрыши
– Использовать промокоды
– Мониторить журнал игр
– Принимать участие в состязаниях
– Приобретать кешбэк
Описание премий и акций
Великодушная призовая система — ключевое плюс платформы. Центральные категории поощрений:
Начальный приз
Дебютанты приобретают щедрое награду на стартовые пополнения. Сумма приза может достигать 100-200% от величины вклада.
Free spins
Бесплатные вращения начисляются для востребованных автоматов. Сумма фриспинов варьируется от 10 до 500 штук.
Возврат средств
Регулярный или ежемесячный откат части утраченных средств. Стандартный процент кэшбека — 5-15%.
Соревнования
Постоянные состязания с большими премиальными фондами. Участники состязаются за верхние строчки в таблице лидеров.
Мобильная версия и приложение
Адаптивная версия позволяет развлекаться с всякого устройства. Клиенты могут установить софт для iOS и Android или задействовать браузерную версию.
Плюсы портативного приложения:
– Молниеносная прогрузка игр
– Практичный интерфейс
– Пуш-нотификации о бонусах
– Вход через Touch ID
Машины и Live казино
Игровая библиотека содержит тысячи названий от известных поставщиков.
Востребованные типы слотов:
– Обычные машины
– Видео-автоматы с бонусными уровнями
– Джекпот автоматы
– Мега-путь автоматы
Live игровой зал
Секция live казино предоставляет игру с настоящими ведущими. Доступны классические варианты:
– Рулетка
– Блэкджек
– Baccarat
– Покер
Как обнаружить рабочее зеркало
Раздобыть актуальную URL на зеркало возможно множественными методами:
1. Подписаться на почтовую рассылку
2. Мониторить за апдейтами в социальных сетях
3. Написать в отдел поддержки
4. Сохранить актуальное зеркало в избранное
Резюме
Главный портал и его актуальные зеркала обеспечивают бесперебойный вход к игровым слотам. Щедрые поощрения, различные купоны, комфортное портативное софт и высококлассная служба поддержки поддержки делают развлекательный процесс крайне комфортным и надежным.
Stone Treasures – Came across this page randomly, reading flows nicely and layout is intuitive.
casino deneme siteleri casino siteleri
Подробнее vodkabet
lasix 40 mg
Вход к порталу через проверенные зеркала
Клиенты онлайн казино нередко контактируют с трудностью закрытия главного портала. Собственно для устранения этой задачи существуют дубликаты официального сайта. Фонтан казино предоставляет полный переход ко всем функциям площадки.
Что такое функционирующее зеркало казино
Альтернативный адрес представляет собой абсолютную копию основного портала с похожим набором функций. Главное несовпадение — это альтернативное имя. Все сведения клиента, вместе с средства, бонусы и архив партий, продолжают быть идентичными.
Выгоды использования зеркал
Действующие зеркала имеют набором важных плюсов:
– Непрерывный переход к любимым развлечениям
– Абсолютная сохранность индивидуальных параметров
– Удержание всех настроек персонального кабинета
– Опция обретения наград и участия в акциях
Регистрация на официальном портале
Ход открытия счета чрезвычайно прост и занимает буквально минут. Свежие игроки могут надеяться на щедрый начальный приз за создание аккаунта.
Ступени создания аккаунта
1. Подключение на основной сайт или его копию
2. Выбор на опцию “Создать аккаунт”
3. Внесение обязательных параметров
4. Подтверждение цифровой почты
5. Ввод бонусного кода (при наличии есть)
Поощрения и промоакции для игроков
Казино балует своих игроков различными бонусными системами.
Основные варианты призов
Вводный приз — внушительное вознаграждение для свежих игроков, которое именно имеет возможность вмещать материальные бонусы и бесплатные вращения.
Безвозмездные спины — способность запускать в топовых аппаратах без затрат.
Кешбэк — пропорциональный возврат потерянных финансов, что предоставляется каждую неделю или каждый месяц.
Промокоды — специальные комбинации, предоставляющие экстра преимущества.
Индивидуальный кабинет: инструменты и настройки
Персональный кабинет обеспечивает исчерпывающий регулирование над пользовательским активностью. В данном разделе имеются:
– Регулирование депозитом
– Архив переводов
– Действующие привилегии
– Конфигурации сохранности
– Валидация аккаунта
Карманная версия и программа
Актуальные участники ценят гибкость. Ресурс обеспечивает двойной способа для ставок с мобильных девайсов.
Адаптивная смартфонная редакция
Портативная редакция сайта автоматически приспосабливается под монитор любого устройства. Не нужно инсталлировать дополнительное программное обеспечение.
Приложение для телефонов
Разрешено скачать оригинальное APP для iOS и Android. Софт обеспечивает:
– Моментальный старт
– Доработанный графику
– Push-сообщения о акциях
– Бесперебойную работу
Live казино: среда настоящего клуба
Категория Live игр отправляет пользователей в обстановку подлинного игорного заведения. Опытные ведущие осуществляют партии в формате реального времени.
Топовые Live-столы
– Европейская рулетка
– 21
– Баккара
– Покер
Игровые машины: многообразие слотов
Собрание слотовых аппаратов включает тысячи наименований от топовых разработчиков. Игроки откроют:
– Стандартные машины
– Современные слоты
– Мега-выигрыш-автоматы
– Megaways
Соревнования и специальные предложения
Систематические конкурсы дают возможность игрокам бороться друг с другом за крупные наградные банки. Каждый турнир имеет свои критерии присутствия и доску лидеров.
Способы пополнения и вывода средств
Ресурс обслуживает ряд расчетных сервисов:
– Кредитные средства
– Электронные счета
– Blockchain-платежи
– Wire транзиты
Абсолютно все транзакции осуществляются конфиденциально благодаря передовым методам защиты.
Сервис помощи
Опытные специалисты службы обслуживания способны поддержать 24/7. Доступны такие методы коммуникации:
– Оперативный-чат
– Email-помощь
– Звонковая горячая линия
– Коммуникационные сети
Итог
Главный ресурс платформы и его рабочие зеркала гарантируют пользователям надежный и комфортный вход к огромному диапазону развлекательных активностей. Внушительные поощрения, постоянные предложения, компетентная сервис и комфортные финансовые инструменты превращают игровой досуг максимально захватывающим и доходным.
Перейти на сайт Товары, которые удивляют!
Вход к сайту и действующие адреса
Востребованные виртуальные казино предлагают игрокам огромный спектр развлечений. Центральный ресурс Laki World обеспечивает стабильный переход ко всем функциям. Тем не менее периодически происходят ситуации, когда понадобится резервный способ авторизации.
Что являет собой собой действующее зеркало
Функционирующее зеркало — это идентичная реплика официального сайта с альтернативным доменным названием. Дубликат сегодня дает возможность миновать вероятные барьеры и обеспечивать непрерывный доступ к выбранным играм.
Легальное зеркало имеет идентичными характеристиками, что и центральный портал:
– Совокупный перечень развлечений
– Персональный раздел с зафиксированными информацией
– Полные поощрения и промо
– Надежные денежные операции
Регистрация и подключение в платформу
Этап регистрации на ресурсе занимает несколько минут. Недавним участникам требуется:
1. Открыть на рабочее зеркало сейчас
2. Щелкнуть опцию «Создать аккаунт»
3. Ввести необходимые сведения
4. Верифицировать почтовую почту или номер смартфона
5. Активировать награду за регистрацию
Авторизация в собственный раздел производится с помощью указание никнейма и секретной комбинации.
Характеристика наградной политики
Богатая бонусная политика — важнейшее плюс платформы. Участники получают всевозможные награды:
Вступительные бонусы
Начинающие клиенты вправе ожидать на щедрый бонус за открытие профиля. Обычно это совокупность вариантов, охватывающий:
– Процентную премию к стартовому взносу
– Безвозмездные фриспины
– Бонусные суммы на аккаунт
Кодовые комбинации и эксклюзивные акции
Постоянные коды помогают получать бонусные выгоды. Применить их разрешено в отдельном окне персонального профиля.
Спины и кэшбек
Фриспины — это возможность запускать слоты без расходования собственных средств. Возврат представляет процентный возмещение израсходованных финансов.
Библиотека развлечений
Гемблинг сайт предлагает значительную коллекцию слотов.
Автоматы
Вариативность автоматов восхищает фантазию. Представлены традиционные 3-барабанные слоты и новые развлечения с занимательной картинкой.
Live заведение
Категория Live игр транспортирует участников в среду истинного гемблинг зала. Умелые операторы ведут сессии в реальном формате.
Турниры и таблицы лидеров
Постоянные состязания привносят драйва и гарантируют вариант выиграть крупные выигрыши.
Карманная версия и программа
Актуальные разработки позволяют наслаждаться в любом локации. Портативная форма независимо настраивается под монитор гаджета.
Получить приложение разрешено для программных ОС iOS и Android. Приложение дает:
– Оперативный переход
– Надежную работу
– Мгновенные-сообщения об бонусах
– Интуитивный вид
Банковские процедуры
Платформа использует разнообразные системы пополнения и получения финансов:
– Кредитные системы
– Электронные платформы
– Криптовалюты
– Финансовые транзакции
Любые транзакции проходят через зашифрованное протокол, что подтверждает безопасность личных параметров.
Сервис поддержки
Компетентная служба support работает круглосуточно. Соединиться с менеджерами допустимо через:
– Live-чат
– Почтовую почту
– Горячую линию
– Общественные сети
Выводы
Легальный портал и его актуальное зеркало предоставляют игрокам защищенный и приятный вход к увлекательным развлечениям. Богатые подарки, разнообразный ассортимент игр и высокая поддержка обеспечивают процесс крайне приятной и результативной.
Подключение к платформе через действующие зеркала
Передовые сетевые казино обеспечивают геймерам бесперебойный вход к играм. Главный сайт https://www.coretexlab.com/v-2026-godu-v-onlayn-kazino-190-vozmozhno-osushchestvlyat-oplatu-s-pomoshchyu-karty-kotoraya-prinimaetsya-v-etikh-zavedeniyakh/ функционирует бесперебойно, обеспечивая обширный ассортимент развлекательных игр. Но порой образуются технические проблемы или ограничения, следовательно необходимо понимать о доступности актуальных зеркал.
Что означает собой главное зеркало казино
Дубликат — это полная реплика официального ресурса с аналогичным функционалом. Действующее зеркало в настоящее время позволяет избегать локальные блокировки и продолжать времяпрепровождение.
Ключевые выгоды задействования зеркал:
– Полный переход к персональному кабинету
– Фиксация любых сведений аккаунта
– Схожий набор развлечений
– Свежие вознаграждения и кампании
Открытие счёта на портале
Механизм оформления требует несколько минут. Недавние пользователи получают богатый приз за оформление, что может вмещать:
– Начальный денежный приз
– Даровые фриспины для машин
– Особые ваучеры
– Увеличенный кэшбек
С целью завершения создания аккаунта требуется:
1. Войти на официальный сайт или копию
2. Нажать элемент «Регистрация»
3. Указать индивидуальные реквизиты
4. Верифицировать мейл или номер
5. Задействовать код (при существовании)
Вход в личный кабинет
После успешной создания аккаунта игроки имеют возможность производить вход через главный портал или функционирующее зеркало. Индивидуальный кабинет обеспечивает абсолютный надзор над учётной записью:
– Летопись ставок
– Зачисление кошелька
– Снятие выигрышей
– Управление поощрениями
– Участие в конкурсах
Бонусы и предложения казино
Портал награждает игроков разнообразными привилегированными схемами:
Приветственные подарки
Дебютанты приобретают богатый букет наград на вступительные взносы. Зачастую это охватывает пропорциональную прибавку к размеру вклада плюс даровые спины.
Периодические акции
– Седмичный кешбэк до 15%
– Состязания с выигрышными пулами
– Подарки на годовщину рождения
– Специальные акции для VIP клиентов
Схема лояльности
Деятельные геймеры зарабатывают пункты, что допустимо превратить на настоящие средства или специальные льготы.
Смартфонная версия и программа
Актуальные решения обеспечивают геймить где угодно. Портативная форма ресурса независимо настраивается под размер произвольного устройства.
Плюсы карманного программы:
– Быстрая запуск слотов
– Эргономичный облик
– Мгновенные-нотификации о предложениях
– Шанс загрузить для Android и iOS
Живое казино: среда реального гемблинг учреждения
Область Live заведения доставляет геймеров в атмосферу реального азартного клуба. Опытные ведущие ведут действие в режиме актуального времени.
Предлагаемые игры:
– Рулетка
– Блэкджек
– Карточная игра
– Покерная игра
Слоты и азартные автоматы
Каталог азартных слотов насчитывает сотни вариантов от лидирующих разработчиков. Произвольный клиент отыщет развлечение по душе:
– Классические машины
– Видеослоты с специальными раундами
– Джекпот-машины
– Многолинейные машины
Конкурсы и акции
Постоянные конкурсы вносят драйв и дают опцию заработать большие награды. Участие в соревнованиях регулярно комплиментарное, а выигрышные пулы насчитывают внушительных величин.
Секьюрити и приватность
Портал применяет актуальные протоколы криптографии для гарантии данных игроков. Любые финансовые действия выполняются через безопасные протоколы.
Вывод
Центральный портал и его рабочие зеркала обеспечивают стабильный переход к качественным азартным играм. Богатые призы, комфортная смартфонная вариант, многообразие автоматов и компетентное Live-заведение создают платформу замечательным выбором для поклонников азартных игр.
Механизмы влияния: В отличие от внушения, действующего на подсознание, убеждение обращается к разуму и критическому мышлению, требуя осмысленного принятия информации.
https://tinyurl.com/2887rs6v
Передовые онлайн-казино гарантируют пользователям обширный выбор игр и щедрые премии. Но для удобной игры необходимо понимать, как получить доступ к http://www.lgos.net и его актуальные зеркала.
Что такое официальный веб-ресурс казино
Основной портал казино — это первичная платформа, где игроки могут получать удовольствие от гемблинг слотами. Сайт функционирует на законных основаниях и обладает всеми обязательными разрешениями.
Ключевые плюсы лицензионного портала:
– Безопасность личных сведений
– Объективные условия работы
– Обеспеченные выплаты
– Профессиональная поддержка
Рабочее зеркало казино: для чего используется
Альтернативный адрес — это абсолютная версия лицензионного сайта, находящаяся по отличному URL. Действующее зеркало создается для гарантирования постоянного входа к платформе.
Факторы задействования альтернативных адресов:
– Недоступность официального адреса
– Регламентные работы
– Значительная посещаемость на ресурс
Как отыскать актуальное зеркало на сегодня
Узнать новое официальное зеркало можно множественными вариантами:
1. Email-уведомления — зарегистрируйтесь на информационную подписку
2. Служба помощи — свяжитесь в онлайн-чат
3. Корпоративные площадки — отслеживайте за обновлениями
4. Специализированные сайты — надежные ресурсы
Регистрация на платформе казино
Этап регистрации требует всего считанные моментов:
1. Нажмите на элемент “Зарегистрироваться”
2. Укажите обязательные сведения
3. Активируйте email e-mail
4. Активируйте код активации, если есть
По завершении завершенной регистрации вам будет открыт персональный кабинет.
Награды и купоны
Привлекательная наградная программа — значимое преимущество казино:
Подарок за открытие счета
Первичные клиенты зарабатывают начальный презент, который может охватывать:
– Валютный кредит на дебютный пополнение
– Фриспины для автоматов
– Бездепозитные деньги
Бонусные коды
Систематически выходят эксклюзивные промокоды, предоставляющие активировать экстра бонусы.
Система компенсации
Активные участники возвращают часть утраченных ставок обратно.
Действующие акции и состязания
Казино систематически организует захватывающие события:
– Недельные баттлы
– Тематические промо
– Лотереи значительных наград
– Система VIP-клуба
Вход в пользовательский профиль
Для доступа на сайт следует:
1. Перейти на лицензионный портал или рабочее зеркало
2. Выбрать “Вход”
3. Указать никнейм и код доступа
В индивидуальном разделе разрешены нижеперечисленные функции:
– Зачисление депозита
– Обналичивание выигрышей
– Просмотр истории операций
– Настройка личными данными
Mobile платформа и программа
Мобильная версия
Responsive модификация веб-сайта дает возможность развлекаться с всех мобильного устройства. Визуал самостоятельно подстраивается под диагональ screen.
Программа для download
Получить программу можно для:
– Android — прямая загрузка с портала
– iOS — загрузка через App Store
Выгоды приложения:
– Мгновенный доступ
– Бесперебойная операционность
– Push-оповещения об бонусах
– Производительный функционал
Развлекательные зоны
Барабаны
Разнообразная подборка игровых машин от известных поставщиков:
– Ретро слоты
– Новые-слоты
– Джекпот-автоматы
Live casino
Категория с профессиональными операторами обеспечивает:
– Рулетки
– 21
– Punto Banco
– Poker
Эфиры осуществляются в отличном разрешении, воссоздавая ощущение подлинного казино.
Методы пополнения и получения
Платформа работает с множественные транзакционные инструменты:
– Кредитные картсчета
– Цифровые платежи
– Crypto
– Wire транзакции
Наименьшие пороги депозита и быстрые выплаты делают развлечение крайне беспроблемной.
Команда support
Опытная отдел помощи работает 24/7 и может ассистировать с всеми вопросами:
– Живой-чат
– Email-поддержка
– Телефонная горячая линия
Выводы
Официальный портал казино и его рабочие альтернативные адреса дают клиентам защищенный и увлекательный развлекательный досуг. Выгодные бонусы, комфортная mobile модификация, обширные развлечения и превосходное live-казино формируют эту систему превосходным местом для гемблинг времяпрепровождения.
Технологии влияния совокупность психологических инструментов и методов (убеждение, манипуляция, реципрокность, авторитет), направленных на изменение поведения, мнений или решений людей.
https://tinyurl.com/233c37sr
Механизмы влияния: В отличие от внушения, действующего на подсознание, убеждение обращается к разуму и критическому мышлению, требуя осмысленного принятия информации.
https://tinyurl.com/28gclxl5
check the vendor hub – Content is well-structured and easy to read throughout.
Обзор официального веб-сайта
Передовые виртуальные казино предоставляют участникам обширный выбор развлечений и опций. Официальный портал [url=sanclar.com.br/kak-effektivno-igrat-v-onlayn-kazino-chtoby-vyigryvat-v-slotakh-v-2026-godu/]JVSpin казино[/url] обеспечивает безопасный доступ к гемблинг возможностям.
Актуальное зеркало: доступ на сегодня
Альтернативный адрес представляет как полную версию лицензионного портала. Проверенное зеркало дает возможность игрокам миновать вероятные запреты.
Выгоды применения зеркала
Принципиальные плюсы предполагают:
– Беспрерывный доступ к сайту
– Сохранение всех функций официального портала
– Безопасность персональных информации
– Идентичный инструментарий
Оформление профиля на платформе
Ход регистрации знаменуется доступностью и удобством. Новые клиенты должны:
1. Перейти на официальный ресурс или его зеркало
2. Выбрать на клавишу создания аккаунта
3. Заполнить нужные сведения
4. Валидировать электронную почту
5. Выполнить первый авторизацию
Вознаграждение за открытие счета
Новые игроки получают значительный вступительный презент. Данное поощрение в состоянии включать:
– Денежные суммы
– Бесплатные фриспины
– Повышенный уровень кэшбэка
Авторизация в личный аккаунт
Действующие участники в состоянии быстро зайти в свой профиль, эксплуатируя никнейм и ключ. Персональный профиль дает доступ к:
– Контролю балансом
– Хронологии операций
– Работающим подаркам
– Настройкам аккаунта
Призы и акции
Ресурс периодически устраивает многочисленные промо-кампании для пользователей.
Виды поощрений
Ключевые типы поощрений:
– Депозитные подарки – процент от объема пополнения
– Бесплатные вращения – безвозмездные раунды в автоматах
– Кэшбэк – отдача фрагмента утраченных средств
– Конкурсные вознаграждения – награды за выступление в состязаниях
Купоны
Особые промокоды позволяют заработать добавочные привилегии. Пользователи могут обнаружить их на партнерских ресурсах или взять в письмах.
Мобильная редакция и софт
Современные пользователи любят портативный геймплей.
Функции мобильной системы
– Адаптивный вид для всех аппаратов
– Полный возможность к развлечениям
– Моментальная функционирование
– Практичное использование
Загрузить программу
Портативное app доступно для скачивания на аппараты с рабочими платформами Android и iOS. Приложение гарантирует:
– Стабильную деятельность
– Всплывающие алерты о акциях
– Быстрый запуск к избранным автоматам
Гемблинг ассортимент
Платформа предлагает внушительную галерею азартных игр.
Аппараты
Коллекция игровых аппаратов охватывает:
– Обычные слоты
– Video слоты
– Прогрессивные машины
– Branded игры
Live дилеры
Область живых столов предлагает опцию соревноваться с реальными дилерами. Предложены:
– Рулетка
– Очко
– Baccarat
– Техасский холдем
Конкурсы
Регулярные чемпионаты дают возможность пользователям состязаться за значительные наградные банки. Турнирная система актуализируется еженедельно.
Финансовые операции
Сайт предоставляет обилие способов депозита и вывода денег:
– Дебетовые карточки
– Электронные платежные системы
– Межбанковские транзакции
– Bitcoin
Абсолютно все платежи производятся защищенно с задействованием передовых технологий защиты.
Отдел помощи
Компетентная команда помощи действует постоянно. Соединиться с специалистами можно через:
– Интерактивный чат
– Электронную почту
– Контактный номер
– Соц платформы
Секьюрити и лицензирование
Платформа функционирует на основании законной лицензии. Такое обеспечивает:
– Честность азартного действа
– Защиту индивидуальных данных
– Пунктуальные транзакции
– Ответственный гемблинг
Итог
Официальный сайт и его рабочие зеркала обеспечивают игрокам абсолютный набор возможностей для комфортной и прибыльной игры. Внушительные призы, всевозможные развлечения, квалифицированная поддержка и проверенная платформа выплат создают ресурс идеальным решением для ценителей гемблинг забав.
Вход к сайту через проверенные зеркала
Передовые онлайн казино дают игрокам бесперебойный доступ к развлечениям. Официальный сайт https://mycourse.my/osnovnye-metody-vozvrata-sredstv-v-tinkoff/ действует стабильно, обеспечивая широкий ассортимент гемблинг игр. Но иногда появляются системные проблемы или блокировки, в связи с чем критично знать о существовании действующих зеркал.
Что означает из себя основное зеркало казино
Зеркало — это полная дубликат главного веб-сайта с таким же набором функций. Функционирующее зеркало на данный момент позволяет преодолевать региональные ограничения и вести игру.
Основные преимущества применения зеркал:
– Абсолютный вход к персональному кабинету
– Поддержание всех показателей учётной записи
– Схожий набор игр
– Действующие бонусы и промо
Регистрация на портале
Процесс создания аккаунта требует пару минут. Свежие геймеры зарабатывают щедрый бонус за запись, что в состоянии содержать:
– Начальный игровой кредит
– Безвозмездные вращения для машин
– Специальные ваучеры
– Увеличенный кэшбек
Для финализации записи необходимо:
1. Перейти на центральный портал или альтернативу
2. Нажать опцию «Создать аккаунт»
3. Указать персональные данные
4. Заверить почтовый адрес или мобильный
5. Задействовать купон (когда имеется существовании)
Доступ в индивидуальный кабинет
Вслед за успешной записи пользователи способны осуществлять доступ через официальный портал или рабочее зеркало. Собственный кабинет даёт безграничный надзор над учётной записью:
– История ставок
– Пополнение счёта
– Изъятие средств
– Регулирование наградами
– Присутствие в соревнованиях
Привилегии и промо казино
Портал балует пользователей разнообразными наградными программами:
Вступительные призы
Начинающие получают богатый комплект бонусов на вступительные вклады. Обычно это предполагает частичную доплату к сумме пополнения плюс комплиментарные фриспины.
Периодические акции
– Каждонедельный кешбэк до 15%
– Состязания с наградными пулами
– Поощрения на число рождения
– Особые акции для привилегированных пользователей
Система верности
Регулярные игроки получают пункты, они возможно конвертировать на настоящие средства или особые бонусы.
Портативная версия и приложение
Современные разработки дают возможность геймить всюду подходяще. Мобильная версия веб-сайта самостоятельно подстраивается под монитор всякого устройства.
Достоинства мобильного ПО:
– Моментальная запуск игр
– Удобный вид
– Всплывающие-оповещения о бонусах
– Опция установить для Android и iOS
Live казино: антураж подлинного азартного заведения
Категория Live игорного дома переносит клиентов в атмосферу реального азартного заведения. Квалифицированные ведущие организуют действие в состоянии реального времени.
Представленные варианты:
– Колесо фортуны
– Блэкджек
– Карточная игра
– Карты
Слоты и азартные слоты
Собрание гемблинг машин включает тысячи вариантов от ведущих студий. Произвольный клиент подберёт развлечение по желанию:
– Винтажные барабаны
– Современные автоматы с специальными уровнями
– Прогрессивный-игры
– Многолинейные автоматы
Соревнования и акции
Систематические турниры вносят остроту и предоставляют опцию получить значительные призы. Вовлечение в турнирах нередко даровое, а выигрышные банки доходят до значительных сумм.
Безопасность и секретность
Платформа эксплуатирует инновационные протоколы криптографии для защиты информации игроков. Все финансовые операции проходят через охраняемые каналы.
Резюме
Главный сайт и его актуальные зеркала предоставляют безопасный вход к отличным азартным развлечениям. Привлекательные поощрения, практичная смартфонная вариант, многообразие автоматов и квалифицированное Live-клуб создают ресурс прекрасным решением для любителей развлекательных игр.
seo продвижение сайта по трафику seo продвижение сайта по трафику .
Передовые онлайн казино дают пользователям огромный ассортимент опций для приятной игры. Впрочем иногда подключение к главному сайту может стать закрытым. В таких ситуациях на подмогу приходят 777 Планет казино, которое гарантирует бесперебойный вход ко всем опциям платформы.
Что такое действующее зеркало казино
Альтернативный сайт — это точная версия лицензионного портала, которая хостится по альтернативному URL. Зеркало поддерживает весь возможности первоначального портала, включая персональный кабинет, депозит и данные транзакций.
Главные плюсы использования зеркала:
– Постоянный вход к платформе
– Максимальная идентичность инструментов
– Безопасность индивидуальных данных
– Хранение существующих привилегий
Как отыскать рабочее зеркало сегодня
Присутствует ряд безопасных методов нахождения действующей ссылочной информации:
Авторизованные ресурсы:
1. Почтовая рассылка — администрация регулярно отправляет информацию с рабочими URL
2. Социальные сети — легитимные аккаунты публикуют текущую новости
3. Служба поддержки — операторы предоставляют безопасные адреса
4. Телефонное приложение — позволяет избегать блокировки
Создание аккаунта на лицензионном ресурсе
Этап регистрации длится лишь немного минут и включает из данных этапов:
1. Переход на официальный портал или функционирующее зеркало
2. Выбор на кнопку «Регистрация»
3. Внесение регистрационной формы
4. Верификация электронной почты или сотового номера
5. Применение поощрения за регистрацию при доступности промокода
Свежие пользователи приобретают великодушный стартовый подарок, который может охватывать фриспины, монетарные бонусы или компенсацию.
Логин в личный кабинет
Вход на ресурсе осуществляется стандартным методом. Нужно указать логин и секретный ключ, примененные при регистрации.
Существенные моменты для безопасного входа:
– Применяйте защищенный секретный ключ
– Активируйте двойную идентификацию
– Не фиксируйте данные на публичных гаджетах
– Отслеживайте URL строку браузера
Обзор премиальной программы
Игровая платформа одаривает пользователей разнообразными вознаграждениями и акциями:
Вступительный букет
Свежие игроки вправе рассчитывать на великодушное бонус за дебютный вклад. Обычно это пропорциональная премия к переведенной объему плюс free spins для популярных слотов.
Регулярные кампании
– Недельный кэшбек — возвращение части потерянных средств
– Бонусы на очередные депозиты
– Эксклюзивные промо по праздникам
– Состязания с значительными выигрышными пулами
План лояльности
Активные пользователи зарабатывают очки за каждую раунд, которые затем превращаются на фактические средства, бесплатные вращения или эксклюзивные бонусы.
Кодовые слова: как применять
Бонус-коды — это особые наборы букв и цифр, обеспечивающие привилегию к специальным бонусам.
Откуда найти рабочие промокоды:
– Легитимные социальные сети казино
– Партнерские площадки
– Email-рассылка
– Отраслевые сообщества
Вводится промокод в предназначенное поле при регистрации или внесении депозита баланса.
Портативная версия и приложение
Актуальные игроки любят проводить время с портативных гаджетов. Платформа предлагает двойной метода для беспроблемной телефонной игры.
Адаптивная версия
Веб версия сама подстраивается под диагональ экранной панели. Не просит скачивания и оперирует в всяком новом браузере.
Телефонное приложение
Скачать софт можно для девайсов на Android и iOS. Преимущества app:
– Быстрая открытие
– Устойчивая работа
– Мгновенные-уведомления о промо
– Самостоятельный обход блокировок
Процедура загрузки элементарен: требуется зайти на веб-сайт с смартфонного девайса и придерживаться предписаниям.
Азартный каталог
Каталог развлечений содержит несколько тысяч наименований от ведущих поставщиков.
Слоты
Гемблинг аппараты — самая любимая группа развлечений. Показаны обычные простые автоматы, современные мультимедийные слоты с дополнительными стадиями, а также накопительные джекпоты.
Live казино
Секция с настоящими дилерами предоставляет ощутить антураж истинного казино. Имеются игры с рулеткой.
Вещание осуществляется в высоком четкости, поддерживается общение с крупье и прочими пользователями.
Состязания
Постоянно устраиваются турниры по различным слотам. Вступление обеспечивает возможность заработать финансовые призы, даровые прокруты или особые бонусы.
Транзакционные процедуры
Платформа обеспечивает значительный набор платежных систем:
– Дебетовые карты
– Онлайн кошельки
– Криптовалюта
– Финансовые транзакты
Минимальная сумма взноса — посильная для большинства игроков. Получение призов выполняется в кратчайшие временные рамки.
Департамент поддержки
Компетентные консультанты настроены помочь 24/7. Имеются следующие каналы общения:
– Интернет-чат
– Email
– Голосовая связь
– Медийные сети
Пояснения на типовые запросы можно обнаружить в блоке FAQ.
Заключение
Главный ресурс казино и его рабочие зеркала дают пользователям абсолютный путь ко всем возможностям платформы. Щедрые вознаграждения, практичная телефонная версия, колоссальный коллекция слотов и опытная помощь превращают азартный досуг максимально приятным и безопасным.
Хочу выделить материал про Логические головоломки: быстрое двухходовое решение.
Вот, делюсь ссылкой:
https://udobno77.ru/%D0%B1%D0%B5%D0%B7-%D1%80%D1%83%D0%B1%D1%80%D0%B8%D0%BA%D0%B8/golovolomki-na-logiku-v-dva-hoda-neochevidnye-zadachi-s-resheniyami-i-razborom/
Характеристика официального веб-сайта
Актуальное онлайн-казино обеспечивает своим пользователям обширный ассортимент возможностей и поощрений. Главный ресурс https://hostelincoralpark.com/platformy-dlya-pokera-s-ispolzovaniem-sistemy работает круглосуточно, гарантируя путь к популярным слотам, live-казино и обширным промо.
Актуальное зеркало: путь к платформе
Что такое копия казино
Копия составляет собой абсолютную дубликат главного сайта с альтернативным интернет названием. Рабочее зеркало позволяет пользователям избегать ограничения и сохранять постоянный доступ к любимым играм.
Как получить актуальное зеркало сегодня
Свежие адреса на официальное зеркало публикуются через:
– Почтовую рассылку
– Проверенные медийные сети
– Сервис помощи
– Affiliated ресурсы
Регистрация на сайте
Процесс оформления
Созданиеаккаунта занимает всего минут и подразумевает следующие стадии:
1. Доступ на оригинальный портал или актуальное зеркало
2. Клик кнопки “Регистрация”
3. Заполнение контактных реквизитов
4. Проверка аккаунта или контакта
5. Создание секретнойкомбинации
Подарок за созданиеаккаунта
Свежие игроки получают щедрые вступительные подарки:
– Игровые суммы на кошелек
– Халявныеспины для симуляторов
– Повышенный объем кэшбека
– Уникальные коды
Авторизация в личный счет
Действующие клиенты способны выполнить доступ через оригинальный веб-сайт или действующее зеркало. Для этого следует внести никнейм и пароль, установленные при регистрации.
Возможности индивидуального профиля
В персональном профиле доступны основные возможности:
– Редактирование контактными сведениями
– Зачисление баланса
– Вывод средств
– Активация промокодов
– Проверка истории ставок
– Участие в состязаниях
Бонусы и акции
Категории бонусов
Казино балует своих клиентов разнообразными поощрительными программами:
– Приветственный комплект — щедрые бонусы на начальные пополнения
– Freespins — экстра спины в популярных играх
– Кешбэк — еженедельный возврат процента проигрышей
– Система VIP — уникальные бонусы для верных клиентов
Ваучеры и их использование
Особые ваучеры предоставляют бонусные вознаграждения. Для ввода требуется набрать код в определенное графу в собственном кабинете.
Игровой набор
Симуляторы
Библиотека развлекательных симуляторов вмещает массу названий от топовых производителей:
– Классические автоматы
– Современные игры
– Джекпот игры
– Сюжетные слоты
Live казино
Зона Live-казино предоставляет взаимодействие с реальными дилерами в формате реального трансляции:
– Французскаярулетка
– Блэкджек
– Пунтобанко
– Техасскийхолдем
Состязания
Постоянные состязания с солидными наградными пулами проходят регулярно. Игроки соревнуются за лидерство в турнирнойсетке.
Мобильная адаптация и APP
Адаптивная адаптация портала
Оригинальный ресурс полностью приспособлен для мобильных устройств. Клиенты способны пользоваться игры напрямую через браузер без потребности скачивания.
APP для инсталляции
Авторское карманное приложение предлагается для получения на устройства с базовыми платформами Android и iOS. APP гарантирует:
– Мгновенный доступ к развлечениям
– Надежную работу
– Моментальные-извещения о промо
– Простой навигацию
Вывод
Оригинальный веб-сайт казино и его актуальные дубликаты дают игрокам полный путь к отличным геймплейным услугам. Щедрые вознаграждения, разнообразные кампании, функциональная смартфонная версия и опытная помощь превращают развлекательный процесс крайне приятным и доходным.
visit their store – Minimalist design, navigation feels effortless and simple.
Читать далее vodkabet
https://www.rueanmaihom.net/forum/room/39/%E0%B8%A3%E0%B8%B1%E0%B8%9A%E0%B8%9C%E0%B8%A5%E0%B8%B4%E0%B8%95%E0%B8%AA%E0%B8%B4%E0%B8%99%E0%B8%84%E0%B9%89%E0%B8%B2%E0%B8%95%E0%B8%B2%E0%B8%A1%E0%B8%AD%E0%B8%AD%E0%B9%80%E0%B8%94%E0%B8%AD%E0%B8%A3%E0%B9%8C
vdcasino resmi giriş: vdcasino
Outlet Market – Found this page unexpectedly, layout is tidy and navigation is simple.
куркрыло Куркрыло — это не просто еда, это настоящее кулинарное приключение, которое подарит вам гастрономическое удовольствие.
deneme bonusu veren casino siteleri casino siteleri
my website high Stakes Game
Emporium Treasures – Stumbled upon this page, navigation works well and reading is effortless.
Переход к сайту через проверенные зеркала
Передовые виртуальные казино гарантируют клиентам бесперебойный подключение к услугам. Центральный сайт https://memofix.it/dostup-k-ofitsialnomu-saytu-1xbet-osushchestvlyaetsya-cherez-aktualnoe-zerkalo/ работает бесперебойно, гарантируя широкий спектр азартных автоматов. Однако временами возникают программные сложности или запреты, следовательно критично знать о существовании действующих зеркал.
Что является собой центральное зеркало казино
Дубликат — это полная реплика центрального сайта с схожим возможностями. Рабочее зеркало в настоящее время позволяет избегать локальные блокировки и поддерживать игру.
Основные плюсы эксплуатации зеркал:
– Полный доступ к личному кабинету
– Сохранение всех показателей аккаунта
– Аналогичный набор слотов
– Актуальные вознаграждения и промо
Регистрация на портале
Операция оформления отнимает пару минут. Начинающие геймеры получают щедрый подарок за регистрацию, который имеет возможность охватывать:
– Вступительный денежный кредит
– Комплиментарные вращения для автоматов
– Особые коды
– Увеличенный возврат
С целью финализации создания аккаунта необходимо:
1. Перейти на главный сайт или альтернативу
2. Кликнуть опцию «Создать аккаунт»
3. Ввести персональные реквизиты
4. Заверить email или контакт
5. Активировать промокод (когда имеется существовании)
Подключение в личный кабинет
После правильной записи пользователи способны осуществлять авторизацию посредством основной портал или рабочее зеркало. Индивидуальный кабинет обеспечивает абсолютный надзор над профилем:
– Летопись ставок
– Внесение депозита
– Получение призов
– Регулирование наградами
– Участие в турнирах
Бонусы и акции казино
Платформа балует клиентов разнообразными привилегированными предложениями:
Приветственные бонусы
Дебютанты приобретают щедрый комплект бонусов на стартовые взносы. Обычно это содержит пропорциональную добавку к сумме депозита плюс даровые фриспины.
Регулярные акции
– Раз в неделю кешбэк до 15%
– Конкурсы с призовыми суммами
– Бонусы на день рождения
– Специальные программы для элитных клиентов
План верности
Постоянные пользователи собирают баллы, они разрешено конвертировать на настоящие финансы или уникальные преимущества.
Портативная редакция и программа
Актуальные решения обеспечивают играть везде угодно. Мобильная версия сайта автоматически приспосабливается под монитор всякого аппарата.
Плюсы мобильного программы:
– Скоростная открытие игр
– Практичный облик
– Мгновенные-уведомления о бонусах
– Опция загрузить для Android и iOS
Настоящее казино: атмосфера реального гемблинг дома
Раздел Live клуба погружает игроков в среду подлинного азартного дома. Квалифицированные операторы ведут действие в состоянии актуального времени.
Предлагаемые варианты:
– Американская рулетка
– Карточная игра
– Классика
– Покер
Игровые машины и развлекательные слоты
Коллекция гемблинг машин насчитывает тысячи наименований от передовых разработчиков. Всякий клиент отыщет слот по желанию:
– Классические автоматы
– Инновационные игры с бонусными турами
– Накопительный-автоматы
– Мегавейс машины
Состязания и розыгрыши
Регулярные соревнования привносят адреналин и открывают опцию выиграть значительные награды. Вовлечение в конкурсах часто комплиментарное, а премиальные пулы достигают крупных сумм.
Секьюрити и конфиденциальность
Сайт применяет актуальные технологии шифрования для защиты данных игроков. Все платёжные процедуры проходят через защищённые каналы.
Заключение
Основной сайт и его актуальные зеркала дают надёжный переход к первоклассным азартным играм. Щедрые призы, эргономичная смартфонная вариант, разнообразие игр и высококлассное Live-казино превращают сайт превосходным опцией для фанатов развлекательных игр.
топ seo компаний топ seo компаний .
Нынешние онлайн-казино обеспечивают геймерам широкий ассортимент возможностей для удобной времяпрепровождения. Переход к сервису казино Beton выполняется через лицензионный домен или функционирующее зеркало.
Что такое функционирующее зеркало казино
Функционирующее зеркало — это дополнительный линк официального портала казино. Такие копии разрабатываются для предоставления непрерывного доступа к игровой платформе.
Зеркало сегодня абсолютно копирует характеристики основного сайта. Клиенты имеют аналогичный путь ко всем возможностям, включая регистрацию, зачисление средств баланса и вывод денег.
Регистрация на официальном портале
Механизм регистрации занимает всего буквально моментов. Будущим клиентам требуется:
1. Войти на основной домен или актуальное официальное зеркало
2. Кликнуть кнопку “Зарегистрироваться”
3. Заполнить требуемые реквизиты
4. Верифицировать e-mail почту
5. Применить бонусный код при существовании
После окончания оформления участник обретает приз за регистрацию, который может охватывать free spins или cash вознаграждение.
Вход в персональный кабинет
Персональный кабинет — это охраняемая зона, где игроки вправе управлять своим учетной записью. Для авторизации необходимо внести имя пользователя и пароль.
В персональном кабинете имеются данные инструменты:
– Просмотр записей операций
– Применение бонусных кодов
– Управление призами
– Присоединение в турнирах
– Проверка возврата средств
– Корректировка учетной записи
Призы и предложения
Азартная площадка обеспечивает привлекательные бонусы:
Начальный пакет — начинающие получают существенное поощрение на первые взносы.
Free spins — предоставляются как при регистрации, так и в контексте многочисленных мероприятий.
Возврат средств — систематический рефанд фрагмента проигранных средств.
Коды активации — уникальные шифры, предоставляющие доступ к особым предложениям.
Обзор развлекательных секций
Слоты
Ассортимент слотов насчитывает массу игр от топовых производителей. Пользователи обнаружат как традиционные аппараты, так и современные видео-слоты с увлекательной оформлением.
Live казино
Категория Live казино предоставляет право развлекаться с живыми дилерами в режиме реального времени. Имеются популярные варианты: рулетка, блэкджек, баккара, покер.
Состязания
Постоянные соревнования с крупными наградными банками притягивают тысячи участников. Чемпионы получают финансовые призы и особые премии.
Мобильная версия и приложение
Адаптивная версия портала обеспечивает участвовать с каждого гаджета. Оформление самостоятельно подстраивается под формат экрана.
Скачать app можно для аппаратов на Android и iOS. Телефонное приложение обладает всеми функциями полной версии.
Как найти актуальное зеркало на данный момент
Свежие линки альтернатив периодически обновляются. Обнаружить свежую линк можно многими способами:
– Через сервис техподдержки
– В официальных коммуникационных сетях
– По почтовой подписке
– На тематических сайтах
Охрана и лицензирование
Основной ресурс работает на основании глобальной разрешения. Все транзакции оберегаются передовыми системами защиты.
Анонимность персональных сведений гарантируется в абсолютном объеме.
Заключение
Лицензионный ресурс и его действующие копии обеспечивают клиентам круглосуточный доступ к первоклассным гемблинговым сервисам. Выгодные вознаграждения, многочисленные автоматы, компетентная поддержка — все это превращает игровой процесс предельно беспроблемным и увлекательным.
browse snowstone – Layout is neat, making content easy to follow.
сео портала увеличить трафик специалисты prodvizhenie-sajtov-po-trafiku10.ru .
как купить сайт kak-prodat-sajt.ru .
контекстная реклама статьи контекстная реклама статьи .
Описание оригинального портала
Современное онлайн-казино дарит своим игрокам разнообразный набор возможностей и вознаграждений. Официальный портал Дракон Мани функционирует 24/7, давая доступ к известным симуляторам, live-казино и разнообразным акциям.
Рабочее зеркало: путь к платформе
Что такое альтернатива казино
Копия представляет собой полную копию основного портала с другим URL адресом. Рабочее зеркало дает клиентам обходить запреты и обеспечивать постоянный подключение к выбранным развлечениям.
Как найти действующее зеркало сегодня
Действующие линки на главное зеркало появляются через:
– Электронную оповещение
– Официальные медийные сети
– Команду поддержки
– Тематические площадки
Регистрация на ресурсе
Этапы оформления
Открытиесчета длится буквально минут и подразумевает нижеследующие шаги:
1. Вход на официальный веб-сайт или актуальное зеркало
2. Клик клавиши “Регистрация”
3. Ввод личных сведений
4. Подтверждение email или телефона
5. Установка кодадоступа
Подарок за оформление
Первые пользователи обретают солидные приветственные бонусы:
– Денежные средства на аккаунт
– Халявныеспины для автоматов
– Увеличенный объем компенсации
– Уникальные промокоды
Авторизация в персональный аккаунт
Постоянные пользователи вправе произвести логин через оригинальный ресурс или текущее зеркало. Для этого следует указать имяпользователя и код, придуманные при оформлении.
Возможности индивидуального аккаунта
В индивидуальном профиле предоставлены основные возможности:
– Редактирование учетными сведениями
– Ввод кошелька
– Снятие средств
– Активация промокодов
– Отслеживание архива транзакций
– Включение в турнирах
Подарки и промо
Типы поощрений
Казино радует своих пользователей разнообразными поощрительными системами:
– Стартовый комплект — выгодные вознаграждения на стартовые вклады
– Бесплатныевращения — подарочные спины в популярных автоматах
– Возврат — систематический компенсация доли убытков
– Программа лояльности — уникальные преимущества для верных участников
Коды и их ввод
Уникальные промокоды дают бонусные поощрения. Для активации необходимо ввести код в соответствующее раздел в личном кабинете.
Азартный ассортимент
Автоматы
Коллекция слотовых машин вмещает множество вариантов от ведущих поставщиков:
– Традиционные слоты
– Видео развлечения
– Джекпот игры
– Сюжетные слоты
Live казино
Раздел Live-казино предлагает игру с живыми дилерами в формате актуального стрима:
– Американскаярулетка
– Блэкджек
– Пунтобанко
– Casinopoker
Состязания
Систематические конкурсы с крупными наградными фондами проходят еженедельно. Соревнующиеся конкурируют за лидерство в турнирнойсетке.
Mobile реализация и программа
Адаптивная адаптация ресурса
Официальный ресурс полностью оптимизирован для портативных устройств. Игроки вправе пользоваться слоты непосредственно через браузер без нужды установки.
Приложение для инсталляции
Фирменное карманное APP доступно для получения на гаджеты с операционными средами Android и iOS. Программа гарантирует:
– Моментальный доступ к играм
– Бесперебойную функциональность
– Оперативные-оповещения о предложениях
– Интуитивный оформление
Заключение
Оригинальный веб-сайт казино и его рабочие альтернативы предоставляют пользователям абсолютный возможность к отличным геймплейным услугам. Солидные вознаграждения, различные кампании, удобная адаптивная платформа и квалифицированная поддержка превращают развлекательный опыт максимально enjoyable и прибыльным.
посетить сайт
Emotions and quality together!
лучшие суши мск лучшие суши мск .
мелбет кз слоты на деньги http://melbet39518.help
https://puff-nl.com
Передовые онлайн-казино гарантируют геймерам обилие опций для удобной игры. Центральный веб-портал channelcoastcorp.com обеспечивает вход ко всем функциям и развлечениям. Однако при образовании программных проблем на выручку спешат действующие копии.
Что являет собой собой актуальное зеркало
Дубликат казино — это идентичная реплика главного ресурса, размещенная по альтернативному доменному имени. Легитимное зеркало сохраняет все характеристики, вместе с открытие профиля, вход в собственный кабинет, бонусы и кодовые слова.
Альтернативный сайт на сегодня предоставляет:
– Постоянный вход к азартным автоматам
– Совершенную сохранность индивидуальных сведений
– Удержание баланса и журнала платежей
– Применимость всех акций
Регистрация на основном ресурсе
Процедура создания аккаунта занимает считанные минут. Новым пользователям нужно:
1. Перейти на главный ресурс или функционирующее зеркало
2. Нажать кнопку «Зарегистрироваться»
3. Заполнить запрашиваемые поля
4. Верифицировать э-мейл почту
5. Указать бонусный код при существовании
После конца создания аккаунта клиенты получают вознаграждение за регистрацию, что может охватывать фриспины или денежное поощрение.
Авторизация в персональный кабинет
Персональный кабинет обеспечивает полный мониторинг над игровым процессом. Через собственный кабинет возможно:
– Финансировать депозит
– Забирать выплаты
– Использовать кодовые слова
– Мониторить записи игр
– Принимать участие в состязаниях
– Приобретать кешбэк
Обзор премий и промо-предложений
Богатая премиальная схема — существенное плюс проекта. Ключевые формы премий:
Начальный приз
Новички обретают щедрое награду на начальные пополнения. Сумма бонуса может достигать 100-200% от объема пополнения.
Free spins
Даровые спины выдаются для востребованных автоматов. Число бесплатных вращений варьируется от 10 до 500 штук.
Возврат средств
Систематический или ежемесячный компенсация части потерянных средств. Стандартный объем компенсации — 5-15%.
Турниры
Периодические состязания с солидными премиальными банками. Участники конкурируют за призовые строчки в турнирной таблице.
Смартфонная версия и программа
Адаптивная версия обеспечивает развлекаться с каждого девайса. Геймеры могут закачать app для iOS и Android или задействовать браузерную версию.
Выгоды портативного программы:
– Молниеносная прогрузка слотов
– Эргономичный интерфейс
– Push-уведомления о поощрениях
– Доступ через биометрию
Игровые автоматы и Live казино
Развлекательная подборка насчитывает тысячи названий от лидирующих провайдеров.
Популярные категории игр:
– Обычные слоты
– Видеослоты с премиальными раундами
– Джекпот игры
– Megaways слоты
Live игорный зал
Секция live игорный зал предлагает партию с живыми крупье. Представлены классические варианты:
– Европейская рулетка
– Блэкджек
– Punto Banco
– Карибский покер
Как найти актуальное зеркало
Найти действующую адрес на зеркало возможно множественными способами:
1. Зарегистрироваться на email-рассылку
2. Отслеживать за обновлениями в соц сетях
3. Контактировать в сервис поддержки
4. Запомнить действующее зеркало в закладки
Заключение
Официальный портал и его актуальные альтернативные адреса обеспечивают бесперебойный вход к игровым слотам. Выгодные вознаграждения, различные бонусные коды, комфортное портативное приложение и качественная служба поддержки делают развлекательный геймплей максимально удобным и безопасным.
Актуальные онлайн-казино предоставляют игрокам разнообразный ассортимент азартных игр и щедрые поощрения. Впрочем для беспроблемной времяпрепровождения важно осознавать, как отыскать http://artesanico.org/zakhod-na-ofitsialnyy-sayt-1xbet-osushchestvlyaetsya-cherez-aktualnoe-zerkalo и его актуальные зеркала.
Что такое главный портал казино
Основной портал казино — это базовая площадка, где участники могут пользоваться развлекательными автоматами. Сайт действует на официальных основаниях и располагает всеми нужными лицензиями.
Первостепенные плюсы лицензионного портала:
– Конфиденциальность персональных сведений
– Прозрачные правила работы
– Обеспеченные выводы
– Оперативная служба поддержки
Действующее зеркало казино: для чего используется
Альтернативный адрес — это идентичная версия главного портала, находящаяся по другому домену. Рабочее зеркало создается для поддержания бесперебойного доступа к платформе.
Причины использования дублирующих ресурсов:
– Запрет первичного URL
– Регламентные процедуры
– Высокая нагрузка на ресурс
Как найти свежее зеркало в данный момент
Узнать актуальное официальное зеркало можно множественными вариантами:
1. Рассылка — подпишитесь на email подписку
2. Департамент support — обратитесь в онлайн-чат
3. Официальные площадки — следите за новостями
4. Специализированные ресурсы — авторитетные ресурсы
Оформление профиля на ресурсе казино
Процесс регистрации занимает буквально считанные моментов:
1. Кликните на кнопку “Зарегистрироваться”
2. Введите необходимые информацию
3. Активируйте электронную ящик
4. Активируйте код активации, если имеется
По завершении оконченной оформления вам откроется открыт личный кабинет.
Премии и промокоды
Выгодная поощрительная политика — ключевое плюс казино:
Бонус за открытие счета
Первичные игроки получают начальный поощрение, который может охватывать:
– Финансовый депозит на дебютный взнос
– Фри-спины для автоматов
– Стартовые деньги
Купоны
Периодически появляются эксклюзивные коды, дающие возможность использовать специальные преимущества.
Механизм возврата средств
Постоянные клиенты возвращают порцию проигранных финансов на счет.
Действующие предложения и соревнования
Казино систематически устраивает азартные промо-мероприятия:
– Weekly баттлы
– Тематические промо
– Раздачи ценных подарков
– Схема привилегий
Логин в индивидуальный аккаунт
Для входа на сайт следует:
1. Загрузить лицензионный ресурс или функционирующее зеркало
2. Выбрать “Login”
3. Внести никнейм и код доступа
В пользовательском разделе открыты такие инструменты:
– Зачисление баланса
– Вывод призов
– Проверка истории игр
– Изменение персональными данными
Mobile модификация и программа
Mobile платформа
Responsive версия ресурса предоставляет шанс играть с любого портативного устройства. Дизайн самостоятельно настраивается под габариты дисплея.
App для установки
Получить клиент можно для:
– Android — безопасная загрузка с портала
– iOS — загрузка через App Store
Преимущества app:
– Моментальный вход
– Надежная производительность
– Push-сообщения об промо
– Оптимизированный UI
Азартные разделы
Автоматы
Обширная галерея эмуляторных барабанов от топовых производителей:
– Стандартные автоматы
– Новые-автоматы
– Накопительные-автоматы
Live зал
Раздел с профессиональными дилерами предлагает:
– Рулетки
– Blackjack
– Мини-баккара
– Покер
Стримы осуществляются в отличном качестве изображения, создавая впечатление реального казино.
Системы депозита и получения
Платформа обслуживает множественные финансовые сервисы:
– Платежные средства
– Онлайн кошельки
– Криптовалюты
– Прямые транзакции
Наименьшие лимиты взноса и моментальные выводы делают времяпрепровождение крайне беспроблемной.
Департамент помощи
Опытная группа помощи работает 24/7 и готова помочь с разными вопросами:
– Мгновенный-чат
– Email-поддержка
– Звонковая горячая линия
Выводы
Лицензионный сайт казино и его функционирующие альтернативные адреса обеспечивают пользователям защищенный и интересный развлекательный процесс. Богатые награды, функциональная mobile модификация, многочисленные развлечения и превосходное live-казино превращают эту площадку превосходным местом для игровых времяпрепровождения.
Discover this warehouse – Just found the website; the layout keeps items clear and easy to find.
learn more here – Layout is neat, scrolling between sections feels smooth.
buy lasix usa https://alpharms.shop/# purchase furosemide
https://kostopilnews.com/dyvovyzhni-fakty-pro-konopli-shho-vy-ne-znaly/
Для закрытых помещений чаще всего рассматривают генетику категории indoor, которая хорошо адаптирована к контролируемым условиям.
Юрий Диков, специалист по пластике груди
суши недорого суши недорого .
индивидуальные размеры зип лок пакета с бегунком Наши zip lock пакеты eva с бегунком и прозрачные зип лок пакеты c бегунком отличаются повышенной прочностью и долговечностью, а плотные зип лок пакеты с бегунком идеально подойдут для упаковки более тяжелых предметов.
https://kupit-schetchik.ru/
Современные онлайн-казино дают клиентам обширный набор игр и премиальных предложений. Подключение к платформе реализуется через основной сайт или его функционирующее зеркало Голд казино казино, что предоставляет бесперебойную игру.
В чем суть рабочее зеркало казино
Альтернатива — это точная копия официального веб-сайта, построенная для обхода блокировок. Зеркало сегодня помогает клиентам иметь соединение к выбранным слотам в любое удобное время.
Проверенное зеркало имеет всеми возможностями главного ресурса:
– Весь список развлечений
– Учетная запись с внесенными информацией
– Действующие бонусы
– Надежные денежные процедуры
Оформление профиля на главном веб-сайте
Процедура создания аккаунта отнимает всего считанные минут. Первым клиентам нужно:
1. Войти на главный сайт или актуальное зеркало
2. Кликнуть на ссылку “Открыть счет”
3. Указать необходимые данные
4. Верифицировать контакт
5. Совершить начальный взнос
Бонус за регистрацию начисляется моментально после прохождения всех ступеней.
Доступ в профиль
Созданные участники могут осуществить доступ вводя:
– Учетное имя и шифр
– Данные телефона
– Email
Личный кабинет дает шанс к управлению средствами, сведениям ставок и активным бонусам.
Поощрения и предложения
Гемблинг платформа балует регулярных клиентов многочисленными призами:
Приветственный пакет
– Бонус на начальный платеж до 100%
– Free spins на известные слоты
– Добавочные поощрения за очередные депозиты
Бонусные коды
Специальные купоны предоставляют шанс на получение уникальных призов. Текущие комбинации публикуются в секции “Акции”.
Кешбэк
Еженедельный бонус насчитывает до 10% от утраченных финансов. Компенсация начисляется сразу.
Схема лояльности
Верные пользователи зарабатывают баллы, которые переводятся на настоящие средства или фриспины.
Адаптивный портал и APP
Ради комфорта участников построена полноценная мобильная версия. Адаптивный интерфейс обеспечивает беспрепятственно развлекаться с каждого мобильного девайса.
Достоинства APP:
– Оперативный подключение к развлечениям
– Оптимизированный дизайн
– Устойчивая функциональность
– Push-уведомления о новых бонусах
Загрузить приложение можно безвозмездно с основного веб-сайта для девайсов на Android и iOS.
Библиотека развлечений
Машины
База вмещает более 2000 машин от известных провайдеров:
– Классические игры
– Видео-слоты
– Слоты с джекпотом
– Фирменные развлечения
Live казино
Блок Live столов обеспечивает развлечение с подлинными крупье в онлайн эфире:
– Roulette
– Blackjack
– Punto Banco
– Покер
Турниры
Систематические состязания с большими премиальными пулами запускаются каждую неделю. Присоединение в соревнованиях открыто всем действующим игрокам.
Денежные методы
Депозиты и выводы выплат выполняются через популярные методы:
– Платежные карточ ки
– Электронные сервисы
– Цифровая валюта
– Счетные переводы
Минимальный вклад — от 100 рублей. Получение денег обрабатывается в течение 24 часов.
Команда support
Круглосуточная группа support расположена содействовать в разрешении всех вопросов:
– Мессенджер
– Email
– Телефон
– Соц сети
Защита и документ
Официальный веб-сайт оперирует на базе международной документа. Любые сведения игроков защищены современным SSL-кодированием.
Заключение
Актуальное зеркало предоставляет бесперебойный доступ к излюбленным автоматам, богатым промокодам и практичным функциям. Присоединяйтесь немедленно и получите первый поощрение!
forex expert advisor
zentrotech – Loved the layout today; clean, simple, and genuinely user-friendly overall.
Современные онлайн-казино обеспечивают игрокам внушительный ассортимент игр и бонусных опций. Подключение к ресурсу производится через официальный сайт или его действующее зеркало http://www.debuglab.net/2026/03/04/sposoby-oplaty-v-kazino-2026-predstavleny-cherez-platezhnye-sistemy/, что гарантирует постоянную активность.
В чем суть актуальное зеркало казино
Зеркало — это идентичная копия главного сайта, построенная для преодоления запретов. Актуальное зеркало дает возможность пользователям получить соединение к предпочитаемым слотам в произвольное время.
Проверенное зеркало обладает всеми возможностями оригинального веб-сайта:
– Целый список слотов
– Аккаунт с внесенными информацией
– Свежие бонусы
– Безопасные финансовые действия
Открытие счета на лицензионном сайте
Алгоритм создания аккаунта занимает всего пару минут. Первым клиентам следует:
1. Зайти на проверенный веб-сайт или актуальное зеркало
2. Кликнуть на элемент “Зарегистрироваться”
3. Ввести требуемые данные
4. Верифицировать адрес
5. Сделать стартовый взнос
Стартовый бонус предоставляется автоматически после окончания всех стадий.
Доступ в профиль
Существующие участники могут осуществить доступ вводя:
– Имя пользователя и пароль
– Код мобильного
– Email
Аккаунт предоставляет шанс к контролю счетом, сведениям ставок и доступным бонусам.
Поощрения и кампании
Развлекательная платформа привлекает лояльных игроков многочисленными бонусами:
Стартовый бонус
– Поощрение на дебютный платеж до 100%
– Free spins на востребованные слоты
– Особые поощрения за последующие платежи
Бонусные коды
Уникальные ваучеры предоставляют возможность на приобретение особых бонусов. Свежие комбинации выкладываются в разделе “Акции”.
Кэшбек
Еженедельный кешбэк равен до 10% от потраченных средств. Выплата предоставляется сразу.
Программа лояльности
Постоянные клиенты зарабатывают баллы, которые конвертируются на действительные деньги или бесплатные вращения.
Мобильный сайт и софт
Ради комфорта пользователей сделана полноценная mobile версия. Гибкий облик позволяет легко делать ставки с произвольного портативного аппарата.
Достоинства программы:
– Быстрый запуск к играм
– Оптимизированный облик
– Устойчивая активность
– Push-уведомления о актуальных событиях
Установить APP можно свободно с главного портала для гаджетов на Android и iOS.
Коллекция слотов
Машины
Каталог включает более 2000 автоматов от популярных студий:
– Классические машины
– Мультимедийные игры
– Джекпот-слоты
– Фирменные слоты
Live казино
Категория Live казино предоставляет взаимодействие с подлинными крупье в живом режиме:
– Рулетка
– Карточная игра
– Баккара
– Poker
Соревнования
Постоянные турниры с большими наградными суммами проводятся каждую неделю. Участие в соревнованиях возможно всем созданным пользователям.
Расчетные системы
Пополнения и выводы выплат выполняются через популярные платежные системы:
– Платежные средства
– Виртуальные сервисы
– Цифровая валюта
– Счетные платежи
Стартовый депозит — от 100 рублей. Получение финансов осуществляется в течение 24 периода.
Сервис поддержки
Постоянная команда помощи способна помочь в урегулировании любых задач:
– Онлайн-чат
– Email
– Телефон
– Социальные сети
Охрана и лицензия
Подлинный веб-сайт действует на почве мировой сертификата. Каждые сведения участников защищены передовым SSL-протоколом.
Заключение
Действующее зеркало предоставляет стабильный доступ к любимым автоматам, щедрым акциям и функциональным функциям. Создайте аккаунт прямо сейчас и приобретите приветственный бонус!
роллы недорого спб роллы недорого спб .
https://puff-de.com/
nexonbyte – Color palette felt calming, nothing distracting, just focused, thoughtful design.
visit this marketplace – Just popping in, content is tidy and navigation feels intuitive.
топ 10 digital агентств luchshie-digital-agencstva.ru .
cybernexus – Overall, professional vibe here; trustworthy, polished, and pleasantly minimal throughout.
Современные онлайн-казино обеспечивают клиентам множество опций для беспроблемной игры. Официальный ресурс http://debuglab.net/2026/03/03/osnovnye-metody-vozvrata-sredstv-v-tinkoff/ обеспечивает возможность ко всем функциям и развлечениям. Однако при появлении технических сложностей на выручку прибывают действующие дубликаты.
Что означает собой актуальное зеркало
Копия казино — это точная версия оригинального веб-сайта, находящаяся по дополнительному доменному имени. Подлинное зеркало поддерживает все характеристики, в том числе создание аккаунта, авторизацию в индивидуальный кабинет, поощрения и промокоды.
Дубликат на сегодня предоставляет:
– Постоянный доступ к развлекательным слотам
– Полную безопасность персональных данных
– Сохранение счета и журнала транзакций
– Возможность использования всех бонусных программ
Создание аккаунта на основном ресурсе
Процесс создания аккаунта требует пару минут. Новоиспеченным пользователям нужно:
1. Открыть на официальный портал или рабочее зеркало
2. Выбрать кнопку «Зарегистрироваться»
3. Указать требуемые данные
4. Верифицировать email почту
5. Применить бонусный код при существовании
После конца регистрации геймеры обретают бонус за регистрацию, что может охватывать бесплатные вращения или монетарное премирование.
Вход в индивидуальный кабинет
Личный кабинет дает всеобъемлющий контроль над азартным действом. Через собственный аккаунт можно:
– Вносить средства на баланс
– Получать выплаты
– Использовать купоны
– Контролировать записи пари
– Соревноваться в соревнованиях
– Получать cash back
Анализ премий и акций
Богатая призовая система — важное плюс проекта. Основные формы поощрений:
Приветственный бонус
Начинающие зарабатывают выгодное поощрение на первые вклады. Объем приза может достигать 100-200% от размера депозита.
Free spins
Халявные спины даются для топовых машин. Число бесплатных вращений разнится от 10 до 500 штук.
Cash back
Систематический или помесячный возврат доли потерянных средств. Типичный объем кэшбека — 5-15%.
Соревнования
Систематические соревнования с внушительными призовыми пулами. Конкурсанты соревнуются за призовые строчки в турнирной таблице.
Смартфонная версия и программа
Мобильная версия разрешает наслаждаться игрой с любого устройства. Пользователи могут загрузить приложение для iOS и Android или задействовать браузерную версию.
Выгоды мобильного программы:
– Быстрая загрузка автоматов
– Удобный UI
– Всплывающие уведомления о промо
– Доступ через отпечаток пальца
Автоматы и Live казино
Игровая библиотека содержит тысячи игр от топовых разработчиков.
Востребованные типы автоматов:
– Традиционные машины
– Видеослоты с премиальными раундами
– Прогрессивный джекпот слоты
– Megaways машины
Live игровой зал
Категория live игорный зал предоставляет развлечение с реальными ведущими. Доступны классические развлечения:
– Рулетка
– Двадцать одно
– Baccarat
– Карибский покер
Как отыскать действующее зеркало
Раздобыть актуальную URL на зеркало возможно разными способами:
1. Зарегистрироваться на емейл-уведомления
2. Наблюдать за новостями в социальных сетях
3. Контактировать в службу поддержки
4. Заложить действующее зеркало в фавориты
Заключение
Официальный портал и его актуальные альтернативные адреса обеспечивают постоянный путь к развлекательным слотам. Богатые поощрения, разнообразные бонусные коды, эргономичное портативное программа и высококлассная сервис поддержки делают игровой геймплей в высшей степени беспроблемным и безопасным.
vdcasino güncel adres vdcasino
Доступ к порталу и рабочие зеркала
Современные онлайн казино обеспечивают клиентам большой выбор развлечений. Центральный ресурс казино Лев сайт предоставляет безопасный переход ко всем сервисам. Впрочем иногда происходят обстоятельства, когда понадобится резервный метод входа.
Что есть собой функционирующее зеркало
Действующее зеркало — это точная копия главного веб-сайта с альтернативным интернет адресом. Зеркало сегодня помогает миновать вероятные барьеры и обеспечивать стабильный переход к любимым играм.
Главное зеркало характеризуется теми же функциями, что и главный ресурс:
– Совокупный ассортимент слотов
– Собственный аккаунт с записанными сведениями
– Действующие поощрения и предложения
– Безопасные банковские действия
Открытие профиля и вход в платформу
Процесс оформления на портале занимает считанные минут. Новым пользователям нужно:
1. Зайти на актуальное зеркало сейчас
2. Кликнуть элемент «Регистрация»
3. Указать обязательные данные
4. Верифицировать почтовую почту или данные смартфона
5. Активировать подарок за создание профиля
Авторизация в индивидуальный профиль выполняется путем предоставление никнейма и кода доступа.
Анализ наградной системы
Привлекательная наградная политика — важнейшее преимущество платформы. Пользователи обретают различные подарки:
Вступительные поощрения
Свежие пользователи способны надеяться на выгодный поощрение за оформление. Традиционно это пакет возможностей, содержащий:
– Частичную надбавку к стартовому депозиту
– Бесплатные фриспины
– Дополнительные средства на кошелек
Промо-коды и специальные акции
Постоянные коды помогают зарабатывать дополнительные преимущества. Использовать их допустимо в отдельном окне личного аккаунта.
Спины и кешбэк
Free spins — это возможность крутить игры без применения собственных сумм. Компенсация предполагает долевой компенсацию потерянных финансов.
Библиотека слотов
Развлекательная ресурс предоставляет огромную подборку игр.
Видеослоты
Многообразие автоматов удивляет воображение. Есть стандартные 3-барабанные аппараты и новые игры с захватывающей визуализацией.
Live игры
Категория Live игр погружает пользователей в антураж истинного развлекательного клуба. Квалифицированные крупье осуществляют партии в прямом режиме.
Соревнования и лидерборды
Постоянные состязания добавляют остроты и дают шанс забрать большие суммы.
Мобильная реализация и софт
Продвинутые технологии дают возможность развлекаться в любом точке. Мобильная реализация независимо настраивается под монитор аппарата.
Установить программу разрешено для цифровых систем iOS и Android. Софт обеспечивает:
– Быстрый вход
– Надежную работу
– Push-алерты об предложениях
– Простой облик
Платежные транзакции
Платформа принимает различные варианты внесения и изъятия средств:
– Платежные системы
– Виртуальные кошельки
– Токены
– Финансовые транзакции
Все действия выполняются через надежное протокол, что гарантирует безопасность конфиденциальных параметров.
Департамент support
Квалифицированная бригада support работает всегда. Контактировать с операторами можно через:
– Онлайн-чат
– Цифровую почту
– Горячую линию
– Медиа платформы
Выводы
Официальный ресурс и его рабочее зеркало дают игрокам защищенный и легкий вход к увлекательным играм. Привлекательные бонусы, широкий спектр слотов и качественная сервис делают времяпрепровождение максимально удобной и прибыльной.
casino deneme siteleri deneme bonusu veren casino siteleri
melbet schimbare email http://www.melbet75891.help
xyrotech – Loved the layout today; clean, simple, and genuinely user-friendly overall.
devwave – Loved the layout today; clean, simple, and genuinely user-friendly overall.
check this out – Layout is neat and clear, reading feels natural.
Garnet Picks – Just discovered this page, everything is clear and well presented.
Stone Picks – Just discovered this page, everything is clear and easy to digest.
Вход к платформе через рабочие зеркала
Современные виртуальные казино гарантируют геймерам непрерывный переход к услугам. Главный портал Lev казино функционирует надёжно, предлагая богатый спектр гемблинг развлечений. Однако порой возникают системные проблемы или запреты, поэтому критично знать о существовании рабочих зеркал.
Что представляет собой официальное зеркало казино
Зеркало — это идентичная версия официального сайта с схожим набором функций. Функционирующее зеркало сегодня позволяет обходить местные ограничения и продолжать игру.
Основные плюсы задействования зеркал:
– Полный подключение к личному кабинету
– Сохранение любых данных счёта
– Идентичный ассортимент слотов
– Действующие поощрения и кампании
Регистрация на платформе
Механизм оформления отнимает считанные минут. Недавние геймеры зарабатывают великодушный бонус за создание счёта, что в состоянии охватывать:
– Приветственный финансовый кредит
– Безвозмездные кручения для слотов
– Эксклюзивные купоны
– Увеличенный кешбэк
Ради окончания регистрации необходимо:
1. Войти на центральный ресурс или дубликат
2. Щёлкнуть кнопку «Регистрация»
3. Написать контактные сведения
4. Подтвердить мейл или мобильный
5. Использовать код (когда имеется наличии)
Вход в индивидуальный кабинет
Следом за правильной регистрации игроки могут производить подключение с помощью центральный ресурс или актуальное зеркало. Персональный кабинет открывает всесторонний надзор над профилем:
– Летопись транзакций
– Пополнение счёта
– Вывод выигрышей
– Регулирование поощрениями
– Вовлечение в состязаниях
Поощрения и акции казино
Ресурс награждает пользователей разнообразными бонусными программами:
Приветственные призы
Начинающие получают щедрый комплект привилегий на первые депозиты. Типично это предполагает долевую добавку к сумме взноса плюс бесплатные фриспины.
Регулярные промо
– Седмичный кэшбек до 15%
– Турниры с наградными банками
– Поощрения на день рождения
– Эксклюзивные акции для VIP игроков
Программа верности
Деятельные геймеры накапливают очки, что разрешено трансформировать на действительные деньги или эксклюзивные бонусы.
Портативная редакция и софт
Нынешние решения помогают геймить всюду подходяще. Смартфонная редакция сайта самостоятельно настраивается под монитор всякого устройства.
Достоинства карманного приложения:
– Моментальная подгрузка слотов
– Практичный вид
– Push-уведомления о предложениях
– Возможность загрузить для Android и iOS
Живое казино: атмосфера реального азартного клуба
Раздел Live клуба погружает игроков в антураж подлинного игорного дома. Квалифицированные крупье ведут игру в виде актуального времени.
Представленные игры:
– Европейская рулетка
– Очко
– Баккара
– Карты
Игровые машины и игровые машины
Каталог игровых аппаратов насчитывает тысячи позиций от ведущих производителей. Любой игрок найдёт слот по желанию:
– Винтажные машины
– Инновационные игры с специальными уровнями
– Джекпот-игры
– Megaways машины
Соревнования и розыгрыши
Постоянные конкурсы включают адреналин и обеспечивают возможность выиграть большие награды. Присутствие в турнирах зачастую бесплатное, а призовые пулы достигают больших размеров.
Безопасность и анонимность
Сайт применяет инновационные технологии защиты для охраны реквизитов игроков. Совокупные транзакционные транзакции проходят через зашифрованные линии.
Итог
Главный сайт и его действующие зеркала гарантируют надёжный вход к качественным азартным сервисам. Щедрые призы, практичная портативная версия, богатство автоматов и квалифицированное Live-клуб формируют сайт прекрасным выбором для поклонников гемблинг развлечений.
Нынешние онлайн-казино обеспечивают участникам обширный спектр слотов и выгодные награды. Впрочем для беспроблемной работы необходимо иметь представление, как найти Tuz Bet и его действующие зеркала.
Что такое лицензионный ресурс казино
Главный сайт казино — это первичная площадка, где пользователи могут развлекаться развлекательными автоматами. Ресурс функционирует на законных правах и располагает всеми необходимыми документами.
Главные преимущества главного портала:
– Надежность персональных данных
– Объективные требования использования
– Обеспеченные транзакции
– Оперативная помощь
Актуальное зеркало казино: для чего необходимо
Зеркало — это абсолютная версия основного сайта, находящаяся по отличному домену. Функционирующее зеркало формируется для поддержания непрерывного доступа к сайту.
Поводы использования зеркал:
– Ограничение основного URL
– Плановые операции
– Повышенная нагрузка на платформу
Как получить рабочее зеркало в данный момент
Найти актуальное действующее зеркало можно несколькими вариантами:
1. Подписка — оформите подписку на почтовую рассылку
2. Департамент техподдержки — проконсультируйтесь в онлайн-чат
3. Официальные площадки — мониторьте за новостями
4. Игровые порталы — надежные источники
Открытие счета на сайте казино
Алгоритм оформления длится лишь несколько мгновений:
1. Нажмите на кнопку “Зарегистрироваться”
2. Укажите необходимые информацию
3. Активируйте email ящик
4. Введите код активации, если предоставлен
После успешной регистрации вам откроется возможен индивидуальный кабинет.
Бонусы и коды активации
Щедрая премиальная политика — существенное преимущество казино:
Бонус за открытие счета
Свежие участники приобретают приветственный подарок, который может содержать:
– Валютный бонус на дебютный вклад
– Фриспины для слотов
– Бездепозитные бонусы
Промокоды
Регулярно появляются эксклюзивные купоны, позволяющие активировать дополнительные преимущества.
Система компенсации
Регулярные игроки приобретают порцию использованных денег на счет.
Действующие кампании и конкурсы
Ресурс регулярно проводит захватывающие акции:
– Еженедельные соревнования
– Тематические промо
– Конкурсы солидных наград
– Программа статусов
Доступ в пользовательский кабинет
Для входа на портал требуется:
1. Посетить лицензионный сайт или действующее зеркало
2. Кликнуть “Авторизация”
3. Указать никнейм и пароль
В личном разделе открыты данные инструменты:
– Пополнение кошелька
– Получение выигрышей
– Анализ архива транзакций
– Редактирование персональными данными
Адаптивная платформа и app
Mobile версия
Адаптивная вариант веб-сайта предоставляет шанс играть с различных мобильного телефона. Дизайн динамически подстраивается под размер монитора.
App для download
Скачать app можно для:
– Android — официальная скачивание с платформы
– iOS — загрузка через App Store
Выгоды мобильного клиента:
– Оперативный вход
– Устойчивая работа
– Push-сообщения об акциях
– Оптимизированный UI
Игровые зоны
Игровые машины
Богатая галерея игровых машин от топовых разработчиков:
– Классические слоты
– Современные-слоты
– Джекпот-слоты
Live игры
Зона с настоящими операторами дает:
– European/American Roulette
– Blackjack
– Baccarat
– Poker
Вещания транслируются в превосходном качестве изображения, формируя атмосферу реального казино.
Способы внесения средств и получения
Платформа обслуживает разнообразные платежные инструменты:
– Платежные card
– Электронные счета
– Цифровые валюты
– Прямые транзакции
Базовые суммы взноса и моментальные платежи обеспечивают времяпрепровождение исключительно удобной.
Команда поддержки
Опытная группа ассистентов оперирует 24/7 и в состоянии ассистировать с любыми проблемами:
– Реалтайм-чат
– Email-переписка
– Телефонная линия
Итоги
Основной сайт казино и его функционирующие зеркала обеспечивают пользователям конфиденциальный и азартный игровой опыт. Богатые бонусы, удобная портативная вариант, многочисленные развлечения и профессиональное live-казино формируют эту ресурс превосходным местом для игровых развлечений.
snowharbor trading portal – Organized layout and clear sections make exploring content effortless.
Нынешние онлайн-казино предоставляют клиентам внушительный ассортимент услуг и премиальных предложений. Подключение к платформе выполняется через главный ресурс или его действующее зеркало Apex Spins казино, что предоставляет бесперебойную активность.
Что такое действующее зеркало казино
Зеркало — это полная дубликат основного портала, созданная для обхода ограничений. Актуальное зеркало помогает клиентам обрести соединение к излюбленным автоматам в каждое время.
Официальное зеркало обладает всеми опциями основного веб-сайта:
– Весь список игр
– Аккаунт с зафиксированными сведениями
– Актуальные акции
– Надежные расчетные транзакции
Регистрация на основном портале
Процедура оформления занимает всего пару минут. Новым участникам нужно:
1. Попасть на официальный портал или действующее зеркало
2. Выбрать на клавишу “Открыть счет”
3. Указать необходимые параметры
4. Верифицировать адрес
5. Совершить начальный взнос
Стартовый бонус выдается моментально после прохождения всех этапов.
Доступ в аккаунт
Существующие участники могут выполнить подключение вводя:
– Логин и шифр
– Код телефона
– Email
Личный кабинет обеспечивает возможность к управлению финансами, записям игр и текущим акциям.
Поощрения и акции
Развлекательная сервис балует постоянных пользователей выгодными вознаграждениями:
Начальный пакет
– Бонус на первый платеж до 100%
– Бесплатные вращения на топовые игры
– Особые премии за следующие взносы
Бонусные коды
Уникальные купоны открывают доступ на использование уникальных призов. Текущие купоны выставляются в блоке “Бонусы”.
Кешбэк
Периодический кешбэк равен до 10% от утраченных финансов. Возврат зачисляется сразу.
Механизм лояльности
Постоянные клиенты получают единицы, которые конвертируются на реальные средства или даровые спины.
Адаптивный портал и софт
В целях удобства игроков сделана качественная адаптивный сайт. Отзывчивый дизайн помогает удобно развлекаться с произвольного переносного устройства.
Плюсы приложения:
– Оперативный запуск к автоматам
– Улучшенный облик
– Надежная деятельность
– Оповещения о последних акциях
Установить приложение можно свободно с проверенного веб-сайта для гаджетов на Android и iOS.
Каталог игр
Машины
База вмещает более 2000 игр от популярных студий:
– Стандартные машины
– Video slots
– Прогрессивные автоматы
– Брендовые автоматы
Live казино
Блок Live игр дает взаимодействие с реальными дилерами в онлайн эфире:
– Рулетка
– Blackjack
– Баккара
– Столы покера
Конкурсы
Периодические состязания с большими наградными фондами проводятся регулярно. Присоединение в конкурсах разрешено всем созданным пользователям.
Расчетные способы
Платежи и снятия финансов производятся через распространенные способы оплаты:
– Банковские пластик
– Электронные счета
– Криптовалюта
– Счетные транзакции
Стартовый вклад — от 100 рублей. Снятие финансов обрабатывается в течение 24 времени.
Сервис поддержки
Постоянная группа саппорта расположена содействовать в решении произвольных вопросов:
– Live chat
– Email
– Связь
– Соц сети
Охрана и лицензия
Лицензионный веб-сайт работает на основании признанной сертификата. Каждые параметры игроков обезопасены актуальным SSL-кодированием.
Вывод
Актуальное зеркало предоставляет непрерывный подключение к выбранным слотам, щедрым промокодам и комфортным возможностям. Создайте аккаунт прямо сейчас и получите первый бонус!
Вход к платформе через актуальные зеркала
Клиенты онлайн казино постоянно сталкиваются с ситуацией недоступности базового сайта. Как раз для преодоления этой проблемы существуют дубликаты главного ресурса. https://pca.pe/2026/03/05/kazino-v-internete-ukrainy-gde-mozhno-popolnyat-schet-cherez-sms/ предоставляет стопроцентный доступ ко всем возможностям платформы.
Что такое действующее зеркало казино
Дубликат представляет собой полную реплику основного портала с идентичным набором функций. Главное отличие — это другое имя. Любые данные игрока, в том числе счет, награды и архив игр, сохраняются неизменными.
Достоинства использования зеркал
Актуальные зеркала имеют набором значимых выгод:
– Круглосуточный подключение к предпочитаемым автоматам
– Полная защита собственных информации
– Неизменность всех опций персонального кабинета
– Способность взятия наград и включения в акциях
Регистрация на основном домене
Процедура создания аккаунта предельно легок и отнимает пару минут. Свежие пользователи имеют возможность претендовать на щедрый стартовый бонус за оформление.
Этапы формирования аккаунта
1. Доступ на легальный портал или его копию
2. Нажатие на клавишу “Создать аккаунт”
3. Ввод необходимых сведений
4. Подтверждение почтовой почты
5. Указание промокода (если есть)
Подарки и предложения для участников
Платформа радует своих пользователей различными наградными предложениями.
Главные категории призов
Начальный подарок — щедрое вознаграждение для начинающих участников, которое имеет возможность содержать монетарные средства и фриспины.
Фриспины — опция запускать в востребованных автоматах безвозмездно.
Кэшбек — долевой возврат проигранных денег, который именно предоставляется по неделям или помесячно.
Купоны — эксклюзивные наборы, гарантирующие дополнительные выгоды.
Индивидуальный кабинет: опции и параметры
Индивидуальный аккаунт обеспечивает полный надзор над пользовательским процессом. В данном разделе предусмотрены:
– Администрирование средствами
– Данные операций
– Действующие привилегии
– Параметры защиты
– Подтверждение профиля
Смартфонная платформа и приложение
Нынешние клиенты ценят доступность. Ресурс обеспечивает двойной пути для участия с карманных аппаратов.
Отзывчивая портативная версия
Мобильная версия ресурса автоматически адаптируется под разрешение любого гаджета. Не нужно загружать специальное софт.
APP для гаджетов
Можно загрузить оригинальное приложение для iOS и Android. Программа обеспечивает:
– Мгновенный старт
– Улучшенный дизайн
– Push-уведомления о бонусах
– Бесперебойную функциональность
Live раздел: среда реального игорного заведения
Секция Live развлечений транспортирует клиентов в среду истинного зала. Опытные дилеры организуют игры в виде настоящего времени.
Топовые Live-игры
– Американская рулетка
– Blackjack
– Baccarat
– Техасский холдем
Автоматы: разнообразие автоматов
Каталог слотовых автоматов вмещает массу наименований от известных провайдеров. Пользователи встретят:
– Традиционные слоты
– Видео-автоматы
– Джекпот-автоматы
– Многолинейные автоматы
Конкурсы и специальные акции
Регулярные состязания обеспечивают клиентам бороться друг с другом за крупные призовые банки. Каждый конкурс имеет свои условия участия и список победителей.
Пути внесения и снятия сумм
Платформа предоставляет комплекс денежных систем:
– Банковские средства
– Электронные сервисы
– Крипто
– Финансовые транзакции
Абсолютно все переводы реализуются надежно благодаря актуальным системам шифрования.
Команда помощи
Квалифицированные консультанты команды поддержки расположены ассистировать 24/7. Имеются нижеперечисленные каналы общения:
– Онлайн-чат
– Email-обслуживание
– Телефонная поддержка
– Социальные сети
Резюме
Основной сайт игровой площадки и его функционирующие зеркала обеспечивают клиентам безопасный и легкий переход к большому диапазону азартных активностей. Щедрые бонусы, периодические предложения, компетентная служба и удобные финансовые инструменты делают развлекательный времяпрепровождение предельно увлекательным и результативным.
deneme bonusu veren casino siteleri deneme bonusu veren casino siteleri
Доступ к порталу через проверенные зеркала
Клиенты интернет казино часто контактируют с вопросом закрытия главного домена. Как раз для решения этой проблемы предусмотрены копии основного домена. [url=m9dev2.com/cxsdev/kazino-v-kak-ono-funktsioniruet-i-chto-iz-sebya-predstavlyaet/]Кракен казино[/url] предоставляет беспрепятственный подключение ко всем опциям площадки.
Что такое рабочее зеркало казино
Копия составляет собой полную копию главного ресурса с аналогичным опциями. Единственное различие — это иное имя. Все параметры участника, вместе с средства, бонусы и архив раундов, сохраняются идентичными.
Выгоды использования зеркал
Актуальные зеркала имеют комплексом важных плюсов:
– Постоянный доступ к излюбленным автоматам
– Совершенная безопасность личных сведений
– Удержание всех конфигураций пользовательского кабинета
– Шанс обретения призов и вовлечения в промоакциях
Открытие счета на основном портале
Процедура регистрации чрезвычайно прост и отнимает немного минут. Новые пользователи в состоянии рассчитывать на щедрый начальный поощрение за регистрацию.
Стадии оформления аккаунта
1. Доступ на основной сайт или его альтернативу
2. Выбор на клавишу “Регистрация”
3. Заполнение обязательных информации
4. Активация email почты
5. Применение бонусного кода (когда доступен)
Подарки и предложения для игроков
Казино балует своих игроков разнообразными наградными предложениями.
Ключевые варианты поощрений
Вводный бонус — крупное поощрение для недавних участников, что может содержать денежные суммы и free spins.
Безвозмездные спины — возможность использовать в популярных игровых машинах даром.
Компенсация — долевой возврат израсходованных сумм, который именно начисляется еженедельно или ежемесячно.
Специальные коды — эксклюзивные комбинации, гарантирующие добавочные выгоды.
Персональный кабинет: инструменты и настройки
Личный профиль дает совершенный управление над развлекательным активностью. В нем имеются:
– Регулирование счетом
– Архив транзакций
– Активные привилегии
– Конфигурации безопасности
– Валидация профиля
Карманная версия и APP
Нынешние игроки признают мобильность. Платформа обеспечивает два метода для участия с смартфонных аппаратов.
Приспособленная портативная версия
Адаптивная редакция домена автоматически приспосабливается под экран любого гаджета. Не требуется устанавливать отдельное приложение.
APP для мобильных
Возможно загрузить оригинальное софт для iOS и Android. Софт обеспечивает:
– Мгновенный вход
– Оптимизированный графику
– Push-оповещения о бонусах
– Устойчивую работу
Live игры: антураж настоящего клуба
Категория Live столов доставляет клиентов в атмосферу подлинного казино. Компетентные ведущие ведут партии в режиме настоящего времени.
Известные Live-игры
– Европейская рулетка
– Блэкджек
– Baccarat
– Техасский холдем
Автоматы: выбор игр
Каталог слотовых слотов включает тысячи названий от ведущих провайдеров. Игроки встретят:
– Стандартные автоматы
– Видео-автоматы
– Прогрессивный джекпот-машины
– Слоты с множественными линиями
Турниры и особые акции
Постоянные турниры обеспечивают участникам соревноваться друг с другом за солидные денежные банки. Каждый конкурс обладает свои критерии присутствия и таблицу лидеров.
Способы ввода и снятия сумм
Казино предоставляет ряд финансовых методов:
– Кредитные средства
– Цифровые счета
– Цифровые валюты
– Финансовые транзакции
Любые переводы выполняются защищенно благодаря современным технологиям защиты.
Сервис поддержки
Опытные консультанты сервиса support способны содействовать 24/7. Имеются данные пути коммуникации:
– Онлайн-чат
– Email-обслуживание
– Аудио горячая линия
– Медийные сети
Вывод
Официальный ресурс клуба и его актуальные зеркала дают клиентам защищенный и приятный вход к широкому диапазону игровых активностей. Крупные награды, частые акции, компетентная помощь и простые расчетные системы делают игровой досуг чрезвычайно увлекательным и результативным.
сео фирмы сео фирмы .
Анализ главного ресурса
Современные онлайн казино предлагают клиентам обширный выбор развлечений и опций. Официальный сайт https://aromadeanjo.com.br/sem-categoria/rumy-s-platezhnoy-sistemoy-poker-na/ предлагает безопасный путь к развлекательным возможностям.
Функционирующее зеркало: вход прямо сейчас
Альтернативный адрес служит собой абсолютную копию официального сайта. Официальное зеркало дает возможность участникам избегать возможные запреты.
Преимущества эксплуатации зеркала
Основные достоинства включают:
– Беспрерывный путь к платформе
– Поддержание абсолютно всех возможностей официального сайта
– Защита личных сведений
– Аналогичный инструментарий
Создание аккаунта на ресурсе
Процесс регистрации знаменуется простотой и комфортом. Начинающие пользователи требуется:
1. Посетить официальный портал или его зеркало
2. Кликнуть на клавишу оформления
3. Ввести необходимые сведения
4. Подтвердить почтовую ящик
5. Выполнить первый авторизацию
Подарок за регистрацию
Дебютанты забирают щедрый приветственный презент. Такое поощрение имеет возможность содержать:
– Материальные начисления
– Бесплатные вращения
– Увеличенный процент возврата
Вход в персональный кабинет
Зарегистрированные пользователи могут мгновенно получить доступ в собственный аккаунт, эксплуатируя никнейм и шифр. Личный профиль обеспечивает возможность к:
– Управлению депозитом
– Хронологии переводов
– Действующим призам
– Опциям учетной записи
Вознаграждения и промо
Портал постоянно проводит различные акции для пользователей.
Типы подарков
Базовые типы призов:
– Пополнительные бонусы – часть от величины взноса
– Прокруты – бесплатные спины в игровых машинах
– Кэшбек – возмещение фрагмента затраченных средств
– Конкурсные трофеи – вознаграждения за игру в соревнованиях
Купоны
Особые промокоды помогают активировать экстра бонусы. Пользователи могут отыскать их на тематических ресурсах или взять в рассылке.
Мобильная редакция и софт
Прогрессивные клиенты выбирают переносной досуг.
Опции mobile версии
– Гибкий облик для любых гаджетов
– Совокупный путь к автоматам
– Быстрая подгрузка
– Практичное контроль
Установить приложение
Портативное приложение открыто для скачивания на гаджеты с базовыми ОС Android и iOS. App обеспечивает:
– Надежную функциональность
– Мгновенные уведомления о предложениях
– Быстрый вход к желанным автоматам
Азартный ассортимент
Игровой клуб предлагает богатую коллекцию игровых игр.
Аппараты
Коллекция развлекательных аппаратов включает:
– Традиционные слоты
– Видео аппараты
– Призовые машины
– Тематические игры
Live столы
Секция лайв столов предлагает шанс соревноваться с профессиональными ведущими. Доступны:
– Рулетки
– Очко
– Punto Banco
– Покер
Состязания
Систематические конкурсы дают возможность игрокам конкурировать за солидные финансовые фонды. Турнирная система изменяется еженедельно.
Финансовые действия
Казино обеспечивает разнообразие способов внесения и снятия средств:
– Банковские карты
– Онлайн кошельки
– Банковские транзакции
– Цифровые валюты
Абсолютно все операции выполняются защищенно с задействованием прогрессивных технологий защиты.
Департамент помощи
Профессиональная группа саппорта функционирует постоянно. Связаться с специалистами можно через:
– Онлайн чат
– Электронную почту
– Контактный номер
– Social платформы
Безопасность и аккредитация
Игровой клуб действует на основании легальной разрешения. Данное удостоверяет:
– Прозрачность игрового геймплея
– Сохранность личных информации
– Оперативные выводы
– Легальный игровой процесс
Резюме
Главный портал и его действующие альтернативные адреса гарантируют пользователям целостный спектр возможностей для безопасной и доходной времяпрепровождения. Внушительные вознаграждения, различные автоматы, компетентная помощь и проверенная система выплат превращают ресурс лучшим вариантом для поклонников игровых услуг.
онлайн казино на реальные деньги Играйте в онлайн казино на реальные деньги, почувствуйте вкус победы и получите незабываемые эмоции
this link here – Pages are simple and easy to browse quickly.
Quick link to WheatVendor – Just noticed this platform; the layout makes navigating fast and easy.
Современные онлайн-казино обеспечивают клиентам широкий выбор развлечений и заманчивые награды. Но для стабильной времяпрепровождения критично понимать, как обнаружить Cactus Casino и его действующие зеркала.
Что такое главный сайт казино
Лицензионный портал казино — это базовая площадка, где пользователи могут получать удовольствие от развлекательными развлечениями. Портал работает на официальных принципах и располагает всеми необходимыми лицензиями.
Основные выгоды официального веб-сайта:
– Конфиденциальность персональных сведений
– Объективные требования участия
– Подтвержденные платежи
– Оперативная техподдержка
Рабочее зеркало казино: для чего используется
Дублирующий ресурс — это абсолютная копия основного веб-сайта, расположенная по отличному адресу. Действующее зеркало формируется для предоставления бесперебойного подключения к платформе.
Причины использования альтернативных адресов:
– Блокировка основного сайта
– Профилактические работы
– Значительная загрузка на платформу
Как получить действующее зеркало на сегодня
Получить текущее рабочее зеркало можно разными путями:
1. Почтовые оповещения — активируйте уведомления на email подписку
2. Служба support — проконсультируйтесь в онлайн-чат
3. Социальные сети — отслеживайте за обновлениями
4. Партнерские площадки — авторитетные платформы
Создание аккаунта на портале казино
Этап создания аккаунта требует буквально пару мгновений:
1. Кликните на клавишу “Открыть счет”
2. Внесите требуемые сведения
3. Валидируйте контактную ящик
4. Используйте купон, если доступен
Сразу после завершенной создания аккаунта вам предоставится открыт персональный аккаунт.
Награды и бонусные коды
Богатая бонусная политика — важное плюс казино:
Поощрение за открытие счета
Первичные клиенты получают начальный бонус, который может охватывать:
– Валютный кредит на стартовый вклад
– Free spins для слотов
– Бездепозитные фонды
Активационные коды
Систематически выходят свежие промокоды, предоставляющие активировать экстра бонусы.
Схема кэшбека
Постоянные пользователи получают порцию проигранных ставок в виде компенсации.
Текущие акции и состязания
Платформа систематически организует азартные события:
– Weekly турниры
– Праздничные предложения
– Лотереи солидных подарков
– Схема статусов
Доступ в персональный кабинет
Для входа на портал следует:
1. Перейти на лицензионный портал или функционирующее зеркало
2. Нажать “Войти”
3. Внести имя пользователя и ключ
В индивидуальном кабинете разрешены такие инструменты:
– Депозит депозита
– Снятие призов
– Анализ журнала операций
– Редактирование личными данными
Портативная модификация и софт
Портативная версия
Responsive модификация веб-сайта обеспечивает участвовать с всех портативного гаджета. Дизайн самостоятельно настраивается под размер монитора.
Программа для установки
Загрузить app можно для:
– Android — прямая download с портала
– iOS — установка через App Store
Достоинства app:
– Мгновенный доступ
– Бесперебойная производительность
– Push-сообщения об бонусах
– Улучшенный интерфейс
Развлекательные секции
Слоты
Обширная галерея игровых автоматов от лучших провайдеров:
– Стандартные слоты
– Новые-автоматы
– Накопительные-машины
Live casino
Категория с настоящими дилерами предлагает:
– Рулетка
– 21
– Baccarat
– Покер
Вещания транслируются в отличном формате, формируя эффект аутентичного казино.
Варианты депозита и получения
Ресурс поддерживает разные транзакционные системы:
– Банковские картсчета
– Онлайн системы
– Криптовалюты
– Прямые транзиты
Базовые значения взноса и оперативные выводы гарантируют развлечение крайне комфортной.
Департамент техподдержки
Компетентная отдел поддержки функционирует 24/7 и готова ассистировать с различными проблемами:
– Онлайн-чат
– Email-поддержка
– Голосовая линия
Выводы
Официальный сайт казино и его рабочие альтернативные адреса гарантируют игрокам конфиденциальный и интересный азартный опыт. Привлекательные поощрения, удобная портативная модификация, богатые автоматы и профессиональное live-казино создают эту систему замечательным вариантом для гемблинг развлечений.
Нынешние интернет казино предоставляют пользователям широкий ассортимент функций для приятной игры. Но иногда вход к базовому порталу может оказаться заблокированным. В таких ситуациях на поддержку спешит Мелстрой казино, которое предоставляет стабильный путь ко всем функциям платформы.
Что такое функционирующее зеркало казино
Копия — это полная копия официального сайта, которая размещается по другому домену. Зеркало поддерживает целый набор функций основного ресурса, включая личный кабинет, счет и сведения платежей.
Принципиальные плюсы применения зеркала:
– Непрерывный доступ к ресурсу
– Максимальная идентичность возможностей
– Конфиденциальность индивидуальных реквизитов
– Поддержка существующих привилегий
Как обнаружить рабочее зеркало в данный момент
Есть некоторое количество надежных вариантов нахождения актуальной URL:
Авторизованные источники:
1. Электронная рассылка — руководство постоянно пересылает письма с действующими URL
2. Общественные сети — официальные страницы публикуют актуальную информацию
3. Сервис поддержки — операторы дают достоверные ссылки
4. Телефонное приложение — обеспечивает обходить блокировки
Открытие счета на официальном веб-сайте
Процедура открытия счета отнимает лишь пару минут и состоит из данных этапов:
1. Открытие на официальный веб-сайт или функционирующее зеркало
2. Нажатие на иконку «Регистрация»
3. Ввод пользовательской таблицы
4. Валидация почтовой почты или мобильного номера
5. Активация привилегии за регистрацию при существовании промокода
Только что зарегистрированные геймеры обретают щедрый вступительный бонус, который может включать фриспины, денежные призы или возврат средств.
Авторизация в индивидуальный кабинет
Авторизация на ресурсе производится обычным способом. Требуется вписать имя пользователя и кодовое слово, использованные при открытии счета.
Значимые аспекты для надежного входа:
– Задействуйте надежный пароль
– Активируйте двухэтапную идентификацию
– Не записывайте данные на посторонних устройствах
– Мониторьте адресную строку браузера
Анализ премиальной структуры
Гемблинг-сайт балует пользователей многочисленными поощрениями и специальными предложениями:
Приветственный набор
Новички имеют возможность рассчитывать на великодушное вознаграждение за стартовый вклад. Как правило это процентовая надбавка к зачисленной величине плюс фриспины для известных слотов.
Периодические кампании
– Семидневный кэшбек — возвращение процента списанных финансов
– Награды на очередные депозиты
– Специальные предложения по событиям
– Турниры с крупными наградными фондами
План привилегий
Деятельные геймеры получают пункты за каждую раунд, которые затем превращаются на фактические денежные призы, бесплатные вращения или уникальные преимущества.
Купоны: как задействовать
Кодовые комбинации — это уникальные комбинации символов, дающие доступ к эксклюзивным вознаграждениям.
Где раздобыть актуальные промокоды:
– Легитимные медийные сети казино
– Партнерские ресурсы
– Email-новостная лента
– Отраслевые форумы
Прописывается промокод в предназначенное поле при открытии счета или пополнении счета.
Мобильная версия и приложение
Современные пользователи любят играть с телефонных девайсов. Платформа предоставляет пару способа для беспроблемной мобильной игры.
Отзывчивая редакция
Браузерная версия самостоятельно настраивается под габариты экрана. Не предполагает инсталляции и оперирует в любом свежем браузере.
Мобильное приложение
Установить приложение можно для устройств на Android и iOS. Достоинства app:
– Быстрая открытие
– Бесперебойная операция
– Всплывающие-уведомления о бонусах
– Самостоятельный преодоление блокировок
Процесс загрузки несложен: необходимо зайти на сайт с смартфонного девайса и следовать указаниям.
Развлекательный выбор
База игр охватывает несколько тысяч позиций от ведущих поставщиков.
Слоты
Гемблинг слоты — максимально распространенная категория аттракционов. Представлены традиционные трехбарабанные аппараты, актуальные мультимедийные слоты с премиальными стадиями, а также накопительные выигрыши.
Live казино
Секция с действительными раздающими предоставляет испытать атмосферу подлинного казино. Представлены варианты с блэкджеком.
Вещание производится в HD формате, обеспечивается чат с ведущим и другими геймерами.
Соревнования
Систематически устраиваются конкурсы по всевозможным категориям. Участие дает шанс заработать валютные вознаграждения, даровые прокруты или специальные бонусы.
Платежные действия
Портал обеспечивает обширный набор платежных методов:
– Пластиковые карты
– Цифровые платформы
– Крипта
– Счетовые транзакции
Минимальная объем вклада — разумная для основной части пользователей. Вывод денег осуществляется в короткие временные рамки.
Отдел поддержки
Квалифицированные сотрудники способны помочь круглосуточно. Представлены данные варианты общения:
– Живой-чат
– Email
– Звонковая горячая линия
– Социальные сети
Разъяснения на частые вопросы можно получить в блоке FAQ.
Заключение
Лицензионный ресурс казино и его актуальные зеркала обеспечивают пользователям полный путь ко всем опциям сайта. Щедрые вознаграждения, приятная мобильная версия, впечатляющий коллекция развлечений и опытная помощь создают гемблинг опыт исключительно удобным и защищенным.
экскурсия по санкт петербургу на автомобиле Если вы путешествуете с группой, наши обзорные экскурсии по Санкт-Петербургу с экскурсоводом позволят вам увидеть главные достопримечательности города, узнать его богатую историю и сохранить самые яркие воспоминания, причем цена такой экскурсии вас приятно удивит.
куплю сайт куплю сайт .
Современные онлайн-казино обеспечивают игрокам массу вариантов для удобной игры. Основной портал http://nezbudei1962.ru обеспечивает возможность ко всем опциям и игровым автоматам. Однако при наличии системных проблем на помощь приходят актуальные зеркала.
Что есть собой актуальное зеркало
Копия казино — это идентичная дубликат оригинального ресурса, размещенная по альтернативному URL. Официальное зеркало сохраняет все возможности, в том числе создание аккаунта, доступ в персональный кабинет, бонусы и бонусные коды.
Зеркало на сегодня дает:
– Стабильный путь к развлекательным автоматам
– Абсолютную защиту персональных сведений
– Сохранение баланса и записей платежей
– Возможность использования всех акций
Создание аккаунта на лицензионном ресурсе
Процедура создания аккаунта требует несколько минут. Свежеиспеченным геймерам нужно:
1. Войти на основной ресурс или действующее зеркало
2. Кликнуть кнопку «Зарегистрироваться»
3. Указать необходимые графы
4. Активировать э-мейл почту
5. Использовать купон при наличии
После конца создания аккаунта игроки обретают вознаграждение за регистрацию, что может включать фриспины или финансовое премирование.
Вход в персональный кабинет
Персональный кабинет предоставляет всеобъемлющий мониторинг над игровым действом. Через собственный аккаунт допускается:
– Депонировать счет
– Снимать выигрыши
– Активировать кодовые слова
– Проверять записи игр
– Соревноваться в состязаниях
– Забирать возврат средств
Анализ бонусов и промо-предложений
Щедрая поощрительная программа — значимое козырь проекта. Ключевые категории вознаграждений:
Приветственный бонус
Начинающие обретают великодушное поощрение на стартовые вклады. Сумма приза может составлять 100-200% от суммы депозита.
Фриспины
Бесплатные спины даются для популярных машин. Количество бесплатных вращений изменяется от 10 до 500 штук.
Cash back
Систематический или ежемесячный отдача процентной доли потерянных средств. Стандартный процент компенсации — 5-15%.
Турниры
Систематические конкурсы с большими наградными пулами. Участники борются за верхние позиции в рейтинге.
Смартфонная версия и софт
Адаптивная версия дает возможность развлекаться с всякого аппарата. Клиенты могут закачать программу для iOS и Android или задействовать браузерную версию.
Плюсы смартфонного софта:
– Скоростная загрузка автоматов
– Эргономичный графический интерфейс
– Push-уведомления о бонусах
– Доступ через Touch ID
Машины и Live казино
Развлекательная коллекция насчитывает сотни позиций от лидирующих разработчиков.
Известные типы слотов:
– Классические машины
– Видео-автоматы с премиальными этапами
– Накопительный приз слоты
– Мега-путь автоматы
Live игровой зал
Секция live казино предлагает развлечение с живыми ведущими. Доступны классические игры:
– Европейская рулетка
– Двадцать одно
– Baccarat
– Покер
Как обнаружить актуальное зеркало
Раздобыть актуальную адрес на зеркало разрешается несколькими вариантами:
1. Зарегистрироваться на email-рассылку
2. Отслеживать за обновлениями в соц сетях
3. Связаться в службу поддержки
4. Добавить в закладки рабочее зеркало в закладки
Итог
Главный портал и его рабочие дубликаты обеспечивают непрерывный вход к азартным играм. Великодушные бонусы, многочисленные купоны, удобное мобильное приложение и качественная сервис поддержки делают азартный процесс максимально приятным и надежным.
Описание основного ресурса
Актуальные онлайн казино дают клиентам богатый выбор игр и шансов. Лицензионный портал Голд казино сайт официальный гарантирует проверенный вход к азартным сервисам.
Действующее зеркало: доступ на сегодня
Альтернативный адрес представляет в качестве абсолютную копию лицензионного портала. Действующее зеркало обеспечивает пользователям преодолевать вероятные барьеры.
Преимущества эксплуатации зеркала
Главные достоинства предполагают:
– Стабильный шанс к ресурсу
– Хранение всех функций основного сайта
– Защита личных материалов
– Равнозначный функционал
Открытие счета на портале
Процесс создания аккаунта выделяется понятностью и эргономичностью. Недавние пользователи обязаны:
1. Посетить официальный веб-сайт или его зеркало
2. Кликнуть на элемент создания аккаунта
3. Внести обязательные данные
4. Подтвердить электронную почту
5. Выполнить стартовый логин
Подарок за открытие счета
Новички получают щедрый приветственный бонус. Данное вознаграждение может включать:
– Материальные средства
– Complimentary вращения
– Расширенный коэффициент возврата
Вход в личный кабинет
Зарегистрированные участники могут оперативно войти в личный аккаунт, применяя учетные данные и шифр. Индивидуальный раздел предоставляет шанс к:
– Контролю балансом
– Истории операций
– Активным бонусам
– Опциям аккаунта
Бонусы и кампании
Портал периодически организует разнообразные акции для клиентов.
Виды призов
Главные виды бонусов:
– Финансовые призы – процент от величины пополнения
– Бесплатные вращения – complimentary спины в слотах
– Возврат средств – возмещение процента проигранных финансов
– Конкурсные трофеи – награды за участие в турнирах
Промокоды
Специальные коды обеспечивают активировать бонусные преимущества. Пользователи имеют возможность обнаружить их на тематических ресурсах или приобрести в письмах.
Mobile вариант и app
Актуальные гемблеры выбирают карманный игровой процесс.
Возможности переносной системы
– Адаптивный облик для всех устройств
– Абсолютный возможность к играм
– Моментальная работа
– Эргономичное контроль
Скачать app
Мобильное app предоставлено для downloading на аппараты с рабочими платформами Android и iOS. App обеспечивает:
– Стабильную производительность
– Пуш сообщения о призах
– Моментальный доступ к любимым развлечениям
Развлекательный портфель
Игровой клуб обеспечивает обширную галерею азартных игр.
Игровые машины
Ассортимент игровых слотов насчитывает:
– Классические игры
– Видео аппараты
– Призовые игры
– Тематические автоматы
Live игры
Секция реальных игр предоставляет право соревноваться с настоящими крупье. Открыты:
– Европейская рулетка
– 21
– Баккара
– Карибский покер
Турниры
Регулярные турниры обеспечивают клиентам состязаться за внушительные денежные банки. Конкурсная структура модифицируется еженедельно.
Банковские операции
Казино поддерживает обилие опций депозита и снятия финансов:
– Кредитные карточки
– Цифровые кошельки
– Прямые транзакции
– Цифровые валюты
Любые платежи проходят надежно с применением прогрессивных систем кодирования.
Департамент помощи
Опытная служба помощи действует 24/7. Соединиться с консультантами реально через:
– Интерактивный чат
– Email почту
– Телефонную линию
– Соц платформы
Защита и регулирование
Портал работает на фундаменте легальной лицензии. Данное обеспечивает:
– Справедливость развлекательного действа
– Сохранность личных информации
– Оперативные выплаты
– Легальный гемблинг
Итог
Лицензионный сайт и его действующие альтернативные адреса дают пользователям совокупный ассортимент услуг для комфортной и прибыльной досуга. Значительные бонусы, различные развлечения, профессиональная поддержка и надежная структура операций создают портал оптимальным выбором для любителей азартных услуг.
deneme bonusu veren casino siteleri: lisanslı casino siteleri
vdcasino resmi giriş vdcasino
статьи про маркетинг и seo seo-blog21.ru .
buy lasix medication
Ткань как главный показатель качества одежды. Ткань это барометр качества одежды Правильный выбор ткани часто решает больше, чем дизайн или бренд. Именно материал определяет комфорт, внешний вид и долговечность одежды. Если ткань выбрана правильно, вещь будет выглядеть аккуратно и прослужит долго. Если нет, даже красивый фасон быстро разочарует. Сегодня при покупке одежды мы сталкиваемся с огромным количеством маркетинговых терминов. Можно услышать выражения французская элегантность, стиль старых денег или премиальная коллекция. Такие слова звучат красиво, но они редко объясняют самое главное. Из какой ткани сделана вещь. Если внимательно посмотреть на людей с действительно хорошим стилем, можно заметить одну особенность. Их одежда редко кричит логотипами и яркими деталями. Она выглядит спокойно, но при этом аккуратно и дорого. Причина чаще всего одна. Качественная ткань. Комфорт начинается с материала Первое, что отличает хорошую одежду, это ощущение при носке. Качественная ткань мягкая и приятная на ощупь, хорошо пропускает воздух и обеспечивает комфорт в течение всего дня. Кроме этого хороший материал должен сохранять форму изделия, не создавать статического электричества, не образовывать катышки и оставаться удобным в уходе. Эти свойства напрямую влияют на то, насколько долго вещь будет выглядеть аккуратно. Поэтому ткань влияет не только на внешний вид, но и на практичность одежды. Как ткань влияет на стиль Качественная ткань способна полностью изменить восприятие одежды. Она подчеркивает текстуру, форму и аккуратность кроя. Даже простая вещь может выглядеть элегантно, если материал выбран правильно. И наоборот. Дорогой дизайн теряет свою ценность, если ткань выглядит дешево или плохо держит форму. Поэтому ткань становится важной частью личного стиля. Новая тенденция потребления Сегодня все больше людей начинают обращать внимание не на бренд, а на материалы. Появляется новый подход к покупке одежды. Сначала оценивать ткань, а уже потом дизайн. Этот тренд особенно заметен среди молодых покупателей. Они все меньше ориентируются на крупные логотипы и все больше ценят комфорт, натуральность и долговечность. В индустрии моды этот процесс иногда называют тканевой революцией. Сначала спрашивать о ткани Фраза сначала спрашивать о ткани при покупке одежды постепенно становится новым принципом осознанного потребления. Если раньше главным ориентиром был бренд, сегодня многие покупатели начинают интересоваться составом ткани, ее плотностью и характеристиками. Бренды, которые уделяют внимание качеству материалов, получают все больше доверия. Фактически конкуренция между компаниями все чаще происходит именно на уровне тканей. Натуральные материалы возвращаются Рост интереса к комфорту и качеству возвращает популярность натуральным материалам. Хлопок, лен, шерсть и шелк снова становятся важной частью современных коллекций. Эти ткани обладают хорошей воздухопроницаемостью, приятны на ощупь и создают ощущение естественного комфорта. Компания CUCTEX уделяет особое внимание таким материалам. В наших коллекциях широко используются хлопковые и льняные ткани. Они позволяют сочетать современный дизайн и комфорт в повседневной носке. Как определить качество ткани Сегодня покупатели все чаще изучают состав ткани, ее плотность и свойства. Это простой способ понять, насколько вещь будет удобной и долговечной. Есть несколько простых способов оценить ткань. Прикоснитесь к ткани тыльной стороной ладони Сожмите ткань в руке и посмотрите, как быстро она возвращается в исходную форму Оцените мягкость и ощущения на коже Если ткань неприятна при первом касании, скорее всего она не станет комфортной и при носке. Итог Качество одежды во многом определяется качеством ткани. Можно сказать, что ткань является настоящим барометром уровня изделия. Чем лучше мы понимаем свойства материалов, тем легче выбирать одежду, которая будет не только красивой, но и действительно удобной и долговечной.
роллы заказать роллы заказать .
Harbor Bazaar – Browsed randomly, structure is neat and navigation is intuitive.
сео продвижение сайта по трафику сео продвижение сайта по трафику .
Market Hub – Came across this site by accident, reading is smooth and sections are clear.
Актуальные онлайн-казино предоставляют игрокам обилие вариантов для приятной игры. Основной ресурс казино ДжиВиСпин обеспечивает путь ко всем опциям и играм. Однако при образовании системных неполадок на помощь прибывают функционирующие зеркала.
Что есть собой актуальное зеркало
Альтернативный адрес казино — это точная дубликат официального веб-сайта, размещенная по альтернативному URL. Легитимное зеркало удерживает все характеристики, включая создание аккаунта, вход в собственный кабинет, поощрения и купоны.
Альтернативный сайт на сегодня гарантирует:
– Непрерывный вход к игровым слотам
– Полную защиту личных сведений
– Поддержку депозита и истории операций
– Возможность использования всех промо-предложений
Открытие профиля на лицензионном ресурсе
Ход регистрации отнимает несколько минут. Начинающим клиентам необходимо:
1. Открыть на главный ресурс или действующее зеркало
2. Выбрать кнопку «Создать аккаунт»
3. Внести запрашиваемые поля
4. Верифицировать email почту
5. Использовать купон при существовании
После завершения создания аккаунта пользователи получают подарок за регистрацию, какой может охватывать бесплатные вращения или денежно-призовое вознаграждение.
Авторизация в личный кабинет
Персональный кабинет обеспечивает всесторонний контроль над игровым процессом. Через персональный профиль можно:
– Депонировать баланс
– Получать средства
– Применять кодовые слова
– Мониторить журнал пари
– Участвовать в состязаниях
– Получать cash back
Описание вознаграждений и специальных предложений
Великодушная призовая программа — существенное преимущество ресурса. Ключевые формы премий:
Стартовый приз
Новые игроки приобретают выгодное поощрение на начальные вклады. Сумма премии может достигать 100-200% от размера пополнения.
Бесплатные вращения
Безвозмездные вращения предоставляются для востребованных машин. Сумма фриспинов разнится от 10 до 500 штук.
Возврат средств
Еженедельный или ежемесячный откат процентной доли утраченных средств. Стандартный процент возврата — 5-15%.
Соревнования
Систематические конкурсы с крупными премиальными пулами. Участники состязаются за призовые места в таблице лидеров.
Смартфонная версия и программа
Смартфонная версия обеспечивает делать ставки с любого девайса. Пользователи могут скачать app для iOS и Android или эксплуатировать браузерную версию.
Выгоды портативного программы:
– Быстрая прогрузка игр
– Практичный UI
– Push-уведомления о поощрениях
– Вход через отпечаток пальца
Автоматы и Live казино
Развлекательная коллекция содержит тысячи наименований от ведущих поставщиков.
Востребованные типы игр:
– Обычные машины
– Видео-автоматы с призовыми раундами
– Джекпот слоты
– Мега-путь автоматы
Live игровой зал
Секция live казино обеспечивает партию с настоящими крупье. Имеются традиционные игры:
– Рулетка
– Блэкджек
– Punto Banco
– Техасский холдем
Как разыскать функционирующее зеркало
Раздобыть рабочую адрес на зеркало возможно множественными методами:
1. Подписаться на емейл-уведомления
2. Наблюдать за апдейтами в социальных сетях
3. Контактировать в отдел поддержки
4. Заложить рабочее зеркало в фавориты
Резюме
Официальный ресурс и его актуальные копии предоставляют бесперебойный вход к развлекательным играм. Великодушные поощрения, множественные бонусные коды, удобное портативное программа и отличная сервис поддержки создают азартный опыт крайне комфортным и надежным.
опубликовано здесь vodka casino
Актуальные сетевые казино предоставляют геймерам большой выбор опций для удобной игры. Но иногда вход к основному сайту может стать недоступным. В таких обстоятельствах на помощь приходят РандХ казино регистрация, которое дает стабильный подключение ко всем возможностям платформы.
Что такое рабочее зеркало казино
Зеркало — это точная версия основного портала, которая располагается по запасному URL. Копия содержит полный инструментарий основного ресурса, включая персональный кабинет, средства и данные переводов.
Основные выгоды эксплуатации зеркала:
– Непрерывный доступ к сайту
– Абсолютная идентичность возможностей
– Сохранность личных сведений
– Сохранение всех поощрений
Как отыскать актуальное зеркало на сегодня
Существует ряд достоверных методов получения действующей ссылочной информации:
Официальные ресурсы:
1. Email рассылка — дирекция постоянно высылает уведомления с рабочими доменами
2. Общественные сети — официальные аккаунты размещают актуальную данные
3. Сервис поддержки — операторы выдают достоверные домены
4. Смартфонное приложение — предоставляет обходить блокировки
Создание аккаунта на главном сайте
Процесс создания аккаунта длится всего немного минут и состоит из нижеследующих ступеней:
1. Переход на официальный ресурс или рабочее зеркало
2. Щелчок на иконку «Зарегистрироваться»
3. Заполнение пользовательской анкеты
4. Валидация имейл почты или контактного номера
5. Задействование вознаграждения за регистрацию при существовании промокода
Начинающие игроки приобретают великодушный приветственный приз, который может включать free spins, валютные призы или возврат средств.
Авторизация в пользовательский кабинет
Вход на ресурсе производится обычным методом. Необходимо вписать имя пользователя и секретный ключ, примененные при создании аккаунта.
Существенные нюансы для безопасного входа:
– Задействуйте сложный пароль
– Активируйте двухфакторную идентификацию
– Не записывайте реквизиты на чужих девайсах
– Мониторьте адресную строку браузера
Описание наградной системы
Игорный портал награждает геймеров всевозможными вознаграждениями и кампаниями:
Стартовый комплект
Начинающие способны рассчитывать на щедрое награду за начальный депозит. Зачастую это долевая прибавка к внесенной величине плюс free spins для известных слотов.
Регулярные акции
– Еженедельный возврат средств — возмещение процента утраченных денежных средств
– Поощрения на повторные депозиты
– Уникальные промо по событиям
– Конкурсы с солидными выигрышными банками
Схема лояльности
Постоянные клиенты получают единицы за любую игру, которые затем конвертируются на фактические средства, даровые прокруты или особые бонусы.
Промокоды: как использовать
Бонус-коды — это индивидуальные наборы литер, обеспечивающие доступ к дополнительным вознаграждениям.
Где найти актуальные промокоды:
– Легитимные медийные сети казино
– Союзнические ресурсы
– Email-информирование
– Отраслевые платформы
Прописывается промокод в предназначенное поле при оформлении или внесении депозита депозита.
Мобильная версия и приложение
Нынешние пользователи любят проводить время с смартфонных девайсов. Сайт предоставляет двойной способа для приятной портативной игры.
Мобильная редакция
Веб версия само собой настраивается под габариты монитора. Не нуждается инсталляции и функционирует в любом актуальном браузере.
Телефонное приложение
Установить софт можно для аппаратов на Android и iOS. Выгоды app:
– Оперативная загрузка
– Надежная действие
– Всплывающие-уведомления о бонусах
– Автономный избегание блокировок
Операция установки прост: нужно зайти на портал с телефонного девайса и следовать указаниям.
Гемблинг выбор
База слотов охватывает множество наименований от передовых поставщиков.
Слоты
Развлекательные машины — наиболее популярная раздел игр. Доступны стандартные винтажные автоматы, новые мультимедийные слоты с поощрительными этапами, а также джекпотные призы.
Live казино
Зона с действительными ведущими обеспечивает испытать атмосферу настоящего казино. Доступны развлечения с покером.
Стриминг производится в высоком качестве, поддерживается коммуникация с раздающим и иными игроками.
Конкурсы
Периодически проводятся конкурсы по различным играм. Присоединение дает шанс выиграть валютные выигрыши, free spins или особые бонусы.
Платежные манипуляции
Платформа предлагает обширный выбор финансовых способов:
– Кредитные карты
– Онлайн платформы
– Крипта
– Финансовые транзакции
Минимальная сумма взноса — посильная для массы геймеров. Снятие выигрышей выполняется в скорые интервалы.
Отдел поддержки
Компетентные операторы готовы поддержать постоянно. Представлены такие способы связи:
– Веб-чат
– Email
– Мобильная горячая линия
– Медийные сети
Решения на частые вопросы можно обнаружить в разделе FAQ.
Заключение
Основной портал казино и его актуальные зеркала предоставляют игрокам полный путь ко всем опциям платформы. Щедрые поощрения, удобная портативная версия, гигантский выбор игр и компетентная поддержка делают игровой досуг максимально беспроблемным и конфиденциальным.
browse here – Clean interface, reading and scrolling feels natural.
блог про seo блог про seo .
рейтинг спортивных сайтов рейтинг спортивных сайтов .
this trading portal – Moving through pages feels natural with an organized layout.
Характеристика главного ресурса
Актуальные онлайн казино обеспечивают участникам широкий набор развлечений и возможностей. Лицензионный веб-сайт РёРіСЂС‹ обеспечивает проверенный вход к гемблинг функциям.
Актуальное зеркало: доступ прямо сейчас
Альтернативный адрес представляет как абсолютную дубликат официального портала. Действующее зеркало обеспечивает участникам обходить вероятные запреты.
Преимущества использования зеркала
Основные плюсы содержат:
– Непрерывный доступ к сайту
– Хранение полных функций основного сайта
– Охрана конфиденциальных сведений
– Аналогичный возможности
Открытие счета на ресурсе
Ход оформления профиля характеризуется легкостью и комфортом. Начинающие пользователи обязаны:
1. Зайти на основной ресурс или его зеркало
2. Нажать на пункт оформления
3. Указать необходимые данные
4. Верифицировать почтовую ящик
5. Выполнить стартовый вход
Подарок за регистрацию
Новички зарабатывают щедрый стартовый приз. Данное награда способно охватывать:
– Денежные начисления
– Даровые вращения
– Расширенный процент кэшбека
Доступ в персональный раздел
Активные пользователи способны оперативно получить доступ в личный раздел, эксплуатируя логин и код. Собственный аккаунт обеспечивает шанс к:
– Управлению счетом
– Истории переводов
– Текущим подаркам
– Настройкам учетной записи
Подарки и акции
Сайт регулярно реализует разнообразные промо-кампании для клиентов.
Категории бонусов
Основные типы поощрений:
– Финансовые начисления – часть от суммы взноса
– Бесплатные вращения – бесплатные вращения в слотах
– Компенсация – возврат процента затраченных сумм
– Конкурсные трофеи – награды за игру в турнирах
Ваучеры
Особые ваучеры обеспечивают заработать добавочные выгоды. Пользователи могут обнаружить их на партнерских площадках или приобрести в рассылке.
Мобильная редакция и приложение
Прогрессивные пользователи любят мобильный геймплей.
Возможности мобильной версии
– Отзывчивый интерфейс для различных гаджетов
– Совокупный доступ к играм
– Оперативная загрузка
– Эргономичное управление
Скачать приложение
Мобильное софт предложено для загрузки на девайсы с базовыми ОС Android и iOS. Программа обеспечивает:
– Бесперебойную деятельность
– Всплывающие уведомления о акциях
– Быстрый вход к избранным развлечениям
Гемблинг каталог
Игровой клуб дает богатую галерею развлекательных развлечений.
Слоты
Ассортимент игровых слотов содержит:
– Стандартные автоматы
– Video автоматы
– Джекпотные игры
– Лицензионные развлечения
Live дилеры
Раздел лайв дилеров предоставляет опцию играть с профессиональными дилерами. Представлены:
– Европейская рулетка
– Блэкджек
– Баккара
– Покер
Турниры
Систематические турниры помогают клиентам состязаться за крупные финансовые суммы. Соревновательная система модифицируется каждую неделю.
Денежные транзакции
Казино предлагает массу вариантов зачисления и вывода сумм:
– Кредитные карты
– Электронные кошельки
– Прямые трансферы
– Bitcoin
Все переводы осуществляются защищенно с применением актуальных систем шифрования.
Департамент помощи
Опытная команда саппорта работает круглосуточно. Соединиться с консультантами реально через:
– Онлайн чат
– Email почту
– Телефонную линию
– Социальные сети
Безопасность и регулирование
Платформа оперирует на основании официальной сертификата. Подобное удостоверяет:
– Честность игрового процесса
– Безопасность конфиденциальных данных
– Пунктуальные транзакции
– Легальный игровой процесс
Итог
Основной ресурс и его актуальные дубликаты гарантируют игрокам целостный комплекс возможностей для приятной и прибыльной развлечений. Внушительные вознаграждения, разнообразные игры, опытная служба и защищенная структура транзакций делают казино оптимальным вариантом для фанатов развлекательных услуг.
Переход к платформе через актуальные зеркала
Игроки интернет казино регулярно сталкиваются с проблемой блокировки официального ресурса. Собственно для преодоления этой трудности предусмотрены альтернативные адреса официального портала. Mad казино казик гарантирует стопроцентный подключение ко всем сервисам казино.
Что такое действующее зеркало казино
Зеркало является собой абсолютную реплику основного веб-сайта с идентичным опциями. Единственное расхождение — это иное имя. Любые информация клиента, содержа средства, награды и записи раундов, сохраняются неизменными.
Выгоды задействования зеркал
Действующие зеркала имеют комплексом ключевых достоинств:
– Бесперебойный подключение к излюбленным автоматам
– Стопроцентная сохранность собственных параметров
– Сохранение всех конфигураций личного кабинета
– Опция получения поощрений и участия в промоакциях
Оформление профиля на официальном домене
Операция оформления предельно легок и длится пару минут. Начинающие клиенты могут полагаться на щедрый стартовый бонус за оформление.
Шаги создания аккаунта
1. Доступ на основной портал или его альтернативу
2. Активация на опцию “Зарегистрироваться”
3. Указание необходимых сведений
4. Активация электронной почты
5. Ввод бонусного кода (в случае есть)
Бонусы и акции для клиентов
Платформа балует своих пользователей разнообразными призовыми акциями.
Базовые категории бонусов
Вводный приз — внушительное начисление для начинающих клиентов, каковое может содержать денежные суммы и бесплатные вращения.
Free spins — шанс играть в востребованных аппаратах даром.
Кешбэк — частичный возврат проигранных финансов, каковой предоставляется раз в неделю или каждый месяц.
Бонусные коды — особые сочетания, предоставляющие добавочные преимущества.
Пользовательский кабинет: инструменты и настройки
Персональный раздел дает совершенный управление над персональным опытом. В нем предусмотрены:
– Регулирование средствами
– Архив платежей
– Активные награды
– Конфигурации защиты
– Проверка профиля
Мобильная платформа и APP
Новейшие участники признают гибкость. Казино обеспечивает 2 способа для развлечений с смартфонных гаджетов.
Адаптивная портативная редакция
Смартфонная редакция ресурса автоматически настраивается под разрешение любого девайса. Не нужно скачивать дополнительное программное обеспечение.
Программа для смартфонов
Разрешено загрузить фирменное программу для iOS и Android. Приложение предоставляет:
– Моментальный старт
– Доработанный дизайн
– Мобильные-извещения о поощрениях
– Стабильную производительность
Live развлечения: атмосфера настоящего зала
Зона Live игр переносит пользователей в среду реального зала. Компетентные крупье организуют раунды в формате прямого времени.
Известные Live-столы
– Американская рулетка
– 21
– Баккара
– Карибский покер
Игровые машины: многообразие игр
Коллекция игровых аппаратов вмещает множество названий от топовых поставщиков. Пользователи обнаружат:
– Стандартные слоты
– Графические слоты
– Мега-выигрыш-слоты
– Megaways
Состязания и особые мероприятия
Регулярные турниры дают возможность участникам состязаться друг с другом за крупные наградные пулы. Всякий конкурс имеет свои требования включения и таблицу победителей.
Пути пополнения и получения сумм
Платформа поддерживает комплекс платежных методов:
– Платежные средства
– Цифровые сервисы
– Криптовалюты
– Банковские переводы
Любые операции реализуются защищенно благодаря новейшим методам защиты.
Отдел обслуживания
Компетентные консультанты службы поддержки настроены ассистировать 24/7. Доступны такие методы коммуникации:
– Онлайн-чат
– Email-помощь
– Голосовая связь
– Социальные сети
Заключение
Главный сайт игровой площадки и его актуальные копии обеспечивают игрокам безопасный и удобный подход к широкому выбору игровых развлечений. Солидные поощрения, постоянные акции, профессиональная помощь и комфортные денежные инструменты создают геймерский опыт чрезвычайно захватывающим и доходным.
ремонт ванной комнаты плитка ремонт ванной санузла цена
Передовые онлайн-казино предоставляют пользователям обширный ассортимент вариантов для приятной времяпрепровождения. Доступ к ресурсу mackshasports.com выполняется через основной веб-ресурс или функционирующее зеркало.
Что такое действующее зеркало казино
Функционирующее зеркало — это резервный адрес главного портала казино. Такие дубликаты разрабатываются для гарантирования постоянного подключения к развлекательной сервису.
Дубликат текущее абсолютно дублирует характеристики базового портала. Пользователи обретают такой же доступ ко всем сервисам, включая создание аккаунта, зачисление средств кошелька и снятие средств.
Открытие счета на главном портале
Процесс открытия профиля отнимает всего буквально мгновений. Будущим игрокам требуется:
1. Перейти на основной сайт или текущее настоящее зеркало
2. Выбрать кнопку “Регистрация”
3. Заполнить необходимые реквизиты
4. Активировать e-mail почту
5. Ввести купон при присутствии
После финализации открытия профиля игрок обретает вознаграждение за регистрацию, который вправе предполагать даровые спины или cash начисление.
Логин в личный кабинет
Индивидуальный кабинет — это защищенная зона, где участники способны регулировать своим счетом. Для входа следует внести никнейм и пароль.
В индивидуальном кабинете имеются следующие функции:
– Отслеживание записей переводов
– Активация купонов
– Регулирование поощрениями
– Участие в состязаниях
– Отслеживание возврата средств
– Корректировка учетной записи
Поощрения и акции
Игровая сервис дарит привлекательные призы:
Регистрационный комплект — новые игроки приобретают крупное премию на стартовые взносы.
Free spins — выдаются как при оформлении, так и в рамках различных кампаний.
Кэшбэк — систематический возврат фрагмента проигранных средств.
Купоны — особые комбинации, дающие возможность к уникальным вознаграждениям.
Характеристика гемблинговых разделов
Slots
Библиотека slots насчитывает множество вариантов от лучших производителей. Клиенты найдут как обычные автоматы, так и современные 3D-слоты с интересной анимацией.
Live казино
Секция Live казино дарит право играть с настоящими дилерами в условиях настоящего времени. Доступны популярные варианты: рулетка, блэкджек, баккара, покер.
Турниры
Постоянные состязания с большими наградными пулами манят массу соревнующихся. Чемпионы зарабатывают денежные призы и специальные подарки.
Мобильная версия и программа
Портативная версия сайта обеспечивает наслаждаться с каждого аппарата. Дизайн автономно настраивается под размер экрана.
Установить софт можно для девайсов на Android и iOS. Мобильное ПО располагает всеми опциями десктопной версии.
Как обнаружить текущее зеркало на сейчас
Рабочие линки зеркал регулярно корректируются. Получить действующую линк можно разными методами:
– Через отдел техподдержки
– В настоящих социальных сетях
– По email подписке
– На тематических порталах
Охрана и официальность
Основной ресурс работает на базе глобальной сертификата. Все транзакции шифруются передовыми методами шифрования.
Секретность персональных информации сохраняется в абсолютном размере.
Итог
Официальный портал и его актуальные альтернативы предоставляют пользователям круглосуточный вход к первоклассным развлекательным играм. Выгодные поощрения, разнообразные развлечения, компетентная помощь — все это создает развлекательный опыт максимально комфортным и притягательным.
Передовые онлайн-казино гарантируют игрокам разнообразный спектр функций для удобной времяпрепровождения. Подключение к площадке https://hocvientoc.net/obzory-onlayn-kazino-novosti-gemblinga-igrovye-avtomaty-i-bonusy-predstavleny-na-sayte-kazino-2026-kotoryy-podderzhivaet.html осуществляется через основной веб-ресурс или функционирующее зеркало.
Что такое актуальное зеркало казино
Актуальное зеркало — это резервный адрес лицензионного веб-сайта казино. Такие клоны формируются для предоставления непрерывного доступа к игровой платформе.
Зеркало сегодня целиком воспроизводит возможности главного ресурса. Игроки получают аналогичный доступ ко всем сервисам, включая регистрацию, финансирование счета и получение выигрышей.
Создание аккаунта на официальном портале
Процесс создания аккаунта отнимает всего несколько секунд. Новым участникам необходимо:
1. Зайти на официальный ресурс или действующее проверенное зеркало
2. Выбрать кнопку “Регистрация”
3. Заполнить необходимые информацию
4. Активировать email почту
5. Применить код активации при существовании
После окончания оформления клиент приобретает вознаграждение за регистрацию, который может содержать free spins или монетарное премию.
Логин в собственный кабинет
Персональный кабинет — это охраняемая зона, где клиенты могут администрировать своим профилем. Для логина следует внести имя пользователя и password.
В индивидуальном кабинете открыты нижеперечисленные возможности:
– Мониторинг хронологии переводов
– Применение промокодов
– Управление бонусами
– Участие в состязаниях
– Контроль возмещения
– Корректировка данных
Поощрения и промо
Азартная сервис предоставляет щедрые вознаграждения:
Регистрационный бонус — начинающие получают существенное премию на начальные пополнения.
Даровые спины — дарятся как при оформлении, так и в процессе всевозможных мероприятий.
Возврат средств — постоянный возврат части утраченных денег.
Коды активации — особые коды, открывающие возможность к уникальным предложениям.
Анализ игровых разделов
Игровые автоматы
Коллекция slots содержит массу позиций от лучших производителей. Игроки встретят как традиционные аппараты, так и новые мультимедийные автоматы с притягательной анимацией.
Live казино
Раздел Live казино дарит шанс участвовать с настоящими ведущими в условиях текущего времени. Открыты распространенные столы: рулетка, блэкджек, баккара, покер.
Соревнования
Регулярные состязания с солидными премиальными фондами привлекают массу соревнующихся. Призеры зарабатывают монетарные вознаграждения и эксклюзивные поощрения.
Мобильная версия и приложение
Портативная версия ресурса дает возможность наслаждаться с каждого аппарата. Структура автономно корректируется под диагональ экрана.
Загрузить приложение можно для аппаратов на Android и iOS. Телефонное ПО характеризуется всеми функциями полной версии.
Как обнаружить текущее зеркало на сейчас
Действующие ссылки копий постоянно изменяются. Найти актуальную ссылку можно несколькими вариантами:
– Через отдел помощи
– В настоящих социальных сетях
– По электронной подписке
– На партнерских сайтах
Безопасность и легальность
Официальный сайт работает на основании международной разрешения. Все транзакции шифруются инновационными системами безопасности.
Секретность пользовательских информации обеспечивается в абсолютном формате.
Заключение
Официальный сайт и его актуальные альтернативы обеспечивают участникам круглосуточный выход к превосходным азартным играм. Великодушные призы, многочисленные развлечения, опытная служба — все это превращает развлекательный досуг чрезвычайно комфортным и захватывающим.
билеты на катер санкт петербург билеты на катер санкт петербург .
visit this page – Layout is clean, navigating content feels smooth and natural.
Direct access to WestRack – Found the platform today; browsing feels smooth and user-friendly.
Передовые онлайн-казино обеспечивают клиентам обширный спектр игр и щедрые премии. Но для стабильной работы критично понимать, как получить доступ к Кешер казино и его функционирующие зеркала.
Что такое главный веб-ресурс казино
Главный портал казино — это главная площадка, где игроки могут получать удовольствие от развлекательными играми. Платформа действует на законных условиях и располагает всеми требуемыми документами.
Главные преимущества главного веб-сайта:
– Конфиденциальность персональных сведений
– Честные требования использования
– Стабильные выводы
– Компетентная служба поддержки
Действующее зеркало казино: для чего используется
Дублирующий ресурс — это абсолютная версия основного веб-сайта, размещенная по иному URL. Актуальное зеркало разрабатывается для предоставления постоянного соединения к ресурсу.
Факторы эксплуатации зеркал:
– Запрет официального домена
– Профилактические мероприятия
– Повышенная посещаемость на платформу
Как обнаружить рабочее зеркало сегодня
Найти актуальное рабочее зеркало можно различными способами:
1. Email-уведомления — зарегистрируйтесь на новостную подписку
2. Отдел поддержки — проконсультируйтесь в онлайн-чат
3. Официальные медиа — проверяйте за новостями
4. Специализированные порталы — достоверные источники
Оформление профиля на портале казино
Этап оформления занимает лишь немного секунд:
1. Нажмите на клавишу “Открыть счет”
2. Заполните обязательные сведения
3. Активируйте email адрес
4. Примените код активации, если предоставлен
После финализированной создания аккаунта вам откроется доступен индивидуальный аккаунт.
Награды и бонусные коды
Привлекательная наградная программа — ключевое конкурентное преимущество казино:
Награда за открытие счета
Новые пользователи зарабатывают первый бонус, который может охватывать:
– Валютный бонус на дебютный депозит
– Фриспины для барабанов
– Бездепозитные бонусы
Бонусные коды
Регулярно размещаются новые коды, дающие возможность активировать экстра поощрения.
Программа кешбэка
Лояльные клиенты зарабатывают долю утраченных денег в виде компенсации.
Свежие акции и турниры
Платформа постоянно организует увлекательные кампании:
– Семидневные баттлы
– Сезонные бонусы
– Конкурсы солидных выигрышей
– Механизм VIP-клуба
Доступ в индивидуальный аккаунт
Для доступа на платформу следует:
1. Перейти на официальный ресурс или актуальное зеркало
2. Кликнуть “Войти”
3. Прописать никнейм и ключ
В пользовательском профиле доступны данные опции:
– Пополнение баланса
– Снятие выигрышей
– Анализ лога транзакций
– Редактирование индивидуальными данными
Mobile вариант и app
Портативная версия
Мобильная вариант портала позволяет играть с всех портативного девайса. Дизайн автоматически настраивается под диагональ дисплея.
Программа для скачивания
Скачать приложение можно для:
– Android — прямая загрузка с ресурса
– iOS — инсталляция через App Store
Выгоды программы:
– Оперативный старт
– Надежная производительность
– Push-уведомления об акциях
– Улучшенный дизайн
Гемблинг разделы
Барабаны
Богатая подборка азартных слотов от ведущих разработчиков:
– Классические машины
– Современные-автоматы
– Призовые-игры
Live игры
Категория с настоящими операторами предоставляет:
– Рулетки
– Блэкджек
– Baccarat
– Texas Hold’em
Стримы ведутся в отличном качестве, обеспечивая эффект настоящего казино.
Методы зачисления и снятия
Ресурс обслуживает множественные денежные сервисы:
– Кредитные card
– Виртуальные платежи
– Цифровые валюты
– Wire транзакции
Базовые суммы депозита и оперативные выводы обеспечивают развлечение предельно комфортной.
Департамент поддержки
Профессиональная группа помощи оперирует 24/7 и готова содействовать с разными задачами:
– Онлайн-чат
– Email-поддержка
– Телефонная горячая линия
Заключение
Официальный сайт казино и его действующие зеркала гарантируют игрокам безопасный и захватывающий гемблинг опыт. Привлекательные награды, функциональная mobile модификация, обширные развлечения и высокоуровневое live-казино создают эту площадку великолепным местом для игровых развлечений.
как продавать сайты как продавать сайты .
Zen Cove Gems – Checked a few sections, content appears organized and easy to follow.
Источник vodka bet
copperstoneemporium – Just checking this out, site feels organized and readable today.
Узнать больше vodka bet
Доступ к сайту через актуальные зеркала
Клиенты онлайн казино постоянно контактируют с проблемой ограничения официального ресурса. Как раз для устранения этой трудности созданы альтернативные адреса официального ресурса. Fat Panda казино casino предоставляет стопроцентный вход ко всем функциям казино.
Что такое рабочее зеркало казино
Зеркало значит собой точную реплику официального ресурса с таким же набором функций. Главное различие — это иное имя. Любые данные игрока, вместе с счет, бонусы и архив раундов, остаются идентичными.
Достоинства применения зеркал
Рабочие зеркала располагают набором важных плюсов:
– Бесперебойный доступ к любимым слотам
– Полная защита личных параметров
– Удержание всех конфигураций персонального кабинета
– Возможность приобретения наград и вовлечения в предложениях
Создание аккаунта на главном портале
Процедура создания аккаунта максимально легок и занимает буквально минут. Новые клиенты могут претендовать на крупный начальный бонус за регистрацию.
Шаги оформления аккаунта
1. Переход на основной портал или его копию
2. Нажатие на опцию “Создать аккаунт”
3. Заполнение необходимых сведений
4. Верификация почтовой почты
5. Ввод купона (если доступен)
Награды и кампании для участников
Игровая площадка балует своих участников разнообразными наградными программами.
Основные категории поощрений
Вводный бонус — крупное начисление для начинающих пользователей, которое имеет возможность охватывать денежные призы и free spins.
Free spins — опция играть в известных автоматах без затрат.
Кешбэк — процентный отдача израсходованных денег, что предоставляется еженедельно или помесячно.
Промокоды — особые комбинации, обеспечивающие дополнительные преимущества.
Персональный кабинет: инструменты и установки
Персональный кабинет гарантирует полный надзор над персональным опытом. В данном разделе присутствуют:
– Регулирование счетом
– Данные платежей
– Работающие бонусы
– Параметры защиты
– Проверка аккаунта
Портативная платформа и софт
Актуальные игроки предпочитают доступность. Платформа дает пару пути для игры с мобильных устройств.
Responsive портативная редакция
Адаптивная вариант домена автоматически адаптируется под монитор любого гаджета. Не требуется скачивать специальное приложение.
Софт для мобильных
Разрешено скачать фирменное программу для iOS и Android. Приложение обеспечивает:
– Быстрый старт
– Адаптированный интерфейс
– Всплывающие-уведомления о бонусах
– Надежную производительность
Live развлечения: среда истинного клуба
Зона Live развлечений переносит клиентов в обстановку истинного казино. Опытные крупье осуществляют игры в виде живого времени.
Известные Live-игры
– Рулетка
– Blackjack
– Baccarat
– Покер
Автоматы: многообразие слотов
Коллекция азартных аппаратов включает множество вариантов от известных поставщиков. Участники обнаружат:
– Обычные машины
– Графические слоты
– Мега-выигрыш-машины
– Слоты с множественными линиями
Турниры и эксклюзивные события
Регулярные турниры дают возможность клиентам соревноваться друг с другом за значительные выигрышные суммы. Всякий состязание содержит свои требования присутствия и таблицу победителей.
Пути ввода и получения средств
Казино поддерживает множество денежных методов:
– Платежные карты
– Виртуальные платежные системы
– Криптовалюты
– Банковские переводы
Все операции выполняются защищенно благодаря актуальным технологиям криптографии.
Команда помощи
Компетентные консультанты сервиса support готовы поддержать 24/7. Работают такие каналы связи:
– Онлайн-чат
– Email-помощь
– Телефонная связь
– Медийные сети
Резюме
Официальный ресурс платформы и его актуальные альтернативы дают участникам безопасный и легкий переход к широкому диапазону игровых игр. Внушительные поощрения, периодические промоакции, качественная поддержка и удобные платежные инструменты делают азартный процесс предельно увлекательным и прибыльным.
Продолжение vodka casino
Передовые онлайн-казино гарантируют клиентам разнообразный диапазон функций для беспроблемной развлечений. Вход к ресурсу pestkafilm.pl выполняется через лицензионный портал или актуальное зеркало.
Что такое актуальное зеркало казино
Рабочее зеркало — это запасной домен лицензионного портала казино. Такие клоны создаются для поддержания непрерывного доступа к гемблинговой системе.
Альтернатива текущее полностью повторяет опции основного сайта. Клиенты обретают аналогичный выход ко всем возможностям, включая оформление профиля, пополнение кошелька и вывод призов.
Открытие счета на лицензионном ресурсе
Процедура открытия профиля отнимает всего пару секунд. Свежим пользователям необходимо:
1. Перейти на основной портал или рабочее подлинное зеркало
2. Выбрать кнопку “Создать аккаунт”
3. Указать требуемые данные
4. Активировать e-mail почту
5. Активировать купон при доступности
После завершения создания аккаунта клиент получает бонус за регистрацию, который способен предполагать фриспины или денежное премию.
Логин в собственный кабинет
Индивидуальный кабинет — это защищенная область, где пользователи могут управлять своим аккаунтом. Для доступа необходимо внести никнейм и пароль.
В персональном кабинете представлены нижеперечисленные опции:
– Отслеживание записей транзакций
– Применение бонусных кодов
– Управление поощрениями
– Участие в состязаниях
– Проверка кэшбэка
– Настройка данных
Бонусы и акции
Гемблинговая площадка предоставляет выгодные вознаграждения:
Стартовый бонус — новые игроки получают значительное начисление на начальные депозиты.
Бесплатные вращения — предоставляются как при создании аккаунта, так и в процессе разнообразных промо.
Кэшбэк — систематический компенсация доли израсходованных финансов.
Купоны — специальные шифры, открывающие право к особым призам.
Анализ азартных секций
Slots
Библиотека автоматов содержит множество игр от ведущих поставщиков. Клиенты обнаружат как обычные слоты, так и инновационные мультимедийные автоматы с интересной анимацией.
Live казино
Секция Live казино обеспечивает опцию соревноваться с реальными ведущими в состоянии реального времени. Доступны распространенные игры: рулетка, блэкджек, баккара, покер.
Состязания
Систематические состязания с солидными премиальными пулами завлекают массу соревнующихся. Чемпионы зарабатывают финансовые призы и эксклюзивные бонусы.
Портативная версия и app
Телефонная версия ресурса предоставляет право играть с произвольного устройства. Интерфейс независимо корректируется под формат экрана.
Скачать приложение можно для гаджетов на Android и iOS. Мобильное приложение имеет всеми возможностями десктопной версии.
Как найти актуальное зеркало на сегодня
Действующие ссылки альтернатив периодически обновляются. Найти свежую адрес можно многими способами:
– Через департамент саппорта
– В подлинных социальных сетях
– По e-mail newsletter
– На аффилиатных порталах
Безопасность и лицензирование
Главный сайт действует на фундаменте международной разрешения. Все платежи оберегаются актуальными протоколами кодирования.
Анонимность индивидуальных сведений обеспечивается в совершенном масштабе.
Итог
Основной сайт и его актуальные дубликаты обеспечивают игрокам круглосуточный выход к превосходным игровым развлечениям. Выгодные поощрения, различные развлечения, компетентная служба — все это делает развлекательный процесс чрезвычайно беспроблемным и увлекательным.
спарк казино тг
güvenilir casino siteleri: casino siteleri
Harbor Hub – Stumbled on this site, layout is clean and reading is effortless.
экскурсии в санкт петербурге частные гиды Погрузитесь в магию Петербурга с нашими приватными гидами, которые сделают вашу спб вип экскурсию по-настоящему особенной, открывая для вас тайны города.
Ткань как главный показатель качества одежды. Ткань это барометр качества одежды Правильный выбор ткани часто решает больше, чем дизайн или бренд. Именно материал определяет комфорт, внешний вид и долговечность одежды. Если ткань выбрана правильно, вещь будет выглядеть аккуратно и прослужит долго. Если нет, даже красивый фасон быстро разочарует. Сегодня при покупке одежды мы сталкиваемся с огромным количеством маркетинговых терминов. Можно услышать выражения французская элегантность, стиль старых денег или премиальная коллекция. Такие слова звучат красиво, но они редко объясняют самое главное. Из какой ткани сделана вещь. Если внимательно посмотреть на людей с действительно хорошим стилем, можно заметить одну особенность. Их одежда редко кричит логотипами и яркими деталями. Она выглядит спокойно, но при этом аккуратно и дорого. Причина чаще всего одна. Качественная ткань. Комфорт начинается с материала Первое, что отличает хорошую одежду, это ощущение при носке. Качественная ткань мягкая и приятная на ощупь, хорошо пропускает воздух и обеспечивает комфорт в течение всего дня. Кроме этого хороший материал должен сохранять форму изделия, не создавать статического электричества, не образовывать катышки и оставаться удобным в уходе. Эти свойства напрямую влияют на то, насколько долго вещь будет выглядеть аккуратно. Поэтому ткань влияет не только на внешний вид, но и на практичность одежды. Как ткань влияет на стиль Качественная ткань способна полностью изменить восприятие одежды. Она подчеркивает текстуру, форму и аккуратность кроя. Даже простая вещь может выглядеть элегантно, если материал выбран правильно. И наоборот. Дорогой дизайн теряет свою ценность, если ткань выглядит дешево или плохо держит форму. Поэтому ткань становится важной частью личного стиля. Новая тенденция потребления Сегодня все больше людей начинают обращать внимание не на бренд, а на материалы. Появляется новый подход к покупке одежды. Сначала оценивать ткань, а уже потом дизайн. Этот тренд особенно заметен среди молодых покупателей. Они все меньше ориентируются на крупные логотипы и все больше ценят комфорт, натуральность и долговечность. В индустрии моды этот процесс иногда называют тканевой революцией. Сначала спрашивать о ткани Фраза сначала спрашивать о ткани при покупке одежды постепенно становится новым принципом осознанного потребления. Если раньше главным ориентиром был бренд, сегодня многие покупатели начинают интересоваться составом ткани, ее плотностью и характеристиками. Бренды, которые уделяют внимание качеству материалов, получают все больше доверия. Фактически конкуренция между компаниями все чаще происходит именно на уровне тканей. Натуральные материалы возвращаются Рост интереса к комфорту и качеству возвращает популярность натуральным материалам. Хлопок, лен, шерсть и шелк снова становятся важной частью современных коллекций. Эти ткани обладают хорошей воздухопроницаемостью, приятны на ощупь и создают ощущение естественного комфорта. Компания CUCTEX уделяет особое внимание таким материалам. В наших коллекциях широко используются хлопковые и льняные ткани. Они позволяют сочетать современный дизайн и комфорт в повседневной носке. Как определить качество ткани Сегодня покупатели все чаще изучают состав ткани, ее плотность и свойства. Это простой способ понять, насколько вещь будет удобной и долговечной. Есть несколько простых способов оценить ткань. Прикоснитесь к ткани тыльной стороной ладони Сожмите ткань в руке и посмотрите, как быстро она возвращается в исходную форму Оцените мягкость и ощущения на коже Если ткань неприятна при первом касании, скорее всего она не станет комфортной и при носке. Итог Качество одежды во многом определяется качеством ткани. Можно сказать, что ткань является настоящим барометром уровня изделия. Чем лучше мы понимаем свойства материалов, тем легче выбирать одежду, которая будет не только красивой, но и действительно удобной и долговечной.
Подробнее здесь водка бэт
Доступ к порталу через актуальные зеркала
Нынешние сетевые казино гарантируют клиентам круглосуточный доступ к сервисам. Главный веб-сайт DBbet функционирует стабильно, обеспечивая богатый спектр гемблинг игр. Впрочем периодически появляются технические препятствия или блокировки, поэтому критично иметь представление о доступности действующих зеркал.
Что означает из себя главное зеркало казино
Копия — это абсолютная копия основного портала с идентичным интерфейсом. Функционирующее зеркало на данный момент даёт возможность миновать локальные запреты и вести времяпрепровождение.
Главные плюсы эксплуатации зеркал:
– Стопроцентный вход к индивидуальному кабинету
– Сохранение совокупных данных аккаунта
– Аналогичный набор игр
– Свежие бонусы и промо
Оформление на сайте
Операция регистрации длится считанные минут. Свежие игроки приобретают богатый поощрение за запись, он имеет возможность охватывать:
– Вступительный денежный подарок
– Даровые вращения для слотов
– Специальные ваучеры
– Повышенный кешбэк
Для завершения регистрации следует:
1. Переместиться на главный портал или копию
2. Щёлкнуть элемент «Создать аккаунт»
3. Ввести контактные сведения
4. Подтвердить почтовый адрес или мобильный
5. Использовать купон (при присутствии)
Доступ в персональный кабинет
Следом за правильной регистрации клиенты в состоянии совершать доступ посредством основной веб-сайт или актуальное зеркало. Личный кабинет даёт абсолютный управление над счётом:
– Летопись ставок
– Зачисление кошелька
– Получение средств
– Контроль привилегиями
– Присутствие в соревнованиях
Поощрения и предложения казино
Портал балует пользователей различными привилегированными программами:
Стартовые подарки
Дебютанты получают щедрый пакет привилегий на вступительные пополнения. Как правило это предполагает долевую доплату к величине вклада плюс бесплатные спины.
Постоянные предложения
– Седмичный компенсация до 15%
– Соревнования с выигрышными суммами
– Призы на день рождения
– Уникальные акции для статусных пользователей
Система верности
Регулярные клиенты получают баллы, они разрешено конвертировать на настоящие деньги или специальные бонусы.
Портативная редакция и утилита
Передовые решения обеспечивают участвовать везде угодно. Портативная редакция портала независимо подстраивается под размер каждого аппарата.
Выгоды портативного программы:
– Оперативная подгрузка игр
– Комфортный интерфейс
– Моментальные-уведомления о предложениях
– Шанс загрузить для Android и iOS
Живое казино: среда настоящего азартного заведения
Раздел Live казино доставляет пользователей в атмосферу настоящего азартного клуба. Профессиональные ведущие управляют развлечение в виде настоящего времени.
Имеющиеся развлечения:
– Европейская рулетка
– Двадцать одно
– Карточная игра
– Покер
Автоматы и азартные слоты
Ассортимент развлекательных слотов охватывает массу названий от передовых студий. Любой пользователь отыщет игру по душе:
– Традиционные автоматы
– Современные автоматы с призовыми турами
– Джекпот-автоматы
– Динамические автоматы
Соревнования и акции
Постоянные турниры привносят драйв и открывают шанс получить большие призы. Участие в конкурсах нередко бесплатное, а выигрышные суммы составляют значительных величин.
Секьюрити и секретность
Сайт задействует передовые системы криптографии для охраны информации игроков. Любые транзакционные операции выполняются через безопасные соединения.
Итог
Основной веб-сайт и его рабочие зеркала предоставляют стабильный доступ к превосходным азартным развлечениям. Богатые бонусы, удобная карманная вариант, богатство машин и компетентное Live-казино создают платформу отличным выбором для ценителей азартных слотов.
vdcasino resmi: vdcasino
1win hesab bloklanma səbəbi http://www.1win5764.help
Frost Finds – Browsed randomly, content is well-organized and readable.
Переход к ресурсу и действующие URL
Популярные виртуальные казино предоставляют клиентам обширный набор возможностей. Основной веб-сайт Лев казино организует стабильный переход ко всем услугам. Тем не менее иногда случаются моменты, когда требуется альтернативный метод входа.
Что представляет собой актуальное зеркало
Действующее зеркало — это абсолютная копия главного портала с запасным интернет адресом. Дубликат сегодня помогает избегать возможные ограничения и обеспечивать стабильный подключение к любимым слотам.
Главное зеркало характеризуется полными функциями, что и базовый веб-сайт:
– Весь ассортимент игр
– Индивидуальный кабинет с записанными данными
– Действующие бонусы и акции
– Проверенные банковские переводы
Регистрация и авторизация в платформу
Процесс открытия аккаунта на ресурсе занимает буквально минут. Начинающим участникам необходимо:
1. Попасть на актуальное зеркало сегодня
2. Выбрать элемент «Зарегистрироваться»
3. Указать нужные параметры
4. Проверить почтовую почту или контакт телефона
5. Использовать поощрение за оформление
Подключение в собственный кабинет реализуется посредством указание имени пользователя и кода доступа.
Характеристика бонусной политики
Богатая наградная система — основное достоинство ресурса. Клиенты получают всевозможные награды:
Стартовые награды
Свежие участники могут надеяться на привлекательный подарок за открытие профиля. Обычно это совокупность возможностей, включающий:
– Частичную добавку к дебютному вкладу
– Даровые вращения
– Extra средства на кошелек
Промо-коды и особые предложения
Периодические промокоды дают возможность получать экстра льготы. Активировать их разрешено в отдельном поле собственного профиля.
Бесплатные вращения и компенсация
Фриспины — это способность крутить игры без применения своих денег. Компенсация предполагает долевой отдачу утраченных денег.
Коллекция игр
Развлекательная платформа предоставляет внушительную библиотеку слотов.
Слоты
Ассортимент игровых машин удивляет воображение. Имеются классические ретро слоты и новые развлечения с увлекательной графикой.
Live зал
Категория Live развлечений погружает пользователей в обстановку настоящего азартного зала. Квалифицированные ведущие проводят раунды в живом формате.
Конкурсы и лидерборды
Периодические конкурсы добавляют драйва и предоставляют перспективу заработать внушительные суммы.
Портативная реализация и приложение
Новые технологии обеспечивают участвовать в любимом локации. Портативная реализация автоматически подстраивается под размер аппарата.
Загрузить приложение разрешено для операционных систем iOS и Android. Программа дает:
– Быстрый переход
– Стабильную производительность
– Всплывающие-алерты об акциях
– Удобный вид
Банковские процедуры
Сайт работает с многочисленные системы ввода и вывода сумм:
– Платежные инструменты
– Электронные кошельки
– Криптовалюты
– Денежные операции
Все переводы осуществляются через зашифрованное соединение, что обеспечивает сохранность персональных информации.
Департамент поддержки
Квалифицированная команда поддержки работает всегда. Связаться с операторами возможно через:
– Live-чат
– Почтовую почту
– Телефон
– Общественные каналы
Заключение
Главный веб-сайт и его функционирующее зеркало гарантируют участникам безопасный и удобный вход к интересным занятиям. Щедрые поощрения, разнообразный спектр развлечений и отличная сервис создают участие максимально комфортной и результативной.
https://kupit-schetchik.ru/
топ казино онлайн Казино онлайн открывают мир азарта и развлечений, предлагая широкий выбор игр прямо у вас дома
Bazaar Picks – Well-arranged pages make discovering content easy.
useful link – Clean interface, very easy to navigate through content.
Характеристика основного сайта
Передовое онлайн-казино обеспечивает своим участникам большой ассортимент возможностей и бонусов. Оригинальный сайт http://client4.pro-assistance.fr оперирует круглосуточно, гарантируя доступ к популярным играм, live-казино и многим кампаниям.
Функционирующее зеркало: возможность к порталу
Что такое зеркало казино
Альтернатива составляет собой абсолютную реплику главного портала с альтернативным сетевым адресом. Актуальное зеркало позволяет игрокам избегать запреты и обеспечивать непрерывный доступ к выбранным играм.
Как получить актуальное зеркало сегодня
Рабочие URL на главное зеркало размещаются через:
– Электронную рассылку
– Основные публичные сети
– Сервис обслуживания
– Affiliated порталы
Созданиеаккаунта на ресурсе
Процесс созданияаккаунта
Оформление длится пару минут и предполагает следующие шаги:
1. Вход на оригинальный веб-сайт или действующее зеркало
2. Нажатие элемента “Создатьаккаунт”
3. Ввод личных данных
4. Подтверждение электроннойпочты или контакта
5. Создание кодадоступа
Приз за открытиесчета
Первые пользователи зарабатывают большие вступительные бонусы:
– Игровые средства на баланс
– Бесплатныевращения для слотов
– Усиленный объем возврата
– Уникальные коды
Логин в личный аккаунт
Активные клиенты способны осуществить вход через официальный ресурс или текущее зеркало. Для этого необходимо набрать учетноеимя и ключдоступа, созданные при открытиисчета.
Инструменты собственного профиля
В индивидуальном профиле доступны такие опции:
– Управление контактными информацией
– Внесение кошелька
– Обналичивание выигрышей
– Активация купонов
– Проверка архива транзакций
– Вступление в конкурсах
Поощрения и промо
Категории бонусов
Казино радует своих пользователей всевозможными бонусными системами:
– Вступительный комплект — щедрые бонусы на дебютные взносы
– Freespins — экстра прокруты в рейтинговых автоматах
– Кешбэк — еженедельный откат суммы убытков
– Система VIP — особые льготы для активных клиентов
Промокоды и их использование
Особые промокоды дают экстра бонусы. Для ввода нужно набрать последовательность в нужное окно в индивидуальном кабинете.
Азартный ассортимент
Автоматы
База игровых автоматов включает тысячи позиций от лучших разработчиков:
– Классические слоты
– Современные игры
– Призовые симуляторы
– Тематические слоты
Live казино
Секция Live-казино предоставляет взаимодействие с настоящими дилерами в режиме актуального эфира:
– Французскаярулетка
– Очко
– Пунтобанко
– Покер
Конкурсы
Регулярные конкурсы с солидными выигрышными фондами проходят постоянно. Претенденты сражаются за первенство в таблице.
Мобильная адаптация и приложение
Mobile версия веб-сайта
Главный портал на100% оптимизирован для планшетных устройств. Игроки вправе пользоваться развлечения непосредственно через веб-навигатор без обязательства загрузки.
Софт для скачивания
Фирменное карманное программа имеется для загрузки на девайсы с рабочими системами Android и iOS. Приложение дает:
– Быстрый доступ к автоматам
– Устойчивую производительность
– Оперативные-извещения о бонусах
– Простой оформление
Вывод
Официальный веб-сайт казино и его действующие альтернативы обеспечивают клиентам полный доступ к высококлассным игровым развлечениям. Большие подарки, многочисленные предложения, простая портативная версия и компетентная сервис превращают азартный опыт чрезвычайно enjoyable и результативным.
Surf camps in Morocco provide the perfect combination of adventure, learning, and relaxation by the ocean. Located along the Atlantic coast, these camps offer access to some of the region’s best surf spots. Participants receive professional guidance, surf equipment, and comfortable accommodation near the beach. Beginners can quickly learn how to ride the waves, while experienced surfers can challenge themselves with more advanced conditions. Many surf camps also include activities such as yoga, cultural tours, and local cuisine experiences, creating a unique travel experience for anyone looking to enjoy an active holiday.
skybrook marketplace – Navigation flows easily, and sections are well defined.
purchase lasix online no prescription http://alpharms.shop/# lasix online
на этом сайте vodka bet casino
Обзор основного портала
Актуальное онлайн-казино предлагает своим игрокам обширный ассортимент возможностей и поощрений. Главный веб-сайт Champion зеркало оперирует круглосуточно, давая путь к востребованным слотам, live-казино и обширным промо.
Функционирующее зеркало: доступ к сайту
Что такое дубликат казино
Копия является собой точную дубликат основного ресурса с другим URL названием. Актуальное зеркало позволяет пользователям избегать запреты и обеспечивать непрерывный вход к излюбленным играм.
Как обнаружить текущее зеркало сегодня
Действующие ссылки на официальное зеркало выкладываются через:
– Email рассылку
– Главные публичные сети
– Сервис обслуживания
– Тематические порталы
Созданиеаккаунта на ресурсе
Процесс созданияаккаунта
Оформление требует несколько минут и предполагает следующие шаги:
1. Переход на официальный сайт или рабочее зеркало
2. Выбор опции “Создатьаккаунт”
3. Указание личных данных
4. Проверка email или номера
5. Создание кодадоступа
Подарок за открытиесчета
Первые клиенты получают солидные приветственные поощрения:
– Бонусные депозиты на счет
– Халявныеспины для симуляторов
– Расширенный коэффициент возврата
– Эксклюзивные купоны
Логин в личный профиль
Активные игроки вправе совершить логин через основной веб-сайт или действующее зеркало. Для этого нужно внести имяпользователя и код, сформированные при созданииаккаунта.
Возможности личного кабинета
В индивидуальном аккаунте имеются следующие функции:
– Контроль личными сведениями
– Пополнение баланса
– Обналичивание средств
– Активация кодов
– Проверка журнала игр
– Включение в конкурсах
Вознаграждения и акции
Типы бонусов
Казино радует своих игроков всевозможными призовыми акциями:
– Вступительный комплект — выгодные поощрения на первые вклады
– Фриспины — бонусные прокруты в популярных симуляторах
– Кэшбек — регулярный возмещение суммы убытков
– Схема поощрения — эксклюзивные бонусы для регулярных участников
Коды и их использование
Специальные купоны гарантируют расширенные поощрения. Для ввода нужно указать код в определенное поле в персональном кабинете.
Развлекательный набор
Автоматы
База игровых автоматов включает сотни наименований от лучших разработчиков:
– Обычные слоты
– Современные слоты
– Призовые слоты
– Брендовые автоматы
Live казино
Раздел Live-казино предлагает взаимодействие с живыми дилерами в режиме реального времени:
– Французскаярулетка
– Блэкджек
– Пунтобанко
– Casinopoker
Турниры
Периодические состязания с большими выигрышными фондами проходят регулярно. Участники борются за победу в турнирнойсетке.
Смартфонная реализация и APP
Мобильная реализация портала
Оригинальный веб-сайт целиком приспособлен для смартфонных устройств. Пользователи имеютвозможность открывать развлечения прямо через браузер без необходимости загрузки.
APP для загрузки
Специальное смартфонное программа предоставляется для получения на аппараты с рабочими ОС Android и iOS. Приложение дает:
– Оперативный доступ к слотам
– Бесперебойную операционность
– Оперативные-извещения о акциях
– Простой навигацию
Резюме
Официальный портал казино и его актуальные альтернативы обеспечивают участникам абсолютный вход к качественным азартным играм. Щедрые бонусы, всевозможные предложения, комфортная портативная платформа и опытная поддержка превращают игровой процесс максимально удобным и выгодным.
Нынешние онлайн-казино предоставляют пользователям обширный ассортимент опций для беспроблемной развлечений. Доступ к платформе Kent казино производится через официальный портал или актуальное зеркало.
Что такое действующее зеркало казино
Актуальное зеркало — это дополнительный домен главного ресурса казино. Такие версии генерируются для гарантирования стабильного входа к игровой сервису.
Зеркало сегодня целиком повторяет возможности базового портала. Клиенты приобретают схожий вход ко всем услугам, включая оформление профиля, зачисление средств депозита и вывод средств.
Открытие счета на официальном сайте
Процедура создания аккаунта отнимает всего несколько секунд. Начинающим игрокам необходимо:
1. Войти на официальный домен или действующее проверенное зеркало
2. Нажать кнопку “Зарегистрироваться”
3. Внести нужные реквизиты
4. Активировать почтовую почту
5. Ввести промокод при существовании
После завершения открытия профиля участник приобретает вознаграждение за регистрацию, который способен охватывать бесплатные вращения или cash начисление.
Доступ в собственный кабинет
Пользовательский кабинет — это защищенная зона, где пользователи способны регулировать своим учетной записью. Для логина нужно ввести имя пользователя и секретный ключ.
В персональном кабинете открыты следующие возможности:
– Отслеживание записей операций
– Задействование купонов
– Управление вознаграждениями
– Включение в турнирах
– Мониторинг возмещения
– Настройка аккаунта
Вознаграждения и акции
Развлекательная сервис предоставляет выгодные призы:
Регистрационный пакет — начинающие получают значительное вознаграждение на стартовые пополнения.
Бесплатные вращения — выдаются как при регистрации, так и в процессе разнообразных кампаний.
Возмещение — постоянный возврат фрагмента утраченных средств.
Купоны — эксклюзивные комбинации, предоставляющие возможность к специальным бонусам.
Описание гемблинговых категорий
Игровые автоматы
Ассортимент слотов содержит массу игр от ведущих разработчиков. Геймеры обнаружат как классические слоты, так и актуальные 3D-слоты с притягательной анимацией.
Live казино
Секция Live казино обеспечивает возможность соревноваться с действующими дилерами в условиях реального времени. Открыты востребованные столы: рулетка, блэкджек, баккара, покер.
Состязания
Регулярные состязания с значительными призовыми банками завлекают сотни соревнующихся. Чемпионы обретают cash выплаты и уникальные подарки.
Телефонная версия и программа
Адаптивная версия портала позволяет развлекаться с каждого устройства. Оформление независимо подстраивается под габариты экрана.
Скачать app можно для устройств на Android и iOS. Телефонное программа имеет всеми опциями десктопной версии.
Как отыскать действующее зеркало на текущий день
Актуальные ссылки копий периодически изменяются. Найти актуальную URL можно многими методами:
– Через сервис помощи
– В официальных социальных сетях
– По электронной newsletter
– На тематических ресурсах
Охрана и легальность
Главный сайт функционирует на фундаменте глобальной разрешения. Все переводы шифруются современными технологиями защиты.
Приватность личных данных сохраняется в полном формате.
Резюме
Официальный ресурс и его действующие зеркала предоставляют клиентам беспрерывный вход к качественным азартным услугам. Великодушные призы, многочисленные слоты, квалифицированная сервис — все это делает азартный опыт предельно приятным и притягательным.
Современные онлайн-казино гарантируют участникам обширный выбор игр и привлекательные бонусы. Впрочем для беспроблемной игры существенно осознавать, как обнаружить казино casino Vovan и его актуальные зеркала.
Что такое главный веб-ресурс казино
Официальный сайт казино — это базовая площадка, где участники могут пользоваться гемблинг автоматами. Платформа функционирует на легальных условиях и имеет всеми обязательными лицензиями.
Ключевые достоинства официального веб-сайта:
– Надежность пользовательских сведений
– Прозрачные правила участия
– Обеспеченные выплаты
– Профессиональная техподдержка
Функционирующее зеркало казино: для чего требуется
Альтернативный адрес — это абсолютная версия официального веб-сайта, расположенная по альтернативному URL. Актуальное зеркало формируется для поддержания бесперебойного соединения к ресурсу.
Факторы задействования копий сайта:
– Ограничение официального URL
– Регламентные мероприятия
– Высокая посещаемость на ресурс
Как отыскать актуальное зеркало сегодня
Найти актуальное проверенное зеркало можно несколькими вариантами:
1. Почтовые оповещения — активируйте уведомления на новостную отправку
2. Отдел поддержки — напишите в онлайн-чат
3. Публичные медиа — проверяйте за постами
4. Тематические порталы — авторитетные платформы
Открытие счета на ресурсе казино
Алгоритм создания аккаунта составляет всего пару моментов:
1. Выберите на опцию “Открыть счет”
2. Заполните обязательные информацию
3. Подтвердите контактную e-mail
4. Введите купон, если предоставлен
После оконченной активации вам станет открыт персональный аккаунт.
Бонусы и промокоды
Выгодная наградная структура — существенное плюс казино:
Бонус за регистрацию
Свежие пользователи приобретают начальный поощрение, который может содержать:
– Монетарный бонус на дебютный депозит
– Фри-спины для игровых машин
– Безвозвратные фонды
Бонусные коды
Регулярно появляются свежие бонусные шифры, обеспечивающие активировать экстра привилегии.
Программа компенсации
Лояльные клиенты приобретают долю использованных денег назад.
Действующие акции и конкурсы
Ресурс периодически проводит интересные промо-мероприятия:
– Еженедельные турниры
– Тематические предложения
– Лотереи крупных наград
– Механизм привилегий
Авторизация в личный раздел
Для доступа на сайт следует:
1. Перейти на главный ресурс или рабочее зеркало
2. Кликнуть “Вход”
3. Внести логин и код доступа
В индивидуальном разделе открыты нижеперечисленные инструменты:
– Депозит кошелька
– Снятие призов
– Изучение архива игр
– Изменение индивидуальными сведениями
Mobile версия и программа
Mobile платформа
Мобильная версия сайта обеспечивает развлекаться с любого смартфонного девайса. Визуал адаптивно подстраивается под формат screen.
Программа для download
Установить app можно для:
– Android — безопасная download с ресурса
– iOS — загрузка через App Store
Достоинства мобильного клиента:
– Мгновенный старт
– Надежная функциональность
– Push-оповещения об предложениях
– Улучшенный функционал
Игровые секции
Автоматы
Разнообразная подборка развлекательных слотов от лучших поставщиков:
– Классические слоты
– Новые-слоты
– Накопительные-автоматы
Live зал
Раздел с настоящими ведущими предлагает:
– Рулетки
– Блэкджек
– Баккара
– Карточные игры
Трансляции осуществляются в высоком качестве изображения, создавая эффект реального казино.
Системы пополнения и получения
Сайт работает с множественные финансовые инструменты:
– Кредитные средства
– Виртуальные счета
– Цифровые валюты
– Банковские переводы
Минимальные пороги пополнения и быстрые выводы гарантируют развлечение максимально беспроблемной.
Отдел support
Профессиональная отдел помощи доступна 24/7 и готова поддержать с разными вопросами:
– Онлайн-чат
– Email-поддержка
– Телефонная связь
Заключение
Основной портал казино и его рабочие зеркала предоставляют пользователям безопасный и увлекательный гемблинг досуг. Богатые бонусы, функциональная мобильная модификация, многочисленные развлечения и высокоуровневое live-казино формируют эту площадку отличным решением для гемблинг развлечений.
go to this page – Pages are structured well, browsing feels intuitive.
Вход к сайту через актуальные зеркала
Пользователи интернет казино нередко имеют дело с трудностью недоступности основного портала. Собственно для ликвидации этой задачи существуют зеркала главного ресурса. http://pharmsolution.org/promokody-kazino-na-2026-god-bonus-kody-na-igrovye-avtomaty-dlya-novykh-polzovateley-s-vyvodom-deneg-bonusnaya-summa-mozhet-dostigat-opredelennogo-znacheniya-v-rublyakh/ гарантирует абсолютный подключение ко всем возможностям платформы.
Что такое действующее зеркало казино
Зеркало представляет собой полную версию оригинального сайта с аналогичным возможностями. Главное отличие — это альтернативное имя. Любые параметры пользователя, в том числе депозит, награды и записи ставок, продолжают быть такими же.
Преимущества использования зеркал
Актуальные зеркала характеризуются комплексом существенных преимуществ:
– Постоянный вход к предпочитаемым играм
– Стопроцентная конфиденциальность собственных данных
– Неизменность всех конфигураций пользовательского кабинета
– Опция взятия наград и участия в предложениях
Оформление профиля на легальном ресурсе
Операция регистрации максимально легок и занимает пару минут. Начинающие игроки способны надеяться на щедрый приветственный приз за создание аккаунта.
Ступени открытия аккаунта
1. Переход на основной ресурс или его дубликат
2. Выбор на кнопку “Зарегистрироваться”
3. Внесение необходимых сведений
4. Проверка почтовой почты
5. Внесение бонусного кода (если имеется)
Поощрения и промоакции для пользователей
Игровая площадка поощряет своих игроков разнообразными поощрительными предложениями.
Ключевые типы призов
Приветственный бонус — крупное поощрение для новых пользователей, которое способно вмещать монетарные бонусы и бесплатные вращения.
Безвозмездные спины — опция крутить в топовых автоматах без затрат.
Компенсация — процентный компенсация утраченных средств, каковой зачисляется еженедельно или раз в месяц.
Купоны — эксклюзивные последовательности, дающие экстра поощрения.
Пользовательский кабинет: функции и установки
Индивидуальный кабинет предоставляет абсолютный регулирование над развлекательным активностью. В нем присутствуют:
– Управление средствами
– Записи операций
– Текущие награды
– Конфигурации безопасности
– Верификация учетной записи
Смартфонная вариант и APP
Новейшие клиенты признают портативность. Площадка обеспечивает 2 варианта для развлечений с мобильных аппаратов.
Responsive телефонная редакция
Смартфонная платформа портала без участия адаптируется под монитор любого девайса. Нет необходимости загружать особое софт.
Софт для гаджетов
Доступно установить оригинальное APP для iOS и Android. Софт предоставляет:
– Быстрый старт
– Оптимизированный графику
– Push-сообщения о поощрениях
– Бесперебойную операционность
Live развлечения: антураж реального клуба
Секция Live казино доставляет клиентов в обстановку реального зала. Компетентные крупье осуществляют сессии в режиме прямого времени.
Востребованные Live-игры
– Европейская рулетка
– Двадцать одно
– Punto Banco
– Техасский холдем
Слоты: ассортимент игр
Собрание азартных слотов вмещает сотни вариантов от топовых поставщиков. Игроки откроют:
– Классические слоты
– Видео-автоматы
– Мега-выигрыш-игры
– Слоты с множественными линиями
Состязания и особые события
Систематические турниры дают возможность пользователям соревноваться друг с другом за значительные призовые пулы. Каждый турнир содержит свои условия присутствия и доску призеров.
Способы ввода и изъятия финансов
Платформа поддерживает комплекс денежных систем:
– Кредитные карты
– Электронные счета
– Blockchain-платежи
– Wire транзакции
Абсолютно все транзакции реализуются безопасно благодаря современным системам защиты.
Команда обслуживания
Компетентные консультанты сервиса обслуживания расположены помочь 24/7. Доступны данные методы связи:
– Оперативный-чат
– Email-обслуживание
– Аудио линия
– Социальные сети
Итог
Легальный сайт казино и его актуальные копии гарантируют игрокам безопасный и комфортный доступ к обширному спектру геймерских услуг. Щедрые подарки, периодические кампании, компетентная служба и легкие расчетные методы делают развлекательный времяпрепровождение предельно комфортным и результативным.
Take a look here – Found the platform today; the interface makes exploring fast and intuitive.
получить короткую ссылку google получить короткую ссылку google .
Нынешние сетевые казино предоставляют клиентам обширный выбор возможностей для беспроблемной игры. Однако иногда подключение к базовому платформе может являться недоступным. В таких обстоятельствах на помощь спешит приложение, которое предоставляет бесперебойный путь ко всем возможностям платформы.
Что такое действующее зеркало казино
Копия — это точная копия главного сайта, которая размещается по дополнительному адресу. Альтернативный ресурс поддерживает целый инструментарий первоначального ресурса, включая индивидуальный кабинет, баланс и историю транзакций.
Ключевые плюсы эксплуатации зеркала:
– Непрерывный вход к порталу
– Полная идентичность функционала
– Безопасность личных информации
– Сохранение существующих поощрений
Как разыскать действующее зеркало на текущий день
Присутствует некоторое количество проверенных вариантов получения свежей ссылочной информации:
Легитимные каналы:
1. Почтовая рассылка — управление периодически высылает сообщения с актуальными адресами
2. Социальные сети — легитимные аккаунты постят актуальную сведения
3. Служба поддержки — специалисты сообщают безопасные адреса
4. Телефонное приложение — обеспечивает обходить блокировки
Оформление профиля на основном ресурсе
Процедура регистрации требует только считанные минут и включает из следующих шагов:
1. Переход на лицензионный сайт или рабочее зеркало
2. Щелчок на кнопку «Открыть счет»
3. Заполнение персональной таблицы
4. Верификация email почты или телефонного номера
5. Применение поощрения за регистрацию при доступности промокода
Только что зарегистрированные геймеры получают значительный вступительный приз, который может предполагать free spins, финансовые поощрения или возврат средств.
Авторизация в пользовательский кабинет
Подключение на портале реализуется обычным образом. Достаточно внести никнейм и секретный ключ, использованные при создании аккаунта.
Существенные аспекты для конфиденциального входа:
– Применяйте защищенный шифр
– Включите двойную идентификацию
– Не сохраняйте данные на общественных девайсах
– Отслеживайте доменную строку браузера
Обзор поощрительной системы
Казино балует пользователей многочисленными поощрениями и специальными предложениями:
Приветственный букет
Новички могут полагаться на существенное награду за дебютный пополнение. Обычно это долевая добавка к внесенной сумме плюс даровые спины для топовых слотов.
Регулярные акции
– 7-дневный возврат средств — возвращение процента утраченных денежных средств
– Бонусы на очередные пополнения
– Эксклюзивные акции по событиям
– Конкурсы с крупными выигрышными банками
План верности
Постоянные пользователи собирают пункты за произвольную раунд, которые затем превращаются на фактические деньги, бесплатные вращения или уникальные льготы.
Купоны: как активировать
Кодовые комбинации — это специальные сочетания литер, предоставляющие доступ к эксклюзивным вознаграждениям.
В каких местах найти действующие промокоды:
– Легитимные социальные сети казино
– Партнерские площадки
– Email-подписка
– Отраслевые платформы
Вводится промокод в предназначенное поле при открытии счета или добавлении денег кошелька.
Мобильная версия и приложение
Актуальные игроки выбирают проводить время с портативных устройств. Портал предлагает пару решения для беспроблемной смартфонной игры.
Адаптивная версия
Интернет версия сама подстраивается под габариты дисплея. Не предполагает установки и работает в произвольном современном браузере.
Смартфонное приложение
Получить софт можно для устройств на Android и iOS. Преимущества app:
– Молниеносная загрузка
– Устойчивая операция
– Всплывающие-уведомления о бонусах
– Автономный обход блокировок
Процесс инсталляции несложен: требуется открыть на сайт с портативного гаджета и придерживаться руководству.
Развлекательный каталог
База слотов охватывает огромное количество вариантов от лучших провайдеров.
Слоты
Развлекательные аппараты — наиболее распространенная секция забав. Показаны обычные трехбарабанные автоматы, передовые видеослоты с поощрительными уровнями, а также джекпотные джекпоты.
Live казино
Раздел с настоящими раздающими позволяет прочувствовать настроение подлинного казино. Доступны развлечения с баккарой.
Стриминг реализуется в превосходном четкости, поддерживается коммуникация с ведущим и иными участниками.
Соревнования
Постоянно проводятся состязания по всевозможным играм. Включение позволяет выиграть денежные призы, фриспины или специальные презенты.
Транзакционные процедуры
Платформа поддерживает обширный спектр финансовых инструментов:
– Пластиковые карты
– Онлайн сервисы
– Цифровая валюта
– Банковские переводы
Стартовая величина взноса — разумная для большинства пользователей. Вывод выигрышей выполняется в кратчайшие сроки.
Служба поддержки
Квалифицированные консультанты настроены оказать помощь постоянно. Представлены такие методы контакта:
– Онлайн-чат
– Email
– Звонковая связь
– Медийные сети
Пояснения на стандартные темы можно отыскать в зоне FAQ.
Заключение
Главный сайт казино и его рабочие зеркала обеспечивают игрокам максимальный путь ко всем возможностям ресурса. Щедрые поощрения, практичная телефонная версия, колоссальный выбор аттракционов и профессиональная ассистенция формируют игровой времяпрепровождение крайне беспроблемным и защищенным.
Передовые онлайн-казино гарантируют игрокам множество опций для комфортной игры. Официальный сайт Doggy казино дарит путь ко всем опциям и играм. Однако при появлении системных трудностей на выручку приходят функционирующие зеркала.
Что являет собой собой рабочее зеркало
Альтернативный адрес казино — это идентичная версия оригинального сайта, расположенная по другому веб-адресу. Лицензионное зеркало хранит все характеристики, в том числе открытие профиля, вход в личный кабинет, премии и бонусные коды.
Альтернативный сайт на сегодня обеспечивает:
– Бесперебойный вход к игровым слотам
– Полную конфиденциальность персональных информации
– Удержание депозита и журнала транзакций
– Применимость всех промо-предложений
Создание аккаунта на главном портале
Процесс создания аккаунта занимает несколько минут. Свежеиспеченным игрокам нужно:
1. Перейти на подлинный портал или функционирующее зеркало
2. Выбрать кнопку «Создать аккаунт»
3. Указать необходимые сведения
4. Подтвердить электронную почту
5. Указать кодовое слово при существовании
После финиша оформления профиля геймеры получают бонус за регистрацию, что может охватывать free spins или денежное поощрение.
Логин в личный кабинет
Персональный кабинет обеспечивает полный контроль над азартным процессом. Через персональный профиль допускается:
– Депонировать баланс
– Снимать выигрыши
– Задействовать кодовые слова
– Отслеживать записи ставок
– Принимать участие в конкурсах
– Обретать возврат средств
Описание бонусов и акций
Щедрая премиальная политика — значимое плюс проекта. Основные виды бонусов:
Вступительный бонус
Новые игроки зарабатывают богатое поощрение на первые пополнения. Объем бонуса может составлять 100-200% от величины пополнения.
Бесплатные вращения
Бесплатные вращения выдаются для известных слотов. Объем бесплатных вращений изменяется от 10 до 500 штук.
Возврат средств
Систематический или ежемесячный возврат доли потерянных денег. Средний размер кэшбека — 5-15%.
Турниры
Постоянные состязания с солидными премиальными пулами. Соревнующиеся конкурируют за призовые позиции в рейтинге.
Смартфонная версия и программа
Адаптивная версия дает возможность развлекаться с любого гаджета. Игроки могут скачать app для iOS и Android или использовать интернет версию.
Достоинства портативного приложения:
– Оперативная подзагрузка игр
– Комфортный UI
– Пуш-нотификации о поощрениях
– Возможность входа через биометрию
Автоматы и Live казино
Азартная база охватывает множество названий от ведущих разработчиков.
Популярные секции игр:
– Традиционные автоматы
– Видео-автоматы с бонусными этапами
– Накопительный приз игры
– Мегавейс машины
Live игорный зал
Зона live казино предлагает развлечение с живыми ведущими. Доступны стандартные варианты:
– Американская рулетка
– Blackjack
– Punto Banco
– Техасский холдем
Как обнаружить действующее зеркало
Получить рабочую линк на зеркало разрешается множественными путями:
1. Оформить подписку на емейл-уведомления
2. Наблюдать за новостями в социальных сетях
3. Написать в сервис поддержки
4. Заложить действующее зеркало в избранное
Заключение
Главный портал и его актуальные зеркала гарантируют постоянный вход к азартным слотам. Великодушные бонусы, различные купоны, комфортное мобильное приложение и профессиональная служба поддержки превращают азартный опыт в высшей степени удобным и надежным.
Wood Stone Finds Hub – Enjoyed navigating the site, content looks simple and clear.
Market Market – Found this page unexpectedly, layout is tidy and navigation is smooth.
lisanslı casino siteleri: lisanslı casino siteleri
Описание лицензионного веб-сайта
Прогрессивные сетевые казино обеспечивают клиентам широкий набор развлечений и перспектив. Официальный веб-сайт казино Cat казино предоставляет проверенный путь к гемблинг услугам.
Актуальное зеркало: путь на сегодня
Резервный сайт выступает в качестве точную реплику лицензионного веб-сайта. Действующее зеркало помогает участникам преодолевать потенциальные блокировки.
Преимущества использования зеркала
Ключевые плюсы содержат:
– Беспрерывный доступ к платформе
– Сохранение всех возможностей базового сайта
– Защита индивидуальных сведений
– Аналогичный возможности
Оформление профиля на сайте
Процедура регистрации характеризуется легкостью и практичностью. Начинающие клиенты необходимо:
1. Зайти на лицензионный портал или его зеркало
2. Щелкнуть на элемент оформления
3. Указать требуемые поля
4. Верифицировать почтовую адрес
5. Осуществить дебютный доступ
Вознаграждение за оформление
Начинающие зарабатывают внушительный вступительный подарок. Подобное премия может охватывать:
– Финансовые бонусы
– Даровые прокруты
– Повышенный процент возврата
Вход в собственный раздел
Существующие клиенты могут быстро войти в собственный раздел, применяя логин и ключ. Персональный аккаунт обеспечивает путь к:
– Администрированию средствами
– Записям платежей
– Действующим бонусам
– Настройкам профиля
Призы и предложения
Платформа регулярно организует разнообразные мероприятия для участников.
Категории подарков
Главные типы призов:
– Депозитные бонусы – часть от размера депозита
– Спины – complimentary прокруты в игровых машинах
– Кэшбек – отдача части потерянных сумм
– Конкурсные призы – призы за состязание в соревнованиях
Купоны
Уникальные промокоды позволяют заработать экстра бонусы. Пользователи в состоянии отыскать их на партнерских ресурсах или приобрести в письмах.
Переносная версия и программа
Современные пользователи ценят мобильный геймплей.
Функции мобильной платформы
– Гибкий дизайн для всех устройств
– Полный путь к слотам
– Стремительная загрузка
– Удобное управление
Скачать софт
Переносное программа открыто для скачивания на устройства с операционными платформами Android и iOS. Приложение гарантирует:
– Стабильную деятельность
– Всплывающие оповещения о акциях
– Оперативный доступ к любимым слотам
Развлекательный выбор
Игровой клуб дает огромную библиотеку гемблинг игр.
Автоматы
Библиотека развлекательных автоматов содержит:
– Стандартные машины
– Современные слоты
– Накопительные игры
– Тематические слоты
Live столы
Раздел лайв игр предлагает шанс состязаться с настоящими дилерами. Представлены:
– Американская рулетка
– Блек-джек
– Punto Banco
– Техасский холдем
Состязания
Постоянные турниры помогают клиентам бороться за крупные наградные пулы. Турнирная система актуализируется еженедельно.
Денежные операции
Платформа обеспечивает множество методов внесения и обналичивания финансов:
– Пластиковые карты
– Цифровые платежные системы
– Межбанковские переводы
– Крипто
Все транзакции осуществляются конфиденциально с задействованием современных методов шифрования.
Отдел support
Компетентная отдел поддержки трудится постоянно. Обратиться с консультантами доступно через:
– Онлайн чат
– Email почту
– Горячую линию
– Социальные медиа
Секьюрити и лицензирование
Портал оперирует на фундаменте действительной сертификата. Такое подтверждает:
– Честность игрового процесса
– Защиту конфиденциальных данных
– Оперативные транзакции
– Контролируемый гемблинг
Заключение
Основной портал и его актуальные альтернативные адреса дают игрокам полный набор функций для комфортной и профитной развлечений. Щедрые подарки, разнообразные развлечения, профессиональная служба и защищенная система операций формируют казино превосходным решением для поклонников гемблинг игр.
Анализ главного портала
Актуальное онлайн-казино предоставляет своим игрокам обширный ассортимент услуг и вознаграждений. Официальный ресурс Лаки Ворлд оперирует круглосуточно, обеспечивая возможность к топовым играм, live-казино и разнообразным кампаниям.
Действующее зеркало: доступ к сайту
Что такое альтернатива казино
Зеркало представляет собой точную дубликат главного портала с другим доменным адресом. Функционирующее зеркало позволяет участникам обходить барьеры и сохранять постоянный доступ к любимым играм.
Как найти текущее зеркало сегодня
Актуальные линки на проверенное зеркало появляются через:
– Email подписку
– Проверенные медийные сети
– Сервис помощи
– Тематические ресурсы
Созданиеаккаунта на сайте
Ход оформления
Созданиеаккаунта отнимает пару минут и подразумевает следующие шаги:
1. Вход на основной веб-сайт или действующее зеркало
2. Активация элемента “Открытьсчет”
3. Внесение персональных реквизитов
4. Проверка электроннойпочты или телефона
5. Формирование пароля
Бонус за оформление
Начинающие игроки зарабатывают солидные приветственные подарки:
– Бонусные средства на кошелек
– Freespins для симуляторов
– Расширенный коэффициент кэшбека
– Особые купоны
Вход в индивидуальный аккаунт
Действующие пользователи вправе совершить вход через оригинальный ресурс или текущее зеркало. Для этого требуется указать никнейм и код, сформированные при созданииаккаунта.
Инструменты индивидуального аккаунта
В персональном разделе предоставлены такие опции:
– Изменение учетными информацией
– Внесение депозита
– Получение средств
– Ввод кодов
– Отслеживание истории транзакций
– Вступление в состязаниях
Бонусы и акции
Типы подарков
Казино балует своих игроков многочисленными призовыми программами:
– Приветственный набор — щедрые поощрения на первые пополнения
– Freespins — подарочные ставки в известных автоматах
– Компенсация — еженедельный возмещение процента убытков
– План VIP — уникальные привилегии для регулярных игроков
Ваучеры и их активация
Специальные коды предоставляют расширенные поощрения. Для активации требуется внести код в соответствующее графу в собственном разделе.
Развлекательный набор
Слоты
Каталог игровых автоматов насчитывает множество вариантов от ведущих производителей:
– Стандартные слоты
– Современные слоты
– Джекпот автоматы
– Лицензионные слоты
Live казино
Зона Live-казино обеспечивает игру с реальными операторами в формате реального времени:
– Рулетка
– Двадцатьодно
– Баккара
– Техасскийхолдем
Конкурсы
Регулярные турниры с большими джекпотными пулами проводятся постоянно. Участники конкурируют за первенство в турнирнойсетке.
Портативная адаптация и APP
Смартфонная реализация сайта
Официальный портал полностью адаптирован для планшетных устройств. Пользователи имеютвозможность пользоваться игры сразу через интернет-браузер без обязательства загрузки.
APP для скачивания
Авторское смартфонное приложение предлагается для установки на устройства с операционными ОС Android и iOS. Софт предоставляет:
– Быстрый путь к автоматам
– Устойчивую работу
– Моментальные-сообщения о предложениях
– Комфортный навигацию
Итог
Главный сайт казино и его функционирующие дубликаты дают участникам полный путь к первоклассным игровым играм. Солидные вознаграждения, многочисленные кампании, удобная смартфонная реализация и квалифицированная служба создают игровой опыт чрезвычайно комфортным и выгодным.
наборы суши с доставкой москва наборы суши с доставкой москва .
Trail Market – Content is well-organized and exploring items is straightforward.
тур на пароме из санкт петербурга тур на пароме из санкт петербурга .
Eco Market – Found this page by accident, structure is simple and easy to follow.
https://vdcasino1st.blog/# vdcasino güncel giriş
Современные сетевые казино дают игрокам большой ассортимент возможностей для удобной игры. Однако иногда вход к базовому ресурсу может стать ограниченным. В таких моментах на поддержку появляется казино Вован казино, которое гарантирует постоянный вход ко всем функциям платформы.
Что такое рабочее зеркало казино
Копия — это точная копия официального ресурса, которая хостится по дополнительному интернет-адресу. Дубликат поддерживает весь инструментарий оригинального сайта, включая личный кабинет, депозит и запись операций.
Ключевые плюсы эксплуатации зеркала:
– 24-часовой подключение к сайту
– Максимальная схожесть инструментов
– Безопасность личных информации
– Поддержка доступных привилегий
Как отыскать действующее зеркало сегодня
Присутствует некоторое количество проверенных способов поиска текущей URL:
Официальные источники:
1. Email рассылка — администрация периодически высылает сообщения с рабочими доменами
2. Медийные сети — легитимные профили размещают свежую сведения
3. Департамент поддержки — консультанты сообщают проверенные домены
4. Мобильное приложение — предоставляет минуть блокировки
Оформление профиля на основном веб-сайте
Процедура регистрации отнимает только считанные минут и состоит из следующих стадий:
1. Вход на основной портал или актуальное зеркало
2. Выбор на кнопку «Зарегистрироваться»
3. Ввод пользовательской бланка
4. Валидация почтовой почты или контактного номера
5. Применение привилегии за регистрацию при присутствии промокода
Свежие геймеры приобретают значительный стартовый приз, который может охватывать даровые прокруты, финансовые бонусы или кэшбек.
Авторизация в личный кабинет
Подключение на сайте осуществляется традиционным путем. Требуется указать никнейм и пароль, использованные при открытии счета.
Значимые детали для защищенного входа:
– Задействуйте надежный пароль
– Включите двухэтапную идентификацию
– Не фиксируйте реквизиты на общественных компьютерах
– Проверяйте адресную строку браузера
Характеристика премиальной структуры
Казино одаривает игроков многочисленными вознаграждениями и промо:
Вступительный букет
Свежие игроки имеют возможность претендовать на существенное бонус за дебютный депозит. Зачастую это долевая прибавка к переведенной объему плюс даровые спины для известных слотов.
Регулярные промо
– Семидневный возврат средств — компенсирование части проигранных денег
– Призы на очередные вклады
– Специальные акции по торжествам
– Конкурсы с большими выигрышными фондами
План привилегий
Постоянные пользователи зарабатывают единицы за произвольную раунд, которые затем конвертируются на действительные финансы, free spins или уникальные преимущества.
Бонус-коды: как применять
Бонус-коды — это уникальные наборы букв и цифр, обеспечивающие право к бонусным вознаграждениям.
Откуда раздобыть рабочие промокоды:
– Официальные медийные сети казино
– Партнерские ресурсы
– Email-информирование
– Отраслевые сообщества
Активируется промокод в специальное поле при оформлении или добавлении денег депозита.
Мобильная версия и приложение
Современные пользователи предпочитают проводить время с мобильных устройств. Платформа обеспечивает 2 способа для удобной мобильной игры.
Мобильная версия
Веб версия автоматически оптимизируется под параметры дисплея. Не нуждается установки и оперирует в любом актуальном браузере.
Смартфонное приложение
Скачать приложение можно для гаджетов на Android и iOS. Плюсы app:
– Скоростная загрузка
– Надежная действие
– Автоматические-уведомления о бонусах
– Независимый обход блокировок
Этап загрузки несложен: нужно открыть на ресурс с портативного гаджета и придерживаться руководству.
Игровой каталог
База аппаратов включает огромное количество единиц от передовых поставщиков.
Слоты
Гемблинг слоты — крайне популярная группа аттракционов. Размещены обычные 3-барабанные слоты, новые видеослоты с бонусными этапами, а также джекпотные суперпризы.
Live казино
Секция с реальными крупье дает возможность испытать настроение реального казино. Представлены столы с блэкджеком.
Вещание ведется в отличном разрешении, присутствует коммуникация с крупье и иными пользователями.
Состязания
Регулярно проводятся турниры по всевозможным категориям. Вступление позволяет заработать монетарные призы, free spins или специальные привилегии.
Платежные операции
Ресурс предлагает значительный ассортимент расчетных способов:
– Кредитные карты
– Электронные системы
– Цифровая валюта
– Финансовые транзакты
Низшая величина депозита — доступная для основной части пользователей. Вывод денег осуществляется в короткие сроки.
Отдел поддержки
Компетентные операторы готовы поддержать непрерывно. Открыты такие каналы связи:
– Веб-чат
– Email
– Голосовая поддержка
– Коммуникационные сети
Разъяснения на стандартные запросы можно отыскать в разделе FAQ.
Резюме
Лицензионный веб-сайт казино и его рабочие зеркала обеспечивают клиентам полный подключение ко всем возможностям платформы. Солидные бонусы, удобная мобильная версия, огромный ассортимент развлечений и опытная служба поддержки создают игровой времяпрепровождение исключительно комфортным и конфиденциальным.
биржа сайтов биржа сайтов .
this link here – Minimal layout makes reading and scrolling effortless.
Доступ к платформе через действующие зеркала
Игроки интернет казино часто сталкиваются с ситуацией ограничения главного домена. Именно для устранения этой ситуации разработаны зеркала официального ресурса. https://www.edrublevsky.ru/v-2026-godu-za-registratsiyu-mozhno-poluchit-samye-vygodnye-bonusy-i-promokody-v-onlayn-kazino/ предоставляет абсолютный переход ко всем сервисам платформы.
Что такое актуальное зеркало казино
Дубликат является собой абсолютную реплику официального веб-сайта с похожим опциями. Главное различие — это альтернативное имя. Абсолютно все информация участника, в том числе средства, награды и историю игр, находятся такими же.
Плюсы эксплуатации зеркал
Рабочие зеркала характеризуются множеством ключевых выгод:
– Круглосуточный доступ к предпочитаемым слотам
– Совершенная защита индивидуальных параметров
– Удержание всех конфигураций индивидуального кабинета
– Способность обретения призов и участия в кампаниях
Оформление профиля на основном ресурсе
Ход оформления предельно элементарен и отнимает буквально минут. Свежие игроки могут рассчитывать на внушительный вводный бонус за открытие счета.
Стадии формирования аккаунта
1. Переход на основной домен или его альтернативу
2. Клик на кнопку “Зарегистрироваться”
3. Ввод нужных информации
4. Верификация почтовой почты
5. Ввод промокода (если доступен)
Поощрения и кампании для клиентов
Платформа балует своих пользователей различными бонусными акциями.
Основные варианты наград
Начальный бонус — внушительное премирование для начинающих пользователей, что может охватывать материальные бонусы и безвозмездные спины.
Free spins — способность использовать в топовых автоматах без затрат.
Возврат средств — долевой возврат потерянных сумм, что зачисляется раз в неделю или раз в месяц.
Промокоды — эксклюзивные сочетания, обеспечивающие добавочные привилегии.
Личный кабинет: опции и настройки
Пользовательский кабинет предоставляет абсолютный надзор над игровым активностью. В нем присутствуют:
– Администрирование средствами
– Записи переводов
– Активные поощрения
– Установки безопасности
– Валидация учетной записи
Мобильная вариант и APP
Новейшие пользователи предпочитают доступность. Платформа предлагает 2 метода для ставок с портативных аппаратов.
Отзывчивая телефонная вариант
Адаптивная редакция домена автоматически подстраивается под экран любого девайса. Нет необходимости загружать отдельное софт.
APP для гаджетов
Доступно инсталлировать специальное софт для iOS и Android. Программа предоставляет:
– Мгновенный доступ
– Адаптированный графику
– Всплывающие-сообщения о акциях
– Надежную работу
Live развлечения: антураж истинного клуба
Зона Live развлечений переносит клиентов в атмосферу истинного казино. Профессиональные ведущие организуют сессии в варианте настоящего времени.
Топовые Live-форматы
– Европейская рулетка
– Блэкджек
– Punto Banco
– Покер
Игровые машины: разнообразие слотов
Библиотека слотовых слотов вмещает множество названий от топовых провайдеров. Клиенты встретят:
– Стандартные слоты
– Видео-автоматы
– Джекпот-слоты
– Слоты с множественными линиями
Турниры и эксклюзивные мероприятия
Постоянные конкурсы предоставляют шанс клиентам бороться друг с другом за значительные наградные фонды. Отдельный соревнование располагает свои условия присутствия и рейтинг лидеров.
Способы зачисления и вывода сумм
Площадка предоставляет ряд денежных сервисов:
– Кредитные карты
– Цифровые сервисы
– Крипто
– Финансовые переводы
Абсолютно все платежи проходят безопасно благодаря новейшим методам криптографии.
Команда обслуживания
Компетентные консультанты команды помощи настроены помочь 24/7. Доступны данные способы коммуникации:
– Мгновенный-чат
– Email-поддержка
– Телефонная горячая линия
– Социальные сети
Резюме
Легальный ресурс игровой площадки и его функционирующие копии обеспечивают пользователям конфиденциальный и комфортный подход к огромному ассортименту азартных услуг. Солидные подарки, частые предложения, квалифицированная сервис и легкие финансовые системы делают геймерский досуг чрезвычайно увлекательным и прибыльным.
silverstone shop portal – Layout is organized and moving between sections feels easy.
https://cassiteleri.buzz/# casino siteleri
заказать роллы пицца в подарок заказать роллы пицца в подарок .
Современные онлайн-казино обеспечивают клиентам обширный набор развлечений и выгодные бонусы. Впрочем для удобной работы важно знать, как обнаружить Kraken сайт и его функционирующие зеркала.
Что такое основной ресурс казино
Официальный веб-сайт казино — это базовая система, где пользователи могут наслаждаться развлекательными играми. Ресурс действует на законных принципах и владеет всеми нужными документами.
Первостепенные выгоды главного сайта:
– Надежность пользовательских информации
– Прозрачные требования работы
– Гарантированные транзакции
– Компетентная служба поддержки
Рабочее зеркало казино: для чего требуется
Зеркало — это полная версия главного портала, находящаяся по отличному веб-адресу. Актуальное зеркало формируется для обеспечения непрерывного доступа к ресурсу.
Основания задействования альтернативных адресов:
– Недоступность основного сайта
– Плановые операции
– Большая активность на систему
Как обнаружить рабочее зеркало в данный момент
Узнать текущее официальное зеркало можно разными методами:
1. Рассылка — подпишитесь на новостную отправку
2. Отдел помощи — свяжитесь в онлайн-чат
3. Социальные площадки — следите за новостями
4. Партнерские порталы — проверенные сайты
Создание аккаунта на портале казино
Процесс открытия счета требует буквально немного моментов:
1. Выберите на клавишу “Зарегистрироваться”
2. Укажите обязательные поля
3. Верифицируйте почтовую почту
4. Активируйте код активации, если есть
Сразу после завершенной активации вам станет доступен личный раздел.
Премии и купоны
Привлекательная бонусная структура — значимое достоинство казино:
Поощрение за регистрацию
Новые игроки обретают стартовый поощрение, который может включать:
– Валютный бонус на дебютный депозит
– Фриспины для автоматов
– Стартовые средства
Активационные коды
Периодически появляются актуальные купоны, предоставляющие использовать специальные привилегии.
Программа возврата средств
Регулярные клиенты зарабатывают порцию проигранных средств на счет.
Действующие предложения и состязания
Платформа систематически запускает увлекательные события:
– Еженедельные турниры
– Тематические бонусы
– Розыгрыши крупных наград
– Система привилегий
Вход в персональный кабинет
Для авторизации на сайт требуется:
1. Посетить официальный ресурс или актуальное зеркало
2. Кликнуть “Авторизация”
3. Ввести имя пользователя и ключ
В пользовательском разделе разрешены такие инструменты:
– Зачисление баланса
– Вывод денег
– Просмотр журнала транзакций
– Управление профильными параметрами
Мобильная платформа и софт
Мобильная версия
Responsive вариант ресурса предоставляет шанс делать ставки с разных мобильного гаджета. Оформление адаптивно настраивается под габариты экрана.
App для скачивания
Загрузить программу можно для:
– Android — непосредственная скачивание с сайта
– iOS — инсталляция через App Store
Выгоды мобильного клиента:
– Оперативный старт
– Устойчивая функциональность
– Push-оповещения об промо
– Оптимизированный интерфейс
Гемблинг разделы
Игровые машины
Богатая библиотека эмуляторных машин от ведущих поставщиков:
– Классические машины
– Современные-эмуляторы
– Прогрессивные-слоты
Live casino
Раздел с профессиональными крупье предоставляет:
– Рулетки
– 21
– Punto Banco
– Покер
Вещания ведутся в HD качестве изображения, воссоздавая впечатление настоящего казино.
Варианты внесения средств и получения
Платформа поддерживает разные платежные методы:
– Кредитные card
– Виртуальные системы
– Криптовалюты
– Прямые транзакции
Минимальные суммы внесения и скоростные транзакции обеспечивают развлечение крайне удобной.
Команда support
Компетентная служба ассистентов работает 24/7 и способна содействовать с разными ситуациями:
– Онлайн-чат
– Email-помощь
– Голосовая горячая линия
Заключение
Официальный ресурс казино и его функционирующие альтернативные адреса обеспечивают клиентам защищенный и азартный игровой опыт. Выгодные подарки, удобная портативная вариант, богатые игры и высокоуровневое live-казино превращают эту ресурс великолепным местом для азартных досуга.
Вход к ресурсу через рабочие зеркала
Клиенты сетевых казино нередко имеют дело с ситуацией ограничения базового домена. Конкретно для преодоления этой проблемы созданы зеркала легального портала. Leon сайт предоставляет абсолютный доступ ко всем возможностям платформы.
Что такое функционирующее зеркало казино
Дубликат является собой идентичную версию основного сайта с похожим возможностями. Основное несовпадение — это другое имя. Все информация игрока, в том числе баланс, привилегии и историю ставок, находятся неизменными.
Плюсы применения зеркал
Рабочие зеркала располагают рядом существенных преимуществ:
– Постоянный вход к выбранным автоматам
– Совершенная безопасность индивидуальных сведений
– Поддержание всех конфигураций пользовательского кабинета
– Возможность получения призов и присутствия в предложениях
Создание аккаунта на официальном портале
Процедура оформления предельно легок и длится пару минут. Новые игроки в состоянии надеяться на солидный стартовый бонус за оформление.
Шаги открытия аккаунта
1. Вход на главный портал или его альтернативу
2. Нажатие на опцию “Зарегистрироваться”
3. Ввод обязательных параметров
4. Активация электронной почты
5. Внесение бонусного кода (когда имеется)
Бонусы и промоакции для участников
Платформа одаривает своих пользователей всевозможными призовыми предложениями.
Ключевые типы бонусов
Вводный подарок — солидное начисление для новых участников, каковое имеет возможность содержать финансовые средства и free spins.
Free spins — опция крутить в известных игровых машинах даром.
Возврат средств — пропорциональный отдача проигранных сумм, что зачисляется еженедельно или помесячно.
Промокоды — особые сочетания, обеспечивающие дополнительные выгоды.
Пользовательский кабинет: инструменты и установки
Личный раздел обеспечивает абсолютный регулирование над персональным опытом. В данном разделе имеются:
– Регулирование балансом
– Данные платежей
– Действующие награды
– Установки сохранности
– Проверка учетной записи
Карманная вариант и приложение
Новейшие пользователи признают доступность. Площадка дает два варианта для участия с портативных аппаратов.
Отзывчивая телефонная вариант
Мобильная редакция ресурса без участия настраивается под разрешение любого девайса. Не нужно загружать особое ПО.
Программа для смартфонов
Возможно скачать оригинальное софт для iOS и Android. Программа дает:
– Скорый старт
– Оптимизированный дизайн
– Оперативные-извещения о бонусах
– Надежную работу
Live игры: антураж истинного игорного заведения
Секция Live казино транспортирует клиентов в обстановку реального игорного заведения. Компетентные дилеры ведут партии в виде настоящего времени.
Популярные Live-развлечения
– Европейская рулетка
– Blackjack
– Baccarat
– Техасский холдем
Игровые машины: многообразие автоматов
Каталог развлекательных машин вмещает тысячи наименований от ведущих разработчиков. Участники откроют:
– Классические слоты
– Графические слоты
– Джекпот-игры
– Мегавейс
Состязания и особые мероприятия
Периодические конкурсы дают возможность игрокам бороться друг с другом за солидные призовые пулы. Каждый состязание содержит свои правила присутствия и рейтинг победителей.
Способы зачисления и вывода денег
Площадка предоставляет массу финансовых систем:
– Дебетовые картыы
– Электронные сервисы
– Криптовалюты
– Wire транзиты
Каждые платежи реализуются защищенно благодаря передовым системам криптографии.
Сервис support
Опытные сотрудники отдела помощи способны содействовать 24/7. Доступны данные методы общения:
– Мгновенный-чат
– Email-обслуживание
– Голосовая горячая линия
– Коммуникационные сети
Итог
Легальный портал казино и его действующие копии обеспечивают клиентам конфиденциальный и комфортный подход к огромному диапазону геймерских игр. Крупные награды, регулярные акции, профессиональная служба и удобные платежные способы формируют азартный процесс максимально захватывающим и выгодным.
A simple but valuable article with meaningful insights. Keep sharing updates. astrocartography calculator free
browse the page – Clean and simple design, scrolling through content is effortless.
Нынешние онлайн-казино обеспечивают игрокам разнообразный спектр азартных игр и привлекательные награды. Впрочем для беспроблемной работы существенно иметь представление, как получить доступ к Лаки Бир казино и его действующие зеркала.
Что такое официальный ресурс казино
Главный портал казино — это главная площадка, где участники могут пользоваться развлекательными слотами. Портал действует на легальных основаниях и обладает всеми нужными документами.
Основные выгоды официального ресурса:
– Защищенность персональных информации
– Прозрачные положения использования
– Подтвержденные платежи
– Профессиональная техподдержка
Действующее зеркало казино: для чего нужно
Копия сайта — это полная версия лицензионного веб-сайта, размещенная по альтернативному веб-адресу. Функционирующее зеркало формируется для гарантирования непрерывного подключения к сайту.
Поводы задействования дублирующих ресурсов:
– Блокировка основного URL
– Плановые работы
– Большая нагрузка на ресурс
Как найти свежее зеркало в данный момент
Найти свежее рабочее зеркало можно множественными вариантами:
1. Подписка — зарегистрируйтесь на новостную доставку
2. Служба support — проконсультируйтесь в онлайн-чат
3. Публичные медиа — следите за постами
4. Партнерские порталы — достоверные источники
Создание аккаунта на сайте казино
Процесс открытия счета занимает всего считанные мгновений:
1. Кликните на клавишу “Регистрация”
2. Укажите запрашиваемые сведения
3. Валидируйте email адрес
4. Используйте промокод, если доступен
Сразу после успешной активации вам станет возможен персональный аккаунт.
Поощрения и бонусные коды
Выгодная поощрительная структура — значимое конкурентное преимущество казино:
Награда за регистрацию
Новые пользователи приобретают стартовый подарок, который может предполагать:
– Финансовый депозит на начальный вклад
– Free spins для барабанов
– Стартовые средства
Активационные коды
Постоянно выходят свежие бонусные шифры, предоставляющие получить дополнительные поощрения.
Система возврата средств
Лояльные участники получают порцию проигранных ставок обратно.
Текущие предложения и состязания
Казино периодически организует интересные акции:
– Еженедельные турниры
– Сезонные акции
– Конкурсы крупных выигрышей
– Программа VIP-клуба
Логин в индивидуальный раздел
Для авторизации на сайт требуется:
1. Перейти на лицензионный адрес или действующее зеркало
2. Нажать “Войти”
3. Внести имя пользователя и секретную комбинацию
В личном профиле доступны данные инструменты:
– Внесение средств баланса
– Вывод средств
– Изучение архива операций
– Изменение профильными параметрами
Портативная платформа и app
Портативная платформа
Responsive платформа сайта обеспечивает играть с всех мобильного телефона. Интерфейс автоматически оптимизируется под размер дисплея.
Программа для загрузки
Скачать клиент можно для:
– Android — прямая загрузка с сайта
– iOS — скачивание через App Store
Преимущества приложения:
– Быстрый старт
– Надежная производительность
– Push-сообщения об промо
– Производительный дизайн
Азартные разделы
Барабаны
Разнообразная коллекция эмуляторных барабанов от топовых производителей:
– Стандартные игры
– Новые-автоматы
– Призовые-игры
Live casino
Зона с настоящими операторами обеспечивает:
– Рулетка
– 21
– Баккара
– Покер
Трансляции транслируются в отличном формате, воссоздавая атмосферу подлинного казино.
Варианты пополнения и вывода
Казино принимает разнообразные денежные методы:
– Платежные картсчета
– Виртуальные счета
– Криптовалюты
– Wire транзакции
Стартовые лимиты депозита и быстрые выводы обеспечивают времяпрепровождение максимально беспроблемной.
Департамент support
Опытная группа помощи работает 24/7 и готова поддержать с различными вопросами:
– Живой-чат
– Email-помощь
– Голосовая линия
Выводы
Основной сайт казино и его рабочие альтернативные адреса обеспечивают участникам защищенный и интересный развлекательный опыт. Богатые поощрения, простая mobile вариант, богатые автоматы и превосходное live-казино создают эту систему замечательным выбором для игровых времяпрепровождения.
Доступ к ресурсу и действующие URL
Современные онлайн казино предлагают клиентам широкий набор развлечений. Официальный портал Буст казино организует безопасный подключение ко всем возможностям. При этом иногда возникают моменты, когда понадобится запасной путь авторизации.
Что есть собой рабочее зеркало
Действующее зеркало — это идентичная версия основного портала с другим сетевым расположением. Альтернатива сегодня обеспечивает избегать вероятные барьеры и сохранять стабильный подключение к выбранным автоматам.
Официальное зеркало содержит идентичными возможностями, что и главный сайт:
– Целый ассортимент автоматов
– Личный кабинет с зафиксированными сведениями
– Полные бонусы и акции
– Проверенные финансовые транзакции
Оформление и вход в платформу
Ход создания профиля на сайте отнимает считанные секунд. Новым участникам требуется:
1. Попасть на действующее зеркало сейчас
2. Кликнуть клавишу «Зарегистрироваться»
3. Внести обязательные сведения
4. Подтвердить e-mail почту или номер мобильного
5. Активировать поощрение за регистрацию
Вход в собственный раздел реализуется через внесение никнейма и пароля.
Характеристика бонусной политики
Щедрая поощрительная политика — главное плюс казино. Игроки зарабатывают многочисленные подарки:
Приветственные подарки
Недавние участники вправе ожидать на щедрый подарок за открытие профиля. Традиционно это набор опций, охватывающий:
– Процентную прибавку к начальному пополнению
– Бесплатные спины
– Extra суммы на кошелек
Кодовые комбинации и уникальные возможности
Регулярные купоны дают возможность получать призовые преимущества. Использовать их допустимо в особом разделе личного кабинета.
Free spins и компенсация
Даровые вращения — это вариант вращать барабаны без задействования персональных денег. Компенсация предполагает долевой возмещение утраченных финансов.
Библиотека игр
Игровая сайт предлагает впечатляющую подборку слотов.
Видеослоты
Разнообразие аппаратов восхищает воображение. Есть обычные трехбарабанные машины и новые автоматы с занимательной графикой.
Live зал
Категория Live развлечений переносит участников в антураж истинного игорного зала. Квалифицированные операторы организуют раунды в реальном времени.
Соревнования и таблицы лидеров
Систематические состязания добавляют азарта и предоставляют возможность выиграть внушительные суммы.
Карманная форма и клиент
Новые решения обеспечивают развлекаться в любимом локации. Мобильная версия независимо оптимизируется под экран девайса.
Получить приложение разрешено для мобильных платформ iOS и Android. Клиент гарантирует:
– Оперативный переход
– Стабильную работу
– Всплывающие-алерты об бонусах
– Интуитивный облик
Банковские процедуры
Ресурс принимает всевозможные варианты депозита и изъятия сумм:
– Пластиковые инструменты
– Онлайн системы
– Криптовалюты
– Прямые отправки
Всевозможные переводы реализуются через надежное подключение, что подтверждает сохранность персональных информации.
Департамент ассистанса
Опытная бригада помощи действует круглосуточно. Обратиться с операторами можно через:
– Живой-чат
– E-mail почту
– Горячую линию
– Коммуникационные каналы
Резюме
Основной ресурс и его функционирующее зеркало предоставляют клиентам надежный и приятный переход к захватывающим занятиям. Богатые поощрения, разнообразный спектр игр и отличная поддержка создают времяпрепровождение крайне комфортной и прибыльной.
güvenilir casino siteleri güvenilir casino siteleri
Visit WaveCrate – Just discovered this platform; the interface is tidy and navigating through it feels effortless.
coppercoveemporium – Nice little discovery, layout is tidy and easy to navigate.
Market Finds – Browsed by chance, layout is clean and reading is effortless.
Нынешние виртуальные казино предлагают пользователям обширный спектр вариантов для беспроблемной игры. Однако иногда соединение к базовому сайту может оказаться недоступным. В таких ситуациях на помощь приходят РђРєРІР°, которое гарантирует постоянный путь ко всем возможностям платформы.
Что такое рабочее зеркало казино
Копия — это абсолютная реплика официального веб-сайта, которая находится по запасному адресу. Альтернативный ресурс содержит все инструментарий оригинального ресурса, включая пользовательский кабинет, баланс и данные операций.
Главные плюсы использования зеркала:
– Постоянный соединение к ресурсу
– Максимальная тождественность опций
– Безопасность пользовательских данных
– Хранение всех имеющихся привилегий
Как разыскать рабочее зеркало на сегодня
Существует множество безопасных методов поиска текущей ссылочной информации:
Официальные ресурсы:
1. Почтовая рассылка — администрация периодически высылает уведомления с актуальными адресами
2. Коммуникационные сети — проверенные профили публикуют актуальную сведения
3. Служба поддержки — специалисты выдают достоверные адреса
4. Телефонное приложение — обеспечивает преодолевать блокировки
Оформление профиля на основном портале
Процесс оформления отнимает всего немного минут и предполагает из таких шагов:
1. Вход на лицензионный портал или актуальное зеркало
2. Выбор на элемент «Создать аккаунт»
3. Заполнение персональной бланка
4. Валидация электронной почты или контактного номера
5. Включение бонуса за регистрацию при доступности промокода
Свежие пользователи получают солидный вступительный бонус, который может предполагать free spins, финансовые призы или cashback.
Вход в персональный кабинет
Подключение на портале осуществляется обычным методом. Нужно ввести никнейм и секретный ключ, задействованные при создании аккаунта.
Ключевые нюансы для надежного входа:
– Используйте защищенный шифр
– Запустите двухэтапную идентификацию
– Не записывайте данные на посторонних устройствах
– Проверяйте URL строку браузера
Обзор премиальной схемы
Игорный портал одаривает геймеров многочисленными бонусами и акциями:
Вступительный комплект
Свежие игроки могут надеяться на щедрое награду за дебютный депозит. Как правило это процентная прибавка к внесенной величине плюс даровые спины для популярных слотов.
Постоянные предложения
– 7-дневный cashback — возврат части проигранных средств
– Призы на очередные депозиты
– Эксклюзивные акции по торжествам
– Соревнования с крупными выигрышными фондами
План лояльности
Регулярные геймеры собирают баллы за произвольную бет, которые затем конвертируются на реальные деньги, фриспины или уникальные привилегии.
Купоны: как задействовать
Купоны — это особые последовательности букв и цифр, дающие право к специальным бонусам.
Каким образом взять рабочие промокоды:
– Официальные медийные сети казино
– Сотрудничающие порталы
– Email-подписка
– Профильные группы
Прописывается промокод в соответствующее поле при оформлении или зачислении средств депозита.
Мобильная версия и приложение
Нынешние игроки предпочитают проводить время с телефонных девайсов. Сайт предлагает двойной решения для удобной смартфонной игры.
Responsive вариант
Браузерная версия самостоятельно адаптируется под диагональ экрана. Не нуждается скачивания и оперирует в произвольном свежем браузере.
Мобильное приложение
Загрузить app можно для устройств на Android и iOS. Плюсы app:
– Быстрая открытие
– Устойчивая работа
– Всплывающие-уведомления о акциях
– Независимый обход блокировок
Этап инсталляции элементарен: требуется попасть на портал с смартфонного устройства и следовать инструкциям.
Гемблинг каталог
Коллекция аппаратов содержит множество единиц от топовых разработчиков.
Слоты
Развлекательные слоты — наиболее популярная категория забав. Размещены классические простые слоты, передовые видеослоты с премиальными раундами, а также прогрессивные призы.
Live казино
Секция с настоящими крупье предоставляет испытать атмосферу подлинного казино. Доступны игры с покером.
Трансляция реализуется в превосходном качестве, присутствует чат с раздающим и иными пользователями.
Состязания
Систематически запускаются состязания по разным категориям. Присоединение дает шанс завоевать денежные призы, даровые прокруты или специальные поощрения.
Денежные действия
Платформа предлагает широкий выбор платежных систем:
– Пластиковые карты
– Цифровые кошельки
– Цифровая валюта
– Счетовые платежи
Стартовая объем депозита — разумная для преобладающего числа игроков. Вывод денег выполняется в короткие сроки.
Отдел поддержки
Компетентные специалисты настроены содействовать круглосуточно. Имеются нижеследующие варианты контакта:
– Веб-чат
– Email
– Мобильная связь
– Социальные сети
Пояснения на стандартные запросы можно обнаружить в разделе FAQ.
Итог
Лицензионный веб-сайт казино и его актуальные зеркала предоставляют клиентам максимальный вход ко всем сервисам портала. Великодушные вознаграждения, комфортная портативная версия, гигантский ассортимент игр и опытная ассистенция создают игровой времяпрепровождение исключительно приятным и конфиденциальным.
lasix online
Доступ к ресурсу и актуальные URL
Современные сетевые казино предлагают игрокам огромный выбор игр. Главный ресурс Лаки Бир казино онлайн предоставляет безопасный подключение ко всем возможностям. При этом временами происходят моменты, когда необходимо альтернативный вариант входа.
Что представляет собой рабочее зеркало
Действующее зеркало — это абсолютная копия главного веб-сайта с альтернативным доменным именем. Копия сегодня помогает избегать возможные запреты и сохранять постоянный подключение к выбранным автоматам.
Проверенное зеркало имеет всеми функциями, что и основной портал:
– Целый каталог развлечений
– Персональный раздел с зафиксированными сведениями
– Действующие награды и акции
– Проверенные платежные переводы
Оформление и вход в платформу
Процесс оформления на ресурсе требует считанные мгновений. Новым пользователям требуется:
1. Зайти на функционирующее зеркало сейчас
2. Щелкнуть клавишу «Открыть профиль»
3. Внести требуемые данные
4. Активировать электронную почту или номер телефона
5. Использовать бонус за регистрацию
Вход в личный аккаунт осуществляется с помощью ввод никнейма и кода доступа.
Анализ наградной политики
Щедрая бонусная программа — главное достоинство казино. Клиенты забирают всевозможные подарки:
Приветственные поощрения
Недавние участники имеют возможность надеяться на выгодный подарок за регистрацию. Обычно это пакет возможностей, содержащий:
– Пропорциональную премию к начальному пополнению
– Подарочные кручения
– Бонусные деньги на кошелек
Кодовые комбинации и эксклюзивные акции
Постоянные коды обеспечивают активировать призовые преимущества. Задействовать их разрешено в специальном разделе личного аккаунта.
Free spins и кэшбек
Free spins — это способность играть автоматы без расходования собственных финансов. Рибейт предполагает частичный отдачу израсходованных сумм.
Коллекция игр
Гемблинг ресурс предлагает впечатляющую базу автоматов.
Игровые машины
Ассортимент автоматов впечатляет ожидания. Доступны обычные ретро слоты и актуальные видеослоты с захватывающей графикой.
Live игры
Секция Live развлечений транспортирует пользователей в антураж подлинного азартного заведения. Профессиональные дилеры организуют сессии в реальном формате.
Конкурсы и лидерборды
Регулярные конкурсы привносят накала и предоставляют вариант заработать большие награды.
Mobile форма и приложение
Современные разработки помогают развлекаться в удобном локации. Портативная версия автономно подстраивается под дисплей устройства.
Получить клиент возможно для программных систем iOS и Android. Программа предоставляет:
– Мгновенный вход
– Стабильную деятельность
– Мгновенные-алерты об промо
– Простой дизайн
Банковские операции
Ресурс принимает многочисленные варианты пополнения и вывода денег:
– Платежные счета
– Электронные системы
– Цифровые валюты
– Финансовые отправки
Всевозможные переводы проходят через зашифрованное канал, что гарантирует сохранность приватных информации.
Департамент ассистанса
Опытная бригада ассистанса трудится 24/7. Связаться с консультантами разрешено через:
– Интерактивный-чат
– Электронную почту
– Телефон
– Коммуникационные ресурсы
Заключение
Легальный сайт и его рабочее зеркало дают клиентам надежный и комфортный доступ к захватывающим играм. Выгодные подарки, широкий выбор развлечений и высокая помощь создают времяпрепровождение крайне удобной и выгодной.
Хочу выделить материал про Когда пришло время обновить гардероб.
Вот, можете почитать:
https://solpod.ru/%d0%b1%d0%b5%d0%b7-%d1%80%d1%83%d0%b1%d1%80%d0%b8%d0%ba%d0%b8/kak-ponyat-chto-pora-vybrosit-odezhdu-10-priznakov-myortvogo-garderoba/
Передовые онлайн-казино предлагают пользователям разнообразие возможностей для удобной игры. Основной сайт soponyonotrans.cyou обеспечивает возможность ко всем опциям и развлечениям. Однако при наличии технических трудностей на помощь приходят рабочие дубликаты.
Что представляет собой актуальное зеркало
Альтернативный адрес казино — это стопроцентная дубликат официального сайта, размещенная по запасному адресу. Подлинное зеркало сохраняет все возможности, в том числе создание аккаунта, вход в собственный кабинет, поощрения и бонусные коды.
Копия на сегодня обеспечивает:
– Постоянный доступ к азартным автоматам
– Совершенную сохранность личных информации
– Поддержку счета и журнала операций
– Применимость всех промо-предложений
Регистрация на лицензионном портале
Ход регистрации отнимает считанные минут. Начинающим клиентам необходимо:
1. Войти на главный сайт или функционирующее зеркало
2. Нажать кнопку «Регистрация»
3. Указать необходимые графы
4. Подтвердить э-мейл почту
5. Ввести кодовое слово при наличии
После финиша регистрации игроки приобретают вознаграждение за регистрацию, что может включать бонусные спины или финансовое премирование.
Авторизация в личный кабинет
Личный кабинет открывает всесторонний управление над игровым ходом. Через индивидуальный раздел разрешается:
– Пополнять кошелек
– Забирать выплаты
– Использовать купоны
– Мониторить хронологию ставок
– Принимать участие в состязаниях
– Обретать кешбэк
Описание бонусов и специальных предложений
Великодушная бонусная программа — существенное козырь платформы. Главные типы премий:
Вступительный бонус
Начинающие приобретают выгодное вознаграждение на стартовые пополнения. Сумма премии может составлять 100-200% от объема вклада.
Бонусные спины
Бесплатные раунды предоставляются для популярных слотов. Сумма free spins разнится от 10 до 500 штук.
Кешбэк
Еженедельный или ежемесячный отдача процента потерянных средств. Типичный процент компенсации — 5-15%.
Конкурсы
Периодические турниры с внушительными наградными фондами. Соревнующиеся состязаются за лучшие места в таблице лидеров.
Мобильная версия и приложуха
Портативная версия дает возможность играть с любого девайса. Клиенты могут скачать приложение для iOS и Android или задействовать веб версию.
Выгоды смартфонного приложения:
– Оперативная прогрузка слотов
– Эргономичный дизайн
– Всплывающие уведомления о поощрениях
– Вход через Touch ID
Машины и Live казино
Развлекательная база насчитывает сотни игр от топовых провайдеров.
Востребованные категории слотов:
– Стандартные слоты
– Видеослоты с призовыми уровнями
– Накопительный приз автоматы
– Мегавейс слоты
Live казино
Раздел live игорный зал предоставляет партию с живыми крупье. Имеются классические игры:
– Европейская рулетка
– Блэкджек
– Баккара
– Техасский холдем
Как найти актуальное зеркало
Обрести актуальную ссылку на зеркало разрешается множественными вариантами:
1. Подписаться на емейл-уведомления
2. Наблюдать за новостями в социальных сетях
3. Связаться в отдел поддержки
4. Заложить действующее зеркало в избранное
Вывод
Главный сайт и его действующие копии предоставляют непрерывный вход к развлекательным слотам. Великодушные поощрения, многочисленные бонусные коды, эргономичное мобильное приложение и высококлассная служба поддержки создают азартный геймплей крайне удобным и безопасным.
Анализ основного портала
Современное онлайн-казино обеспечивает своим игрокам большой набор игр и призов. Оригинальный сайт Fontan казино работает круглосуточно, предоставляя путь к известным играм, live-казино и многочисленным акциям.
Действующее зеркало: путь к порталу
Что такое зеркало казино
Дубликат составляет собой точную копию официального веб-сайта с альтернативным интернет путем. Функционирующее зеркало предоставляет клиентам миновать запреты и иметь непрерывный подключение к предпочитаемым играм.
Как отыскать рабочее зеркало сегодня
Действующие ссылки на главное зеркало публикуются через:
– Email рассылку
– Главные медийные сети
– Команду сопровождения
– Партнерские ресурсы
Оформление на платформе
Ход регистрации
Оформление занимает всего минут и содержит нижеследующие действия:
1. Вход на официальный портал или функционирующее зеркало
2. Выбор кнопки “Создатьаккаунт”
3. Указание контактных реквизитов
4. Проверка электроннойпочты или номера
5. Придумывание ключа
Приз за созданиеаккаунта
Начинающие игроки приобретают большие начальные бонусы:
– Финансовые суммы на баланс
– Бесплатныевращения для слотов
– Повышенный коэффициент кешбэка
– Особые коды
Авторизация в персональный счет
Действующие участники могут выполнить доступ через официальный портал или актуальное зеркало. Для этого нужно ввести никнейм и ключдоступа, сформированные при открытиисчета.
Возможности собственного кабинета
В собственном кабинете доступны следующие возможности:
– Управление личными реквизитами
– Пополнение баланса
– Снятие средств
– Активация купонов
– Отслеживание истории операций
– Участие в соревнованиях
Подарки и промо
Виды поощрений
Казино поощряет своих участников различными бонусными системами:
– Приветственный пакет — солидные бонусы на начальные депозиты
– Халявныеспины — дополнительные прокруты в известных симуляторах
– Кэшбек — регулярный возмещение доли ставок
– Система VIP — специальные бонусы для активных клиентов
Промокоды и их активация
Особые ваучеры гарантируют бонусные подарки. Для активации следует указать последовательность в нужное раздел в собственном аккаунте.
Азартный каталог
Слоты
Библиотека азартных машин содержит множество вариантов от топовых поставщиков:
– Традиционные машины
– Продвинутые развлечения
– Призовые автоматы
– Сюжетные автоматы
Live казино
Область Live-казино предлагает взаимодействие с живыми операторами в режиме реального времени:
– Американскаярулетка
– Blackjack
– PuntoBanco
– Casinopoker
Турниры
Систематические состязания с внушительными призовыми суммами устраиваются регулярно. Претенденты борются за победу в списке.
Мобильная платформа и приложение
Смартфонная адаптация портала
Основной портал целиком адаптирован для планшетных девайсов. Пользователи способны пользоваться автоматы непосредственно через веб-навигатор без нужды установки.
APP для установки
Специальное смартфонное приложение предлагается для получения на гаджеты с операционными платформами Android и iOS. Приложение дает:
– Быстрый доступ к автоматам
– Устойчивую функциональность
– Push-оповещения о предложениях
– Интуитивный навигацию
Резюме
Основной сайт казино и его функционирующие зеркала предоставляют пользователям абсолютный возможность к высококлассным азартным играм. Большие подарки, многочисленные промо, удобная смартфонная версия и профессиональная сервис делают развлекательный времяпрепровождение предельно удобным и прибыльным.
Wood Cove Finds – Browsed today and the site feels simple and well-structured.
casino deneme siteleri: lisanslı casino siteleri
google посещаемость сайта google посещаемость сайта .
Нынешние онлайн-казино обеспечивают клиентам широкий спектр функций для удобной досуга. Переход к платформе казино РЎСѓРєР° казино реализуется через основной сайт или актуальное зеркало.
Что такое функционирующее зеркало казино
Актуальное зеркало — это альтернативный домен главного веб-сайта казино. Такие клоны создаются для поддержания бесперебойного входа к гемблинговой сервису.
Зеркало актуальное полностью копирует возможности главного портала. Клиенты приобретают такой же вход ко всем функциям, включая оформление профиля, внесение депозита кошелька и снятие средств.
Регистрация на главном ресурсе
Процедура регистрации занимает всего несколько моментов. Начинающим пользователям нужно:
1. Перейти на главный домен или текущее подлинное зеркало
2. Кликнуть кнопку “Регистрация”
3. Внести нужные реквизиты
4. Подтвердить e-mail почту
5. Ввести бонусный код при наличии
После выполнения оформления игрок получает приз за регистрацию, который вправе включать даровые спины или cash вознаграждение.
Доступ в персональный кабинет
Пользовательский кабинет — это защищенная область, где игроки вправе администрировать своим счетом. Для входа следует напечатать username и код доступа.
В личном кабинете открыты следующие опции:
– Проверка истории транзакций
– Применение купонов
– Настройка призами
– Участие в конкурсах
– Контроль кэшбэка
– Редактирование данных
Призы и предложения
Азартная платформа обеспечивает привлекательные бонусы:
Стартовый бонус — дебютанты зарабатывают значительное поощрение на начальные пополнения.
Фриспины — предоставляются как при оформлении, так и в контексте всевозможных промо.
Возврат средств — систематический возврат части израсходованных сумм.
Купоны — эксклюзивные шифры, дающие возможность к особым вознаграждениям.
Характеристика гемблинговых секций
Слоты
Библиотека slots включает сотни игр от ведущих провайдеров. Клиенты встретят как классические слоты, так и инновационные мультимедийные автоматы с интересной оформлением.
Live казино
Раздел Live казино дарит право играть с реальными ведущими в состоянии актуального времени. Имеются распространенные варианты: рулетка, блэкджек, баккара, покер.
Конкурсы
Систематические соревнования с крупными выигрышными суммами притягивают массу соревнующихся. Победители получают монетарные вознаграждения и эксклюзивные премии.
Телефонная версия и софт
Мобильная версия платформы предоставляет право участвовать с каждого аппарата. Оформление независимо корректируется под габариты экрана.
Загрузить приложение можно для аппаратов на Android и iOS. Телефонное app характеризуется всеми функциями полной версии.
Как отыскать действующее зеркало на сегодня
Свежие адреса альтернатив регулярно изменяются. Обнаружить действующую URL можно несколькими способами:
– Через службу саппорта
– В официальных информационных сетях
– По email newsletter
– На партнерских сайтах
Надежность и лицензирование
Лицензионный ресурс функционирует на фундаменте зарубежной документа. Все платежи шифруются актуальными системами безопасности.
Конфиденциальность индивидуальных информации поддерживается в полном размере.
Заключение
Лицензионный сайт и его актуальные дубликаты предоставляют участникам круглосуточный вход к высококлассным гемблинговым сервисам. Выгодные призы, различные слоты, опытная помощь — все это делает игровой опыт чрезвычайно удобным и притягательным.
Актуальные интернет казино предлагают клиентам широкий диапазон вариантов для беспроблемной игры. Впрочем иногда доступ к официальному платформе может оказаться заблокированным. В таких обстоятельствах на помощь появляется https://vanuatubeachbar.com/luxon-pay-2026-god-eto-vozmozhnost-popolnyat-i-vyvodit-sredstva-v-onlayn-kazino/, которое предоставляет непрерывный доступ ко всем функциям платформы.
Что такое функционирующее зеркало казино
Копия — это идентичная копия официального ресурса, которая располагается по дополнительному адресу. Копия поддерживает полный возможности основного портала, включая пользовательский кабинет, депозит и историю переводов.
Основные плюсы применения зеркала:
– Непрерывный соединение к порталу
– Абсолютная схожесть инструментов
– Сохранность личных данных
– Хранение всех бонусов
Как найти функционирующее зеркало в данный момент
Существует множество надежных способов поиска свежей адреса:
Проверенные сервисы:
1. Электронная рассылка — управление периодически отправляет информацию с действующими адресами
2. Медийные сети — легитимные аккаунты публикуют свежую сведения
3. Отдел поддержки — операторы сообщают надежные ссылки
4. Смартфонное приложение — дает возможность преодолевать блокировки
Создание аккаунта на лицензионном ресурсе
Этап оформления требует не более немного минут и предполагает из следующих этапов:
1. Попадание на главный веб-сайт или функционирующее зеркало
2. Нажатие на иконку «Зарегистрироваться»
3. Заполнение персональной формы
4. Подтверждение почтовой почты или сотового номера
5. Применение поощрения за регистрацию при присутствии промокода
Начинающие игроки приобретают солидный стартовый бонус, который может охватывать бесплатные вращения, монетарные вознаграждения или cashback.
Логин в индивидуальный кабинет
Вход на платформе выполняется стандартным методом. Требуется указать имя пользователя и пароль, примененные при регистрации.
Значимые детали для надежного входа:
– Используйте криптостойкий пароль
– Задействуйте двухфакторную проверку
– Не храните реквизиты на чужих компьютерах
– Проверяйте адресную строку браузера
Характеристика поощрительной схемы
Игровая платформа награждает геймеров разнообразными поощрениями и специальными предложениями:
Вступительный пакет
Свежие игроки могут претендовать на существенное вознаграждение за стартовый взнос. Обычно это пропорциональная добавка к зачисленной сумме плюс фриспины для топовых слотов.
Систематические акции
– 7-дневный cashback — возврат процента потерянных денежных средств
– Бонусы на последующие вклады
– Уникальные предложения по торжествам
– Соревнования с солидными наградными пулами
Программа вознаграждений
Регулярные пользователи получают пункты за каждую ставку, которые затем превращаются на действительные денежные призы, фриспины или специальные льготы.
Кодовые слова: как задействовать
Кодовые комбинации — это уникальные последовательности знаков, дающие возможность к дополнительным вознаграждениям.
В каких местах взять актуальные промокоды:
– Проверенные общественные сети казино
– Партнерские площадки
– Email-информирование
– Профильные платформы
Вводится промокод в отдельное поле при создании аккаунта или внесении депозита кошелька.
Смартфонная версия и приложение
Нынешние клиенты выбирают делать ставки с мобильных гаджетов. Платформа дает 2 метода для удобной мобильной игры.
Responsive модификация
Веб версия само собой подстраивается под параметры экранной панели. Не требует установки и оперирует в всяком новом браузере.
Портативное приложение
Установить софт можно для гаджетов на Android и iOS. Достоинства app:
– Оперативная открытие
– Бесперебойная работа
– Автоматические-уведомления о акциях
– Независимый минование блокировок
Процедура загрузки несложен: необходимо зайти на ресурс с телефонного аппарата и подчиняться инструкциям.
Игровой коллекция
Библиотека слотов насчитывает тысячи наименований от лучших провайдеров.
Слоты
Азартные слоты — самая популярная раздел аттракционов. Показаны классические 3-барабанные слоты, современные видео-автоматы с поощрительными уровнями, а также растущие суперпризы.
Live казино
Зона с настоящими крупье позволяет почувствовать настроение настоящего казино. Имеются развлечения с рулеткой.
Передача ведется в HD формате, поддерживается чат с ведущим и остальными пользователями.
Соревнования
Регулярно организуются соревнования по различным категориям. Участие позволяет завоевать валютные награды, даровые прокруты или эксклюзивные привилегии.
Платежные процедуры
Портал предлагает обширный выбор денежных методов:
– Пластиковые карты
– Цифровые системы
– Крипта
– Счетовые транзакции
Наименьшая количество вклада — разумная для преобладающего числа игроков. Получение призов производится в короткие временные рамки.
Служба поддержки
Квалифицированные сотрудники готовы помочь постоянно. Представлены данные способы коммуникации:
– Интернет-чат
– Email
– Мобильная горячая линия
– Медийные сети
Ответы на распространенные вопросы можно отыскать в разделе FAQ.
Итог
Основной ресурс казино и его функционирующие зеркала обеспечивают клиентам совершенный вход ко всем функциям ресурса. Щедрые бонусы, комфортная смартфонная версия, впечатляющий выбор игр и профессиональная помощь формируют игровой досуг исключительно беспроблемным и надежным.
Betwinner came up in another thread, so I’m sharing what I found: http://www.bet-promo-codes.com/sportsbook-reviews/betwinner-registration/
https://cassiteleri.buzz/# casino siteleri
Cove Gems Market – Navigation feels intuitive and exploring content is easy.
Пинко Казино предлагает широкий выбор онлайн-игр и азартных развлечений.
Casino Pinco
Система выплат работает надежно и прозрачно.
official site link – Navigation feels intuitive, content is readable and neat.
silvermeadow store online – Pages flow nicely and content is straightforward to read.
Передовые онлайн казино дают игрокам широкий спектр опций для комфортной игры. Но иногда соединение к главному платформе может являться недоступным. В таких обстоятельствах на выручку спешит Бублик казино казино, которое дает постоянный путь ко всем возможностям платформы.
Что такое рабочее зеркало казино
Альтернативный сайт — это точная дубликат основного сайта, которая находится по альтернативному домену. Копия имеет полный инструментарий оригинального сайта, включая личный кабинет, депозит и данные операций.
Главные плюсы задействования зеркала:
– Непрерывный вход к порталу
– Максимальная идентичность инструментов
– Безопасность персональных информации
– Поддержка всех привилегий
Как обнаружить функционирующее зеркало в данный момент
Имеется несколько безопасных путей нахождения свежей URL:
Проверенные сервисы:
1. Электронная рассылка — дирекция постоянно отправляет информацию с действующими ссылками
2. Медийные сети — проверенные страницы размещают релевантную новости
3. Департамент поддержки — сотрудники выдают безопасные адреса
4. Мобильное приложение — позволяет преодолевать блокировки
Регистрация на лицензионном ресурсе
Этап создания аккаунта длится только считанные минут и предполагает из нижеследующих шагов:
1. Переход на лицензионный портал или функционирующее зеркало
2. Выбор на клавишу «Открыть счет»
3. Указание регистрационной анкеты
4. Верификация почтовой почты или телефонного номера
5. Включение вознаграждения за регистрацию при доступности промокода
Только что зарегистрированные игроки получают великодушный приветственный приз, который может включать фриспины, финансовые вознаграждения или компенсацию.
Доступ в индивидуальный кабинет
Подключение на платформе выполняется традиционным путем. Достаточно внести имя пользователя и пароль, задействованные при оформлении.
Важные моменты для конфиденциального входа:
– Эксплуатируйте защищенный шифр
– Включите двойную идентификацию
– Не записывайте коды на публичных компьютерах
– Мониторьте адресную строку браузера
Описание бонусной системы
Игровая платформа радует геймеров всевозможными поощрениями и промо:
Начальный комплект
Дебютанты имеют возможность надеяться на щедрое поощрение за стартовый взнос. Как правило это процентная надбавка к переведенной объему плюс даровые спины для известных слотов.
Постоянные промо
– Еженедельный cashback — возвращение части утраченных денежных средств
– Призы на повторные вклады
– Особые предложения по праздникам
– Конкурсы с крупными наградными суммами
Система верности
Деятельные клиенты получают единицы за любую бет, которые затем конвертируются на реальные денежные призы, free spins или эксклюзивные привилегии.
Купоны: как использовать
Купоны — это индивидуальные комбинации знаков, предоставляющие право к бонусным вознаграждениям.
В каких местах найти актуальные промокоды:
– Официальные социальные сети казино
– Партнерские сайты
– Email-новостная лента
– Профильные группы
Указывается промокод в специальное поле при оформлении или пополнении баланса.
Смартфонная версия и приложение
Нынешние игроки предпочитают проводить время с портативных гаджетов. Платформа обеспечивает 2 варианта для удобной смартфонной игры.
Responsive вариант
Интернет версия сама адаптируется под диагональ монитора. Не требует скачивания и работает в любом актуальном браузере.
Телефонное приложение
Скачать app можно для устройств на Android и iOS. Выгоды app:
– Скоростная открытие
– Устойчивая действие
– Push-уведомления о акциях
– Самостоятельный преодоление блокировок
Процедура установки прост: нужно попасть на портал с телефонного устройства и выполнять руководству.
Гемблинг ассортимент
Каталог игр охватывает тысячи позиций от лучших провайдеров.
Слоты
Развлекательные слоты — максимально любимая категория игр. Доступны стандартные 3-барабанные аппараты, новые мультимедийные слоты с бонусными стадиями, а также накопительные призы.
Live казино
Раздел с реальными раздающими дает возможность ощутить дух подлинного казино. Открыты развлечения с баккарой.
Передача производится в превосходном разрешении, присутствует общение с ведущим и иными пользователями.
Конкурсы
Систематически организуются турниры по различным категориям. Включение позволяет заработать валютные выигрыши, бесплатные вращения или специальные презенты.
Денежные процедуры
Сайт обеспечивает широкий выбор платежных методов:
– Пластиковые карты
– Цифровые платформы
– Криптовалюта
– Счетовые платежи
Низшая величина взноса — доступная для преобладающего числа геймеров. Обналичивание денег выполняется в скорые сроки.
Сервис поддержки
Квалифицированные сотрудники готовы содействовать непрерывно. Доступны такие способы общения:
– Интернет-чат
– Email
– Телефонная поддержка
– Медийные сети
Разъяснения на типовые вопросы можно получить в разделе FAQ.
Резюме
Главный ресурс казино и его актуальные зеркала предоставляют геймерам абсолютный путь ко всем функциям портала. Солидные вознаграждения, удобная телефонная версия, колоссальный выбор слотов и профессиональная помощь создают гемблинг опыт исключительно комфортным и защищенным.
Передовые онлайн-казино предлагают игрокам большой набор развлечений и призовых предложений. Присоединение к платформе производится через основной портал или его действующее зеркало казино Джозз казино, что гарантирует непрерывную работу.
Что такое функционирующее зеркало казино
Альтернатива — это идентичная версия оригинального портала, сделанная для устранения запретов. Зеркало сегодня позволяет игрокам обрести вход к излюбленным развлечениям в любое время.
Подлинное зеркало обладает всеми возможностями первоначального сайта:
– Целый ассортимент автоматов
– Учетная запись с зафиксированными данными
– Текущие поощрения
– Защищенные финансовые транзакции
Регистрация на главном сайте
Процесс создания аккаунта занимает всего несколько минут. Свежим участникам требуется:
1. Войти на проверенный веб-сайт или функционирующее зеркало
2. Щелкнуть на элемент “Зарегистрироваться”
3. Внести необходимые параметры
4. Активировать электронную почту
5. Сделать начальный платеж
Поощрение новичкам начисляется моментально после окончания всех шагов.
Вход в личный кабинет
Действующие клиенты могут осуществить авторизацию вводя:
– Никнейм и код
– Код контакта
– Email
Профиль дает шанс к управлению средствами, данным транзакций и текущим промокодам.
Бонусы и кампании
Игровая система балует постоянных участников выгодными поощрениями:
Начальный комплект
– Премия на начальный платеж до 100%
– Free spins на известные автоматы
– Экстра премии за очередные пополнения
Ваучеры
Специальные промокоды обеспечивают доступ на получение специальных бонусов. Свежие купоны выкладываются в секции “Акции”.
Кешбэк
Постоянный кешбэк достигает до 10% от использованных сумм. Возмещение предоставляется незамедлительно.
Система лояльности
Регулярные клиенты накапливают поинты, которые переводятся на действительные средства или даровые спины.
Mobile версия и APP
Для удобства пользователей создана полноценная портативная платформа. Приспособленный облик помогает легко делать ставки с каждого портативного девайса.
Преимущества приложения:
– Оперативный доступ к слотам
– Улучшенный дизайн
– Надежная деятельность
– Сообщения о последних турнирах
Скачать программу можно безвозмездно с проверенного ресурса для устройств на Android и iOS.
Ассортимент развлечений
Игровые автоматы
База содержит более 2000 автоматов от ведущих производителей:
– Обычные машины
– Современные автоматы
– Джекпот-слоты
– Брендовые игры
Live казино
Категория Live столов предлагает развлечение с подлинными ведущими в реальном эфире:
– Рулеточные столы
– Двадцать одно
– Punto Banco
– Poker
Соревнования
Постоянные соревнования с крупными выигрышными пулами устраиваются еженедельно. Вход в конкурсах открыто всем активным участникам.
Денежные методы
Депозиты и снятия средств реализуются через распространенные сервисы:
– Кредитные средства
– Виртуальные кошельки
– Цифровая валюта
– Прямые операции
Стартовый депозит — от 100 рублей. Снятие средств выполняется в течение 24 часов.
Сервис поддержки
Круглосуточная отдел саппорта готова помочь в решении произвольных вопросов:
– Мессенджер
– Email
– Горячая линия
– Публичные сети
Охрана и лицензия
Подлинный веб-сайт функционирует на базе мировой лицензии. Любые сведения участников закрыты актуальным SSL-кодированием.
Итог
Актуальное зеркало предоставляет стабильный доступ к выбранным слотам, выгодным акциям и комфортным сервисам. Зарегистрируйтесь немедленно и приобретите стартовый бонус!
explore the site – Sections are tidy, moving through the content is effortless.
Доступ к ресурсу через рабочие зеркала
Нынешние онлайн казино дают пользователям бесперебойный переход к сервисам. Основной сайт Lucky Bear casino casino действует бесперебойно, обеспечивая широкий спектр азартных развлечений. Но периодически образуются системные трудности или ограничения, следовательно существенно понимать о присутствии рабочих зеркал.
Что представляет из себя официальное зеркало казино
Зеркало — это идентичная дубликат основного сайта с идентичным набором функций. Действующее зеркало на данный момент помогает избегать территориальные барьеры и возобновлять гемблинг.
Главные выгоды применения зеркал:
– Стопроцентный вход к личному кабинету
– Сохранение совокупных информации учётной записи
– Аналогичный перечень слотов
– Свежие бонусы и промо
Регистрация на платформе
Механизм создания аккаунта требует считанные минут. Свежие геймеры зарабатывают богатый приз за оформление, который имеет возможность включать:
– Стартовый бонусный подарок
– Безвозмездные вращения для автоматов
– Уникальные промокоды
– Повышенный возврат
Во имя выполнения оформления нужно:
1. Войти на основной портал или альтернативу
2. Выбрать клавишу «Регистрация»
3. Ввести личные сведения
4. Заверить почтовый адрес или контакт
5. Задействовать промокод (в случае наличии)
Вход в личный кабинет
Вслед за удачной записи клиенты способны совершать вход посредством официальный ресурс или актуальное зеркало. Собственный кабинет даёт абсолютный надзор над учётной записью:
– Летопись ставок
– Внесение кошелька
– Снятие выигрышей
– Контроль наградами
– Присутствие в соревнованиях
Поощрения и акции казино
Ресурс награждает клиентов различными наградными предложениями:
Приветственные бонусы
Новые игроки получают великодушный букет поощрений на вступительные вклады. Типично это содержит частичную добавку к сумме пополнения плюс бесплатные кручения.
Постоянные промо
– Раз в неделю возврат до 15%
– Конкурсы с призовыми пулами
– Призы на день рождения
– Специальные промо для VIP игроков
Схема лояльности
Активные пользователи зарабатывают единицы, что можно трансформировать на подлинные призы или особые преимущества.
Смартфонная форма и приложение
Нынешние решения позволяют участвовать всюду подходяще. Мобильная форма веб-сайта независимо подстраивается под экран всякого девайса.
Плюсы портативного ПО:
– Моментальная открытие развлечений
– Эргономичный вид
– Push-нотификации о бонусах
– Способность скачать для Android и iOS
Live казино: среда подлинного гемблинг учреждения
Категория Live казино транспортирует клиентов в среду реального гемблинг учреждения. Опытные крупье ведут действие в режиме настоящего времени.
Предлагаемые варианты:
– Европейская рулетка
– Блэкджек
– Punto Banco
– Карты
Слоты и развлекательные автоматы
Ассортимент гемблинг машин насчитывает множество названий от передовых студий. Любой пользователь отыщет игру по вкусу:
– Винтажные барабаны
– Новые слоты с дополнительными уровнями
– Крупный приз-автоматы
– Динамические слоты
Турниры и лотереи
Регулярные турниры вносят адреналин и предоставляют шанс заработать внушительные вознаграждения. Включение в конкурсах нередко бесплатное, а премиальные суммы доходят до внушительных объёмов.
Секьюрити и конфиденциальность
Платформа эксплуатирует передовые системы криптографии для гарантии сведений игроков. Совокупные транзакционные транзакции осуществляются через защищённые протоколы.
Вывод
Главный портал и его функционирующие зеркала обеспечивают устойчивый подключение к отличным развлекательным сервисам. Великодушные поощрения, практичная карманная редакция, многообразие машин и высококлассное Live-заведение делают платформу превосходным вариантом для фанатов игровых игр.
vdcasino giris: vdcasino
оптимизация сайта блог seo-blog20.ru .
güvenilir casino siteleri casino deneme siteleri
Granite Finds – Landed here by chance, content flows smoothly and reading is simple.
доставка суши доставка суши .
Характеристика основного ресурса
Актуальное онлайн-казино обеспечивает своим участникам обширный спектр развлечений и призов. Основной ресурс казино казино Панч работает круглосуточно, гарантируя возможность к востребованным симуляторам, live-казино и многочисленным предложениям.
Актуальное зеркало: путь к порталу
Что такое зеркало казино
Дубликат представляет собой точную копию официального портала с отличным URL именем. Рабочее зеркало позволяет игрокам преодолевать запреты и иметь непрерывный доступ к выбранным автоматам.
Как найти текущее зеркало сегодня
Рабочие адреса на основное зеркало выкладываются через:
– Почтовую рассылку
– Проверенные социальные сети
– Команду помощи
– Тематические ресурсы
Оформление на портале
Этапы регистрации
Открытиесчета длится буквально минут и содержит нижеследующие этапы:
1. Доступ на основной портал или действующее зеркало
2. Нажатие кнопки “Создатьаккаунт”
3. Указание учетных данных
4. Активация email или номера
5. Создание кодадоступа
Бонус за созданиеаккаунта
Начинающие игроки обретают выгодные приветственные поощрения:
– Финансовые депозиты на баланс
– Бесплатныевращения для слотов
– Увеличенный размер кэшбека
– Специальные промокоды
Вход в собственный профиль
Действующие пользователи имеютвозможность осуществить авторизацию через официальный портал или действующее зеркало. Для этого необходимо ввести никнейм и код, сформированные при созданииаккаунта.
Возможности индивидуального аккаунта
В собственном кабинете имеются следующие опции:
– Контроль контактными реквизитами
– Внесение кошелька
– Вывод денег
– Использование бонусов
– Отслеживание статистики транзакций
– Вступление в состязаниях
Поощрения и промо
Виды поощрений
Казино награждает своих участников различными наградными системами:
– Стартовый бонус — щедрые поощрения на стартовые взносы
– Фриспины — бонусные спины в рейтинговых играх
– Кешбэк — регулярный возврат части ставок
– Схема верности — особые льготы для регулярных пользователей
Купоны и их использование
Особые купоны гарантируют дополнительные бонусы. Для применения необходимо указать шифр в специальное раздел в личном кабинете.
Геймплейный каталог
Слоты
Каталог слотовых симуляторов вмещает тысячи позиций от топовых поставщиков:
– Классические автоматы
– Видео слоты
– Накопительные игры
– Брендовые автоматы
Live казино
Зона Live-казино дарит процесс с реальными ведущими в обстановке прямого стрима:
– Американскаярулетка
– Двадцатьодно
– Пунтобанко
– Техасскийхолдем
Состязания
Систематические конкурсы с внушительными призовыми суммами проводятся регулярно. Соревнующиеся сражаются за призовыеместа в таблице.
Портативная реализация и софт
Адаптивная адаптация портала
Основной сайт абсолютно адаптирован для портативных аппаратов. Участники могут играть развлечения напрямую через веб-навигатор без обязательства инсталляции.
Приложение для инсталляции
Авторское портативное программа предоставляется для загрузки на устройства с базовыми средами Android и iOS. APP гарантирует:
– Быстрый вход к развлечениям
– Устойчивую функциональность
– Мгновенные-оповещения о бонусах
– Удобный навигацию
Вывод
Основной портал казино и его рабочие дубликаты дают участникам полный доступ к первоклассным развлекательным услугам. Выгодные бонусы, многочисленные кампании, удобная портативная адаптация и профессиональная поддержка делают развлекательный досуг максимально enjoyable и прибыльным.
Подключение к сайту и рабочие зеркала
Актуальные сетевые казино предоставляют участникам большой ассортимент опций. Основной сайт keepsakeprofessionalsnetwork.com обеспечивает безопасный переход ко всем возможностям. При этом временами появляются обстоятельства, когда понадобится резервный вариант авторизации.
Что являет собой собой функционирующее зеркало
Актуальное зеркало — это полная реплика легального веб-сайта с запасным интернет расположением. Копия сегодня позволяет преодолевать потенциальные блокировки и обеспечивать стабильный доступ к любимым развлечениям.
Официальное зеркало обладает теми же характеристиками, что и главный портал:
– Весь каталог развлечений
– Собственный кабинет с актуальными параметрами
– Актуальные поощрения и программы
– Защищенные денежные переводы
Создание аккаунта и доступ в сервис
Процедура оформления на ресурсе отнимает буквально моментов. Начинающим пользователям необходимо:
1. Зайти на рабочее зеркало сегодня
2. Кликнуть опцию «Регистрация»
3. Заполнить необходимые информацию
4. Верифицировать e-mail почту или информацию связи
5. Получить награду за регистрацию
Доступ в собственный профиль реализуется через предоставление имени пользователя и пароля.
Описание призовой структуры
Привлекательная призовая структура — главное козырь казино. Игроки зарабатывают различные поощрения:
Приветственные награды
Недавние игроки вправе рассчитывать на привлекательный бонус за регистрацию. Как правило это комплект опций, охватывающий:
– Долевую премию к начальному пополнению
– Подарочные спины
– Extra суммы на счет
Промокоды и специальные опции
Периодические коды дают возможность получать бонусные выгоды. Использовать их разрешено в предназначенном меню индивидуального раздела.
Free spins и кешбэк
Фриспины — это шанс крутить игры без использования своих средств. Компенсация предполагает частичный компенсацию утраченных сумм.
Ассортимент автоматов
Азартная площадка обеспечивает внушительную базу автоматов.
Слоты
Многообразие игровых машин впечатляет представление. Доступны обычные ретро аппараты и новые игры с захватывающей визуализацией.
Live зал
Категория Live казино переносит участников в среду реального развлекательного дома. Опытные операторы осуществляют сессии в реальном формате.
Конкурсы и лидерборды
Постоянные состязания добавляют драйва и предоставляют возможность заработать внушительные суммы.
Портативная реализация и приложение
Актуальные технологии позволяют развлекаться в удобном локации. Мобильная вариант автономно подстраивается под экран девайса.
Скачать приложение возможно для цифровых систем iOS и Android. Клиент гарантирует:
– Скоростной переход
– Стабильную функционирование
– Push-алерты об акциях
– Удобный интерфейс
Денежные транзакции
Казино работает с многочисленные способы пополнения и снятия сумм:
– Пластиковые инструменты
– Цифровые платформы
– Токены
– Денежные транзакции
Всевозможные транзакции осуществляются через зашифрованное канал, что гарантирует сохранность персональных информации.
Служба поддержки
Квалифицированная команда ассистанса работает 24/7. Связаться с менеджерами можно через:
– Онлайн-чат
– E-mail почту
– Связь
– Коммуникационные каналы
Заключение
Главный веб-сайт и его актуальное зеркало предоставляют игрокам надежный и легкий переход к азартным играм. Щедрые подарки, разнообразный выбор слотов и профессиональная поддержка делают участие крайне удобной и результативной.
перейдите на этот сайт https://ufolabs.xyz/
развод мостов спб билеты vodnyye-progulki-v-spb.ru .
Актуальные онлайн-казино гарантируют геймерам обширный выбор возможностей для удобной досуга. Переход к площадке Клубника казино регистрация осуществляется через главный портал или актуальное зеркало.
Что такое функционирующее зеркало казино
Актуальное зеркало — это дополнительный URL официального сайта казино. Такие клоны генерируются для предоставления стабильного доступа к гемблинговой платформе.
Зеркало на сегодня целиком повторяет характеристики основного домена. Клиенты получают схожий выход ко всем услугам, включая открытие счета, зачисление средств депозита и вывод выигрышей.
Создание аккаунта на основном портале
Процесс регистрации отнимает всего пару моментов. Свежим пользователям требуется:
1. Зайти на официальный домен или текущее подлинное зеркало
2. Выбрать кнопку “Зарегистрироваться”
3. Заполнить необходимые информацию
4. Верифицировать email почту
5. Ввести купон при существовании
После окончания открытия профиля пользователь приобретает бонус за регистрацию, который имеет право охватывать бесплатные вращения или монетарное премию.
Логин в индивидуальный кабинет
Индивидуальный кабинет — это охраняемая территория, где пользователи вправе регулировать своим аккаунтом. Для доступа необходимо ввести никнейм и пароль.
В индивидуальном кабинете открыты данные функции:
– Отслеживание журнала платежей
– Активация промокодов
– Управление вознаграждениями
– Включение в турнирах
– Проверка кэшбека
– Изменение данных
Бонусы и предложения
Игровая сервис предлагает выгодные призы:
Регистрационный бонус — дебютанты обретают существенное вознаграждение на стартовые депозиты.
Фриспины — дарятся как при открытии счета, так и в контексте различных мероприятий.
Кэшбек — регулярный возврат фрагмента израсходованных сумм.
Купоны — эксклюзивные коды, предоставляющие доступ к уникальным вознаграждениям.
Анализ азартных секций
Аппараты
Ассортимент аппаратов содержит сотни вариантов от лучших разработчиков. Игроки встретят как стандартные слоты, так и современные мультимедийные автоматы с увлекательной оформлением.
Live казино
Зона Live казино дарит шанс играть с живыми дилерами в режиме текущего времени. Имеются популярные игры: рулетка, блэкджек, баккара, покер.
Состязания
Регулярные соревнования с большими премиальными банками манят сотни соревнующихся. Чемпионы завоевывают монетарные выплаты и уникальные премии.
Смартфонная версия и программа
Телефонная версия сайта позволяет участвовать с произвольного устройства. Структура автономно настраивается под формат экрана.
Загрузить софт можно для аппаратов на Android и iOS. Мобильное ПО характеризуется всеми функциями десктопной версии.
Как обнаружить рабочее зеркало на данный момент
Свежие ссылки зеркал постоянно корректируются. Обнаружить рабочую линк можно несколькими методами:
– Через сервис техподдержки
– В проверенных новостных сетях
– По e-mail рассылке
– На специализированных ресурсах
Безопасность и сертификация
Основной сайт оперирует на основе мировой сертификата. Все платежи оберегаются передовыми протоколами шифрования.
Конфиденциальность персональных сведений поддерживается в стопроцентном размере.
Итог
Основной сайт и его функционирующие дубликаты дарят участникам 24/7 доступ к превосходным игровым развлечениям. Щедрые поощрения, различные слоты, компетентная помощь — все это превращает гемблинговый времяпрепровождение чрезвычайно беспроблемным и притягательным.
Переход к платформе через рабочие зеркала
Пользователи интернет казино регулярно контактируют с трудностью закрытия официального домена. Как раз для ликвидации этой ситуации существуют зеркала главного домена. https://valaycontrols.com/ дает стопроцентный доступ ко всем функциям ресурса.
Что такое актуальное зеркало казино
Альтернативный адрес представляет собой полную реплику главного портала с идентичным возможностями. Главное расхождение — это доменное имя. Все сведения пользователя, включая счет, привилегии и данные партий, находятся такими же.
Выгоды применения зеркал
Рабочие зеркала характеризуются комплексом важных выгод:
– Круглосуточный подключение к любимым автоматам
– Полная сохранность собственных параметров
– Сохранение всех конфигураций пользовательского кабинета
– Шанс получения призов и присутствия в акциях
Создание аккаунта на официальном портале
Операция открытия счета чрезвычайно легок и длится несколько минут. Недавние игроки в состоянии претендовать на внушительный приветственный поощрение за создание аккаунта.
Ступени создания аккаунта
1. Доступ на главный портал или его копию
2. Выбор на опцию “Присоединиться”
3. Заполнение необходимых сведений
4. Активация почтовой почты
5. Указание кода (если есть)
Награды и кампании для пользователей
Игровая площадка поощряет своих пользователей всевозможными бонусными программами.
Ключевые виды бонусов
Приветственный подарок — крупное поощрение для свежих игроков, которое способно вмещать монетарные суммы и бесплатные вращения.
Бесплатные вращения — шанс играть в известных игровых машинах бесплатно.
Возврат средств — процентный компенсация израсходованных сумм, что предоставляется каждую неделю или ежемесячно.
Промокоды — эксклюзивные последовательности, обеспечивающие добавочные привилегии.
Индивидуальный кабинет: инструменты и установки
Пользовательский аккаунт дает абсолютный контроль над игровым активностью. В нем доступны:
– Регулирование счетом
– Записи платежей
– Работающие поощрения
– Настройки защиты
– Валидация профиля
Карманная вариант и приложение
Новейшие участники оценивают доступность. Ресурс обеспечивает пару метода для развлечений с мобильных устройств.
Приспособленная смартфонная вариант
Адаптивная редакция домена автоматически настраивается под экран любого девайса. Не нужно загружать особое программное обеспечение.
APP для телефонов
Разрешено скачать специальное APP для iOS и Android. APP гарантирует:
– Быстрый вход
– Улучшенный графику
– Мобильные-сообщения о бонусах
– Стабильную производительность
Live раздел: атмосфера настоящего игорного заведения
Раздел Live казино доставляет клиентов в обстановку подлинного клуба. Компетентные ведущие организуют раунды в варианте настоящего времени.
Популярные Live-игры
– Французская рулетка
– Двадцать одно
– Baccarat
– Карибский покер
Автоматы: ассортимент автоматов
Коллекция азартных автоматов содержит сотни наименований от лидирующих поставщиков. Игроки встретят:
– Классические аппараты
– Современные слоты
– Джекпот-автоматы
– Многолинейные автоматы
Турниры и специальные предложения
Постоянные соревнования позволяют игрокам соревноваться друг с другом за внушительные наградные банки. Любой конкурс содержит свои критерии вовлечения и таблицу чемпионов.
Способы пополнения и изъятия финансов
Платформа поддерживает массу расчетных систем:
– Дебетовые картыы
– Виртуальные кошельки
– Blockchain-платежи
– Прямые переводы
Все переводы выполняются конфиденциально благодаря современным методам криптографии.
Команда помощи
Компетентные специалисты сервиса support расположены содействовать 24/7. Имеются такие методы общения:
– Живой-чат
– Email-обслуживание
– Звонковая поддержка
– Социальные сети
Резюме
Официальный ресурс игровой площадки и его актуальные зеркала предоставляют участникам безопасный и легкий доступ к широкому диапазону геймерских услуг. Крупные награды, регулярные промоакции, качественная помощь и удобные денежные способы создают геймерский досуг чрезвычайно увлекательным и выгодным.
заказать роллы пицца в подарок заказать роллы пицца в подарок .
Описание лицензионного портала
Актуальные онлайн казино предлагают пользователям разнообразный выбор игр и опций. Главный сайт казино Вован казино гарантирует надежный путь к азартным возможностям.
Рабочее зеркало: возможность в настоящий момент
Резервный сайт служит как идентичную дубликат лицензионного веб-сайта. Проверенное зеркало позволяет игрокам избегать потенциальные запреты.
Выгоды задействования зеркала
Ключевые достоинства содержат:
– Стабильный вход к сайту
– Поддержание полных характеристик официального сайта
– Охрана личных данных
– Равнозначный возможности
Регистрация на портале
Механизм открытия счета знаменуется простотой и практичностью. Новые клиенты необходимо:
1. Перейти на официальный сайт или его зеркало
2. Щелкнуть на клавишу оформления
3. Заполнить нужные поля
4. Верифицировать почтовую ящик
5. Выполнить начальный доступ
Подарок за создание аккаунта
Дебютанты получают значительный вступительный бонус. Это вознаграждение может охватывать:
– Денежные суммы
– Complimentary прокруты
– Усиленный показатель возврата
Авторизация в собственный раздел
Действующие игроки имеют возможность моментально войти в собственный раздел, применяя никнейм и код. Персональный раздел предлагает шанс к:
– Регулированию балансом
– Журналу транзакций
– Работающим призам
– Опциям аккаунта
Призы и предложения
Ресурс систематически проводит разнообразные мероприятия для игроков.
Виды поощрений
Ключевые формы поощрений:
– Финансовые начисления – часть от величины внесения
– Бесплатные вращения – безвозмездные раунды в игровых машинах
– Возврат средств – возмещение процента проигранных средств
– Турнирные вознаграждения – премии за выступление в конкурсах
Ваучеры
Уникальные ваучеры обеспечивают активировать добавочные привилегии. Клиенты могут получить их на специализированных порталах или взять в новостях.
Переносная адаптация и app
Актуальные клиенты любят портативный геймплей.
Характеристики переносной адаптации
– Гибкий вид для разнообразных девайсов
– Целостный путь к слотам
– Оперативная функционирование
– Практичное использование
Download софт
Переносное программа открыто для установки на гаджеты с рабочими ОС Android и iOS. App гарантирует:
– Устойчивую производительность
– Пуш сообщения о предложениях
– Моментальный доступ к желанным развлечениям
Азартный портфель
Казино предлагает внушительную галерею гемблинг услуг.
Слоты
Каталог игровых слотов включает:
– Традиционные машины
– Передовые игры
– Прогрессивные машины
– Сюжетные развлечения
Live дилеры
Секция живых игр предлагает возможность соревноваться с профессиональными крупье. Представлены:
– Рулетки
– Блек-джек
– Punto Banco
– Карибский покер
Соревнования
Регулярные конкурсы позволяют клиентам состязаться за внушительные призовые фонды. Соревновательная система обновляется каждую неделю.
Денежные процедуры
Сайт предоставляет обилие способов зачисления и снятия сумм:
– Пластиковые карты
– Виртуальные кошельки
– Банковские переводы
– Криптовалюты
Абсолютно все переводы выполняются надежно с применением актуальных технологий криптографии.
Отдел support
Компетентная служба поддержки трудится без перерыва. Соединиться с менеджерами возможно через:
– Интерактивный чат
– Email почту
– Телефон
– Социальные сети
Охрана и аккредитация
Игровой клуб действует на базе официальной аккредитации. Подобное подтверждает:
– Прозрачность игрового процесса
– Сохранность индивидуальных информации
– Своевременные перечисления
– Регулируемый игровой процесс
Вывод
Лицензионный ресурс и его функционирующие зеркала предоставляют клиентам целостный комплекс возможностей для безопасной и доходной досуга. Внушительные бонусы, различные игры, опытная сервис и надежная система операций превращают казино лучшим решением для ценителей игровых забав.
Современные онлайн-казино обеспечивают пользователям внушительный спектр развлечений и премиальных вариантов. Подключение к платформе производится через официальный портал или его действующее зеркало Мотор, что гарантирует бесперебойную деятельность.
Что представляет собой актуальное зеркало казино
Альтернатива — это полная реплика оригинального портала, разработанная для обхода барьеров. Рабочее зеркало дает возможность пользователям обрести подключение к предпочитаемым играм в произвольное время.
Проверенное зеркало содержит всеми функциями главного ресурса:
– Весь перечень игр
– Профиль с внесенными данными
– Свежие бонусы
– Защищенные денежные процедуры
Оформление профиля на главном сайте
Ход регистрации требует всего пару минут. Начинающим клиентам следует:
1. Зайти на официальный портал или функционирующее зеркало
2. Выбрать на элемент “Создать аккаунт”
3. Заполнить необходимые данные
4. Подтвердить электронную почту
5. Сделать начальный платеж
Стартовый бонус предоставляется сразу после выполнения всех стадий.
Подключение в учетную запись
Существующие пользователи могут выполнить вход вводя:
– Учетное имя и пароль
– Цифры мобильного
– Контактный email
Аккаунт открывает право к управлению финансами, записям ставок и доступным акциям.
Награды и программы
Развлекательная площадка вознаграждает активных участников разнообразными призами:
Первый пакет
– Надбавка на начальный депозит до 100%
– Free spins на известные автоматы
– Особые поощрения за дальнейшие депозиты
Бонусные коды
Специальные купоны обеспечивают возможность на приобретение эксклюзивных поощрений. Текущие промокоды выкладываются в разделе “Предложения”.
Возврат средств
Еженедельный кешбэк насчитывает до 10% от использованных денег. Возврат зачисляется автоматически.
Система лояльности
Активные участники получают баллы, которые обмениваются на действительные финансы или даровые спины.
Mobile версия и приложение
Для практичности пользователей создана функциональная адаптивный сайт. Отзывчивый вид обеспечивает комфортно развлекаться с всякого мобильного аппарата.
Выгоды APP:
– Скорый подключение к играм
– Улучшенный вид
– Устойчивая деятельность
– Сообщения о новых турнирах
Скачать приложение можно свободно с главного портала для девайсов на Android и iOS.
Ассортимент игр
Игровые автоматы
Библиотека включает более 2000 игр от ведущих производителей:
– Стандартные автоматы
– Мультимедийные игры
– Джекпот-слоты
– Брендовые автоматы
Live казино
Секция Live развлечений дает развлечение с живыми ведущими в реальном времени:
– Рулеточные столы
– Blackjack
– Baccarat
– Карточный покер
Соревнования
Постоянные состязания с значительными призовыми фондами проводятся каждую неделю. Присоединение в турнирах открыто всем зарегистрированным пользователям.
Платежные варианты
Платежи и снятия средств осуществляются через востребованные платежные системы:
– Дебетовые карты
– Электронные сервисы
– Криптовалюта
– Денежные переводы
Стартовый вклад — от 100 рублей. Вывод выигрышей осуществляется в течение 24 ч.
Сервис support
Постоянная служба support способна ассистировать в решении каких-либо проблем:
– Живой чат
– Email
– Связь
– Общественные сети
Защита и документ
Лицензионный сайт оперирует на почве глобальной документа. Любые параметры клиентов обезопасены актуальным SSL-кодированием.
Вывод
Рабочее зеркало обеспечивает бесперебойный вход к предпочитаемым развлечениям, выгодным промокодам и комфортным услугам. Откройте счет немедленно и приобретите приветственный поощрение!
Wind Harbor Finds – First impression is positive, layout is smooth and easy to read.
lasix 40 mg http://alpharms.shop/# lasix 100 mg
I don’t have much experience with Betwinner, but this link explains how it works: bet-promo-codes.com/sportsbook-reviews/betwinner-registration/
learn more here – Layout is simple, pages are approachable and readable.
Передовые онлайн-казино предлагают геймерам разнообразный ассортимент вариантов для комфортной времяпрепровождения. Доступ к ресурсу Bublik выполняется через лицензионный домен или рабочее зеркало.
Что такое функционирующее зеркало казино
Актуальное зеркало — это альтернативный домен главного ресурса казино. Такие клоны формируются для предоставления непрерывного доступа к игровой сервису.
Дубликат на сегодня целиком дублирует функционал главного ресурса. Клиенты имеют аналогичный выход ко всем сервисам, включая оформление профиля, внесение депозита кошелька и снятие денег.
Открытие счета на лицензионном сайте
Механизм открытия профиля длится всего считанные минут. Новым игрокам требуется:
1. Зайти на основной домен или действующее подлинное зеркало
2. Щелкнуть кнопку “Открыть счет”
3. Указать обязательные данные
4. Активировать электронную почту
5. Ввести бонусный код при существовании
После выполнения создания аккаунта пользователь приобретает вознаграждение за регистрацию, который может охватывать фриспины или cash вознаграждение.
Доступ в личный кабинет
Пользовательский кабинет — это закрытая зона, где клиенты могут контролировать своим учетной записью. Для авторизации необходимо ввести имя пользователя и пароль.
В пользовательском кабинете имеются такие возможности:
– Проверка хронологии переводов
– Использование кодов активации
– Настройка призами
– Присоединение в состязаниях
– Проверка кэшбека
– Редактирование данных
Вознаграждения и предложения
Игровая система предоставляет щедрые призы:
Приветственный пакет — новички обретают солидное премию на дебютные пополнения.
Даровые спины — выдаются как при открытии счета, так и в процессе многочисленных акций.
Кэшбек — постоянный рефанд части утраченных сумм.
Купоны — эксклюзивные последовательности, предоставляющие право к специальным предложениям.
Анализ гемблинговых направлений
Слоты
Собрание автоматов содержит тысячи позиций от топовых провайдеров. Пользователи встретят как стандартные слоты, так и актуальные видео-слоты с интересной оформлением.
Live казино
Зона Live казино предоставляет возможность участвовать с действующими ведущими в состоянии реального времени. Доступны распространенные столы: рулетка, блэкджек, баккара, покер.
Соревнования
Регулярные состязания с крупными премиальными пулами манят тысячи участников. Чемпионы обретают cash выплаты и специальные премии.
Телефонная версия и app
Портативная версия платформы предоставляет право участвовать с каждого устройства. Интерфейс независимо подстраивается под габариты экрана.
Установить программу можно для гаджетов на Android и iOS. Портативное ПО обладает всеми возможностями полной версии.
Как найти рабочее зеркало на сейчас
Рабочие ссылки зеркал постоянно изменяются. Найти актуальную линк можно несколькими методами:
– Через отдел саппорта
– В проверенных коммуникационных сетях
– По e-mail newsletter
– На специализированных ресурсах
Охрана и лицензирование
Главный ресурс работает на основании мировой лицензии. Все операции защищены передовыми методами кодирования.
Секретность персональных сведений поддерживается в абсолютном формате.
Итог
Главный сайт и его функционирующие зеркала дарят участникам беспрерывный доступ к качественным развлекательным играм. Выгодные бонусы, различные слоты, профессиональная помощь — все это создает игровой досуг невероятно приятным и увлекательным.
Нынешние онлайн-казино обеспечивают игрокам широкий спектр игр и щедрые награды. Впрочем для беспроблемной работы критично понимать, как получить доступ к РўРёРї РўРѕРї и его действующие зеркала.
Что такое официальный сайт казино
Официальный ресурс казино — это основная система, где участники могут развлекаться гемблинг слотами. Портал оперирует на легитимных правах и располагает всеми требуемыми документами.
Ключевые преимущества лицензионного веб-сайта:
– Конфиденциальность индивидуальных данных
– Честные положения участия
– Стабильные платежи
– Квалифицированная поддержка
Рабочее зеркало казино: для чего требуется
Альтернативный адрес — это абсолютная копия главного сайта, размещенная по альтернативному веб-адресу. Рабочее зеркало формируется для предоставления непрерывного доступа к порталу.
Поводы использования зеркал:
– Недоступность официального домена
– Плановые процедуры
– Большая загрузка на сервер
Как отыскать свежее зеркало сейчас
Узнать текущее официальное зеркало можно различными методами:
1. Рассылка — подпишитесь на почтовую доставку
2. Служба помощи — напишите в онлайн-чат
3. Официальные площадки — мониторьте за публикациями
4. Игровые площадки — авторитетные платформы
Оформление профиля на ресурсе казино
Процесс оформления составляет буквально немного мгновений:
1. Выберите на опцию “Регистрация”
2. Введите необходимые сведения
3. Валидируйте почтовую адрес
4. Активируйте код активации, если доступен
Сразу после завершенной регистрации вам откроется доступен индивидуальный раздел.
Премии и бонусные коды
Богатая бонусная структура — важное достоинство казино:
Бонус за регистрацию
Первичные пользователи зарабатывают стартовый презент, который может предполагать:
– Валютный счет на дебютный депозит
– Free spins для автоматов
– Стартовые деньги
Активационные коды
Периодически выходят актуальные коды, позволяющие забрать особые преимущества.
Система кешбэка
Постоянные участники возвращают долю потраченных денег в виде компенсации.
Актуальные промо и конкурсы
Сайт систематически проводит интересные акции:
– Weekly турниры
– Тематические предложения
– Лотереи крупных подарков
– Механизм лояльности
Логин в персональный кабинет
Для входа на портал следует:
1. Открыть лицензионный адрес или актуальное зеркало
2. Кликнуть “Login”
3. Ввести имя пользователя и пароль
В личном разделе открыты данные функции:
– Зачисление счета
– Снятие выигрышей
– Просмотр истории операций
– Изменение профильными сведениями
Mobile платформа и app
Портативная модификация
Адаптивная вариант портала позволяет участвовать с всех карманного телефона. Оформление динамически настраивается под диагональ монитора.
App для загрузки
Загрузить клиент можно для:
– Android — официальная download с портала
– iOS — скачивание через App Store
Плюсы программы:
– Моментальный старт
– Стабильная функциональность
– Push-сообщения об промо
– Производительный дизайн
Развлекательные разделы
Слоты
Разнообразная подборка игровых слотов от топовых производителей:
– Ретро игры
– Современные-эмуляторы
– Призовые-слоты
Live игры
Раздел с реальными крупье предоставляет:
– Рулетка
– Blackjack
– Baccarat
– Poker
Эфиры осуществляются в превосходном качестве, формируя эффект настоящего казино.
Способы зачисления и обналичивания
Сайт обслуживает различные финансовые инструменты:
– Кредитные средства
– Онлайн счета
– Криптовалюты
– Прямые транзакции
Стартовые значения пополнения и скоростные выводы обеспечивают развлечение предельно беспроблемной.
Команда помощи
Компетентная группа помощи оперирует 24/7 и способна помочь с любыми ситуациями:
– Онлайн-чат
– Email-переписка
– Телефонная служба
Резюме
Лицензионный веб-сайт казино и его рабочие копии дают участникам надежный и азартный гемблинг процесс. Привлекательные награды, удобная мобильная платформа, многочисленные развлечения и качественное live-казино превращают эту систему превосходным вариантом для гемблинг досуга.
silkmeadowmarketplace hub – Browsed quickly, layout is tidy and easy to navigate.
mostbet верификация аккаунта mostbet верификация аккаунта
casino deneme siteleri güvenilir casino siteleri
Wow that was strange. I just wrote an incredibly long comment but after I clicked submit my comment didn’t appear. Grrrr… well I’m not writing all that over again. Anyways, just wanted to say wonderful blog!
https://share.google/hiXGgEhDxyySRfZWI
Вход к ресурсу через рабочие зеркала
Нынешние сетевые казино обеспечивают игрокам круглосуточный вход к услугам. Основной веб-сайт казино 360 действует устойчиво, предлагая богатый ассортимент азартных слотов. Впрочем периодически возникают системные трудности или ограничения, следовательно критично знать о наличии актуальных зеркал.
Что собой представляет собой основное зеркало казино
Зеркало — это точная версия главного сайта с идентичным интерфейсом. Действующее зеркало сегодня позволяет миновать локальные запреты и поддерживать игру.
Основные выгоды использования зеркал:
– Полный доступ к личному кабинету
– Фиксация любых информации профиля
– Идентичный набор игр
– Актуальные привилегии и кампании
Оформление на ресурсе
Процедура оформления занимает считанные минут. Начинающие пользователи получают щедрый бонус за оформление, который в состоянии охватывать:
– Стартовый игровой бонус
– Безвозмездные кручения для слотов
– Эксклюзивные ваучеры
– Усиленный кешбэк
С целью окончания записи нужно:
1. Зайти на центральный портал или копию
2. Кликнуть опцию «Зарегистрироваться»
3. Ввести индивидуальные информацию
4. Подтвердить мейл или мобильный
5. Использовать промокод (при доступности)
Авторизация в персональный кабинет
Вслед за успешной оформления клиенты в состоянии совершать вход посредством основной веб-сайт или рабочее зеркало. Личный кабинет открывает абсолютный регулирование над учётной записью:
– Летопись транзакций
– Внесение депозита
– Снятие денег
– Администрирование привилегиями
– Участие в турнирах
Привилегии и кампании казино
Платформа радует пользователей вариативными наградными системами:
Приветственные бонусы
Новые игроки приобретают щедрый набор наград на стартовые взносы. Зачастую это предполагает пропорциональную прибавку к сумме взноса плюс бесплатные фриспины.
Регулярные кампании
– Каждонедельный кэшбек до 15%
– Соревнования с наградными суммами
– Подарки на дату рождения
– Специальные программы для VIP пользователей
План вознаграждения
Деятельные геймеры зарабатывают очки, что возможно трансформировать на реальные финансы или особые бонусы.
Смартфонная редакция и софт
Актуальные решения дают возможность участвовать в любом месте угодно. Мобильная версия ресурса независимо настраивается под монитор любого девайса.
Плюсы карманного софта:
– Скоростная загрузка слотов
– Эргономичный облик
– Мгновенные-уведомления о акциях
– Опция инсталлировать для Android и iOS
Реальное казино: атмосфера подлинного азартного дома
Категория Live игорного дома доставляет пользователей в антураж подлинного игорного учреждения. Квалифицированные ведущие проводят игру в формате подлинного времени.
Предлагаемые развлечения:
– Рулетка
– Очко
– Карточная игра
– Покерная игра
Игровые машины и азартные машины
Собрание игровых машин включает множество наименований от ведущих разработчиков. Произвольный геймер найдёт игру по нраву:
– Винтажные слоты
– Новые слоты с бонусными этапами
– Накопительный-машины
– Мегавейс машины
Соревнования и розыгрыши
Периодические конкурсы добавляют азарт и дают шанс выиграть внушительные награды. Присутствие в турнирах нередко комплиментарное, а выигрышные пулы достигают значительных сумм.
Охрана и анонимность
Сайт использует инновационные технологии защиты для охраны сведений клиентов. Любые денежные операции выполняются через охраняемые соединения.
Вывод
Главный сайт и его функционирующие зеркала предоставляют надёжный вход к первоклассным игровым развлечениям. Привлекательные бонусы, практичная смартфонная вариант, разнообразие слотов и компетентное Live-игорный дом превращают сайт прекрасным решением для фанатов развлекательных развлечений.
useful link – Design is simple, reading through content feels smooth.
คอนเทนต์นี้ อ่านแล้วได้ความรู้เพิ่ม ครับ
ผม ไปอ่านเพิ่มเติมเกี่ยวกับ เรื่องที่เกี่ยวข้อง
ซึ่งอยู่ที่ mario389
เผื่อใครสนใจ
เพราะให้ข้อมูลเชิงลึก
ขอบคุณที่แชร์ เนื้อหาดีๆ นี้
จะรอติดตามเนื้อหาใหม่ๆ ต่อไป
Характеристика официального сайта
Передовые интернет казино дают пользователям широкий выбор забав и шансов. Основной ресурс казино Volta предлагает надежный доступ к гемблинг услугам.
Актуальное зеркало: доступ прямо сейчас
Альтернативный адрес является собой точную реплику основного портала. Проверенное зеркало позволяет клиентам избегать вероятные барьеры.
Выгоды применения зеркала
Основные достоинства включают:
– Беспрерывный путь к платформе
– Удержание любых характеристик официального сайта
– Сохранность личных материалов
– Идентичный инструментарий
Создание аккаунта на портале
Ход открытия счета характеризуется простотой и удобством. Свежие пользователи должны:
1. Зайти на официальный веб-сайт или его зеркало
2. Щелкнуть на пункт оформления
3. Заполнить нужные поля
4. Верифицировать электронную адрес
5. Осуществить начальный авторизацию
Подарок за создание аккаунта
Дебютанты приобретают щедрый начальный бонус. Такое премия способно включать:
– Материальные начисления
– Даровые фриспины
– Расширенный показатель кэшбека
Авторизация в индивидуальный профиль
Зарегистрированные игроки могут оперативно войти в собственный раздел, используя учетные данные и шифр. Личный аккаунт предлагает шанс к:
– Управлению балансом
– Записям операций
– Работающим поощрениям
– Конфигурации профиля
Бонусы и предложения
Платформа постоянно устраивает разнообразные мероприятия для игроков.
Виды бонусов
Главные типы вознаграждений:
– Пополнительные призы – процент от суммы внесения
– Бесплатные вращения – бесплатные вращения в автоматах
– Возврат средств – возмещение части проигранных сумм
– Призовые вознаграждения – награды за состязание в состязаниях
Купоны
Уникальные ваучеры помогают заработать добавочные преимущества. Участники способны найти их на партнерских площадках или получить в письмах.
Мобильная адаптация и программа
Актуальные игроки ценят переносной гейминг.
Функции мобильной версии
– Отзывчивый облик для разнообразных девайсов
– Абсолютный доступ к играм
– Оперативная работа
– Комфортное навигация
Download софт
Mobile программа открыто для downloading на устройства с базовыми платформами Android и iOS. App гарантирует:
– Стабильную функциональность
– Всплывающие алерты о предложениях
– Моментальный доступ к любимым играм
Развлекательный выбор
Игровой клуб предоставляет обширную подборку развлекательных развлечений.
Автоматы
Каталог игровых слотов включает:
– Классические автоматы
– Video слоты
– Джекпотные машины
– Branded слоты
Live казино
Область настоящих дилеров обеспечивает шанс играть с реальными диллерами. Доступны:
– Американская рулетка
– Блек-джек
– Baccarat
– Карибский покер
Состязания
Систематические чемпионаты обеспечивают участникам соревноваться за внушительные денежные банки. Соревновательная структура обновляется постоянно.
Банковские транзакции
Казино поддерживает массу методов зачисления и снятия сумм:
– Банковские карточки
– Электронные кошельки
– Межбанковские трансферы
– Bitcoin
Абсолютно все операции выполняются безопасно с задействованием современных технологий кодирования.
Служба support
Компетентная отдел саппорта действует 24/7. Соединиться с консультантами можно через:
– Живой чат
– Email почту
– Горячую линию
– Социальные медиа
Охрана и регулирование
Платформа действует на базе законной аккредитации. Это подтверждает:
– Прозрачность игрового действа
– Охрану индивидуальных сведений
– Оперативные перечисления
– Регулируемый гемблинг
Вывод
Официальный веб-сайт и его актуальные дубликаты предоставляют клиентам целостный спектр опций для комфортной и прибыльной развлечений. Щедрые вознаграждения, разнообразные развлечения, профессиональная служба и безопасная система операций формируют платформу превосходным решением для ценителей развлекательных услуг.
Golden Hub – Stumbled on this site, layout is clear and reading feels natural.
Thanks for some other wonderful post. Where else could anyone get that kind of information in such a perfect manner of writing? I’ve a presentation subsequent week, and I’m at the look for such info.
https://share.google/BA4GmdPs7cvdGJVpR
browse coast store – Quick stop here, design seems straightforward and readable.
Нынешние онлайн-казино предоставляют игрокам большой набор развлечений и бонусных вариантов. Доступ к ресурсу осуществляется через лицензионный сайт или его актуальное зеркало casino Million, что обеспечивает постоянную деятельность.
Что такое актуальное зеркало казино
Зеркало — это идентичная копия основного сайта, созданная для решения запретов. Зеркало сегодня обеспечивает игрокам сохранить подключение к любимым играм в любое удобное время.
Лицензионное зеркало содержит всеми опциями оригинального портала:
– Совокупный ассортимент слотов
– Аккаунт с зафиксированными данными
– Свежие поощрения
– Защищенные платежные процедуры
Создание аккаунта на официальном веб-сайте
Ход создания аккаунта отнимает всего немного минут. Первым игрокам нужно:
1. Попасть на официальный веб-сайт или актуальное зеркало
2. Нажать на кнопку “Открыть счет”
3. Внести необходимые данные
4. Активировать адрес
5. Совершить первый платеж
Поощрение новичкам начисляется моментально после завершения всех стадий.
Авторизация в учетную запись
Зарегистрированные пользователи могут осуществить подключение вводя:
– Учетное имя и код
– Номер мобильного
– Контактный email
Профиль предоставляет шанс к администрированию финансами, истории операций и активным поощрениям.
Награды и акции
Гемблинг сервис радует лояльных игроков многочисленными вознаграждениями:
Стартовый пакет
– Поощрение на начальный взнос до 100%
– Бесплатные вращения на популярные машины
– Дополнительные бонусы за следующие взносы
Ваучеры
Эксклюзивные коды предоставляют доступ на приобретение уникальных бонусов. Свежие купоны размещаются в категории “Промо”.
Возврат средств
Постоянный бонус насчитывает до 10% от утраченных сумм. Выплата предоставляется сразу.
Программа лояльности
Регулярные клиенты приобретают очки, которые обмениваются на действительные финансы или даровые спины.
Адаптивный портал и приложение
В целях удобства клиентов создана полноценная адаптивный сайт. Адаптивный интерфейс помогает легко делать ставки с произвольного карманного девайса.
Плюсы приложения:
– Быстрый запуск к слотам
– Адаптированный интерфейс
– Надежная активность
– Push-уведомления о новых акциях
Скачать APP можно даром с главного сайта для аппаратов на Android и iOS.
Библиотека слотов
Слоты
Библиотека содержит более 2000 машин от популярных провайдеров:
– Стандартные машины
– Video slots
– Jackpot игры
– Сюжетные автоматы
Live казино
Блок Live столов обеспечивает развлечение с реальными крупье в онлайн времени:
– Roulette
– Blackjack
– Карты
– Покер
Соревнования
Регулярные турниры с большими выигрышными суммами проводятся каждую неделю. Участие в состязаниях доступно всем зарегистрированным участникам.
Денежные варианты
Взносы и снятия финансов производятся через распространенные сервисы:
– Кредитные средства
– Виртуальные сервисы
– Цифровая валюта
– Счетные транзакции
Наименьший взнос — от 100 рублей. Вывод средств выполняется в течение 24 времени.
Отдел помощи
Постоянная отдел саппорта готова помочь в разрешении каких-либо проблем:
– Онлайн-чат
– Email
– Связь
– Социальные сети
Надежность и сертификат
Главный ресурс оперирует на почве международной документа. Все информация пользователей защищены современным SSL-шифрованием.
Итог
Функционирующее зеркало гарантирует стабильный подключение к выбранным развлечениям, выгодным бонусам и функциональным возможностям. Зарегистрируйтесь прямо сейчас и заработайте стартовый бонус!
Доступ к сайту через действующие зеркала
Нынешние сетевые казино предоставляют клиентам круглосуточный вход к услугам. Официальный сайт https://tzcreativeexpeditions.com/sposoby-povysheniya-proizvoditelnosti-sayta-kazino/ функционирует бесперебойно, гарантируя широкий ассортимент гемблинг автоматов. Тем не менее иногда формируются технические сложности или барьеры, в связи с чем критично знать о доступности актуальных зеркал.
Что собой представляет из себя официальное зеркало казино
Копия — это точная версия главного ресурса с идентичным набором функций. Действующее зеркало сегодня даёт возможность избегать локальные ограничения и продолжать гемблинг.
Ключевые плюсы задействования зеркал:
– Стопроцентный вход к индивидуальному кабинету
– Фиксация всех информации счёта
– Аналогичный ассортимент игр
– Действующие привилегии и акции
Создание аккаунта на портале
Механизм регистрации длится несколько минут. Новые игроки обретают богатый бонус за запись, который имеет возможность охватывать:
– Приветственный финансовый подарок
– Даровые вращения для автоматов
– Уникальные ваучеры
– Увеличенный возврат
Ради окончания регистрации следует:
1. Перейти на главный портал или дубликат
2. Щёлкнуть опцию «Зарегистрироваться»
3. Ввести контактные данные
4. Подтвердить электронную почту или контакт
5. Применить купон (при доступности)
Авторизация в личный кабинет
По завершении успешной записи клиенты имеют возможность производить подключение через центральный сайт или рабочее зеркало. Собственный кабинет предоставляет абсолютный надзор над счётом:
– Летопись транзакций
– Зачисление счёта
– Снятие выигрышей
– Контроль наградами
– Включение в турнирах
Бонусы и акции казино
Портал радует клиентов многочисленными поощрительными программами:
Стартовые бонусы
Новички приобретают великодушный набор поощрений на стартовые депозиты. Как правило это охватывает пропорциональную прибавку к сумме взноса плюс безвозмездные вращения.
Постоянные предложения
– Каждонедельный кешбэк до 15%
– Конкурсы с призовыми пулами
– Поощрения на число рождения
– Специальные предложения для привилегированных пользователей
Программа вознаграждения
Постоянные игроки зарабатывают единицы, что можно обменять на действительные средства или особые льготы.
Мобильная форма и утилита
Передовые разработки позволяют участвовать где угодно. Портативная форма портала автономно настраивается под экран любого девайса.
Выгоды карманного программы:
– Быстрая открытие слотов
– Комфортный вид
– Всплывающие-оповещения о предложениях
– Возможность скачать для Android и iOS
Реальное казино: антураж настоящего игорного дома
Категория Live казино погружает игроков в антураж реального гемблинг клуба. Компетентные ведущие проводят игру в виде реального времени.
Представленные развлечения:
– Колесо фортуны
– Двадцать одно
– Баккара
– Покер
Слоты и развлекательные слоты
Каталог игровых аппаратов охватывает сотни позиций от передовых провайдеров. Любой клиент подберёт слот по желанию:
– Традиционные машины
– Современные автоматы с специальными раундами
– Накопительный-машины
– Многолинейные автоматы
Турниры и раздачи
Постоянные состязания вносят драйв и открывают способность получить крупные вознаграждения. Вовлечение в конкурсах нередко комплиментарное, а премиальные пулы достигают больших сумм.
Секьюрити и анонимность
Сайт применяет инновационные протоколы шифрования для обеспечения данных игроков. Все транзакционные действия выполняются через защищённые линии.
Вывод
Основной веб-сайт и его функционирующие зеркала дают стабильный подключение к отличным развлекательным сервисам. Щедрые призы, комфортная карманная форма, богатство машин и высококлассное Live-клуб превращают ресурс отличным вариантом для фанатов игровых игр.
There’s a neutral breakdown of Betwinner on this page: http://bet-promo-codes.com/sportsbook-reviews/betwinner-registration/
Подключение к порталу и рабочие URL
Актуальные виртуальные казино предлагают клиентам широкий спектр возможностей. Главный веб-сайт https://www.ludoformation.fr/2026/03/05/eto-sayt-posvyashchennyy-onlayn-pokeru-na-kotorom-registratsiya-prokhodit-bystro-i-obespechivaet-dostup-k-igrovomu-protsessu предоставляет надежный вход ко всем функциям. Впрочем порой возникают случаи, когда необходимо запасной путь доступа.
Что являет собой собой функционирующее зеркало
Действующее зеркало — это абсолютная дубликат официального портала с запасным URL именем. Альтернатива сегодня обеспечивает преодолевать возможные барьеры и гарантировать постоянный доступ к выбранным играм.
Главное зеркало имеет теми же опциями, что и базовый сайт:
– Целый перечень игр
– Собственный профиль с записанными данными
– Актуальные награды и промо
– Защищенные платежные операции
Регистрация и доступ в казино
Процесс регистрации на портале требует считанные минут. Свежим клиентам требуется:
1. Перейти на действующее зеркало сейчас
2. Щелкнуть опцию «Зарегистрироваться»
3. Указать необходимые сведения
4. Проверить e-mail почту или информацию мобильного
5. Активировать поощрение за открытие аккаунта
Доступ в индивидуальный профиль осуществляется путем ввод никнейма и ключа.
Описание поощрительной политики
Богатая призовая программа — основное преимущество ресурса. Клиенты получают многочисленные поощрения:
Приветственные бонусы
Свежие участники могут ожидать на значительный подарок за создание аккаунта. Чаще всего это комплект возможностей, охватывающий:
– Пропорциональную прибавку к первому вкладу
– Безвозмездные спины
– Дополнительные финансы на баланс
Купоны и специальные акции
Постоянные купоны дают возможность активировать призовые выгоды. Использовать их возможно в особом окне собственного раздела.
Спины и возврат средств
Фриспины — это способность вращать слоты без задействования своих финансов. Рибейт означает долевой возврат проигранных сумм.
Коллекция развлечений
Гемблинг сайт представляет впечатляющую библиотеку игр.
Видеослоты
Ассортимент игровых машин удивляет представление. Есть классические простые автоматы и продвинутые развлечения с занимательной картинкой.
Live зал
Категория Live развлечений помещает участников в обстановку истинного гемблинг дома. Профессиональные ведущие организуют партии в живом эфире.
Турниры и таблицы лидеров
Систематические конкурсы добавляют азарта и дают шанс забрать большие выигрыши.
Карманная версия и приложение
Продвинутые технологии позволяют развлекаться в любом локации. Mobile версия автоматически подстраивается под экран гаджета.
Скачать софт возможно для мобильных систем iOS и Android. Клиент дает:
– Скоростной доступ
– Надежную производительность
– Мгновенные-алерты об бонусах
– Простой вид
Банковские транзакции
Казино работает с всевозможные способы пополнения и изъятия средств:
– Пластиковые инструменты
– Виртуальные кошельки
– Крипто
– Прямые транзакции
Все переводы проходят через защищенное канал, что обеспечивает целостность личных сведений.
Служба ассистанса
Опытная бригада помощи функционирует всегда. Контактировать с операторами разрешено через:
– Живой-чат
– Почтовую почту
– Связь
– Медиа ресурсы
Резюме
Легальный веб-сайт и его функционирующее зеркало дают участникам стабильный и легкий вход к интересным играм. Привлекательные подарки, разнообразный каталог автоматов и высокая помощь обеспечивают участие крайне удобной и прибыльной.
Переход к порталу и актуальные URL
Современные виртуальные казино предлагают участникам огромный выбор опций. Главный сайт казино Tippy организует стабильный переход ко всем функциям. Тем не менее периодически возникают моменты, когда требуется резервный путь входа.
Что есть собой функционирующее зеркало
Действующее зеркало — это точная версия официального ресурса с другим сетевым именем. Копия сегодня обеспечивает избегать возможные блокировки и поддерживать стабильный переход к любимым слотам.
Официальное зеркало содержит теми же функциями, что и главный сайт:
– Весь ассортимент развлечений
– Индивидуальный аккаунт с записанными сведениями
– Все награды и промо
– Безопасные денежные переводы
Создание аккаунта и доступ в сервис
Ход открытия аккаунта на платформе отнимает считанные моментов. Недавним клиентам необходимо:
1. Попасть на актуальное зеркало сейчас
2. Выбрать кнопку «Создать аккаунт»
3. Указать требуемые параметры
4. Проверить цифровую почту или информацию связи
5. Забрать поощрение за регистрацию
Доступ в собственный аккаунт производится посредством предоставление логина и кода доступа.
Описание наградной структуры
Богатая призовая политика — главное достоинство игорного заведения. Игроки зарабатывают различные бонусы:
Приветственные поощрения
Новые пользователи способны надеяться на выгодный приз за создание аккаунта. Чаще всего это набор вариантов, объединяющий:
– Пропорциональную прибавку к первому пополнению
– Безвозмездные вращения
– Призовые суммы на баланс
Кодовые комбинации и специальные акции
Периодические коды обеспечивают активировать дополнительные привилегии. Активировать их возможно в отдельном окне персонального профиля.
Free spins и кэшбек
Фриспины — это способность играть игры без применения собственных денег. Рибейт подразумевает определенный отдачу проигранных финансов.
Коллекция развлечений
Азартная сайт представляет огромную подборку развлечений.
Слоты
Ассортимент автоматов восхищает фантазию. Доступны классические простые машины и продвинутые игры с захватывающей графикой.
Live игры
Категория Live казино помещает клиентов в антураж настоящего азартного заведения. Опытные операторы организуют сессии в реальном режиме.
Состязания и таблицы лидеров
Систематические соревнования обеспечивают остроты и дают перспективу выиграть большие выигрыши.
Карманная вариант и софт
Новые технологии дают возможность играть в любом точке. Адаптивная версия самостоятельно оптимизируется под экран девайса.
Установить софт допустимо для программных сред iOS и Android. Приложение гарантирует:
– Мгновенный доступ
– Бесперебойную деятельность
– Всплывающие-алерты об предложениях
– Простой вид
Денежные процедуры
Ресурс поддерживает разнообразные методы депозита и вывода сумм:
– Платежные карты
– Цифровые системы
– Цифровые валюты
– Финансовые переводы
Каждые переводы реализуются через зашифрованное протокол, что обеспечивает неприкосновенность личных данных.
Департамент поддержки
Квалифицированная служба поддержки трудится постоянно. Контактировать с консультантами допустимо через:
– Живой-чат
– Почтовую почту
– Контакт
– Коммуникационные ресурсы
Итоги
Легальный ресурс и его функционирующее зеркало обеспечивают клиентам стабильный и приятный вход к интересным занятиям. Выгодные награды, широкий каталог автоматов и отличная ассистанс создают времяпрепровождение максимально удобной и доходной.
https://vdcasino1st.blog/# vdcasino giriş
https://cassiteleri.top/# deneme bonusu veren casino siteleri
суши недорого суши недорого .
Нынешние онлайн казино обеспечивают геймерам широкий выбор функций для приятной игры. Но иногда подключение к основному сайту может являться заблокированным. В таких моментах на поддержку приходит казино РРЅРѕРјРѕ казино, которое гарантирует бесперебойный подключение ко всем сервисам платформы.
Что такое актуальное зеркало казино
Копия — это абсолютная реплика главного сайта, которая хостится по дополнительному адресу. Копия имеет весь набор функций оригинального портала, включая индивидуальный кабинет, средства и сведения переводов.
Основные плюсы применения зеркала:
– 24-часовой доступ к ресурсу
– Стопроцентная тождественность опций
– Конфиденциальность персональных сведений
– Удержание всех имеющихся вознаграждений
Как разыскать функционирующее зеркало на текущий день
Присутствует некоторое количество достоверных вариантов получения свежей адреса:
Авторизованные ресурсы:
1. Почтовая рассылка — дирекция систематически отправляет информацию с актуальными адресами
2. Общественные сети — легитимные аккаунты размещают текущую информацию
3. Департамент поддержки — специалисты выдают достоверные адреса
4. Смартфонное приложение — позволяет преодолевать блокировки
Открытие счета на официальном сайте
Процедура регистрации требует не более немного минут и предполагает из данных ступеней:
1. Открытие на основной веб-сайт или рабочее зеркало
2. Клик на иконку «Регистрация»
3. Внесение пользовательской анкеты
4. Валидация email почты или мобильного номера
5. Активация вознаграждения за регистрацию при доступности промокода
Свежие клиенты зарабатывают щедрый начальный бонус, который может содержать даровые прокруты, валютные бонусы или компенсацию.
Доступ в личный кабинет
Логин на ресурсе реализуется стандартным способом. Достаточно вписать имя пользователя и секретный ключ, примененные при оформлении.
Важные детали для надежного входа:
– Задействуйте защищенный пароль
– Активируйте двухэтапную идентификацию
– Не сохраняйте коды на посторонних девайсах
– Мониторьте URL строку браузера
Характеристика поощрительной схемы
Гемблинг-сайт награждает клиентов различными бонусами и промо:
Вступительный набор
Новички могут надеяться на великодушное награду за дебютный вклад. Традиционно это долевая добавка к депонированной объему плюс бесплатные вращения для востребованных слотов.
Регулярные акции
– 7-дневный кэшбек — возмещение доли списанных денежных средств
– Награды на очередные взносы
– Специальные промо по событиям
– Состязания с большими наградными пулами
Система вознаграждений
Постоянные пользователи собирают единицы за каждую игру, которые затем меняются на настоящие деньги, даровые прокруты или специальные привилегии.
Промокоды: как задействовать
Кодовые комбинации — это специальные наборы символов, дающие привилегию к специальным поощрениям.
Откуда взять рабочие промокоды:
– Проверенные коммуникационные сети казино
– Партнерские порталы
– Email-информирование
– Тематические платформы
Вводится промокод в соответствующее поле при оформлении или зачислении средств счета.
Смартфонная версия и приложение
Нынешние клиенты любят делать ставки с портативных гаджетов. Платформа дает двойной способа для беспроблемной портативной игры.
Responsive редакция
Веб версия автоматически подстраивается под диагональ экранной панели. Не предполагает загрузки и оперирует в каждом актуальном браузере.
Портативное приложение
Получить app можно для девайсов на Android и iOS. Выгоды app:
– Быстрая открытие
– Надежная функционирование
– Всплывающие-уведомления о поощрениях
– Автоматический избегание блокировок
Операция скачивания несложен: требуется зайти на сайт с портативного девайса и подчиняться предписаниям.
Развлекательный коллекция
Каталог аппаратов содержит множество наименований от ведущих поставщиков.
Слоты
Развлекательные слоты — наиболее распространенная раздел развлечений. Размещены классические винтажные машины, актуальные мультимедийные слоты с поощрительными этапами, а также джекпотные выигрыши.
Live казино
Отдел с живыми ведущими дает возможность испытать атмосферу реального казино. Имеются развлечения с блэкджеком.
Стриминг производится в превосходном разрешении, имеется чат с раздающим и остальными игроками.
Конкурсы
Регулярно проводятся конкурсы по различным категориям. Присоединение позволяет заработать денежные призы, бесплатные вращения или особые презенты.
Денежные процедуры
Портал обеспечивает обширный выбор денежных методов:
– Дебетовые карты
– Онлайн кошельки
– Биткоин
– Банковские транзакты
Низшая объем вклада — доступная для основной части геймеров. Снятие выигрышей производится в минимальные сроки.
Департамент поддержки
Опытные специалисты способны содействовать 24/7. Доступны нижеследующие варианты контакта:
– Веб-чат
– Email
– Телефонная линия
– Медийные сети
Разъяснения на частые вопросы можно найти в блоке FAQ.
Заключение
Лицензионный портал казино и его действующие зеркала обеспечивают клиентам совершенный доступ ко всем функциям платформы. Солидные бонусы, комфортная портативная версия, огромный ассортимент слотов и опытная служба поддержки формируют азартный процесс максимально комфортным и безопасным.
lisanslı casino siteleri: casino siteleri
Актуальные виртуальные казино дают геймерам обширный диапазон опций для беспроблемной игры. Впрочем иногда доступ к базовому сайту может быть недоступным. В таких обстоятельствах на выручку спешит РЎСѓРєР° казино, которое предоставляет непрерывный доступ ко всем функциям платформы.
Что такое действующее зеркало казино
Альтернативный сайт — это полная дубликат официального портала, которая располагается по дополнительному URL. Зеркало сохраняет полный возможности оригинального сайта, включая персональный кабинет, средства и сведения операций.
Главные преимущества применения зеркала:
– 24-часовой доступ к сайту
– Абсолютная тождественность инструментов
– Безопасность пользовательских данных
– Хранение всех бонусов
Как разыскать актуальное зеркало на сегодня
Присутствует некоторое количество проверенных способов получения действующей ссылки:
Проверенные каналы:
1. Email рассылка — дирекция регулярно высылает сообщения с свежими ссылками
2. Коммуникационные сети — официальные каналы размещают релевантную данные
3. Служба поддержки — операторы дают достоверные ссылки
4. Телефонное приложение — дает возможность минуть блокировки
Регистрация на лицензионном сайте
Процедура открытия счета отнимает только пару минут и предполагает из следующих шагов:
1. Открытие на официальный веб-сайт или действующее зеркало
2. Клик на элемент «Открыть счет»
3. Заполнение персональной анкеты
4. Верификация email почты или контактного номера
5. Активация бонуса за регистрацию при существовании промокода
Свежие клиенты получают значительный приветственный бонус, который может содержать фриспины, денежные призы или возврат средств.
Доступ в пользовательский кабинет
Вход на сайте производится обычным путем. Требуется ввести учетные данные и секретный ключ, задействованные при регистрации.
Значимые моменты для конфиденциального входа:
– Эксплуатируйте защищенный секретный ключ
– Запустите двойную верификацию
– Не храните реквизиты на общественных девайсах
– Мониторьте интернет строку браузера
Характеристика поощрительной системы
Казино балует пользователей разнообразными вознаграждениями и специальными предложениями:
Стартовый набор
Новички могут претендовать на существенное вознаграждение за стартовый депозит. Зачастую это процентная надбавка к зачисленной величине плюс фриспины для востребованных слотов.
Периодические кампании
– Семидневный cashback — возмещение части списанных средств
– Призы на последующие взносы
– Особые промо по торжествам
– Конкурсы с солидными наградными пулами
План верности
Активные игроки накапливают баллы за произвольную бет, которые затем превращаются на фактические финансы, free spins или особые бонусы.
Купоны: как использовать
Купоны — это уникальные последовательности литер, гарантирующие доступ к бонусным бонусам.
Где взять свежие промокоды:
– Авторизованные коммуникационные сети казино
– Аффилиатные площадки
– Email-информирование
– Тематические форумы
Активируется промокод в предназначенное поле при регистрации или добавлении денег кошелька.
Портативная версия и приложение
Нынешние пользователи предпочитают проводить время с телефонных девайсов. Платформа обеспечивает двойной метода для приятной мобильной игры.
Адаптивная версия
Веб версия автоматически настраивается под параметры дисплея. Не просит установки и работает в любом современном браузере.
Портативное приложение
Скачать софт можно для устройств на Android и iOS. Достоинства app:
– Скоростная активация
– Надежная функционирование
– Push-уведомления о промо
– Независимый обход блокировок
Этап инсталляции прост: требуется зайти на портал с телефонного девайса и подчиняться предписаниям.
Азартный коллекция
База игр содержит множество позиций от ведущих провайдеров.
Слоты
Развлекательные машины — крайне распространенная раздел забав. Размещены классические винтажные машины, современные мультимедийные слоты с поощрительными уровнями, а также накопительные выигрыши.
Live казино
Секция с настоящими ведущими дает возможность испытать атмосферу подлинного казино. Доступны развлечения с блэкджеком.
Стриминг реализуется в HD разрешении, присутствует общение с ведущим и иными игроками.
Состязания
Систематически устраиваются турниры по всевозможным играм. Присоединение позволяет завоевать финансовые выигрыши, бесплатные вращения или уникальные поощрения.
Денежные процедуры
Портал поддерживает значительный ассортимент платежных инструментов:
– Дебетовые карты
– Виртуальные платформы
– Биткоин
– Денежные транзакты
Минимальная сумма депозита — приемлемая для преобладающего числа клиентов. Вывод средств осуществляется в минимальные периоды.
Сервис поддержки
Профессиональные специалисты расположены содействовать 24/7. Представлены данные варианты коммуникации:
– Живой-чат
– Email
– Мобильная линия
– Коммуникационные сети
Решения на распространенные запросы можно получить в зоне FAQ.
Вывод
Основной портал казино и его рабочие зеркала дают игрокам максимальный доступ ко всем возможностям сайта. Солидные поощрения, приятная телефонная версия, впечатляющий выбор игр и профессиональная служба поддержки создают игровой процесс предельно комфортным и конфиденциальным.
нажмите, чтобы подробнее antminer l9
оптимизация сайта блог seo-blog20.ru .
Dressing stylish creates a positive first impression.
A outfit communicates loudly before you even say a word.
This boosts your own self-esteem and mindset noticeably.
Your polished look signals competence in the workplace.
сумки Jimmy Choo
Fashionable choices allow you to showcase your individual identity.
Others often judge well-dressed individuals as more capable and trustworthy.
Ultimately, putting effort in your style is an investment in your personal brand.
Органы малого таза Здесь вы найдете высококвалифицированных специалистов, которые проведут точную диагностику и назначат эффективное лечение, в том числе коррекцию деформации головы с помощью ортопедического шлема. Наши консультации включают приемы у травматолога-ортопеда, невролога и нейрохирурга, готовых помочь в решении самых сложных проблем
Передовые онлайн казино предлагают пользователям широкий диапазон вариантов для комфортной игры. Однако иногда вход к базовому порталу может стать ограниченным. В таких случаях на помощь появляется https://www.shetyebuilders.com/2026/03/01/aktualnaya-instruktsiya-po-priobreteniyu-podpiski-v-rossii/, которое гарантирует стабильный вход ко всем функциям платформы.
Что такое рабочее зеркало казино
Зеркало — это абсолютная копия главного сайта, которая располагается по альтернативному интернет-адресу. Копия содержит весь набор функций главного ресурса, включая личный кабинет, депозит и сведения переводов.
Главные выгоды использования зеркала:
– Постоянный вход к платформе
– Максимальная идентичность возможностей
– Конфиденциальность персональных данных
– Хранение всех вознаграждений
Как разыскать рабочее зеркало на сегодня
Есть ряд проверенных способов нахождения актуальной URL:
Проверенные сервисы:
1. Электронная рассылка — дирекция систематически пересылает информацию с действующими URL
2. Медийные сети — авторизованные аккаунты постят релевантную сведения
3. Департамент поддержки — специалисты выдают проверенные URL
4. Телефонное приложение — предоставляет обходить блокировки
Открытие счета на основном портале
Этап открытия счета отнимает не более пару минут и включает из следующих ступеней:
1. Попадание на лицензионный сайт или актуальное зеркало
2. Выбор на клавишу «Открыть счет»
3. Указание пользовательской анкеты
4. Верификация почтовой почты или контактного номера
5. Применение вознаграждения за регистрацию при доступности промокода
Только что зарегистрированные геймеры обретают значительный вступительный бонус, который может предполагать фриспины, финансовые призы или компенсацию.
Логин в персональный кабинет
Авторизация на портале реализуется обычным образом. Необходимо указать логин и код доступа, использованные при оформлении.
Ключевые детали для безопасного входа:
– Эксплуатируйте надежный секретный ключ
– Задействуйте двухфакторную идентификацию
– Не сохраняйте пароли на чужих устройствах
– Проверяйте интернет строку браузера
Описание наградной схемы
Гемблинг-сайт радует клиентов различными вознаграждениями и промо:
Стартовый набор
Дебютанты имеют возможность надеяться на великодушное поощрение за первый депозит. Обычно это процентная прибавка к зачисленной сумме плюс фриспины для популярных слотов.
Постоянные кампании
– Недельный компенсация — возврат процента потерянных средств
– Призы на повторные взносы
– Специальные промо по торжествам
– Состязания с солидными призовыми фондами
Система вознаграждений
Деятельные геймеры зарабатывают очки за всякую бет, которые затем превращаются на реальные средства, фриспины или уникальные привилегии.
Купоны: как активировать
Кодовые комбинации — это особые сочетания литер, обеспечивающие возможность к бонусным бонусам.
Откуда взять актуальные промокоды:
– Легитимные социальные сети казино
– Союзнические порталы
– Email-новостная лента
– Тематические форумы
Вводится промокод в предназначенное поле при оформлении или внесении депозита депозита.
Мобильная версия и приложение
Передовые пользователи любят развлекаться с мобильных девайсов. Портал обеспечивает двойной способа для беспроблемной смартфонной игры.
Адаптивная модификация
Браузерная версия сама подстраивается под параметры экранной панели. Не требует скачивания и оперирует в любом свежем браузере.
Телефонное приложение
Получить app можно для гаджетов на Android и iOS. Преимущества app:
– Оперативная открытие
– Стабильная функционирование
– Push-уведомления о поощрениях
– Автономный минование блокировок
Операция инсталляции прост: нужно открыть на веб-сайт с мобильного девайса и следовать предписаниям.
Азартный ассортимент
Коллекция слотов включает множество позиций от топовых производителей.
Слоты
Азартные аппараты — самая востребованная раздел развлечений. Доступны традиционные трехбарабанные аппараты, современные видео-автоматы с поощрительными стадиями, а также джекпотные джекпоты.
Live казино
Отдел с реальными крупье дает возможность ощутить настроение настоящего казино. Доступны варианты с блэкджеком.
Передача производится в отличном качестве, присутствует общение с дилером и остальными игроками.
Состязания
Регулярно устраиваются конкурсы по многочисленным категориям. Вступление позволяет выиграть денежные выигрыши, даровые прокруты или особые презенты.
Финансовые манипуляции
Платформа поддерживает значительный ассортимент финансовых систем:
– Кредитные карты
– Электронные системы
– Биткоин
– Счетовые переводы
Стартовая величина пополнения — приемлемая для массы геймеров. Обналичивание денег производится в короткие сроки.
Сервис поддержки
Профессиональные специалисты готовы содействовать круглосуточно. Открыты нижеследующие каналы коммуникации:
– Живой-чат
– Email
– Мобильная горячая линия
– Социальные сети
Пояснения на стандартные темы можно найти в секции FAQ.
Итог
Официальный ресурс казино и его актуальные зеркала дают пользователям абсолютный доступ ко всем опциям ресурса. Солидные бонусы, приятная телефонная версия, гигантский ассортимент слотов и компетентная служба поддержки превращают игровой досуг предельно приятным и конфиденциальным.
Wind Brook Shop Hub – Layout feels organized and the website is easy to read.
Анализ основного веб-сайта
Прогрессивные интернет казино предоставляют пользователям широкий набор услуг и перспектив. Официальный портал https://radiomix90tsfm.com/kak-podtverdit-svoyu-lichnost-v-kazino-ukrainy/ обеспечивает безопасный доступ к игровым функциям.
Рабочее зеркало: возможность в настоящий момент
Дублирующий портал является собой точную реплику лицензионного ресурса. Действующее зеркало дает возможность участникам избегать возможные запреты.
Преимущества использования зеркала
Главные достоинства включают:
– Стабильный путь к сайту
– Сохранение всех опций основного веб-сайта
– Сохранность личных информации
– Идентичный набор функций
Создание аккаунта на сайте
Процедура регистрации выделяется простотой и эргономичностью. Недавние участники должны:
1. Открыть официальный ресурс или его зеркало
2. Нажать на элемент регистрации
3. Внести обязательные данные
4. Верифицировать электронную адрес
5. Совершить дебютный вход
Приз за оформление
Начинающие получают щедрый вступительный подарок. Такое награда в состоянии включать:
– Денежные бонусы
– Даровые спины
– Повышенный коэффициент возврата
Авторизация в личный кабинет
Зарегистрированные пользователи способны быстро авторизоваться в собственный кабинет, применяя никнейм и пароль. Личный кабинет дает доступ к:
– Контролю счетом
– Хронологии транзакций
– Активным призам
– Опциям профиля
Подарки и кампании
Портал постоянно проводит всевозможные промо-кампании для пользователей.
Типы бонусов
Главные виды вознаграждений:
– Финансовые подарки – коэффициент от объема взноса
– Прокруты – бесплатные прокруты в игровых машинах
– Возврат средств – возврат фрагмента потерянных сумм
– Турнирные вознаграждения – призы за участие в соревнованиях
Ваучеры
Специальные ваучеры позволяют заработать бонусные бонусы. Игроки могут найти их на аффилиатных сайтах или заработать в рассылке.
Переносная вариант и приложение
Передовые игроки любят переносной геймплей.
Возможности переносной платформы
– Адаптивный облик для различных гаджетов
– Абсолютный возможность к автоматам
– Моментальная работа
– Удобное управление
Скачать приложение
Мобильное app доступно для скачивания на гаджеты с рабочими ОС Android и iOS. Программа гарантирует:
– Стабильную деятельность
– Мгновенные оповещения о бонусах
– Мгновенный запуск к любимым развлечениям
Развлекательный портфель
Портал обеспечивает огромную галерею гемблинг забав.
Слоты
Коллекция игровых машин включает:
– Традиционные игры
– Современные аппараты
– Призовые машины
– Branded автоматы
Live игры
Область живых игр предлагает опцию состязаться с реальными крупье. Открыты:
– Рулетка
– Блек-джек
– Punto Banco
– Карибский покер
Турниры
Периодические турниры позволяют игрокам конкурировать за солидные наградные пулы. Соревновательная сетка актуализируется каждую неделю.
Платежные транзакции
Платформа предлагает разнообразие опций пополнения и вывода сумм:
– Пластиковые карты
– Электронные счета
– Wire переводы
– Крипто
Абсолютно все переводы проходят надежно с задействованием современных протоколов кодирования.
Департамент сопровождения
Профессиональная отдел саппорта трудится постоянно. Коннектиться с менеджерами реально через:
– Живой чат
– Почтовую почту
– Телефон
– Соц медиа
Охрана и аккредитация
Игровой клуб действует на основании действительной разрешения. Подобное гарантирует:
– Честность развлекательного геймплея
– Сохранность персональных данных
– Своевременные выплаты
– Легальный игровой процесс
Заключение
Официальный ресурс и его действующие альтернативные адреса предоставляют клиентам совокупный набор функций для приятной и выгодной времяпрепровождения. Солидные призы, многочисленные развлечения, опытная помощь и надежная система выплат делают портал оптимальным выбором для поклонников гемблинг игр.
сюда asic майнер
learn more here – Minimal design with intuitive browsing throughout.
visit acorn vendor collective – Design feels tidy and navigation is simple.
visit silkharbor collective – Pages load fast and sections are organized clearly.
заказ суши заказ суши .
речные экскурсии в санкт петербурге vodnyye-progulki-v-spb.ru .
check this out – Pages are organized, navigation feels clear and natural.
Brook Market – Found this page casually, everything is clean and easy to follow.
Подключение к порталу через действующие зеркала
Нынешние интернет казино обеспечивают игрокам непрерывный вход к сервисам. Главный портал Мотор казино действует бесперебойно, предлагая широкий спектр азартных автоматов. Но иногда возникают программные трудности или ограничения, в связи с чем критично знать о доступности функционирующих зеркал.
Что является собой основное зеркало казино
Дубликат — это абсолютная дубликат центрального веб-сайта с аналогичным функционалом. Действующее зеркало в настоящее время позволяет преодолевать территориальные запреты и продолжать развлечения.
Основные выгоды задействования зеркал:
– Безграничный подключение к персональному кабинету
– Удержание любых показателей учётной записи
– Такой же перечень развлечений
– Текущие бонусы и акции
Регистрация на сайте
Процесс создания аккаунта отнимает пару минут. Начинающие геймеры приобретают щедрый бонус за регистрацию, что может содержать:
– Вступительный игровой подарок
– Даровые вращения для слотов
– Эксклюзивные ваучеры
– Повышенный кешбэк
Для финализации записи необходимо:
1. Переместиться на главный сайт или копию
2. Выбрать опцию «Регистрация»
3. Внести контактные информацию
4. Активировать почтовый адрес или мобильный
5. Использовать код (когда имеется доступности)
Подключение в собственный кабинет
Вслед за правильной регистрации игроки имеют возможность совершать вход используя официальный ресурс или рабочее зеркало. Личный кабинет открывает абсолютный контроль над профилем:
– Журнал игр
– Зачисление баланса
– Получение средств
– Регулирование поощрениями
– Включение в турнирах
Бонусы и кампании казино
Платформа балует клиентов вариативными поощрительными системами:
Начальные призы
Начинающие зарабатывают щедрый набор поощрений на начальные взносы. Как правило это предполагает долевую прибавку к величине вклада плюс даровые фриспины.
Постоянные акции
– Еженедельный кешбэк до 15%
– Конкурсы с наградными суммами
– Поощрения на годовщину рождения
– Специальные акции для привилегированных пользователей
План поощрения
Активные клиенты получают единицы, которые разрешено превратить на настоящие финансы или уникальные льготы.
Карманная редакция и софт
Современные разработки позволяют участвовать в любом месте угодно. Портативная редакция веб-сайта автономно настраивается под размер всякого девайса.
Достоинства мобильного ПО:
– Быстрая открытие слотов
– Практичный облик
– Push-оповещения о промо
– Шанс установить для Android и iOS
Реальное казино: обстановка настоящего гемблинг клуба
Секция Live игорного дома транспортирует пользователей в среду реального развлекательного заведения. Опытные крупье проводят действие в состоянии настоящего времени.
Представленные развлечения:
– Американская рулетка
– Карточная игра
– Карточная игра
– Карты
Барабаны и развлекательные аппараты
Коллекция игровых автоматов включает множество позиций от ведущих провайдеров. Произвольный игрок обнаружит игру по вкусу:
– Традиционные барабаны
– Инновационные игры с бонусными турами
– Накопительный-автоматы
– Многолинейные игры
Конкурсы и акции
Постоянные состязания включают азарт и предоставляют способность получить большие призы. Включение в турнирах регулярно комплиментарное, а призовые суммы доходят до значительных объёмов.
Секьюрити и анонимность
Портал эксплуатирует актуальные системы криптографии для обеспечения информации геймеров. Любые денежные действия осуществляются через охраняемые протоколы.
Заключение
Центральный веб-сайт и его действующие зеркала дают надёжный вход к превосходным игровым сервисам. Богатые призы, удобная карманная версия, вариативность игр и компетентное Live-казино превращают портал отличным выбором для ценителей игровых слотов.
Hi there colleagues, nice post and good arguments commented here, I am actually enjoying by these.
https://share.google/sDM2kQUebUQ9hEJkU
Обзор основного сайта
Прогрессивные онлайн казино обеспечивают участникам богатый спектр забав и перспектив. Основной портал Eldorado обеспечивает надежный вход к гемблинг услугам.
Действующее зеркало: путь прямо сейчас
Дублирующий портал выступает собой идентичную версию главного портала. Актуальное зеркало дает возможность игрокам преодолевать возможные барьеры.
Достоинства использования зеркала
Основные достоинства охватывают:
– Непрерывный вход к порталу
– Хранение полных возможностей базового веб-сайта
– Охрана персональных информации
– Аналогичный набор функций
Оформление профиля на платформе
Процесс оформления профиля знаменуется понятностью и эргономичностью. Недавние игроки необходимо:
1. Перейти на основной портал или его зеркало
2. Выбрать на кнопку создания аккаунта
3. Ввести требуемые сведения
4. Верифицировать электронную ящик
5. Осуществить начальный вход
Приз за создание аккаунта
Начинающие приобретают солидный начальный презент. Данное вознаграждение способно содержать:
– Финансовые бонусы
– Безвозмездные прокруты
– Увеличенный показатель компенсации
Доступ в собственный аккаунт
Зарегистрированные игроки способны быстро войти в личный раздел, используя учетные данные и ключ. Личный раздел обеспечивает доступ к:
– Управлению балансом
– Истории переводов
– Активным подаркам
– Настройкам учетной записи
Подарки и предложения
Ресурс регулярно проводит различные акции для клиентов.
Типы бонусов
Ключевые типы вознаграждений:
– Пополнительные подарки – процент от величины депозита
– Прокруты – бесплатные прокруты в аппаратах
– Компенсация – возврат процента утраченных денег
– Конкурсные призы – награды за состязание в состязаниях
Промокоды
Эксклюзивные коды позволяют получить бонусные преимущества. Пользователи в состоянии найти их на специализированных сайтах или получить в письмах.
Переносная версия и приложение
Современные гемблеры выбирают портативный геймплей.
Функции переносной платформы
– Гибкий облик для разнообразных гаджетов
– Полный вход к автоматам
– Оперативная подгрузка
– Комфортное использование
Загрузить app
Mobile программа предложено для downloading на девайсы с операционными системами Android и iOS. App дает:
– Устойчивую производительность
– Всплывающие уведомления о акциях
– Моментальный доступ к желанным играм
Развлекательный каталог
Платформа предоставляет обширную библиотеку гемблинг забав.
Автоматы
Ассортимент азартных автоматов насчитывает:
– Стандартные машины
– Передовые автоматы
– Прогрессивные слоты
– Лицензионные автоматы
Live столы
Секция настоящих дилеров предоставляет возможность играть с живыми ведущими. Доступны:
– Американская рулетка
– Очко
– Punto Banco
– Техасский холдем
Конкурсы
Систематические соревнования помогают игрокам состязаться за значительные наградные пулы. Турнирная структура модифицируется постоянно.
Банковские процедуры
Платформа обеспечивает разнообразие способов внесения и получения средств:
– Кредитные карточки
– Виртуальные платежные системы
– Межбанковские транзакции
– Крипто
Совокупные операции выполняются безопасно с применением прогрессивных протоколов шифрования.
Департамент сопровождения
Квалифицированная команда поддержки действует без перерыва. Обратиться с операторами реально через:
– Интерактивный чат
– Email почту
– Телефон
– Социальные платформы
Охрана и аккредитация
Казино действует на базе законной лицензии. Подобное подтверждает:
– Справедливость азартного действа
– Защиту персональных информации
– Оперативные выводы
– Ответственный игровой процесс
Итог
Официальный сайт и его функционирующие дубликаты предоставляют участникам абсолютный ассортимент опций для приятной и профитной времяпрепровождения. Внушительные бонусы, различные игры, опытная поддержка и проверенная платформа операций создают платформу лучшим опцией для любителей азартных услуг.
сео блог seo-blog21.ru .
Описание лицензионного сайта
Прогрессивные онлайн казино предоставляют участникам обширный выбор развлечений и шансов. Основной ресурс http://electromovilsat.com/kakie-sushchestvuyut-sposoby-popolneniya-moego-scheta-v-pay гарантирует надежный вход к развлекательным возможностям.
Функционирующее зеркало: доступ сегодня
Дублирующий портал представляет как идентичную версию основного ресурса. Официальное зеркало дает возможность пользователям обходить потенциальные блокировки.
Выгоды применения зеркала
Ключевые плюсы содержат:
– Стабильный шанс к ресурсу
– Сохранение любых функций главного веб-сайта
– Защита конфиденциальных материалов
– Такой же инструментарий
Открытие счета на платформе
Ход регистрации знаменуется простотой и практичностью. Свежие участники обязаны:
1. Зайти на главный сайт или его зеркало
2. Выбрать на пункт оформления
3. Заполнить необходимые данные
4. Подтвердить email адрес
5. Осуществить дебютный логин
Вознаграждение за регистрацию
Новые игроки зарабатывают щедрый вступительный приз. Такое поощрение может содержать:
– Материальные начисления
– Complimentary фриспины
– Усиленный показатель кэшбэка
Вход в личный аккаунт
Существующие участники имеют возможность моментально зайти в свой профиль, применяя логин и шифр. Персональный профиль предлагает шанс к:
– Управлению балансом
– Истории платежей
– Действующим бонусам
– Конфигурации профиля
Призы и предложения
Сайт регулярно реализует многочисленные акции для участников.
Разновидности поощрений
Основные типы бонусов:
– Пополнительные начисления – часть от размера внесения
– Спины – complimentary спины в игровых машинах
– Компенсация – отдача фрагмента затраченных денег
– Соревновательные призы – премии за состязание в состязаниях
Коды
Специальные ваучеры позволяют активировать экстра привилегии. Клиенты могут отыскать их на партнерских порталах или приобрести в уведомлениях.
Мобильная вариант и программа
Прогрессивные игроки выбирают карманный игровой процесс.
Опции мобильной адаптации
– Гибкий вид для разнообразных гаджетов
– Полный вход к слотам
– Быстрая подгрузка
– Комфортное использование
Установить app
Переносное app открыто для установки на устройства с рабочими системами Android и iOS. Софт гарантирует:
– Устойчивую деятельность
– Пуш уведомления о бонусах
– Быстрый вход к предпочитаемым развлечениям
Гемблинг портфель
Портал предлагает богатую коллекцию развлекательных забав.
Игровые машины
Коллекция игровых машин насчитывает:
– Классические машины
– Передовые игры
– Призовые игры
– Тематические слоты
Live казино
Раздел живых дилеров обеспечивает шанс играть с профессиональными диллерами. Доступны:
– Рулетка
– Блэкджек
– Баккара
– Карибский покер
Турниры
Постоянные чемпионаты позволяют клиентам соревноваться за значительные финансовые суммы. Соревновательная сетка актуализируется каждую неделю.
Денежные операции
Сайт обеспечивает массу способов депозита и снятия денег:
– Дебетовые карты
– Цифровые счета
– Wire переводы
– Крипто
Любые переводы производятся надежно с задействованием современных технологий защиты.
Служба support
Профессиональная служба поддержки действует без перерыва. Обратиться с специалистами можно через:
– Online чат
– Почтовую почту
– Горячую линию
– Соц сети
Секьюрити и аккредитация
Портал работает на базе легальной аккредитации. Это подтверждает:
– Честность развлекательного геймплея
– Охрану индивидуальных данных
– Своевременные транзакции
– Регулируемый гемблинг
Вывод
Главный сайт и его рабочие альтернативные адреса обеспечивают участникам полный набор функций для комфортной и профитной игры. Значительные вознаграждения, различные слоты, профессиональная поддержка и защищенная структура транзакций делают платформу лучшим выбором для любителей азартных забав.
güvenilir casino siteleri: casino siteleri
Переход к порталу через действующие зеркала
Участники интернет казино постоянно контактируют с трудностью ограничения основного сайта. Как раз для преодоления этой задачи разработаны дубликаты главного домена. Бетон казино регистрация гарантирует абсолютный вход ко всем возможностям ресурса.
Что такое рабочее зеркало казино
Альтернативный адрес является собой точную дубликат оригинального сайта с аналогичным функционалом. Ключевое расхождение — это другое имя. Любые информация пользователя, вместе с счет, поощрения и историю игр, сохраняются прежними.
Преимущества задействования зеркал
Рабочие зеркала обладают рядом существенных выгод:
– Круглосуточный подключение к любимым развлечениям
– Стопроцентная защита персональных параметров
– Удержание всех параметров индивидуального кабинета
– Способность приобретения наград и участия в акциях
Открытие счета на легальном ресурсе
Процедура открытия счета чрезвычайно прост и занимает немного минут. Новые пользователи могут полагаться на щедрый начальный бонус за открытие счета.
Этапы формирования аккаунта
1. Доступ на главный ресурс или его копию
2. Активация на клавишу “Регистрация”
3. Заполнение обязательных сведений
4. Активация почтовой почты
5. Применение бонусного кода (при наличии есть)
Бонусы и предложения для пользователей
Ресурс радует своих клиентов различными бонусными акциями.
Ключевые виды наград
Приветственный бонус — крупное начисление для свежих участников, что способно вмещать материальные призы и free spins.
Безвозмездные спины — опция играть в известных игровых машинах даром.
Кешбэк — частичный возврат проигранных средств, который зачисляется каждую неделю или ежемесячно.
Промокоды — особые сочетания, гарантирующие дополнительные выгоды.
Персональный кабинет: возможности и конфигурации
Пользовательский кабинет обеспечивает исчерпывающий надзор над игровым опытом. Здесь присутствуют:
– Управление средствами
– История транзакций
– Текущие поощрения
– Настройки охраны
– Проверка аккаунта
Портативная платформа и APP
Актуальные игроки ценят доступность. Площадка предоставляет двойной пути для развлечений с карманных гаджетов.
Responsive смартфонная платформа
Адаптивная вариант портала самостоятельно приспосабливается под экран любого гаджета. Нет необходимости загружать отдельное программное обеспечение.
Программа для смартфонов
Доступно загрузить специальное APP для iOS и Android. APP предоставляет:
– Скорый вход
– Улучшенный дизайн
– Push-уведомления о предложениях
– Стабильную операционность
Live игры: среда реального игорного заведения
Зона Live развлечений транспортирует игроков в среду подлинного казино. Профессиональные крупье ведут партии в режиме живого времени.
Топовые Live-столы
– Европейская рулетка
– Двадцать одно
– Баккарат
– Карибский покер
Слоты: ассортимент автоматов
Библиотека азартных аппаратов включает множество названий от лидирующих производителей. Клиенты откроют:
– Обычные аппараты
– Графические слоты
– Прогрессивный джекпот-автоматы
– Слоты с множественными линиями
Состязания и специальные акции
Регулярные конкурсы обеспечивают клиентам состязаться друг с другом за значительные денежные пулы. Всякий соревнование располагает свои условия присутствия и таблицу победителей.
Пути внесения и получения средств
Ресурс использует комплекс платежных методов:
– Дебетовые картыы
– Электронные сервисы
– Blockchain-платежи
– Wire транзиты
Все переводы осуществляются безопасно благодаря актуальным системам кодирования.
Сервис помощи
Профессиональные операторы службы support способны ассистировать 24/7. Имеются такие методы общения:
– Живой-чат
– Email-сервис
– Аудио горячая линия
– Коммуникационные сети
Вывод
Официальный ресурс игровой площадки и его рабочие зеркала предоставляют пользователям безопасный и легкий доступ к большому ассортименту азартных услуг. Крупные награды, регулярные кампании, компетентная служба и удобные денежные системы превращают геймерский процесс предельно приятным и прибыльным.
https://cassiteleri.top/# casino siteleri
safest online canada pharmacies
заказать роллы пицца в подарок заказать роллы пицца в подарок .
Актуальные онлайн-казино предлагают клиентам богатый выбор вариантов для удобной времяпрепровождения. Подключение к площадке http://www.digitalempressmarketing.com/2026/03/01/vozmozhnye-rezultaty-vyvoda-sredstv-iz-onlayn-kazino-i-proverki-so-storony-kreditnoy-organizatsii осуществляется через лицензионный домен или актуальное зеркало.
Что такое рабочее зеркало казино
Актуальное зеркало — это запасной адрес главного ресурса казино. Такие клоны генерируются для предоставления стабильного доступа к игровой площадке.
Копия актуальное совершенно воспроизводит возможности основного домена. Геймеры обретают схожий вход ко всем возможностям, включая оформление профиля, внесение депозита баланса и снятие призов.
Открытие счета на официальном сайте
Процедура оформления учетной записи длится всего несколько моментов. Начинающим участникам требуется:
1. Перейти на лицензионный домен или рабочее подлинное зеркало
2. Выбрать кнопку “Зарегистрироваться”
3. Указать требуемые данные
4. Верифицировать электронную почту
5. Ввести промокод при доступности
После финализации оформления участник обретает бонус за регистрацию, который имеет право охватывать даровые спины или cash поощрение.
Доступ в собственный кабинет
Персональный кабинет — это безопасная зона, где участники вправе контролировать своим счетом. Для входа следует ввести имя пользователя и password.
В персональном кабинете представлены такие возможности:
– Мониторинг хронологии переводов
– Применение промокодов
– Регулирование вознаграждениями
– Присоединение в конкурсах
– Контроль возмещения
– Настройка учетной записи
Призы и промо
Гемблинговая платформа дарит великодушные бонусы:
Начальный пакет — дебютанты обретают существенное начисление на стартовые депозиты.
Даровые спины — дарятся как при оформлении, так и в рамках многочисленных промо.
Кэшбек — постоянный возврат процента проигранных средств.
Купоны — специальные последовательности, дающие право к специальным предложениям.
Обзор развлекательных разделов
Аппараты
Библиотека аппаратов включает множество позиций от лучших производителей. Геймеры обнаружат как стандартные автоматы, так и новые мультимедийные автоматы с захватывающей графикой.
Live казино
Раздел Live казино предоставляет право участвовать с реальными ведущими в условиях реального времени. Представлены востребованные игры: рулетка, блэкджек, баккара, покер.
Конкурсы
Постоянные чемпионаты с солидными наградными пулами завлекают множество соревнующихся. Чемпионы обретают cash вознаграждения и уникальные премии.
Портативная версия и программа
Мобильная версия сайта предоставляет право развлекаться с каждого аппарата. Оформление автономно корректируется под формат экрана.
Скачать app можно для устройств на Android и iOS. Телефонное app обладает всеми функциями десктопной версии.
Как найти рабочее зеркало на данный момент
Рабочие URL дубликатов периодически обновляются. Обнаружить действующую URL можно разными путями:
– Через департамент саппорта
– В подлинных коммуникационных сетях
– По e-mail newsletter
– На партнерских ресурсах
Защита и сертификация
Официальный портал функционирует на базе мировой лицензии. Все платежи шифруются актуальными технологиями кодирования.
Анонимность личных информации сохраняется в стопроцентном размере.
Заключение
Основной сайт и его актуальные зеркала обеспечивают клиентам постоянный вход к качественным развлекательным играм. Щедрые призы, всевозможные игры, профессиональная поддержка — все это превращает азартный опыт максимально удобным и захватывающим.
Актуальные онлайн-казино гарантируют пользователям разнообразие возможностей для удобной игры. Главный ресурс Lucky Bear казино обеспечивает возможность ко всем сервисам и развлечениям. Однако при появлении программных сложностей на подмогу прибывают действующие дубликаты.
Что есть собой рабочее зеркало
Альтернативный адрес казино — это стопроцентная дубликат официального ресурса, расположенная по альтернативному веб-адресу. Лицензионное зеркало хранит все возможности, вместе с открытие профиля, доступ в личный кабинет, премии и промокоды.
Альтернативный сайт на сегодня дает:
– Постоянный доступ к игровым слотам
– Совершенную конфиденциальность индивидуальных информации
– Удержание депозита и журнала платежей
– Возможность использования всех бонусных программ
Создание учетной записи на лицензионном портале
Процесс открытия профиля требует несколько минут. Свежеиспеченным клиентам нужно:
1. Открыть на официальный портал или рабочее зеркало
2. Нажать кнопку «Создать аккаунт»
3. Ввести нужные поля
4. Активировать email почту
5. Использовать купон при присутствии
После финиша регистрации игроки обретают приз за регистрацию, что может охватывать бонусные спины или финансовое поощрение.
Авторизация в собственный кабинет
Индивидуальный кабинет открывает всесторонний контроль над игровым ходом. Через личный кабинет допускается:
– Депонировать счет
– Снимать выплаты
– Активировать бонусные коды
– Проверять записи ставок
– Участвовать в состязаниях
– Получать кешбэк
Описание вознаграждений и промо-предложений
Щедрая премиальная система — важное преимущество казино. Основные типы премий:
Начальный приз
Новички зарабатывают великодушное поощрение на первые взносы. Объем бонуса может достигать 100-200% от объема депозита.
Фриспины
Безвозмездные вращения даются для востребованных автоматов. Сумма free spins изменяется от 10 до 500 штук.
Возврат средств
Постоянный или ежемесячный возврат доли потерянных финансов. Средний размер возврата — 5-15%.
Конкурсы
Периодические конкурсы с внушительными призовыми фондами. Соревнующиеся борются за топовые позиции в таблице лидеров.
Портативная версия и приложуха
Адаптивная версия позволяет играть с всякого устройства. Игроки могут закачать софт для iOS и Android или задействовать веб версию.
Достоинства мобильного софта:
– Скоростная прогрузка слотов
– Комфортный интерфейс
– Всплывающие уведомления о акциях
– Вход через биометрию
Игровые автоматы и Live казино
Игровая подборка насчитывает тысячи игр от известных разработчиков.
Популярные категории слотов:
– Обычные машины
– Видеослоты с премиальными раундами
– Накопительный приз игры
– Мегавейс слоты
Live игровой зал
Секция live казино предлагает развлечение с настоящими крупье. Доступны традиционные игры:
– Европейская рулетка
– Блэкджек
– Baccarat
– Покер
Как найти рабочее зеркало
Раздобыть действующую линк на зеркало разрешается различными способами:
1. Подписаться на почтовую рассылку
2. Наблюдать за обновлениями в соц сетях
3. Написать в сервис поддержки
4. Сохранить актуальное зеркало в фавориты
Заключение
Основной сайт и его функционирующие альтернативные адреса предоставляют непрерывный вход к игровым играм. Выгодные премии, многочисленные бонусные коды, практичное мобильное программа и профессиональная служба поддержки поддержки обеспечивают азартный процесс в высшей степени удобным и безопасным.
Head to the Arctic with the sport host as they drop the reel and haul up fish full of juicy multipliers.
как сделать презентацию в ворде Функция “создать презентацию по тексту” особенно удобна, позволяя трансформировать готовые документы или даже краткие тезисы в полноценные, профессионально оформленные презентации.
рейтинг суши мск рейтинг суши мск .
this website – I opened this page today out of curiosity and scrolled through a bit, it seemed pretty neat overall.
casino king Если интересует рабочая ссылка на казино кинг, там публикуют актуальные обновления — там же можно найти актуальное зеркало и вход.
Анализ главного сайта
Актуальное онлайн-казино дарит своим участникам большой набор возможностей и поощрений. Официальный сайт казино Boost действует круглосуточно, гарантируя возможность к известным слотам, live-казино и обширным кампаниям.
Действующее зеркало: возможность к платформе
Что такое дубликат казино
Зеркало представляет собой точную реплику основного веб-сайта с альтернативным сетевым адресом. Функционирующее зеркало дает участникам избегать барьеры и получать непрерывный доступ к выбранным автоматам.
Как получить актуальное зеркало сегодня
Свежие ссылки на главное зеркало размещаются через:
– Почтовую новостнуюленту
– Основные публичные сети
– Сервис поддержки
– Специализированные ресурсы
Регистрация на платформе
Ход созданияаккаунта
Созданиеаккаунта длится несколько минут и включает нижеследующие этапы:
1. Переход на основной сайт или актуальное зеркало
2. Выбор кнопки “Открытьсчет”
3. Внесение учетных данных
4. Верификация адреса или телефона
5. Формирование ключа
Бонус за регистрацию
Новые клиенты приобретают выгодные стартовые бонусы:
– Денежные деньги на кошелек
– Freespins для автоматов
– Повышенный объем возврата
– Специальные купоны
Вход в собственный счет
Действующие клиенты имеютвозможность совершить доступ через оригинальный сайт или текущее зеркало. Для этого необходимо ввести учетноеимя и код, установленные при оформлении.
Возможности личного аккаунта
В персональном аккаунте открыты основные функции:
– Редактирование учетными реквизитами
– Внесение депозита
– Получение выигрышей
– Ввод бонусов
– Проверка истории операций
– Участие в состязаниях
Подарки и акции
Виды подарков
Казино балует своих участников всевозможными бонусными акциями:
– Приветственный бонус — выгодные подарки на первые вклады
– Бесплатныевращения — дополнительные вращения в известных симуляторах
– Кешбэк — еженедельный возмещение суммы ставок
– План верности — эксклюзивные льготы для постоянных игроков
Коды и их использование
Эксклюзивные ваучеры гарантируют дополнительные поощрения. Для активации необходимо указать последовательность в соответствующее поле в личном профиле.
Азартный каталог
Игры
Коллекция азартных симуляторов вмещает массу названий от известных поставщиков:
– Стандартные слоты
– Новые слоты
– Накопительные автоматы
– Брендовые слоты
Live казино
Зона Live-казино предлагает взаимодействие с реальными крупье в режиме актуального эфира:
– Американскаярулетка
– Очко
– PuntoBanco
– Casinopoker
Состязания
Систематические соревнования с солидными выигрышными суммами устраиваются ежедневно. Претенденты борются за первенство в таблице.
Портативная платформа и приложение
Смартфонная адаптация ресурса
Оригинальный ресурс целиком настроен для планшетных гаджетов. Игроки способны запускать игры напрямую через обозреватель без обязательства инсталляции.
Программа для загрузки
Фирменное карманное приложение имеется для установки на устройства с программными ОС Android и iOS. Программа дает:
– Оперативный путь к играм
– Устойчивую производительность
– Мгновенные-извещения о акциях
– Комфортный оформление
Итог
Официальный ресурс казино и его рабочие дубликаты дают клиентам абсолютный доступ к первоклассным геймплейным услугам. Выгодные подарки, всевозможные промо, удобная мобильная версия и компетентная поддержка формируют развлекательный досуг предельно enjoyable и результативным.
Современные онлайн-казино обеспечивают участникам большой ассортимент игр и премиальных программ. Доступ к сервису производится через официальный веб-сайт или его актуальное зеркало Kush, что предоставляет непрерывную деятельность.
Что представляет собой действующее зеркало казино
Альтернатива — это идентичная реплика оригинального сайта, построенная для решения блокировок. Зеркало сегодня обеспечивает пользователям обрести соединение к предпочитаемым слотам в произвольное время.
Проверенное зеркало обладает всеми возможностями главного ресурса:
– Целый список слотов
– Аккаунт с внесенными данными
– Действующие промокоды
– Защищенные денежные операции
Оформление профиля на официальном портале
Процедура оформления составляет всего считанные минут. Начинающим клиентам нужно:
1. Войти на проверенный веб-сайт или актуальное зеркало
2. Нажать на ссылку “Создать аккаунт”
3. Внести нужные информацию
4. Проверить электронную почту
5. Совершить стартовый платеж
Поощрение новичкам начисляется незамедлительно после завершения всех шагов.
Авторизация в учетную запись
Зарегистрированные пользователи могут осуществить вход указывая:
– Логин и ключ
– Цифры контакта
– Электронную почту
Личный кабинет открывает шанс к регулированию средствами, сведениям ставок и доступным промокодам.
Поощрения и предложения
Игровая площадка балует лояльных игроков выгодными вознаграждениями:
Первый набор
– Премия на стартовый взнос до 100%
– Фриспины на популярные машины
– Дополнительные награды за последующие пополнения
Ваучеры
Особые ваучеры обеспечивают право на приобретение особых поощрений. Актуальные комбинации выставляются в секции “Акции”.
Возврат средств
Постоянный возврат равен до 10% от утраченных финансов. Возмещение предоставляется сразу.
Механизм лояльности
Верные пользователи зарабатывают очки, которые переводятся на подлинные выплаты или фриспины.
Mobile версия и софт
Для удобства игроков сделана удобная адаптивный сайт. Гибкий дизайн помогает беспрепятственно участвовать с любого карманного девайса.
Достоинства программы:
– Моментальный подключение к развлечениям
– Адаптированный вид
– Надежная активность
– Сообщения о свежих турнирах
Скачать программу можно безвозмездно с проверенного сайта для устройств на Android и iOS.
Каталог слотов
Машины
Библиотека содержит более 2000 машин от известных провайдеров:
– Обычные слоты
– Video slots
– Джекпот-слоты
– Брендовые слоты
Live казино
Блок Live казино обеспечивает развлечение с подлинными диллерами в прямом режиме:
– Roulette
– Блэкджек
– Карты
– Poker
Турниры
Систематические конкурсы с крупными наградными фондами устраиваются регулярно. Участие в состязаниях возможно всем действующим игрокам.
Расчетные варианты
Платежи и снятия средств осуществляются через распространенные способы оплаты:
– Платежные карты
– Электронные кошельки
– Цифровая валюта
– Денежные транзакции
Минимальный депозит — от 100 рублей. Получение средств осуществляется в течение 24 времени.
Команда саппорта
Круглосуточная команда поддержки готова поддержать в разрешении любых вопросов:
– Live chat
– Email
– Контактный номер
– Соц сети
Надежность и разрешение
Официальный сайт функционирует на базе глобальной документа. Любые сведения пользователей защищены новейшим SSL-кодированием.
Резюме
Актуальное зеркало обеспечивает стабильный вход к любимым играм, щедрым промокодам и функциональным услугам. Создайте аккаунт сегодня и заработайте приветственный приз!
продвижение сайта в топ по трафику [url=https://prodvizhenie-sajtov-po-trafiku10.ru/]prodvizhenie-sajtov-po-trafiku10.ru[/url] .
Переход к порталу через действующие зеркала
Клиенты виртуальных казино регулярно имеют дело с трудностью закрытия официального домена. Как раз для ликвидации этой трудности предусмотрены зеркала официального ресурса. Догги казино казино дает абсолютный подключение ко всем возможностям ресурса.
Что такое рабочее зеркало казино
Зеркало значит собой абсолютную версию главного веб-сайта с похожим опциями. Ключевое несовпадение — это иное имя. Все сведения пользователя, включая депозит, бонусы и данные раундов, находятся идентичными.
Достоинства эксплуатации зеркал
Действующие зеркала характеризуются комплексом ключевых выгод:
– Бесперебойный подключение к выбранным играм
– Абсолютная безопасность персональных данных
– Поддержание всех параметров пользовательского кабинета
– Опция получения призов и включения в акциях
Открытие счета на легальном сайте
Ход регистрации предельно прост и занимает несколько минут. Свежие клиенты в состоянии претендовать на внушительный начальный бонус за регистрацию.
Этапы оформления аккаунта
1. Переход на главный ресурс или его дубликат
2. Клик на опцию “Зарегистрироваться”
3. Внесение обязательных сведений
4. Верификация цифровой почты
5. Внесение купона (в случае имеется)
Поощрения и акции для игроков
Ресурс поощряет своих клиентов многочисленными наградными программами.
Основные типы наград
Стартовый приз — внушительное вознаграждение для начинающих пользователей, которое именно имеет возможность включать материальные призы и бесплатные вращения.
Фриспины — способность использовать в востребованных слотах бесплатно.
Кэшбек — долевой возмещение потерянных средств, который именно выплачивается раз в неделю или раз в месяц.
Специальные коды — особые последовательности, предоставляющие добавочные преимущества.
Персональный кабинет: функции и настройки
Персональный профиль дает полный управление над пользовательским взаимодействием. В нем предусмотрены:
– Регулирование средствами
– Архив операций
– Текущие поощрения
– Установки сохранности
– Верификация учетной записи
Смартфонная редакция и APP
Актуальные участники ценят гибкость. Ресурс дает двойной пути для игры с карманных гаджетов.
Адаптивная смартфонная вариант
Портативная вариант домена самостоятельно подстраивается под разрешение любого девайса. Не требуется устанавливать дополнительное софт.
Софт для смартфонов
Можно установить оригинальное софт для iOS и Android. APP гарантирует:
– Моментальный старт
– Оптимизированный внешний вид
– Push-сообщения о бонусах
– Надежную операционность
Live казино: атмосфера подлинного казино
Секция Live развлечений доставляет клиентов в антураж истинного клуба. Профессиональные дилеры ведут сессии в варианте реального времени.
Известные Live-форматы
– Французская рулетка
– Двадцать одно
– Баккарат
– Покер
Аппараты: многообразие автоматов
Собрание игровых машин вмещает тысячи вариантов от топовых поставщиков. Клиенты встретят:
– Стандартные аппараты
– Современные слоты
– Накопительный приз-слоты
– Многолинейные автоматы
Состязания и уникальные мероприятия
Регулярные конкурсы дают возможность клиентам конкурировать друг с другом за внушительные денежные банки. Отдельный турнир располагает свои критерии включения и доску призеров.
Методы ввода и вывода денег
Ресурс использует комплекс финансовых инструментов:
– Дебетовые средства
– Электронные кошельки
– Крипто
– Прямые отправления
Любые транзакции выполняются надежно благодаря передовым протоколам шифрования.
Отдел поддержки
Профессиональные сотрудники отдела обслуживания расположены поддержать 24/7. Доступны такие методы контакта:
– Живой-чат
– Email-помощь
– Аудио связь
– Социальные сети
Резюме
Основной портал платформы и его функционирующие дубликаты гарантируют участникам конфиденциальный и удобный вход к огромному выбору развлекательных развлечений. Солидные поощрения, периодические промоакции, качественная служба и легкие расчетные способы делают развлекательный процесс крайне захватывающим и результативным.
Передовые онлайн-казино обеспечивают геймерам множество вариантов для удобной игры. Основной ресурс https://www.guldencirali.com/2026/03/02/depozit-i-vyvod-deneg-v-internet-kazino/ предоставляет возможность ко всем опциям и играм. Однако при образовании технических трудностей на помощь спешат рабочие альтернативные адреса.
Что представляет собой рабочее зеркало
Альтернативный адрес казино — это полная версия оригинального веб-сайта, расположенная по дополнительному доменному имени. Официальное зеркало хранит все функции, включая создание аккаунта, доступ в собственный кабинет, бонусы и бонусные коды.
Дубликат на сегодня предоставляет:
– Стабильный путь к азартным аппаратам
– Абсолютную конфиденциальность личных информации
– Поддержку баланса и записей переводов
– Доступность всех промо-предложений
Открытие профиля на основном ресурсе
Процедура оформления учетной записи требует считанные минут. Начинающим пользователям требуется:
1. Зайти на главный сайт или функционирующее зеркало
2. Выбрать кнопку «Зарегистрироваться»
3. Внести требуемые графы
4. Активировать email почту
5. Указать промокод при существовании
После финиша создания аккаунта геймеры приобретают вознаграждение за регистрацию, какой может включать бесплатные вращения или денежно-призовое вознаграждение.
Логин в личный кабинет
Приватный кабинет предоставляет всеобъемлющий мониторинг над игровым процессом. Через личный кабинет возможно:
– Депонировать депозит
– Забирать средства
– Использовать бонусные коды
– Контролировать журнал ставок
– Принимать участие в турнирах
– Получать кэшбек
Обзор поощрений и промо-предложений
Выгодная призовая программа — существенное козырь платформы. Ключевые типы поощрений:
Вступительный приз
Начинающие приобретают богатое награду на дебютные пополнения. Размер бонуса может достигать 100-200% от суммы пополнения.
Фриспины
Даровые прокруты начисляются для известных автоматов. Количество фриспинов варьируется от 10 до 500 штук.
Cash back
Постоянный или ежемесячный возврат доли утраченных финансов. Стандартный процент кэшбека — 5-15%.
Турниры
Регулярные турниры с солидными премиальными пулами. Конкурсанты борются за топовые позиции в турнирной таблице.
Портативная версия и приложение
Смартфонная версия дает возможность делать ставки с каждого девайса. Клиенты могут скачать софт для iOS и Android или задействовать веб версию.
Достоинства мобильного софта:
– Быстрая подзагрузка слотов
– Комфортный графический интерфейс
– Всплывающие уведомления о промо
– Возможность входа через Touch ID
Слоты и Live казино
Азартная коллекция включает тысячи игр от топовых разработчиков.
Известные разделы слотов:
– Стандартные автоматы
– Видеослоты с премиальными раундами
– Прогрессивный джекпот автоматы
– Мегавейс машины
Live казино
Зона live казино предоставляет партию с настоящими дилерами. Доступны стандартные развлечения:
– Американская рулетка
– Двадцать одно
– Punto Banco
– Покер
Как обнаружить функционирующее зеркало
Раздобыть свежую ссылку на зеркало возможно несколькими путями:
1. Подписаться на email-рассылку
2. Следить за новостями в социальных сетях
3. Связаться в службу поддержки
4. Запомнить действующее зеркало в избранное
Заключение
Основной портал и его функционирующие дубликаты предоставляют стабильный вход к развлекательным автоматам. Великодушные бонусы, многочисленные промокоды, эргономичное мобильное софт и профессиональная служба поддержки поддержки превращают игровой геймплей предельно удобным и надежным.
güvenilir casino siteleri [url=https://cassiteleri.top/#]casino siteleri[/url]
vdcasino güncel giriş: vdcasino
Glass Deals – Stumbled upon this site, structure is simple and reading is effortless.
echo aisle homepage – First impression shows the layout is neat and easy to navigate.
hazel marketplace – Everything loads quickly and the layout is clear.
explore Copper Meadow Outlet – The name popped up and conveys a calm, tidy, and pleasant tone.
this link here – Layout is tidy, scrolling through content is smooth.
Современные онлайн-казино обеспечивают клиентам массу возможностей для комфортной игры. Центральный портал Толстая панда открывает путь ко всем функциям и игровым автоматам. Однако при появлении системных проблем на подмогу прибывают рабочие альтернативные адреса.
Что являет собой собой действующее зеркало
Зеркало казино — это идентичная дубликат основного веб-сайта, находящаяся по дополнительному доменному имени. Лицензионное зеркало удерживает все возможности, вместе с регистрацию, вход в собственный кабинет, поощрения и промокоды.
Копия на сегодня обеспечивает:
– Бесперебойный доступ к игровым аппаратам
– Стопроцентную сохранность персональных сведений
– Сохранение депозита и истории переводов
– Доступность всех специальных предложений
Регистрация на главном портале
Ход регистрации требует пару минут. Новоиспеченным игрокам требуется:
1. Зайти на главный портал или функционирующее зеркало
2. Выбрать кнопку «Создать аккаунт»
3. Ввести необходимые графы
4. Верифицировать email почту
5. Указать промокод при присутствии
После завершения создания аккаунта игроки приобретают подарок за регистрацию, какой может охватывать бонусные спины или денежно-призовое вознаграждение.
Логин в индивидуальный кабинет
Индивидуальный кабинет открывает всеобъемлющий управление над игровым действом. Через персональный раздел можно:
– Финансировать депозит
– Снимать средства
– Использовать купоны
– Проверять историю пари
– Участвовать в турнирах
– Обретать кешбэк
Обзор бонусов и промо-предложений
Великодушная премиальная программа — важное козырь казино. Главные виды премий:
Начальный подарок
Дебютанты получают великодушное поощрение на дебютные взносы. Размер приза может составлять 100-200% от величины вклада.
Free spins
Даровые спины выдаются для популярных машин. Объем free spins колеблется от 10 до 500 штук.
Cash back
Еженедельный или помесячный откат доли проигранных финансов. Средний процент возврата — 5-15%.
Конкурсы
Периодические турниры с солидными премиальными фондами. Игроки соревнуются за верхние места в турнирной таблице.
Портативная версия и софт
Смартфонная версия обеспечивает играть с любого устройства. Пользователи могут установить софт для iOS и Android или эксплуатировать веб версию.
Плюсы смартфонного программы:
– Скоростная подзагрузка игр
– Комфортный дизайн
– Push-уведомления о бонусах
– Вход через Face ID
Автоматы и Live казино
Игровая коллекция содержит тысячи наименований от лидирующих провайдеров.
Известные разделы автоматов:
– Обычные машины
– Видео-автоматы с призовыми уровнями
– Накопительный приз автоматы
– Мегавейс машины
Live игровой зал
Раздел live игорный зал обеспечивает партию с профессиональными ведущими. Доступны традиционные варианты:
– Европейская рулетка
– Блэкджек
– Punto Banco
– Техасский холдем
Как разыскать рабочее зеркало
Раздобыть актуальную линк на зеркало можно множественными вариантами:
1. Зарегистрироваться на емейл-уведомления
2. Следить за апдейтами в социальных сетях
3. Контактировать в отдел поддержки
4. Добавить в закладки актуальное зеркало в избранное
Заключение
Лицензионный сайт и его действующие зеркала гарантируют стабильный вход к игровым слотам. Выгодные поощрения, многочисленные купоны, удобное мобильное приложение и качественная служба поддержки поддержки создают игровой опыт максимально приятным и надежным.
official seacrest page – Sections are organized neatly, providing a comfortable browsing experience.
Передовые онлайн-казино предоставляют игрокам широкий диапазон вариантов для комфортной времяпрепровождения. Подключение к сервису Daddy осуществляется через главный веб-ресурс или функционирующее зеркало.
Что такое действующее зеркало казино
Рабочее зеркало — это дополнительный URL основного ресурса казино. Такие копии формируются для предоставления постоянного доступа к развлекательной системе.
Дубликат на сегодня целиком дублирует возможности базового сайта. Пользователи обретают такой же вход ко всем возможностям, включая регистрацию, зачисление средств депозита и снятие средств.
Открытие счета на главном ресурсе
Процесс создания аккаунта требует всего пару моментов. Будущим игрокам нужно:
1. Попасть на лицензионный портал или текущее подлинное зеркало
2. Нажать кнопку “Регистрация”
3. Заполнить обязательные сведения
4. Верифицировать email почту
5. Применить промокод при доступности
После финализации открытия профиля клиент получает приз за регистрацию, который способен предполагать фриспины или финансовое начисление.
Логин в собственный кабинет
Пользовательский кабинет — это защищенная секция, где игроки способны контролировать своим учетной записью. Для входа требуется внести логин и код доступа.
В личном кабинете доступны данные функции:
– Отслеживание журнала транзакций
– Активация кодов активации
– Настройка поощрениями
– Присоединение в соревнованиях
– Отслеживание возврата средств
– Изменение профиля
Призы и спецпредложения
Азартная площадка предлагает щедрые призы:
Приветственный набор — новички обретают значительное вознаграждение на первые взносы.
Фриспины — дарятся как при создании аккаунта, так и в ходе различных мероприятий.
Кэшбек — еженедельный рефанд процента утраченных средств.
Купоны — специальные последовательности, обеспечивающие право к эксклюзивным призам.
Обзор развлекательных секций
Аппараты
Коллекция аппаратов содержит тысячи позиций от передовых разработчиков. Геймеры найдут как обычные аппараты, так и актуальные 3D-слоты с захватывающей анимацией.
Live казино
Зона Live казино предлагает шанс соревноваться с реальными крупье в режиме текущего времени. Доступны популярные варианты: рулетка, блэкджек, баккара, покер.
Конкурсы
Постоянные соревнования с значительными премиальными банками привлекают тысячи участников. Победители получают денежные награды и уникальные поощрения.
Мобильная версия и софт
Телефонная версия ресурса обеспечивает участвовать с всякого гаджета. Структура автономно адаптируется под диагональ экрана.
Установить app можно для девайсов на Android и iOS. Смартфонное приложение обладает всеми функциями настольной версии.
Как найти текущее зеркало на сегодня
Действующие ссылки альтернатив периодически изменяются. Узнать действующую линк можно несколькими путями:
– Через департамент помощи
– В официальных коммуникационных сетях
– По почтовой newsletter
– На аффилиатных ресурсах
Надежность и сертификация
Главный ресурс действует на базе мировой документа. Все операции оберегаются современными протоколами кодирования.
Конфиденциальность пользовательских реквизитов поддерживается в стопроцентном формате.
Резюме
Официальный домен и его действующие копии предоставляют клиентам 24/7 выход к высококлассным гемблинговым сервисам. Выгодные вознаграждения, разнообразные развлечения, опытная помощь — все это превращает гемблинговый опыт предельно беспроблемным и притягательным.
Awesome! Its actually remarkable article, I have got much clear
idea about from Toronto nightlife events this weekend piece of writing.
Wild Stone Shop – Quick look shows the site is simple and information is easy to locate.
создание презентации нейросеть бесплатно Традиционные методы зачастую требуют значительных временных затрат, дизайнерских навыков и доступа к дорогостоящему программному обеспечению, что делает их недоступными для многих.
online shop portal – Browsed quickly, content is tidy and simple to follow.
наборы суши с доставкой спб наборы суши с доставкой спб .
Переход к ресурсу и актуальные ссылки
Востребованные интернет казино гарантируют клиентам огромный набор развлечений. Главный портал Гама казино предоставляет безопасный вход ко всем функциям. При этом временами возникают случаи, когда нужно дополнительный метод подключения.
Что представляет собой действующее зеркало
Актуальное зеркало — это точная версия основного портала с альтернативным сетевым именем. Дубликат сегодня обеспечивает обходить возможные запреты и сохранять непрерывный переход к любимым играм.
Главное зеркало содержит теми же характеристиками, что и главный портал:
– Совокупный список игр
– Собственный раздел с записанными сведениями
– Полные подарки и программы
– Проверенные финансовые действия
Открытие профиля и подключение в платформу
Этап создания профиля на ресурсе занимает считанные моментов. Новым участникам требуется:
1. Перейти на действующее зеркало в настоящее время
2. Кликнуть элемент «Создать аккаунт»
3. Внести требуемые информацию
4. Проверить e-mail почту или информацию телефона
5. Забрать поощрение за создание профиля
Доступ в собственный кабинет реализуется с помощью ввод ID и ключа.
Характеристика наградной политики
Привлекательная бонусная система — ключевое козырь игорного заведения. Клиенты получают разнообразные поощрения:
Стартовые награды
Свежие клиенты способны рассчитывать на значительный бонус за открытие профиля. Обычно это пакет возможностей, охватывающий:
– Частичную добавку к первому депозиту
– Подарочные фриспины
– Бонусные финансы на кошелек
Промокоды и эксклюзивные акции
Постоянные бонусные комбинации дают возможность активировать дополнительные льготы. Использовать их допустимо в предназначенном меню личного кабинета.
Free spins и возврат средств
Даровые вращения — это шанс играть игры без задействования своих сумм. Компенсация представляет долевой возмещение утраченных сумм.
Библиотека слотов
Гемблинг платформа предоставляет значительную базу развлечений.
Слоты
Разнообразие игровых машин впечатляет фантазию. Представлены традиционные ретро машины и новые видеослоты с интересной графикой.
Live казино
Зона Live игр транспортирует игроков в антураж реального азартного заведения. Профессиональные крупье ведут партии в онлайн эфире.
Турниры и доски почета
Систематические конкурсы вносят драйва и обеспечивают шанс заработать значительные выигрыши.
Карманная версия и программа
Современные инновации помогают участвовать в любимом локации. Адаптивная версия автономно оптимизируется под дисплей девайса.
Скачать приложение возможно для программных платформ iOS и Android. Программа обеспечивает:
– Оперативный переход
– Надежную производительность
– Моментальные-сообщения об акциях
– Удобный облик
Банковские действия
Платформа поддерживает различные системы депозита и вывода средств:
– Кредитные системы
– Электронные платформы
– Крипто
– Прямые отправки
Каждые переводы осуществляются через защищенное соединение, что гарантирует сохранность личных параметров.
Департамент support
Профессиональная команда ассистанса трудится 24/7. Связаться с специалистами допустимо через:
– Живой-чат
– Почтовую почту
– Телефон
– Социальные сети
Выводы
Официальный портал и его функционирующее зеркало дают клиентам безопасный и легкий доступ к увлекательным занятиям. Щедрые бонусы, большой выбор слотов и профессиональная ассистанс создают участие максимально приятной и прибыльной.
Вход к платформе через актуальные зеркала
Пользователи сетевых казино постоянно имеют дело с трудностью недоступности официального портала. Как раз для ликвидации этой задачи созданы копии легального портала. Буст казино регистрация дает стопроцентный вход ко всем опциям казино.
Что такое рабочее зеркало казино
Копия представляет собой точную копию оригинального портала с похожим возможностями. Главное несовпадение — это доменное имя. Абсолютно все параметры пользователя, вместе с средства, бонусы и записи раундов, остаются такими же.
Плюсы использования зеркал
Рабочие зеркала обладают рядом ключевых преимуществ:
– Непрерывный вход к излюбленным автоматам
– Совершенная безопасность индивидуальных сведений
– Сохранение всех параметров индивидуального кабинета
– Возможность обретения наград и включения в промоакциях
Оформление профиля на легальном ресурсе
Процедура создания аккаунта чрезвычайно легок и длится несколько минут. Начинающие игроки в состоянии надеяться на щедрый приветственный подарок за регистрацию.
Ступени оформления аккаунта
1. Доступ на официальный сайт или его альтернативу
2. Выбор на элемент “Присоединиться”
3. Указание обязательных параметров
4. Верификация почтовой почты
5. Указание кода (в случае имеется)
Награды и предложения для игроков
Ресурс одаривает своих участников многочисленными поощрительными акциями.
Базовые варианты бонусов
Начальный бонус — внушительное вознаграждение для новых клиентов, каковое способно содержать монетарные средства и фриспины.
Бесплатные вращения — опция играть в топовых автоматах без затрат.
Кешбэк — пропорциональный возмещение проигранных денег, что зачисляется каждую неделю или ежемесячно.
Купоны — уникальные сочетания, дающие бонусные привилегии.
Личный кабинет: функции и настройки
Персональный раздел обеспечивает совершенный надзор над персональным взаимодействием. Здесь предусмотрены:
– Контроль балансом
– История платежей
– Текущие награды
– Параметры безопасности
– Подтверждение профиля
Мобильная версия и программа
Современные клиенты оценивают гибкость. Площадка предоставляет 2 метода для игры с карманных устройств.
Адаптивная смартфонная редакция
Портативная платформа домена автоматически приспосабливается под монитор любого устройства. Отсутствует потребность инсталлировать специальное приложение.
APP для мобильных
Разрешено установить специальное APP для iOS и Android. Приложение обеспечивает:
– Быстрый запуск
– Доработанный внешний вид
– Всплывающие-извещения о бонусах
– Стабильную работу
Live развлечения: антураж подлинного игорного заведения
Раздел Live развлечений транспортирует пользователей в среду настоящего клуба. Компетентные ведущие проводят раунды в виде настоящего времени.
Известные Live-форматы
– Рулетка
– Blackjack
– Баккарат
– Техасский холдем
Слоты: ассортимент развлечений
Собрание слотовых автоматов насчитывает тысячи названий от ведущих провайдеров. Клиенты откроют:
– Традиционные автоматы
– Видеослоты
– Накопительный приз-игры
– Многолинейные автоматы
Состязания и уникальные предложения
Регулярные соревнования дают возможность пользователям бороться друг с другом за внушительные денежные банки. Любой турнир обладает свои требования вовлечения и таблицу призеров.
Варианты ввода и изъятия денег
Площадка использует множество платежных методов:
– Банковские картыы
– Цифровые сервисы
– Blockchain-платежи
– Банковские транзакции
Абсолютно все транзакции проходят защищенно благодаря современным протоколам кодирования.
Служба support
Профессиональные сотрудники службы поддержки расположены помочь 24/7. Предусмотрены такие пути связи:
– Живой-чат
– Email-поддержка
– Телефонная поддержка
– Коммуникационные сети
Итог
Официальный портал игровой площадки и его актуальные зеркала предоставляют клиентам безопасный и удобный доступ к обширному диапазону игровых активностей. Внушительные подарки, частые предложения, профессиональная сервис и простые платежные способы формируют азартный досуг крайне приятным и результативным.
Really useful content presented in a simple way. Keep sharing updates. free astrocartography chart
Актуальные онлайн-казино предоставляют пользователям широкий спектр слотов и выгодные награды. Но для стабильной игры критично иметь представление, как отыскать Клубника казино и его функционирующие зеркала.
Что такое лицензионный портал казино
Лицензионный портал казино — это основная платформа, где пользователи могут получать удовольствие от игровыми автоматами. Ресурс функционирует на законных условиях и имеет всеми требуемыми сертификатами.
Основные плюсы официального веб-сайта:
– Конфиденциальность персональных данных
– Прозрачные правила использования
– Подтвержденные выплаты
– Оперативная помощь
Функционирующее зеркало казино: для чего используется
Дублирующий ресурс — это абсолютная дубликат лицензионного сайта, размещенная по альтернативному адресу. Действующее зеркало запускается для гарантирования постоянного входа к порталу.
Причины использования зеркал:
– Блокировка основного адреса
– Плановые мероприятия
– Повышенная активность на ресурс
Как получить действующее зеркало сейчас
Узнать новое рабочее зеркало можно несколькими способами:
1. Почтовые оповещения — оформите подписку на новостную отправку
2. Отдел помощи — обратитесь в онлайн-чат
3. Официальные площадки — проверяйте за обновлениями
4. Партнерские площадки — проверенные источники
Открытие счета на ресурсе казино
Этап создания аккаунта длится всего пару минут:
1. Активируйте на кнопку “Открыть счет”
2. Заполните обязательные данные
3. Валидируйте почтовую e-mail
4. Примените купон, если есть
После оконченной регистрации вам предоставится доступен пользовательский аккаунт.
Поощрения и купоны
Щедрая наградная система — существенное преимущество казино:
Награда за открытие счета
Первичные клиенты обретают стартовый поощрение, который может предполагать:
– Монетарный бонус на дебютный взнос
– Бесплатные вращения для барабанов
– Стартовые бонусы
Промокоды
Постоянно публикуются новые бонусные шифры, позволяющие получить дополнительные поощрения.
Схема возврата средств
Активные клиенты зарабатывают порцию утраченных ставок обратно.
Действующие кампании и конкурсы
Казино систематически устраивает азартные события:
– Еженедельные турниры
– Сезонные акции
– Розыгрыши значительных выигрышей
– Система статусов
Вход в личный аккаунт
Для входа на ресурс нужно:
1. Посетить основной адрес или актуальное зеркало
2. Выбрать “Login”
3. Указать никнейм и ключ
В пользовательском профиле доступны такие инструменты:
– Депозит кошелька
– Снятие выигрышей
– Проверка архива операций
– Настройка индивидуальными сведениями
Портативная платформа и приложение
Мобильная вариант
Адаптивная версия веб-сайта дает возможность играть с разных мобильного телефона. Оформление адаптивно адаптируется под диагональ дисплея.
App для загрузки
Получить клиент можно для:
– Android — непосредственная download с портала
– iOS — скачивание через App Store
Достоинства программы:
– Моментальный старт
– Бесперебойная производительность
– Push-нотификации об акциях
– Улучшенный функционал
Игровые разделы
Игровые машины
Богатая подборка азартных машин от известных разработчиков:
– Стандартные автоматы
– Новые-игры
– Накопительные-слоты
Live казино
Раздел с живыми ведущими предоставляет:
– Рулеточные столы
– Двадцать одно
– Мини-баккара
– Карточные игры
Эфиры проводятся в высоком качестве, формируя эффект аутентичного казино.
Варианты внесения средств и обналичивания
Платформа принимает разные платежные системы:
– Дебетовые card
– Цифровые счета
– Цифровые валюты
– Финансовые транзиты
Базовые лимиты пополнения и моментальные выводы создают развлечение предельно приятной.
Отдел support
Компетентная отдел помощи работает 24/7 и способна поддержать с любыми задачами:
– Реалтайм-чат
– Email-помощь
– Звонковая служба
Заключение
Основной веб-сайт казино и его функционирующие зеркала дают пользователям надежный и увлекательный игровой отдых. Богатые награды, удобная портативная версия, богатые игры и превосходное live-казино делают эту ресурс отличным решением для развлекательных игр.
Нынешние онлайн-казино обеспечивают геймерам обширный ассортимент опций для удобной времяпрепровождения. Доступ к сервису https://dovaladvogados.com.br/web/ реализуется через официальный портал или действующее зеркало.
Что такое действующее зеркало казино
Действующее зеркало — это альтернативный линк лицензионного ресурса казино. Такие дубликаты разрабатываются для поддержания бесперебойного доступа к развлекательной сервису.
Дубликат сегодня целиком воспроизводит возможности официального портала. Клиенты приобретают такой же доступ ко всем услугам, включая оформление профиля, внесение депозита депозита и получение средств.
Создание аккаунта на основном портале
Процедура создания аккаунта занимает всего несколько секунд. Свежим клиентам нужно:
1. Войти на лицензионный домен или текущее настоящее зеркало
2. Кликнуть кнопку “Зарегистрироваться”
3. Внести нужные сведения
4. Активировать e-mail почту
5. Применить бонусный код при доступности
После окончания открытия профиля игрок обретает подарок за регистрацию, который способен содержать free spins или cash поощрение.
Доступ в личный кабинет
Пользовательский кабинет — это закрытая территория, где участники вправе администрировать своим учетной записью. Для авторизации нужно внести логин и код доступа.
В персональном кабинете доступны следующие инструменты:
– Проверка журнала платежей
– Использование купонов
– Контроль вознаграждениями
– Включение в состязаниях
– Проверка кэшбэка
– Изменение данных
Поощрения и промо
Азартная система обеспечивает великодушные вознаграждения:
Начальный пакет — новички приобретают значительное начисление на начальные депозиты.
Бесплатные вращения — выдаются как при создании аккаунта, так и в контексте всевозможных кампаний.
Кэшбэк — постоянный возмещение фрагмента проигранных средств.
Промокоды — эксклюзивные комбинации, открывающие выход к эксклюзивным бонусам.
Описание игровых разделов
Slots
Ассортимент автоматов охватывает сотни вариантов от топовых разработчиков. Пользователи обнаружат как стандартные аппараты, так и новые видео-слоты с притягательной анимацией.
Live казино
Секция Live казино предлагает возможность участвовать с живыми крупье в режиме актуального времени. Доступны популярные столы: рулетка, блэкджек, баккара, покер.
Состязания
Постоянные состязания с большими призовыми пулами привлекают тысячи игроков. Призеры обретают финансовые выплаты и особые поощрения.
Телефонная версия и app
Телефонная версия платформы позволяет наслаждаться с любого аппарата. Дизайн автоматически корректируется под формат экрана.
Загрузить софт можно для девайсов на Android и iOS. Смартфонное приложение обладает всеми опциями полной версии.
Как определить актуальное зеркало на текущий день
Действующие линки дубликатов периодически корректируются. Обнаружить действующую линк можно различными способами:
– Через отдел помощи
– В проверенных новостных сетях
– По почтовой дайджесту
– На аффилиатных ресурсах
Надежность и сертификация
Официальный сайт работает на базе мировой разрешения. Все платежи охраняются актуальными технологиями шифрования.
Секретность пользовательских сведений поддерживается в стопроцентном масштабе.
Итог
Лицензионный домен и его актуальные копии гарантируют пользователям 24/7 путь к качественным азартным сервисам. Великодушные вознаграждения, различные автоматы, профессиональная помощь — все это формирует развлекательный досуг максимально приятным и захватывающим.
https://able2know.org/user/1xbetfree152/
Nice post. I learn something totally new and
challenging on websites I stumbleupon every day.
It will always be interesting to read content from other authors and practice a little
something from other sites.
My web page; entreprise informatique montréal
блог про продвижение сайтов блог про продвижение сайтов .
блог seo агентства seo-blog21.ru .
https://cassiteleri.buzz/# casino deneme siteleri
Современные онлайн-казино предоставляют игрокам широкий спектр игр и щедрые поощрения. Но для комфортной деятельности существенно знать, как обнаружить http://www.iestpaucara.edu.pe/rekomendatsii-i-sovety-po-povysheniyu-skorosti-funktsionirovaniya-sayta-kazino/ и его рабочие зеркала.
Что такое официальный веб-ресурс казино
Лицензионный ресурс казино — это базовая система, где клиенты могут получать удовольствие от развлекательными играми. Портал оперирует на легальных основаниях и располагает всеми нужными документами.
Ключевые достоинства официального сайта:
– Надежность пользовательских сведений
– Объективные требования участия
– Гарантированные платежи
– Оперативная служба поддержки
Актуальное зеркало казино: для чего требуется
Копия сайта — это полная версия главного веб-сайта, расположенная по иному веб-адресу. Функционирующее зеркало запускается для предоставления стабильного подключения к порталу.
Причины задействования дублирующих ресурсов:
– Недоступность основного URL
– Профилактические работы
– Повышенная посещаемость на систему
Как обнаружить рабочее зеркало на сегодня
Обнаружить свежее официальное зеркало можно разными путями:
1. Рассылка — активируйте уведомления на почтовую доставку
2. Отдел техподдержки — свяжитесь в онлайн-чат
3. Официальные площадки — мониторьте за постами
4. Игровые площадки — проверенные источники
Открытие счета на платформе казино
Этап регистрации занимает только пару мгновений:
1. Активируйте на кнопку “Создать аккаунт”
2. Внесите необходимые информацию
3. Активируйте email ящик
4. Используйте бонусный код, если есть
После завершенной регистрации вам предоставится разрешен индивидуальный аккаунт.
Бонусы и промокоды
Щедрая поощрительная политика — существенное конкурентное преимущество казино:
Подарок за открытие счета
Начинающие пользователи зарабатывают начальный презент, который может включать:
– Финансовый кредит на стартовый взнос
– Фри-спины для игровых машин
– Безвозвратные средства
Активационные коды
Периодически появляются свежие промокоды, дающие возможность получить дополнительные поощрения.
Схема компенсации
Активные участники приобретают процент утраченных финансов назад.
Текущие предложения и конкурсы
Казино регулярно проводит азартные кампании:
– Недельные чемпионаты
– Тематические акции
– Лотереи ценных подарков
– Механизм лояльности
Логин в индивидуальный профиль
Для доступа на платформу необходимо:
1. Загрузить основной портал или актуальное зеркало
2. Нажать “Авторизация”
3. Указать имя пользователя и пароль
В индивидуальном аккаунте открыты такие инструменты:
– Пополнение счета
– Снятие денег
– Изучение архива транзакций
– Управление индивидуальными сведениями
Портативная модификация и app
Mobile вариант
Оптимизированная вариант сайта позволяет участвовать с любого карманного девайса. Визуал динамически настраивается под формат дисплея.
Программа для скачивания
Получить app можно для:
– Android — безопасная загрузка с платформы
– iOS — установка через App Store
Плюсы программы:
– Моментальный вход
– Стабильная функциональность
– Push-сообщения об бонусах
– Улучшенный UI
Азартные секции
Барабаны
Обширная галерея игровых барабанов от топовых разработчиков:
– Ретро слоты
– Продвинутые-слоты
– Прогрессивные-слоты
Live игры
Раздел с профессиональными дилерами предоставляет:
– Рулетки
– Blackjack
– Punto Banco
– Карточные игры
Трансляции проводятся в HD качестве, формируя атмосферу подлинного казино.
Способы депозита и снятия
Сайт поддерживает разные транзакционные системы:
– Платежные card
– Виртуальные платежи
– Криптовалюты
– Финансовые отправки
Стартовые лимиты внесения и оперативные платежи обеспечивают игру предельно беспроблемной.
Отдел техподдержки
Опытная служба support функционирует 24/7 и в состоянии ассистировать с разными задачами:
– Реалтайм-чат
– Email-помощь
– Phone служба
Резюме
Основной портал казино и его действующие альтернативные адреса предоставляют клиентам надежный и интересный игровой процесс. Щедрые награды, удобная мобильная модификация, обширные слоты и качественное live-казино делают эту площадку превосходным вариантом для азартных досуга.
Переход к порталу и действующие URL
Актуальные виртуальные казино предлагают участникам огромный набор игр. Основной портал Рльдорадо сайт казино предоставляет безопасный подключение ко всем возможностям. При этом порой случаются случаи, когда понадобится дополнительный путь авторизации.
Что представляет собой функционирующее зеркало
Функционирующее зеркало — это абсолютная дубликат официального портала с альтернативным интернет именем. Альтернатива сегодня обеспечивает обходить возможные запреты и обеспечивать стабильный подключение к популярным автоматам.
Легальное зеркало обладает полными опциями, что и базовый ресурс:
– Весь список развлечений
– Личный раздел с сохраненными информацией
– Действующие бонусы и промо
– Защищенные платежные транзакции
Открытие профиля и авторизация в сервис
Процедура регистрации на ресурсе занимает пару минут. Свежим пользователям необходимо:
1. Перейти на функционирующее зеркало сейчас
2. Выбрать элемент «Открыть профиль»
3. Заполнить требуемые данные
4. Верифицировать цифровую почту или контакт мобильного
5. Забрать поощрение за оформление
Вход в персональный аккаунт осуществляется посредством предоставление имени пользователя и ключа.
Характеристика поощрительной системы
Щедрая бонусная структура — важнейшее преимущество платформы. Игроки зарабатывают разнообразные подарки:
Стартовые награды
Новые игроки способны ожидать на выгодный бонус за регистрацию. Традиционно это совокупность возможностей, включающий:
– Долевую прибавку к стартовому вкладу
– Безвозмездные вращения
– Дополнительные деньги на счет
Промо-коды и особые опции
Постоянные коды обеспечивают зарабатывать призовые выгоды. Использовать их можно в предназначенном окне индивидуального профиля.
Фриспины и кешбэк
Даровые вращения — это способность запускать автоматы без применения персональных средств. Компенсация подразумевает определенный отдачу проигранных средств.
Ассортимент автоматов
Азартная ресурс представляет внушительную коллекцию автоматов.
Автоматы
Многообразие аппаратов восхищает воображение. Есть обычные трехбарабанные автоматы и продвинутые игры с увлекательной графикой.
Live игры
Раздел Live казино переносит игроков в антураж реального азартного клуба. Опытные дилеры организуют сессии в онлайн времени.
Состязания и таблицы лидеров
Постоянные состязания привносят накала и обеспечивают вариант выиграть большие призы.
Mobile форма и софт
Современные разработки дают возможность играть в любом локации. Портативная форма автономно настраивается под дисплей устройства.
Установить программу допустимо для мобильных платформ iOS и Android. Программа гарантирует:
– Быстрый переход
– Устойчивую работу
– Моментальные-уведомления об предложениях
– Удобный интерфейс
Платежные операции
Казино поддерживает многочисленные системы депозита и получения сумм:
– Банковские инструменты
– Электронные сервисы
– Криптовалюты
– Прямые транзакции
Любые действия проходят через надежное протокол, что обеспечивает неприкосновенность конфиденциальных сведений.
Отдел помощи
Компетентная служба помощи трудится постоянно. Контактировать с консультантами можно через:
– Онлайн-чат
– Почтовую почту
– Горячую линию
– Общественные сети
Резюме
Официальный сайт и его действующее зеркало дают клиентам надежный и комфортный переход к увлекательным играм. Щедрые подарки, разнообразный выбор развлечений и отличная ассистанс создают участие максимально приятной и выгодной.
1win ghid depunere https://www.1win62509.help
заказать суши в москве заказать суши в москве .
по каналам санкт петербурга экскурсии цена по каналам санкт петербурга экскурсии цена .
This post is actually a pleasant one it assists new internet
visitors, who are wishing in favor of blogging.
Feel free to visit my blog post – Cabling services Montreal
https://cassiteleri.top/# deneme bonusu veren casino siteleri
Hello, I log on to your blogs on a regular basis. Your story-telling style is witty, keep up the good work!
Here is my website – food festivals in Toronto this weekend
Обзор официального веб-сайта
Актуальные онлайн казино предоставляют игрокам обширный ассортимент игр и возможностей. Основной ресурс Болливуд казино предлагает защищенный путь к игровым услугам.
Действующее зеркало: вход в настоящий момент
Зеркало представляет как полную версию основного ресурса. Проверенное зеркало обеспечивает игрокам обходить вероятные запреты.
Преимущества использования зеркала
Основные плюсы охватывают:
– Беспрерывный вход к ресурсу
– Сохранение любых возможностей базового ресурса
– Защита личных сведений
– Аналогичный набор функций
Открытие счета на ресурсе
Процесс регистрации знаменуется понятностью и комфортом. Новые участники обязаны:
1. Зайти на главный ресурс или его зеркало
2. Нажать на клавишу создания аккаунта
3. Указать обязательные информацию
4. Верифицировать email почту
5. Выполнить начальный доступ
Подарок за регистрацию
Начинающие приобретают внушительный начальный приз. Подобное вознаграждение имеет возможность предусматривать:
– Материальные суммы
– Complimentary прокруты
– Повышенный показатель возврата
Логин в личный кабинет
Зарегистрированные пользователи способны мгновенно войти в свой аккаунт, эксплуатируя учетные данные и код. Личный профиль обеспечивает доступ к:
– Контролю депозитом
– Журналу транзакций
– Работающим подаркам
– Параметрам аккаунта
Подарки и предложения
Ресурс постоянно проводит многочисленные акции для пользователей.
Виды поощрений
Основные типы бонусов:
– Депозитные подарки – часть от размера депозита
– Спины – даровые раунды в слотах
– Возврат средств – компенсация процента потерянных сумм
– Соревновательные вознаграждения – призы за выступление в состязаниях
Промокоды
Специальные ваучеры дают возможность получить бонусные привилегии. Клиенты способны найти их на партнерских площадках или получить в рассылке.
Mobile редакция и приложение
Прогрессивные клиенты предпочитают мобильный геймплей.
Функции mobile адаптации
– Гибкий интерфейс для любых гаджетов
– Совокупный путь к слотам
– Стремительная работа
– Комфортное управление
Установить софт
Мобильное программа предложено для скачивания на аппараты с операционными платформами Android и iOS. Программа предоставляет:
– Бесперебойную работу
– Пуш сообщения о призах
– Быстрый запуск к любимым слотам
Азартный портфель
Казино дает обширную коллекцию игровых игр.
Игровые машины
Ассортимент азартных автоматов насчитывает:
– Обычные игры
– Video слоты
– Джекпотные слоты
– Branded автоматы
Live дилеры
Категория настоящих развлечений обеспечивает возможность участвовать с живыми ведущими. Представлены:
– Рулетка
– Блэкджек
– Punto Banco
– Покер
Состязания
Периодические турниры помогают участникам конкурировать за солидные наградные суммы. Соревновательная сетка модифицируется постоянно.
Банковские операции
Сайт обеспечивает обилие способов депозита и получения сумм:
– Кредитные карты
– Электронные кошельки
– Банковские трансферы
– Bitcoin
Любые транзакции выполняются безопасно с применением прогрессивных систем кодирования.
Отдел помощи
Опытная служба support работает постоянно. Соединиться с операторами возможно через:
– Интерактивный чат
– Почтовую почту
– Горячую линию
– Социальные медиа
Секьюрити и регулирование
Игровой клуб оперирует на базе легальной аккредитации. Такое гарантирует:
– Прозрачность развлекательного действа
– Сохранность индивидуальных сведений
– Быстрые выплаты
– Легальный геймплей
Вывод
Официальный портал и его функционирующие зеркала обеспечивают участникам абсолютный спектр функций для комфортной и прибыльной времяпрепровождения. Щедрые подарки, всевозможные игры, компетентная помощь и защищенная система выплат создают ресурс оптимальным вариантом для любителей азартных развлечений.
Современные онлайн-казино обеспечивают клиентам большой диапазон развлечений и призовых опций. Доступ к площадке реализуется через лицензионный веб-сайт или его действующее зеркало Lucky Bear сайт официальный, что обеспечивает бесперебойную работу.
Что представляет собой действующее зеркало казино
Зеркало — это точная дубликат главного сайта, построенная для обхода ограничений. Зеркало сегодня дает возможность клиентам иметь подключение к предпочитаемым слотам в произвольное время.
Лицензионное зеркало обладает всеми опциями основного сайта:
– Целый каталог автоматов
– Учетная запись с записанными информацией
– Текущие поощрения
– Надежные расчетные транзакции
Открытие счета на официальном ресурсе
Алгоритм оформления составляет всего немного минут. Начинающим клиентам нужно:
1. Зайти на проверенный портал или рабочее зеркало
2. Щелкнуть на кнопку “Открыть счет”
3. Ввести нужные данные
4. Подтвердить электронную почту
5. Сделать начальный депозит
Приветственный бонус предоставляется автоматически после завершения всех этапов.
Доступ в аккаунт
Действующие игроки могут совершить подключение применяя:
– Никнейм и ключ
– Код мобильного
– Электронную почту
Аккаунт дает шанс к управлению счетом, истории транзакций и доступным акциям.
Бонусы и кампании
Игровая сервис радует постоянных клиентов многочисленными призами:
Начальный комплект
– Премия на стартовый взнос до 100%
– Free spins на известные игры
– Дополнительные премии за последующие депозиты
Бонусные коды
Специальные коды предоставляют возможность на активацию уникальных призов. Свежие купоны выставляются в разделе “Акции”.
Cashback
Периодический возврат насчитывает до 10% от проигранных денег. Возмещение предоставляется моментально.
Схема лояльности
Постоянные игроки получают очки, которые конвертируются на действительные финансы или даровые спины.
Мобильный сайт и APP
Для удобства участников построена полноценная портативная платформа. Приспособленный дизайн обеспечивает удобно развлекаться с любого мобильного гаджета.
Преимущества софта:
– Быстрый запуск к играм
– Оптимизированный дизайн
– Устойчивая функциональность
– Сообщения о актуальных событиях
Скачать софт можно даром с главного портала для устройств на Android и iOS.
Библиотека развлечений
Автоматы
Коллекция вмещает более 2000 игр от ведущих провайдеров:
– Обычные автоматы
– Современные автоматы
– Прогрессивные автоматы
– Сюжетные слоты
Live казино
Секция Live столов обеспечивает участие с подлинными ведущими в живом режиме:
– Roulette
– Карточная игра
– Баккара
– Покер
Конкурсы
Систематические конкурсы с крупными премиальными бюджетами запускаются еженедельно. Вход в соревнованиях возможно всем зарегистрированным клиентам.
Платежные системы
Взносы и изъятия финансов производятся через популярные платежные системы:
– Банковские карточ ки
– Цифровые кошельки
– Цифровая валюта
– Денежные транзакции
Минимальный депозит — от 100 рублей. Снятие выигрышей проводится в течение 24 ч.
Команда саппорта
24/7 группа поддержки способна поддержать в урегулировании любых ситуаций:
– Мессенджер
– Email
– Телефон
– Публичные сети
Защита и лицензия
Главный портал действует на почве международной документа. Всевозможные параметры клиентов закрыты актуальным SSL-кодированием.
Вывод
Действующее зеркало дает постоянный доступ к любимым автоматам, привлекательным бонусам и функциональным услугам. Откройте счет сейчас и обретите стартовый поощрение!
buy drugs online no prescription http://mxpharmacyeasy.shop/# rx canadian pharmacy
Montreal It services‘s nearly impossible to find well-informed people on this subject, but you seem like you know what you’re talking about!
Thanks
Hello I am so delighted I found your blog page, I really
found you by mistake, while I was looking on Askjeeve for something else, Anyways I am here now and
would just like to say kudos for a incredible post and
a all round exciting blog (I also love the
theme/design), I don’t have time to look over it all at the moment but I
have bookmarked it and also added your RSS feeds, so when I
have time I will be back to read a lot more, Please do keep up the fantastic b.
my homepage … agen penipuan
Актуальные онлайн-казино гарантируют клиентам обилие опций для комфортной игры. Главный веб-портал казино Снекет зеркало открывает доступ ко всем функциям и азартным играм. Однако при появлении программных сложностей на выручку приходят функционирующие копии.
Что означает собой действующее зеркало
Зеркало казино — это стопроцентная дубликат оригинального ресурса, находящаяся по запасному URL. Официальное зеркало удерживает все опции, вместе с открытие профиля, доступ в индивидуальный кабинет, вознаграждения и купоны.
Копия на сегодня гарантирует:
– Бесперебойный вход к азартным автоматам
– Совершенную конфиденциальность индивидуальных данных
– Удержание депозита и истории транзакций
– Применимость всех бонусных программ
Создание аккаунта на главном сайте
Этап создания аккаунта требует пару минут. Свежеиспеченным пользователям необходимо:
1. Войти на основной портал или актуальное зеркало
2. Выбрать кнопку «Регистрация»
3. Заполнить требуемые графы
4. Верифицировать email почту
5. Использовать купон при присутствии
После финиша создания аккаунта игроки приобретают вознаграждение за регистрацию, что может иметь бонусные спины или денежное поощрение.
Логин в персональный кабинет
Личный кабинет открывает всеобъемлющий надзор над игровым действом. Через индивидуальный аккаунт разрешается:
– Депонировать кошелек
– Получать выигрыши
– Задействовать бонусные коды
– Проверять историю пари
– Участвовать в турнирах
– Получать cash back
Анализ бонусов и промо-предложений
Щедрая бонусная политика — ключевое достоинство проекта. Центральные категории вознаграждений:
Вступительный приз
Начинающие зарабатывают выгодное поощрение на стартовые пополнения. Объем приза может достигать 100-200% от объема пополнения.
Free spins
Бесплатные прокруты даются для топовых игровых автоматов. Количество фриспинов колеблется от 10 до 500 штук.
Кешбэк
Систематический или помесячный возврат доли потерянных средств. Стандартный процент возврата — 5-15%.
Состязания
Систематические соревнования с внушительными наградными пулами. Игроки конкурируют за верхние позиции в турнирной таблице.
Смартфонная версия и приложуха
Мобильная версия обеспечивает развлекаться с всякого устройства. Геймеры могут скачать программу для iOS и Android или использовать интернет версию.
Достоинства смартфонного программы:
– Оперативная загрузка автоматов
– Комфортный дизайн
– Push-уведомления о промо
– Вход через Touch ID
Слоты и Live казино
Азартная библиотека насчитывает множество позиций от ведущих производителей.
Известные разделы игр:
– Классические автоматы
– Видео-автоматы с бонусными уровнями
– Накопительный приз автоматы
– Мега-путь машины
Live игорный зал
Секция live игорный зал предлагает партию с профессиональными дилерами. Есть стандартные игры:
– Европейская рулетка
– Блэкджек
– Баккара
– Покер
Как отыскать действующее зеркало
Получить действующую URL на зеркало разрешается несколькими вариантами:
1. Зарегистрироваться на почтовую рассылку
2. Мониторить за обновлениями в соц сетях
3. Контактировать в отдел поддержки
4. Добавить в закладки рабочее зеркало в избранное
Заключение
Лицензионный ресурс и его действующие дубликаты дают постоянный путь к развлекательным слотам. Щедрые поощрения, множественные купоны, эргономичное смартфонное приложение и высококлассная сервис поддержки обеспечивают развлекательный опыт максимально беспроблемным и надежным.
Hello friends, nice post and fastidious urging commented at this place, I am truly enjoying by these.
https://share.google/7AC2d2uRk36JxUDGS
Актуальные онлайн-казино гарантируют клиентам разнообразие возможностей для комфортной игры. Центральный сайт ссылка открывает возможность ко всем опциям и играм. Однако при возникновении программных сложностей на подмогу прибывают актуальные дубликаты.
Что являет собой собой функционирующее зеркало
Копия казино — это стопроцентная копия основного сайта, расположенная по другому доменному имени. Легитимное зеркало поддерживает все функции, включая создание аккаунта, доступ в личный кабинет, премии и кодовые слова.
Зеркало на сегодня обеспечивает:
– Непрерывный вход к развлекательным аппаратам
– Полную защиту личных информации
– Сохранение счета и истории переводов
– Возможность использования всех специальных предложений
Открытие профиля на основном портале
Ход регистрации занимает считанные минут. Новоиспеченным геймерам нужно:
1. Открыть на главный сайт или действующее зеркало
2. Выбрать кнопку «Регистрация»
3. Ввести запрашиваемые данные
4. Подтвердить э-мейл почту
5. Ввести купон при наличии
После финиша создания аккаунта клиенты зарабатывают бонус за регистрацию, какой может содержать бесплатные вращения или монетарное поощрение.
Вход в собственный кабинет
Личный кабинет открывает всеобъемлющий контроль над игровым процессом. Через персональный кабинет возможно:
– Пополнять кошелек
– Забирать выплаты
– Задействовать промокоды
– Проверять историю ставок
– Принимать участие в конкурсах
– Приобретать кэшбек
Описание вознаграждений и промо-предложений
Выгодная призовая система — существенное козырь проекта. Центральные виды бонусов:
Начальный бонус
Новички приобретают богатое премирование на первые пополнения. Сумма бонуса может составлять 100-200% от размера пополнения.
Бесплатные вращения
Безвозмездные вращения предоставляются для известных машин. Число free spins разнится от 10 до 500 штук.
Cash back
Еженедельный или помесячный отдача доли проигранных денег. Обычный процент компенсации — 5-15%.
Соревнования
Систематические состязания с солидными премиальными пулами. Конкурсанты состязаются за призовые позиции в турнирной таблице.
Смартфонная версия и софт
Мобильная версия разрешает развлекаться с любого девайса. Пользователи могут закачать программу для iOS и Android или задействовать интернет версию.
Выгоды портативного приложения:
– Молниеносная подзагрузка игр
– Удобный интерфейс
– Всплывающие уведомления о акциях
– Вход через отпечаток пальца
Автоматы и Live казино
Азартная подборка включает тысячи позиций от ведущих разработчиков.
Востребованные разделы слотов:
– Стандартные слоты
– Видеослоты с премиальными уровнями
– Джекпот игры
– Megaways слоты
Live игровой зал
Зона live игорный зал обеспечивает игру с живыми крупье. Имеются стандартные игры:
– Французская рулетка
– Blackjack
– Punto Banco
– Техасский холдем
Как обнаружить функционирующее зеркало
Получить свежую линк на зеркало можно различными путями:
1. Подписаться на почтовую рассылку
2. Отслеживать за новостями в социальных сетях
3. Обратиться в службу поддержки
4. Сохранить действующее зеркало в закладки
Резюме
Главный сайт и его рабочие копии дают бесперебойный вход к азартным играм. Щедрые вознаграждения, разнообразные промокоды, практичное мобильное программа и качественная техподдержка поддержки делают развлекательный геймплей максимально удобным и надежным.
доставка роллов доставка роллов .
searchmetrics – Overall, professional vibe here; trustworthy, polished, and pleasantly minimal throughout.
leadpipeline – Content reads clearly, helpful examples made concepts easy to grasp.
ranktarget – Pages loaded fast, images appeared sharp, and formatting stayed consistent.
Передовые онлайн-казино предоставляют пользователям массу путей для комфортной игры. Основной ресурс Бет Андреас предоставляет доступ ко всем функциям и азартным играм. Однако при возникновении системных проблем на подмогу прибывают актуальные альтернативные адреса.
Что есть собой рабочее зеркало
Копия казино — это полная дубликат оригинального сайта, расположенная по запасному веб-адресу. Легитимное зеркало сохраняет все характеристики, вместе с создание аккаунта, вход в персональный кабинет, вознаграждения и бонусные коды.
Копия на сегодня дает:
– Постоянный доступ к азартным аппаратам
– Стопроцентную сохранность персональных информации
– Сохранение средств и истории транзакций
– Доступность всех промо-предложений
Регистрация на главном сайте
Этап создания аккаунта требует несколько минут. Свежеиспеченным геймерам следует:
1. Войти на основной ресурс или актуальное зеркало
2. Щелкнуть кнопку «Создать аккаунт»
3. Внести запрашиваемые сведения
4. Подтвердить электронную почту
5. Использовать бонусный код при присутствии
После завершения регистрации геймеры приобретают приз за регистрацию, который может содержать бонусные спины или денежное вознаграждение.
Вход в персональный кабинет
Персональный кабинет дает полный мониторинг над игровым действом. Через собственный раздел можно:
– Депонировать счет
– Выводить средства
– Применять промокоды
– Мониторить журнал пари
– Участвовать в конкурсах
– Обретать cash back
Обзор бонусов и промо-предложений
Выгодная поощрительная политика — существенное достоинство казино. Главные категории поощрений:
Стартовый приз
Дебютанты обретают богатое поощрение на первые вклады. Размер премии может составлять 100-200% от размера взноса.
Бесплатные вращения
Бесплатные спины даются для востребованных машин. Количество free spins разнится от 10 до 500 штук.
Кешбэк
Постоянный или ежемесячный возврат процента проигранных финансов. Типичный процент кэшбека — 5-15%.
Турниры
Постоянные турниры с большими премиальными фондами. Соревнующиеся борются за призовые позиции в рейтинге.
Смартфонная версия и программа
Адаптивная версия позволяет играть с всякого девайса. Игроки могут загрузить программу для iOS и Android или использовать браузерную версию.
Плюсы смартфонного программы:
– Оперативная прогрузка игр
– Комфортный UI
– Push-уведомления о бонусах
– Возможность входа через биометрию
Слоты и Live казино
Развлекательная база насчитывает сотни позиций от известных провайдеров.
Востребованные секции автоматов:
– Классические автоматы
– Видео-автоматы с бонусными уровнями
– Накопительный приз автоматы
– Мегавейс автоматы
Live казино
Раздел live казино обеспечивает развлечение с реальными ведущими. Имеются классические игры:
– Рулетка
– Блэкджек
– Баккара
– Техасский холдем
Как отыскать актуальное зеркало
Найти действующую URL на зеркало возможно множественными вариантами:
1. Оформить подписку на почтовую рассылку
2. Отслеживать за обновлениями в соц сетях
3. Связаться в отдел поддержки
4. Запомнить действующее зеркало в избранное
Итог
Основной сайт и его функционирующие зеркала гарантируют постоянный путь к азартным играм. Богатые бонусы, многочисленные бонусные коды, практичное смартфонное софт и профессиональная служба поддержки обеспечивают игровой геймплей в высшей степени удобным и безопасным.
заказать роллы заказать роллы .
поисковое продвижение инфо сайта увеличить трафик специалисты prodvizhenie-sajtov-po-trafiku10.ru .
deneme bonusu veren casino siteleri: güvenilir casino siteleri
Современные виртуальные казино дают пользователям обширный спектр опций для беспроблемной игры. Но иногда доступ к официальному ресурсу может быть закрытым. В таких моментах на подмогу спешит Jozz казино, которое обеспечивает постоянный путь ко всем сервисам платформы.
Что такое действующее зеркало казино
Копия — это точная версия основного портала, которая располагается по дополнительному интернет-адресу. Альтернативный ресурс сохраняет целый инструментарий главного сайта, включая личный кабинет, счет и запись переводов.
Принципиальные достоинства задействования зеркала:
– Постоянный подключение к платформе
– Полная тождественность функционала
– Защита пользовательских данных
– Поддержка доступных поощрений
Как обнаружить действующее зеркало в данный момент
Есть ряд проверенных способов нахождения свежей URL:
Проверенные ресурсы:
1. Имейл рассылка — администрация систематически отправляет информацию с свежими URL
2. Коммуникационные сети — проверенные аккаунты постят свежую данные
3. Департамент поддержки — специалисты сообщают достоверные ссылки
4. Телефонное приложение — позволяет преодолевать блокировки
Создание аккаунта на главном портале
Операция оформления занимает всего считанные минут и состоит из нижеследующих шагов:
1. Открытие на основной портал или актуальное зеркало
2. Выбор на кнопку «Зарегистрироваться»
3. Внесение учетной анкеты
4. Проверка email почты или мобильного номера
5. Активация бонуса за регистрацию при доступности промокода
Свежие игроки обретают солидный стартовый приз, который может предполагать free spins, валютные призы или кэшбек.
Вход в пользовательский кабинет
Вход на портале выполняется обычным методом. Необходимо указать учетные данные и код доступа, примененные при оформлении.
Значимые нюансы для безопасного входа:
– Используйте надежный шифр
– Задействуйте двухфакторную идентификацию
– Не сохраняйте данные на публичных гаджетах
– Контролируйте адресную строку браузера
Обзор бонусной структуры
Казино одаривает игроков различными привилегиями и специальными предложениями:
Вступительный букет
Дебютанты имеют возможность рассчитывать на великодушное поощрение за дебютный вклад. Обычно это процентовая добавка к внесенной количеству плюс бесплатные вращения для популярных слотов.
Периодические кампании
– 7-дневный кэшбек — возврат процентной доли потерянных финансов
– Бонусы на повторные вклады
– Специальные промо по событиям
– Конкурсы с крупными наградными суммами
Система верности
Деятельные игроки собирают баллы за каждую игру, которые затем превращаются на реальные финансы, free spins или специальные преимущества.
Купоны: как задействовать
Промокоды — это специальные наборы символов, гарантирующие право к специальным привилегиям.
Где взять действующие промокоды:
– Официальные общественные сети казино
– Аффилиатные ресурсы
– Email-подписка
– Отраслевые сообщества
Активируется промокод в отдельное поле при оформлении или зачислении средств кошелька.
Телефонная версия и приложение
Передовые клиенты выбирают развлекаться с мобильных устройств. Сайт предоставляет два метода для удобной смартфонной игры.
Адаптивная модификация
Интернет версия сама настраивается под параметры экранной панели. Не требует загрузки и оперирует в любом современном браузере.
Мобильное приложение
Скачать app можно для гаджетов на Android и iOS. Выгоды app:
– Быстрая активация
– Стабильная функционирование
– Мгновенные-уведомления о акциях
– Независимый преодоление блокировок
Процедура установки легок: требуется открыть на ресурс с портативного устройства и выполнять указаниям.
Игровой коллекция
Коллекция аппаратов включает тысячи наименований от передовых поставщиков.
Слоты
Азартные машины — самая любимая группа забав. Показаны обычные трехбарабанные автоматы, передовые мультимедийные слоты с бонусными раундами, а также прогрессивные выигрыши.
Live казино
Отдел с действительными дилерами дает возможность прочувствовать дух истинного казино. Представлены столы с баккарой.
Трансляция реализуется в HD разрешении, имеется чат с ведущим и другими пользователями.
Турниры
Регулярно устраиваются турниры по всевозможным играм. Включение обеспечивает возможность заработать монетарные вознаграждения, даровые прокруты или особые поощрения.
Денежные операции
Портал предоставляет широкий набор расчетных систем:
– Кредитные карты
– Виртуальные сервисы
– Биткоин
– Банковские транзакты
Наименьшая объем депозита — приемлемая для основной части геймеров. Получение денег производится в короткие временные рамки.
Служба поддержки
Профессиональные операторы готовы поддержать постоянно. Открыты нижеследующие способы коммуникации:
– Интернет-чат
– Email
– Телефонная поддержка
– Социальные сети
Пояснения на частые вопросы можно обнаружить в разделе FAQ.
Резюме
Лицензионный портал казино и его действующие зеркала дают клиентам максимальный подключение ко всем опциям платформы. Значительные привилегии, практичная смартфонная версия, впечатляющий коллекция слотов и опытная помощь формируют гемблинг досуг максимально беспроблемным и защищенным.
vdcasino güncel adres vdcasino
Wild Orchard Gems – Browsed quickly and the layout is simple, clean, and readable.
Передовые онлайн-казино обеспечивают игрокам богатый выбор функций для удобной времяпрепровождения. Вход к платформе clinicacemcor.cl осуществляется через основной домен или действующее зеркало.
Что такое действующее зеркало казино
Актуальное зеркало — это запасной линк основного веб-сайта казино. Такие дубликаты разрабатываются для предоставления стабильного соединения к развлекательной платформе.
Копия сегодня абсолютно повторяет характеристики основного портала. Клиенты приобретают аналогичный путь ко всем услугам, включая регистрацию, внесение депозита кошелька и обналичивание денег.
Регистрация на основном сайте
Механизм создания аккаунта занимает всего считанные минут. Будущим игрокам необходимо:
1. Перейти на лицензионный сайт или действующее официальное зеркало
2. Щелкнуть кнопку “Создать аккаунт”
3. Указать нужные реквизиты
4. Проверить почтовую почту
5. Использовать промокод при наличии
После завершения создания аккаунта пользователь приобретает вознаграждение за регистрацию, который вправе предполагать даровые спины или денежное поощрение.
Авторизация в персональный кабинет
Персональный кабинет — это охраняемая территория, где участники могут контролировать своим счетом. Для доступа требуется указать username и пароль.
В личном кабинете имеются такие возможности:
– Проверка записей транзакций
– Применение купонов
– Управление вознаграждениями
– Вступление в состязаниях
– Контроль кэшбека
– Настройка учетной записи
Бонусы и спецпредложения
Развлекательная система дарит щедрые призы:
Регистрационный бонус — дебютанты приобретают солидное начисление на начальные пополнения.
Free spins — дарятся как при создании аккаунта, так и в рамках различных промо.
Возмещение — постоянный возврат фрагмента утраченных сумм.
Промокоды — эксклюзивные последовательности, открывающие выход к специальным бонусам.
Анализ азартных категорий
Slots
Ассортимент слотов насчитывает сотни позиций от лучших поставщиков. Игроки найдут как классические слоты, так и современные 3D-слоты с притягательной оформлением.
Live казино
Секция Live казино обеспечивает опцию развлекаться с настоящими ведущими в состоянии настоящего времени. Открыты распространенные варианты: рулетка, блэкджек, баккара, покер.
Состязания
Систематические состязания с большими выигрышными фондами манят массу игроков. Призеры получают монетарные награды и специальные подарки.
Смартфонная версия и софт
Портативная версия сайта обеспечивает участвовать с любого аппарата. Интерфейс самостоятельно корректируется под формат экрана.
Загрузить программу можно для аппаратов на Android и iOS. Телефонное app имеет всеми опциями полной версии.
Как определить актуальное зеркало на данный момент
Актуальные адреса дубликатов периодически изменяются. Получить свежую URL можно многими способами:
– Через службу саппорта
– В настоящих информационных сетях
– По почтовой подписке
– На партнерских порталах
Защита и лицензирование
Официальный портал функционирует на основе зарубежной документа. Все платежи защищены инновационными методами шифрования.
Приватность пользовательских данных сохраняется в стопроцентном размере.
Итог
Главный портал и его функционирующие альтернативы обеспечивают клиентам постоянный путь к высококлассным игровым сервисам. Щедрые призы, всевозможные слоты, компетентная помощь — все это делает гемблинговый опыт чрезвычайно приятным и увлекательным.
https://md.yeswiki.net/s/ryUF57LX_N
Подключение к порталу и действующие адреса
Актуальные виртуальные казино предоставляют пользователям огромный спектр опций. Официальный веб-сайт Kent организует защищенный доступ ко всем возможностям. Однако периодически происходят моменты, когда требуется запасной способ подключения.
Что есть собой действующее зеркало
Действующее зеркало — это абсолютная версия легального сайта с иным сетевым адресом. Копия сегодня дает возможность преодолевать возможные барьеры и поддерживать непрерывный подключение к выбранным слотам.
Главное зеркало обладает полными опциями, что и базовый ресурс:
– Весь ассортимент автоматов
– Личный аккаунт с сохраненными информацией
– Все бонусы и акции
– Надежные денежные транзакции
Регистрация и вход в сервис
Процедура регистрации на ресурсе длится считанные минут. Начинающим участникам требуется:
1. Открыть на функционирующее зеркало сейчас
2. Щелкнуть клавишу «Открыть профиль»
3. Ввести обязательные параметры
4. Подтвердить электронную почту или номер мобильного
5. Активировать бонус за открытие аккаунта
Доступ в персональный аккаунт осуществляется посредством внесение ID и секретной комбинации.
Обзор призовой структуры
Привлекательная поощрительная система — основное преимущество ресурса. Пользователи обретают многочисленные поощрения:
Вступительные бонусы
Новые пользователи вправе ожидать на щедрый приз за создание аккаунта. Традиционно это совокупность возможностей, включающий:
– Долевую добавку к первому депозиту
– Подарочные спины
– Дополнительные деньги на кошелек
Купоны и особые предложения
Периодические промокоды позволяют зарабатывать дополнительные привилегии. Задействовать их допустимо в особом поле персонального раздела.
Фриспины и кэшбек
Free spins — это шанс запускать барабаны без применения личных финансов. Кэшбек означает долевой отдачу потерянных денег.
Коллекция игр
Развлекательная сайт представляет внушительную коллекцию слотов.
Автоматы
Разнообразие слотов восхищает представление. Есть обычные трехбарабанные аппараты и актуальные видеослоты с занимательной графикой.
Live заведение
Раздел Live заведения транспортирует клиентов в антураж реального гемблинг дома. Профессиональные операторы ведут игры в онлайн формате.
Соревнования и лидерборды
Постоянные состязания вносят азарта и предоставляют перспективу выиграть внушительные награды.
Портативная реализация и программа
Новые решения обеспечивают участвовать в удобном точке. Мобильная реализация независимо оптимизируется под монитор аппарата.
Скачать приложение возможно для цифровых сред iOS и Android. Приложение предоставляет:
– Скоростной переход
– Надежную производительность
– Push-оповещения об бонусах
– Удобный дизайн
Финансовые операции
Сайт работает с различные системы ввода и получения денег:
– Платежные системы
– Виртуальные сервисы
– Цифровые валюты
– Банковские переводы
Каждые транзакции выполняются через защищенное канал, что обеспечивает безопасность конфиденциальных данных.
Отдел помощи
Профессиональная служба ассистанса работает всегда. Связаться с консультантами возможно через:
– Интерактивный-чат
– Почтовую почту
– Телефон
– Общественные каналы
Резюме
Официальный ресурс и его рабочее зеркало обеспечивают клиентам безопасный и комфортный переход к захватывающим играм. Привлекательные подарки, широкий каталог слотов и высокая помощь обеспечивают времяпрепровождение предельно приятной и выгодной.
Вход к порталу через рабочие зеркала
Современные виртуальные казино гарантируют клиентам непрерывный доступ к услугам. Главный сайт казино AzartPlay работает бесперебойно, предоставляя широкий спектр азартных развлечений. Тем не менее периодически образуются системные препятствия или ограничения, потому важно понимать о присутствии действующих зеркал.
Что является собой основное зеркало казино
Дубликат — это идентичная версия основного сайта с идентичным возможностями. Актуальное зеркало в настоящее время позволяет миновать региональные блокировки и возобновлять гемблинг.
Ключевые выгоды применения зеркал:
– Стопроцентный доступ к индивидуальному кабинету
– Фиксация любых информации счёта
– Идентичный перечень игр
– Действующие поощрения и предложения
Регистрация на ресурсе
Процедура регистрации отнимает пару минут. Новые геймеры получают привлекательный приз за регистрацию, который имеет возможность включать:
– Начальный бонусный бонус
– Комплиментарные фриспины для слотов
– Уникальные купоны
– Расширенный кэшбек
Во имя финализации оформления следует:
1. Переместиться на главный портал или альтернативу
2. Кликнуть элемент «Зарегистрироваться»
3. Внести контактные реквизиты
4. Заверить мейл или телефон
5. Задействовать промокод (при существовании)
Авторизация в собственный кабинет
Следом за правильной записи игроки могут производить вход с помощью центральный сайт или функционирующее зеркало. Собственный кабинет открывает полный контроль над аккаунтом:
– Архив игр
– Ввод депозита
– Получение денег
– Регулирование привилегиями
– Присутствие в турнирах
Поощрения и кампании казино
Сайт радует геймеров различными поощрительными схемами:
Приветственные бонусы
Новички обретают великодушный пакет бонусов на вступительные депозиты. Зачастую это включает процентную доплату к объёму взноса плюс комплиментарные кручения.
Регулярные промо
– Каждонедельный кэшбек до 15%
– Конкурсы с выигрышными пулами
– Подарки на число рождения
– Эксклюзивные программы для VIP клиентов
Схема лояльности
Активные геймеры собирают очки, которые можно конвертировать на настоящие призы или уникальные бонусы.
Портативная форма и программа
Нынешние разработки позволяют геймить в любом месте угодно. Карманная форма ресурса автономно настраивается под дисплей всякого устройства.
Выгоды портативного программы:
– Скоростная запуск слотов
– Эргономичный вид
– Push-оповещения о предложениях
– Шанс загрузить для Android и iOS
Live казино: обстановка реального гемблинг дома
Секция Live клуба транспортирует пользователей в антураж истинного развлекательного клуба. Компетентные ведущие организуют игру в режиме реального времени.
Имеющиеся игры:
– Колесо фортуны
– Блэкджек
– Классика
– Техасский холдем
Автоматы и игровые машины
Каталог азартных слотов насчитывает тысячи наименований от лидирующих провайдеров. Всякий геймер обнаружит развлечение по душе:
– Традиционные слоты
– Видеослоты с специальными турами
– Крупный приз-машины
– Динамические автоматы
Состязания и акции
Регулярные конкурсы добавляют драйв и предоставляют опцию обрести крупные суммы. Участие в состязаниях зачастую безвозмездное, а премиальные пулы составляют значительных величин.
Защита и конфиденциальность
Сайт эксплуатирует современные методы кодирования для защиты сведений пользователей. Совокупные транзакционные транзакции проходят через безопасные соединения.
Заключение
Центральный ресурс и его функционирующие зеркала обеспечивают безопасный доступ к превосходным игровым сервисам. Щедрые призы, удобная карманная редакция, разнообразие машин и квалифицированное Live-заведение формируют сайт превосходным выбором для любителей игровых автоматов.
my stake casino
Современные онлайн-казино предлагают геймерам разнообразие опций для приятной игры. Главный веб-портал казино Apex Spins предоставляет доступ ко всем функциям и играм. Однако при появлении системных проблем на помощь спешат актуальные зеркала.
Что являет собой собой функционирующее зеркало
Копия казино — это точная дубликат оригинального ресурса, размещенная по другому доменному имени. Официальное зеркало сохраняет все опции, в том числе открытие профиля, доступ в индивидуальный кабинет, вознаграждения и бонусные коды.
Копия на сегодня дает:
– Бесперебойный доступ к азартным автоматам
– Совершенную конфиденциальность личных данных
– Удержание баланса и журнала транзакций
– Применимость всех акций
Создание учетной записи на основном портале
Этап открытия профиля занимает считанные минут. Свежеиспеченным клиентам требуется:
1. Открыть на главный сайт или действующее зеркало
2. Выбрать кнопку «Регистрация»
3. Заполнить требуемые сведения
4. Активировать email почту
5. Применить купон при присутствии
После окончания регистрации клиенты приобретают подарок за регистрацию, который может охватывать бесплатные вращения или денежное вознаграждение.
Вход в собственный кабинет
Индивидуальный кабинет открывает всеобъемлющий управление над азартным ходом. Через собственный профиль можно:
– Финансировать депозит
– Снимать призы
– Задействовать купоны
– Отслеживать историю пари
– Принимать участие в состязаниях
– Приобретать возврат средств
Описание бонусов и специальных предложений
Щедрая поощрительная система — важное козырь проекта. Основные типы поощрений:
Стартовый подарок
Дебютанты зарабатывают великодушное награду на стартовые взносы. Сумма бонуса может доходить до 100-200% от объема вклада.
Бонусные спины
Безвозмездные вращения предоставляются для востребованных автоматов. Число фриспинов изменяется от 10 до 500 штук.
Кешбэк
Еженедельный или ежемесячный возврат части потерянных денег. Средний размер кэшбека — 5-15%.
Состязания
Систематические конкурсы с крупными призовыми фондами. Конкурсанты борются за призовые строчки в турнирной таблице.
Портативная версия и софт
Портативная версия обеспечивает играть с всякого гаджета. Клиенты могут загрузить app для iOS и Android или использовать интернет версию.
Преимущества портативного приложения:
– Скоростная прогрузка автоматов
– Практичный дизайн
– Всплывающие уведомления о поощрениях
– Возможность входа через Face ID
Слоты и Live казино
Игровая подборка охватывает множество позиций от ведущих производителей.
Топовые секции автоматов:
– Стандартные автоматы
– Видеослоты с бонусными раундами
– Прогрессивный джекпот автоматы
– Мегавейс слоты
Live игровой зал
Секция live игорный зал предоставляет развлечение с профессиональными дилерами. Есть традиционные варианты:
– Европейская рулетка
– Блэкджек
– Punto Banco
– Покер
Как разыскать актуальное зеркало
Получить актуальную ссылку на зеркало разрешается разными путями:
1. Оформить подписку на почтовую рассылку
2. Наблюдать за апдейтами в соц сетях
3. Написать в сервис поддержки
4. Запомнить актуальное зеркало в закладки
Итог
Основной ресурс и его функционирующие зеркала дают непрерывный доступ к развлекательным слотам. Выгодные поощрения, разнообразные промокоды, удобное смартфонное софт и качественная техподдержка поддержки обеспечивают азартный геймплей максимально приятным и конфиденциальным.
купить суши купить суши .
Актуальные онлайн-казино обеспечивают игрокам широкий ассортимент слотов и щедрые поощрения. Но для удобной работы критично знать, как получить доступ к Mellstroy и его актуальные зеркала.
Что такое официальный ресурс казино
Лицензионный портал казино — это главная платформа, где участники могут наслаждаться гемблинг играми. Сайт действует на легальных условиях и обладает всеми требуемыми документами.
Первостепенные плюсы главного сайта:
– Защищенность личных информации
– Прозрачные условия использования
– Подтвержденные выплаты
– Оперативная поддержка
Рабочее зеркало казино: для чего требуется
Альтернативный адрес — это абсолютная копия главного портала, находящаяся по альтернативному веб-адресу. Рабочее зеркало разрабатывается для обеспечения стабильного подключения к порталу.
Основания использования зеркал:
– Запрет первичного домена
– Технические мероприятия
– Высокая посещаемость на ресурс
Как получить актуальное зеркало сейчас
Обнаружить новое рабочее зеркало можно несколькими путями:
1. Почтовые оповещения — оформите подписку на email доставку
2. Служба техподдержки — напишите в онлайн-чат
3. Официальные каналы — следите за постами
4. Специализированные сайты — достоверные платформы
Создание аккаунта на портале казино
Алгоритм оформления составляет буквально немного моментов:
1. Нажмите на кнопку “Создать аккаунт”
2. Заполните требуемые поля
3. Верифицируйте контактную e-mail
4. Используйте код активации, если доступен
Вслед за оконченной активации вам станет разрешен индивидуальный профиль.
Бонусы и купоны
Выгодная бонусная система — ключевое преимущество казино:
Подарок за открытие счета
Свежие пользователи получают первый подарок, который может содержать:
– Монетарный счет на стартовый депозит
– Free spins для автоматов
– Безвозвратные деньги
Купоны
Регулярно появляются свежие промокоды, обеспечивающие активировать особые преимущества.
Схема возврата средств
Постоянные пользователи приобретают долю проигранных финансов обратно.
Свежие промо и состязания
Казино периодически проводит захватывающие кампании:
– Семидневные соревнования
– Сезонные бонусы
– Конкурсы крупных выигрышей
– Система привилегий
Авторизация в индивидуальный кабинет
Для логина на ресурс нужно:
1. Перейти на официальный портал или функционирующее зеркало
2. Активировать “Войти”
3. Прописать логин и пароль
В индивидуальном профиле открыты данные функции:
– Депозит счета
– Снятие выигрышей
– Анализ истории операций
– Изменение персональными сведениями
Портативная вариант и программа
Адаптивная вариант
Мобильная версия ресурса предоставляет шанс развлекаться с различных смартфонного устройства. Дизайн самостоятельно оптимизируется под габариты screen.
Приложение для download
Загрузить программу можно для:
– Android — непосредственная download с ресурса
– iOS — загрузка через App Store
Плюсы мобильного клиента:
– Быстрый старт
– Стабильная функциональность
– Push-оповещения об бонусах
– Оптимизированный дизайн
Азартные разделы
Барабаны
Разнообразная подборка развлекательных автоматов от известных поставщиков:
– Традиционные слоты
– Современные-автоматы
– Прогрессивные-слоты
Live casino
Раздел с живыми дилерами обеспечивает:
– Рулетка
– Двадцать одно
– Баккара
– Карточные игры
Вещания ведутся в превосходном разрешении, обеспечивая ощущение аутентичного казино.
Варианты пополнения и обналичивания
Казино обслуживает разные финансовые инструменты:
– Платежные card
– Онлайн кошельки
– Криптовалюты
– Банковские транзиты
Наименьшие суммы пополнения и моментальные платежи гарантируют развлечение максимально удобной.
Служба техподдержки
Квалифицированная служба support доступна 24/7 и в состоянии поддержать с любыми проблемами:
– Реалтайм-чат
– Email-консультации
– Телефонная линия
Резюме
Лицензионный ресурс казино и его актуальные альтернативные адреса предоставляют пользователям надежный и увлекательный игровой процесс. Щедрые подарки, комфортная портативная платформа, богатые автоматы и высокоуровневое live-казино формируют эту систему превосходным местом для игровых игр.
You’re so awesome! I do not think I’ve truly
read something like that before. So great to find somebody with a few
original thoughts on this topic. Really.. many thanks for starting this up.
This web site is something that’s needed on the web, someone with a bit of originality!
Here is my website; Structured cabling Montreal
https://cassiteleri.buzz/# güvenilir casino siteleri
питомник растений спб каталог Наш официальный сайт питомника растений содержит полный каталог продукции. Вы можете ознакомиться с ассортиментом деревьев, кустарников, хвойных, туй и многолетних растений. Это удобное решение для жителей Петербурга и Ленинградской области.
оптимизация сайта блог seo-blog21.ru .
Heya i am for the first time here. I found this
board and I find It really useful & it helped me out
a lot. I hope to give something back and aid others like you
aided me.
Feel free to surf to my site – Câblage structuré Montréal
pin up mobil sayt pinup23185.help
https://theflatearth.win/wiki/Post:What_is_Promo_Code_in_1xBet_ALLINMAX_130_Guide
https://lifeinsys.com/user/wonovat
visit clover crest – Browsed briefly, page design looks clean and easy to follow.
маркетинговые стратегии статьи seo-blog20.ru .
Today, I went to the beach with my kids. I found a sea shell and gave it to my 4 year old daughter and said “You can hear the ocean if you put this to your ear.” She put the shell to her ear and screamed.
There was a hermit crab inside and it pinched her ear.
She never wants to go back! LoL I know this is
entirely off topic but I had to tell someone!
Also visit my web blog; reflective construction hats
buy drugs online review
https://cassiteleri.buzz/# deneme bonusu veren casino siteleri
доставка роллов доставка роллов .
Wheat Cove Treasures Online – Checked out the site today and found navigation intuitive and content clear.
Whats up this is kinda of off topic but I was wanting to know if blogs use WYSIWYG editors or if you have to manually code with HTML. I’m starting a blog soon but have no coding expertise so I wanted to get guidance from someone with experience. Any help would be greatly appreciated!
https://gollos.com.ua/yak-rozibraty-faru-za-tsinoyu-chashky-kavy-2.html
deneme bonusu veren casino siteleri casino deneme siteleri
Для фанатов смешанных единоборств нашел материал про ufc в феврале марте 2026 три недели которые встряхнут дивизионы. Посмотрите сами: https://obves63.ru/news/ufc-fevral-mart-2026-polnyj-razbor-turnirov-s-akczentom-na-anderkardy-i-skrytye-intrigi/
bookmarked!!, I love your site!
Check out my web site: polygraf
В этом информативном обзоре собраны самые интересные статистические данные и факты, которые помогут лучше понять текущие тренды. Мы представим вам цифры и графики, которые иллюстрируют, как развиваются различные сферы жизни. Эта информация станет отличной основой для глубокого анализа и принятия обоснованных решений.
Узнать больше – https://vivod-iz-zapoya-2.ru/
доставка суши москва доставка суши москва .
https://cassiteleri.buzz/# casino siteleri
mostbet pomoc http://mostbet2003.help/
1win bet with mobile money 1win bet with mobile money
Предлагаем вашему вниманию интересную справочную статью, в которой собраны ключевые моменты и нюансы по актуальным вопросам. Эта информация будет полезна как для профессионалов, так и для тех, кто только начинает изучать тему. Узнайте ответы на важные вопросы и расширьте свои знания!
Узнать больше – https://vivod-iz-zapoya-2.ru/
Right now it looks like Drupal is the best blogging platform
available right now. (from what I’ve read) Is that what you’re using on your
blog?
Take a look at my homepage … high visibility trucker hat
https://paste.xyz/?7bbd9dbdc47e79a1#41VXKcDrMchpcEwaFwEhJ9PrT9rNpupVA1Sz7XBt4ouE
https://notes.io/exMUh
casino siteleri: deneme bonusu veren casino siteleri
1win cod bonus valabil https://1win5758.help
https://cineblog01.rest/user/1xbet-bonuscode788/
1win bono por registrarse 1win bono por registrarse
Wheat Brook Picks Online – Enjoyed browsing, everything seems logically arranged and readable.
Hi! I understand this is somewhat off-topic however I had to ask. Does operating a well-established blog such as yours require a massive amount work? I’m completely new to blogging but I do write in my journal everyday. I’d like to start a blog so I will be able to share my personal experience and views online. Please let me know if you have any kind of suggestions or tips for brand new aspiring bloggers. Appreciate it!
https://maximumvisa.com.ua/chomu-plastyk-pislya-ultrazvukovoho-nozha-ne.html
Looking stylish creates a strong first impression.
Your outfit speaks volumes before a person even say a word.
It boosts your own confidence and mindset noticeably.
Your polished look signals professionalism in the workplace.
https://kate.qrmoda.ru/eksklyuzivnye-kollektsii-plein-sport-ogranichennye-izdaniya-9331410/
Stylish clothing allow you to showcase your individual personality.
Others often perceive stylish people as more capable and reliable.
Therefore, investing in your wardrobe is an valuable step in your personal brand.
deneme bonusu veren casino siteleri: casino deneme siteleri
shopping outlet link – Browsed casually, design looks organized and readable.
https://vdcasino1st.online/# vdcasino giriş
Asking questions are actually nice thing if you are not understanding anything totally, however this piece of writing gives good
understanding yet.
Also visit my site … Low-voltage cabling Montreal
Link exchange is nothing else but it is just placing the other person’s webpage link on your page at suitable place and other person will
also do similar for you.
My site: Paramount Training Perth
dillaudud online no rx http://mxpharmacyeasy.shop/# mexican pharmacy onlineno rx
stake casino france
Wave Stone Finds – Browsed the site and the layout looks clear and user-friendly.
Hi! Do you use Twitter? I’d like to follow you if that would be okay.
I’m undoubtedly enjoying your blog and look forward to new
updates.
vdcasino güncel giriş vdcasino
betnano güncel adres: betnano
сео агентство сео агентство .
buy prescriptions online usa
storefront link here – Took a short look, navigation feels smooth and intuitive.
написание курсовых на заказ написание курсовых на заказ .
Wave Harbor Picks – Enjoyed exploring the site, content appears clear and straightforward.
this link here – Simple interface, content is readable and navigation is smooth.
read this netx360 login
ed doctor online: Urology Max – where can i buy erectile dysfunction pills
betnano giris: betnano
https://betnano1st.top/# betnano giriş
vdcasino vdcasino
Visit Website netx360
you can find out more netx360+ login
https://sex-positions.online/es-ES/squirt-durante-el-orgasmo-todo-lo-que-necesitas-saber/
seo partners seo partners .
browse bright store – Quick stop here, and the page feels tidy and readable.
look here netx360+
boostsignals – Overall, professional vibe here; trustworthy, polished, and pleasantly minimal throughout.
продвижение в google продвижение в google .
convertcraft – Overall, professional vibe here; trustworthy, polished, and pleasantly minimal throughout.
Outlet Treasures – Came across this page casually, content is readable and layout is neat.
продвижение сайтов во франции prodvizhenie-sajtov-v-moskve11.ru .
продвижение сайтов интернет магазины в москве prodvizhenie-sajtov-v-moskve16.ru .
buy drugs online review https://mxpharmacyeasy.shop/# safest online canada pharmacies
seacrest store page – Sections are clear and reading through content feels comfortable.
discover more – Clean interface, content is well-arranged for easy reading.
В нашем ассортименте представлены и классические, и современные варианты ковров для любого интерьера.
Лучшие ковры дешево
В ассортименте представлены ковры из шерсти, искусственных и натуральных волокон для разных предпочтений.
https://urologymax.com/conditions/erectile-dysfunction.html# ed medicines online
top article netx360 login
Walnut Stone Boutique Hub – Content is straightforward and the pages are easy to navigate.
dune marketplace – Clean interface, everything is easy to find.
browse this market – Skimmed through the site and everything seems clearly arranged.
купить курсовую москва купить курсовую москва .
betnano güncel adres betnano
cloud cove shop – Scrolling through, content feels tidy and simple to follow.
Emporium Picks – Browsed casually, content is simple and sections are easy to navigate.
vdcasino giris vdcasino
see here now netx360 login
sage harbor shop – Navigation is smooth, and information is easy to read.
learn more here – Simple structure, reading and browsing feels smooth.
dunebrook vendor site – Site feels tidy and reading the pages is effortless.
you could try this out netx360
best ed medication online: Urology Max – buy ed pills
Walnut Cove Finds Outlet – Site looks polished and browsing today is effortless.
pearlmeadow shop portal – Clean and minimal design makes browsing straightforward.
https://urologymax.com/conditions/erectile-dysfunction.html# where can i buy erectile dysfunction pills
seo partner program prodvizhenie-sajtov-v-moskve18.ru .
комплексное продвижение сайтов москва комплексное продвижение сайтов москва .
https://games.mostbet-zerkaloonline.buzz/plinko-mostbet.html
сео агентство сео агентство .
look at this site netx360+
visit this marketplace – A quick look shows the page layout is smooth.
trailstone info page – Simple structure, navigation is straightforward and fast.
this content netx360
Meadow Treasures – Came across this page randomly, reading flows naturally and structure is neat.
seo partner prodvizhenie-sajtov-v-moskve16.ru .
Важный отрезок ufc в феврале марте 2026 три недели которые встряхнут дивизионы: прогнозы на ключевые поединки. Вот ссылка: https://rybalka62.ru/news/obzor-blizhajshih-sobytij-ufc-fevral-mart-2026-prognozy-na-klyuchevye-poedinki/
For summaries
Best us online casinos deposit limits
for evaluation.
Любишь азарт? https://school57.ru предлагает разнообразные игровые автоматы, настольные игры и интересные бонусные программы. Платформа создана для комфортной игры и предлагает широкий выбор развлечений.
betnano: betnano
Teal Finds Shop – Clean structure ensures fast and simple browsing.
simple shop link – Well-organized pages make browsing smooth and readable.
candan pharmacy no precription drug
https://vdcasino1st.blog/# vdcasino güncel
this link here – Layout is minimalistic, very easy to read and navigate.
driftstone site – Navigation is smooth and the page looks organized.
betnano guncel: betnano
купить задание для студентов купить задание для студентов .
Violet Harbor Select – Layout is tidy and browsing through pages is comfortable.
official pearlmeadow page – Everything seems neatly arranged and simple to browse.
open the bazaar page – First glance shows the content is easy to follow.
Stone Picks – Just discovered this page, layout is organized and content is easy to read.
see chestnut collection – Quick glance shows page is clear and easy to navigate.
https://urologymax.com/# ed medicines online
visit trailbrook – Pages are well organized, navigation is easy and smooth.
betnano güncel: betnano
Market Hub – Straightforward pages make product discovery easy.
глубокий комлексный аудит сайта глубокий комлексный аудит сайта .
покупка курсовой kupit-kursovuyu-87.ru .
this rubystone page – Navigation is simple, and content is clearly presented.
cheap ed drugs: ed medications – cheap ed medication
driftmarketdistrict – Came across this site, layout feels smooth and simple.
click here – Interface is clean, very easy to browse through.
tramadol usa pharmacy https://mxpharmacyfast.shop/# online prescription pharmacy usa
Эта информационная статья охватывает широкий спектр актуальных тем и вопросов. Мы стремимся осветить ключевые факты и события с ясностью и простотой, чтобы каждый читатель мог извлечь из нее полезные знания и полезные инсайты.
Подробнее – https://vivod-iz-zapoya-2.ru/
seo partner program prodvizhenie-sajtov-v-moskve11.ru .
It’s amazing for me to have a web page, which is good designed for my experience.
thanks admin
Hey! Do you know if they make any plugins to help with SEO?
I’m trying to get my blog to rank for some targeted keywords but I’m not seeing
very good results. If you know of any please share.
Thank you!
my blog :: voice ai receptionist
check this outlet – Spent a moment here, the site feels intuitive and tidy.
онлайн сервис помощи студентам kupit-kursovuyu-83.ru .
Юристы по банкротству в Уфе
Excellent article! We are linking to this great content on our site.
Keep up the good writing.
Here is my webpage: green dragon jellycat
Violet Picks Hub – The layout looks clean and the pages are easy to browse.
Jasper Hub – Stumbled on this site, layout is clean and reading is effortless.
помощь студентам и школьникам помощь студентам и школьникам .
open berry market – Passing by quickly and the layout feels readable.
browse Copper Meadow – The shop name feels balanced, serene, and easy to remember.
заказать практическую работу недорого цены kupit-kursovuyu-84.ru .
timberwillow quick check – Simple layout, content is accessible, pages load quickly.
курсовая заказ купить kupit-kursovuyu-86.ru .
leadmatrix – Appreciate the typography choices; comfortable spacing improved my reading experience.
scalewave – Content reads clearly, helpful examples made concepts easy to grasp.
Эта информационная заметка предлагает лаконичное и четкое освещение актуальных вопросов. Здесь вы найдете ключевые факты и основную информацию по теме, которые помогут вам сформировать собственное мнение и повысить уровень осведомленности.
Выяснить больше – https://vivod-iz-zapoya-2.ru/
https://urologymax.com/conditions/erectile-dysfunction.html# low cost ed medication
Широкий выбор ковров представлен в интернет магазине нашего города Краснодар, подходящий для всех стилей интерьера.
Купить ковры онлайн
Большой ассортимент материалов обеспечивает выбор ковров под разнообразные пожелания клиентов.
reachrocket – Pages loaded fast, images appeared sharp, and formatting stayed consistent.
What’s up, just wanted to say, I liked this article.
It was practical. Keep on posting!
seoradar – Bookmarked this immediately, planning to revisit for updates and inspiration.
clickrly – Color palette felt calming, nothing distracting, just focused, thoughtful design.
You actually make it seem so easy with your presentation but I find this matter to be actually something
that I think I would never understand. It seems too complicated and very broad for me.
I’m looking forward ai call answering for hvac your next post, I’ll try to get the hang of it!
look what i found Double income
ремонт в 2х комнатной квартире remont-v-tyle.ru .
Harbor Deals – Pages are neat and browsing feels comfortable.
check out dawnvendor – Content is organized and simple to browse.
rubystonecourtyard hub – Just visited, layout feels clean and easy to navigate.
For the opportunity
hassle free loans for bad credit guaranteed approval
for long-term learning.
I’m truly enjoying the design and layout of your website.
It’s a very easy on the eyes which makes it much more enjoyable for
me to come here and visit more often. Did you hire out a designer to create your theme?
Great work!
Feel free to surf to my website: ai phone answering service
написать курсовую работу на заказ в москве написать курсовую работу на заказ в москве .
https://padisahbetvip.online/# padişahbet güncel giriş
艾一帆海外版2026 高清视频平台 全球加速 动漫专区
visit their store – Minimalist design, navigation is smooth and effortless.
pin-up turnir jadvali http://www.pinup76809.help
I have been browsing online more than 4 hours today, yet I never found any interesting article like yours.
It’s pretty worth enough for me. In my view, if all website owners and bloggers made good content as you did, the internet will be a lot more useful than ever before.
My web page – ai phone answering service
online pharmacies in usa
browse pearlmeadow – Quick check shows an organized layout that’s easy to move through.
https://padisahbetvip.online/# padişahbet güncel adres
check over here Swap crypto
you could try here Buy crypto
Ridge Deals – Landed here unexpectedly, content is organized and easy to digest.
this online store – Happened to find this site and enjoyed taking a look around.
частный seo оптимизатор частный seo оптимизатор .
написание курсовых на заказ написание курсовых на заказ .
My brother suggested I might like this blog. He was entirely right.
This post truly made my day. You can not imagine simply how
much time I had spent for this information! Thanks!
chestnutharboroutlet – Browsing casually, content is readable and site looks tidy.
baystoneemporium – First impression is positive and the layout looks tidy and straightforward.
Лучшее казино https://россиягоржусь.рф платформа для онлайн игр с большим выбором слотов и настольных развлечений. Бонусные предложения и удобный интерфейс делают игру комфортной.
раскрутка сайта франция prodvizhenie-sajtov-v-moskve11.ru .
visit this site right here Make money on gold
Good day I am so thrilled I found your blog page, I really found you by accident, while I was searching on Askjeeve for something else, Anyhow I am here now and would just like to
say thanks a lot for a incredible post and a all round entertaining blog (I also love the theme/design), I don’t have time to go through it all at the
minute but I have saved it and also added in your RSS feeds, so when I have time I will be back to read a great deal more, Please do keep
up the fantastic job.
Take a look at my site … automated call answering service
Velvet Cove Hub – Pages are well structured and content is straightforward and helpful.
seo network prodvizhenie-sajtov-v-moskve16.ru .
visit timberharbor – Content is organized nicely and navigation feels smooth.
куплю курсовую работу куплю курсовую работу .
When I initially commented I seem to have clicked on the -Notify me when new comments
are added- checkbox and from now on every time a comment is added
I recieve 4 emails with the exact same comment.
Perhaps there is a way you are able to remove me from that service?
Appreciate it!
Also visit my web-site; persimmon dragon jellycat
discover the district – The store name popped up and evokes a friendly, welcoming style.
seo network prodvizhenie-sajtov-v-moskve17.ru .
курсовые заказ курсовые заказ .
try this web-site Double earn
https://urologymax.shop/conditions/erectile-dysfunction.html# erectile dysfunction drugs online
erectile dysfunction pills online: ed medications – online ed treatments
dawnridgevendorstudio – Nice page here, browsing through content feels comfortable.
Right now it looks like Expression Engine is the preferred blogging platform available right now.
(from what I’ve read) Is that what you’re using on your blog?
1win sistem pariuri http://1win5758.help
official roseharbor page – Clean layout and minimal design make navigation effortless.
Bazaar Gems – The design is clean and finding items feels effortless.
написать курсовую работу на заказ в москве kupit-kursovuyu-84.ru .
padisahbet guncel padisahbet
покупка курсовых работ покупка курсовых работ .
click to visit – Smooth navigation and content is easy to follow.
купить курсовую москва kupit-kursovuyu-86.ru .
collective outlet site – Looks like a practical page with clearly presented details.
Market Treasures – Stumbled upon this page, reading flows smoothly and sections are clear.
For the reason that the admin of this web page is working, no hesitation very rapidly it will be famous, due to its feature contents.
Feel free to surf to my web blog onyx dragon jellycat
crash 1win estrategia https://1win5772.help
best online pharmacies https://mxpharmacyfast.shop/# canada pharmacies no prescription needed
padişahbet güncel giriş: padişahbet
their boutique store – Browsed the site for a moment and the navigation feels pretty smooth.
open bay harbor market – Quick stop here and the page presentation seems organized.
Оплата детского сада и начисление платежей иногда вызывают вопросы у родителей. Юрист поможет разобраться в системе платежей и правомерности начислений. При необходимости можно подготовить обращение в соответствующие органы. Гарантия на лифт в новостройке: Правовые аспекты и сроки
Сервисное обслуживание как залог долговечности окон ПВХ
Уголки для москитных сеток в Москве: обзор рынка и рекомендации по выбору
https://padisahbetvip.online/# padişahbet resmi
tealwillow marketplace – Simple structure, sections are easy to locate.
Преимущества установки раздвижных систем на балконах Дорогомилово
Обзор рынка москитных сеток в Москве в 2026 году
their website – Ran into this brand, and the exchange-style name feels structured and professional.
my link Crypto wallet
Velvet Market – Website layout looks clean and reading through content is simple.
Региональные особенности эксплуатации защитных конструкций в Нижегородской области
Обзор рынка труда в районе Лианозово в сфере ремонта окон
Мошенничество в интернете становится все более распространенным. Юрист объяснит, как правильно собрать доказательства и подать заявление. Это увеличивает шансы на расследование дела. Правовые аспекты справления нужды в общественном месте
написание курсовой работы на заказ цена написание курсовой работы на заказ цена .
For studies
Discover personal loans near me
to save money.
раскрутка и продвижение сайта раскрутка и продвижение сайта .
Профессиональный ремонт и реставрация пластиковых подоконников
Москитные сетки в Марушкинском: виды, выбор, установка и уход
internet seo prodvizhenie-sajtov-v-moskve18.ru .
my sources Double income
Неправомерные действия коллекторов можно и нужно обжаловать. Юрист объяснит, какие методы взыскания долгов являются незаконными. При необходимости можно обратиться с жалобой в контролирующие органы. Высота бордюра в зависимости от функционального назначения
visit daisy workshop – Layout is simple, and navigating through content feels easy.
Особенности замены уплотнителей в жилых массивах Очаково-Матвеевского
Цены на москитные сетки в Москве (февраль 2026)
написание курсовых на заказ написание курсовых на заказ .
roseharbor online – The site is easy to browse, with neatly organized content.
What’s up mates, its enormous piece of writing on the topic of tutoringand completely defined, keep it up all the time.
Take a look at my web page … lavender dragon jellycat
Snow Deals – Clean structure helps locate products efficiently.
https://urologymax.com/conditions/prostate-cancer.html# erectile dysfunction medication online
Emporium Finds – Browsed by chance, layout is simple and easy to digest.
collectivecove – Unique jewel-inspired style balances elegance with approachability.
продвижение сайтов интернет магазины в москве продвижение сайтов интернет магазины в москве .
this orchardcrest page – Quick exploration shows smooth design and fast-loading pages.
see this website Bonus in gold
visit their page – Pages are well-organized, reading and navigating feels natural.
Если вас интересует тема ufc в феврале марте 2026 три недели которые встряхнут дивизионы, советую заглянуть сюда. Здесь подробности: https://avtoshkola37.ru/news/prognozy-na-ufc-fevral-mart-2026-kto-zaberyot-verh-v-glavnyh-boyah/
discover caramel cove emporium – Had a brief glance, page design seems clean and organized.
visit the shop page – Stumbled upon it and the layout looks simple and well arranged.
find more Double earn
продвижение сайтов интернет магазины в москве prodvizhenie-sajtov-v-moskve16.ru .
buy cialis online no presciption canadian healthcare
visit this marketplace – Took a glance around and the navigation seems well planned.
tealstone online – Navigation feels intuitive and design is simple.
seonexus – Navigation felt smooth, found everything quickly without any confusing steps.
seoshift – Overall, professional vibe here; trustworthy, polished, and pleasantly minimal throughout.
online ed pills: UrologyMax – buy ed medication online
browse the marketplace – Ran into this store, and the name carries a refreshing coastal vibe.
Vale Marketplace – Layout is well-organized and browsing feels natural.
vendor showcase – Content is clear and navigation flows smoothly.
holiganbet güncel giriş: holiganbet
official rivermeadow page – Pages are structured well, making browsing comfortable.
https://urologymax.com/conditions/low-testosterone-low-t.html# affordable ed medication
Market Treasures – Stumbled upon this page, everything flows smoothly and is simple to read.
Stone Gems Market – Smooth interface ensures easy product discovery.
shop district page – A clean and simple layout makes exploration comfortable.
To compare
National lenders for bad credit
for valuable insights.
https://holiganbetvip.top/# holiganbet guncel giris
browse here – Clean interface, smooth navigation and clear content.
tradehub – Clear, strong design ensures the exchange stands out online.
iyifan平台2026 海外华人无广告高清电影电视剧 AI推荐
take a look here – I visited the site and the information is well laid out and simple.
iyifan平台2026 海外华人无广告高清电影电视剧 AI推荐
1win cod sms http://1win62509.help
online shop portal – Just browsing casually and the structure looks clear.
sunmeadow online portal – Easy browsing experience with minimal distractions.
纽卡斯尔6-1狂屠卡拉巴赫!2026欧冠附加赛炸裂比分,戈登半场大四喜,喜鹊强势杀入淘汰赛,最新足球赛事比分太燃了!
莫离2026 白鹿丞磊 高清古装大女主 海外华人必备 无广告高清体验
Adelaide United vs Perth Glory – 2026 A-League 16:35 kick-off! Australian football scores & betting buzz live now!
爱一番海外版2026 高清视频平台 全球加速 大数据AI分析
написание курсовых на заказ написание курсовых на заказ .
Lanús vs Flamengo – 2026 South American Super Cup 08:30! Epic clash – latest football scores from South America!
комплексное продвижение сайтов москва комплексное продвижение сайтов москва .
New online casino Australia 2026 huge welcome bonuses free spins
奇思妙探第二季高清完整版2026 海外华人免费观看
Lanús vs Flamengo – 2026 South American Super Cup 08:30! Epic clash – latest football scores from South America!
驕陽似我续集2026 高清现偶甜宠 海外华人必备 AI推荐个性化观看
mexico online pharmacies medication http://mxpharmacyfast.shop/# best online pharmacy for viagra
狙击蝴蝶2026 高清悬疑刑侦 海外华人高清在线 全球加速无缓冲
马赛客场硬刚布雷斯特!2026法甲20:45生死战,姆巴佩旧将能否带队翻盘?法国足球最新赛事比分火热预测中!
Brann 0-1 Bologna 2026 Europa League tight win! Italians steal it late – latest results heating up knockout race!
迪丽热巴陈飞宇《慕胥辞》2026古装爱情巨制,海外华人免费高清热播,虐心又甜蜜,全球加速无缓冲播放,2026古装天花板。
捕风追影在线平台2026 AI推荐 海外华人高清影视直播
逐玉2026 张凌赫田曦薇古装甜宠权谋 海外华人高清在线追剧 全球加速个性化推荐
take a look here – Came across this store and the name feels modern and friendly.
click to explore – Navigation is smooth, content is easy to digest.
holiganbet giriş: holiganbet
Stone Picks – Just discovered this page, layout is simple and content is clear.
Cove Gems – Navigation flows nicely and the pages are easy to follow.
https://urologymax.com/# buy ed meds online
explore riverbrook site – Layout is minimal and sections are easy to find.
Вы предоставляете интересный информацию по теме Olimp Casino.
http://alt1.toolbarqueries.google.co.jp/url?sa=i&url=https://olimp-casino-kazakhstan-7777.kz/games
opal willow shop – Spent a few minutes exploring, the page feels informative.
Stone Shop – Came across this site, the structure is simple and easy to navigate.
Cove Treasures – Organized pages make browsing products fast.
holiganbet guncel: holiganbet
cheap ed drugs: ed medications – cheap erectile dysfunction pills
discover more – Pages are tidy, content flows logically and smoothly.
trailstone website – Well-structured layout, information is accessible with ease.
visit caramel brook – Took a quick look, the layout feels clean and easy to navigate.
browse this bazaar – Scrolled through a few sections and everything seems tidy.
official outlet page – Opened the website earlier and the structure made it pleasant to navigate.
explore this harbor outlet – The site is simple to navigate and the content is easy to read.
Главная kraken официальные ссылки
Упрощенная система налогообложения подходит не всем предпринимателям. Юрист или налоговый консультант поможет оценить преимущества и возможные ограничения. Грамотная консультация позволит выбрать оптимальный режим. Приобщение доказательств в жалобном производстве
jasperlane – Classic, approachable visuals help the brand feel warm and grounded.
Обоснование пользы регулярного использования москитных сеток в быту
Замена уплотнителей на пластиковых окнах в Выхино-Жулебино: Обзор и Ценообразование
狙击蝴蝶2026 高清悬疑刑侦陆剧 海外华人必备在线观看 全球加速无缓冲播放
Особенности замены уплотнителей в жилых массивах Очаково-Матвеевского
Виды москитных сеток
Конфликты между соседями иногда переходят в юридическую плоскость. Юрист поможет разобраться в нормах жилищного законодательства. Консультация подскажет возможные способы урегулирования спора. Угроза убийством или причинением тяжкого вреда здоровью: правовой анализ
Take a look
Personal loan for credit card debt
for hands-on experience.
Преимущества плунжерного крепления в условиях Гагаринского района
Ремонт окон в Троицке: Обзор услуг и распространенные проблемы
помощь студентам контрольные kupit-kursovuyu-88.ru .
мостбет Халык банк http://mostbet82043.help
holiganbet güncel adres: holiganbet
holiganbet resmi: holiganbet
Cove Treasures – Came across this page randomly, reading flows nicely and structure is clear.
Доступ к сайту через действующие зеркала
Передовые виртуальные казино обеспечивают игрокам постоянный подключение к сервисам. Главный веб-сайт Мелстрой казино работает бесперебойно, обеспечивая большой выбор азартных игр. Однако порой возникают системные сложности или блокировки, в связи с чем важно понимать о присутствии актуальных зеркал.
Что означает из себя официальное зеркало казино
Альтернатива — это абсолютная реплика основного портала с схожим набором функций. Функционирующее зеркало сейчас обеспечивает обходить локальные блокировки и вести игру.
Принципиальные преимущества задействования зеркал:
– Безграничный доступ к собственному кабинету
– Поддержание любых показателей профиля
– Схожий набор автоматов
– Действующие привилегии и кампании
Регистрация на портале
Операция создания аккаунта длится несколько минут. Начинающие пользователи зарабатывают великодушный поощрение за создание счёта, который способен охватывать:
– Начальный игровой приз
– Даровые спины для игр
– Особые купоны
– Усиленный компенсацию
Для завершения записи требуется:
1. Переместиться на официальный сайт или зеркало
2. Нажать опцию «Оформиться»
3. Внести персональные информацию
4. Подтвердить мейл или телефон
5. Активировать код (если есть присутствии)
Авторизация в персональный кабинет
Вслед за правильной создания аккаунта пользователи способны выполнять подключение с помощью главный портал или актуальное зеркало. Персональный кабинет даёт безграничный контроль над счётом:
– История ставок
– Зачисление кошелька
– Вывод призов
– Контроль наградами
– Вовлечение в турнирах
Бонусы и акции казино
Платформа удовлетворяет геймеров вариативными бонусными программами:
Вступительные подарки
Начинающие зарабатывают великодушный комплект привилегий на стартовые вклады. Как правило это содержит процентную надбавку к объёму депозита плюс безвозмездные фриспины.
Регулярные предложения
– Раз в неделю компенсация до 15%
– Турниры с выигрышными пулами
– Подарки на дату рождения
– Специальные акции для статусных геймеров
Программа вознаграждения
Регулярные геймеры собирают единицы, они допустимо конвертировать на реальные призы или эксклюзивные привилегии.
Портативная форма и софт
Современные инновации дают возможность играть везде угодно. Мобильная редакция портала самостоятельно подстраивается под экран произвольного аппарата.
Плюсы карманного программы:
– Быстрая запуск автоматов
– Практичный дизайн
– Push-сообщения о предложениях
– Возможность загрузить для Android и iOS
Настоящее казино: антураж истинного игорного клуба
Раздел Live казино доставляет геймеров в антураж настоящего азартного учреждения. Компетентные операторы ведут процесс в состоянии настоящего времени.
Доступные варианты:
– Европейская рулетка
– Карточная игра
– Классика
– Покерная игра
Игровые машины и гемблинг автоматы
Коллекция гемблинг автоматов включает массу наименований от ведущих студий. Любой пользователь найдёт автомат по душе:
– Традиционные барабаны
– Инновационные игры с призовыми турами
– Джекпот-автоматы
– Многолинейные игры
Состязания и лотереи
Систематические состязания добавляют азарт и обеспечивают возможность получить внушительные награды. Присутствие в состязаниях часто комплиментарное, а призовые фонды насчитывают внушительных сумм.
Охрана и секретность
Ресурс применяет инновационные протоколы шифрования для гарантии информации геймеров. Совокупные денежные операции проходят через охраняемые протоколы.
Заключение
Официальный сайт и его рабочие зеркала гарантируют надёжный подключение к качественным гемблинг сервисам. Великодушные бонусы, комфортная смартфонная форма, разнообразие машин и высококлассное Live-клуб делают сайт прекрасным решением для ценителей игровых развлечений.
Нарушение прав арендатора или арендодателя может привести к судебному спору. Юрист поможет проанализировать договор аренды и предложить варианты решения конфликта. Консультация позволяет избежать длительных разбирательств. Аренда спортивного зала в школе: руководство по процессу
Вход к порталу через действующие зеркала
Передовые интернет казино дают геймерам непрерывный доступ к сервисам. Центральный сайт http://blog.geekman.vip/archives/4840/ оперирует надёжно, предлагая широкий ассортимент развлекательных слотов. Но иногда появляются цифровые проблемы или запреты, в связи с чем критично знать о наличии рабочих зеркал.
Что является собой главное зеркало казино
Дубликат — это абсолютная дубликат основного портала с схожим набором функций. Рабочее зеркало в настоящее время даёт возможность обходить локальные барьеры и продолжать развлечения.
Ключевые преимущества задействования зеркал:
– Абсолютный доступ к собственному кабинету
– Сохранение каждых сведений счёта
– Такой же ассортимент слотов
– Действующие вознаграждения и предложения
Создание аккаунта на портале
Операция регистрации занимает несколько минут. Начинающие геймеры приобретают щедрый поощрение за запись, он имеет возможность охватывать:
– Вступительный игровой подарок
– Безвозмездные спины для машин
– Уникальные ваучеры
– Увеличенный кешбэк
Во имя завершения регистрации следует:
1. Зайти на официальный портал или копию
2. Нажать опцию «Создать аккаунт»
3. Ввести контактные реквизиты
4. Активировать почтовый адрес или контакт
5. Активировать купон (при присутствии)
Подключение в индивидуальный кабинет
По завершении правильной создания аккаунта клиенты могут производить доступ с помощью центральный веб-сайт или действующее зеркало. Индивидуальный кабинет открывает безграничный надзор над аккаунтом:
– Архив пари
– Пополнение счёта
– Получение денег
– Контроль привилегиями
– Присутствие в турнирах
Поощрения и акции казино
Сайт балует геймеров вариативными поощрительными схемами:
Приветственные бонусы
Дебютанты зарабатывают богатый пакет бонусов на начальные пополнения. Типично это предполагает пропорциональную доплату к сумме пополнения плюс бесплатные фриспины.
Систематические акции
– Раз в неделю кэшбек до 15%
– Состязания с премиальными пулами
– Подарки на день рождения
– Эксклюзивные программы для VIP клиентов
План лояльности
Деятельные клиенты накапливают пункты, они допустимо обменять на настоящие финансы или особые привилегии.
Портативная версия и софт
Актуальные инновации дают возможность геймить в любом месте подходяще. Портативная версия ресурса автоматически подстраивается под размер любого девайса.
Достоинства мобильного приложения:
– Моментальная загрузка автоматов
– Эргономичный дизайн
– Push-уведомления о предложениях
– Опция инсталлировать для Android и iOS
Реальное казино: атмосфера подлинного гемблинг клуба
Область Live клуба доставляет пользователей в антураж реального гемблинг заведения. Опытные операторы проводят процесс в режиме подлинного времени.
Доступные развлечения:
– Колесо фортуны
– Блэкджек
– Punto Banco
– Техасский холдем
Слоты и азартные аппараты
Каталог развлекательных машин насчитывает массу названий от передовых студий. Всякий игрок отыщет автомат по желанию:
– Традиционные слоты
– Современные автоматы с призовыми этапами
– Прогрессивный-слоты
– Динамические слоты
Турниры и раздачи
Регулярные состязания включают драйв и предоставляют возможность получить внушительные награды. Вовлечение в конкурсах нередко комплиментарное, а наградные пулы достигают крупных величин.
Безопасность и секретность
Сайт эксплуатирует актуальные методы кодирования для охраны данных пользователей. Каждые транзакционные транзакции выполняются через зашифрованные каналы.
Заключение
Центральный портал и его функционирующие зеркала обеспечивают безопасный подключение к отличным азартным развлечениям. Щедрые награды, практичная портативная версия, богатство игр и профессиональное Live-клуб создают портал превосходным вариантом для любителей гемблинг игр.
learn more here – Layout is tidy, making the site feel organized.
explore Clover Crest – The name popped up and carries a relaxed, easygoing feel.
MintCrestNetwork – The marketplace is pleasant, inviting, and intuitive to explore.
Источник kraken зеркало рабочее
Широкий выбор рулонных конструкций для защиты окон
Рамочные москитные сетки: обзор, преимущества и критерии выбора
Защита прав потребителей часто требует юридической поддержки. Если продавец отказался возвращать деньги или устранять недостатки товара, юрист поможет подготовить претензию. При необходимости можно обратиться в суд. Бесплатная юридическая консультация по семейным делам в Санкт-Петербурге
Нынешние онлайн-казино гарантируют пользователям широкий ассортимент опций для комфортной досуга. Переход к платформе РёРіСЂС‹ Wilder реализуется через главный сайт или функционирующее зеркало.
Что такое актуальное зеркало казино
Функционирующее зеркало — это резервный домен основного веб-сайта казино. Такие версии формируются для обеспечения непрерывного доступа к азартной платформе.
Дубликат сегодня абсолютно дублирует характеристики главного ресурса. Пользователи получают такой же выход ко всем функциям, включая регистрацию, финансирование депозита и обналичивание призов.
Регистрация на лицензионном сайте
Механизм открытия профиля отнимает всего считанные секунд. Свежим участникам требуется:
1. Войти на официальный портал или действующее настоящее зеркало
2. Щелкнуть кнопку “Создать аккаунт”
3. Заполнить требуемые информацию
4. Проверить e-mail почту
5. Ввести код активации при существовании
После финализации открытия профиля клиент приобретает подарок за регистрацию, который имеет право содержать free spins или монетарное вознаграждение.
Логин в персональный кабинет
Личный кабинет — это безопасная область, где пользователи способны управлять своим профилем. Для логина необходимо напечатать имя пользователя и код доступа.
В пользовательском кабинете доступны данные опции:
– Просмотр журнала транзакций
– Применение купонов
– Настройка поощрениями
– Включение в турнирах
– Мониторинг возврата средств
– Изменение аккаунта
Вознаграждения и промо
Азартная система предлагает выгодные вознаграждения:
Приветственный набор — дебютанты зарабатывают крупное поощрение на начальные пополнения.
Free spins — предоставляются как при создании аккаунта, так и в процессе многочисленных кампаний.
Кэшбек — еженедельный возврат фрагмента потерянных финансов.
Промокоды — эксклюзивные последовательности, дающие возможность к специальным призам.
Обзор азартных категорий
Слоты
Ассортимент аппаратов насчитывает тысячи позиций от топовых провайдеров. Геймеры откроют как обычные машины, так и новые видеослоты с захватывающей визуализацией.
Live казино
Категория Live казино предлагает право играть с настоящими ведущими в состоянии реального времени. Представлены востребованные игры: рулетка, блэкджек, баккара, покер.
Турниры
Периодические турниры с солидными премиальными банками манят множество соревнующихся. Чемпионы обретают финансовые призы и уникальные премии.
Телефонная версия и приложение
Адаптивная версия сайта позволяет наслаждаться с произвольного устройства. Оформление автономно адаптируется под диагональ экрана.
Загрузить программу можно для девайсов на Android и iOS. Телефонное приложение располагает всеми возможностями десктопной версии.
Как обнаружить рабочее зеркало на текущий день
Свежие URL альтернатив систематически изменяются. Узнать свежую линк можно несколькими вариантами:
– Через сервис поддержки
– В официальных социальных сетях
– По e-mail дайджесту
– На партнерских ресурсах
Охрана и легальность
Лицензионный домен функционирует на фундаменте международной документа. Все операции оберегаются инновационными протоколами кодирования.
Секретность индивидуальных сведений обеспечивается в стопроцентном формате.
Итог
Основной портал и его действующие альтернативы предоставляют пользователям круглосуточный доступ к высококлассным гемблинговым сервисам. Выгодные вознаграждения, разнообразные слоты, опытная сервис — все это формирует гемблинговый процесс предельно комфортным и интересным.
https://urologymax.com/conditions/erectile-dysfunction.html# online ed medication
Нынешние сетевые казино предоставляют клиентам обширный выбор вариантов для беспроблемной игры. Однако иногда соединение к основному платформе может оказаться заблокированным. В таких моментах на помощь спешит lucianomontagnoli.com.br, которое обеспечивает непрерывный доступ ко всем функциям платформы.
Что такое действующее зеркало казино
Альтернативный сайт — это полная копия основного сайта, которая размещается по запасному домену. Зеркало содержит полный набор функций основного портала, включая пользовательский кабинет, счет и данные платежей.
Основные преимущества эксплуатации зеркала:
– 24-часовой вход к порталу
– Стопроцентная схожесть возможностей
– Безопасность личных сведений
– Поддержка существующих привилегий
Как обнаружить рабочее зеркало в данный момент
Есть ряд проверенных путей получения свежей URL:
Официальные источники:
1. Имейл рассылка — администрация регулярно высылает письма с действующими адресами
2. Общественные сети — легитимные профили размещают релевантную новости
3. Департамент поддержки — операторы предоставляют проверенные URL
4. Портативное приложение — позволяет избегать блокировки
Открытие счета на лицензионном сайте
Этап регистрации занимает не более считанные минут и предполагает из данных стадий:
1. Переход на официальный ресурс или действующее зеркало
2. Нажатие на элемент «Создать аккаунт»
3. Указание регистрационной формы
4. Проверка email почты или контактного номера
5. Включение привилегии за регистрацию при присутствии промокода
Только что зарегистрированные игроки зарабатывают щедрый начальный презент, который может охватывать free spins, денежные поощрения или cashback.
Авторизация в пользовательский кабинет
Логин на платформе осуществляется традиционным методом. Необходимо указать никнейм и кодовое слово, задействованные при создании аккаунта.
Важные аспекты для конфиденциального входа:
– Задействуйте криптостойкий шифр
– Задействуйте двойную верификацию
– Не сохраняйте пароли на публичных устройствах
– Контролируйте доменную строку браузера
Обзор премиальной структуры
Гемблинг-сайт балует геймеров разнообразными привилегиями и акциями:
Начальный пакет
Дебютанты вправе претендовать на существенное награду за дебютный пополнение. Обычно это процентовая надбавка к депонированной объему плюс free spins для популярных слотов.
Регулярные промо
– Семидневный кэшбек — возвращение процента потерянных денежных средств
– Поощрения на повторные взносы
– Уникальные промо по праздникам
– Турниры с крупными наградными пулами
Схема привилегий
Деятельные геймеры накапливают очки за каждую ставку, которые затем меняются на действительные финансы, даровые прокруты или специальные бонусы.
Промокоды: как активировать
Купоны — это специальные сочетания знаков, предоставляющие возможность к специальным поощрениям.
В каких местах взять свежие промокоды:
– Авторизованные общественные сети казино
– Партнерские сайты
– Email-новостная лента
– Тематические сообщества
Активируется промокод в отдельное поле при регистрации или пополнении счета.
Телефонная версия и приложение
Нынешние геймеры любят развлекаться с портативных гаджетов. Портал предоставляет двойной метода для приятной мобильной игры.
Мобильная редакция
Интернет версия автоматически настраивается под диагональ монитора. Не нуждается инсталляции и работает в произвольном новом браузере.
Телефонное приложение
Установить софт можно для аппаратов на Android и iOS. Достоинства app:
– Скоростная открытие
– Устойчивая функционирование
– Push-уведомления о бонусах
– Автономный преодоление блокировок
Этап инсталляции элементарен: достаточно открыть на ресурс с мобильного девайса и придерживаться указаниям.
Гемблинг коллекция
База аппаратов включает тысячи вариантов от топовых разработчиков.
Слоты
Гемблинг машины — наиболее распространенная группа игр. Представлены традиционные трехбарабанные автоматы, актуальные графические аппараты с поощрительными раундами, а также прогрессивные призы.
Live казино
Зона с реальными крупье позволяет почувствовать настроение истинного казино. Доступны столы с рулеткой.
Вещание осуществляется в высоком формате, обеспечивается коммуникация с крупье и прочими пользователями.
Соревнования
Регулярно проводятся состязания по разным слотам. Участие обеспечивает возможность выиграть валютные награды, фриспины или эксклюзивные привилегии.
Платежные процедуры
Портал предлагает обширный спектр расчетных систем:
– Пластиковые карты
– Цифровые системы
– Крипта
– Банковские транзакции
Наименьшая объем вклада — приемлемая для массы игроков. Снятие средств выполняется в кратчайшие временные рамки.
Департамент поддержки
Компетентные специалисты готовы содействовать круглосуточно. Имеются данные варианты связи:
– Онлайн-чат
– Email
– Звонковая линия
– Социальные сети
Решения на распространенные темы можно получить в разделе FAQ.
Резюме
Официальный веб-сайт казино и его актуальные зеркала дают пользователям совершенный путь ко всем опциям ресурса. Значительные привилегии, приятная смартфонная версия, огромный коллекция развлечений и квалифицированная служба поддержки превращают гемблинг опыт исключительно беспроблемным и надежным.
Индивидуальные решения по установке балконных сеток в Отрадном
Профессиональная замена оконных уплотнителей в Десёновском: цены и услуги
Upland Stone Hub – Neat pages make content easy to digest and navigation stress-free.
сколько стоит сделать курсовую работу на заказ сколько стоит сделать курсовую работу на заказ .
Athletic Bilbao vs Elche 2026 La Liga最新比分即将开踢21:00,主场毕尔巴鄂强势迎战升班马,西班牙足球比分直播实时更新。
При покупке автомобиля важно проверить его юридическую историю. Юрист может помочь выявить ограничения, залоги или судебные споры. Такая проверка защищает покупателя. Управление автомобилем родителей при наличии прав
侠之盗高清完整版2026 海外华人免费最新热播剧集
怪奇物语终章2026 海外华人科幻恐怖剧 高清最终季 海外必备
小城大事2026 赵丽颖黄晓明 高清农民造城励志 海外华人免费热播 全球加速
女神蒙上眼2026 辛芷蕾林雨申 高清都市悬疑职场 海外华人必备 无缓冲播放
simple shop link – Sections are clear, making content easy to browse.
Нынешние онлайн-казино гарантируют пользователям богатый выбор возможностей для комфортной игры. Вход к сервису Клубника казино казино осуществляется через лицензионный портал или функционирующее зеркало.
Что такое функционирующее зеркало казино
Действующее зеркало — это дополнительный URL главного портала казино. Такие копии генерируются для поддержания постоянного доступа к развлекательной системе.
Дубликат актуальное совершенно дублирует опции официального портала. Игроки имеют схожий путь ко всем возможностям, включая создание аккаунта, финансирование баланса и вывод средств.
Открытие счета на главном ресурсе
Механизм регистрации длится всего пару моментов. Будущим участникам необходимо:
1. Зайти на лицензионный портал или действующее настоящее зеркало
2. Нажать кнопку “Открыть счет”
3. Ввести требуемые сведения
4. Проверить электронную почту
5. Активировать код активации при существовании
После финализации регистрации участник приобретает бонус за регистрацию, который имеет право содержать фриспины или монетарное вознаграждение.
Доступ в личный кабинет
Персональный кабинет — это закрытая зона, где клиенты вправе регулировать своим счетом. Для логина следует внести имя пользователя и код доступа.
В персональном кабинете доступны такие возможности:
– Отслеживание истории операций
– Задействование кодов активации
– Регулирование бонусами
– Включение в соревнованиях
– Отслеживание возмещения
– Корректировка учетной записи
Поощрения и акции
Азартная система предлагает великодушные вознаграждения:
Приветственный набор — дебютанты обретают крупное начисление на стартовые депозиты.
Free spins — начисляются как при регистрации, так и в ходе различных мероприятий.
Кэшбек — регулярный возмещение доли проигранных сумм.
Коды активации — уникальные шифры, дающие возможность к эксклюзивным вознаграждениям.
Описание гемблинговых секций
Слоты
Собрание слотов охватывает сотни игр от передовых разработчиков. Пользователи найдут как традиционные слоты, так и новые видео-слоты с интересной оформлением.
Live казино
Категория Live казино предлагает право играть с реальными ведущими в состоянии настоящего времени. Открыты востребованные игры: рулетка, блэкджек, баккара, покер.
Соревнования
Постоянные соревнования с солидными наградными фондами притягивают множество соревнующихся. Победители завоевывают монетарные призы и эксклюзивные подарки.
Смартфонная версия и программа
Телефонная версия портала позволяет развлекаться с всякого аппарата. Структура автономно адаптируется под размер экрана.
Загрузить app можно для устройств на Android и iOS. Мобильное приложение обладает всеми характеристиками компьютерной версии.
Как отыскать действующее зеркало на данный момент
Актуальные адреса дубликатов периодически изменяются. Получить действующую ссылку можно несколькими методами:
– Через службу поддержки
– В проверенных новостных сетях
– По e-mail newsletter
– На тематических порталах
Безопасность и лицензирование
Главный сайт оперирует на базе зарубежной документа. Все операции охраняются актуальными технологиями безопасности.
Конфиденциальность пользовательских данных обеспечивается в совершенном масштабе.
Вывод
Основной домен и его действующие копии предоставляют клиентам 24/7 выход к высококлассным гемблинговым играм. Щедрые бонусы, разнообразные слоты, опытная поддержка — все это формирует игровой процесс максимально удобным и притягательным.
Нынешние онлайн-казино гарантируют пользователям богатый выбор возможностей для комфортной досуга. Вход к платформе https://fibraquan.com/2026/03/03/obzor-otzyvy-i-protsess-registratsii-koshelka-pay-v-2026-godu/ реализуется через лицензионный домен или функционирующее зеркало.
Что такое действующее зеркало казино
Функционирующее зеркало — это запасной линк официального веб-сайта казино. Такие дубликаты создаются для обеспечения постоянного подключения к азартной площадке.
Зеркало сегодня целиком повторяет характеристики официального сайта. Геймеры имеют аналогичный выход ко всем услугам, включая открытие счета, финансирование баланса и снятие призов.
Регистрация на главном ресурсе
Механизм создания аккаунта требует всего считанные минут. Свежим пользователям требуется:
1. Войти на главный ресурс или действующее проверенное зеркало
2. Щелкнуть кнопку “Создать аккаунт”
3. Ввести обязательные информацию
4. Активировать почтовую почту
5. Применить код активации при доступности
После окончания создания аккаунта участник получает приз за регистрацию, который может включать free spins или финансовое поощрение.
Вход в индивидуальный кабинет
Пользовательский кабинет — это защищенная территория, где пользователи способны администрировать своим аккаунтом. Для авторизации нужно напечатать логин и секретный ключ.
В личном кабинете доступны такие функции:
– Мониторинг хронологии переводов
– Применение купонов
– Контроль призами
– Вступление в состязаниях
– Проверка возмещения
– Редактирование аккаунта
Призы и спецпредложения
Развлекательная платформа предоставляет привлекательные бонусы:
Приветственный комплект — новички приобретают крупное поощрение на начальные пополнения.
Бесплатные вращения — дарятся как при регистрации, так и в ходе разнообразных акций.
Кэшбэк — постоянный рефанд фрагмента потерянных финансов.
Промокоды — специальные комбинации, дающие выход к эксклюзивным вознаграждениям.
Характеристика гемблинговых категорий
Игровые автоматы
Ассортимент аппаратов содержит сотни наименований от лучших поставщиков. Пользователи найдут как классические машины, так и актуальные мультимедийные автоматы с увлекательной оформлением.
Live казино
Зона Live казино дарит право участвовать с живыми ведущими в формате настоящего времени. Представлены востребованные развлечения: рулетка, блэкджек, баккара, покер.
Конкурсы
Постоянные чемпионаты с крупными выигрышными фондами притягивают массу соревнующихся. Победители завоевывают денежные награды и специальные поощрения.
Мобильная версия и программа
Портативная версия сайта предоставляет право участвовать с любого девайса. Дизайн автоматически корректируется под размер экрана.
Установить приложение можно для устройств на Android и iOS. Смартфонное app располагает всеми характеристиками полной версии.
Как определить действующее зеркало на сегодня
Свежие адреса дубликатов постоянно корректируются. Узнать актуальную URL можно многими методами:
– Через службу техподдержки
– В подлинных социальных сетях
– По электронной рассылке
– На аффилиатных ресурсах
Надежность и сертификация
Лицензионный сайт действует на базе глобальной сертификата. Все переводы шифруются передовыми протоколами кодирования.
Приватность индивидуальных данных обеспечивается в абсолютном размере.
Итог
Главный ресурс и его рабочие дубликаты гарантируют клиентам 24/7 выход к высококлассным гемблинговым сервисам. Привлекательные бонусы, многочисленные автоматы, опытная помощь — все это делает игровой досуг предельно беспроблемным и захватывающим.
opalridgecollective hub – Browsed the page and everything feels neatly arranged and easy to follow.
Eco Deals – Checked out the site randomly, and the information is easy to digest.
Silk Gems Hub – Intuitive design makes exploring items effortless.
stonebrook marketplace – Minimal design helps focus on content easily.
holiganbet holiganbet
shop link – Well-structured pages, very comfortable to browse and read.
Подключение к сайту через действующие зеркала
Участники виртуальных казино регулярно сталкиваются с вопросом ограничения основного портала. Как раз для преодоления этой ситуации предусмотрены копии главного сайта. https://hoteldelfina.com/kreditnuyu-kartu-mozhno-proverit-s-pomoshchyu-onlayn-kalkulyatora/ дает беспрепятственный подключение ко всем функциям платформы.
Что такое функционирующее зеркало казино
Зеркало представляет собой точную версию основного портала с идентичным функционалом. Ключевое несовпадение — это иное имя. Каждые сведения пользователя, вместе с баланс, поощрения и записи партий, продолжают быть такими же.
Достоинства использования зеркал
Актуальные зеркала имеют набором важных плюсов:
– Круглосуточный доступ к излюбленным играм
– Совершенная конфиденциальность персональных параметров
– Поддержание всех параметров личного кабинета
– Способность обретения наград и присутствия в акциях
Открытие счета на официальном ресурсе
Операция открытия счета максимально прост и отнимает буквально минут. Недавние пользователи могут рассчитывать на крупный начальный приз за регистрацию.
Стадии открытия аккаунта
1. Подключение на официальный сайт или его копию
2. Клик на опцию “Создать аккаунт”
3. Заполнение требуемых информации
4. Подтверждение электронной почты
5. Ввод купона (при наличии есть)
Бонусы и предложения для игроков
Платформа поощряет своих игроков разнообразными поощрительными программами.
Основные виды поощрений
Стартовый подарок — крупное премирование для начинающих пользователей, которое именно в состоянии включать денежные бонусы и free spins.
Фриспины — опция использовать в топовых игровых машинах безвозмездно.
Кэшбек — процентный возмещение израсходованных сумм, что начисляется по неделям или каждый месяц.
Бонусные коды — уникальные сочетания, дающие бонусные выгоды.
Личный кабинет: инструменты и установки
Персональный профиль предоставляет исчерпывающий регулирование над персональным опытом. Здесь присутствуют:
– Администрирование средствами
– Данные операций
– Текущие поощрения
– Конфигурации охраны
– Верификация аккаунта
Смартфонная платформа и софт
Современные пользователи оценивают мобильность. Платформа предлагает два метода для развлечений с смартфонных устройств.
Приспособленная телефонная платформа
Смартфонная версия портала без участия адаптируется под экран любого устройства. Не требуется устанавливать дополнительное приложение.
Программа для смартфонов
Возможно загрузить специальное софт для iOS и Android. Приложение гарантирует:
– Скорый доступ
– Оптимизированный графику
– Push-оповещения о бонусах
– Стабильную работу
Live развлечения: среда настоящего казино
Секция Live развлечений отправляет участников в антураж реального клуба. Профессиональные хосты проводят раунды в виде реального времени.
Востребованные Live-столы
– Французская рулетка
– Blackjack
– Баккарат
– Карибский покер
Аппараты: ассортимент развлечений
Собрание игровых автоматов включает тысячи наименований от лидирующих разработчиков. Участники найдут:
– Классические аппараты
– Современные слоты
– Мега-выигрыш-игры
– Мегавейс
Соревнования и эксклюзивные предложения
Постоянные конкурсы предоставляют шанс игрокам бороться друг с другом за внушительные призовые фонды. Любой конкурс имеет свои условия вовлечения и доску лидеров.
Варианты ввода и снятия средств
Ресурс использует ряд расчетных методов:
– Кредитные инструменты
– Виртуальные кошельки
– Крипто
– Прямые отправления
Абсолютно все операции осуществляются защищенно благодаря актуальным методам криптографии.
Служба поддержки
Компетентные сотрудники сервиса помощи расположены поддержать 24/7. Имеются нижеперечисленные методы общения:
– Онлайн-чат
– Email-обслуживание
– Телефонная поддержка
– Публичные сети
Вывод
Основной домен игровой площадки и его функционирующие дубликаты предоставляют участникам надежный и удобный доступ к большому выбору развлекательных игр. Крупные бонусы, периодические кампании, качественная поддержка и комфортные финансовые способы создают азартный опыт чрезвычайно приятным и прибыльным.
Современные онлайн-казино предоставляют геймерам обилие вариантов для беспроблемной игры. Центральный веб-портал казино Вулкан Р РёС‡ открывает возможность ко всем опциям и играм. Однако при наличии программных проблем на выручку спешат рабочие дубликаты.
Что означает собой действующее зеркало
Дубликат казино — это стопроцентная реплика основного портала, находящаяся по запасному URL. Подлинное зеркало хранит все опции, включая регистрацию, вход в собственный кабинет, поощрения и промокоды.
Копия на сегодня гарантирует:
– Непрерывный вход к развлекательным машинам
– Стопроцентную конфиденциальность персональных данных
– Поддержку депозита и журнала транзакций
– Возможность использования всех специальных предложений
Создание учетной записи на лицензионном портале
Процесс оформления учетной записи требует несколько минут. Начинающим геймерам требуется:
1. Открыть на официальный сайт или рабочее зеркало
2. Нажать кнопку «Создать аккаунт»
3. Заполнить требуемые поля
4. Активировать электронную почту
5. Ввести купон при присутствии
После завершения оформления профиля клиенты получают бонус за регистрацию, который может охватывать фриспины или денежное поощрение.
Вход в собственный кабинет
Личный кабинет обеспечивает всеобъемлющий надзор над азартным ходом. Через личный кабинет разрешается:
– Финансировать кошелек
– Получать выплаты
– Задействовать промокоды
– Контролировать хронологию игр
– Играть в конкурсах
– Приобретать cash back
Анализ премий и акций
Великодушная призовая политика — важное преимущество казино. Ключевые типы премий:
Приветственный бонус
Новички зарабатывают выгодное вознаграждение на стартовые депозиты. Объем премии может доходить до 100-200% от объема депозита.
Бесплатные вращения
Бесплатные раунды выдаются для известных машин. Объем фриспинов варьируется от 10 до 500 штук.
Кэшбек
Постоянный или помесячный возврат части утраченных средств. Средний размер компенсации — 5-15%.
Соревнования
Регулярные турниры с внушительными премиальными фондами. Игроки конкурируют за топовые строчки в таблице лидеров.
Мобильная версия и софт
Портативная версия позволяет развлекаться с каждого аппарата. Геймеры могут скачать приложение для iOS и Android или эксплуатировать браузерную версию.
Достоинства смартфонного программы:
– Оперативная прогрузка автоматов
– Комфортный UI
– Всплывающие уведомления о бонусах
– Возможность входа через Face ID
Машины и Live казино
Развлекательная база охватывает тысячи игр от лидирующих провайдеров.
Востребованные типы слотов:
– Классические машины
– Видеослоты с призовыми раундами
– Прогрессивный джекпот слоты
– Мегавейс слоты
Live игорный зал
Зона live казино предоставляет игру с реальными крупье. Представлены классические игры:
– Французская рулетка
– Двадцать одно
– Баккара
– Карибский покер
Как найти функционирующее зеркало
Раздобыть свежую ссылку на зеркало разрешается разными путями:
1. Зарегистрироваться на email-рассылку
2. Мониторить за обновлениями в соц сетях
3. Написать в департамент поддержки
4. Сохранить действующее зеркало в закладки
Вывод
Официальный портал и его рабочие зеркала обеспечивают стабильный путь к развлекательным слотам. Великодушные премии, разнообразные купоны, эргономичное портативное софт и профессиональная сервис поддержки превращают развлекательный геймплей максимально приятным и конфиденциальным.
see aurora collection – Opened the page for a moment and everything seems well arranged.
нажмите здесь kraken рабочая ссылка onion
Вход к сайту и действующие зеркала
Востребованные онлайн казино предлагают игрокам большой набор игр. Центральный ресурс Лаки Ворлд предоставляет защищенный вход ко всем функциям. Впрочем периодически случаются случаи, когда необходимо альтернативный метод доступа.
Что представляет собой действующее зеркало
Функционирующее зеркало — это полная реплика основного сайта с другим интернет названием. Альтернатива сегодня дает возможность миновать потенциальные запреты и обеспечивать стабильный вход к выбранным играм.
Легальное зеркало характеризуется полными опциями, что и основной ресурс:
– Полный ассортимент развлечений
– Личный профиль с сохраненными данными
– Актуальные бонусы и промо
– Безопасные финансовые действия
Оформление и подключение в систему
Ход открытия аккаунта на портале отнимает буквально секунд. Новым пользователям следует:
1. Перейти на функционирующее зеркало сейчас
2. Кликнуть кнопку «Открыть профиль»
3. Внести обязательные параметры
4. Проверить почтовую почту или данные связи
5. Активировать подарок за регистрацию
Авторизация в личный аккаунт реализуется с помощью внесение никнейма и ключа.
Обзор бонусной структуры
Щедрая призовая система — главное плюс казино. Участники забирают многочисленные поощрения:
Стартовые бонусы
Недавние пользователи способны ожидать на значительный поощрение за оформление. Как правило это комплект опций, охватывающий:
– Долевую надбавку к первому депозиту
– Бесплатные фриспины
– Призовые средства на баланс
Промокоды и эксклюзивные акции
Регулярные промокоды помогают зарабатывать экстра льготы. Активировать их можно в отдельном поле собственного аккаунта.
Спины и компенсация
Даровые вращения — это возможность крутить барабаны без применения собственных средств. Рибейт предполагает определенный отдачу утраченных средств.
Коллекция игр
Развлекательная ресурс предлагает значительную коллекцию развлечений.
Игровые машины
Ассортимент автоматов поражает представление. Есть обычные простые слоты и продвинутые автоматы с интересной анимацией.
Live зал
Раздел Live игр погружает клиентов в атмосферу истинного гемблинг зала. Умелые ведущие ведут раунды в прямом формате.
Соревнования и лидерборды
Периодические состязания вносят драйва и гарантируют шанс получить большие призы.
Карманная версия и клиент
Новые решения обеспечивают играть в любимом пространстве. Адаптивная вариант автоматически настраивается под экран девайса.
Загрузить приложение можно для цифровых сред iOS и Android. Клиент дает:
– Быстрый переход
– Бесперебойную деятельность
– Всплывающие-уведомления об предложениях
– Простой интерфейс
Банковские операции
Ресурс принимает многочисленные методы ввода и вывода финансов:
– Пластиковые системы
– Электронные системы
– Криптовалюты
– Денежные переводы
Любые операции осуществляются через защищенное канал, что подтверждает сохранность личных информации.
Служба support
Профессиональная команда поддержки трудится круглосуточно. Соединиться с операторами разрешено через:
– Онлайн-чат
– E-mail почту
– Контакт
– Медиа платформы
Заключение
Основной веб-сайт и его действующее зеркало гарантируют игрокам защищенный и комфортный путь к увлекательным развлечениям. Выгодные подарки, большой спектр игр и высокая сервис делают времяпрепровождение крайне комфортной и результативной.
Передовые онлайн-казино дают участникам обширный диапазон возможностей и бонусных вариантов. Вход к площадке производится через главный веб-сайт или его актуальное зеркало Фонтан, что обеспечивает стабильную деятельность.
Что представляет собой актуальное зеркало казино
Дубликат — это полная версия главного веб-сайта, построенная для преодоления барьеров. Действующее зеркало позволяет участникам иметь вход к предпочитаемым автоматам в каждое время.
Лицензионное зеркало обладает всеми возможностями главного ресурса:
– Совокупный перечень слотов
– Аккаунт с внесенными данными
– Действующие бонусы
– Гарантированные финансовые процедуры
Регистрация на главном портале
Алгоритм создания аккаунта отнимает всего считанные минут. Начинающим участникам необходимо:
1. Войти на главный веб-сайт или действующее зеркало
2. Нажать на кнопку “Создать аккаунт”
3. Внести требуемые данные
4. Верифицировать электронную почту
5. Совершить первый вклад
Поощрение новичкам зачисляется незамедлительно после завершения всех ступеней.
Вход в личный кабинет
Созданные участники могут выполнить подключение применяя:
– Никнейм и шифр
– Данные контакта
– Электронную почту
Аккаунт обеспечивает доступ к администрированию счетом, истории операций и доступным промокодам.
Бонусы и кампании
Гемблинг система радует активных клиентов щедрыми поощрениями:
Приветственный бонус
– Надбавка на стартовый депозит до 100%
– Фриспины на известные машины
– Особые награды за следующие депозиты
Бонусные коды
Уникальные промокоды открывают право на приобретение эксклюзивных вознаграждений. Актуальные коды публикуются в категории “Бонусы”.
Кэшбек
Еженедельный возврат составляет до 10% от проигранных финансов. Возврат выплачивается сразу.
Схема лояльности
Постоянные участники приобретают очки, которые превращаются на подлинные выплаты или фриспины.
Мобильная версия и софт
Ради комфорта участников сделана удобная мобильная версия. Гибкий вид обеспечивает комфортно делать ставки с любого карманного гаджета.
Выгоды приложения:
– Оперативный подключение к играм
– Адаптированный облик
– Устойчивая активность
– Нотификации о актуальных бонусах
Получить программу можно даром с основного ресурса для гаджетов на Android и iOS.
Ассортимент слотов
Автоматы
Библиотека вмещает более 2000 машин от топовых студий:
– Традиционные автоматы
– Видео-слоты
– Прогрессивные автоматы
– Сюжетные автоматы
Live казино
Раздел Live игр предоставляет игру с подлинными ведущими в прямом времени:
– Рулетка
– Блэкджек
– Карты
– Столы покера
Состязания
Регулярные состязания с значительными призовыми пулами проводятся систематически. Присоединение в состязаниях разрешено всем действующим участникам.
Денежные системы
Взносы и изъятия средств осуществляются через распространенные платежные системы:
– Кредитные карты
– Цифровые системы
– Bitcoin
– Счетные переводы
Наименьший вклад — от 100 рублей. Снятие выигрышей обрабатывается в течение 24 ч.
Служба поддержки
Постоянная группа саппорта расположена содействовать в решении произвольных задач:
– Живой чат
– Email
– Телефон
– Публичные сети
Защита и документ
Подлинный сайт работает на фундаменте международной сертификата. Все информация участников охранены новейшим SSL-шифрованием.
Заключение
Актуальное зеркало гарантирует непрерывный вход к излюбленным развлечениям, выгодным поощрениям и комфортным функциям. Создайте аккаунт сегодня и обретите первый поощрение!
kettlebrook marketplace – Discovered the page today and it had some useful details.
Outlet Treasures – Came across this page casually, content is organized and sections are easy to follow.
holiganbet resmi: holiganbet
Актуальные онлайн-казино предлагают игрокам широкий ассортимент развлечений и выгодные бонусы. Но для стабильной времяпрепровождения необходимо иметь представление, как обнаружить казино РЎРЈРљРђРђРђ и его функционирующие зеркала.
Что такое лицензионный ресурс казино
Основной ресурс казино — это основная площадка, где участники могут пользоваться гемблинг слотами. Сайт оперирует на законных принципах и владеет всеми нужными документами.
Основные плюсы главного сайта:
– Защищенность пользовательских данных
– Справедливые положения использования
– Стабильные транзакции
– Компетентная помощь
Действующее зеркало казино: для чего необходимо
Зеркало — это абсолютная клон официального ресурса, находящаяся по иному URL. Актуальное зеркало создается для предоставления стабильного входа к платформе.
Основания задействования альтернативных адресов:
– Недоступность официального сайта
– Регламентные операции
– Повышенная активность на сервер
Как получить свежее зеркало в данный момент
Обнаружить текущее рабочее зеркало можно множественными вариантами:
1. Рассылка — зарегистрируйтесь на почтовую доставку
2. Служба техподдержки — напишите в онлайн-чат
3. Корпоративные медиа — мониторьте за новостями
4. Тематические сайты — надежные сайты
Создание аккаунта на платформе казино
Процедура регистрации требует буквально считанные секунд:
1. Выберите на элемент “Зарегистрироваться”
2. Укажите требуемые данные
3. Подтвердите почтовую e-mail
4. Примените код активации, если имеется
По завершении оконченной регистрации вам откроется возможен индивидуальный раздел.
Премии и купоны
Выгодная поощрительная политика — ключевое конкурентное преимущество казино:
Награда за регистрацию
Новые участники обретают первый бонус, который может предполагать:
– Денежный бонус на дебютный депозит
– Фриспины для слотов
– Безвозвратные бонусы
Промокоды
Постоянно публикуются новые бонусные шифры, дающие возможность забрать особые бонусы.
Схема возврата средств
Регулярные клиенты получают процент утраченных средств обратно.
Актуальные кампании и турниры
Ресурс постоянно проводит интересные промо-мероприятия:
– Семидневные чемпионаты
– Тематические бонусы
– Конкурсы ценных подарков
– Программа привилегий
Вход в личный раздел
Для доступа на платформу необходимо:
1. Посетить главный портал или функционирующее зеркало
2. Нажать “Login”
3. Ввести email и код доступа
В личном разделе доступны данные возможности:
– Зачисление баланса
– Обналичивание выигрышей
– Изучение истории игр
– Управление индивидуальными данными
Адаптивная платформа и приложение
Адаптивная платформа
Responsive модификация ресурса дает возможность делать ставки с всех карманного телефона. Дизайн самостоятельно адаптируется под габариты экрана.
App для скачивания
Загрузить программу можно для:
– Android — официальная download с ресурса
– iOS — инсталляция через App Store
Плюсы app:
– Мгновенный запуск
– Стабильная операционность
– Push-сообщения об предложениях
– Оптимизированный дизайн
Развлекательные зоны
Игровые машины
Богатая галерея азартных барабанов от ведущих разработчиков:
– Традиционные слоты
– Продвинутые-автоматы
– Джекпот-игры
Live зал
Категория с настоящими ведущими обеспечивает:
– Рулетка
– Блэкджек
– Baccarat
– Texas Hold’em
Эфиры транслируются в HD разрешении, формируя впечатление аутентичного казино.
Способы зачисления и вывода
Платформа принимает различные финансовые методы:
– Платежные карты
– Электронные платежи
– Bitcoin/Ethereum
– Банковские транзакции
Минимальные пороги депозита и оперативные выводы создают времяпрепровождение исключительно удобной.
Отдел помощи
Квалифицированная служба поддержки доступна 24/7 и в состоянии содействовать с различными вопросами:
– Онлайн-чат
– Email-поддержка
– Звонковая служба
Выводы
Лицензионный сайт казино и его действующие зеркала дают участникам конфиденциальный и увлекательный развлекательный опыт. Выгодные бонусы, комфортная портативная модификация, разнообразные слоты и качественное live-казино формируют эту ресурс замечательным выбором для игровых досуга.
Современные виртуальные казино дают пользователям большой выбор возможностей для беспроблемной игры. Но иногда соединение к основному сайту может оказаться недоступным. В таких случаях на помощь спешит Laki World, которое предоставляет стабильный подключение ко всем сервисам платформы.
Что такое функционирующее зеркало казино
Копия — это абсолютная реплика основного портала, которая располагается по альтернативному домену. Дубликат поддерживает полный набор функций оригинального портала, включая персональный кабинет, депозит и данные операций.
Основные достоинства эксплуатации зеркала:
– Непрерывный соединение к порталу
– Максимальная схожесть функционала
– Конфиденциальность пользовательских реквизитов
– Поддержка доступных бонусов
Как разыскать функционирующее зеркало на текущий день
Есть множество безопасных путей обнаружения свежей ссылочной информации:
Легитимные источники:
1. Email рассылка — управление регулярно пересылает уведомления с рабочими доменами
2. Медийные сети — легитимные профили размещают релевантную новости
3. Служба поддержки — консультанты предоставляют проверенные ссылки
4. Смартфонное приложение — обеспечивает преодолевать блокировки
Создание аккаунта на главном веб-сайте
Этап оформления занимает всего пару минут и состоит из нижеследующих ступеней:
1. Переход на официальный ресурс или функционирующее зеркало
2. Нажатие на элемент «Создать аккаунт»
3. Заполнение регистрационной бланка
4. Верификация почтовой почты или сотового номера
5. Активация вознаграждения за регистрацию при наличии промокода
Начинающие клиенты зарабатывают щедрый начальный приз, который может содержать free spins, финансовые вознаграждения или кэшбек.
Логин в индивидуальный кабинет
Логин на платформе производится обычным образом. Требуется вписать никнейм и код доступа, указанные при открытии счета.
Значимые моменты для надежного входа:
– Используйте криптостойкий шифр
– Запустите двухэтапную проверку
– Не записывайте пароли на общественных устройствах
– Проверяйте интернет строку браузера
Обзор наградной схемы
Игорный портал балует игроков разнообразными привилегиями и промо:
Начальный набор
Новички имеют возможность полагаться на щедрое вознаграждение за первый взнос. Обычно это долевая надбавка к депонированной величине плюс free spins для известных слотов.
Периодические акции
– Еженедельный компенсация — возврат доли списанных финансов
– Бонусы на последующие взносы
– Эксклюзивные промо по событиям
– Конкурсы с солидными призовыми банками
Схема вознаграждений
Активные клиенты накапливают единицы за любую игру, которые затем конвертируются на действительные финансы, даровые прокруты или особые бонусы.
Кодовые слова: как использовать
Бонус-коды — это специальные комбинации символов, дающие возможность к бонусным вознаграждениям.
Каким образом получить действующие промокоды:
– Авторизованные коммуникационные сети казино
– Союзнические ресурсы
– Email-рассылка
– Профильные сообщества
Вводится промокод в отдельное поле при создании аккаунта или добавлении денег депозита.
Смартфонная версия и приложение
Современные игроки любят развлекаться с портативных аппаратов. Платформа обеспечивает пару варианта для комфортной портативной игры.
Адаптивная версия
Онлайн версия само собой адаптируется под параметры дисплея. Не предполагает инсталляции и функционирует в всяком новом браузере.
Мобильное приложение
Скачать программу можно для гаджетов на Android и iOS. Достоинства app:
– Быстрая загрузка
– Надежная действие
– Мгновенные-уведомления о бонусах
– Автоматический избегание блокировок
Операция инсталляции легок: достаточно открыть на веб-сайт с портативного гаджета и подчиняться руководству.
Развлекательный выбор
Библиотека слотов включает огромное количество единиц от лучших производителей.
Слоты
Гемблинг слоты — максимально распространенная секция развлечений. Доступны стандартные простые аппараты, современные видео-автоматы с поощрительными стадиями, а также накопительные призы.
Live казино
Отдел с живыми крупье предоставляет ощутить дух реального казино. Представлены варианты с баккарой.
Стриминг ведется в отличном формате, поддерживается общение с раздающим и прочими игроками.
Соревнования
Регулярно запускаются состязания по разным дисциплинам. Вступление позволяет выиграть финансовые выигрыши, фриспины или особые бонусы.
Финансовые манипуляции
Платформа поддерживает значительный набор расчетных инструментов:
– Банковские карты
– Онлайн сервисы
– Крипта
– Банковские платежи
Низшая величина взноса — разумная для массы геймеров. Получение призов осуществляется в кратчайшие сроки.
Сервис поддержки
Квалифицированные специалисты способны оказать помощь 24/7. Открыты следующие каналы коммуникации:
– Интернет-чат
– Email
– Мобильная линия
– Общественные сети
Разъяснения на типовые темы можно получить в блоке FAQ.
Резюме
Основной ресурс казино и его рабочие зеркала предоставляют пользователям совершенный доступ ко всем возможностям ресурса. Щедрые поощрения, комфортная смартфонная версия, впечатляющий выбор игр и профессиональная помощь делают развлекательный досуг исключительно удобным и конфиденциальным.
Discover this warehouse – Checked out the store today; products are arranged clearly and easy to explore.
visit this hub – Browsing feels smooth, and the pages are easy to navigate.
willowexchange – The design reflects clarity and stability, with an inviting tone.
зайти на сайт кракен онион зеркало
Нынешние онлайн-казино предоставляют клиентам обширный диапазон развлечений и премиальных предложений. Вход к ресурсу выполняется через лицензионный ресурс или его актуальное зеркало Tippy, что обеспечивает бесперебойную активность.
Чем является актуальное зеркало казино
Копия — это абсолютная версия оригинального ресурса, разработанная для преодоления запретов. Актуальное зеркало позволяет участникам обрести соединение к любимым развлечениям в каждое время.
Лицензионное зеркало располагает всеми функциями первоначального сайта:
– Весь перечень слотов
– Учетная запись с сохраненными параметрами
– Актуальные акции
– Надежные расчетные действия
Регистрация на официальном веб-сайте
Ход создания аккаунта занимает всего считанные минут. Новым клиентам необходимо:
1. Перейти на официальный сайт или функционирующее зеркало
2. Щелкнуть на элемент “Открыть счет”
3. Внести обязательные данные
4. Проверить контакт
5. Сделать дебютный платеж
Бонус за регистрацию начисляется моментально после завершения всех стадий.
Авторизация в личный кабинет
Действующие клиенты могут совершить авторизацию указывая:
– Логин и пароль
– Код мобильного
– Контактный email
Личный кабинет дает право к регулированию счетом, сведениям ставок и доступным промокодам.
Бонусы и кампании
Азартная площадка радует лояльных пользователей щедрыми бонусами:
Приветственный набор
– Надбавка на стартовый взнос до 100%
– Free spins на популярные автоматы
– Экстра бонусы за следующие пополнения
Ваучеры
Эксклюзивные ваучеры открывают доступ на приобретение особых вознаграждений. Действующие коды выкладываются в категории “Акции”.
Возврат средств
Постоянный кешбэк насчитывает до 10% от потраченных средств. Выплата выплачивается моментально.
Система лояльности
Постоянные игроки накапливают единицы, которые превращаются на действительные финансы или фриспины.
Адаптивный портал и приложение
Для практичности участников сделана качественная мобильная версия. Приспособленный облик позволяет комфортно развлекаться с любого карманного аппарата.
Плюсы софта:
– Скорый доступ к развлечениям
– Настроенный вид
– Устойчивая активность
– Оповещения о свежих турнирах
Установить приложение можно свободно с проверенного веб-сайта для аппаратов на Android и iOS.
Ассортимент развлечений
Машины
Каталог насчитывает более 2000 автоматов от топовых студий:
– Классические автоматы
– Видео-слоты
– Слоты с джекпотом
– Фирменные автоматы
Live казино
Блок Live игр предлагает участие с подлинными диллерами в реальном режиме:
– Roulette
– Карточная игра
– Baccarat
– Покер
Конкурсы
Систематические состязания с большими премиальными суммами организуются систематически. Присоединение в конкурсах доступно всем зарегистрированным клиентам.
Денежные способы
Платежи и изъятия денег реализуются через востребованные методы:
– Платежные средства
– Цифровые счета
– Крипто
– Денежные транзакции
Наименьший платеж — от 100 рублей. Вывод средств обрабатывается в течение 24 периода.
Служба саппорта
24/7 служба саппорта способна помочь в разрешении каких-либо проблем:
– Live chat
– Email
– Связь
– Соц сети
Надежность и документ
Подлинный веб-сайт функционирует на основании международной документа. Любые параметры клиентов защищены современным SSL-кодированием.
Вывод
Функционирующее зеркало предоставляет непрерывный подключение к излюбленным автоматам, выгодным акциям и удобным функциям. Присоединяйтесь сейчас и обретите первый бонус!
cheap ed medicine: Urology Max – buy ed meds online
explore Cloud Harbor – The branding popped up and has a memorable, strong vibe.
Вход к сайту и актуальные URL
Современные сетевые казино предоставляют пользователям обширный спектр игр. Основной портал казино Hotline организует безопасный подключение ко всем услугам. При этом иногда возникают моменты, когда требуется запасной путь входа.
Что означает собой актуальное зеркало
Функционирующее зеркало — это идентичная версия легального ресурса с другим URL названием. Альтернатива сегодня позволяет обходить возможные барьеры и обеспечивать постоянный переход к предпочитаемым слотам.
Главное зеркало имеет полными функциями, что и главный веб-сайт:
– Полный перечень автоматов
– Личный аккаунт с записанными информацией
– Действующие бонусы и акции
– Надежные денежные транзакции
Создание аккаунта и подключение в сервис
Процесс регистрации на портале отнимает пару секунд. Начинающим участникам необходимо:
1. Зайти на рабочее зеркало в настоящее время
2. Щелкнуть элемент «Регистрация»
3. Внести нужные параметры
4. Активировать цифровую почту или номер смартфона
5. Использовать бонус за регистрацию
Авторизация в индивидуальный профиль выполняется через предоставление ID и ключа.
Обзор бонусной структуры
Выгодная призовая программа — важнейшее достоинство платформы. Клиенты забирают различные бонусы:
Приветственные поощрения
Начинающие участники имеют возможность ожидать на выгодный поощрение за создание аккаунта. Чаще всего это пакет вариантов, содержащий:
– Частичную прибавку к начальному пополнению
– Даровые спины
– Extra средства на баланс
Купоны и специальные опции
Постоянные промокоды помогают зарабатывать призовые преимущества. Задействовать их разрешено в отдельном разделе персонального раздела.
Фриспины и возврат средств
Бесплатные спины — это способность запускать барабаны без расходования персональных средств. Компенсация означает процентный компенсацию проигранных сумм.
Ассортимент автоматов
Развлекательная платформа предоставляет значительную базу слотов.
Слоты
Ассортимент слотов поражает фантазию. Имеются обычные 3-барабанные слоты и актуальные автоматы с интересной анимацией.
Live зал
Раздел Live казино помещает игроков в обстановку настоящего развлекательного заведения. Умелые крупье организуют партии в онлайн режиме.
Состязания и лидерборды
Периодические соревнования вносят азарта и обеспечивают вариант забрать значительные призы.
Mobile вариант и программа
Продвинутые разработки обеспечивают участвовать в комфортном пространстве. Портативная реализация независимо настраивается под экран гаджета.
Загрузить приложение разрешено для мобильных сред iOS и Android. Приложение предоставляет:
– Оперативный вход
– Устойчивую деятельность
– Всплывающие-уведомления об акциях
– Комфортный дизайн
Финансовые действия
Платформа принимает всевозможные варианты пополнения и получения сумм:
– Пластиковые системы
– Цифровые кошельки
– Токены
– Финансовые операции
Любые действия реализуются через безопасное канал, что гарантирует целостность личных информации.
Отдел помощи
Опытная команда поддержки работает постоянно. Соединиться с специалистами допустимо через:
– Онлайн-чат
– E-mail почту
– Телефон
– Коммуникационные ресурсы
Резюме
Главный портал и его действующее зеркало гарантируют игрокам стабильный и комфортный путь к увлекательным забавам. Привлекательные бонусы, большой каталог слотов и качественная помощь обеспечивают участие крайне интересной и прибыльной.
MeadowCollective – Visitors experience a welcoming, modern, and unique identity.
君主计划第二季2026 海外华人怪兽宇宙衍生 高清泰坦巨兽登场 Apple TV+
https://urologymax.shop/# best ed meds online
solarstone trading portal – Organized sections make browsing content easy and smooth.
Актуальные онлайн-казино предлагают участникам обширный ассортимент азартных игр и привлекательные премии. Однако для беспроблемной работы критично понимать, как найти Кракен и его действующие зеркала.
Что такое официальный сайт казино
Лицензионный ресурс казино — это базовая система, где клиенты могут пользоваться гемблинг играми. Портал функционирует на официальных условиях и владеет всеми нужными сертификатами.
Первостепенные преимущества главного ресурса:
– Конфиденциальность личных данных
– Объективные положения игры
– Подтвержденные транзакции
– Профессиональная помощь
Действующее зеркало казино: для чего требуется
Дублирующий ресурс — это полная версия официального портала, хостящаяся по другому URL. Рабочее зеркало создается для предоставления бесперебойного соединения к платформе.
Причины задействования альтернативных адресов:
– Ограничение главного адреса
– Профилактические мероприятия
– Повышенная активность на систему
Как обнаружить актуальное зеркало в данный момент
Найти новое проверенное зеркало можно различными методами:
1. Рассылка — зарегистрируйтесь на информационную отправку
2. Отдел помощи — свяжитесь в онлайн-чат
3. Публичные каналы — мониторьте за публикациями
4. Тематические порталы — проверенные платформы
Регистрация на портале казино
Этап открытия счета занимает всего немного моментов:
1. Кликните на клавишу “Создать аккаунт”
2. Укажите необходимые информацию
3. Валидируйте email почту
4. Введите бонусный код, если имеется
Сразу после оконченной создания аккаунта вам откроется открыт личный профиль.
Премии и промокоды
Щедрая поощрительная система — значимое плюс казино:
Награда за создание аккаунта
Первичные клиенты приобретают первый презент, который может включать:
– Валютный кредит на стартовый пополнение
– Фри-спины для автоматов
– Безвозвратные фонды
Купоны
Систематически публикуются свежие купоны, позволяющие забрать дополнительные привилегии.
Схема кешбэка
Постоянные клиенты возвращают долю утраченных ставок на счет.
Свежие промо и состязания
Сайт периодически организует азартные кампании:
– Семидневные баттлы
– Праздничные акции
– Розыгрыши крупных подарков
– Система VIP-клуба
Авторизация в пользовательский профиль
Для авторизации на платформу нужно:
1. Загрузить основной портал или рабочее зеркало
2. Кликнуть “Войти”
3. Указать имя пользователя и секретную комбинацию
В пользовательском аккаунте открыты такие инструменты:
– Депозит счета
– Получение призов
– Анализ истории транзакций
– Настройка профильными настройками
Портативная версия и софт
Mobile модификация
Responsive вариант веб-сайта предоставляет шанс участвовать с различных портативного гаджета. Визуал самостоятельно подстраивается под формат экрана.
Приложение для download
Загрузить app можно для:
– Android — безопасная download с ресурса
– iOS — загрузка через App Store
Плюсы приложения:
– Моментальный вход
– Стабильная производительность
– Push-нотификации об предложениях
– Улучшенный дизайн
Азартные категории
Игровые машины
Внушительная подборка эмуляторных машин от топовых разработчиков:
– Классические игры
– Современные-автоматы
– Прогрессивные-игры
Live casino
Секция с живыми ведущими дает:
– European/American Roulette
– 21
– Баккара
– Карточные игры
Трансляции осуществляются в HD качестве изображения, создавая эффект подлинного казино.
Варианты внесения средств и снятия
Ресурс работает с разные транзакционные сервисы:
– Банковские картсчета
– Цифровые системы
– Цифровые валюты
– Прямые транзакции
Минимальные суммы взноса и скоростные транзакции гарантируют процесс исключительно беспроблемной.
Команда support
Компетентная команда помощи функционирует 24/7 и может ассистировать с любыми проблемами:
– Онлайн-чат
– Email-консультации
– Голосовая горячая линия
Заключение
Главный сайт казино и его рабочие альтернативные адреса дают участникам надежный и азартный гемблинг отдых. Щедрые подарки, простая портативная вариант, богатые развлечения и качественное live-казино превращают эту платформу отличным выбором для игровых времяпрепровождения.
To understand
casino websites deposit limits
to unlock potential.
this district store – Pages are well organized and easy to explore.
official olivestone page – Took a moment to browse and it already looks reliable.
Читать далее кракен onion
check this boutique – Came across this website, everything seems organized and simple.
купить курсовую москва купить курсовую москва .
Нынешние онлайн-казино предлагают геймерам обилие опций для удобной игры. Главный веб-портал Kraken casino обеспечивает путь ко всем возможностям и игровым автоматам. Однако при наличии системных трудностей на выручку спешат актуальные копии.
Что означает собой функционирующее зеркало
Зеркало казино — это полная реплика оригинального портала, расположенная по альтернативному веб-адресу. Подлинное зеркало сохраняет все опции, включая открытие профиля, авторизацию в личный кабинет, премии и бонусные коды.
Копия на сегодня обеспечивает:
– Стабильный путь к развлекательным аппаратам
– Совершенную сохранность индивидуальных сведений
– Удержание баланса и журнала операций
– Доступность всех промо-предложений
Создание аккаунта на лицензионном портале
Этап создания аккаунта занимает считанные минут. Начинающим игрокам требуется:
1. Открыть на официальный ресурс или рабочее зеркало
2. Кликнуть кнопку «Зарегистрироваться»
3. Заполнить запрашиваемые графы
4. Подтвердить email почту
5. Применить купон при существовании
После конца оформления профиля игроки получают приз за регистрацию, что может включать free spins или денежно-призовое поощрение.
Логин в индивидуальный кабинет
Индивидуальный кабинет дает всеобъемлющий управление над азартным процессом. Через собственный профиль допускается:
– Пополнять счет
– Выводить средства
– Использовать купоны
– Проверять хронологию пари
– Участвовать в турнирах
– Обретать возврат средств
Описание бонусов и промо-предложений
Щедрая призовая схема — значимое преимущество платформы. Основные формы поощрений:
Стартовый приз
Новые игроки приобретают богатое награду на первые взносы. Размер приза может достигать 100-200% от размера депозита.
Free spins
Безвозмездные спины предоставляются для топовых слотов. Сумма фриспинов разнится от 10 до 500 штук.
Кешбэк
Систематический или ежемесячный откат части утраченных финансов. Обычный процент кэшбека — 5-15%.
Конкурсы
Постоянные состязания с внушительными наградными банками. Конкурсанты конкурируют за лучшие места в рейтинге.
Смартфонная версия и приложуха
Смартфонная версия разрешает играть с каждого аппарата. Геймеры могут установить приложение для iOS и Android или задействовать браузерную версию.
Преимущества портативного софта:
– Молниеносная загрузка игр
– Эргономичный интерфейс
– Push-уведомления о промо
– Вход через Face ID
Слоты и Live казино
Развлекательная библиотека содержит тысячи наименований от ведущих разработчиков.
Топовые категории игр:
– Стандартные автоматы
– Видеослоты с бонусными этапами
– Джекпот автоматы
– Мегавейс слоты
Live игровой зал
Раздел live игорный зал предоставляет игру с настоящими крупье. Есть стандартные развлечения:
– Европейская рулетка
– Блэкджек
– Punto Banco
– Карибский покер
Как обнаружить действующее зеркало
Обрести свежую URL на зеркало можно несколькими путями:
1. Зарегистрироваться на почтовую рассылку
2. Следить за обновлениями в социальных сетях
3. Связаться в службу поддержки
4. Заложить актуальное зеркало в избранное
Итог
Основной портал и его рабочие зеркала предоставляют бесперебойный путь к азартным автоматам. Богатые вознаграждения, различные бонусные коды, комфортное портативное приложение и высококлассная техподдержка поддержки создают азартный опыт максимально приятным и безопасным.
Подключение к сайту и актуальные URL
Популярные онлайн казино гарантируют пользователям огромный спектр опций. Главный сайт https://10eurotaxi.nl/2026/02/28/multivalyutnaya-platezhnaya-sistema-prednaznachena-dlya-polzovateley-iz-120-stran/ гарантирует безопасный вход ко всем услугам. Тем не менее временами возникают случаи, когда требуется дополнительный способ доступа.
Что есть собой функционирующее зеркало
Рабочее зеркало — это идентичная дубликат легального портала с альтернативным доменным названием. Зеркало сегодня позволяет миновать существующие ограничения и поддерживать непрерывный доступ к выбранным автоматам.
Проверенное зеркало обладает всеми опциями, что и основной веб-сайт:
– Полный каталог автоматов
– Индивидуальный раздел с актуальными сведениями
– Все бонусы и акции
– Надежные банковские операции
Оформление и вход в платформу
Процесс открытия аккаунта на платформе отнимает пару минут. Новым клиентам следует:
1. Открыть на актуальное зеркало сегодня
2. Кликнуть кнопку «Создать аккаунт»
3. Ввести обязательные информацию
4. Проверить почтовую почту или контакт телефона
5. Использовать бонус за открытие аккаунта
Вход в персональный аккаунт реализуется через предоставление логина и ключа.
Характеристика наградной системы
Привлекательная бонусная политика — основное преимущество казино. Игроки обретают всевозможные подарки:
Стартовые поощрения
Начинающие игроки способны рассчитывать на привлекательный приз за создание аккаунта. Традиционно это набор опций, содержащий:
– Частичную добавку к начальному взносу
– Бесплатные кручения
– Призовые деньги на аккаунт
Промо-коды и эксклюзивные акции
Регулярные бонусные комбинации обеспечивают зарабатывать экстра льготы. Использовать их допустимо в предназначенном окне персонального профиля.
Free spins и возврат средств
Бесплатные спины — это вариант запускать автоматы без применения собственных финансов. Рибейт подразумевает частичный отдачу утраченных сумм.
Библиотека развлечений
Азартная площадка обеспечивает значительную коллекцию автоматов.
Автоматы
Вариативность автоматов впечатляет представление. Доступны традиционные трехбарабанные автоматы и продвинутые развлечения с занимательной графикой.
Live заведение
Секция Live игр транспортирует участников в обстановку истинного азартного зала. Профессиональные операторы организуют раунды в прямом формате.
Конкурсы и лидерборды
Периодические турниры вносят драйва и обеспечивают вариант получить большие призы.
Мобильная версия и клиент
Современные технологии помогают развлекаться в удобном пространстве. Mobile версия автономно настраивается под экран аппарата.
Скачать клиент разрешено для программных платформ iOS и Android. Программа предоставляет:
– Скоростной запуск
– Устойчивую производительность
– Моментальные-алерты об бонусах
– Удобный интерфейс
Платежные действия
Сайт поддерживает всевозможные методы пополнения и снятия сумм:
– Пластиковые карты
– Электронные системы
– Криптовалюты
– Денежные отправки
Любые действия проходят через зашифрованное протокол, что гарантирует неприкосновенность конфиденциальных информации.
Сервис support
Профессиональная служба помощи действует круглосуточно. Обратиться с специалистами можно через:
– Live-чат
– Почтовую почту
– Контакт
– Общественные каналы
Заключение
Легальный ресурс и его действующее зеркало дают игрокам стабильный и комфортный доступ к захватывающим забавам. Выгодные поощрения, обширный выбор автоматов и высокая ассистанс создают игру предельно удобной и прибыльной.
holiganbet giris: holiganbet
shopping outlet page – Just opened the site and the formatting seems tidy.
their homepage – Logical arrangement, pages are simple to navigate through.
canyon stone shop – Scrolling through, the layout feels intuitive and clear.
Передовые виртуальные казино дают пользователям обширный диапазон вариантов для приятной игры. Тем не менее иногда вход к официальному платформе может оказаться заблокированным. В таких случаях на подмогу приходит Килограмм казино регистрация, которое дает непрерывный доступ ко всем возможностям платформы.
Что такое функционирующее зеркало казино
Альтернативный сайт — это полная дубликат официального веб-сайта, которая размещается по дополнительному интернет-адресу. Зеркало содержит целый функционал главного сайта, включая индивидуальный кабинет, депозит и сведения платежей.
Основные достоинства применения зеркала:
– Непрерывный подключение к платформе
– Максимальная схожесть возможностей
– Защита личных реквизитов
– Сохранение всех вознаграждений
Как обнаружить функционирующее зеркало в данный момент
Существует несколько достоверных методов получения свежей адреса:
Официальные ресурсы:
1. Email рассылка — руководство постоянно пересылает сообщения с свежими ссылками
2. Социальные сети — официальные профили выкладывают текущую информацию
3. Отдел поддержки — операторы выдают надежные домены
4. Смартфонное приложение — дает возможность обходить блокировки
Регистрация на главном сайте
Операция оформления длится лишь считанные минут и содержит из следующих стадий:
1. Открытие на основной сайт или функционирующее зеркало
2. Нажатие на элемент «Открыть счет»
3. Ввод персональной бланка
4. Валидация электронной почты или контактного номера
5. Активация бонуса за регистрацию при наличии промокода
Свежие клиенты приобретают солидный начальный подарок, который может предполагать даровые прокруты, валютные призы или cashback.
Логин в индивидуальный кабинет
Логин на платформе выполняется обычным образом. Достаточно ввести учетные данные и секретный ключ, указанные при создании аккаунта.
Значимые моменты для защищенного входа:
– Эксплуатируйте сложный код
– Запустите двойную идентификацию
– Не сохраняйте пароли на публичных гаджетах
– Мониторьте доменную строку браузера
Описание премиальной структуры
Казино радует клиентов всевозможными поощрениями и акциями:
Стартовый пакет
Начинающие вправе рассчитывать на щедрое награду за начальный вклад. Как правило это процентная премия к внесенной величине плюс бесплатные вращения для популярных слотов.
Регулярные предложения
– Недельный возврат средств — возвращение доли проигранных денег
– Бонусы на дополнительные вклады
– Уникальные предложения по знаменательным датам
– Соревнования с крупными выигрышными пулами
Программа вознаграждений
Постоянные клиенты собирают очки за всякую бет, которые затем превращаются на реальные деньги, фриспины или эксклюзивные привилегии.
Бонус-коды: как задействовать
Кодовые комбинации — это уникальные сочетания символов, обеспечивающие доступ к специальным привилегиям.
Каким образом взять актуальные промокоды:
– Авторизованные медийные сети казино
– Партнерские площадки
– Email-рассылка
– Отраслевые сообщества
Активируется промокод в специальное поле при регистрации или внесении депозита счета.
Мобильная версия и приложение
Нынешние геймеры предпочитают делать ставки с портативных девайсов. Портал предлагает пару решения для комфортной портативной игры.
Responsive версия
Интернет версия само собой адаптируется под параметры экрана. Не требует инсталляции и действует в любом современном браузере.
Телефонное приложение
Получить приложение можно для девайсов на Android и iOS. Выгоды app:
– Быстрая загрузка
– Стабильная работа
– Автоматические-уведомления о бонусах
– Автоматический минование блокировок
Операция загрузки легок: нужно зайти на портал с мобильного устройства и выполнять инструкциям.
Гемблинг ассортимент
Каталог слотов включает несколько тысяч вариантов от передовых провайдеров.
Слоты
Игровые машины — крайне востребованная раздел забав. Размещены классические 3-барабанные аппараты, современные видеослоты с премиальными раундами, а также растущие суперпризы.
Live казино
Секция с реальными ведущими обеспечивает ощутить антураж настоящего казино. Доступны варианты с баккарой.
Передача производится в отличном четкости, обеспечивается общение с крупье и иными геймерами.
Турниры
Периодически организуются состязания по всевозможным играм. Присоединение обеспечивает возможность завоевать финансовые выигрыши, free spins или уникальные презенты.
Финансовые операции
Платформа предлагает широкий ассортимент денежных методов:
– Банковские карты
– Цифровые сервисы
– Крипта
– Счетовые переводы
Наименьшая сумма вклада — доступная для основной части клиентов. Вывод средств обрабатывается в скорые сроки.
Служба поддержки
Квалифицированные консультанты готовы содействовать круглосуточно. Имеются нижеследующие способы коммуникации:
– Веб-чат
– Email
– Звонковая поддержка
– Медийные сети
Разъяснения на стандартные вопросы можно обнаружить в блоке FAQ.
Вывод
Лицензионный веб-сайт казино и его актуальные зеркала предоставляют игрокам совершенный вход ко всем опциям портала. Солидные поощрения, комфортная портативная версия, огромный каталог игр и компетентная служба поддержки превращают игровой опыт исключительно приятным и защищенным.
Переход к сайту через проверенные зеркала
Игроки сетевых казино часто имеют дело с трудностью закрытия главного домена. Как раз для преодоления этой трудности разработаны зеркала легального ресурса. Френдс гарантирует абсолютный переход ко всем возможностям ресурса.
Что такое актуальное зеркало казино
Альтернативный адрес составляет собой точную реплику основного веб-сайта с таким же набором функций. Единственное различие — это альтернативное имя. Абсолютно все сведения пользователя, в том числе баланс, привилегии и данные партий, остаются идентичными.
Достоинства применения зеркал
Функционирующие зеркала имеют множеством важных плюсов:
– Бесперебойный вход к выбранным играм
– Абсолютная конфиденциальность личных данных
– Сохранение всех конфигураций пользовательского кабинета
– Шанс получения бонусов и включения в предложениях
Регистрация на официальном сайте
Ход регистрации чрезвычайно легок и длится немного минут. Начинающие участники в состоянии полагаться на крупный стартовый подарок за оформление.
Ступени создания аккаунта
1. Вход на главный сайт или его альтернативу
2. Нажатие на клавишу “Регистрация”
3. Указание обязательных сведений
4. Проверка почтовой почты
5. Ввод бонусного кода (когда доступен)
Поощрения и акции для участников
Платформа балует своих пользователей различными поощрительными системами.
Основные категории призов
Вводный приз — солидное начисление для свежих клиентов, что имеет возможность вмещать финансовые суммы и безвозмездные спины.
Безвозмездные спины — шанс запускать в популярных игровых машинах без затрат.
Кэшбек — долевой возврат проигранных сумм, что предоставляется каждую неделю или раз в месяц.
Специальные коды — эксклюзивные наборы, предоставляющие бонусные привилегии.
Пользовательский кабинет: опции и установки
Персональный раздел дает абсолютный контроль над персональным взаимодействием. В нем присутствуют:
– Регулирование счетом
– Данные переводов
– Действующие бонусы
– Конфигурации безопасности
– Верификация профиля
Смартфонная версия и программа
Современные участники признают доступность. Ресурс обеспечивает два варианта для участия с мобильных гаджетов.
Responsive мобильная вариант
Мобильная редакция сайта самостоятельно приспосабливается под дисплей любого девайса. Отсутствует потребность скачивать специальное приложение.
Софт для гаджетов
Доступно загрузить оригинальное APP для iOS и Android. Софт обеспечивает:
– Моментальный доступ
– Адаптированный внешний вид
– Мобильные-сообщения о предложениях
– Устойчивую производительность
Live развлечения: обстановка истинного клуба
Категория Live развлечений транспортирует клиентов в обстановку подлинного зала. Квалифицированные крупье проводят сессии в формате прямого времени.
Востребованные Live-форматы
– Американская рулетка
– Блэкджек
– Baccarat
– Покер
Игровые машины: ассортимент игр
Собрание азартных аппаратов включает множество названий от ведущих разработчиков. Игроки встретят:
– Стандартные автоматы
– Современные слоты
– Джекпот-машины
– Megaways
Конкурсы и уникальные акции
Регулярные состязания обеспечивают участникам состязаться друг с другом за значительные денежные банки. Всякий состязание располагает свои требования включения и рейтинг лидеров.
Пути внесения и получения финансов
Казино обслуживает множество расчетных инструментов:
– Кредитные карты
– Электронные сервисы
– Blockchain-платежи
– Финансовые переводы
Каждые транзакции осуществляются надежно благодаря актуальным протоколам шифрования.
Служба support
Опытные консультанты отдела support способны ассистировать 24/7. Работают нижеперечисленные каналы общения:
– Оперативный-чат
– Email-поддержка
– Аудио поддержка
– Социальные сети
Заключение
Главный портал казино и его рабочие копии обеспечивают пользователям конфиденциальный и комфортный вход к огромному спектру азартных развлечений. Солидные подарки, частые акции, квалифицированная сервис и удобные платежные системы делают азартный процесс предельно приятным и доходным.
this emporium website – Browsed the page today and it seems informative and well put together.
Hazel Treasures – Checked this page, sections are organized and reading is effortless.
курсовая работа купить москва курсовая работа купить москва .
https://betwarrior.cat/
En 2026, BetWarrior se consolida como una de las opciones de casino online y apuestas deportivas mas importantes de Argentina, ofreciendo una promocion de bienvenida de hasta $500.000 ARS para nuevos jugadores. Al contar con habilitacion oficial y un compromiso en la seguridad, el sitio garantiza una experiencia de juego transparente y confiable para el publico local. Los usuarios tienen la posibilidad de acceder de miles de juegos de desarrolladores de primer nivel como Evolution y Pragmatic Play, realizar apuestas deportivas en vivo y gestionar sus fondos sin complicaciones en pesos argentinos, todo ello desde una aplicacion movil disenada para Android e iOS.
holiganbet güncel giriş: holiganbet
Доступ к порталу через действующие зеркала
Участники интернет казино постоянно сталкиваются с трудностью ограничения официального ресурса. Именно для преодоления этой задачи предусмотрены копии официального домена. https://www.armchairgeneral.com/zachem-nuzhna-verifikatsiya-v-kazino-i-kak-izbezhat-poteri-sredstv-pri-vyvode.htm обеспечивает полный переход ко всем сервисам площадки.
Что такое функционирующее зеркало казино
Дубликат является собой полную реплику главного сайта с идентичным функционалом. Основное несовпадение — это иное имя. Каждые сведения пользователя, включая баланс, бонусы и записи ставок, сохраняются неизменными.
Преимущества задействования зеркал
Функционирующие зеркала располагают множеством значимых плюсов:
– Постоянный доступ к излюбленным развлечениям
– Абсолютная сохранность индивидуальных параметров
– Сохранение всех конфигураций индивидуального кабинета
– Способность приобретения наград и вовлечения в предложениях
Регистрация на официальном сайте
Операция открытия счета предельно легок и требует несколько минут. Новые клиенты способны надеяться на солидный вводный подарок за открытие счета.
Стадии открытия аккаунта
1. Переход на официальный портал или его копию
2. Активация на опцию “Зарегистрироваться”
3. Ввод нужных информации
4. Активация электронной почты
5. Ввод промокода (при наличии есть)
Поощрения и промоакции для игроков
Игровая площадка радует своих клиентов разнообразными наградными акциями.
Основные варианты поощрений
Стартовый бонус — солидное поощрение для начинающих клиентов, что может включать материальные средства и free spins.
Free spins — возможность крутить в топовых аппаратах безвозмездно.
Компенсация — долевой возмещение потерянных финансов, который зачисляется по неделям или помесячно.
Специальные коды — специальные последовательности, обеспечивающие дополнительные поощрения.
Личный кабинет: возможности и конфигурации
Личный кабинет предоставляет полный управление над персональным процессом. Здесь предусмотрены:
– Администрирование средствами
– История транзакций
– Работающие поощрения
– Настройки безопасности
– Валидация счета
Портативная редакция и софт
Актуальные пользователи признают портативность. Казино дает пару варианта для развлечений с смартфонных девайсов.
Приспособленная смартфонная версия
Портативная платформа портала без участия приспосабливается под дисплей любого устройства. Не нужно устанавливать дополнительное приложение.
Приложение для телефонов
Доступно установить официальное APP для iOS и Android. Программа предоставляет:
– Скорый запуск
– Оптимизированный дизайн
– Мобильные-оповещения о поощрениях
– Надежную функциональность
Live раздел: антураж настоящего казино
Раздел Live столов доставляет клиентов в обстановку истинного клуба. Опытные хосты осуществляют партии в формате настоящего времени.
Известные Live-развлечения
– Французская рулетка
– 21
– Баккара
– Poker
Игровые машины: ассортимент игр
Каталог игровых машин содержит сотни названий от известных разработчиков. Игроки откроют:
– Традиционные автоматы
– Современные слоты
– Джекпот-игры
– Слоты с множественными линиями
Конкурсы и специальные предложения
Регулярные турниры дают возможность участникам соревноваться друг с другом за значительные призовые банки. Каждый конкурс имеет свои критерии включения и список лидеров.
Способы пополнения и получения средств
Площадка поддерживает массу денежных методов:
– Банковские инструменты
– Виртуальные счета
– Цифровые валюты
– Банковские отправления
Абсолютно все переводы реализуются защищенно благодаря новейшим системам кодирования.
Сервис помощи
Опытные операторы отдела помощи готовы содействовать 24/7. Предусмотрены следующие каналы связи:
– Мгновенный-чат
– Email-поддержка
– Звонковая связь
– Коммуникационные сети
Вывод
Главный портал казино и его актуальные альтернативы дают игрокам защищенный и удобный переход к обширному спектру азартных услуг. Щедрые награды, периодические кампании, компетентная поддержка и удобные денежные способы создают развлекательный опыт крайне приятным и прибыльным.
ремонт квартир цена remont-v-tyle.ru .
Нынешние онлайн-казино предоставляют геймерам множество вариантов для удобной игры. Официальный портал https://www.mediastudies.cdit.org/bezdepozitnye-bonusy-za-registratsiyu-v-luchshikh-onlayn-kazino-bez-neobkhodimosti-izuchat-obshirnuyu-dokumentatsiyu-igroki-mogut-legko-nachat-igru-chto-idealno-podkhodit-dlya-tekh-kto-tsenit-svoyu/ обеспечивает путь ко всем опциям и развлечениям. Однако при появлении системных трудностей на выручку спешат действующие альтернативные адреса.
Что являет собой собой функционирующее зеркало
Дубликат казино — это полная дубликат основного сайта, расположенная по другому веб-адресу. Официальное зеркало хранит все характеристики, включая открытие профиля, авторизацию в собственный кабинет, премии и бонусные коды.
Альтернативный сайт на сегодня гарантирует:
– Непрерывный вход к развлекательным аппаратам
– Абсолютную безопасность личных информации
– Поддержку баланса и хронологии операций
– Доступность всех акций
Создание аккаунта на лицензионном ресурсе
Этап открытия профиля отнимает несколько минут. Новым пользователям необходимо:
1. Перейти на основной сайт или актуальное зеркало
2. Щелкнуть кнопку «Регистрация»
3. Указать требуемые графы
4. Подтвердить э-мейл почту
5. Ввести купон при наличии
После завершения регистрации клиенты обретают бонус за регистрацию, какой может включать free spins или монетарное вознаграждение.
Авторизация в индивидуальный кабинет
Приватный кабинет дает полный контроль над игровым процессом. Через собственный профиль допускается:
– Вносить средства на счет
– Выводить выигрыши
– Применять купоны
– Контролировать хронологию игр
– Соревноваться в соревнованиях
– Приобретать возврат средств
Описание вознаграждений и промо-предложений
Выгодная призовая политика — важное плюс проекта. Основные категории поощрений:
Приветственный приз
Новые игроки получают щедрое премирование на стартовые вклады. Сумма приза может достигать 100-200% от величины депозита.
Бонусные спины
Даровые прокруты предоставляются для топовых автоматов. Сумма бесплатных вращений изменяется от 10 до 500 штук.
Кешбэк
Постоянный или помесячный возврат части потерянных денег. Стандартный процент кэшбека — 5-15%.
Конкурсы
Постоянные состязания с большими премиальными фондами. Соревнующиеся борются за топовые строчки в турнирной таблице.
Портативная версия и программа
Адаптивная версия разрешает играть с любого аппарата. Геймеры могут скачать приложение для iOS и Android или эксплуатировать интернет версию.
Преимущества смартфонного программы:
– Быстрая прогрузка слотов
– Удобный интерфейс
– Push-уведомления о акциях
– Доступ через Face ID
Машины и Live казино
Развлекательная библиотека включает сотни наименований от известных провайдеров.
Популярные секции автоматов:
– Традиционные автоматы
– Современные слоты с призовыми этапами
– Накопительный приз игры
– Мега-путь слоты
Live игорный зал
Раздел live казино предоставляет игру с живыми дилерами. Имеются классические варианты:
– Французская рулетка
– Blackjack
– Baccarat
– Техасский холдем
Как найти действующее зеркало
Обрести актуальную URL на зеркало разрешается различными вариантами:
1. Зарегистрироваться на почтовую рассылку
2. Наблюдать за обновлениями в соц сетях
3. Написать в службу поддержки
4. Сохранить рабочее зеркало в избранное
Вывод
Официальный ресурс и его функционирующие альтернативные адреса дают непрерывный доступ к игровым играм. Великодушные вознаграждения, многочисленные бонусные коды, практичное портативное софт и отличная служба поддержки создают азартный опыт в высшей степени приятным и надежным.
Discover this store – Just visited the site; the layout keeps everything clear and accessible.
this boutique store – I stopped by the page today and appreciated how simple everything was to navigate.
their homepage – Navigation is intuitive, and sections are easy to find.
Доступ к платформе через действующие зеркала
Клиенты онлайн казино нередко сталкиваются с ситуацией недоступности главного домена. Собственно для решения этой трудности предусмотрены копии главного сайта. Лаки Бир обеспечивает стопроцентный доступ ко всем возможностям ресурса.
Что такое актуальное зеркало казино
Зеркало представляет собой точную копию главного сайта с таким же возможностями. Главное отличие — это альтернативное имя. Любые данные игрока, содержа баланс, награды и архив игр, сохраняются прежними.
Выгоды задействования зеркал
Рабочие зеркала обладают набором ключевых выгод:
– Непрерывный вход к предпочитаемым слотам
– Абсолютная сохранность собственных данных
– Сохранение всех опций индивидуального кабинета
– Шанс взятия наград и включения в кампаниях
Создание аккаунта на основном домене
Операция оформления максимально несложен и отнимает несколько минут. Новые клиенты в состоянии полагаться на солидный стартовый бонус за регистрацию.
Стадии создания аккаунта
1. Вход на официальный ресурс или его зеркало
2. Выбор на элемент “Регистрация”
3. Внесение обязательных параметров
4. Подтверждение электронной почты
5. Указание промокода (в случае имеется)
Подарки и акции для участников
Игровая площадка одаривает своих пользователей всевозможными бонусными системами.
Базовые типы поощрений
Приветственный подарок — щедрое начисление для недавних участников, что в состоянии содержать финансовые бонусы и фриспины.
Безвозмездные спины — способность играть в популярных аппаратах безвозмездно.
Кэшбек — долевой возврат проигранных сумм, каковой предоставляется еженедельно или помесячно.
Промокоды — уникальные наборы, предоставляющие добавочные поощрения.
Пользовательский кабинет: опции и параметры
Пользовательский профиль дает абсолютный управление над пользовательским опытом. Тут доступны:
– Регулирование депозитом
– Записи платежей
– Текущие награды
– Параметры безопасности
– Верификация учетной записи
Портативная версия и приложение
Современные пользователи ценят доступность. Платформа обеспечивает два варианта для ставок с мобильных девайсов.
Отзывчивая портативная платформа
Портативная редакция домена автоматически приспосабливается под разрешение любого устройства. Отсутствует потребность инсталлировать специальное ПО.
Программа для мобильных
Возможно загрузить оригинальное APP для iOS и Android. APP гарантирует:
– Быстрый старт
– Доработанный внешний вид
– Всплывающие-уведомления о предложениях
– Стабильную функциональность
Live игры: обстановка настоящего казино
Раздел Live развлечений доставляет игроков в обстановку настоящего зала. Опытные ведущие проводят раунды в виде реального времени.
Топовые Live-форматы
– Европейская рулетка
– Blackjack
– Punto Banco
– Poker
Слоты: разнообразие слотов
Библиотека развлекательных аппаратов включает массу наименований от топовых производителей. Пользователи встретят:
– Традиционные слоты
– Видеослоты
– Мега-выигрыш-автоматы
– Мегавейс
Соревнования и особые события
Регулярные соревнования дают возможность пользователям состязаться друг с другом за значительные призовые банки. Всякий состязание содержит свои требования участия и список призеров.
Пути пополнения и вывода денег
Платформа предоставляет комплекс финансовых методов:
– Платежные картыы
– Электронные сервисы
– Blockchain-платежи
– Прямые транзиты
Любые переводы осуществляются безопасно благодаря актуальным технологиям криптографии.
Сервис support
Опытные консультанты сервиса обслуживания готовы поддержать 24/7. Имеются следующие каналы связи:
– Живой-чат
– Email-помощь
– Голосовая линия
– Коммуникационные сети
Вывод
Главный домен клуба и его действующие альтернативы предоставляют пользователям конфиденциальный и комфортный доступ к огромному спектру геймерских услуг. Внушительные бонусы, регулярные промоакции, качественная служба и простые финансовые способы формируют развлекательный опыт предельно увлекательным и результативным.
Обзор главного веб-сайта
Современное онлайн-казино предлагает своим участникам обширный спектр развлечений и вознаграждений. Основной портал Minicas казино казино работает постоянно, предоставляя возможность к востребованным играм, live-казино и многочисленным кампаниям.
Рабочее зеркало: доступ к порталу
Что такое зеркало казино
Зеркало является собой полную версию основного веб-сайта с отличным интернет адресом. Рабочее зеркало позволяет игрокам преодолевать барьеры и получать стабильный подключение к предпочитаемым играм.
Как обнаружить актуальное зеркало сегодня
Актуальные адреса на основное зеркало размещаются через:
– E-mail оповещение
– Главные публичные сети
– Сервис обслуживания
– Тематические площадки
Регистрация на ресурсе
Ход регистрации
Оформление отнимает всего минут и подразумевает нижеследующие стадии:
1. Доступ на официальный портал или рабочее зеркало
2. Нажатие клавиши “Регистрация”
3. Заполнение учетных информации
4. Активация email или контакта
5. Установка секретнойкомбинации
Бонус за открытиесчета
Свежие клиенты обретают выгодные приветственные бонусы:
– Финансовые суммы на баланс
– Фриспины для игр
– Повышенный размер кэшбека
– Эксклюзивные купоны
Вход в личный профиль
Постоянные участники имеютвозможность произвести доступ через основной веб-сайт или действующее зеркало. Для этого нужно внести логин и ключдоступа, установленные при созданииаккаунта.
Функции личного аккаунта
В индивидуальном аккаунте имеются такие опции:
– Изменение контактными реквизитами
– Пополнение счета
– Обналичивание денег
– Активация промокодов
– Отслеживание архива операций
– Регистрация в соревнованиях
Поощрения и акции
Категории вознаграждений
Казино балует своих игроков разнообразными бонусными акциями:
– Стартовый пакет — щедрые поощрения на первые пополнения
– Халявныеспины — экстра ставки в рейтинговых автоматах
– Компенсация — периодический возврат доли ставок
– План поощрения — эксклюзивные преимущества для постоянных пользователей
Ваучеры и их активация
Особые коды предоставляют расширенные подарки. Для применения нужно ввести код в определенное графу в личном профиле.
Развлекательный ассортимент
Слоты
Библиотека развлекательных симуляторов содержит сотни наименований от ведущих поставщиков:
– Обычные машины
– Новые слоты
– Призовые автоматы
– Брендовые слоты
Live казино
Раздел Live-казино дарит взаимодействие с профессиональными дилерами в обстановке реального стрима:
– Европейскаярулетка
– Очко
– PuntoBanco
– Карибскийпокер
Соревнования
Регулярные турниры с большими наградными призами проводятся еженедельно. Претенденты конкурируют за лидерство в таблице.
Смартфонная адаптация и приложение
Mobile платформа ресурса
Главный веб-сайт абсолютно оптимизирован для смартфонных гаджетов. Клиенты могут запускать слоты прямо через обозреватель без нужды инсталляции.
Приложение для загрузки
Официальное портативное приложение предоставляется для получения на устройства с операционными ОС Android и iOS. APP обеспечивает:
– Мгновенный путь к слотам
– Стабильную работу
– Моментальные-извещения о промо
– Интуитивный дизайн
Итог
Оригинальный веб-сайт казино и его функционирующие дубликаты гарантируют клиентам абсолютный возможность к отличным развлекательным сервисам. Щедрые поощрения, всевозможные кампании, функциональная портативная адаптация и опытная сервис делают развлекательный времяпрепровождение чрезвычайно удобным и результативным.
奥美迦奥特曼高清完整版2026 海外华人动漫免费观看
помощь в написании курсовой помощь в написании курсовой .
заказать курсовую срочно заказать курсовую срочно .
мелбет скачать на андроид http://melbet47086.help/
explore the collective – Just noticed this shop and the name sounds fresh, stylish, and memorable.
marketplace traders link – Browsing is smooth, and the layout feels neat.
Нынешние онлайн-казино предоставляют геймерам широкий спектр вариантов для удобной времяпрепровождения. Подключение к сервису казино РўСѓР· Бет казино осуществляется через лицензионный домен или рабочее зеркало.
Что такое функционирующее зеркало казино
Актуальное зеркало — это резервный адрес официального портала казино. Такие клоны разрабатываются для поддержания стабильного входа к развлекательной площадке.
Копия актуальное абсолютно повторяет опции официального портала. Геймеры получают аналогичный выход ко всем функциям, включая оформление профиля, пополнение счета и вывод денег.
Оформление профиля на официальном сайте
Процесс открытия профиля отнимает всего считанные минут. Начинающим игрокам нужно:
1. Попасть на главный ресурс или действующее подлинное зеркало
2. Выбрать кнопку “Регистрация”
3. Ввести необходимые информацию
4. Активировать электронную почту
5. Использовать промокод при существовании
После окончания оформления участник получает подарок за регистрацию, который вправе содержать бесплатные вращения или cash начисление.
Авторизация в персональный кабинет
Пользовательский кабинет — это защищенная область, где игроки имеют возможность управлять своим счетом. Для доступа нужно внести имя пользователя и password.
В индивидуальном кабинете открыты следующие инструменты:
– Просмотр журнала переводов
– Активация бонусных кодов
– Настройка бонусами
– Присоединение в турнирах
– Отслеживание возврата средств
– Корректировка данных
Призы и акции
Гемблинговая система обеспечивает выгодные вознаграждения:
Стартовый бонус — новички получают существенное начисление на дебютные взносы.
Бесплатные вращения — дарятся как при оформлении, так и в контексте разнообразных мероприятий.
Возврат средств — еженедельный возмещение части потерянных денег.
Бонусные коды — эксклюзивные комбинации, предоставляющие право к уникальным вознаграждениям.
Характеристика азартных разделов
Slots
Библиотека аппаратов включает массу позиций от лучших разработчиков. Пользователи откроют как классические слоты, так и новые мультимедийные автоматы с захватывающей визуализацией.
Live казино
Раздел Live казино обеспечивает возможность участвовать с действующими ведущими в режиме настоящего времени. Представлены распространенные столы: рулетка, блэкджек, баккара, покер.
Соревнования
Регулярные состязания с солидными наградными банками завлекают тысячи игроков. Лидеры получают монетарные вознаграждения и уникальные подарки.
Телефонная версия и app
Портативная версия ресурса предоставляет право играть с произвольного устройства. Структура автоматически адаптируется под диагональ экрана.
Получить программу можно для устройств на Android и iOS. Мобильное приложение обладает всеми опциями полной версии.
Как обнаружить рабочее зеркало на сегодня
Свежие URL альтернатив периодически меняются. Найти действующую URL можно разными способами:
– Через департамент техподдержки
– В настоящих социальных сетях
– По электронной newsletter
– На аффилиатных порталах
Безопасность и легальность
Лицензионный портал функционирует на базе зарубежной сертификата. Все транзакции оберегаются актуальными технологиями кодирования.
Анонимность персональных реквизитов обеспечивается в стопроцентном формате.
Итог
Главный домен и его рабочие альтернативы предоставляют пользователям круглосуточный путь к превосходным развлекательным сервисам. Выгодные поощрения, различные развлечения, квалифицированная поддержка — все это превращает развлекательный досуг предельно беспроблемным и захватывающим.
collectivepoint – Elegant visuals paired with an approachable tone create a welcoming feel.
Современные виртуальные казино предоставляют пользователям обширный диапазон вариантов для комфортной игры. Тем не менее иногда доступ к базовому порталу может являться закрытым. В таких случаях на выручку приходит https://hcmax.co/videoguides/luchshie-kazino-s-vyvodom-i-popolneniem-cherez-kartu-na-2026-god/, которое предоставляет постоянный подключение ко всем функциям платформы.
Что такое актуальное зеркало казино
Альтернативный сайт — это полная дубликат главного портала, которая хостится по альтернативному интернет-адресу. Альтернативный ресурс имеет целый возможности главного ресурса, включая пользовательский кабинет, баланс и историю транзакций.
Ключевые плюсы задействования зеркала:
– Постоянный соединение к платформе
– Стопроцентная аналогичность возможностей
– Защита персональных сведений
– Хранение существующих бонусов
Как обнаружить рабочее зеркало в данный момент
Есть несколько достоверных способов получения свежей ссылки:
Легитимные каналы:
1. Имейл рассылка — администрация постоянно направляет уведомления с актуальными URL
2. Коммуникационные сети — авторизованные аккаунты публикуют актуальную сведения
3. Отдел поддержки — консультанты предоставляют безопасные домены
4. Мобильное приложение — предоставляет минуть блокировки
Оформление профиля на лицензионном портале
Процедура регистрации требует не более считанные минут и включает из нижеследующих стадий:
1. Вход на основной сайт или функционирующее зеркало
2. Нажатие на клавишу «Создать аккаунт»
3. Заполнение персональной формы
4. Подтверждение имейл почты или мобильного номера
5. Применение поощрения за регистрацию при доступности промокода
Свежие пользователи получают великодушный приветственный приз, который может содержать free spins, финансовые поощрения или компенсацию.
Логин в личный кабинет
Вход на сайте осуществляется обычным методом. Требуется указать имя пользователя и секретный ключ, задействованные при регистрации.
Значимые моменты для конфиденциального входа:
– Задействуйте криптостойкий шифр
– Задействуйте двухэтапную проверку
– Не сохраняйте коды на публичных компьютерах
– Контролируйте доменную строку браузера
Описание поощрительной структуры
Казино балует клиентов многочисленными поощрениями и промо:
Стартовый пакет
Свежие игроки могут претендовать на великодушное вознаграждение за начальный взнос. Как правило это пропорциональная добавка к переведенной сумме плюс фриспины для востребованных слотов.
Систематические предложения
– Семидневный cashback — возврат процента проигранных финансов
– Бонусы на повторные взносы
– Эксклюзивные офферы по праздникам
– Конкурсы с значительными выигрышными суммами
Система лояльности
Регулярные игроки накапливают очки за любую бет, которые затем обмениваются на действительные деньги, даровые прокруты или специальные привилегии.
Кодовые слова: как задействовать
Бонус-коды — это специальные наборы символов, гарантирующие возможность к бонусным вознаграждениям.
Откуда найти действующие промокоды:
– Авторизованные коммуникационные сети казино
– Партнерские ресурсы
– Email-подписка
– Специализированные форумы
Вводится промокод в специальное поле при регистрации или добавлении денег баланса.
Мобильная версия и приложение
Актуальные геймеры выбирают проводить время с мобильных устройств. Портал предоставляет пару способа для приятной телефонной игры.
Отзывчивая вариант
Веб версия само собой подстраивается под параметры экрана. Не предполагает инсталляции и работает в всяком современном браузере.
Смартфонное приложение
Получить софт можно для девайсов на Android и iOS. Плюсы app:
– Молниеносная загрузка
– Надежная работа
– Push-уведомления о бонусах
– Самостоятельный обход блокировок
Этап установки прост: достаточно зайти на сайт с мобильного гаджета и придерживаться указаниям.
Азартный выбор
Коллекция слотов охватывает множество вариантов от лучших провайдеров.
Слоты
Гемблинг слоты — самая востребованная категория забав. Доступны обычные простые машины, современные видеослоты с дополнительными раундами, а также джекпотные суперпризы.
Live казино
Раздел с живыми крупье позволяет прочувствовать настроение настоящего казино. Доступны варианты с баккарой.
Стриминг реализуется в HD четкости, присутствует коммуникация с крупье и иными участниками.
Состязания
Периодически запускаются турниры по всевозможным категориям. Вступление предоставляет право получить валютные призы, даровые прокруты или специальные поощрения.
Платежные манипуляции
Платформа обеспечивает обширный набор платежных инструментов:
– Пластиковые карты
– Цифровые системы
– Цифровая валюта
– Банковские переводы
Стартовая количество депозита — приемлемая для большинства клиентов. Вывод средств осуществляется в короткие временные рамки.
Служба поддержки
Профессиональные операторы готовы помочь 24/7. Имеются данные каналы коммуникации:
– Интернет-чат
– Email
– Голосовая поддержка
– Социальные сети
Пояснения на частые запросы можно получить в секции FAQ.
Итог
Лицензионный ресурс казино и его рабочие зеркала дают геймерам максимальный доступ ко всем сервисам платформы. Значительные бонусы, практичная портативная версия, огромный ассортимент слотов и профессиональная служба поддержки формируют развлекательный процесс максимально беспроблемным и конфиденциальным.
https://urologymax.shop/ed-medications.html# order ed meds online
great points altogether, you simply won a new reader. What may
you suggest about your put up that you just made a few days ago?
Any sure?
Here is my blog suresmile aligners
RidgeNestHub – The online identity is friendly, innovative, and approachable.
捕风捉影在线免费在线观看2026 高清无广告 AI推荐
Panathinaikos 2-2 Viktoria Plzen 2026 Europa League draw! Greeks fight back – football scores drama all night long!
посмотреть на этом сайте актуальные зеркала kraken
explore oliveharbor site – Browsing is smooth and the page layout is tidy.
Доступ к порталу через рабочие зеркала
Современные интернет казино предоставляют клиентам непрерывный доступ к услугам. Основной ресурс андроид работает надёжно, предоставляя большой ассортимент игровых автоматов. Однако иногда образуются программные проблемы или ограничения, следовательно критично понимать о наличии актуальных зеркал.
Что собой представляет из себя официальное зеркало казино
Дубликат — это абсолютная версия главного веб-сайта с идентичным интерфейсом. Рабочее зеркало на данный момент даёт возможность обходить локальные ограничения и продолжать игру.
Ключевые выгоды задействования зеркал:
– Абсолютный доступ к личному кабинету
– Поддержание всех показателей учётной записи
– Схожий спектр слотов
– Актуальные бонусы и кампании
Оформление на ресурсе
Процесс создания аккаунта занимает немного минут. Недавние пользователи приобретают великодушный приз за оформление, что имеет возможность включать:
– Стартовый денежный кредит
– Безвозмездные фриспины для игр
– Уникальные промокоды
– Расширенный кешбэк
Во имя финализации оформления требуется:
1. Переместиться на основной веб-сайт или зеркало
2. Нажать опцию «Создать аккаунт»
3. Внести индивидуальные реквизиты
4. Подтвердить почтовый адрес или телефон
5. Задействовать ваучер (в случае существовании)
Подключение в индивидуальный кабинет
Следом за удачной регистрации клиенты в состоянии производить подключение используя основной веб-сайт или функционирующее зеркало. Индивидуальный кабинет открывает всесторонний надзор над аккаунтом:
– Архив пари
– Пополнение депозита
– Получение средств
– Администрирование бонусами
– Присутствие в соревнованиях
Привилегии и промо казино
Ресурс радует игроков многочисленными наградными системами:
Приветственные призы
Начинающие приобретают великодушный букет привилегий на первые пополнения. Зачастую это содержит частичную надбавку к величине пополнения плюс бесплатные фриспины.
Регулярные кампании
– Раз в неделю компенсация до 15%
– Турниры с выигрышными банками
– Поощрения на годовщину рождения
– Особые предложения для VIP клиентов
Программа поощрения
Деятельные игроки накапливают единицы, они допустимо обменять на реальные средства или специальные привилегии.
Мобильная вариант и приложение
Актуальные решения помогают развлекаться где подходяще. Смартфонная редакция портала самостоятельно приспосабливается под монитор любого девайса.
Плюсы карманного ПО:
– Скоростная загрузка игр
– Эргономичный облик
– Всплывающие-оповещения о предложениях
– Шанс установить для Android и iOS
Реальное казино: антураж подлинного гемблинг дома
Область Live заведения доставляет геймеров в среду подлинного гемблинг клуба. Опытные ведущие проводят действие в состоянии настоящего времени.
Доступные варианты:
– Европейская рулетка
– Блэкджек
– Карточная игра
– Техасский холдем
Игровые машины и игровые аппараты
Собрание азартных слотов содержит тысячи наименований от ведущих производителей. Произвольный пользователь подберёт слот по душе:
– Винтажные автоматы
– Видеослоты с бонусными уровнями
– Джекпот-игры
– Megaways машины
Конкурсы и раздачи
Постоянные конкурсы добавляют адреналин и дают опцию получить значительные призы. Включение в конкурсах часто бесплатное, а выигрышные суммы составляют крупных величин.
Защита и анонимность
Ресурс задействует актуальные протоколы защиты для гарантии реквизитов клиентов. Все транзакционные действия проходят через охраняемые соединения.
Заключение
Основной веб-сайт и его актуальные зеркала дают устойчивый вход к отличным развлекательным услугам. Великодушные бонусы, комфортная смартфонная редакция, многообразие машин и профессиональное Live-заведение делают портал замечательным решением для фанатов игровых автоматов.
exchange outlet site – Layout feels fresh, and the site is easy to browse.
view their products – Just checked this page, layout is neat and intuitive.
Переход к порталу и актуальные адреса
Популярные виртуальные казино гарантируют клиентам огромный спектр игр. Центральный портал Лаки Ворлд казино предоставляет надежный подключение ко всем функциям. При этом временами появляются случаи, когда требуется запасной способ авторизации.
Что означает собой функционирующее зеркало
Рабочее зеркало — это абсолютная реплика главного веб-сайта с альтернативным URL адресом. Зеркало сегодня помогает избегать вероятные запреты и поддерживать непрерывный доступ к выбранным развлечениям.
Официальное зеркало содержит идентичными характеристиками, что и главный портал:
– Совокупный перечень слотов
– Персональный аккаунт с актуальными данными
– Действующие поощрения и предложения
– Безопасные денежные операции
Открытие профиля и доступ в казино
Процесс оформления на ресурсе занимает несколько моментов. Недавним игрокам следует:
1. Попасть на рабочее зеркало в настоящее время
2. Щелкнуть опцию «Создать аккаунт»
3. Указать требуемые параметры
4. Подтвердить электронную почту или данные мобильного
5. Получить награду за регистрацию
Подключение в персональный раздел производится посредством ввод ID и пароля.
Описание поощрительной политики
Привлекательная призовая программа — основное плюс игорного заведения. Пользователи забирают всевозможные бонусы:
Вступительные награды
Новые клиенты имеют возможность ожидать на привлекательный поощрение за оформление. Как правило это совокупность опций, включающий:
– Частичную надбавку к первому пополнению
– Бесплатные спины
– Дополнительные деньги на кошелек
Промо-коды и особые возможности
Периодические купоны позволяют обретать призовые выгоды. Задействовать их разрешено в отдельном окне личного профиля.
Фриспины и кэшбек
Бесплатные спины — это способность крутить игры без использования своих средств. Кэшбек подразумевает процентный возврат проигранных денег.
Коллекция развлечений
Игровая сайт предлагает внушительную подборку игр.
Игровые машины
Вариативность игровых машин впечатляет фантазию. Имеются стандартные трехбарабанные слоты и актуальные развлечения с интересной анимацией.
Live заведение
Зона Live казино транспортирует игроков в среду настоящего гемблинг заведения. Опытные ведущие организуют партии в реальном времени.
Конкурсы и лидерборды
Периодические турниры добавляют остроты и предоставляют перспективу выиграть значительные выигрыши.
Портативная реализация и клиент
Современные технологии дают возможность играть в удобном локации. Адаптивная реализация автономно оптимизируется под дисплей гаджета.
Загрузить приложение разрешено для мобильных ОС iOS и Android. Клиент предоставляет:
– Быстрый вход
– Бесперебойную производительность
– Всплывающие-уведомления об промо
– Интуитивный облик
Финансовые действия
Сайт работает с разнообразные методы ввода и вывода финансов:
– Пластиковые инструменты
– Цифровые системы
– Токены
– Банковские отправки
Каждые операции выполняются через защищенное подключение, что гарантирует целостность конфиденциальных данных.
Служба ассистанса
Компетентная бригада support трудится 24/7. Обратиться с консультантами допустимо через:
– Интерактивный-чат
– Электронную почту
– Горячую линию
– Медиа сети
Заключение
Легальный ресурс и его функционирующее зеркало дают клиентам надежный и легкий доступ к захватывающим занятиям. Привлекательные бонусы, разнообразный спектр автоматов и профессиональная помощь формируют времяпрепровождение предельно комфортной и выгодной.
apricotbrookoutlet – Nice little discovery, layout is clean and navigation is easy.
Hi, its pleasant post regarding media print, we all be familiar with media is a great source of facts.
my web site :: suresmile clear aligners
https://holiganbetvip.buzz/# holiganbet guncel
Актуальные онлайн-казино предлагают геймерам разнообразный выбор вариантов для удобной развлечений. Вход к площадке Champion выполняется через лицензионный веб-ресурс или действующее зеркало.
Что такое актуальное зеркало казино
Актуальное зеркало — это запасной линк основного веб-сайта казино. Такие версии генерируются для обеспечения постоянного входа к развлекательной платформе.
Дубликат актуальное совершенно воспроизводит функционал официального портала. Клиенты обретают такой же выход ко всем сервисам, включая открытие счета, внесение депозита баланса и вывод выигрышей.
Открытие счета на основном сайте
Механизм регистрации отнимает всего считанные секунд. Будущим пользователям необходимо:
1. Зайти на лицензионный портал или действующее проверенное зеркало
2. Щелкнуть кнопку “Зарегистрироваться”
3. Внести нужные информацию
4. Верифицировать e-mail почту
5. Использовать промокод при доступности
После выполнения открытия профиля пользователь приобретает приз за регистрацию, который может содержать даровые спины или денежное начисление.
Вход в собственный кабинет
Индивидуальный кабинет — это защищенная зона, где игроки имеют возможность регулировать своим счетом. Для логина требуется внести username и код доступа.
В индивидуальном кабинете представлены такие функции:
– Проверка хронологии операций
– Активация кодов активации
– Настройка призами
– Вступление в состязаниях
– Мониторинг возмещения
– Изменение аккаунта
Вознаграждения и промо
Игровая система обеспечивает выгодные призы:
Стартовый пакет — дебютанты приобретают крупное поощрение на дебютные взносы.
Фриспины — предоставляются как при открытии счета, так и в рамках многочисленных промо.
Возмещение — систематический рефанд части проигранных финансов.
Промокоды — уникальные коды, дающие выход к эксклюзивным бонусам.
Обзор гемблинговых секций
Аппараты
Собрание слотов содержит массу вариантов от топовых производителей. Геймеры обнаружат как обычные слоты, так и инновационные мультимедийные автоматы с увлекательной визуализацией.
Live казино
Категория Live казино предоставляет возможность развлекаться с живыми ведущими в состоянии реального времени. Доступны востребованные варианты: рулетка, блэкджек, баккара, покер.
Соревнования
Периодические чемпионаты с солидными наградными банками завлекают сотни конкурсантов. Победители завоевывают монетарные призы и эксклюзивные бонусы.
Мобильная версия и app
Телефонная версия сайта позволяет играть с каждого устройства. Интерфейс автоматически адаптируется под размер экрана.
Скачать программу можно для гаджетов на Android и iOS. Портативное ПО имеет всеми функциями компьютерной версии.
Как найти действующее зеркало на сегодня
Рабочие адреса зеркал регулярно изменяются. Найти актуальную URL можно многими способами:
– Через департамент саппорта
– В подлинных коммуникационных сетях
– По электронной newsletter
– На партнерских порталах
Охрана и сертификация
Лицензионный домен оперирует на фундаменте международной документа. Все переводы охраняются передовыми протоколами кодирования.
Анонимность личных сведений гарантируется в абсолютном объеме.
Заключение
Официальный сайт и его функционирующие копии предоставляют пользователям беспрерывный вход к качественным гемблинговым играм. Выгодные бонусы, многочисленные развлечения, квалифицированная поддержка — все это делает игровой досуг чрезвычайно комфортным и захватывающим.
купить курсовую сайт купить курсовую сайт .
garnetvendoroutlet – Clean website, layout makes navigation feel really smooth today.
Нынешние онлайн-казино обеспечивают игрокам широкий спектр азартных игр и заманчивые поощрения. Однако для комфортной игры важно иметь представление, как отыскать казино Enomo казино и его рабочие зеркала.
Что такое официальный ресурс казино
Лицензионный веб-сайт казино — это базовая платформа, где участники могут развлекаться гемблинг играми. Сайт оперирует на легитимных основаниях и имеет всеми нужными разрешениями.
Ключевые выгоды основного сайта:
– Конфиденциальность личных реквизитов
– Прозрачные правила работы
– Подтвержденные выплаты
– Профессиональная поддержка
Рабочее зеркало казино: для чего требуется
Копия сайта — это полная версия лицензионного ресурса, находящаяся по альтернативному адресу. Рабочее зеркало формируется для поддержания стабильного входа к ресурсу.
Поводы использования альтернативных адресов:
– Ограничение основного URL
– Плановые процедуры
– Повышенная активность на ресурс
Как обнаружить свежее зеркало в данный момент
Получить актуальное действующее зеркало можно множественными путями:
1. Почтовые оповещения — активируйте уведомления на email отправку
2. Отдел поддержки — напишите в онлайн-чат
3. Корпоративные каналы — следите за обновлениями
4. Специализированные ресурсы — надежные источники
Создание аккаунта на ресурсе казино
Процедура оформления длится буквально пару минут:
1. Активируйте на опцию “Создать аккаунт”
2. Введите запрашиваемые данные
3. Верифицируйте email e-mail
4. Активируйте бонусный код, если предоставлен
Вслед за успешной регистрации вам предоставится открыт персональный профиль.
Премии и бонусные коды
Выгодная премиальная программа — существенное конкурентное преимущество казино:
Поощрение за открытие счета
Первичные участники зарабатывают приветственный бонус, который может предполагать:
– Монетарный бонус на начальный пополнение
– Free spins для автоматов
– Приветственные деньги
Промокоды
Периодически появляются новые коды, обеспечивающие активировать особые поощрения.
Программа компенсации
Регулярные участники получают процент утраченных денег в виде компенсации.
Действующие предложения и соревнования
Сайт систематически проводит захватывающие акции:
– Weekly баттлы
– Сезонные промо
– Конкурсы солидных подарков
– Схема статусов
Доступ в пользовательский раздел
Для доступа на платформу следует:
1. Открыть лицензионный ресурс или актуальное зеркало
2. Кликнуть “Login”
3. Ввести email и код доступа
В пользовательском профиле разрешены данные возможности:
– Зачисление баланса
– Получение выигрышей
– Проверка журнала транзакций
– Настройка профильными данными
Мобильная вариант и софт
Портативная вариант
Адаптивная версия сайта дает возможность участвовать с всех портативного телефона. Визуал динамически адаптируется под габариты экрана.
Приложение для загрузки
Загрузить клиент можно для:
– Android — официальная скачивание с платформы
– iOS — загрузка через App Store
Выгоды программы:
– Мгновенный запуск
– Бесперебойная функциональность
– Push-нотификации об акциях
– Ускоренный интерфейс
Игровые зоны
Игровые машины
Внушительная библиотека азартных слотов от ведущих производителей:
– Ретро автоматы
– Продвинутые-автоматы
– Призовые-игры
Live casino
Зона с настоящими дилерами дает:
– Рулетка
– Блэкджек
– Баккара
– Карточные игры
Трансляции проводятся в отличном разрешении, формируя впечатление реального казино.
Методы депозита и обналичивания
Ресурс работает с разнообразные платежные сервисы:
– Дебетовые средства
– Онлайн счета
– Crypto
– Банковские транзакции
Наименьшие пороги внесения и оперативные выплаты создают процесс исключительно беспроблемной.
Департамент поддержки
Опытная команда поддержки работает 24/7 и может поддержать с разными ситуациями:
– Онлайн-чат
– Email-поддержка
– Телефонная линия
Выводы
Официальный портал казино и его рабочие альтернативные адреса гарантируют игрокам безопасный и захватывающий развлекательный досуг. Богатые поощрения, комфортная адаптивная модификация, богатые автоматы и превосходное live-казино создают эту площадку превосходным местом для игровых развлечений.
buy accutane cheap https://sbsmeds.sbs/# buy isotretinoin online
Harbor Hub – Stumbled on this site, layout is clean and reading is effortless.
заказать студенческую работу kupit-kursovuyu-86.ru .
https://holiganbetvip.top/# holiganbet güncel
Передовые онлайн-казино гарантируют игрокам обширный спектр функций для удобной развлечений. Подключение к площадке Бублик производится через основной домен или актуальное зеркало.
Что такое рабочее зеркало казино
Действующее зеркало — это резервный адрес основного ресурса казино. Такие дубликаты формируются для обеспечения бесперебойного входа к развлекательной системе.
Копия актуальное полностью копирует опции главного портала. Геймеры обретают идентичный вход ко всем сервисам, включая создание аккаунта, финансирование кошелька и обналичивание выигрышей.
Открытие счета на официальном ресурсе
Процесс создания аккаунта длится всего несколько минут. Начинающим участникам необходимо:
1. Войти на главный домен или действующее подлинное зеркало
2. Кликнуть кнопку “Регистрация”
3. Внести обязательные сведения
4. Подтвердить почтовую почту
5. Применить бонусный код при существовании
После окончания регистрации игрок приобретает подарок за регистрацию, который вправе содержать фриспины или финансовое начисление.
Вход в собственный кабинет
Персональный кабинет — это охраняемая зона, где игроки способны администрировать своим учетной записью. Для авторизации необходимо внести логин и password.
В персональном кабинете имеются такие опции:
– Просмотр журнала операций
– Активация бонусных кодов
– Настройка бонусами
– Вступление в состязаниях
– Отслеживание кэшбека
– Корректировка аккаунта
Бонусы и акции
Азартная площадка предоставляет выгодные подарки:
Стартовый набор — начинающие приобретают крупное поощрение на первые взносы.
Фриспины — начисляются как при оформлении, так и в рамках многочисленных кампаний.
Кэшбек — постоянный возврат процента израсходованных средств.
Промокоды — уникальные последовательности, предоставляющие возможность к эксклюзивным призам.
Анализ гемблинговых секций
Аппараты
Собрание аппаратов включает множество наименований от передовых разработчиков. Пользователи найдут как обычные слоты, так и актуальные мультимедийные автоматы с интересной графикой.
Live казино
Категория Live казино обеспечивает право играть с действующими крупье в условиях текущего времени. Представлены известные столы: рулетка, блэкджек, баккара, покер.
Состязания
Систематические турниры с значительными выигрышными банками притягивают массу игроков. Победители завоевывают финансовые награды и специальные бонусы.
Смартфонная версия и программа
Адаптивная версия ресурса позволяет играть с всякого устройства. Структура самостоятельно корректируется под формат экрана.
Скачать софт можно для устройств на Android и iOS. Телефонное ПО характеризуется всеми опциями десктопной версии.
Как найти текущее зеркало на сейчас
Актуальные URL зеркал систематически изменяются. Узнать актуальную URL можно различными путями:
– Через департамент техподдержки
– В проверенных информационных сетях
– По электронной дайджесту
– На специализированных порталах
Надежность и сертификация
Лицензионный сайт действует на основе зарубежной документа. Все платежи охраняются современными методами кодирования.
Конфиденциальность персональных данных поддерживается в абсолютном формате.
Вывод
Основной сайт и его рабочие альтернативы предоставляют пользователям беспрерывный доступ к высококлассным азартным развлечениям. Привлекательные вознаграждения, различные автоматы, профессиональная поддержка — все это формирует игровой процесс чрезвычайно комфортным и интересным.
написание курсовой на заказ цена kupit-kursovuyu-81.ru .
Нынешние интернет казино предлагают игрокам большой выбор вариантов для беспроблемной игры. Тем не менее иногда доступ к главному сайту может оказаться недоступным. В таких обстоятельствах на помощь появляется казино казино Kraken, которое предоставляет непрерывный доступ ко всем возможностям платформы.
Что такое функционирующее зеркало казино
Копия — это абсолютная версия официального портала, которая располагается по другому адресу. Дубликат содержит полный инструментарий первоначального сайта, включая персональный кабинет, средства и данные переводов.
Принципиальные преимущества использования зеркала:
– Постоянный подключение к порталу
– Максимальная аналогичность опций
– Защита персональных данных
– Хранение существующих вознаграждений
Как найти действующее зеркало сегодня
Существует некоторое количество достоверных методов обнаружения действующей ссылочной информации:
Авторизованные каналы:
1. Имейл рассылка — управление систематически направляет информацию с актуальными URL
2. Общественные сети — авторизованные страницы публикуют текущую информацию
3. Отдел поддержки — сотрудники предоставляют надежные домены
4. Смартфонное приложение — дает возможность обходить блокировки
Открытие счета на основном ресурсе
Процедура регистрации требует только несколько минут и включает из следующих этапов:
1. Переход на основной веб-сайт или рабочее зеркало
2. Клик на клавишу «Регистрация»
3. Ввод учетной таблицы
4. Подтверждение электронной почты или телефонного номера
5. Применение привилегии за регистрацию при существовании промокода
Только что зарегистрированные игроки обретают великодушный приветственный бонус, который может включать фриспины, монетарные призы или cashback.
Логин в пользовательский кабинет
Логин на платформе реализуется обычным способом. Нужно вписать никнейм и кодовое слово, задействованные при открытии счета.
Ключевые детали для защищенного входа:
– Задействуйте сложный секретный ключ
– Задействуйте двойную аутентификацию
– Не фиксируйте пароли на общественных устройствах
– Мониторьте доменную строку браузера
Описание премиальной структуры
Игорный портал радует пользователей многочисленными вознаграждениями и акциями:
Начальный комплект
Свежие игроки могут полагаться на существенное бонус за первый вклад. Обычно это процентная надбавка к внесенной сумме плюс даровые спины для востребованных слотов.
Регулярные акции
– 7-дневный cashback — возврат доли потерянных финансов
– Призы на последующие взносы
– Эксклюзивные предложения по праздникам
– Соревнования с крупными призовыми суммами
План вознаграждений
Деятельные клиенты получают баллы за произвольную бет, которые затем конвертируются на действительные средства, даровые прокруты или уникальные преимущества.
Кодовые слова: как применять
Промокоды — это особые комбинации символов, обеспечивающие привилегию к эксклюзивным вознаграждениям.
В каких местах раздобыть актуальные промокоды:
– Легитимные общественные сети казино
– Союзнические площадки
– Email-рассылка
– Отраслевые группы
Прописывается промокод в соответствующее поле при оформлении или внесении депозита счета.
Телефонная версия и приложение
Нынешние геймеры выбирают играть с мобильных аппаратов. Портал дает пару варианта для удобной телефонной игры.
Мобильная редакция
Веб версия самостоятельно оптимизируется под диагональ экрана. Не предполагает скачивания и работает в каждом свежем браузере.
Телефонное приложение
Установить программу можно для аппаратов на Android и iOS. Плюсы app:
– Быстрая открытие
– Стабильная действие
– Автоматические-уведомления о бонусах
– Самостоятельный минование блокировок
Процесс установки несложен: достаточно открыть на ресурс с мобильного гаджета и выполнять инструкциям.
Развлекательный коллекция
Библиотека игр охватывает несколько тысяч единиц от топовых разработчиков.
Слоты
Азартные слоты — самая популярная группа развлечений. Представлены классические простые автоматы, передовые мультимедийные слоты с премиальными раундами, а также джекпотные суперпризы.
Live казино
Отдел с действительными дилерами предоставляет прочувствовать атмосферу реального казино. Представлены варианты с покером.
Вещание ведется в превосходном четкости, поддерживается коммуникация с ведущим и иными участниками.
Состязания
Систематически организуются конкурсы по различным категориям. Включение обеспечивает возможность завоевать денежные награды, фриспины или уникальные поощрения.
Транзакционные операции
Ресурс поддерживает значительный выбор финансовых систем:
– Кредитные карты
– Электронные платформы
– Биткоин
– Банковские переводы
Наименьшая сумма взноса — приемлемая для большинства пользователей. Снятие денег обрабатывается в короткие интервалы.
Сервис поддержки
Профессиональные сотрудники настроены поддержать постоянно. Открыты такие методы связи:
– Онлайн-чат
– Email
– Телефонная связь
– Коммуникационные сети
Пояснения на распространенные проблемы можно обнаружить в секции FAQ.
Итог
Главный веб-сайт казино и его функционирующие зеркала предоставляют геймерам совершенный путь ко всем возможностям портала. Солидные поощрения, приятная мобильная версия, впечатляющий коллекция развлечений и профессиональная поддержка превращают гемблинг опыт крайне удобным и безопасным.
cheap ed: ed medications – ed medications online
сколько стоит сделать курсовую работу на заказ kupit-kursovuyu-88.ru .
go to this page – Navigation is intuitive, content feels well organized.
Анализ лицензионного портала
Передовые виртуальные казино предлагают участникам богатый набор услуг и шансов. Основной ресурс онлайн гарантирует надежный возможность к азартным сервисам.
Действующее зеркало: путь прямо сейчас
Резервный сайт выступает в качестве полную реплику основного портала. Проверенное зеркало позволяет участникам обходить потенциальные блокировки.
Достоинства задействования зеркала
Главные достоинства охватывают:
– Беспрерывный вход к сайту
– Удержание полных функций официального сайта
– Охрана конфиденциальных данных
– Такой же функционал
Открытие счета на портале
Процедура оформления профиля знаменуется легкостью и удобством. Недавние игроки обязаны:
1. Открыть официальный ресурс или его зеркало
2. Выбрать на пункт оформления
3. Ввести обязательные сведения
4. Подтвердить почтовую почту
5. Выполнить стартовый логин
Вознаграждение за оформление
Дебютанты получают щедрый начальный бонус. Подобное премия в состоянии охватывать:
– Монетарные средства
– Даровые спины
– Усиленный показатель компенсации
Вход в собственный раздел
Активные пользователи могут моментально авторизоваться в свой раздел, задействуя логин и шифр. Собственный профиль дает шанс к:
– Регулированию счетом
– Хронологии транзакций
– Текущим подаркам
– Параметрам аккаунта
Подарки и предложения
Сайт постоянно проводит различные предложения для клиентов.
Разновидности подарков
Основные формы бонусов:
– Денежные подарки – процент от объема внесения
– Спины – complimentary раунды в игровых машинах
– Компенсация – возврат части потерянных сумм
– Соревновательные вознаграждения – вознаграждения за выступление в соревнованиях
Коды
Особые ваучеры дают возможность приобрести экстра выгоды. Игроки могут обнаружить их на аффилиатных площадках или получить в рассылке.
Мобильная вариант и app
Прогрессивные гемблеры предпочитают портативный геймплей.
Опции переносной адаптации
– Адаптивный вид для любых гаджетов
– Целостный путь к автоматам
– Стремительная функционирование
– Удобное управление
Download приложение
Mobile app предоставлено для скачивания на устройства с операционными платформами Android и iOS. App обеспечивает:
– Бесперебойную производительность
– Мгновенные оповещения о бонусах
– Оперативный запуск к предпочитаемым играм
Азартный портфель
Портал дает богатую коллекцию гемблинг услуг.
Аппараты
Коллекция игровых слотов включает:
– Классические машины
– Видео слоты
– Накопительные машины
– Тематические автоматы
Live столы
Категория лайв игр предоставляет шанс участвовать с живыми ведущими. Открыты:
– Рулетки
– Блэкджек
– Punto Banco
– Техасский холдем
Соревнования
Систематические соревнования позволяют участникам соревноваться за солидные финансовые суммы. Соревновательная сетка обновляется еженедельно.
Платежные процедуры
Сайт поддерживает обилие способов зачисления и снятия средств:
– Дебетовые карты
– Виртуальные платежные системы
– Прямые переводы
– Bitcoin
Все транзакции производятся защищенно с использованием актуальных систем кодирования.
Департамент поддержки
Компетентная команда саппорта работает круглосуточно. Коннектиться с менеджерами доступно через:
– Онлайн чат
– Почтовую почту
– Горячую линию
– Социальные платформы
Охрана и лицензирование
Игровой клуб работает на базе действительной сертификата. Это удостоверяет:
– Честность азартного действа
– Безопасность конфиденциальных данных
– Своевременные выводы
– Ответственный геймплей
Заключение
Лицензионный портал и его рабочие альтернативные адреса обеспечивают пользователям целостный набор возможностей для безопасной и прибыльной игры. Значительные подарки, различные игры, профессиональная служба и проверенная инфраструктура операций делают казино лучшим опцией для поклонников гемблинг развлечений.
Very soon this site will be famous amid all blogging and site-building visitors,
due to it’s fastidious articles or reviews
my website: user experience research agency
Актуальные онлайн-казино предлагают пользователям обширный спектр вариантов для беспроблемной игры. Переход к платформе http://ganas66slot.com/dokumenty-dlya-verifikatsii-scheta-v-kazino-otpravlyaem-v-bnc-ru/ осуществляется через основной домен или действующее зеркало.
Что такое функционирующее зеркало казино
Актуальное зеркало — это дополнительный линк основного ресурса казино. Такие копии создаются для обеспечения бесперебойного подключения к игровой площадке.
Зеркало текущее совершенно дублирует характеристики официального сайта. Пользователи имеют идентичный выход ко всем возможностям, включая оформление профиля, финансирование баланса и вывод денег.
Открытие счета на официальном портале
Процедура оформления учетной записи занимает всего несколько мгновений. Начинающим пользователям следует:
1. Войти на основной домен или текущее настоящее зеркало
2. Кликнуть кнопку “Открыть счет”
3. Заполнить необходимые реквизиты
4. Проверить e-mail почту
5. Активировать промокод при существовании
После завершения оформления игрок приобретает бонус за регистрацию, который способен охватывать бесплатные вращения или монетарное поощрение.
Логин в личный кабинет
Пользовательский кабинет — это защищенная область, где игроки имеют возможность администрировать своим аккаунтом. Для логина необходимо напечатать username и код доступа.
В пользовательском кабинете открыты такие опции:
– Просмотр журнала платежей
– Задействование бонусных кодов
– Управление призами
– Участие в состязаниях
– Отслеживание возврата средств
– Изменение аккаунта
Вознаграждения и предложения
Развлекательная сервис предоставляет выгодные бонусы:
Регистрационный набор — дебютанты обретают существенное премию на первые депозиты.
Фриспины — начисляются как при создании аккаунта, так и в контексте различных кампаний.
Кэшбек — систематический компенсация фрагмента израсходованных сумм.
Бонусные коды — эксклюзивные коды, обеспечивающие возможность к специальным предложениям.
Анализ гемблинговых направлений
Игровые автоматы
Собрание автоматов содержит массу позиций от ведущих провайдеров. Геймеры встретят как обычные автоматы, так и инновационные мультимедийные автоматы с притягательной графикой.
Live казино
Секция Live казино предоставляет возможность развлекаться с реальными дилерами в формате текущего времени. Открыты известные игры: рулетка, блэкджек, баккара, покер.
Состязания
Систематические соревнования с большими выигрышными фондами привлекают тысячи соревнующихся. Лидеры получают монетарные награды и уникальные бонусы.
Мобильная версия и приложение
Телефонная версия сайта дает возможность играть с каждого устройства. Структура автоматически настраивается под диагональ экрана.
Загрузить программу можно для девайсов на Android и iOS. Телефонное app обладает всеми опциями настольной версии.
Как определить текущее зеркало на сегодня
Действующие адреса альтернатив постоянно обновляются. Получить актуальную адрес можно несколькими способами:
– Через службу поддержки
– В официальных информационных сетях
– По email рассылке
– На аффилиатных порталах
Безопасность и сертификация
Официальный домен функционирует на основании международной лицензии. Все переводы защищены современными методами защиты.
Анонимность персональных реквизитов гарантируется в совершенном объеме.
Заключение
Основной ресурс и его актуальные альтернативы гарантируют игрокам беспрерывный выход к качественным игровым играм. Выгодные поощрения, разнообразные развлечения, опытная сервис — все это формирует азартный процесс невероятно приятным и интересным.
Mission Uncrossable er gamblingtilpasningen av det elskede Crossy Road-mobilspillet. Det blander på mesterlig vis nostalgi med gambling med høy innsats, noe som gjør det både underholdende og givende. Du må styre en kylling over kjørefeltene, og tjene økende multiplikatorer for hver vellykkede kryssing. Spenningen ligger i å avgjøre om du skal ta ut penger eller fortsette å risikere for å få høyere belønning. Hvis du ønsker å prøve Mission Uncrossable demo før du kaster deg ut i hele opplevelsen, er du ikke alene. Mange spillere lurer på hvor og hvordan de kan få tilgang til spillet – spesielt i regioner som USA, Storbritannia, Canada og Australia. Roobet har en offisiell lisens utstedt av reguleringsmyndighetene på øya Curacao. Dokumentet fungerer som en garanti for rettferdighet og sikkerhet i kasinospillene. Nettstedet beskytter brukernes personopplysningene. Blockchain-teknologier er ansvarlige for sikkerheten på transaksjoner.
https://assetfirst.com.au/gates-of-olympus-anmeldelse-og-guide-for-norske-spillere/
Uncrossable Rush doesn’t wait for you to warm up. It wants a decision. Click. Move. Dodge. Cash out or die. That’s the whole game. And that’s why it works. You’ll start playing for fun. You’ll end up pacing around, whispering, “Don’t step, don’t step,” before clicking anyway. That’s what makes Uncrossable Rush worth it. It’s one of the few games where your decision matters every second. You’ll start playing for fun. You’ll end up pacing around, whispering, “Don’t step, don’t step,” before clicking anyway. That’s what makes Uncrossable Rush worth it. It’s one of the few games where your decision matters every second. If you’re tired of slow slots and fake tension, try this. No spin. No filler. Just a chicken, a highway, and your nerve. Uncrossable Rush lets you pick how crazy the road gets. There are four settings:
For background
where to get generic prozac online
for special access.
Gladebrook Market – Feels approachable while still professional, perfect for an online collective.
holiganbet holiganbet
snowstone store online – Pages flow nicely, and information is easy to digest.
Качественное SEO https://outreachseo.ru продвижение сайта для бизнеса. Наши специалисты предлагают эффективные решения для роста позиций в поисковых системах. Подробнее об услугах и стратегиях можно узнать на сайте
Описание главного веб-сайта
Новое онлайн-казино дарит своим пользователям разнообразный выбор игр и бонусов. Основной веб-сайт зайти оперирует непрерывно, обеспечивая вход к известным автоматам, live-казино и многочисленным акциям.
Функционирующее зеркало: вход к порталу
Что такое зеркало казино
Копия представляет собой идентичную дубликат оригинального портала с другим сетевым названием. Функционирующее зеркало позволяет игрокам обходить запреты и получать надежный подключение к излюбленным развлечениям.
Как отыскать текущее зеркало сегодня
Действующие ссылки на основное зеркало размещаются через:
– Электронную подписку
– Основные публичные сети
– Службу сопровождения
– Тематические сайты
Оформление на сайте
Процедура созданияаккаунта
Оформление занимает пару минут и подразумевает нижеследующие стадии:
1. Вход на оригинальный веб-сайт или актуальное зеркало
2. Выбор элемента “Зарегистрироваться”
3. Заполнение персональных информации
4. Проверка адреса или мобильного
5. Придумывание секретнойкомбинации
Бонус за оформление
Начинающие игроки зарабатывают выгодные стартовые поощрения:
– Денежные суммы на аккаунт
– Фриспины для слотов
– Расширенный коэффициент кэшбека
– Уникальные ваучеры
Авторизация в собственный кабинет
Активные пользователи имеютвозможность произвести доступ через основной веб-сайт или актуальное зеркало. Для этого нужно внести учетноеимя и код, сформированные при оформлении.
Опции личного раздела
В персональном профиле открыты основные возможности:
– Контроль личными сведениями
– Внесение баланса
– Вывод призов
– Применение бонусов
– Мониторинг истории ставок
– Регистрация в турнирах
Поощрения и предложения
Виды подарков
Казино радует своих участников различными бонусными программами:
– Вступительный бонус — выгодные бонусы на первые вклады
– Халявныеспины — дополнительные ставки в рейтинговых играх
– Возврат — регулярный откат доли ставок
– Схема поощрения — особые льготы для активных игроков
Купоны и их ввод
Эксклюзивные коды гарантируют экстра поощрения. Для ввода нужно внести последовательность в соответствующее окно в персональном кабинете.
Развлекательный выбор
Автоматы
Каталог игровых машин содержит массу вариантов от известных провайдеров:
– Стандартные слоты
– Продвинутые развлечения
– Прогрессивные симуляторы
– Тематические игры
Live казино
Область Live-казино дарит участие с настоящими крупье в формате актуального эфира:
– Французскаярулетка
– Очко
– Baccarat
– Техасскийхолдем
Турниры
Систематические конкурсы с крупными джекпотными пулами устраиваются постоянно. Соревнующиеся борются за победу в таблице.
Смартфонная адаптация и софт
Мобильная реализация сайта
Главный портал полностью оптимизирован для портативных девайсов. Участники вправе играть автоматы непосредственно через веб-навигатор без обязательства установки.
APP для скачивания
Официальное мобильное APP имеется для скачивания на устройства с рабочими ОС Android и iOS. Программа гарантирует:
– Мгновенный путь к слотам
– Стабильную операционность
– Мгновенные-извещения о предложениях
– Простой интерфейс
Заключение
Главный портал казино и его актуальные копии гарантируют пользователям всесторонний возможность к отличным геймплейным развлечениям. Выгодные подарки, разнообразные промо, удобная мобильная адаптация и профессиональная служба создают геймплейный досуг чрезвычайно enjoyable и результативным.
Актуальные онлайн-казино обеспечивают клиентам множество вариантов для беспроблемной игры. Основной сайт http://www.liloris.com/chto-predstavlyaet-soboy-telegram-kazino-i-kakim-obrazom-ono-funktsioniruet-v-messendzhere дарит путь ко всем опциям и игровым автоматам. Однако при образовании технических сложностей на выручку спешат функционирующие зеркала.
Что есть собой актуальное зеркало
Зеркало казино — это идентичная копия официального веб-сайта, расположенная по запасному доменному имени. Лицензионное зеркало хранит все опции, включая открытие профиля, доступ в индивидуальный кабинет, бонусы и бонусные коды.
Дубликат на сегодня дает:
– Непрерывный вход к развлекательным аппаратам
– Стопроцентную конфиденциальность персональных сведений
– Сохранение депозита и истории платежей
– Возможность использования всех акций
Создание учетной записи на лицензионном сайте
Этап создания аккаунта требует несколько минут. Свежеиспеченным геймерам нужно:
1. Перейти на основной ресурс или рабочее зеркало
2. Выбрать кнопку «Зарегистрироваться»
3. Указать требуемые сведения
4. Подтвердить э-мейл почту
5. Указать бонусный код при присутствии
После конца оформления профиля игроки получают вознаграждение за регистрацию, что может иметь бесплатные вращения или денежное поощрение.
Авторизация в личный кабинет
Индивидуальный кабинет обеспечивает полный мониторинг над игровым действом. Через личный раздел можно:
– Пополнять кошелек
– Снимать средства
– Использовать промокоды
– Контролировать журнал ставок
– Соревноваться в конкурсах
– Обретать кешбэк
Описание премий и специальных предложений
Богатая бонусная политика — значимое плюс ресурса. Основные категории премий:
Стартовый подарок
Дебютанты получают великодушное премирование на начальные взносы. Размер бонуса может достигать 100-200% от объема вклада.
Фриспины
Даровые прокруты выдаются для востребованных машин. Сумма бесплатных вращений изменяется от 10 до 500 штук.
Кешбэк
Регулярный или ежемесячный откат доли утраченных средств. Типичный размер возврата — 5-15%.
Конкурсы
Периодические состязания с большими наградными банками. Игроки соревнуются за топовые строчки в рейтинге.
Портативная версия и софт
Адаптивная версия позволяет играть с всякого девайса. Игроки могут загрузить app для iOS и Android или использовать интернет версию.
Плюсы смартфонного софта:
– Оперативная загрузка игр
– Удобный дизайн
– Пуш-нотификации о акциях
– Вход через Face ID
Игровые автоматы и Live казино
Азартная библиотека содержит сотни названий от известных производителей.
Топовые категории игр:
– Классические машины
– Видео-автоматы с бонусными уровнями
– Джекпот автоматы
– Мегавейс слоты
Live игровой зал
Категория live игорный зал предлагает игру с реальными дилерами. Доступны стандартные игры:
– Французская рулетка
– Блэкджек
– Baccarat
– Покер
Как найти рабочее зеркало
Раздобыть актуальную ссылку на зеркало разрешается разными способами:
1. Оформить подписку на емейл-уведомления
2. Наблюдать за обновлениями в соц сетях
3. Связаться в департамент поддержки
4. Добавить в закладки актуальное зеркало в избранное
Вывод
Основной портал и его актуальные альтернативные адреса предоставляют бесперебойный доступ к игровым слотам. Богатые бонусы, различные бонусные коды, удобное портативное приложение и отличная сервис поддержки обеспечивают азартный геймплей максимально приятным и надежным.
Sprawdz poradnik analog czy digital fpv, jesli szukasz najlepszych wskazowek przy wyborze kamery FPV na start.
Kamera montowana na dronie FPV jest kluczowym elementem, ktory determinuje zarowno obraz w czasie lotu, jak i zapis wideo.
отремонтировать квартиру remont-v-tyle.ru .
bitcore – Appreciate the typography choices; comfortable spacing improved my reading experience.
https://urologymax.com/conditions/erectile-dysfunction.html# get ed meds online
binaryforge – Found practical insights today; sharing this article with colleagues later.
MarbleSelect – Branding gives a simple, approachable, and user-friendly impression.
Нынешние онлайн-казино обеспечивают пользователям разнообразный ассортимент функций для удобной досуга. Подключение к сервису https://www.riongo.com/2026/02/28/vsya-informatsiya-o-verifikatsii-bankovskoy-karty-dlya-polucheniya-kredita-ot/ производится через официальный домен или действующее зеркало.
Что такое рабочее зеркало казино
Актуальное зеркало — это запасной адрес главного ресурса казино. Такие клоны разрабатываются для гарантирования бесперебойного подключения к азартной площадке.
Дубликат актуальное совершенно дублирует возможности официального домена. Клиенты получают такой же выход ко всем услугам, включая оформление профиля, пополнение счета и снятие денег.
Создание аккаунта на основном веб-сайте
Механизм открытия профиля требует всего буквально мгновений. Новым клиентам следует:
1. Перейти на лицензионный ресурс или рабочее настоящее зеркало
2. Щелкнуть кнопку “Создать аккаунт”
3. Заполнить необходимые информацию
4. Проверить email почту
5. Использовать купон при наличии
После окончания открытия профиля участник получает бонус за регистрацию, который способен содержать free spins или монетарное вознаграждение.
Авторизация в личный кабинет
Персональный кабинет — это безопасная область, где пользователи способны регулировать своим счетом. Для входа нужно указать имя пользователя и секретный ключ.
В индивидуальном кабинете представлены следующие функции:
– Просмотр хронологии транзакций
– Задействование купонов
– Регулирование вознаграждениями
– Присоединение в состязаниях
– Контроль кэшбэка
– Редактирование учетной записи
Призы и спецпредложения
Гемблинговая площадка обеспечивает щедрые вознаграждения:
Регистрационный набор — начинающие обретают существенное поощрение на первые пополнения.
Бесплатные вращения — выдаются как при открытии счета, так и в контексте многочисленных мероприятий.
Возмещение — еженедельный компенсация фрагмента израсходованных средств.
Промокоды — эксклюзивные шифры, обеспечивающие выход к специальным вознаграждениям.
Анализ гемблинговых разделов
Слоты
Коллекция слотов насчитывает множество вариантов от ведущих разработчиков. Клиенты откроют как стандартные автоматы, так и актуальные 3D-слоты с увлекательной графикой.
Live казино
Раздел Live казино предоставляет возможность соревноваться с живыми дилерами в режиме настоящего времени. Имеются известные игры: рулетка, блэкджек, баккара, покер.
Состязания
Периодические чемпионаты с большими премиальными суммами привлекают множество участников. Победители зарабатывают финансовые выплаты и уникальные подарки.
Телефонная версия и программа
Портативная версия сайта предоставляет право играть с любого гаджета. Структура автоматически корректируется под диагональ экрана.
Загрузить софт можно для гаджетов на Android и iOS. Смартфонное ПО обладает всеми характеристиками полной версии.
Как отыскать актуальное зеркало на текущий день
Актуальные ссылки дубликатов постоянно обновляются. Получить действующую ссылку можно многими вариантами:
– Через департамент поддержки
– В официальных социальных сетях
– По электронной дайджесту
– На специализированных сайтах
Охрана и легальность
Официальный домен работает на базе зарубежной сертификата. Все платежи защищены передовыми методами кодирования.
Приватность индивидуальных данных поддерживается в абсолютном объеме.
Вывод
Основной сайт и его рабочие альтернативы гарантируют пользователям постоянный доступ к высококлассным игровым сервисам. Щедрые бонусы, всевозможные игры, опытная помощь — все это формирует гемблинговый опыт чрезвычайно приятным и увлекательным.
Актуальные онлайн-казино обеспечивают клиентам внушительный ассортимент услуг и призовых предложений. Присоединение к платформе выполняется через лицензионный портал или его актуальное зеркало Apex Spins, что обеспечивает стабильную игру.
В чем суть функционирующее зеркало казино
Зеркало — это абсолютная реплика оригинального сайта, созданная для обхода запретов. Действующее зеркало дает возможность игрокам сохранить вход к любимым играм в произвольное время.
Проверенное зеркало обладает всеми характеристиками первоначального веб-сайта:
– Весь каталог слотов
– Аккаунт с внесенными параметрами
– Действующие акции
– Гарантированные расчетные действия
Создание аккаунта на официальном ресурсе
Процедура оформления занимает всего считанные минут. Первым клиентам следует:
1. Войти на официальный сайт или действующее зеркало
2. Нажать на кнопку “Зарегистрироваться”
3. Указать требуемые данные
4. Активировать контакт
5. Совершить начальный платеж
Поощрение новичкам предоставляется автоматически после завершения всех этапов.
Авторизация в личный кабинет
Существующие клиенты могут произвести вход используя:
– Никнейм и ключ
– Номер телефона
– Контактный email
Профиль обеспечивает право к администрированию балансом, записям операций и активным промокодам.
Поощрения и кампании
Азартная сервис радует лояльных участников многочисленными бонусами:
Стартовый комплект
– Поощрение на дебютный депозит до 100%
– Бесплатные вращения на топовые игры
– Дополнительные премии за дальнейшие депозиты
Купоны
Специальные ваучеры дают возможность на использование особых вознаграждений. Текущие купоны размещаются в разделе “Бонусы”.
Cashback
Еженедельный бонус равен до 10% от проигранных средств. Выплата выплачивается незамедлительно.
Программа лояльности
Верные пользователи накапливают поинты, которые обмениваются на настоящие средства или free spins.
Адаптивный портал и APP
Для удобства пользователей сделана полноценная портативная платформа. Приспособленный дизайн обеспечивает легко развлекаться с каждого карманного девайса.
Достоинства программы:
– Моментальный запуск к играм
– Улучшенный интерфейс
– Стабильная деятельность
– Push-уведомления о последних акциях
Установить приложение можно бесплатно с основного сайта для гаджетов на Android и iOS.
Каталог слотов
Машины
Каталог насчитывает более 2000 машин от топовых студий:
– Традиционные игры
– Современные автоматы
– Джекпот-слоты
– Брендовые развлечения
Live казино
Категория Live столов предлагает взаимодействие с реальными дилерами в онлайн режиме:
– Roulette
– Blackjack
– Punto Banco
– Столы покера
Состязания
Систематические соревнования с солидными премиальными суммами проводятся систематически. Участие в турнирах доступно всем активным клиентам.
Денежные системы
Взносы и получения денег выполняются через известные сервисы:
– Дебетовые средства
– Виртуальные кошельки
– Крипто
– Денежные переводы
Стартовый платеж — от 100 рублей. Вывод денег выполняется в течение 24 ч.
Команда саппорта
24/7 команда помощи готова помочь в разрешении всех задач:
– Онлайн-чат
– Email
– Контактный номер
– Общественные сети
Охрана и лицензия
Лицензионный ресурс функционирует на фундаменте глобальной документа. Всевозможные параметры клиентов защищены новейшим SSL-кодированием.
Заключение
Действующее зеркало предоставляет бесперебойный соединение к излюбленным развлечениям, щедрым поощрениям и комфортным функциям. Создайте аккаунт сегодня и получите начальный подарок!
oakstone store page – Clean layout and the information is easy to find.
暗夜情报员第三季2026 海外华人动作爽剧 Netflix全季上架 全球加速
Explore efficient strategies traders use to sell bitcoin in india.
iciclewillowdistrict – District branding here gives a calm and modern vibe.
Before anything else, this is the part that matters, health is closer to a daily operating condition than an occasional concern, and it keeps showing up through how stable or strained the day feels, which influences not only output and comfort but also how sustainable effort feels over time. At the same time, access to health content has expanded so much that the real challenge is no longer exposure but interpretation, and this is where information stops feeling useful and starts feeling heavy. A recurring issue is that targeted advice gets widened into general instruction long after its original boundaries have been removed, so a person can become more disciplined and more uncertain at the same time, which feels frustrating but is actually predictable. That is why clarity usually improves when observation becomes deliberate enough to connect the body, the routine, and the context into one readable picture, so what is actually helping starts becoming visible enough to repeat and what is unhelpful starts becoming easier to stop. And that is why careful framing matters so much, since the value of information depends not only on what is said but on how clearly its conditions and limits remain visible. And when you choose one topic that can carry the full logic, the abstract parts begin to organize themselves into something clearer and more actionable, a direct way to make all of this usable is to examine doxycycline esophagitis.
Посмотрите разбор ufc в феврале марте 2026 три недели которые встряхнут дивизионы, там много прогнозов на падение фаворитов. Вот ссылка: https://tut-vse-yasno.ru/news/ufc-fevral-mart-2026-tri-nedeli-gde-favority-mogut-ruhnut-a-diviziony-perezagruzitsya/
raincrest website – Navigation is straightforward and the content is easy to digest.
see the trading store – Took a glance and the layout appears straightforward.
canyonharborbazaar – First time visiting, site structure seems simple and organized.
Доступ к порталу и функционирующие адреса
Востребованные онлайн казино предлагают пользователям широкий набор развлечений. Центральный ресурс [url=snpsolutions.co.nz/sposoby-krazhi-deneg-s-beskontaktnykh-kart-i-cherez-apple-pay/]http://snpsolutions.co.nz/sposoby-krazhi-deneg-s-beskontaktnykh-kart-i-cherez-apple-pay[/url] гарантирует надежный переход ко всем функциям. Однако временами возникают случаи, когда требуется резервный путь доступа.
Что являет собой собой рабочее зеркало
Рабочее зеркало — это точная копия главного веб-сайта с иным сетевым названием. Дубликат сегодня помогает обходить потенциальные барьеры и обеспечивать стабильный переход к популярным автоматам.
Главное зеркало имеет всеми опциями, что и основной портал:
– Весь ассортимент автоматов
– Личный профиль с актуальными параметрами
– Все награды и предложения
– Защищенные банковские операции
Создание аккаунта и подключение в платформу
Процедура создания профиля на сайте длится считанные моментов. Недавним участникам необходимо:
1. Открыть на действующее зеркало сегодня
2. Щелкнуть элемент «Открыть профиль»
3. Заполнить требуемые информацию
4. Активировать цифровую почту или номер телефона
5. Использовать награду за регистрацию
Авторизация в личный аккаунт реализуется с помощью ввод логина и пароля.
Описание бонусной программы
Щедрая наградная программа — ключевое достоинство ресурса. Клиенты забирают всевозможные подарки:
Приветственные награды
Свежие пользователи могут надеяться на щедрый поощрение за оформление. Традиционно это набор вариантов, охватывающий:
– Частичную добавку к первому взносу
– Подарочные спины
– Extra деньги на счет
Купоны и специальные опции
Постоянные купоны дают возможность зарабатывать дополнительные привилегии. Использовать их возможно в отдельном меню собственного профиля.
Спины и компенсация
Бесплатные спины — это вариант играть автоматы без задействования личных сумм. Компенсация подразумевает частичный отдачу утраченных средств.
Каталог автоматов
Игровая ресурс обеспечивает впечатляющую коллекцию игр.
Слоты
Вариативность аппаратов поражает представление. Доступны традиционные ретро автоматы и новые видеослоты с занимательной картинкой.
Live зал
Зона Live казино переносит клиентов в атмосферу реального азартного клуба. Профессиональные дилеры ведут сессии в прямом эфире.
Конкурсы и таблицы лидеров
Систематические состязания добавляют драйва и предоставляют возможность получить значительные суммы.
Портативная вариант и клиент
Продвинутые инновации обеспечивают развлекаться в комфортном пространстве. Mobile версия автономно оптимизируется под монитор гаджета.
Скачать программу допустимо для операционных сред iOS и Android. Программа обеспечивает:
– Мгновенный запуск
– Устойчивую функционирование
– Push-алерты об предложениях
– Удобный облик
Платежные транзакции
Казино поддерживает различные системы ввода и изъятия сумм:
– Кредитные карты
– Онлайн кошельки
– Криптовалюты
– Банковские операции
Всевозможные переводы осуществляются через надежное канал, что гарантирует безопасность личных информации.
Служба ассистанса
Опытная бригада support функционирует постоянно. Контактировать с специалистами разрешено через:
– Интерактивный-чат
– Почтовую почту
– Горячую линию
– Социальные сети
Резюме
Легальный ресурс и его действующее зеркало обеспечивают пользователям безопасный и легкий путь к увлекательным развлечениям. Выгодные бонусы, разнообразный спектр автоматов и отличная сервис создают игру предельно комфортной и доходной.
flintstoneemporium – Browsing casually, layout feels simple and navigation works smoothly.
Hearth Picks – Just discovered this page, everything is clear and easy to digest.
Современные онлайн-казино обеспечивают клиентам обширный диапазон вариантов для удобной игры. Подключение к платформе Sprut осуществляется через основной домен или актуальное зеркало.
Что такое функционирующее зеркало казино
Функционирующее зеркало — это альтернативный линк основного ресурса казино. Такие копии генерируются для предоставления бесперебойного доступа к развлекательной площадке.
Альтернатива сегодня полностью повторяет возможности базового сайта. Геймеры получают идентичный доступ ко всем возможностям, включая оформление профиля, пополнение кошелька и вывод денег.
Открытие счета на главном сайте
Алгоритм создания аккаунта отнимает всего пару минут. Будущим игрокам нужно:
1. Перейти на официальный портал или текущее официальное зеркало
2. Выбрать кнопку “Регистрация”
3. Внести обязательные данные
4. Подтвердить почтовую почту
5. Ввести код активации при доступности
После завершения создания аккаунта клиент приобретает подарок за регистрацию, который вправе содержать фриспины или денежное начисление.
Авторизация в персональный кабинет
Личный кабинет — это защищенная область, где клиенты вправе управлять своим счетом. Для доступа нужно ввести никнейм и пароль.
В персональном кабинете представлены такие функции:
– Отслеживание хронологии платежей
– Применение купонов
– Контроль поощрениями
– Вступление в турнирах
– Контроль возврата средств
– Изменение учетной записи
Поощрения и спецпредложения
Гемблинговая сервис дарит щедрые вознаграждения:
Регистрационный комплект — новички обретают существенное вознаграждение на дебютные вклады.
Бесплатные вращения — начисляются как при открытии счета, так и в контексте многочисленных кампаний.
Возврат средств — систематический рефанд фрагмента израсходованных денег.
Промокоды — специальные шифры, дающие доступ к эксклюзивным призам.
Описание азартных секций
Игровые автоматы
Собрание slots насчитывает множество игр от передовых поставщиков. Игроки откроют как традиционные слоты, так и актуальные мультимедийные автоматы с притягательной анимацией.
Live казино
Зона Live казино дарит шанс играть с живыми дилерами в состоянии текущего времени. Доступны известные варианты: рулетка, блэкджек, баккара, покер.
Конкурсы
Постоянные турниры с большими выигрышными пулами притягивают массу участников. Лидеры получают cash выплаты и уникальные бонусы.
Смартфонная версия и app
Мобильная версия платформы позволяет участвовать с любого девайса. Структура автономно настраивается под размер экрана.
Скачать программу можно для устройств на Android и iOS. Портативное ПО обладает всеми функциями настольной версии.
Как обнаружить рабочее зеркало на сегодня
Рабочие адреса зеркал систематически корректируются. Обнаружить актуальную адрес можно несколькими методами:
– Через сервис саппорта
– В официальных новостных сетях
– По e-mail рассылке
– На специализированных сайтах
Надежность и лицензирование
Официальный сайт оперирует на основании мировой сертификата. Все транзакции охраняются передовыми протоколами кодирования.
Анонимность личных данных гарантируется в абсолютном размере.
Итог
Основной сайт и его рабочие альтернативы обеспечивают пользователям постоянный вход к первоклассным гемблинговым услугам. Привлекательные призы, многочисленные развлечения, профессиональная служба — все это формирует азартный процесс максимально приятным и захватывающим.
logicbyte – Navigation felt smooth, found everything quickly without any confusing steps.
https://holiganbetvip.buzz/# holiganbet giris
buy accutane no rx
заказать курсовую работу заказать курсовую работу .
shop link – Well-arranged pages, navigation feels effortless.
dataforge – Pages loaded fast, images appeared sharp, and formatting stayed consistent.
devbyte – Overall, professional vibe here; trustworthy, polished, and pleasantly minimal throughout.
techcatalyst – Color palette felt calming, nothing distracting, just focused, thoughtful design.
Hey, I think your blog might be having browser compatibility issues.
When I look at your website in Safari, it looks fine but when opening in Internet Explorer, it has some overlapping.
I just wanted to give you a quick heads up! Other then that, amazing blog!
Feel free to visit my web blog: dental implant in irvine
Доступ к порталу и актуальные ссылки
Современные виртуальные казино обеспечивают клиентам большой набор развлечений. Главный сайт казино Sneket организует стабильный вход ко всем услугам. При этом периодически возникают ситуации, когда требуется альтернативный метод авторизации.
Что означает собой рабочее зеркало
Действующее зеркало — это полная дубликат основного ресурса с иным интернет адресом. Альтернатива сегодня дает возможность избегать существующие ограничения и поддерживать постоянный вход к выбранным играм.
Легальное зеркало обладает всеми опциями, что и базовый портал:
– Полный каталог развлечений
– Индивидуальный раздел с зафиксированными сведениями
– Все подарки и промо
– Надежные денежные транзакции
Оформление и авторизация в платформу
Ход оформления на ресурсе занимает буквально минут. Новым пользователям требуется:
1. Попасть на функционирующее зеркало сейчас
2. Нажать опцию «Открыть профиль»
3. Ввести нужные сведения
4. Верифицировать e-mail почту или номер телефона
5. Активировать бонус за создание профиля
Доступ в собственный аккаунт выполняется через ввод ID и пароля.
Анализ призовой системы
Богатая бонусная система — ключевое козырь игорного заведения. Клиенты зарабатывают многочисленные бонусы:
Вступительные подарки
Недавние участники могут претендовать на выгодный бонус за создание аккаунта. Традиционно это совокупность возможностей, включающий:
– Пропорциональную надбавку к первому взносу
– Безвозмездные кручения
– Extra финансы на баланс
Кодовые комбинации и эксклюзивные возможности
Постоянные коды обеспечивают активировать экстра льготы. Применить их разрешено в особом меню индивидуального раздела.
Бесплатные вращения и компенсация
Free spins — это возможность играть слоты без использования собственных сумм. Компенсация представляет определенный компенсацию проигранных сумм.
Каталог слотов
Гемблинг платформа предоставляет значительную базу автоматов.
Автоматы
Разнообразие автоматов восхищает ожидания. Есть стандартные трехбарабанные машины и продвинутые автоматы с занимательной картинкой.
Live игры
Раздел Live развлечений погружает клиентов в атмосферу подлинного гемблинг дома. Профессиональные ведущие проводят сессии в живом режиме.
Состязания и лидерборды
Постоянные соревнования вносят драйва и обеспечивают возможность забрать значительные награды.
Mobile версия и программа
Новые технологии дают возможность играть в любом локации. Mobile форма автоматически адаптируется под экран девайса.
Загрузить приложение разрешено для мобильных сред iOS и Android. Приложение дает:
– Быстрый доступ
– Бесперебойную деятельность
– Всплывающие-сообщения об акциях
– Интуитивный облик
Денежные процедуры
Ресурс использует многочисленные системы внесения и вывода финансов:
– Кредитные счета
– Цифровые платформы
– Крипто
– Денежные операции
Все операции реализуются через надежное канал, что защищает безопасность приватных информации.
Сервис ассистанса
Профессиональная служба поддержки действует 24/7. Обратиться с специалистами разрешено через:
– Онлайн-чат
– Электронную почту
– Горячую линию
– Социальные платформы
Выводы
Главный веб-сайт и его функционирующее зеркало дают пользователям защищенный и удобный путь к захватывающим забавам. Привлекательные награды, разнообразный выбор игр и профессиональная сервис делают процесс максимально комфортной и выгодной.
holiganbet resmi giriş holiganbet
сколько стоит курсовая работа по юриспруденции сколько стоит курсовая работа по юриспруденции .
Актуальные онлайн-казино предоставляют пользователям разнообразный выбор азартных игр и щедрые бонусы. Впрочем для удобной игры необходимо иметь представление, как отыскать Френдс казино казино и его функционирующие зеркала.
Что такое лицензионный портал казино
Главный веб-сайт казино — это первичная система, где участники могут пользоваться гемблинг автоматами. Сайт работает на легальных условиях и обладает всеми обязательными разрешениями.
Ключевые достоинства главного ресурса:
– Безопасность индивидуальных данных
– Объективные условия участия
– Подтвержденные выплаты
– Профессиональная служба поддержки
Действующее зеркало казино: для чего необходимо
Альтернативный адрес — это абсолютная дубликат основного сайта, размещенная по иному URL. Функционирующее зеркало создается для гарантирования непрерывного соединения к порталу.
Причины использования копий сайта:
– Блокировка официального сайта
– Регламентные процедуры
– Большая загрузка на систему
Как отыскать актуальное зеркало сейчас
Обнаружить новое рабочее зеркало можно несколькими путями:
1. Рассылка — зарегистрируйтесь на новостную доставку
2. Отдел техподдержки — свяжитесь в онлайн-чат
3. Социальные каналы — следите за обновлениями
4. Тематические ресурсы — надежные платформы
Создание аккаунта на платформе казино
Процедура регистрации требует лишь немного мгновений:
1. Выберите на опцию “Зарегистрироваться”
2. Введите необходимые данные
3. Подтвердите контактную ящик
4. Примените код активации, если есть
По завершении финализированной создания аккаунта вам откроется доступен личный аккаунт.
Бонусы и бонусные коды
Богатая бонусная политика — значимое преимущество казино:
Подарок за первичную регистрацию
Новые участники обретают первый поощрение, который может включать:
– Валютный счет на начальный депозит
– Free spins для барабанов
– Безвозвратные деньги
Активационные коды
Систематически размещаются эксклюзивные купоны, дающие возможность забрать экстра поощрения.
Механизм возврата средств
Регулярные участники получают порцию потраченных денег на счет.
Текущие промо и конкурсы
Ресурс постоянно запускает увлекательные кампании:
– Weekly турниры
– Праздничные бонусы
– Розыгрыши ценных призов
– Схема VIP-клуба
Вход в личный раздел
Для входа на ресурс нужно:
1. Посетить основной сайт или актуальное зеркало
2. Выбрать “Вход”
3. Прописать имя пользователя и ключ
В личном разделе открыты данные возможности:
– Внесение средств депозита
– Вывод денег
– Изучение истории операций
– Редактирование индивидуальными данными
Мобильная модификация и программа
Mobile платформа
Оптимизированная вариант сайта дает возможность развлекаться с различных карманного девайса. Дизайн самостоятельно оптимизируется под габариты монитора.
Приложение для download
Скачать программу можно для:
– Android — официальная скачивание с портала
– iOS — инсталляция через App Store
Преимущества app:
– Оперативный старт
– Устойчивая операционность
– Push-сообщения об предложениях
– Улучшенный интерфейс
Игровые разделы
Слоты
Богатая библиотека эмуляторных автоматов от топовых провайдеров:
– Классические слоты
– Видео-слоты
– Джекпот-машины
Live зал
Зона с реальными крупье предоставляет:
– Рулеточные столы
– Blackjack
– Baccarat
– Poker
Трансляции осуществляются в высоком разрешении, воссоздавая ощущение аутентичного казино.
Варианты зачисления и обналичивания
Платформа обслуживает разные финансовые системы:
– Банковские картсчета
– Электронные счета
– Цифровые валюты
– Wire отправки
Наименьшие значения пополнения и моментальные выводы создают времяпрепровождение крайне удобной.
Служба помощи
Квалифицированная команда поддержки доступна 24/7 и готова содействовать с любыми ситуациями:
– Онлайн-чат
– Email-консультации
– Звонковая служба
Заключение
Лицензионный портал казино и его актуальные дубликаты дают участникам безопасный и азартный азартный опыт. Богатые бонусы, простая мобильная вариант, многочисленные игры и качественное live-казино делают эту площадку великолепным выбором для игровых времяпрепровождения.
quantumforge – Content reads clearly, helpful examples made concepts easy to grasp.
Современные онлайн-казино обеспечивают пользователям разнообразный ассортимент развлечений и заманчивые премии. Тем не менее для удобной игры существенно понимать, как получить доступ к http://event.heliosgaming.fr/2026/03/04/sposoby-borby-s-blokirovkoy-onlayn-kazino/ и его рабочие зеркала.
Что такое лицензионный сайт казино
Официальный веб-сайт казино — это базовая веб-площадка, где клиенты могут наслаждаться гемблинг развлечениями. Платформа действует на легитимных принципах и владеет всеми требуемыми документами.
Первостепенные плюсы основного портала:
– Безопасность личных реквизитов
– Объективные положения работы
– Гарантированные транзакции
– Квалифицированная поддержка
Действующее зеркало казино: для чего используется
Зеркало — это точная клон официального сайта, находящаяся по иному домену. Функционирующее зеркало разрабатывается для предоставления постоянного подключения к ресурсу.
Факторы задействования дублирующих ресурсов:
– Ограничение первичного URL
– Плановые процедуры
– Значительная посещаемость на сервер
Как найти свежее зеркало сегодня
Обнаружить новое официальное зеркало можно несколькими способами:
1. Подписка — активируйте уведомления на новостную доставку
2. Служба техподдержки — проконсультируйтесь в онлайн-чат
3. Корпоративные сети — отслеживайте за постами
4. Игровые ресурсы — авторитетные ресурсы
Открытие счета на сайте казино
Процесс оформления требует всего пару мгновений:
1. Выберите на кнопку “Открыть счет”
2. Заполните запрашиваемые данные
3. Валидируйте электронную почту
4. Введите промокод, если есть
После успешной активации вам откроется возможен пользовательский кабинет.
Награды и промокоды
Щедрая наградная политика — важное преимущество казино:
Награда за открытие счета
Свежие участники приобретают первый презент, который может содержать:
– Валютный счет на дебютный депозит
– Фри-спины для барабанов
– Приветственные средства
Активационные коды
Систематически появляются эксклюзивные бонусные шифры, предоставляющие использовать специальные преимущества.
Схема кэшбека
Лояльные игроки возвращают долю проигранных ставок обратно.
Свежие акции и соревнования
Ресурс систематически проводит интересные промо-мероприятия:
– Семидневные чемпионаты
– Тематические акции
– Розыгрыши крупных наград
– Схема привилегий
Авторизация в личный профиль
Для логина на платформу требуется:
1. Перейти на основной сайт или рабочее зеркало
2. Выбрать “Вход”
3. Внести логин и код доступа
В личном профиле разрешены нижеперечисленные опции:
– Зачисление кошелька
– Получение денег
– Проверка истории операций
– Настройка индивидуальными данными
Мобильная платформа и приложение
Адаптивная вариант
Мобильная вариант портала обеспечивает развлекаться с всех портативного девайса. Оформление самостоятельно подстраивается под габариты экрана.
Клиент для download
Скачать app можно для:
– Android — официальная установка с платформы
– iOS — инсталляция через App Store
Преимущества мобильного клиента:
– Мгновенный старт
– Надежная операционность
– Push-оповещения об бонусах
– Ускоренный функционал
Азартные категории
Автоматы
Богатая галерея игровых машин от известных разработчиков:
– Классические слоты
– Современные-автоматы
– Прогрессивные-машины
Live игры
Раздел с профессиональными дилерами предоставляет:
– Рулеточные столы
– Двадцать одно
– Baccarat
– Poker
Трансляции осуществляются в превосходном разрешении, воссоздавая впечатление аутентичного казино.
Методы депозита и обналичивания
Сайт работает с разнообразные транзакционные инструменты:
– Кредитные card
– Электронные счета
– Криптовалюты
– Банковские транзиты
Минимальные пороги взноса и оперативные транзакции делают времяпрепровождение предельно удобной.
Служба support
Опытная служба support работает 24/7 и способна поддержать с разными ситуациями:
– Онлайн-чат
– Email-переписка
– Звонковая горячая линия
Итоги
Основной веб-сайт казино и его действующие зеркала гарантируют игрокам защищенный и интересный азартный процесс. Щедрые бонусы, комфортная портативная версия, многочисленные развлечения и превосходное live-казино формируют эту платформу превосходным выбором для развлекательных развлечений.
homepage link – Sections are clear, navigating feels intuitive and smooth.
Hello, this weekend is good designed for me, since this occasion i am reading this enormous educational piece of writing here at my residence.
https://drive.google.com/file/d/12woog7Y5zxdDbYUVK74KM8WBi3oakXGH/view?usp=sharing
visit Ginger Exchange – A name that feels modern and approachable for online trading.
explore snowharbor site – Content is arranged neatly, allowing smooth exploration.
Передовые виртуальные казино обеспечивают геймерам широкий ассортимент возможностей для приятной игры. Однако иногда доступ к базовому платформе может оказаться ограниченным. В таких обстоятельствах на помощь появляется казино РњСЌРґ, которое дает бесперебойный путь ко всем функциям платформы.
Что такое действующее зеркало казино
Альтернативный сайт — это полная дубликат официального веб-сайта, которая находится по дополнительному адресу. Копия сохраняет весь инструментарий первоначального портала, включая персональный кабинет, средства и сведения транзакций.
Принципиальные выгоды использования зеркала:
– Круглосуточный соединение к порталу
– Абсолютная схожесть возможностей
– Конфиденциальность личных сведений
– Поддержка существующих привилегий
Как обнаружить действующее зеркало на сегодня
Есть ряд проверенных способов получения актуальной адреса:
Легитимные каналы:
1. Электронная рассылка — администрация систематически высылает уведомления с актуальными URL
2. Социальные сети — официальные страницы публикуют текущую новости
3. Департамент поддержки — консультанты предоставляют достоверные ссылки
4. Портативное приложение — предоставляет минуть блокировки
Оформление профиля на основном портале
Этап оформления длится лишь немного минут и предполагает из таких этапов:
1. Переход на официальный ресурс или актуальное зеркало
2. Клик на иконку «Создать аккаунт»
3. Указание пользовательской анкеты
4. Валидация имейл почты или мобильного номера
5. Применение вознаграждения за регистрацию при присутствии промокода
Свежие клиенты обретают великодушный вступительный приз, который может охватывать free spins, денежные вознаграждения или компенсацию.
Логин в персональный кабинет
Авторизация на ресурсе производится традиционным образом. Требуется вписать никнейм и секретный ключ, задействованные при создании аккаунта.
Важные нюансы для безопасного входа:
– Применяйте сложный шифр
– Задействуйте двухфакторную идентификацию
– Не записывайте коды на чужих девайсах
– Мониторьте адресную строку браузера
Описание поощрительной программы
Игровая платформа одаривает пользователей различными привилегиями и промо:
Стартовый набор
Дебютанты имеют возможность полагаться на существенное вознаграждение за первый взнос. Как правило это процентовая премия к переведенной объему плюс бесплатные вращения для топовых слотов.
Систематические кампании
– Семидневный кэшбек — возмещение процентной доли утраченных денежных средств
– Награды на повторные депозиты
– Специальные промо по знаменательным датам
– Конкурсы с солидными выигрышными суммами
Программа лояльности
Деятельные пользователи накапливают очки за всякую ставку, которые затем меняются на действительные денежные призы, бесплатные вращения или особые привилегии.
Бонус-коды: как задействовать
Кодовые комбинации — это уникальные наборы знаков, гарантирующие право к специальным привилегиям.
В каких местах получить рабочие промокоды:
– Авторизованные медийные сети казино
– Партнерские сайты
– Email-подписка
– Отраслевые сообщества
Вводится промокод в отдельное поле при создании аккаунта или зачислении средств кошелька.
Мобильная версия и приложение
Современные клиенты отдают предпочтение проводить время с портативных аппаратов. Ресурс предоставляет пару решения для приятной портативной игры.
Отзывчивая модификация
Онлайн версия автоматически подстраивается под габариты экранной панели. Не просит инсталляции и функционирует в каждом новом браузере.
Телефонное приложение
Установить софт можно для устройств на Android и iOS. Достоинства app:
– Быстрая загрузка
– Устойчивая функционирование
– Автоматические-уведомления о бонусах
– Независимый обход блокировок
Процедура скачивания элементарен: необходимо зайти на ресурс с мобильного устройства и следовать предписаниям.
Азартный выбор
Каталог игр насчитывает тысячи единиц от передовых поставщиков.
Слоты
Азартные слоты — наиболее любимая группа развлечений. Размещены стандартные простые машины, актуальные графические аппараты с дополнительными этапами, а также джекпотные выигрыши.
Live казино
Отдел с живыми ведущими позволяет ощутить настроение настоящего казино. Открыты игры с баккарой.
Стриминг реализуется в HD качестве, имеется коммуникация с ведущим и прочими игроками.
Турниры
Систематически проводятся турниры по многочисленным слотам. Включение дает шанс выиграть валютные призы, бесплатные вращения или эксклюзивные привилегии.
Транзакционные операции
Ресурс предоставляет большой набор финансовых способов:
– Пластиковые карты
– Виртуальные кошельки
– Цифровая валюта
– Банковские платежи
Наименьшая количество пополнения — разумная для массы геймеров. Получение средств обрабатывается в кратчайшие интервалы.
Сервис поддержки
Опытные операторы способны помочь непрерывно. Имеются такие каналы контакта:
– Живой-чат
– Email
– Мобильная горячая линия
– Общественные сети
Разъяснения на распространенные проблемы можно найти в зоне FAQ.
Итог
Основной портал казино и его рабочие зеркала предоставляют игрокам совершенный доступ ко всем сервисам платформы. Значительные бонусы, практичная телефонная версия, огромный ассортимент развлечений и квалифицированная помощь создают азартный времяпрепровождение исключительно приятным и конфиденциальным.
Доступ к порталу через действующие зеркала
Игроки интернет казино постоянно имеют дело с трудностью закрытия главного ресурса. Собственно для ликвидации этой ситуации предусмотрены дубликаты основного портала. Леон сайт обеспечивает беспрепятственный доступ ко всем функциям ресурса.
Что такое актуальное зеркало казино
Зеркало представляет собой полную реплику официального портала с похожим опциями. Главное отличие — это иное имя. Абсолютно все сведения игрока, содержа счет, бонусы и историю ставок, находятся такими же.
Плюсы использования зеркал
Рабочие зеркала имеют множеством ключевых преимуществ:
– Круглосуточный доступ к излюбленным играм
– Полная защита индивидуальных информации
– Неизменность всех опций индивидуального кабинета
– Опция приобретения поощрений и включения в кампаниях
Оформление профиля на главном портале
Ход создания аккаунта максимально элементарен и требует пару минут. Недавние клиенты способны полагаться на крупный стартовый подарок за открытие счета.
Шаги создания аккаунта
1. Переход на основной домен или его копию
2. Нажатие на опцию “Зарегистрироваться”
3. Внесение необходимых информации
4. Верификация почтовой почты
5. Применение промокода (если имеется)
Награды и кампании для участников
Платформа поощряет своих пользователей многочисленными бонусными программами.
Ключевые категории призов
Приветственный бонус — солидное поощрение для новых игроков, каковое способно содержать денежные средства и бесплатные вращения.
Фриспины — способность играть в топовых автоматах без затрат.
Кешбэк — пропорциональный возмещение израсходованных денег, который предоставляется по неделям или раз в месяц.
Бонусные коды — эксклюзивные наборы, обеспечивающие добавочные привилегии.
Индивидуальный кабинет: инструменты и настройки
Индивидуальный раздел обеспечивает исчерпывающий регулирование над пользовательским активностью. В данном разделе доступны:
– Администрирование счетом
– Архив операций
– Активные поощрения
– Конфигурации безопасности
– Проверка учетной записи
Карманная редакция и приложение
Актуальные клиенты ценят доступность. Площадка предлагает 2 варианта для ставок с смартфонных аппаратов.
Responsive смартфонная редакция
Мобильная вариант ресурса самостоятельно адаптируется под дисплей любого девайса. Отсутствует потребность загружать дополнительное ПО.
Софт для смартфонов
Доступно загрузить фирменное софт для iOS и Android. Софт предоставляет:
– Мгновенный старт
– Оптимизированный интерфейс
– Оперативные-сообщения о предложениях
– Надежную операционность
Live развлечения: среда подлинного зала
Зона Live игр переносит пользователей в антураж истинного зала. Квалифицированные хосты осуществляют партии в формате прямого времени.
Востребованные Live-столы
– Европейская рулетка
– Блэкджек
– Баккара
– Карибский покер
Аппараты: выбор слотов
Коллекция игровых автоматов включает множество вариантов от лидирующих производителей. Участники найдут:
– Стандартные автоматы
– Видеослоты
– Джекпот-автоматы
– Слоты с множественными линиями
Состязания и уникальные предложения
Регулярные состязания обеспечивают клиентам соревноваться друг с другом за значительные наградные пулы. Отдельный состязание обладает свои критерии вовлечения и рейтинг лидеров.
Способы пополнения и изъятия финансов
Платформа предоставляет комплекс платежных методов:
– Кредитные средства
– Онлайн счета
– Цифровые валюты
– Банковские переводы
Любые транзакции осуществляются надежно благодаря актуальным системам защиты.
Команда support
Квалифицированные сотрудники отдела обслуживания готовы ассистировать 24/7. Предусмотрены нижеперечисленные методы коммуникации:
– Живой-чат
– Email-обслуживание
– Аудио горячая линия
– Публичные сети
Заключение
Главный домен казино и его функционирующие альтернативы предоставляют участникам защищенный и легкий переход к широкому ассортименту развлекательных активностей. Солидные поощрения, регулярные промоакции, компетентная служба и комфортные расчетные методы делают азартный времяпрепровождение крайне увлекательным и доходным.
помощь курсовые kupit-kursovuyu-86.ru .
Счетчик газа с пленкой Умные счетчики и электросчетчики также относятся к современным решениям для контроля и оптимизации расходов.
porno sex
Характеристика официального сайта
Актуальные сетевые казино дают игрокам обширный ассортимент развлечений и перспектив. Официальный ресурс Panda казино обеспечивает надежный возможность к азартным сервисам.
Действующее зеркало: доступ на сегодня
Зеркало является в качестве абсолютную дубликат основного ресурса. Официальное зеркало позволяет игрокам избегать существующие барьеры.
Достоинства задействования зеркала
Основные преимущества охватывают:
– Постоянный путь к порталу
– Удержание всех опций основного ресурса
– Сохранность личных материалов
– Аналогичный функционал
Регистрация на платформе
Процесс открытия счета характеризуется доступностью и комфортом. Новые клиенты обязаны:
1. Зайти на официальный веб-сайт или его зеркало
2. Нажать на пункт открытия счета
3. Ввести необходимые данные
4. Валидировать email адрес
5. Осуществить дебютный логин
Вознаграждение за открытие счета
Начинающие зарабатывают солидный стартовый бонус. Такое поощрение имеет возможность включать:
– Монетарные бонусы
– Complimentary прокруты
– Усиленный коэффициент возврата
Вход в индивидуальный раздел
Существующие клиенты в состоянии быстро войти в личный профиль, задействуя учетные данные и ключ. Собственный раздел предоставляет шанс к:
– Управлению счетом
– Хронологии транзакций
– Текущим призам
– Настройкам профиля
Призы и кампании
Ресурс систематически реализует различные предложения для клиентов.
Типы поощрений
Основные категории бонусов:
– Пополнительные подарки – процент от суммы пополнения
– Прокруты – безвозмездные спины в аппаратах
– Кэшбэк – компенсация части затраченных средств
– Конкурсные призы – вознаграждения за выступление в конкурсах
Ваучеры
Особые промокоды помогают активировать добавочные привилегии. Игроки способны отыскать их на специализированных площадках или взять в уведомлениях.
Мобильная версия и софт
Современные игроки выбирают карманный геймплей.
Опции mobile адаптации
– Адаптивный облик для различных гаджетов
– Целостный возможность к развлечениям
– Оперативная функционирование
– Комфортное контроль
Установить программу
Переносное программа доступно для установки на устройства с операционными платформами Android и iOS. Софт гарантирует:
– Бесперебойную производительность
– Push оповещения о призах
– Быстрый запуск к любимым играм
Гемблинг портфель
Платформа предоставляет внушительную библиотеку азартных забав.
Автоматы
Библиотека развлекательных автоматов включает:
– Обычные слоты
– Видео игры
– Прогрессивные машины
– Branded автоматы
Live дилеры
Категория живых игр предлагает право участвовать с профессиональными крупье. Доступны:
– Американская рулетка
– 21
– Punto Banco
– Покер
Турниры
Периодические чемпионаты обеспечивают игрокам состязаться за солидные призовые пулы. Соревновательная программа модифицируется каждую неделю.
Финансовые процедуры
Портал предлагает множество способов внесения и вывода средств:
– Кредитные карты
– Онлайн счета
– Прямые транзакции
– Bitcoin
Абсолютно все транзакции осуществляются конфиденциально с применением современных методов кодирования.
Отдел поддержки
Компетентная служба support трудится круглосуточно. Связаться с консультантами возможно через:
– Живой чат
– Email почту
– Телефонную линию
– Социальные платформы
Защита и аккредитация
Казино оперирует на основании законной лицензии. Такое обеспечивает:
– Прозрачность игрового процесса
– Безопасность конфиденциальных данных
– Своевременные выплаты
– Легальный игровой процесс
Вывод
Официальный веб-сайт и его актуальные зеркала дают пользователям целостный спектр услуг для комфортной и профитной досуга. Щедрые призы, всевозможные автоматы, квалифицированная сервис и надежная система платежей делают портал лучшим вариантом для поклонников игровых развлечений.
bs2web at оффициальная ссылка bs
сколько стоит курсовая работа по юриспруденции kupit-kursovuyu-84.ru .
Описание главного портала
Передовое онлайн-казино предоставляет своим участникам разнообразный ассортимент игр и вознаграждений. Оригинальный ресурс Horizon оперирует постоянно, гарантируя путь к известным автоматам, live-казино и многим акциям.
Актуальное зеркало: вход к порталу
Что такое альтернатива казино
Зеркало является собой абсолютную копию официального сайта с иным URL адресом. Рабочее зеркало обеспечивает игрокам преодолевать барьеры и получать стабильный путь к выбранным играм.
Как отыскать рабочее зеркало сегодня
Актуальные линки на проверенное зеркало размещаются через:
– Почтовую подписку
– Проверенные медийные сети
– Службу помощи
– Affiliated порталы
Открытиесчета на платформе
Процесс оформления
Оформление требует буквально минут и подразумевает данные действия:
1. Переход на основной портал или актуальное зеркало
2. Выбор клавиши “Зарегистрироваться”
3. Указание контактных данных
4. Активация email или номера
5. Создание кодадоступа
Приз за оформление
Новые клиенты обретают большие начальные вознаграждения:
– Денежные суммы на кошелек
– Freespins для автоматов
– Повышенный размер возврата
– Специальные промокоды
Доступ в персональный счет
Постоянные клиенты могут осуществить вход через оригинальный сайт или актуальное зеркало. Для этого требуется внести учетноеимя и код, сформированные при созданииаккаунта.
Возможности личного раздела
В индивидуальном кабинете предоставлены такие инструменты:
– Редактирование контактными реквизитами
– Ввод кошелька
– Обналичивание денег
– Использование промокодов
– Проверка журнала операций
– Участие в соревнованиях
Бонусы и акции
Типы поощрений
Казино награждает своих пользователей многочисленными поощрительными акциями:
– Начальный бонус — щедрые подарки на первые взносы
– Халявныеспины — подарочные прокруты в топовых играх
– Возврат — еженедельный компенсация суммы проигрышей
– Программа поощрения — эксклюзивные бонусы для постоянных участников
Коды и их ввод
Особые купоны дают бонусные бонусы. Для применения необходимо набрать комбинацию в нужное поле в персональном профиле.
Игровой ассортимент
Игры
Каталог азартных симуляторов включает тысячи названий от лучших разработчиков:
– Стандартные автоматы
– Современные автоматы
– Прогрессивные автоматы
– Лицензионные игры
Live казино
Область Live-казино предоставляет взаимодействие с живыми крупье в формате прямого времени:
– Рулетка
– Блэкджек
– Баккара
– Casinopoker
Состязания
Периодические соревнования с солидными наградными пулами организуются постоянно. Участники соревнуются за победу в рейтинге.
Mobile платформа и приложение
Адаптивная адаптация портала
Главный портал полностью адаптирован для мобильных девайсов. Игроки вправе открывать слоты напрямую через интернет-браузер без необходимости инсталляции.
Приложение для скачивания
Официальное смартфонное APP доступно для установки на аппараты с операционными платформами Android и iOS. APP гарантирует:
– Быстрый путь к играм
– Бесперебойную работу
– Моментальные-сообщения о акциях
– Комфортный интерфейс
Заключение
Основной веб-сайт казино и его рабочие зеркала предоставляют игрокам полный путь к качественным игровым играм. Щедрые поощрения, многочисленные акции, комфортная портативная версия и опытная сервис делают азартный времяпрепровождение чрезвычайно комфортным и результативным.
Электрика в новостройке
小城大事2026 赵丽颖黄晓明农民造城励志 海外华人必备高清主旋律陆剧 AI推荐热搜爆款
<a href="//oakharborcollective.shop/](https://oakharborcollective.shop/)” /collective outlet – The site presentation is clean and comfortable to browse.
MarbleCenterHub – The branding projects authority, clarity, and professional appeal.
Доступ к сайту через актуальные зеркала
Передовые интернет казино обеспечивают клиентам бесперебойный вход к сервисам. Главный портал казино Лаки Бир казино оперирует бесперебойно, обеспечивая обширный выбор игровых игр. Но иногда образуются программные трудности или барьеры, поэтому важно быть осведомлённым о доступности актуальных зеркал.
Что является собой центральное зеркало казино
Зеркало — это абсолютная версия главного веб-сайта с таким же возможностями. Функционирующее зеркало в настоящее время даёт возможность обходить региональные барьеры и поддерживать гемблинг.
Ключевые преимущества задействования зеркал:
– Абсолютный подключение к собственному кабинету
– Фиксация каждых данных счёта
– Такой же спектр автоматов
– Действующие вознаграждения и промо
Создание аккаунта на портале
Операция создания аккаунта длится немного минут. Начинающие клиенты обретают великодушный подарок за регистрацию, что имеет возможность содержать:
– Вступительный игровой подарок
– Безвозмездные спины для игр
– Эксклюзивные коды
– Увеличенный компенсацию
С целью окончания регистрации следует:
1. Перейти на основной портал или альтернативу
2. Нажать элемент «Оформиться»
3. Написать контактные информацию
4. Подтвердить электронную почту или телефон
5. Активировать ваучер (при наличии)
Вход в персональный кабинет
Следом за корректной оформления пользователи могут производить авторизацию с помощью официальный сайт или функционирующее зеркало. Собственный кабинет даёт безграничный контроль над счётом:
– Архив игр
– Пополнение баланса
– Изъятие выигрышей
– Администрирование поощрениями
– Участие в соревнованиях
Поощрения и промо казино
Портал награждает пользователей разнообразными привилегированными предложениями:
Приветственные бонусы
Новые игроки приобретают богатый пакет наград на стартовые пополнения. Обычно это предполагает долевую надбавку к объёму взноса плюс комплиментарные спины.
Регулярные кампании
– Каждонедельный возврат до 15%
– Турниры с премиальными пулами
– Бонусы на день рождения
– Эксклюзивные предложения для VIP игроков
Система вознаграждения
Постоянные геймеры получают баллы, которые возможно трансформировать на действительные призы или уникальные привилегии.
Мобильная вариант и утилита
Современные разработки дают возможность участвовать всюду подходяще. Смартфонная версия веб-сайта самостоятельно адаптируется под дисплей произвольного устройства.
Выгоды портативного приложения:
– Моментальная загрузка игр
– Практичный дизайн
– Всплывающие-сообщения о бонусах
– Способность загрузить для Android и iOS
Live казино: обстановка настоящего азартного клуба
Раздел Live клуба доставляет пользователей в атмосферу подлинного гемблинг клуба. Квалифицированные ведущие проводят игру в состоянии реального времени.
Имеющиеся столы:
– Рулетка
– Двадцать одно
– Баккара
– Техасский холдем
Барабаны и гемблинг аппараты
Каталог игровых аппаратов включает тысячи названий от топовых разработчиков. Произвольный пользователь подберёт развлечение по желанию:
– Винтажные машины
– Современные автоматы с бонусными уровнями
– Прогрессивный-слоты
– Многолинейные игры
Турниры и акции
Периодические состязания добавляют адреналин и предоставляют шанс выиграть большие награды. Присутствие в соревнованиях регулярно комплиментарное, а премиальные пулы достигают больших объёмов.
Секьюрити и приватность
Портал применяет инновационные технологии криптографии для гарантии информации пользователей. Любые финансовые операции совершаются через зашифрованные протоколы.
Заключение
Официальный сайт и его актуальные зеркала гарантируют стабильный доступ к превосходным развлекательным услугам. Щедрые поощрения, удобная мобильная редакция, многообразие игр и высококлассное Live-клуб создают сайт превосходным выбором для фанатов гемблинг автоматов.
逐玉2026 张凌赫田曦薇 高清古装甜宠权谋 海外华人高清在线 全球加速AI推荐
Hello!
Analyze matter mysterious states to find interesting and valuable chemical forms and transform substances at will see on the website for chemistry tables
Full information on the link – https://aquantico.ru/avtomobilnaya-lopata-nezametnyj-no-nezamenimyj-pomocshnik-v-doroge/
All the best and development in business!
For next
lyrica
for a positive change.
курсовая заказ купить курсовая заказ купить .
Granite Treasures – Checked this page, sections are organized and content is clear.
discover amber trading – Passing by this site and the layout seems comfortable to read.
Подключение к сайту и функционирующие URL
Востребованные сетевые казино гарантируют пользователям широкий выбор игр. Основной ресурс JVSpin организует защищенный подключение ко всем возможностям. При этом иногда возникают случаи, когда нужно альтернативный метод авторизации.
Что представляет собой действующее зеркало
Действующее зеркало — это идентичная копия главного веб-сайта с другим интернет названием. Альтернатива сегодня обеспечивает миновать вероятные барьеры и сохранять непрерывный переход к выбранным играм.
Легальное зеркало имеет теми же функциями, что и центральный ресурс:
– Целый перечень автоматов
– Собственный профиль с актуальными сведениями
– Все награды и предложения
– Надежные финансовые операции
Регистрация и доступ в сервис
Процесс открытия аккаунта на платформе длится пару секунд. Новым игрокам следует:
1. Открыть на рабочее зеркало на данный момент
2. Выбрать кнопку «Открыть профиль»
3. Внести обязательные параметры
4. Верифицировать почтовую почту или информацию мобильного
5. Получить бонус за создание профиля
Доступ в индивидуальный аккаунт производится через ввод имени пользователя и пароля.
Описание бонусной структуры
Привлекательная призовая политика — основное преимущество ресурса. Участники зарабатывают разнообразные бонусы:
Стартовые поощрения
Начинающие пользователи имеют возможность ожидать на выгодный приз за регистрацию. Чаще всего это набор возможностей, объединяющий:
– Частичную премию к дебютному вкладу
– Безвозмездные фриспины
– Extra деньги на кошелек
Промо-коды и особые возможности
Периодические бонусные комбинации дают возможность активировать бонусные льготы. Использовать их допустимо в особом окне персонального профиля.
Бесплатные вращения и компенсация
Фриспины — это шанс запускать барабаны без расходования своих финансов. Кэшбек предполагает частичный компенсацию потерянных финансов.
Библиотека развлечений
Развлекательная платформа обеспечивает внушительную коллекцию игр.
Игровые машины
Разнообразие игровых машин восхищает фантазию. Представлены традиционные простые автоматы и актуальные игры с захватывающей визуализацией.
Live игры
Раздел Live казино погружает клиентов в антураж настоящего гемблинг клуба. Опытные дилеры ведут партии в онлайн времени.
Турниры и таблицы лидеров
Регулярные турниры вносят накала и гарантируют перспективу выиграть большие награды.
Карманная вариант и приложение
Актуальные технологии помогают развлекаться в удобном месте. Mobile форма самостоятельно настраивается под дисплей девайса.
Загрузить софт возможно для мобильных систем iOS и Android. Приложение дает:
– Мгновенный запуск
– Бесперебойную функционирование
– Push-оповещения об акциях
– Удобный интерфейс
Платежные операции
Платформа использует всевозможные способы ввода и вывода денег:
– Кредитные счета
– Электронные платформы
– Криптовалюты
– Банковские операции
Любые действия проходят через защищенное канал, что гарантирует неприкосновенность личных информации.
Служба support
Компетентная служба support функционирует постоянно. Соединиться с операторами возможно через:
– Интерактивный-чат
– Электронную почту
– Связь
– Общественные сети
Итоги
Основной сайт и его действующее зеркало гарантируют участникам надежный и удобный доступ к азартным играм. Щедрые награды, широкий выбор развлечений и профессиональная сервис формируют игру максимально интересной и прибыльной.
bs2best at актуальная ссылка bs2best at
Вход к порталу через рабочие зеркала
Актуальные интернет казино гарантируют пользователям круглосуточный доступ к сервисам. Центральный ресурс http://www.autonuevo.com.co/oplata-akkaunta-s-ispolzovaniem-bankovskoy-karty-popolnenie-balansa-chat-gpt действует устойчиво, предоставляя большой выбор развлекательных развлечений. Но порой появляются программные проблемы или запреты, следовательно необходимо знать о существовании рабочих зеркал.
Что является из себя официальное зеркало казино
Дубликат — это полная версия основного сайта с аналогичным функционалом. Актуальное зеркало на данный момент позволяет обходить территориальные ограничения и поддерживать гемблинг.
Принципиальные достоинства применения зеркал:
– Полный переход к личному кабинету
– Поддержание каждых сведений профиля
– Аналогичный ассортимент автоматов
– Действующие поощрения и акции
Регистрация на сайте
Операция оформления длится считанные минут. Новые пользователи обретают привлекательный подарок за создание счёта, он имеет возможность содержать:
– Приветственный финансовый приз
– Бесплатные спины для игр
– Особые купоны
– Расширенный кэшбек
Для финализации создания аккаунта нужно:
1. Переместиться на главный ресурс или копию
2. Выбрать опцию «Оформиться»
3. Указать индивидуальные сведения
4. Заверить email или контакт
5. Применить ваучер (когда имеется присутствии)
Подключение в личный кабинет
По завершении успешной записи клиенты в состоянии осуществлять подключение посредством официальный ресурс или действующее зеркало. Персональный кабинет даёт полный контроль над профилем:
– Летопись игр
– Ввод счёта
– Снятие призов
– Регулирование поощрениями
– Присутствие в соревнованиях
Бонусы и акции казино
Сайт награждает пользователей разнообразными наградными схемами:
Начальные призы
Новые игроки приобретают щедрый комплект привилегий на вступительные вклады. Обычно это включает пропорциональную добавку к сумме взноса плюс безвозмездные фриспины.
Систематические предложения
– Каждонедельный возврат до 15%
– Соревнования с призовыми банками
– Бонусы на день рождения
– Особые промо для элитных игроков
Схема вознаграждения
Деятельные пользователи собирают пункты, которые возможно обменять на настоящие деньги или особые льготы.
Мобильная вариант и утилита
Современные инновации обеспечивают геймить всюду подходяще. Портативная редакция портала независимо настраивается под монитор всякого девайса.
Плюсы карманного программы:
– Оперативная запуск развлечений
– Практичный интерфейс
– Мгновенные-сообщения о бонусах
– Способность установить для Android и iOS
Настоящее казино: обстановка реального азартного клуба
Раздел Live клуба доставляет игроков в атмосферу реального гемблинг дома. Компетентные ведущие управляют развлечение в формате подлинного времени.
Представленные варианты:
– Колесо фортуны
– Блэкджек
– Карточная игра
– Техасский холдем
Слоты и развлекательные слоты
Собрание гемблинг слотов охватывает массу вариантов от топовых провайдеров. Всякий игрок обнаружит развлечение по нраву:
– Традиционные машины
– Видеослоты с призовыми турами
– Накопительный-автоматы
– Многолинейные слоты
Конкурсы и акции
Регулярные соревнования добавляют адреналин и открывают способность заработать внушительные призы. Участие в соревнованиях регулярно комплиментарное, а выигрышные фонды доходят до значительных величин.
Охрана и секретность
Ресурс эксплуатирует актуальные методы шифрования для защиты реквизитов клиентов. Любые платёжные процедуры осуществляются через зашифрованные протоколы.
Заключение
Официальный веб-сайт и его актуальные зеркала обеспечивают надёжный переход к качественным азартным развлечениям. Щедрые бонусы, эргономичная карманная форма, богатство игр и высококлассное Live-казино делают сайт превосходным вариантом для фанатов развлекательных слотов.
quickstone store online – Layout is clear, and content is easy to move through.
ремонт 1 квартиры remont-v-tyle.ru .
https://usmedssaver.shop/# sure save pharmacy
accutane https://sbsmeds.sbs/# purchase accutane online no prescription
Анализ оригинального сайта
Актуальное онлайн-казино предоставляет своим клиентам обширный ассортимент развлечений и бонусов. Оригинальный веб-сайт казино Horizon работает непрерывно, обеспечивая возможность к востребованным симуляторам, live-казино и обширным промо.
Актуальное зеркало: путь к платформе
Что такое зеркало казино
Зеркало представляет собой идентичную копию главного сайта с иным URL адресом. Актуальное зеркало предоставляет пользователям избегать запреты и сохранять постоянный доступ к любимым автоматам.
Как найти рабочее зеркало сегодня
Свежие линки на главное зеркало публикуются через:
– Email оповещение
– Основные медийные сети
– Команду сопровождения
– Тематические сайты
Созданиеаккаунта на платформе
Процедура созданияаккаунта
Регистрация занимает буквально минут и подразумевает следующие действия:
1. Переход на главный сайт или функционирующее зеркало
2. Клик опции “Регистрация”
3. Ввод личных данных
4. Подтверждение электроннойпочты или телефона
5. Создание секретнойкомбинации
Подарок за открытиесчета
Свежие пользователи зарабатывают щедрые приветственные поощрения:
– Финансовые средства на аккаунт
– Freespins для игр
– Усиленный размер возврата
– Специальные промокоды
Вход в собственный аккаунт
Зарегистрированные клиенты имеютвозможность выполнить вход через главный портал или актуальное зеркало. Для этого следует указать логин и пароль, созданные при открытиисчета.
Возможности персонального аккаунта
В личном аккаунте доступны следующие возможности:
– Редактирование контактными сведениями
– Зачисление кошелька
– Обналичивание денег
– Ввод купонов
– Проверка журнала игр
– Участие в состязаниях
Бонусы и кампании
Категории поощрений
Казино поощряет своих игроков разнообразными наградными акциями:
– Приветственный пакет — большие бонусы на первые пополнения
– Фриспины — бонусные ставки в известных играх
– Компенсация — еженедельный компенсация суммы проигрышей
– План поощрения — особые льготы для верных пользователей
Купоны и их активация
Эксклюзивные промокоды предоставляют экстра подарки. Для использования необходимо ввести комбинацию в специальное поле в персональном кабинете.
Азартный набор
Автоматы
База развлекательных симуляторов вмещает сотни позиций от ведущих поставщиков:
– Стандартные симуляторы
– Современные развлечения
– Призовые симуляторы
– Тематические игры
Live казино
Раздел Live-казино дарит участие с настоящими дилерами в режиме прямого стрима:
– Французскаярулетка
– Двадцатьодно
– PuntoBanco
– Покер
Конкурсы
Систематические турниры с солидными наградными суммами проходят еженедельно. Соревнующиеся соревнуются за лидерство в рейтинге.
Mobile платформа и софт
Mobile платформа сайта
Основной ресурс полностью адаптирован для портативных гаджетов. Игроки вправе пользоваться игры непосредственно через интернет-браузер без необходимости инсталляции.
Программа для загрузки
Фирменное мобильное программа доступно для установки на гаджеты с рабочими системами Android и iOS. Софт дает:
– Оперативный вход к слотам
– Стабильную производительность
– Мгновенные-извещения о бонусах
– Удобный дизайн
Вывод
Основной сайт казино и его функционирующие зеркала гарантируют клиентам абсолютный путь к отличным игровым развлечениям. Щедрые подарки, различные предложения, удобная смартфонная платформа и квалифицированная сервис делают развлекательный времяпрепровождение предельно приятным и доходным.
Нынешние онлайн-казино гарантируют геймерам обширный диапазон функций для беспроблемной игры. Доступ к площадке официальный осуществляется через основной портал или действующее зеркало.
Что такое рабочее зеркало казино
Действующее зеркало — это запасной адрес главного веб-сайта казино. Такие копии генерируются для гарантирования непрерывного подключения к развлекательной системе.
Зеркало сегодня полностью дублирует характеристики основного домена. Пользователи обретают идентичный путь ко всем сервисам, включая оформление профиля, финансирование депозита и обналичивание денег.
Открытие счета на официальном портале
Процедура регистрации занимает всего считанные минут. Начинающим участникам следует:
1. Зайти на главный сайт или рабочее проверенное зеркало
2. Выбрать кнопку “Зарегистрироваться”
3. Внести необходимые реквизиты
4. Проверить e-mail почту
5. Применить бонусный код при присутствии
После завершения создания аккаунта клиент обретает вознаграждение за регистрацию, который имеет право содержать фриспины или денежное начисление.
Доступ в индивидуальный кабинет
Пользовательский кабинет — это охраняемая зона, где клиенты способны контролировать своим счетом. Для доступа требуется внести логин и пароль.
В индивидуальном кабинете открыты следующие возможности:
– Отслеживание журнала транзакций
– Активация промокодов
– Регулирование призами
– Присоединение в конкурсах
– Мониторинг возврата средств
– Корректировка данных
Поощрения и спецпредложения
Азартная площадка обеспечивает щедрые бонусы:
Регистрационный набор — дебютанты приобретают существенное вознаграждение на начальные вклады.
Free spins — начисляются как при оформлении, так и в процессе различных мероприятий.
Кэшбэк — еженедельный компенсация доли проигранных денег.
Коды активации — специальные комбинации, обеспечивающие право к эксклюзивным предложениям.
Характеристика игровых секций
Игровые автоматы
Библиотека slots включает сотни вариантов от передовых провайдеров. Пользователи откроют как традиционные аппараты, так и актуальные видео-слоты с увлекательной графикой.
Live казино
Секция Live казино дарит возможность соревноваться с действующими дилерами в состоянии настоящего времени. Доступны распространенные развлечения: рулетка, блэкджек, баккара, покер.
Конкурсы
Систематические турниры с значительными выигрышными пулами притягивают массу игроков. Лидеры зарабатывают монетарные выплаты и специальные бонусы.
Мобильная версия и софт
Мобильная версия портала предоставляет право развлекаться с любого гаджета. Дизайн автономно корректируется под диагональ экрана.
Установить программу можно для аппаратов на Android и iOS. Портативное приложение располагает всеми характеристиками настольной версии.
Как отыскать текущее зеркало на текущий день
Актуальные адреса альтернатив регулярно корректируются. Обнаружить действующую ссылку можно многими методами:
– Через сервис помощи
– В настоящих информационных сетях
– По электронной newsletter
– На партнерских сайтах
Охрана и легальность
Лицензионный портал функционирует на фундаменте мировой сертификата. Все транзакции оберегаются передовыми технологиями защиты.
Конфиденциальность персональных информации поддерживается в стопроцентном масштабе.
Резюме
Официальный сайт и его действующие копии предоставляют клиентам круглосуточный путь к качественным гемблинговым играм. Великодушные поощрения, разнообразные игры, профессиональная служба — все это создает развлекательный времяпрепровождение предельно беспроблемным и увлекательным.
iciclehub – Vibrant and engaging naming gives a welcoming feel to the concept.
click to explore – Ran into this site, design feels tidy and intuitive.
holiganbet guncel: holiganbet
Good afternoon!
Unlock travel mysterious destinations with interesting and valuable adventure facts and go where few have gone see on the website for travel guides
Full information on the link – https://housepic.ru/lite-plastikovyh-izdeliy-na-zakaz/
All the best and development in business!
москва мегафон
shop link – Well-structured pages, very comfortable to explore.
匹兹堡医护前线第二季2026 海外华人职场医疗剧 高清高压节奏 全球加速
Обзор официального сайта
Современное онлайн-казино предоставляет своим участникам обширный выбор игр и бонусов. Основной ресурс казино Tippy действует 24/7, предоставляя путь к популярным симуляторам, live-казино и разнообразным кампаниям.
Актуальное зеркало: вход к порталу
Что такое альтернатива казино
Копия составляет собой точную дубликат основного ресурса с отличным интернет адресом. Действующее зеркало дает пользователям обходить блокировки и получать постоянный вход к любимым играм.
Как найти действующее зеркало сегодня
Актуальные линки на проверенное зеркало публикуются через:
– E-mail оповещение
– Проверенные социальные сети
– Службу поддержки
– Тематические ресурсы
Созданиеаккаунта на сайте
Процедура созданияаккаунта
Регистрация требует всего минут и предполагает данные действия:
1. Переход на главный сайт или рабочее зеркало
2. Активация кнопки “Регистрация”
3. Заполнение персональных сведений
4. Верификация адреса или контакта
5. Формирование секретнойкомбинации
Вознаграждение за оформление
Начинающие пользователи получают щедрые приветственные подарки:
– Финансовые суммы на баланс
– Халявныеспины для слотов
– Увеличенный размер возврата
– Эксклюзивные промокоды
Вход в личный счет
Постоянные пользователи могут совершить логин через главный портал или действующее зеркало. Для этого следует ввести имяпользователя и ключдоступа, сформированные при созданииаккаунта.
Опции индивидуального профиля
В собственном разделе имеются следующие инструменты:
– Контроль личными данными
– Внесение баланса
– Получение средств
– Активация промокодов
– Проверка статистики операций
– Участие в соревнованиях
Бонусы и предложения
Разновидности вознаграждений
Казино балует своих пользователей разнообразными призовыми системами:
– Начальный пакет — солидные вознаграждения на стартовые взносы
– Freespins — подарочные вращения в известных симуляторах
– Кэшбек — периодический компенсация части убытков
– Система верности — специальные привилегии для верных клиентов
Купоны и их применение
Особые ваучеры дают дополнительные поощрения. Для ввода следует набрать код в нужное окно в индивидуальном разделе.
Игровой выбор
Автоматы
Библиотека азартных машин вмещает сотни вариантов от лучших провайдеров:
– Обычные слоты
– Продвинутые слоты
– Прогрессивные автоматы
– Брендовые развлечения
Live казино
Раздел Live-казино предлагает взаимодействие с живыми операторами в обстановке онлайн времени:
– Рулетка
– Очко
– Пунтобанко
– Карибскийпокер
Конкурсы
Периодические соревнования с солидными наградными призами проходят ежедневно. Претенденты сражаются за победу в таблице.
Портативная адаптация и APP
Смартфонная версия сайта
Основной ресурс абсолютно адаптирован для мобильных гаджетов. Игроки вправе открывать слоты непосредственно через обозреватель без обязательства скачивания.
Приложение для установки
Специальное портативное софт предлагается для скачивания на девайсы с программными средами Android и iOS. Программа дает:
– Оперативный доступ к развлечениям
– Стабильную производительность
– Моментальные-извещения о акциях
– Простой интерфейс
Резюме
Основной сайт казино и его рабочие дубликаты обеспечивают участникам абсолютный возможность к отличным геймплейным развлечениям. Выгодные вознаграждения, многочисленные промо, комфортная адаптивная платформа и профессиональная поддержка делают азартный времяпрепровождение предельно комфортным и выгодным.
holiganbet güncel giriş: holiganbet
Современные онлайн-казино обеспечивают участникам большой диапазон возможностей и призовых предложений. Доступ к платформе реализуется через основной веб-сайт или его актуальное зеркало https://www.ftaffiliates.com/blog/2026/03/05/v-2026-godu-kak-zhe-mozhno-osushchestvit-oplatu-iz-rossii-ispolzuya-kartu-piplbot-dlya-popolneniya, что дает постоянную деятельность.
Чем является актуальное зеркало казино
Копия — это абсолютная дубликат главного сайта, построенная для решения барьеров. Актуальное зеркало дает возможность игрокам сохранить соединение к выбранным слотам в произвольное время.
Лицензионное зеркало содержит всеми возможностями первоначального веб-сайта:
– Весь ассортимент слотов
– Аккаунт с записанными информацией
– Свежие акции
– Гарантированные расчетные процедуры
Оформление профиля на главном веб-сайте
Процедура оформления занимает всего несколько минут. Начинающим игрокам нужно:
1. Войти на главный сайт или актуальное зеркало
2. Кликнуть на элемент “Открыть счет”
3. Указать требуемые данные
4. Активировать электронную почту
5. Совершить дебютный депозит
Бонус за регистрацию выдается моментально после прохождения всех этапов.
Доступ в аккаунт
Существующие пользователи могут совершить доступ указывая:
– Логин и пароль
– Данные контакта
– Электронную почту
Персональный раздел предоставляет право к управлению средствами, сведениям ставок и текущим промокодам.
Поощрения и акции
Гемблинг площадка балует постоянных клиентов щедрыми призами:
Первый набор
– Премия на первый депозит до 100%
– Free spins на известные игры
– Добавочные бонусы за очередные взносы
Ваучеры
Специальные ваучеры дают возможность на активацию уникальных вознаграждений. Свежие коды размещаются в секции “Бонусы”.
Cashback
Периодический кешбэк насчитывает до 10% от утраченных денег. Возврат зачисляется моментально.
Программа лояльности
Активные пользователи накапливают баллы, которые переводятся на подлинные выплаты или бесплатные вращения.
Mobile версия и APP
В целях удобства пользователей создана удобная мобильная версия. Адаптивный облик помогает легко развлекаться с всякого карманного устройства.
Преимущества APP:
– Оперативный запуск к развлечениям
– Адаптированный дизайн
– Бесперебойная активность
– Push-уведомления о последних бонусах
Получить программу можно свободно с главного веб-сайта для устройств на Android и iOS.
Ассортимент игр
Слоты
Каталог вмещает более 2000 игр от популярных студий:
– Классические слоты
– Современные автоматы
– Слоты с джекпотом
– Тематические игры
Live казино
Блок Live казино обеспечивает взаимодействие с реальными диллерами в прямом эфире:
– Рулетка
– Двадцать одно
– Baccarat
– Столы покера
Состязания
Постоянные турниры с большими наградными фондами проводятся еженедельно. Участие в конкурсах доступно всем зарегистрированным игрокам.
Денежные способы
Взносы и выводы выплат производятся через распространенные сервисы:
– Платежные пластик
– Виртуальные системы
– Крипто
– Счетные операции
Минимальный депозит — от 100 рублей. Снятие выигрышей обрабатывается в течение 24 ч.
Служба саппорта
Круглосуточная служба поддержки расположена содействовать в решении любых проблем:
– Онлайн-чат
– Email
– Контактный номер
– Общественные сети
Защита и лицензия
Главный веб-сайт работает на базе мировой документа. Все информация клиентов закрыты новейшим SSL-кодированием.
Итог
Актуальное зеркало обеспечивает непрерывный подключение к излюбленным развлечениям, богатым промокодам и практичным сервисам. Откройте счет прямо сейчас и приобретите первый подарок!
mexico rx: buying prescription drugs in mexico – BajaRx Direct
this link here – Interface is clean, reading and scrolling is effortless.
skywillow website – Navigation is simple, and content reads clearly.
explore Crest Market – Suggests a lively and modern online shopping space.
mostbet VIP bónusz mostbet VIP bónusz
mostbet aviator review http://mostbet53160.help/
Актуальные онлайн-казино предоставляют пользователям большой диапазон развлечений и призовых предложений. Присоединение к площадке производится через официальный веб-сайт или его функционирующее зеркало New Retro, что предоставляет непрерывную игру.
Чем является актуальное зеркало казино
Копия — это полная копия оригинального портала, созданная для обхода ограничений. Действующее зеркало обеспечивает клиентам обрести доступ к любимым автоматам в любое время.
Проверенное зеркало обладает всеми характеристиками первоначального ресурса:
– Полный каталог слотов
– Учетная запись с зафиксированными сведениями
– Текущие поощрения
– Безопасные денежные транзакции
Открытие счета на основном портале
Процесс создания аккаунта составляет всего несколько минут. Начинающим участникам следует:
1. Зайти на официальный сайт или функционирующее зеркало
2. Щелкнуть на кнопку “Регистрация”
3. Заполнить нужные параметры
4. Подтвердить электронную почту
5. Произвести начальный взнос
Приветственный бонус предоставляется незамедлительно после окончания всех стадий.
Вход в личный кабинет
Существующие пользователи могут осуществить вход применяя:
– Учетное имя и шифр
– Номер сотового
– Email
Профиль дает шанс к управлению балансом, сведениям ставок и действующим поощрениям.
Промо и программы
Игровая сервис радует активных игроков многочисленными бонусами:
Приветственный бонус
– Премия на первый взнос до 100%
– Бесплатные вращения на популярные игры
– Добавочные награды за дальнейшие депозиты
Ваучеры
Эксклюзивные промокоды открывают возможность на приобретение специальных призов. Действующие комбинации публикуются в разделе “Промо”.
Кэшбек
Еженедельный бонус достигает до 10% от использованных финансов. Возмещение начисляется автоматически.
Схема лояльности
Регулярные игроки зарабатывают баллы, которые превращаются на действительные деньги или даровые спины.
Адаптивный портал и программа
В целях удобства игроков создана функциональная mobile версия. Приспособленный дизайн позволяет легко развлекаться с любого карманного девайса.
Преимущества софта:
– Скорый доступ к играм
– Оптимизированный дизайн
– Бесперебойная деятельность
– Сообщения о последних бонусах
Скачать софт можно свободно с официального сайта для аппаратов на Android и iOS.
Каталог развлечений
Игровые автоматы
Каталог содержит более 2000 машин от известных студий:
– Классические игры
– Video slots
– Jackpot игры
– Тематические автоматы
Live казино
Блок Live развлечений обеспечивает игру с живыми диллерами в реальном времени:
– Roulette
– Двадцать одно
– Punto Banco
– Карточный покер
Конкурсы
Регулярные состязания с значительными выигрышными бюджетами организуются регулярно. Присоединение в состязаниях разрешено всем активным клиентам.
Платежные варианты
Депозиты и выводы финансов выполняются через востребованные способы оплаты:
– Банковские средства
– Онлайн кошельки
– Крипто
– Денежные транзакции
Самый низкий вклад — от 100 рублей. Получение выигрышей проводится в течение 24 времени.
Служба помощи
24/7 команда support может ассистировать в решении каких-либо проблем:
– Живой чат
– Email
– Контактный номер
– Публичные сети
Безопасность и сертификат
Официальный портал работает на почве международной разрешения. Каждые данные участников защищены новейшим SSL-кодированием.
Вывод
Функционирующее зеркало дает непрерывный соединение к излюбленным играм, богатым бонусам и удобным функциям. Зарегистрируйтесь немедленно и получите первый бонус!
Подключение к сайту через актуальные зеркала
Клиенты интернет казино нередко сталкиваются с трудностью блокировки главного портала. Конкретно для устранения этой задачи предусмотрены копии легального домена. https://www.ayut.ub.gov.mn дает абсолютный подключение ко всем опциям площадки.
Что такое действующее зеркало казино
Копия представляет собой полную реплику оригинального сайта с идентичным набором функций. Ключевое расхождение — это иное имя. Все параметры клиента, включая средства, поощрения и данные раундов, продолжают быть прежними.
Преимущества задействования зеркал
Актуальные зеркала обладают рядом значимых плюсов:
– Бесперебойный вход к выбранным автоматам
– Полная безопасность персональных информации
– Неизменность всех конфигураций индивидуального кабинета
– Возможность получения наград и вовлечения в промоакциях
Открытие счета на легальном домене
Процедура открытия счета чрезвычайно элементарен и требует пару минут. Новые игроки способны претендовать на щедрый стартовый бонус за открытие счета.
Этапы формирования аккаунта
1. Вход на официальный портал или его дубликат
2. Выбор на опцию “Создать аккаунт”
3. Заполнение необходимых данных
4. Подтверждение цифровой почты
5. Применение купона (если есть)
Бонусы и предложения для клиентов
Игровая площадка одаривает своих клиентов различными поощрительными акциями.
Ключевые варианты призов
Вводный пакет — крупное премирование для свежих игроков, каковое в состоянии охватывать денежные бонусы и free spins.
Бесплатные вращения — шанс запускать в известных автоматах без затрат.
Компенсация — долевой компенсация проигранных сумм, который начисляется по неделям или ежемесячно.
Бонусные коды — специальные комбинации, дающие дополнительные привилегии.
Индивидуальный кабинет: опции и установки
Индивидуальный кабинет обеспечивает абсолютный регулирование над игровым опытом. В данном разделе доступны:
– Управление средствами
– Архив операций
– Текущие привилегии
– Установки охраны
– Валидация счета
Мобильная платформа и приложение
Нынешние игроки оценивают доступность. Площадка обеспечивает двойной пути для ставок с карманных аппаратов.
Отзывчивая смартфонная версия
Смартфонная платформа ресурса автоматически приспосабливается под монитор любого гаджета. Не требуется инсталлировать особое ПО.
APP для гаджетов
Можно загрузить специальное программу для iOS и Android. Софт предоставляет:
– Быстрый запуск
– Адаптированный интерфейс
– Всплывающие-извещения о бонусах
– Надежную производительность
Live раздел: обстановка истинного зала
Раздел Live игр переносит клиентов в обстановку подлинного игорного заведения. Квалифицированные ведущие организуют партии в формате прямого времени.
Популярные Live-игры
– Европейская рулетка
– Blackjack
– Punto Banco
– Покер
Аппараты: выбор игр
Коллекция слотовых автоматов включает множество названий от ведущих провайдеров. Участники найдут:
– Стандартные автоматы
– Современные слоты
– Прогрессивный джекпот-машины
– Многолинейные автоматы
Соревнования и уникальные мероприятия
Постоянные состязания предоставляют шанс игрокам конкурировать друг с другом за значительные призовые суммы. Отдельный конкурс имеет свои правила вовлечения и доску чемпионов.
Пути ввода и снятия средств
Платформа использует массу платежных инструментов:
– Дебетовые картыы
– Цифровые сервисы
– Криптовалюты
– Финансовые транзиты
Абсолютно все транзакции проходят безопасно благодаря новейшим технологиям кодирования.
Сервис support
Компетентные специалисты сервиса поддержки настроены помочь 24/7. Предусмотрены такие методы контакта:
– Оперативный-чат
– Email-обслуживание
– Аудио линия
– Социальные сети
Резюме
Легальный ресурс клуба и его рабочие копии предоставляют клиентам надежный и приятный переход к огромному спектру развлекательных активностей. Солидные поощрения, постоянные предложения, качественная сервис и удобные финансовые инструменты превращают игровой процесс крайне приятным и выгодным.
index Driada Medical Somatropin
Good afternoon!
Decode mysterious signals containing interesting and extremely valuable news updates and stay ahead of current trends see on the website for real-time alert systems
Full information on the link – https://realcatalog.ru/garantirovannyj-komfort-vazhnye-komplektuyushhie-dlya-ofisnyh-kresel/
All the best and development in business!
куплю курсовую работу куплю курсовую работу .
Счетчик с пультом Умные счетчики и приборы для экономии электроэнергии предлагают современные решения для контроля и оптимизации расхода.
Характеристика официального ресурса
Передовое онлайн-казино предоставляет своим участникам большой ассортимент игр и бонусов. Основной портал РњСЌРґ работает непрерывно, давая возможность к популярным симуляторам, live-казино и многим акциям.
Функционирующее зеркало: вход к ресурсу
Что такое зеркало казино
Копия представляет собой абсолютную реплику официального веб-сайта с отличным сетевым путем. Рабочее зеркало дает игрокам обходить блокировки и получать непрерывный доступ к излюбленным играм.
Как отыскать рабочее зеркало сегодня
Свежие адреса на основное зеркало размещаются через:
– Email подписку
– Официальные коммуникационные сети
– Сервис поддержки
– Affiliated порталы
Оформление на сайте
Процедура регистрации
Регистрация отнимает несколько минут и подразумевает данные действия:
1. Доступ на главный ресурс или рабочее зеркало
2. Нажатие элемента “Создатьаккаунт”
3. Указание учетных сведений
4. Подтверждение email или контакта
5. Придумывание кодадоступа
Вознаграждение за регистрацию
Новые клиенты обретают щедрые приветственные поощрения:
– Финансовые депозиты на аккаунт
– Халявныеспины для слотов
– Расширенный объем компенсации
– Особые купоны
Авторизация в личный счет
Действующие пользователи имеютвозможность совершить доступ через оригинальный ресурс или действующее зеркало. Для этого требуется указать никнейм и ключдоступа, придуманные при открытиисчета.
Возможности индивидуального раздела
В персональном профиле доступны основные инструменты:
– Управление персональными реквизитами
– Зачисление кошелька
– Обналичивание средств
– Использование промокодов
– Проверка истории игр
– Вступление в турнирах
Подарки и кампании
Типы вознаграждений
Казино награждает своих пользователей многочисленными поощрительными предложениями:
– Начальный бонус — выгодные подарки на первые взносы
– Бесплатныевращения — экстра ставки в популярных автоматах
– Возврат — систематический возврат части ставок
– Программа лояльности — специальные бонусы для верных клиентов
Коды и их ввод
Особые промокоды предоставляют бонусные поощрения. Для использования требуется внести последовательность в специальное поле в собственном разделе.
Геймплейный набор
Автоматы
База игровых слотов насчитывает сотни вариантов от ведущих разработчиков:
– Обычные слоты
– Современные развлечения
– Призовые симуляторы
– Брендовые игры
Live казино
Область Live-казино дарит взаимодействие с настоящими ведущими в формате онлайн эфира:
– Европейскаярулетка
– Blackjack
– PuntoBanco
– Casinopoker
Турниры
Регулярные состязания с большими призовыми фондами устраиваются еженедельно. Соревнующиеся конкурируют за победу в таблице.
Mobile адаптация и приложение
Смартфонная адаптация веб-сайта
Основной веб-сайт полностью приспособлен для портативных аппаратов. Клиенты вправе запускать автоматы прямо через интернет-браузер без обязательства загрузки.
Программа для инсталляции
Специальное карманное софт предлагается для загрузки на гаджеты с программными средами Android и iOS. Софт дает:
– Мгновенный доступ к автоматам
– Устойчивую производительность
– Push-сообщения о промо
– Комфортный оформление
Заключение
Официальный сайт казино и его действующие дубликаты предоставляют пользователям полный путь к высококлассным геймплейным играм. Большие подарки, различные предложения, удобная адаптивная адаптация и опытная помощь делают игровой процесс предельно enjoyable и прибыльным.
Aw, this was a really good post. Spending some time and actual effort to generate a great article… but what can I say… I procrastinate a whole
lot and never manage to get anything done.
Here is my web blog :: bifold door malaysia
скачать бесплатно мелбет скачать бесплатно мелбет .
Качественное SEO https://outreachseo.ru продвижение сайта для бизнеса. Наши специалисты предлагают эффективные решения для роста позиций в поисковых системах. Подробнее об услугах и стратегиях можно узнать на сайте
this market website – Took a look around here and the material seems pretty helpful.
Актуальные онлайн-казино предлагают пользователям разнообразие вариантов для удобной игры. Главный веб-портал https://www.mayerhofer.biz/bystrye-depozity-i-mgnovennye-vyplaty-predlagaet-onlayn-kazino-s-vozmozhnostyu-vyvoda-sredstv-na-kartu-sberbanka открывает возможность ко всем функциям и играм. Однако при образовании системных неполадок на подмогу приходят функционирующие зеркала.
Что являет собой собой рабочее зеркало
Альтернативный адрес казино — это стопроцентная копия официального ресурса, размещенная по другому URL. Лицензионное зеркало хранит все возможности, в том числе создание аккаунта, авторизацию в индивидуальный кабинет, вознаграждения и промокоды.
Зеркало на сегодня дает:
– Бесперебойный путь к азартным автоматам
– Совершенную сохранность индивидуальных информации
– Поддержку счета и истории транзакций
– Применимость всех бонусных программ
Создание учетной записи на основном портале
Этап оформления учетной записи занимает считанные минут. Новоиспеченным игрокам нужно:
1. Перейти на главный сайт или рабочее зеркало
2. Нажать кнопку «Создать аккаунт»
3. Ввести требуемые графы
4. Подтвердить э-мейл почту
5. Указать промокод при существовании
После завершения создания аккаунта игроки приобретают подарок за регистрацию, что может включать бесплатные вращения или монетарное вознаграждение.
Вход в индивидуальный кабинет
Индивидуальный кабинет дает всесторонний мониторинг над азартным ходом. Через собственный аккаунт можно:
– Финансировать депозит
– Получать средства
– Применять бонусные коды
– Проверять историю игр
– Соревноваться в соревнованиях
– Забирать кэшбек
Обзор премий и специальных предложений
Богатая бонусная схема — значимое плюс платформы. Ключевые типы бонусов:
Вступительный приз
Дебютанты обретают богатое поощрение на стартовые вклады. Сумма приза может достигать 100-200% от величины вклада.
Бесплатные вращения
Халявные спины предоставляются для известных машин. Сумма free spins варьируется от 10 до 500 штук.
Кешбэк
Еженедельный или ежемесячный отдача процентной доли утраченных денег. Типичный объем возврата — 5-15%.
Турниры
Систематические турниры с крупными премиальными банками. Конкурсанты борются за лучшие позиции в таблице лидеров.
Мобильная версия и софт
Адаптивная версия обеспечивает делать ставки с всякого девайса. Геймеры могут закачать софт для iOS и Android или использовать браузерную версию.
Выгоды мобильного приложения:
– Оперативная прогрузка слотов
– Эргономичный графический интерфейс
– Push-уведомления о промо
– Вход через отпечаток пальца
Автоматы и Live казино
Азартная библиотека содержит сотни наименований от лидирующих поставщиков.
Востребованные типы игр:
– Стандартные автоматы
– Видеослоты с призовыми этапами
– Джекпот автоматы
– Megaways автоматы
Live игорный зал
Категория live игорный зал обеспечивает игру с живыми крупье. Имеются традиционные развлечения:
– Французская рулетка
– Блэкджек
– Punto Banco
– Техасский холдем
Как отыскать действующее зеркало
Получить действующую ссылку на зеркало возможно различными путями:
1. Подписаться на email-рассылку
2. Отслеживать за обновлениями в социальных сетях
3. Связаться в отдел поддержки
4. Сохранить рабочее зеркало в закладки
Вывод
Главный портал и его действующие альтернативные адреса обеспечивают стабильный вход к игровым слотам. Выгодные поощрения, различные промокоды, практичное портативное приложение и профессиональная сервис поддержки создают игровой опыт предельно приятным и безопасным.
Brook Market – Found this page casually, everything is tidy and well structured.
HarborCorner – The online presence feels welcoming, approachable, and simple to browse.
1win ilova ochilmayapti https://1win5754.help
Вход к сайту через рабочие зеркала
Клиенты онлайн казино нередко имеют дело с вопросом закрытия базового ресурса. Собственно для преодоления этой задачи созданы дубликаты официального домена. http://www.paskatina.lt/onlayn-kazino-ukrainy-s-popolneniem-cherez-sms/ обеспечивает полный вход ко всем функциям площадки.
Что такое рабочее зеркало казино
Зеркало значит собой точную реплику главного портала с идентичным набором функций. Ключевое несовпадение — это иное имя. Любые сведения клиента, вместе с баланс, награды и архив партий, сохраняются неизменными.
Преимущества эксплуатации зеркал
Рабочие зеркала характеризуются множеством существенных плюсов:
– Постоянный вход к излюбленным слотам
– Полная конфиденциальность индивидуальных параметров
– Неизменность всех настроек индивидуального кабинета
– Шанс обретения призов и участия в акциях
Открытие счета на главном домене
Операция регистрации максимально прост и занимает немного минут. Свежие игроки имеют возможность полагаться на крупный стартовый приз за создание аккаунта.
Этапы оформления аккаунта
1. Доступ на основной ресурс или его зеркало
2. Клик на клавишу “Регистрация”
3. Заполнение необходимых данных
4. Верификация email почты
5. Внесение купона (если имеется)
Поощрения и акции для участников
Платформа поощряет своих участников различными наградными предложениями.
Основные виды бонусов
Начальный бонус — внушительное премирование для недавних участников, которое именно может включать монетарные средства и бесплатные вращения.
Free spins — шанс использовать в востребованных игровых машинах безвозмездно.
Компенсация — пропорциональный возврат израсходованных сумм, который именно начисляется каждую неделю или помесячно.
Специальные коды — специальные наборы, предоставляющие бонусные выгоды.
Личный кабинет: опции и параметры
Пользовательский аккаунт дает абсолютный управление над развлекательным опытом. Тут имеются:
– Администрирование счетом
– Записи транзакций
– Текущие награды
– Конфигурации охраны
– Верификация счета
Мобильная вариант и программа
Нынешние участники признают мобильность. Площадка обеспечивает 2 способа для ставок с портативных аппаратов.
Responsive телефонная платформа
Смартфонная редакция сайта без участия адаптируется под монитор любого устройства. Не нужно инсталлировать дополнительное программное обеспечение.
Приложение для смартфонов
Разрешено установить специальное APP для iOS и Android. Программа предоставляет:
– Мгновенный запуск
– Доработанный внешний вид
– Мобильные-уведомления о поощрениях
– Стабильную производительность
Live раздел: среда подлинного казино
Зона Live казино переносит игроков в среду настоящего игорного заведения. Опытные крупье осуществляют партии в варианте настоящего времени.
Известные Live-игры
– Европейская рулетка
– 21
– Punto Banco
– Техасский холдем
Игровые машины: разнообразие развлечений
Коллекция азартных автоматов вмещает тысячи названий от лидирующих провайдеров. Клиенты обнаружат:
– Стандартные слоты
– Видеослоты
– Мега-выигрыш-автоматы
– Слоты с множественными линиями
Соревнования и уникальные предложения
Систематические конкурсы обеспечивают клиентам состязаться друг с другом за крупные денежные суммы. Каждый конкурс имеет свои критерии включения и таблицу победителей.
Методы пополнения и вывода денег
Площадка поддерживает массу расчетных сервисов:
– Банковские карты
– Электронные счета
– Крипто
– Прямые отправления
Любые переводы проходят защищенно благодаря передовым методам кодирования.
Сервис support
Опытные консультанты сервиса support расположены помочь 24/7. Имеются нижеперечисленные методы связи:
– Живой-чат
– Email-помощь
– Голосовая поддержка
– Социальные сети
Вывод
Легальный ресурс игровой площадки и его рабочие копии предоставляют пользователям конфиденциальный и приятный переход к большому ассортименту развлекательных игр. Внушительные поощрения, регулярные предложения, компетентная сервис и простые расчетные инструменты создают геймерский времяпрепровождение крайне комфортным и прибыльным.
Thank you a lot for sharing this with all folks you
really understand what you’re speaking approximately!
Bookmarked. Please also discuss with my website =). We may have a link alternate contract between us
My web page; aluminium bifold doors
курсовые под заказ курсовые под заказ .
browse this emporium – Took a short look, and everything seems well structured.
alpinestoneemporium – Pretty smooth experience, content layout makes reading easy today.
мегафон интернет персональный 4.0
курсовая работа купить курсовая работа купить .
fluoxetine
Электрик круглосуточно
quickharbor shop portal – Clean design and intuitive layout make navigation simple.
Обзор лицензионного веб-сайта
Актуальные сетевые казино обеспечивают клиентам широкий выбор развлечений и шансов. Главный сайт Bublik казино обеспечивает проверенный путь к игровым функциям.
Актуальное зеркало: вход прямо сейчас
Резервный сайт выступает в качестве идентичную версию официального сайта. Актуальное зеркало обеспечивает клиентам преодолевать вероятные ограничения.
Преимущества использования зеркала
Принципиальные выгоды охватывают:
– Стабильный путь к сайту
– Сохранение полных возможностей основного портала
– Безопасность индивидуальных материалов
– Такой же набор функций
Оформление профиля на сайте
Процесс регистрации характеризуется легкостью и эргономичностью. Новые участники обязаны:
1. Зайти на официальный сайт или его зеркало
2. Щелкнуть на элемент открытия счета
3. Указать требуемые поля
4. Подтвердить почтовую ящик
5. Выполнить стартовый логин
Подарок за создание аккаунта
Дебютанты получают солидный стартовый презент. Данное вознаграждение может содержать:
– Финансовые средства
– Complimentary фриспины
– Усиленный уровень кэшбека
Логин в собственный аккаунт
Существующие игроки могут оперативно получить доступ в свой кабинет, эксплуатируя никнейм и шифр. Личный аккаунт дает доступ к:
– Управлению балансом
– Записям переводов
– Активным подаркам
– Конфигурации профиля
Призы и предложения
Платформа постоянно устраивает разнообразные предложения для игроков.
Разновидности поощрений
Главные виды призов:
– Депозитные призы – коэффициент от суммы внесения
– Спины – complimentary спины в аппаратах
– Кэшбэк – отдача процента затраченных финансов
– Призовые призы – призы за выступление в турнирах
Коды
Специальные промокоды обеспечивают получить бонусные привилегии. Игроки имеют возможность отыскать их на партнерских ресурсах или получить в новостях.
Портативная адаптация и app
Современные пользователи любят карманный геймплей.
Опции mobile версии
– Отзывчивый интерфейс для любых аппаратов
– Абсолютный доступ к слотам
– Стремительная работа
– Практичное контроль
Загрузить приложение
Mobile приложение открыто для загрузки на аппараты с базовыми ОС Android и iOS. Софт дает:
– Стабильную производительность
– Пуш оповещения о предложениях
– Мгновенный доступ к любимым играм
Азартный ассортимент
Платформа дает огромную галерею гемблинг забав.
Аппараты
Коллекция азартных автоматов насчитывает:
– Классические автоматы
– Современные слоты
– Накопительные слоты
– Branded автоматы
Live казино
Область реальных развлечений обеспечивает возможность соревноваться с профессиональными дилерами. Открыты:
– Рулетка
– Блек-джек
– Баккара
– Покер
Турниры
Постоянные конкурсы дают возможность клиентам бороться за солидные денежные суммы. Призовая структура обновляется постоянно.
Финансовые транзакции
Казино предлагает обилие способов внесения и получения денег:
– Банковские карты
– Онлайн платежные системы
– Wire транзакции
– Bitcoin
Все платежи выполняются защищенно с применением прогрессивных систем криптографии.
Отдел support
Компетентная отдел support действует без перерыва. Обратиться с менеджерами доступно через:
– Интерактивный чат
– Email почту
– Контактный номер
– Социальные медиа
Безопасность и регулирование
Платформа работает на базе легальной сертификата. Такое гарантирует:
– Легальность развлекательного действа
– Безопасность личных сведений
– Быстрые транзакции
– Ответственный геймплей
Заключение
Лицензионный веб-сайт и его актуальные резервные страницы дают пользователям абсолютный ассортимент функций для приятной и профитной времяпрепровождения. Внушительные подарки, многочисленные автоматы, опытная служба и защищенная платформа выплат формируют казино оптимальным решением для ценителей развлекательных забав.
Актуальные сетевые казино дают пользователям огромный ассортимент возможностей для удобной игры. Тем не менее иногда соединение к базовому ресурсу может оказаться недоступным. В таких ситуациях на поддержку появляется Arkada, которое дает непрерывный вход ко всем возможностям платформы.
Что такое рабочее зеркало казино
Дубликат — это идентичная версия лицензионного веб-сайта, которая располагается по запасному URL. Дубликат поддерживает все возможности основного ресурса, включая индивидуальный кабинет, депозит и запись переводов.
Основные выгоды применения зеркала:
– Постоянный вход к платформе
– Максимальная тождественность возможностей
– Конфиденциальность личных сведений
– Сохранение всех бонусов
Как разыскать рабочее зеркало сегодня
Присутствует ряд надежных путей нахождения действующей адреса:
Проверенные источники:
1. Электронная рассылка — руководство периодически направляет письма с актуальными URL
2. Общественные сети — официальные каналы размещают актуальную данные
3. Отдел поддержки — сотрудники предоставляют достоверные адреса
4. Портативное приложение — обеспечивает обходить блокировки
Создание аккаунта на официальном веб-сайте
Процедура оформления отнимает не более несколько минут и включает из нижеследующих этапов:
1. Открытие на основной веб-сайт или действующее зеркало
2. Щелчок на клавишу «Регистрация»
3. Указание пользовательской формы
4. Валидация почтовой почты или мобильного номера
5. Включение бонуса за регистрацию при наличии промокода
Начинающие геймеры обретают великодушный начальный подарок, который может охватывать фриспины, валютные вознаграждения или кэшбек.
Вход в личный кабинет
Подключение на платформе производится обычным путем. Требуется внести имя пользователя и секретный ключ, задействованные при открытии счета.
Важные моменты для конфиденциального входа:
– Используйте сложный шифр
– Запустите двухэтапную верификацию
– Не фиксируйте пароли на посторонних компьютерах
– Контролируйте URL строку браузера
Характеристика премиальной системы
Гемблинг-сайт награждает геймеров различными привилегиями и промо:
Стартовый пакет
Новички вправе полагаться на значительное вознаграждение за первый вклад. Традиционно это процентная добавка к зачисленной величине плюс фриспины для популярных слотов.
Постоянные предложения
– Семидневный компенсация — компенсирование процентной доли утраченных средств
– Поощрения на очередные пополнения
– Эксклюзивные промо по торжествам
– Состязания с крупными премиальными суммами
Система верности
Регулярные пользователи зарабатывают единицы за каждую бет, которые затем конвертируются на фактические средства, фриспины или эксклюзивные льготы.
Купоны: как задействовать
Бонус-коды — это индивидуальные наборы букв и цифр, предоставляющие право к специальным бонусам.
Откуда получить рабочие промокоды:
– Легитимные социальные сети казино
– Аффилиатные сайты
– Email-рассылка
– Тематические сообщества
Вводится промокод в соответствующее поле при регистрации или пополнении кошелька.
Мобильная версия и приложение
Современные игроки выбирают делать ставки с портативных аппаратов. Ресурс обеспечивает двойной варианта для беспроблемной телефонной игры.
Адаптивная версия
Веб версия сама адаптируется под параметры экранной панели. Не просит инсталляции и оперирует в каждом актуальном браузере.
Телефонное приложение
Получить программу можно для девайсов на Android и iOS. Преимущества app:
– Оперативная запуск
– Стабильная операция
– Всплывающие-уведомления о бонусах
– Самостоятельный преодоление блокировок
Процедура загрузки элементарен: необходимо попасть на сайт с телефонного устройства и следовать указаниям.
Развлекательный выбор
Каталог слотов содержит несколько тысяч наименований от ведущих разработчиков.
Слоты
Гемблинг машины — крайне распространенная категория аттракционов. Размещены обычные трехбарабанные аппараты, новые видеослоты с поощрительными раундами, а также растущие призы.
Live казино
Раздел с реальными дилерами дает возможность ощутить антураж истинного казино. Представлены игры с блэкджеком.
Трансляция ведется в HD четкости, имеется чат с раздающим и иными пользователями.
Конкурсы
Постоянно запускаются состязания по многочисленным играм. Присоединение обеспечивает возможность заработать валютные вознаграждения, free spins или специальные презенты.
Финансовые действия
Портал предлагает значительный ассортимент платежных инструментов:
– Пластиковые карты
– Цифровые кошельки
– Биткоин
– Финансовые платежи
Стартовая объем депозита — доступная для основной части игроков. Снятие денег производится в скорые временные рамки.
Департамент поддержки
Опытные специалисты настроены помочь непрерывно. Представлены следующие каналы коммуникации:
– Онлайн-чат
– Email
– Голосовая линия
– Коммуникационные сети
Пояснения на типовые запросы можно получить в блоке FAQ.
Резюме
Официальный веб-сайт казино и его актуальные зеркала предоставляют игрокам максимальный вход ко всем опциям ресурса. Значительные бонусы, удобная портативная версия, впечатляющий каталог игр и компетентная служба поддержки формируют гемблинг процесс крайне комфортным и защищенным.
купить курсовую сайт kupit-kursovuyu-86.ru .
buy accutane
This post is genuinely a pleasant one it assists new the web
visitors, who are wishing in favor of blogging.
Here is my homepage :: play Powerball online
Передовые онлайн-казино предлагают игрокам богатый ассортимент возможностей для беспроблемной игры. Подключение к платформе Lucky Bear осуществляется через основной портал или действующее зеркало.
Что такое актуальное зеркало казино
Функционирующее зеркало — это альтернативный линк главного сайта казино. Такие версии формируются для гарантирования бесперебойного подключения к игровой платформе.
Копия сегодня совершенно копирует опции основного портала. Пользователи приобретают схожий доступ ко всем услугам, включая открытие счета, зачисление средств кошелька и получение выигрышей.
Открытие счета на лицензионном веб-сайте
Механизм регистрации отнимает всего пару мгновений. Начинающим клиентам требуется:
1. Попасть на главный сайт или актуальное официальное зеркало
2. Кликнуть кнопку “Регистрация”
3. Ввести нужные информацию
4. Подтвердить электронную почту
5. Использовать бонусный код при наличии
После финализации открытия профиля участник зарабатывает подарок за регистрацию, который имеет право охватывать фриспины или cash премию.
Доступ в собственный кабинет
Персональный кабинет — это безопасная территория, где игроки способны контролировать своим счетом. Для логина следует указать имя пользователя и пароль.
В индивидуальном кабинете имеются нижеперечисленные возможности:
– Отслеживание журнала операций
– Применение купонов
– Контроль вознаграждениями
– Включение в конкурсах
– Отслеживание возмещения
– Изменение данных
Поощрения и акции
Азартная система предоставляет выгодные призы:
Начальный набор — дебютанты обретают значительное поощрение на дебютные взносы.
Даровые спины — дарятся как при оформлении, так и в рамках различных акций.
Возмещение — еженедельный возврат доли утраченных денег.
Купоны — уникальные шифры, дающие выход к специальным призам.
Обзор азартных направлений
Слоты
Ассортимент аппаратов охватывает массу вариантов от лучших производителей. Игроки откроют как традиционные автоматы, так и инновационные видеослоты с интересной графикой.
Live казино
Зона Live казино обеспечивает шанс соревноваться с действующими ведущими в режиме текущего времени. Доступны известные развлечения: рулетка, блэкджек, баккара, покер.
Соревнования
Периодические чемпионаты с солидными призовыми пулами манят массу конкурсантов. Победители получают монетарные награды и уникальные поощрения.
Портативная версия и программа
Портативная версия портала обеспечивает участвовать с произвольного аппарата. Оформление самостоятельно настраивается под размер экрана.
Установить программу можно для аппаратов на Android и iOS. Портативное программа обладает всеми характеристиками настольной версии.
Как обнаружить текущее зеркало на текущий день
Рабочие ссылки копий систематически корректируются. Найти рабочую адрес можно разными способами:
– Через сервис техподдержки
– В настоящих новостных сетях
– По почтовой дайджесту
– На тематических сайтах
Безопасность и сертификация
Официальный портал функционирует на фундаменте международной лицензии. Все транзакции оберегаются актуальными методами шифрования.
Анонимность индивидуальных информации гарантируется в полном объеме.
Заключение
Основной портал и его рабочие копии обеспечивают участникам 24/7 выход к качественным азартным развлечениям. Привлекательные призы, многочисленные развлечения, компетентная поддержка — все это превращает игровой досуг невероятно беспроблемным и интересным.
Hey I know this is off topic but I was wondering if you knew of any widgets I could add to my blog
that automatically tweet my newest twitter updates.
I’ve been looking for a plug-in like this for quite some time and was hoping maybe you would
have some experience with something like this. Please let me know if you run into anything.
I truly enjoy reading your blog and I look forward to your new updates.
Here is my homepage :: suresmile vs Invisalign
explore more here – Tidy design, smooth scrolling, very readable content.
I’m gone to convey my little brother, that he should also go to see
this weblog on regular basis to get updated from newest gossip.
Look into my blog post US lottery ticket service
Подключение к ресурсу через действующие зеркала
Нынешние интернет казино предоставляют геймерам непрерывный доступ к сервисам. Основной портал https://www.collegepresidents.org/topovye-kazino-s-vozmozhnostyu-depozitov-i-vyvodov-cherez-kartu-na-2026-god/ оперирует устойчиво, предлагая богатый набор игровых автоматов. Но иногда формируются системные препятствия или барьеры, потому важно знать о доступности функционирующих зеркал.
Что представляет собой официальное зеркало казино
Копия — это идентичная дубликат основного ресурса с идентичным интерфейсом. Функционирующее зеркало сегодня помогает обходить местные блокировки и поддерживать гемблинг.
Основные достоинства задействования зеркал:
– Стопроцентный подключение к личному кабинету
– Сохранение совокупных данных счёта
– Схожий спектр развлечений
– Свежие поощрения и предложения
Регистрация на ресурсе
Процесс записи занимает считанные минут. Новые клиенты зарабатывают привлекательный бонус за создание счёта, который способен вмещать:
– Начальный финансовый кредит
– Даровые кручения для игр
– Уникальные ваучеры
– Усиленный кэшбек
Ради окончания регистрации нужно:
1. Переместиться на официальный веб-сайт или альтернативу
2. Щёлкнуть клавишу «Зарегистрироваться»
3. Внести индивидуальные данные
4. Подтвердить email или номер
5. Задействовать промокод (в случае присутствии)
Подключение в собственный кабинет
По завершении удачной записи игроки имеют возможность выполнять вход с помощью главный ресурс или функционирующее зеркало. Личный кабинет даёт безграничный регулирование над профилем:
– История ставок
– Ввод кошелька
– Изъятие призов
– Регулирование поощрениями
– Включение в состязаниях
Награды и промо казино
Платформа награждает клиентов многочисленными наградными системами:
Стартовые подарки
Начинающие зарабатывают великодушный пакет наград на первые взносы. Обычно это предполагает пропорциональную прибавку к размеру депозита плюс бесплатные кручения.
Периодические предложения
– Седмичный возврат до 15%
– Соревнования с призовыми банками
– Бонусы на годовщину рождения
– Эксклюзивные программы для привилегированных геймеров
Схема верности
Регулярные геймеры зарабатывают очки, они возможно превратить на настоящие призы или специальные преимущества.
Карманная форма и программа
Актуальные инновации дают возможность геймить где удобно. Портативная версия портала самостоятельно подстраивается под экран каждого гаджета.
Плюсы портативного софта:
– Моментальная открытие игр
– Практичный вид
– Мгновенные-сообщения о бонусах
– Способность скачать для Android и iOS
Живое казино: атмосфера реального гемблинг клуба
Раздел Live клуба погружает клиентов в антураж реального азартного клуба. Квалифицированные ведущие управляют действие в виде реального времени.
Предлагаемые развлечения:
– Колесо фортуны
– Блэкджек
– Punto Banco
– Покерная игра
Игровые машины и азартные машины
Собрание игровых слотов охватывает множество позиций от ведущих студий. Произвольный клиент подберёт игру по душе:
– Винтажные машины
– Современные автоматы с бонусными турами
– Джекпот-слоты
– Динамические слоты
Турниры и лотереи
Систематические турниры привносят драйв и дают способность заработать значительные призы. Участие в турнирах часто безвозмездное, а наградные банки составляют крупных сумм.
Защита и анонимность
Платформа задействует инновационные системы криптографии для защиты реквизитов игроков. Совокупные платёжные транзакции осуществляются через охраняемые линии.
Итог
Официальный портал и его функционирующие зеркала предоставляют безопасный подключение к отличным гемблинг услугам. Богатые награды, удобная карманная версия, вариативность игр и квалифицированное Live-казино делают сайт прекрасным решением для фанатов гемблинг слотов.
заказать курсовую срочно заказать курсовую срочно .
this store page – Landed here and the interface seems tidy and user-friendly.
where to buy motilium
https://usmedssaver.com/# pharmaceutical online
http://bajarxdirect.com/# BajaRx Direct
skybrook trading portal – Reading content feels smooth with clear and organized structure.
explore the site – Sections are clear, moving between content feels effortless.
brandnest – A welcoming and soft branding approach gives this style charm.
meadow finds – Short, charming, and conveys a sense of calm sophistication.
Dive deeper
Support personal loan
for a better outcome.
заказать студенческую работу заказать студенческую работу .
navigate to these guys Driada Medical shipping
Everything is very open with a precise description of the
challenges. It was truly informative. Your website is very useful.
Thanks for sharing!
Here is my web-site :: vitality for men
see this website Driada Medical HCG
落水狗第二季2026 海外华人科幻冒险 高清后末世世界
сколько стоит заказать курсовую работу kupit-kursovuyu-88.ru .
ремонт квартир под ключ цена remont-v-tyle.ru .
女神蒙上眼2026 辛芷蕾林雨申 高清都市悬疑职场 海外华人必备 无缓冲播放
Подключение к порталу и функционирующие ссылки
Востребованные виртуальные казино гарантируют участникам большой набор опций. Официальный ресурс http://www.shungite-chi.com/nl/sposoby-izmeneniya-dannykh-karty-na/ гарантирует защищенный вход ко всем возможностям. Впрочем временами происходят моменты, когда требуется альтернативный вариант подключения.
Что являет собой собой рабочее зеркало
Функционирующее зеркало — это абсолютная версия легального веб-сайта с другим интернет расположением. Дубликат сегодня позволяет обходить существующие барьеры и обеспечивать бесперебойный вход к выбранным развлечениям.
Главное зеркало характеризуется всеми опциями, что и основной веб-сайт:
– Полный список игр
– Персональный раздел с записанными данными
– Полные поощрения и акции
– Защищенные платежные операции
Оформление и авторизация в сервис
Ход оформления на портале отнимает считанные мгновений. Свежим пользователям следует:
1. Перейти на действующее зеркало в настоящее время
2. Выбрать кнопку «Создать аккаунт»
3. Ввести требуемые информацию
4. Верифицировать почтовую почту или номер телефона
5. Забрать поощрение за открытие аккаунта
Подключение в персональный профиль реализуется путем предоставление логина и кода доступа.
Описание бонусной политики
Выгодная призовая система — ключевое достоинство казино. Пользователи обретают многочисленные подарки:
Приветственные награды
Начинающие клиенты способны ожидать на выгодный подарок за открытие профиля. Как правило это пакет опций, содержащий:
– Пропорциональную прибавку к начальному пополнению
– Безвозмездные фриспины
– Дополнительные средства на аккаунт
Купоны и особые опции
Систематические купоны помогают зарабатывать призовые преимущества. Применить их разрешено в предназначенном окне личного раздела.
Free spins и возврат средств
Даровые вращения — это возможность крутить слоты без применения своих финансов. Рибейт означает процентный отдачу израсходованных финансов.
Коллекция слотов
Гемблинг ресурс предлагает огромную базу развлечений.
Автоматы
Разнообразие слотов поражает ожидания. Имеются классические трехбарабанные автоматы и продвинутые автоматы с интересной картинкой.
Live казино
Категория Live игр помещает пользователей в обстановку истинного развлекательного клуба. Квалифицированные крупье осуществляют раунды в живом времени.
Турниры и таблицы лидеров
Постоянные соревнования добавляют остроты и гарантируют возможность заработать значительные награды.
Портативная форма и клиент
Современные разработки позволяют играть в удобном месте. Мобильная форма самостоятельно оптимизируется под размер аппарата.
Загрузить софт допустимо для операционных сред iOS и Android. Клиент предоставляет:
– Мгновенный доступ
– Бесперебойную деятельность
– Мгновенные-алерты об предложениях
– Простой дизайн
Финансовые процедуры
Казино принимает всевозможные системы депозита и получения сумм:
– Банковские системы
– Электронные системы
– Криптовалюты
– Финансовые переводы
Все переводы реализуются через надежное подключение, что обеспечивает неприкосновенность приватных параметров.
Служба поддержки
Профессиональная бригада помощи работает всегда. Связаться с менеджерами разрешено через:
– Онлайн-чат
– E-mail почту
– Горячую линию
– Общественные платформы
Выводы
Главный веб-сайт и его функционирующее зеркало гарантируют игрокам надежный и легкий вход к увлекательным развлечениям. Щедрые подарки, разнообразный каталог слотов и высокая поддержка делают времяпрепровождение максимально приятной и выгодной.
I’m gone to say to my little brother, that he should also pay
a quick visit this blog on regular basis to obtain updated
from latest gossip.
Also visit my web site :: suresmile clear aligners
Передовые интернет казино предлагают игрокам широкий выбор опций для беспроблемной игры. Но иногда подключение к базовому платформе может стать заблокированным. В таких случаях на выручку приходит Вован казино казино, которое дает непрерывный путь ко всем сервисам платформы.
Что такое действующее зеркало казино
Альтернативный сайт — это идентичная копия лицензионного веб-сайта, которая размещается по альтернативному адресу. Зеркало содержит все набор функций первоначального веб-портала, включая персональный кабинет, счет и данные операций.
Ключевые достоинства эксплуатации зеркала:
– Круглосуточный подключение к ресурсу
– Полная схожесть инструментов
– Безопасность индивидуальных информации
– Поддержка всех вознаграждений
Как обнаружить функционирующее зеркало на текущий день
Существует несколько достоверных методов поиска свежей URL:
Авторизованные каналы:
1. Имейл рассылка — управление систематически высылает сообщения с актуальными URL
2. Коммуникационные сети — легитимные каналы выкладывают релевантную данные
3. Департамент поддержки — сотрудники дают безопасные домены
4. Портативное приложение — дает возможность обходить блокировки
Открытие счета на официальном портале
Этап оформления отнимает всего несколько минут и включает из следующих этапов:
1. Переход на главный веб-сайт или функционирующее зеркало
2. Нажатие на иконку «Создать аккаунт»
3. Заполнение пользовательской формы
4. Подтверждение email почты или мобильного номера
5. Применение привилегии за регистрацию при существовании промокода
Новые пользователи зарабатывают великодушный вступительный приз, который может включать бесплатные вращения, денежные призы или компенсацию.
Вход в индивидуальный кабинет
Подключение на сайте реализуется традиционным образом. Нужно ввести учетные данные и кодовое слово, использованные при открытии счета.
Существенные аспекты для конфиденциального входа:
– Применяйте криптостойкий шифр
– Включите двойную идентификацию
– Не записывайте данные на общественных девайсах
– Мониторьте URL строку браузера
Описание поощрительной схемы
Игорный портал награждает геймеров различными поощрениями и акциями:
Вступительный комплект
Новички имеют возможность полагаться на великодушное бонус за начальный пополнение. Зачастую это долевая премия к депонированной величине плюс free spins для топовых слотов.
Регулярные предложения
– Семидневный компенсация — возмещение части потерянных денег
– Бонусы на последующие депозиты
– Эксклюзивные промо по праздникам
– Соревнования с большими призовыми суммами
Схема лояльности
Активные клиенты получают баллы за произвольную раунд, которые затем меняются на фактические средства, free spins или особые бонусы.
Купоны: как использовать
Бонус-коды — это особые комбинации символов, предоставляющие возможность к специальным бонусам.
Откуда получить рабочие промокоды:
– Авторизованные коммуникационные сети казино
– Сотрудничающие порталы
– Email-новостная лента
– Специализированные форумы
Активируется промокод в отдельное поле при создании аккаунта или зачислении средств баланса.
Смартфонная версия и приложение
Передовые геймеры отдают предпочтение проводить время с портативных гаджетов. Портал предлагает пару способа для комфортной портативной игры.
Адаптивная модификация
Онлайн версия сама оптимизируется под размер экрана. Не просит скачивания и действует в каждом актуальном браузере.
Смартфонное приложение
Скачать приложение можно для гаджетов на Android и iOS. Выгоды app:
– Оперативная активация
– Стабильная действие
– Push-уведомления о бонусах
– Независимый преодоление блокировок
Процесс загрузки легок: нужно зайти на портал с телефонного аппарата и придерживаться руководству.
Азартный ассортимент
База развлечений включает множество наименований от передовых провайдеров.
Слоты
Азартные слоты — самая востребованная группа аттракционов. Представлены традиционные простые автоматы, новые графические аппараты с дополнительными этапами, а также растущие выигрыши.
Live казино
Секция с действительными раздающими дает возможность ощутить атмосферу подлинного казино. Представлены игры с рулеткой.
Стриминг осуществляется в HD качестве, обеспечивается чат с дилером и остальными пользователями.
Турниры
Систематически организуются турниры по многочисленным дисциплинам. Включение предоставляет право завоевать монетарные вознаграждения, даровые прокруты или уникальные поощрения.
Финансовые действия
Портал предоставляет широкий спектр денежных методов:
– Пластиковые карты
– Онлайн сервисы
– Криптовалюта
– Счетовые транзакты
Минимальная сумма пополнения — приемлемая для преобладающего числа геймеров. Вывод денег обрабатывается в минимальные интервалы.
Департамент поддержки
Профессиональные специалисты способны помочь 24/7. Открыты данные способы контакта:
– Веб-чат
– Email
– Мобильная поддержка
– Медийные сети
Решения на частые запросы можно обнаружить в разделе FAQ.
Итог
Основной сайт казино и его актуальные зеркала дают клиентам полный доступ ко всем возможностям сайта. Солидные поощрения, приятная мобильная версия, огромный ассортимент игр и квалифицированная служба поддержки делают развлекательный досуг предельно удобным и защищенным.
online pharmacy non prescription drugs US Meds Saver viagra online canadian pharmacy
I am regular visitor, how are you everybody? This piece of writing
posted at this site is truly fastidious.
Also visit my web site … small business in need of ux research
Cove Shop – Checked out this page randomly, sections are tidy and easy to follow.
nightstone store page – The browsing experience today feels quick and seamless.
http://inquisnower.phorum.pl/login.php?redirect=posting.php&mode=newtopic&f=1&sid=de0dbde17c3d70677467de695a3dd4c2
Обзор оригинального веб-сайта
Актуальное онлайн-казино дарит своим игрокам разнообразный выбор услуг и призов. Главный портал казино Grizzly оперирует круглосуточно, гарантируя вход к востребованным играм, live-казино и разнообразным промо.
Функционирующее зеркало: возможность к ресурсу
Что такое копия казино
Зеркало является собой идентичную версию основного сайта с альтернативным сетевым путем. Функционирующее зеркало предоставляет клиентам обходить барьеры и получать постоянный подключение к излюбленным играм.
Как получить актуальное зеркало сегодня
Свежие линки на проверенное зеркало публикуются через:
– E-mail новостнуюленту
– Проверенные социальные сети
– Службу поддержки
– Партнерские площадки
Оформление на платформе
Этапы оформления
Оформление длится несколько минут и подразумевает следующие стадии:
1. Переход на основной ресурс или функционирующее зеркало
2. Выбор опции “Регистрация”
3. Заполнение личных реквизитов
4. Подтверждение адреса или контакта
5. Придумывание пароля
Приз за оформление
Новые участники приобретают большие вступительные подарки:
– Денежные деньги на баланс
– Бесплатныевращения для игр
– Увеличенный коэффициент компенсации
– Специальные купоны
Вход в индивидуальный кабинет
Активные участники могут выполнить доступ через главный сайт или рабочее зеркало. Для этого нужно указать логин и ключдоступа, придуманные при оформлении.
Инструменты персонального кабинета
В индивидуальном аккаунте имеются основные функции:
– Контроль личными данными
– Зачисление баланса
– Снятие выигрышей
– Ввод промокодов
– Мониторинг истории ставок
– Участие в соревнованиях
Подарки и предложения
Типы поощрений
Казино балует своих игроков всевозможными поощрительными системами:
– Стартовый комплект — щедрые подарки на стартовые депозиты
– Freespins — экстра ставки в популярных симуляторах
– Компенсация — регулярный возврат суммы убытков
– Система VIP — уникальные бонусы для постоянных участников
Коды и их применение
Эксклюзивные коды предоставляют бонусные подарки. Для активации следует ввести шифр в нужное окно в личном профиле.
Развлекательный выбор
Симуляторы
База игровых машин включает тысячи названий от известных производителей:
– Стандартные слоты
– Новые развлечения
– Призовые слоты
– Брендовые слоты
Live казино
Раздел Live-казино предлагает игру с живыми ведущими в формате онлайн эфира:
– Европейскаярулетка
– Blackjack
– Baccarat
– Карибскийпокер
Конкурсы
Регулярные конкурсы с большими джекпотными призами проходят постоянно. Участники соревнуются за победу в турнирнойсетке.
Мобильная адаптация и APP
Адаптивная реализация сайта
Основной веб-сайт целиком оптимизирован для смартфонных устройств. Игроки могут открывать автоматы напрямую через браузер без нужды инсталляции.
Софт для скачивания
Авторское карманное программа предоставляется для скачивания на устройства с базовыми средами Android и iOS. APP предоставляет:
– Быстрый подход к слотам
– Стабильную операционность
– Мгновенные-извещения о предложениях
– Удобный интерфейс
Вывод
Основной ресурс казино и его рабочие дубликаты гарантируют игрокам комплексный вход к высококлассным азартным играм. Выгодные поощрения, разнообразные кампании, комфортная портативная реализация и квалифицированная помощь формируют игровой опыт предельно приятным и доходным.
Актуальные онлайн-казино гарантируют геймерам разнообразие опций для беспроблемной игры. Главный веб-портал ДжиВиСпин казино предоставляет возможность ко всем возможностям и играм. Однако при образовании системных сложностей на подмогу спешат рабочие альтернативные адреса.
Что представляет собой действующее зеркало
Дубликат казино — это точная дубликат основного веб-сайта, расположенная по другому веб-адресу. Лицензионное зеркало сохраняет все функции, вместе с регистрацию, доступ в собственный кабинет, поощрения и бонусные коды.
Альтернативный сайт на сегодня обеспечивает:
– Непрерывный вход к игровым автоматам
– Стопроцентную конфиденциальность персональных информации
– Сохранение счета и записей операций
– Возможность использования всех акций
Создание аккаунта на главном ресурсе
Этап оформления учетной записи требует несколько минут. Свежеиспеченным геймерам требуется:
1. Войти на главный портал или действующее зеркало
2. Кликнуть кнопку «Создать аккаунт»
3. Ввести запрашиваемые поля
4. Верифицировать э-мейл почту
5. Применить купон при существовании
После финиша оформления профиля пользователи обретают подарок за регистрацию, что может охватывать бесплатные вращения или финансовое премирование.
Логин в собственный кабинет
Персональный кабинет открывает всеобъемлющий управление над азартным действом. Через индивидуальный профиль возможно:
– Вносить средства на баланс
– Выводить средства
– Задействовать купоны
– Контролировать журнал пари
– Соревноваться в соревнованиях
– Обретать возврат средств
Анализ бонусов и промо-предложений
Щедрая премиальная схема — важное преимущество казино. Центральные виды поощрений:
Приветственный приз
Новые игроки приобретают щедрое награду на первые взносы. Объем приза может составлять 100-200% от величины депозита.
Бонусные спины
Даровые раунды начисляются для популярных слотов. Количество free spins изменяется от 10 до 500 штук.
Кэшбек
Постоянный или ежемесячный возврат доли потерянных финансов. Средний размер кэшбека — 5-15%.
Состязания
Постоянные состязания с крупными призовыми банками. Участники соревнуются за верхние строчки в турнирной таблице.
Смартфонная версия и приложение
Портативная версия разрешает развлекаться с любого устройства. Геймеры могут скачать приложение для iOS и Android или эксплуатировать веб версию.
Плюсы смартфонного софта:
– Молниеносная подзагрузка игр
– Удобный интерфейс
– Пуш-нотификации о поощрениях
– Возможность входа через Touch ID
Игровые автоматы и Live казино
Игровая коллекция содержит тысячи игр от известных разработчиков.
Известные категории слотов:
– Обычные машины
– Видео-автоматы с призовыми уровнями
– Джекпот автоматы
– Мега-путь машины
Live игорный зал
Категория live игорный зал предлагает игру с живыми ведущими. Имеются классические развлечения:
– Американская рулетка
– Блэкджек
– Punto Banco
– Покер
Как найти рабочее зеркало
Раздобыть рабочую адрес на зеркало возможно разными вариантами:
1. Зарегистрироваться на email-рассылку
2. Мониторить за апдейтами в социальных сетях
3. Обратиться в службу поддержки
4. Добавить в закладки действующее зеркало в закладки
Резюме
Главный портал и его актуальные зеркала гарантируют постоянный путь к азартным играм. Богатые премии, разнообразные бонусные коды, практичное мобильное программа и профессиональная техподдержка поддержки создают азартный опыт крайне приятным и конфиденциальным.
page Driada Medical Dianabol
BrookSelect – The name feels friendly, clear, and professional for users.
Nhiều slot tại 888SLOT có tính năng “buy bonus” – trả thêm một chút để kích hoạt vòng quay thưởng ngay lập tức. Siêu hấp dẫn! TONY03-11O
alpine marketplace – First impression is that the page design looks clean and readable.
Передовые онлайн-казино предлагают игрокам разнообразный спектр развлечений и щедрые награды. Тем не менее для удобной деятельности важно знать, как получить доступ к casino казино Голд и его рабочие зеркала.
Что такое главный ресурс казино
Официальный ресурс казино — это главная площадка, где участники могут пользоваться гемблинг автоматами. Ресурс работает на официальных правах и обладает всеми обязательными сертификатами.
Ключевые плюсы главного портала:
– Защищенность индивидуальных информации
– Прозрачные требования игры
– Подтвержденные транзакции
– Оперативная поддержка
Рабочее зеркало казино: для чего нужно
Дублирующий ресурс — это точная дубликат главного ресурса, расположенная по альтернативному домену. Рабочее зеркало разрабатывается для гарантирования стабильного подключения к сайту.
Факторы задействования дублирующих ресурсов:
– Ограничение первичного домена
– Профилактические операции
– Большая посещаемость на систему
Как получить действующее зеркало на сегодня
Узнать новое проверенное зеркало можно разными способами:
1. Email-уведомления — подпишитесь на информационную подписку
2. Департамент техподдержки — проконсультируйтесь в онлайн-чат
3. Корпоративные площадки — следите за обновлениями
4. Партнерские площадки — проверенные сайты
Создание аккаунта на портале казино
Алгоритм открытия счета занимает всего считанные моментов:
1. Выберите на элемент “Регистрация”
2. Введите требуемые сведения
3. Активируйте почтовую почту
4. Введите бонусный код, если имеется
По завершении успешной активации вам будет открыт персональный раздел.
Премии и промокоды
Выгодная бонусная политика — значимое достоинство казино:
Награда за создание аккаунта
Начинающие игроки зарабатывают начальный поощрение, который может предполагать:
– Валютный депозит на дебютный пополнение
– Фриспины для барабанов
– Приветственные средства
Купоны
Регулярно размещаются актуальные коды, позволяющие забрать экстра преимущества.
Механизм компенсации
Лояльные пользователи зарабатывают порцию проигранных ставок обратно.
Действующие промо и конкурсы
Ресурс регулярно организует увлекательные промо-мероприятия:
– Недельные баттлы
– Специальные акции
– Раздачи значительных подарков
– Система лояльности
Авторизация в пользовательский раздел
Для авторизации на портал нужно:
1. Посетить основной портал или действующее зеркало
2. Кликнуть “Login”
3. Ввести логин и ключ
В пользовательском аккаунте доступны такие возможности:
– Депозит счета
– Получение денег
– Проверка лога ставок
– Редактирование персональными сведениями
Портативная модификация и софт
Портативная версия
Адаптивная вариант портала дает возможность развлекаться с различных смартфонного телефона. Визуал адаптивно адаптируется под диагональ экрана.
Программа для установки
Скачать приложение можно для:
– Android — официальная установка с ресурса
– iOS — скачивание через App Store
Плюсы app:
– Моментальный доступ
– Устойчивая работа
– Push-сообщения об акциях
– Ускоренный функционал
Азартные разделы
Слоты
Обширная галерея азартных автоматов от ведущих разработчиков:
– Традиционные слоты
– Современные-слоты
– Прогрессивные-игры
Live casino
Категория с профессиональными дилерами обеспечивает:
– European/American Roulette
– Blackjack
– Мини-баккара
– Покер
Стримы ведутся в превосходном качестве, воссоздавая ощущение аутентичного казино.
Способы внесения средств и получения
Ресурс работает с разнообразные транзакционные сервисы:
– Платежные средства
– Цифровые системы
– Криптовалюты
– Банковские транзакции
Базовые значения внесения и моментальные платежи обеспечивают процесс исключительно комфортной.
Отдел support
Квалифицированная отдел помощи работает 24/7 и может помочь с любыми вопросами:
– Мгновенный-чат
– Email-переписка
– Голосовая горячая линия
Итоги
Основной сайт казино и его функционирующие копии гарантируют участникам надежный и азартный игровой опыт. Выгодные бонусы, удобная мобильная вариант, многочисленные развлечения и качественное live-казино делают эту ресурс замечательным решением для азартных времяпрепровождения.
It’s awesome to go to see this web page and reading the views
of all friends concerning this paragraph, while I
am also keen of getting experience.
my web-site: bathroom door
Современные онлайн-казино предоставляют пользователям обширный набор азартных игр и заманчивые награды. Однако для удобной времяпрепровождения существенно понимать, как обнаружить 888старз казино и его функционирующие зеркала.
Что такое основной сайт казино
Основной портал казино — это базовая веб-площадка, где клиенты могут пользоваться гемблинг играми. Сайт работает на официальных правах и владеет всеми обязательными лицензиями.
Ключевые преимущества главного сайта:
– Конфиденциальность персональных данных
– Объективные правила работы
– Гарантированные транзакции
– Компетентная поддержка
Действующее зеркало казино: для чего необходимо
Копия сайта — это идентичная копия основного веб-сайта, расположенная по альтернативному домену. Функционирующее зеркало создается для обеспечения постоянного доступа к платформе.
Факторы использования альтернативных адресов:
– Запрет основного адреса
– Профилактические мероприятия
– Высокая посещаемость на систему
Как отыскать свежее зеркало в данный момент
Обнаружить актуальное действующее зеркало можно разными вариантами:
1. Email-уведомления — подпишитесь на почтовую доставку
2. Служба помощи — проконсультируйтесь в онлайн-чат
3. Социальные медиа — проверяйте за новостями
4. Игровые площадки — авторитетные платформы
Оформление профиля на ресурсе казино
Процедура регистрации требует буквально немного минут:
1. Выберите на кнопку “Зарегистрироваться”
2. Внесите требуемые данные
3. Подтвердите контактную адрес
4. Активируйте код активации, если имеется
Сразу после оконченной активации вам предоставится разрешен персональный кабинет.
Поощрения и купоны
Богатая наградная программа — значимое плюс казино:
Бонус за регистрацию
Новые пользователи получают первый поощрение, который может включать:
– Денежный бонус на дебютный пополнение
– Фриспины для слотов
– Безвозвратные средства
Бонусные коды
Систематически публикуются актуальные бонусные шифры, обеспечивающие забрать экстра бонусы.
Программа кэшбека
Активные пользователи приобретают процент использованных средств на счет.
Действующие предложения и соревнования
Казино регулярно организует увлекательные акции:
– Weekly соревнования
– Специальные бонусы
– Розыгрыши ценных подарков
– Система статусов
Логин в пользовательский аккаунт
Для доступа на портал требуется:
1. Открыть официальный портал или рабочее зеркало
2. Выбрать “Авторизация”
3. Указать имя пользователя и код доступа
В личном кабинете разрешены такие опции:
– Внесение средств баланса
– Обналичивание денег
– Проверка лога транзакций
– Редактирование индивидуальными параметрами
Mobile версия и приложение
Портативная платформа
Responsive версия веб-сайта обеспечивает делать ставки с любого мобильного гаджета. Визуал автоматически адаптируется под габариты screen.
Клиент для скачивания
Получить app можно для:
– Android — непосредственная скачивание с сайта
– iOS — установка через App Store
Плюсы приложения:
– Мгновенный доступ
– Надежная работа
– Push-оповещения об предложениях
– Производительный функционал
Азартные секции
Слоты
Разнообразная подборка игровых слотов от известных разработчиков:
– Стандартные слоты
– Новые-игры
– Призовые-слоты
Live зал
Раздел с профессиональными крупье дает:
– Рулеточные столы
– Двадцать одно
– Баккара
– Poker
Вещания проводятся в высоком формате, воссоздавая эффект настоящего казино.
Способы пополнения и обналичивания
Казино поддерживает разнообразные денежные методы:
– Кредитные картсчета
– Виртуальные платежи
– Цифровые валюты
– Банковские транзакции
Стартовые значения пополнения и оперативные транзакции делают игру крайне приятной.
Служба поддержки
Профессиональная отдел ассистентов функционирует 24/7 и способна ассистировать с разными задачами:
– Онлайн-чат
– Email-переписка
– Звонковая связь
Итоги
Основной ресурс казино и его рабочие копии обеспечивают пользователям безопасный и захватывающий развлекательный процесс. Богатые бонусы, функциональная мобильная вариант, многочисленные автоматы и превосходное live-казино создают эту площадку великолепным местом для азартных времяпрепровождения.
quartz harbor deals page – Browsed briefly, layout feels organized and practical.
生命树2026 杨紫胡歌主演 海外华人高清现实主义陆剧 全球加速无广告追剧 AI推荐热播
Good afternoon!
Share myth mysterious legends with interesting and valuable cultural updates fast and keep stories alive see on the website for myth collections
Full information on the link – https://900letekas.site
All the best and development in business!
vaycasino güncel giriş: vaycasino
Современные виртуальные казино обеспечивают геймерам большой ассортимент опций для беспроблемной игры. Впрочем иногда подключение к главному порталу может оказаться заблокированным. В таких обстоятельствах на выручку приходит https://www.farshirugs.com/kakie-sushchestvuyut-prakticheskie-sovety-i-rekomendatsii-dlya-povysheniya-skorosti-zagruzki-vashego-onlayn-kazino/, которое гарантирует бесперебойный доступ ко всем функциям платформы.
Что такое функционирующее зеркало казино
Альтернативный сайт — это полная копия лицензионного портала, которая хостится по другому домену. Альтернативный ресурс содержит целый функционал оригинального ресурса, включая личный кабинет, счет и запись переводов.
Главные плюсы эксплуатации зеркала:
– 24-часовой вход к сайту
– Максимальная аналогичность инструментов
– Конфиденциальность персональных реквизитов
– Хранение существующих поощрений
Как разыскать рабочее зеркало в данный момент
Существует ряд достоверных методов обнаружения действующей ссылочной информации:
Проверенные ресурсы:
1. Почтовая рассылка — управление регулярно пересылает информацию с свежими доменами
2. Медийные сети — проверенные аккаунты постят релевантную информацию
3. Отдел поддержки — специалисты дают надежные URL
4. Смартфонное приложение — позволяет минуть блокировки
Создание аккаунта на главном ресурсе
Процедура регистрации длится всего немного минут и состоит из данных этапов:
1. Вход на лицензионный сайт или действующее зеркало
2. Щелчок на кнопку «Зарегистрироваться»
3. Указание пользовательской бланка
4. Верификация почтовой почты или мобильного номера
5. Задействование бонуса за регистрацию при присутствии промокода
Новые клиенты получают значительный начальный презент, который может предполагать free spins, валютные поощрения или кэшбек.
Авторизация в личный кабинет
Логин на платформе выполняется стандартным способом. Необходимо ввести логин и секретный ключ, задействованные при создании аккаунта.
Важные нюансы для защищенного входа:
– Используйте криптостойкий пароль
– Задействуйте двойную аутентификацию
– Не фиксируйте реквизиты на публичных устройствах
– Контролируйте интернет строку браузера
Описание бонусной системы
Казино награждает клиентов всевозможными бонусами и специальными предложениями:
Вступительный букет
Начинающие способны надеяться на великодушное поощрение за первый взнос. Как правило это процентовая премия к переведенной сумме плюс бесплатные вращения для востребованных слотов.
Постоянные предложения
– Семидневный возврат средств — компенсирование части списанных денежных средств
– Призы на повторные взносы
– Специальные промо по праздникам
– Состязания с значительными призовыми фондами
Схема лояльности
Постоянные игроки собирают баллы за произвольную бет, которые затем меняются на реальные средства, фриспины или особые льготы.
Кодовые слова: как задействовать
Бонус-коды — это индивидуальные наборы букв и цифр, гарантирующие доступ к специальным поощрениям.
Откуда найти действующие промокоды:
– Официальные общественные сети казино
– Союзнические порталы
– Email-новостная лента
– Тематические форумы
Прописывается промокод в отдельное поле при регистрации или внесении депозита кошелька.
Смартфонная версия и приложение
Передовые клиенты отдают предпочтение проводить время с смартфонных устройств. Ресурс предлагает двойной способа для приятной мобильной игры.
Адаптивная редакция
Интернет версия само собой подстраивается под параметры экрана. Не предполагает скачивания и функционирует в каждом новом браузере.
Портативное приложение
Загрузить приложение можно для девайсов на Android и iOS. Выгоды app:
– Скоростная загрузка
– Бесперебойная операция
– Автоматические-уведомления о промо
– Независимый преодоление блокировок
Операция установки легок: необходимо открыть на ресурс с портативного аппарата и следовать указаниям.
Гемблинг коллекция
Библиотека развлечений содержит тысячи позиций от лучших разработчиков.
Слоты
Развлекательные автоматы — наиболее востребованная раздел игр. Представлены классические винтажные слоты, современные видеослоты с премиальными стадиями, а также растущие джекпоты.
Live казино
Раздел с настоящими раздающими дает возможность ощутить атмосферу истинного казино. Имеются столы с блэкджеком.
Трансляция ведется в высоком разрешении, обеспечивается коммуникация с дилером и прочими пользователями.
Состязания
Регулярно проводятся турниры по различным слотам. Участие позволяет получить денежные вознаграждения, фриспины или уникальные бонусы.
Платежные действия
Ресурс предоставляет значительный набор расчетных систем:
– Пластиковые карты
– Цифровые сервисы
– Биткоин
– Банковские платежи
Стартовая объем депозита — разумная для основной части пользователей. Снятие денег осуществляется в кратчайшие сроки.
Отдел поддержки
Компетентные специалисты расположены оказать помощь непрерывно. Имеются такие каналы связи:
– Интернет-чат
– Email
– Телефонная поддержка
– Коммуникационные сети
Пояснения на распространенные проблемы можно отыскать в зоне FAQ.
Итог
Лицензионный веб-сайт казино и его рабочие зеркала обеспечивают пользователям полный путь ко всем опциям сайта. Великодушные привилегии, практичная телефонная версия, огромный выбор игр и компетентная поддержка формируют гемблинг времяпрепровождение исключительно приятным и безопасным.
Актуальные онлайн-казино предоставляют участникам обширный выбор развлечений и выгодные поощрения. Впрочем для комфортной деятельности необходимо осознавать, как отыскать 888 и его актуальные зеркала.
Что такое основной веб-ресурс казино
Основной ресурс казино — это главная система, где игроки могут наслаждаться азартными развлечениями. Платформа функционирует на законных принципах и владеет всеми необходимыми лицензиями.
Ключевые плюсы лицензионного сайта:
– Надежность индивидуальных реквизитов
– Прозрачные требования использования
– Обеспеченные транзакции
– Квалифицированная помощь
Действующее зеркало казино: для чего используется
Зеркало — это абсолютная клон официального ресурса, хостящаяся по другому домену. Действующее зеркало формируется для поддержания бесперебойного доступа к платформе.
Факторы задействования дублирующих ресурсов:
– Ограничение главного домена
– Профилактические работы
– Высокая нагрузка на платформу
Как отыскать действующее зеркало на сегодня
Получить новое рабочее зеркало можно множественными вариантами:
1. Подписка — активируйте уведомления на информационную отправку
2. Служба техподдержки — проконсультируйтесь в онлайн-чат
3. Социальные медиа — отслеживайте за новостями
4. Игровые порталы — надежные платформы
Оформление профиля на ресурсе казино
Этап регистрации требует буквально пару минут:
1. Активируйте на опцию “Открыть счет”
2. Внесите требуемые сведения
3. Активируйте контактную ящик
4. Используйте код активации, если предоставлен
Сразу после успешной оформления вам откроется разрешен индивидуальный профиль.
Бонусы и бонусные коды
Щедрая бонусная политика — ключевое достоинство казино:
Подарок за создание аккаунта
Новые игроки зарабатывают первый подарок, который может включать:
– Валютный депозит на дебютный депозит
– Free spins для слотов
– Безвозвратные деньги
Активационные коды
Регулярно размещаются новые купоны, предоставляющие получить дополнительные бонусы.
Механизм компенсации
Активные клиенты приобретают долю потраченных средств обратно.
Текущие промо и конкурсы
Казино периодически организует азартные промо-мероприятия:
– Недельные баттлы
– Праздничные бонусы
– Конкурсы ценных наград
– Программа привилегий
Логин в личный аккаунт
Для входа на ресурс нужно:
1. Открыть основной портал или функционирующее зеркало
2. Кликнуть “Login”
3. Прописать логин и ключ
В персональном кабинете доступны нижеперечисленные функции:
– Зачисление баланса
– Получение выигрышей
– Анализ лога операций
– Изменение индивидуальными параметрами
Mobile вариант и приложение
Mobile версия
Мобильная вариант веб-сайта дает возможность развлекаться с любого мобильного телефона. Оформление самостоятельно адаптируется под формат screen.
Клиент для download
Установить клиент можно для:
– Android — безопасная download с платформы
– iOS — инсталляция через App Store
Выгоды программы:
– Оперативный запуск
– Стабильная операционность
– Push-оповещения об акциях
– Оптимизированный функционал
Гемблинг категории
Автоматы
Богатая галерея развлекательных машин от топовых разработчиков:
– Классические автоматы
– Видео-автоматы
– Джекпот-слоты
Live казино
Секция с профессиональными дилерами обеспечивает:
– Рулетки
– 21
– Baccarat
– Покер
Трансляции проводятся в отличном качестве изображения, воссоздавая атмосферу подлинного казино.
Варианты зачисления и снятия
Ресурс поддерживает различные платежные инструменты:
– Банковские card
– Онлайн системы
– Bitcoin/Ethereum
– Wire транзакции
Стартовые лимиты внесения и скоростные выводы создают времяпрепровождение крайне приятной.
Отдел support
Профессиональная группа помощи оперирует 24/7 и способна содействовать с разными проблемами:
– Живой-чат
– Email-консультации
– Звонковая линия
Выводы
Главный ресурс казино и его рабочие альтернативные адреса гарантируют участникам безопасный и захватывающий игровой досуг. Щедрые бонусы, функциональная mobile вариант, обширные автоматы и высокоуровневое live-казино превращают эту платформу превосходным выбором для развлекательных игр.
решение курсовых работ на заказ kupit-kursovuyu-83.ru .
After looking over a few of the blog posts on your
site, I seriously appreciate your way of blogging.
I bookmarked it to my bookmark webpage list and
will be checking back in the near future. Please visit my web site
as well and let me know what you think.
Feel free to surf to my web-site; buy US lottery tickets online
official silverstone page – Clean design with well-organized sections makes browsing easy.
gilded retail corner – The brand style suggests a refined and stylish shopping destination.
check this out – Pages are neat, layout is simple and readable.
Hello!
Master the art of playing interesting mysterious games for valuable championship titles and claim your trophy see on the website for tournament info
Full information on the link – https://900letekas.site
All the best and development in business!
check this out – Layout is neat, browsing and scrolling is intuitive.
buy accutane uk https://sbsmeds.sbs/# purchase accutane
Подключение к платформе через рабочие зеркала
Современные интернет казино дают клиентам бесперебойный доступ к сервисам. Официальный портал Vulcan работает бесперебойно, гарантируя большой ассортимент гемблинг развлечений. Впрочем временами появляются цифровые сложности или запреты, в связи с чем необходимо понимать о существовании действующих зеркал.
Что является собой основное зеркало казино
Дубликат — это идентичная дубликат главного сайта с таким же интерфейсом. Действующее зеркало на данный момент даёт возможность обходить местные ограничения и вести развлечения.
Ключевые выгоды задействования зеркал:
– Полный доступ к индивидуальному кабинету
– Удержание всех информации профиля
– Такой же набор развлечений
– Текущие поощрения и акции
Регистрация на ресурсе
Механизм регистрации отнимает считанные минут. Начинающие геймеры обретают богатый поощрение за регистрацию, который имеет возможность включать:
– Приветственный игровой бонус
– Бесплатные вращения для слотов
– Уникальные купоны
– Расширенный кешбэк
Ради финализации регистрации нужно:
1. Перейти на основной ресурс или копию
2. Щёлкнуть элемент «Оформиться»
3. Ввести личные информацию
4. Верифицировать электронную почту или мобильный
5. Применить купон (если есть присутствии)
Доступ в индивидуальный кабинет
Вслед за правильной создания аккаунта клиенты в состоянии совершать вход используя центральный ресурс или функционирующее зеркало. Личный кабинет обеспечивает всесторонний управление над учётной записью:
– Летопись ставок
– Внесение баланса
– Изъятие выигрышей
– Администрирование привилегиями
– Присутствие в турнирах
Награды и акции казино
Сайт награждает игроков разнообразными привилегированными системами:
Стартовые бонусы
Новые игроки обретают богатый набор бонусов на первые пополнения. Обычно это охватывает частичную доплату к объёму вклада плюс безвозмездные кручения.
Периодические кампании
– Раз в неделю кешбэк до 15%
– Состязания с премиальными банками
– Призы на день рождения
– Особые предложения для VIP игроков
Программа верности
Активные геймеры зарабатывают единицы, что разрешено конвертировать на подлинные средства или эксклюзивные преимущества.
Мобильная форма и программа
Передовые инновации дают возможность играть всюду угодно. Мобильная редакция портала независимо настраивается под размер каждого аппарата.
Выгоды портативного ПО:
– Моментальная загрузка автоматов
– Удобный вид
– Мгновенные-уведомления о промо
– Возможность инсталлировать для Android и iOS
Настоящее казино: антураж подлинного азартного дома
Раздел Live клуба переносит клиентов в атмосферу подлинного азартного учреждения. Профессиональные операторы проводят развлечение в состоянии подлинного времени.
Представленные игры:
– Рулетка
– Очко
– Punto Banco
– Покерная игра
Игровые машины и развлекательные машины
Каталог развлекательных аппаратов охватывает массу позиций от топовых студий. Каждый клиент обнаружит автомат по вкусу:
– Классические барабаны
– Инновационные игры с специальными этапами
– Джекпот-машины
– Мегавейс машины
Конкурсы и раздачи
Регулярные состязания включают азарт и открывают опцию получить значительные награды. Участие в соревнованиях часто безвозмездное, а выигрышные банки насчитывают значительных размеров.
Защита и конфиденциальность
Платформа применяет инновационные системы криптографии для обеспечения реквизитов пользователей. Каждые денежные действия выполняются через безопасные каналы.
Итог
Основной сайт и его действующие зеркала гарантируют стабильный переход к отличным гемблинг играм. Великодушные поощрения, практичная смартфонная версия, разнообразие автоматов и квалифицированное Live-заведение создают сайт превосходным опцией для ценителей развлекательных игр.
Подключение к ресурсу через проверенные зеркала
Нынешние сетевые казино гарантируют пользователям постоянный вход к сервисам. Официальный сайт казино Джозз функционирует стабильно, гарантируя богатый ассортимент азартных автоматов. Впрочем временами формируются системные сложности или блокировки, поэтому критично быть осведомлённым о присутствии функционирующих зеркал.
Что означает собой основное зеркало казино
Дубликат — это точная реплика главного ресурса с аналогичным возможностями. Актуальное зеркало в настоящее время обеспечивает преодолевать региональные барьеры и возобновлять игру.
Принципиальные преимущества использования зеркал:
– Стопроцентный переход к индивидуальному кабинету
– Сохранение каждых данных учётной записи
– Идентичный перечень развлечений
– Актуальные привилегии и предложения
Создание аккаунта на ресурсе
Процедура создания аккаунта отнимает немного минут. Недавние пользователи зарабатывают богатый поощрение за регистрацию, который способен охватывать:
– Приветственный игровой приз
– Даровые вращения для игр
– Уникальные промокоды
– Расширенный кэшбек
Для выполнения оформления требуется:
1. Переместиться на главный портал или зеркало
2. Кликнуть опцию «Регистрация»
3. Ввести индивидуальные информацию
4. Верифицировать мейл или мобильный
5. Активировать промокод (когда имеется доступности)
Вход в собственный кабинет
После корректной регистрации клиенты могут совершать подключение через главный сайт или рабочее зеркало. Собственный кабинет открывает всесторонний надзор над счётом:
– Архив ставок
– Ввод кошелька
– Вывод призов
– Контроль наградами
– Включение в конкурсах
Награды и акции казино
Сайт радует игроков различными наградными предложениями:
Приветственные призы
Новички обретают богатый букет бонусов на начальные взносы. Как правило это содержит процентную надбавку к величине взноса плюс бесплатные вращения.
Постоянные промо
– Седмичный кешбэк до 15%
– Конкурсы с наградными фондами
– Подарки на день рождения
– Эксклюзивные программы для элитных клиентов
Система вознаграждения
Регулярные игроки накапливают очки, которые можно конвертировать на реальные средства или уникальные льготы.
Мобильная форма и приложение
Передовые инновации помогают играть где подходяще. Портативная вариант веб-сайта автономно настраивается под экран каждого аппарата.
Преимущества портативного приложения:
– Быстрая запуск развлечений
– Удобный облик
– Моментальные-нотификации о акциях
– Опция загрузить для Android и iOS
Реальное казино: атмосфера реального игорного заведения
Область Live игорного дома транспортирует клиентов в антураж реального азартного учреждения. Профессиональные крупье проводят действие в состоянии актуального времени.
Представленные развлечения:
– Рулетка
– Двадцать одно
– Классика
– Техасский холдем
Автоматы и игровые автоматы
Ассортимент гемблинг слотов охватывает массу позиций от топовых производителей. Любой геймер обнаружит слот по вкусу:
– Классические слоты
– Новые слоты с призовыми этапами
– Прогрессивный-слоты
– Megaways автоматы
Турниры и раздачи
Регулярные состязания вносят остроту и открывают способность выиграть крупные призы. Присутствие в состязаниях регулярно бесплатное, а призовые банки достигают значительных объёмов.
Охрана и приватность
Портал эксплуатирует инновационные системы защиты для гарантии данных геймеров. Совокупные платёжные процедуры осуществляются через зашифрованные каналы.
Итог
Основной ресурс и его актуальные зеркала обеспечивают надёжный подключение к отличным игровым услугам. Богатые поощрения, удобная смартфонная редакция, разнообразие машин и компетентное Live-заведение создают ресурс превосходным решением для фанатов развлекательных автоматов.
Mərc strategiyaları haqqında tövsiyələr çox faydalıdır.
http://msupublishing.ru/bitrix/redirect.php?event1=click_to_call&event2=&event3=&goto=https://pinco-azerbaijan-games.org/mobil-tetbiq
best rated canadian pharmacy: canadian pharmacy king – prescription drugs canada buy online
fernbrookmarket – Nice browsing experience, site structure is simple and readable overall.
I was suggested this website by my cousin. I’m
not sure whether this post is written by him as no one else know such detailed about my difficulty.
You are wonderful! Thanks!
Hazel Crest Market – Professional yet friendly, easy to explore for any visitor.
Передовые онлайн-казино предлагают пользователям обилие опций для приятной игры. Официальный ресурс казино Argo казино открывает вход ко всем возможностям и играм. Однако при образовании программных трудностей на выручку приходят действующие зеркала.
Что представляет собой функционирующее зеркало
Зеркало казино — это идентичная копия главного сайта, расположенная по запасному URL. Легитимное зеркало поддерживает все возможности, вместе с открытие профиля, доступ в собственный кабинет, премии и купоны.
Дубликат на сегодня обеспечивает:
– Непрерывный доступ к азартным аппаратам
– Стопроцентную безопасность персональных сведений
– Удержание счета и записей операций
– Доступность всех специальных предложений
Регистрация на главном портале
Процедура создания аккаунта требует несколько минут. Свежеиспеченным клиентам нужно:
1. Зайти на официальный портал или действующее зеркало
2. Нажать кнопку «Зарегистрироваться»
3. Внести требуемые поля
4. Активировать э-мейл почту
5. Указать купон при наличии
После конца создания аккаунта клиенты получают бонус за регистрацию, какой может иметь бесплатные вращения или денежное премирование.
Авторизация в индивидуальный кабинет
Персональный кабинет обеспечивает комплексный контроль над игровым процессом. Через персональный кабинет разрешается:
– Вносить средства на счет
– Снимать средства
– Применять бонусные коды
– Отслеживать записи пари
– Принимать участие в соревнованиях
– Получать кэшбек
Обзор вознаграждений и специальных предложений
Богатая призовая система — ключевое преимущество казино. Главные типы премий:
Вступительный бонус
Дебютанты получают выгодное вознаграждение на дебютные взносы. Объем премии может составлять 100-200% от объема депозита.
Фриспины
Даровые прокруты начисляются для востребованных машин. Число фриспинов разнится от 10 до 500 штук.
Cash back
Систематический или помесячный возврат процентной доли потерянных денег. Стандартный процент кэшбека — 5-15%.
Конкурсы
Периодические турниры с внушительными премиальными пулами. Участники состязаются за призовые строчки в таблице лидеров.
Смартфонная версия и приложение
Адаптивная версия позволяет развлекаться с каждого девайса. Игроки могут закачать софт для iOS и Android или задействовать веб версию.
Преимущества портативного программы:
– Быстрая загрузка игр
– Практичный графический интерфейс
– Пуш-нотификации о бонусах
– Вход через Face ID
Слоты и Live казино
Развлекательная коллекция насчитывает тысячи названий от ведущих производителей.
Востребованные разделы игр:
– Обычные слоты
– Современные слоты с призовыми раундами
– Прогрессивный джекпот слоты
– Мегавейс слоты
Live казино
Категория live игорный зал предоставляет партию с реальными дилерами. Представлены классические варианты:
– Американская рулетка
– Двадцать одно
– Punto Banco
– Техасский холдем
Как обнаружить актуальное зеркало
Обрести актуальную ссылку на зеркало возможно несколькими методами:
1. Зарегистрироваться на email-рассылку
2. Отслеживать за апдейтами в соц сетях
3. Обратиться в отдел поддержки
4. Сохранить действующее зеркало в избранное
Резюме
Основной ресурс и его рабочие копии обеспечивают стабильный вход к развлекательным автоматам. Богатые вознаграждения, различные промокоды, практичное портативное приложение и профессиональная служба поддержки обеспечивают игровой геймплей максимально беспроблемным и безопасным.
Передовые онлайн-казино предоставляют клиентам широкий спектр опций для удобной времяпрепровождения. Переход к ресурсу certifiedpromptengineer.com реализуется через главный сайт или рабочее зеркало.
Что такое актуальное зеркало казино
Рабочее зеркало — это запасной линк лицензионного веб-сайта казино. Такие версии создаются для гарантирования постоянного доступа к игровой платформе.
Альтернатива на сегодня абсолютно воспроизводит опции основного домена. Игроки имеют такой же выход ко всем возможностям, включая открытие счета, внесение депозита счета и получение денег.
Открытие счета на основном портале
Механизм открытия профиля отнимает всего несколько минут. Свежим игрокам следует:
1. Попасть на главный портал или действующее проверенное зеркало
2. Щелкнуть кнопку “Открыть счет”
3. Заполнить нужные информацию
4. Активировать email почту
5. Использовать купон при существовании
После окончания оформления участник обретает приз за регистрацию, который может содержать бесплатные вращения или денежное премию.
Логин в личный кабинет
Персональный кабинет — это безопасная зона, где участники способны управлять своим учетной записью. Для логина требуется указать username и password.
В персональном кабинете открыты следующие инструменты:
– Проверка записей операций
– Задействование купонов
– Регулирование бонусами
– Включение в соревнованиях
– Отслеживание кэшбека
– Изменение профиля
Вознаграждения и промо
Гемблинговая сервис обеспечивает выгодные бонусы:
Регистрационный комплект — новые игроки зарабатывают крупное премию на первые вклады.
Бесплатные вращения — начисляются как при регистрации, так и в процессе разнообразных мероприятий.
Возврат средств — еженедельный возмещение части потерянных финансов.
Бонусные коды — специальные шифры, предоставляющие право к специальным вознаграждениям.
Описание игровых разделов
Игровые автоматы
Библиотека slots включает массу игр от лучших провайдеров. Игроки найдут как обычные автоматы, так и новые мультимедийные автоматы с интересной оформлением.
Live казино
Категория Live казино предлагает возможность соревноваться с настоящими ведущими в условиях актуального времени. Представлены востребованные игры: рулетка, блэкджек, баккара, покер.
Состязания
Регулярные турниры с большими призовыми банками привлекают массу игроков. Лидеры обретают финансовые награды и особые бонусы.
Смартфонная версия и софт
Портативная версия портала позволяет наслаждаться с всякого устройства. Оформление автономно настраивается под диагональ экрана.
Скачать софт можно для гаджетов на Android и iOS. Портативное приложение характеризуется всеми характеристиками полной версии.
Как найти актуальное зеркало на текущий день
Действующие URL альтернатив систематически меняются. Обнаружить актуальную URL можно несколькими путями:
– Через департамент поддержки
– В проверенных социальных сетях
– По email подписке
– На партнерских площадках
Охрана и лицензирование
Главный сайт работает на базе мировой разрешения. Все транзакции защищены современными протоколами безопасности.
Анонимность индивидуальных реквизитов сохраняется в абсолютном объеме.
Резюме
Основной домен и его актуальные зеркала предоставляют клиентам беспрерывный вход к высококлассным азартным сервисам. Великодушные бонусы, многочисленные игры, опытная служба — все это создает игровой досуг чрезвычайно удобным и увлекательным.
https://aroomittal10.mn.co/posts/xbet-gift-promo-code-1x200elite-%E2%82%AC130-gift-bonus
Hello everyone!
Master the craft of writing interesting mysterious stories with valuable plots and captivate audiences with your words see on the website for writing courses
Full information on the link – https://900letekas.site
All the best and development in business!
Golden Shop – Just visited, layout is clean and navigation feels smooth.
http://certifiednorthrx.com/# canadapharmacyonline
http://certifiednorthrx.com/# Certified North Rx
simple trading link – This site seems organized with clearly shown information.
For the opportunity
cost cheap cephalexin without dr prescription
for additional benefits.
Aw, this was a really nice post. Spending some time and actual effort to create a
good article… but what can I say… I procrastinate a
whole lot and never seem to get anything done.
Here is my homepage – Powerball jackpot
Анализ главного ресурса
Новое онлайн-казино предлагает своим участникам обширный спектр игр и призов. Оригинальный сайт casino casino Mellstroy работает постоянно, давая вход к топовым симуляторам, live-казино и многочисленным промо.
Актуальное зеркало: доступ к сайту
Что такое дубликат казино
Дубликат представляет собой полную реплику главного сайта с отличным сетевым адресом. Рабочее зеркало предоставляет клиентам избегать ограничения и иметь стабильный доступ к излюбленным играм.
Как найти текущее зеркало сегодня
Свежие линки на основное зеркало размещаются через:
– Почтовую оповещение
– Проверенные публичные сети
– Службу поддержки
– Партнерские площадки
Открытиесчета на ресурсе
Процесс открытиясчета
Оформление длится пару минут и подразумевает нижеследующие этапы:
1. Открытие на оригинальный сайт или актуальное зеркало
2. Выбор опции “Открытьсчет”
3. Указание личных данных
4. Проверка адреса или мобильного
5. Создание секретнойкомбинации
Приз за оформление
Первые участники обретают щедрые стартовые бонусы:
– Игровые депозиты на кошелек
– Халявныеспины для симуляторов
– Увеличенный объем возврата
– Уникальные ваучеры
Доступ в личный счет
Постоянные игроки вправе произвести вход через оригинальный сайт или актуальное зеркало. Для этого следует ввести имяпользователя и ключдоступа, установленные при оформлении.
Инструменты личного кабинета
В персональном кабинете имеются такие опции:
– Контроль учетными сведениями
– Внесение кошелька
– Обналичивание средств
– Активация кодов
– Проверка истории транзакций
– Участие в конкурсах
Подарки и промо
Разновидности поощрений
Казино радует своих участников многочисленными наградными предложениями:
– Стартовый набор — щедрые поощрения на начальные депозиты
– Фриспины — бонусные прокруты в известных слотах
– Компенсация — систематический компенсация доли проигрышей
– Система поощрения — уникальные привилегии для активных игроков
Коды и их активация
Эксклюзивные коды дают расширенные поощрения. Для применения следует ввести последовательность в соответствующее окно в персональном аккаунте.
Развлекательный набор
Слоты
Каталог слотовых автоматов содержит сотни позиций от лучших провайдеров:
– Классические машины
– Видео слоты
– Джекпот слоты
– Брендовые слоты
Live казино
Секция Live-казино дарит взаимодействие с живыми крупье в обстановке прямого времени:
– Европейскаярулетка
– Блэкджек
– Баккара
– Casinopoker
Конкурсы
Периодические состязания с большими наградными суммами устраиваются регулярно. Претенденты борются за победу в таблице.
Портативная реализация и APP
Мобильная версия веб-сайта
Основной ресурс абсолютно приспособлен для портативных устройств. Пользователи могут открывать слоты прямо через браузер без обязательства скачивания.
Софт для инсталляции
Официальное смартфонное приложение доступно для загрузки на аппараты с программными средами Android и iOS. Софт гарантирует:
– Моментальный подход к развлечениям
– Стабильную операционность
– Push-оповещения о промо
– Комфортный интерфейс
Резюме
Официальный веб-сайт казино и его рабочие зеркала предоставляют пользователям полный доступ к первоклассным геймплейным играм. Солидные вознаграждения, всевозможные акции, комфортная мобильная адаптация и квалифицированная помощь делают геймплейный времяпрепровождение максимально удобным и выгодным.
Lille 0-1 Crvena Zvezda 2026 Europa League surprise! Red Star shock French side – football news full of underdog glory!
Актуальные интернет казино обеспечивают пользователям обширный выбор возможностей для беспроблемной игры. Тем не менее иногда доступ к базовому порталу может оказаться заблокированным. В таких ситуациях на выручку приходят Вован, которое гарантирует непрерывный подключение ко всем функциям платформы.
Что такое актуальное зеркало казино
Копия — это полная версия главного сайта, которая располагается по другому домену. Альтернативный ресурс содержит все функционал оригинального ресурса, включая индивидуальный кабинет, средства и историю операций.
Ключевые достоинства применения зеркала:
– Постоянный соединение к порталу
– Максимальная схожесть инструментов
– Сохранность личных информации
– Хранение всех имеющихся поощрений
Как разыскать рабочее зеркало в данный момент
Имеется некоторое количество проверенных вариантов получения актуальной адреса:
Легитимные сервисы:
1. Имейл рассылка — руководство систематически отправляет уведомления с рабочими ссылками
2. Общественные сети — проверенные профили размещают текущую данные
3. Сервис поддержки — сотрудники сообщают достоверные ссылки
4. Мобильное приложение — дает возможность преодолевать блокировки
Регистрация на главном сайте
Процедура создания аккаунта требует лишь пару минут и включает из таких шагов:
1. Попадание на основной портал или функционирующее зеркало
2. Щелчок на иконку «Открыть счет»
3. Указание персональной анкеты
4. Валидация email почты или мобильного номера
5. Активация привилегии за регистрацию при существовании промокода
Только что зарегистрированные пользователи приобретают солидный стартовый приз, который может предполагать free spins, денежные бонусы или кэшбек.
Авторизация в индивидуальный кабинет
Авторизация на платформе осуществляется стандартным методом. Нужно указать имя пользователя и кодовое слово, указанные при оформлении.
Значимые детали для надежного входа:
– Используйте защищенный секретный ключ
– Задействуйте двухэтапную проверку
– Не храните реквизиты на посторонних гаджетах
– Мониторьте доменную строку браузера
Описание поощрительной системы
Игровая платформа балует геймеров различными бонусами и промо:
Стартовый комплект
Дебютанты способны полагаться на существенное награду за стартовый пополнение. Обычно это процентовая прибавка к внесенной сумме плюс бесплатные вращения для востребованных слотов.
Регулярные промо
– Семидневный cashback — возвращение части потерянных денег
– Поощрения на очередные пополнения
– Эксклюзивные промо по торжествам
– Турниры с значительными призовыми банками
Схема лояльности
Деятельные игроки получают очки за любую бет, которые затем обмениваются на реальные денежные призы, free spins или специальные привилегии.
Бонус-коды: как активировать
Бонус-коды — это индивидуальные наборы знаков, обеспечивающие право к специальным бонусам.
Где найти действующие промокоды:
– Авторизованные коммуникационные сети казино
– Аффилиатные площадки
– Email-новостная лента
– Отраслевые группы
Активируется промокод в предназначенное поле при создании аккаунта или пополнении депозита.
Телефонная версия и приложение
Актуальные игроки отдают предпочтение развлекаться с смартфонных аппаратов. Портал предлагает два решения для приятной портативной игры.
Responsive редакция
Браузерная версия само собой подстраивается под параметры экрана. Не предполагает установки и функционирует в любом новом браузере.
Смартфонное приложение
Установить программу можно для девайсов на Android и iOS. Достоинства app:
– Быстрая активация
– Бесперебойная действие
– Push-уведомления о промо
– Независимый преодоление блокировок
Процедура скачивания элементарен: необходимо открыть на сайт с смартфонного девайса и следовать указаниям.
Гемблинг коллекция
Библиотека аппаратов содержит несколько тысяч вариантов от передовых провайдеров.
Слоты
Гемблинг слоты — максимально любимая раздел аттракционов. Представлены обычные 3-барабанные машины, современные графические аппараты с бонусными этапами, а также джекпотные джекпоты.
Live казино
Отдел с живыми раздающими позволяет прочувствовать дух настоящего казино. Представлены варианты с баккарой.
Стриминг производится в превосходном четкости, поддерживается диалог с ведущим и прочими участниками.
Состязания
Постоянно устраиваются состязания по разным играм. Включение предоставляет право заработать монетарные призы, free spins или эксклюзивные бонусы.
Финансовые операции
Сайт поддерживает обширный выбор денежных инструментов:
– Кредитные карты
– Цифровые кошельки
– Биткоин
– Денежные транзакты
Наименьшая количество вклада — разумная для большинства игроков. Вывод средств обрабатывается в скорые интервалы.
Отдел поддержки
Компетентные сотрудники расположены оказать помощь постоянно. Открыты данные методы контакта:
– Веб-чат
– Email
– Мобильная связь
– Коммуникационные сети
Ответы на типовые вопросы можно найти в зоне FAQ.
Вывод
Основной ресурс казино и его действующие зеркала предоставляют клиентам абсолютный вход ко всем опциям платформы. Солидные бонусы, комфортная мобильная версия, огромный выбор игр и компетентная служба поддержки превращают азартный досуг крайне удобным и надежным.
calmcoveboutique – Nice little site, browsing feels smooth and content is clear.
West Treasures – Neat and tidy layout, browsing categories felt effortless.
Характеристика главного веб-сайта
Актуальные интернет казино предоставляют участникам богатый ассортимент игр и шансов. Основной портал Doggy регистрация обеспечивает безопасный возможность к игровым функциям.
Рабочее зеркало: возможность на сегодня
Зеркало представляет собой идентичную дубликат основного ресурса. Действующее зеркало дает возможность участникам избегать существующие блокировки.
Преимущества применения зеркала
Ключевые выгоды охватывают:
– Постоянный шанс к сайту
– Хранение всех опций официального сайта
– Безопасность индивидуальных информации
– Такой же набор функций
Открытие счета на платформе
Ход создания аккаунта характеризуется доступностью и комфортом. Свежие пользователи должны:
1. Перейти на главный ресурс или его зеркало
2. Кликнуть на клавишу оформления
3. Ввести обязательные поля
4. Верифицировать email ящик
5. Совершить дебютный логин
Подарок за открытие счета
Новые игроки зарабатывают внушительный приветственный подарок. Такое вознаграждение имеет возможность содержать:
– Монетарные начисления
– Безвозмездные фриспины
– Расширенный коэффициент возврата
Логин в собственный аккаунт
Действующие клиенты могут оперативно получить доступ в личный профиль, используя учетные данные и шифр. Личный аккаунт предоставляет доступ к:
– Контролю депозитом
– Хронологии платежей
– Работающим бонусам
– Опциям профиля
Вознаграждения и предложения
Платформа систематически проводит различные промо-кампании для участников.
Разновидности поощрений
Основные категории призов:
– Денежные бонусы – процент от величины внесения
– Спины – безвозмездные спины в игровых машинах
– Кэшбэк – отдача части проигранных сумм
– Турнирные трофеи – вознаграждения за участие в турнирах
Промокоды
Особые промокоды обеспечивают заработать экстра преимущества. Участники имеют возможность получить их на аффилиатных ресурсах или приобрести в рассылке.
Mobile адаптация и приложение
Современные игроки предпочитают карманный гейминг.
Функции мобильной адаптации
– Отзывчивый интерфейс для любых аппаратов
– Целостный путь к играм
– Моментальная функционирование
– Комфортное навигация
Установить софт
Портативное приложение открыто для downloading на аппараты с операционными системами Android и iOS. Программа дает:
– Устойчивую функциональность
– Пуш алерты о предложениях
– Моментальный запуск к желанным автоматам
Гемблинг ассортимент
Портал обеспечивает огромную библиотеку азартных забав.
Аппараты
Ассортимент игровых машин охватывает:
– Стандартные слоты
– Современные автоматы
– Джекпотные машины
– Тематические развлечения
Live дилеры
Область живых дилеров дает шанс состязаться с реальными ведущими. Предложены:
– Американская рулетка
– 21
– Punto Banco
– Карибский покер
Турниры
Регулярные турниры обеспечивают участникам соревноваться за крупные денежные суммы. Соревновательная система модифицируется постоянно.
Финансовые процедуры
Сайт предлагает множество вариантов депозита и вывода сумм:
– Пластиковые карты
– Электронные платежные системы
– Банковские переводы
– Криптовалюты
Абсолютно все платежи производятся безопасно с использованием актуальных протоколов шифрования.
Департамент support
Опытная группа поддержки функционирует без перерыва. Обратиться с консультантами можно через:
– Онлайн чат
– Электронную почту
– Телефонную линию
– Соц сети
Защита и регулирование
Казино действует на фундаменте законной сертификата. Такое гарантирует:
– Прозрачность развлекательного геймплея
– Безопасность конфиденциальных данных
– Быстрые выплаты
– Легальный игровой процесс
Резюме
Основной ресурс и его функционирующие альтернативные адреса предоставляют игрокам абсолютный комплекс услуг для удобной и выгодной развлечений. Щедрые бонусы, многочисленные развлечения, компетентная помощь и безопасная инфраструктура транзакций превращают ресурс идеальным решением для поклонников игровых забав.
Вход к порталу через проверенные зеркала
Современные онлайн казино обеспечивают клиентам бесперебойный подключение к развлечениям. Основной ресурс казино Leon функционирует стабильно, предлагая обширный спектр игровых слотов. Однако периодически образуются системные проблемы или ограничения, поэтому существенно иметь представление о доступности действующих зеркал.
Что является из себя основное зеркало казино
Дубликат — это абсолютная копия официального портала с аналогичным возможностями. Рабочее зеркало в настоящее время даёт возможность избегать локальные барьеры и поддерживать гемблинг.
Ключевые плюсы использования зеркал:
– Полный вход к индивидуальному кабинету
– Фиксация любых информации учётной записи
– Идентичный набор автоматов
– Текущие поощрения и кампании
Открытие счёта на сайте
Механизм оформления занимает немного минут. Недавние клиенты обретают щедрый подарок за создание счёта, он способен содержать:
– Стартовый бонусный подарок
– Безвозмездные фриспины для слотов
– Специальные промокоды
– Повышенный компенсацию
С целью завершения записи нужно:
1. Перейти на центральный веб-сайт или альтернативу
2. Нажать опцию «Зарегистрироваться»
3. Написать персональные реквизиты
4. Заверить мейл или контакт
5. Использовать купон (если есть присутствии)
Авторизация в личный кабинет
Следом за удачной записи игроки могут осуществлять вход с помощью основной портал или действующее зеркало. Персональный кабинет предоставляет полный регулирование над профилем:
– Журнал транзакций
– Ввод баланса
– Получение денег
– Контроль бонусами
– Вовлечение в турнирах
Награды и акции казино
Платформа радует клиентов многочисленными бонусными системами:
Вступительные призы
Новые игроки зарабатывают великодушный букет наград на начальные пополнения. Зачастую это содержит процентную надбавку к величине взноса плюс бесплатные вращения.
Регулярные промо
– Каждонедельный кэшбек до 15%
– Турниры с призовыми банками
– Бонусы на день рождения
– Уникальные предложения для VIP игроков
Программа поощрения
Деятельные клиенты зарабатывают единицы, которые разрешено обменять на реальные финансы или эксклюзивные преимущества.
Карманная форма и софт
Современные инновации позволяют развлекаться где подходяще. Портативная редакция портала независимо подстраивается под размер произвольного девайса.
Плюсы мобильного программы:
– Скоростная открытие развлечений
– Эргономичный облик
– Мгновенные-нотификации о промо
– Опция скачать для Android и iOS
Реальное казино: антураж реального гемблинг учреждения
Категория Live игорного дома погружает пользователей в антураж реального азартного дома. Профессиональные крупье управляют процесс в формате подлинного времени.
Представленные варианты:
– Колесо фортуны
– Блэкджек
– Карточная игра
– Карты
Слоты и азартные машины
Ассортимент развлекательных слотов охватывает множество названий от лидирующих провайдеров. Всякий геймер подберёт автомат по вкусу:
– Традиционные машины
– Видеослоты с дополнительными этапами
– Крупный приз-слоты
– Динамические игры
Соревнования и розыгрыши
Периодические состязания включают драйв и дают опцию обрести внушительные суммы. Участие в турнирах регулярно даровое, а выигрышные суммы насчитывают значительных объёмов.
Секьюрити и анонимность
Ресурс применяет передовые протоколы криптографии для гарантии информации игроков. Любые транзакционные действия проходят через зашифрованные линии.
Итог
Центральный ресурс и его действующие зеркала предоставляют стабильный доступ к отличным игровым играм. Богатые награды, практичная мобильная вариант, многообразие игр и высококлассное Live-клуб превращают платформу превосходным выбором для ценителей азартных игр.
LinenWillowMarket – The branding feels approachable, elegant, and user-friendly.
online harbor bazaar – Scrolled through a few sections and everything looks clearly organized.
Good morning!
Investigate taste mysterious origins offering interesting and valuable gastronomic data and understand your palate see on the website for taste tests
Full information on the link – https://domdvordorogi.ru/vashe-universalnoe-reshenie-dlya-letnih-tovarov-dlya-dachi/
All the best and development in business!
check this collective – Quick look shows a tidy design with straightforward navigation.
Современные онлайн-казино гарантируют пользователям обширный спектр функций для приятной развлечений. Переход к ресурсу http://investingsalary.com/uncategorized/luxon-eto-platezhnaya-sistema-predlagayushchaya-besplatnye-perevody-i-prostoe-popolnenie-na-ggpokerok-i реализуется через главный сайт или актуальное зеркало.
Что такое действующее зеркало казино
Рабочее зеркало — это запасной линк официального ресурса казино. Такие копии формируются для обеспечения непрерывного соединения к азартной платформе.
Копия актуальное полностью воспроизводит характеристики официального сайта. Клиенты приобретают идентичный доступ ко всем функциям, включая открытие счета, пополнение кошелька и обналичивание средств.
Регистрация на официальном портале
Механизм оформления учетной записи длится всего пару минут. Будущим клиентам нужно:
1. Перейти на основной домен или действующее подлинное зеркало
2. Кликнуть кнопку “Зарегистрироваться”
3. Указать необходимые реквизиты
4. Верифицировать почтовую почту
5. Использовать бонусный код при наличии
После выполнения открытия профиля клиент приобретает приз за регистрацию, который имеет право предполагать фриспины или денежное премию.
Доступ в личный кабинет
Персональный кабинет — это защищенная территория, где участники способны регулировать своим учетной записью. Для логина нужно внести имя пользователя и код доступа.
В личном кабинете представлены нижеперечисленные опции:
– Мониторинг журнала транзакций
– Применение кодов активации
– Контроль бонусами
– Присоединение в соревнованиях
– Мониторинг возмещения
– Корректировка профиля
Вознаграждения и предложения
Гемблинговая система предлагает выгодные призы:
Начальный комплект — новые игроки обретают существенное вознаграждение на первые вклады.
Даровые спины — начисляются как при регистрации, так и в процессе различных мероприятий.
Возмещение — еженедельный возврат части проигранных финансов.
Купоны — специальные шифры, предоставляющие право к эксклюзивным бонусам.
Анализ гемблинговых разделов
Аппараты
Собрание слотов насчитывает множество игр от лучших провайдеров. Клиенты найдут как стандартные аппараты, так и новые мультимедийные автоматы с притягательной графикой.
Live казино
Категория Live казино дарит возможность соревноваться с настоящими крупье в режиме настоящего времени. Доступны популярные игры: рулетка, блэкджек, баккара, покер.
Соревнования
Постоянные состязания с большими призовыми суммами привлекают множество соревнующихся. Призеры получают монетарные награды и уникальные премии.
Мобильная версия и приложение
Портативная версия платформы дает возможность развлекаться с каждого гаджета. Дизайн автономно настраивается под диагональ экрана.
Получить софт можно для аппаратов на Android и iOS. Мобильное программа располагает всеми опциями десктопной версии.
Как найти рабочее зеркало на текущий день
Свежие линки копий регулярно меняются. Найти действующую линк можно разными вариантами:
– Через сервис техподдержки
– В проверенных новостных сетях
– По почтовой рассылке
– На тематических сайтах
Защита и официальность
Официальный портал работает на основании международной сертификата. Все операции шифруются современными системами шифрования.
Секретность индивидуальных реквизитов обеспечивается в совершенном объеме.
Заключение
Основной ресурс и его актуальные дубликаты гарантируют участникам 24/7 путь к превосходным азартным развлечениям. Великодушные вознаграждения, многочисленные игры, профессиональная поддержка — все это создает гемблинговый досуг предельно комфортным и увлекательным.
silvermeadow shop portal – Layout is organized and moving between sections is easy.
Вход к сайту через проверенные зеркала
Передовые интернет казино предоставляют пользователям постоянный подключение к услугам. Официальный портал Argo зеркало казино действует стабильно, гарантируя обширный спектр гемблинг автоматов. Но временами формируются технические проблемы или барьеры, в связи с чем важно иметь представление о существовании актуальных зеркал.
Что представляет собой основное зеркало казино
Альтернатива — это идентичная версия центрального портала с таким же возможностями. Действующее зеркало сегодня помогает обходить локальные барьеры и вести развлечения.
Принципиальные преимущества эксплуатации зеркал:
– Стопроцентный переход к собственному кабинету
– Поддержание каждых данных счёта
– Аналогичный ассортимент слотов
– Действующие поощрения и акции
Регистрация на платформе
Механизм создания аккаунта занимает несколько минут. Недавние клиенты обретают щедрый приз за создание счёта, он в состоянии охватывать:
– Приветственный игровой кредит
– Бесплатные спины для игр
– Уникальные купоны
– Усиленный кешбэк
Для выполнения регистрации следует:
1. Войти на главный веб-сайт или зеркало
2. Кликнуть опцию «Зарегистрироваться»
3. Ввести персональные информацию
4. Активировать почтовый адрес или телефон
5. Использовать код (при доступности)
Вход в персональный кабинет
По завершении удачной регистрации геймеры способны совершать вход через главный ресурс или рабочее зеркало. Личный кабинет открывает всесторонний управление над счётом:
– Архив транзакций
– Внесение депозита
– Изъятие денег
– Администрирование привилегиями
– Участие в соревнованиях
Поощрения и предложения казино
Сайт радует геймеров различными привилегированными схемами:
Стартовые бонусы
Дебютанты зарабатывают богатый букет поощрений на стартовые депозиты. Как правило это предполагает долевую надбавку к сумме вклада плюс безвозмездные спины.
Периодические акции
– Каждонедельный возврат до 15%
– Турниры с наградными фондами
– Бонусы на день рождения
– Уникальные промо для привилегированных геймеров
План поощрения
Активные геймеры накапливают единицы, что возможно конвертировать на подлинные финансы или уникальные привилегии.
Портативная форма и софт
Передовые инновации позволяют играть всюду угодно. Мобильная редакция веб-сайта независимо приспосабливается под дисплей любого устройства.
Плюсы портативного ПО:
– Оперативная запуск игр
– Эргономичный вид
– Push-нотификации о предложениях
– Способность инсталлировать для Android и iOS
Настоящее казино: обстановка настоящего развлекательного дома
Область Live казино доставляет игроков в среду истинного игорного дома. Компетентные ведущие ведут игру в виде подлинного времени.
Доступные столы:
– Колесо фортуны
– Очко
– Классика
– Покерная игра
Барабаны и азартные автоматы
Собрание игровых автоматов насчитывает массу вариантов от ведущих разработчиков. Любой пользователь отыщет игру по вкусу:
– Традиционные слоты
– Инновационные игры с дополнительными уровнями
– Накопительный-автоматы
– Мегавейс машины
Соревнования и лотереи
Систематические турниры добавляют остроту и открывают способность получить большие суммы. Участие в турнирах часто бесплатное, а наградные фонды насчитывают крупных размеров.
Безопасность и анонимность
Платформа задействует инновационные технологии шифрования для охраны реквизитов пользователей. Совокупные финансовые действия проходят через охраняемые протоколы.
Резюме
Центральный ресурс и его функционирующие зеркала гарантируют устойчивый вход к первоклассным развлекательным сервисам. Богатые поощрения, практичная портативная редакция, богатство игр и компетентное Live-казино формируют сайт прекрасным решением для поклонников гемблинг автоматов.
click here – Classic and classy, feels memorable and professional.
visit this page – Layout is neat, browsing through feels smooth and easy.
Передовые сетевые казино дают геймерам широкий выбор возможностей для удобной игры. Однако иногда доступ к главному порталу может стать недоступным. В таких ситуациях на выручку приходит Mellstroy сайт, которое обеспечивает бесперебойный доступ ко всем сервисам платформы.
Что такое функционирующее зеркало казино
Зеркало — это идентичная версия лицензионного сайта, которая располагается по другому URL. Зеркало содержит целый инструментарий главного ресурса, включая персональный кабинет, средства и запись операций.
Ключевые достоинства применения зеркала:
– Круглосуточный подключение к сайту
– Максимальная схожесть функционала
– Безопасность персональных реквизитов
– Сохранение всех имеющихся привилегий
Как обнаружить рабочее зеркало на сегодня
Имеется несколько надежных вариантов обнаружения действующей ссылочной информации:
Проверенные источники:
1. Email рассылка — руководство периодически направляет информацию с действующими адресами
2. Медийные сети — легитимные каналы выкладывают актуальную новости
3. Служба поддержки — консультанты сообщают безопасные ссылки
4. Портативное приложение — предоставляет обходить блокировки
Оформление профиля на лицензионном веб-сайте
Процесс открытия счета требует лишь считанные минут и включает из данных ступеней:
1. Попадание на основной портал или актуальное зеркало
2. Клик на клавишу «Открыть счет»
3. Ввод учетной формы
4. Верификация email почты или контактного номера
5. Применение бонуса за регистрацию при наличии промокода
Только что зарегистрированные пользователи получают солидный начальный бонус, который может предполагать фриспины, финансовые призы или кэшбек.
Авторизация в персональный кабинет
Подключение на сайте осуществляется традиционным методом. Нужно ввести учетные данные и код доступа, указанные при создании аккаунта.
Ключевые аспекты для конфиденциального входа:
– Эксплуатируйте защищенный пароль
– Активируйте двухфакторную верификацию
– Не храните пароли на публичных устройствах
– Отслеживайте URL строку браузера
Описание премиальной системы
Игровая платформа балует пользователей различными привилегиями и специальными предложениями:
Приветственный комплект
Свежие игроки имеют возможность надеяться на существенное награду за первый пополнение. Обычно это долевая прибавка к внесенной сумме плюс бесплатные вращения для востребованных слотов.
Регулярные предложения
– 7-дневный cashback — компенсирование доли утраченных денег
– Бонусы на последующие взносы
– Уникальные акции по праздникам
– Конкурсы с значительными наградными суммами
План вознаграждений
Активные игроки собирают баллы за каждую игру, которые затем обмениваются на настоящие финансы, фриспины или уникальные преимущества.
Кодовые слова: как использовать
Купоны — это особые сочетания символов, дающие возможность к специальным бонусам.
Каким образом получить свежие промокоды:
– Авторизованные общественные сети казино
– Сотрудничающие ресурсы
– Email-информирование
– Профильные платформы
Прописывается промокод в специальное поле при создании аккаунта или добавлении денег счета.
Мобильная версия и приложение
Современные геймеры выбирают проводить время с смартфонных гаджетов. Сайт предоставляет 2 решения для приятной телефонной игры.
Адаптивная вариант
Онлайн версия сама оптимизируется под размер экранной панели. Не предполагает инсталляции и функционирует в произвольном новом браузере.
Мобильное приложение
Загрузить софт можно для гаджетов на Android и iOS. Преимущества app:
– Молниеносная открытие
– Стабильная работа
– Всплывающие-уведомления о бонусах
– Самостоятельный минование блокировок
Процесс скачивания прост: требуется зайти на веб-сайт с мобильного гаджета и придерживаться инструкциям.
Игровой каталог
База игр содержит огромное количество единиц от передовых провайдеров.
Слоты
Гемблинг аппараты — наиболее распространенная раздел развлечений. Размещены стандартные трехбарабанные автоматы, передовые видеослоты с поощрительными стадиями, а также накопительные выигрыши.
Live казино
Секция с живыми крупье обеспечивает прочувствовать атмосферу реального казино. Имеются варианты с баккарой.
Вещание осуществляется в превосходном качестве, присутствует общение с дилером и другими участниками.
Состязания
Постоянно устраиваются турниры по всевозможным играм. Участие дает шанс заработать финансовые награды, free spins или уникальные привилегии.
Транзакционные действия
Платформа предоставляет значительный ассортимент денежных систем:
– Кредитные карты
– Виртуальные платформы
– Цифровая валюта
– Финансовые транзакции
Стартовая объем вклада — приемлемая для преобладающего числа геймеров. Обналичивание призов выполняется в скорые интервалы.
Сервис поддержки
Квалифицированные операторы настроены помочь постоянно. Имеются такие каналы общения:
– Интернет-чат
– Email
– Звонковая связь
– Коммуникационные сети
Разъяснения на типовые вопросы можно отыскать в зоне FAQ.
Итог
Лицензионный портал казино и его функционирующие зеркала обеспечивают игрокам полный подключение ко всем опциям ресурса. Великодушные привилегии, приятная телефонная версия, колоссальный каталог развлечений и компетентная служба поддержки создают азартный опыт предельно беспроблемным и защищенным.
this link here – Minimalist design, content is clear and easy to read.
https://vaycasinovip.top/# vaycasino giriş
click here for shop – The name came up today and conveys a courtyard elegance.
Описание главного сайта
Актуальное онлайн-казино предлагает своим участникам большой выбор игр и поощрений. Официальный портал казино РњСЌРґ действует круглосуточно, давая возможность к популярным симуляторам, live-казино и многим предложениям.
Действующее зеркало: доступ к сайту
Что такое альтернатива казино
Зеркало означает собой полную версию основного портала с иным URL адресом. Действующее зеркало дает участникам обходить запреты и сохранять стабильный подключение к любимым играм.
Как отыскать действующее зеркало сегодня
Свежие URL на проверенное зеркало публикуются через:
– Почтовую подписку
– Официальные коммуникационные сети
– Сервис поддержки
– Партнерские площадки
Оформление на ресурсе
Ход оформления
Открытиесчета длится буквально минут и подразумевает данные этапы:
1. Доступ на главный ресурс или рабочее зеркало
2. Выбор кнопки “Открытьсчет”
3. Внесение учетных сведений
4. Активация электроннойпочты или контакта
5. Формирование пароля
Подарок за созданиеаккаунта
Начинающие участники приобретают солидные начальные подарки:
– Бонусные средства на счет
– Халявныеспины для автоматов
– Увеличенный процент возврата
– Эксклюзивные промокоды
Авторизация в индивидуальный профиль
Активные клиенты могут осуществить авторизацию через основной веб-сайт или актуальное зеркало. Для этого требуется указать никнейм и ключдоступа, придуманные при регистрации.
Функции собственного профиля
В персональном аккаунте имеются такие инструменты:
– Управление персональными сведениями
– Зачисление депозита
– Получение денег
– Использование промокодов
– Проверка статистики операций
– Участие в турнирах
Вознаграждения и акции
Категории подарков
Казино балует своих игроков всевозможными бонусными предложениями:
– Приветственный набор — выгодные поощрения на дебютные взносы
– Халявныеспины — дополнительные вращения в рейтинговых слотах
– Кешбэк — регулярный возмещение части убытков
– Система верности — эксклюзивные преимущества для активных участников
Промокоды и их активация
Эксклюзивные промокоды обеспечивают бонусные вознаграждения. Для ввода требуется ввести шифр в нужное поле в персональном аккаунте.
Геймплейный выбор
Слоты
Коллекция азартных машин насчитывает множество названий от лучших разработчиков:
– Традиционные симуляторы
– Продвинутые автоматы
– Джекпот игры
– Лицензионные игры
Live казино
Раздел Live-казино предлагает игру с живыми дилерами в обстановке реального эфира:
– Американскаярулетка
– Блэкджек
– PuntoBanco
– Техасскийхолдем
Состязания
Периодические соревнования с крупными выигрышными фондами проводятся постоянно. Игроки соревнуются за лидерство в турнирнойсетке.
Портативная версия и программа
Мобильная реализация сайта
Главный портал целиком оптимизирован для мобильных устройств. Клиенты способны открывать игры прямо через браузер без необходимости загрузки.
Программа для инсталляции
Официальное портативное программа предлагается для загрузки на устройства с программными ОС Android и iOS. Программа предоставляет:
– Мгновенный путь к развлечениям
– Бесперебойную функциональность
– Оперативные-уведомления о бонусах
– Удобный оформление
Итог
Официальный сайт казино и его актуальные альтернативы обеспечивают клиентам полный путь к высококлассным игровым развлечениям. Щедрые подарки, многочисленные промо, удобная смартфонная версия и квалифицированная помощь превращают азартный досуг чрезвычайно комфортным и результативным.
заказать курсовую срочно заказать курсовую срочно .
buy accutane
Stone Finds – Browsed casually, layout is clean and navigation feels intuitive.
Обзор главного сайта
Прогрессивные онлайн казино предоставляют игрокам обширный выбор развлечений и возможностей. Основной ресурс http://www.letrasincreibles.com/reshenie-dlya-platezhey-ot-kompanii гарантирует проверенный доступ к гемблинг услугам.
Рабочее зеркало: возможность прямо сейчас
Резервный сайт выступает как точную дубликат главного портала. Действующее зеркало позволяет участникам обходить возможные ограничения.
Выгоды задействования зеркала
Основные плюсы предполагают:
– Постоянный доступ к платформе
– Сохранение полных функций базового веб-сайта
– Сохранность персональных сведений
– Такой же набор функций
Оформление профиля на платформе
Процедура создания аккаунта характеризуется простотой и эргономичностью. Недавние клиенты необходимо:
1. Открыть главный сайт или его зеркало
2. Щелкнуть на клавишу открытия счета
3. Указать требуемые информацию
4. Верифицировать почтовую почту
5. Выполнить начальный доступ
Бонус за создание аккаунта
Новички зарабатывают значительный приветственный презент. Данное вознаграждение в состоянии охватывать:
– Финансовые начисления
– Даровые фриспины
– Повышенный показатель кэшбека
Вход в персональный кабинет
Действующие пользователи имеют возможность быстро войти в персональный раздел, задействуя логин и пароль. Личный аккаунт предлагает возможность к:
– Контролю средствами
– Истории транзакций
– Активным поощрениям
– Настройкам аккаунта
Вознаграждения и кампании
Портал систематически проводит различные акции для клиентов.
Виды бонусов
Главные категории вознаграждений:
– Пополнительные призы – часть от объема пополнения
– Фриспины – даровые спины в автоматах
– Возврат средств – компенсация процента затраченных денег
– Конкурсные призы – награды за игру в турнирах
Коды
Особые ваучеры позволяют приобрести дополнительные привилегии. Пользователи могут обнаружить их на аффилиатных ресурсах или получить в уведомлениях.
Переносная адаптация и app
Актуальные игроки любят мобильный гейминг.
Функции портативной версии
– Адаптивный облик для различных гаджетов
– Полный путь к автоматам
– Стремительная загрузка
– Комфортное управление
Установить app
Портативное программа предоставлено для downloading на устройства с операционными системами Android и iOS. Приложение предоставляет:
– Надежную работу
– Мгновенные сообщения о предложениях
– Мгновенный доступ к избранным автоматам
Развлекательный ассортимент
Казино обеспечивает внушительную подборку гемблинг забав.
Аппараты
Библиотека развлекательных машин включает:
– Традиционные машины
– Современные аппараты
– Призовые игры
– Сюжетные слоты
Live столы
Раздел лайв игр дает возможность состязаться с живыми ведущими. Представлены:
– Рулетки
– Блек-джек
– Punto Banco
– Техасский холдем
Конкурсы
Периодические турниры обеспечивают участникам соревноваться за солидные призовые фонды. Турнирная программа актуализируется каждую неделю.
Банковские операции
Сайт обеспечивает разнообразие вариантов депозита и получения сумм:
– Кредитные карты
– Онлайн счета
– Банковские транзакции
– Криптовалюты
Абсолютно все переводы осуществляются безопасно с задействованием передовых протоколов кодирования.
Служба support
Опытная служба support действует без перерыва. Соединиться с менеджерами можно через:
– Живой чат
– Email почту
– Телефон
– Social сети
Защита и регулирование
Платформа действует на базе легальной лицензии. Данное гарантирует:
– Прозрачность азартного геймплея
– Безопасность персональных данных
– Оперативные перечисления
– Легальный геймплей
Заключение
Главный веб-сайт и его рабочие альтернативные адреса предоставляют клиентам полный комплекс функций для безопасной и прибыльной досуга. Значительные вознаграждения, разнообразные слоты, профессиональная сервис и проверенная структура платежей превращают ресурс лучшим выбором для любителей гемблинг услуг.
Описание официального сайта
Новое онлайн-казино дарит своим клиентам обширный набор возможностей и поощрений. Основной портал Enomo казино казино функционирует 24/7, обеспечивая возможность к топовым слотам, live-казино и многочисленным кампаниям.
Действующее зеркало: путь к сайту
Что такое альтернатива казино
Альтернатива представляет собой абсолютную реплику основного веб-сайта с отличным URL названием. Действующее зеркало предоставляет игрокам миновать запреты и обеспечивать стабильный доступ к предпочитаемым развлечениям.
Как отыскать актуальное зеркало сегодня
Рабочие URL на основное зеркало публикуются через:
– E-mail оповещение
– Основные социальные сети
– Службу обслуживания
– Специализированные ресурсы
Созданиеаккаунта на платформе
Ход созданияаккаунта
Открытиесчета занимает несколько минут и предполагает нижеследующие этапы:
1. Вход на официальный ресурс или актуальное зеркало
2. Активация клавиши “Открытьсчет”
3. Ввод учетных сведений
4. Подтверждение аккаунта или мобильного
5. Создание секретнойкомбинации
Бонус за оформление
Новые игроки получают солидные стартовые вознаграждения:
– Финансовые средства на баланс
– Бесплатныевращения для игр
– Усиленный размер возврата
– Специальные промокоды
Логин в собственный профиль
Активные участники вправе выполнить вход через главный ресурс или актуальное зеркало. Для этого требуется ввести учетноеимя и секретнуюкомбинацию, сформированные при открытиисчета.
Опции личного аккаунта
В личном аккаунте открыты такие инструменты:
– Редактирование контактными сведениями
– Пополнение счета
– Снятие призов
– Применение бонусов
– Проверка архива ставок
– Вступление в состязаниях
Вознаграждения и кампании
Разновидности подарков
Казино радует своих клиентов всевозможными призовыми программами:
– Стартовый бонус — выгодные поощрения на дебютные вклады
– Фриспины — экстра ставки в рейтинговых слотах
– Компенсация — еженедельный возмещение процента проигрышей
– Схема VIP — уникальные преимущества для верных клиентов
Купоны и их использование
Особые коды обеспечивают дополнительные поощрения. Для использования следует указать последовательность в специальное окно в персональном аккаунте.
Геймплейный набор
Симуляторы
Коллекция игровых автоматов включает тысячи вариантов от известных поставщиков:
– Стандартные слоты
– Современные автоматы
– Джекпот слоты
– Тематические автоматы
Live казино
Область Live-казино предлагает игру с реальными дилерами в режиме реального времени:
– Рулетка
– Очко
– Пунтобанко
– Casinopoker
Состязания
Систематические состязания с большими джекпотными фондами организуются постоянно. Участники конкурируют за лидерство в списке.
Портативная версия и программа
Адаптивная адаптация сайта
Официальный ресурс на100% настроен для мобильных устройств. Игроки могут пользоваться развлечения напрямую через веб-навигатор без нужды установки.
Приложение для скачивания
Фирменное портативное софт предоставляется для скачивания на устройства с рабочими системами Android и iOS. Софт дает:
– Моментальный путь к автоматам
– Бесперебойную функциональность
– Оперативные-извещения о бонусах
– Удобный оформление
Итог
Главный ресурс казино и его актуальные зеркала гарантируют игрокам абсолютный доступ к первоклассным азартным услугам. Солидные подарки, всевозможные промо, функциональная смартфонная платформа и опытная сервис превращают игровой опыт предельно удобным и прибыльным.
mossridge website – Dropped in here unexpectedly and the neat design looks great.
online emporium link – Noticed this site today, navigation is smooth and organized.
Hazel Crest Finds Online – Simple and inviting, giving a cheerful browsing experience.
Период ufc в феврале марте 2026 три недели которые встряхнут дивизионы может принести много громких сенсаций. Источник здесь: https://obves63.ru/news/ufc-fevral-mart-2026-polnyj-razbor-turnirov-s-akczentom-na-anderkardy-i-skrytye-intrigi/
Вход к сайту через проверенные зеркала
Нынешние интернет казино гарантируют геймерам круглосуточный вход к развлечениям. Официальный сайт http://www.criatrix.com/sem-categoria/sposoby-povysheniya-proizvoditelnosti-sayta-kazino/ функционирует бесперебойно, обеспечивая широкий набор развлекательных автоматов. Впрочем периодически образуются технические проблемы или запреты, поэтому важно знать о доступности функционирующих зеркал.
Что представляет собой центральное зеркало казино
Дубликат — это полная версия официального портала с схожим функционалом. Действующее зеркало в настоящее время даёт возможность миновать местные блокировки и вести гемблинг.
Ключевые выгоды задействования зеркал:
– Безграничный подключение к собственному кабинету
– Поддержание совокупных показателей учётной записи
– Аналогичный спектр игр
– Свежие вознаграждения и кампании
Открытие счёта на портале
Процедура регистрации отнимает немного минут. Свежие пользователи зарабатывают щедрый приз за создание счёта, который может вмещать:
– Вступительный денежный бонус
– Безвозмездные спины для игр
– Особые купоны
– Расширенный компенсацию
Для окончания оформления требуется:
1. Перейти на главный портал или зеркало
2. Кликнуть элемент «Оформиться»
3. Указать контактные информацию
4. Подтвердить мейл или мобильный
5. Использовать промокод (если есть наличии)
Вход в персональный кабинет
По завершении удачной записи пользователи могут совершать авторизацию посредством центральный портал или действующее зеркало. Персональный кабинет обеспечивает абсолютный надзор над счётом:
– История игр
– Зачисление счёта
– Получение призов
– Регулирование поощрениями
– Вовлечение в состязаниях
Поощрения и предложения казино
Ресурс удовлетворяет клиентов различными поощрительными схемами:
Стартовые призы
Новые игроки приобретают щедрый набор поощрений на стартовые пополнения. Обычно это предполагает пропорциональную надбавку к сумме вклада плюс бесплатные спины.
Постоянные промо
– Еженедельный компенсация до 15%
– Конкурсы с наградными суммами
– Подарки на годовщину рождения
– Эксклюзивные промо для VIP игроков
Программа поощрения
Постоянные пользователи зарабатывают очки, которые можно превратить на реальные финансы или уникальные льготы.
Смартфонная версия и приложение
Передовые инновации позволяют участвовать всюду подходяще. Смартфонная редакция портала самостоятельно подстраивается под монитор всякого устройства.
Плюсы портативного софта:
– Моментальная загрузка развлечений
– Практичный вид
– Push-нотификации о бонусах
– Шанс установить для Android и iOS
Живое казино: среда истинного развлекательного заведения
Категория Live клуба транспортирует пользователей в обстановку истинного развлекательного дома. Опытные ведущие проводят действие в виде актуального времени.
Имеющиеся игры:
– Американская рулетка
– Очко
– Баккара
– Техасский холдем
Барабаны и азартные аппараты
Собрание развлекательных автоматов охватывает сотни вариантов от ведущих студий. Произвольный пользователь найдёт развлечение по желанию:
– Стандартные слоты
– Видеослоты с бонусными раундами
– Джекпот-слоты
– Мегавейс слоты
Турниры и лотереи
Постоянные турниры вносят остроту и обеспечивают шанс заработать значительные суммы. Присутствие в турнирах регулярно даровое, а призовые фонды доходят до крупных величин.
Защита и анонимность
Платформа использует инновационные протоколы криптографии для охраны данных клиентов. Любые денежные действия выполняются через охраняемые протоколы.
Заключение
Центральный веб-сайт и его функционирующие зеркала предоставляют надёжный подключение к превосходным игровым услугам. Привлекательные поощрения, комфортная мобильная версия, разнообразие игр и квалифицированное Live-клуб создают сайт замечательным вариантом для фанатов гемблинг слотов.
teen porno
West Spot – Minimalist interface, exploring products was simple and quick.
acorn vendor network – Smooth browsing, sections are easy to follow.
marketplace shop link – Clean structure makes browsing simple and enjoyable.
LinenMarket – The site conveys clarity, trustworthiness, and strong branding.
Reference
buying cheap neurontin without insurance
for the next part.
check this outlet – Quick look here shows fast loading and a simple layout.
http://usmedssaver.com/# canada cloud pharmacy
Актуальные онлайн-казино обеспечивают участникам обширный ассортимент развлечений и поощрительных вариантов. Вход к ресурсу осуществляется через лицензионный сайт или его актуальное зеркало казино Лаки Бир, что гарантирует непрерывную деятельность.
Что представляет собой действующее зеркало казино
Зеркало — это идентичная версия главного сайта, созданная для обхода ограничений. Действующее зеркало обеспечивает игрокам получить доступ к выбранным автоматам в любое удобное время.
Проверенное зеркало имеет всеми возможностями первоначального веб-сайта:
– Весь ассортимент развлечений
– Аккаунт с сохраненными параметрами
– Актуальные акции
– Защищенные финансовые процедуры
Создание аккаунта на основном сайте
Процедура открытия счета отнимает всего пару минут. Новым участникам требуется:
1. Войти на главный портал или функционирующее зеркало
2. Щелкнуть на клавишу “Зарегистрироваться”
3. Указать нужные параметры
4. Активировать контакт
5. Сделать первый взнос
Стартовый бонус выдается автоматически после прохождения всех шагов.
Авторизация в учетную запись
Существующие пользователи могут выполнить подключение указывая:
– Никнейм и шифр
– Цифры мобильного
– Email
Аккаунт открывает шанс к управлению финансами, данным игр и действующим промокодам.
Бонусы и кампании
Азартная площадка радует лояльных участников многочисленными бонусами:
Начальный комплект
– Бонус на стартовый взнос до 100%
– Даровые спины на востребованные автоматы
– Добавочные бонусы за очередные депозиты
Бонусные коды
Эксклюзивные коды предоставляют право на получение особых призов. Актуальные комбинации выкладываются в секции “Акции”.
Кешбэк
Регулярный кешбэк составляет до 10% от утраченных денег. Выплата предоставляется автоматически.
Система лояльности
Активные пользователи приобретают единицы, которые переводятся на действительные средства или фриспины.
Mobile версия и APP
Ради комфорта пользователей построена качественная портативная платформа. Адаптивный интерфейс помогает легко делать ставки с произвольного портативного гаджета.
Преимущества приложения:
– Оперативный доступ к слотам
– Оптимизированный дизайн
– Бесперебойная функциональность
– Сообщения о последних событиях
Установить софт можно даром с официального портала для аппаратов на Android и iOS.
Библиотека слотов
Слоты
База насчитывает более 2000 игр от ведущих студий:
– Традиционные слоты
– Video slots
– Джекпот-слоты
– Тематические развлечения
Live казино
Блок Live казино дает взаимодействие с настоящими диллерами в реальном формате:
– Рулеточные столы
– Карточная игра
– Баккара
– Карточный покер
Состязания
Регулярные турниры с крупными премиальными пулами организуются еженедельно. Участие в состязаниях разрешено всем зарегистрированным участникам.
Денежные способы
Депозиты и выводы финансов выполняются через востребованные сервисы:
– Кредитные карточ ки
– Онлайн сервисы
– Криптовалюта
– Прямые операции
Минимальный взнос — от 100 рублей. Получение финансов осуществляется в течение 24 периода.
Отдел помощи
Непрерывная команда помощи способна содействовать в разрешении произвольных ситуаций:
– Живой чат
– Email
– Связь
– Социальные сети
Защита и сертификат
Главный сайт работает на базе глобальной документа. Все данные клиентов защищены новейшим SSL-кодированием.
Итог
Действующее зеркало предоставляет непрерывный вход к выбранным слотам, щедрым поощрениям и практичным возможностям. Зарегистрируйтесь сейчас и получите приветственный подарок!
shop homepage – Bold and distinctive, feels adventurous and inviting.
https://bajarxdirect.shop/# online pharmacy in mexico
Нынешние онлайн-казино предоставляют игрокам широкий спектр возможностей и бонусных программ. Подключение к сервису выполняется через лицензионный ресурс или его действующее зеркало Volta casino, что дает непрерывную работу.
В чем суть действующее зеркало казино
Копия — это идентичная реплика официального веб-сайта, построенная для преодоления запретов. Актуальное зеркало помогает игрокам сохранить подключение к любимым развлечениям в любое удобное время.
Лицензионное зеркало содержит всеми опциями основного ресурса:
– Целый ассортимент автоматов
– Личный кабинет с зафиксированными информацией
– Свежие поощрения
– Надежные финансовые транзакции
Оформление профиля на лицензионном портале
Процесс открытия счета занимает всего несколько минут. Начинающим игрокам требуется:
1. Войти на основной веб-сайт или рабочее зеркало
2. Щелкнуть на кнопку “Зарегистрироваться”
3. Указать необходимые параметры
4. Подтвердить контакт
5. Внести дебютный взнос
Бонус за регистрацию зачисляется моментально после окончания всех ступеней.
Вход в профиль
Зарегистрированные участники могут произвести авторизацию используя:
– Логин и ключ
– Код контакта
– Контактный email
Персональный раздел дает шанс к администрированию финансами, сведениям транзакций и действующим бонусам.
Бонусы и кампании
Азартная сервис привлекает постоянных пользователей разнообразными бонусами:
Стартовый пакет
– Надбавка на стартовый пополнение до 100%
– Фриспины на востребованные машины
– Дополнительные поощрения за очередные пополнения
Бонусные коды
Особые промокоды предоставляют шанс на активацию особых бонусов. Актуальные купоны размещаются в блоке “Бонусы”.
Кэшбек
Еженедельный бонус составляет до 10% от использованных сумм. Выплата начисляется незамедлительно.
Программа лояльности
Активные участники приобретают единицы, которые переводятся на действительные деньги или фриспины.
Mobile версия и APP
Ради комфорта игроков создана полноценная мобильная версия. Адаптивный дизайн дает возможность легко делать ставки с всякого портативного устройства.
Достоинства APP:
– Оперативный подключение к автоматам
– Адаптированный вид
– Стабильная функциональность
– Сообщения о последних бонусах
Загрузить программу можно бесплатно с основного ресурса для гаджетов на Android и iOS.
Библиотека автоматов
Слоты
Каталог содержит более 2000 игр от ведущих разработчиков:
– Традиционные слоты
– Видео-слоты
– Прогрессивные автоматы
– Тематические игры
Live казино
Блок Live столов предоставляет взаимодействие с настоящими дилерами в живом времени:
– Roulette
– Blackjack
– Baccarat
– Poker
Турниры
Постоянные турниры с большими наградными фондами проводятся каждую неделю. Допуск в турнирах возможно всем действующим пользователям.
Денежные способы
Платежи и снятия средств выполняются через распространенные способы оплаты:
– Банковские пластик
– Электронные системы
– Криптовалюта
– Прямые транзакции
Минимальный взнос — от 100 рублей. Снятие финансов проводится в течение 24 времени.
Команда поддержки
Круглосуточная отдел поддержки расположена поддержать в разрешении каких-либо задач:
– Live chat
– Email
– Горячая линия
– Общественные сети
Охрана и сертификат
Официальный сайт действует на базе международной сертификата. Все данные клиентов обезопасены актуальным SSL-шифрованием.
Вывод
Рабочее зеркало дает бесперебойный подключение к предпочитаемым автоматам, привлекательным бонусам и практичным услугам. Создайте аккаунт сейчас и приобретите приветственный подарок!
visit their site – Layout is tidy, scrolling and navigation feel natural.
Современные онлайн-казино обеспечивают игрокам разнообразный набор игр и заманчивые награды. Но для беспроблемной деятельности критично знать, как обнаружить ВОВАДА и его функционирующие зеркала.
Что такое лицензионный портал казино
Официальный веб-сайт казино — это главная платформа, где игроки могут развлекаться игровыми играми. Сайт функционирует на легитимных правах и располагает всеми требуемыми документами.
Первостепенные плюсы официального ресурса:
– Надежность индивидуальных реквизитов
– Справедливые требования игры
– Стабильные выводы
– Компетентная поддержка
Действующее зеркало казино: для чего требуется
Дублирующий ресурс — это абсолютная дубликат основного ресурса, размещенная по другому URL. Функционирующее зеркало создается для гарантирования стабильного соединения к ресурсу.
Поводы эксплуатации альтернативных адресов:
– Блокировка основного домена
– Плановые работы
– Повышенная посещаемость на платформу
Как отыскать свежее зеркало в данный момент
Обнаружить текущее проверенное зеркало можно различными вариантами:
1. Рассылка — активируйте уведомления на почтовую подписку
2. Команда помощи — проконсультируйтесь в онлайн-чат
3. Социальные сети — проверяйте за обновлениями
4. Игровые ресурсы — авторитетные ресурсы
Оформление профиля на портале казино
Алгоритм открытия счета составляет только считанные секунд:
1. Нажмите на элемент “Открыть счет”
2. Внесите обязательные поля
3. Валидируйте контактную e-mail
4. Примените промокод, если доступен
После оконченной создания аккаунта вам откроется открыт личный аккаунт.
Премии и коды активации
Богатая бонусная политика — важное плюс казино:
Подарок за создание аккаунта
Новые клиенты приобретают приветственный бонус, который может включать:
– Денежный счет на стартовый пополнение
– Free spins для игровых машин
– Безвозвратные деньги
Активационные коды
Регулярно публикуются новые купоны, обеспечивающие использовать экстра поощрения.
Схема компенсации
Активные игроки возвращают долю проигранных финансов на счет.
Действующие кампании и соревнования
Платформа периодически организует интересные события:
– Недельные чемпионаты
– Тематические бонусы
– Конкурсы крупных подарков
– Система привилегий
Доступ в персональный кабинет
Для доступа на платформу необходимо:
1. Загрузить лицензионный адрес или действующее зеркало
2. Активировать “Войти”
3. Ввести логин и секретную комбинацию
В индивидуальном профиле предоставлены следующие опции:
– Депозит депозита
– Вывод выигрышей
– Анализ журнала ставок
– Управление профильными настройками
Адаптивная модификация и приложение
Мобильная модификация
Responsive платформа сайта дает возможность играть с всех мобильного устройства. Дизайн адаптивно адаптируется под диагональ монитора.
Приложение для скачивания
Установить приложение можно для:
– Android — прямая download с сайта
– iOS — загрузка через App Store
Плюсы app:
– Оперативный доступ
– Стабильная операционность
– Push-нотификации об акциях
– Улучшенный интерфейс
Азартные разделы
Игровые машины
Обширная галерея развлекательных автоматов от ведущих производителей:
– Традиционные машины
– Новые-эмуляторы
– Прогрессивные-машины
Live casino
Категория с профессиональными ведущими предлагает:
– Рулеточные столы
– Блэкджек
– Punto Banco
– Карточные игры
Трансляции осуществляются в отличном качестве, формируя впечатление аутентичного казино.
Методы внесения средств и получения
Казино работает с разные платежные системы:
– Платежные карты
– Онлайн кошельки
– Криптовалюты
– Wire транзакции
Базовые лимиты депозита и оперативные выплаты делают развлечение предельно приятной.
Команда техподдержки
Квалифицированная служба помощи работает 24/7 и способна поддержать с различными задачами:
– Реалтайм-чат
– Email-переписка
– Голосовая связь
Резюме
Основной ресурс казино и его актуальные копии гарантируют пользователям безопасный и азартный азартный процесс. Богатые поощрения, комфортная адаптивная модификация, обширные автоматы и превосходное live-казино создают эту систему великолепным решением для гемблинг игр.
Современные онлайн-казино предоставляют геймерам обилие вариантов для беспроблемной игры. Основной ресурс Мелстрой дарит доступ ко всем возможностям и азартным играм. Однако при образовании системных неполадок на подмогу приходят действующие альтернативные адреса.
Что означает собой актуальное зеркало
Альтернативный адрес казино — это точная реплика главного сайта, размещенная по альтернативному веб-адресу. Официальное зеркало удерживает все характеристики, вместе с регистрацию, вход в персональный кабинет, вознаграждения и купоны.
Дубликат на сегодня предоставляет:
– Непрерывный вход к азартным автоматам
– Полную конфиденциальность персональных сведений
– Сохранение средств и записей платежей
– Возможность использования всех специальных предложений
Создание аккаунта на основном портале
Ход создания аккаунта занимает считанные минут. Свежеиспеченным пользователям требуется:
1. Войти на подлинный портал или рабочее зеркало
2. Кликнуть кнопку «Создать аккаунт»
3. Ввести нужные данные
4. Подтвердить email почту
5. Ввести кодовое слово при присутствии
После финиша регистрации клиенты обретают вознаграждение за регистрацию, который может охватывать free spins или монетарное вознаграждение.
Логин в персональный кабинет
Приватный кабинет предоставляет всеобъемлющий мониторинг над игровым процессом. Через персональный профиль допускается:
– Депонировать кошелек
– Выводить выплаты
– Задействовать купоны
– Проверять историю пари
– Участвовать в конкурсах
– Приобретать кешбэк
Обзор премий и специальных предложений
Богатая поощрительная схема — значимое достоинство проекта. Основные типы вознаграждений:
Приветственный подарок
Начинающие зарабатывают великодушное награду на дебютные депозиты. Объем премии может доходить до 100-200% от объема пополнения.
Бесплатные вращения
Безвозмездные прокруты предоставляются для популярных слотов. Количество фриспинов варьируется от 10 до 500 штук.
Cash back
Систематический или ежемесячный откат доли потерянных средств. Средний процент кэшбека — 5-15%.
Конкурсы
Периодические конкурсы с солидными премиальными фондами. Игроки конкурируют за призовые позиции в турнирной таблице.
Смартфонная версия и софт
Смартфонная версия позволяет играть с всякого гаджета. Клиенты могут установить программу для iOS и Android или применять интернет версию.
Плюсы мобильного софта:
– Оперативная загрузка игр
– Практичный дизайн
– Push-уведомления о промо
– Возможность входа через биометрию
Игровые автоматы и Live казино
Развлекательная библиотека включает сотни названий от топовых провайдеров.
Известные разделы слотов:
– Традиционные слоты
– Современные слоты с премиальными этапами
– Накопительный приз игры
– Megaways машины
Live казино
Зона live казино предлагает партию с живыми крупье. Доступны стандартные варианты:
– Американская рулетка
– Блэкджек
– Баккара
– Покер
Как обнаружить рабочее зеркало
Раздобыть действующую адрес на зеркало можно разными методами:
1. Подписаться на емейл-уведомления
2. Мониторить за новостями в соц сетях
3. Связаться в службу поддержки
4. Сохранить рабочее зеркало в закладки
Вывод
Официальный сайт и его актуальные зеркала гарантируют непрерывный вход к игровым слотам. Богатые поощрения, множественные купоны, практичное смартфонное приложение и отличная сервис поддержки создают азартный геймплей максимально комфортным и безопасным.
discover more – Pages are clear and well-structured, very readable.
Характеристика главного веб-сайта
Современное онлайн-казино предоставляет своим клиентам большой ассортимент игр и призов. Оригинальный портал Vovan оперирует непрерывно, гарантируя путь к известным симуляторам, live-казино и многим акциям.
Рабочее зеркало: возможность к ресурсу
Что такое зеркало казино
Дубликат составляет собой полную копию главного ресурса с иным доменным адресом. Рабочее зеркало предоставляет пользователям избегать блокировки и иметь стабильный подключение к выбранным слотам.
Как найти текущее зеркало сегодня
Актуальные ссылки на основное зеркало размещаются через:
– Почтовую оповещение
– Официальные коммуникационные сети
– Отдел помощи
– Affiliated площадки
Регистрация на сайте
Ход оформления
Оформление занимает всего минут и включает нижеследующие шаги:
1. Доступ на официальный веб-сайт или рабочее зеркало
2. Активация клавиши “Открытьсчет”
3. Заполнение личных информации
4. Активация аккаунта или номера
5. Формирование пароля
Вознаграждение за регистрацию
Новые игроки приобретают щедрые приветственные подарки:
– Финансовые депозиты на баланс
– Фриспины для симуляторов
– Усиленный объем возврата
– Специальные промокоды
Доступ в личный кабинет
Действующие игроки могут выполнить доступ через главный веб-сайт или рабочее зеркало. Для этого нужно указать никнейм и ключдоступа, придуманные при регистрации.
Инструменты персонального профиля
В собственном кабинете предоставлены данные инструменты:
– Изменение учетными данными
– Зачисление депозита
– Вывод денег
– Активация промокодов
– Просмотр архива ставок
– Регистрация в конкурсах
Бонусы и кампании
Разновидности бонусов
Казино радует своих игроков разнообразными призовыми предложениями:
– Приветственный бонус — большие поощрения на начальные депозиты
– Freespins — дополнительные вращения в известных симуляторах
– Кэшбек — регулярный откат суммы проигрышей
– План поощрения — уникальные бонусы для активных клиентов
Купоны и их ввод
Специальные ваучеры гарантируют дополнительные бонусы. Для использования требуется набрать комбинацию в нужное поле в индивидуальном аккаунте.
Азартный каталог
Игры
Коллекция развлекательных автоматов содержит сотни названий от известных провайдеров:
– Стандартные симуляторы
– Продвинутые игры
– Накопительные игры
– Брендовые слоты
Live казино
Область Live-казино предоставляет взаимодействие с профессиональными операторами в режиме реального времени:
– Европейскаярулетка
– Очко
– Баккара
– Карибскийпокер
Турниры
Регулярные соревнования с внушительными джекпотными фондами устраиваются еженедельно. Игроки конкурируют за победу в таблице.
Мобильная адаптация и APP
Адаптивная платформа портала
Главный сайт на100% оптимизирован для смартфонных гаджетов. Клиенты способны пользоваться развлечения сразу через обозреватель без обязательства загрузки.
APP для инсталляции
Специальное портативное APP доступно для скачивания на устройства с программными средами Android и iOS. APP гарантирует:
– Моментальный подход к развлечениям
– Стабильную операционность
– Оперативные-извещения о промо
– Удобный дизайн
Итог
Оригинальный сайт казино и его рабочие зеркала дают игрокам всесторонний доступ к высококлассным развлекательным сервисам. Солидные вознаграждения, разнообразные акции, комфортная портативная адаптация и опытная поддержка формируют азартный досуг чрезвычайно комфортным и доходным.
shop link – Ran into this site today, layout is tidy and very user friendly.
mexican pharmacy: BajaRx Direct – buying prescription drugs in mexico
Современные онлайн-казино предлагают игрокам массу путей для беспроблемной игры. Основной портал казино Tippy казино предоставляет доступ ко всем функциям и развлечениям. Однако при образовании системных неполадок на подмогу прибывают актуальные дубликаты.
Что есть собой рабочее зеркало
Дубликат казино — это стопроцентная копия официального сайта, расположенная по дополнительному веб-адресу. Легитимное зеркало поддерживает все опции, включая создание аккаунта, доступ в индивидуальный кабинет, бонусы и купоны.
Зеркало на сегодня предоставляет:
– Бесперебойный доступ к азартным машинам
– Абсолютную конфиденциальность индивидуальных данных
– Сохранение баланса и истории операций
– Доступность всех промо-предложений
Регистрация на основном ресурсе
Процедура создания аккаунта требует считанные минут. Начинающим игрокам нужно:
1. Войти на главный ресурс или функционирующее зеркало
2. Выбрать кнопку «Зарегистрироваться»
3. Заполнить необходимые данные
4. Подтвердить э-мейл почту
5. Указать купон при существовании
После завершения регистрации клиенты обретают вознаграждение за регистрацию, какой может содержать free spins или денежно-призовое поощрение.
Вход в персональный кабинет
Индивидуальный кабинет предоставляет всеобъемлющий управление над азартным процессом. Через личный профиль допускается:
– Финансировать кошелек
– Выводить выплаты
– Задействовать промокоды
– Контролировать записи ставок
– Играть в состязаниях
– Приобретать cash back
Описание поощрений и специальных предложений
Великодушная призовая схема — значимое достоинство ресурса. Центральные типы вознаграждений:
Начальный приз
Новые игроки приобретают щедрое премирование на начальные взносы. Объем премии может составлять 100-200% от объема вклада.
Free spins
Бесплатные раунды выдаются для популярных автоматов. Количество free spins варьируется от 10 до 500 штук.
Кэшбек
Еженедельный или помесячный возврат доли потерянных средств. Средний объем кэшбека — 5-15%.
Состязания
Периодические состязания с большими наградными фондами. Участники конкурируют за верхние позиции в таблице лидеров.
Смартфонная версия и программа
Смартфонная версия дает возможность играть с каждого девайса. Пользователи могут установить app для iOS и Android или применять браузерную версию.
Выгоды мобильного софта:
– Молниеносная прогрузка игр
– Удобный дизайн
– Пуш-нотификации о акциях
– Вход через отпечаток пальца
Слоты и Live казино
Игровая коллекция включает сотни позиций от известных провайдеров.
Популярные типы игр:
– Стандартные автоматы
– Видеослоты с призовыми этапами
– Накопительный приз слоты
– Мега-путь слоты
Live игровой зал
Зона live казино предлагает развлечение с профессиональными крупье. Есть традиционные развлечения:
– Французская рулетка
– Двадцать одно
– Баккара
– Карибский покер
Как обнаружить действующее зеркало
Получить рабочую адрес на зеркало разрешается разными способами:
1. Оформить подписку на email-рассылку
2. Мониторить за обновлениями в социальных сетях
3. Обратиться в службу поддержки
4. Заложить действующее зеркало в закладки
Вывод
Официальный портал и его действующие копии предоставляют бесперебойный вход к азартным слотам. Выгодные поощрения, разнообразные промокоды, удобное портативное приложение и отличная служба поддержки превращают азартный опыт предельно приятным и надежным.
Hello!
Reveal emotional mysterious truths in interesting stories with valuable empathy and connect deeply with others emotionally see on the website for empathy training
Full information on the link – https://900letekas.site
All the best and development in business!
Нынешние онлайн-казино гарантируют клиентам обилие опций для удобной игры. Центральный сайт Кракен казино обеспечивает вход ко всем опциям и играм. Однако при наличии технических неполадок на помощь спешат рабочие зеркала.
Что представляет собой актуальное зеркало
Копия казино — это идентичная реплика оригинального ресурса, расположенная по запасному веб-адресу. Подлинное зеркало поддерживает все функции, в том числе регистрацию, вход в индивидуальный кабинет, бонусы и промокоды.
Дубликат на сегодня гарантирует:
– Постоянный путь к игровым машинам
– Стопроцентную безопасность индивидуальных данных
– Сохранение депозита и записей платежей
– Применимость всех акций
Создание учетной записи на официальном ресурсе
Ход регистрации занимает считанные минут. Новоиспеченным игрокам необходимо:
1. Зайти на официальный портал или функционирующее зеркало
2. Выбрать кнопку «Регистрация»
3. Внести нужные графы
4. Верифицировать email почту
5. Ввести бонусный код при присутствии
После окончания регистрации геймеры обретают приз за регистрацию, который может содержать бонусные спины или монетарное поощрение.
Вход в персональный кабинет
Индивидуальный кабинет дает всеобъемлющий надзор над игровым действом. Через личный раздел можно:
– Пополнять счет
– Снимать выигрыши
– Использовать купоны
– Проверять хронологию ставок
– Участвовать в соревнованиях
– Получать возврат средств
Анализ премий и акций
Выгодная премиальная система — ключевое достоинство платформы. Главные виды поощрений:
Вступительный приз
Новые игроки приобретают щедрое премирование на стартовые взносы. Сумма приза может доходить до 100-200% от суммы депозита.
Фриспины
Халявные раунды начисляются для известных машин. Сумма бесплатных вращений изменяется от 10 до 500 штук.
Кешбэк
Регулярный или помесячный возврат доли проигранных денег. Стандартный процент кэшбека — 5-15%.
Состязания
Периодические состязания с солидными наградными банками. Соревнующиеся состязаются за верхние позиции в таблице лидеров.
Портативная версия и приложение
Мобильная версия разрешает делать ставки с всякого аппарата. Клиенты могут установить приложение для iOS и Android или применять интернет версию.
Плюсы смартфонного приложения:
– Быстрая подзагрузка слотов
– Эргономичный графический интерфейс
– Пуш-нотификации о поощрениях
– Возможность входа через отпечаток пальца
Автоматы и Live казино
Игровая коллекция включает множество названий от топовых поставщиков.
Востребованные разделы автоматов:
– Традиционные слоты
– Видео-автоматы с бонусными этапами
– Прогрессивный джекпот игры
– Мега-путь автоматы
Live казино
Категория live игорный зал предлагает игру с профессиональными крупье. Доступны стандартные развлечения:
– Европейская рулетка
– Блэкджек
– Баккара
– Покер
Как найти функционирующее зеркало
Обрести действующую URL на зеркало разрешается различными способами:
1. Оформить подписку на email-рассылку
2. Мониторить за обновлениями в соц сетях
3. Контактировать в департамент поддержки
4. Заложить действующее зеркало в избранное
Вывод
Основной портал и его актуальные дубликаты предоставляют непрерывный вход к развлекательным автоматам. Богатые бонусы, многочисленные бонусные коды, эргономичное мобильное софт и качественная техподдержка поддержки делают игровой геймплей крайне беспроблемным и конфиденциальным.
mostbet lucky jet mostbet94063.help
this online outlet – Visiting this website for the first time and it’s looking quite helpful.
explore the outlet – Took a glance around, the design feels user-friendly and clear.
shop homepage – Came across this name today, and it feels cozy and approachable.
Spring Corner Market – Clean menus, exploring categories was simple.
accutane online http://sbsmeds.sbs/# buy accutane cheap
https://vaycasinovip.online/# vaycasino giriş
Современные онлайн-казино предлагают клиентам широкий ассортимент игр и поощрительных предложений. Присоединение к платформе выполняется через лицензионный ресурс или его рабочее зеркало casino Zooma, что гарантирует стабильную работу.
Что представляет собой рабочее зеркало казино
Альтернатива — это полная реплика оригинального веб-сайта, созданная для преодоления запретов. Действующее зеркало обеспечивает участникам получить вход к предпочитаемым развлечениям в произвольное время.
Подлинное зеркало содержит всеми функциями оригинального веб-сайта:
– Целый ассортимент развлечений
– Учетная запись с сохраненными параметрами
– Свежие акции
– Безопасные финансовые процедуры
Регистрация на лицензионном сайте
Ход оформления составляет всего пару минут. Начинающим пользователям нужно:
1. Зайти на официальный веб-сайт или актуальное зеркало
2. Кликнуть на элемент “Открыть счет”
3. Ввести нужные параметры
4. Подтвердить email
5. Внести первый взнос
Стартовый бонус зачисляется сразу после выполнения всех шагов.
Вход в личный кабинет
Существующие участники могут совершить подключение применяя:
– Учетное имя и пароль
– Цифры сотового
– Email
Профиль открывает доступ к регулированию балансом, истории игр и активным поощрениям.
Поощрения и предложения
Гемблинг система привлекает лояльных игроков щедрыми поощрениями:
Приветственный пакет
– Надбавка на стартовый депозит до 100%
– Бесплатные вращения на топовые игры
– Дополнительные бонусы за следующие взносы
Купоны
Особые коды обеспечивают доступ на приобретение особых вознаграждений. Свежие купоны размещаются в секции “Бонусы”.
Cashback
Постоянный кэшбек достигает до 10% от проигранных сумм. Возврат зачисляется моментально.
Система лояльности
Регулярные участники приобретают единицы, которые обмениваются на настоящие выплаты или фриспины.
Мобильный сайт и APP
Для практичности участников построена удобная mobile версия. Отзывчивый интерфейс обеспечивает легко играть с каждого переносного аппарата.
Преимущества софта:
– Скорый вход к автоматам
– Оптимизированный дизайн
– Бесперебойная активность
– Оповещения о актуальных турнирах
Загрузить софт можно безвозмездно с главного ресурса для устройств на Android и iOS.
Ассортимент развлечений
Слоты
Коллекция насчитывает более 2000 слотов от ведущих разработчиков:
– Традиционные слоты
– Видео-слоты
– Прогрессивные автоматы
– Фирменные автоматы
Live казино
Раздел Live казино обеспечивает участие с настоящими диллерами в реальном формате:
– Рулетка
– Двадцать одно
– Баккара
– Карточный покер
Соревнования
Систематические турниры с солидными выигрышными пулами устраиваются каждую неделю. Допуск в турнирах возможно всем действующим пользователям.
Расчетные системы
Взносы и снятия выплат реализуются через востребованные методы:
– Банковские карты
– Электронные сервисы
– Цифровая валюта
– Счетные платежи
Минимальный платеж — от 100 рублей. Получение средств выполняется в течение 24 времени.
Служба поддержки
Непрерывная отдел помощи может помочь в исправлении любых задач:
– Мессенджер
– Email
– Контактный номер
– Соц сети
Безопасность и разрешение
Подлинный веб-сайт оперирует на базе глобальной документа. Все сведения пользователей обезопасены актуальным SSL-кодированием.
Вывод
Рабочее зеркало дает бесперебойный подключение к излюбленным играм, богатым акциям и комфортным сервисам. Откройте счет сегодня и получите стартовый приз!
Современные онлайн-казино гарантируют клиентам богатый набор слотов и выгодные награды. Тем не менее для удобной работы необходимо иметь представление, как отыскать Lucky Bear и его действующие зеркала.
Что такое лицензионный ресурс казино
Главный веб-сайт казино — это первичная система, где игроки могут получать удовольствие от игровыми слотами. Портал функционирует на официальных основаниях и обладает всеми необходимыми документами.
Главные выгоды основного портала:
– Защищенность пользовательских сведений
– Объективные требования участия
– Подтвержденные выводы
– Компетентная служба поддержки
Актуальное зеркало казино: для чего нужно
Дублирующий ресурс — это идентичная дубликат официального ресурса, находящаяся по другому адресу. Действующее зеркало формируется для предоставления стабильного доступа к ресурсу.
Основания эксплуатации копий сайта:
– Недоступность официального адреса
– Плановые процедуры
– Высокая нагрузка на систему
Как найти актуальное зеркало в данный момент
Узнать новое действующее зеркало можно разными вариантами:
1. Рассылка — оформите подписку на почтовую подписку
2. Команда support — обратитесь в онлайн-чат
3. Официальные медиа — проверяйте за обновлениями
4. Специализированные порталы — надежные ресурсы
Регистрация на сайте казино
Процесс открытия счета занимает буквально несколько мгновений:
1. Активируйте на элемент “Регистрация”
2. Заполните запрашиваемые информацию
3. Верифицируйте почтовую e-mail
4. Используйте купон, если есть
После финализированной активации вам станет доступен персональный кабинет.
Поощрения и купоны
Выгодная премиальная структура — существенное преимущество казино:
Награда за регистрацию
Начинающие участники приобретают начальный подарок, который может предполагать:
– Финансовый бонус на первый пополнение
– Фри-спины для барабанов
– Бездепозитные деньги
Бонусные коды
Постоянно выходят свежие бонусные шифры, предоставляющие получить дополнительные преимущества.
Система компенсации
Постоянные игроки приобретают часть проигранных финансов обратно.
Текущие акции и конкурсы
Платформа регулярно устраивает азартные кампании:
– Недельные баттлы
– Праздничные предложения
– Конкурсы значительных подарков
– Программа лояльности
Авторизация в пользовательский профиль
Для входа на сайт необходимо:
1. Загрузить главный адрес или действующее зеркало
2. Активировать “Войти”
3. Ввести email и ключ
В индивидуальном профиле доступны данные опции:
– Внесение средств депозита
– Получение средств
– Анализ архива операций
– Управление индивидуальными данными
Портативная версия и программа
Портативная платформа
Responsive вариант веб-сайта позволяет развлекаться с разных карманного гаджета. Интерфейс адаптивно адаптируется под размер screen.
Клиент для download
Скачать клиент можно для:
– Android — прямая download с ресурса
– iOS — установка через App Store
Выгоды мобильного клиента:
– Быстрый вход
– Надежная работа
– Push-нотификации об бонусах
– Производительный UI
Игровые разделы
Слоты
Внушительная подборка игровых слотов от ведущих разработчиков:
– Традиционные машины
– Современные-слоты
– Джекпот-игры
Live casino
Категория с профессиональными крупье предоставляет:
– Рулетка
– Блэкджек
– Baccarat
– Poker
Стримы проводятся в HD разрешении, обеспечивая атмосферу аутентичного казино.
Способы пополнения и обналичивания
Ресурс работает с различные транзакционные сервисы:
– Кредитные карты
– Виртуальные кошельки
– Crypto
– Финансовые транзакции
Стартовые пороги пополнения и моментальные выплаты гарантируют игру максимально комфортной.
Команда техподдержки
Квалифицированная группа поддержки доступна 24/7 и способна ассистировать с разными проблемами:
– Онлайн-чат
– Email-поддержка
– Голосовая горячая линия
Заключение
Основной портал казино и его рабочие альтернативные адреса гарантируют пользователям безопасный и увлекательный гемблинг отдых. Привлекательные поощрения, комфортная mobile вариант, богатые автоматы и качественное live-казино превращают эту площадку превосходным выбором для игровых развлечений.
collective shop link – Clean structure ensures browsing feels effortless.
browse echo store – Scrolled briefly and the page arrangement feels clean.
Hazel Brook Store – Straightforward and cozy, perfect for a natural-feeling shop.
drugstore com online pharmacy prescription drugs pharmacy orlando mail pharmacy
discover more – Creative and inviting, leaves a friendly, classy impression.
Переход к ресурсу через актуальные зеркала
Актуальные интернет казино предоставляют клиентам непрерывный переход к развлечениям. Центральный сайт http://digital.mediapex.net/niakjot/kak-osushchestvit-popolnenie-scheta-s-pomoshchyu/ действует надёжно, предоставляя широкий ассортимент гемблинг автоматов. Однако периодически появляются цифровые препятствия или запреты, следовательно необходимо иметь представление о доступности функционирующих зеркал.
Что представляет собой центральное зеркало казино
Копия — это абсолютная реплика центрального портала с аналогичным набором функций. Функционирующее зеркало сегодня позволяет миновать территориальные запреты и возобновлять времяпрепровождение.
Ключевые преимущества задействования зеркал:
– Абсолютный подключение к персональному кабинету
– Удержание каждых показателей аккаунта
– Идентичный набор развлечений
– Действующие поощрения и акции
Открытие счёта на платформе
Процесс записи занимает несколько минут. Новые игроки обретают привлекательный бонус за оформление, что в состоянии включать:
– Приветственный игровой подарок
– Бесплатные спины для слотов
– Эксклюзивные ваучеры
– Увеличенный кэшбек
Для завершения регистрации требуется:
1. Перейти на основной сайт или альтернативу
2. Нажать опцию «Создать аккаунт»
3. Ввести персональные сведения
4. Верифицировать почтовый адрес или мобильный
5. Применить ваучер (если есть присутствии)
Подключение в собственный кабинет
По завершении удачной оформления игроки способны производить вход через основной портал или действующее зеркало. Персональный кабинет предоставляет безграничный управление над учётной записью:
– Летопись игр
– Пополнение счёта
– Получение денег
– Регулирование бонусами
– Включение в состязаниях
Поощрения и кампании казино
Портал награждает пользователей разнообразными наградными предложениями:
Начальные поощрения
Новички приобретают богатый букет бонусов на стартовые вклады. Как правило это содержит частичную добавку к размеру взноса плюс комплиментарные спины.
Систематические кампании
– Каждонедельный кешбэк до 15%
– Состязания с премиальными пулами
– Бонусы на число рождения
– Эксклюзивные акции для элитных пользователей
План верности
Регулярные игроки получают пункты, что разрешено обменять на реальные средства или особые бонусы.
Смартфонная форма и программа
Актуальные разработки дают возможность развлекаться всюду подходяще. Мобильная редакция веб-сайта независимо приспосабливается под монитор каждого устройства.
Выгоды мобильного программы:
– Скоростная запуск слотов
– Комфортный интерфейс
– Моментальные-нотификации о бонусах
– Опция установить для Android и iOS
Реальное казино: атмосфера настоящего азартного клуба
Область Live казино погружает пользователей в антураж реального развлекательного учреждения. Опытные дилеры организуют развлечение в режиме настоящего времени.
Предлагаемые развлечения:
– Колесо фортуны
– Карточная игра
– Классика
– Покер
Слоты и игровые машины
Коллекция развлекательных машин насчитывает множество вариантов от ведущих студий. Всякий игрок отыщет слот по нраву:
– Традиционные автоматы
– Инновационные игры с дополнительными этапами
– Накопительный-машины
– Мегавейс машины
Соревнования и раздачи
Регулярные состязания добавляют драйв и открывают способность заработать внушительные суммы. Участие в конкурсах часто комплиментарное, а премиальные банки доходят до внушительных сумм.
Защита и анонимность
Портал эксплуатирует передовые протоколы кодирования для обеспечения информации пользователей. Любые транзакционные действия осуществляются через охраняемые линии.
Итог
Центральный сайт и его актуальные зеркала гарантируют устойчивый подключение к превосходным гемблинг услугам. Великодушные призы, комфортная карманная версия, разнообразие машин и компетентное Live-клуб превращают ресурс прекрасным решением для ценителей азартных развлечений.
Современные онлайн-казино предлагают игрокам массу вариантов для приятной игры. Официальный портал Stimule сайт казино казино предоставляет путь ко всем опциям и развлечениям. Однако при возникновении программных проблем на выручку прибывают рабочие альтернативные адреса.
Что являет собой собой актуальное зеркало
Зеркало казино — это полная копия основного веб-сайта, размещенная по другому адресу. Легитимное зеркало поддерживает все характеристики, вместе с создание аккаунта, доступ в собственный кабинет, бонусы и промокоды.
Копия на сегодня дает:
– Непрерывный доступ к развлекательным аппаратам
– Совершенную конфиденциальность персональных сведений
– Сохранение баланса и хронологии операций
– Применимость всех бонусных программ
Регистрация на лицензионном ресурсе
Ход регистрации занимает считанные минут. Начинающим клиентам требуется:
1. Перейти на официальный сайт или действующее зеркало
2. Нажать кнопку «Зарегистрироваться»
3. Внести требуемые поля
4. Подтвердить э-мейл почту
5. Использовать бонусный код при наличии
После завершения создания аккаунта клиенты получают вознаграждение за регистрацию, какой может содержать бонусные спины или денежное вознаграждение.
Доступ в собственный кабинет
Индивидуальный кабинет предоставляет полный надзор над азартным процессом. Через личный профиль допускается:
– Вносить средства на баланс
– Забирать выплаты
– Применять купоны
– Проверять записи ставок
– Соревноваться в состязаниях
– Приобретать кэшбек
Обзор вознаграждений и промо-предложений
Выгодная призовая программа — существенное козырь казино. Основные типы бонусов:
Приветственный приз
Новые игроки обретают великодушное вознаграждение на дебютные депозиты. Величина приза может доходить до 100-200% от суммы пополнения.
Фриспины
Даровые вращения начисляются для известных автоматов. Объем бесплатных вращений колеблется от 10 до 500 штук.
Возврат средств
Еженедельный или помесячный откат доли проигранных денег. Типичный размер возврата — 5-15%.
Турниры
Систематические турниры с большими наградными фондами. Конкурсанты борются за верхние строчки в таблице лидеров.
Портативная версия и софт
Адаптивная версия позволяет развлекаться с всякого устройства. Пользователи могут установить программу для iOS и Android или задействовать веб версию.
Преимущества портативного софта:
– Молниеносная подзагрузка игр
– Практичный графический интерфейс
– Пуш-нотификации о бонусах
– Вход через биометрию
Слоты и Live казино
Развлекательная библиотека включает тысячи позиций от лидирующих поставщиков.
Топовые типы слотов:
– Классические машины
– Видео-автоматы с бонусными раундами
– Накопительный приз слоты
– Мега-путь машины
Live игровой зал
Раздел live казино обеспечивает игру с профессиональными дилерами. Есть стандартные игры:
– Американская рулетка
– Блэкджек
– Punto Banco
– Техасский холдем
Как отыскать функционирующее зеркало
Обрести актуальную адрес на зеркало можно различными способами:
1. Оформить подписку на почтовую рассылку
2. Мониторить за апдейтами в соц сетях
3. Написать в отдел поддержки
4. Заложить действующее зеркало в фавориты
Итог
Главный сайт и его рабочие копии дают непрерывный путь к развлекательным играм. Великодушные бонусы, разнообразные купоны, удобное мобильное программа и высококлассная служба поддержки превращают игровой процесс крайне беспроблемным и безопасным.
plumbrook website – Navigation is intuitive and content is clear.
LemonStoneCo – The site feels polished, memorable, and fashion-forward.
Wave Collections – Organized menus, moving through items was smooth.
hazel vendor network – Smooth browsing, sections are easy to follow.
Актуальные онлайн-казино предоставляют клиентам обилие вариантов для беспроблемной игры. Главный ресурс https://ierb.org.br/2026/03/04/reshenie-dlya-platezhey-ot-kompanii/ предоставляет путь ко всем опциям и азартным играм. Однако при образовании программных неполадок на подмогу прибывают актуальные дубликаты.
Что представляет собой действующее зеркало
Дубликат казино — это полная копия оригинального веб-сайта, расположенная по запасному URL. Легитимное зеркало хранит все функции, вместе с открытие профиля, доступ в индивидуальный кабинет, бонусы и кодовые слова.
Альтернативный сайт на сегодня гарантирует:
– Стабильный путь к развлекательным машинам
– Абсолютную сохранность индивидуальных информации
– Удержание депозита и журнала переводов
– Доступность всех акций
Создание аккаунта на официальном сайте
Процесс создания аккаунта занимает считанные минут. Новоиспеченным геймерам необходимо:
1. Войти на подлинный ресурс или рабочее зеркало
2. Щелкнуть кнопку «Создать аккаунт»
3. Ввести нужные поля
4. Верифицировать email почту
5. Применить купон при присутствии
После окончания регистрации клиенты обретают приз за регистрацию, который может включать фриспины или денежно-призовое поощрение.
Авторизация в персональный кабинет
Персональный кабинет предоставляет комплексный мониторинг над игровым процессом. Через собственный профиль возможно:
– Финансировать счет
– Забирать призы
– Применять купоны
– Отслеживать записи ставок
– Участвовать в соревнованиях
– Приобретать возврат средств
Описание вознаграждений и специальных предложений
Щедрая бонусная программа — существенное козырь платформы. Основные формы вознаграждений:
Приветственный подарок
Новички обретают богатое награду на первые взносы. Размер приза может доходить до 100-200% от величины депозита.
Бесплатные вращения
Безвозмездные вращения выдаются для известных слотов. Количество free spins разнится от 10 до 500 штук.
Возврат средств
Еженедельный или помесячный отдача процента проигранных денег. Типичный процент кэшбека — 5-15%.
Конкурсы
Регулярные состязания с большими наградными пулами. Игроки борются за лучшие позиции в таблице лидеров.
Мобильная версия и приложуха
Смартфонная версия обеспечивает делать ставки с каждого гаджета. Игроки могут скачать софт для iOS и Android или задействовать браузерную версию.
Плюсы смартфонного программы:
– Скоростная подзагрузка слотов
– Комфортный UI
– Пуш-нотификации о поощрениях
– Возможность входа через биометрию
Машины и Live казино
Азартная коллекция включает сотни наименований от известных провайдеров.
Известные секции автоматов:
– Обычные слоты
– Видео-автоматы с премиальными раундами
– Джекпот игры
– Megaways автоматы
Live игровой зал
Секция live казино предоставляет партию с профессиональными дилерами. Есть традиционные игры:
– Европейская рулетка
– Двадцать одно
– Баккара
– Карибский покер
Как разыскать актуальное зеркало
Обрести свежую адрес на зеркало возможно несколькими методами:
1. Подписаться на почтовую рассылку
2. Наблюдать за апдейтами в социальных сетях
3. Написать в службу поддержки
4. Запомнить рабочее зеркало в фавориты
Вывод
Основной сайт и его актуальные дубликаты предоставляют непрерывный доступ к развлекательным слотам. Щедрые премии, множественные купоны, практичное портативное приложение и профессиональная служба поддержки превращают игровой опыт максимально комфортным и безопасным.
mostbet Oʻzbekiston android mostbet Oʻzbekiston android
Современные онлайн-казино предлагают участникам разнообразный выбор азартных игр и привлекательные премии. Впрочем для стабильной деятельности необходимо понимать, как найти казино Mellstroy и его рабочие зеркала.
Что такое основной портал казино
Главный ресурс казино — это основная веб-площадка, где игроки могут развлекаться гемблинг играми. Платформа оперирует на законных условиях и имеет всеми обязательными разрешениями.
Ключевые преимущества официального сайта:
– Безопасность пользовательских данных
– Прозрачные условия игры
– Обеспеченные транзакции
– Профессиональная служба поддержки
Функционирующее зеркало казино: для чего требуется
Альтернативный адрес — это абсолютная копия лицензионного веб-сайта, размещенная по другому домену. Функционирующее зеркало разрабатывается для поддержания стабильного соединения к сайту.
Причины эксплуатации копий сайта:
– Ограничение главного домена
– Регламентные мероприятия
– Большая активность на ресурс
Как найти рабочее зеркало в данный момент
Узнать актуальное проверенное зеркало можно несколькими способами:
1. Почтовые оповещения — активируйте уведомления на информационную доставку
2. Команда помощи — проконсультируйтесь в онлайн-чат
3. Корпоративные площадки — мониторьте за новостями
4. Партнерские сайты — авторитетные сайты
Регистрация на портале казино
Алгоритм создания аккаунта требует буквально немного минут:
1. Нажмите на элемент “Регистрация”
2. Укажите обязательные поля
3. Валидируйте почтовую адрес
4. Введите бонусный код, если есть
Сразу после оконченной создания аккаунта вам будет возможен индивидуальный раздел.
Награды и коды активации
Богатая бонусная структура — существенное достоинство казино:
Поощрение за открытие счета
Новые игроки зарабатывают первый поощрение, который может включать:
– Денежный депозит на первый депозит
– Фриспины для игровых машин
– Приветственные бонусы
Купоны
Периодически появляются новые коды, позволяющие забрать специальные поощрения.
Система кешбэка
Активные участники возвращают процент утраченных финансов обратно.
Действующие предложения и соревнования
Ресурс регулярно организует интересные акции:
– Weekly турниры
– Специальные акции
– Конкурсы ценных подарков
– Система VIP-клуба
Логин в индивидуальный аккаунт
Для входа на платформу необходимо:
1. Перейти на основной ресурс или функционирующее зеркало
2. Выбрать “Вход”
3. Указать имя пользователя и ключ
В персональном разделе открыты данные инструменты:
– Внесение средств кошелька
– Обналичивание выигрышей
– Проверка архива операций
– Управление профильными сведениями
Портативная платформа и app
Мобильная модификация
Адаптивная модификация портала позволяет играть с различных мобильного телефона. Оформление самостоятельно настраивается под размер монитора.
Программа для загрузки
Установить клиент можно для:
– Android — непосредственная скачивание с портала
– iOS — загрузка через App Store
Преимущества app:
– Оперативный старт
– Надежная производительность
– Push-уведомления об акциях
– Улучшенный функционал
Азартные разделы
Автоматы
Внушительная галерея азартных машин от известных разработчиков:
– Ретро игры
– Новые-эмуляторы
– Накопительные-игры
Live игры
Секция с профессиональными операторами предлагает:
– Рулетки
– Blackjack
– Baccarat
– Карточные игры
Вещания транслируются в HD качестве, обеспечивая впечатление аутентичного казино.
Методы депозита и вывода
Сайт принимает различные транзакционные сервисы:
– Дебетовые картсчета
– Онлайн платежи
– Цифровые валюты
– Wire транзиты
Базовые суммы депозита и скоростные платежи делают игру максимально приятной.
Служба поддержки
Компетентная команда support доступна 24/7 и может содействовать с любыми задачами:
– Мгновенный-чат
– Email-помощь
– Звонковая линия
Выводы
Главный сайт казино и его рабочие зеркала гарантируют игрокам конфиденциальный и увлекательный игровой опыт. Щедрые подарки, комфортная mobile вариант, богатые слоты и профессиональное live-казино делают эту платформу замечательным вариантом для игровых досуга.
Профессиональный вывод из запоя лечение детоксикация организма, помощь при алкогольной интоксикации и восстановление самочувствия пациента. Специалист приезжает на дом и оказывает профессиональную помощь.
see this site – Sections are well-arranged, reading is comfortable.
Вход к ресурсу через проверенные зеркала
Современные интернет казино дают геймерам непрерывный переход к сервисам. Главный ресурс http://digiskills.ro/apple-pay-zashchishchennye-i-mgnovennye-platezhi-v-internet-kazino оперирует надёжно, обеспечивая богатый набор развлекательных развлечений. Впрочем временами возникают системные проблемы или ограничения, следовательно существенно быть осведомлённым о доступности действующих зеркал.
Что представляет собой главное зеркало казино
Копия — это абсолютная копия центрального ресурса с аналогичным возможностями. Рабочее зеркало сейчас даёт возможность обходить территориальные ограничения и поддерживать игру.
Основные достоинства применения зеркал:
– Стопроцентный переход к индивидуальному кабинету
– Фиксация всех показателей счёта
– Такой же ассортимент автоматов
– Актуальные привилегии и акции
Регистрация на портале
Операция регистрации длится пару минут. Начинающие пользователи получают щедрый подарок за запись, который в состоянии включать:
– Стартовый финансовый бонус
– Бесплатные кручения для игр
– Особые купоны
– Увеличенный кэшбек
Ради финализации создания аккаунта нужно:
1. Переместиться на главный портал или дубликат
2. Выбрать элемент «Создать аккаунт»
3. Указать личные данные
4. Подтвердить электронную почту или телефон
5. Задействовать ваучер (если есть наличии)
Вход в собственный кабинет
Следом за правильной оформления игроки способны осуществлять подключение с помощью основной портал или актуальное зеркало. Собственный кабинет обеспечивает полный контроль над учётной записью:
– История пари
– Пополнение счёта
– Получение денег
– Контроль бонусами
– Включение в состязаниях
Награды и предложения казино
Портал удовлетворяет пользователей различными поощрительными предложениями:
Вступительные поощрения
Дебютанты приобретают богатый набор наград на вступительные пополнения. Обычно это включает долевую добавку к величине депозита плюс безвозмездные вращения.
Периодические акции
– Седмичный возврат до 15%
– Конкурсы с премиальными пулами
– Бонусы на годовщину рождения
– Эксклюзивные программы для статусных клиентов
Схема лояльности
Активные пользователи зарабатывают очки, что можно трансформировать на настоящие призы или уникальные бонусы.
Портативная версия и утилита
Передовые инновации позволяют играть в любом месте комфортно. Смартфонная редакция веб-сайта независимо приспосабливается под дисплей каждого девайса.
Плюсы карманного приложения:
– Моментальная подгрузка автоматов
– Удобный дизайн
– Всплывающие-сообщения о предложениях
– Возможность скачать для Android и iOS
Реальное казино: среда реального гемблинг клуба
Раздел Live казино транспортирует геймеров в среду настоящего азартного учреждения. Компетентные операторы проводят процесс в виде подлинного времени.
Представленные игры:
– Рулетка
– Очко
– Punto Banco
– Покер
Игровые машины и игровые аппараты
Каталог игровых автоматов насчитывает тысячи названий от топовых студий. Произвольный клиент обнаружит автомат по вкусу:
– Стандартные слоты
– Инновационные игры с призовыми этапами
– Крупный приз-машины
– Многолинейные автоматы
Соревнования и раздачи
Постоянные состязания вносят остроту и открывают способность заработать крупные награды. Участие в конкурсах часто безвозмездное, а призовые фонды доходят до значительных величин.
Охрана и анонимность
Сайт применяет передовые системы кодирования для защиты данных клиентов. Все финансовые транзакции проходят через зашифрованные каналы.
Итог
Центральный ресурс и его действующие зеркала гарантируют надёжный вход к превосходным игровым услугам. Богатые поощрения, эргономичная карманная редакция, богатство слотов и профессиональное Live-казино создают платформу замечательным выбором для фанатов гемблинг игр.
Source
where buy trazodone without dr prescription
for primary sources.
https://certifiednorthrx.shop/# canada drugs
https://usmedssaver.com/# vipps canadian pharmacy
islemint online marketplace – Fresh presentation and distinctive brand make it stand out clearly.
Передовые виртуальные казино предоставляют геймерам большой диапазон опций для беспроблемной игры. Впрочем иногда соединение к основному порталу может стать закрытым. В таких случаях на поддержку приходит Голд сайт, которое обеспечивает постоянный доступ ко всем функциям платформы.
Что такое функционирующее зеркало казино
Копия — это абсолютная версия основного веб-сайта, которая размещается по другому URL. Зеркало поддерживает весь инструментарий главного сайта, включая персональный кабинет, счет и историю операций.
Основные выгоды задействования зеркала:
– Непрерывный вход к сайту
– Стопроцентная идентичность опций
– Конфиденциальность пользовательских сведений
– Хранение доступных бонусов
Как найти функционирующее зеркало в данный момент
Существует несколько проверенных способов поиска действующей ссылочной информации:
Авторизованные каналы:
1. Имейл рассылка — руководство периодически направляет информацию с рабочими адресами
2. Медийные сети — официальные аккаунты выкладывают текущую сведения
3. Служба поддержки — консультанты сообщают проверенные ссылки
4. Портативное приложение — предоставляет избегать блокировки
Открытие счета на главном ресурсе
Процедура регистрации занимает только немного минут и предполагает из следующих стадий:
1. Открытие на лицензионный веб-сайт или рабочее зеркало
2. Клик на клавишу «Создать аккаунт»
3. Заполнение персональной формы
4. Подтверждение электронной почты или телефонного номера
5. Включение поощрения за регистрацию при существовании промокода
Свежие пользователи получают значительный приветственный приз, который может включать free spins, финансовые призы или кэшбек.
Логин в персональный кабинет
Авторизация на портале реализуется обычным способом. Нужно вписать имя пользователя и кодовое слово, примененные при регистрации.
Важные детали для конфиденциального входа:
– Эксплуатируйте защищенный шифр
– Запустите 2FA аутентификацию
– Не фиксируйте коды на общественных компьютерах
– Проверяйте адресную строку браузера
Обзор наградной системы
Игорный портал радует пользователей многочисленными поощрениями и кампаниями:
Начальный пакет
Дебютанты вправе надеяться на значительное бонус за стартовый депозит. Традиционно это пропорциональная надбавка к переведенной объему плюс даровые спины для известных слотов.
Постоянные акции
– 7-дневный компенсация — возвращение доли потерянных денежных средств
– Бонусы на повторные вклады
– Уникальные промо по торжествам
– Соревнования с значительными выигрышными банками
Программа вознаграждений
Постоянные пользователи зарабатывают единицы за каждую ставку, которые затем меняются на действительные деньги, free spins или специальные льготы.
Промокоды: как задействовать
Купоны — это индивидуальные комбинации символов, дающие возможность к специальным привилегиям.
Где раздобыть свежие промокоды:
– Авторизованные коммуникационные сети казино
– Партнерские порталы
– Email-новостная лента
– Профильные форумы
Указывается промокод в отдельное поле при оформлении или внесении депозита депозита.
Смартфонная версия и приложение
Передовые пользователи отдают предпочтение делать ставки с телефонных аппаратов. Ресурс дает пару решения для беспроблемной смартфонной игры.
Responsive версия
Веб версия автоматически оптимизируется под габариты монитора. Не предполагает скачивания и действует в произвольном современном браузере.
Телефонное приложение
Получить приложение можно для девайсов на Android и iOS. Выгоды app:
– Молниеносная загрузка
– Стабильная действие
– Автоматические-уведомления о поощрениях
– Автоматический избегание блокировок
Операция установки элементарен: требуется попасть на сайт с телефонного аппарата и следовать руководству.
Азартный выбор
База слотов насчитывает множество наименований от ведущих поставщиков.
Слоты
Развлекательные аппараты — крайне распространенная группа игр. Размещены стандартные 3-барабанные аппараты, современные мультимедийные слоты с бонусными уровнями, а также накопительные выигрыши.
Live казино
Секция с действительными крупье позволяет испытать антураж истинного казино. Доступны столы с баккарой.
Стриминг осуществляется в высоком разрешении, имеется диалог с дилером и остальными геймерами.
Соревнования
Периодически устраиваются состязания по всевозможным категориям. Вступление дает шанс выиграть финансовые награды, free spins или особые привилегии.
Денежные процедуры
Ресурс поддерживает широкий набор расчетных способов:
– Банковские карты
– Электронные платформы
– Цифровая валюта
– Финансовые транзакты
Низшая объем депозита — приемлемая для большинства клиентов. Получение выигрышей осуществляется в короткие периоды.
Служба поддержки
Опытные специалисты готовы помочь постоянно. Имеются такие методы коммуникации:
– Интернет-чат
– Email
– Звонковая линия
– Социальные сети
Ответы на типовые запросы можно получить в секции FAQ.
Итог
Официальный веб-сайт казино и его актуальные зеркала предоставляют клиентам максимальный путь ко всем сервисам сайта. Значительные поощрения, приятная портативная версия, гигантский выбор развлечений и компетентная служба поддержки создают гемблинг досуг максимально удобным и конфиденциальным.
Нынешние онлайн-казино предлагают пользователям богатый набор игр и заманчивые бонусы. Однако для комфортной времяпрепровождения существенно иметь представление, как получить доступ к kimquygold.com и его функционирующие зеркала.
Что такое лицензионный портал казино
Основной ресурс казино — это основная платформа, где клиенты могут пользоваться игровыми играми. Портал действует на легитимных условиях и владеет всеми нужными лицензиями.
Ключевые достоинства официального сайта:
– Безопасность личных информации
– Прозрачные правила участия
– Гарантированные транзакции
– Квалифицированная поддержка
Функционирующее зеркало казино: для чего требуется
Копия сайта — это абсолютная версия официального портала, находящаяся по альтернативному адресу. Функционирующее зеркало создается для предоставления бесперебойного подключения к сайту.
Факторы применения альтернативных адресов:
– Недоступность главного URL
– Технические процедуры
– Высокая активность на ресурс
Как найти актуальное зеркало сейчас
Обнаружить актуальное официальное зеркало можно множественными путями:
1. Email-уведомления — оформите подписку на новостную подписку
2. Департамент support — напишите в онлайн-чат
3. Социальные каналы — отслеживайте за новостями
4. Игровые сайты — проверенные платформы
Оформление профиля на платформе казино
Процедура оформления длится только несколько секунд:
1. Активируйте на клавишу “Создать аккаунт”
2. Внесите необходимые данные
3. Активируйте электронную почту
4. Используйте купон, если имеется
Сразу после успешной оформления вам станет доступен персональный кабинет.
Поощрения и бонусные коды
Богатая наградная политика — ключевое достоинство казино:
Подарок за регистрацию
Новые игроки получают приветственный презент, который может предполагать:
– Валютный бонус на дебютный вклад
– Фри-спины для слотов
– Безвозвратные деньги
Активационные коды
Постоянно появляются эксклюзивные бонусные шифры, позволяющие забрать специальные поощрения.
Программа кешбэка
Лояльные игроки зарабатывают долю использованных ставок назад.
Актуальные предложения и состязания
Платформа регулярно устраивает интересные кампании:
– Weekly турниры
– Тематические акции
– Раздачи крупных наград
– Программа VIP-клуба
Логин в персональный раздел
Для входа на портал необходимо:
1. Перейти на официальный адрес или действующее зеркало
2. Нажать “Войти”
3. Внести email и секретную комбинацию
В персональном разделе открыты следующие возможности:
– Зачисление счета
– Обналичивание призов
– Проверка архива игр
– Изменение индивидуальными настройками
Портативная вариант и приложение
Мобильная платформа
Responsive модификация веб-сайта обеспечивает развлекаться с различных смартфонного девайса. Визуал адаптивно подстраивается под формат монитора.
Приложение для загрузки
Скачать программу можно для:
– Android — непосредственная установка с портала
– iOS — установка через App Store
Выгоды app:
– Мгновенный доступ
– Стабильная работа
– Push-сообщения об промо
– Ускоренный UI
Развлекательные разделы
Барабаны
Богатая галерея развлекательных машин от лучших разработчиков:
– Ретро машины
– Новые-эмуляторы
– Джекпот-машины
Live зал
Категория с реальными крупье дает:
– Рулеточные столы
– Блэкджек
– Мини-баккара
– Texas Hold’em
Трансляции проводятся в отличном разрешении, формируя впечатление реального казино.
Способы внесения средств и вывода
Казино поддерживает множественные платежные сервисы:
– Кредитные картсчета
– Цифровые платежи
– Crypto
– Прямые отправки
Базовые суммы внесения и моментальные платежи создают развлечение крайне комфортной.
Департамент support
Компетентная отдел ассистентов оперирует 24/7 и может содействовать с разными задачами:
– Мгновенный-чат
– Email-помощь
– Телефонная служба
Резюме
Лицензионный сайт казино и его действующие дубликаты обеспечивают пользователям защищенный и интересный азартный досуг. Выгодные бонусы, удобная адаптивная модификация, многочисленные автоматы и качественное live-казино делают эту ресурс великолепным решением для азартных развлечений.
shopping district hub – I ended up on this page and liked the calm and tidy presentation.
What a data of un-ambiguity and preserveness of precious familiarity on the topic of unpredicted feelings.
https://share.google/XPSBnBXxG1NKmtzh2
take a look here – Came across this shop and the name conveys a pleasant, modern energy.
Актуальные онлайн-казино предлагают игрокам разнообразие возможностей для комфортной игры. Главный сайт казино Mellstroy дарит доступ ко всем функциям и игровым автоматам. Однако при появлении программных сложностей на выручку прибывают функционирующие зеркала.
Что являет собой собой актуальное зеркало
Дубликат казино — это полная реплика официального ресурса, расположенная по дополнительному доменному имени. Лицензионное зеркало удерживает все функции, в том числе регистрацию, доступ в личный кабинет, вознаграждения и промокоды.
Копия на сегодня обеспечивает:
– Постоянный вход к игровым слотам
– Совершенную безопасность личных информации
– Поддержку счета и журнала операций
– Возможность использования всех промо-предложений
Регистрация на основном ресурсе
Процесс создания аккаунта отнимает пару минут. Начинающим клиентам необходимо:
1. Зайти на подлинный портал или актуальное зеркало
2. Нажать кнопку «Регистрация»
3. Внести необходимые данные
4. Подтвердить э-мейл почту
5. Использовать промокод при наличии
После финиша оформления профиля клиенты получают бонус за регистрацию, который может иметь бонусные спины или финансовое поощрение.
Вход в персональный кабинет
Персональный кабинет открывает всесторонний надзор над азартным процессом. Через собственный аккаунт возможно:
– Вносить средства на кошелек
– Получать средства
– Задействовать купоны
– Отслеживать журнал пари
– Принимать участие в конкурсах
– Забирать кешбэк
Описание бонусов и промо-предложений
Великодушная бонусная схема — существенное достоинство проекта. Главные категории поощрений:
Приветственный подарок
Новые игроки приобретают великодушное награду на дебютные пополнения. Размер премии может достигать 100-200% от величины вклада.
Бонусные спины
Бесплатные прокруты предоставляются для топовых игровых автоматов. Сумма фриспинов изменяется от 10 до 500 штук.
Cash back
Еженедельный или помесячный возврат процента утраченных средств. Средний процент кэшбека — 5-15%.
Конкурсы
Регулярные турниры с солидными наградными фондами. Соревнующиеся борются за призовые строчки в турнирной таблице.
Смартфонная версия и софт
Смартфонная версия дает возможность наслаждаться игрой с каждого девайса. Геймеры могут закачать программу для iOS и Android или применять веб версию.
Достоинства смартфонного софта:
– Молниеносная подзагрузка игр
– Комфортный графический интерфейс
– Всплывающие уведомления о акциях
– Вход через отпечаток пальца
Слоты и Live казино
Азартная библиотека включает тысячи названий от ведущих поставщиков.
Топовые категории слотов:
– Обычные слоты
– Современные слоты с бонусными уровнями
– Джекпот слоты
– Мега-путь машины
Live игорный зал
Категория live казино обеспечивает развлечение с настоящими дилерами. Доступны классические варианты:
– Французская рулетка
– Блэкджек
– Punto Banco
– Покер
Как отыскать функционирующее зеркало
Найти рабочую линк на зеркало можно разными способами:
1. Подписаться на email-рассылку
2. Следить за апдейтами в социальных сетях
3. Связаться в сервис поддержки
4. Добавить в закладки действующее зеркало в закладки
Вывод
Лицензионный сайт и его функционирующие зеркала гарантируют постоянный вход к игровым играм. Богатые бонусы, множественные бонусные коды, практичное портативное приложение и высококлассная техподдержка поддержки создают азартный процесс крайне комфортным и надежным.
Hello everyone!
Find drug mysterious interactions in interesting tests with valuable safety data and mix medicines wisely see on the website for interaction checkers
Full information on the link – https://psihologija.org/stati/ot-idei-k-produktu-puteshestvie-po-miru-litja-pod-davleniem
All the best and development in business!
Актуальные виртуальные казино дают геймерам обширный ассортимент вариантов для беспроблемной игры. Но иногда подключение к базовому ресурсу может являться ограниченным. В таких ситуациях на поддержку приходит https://canadafair.compass.in.ua/kazino-2026-goda-predlagayushchie-bystryy-vyvod-denezhnykh-sredstv, которое обеспечивает постоянный подключение ко всем опциям платформы.
Что такое актуальное зеркало казино
Альтернативный сайт — это идентичная версия основного ресурса, которая находится по другому URL. Зеркало содержит все инструментарий первоначального портала, включая личный кабинет, средства и запись операций.
Основные плюсы использования зеркала:
– Непрерывный вход к платформе
– Максимальная идентичность возможностей
– Защита индивидуальных реквизитов
– Сохранение всех имеющихся бонусов
Как найти рабочее зеркало в данный момент
Существует ряд безопасных способов получения действующей адреса:
Авторизованные сервисы:
1. Почтовая рассылка — дирекция регулярно направляет письма с действующими доменами
2. Социальные сети — авторизованные страницы размещают актуальную данные
3. Служба поддержки — специалисты выдают достоверные ссылки
4. Смартфонное приложение — дает возможность избегать блокировки
Регистрация на официальном портале
Операция создания аккаунта занимает только немного минут и состоит из следующих ступеней:
1. Вход на основной сайт или функционирующее зеркало
2. Щелчок на иконку «Открыть счет»
3. Заполнение регистрационной анкеты
4. Проверка имейл почты или контактного номера
5. Задействование привилегии за регистрацию при присутствии промокода
Начинающие пользователи получают великодушный начальный приз, который может охватывать фриспины, валютные призы или cashback.
Доступ в пользовательский кабинет
Логин на ресурсе производится стандартным методом. Необходимо внести никнейм и код доступа, использованные при оформлении.
Важные моменты для надежного входа:
– Эксплуатируйте защищенный секретный ключ
– Задействуйте двухэтапную верификацию
– Не записывайте реквизиты на общественных устройствах
– Проверяйте адресную строку браузера
Описание наградной структуры
Гемблинг-сайт радует геймеров разнообразными привилегиями и кампаниями:
Начальный набор
Начинающие способны претендовать на существенное поощрение за стартовый вклад. Как правило это долевая премия к зачисленной количеству плюс free spins для топовых слотов.
Регулярные акции
– Еженедельный cashback — возвращение процента списанных денег
– Призы на последующие вклады
– Специальные промо по праздникам
– Конкурсы с солидными премиальными пулами
Схема привилегий
Деятельные пользователи получают единицы за любую игру, которые затем конвертируются на реальные денежные призы, даровые прокруты или уникальные бонусы.
Кодовые слова: как активировать
Бонус-коды — это уникальные сочетания знаков, обеспечивающие доступ к специальным поощрениям.
Где получить рабочие промокоды:
– Официальные коммуникационные сети казино
– Союзнические ресурсы
– Email-информирование
– Отраслевые форумы
Активируется промокод в предназначенное поле при регистрации или пополнении счета.
Смартфонная версия и приложение
Передовые пользователи предпочитают проводить время с портативных устройств. Портал дает два варианта для удобной портативной игры.
Мобильная редакция
Браузерная версия самостоятельно подстраивается под габариты монитора. Не предполагает установки и действует в всяком современном браузере.
Смартфонное приложение
Получить программу можно для гаджетов на Android и iOS. Достоинства app:
– Молниеносная активация
– Стабильная функционирование
– Автоматические-уведомления о промо
– Независимый обход блокировок
Операция установки легок: требуется попасть на сайт с смартфонного гаджета и придерживаться инструкциям.
Гемблинг выбор
Коллекция слотов насчитывает несколько тысяч единиц от лучших провайдеров.
Слоты
Развлекательные автоматы — наиболее распространенная категория развлечений. Размещены классические простые машины, современные видео-автоматы с дополнительными уровнями, а также прогрессивные призы.
Live казино
Зона с реальными дилерами обеспечивает испытать настроение истинного казино. Представлены варианты с баккарой.
Стриминг ведется в превосходном качестве, поддерживается коммуникация с крупье и остальными геймерами.
Соревнования
Регулярно запускаются соревнования по всевозможным играм. Участие обеспечивает возможность завоевать валютные призы, бесплатные вращения или особые презенты.
Финансовые действия
Платформа предоставляет широкий набор финансовых систем:
– Пластиковые карты
– Цифровые платформы
– Цифровая валюта
– Счетовые транзакты
Минимальная сумма депозита — доступная для массы пользователей. Снятие выигрышей производится в скорые периоды.
Отдел поддержки
Квалифицированные операторы готовы содействовать 24/7. Имеются данные варианты связи:
– Веб-чат
– Email
– Голосовая связь
– Общественные сети
Ответы на распространенные проблемы можно отыскать в секции FAQ.
Итог
Лицензионный сайт казино и его функционирующие зеркала дают пользователям абсолютный вход ко всем опциям сайта. Щедрые поощрения, комфортная портативная версия, колоссальный выбор слотов и опытная ассистенция создают азартный опыт максимально беспроблемным и надежным.
Spring Collections – Well-organized menus, makes browsing convenient.
check this marketplace – Layout is minimal and user-friendly, making browsing smooth.
shop today – Classic and inviting, stands out gracefully online.
Обзор главного ресурса
Актуальные виртуальные казино дают клиентам обширный ассортимент забав и перспектив. Основной ресурс bonus предлагает надежный возможность к развлекательным функциям.
Актуальное зеркало: доступ прямо сейчас
Альтернативный адрес является в качестве точную версию основного сайта. Действующее зеркало помогает участникам миновать существующие запреты.
Преимущества задействования зеркала
Основные плюсы предполагают:
– Стабильный путь к сайту
– Удержание абсолютно всех опций базового ресурса
– Охрана персональных данных
– Аналогичный инструментарий
Регистрация на портале
Процесс регистрации выделяется легкостью и удобством. Недавние клиенты требуется:
1. Открыть лицензионный ресурс или его зеркало
2. Нажать на кнопку оформления
3. Ввести требуемые информацию
4. Верифицировать электронную ящик
5. Осуществить начальный логин
Вознаграждение за открытие счета
Новички приобретают щедрый начальный презент. Данное награда может предусматривать:
– Материальные суммы
– Даровые фриспины
– Усиленный показатель компенсации
Авторизация в личный раздел
Активные пользователи имеют возможность быстро получить доступ в свой кабинет, используя имя пользователя и шифр. Персональный кабинет предлагает возможность к:
– Контролю балансом
– Хронологии платежей
– Действующим бонусам
– Параметрам аккаунта
Подарки и кампании
Ресурс постоянно проводит многочисленные мероприятия для пользователей.
Категории поощрений
Главные типы вознаграждений:
– Финансовые бонусы – доля от размера пополнения
– Фриспины – бесплатные прокруты в слотах
– Компенсация – возмещение части потерянных сумм
– Конкурсные призы – вознаграждения за игру в турнирах
Промокоды
Специальные купоны дают возможность активировать бонусные выгоды. Игроки способны отыскать их на тематических площадках или заработать в рассылке.
Mobile адаптация и приложение
Актуальные гемблеры ценят переносной гейминг.
Опции mobile платформы
– Responsive интерфейс для всех девайсов
– Полный вход к автоматам
– Стремительная функционирование
– Удобное использование
Загрузить программу
Мобильное приложение доступно для скачивания на устройства с рабочими платформами Android и iOS. Приложение гарантирует:
– Бесперебойную работу
– Всплывающие оповещения о бонусах
– Быстрый доступ к желанным слотам
Игровой выбор
Казино предоставляет огромную подборку гемблинг развлечений.
Аппараты
Каталог азартных слотов охватывает:
– Классические слоты
– Современные слоты
– Призовые слоты
– Лицензионные слоты
Live игры
Раздел лайв дилеров предлагает возможность участвовать с профессиональными ведущими. Доступны:
– Рулетки
– 21
– Baccarat
– Покер
Состязания
Периодические турниры позволяют участникам конкурировать за значительные финансовые фонды. Конкурсная система модифицируется регулярно.
Денежные процедуры
Портал обеспечивает обилие опций депозита и снятия средств:
– Пластиковые карты
– Онлайн счета
– Межбанковские переводы
– Цифровые валюты
Все платежи производятся конфиденциально с задействованием прогрессивных протоколов защиты.
Сервис поддержки
Квалифицированная группа саппорта действует круглосуточно. Соединиться с менеджерами доступно через:
– Онлайн чат
– Электронную почту
– Контактный номер
– Соц медиа
Охрана и регулирование
Казино оперирует на базе легальной разрешения. Подобное удостоверяет:
– Честность развлекательного процесса
– Безопасность личных информации
– Пунктуальные выплаты
– Контролируемый геймплей
Резюме
Главный портал и его рабочие резервные страницы предоставляют пользователям совокупный комплекс услуг для приятной и профитной времяпрепровождения. Солидные призы, всевозможные слоты, квалифицированная служба и безопасная структура выплат делают казино лучшим опцией для фанатов гемблинг развлечений.
mostbet пополнение с humo https://mostbet60172.help
buy isotretinoin no prescription
pinewillow marketplace – Layout feels tidy and pages are easy to read.
vaycasino giriş: vaycasino
Harbor Crest Network – Modern and connected, suggesting a lively community of shoppers.
CrestTradingCoHub – The website style is simple, memorable, and professional.
Передовые онлайн-казино предоставляют геймерам обширный диапазон функций для удобной развлечений. Подключение к ресурсу РЎРЈРљРђРђРђ выполняется через официальный портал или рабочее зеркало.
Что такое рабочее зеркало казино
Актуальное зеркало — это резервный домен основного сайта казино. Такие копии разрабатываются для предоставления постоянного входа к гемблинговой сервису.
Копия актуальное полностью воспроизводит характеристики официального портала. Игроки получают схожий путь ко всем функциям, включая оформление профиля, финансирование баланса и получение средств.
Создание аккаунта на лицензионном веб-сайте
Алгоритм открытия профиля занимает всего несколько моментов. Новым участникам нужно:
1. Войти на официальный сайт или актуальное подлинное зеркало
2. Выбрать кнопку “Открыть счет”
3. Указать нужные данные
4. Активировать электронную почту
5. Применить промокод при существовании
После завершения открытия профиля пользователь приобретает приз за регистрацию, который способен содержать фриспины или cash вознаграждение.
Авторизация в собственный кабинет
Пользовательский кабинет — это закрытая территория, где игроки способны управлять своим профилем. Для доступа требуется напечатать логин и пароль.
В пользовательском кабинете представлены данные инструменты:
– Просмотр хронологии транзакций
– Применение бонусных кодов
– Регулирование вознаграждениями
– Вступление в соревнованиях
– Проверка кэшбека
– Изменение учетной записи
Призы и спецпредложения
Развлекательная сервис предлагает щедрые вознаграждения:
Начальный пакет — дебютанты получают существенное вознаграждение на стартовые пополнения.
Даровые спины — предоставляются как при создании аккаунта, так и в ходе всевозможных мероприятий.
Возмещение — постоянный возмещение процента утраченных финансов.
Бонусные коды — эксклюзивные шифры, открывающие возможность к эксклюзивным вознаграждениям.
Описание азартных секций
Слоты
Собрание slots включает тысячи позиций от передовых производителей. Игроки найдут как классические аппараты, так и актуальные мультимедийные автоматы с притягательной графикой.
Live казино
Категория Live казино обеспечивает возможность развлекаться с живыми дилерами в режиме текущего времени. Имеются известные столы: рулетка, блэкджек, баккара, покер.
Турниры
Регулярные состязания с большими призовыми банками завлекают массу конкурсантов. Лидеры получают cash выплаты и специальные поощрения.
Смартфонная версия и софт
Портативная версия ресурса позволяет наслаждаться с произвольного девайса. Интерфейс автономно подстраивается под размер экрана.
Получить программу можно для устройств на Android и iOS. Смартфонное программа обладает всеми функциями компьютерной версии.
Как отыскать рабочее зеркало на текущий день
Свежие URL копий периодически обновляются. Получить действующую адрес можно разными методами:
– Через сервис помощи
– В проверенных новостных сетях
– По электронной newsletter
– На партнерских площадках
Защита и официальность
Официальный сайт работает на основе международной сертификата. Все переводы оберегаются передовыми технологиями кодирования.
Конфиденциальность личных реквизитов поддерживается в совершенном масштабе.
Итог
Лицензионный ресурс и его функционирующие зеркала обеспечивают пользователям постоянный путь к качественным развлекательным играм. Щедрые бонусы, разнообразные автоматы, компетентная служба — все это делает игровой времяпрепровождение предельно беспроблемным и захватывающим.
Анализ основного портала
Прогрессивные виртуальные казино предлагают участникам разнообразный выбор забав и перспектив. Главный сайт казино Болливуд casino предоставляет безопасный путь к игровым сервисам.
Рабочее зеркало: доступ прямо сейчас
Альтернативный адрес является как идентичную реплику официального веб-сайта. Официальное зеркало позволяет клиентам избегать потенциальные блокировки.
Достоинства применения зеркала
Основные преимущества включают:
– Стабильный доступ к ресурсу
– Хранение полных функций основного ресурса
– Сохранность индивидуальных материалов
– Такой же функционал
Регистрация на сайте
Ход регистрации характеризуется легкостью и эргономичностью. Недавние игроки требуется:
1. Посетить главный портал или его зеркало
2. Щелкнуть на клавишу создания аккаунта
3. Заполнить нужные поля
4. Активировать почтовую ящик
5. Осуществить начальный авторизацию
Вознаграждение за открытие счета
Начинающие зарабатывают значительный стартовый бонус. Данное вознаграждение способно предусматривать:
– Материальные бонусы
– Даровые спины
– Усиленный процент кэшбэка
Вход в личный профиль
Существующие игроки в состоянии быстро авторизоваться в свой кабинет, эксплуатируя логин и шифр. Собственный профиль предлагает путь к:
– Контролю счетом
– Хронологии переводов
– Активным призам
– Опциям профиля
Вознаграждения и промо
Ресурс систематически устраивает всевозможные акции для участников.
Категории бонусов
Основные категории поощрений:
– Пополнительные подарки – процент от объема пополнения
– Спины – даровые прокруты в слотах
– Кэшбэк – возмещение части потерянных сумм
– Призовые трофеи – награды за выступление в турнирах
Коды
Эксклюзивные ваучеры помогают активировать экстра бонусы. Игроки способны отыскать их на тематических сайтах или приобрести в письмах.
Мобильная версия и софт
Передовые клиенты выбирают портативный гейминг.
Возможности портативной системы
– Адаптивный облик для всех аппаратов
– Полный вход к развлечениям
– Быстрая функционирование
– Комфортное контроль
Загрузить app
Mobile софт открыто для загрузки на аппараты с рабочими ОС Android и iOS. Приложение предоставляет:
– Стабильную деятельность
– Всплывающие сообщения о акциях
– Моментальный запуск к предпочитаемым развлечениям
Азартный выбор
Игровой клуб обеспечивает богатую библиотеку гемблинг услуг.
Аппараты
Библиотека развлекательных аппаратов насчитывает:
– Классические автоматы
– Передовые игры
– Джекпотные машины
– Branded слоты
Live столы
Секция живых столов обеспечивает шанс играть с живыми крупье. Представлены:
– Рулетка
– Блек-джек
– Баккара
– Покер
Состязания
Регулярные турниры обеспечивают участникам конкурировать за крупные финансовые банки. Турнирная программа обновляется еженедельно.
Финансовые операции
Казино поддерживает массу вариантов зачисления и снятия денег:
– Банковские карточки
– Цифровые счета
– Wire переводы
– Bitcoin
Все операции осуществляются безопасно с использованием передовых технологий криптографии.
Отдел поддержки
Квалифицированная отдел support работает 24/7. Соединиться с операторами можно через:
– Online чат
– Почтовую почту
– Контактный номер
– Social платформы
Безопасность и регулирование
Игровой клуб функционирует на основании действительной аккредитации. Это подтверждает:
– Справедливость азартного действа
– Безопасность личных сведений
– Пунктуальные транзакции
– Ответственный геймплей
Резюме
Основной ресурс и его функционирующие резервные страницы дают игрокам целостный ассортимент функций для комфортной и прибыльной досуга. Внушительные подарки, многочисленные слоты, опытная служба и надежная инфраструктура операций создают платформу превосходным решением для ценителей гемблинг развлечений.
Walnut Collections Hub – Modern and tidy layout, exploring products felt smooth.
夜色正浓2026 江疏影佟大为都市婚姻职场 海外华人无广告高清观看 全球加速实时更新
Переход к платформе и функционирующие адреса
Актуальные онлайн казино обеспечивают игрокам обширный ассортимент развлечений. Официальный сайт Mellstroy casino гарантирует стабильный подключение ко всем функциям. Однако иногда случаются обстоятельства, когда необходимо запасной метод доступа.
Что представляет собой действующее зеркало
Действующее зеркало — это точная копия легального сайта с альтернативным URL названием. Копия сегодня дает возможность избегать потенциальные ограничения и поддерживать бесперебойный подключение к популярным автоматам.
Официальное зеркало обладает теми же опциями, что и центральный портал:
– Весь перечень автоматов
– Индивидуальный профиль с актуальными информацией
– Актуальные подарки и программы
– Проверенные денежные операции
Открытие профиля и подключение в сервис
Этап создания профиля на сайте длится несколько моментов. Свежим участникам необходимо:
1. Попасть на функционирующее зеркало на данный момент
2. Выбрать кнопку «Зарегистрироваться»
3. Заполнить нужные данные
4. Верифицировать почтовую почту или контакт связи
5. Использовать награду за открытие аккаунта
Подключение в собственный аккаунт выполняется путем указание логина и секретной комбинации.
Обзор наградной политики
Богатая призовая система — главное достоинство платформы. Клиенты обретают различные награды:
Вступительные награды
Недавние игроки могут претендовать на щедрый поощрение за регистрацию. Обычно это набор вариантов, включающий:
– Процентную прибавку к первому взносу
– Даровые кручения
– Дополнительные суммы на аккаунт
Кодовые комбинации и особые возможности
Систематические купоны помогают зарабатывать бонусные выгоды. Задействовать их можно в предназначенном поле индивидуального раздела.
Free spins и компенсация
Бесплатные спины — это возможность запускать автоматы без применения персональных денег. Компенсация предполагает процентный отдачу проигранных средств.
Ассортимент слотов
Азартная ресурс предлагает огромную подборку игр.
Автоматы
Вариативность игровых машин удивляет ожидания. Представлены обычные трехбарабанные автоматы и новые игры с интересной картинкой.
Live зал
Категория Live развлечений переносит участников в атмосферу истинного игорного заведения. Профессиональные ведущие организуют сессии в прямом режиме.
Соревнования и рейтинги
Постоянные состязания обеспечивают азарта и предоставляют перспективу заработать большие призы.
Портативная вариант и клиент
Актуальные разработки позволяют участвовать в любом точке. Mobile вариант автономно настраивается под размер устройства.
Получить клиент разрешено для мобильных ОС iOS и Android. Приложение обеспечивает:
– Скоростной переход
– Устойчивую производительность
– Моментальные-сообщения об предложениях
– Интуитивный дизайн
Банковские транзакции
Сайт поддерживает многочисленные варианты внесения и получения финансов:
– Банковские карты
– Виртуальные системы
– Крипто
– Банковские отправки
Все действия выполняются через защищенное соединение, что подтверждает безопасность личных параметров.
Отдел support
Профессиональная бригада поддержки работает всегда. Контактировать с операторами допустимо через:
– Интерактивный-чат
– Почтовую почту
– Горячую линию
– Общественные платформы
Резюме
Официальный веб-сайт и его функционирующее зеркало обеспечивают участникам защищенный и приятный вход к интересным забавам. Привлекательные подарки, разнообразный каталог развлечений и отличная помощь обеспечивают участие максимально интересной и доходной.
Переход к порталу и актуальные URL
Востребованные сетевые казино предлагают пользователям обширный набор игр. Основной сайт казино Догги организует защищенный доступ ко всем услугам. Тем не менее временами появляются случаи, когда требуется альтернативный способ доступа.
Что являет собой собой действующее зеркало
Действующее зеркало — это абсолютная реплика легального ресурса с альтернативным URL названием. Альтернатива сегодня позволяет преодолевать вероятные запреты и поддерживать постоянный вход к выбранным автоматам.
Легальное зеркало имеет идентичными опциями, что и главный веб-сайт:
– Целый ассортимент автоматов
– Персональный профиль с сохраненными информацией
– Действующие подарки и предложения
– Надежные платежные переводы
Оформление и авторизация в систему
Процедура создания профиля на сайте требует буквально моментов. Недавним участникам требуется:
1. Открыть на функционирующее зеркало на данный момент
2. Нажать опцию «Зарегистрироваться»
3. Заполнить требуемые сведения
4. Проверить e-mail почту или номер смартфона
5. Забрать поощрение за регистрацию
Вход в личный кабинет производится путем предоставление никнейма и кода доступа.
Характеристика наградной структуры
Привлекательная бонусная программа — основное козырь ресурса. Клиенты зарабатывают многочисленные бонусы:
Начальные поощрения
Новые пользователи способны претендовать на щедрый поощрение за оформление. Как правило это пакет предложений, включающий:
– Процентную надбавку к стартовому пополнению
– Даровые фриспины
– Бонусные суммы на кошелек
Купоны и эксклюзивные возможности
Постоянные промокоды обеспечивают обретать призовые привилегии. Задействовать их возможно в специальном разделе собственного раздела.
Фриспины и компенсация
Бесплатные спины — это вариант вращать слоты без применения персональных средств. Компенсация означает частичный возмещение израсходованных денег.
Каталог слотов
Гемблинг сайт обеспечивает впечатляющую библиотеку развлечений.
Автоматы
Многообразие игровых машин впечатляет воображение. Представлены обычные трехбарабанные слоты и актуальные автоматы с занимательной графикой.
Live заведение
Раздел Live заведения переносит пользователей в атмосферу реального гемблинг клуба. Опытные ведущие организуют раунды в прямом эфире.
Турниры и лидерборды
Систематические состязания добавляют остроты и предоставляют шанс заработать крупные выигрыши.
Карманная реализация и софт
Современные технологии обеспечивают играть в любом локации. Портативная вариант самостоятельно оптимизируется под размер устройства.
Получить программу можно для операционных ОС iOS и Android. Софт дает:
– Быстрый вход
– Бесперебойную производительность
– Push-оповещения об акциях
– Интуитивный вид
Платежные операции
Платформа поддерживает различные варианты пополнения и изъятия финансов:
– Банковские счета
– Онлайн платформы
– Цифровые валюты
– Банковские транзакции
Все действия выполняются через защищенное протокол, что подтверждает неприкосновенность приватных сведений.
Отдел support
Профессиональная бригада ассистанса функционирует 24/7. Обратиться с менеджерами допустимо через:
– Живой-чат
– Почтовую почту
– Телефон
– Коммуникационные сети
Заключение
Основной сайт и его актуальное зеркало обеспечивают участникам безопасный и удобный путь к увлекательным развлечениям. Выгодные награды, большой каталог слотов и высокая помощь формируют участие исключительно комфортной и доходной.
Передовые онлайн-казино обеспечивают участникам внушительный набор игр и бонусных опций. Подключение к ресурсу осуществляется через главный веб-сайт или его рабочее зеркало 888starz, что гарантирует непрерывную игру.
В чем суть действующее зеркало казино
Альтернатива — это точная дубликат оригинального веб-сайта, разработанная для обхода барьеров. Актуальное зеркало позволяет участникам сохранить вход к предпочитаемым автоматам в любое время.
Лицензионное зеркало имеет всеми возможностями главного портала:
– Полный каталог игр
– Аккаунт с зафиксированными сведениями
– Действующие промокоды
– Защищенные финансовые процедуры
Оформление профиля на главном портале
Алгоритм оформления отнимает всего считанные минут. Свежим клиентам нужно:
1. Войти на официальный портал или рабочее зеркало
2. Кликнуть на кнопку “Регистрация”
3. Внести нужные параметры
4. Верифицировать email
5. Внести стартовый вклад
Бонус за регистрацию начисляется автоматически после окончания всех этапов.
Доступ в учетную запись
Существующие клиенты могут выполнить подключение используя:
– Никнейм и шифр
– Код мобильного
– Электронную почту
Личный кабинет дает доступ к управлению счетом, сведениям операций и текущим бонусам.
Промо и акции
Гемблинг площадка вознаграждает активных клиентов выгодными поощрениями:
Стартовый набор
– Премия на стартовый платеж до 100%
– Бесплатные вращения на популярные игры
– Добавочные премии за следующие депозиты
Бонусные коды
Уникальные промокоды дают право на активацию эксклюзивных бонусов. Свежие купоны публикуются в категории “Предложения”.
Кешбэк
Постоянный кешбэк равен до 10% от потраченных средств. Возмещение предоставляется моментально.
Схема лояльности
Активные пользователи приобретают баллы, которые переводятся на реальные деньги или бесплатные вращения.
Мобильный сайт и софт
Для удобства клиентов сделана удобная адаптивный сайт. Отзывчивый вид помогает удобно играть с любого мобильного устройства.
Плюсы APP:
– Оперативный доступ к слотам
– Настроенный дизайн
– Стабильная работа
– Нотификации о новых акциях
Установить софт можно свободно с основного ресурса для гаджетов на Android и iOS.
Ассортимент развлечений
Игровые автоматы
Каталог включает более 2000 слотов от популярных производителей:
– Классические игры
– Video slots
– Слоты с джекпотом
– Сюжетные автоматы
Live казино
Блок Live столов обеспечивает игру с настоящими крупье в онлайн режиме:
– Рулетка
– Карточная игра
– Baccarat
– Покер
Состязания
Регулярные соревнования с крупными наградными бюджетами проводятся каждую неделю. Допуск в состязаниях открыто всем активным пользователям.
Платежные варианты
Взносы и снятия финансов реализуются через распространенные методы:
– Платежные карты
– Электронные кошельки
– Bitcoin
– Счетные операции
Минимальный взнос — от 100 рублей. Снятие финансов обрабатывается в течение 24 времени.
Команда поддержки
24/7 группа саппорта может поддержать в решении всех ситуаций:
– Мессенджер
– Email
– Горячая линия
– Соц сети
Безопасность и документ
Лицензионный веб-сайт работает на фундаменте международной сертификата. Всевозможные параметры игроков охранены передовым SSL-криптованием.
Итог
Актуальное зеркало дает постоянный доступ к выбранным слотам, щедрым бонусам и комфортным сервисам. Присоединяйтесь сегодня и получите стартовый бонус!
Обзор основного сайта
Новое онлайн-казино обеспечивает своим пользователям большой спектр услуг и поощрений. Оригинальный портал https://clinicacemcor.cl/podrobnyy-gid-po-zashchite-ot-krazhi-dannykh-i-deneg-polzovatelyami-telegram-botov-tekhnologii-sekret-firmy/ работает непрерывно, гарантируя путь к известным автоматам, live-казино и многим кампаниям.
Функционирующее зеркало: доступ к платформе
Что такое альтернатива казино
Зеркало означает собой абсолютную дубликат официального ресурса с иным доменным путем. Актуальное зеркало позволяет пользователям обходить ограничения и получать постоянный вход к выбранным автоматам.
Как обнаружить рабочее зеркало сегодня
Свежие URL на проверенное зеркало выкладываются через:
– Email рассылку
– Главные коммуникационные сети
– Команду обслуживания
– Affiliated ресурсы
Открытиесчета на ресурсе
Ход созданияаккаунта
Регистрация отнимает несколько минут и предполагает такие этапы:
1. Открытие на официальный сайт или действующее зеркало
2. Нажатие клавиши “Регистрация”
3. Заполнение контактных данных
4. Верификация адреса или телефона
5. Формирование кодадоступа
Бонус за открытиесчета
Новые пользователи приобретают выгодные начальные подарки:
– Игровые деньги на аккаунт
– Бесплатныевращения для симуляторов
– Увеличенный коэффициент кэшбека
– Эксклюзивные промокоды
Логин в индивидуальный счет
Действующие пользователи имеютвозможность совершить вход через официальный сайт или текущее зеркало. Для этого требуется набрать имяпользователя и код, сформированные при оформлении.
Возможности персонального кабинета
В собственном профиле предоставлены следующие инструменты:
– Редактирование учетными сведениями
– Зачисление счета
– Получение средств
– Активация кодов
– Проверка истории ставок
– Участие в состязаниях
Вознаграждения и промо
Типы вознаграждений
Казино радует своих игроков различными бонусными системами:
– Приветственный пакет — щедрые вознаграждения на дебютные пополнения
– Фриспины — дополнительные вращения в популярных слотах
– Кэшбек — периодический откат доли потерь
– Схема лояльности — уникальные бонусы для активных клиентов
Ваучеры и их использование
Уникальные коды гарантируют расширенные поощрения. Для использования нужно внести последовательность в специальное окно в личном разделе.
Геймплейный набор
Автоматы
Коллекция игровых симуляторов вмещает сотни позиций от топовых разработчиков:
– Классические симуляторы
– Современные игры
– Накопительные слоты
– Лицензионные слоты
Live казино
Раздел Live-казино дарит участие с реальными крупье в формате онлайн времени:
– Европейскаярулетка
– Blackjack
– PuntoBanco
– Покер
Конкурсы
Регулярные турниры с солидными призовыми суммами устраиваются еженедельно. Соревнующиеся конкурируют за лидерство в турнирнойсетке.
Смартфонная адаптация и APP
Смартфонная платформа веб-сайта
Официальный сайт на100% адаптирован для портативных устройств. Пользователи вправе открывать игры непосредственно через веб-навигатор без обязательства установки.
Приложение для установки
Авторское карманное приложение имеется для получения на устройства с базовыми платформами Android и iOS. Программа предоставляет:
– Быстрый доступ к слотам
– Стабильную операционность
– Push-извещения о акциях
– Комфортный интерфейс
Заключение
Оригинальный веб-сайт казино и его действующие копии гарантируют участникам полный вход к отличным развлекательным развлечениям. Солидные поощрения, многочисленные промо, удобная мобильная адаптация и квалифицированная помощь превращают игровой времяпрепровождение предельно удобным и прибыльным.
毕尔巴鄂主场火力全开 vs 埃尔切!2026西甲21:00激战开踢,雄狮能否继续碾压?西班牙足球比分直播等你见证!
惊奇蜘蛛侠黑白版2026 海外华人漫威新作 高清黑色英雄故事
yardcart online hub – Appealing marketplace, seems likely to grow in popularity.
https://coub.com/3c6051c14321cf5c22cc
Обзор основного ресурса
Актуальное онлайн-казино обеспечивает своим пользователям обширный выбор возможностей и призов. Основной портал https://sja.org.sg/en/luxon-pay-udobnye-platezhi-zakhvatyvayushchie-igry/ функционирует круглосуточно, давая возможность к топовым играм, live-казино и многим промо.
Рабочее зеркало: вход к сайту
Что такое копия казино
Зеркало составляет собой полную реплику официального веб-сайта с отличным URL адресом. Рабочее зеркало предоставляет пользователям миновать запреты и обеспечивать надежный подключение к предпочитаемым автоматам.
Как обнаружить текущее зеркало сегодня
Рабочие URL на основное зеркало появляются через:
– Электронную оповещение
– Официальные публичные сети
– Службу поддержки
– Партнерские порталы
Открытиесчета на портале
Процесс оформления
Регистрация длится всего минут и предполагает следующие действия:
1. Переход на официальный портал или актуальное зеркало
2. Клик опции “Зарегистрироваться”
3. Ввод личных сведений
4. Верификация аккаунта или телефона
5. Установка пароля
Бонус за созданиеаккаунта
Начинающие игроки получают щедрые вступительные вознаграждения:
– Игровые деньги на аккаунт
– Бесплатныевращения для автоматов
– Расширенный коэффициент возврата
– Уникальные ваучеры
Логин в персональный кабинет
Действующие игроки имеютвозможность выполнить вход через главный сайт или действующее зеркало. Для этого требуется ввести имяпользователя и код, придуманные при открытиисчета.
Возможности индивидуального аккаунта
В индивидуальном кабинете имеются основные инструменты:
– Контроль персональными реквизитами
– Внесение депозита
– Вывод призов
– Активация бонусов
– Просмотр архива игр
– Вступление в соревнованиях
Вознаграждения и акции
Виды поощрений
Казино поощряет своих клиентов всевозможными призовыми системами:
– Стартовый набор — солидные подарки на стартовые пополнения
– Freespins — бонусные спины в популярных автоматах
– Компенсация — регулярный возмещение суммы потерь
– Система VIP — особые бонусы для регулярных участников
Коды и их активация
Эксклюзивные промокоды предоставляют расширенные подарки. Для ввода следует набрать последовательность в соответствующее окно в персональном профиле.
Развлекательный каталог
Игры
Каталог азартных слотов включает сотни вариантов от известных производителей:
– Стандартные симуляторы
– Продвинутые слоты
– Прогрессивные автоматы
– Лицензионные игры
Live казино
Раздел Live-казино предлагает процесс с настоящими крупье в режиме онлайн эфира:
– Французскаярулетка
– Blackjack
– PuntoBanco
– Карибскийпокер
Состязания
Периодические конкурсы с крупными джекпотными пулами проходят ежедневно. Участники борются за лидерство в турнирнойсетке.
Мобильная реализация и программа
Мобильная платформа портала
Официальный ресурс абсолютно оптимизирован для портативных устройств. Игроки вправе открывать игры напрямую через интернет-браузер без потребности установки.
Программа для установки
Фирменное смартфонное программа имеется для скачивания на устройства с операционными средами Android и iOS. Приложение дает:
– Оперативный вход к развлечениям
– Устойчивую производительность
– Мгновенные-уведомления о бонусах
– Интуитивный навигацию
Итог
Официальный портал казино и его актуальные копии гарантируют клиентам комплексный доступ к первоклассным азартным развлечениям. Щедрые бонусы, различные акции, удобная смартфонная версия и профессиональная сервис делают азартный досуг чрезвычайно удобным и выгодным.
Передовые онлайн-казино предоставляют пользователям обилие опций для комфортной игры. Официальный веб-портал https://zkdynamic.org/osnovnye-metody-vozvrata-sredstv-v-tinkoff/ открывает путь ко всем возможностям и играм. Однако при наличии программных неполадок на подмогу спешат функционирующие копии.
Что означает собой действующее зеркало
Зеркало казино — это точная версия основного веб-сайта, находящаяся по дополнительному доменному имени. Официальное зеркало удерживает все возможности, вместе с открытие профиля, доступ в собственный кабинет, вознаграждения и бонусные коды.
Копия на сегодня гарантирует:
– Бесперебойный путь к азартным слотам
– Стопроцентную сохранность индивидуальных данных
– Поддержку счета и истории транзакций
– Доступность всех акций
Создание учетной записи на официальном портале
Этап оформления учетной записи отнимает несколько минут. Начинающим игрокам следует:
1. Открыть на официальный ресурс или актуальное зеркало
2. Кликнуть кнопку «Создать аккаунт»
3. Ввести нужные поля
4. Активировать э-мейл почту
5. Применить промокод при присутствии
После конца регистрации клиенты приобретают подарок за регистрацию, что может иметь бонусные спины или денежно-призовое вознаграждение.
Доступ в собственный кабинет
Индивидуальный кабинет дает всесторонний надзор над азартным ходом. Через личный профиль допускается:
– Финансировать баланс
– Снимать средства
– Применять кодовые слова
– Контролировать журнал пари
– Участвовать в состязаниях
– Получать cash back
Анализ бонусов и акций
Выгодная премиальная программа — важное плюс проекта. Ключевые виды поощрений:
Приветственный подарок
Начинающие приобретают щедрое премирование на начальные взносы. Объем бонуса может доходить до 100-200% от объема вклада.
Бонусные спины
Халявные прокруты предоставляются для популярных автоматов. Объем free spins разнится от 10 до 500 штук.
Возврат средств
Систематический или помесячный возврат части проигранных средств. Обычный размер компенсации — 5-15%.
Турниры
Регулярные соревнования с большими призовыми пулами. Соревнующиеся состязаются за верхние строчки в рейтинге.
Портативная версия и софт
Мобильная версия разрешает делать ставки с всякого гаджета. Игроки могут закачать приложение для iOS и Android или использовать интернет версию.
Выгоды мобильного программы:
– Скоростная прогрузка слотов
– Комфортный интерфейс
– Push-уведомления о бонусах
– Возможность входа через Touch ID
Игровые автоматы и Live казино
Игровая база включает множество позиций от ведущих разработчиков.
Известные секции игр:
– Традиционные машины
– Видеослоты с бонусными этапами
– Прогрессивный джекпот игры
– Megaways слоты
Live игорный зал
Секция live игорный зал предоставляет развлечение с живыми крупье. Доступны классические варианты:
– Европейская рулетка
– Блэкджек
– Baccarat
– Покер
Как разыскать рабочее зеркало
Обрести действующую URL на зеркало разрешается множественными способами:
1. Подписаться на почтовую рассылку
2. Мониторить за апдейтами в социальных сетях
3. Обратиться в сервис поддержки
4. Добавить в закладки действующее зеркало в фавориты
Вывод
Главный сайт и его функционирующие зеркала обеспечивают стабильный путь к развлекательным играм. Великодушные вознаграждения, множественные промокоды, комфортное смартфонное софт и профессиональная сервис поддержки обеспечивают азартный процесс максимально комфортным и конфиденциальным.
see this store – This marketplace name feels inviting and comforting.
BajaRx Direct: BajaRx Direct – BajaRx Direct
shop today – Charming and approachable, stands out nicely online.
http://bajarxdirect.com/# pharma mexicana
You’re so interesting! I don’t believe I’ve read a single thing like that
before. So wonderful to discover someone with some unique thoughts on this subject.
Really.. many thanks for starting this up. This web site is something
that is required on the internet, someone with some originality!
http://certifiednorthrx.com/# Certified North Rx
The Solar Spot – Friendly structure, navigating vendors is straightforward.
Современные онлайн-казино гарантируют геймерам разнообразный ассортимент возможностей для комфортной развлечений. Подключение к ресурсу Laki World выполняется через главный веб-ресурс или актуальное зеркало.
Что такое функционирующее зеркало казино
Актуальное зеркало — это резервный адрес официального портала казино. Такие версии создаются для поддержания непрерывного доступа к развлекательной сервису.
Копия на сегодня совершенно повторяет опции официального портала. Геймеры получают аналогичный путь ко всем функциям, включая оформление профиля, пополнение депозита и обналичивание выигрышей.
Открытие счета на основном веб-сайте
Процесс оформления учетной записи занимает всего буквально мгновений. Свежим клиентам нужно:
1. Перейти на официальный портал или актуальное проверенное зеркало
2. Выбрать кнопку “Регистрация”
3. Указать нужные данные
4. Подтвердить email почту
5. Ввести бонусный код при доступности
После выполнения создания аккаунта игрок зарабатывает вознаграждение за регистрацию, который вправе предполагать free spins или финансовое вознаграждение.
Доступ в личный кабинет
Личный кабинет — это закрытая область, где пользователи способны управлять своим аккаунтом. Для входа требуется ввести username и пароль.
В персональном кабинете представлены такие опции:
– Мониторинг записей платежей
– Применение промокодов
– Контроль вознаграждениями
– Присоединение в состязаниях
– Мониторинг кэшбэка
– Изменение профиля
Поощрения и промо
Гемблинговая платформа предлагает привлекательные подарки:
Приветственный пакет — начинающие зарабатывают солидное премию на дебютные вклады.
Даровые спины — выдаются как при открытии счета, так и в контексте всевозможных промо.
Кэшбек — систематический возмещение фрагмента проигранных сумм.
Коды активации — специальные коды, обеспечивающие возможность к специальным предложениям.
Описание развлекательных категорий
Slots
Собрание автоматов насчитывает сотни вариантов от лучших производителей. Геймеры обнаружат как обычные аппараты, так и современные 3D-слоты с увлекательной графикой.
Live казино
Зона Live казино предлагает возможность играть с реальными дилерами в условиях текущего времени. Имеются популярные развлечения: рулетка, блэкджек, баккара, покер.
Конкурсы
Периодические турниры с солидными призовыми пулами притягивают массу участников. Чемпионы обретают денежные награды и специальные подарки.
Портативная версия и программа
Телефонная версия сайта дает возможность наслаждаться с всякого устройства. Структура независимо адаптируется под размер экрана.
Получить софт можно для устройств на Android и iOS. Мобильное программа располагает всеми функциями настольной версии.
Как найти текущее зеркало на сейчас
Действующие ссылки копий систематически изменяются. Узнать рабочую линк можно многими методами:
– Через сервис техподдержки
– В официальных социальных сетях
– По электронной newsletter
– На партнерских порталах
Безопасность и сертификация
Официальный ресурс функционирует на фундаменте международной сертификата. Все операции шифруются передовыми методами безопасности.
Конфиденциальность индивидуальных данных обеспечивается в стопроцентном размере.
Вывод
Основной сайт и его рабочие копии обеспечивают пользователям 24/7 вход к качественным игровым услугам. Привлекательные поощрения, многочисленные автоматы, профессиональная поддержка — все это создает азартный досуг предельно беспроблемным и захватывающим.
Современные онлайн-казино гарантируют пользователям разнообразный ассортимент функций для приятной развлечений. Вход к сервису Rich казино казино осуществляется через главный портал или актуальное зеркало.
Что такое рабочее зеркало казино
Рабочее зеркало — это альтернативный URL официального веб-сайта казино. Такие дубликаты формируются для гарантирования постоянного соединения к гемблинговой системе.
Зеркало сегодня абсолютно копирует характеристики базового портала. Пользователи обретают идентичный вход ко всем услугам, включая регистрацию, зачисление средств кошелька и вывод денег.
Открытие счета на основном портале
Механизм оформления учетной записи требует всего пару минут. Свежим пользователям требуется:
1. Попасть на главный портал или рабочее подлинное зеркало
2. Щелкнуть кнопку “Регистрация”
3. Ввести требуемые реквизиты
4. Подтвердить e-mail почту
5. Ввести купон при присутствии
После финализации оформления пользователь получает вознаграждение за регистрацию, который способен включать free spins или cash премию.
Логин в индивидуальный кабинет
Личный кабинет — это закрытая территория, где участники имеют возможность регулировать своим счетом. Для доступа следует внести никнейм и пароль.
В индивидуальном кабинете представлены нижеперечисленные инструменты:
– Мониторинг хронологии транзакций
– Применение бонусных кодов
– Контроль бонусами
– Включение в соревнованиях
– Мониторинг возврата средств
– Редактирование аккаунта
Поощрения и акции
Развлекательная система предлагает щедрые подарки:
Регистрационный бонус — начинающие обретают значительное поощрение на стартовые пополнения.
Фриспины — предоставляются как при открытии счета, так и в ходе всевозможных акций.
Возмещение — регулярный компенсация фрагмента потерянных средств.
Промокоды — специальные коды, предоставляющие право к уникальным предложениям.
Характеристика развлекательных секций
Игровые автоматы
Библиотека слотов включает множество наименований от передовых производителей. Геймеры обнаружат как традиционные автоматы, так и современные видео-слоты с интересной визуализацией.
Live казино
Секция Live казино предлагает шанс участвовать с реальными дилерами в условиях реального времени. Представлены известные игры: рулетка, блэкджек, баккара, покер.
Турниры
Систематические турниры с солидными призовыми банками притягивают массу соревнующихся. Лидеры обретают cash награды и эксклюзивные подарки.
Мобильная версия и приложение
Адаптивная версия сайта дает возможность участвовать с любого устройства. Структура автоматически подстраивается под формат экрана.
Загрузить программу можно для девайсов на Android и iOS. Смартфонное приложение имеет всеми функциями полной версии.
Как найти текущее зеркало на сейчас
Свежие адреса альтернатив периодически корректируются. Получить рабочую URL можно многими способами:
– Через департамент техподдержки
– В подлинных социальных сетях
– По почтовой дайджесту
– На специализированных площадках
Защита и официальность
Основной портал работает на фундаменте зарубежной документа. Все операции оберегаются передовыми технологиями кодирования.
Секретность личных информации обеспечивается в полном размере.
Резюме
Главный сайт и его действующие зеркала дарят пользователям 24/7 вход к превосходным гемблинговым услугам. Выгодные бонусы, разнообразные слоты, профессиональная сервис — все это формирует игровой времяпрепровождение предельно удобным и интересным.
Hello!
Analyze space mysterious usage to find interesting and valuable layout depth now and maximize every inch see on the website for layout tools
Full information on the link – https://900letekas.site
All the best and development in business!
найти это ferma обменник
Передовые виртуальные казино предлагают игрокам широкий диапазон возможностей для беспроблемной игры. Но иногда вход к официальному платформе может являться закрытым. В таких ситуациях на поддержку приходит https://www.beautyfamily.net/na-2026-god-luchshie-kazino-pozvolyayushchie-popolnenie-i-vyvod-sredstv-s-ispolzovaniem-karty.html, которое обеспечивает бесперебойный вход ко всем возможностям платформы.
Что такое действующее зеркало казино
Зеркало — это точная версия главного портала, которая находится по альтернативному интернет-адресу. Альтернативный ресурс имеет целый функционал главного веб-портала, включая пользовательский кабинет, баланс и данные транзакций.
Принципиальные выгоды использования зеркала:
– 24-часовой вход к платформе
– Стопроцентная схожесть опций
– Конфиденциальность личных данных
– Поддержка доступных вознаграждений
Как отыскать рабочее зеркало сегодня
Существует несколько надежных методов нахождения текущей ссылочной информации:
Проверенные ресурсы:
1. Почтовая рассылка — руководство систематически высылает информацию с действующими URL
2. Общественные сети — легитимные каналы публикуют релевантную сведения
3. Служба поддержки — операторы выдают достоверные домены
4. Портативное приложение — дает возможность обходить блокировки
Открытие счета на лицензионном портале
Процедура регистрации отнимает всего несколько минут и содержит из таких ступеней:
1. Переход на официальный ресурс или рабочее зеркало
2. Щелчок на иконку «Регистрация»
3. Внесение персональной бланка
4. Верификация почтовой почты или телефонного номера
5. Активация бонуса за регистрацию при наличии промокода
Начинающие игроки приобретают великодушный приветственный подарок, который может включать бесплатные вращения, денежные вознаграждения или cashback.
Авторизация в личный кабинет
Вход на сайте выполняется привычным способом. Требуется внести никнейм и кодовое слово, задействованные при открытии счета.
Ключевые нюансы для надежного входа:
– Применяйте криптостойкий пароль
– Активируйте двойную проверку
– Не сохраняйте коды на чужих девайсах
– Проверяйте доменную строку браузера
Характеристика поощрительной структуры
Игровая платформа радует игроков всевозможными поощрениями и специальными предложениями:
Стартовый пакет
Дебютанты способны надеяться на щедрое вознаграждение за дебютный депозит. Обычно это пропорциональная надбавка к внесенной объему плюс фриспины для топовых слотов.
Систематические кампании
– Недельный компенсация — возврат процентной доли потерянных денежных средств
– Поощрения на последующие депозиты
– Особые офферы по знаменательным датам
– Турниры с значительными призовыми банками
План верности
Постоянные геймеры получают пункты за всякую раунд, которые затем конвертируются на действительные деньги, даровые прокруты или эксклюзивные льготы.
Кодовые слова: как применять
Бонус-коды — это индивидуальные последовательности литер, гарантирующие право к эксклюзивным поощрениям.
Каким образом взять рабочие промокоды:
– Официальные общественные сети казино
– Аффилиатные порталы
– Email-рассылка
– Профильные платформы
Указывается промокод в специальное поле при оформлении или пополнении баланса.
Портативная версия и приложение
Нынешние геймеры выбирают играть с смартфонных гаджетов. Сайт дает 2 решения для приятной портативной игры.
Responsive версия
Браузерная версия сама оптимизируется под параметры экранной панели. Не предполагает загрузки и работает в произвольном актуальном браузере.
Портативное приложение
Установить программу можно для аппаратов на Android и iOS. Преимущества app:
– Скоростная загрузка
– Бесперебойная функционирование
– Мгновенные-уведомления о промо
– Автономный избегание блокировок
Процедура инсталляции несложен: достаточно попасть на ресурс с портативного аппарата и выполнять руководству.
Игровой ассортимент
База игр включает несколько тысяч единиц от ведущих разработчиков.
Слоты
Гемблинг машины — самая востребованная раздел аттракционов. Показаны стандартные 3-барабанные аппараты, современные мультимедийные слоты с бонусными этапами, а также прогрессивные суперпризы.
Live казино
Секция с реальными дилерами дает возможность прочувствовать атмосферу настоящего казино. Открыты игры с рулеткой.
Вещание производится в превосходном качестве, имеется коммуникация с ведущим и остальными пользователями.
Конкурсы
Постоянно проводятся состязания по разным дисциплинам. Участие позволяет выиграть денежные вознаграждения, бесплатные вращения или специальные презенты.
Финансовые манипуляции
Портал обеспечивает значительный ассортимент денежных способов:
– Дебетовые карты
– Электронные системы
– Криптовалюта
– Денежные платежи
Низшая величина вклада — разумная для основной части геймеров. Обналичивание денег производится в минимальные сроки.
Департамент поддержки
Опытные специалисты готовы поддержать 24/7. Имеются такие методы коммуникации:
– Интернет-чат
– Email
– Мобильная связь
– Общественные сети
Разъяснения на типовые темы можно найти в зоне FAQ.
Итог
Основной веб-сайт казино и его функционирующие зеркала гарантируют игрокам абсолютный подключение ко всем сервисам платформы. Солидные вознаграждения, практичная смартфонная версия, гигантский ассортимент развлечений и опытная ассистенция формируют игровой досуг исключительно комфортным и защищенным.
Актуальные онлайн-казино предлагают клиентам обширный спектр развлечений и поощрительных программ. Доступ к площадке реализуется через лицензионный ресурс или его функционирующее зеркало sso-events.fr, что гарантирует постоянную работу.
Чем является рабочее зеркало казино
Копия — это идентичная реплика главного портала, построенная для устранения ограничений. Действующее зеркало дает возможность участникам иметь вход к выбранным слотам в каждое время.
Подлинное зеркало обладает всеми возможностями первоначального ресурса:
– Полный каталог игр
– Аккаунт с зафиксированными сведениями
– Свежие акции
– Безопасные денежные операции
Создание аккаунта на официальном ресурсе
Ход регистрации требует всего немного минут. Свежим клиентам следует:
1. Попасть на главный сайт или действующее зеркало
2. Нажать на элемент “Создать аккаунт”
3. Заполнить требуемые параметры
4. Проверить email
5. Внести дебютный вклад
Поощрение новичкам зачисляется моментально после прохождения всех стадий.
Доступ в профиль
Зарегистрированные пользователи могут произвести доступ используя:
– Никнейм и код
– Данные телефона
– Контактный email
Профиль предоставляет право к управлению средствами, записям транзакций и действующим акциям.
Поощрения и предложения
Игровая система балует лояльных клиентов многочисленными поощрениями:
Приветственный набор
– Поощрение на стартовый взнос до 100%
– Даровые спины на востребованные автоматы
– Добавочные награды за следующие пополнения
Бонусные коды
Специальные купоны обеспечивают возможность на использование специальных вознаграждений. Свежие коды выставляются в категории “Предложения”.
Кэшбек
Регулярный кешбэк равен до 10% от потраченных сумм. Выплата предоставляется моментально.
Схема лояльности
Постоянные пользователи получают баллы, которые конвертируются на настоящие финансы или free spins.
Адаптивный портал и приложение
Для удобства пользователей построена качественная портативная платформа. Приспособленный дизайн помогает удобно развлекаться с каждого переносного гаджета.
Выгоды софта:
– Быстрый запуск к автоматам
– Настроенный вид
– Устойчивая деятельность
– Push-уведомления о свежих бонусах
Получить программу можно безвозмездно с основного ресурса для девайсов на Android и iOS.
Библиотека автоматов
Слоты
Библиотека насчитывает более 2000 автоматов от ведущих провайдеров:
– Классические машины
– Мультимедийные игры
– Слоты с джекпотом
– Сюжетные развлечения
Live казино
Раздел Live казино предоставляет участие с живыми дилерами в реальном эфире:
– Колесо фортуны
– Двадцать одно
– Баккара
– Poker
Турниры
Периодические турниры с солидными призовыми бюджетами устраиваются регулярно. Допуск в соревнованиях возможно всем созданным пользователям.
Финансовые методы
Депозиты и изъятия денег осуществляются через востребованные методы:
– Кредитные карты
– Виртуальные кошельки
– Крипто
– Банковские платежи
Самый низкий вклад — от 100 рублей. Вывод финансов выполняется в течение 24 ч.
Отдел помощи
Непрерывная служба поддержки расположена ассистировать в решении каких-либо ситуаций:
– Live chat
– Email
– Связь
– Публичные сети
Надежность и лицензия
Подлинный веб-сайт функционирует на базе мировой разрешения. Всевозможные информация пользователей закрыты новейшим SSL-шифрованием.
Вывод
Действующее зеркало предоставляет бесперебойный подключение к выбранным развлечениям, богатым бонусам и удобным функциям. Зарегистрируйтесь сегодня и обретите начальный приз!
caramelcrate online hub – Nice and charming branding, gives a positive impression.
LavenderCorner – Branding is gentle, approachable, and easy for users to navigate.
Характеристика главного веб-сайта
Современное онлайн-казино обеспечивает своим пользователям разнообразный выбор развлечений и призов. Главный ресурс Лаки Бир функционирует 24/7, давая доступ к популярным автоматам, live-казино и многим акциям.
Функционирующее зеркало: возможность к порталу
Что такое дубликат казино
Зеркало представляет собой идентичную версию главного портала с другим URL названием. Рабочее зеркало позволяет участникам миновать запреты и обеспечивать непрерывный доступ к выбранным развлечениям.
Как отыскать рабочее зеркало сегодня
Действующие адреса на главное зеркало размещаются через:
– E-mail новостнуюленту
– Основные коммуникационные сети
– Команду поддержки
– Партнерские порталы
Регистрация на портале
Ход оформления
Созданиеаккаунта отнимает буквально минут и предполагает такие действия:
1. Открытие на основной сайт или актуальное зеркало
2. Клик опции “Регистрация”
3. Указание персональных информации
4. Верификация адреса или номера
5. Формирование пароля
Бонус за открытиесчета
Начинающие пользователи приобретают выгодные начальные вознаграждения:
– Игровые депозиты на аккаунт
– Freespins для симуляторов
– Увеличенный процент компенсации
– Особые коды
Доступ в индивидуальный профиль
Активные игроки имеютвозможность осуществить авторизацию через основной сайт или действующее зеркало. Для этого следует внести никнейм и пароль, сформированные при открытиисчета.
Возможности собственного раздела
В собственном кабинете доступны данные функции:
– Контроль персональными реквизитами
– Зачисление баланса
– Вывод призов
– Ввод кодов
– Мониторинг истории ставок
– Участие в соревнованиях
Вознаграждения и промо
Разновидности подарков
Казино радует своих клиентов всевозможными бонусными предложениями:
– Вступительный набор — большие вознаграждения на стартовые взносы
– Халявныеспины — бонусные прокруты в популярных слотах
– Компенсация — систематический откат доли убытков
– Схема поощрения — особые льготы для верных участников
Ваучеры и их использование
Специальные ваучеры предоставляют бонусные бонусы. Для применения необходимо внести комбинацию в нужное окно в индивидуальном аккаунте.
Геймплейный каталог
Симуляторы
Каталог развлекательных автоматов содержит массу названий от известных провайдеров:
– Стандартные автоматы
– Продвинутые развлечения
– Призовые игры
– Сюжетные слоты
Live казино
Область Live-казино дарит игру с живыми крупье в обстановке реального стрима:
– Европейскаярулетка
– Блэкджек
– Baccarat
– Техасскийхолдем
Турниры
Постоянные турниры с солидными наградными призами проходят регулярно. Соревнующиеся соревнуются за призовыеместа в списке.
Портативная версия и софт
Мобильная адаптация сайта
Главный ресурс абсолютно настроен для портативных аппаратов. Участники способны играть развлечения напрямую через веб-навигатор без потребности инсталляции.
APP для скачивания
Официальное портативное программа предлагается для скачивания на девайсы с базовыми средами Android и iOS. Софт предоставляет:
– Оперативный доступ к играм
– Стабильную производительность
– Оперативные-уведомления о предложениях
– Простой интерфейс
Заключение
Главный ресурс казино и его рабочие дубликаты дают клиентам абсолютный вход к высококлассным игровым услугам. Выгодные подарки, многочисленные акции, удобная мобильная версия и компетентная сервис делают игровой процесс чрезвычайно enjoyable и результативным.
For the event
Best online casino usa no deposit bonus
to witness the impact.
Современные онлайн-казино гарантируют пользователям обилие путей для приятной игры. Основной сайт казино Enomo открывает доступ ко всем сервисам и развлечениям. Однако при образовании программных неполадок на помощь приходят функционирующие копии.
Что являет собой собой актуальное зеркало
Альтернативный адрес казино — это стопроцентная дубликат официального сайта, находящаяся по запасному URL. Лицензионное зеркало хранит все характеристики, включая регистрацию, вход в индивидуальный кабинет, вознаграждения и кодовые слова.
Альтернативный сайт на сегодня обеспечивает:
– Постоянный доступ к развлекательным машинам
– Полную защиту персональных информации
– Поддержку средств и журнала операций
– Применимость всех акций
Регистрация на главном сайте
Процедура регистрации требует пару минут. Начинающим игрокам следует:
1. Открыть на главный ресурс или действующее зеркало
2. Нажать кнопку «Создать аккаунт»
3. Указать нужные данные
4. Верифицировать э-мейл почту
5. Ввести промокод при присутствии
После конца регистрации геймеры обретают приз за регистрацию, который может иметь бонусные спины или финансовое вознаграждение.
Вход в личный кабинет
Приватный кабинет обеспечивает всесторонний управление над азартным действом. Через индивидуальный аккаунт возможно:
– Пополнять счет
– Забирать средства
– Активировать кодовые слова
– Проверять журнал пари
– Принимать участие в состязаниях
– Забирать кэшбек
Характеристика вознаграждений и промо-предложений
Выгодная призовая политика — важное плюс казино. Главные формы вознаграждений:
Приветственный подарок
Новички зарабатывают великодушное награду на начальные депозиты. Размер премии может составлять 100-200% от размера вклада.
Free spins
Даровые спины даются для востребованных игровых автоматов. Объем бесплатных вращений варьируется от 10 до 500 штук.
Кэшбек
Систематический или помесячный возврат процентной доли утраченных средств. Средний процент кэшбека — 5-15%.
Турниры
Периодические соревнования с большими наградными пулами. Участники борются за призовые позиции в рейтинге.
Портативная версия и софт
Мобильная версия обеспечивает развлекаться с каждого устройства. Геймеры могут установить программу для iOS и Android или задействовать браузерную версию.
Достоинства смартфонного приложения:
– Молниеносная загрузка слотов
– Комфортный дизайн
– Push-уведомления о поощрениях
– Вход через биометрию
Автоматы и Live казино
Азартная коллекция содержит тысячи игр от известных поставщиков.
Известные разделы автоматов:
– Классические машины
– Видео-автоматы с призовыми уровнями
– Прогрессивный джекпот игры
– Мега-путь машины
Live игорный зал
Секция live игорный зал предоставляет развлечение с живыми ведущими. Имеются классические развлечения:
– Европейская рулетка
– Blackjack
– Punto Banco
– Техасский холдем
Как разыскать рабочее зеркало
Раздобыть действующую ссылку на зеркало возможно несколькими способами:
1. Подписаться на емейл-уведомления
2. Отслеживать за апдейтами в социальных сетях
3. Связаться в сервис поддержки
4. Добавить в закладки действующее зеркало в закладки
Вывод
Лицензионный сайт и его актуальные альтернативные адреса дают стабильный доступ к азартным слотам. Щедрые вознаграждения, многочисленные бонусные коды, эргономичное портативное софт и отличная техподдержка поддержки делают азартный геймплей крайне комфортным и защищенным.
explore Harbor Crest Hub – Inviting and organized, making the outlet feel accessible.
Walnut Spot – Modern interface, browsing categories was simple.
монтаж газового пожаротушения в офис montazh-gazovogo-pozharotusheniya-3.ru .
Hi, after reading this awesome article i am too
delighted to share my experience here with colleagues.
Stop by my webpage … garantía de pago para propietarios
https://vaycasinovip.online/# vaycasino
круглосуточный вывод из запоя в ростове vyvod-iz-zapoya-v-rostove-1.ru .
Актуальные онлайн-казино дают клиентам обширный спектр услуг и бонусных вариантов. Подключение к ресурсу осуществляется через основной портал или его действующее зеркало New Retro, что предоставляет стабильную игру.
Что представляет собой рабочее зеркало казино
Дубликат — это точная копия основного портала, созданная для решения запретов. Рабочее зеркало помогает игрокам иметь соединение к любимым автоматам в произвольное время.
Подлинное зеркало имеет всеми опциями основного сайта:
– Совокупный перечень автоматов
– Личный кабинет с записанными сведениями
– Актуальные поощрения
– Гарантированные финансовые операции
Оформление профиля на главном веб-сайте
Процесс оформления отнимает всего немного минут. Новым участникам следует:
1. Войти на официальный портал или рабочее зеркало
2. Выбрать на клавишу “Создать аккаунт”
3. Указать требуемые сведения
4. Верифицировать электронную почту
5. Произвести первый взнос
Стартовый бонус выдается незамедлительно после прохождения всех этапов.
Подключение в учетную запись
Зарегистрированные пользователи могут совершить авторизацию используя:
– Никнейм и код
– Код сотового
– Адрес
Персональный раздел открывает шанс к контролю средствами, данным операций и доступным поощрениям.
Награды и программы
Игровая система вознаграждает активных пользователей выгодными вознаграждениями:
Приветственный комплект
– Надбавка на дебютный депозит до 100%
– Free spins на топовые игры
– Особые поощрения за дальнейшие платежи
Купоны
Уникальные ваучеры предоставляют возможность на использование особых поощрений. Свежие комбинации выставляются в разделе “Акции”.
Кэшбек
Периодический бонус составляет до 10% от проигранных средств. Выплата начисляется незамедлительно.
Схема лояльности
Верные клиенты получают очки, которые обмениваются на реальные финансы или бесплатные вращения.
Mobile версия и APP
Ради комфорта игроков разработана функциональная mobile версия. Гибкий дизайн помогает удобно играть с всякого портативного аппарата.
Выгоды программы:
– Быстрый запуск к играм
– Настроенный вид
– Бесперебойная работа
– Сообщения о новых акциях
Загрузить программу можно бесплатно с основного ресурса для устройств на Android и iOS.
Ассортимент слотов
Слоты
Коллекция насчитывает более 2000 слотов от топовых разработчиков:
– Стандартные машины
– Видео-слоты
– Прогрессивные автоматы
– Тематические автоматы
Live казино
Раздел Live казино обеспечивает взаимодействие с настоящими крупье в онлайн формате:
– Roulette
– Карточная игра
– Punto Banco
– Poker
Турниры
Постоянные турниры с большими выигрышными суммами устраиваются каждую неделю. Присоединение в турнирах открыто всем зарегистрированным игрокам.
Финансовые варианты
Платежи и выводы выплат реализуются через известные методы:
– Кредитные карточ ки
– Онлайн системы
– Крипто
– Денежные транзакции
Самый низкий депозит — от 100 рублей. Получение выигрышей обрабатывается в течение 24 времени.
Служба помощи
Круглосуточная служба поддержки готова помочь в урегулировании произвольных ситуаций:
– Live chat
– Email
– Телефон
– Соц сети
Безопасность и разрешение
Подлинный ресурс оперирует на базе глобальной документа. Любые информация участников обезопасены современным SSL-шифрованием.
Вывод
Рабочее зеркало гарантирует постоянный вход к предпочитаемым развлечениям, щедрым промокодам и функциональным сервисам. Создайте аккаунт сегодня и обретите первый поощрение!
Современные онлайн казино предлагают пользователям обширный ассортимент опций для комфортной игры. Но иногда соединение к основному порталу может оказаться закрытым. В таких моментах на подмогу приходят http://www.kaukal.hr/kazino-s-sms-oplatoy-v-2026-igrovye-avtomaty-onlayn-popolnenie-dengami-s-mobilnogo-igrovoy-podkhod-prakticheski-vse-zarubezhnye-onlayn-kazino-sotrudnichayut-s-etoy-sistemoy, которое гарантирует непрерывный путь ко всем опциям платформы.
Что такое действующее зеркало казино
Зеркало — это полная реплика главного ресурса, которая находится по другому интернет-адресу. Зеркало имеет полный инструментарий основного ресурса, включая пользовательский кабинет, средства и данные переводов.
Ключевые достоинства задействования зеркала:
– 24-часовой подключение к платформе
– Полная схожесть функционала
– Конфиденциальность персональных информации
– Удержание всех имеющихся вознаграждений
Как отыскать функционирующее зеркало в данный момент
Есть несколько надежных вариантов обнаружения актуальной ссылочной информации:
Легитимные каналы:
1. Почтовая рассылка — администрация регулярно отправляет информацию с актуальными URL
2. Социальные сети — авторизованные аккаунты выкладывают свежую информацию
3. Сервис поддержки — специалисты сообщают надежные URL
4. Мобильное приложение — позволяет обходить блокировки
Оформление профиля на главном веб-сайте
Этап открытия счета требует всего считанные минут и состоит из следующих этапов:
1. Открытие на главный сайт или функционирующее зеркало
2. Щелчок на клавишу «Открыть счет»
3. Внесение учетной формы
4. Валидация электронной почты или сотового номера
5. Задействование бонуса за регистрацию при существовании промокода
Новые геймеры получают великодушный начальный приз, который может охватывать даровые прокруты, валютные вознаграждения или кэшбек.
Вход в персональный кабинет
Вход на портале осуществляется стандартным путем. Нужно ввести учетные данные и пароль, примененные при регистрации.
Значимые моменты для надежного входа:
– Применяйте криптостойкий пароль
– Задействуйте двойную верификацию
– Не храните коды на чужих девайсах
– Проверяйте доменную строку браузера
Обзор премиальной схемы
Игровая платформа награждает пользователей многочисленными поощрениями и кампаниями:
Стартовый пакет
Новички способны рассчитывать на значительное вознаграждение за дебютный вклад. Зачастую это процентовая надбавка к переведенной количеству плюс даровые спины для известных слотов.
Постоянные предложения
– 7-дневный компенсация — возврат процентной доли проигранных средств
– Бонусы на последующие депозиты
– Уникальные офферы по праздникам
– Состязания с значительными наградными пулами
Система верности
Деятельные геймеры получают единицы за каждую ставку, которые затем меняются на фактические деньги, free spins или эксклюзивные преимущества.
Промокоды: как применять
Купоны — это уникальные комбинации литер, гарантирующие право к эксклюзивным привилегиям.
Каким образом раздобыть рабочие промокоды:
– Проверенные социальные сети казино
– Партнерские ресурсы
– Email-рассылка
– Тематические платформы
Вводится промокод в специальное поле при создании аккаунта или добавлении денег баланса.
Портативная версия и приложение
Современные клиенты предпочитают развлекаться с мобильных аппаратов. Платформа дает два варианта для удобной портативной игры.
Отзывчивая версия
Интернет версия сама настраивается под параметры дисплея. Не требует скачивания и оперирует в произвольном актуальном браузере.
Мобильное приложение
Установить приложение можно для устройств на Android и iOS. Достоинства app:
– Молниеносная запуск
– Бесперебойная операция
– Всплывающие-уведомления о поощрениях
– Самостоятельный минование блокировок
Процедура инсталляции несложен: достаточно открыть на ресурс с портативного устройства и подчиняться инструкциям.
Развлекательный ассортимент
Каталог игр включает множество вариантов от лучших разработчиков.
Слоты
Азартные аппараты — максимально популярная раздел забав. Показаны традиционные трехбарабанные аппараты, актуальные мультимедийные слоты с бонусными уровнями, а также джекпотные суперпризы.
Live казино
Отдел с живыми ведущими обеспечивает ощутить атмосферу настоящего казино. Представлены развлечения с блэкджеком.
Передача осуществляется в превосходном четкости, присутствует коммуникация с ведущим и остальными геймерами.
Турниры
Регулярно организуются конкурсы по разным слотам. Присоединение дает шанс завоевать денежные вознаграждения, фриспины или эксклюзивные презенты.
Финансовые процедуры
Сайт обеспечивает обширный спектр финансовых методов:
– Дебетовые карты
– Онлайн кошельки
– Крипта
– Банковские транзакты
Стартовая количество депозита — доступная для основной части пользователей. Вывод средств выполняется в короткие периоды.
Служба поддержки
Компетентные операторы способны оказать помощь круглосуточно. Имеются такие способы общения:
– Веб-чат
– Email
– Телефонная связь
– Социальные сети
Разъяснения на частые запросы можно получить в блоке FAQ.
Резюме
Официальный ресурс казино и его рабочие зеркала гарантируют игрокам совершенный подключение ко всем опциям ресурса. Великодушные привилегии, удобная портативная версия, гигантский выбор игр и квалифицированная ассистенция формируют развлекательный процесс крайне удобным и надежным.
http://nec.phorum.pl/viewtopic.php?p=780622#780622
You can certainly see your enthusiasm within the work you write.
The arena hopes for even more passionate writers like you who
are not afraid to mention how they believe. All the time go after your heart.
my webpage :: garantía para rentar casa
Переход к порталу через проверенные зеркала
Передовые онлайн казино предоставляют игрокам постоянный подключение к развлечениям. Главный веб-сайт Taker казино работает надёжно, обеспечивая широкий ассортимент гемблинг игр. Тем не менее периодически образуются программные проблемы или ограничения, в связи с чем важно понимать о наличии действующих зеркал.
Что означает из себя основное зеркало казино
Дубликат — это идентичная дубликат официального сайта с аналогичным интерфейсом. Функционирующее зеркало на данный момент позволяет избегать региональные ограничения и поддерживать времяпрепровождение.
Принципиальные преимущества использования зеркал:
– Безграничный переход к индивидуальному кабинету
– Поддержание совокупных данных учётной записи
– Идентичный ассортимент автоматов
– Текущие бонусы и акции
Создание аккаунта на сайте
Процедура оформления требует пару минут. Свежие игроки зарабатывают великодушный бонус за оформление, который в состоянии содержать:
– Начальный игровой приз
– Бесплатные кручения для автоматов
– Особые ваучеры
– Расширенный возврат
Для финализации создания аккаунта нужно:
1. Войти на главный веб-сайт или зеркало
2. Кликнуть кнопку «Зарегистрироваться»
3. Написать контактные данные
4. Активировать электронную почту или номер
5. Активировать ваучер (когда имеется наличии)
Вход в собственный кабинет
После удачной создания аккаунта геймеры имеют возможность производить подключение используя главный веб-сайт или действующее зеркало. Собственный кабинет открывает безграничный контроль над учётной записью:
– Архив пари
– Ввод счёта
– Получение денег
– Управление поощрениями
– Присутствие в состязаниях
Поощрения и промо казино
Портал балует клиентов разнообразными наградными схемами:
Приветственные бонусы
Новые игроки получают богатый букет бонусов на первые депозиты. Как правило это предполагает процентную доплату к объёму взноса плюс комплиментарные кручения.
Периодические кампании
– Каждонедельный кэшбек до 15%
– Конкурсы с призовыми суммами
– Бонусы на число рождения
– Специальные акции для статусных игроков
Схема верности
Регулярные пользователи зарабатывают очки, что можно обменять на реальные средства или специальные привилегии.
Мобильная форма и приложение
Актуальные технологии дают возможность развлекаться где удобно. Портативная вариант сайта автономно настраивается под размер любого девайса.
Плюсы портативного софта:
– Быстрая загрузка слотов
– Эргономичный вид
– Моментальные-сообщения о промо
– Опция скачать для Android и iOS
Настоящее казино: обстановка реального игорного дома
Секция Live заведения переносит игроков в антураж подлинного азартного клуба. Профессиональные дилеры организуют процесс в режиме актуального времени.
Доступные игры:
– Американская рулетка
– Очко
– Баккара
– Карты
Автоматы и гемблинг аппараты
Собрание азартных автоматов содержит тысячи наименований от передовых разработчиков. Всякий игрок отыщет слот по желанию:
– Классические автоматы
– Инновационные игры с дополнительными этапами
– Прогрессивный-машины
– Динамические слоты
Соревнования и акции
Регулярные соревнования вносят адреналин и обеспечивают шанс заработать крупные суммы. Присутствие в состязаниях регулярно даровое, а выигрышные суммы составляют крупных величин.
Охрана и конфиденциальность
Ресурс применяет актуальные системы защиты для охраны реквизитов геймеров. Все денежные процедуры проходят через безопасные линии.
Заключение
Основной портал и его рабочие зеркала обеспечивают надёжный вход к качественным развлекательным развлечениям. Щедрые награды, комфортная карманная редакция, богатство автоматов и высококлассное Live-заведение формируют ресурс замечательным вариантом для фанатов игровых развлечений.
shop today – Memorable and inviting, leaves a pleasant impression.
парк отели с программой все включено
Hi everyone, it’s my first pay a quick visit at this web page, and piece of
writing is truly fruitful for me, keep up posting these articles.
Feel free to surf to my web-site: online slots malaysia
нажмите здесь ferma.cc
visit gold vendor – Browsed the page and it seems promising; looking forward to new listings.
Характеристика лицензионного сайта
Актуальные интернет казино обеспечивают игрокам богатый спектр забав и опций. Основной веб-сайт казино Enomo предлагает надежный доступ к развлекательным функциям.
Действующее зеркало: возможность сегодня
Резервный сайт является собой точную версию главного веб-сайта. Официальное зеркало помогает клиентам избегать существующие блокировки.
Выгоды использования зеркала
Принципиальные достоинства включают:
– Беспрерывный вход к сайту
– Поддержание всех возможностей основного сайта
– Защита личных данных
– Аналогичный возможности
Создание аккаунта на сайте
Механизм регистрации знаменуется легкостью и практичностью. Недавние пользователи необходимо:
1. Зайти на основной сайт или его зеркало
2. Выбрать на элемент регистрации
3. Внести необходимые сведения
4. Верифицировать email почту
5. Произвести первый авторизацию
Бонус за открытие счета
Начинающие зарабатывают внушительный начальный подарок. Данное поощрение имеет возможность содержать:
– Финансовые бонусы
– Даровые фриспины
– Увеличенный уровень кэшбэка
Авторизация в личный аккаунт
Существующие пользователи в состоянии мгновенно войти в собственный профиль, эксплуатируя имя пользователя и пароль. Персональный кабинет дает доступ к:
– Контролю балансом
– Хронологии платежей
– Текущим бонусам
– Опциям профиля
Бонусы и акции
Портал постоянно реализует различные предложения для пользователей.
Типы бонусов
Главные виды вознаграждений:
– Депозитные начисления – коэффициент от величины депозита
– Спины – complimentary прокруты в слотах
– Кэшбек – возврат части затраченных средств
– Призовые призы – награды за выступление в соревнованиях
Ваучеры
Специальные купоны помогают получить дополнительные выгоды. Участники способны найти их на аффилиатных сайтах или взять в уведомлениях.
Переносная вариант и app
Современные игроки выбирают портативный гейминг.
Характеристики переносной версии
– Адаптивный облик для любых устройств
– Целостный вход к автоматам
– Оперативная функционирование
– Практичное навигация
Скачать приложение
Mobile app предложено для загрузки на девайсы с базовыми ОС Android и iOS. Софт гарантирует:
– Устойчивую производительность
– Пуш уведомления о предложениях
– Мгновенный вход к любимым автоматам
Азартный выбор
Игровой клуб обеспечивает огромную галерею гемблинг забав.
Аппараты
Каталог азартных машин охватывает:
– Классические машины
– Видео игры
– Призовые машины
– Branded развлечения
Live дилеры
Категория настоящих дилеров дает шанс соревноваться с живыми крупье. Представлены:
– Рулетка
– Блэкджек
– Баккара
– Покер
Состязания
Регулярные чемпионаты помогают игрокам состязаться за солидные призовые суммы. Турнирная система обновляется еженедельно.
Платежные операции
Сайт предоставляет массу методов пополнения и получения сумм:
– Банковские карточки
– Виртуальные счета
– Банковские переводы
– Криптовалюты
Абсолютно все платежи выполняются конфиденциально с применением актуальных систем криптографии.
Отдел помощи
Квалифицированная группа саппорта функционирует 24/7. Соединиться с операторами можно через:
– Online чат
– Email почту
– Телефонную линию
– Соц сети
Безопасность и лицензирование
Казино работает на основании законной аккредитации. Это подтверждает:
– Легальность азартного действа
– Безопасность индивидуальных данных
– Своевременные выплаты
– Ответственный гейминг
Заключение
Главный ресурс и его функционирующие дубликаты гарантируют клиентам целостный комплекс функций для комфортной и профитной игры. Солидные подарки, многочисленные автоматы, квалифицированная помощь и защищенная инфраструктура платежей формируют платформу превосходным вариантом для поклонников азартных игр.
Вход к ресурсу через действующие зеркала
Современные сетевые казино дают игрокам круглосуточный вход к развлечениям. Главный ресурс https://geex.co.za/2026/03/04/kak-mozhno-otmenit-operatsiyu-po-bankovskoy-karte-chtoby-vernut-proigrannye-v-kazino-sredstva-bnc-ru-platforma-slavitsya-raznoobraziem-bonusov-mozhno-aktivirovat-shchedryy-privetstvennyy-bonus-pri/ функционирует устойчиво, предлагая богатый выбор развлекательных игр. Впрочем временами образуются цифровые препятствия или ограничения, в связи с чем важно быть осведомлённым о присутствии рабочих зеркал.
Что представляет собой основное зеркало казино
Зеркало — это точная дубликат основного портала с таким же набором функций. Актуальное зеркало сегодня позволяет обходить региональные запреты и возобновлять времяпрепровождение.
Основные плюсы использования зеркал:
– Стопроцентный подключение к собственному кабинету
– Удержание любых информации учётной записи
– Такой же набор развлечений
– Действующие бонусы и промо
Оформление на сайте
Процесс записи занимает немного минут. Недавние пользователи зарабатывают великодушный приз за оформление, он способен включать:
– Приветственный денежный кредит
– Даровые фриспины для слотов
– Особые коды
– Увеличенный компенсацию
Ради финализации регистрации требуется:
1. Перейти на центральный веб-сайт или альтернативу
2. Кликнуть элемент «Зарегистрироваться»
3. Внести личные сведения
4. Верифицировать почтовый адрес или телефон
5. Применить купон (когда имеется существовании)
Авторизация в личный кабинет
После успешной оформления пользователи способны совершать авторизацию посредством центральный сайт или функционирующее зеркало. Личный кабинет даёт абсолютный контроль над счётом:
– Архив ставок
– Зачисление кошелька
– Получение средств
– Управление бонусами
– Вовлечение в соревнованиях
Поощрения и промо казино
Портал награждает клиентов различными привилегированными предложениями:
Приветственные призы
Дебютанты получают щедрый набор поощрений на вступительные вклады. Обычно это предполагает пропорциональную доплату к сумме пополнения плюс даровые спины.
Регулярные промо
– Раз в неделю компенсация до 15%
– Соревнования с призовыми фондами
– Подарки на число рождения
– Особые предложения для VIP геймеров
План вознаграждения
Регулярные геймеры получают пункты, они допустимо обменять на реальные финансы или эксклюзивные преимущества.
Смартфонная редакция и приложение
Нынешние инновации дают возможность участвовать в любом месте подходяще. Портативная редакция портала автономно приспосабливается под дисплей любого девайса.
Выгоды портативного приложения:
– Моментальная загрузка развлечений
– Эргономичный вид
– Всплывающие-сообщения о бонусах
– Способность инсталлировать для Android и iOS
Реальное казино: обстановка настоящего азартного заведения
Секция Live казино транспортирует клиентов в среду реального развлекательного заведения. Профессиональные операторы управляют развлечение в состоянии актуального времени.
Имеющиеся игры:
– Колесо фортуны
– Двадцать одно
– Карточная игра
– Покер
Барабаны и гемблинг машины
Собрание гемблинг слотов содержит массу позиций от лидирующих студий. Всякий клиент подберёт игру по желанию:
– Традиционные автоматы
– Инновационные игры с специальными этапами
– Крупный приз-слоты
– Мегавейс слоты
Соревнования и лотереи
Постоянные соревнования вносят адреналин и предоставляют шанс обрести внушительные награды. Включение в соревнованиях нередко безвозмездное, а призовые банки насчитывают крупных сумм.
Охрана и секретность
Ресурс эксплуатирует актуальные системы шифрования для гарантии сведений пользователей. Каждые денежные транзакции совершаются через защищённые каналы.
Заключение
Основной портал и его функционирующие зеркала обеспечивают устойчивый вход к превосходным игровым развлечениям. Щедрые награды, удобная мобильная вариант, вариативность слотов и компетентное Live-казино формируют сайт превосходным выбором для ценителей азартных слотов.
вывод из запоя в ростове на дону вывод из запоя в ростове на дону .
Snow Crate Gems – Distinctive and memorable, fits the modern aesthetic.
https://www.flwbmuseum.com/profile/padalo74639095/profile
byterise – Appreciate the typography choices; comfortable spacing improved my reading experience.
see this outlet – The name popped up today and has a unique, creative vibe.
https://www.reddit.com/user/Repulsive_Cook8865/
Современные онлайн-казино предоставляют геймерам обилие вариантов для удобной игры. Официальный портал https://www.theforuminternational.com/pyat-sposobov-priobresti-podpisku-4-i-iz-rossii открывает вход ко всем функциям и азартным играм. Однако при возникновении программных трудностей на выручку прибывают функционирующие копии.
Что есть собой функционирующее зеркало
Альтернативный адрес казино — это точная дубликат оригинального портала, находящаяся по другому веб-адресу. Лицензионное зеркало сохраняет все возможности, включая создание аккаунта, вход в индивидуальный кабинет, премии и бонусные коды.
Дубликат на сегодня дает:
– Стабильный вход к развлекательным аппаратам
– Стопроцентную защиту индивидуальных сведений
– Поддержку депозита и журнала транзакций
– Возможность использования всех акций
Создание учетной записи на основном сайте
Ход создания аккаунта отнимает пару минут. Новым клиентам требуется:
1. Зайти на официальный портал или рабочее зеркало
2. Щелкнуть кнопку «Создать аккаунт»
3. Внести требуемые сведения
4. Активировать email почту
5. Использовать кодовое слово при наличии
После завершения оформления профиля клиенты обретают вознаграждение за регистрацию, который может иметь free spins или финансовое поощрение.
Авторизация в персональный кабинет
Индивидуальный кабинет дает всеобъемлющий мониторинг над азартным действом. Через персональный раздел разрешается:
– Пополнять кошелек
– Выводить призы
– Активировать кодовые слова
– Контролировать записи ставок
– Участвовать в состязаниях
– Забирать кэшбек
Характеристика вознаграждений и промо-предложений
Щедрая премиальная политика — важное плюс ресурса. Основные типы премий:
Приветственный приз
Начинающие получают выгодное поощрение на стартовые вклады. Размер премии может составлять 100-200% от размера пополнения.
Бонусные спины
Бесплатные спины выдаются для топовых автоматов. Число фриспинов колеблется от 10 до 500 штук.
Возврат средств
Регулярный или помесячный отдача процентной доли проигранных средств. Средний объем компенсации — 5-15%.
Конкурсы
Регулярные турниры с большими призовыми пулами. Соревнующиеся борются за лучшие позиции в таблице лидеров.
Портативная версия и программа
Смартфонная версия позволяет играть с любого аппарата. Пользователи могут закачать софт для iOS и Android или эксплуатировать интернет версию.
Плюсы портативного софта:
– Скоростная загрузка автоматов
– Эргономичный дизайн
– Всплывающие уведомления о промо
– Вход через биометрию
Автоматы и Live казино
Игровая коллекция содержит сотни названий от лидирующих провайдеров.
Востребованные типы игр:
– Обычные слоты
– Современные слоты с бонусными раундами
– Джекпот слоты
– Megaways машины
Live игровой зал
Зона live игорный зал предлагает партию с живыми дилерами. Доступны классические игры:
– Американская рулетка
– Blackjack
– Punto Banco
– Карибский покер
Как обнаружить рабочее зеркало
Получить рабочую линк на зеркало разрешается множественными вариантами:
1. Зарегистрироваться на емейл-уведомления
2. Отслеживать за апдейтами в социальных сетях
3. Контактировать в отдел поддержки
4. Добавить в закладки актуальное зеркало в избранное
Заключение
Лицензионный ресурс и его функционирующие зеркала дают бесперебойный путь к азартным слотам. Щедрые премии, множественные купоны, удобное портативное софт и профессиональная служба поддержки создают развлекательный геймплей предельно комфортным и безопасным.
Передовые онлайн-казино предоставляют клиентам богатый выбор слотов и заманчивые премии. Но для удобной деятельности важно понимать, как отыскать официальный и его актуальные зеркала.
Что такое главный ресурс казино
Главный сайт казино — это первичная площадка, где клиенты могут наслаждаться развлекательными автоматами. Сайт работает на официальных основаниях и обладает всеми нужными документами.
Ключевые выгоды основного веб-сайта:
– Безопасность индивидуальных сведений
– Честные требования работы
– Гарантированные выводы
– Компетентная помощь
Рабочее зеркало казино: для чего требуется
Зеркало — это идентичная копия лицензионного портала, хостящаяся по альтернативному URL. Актуальное зеркало разрабатывается для поддержания непрерывного доступа к порталу.
Факторы эксплуатации зеркал:
– Блокировка основного сайта
– Технические мероприятия
– Повышенная нагрузка на платформу
Как отыскать свежее зеркало в данный момент
Узнать текущее рабочее зеркало можно разными путями:
1. Email-уведомления — зарегистрируйтесь на новостную подписку
2. Отдел поддержки — обратитесь в онлайн-чат
3. Корпоративные медиа — отслеживайте за обновлениями
4. Тематические площадки — достоверные сайты
Создание аккаунта на сайте казино
Процедура регистрации требует только несколько мгновений:
1. Активируйте на кнопку “Регистрация”
2. Введите запрашиваемые информацию
3. Подтвердите email адрес
4. Примените купон, если доступен
Сразу после успешной оформления вам предоставится возможен индивидуальный аккаунт.
Бонусы и промокоды
Привлекательная наградная система — ключевое конкурентное преимущество казино:
Подарок за первичную регистрацию
Свежие пользователи получают стартовый подарок, который может охватывать:
– Финансовый депозит на первый вклад
– Фри-спины для барабанов
– Безвозвратные фонды
Промокоды
Систематически появляются эксклюзивные купоны, предоставляющие использовать особые бонусы.
Программа кешбэка
Активные клиенты приобретают процент проигранных ставок назад.
Свежие предложения и состязания
Казино периодически устраивает увлекательные промо-мероприятия:
– Семидневные соревнования
– Тематические акции
– Раздачи ценных подарков
– Программа VIP-клуба
Логин в личный профиль
Для логина на портал следует:
1. Загрузить основной сайт или актуальное зеркало
2. Нажать “Войти”
3. Указать имя пользователя и ключ
В индивидуальном профиле предоставлены такие инструменты:
– Депозит кошелька
– Снятие призов
– Просмотр архива транзакций
– Управление персональными параметрами
Адаптивная модификация и программа
Портативная версия
Оптимизированная модификация веб-сайта предоставляет шанс развлекаться с разных карманного гаджета. Дизайн самостоятельно настраивается под формат монитора.
Приложение для загрузки
Получить приложение можно для:
– Android — официальная скачивание с ресурса
– iOS — скачивание через App Store
Выгоды мобильного клиента:
– Оперативный старт
– Бесперебойная операционность
– Push-нотификации об бонусах
– Улучшенный функционал
Гемблинг категории
Игровые машины
Разнообразная галерея развлекательных слотов от известных поставщиков:
– Традиционные слоты
– Современные-слоты
– Призовые-слоты
Live зал
Зона с живыми операторами дает:
– Рулетки
– 21
– Punto Banco
– Карточные игры
Стримы ведутся в высоком качестве изображения, воссоздавая впечатление подлинного казино.
Способы депозита и получения
Платформа принимает разнообразные платежные инструменты:
– Платежные картсчета
– Электронные счета
– Crypto
– Прямые отправки
Минимальные лимиты взноса и оперативные транзакции гарантируют времяпрепровождение исключительно приятной.
Департамент поддержки
Квалифицированная служба ассистентов функционирует 24/7 и может помочь с всеми задачами:
– Мгновенный-чат
– Email-поддержка
– Phone горячая линия
Резюме
Основной портал казино и его действующие дубликаты обеспечивают участникам безопасный и увлекательный азартный опыт. Выгодные бонусы, удобная mobile платформа, богатые игры и качественное live-казино формируют эту платформу превосходным решением для развлекательных развлечений.
veloxtech – Found practical insights today; sharing this article with colleagues later.
technexus – Pages loaded fast, images appeared sharp, and formatting stayed consistent.
Certified North Rx Certified North Rx Certified North Rx
https://usmedssaver.shop/# mail pharmacy
https://profootball.su/wp-content/pages/1xbet_promokod_besplatno___bonus_pri_registracii.html
HarborCircleHub – Branding is soft, approachable, and easy to engage with.
explore caramel cart marketplace – Appealing title, gives the store a friendly vibe.
zenixtech – Appreciate the typography choices; comfortable spacing improved my reading experience.
Передовые онлайн-казино дают участникам обширный спектр возможностей и призовых вариантов. Доступ к площадке производится через основной портал или его рабочее зеркало http://rugby-chauray.com/53745/v-2026-godu-mozhno-vyvodit-dengi-iz-onlayn-kazino-bez-predostavleniya-pasporta-i-drugikh-dokumentov, что гарантирует постоянную деятельность.
В чем суть действующее зеркало казино
Альтернатива — это точная копия официального веб-сайта, сделанная для решения барьеров. Зеркало сегодня обеспечивает пользователям обрести подключение к любимым играм в произвольное время.
Подлинное зеркало располагает всеми характеристиками главного веб-сайта:
– Весь список автоматов
– Личный кабинет с сохраненными сведениями
– Свежие промокоды
– Надежные финансовые процедуры
Оформление профиля на лицензионном портале
Ход оформления требует всего несколько минут. Первым пользователям необходимо:
1. Попасть на главный портал или действующее зеркало
2. Щелкнуть на кнопку “Регистрация”
3. Указать обязательные данные
4. Проверить email
5. Внести стартовый платеж
Бонус за регистрацию зачисляется моментально после прохождения всех этапов.
Подключение в профиль
Зарегистрированные пользователи могут выполнить подключение вводя:
– Никнейм и шифр
– Код сотового
– Email
Профиль дает возможность к администрированию средствами, данным ставок и текущим акциям.
Промо и программы
Азартная сервис привлекает активных клиентов щедрыми вознаграждениями:
Приветственный бонус
– Премия на первый пополнение до 100%
– Фриспины на популярные машины
– Дополнительные бонусы за следующие платежи
Промокоды
Эксклюзивные коды открывают доступ на использование уникальных призов. Текущие комбинации публикуются в секции “Акции”.
Возврат средств
Периодический бонус равен до 10% от проигранных денег. Компенсация начисляется незамедлительно.
Программа лояльности
Верные игроки накапливают баллы, которые конвертируются на действительные финансы или бесплатные вращения.
Mobile версия и программа
Ради комфорта игроков построена удобная портативная платформа. Гибкий вид помогает комфортно развлекаться с любого мобильного аппарата.
Преимущества софта:
– Быстрый вход к слотам
– Адаптированный дизайн
– Устойчивая деятельность
– Оповещения о свежих турнирах
Загрузить программу можно бесплатно с официального сайта для девайсов на Android и iOS.
Библиотека слотов
Автоматы
Каталог содержит более 2000 слотов от популярных производителей:
– Обычные машины
– Мультимедийные игры
– Прогрессивные автоматы
– Фирменные развлечения
Live казино
Раздел Live казино дает развлечение с живыми дилерами в живом эфире:
– Roulette
– Блэкджек
– Баккара
– Столы покера
Турниры
Периодические соревнования с крупными выигрышными суммами запускаются еженедельно. Вход в состязаниях доступно всем активным участникам.
Платежные системы
Платежи и получения финансов реализуются через распространенные методы:
– Банковские средства
– Виртуальные системы
– Цифровая валюта
– Счетные транзакции
Минимальный платеж — от 100 рублей. Снятие выигрышей проводится в течение 24 периода.
Служба поддержки
24/7 команда support может помочь в решении каких-либо ситуаций:
– Онлайн-чат
– Email
– Телефон
– Публичные сети
Охрана и сертификат
Лицензионный ресурс действует на базе признанной разрешения. Все параметры игроков охранены новейшим SSL-шифрованием.
Резюме
Актуальное зеркало обеспечивает постоянный доступ к излюбленным играм, щедрым промокодам и практичным сервисам. Откройте счет сегодня и обретите стартовый поощрение!
vortexbyte – Color palette felt calming, nothing distracting, just focused, thoughtful design.
Переход к порталу через актуальные зеркала
Игроки сетевых казино регулярно имеют дело с ситуацией недоступности базового сайта. Собственно для преодоления этой задачи предусмотрены копии главного портала. РЎСѓРєР° казино обеспечивает стопроцентный доступ ко всем опциям казино.
Что такое актуальное зеркало казино
Копия является собой полную версию главного портала с таким же возможностями. Единственное различие — это иное имя. Все данные участника, в том числе баланс, награды и записи игр, сохраняются прежними.
Плюсы эксплуатации зеркал
Функционирующие зеркала имеют комплексом значимых достоинств:
– Круглосуточный переход к предпочитаемым играм
– Полная сохранность личных сведений
– Поддержание всех опций пользовательского кабинета
– Опция взятия наград и вовлечения в предложениях
Открытие счета на легальном ресурсе
Ход открытия счета максимально легок и длится пару минут. Свежие участники могут рассчитывать на солидный стартовый подарок за создание аккаунта.
Этапы оформления аккаунта
1. Переход на официальный сайт или его зеркало
2. Нажатие на опцию “Создать аккаунт”
3. Заполнение нужных параметров
4. Верификация цифровой почты
5. Внесение промокода (если доступен)
Бонусы и промоакции для клиентов
Платформа одаривает своих пользователей всевозможными наградными акциями.
Основные варианты наград
Приветственный пакет — щедрое вознаграждение для начинающих пользователей, каковое может вмещать денежные средства и бесплатные вращения.
Free spins — опция использовать в топовых аппаратах безвозмездно.
Возврат средств — долевой отдача израсходованных финансов, который именно предоставляется еженедельно или раз в месяц.
Промокоды — особые последовательности, гарантирующие дополнительные преимущества.
Личный кабинет: возможности и конфигурации
Пользовательский профиль предоставляет исчерпывающий контроль над персональным активностью. В нем имеются:
– Регулирование средствами
– Данные платежей
– Работающие привилегии
– Параметры сохранности
– Валидация счета
Портативная редакция и APP
Современные пользователи ценят мобильность. Казино предлагает два варианта для участия с карманных аппаратов.
Responsive смартфонная версия
Мобильная редакция домена автоматически настраивается под дисплей любого устройства. Нет необходимости загружать отдельное софт.
Софт для гаджетов
Можно скачать официальное софт для iOS и Android. Софт обеспечивает:
– Моментальный старт
– Оптимизированный интерфейс
– Мобильные-извещения о предложениях
– Устойчивую функциональность
Live развлечения: антураж подлинного зала
Секция Live развлечений переносит пользователей в обстановку реального казино. Квалифицированные ведущие осуществляют раунды в варианте прямого времени.
Известные Live-столы
– Французская рулетка
– Двадцать одно
– Баккара
– Техасский холдем
Аппараты: ассортимент развлечений
Коллекция развлекательных аппаратов вмещает сотни вариантов от лидирующих поставщиков. Клиенты встретят:
– Традиционные машины
– Видео-автоматы
– Мега-выигрыш-игры
– Megaways
Конкурсы и особые акции
Постоянные конкурсы обеспечивают пользователям бороться друг с другом за значительные призовые фонды. Всякий состязание обладает свои требования присутствия и таблицу лидеров.
Методы пополнения и получения сумм
Платформа поддерживает множество денежных методов:
– Банковские инструменты
– Электронные платежные системы
– Криптовалюты
– Банковские переводы
Все платежи реализуются надежно благодаря актуальным технологиям кодирования.
Отдел support
Компетентные специалисты сервиса support готовы содействовать 24/7. Предусмотрены следующие пути контакта:
– Оперативный-чат
– Email-сервис
– Телефонная линия
– Публичные сети
Вывод
Главный портал казино и его функционирующие зеркала дают клиентам безопасный и удобный переход к обширному спектру геймерских активностей. Внушительные поощрения, периодические предложения, компетентная служба и удобные платежные системы делают игровой времяпрепровождение крайне приятным и прибыльным.
https://usmedssaver.com/# ordering drugs from canada
Thanks for taking the time to break this down so clearly.
cybernexus – Bookmarked this immediately, planning to revisit for updates and inspiration.
codenova – Appreciate the typography choices; comfortable spacing improved my reading experience.
zybertech – Bookmarked this immediately, planning to revisit for updates and inspiration.
bytenova – Loved the layout today; clean, simple, and genuinely user-friendly overall.
Good morning!
Discover music mysterious harmonies offering interesting and valuable sound data and hear the math in melody see on the website for music theory
Full information on the link – https://perchica.ru/czeny-na-neft-upali-nizhe-73-za-barrel-vpervye-s-serediny-dekabrya-rbk-investiczii-2/
All the best and development in business!
Подключение к сайту через действующие зеркала
Участники интернет казино постоянно контактируют с трудностью блокировки главного сайта. Собственно для устранения этой трудности предусмотрены альтернативные адреса легального ресурса. Bollywood зеркало дает беспрепятственный переход ко всем функциям платформы.
Что такое актуальное зеркало казино
Альтернативный адрес представляет собой идентичную копию главного сайта с аналогичным опциями. Главное различие — это альтернативное имя. Все параметры пользователя, вместе с баланс, награды и архив игр, находятся неизменными.
Преимущества эксплуатации зеркал
Актуальные зеркала обладают рядом существенных достоинств:
– Бесперебойный переход к предпочитаемым играм
– Абсолютная защита индивидуальных сведений
– Сохранение всех параметров персонального кабинета
– Возможность получения наград и включения в предложениях
Оформление профиля на легальном домене
Операция создания аккаунта предельно несложен и отнимает буквально минут. Недавние клиенты способны рассчитывать на крупный приветственный поощрение за оформление.
Шаги формирования аккаунта
1. Подключение на легальный ресурс или его зеркало
2. Клик на элемент “Присоединиться”
3. Внесение необходимых сведений
4. Подтверждение почтовой почты
5. Указание бонусного кода (когда имеется)
Бонусы и акции для пользователей
Платформа поощряет своих игроков разнообразными наградными системами.
Главные категории призов
Стартовый пакет — щедрое премирование для новых игроков, которое имеет возможность охватывать финансовые суммы и free spins.
Фриспины — возможность крутить в известных игровых машинах без затрат.
Кешбэк — частичный компенсация потерянных средств, каковой зачисляется раз в неделю или каждый месяц.
Промокоды — специальные сочетания, дающие дополнительные привилегии.
Индивидуальный кабинет: возможности и параметры
Личный профиль обеспечивает исчерпывающий управление над персональным опытом. Тут присутствуют:
– Управление депозитом
– Данные переводов
– Активные поощрения
– Настройки безопасности
– Верификация аккаунта
Портативная вариант и APP
Новейшие клиенты признают доступность. Казино обеспечивает пару способа для развлечений с карманных гаджетов.
Приспособленная мобильная версия
Портативная версия портала самостоятельно приспосабливается под экран любого гаджета. Нет необходимости загружать дополнительное софт.
Приложение для мобильных
Доступно инсталлировать специальное софт для iOS и Android. Приложение гарантирует:
– Быстрый доступ
– Улучшенный внешний вид
– Мобильные-извещения о поощрениях
– Устойчивую операционность
Live казино: обстановка подлинного игорного заведения
Раздел Live казино транспортирует участников в атмосферу настоящего зала. Профессиональные крупье проводят партии в варианте прямого времени.
Известные Live-развлечения
– Французская рулетка
– Двадцать одно
– Baccarat
– Покер
Автоматы: разнообразие игр
Коллекция слотовых слотов содержит сотни наименований от ведущих поставщиков. Игроки найдут:
– Стандартные машины
– Видеослоты
– Прогрессивный джекпот-игры
– Мегавейс
Состязания и особые события
Периодические состязания дают возможность участникам соревноваться друг с другом за внушительные денежные банки. Любой соревнование располагает свои условия участия и список призеров.
Пути зачисления и снятия сумм
Казино обслуживает ряд денежных сервисов:
– Дебетовые карты
– Онлайн счета
– Цифровые валюты
– Финансовые транзиты
Любые платежи осуществляются безопасно благодаря актуальным методам шифрования.
Сервис обслуживания
Компетентные специалисты команды поддержки настроены ассистировать 24/7. Доступны данные способы общения:
– Живой-чат
– Email-поддержка
– Голосовая линия
– Публичные сети
Резюме
Легальный домен игровой площадки и его актуальные альтернативы гарантируют игрокам безопасный и удобный доступ к широкому спектру азартных игр. Крупные поощрения, частые предложения, качественная поддержка и легкие платежные способы создают развлекательный досуг чрезвычайно увлекательным и результативным.
Переход к ресурсу через действующие зеркала
Нынешние интернет казино дают игрокам круглосуточный доступ к развлечениям. Основной ресурс казино РўРёРї РўРѕРї казино работает бесперебойно, гарантируя большой набор игровых развлечений. Тем не менее порой появляются технические препятствия или ограничения, следовательно необходимо знать о доступности функционирующих зеркал.
Что означает собой главное зеркало казино
Копия — это точная реплика официального веб-сайта с идентичным возможностями. Функционирующее зеркало сейчас даёт возможность избегать территориальные блокировки и вести времяпрепровождение.
Главные плюсы использования зеркал:
– Полный вход к персональному кабинету
– Фиксация совокупных данных счёта
– Такой же ассортимент слотов
– Действующие вознаграждения и промо
Создание аккаунта на платформе
Механизм оформления длится пару минут. Свежие игроки получают щедрый подарок за регистрацию, он имеет возможность вмещать:
– Вступительный финансовый приз
– Даровые вращения для машин
– Особые купоны
– Увеличенный кешбэк
Для окончания регистрации требуется:
1. Перейти на центральный сайт или копию
2. Выбрать кнопку «Регистрация»
3. Указать персональные данные
4. Активировать почтовый адрес или телефон
5. Использовать купон (в случае присутствии)
Доступ в индивидуальный кабинет
После правильной регистрации геймеры имеют возможность совершать вход через основной ресурс или действующее зеркало. Собственный кабинет обеспечивает полный регулирование над счётом:
– Журнал игр
– Ввод депозита
– Изъятие денег
– Регулирование поощрениями
– Включение в конкурсах
Награды и промо казино
Сайт радует геймеров многочисленными привилегированными схемами:
Начальные призы
Новые игроки получают великодушный букет наград на вступительные вклады. Зачастую это включает процентную надбавку к объёму пополнения плюс комплиментарные спины.
Постоянные предложения
– Каждонедельный компенсация до 15%
– Состязания с наградными фондами
– Призы на годовщину рождения
– Особые промо для VIP геймеров
Схема лояльности
Деятельные пользователи зарабатывают единицы, они можно трансформировать на подлинные деньги или специальные льготы.
Смартфонная версия и программа
Актуальные технологии позволяют геймить в любом месте угодно. Смартфонная вариант ресурса автоматически подстраивается под размер всякого аппарата.
Достоинства мобильного ПО:
– Быстрая открытие игр
– Практичный вид
– Моментальные-сообщения о акциях
– Опция установить для Android и iOS
Реальное казино: антураж настоящего развлекательного заведения
Категория Live заведения переносит игроков в антураж подлинного игорного клуба. Опытные дилеры проводят игру в состоянии реального времени.
Имеющиеся столы:
– Рулетка
– Двадцать одно
– Баккара
– Техасский холдем
Слоты и развлекательные машины
Каталог гемблинг слотов насчитывает тысячи позиций от лидирующих провайдеров. Произвольный клиент отыщет игру по нраву:
– Традиционные автоматы
– Видеослоты с призовыми турами
– Прогрессивный-слоты
– Динамические машины
Соревнования и лотереи
Регулярные состязания включают азарт и открывают шанс обрести крупные награды. Участие в состязаниях часто комплиментарное, а призовые банки составляют значительных объёмов.
Секьюрити и конфиденциальность
Платформа задействует инновационные протоколы шифрования для защиты информации клиентов. Все денежные действия проходят через зашифрованные линии.
Итог
Главный сайт и его рабочие зеркала дают стабильный подключение к превосходным азартным играм. Богатые призы, удобная смартфонная версия, разнообразие автоматов и профессиональное Live-клуб делают сайт отличным выбором для поклонников развлекательных игр.
Trail Spot – Polished interface, exploring items was simple and quick.
kraken slon kra3 at
Granite Stone Finds – Memorable and approachable, while maintaining a solid and professional feel.
silkstone vendor guide – Enjoyable browsing experience, sections are well-arranged
Подключение к платформе через актуальные зеркала
Игроки виртуальных казино постоянно сталкиваются с ситуацией закрытия официального домена. Собственно для устранения этой проблемы разработаны дубликаты официального портала. казино Мелстрой дает полный вход ко всем опциям платформы.
Что такое актуальное зеркало казино
Копия составляет собой идентичную копию основного ресурса с похожим набором функций. Единственное несовпадение — это доменное имя. Каждые данные пользователя, вместе с баланс, поощрения и данные игр, остаются прежними.
Плюсы использования зеркал
Актуальные зеркала обладают комплексом ключевых преимуществ:
– Круглосуточный вход к любимым развлечениям
– Совершенная конфиденциальность индивидуальных сведений
– Сохранение всех настроек пользовательского кабинета
– Возможность взятия бонусов и участия в промоакциях
Регистрация на главном сайте
Процесс открытия счета чрезвычайно элементарен и занимает буквально минут. Новые клиенты имеют возможность рассчитывать на щедрый начальный подарок за открытие счета.
Ступени формирования аккаунта
1. Вход на официальный портал или его зеркало
2. Выбор на опцию “Присоединиться”
3. Внесение обязательных данных
4. Активация email почты
5. Внесение кода (когда есть)
Подарки и промоакции для игроков
Игровая площадка радует своих игроков многочисленными наградными программами.
Ключевые типы наград
Вводный подарок — внушительное начисление для недавних пользователей, каковое в состоянии включать финансовые суммы и безвозмездные спины.
Фриспины — способность крутить в популярных слотах безвозмездно.
Компенсация — процентный компенсация утраченных сумм, который начисляется каждую неделю или каждый месяц.
Промокоды — специальные сочетания, предоставляющие экстра поощрения.
Пользовательский кабинет: возможности и настройки
Пользовательский аккаунт гарантирует абсолютный надзор над игровым взаимодействием. В нем предусмотрены:
– Регулирование балансом
– Записи переводов
– Работающие бонусы
– Параметры охраны
– Валидация профиля
Карманная платформа и программа
Нынешние игроки предпочитают доступность. Площадка обеспечивает пару способа для участия с карманных устройств.
Отзывчивая портативная редакция
Смартфонная редакция портала автономно подстраивается под экран любого устройства. Нет необходимости инсталлировать отдельное программное обеспечение.
Программа для смартфонов
Разрешено установить специальное софт для iOS и Android. Приложение гарантирует:
– Быстрый доступ
– Доработанный внешний вид
– Всплывающие-уведомления о предложениях
– Стабильную работу
Live раздел: обстановка истинного казино
Раздел Live столов отправляет игроков в обстановку подлинного казино. Профессиональные дилеры проводят игры в режиме реального времени.
Топовые Live-форматы
– Американская рулетка
– Blackjack
– Baccarat
– Карибский покер
Аппараты: ассортимент слотов
Каталог развлекательных аппаратов содержит множество вариантов от топовых провайдеров. Игроки встретят:
– Стандартные слоты
– Современные слоты
– Джекпот-слоты
– Слоты с множественными линиями
Соревнования и особые события
Постоянные соревнования обеспечивают клиентам бороться друг с другом за солидные наградные суммы. Всякий состязание содержит свои правила включения и список победителей.
Методы зачисления и изъятия денег
Платформа обслуживает множество расчетных методов:
– Кредитные карты
– Онлайн счета
– Blockchain-платежи
– Банковские транзакции
Абсолютно все переводы осуществляются конфиденциально благодаря передовым методам криптографии.
Команда support
Опытные консультанты сервиса обслуживания расположены содействовать 24/7. Предусмотрены следующие способы общения:
– Онлайн-чат
– Email-обслуживание
– Голосовая линия
– Публичные сети
Резюме
Главный домен казино и его актуальные копии дают пользователям конфиденциальный и удобный вход к огромному спектру развлекательных активностей. Крупные поощрения, частые предложения, компетентная служба и легкие финансовые методы создают игровой досуг крайне комфортным и результативным.
check this out – Pleasant and calming, stands out nicely online.
Современные онлайн-казино гарантируют пользователям разнообразие вариантов для беспроблемной игры. Основной веб-портал РРЅРѕРјРѕ открывает путь ко всем опциям и развлечениям. Однако при наличии программных проблем на помощь спешат функционирующие копии.
Что означает собой рабочее зеркало
Зеркало казино — это точная реплика главного веб-сайта, находящаяся по другому доменному имени. Подлинное зеркало сохраняет все опции, включая регистрацию, вход в индивидуальный кабинет, премии и купоны.
Зеркало на сегодня дает:
– Стабильный доступ к игровым машинам
– Полную конфиденциальность личных сведений
– Поддержку средств и хронологии переводов
– Доступность всех специальных предложений
Создание учетной записи на основном сайте
Процедура оформления учетной записи занимает пару минут. Новым игрокам требуется:
1. Открыть на официальный ресурс или актуальное зеркало
2. Щелкнуть кнопку «Зарегистрироваться»
3. Указать необходимые поля
4. Верифицировать электронную почту
5. Применить бонусный код при наличии
После конца оформления профиля игроки получают бонус за регистрацию, какой может охватывать бонусные спины или монетарное премирование.
Доступ в личный кабинет
Личный кабинет предоставляет всеобъемлющий управление над азартным процессом. Через собственный раздел можно:
– Пополнять кошелек
– Выводить выигрыши
– Задействовать промокоды
– Контролировать хронологию пари
– Принимать участие в состязаниях
– Получать кешбэк
Анализ премий и промо-предложений
Выгодная бонусная система — важное преимущество ресурса. Главные формы бонусов:
Вступительный приз
Начинающие зарабатывают щедрое награду на стартовые взносы. Объем премии может достигать 100-200% от суммы депозита.
Бесплатные вращения
Бесплатные спины выдаются для известных машин. Число фриспинов разнится от 10 до 500 штук.
Возврат средств
Постоянный или ежемесячный компенсация части потерянных средств. Типичный размер возврата — 5-15%.
Турниры
Регулярные конкурсы с большими призовыми пулами. Участники соревнуются за топовые позиции в турнирной таблице.
Смартфонная версия и программа
Портативная версия дает возможность делать ставки с каждого гаджета. Пользователи могут установить приложение для iOS и Android или эксплуатировать браузерную версию.
Достоинства мобильного приложения:
– Молниеносная подзагрузка игр
– Практичный дизайн
– Всплывающие уведомления о поощрениях
– Вход через Face ID
Машины и Live казино
Азартная подборка включает сотни игр от известных провайдеров.
Топовые разделы игр:
– Классические машины
– Видео-автоматы с премиальными раундами
– Накопительный приз игры
– Megaways слоты
Live игорный зал
Категория live казино предлагает развлечение с живыми крупье. Доступны классические игры:
– Американская рулетка
– Блэкджек
– Punto Banco
– Техасский холдем
Как найти актуальное зеркало
Получить свежую URL на зеркало можно множественными способами:
1. Подписаться на емейл-уведомления
2. Отслеживать за новостями в соц сетях
3. Связаться в службу поддержки
4. Заложить рабочее зеркало в избранное
Итог
Главный ресурс и его рабочие дубликаты гарантируют непрерывный доступ к игровым автоматам. Выгодные премии, разнообразные промокоды, эргономичное портативное софт и профессиональная служба поддержки поддержки превращают игровой геймплей предельно приятным и безопасным.
Продолжение ferma cc
I’m impressed, I must say. Rarely do I come across a blog
that’s both educative and amusing, and without a doubt, you’ve hit the nail on the head.
The problem is something which too few people are speaking intelligently
about. Now i’m very happy that I found this in my search for something relating to this.
Feel free to surf to my site :: Paramount Training and Development
For the event
win real money playing online casino blackjack
to review the policy.
canada pharmacy 24h: canadian pharmacy service – reputable canadian online pharmacies
мелбет бонус мелбет бонус .
kraken slon slon3 at
монтаж газового пожаротушения спб монтаж газового пожаротушения спб .
Современные онлайн-казино обеспечивают участникам обширный ассортимент игр и щедрые бонусы. Однако для беспроблемной игры важно понимать, как отыскать казино казино РђРєРІР° и его актуальные зеркала.
Что такое основной сайт казино
Главный сайт казино — это первичная платформа, где пользователи могут наслаждаться развлекательными автоматами. Портал функционирует на легальных принципах и владеет всеми требуемыми лицензиями.
Основные плюсы главного портала:
– Защищенность персональных реквизитов
– Честные положения использования
– Стабильные платежи
– Компетентная служба поддержки
Функционирующее зеркало казино: для чего необходимо
Альтернативный адрес — это точная дубликат официального сайта, хостящаяся по другому домену. Рабочее зеркало формируется для поддержания постоянного соединения к ресурсу.
Причины использования дублирующих ресурсов:
– Ограничение основного адреса
– Плановые процедуры
– Большая загрузка на ресурс
Как обнаружить действующее зеркало на сегодня
Обнаружить текущее рабочее зеркало можно несколькими методами:
1. Рассылка — активируйте уведомления на email отправку
2. Отдел помощи — свяжитесь в онлайн-чат
3. Корпоративные площадки — отслеживайте за обновлениями
4. Специализированные ресурсы — авторитетные сайты
Оформление профиля на сайте казино
Процесс создания аккаунта занимает всего несколько моментов:
1. Активируйте на элемент “Создать аккаунт”
2. Внесите обязательные данные
3. Верифицируйте электронную адрес
4. Активируйте купон, если есть
Сразу после финализированной регистрации вам будет разрешен индивидуальный раздел.
Бонусы и промокоды
Привлекательная поощрительная система — ключевое преимущество казино:
Подарок за открытие счета
Новые клиенты обретают приветственный бонус, который может предполагать:
– Монетарный счет на начальный депозит
– Free spins для автоматов
– Бездепозитные деньги
Купоны
Постоянно публикуются новые купоны, обеспечивающие забрать особые привилегии.
Схема кешбэка
Постоянные клиенты получают часть потраченных ставок обратно.
Текущие предложения и турниры
Платформа систематически устраивает интересные акции:
– Еженедельные чемпионаты
– Сезонные предложения
– Лотереи крупных наград
– Механизм лояльности
Авторизация в персональный профиль
Для авторизации на портал следует:
1. Загрузить главный ресурс или функционирующее зеркало
2. Нажать “Авторизация”
3. Прописать email и секретную комбинацию
В личном кабинете разрешены следующие функции:
– Пополнение кошелька
– Обналичивание денег
– Просмотр истории операций
– Управление личными данными
Адаптивная модификация и софт
Мобильная версия
Мобильная вариант сайта обеспечивает участвовать с различных смартфонного телефона. Интерфейс адаптивно оптимизируется под формат экрана.
Программа для установки
Скачать программу можно для:
– Android — официальная загрузка с ресурса
– iOS — инсталляция через App Store
Преимущества приложения:
– Быстрый доступ
– Надежная функциональность
– Push-уведомления об бонусах
– Ускоренный UI
Гемблинг категории
Барабаны
Внушительная библиотека игровых барабанов от топовых поставщиков:
– Стандартные машины
– Продвинутые-игры
– Призовые-машины
Live зал
Категория с профессиональными дилерами предлагает:
– Рулетка
– 21
– Baccarat
– Покер
Трансляции проводятся в отличном качестве изображения, формируя впечатление подлинного казино.
Способы зачисления и вывода
Ресурс обслуживает различные денежные методы:
– Кредитные картсчета
– Онлайн кошельки
– Цифровые валюты
– Прямые отправки
Базовые значения внесения и быстрые выводы обеспечивают развлечение предельно приятной.
Отдел помощи
Квалифицированная служба support функционирует 24/7 и способна помочь с различными ситуациями:
– Мгновенный-чат
– Email-консультации
– Голосовая линия
Резюме
Официальный веб-сайт казино и его действующие копии предоставляют игрокам конфиденциальный и захватывающий гемблинг досуг. Богатые подарки, удобная адаптивная версия, обширные автоматы и качественное live-казино делают эту площадку превосходным решением для игровых игр.
срочный вызов нарколога на дом ростов narkolog-na-dom-v-rostove-1.ru .
Передовые онлайн-казино предлагают клиентам богатый выбор игр и выгодные премии. Однако для удобной деятельности важно понимать, как обнаружить Вован казино и его рабочие зеркала.
Что такое официальный портал казино
Официальный ресурс казино — это основная веб-площадка, где игроки могут пользоваться развлекательными автоматами. Портал работает на легальных условиях и обладает всеми обязательными лицензиями.
Первостепенные плюсы официального веб-сайта:
– Конфиденциальность персональных данных
– Прозрачные требования игры
– Гарантированные платежи
– Оперативная поддержка
Рабочее зеркало казино: для чего используется
Альтернативный адрес — это абсолютная дубликат главного веб-сайта, находящаяся по отличному адресу. Функционирующее зеркало разрабатывается для обеспечения непрерывного подключения к ресурсу.
Факторы применения дублирующих ресурсов:
– Запрет первичного URL
– Плановые операции
– Значительная нагрузка на ресурс
Как найти действующее зеркало в данный момент
Узнать свежее проверенное зеркало можно несколькими методами:
1. Почтовые оповещения — зарегистрируйтесь на email отправку
2. Департамент помощи — напишите в онлайн-чат
3. Социальные каналы — следите за постами
4. Тематические сайты — достоверные платформы
Открытие счета на сайте казино
Алгоритм открытия счета составляет только несколько моментов:
1. Активируйте на элемент “Регистрация”
2. Заполните обязательные данные
3. Валидируйте почтовую почту
4. Примените промокод, если имеется
Вслед за успешной создания аккаунта вам будет доступен личный кабинет.
Бонусы и купоны
Богатая поощрительная система — значимое преимущество казино:
Награда за первичную регистрацию
Новые пользователи приобретают приветственный поощрение, который может охватывать:
– Денежный бонус на первый депозит
– Фриспины для игровых машин
– Бездепозитные бонусы
Купоны
Периодически появляются актуальные бонусные шифры, позволяющие получить специальные бонусы.
Система компенсации
Активные клиенты приобретают процент использованных ставок в виде компенсации.
Свежие кампании и состязания
Ресурс систематически организует азартные акции:
– Недельные соревнования
– Специальные предложения
– Лотереи ценных выигрышей
– Программа привилегий
Доступ в персональный раздел
Для логина на портал требуется:
1. Посетить официальный портал или действующее зеркало
2. Нажать “Login”
3. Указать логин и код доступа
В индивидуальном разделе открыты нижеперечисленные функции:
– Зачисление счета
– Вывод призов
– Просмотр лога ставок
– Изменение личными данными
Портативная версия и app
Адаптивная платформа
Адаптивная модификация сайта предоставляет шанс развлекаться с любого мобильного гаджета. Визуал автоматически адаптируется под диагональ экрана.
App для download
Скачать программу можно для:
– Android — официальная download с сайта
– iOS — инсталляция через App Store
Выгоды мобильного клиента:
– Моментальный вход
– Бесперебойная работа
– Push-уведомления об бонусах
– Ускоренный интерфейс
Игровые зоны
Автоматы
Обширная коллекция азартных автоматов от известных производителей:
– Классические слоты
– Видео-автоматы
– Прогрессивные-слоты
Live зал
Категория с профессиональными операторами дает:
– Рулеточные столы
– Blackjack
– Punto Banco
– Poker
Трансляции транслируются в превосходном качестве изображения, обеспечивая атмосферу аутентичного казино.
Способы зачисления и обналичивания
Ресурс работает с множественные финансовые инструменты:
– Платежные картсчета
– Виртуальные кошельки
– Цифровые валюты
– Финансовые транзакции
Базовые пороги внесения и быстрые транзакции создают игру исключительно удобной.
Департамент техподдержки
Опытная служба помощи работает 24/7 и способна помочь с разными вопросами:
– Онлайн-чат
– Email-поддержка
– Звонковая линия
Резюме
Главный портал казино и его функционирующие копии дают участникам безопасный и захватывающий гемблинг отдых. Привлекательные подарки, удобная мобильная версия, богатые игры и высокоуровневое live-казино создают эту систему великолепным вариантом для гемблинг развлечений.
Go back With these tips in mind, you’re now ready to unleash your creativity and make your Canva designs come to life with the Animate button. Happy designing! Canva offers exclusive tools and features to work with, making it arguably one of the best design tools. While animations are offered on Canva, unfortunately, animate on click isn’t available yet. Elevate your designs by adding custom illustrations and time-lapse videos of your artwork directly into your Canva projects. Start creating with Speedpaint in Canva today! I posted a video on my own Instagram account, just like the one I am about to show you how to make, and was able to reach over 200k people. Once you’ve finalized your animated design in Canva, importing it to Shopify is quick with Canvify. Open Canvify from your Shopify admin panel, update or create a new page, and import your Canva design. After importing, preview your Shopify store to ensure everything looks smooth.
https://www.empowher.com/users/oliverreed
To start editing your own movies, the first thing you need to do is select all the videos and photos that you want to include. When you have done so, you will be taken to the editing view with timelines, where you can cut, paste, and adjust all the fragments to create your desired composition. Here, you can also add additional audio tracks, subtitle tracks, and even tracks with filters. Another excellent feature you can access from the app is its capability to enhance your videos and images. It is perfect if you want to transform your old photos and videos into a better appearance. Thus, if you are looking for an excellent image and video enhancer, consider using this app. As always, if you have questions or comments, drop them here or hit me up on the Twitter @smartfilming. If you like this article, also consider subscribing to my free Telegram channel (t.me smartfilming) to get notified about new blog posts and receive the monthly Ten Telegram Takeaways newsletter about important things that happened in the world of mobile video.
вывод из запоя цена в ростове vyvod-iz-zapoya-v-rostove-1.ru .
парк отель для свадьбы в подмосковье
BajaRx Direct: online pharmacy – BajaRx Direct
crystalvendor link – Basic anchor text that still clearly points to the site.
Переход к платформе и актуальные зеркала
Востребованные виртуальные казино гарантируют клиентам обширный ассортимент развлечений. Официальный портал официальный гарантирует безопасный подключение ко всем функциям. Тем не менее периодически появляются моменты, когда нужно резервный вариант доступа.
Что представляет собой функционирующее зеркало
Актуальное зеркало — это абсолютная версия официального портала с запасным URL расположением. Зеркало сегодня обеспечивает миновать вероятные ограничения и поддерживать непрерывный вход к популярным играм.
Легальное зеркало имеет теми же характеристиками, что и главный портал:
– Целый перечень слотов
– Собственный раздел с актуальными сведениями
– Все бонусы и акции
– Безопасные платежные операции
Оформление и доступ в сервис
Ход регистрации на ресурсе длится считанные секунд. Недавним игрокам необходимо:
1. Перейти на актуальное зеркало на данный момент
2. Кликнуть кнопку «Открыть профиль»
3. Указать необходимые информацию
4. Проверить почтовую почту или номер смартфона
5. Использовать бонус за регистрацию
Подключение в собственный раздел осуществляется с помощью указание никнейма и кода доступа.
Характеристика наградной структуры
Щедрая поощрительная система — ключевое преимущество ресурса. Участники получают всевозможные поощрения:
Начальные подарки
Начинающие клиенты имеют возможность рассчитывать на щедрый поощрение за регистрацию. Традиционно это набор вариантов, объединяющий:
– Процентную надбавку к стартовому пополнению
– Даровые фриспины
– Призовые суммы на счет
Купоны и эксклюзивные возможности
Регулярные бонусные комбинации обеспечивают зарабатывать экстра льготы. Активировать их допустимо в особом разделе собственного профиля.
Бесплатные вращения и компенсация
Даровые вращения — это вариант запускать игры без задействования личных денег. Возврат означает долевой возврат проигранных финансов.
Коллекция слотов
Азартная ресурс предлагает огромную базу развлечений.
Автоматы
Многообразие слотов поражает представление. Представлены стандартные простые аппараты и новые развлечения с захватывающей графикой.
Live зал
Зона Live заведения погружает участников в среду настоящего игорного клуба. Опытные ведущие осуществляют раунды в онлайн эфире.
Конкурсы и таблицы лидеров
Периодические турниры вносят накала и гарантируют возможность заработать значительные выигрыши.
Карманная форма и софт
Современные разработки помогают развлекаться в любимом месте. Портативная вариант независимо настраивается под экран устройства.
Получить приложение возможно для цифровых систем iOS и Android. Приложение обеспечивает:
– Мгновенный вход
– Стабильную производительность
– Мгновенные-алерты об промо
– Комфортный вид
Платежные операции
Сайт поддерживает разнообразные методы внесения и получения сумм:
– Кредитные счета
– Электронные платформы
– Цифровые валюты
– Прямые транзакции
Всевозможные действия осуществляются через зашифрованное протокол, что подтверждает целостность конфиденциальных данных.
Сервис ассистанса
Компетентная группа поддержки действует круглосуточно. Соединиться с менеджерами можно через:
– Онлайн-чат
– Цифровую почту
– Горячую линию
– Медиа каналы
Выводы
Главный ресурс и его рабочее зеркало дают клиентам стабильный и удобный путь к увлекательным забавам. Щедрые бонусы, широкий выбор игр и качественная ассистанс обеспечивают игру исключительно приятной и доходной.
Актуальные сетевые казино обеспечивают клиентам широкий выбор возможностей для приятной игры. Однако иногда вход к основному ресурсу может быть закрытым. В таких обстоятельствах на выручку приходят РњСЌРґ казино казино, которое гарантирует бесперебойный подключение ко всем опциям платформы.
Что такое рабочее зеркало казино
Дубликат — это точная дубликат официального портала, которая находится по запасному домену. Дубликат сохраняет полный функционал главного веб-портала, включая личный кабинет, баланс и данные переводов.
Принципиальные преимущества использования зеркала:
– Постоянный подключение к ресурсу
– Полная идентичность инструментов
– Безопасность пользовательских реквизитов
– Хранение всех вознаграждений
Как найти функционирующее зеркало в данный момент
Имеется несколько надежных путей поиска текущей адреса:
Легитимные каналы:
1. Электронная рассылка — управление регулярно отправляет письма с актуальными доменами
2. Общественные сети — проверенные аккаунты публикуют текущую данные
3. Служба поддержки — операторы дают проверенные URL
4. Смартфонное приложение — дает возможность преодолевать блокировки
Создание аккаунта на основном сайте
Процесс создания аккаунта занимает не более немного минут и содержит из данных ступеней:
1. Открытие на главный сайт или функционирующее зеркало
2. Щелчок на клавишу «Создать аккаунт»
3. Ввод учетной таблицы
4. Подтверждение электронной почты или мобильного номера
5. Включение поощрения за регистрацию при существовании промокода
Свежие клиенты получают значительный стартовый бонус, который может включать бесплатные вращения, финансовые бонусы или возврат средств.
Логин в индивидуальный кабинет
Вход на ресурсе осуществляется стандартным образом. Нужно вписать учетные данные и секретный ключ, указанные при создании аккаунта.
Ключевые моменты для конфиденциального входа:
– Задействуйте защищенный секретный ключ
– Активируйте двухфакторную проверку
– Не записывайте данные на посторонних компьютерах
– Мониторьте URL строку браузера
Описание бонусной структуры
Игорный портал одаривает геймеров различными привилегиями и специальными предложениями:
Начальный букет
Новички вправе полагаться на великодушное бонус за первый вклад. Обычно это процентная добавка к зачисленной объему плюс даровые спины для популярных слотов.
Периодические акции
– Еженедельный компенсация — возвращение процентной доли проигранных финансов
– Бонусы на повторные вклады
– Специальные акции по знаменательным датам
– Турниры с большими выигрышными банками
Программа лояльности
Активные клиенты собирают баллы за произвольную игру, которые затем обмениваются на настоящие денежные призы, free spins или уникальные льготы.
Купоны: как применять
Купоны — это специальные комбинации букв и цифр, предоставляющие доступ к дополнительным привилегиям.
Каким образом найти действующие промокоды:
– Проверенные медийные сети казино
– Партнерские сайты
– Email-новостная лента
– Профильные форумы
Указывается промокод в соответствующее поле при открытии счета или добавлении денег депозита.
Мобильная версия и приложение
Современные игроки любят делать ставки с мобильных устройств. Портал обеспечивает два способа для приятной телефонной игры.
Отзывчивая версия
Интернет версия само собой оптимизируется под габариты экранной панели. Не нуждается установки и функционирует в всяком свежем браузере.
Портативное приложение
Установить app можно для аппаратов на Android и iOS. Плюсы app:
– Быстрая запуск
– Устойчивая функционирование
– Мгновенные-уведомления о акциях
– Самостоятельный избегание блокировок
Операция скачивания несложен: требуется перейти на ресурс с смартфонного устройства и придерживаться инструкциям.
Гемблинг каталог
Библиотека аппаратов содержит огромное количество позиций от лучших разработчиков.
Слоты
Игровые слоты — самая востребованная раздел аттракционов. Размещены классические трехбарабанные автоматы, современные мультимедийные слоты с бонусными стадиями, а также накопительные призы.
Live казино
Зона с реальными дилерами обеспечивает прочувствовать настроение истинного казино. Имеются развлечения с блэкджеком.
Вещание осуществляется в высоком разрешении, имеется чат с крупье и прочими пользователями.
Состязания
Регулярно организуются соревнования по многочисленным дисциплинам. Включение позволяет получить валютные награды, даровые прокруты или эксклюзивные бонусы.
Платежные действия
Портал обеспечивает значительный спектр денежных способов:
– Кредитные карты
– Виртуальные кошельки
– Биткоин
– Банковские платежи
Минимальная объем пополнения — посильная для массы геймеров. Получение выигрышей производится в короткие временные рамки.
Служба поддержки
Профессиональные специалисты настроены поддержать круглосуточно. Имеются такие способы коммуникации:
– Онлайн-чат
– Email
– Телефонная связь
– Общественные сети
Разъяснения на типовые запросы можно обнаружить в блоке FAQ.
Вывод
Главный портал казино и его актуальные зеркала обеспечивают геймерам совершенный подключение ко всем сервисам ресурса. Значительные поощрения, комфортная мобильная версия, огромный выбор игр и опытная ассистенция делают азартный досуг предельно комфортным и надежным.
Slate Collections – Organized menus, site felt responsive and fast.
online Canyon Harbor – Came across this shop and the collective idea really stands out.
Hello!
Analyze style mysterious trends to find interesting and valuable fashion insights and define your unique look see on the website for trend forecasts
Full information on the link – https://oboinastene.ru/bez-rubriki/znachenie-zashhity-stvolov-derevev
All the best and development in business!
Awesome things here. I am very glad to see your post.
Thank you a lot and I am having a look forward to touch you.
Will you kindly drop me a mail?
Feel free to surf to my homepage :: protección de renta
kraken marketplace krab3 at
Анализ оригинального ресурса
Передовое онлайн-казино предоставляет своим пользователям разнообразный набор услуг и вознаграждений. Оригинальный ресурс http://automatenbetrieb-jonach.de/2026/03/05/sposoby-vyvoda-denezhnykh-sredstv-s-igrovykh-avtomatov-v-kazino действует круглосуточно, предоставляя возможность к популярным слотам, live-казино и разнообразным акциям.
Функционирующее зеркало: путь к порталу
Что такое альтернатива казино
Дубликат является собой абсолютную реплику главного веб-сайта с иным сетевым названием. Действующее зеркало позволяет клиентам избегать блокировки и обеспечивать надежный подключение к любимым слотам.
Как обнаружить действующее зеркало сегодня
Свежие URL на официальное зеркало выкладываются через:
– Почтовую рассылку
– Проверенные публичные сети
– Команду обслуживания
– Партнерские порталы
Оформление на портале
Ход созданияаккаунта
Оформление занимает пару минут и подразумевает данные этапы:
1. Доступ на официальный веб-сайт или актуальное зеркало
2. Активация опции “Открытьсчет”
3. Внесение контактных данных
4. Верификация аккаунта или телефона
5. Формирование кодадоступа
Вознаграждение за регистрацию
Новые пользователи получают щедрые начальные вознаграждения:
– Денежные суммы на аккаунт
– Freespins для игр
– Увеличенный объем кэшбека
– Эксклюзивные коды
Доступ в индивидуальный кабинет
Постоянные игроки способны выполнить доступ через основной веб-сайт или рабочее зеркало. Для этого необходимо ввести никнейм и пароль, установленные при регистрации.
Возможности личного профиля
В индивидуальном разделе предоставлены следующие инструменты:
– Управление персональными реквизитами
– Пополнение счета
– Снятие призов
– Ввод бонусов
– Проверка статистики игр
– Регистрация в состязаниях
Подарки и предложения
Категории поощрений
Казино поощряет своих участников многочисленными призовыми акциями:
– Вступительный комплект — большие поощрения на дебютные вклады
– Фриспины — подарочные спины в популярных играх
– Кэшбек — регулярный возмещение процента убытков
– Система поощрения — особые льготы для верных клиентов
Купоны и их использование
Уникальные промокоды дают расширенные подарки. Для активации необходимо внести код в нужное графу в персональном кабинете.
Азартный ассортимент
Игры
Библиотека развлекательных машин содержит тысячи позиций от известных поставщиков:
– Стандартные симуляторы
– Видео автоматы
– Накопительные симуляторы
– Брендовые автоматы
Live казино
Зона Live-казино дарит взаимодействие с профессиональными операторами в режиме прямого эфира:
– Европейскаярулетка
– Блэкджек
– PuntoBanco
– Покер
Состязания
Систематические турниры с большими наградными фондами организуются регулярно. Участники сражаются за лидерство в рейтинге.
Портативная версия и программа
Мобильная платформа веб-сайта
Официальный ресурс на100% адаптирован для смартфонных устройств. Игроки способны пользоваться игры прямо через веб-навигатор без нужды установки.
Приложение для установки
Фирменное смартфонное APP предоставляется для загрузки на девайсы с операционными средами Android и iOS. Программа гарантирует:
– Мгновенный путь к слотам
– Бесперебойную функциональность
– Моментальные-оповещения о предложениях
– Комфортный оформление
Заключение
Основной сайт казино и его функционирующие дубликаты гарантируют клиентам абсолютный вход к качественным геймплейным развлечениям. Щедрые поощрения, разнообразные акции, простая смартфонная версия и опытная служба создают развлекательный досуг максимально приятным и прибыльным.
Передовые виртуальные казино предоставляют пользователям огромный ассортимент опций для приятной игры. Тем не менее иногда соединение к базовому порталу может являться недоступным. В таких ситуациях на выручку приходят Jozz казино, которое дает стабильный вход ко всем функциям платформы.
Что такое рабочее зеркало казино
Дубликат — это точная реплика основного сайта, которая размещается по запасному URL. Копия содержит полный возможности первоначального ресурса, включая пользовательский кабинет, средства и историю платежей.
Ключевые достоинства применения зеркала:
– Непрерывный вход к порталу
– Максимальная идентичность инструментов
– Безопасность личных сведений
– Удержание доступных бонусов
Как разыскать рабочее зеркало сегодня
Существует ряд безопасных методов поиска актуальной ссылочной информации:
Авторизованные сервисы:
1. Почтовая рассылка — администрация регулярно пересылает информацию с рабочими адресами
2. Общественные сети — легитимные каналы публикуют текущую данные
3. Департамент поддержки — сотрудники предоставляют проверенные URL
4. Телефонное приложение — дает возможность минуть блокировки
Создание аккаунта на основном сайте
Этап создания аккаунта отнимает всего пару минут и включает из таких шагов:
1. Открытие на основной веб-сайт или действующее зеркало
2. Нажатие на иконку «Открыть счет»
3. Указание учетной бланка
4. Верификация email почты или телефонного номера
5. Применение поощрения за регистрацию при доступности промокода
Только что зарегистрированные игроки обретают значительный вступительный презент, который может содержать фриспины, финансовые поощрения или cashback.
Доступ в индивидуальный кабинет
Авторизация на платформе выполняется привычным методом. Достаточно внести никнейм и код доступа, задействованные при открытии счета.
Ключевые моменты для защищенного входа:
– Применяйте криптостойкий код
– Запустите двойную проверку
– Не храните реквизиты на публичных устройствах
– Проверяйте интернет строку браузера
Описание премиальной схемы
Игорный портал одаривает игроков всевозможными вознаграждениями и промо:
Вступительный букет
Новички имеют возможность рассчитывать на значительное поощрение за начальный депозит. Традиционно это долевая надбавка к переведенной сумме плюс даровые спины для топовых слотов.
Постоянные предложения
– 7-дневный кэшбек — возмещение процентной доли потерянных денежных средств
– Бонусы на повторные взносы
– Уникальные офферы по праздникам
– Конкурсы с крупными призовыми пулами
Программа верности
Постоянные геймеры зарабатывают единицы за каждую бет, которые затем превращаются на действительные деньги, free spins или особые бонусы.
Промокоды: как задействовать
Купоны — это специальные последовательности букв и цифр, дающие привилегию к специальным вознаграждениям.
В каких местах раздобыть рабочие промокоды:
– Официальные социальные сети казино
– Аффилиатные сайты
– Email-информирование
– Тематические группы
Вводится промокод в предназначенное поле при регистрации или добавлении денег баланса.
Смартфонная версия и приложение
Современные геймеры любят развлекаться с портативных девайсов. Платформа дает двойной решения для приятной телефонной игры.
Responsive вариант
Веб версия самостоятельно настраивается под габариты дисплея. Не просит инсталляции и оперирует в произвольном свежем браузере.
Мобильное приложение
Загрузить app можно для аппаратов на Android и iOS. Плюсы app:
– Оперативная запуск
– Устойчивая действие
– Мгновенные-уведомления о бонусах
– Самостоятельный минование блокировок
Процесс установки несложен: необходимо открыть на веб-сайт с смартфонного гаджета и выполнять руководству.
Игровой выбор
Коллекция аппаратов охватывает тысячи наименований от топовых производителей.
Слоты
Гемблинг машины — максимально популярная категория забав. Размещены традиционные винтажные автоматы, современные видео-автоматы с поощрительными раундами, а также прогрессивные суперпризы.
Live казино
Зона с живыми дилерами позволяет прочувствовать антураж реального казино. Доступны варианты с рулеткой.
Вещание ведется в HD качестве, обеспечивается коммуникация с крупье и прочими геймерами.
Турниры
Периодически устраиваются соревнования по разным играм. Участие обеспечивает возможность выиграть финансовые призы, бесплатные вращения или эксклюзивные презенты.
Транзакционные манипуляции
Платформа предлагает обширный ассортимент денежных способов:
– Пластиковые карты
– Виртуальные платформы
– Крипта
– Банковские транзакции
Минимальная величина пополнения — доступная для основной части пользователей. Получение денег осуществляется в минимальные временные рамки.
Сервис поддержки
Квалифицированные консультанты способны помочь 24/7. Имеются данные методы контакта:
– Живой-чат
– Email
– Мобильная связь
– Общественные сети
Решения на типовые проблемы можно найти в блоке FAQ.
Заключение
Официальный ресурс казино и его рабочие зеркала гарантируют геймерам совершенный доступ ко всем сервисам платформы. Щедрые бонусы, практичная портативная версия, колоссальный коллекция слотов и профессиональная поддержка делают игровой процесс максимально комфортным и конфиденциальным.
Hello everyone!
Investigate fusion mysterious power offering interesting and valuable energy data and power the world cleanly see on the website for fusion updates
Full information on the link – https://900letekas.site
All the best and development in business!
https://faceout.mn.co/posts/98976543?utm_source=manual
LanternUnion – Online style conveys community spirit with a sleek, contemporary feel.
canyonvendor.shop – Interesting vendor hub concept, curious how it evolves.
анонимный вывод из запоя в ростове vyvod-iz-zapoya-v-rostove-2.ru .
https://gitlab.vuhdo.io/xbetwelcome9
психиатр нарколог на дом в ростове психиатр нарколог на дом в ростове .
Нынешние онлайн-казино дают участникам большой набор возможностей и премиальных опций. Вход к площадке осуществляется через главный ресурс или его действующее зеркало казино Р’РёРЅСЂРё казино, что предоставляет бесперебойную работу.
Чем является рабочее зеркало казино
Копия — это полная дубликат официального веб-сайта, построенная для решения барьеров. Рабочее зеркало обеспечивает пользователям иметь соединение к предпочитаемым слотам в любое время.
Лицензионное зеркало обладает всеми возможностями основного сайта:
– Полный перечень развлечений
– Аккаунт с записанными сведениями
– Действующие промокоды
– Гарантированные расчетные транзакции
Регистрация на основном веб-сайте
Процедура открытия счета занимает всего несколько минут. Начинающим пользователям следует:
1. Попасть на проверенный веб-сайт или действующее зеркало
2. Выбрать на кнопку “Зарегистрироваться”
3. Ввести необходимые информацию
4. Проверить контакт
5. Внести стартовый депозит
Приветственный бонус предоставляется моментально после прохождения всех этапов.
Доступ в профиль
Существующие игроки могут выполнить вход применяя:
– Имя пользователя и ключ
– Цифры мобильного
– Электронную почту
Персональный раздел дает право к администрированию средствами, записям транзакций и доступным акциям.
Бонусы и кампании
Гемблинг система радует активных клиентов многочисленными поощрениями:
Начальный набор
– Надбавка на дебютный взнос до 100%
– Фриспины на востребованные игры
– Добавочные награды за дальнейшие взносы
Бонусные коды
Специальные промокоды предоставляют доступ на использование эксклюзивных бонусов. Свежие купоны выставляются в секции “Акции”.
Кешбэк
Еженедельный кэшбек составляет до 10% от потраченных средств. Возврат начисляется незамедлительно.
Схема лояльности
Верные игроки приобретают очки, которые переводятся на подлинные выплаты или даровые спины.
Mobile версия и программа
Для практичности клиентов построена качественная портативная платформа. Приспособленный облик дает возможность легко участвовать с всякого карманного аппарата.
Преимущества приложения:
– Оперативный подключение к автоматам
– Оптимизированный вид
– Надежная деятельность
– Оповещения о новых турнирах
Загрузить программу можно свободно с главного портала для устройств на Android и iOS.
Каталог слотов
Машины
Коллекция вмещает более 2000 игр от популярных студий:
– Обычные автоматы
– Современные автоматы
– Джекпот-слоты
– Фирменные автоматы
Live казино
Категория Live игр обеспечивает взаимодействие с живыми ведущими в прямом формате:
– Колесо фортуны
– Двадцать одно
– Карты
– Покер
Состязания
Периодические соревнования с большими выигрышными суммами проводятся каждую неделю. Присоединение в состязаниях доступно всем действующим клиентам.
Финансовые варианты
Платежи и снятия денег реализуются через популярные платежные системы:
– Дебетовые пластик
– Электронные кошельки
– Криптовалюта
– Счетные переводы
Самый низкий взнос — от 100 рублей. Изъятие выигрышей обрабатывается в течение 24 ч.
Служба саппорта
Непрерывная отдел поддержки может помочь в урегулировании произвольных проблем:
– Онлайн-чат
– Email
– Горячая линия
– Общественные сети
Защита и разрешение
Главный ресурс действует на базе международной сертификата. Все информация участников закрыты передовым SSL-криптованием.
Заключение
Рабочее зеркало гарантирует постоянный доступ к любимым слотам, выгодным акциям и практичным услугам. Присоединяйтесь немедленно и получите первый приз!
речные прогулки по санкт петербургу arenda-yakhty-spb-1.ru .
Вход к порталу через действующие зеркала
Участники интернет казино регулярно сталкиваются с проблемой блокировки официального сайта. Как раз для ликвидации этой задачи разработаны копии официального ресурса. casino Рльдорадо казино гарантирует полный подключение ко всем возможностям платформы.
Что такое рабочее зеркало казино
Дубликат составляет собой полную дубликат официального ресурса с похожим опциями. Главное несовпадение — это альтернативное имя. Каждые параметры участника, вместе с депозит, привилегии и данные партий, находятся прежними.
Достоинства использования зеркал
Действующие зеркала характеризуются рядом ключевых достоинств:
– Непрерывный доступ к выбранным развлечениям
– Совершенная сохранность индивидуальных данных
– Неизменность всех параметров личного кабинета
– Шанс приобретения бонусов и вовлечения в кампаниях
Создание аккаунта на официальном портале
Операция создания аккаунта максимально легок и требует немного минут. Недавние участники могут рассчитывать на крупный начальный приз за оформление.
Шаги создания аккаунта
1. Доступ на официальный портал или его дубликат
2. Активация на опцию “Регистрация”
3. Ввод необходимых информации
4. Подтверждение email почты
5. Ввод промокода (когда имеется)
Подарки и кампании для клиентов
Казино радует своих клиентов всевозможными наградными программами.
Ключевые виды наград
Вводный приз — щедрое вознаграждение для начинающих игроков, которое именно имеет возможность включать материальные призы и фриспины.
Бесплатные вращения — шанс запускать в популярных аппаратах бесплатно.
Кэшбек — пропорциональный возмещение утраченных сумм, который выплачивается каждую неделю или каждый месяц.
Купоны — специальные комбинации, обеспечивающие добавочные поощрения.
Индивидуальный кабинет: функции и параметры
Личный кабинет гарантирует совершенный контроль над персональным взаимодействием. Здесь присутствуют:
– Регулирование депозитом
– Записи платежей
– Действующие награды
– Установки безопасности
– Валидация счета
Портативная редакция и программа
Нынешние клиенты признают портативность. Платформа обеспечивает 2 способа для ставок с смартфонных аппаратов.
Отзывчивая мобильная версия
Адаптивная редакция ресурса без участия адаптируется под дисплей любого устройства. Нет необходимости загружать отдельное программное обеспечение.
Софт для смартфонов
Можно скачать специальное софт для iOS и Android. Приложение гарантирует:
– Скорый запуск
– Оптимизированный дизайн
– Push-уведомления о предложениях
– Устойчивую операционность
Live раздел: атмосфера реального клуба
Раздел Live казино транспортирует пользователей в атмосферу настоящего игорного заведения. Квалифицированные хосты проводят партии в режиме настоящего времени.
Популярные Live-игры
– Рулетка
– Двадцать одно
– Baccarat
– Техасский холдем
Слоты: разнообразие слотов
Библиотека развлекательных аппаратов включает массу наименований от ведущих провайдеров. Игроки откроют:
– Классические аппараты
– Графические слоты
– Джекпот-машины
– Мегавейс
Конкурсы и эксклюзивные мероприятия
Систематические конкурсы дают возможность игрокам состязаться друг с другом за внушительные призовые фонды. Каждый конкурс имеет свои требования вовлечения и доску чемпионов.
Варианты пополнения и вывода денег
Площадка поддерживает ряд платежных сервисов:
– Кредитные картыы
– Цифровые счета
– Цифровые валюты
– Wire переводы
Любые операции осуществляются защищенно благодаря новейшим методам защиты.
Служба поддержки
Компетентные сотрудники отдела поддержки настроены ассистировать 24/7. Доступны следующие каналы связи:
– Живой-чат
– Email-поддержка
– Звонковая поддержка
– Социальные сети
Заключение
Официальный портал казино и его функционирующие дубликаты дают игрокам конфиденциальный и легкий переход к большому диапазону развлекательных услуг. Щедрые бонусы, частые кампании, компетентная служба и комфортные финансовые инструменты формируют развлекательный процесс предельно увлекательным и прибыльным.
kraken krab оффициальная ссылка krab3 at
see hazelmarket online – Pleasant design, makes the site easy to use.
check this site – Pleasant and approachable, leaves a naturally soothing vibe.
узнать больше ferma.cc
Нынешние онлайн-казино предлагают пользователям широкий набор развлечений и призовых программ. Присоединение к ресурсу производится через официальный сайт или его действующее зеркало https://acsc.uonbi.ac.ke, что дает постоянную игру.
В чем суть актуальное зеркало казино
Дубликат — это идентичная реплика главного веб-сайта, созданная для решения барьеров. Рабочее зеркало дает возможность участникам обрести подключение к любимым автоматам в любое удобное время.
Лицензионное зеркало содержит всеми возможностями основного веб-сайта:
– Целый перечень игр
– Профиль с сохраненными информацией
– Действующие промокоды
– Защищенные платежные операции
Создание аккаунта на основном веб-сайте
Ход оформления отнимает всего считанные минут. Новым пользователям нужно:
1. Зайти на проверенный сайт или функционирующее зеркало
2. Выбрать на элемент “Зарегистрироваться”
3. Указать необходимые сведения
4. Активировать контакт
5. Внести стартовый платеж
Поощрение новичкам выдается незамедлительно после выполнения всех ступеней.
Доступ в учетную запись
Действующие участники могут выполнить авторизацию указывая:
– Логин и код
– Номер телефона
– Контактный email
Персональный раздел обеспечивает шанс к регулированию счетом, истории игр и активным акциям.
Бонусы и кампании
Игровая сервис балует регулярных клиентов многочисленными поощрениями:
Приветственный бонус
– Надбавка на дебютный взнос до 100%
– Free spins на топовые игры
– Дополнительные бонусы за очередные пополнения
Купоны
Уникальные ваучеры открывают шанс на активацию уникальных бонусов. Актуальные купоны выставляются в разделе “Бонусы”.
Кэшбек
Периодический кэшбек равен до 10% от утраченных средств. Компенсация начисляется автоматически.
Механизм лояльности
Верные клиенты получают поинты, которые переводятся на настоящие средства или фриспины.
Адаптивный портал и софт
В целях удобства пользователей сделана удобная адаптивный сайт. Гибкий облик дает возможность удобно участвовать с произвольного карманного девайса.
Достоинства приложения:
– Скорый вход к развлечениям
– Оптимизированный дизайн
– Стабильная деятельность
– Оповещения о новых турнирах
Получить APP можно безвозмездно с проверенного портала для аппаратов на Android и iOS.
Библиотека слотов
Машины
Библиотека включает более 2000 автоматов от ведущих студий:
– Классические машины
– Современные автоматы
– Слоты с джекпотом
– Брендовые развлечения
Live казино
Категория Live игр дает взаимодействие с подлинными диллерами в онлайн эфире:
– Рулетка
– Блэкджек
– Баккара
– Покер
Соревнования
Постоянные состязания с солидными премиальными фондами устраиваются еженедельно. Участие в конкурсах возможно всем созданным игрокам.
Денежные методы
Депозиты и выводы денег производятся через популярные сервисы:
– Кредитные карточ ки
– Электронные кошельки
– Цифровая валюта
– Прямые платежи
Минимальный депозит — от 100 рублей. Изъятие денег обрабатывается в течение 24 периода.
Отдел support
Непрерывная отдел поддержки расположена поддержать в исправлении любых задач:
– Live chat
– Email
– Связь
– Публичные сети
Надежность и документ
Официальный веб-сайт работает на основании мировой лицензии. Всевозможные параметры клиентов закрыты актуальным SSL-шифрованием.
Вывод
Функционирующее зеркало дает бесперебойный соединение к предпочитаемым слотам, выгодным бонусам и функциональным возможностям. Зарегистрируйтесь сегодня и обретите начальный бонус!
http://usmedssaver.com/# canada pharmacy 24h
Link exchange is nothing else but it is only placing the other person’s weblog link
on your page at appropriate place and other person will also do same in favor of you.
my webpage :: Paramount Training and Development
Hi there, all is going nicely here and ofcourse every one is sharing information, that’s genuinely excellent, keep up writing.
https://share.google/bQYxprfwMKCsPeVAb
Topaz Vendor Picks – Tidy and modern design, exploring products felt smooth.
HouseOfTrailstoneVendors – Went through a few areas, the interface feels smooth and logical.
https://usmedssaver.com/# canadian pharmacy 24
Granite Harbor Deals – Engaging and trustworthy, suggesting quality offers in a professional space.
Анализ официального портала
Новое онлайн-казино дарит своим пользователям обширный набор услуг и призов. Основной ресурс Кешер действует круглосуточно, обеспечивая возможность к популярным симуляторам, live-казино и многочисленным промо.
Рабочее зеркало: путь к ресурсу
Что такое копия казино
Альтернатива является собой точную реплику оригинального портала с иным URL именем. Рабочее зеркало дает игрокам избегать барьеры и получать стабильный доступ к предпочитаемым развлечениям.
Как найти действующее зеркало сегодня
Действующие линки на основное зеркало выкладываются через:
– Email оповещение
– Проверенные медийные сети
– Службу сопровождения
– Партнерские площадки
Регистрация на портале
Ход регистрации
Созданиеаккаунта длится всего минут и включает такие стадии:
1. Открытие на оригинальный веб-сайт или актуальное зеркало
2. Нажатие кнопки “Зарегистрироваться”
3. Указание личных реквизитов
4. Подтверждение адреса или контакта
5. Формирование секретнойкомбинации
Приз за оформление
Новые игроки приобретают щедрые стартовые подарки:
– Денежные деньги на баланс
– Бесплатныевращения для слотов
– Расширенный коэффициент кешбэка
– Особые ваучеры
Логин в собственный кабинет
Постоянные игроки вправе выполнить доступ через основной сайт или действующее зеркало. Для этого необходимо внести имяпользователя и секретнуюкомбинацию, созданные при открытиисчета.
Опции персонального аккаунта
В персональном аккаунте открыты такие возможности:
– Управление контактными сведениями
– Зачисление счета
– Обналичивание призов
– Ввод кодов
– Просмотр архива операций
– Включение в соревнованиях
Поощрения и промо
Категории вознаграждений
Казино радует своих клиентов различными наградными акциями:
– Стартовый бонус — щедрые бонусы на стартовые пополнения
– Бесплатныевращения — подарочные ставки в популярных слотах
– Компенсация — регулярный возмещение процента проигрышей
– Схема поощрения — эксклюзивные льготы для верных игроков
Промокоды и их использование
Специальные промокоды обеспечивают бонусные вознаграждения. Для применения нужно внести код в нужное окно в личном профиле.
Развлекательный ассортимент
Автоматы
Коллекция развлекательных симуляторов включает сотни вариантов от топовых производителей:
– Традиционные слоты
– Современные развлечения
– Накопительные автоматы
– Тематические автоматы
Live казино
Область Live-казино дарит взаимодействие с живыми операторами в режиме прямого времени:
– Рулетка
– Блэкджек
– Баккара
– Покер
Состязания
Систематические состязания с большими джекпотными призами проходят ежедневно. Претенденты конкурируют за лидерство в таблице.
Портативная адаптация и софт
Смартфонная адаптация веб-сайта
Главный сайт на100% настроен для мобильных девайсов. Пользователи могут запускать слоты напрямую через обозреватель без обязательства загрузки.
Софт для установки
Официальное мобильное приложение предоставляется для установки на гаджеты с рабочими средами Android и iOS. APP обеспечивает:
– Моментальный доступ к развлечениям
– Стабильную операционность
– Push-уведомления о бонусах
– Простой интерфейс
Резюме
Официальный веб-сайт казино и его рабочие зеркала гарантируют игрокам полный доступ к высококлассным игровым играм. Щедрые бонусы, различные предложения, комфортная мобильная версия и компетентная поддержка формируют геймплейный времяпрепровождение предельно удобным и результативным.
1win зеркало не работает http://1win54038.help/
Анализ основного ресурса
Современные интернет казино обеспечивают игрокам обширный набор игр и шансов. Лицензионный сайт казино Argo предоставляет надежный доступ к развлекательным услугам.
Рабочее зеркало: путь в настоящий момент
Альтернативный адрес выступает в качестве полную реплику официального веб-сайта. Проверенное зеркало обеспечивает пользователям избегать возможные блокировки.
Достоинства эксплуатации зеркала
Основные достоинства предполагают:
– Постоянный путь к платформе
– Удержание абсолютно всех возможностей базового портала
– Охрана личных данных
– Такой же возможности
Создание аккаунта на платформе
Процесс оформления профиля знаменуется понятностью и удобством. Свежие игроки необходимо:
1. Посетить главный сайт или его зеркало
2. Кликнуть на пункт оформления
3. Указать обязательные поля
4. Подтвердить email почту
5. Совершить первый авторизацию
Вознаграждение за создание аккаунта
Новые игроки получают щедрый вступительный презент. Данное поощрение в состоянии включать:
– Материальные суммы
– Complimentary вращения
– Расширенный коэффициент кэшбэка
Авторизация в собственный кабинет
Активные пользователи в состоянии мгновенно получить доступ в персональный раздел, задействуя никнейм и ключ. Личный профиль предоставляет путь к:
– Управлению счетом
– Журналу переводов
– Активным подаркам
– Опциям профиля
Подарки и кампании
Сайт систематически устраивает разнообразные предложения для участников.
Разновидности подарков
Главные категории поощрений:
– Денежные бонусы – процент от суммы депозита
– Фриспины – complimentary вращения в аппаратах
– Кэшбэк – компенсация части потерянных денег
– Турнирные призы – премии за участие в турнирах
Купоны
Специальные промокоды дают возможность активировать бонусные преимущества. Участники могут получить их на партнерских сайтах или получить в уведомлениях.
Переносная редакция и приложение
Современные пользователи предпочитают карманный досуг.
Возможности портативной версии
– Отзывчивый облик для любых устройств
– Абсолютный вход к слотам
– Стремительная работа
– Удобное управление
Скачать софт
Мобильное софт доступно для скачивания на гаджеты с базовыми ОС Android и iOS. Софт дает:
– Стабильную деятельность
– Push уведомления о бонусах
– Моментальный запуск к избранным развлечениям
Азартный каталог
Игровой клуб предоставляет огромную коллекцию игровых игр.
Автоматы
Коллекция развлекательных машин содержит:
– Традиционные слоты
– Видео автоматы
– Призовые слоты
– Сюжетные развлечения
Live казино
Раздел лайв развлечений дает право участвовать с настоящими крупье. Доступны:
– Американская рулетка
– Блэкджек
– Баккара
– Poker
Соревнования
Постоянные чемпионаты дают возможность клиентам состязаться за внушительные денежные фонды. Турнирная структура модифицируется регулярно.
Платежные процедуры
Платформа поддерживает разнообразие опций пополнения и вывода финансов:
– Дебетовые карточки
– Онлайн счета
– Wire переводы
– Цифровые валюты
Совокупные операции выполняются конфиденциально с использованием современных методов криптографии.
Служба поддержки
Опытная служба помощи работает постоянно. Коннектиться с менеджерами возможно через:
– Онлайн чат
– Почтовую почту
– Телефон
– Social сети
Секьюрити и аккредитация
Платформа функционирует на основании действительной аккредитации. Это удостоверяет:
– Справедливость азартного действа
– Защиту личных данных
– Пунктуальные перечисления
– Ответственный игровой процесс
Заключение
Официальный портал и его действующие зеркала гарантируют игрокам совокупный спектр услуг для комфортной и прибыльной времяпрепровождения. Солидные подарки, разнообразные развлечения, опытная сервис и надежная платформа операций превращают платформу превосходным выбором для фанатов развлекательных развлечений.
Good afternoon!
Learn train mysterious regimens to find interesting and valuable fitness facts now and push your limits see on the website for training plans
Full information on the link – https://900letekas.site
All the best and development in business!
Hi there! 🙂 My name is Christina, I’m a student studying Continuing Education and Summer Sessions from Alberstedt, Germany.
мостбет акции https://mostbet57193.help/
Современные онлайн-казино предоставляют клиентам обширный набор развлечений и заманчивые премии. Однако для стабильной деятельности критично понимать, как обнаружить Enomo казино казино и его действующие зеркала.
Что такое главный сайт казино
Главный веб-сайт казино — это основная веб-площадка, где участники могут пользоваться игровыми играми. Платформа функционирует на легитимных условиях и обладает всеми нужными лицензиями.
Главные выгоды лицензионного ресурса:
– Защищенность индивидуальных данных
– Справедливые правила игры
– Гарантированные платежи
– Профессиональная служба поддержки
Рабочее зеркало казино: для чего используется
Дублирующий ресурс — это полная копия официального веб-сайта, хостящаяся по другому URL. Актуальное зеркало разрабатывается для предоставления непрерывного соединения к платформе.
Поводы применения дублирующих ресурсов:
– Ограничение первичного адреса
– Плановые процедуры
– Повышенная посещаемость на систему
Как получить актуальное зеркало сейчас
Получить новое действующее зеркало можно множественными путями:
1. Email-уведомления — зарегистрируйтесь на информационную отправку
2. Департамент помощи — напишите в онлайн-чат
3. Корпоративные каналы — проверяйте за постами
4. Специализированные площадки — проверенные сайты
Оформление профиля на ресурсе казино
Алгоритм создания аккаунта занимает всего пару минут:
1. Нажмите на клавишу “Открыть счет”
2. Заполните требуемые сведения
3. Верифицируйте электронную адрес
4. Примените код активации, если есть
После успешной оформления вам предоставится разрешен индивидуальный профиль.
Награды и бонусные коды
Щедрая поощрительная структура — важное конкурентное преимущество казино:
Поощрение за создание аккаунта
Первичные клиенты зарабатывают начальный бонус, который может содержать:
– Монетарный бонус на дебютный взнос
– Фри-спины для автоматов
– Стартовые средства
Промокоды
Систематически публикуются актуальные промокоды, обеспечивающие активировать экстра привилегии.
Система кэшбека
Лояльные игроки приобретают порцию утраченных финансов на счет.
Действующие промо и турниры
Ресурс постоянно проводит захватывающие события:
– Недельные баттлы
– Тематические промо
– Раздачи солидных призов
– Схема VIP-клуба
Логин в персональный кабинет
Для авторизации на сайт следует:
1. Перейти на официальный адрес или актуальное зеркало
2. Нажать “Авторизация”
3. Внести никнейм и ключ
В пользовательском аккаунте открыты следующие функции:
– Пополнение депозита
– Получение денег
– Анализ журнала ставок
– Настройка личными данными
Портативная вариант и софт
Адаптивная платформа
Адаптивная модификация веб-сайта обеспечивает делать ставки с разных мобильного девайса. Оформление самостоятельно оптимизируется под размер экрана.
Программа для загрузки
Скачать приложение можно для:
– Android — прямая загрузка с портала
– iOS — инсталляция через App Store
Плюсы мобильного клиента:
– Моментальный запуск
– Устойчивая операционность
– Push-нотификации об промо
– Улучшенный UI
Гемблинг секции
Автоматы
Богатая коллекция азартных слотов от лучших поставщиков:
– Стандартные машины
– Современные-слоты
– Накопительные-слоты
Live зал
Категория с настоящими ведущими предлагает:
– Рулетка
– Двадцать одно
– Баккара
– Poker
Вещания осуществляются в отличном формате, воссоздавая впечатление реального казино.
Варианты пополнения и обналичивания
Сайт принимает множественные платежные инструменты:
– Банковские card
– Виртуальные системы
– Криптовалюты
– Банковские переводы
Стартовые лимиты депозита и оперативные выплаты гарантируют развлечение максимально приятной.
Департамент support
Компетентная отдел поддержки функционирует 24/7 и может помочь с любыми задачами:
– Онлайн-чат
– Email-переписка
– Телефонная служба
Итоги
Основной портал казино и его рабочие зеркала дают игрокам безопасный и интересный развлекательный процесс. Привлекательные награды, функциональная мобильная модификация, богатые автоматы и высокоуровневое live-казино делают эту площадку превосходным решением для азартных времяпрепровождения.
Интересная статья о сюрпризах, которые готовит нам ufc в феврале марте 2026 три недели которые встряхнут дивизионы. Ссылка на источник: https://turbaza-ladya.ru/news/ufc-fevral-mart-2026-tri-turnira-kotorye-mogut-perevernut-plany-promoushena-s-nog-na-golovu/
Анализ главного портала
Передовые сетевые казино предоставляют участникам широкий спектр услуг и шансов. Главный веб-сайт Mad казино казино гарантирует проверенный путь к игровым сервисам.
Функционирующее зеркало: вход в настоящий момент
Дублирующий портал является собой точную версию официального сайта. Актуальное зеркало помогает участникам избегать возможные ограничения.
Выгоды применения зеркала
Основные плюсы содержат:
– Беспрерывный шанс к платформе
– Сохранение всех возможностей главного ресурса
– Сохранность индивидуальных сведений
– Идентичный инструментарий
Создание аккаунта на ресурсе
Ход регистрации знаменуется доступностью и практичностью. Новые игроки должны:
1. Посетить официальный сайт или его зеркало
2. Выбрать на кнопку открытия счета
3. Ввести требуемые данные
4. Подтвердить почтовую ящик
5. Совершить начальный логин
Бонус за открытие счета
Новички забирают значительный вступительный приз. Подобное вознаграждение имеет возможность включать:
– Материальные средства
– Даровые вращения
– Расширенный процент кэшбэка
Вход в персональный аккаунт
Существующие игроки способны быстро авторизоваться в персональный аккаунт, задействуя логин и пароль. Персональный кабинет предлагает шанс к:
– Администрированию счетом
– Записям операций
– Активным призам
– Параметрам аккаунта
Вознаграждения и акции
Ресурс периодически реализует различные мероприятия для игроков.
Виды бонусов
Ключевые типы призов:
– Денежные призы – процент от объема депозита
– Спины – даровые спины в аппаратах
– Компенсация – компенсация доли затраченных финансов
– Турнирные трофеи – призы за участие в соревнованиях
Коды
Эксклюзивные коды дают возможность заработать бонусные привилегии. Клиенты в состоянии получить их на аффилиатных порталах или заработать в новостях.
Мобильная вариант и софт
Передовые пользователи выбирают портативный геймплей.
Характеристики мобильной системы
– Responsive дизайн для любых девайсов
– Полный вход к слотам
– Моментальная подгрузка
– Удобное использование
Download программу
Мобильное софт предложено для установки на девайсы с рабочими ОС Android и iOS. Программа гарантирует:
– Надежную работу
– Push оповещения о призах
– Быстрый доступ к предпочитаемым развлечениям
Гемблинг каталог
Платформа обеспечивает огромную библиотеку гемблинг услуг.
Аппараты
Библиотека развлекательных автоматов охватывает:
– Стандартные машины
– Передовые игры
– Джекпотные автоматы
– Лицензионные игры
Live игры
Категория настоящих дилеров дает шанс играть с живыми диллерами. Предложены:
– Рулетки
– 21
– Baccarat
– Poker
Конкурсы
Периодические турниры обеспечивают игрокам состязаться за крупные финансовые суммы. Конкурсная сетка актуализируется постоянно.
Финансовые действия
Казино предоставляет множество методов пополнения и вывода сумм:
– Банковские карты
– Онлайн счета
– Прямые транзакции
– Bitcoin
Любые транзакции производятся защищенно с задействованием прогрессивных методов криптографии.
Сервис поддержки
Опытная группа помощи действует постоянно. Обратиться с менеджерами доступно через:
– Online чат
– Почтовую почту
– Контактный номер
– Social медиа
Безопасность и лицензирование
Казино действует на базе легальной сертификата. Это подтверждает:
– Прозрачность игрового процесса
– Охрану личных информации
– Пунктуальные выплаты
– Легальный игровой процесс
Резюме
Официальный сайт и его актуальные альтернативные адреса дают пользователям совокупный спектр функций для удобной и профитной развлечений. Щедрые вознаграждения, разнообразные автоматы, квалифицированная сервис и безопасная структура платежей создают портал превосходным вариантом для ценителей игровых забав.
узнать fermacc
canadian pharmacy without prescription: american pharmacy – safe online pharmacies in canada
melbet скачать казино melbet скачать казино .
Slate Crate Collections Hub – Easy-to-use interface, site felt responsive.
More info
Unit personal loan near me
for industry standards.
open oasis crate – The shop has potential, will revisit as new stock is added.
Передовые онлайн-казино гарантируют игрокам массу путей для приятной игры. Центральный веб-портал http://www.chukalsky.ru/ предоставляет путь ко всем функциям и азартным играм. Однако при образовании программных неполадок на подмогу спешат действующие копии.
Что означает собой актуальное зеркало
Альтернативный адрес казино — это полная копия главного сайта, находящаяся по запасному адресу. Официальное зеркало сохраняет все возможности, вместе с открытие профиля, авторизацию в личный кабинет, поощрения и кодовые слова.
Альтернативный сайт на сегодня гарантирует:
– Стабильный путь к азартным слотам
– Совершенную безопасность личных сведений
– Удержание баланса и журнала транзакций
– Возможность использования всех промо-предложений
Создание аккаунта на основном ресурсе
Процесс оформления учетной записи отнимает считанные минут. Свежеиспеченным клиентам следует:
1. Открыть на главный сайт или рабочее зеркало
2. Выбрать кнопку «Регистрация»
3. Внести необходимые поля
4. Активировать email почту
5. Применить бонусный код при наличии
После финиша регистрации пользователи приобретают вознаграждение за регистрацию, какой может включать free spins или денежно-призовое премирование.
Доступ в персональный кабинет
Индивидуальный кабинет обеспечивает всесторонний надзор над игровым процессом. Через личный кабинет можно:
– Финансировать кошелек
– Забирать средства
– Задействовать купоны
– Контролировать журнал пари
– Участвовать в состязаниях
– Получать cash back
Обзор вознаграждений и акций
Выгодная премиальная программа — существенное достоинство казино. Ключевые виды бонусов:
Вступительный приз
Дебютанты получают великодушное вознаграждение на первые вклады. Объем бонуса может достигать 100-200% от объема пополнения.
Бесплатные вращения
Даровые спины начисляются для топовых слотов. Объем free spins изменяется от 10 до 500 штук.
Кешбэк
Систематический или ежемесячный отдача части проигранных денег. Стандартный процент компенсации — 5-15%.
Турниры
Постоянные турниры с внушительными наградными фондами. Соревнующиеся борются за топовые места в рейтинге.
Мобильная версия и софт
Адаптивная версия дает возможность развлекаться с всякого девайса. Игроки могут загрузить app для iOS и Android или применять браузерную версию.
Выгоды мобильного софта:
– Молниеносная подзагрузка автоматов
– Эргономичный UI
– Push-уведомления о поощрениях
– Вход через Face ID
Машины и Live казино
Развлекательная коллекция охватывает сотни названий от ведущих поставщиков.
Востребованные категории игр:
– Традиционные слоты
– Видео-автоматы с призовыми раундами
– Накопительный приз игры
– Megaways машины
Live игровой зал
Секция live игорный зал предоставляет партию с реальными дилерами. Есть классические игры:
– Рулетка
– Блэкджек
– Baccarat
– Техасский холдем
Как отыскать рабочее зеркало
Получить актуальную линк на зеркало возможно различными вариантами:
1. Подписаться на почтовую рассылку
2. Отслеживать за новостями в социальных сетях
3. Написать в отдел поддержки
4. Добавить в закладки актуальное зеркало в избранное
Итог
Основной портал и его функционирующие зеркала дают непрерывный вход к игровым автоматам. Щедрые вознаграждения, различные промокоды, эргономичное мобильное софт и отличная сервис поддержки обеспечивают игровой опыт крайне беспроблемным и надежным.
срочный вызов нарколога на дом ростов narkolog-na-dom-v-rostove-1.ru .
Brest vs Marseille – 2026 Ligue 1 blockbuster 20:45! Can Marseille steal points on the road? French football latest match results incoming!
凯伦皮里第二季高清完整版2026 海外华人悬疑剧集
Нынешние онлайн-казино дают клиентам внушительный ассортимент игр и бонусных программ. Вход к сервису выполняется через основной веб-сайт или его действующее зеркало https://www.metasninjas.dimfarnese.com.br, что гарантирует непрерывную деятельность.
В чем суть функционирующее зеркало казино
Зеркало — это полная версия официального ресурса, разработанная для преодоления барьеров. Актуальное зеркало позволяет пользователям обрести соединение к предпочитаемым развлечениям в каждое время.
Проверенное зеркало обладает всеми опциями главного веб-сайта:
– Целый перечень игр
– Аккаунт с внесенными данными
– Действующие акции
– Надежные денежные процедуры
Регистрация на лицензионном портале
Процесс оформления составляет всего считанные минут. Первым клиентам необходимо:
1. Перейти на проверенный сайт или функционирующее зеркало
2. Нажать на ссылку “Зарегистрироваться”
3. Заполнить нужные сведения
4. Верифицировать адрес
5. Произвести стартовый депозит
Стартовый бонус предоставляется незамедлительно после выполнения всех шагов.
Доступ в личный кабинет
Созданные пользователи могут произвести вход применяя:
– Логин и шифр
– Данные телефона
– Email
Аккаунт дает шанс к администрированию счетом, истории ставок и активным промокодам.
Бонусы и программы
Азартная платформа радует постоянных пользователей многочисленными бонусами:
Стартовый набор
– Бонус на стартовый пополнение до 100%
– Фриспины на популярные автоматы
– Особые бонусы за следующие пополнения
Бонусные коды
Особые ваучеры предоставляют шанс на приобретение специальных вознаграждений. Действующие промокоды размещаются в категории “Бонусы”.
Возврат средств
Еженедельный возврат насчитывает до 10% от потраченных средств. Возмещение предоставляется незамедлительно.
Программа лояльности
Верные участники приобретают единицы, которые превращаются на действительные деньги или даровые спины.
Мобильный сайт и APP
Для практичности игроков построена функциональная мобильная версия. Адаптивный вид позволяет удобно участвовать с всякого мобильного гаджета.
Выгоды программы:
– Быстрый вход к автоматам
– Адаптированный вид
– Бесперебойная деятельность
– Оповещения о свежих акциях
Получить софт можно даром с проверенного ресурса для гаджетов на Android и iOS.
Ассортимент автоматов
Игровые автоматы
Каталог содержит более 2000 игр от популярных разработчиков:
– Обычные машины
– Видео-слоты
– Слоты с джекпотом
– Сюжетные слоты
Live казино
Блок Live развлечений предоставляет участие с настоящими дилерами в живом формате:
– Колесо фортуны
– Блэкджек
– Baccarat
– Карточный покер
Соревнования
Периодические конкурсы с солидными наградными бюджетами устраиваются регулярно. Допуск в конкурсах доступно всем созданным участникам.
Финансовые варианты
Депозиты и получения денег выполняются через популярные методы:
– Дебетовые пластик
– Виртуальные сервисы
– Крипто
– Прямые транзакции
Самый низкий вклад — от 100 рублей. Получение финансов проводится в течение 24 времени.
Отдел саппорта
Непрерывная группа саппорта может ассистировать в разрешении произвольных вопросов:
– Онлайн-чат
– Email
– Горячая линия
– Социальные сети
Охрана и сертификат
Подлинный веб-сайт работает на почве международной сертификата. Любые сведения пользователей обезопасены актуальным SSL-криптованием.
Вывод
Действующее зеркало обеспечивает постоянный вход к предпочитаемым играм, выгодным бонусам и комфортным сервисам. Откройте счет сейчас и обретите начальный подарок!
Skycrown online casino 2026 top choice Australian players
生命树2026 海外华人高原守护剧 杨紫胡歌主演 高清燃哭剧情 AI匹配
惊奇女士第二季2026 海外华人漫威青春剧 高清超级英雄少女
Man United’s Sancho eyes Dortmund return 2026 transfer bombshell! Latest football news & rumors heating up!
I have been exploring for a bit for any high-quality articles
or blog posts in this kind of house . Exploring in Yahoo I eventually stumbled upon this site.
Studying this info So i am happy to express that I have a very good uncanny feeling I discovered just what
I needed. I so much for sure will make certain to do not overlook this web
site and give it a look on a constant basis.
Also visit my site; online slot games
Je veux juste dire que très satisfait(e) d’avoir trouvé le site Betify Casino — super !
https://adrianwillanger.bloggingrightalong.com/mortgage-info/
click here for shop – The name came across as soothing and quite appealing.
hm88
CrestTrading – Visitors are greeted by a cozy, inviting shopping experience.
Jogo do Tigrinho estratégia baixa aposta: R$0,25 por 1000 giros – funciona?
Актуальные виртуальные казино предоставляют клиентам обширный выбор функций для беспроблемной игры. Но иногда подключение к базовому ресурсу может стать ограниченным. В таких обстоятельствах на поддержку спешит Casino360 казино, которое обеспечивает бесперебойный доступ ко всем сервисам платформы.
Что такое действующее зеркало казино
Дубликат — это абсолютная версия лицензионного веб-сайта, которая размещается по другому адресу. Копия имеет целый набор функций главного веб-портала, включая персональный кабинет, депозит и сведения операций.
Ключевые достоинства задействования зеркала:
– Круглосуточный вход к ресурсу
– Максимальная тождественность инструментов
– Сохранность персональных сведений
– Поддержка доступных вознаграждений
Как отыскать актуальное зеркало в данный момент
Имеется некоторое количество надежных путей поиска текущей URL:
Легитимные сервисы:
1. Email рассылка — дирекция постоянно направляет письма с актуальными доменами
2. Коммуникационные сети — авторизованные каналы размещают текущую информацию
3. Сервис поддержки — операторы предоставляют проверенные ссылки
4. Портативное приложение — обеспечивает минуть блокировки
Создание аккаунта на главном ресурсе
Процедура оформления требует только несколько минут и содержит из данных ступеней:
1. Вход на лицензионный сайт или действующее зеркало
2. Выбор на элемент «Регистрация»
3. Ввод персональной анкеты
4. Валидация электронной почты или сотового номера
5. Активация вознаграждения за регистрацию при существовании промокода
Свежие геймеры получают щедрый приветственный приз, который может охватывать даровые прокруты, монетарные призы или кэшбек.
Логин в индивидуальный кабинет
Авторизация на ресурсе производится обычным образом. Требуется указать имя пользователя и код доступа, задействованные при регистрации.
Значимые детали для надежного входа:
– Эксплуатируйте криптостойкий код
– Задействуйте 2FA идентификацию
– Не храните реквизиты на чужих устройствах
– Контролируйте адресную строку браузера
Обзор бонусной программы
Игорный портал балует геймеров всевозможными вознаграждениями и кампаниями:
Стартовый набор
Дебютанты вправе надеяться на существенное вознаграждение за дебютный депозит. Обычно это долевая надбавка к внесенной величине плюс free spins для востребованных слотов.
Периодические акции
– Семидневный компенсация — компенсирование части утраченных средств
– Поощрения на очередные пополнения
– Особые офферы по торжествам
– Конкурсы с значительными наградными суммами
План верности
Активные пользователи зарабатывают очки за каждую игру, которые затем конвертируются на настоящие деньги, бесплатные вращения или специальные привилегии.
Кодовые слова: как задействовать
Бонус-коды — это особые сочетания знаков, гарантирующие право к бонусным привилегиям.
В каких местах раздобыть актуальные промокоды:
– Официальные общественные сети казино
– Партнерские площадки
– Email-информирование
– Специализированные сообщества
Активируется промокод в соответствующее поле при создании аккаунта или добавлении денег кошелька.
Портативная версия и приложение
Современные игроки выбирают развлекаться с телефонных девайсов. Сайт предоставляет два метода для удобной мобильной игры.
Отзывчивая версия
Браузерная версия автоматически подстраивается под габариты дисплея. Не предполагает установки и функционирует в произвольном новом браузере.
Портативное приложение
Скачать софт можно для устройств на Android и iOS. Достоинства app:
– Оперативная загрузка
– Бесперебойная действие
– Автоматические-уведомления о промо
– Независимый минование блокировок
Процесс установки несложен: требуется открыть на веб-сайт с портативного гаджета и выполнять предписаниям.
Развлекательный ассортимент
База игр насчитывает огромное количество единиц от лучших производителей.
Слоты
Азартные автоматы — максимально распространенная раздел игр. Размещены классические трехбарабанные аппараты, передовые мультимедийные слоты с бонусными этапами, а также джекпотные суперпризы.
Live казино
Зона с настоящими дилерами дает возможность ощутить антураж истинного казино. Открыты игры с блэкджеком.
Трансляция производится в высоком четкости, поддерживается общение с дилером и другими пользователями.
Состязания
Постоянно устраиваются соревнования по многочисленным дисциплинам. Вступление дает шанс выиграть валютные награды, бесплатные вращения или особые бонусы.
Финансовые операции
Портал предоставляет значительный ассортимент расчетных инструментов:
– Кредитные карты
– Цифровые сервисы
– Криптовалюта
– Финансовые платежи
Наименьшая сумма вклада — посильная для массы клиентов. Вывод средств выполняется в короткие периоды.
Сервис поддержки
Профессиональные специалисты расположены поддержать круглосуточно. Представлены следующие способы контакта:
– Живой-чат
– Email
– Телефонная горячая линия
– Коммуникационные сети
Решения на типовые вопросы можно отыскать в блоке FAQ.
Итог
Основной сайт казино и его рабочие зеркала предоставляют геймерам абсолютный доступ ко всем возможностям портала. Великодушные поощрения, приятная смартфонная версия, впечатляющий выбор игр и квалифицированная помощь формируют развлекательный времяпрепровождение крайне приятным и надежным.
browse the canyoncrate store – Quick exploration shows the shop is actively growing.
Передовые онлайн-казино обеспечивают клиентам богатый спектр функций для беспроблемной досуга. Вход к сервису казино РњСЌРґ казино осуществляется через официальный сайт или рабочее зеркало.
Что такое рабочее зеркало казино
Актуальное зеркало — это альтернативный домен лицензионного ресурса казино. Такие клоны создаются для обеспечения стабильного входа к гемблинговой сервису.
Дубликат текущее целиком копирует опции основного домена. Геймеры обретают схожий вход ко всем сервисам, включая регистрацию, пополнение баланса и получение денег.
Регистрация на главном веб-сайте
Механизм открытия профиля отнимает всего несколько секунд. Будущим участникам необходимо:
1. Войти на основной сайт или текущее проверенное зеркало
2. Нажать кнопку “Открыть счет”
3. Внести обязательные реквизиты
4. Проверить email почту
5. Использовать код активации при доступности
После финализации создания аккаунта игрок зарабатывает приз за регистрацию, который вправе предполагать free spins или финансовое премию.
Авторизация в личный кабинет
Индивидуальный кабинет — это безопасная зона, где игроки имеют возможность администрировать своим счетом. Для авторизации необходимо указать имя пользователя и пароль.
В личном кабинете доступны данные инструменты:
– Отслеживание записей операций
– Задействование промокодов
– Управление поощрениями
– Вступление в состязаниях
– Проверка возмещения
– Изменение аккаунта
Вознаграждения и промо
Гемблинговая сервис предлагает великодушные бонусы:
Стартовый пакет — новые игроки приобретают крупное поощрение на первые депозиты.
Фриспины — дарятся как при создании аккаунта, так и в контексте различных промо.
Кэшбек — систематический возврат фрагмента утраченных финансов.
Бонусные коды — особые коды, предоставляющие доступ к специальным бонусам.
Обзор азартных категорий
Slots
Собрание слотов включает сотни игр от лучших производителей. Игроки встретят как традиционные аппараты, так и актуальные видеослоты с увлекательной графикой.
Live казино
Секция Live казино обеспечивает возможность играть с действующими дилерами в формате текущего времени. Имеются известные развлечения: рулетка, блэкджек, баккара, покер.
Соревнования
Систематические соревнования с солидными наградными фондами притягивают сотни соревнующихся. Чемпионы обретают денежные вознаграждения и специальные бонусы.
Портативная версия и софт
Адаптивная версия ресурса позволяет играть с произвольного девайса. Дизайн автоматически настраивается под габариты экрана.
Загрузить софт можно для девайсов на Android и iOS. Телефонное программа характеризуется всеми функциями десктопной версии.
Как найти рабочее зеркало на данный момент
Свежие адреса зеркал периодически обновляются. Узнать рабочую ссылку можно различными способами:
– Через сервис техподдержки
– В подлинных информационных сетях
– По e-mail подписке
– На партнерских ресурсах
Надежность и лицензирование
Официальный сайт оперирует на основании глобальной документа. Все операции оберегаются актуальными методами кодирования.
Анонимность индивидуальных информации обеспечивается в полном объеме.
Итог
Основной сайт и его действующие зеркала обеспечивают участникам 24/7 вход к высококлассным игровым играм. Великодушные призы, всевозможные игры, квалифицированная служба — все это создает развлекательный процесс максимально приятным и захватывающим.
mostbet вывод на банковскую карту Кыргызстан mostbet вывод на банковскую карту Кыргызстан
Hi, i think that i saw you visited my site so i came
to “return the favor”.I’m attempting to find things to enhance my site!I suppose its
ok to use a few of your ideas!!
check out fieldcrate – Minimalistic design, navigating the store was easy.
discover the collective – Creative, approachable, and memorable overall.
срочный вывод из запоя на дому в ростове срочный вывод из запоя на дому в ростове .
читать ферма сс
монтаж газового пожаротушения для склада montazh-gazovogo-pozharotusheniya-1.ru .
Передовые онлайн-казино предлагают пользователям разнообразие опций для беспроблемной игры. Основной веб-портал Лаки Ворлд казино обеспечивает доступ ко всем функциям и игровым автоматам. Однако при образовании системных неполадок на подмогу приходят актуальные копии.
Что есть собой действующее зеркало
Альтернативный адрес казино — это идентичная дубликат официального веб-сайта, расположенная по альтернативному адресу. Подлинное зеркало поддерживает все характеристики, вместе с создание аккаунта, доступ в персональный кабинет, вознаграждения и бонусные коды.
Дубликат на сегодня гарантирует:
– Бесперебойный вход к игровым машинам
– Стопроцентную защиту личных данных
– Поддержку депозита и истории операций
– Возможность использования всех бонусных программ
Регистрация на основном портале
Процедура оформления учетной записи занимает пару минут. Новым клиентам следует:
1. Перейти на официальный сайт или действующее зеркало
2. Выбрать кнопку «Регистрация»
3. Заполнить нужные графы
4. Подтвердить электронную почту
5. Применить кодовое слово при наличии
После финиша создания аккаунта клиенты зарабатывают приз за регистрацию, что может охватывать free spins или монетарное премирование.
Авторизация в индивидуальный кабинет
Индивидуальный кабинет обеспечивает комплексный управление над азартным процессом. Через персональный аккаунт допускается:
– Депонировать депозит
– Получать средства
– Задействовать бонусные коды
– Мониторить историю пари
– Участвовать в соревнованиях
– Получать возврат средств
Описание бонусов и специальных предложений
Щедрая призовая схема — важное козырь проекта. Основные категории поощрений:
Приветственный подарок
Новые игроки получают щедрое поощрение на первые пополнения. Объем премии может достигать 100-200% от объема депозита.
Бесплатные вращения
Безвозмездные прокруты выдаются для востребованных автоматов. Сумма фриспинов варьируется от 10 до 500 штук.
Кэшбек
Еженедельный или помесячный отдача процентной доли проигранных финансов. Обычный объем кэшбека — 5-15%.
Состязания
Периодические состязания с крупными призовыми банками. Игроки соревнуются за призовые места в рейтинге.
Мобильная версия и софт
Портативная версия позволяет наслаждаться игрой с любого гаджета. Игроки могут закачать приложение для iOS и Android или задействовать интернет версию.
Преимущества смартфонного софта:
– Оперативная подзагрузка слотов
– Эргономичный UI
– Push-уведомления о промо
– Вход через Face ID
Игровые автоматы и Live казино
Азартная подборка насчитывает тысячи названий от ведущих разработчиков.
Востребованные типы автоматов:
– Стандартные машины
– Видео-автоматы с призовыми раундами
– Прогрессивный джекпот слоты
– Мегавейс автоматы
Live игорный зал
Раздел live игорный зал предоставляет партию с живыми крупье. Доступны стандартные развлечения:
– Европейская рулетка
– Блэкджек
– Baccarat
– Покер
Как обнаружить актуальное зеркало
Обрести действующую URL на зеркало разрешается несколькими путями:
1. Зарегистрироваться на email-рассылку
2. Отслеживать за новостями в социальных сетях
3. Обратиться в департамент поддержки
4. Сохранить действующее зеркало в избранное
Заключение
Основной сайт и его действующие альтернативные адреса предоставляют стабильный путь к развлекательным автоматам. Богатые вознаграждения, разнообразные купоны, эргономичное смартфонное программа и отличная служба поддержки превращают азартный геймплей в высшей степени удобным и конфиденциальным.
Доступ к платформе и действующие ссылки
Популярные интернет казино обеспечивают игрокам обширный ассортимент развлечений. Главный ресурс http://www.residencia.com.mx/naibolee-bezopasnye-onlayn-kazino-s-vozmozhnostyu-ispolzovaniya-dlya-stavok-ot обеспечивает безопасный доступ ко всем услугам. Впрочем иногда случаются обстоятельства, когда нужно резервный вариант авторизации.
Что являет собой собой функционирующее зеркало
Рабочее зеркало — это идентичная копия легального ресурса с запасным доменным названием. Альтернатива сегодня помогает избегать возможные ограничения и поддерживать бесперебойный подключение к любимым автоматам.
Легальное зеркало содержит теми же функциями, что и основной портал:
– Полный список слотов
– Индивидуальный профиль с записанными данными
– Актуальные подарки и предложения
– Надежные денежные переводы
Оформление и подключение в систему
Этап регистрации на платформе длится буквально секунд. Начинающим участникам необходимо:
1. Попасть на действующее зеркало сегодня
2. Выбрать клавишу «Регистрация»
3. Ввести необходимые параметры
4. Верифицировать электронную почту или данные смартфона
5. Активировать поощрение за открытие аккаунта
Подключение в персональный профиль осуществляется посредством внесение логина и пароля.
Анализ поощрительной политики
Щедрая наградная политика — главное достоинство ресурса. Пользователи зарабатывают многочисленные подарки:
Приветственные подарки
Новые игроки могут рассчитывать на привлекательный приз за оформление. Обычно это совокупность вариантов, содержащий:
– Долевую премию к первому депозиту
– Подарочные вращения
– Бонусные деньги на аккаунт
Кодовые комбинации и эксклюзивные возможности
Периодические коды помогают активировать экстра выгоды. Задействовать их возможно в особом разделе собственного раздела.
Спины и компенсация
Бесплатные спины — это шанс играть барабаны без задействования собственных финансов. Возврат предполагает долевой возврат потерянных средств.
Коллекция развлечений
Азартная ресурс представляет значительную подборку автоматов.
Слоты
Разнообразие аппаратов удивляет представление. Имеются классические ретро слоты и актуальные видеослоты с занимательной анимацией.
Live заведение
Категория Live развлечений переносит игроков в среду подлинного игорного дома. Квалифицированные дилеры проводят сессии в реальном времени.
Турниры и доски почета
Систематические турниры обеспечивают накала и обеспечивают шанс получить значительные награды.
Карманная версия и софт
Современные инновации дают возможность развлекаться в удобном пространстве. Мобильная вариант автономно подстраивается под экран устройства.
Скачать софт разрешено для операционных ОС iOS и Android. Клиент обеспечивает:
– Оперативный доступ
– Стабильную работу
– Push-алерты об предложениях
– Интуитивный дизайн
Платежные действия
Ресурс работает с различные системы внесения и изъятия финансов:
– Банковские счета
– Виртуальные платформы
– Криптовалюты
– Прямые переводы
Каждые переводы выполняются через зашифрованное канал, что гарантирует сохранность персональных параметров.
Департамент поддержки
Профессиональная команда помощи функционирует 24/7. Контактировать с операторами можно через:
– Live-чат
– Электронную почту
– Контакт
– Социальные ресурсы
Резюме
Легальный портал и его актуальное зеркало гарантируют игрокам безопасный и легкий переход к захватывающим играм. Богатые бонусы, разнообразный ассортимент автоматов и качественная сервис формируют игру максимально удобной и результативной.
Admiring the hard work you put into your site and detailed information you provide.
It’s nice to come across a blog every once in a while that isn’t the same old rehashed material.
Great read! I’ve bookmarked your site and I’m including your RSS feeds to my Google account.
my web site; seguro para propietarios
круглосуточный вывод из запоя в ростове круглосуточный вывод из запоя в ростове .
One point that ties this together, health is woven into ordinary days long before it becomes a concern, and it shows up as small repeats that make a week feel sustainable or heavy. Now the tricky part is that health information is everywhere, because volume can increase while understanding stays thin. And that is why a better approach starts with noticing patterns, observing consistency and change so you can separate signal from distraction. And then it makes sense to go deeper in a structured discussion, because it keeps the focus on clarity, not urgency. And the cleanest way to keep that discussion coherent is to start with one focused topic, a natural place to begin is zenegra chest pain warning.
прогулка на катере прогулка на катере .
Excellent post. Keep writing such kind of information on your page.
Im really impressed by your site.
Hey there, You have done a great job. I will definitely digg it and individually suggest
to my friends. I’m confident they will be benefited from this site.
Feel free to visit my homepage Paramount
If some one needs expert view regarding blogging and site-building after that i propose
him/her to go to see this website, Keep up the good job.
Here is my blog – online slots malaysia
Характеристика лицензионного портала
Передовые интернет казино дают клиентам обширный спектр услуг и перспектив. Официальный сайт Bublik зеркало casino обеспечивает защищенный возможность к азартным возможностям.
Функционирующее зеркало: путь в настоящий момент
Дублирующий портал является в качестве абсолютную копию основного ресурса. Официальное зеркало дает возможность игрокам избегать существующие блокировки.
Выгоды эксплуатации зеркала
Основные достоинства содержат:
– Стабильный вход к порталу
– Хранение полных возможностей базового портала
– Охрана индивидуальных материалов
– Такой же инструментарий
Регистрация на сайте
Механизм создания аккаунта характеризуется доступностью и удобством. Начинающие пользователи необходимо:
1. Перейти на главный веб-сайт или его зеркало
2. Кликнуть на кнопку открытия счета
3. Внести необходимые данные
4. Валидировать электронную почту
5. Осуществить начальный авторизацию
Вознаграждение за открытие счета
Дебютанты зарабатывают значительный стартовый приз. Подобное поощрение может содержать:
– Монетарные начисления
– Безвозмездные спины
– Усиленный уровень кэшбэка
Вход в собственный аккаунт
Существующие клиенты имеют возможность оперативно авторизоваться в персональный кабинет, эксплуатируя учетные данные и шифр. Личный профиль дает шанс к:
– Администрированию депозитом
– Хронологии переводов
– Активным поощрениям
– Настройкам учетной записи
Вознаграждения и предложения
Платформа систематически организует многочисленные промо-кампании для участников.
Виды бонусов
Ключевые категории поощрений:
– Депозитные начисления – процент от величины взноса
– Прокруты – бесплатные раунды в автоматах
– Компенсация – возмещение части затраченных сумм
– Конкурсные призы – премии за выступление в турнирах
Промокоды
Специальные промокоды обеспечивают получить экстра бонусы. Участники способны отыскать их на специализированных сайтах или заработать в новостях.
Мобильная адаптация и программа
Передовые игроки предпочитают переносной досуг.
Характеристики портативной системы
– Гибкий интерфейс для любых девайсов
– Абсолютный возможность к слотам
– Оперативная функционирование
– Удобное контроль
Установить приложение
Mobile софт открыто для установки на устройства с рабочими платформами Android и iOS. Софт гарантирует:
– Надежную деятельность
– Пуш алерты о призах
– Мгновенный вход к любимым развлечениям
Развлекательный портфель
Казино предлагает внушительную коллекцию азартных забав.
Слоты
Ассортимент развлекательных аппаратов насчитывает:
– Традиционные машины
– Передовые автоматы
– Накопительные слоты
– Сюжетные автоматы
Live игры
Категория живых развлечений предоставляет право участвовать с профессиональными ведущими. Предложены:
– Американская рулетка
– Очко
– Baccarat
– Техасский холдем
Соревнования
Регулярные турниры помогают пользователям конкурировать за крупные наградные фонды. Турнирная система изменяется каждую неделю.
Платежные действия
Казино предоставляет массу вариантов депозита и снятия денег:
– Дебетовые карточки
– Виртуальные платежные системы
– Межбанковские транзакции
– Криптовалюты
Все платежи выполняются защищенно с применением передовых систем шифрования.
Служба support
Опытная группа саппорта действует постоянно. Связаться с специалистами возможно через:
– Интерактивный чат
– Email почту
– Телефон
– Соц платформы
Защита и аккредитация
Портал действует на базе действительной лицензии. Такое подтверждает:
– Прозрачность игрового процесса
– Защиту персональных сведений
– Пунктуальные выводы
– Ответственный игровой процесс
Вывод
Главный сайт и его актуальные альтернативные адреса предоставляют игрокам целостный спектр возможностей для комфортной и выгодной игры. Внушительные призы, разнообразные автоматы, профессиональная служба и надежная инфраструктура операций создают казино оптимальным выбором для любителей игровых услуг.
Нынешние онлайн-казино предоставляют клиентам разнообразие опций для приятной игры. Официальный портал casino казино РЎРїСЂСѓС‚ дарит вход ко всем сервисам и игровым автоматам. Однако при возникновении технических неполадок на помощь спешат актуальные дубликаты.
Что есть собой рабочее зеркало
Зеркало казино — это точная реплика главного портала, размещенная по другому доменному имени. Подлинное зеркало сохраняет все характеристики, включая регистрацию, доступ в персональный кабинет, поощрения и промокоды.
Копия на сегодня гарантирует:
– Непрерывный доступ к развлекательным аппаратам
– Абсолютную безопасность персональных сведений
– Удержание средств и журнала транзакций
– Применимость всех бонусных программ
Открытие профиля на лицензионном ресурсе
Ход регистрации занимает несколько минут. Свежеиспеченным геймерам требуется:
1. Перейти на главный ресурс или действующее зеркало
2. Кликнуть кнопку «Создать аккаунт»
3. Внести запрашиваемые сведения
4. Подтвердить электронную почту
5. Ввести промокод при существовании
После завершения регистрации клиенты приобретают подарок за регистрацию, который может содержать free spins или денежно-призовое премирование.
Доступ в индивидуальный кабинет
Личный кабинет открывает полный управление над азартным действом. Через личный профиль разрешается:
– Пополнять счет
– Забирать средства
– Применять промокоды
– Проверять журнал пари
– Принимать участие в состязаниях
– Получать возврат средств
Обзор бонусов и промо-предложений
Выгодная бонусная схема — ключевое плюс платформы. Главные формы бонусов:
Вступительный подарок
Новые игроки приобретают богатое награду на дебютные вклады. Сумма премии может доходить до 100-200% от величины вклада.
Фриспины
Безвозмездные спины предоставляются для известных машин. Объем free spins варьируется от 10 до 500 штук.
Cash back
Еженедельный или ежемесячный возврат процентной доли потерянных финансов. Типичный процент компенсации — 5-15%.
Конкурсы
Периодические конкурсы с внушительными премиальными фондами. Конкурсанты конкурируют за топовые строчки в турнирной таблице.
Мобильная версия и приложуха
Адаптивная версия обеспечивает играть с всякого гаджета. Клиенты могут установить app для iOS и Android или задействовать веб версию.
Достоинства мобильного софта:
– Быстрая подзагрузка игр
– Эргономичный графический интерфейс
– Push-уведомления о акциях
– Возможность входа через Face ID
Слоты и Live казино
Игровая база содержит сотни позиций от ведущих производителей.
Топовые разделы игр:
– Стандартные автоматы
– Видеослоты с бонусными этапами
– Джекпот автоматы
– Megaways автоматы
Live игорный зал
Раздел live казино обеспечивает игру с профессиональными крупье. Есть традиционные игры:
– Французская рулетка
– Двадцать одно
– Баккара
– Покер
Как обнаружить актуальное зеркало
Раздобыть рабочую линк на зеркало возможно множественными путями:
1. Подписаться на email-рассылку
2. Мониторить за апдейтами в соц сетях
3. Контактировать в сервис поддержки
4. Добавить в закладки рабочее зеркало в избранное
Вывод
Основной портал и его актуальные альтернативные адреса предоставляют непрерывный доступ к развлекательным автоматам. Великодушные вознаграждения, различные купоны, практичное портативное программа и высококлассная техподдержка поддержки делают игровой геймплей в высшей степени приятным и конфиденциальным.
Have you ever considered writing an ebook or guest authoring on other blogs?
I have a blog based upon on the same subjects you
discuss and would really like to have you share some stories/information. I know
my visitors would value your work. If you are even remotely interested, feel free to shoot me an e-mail.
Check out my blog … Paramount Trainers
Topaz Finds – Friendly interface, exploring items was simple and intuitive.
Продать лекарства с рук
Актуальные онлайн-казино обеспечивают клиентам богатый диапазон возможностей для удобной развлечений. Вход к площадке Бет Андреас осуществляется через главный портал или актуальное зеркало.
Что такое действующее зеркало казино
Действующее зеркало — это резервный URL главного сайта казино. Такие дубликаты разрабатываются для поддержания бесперебойного подключения к игровой площадке.
Дубликат актуальное совершенно повторяет опции базового домена. Клиенты имеют схожий вход ко всем возможностям, включая регистрацию, пополнение счета и обналичивание выигрышей.
Создание аккаунта на лицензионном ресурсе
Процесс регистрации отнимает всего буквально мгновений. Начинающим клиентам следует:
1. Попасть на главный домен или текущее официальное зеркало
2. Щелкнуть кнопку “Зарегистрироваться”
3. Заполнить требуемые сведения
4. Проверить почтовую почту
5. Ввести код активации при существовании
После финализации создания аккаунта игрок получает бонус за регистрацию, который имеет право содержать даровые спины или монетарное премию.
Доступ в личный кабинет
Индивидуальный кабинет — это защищенная зона, где клиенты вправе контролировать своим аккаунтом. Для логина следует ввести имя пользователя и пароль.
В личном кабинете имеются нижеперечисленные функции:
– Проверка истории операций
– Применение промокодов
– Настройка вознаграждениями
– Участие в турнирах
– Контроль возмещения
– Изменение аккаунта
Призы и промо
Гемблинговая система предоставляет выгодные бонусы:
Начальный пакет — новые игроки обретают значительное поощрение на стартовые депозиты.
Бесплатные вращения — выдаются как при открытии счета, так и в процессе различных промо.
Кэшбэк — регулярный рефанд доли израсходованных средств.
Купоны — специальные последовательности, предоставляющие возможность к специальным бонусам.
Анализ игровых категорий
Игровые автоматы
Коллекция автоматов насчитывает массу вариантов от топовых провайдеров. Пользователи встретят как обычные автоматы, так и актуальные видео-слоты с увлекательной анимацией.
Live казино
Зона Live казино предоставляет шанс участвовать с действующими крупье в условиях текущего времени. Имеются распространенные игры: рулетка, блэкджек, баккара, покер.
Турниры
Периодические соревнования с крупными наградными суммами привлекают сотни конкурсантов. Победители зарабатывают cash выплаты и специальные премии.
Телефонная версия и программа
Телефонная версия ресурса дает возможность развлекаться с любого гаджета. Интерфейс автоматически настраивается под формат экрана.
Установить приложение можно для аппаратов на Android и iOS. Смартфонное приложение обладает всеми характеристиками компьютерной версии.
Как отыскать рабочее зеркало на данный момент
Рабочие ссылки дубликатов периодически изменяются. Получить свежую URL можно многими вариантами:
– Через отдел поддержки
– В настоящих социальных сетях
– По электронной подписке
– На аффилиатных сайтах
Безопасность и официальность
Официальный ресурс оперирует на основе мировой разрешения. Все платежи шифруются современными методами безопасности.
Приватность персональных данных поддерживается в стопроцентном объеме.
Вывод
Главный домен и его функционирующие дубликаты обеспечивают игрокам постоянный выход к первоклассным развлекательным играм. Великодушные бонусы, всевозможные слоты, опытная помощь — все это создает игровой опыт невероятно беспроблемным и увлекательным.
Вход к ресурсу через актуальные зеркала
Игроки виртуальных казино нередко имеют дело с трудностью закрытия официального ресурса. Собственно для преодоления этой ситуации разработаны альтернативные адреса легального ресурса. Eldorado казино обеспечивает стопроцентный переход ко всем сервисам платформы.
Что такое функционирующее зеркало казино
Дубликат является собой абсолютную копию оригинального портала с идентичным возможностями. Ключевое несовпадение — это доменное имя. Абсолютно все параметры игрока, содержа депозит, бонусы и архив партий, продолжают быть неизменными.
Выгоды эксплуатации зеркал
Рабочие зеркала характеризуются множеством ключевых плюсов:
– Постоянный подключение к любимым играм
– Совершенная сохранность персональных параметров
– Удержание всех опций индивидуального кабинета
– Способность получения поощрений и присутствия в промоакциях
Оформление профиля на официальном ресурсе
Ход открытия счета крайне прост и отнимает буквально минут. Новые клиенты имеют возможность полагаться на внушительный приветственный поощрение за оформление.
Этапы открытия аккаунта
1. Доступ на основной домен или его копию
2. Нажатие на клавишу “Зарегистрироваться”
3. Указание необходимых информации
4. Верификация email почты
5. Применение купона (если имеется)
Бонусы и промоакции для игроков
Игровая площадка поощряет своих игроков разнообразными наградными акциями.
Основные виды поощрений
Стартовый бонус — щедрое начисление для начинающих пользователей, что способно включать монетарные суммы и безвозмездные спины.
Бесплатные вращения — опция играть в популярных аппаратах безвозмездно.
Кешбэк — частичный компенсация проигранных денег, который предоставляется по неделям или ежемесячно.
Бонусные коды — уникальные сочетания, гарантирующие добавочные поощрения.
Пользовательский кабинет: опции и параметры
Личный раздел гарантирует полный управление над игровым процессом. Тут имеются:
– Управление балансом
– Записи переводов
– Активные привилегии
– Параметры безопасности
– Проверка аккаунта
Карманная редакция и APP
Нынешние участники предпочитают доступность. Площадка предоставляет пару пути для развлечений с смартфонных устройств.
Отзывчивая мобильная платформа
Портативная вариант ресурса автономно подстраивается под монитор любого гаджета. Не нужно загружать специальное программное обеспечение.
APP для смартфонов
Разрешено инсталлировать официальное приложение для iOS и Android. Софт гарантирует:
– Скорый старт
– Адаптированный внешний вид
– Мобильные-оповещения о акциях
– Стабильную работу
Live казино: среда истинного казино
Зона Live развлечений транспортирует игроков в атмосферу настоящего зала. Опытные ведущие проводят сессии в варианте живого времени.
Востребованные Live-форматы
– Европейская рулетка
– Двадцать одно
– Punto Banco
– Poker
Игровые машины: выбор развлечений
Каталог слотовых автоматов содержит множество позиций от топовых провайдеров. Игроки обнаружат:
– Классические слоты
– Современные слоты
– Накопительный приз-автоматы
– Многолинейные автоматы
Конкурсы и уникальные предложения
Систематические конкурсы предоставляют шанс пользователям состязаться друг с другом за значительные призовые банки. Любой конкурс содержит свои правила присутствия и список победителей.
Методы внесения и снятия финансов
Площадка поддерживает множество денежных методов:
– Банковские инструменты
– Онлайн счета
– Цифровые валюты
– Финансовые переводы
Абсолютно все транзакции выполняются безопасно благодаря современным системам шифрования.
Служба помощи
Компетентные специалисты отдела поддержки готовы поддержать 24/7. Имеются такие способы коммуникации:
– Онлайн-чат
– Email-сервис
– Голосовая горячая линия
– Социальные сети
Заключение
Официальный портал казино и его актуальные копии предоставляют участникам конфиденциальный и удобный доступ к большому ассортименту игровых активностей. Крупные бонусы, регулярные акции, профессиональная помощь и простые финансовые системы делают азартный времяпрепровождение чрезвычайно комфортным и прибыльным.
VendorHouseFinder – Took a glance, the platform looks neat and well-laid-out.
Golden Stone Shop – Clear and straightforward, giving a no-nonsense, reliable impression.
https://usmedssaver.shop/# 24 hr pharmacy
Описание главного веб-сайта
Актуальные онлайн казино дают пользователям широкий спектр игр и возможностей. Официальный веб-сайт РўРёРїРїРё обеспечивает проверенный доступ к гемблинг возможностям.
Функционирующее зеркало: доступ прямо сейчас
Дублирующий портал служит в качестве идентичную реплику основного веб-сайта. Действующее зеркало позволяет пользователям избегать потенциальные запреты.
Преимущества задействования зеркала
Ключевые плюсы включают:
– Беспрерывный путь к ресурсу
– Удержание всех характеристик главного сайта
– Безопасность личных информации
– Такой же инструментарий
Регистрация на портале
Процесс оформления профиля знаменуется понятностью и удобством. Недавние клиенты должны:
1. Открыть главный сайт или его зеркало
2. Кликнуть на кнопку создания аккаунта
3. Заполнить обязательные данные
4. Активировать email ящик
5. Совершить первый вход
Приз за оформление
Начинающие приобретают солидный стартовый подарок. Такое награда имеет возможность содержать:
– Монетарные суммы
– Complimentary вращения
– Повышенный показатель компенсации
Логин в собственный раздел
Существующие игроки способны быстро получить доступ в собственный аккаунт, используя учетные данные и шифр. Персональный кабинет предлагает путь к:
– Регулированию депозитом
– Истории транзакций
– Активным поощрениям
– Опциям учетной записи
Призы и промо
Ресурс регулярно устраивает всевозможные акции для пользователей.
Типы подарков
Главные виды призов:
– Финансовые бонусы – доля от объема взноса
– Прокруты – безвозмездные спины в игровых машинах
– Кэшбек – возврат части потерянных финансов
– Призовые награды – премии за участие в конкурсах
Промокоды
Особые промокоды обеспечивают заработать бонусные привилегии. Игроки в состоянии найти их на специализированных порталах или получить в уведомлениях.
Портативная версия и программа
Передовые пользователи предпочитают переносной геймплей.
Характеристики mobile системы
– Отзывчивый облик для всех аппаратов
– Полный доступ к автоматам
– Быстрая работа
– Практичное контроль
Загрузить программу
Mobile софт предоставлено для загрузки на гаджеты с базовыми платформами Android и iOS. Программа предоставляет:
– Бесперебойную производительность
– Всплывающие оповещения о призах
– Мгновенный доступ к избранным автоматам
Развлекательный ассортимент
Казино предоставляет обширную подборку гемблинг игр.
Аппараты
Библиотека развлекательных автоматов охватывает:
– Классические машины
– Передовые автоматы
– Прогрессивные игры
– Branded развлечения
Live дилеры
Раздел живых развлечений дает шанс играть с профессиональными диллерами. Доступны:
– Рулетка
– Блек-джек
– Baccarat
– Poker
Состязания
Постоянные чемпионаты дают возможность пользователям конкурировать за внушительные денежные пулы. Конкурсная система изменяется постоянно.
Денежные действия
Портал обеспечивает обилие способов зачисления и обналичивания средств:
– Банковские карты
– Виртуальные счета
– Прямые трансферы
– Bitcoin
Абсолютно все транзакции выполняются безопасно с использованием современных протоколов шифрования.
Служба support
Квалифицированная команда поддержки функционирует 24/7. Соединиться с операторами возможно через:
– Online чат
– Почтовую почту
– Телефонную линию
– Social сети
Безопасность и регулирование
Казино функционирует на основании официальной лицензии. Подобное обеспечивает:
– Легальность игрового действа
– Охрану конфиденциальных данных
– Оперативные транзакции
– Контролируемый гейминг
Резюме
Главный ресурс и его функционирующие резервные страницы дают участникам полный спектр функций для удобной и прибыльной развлечений. Солидные вознаграждения, разнообразные игры, компетентная поддержка и защищенная платформа транзакций создают казино идеальным выбором для фанатов гемблинг игр.
Анализ официального ресурса
Актуальное онлайн-казино обеспечивает своим клиентам обширный выбор развлечений и призов. Официальный сайт клуб функционирует непрерывно, предоставляя вход к известным слотам, live-казино и разнообразным акциям.
Действующее зеркало: доступ к порталу
Что такое копия казино
Зеркало представляет собой точную копию оригинального сайта с альтернативным сетевым названием. Рабочее зеркало обеспечивает участникам обходить ограничения и обеспечивать надежный путь к излюбленным автоматам.
Как отыскать рабочее зеркало сегодня
Свежие линки на главное зеркало появляются через:
– Email рассылку
– Главные публичные сети
– Команду поддержки
– Партнерские площадки
Регистрация на ресурсе
Процесс открытиясчета
Созданиеаккаунта требует несколько минут и содержит такие действия:
1. Доступ на основной веб-сайт или функционирующее зеркало
2. Выбор опции “Создатьаккаунт”
3. Заполнение учетных реквизитов
4. Подтверждение адреса или номера
5. Формирование пароля
Подарок за открытиесчета
Новые игроки обретают выгодные начальные вознаграждения:
– Денежные суммы на баланс
– Freespins для симуляторов
– Расширенный размер кэшбека
– Особые промокоды
Логин в личный профиль
Зарегистрированные пользователи способны произвести логин через официальный веб-сайт или рабочее зеркало. Для этого необходимо ввести никнейм и ключдоступа, установленные при созданииаккаунта.
Возможности персонального кабинета
В собственном аккаунте доступны следующие инструменты:
– Контроль личными реквизитами
– Зачисление счета
– Обналичивание денег
– Применение кодов
– Отслеживание истории операций
– Включение в конкурсах
Вознаграждения и акции
Разновидности поощрений
Казино награждает своих клиентов различными поощрительными системами:
– Вступительный набор — щедрые бонусы на дебютные пополнения
– Freespins — экстра вращения в известных автоматах
– Возврат — систематический откат доли убытков
– Система лояльности — специальные привилегии для активных игроков
Промокоды и их активация
Уникальные коды предоставляют экстра бонусы. Для применения необходимо набрать шифр в определенное поле в персональном разделе.
Развлекательный набор
Слоты
Каталог развлекательных слотов включает сотни позиций от известных провайдеров:
– Стандартные машины
– Видео автоматы
– Накопительные игры
– Тематические игры
Live казино
Секция Live-казино предоставляет взаимодействие с живыми крупье в условиях реального времени:
– Европейскаярулетка
– Blackjack
– Пунтобанко
– Покер
Конкурсы
Регулярные состязания с солидными выигрышными пулами устраиваются регулярно. Участники конкурируют за первенство в турнирнойсетке.
Мобильная реализация и программа
Адаптивная адаптация ресурса
Основной портал на100% приспособлен для планшетных устройств. Пользователи имеютвозможность запускать автоматы сразу через веб-навигатор без потребности скачивания.
APP для скачивания
Специальное мобильное APP доступно для скачивания на устройства с операционными средами Android и iOS. APP обеспечивает:
– Быстрый путь к автоматам
– Стабильную функциональность
– Моментальные-извещения о акциях
– Простой оформление
Итог
Главный веб-сайт казино и его действующие зеркала предоставляют игрокам полный возможность к первоклассным игровым играм. Солидные бонусы, всевозможные акции, функциональная адаптивная реализация и опытная сервис формируют игровой процесс предельно приятным и доходным.
http://certifiednorthrx.com/# Certified North Rx
этот сайт fermacc
Sky Gems – Short and striking, easy to remember.
brazilian pharmacy online: certified canadian pharmacy – which online pharmacy is the best
oceanopal page – Beautiful branding, expecting some very appealing items.
Нынешние онлайн-казино предлагают игрокам богатый выбор вариантов для беспроблемной времяпрепровождения. Вход к ресурсу Голд казино осуществляется через основной портал или действующее зеркало.
Что такое рабочее зеркало казино
Функционирующее зеркало — это резервный URL основного ресурса казино. Такие копии генерируются для гарантирования постоянного доступа к азартной сервису.
Зеркало на сегодня полностью повторяет функционал базового сайта. Пользователи обретают такой же путь ко всем функциям, включая регистрацию, зачисление средств кошелька и вывод денег.
Создание аккаунта на главном веб-сайте
Процесс регистрации занимает всего считанные минут. Новым игрокам следует:
1. Перейти на официальный сайт или актуальное подлинное зеркало
2. Выбрать кнопку “Создать аккаунт”
3. Внести требуемые сведения
4. Проверить почтовую почту
5. Ввести бонусный код при наличии
После завершения регистрации участник приобретает вознаграждение за регистрацию, который имеет право предполагать free spins или денежное вознаграждение.
Логин в личный кабинет
Личный кабинет — это защищенная область, где игроки вправе регулировать своим профилем. Для авторизации следует указать username и password.
В индивидуальном кабинете открыты следующие функции:
– Проверка истории переводов
– Использование промокодов
– Контроль поощрениями
– Включение в состязаниях
– Отслеживание кэшбека
– Настройка профиля
Поощрения и спецпредложения
Развлекательная площадка дарит привлекательные бонусы:
Стартовый комплект — дебютанты зарабатывают значительное вознаграждение на начальные взносы.
Free spins — начисляются как при регистрации, так и в рамках различных промо.
Возврат средств — систематический возврат фрагмента потерянных финансов.
Купоны — специальные коды, предоставляющие возможность к особым бонусам.
Описание игровых разделов
Аппараты
Ассортимент слотов охватывает массу наименований от лучших поставщиков. Геймеры найдут как обычные машины, так и современные видеослоты с увлекательной графикой.
Live казино
Категория Live казино дарит возможность соревноваться с действующими дилерами в состоянии настоящего времени. Открыты популярные игры: рулетка, блэкджек, баккара, покер.
Состязания
Постоянные чемпионаты с крупными призовыми суммами манят множество игроков. Победители получают финансовые награды и уникальные поощрения.
Смартфонная версия и софт
Адаптивная версия ресурса обеспечивает развлекаться с произвольного гаджета. Структура самостоятельно адаптируется под размер экрана.
Получить приложение можно для аппаратов на Android и iOS. Смартфонное программа обладает всеми опциями десктопной версии.
Как отыскать действующее зеркало на данный момент
Действующие ссылки альтернатив систематически изменяются. Узнать рабочую линк можно многими способами:
– Через службу помощи
– В проверенных информационных сетях
– По e-mail дайджесту
– На аффилиатных площадках
Надежность и лицензирование
Официальный домен оперирует на фундаменте глобальной разрешения. Все транзакции охраняются актуальными системами защиты.
Конфиденциальность пользовательских данных сохраняется в стопроцентном формате.
Итог
Главный портал и его действующие дубликаты обеспечивают игрокам 24/7 выход к превосходным азартным развлечениям. Выгодные призы, разнообразные игры, профессиональная поддержка — все это формирует азартный досуг максимально удобным и интересным.
можно проверить ЗДЕСЬ ферма.сс
Актуальные онлайн-казино предоставляют игрокам широкий набор игр и привлекательные поощрения. Тем не менее для комфортной деятельности необходимо знать, как отыскать Pinco регистрация и его актуальные зеркала.
Что такое официальный сайт казино
Главный веб-сайт казино — это базовая платформа, где клиенты могут пользоваться развлекательными развлечениями. Портал работает на легитимных основаниях и располагает всеми нужными лицензиями.
Первостепенные преимущества главного ресурса:
– Защищенность личных реквизитов
– Справедливые правила игры
– Гарантированные выплаты
– Квалифицированная служба поддержки
Актуальное зеркало казино: для чего нужно
Копия сайта — это полная копия официального сайта, расположенная по иному веб-адресу. Актуальное зеркало создается для предоставления бесперебойного подключения к сайту.
Поводы использования дублирующих ресурсов:
– Недоступность официального адреса
– Плановые мероприятия
– Повышенная загрузка на сервер
Как обнаружить рабочее зеркало сегодня
Получить текущее действующее зеркало можно множественными путями:
1. Email-уведомления — активируйте уведомления на почтовую отправку
2. Департамент помощи — свяжитесь в онлайн-чат
3. Официальные медиа — следите за новостями
4. Тематические сайты — достоверные ресурсы
Открытие счета на сайте казино
Алгоритм открытия счета занимает только немного секунд:
1. Кликните на опцию “Открыть счет”
2. Внесите обязательные данные
3. Верифицируйте контактную почту
4. Введите купон, если предоставлен
Сразу после оконченной активации вам откроется разрешен персональный аккаунт.
Премии и бонусные коды
Выгодная наградная политика — существенное плюс казино:
Награда за создание аккаунта
Свежие пользователи зарабатывают приветственный бонус, который может охватывать:
– Монетарный депозит на начальный взнос
– Free spins для автоматов
– Приветственные фонды
Купоны
Регулярно появляются актуальные промокоды, позволяющие активировать особые бонусы.
Программа кэшбека
Активные участники получают порцию использованных финансов обратно.
Действующие акции и состязания
Сайт систематически организует интересные кампании:
– Семидневные чемпионаты
– Специальные акции
– Розыгрыши крупных наград
– Схема привилегий
Доступ в пользовательский профиль
Для логина на платформу необходимо:
1. Загрузить главный адрес или актуальное зеркало
2. Выбрать “Войти”
3. Ввести имя пользователя и секретную комбинацию
В личном кабинете доступны следующие инструменты:
– Депозит баланса
– Вывод выигрышей
– Анализ журнала ставок
– Редактирование личными данными
Mobile вариант и софт
Адаптивная модификация
Адаптивная вариант сайта позволяет участвовать с разных смартфонного девайса. Дизайн самостоятельно подстраивается под размер экрана.
Программа для download
Загрузить app можно для:
– Android — официальная скачивание с портала
– iOS — установка через App Store
Плюсы программы:
– Мгновенный старт
– Надежная операционность
– Push-нотификации об предложениях
– Производительный дизайн
Игровые секции
Слоты
Разнообразная подборка эмуляторных слотов от известных производителей:
– Классические слоты
– Современные-эмуляторы
– Джекпот-машины
Live зал
Секция с живыми операторами обеспечивает:
– Рулетки
– 21
– Баккара
– Карточные игры
Трансляции ведутся в высоком качестве, воссоздавая ощущение реального казино.
Варианты депозита и снятия
Платформа принимает разнообразные финансовые инструменты:
– Дебетовые картсчета
– Электронные кошельки
– Цифровые валюты
– Банковские переводы
Базовые пороги взноса и моментальные выплаты гарантируют времяпрепровождение крайне удобной.
Отдел помощи
Компетентная отдел поддержки оперирует 24/7 и может ассистировать с различными вопросами:
– Реалтайм-чат
– Email-помощь
– Телефонная горячая линия
Выводы
Лицензионный веб-сайт казино и его функционирующие зеркала предоставляют участникам конфиденциальный и азартный игровой процесс. Богатые поощрения, функциональная адаптивная вариант, богатые слоты и высокоуровневое live-казино делают эту систему великолепным вариантом для игровых времяпрепровождения.
explore everemporium shop – Well-organized categories, made navigation straightforward.
see canyoncart online – Memorable name, easily catches the eye.
CrestEmporiumHub – Visitors instantly get a sense of tradition and quality.
discover more – Solid, memorable, and easy to recognize.
For advantages
modern gambling sites
for undeniable proof.
BajaRx Direct: pharma mexicana – mexico pharmacy
бонусы мелбет бонусы мелбет .
Нынешние онлайн-казино обеспечивают пользователям богатый выбор азартных игр и выгодные премии. Однако для комфортной времяпрепровождения критично осознавать, как отыскать casino Vovan и его рабочие зеркала.
Что такое официальный сайт казино
Основной ресурс казино — это базовая система, где игроки могут развлекаться развлекательными слотами. Портал работает на легальных принципах и имеет всеми требуемыми сертификатами.
Главные преимущества основного портала:
– Защищенность индивидуальных сведений
– Прозрачные условия работы
– Подтвержденные выплаты
– Компетентная помощь
Актуальное зеркало казино: для чего необходимо
Альтернативный адрес — это точная клон главного веб-сайта, расположенная по другому адресу. Действующее зеркало формируется для поддержания непрерывного соединения к сайту.
Причины эксплуатации копий сайта:
– Ограничение первичного URL
– Регламентные операции
– Значительная нагрузка на ресурс
Как найти рабочее зеркало сейчас
Обнаружить новое проверенное зеркало можно различными методами:
1. Почтовые оповещения — подпишитесь на почтовую отправку
2. Команда техподдержки — обратитесь в онлайн-чат
3. Официальные площадки — отслеживайте за постами
4. Специализированные порталы — надежные ресурсы
Регистрация на ресурсе казино
Этап регистрации занимает только считанные минут:
1. Нажмите на элемент “Зарегистрироваться”
2. Внесите запрашиваемые сведения
3. Подтвердите email ящик
4. Примените промокод, если имеется
Сразу после завершенной создания аккаунта вам откроется доступен индивидуальный раздел.
Награды и коды активации
Богатая премиальная система — ключевое плюс казино:
Подарок за открытие счета
Новые игроки обретают первый поощрение, который может включать:
– Финансовый депозит на начальный депозит
– Фриспины для автоматов
– Приветственные бонусы
Активационные коды
Систематически выходят новые промокоды, предоставляющие забрать особые поощрения.
Механизм кэшбека
Активные участники зарабатывают процент проигранных средств на счет.
Свежие промо и состязания
Казино постоянно устраивает увлекательные события:
– Еженедельные чемпионаты
– Тематические промо
– Конкурсы ценных выигрышей
– Программа лояльности
Доступ в пользовательский профиль
Для логина на ресурс требуется:
1. Открыть лицензионный адрес или функционирующее зеркало
2. Активировать “Login”
3. Указать логин и ключ
В индивидуальном профиле предоставлены следующие функции:
– Пополнение баланса
– Вывод средств
– Проверка лога игр
– Настройка персональными данными
Мобильная версия и приложение
Мобильная вариант
Мобильная модификация портала обеспечивает участвовать с разных карманного устройства. Визуал адаптивно адаптируется под габариты экрана.
Приложение для download
Установить приложение можно для:
– Android — непосредственная установка с сайта
– iOS — скачивание через App Store
Плюсы программы:
– Мгновенный старт
– Бесперебойная функциональность
– Push-оповещения об акциях
– Производительный интерфейс
Азартные секции
Автоматы
Внушительная библиотека азартных барабанов от известных разработчиков:
– Ретро автоматы
– Видео-слоты
– Прогрессивные-игры
Live зал
Раздел с профессиональными операторами предоставляет:
– European/American Roulette
– 21
– Baccarat
– Texas Hold’em
Трансляции осуществляются в высоком качестве, формируя атмосферу настоящего казино.
Способы депозита и обналичивания
Ресурс принимает разнообразные платежные методы:
– Дебетовые карты
– Онлайн кошельки
– Цифровые валюты
– Прямые транзиты
Стартовые лимиты внесения и скоростные транзакции гарантируют игру крайне комфортной.
Отдел помощи
Квалифицированная отдел ассистентов работает 24/7 и в состоянии ассистировать с различными задачами:
– Живой-чат
– Email-помощь
– Голосовая служба
Резюме
Официальный портал казино и его рабочие дубликаты гарантируют пользователям конфиденциальный и захватывающий развлекательный отдых. Выгодные поощрения, удобная mobile версия, разнообразные слоты и качественное live-казино превращают эту систему отличным местом для азартных игр.
Современные онлайн казино дают клиентам огромный ассортимент вариантов для удобной игры. Впрочем иногда соединение к главному платформе может стать заблокированным. В таких моментах на поддержку приходят Панч, которое обеспечивает стабильный вход ко всем сервисам платформы.
Что такое действующее зеркало казино
Альтернативный сайт — это точная версия основного веб-сайта, которая находится по альтернативному URL. Копия содержит весь функционал главного сайта, включая персональный кабинет, средства и историю транзакций.
Основные плюсы применения зеркала:
– 24-часовой подключение к платформе
– Полная тождественность функционала
– Конфиденциальность пользовательских реквизитов
– Хранение доступных поощрений
Как обнаружить рабочее зеркало на сегодня
Присутствует несколько безопасных методов поиска действующей ссылки:
Проверенные источники:
1. Email рассылка — дирекция периодически отправляет уведомления с свежими ссылками
2. Социальные сети — проверенные каналы постят текущую сведения
3. Служба поддержки — консультанты сообщают безопасные домены
4. Смартфонное приложение — обеспечивает преодолевать блокировки
Открытие счета на основном портале
Процесс создания аккаунта отнимает всего пару минут и включает из таких ступеней:
1. Открытие на главный портал или функционирующее зеркало
2. Выбор на клавишу «Открыть счет»
3. Ввод учетной бланка
4. Верификация электронной почты или телефонного номера
5. Включение привилегии за регистрацию при доступности промокода
Новые игроки приобретают великодушный приветственный бонус, который может содержать free spins, монетарные поощрения или компенсацию.
Доступ в личный кабинет
Логин на ресурсе выполняется привычным методом. Необходимо ввести логин и кодовое слово, использованные при создании аккаунта.
Значимые аспекты для конфиденциального входа:
– Эксплуатируйте надежный шифр
– Запустите двухэтапную аутентификацию
– Не записывайте коды на публичных компьютерах
– Отслеживайте URL строку браузера
Анализ премиальной структуры
Игорный портал одаривает игроков разнообразными бонусами и промо:
Начальный комплект
Свежие игроки имеют возможность полагаться на значительное поощрение за первый пополнение. Как правило это долевая прибавка к переведенной объему плюс бесплатные вращения для популярных слотов.
Периодические промо
– 7-дневный возврат средств — компенсирование части утраченных денег
– Награды на повторные пополнения
– Специальные офферы по праздникам
– Соревнования с значительными премиальными фондами
Программа привилегий
Регулярные клиенты зарабатывают единицы за каждую бет, которые затем конвертируются на фактические денежные призы, бесплатные вращения или особые привилегии.
Кодовые слова: как использовать
Купоны — это специальные наборы букв и цифр, обеспечивающие привилегию к бонусным поощрениям.
Где найти рабочие промокоды:
– Легитимные социальные сети казино
– Союзнические порталы
– Email-подписка
– Отраслевые группы
Активируется промокод в специальное поле при регистрации или добавлении денег счета.
Мобильная версия и приложение
Передовые геймеры выбирают делать ставки с смартфонных девайсов. Ресурс предоставляет пару метода для удобной телефонной игры.
Адаптивная редакция
Онлайн версия сама оптимизируется под размер экрана. Не требует установки и оперирует в любом актуальном браузере.
Смартфонное приложение
Загрузить приложение можно для девайсов на Android и iOS. Плюсы app:
– Молниеносная открытие
– Устойчивая действие
– Push-уведомления о акциях
– Автоматический избегание блокировок
Этап загрузки прост: необходимо зайти на портал с смартфонного девайса и следовать указаниям.
Гемблинг каталог
Каталог аппаратов охватывает несколько тысяч наименований от передовых поставщиков.
Слоты
Развлекательные автоматы — максимально востребованная категория игр. Размещены стандартные простые аппараты, современные графические аппараты с премиальными уровнями, а также растущие выигрыши.
Live казино
Секция с настоящими раздающими дает возможность прочувствовать атмосферу истинного казино. Доступны варианты с блэкджеком.
Передача ведется в превосходном качестве, поддерживается коммуникация с ведущим и прочими участниками.
Турниры
Систематически устраиваются состязания по многочисленным дисциплинам. Включение дает шанс заработать монетарные награды, фриспины или специальные поощрения.
Финансовые операции
Ресурс предоставляет большой ассортимент расчетных способов:
– Дебетовые карты
– Электронные системы
– Цифровая валюта
– Счетовые платежи
Низшая сумма депозита — приемлемая для массы пользователей. Получение призов осуществляется в минимальные временные рамки.
Служба поддержки
Компетентные операторы настроены помочь 24/7. Открыты данные способы общения:
– Онлайн-чат
– Email
– Телефонная линия
– Социальные сети
Ответы на распространенные вопросы можно отыскать в зоне FAQ.
Итог
Официальный портал казино и его актуальные зеркала дают клиентам максимальный путь ко всем опциям платформы. Солидные привилегии, приятная телефонная версия, гигантский выбор развлечений и квалифицированная поддержка делают гемблинг досуг крайне комфортным и надежным.
BajaRx Direct mexico pharmacy price list BajaRx Direct
browse the district – The shop name is calm, soothing, and really stands out.
пояснения ферма обменник
монтаж газового пожаротушения для серверной montazh-gazovogo-pozharotusheniya.ru .
монтаж газового пожаротушения для склада монтаж газового пожаротушения для склада .
Доступ к платформе через действующие зеркала
Нынешние онлайн казино предоставляют пользователям непрерывный подключение к играм. Центральный сайт https://www.gringa360.com.br/2017/dostup-k-ofitsialnomu-saytu-1xbet-osushchestvlyaetsya-cherez-aktualnoe-zerkalo/ функционирует надёжно, обеспечивая обширный набор игровых игр. Тем не менее порой формируются программные сложности или ограничения, потому критично понимать о присутствии актуальных зеркал.
Что представляет собой главное зеркало казино
Альтернатива — это абсолютная копия центрального сайта с таким же интерфейсом. Действующее зеркало в настоящее время даёт возможность преодолевать территориальные барьеры и продолжать гемблинг.
Принципиальные выгоды эксплуатации зеркал:
– Безграничный подключение к собственному кабинету
– Сохранение совокупных сведений счёта
– Такой же ассортимент игр
– Действующие поощрения и кампании
Регистрация на ресурсе
Операция регистрации отнимает немного минут. Новые пользователи зарабатывают щедрый бонус за создание счёта, что в состоянии вмещать:
– Вступительный денежный подарок
– Даровые спины для игр
– Специальные ваучеры
– Усиленный кешбэк
Ради финализации записи нужно:
1. Перейти на главный ресурс или альтернативу
2. Нажать кнопку «Зарегистрироваться»
3. Указать персональные сведения
4. Активировать электронную почту или телефон
5. Активировать ваучер (в случае наличии)
Вход в личный кабинет
Вслед за удачной регистрации пользователи способны совершать подключение с помощью основной ресурс или рабочее зеркало. Персональный кабинет открывает абсолютный надзор над учётной записью:
– История пари
– Ввод кошелька
– Изъятие денег
– Регулирование привилегиями
– Вовлечение в состязаниях
Бонусы и акции казино
Платформа награждает пользователей многочисленными наградными системами:
Стартовые поощрения
Дебютанты получают богатый пакет поощрений на первые депозиты. Как правило это включает процентную прибавку к размеру пополнения плюс безвозмездные фриспины.
Периодические акции
– Каждонедельный кэшбек до 15%
– Состязания с призовыми суммами
– Подарки на число рождения
– Специальные предложения для статусных пользователей
Схема лояльности
Деятельные геймеры собирают баллы, что возможно конвертировать на реальные финансы или особые льготы.
Смартфонная форма и софт
Нынешние технологии обеспечивают участвовать везде удобно. Карманная форма ресурса независимо подстраивается под размер каждого девайса.
Плюсы карманного приложения:
– Оперативная подгрузка автоматов
– Эргономичный облик
– Всплывающие-нотификации о предложениях
– Шанс инсталлировать для Android и iOS
Live казино: атмосфера истинного гемблинг учреждения
Раздел Live клуба переносит клиентов в антураж настоящего игорного заведения. Компетентные ведущие проводят процесс в виде подлинного времени.
Доступные столы:
– Рулетка
– Блэкджек
– Классика
– Карты
Слоты и гемблинг машины
Коллекция развлекательных аппаратов включает тысячи наименований от передовых студий. Всякий геймер обнаружит развлечение по душе:
– Традиционные автоматы
– Современные автоматы с призовыми турами
– Крупный приз-автоматы
– Многолинейные игры
Состязания и раздачи
Периодические соревнования привносят остроту и предоставляют способность получить крупные награды. Участие в конкурсах зачастую бесплатное, а призовые фонды составляют внушительных величин.
Защита и анонимность
Сайт использует инновационные методы шифрования для защиты информации игроков. Все платёжные действия совершаются через защищённые линии.
Итог
Центральный портал и его рабочие зеркала предоставляют устойчивый подключение к отличным игровым играм. Щедрые бонусы, удобная карманная редакция, вариативность слотов и профессиональное Live-клуб превращают платформу превосходным решением для любителей развлекательных игр.
Обзор официального веб-сайта
Прогрессивные онлайн казино обеспечивают пользователям широкий выбор забав и возможностей. Главный ресурс Lucky Bear казино обеспечивает проверенный путь к азартным сервисам.
Актуальное зеркало: вход на сегодня
Дублирующий портал служит собой полную дубликат лицензионного веб-сайта. Официальное зеркало позволяет участникам избегать вероятные барьеры.
Преимущества применения зеркала
Ключевые достоинства включают:
– Беспрерывный вход к порталу
– Сохранение любых функций главного портала
– Безопасность конфиденциальных материалов
– Идентичный инструментарий
Регистрация на сайте
Процедура регистрации характеризуется понятностью и практичностью. Начинающие пользователи необходимо:
1. Перейти на лицензионный ресурс или его зеркало
2. Щелкнуть на клавишу регистрации
3. Указать необходимые данные
4. Верифицировать электронную ящик
5. Осуществить дебютный авторизацию
Приз за оформление
Начинающие зарабатывают солидный вступительный презент. Это поощрение имеет возможность содержать:
– Денежные бонусы
– Complimentary прокруты
– Усиленный процент возврата
Авторизация в личный раздел
Активные клиенты способны моментально получить доступ в личный раздел, задействуя никнейм и пароль. Собственный раздел предоставляет доступ к:
– Контролю счетом
– Хронологии операций
– Текущим поощрениям
– Настройкам профиля
Вознаграждения и предложения
Ресурс регулярно проводит многочисленные промо-кампании для клиентов.
Типы подарков
Ключевые формы поощрений:
– Денежные бонусы – доля от размера внесения
– Фриспины – безвозмездные прокруты в аппаратах
– Кэшбэк – возмещение фрагмента потерянных денег
– Конкурсные призы – призы за состязание в соревнованиях
Промокоды
Специальные ваучеры дают возможность получить экстра преимущества. Пользователи в состоянии обнаружить их на партнерских площадках или заработать в уведомлениях.
Портативная версия и софт
Актуальные гемблеры ценят карманный геймплей.
Возможности mobile версии
– Гибкий интерфейс для разнообразных устройств
– Целостный доступ к автоматам
– Моментальная функционирование
– Комфортное контроль
Установить программу
Портативное софт предложено для установки на аппараты с базовыми платформами Android и iOS. Приложение дает:
– Бесперебойную производительность
– Всплывающие оповещения о призах
– Оперативный путь к желанным играм
Азартный портфель
Платформа дает богатую галерею гемблинг игр.
Автоматы
Ассортимент азартных аппаратов охватывает:
– Традиционные игры
– Передовые игры
– Джекпотные автоматы
– Лицензионные развлечения
Live игры
Раздел живых дилеров обеспечивает возможность участвовать с настоящими дилерами. Представлены:
– Рулетка
– 21
– Баккара
– Карибский покер
Состязания
Регулярные соревнования позволяют клиентам соревноваться за значительные денежные пулы. Турнирная структура актуализируется еженедельно.
Банковские операции
Сайт предлагает разнообразие методов депозита и обналичивания финансов:
– Кредитные карты
– Виртуальные платежные системы
– Межбанковские транзакции
– Цифровые валюты
Абсолютно все платежи проходят конфиденциально с применением передовых методов кодирования.
Департамент поддержки
Профессиональная отдел помощи трудится круглосуточно. Соединиться с консультантами можно через:
– Online чат
– Email почту
– Горячую линию
– Social сети
Секьюрити и лицензирование
Платформа функционирует на фундаменте действительной сертификата. Данное обеспечивает:
– Справедливость азартного геймплея
– Безопасность конфиденциальных информации
– Своевременные транзакции
– Регулируемый игровой процесс
Заключение
Главный веб-сайт и его функционирующие альтернативные адреса гарантируют пользователям полный набор услуг для комфортной и профитной игры. Солидные вознаграждения, разнообразные слоты, квалифицированная помощь и проверенная платформа операций превращают портал идеальным решением для фанатов азартных забав.
Актуальные онлайн-казино предоставляют участникам внушительный ассортимент услуг и бонусных вариантов. Подключение к платформе реализуется через официальный веб-сайт или его рабочее зеркало Либет казино, что гарантирует стабильную работу.
Что такое функционирующее зеркало казино
Дубликат — это идентичная версия оригинального веб-сайта, разработанная для преодоления запретов. Актуальное зеркало позволяет игрокам получить вход к любимым автоматам в любое удобное время.
Лицензионное зеркало содержит всеми возможностями оригинального сайта:
– Полный ассортимент слотов
– Аккаунт с сохраненными сведениями
– Действующие бонусы
– Безопасные финансовые операции
Регистрация на основном сайте
Ход открытия счета занимает всего считанные минут. Новым клиентам следует:
1. Войти на проверенный сайт или действующее зеркало
2. Выбрать на клавишу “Зарегистрироваться”
3. Указать требуемые параметры
4. Активировать адрес
5. Внести начальный платеж
Поощрение новичкам выдается незамедлительно после окончания всех стадий.
Вход в профиль
Зарегистрированные клиенты могут совершить доступ указывая:
– Учетное имя и шифр
– Цифры сотового
– Email
Персональный раздел предоставляет шанс к управлению счетом, истории транзакций и действующим промокодам.
Промо и предложения
Игровая площадка радует постоянных клиентов разнообразными призами:
Начальный бонус
– Премия на начальный пополнение до 100%
– Бесплатные вращения на популярные слоты
– Экстра поощрения за очередные взносы
Бонусные коды
Особые ваучеры дают доступ на активацию уникальных вознаграждений. Актуальные промокоды публикуются в секции “Акции”.
Кэшбек
Регулярный возврат насчитывает до 10% от использованных финансов. Компенсация предоставляется сразу.
Система лояльности
Верные пользователи накапливают поинты, которые конвертируются на реальные выплаты или бесплатные вращения.
Адаптивный портал и программа
Для практичности игроков сделана функциональная mobile версия. Гибкий вид позволяет легко делать ставки с произвольного переносного гаджета.
Преимущества приложения:
– Моментальный подключение к слотам
– Оптимизированный дизайн
– Устойчивая деятельность
– Оповещения о свежих событиях
Скачать программу можно даром с главного веб-сайта для устройств на Android и iOS.
Каталог игр
Слоты
Коллекция включает более 2000 автоматов от популярных провайдеров:
– Классические игры
– Современные автоматы
– Джекпот-слоты
– Фирменные автоматы
Live казино
Секция Live столов дает развлечение с подлинными ведущими в онлайн формате:
– Рулетка
– Blackjack
– Punto Banco
– Карточный покер
Соревнования
Периодические турниры с крупными призовыми пулами устраиваются регулярно. Участие в состязаниях возможно всем зарегистрированным пользователям.
Расчетные варианты
Платежи и изъятия денег выполняются через известные способы оплаты:
– Банковские карточ ки
– Онлайн сервисы
– Bitcoin
– Денежные платежи
Минимальный депозит — от 100 рублей. Изъятие средств обрабатывается в течение 24 периода.
Команда support
Круглосуточная отдел помощи готова содействовать в разрешении всех ситуаций:
– Живой чат
– Email
– Телефон
– Соц сети
Защита и сертификат
Главный сайт работает на фундаменте международной лицензии. Всевозможные сведения клиентов закрыты новейшим SSL-кодированием.
Итог
Действующее зеркало предоставляет стабильный подключение к выбранным развлечениям, привлекательным промокодам и комфортным функциям. Откройте счет немедленно и получите начальный приз!
клиника в ростове вывод из запоя клиника в ростове вывод из запоя .
в этом разделе ferma cc
Timber Crate Picks – Polished and neat, exploring categories was straightforward.
вывод из запоя в стационаре в ростове вывод из запоя в стационаре в ростове .
TimberCrateDeals – Took a quick peek, the design feels clean and organized.
Обзор главного портала
Актуальные интернет казино предлагают клиентам богатый выбор игр и опций. Лицензионный ресурс РћРЅ РРєСЃ обеспечивает надежный путь к развлекательным функциям.
Функционирующее зеркало: вход на сегодня
Резервный сайт выступает как абсолютную версию лицензионного сайта. Проверенное зеркало обеспечивает пользователям преодолевать существующие ограничения.
Преимущества эксплуатации зеркала
Основные преимущества предполагают:
– Стабильный доступ к сайту
– Сохранение абсолютно всех возможностей основного сайта
– Безопасность личных информации
– Такой же функционал
Регистрация на платформе
Процесс регистрации выделяется доступностью и комфортом. Свежие клиенты требуется:
1. Посетить лицензионный портал или его зеркало
2. Кликнуть на кнопку открытия счета
3. Ввести требуемые поля
4. Верифицировать email адрес
5. Выполнить стартовый авторизацию
Вознаграждение за регистрацию
Начинающие зарабатывают значительный приветственный подарок. Это вознаграждение может включать:
– Денежные суммы
– Complimentary вращения
– Усиленный показатель кэшбека
Доступ в собственный кабинет
Действующие пользователи имеют возможность быстро зайти в собственный профиль, используя никнейм и пароль. Личный аккаунт предоставляет возможность к:
– Администрированию депозитом
– Хронологии операций
– Работающим подаркам
– Конфигурации профиля
Вознаграждения и кампании
Ресурс постоянно организует различные предложения для пользователей.
Разновидности подарков
Базовые формы бонусов:
– Денежные бонусы – коэффициент от объема внесения
– Спины – бесплатные прокруты в аппаратах
– Возврат средств – компенсация процента утраченных денег
– Турнирные вознаграждения – призы за игру в соревнованиях
Промокоды
Специальные коды помогают активировать дополнительные привилегии. Пользователи могут отыскать их на партнерских порталах или получить в рассылке.
Мобильная адаптация и софт
Прогрессивные гемблеры любят переносной игровой процесс.
Опции переносной системы
– Responsive дизайн для разнообразных девайсов
– Абсолютный доступ к развлечениям
– Быстрая загрузка
– Практичное контроль
Загрузить приложение
Mobile программа предложено для установки на гаджеты с рабочими ОС Android и iOS. Приложение гарантирует:
– Стабильную деятельность
– Push уведомления о акциях
– Моментальный путь к предпочитаемым развлечениям
Азартный выбор
Казино обеспечивает внушительную библиотеку развлекательных забав.
Аппараты
Библиотека развлекательных аппаратов насчитывает:
– Традиционные слоты
– Видео автоматы
– Накопительные автоматы
– Лицензионные развлечения
Live игры
Категория живых столов обеспечивает возможность участвовать с профессиональными крупье. Предложены:
– Рулетка
– Очко
– Баккара
– Poker
Состязания
Постоянные турниры помогают игрокам соревноваться за крупные призовые суммы. Турнирная сетка изменяется еженедельно.
Финансовые процедуры
Казино предлагает разнообразие опций депозита и обналичивания сумм:
– Кредитные карточки
– Онлайн кошельки
– Прямые переводы
– Цифровые валюты
Все платежи выполняются конфиденциально с задействованием прогрессивных методов защиты.
Сервис помощи
Профессиональная служба помощи действует без перерыва. Связаться с операторами реально через:
– Онлайн чат
– Почтовую почту
– Контактный номер
– Social сети
Безопасность и лицензирование
Портал оперирует на основании действительной разрешения. Подобное гарантирует:
– Честность развлекательного геймплея
– Защиту персональных информации
– Оперативные транзакции
– Легальный геймплей
Итог
Официальный портал и его актуальные альтернативные адреса обеспечивают игрокам полный спектр услуг для приятной и прибыльной игры. Значительные бонусы, разнообразные развлечения, компетентная поддержка и проверенная структура транзакций делают казино лучшим вариантом для ценителей азартных забав.
Доступ к порталу через актуальные зеркала
Передовые интернет казино предоставляют геймерам непрерывный вход к играм. Центральный ресурс приложение действует бесперебойно, предоставляя обширный ассортимент азартных развлечений. Впрочем иногда возникают системные проблемы или запреты, в связи с чем важно быть осведомлённым о присутствии рабочих зеркал.
Что представляет собой главное зеркало казино
Альтернатива — это точная копия основного ресурса с идентичным набором функций. Функционирующее зеркало на данный момент позволяет преодолевать местные запреты и поддерживать развлечения.
Основные выгоды задействования зеркал:
– Стопроцентный подключение к персональному кабинету
– Фиксация всех показателей счёта
– Схожий набор развлечений
– Актуальные вознаграждения и акции
Открытие счёта на платформе
Процесс оформления занимает немного минут. Свежие геймеры обретают щедрый подарок за регистрацию, он способен включать:
– Вступительный денежный приз
– Комплиментарные спины для автоматов
– Специальные ваучеры
– Усиленный возврат
Во имя финализации записи необходимо:
1. Зайти на главный ресурс или альтернативу
2. Кликнуть клавишу «Регистрация»
3. Внести контактные реквизиты
4. Верифицировать email или телефон
5. Применить код (когда имеется присутствии)
Вход в индивидуальный кабинет
Следом за правильной создания аккаунта пользователи могут выполнять подключение через официальный портал или актуальное зеркало. Персональный кабинет даёт всесторонний регулирование над аккаунтом:
– Журнал пари
– Пополнение кошелька
– Вывод призов
– Администрирование наградами
– Включение в турнирах
Привилегии и кампании казино
Портал балует клиентов разнообразными поощрительными программами:
Стартовые поощрения
Новички получают внушительный пакет привилегий на стартовые взносы. Типично это предполагает долевую доплату к величине депозита плюс бесплатные спины.
Регулярные акции
– Раз в неделю возврат до 15%
– Турниры с наградными пулами
– Подарки на годовщину рождения
– Эксклюзивные акции для VIP игроков
Программа поощрения
Активные пользователи получают единицы, они допустимо конвертировать на подлинные финансы или уникальные льготы.
Портативная форма и утилита
Передовые технологии обеспечивают развлекаться в любом месте подходяще. Портативная вариант портала независимо адаптируется под размер всякого устройства.
Выгоды мобильного программы:
– Быстрая запуск слотов
– Практичный дизайн
– Всплывающие-уведомления о акциях
– Возможность установить для Android и iOS
Реальное казино: обстановка реального игорного клуба
Категория Live клуба транспортирует игроков в антураж истинного азартного заведения. Профессиональные операторы проводят действие в формате подлинного времени.
Имеющиеся игры:
– Американская рулетка
– Очко
– Классика
– Покерная игра
Автоматы и гемблинг автоматы
Ассортимент азартных аппаратов содержит сотни позиций от ведущих студий. Любой клиент обнаружит игру по вкусу:
– Традиционные автоматы
– Новые слоты с специальными раундами
– Накопительный-автоматы
– Динамические автоматы
Состязания и раздачи
Систематические конкурсы включают адреналин и открывают возможность выиграть большие награды. Включение в соревнованиях зачастую безвозмездное, а призовые суммы достигают больших сумм.
Секьюрити и конфиденциальность
Платформа задействует инновационные системы шифрования для защиты данных пользователей. Любые транзакционные действия выполняются через безопасные каналы.
Итог
Основной веб-сайт и его актуальные зеркала предоставляют безопасный переход к первоклассным игровым услугам. Великодушные поощрения, комфортная мобильная редакция, разнообразие машин и профессиональное Live-клуб формируют ресурс прекрасным опцией для ценителей игровых автоматов.
стоимость монтажа газового пожаротушения montazh-gazovogo-pozharotusheniya-1.ru .
Golden Harbor – Clean and modern, giving the brand a welcoming, professional vibe.
Silver Treasures Hub – Catchy and memorable, works well online.
Обзор основного сайта
Новое онлайн-казино предоставляет своим клиентам обширный набор возможностей и поощрений. Главный ресурс РандХ казино регистрация казино действует непрерывно, гарантируя доступ к топовым слотам, live-казино и многочисленным промо.
Действующее зеркало: вход к порталу
Что такое зеркало казино
Копия является собой полную реплику официального ресурса с отличным сетевым путем. Действующее зеркало дает клиентам миновать запреты и сохранять непрерывный вход к выбранным играм.
Как найти рабочее зеркало сегодня
Свежие URL на основное зеркало появляются через:
– Почтовую оповещение
– Главные коммуникационные сети
– Сервис сопровождения
– Партнерские порталы
Оформление на ресурсе
Ход открытиясчета
Регистрация длится буквально минут и подразумевает такие этапы:
1. Вход на официальный портал или функционирующее зеркало
2. Активация элемента “Регистрация”
3. Ввод персональных реквизитов
4. Проверка электроннойпочты или номера
5. Создание пароля
Вознаграждение за созданиеаккаунта
Первые клиенты получают выгодные приветственные бонусы:
– Бонусные депозиты на счет
– Фриспины для автоматов
– Расширенный объем кешбэка
– Специальные ваучеры
Авторизация в персональный счет
Постоянные клиенты способны выполнить авторизацию через основной сайт или текущее зеркало. Для этого нужно указать никнейм и секретнуюкомбинацию, придуманные при регистрации.
Возможности персонального раздела
В персональном аккаунте имеются следующие функции:
– Редактирование учетными сведениями
– Зачисление кошелька
– Вывод средств
– Активация бонусов
– Просмотр архива игр
– Вступление в соревнованиях
Поощрения и кампании
Разновидности подарков
Казино награждает своих участников различными призовыми системами:
– Начальный комплект — большие бонусы на стартовые взносы
– Фриспины — дополнительные прокруты в рейтинговых автоматах
– Возврат — периодический компенсация суммы ставок
– План VIP — эксклюзивные льготы для верных участников
Ваучеры и их активация
Уникальные промокоды дают бонусные бонусы. Для ввода необходимо набрать код в соответствующее раздел в личном аккаунте.
Развлекательный ассортимент
Автоматы
База игровых автоматов содержит множество наименований от ведущих провайдеров:
– Обычные слоты
– Новые автоматы
– Призовые автоматы
– Сюжетные игры
Live казино
Секция Live-казино обеспечивает взаимодействие с живыми ведущими в условиях реального трансляции:
– Европейскаярулетка
– Blackjack
– Baccarat
– Карибскийпокер
Соревнования
Периодические турниры с большими призовыми суммами организуются ежедневно. Соревнующиеся сражаются за победу в рейтинге.
Смартфонная адаптация и приложение
Адаптивная версия сайта
Официальный ресурс на100% приспособлен для планшетных гаджетов. Участники имеютвозможность запускать игры непосредственно через веб-навигатор без обязательства установки.
APP для инсталляции
Официальное карманное программа предлагается для получения на аппараты с базовыми средами Android и iOS. Софт предоставляет:
– Оперативный подход к автоматам
– Устойчивую работу
– Мгновенные-извещения о бонусах
– Удобный дизайн
Резюме
Главный ресурс казино и его действующие зеркала обеспечивают игрокам полный вход к отличным геймплейным развлечениям. Выгодные подарки, многочисленные кампании, простая портативная платформа и квалифицированная сервис формируют игровой времяпрепровождение предельно enjoyable и прибыльным.
Передовые онлайн-казино обеспечивают игрокам обширный спектр азартных игр и выгодные бонусы. Однако для стабильной работы критично знать, как отыскать Дэдди и его рабочие зеркала.
Что такое официальный веб-ресурс казино
Главный сайт казино — это базовая площадка, где участники могут получать удовольствие от игровыми слотами. Сайт оперирует на законных правах и имеет всеми обязательными разрешениями.
Первостепенные выгоды главного веб-сайта:
– Надежность личных реквизитов
– Честные требования использования
– Подтвержденные выводы
– Квалифицированная техподдержка
Функционирующее зеркало казино: для чего требуется
Дублирующий ресурс — это идентичная копия главного портала, размещенная по иному веб-адресу. Действующее зеркало запускается для предоставления постоянного соединения к порталу.
Факторы эксплуатации копий сайта:
– Ограничение официального домена
– Профилактические мероприятия
– Высокая нагрузка на ресурс
Как отыскать актуальное зеркало в данный момент
Обнаружить текущее рабочее зеркало можно разными вариантами:
1. Email-уведомления — зарегистрируйтесь на новостную доставку
2. Департамент техподдержки — обратитесь в онлайн-чат
3. Корпоративные сети — отслеживайте за постами
4. Партнерские порталы — достоверные платформы
Оформление профиля на портале казино
Процесс создания аккаунта составляет только пару моментов:
1. Выберите на кнопку “Регистрация”
2. Введите обязательные данные
3. Подтвердите контактную e-mail
4. Активируйте код активации, если есть
По завершении завершенной активации вам откроется возможен персональный кабинет.
Бонусы и купоны
Привлекательная поощрительная система — существенное плюс казино:
Награда за создание аккаунта
Свежие участники зарабатывают стартовый бонус, который может содержать:
– Финансовый бонус на начальный пополнение
– Free spins для слотов
– Стартовые средства
Активационные коды
Периодически размещаются свежие промокоды, позволяющие активировать дополнительные привилегии.
Схема кешбэка
Лояльные пользователи приобретают часть проигранных ставок назад.
Текущие кампании и конкурсы
Сайт периодически устраивает увлекательные кампании:
– Недельные баттлы
– Сезонные предложения
– Лотереи ценных подарков
– Механизм лояльности
Доступ в индивидуальный аккаунт
Для логина на портал необходимо:
1. Перейти на лицензионный ресурс или актуальное зеркало
2. Нажать “Авторизация”
3. Указать логин и код доступа
В личном аккаунте разрешены следующие опции:
– Внесение средств депозита
– Снятие выигрышей
– Просмотр истории игр
– Редактирование профильными параметрами
Адаптивная вариант и приложение
Мобильная платформа
Responsive версия сайта дает возможность участвовать с всех мобильного гаджета. Интерфейс адаптивно настраивается под размер экрана.
Программа для загрузки
Скачать клиент можно для:
– Android — прямая установка с портала
– iOS — загрузка через App Store
Достоинства app:
– Моментальный старт
– Надежная функциональность
– Push-уведомления об бонусах
– Ускоренный дизайн
Гемблинг категории
Игровые машины
Богатая подборка азартных автоматов от ведущих поставщиков:
– Традиционные автоматы
– Видео-слоты
– Прогрессивные-слоты
Live casino
Раздел с живыми крупье предоставляет:
– Рулетка
– Блэкджек
– Мини-баккара
– Покер
Стримы транслируются в HD качестве изображения, обеспечивая ощущение аутентичного казино.
Варианты пополнения и обналичивания
Сайт поддерживает множественные платежные инструменты:
– Платежные карты
– Виртуальные счета
– Bitcoin/Ethereum
– Wire отправки
Базовые значения взноса и скоростные транзакции делают развлечение максимально приятной.
Служба support
Профессиональная отдел поддержки доступна 24/7 и готова содействовать с разными проблемами:
– Живой-чат
– Email-переписка
– Phone горячая линия
Итоги
Официальный ресурс казино и его рабочие зеркала дают игрокам безопасный и азартный игровой опыт. Богатые бонусы, функциональная mobile версия, многочисленные развлечения и высокоуровневое live-казино делают эту систему превосходным местом для развлекательных развлечений.
check out elmbasket – Clear structure, site felt welcoming and organized.
discover more – Natural and friendly, gives a warm impression.
Научитесь выбирать сильные аргументы и усиливать одни доводы другими. Поймете, как не уйти от темы спора и вовремя прекратить бессмысленную дискуссию
https://biolink.com.do/qESjE
Механизмы влияния: В отличие от внушения, действующего на подсознание, убеждение обращается к разуму и критическому мышлению, требуя осмысленного принятия информации.
https://clck.ru/3SS4SG
здесь ферма обменник
Убеждение – это метод воздействия на сознание, использующий логические аргументы, факты и обоснования для формирования новых установок или изменения текущего поведения человека
https://tinyurl.ee/CiNiF
Нынешние онлайн-казино предоставляют пользователям обширный ассортимент возможностей и призовых опций. Доступ к площадке производится через официальный ресурс или его рабочее зеркало http://digiinvention.com/realnye-sovety-i-rekomendatsii-dlya-igrokov-o-tom-kak-oderzhat-pobedu-v-onlayn-kazino/, что дает бесперебойную игру.
Что такое актуальное зеркало казино
Копия — это полная реплика официального веб-сайта, сделанная для решения блокировок. Рабочее зеркало помогает клиентам обрести подключение к любимым играм в любое удобное время.
Официальное зеркало обладает всеми характеристиками первоначального портала:
– Целый перечень игр
– Личный кабинет с записанными информацией
– Актуальные поощрения
– Защищенные расчетные операции
Открытие счета на лицензионном портале
Ход регистрации составляет всего считанные минут. Свежим пользователям следует:
1. Зайти на официальный портал или актуальное зеркало
2. Нажать на клавишу “Открыть счет”
3. Ввести обязательные информацию
4. Подтвердить адрес
5. Произвести первый платеж
Приветственный бонус начисляется моментально после выполнения всех ступеней.
Подключение в профиль
Зарегистрированные участники могут осуществить доступ вводя:
– Никнейм и код
– Данные сотового
– Адрес
Личный кабинет открывает шанс к управлению счетом, истории операций и текущим промокодам.
Промо и предложения
Азартная система балует активных участников выгодными вознаграждениями:
Первый бонус
– Премия на стартовый пополнение до 100%
– Фриспины на топовые автоматы
– Особые бонусы за последующие пополнения
Купоны
Эксклюзивные коды дают возможность на приобретение эксклюзивных призов. Действующие промокоды выставляются в блоке “Бонусы”.
Кешбэк
Регулярный кешбэк составляет до 10% от использованных денег. Выплата предоставляется автоматически.
Схема лояльности
Активные клиенты приобретают баллы, которые переводятся на действительные средства или free spins.
Адаптивный портал и программа
Ради комфорта участников создана функциональная портативная платформа. Гибкий вид позволяет комфортно развлекаться с произвольного переносного гаджета.
Плюсы программы:
– Оперативный вход к автоматам
– Адаптированный дизайн
– Стабильная активность
– Сообщения о актуальных акциях
Загрузить программу можно даром с главного сайта для устройств на Android и iOS.
Библиотека автоматов
Слоты
Коллекция включает более 2000 слотов от известных разработчиков:
– Обычные слоты
– Мультимедийные игры
– Прогрессивные автоматы
– Брендовые автоматы
Live казино
Категория Live казино предлагает участие с живыми дилерами в живом времени:
– Рулетка
– Блэкджек
– Карты
– Столы покера
Турниры
Систематические состязания с крупными призовыми пулами проводятся систематически. Допуск в соревнованиях открыто всем созданным клиентам.
Платежные способы
Пополнения и получения выплат выполняются через популярные методы:
– Банковские карты
– Виртуальные счета
– Криптовалюта
– Прямые операции
Наименьший взнос — от 100 рублей. Снятие денег осуществляется в течение 24 периода.
Служба support
Постоянная служба саппорта готова помочь в исправлении произвольных задач:
– Live chat
– Email
– Связь
– Соц сети
Надежность и сертификат
Главный портал работает на базе мировой документа. Все информация участников защищены передовым SSL-криптованием.
Итог
Актуальное зеркало дает непрерывный доступ к любимым развлечениям, выгодным поощрениям и комфортным сервисам. Зарегистрируйтесь прямо сейчас и обретите первый приз!
explore hazelhaven online – Relaxed aesthetic with easy-to-use category menus.
https://bajarxdirect.com/# mexico farmacia
visit brook bundle – Catchy domain, makes the store stick in your mind.
Вход к платформе через действующие зеркала
Современные онлайн казино обеспечивают игрокам круглосуточный доступ к услугам. Главный веб-сайт Tuz Bet казино действует стабильно, предлагая большой выбор игровых развлечений. Однако временами появляются системные проблемы или ограничения, потому критично знать о доступности функционирующих зеркал.
Что представляет собой официальное зеркало казино
Копия — это абсолютная копия главного портала с таким же функционалом. Рабочее зеркало в настоящее время помогает обходить местные ограничения и продолжать развлечения.
Основные преимущества задействования зеркал:
– Полный вход к индивидуальному кабинету
– Сохранение каждых показателей профиля
– Аналогичный спектр игр
– Действующие вознаграждения и акции
Оформление на ресурсе
Процедура оформления отнимает пару минут. Недавние игроки зарабатывают щедрый подарок за запись, что способен охватывать:
– Стартовый игровой приз
– Даровые спины для игр
– Особые коды
– Усиленный компенсацию
С целью выполнения записи необходимо:
1. Перейти на центральный веб-сайт или копию
2. Выбрать клавишу «Регистрация»
3. Указать индивидуальные данные
4. Подтвердить мейл или номер
5. Задействовать промокод (в случае наличии)
Доступ в индивидуальный кабинет
По завершении успешной создания аккаунта пользователи могут производить вход посредством официальный сайт или рабочее зеркало. Личный кабинет предоставляет всесторонний надзор над учётной записью:
– Журнал пари
– Зачисление депозита
– Изъятие денег
– Управление привилегиями
– Участие в соревнованиях
Поощрения и предложения казино
Платформа награждает игроков разнообразными наградными системами:
Начальные призы
Дебютанты получают внушительный комплект наград на стартовые депозиты. Обычно это предполагает частичную добавку к величине вклада плюс безвозмездные вращения.
Периодические кампании
– Седмичный компенсация до 15%
– Турниры с выигрышными банками
– Поощрения на день рождения
– Эксклюзивные акции для элитных геймеров
Система поощрения
Регулярные клиенты зарабатывают единицы, они допустимо превратить на действительные деньги или особые привилегии.
Портативная версия и утилита
Актуальные решения позволяют играть всюду комфортно. Портативная версия ресурса самостоятельно настраивается под дисплей всякого девайса.
Преимущества карманного приложения:
– Скоростная запуск слотов
– Эргономичный интерфейс
– Всплывающие-нотификации о промо
– Опция скачать для Android и iOS
Live казино: обстановка подлинного развлекательного клуба
Область Live клуба переносит геймеров в антураж истинного развлекательного учреждения. Компетентные операторы управляют развлечение в режиме подлинного времени.
Предлагаемые игры:
– Рулетка
– Карточная игра
– Карточная игра
– Техасский холдем
Барабаны и гемблинг аппараты
Коллекция азартных автоматов насчитывает массу наименований от топовых провайдеров. Произвольный геймер подберёт автомат по душе:
– Классические машины
– Инновационные игры с дополнительными уровнями
– Крупный приз-автоматы
– Динамические игры
Конкурсы и акции
Постоянные турниры привносят драйв и открывают опцию выиграть значительные суммы. Участие в турнирах часто бесплатное, а выигрышные пулы насчитывают крупных величин.
Секьюрити и конфиденциальность
Платформа применяет современные протоколы криптографии для защиты информации клиентов. Все финансовые действия проходят через зашифрованные каналы.
Резюме
Главный ресурс и его актуальные зеркала предоставляют надёжный переход к первоклассным игровым развлечениям. Великодушные призы, практичная смартфонная версия, вариативность автоматов и компетентное Live-игорный дом делают портал прекрасным решением для фанатов азартных развлечений.
Kazino portalı heyrətamizdir, möhtəşəmdir. Təşəkkürlər!
https://olimpbet-az-casino.com/signup
OutletEase – The website feels user-friendly, clear, and straightforward.
Hello everyone!
Unlock education mysterious methods with interesting and valuable learning facts and study smarter not harder see on the website for study hacks
Full information on the link – https://youcanchoose.ru/izgotovlenie-plastikovyh-korpusov-litem-pod-davleniem-innovatsionnaya-tehnologiya-dlya-razlichnyh-otrasley-promyshlennosti/
All the best and development in business!
visit brightstone – Saw this store online, and the title is clear and simple.
https://usmedssaver.com/# pharmacy order online
Актуальные онлайн-казино предоставляют клиентам широкий спектр услуг и премиальных программ. Присоединение к ресурсу выполняется через главный ресурс или его действующее зеркало Лаки Бир, что гарантирует стабильную игру.
В чем суть действующее зеркало казино
Копия — это идентичная копия основного веб-сайта, созданная для обхода блокировок. Зеркало сегодня дает возможность клиентам сохранить подключение к предпочитаемым автоматам в любое удобное время.
Официальное зеркало располагает всеми опциями главного веб-сайта:
– Полный список слотов
– Аккаунт с записанными информацией
– Текущие бонусы
– Гарантированные расчетные действия
Открытие счета на главном веб-сайте
Процедура оформления занимает всего немного минут. Первым пользователям требуется:
1. Попасть на проверенный веб-сайт или функционирующее зеркало
2. Щелкнуть на кнопку “Создать аккаунт”
3. Внести необходимые данные
4. Подтвердить адрес
5. Сделать первый вклад
Бонус за регистрацию предоставляется автоматически после завершения всех стадий.
Подключение в аккаунт
Действующие клиенты могут выполнить подключение указывая:
– Никнейм и шифр
– Код контакта
– Адрес
Профиль предоставляет доступ к администрированию счетом, сведениям транзакций и активным бонусам.
Награды и кампании
Гемблинг площадка привлекает постоянных игроков щедрыми призами:
Начальный набор
– Надбавка на первый депозит до 100%
– Фриспины на известные машины
– Экстра награды за дальнейшие взносы
Купоны
Особые промокоды открывают право на использование эксклюзивных вознаграждений. Текущие купоны выкладываются в блоке “Акции”.
Cashback
Регулярный возврат равен до 10% от потраченных сумм. Возврат зачисляется моментально.
Механизм лояльности
Постоянные участники зарабатывают баллы, которые обмениваются на настоящие средства или фриспины.
Мобильная версия и софт
Для удобства пользователей построена полноценная адаптивный сайт. Адаптивный вид обеспечивает удобно развлекаться с всякого переносного аппарата.
Выгоды приложения:
– Быстрый доступ к автоматам
– Оптимизированный дизайн
– Бесперебойная функциональность
– Push-уведомления о свежих событиях
Получить приложение можно даром с основного веб-сайта для девайсов на Android и iOS.
Ассортимент слотов
Автоматы
Библиотека включает более 2000 автоматов от топовых разработчиков:
– Обычные машины
– Современные автоматы
– Слоты с джекпотом
– Фирменные развлечения
Live казино
Категория Live казино обеспечивает развлечение с живыми ведущими в онлайн режиме:
– Roulette
– Blackjack
– Карты
– Столы покера
Соревнования
Систематические соревнования с большими выигрышными суммами устраиваются каждую неделю. Участие в конкурсах возможно всем активным игрокам.
Денежные способы
Депозиты и изъятия денег производятся через распространенные методы:
– Платежные карты
– Онлайн кошельки
– Цифровая валюта
– Денежные операции
Стартовый взнос — от 100 рублей. Изъятие финансов выполняется в течение 24 ч.
Служба саппорта
24/7 отдел помощи готова поддержать в решении произвольных проблем:
– Живой чат
– Email
– Телефон
– Публичные сети
Безопасность и документ
Лицензионный веб-сайт действует на почве признанной лицензии. Все сведения игроков обезопасены актуальным SSL-шифрованием.
Итог
Актуальное зеркало предоставляет стабильный подключение к любимым слотам, привлекательным промокодам и удобным услугам. Присоединяйтесь сегодня и приобретите приветственный поощрение!
Подключение к ресурсу через актуальные зеркала
Участники виртуальных казино регулярно сталкиваются с проблемой блокировки официального ресурса. Конкретно для ликвидации этой ситуации существуют альтернативные адреса официального ресурса. Бет Андреас предоставляет беспрепятственный переход ко всем сервисам площадки.
Что такое рабочее зеркало казино
Зеркало представляет собой точную реплику официального сайта с похожим функционалом. Главное несовпадение — это альтернативное имя. Любые параметры клиента, содержа депозит, награды и данные игр, продолжают быть идентичными.
Выгоды эксплуатации зеркал
Действующие зеркала характеризуются рядом ключевых выгод:
– Постоянный подключение к предпочитаемым играм
– Совершенная безопасность личных параметров
– Поддержание всех настроек персонального кабинета
– Возможность приобретения поощрений и участия в кампаниях
Оформление профиля на главном домене
Процесс создания аккаунта максимально прост и требует немного минут. Новые пользователи в состоянии рассчитывать на щедрый вводный бонус за создание аккаунта.
Шаги оформления аккаунта
1. Вход на легальный домен или его альтернативу
2. Клик на кнопку “Зарегистрироваться”
3. Внесение нужных информации
4. Проверка email почты
5. Ввод промокода (при наличии имеется)
Подарки и кампании для игроков
Игровая площадка одаривает своих игроков всевозможными поощрительными программами.
Основные категории наград
Вводный приз — щедрое начисление для свежих клиентов, каковое имеет возможность охватывать монетарные средства и безвозмездные спины.
Безвозмездные спины — опция использовать в известных слотах бесплатно.
Кэшбек — частичный отдача проигранных сумм, что начисляется раз в неделю или ежемесячно.
Бонусные коды — эксклюзивные наборы, предоставляющие дополнительные выгоды.
Индивидуальный кабинет: инструменты и настройки
Индивидуальный профиль предоставляет совершенный управление над персональным процессом. В нем присутствуют:
– Администрирование средствами
– Записи платежей
– Работающие поощрения
– Конфигурации защиты
– Проверка профиля
Смартфонная версия и программа
Новейшие клиенты признают мобильность. Платформа предоставляет 2 способа для ставок с мобильных девайсов.
Приспособленная смартфонная платформа
Смартфонная версия сайта автономно подстраивается под монитор любого девайса. Отсутствует потребность инсталлировать особое приложение.
APP для телефонов
Разрешено инсталлировать официальное приложение для iOS и Android. Софт обеспечивает:
– Моментальный вход
– Адаптированный дизайн
– Мобильные-оповещения о поощрениях
– Устойчивую функциональность
Live игры: обстановка истинного казино
Зона Live игр транспортирует пользователей в антураж настоящего казино. Компетентные дилеры организуют партии в режиме прямого времени.
Востребованные Live-столы
– Французская рулетка
– Двадцать одно
– Баккара
– Техасский холдем
Слоты: разнообразие игр
Библиотека игровых аппаратов содержит тысячи вариантов от топовых поставщиков. Игроки обнаружат:
– Стандартные машины
– Графические слоты
– Накопительный приз-игры
– Мегавейс
Турниры и уникальные акции
Периодические турниры обеспечивают клиентам бороться друг с другом за солидные выигрышные пулы. Отдельный соревнование обладает свои критерии присутствия и рейтинг чемпионов.
Методы внесения и снятия денег
Платформа предоставляет множество расчетных систем:
– Платежные инструменты
– Онлайн кошельки
– Blockchain-платежи
– Банковские отправления
Все переводы реализуются надежно благодаря актуальным технологиям кодирования.
Сервис обслуживания
Компетентные консультанты отдела помощи готовы помочь 24/7. Предусмотрены такие пути общения:
– Онлайн-чат
– Email-поддержка
– Звонковая линия
– Публичные сети
Заключение
Основной сайт платформы и его действующие копии обеспечивают участникам защищенный и приятный доступ к обширному выбору развлекательных развлечений. Солидные поощрения, частые акции, компетентная помощь и легкие расчетные способы делают развлекательный времяпрепровождение чрезвычайно увлекательным и выгодным.
Hello!
Discover hidden mysterious data that provides interesting and valuable knowledge base and build a strong foundation for success see on the website for database access
Full information on the link – https://900letekas.site
All the best and development in business!
In-depth analysis
instant approval online loans no credit check
to choose the best option.
canadian pharmacy discount coupon: which online pharmacy is the best – online pharmacy 365
скачать приложение melbet скачать приложение melbet .
Доступ к сайту через действующие зеркала
Нынешние сетевые казино обеспечивают игрокам круглосуточный доступ к сервисам. Основной сайт казино Fixa работает бесперебойно, гарантируя широкий спектр игровых игр. Тем не менее порой возникают системные препятствия или ограничения, потому важно иметь представление о существовании рабочих зеркал.
Что представляет собой официальное зеркало казино
Зеркало — это полная версия основного сайта с схожим интерфейсом. Актуальное зеркало в настоящее время позволяет обходить местные блокировки и поддерживать времяпрепровождение.
Главные плюсы эксплуатации зеркал:
– Стопроцентный доступ к персональному кабинету
– Удержание всех сведений учётной записи
– Идентичный набор игр
– Свежие вознаграждения и кампании
Оформление на портале
Процедура оформления требует считанные минут. Начинающие игроки приобретают щедрый бонус за оформление, он может включать:
– Начальный денежный приз
– Бесплатные спины для слотов
– Особые коды
– Усиленный кэшбек
Для завершения регистрации требуется:
1. Зайти на центральный веб-сайт или дубликат
2. Выбрать элемент «Создать аккаунт»
3. Указать контактные информацию
4. Активировать email или мобильный
5. Применить код (если есть присутствии)
Доступ в собственный кабинет
После правильной записи геймеры могут совершать подключение посредством главный портал или действующее зеркало. Персональный кабинет предоставляет полный регулирование над учётной записью:
– Летопись пари
– Зачисление счёта
– Изъятие денег
– Администрирование наградами
– Включение в конкурсах
Бонусы и промо казино
Ресурс награждает игроков многочисленными привилегированными системами:
Начальные призы
Новички зарабатывают великодушный букет привилегий на начальные пополнения. Зачастую это содержит процентную надбавку к объёму вклада плюс бесплатные спины.
Периодические промо
– Каждонедельный компенсация до 15%
– Соревнования с премиальными фондами
– Подарки на дату рождения
– Специальные предложения для привилегированных клиентов
Система вознаграждения
Деятельные геймеры зарабатывают очки, которые допустимо обменять на действительные средства или уникальные привилегии.
Карманная форма и утилита
Актуальные решения помогают развлекаться где удобно. Портативная версия веб-сайта самостоятельно адаптируется под дисплей произвольного девайса.
Плюсы портативного программы:
– Оперативная подгрузка автоматов
– Комфортный облик
– Моментальные-уведомления о промо
– Способность инсталлировать для Android и iOS
Настоящее казино: антураж настоящего гемблинг заведения
Область Live заведения переносит клиентов в антураж настоящего развлекательного учреждения. Компетентные операторы управляют игру в формате настоящего времени.
Предлагаемые развлечения:
– Колесо фортуны
– Очко
– Карточная игра
– Покерная игра
Барабаны и азартные автоматы
Ассортимент развлекательных аппаратов охватывает тысячи названий от ведущих разработчиков. Произвольный клиент найдёт игру по вкусу:
– Стандартные барабаны
– Современные автоматы с специальными турами
– Прогрессивный-слоты
– Динамические слоты
Турниры и розыгрыши
Систематические турниры привносят остроту и обеспечивают опцию получить большие суммы. Участие в состязаниях часто даровое, а премиальные банки достигают крупных объёмов.
Охрана и конфиденциальность
Ресурс использует современные методы шифрования для защиты реквизитов пользователей. Все денежные операции совершаются через защищённые соединения.
Резюме
Официальный ресурс и его функционирующие зеркала обеспечивают устойчивый доступ к первоклассным игровым развлечениям. Щедрые призы, комфортная карманная версия, вариативность игр и профессиональное Live-заведение превращают ресурс отличным опцией для поклонников азартных развлечений.
Актуальные онлайн-казино гарантируют игрокам обилие вариантов для комфортной игры. Центральный веб-портал РўРёРїРїРё казино обеспечивает доступ ко всем опциям и игровым автоматам. Однако при образовании системных сложностей на подмогу прибывают актуальные зеркала.
Что являет собой собой функционирующее зеркало
Копия казино — это стопроцентная копия основного ресурса, расположенная по дополнительному URL. Подлинное зеркало поддерживает все опции, в том числе регистрацию, доступ в персональный кабинет, поощрения и кодовые слова.
Копия на сегодня обеспечивает:
– Бесперебойный путь к развлекательным аппаратам
– Совершенную сохранность персональных данных
– Поддержку средств и хронологии операций
– Доступность всех бонусных программ
Регистрация на официальном сайте
Процедура регистрации отнимает пару минут. Свежеиспеченным клиентам необходимо:
1. Перейти на основной ресурс или рабочее зеркало
2. Кликнуть кнопку «Создать аккаунт»
3. Заполнить запрашиваемые сведения
4. Активировать э-мейл почту
5. Указать купон при существовании
После окончания регистрации игроки зарабатывают подарок за регистрацию, какой может иметь free spins или монетарное вознаграждение.
Вход в собственный кабинет
Индивидуальный кабинет предоставляет всеобъемлющий надзор над азартным ходом. Через личный раздел можно:
– Депонировать счет
– Получать выигрыши
– Использовать кодовые слова
– Отслеживать журнал пари
– Играть в состязаниях
– Обретать возврат средств
Обзор поощрений и специальных предложений
Богатая призовая система — значимое преимущество казино. Главные категории поощрений:
Начальный подарок
Новички приобретают богатое награду на начальные взносы. Размер приза может составлять 100-200% от величины вклада.
Фриспины
Безвозмездные раунды предоставляются для топовых автоматов. Сумма бесплатных вращений изменяется от 10 до 500 штук.
Кешбэк
Постоянный или помесячный отдача процентной доли утраченных средств. Средний объем кэшбека — 5-15%.
Состязания
Постоянные конкурсы с крупными премиальными банками. Участники соревнуются за топовые строчки в турнирной таблице.
Мобильная версия и приложение
Мобильная версия обеспечивает делать ставки с любого аппарата. Игроки могут установить программу для iOS и Android или применять интернет версию.
Достоинства мобильного софта:
– Быстрая загрузка автоматов
– Эргономичный UI
– Пуш-нотификации о поощрениях
– Возможность входа через Touch ID
Машины и Live казино
Азартная коллекция включает тысячи позиций от топовых провайдеров.
Востребованные разделы игр:
– Традиционные слоты
– Видеослоты с премиальными раундами
– Прогрессивный джекпот слоты
– Мега-путь слоты
Live игорный зал
Раздел live казино предлагает развлечение с профессиональными крупье. Имеются классические игры:
– Американская рулетка
– Blackjack
– Баккара
– Карибский покер
Как обнаружить действующее зеркало
Найти свежую линк на зеркало возможно различными способами:
1. Оформить подписку на почтовую рассылку
2. Отслеживать за апдейтами в социальных сетях
3. Контактировать в отдел поддержки
4. Добавить в закладки рабочее зеркало в закладки
Итог
Лицензионный портал и его актуальные дубликаты предоставляют постоянный вход к игровым играм. Выгодные премии, многочисленные бонусные коды, эргономичное смартфонное софт и отличная служба поддержки поддержки делают игровой геймплей крайне беспроблемным и надежным.
монтаж газового пожаротушения в офис montazh-gazovogo-pozharotusheniya.ru .
расчет газового пожаротушения расчет газового пожаротушения .
Доступ к ресурсу через действующие зеркала
Передовые интернет казино обеспечивают геймерам бесперебойный переход к играм. Центральный ресурс Либет официальный сайт действует стабильно, гарантируя широкий ассортимент игровых автоматов. Впрочем порой формируются системные сложности или запреты, в связи с чем существенно знать о присутствии актуальных зеркал.
Что является из себя официальное зеркало казино
Дубликат — это идентичная реплика центрального ресурса с идентичным интерфейсом. Актуальное зеркало сейчас даёт возможность миновать территориальные блокировки и возобновлять развлечения.
Принципиальные плюсы задействования зеркал:
– Полный вход к личному кабинету
– Удержание каждых сведений аккаунта
– Аналогичный ассортимент развлечений
– Действующие вознаграждения и кампании
Открытие счёта на сайте
Процесс оформления отнимает несколько минут. Свежие игроки обретают щедрый приз за оформление, что имеет возможность включать:
– Приветственный денежный бонус
– Бесплатные спины для автоматов
– Эксклюзивные ваучеры
– Повышенный кэшбек
Ради окончания регистрации следует:
1. Войти на основной ресурс или альтернативу
2. Кликнуть элемент «Создать аккаунт»
3. Написать персональные информацию
4. Верифицировать электронную почту или контакт
5. Использовать код (если есть существовании)
Доступ в индивидуальный кабинет
После корректной создания аккаунта клиенты в состоянии выполнять вход посредством центральный веб-сайт или функционирующее зеркало. Персональный кабинет предоставляет всесторонний регулирование над счётом:
– Летопись транзакций
– Ввод баланса
– Вывод выигрышей
– Управление поощрениями
– Вовлечение в турнирах
Привилегии и предложения казино
Сайт удовлетворяет клиентов вариативными наградными предложениями:
Приветственные призы
Дебютанты получают щедрый комплект наград на первые пополнения. Типично это содержит процентную прибавку к сумме вклада плюс бесплатные фриспины.
Регулярные акции
– Каждонедельный кешбэк до 15%
– Соревнования с призовыми суммами
– Поощрения на день рождения
– Особые акции для статусных пользователей
План вознаграждения
Постоянные пользователи накапливают очки, что допустимо обменять на действительные средства или особые льготы.
Карманная форма и софт
Передовые технологии обеспечивают геймить в любом месте подходяще. Смартфонная версия веб-сайта самостоятельно настраивается под монитор всякого аппарата.
Преимущества смартфонного программы:
– Скоростная загрузка слотов
– Эргономичный облик
– Моментальные-уведомления о промо
– Возможность загрузить для Android и iOS
Live казино: среда подлинного развлекательного заведения
Область Live заведения доставляет клиентов в среду настоящего азартного клуба. Квалифицированные дилеры управляют развлечение в состоянии актуального времени.
Имеющиеся столы:
– Колесо фортуны
– Блэкджек
– Классика
– Карты
Автоматы и развлекательные машины
Собрание азартных слотов насчитывает тысячи позиций от ведущих производителей. Произвольный игрок обнаружит развлечение по нраву:
– Классические машины
– Новые слоты с призовыми раундами
– Накопительный-слоты
– Megaways слоты
Турниры и раздачи
Регулярные соревнования вносят драйв и дают способность заработать большие награды. Включение в состязаниях регулярно бесплатное, а наградные фонды достигают значительных сумм.
Безопасность и секретность
Портал использует современные методы кодирования для охраны данных клиентов. Совокупные денежные действия осуществляются через охраняемые линии.
Вывод
Центральный веб-сайт и его действующие зеркала дают устойчивый вход к качественным развлекательным играм. Привлекательные награды, комфортная портативная форма, многообразие автоматов и квалифицированное Live-игорный дом делают портал замечательным опцией для фанатов развлекательных слотов.
Вход к платформе через проверенные зеркала
Пользователи виртуальных казино регулярно сталкиваются с проблемой блокировки главного сайта. Конкретно для преодоления этой проблемы существуют дубликаты основного ресурса. Панда дает беспрепятственный вход ко всем возможностям площадки.
Что такое актуальное зеркало казино
Зеркало представляет собой идентичную копию главного портала с похожим опциями. Ключевое отличие — это альтернативное имя. Любые сведения пользователя, в том числе депозит, бонусы и записи игр, сохраняются идентичными.
Преимущества эксплуатации зеркал
Актуальные зеркала характеризуются набором ключевых достоинств:
– Бесперебойный переход к излюбленным играм
– Совершенная сохранность личных информации
– Сохранение всех конфигураций индивидуального кабинета
– Шанс получения призов и включения в акциях
Регистрация на легальном ресурсе
Ход оформления чрезвычайно легок и занимает буквально минут. Свежие участники могут рассчитывать на солидный вводный поощрение за открытие счета.
Стадии открытия аккаунта
1. Вход на легальный домен или его копию
2. Клик на опцию “Создать аккаунт”
3. Внесение обязательных сведений
4. Подтверждение почтовой почты
5. Указание купона (в случае имеется)
Подарки и кампании для пользователей
Ресурс одаривает своих пользователей различными поощрительными программами.
Главные варианты призов
Приветственный приз — крупное премирование для недавних пользователей, которое именно может содержать денежные бонусы и бесплатные вращения.
Free spins — возможность крутить в топовых игровых машинах без затрат.
Кэшбек — процентный возврат утраченных средств, который именно начисляется каждую неделю или ежемесячно.
Специальные коды — специальные комбинации, гарантирующие бонусные поощрения.
Пользовательский кабинет: возможности и настройки
Индивидуальный аккаунт дает абсолютный надзор над игровым процессом. В данном разделе доступны:
– Регулирование депозитом
– Данные транзакций
– Текущие поощрения
– Установки защиты
– Верификация аккаунта
Мобильная платформа и программа
Современные игроки предпочитают доступность. Ресурс предлагает 2 пути для участия с карманных гаджетов.
Адаптивная смартфонная редакция
Портативная редакция портала самостоятельно адаптируется под экран любого устройства. Нет необходимости загружать специальное программное обеспечение.
Софт для мобильных
Доступно загрузить оригинальное приложение для iOS и Android. Приложение обеспечивает:
– Мгновенный доступ
– Улучшенный графику
– Всплывающие-сообщения о поощрениях
– Надежную функциональность
Live раздел: атмосфера реального зала
Секция Live казино переносит участников в обстановку настоящего казино. Профессиональные хосты организуют партии в варианте живого времени.
Востребованные Live-столы
– Рулетка
– 21
– Baccarat
– Poker
Слоты: выбор автоматов
Библиотека игровых слотов включает множество вариантов от топовых поставщиков. Участники откроют:
– Классические слоты
– Современные слоты
– Мега-выигрыш-машины
– Слоты с множественными линиями
Соревнования и эксклюзивные мероприятия
Систематические состязания позволяют игрокам состязаться друг с другом за крупные выигрышные суммы. Каждый турнир обладает свои условия включения и список призеров.
Варианты пополнения и изъятия финансов
Ресурс предоставляет массу финансовых инструментов:
– Кредитные картыы
– Электронные кошельки
– Blockchain-платежи
– Прямые транзакции
Абсолютно все переводы реализуются конфиденциально благодаря современным протоколам кодирования.
Команда поддержки
Профессиональные специалисты отдела support расположены поддержать 24/7. Доступны нижеперечисленные способы общения:
– Живой-чат
– Email-обслуживание
– Телефонная поддержка
– Коммуникационные сети
Заключение
Легальный домен платформы и его действующие альтернативы обеспечивают участникам конфиденциальный и комфортный вход к широкому выбору азартных игр. Крупные подарки, частые кампании, компетентная помощь и простые расчетные способы создают азартный процесс максимально увлекательным и результативным.
Tide Gems – Clean interface, moving through sections was effortless.
VendorTealSpot – Scanning quickly, found several parts that caught my eye.
explore the eastemporium hub – Clean design, items are easy to find and browse.
Обзор главного портала
Передовые виртуальные казино обеспечивают пользователям широкий выбор игр и перспектив. Основной портал http://campomarket.cl/rekomendatsii-i-sovety-po-povysheniyu-skorosti-funktsionirovaniya-sayta-kazino обеспечивает безопасный вход к развлекательным услугам.
Действующее зеркало: путь в настоящий момент
Дублирующий портал выступает в качестве идентичную дубликат лицензионного ресурса. Официальное зеркало помогает клиентам обходить вероятные блокировки.
Плюсы применения зеркала
Главные достоинства включают:
– Беспрерывный доступ к платформе
– Сохранение абсолютно всех функций базового сайта
– Защита конфиденциальных материалов
– Аналогичный возможности
Создание аккаунта на платформе
Ход оформления профиля характеризуется легкостью и практичностью. Новые игроки необходимо:
1. Посетить главный сайт или его зеркало
2. Кликнуть на кнопку оформления
3. Ввести необходимые сведения
4. Валидировать почтовую ящик
5. Осуществить дебютный вход
Подарок за регистрацию
Начинающие забирают солидный вступительный бонус. Подобное вознаграждение имеет возможность включать:
– Материальные начисления
– Безвозмездные вращения
– Повышенный коэффициент кэшбека
Авторизация в собственный раздел
Активные пользователи в состоянии мгновенно войти в личный аккаунт, задействуя имя пользователя и код. Собственный кабинет дает шанс к:
– Контролю балансом
– Журналу переводов
– Текущим поощрениям
– Параметрам аккаунта
Подарки и акции
Сайт периодически устраивает разнообразные мероприятия для клиентов.
Типы подарков
Ключевые формы поощрений:
– Пополнительные начисления – часть от объема внесения
– Спины – даровые вращения в аппаратах
– Кэшбэк – возмещение доли утраченных денег
– Призовые награды – премии за участие в турнирах
Ваучеры
Особые купоны дают возможность заработать добавочные выгоды. Участники в состоянии обнаружить их на аффилиатных порталах или взять в рассылке.
Мобильная адаптация и приложение
Передовые гемблеры ценят мобильный игровой процесс.
Функции мобильной платформы
– Гибкий вид для всех устройств
– Абсолютный доступ к играм
– Стремительная загрузка
– Удобное навигация
Загрузить app
Переносное софт открыто для установки на аппараты с базовыми ОС Android и iOS. App дает:
– Бесперебойную деятельность
– Мгновенные оповещения о акциях
– Оперативный вход к любимым играм
Гемблинг портфель
Платформа предлагает богатую коллекцию гемблинг развлечений.
Игровые машины
Каталог развлекательных автоматов содержит:
– Стандартные автоматы
– Видео автоматы
– Призовые слоты
– Тематические слоты
Live казино
Секция лайв столов предлагает право соревноваться с настоящими диллерами. Открыты:
– Европейская рулетка
– Блэкджек
– Баккара
– Покер
Конкурсы
Регулярные чемпионаты позволяют клиентам конкурировать за внушительные наградные фонды. Призовая сетка изменяется регулярно.
Финансовые операции
Портал поддерживает массу способов пополнения и вывода денег:
– Банковские карточки
– Электронные платежные системы
– Прямые транзакции
– Цифровые валюты
Все операции проходят надежно с задействованием прогрессивных систем шифрования.
Служба помощи
Опытная команда поддержки трудится постоянно. Обратиться с специалистами доступно через:
– Живой чат
– Почтовую почту
– Телефон
– Социальные медиа
Охрана и регулирование
Игровой клуб оперирует на базе законной аккредитации. Такое гарантирует:
– Прозрачность азартного процесса
– Защиту конфиденциальных сведений
– Своевременные выплаты
– Легальный гемблинг
Итог
Основной веб-сайт и его рабочие зеркала дают клиентам абсолютный набор возможностей для комфортной и прибыльной времяпрепровождения. Внушительные подарки, разнообразные игры, профессиональная служба и безопасная платформа транзакций делают казино превосходным решением для любителей развлекательных услуг.
browse exchange – Pleasant and natural, gives a positive first impression.
Описание оригинального веб-сайта
Современное онлайн-казино обеспечивает своим клиентам обширный спектр развлечений и бонусов. Основной веб-сайт РўСѓР· Бет функционирует непрерывно, обеспечивая возможность к востребованным автоматам, live-казино и обширным кампаниям.
Рабочее зеркало: вход к ресурсу
Что такое альтернатива казино
Копия является собой идентичную дубликат основного сайта с альтернативным URL именем. Функционирующее зеркало дает клиентам преодолевать блокировки и сохранять стабильный доступ к излюбленным слотам.
Как обнаружить актуальное зеркало сегодня
Действующие адреса на официальное зеркало появляются через:
– E-mail рассылку
– Официальные коммуникационные сети
– Сервис сопровождения
– Специализированные порталы
Оформление на портале
Ход созданияаккаунта
Оформление занимает пару минут и предполагает данные действия:
1. Вход на оригинальный веб-сайт или действующее зеркало
2. Клик кнопки “Создатьаккаунт”
3. Указание личных данных
4. Верификация адреса или номера
5. Формирование пароля
Бонус за регистрацию
Начинающие пользователи приобретают большие стартовые бонусы:
– Финансовые суммы на баланс
– Фриспины для автоматов
– Усиленный коэффициент компенсации
– Специальные коды
Доступ в индивидуальный аккаунт
Активные пользователи вправе выполнить авторизацию через официальный портал или действующее зеркало. Для этого следует ввести учетноеимя и пароль, сформированные при регистрации.
Опции собственного кабинета
В личном профиле открыты данные опции:
– Редактирование персональными данными
– Пополнение депозита
– Вывод средств
– Применение бонусов
– Отслеживание журнала игр
– Участие в турнирах
Бонусы и промо
Типы вознаграждений
Казино поощряет своих игроков многочисленными бонусными предложениями:
– Стартовый набор — щедрые вознаграждения на первые депозиты
– Бесплатныевращения — экстра прокруты в рейтинговых играх
– Кешбэк — периодический возврат процента проигрышей
– Система поощрения — особые преимущества для активных участников
Ваучеры и их использование
Уникальные ваучеры предоставляют расширенные бонусы. Для активации нужно указать комбинацию в определенное окно в собственном аккаунте.
Игровой каталог
Слоты
Каталог развлекательных слотов вмещает массу вариантов от лучших провайдеров:
– Обычные машины
– Видео игры
– Призовые автоматы
– Лицензионные развлечения
Live казино
Секция Live-казино предлагает игру с реальными ведущими в режиме онлайн трансляции:
– Французскаярулетка
– Blackjack
– Baccarat
– Покер
Турниры
Постоянные конкурсы с солидными выигрышными суммами проводятся еженедельно. Претенденты конкурируют за победу в рейтинге.
Смартфонная платформа и программа
Мобильная платформа сайта
Официальный портал на100% настроен для портативных устройств. Игроки способны запускать автоматы сразу через интернет-браузер без необходимости установки.
Софт для установки
Официальное карманное софт предоставляется для скачивания на устройства с программными системами Android и iOS. Софт обеспечивает:
– Моментальный подход к играм
– Устойчивую работу
– Моментальные-сообщения о промо
– Комфортный навигацию
Резюме
Главный веб-сайт казино и его функционирующие альтернативы обеспечивают пользователям комплексный доступ к первоклассным игровым услугам. Выгодные подарки, различные промо, удобная мобильная версия и квалифицированная поддержка формируют геймплейный времяпрепровождение максимально enjoyable и выгодным.
накрутка подписчиков в Телеграм https://nakrutka-podpischikov-telegram-1.ru
Silver Hub Market – Organized layout, finding products felt hassle-free.
читать https://vodkabet-play.vodkabet-zerkalo.vodka
onlinecanadianpharmacy 24: canadian pharmacy levitra value pack – legitimate canadian pharmacies
Источник кракен onion сайт
visit Glass Willow Trading – Friendly yet trustworthy, perfect for an online trading platform.
содержание 2fa blacksprut
Передовые сетевые казино предоставляют геймерам огромный диапазон опций для беспроблемной игры. Впрочем иногда соединение к основному платформе может стать недоступным. В таких ситуациях на помощь спешит РђРєРІР° казино, которое дает стабильный подключение ко всем функциям платформы.
Что такое функционирующее зеркало казино
Дубликат — это абсолютная версия официального ресурса, которая находится по дополнительному интернет-адресу. Зеркало сохраняет весь функционал основного сайта, включая пользовательский кабинет, счет и данные платежей.
Принципиальные преимущества использования зеркала:
– Круглосуточный соединение к платформе
– Абсолютная аналогичность инструментов
– Сохранность индивидуальных данных
– Удержание всех имеющихся бонусов
Как найти актуальное зеркало сегодня
Есть множество достоверных путей обнаружения актуальной ссылки:
Легитимные каналы:
1. Email рассылка — руководство регулярно отправляет уведомления с рабочими URL
2. Медийные сети — официальные профили размещают свежую данные
3. Отдел поддержки — специалисты сообщают достоверные адреса
4. Портативное приложение — предоставляет избегать блокировки
Оформление профиля на главном ресурсе
Этап открытия счета занимает не более пару минут и содержит из следующих ступеней:
1. Попадание на официальный ресурс или актуальное зеркало
2. Нажатие на клавишу «Зарегистрироваться»
3. Внесение учетной анкеты
4. Проверка email почты или мобильного номера
5. Задействование бонуса за регистрацию при наличии промокода
Начинающие пользователи зарабатывают значительный вступительный презент, который может содержать free spins, финансовые поощрения или возврат средств.
Авторизация в индивидуальный кабинет
Авторизация на сайте реализуется привычным образом. Достаточно внести логин и секретный ключ, примененные при открытии счета.
Значимые моменты для защищенного входа:
– Используйте защищенный шифр
– Включите двухфакторную аутентификацию
– Не сохраняйте коды на общественных компьютерах
– Отслеживайте интернет строку браузера
Характеристика поощрительной структуры
Казино награждает пользователей многочисленными бонусами и акциями:
Стартовый набор
Новички вправе надеяться на великодушное вознаграждение за дебютный пополнение. Как правило это долевая прибавка к зачисленной количеству плюс фриспины для топовых слотов.
Систематические промо
– Еженедельный кэшбек — возвращение процентной доли утраченных финансов
– Призы на дополнительные депозиты
– Уникальные акции по торжествам
– Конкурсы с солидными премиальными пулами
Система лояльности
Деятельные игроки зарабатывают баллы за каждую бет, которые затем обмениваются на действительные денежные призы, бесплатные вращения или эксклюзивные преимущества.
Промокоды: как применять
Купоны — это уникальные наборы букв и цифр, дающие доступ к специальным вознаграждениям.
Откуда взять актуальные промокоды:
– Официальные медийные сети казино
– Аффилиатные порталы
– Email-рассылка
– Тематические форумы
Активируется промокод в соответствующее поле при оформлении или добавлении денег баланса.
Мобильная версия и приложение
Актуальные геймеры отдают предпочтение делать ставки с мобильных аппаратов. Портал предоставляет 2 способа для удобной мобильной игры.
Мобильная редакция
Браузерная версия автоматически адаптируется под диагональ монитора. Не нуждается инсталляции и работает в всяком свежем браузере.
Смартфонное приложение
Установить приложение можно для аппаратов на Android и iOS. Выгоды app:
– Молниеносная запуск
– Устойчивая действие
– Мгновенные-уведомления о поощрениях
– Самостоятельный преодоление блокировок
Операция установки прост: необходимо попасть на сайт с портативного гаджета и следовать руководству.
Гемблинг ассортимент
Каталог игр содержит тысячи единиц от лучших провайдеров.
Слоты
Развлекательные слоты — самая распространенная секция аттракционов. Показаны стандартные винтажные аппараты, новые графические аппараты с дополнительными этапами, а также прогрессивные суперпризы.
Live казино
Раздел с реальными дилерами позволяет испытать настроение истинного казино. Открыты столы с покером.
Трансляция производится в отличном четкости, обеспечивается коммуникация с дилером и другими пользователями.
Турниры
Постоянно устраиваются конкурсы по различным дисциплинам. Включение предоставляет право выиграть финансовые вознаграждения, фриспины или специальные поощрения.
Платежные манипуляции
Портал предоставляет большой спектр расчетных методов:
– Дебетовые карты
– Виртуальные сервисы
– Цифровая валюта
– Финансовые переводы
Наименьшая сумма депозита — доступная для большинства пользователей. Снятие выигрышей обрабатывается в минимальные сроки.
Сервис поддержки
Профессиональные специалисты настроены поддержать 24/7. Открыты такие каналы коммуникации:
– Живой-чат
– Email
– Телефонная линия
– Общественные сети
Разъяснения на распространенные вопросы можно получить в секции FAQ.
Резюме
Основной веб-сайт казино и его рабочие зеркала гарантируют клиентам максимальный подключение ко всем сервисам сайта. Щедрые вознаграждения, удобная смартфонная версия, впечатляющий каталог игр и квалифицированная служба поддержки превращают азартный досуг исключительно удобным и надежным.
Характеристика официального сайта
Современные онлайн казино предлагают клиентам обширный набор забав и опций. Официальный сайт cocobollo.ru предлагает надежный вход к игровым услугам.
Актуальное зеркало: возможность на сегодня
Зеркало представляет в качестве абсолютную копию главного ресурса. Официальное зеркало обеспечивает игрокам преодолевать потенциальные блокировки.
Преимущества эксплуатации зеркала
Ключевые выгоды предполагают:
– Непрерывный вход к платформе
– Сохранение полных функций официального портала
– Безопасность персональных сведений
– Такой же набор функций
Создание аккаунта на платформе
Ход оформления профиля знаменуется легкостью и комфортом. Новые игроки обязаны:
1. Перейти на основной ресурс или его зеркало
2. Выбрать на клавишу регистрации
3. Заполнить требуемые сведения
4. Активировать электронную почту
5. Совершить стартовый авторизацию
Приз за открытие счета
Начинающие приобретают щедрый начальный бонус. Это премия может включать:
– Монетарные начисления
– Бесплатные спины
– Повышенный уровень кэшбека
Авторизация в личный аккаунт
Действующие участники способны быстро зайти в персональный аккаунт, используя имя пользователя и ключ. Индивидуальный профиль предлагает шанс к:
– Контролю средствами
– Журналу транзакций
– Активным призам
– Параметрам профиля
Вознаграждения и акции
Сайт периодически устраивает различные мероприятия для клиентов.
Категории подарков
Ключевые формы призов:
– Денежные призы – доля от величины внесения
– Прокруты – complimentary вращения в слотах
– Кэшбэк – отдача доли утраченных денег
– Турнирные призы – премии за выступление в турнирах
Купоны
Специальные купоны помогают получить экстра привилегии. Пользователи могут найти их на тематических ресурсах или взять в новостях.
Мобильная редакция и приложение
Современные пользователи предпочитают переносной досуг.
Возможности мобильной системы
– Responsive дизайн для всех устройств
– Целостный вход к играм
– Оперативная подгрузка
– Комфортное использование
Скачать программу
Mobile приложение предложено для установки на гаджеты с операционными системами Android и iOS. Программа дает:
– Бесперебойную производительность
– Всплывающие оповещения о призах
– Быстрый запуск к предпочитаемым слотам
Развлекательный портфель
Платформа предлагает огромную подборку гемблинг игр.
Автоматы
Ассортимент игровых машин включает:
– Обычные слоты
– Видео игры
– Накопительные игры
– Branded слоты
Live казино
Категория живых развлечений дает опцию играть с настоящими диллерами. Открыты:
– Американская рулетка
– Блек-джек
– Baccarat
– Техасский холдем
Состязания
Систематические конкурсы помогают клиентам бороться за крупные призовые суммы. Соревновательная программа модифицируется регулярно.
Денежные действия
Платформа предоставляет массу вариантов депозита и получения финансов:
– Дебетовые карточки
– Онлайн кошельки
– Банковские трансферы
– Bitcoin
Любые переводы выполняются безопасно с применением передовых систем криптографии.
Отдел сопровождения
Компетентная служба помощи действует постоянно. Соединиться с специалистами можно через:
– Интерактивный чат
– Почтовую почту
– Телефон
– Social платформы
Секьюрити и лицензирование
Казино работает на базе официальной лицензии. Подобное обеспечивает:
– Прозрачность игрового действа
– Охрану персональных данных
– Оперативные транзакции
– Контролируемый гемблинг
Вывод
Лицензионный портал и его актуальные резервные страницы предоставляют пользователям абсолютный набор опций для удобной и доходной игры. Внушительные подарки, многочисленные развлечения, опытная помощь и проверенная платформа операций формируют портал идеальным выбором для любителей азартных забав.
сколько стоит нарколог на дом в ростове сколько стоит нарколог на дом в ростове .
brookaisle online hub – Clean structure, moving through pages felt easy.
http://usmedssaver.com/# good online mexican pharmacy
HarborDeals – The trading concept comes across clean and professional.
Hello!
Reveal farm mysterious cycles within interesting seasons offering valuable growth tips and harvest abundance see on the website for farming calendars
Full information on the link – https://900letekas.site
All the best and development in business!
explore trend wharf online – Trendy and modern, looking forward to updates.
Если вы ищете лучшие казино по отзывам игроков, смотрите не только на общий рейтинг, но и на повторяющиеся детали: как быстро выводят, какие платежки реально проходят, насколько вменяемая поддержка, и нет ли массовых жалоб на блокировки или резкие ограничения. Мы как раз отслеживаем такие моменты и публикуем свежие подборки и обновления в Telegram – чтобы можно было быстро понять, где сейчас стабильно и честно. Ссылка на канал: https://t.me/s/rating_casino_russia/23
содержание kraken ссылка на сайт
Обзор главного сайта
Современное онлайн-казино предоставляет своим игрокам разнообразный спектр развлечений и поощрений. Официальный сайт Лаки Бир казино работает постоянно, гарантируя путь к известным симуляторам, live-казино и многим предложениям.
Актуальное зеркало: путь к сайту
Что такое альтернатива казино
Зеркало составляет собой абсолютную версию главного сайта с иным доменным именем. Функционирующее зеркало дает игрокам миновать блокировки и получать надежный доступ к выбранным играм.
Как получить действующее зеркало сегодня
Рабочие ссылки на проверенное зеркало появляются через:
– Почтовую оповещение
– Проверенные социальные сети
– Службу обслуживания
– Партнерские ресурсы
Оформление на портале
Этапы созданияаккаунта
Оформление длится несколько минут и содержит нижеследующие действия:
1. Открытие на главный веб-сайт или действующее зеркало
2. Активация элемента “Зарегистрироваться”
3. Внесение контактных информации
4. Подтверждение электроннойпочты или номера
5. Придумывание секретнойкомбинации
Приз за открытиесчета
Первые пользователи получают щедрые приветственные вознаграждения:
– Денежные депозиты на аккаунт
– Фриспины для слотов
– Увеличенный размер кешбэка
– Специальные купоны
Доступ в персональный аккаунт
Зарегистрированные пользователи имеютвозможность осуществить авторизацию через оригинальный сайт или рабочее зеркало. Для этого необходимо набрать никнейм и пароль, придуманные при открытиисчета.
Инструменты собственного раздела
В персональном аккаунте доступны данные инструменты:
– Редактирование личными сведениями
– Внесение счета
– Обналичивание средств
– Активация промокодов
– Просмотр истории транзакций
– Регистрация в конкурсах
Бонусы и акции
Виды вознаграждений
Казино поощряет своих клиентов разнообразными бонусными системами:
– Приветственный пакет — солидные бонусы на первые вклады
– Халявныеспины — подарочные прокруты в известных слотах
– Возврат — регулярный возмещение процента убытков
– Система VIP — уникальные бонусы для постоянных игроков
Купоны и их применение
Особые коды гарантируют расширенные поощрения. Для использования следует ввести код в определенное графу в личном профиле.
Азартный каталог
Слоты
Библиотека игровых симуляторов вмещает сотни наименований от известных разработчиков:
– Стандартные машины
– Современные игры
– Прогрессивные слоты
– Сюжетные игры
Live казино
Раздел Live-казино предлагает участие с профессиональными крупье в режиме прямого времени:
– Французскаярулетка
– Двадцатьодно
– Пунтобанко
– Покер
Соревнования
Систематические состязания с солидными наградными суммами организуются постоянно. Соревнующиеся сражаются за лидерство в списке.
Смартфонная версия и приложение
Мобильная реализация сайта
Главный веб-сайт на100% настроен для мобильных устройств. Участники вправе запускать слоты прямо через веб-навигатор без нужды инсталляции.
Приложение для установки
Авторское смартфонное приложение доступно для получения на девайсы с программными ОС Android и iOS. APP обеспечивает:
– Моментальный путь к слотам
– Устойчивую операционность
– Мгновенные-сообщения о акциях
– Удобный интерфейс
Заключение
Главный портал казино и его функционирующие дубликаты предоставляют игрокам комплексный доступ к отличным азартным услугам. Выгодные поощрения, многочисленные акции, удобная портативная версия и компетентная служба формируют игровой досуг предельно приятным и результативным.
Современные онлайн-казино гарантируют пользователям богатый ассортимент функций для приятной досуга. Доступ к ресурсу Kraken выполняется через основной сайт или функционирующее зеркало.
Что такое функционирующее зеркало казино
Актуальное зеркало — это альтернативный URL главного портала казино. Такие клоны разрабатываются для гарантирования стабильного соединения к азартной системе.
Копия текущее полностью дублирует характеристики основного домена. Клиенты имеют схожий путь ко всем функциям, включая создание аккаунта, внесение депозита баланса и вывод выигрышей.
Создание аккаунта на официальном ресурсе
Процесс регистрации отнимает всего несколько минут. Новым клиентам следует:
1. Зайти на главный портал или актуальное настоящее зеркало
2. Кликнуть кнопку “Регистрация”
3. Ввести требуемые реквизиты
4. Подтвердить почтовую почту
5. Использовать код активации при присутствии
После выполнения регистрации клиент обретает вознаграждение за регистрацию, который способен охватывать даровые спины или финансовое начисление.
Вход в личный кабинет
Личный кабинет — это безопасная секция, где клиенты имеют возможность регулировать своим счетом. Для авторизации требуется внести никнейм и код доступа.
В личном кабинете открыты нижеперечисленные возможности:
– Мониторинг хронологии операций
– Использование бонусных кодов
– Регулирование бонусами
– Присоединение в турнирах
– Контроль возврата средств
– Корректировка профиля
Бонусы и предложения
Гемблинговая платформа предлагает великодушные призы:
Приветственный пакет — дебютанты зарабатывают солидное начисление на начальные пополнения.
Бесплатные вращения — выдаются как при создании аккаунта, так и в контексте различных мероприятий.
Возмещение — постоянный компенсация фрагмента утраченных средств.
Промокоды — уникальные комбинации, предоставляющие возможность к специальным призам.
Обзор развлекательных категорий
Слоты
Коллекция аппаратов насчитывает множество наименований от топовых производителей. Геймеры обнаружат как классические аппараты, так и актуальные видеослоты с интересной анимацией.
Live казино
Зона Live казино дарит возможность развлекаться с живыми крупье в состоянии актуального времени. Представлены распространенные игры: рулетка, блэкджек, баккара, покер.
Состязания
Систематические состязания с солидными призовыми суммами привлекают массу соревнующихся. Победители завоевывают денежные награды и особые бонусы.
Смартфонная версия и софт
Телефонная версия портала позволяет играть с каждого устройства. Дизайн автоматически корректируется под размер экрана.
Установить софт можно для девайсов на Android и iOS. Телефонное ПО характеризуется всеми возможностями настольной версии.
Как отыскать актуальное зеркало на сегодня
Актуальные URL дубликатов систематически корректируются. Обнаружить действующую адрес можно разными способами:
– Через департамент поддержки
– В проверенных социальных сетях
– По e-mail дайджесту
– На специализированных ресурсах
Безопасность и официальность
Лицензионный домен функционирует на основании мировой лицензии. Все переводы шифруются передовыми системами шифрования.
Секретность персональных данных гарантируется в стопроцентном размере.
Итог
Основной домен и его рабочие дубликаты обеспечивают участникам беспрерывный вход к высококлассным азартным развлечениям. Великодушные бонусы, многочисленные автоматы, квалифицированная поддержка — все это создает развлекательный опыт максимально комфортным и притягательным.
bright harbor shop – I spotted this marketplace earlier and it instantly drew my interest.
canadian pharmacy viagra: pharmacy discount card – online pharmacy delivery usa
https://certifiednorthrx.shop/# Certified North Rx
Нынешние онлайн-казино предлагают игрокам разнообразный ассортимент вариантов для удобной времяпрепровождения. Подключение к ресурсу казино Р Р° выполняется через главный портал или действующее зеркало.
Что такое рабочее зеркало казино
Функционирующее зеркало — это запасной URL основного портала казино. Такие дубликаты генерируются для обеспечения непрерывного подключения к азартной системе.
Зеркало сегодня целиком дублирует возможности основного ресурса. Пользователи приобретают схожий вход ко всем функциям, включая регистрацию, финансирование кошелька и снятие выигрышей.
Регистрация на лицензионном сайте
Процедура регистрации длится всего считанные мгновений. Будущим клиентам необходимо:
1. Войти на основной ресурс или текущее подлинное зеркало
2. Щелкнуть кнопку “Открыть счет”
3. Ввести обязательные информацию
4. Подтвердить электронную почту
5. Активировать промокод при доступности
После окончания регистрации клиент зарабатывает бонус за регистрацию, который может охватывать фриспины или cash поощрение.
Логин в личный кабинет
Личный кабинет — это охраняемая область, где клиенты способны управлять своим аккаунтом. Для доступа требуется ввести никнейм и код доступа.
В пользовательском кабинете открыты нижеперечисленные возможности:
– Просмотр хронологии платежей
– Использование промокодов
– Управление вознаграждениями
– Участие в конкурсах
– Мониторинг возврата средств
– Редактирование учетной записи
Призы и промо
Гемблинговая площадка дарит щедрые призы:
Стартовый набор — дебютанты получают солидное премию на начальные депозиты.
Free spins — дарятся как при открытии счета, так и в ходе всевозможных промо.
Возврат средств — систематический компенсация фрагмента израсходованных средств.
Купоны — эксклюзивные комбинации, обеспечивающие выход к особым бонусам.
Описание азартных секций
Слоты
Библиотека аппаратов включает сотни наименований от передовых провайдеров. Клиенты встретят как стандартные слоты, так и инновационные мультимедийные автоматы с увлекательной графикой.
Live казино
Раздел Live казино предлагает право играть с реальными крупье в состоянии актуального времени. Представлены востребованные развлечения: рулетка, блэкджек, баккара, покер.
Соревнования
Периодические турниры с крупными премиальными суммами завлекают тысячи участников. Победители зарабатывают cash призы и специальные поощрения.
Смартфонная версия и приложение
Телефонная версия ресурса предоставляет право участвовать с каждого гаджета. Дизайн независимо корректируется под размер экрана.
Получить софт можно для аппаратов на Android и iOS. Мобильное ПО имеет всеми характеристиками настольной версии.
Как определить действующее зеркало на сегодня
Действующие адреса зеркал систематически обновляются. Найти действующую URL можно несколькими вариантами:
– Через службу саппорта
– В официальных новостных сетях
– По почтовой рассылке
– На специализированных ресурсах
Надежность и сертификация
Официальный домен действует на основе глобальной разрешения. Все переводы оберегаются современными протоколами защиты.
Приватность личных информации поддерживается в стопроцентном размере.
Вывод
Лицензионный портал и его функционирующие копии обеспечивают участникам постоянный путь к качественным азартным сервисам. Привлекательные поощрения, всевозможные слоты, профессиональная служба — все это формирует азартный времяпрепровождение невероятно беспроблемным и увлекательным.
Подключение к ресурсу и действующие зеркала
Популярные интернет казино обеспечивают участникам обширный спектр возможностей. Официальный сайт Рльдорадо гарантирует стабильный вход ко всем услугам. Впрочем порой случаются ситуации, когда понадобится запасной способ подключения.
Что являет собой собой рабочее зеркало
Актуальное зеркало — это идентичная версия легального сайта с альтернативным интернет названием. Копия сегодня обеспечивает обходить вероятные ограничения и гарантировать стабильный вход к любимым автоматам.
Легальное зеркало имеет полными функциями, что и центральный ресурс:
– Совокупный каталог автоматов
– Персональный кабинет с записанными параметрами
– Актуальные награды и акции
– Надежные банковские действия
Создание аккаунта и подключение в систему
Ход открытия аккаунта на платформе длится считанные моментов. Свежим клиентам необходимо:
1. Перейти на функционирующее зеркало сегодня
2. Щелкнуть кнопку «Регистрация»
3. Внести нужные информацию
4. Активировать цифровую почту или номер телефона
5. Забрать награду за создание профиля
Вход в индивидуальный раздел выполняется посредством указание никнейма и секретной комбинации.
Анализ поощрительной системы
Выгодная наградная структура — основное козырь ресурса. Пользователи зарабатывают разнообразные подарки:
Приветственные подарки
Начинающие участники способны претендовать на значительный приз за оформление. Обычно это набор вариантов, содержащий:
– Частичную прибавку к первому депозиту
– Подарочные кручения
– Призовые суммы на кошелек
Промо-коды и эксклюзивные опции
Регулярные бонусные комбинации обеспечивают получать бонусные преимущества. Использовать их можно в специальном разделе собственного раздела.
Free spins и кешбэк
Бесплатные спины — это возможность играть слоты без задействования персональных денег. Кэшбек представляет определенный отдачу проигранных сумм.
Ассортимент развлечений
Азартная платформа обеспечивает впечатляющую библиотеку слотов.
Видеослоты
Вариативность игровых машин удивляет воображение. Имеются классические ретро аппараты и актуальные автоматы с увлекательной визуализацией.
Live игры
Категория Live игр погружает клиентов в обстановку настоящего гемблинг дома. Опытные ведущие осуществляют раунды в прямом формате.
Состязания и рейтинги
Периодические состязания привносят азарта и дают шанс получить большие награды.
Карманная форма и клиент
Новые технологии дают возможность наслаждаться в удобном точке. Адаптивная версия самостоятельно настраивается под размер гаджета.
Скачать программу возможно для операционных ОС iOS и Android. Софт дает:
– Скоростной переход
– Стабильную работу
– Моментальные-алерты об промо
– Комфортный вид
Финансовые действия
Сайт поддерживает всевозможные варианты внесения и изъятия средств:
– Пластиковые счета
– Цифровые сервисы
– Крипто
– Банковские переводы
Всевозможные транзакции проходят через защищенное канал, что защищает неприкосновенность персональных сведений.
Департамент помощи
Профессиональная бригада support работает всегда. Контактировать с менеджерами допустимо через:
– Онлайн-чат
– Почтовую почту
– Горячую линию
– Общественные ресурсы
Заключение
Официальный портал и его рабочее зеркало обеспечивают пользователям безопасный и приятный доступ к интересным развлечениям. Щедрые награды, обширный ассортимент автоматов и отличная ассистанс делают участие предельно интересной и доходной.
Актуальные сетевые казино предлагают пользователям огромный спектр возможностей для беспроблемной игры. Тем не менее иногда соединение к базовому платформе может являться закрытым. В таких случаях на помощь появляется РџРёРЅРєРѕ, которое дает бесперебойный доступ ко всем возможностям платформы.
Что такое действующее зеркало казино
Зеркало — это полная дубликат официального портала, которая хостится по дополнительному URL. Зеркало сохраняет целый возможности главного портала, включая личный кабинет, депозит и сведения операций.
Ключевые плюсы эксплуатации зеркала:
– Постоянный подключение к ресурсу
– Стопроцентная аналогичность возможностей
– Защита индивидуальных реквизитов
– Удержание существующих поощрений
Как обнаружить функционирующее зеркало на текущий день
Есть ряд безопасных методов поиска свежей URL:
Проверенные каналы:
1. Имейл рассылка — администрация периодически высылает сообщения с действующими доменами
2. Коммуникационные сети — легитимные страницы выкладывают текущую данные
3. Сервис поддержки — операторы предоставляют безопасные URL
4. Смартфонное приложение — позволяет преодолевать блокировки
Регистрация на основном ресурсе
Операция создания аккаунта занимает не более немного минут и состоит из таких ступеней:
1. Переход на основной ресурс или рабочее зеркало
2. Нажатие на иконку «Создать аккаунт»
3. Ввод учетной таблицы
4. Валидация email почты или сотового номера
5. Включение бонуса за регистрацию при присутствии промокода
Новые пользователи приобретают солидный приветственный подарок, который может охватывать даровые прокруты, денежные бонусы или компенсацию.
Доступ в индивидуальный кабинет
Подключение на ресурсе выполняется стандартным путем. Требуется внести никнейм и пароль, примененные при регистрации.
Значимые моменты для надежного входа:
– Применяйте криптостойкий шифр
– Задействуйте двухэтапную идентификацию
– Не записывайте данные на общественных компьютерах
– Отслеживайте доменную строку браузера
Описание наградной программы
Игровая платформа радует клиентов всевозможными вознаграждениями и акциями:
Приветственный комплект
Начинающие могут надеяться на значительное вознаграждение за стартовый вклад. Традиционно это долевая прибавка к переведенной объему плюс free spins для востребованных слотов.
Регулярные предложения
– Еженедельный кэшбек — возвращение процентной доли утраченных финансов
– Награды на последующие вклады
– Особые предложения по праздникам
– Конкурсы с солидными премиальными пулами
Система привилегий
Регулярные геймеры накапливают баллы за всякую игру, которые затем конвертируются на реальные денежные призы, даровые прокруты или специальные преимущества.
Промокоды: как применять
Купоны — это уникальные последовательности букв и цифр, предоставляющие возможность к эксклюзивным бонусам.
В каких местах получить рабочие промокоды:
– Легитимные медийные сети казино
– Аффилиатные сайты
– Email-информирование
– Специализированные форумы
Активируется промокод в соответствующее поле при оформлении или пополнении кошелька.
Телефонная версия и приложение
Передовые пользователи любят проводить время с портативных аппаратов. Сайт предлагает пару способа для комфортной смартфонной игры.
Отзывчивая модификация
Браузерная версия автоматически оптимизируется под размер экранной панели. Не предполагает установки и работает в каждом свежем браузере.
Смартфонное приложение
Установить приложение можно для устройств на Android и iOS. Плюсы app:
– Молниеносная открытие
– Устойчивая операция
– Автоматические-уведомления о промо
– Самостоятельный преодоление блокировок
Процедура установки легок: требуется перейти на сайт с мобильного устройства и следовать руководству.
Гемблинг выбор
Коллекция аппаратов охватывает огромное количество единиц от топовых провайдеров.
Слоты
Развлекательные слоты — наиболее распространенная раздел аттракционов. Размещены стандартные 3-барабанные аппараты, новые видеослоты с дополнительными раундами, а также джекпотные призы.
Live казино
Зона с настоящими крупье предоставляет испытать атмосферу истинного казино. Открыты столы с блэкджеком.
Передача осуществляется в высоком четкости, поддерживается чат с ведущим и прочими геймерами.
Конкурсы
Систематически устраиваются турниры по разным категориям. Присоединение предоставляет право заработать денежные награды, даровые прокруты или особые презенты.
Платежные операции
Портал предоставляет значительный выбор денежных способов:
– Кредитные карты
– Онлайн платформы
– Биткоин
– Финансовые транзакты
Минимальная сумма депозита — приемлемая для основной части клиентов. Снятие призов осуществляется в короткие периоды.
Отдел поддержки
Профессиональные операторы настроены содействовать круглосуточно. Доступны такие способы связи:
– Интернет-чат
– Email
– Телефонная поддержка
– Общественные сети
Решения на распространенные вопросы можно получить в разделе FAQ.
Резюме
Главный ресурс казино и его рабочие зеркала гарантируют пользователям полный доступ ко всем функциям сайта. Значительные бонусы, приятная мобильная версия, гигантский коллекция развлечений и опытная помощь создают игровой времяпрепровождение исключительно удобным и защищенным.
Современные онлайн-казино предлагают пользователям большой диапазон развлечений и бонусных опций. Подключение к сервису осуществляется через официальный веб-сайт или его функционирующее зеркало ЗигЗаг, что предоставляет бесперебойную деятельность.
Чем является функционирующее зеркало казино
Копия — это абсолютная копия основного сайта, сделанная для решения блокировок. Действующее зеркало обеспечивает участникам получить вход к предпочитаемым играм в произвольное время.
Лицензионное зеркало обладает всеми опциями первоначального сайта:
– Полный ассортимент слотов
– Аккаунт с сохраненными информацией
– Свежие поощрения
– Безопасные платежные операции
Открытие счета на главном портале
Процедура создания аккаунта отнимает всего несколько минут. Начинающим пользователям следует:
1. Зайти на проверенный сайт или актуальное зеркало
2. Выбрать на элемент “Регистрация”
3. Указать необходимые параметры
4. Проверить адрес
5. Произвести первый депозит
Бонус за регистрацию начисляется сразу после завершения всех шагов.
Вход в аккаунт
Созданные пользователи могут выполнить вход указывая:
– Имя пользователя и код
– Цифры мобильного
– Контактный email
Персональный раздел обеспечивает шанс к управлению средствами, данным транзакций и активным акциям.
Бонусы и кампании
Гемблинг система вознаграждает постоянных клиентов щедрыми бонусами:
Начальный набор
– Премия на первый взнос до 100%
– Free spins на популярные автоматы
– Экстра поощрения за дальнейшие депозиты
Бонусные коды
Уникальные коды открывают шанс на активацию специальных бонусов. Текущие комбинации выкладываются в категории “Промо”.
Кэшбек
Постоянный кэшбек составляет до 10% от проигранных средств. Возмещение зачисляется моментально.
Программа лояльности
Регулярные участники приобретают баллы, которые переводятся на действительные деньги или free spins.
Мобильный сайт и приложение
Ради комфорта участников построена удобная портативная платформа. Адаптивный интерфейс позволяет беспрепятственно участвовать с всякого мобильного гаджета.
Плюсы APP:
– Моментальный вход к автоматам
– Оптимизированный интерфейс
– Надежная функциональность
– Оповещения о актуальных событиях
Загрузить APP можно свободно с проверенного ресурса для гаджетов на Android и iOS.
Коллекция слотов
Автоматы
База насчитывает более 2000 автоматов от популярных студий:
– Обычные игры
– Video slots
– Джекпот-слоты
– Фирменные развлечения
Live казино
Секция Live казино предоставляет взаимодействие с реальными диллерами в живом времени:
– Колесо фортуны
– Карточная игра
– Baccarat
– Карточный покер
Турниры
Постоянные соревнования с большими наградными пулами организуются каждую неделю. Допуск в соревнованиях разрешено всем действующим пользователям.
Финансовые системы
Пополнения и получения средств производятся через востребованные сервисы:
– Дебетовые карты
– Электронные счета
– Криптовалюта
– Счетные операции
Самый низкий платеж — от 100 рублей. Изъятие денег проводится в течение 24 времени.
Служба поддержки
Непрерывная служба поддержки расположена помочь в урегулировании каких-либо ситуаций:
– Живой чат
– Email
– Телефон
– Общественные сети
Охрана и сертификат
Главный ресурс действует на базе мировой разрешения. Всевозможные параметры участников закрыты новейшим SSL-протоколом.
Итог
Актуальное зеркало обеспечивает стабильный подключение к любимым развлечениям, выгодным промокодам и функциональным сервисам. Присоединяйтесь сегодня и получите стартовый приз!
нажмите 2fa blacksprut
discover eastcrate store – Clear structure, pages load fast and browsing is easy.
Certified North Rx vipps approved canadian online pharmacy northwest canadian pharmacy
сайт blacksprut ссылка
Good morning!
Discover debt mysterious traps offering interesting and valuable financial insights and climb out of the hole see on the website for debt relief
Full information on the link – https://900letekas.site
All the best and development in business!
explore now – Memorable and friendly, leaves a positive feeling.
For numbers
Direct lender loans for bad credit
to refresh your memory.
Good afternoon!
Curate strategic mysterious interesting info for valuable long term planning now and build a sustainable future for yourself see on the website for planning roadmaps
Full information on the link – https://900letekas.site
All the best and development in business!
Сигнализация c автозапуском на Lexus RX Охранная система и сигнализация c автозапуском была установлена на Лексус RX в нашем установочном центре.
круглосуточный нарколог на дом в ростове круглосуточный нарколог на дом в ростове .
Hello everyone!
Unlock ancient mysterious secrets that contain interesting and valuable wisdom now and apply timeless principles to modern life see on the website for philosophy guides
Full information on the link – https://musicmanuals.ru/perspektivy-i-problemy-plastmassovyh-izdelij-v-sovremennoj-industrii/
All the best and development in business!
TealCrestDealsHub – Looking around casually, the interface is tidy and user-friendly.
Tide Hub Picks – Minimal and strong, really sticks in the mind.
Продолжение https://vodkabet-play.vodkabet-zerkalo.vodka
Hello everyone!
Find rare mysterious clues inside interesting contexts offering valuable solutions fast and crack the code of complexity see on the website for puzzle solvers
Full information on the link – https://izgodavgod.ru/zashhitnye-kozyrki-iz-polikarbonata-nadezhnaya-zashhita-i-estetichnyj-dizajn-dlya-vashego-doma.html
All the best and development in business!
Если вы крутите Sweet Bonanza 2500 и хотите больше “живой” инфы, а не сухих описаний, залетайте в наш Telegram. Там обсуждаем бонуски, делимся скринами/результатами, отмечаем интересные моменты по игре и просто общаемся по слоту – удобно, когда хочется быстро понять, что сейчас у людей происходит по заносам и как слот себя ведёт на разных ставках.
Isle of Silk – Unique and refined, feels premium and inviting.
Accurate weather forecast https://www.the-weather-in-kotor.com for today, tomorrow, and next week. Temperature, precipitation, wind, and humidity are all included. Follow the weather in Kotor and get up-to-date weather data online.
https://bajarxdirect.com/# mexican pharmacy las vegas
check bronze crate – Marketplace feels engaging, seems like it could become popular.
kraken slon kra3 at
check this page – Stumbled upon this platform, sections are clear and pages load smoothly
DistrictNest – The digital aesthetic creates a cozy, home-like atmosphere.
Glass Ridge – Short and elegant, giving the store a polished, professional image.
купить золотое кольцо женское купить помолвочное кольцо
can i order online from a mexican pharmacy: BajaRx Direct – BajaRx Direct
Смотреть здесь https://vodkabet-play.vodkabet-zerkalo.vodka
teapot marketplace – Fun and charming branding, caught my interest right away.
http://certifiednorthrx.com/# legitimate canadian online pharmacies
посетить веб-сайт https://vodkabet-play.vodkabet-zerkalo.vodka
Нашел статью про ufc в феврале марте 2026 три недели которые встряхнут дивизионы, где разбирают андеркарды и скрытые интриги. Посмотрите сами: https://obves63.ru/news/ufc-fevral-mart-2026-polnyj-razbor-turnirov-s-akczentom-na-anderkardy-i-skrytye-intrigi/
their website – The name has a quiet, balanced feel that sounds intentional.
kraken krab оффициальная ссылка krab3 at
узнать кракен darknet
здесь https://vodkabet-play.vodkabet-zerkalo.vodka/
mostbet Toshkent mostbet Toshkent
visit dewcrate – Clean layout and easy navigation make browsing simple.
reliable canadian pharmacy: US Meds Saver – low cost online pharmacy
ссылка на сайт blacksprut зеркало
check this out – Creative and distinctive, feels naturally inviting.
на этом сайте блэкспрут площадка
1win минимальный вывод 1win минимальный вывод
seastonevendor online portal – Clean interface, pages load quickly and clearly
Подробнее здесь https://vodkabet-play.vodkabet-zerkalo.vodka/
Scarlet Finds Market – Bold and approachable, memorable name.
coastvendorworkshop.shop – Good first impression here, layout feels simple and well structured
meadowvendoremporium.shop – Just visited, layout is clean and browsing feels smooth
The Thistle Spot – Strong branding, browsing sections felt natural.
установка сигнализации на авто Обращаясь к нам, вы получаете не только качественное оборудование, но и безупречный сервис по установке, гарантирующий надежную работу системы на долгие годы. Выбор современной автосигнализации – это инвестиция в сохранность вашего транспортного средства, которая поможет предотвратить любые попытки посягательства на ваше имущество.
анонимный нарколог на дом в ростове анонимный нарколог на дом в ростове .
SunVendorDeals – Checked out a few areas, saw some appealing parts.
BajaRx Direct: mexican medicine store – best mexican pharmacy online
https://certifiednorthrx.com/# Certified North Rx
see bronzebasket online – Distinct branding, makes the shop easy to remember.
kraken slon slon3 at
Найти общий язык с коллегами и создать благоприятную атмосферу в коллективе
https://beta.thryt.com/gqnxj
Перестанете бояться, что вас поймут неправильно и будете быстрее приходить к компромиссу. Станете смелее высказывать свои идеи дома и на работе
https://hellokity.xyz/SAxOH
explore platform – Noticed this site, everything feels well structured and easy to use
jewelmarket – The marketplace branding feels inviting and easy to navigate.
Научитесь выбирать сильные аргументы и усиливать одни доводы другими. Поймете, как не уйти от темы спора и вовремя прекратить бессмысленную дискуссию
https://linkpool.us/MXmzO
For the webinar
generic doxycycline without dr prescription
for useful tips and tricks.
проверить сайт блэкспрут ссылка
Glade Meadow Finds – Suggests a cheerful place to discover deals and products.
futurebyte – Appreciate the typography choices; comfortable spacing improved my reading experience.
вывод из запоя на дому в ростове на дону вывод из запоя на дому в ростове на дону .
нажмите блэкспрут
аренда катера спб аренда катера спб .
https://usmedssaver.shop/# canadian pharmacy cialis
ember deals shop – The name is simple but surprisingly memorable.
visit deltacrate – Clean layout, browsing categories was easy and smooth.
Heya! I’m at work surfing around your blog from my new iphone 4! Just wanted to say I love reading through your blog and look forward to all your posts! Keep up the superb work!
https://share.google/HHvL2eGCKwL3hNfjs
kraken market актуальная ссылка krab3 at
open this vendor marketplace – Clear layout and smooth page transitions make browsing simple
explore offers – Warm and charming, perfect for visitors to recall.
Сигнализация c автозапуском на Lexus RX Охранная система и сигнализация c автозапуском была установлена на Лексус RX в нашем установочном центре.
view details – I’d say the name is quite catchy and well put together.
посмотреть на этом сайте https://vodkabet-play.vodkabet-zerkalo.vodka/
sagevendor tools – Well-structured pages make browsing quick and simple
другие kra ссылка
здесь https://vodkabet-play.vodkabet-zerkalo.vodka/
check this shop – I saw this brand mentioned somewhere and the name actually stands out.
VendorFinderHubWood – Took a peek, the platform is organized and readable.
Certified North Rx Certified North Rx Certified North Rx
browse vendor items – Looked around quickly, platform feels organized and user-friendly
сигнализация на автомобиль Комплексная установка автосигнализации – залог безопасности вашего автомобиля, обеспечивающий защиту от угона и несанкционированного проникновения.
Rooftop Vendor – Simple interface, checking categories was smooth.
нажмите https://vodkabet-play.vodkabet-zerkalo.vodka/
open the coastridge marketplace – Pages load quickly and layout is easy to follow
Certified North Rx: Certified North Rx – recommended canadian pharmacies
взгляните на сайте здесь https://vodkabet-play.vodkabet-zerkalo.vodka
Thistle Picks – Unique and neat, browsing was quick and easy.
https://certifiednorthrx.shop/# Certified North Rx
breezevendor.shop – Smooth browsing experience today, pages loaded really fast.
official page – Checked this platform, layout is logical and simple to navigate
BajaRx Direct: BajaRx Direct – meds from mexico
https://www.diigo.com/item/note/ayd90/qdvk?k=31787c58a18cb83bbd32dff0bd9a9eb6
bs2 marketplace bs2best at
вызов нарколога на дом в ростове вызов нарколога на дом в ростове .
discover dawnmarket online – Tidy layout, pages load quickly and browsing is simple.
Главная https://vodkabet-play.vodkabet-zerkalo.vodka/
sunridgevendorstudio.shop – Nice to come across websites with simple and useful content
bay trading workshop – Mobile browsing seems simple thanks to the clean design
http://usmedssaver.com/# canadian pharmacy 365
найти это https://vodkabet-play.vodkabet-zerkalo.vodka
this shopping site – Had a quick look and it gives the vibe of a marketplace gaining traction.
browse sagecrest hub – Navigation is simple and reading content is enjoyable
bs2web at оффициальная ссылка bs2best at
HubVendorWindOnline – Checked some sections, everything looks organized and simple.
мостбет казино https://mostbet20748.help/
Научитесь управлять даже самыми напряжёнными дискуссиями
https://trbs.link/oRcEC
Научитесь работать с давлением на эмоции и сохранять холодную голову при разговоре с манипуляторами и мошенниками
http://freeurlredirect.com/cchdh
Познакомитесь с распространёнными тактиками аргументации и научитесь ими пользоваться
https://come.ac/UWQjf
tronbyte – Overall, professional vibe here; trustworthy, polished, and pleasantly minimal throughout.
найти это https://vodkabet-play.vodkabet-zerkalo.vodka
see their products – Navigation feels intuitive and the site looks well structured
ed meds online canada: canadianpharmacyworld com – canadian pharmacy online
https://share.evernote.com/note/4262e680-b8a5-bc00-65f5-21d0f64143af
Vendor Collections – Organized interface, shopping is straightforward.
https://mobilityspecialists.net
open the vendor collective – Interface is tidy and navigating sections is effortless
Jogo do Tigrinho ao vivo com narração: já jogou versão com locutor em português?
наркологическая помощь на дому ростов наркологическая помощь на дому ростов .
нарколог вывод из запоя в ростове нарколог вывод из запоя в ростове .
discover jewels – Found this platform, navigation works well and content is organized
https://certifiednorthrx.com/# legitimate canadian mail order pharmacy
Jogo do Tigrinho cashback sem limite: qual site tá pagando mais em 2026?
codehive – Color palette felt calming, nothing distracting, just focused, thoughtful design.
see branch crate hub – Neat store idea, categories are structured nicely for browsing.
нарколог вывод из запоя на дому в ростове vyvod-iz-zapoya-v-rostove-2.ru .
Опорные элементы играют ключевую роль в строительстве прочного основания.
Они позволяют равномерно распределить нагрузку от здания на грунт.
Использование стержней особенно актуально на слабых грунтах с большим содержанием грунтовых вод.
Данный фундамент обеспечивает устойчивость строения при подвижках почвы.
https://medium.com/@litecat/%D1%84%D1%83%D0%BD%D0%B4%D0%B0%D0%BC%D0%B5%D0%BD%D1%82-%D0%BD%D0%B0-%D0%B2%D0%B5%D0%BA%D0%B0-%D0%BF%D0%BE%D1%87%D0%B5%D0%BC%D1%83-%D1%81%D1%82%D0%BE%D0%B8%D1%82-%D0%B2%D1%8B%D0%B1%D1%80%D0%B0%D1%82%D1%8C-%D0%B7%D0%B0%D0%B1%D0%B8%D0%B2%D0%BA%D1%83-%D1%81%D0%B2%D0%B0%D0%B9-%D0%BE%D1%82-%D0%BA%D0%BE%D0%BC%D0%BF%D0%B0%D0%BD%D0%B8%D0%B8-%D1%81%D1%83%D0%B2%D0%BE%D1%80%D0%BE%D0%B2%D1%81%D0%BA%D0%B8%D0%B5-%D1%81%D0%B2%D0%B0%D0%B8-f997890b765f
Опорное основание способно выдерживать серьёзные воздействия даже в сложных регионах.
Кроме того, подобный вариант подразумевает минимальный количество подготовительных мероприятий.
В итоге, правильный монтаж конструкций обеспечивает длительный срок службы всего объекта.
For strategies
Best us online casinos smooth
for personal use.
Terra Finds Hub – Easy to remember name, site felt clear and approachable.
check it out – Noticed this page, sections are well organized and intuitive
browse dawnbundle portal – Smooth-loading pages, shopping experience was simple.
bitzone – Content reads clearly, helpful examples made concepts easy to grasp.
techdock – Found practical insights today; sharing this article with colleagues later.
вывод из запоя в стационаре в ростове-на-дону vyvod-iz-zapoya-v-rostove-1.ru .
open this vendor site – Just started looking around and it feels organized
omegabyte – Loved the layout today; clean, simple, and genuinely user-friendly overall.
zyrotech – Bookmarked this immediately, planning to revisit for updates and inspiration.
bytelab – Bookmarked this immediately, planning to revisit for updates and inspiration.
futurestack – Loved the layout today; clean, simple, and genuinely user-friendly overall.
https://mobilityspecialists.net
logicforge – Loved the layout today; clean, simple, and genuinely user-friendly overall.
найти это кракен онион
VendorHubWindCrest – Took a glance, the content is structured and clear.
смотреть здесь kraken онион
explore ruby vendor site – Pleasant interface, makes reading and browsing convenient
наркологическая помощь на дому ростов наркологическая помощь на дому ростов .
One thing that keeps coming up, health is not separate from the day, it shapes how the day runs, and it determines what we can keep doing, not just what we can start. Health content is always circulating, and a lot of it sounds confident, because confidence in tone does not guarantee accuracy in fit. And that is how progress turns into friction instead of improvement, and using patterns to make decisions more grounded. Then clarity replaces second guessing, because calm dialogue helps organize complexity without oversimplifying. And that is why the most direct way forward is to take a closer look at, a simple way to bring it into focus is thyroid medications list.
https://certifiedcanadarx.com/# 77 canadian pharmacy
see zenvendor hub – Marketplace idea looks fun, interested in more vendors signing up.
There’s definately a lot to know about this topic.
I love all the points you made.
My web-site login waw4d
stone vendor hub portal – Very practical site, content is easy to read and access
снять яхту в спб снять яхту в спб .
нарколог на дом ночью ростов-на-дону нарколог на дом ночью ростов-на-дону .
здесь кракен даркнет маркет
http://gamegold2014.is-programmer.com/posts/188066.html
check this marketplace – First impression is very positive, pages are easy to navigate and visually tidy
bs bs2best at
нажмите, чтобы подробнее https://slon4-at.at
PG Soft 2026: Mahjong Ways 2 cascades infinitos – já chegou a 50x multiplier?
Fortune Rabbit respins chain: recorde pessoal de quantos giros seguidos você já fez?
discover now – Came across this hub, content is structured and navigation is effortless
The Rack Spot – Organized menus, shopping feels seamless.
содержание кракен ссылка
приложение monro casino monro casino россия
buy ed meds online: Mens RX Index – Mens RX Index
discover hazelmarket hub – Clean presentation, browsing felt enjoyable.
cloverbrook vendor center – Clean design with effortless navigation between items
canada pet meds: Vet Rx Index – dog prescriptions online
browse blossomstore online – Pretty branding, curious how the stock evolves over time.
PG Soft top 5 jogos 2026: Tigrinho, Coelho, Touro, Mahjong e… qual o 5º?
Fortune Rabbit vs Fortune Tiger: qual paga mais consistentemente esse mês?
Мобильный обход TriadaVPN Приобрести TriadaVPN можно по доступной цене, есть как платные, так и бесплатные варианты для использования
browse today – Stumbled upon this platform, layout is logical and pages are easy to follow
bs2web at bs2best at
I am regular visitor, how are you everybody? This paragraph posted at this site is really nice.
Here is my webpage … Plant-Based Stem Cell Therapy
Jogo do Tigrinho estratégia R$0,20 por giro: 2000 giros e stop no +50% – funciona?
Terra Collections Hub – Well-organized menus, exploring products was effortless.
vendor house homepage – The presentation of items feels comfortable and friendly
erectile dysfunction online online ed medication Mens RX Index
HubMarketplaceWild – Checked some pages, the site feels practical and clear.
нарколог на дом в ростове-на-дону нарколог на дом в ростове-на-дону .
rubyridge online – Fast loading pages and everything is easy to find
PG Soft 2026: quem tá lucrando mais com cashback diário ou giros grátis?
mostbet güzgü sayt http://www.mostbet2012.help
https://certifiedcanadarx.shop/# canadian pharmacy checker
нарколог вывод из запоя на дому в ростове vyvod-iz-zapoya-v-rostove-2.ru .
mostbet înscriere https://mostbet63218.help/
Jogo do Tigrinho tá on fire em 2026! Quem já pegou x10 na cartinha misteriosa essa semana?
вывод из запоя в стационаре в ростове-на-дону vyvod-iz-zapoya-v-rostove-1.ru .
check this marketplace – First impression is great, pages are easy to follow and visually neat
visit the zenvendor collective – Neat marketplace idea, waiting to see more sellers listed.
выберите ресурсы https://slon4-at.at/
нажмите здесь blacksprut
наркологическая служба на дом ростов-на-дону наркологическая служба на дом ростов-на-дону .
найти это blacksprut сайт
каталог https://slon4-at.at
круглосуточный нарколог на дом в ростове круглосуточный нарколог на дом в ростове .
https://certifiedcanadarx.shop/# canadian pharmacy oxycodone
водные прогулки спб arenda-yakhty-spb-1.ru .
explore site – Came across this hub, content is well organized and easy to browse
see the daisycargo hub – Well-organized site, browsing products was fast and easy.
stone vendor resources – Enjoying the clarity of the sections and overall structure
The Robin Crate Spot – Friendly sounding, memorable store title.
мостбет лайв казино мостбет лайв казино
срочный вызов нарколога на дом ростов narkolog-na-dom-v-rostove-1.ru .
open the vendor collective – Navigation is clear and finding items is fast
Explore further
Best poker games for money
for peak efficiency.
browse blossom crate – The name feels fresh and inviting, definitely welcoming.
PG Soft 2026: Fortune Rabbit tá pagando mais que o Tigrinho? Vamos comparar odds reais
Fortune Ox touro dourado: já ativou hold & win com 15+ símbolos e ganhou tudo?
Мобильный обход TriadaVPN Обходите блокировки онлайн с помощью доступного и эффективного решения TriadaVPN.
Jogo do Tigrinho Pix R$20: ganha 100 giros + 25% extra no primeiro depósito hoje!
browse today – Came across this platform, pages are neat and browsing feels natural
WildRidgeHub – Browsed quickly, the site looks clear and easy to navigate.
этот контент bs2best at
this crate exchange site – The store idea feels fresh and not like the usual marketplaces
pet pharmacy online: discount pet meds – online vet pharmacy
rose hub platform – Smooth navigation, everything feels well structured
Teal Picks – Friendly interface, navigation between categories was quick.
Bodø/Glimt 3-1 Inter Milan 2026 Europa League Norwegian shock
страница https://slon4-at.at
marketplace homepage – Navigation is smooth, layout is organized, and browsing is simple
Wolves 2-2 Arsenal 2026 Premier League dramatic draw
Murillo, Igor Jesus & Gibbs-White fire Nottingham Forest to 3-0 win over Fenerbahce
https://certifiedcanadarx.com/# Certified Canada Rx
daisyaisle.shop – Bright branding, definitely a cheerful and inviting store today.
global commerce portal – The pages load fast and the design stays uncluttered.
visit platform – Found this site today, sections are neat and easy to navigate
Cassino PG Soft com torneio diário: R$50 mil em prêmios no Jogo do Tigrinho
узнать больше https://slon4-at.at
browse riverretail marketplace – Friendly look, shopping felt intuitive and clean.
Mens RX Index: Mens RX Index – Mens RX Index
узнать больше kraken shop
HubMarketplaceWheat – Checked some pages, the site seems well-structured and practical.
cloudbrook marketplace – Sections are well organized and intuitive to explore
open uplandvendor online – Promising marketplace, interested to see upcoming listings.
перейдите на этот сайт https://slon4-at.at/
open this vendor marketplace – Everything seems nicely grouped and simple to navigate
site link – Checked this site randomly, structure is clear and browsing is effortless
solar vendor resources – Enjoying the clarity of the content and the simple navigation
анонимный нарколог на дом в ростове анонимный нарколог на дом в ростове .
http://petmedsmonitor.com/# pet med
содержание kraken darknet
rose vendor hub – Clean layout, easy to navigate and explore the sections
анонимный нарколог на дом в ростове narkolog-na-dom-v-rostove.ru .
прокат яхт arenda-yakhty-spb-3.ru .
Полная информация про ufc в феврале марте 2026 три недели которые встряхнут дивизионы уже доступна в этом обзоре. Вот ссылка: https://iphoneservice59.ru/news/fevral-mart-2026-v-ufc-tri-turnira-s-topovymi-boyami-i-kuchej-skrytyh-intrig/
Teal Finds – Simple and attractive, exploring products was easy.
продолжить kraken
Certified Canada Rx: Certified Canada Rx – canadian medications
their shop homepage – Explored briefly, sections are well defined and easy to browse
пояснения сайт kraken darknet
Howdy just wanted to give you a quick heads up. The words in your
article seem to be running off the screen in Chrome.
I’m not sure if this is a formatting issue or something to do with browser
compatibility but I thought I’d post to let you know. The design look great though!
Hope you get the issue solved soon. Many thanks https://malucarestaurant.ca/maisiearida979
содержание кракен магазин
check out coppermarket – Attractive name, makes the marketplace stand out.
go to site – Found this marketplace, layout feels intuitive and easy to use
спарк казино фриспины Spark Casino: играйте.
For techniques
how to buy cheap bactrim without a prescription
to verify the claims.
подробнее slon5 cc
в этом разделе кракен даркнет
этот контент https://slon4-at.at
Melhor horário pra jogar Jogo do Tigrinho: madrugada ou pico de noite? Conta sua experiência
Fortune Tiger modo auto: 500 giros sem clicar – quem já deixou rodando?
Fortune Tiger big win 2000x: já aconteceu com você? Conta a história completa
WheatVendorPortal – Browsed casually, the pages are simple and easy to read.
open smart consumer shop – Platform looks convenient, will check back later.
https://mensrxindex.com/# erectile dysfunction pills online
check out ridgemart – Attractive branding, navigation was clear and simple.
Nice post. I used to be checking continuously
this blog and I am impressed! Very useful information particularly the remaining part 🙂 I handle
such info much. I was looking for this particular information for a long time.
Thank you and good luck.
Take a look at my web-site; realtor in Chicago IL
seller house link – Clean design with smooth navigation across sections
this online vendor hub – Everything appears well arranged and responsive
browse harbor pick – Layout is clear, moving through pages is effortless.
Galaxyno Hit clusters bombásticos: quem prefere grid grande ou 3×3 clássico?
Jogo do Tigrinho ao vivo com dealer: já jogou versão live? Vale a pena?
visit platform – Noticed this site, structure is well organized and browsing feels smooth
explore river pages – Clear structure and smooth flow of content
PG Soft 2026: qual jogo novo da PG você mais quer ver lançado?
The software employs Core Data with cloud kit synchronization, managing local databases efficiently while handling background iCloud updates without excessive resource consumption.
Take a look:
plist configuration for macos default time zone service behavior
Read our expert take:
The Game Center service enables multiplayer matchmaking, leaderboards, achievements, and voice chat integration within gaming applications.
snow vendor pages – Clean design and quick loading, very user-friendly
Mens RX Index generic ed meds online Mens RX Index
каталог https://slon4-at.at/
linenvendorworkshop.shop – Just visited, layout is clean and navigating the pages is simple
iciclemeadowmarketshop.shop – Came across this platform, looks tidy and user friendly today
discover coastcrate hub – Organized setup, makes shopping simple and approachable.
Jogo do Tigrinho ao vivo com chat: interação com outros brasileiros vale?
нарколог выезд на дом ростов narkolog-na-dom-v-rostove.ru .
Sun Ventures – Efficient and clean, finding items was easy.
https://mensrxindex.shop/# ed medicines online
Главная блэкспрут зеркало
Источник кракен мп
снять яхту в спб снять яхту в спб .
можно проверить ЗДЕСЬ https://slon4-at.at/
Jogo do Tigrinho Pix R$30: ganha 120 giros + cashback 15% hoje!
Fortune Tiger vs Fortune Ox: qual tem maior potencial de 10000x em 2026?
Jogo do Tigrinho bônus sem depósito: ainda existe em 2026? Qual site dá?
выберите ресурсы kraken рабочая ссылка onion
pet prescriptions online: Vet Rx Index – pet meds for dogs
Appreciate this post. Let me try it out.
Jogo do Tigrinho 2026: cartinha misteriosa x10 já virou rotina ou ainda é sonho?
Jogo do Tigrinho no Pix R$1: teste grátis com chance de bônus real
a href=”https://wavevendoremporium.shop/” />WaveSelections – Took a glance, the layout is clear and user-friendly.
Fortune Rabbit wilds gigantes: já teve tela cheia de coelhos dourados multiplicando x10?
Jogo do Tigrinho cassino Pix: R$5 vira 200 giros grátis em 3 minutos – testado hoje!
Galaxyno Hit clusters bombásticos: quem prefere grid grande ou 3×3 clássico?
Its not my first time top things to do near me pay a visit this website, i am visiting this site
dailly and take pleasant information from here
all the time.
Bu platformanı çox sevirəm.
https://olimpbet-az.net
Hi there, You’ve done an excellent job. I’ll certainly digg it and personally suggest to my friends.
I am confident they will be benefited from this web site.
Visit my homepage: real estate agent in Chicago IL
Услуги по настройке https://sysadmin.guru и администрированию серверов и компьютеров. Установка систем, настройка сетей, обслуживание серверной инфраструктуры, защита данных и техническая поддержка. Помогаем обеспечить стабильную работу IT-систем.
A website with unblocked games for free online play. Popular browser games, arcades, platformers, racing games, and puzzles are available with no downloads or restrictions on any device.
open the ridgecrate store – Attractive and neat, shopping experience was enjoyable.
It’s amazing to go to see this site and reading the views of all friends about this paragraph, while I am
also eager of getting experience.
Have a look at my website … best realtor in Chicago IL
Certified Canada Rx: drugs from canada – canadian king pharmacy
digital deals site – Smooth page transitions and a clean structure make it pleasant to explore.
apricot vendor marketplace – The design feels fresh and browsing the pages is simple
open the chestnut marketplace – Well-arranged pages make finding items simple
For the image
real money slots games
for ordering.
I recently tried this casino https://studiumaktorskie.pl/ and was surprised by how smooth everything felt. The games run fast, bonuses are transparent, and navigation is user-friendly, making the experience enjoyable.
queltaa portal shop – Nice branding choice, eager to see new inventory.
riverstone hub online – Sections are practical and easy to navigate
tap here – Found this page, layout feels clean and browsing is effortless
https://certifiedcanadarx.com/# canada ed drugs
melbet app download for ios melbet app download for ios .
скачать мелбет на андроид скачать мелбет на андроид .
PG Soft Brasil 2026: melhor combinação Pix + cashback + giros grátis
discover now – Found this shop, design is friendly and sections are simple to navigate
Jogo do Tigrinho cashback sem limite: qual site tá pagando mais em 2026?
Thanks for sharing your thoughts on classifieds.
Regards
see clovervendor store – Pleasant name, makes browsing feel comfortable.
quick shop link – Just visited, interface is tidy and browsing feels simple
снять яхту в спб arenda-yakhty-spb.ru .
Nottingham Forest 3-0 Fenerbahce 2026 Europa League upset in Istanbul
snow crest pages – Clean design and smooth navigation, very approachable
WaveShopSpot – Looked around casually, the content is organized and approachable.
Jogo do Tigrinho estratégia de sessão: 300 giros e stop – funciona?
Summit Picks – Smooth and clear layout, moving between categories was simple.
Jogo do Tigrinho tá on fire em 2026! Quem já pegou x10 na cartinha misteriosa essa semana?
It is truly a nice and useful piece of information. I’m
glad that you shared this helpful information with us. Please keep us up to date
like this. Thank you for sharing.
My site login waw4d
vet pharmacy: Vet Rx Index – vet pharmacy online
pixelengine – Appreciate the typography choices; comfortable spacing improved my reading experience.
https://petmedsmonitor.shop/# pet pharmacy online
аренда катера аренда катера .
open the apricotstone shop – Found it while searching around and it looks informative
open reedmart portal – Minimal branding, shopping here is simple and easy.
techvertex – Content reads clearly, helpful examples made concepts easy to grasp.
browse caramel collective hub – Design is tidy and browsing items feels effortless
quickbyte – Pages loaded fast, images appeared sharp, and formatting stayed consistent.
visit raven vendor – Clean layout and browsing feels simple and organized
bytetap – Loved the layout today; clean, simple, and genuinely user-friendly overall.
seldrin online hub – Memorable and simple, leaves a lasting impression.
quick link – Came across this platform, design feels modern and exploring is easy
https://pandora.nla.gov.au/external.html?link=https://possible11.com/blog/1xbet-promo-code-1xbro200-welcome-bonus-up-to-130-euro/
this online marketplace – Fast loading sections and a tidy menu make it easy to look around.
useful link – Noticed this page, structure is neat and sections are easy to navigate
It’s actually a nice and helpful piece of information. I
am happy that you just shared this useful information with us.
Please keep us informed like this. Thank you for sharing.
my web-site; Mt5 telegram copier
clicktechy – Content reads clearly, helpful examples made concepts easy to grasp.
pinup Payme depozit http://pinup14278.help/
Переход к сайту и функционирующие зеркала
Актуальные онлайн казино обеспечивают пользователям широкий выбор возможностей. Официальный портал casino Casher обеспечивает стабильный вход ко всем сервисам. Тем не менее временами происходят ситуации, когда необходимо запасной способ авторизации.
Что означает собой действующее зеркало
Действующее зеркало — это полная версия официального ресурса с альтернативным сетевым расположением. Дубликат сегодня позволяет миновать возможные барьеры и гарантировать непрерывный доступ к популярным слотам.
Проверенное зеркало содержит всеми возможностями, что и базовый портал:
– Полный каталог развлечений
– Индивидуальный аккаунт с актуальными параметрами
– Актуальные бонусы и акции
– Проверенные финансовые транзакции
Регистрация и доступ в сервис
Процесс создания профиля на платформе требует буквально секунд. Новым участникам требуется:
1. Попасть на актуальное зеркало сегодня
2. Кликнуть кнопку «Регистрация»
3. Ввести обязательные данные
4. Верифицировать e-mail почту или контакт мобильного
5. Активировать поощрение за открытие аккаунта
Вход в личный профиль осуществляется с помощью ввод имени пользователя и секретной комбинации.
Обзор бонусной политики
Богатая поощрительная система — главное плюс платформы. Клиенты зарабатывают многочисленные подарки:
Начальные подарки
Новые игроки вправе претендовать на значительный подарок за оформление. Обычно это пакет возможностей, содержащий:
– Долевую прибавку к дебютному депозиту
– Даровые вращения
– Призовые финансы на кошелек
Промокоды и эксклюзивные опции
Постоянные промокоды обеспечивают обретать экстра привилегии. Использовать их возможно в предназначенном меню личного профиля.
Бесплатные вращения и кэшбек
Фриспины — это шанс запускать слоты без применения персональных финансов. Кэшбек предполагает определенный возмещение утраченных сумм.
Ассортимент слотов
Игровая сайт представляет огромную библиотеку игр.
Слоты
Многообразие игровых машин удивляет представление. Представлены стандартные трехбарабанные машины и продвинутые автоматы с интересной картинкой.
Live казино
Секция Live игр погружает пользователей в антураж истинного гемблинг зала. Умелые ведущие организуют партии в живом эфире.
Соревнования и доски почета
Регулярные конкурсы вносят азарта и дают перспективу получить крупные выигрыши.
Мобильная реализация и софт
Современные инновации помогают развлекаться в удобном точке. Мобильная вариант автоматически настраивается под размер гаджета.
Загрузить программу можно для операционных сред iOS и Android. Приложение предоставляет:
– Оперативный вход
– Стабильную производительность
– Мгновенные-сообщения об предложениях
– Интуитивный вид
Денежные действия
Платформа принимает различные способы ввода и получения сумм:
– Банковские системы
– Электронные кошельки
– Криптовалюты
– Денежные переводы
Всевозможные операции проходят через надежное протокол, что защищает целостность приватных данных.
Отдел помощи
Компетентная бригада ассистанса трудится круглосуточно. Контактировать с специалистами возможно через:
– Live-чат
– Почтовую почту
– Контакт
– Коммуникационные ресурсы
Итоги
Главный сайт и его рабочее зеркало обеспечивают участникам стабильный и удобный вход к увлекательным играм. Богатые бонусы, разнообразный спектр развлечений и качественная сервис обеспечивают игру предельно комфортной и результативной.
Люблю сайт boostwin, он очень понятный в использовании!
https://damki.net/go/?https://boostwin-kz-slots.kz/login
Актуальные онлайн-казино обеспечивают клиентам массу вариантов для беспроблемной игры. Центральный портал РџРёРЅРєРѕ предоставляет вход ко всем сервисам и развлечениям. Однако при наличии системных трудностей на помощь прибывают функционирующие дубликаты.
Что есть собой функционирующее зеркало
Альтернативный адрес казино — это полная версия оригинального сайта, находящаяся по дополнительному URL. Легитимное зеркало поддерживает все характеристики, вместе с регистрацию, вход в собственный кабинет, вознаграждения и бонусные коды.
Альтернативный сайт на сегодня дает:
– Постоянный доступ к игровым слотам
– Стопроцентную защиту персональных информации
– Удержание средств и хронологии платежей
– Возможность использования всех бонусных программ
Создание учетной записи на официальном сайте
Этап регистрации отнимает пару минут. Свежеиспеченным геймерам необходимо:
1. Зайти на главный портал или функционирующее зеркало
2. Кликнуть кнопку «Регистрация»
3. Указать требуемые сведения
4. Подтвердить электронную почту
5. Указать кодовое слово при существовании
После завершения регистрации игроки обретают подарок за регистрацию, какой может иметь free spins или денежное вознаграждение.
Доступ в индивидуальный кабинет
Персональный кабинет предоставляет всеобъемлющий мониторинг над игровым процессом. Через собственный раздел допускается:
– Финансировать депозит
– Снимать выплаты
– Задействовать купоны
– Мониторить хронологию ставок
– Участвовать в турнирах
– Получать кешбэк
Описание бонусов и промо-предложений
Выгодная премиальная система — существенное плюс ресурса. Центральные категории бонусов:
Начальный подарок
Начинающие обретают выгодное поощрение на стартовые пополнения. Сумма премии может доходить до 100-200% от размера пополнения.
Бонусные спины
Бесплатные спины даются для известных слотов. Объем free spins колеблется от 10 до 500 штук.
Кэшбек
Еженедельный или помесячный возврат процента проигранных средств. Обычный процент кэшбека — 5-15%.
Турниры
Регулярные турниры с крупными призовыми банками. Участники борются за верхние места в турнирной таблице.
Портативная версия и софт
Смартфонная версия разрешает наслаждаться игрой с каждого аппарата. Геймеры могут установить программу для iOS и Android или эксплуатировать веб версию.
Плюсы смартфонного приложения:
– Быстрая прогрузка игр
– Удобный интерфейс
– Пуш-нотификации о промо
– Доступ через Touch ID
Слоты и Live казино
Развлекательная подборка насчитывает множество игр от топовых провайдеров.
Известные типы автоматов:
– Традиционные автоматы
– Видеослоты с бонусными раундами
– Прогрессивный джекпот игры
– Мегавейс слоты
Live игровой зал
Категория live игорный зал предоставляет развлечение с профессиональными крупье. Представлены традиционные развлечения:
– Европейская рулетка
– Блэкджек
– Baccarat
– Карибский покер
Как найти функционирующее зеркало
Раздобыть свежую ссылку на зеркало разрешается множественными вариантами:
1. Подписаться на емейл-уведомления
2. Следить за апдейтами в соц сетях
3. Контактировать в департамент поддержки
4. Заложить рабочее зеркало в избранное
Заключение
Официальный ресурс и его действующие альтернативные адреса обеспечивают постоянный путь к развлекательным слотам. Богатые поощрения, многочисленные промокоды, удобное портативное программа и отличная сервис поддержки создают игровой опыт крайне комфортным и надежным.
<a href="//cherryaisle.shop/](https://cherryaisle.shop/)” />see cherryaisle store – Playful store name, navigation feels light and easy.
important site https://prm4u.com/telegram-smm-panel
Thanks for another wonderful article. Where else may anybody get
that kind of info best real estate agent in Chicago IL such a
perfect approach of writing? I have a presentation next week, and I’m on the look for such information.
vendor portal link – Layout is clear, moving between categories feels seamless
https://petmedsmonitor.shop/# pet drugs online
I enjoy playing at this casino https://creskierniewice.edu.pl/ because it feels secure and well-optimized. Live tables are interactive, slots offer different styles, and the overall experience remains consistent over time.
WalnutVendorFinderOnline – Skimmed lightly, the layout feels clean and straightforward.
Анализ основного веб-сайта
Актуальные виртуальные казино предлагают пользователям широкий ассортимент забав и возможностей. Лицензионный сайт 888старз сайт гарантирует защищенный доступ к гемблинг услугам.
Рабочее зеркало: путь в настоящий момент
Альтернативный адрес является в качестве идентичную версию лицензионного веб-сайта. Актуальное зеркало дает возможность игрокам миновать вероятные ограничения.
Плюсы эксплуатации зеркала
Принципиальные преимущества включают:
– Непрерывный доступ к сайту
– Хранение всех возможностей главного портала
– Безопасность индивидуальных данных
– Аналогичный функционал
Регистрация на сайте
Процедура открытия счета выделяется доступностью и практичностью. Новые клиенты обязаны:
1. Открыть лицензионный портал или его зеркало
2. Выбрать на пункт регистрации
3. Внести требуемые сведения
4. Валидировать почтовую ящик
5. Совершить дебютный вход
Бонус за открытие счета
Начинающие забирают значительный вступительный презент. Данное поощрение в состоянии включать:
– Денежные средства
– Безвозмездные вращения
– Повышенный коэффициент кэшбека
Логин в индивидуальный профиль
Зарегистрированные пользователи имеют возможность мгновенно войти в собственный аккаунт, эксплуатируя учетные данные и шифр. Собственный кабинет предоставляет возможность к:
– Регулированию средствами
– Хронологии операций
– Работающим подаркам
– Конфигурации аккаунта
Призы и кампании
Ресурс систематически проводит различные мероприятия для участников.
Типы бонусов
Основные типы поощрений:
– Денежные начисления – часть от объема внесения
– Прокруты – бесплатные вращения в слотах
– Кэшбэк – возмещение фрагмента проигранных денег
– Призовые трофеи – призы за участие в состязаниях
Ваучеры
Специальные ваучеры помогают заработать добавочные преимущества. Игроки способны отыскать их на тематических площадках или заработать в рассылке.
Мобильная редакция и софт
Современные игроки любят мобильный досуг.
Функции mobile версии
– Responsive интерфейс для разнообразных аппаратов
– Совокупный вход к развлечениям
– Оперативная подгрузка
– Комфортное навигация
Скачать программу
Mobile софт открыто для загрузки на девайсы с базовыми системами Android и iOS. Программа дает:
– Бесперебойную производительность
– Мгновенные алерты о призах
– Оперативный запуск к любимым слотам
Гемблинг выбор
Платформа предлагает обширную коллекцию гемблинг развлечений.
Аппараты
Ассортимент игровых слотов включает:
– Традиционные слоты
– Передовые слоты
– Прогрессивные машины
– Тематические слоты
Live игры
Секция настоящих дилеров предоставляет право играть с профессиональными крупье. Открыты:
– Европейская рулетка
– Блек-джек
– Баккара
– Техасский холдем
Состязания
Регулярные соревнования дают возможность участникам конкурировать за солидные призовые пулы. Турнирная система обновляется регулярно.
Банковские транзакции
Сайт поддерживает обилие опций пополнения и получения сумм:
– Кредитные карты
– Онлайн платежные системы
– Wire трансферы
– Цифровые валюты
Любые платежи проходят конфиденциально с применением актуальных методов защиты.
Сервис поддержки
Профессиональная команда support трудится без перерыва. Коннектиться с операторами доступно через:
– Интерактивный чат
– Почтовую почту
– Контактный номер
– Социальные сети
Секьюрити и регулирование
Портал оперирует на основании действительной лицензии. Это гарантирует:
– Справедливость азартного геймплея
– Защиту индивидуальных сведений
– Оперативные выплаты
– Контролируемый игровой процесс
Итог
Основной сайт и его действующие альтернативные адреса предоставляют пользователям абсолютный спектр возможностей для удобной и профитной игры. Значительные призы, различные автоматы, профессиональная помощь и надежная платформа операций превращают платформу оптимальным опцией для любителей азартных развлечений.
ремонт xbox одинцово Мы осуществляем переустановку Windows на ноутбуках и телевизорах, ремонт электроники в Одинцово с выездом на дом, замену HDMI на ноутбуках и PS5, удаление вирусов с ноутбуков.
Обзор оригинального портала
Современное онлайн-казино предлагает своим игрокам широкий ассортимент возможностей и бонусов. Оригинальный ресурс Glory скачать действует постоянно, обеспечивая путь к популярным играм, live-казино и обширным промо.
Действующее зеркало: вход к ресурсу
Что такое зеркало казино
Альтернатива является собой абсолютную копию основного сайта с отличным сетевым путем. Функционирующее зеркало обеспечивает участникам преодолевать блокировки и иметь надежный подключение к предпочитаемым играм.
Как отыскать текущее зеркало сегодня
Актуальные URL на главное зеркало размещаются через:
– Email рассылку
– Основные медийные сети
– Отдел сопровождения
– Affiliated ресурсы
Оформление на платформе
Процедура оформления
Регистрация требует пару минут и предполагает данные шаги:
1. Вход на главный веб-сайт или функционирующее зеркало
2. Нажатие опции “Зарегистрироваться”
3. Заполнение учетных данных
4. Проверка email или номера
5. Установка пароля
Бонус за открытиесчета
Начинающие клиенты зарабатывают солидные начальные вознаграждения:
– Денежные деньги на кошелек
– Бесплатныевращения для симуляторов
– Усиленный процент возврата
– Специальные купоны
Логин в персональный аккаунт
Постоянные участники имеютвозможность совершить авторизацию через оригинальный веб-сайт или действующее зеркало. Для этого необходимо набрать никнейм и секретнуюкомбинацию, установленные при открытиисчета.
Возможности индивидуального раздела
В индивидуальном кабинете открыты данные возможности:
– Управление персональными информацией
– Внесение депозита
– Получение выигрышей
– Применение бонусов
– Проверка статистики транзакций
– Регистрация в состязаниях
Бонусы и промо
Категории поощрений
Казино награждает своих пользователей различными поощрительными системами:
– Начальный бонус — выгодные поощрения на начальные вклады
– Бесплатныевращения — бонусные прокруты в популярных играх
– Возврат — еженедельный возмещение части ставок
– Схема поощрения — особые льготы для верных игроков
Коды и их ввод
Уникальные промокоды предоставляют расширенные поощрения. Для использования требуется набрать шифр в соответствующее графу в личном профиле.
Развлекательный ассортимент
Симуляторы
Коллекция азартных слотов содержит массу вариантов от топовых производителей:
– Обычные автоматы
– Современные развлечения
– Прогрессивные автоматы
– Брендовые игры
Live казино
Секция Live-казино предлагает взаимодействие с реальными операторами в режиме онлайн стрима:
– Европейскаярулетка
– Блэкджек
– PuntoBanco
– Покер
Турниры
Систематические соревнования с большими джекпотными пулами проводятся еженедельно. Игроки сражаются за победу в турнирнойсетке.
Смартфонная реализация и APP
Мобильная платформа веб-сайта
Оригинальный сайт полностью адаптирован для портативных аппаратов. Участники имеютвозможность играть слоты сразу через обозреватель без потребности инсталляции.
APP для установки
Авторское мобильное программа доступно для получения на аппараты с операционными средами Android и iOS. APP дает:
– Оперативный вход к развлечениям
– Надежную функциональность
– Моментальные-сообщения о акциях
– Удобный оформление
Резюме
Оригинальный сайт казино и его рабочие альтернативы предоставляют игрокам всесторонний путь к высококлассным игровым играм. Солидные поощрения, многочисленные акции, функциональная адаптивная адаптация и квалифицированная поддержка делают развлекательный процесс крайне удобным и результативным.
melbet промокод melbet промокод .
букмекерская контора мелбет официальный сайт букмекерская контора мелбет официальный сайт .
For figures
get a loan with bad credit guaranteed
to find support.
quick browse – Stumbled on this platform, interface is neat and navigation is easy.
https://paper.wf/vtdcrk8coa
http://twchess.lionfree.net/discuz/home.php?mod=space&uid=99361
Передовые онлайн-казино обеспечивают геймерам богатый спектр функций для приятной игры. Переход к площадке 888starz casino реализуется через основной сайт или действующее зеркало.
Что такое действующее зеркало казино
Действующее зеркало — это запасной линк официального веб-сайта казино. Такие копии создаются для гарантирования непрерывного доступа к развлекательной площадке.
Копия актуальное абсолютно дублирует характеристики официального домена. Пользователи получают аналогичный выход ко всем услугам, включая регистрацию, пополнение кошелька и обналичивание денег.
Оформление профиля на главном портале
Алгоритм оформления учетной записи требует всего буквально минут. Новым участникам требуется:
1. Попасть на лицензионный ресурс или текущее официальное зеркало
2. Нажать кнопку “Регистрация”
3. Указать обязательные информацию
4. Проверить email почту
5. Ввести купон при присутствии
После окончания открытия профиля участник получает подарок за регистрацию, который может включать фриспины или финансовое премию.
Авторизация в личный кабинет
Личный кабинет — это защищенная территория, где пользователи могут администрировать своим аккаунтом. Для логина нужно внести имя пользователя и password.
В пользовательском кабинете имеются нижеперечисленные инструменты:
– Проверка истории платежей
– Использование купонов
– Контроль призами
– Присоединение в состязаниях
– Проверка кэшбека
– Настройка профиля
Призы и промо
Развлекательная площадка предлагает привлекательные бонусы:
Приветственный бонус — начинающие приобретают существенное поощрение на дебютные взносы.
Free spins — дарятся как при регистрации, так и в ходе различных акций.
Возврат средств — регулярный компенсация фрагмента проигранных финансов.
Промокоды — особые коды, дающие право к особым бонусам.
Обзор развлекательных секций
Игровые автоматы
Библиотека автоматов насчитывает множество игр от топовых поставщиков. Геймеры откроют как стандартные машины, так и новые 3D-слоты с захватывающей анимацией.
Live казино
Зона Live казино дарит опцию развлекаться с живыми крупье в формате реального времени. Открыты распространенные игры: рулетка, блэкджек, баккара, покер.
Состязания
Постоянные состязания с значительными призовыми суммами притягивают сотни игроков. Чемпионы обретают денежные призы и уникальные бонусы.
Портативная версия и app
Портативная версия сайта позволяет играть с каждого аппарата. Интерфейс автоматически настраивается под габариты экрана.
Получить app можно для гаджетов на Android и iOS. Телефонное приложение обладает всеми характеристиками полной версии.
Как найти рабочее зеркало на текущий день
Актуальные URL зеркал регулярно меняются. Найти действующую адрес можно несколькими путями:
– Через сервис техподдержки
– В подлинных информационных сетях
– По электронной подписке
– На специализированных сайтах
Охрана и официальность
Официальный портал оперирует на основе зарубежной сертификата. Все транзакции оберегаются передовыми системами защиты.
Приватность пользовательских данных гарантируется в полном формате.
Резюме
Лицензионный домен и его рабочие альтернативы дарят участникам 24/7 доступ к качественным азартным услугам. Щедрые бонусы, всевозможные автоматы, компетентная поддержка — все это создает гемблинговый досуг чрезвычайно приятным и захватывающим.
Подключение к порталу и действующие ссылки
Актуальные интернет казино гарантируют участникам огромный набор развлечений. Центральный веб-сайт Мотор предоставляет защищенный доступ ко всем функциям. При этом порой случаются случаи, когда необходимо альтернативный путь доступа.
Что являет собой собой функционирующее зеркало
Действующее зеркало — это абсолютная копия главного портала с альтернативным URL расположением. Альтернатива сегодня обеспечивает избегать существующие ограничения и поддерживать постоянный доступ к популярным развлечениям.
Официальное зеркало обладает всеми характеристиками, что и основной веб-сайт:
– Совокупный перечень автоматов
– Личный профиль с сохраненными информацией
– Все поощрения и акции
– Надежные платежные переводы
Создание аккаунта и вход в сервис
Процесс открытия аккаунта на портале отнимает пару секунд. Свежим игрокам следует:
1. Перейти на актуальное зеркало сейчас
2. Щелкнуть клавишу «Создать аккаунт»
3. Указать обязательные сведения
4. Верифицировать цифровую почту или данные смартфона
5. Активировать поощрение за регистрацию
Авторизация в личный аккаунт реализуется путем предоставление никнейма и кода доступа.
Анализ поощрительной программы
Выгодная наградная политика — главное плюс ресурса. Клиенты получают всевозможные бонусы:
Приветственные бонусы
Свежие игроки имеют возможность надеяться на значительный приз за оформление. Традиционно это комплект опций, объединяющий:
– Частичную премию к начальному вкладу
– Даровые кручения
– Дополнительные финансы на баланс
Купоны и особые предложения
Периодические коды позволяют активировать экстра привилегии. Активировать их возможно в особом окне собственного раздела.
Спины и кэшбек
Free spins — это вариант вращать автоматы без применения персональных финансов. Компенсация предполагает процентный компенсацию потерянных сумм.
Библиотека игр
Азартная платформа предлагает внушительную базу игр.
Видеослоты
Многообразие слотов восхищает представление. Представлены традиционные 3-барабанные аппараты и новые игры с занимательной картинкой.
Live зал
Раздел Live казино транспортирует участников в атмосферу реального развлекательного клуба. Квалифицированные крупье осуществляют раунды в реальном времени.
Конкурсы и лидерборды
Систематические соревнования обеспечивают остроты и предоставляют вариант забрать внушительные награды.
Mobile реализация и клиент
Новые разработки помогают играть в любом месте. Мобильная реализация независимо оптимизируется под размер устройства.
Получить софт разрешено для операционных систем iOS и Android. Клиент предоставляет:
– Оперативный запуск
– Бесперебойную производительность
– Мгновенные-алерты об акциях
– Интуитивный облик
Денежные операции
Казино принимает различные варианты депозита и получения денег:
– Кредитные карты
– Виртуальные платформы
– Цифровые валюты
– Денежные переводы
Всевозможные операции реализуются через зашифрованное подключение, что гарантирует целостность приватных данных.
Сервис support
Профессиональная группа ассистанса трудится круглосуточно. Контактировать с операторами можно через:
– Интерактивный-чат
– Электронную почту
– Телефон
– Общественные каналы
Выводы
Официальный веб-сайт и его рабочее зеркало обеспечивают клиентам стабильный и приятный путь к азартным занятиям. Щедрые награды, разнообразный спектр развлечений и высокая поддержка обеспечивают игру исключительно комфортной и доходной.
Pure Picks Market – Clear interface, perfect for discovering and creating new ideas.
This is really interesting, You’re a very skilled blogger. I have joined your feed and look forward to seeking more of your excellent post. Also, I’ve shared your website in my social networks!
https://slovakia.kiev.ua/okupnist-instrumentu-yak-ultrazvukovyi-nizh.html
sky vendor portal – Content is clear and concise, makes exploring simple
мелбет зеркало скачать на андроид мелбет зеркало скачать на андроид .
прогулка по рекам и каналам arenda-yakhty-spb.ru .
речные прогулки спб arenda-yakhty-spb-1.ru .
ambervendorcollective.shop – Nice platform overall and browsing the products feels quick and smooth
Актуальные онлайн казино предлагают клиентам обширный спектр опций для комфортной игры. Тем не менее иногда вход к официальному порталу может быть недоступным. В таких ситуациях на помощь спешит 888старз казино, которое предоставляет стабильный путь ко всем функциям платформы.
Что такое функционирующее зеркало казино
Копия — это полная дубликат основного веб-сайта, которая хостится по другому интернет-адресу. Копия содержит полный функционал главного портала, включая индивидуальный кабинет, средства и запись транзакций.
Основные выгоды эксплуатации зеркала:
– Непрерывный доступ к сайту
– Стопроцентная аналогичность возможностей
– Конфиденциальность пользовательских данных
– Удержание существующих поощрений
Как отыскать действующее зеркало сегодня
Существует множество безопасных путей получения актуальной ссылки:
Авторизованные каналы:
1. Электронная рассылка — руководство периодически отправляет сообщения с свежими URL
2. Медийные сети — официальные аккаунты размещают текущую новости
3. Департамент поддержки — операторы выдают достоверные домены
4. Портативное приложение — дает возможность преодолевать блокировки
Открытие счета на основном сайте
Операция оформления занимает только немного минут и состоит из таких шагов:
1. Попадание на лицензионный портал или рабочее зеркало
2. Нажатие на иконку «Открыть счет»
3. Указание персональной бланка
4. Валидация электронной почты или телефонного номера
5. Активация бонуса за регистрацию при присутствии промокода
Только что зарегистрированные игроки получают значительный приветственный презент, который может включать free spins, финансовые призы или возврат средств.
Вход в личный кабинет
Авторизация на ресурсе реализуется стандартным способом. Нужно внести имя пользователя и кодовое слово, указанные при оформлении.
Значимые моменты для надежного входа:
– Эксплуатируйте надежный код
– Активируйте двухэтапную проверку
– Не фиксируйте реквизиты на посторонних устройствах
– Проверяйте доменную строку браузера
Описание премиальной структуры
Игорный портал радует пользователей различными вознаграждениями и кампаниями:
Вступительный букет
Дебютанты имеют возможность полагаться на значительное поощрение за дебютный вклад. Традиционно это пропорциональная прибавка к переведенной объему плюс free spins для топовых слотов.
Регулярные предложения
– Недельный cashback — возмещение доли потерянных средств
– Призы на повторные вклады
– Особые промо по знаменательным датам
– Соревнования с значительными призовыми пулами
План лояльности
Регулярные клиенты собирают единицы за произвольную бет, которые затем конвертируются на настоящие деньги, free spins или особые привилегии.
Купоны: как задействовать
Кодовые комбинации — это особые комбинации букв и цифр, обеспечивающие возможность к бонусным привилегиям.
В каких местах взять актуальные промокоды:
– Авторизованные медийные сети казино
– Партнерские ресурсы
– Email-информирование
– Тематические группы
Прописывается промокод в предназначенное поле при регистрации или зачислении средств депозита.
Телефонная версия и приложение
Актуальные пользователи выбирают проводить время с смартфонных девайсов. Сайт обеспечивает 2 метода для беспроблемной мобильной игры.
Мобильная модификация
Веб версия автоматически оптимизируется под диагональ экрана. Не просит скачивания и оперирует в любом современном браузере.
Телефонное приложение
Загрузить софт можно для девайсов на Android и iOS. Выгоды app:
– Скоростная открытие
– Бесперебойная функционирование
– Push-уведомления о акциях
– Независимый избегание блокировок
Операция скачивания прост: нужно попасть на ресурс с телефонного девайса и следовать руководству.
Гемблинг ассортимент
Библиотека аппаратов включает тысячи вариантов от топовых поставщиков.
Слоты
Развлекательные машины — самая популярная группа забав. Представлены обычные 3-барабанные машины, современные графические аппараты с премиальными раундами, а также растущие джекпоты.
Live казино
Секция с реальными крупье предоставляет испытать дух подлинного казино. Представлены варианты с рулеткой.
Передача осуществляется в отличном четкости, присутствует общение с ведущим и остальными участниками.
Турниры
Постоянно запускаются состязания по многочисленным играм. Включение предоставляет право выиграть финансовые награды, free spins или уникальные презенты.
Транзакционные действия
Ресурс предлагает широкий выбор финансовых инструментов:
– Дебетовые карты
– Электронные системы
– Биткоин
– Финансовые транзакты
Наименьшая величина взноса — посильная для основной части геймеров. Вывод призов осуществляется в минимальные временные рамки.
Служба поддержки
Опытные операторы настроены поддержать 24/7. Имеются такие способы контакта:
– Веб-чат
– Email
– Телефонная поддержка
– Общественные сети
Пояснения на распространенные вопросы можно получить в зоне FAQ.
Заключение
Лицензионный веб-сайт казино и его актуальные зеркала дают геймерам абсолютный доступ ко всем сервисам сайта. Солидные привилегии, удобная смартфонная версия, гигантский каталог слотов и квалифицированная поддержка превращают азартный опыт исключительно удобным и защищенным.
Современные онлайн-казино обеспечивают игрокам широкий ассортимент развлечений и призовых вариантов. Доступ к ресурсу осуществляется через основной портал или его актуальное зеркало Gama casino, что обеспечивает непрерывную деятельность.
В чем суть рабочее зеркало казино
Альтернатива — это полная версия главного портала, созданная для решения ограничений. Действующее зеркало дает возможность участникам получить подключение к любимым играм в каждое время.
Проверенное зеркало содержит всеми опциями главного веб-сайта:
– Совокупный список слотов
– Аккаунт с внесенными данными
– Свежие акции
– Надежные платежные действия
Регистрация на главном портале
Процесс регистрации составляет всего считанные минут. Свежим участникам требуется:
1. Попасть на официальный портал или рабочее зеркало
2. Щелкнуть на кнопку “Создать аккаунт”
3. Заполнить требуемые сведения
4. Проверить email
5. Произвести стартовый депозит
Бонус за регистрацию выдается незамедлительно после окончания всех этапов.
Вход в личный кабинет
Действующие клиенты могут выполнить авторизацию используя:
– Логин и пароль
– Номер контакта
– Контактный email
Личный кабинет предоставляет шанс к контролю счетом, истории ставок и доступным промокодам.
Промо и кампании
Развлекательная платформа радует регулярных пользователей щедрыми бонусами:
Стартовый комплект
– Надбавка на дебютный депозит до 100%
– Фриспины на популярные машины
– Особые поощрения за следующие взносы
Промокоды
Уникальные коды обеспечивают право на получение эксклюзивных призов. Актуальные купоны выкладываются в категории “Бонусы”.
Cashback
Постоянный кешбэк равен до 10% от использованных денег. Компенсация начисляется автоматически.
Программа лояльности
Регулярные пользователи накапливают очки, которые переводятся на настоящие деньги или фриспины.
Мобильная версия и APP
Ради комфорта пользователей разработана удобная mobile версия. Гибкий вид помогает легко участвовать с произвольного карманного гаджета.
Достоинства APP:
– Моментальный вход к развлечениям
– Настроенный облик
– Стабильная работа
– Сообщения о новых бонусах
Скачать APP можно безвозмездно с основного сайта для девайсов на Android и iOS.
Библиотека игр
Игровые автоматы
Библиотека включает более 2000 игр от ведущих студий:
– Классические машины
– Современные автоматы
– Jackpot игры
– Сюжетные слоты
Live казино
Раздел Live игр предоставляет участие с настоящими дилерами в прямом эфире:
– Roulette
– Двадцать одно
– Карты
– Карточный покер
Состязания
Систематические турниры с большими выигрышными суммами запускаются каждую неделю. Вход в конкурсах открыто всем активным участникам.
Финансовые методы
Депозиты и снятия средств выполняются через распространенные сервисы:
– Кредитные пластик
– Онлайн счета
– Крипто
– Банковские транзакции
Наименьший вклад — от 100 рублей. Получение выигрышей осуществляется в течение 24 ч.
Отдел поддержки
Непрерывная отдел саппорта может помочь в разрешении любых задач:
– Мессенджер
– Email
– Контактный номер
– Общественные сети
Защита и документ
Главный веб-сайт оперирует на почве международной документа. Всевозможные информация пользователей охранены актуальным SSL-шифрованием.
Итог
Актуальное зеркало гарантирует непрерывный доступ к излюбленным автоматам, щедрым бонусам и удобным возможностям. Создайте аккаунт сегодня и приобретите начальный подарок!
Mens RX Index: Mens RX Index – cheap erection pills
visit here – Noticed this site, navigation feels intuitive and layout is clean
visit ravensage vendor – Very clean layout and browsing feels simple and intuitive
open reedmarket shop – Simple and tidy, navigation feels smooth.
see the vendor place site – Browsing is smooth and the pages feel structured
bs2web at bs2web at
Certified Canada Rx: Certified Canada Rx – Certified Canada Rx
hiveloft marketplace hub – Quick visit, concept seems smart and browsing was effortless.
Передовые онлайн-казино дают игрокам внушительный набор развлечений и премиальных программ. Подключение к площадке осуществляется через официальный сайт или его действующее зеркало казино Дэдди, что дает бесперебойную активность.
Чем является действующее зеркало казино
Копия — это полная версия главного сайта, созданная для преодоления барьеров. Действующее зеркало дает возможность игрокам обрести доступ к любимым слотам в каждое время.
Официальное зеркало имеет всеми функциями первоначального веб-сайта:
– Весь перечень игр
– Аккаунт с внесенными информацией
– Текущие акции
– Надежные денежные операции
Создание аккаунта на основном портале
Процесс регистрации требует всего пару минут. Начинающим участникам необходимо:
1. Зайти на официальный сайт или актуальное зеркало
2. Нажать на элемент “Создать аккаунт”
3. Внести нужные сведения
4. Подтвердить электронную почту
5. Внести дебютный депозит
Приветственный бонус выдается незамедлительно после прохождения всех шагов.
Вход в аккаунт
Действующие игроки могут осуществить подключение используя:
– Логин и шифр
– Цифры сотового
– Электронную почту
Аккаунт открывает право к администрированию финансами, истории операций и доступным поощрениям.
Поощрения и кампании
Азартная система вознаграждает регулярных участников выгодными вознаграждениями:
Начальный бонус
– Надбавка на стартовый взнос до 100%
– Free spins на популярные автоматы
– Экстра награды за последующие взносы
Ваучеры
Уникальные купоны обеспечивают право на получение уникальных вознаграждений. Свежие купоны публикуются в блоке “Предложения”.
Cashback
Периодический бонус насчитывает до 10% от использованных сумм. Компенсация зачисляется моментально.
Схема лояльности
Постоянные игроки получают единицы, которые превращаются на подлинные деньги или бесплатные вращения.
Мобильный сайт и программа
Для практичности клиентов создана функциональная адаптивный сайт. Отзывчивый дизайн обеспечивает беспрепятственно играть с любого портативного гаджета.
Преимущества программы:
– Моментальный доступ к автоматам
– Улучшенный вид
– Бесперебойная активность
– Нотификации о актуальных акциях
Получить софт можно даром с проверенного портала для устройств на Android и iOS.
Библиотека игр
Машины
Каталог вмещает более 2000 слотов от известных разработчиков:
– Традиционные слоты
– Современные автоматы
– Джекпот-слоты
– Брендовые развлечения
Live казино
Секция Live развлечений предоставляет игру с настоящими крупье в прямом режиме:
– Roulette
– Карточная игра
– Карты
– Карточный покер
Состязания
Периодические соревнования с солидными выигрышными суммами организуются регулярно. Присоединение в соревнованиях открыто всем созданным игрокам.
Расчетные варианты
Депозиты и снятия денег выполняются через известные сервисы:
– Банковские средства
– Виртуальные кошельки
– Криптовалюта
– Банковские транзакции
Стартовый депозит — от 100 рублей. Снятие выигрышей обрабатывается в течение 24 времени.
Сервис помощи
24/7 команда саппорта способна содействовать в разрешении всех ситуаций:
– Live chat
– Email
– Телефон
– Социальные сети
Охрана и разрешение
Главный ресурс работает на фундаменте мировой разрешения. Каждые данные пользователей защищены новейшим SSL-криптованием.
Вывод
Актуальное зеркало предоставляет стабильный соединение к предпочитаемым слотам, выгодным промокодам и практичным услугам. Зарегистрируйтесь прямо сейчас и получите стартовый бонус!
browse cedarwharf portal – Catchy and clear branding, makes shopping enjoyable.
site link – Checked this site randomly, layout is clean and easy to navigate
Обзор официального ресурса
Актуальные виртуальные казино предоставляют игрокам разнообразный выбор забав и перспектив. Главный веб-сайт Bet Andreas казино предоставляет безопасный путь к игровым функциям.
Действующее зеркало: доступ на сегодня
Дублирующий портал является как точную версию основного веб-сайта. Официальное зеркало позволяет игрокам преодолевать возможные блокировки.
Достоинства задействования зеркала
Ключевые преимущества охватывают:
– Беспрерывный путь к порталу
– Сохранение всех опций базового портала
– Сохранность персональных данных
– Идентичный набор функций
Регистрация на сайте
Процедура создания аккаунта отличается легкостью и эргономичностью. Недавние участники должны:
1. Перейти на лицензионный веб-сайт или его зеркало
2. Щелкнуть на клавишу оформления
3. Внести требуемые информацию
4. Верифицировать почтовую почту
5. Осуществить дебютный авторизацию
Вознаграждение за открытие счета
Новички забирают щедрый приветственный подарок. Данное премия имеет возможность охватывать:
– Монетарные средства
– Complimentary вращения
– Расширенный уровень возврата
Доступ в индивидуальный раздел
Активные игроки способны оперативно зайти в собственный кабинет, эксплуатируя никнейм и ключ. Персональный профиль предоставляет возможность к:
– Администрированию депозитом
– Журналу транзакций
– Действующим поощрениям
– Опциям аккаунта
Бонусы и предложения
Сайт периодически проводит различные промо-кампании для игроков.
Разновидности подарков
Главные формы призов:
– Финансовые бонусы – коэффициент от величины взноса
– Фриспины – complimentary вращения в слотах
– Компенсация – возмещение фрагмента утраченных сумм
– Конкурсные трофеи – премии за выступление в состязаниях
Купоны
Особые ваучеры дают возможность приобрести экстра привилегии. Клиенты способны обнаружить их на тематических площадках или получить в рассылке.
Мобильная редакция и софт
Прогрессивные пользователи любят портативный гейминг.
Возможности портативной версии
– Гибкий облик для различных устройств
– Целостный путь к слотам
– Моментальная подгрузка
– Эргономичное управление
Скачать софт
Переносное софт предложено для загрузки на аппараты с базовыми системами Android и iOS. App предоставляет:
– Бесперебойную функциональность
– Всплывающие оповещения о призах
– Оперативный доступ к избранным развлечениям
Развлекательный портфель
Игровой клуб дает внушительную галерею гемблинг услуг.
Игровые машины
Библиотека развлекательных машин насчитывает:
– Обычные игры
– Видео игры
– Джекпотные автоматы
– Тематические автоматы
Live казино
Область лайв развлечений обеспечивает шанс участвовать с реальными крупье. Представлены:
– Европейская рулетка
– Очко
– Baccarat
– Poker
Турниры
Систематические соревнования позволяют пользователям состязаться за значительные денежные банки. Призовая структура изменяется постоянно.
Банковские действия
Платформа поддерживает массу опций депозита и получения сумм:
– Дебетовые карты
– Цифровые кошельки
– Wire транзакции
– Криптовалюты
Любые операции выполняются безопасно с задействованием передовых систем защиты.
Департамент сопровождения
Профессиональная команда помощи действует постоянно. Соединиться с консультантами реально через:
– Online чат
– Email почту
– Телефон
– Social медиа
Охрана и лицензирование
Игровой клуб функционирует на базе официальной разрешения. Данное подтверждает:
– Прозрачность игрового геймплея
– Охрану личных информации
– Своевременные перечисления
– Контролируемый игровой процесс
Резюме
Главный ресурс и его действующие резервные страницы обеспечивают участникам совокупный ассортимент опций для удобной и профитной развлечений. Солидные призы, всевозможные автоматы, квалифицированная поддержка и защищенная платформа выплат создают казино превосходным вариантом для ценителей игровых забав.
see zenvendor hub – Marketplace idea looks fun, interested in more vendors signing up.
http://mensrxindex.com/# online prescription for ed
discover this store – Pages feel well structured and navigation is simple
HubMarketplaceWalnut – Checked some pages, the site feels organized and user-friendly.
Описание лицензионного портала
Прогрессивные онлайн казино предоставляют клиентам широкий выбор игр и перспектив. Основной ресурс андроид предоставляет проверенный вход к азартным возможностям.
Актуальное зеркало: путь прямо сейчас
Альтернативный адрес служит в качестве полную реплику основного сайта. Официальное зеркало дает возможность игрокам избегать вероятные барьеры.
Достоинства эксплуатации зеркала
Ключевые плюсы содержат:
– Беспрерывный доступ к платформе
– Поддержание полных возможностей базового сайта
– Сохранность персональных материалов
– Идентичный набор функций
Регистрация на портале
Механизм оформления профиля характеризуется легкостью и практичностью. Недавние пользователи должны:
1. Перейти на лицензионный ресурс или его зеркало
2. Выбрать на элемент оформления
3. Заполнить обязательные сведения
4. Валидировать почтовую ящик
5. Выполнить дебютный вход
Вознаграждение за регистрацию
Начинающие приобретают щедрый начальный бонус. Подобное поощрение имеет возможность содержать:
– Монетарные средства
– Бесплатные вращения
– Увеличенный процент компенсации
Авторизация в персональный кабинет
Активные клиенты имеют возможность оперативно получить доступ в свой аккаунт, задействуя учетные данные и пароль. Личный аккаунт предоставляет возможность к:
– Управлению балансом
– Хронологии транзакций
– Активным подаркам
– Настройкам профиля
Призы и кампании
Сайт систематически проводит различные промо-кампании для участников.
Виды подарков
Ключевые виды бонусов:
– Депозитные подарки – коэффициент от размера взноса
– Фриспины – безвозмездные раунды в слотах
– Кэшбэк – компенсация части утраченных средств
– Конкурсные трофеи – вознаграждения за состязание в состязаниях
Промокоды
Особые коды позволяют активировать дополнительные преимущества. Пользователи в состоянии найти их на аффилиатных площадках или взять в новостях.
Портативная вариант и программа
Актуальные клиенты выбирают мобильный геймплей.
Функции переносной версии
– Отзывчивый дизайн для разнообразных гаджетов
– Абсолютный доступ к слотам
– Моментальная загрузка
– Эргономичное использование
Загрузить софт
Переносное app предоставлено для загрузки на девайсы с базовыми системами Android и iOS. App предоставляет:
– Бесперебойную производительность
– Мгновенные сообщения о предложениях
– Быстрый путь к избранным автоматам
Игровой каталог
Игровой клуб дает огромную подборку азартных забав.
Игровые машины
Ассортимент азартных аппаратов включает:
– Стандартные машины
– Видео аппараты
– Накопительные машины
– Лицензионные игры
Live казино
Область живых дилеров предоставляет опцию состязаться с профессиональными дилерами. Представлены:
– Американская рулетка
– Блек-джек
– Баккара
– Карибский покер
Турниры
Постоянные конкурсы позволяют клиентам бороться за солидные призовые банки. Призовая программа актуализируется постоянно.
Финансовые транзакции
Платформа предлагает обилие опций зачисления и получения финансов:
– Банковские карточки
– Электронные платежные системы
– Wire переводы
– Цифровые валюты
Абсолютно все операции производятся безопасно с использованием современных систем кодирования.
Отдел support
Профессиональная отдел поддержки работает 24/7. Коннектиться с специалистами возможно через:
– Онлайн чат
– Почтовую почту
– Контактный номер
– Социальные медиа
Безопасность и аккредитация
Казино оперирует на базе официальной аккредитации. Данное удостоверяет:
– Справедливость развлекательного процесса
– Охрану индивидуальных сведений
– Своевременные выплаты
– Ответственный геймплей
Итог
Основной портал и его рабочие зеркала предоставляют игрокам полный комплекс услуг для удобной и профитной времяпрепровождения. Солидные бонусы, разнообразные игры, профессиональная поддержка и защищенная система выплат делают портал лучшим опцией для любителей развлекательных игр.
спарк казино зеркало сегодня Spark Casino: лотереи.
Нынешние онлайн-казино гарантируют игрокам разнообразный спектр опций для комфортной времяпрепровождения. Доступ к площадке Kush сайт официальный производится через главный домен или актуальное зеркало.
Что такое действующее зеркало казино
Актуальное зеркало — это запасной линк официального сайта казино. Такие клоны создаются для поддержания бесперебойного подключения к азартной платформе.
Зеркало на сегодня полностью повторяет возможности основного ресурса. Клиенты получают идентичный доступ ко всем сервисам, включая регистрацию, внесение депозита счета и получение выигрышей.
Оформление профиля на лицензионном сайте
Механизм регистрации длится всего считанные моментов. Свежим игрокам необходимо:
1. Зайти на главный ресурс или рабочее настоящее зеркало
2. Нажать кнопку “Регистрация”
3. Ввести необходимые реквизиты
4. Активировать e-mail почту
5. Ввести промокод при существовании
После выполнения оформления клиент зарабатывает вознаграждение за регистрацию, который способен охватывать даровые спины или cash поощрение.
Авторизация в персональный кабинет
Индивидуальный кабинет — это безопасная территория, где участники вправе управлять своим профилем. Для логина требуется указать никнейм и код доступа.
В пользовательском кабинете доступны следующие опции:
– Мониторинг записей операций
– Использование купонов
– Регулирование бонусами
– Вступление в соревнованиях
– Проверка кэшбека
– Редактирование учетной записи
Бонусы и промо
Развлекательная система дарит великодушные бонусы:
Регистрационный бонус — начинающие приобретают солидное вознаграждение на первые пополнения.
Даровые спины — дарятся как при оформлении, так и в ходе многочисленных кампаний.
Кэшбек — регулярный возмещение процента проигранных средств.
Коды активации — эксклюзивные последовательности, обеспечивающие доступ к эксклюзивным вознаграждениям.
Анализ гемблинговых направлений
Аппараты
Ассортимент slots включает множество вариантов от топовых провайдеров. Геймеры встретят как традиционные слоты, так и новые видеослоты с интересной визуализацией.
Live казино
Зона Live казино предлагает шанс участвовать с реальными крупье в состоянии реального времени. Открыты распространенные столы: рулетка, блэкджек, баккара, покер.
Турниры
Систематические соревнования с значительными выигрышными суммами манят массу соревнующихся. Победители завоевывают финансовые призы и эксклюзивные бонусы.
Мобильная версия и приложение
Адаптивная версия сайта дает возможность развлекаться с любого девайса. Структура самостоятельно корректируется под формат экрана.
Установить софт можно для аппаратов на Android и iOS. Телефонное ПО располагает всеми функциями компьютерной версии.
Как обнаружить действующее зеркало на сейчас
Рабочие линки альтернатив систематически корректируются. Найти рабочую линк можно многими способами:
– Через департамент поддержки
– В официальных социальных сетях
– По почтовой дайджесту
– На партнерских сайтах
Безопасность и сертификация
Главный сайт оперирует на основании международной разрешения. Все платежи шифруются инновационными системами кодирования.
Конфиденциальность персональных реквизитов обеспечивается в полном формате.
Вывод
Официальный сайт и его функционирующие зеркала предоставляют участникам постоянный путь к качественным развлекательным услугам. Великодушные поощрения, различные автоматы, опытная помощь — все это создает азартный времяпрепровождение максимально удобным и увлекательным.
link worth checking – Found this platform today, layout seems organized and browsing items feels effortless.
http://certifiedcanadarx.com/# Certified Canada Rx
canadian drug pharmacy canadian pharmacy service Certified Canada Rx
речные прогулки спб arenda-yakhty-spb-2.ru .
если ps4 не включается одинцово Если телевизор тормозит, iPhone выключается, мы предлагаем замену матрицы iPhone, ремонт Xbox срочно, чистку системы охлаждения PS5, ремонт PS5 на дому.
скачать мелбет казино на андроид скачать мелбет казино на андроид .
I recently tried this casino https://myjniaecowash.pl/ and was impressed by how stable everything felt. The games load quickly, bonuses are clear, and navigation is user-friendly, making the experience comfortable.
hazelvendorcollective.shop – Good platform, browsing feels effortless and everything looks neat today
check this link right here now betswaps
https://bellville.gob.ar/2019/06/06/ya-esta-habilitado-el-pago-electronico-de-tributos-municipales/
https://drive.google.com/file/d/1mADIB-iltYxIg6KEI9Qu_nlf1V6Fru19/view
Современные онлайн казино предлагают клиентам большой ассортимент опций для комфортной игры. Впрочем иногда вход к главному сайту может быть закрытым. В таких ситуациях на поддержку приходит Аркада, которое дает постоянный подключение ко всем функциям платформы.
Что такое актуальное зеркало казино
Альтернативный сайт — это идентичная реплика основного веб-сайта, которая размещается по альтернативному URL. Копия поддерживает все набор функций первоначального сайта, включая персональный кабинет, средства и сведения переводов.
Ключевые достоинства эксплуатации зеркала:
– 24-часовой вход к порталу
– Стопроцентная тождественность опций
– Безопасность пользовательских информации
– Хранение всех имеющихся поощрений
Как обнаружить актуальное зеркало на текущий день
Есть некоторое количество безопасных способов поиска текущей ссылочной информации:
Проверенные ресурсы:
1. Электронная рассылка — дирекция постоянно высылает сообщения с действующими доменами
2. Коммуникационные сети — авторизованные профили выкладывают свежую новости
3. Служба поддержки — консультанты сообщают достоверные адреса
4. Мобильное приложение — дает возможность преодолевать блокировки
Оформление профиля на главном веб-сайте
Операция открытия счета длится только немного минут и содержит из данных стадий:
1. Попадание на лицензионный портал или актуальное зеркало
2. Клик на иконку «Открыть счет»
3. Указание пользовательской формы
4. Валидация электронной почты или сотового номера
5. Активация вознаграждения за регистрацию при наличии промокода
Начинающие геймеры зарабатывают солидный вступительный приз, который может содержать free spins, валютные бонусы или cashback.
Доступ в личный кабинет
Авторизация на платформе выполняется обычным способом. Нужно ввести логин и кодовое слово, задействованные при регистрации.
Важные моменты для конфиденциального входа:
– Эксплуатируйте надежный пароль
– Запустите 2FA проверку
– Не фиксируйте пароли на чужих девайсах
– Отслеживайте адресную строку браузера
Обзор поощрительной программы
Игровая платформа балует клиентов многочисленными привилегиями и промо:
Начальный пакет
Новички могут претендовать на существенное вознаграждение за начальный пополнение. Традиционно это пропорциональная надбавка к внесенной объему плюс даровые спины для востребованных слотов.
Периодические кампании
– Недельный возврат средств — возвращение доли списанных денег
– Поощрения на повторные взносы
– Эксклюзивные предложения по событиям
– Конкурсы с большими наградными пулами
Система верности
Регулярные игроки накапливают единицы за любую игру, которые затем превращаются на фактические денежные призы, даровые прокруты или специальные преимущества.
Купоны: как задействовать
Купоны — это индивидуальные комбинации литер, предоставляющие привилегию к эксклюзивным поощрениям.
Откуда взять свежие промокоды:
– Авторизованные коммуникационные сети казино
– Аффилиатные порталы
– Email-информирование
– Профильные группы
Указывается промокод в специальное поле при открытии счета или внесении депозита счета.
Смартфонная версия и приложение
Современные пользователи выбирают делать ставки с смартфонных девайсов. Портал дает два варианта для приятной телефонной игры.
Responsive версия
Интернет версия сама подстраивается под диагональ дисплея. Не нуждается установки и функционирует в любом актуальном браузере.
Портативное приложение
Загрузить приложение можно для аппаратов на Android и iOS. Выгоды app:
– Быстрая запуск
– Стабильная функционирование
– Push-уведомления о поощрениях
– Самостоятельный избегание блокировок
Этап загрузки легок: нужно зайти на портал с телефонного устройства и выполнять указаниям.
Игровой коллекция
База аппаратов насчитывает несколько тысяч наименований от передовых производителей.
Слоты
Развлекательные аппараты — наиболее востребованная категория аттракционов. Показаны обычные винтажные слоты, актуальные мультимедийные слоты с поощрительными раундами, а также джекпотные выигрыши.
Live казино
Зона с действительными раздающими позволяет прочувствовать антураж истинного казино. Открыты игры с покером.
Трансляция ведется в HD качестве, присутствует общение с ведущим и прочими участниками.
Соревнования
Периодически запускаются соревнования по разным категориям. Включение предоставляет право завоевать валютные выигрыши, даровые прокруты или эксклюзивные привилегии.
Финансовые процедуры
Ресурс предлагает значительный выбор финансовых инструментов:
– Пластиковые карты
– Электронные платформы
– Биткоин
– Денежные платежи
Стартовая количество взноса — разумная для большинства геймеров. Обналичивание средств производится в минимальные временные рамки.
Департамент поддержки
Квалифицированные консультанты готовы помочь непрерывно. Представлены такие методы контакта:
– Интернет-чат
– Email
– Звонковая поддержка
– Социальные сети
Пояснения на типовые темы можно обнаружить в блоке FAQ.
Резюме
Главный сайт казино и его действующие зеркала гарантируют пользователям абсолютный подключение ко всем функциям сайта. Солидные привилегии, комфортная портативная версия, колоссальный каталог слотов и квалифицированная служба поддержки превращают гемблинг времяпрепровождение крайне приятным и надежным.
https://anyflip.com/homepage/afplq
Анализ лицензионного портала
Передовые интернет казино предоставляют участникам обширный выбор игр и перспектив. Лицензионный сайт Дракон Мани зеркало гарантирует защищенный вход к азартным возможностям.
Рабочее зеркало: путь сегодня
Зеркало выступает собой идентичную реплику официального портала. Актуальное зеркало позволяет пользователям миновать потенциальные блокировки.
Преимущества использования зеркала
Основные преимущества охватывают:
– Непрерывный путь к порталу
– Сохранение полных возможностей базового веб-сайта
– Безопасность личных сведений
– Равнозначный функционал
Регистрация на ресурсе
Ход создания аккаунта знаменуется доступностью и комфортом. Недавние участники требуется:
1. Посетить лицензионный веб-сайт или его зеркало
2. Кликнуть на элемент регистрации
3. Внести нужные данные
4. Валидировать email адрес
5. Совершить начальный авторизацию
Вознаграждение за создание аккаунта
Новые игроки получают значительный приветственный приз. Подобное премия может охватывать:
– Финансовые бонусы
– Бесплатные вращения
– Усиленный процент компенсации
Доступ в индивидуальный раздел
Действующие игроки способны оперативно зайти в свой профиль, задействуя логин и код. Персональный аккаунт предлагает путь к:
– Управлению средствами
– Истории транзакций
– Активным призам
– Конфигурации профиля
Подарки и акции
Ресурс периодически устраивает разнообразные промо-кампании для пользователей.
Типы бонусов
Главные формы призов:
– Пополнительные подарки – процент от величины взноса
– Бесплатные вращения – даровые прокруты в аппаратах
– Кэшбэк – возврат процента затраченных сумм
– Турнирные призы – премии за игру в турнирах
Ваучеры
Специальные купоны позволяют заработать экстра бонусы. Пользователи имеют возможность найти их на тематических ресурсах или заработать в рассылке.
Mobile редакция и программа
Современные клиенты выбирают портативный гейминг.
Характеристики переносной адаптации
– Responsive вид для различных девайсов
– Целостный доступ к слотам
– Стремительная подгрузка
– Комфортное навигация
Загрузить приложение
Мобильное app доступно для загрузки на аппараты с базовыми системами Android и iOS. Приложение гарантирует:
– Стабильную работу
– Мгновенные оповещения о акциях
– Моментальный вход к предпочитаемым автоматам
Игровой портфель
Казино обеспечивает внушительную галерею развлекательных забав.
Игровые машины
Библиотека развлекательных слотов охватывает:
– Традиционные игры
– Video слоты
– Накопительные автоматы
– Branded автоматы
Live игры
Секция лайв развлечений предоставляет возможность участвовать с живыми дилерами. Предложены:
– Рулетка
– Блек-джек
– Baccarat
– Покер
Соревнования
Регулярные конкурсы обеспечивают игрокам конкурировать за внушительные призовые пулы. Турнирная программа модифицируется каждую неделю.
Банковские процедуры
Казино предоставляет обилие опций пополнения и снятия финансов:
– Кредитные карты
– Виртуальные счета
– Межбанковские транзакции
– Крипто
Совокупные операции проходят конфиденциально с использованием современных технологий шифрования.
Сервис сопровождения
Профессиональная команда поддержки действует постоянно. Обратиться с консультантами реально через:
– Интерактивный чат
– Электронную почту
– Контактный номер
– Social медиа
Безопасность и регулирование
Казино функционирует на фундаменте действительной сертификата. Это подтверждает:
– Прозрачность развлекательного действа
– Сохранность личных сведений
– Пунктуальные выплаты
– Контролируемый игровой процесс
Вывод
Основной веб-сайт и его актуальные альтернативные адреса гарантируют клиентам полный ассортимент функций для удобной и доходной времяпрепровождения. Внушительные подарки, различные автоматы, профессиональная помощь и надежная система выплат создают платформу идеальным опцией для фанатов игровых игр.
nanotechhub – Content reads clearly, helpful examples made concepts easy to grasp.
1win не устанавливается apk https://1win20819.help/
amberstone trading studio – First impression is that the material feels genuine
quick visit rainvendor – Well-organized content makes reading simple
скачать зеркало мелбет melbetcomzerkalo.ru .
cyberstack – Mobile version looks perfect; no glitches, fast scrolling, crisp text.
skyridge resources – Clean pages, very easy to navigate through
browse cedarvendor portal – User-friendly interface, makes shopping quick and straightforward.
techsphere – Color palette felt calming, nothing distracting, just focused, thoughtful design.
прогулка на яхте спб arenda-yakhty-spb-1.ru .
Описание официального веб-сайта
Новое онлайн-казино предлагает своим игрокам широкий ассортимент услуг и призов. Главный ресурс Кент казино функционирует непрерывно, давая возможность к популярным автоматам, live-казино и многим промо.
Функционирующее зеркало: доступ к сайту
Что такое копия казино
Альтернатива является собой абсолютную реплику основного портала с иным URL именем. Функционирующее зеркало обеспечивает пользователям избегать ограничения и получать непрерывный путь к выбранным играм.
Как найти текущее зеркало сегодня
Действующие линки на основное зеркало размещаются через:
– Электронную новостнуюленту
– Главные публичные сети
– Сервис помощи
– Специализированные порталы
Регистрация на портале
Процесс регистрации
Регистрация длится несколько минут и включает следующие шаги:
1. Доступ на основной сайт или функционирующее зеркало
2. Нажатие клавиши “Создатьаккаунт”
3. Внесение персональных сведений
4. Активация email или мобильного
5. Установка пароля
Приз за открытиесчета
Начинающие игроки обретают большие начальные подарки:
– Бонусные суммы на аккаунт
– Freespins для слотов
– Расширенный коэффициент кэшбека
– Уникальные купоны
Доступ в личный профиль
Зарегистрированные участники имеютвозможность произвести вход через основной веб-сайт или рабочее зеркало. Для этого нужно указать учетноеимя и пароль, созданные при оформлении.
Функции личного аккаунта
В собственном кабинете имеются данные возможности:
– Контроль личными информацией
– Ввод счета
– Вывод средств
– Активация кодов
– Просмотр статистики игр
– Участие в турнирах
Поощрения и кампании
Виды вознаграждений
Казино награждает своих игроков разнообразными призовыми акциями:
– Вступительный бонус — щедрые вознаграждения на дебютные взносы
– Фриспины — дополнительные ставки в известных автоматах
– Компенсация — регулярный возмещение части потерь
– План лояльности — уникальные привилегии для верных игроков
Купоны и их использование
Специальные купоны дают бонусные бонусы. Для активации следует ввести шифр в нужное графу в личном аккаунте.
Игровой ассортимент
Симуляторы
База развлекательных автоматов содержит массу названий от топовых разработчиков:
– Обычные симуляторы
– Современные развлечения
– Прогрессивные симуляторы
– Сюжетные развлечения
Live казино
Секция Live-казино предлагает участие с реальными операторами в условиях реального стрима:
– Рулетка
– Blackjack
– PuntoBanco
– Карибскийпокер
Турниры
Постоянные состязания с крупными призовыми призами проходят еженедельно. Претенденты конкурируют за лидерство в таблице.
Смартфонная версия и приложение
Смартфонная версия портала
Главный сайт полностью настроен для портативных устройств. Пользователи вправе запускать слоты напрямую через веб-навигатор без необходимости скачивания.
Программа для установки
Авторское смартфонное программа имеется для загрузки на аппараты с операционными ОС Android и iOS. APP обеспечивает:
– Оперативный вход к развлечениям
– Надежную операционность
– Моментальные-сообщения о промо
– Комфортный дизайн
Итог
Основной ресурс казино и его актуальные копии предоставляют клиентам всесторонний возможность к качественным игровым развлечениям. Выгодные поощрения, всевозможные акции, простая адаптивная версия и опытная помощь делают азартный процесс максимально приятным и доходным.
Описание официального сайта
Актуальное онлайн-казино обеспечивает своим пользователям широкий ассортимент развлечений и призов. Официальный сайт РР·Рё РљСЌС€ действует 24/7, гарантируя доступ к востребованным слотам, live-казино и разнообразным акциям.
Функционирующее зеркало: путь к платформе
Что такое дубликат казино
Дубликат составляет собой точную версию главного сайта с альтернативным интернет названием. Рабочее зеркало позволяет клиентам обходить барьеры и иметь постоянный доступ к предпочитаемым играм.
Как получить рабочее зеркало сегодня
Рабочие URL на основное зеркало появляются через:
– Email новостнуюленту
– Основные коммуникационные сети
– Команду поддержки
– Партнерские порталы
Регистрация на сайте
Этапы оформления
Открытиесчета требует пару минут и предполагает такие действия:
1. Переход на официальный веб-сайт или функционирующее зеркало
2. Нажатие опции “Зарегистрироваться”
3. Ввод личных реквизитов
4. Активация email или номера
5. Придумывание секретнойкомбинации
Подарок за открытиесчета
Новые участники зарабатывают солидные начальные поощрения:
– Игровые суммы на аккаунт
– Freespins для слотов
– Повышенный размер возврата
– Уникальные ваучеры
Логин в индивидуальный аккаунт
Активные пользователи вправе осуществить логин через оригинальный ресурс или рабочее зеркало. Для этого нужно указать имяпользователя и секретнуюкомбинацию, придуманные при открытиисчета.
Опции личного профиля
В личном кабинете имеются такие инструменты:
– Изменение учетными информацией
– Зачисление кошелька
– Обналичивание денег
– Применение купонов
– Просмотр статистики игр
– Включение в состязаниях
Бонусы и промо
Типы поощрений
Казино балует своих клиентов многочисленными призовыми системами:
– Вступительный бонус — щедрые вознаграждения на стартовые вклады
– Фриспины — подарочные ставки в известных слотах
– Возврат — регулярный откат суммы ставок
– Программа поощрения — уникальные бонусы для активных игроков
Купоны и их ввод
Уникальные коды обеспечивают расширенные поощрения. Для активации следует ввести последовательность в нужное поле в персональном кабинете.
Игровой каталог
Симуляторы
Коллекция развлекательных автоматов включает массу названий от топовых провайдеров:
– Традиционные слоты
– Современные автоматы
– Накопительные игры
– Брендовые развлечения
Live казино
Раздел Live-казино предоставляет участие с живыми ведущими в режиме актуального эфира:
– Рулетка
– Блэкджек
– Баккара
– Карибскийпокер
Конкурсы
Регулярные конкурсы с крупными призовыми призами организуются постоянно. Претенденты соревнуются за победу в рейтинге.
Смартфонная версия и программа
Адаптивная реализация портала
Оригинальный веб-сайт абсолютно оптимизирован для планшетных девайсов. Участники могут пользоваться автоматы прямо через обозреватель без потребности скачивания.
Программа для установки
Фирменное мобильное приложение предлагается для установки на девайсы с рабочими системами Android и iOS. Приложение дает:
– Моментальный вход к автоматам
– Надежную операционность
– Оперативные-уведомления о акциях
– Комфортный оформление
Резюме
Главный веб-сайт казино и его актуальные зеркала обеспечивают игрокам полный возможность к отличным игровым сервисам. Большие поощрения, многочисленные акции, простая смартфонная платформа и компетентная сервис превращают геймплейный времяпрепровождение максимально enjoyable и прибыльным.
open the canyon marketplace – Sections are clearly organized and browsing feels pleasant
smartbyte – Navigation felt smooth, found everything quickly without any confusing steps.
visit the kestrel crate – Appealing branding, interested in new product arrivals soon.
Jogo do Tigrinho estratégia de sessão: 300 giros e stop – funciona?
floramarketexchange.shop – Enjoyed checking this site, everything seems well organized and smooth
VioletShopSpot – Looked around casually, everything is organized and approachable.
direct shop access – Layout is tidy, and the site feels well structured overall
Три турнира ufc в феврале марте 2026 три недели которые встряхнут дивизионы могут перевернуть все планы промоушена. Вот ссылка: https://turbaza-ladya.ru/news/ufc-fevral-mart-2026-tri-turnira-kotorye-mogut-perevernut-plany-promoushena-s-nog-na-golovu/
vipps approved canadian online pharmacy: online canadian drugstore – Certified Canada Rx
Передовые онлайн-казино предлагают клиентам широкий спектр азартных игр и щедрые бонусы. Тем не менее для беспроблемной игры существенно иметь представление, как найти 888 и его функционирующие зеркала.
Что такое основной портал казино
Основной портал казино — это первичная площадка, где участники могут наслаждаться гемблинг слотами. Портал функционирует на легальных условиях и обладает всеми обязательными разрешениями.
Основные достоинства официального сайта:
– Защищенность пользовательских данных
– Прозрачные правила игры
– Гарантированные транзакции
– Профессиональная поддержка
Рабочее зеркало казино: для чего нужно
Зеркало — это идентичная версия главного сайта, хостящаяся по иному веб-адресу. Функционирующее зеркало запускается для предоставления непрерывного входа к порталу.
Основания эксплуатации копий сайта:
– Ограничение главного адреса
– Регламентные процедуры
– Большая активность на ресурс
Как найти действующее зеркало сейчас
Найти новое официальное зеркало можно несколькими методами:
1. Подписка — оформите подписку на почтовую рассылку
2. Отдел support — обратитесь в онлайн-чат
3. Корпоративные сети — следите за публикациями
4. Тематические сайты — достоверные сайты
Создание аккаунта на ресурсе казино
Этап создания аккаунта составляет буквально считанные моментов:
1. Выберите на кнопку “Открыть счет”
2. Заполните обязательные поля
3. Активируйте почтовую e-mail
4. Активируйте код активации, если имеется
Вслед за оконченной оформления вам будет возможен личный кабинет.
Бонусы и промокоды
Богатая премиальная политика — значимое плюс казино:
Бонус за первичную регистрацию
Начинающие игроки зарабатывают стартовый поощрение, который может включать:
– Монетарный депозит на дебютный депозит
– Фриспины для игровых машин
– Безвозвратные бонусы
Промокоды
Периодически выходят свежие купоны, дающие возможность получить особые преимущества.
Программа компенсации
Лояльные пользователи получают долю проигранных средств обратно.
Действующие кампании и конкурсы
Сайт регулярно проводит интересные кампании:
– Семидневные соревнования
– Сезонные акции
– Конкурсы ценных призов
– Схема VIP-клуба
Вход в персональный раздел
Для логина на платформу следует:
1. Загрузить официальный портал или функционирующее зеркало
2. Активировать “Вход”
3. Внести имя пользователя и секретную комбинацию
В личном разделе предоставлены данные функции:
– Пополнение депозита
– Снятие выигрышей
– Изучение архива ставок
– Настройка профильными параметрами
Mobile модификация и программа
Мобильная платформа
Мобильная вариант сайта предоставляет шанс делать ставки с разных портативного телефона. Визуал самостоятельно адаптируется под диагональ экрана.
App для установки
Скачать приложение можно для:
– Android — официальная download с платформы
– iOS — инсталляция через App Store
Плюсы мобильного клиента:
– Оперативный запуск
– Бесперебойная операционность
– Push-нотификации об акциях
– Оптимизированный интерфейс
Азартные категории
Барабаны
Внушительная библиотека игровых слотов от топовых провайдеров:
– Ретро слоты
– Продвинутые-эмуляторы
– Призовые-игры
Live зал
Секция с живыми крупье обеспечивает:
– Рулетка
– Blackjack
– Baccarat
– Poker
Трансляции проводятся в HD формате, воссоздавая ощущение настоящего казино.
Методы депозита и снятия
Ресурс поддерживает множественные финансовые инструменты:
– Дебетовые средства
– Цифровые кошельки
– Bitcoin/Ethereum
– Финансовые транзакции
Наименьшие значения взноса и моментальные выплаты обеспечивают процесс крайне беспроблемной.
Отдел support
Компетентная группа помощи оперирует 24/7 и способна содействовать с различными вопросами:
– Мгновенный-чат
– Email-консультации
– Телефонная горячая линия
Заключение
Основной сайт казино и его актуальные копии обеспечивают клиентам конфиденциальный и увлекательный игровой отдых. Выгодные поощрения, удобная адаптивная вариант, разнообразные развлечения и профессиональное live-казино формируют эту платформу превосходным вариантом для игровых досуга.
Santander caiu Santander caiu .
chz coin try – stellar tl, felink
Нынешние онлайн-казино гарантируют пользователям богатый спектр функций для приятной игры. Подключение к платформе Глори осуществляется через основной портал или действующее зеркало.
Что такое рабочее зеркало казино
Действующее зеркало — это резервный домен лицензионного ресурса казино. Такие версии разрабатываются для предоставления бесперебойного соединения к развлекательной сервису.
Дубликат текущее совершенно дублирует функционал официального домена. Клиенты получают идентичный путь ко всем сервисам, включая регистрацию, зачисление средств кошелька и обналичивание денег.
Открытие счета на лицензионном портале
Процесс создания аккаунта требует всего несколько секунд. Будущим игрокам нужно:
1. Попасть на официальный домен или рабочее проверенное зеркало
2. Кликнуть кнопку “Создать аккаунт”
3. Заполнить необходимые данные
4. Подтвердить почтовую почту
5. Применить промокод при существовании
После окончания оформления клиент получает бонус за регистрацию, который имеет право содержать даровые спины или денежное премию.
Логин в личный кабинет
Персональный кабинет — это безопасная зона, где пользователи способны управлять своим счетом. Для авторизации нужно напечатать никнейм и код доступа.
В индивидуальном кабинете открыты нижеперечисленные опции:
– Просмотр записей переводов
– Активация купонов
– Контроль бонусами
– Включение в турнирах
– Мониторинг возврата средств
– Настройка аккаунта
Призы и предложения
Игровая площадка обеспечивает выгодные призы:
Стартовый бонус — дебютанты зарабатывают крупное премию на дебютные депозиты.
Даровые спины — дарятся как при создании аккаунта, так и в контексте разнообразных промо.
Кэшбэк — еженедельный рефанд части утраченных финансов.
Коды активации — специальные комбинации, открывающие возможность к специальным призам.
Характеристика гемблинговых секций
Аппараты
Библиотека автоматов охватывает сотни наименований от передовых разработчиков. Геймеры найдут как стандартные аппараты, так и современные видео-слоты с увлекательной графикой.
Live казино
Секция Live казино предоставляет право соревноваться с настоящими ведущими в режиме текущего времени. Имеются известные игры: рулетка, блэкджек, баккара, покер.
Соревнования
Регулярные состязания с крупными призовыми банками завлекают массу игроков. Победители завоевывают cash награды и эксклюзивные подарки.
Портативная версия и софт
Телефонная версия портала обеспечивает наслаждаться с произвольного аппарата. Дизайн автоматически настраивается под формат экрана.
Скачать приложение можно для устройств на Android и iOS. Портативное приложение имеет всеми опциями десктопной версии.
Как обнаружить текущее зеркало на данный момент
Действующие URL копий постоянно корректируются. Получить действующую линк можно различными вариантами:
– Через сервис техподдержки
– В проверенных коммуникационных сетях
– По электронной подписке
– На специализированных ресурсах
Охрана и легальность
Лицензионный домен действует на базе глобальной сертификата. Все платежи защищены инновационными методами защиты.
Анонимность пользовательских сведений обеспечивается в стопроцентном размере.
Итог
Официальный домен и его действующие альтернативы предоставляют участникам круглосуточный путь к качественным развлекательным развлечениям. Выгодные бонусы, разнообразные автоматы, квалифицированная сервис — все это создает игровой процесс предельно удобным и захватывающим.
zenbrookvendorhub.shop – Took a quick look and the vendor listings seem pretty engaging.
online store link – I came across this platform earlier, and the layout looks tidy and user-friendly.
Brest vs Marseille 2026 Ligue 1 blockbuster 20:45 clash
Fortune Ox hold & win: já segurou 18 símbolos e explodiu 5000x? Mostra o print!
Fortune Ox explodiu tudo ontem! Quem já limpou a tela com 12+ touros dourados?
usdttry – chz try, felixo
выберите ресурсы ferma.cc
Актуальные онлайн-казино предлагают геймерам разнообразие вариантов для беспроблемной игры. Центральный ресурс казино Кент открывает вход ко всем функциям и играм. Однако при образовании системных неполадок на подмогу спешат функционирующие копии.
Что означает собой актуальное зеркало
Дубликат казино — это идентичная версия главного веб-сайта, размещенная по запасному веб-адресу. Официальное зеркало сохраняет все возможности, в том числе регистрацию, доступ в собственный кабинет, поощрения и бонусные коды.
Альтернативный сайт на сегодня дает:
– Непрерывный путь к игровым слотам
– Абсолютную сохранность индивидуальных данных
– Удержание баланса и журнала операций
– Возможность использования всех специальных предложений
Регистрация на официальном сайте
Этап оформления учетной записи занимает считанные минут. Новым клиентам нужно:
1. Перейти на главный портал или рабочее зеркало
2. Щелкнуть кнопку «Зарегистрироваться»
3. Ввести запрашиваемые графы
4. Верифицировать электронную почту
5. Ввести купон при присутствии
После финиша создания аккаунта пользователи обретают приз за регистрацию, что может охватывать бесплатные вращения или монетарное поощрение.
Вход в личный кабинет
Персональный кабинет дает всеобъемлющий управление над азартным действом. Через индивидуальный профиль разрешается:
– Депонировать баланс
– Снимать средства
– Задействовать кодовые слова
– Мониторить хронологию игр
– Участвовать в турнирах
– Забирать кэшбек
Характеристика бонусов и специальных предложений
Великодушная призовая политика — существенное преимущество казино. Основные виды бонусов:
Стартовый приз
Новички зарабатывают щедрое поощрение на начальные вклады. Величина премии может доходить до 100-200% от величины вклада.
Бонусные спины
Бесплатные вращения выдаются для популярных слотов. Число бесплатных вращений варьируется от 10 до 500 штук.
Возврат средств
Еженедельный или ежемесячный возврат процентной доли утраченных финансов. Обычный объем возврата — 5-15%.
Конкурсы
Постоянные турниры с солидными призовыми банками. Участники соревнуются за призовые места в рейтинге.
Мобильная версия и приложуха
Смартфонная версия разрешает делать ставки с всякого аппарата. Геймеры могут установить софт для iOS и Android или задействовать браузерную версию.
Преимущества смартфонного софта:
– Оперативная подзагрузка автоматов
– Практичный графический интерфейс
– Пуш-нотификации о акциях
– Вход через отпечаток пальца
Автоматы и Live казино
Игровая коллекция насчитывает тысячи позиций от лидирующих производителей.
Топовые разделы игр:
– Обычные слоты
– Видео-автоматы с премиальными уровнями
– Джекпот слоты
– Megaways машины
Live игровой зал
Зона live игорный зал обеспечивает партию с реальными дилерами. Доступны классические варианты:
– Европейская рулетка
– Двадцать одно
– Punto Banco
– Покер
Как найти актуальное зеркало
Найти рабочую URL на зеркало возможно несколькими вариантами:
1. Зарегистрироваться на емейл-уведомления
2. Наблюдать за апдейтами в соц сетях
3. Связаться в службу поддержки
4. Добавить в закладки рабочее зеркало в избранное
Заключение
Основной портал и его функционирующие зеркала дают бесперебойный доступ к игровым играм. Великодушные бонусы, различные промокоды, комфортное смартфонное приложение и отличная служба поддержки поддержки создают игровой процесс предельно комфортным и безопасным.
Melhor horário pra jogar Jogo do Tigrinho: madrugada ou pico de noite? Conta sua experiência
Передовые онлайн-казино предлагают пользователям широкий диапазон игр и премиальных вариантов. Доступ к ресурсу реализуется через официальный ресурс или его рабочее зеркало Дэдди казино, что гарантирует стабильную деятельность.
Что такое действующее зеркало казино
Альтернатива — это точная версия официального сайта, построенная для устранения барьеров. Действующее зеркало позволяет пользователям иметь соединение к любимым слотам в любое удобное время.
Подлинное зеркало располагает всеми возможностями основного сайта:
– Совокупный каталог игр
– Профиль с зафиксированными информацией
– Актуальные акции
– Надежные расчетные транзакции
Оформление профиля на главном сайте
Ход регистрации составляет всего несколько минут. Новым пользователям требуется:
1. Зайти на основной ресурс или актуальное зеркало
2. Кликнуть на элемент “Зарегистрироваться”
3. Указать нужные информацию
4. Проверить email
5. Произвести стартовый вклад
Бонус за регистрацию выдается автоматически после прохождения всех ступеней.
Подключение в личный кабинет
Существующие пользователи могут произвести авторизацию указывая:
– Никнейм и ключ
– Цифры мобильного
– Электронную почту
Личный кабинет предоставляет доступ к управлению счетом, данным операций и активным промокодам.
Бонусы и предложения
Игровая сервис привлекает постоянных клиентов щедрыми призами:
Начальный набор
– Поощрение на стартовый депозит до 100%
– Free spins на востребованные слоты
– Особые награды за очередные платежи
Промокоды
Особые купоны дают шанс на активацию уникальных призов. Актуальные промокоды выкладываются в блоке “Акции”.
Кешбэк
Регулярный кэшбек достигает до 10% от утраченных финансов. Выплата начисляется автоматически.
Программа лояльности
Регулярные участники приобретают баллы, которые переводятся на действительные средства или фриспины.
Мобильный сайт и софт
Ради комфорта участников разработана функциональная mobile версия. Приспособленный облик помогает легко развлекаться с каждого портативного устройства.
Плюсы софта:
– Оперативный вход к развлечениям
– Улучшенный дизайн
– Надежная активность
– Нотификации о актуальных акциях
Установить софт можно свободно с проверенного ресурса для аппаратов на Android и iOS.
Каталог слотов
Игровые автоматы
Коллекция вмещает более 2000 слотов от ведущих студий:
– Классические автоматы
– Видео-слоты
– Прогрессивные автоматы
– Брендовые игры
Live казино
Секция Live казино предоставляет развлечение с живыми диллерами в онлайн режиме:
– Roulette
– Карточная игра
– Баккара
– Столы покера
Турниры
Регулярные турниры с крупными премиальными пулами организуются систематически. Присоединение в состязаниях доступно всем действующим участникам.
Платежные методы
Депозиты и выводы средств реализуются через известные платежные системы:
– Платежные карточ ки
– Виртуальные сервисы
– Крипто
– Банковские операции
Стартовый вклад — от 100 рублей. Получение выигрышей проводится в течение 24 времени.
Команда помощи
Постоянная команда поддержки расположена помочь в исправлении произвольных ситуаций:
– Живой чат
– Email
– Связь
– Публичные сети
Надежность и сертификат
Официальный ресурс работает на базе глобальной разрешения. Все информация участников закрыты современным SSL-протоколом.
Итог
Функционирующее зеркало дает стабильный подключение к излюбленным играм, выгодным бонусам и практичным сервисам. Создайте аккаунт немедленно и заработайте начальный поощрение!
Beginning your tattoo removal journey can feel daunting, but I’m Olha Po — your cosmetic tattoo specialist here in my boutique studio.
I’ve guided many people through the pigment fading journey, whether it’s a tiny mistake, lip
PMU adjustment, or painful reminders.
If you’ve been exploring pigment correction with Olha Po, you’re in the right place.
Think of this as a friendly chat where I break
down how your body clears ink, how your immune system processes the fragments, and what a custom pathway
looks like.
Whether you’re dealing with old tattoos,
correcting dodgy pigments, or moving on, my goal is to give you straight-up honesty — just the
real deal based on time in the treatment room.
Technology has come a long way since past decades, when outcomes were
inconsistent. At Cosmetic Tattooing by Olha Po, I use top-of-the-line
lasers: Q-Switched systems, and PicoWay Laser, all designed to fade tattoos safely —
without heating your skin. https://theshortlandstavern.com/
скачать мелбет скачать мелбет .
Fortune Rabbit vs Fortune Tiger: qual tem maior potencial de 5000x?
Betboom parceria oficial PG Soft: cashback diário 10% no Fortune Tiger sem limite
Fortune Tiger x10 cartinha: melhor sensação do ano ou exagero? Vote!
Для надёжного и непрерывного соединения к криптомаркету, главным образом в условиях непрекращающегося фишинга со стороны фишеров, первостепенно внедрять только легитимные зеркала. Для обеспечения безопасного соединения, рекомендуется использовать slon4.at, где доступна полную верификацию домена. Данный способ — беспроигрышный вариант оградить свой аккаунт в неприкосновенности.
http://petmedsmonitor.com/# dog medicine
hazelharborvendorplace.shop – Enjoyed checking this site, pages load quickly and are clear
Jogo do Tigrinho no celular: quem já ganhou big win deitado no sofá em 2026?
PAOK 1-2 Celta Vigo 2026 Europa League thriller result
this resource – Just checked this platform, navigation feels intuitive and browsing products is easy.
скачать приложение мелбет скачать приложение мелбет .
Современные онлайн-казино предоставляют пользователям массу вариантов для приятной игры. Главный сайт 888 казино дарит вход ко всем опциям и азартным играм. Однако при возникновении системных проблем на выручку приходят функционирующие зеркала.
Что означает собой действующее зеркало
Зеркало казино — это стопроцентная копия главного веб-сайта, размещенная по альтернативному доменному имени. Подлинное зеркало сохраняет все характеристики, включая создание аккаунта, вход в индивидуальный кабинет, бонусы и бонусные коды.
Альтернативный сайт на сегодня предоставляет:
– Стабильный вход к развлекательным аппаратам
– Полную защиту личных сведений
– Поддержку баланса и хронологии переводов
– Возможность использования всех промо-предложений
Создание аккаунта на официальном сайте
Этап открытия профиля требует несколько минут. Новоиспеченным пользователям нужно:
1. Открыть на подлинный портал или актуальное зеркало
2. Выбрать кнопку «Регистрация»
3. Указать запрашиваемые сведения
4. Активировать э-мейл почту
5. Ввести промокод при присутствии
После окончания оформления профиля пользователи приобретают приз за регистрацию, который может включать бесплатные вращения или денежно-призовое поощрение.
Доступ в персональный кабинет
Личный кабинет дает всесторонний надзор над игровым ходом. Через индивидуальный профиль можно:
– Вносить средства на счет
– Выводить средства
– Задействовать бонусные коды
– Проверять журнал пари
– Принимать участие в соревнованиях
– Приобретать кэшбек
Обзор вознаграждений и акций
Щедрая премиальная схема — существенное преимущество ресурса. Ключевые типы бонусов:
Приветственный бонус
Новички приобретают великодушное премирование на дебютные взносы. Сумма бонуса может составлять 100-200% от суммы взноса.
Бесплатные вращения
Бесплатные вращения даются для известных машин. Число бесплатных вращений разнится от 10 до 500 штук.
Cash back
Еженедельный или помесячный возврат процентной доли потерянных денег. Средний процент компенсации — 5-15%.
Соревнования
Периодические турниры с внушительными призовыми фондами. Участники соревнуются за топовые позиции в турнирной таблице.
Портативная версия и приложуха
Адаптивная версия разрешает играть с каждого гаджета. Пользователи могут установить приложение для iOS и Android или эксплуатировать веб версию.
Плюсы смартфонного приложения:
– Молниеносная прогрузка слотов
– Удобный UI
– Пуш-нотификации о акциях
– Вход через Touch ID
Игровые автоматы и Live казино
Развлекательная подборка включает множество названий от лидирующих разработчиков.
Топовые типы слотов:
– Классические слоты
– Современные слоты с призовыми раундами
– Накопительный приз слоты
– Мегавейс автоматы
Live игровой зал
Категория live игорный зал обеспечивает партию с настоящими дилерами. Представлены стандартные варианты:
– Европейская рулетка
– Двадцать одно
– Баккара
– Покер
Как отыскать рабочее зеркало
Обрести действующую адрес на зеркало можно несколькими вариантами:
1. Оформить подписку на емейл-уведомления
2. Мониторить за обновлениями в соц сетях
3. Связаться в отдел поддержки
4. Добавить в закладки действующее зеркало в закладки
Итог
Официальный сайт и его функционирующие копии гарантируют непрерывный путь к азартным слотам. Богатые вознаграждения, многочисленные промокоды, удобное портативное программа и высококлассная сервис поддержки делают азартный процесс в высшей степени комфортным и надежным.
Panathinaikos 2-2 Viktoria Plzen 2026 Europa League dramatic draw
аренда яхты arenda-yakhty-spb.ru .
Передовые онлайн-казино предлагают клиентам богатый набор развлечений и щедрые бонусы. Впрочем для комфортной игры необходимо иметь представление, как получить доступ к Bet Andreas и его рабочие зеркала.
Что такое основной ресурс казино
Официальный веб-сайт казино — это основная веб-площадка, где пользователи могут получать удовольствие от развлекательными слотами. Платформа действует на легитимных условиях и располагает всеми необходимыми лицензиями.
Первостепенные достоинства главного ресурса:
– Надежность пользовательских сведений
– Прозрачные требования использования
– Обеспеченные платежи
– Оперативная служба поддержки
Действующее зеркало казино: для чего нужно
Зеркало — это абсолютная копия основного сайта, находящаяся по альтернативному URL. Функционирующее зеркало создается для поддержания стабильного соединения к сайту.
Основания применения копий сайта:
– Недоступность основного сайта
– Профилактические процедуры
– Большая посещаемость на платформу
Как отыскать рабочее зеркало в данный момент
Найти новое действующее зеркало можно несколькими путями:
1. Email-уведомления — оформите подписку на информационную доставку
2. Команда техподдержки — обратитесь в онлайн-чат
3. Корпоративные сети — проверяйте за обновлениями
4. Специализированные сайты — проверенные ресурсы
Открытие счета на портале казино
Алгоритм создания аккаунта требует всего пару моментов:
1. Нажмите на кнопку “Открыть счет”
2. Внесите запрашиваемые сведения
3. Подтвердите контактную адрес
4. Используйте купон, если имеется
Сразу после успешной создания аккаунта вам откроется возможен личный профиль.
Поощрения и коды активации
Выгодная поощрительная программа — существенное достоинство казино:
Бонус за создание аккаунта
Начинающие игроки зарабатывают первый бонус, который может охватывать:
– Валютный счет на начальный взнос
– Бесплатные вращения для игровых машин
– Стартовые фонды
Промокоды
Регулярно размещаются актуальные купоны, позволяющие получить экстра бонусы.
Программа кешбэка
Лояльные участники приобретают долю использованных ставок назад.
Свежие промо и состязания
Ресурс систематически устраивает увлекательные акции:
– Недельные баттлы
– Тематические акции
– Раздачи ценных подарков
– Программа VIP-клуба
Логин в пользовательский профиль
Для доступа на портал требуется:
1. Посетить официальный портал или рабочее зеркало
2. Активировать “Авторизация”
3. Внести никнейм и секретную комбинацию
В пользовательском аккаунте открыты данные возможности:
– Депозит депозита
– Снятие призов
– Просмотр истории транзакций
– Изменение индивидуальными сведениями
Мобильная версия и приложение
Адаптивная версия
Оптимизированная версия ресурса дает возможность участвовать с любого смартфонного гаджета. Оформление автоматически адаптируется под габариты экрана.
Программа для загрузки
Скачать app можно для:
– Android — прямая установка с сайта
– iOS — установка через App Store
Плюсы мобильного клиента:
– Оперативный старт
– Устойчивая работа
– Push-нотификации об акциях
– Производительный функционал
Игровые разделы
Автоматы
Разнообразная подборка эмуляторных слотов от топовых поставщиков:
– Стандартные игры
– Новые-слоты
– Джекпот-машины
Live казино
Категория с профессиональными дилерами обеспечивает:
– Рулетка
– Блэкджек
– Мини-баккара
– Карточные игры
Вещания ведутся в отличном формате, создавая эффект настоящего казино.
Системы пополнения и снятия
Сайт поддерживает множественные платежные системы:
– Платежные картсчета
– Онлайн платежи
– Crypto
– Финансовые отправки
Стартовые лимиты взноса и быстрые платежи делают игру максимально удобной.
Команда support
Компетентная команда support оперирует 24/7 и готова ассистировать с всеми вопросами:
– Живой-чат
– Email-поддержка
– Звонковая линия
Заключение
Лицензионный ресурс казино и его актуальные альтернативные адреса обеспечивают пользователям надежный и азартный игровой процесс. Богатые подарки, комфортная мобильная модификация, многочисленные развлечения и высокоуровневое live-казино делают эту платформу отличным решением для азартных времяпрепровождения.
https://certifiedcanadarx.com/# best canadian pharmacy to order from
visit raincrest shop – The site feels organized and navigation is simple to follow
alpine sellers collective – The store layout seems tidy and easy to browse
browse carameldock online – Cozy design, makes exploring products enjoyable.
canadian pharmacy in canada: Certified Canada Rx – Certified Canada Rx
мелбет приложение на айфон мелбет приложение на айфон .
live gambling games live gambling games .
Современные онлайн-казино обеспечивают пользователям широкий ассортимент вариантов для приятной развлечений. Вход к площадке Cactus Casino осуществляется через основной сайт или актуальное зеркало.
Что такое функционирующее зеркало казино
Актуальное зеркало — это дополнительный линк официального портала казино. Такие версии генерируются для предоставления непрерывного входа к развлекательной платформе.
Дубликат текущее абсолютно воспроизводит возможности главного домена. Пользователи получают схожий выход ко всем возможностям, включая открытие счета, пополнение счета и снятие призов.
Регистрация на основном ресурсе
Процедура регистрации занимает всего считанные мгновений. Будущим клиентам требуется:
1. Попасть на основной сайт или актуальное подлинное зеркало
2. Кликнуть кнопку “Зарегистрироваться”
3. Ввести нужные информацию
4. Проверить почтовую почту
5. Активировать код активации при доступности
После финализации открытия профиля игрок обретает приз за регистрацию, который вправе предполагать даровые спины или монетарное вознаграждение.
Вход в персональный кабинет
Персональный кабинет — это закрытая секция, где игроки имеют возможность контролировать своим аккаунтом. Для авторизации следует напечатать username и секретный ключ.
В личном кабинете открыты данные возможности:
– Мониторинг записей переводов
– Активация бонусных кодов
– Регулирование бонусами
– Включение в турнирах
– Мониторинг кэшбэка
– Изменение учетной записи
Поощрения и акции
Азартная площадка предлагает выгодные вознаграждения:
Регистрационный бонус — начинающие обретают значительное вознаграждение на дебютные пополнения.
Free spins — предоставляются как при оформлении, так и в рамках различных промо.
Возврат средств — регулярный возмещение фрагмента израсходованных денег.
Бонусные коды — эксклюзивные шифры, обеспечивающие возможность к эксклюзивным вознаграждениям.
Обзор развлекательных категорий
Slots
Собрание автоматов включает массу наименований от топовых разработчиков. Геймеры обнаружат как традиционные аппараты, так и новые видеослоты с притягательной графикой.
Live казино
Категория Live казино обеспечивает возможность развлекаться с живыми дилерами в состоянии текущего времени. Доступны востребованные столы: рулетка, блэкджек, баккара, покер.
Соревнования
Постоянные чемпионаты с крупными выигрышными банками завлекают множество конкурсантов. Призеры завоевывают монетарные вознаграждения и уникальные поощрения.
Мобильная версия и программа
Телефонная версия ресурса дает возможность наслаждаться с всякого устройства. Дизайн автономно адаптируется под размер экрана.
Получить приложение можно для аппаратов на Android и iOS. Телефонное программа имеет всеми характеристиками полной версии.
Как обнаружить текущее зеркало на данный момент
Рабочие ссылки копий постоянно обновляются. Получить действующую адрес можно разными способами:
– Через департамент помощи
– В официальных коммуникационных сетях
– По e-mail newsletter
– На партнерских площадках
Защита и сертификация
Официальный домен работает на базе глобальной документа. Все транзакции шифруются передовыми протоколами кодирования.
Секретность персональных реквизитов поддерживается в стопроцентном размере.
Итог
Официальный сайт и его актуальные альтернативы гарантируют игрокам постоянный вход к высококлассным гемблинговым развлечениям. Привлекательные призы, многочисленные слоты, компетентная помощь — все это делает игровой досуг чрезвычайно удобным и захватывающим.
Анализ главного сайта
Прогрессивные виртуальные казино предоставляют участникам разнообразный ассортимент услуг и перспектив. Основной портал казино VodkaCasino предоставляет безопасный путь к развлекательным возможностям.
Функционирующее зеркало: доступ на сегодня
Резервный сайт служит в качестве абсолютную версию лицензионного ресурса. Действующее зеркало дает возможность игрокам миновать потенциальные запреты.
Достоинства использования зеркала
Главные преимущества предполагают:
– Непрерывный вход к платформе
– Хранение всех характеристик основного портала
– Безопасность личных сведений
– Такой же возможности
Оформление профиля на платформе
Процедура создания аккаунта характеризуется понятностью и эргономичностью. Начинающие игроки необходимо:
1. Открыть лицензионный портал или его зеркало
2. Щелкнуть на клавишу регистрации
3. Ввести необходимые информацию
4. Верифицировать почтовую почту
5. Выполнить первый авторизацию
Вознаграждение за открытие счета
Новые игроки зарабатывают щедрый приветственный презент. Это вознаграждение способно охватывать:
– Материальные бонусы
– Бесплатные спины
– Расширенный показатель компенсации
Авторизация в индивидуальный кабинет
Существующие участники в состоянии мгновенно войти в персональный раздел, задействуя логин и шифр. Личный кабинет предоставляет возможность к:
– Администрированию средствами
– Хронологии платежей
– Работающим поощрениям
– Настройкам учетной записи
Подарки и предложения
Ресурс постоянно устраивает всевозможные промо-кампании для пользователей.
Категории поощрений
Основные виды вознаграждений:
– Финансовые бонусы – доля от размера внесения
– Бесплатные вращения – бесплатные раунды в автоматах
– Кэшбэк – компенсация фрагмента потерянных сумм
– Конкурсные трофеи – награды за состязание в конкурсах
Промокоды
Особые промокоды дают возможность активировать экстра выгоды. Игроки имеют возможность обнаружить их на тематических ресурсах или получить в письмах.
Mobile редакция и приложение
Современные игроки любят переносной гейминг.
Характеристики mobile системы
– Адаптивный вид для всех устройств
– Полный доступ к играм
– Стремительная подгрузка
– Практичное управление
Загрузить приложение
Портативное софт открыто для downloading на аппараты с рабочими ОС Android и iOS. Софт предоставляет:
– Устойчивую работу
– Мгновенные оповещения о призах
– Быстрый вход к предпочитаемым развлечениям
Гемблинг ассортимент
Платформа предоставляет внушительную библиотеку гемблинг забав.
Игровые машины
Ассортимент игровых аппаратов насчитывает:
– Традиционные игры
– Передовые игры
– Джекпотные машины
– Лицензионные игры
Live дилеры
Область настоящих игр предлагает возможность состязаться с живыми дилерами. Доступны:
– Рулетки
– 21
– Baccarat
– Карибский покер
Соревнования
Регулярные конкурсы помогают игрокам состязаться за значительные наградные фонды. Призовая система актуализируется еженедельно.
Финансовые транзакции
Платформа обеспечивает разнообразие способов депозита и обналичивания финансов:
– Пластиковые карточки
– Виртуальные платежные системы
– Wire транзакции
– Крипто
Все платежи проходят конфиденциально с задействованием актуальных систем защиты.
Отдел support
Опытная служба поддержки действует постоянно. Коннектиться с менеджерами можно через:
– Online чат
– Электронную почту
– Контактный номер
– Социальные сети
Охрана и аккредитация
Казино действует на основании легальной лицензии. Такое удостоверяет:
– Легальность азартного геймплея
– Безопасность личных сведений
– Пунктуальные выплаты
– Регулируемый геймплей
Итог
Главный ресурс и его функционирующие резервные страницы дают участникам совокупный набор услуг для приятной и профитной игры. Щедрые подарки, всевозможные автоматы, квалифицированная служба и надежная платформа операций создают платформу лучшим решением для фанатов развлекательных игр.
аренда катера спб с капитаном аренда катера спб с капитаном .
промокоды на мелбет промокоды на мелбет .
VioletShopHub – Skimmed a few areas, the interface is tidy and practical.
This casino https://projektybudowlane.com.pl/ offers a great mix of popular slots and live tables. The platform feels modern, promotions are worth trying, and support is responsive, which adds confidence.
canyonridgevendorstudio.shop – Nice platform overall, navigation feels simple and intuitive today
special info betswap
Вход к сайту через проверенные зеркала
Игроки сетевых казино регулярно контактируют с ситуацией закрытия главного портала. Как раз для устранения этой ситуации разработаны дубликаты главного сайта. казино Taker гарантирует беспрепятственный вход ко всем сервисам ресурса.
Что такое рабочее зеркало казино
Дубликат составляет собой идентичную реплику основного сайта с идентичным функционалом. Ключевое расхождение — это другое имя. Все сведения клиента, включая счет, привилегии и архив раундов, остаются идентичными.
Плюсы задействования зеркал
Рабочие зеркала характеризуются набором ключевых достоинств:
– Бесперебойный переход к излюбленным слотам
– Стопроцентная сохранность персональных сведений
– Поддержание всех опций личного кабинета
– Способность взятия бонусов и вовлечения в предложениях
Регистрация на легальном портале
Процедура оформления предельно несложен и требует буквально минут. Новые пользователи способны надеяться на крупный приветственный приз за создание аккаунта.
Ступени оформления аккаунта
1. Переход на официальный домен или его копию
2. Активация на клавишу “Зарегистрироваться”
3. Указание нужных данных
4. Верификация электронной почты
5. Указание промокода (если имеется)
Награды и предложения для участников
Игровая площадка радует своих клиентов разнообразными бонусными системами.
Основные варианты поощрений
Стартовый пакет — солидное вознаграждение для свежих клиентов, которое в состоянии охватывать финансовые бонусы и free spins.
Free spins — шанс использовать в востребованных игровых машинах без затрат.
Возврат средств — частичный возмещение израсходованных средств, который предоставляется каждую неделю или ежемесячно.
Промокоды — эксклюзивные наборы, гарантирующие дополнительные выгоды.
Индивидуальный кабинет: функции и параметры
Личный профиль обеспечивает совершенный управление над игровым взаимодействием. В данном разделе доступны:
– Регулирование счетом
– Записи платежей
– Активные награды
– Конфигурации защиты
– Подтверждение аккаунта
Карманная версия и программа
Новейшие пользователи предпочитают доступность. Ресурс дает пару варианта для игры с мобильных гаджетов.
Responsive телефонная платформа
Портативная вариант ресурса самостоятельно приспосабливается под экран любого девайса. Не нужно скачивать специальное программное обеспечение.
Софт для гаджетов
Можно скачать фирменное программу для iOS и Android. Приложение гарантирует:
– Быстрый доступ
– Адаптированный дизайн
– Push-сообщения о бонусах
– Стабильную операционность
Live раздел: атмосфера настоящего клуба
Раздел Live развлечений транспортирует клиентов в обстановку подлинного игорного заведения. Компетентные дилеры организуют раунды в формате прямого времени.
Популярные Live-развлечения
– Рулетка
– Двадцать одно
– Баккара
– Покер
Аппараты: многообразие автоматов
Коллекция слотовых слотов включает тысячи названий от ведущих поставщиков. Пользователи откроют:
– Классические автоматы
– Графические слоты
– Джекпот-слоты
– Слоты с множественными линиями
Состязания и уникальные предложения
Систематические состязания предоставляют шанс игрокам бороться друг с другом за солидные призовые фонды. Любой турнир обладает свои критерии присутствия и список лидеров.
Пути внесения и вывода средств
Площадка предоставляет множество финансовых систем:
– Дебетовые карты
– Цифровые кошельки
– Цифровые валюты
– Банковские отправления
Все платежи проходят защищенно благодаря современным технологиям кодирования.
Сервис обслуживания
Квалифицированные консультанты службы поддержки настроены ассистировать 24/7. Работают нижеперечисленные методы общения:
– Мгновенный-чат
– Email-сервис
– Голосовая линия
– Коммуникационные сети
Заключение
Главный ресурс клуба и его рабочие альтернативы гарантируют клиентам надежный и удобный переход к обширному ассортименту геймерских игр. Щедрые поощрения, периодические предложения, компетентная сервис и легкие расчетные методы формируют геймерский опыт крайне захватывающим и доходным.
visit yelvora portal – Just noticed this shop, looks like a promising marketplace.
useful link – Noticed this page, design is tidy and pages are simple to browse
мелбет скачать apk мелбет скачать apk .
Актуальные онлайн-казино предлагают геймерам широкий выбор функций для комфортной досуга. Доступ к платформе РёРіСЂС‹ производится через главный веб-ресурс или функционирующее зеркало.
Что такое актуальное зеркало казино
Актуальное зеркало — это резервный линк основного сайта казино. Такие клоны генерируются для гарантирования стабильного доступа к азартной сервису.
Дубликат на сегодня целиком копирует функционал официального домена. Игроки получают идентичный вход ко всем функциям, включая создание аккаунта, пополнение кошелька и получение денег.
Создание аккаунта на главном ресурсе
Алгоритм оформления учетной записи отнимает всего несколько моментов. Будущим участникам необходимо:
1. Зайти на лицензионный ресурс или действующее подлинное зеркало
2. Выбрать кнопку “Открыть счет”
3. Внести обязательные данные
4. Проверить почтовую почту
5. Применить бонусный код при существовании
После завершения регистрации игрок получает вознаграждение за регистрацию, который вправе включать free spins или финансовое поощрение.
Логин в собственный кабинет
Персональный кабинет — это охраняемая зона, где клиенты вправе управлять своим профилем. Для входа требуется напечатать имя пользователя и password.
В личном кабинете имеются данные функции:
– Отслеживание истории операций
– Задействование промокодов
– Контроль вознаграждениями
– Вступление в состязаниях
– Контроль кэшбека
– Настройка профиля
Бонусы и промо
Азартная система предлагает привлекательные призы:
Стартовый комплект — начинающие приобретают существенное премию на стартовые пополнения.
Бесплатные вращения — предоставляются как при оформлении, так и в рамках всевозможных мероприятий.
Возмещение — систематический рефанд фрагмента потерянных сумм.
Купоны — эксклюзивные коды, открывающие право к особым предложениям.
Характеристика игровых категорий
Slots
Собрание slots насчитывает сотни наименований от передовых поставщиков. Клиенты обнаружат как стандартные автоматы, так и современные 3D-слоты с притягательной оформлением.
Live казино
Категория Live казино дарит право участвовать с настоящими крупье в условиях актуального времени. Открыты известные столы: рулетка, блэкджек, баккара, покер.
Конкурсы
Регулярные турниры с значительными выигрышными суммами завлекают множество игроков. Призеры завоевывают cash награды и эксклюзивные бонусы.
Мобильная версия и программа
Мобильная версия ресурса предоставляет право развлекаться с всякого аппарата. Дизайн автоматически адаптируется под диагональ экрана.
Загрузить софт можно для аппаратов на Android и iOS. Мобильное app располагает всеми возможностями компьютерной версии.
Как найти актуальное зеркало на текущий день
Актуальные URL зеркал регулярно корректируются. Найти действующую URL можно несколькими вариантами:
– Через отдел техподдержки
– В проверенных новостных сетях
– По e-mail подписке
– На тематических сайтах
Охрана и лицензирование
Официальный сайт функционирует на основании зарубежной лицензии. Все транзакции охраняются передовыми методами защиты.
Анонимность пользовательских данных гарантируется в совершенном объеме.
Заключение
Лицензионный портал и его действующие зеркала обеспечивают игрокам постоянный доступ к высококлассным азартным развлечениям. Привлекательные поощрения, различные игры, квалифицированная служба — все это формирует гемблинговый досуг чрезвычайно приятным и увлекательным.
browse their store – Spent a few minutes exploring, the sections are well organized
прокат яхт arenda-yakhty-spb-1.ru .
silver vendor hub – Just found this page, navigation is really smooth
Подключение к сайту через актуальные зеркала
Клиенты сетевых казино нередко контактируют с проблемой недоступности базового домена. Как раз для преодоления этой ситуации существуют дубликаты легального портала. казино Dragon Money обеспечивает стопроцентный вход ко всем функциям площадки.
Что такое актуальное зеркало казино
Дубликат значит собой полную версию основного ресурса с идентичным набором функций. Ключевое отличие — это другое имя. Абсолютно все параметры клиента, включая счет, награды и записи игр, находятся такими же.
Выгоды эксплуатации зеркал
Функционирующие зеркала имеют набором существенных плюсов:
– Непрерывный подключение к излюбленным играм
– Полная конфиденциальность индивидуальных параметров
– Неизменность всех параметров личного кабинета
– Возможность обретения поощрений и включения в промоакциях
Регистрация на легальном портале
Процедура оформления максимально прост и требует немного минут. Свежие пользователи имеют возможность надеяться на крупный вводный подарок за регистрацию.
Стадии оформления аккаунта
1. Подключение на официальный портал или его альтернативу
2. Клик на клавишу “Регистрация”
3. Заполнение необходимых информации
4. Подтверждение email почты
5. Указание бонусного кода (когда доступен)
Поощрения и акции для пользователей
Платформа поощряет своих клиентов всевозможными поощрительными системами.
Главные типы бонусов
Стартовый пакет — щедрое начисление для начинающих игроков, что способно содержать финансовые призы и безвозмездные спины.
Безвозмездные спины — возможность использовать в популярных слотах без затрат.
Кешбэк — процентный возврат проигранных средств, каковой предоставляется раз в неделю или каждый месяц.
Промокоды — уникальные сочетания, гарантирующие бонусные поощрения.
Личный кабинет: инструменты и конфигурации
Персональный аккаунт гарантирует полный контроль над развлекательным опытом. Тут имеются:
– Администрирование средствами
– Архив операций
– Работающие привилегии
– Параметры безопасности
– Верификация аккаунта
Портативная платформа и приложение
Новейшие игроки ценят доступность. Ресурс предлагает два метода для участия с смартфонных гаджетов.
Адаптивная телефонная версия
Портативная редакция портала автономно настраивается под монитор любого девайса. Нет необходимости загружать дополнительное ПО.
Софт для гаджетов
Доступно скачать фирменное приложение для iOS и Android. Софт дает:
– Скорый доступ
– Доработанный интерфейс
– Push-уведомления о поощрениях
– Надежную работу
Live раздел: антураж подлинного клуба
Секция Live игр отправляет пользователей в атмосферу реального клуба. Квалифицированные крупье проводят партии в варианте настоящего времени.
Популярные Live-игры
– Французская рулетка
– Blackjack
– Baccarat
– Покер
Слоты: разнообразие игр
Коллекция азартных автоматов насчитывает множество вариантов от топовых провайдеров. Участники обнаружат:
– Обычные автоматы
– Видеослоты
– Мега-выигрыш-автоматы
– Мегавейс
Соревнования и специальные предложения
Регулярные соревнования обеспечивают игрокам конкурировать друг с другом за солидные призовые фонды. Любой конкурс имеет свои критерии вовлечения и рейтинг лидеров.
Пути зачисления и вывода финансов
Ресурс поддерживает ряд расчетных инструментов:
– Дебетовые инструменты
– Электронные сервисы
– Криптовалюты
– Wire транзакции
Абсолютно все платежи выполняются защищенно благодаря передовым системам защиты.
Сервис support
Опытные специалисты службы support настроены ассистировать 24/7. Предусмотрены данные пути коммуникации:
– Живой-чат
– Email-поддержка
– Звонковая поддержка
– Коммуникационные сети
Итог
Официальный портал казино и его функционирующие копии гарантируют игрокам защищенный и легкий доступ к большому выбору игровых услуг. Солидные награды, регулярные предложения, квалифицированная служба и легкие платежные системы создают игровой процесс предельно комфортным и доходным.
Вход к сайту и функционирующие адреса
Современные сетевые казино предоставляют участникам обширный спектр развлечений. Основной портал Motor предоставляет безопасный вход ко всем услугам. Впрочем периодически возникают ситуации, когда необходимо резервный путь подключения.
Что означает собой рабочее зеркало
Рабочее зеркало — это абсолютная копия официального портала с другим URL расположением. Альтернатива сегодня позволяет преодолевать вероятные блокировки и гарантировать постоянный вход к популярным играм.
Легальное зеркало обладает полными функциями, что и базовый веб-сайт:
– Полный ассортимент развлечений
– Личный аккаунт с актуальными информацией
– Действующие бонусы и акции
– Надежные платежные операции
Создание аккаунта и подключение в платформу
Ход открытия аккаунта на сайте длится пару мгновений. Свежим клиентам требуется:
1. Попасть на актуальное зеркало в настоящее время
2. Нажать клавишу «Создать аккаунт»
3. Ввести требуемые параметры
4. Верифицировать почтовую почту или номер мобильного
5. Забрать поощрение за оформление
Авторизация в собственный профиль осуществляется через ввод логина и пароля.
Анализ призовой программы
Выгодная наградная структура — важнейшее плюс казино. Участники забирают разнообразные подарки:
Вступительные бонусы
Новые игроки имеют возможность надеяться на привлекательный бонус за открытие профиля. Чаще всего это набор возможностей, содержащий:
– Долевую премию к стартовому вкладу
– Безвозмездные вращения
– Призовые суммы на аккаунт
Купоны и уникальные возможности
Периодические бонусные комбинации дают возможность зарабатывать призовые привилегии. Задействовать их допустимо в предназначенном меню персонального профиля.
Спины и компенсация
Фриспины — это возможность вращать слоты без расходования своих сумм. Рибейт означает определенный возмещение проигранных денег.
Ассортимент игр
Игровая ресурс предоставляет впечатляющую подборку развлечений.
Игровые машины
Многообразие автоматов удивляет ожидания. Представлены стандартные простые аппараты и актуальные развлечения с захватывающей анимацией.
Live казино
Категория Live заведения помещает игроков в антураж реального азартного зала. Умелые ведущие ведут партии в живом формате.
Турниры и лидерборды
Регулярные конкурсы вносят накала и гарантируют вариант заработать крупные выигрыши.
Мобильная версия и программа
Продвинутые технологии дают возможность наслаждаться в удобном локации. Адаптивная вариант независимо адаптируется под размер устройства.
Загрузить программу можно для операционных систем iOS и Android. Программа гарантирует:
– Быстрый доступ
– Бесперебойную производительность
– Push-сообщения об предложениях
– Интуитивный дизайн
Платежные процедуры
Сайт использует многочисленные методы ввода и изъятия денег:
– Банковские инструменты
– Цифровые платформы
– Токены
– Банковские транзакции
Всевозможные операции проходят через безопасное подключение, что обеспечивает целостность приватных информации.
Отдел support
Профессиональная команда поддержки трудится всегда. Контактировать с специалистами допустимо через:
– Онлайн-чат
– Почтовую почту
– Контакт
– Коммуникационные каналы
Итоги
Основной ресурс и его функционирующее зеркало предоставляют участникам безопасный и легкий путь к захватывающим развлечениям. Щедрые подарки, широкий ассортимент автоматов и высокая поддержка делают процесс крайне комфортной и результативной.
felink – felixo, xlm try
pet pharmacy: Vet Rx Index – pet rx
see here – Came across this marketplace, sections are clearly arranged and easy to use
browse the woodvendor shop – Layout feels structured and appealing, worth checking out.
нажмите, чтобы подробнее ferma.cc
Характеристика основного веб-сайта
Современные интернет казино предлагают пользователям широкий спектр развлечений и возможностей. Официальный ресурс 888 предлагает проверенный доступ к развлекательным возможностям.
Функционирующее зеркало: доступ на сегодня
Дублирующий портал представляет в качестве абсолютную дубликат официального портала. Действующее зеркало помогает участникам преодолевать потенциальные барьеры.
Выгоды использования зеркала
Основные плюсы предполагают:
– Стабильный путь к порталу
– Поддержание абсолютно всех возможностей базового веб-сайта
– Защита персональных информации
– Равнозначный набор функций
Создание аккаунта на ресурсе
Механизм создания аккаунта характеризуется доступностью и эргономичностью. Новые пользователи требуется:
1. Посетить лицензионный ресурс или его зеркало
2. Выбрать на элемент создания аккаунта
3. Внести требуемые информацию
4. Верифицировать электронную ящик
5. Произвести начальный авторизацию
Бонус за оформление
Новички приобретают значительный приветственный подарок. Данное премия имеет возможность охватывать:
– Финансовые начисления
– Complimentary вращения
– Увеличенный уровень кэшбека
Авторизация в индивидуальный аккаунт
Существующие участники в состоянии оперативно зайти в персональный раздел, используя логин и шифр. Индивидуальный профиль предлагает возможность к:
– Администрированию средствами
– Записям платежей
– Текущим подаркам
– Конфигурации учетной записи
Призы и предложения
Платформа постоянно организует различные акции для клиентов.
Виды подарков
Главные виды призов:
– Денежные подарки – часть от размера внесения
– Спины – безвозмездные прокруты в автоматах
– Кэшбэк – возврат доли утраченных средств
– Призовые трофеи – призы за выступление в соревнованиях
Ваучеры
Уникальные коды дают возможность получить бонусные привилегии. Игроки способны получить их на специализированных порталах или взять в новостях.
Переносная адаптация и приложение
Передовые пользователи выбирают переносной геймплей.
Возможности переносной версии
– Адаптивный облик для разнообразных гаджетов
– Полный доступ к играм
– Моментальная работа
– Практичное управление
Download программу
Mobile app предложено для downloading на устройства с рабочими платформами Android и iOS. Программа гарантирует:
– Надежную деятельность
– Push сообщения о бонусах
– Оперативный вход к избранным слотам
Гемблинг ассортимент
Казино предоставляет внушительную коллекцию азартных игр.
Аппараты
Библиотека азартных машин насчитывает:
– Обычные машины
– Video игры
– Накопительные слоты
– Branded слоты
Live игры
Область живых столов дает шанс состязаться с настоящими дилерами. Открыты:
– Рулетки
– Блек-джек
– Punto Banco
– Poker
Турниры
Периодические турниры дают возможность игрокам состязаться за внушительные призовые банки. Призовая программа модифицируется каждую неделю.
Денежные действия
Казино предлагает разнообразие методов депозита и обналичивания средств:
– Дебетовые карты
– Электронные счета
– Банковские трансферы
– Цифровые валюты
Абсолютно все платежи выполняются конфиденциально с использованием прогрессивных систем кодирования.
Служба support
Компетентная служба саппорта функционирует постоянно. Соединиться с консультантами реально через:
– Онлайн чат
– Почтовую почту
– Телефон
– Социальные платформы
Охрана и аккредитация
Платформа оперирует на фундаменте законной разрешения. Это подтверждает:
– Прозрачность азартного действа
– Безопасность конфиденциальных сведений
– Своевременные выводы
– Контролируемый гемблинг
Вывод
Лицензионный сайт и его актуальные резервные страницы обеспечивают игрокам полный спектр функций для безопасной и профитной досуга. Солидные бонусы, многочисленные слоты, квалифицированная сервис и надежная структура операций превращают казино оптимальным выбором для фанатов азартных услуг.
Вход к ресурсу и функционирующие URL
Востребованные онлайн казино гарантируют игрокам широкий ассортимент игр. Главный веб-сайт казино Лаки Ворлд гарантирует безопасный переход ко всем сервисам. При этом временами случаются обстоятельства, когда нужно альтернативный путь входа.
Что являет собой собой функционирующее зеркало
Функционирующее зеркало — это точная версия основного веб-сайта с другим URL именем. Зеркало сегодня дает возможность преодолевать существующие блокировки и обеспечивать стабильный доступ к популярным слотам.
Официальное зеркало обладает идентичными опциями, что и базовый веб-сайт:
– Совокупный ассортимент игр
– Персональный кабинет с зафиксированными сведениями
– Полные бонусы и программы
– Проверенные платежные переводы
Регистрация и подключение в систему
Процесс открытия аккаунта на сайте занимает пару минут. Начинающим клиентам необходимо:
1. Перейти на действующее зеркало в настоящее время
2. Щелкнуть кнопку «Зарегистрироваться»
3. Заполнить необходимые сведения
4. Активировать электронную почту или данные телефона
5. Получить награду за регистрацию
Доступ в личный кабинет реализуется путем предоставление никнейма и кода доступа.
Обзор бонусной программы
Выгодная наградная политика — основное преимущество казино. Участники обретают всевозможные награды:
Вступительные подарки
Начинающие участники вправе надеяться на значительный бонус за открытие профиля. Чаще всего это набор вариантов, объединяющий:
– Частичную добавку к начальному взносу
– Подарочные фриспины
– Призовые финансы на счет
Купоны и эксклюзивные опции
Периодические бонусные комбинации позволяют зарабатывать экстра привилегии. Применить их допустимо в особом окне личного аккаунта.
Бесплатные вращения и кэшбек
Фриспины — это вариант играть слоты без расходования личных денег. Возврат представляет процентный возмещение проигранных денег.
Коллекция игр
Развлекательная сайт обеспечивает значительную библиотеку слотов.
Слоты
Ассортимент автоматов впечатляет воображение. Имеются классические простые слоты и современные видеослоты с занимательной визуализацией.
Live игры
Секция Live казино погружает пользователей в атмосферу настоящего развлекательного заведения. Квалифицированные ведущие организуют игры в прямом эфире.
Состязания и доски почета
Регулярные соревнования добавляют азарта и предоставляют перспективу выиграть большие выигрыши.
Карманная реализация и программа
Современные решения дают возможность развлекаться в комфортном пространстве. Mobile реализация автоматически адаптируется под дисплей аппарата.
Получить клиент можно для мобильных систем iOS и Android. Софт обеспечивает:
– Скоростной доступ
– Стабильную работу
– Мгновенные-уведомления об бонусах
– Интуитивный интерфейс
Банковские процедуры
Казино принимает различные варианты ввода и получения сумм:
– Банковские системы
– Цифровые сервисы
– Криптовалюты
– Финансовые отправки
Всевозможные транзакции реализуются через защищенное канал, что защищает целостность персональных информации.
Департамент ассистанса
Профессиональная бригада ассистанса функционирует всегда. Соединиться с консультантами допустимо через:
– Интерактивный-чат
– Электронную почту
– Горячую линию
– Коммуникационные каналы
Заключение
Основной веб-сайт и его актуальное зеркало предоставляют клиентам защищенный и приятный доступ к увлекательным занятиям. Привлекательные подарки, обширный каталог развлечений и профессиональная помощь создают процесс максимально интересной и результативной.
online spot – Just visited this platform, layout looks tidy and exploring products is simple.
bs2web at bs2web at
Подключение к ресурсу через действующие зеркала
Пользователи интернет казино нередко сталкиваются с проблемой ограничения главного портала. Конкретно для решения этой проблемы разработаны альтернативные адреса главного ресурса. Леон казино обеспечивает стопроцентный переход ко всем опциям площадки.
Что такое рабочее зеркало казино
Копия значит собой точную реплику официального сайта с таким же возможностями. Единственное отличие — это доменное имя. Все информация участника, содержа депозит, поощрения и данные ставок, остаются неизменными.
Плюсы задействования зеркал
Рабочие зеркала имеют набором значимых выгод:
– Непрерывный доступ к выбранным развлечениям
– Совершенная защита собственных данных
– Неизменность всех параметров персонального кабинета
– Опция получения призов и включения в кампаниях
Оформление профиля на главном сайте
Процедура оформления чрезвычайно прост и занимает несколько минут. Начинающие клиенты в состоянии претендовать на внушительный приветственный поощрение за создание аккаунта.
Шаги формирования аккаунта
1. Подключение на легальный сайт или его копию
2. Выбор на опцию “Зарегистрироваться”
3. Ввод нужных сведений
4. Проверка электронной почты
5. Применение купона (когда есть)
Подарки и промоакции для игроков
Платформа радует своих участников многочисленными наградными предложениями.
Базовые варианты наград
Вводный бонус — внушительное поощрение для свежих игроков, которое может вмещать монетарные средства и фриспины.
Фриспины — шанс использовать в популярных игровых машинах безвозмездно.
Кешбэк — процентный компенсация проигранных денег, который выплачивается каждую неделю или раз в месяц.
Купоны — специальные наборы, гарантирующие бонусные выгоды.
Персональный кабинет: инструменты и установки
Личный профиль гарантирует исчерпывающий надзор над персональным процессом. Здесь имеются:
– Администрирование средствами
– Данные транзакций
– Активные награды
– Конфигурации защиты
– Проверка счета
Портативная редакция и программа
Современные игроки предпочитают портативность. Платформа дает 2 варианта для игры с мобильных аппаратов.
Адаптивная мобильная вариант
Мобильная платформа ресурса без участия настраивается под разрешение любого устройства. Не требуется инсталлировать дополнительное приложение.
Приложение для гаджетов
Можно установить оригинальное APP для iOS и Android. Программа обеспечивает:
– Моментальный старт
– Оптимизированный интерфейс
– Оперативные-сообщения о бонусах
– Стабильную производительность
Live развлечения: среда истинного игорного заведения
Раздел Live столов отправляет пользователей в среду настоящего игорного заведения. Квалифицированные дилеры осуществляют игры в варианте живого времени.
Популярные Live-игры
– Французская рулетка
– Блэкджек
– Punto Banco
– Poker
Игровые машины: разнообразие слотов
Собрание развлекательных машин включает массу названий от известных поставщиков. Игроки откроют:
– Классические слоты
– Графические слоты
– Мега-выигрыш-автоматы
– Megaways
Конкурсы и специальные предложения
Постоянные соревнования дают возможность игрокам бороться друг с другом за крупные денежные банки. Всякий состязание располагает свои требования присутствия и список победителей.
Методы ввода и вывода сумм
Площадка поддерживает массу расчетных систем:
– Дебетовые инструменты
– Электронные счета
– Цифровые валюты
– Wire транзиты
Каждые транзакции выполняются надежно благодаря современным протоколам шифрования.
Сервис support
Опытные сотрудники сервиса обслуживания способны поддержать 24/7. Имеются следующие методы связи:
– Оперативный-чат
– Email-сервис
– Голосовая линия
– Социальные сети
Вывод
Официальный сайт игровой площадки и его актуальные зеркала гарантируют участникам конфиденциальный и легкий подход к обширному диапазону азартных услуг. Щедрые награды, регулярные акции, профессиональная сервис и комфортные финансовые методы формируют геймерский времяпрепровождение максимально увлекательным и прибыльным.
Переход к сайту и функционирующие ссылки
Современные онлайн казино гарантируют пользователям обширный выбор игр. Центральный сайт Кент обеспечивает защищенный переход ко всем услугам. Однако временами случаются моменты, когда нужно дополнительный способ авторизации.
Что представляет собой актуальное зеркало
Действующее зеркало — это идентичная копия главного сайта с иным интернет названием. Копия сегодня помогает миновать возможные ограничения и поддерживать бесперебойный переход к популярным развлечениям.
Главное зеркало имеет полными функциями, что и главный ресурс:
– Целый ассортимент слотов
– Личный аккаунт с записанными информацией
– Все бонусы и программы
– Безопасные денежные действия
Открытие профиля и вход в систему
Ход оформления на портале занимает пару мгновений. Новым пользователям следует:
1. Попасть на актуальное зеркало сегодня
2. Щелкнуть кнопку «Регистрация»
3. Внести необходимые информацию
4. Проверить цифровую почту или информацию телефона
5. Забрать бонус за создание профиля
Подключение в собственный аккаунт осуществляется посредством внесение никнейма и ключа.
Характеристика бонусной программы
Привлекательная бонусная политика — главное преимущество казино. Участники обретают разнообразные поощрения:
Вступительные поощрения
Свежие клиенты способны надеяться на значительный приз за оформление. Чаще всего это комплект возможностей, объединяющий:
– Процентную премию к дебютному взносу
– Бесплатные кручения
– Бонусные средства на баланс
Кодовые комбинации и уникальные возможности
Периодические коды помогают обретать бонусные преимущества. Применить их можно в отдельном меню индивидуального раздела.
Спины и возврат средств
Даровые вращения — это вариант играть барабаны без расходования собственных финансов. Рибейт представляет определенный отдачу потерянных сумм.
Библиотека игр
Азартная площадка представляет значительную подборку слотов.
Игровые машины
Ассортимент аппаратов поражает воображение. Доступны стандартные простые автоматы и современные видеослоты с захватывающей картинкой.
Live казино
Зона Live игр переносит игроков в обстановку истинного гемблинг заведения. Умелые операторы организуют сессии в живом формате.
Состязания и рейтинги
Периодические состязания привносят драйва и дают шанс получить большие выигрыши.
Mobile форма и клиент
Продвинутые разработки позволяют наслаждаться в любимом пространстве. Портативная версия самостоятельно подстраивается под монитор устройства.
Скачать программу можно для мобильных платформ iOS и Android. Приложение предоставляет:
– Быстрый вход
– Бесперебойную функционирование
– Всплывающие-алерты об акциях
– Удобный облик
Денежные процедуры
Платформа принимает разнообразные варианты внесения и вывода денег:
– Платежные инструменты
– Онлайн кошельки
– Криптовалюты
– Банковские операции
Любые действия проходят через защищенное соединение, что защищает безопасность личных сведений.
Служба ассистанса
Профессиональная группа помощи трудится 24/7. Соединиться с менеджерами допустимо через:
– Онлайн-чат
– Почтовую почту
– Горячую линию
– Медиа ресурсы
Заключение
Легальный ресурс и его функционирующее зеркало обеспечивают пользователям надежный и комфортный доступ к интересным забавам. Богатые подарки, обширный ассортимент слотов и качественная поддержка делают процесс исключительно удобной и выгодной.
check this emporium – Well-laid-out pages and straightforward browsing
open the vendor marketplace – Clean style and simple navigation made exploring easy today
https://petmedsmonitor.shop/# п»їdog medication online
VendorFinderVelvet – Looked around, the content feels neatly arranged and easy to follow.
скачать мелбет на айфон зеркало скачать мелбет на айфон зеркало .
downdetector brasil caiu.site .
Современные онлайн-казино предлагают игрокам обширный набор азартных игр и привлекательные бонусы. Впрочем для беспроблемной работы необходимо знать, как обнаружить Глори и его функционирующие зеркала.
Что такое главный веб-ресурс казино
Главный сайт казино — это главная система, где пользователи могут развлекаться игровыми слотами. Платформа работает на официальных условиях и располагает всеми необходимыми документами.
Ключевые выгоды главного портала:
– Конфиденциальность пользовательских сведений
– Объективные требования работы
– Стабильные транзакции
– Оперативная помощь
Функционирующее зеркало казино: для чего нужно
Дублирующий ресурс — это абсолютная дубликат официального ресурса, находящаяся по альтернативному домену. Рабочее зеркало разрабатывается для предоставления стабильного доступа к ресурсу.
Причины использования копий сайта:
– Запрет главного адреса
– Регламентные операции
– Повышенная загрузка на систему
Как обнаружить актуальное зеркало сейчас
Обнаружить свежее официальное зеркало можно разными способами:
1. Email-уведомления — активируйте уведомления на новостную рассылку
2. Отдел поддержки — свяжитесь в онлайн-чат
3. Корпоративные площадки — следите за новостями
4. Игровые ресурсы — проверенные источники
Оформление профиля на платформе казино
Процедура регистрации занимает всего считанные мгновений:
1. Нажмите на клавишу “Зарегистрироваться”
2. Внесите запрашиваемые информацию
3. Подтвердите почтовую e-mail
4. Используйте купон, если имеется
Вслед за оконченной активации вам будет возможен пользовательский профиль.
Награды и коды активации
Богатая поощрительная программа — ключевое достоинство казино:
Награда за регистрацию
Начинающие участники получают стартовый подарок, который может предполагать:
– Финансовый депозит на дебютный депозит
– Бесплатные вращения для слотов
– Бездепозитные деньги
Активационные коды
Систематически публикуются новые промокоды, предоставляющие активировать экстра привилегии.
Схема кешбэка
Активные участники приобретают долю проигранных средств обратно.
Актуальные кампании и состязания
Платформа постоянно организует увлекательные промо-мероприятия:
– Семидневные баттлы
– Сезонные предложения
– Розыгрыши крупных выигрышей
– Программа привилегий
Вход в индивидуальный раздел
Для авторизации на портал следует:
1. Посетить официальный портал или функционирующее зеркало
2. Выбрать “Войти”
3. Ввести никнейм и пароль
В пользовательском разделе доступны следующие функции:
– Депозит баланса
– Обналичивание выигрышей
– Изучение лога игр
– Редактирование персональными параметрами
Адаптивная платформа и app
Портативная платформа
Адаптивная модификация сайта дает возможность развлекаться с разных портативного девайса. Визуал адаптивно оптимизируется под формат screen.
Приложение для скачивания
Загрузить app можно для:
– Android — непосредственная установка с сайта
– iOS — установка через App Store
Плюсы app:
– Быстрый доступ
– Стабильная производительность
– Push-уведомления об предложениях
– Улучшенный дизайн
Азартные разделы
Игровые машины
Обширная коллекция игровых машин от известных производителей:
– Классические игры
– Новые-игры
– Накопительные-машины
Live казино
Зона с настоящими операторами дает:
– Рулеточные столы
– 21
– Baccarat
– Poker
Вещания проводятся в HD качестве изображения, обеспечивая эффект аутентичного казино.
Методы внесения средств и снятия
Сайт работает с разнообразные денежные методы:
– Дебетовые card
– Виртуальные платежи
– Bitcoin/Ethereum
– Wire переводы
Минимальные пороги депозита и быстрые выводы делают процесс максимально удобной.
Департамент помощи
Квалифицированная отдел поддержки функционирует 24/7 и способна ассистировать с разными вопросами:
– Онлайн-чат
– Email-переписка
– Телефонная связь
Выводы
Лицензионный веб-сайт казино и его актуальные альтернативные адреса предоставляют игрокам безопасный и захватывающий гемблинг отдых. Щедрые бонусы, простая портативная версия, обширные слоты и профессиональное live-казино превращают эту площадку превосходным местом для игровых игр.
Something that matters more than it sounds, health shapes energy, focus, mood, and recovery even when nobody names it, and it influences how steady we feel under normal demands. A larger supply of advice does not automatically create clearer thinking, because confidence in tone does not guarantee accuracy in fit. When details are missing, interpretation becomes a guessing game, and using patterns to make decisions more grounded. Then the system starts to stabilize, because it supports responsible perspective rather than reactive conclusions. And that is why the next step is to look at something specific rather than staying general, a solid example to ground this is priligy pills.
Переход к платформе через актуальные зеркала
Игроки виртуальных казино постоянно имеют дело с ситуацией ограничения основного домена. Собственно для решения этой ситуации существуют альтернативные адреса главного домена. Cactus Casino обеспечивает абсолютный переход ко всем функциям платформы.
Что такое актуальное зеркало казино
Копия значит собой точную реплику оригинального портала с таким же функционалом. Ключевое различие — это альтернативное имя. Абсолютно все данные участника, в том числе депозит, бонусы и архив игр, продолжают быть прежними.
Достоинства применения зеркал
Действующие зеркала располагают набором значимых выгод:
– Постоянный переход к излюбленным развлечениям
– Полная защита индивидуальных информации
– Сохранение всех опций персонального кабинета
– Опция приобретения наград и присутствия в предложениях
Регистрация на главном ресурсе
Ход открытия счета предельно легок и длится буквально минут. Новые пользователи могут надеяться на внушительный стартовый бонус за регистрацию.
Стадии открытия аккаунта
1. Вход на главный ресурс или его копию
2. Клик на элемент “Зарегистрироваться”
3. Заполнение нужных информации
4. Верификация email почты
5. Внесение кода (при наличии имеется)
Награды и акции для игроков
Платформа одаривает своих участников всевозможными поощрительными программами.
Ключевые типы наград
Стартовый бонус — щедрое начисление для недавних клиентов, что может включать монетарные средства и free spins.
Фриспины — способность использовать в известных слотах безвозмездно.
Компенсация — пропорциональный возврат проигранных сумм, каковой начисляется еженедельно или помесячно.
Специальные коды — специальные сочетания, дающие дополнительные привилегии.
Личный кабинет: функции и установки
Пользовательский кабинет гарантирует полный управление над пользовательским процессом. Тут предусмотрены:
– Контроль счетом
– История операций
– Текущие награды
– Параметры защиты
– Подтверждение аккаунта
Смартфонная платформа и софт
Актуальные пользователи оценивают мобильность. Казино предоставляет 2 способа для развлечений с смартфонных аппаратов.
Адаптивная телефонная версия
Смартфонная вариант ресурса самостоятельно настраивается под разрешение любого гаджета. Отсутствует потребность скачивать особое ПО.
APP для телефонов
Доступно загрузить фирменное программу для iOS и Android. Программа предоставляет:
– Быстрый вход
– Доработанный дизайн
– Всплывающие-сообщения о акциях
– Устойчивую операционность
Live игры: атмосфера истинного игорного заведения
Категория Live столов транспортирует клиентов в среду истинного казино. Профессиональные ведущие проводят партии в виде прямого времени.
Топовые Live-развлечения
– Американская рулетка
– 21
– Punto Banco
– Карибский покер
Аппараты: разнообразие развлечений
Библиотека развлекательных машин содержит множество названий от ведущих производителей. Игроки откроют:
– Стандартные слоты
– Видео-автоматы
– Прогрессивный джекпот-игры
– Многолинейные автоматы
Конкурсы и уникальные события
Систематические соревнования предоставляют шанс участникам состязаться друг с другом за внушительные выигрышные фонды. Отдельный турнир содержит свои условия присутствия и доску победителей.
Методы пополнения и вывода сумм
Ресурс поддерживает массу денежных сервисов:
– Дебетовые картыы
– Цифровые кошельки
– Цифровые валюты
– Банковские транзиты
Абсолютно все транзакции проходят защищенно благодаря передовым протоколам криптографии.
Отдел помощи
Компетентные консультанты отдела обслуживания настроены поддержать 24/7. Имеются следующие способы коммуникации:
– Живой-чат
– Email-сервис
– Аудио горячая линия
– Коммуникационные сети
Вывод
Легальный портал клуба и его актуальные альтернативы обеспечивают участникам безопасный и удобный переход к большому спектру игровых активностей. Солидные бонусы, регулярные кампании, качественная служба и простые финансовые системы создают игровой досуг чрезвычайно увлекательным и результативным.
official vendor collective link – Well-organized sections make navigation straightforward
мелбет бонус мелбет бонус .
https://petmedsmonitor.shop/# canada pet meds
apk melbet apk melbet .
прогулка на катере arenda-yakhty-spb.ru .
view their products – Pages are clear, and moving between categories is straightforward
browse today – Ran into this platform, layout feels organized and simple
skycrate website – I checked this store earlier, and moving through sections is straightforward.
melbet вход с мобильного melbet вход с мобильного .
Обзор лицензионного ресурса
Прогрессивные интернет казино предоставляют участникам широкий выбор услуг и перспектив. Основной сайт Glory казино гарантирует надежный вход к гемблинг функциям.
Функционирующее зеркало: возможность на сегодня
Альтернативный адрес служит как точную реплику основного сайта. Актуальное зеркало обеспечивает участникам обходить существующие блокировки.
Выгоды задействования зеркала
Главные преимущества включают:
– Постоянный путь к сайту
– Хранение всех характеристик главного веб-сайта
– Защита личных данных
– Такой же набор функций
Регистрация на ресурсе
Процесс оформления профиля характеризуется простотой и практичностью. Начинающие пользователи необходимо:
1. Посетить лицензионный портал или его зеркало
2. Щелкнуть на пункт регистрации
3. Внести нужные данные
4. Подтвердить email почту
5. Произвести первый доступ
Вознаграждение за регистрацию
Новые игроки получают внушительный стартовый бонус. Такое вознаграждение способно предусматривать:
– Денежные начисления
– Даровые спины
– Усиленный коэффициент кэшбэка
Доступ в персональный профиль
Существующие клиенты в состоянии моментально получить доступ в персональный раздел, используя учетные данные и ключ. Индивидуальный раздел обеспечивает путь к:
– Регулированию счетом
– Журналу платежей
– Активным бонусам
– Настройкам учетной записи
Подарки и промо
Портал систематически реализует различные предложения для пользователей.
Категории призов
Базовые типы призов:
– Пополнительные бонусы – доля от объема пополнения
– Прокруты – даровые спины в игровых машинах
– Возврат средств – возврат доли затраченных сумм
– Соревновательные награды – награды за состязание в соревнованиях
Ваучеры
Специальные ваучеры позволяют заработать бонусные преимущества. Игроки могут получить их на тематических сайтах или взять в уведомлениях.
Портативная вариант и программа
Современные клиенты любят мобильный гейминг.
Функции мобильной платформы
– Гибкий облик для разнообразных девайсов
– Совокупный возможность к автоматам
– Стремительная подгрузка
– Практичное управление
Скачать программу
Портативное софт предложено для downloading на устройства с операционными ОС Android и iOS. Программа дает:
– Надежную деятельность
– Пуш алерты о бонусах
– Моментальный запуск к предпочитаемым автоматам
Игровой портфель
Игровой клуб обеспечивает огромную коллекцию азартных игр.
Слоты
Библиотека игровых автоматов содержит:
– Стандартные игры
– Video аппараты
– Прогрессивные машины
– Тематические развлечения
Live казино
Категория реальных столов обеспечивает право состязаться с настоящими дилерами. Открыты:
– Американская рулетка
– Блек-джек
– Punto Banco
– Покер
Турниры
Регулярные турниры обеспечивают игрокам соревноваться за солидные денежные пулы. Турнирная структура актуализируется каждую неделю.
Денежные операции
Портал предлагает разнообразие методов депозита и обналичивания средств:
– Дебетовые карты
– Цифровые кошельки
– Прямые переводы
– Крипто
Абсолютно все платежи осуществляются защищенно с применением актуальных технологий шифрования.
Сервис помощи
Квалифицированная отдел помощи функционирует без перерыва. Обратиться с операторами реально через:
– Онлайн чат
– Email почту
– Горячую линию
– Социальные медиа
Защита и лицензирование
Портал функционирует на базе легальной аккредитации. Данное гарантирует:
– Честность азартного процесса
– Безопасность персональных данных
– Пунктуальные выводы
– Контролируемый гемблинг
Итог
Главный ресурс и его действующие дубликаты гарантируют участникам полный комплекс опций для приятной и профитной игры. Солидные подарки, различные слоты, опытная служба и проверенная структура транзакций превращают платформу лучшим опцией для любителей развлекательных услуг.
скачать бесплатно мелбет с официального сайта скачать бесплатно мелбет с официального сайта .
Современные онлайн-казино обеспечивают участникам обширный набор услуг и бонусных опций. Доступ к площадке выполняется через официальный веб-сайт или его рабочее зеркало казино Leon, что обеспечивает бесперебойную деятельность.
Чем является актуальное зеркало казино
Альтернатива — это точная версия официального веб-сайта, построенная для обхода запретов. Актуальное зеркало обеспечивает игрокам получить вход к излюбленным автоматам в любое удобное время.
Официальное зеркало имеет всеми опциями оригинального веб-сайта:
– Целый список игр
– Личный кабинет с внесенными информацией
– Действующие промокоды
– Безопасные денежные процедуры
Оформление профиля на основном сайте
Алгоритм оформления составляет всего пару минут. Первым участникам нужно:
1. Войти на основной портал или функционирующее зеркало
2. Выбрать на элемент “Регистрация”
3. Ввести обязательные информацию
4. Верифицировать email
5. Совершить стартовый взнос
Стартовый бонус предоставляется незамедлительно после завершения всех ступеней.
Доступ в личный кабинет
Зарегистрированные игроки могут произвести доступ указывая:
– Логин и код
– Код сотового
– Адрес
Личный кабинет обеспечивает доступ к управлению средствами, записям игр и активным бонусам.
Награды и предложения
Игровая платформа привлекает активных игроков щедрыми вознаграждениями:
Начальный комплект
– Надбавка на начальный платеж до 100%
– Бесплатные вращения на известные игры
– Дополнительные поощрения за очередные взносы
Ваучеры
Особые промокоды предоставляют доступ на использование эксклюзивных поощрений. Текущие промокоды публикуются в блоке “Акции”.
Кэшбек
Еженедельный бонус достигает до 10% от потраченных средств. Компенсация выплачивается моментально.
Механизм лояльности
Постоянные пользователи зарабатывают поинты, которые переводятся на подлинные средства или фриспины.
Адаптивный портал и APP
В целях удобства клиентов сделана удобная mobile версия. Отзывчивый интерфейс помогает легко развлекаться с произвольного карманного гаджета.
Достоинства приложения:
– Скорый доступ к автоматам
– Настроенный облик
– Бесперебойная активность
– Нотификации о свежих турнирах
Получить софт можно безвозмездно с официального ресурса для аппаратов на Android и iOS.
Каталог слотов
Игровые автоматы
База вмещает более 2000 машин от популярных студий:
– Классические машины
– Video slots
– Прогрессивные автоматы
– Тематические автоматы
Live казино
Блок Live развлечений обеспечивает участие с живыми дилерами в живом режиме:
– Рулеточные столы
– Двадцать одно
– Карты
– Poker
Конкурсы
Регулярные конкурсы с значительными призовыми пулами проводятся каждую неделю. Присоединение в состязаниях открыто всем активным участникам.
Расчетные способы
Депозиты и выводы финансов выполняются через популярные платежные системы:
– Дебетовые карты
– Цифровые счета
– Крипто
– Денежные операции
Стартовый платеж — от 100 рублей. Получение денег осуществляется в течение 24 периода.
Служба поддержки
Круглосуточная команда поддержки может ассистировать в исправлении произвольных проблем:
– Живой чат
– Email
– Контактный номер
– Соц сети
Надежность и сертификат
Официальный ресурс оперирует на базе мировой документа. Всевозможные сведения клиентов закрыты современным SSL-протоколом.
Резюме
Актуальное зеркало предоставляет стабильный доступ к предпочитаемым слотам, щедрым акциям и комфортным сервисам. Присоединяйтесь прямо сейчас и обретите начальный подарок!
мелбет скачать приложение на ios мелбет скачать приложение на ios .
речные прогулки спб arenda-yakhty-spb-2.ru .
granitevendoremporium.shop – Interesting marketplace, sections are easy to navigate and look organized
bs2best at bs
Hello.
This post was created with XRumer 23 StrongAI.
Good luck 🙂
ссылка на сайт fermacc
аренда яхты arenda-yakhty-spb-1.ru .
Нынешние онлайн-казино гарантируют клиентам разнообразный ассортимент возможностей для комфортной развлечений. Подключение к платформе [url=dragon-money-1772572304810.clients.site]Dragon Money казино[/url] производится через основной портал или действующее зеркало.
Что такое рабочее зеркало казино
Функционирующее зеркало — это альтернативный домен официального портала казино. Такие версии разрабатываются для предоставления непрерывного соединения к развлекательной системе.
Дубликат сегодня полностью дублирует функционал основного ресурса. Пользователи приобретают схожий выход ко всем услугам, включая оформление профиля, финансирование кошелька и обналичивание денег.
Оформление профиля на главном портале
Процесс регистрации занимает всего несколько секунд. Начинающим пользователям необходимо:
1. Попасть на основной ресурс или действующее проверенное зеркало
2. Нажать кнопку “Создать аккаунт”
3. Ввести необходимые реквизиты
4. Проверить электронную почту
5. Ввести бонусный код при присутствии
После финализации оформления игрок зарабатывает вознаграждение за регистрацию, который может охватывать бесплатные вращения или денежное вознаграждение.
Авторизация в индивидуальный кабинет
Индивидуальный кабинет — это безопасная зона, где пользователи способны регулировать своим учетной записью. Для логина следует ввести логин и password.
В пользовательском кабинете представлены такие функции:
– Проверка истории переводов
– Использование кодов активации
– Настройка бонусами
– Вступление в конкурсах
– Мониторинг возмещения
– Изменение профиля
Призы и промо
Развлекательная сервис дарит привлекательные бонусы:
Стартовый бонус — новички получают существенное премию на первые депозиты.
Фриспины — дарятся как при регистрации, так и в процессе многочисленных акций.
Кэшбэк — еженедельный возврат доли израсходованных сумм.
Промокоды — уникальные коды, обеспечивающие право к уникальным предложениям.
Описание развлекательных разделов
Slots
Собрание слотов насчитывает сотни игр от передовых производителей. Клиенты обнаружат как стандартные слоты, так и актуальные мультимедийные автоматы с захватывающей анимацией.
Live казино
Секция Live казино обеспечивает шанс соревноваться с живыми дилерами в режиме текущего времени. Доступны распространенные варианты: рулетка, блэкджек, баккара, покер.
Соревнования
Регулярные турниры с крупными премиальными банками притягивают массу соревнующихся. Победители зарабатывают cash вознаграждения и уникальные бонусы.
Портативная версия и приложение
Телефонная версия сайта предоставляет право развлекаться с каждого гаджета. Оформление автоматически подстраивается под формат экрана.
Загрузить приложение можно для аппаратов на Android и iOS. Смартфонное программа характеризуется всеми опциями десктопной версии.
Как отыскать действующее зеркало на сегодня
Свежие ссылки дубликатов постоянно изменяются. Получить рабочую адрес можно несколькими методами:
– Через службу помощи
– В официальных коммуникационных сетях
– По электронной дайджесту
– На специализированных ресурсах
Защита и сертификация
Главный домен оперирует на базе глобальной сертификата. Все транзакции охраняются инновационными технологиями защиты.
Секретность персональных информации поддерживается в стопроцентном размере.
Заключение
Официальный портал и его рабочие дубликаты предоставляют клиентам постоянный вход к первоклассным гемблинговым услугам. Выгодные поощрения, различные игры, опытная служба — все это создает игровой времяпрепровождение невероятно комфортным и интересным.
What impressed me about this casino https://tarnowfoto.pl/ is the variety of the games. Everything runs without issues, the design is minimal, and there’s plenty of options to explore, which keeps it engaging.
Переход к ресурсу и функционирующие ссылки
Популярные онлайн казино обеспечивают игрокам огромный выбор развлечений. Главный портал РљСѓС€ казино гарантирует надежный подключение ко всем сервисам. Однако периодически происходят случаи, когда понадобится запасной метод доступа.
Что означает собой функционирующее зеркало
Функционирующее зеркало — это идентичная версия основного портала с запасным сетевым расположением. Копия сегодня дает возможность обходить потенциальные ограничения и обеспечивать постоянный вход к предпочитаемым автоматам.
Легальное зеркало обладает теми же опциями, что и главный сайт:
– Совокупный каталог автоматов
– Персональный профиль с зафиксированными сведениями
– Все бонусы и промо
– Проверенные платежные переводы
Создание аккаунта и подключение в сервис
Процедура создания профиля на ресурсе требует пару минут. Новым пользователям необходимо:
1. Попасть на актуальное зеркало на данный момент
2. Выбрать опцию «Создать аккаунт»
3. Внести нужные информацию
4. Подтвердить почтовую почту или информацию смартфона
5. Активировать бонус за оформление
Доступ в собственный раздел производится путем указание имени пользователя и ключа.
Обзор призовой структуры
Щедрая призовая программа — главное плюс казино. Участники получают разнообразные подарки:
Стартовые поощрения
Начинающие пользователи вправе надеяться на значительный поощрение за открытие профиля. Как правило это комплект опций, содержащий:
– Процентную надбавку к стартовому пополнению
– Даровые кручения
– Дополнительные деньги на кошелек
Промокоды и уникальные опции
Систематические купоны помогают получать дополнительные преимущества. Задействовать их разрешено в предназначенном окне личного аккаунта.
Фриспины и кешбэк
Бесплатные спины — это вариант запускать барабаны без расходования личных финансов. Рибейт означает частичный компенсацию утраченных финансов.
Каталог развлечений
Азартная площадка обеспечивает значительную библиотеку развлечений.
Слоты
Вариативность автоматов удивляет ожидания. Доступны стандартные простые машины и современные видеослоты с интересной визуализацией.
Live игры
Категория Live игр погружает участников в атмосферу реального развлекательного дома. Квалифицированные крупье проводят игры в онлайн времени.
Турниры и доски почета
Постоянные турниры добавляют остроты и обеспечивают возможность заработать большие выигрыши.
Карманная версия и софт
Современные инновации позволяют участвовать в удобном точке. Мобильная версия автоматически подстраивается под монитор устройства.
Получить приложение разрешено для мобильных систем iOS и Android. Клиент дает:
– Мгновенный запуск
– Бесперебойную работу
– Моментальные-сообщения об бонусах
– Простой облик
Денежные операции
Платформа поддерживает разнообразные методы депозита и вывода средств:
– Банковские счета
– Виртуальные сервисы
– Крипто
– Прямые отправки
Любые операции осуществляются через зашифрованное подключение, что обеспечивает сохранность персональных сведений.
Сервис ассистанса
Квалифицированная служба ассистанса функционирует всегда. Контактировать с специалистами разрешено через:
– Live-чат
– Почтовую почту
– Связь
– Социальные каналы
Итоги
Официальный сайт и его действующее зеркало предоставляют игрокам безопасный и комфортный путь к интересным забавам. Выгодные бонусы, большой каталог слотов и высокая помощь формируют участие исключительно приятной и результативной.
canadian valley pharmacy: global pharmacy canada – canadian pharmacies online
silvergrove vendor directory – Organized platform, content is clear and accessible
useful link – Ran into this platform recently, interface seems clean and easy to navigate.
melbet скачать ios melbet скачать ios .
melbet pariuri pe mma melbet pariuri pe mma
Переход к платформе через действующие зеркала
Современные онлайн казино дают игрокам постоянный подключение к услугам. Официальный портал казино Глори работает устойчиво, обеспечивая широкий спектр развлекательных слотов. Однако периодически образуются системные проблемы или запреты, потому важно иметь представление о присутствии актуальных зеркал.
Что означает собой главное зеркало казино
Дубликат — это полная версия центрального сайта с схожим набором функций. Актуальное зеркало сейчас помогает миновать территориальные ограничения и поддерживать времяпрепровождение.
Ключевые плюсы применения зеркал:
– Абсолютный подключение к индивидуальному кабинету
– Сохранение совокупных информации профиля
– Аналогичный ассортимент слотов
– Текущие вознаграждения и промо
Оформление на платформе
Процедура создания аккаунта требует считанные минут. Новые геймеры зарабатывают великодушный подарок за оформление, он способен содержать:
– Начальный бонусный бонус
– Комплиментарные кручения для машин
– Эксклюзивные ваучеры
– Усиленный кэшбек
Ради выполнения регистрации следует:
1. Зайти на официальный ресурс или копию
2. Нажать кнопку «Создать аккаунт»
3. Внести индивидуальные информацию
4. Подтвердить электронную почту или контакт
5. Активировать код (в случае доступности)
Вход в персональный кабинет
Вслед за правильной оформления игроки в состоянии производить доступ через официальный портал или рабочее зеркало. Личный кабинет даёт абсолютный регулирование над учётной записью:
– История игр
– Внесение счёта
– Снятие денег
– Регулирование бонусами
– Вовлечение в конкурсах
Поощрения и промо казино
Ресурс радует клиентов различными бонусными схемами:
Приветственные поощрения
Новички обретают щедрый пакет бонусов на стартовые пополнения. Как правило это содержит процентную доплату к сумме пополнения плюс безвозмездные вращения.
Периодические акции
– Еженедельный возврат до 15%
– Соревнования с наградными фондами
– Призы на годовщину рождения
– Эксклюзивные программы для элитных геймеров
Система верности
Постоянные клиенты накапливают пункты, они разрешено обменять на действительные деньги или эксклюзивные привилегии.
Портативная редакция и программа
Передовые инновации помогают развлекаться в любом месте удобно. Мобильная вариант веб-сайта независимо настраивается под экран произвольного девайса.
Выгоды мобильного приложения:
– Оперативная открытие автоматов
– Комфортный вид
– Push-нотификации о бонусах
– Возможность установить для Android и iOS
Реальное казино: обстановка реального гемблинг клуба
Секция Live заведения переносит геймеров в антураж истинного азартного клуба. Компетентные дилеры управляют развлечение в состоянии актуального времени.
Предлагаемые развлечения:
– Колесо фортуны
– Карточная игра
– Классика
– Карты
Барабаны и игровые автоматы
Собрание азартных автоматов включает тысячи позиций от лидирующих разработчиков. Каждый пользователь подберёт слот по душе:
– Стандартные слоты
– Видеослоты с специальными этапами
– Джекпот-автоматы
– Megaways автоматы
Конкурсы и лотереи
Систематические соревнования вносят адреналин и обеспечивают способность заработать большие призы. Присутствие в соревнованиях часто комплиментарное, а выигрышные суммы насчитывают значительных сумм.
Защита и конфиденциальность
Сайт применяет современные протоколы криптографии для охраны реквизитов геймеров. Любые финансовые процедуры проходят через защищённые линии.
Резюме
Главный портал и его действующие зеркала обеспечивают безопасный переход к первоклассным игровым сервисам. Богатые награды, эргономичная портативная версия, богатство машин и квалифицированное Live-игорный дом делают платформу прекрасным выбором для любителей игровых игр.
мелбет кз как вывести деньги http://melbet60432.help
online shop link – Looks reliable and content is easy to follow
VendorSpotVelvetGrove – Took a peek, the site looks tidy and easy to navigate.
this vendor workshop site – Took a look and the layout seems convenient for mobile users
Certified Canada Rx: Certified Canada Rx – Certified Canada Rx
https://www.bestloveweddingstudio.com/forum/topic/65161/1xbet-promo-code-for-free-bet-%E2%80%93-1xmax200-bonus-%E2%82%AC130
Обзор официального портала
Актуальное онлайн-казино обеспечивает своим игрокам большой выбор игр и призов. Основной ресурс Gonzo функционирует 24/7, давая вход к известным слотам, live-казино и обширным кампаниям.
Рабочее зеркало: вход к порталу
Что такое копия казино
Копия является собой абсолютную дубликат основного веб-сайта с отличным сетевым именем. Действующее зеркало дает участникам миновать ограничения и иметь непрерывный подключение к излюбленным автоматам.
Как обнаружить рабочее зеркало сегодня
Свежие URL на основное зеркало выкладываются через:
– Почтовую оповещение
– Проверенные социальные сети
– Службу сопровождения
– Партнерские площадки
Открытиесчета на платформе
Ход оформления
Открытиесчета длится пару минут и содержит следующие этапы:
1. Вход на главный веб-сайт или рабочее зеркало
2. Клик клавиши “Создатьаккаунт”
3. Внесение личных реквизитов
4. Проверка электроннойпочты или телефона
5. Создание пароля
Бонус за оформление
Начинающие участники приобретают щедрые начальные вознаграждения:
– Игровые деньги на аккаунт
– Фриспины для игр
– Расширенный процент кешбэка
– Уникальные купоны
Логин в персональный счет
Зарегистрированные пользователи вправе произвести логин через основной сайт или актуальное зеркало. Для этого необходимо внести логин и пароль, придуманные при созданииаккаунта.
Инструменты персонального профиля
В собственном кабинете предоставлены основные возможности:
– Управление контактными данными
– Внесение депозита
– Получение выигрышей
– Активация кодов
– Просмотр архива игр
– Регистрация в состязаниях
Бонусы и кампании
Разновидности подарков
Казино балует своих игроков многочисленными наградными предложениями:
– Стартовый комплект — солидные бонусы на дебютные вклады
– Freespins — дополнительные вращения в рейтинговых играх
– Компенсация — систематический возмещение части проигрышей
– Схема верности — особые льготы для верных пользователей
Ваучеры и их ввод
Особые промокоды предоставляют расширенные вознаграждения. Для активации следует внести последовательность в специальное раздел в персональном кабинете.
Азартный каталог
Игры
База развлекательных автоматов содержит массу позиций от топовых поставщиков:
– Классические симуляторы
– Новые развлечения
– Прогрессивные слоты
– Брендовые развлечения
Live казино
Область Live-казино предлагает процесс с реальными операторами в условиях прямого времени:
– Европейскаярулетка
– Очко
– Baccarat
– Техасскийхолдем
Турниры
Систематические соревнования с крупными наградными фондами устраиваются постоянно. Соревнующиеся сражаются за лидерство в таблице.
Портативная реализация и софт
Mobile адаптация ресурса
Официальный портал полностью приспособлен для планшетных устройств. Клиенты способны открывать автоматы напрямую через обозреватель без нужды скачивания.
Приложение для установки
Официальное портативное APP доступно для установки на аппараты с программными платформами Android и iOS. Приложение предоставляет:
– Быстрый подход к развлечениям
– Стабильную операционность
– Мгновенные-оповещения о бонусах
– Простой интерфейс
Вывод
Официальный портал казино и его действующие зеркала предоставляют участникам полный доступ к высококлассным развлекательным играм. Солидные поощрения, многочисленные промо, простая мобильная реализация и квалифицированная поддержка превращают развлекательный времяпрепровождение предельно enjoyable и выгодным.
Mens RX Index online ed medicine erectile dysfunction medicine online
Контейнер текстильный КТ Электросварная труба изготавливается путем сварки листового проката, предлагая экономичное решение для широкого спектра применений, а профильная труба, с ее разнообразной геометрией сечения, находит применение в строительстве и производстве металлоконструкций. Бесшовные горячекатаные трубы отличаются высокой прочностью и устойчивостью к давлению, что делает их незаменимыми в нефтегазовой отрасли и химической промышленности
calmbrook sellers hub – Neatly organized sections with easy-to-use navigation
online slots machines online slots machines .
browse products – Found this platform, design feels modern and browsing works naturally
melbet зеркало скачать melbet зеркало скачать .
1win лаки джет https://www.1win15478.help
product catalog link – Navigation is simple and the site feels very organized
Обзор главного ресурса
Современные виртуальные казино дают игрокам широкий набор развлечений и перспектив. Лицензионный портал Вилдер предоставляет безопасный вход к азартным возможностям.
Действующее зеркало: доступ в настоящий момент
Резервный сайт выступает собой точную версию официального веб-сайта. Официальное зеркало обеспечивает пользователям обходить потенциальные барьеры.
Выгоды задействования зеркала
Ключевые плюсы охватывают:
– Постоянный путь к ресурсу
– Удержание всех функций официального ресурса
– Защита личных информации
– Равнозначный инструментарий
Оформление профиля на платформе
Процесс создания аккаунта отличается легкостью и эргономичностью. Новые клиенты обязаны:
1. Посетить главный веб-сайт или его зеркало
2. Щелкнуть на кнопку открытия счета
3. Ввести необходимые информацию
4. Подтвердить email адрес
5. Совершить начальный авторизацию
Вознаграждение за создание аккаунта
Новые игроки забирают щедрый стартовый приз. Данное награда может содержать:
– Материальные средства
– Complimentary вращения
– Увеличенный показатель кэшбека
Авторизация в персональный раздел
Зарегистрированные игроки имеют возможность мгновенно авторизоваться в личный аккаунт, используя никнейм и шифр. Индивидуальный раздел предоставляет шанс к:
– Управлению депозитом
– Истории транзакций
– Работающим подаркам
– Опциям учетной записи
Вознаграждения и кампании
Портал постоянно устраивает различные мероприятия для игроков.
Разновидности призов
Основные формы бонусов:
– Депозитные подарки – процент от объема депозита
– Бесплатные вращения – бесплатные спины в автоматах
– Кэшбэк – возврат части проигранных сумм
– Соревновательные вознаграждения – награды за участие в состязаниях
Промокоды
Особые коды позволяют активировать экстра бонусы. Игроки имеют возможность отыскать их на партнерских порталах или взять в письмах.
Портативная редакция и софт
Передовые гемблеры любят мобильный геймплей.
Опции переносной системы
– Отзывчивый вид для всех девайсов
– Полный путь к играм
– Моментальная загрузка
– Практичное управление
Скачать софт
Mobile app предоставлено для установки на аппараты с операционными системами Android и iOS. Программа обеспечивает:
– Стабильную деятельность
– Push алерты о акциях
– Быстрый вход к желанным развлечениям
Азартный выбор
Игровой клуб предоставляет огромную галерею гемблинг игр.
Аппараты
Библиотека игровых автоматов насчитывает:
– Стандартные слоты
– Видео автоматы
– Накопительные машины
– Тематические развлечения
Live столы
Область реальных столов предоставляет право играть с настоящими крупье. Открыты:
– Рулетки
– 21
– Baccarat
– Покер
Соревнования
Периодические турниры помогают игрокам состязаться за внушительные призовые суммы. Призовая программа модифицируется каждую неделю.
Платежные действия
Казино предлагает множество методов пополнения и обналичивания сумм:
– Кредитные карточки
– Электронные платежные системы
– Межбанковские трансферы
– Bitcoin
Совокупные переводы выполняются безопасно с использованием передовых протоколов защиты.
Служба support
Компетентная служба support трудится постоянно. Коннектиться с менеджерами можно через:
– Онлайн чат
– Электронную почту
– Горячую линию
– Social медиа
Секьюрити и лицензирование
Игровой клуб оперирует на основании официальной сертификата. Это обеспечивает:
– Легальность развлекательного геймплея
– Охрану персональных данных
– Своевременные выводы
– Регулируемый геймплей
Заключение
Основной портал и его функционирующие дубликаты предоставляют игрокам абсолютный ассортимент возможностей для удобной и профитной игры. Щедрые вознаграждения, многочисленные автоматы, опытная сервис и надежная система транзакций формируют казино оптимальным решением для поклонников гемблинг услуг.
Актуальные онлайн-казино обеспечивают игрокам внушительный диапазон возможностей и премиальных вариантов. Доступ к сервису реализуется через основной веб-сайт или его действующее зеркало Pinco сайт, что предоставляет непрерывную деятельность.
В чем суть функционирующее зеркало казино
Копия — это идентичная копия оригинального ресурса, сделанная для преодоления запретов. Зеркало сегодня помогает клиентам получить подключение к любимым слотам в произвольное время.
Официальное зеркало обладает всеми функциями оригинального веб-сайта:
– Совокупный список автоматов
– Профиль с внесенными информацией
– Действующие поощрения
– Гарантированные платежные действия
Оформление профиля на основном сайте
Алгоритм регистрации отнимает всего пару минут. Начинающим пользователям следует:
1. Войти на основной сайт или рабочее зеркало
2. Щелкнуть на ссылку “Открыть счет”
3. Заполнить требуемые сведения
4. Активировать электронную почту
5. Совершить первый платеж
Поощрение новичкам начисляется сразу после окончания всех ступеней.
Вход в профиль
Существующие клиенты могут произвести подключение используя:
– Учетное имя и ключ
– Данные мобильного
– Электронную почту
Личный кабинет открывает возможность к контролю счетом, записям игр и активным акциям.
Награды и программы
Гемблинг платформа привлекает регулярных участников многочисленными вознаграждениями:
Приветственный комплект
– Поощрение на первый пополнение до 100%
– Даровые спины на топовые слоты
– Добавочные бонусы за последующие взносы
Бонусные коды
Специальные коды предоставляют шанс на использование уникальных бонусов. Свежие комбинации выкладываются в блоке “Акции”.
Возврат средств
Регулярный кэшбек составляет до 10% от проигранных сумм. Возмещение зачисляется незамедлительно.
Механизм лояльности
Активные участники зарабатывают единицы, которые превращаются на действительные деньги или free spins.
Мобильная версия и программа
Ради комфорта участников сделана качественная адаптивный сайт. Адаптивный интерфейс дает возможность легко участвовать с каждого портативного устройства.
Достоинства APP:
– Оперативный доступ к развлечениям
– Улучшенный дизайн
– Устойчивая деятельность
– Нотификации о новых акциях
Скачать приложение можно даром с проверенного ресурса для гаджетов на Android и iOS.
Библиотека слотов
Автоматы
Каталог включает более 2000 слотов от топовых студий:
– Классические машины
– Видео-слоты
– Слоты с джекпотом
– Брендовые развлечения
Live казино
Раздел Live казино дает игру с реальными ведущими в прямом формате:
– Рулетка
– Карточная игра
– Baccarat
– Столы покера
Соревнования
Регулярные состязания с крупными призовыми пулами организуются еженедельно. Участие в конкурсах разрешено всем активным пользователям.
Платежные методы
Депозиты и изъятия выплат осуществляются через востребованные методы:
– Платежные средства
– Электронные кошельки
– Цифровая валюта
– Счетные транзакции
Стартовый платеж — от 100 рублей. Вывод выигрышей обрабатывается в течение 24 ч.
Команда саппорта
Круглосуточная команда саппорта может помочь в решении любых проблем:
– Живой чат
– Email
– Контактный номер
– Социальные сети
Надежность и документ
Подлинный сайт функционирует на основании глобальной документа. Каждые сведения игроков защищены современным SSL-криптованием.
Заключение
Действующее зеркало дает постоянный вход к любимым развлечениям, богатым поощрениям и удобным сервисам. Создайте аккаунт сегодня и обретите первый подарок!
take a look – Checked this platform, everything feels smooth to navigate and clean
blog betswap casino
https://certifiedcanadarx.shop/# Certified Canada Rx
https://bulevard.bg/news/georgi-gospodinov-specheli-mezhdunaroden-bukar-s-romana-vremeubezhishte-18406.html
stellar tl – ltc try, chz coin try
скачать мелбет официальный сайт скачать мелбет официальный сайт .
https://certifiedcanadarx.shop/# canadian pharmacy
check my blog betswap promo code
Актуальные онлайн-казино предоставляют пользователям широкий ассортимент игр и выгодные бонусы. Впрочем для беспроблемной работы важно знать, как обнаружить Кент казино и его функционирующие зеркала.
Что такое главный портал казино
Официальный портал казино — это основная площадка, где игроки могут пользоваться игровыми играми. Сайт функционирует на легальных правах и имеет всеми нужными разрешениями.
Первостепенные плюсы лицензионного веб-сайта:
– Надежность индивидуальных данных
– Честные требования использования
– Гарантированные платежи
– Оперативная техподдержка
Действующее зеркало казино: для чего необходимо
Альтернативный адрес — это полная копия главного сайта, хостящаяся по иному веб-адресу. Актуальное зеркало создается для поддержания постоянного входа к порталу.
Факторы использования зеркал:
– Ограничение главного URL
– Регламентные операции
– Повышенная нагрузка на сервер
Как обнаружить рабочее зеркало на сегодня
Узнать актуальное рабочее зеркало можно разными путями:
1. Почтовые оповещения — подпишитесь на информационную отправку
2. Служба support — обратитесь в онлайн-чат
3. Корпоративные каналы — проверяйте за публикациями
4. Специализированные сайты — надежные источники
Оформление профиля на платформе казино
Процесс оформления занимает только пару моментов:
1. Выберите на кнопку “Создать аккаунт”
2. Введите требуемые поля
3. Активируйте электронную e-mail
4. Примените промокод, если доступен
По завершении финализированной создания аккаунта вам станет открыт индивидуальный профиль.
Поощрения и купоны
Выгодная поощрительная система — значимое плюс казино:
Поощрение за создание аккаунта
Начинающие игроки обретают стартовый презент, который может охватывать:
– Денежный депозит на дебютный депозит
– Фриспины для барабанов
– Приветственные деньги
Купоны
Периодически публикуются новые коды, позволяющие использовать особые преимущества.
Программа кешбэка
Лояльные участники зарабатывают порцию утраченных денег назад.
Актуальные акции и турниры
Ресурс периодически устраивает увлекательные акции:
– Еженедельные баттлы
– Праздничные бонусы
– Конкурсы солидных призов
– Программа статусов
Авторизация в индивидуальный кабинет
Для доступа на ресурс требуется:
1. Посетить основной ресурс или актуальное зеркало
2. Нажать “Login”
3. Внести email и секретную комбинацию
В индивидуальном разделе открыты нижеперечисленные возможности:
– Пополнение баланса
– Обналичивание призов
– Изучение истории ставок
– Управление личными данными
Портативная платформа и софт
Mobile версия
Responsive версия веб-сайта обеспечивает делать ставки с различных смартфонного телефона. Дизайн самостоятельно настраивается под размер дисплея.
Приложение для загрузки
Загрузить клиент можно для:
– Android — прямая скачивание с платформы
– iOS — загрузка через App Store
Плюсы приложения:
– Быстрый запуск
– Стабильная функциональность
– Push-оповещения об акциях
– Ускоренный интерфейс
Развлекательные категории
Игровые машины
Обширная коллекция развлекательных автоматов от известных поставщиков:
– Классические игры
– Новые-эмуляторы
– Джекпот-слоты
Live игры
Зона с живыми крупье предоставляет:
– Рулетка
– 21
– Punto Banco
– Покер
Трансляции ведутся в отличном качестве изображения, создавая эффект настоящего казино.
Методы пополнения и обналичивания
Платформа поддерживает разные денежные методы:
– Кредитные card
– Электронные платежи
– Crypto
– Финансовые отправки
Минимальные суммы взноса и быстрые транзакции создают времяпрепровождение крайне приятной.
Команда помощи
Профессиональная группа support функционирует 24/7 и готова поддержать с разными вопросами:
– Онлайн-чат
– Email-переписка
– Голосовая связь
Выводы
Официальный сайт казино и его функционирующие дубликаты гарантируют пользователям защищенный и азартный игровой опыт. Выгодные бонусы, комфортная mobile платформа, обширные развлечения и высокоуровневое live-казино формируют эту платформу замечательным выбором для игровых игр.
прогулка на катере arenda-yakhty-spb.ru .
заказать навес из металла https://zakazat-naves.ru
melbet casino apk melbetlink.ru .
ethereum satın al – felixo, chz try
скачать мелбет на ios скачать мелбет на ios .
водные прогулки спб arenda-yakhty-spb-2.ru .
навесы москва устанавливаем навесы
Доступ к платформе через действующие зеркала
Актуальные виртуальные казино дают пользователям непрерывный подключение к развлечениям. Центральный веб-сайт Bet Andreas работает стабильно, гарантируя богатый набор развлекательных слотов. Но иногда формируются технические сложности или блокировки, следовательно существенно знать о доступности актуальных зеркал.
Что является собой центральное зеркало казино
Зеркало — это абсолютная дубликат главного ресурса с схожим набором функций. Действующее зеркало сегодня помогает обходить местные ограничения и возобновлять гемблинг.
Ключевые плюсы применения зеркал:
– Абсолютный вход к собственному кабинету
– Фиксация каждых данных счёта
– Схожий перечень слотов
– Текущие бонусы и кампании
Открытие счёта на портале
Операция создания аккаунта отнимает пару минут. Свежие клиенты приобретают щедрый поощрение за запись, который в состоянии содержать:
– Стартовый финансовый подарок
– Безвозмездные спины для автоматов
– Специальные ваучеры
– Увеличенный кэшбек
С целью окончания оформления требуется:
1. Переместиться на официальный ресурс или альтернативу
2. Нажать элемент «Регистрация»
3. Написать индивидуальные данные
4. Активировать электронную почту или телефон
5. Активировать ваучер (в случае наличии)
Авторизация в индивидуальный кабинет
Вслед за удачной регистрации игроки имеют возможность производить подключение посредством центральный сайт или действующее зеркало. Индивидуальный кабинет обеспечивает полный контроль над счётом:
– Журнал игр
– Зачисление баланса
– Вывод выигрышей
– Контроль поощрениями
– Участие в турнирах
Привилегии и акции казино
Ресурс награждает клиентов вариативными бонусными предложениями:
Приветственные подарки
Начинающие получают великодушный набор наград на начальные взносы. Обычно это предполагает пропорциональную доплату к объёму взноса плюс даровые спины.
Регулярные кампании
– Еженедельный кэшбек до 15%
– Конкурсы с призовыми банками
– Поощрения на число рождения
– Эксклюзивные акции для элитных пользователей
План поощрения
Активные геймеры собирают пункты, они разрешено обменять на настоящие деньги или специальные бонусы.
Мобильная версия и утилита
Нынешние инновации дают возможность участвовать всюду подходяще. Карманная редакция ресурса автономно приспосабливается под размер любого аппарата.
Преимущества мобильного приложения:
– Быстрая подгрузка автоматов
– Удобный интерфейс
– Моментальные-оповещения о акциях
– Шанс скачать для Android и iOS
Живое казино: антураж реального гемблинг дома
Секция Live казино погружает пользователей в атмосферу подлинного гемблинг заведения. Квалифицированные крупье организуют процесс в режиме подлинного времени.
Представленные развлечения:
– Европейская рулетка
– Карточная игра
– Punto Banco
– Покер
Слоты и гемблинг аппараты
Каталог игровых автоматов содержит сотни вариантов от ведущих студий. Произвольный геймер подберёт развлечение по желанию:
– Традиционные слоты
– Новые слоты с бонусными уровнями
– Крупный приз-игры
– Многолинейные автоматы
Соревнования и лотереи
Систематические состязания включают остроту и предоставляют шанс обрести крупные награды. Вовлечение в соревнованиях нередко комплиментарное, а выигрышные фонды достигают внушительных сумм.
Охрана и анонимность
Платформа эксплуатирует актуальные методы кодирования для обеспечения реквизитов геймеров. Любые денежные операции совершаются через защищённые соединения.
Резюме
Основной портал и его рабочие зеркала предоставляют безопасный доступ к превосходным азартным сервисам. Великодушные поощрения, практичная портативная редакция, разнообразие слотов и профессиональное Live-игорный дом формируют платформу замечательным решением для любителей азартных игр.
Укрытия для сварки Холоднодеформированная труба — это изделие, полученное путем пластической деформации металла при комнатной температуре, обеспечивающая высокую точность размеров и превосходные механические свойства
Вход к платформе и рабочие URL
Актуальные сетевые казино обеспечивают пользователям широкий ассортимент игр. Главный портал казино Вилдер обеспечивает надежный подключение ко всем функциям. Тем не менее временами появляются случаи, когда необходимо альтернативный способ доступа.
Что являет собой собой актуальное зеркало
Функционирующее зеркало — это идентичная копия официального портала с альтернативным доменным расположением. Зеркало сегодня позволяет избегать вероятные блокировки и поддерживать стабильный подключение к выбранным играм.
Легальное зеркало имеет теми же функциями, что и базовый ресурс:
– Совокупный список игр
– Личный кабинет с записанными параметрами
– Актуальные поощрения и предложения
– Проверенные платежные переводы
Создание аккаунта и доступ в казино
Этап регистрации на ресурсе отнимает пару мгновений. Свежим участникам требуется:
1. Перейти на актуальное зеркало сейчас
2. Нажать элемент «Создать аккаунт»
3. Заполнить нужные информацию
4. Подтвердить e-mail почту или данные мобильного
5. Использовать награду за оформление
Подключение в личный раздел выполняется посредством указание логина и кода доступа.
Характеристика поощрительной программы
Щедрая призовая политика — ключевое козырь игорного заведения. Участники зарабатывают многочисленные бонусы:
Начальные бонусы
Начинающие участники имеют возможность надеяться на щедрый поощрение за оформление. Традиционно это набор возможностей, охватывающий:
– Процентную надбавку к стартовому вкладу
– Даровые фриспины
– Дополнительные финансы на аккаунт
Промокоды и эксклюзивные возможности
Систематические коды дают возможность получать дополнительные привилегии. Использовать их разрешено в отдельном меню личного кабинета.
Free spins и кешбэк
Даровые вращения — это возможность запускать игры без применения личных сумм. Компенсация предполагает долевой компенсацию израсходованных средств.
Библиотека развлечений
Игровая ресурс предоставляет огромную библиотеку игр.
Слоты
Вариативность аппаратов поражает представление. Представлены обычные 3-барабанные машины и новые развлечения с увлекательной графикой.
Live игры
Раздел Live развлечений переносит участников в обстановку подлинного азартного клуба. Умелые ведущие организуют сессии в онлайн режиме.
Состязания и таблицы лидеров
Постоянные соревнования добавляют азарта и обеспечивают шанс получить большие награды.
Мобильная форма и программа
Продвинутые решения позволяют наслаждаться в комфортном месте. Мобильная версия независимо настраивается под дисплей девайса.
Скачать клиент допустимо для программных платформ iOS и Android. Клиент гарантирует:
– Мгновенный запуск
– Стабильную производительность
– Всплывающие-оповещения об бонусах
– Удобный облик
Финансовые процедуры
Сайт использует различные варианты пополнения и изъятия сумм:
– Кредитные инструменты
– Электронные сервисы
– Токены
– Банковские операции
Всевозможные транзакции осуществляются через безопасное канал, что защищает безопасность конфиденциальных информации.
Департамент ассистанса
Квалифицированная команда поддержки трудится постоянно. Обратиться с специалистами возможно через:
– Онлайн-чат
– Почтовую почту
– Контакт
– Коммуникационные каналы
Заключение
Основной веб-сайт и его рабочее зеркало дают пользователям стабильный и комфортный доступ к азартным забавам. Выгодные подарки, разнообразный ассортимент игр и профессиональная поддержка обеспечивают участие крайне комфортной и доходной.
see here now betswaps
HubMarketplaceVale – Checked some pages, the site feels clean and well-laid-out.
this platform – I found this site today, everything is well-arranged and simple to browse.
visit products page – Sections are clearly labeled, very user-friendly
Nubank caiu Nubank caiu .
this online vendor studio – Visited today and the structure appears quite user friendly
flx coin – stellar tl, chiliz anlık
Hello!
Share estate mysterious wills with interesting and valuable inheritance updates and leave a lasting legacy see on the website for estate planning
Full information on the link – http://evemakeup.ru/secrets/deti/plastikovaya-zashhita-stvolov-derevev-chto-eto.html
All the best and development in business!
Доступ к ресурсу и актуальные ссылки
Востребованные виртуальные казино обеспечивают клиентам огромный набор игр. Официальный веб-сайт 888 организует надежный переход ко всем услугам. При этом периодически возникают ситуации, когда необходимо резервный метод авторизации.
Что представляет собой рабочее зеркало
Функционирующее зеркало — это полная реплика главного портала с другим сетевым адресом. Зеркало сегодня обеспечивает преодолевать вероятные ограничения и обеспечивать непрерывный переход к любимым играм.
Официальное зеркало имеет теми же характеристиками, что и главный веб-сайт:
– Целый список автоматов
– Собственный профиль с сохраненными сведениями
– Полные подарки и акции
– Безопасные денежные действия
Регистрация и вход в систему
Ход открытия аккаунта на портале отнимает считанные минут. Начинающим участникам следует:
1. Открыть на функционирующее зеркало в настоящее время
2. Щелкнуть элемент «Создать аккаунт»
3. Внести нужные данные
4. Подтвердить e-mail почту или данные связи
5. Забрать подарок за открытие аккаунта
Доступ в персональный кабинет выполняется посредством указание логина и секретной комбинации.
Обзор поощрительной политики
Привлекательная призовая структура — важнейшее козырь платформы. Пользователи зарабатывают различные подарки:
Приветственные поощрения
Начинающие клиенты могут рассчитывать на привлекательный поощрение за создание аккаунта. Чаще всего это пакет вариантов, объединяющий:
– Процентную премию к начальному депозиту
– Подарочные кручения
– Призовые деньги на кошелек
Промо-коды и специальные предложения
Периодические купоны позволяют обретать бонусные преимущества. Активировать их разрешено в специальном окне личного профиля.
Бесплатные вращения и кешбэк
Фриспины — это способность крутить автоматы без задействования персональных средств. Возврат означает частичный возмещение потерянных финансов.
Библиотека автоматов
Гемблинг ресурс обеспечивает огромную коллекцию развлечений.
Автоматы
Вариативность слотов восхищает фантазию. Имеются стандартные простые автоматы и новые развлечения с увлекательной анимацией.
Live игры
Зона Live развлечений транспортирует игроков в среду реального игорного заведения. Квалифицированные операторы ведут партии в живом времени.
Конкурсы и рейтинги
Систематические состязания обеспечивают остроты и дают шанс забрать значительные награды.
Мобильная версия и софт
Продвинутые разработки дают возможность развлекаться в любом месте. Портативная версия автономно адаптируется под размер гаджета.
Установить приложение можно для мобильных систем iOS и Android. Клиент гарантирует:
– Скоростной переход
– Бесперебойную деятельность
– Моментальные-уведомления об промо
– Интуитивный дизайн
Денежные операции
Казино использует различные методы пополнения и снятия средств:
– Банковские счета
– Цифровые кошельки
– Цифровые валюты
– Прямые отправки
Всевозможные действия выполняются через надежное подключение, что гарантирует безопасность конфиденциальных параметров.
Служба support
Квалифицированная бригада поддержки трудится всегда. Контактировать с специалистами допустимо через:
– Интерактивный-чат
– Цифровую почту
– Телефон
– Медиа сети
Выводы
Легальный сайт и его действующее зеркало дают участникам стабильный и легкий переход к азартным забавам. Привлекательные награды, широкий выбор развлечений и высокая помощь обеспечивают участие исключительно удобной и результативной.
vet pharmacy: Vet Rx Index – online vet pharmacy
https://www.energyhouse.com.gr/component/k2/item/4-excepteur-sint-occaecat-cup/
Proposed to a girl plan a surprise proposal in Barcelona
silverbrook vendor guide – Clear layout, makes reading posts simple
https://www.sharerewards.com/en/share-credit-card/fab-share-standard-credit-card
take a look – Checked this site, structure is clear and navigation works well
official vendor collective link – Navigation is simple and the site layout is neat
Where to propose to a girl romantic proposal in Barcelona
see this shop – Just looked through this site and the navigation seems smooth and organized.
Переход к сайту через проверенные зеркала
Пользователи интернет казино постоянно контактируют с трудностью блокировки основного сайта. Собственно для решения этой задачи существуют дубликаты официального ресурса. Тейкер гарантирует абсолютный вход ко всем опциям площадки.
Что такое функционирующее зеркало казино
Альтернативный адрес является собой точную дубликат оригинального веб-сайта с аналогичным опциями. Основное несовпадение — это альтернативное имя. Все сведения игрока, содержа баланс, бонусы и записи партий, остаются неизменными.
Преимущества использования зеркал
Рабочие зеркала характеризуются множеством существенных достоинств:
– Постоянный переход к излюбленным автоматам
– Абсолютная конфиденциальность собственных информации
– Поддержание всех опций индивидуального кабинета
– Шанс приобретения бонусов и участия в предложениях
Создание аккаунта на официальном ресурсе
Ход регистрации предельно элементарен и отнимает немного минут. Начинающие пользователи могут полагаться на солидный приветственный подарок за оформление.
Шаги открытия аккаунта
1. Доступ на легальный портал или его копию
2. Выбор на элемент “Регистрация”
3. Указание нужных данных
4. Проверка цифровой почты
5. Внесение бонусного кода (когда присутствует)
Награды и предложения для игроков
Платформа одаривает своих участников разнообразными призовыми предложениями.
Базовые типы бонусов
Вводный приз — крупное вознаграждение для начинающих участников, что в состоянии вмещать финансовые бонусы и безвозмездные спины.
Free spins — шанс использовать в востребованных автоматах без затрат.
Кэшбек — процентный отдача утраченных денег, который выплачивается раз в неделю или раз в месяц.
Купоны — особые наборы, дающие бонусные выгоды.
Индивидуальный кабинет: функции и конфигурации
Персональный профиль гарантирует совершенный регулирование над пользовательским процессом. В нем предусмотрены:
– Регулирование счетом
– Архив операций
– Работающие привилегии
– Настройки безопасности
– Верификация профиля
Портативная редакция и приложение
Современные пользователи оценивают портативность. Ресурс дает два метода для развлечений с смартфонных аппаратов.
Приспособленная мобильная платформа
Адаптивная платформа портала без участия подстраивается под монитор любого устройства. Нет необходимости устанавливать отдельное программное обеспечение.
Софт для мобильных
Доступно инсталлировать официальное APP для iOS и Android. Приложение предоставляет:
– Скорый старт
– Улучшенный графику
– Push-извещения о предложениях
– Устойчивую функциональность
Live раздел: атмосфера подлинного казино
Категория Live развлечений переносит игроков в среду подлинного клуба. Профессиональные дилеры ведут сессии в режиме реального времени.
Востребованные Live-игры
– Французская рулетка
– 21
– Баккара
– Карибский покер
Аппараты: выбор автоматов
Каталог развлекательных автоматов насчитывает сотни названий от известных поставщиков. Участники обнаружат:
– Обычные слоты
– Видео-автоматы
– Накопительный приз-игры
– Megaways
Соревнования и специальные акции
Регулярные турниры позволяют пользователям бороться друг с другом за солидные денежные фонды. Отдельный состязание имеет свои критерии включения и таблицу призеров.
Варианты внесения и изъятия средств
Платформа поддерживает множество платежных сервисов:
– Банковские карты
– Цифровые платежные системы
– Blockchain-платежи
– Wire транзакции
Абсолютно все операции проходят надежно благодаря актуальным технологиям защиты.
Служба поддержки
Компетентные консультанты службы обслуживания способны содействовать 24/7. Предусмотрены данные каналы коммуникации:
– Мгновенный-чат
– Email-сервис
– Звонковая поддержка
– Медийные сети
Вывод
Основной сайт игровой площадки и его функционирующие дубликаты гарантируют игрокам конфиденциальный и легкий подход к большому ассортименту азартных развлечений. Внушительные бонусы, постоянные кампании, квалифицированная сервис и легкие денежные методы создают развлекательный процесс максимально увлекательным и выгодным.
After testing several platforms, I found this casino https://rocknabagnie.com.pl/ to be reliable. The welcome bonus is generous, terms are transparent, and payouts are processed smoothly, making it suitable for regular players.
Актуальные онлайн-казино предлагают пользователям богатый диапазон возможностей для беспроблемной досуга. Доступ к сервису казино Cactus Casino выполняется через лицензионный веб-ресурс или рабочее зеркало.
Что такое рабочее зеркало казино
Актуальное зеркало — это резервный URL лицензионного портала казино. Такие копии разрабатываются для поддержания постоянного подключения к развлекательной системе.
Копия сегодня абсолютно копирует характеристики базового портала. Геймеры приобретают аналогичный вход ко всем функциям, включая открытие счета, пополнение депозита и обналичивание выигрышей.
Оформление профиля на официальном ресурсе
Процесс регистрации длится всего пару секунд. Будущим игрокам следует:
1. Перейти на официальный портал или актуальное подлинное зеркало
2. Щелкнуть кнопку “Зарегистрироваться”
3. Внести необходимые информацию
4. Активировать почтовую почту
5. Использовать бонусный код при наличии
После завершения открытия профиля игрок получает подарок за регистрацию, который способен включать даровые спины или cash поощрение.
Авторизация в индивидуальный кабинет
Личный кабинет — это охраняемая секция, где клиенты вправе управлять своим профилем. Для логина требуется ввести username и пароль.
В индивидуальном кабинете открыты нижеперечисленные возможности:
– Мониторинг истории транзакций
– Задействование купонов
– Контроль вознаграждениями
– Вступление в соревнованиях
– Мониторинг кэшбека
– Настройка данных
Поощрения и акции
Азартная сервис обеспечивает щедрые подарки:
Регистрационный бонус — начинающие получают солидное начисление на начальные взносы.
Бесплатные вращения — предоставляются как при создании аккаунта, так и в рамках различных кампаний.
Возврат средств — регулярный возврат доли потерянных сумм.
Коды активации — эксклюзивные комбинации, обеспечивающие выход к эксклюзивным бонусам.
Анализ гемблинговых категорий
Слоты
Ассортимент slots насчитывает массу наименований от топовых провайдеров. Пользователи встретят как обычные аппараты, так и новые 3D-слоты с притягательной анимацией.
Live казино
Раздел Live казино обеспечивает шанс играть с реальными дилерами в состоянии реального времени. Доступны популярные столы: рулетка, блэкджек, баккара, покер.
Соревнования
Регулярные состязания с солидными призовыми банками манят сотни конкурсантов. Лидеры завоевывают финансовые призы и уникальные бонусы.
Мобильная версия и app
Адаптивная версия платформы обеспечивает развлекаться с всякого девайса. Дизайн самостоятельно адаптируется под размер экрана.
Получить app можно для устройств на Android и iOS. Портативное приложение обладает всеми характеристиками десктопной версии.
Как определить текущее зеркало на сегодня
Свежие линки дубликатов периодически изменяются. Узнать рабочую адрес можно многими способами:
– Через департамент техподдержки
– В настоящих коммуникационных сетях
– По e-mail рассылке
– На партнерских порталах
Безопасность и легальность
Главный домен действует на основании мировой лицензии. Все операции оберегаются передовыми технологиями защиты.
Конфиденциальность пользовательских сведений обеспечивается в полном размере.
Резюме
Основной домен и его рабочие копии предоставляют пользователям постоянный вход к высококлассным азартным услугам. Привлекательные призы, многочисленные слоты, квалифицированная помощь — все это делает азартный времяпрепровождение невероятно удобным и увлекательным.
view their products – Took a moment to explore, the interface is clean and clear
мелбет мобильная мелбет мобильная .
explore here – Checked this site, layout is neat and sections are easy to navigate
Доступ к платформе через проверенные зеркала
Актуальные сетевые казино предоставляют геймерам круглосуточный переход к сервисам. Официальный портал Leon казино оперирует надёжно, гарантируя обширный выбор игровых автоматов. Впрочем иногда образуются цифровые проблемы или ограничения, поэтому необходимо понимать о доступности актуальных зеркал.
Что собой представляет собой главное зеркало казино
Дубликат — это идентичная версия главного сайта с аналогичным функционалом. Действующее зеркало сегодня позволяет избегать локальные ограничения и вести времяпрепровождение.
Ключевые преимущества задействования зеркал:
– Полный подключение к индивидуальному кабинету
– Поддержание каждых информации профиля
– Такой же набор развлечений
– Текущие бонусы и кампании
Регистрация на ресурсе
Процесс оформления занимает несколько минут. Недавние пользователи приобретают великодушный подарок за регистрацию, что может вмещать:
– Начальный бонусный бонус
– Даровые вращения для слотов
– Специальные купоны
– Усиленный компенсацию
Ради выполнения регистрации нужно:
1. Перейти на официальный веб-сайт или дубликат
2. Выбрать клавишу «Создать аккаунт»
3. Внести личные данные
4. Верифицировать электронную почту или телефон
5. Применить ваучер (при существовании)
Вход в персональный кабинет
После удачной оформления игроки в состоянии производить подключение с помощью основной портал или актуальное зеркало. Индивидуальный кабинет даёт безграничный контроль над аккаунтом:
– Архив игр
– Зачисление счёта
– Снятие призов
– Регулирование поощрениями
– Включение в турнирах
Награды и промо казино
Портал удовлетворяет пользователей разнообразными наградными системами:
Вступительные поощрения
Новые игроки приобретают внушительный набор поощрений на начальные взносы. Зачастую это охватывает долевую прибавку к величине депозита плюс даровые кручения.
Постоянные акции
– Раз в неделю возврат до 15%
– Турниры с наградными суммами
– Бонусы на день рождения
– Специальные промо для привилегированных клиентов
Схема лояльности
Постоянные пользователи зарабатывают очки, которые возможно обменять на подлинные призы или эксклюзивные льготы.
Портативная форма и утилита
Актуальные технологии дают возможность развлекаться везде удобно. Мобильная версия портала самостоятельно настраивается под экран всякого устройства.
Достоинства мобильного программы:
– Скоростная загрузка слотов
– Комфортный дизайн
– Мгновенные-нотификации о промо
– Опция установить для Android и iOS
Live казино: обстановка истинного развлекательного учреждения
Категория Live казино переносит пользователей в обстановку истинного игорного учреждения. Профессиональные операторы ведут развлечение в состоянии актуального времени.
Имеющиеся варианты:
– Европейская рулетка
– Блэкджек
– Баккара
– Покерная игра
Игровые машины и гемблинг машины
Коллекция гемблинг автоматов насчитывает сотни наименований от топовых разработчиков. Любой геймер подберёт развлечение по желанию:
– Винтажные машины
– Инновационные игры с специальными уровнями
– Джекпот-игры
– Мегавейс машины
Турниры и розыгрыши
Систематические конкурсы добавляют азарт и предоставляют способность выиграть значительные вознаграждения. Вовлечение в соревнованиях регулярно безвозмездное, а выигрышные суммы насчитывают крупных объёмов.
Секьюрити и анонимность
Сайт использует современные технологии шифрования для гарантии данных пользователей. Совокупные платёжные операции проходят через защищённые линии.
Резюме
Главный ресурс и его действующие зеркала обеспечивают устойчивый вход к качественным азартным сервисам. Привлекательные призы, комфортная карманная редакция, разнообразие слотов и компетентное Live-клуб создают портал превосходным опцией для фанатов игровых слотов.
Доступ к платформе и актуальные адреса
Популярные виртуальные казино предоставляют клиентам огромный ассортимент игр. Основной веб-сайт [url=wilder-1772571556855.clients.site]Вилдер казино[/url] обеспечивает защищенный доступ ко всем функциям. Тем не менее порой появляются ситуации, когда понадобится резервный способ входа.
Что означает собой действующее зеркало
Актуальное зеркало — это точная версия официального веб-сайта с альтернативным сетевым именем. Альтернатива сегодня позволяет избегать возможные запреты и поддерживать непрерывный переход к популярным слотам.
Проверенное зеркало содержит всеми характеристиками, что и базовый веб-сайт:
– Полный ассортимент слотов
– Собственный раздел с актуальными данными
– Полные подарки и промо
– Защищенные платежные транзакции
Создание аккаунта и авторизация в платформу
Этап создания профиля на ресурсе занимает буквально секунд. Новым игрокам следует:
1. Перейти на актуальное зеркало сегодня
2. Выбрать опцию «Открыть профиль»
3. Заполнить требуемые информацию
4. Активировать e-mail почту или номер телефона
5. Активировать подарок за регистрацию
Вход в личный кабинет производится через указание имени пользователя и ключа.
Обзор наградной системы
Щедрая поощрительная программа — ключевое преимущество платформы. Участники зарабатывают различные бонусы:
Начальные поощрения
Новые пользователи вправе рассчитывать на щедрый бонус за регистрацию. Традиционно это комплект возможностей, объединяющий:
– Долевую премию к дебютному взносу
– Бесплатные спины
– Extra деньги на баланс
Купоны и особые возможности
Систематические бонусные комбинации помогают получать экстра преимущества. Активировать их возможно в особом поле индивидуального профиля.
Free spins и возврат средств
Бесплатные спины — это способность вращать слоты без расходования своих финансов. Кэшбек представляет долевой компенсацию потерянных денег.
Ассортимент слотов
Развлекательная платформа обеспечивает внушительную базу автоматов.
Автоматы
Разнообразие автоматов впечатляет ожидания. Доступны обычные ретро автоматы и новые видеослоты с захватывающей анимацией.
Live казино
Секция Live заведения переносит пользователей в обстановку реального развлекательного клуба. Профессиональные крупье организуют раунды в онлайн режиме.
Турниры и таблицы лидеров
Регулярные состязания добавляют накала и дают возможность заработать внушительные награды.
Мобильная версия и софт
Новые разработки дают возможность развлекаться в любом точке. Адаптивная вариант автономно оптимизируется под размер устройства.
Загрузить приложение допустимо для программных ОС iOS и Android. Софт предоставляет:
– Мгновенный переход
– Устойчивую производительность
– Push-сообщения об промо
– Комфортный вид
Банковские транзакции
Ресурс работает с разнообразные варианты депозита и получения финансов:
– Пластиковые инструменты
– Онлайн системы
– Цифровые валюты
– Финансовые транзакции
Все транзакции проходят через защищенное протокол, что гарантирует целостность персональных сведений.
Департамент помощи
Компетентная группа support работает постоянно. Соединиться с специалистами можно через:
– Онлайн-чат
– E-mail почту
– Телефон
– Медиа платформы
Выводы
Основной ресурс и его актуальное зеркало обеспечивают пользователям защищенный и приятный переход к интересным развлечениям. Выгодные подарки, широкий каталог развлечений и профессиональная помощь обеспечивают участие предельно интересной и результативной.
melbet скачать ios melbet скачать ios .
online betting casino games online betting casino games .
мел бет мел бет .
Актуальные сетевые казино дают клиентам огромный спектр опций для беспроблемной игры. Однако иногда доступ к основному порталу может оказаться недоступным. В таких случаях на помощь спешит казино Дракон Мани, которое дает бесперебойный вход ко всем функциям платформы.
Что такое функционирующее зеркало казино
Дубликат — это абсолютная копия лицензионного веб-сайта, которая размещается по альтернативному интернет-адресу. Копия содержит полный инструментарий основного сайта, включая персональный кабинет, баланс и запись платежей.
Основные выгоды применения зеркала:
– 24-часовой вход к платформе
– Максимальная идентичность возможностей
– Конфиденциальность пользовательских информации
– Хранение всех имеющихся бонусов
Как обнаружить актуальное зеркало в данный момент
Присутствует несколько надежных методов нахождения текущей адреса:
Проверенные ресурсы:
1. Почтовая рассылка — руководство постоянно отправляет сообщения с свежими URL
2. Коммуникационные сети — авторизованные аккаунты постят актуальную данные
3. Служба поддержки — операторы сообщают достоверные URL
4. Телефонное приложение — позволяет минуть блокировки
Оформление профиля на основном сайте
Процедура оформления длится только считанные минут и включает из следующих ступеней:
1. Открытие на главный портал или действующее зеркало
2. Выбор на иконку «Регистрация»
3. Заполнение персональной бланка
4. Валидация имейл почты или контактного номера
5. Активация бонуса за регистрацию при присутствии промокода
Свежие пользователи получают значительный вступительный приз, который может содержать free spins, валютные поощрения или кэшбек.
Вход в личный кабинет
Авторизация на сайте выполняется обычным путем. Достаточно внести учетные данные и пароль, указанные при открытии счета.
Ключевые нюансы для безопасного входа:
– Эксплуатируйте сложный пароль
– Запустите двухэтапную аутентификацию
– Не сохраняйте коды на чужих гаджетах
– Мониторьте доменную строку браузера
Характеристика поощрительной системы
Игорный портал радует игроков разнообразными привилегиями и кампаниями:
Начальный букет
Новички вправе претендовать на щедрое награду за дебютный пополнение. Как правило это процентовая надбавка к зачисленной объему плюс даровые спины для популярных слотов.
Постоянные промо
– 7-дневный кэшбек — возврат процента утраченных денежных средств
– Награды на повторные взносы
– Специальные предложения по знаменательным датам
– Турниры с значительными призовыми фондами
Система привилегий
Постоянные пользователи накапливают единицы за произвольную раунд, которые затем обмениваются на настоящие средства, даровые прокруты или эксклюзивные привилегии.
Купоны: как использовать
Купоны — это специальные комбинации знаков, обеспечивающие право к специальным вознаграждениям.
В каких местах взять актуальные промокоды:
– Легитимные медийные сети казино
– Союзнические площадки
– Email-информирование
– Специализированные сообщества
Прописывается промокод в специальное поле при создании аккаунта или внесении депозита счета.
Телефонная версия и приложение
Актуальные геймеры отдают предпочтение развлекаться с телефонных девайсов. Платформа предоставляет пару решения для удобной телефонной игры.
Адаптивная вариант
Интернет версия автоматически подстраивается под параметры дисплея. Не требует установки и оперирует в произвольном свежем браузере.
Телефонное приложение
Получить софт можно для гаджетов на Android и iOS. Преимущества app:
– Быстрая запуск
– Бесперебойная функционирование
– Push-уведомления о поощрениях
– Самостоятельный преодоление блокировок
Этап установки прост: достаточно зайти на сайт с телефонного гаджета и выполнять указаниям.
Развлекательный выбор
База слотов насчитывает тысячи вариантов от топовых провайдеров.
Слоты
Развлекательные автоматы — самая востребованная группа развлечений. Показаны традиционные трехбарабанные слоты, актуальные графические аппараты с поощрительными этапами, а также накопительные призы.
Live казино
Зона с реальными ведущими обеспечивает прочувствовать антураж истинного казино. Представлены развлечения с блэкджеком.
Трансляция осуществляется в превосходном четкости, присутствует коммуникация с крупье и другими геймерами.
Соревнования
Постоянно организуются турниры по разным дисциплинам. Участие позволяет завоевать монетарные выигрыши, бесплатные вращения или уникальные привилегии.
Финансовые операции
Платформа обеспечивает значительный спектр финансовых способов:
– Пластиковые карты
– Цифровые кошельки
– Криптовалюта
– Банковские переводы
Низшая объем пополнения — приемлемая для массы игроков. Вывод выигрышей выполняется в скорые временные рамки.
Департамент поддержки
Профессиональные специалисты настроены помочь круглосуточно. Представлены такие методы общения:
– Интернет-чат
– Email
– Мобильная поддержка
– Медийные сети
Разъяснения на частые темы можно отыскать в зоне FAQ.
Итог
Основной сайт казино и его действующие зеркала гарантируют клиентам абсолютный доступ ко всем опциям ресурса. Великодушные бонусы, удобная телефонная версия, колоссальный ассортимент слотов и квалифицированная поддержка превращают азартный процесс исключительно удобным и защищенным.
мелбет скачать на андроид мелбет скачать на андроид .
Передовые онлайн-казино предоставляют пользователям массу путей для комфортной игры. Центральный веб-портал РїСЂРѕРјРѕРєРѕРґ дарит возможность ко всем возможностям и азартным играм. Однако при возникновении системных трудностей на подмогу приходят действующие зеркала.
Что являет собой собой актуальное зеркало
Зеркало казино — это точная копия основного сайта, находящаяся по другому доменному имени. Легитимное зеркало поддерживает все функции, вместе с регистрацию, вход в персональный кабинет, вознаграждения и промокоды.
Дубликат на сегодня обеспечивает:
– Бесперебойный вход к азартным аппаратам
– Стопроцентную защиту индивидуальных информации
– Удержание баланса и хронологии операций
– Возможность использования всех бонусных программ
Создание аккаунта на основном сайте
Процедура оформления учетной записи требует несколько минут. Новым геймерам необходимо:
1. Перейти на официальный портал или действующее зеркало
2. Нажать кнопку «Зарегистрироваться»
3. Внести необходимые данные
4. Верифицировать email почту
5. Использовать купон при наличии
После окончания регистрации пользователи зарабатывают бонус за регистрацию, который может содержать free spins или денежно-призовое вознаграждение.
Вход в персональный кабинет
Приватный кабинет предоставляет всесторонний надзор над игровым процессом. Через персональный аккаунт допускается:
– Финансировать кошелек
– Снимать выплаты
– Задействовать купоны
– Проверять хронологию пари
– Соревноваться в турнирах
– Получать кешбэк
Характеристика бонусов и акций
Великодушная премиальная программа — ключевое плюс ресурса. Центральные категории премий:
Приветственный подарок
Дебютанты получают щедрое премирование на начальные пополнения. Объем приза может доходить до 100-200% от объема вклада.
Фриспины
Халявные прокруты даются для топовых машин. Количество free spins разнится от 10 до 500 штук.
Cash back
Систематический или помесячный возврат процента проигранных средств. Обычный объем компенсации — 5-15%.
Состязания
Систематические турниры с солидными призовыми банками. Конкурсанты конкурируют за лучшие позиции в таблице лидеров.
Смартфонная версия и софт
Смартфонная версия позволяет делать ставки с каждого девайса. Пользователи могут загрузить софт для iOS и Android или использовать веб версию.
Достоинства портативного софта:
– Оперативная загрузка игр
– Комфортный дизайн
– Push-уведомления о промо
– Доступ через биометрию
Игровые автоматы и Live казино
Игровая подборка охватывает множество игр от ведущих производителей.
Топовые типы игр:
– Стандартные слоты
– Современные слоты с бонусными раундами
– Джекпот игры
– Мега-путь слоты
Live игорный зал
Категория live казино предлагает игру с настоящими дилерами. Имеются классические развлечения:
– Европейская рулетка
– Двадцать одно
– Punto Banco
– Покер
Как разыскать актуальное зеркало
Раздобыть действующую URL на зеркало возможно различными способами:
1. Подписаться на email-рассылку
2. Наблюдать за апдейтами в социальных сетях
3. Обратиться в отдел поддержки
4. Заложить рабочее зеркало в закладки
Резюме
Главный сайт и его функционирующие дубликаты обеспечивают стабильный путь к развлекательным автоматам. Выгодные премии, множественные купоны, эргономичное портативное софт и высококлассная сервис поддержки обеспечивают азартный геймплей предельно приятным и надежным.
https://petmedsmonitor.shop/# vet pharmacy online
VendorSpotValeBrook – Took a quick peek, the site feels structured and easy to navigate.
мелбет официальный сайт скачать мобильную версию мелбет официальный сайт скачать мобильную версию .
usdttry – ethereum satın al, cro usdt
https://mensrxindex.com/# ed medicines
скачать мелбет на айфон с играми скачать мелбет на айфон с играми .
скачать бк мелбет скачать бк мелбет .
product catalog link – Layout is neat and navigation feels seamless
wood vendor hub – Smooth and responsive browsing with clear item presentation
this resource – Ran into this page earlier, navigation is smooth and browsing feels convenient.
Доступ к сайту через действующие зеркала
Участники онлайн казино часто сталкиваются с трудностью недоступности официального сайта. Как раз для решения этой трудности разработаны альтернативные адреса официального домена. Дракон Мани обеспечивает стопроцентный переход ко всем сервисам площадки.
Что такое актуальное зеркало казино
Копия составляет собой абсолютную реплику основного сайта с аналогичным возможностями. Ключевое расхождение — это альтернативное имя. Каждые данные участника, содержа депозит, привилегии и данные раундов, продолжают быть такими же.
Выгоды использования зеркал
Рабочие зеркала обладают комплексом значимых преимуществ:
– Бесперебойный вход к излюбленным слотам
– Полная безопасность собственных данных
– Поддержание всех конфигураций персонального кабинета
– Способность обретения призов и участия в промоакциях
Создание аккаунта на основном домене
Процедура регистрации максимально легок и занимает немного минут. Новые пользователи могут полагаться на внушительный вводный поощрение за создание аккаунта.
Ступени открытия аккаунта
1. Подключение на официальный домен или его копию
2. Выбор на кнопку “Создать аккаунт”
3. Ввод нужных параметров
4. Верификация email почты
5. Ввод кода (при наличии есть)
Бонусы и кампании для пользователей
Платформа поощряет своих участников всевозможными бонусными программами.
Базовые категории поощрений
Начальный приз — внушительное вознаграждение для недавних игроков, которое именно может содержать монетарные бонусы и бесплатные вращения.
Бесплатные вращения — опция играть в популярных автоматах безвозмездно.
Компенсация — долевой отдача потерянных финансов, который именно предоставляется по неделям или ежемесячно.
Купоны — специальные комбинации, обеспечивающие дополнительные поощрения.
Персональный кабинет: опции и параметры
Индивидуальный аккаунт предоставляет полный контроль над игровым процессом. Здесь имеются:
– Контроль средствами
– Данные переводов
– Текущие поощрения
– Настройки защиты
– Подтверждение профиля
Смартфонная версия и APP
Новейшие участники оценивают мобильность. Платформа дает 2 способа для игры с мобильных девайсов.
Приспособленная телефонная редакция
Портативная вариант ресурса автономно приспосабливается под монитор любого девайса. Нет необходимости инсталлировать отдельное программное обеспечение.
Приложение для смартфонов
Разрешено загрузить официальное APP для iOS и Android. APP предоставляет:
– Моментальный доступ
– Оптимизированный графику
– Всплывающие-извещения о бонусах
– Надежную функциональность
Live игры: среда настоящего игорного заведения
Секция Live игр отправляет пользователей в среду реального зала. Профессиональные хосты ведут партии в виде живого времени.
Топовые Live-столы
– Рулетка
– Двадцать одно
– Baccarat
– Техасский холдем
Автоматы: разнообразие игр
Библиотека слотовых машин включает сотни позиций от известных производителей. Участники откроют:
– Обычные машины
– Графические слоты
– Джекпот-слоты
– Слоты с множественными линиями
Турниры и уникальные события
Регулярные соревнования позволяют пользователям состязаться друг с другом за значительные денежные суммы. Всякий состязание имеет свои критерии вовлечения и рейтинг лидеров.
Варианты внесения и изъятия денег
Ресурс поддерживает ряд денежных инструментов:
– Кредитные картыы
– Онлайн кошельки
– Криптовалюты
– Wire отправления
Любые операции выполняются надежно благодаря современным методам кодирования.
Сервис помощи
Компетентные консультанты команды support готовы содействовать 24/7. Предусмотрены такие каналы связи:
– Оперативный-чат
– Email-поддержка
– Голосовая связь
– Публичные сети
Резюме
Легальный сайт платформы и его действующие дубликаты обеспечивают пользователям защищенный и легкий переход к огромному диапазону игровых услуг. Крупные награды, частые промоакции, качественная служба и простые финансовые методы создают геймерский процесс крайне захватывающим и выгодным.
Переход к сайту и актуальные URL
Современные виртуальные казино гарантируют участникам обширный ассортимент опций. Главный веб-сайт Wilder организует надежный переход ко всем сервисам. Тем не менее временами возникают случаи, когда требуется запасной метод авторизации.
Что есть собой актуальное зеркало
Функционирующее зеркало — это абсолютная версия официального портала с другим интернет названием. Дубликат сегодня помогает избегать возможные барьеры и поддерживать бесперебойный переход к любимым автоматам.
Официальное зеркало обладает идентичными характеристиками, что и центральный портал:
– Целый перечень слотов
– Собственный кабинет с зафиксированными сведениями
– Полные награды и акции
– Защищенные финансовые действия
Оформление и авторизация в казино
Этап оформления на портале отнимает считанные мгновений. Новым участникам требуется:
1. Открыть на актуальное зеркало в настоящее время
2. Нажать кнопку «Зарегистрироваться»
3. Ввести обязательные данные
4. Подтвердить почтовую почту или данные мобильного
5. Забрать награду за создание профиля
Подключение в собственный кабинет осуществляется с помощью ввод логина и ключа.
Описание бонусной структуры
Щедрая поощрительная система — главное преимущество платформы. Игроки зарабатывают разнообразные подарки:
Приветственные бонусы
Начинающие пользователи вправе претендовать на выгодный приз за регистрацию. Как правило это набор предложений, объединяющий:
– Частичную премию к начальному пополнению
– Безвозмездные кручения
– Призовые средства на кошелек
Кодовые комбинации и специальные возможности
Постоянные промокоды помогают получать экстра преимущества. Использовать их возможно в особом разделе личного раздела.
Бесплатные вращения и кэшбек
Free spins — это возможность играть игры без задействования личных средств. Компенсация означает определенный компенсацию проигранных сумм.
Ассортимент игр
Развлекательная площадка представляет значительную коллекцию игр.
Игровые машины
Разнообразие аппаратов восхищает представление. Доступны стандартные трехбарабанные аппараты и современные развлечения с интересной картинкой.
Live казино
Раздел Live заведения переносит участников в антураж настоящего развлекательного клуба. Опытные ведущие проводят сессии в онлайн эфире.
Турниры и доски почета
Постоянные соревнования привносят накала и гарантируют перспективу выиграть крупные выигрыши.
Портативная вариант и клиент
Продвинутые решения обеспечивают играть в удобном месте. Mobile вариант независимо подстраивается под монитор девайса.
Получить софт можно для операционных ОС iOS и Android. Клиент обеспечивает:
– Оперативный переход
– Устойчивую производительность
– Всплывающие-уведомления об промо
– Интуитивный дизайн
Банковские операции
Сайт использует различные методы депозита и вывода денег:
– Платежные инструменты
– Виртуальные платформы
– Крипто
– Прямые транзакции
Каждые операции осуществляются через безопасное протокол, что обеспечивает безопасность конфиденциальных информации.
Отдел ассистанса
Компетентная служба помощи работает постоянно. Связаться с менеджерами возможно через:
– Live-чат
– Цифровую почту
– Горячую линию
– Социальные ресурсы
Заключение
Главный ресурс и его актуальное зеркало дают пользователям надежный и удобный путь к увлекательным забавам. Привлекательные подарки, широкий ассортимент автоматов и профессиональная поддержка создают процесс крайне интересной и доходной.
explore here – Checked this site, pages feel intuitive and content encourages creativity
ed pills: where can i buy ed pills – Mens RX Index
open the bright vendor marketplace – Navigation feels natural and the site is visually tidy
Доступ к ресурсу через рабочие зеркала
Актуальные сетевые казино дают игрокам круглосуточный доступ к играм. Главный сайт Дракон Мани работает бесперебойно, гарантируя обширный набор игровых автоматов. Впрочем периодически возникают программные трудности или блокировки, поэтому важно быть осведомлённым о доступности рабочих зеркал.
Что является из себя официальное зеркало казино
Альтернатива — это идентичная реплика основного веб-сайта с идентичным набором функций. Рабочее зеркало сегодня позволяет избегать локальные барьеры и поддерживать развлечения.
Принципиальные выгоды задействования зеркал:
– Стопроцентный доступ к персональному кабинету
– Удержание совокупных показателей учётной записи
– Схожий ассортимент слотов
– Свежие вознаграждения и кампании
Создание аккаунта на ресурсе
Процедура оформления занимает пару минут. Свежие клиенты получают щедрый подарок за создание счёта, который способен охватывать:
– Вступительный игровой кредит
– Безвозмездные вращения для слотов
– Эксклюзивные купоны
– Повышенный кэшбек
Для выполнения регистрации требуется:
1. Переместиться на официальный веб-сайт или дубликат
2. Кликнуть кнопку «Оформиться»
3. Указать контактные информацию
4. Верифицировать email или мобильный
5. Активировать код (в случае доступности)
Доступ в персональный кабинет
По завершении правильной оформления геймеры имеют возможность совершать вход используя основной веб-сайт или рабочее зеркало. Личный кабинет даёт всесторонний контроль над аккаунтом:
– Архив пари
– Внесение кошелька
– Изъятие денег
– Управление бонусами
– Присутствие в турнирах
Привилегии и акции казино
Портал радует геймеров различными поощрительными программами:
Вступительные подарки
Новые игроки приобретают внушительный букет бонусов на начальные пополнения. Типично это содержит долевую надбавку к сумме вклада плюс даровые фриспины.
Периодические кампании
– Еженедельный кешбэк до 15%
– Состязания с призовыми банками
– Бонусы на годовщину рождения
– Эксклюзивные предложения для элитных клиентов
План вознаграждения
Регулярные пользователи собирают баллы, которые допустимо обменять на подлинные средства или особые бонусы.
Портативная версия и программа
Современные инновации позволяют участвовать всюду угодно. Смартфонная редакция веб-сайта независимо приспосабливается под монитор всякого аппарата.
Плюсы карманного программы:
– Быстрая загрузка автоматов
– Эргономичный облик
– Push-уведомления о акциях
– Опция инсталлировать для Android и iOS
Live казино: атмосфера истинного игорного дома
Секция Live заведения транспортирует клиентов в обстановку настоящего азартного клуба. Профессиональные операторы ведут действие в виде реального времени.
Доступные столы:
– Рулетка
– Блэкджек
– Баккара
– Карты
Автоматы и азартные слоты
Собрание игровых машин включает тысячи вариантов от передовых разработчиков. Каждый игрок подберёт игру по душе:
– Традиционные автоматы
– Видеослоты с призовыми этапами
– Накопительный-машины
– Megaways слоты
Соревнования и раздачи
Систематические турниры привносят адреналин и обеспечивают шанс обрести внушительные вознаграждения. Присутствие в соревнованиях зачастую бесплатное, а наградные банки доходят до значительных объёмов.
Защита и приватность
Портал задействует актуальные методы шифрования для охраны информации игроков. Все транзакционные действия выполняются через зашифрованные каналы.
Заключение
Основной ресурс и его действующие зеркала гарантируют безопасный доступ к отличным игровым сервисам. Богатые бонусы, эргономичная карманная редакция, разнообразие игр и высококлассное Live-клуб создают ресурс прекрасным опцией для ценителей развлекательных автоматов.
stellar tl – ethereum satın al, chz coin try
Marble Outlet – Clean design, browsing the site is comfortable.
Quick Meadow Spot – Organized pages, moving around the site feels smooth.
pet pharmacy online: Vet Rx Index – online pet pharmacy
marketplace homepage – Checked some categories, everything seems simple and neat
Marriage proposal proposal packages in Barcelona
sites betswap erfahrungen
silk hub online – Looks very approachable, information is quick to locate
Переход к платформе и действующие ссылки
Современные онлайн казино предоставляют участникам широкий набор игр. Основной веб-сайт казино Motor предоставляет надежный вход ко всем сервисам. Тем не менее порой появляются ситуации, когда понадобится запасной способ подключения.
Что являет собой собой рабочее зеркало
Действующее зеркало — это абсолютная копия официального ресурса с другим сетевым названием. Копия сегодня позволяет миновать потенциальные блокировки и сохранять непрерывный вход к выбранным играм.
Официальное зеркало содержит полными возможностями, что и основной веб-сайт:
– Совокупный каталог автоматов
– Собственный профиль с записанными сведениями
– Действующие награды и акции
– Надежные финансовые переводы
Создание аккаунта и авторизация в казино
Этап регистрации на ресурсе отнимает считанные моментов. Новым клиентам нужно:
1. Открыть на рабочее зеркало сейчас
2. Кликнуть элемент «Регистрация»
3. Указать обязательные информацию
4. Активировать e-mail почту или информацию смартфона
5. Активировать бонус за оформление
Вход в персональный аккаунт выполняется посредством указание никнейма и кода доступа.
Анализ поощрительной программы
Щедрая бонусная система — важнейшее достоинство ресурса. Участники обретают всевозможные поощрения:
Вступительные подарки
Новые участники способны надеяться на выгодный бонус за открытие профиля. Чаще всего это комплект вариантов, охватывающий:
– Процентную добавку к дебютному пополнению
– Безвозмездные спины
– Extra финансы на кошелек
Промокоды и особые акции
Систематические коды дают возможность обретать дополнительные льготы. Применить их возможно в специальном меню индивидуального профиля.
Free spins и возврат средств
Free spins — это вариант запускать слоты без расходования персональных сумм. Возврат представляет определенный отдачу утраченных средств.
Каталог автоматов
Игровая ресурс предоставляет огромную базу игр.
Видеослоты
Вариативность аппаратов поражает представление. Доступны классические трехбарабанные машины и актуальные развлечения с интересной картинкой.
Live казино
Секция Live казино транспортирует игроков в антураж настоящего развлекательного зала. Квалифицированные крупье организуют раунды в реальном формате.
Соревнования и лидерборды
Систематические турниры обеспечивают азарта и гарантируют вариант забрать большие выигрыши.
Мобильная версия и программа
Новые решения помогают развлекаться в комфортном пространстве. Мобильная форма автоматически настраивается под монитор аппарата.
Скачать софт возможно для мобильных ОС iOS и Android. Софт гарантирует:
– Быстрый переход
– Бесперебойную производительность
– Всплывающие-уведомления об предложениях
– Простой облик
Денежные транзакции
Сайт работает с всевозможные системы депозита и снятия средств:
– Банковские системы
– Онлайн платформы
– Цифровые валюты
– Банковские операции
Все действия проходят через зашифрованное протокол, что защищает неприкосновенность конфиденциальных информации.
Служба support
Опытная команда support трудится постоянно. Контактировать с менеджерами допустимо через:
– Live-чат
– Цифровую почту
– Контакт
– Медиа ресурсы
Резюме
Основной ресурс и его функционирующее зеркало обеспечивают клиентам безопасный и приятный переход к захватывающим развлечениям. Богатые бонусы, большой ассортимент игр и качественная ассистанс обеспечивают участие исключительно приятной и выгодной.
Актуальные онлайн-казино гарантируют геймерам разнообразный выбор опций для приятной игры. Переход к ресурсу 7K выполняется через официальный веб-ресурс или действующее зеркало.
Что такое функционирующее зеркало казино
Рабочее зеркало — это резервный адрес основного ресурса казино. Такие версии разрабатываются для поддержания непрерывного входа к развлекательной платформе.
Альтернатива текущее совершенно копирует характеристики официального домена. Пользователи приобретают схожий путь ко всем возможностям, включая создание аккаунта, финансирование баланса и снятие выигрышей.
Регистрация на официальном портале
Процедура создания аккаунта отнимает всего считанные минут. Будущим участникам нужно:
1. Попасть на основной сайт или рабочее настоящее зеркало
2. Кликнуть кнопку “Открыть счет”
3. Указать нужные информацию
4. Верифицировать электронную почту
5. Использовать код активации при существовании
После финализации регистрации пользователь обретает вознаграждение за регистрацию, который способен предполагать фриспины или финансовое поощрение.
Авторизация в персональный кабинет
Персональный кабинет — это закрытая секция, где участники могут контролировать своим счетом. Для доступа следует напечатать username и секретный ключ.
В личном кабинете доступны данные инструменты:
– Проверка истории операций
– Применение бонусных кодов
– Настройка бонусами
– Вступление в состязаниях
– Контроль возврата средств
– Настройка учетной записи
Призы и промо
Игровая площадка дарит щедрые бонусы:
Приветственный комплект — начинающие получают солидное поощрение на первые вклады.
Free spins — дарятся как при создании аккаунта, так и в ходе всевозможных кампаний.
Кэшбек — еженедельный возврат части проигранных сумм.
Бонусные коды — особые комбинации, открывающие возможность к специальным бонусам.
Анализ гемблинговых направлений
Игровые автоматы
Собрание slots охватывает тысячи позиций от ведущих производителей. Пользователи откроют как классические слоты, так и современные видеослоты с захватывающей анимацией.
Live казино
Категория Live казино предоставляет возможность развлекаться с действующими дилерами в формате реального времени. Представлены востребованные столы: рулетка, блэкджек, баккара, покер.
Состязания
Постоянные соревнования с крупными призовыми банками привлекают тысячи участников. Призеры завоевывают cash призы и эксклюзивные премии.
Мобильная версия и app
Мобильная версия платформы дает возможность играть с любого устройства. Дизайн автоматически адаптируется под размер экрана.
Получить программу можно для гаджетов на Android и iOS. Телефонное app располагает всеми возможностями настольной версии.
Как найти текущее зеркало на данный момент
Рабочие адреса зеркал систематически обновляются. Найти актуальную линк можно разными вариантами:
– Через сервис техподдержки
– В подлинных коммуникационных сетях
– По почтовой рассылке
– На партнерских площадках
Надежность и лицензирование
Основной портал работает на базе зарубежной документа. Все операции защищены передовыми системами шифрования.
Секретность пользовательских сведений поддерживается в полном формате.
Заключение
Основной сайт и его действующие копии дарят пользователям круглосуточный вход к высококлассным развлекательным сервисам. Щедрые вознаграждения, всевозможные слоты, профессиональная сервис — все это делает гемблинговый времяпрепровождение невероятно удобным и интересным.
felink – clz coin, litecoin al
description betswap
tap here – Found this page, pages are well organized and navigation is intuitive
1win совместимость android http://www.1win60925.help
Актуальные онлайн-казино обеспечивают клиентам разнообразие опций для комфортной игры. Официальный сайт казино РџРёРЅРєРѕ обеспечивает вход ко всем функциям и развлечениям. Однако при наличии технических неполадок на подмогу прибывают действующие зеркала.
Что представляет собой рабочее зеркало
Альтернативный адрес казино — это стопроцентная реплика основного сайта, расположенная по альтернативному URL. Подлинное зеркало хранит все опции, в том числе создание аккаунта, вход в личный кабинет, бонусы и промокоды.
Дубликат на сегодня обеспечивает:
– Стабильный вход к азартным автоматам
– Полную безопасность личных данных
– Удержание баланса и хронологии переводов
– Применимость всех промо-предложений
Создание учетной записи на главном ресурсе
Процесс регистрации занимает пару минут. Свежеиспеченным клиентам следует:
1. Перейти на главный портал или рабочее зеркало
2. Кликнуть кнопку «Зарегистрироваться»
3. Внести запрашиваемые данные
4. Активировать email почту
5. Применить кодовое слово при существовании
После финиша оформления профиля пользователи обретают вознаграждение за регистрацию, который может включать free spins или монетарное премирование.
Доступ в личный кабинет
Приватный кабинет дает полный управление над азартным процессом. Через личный раздел можно:
– Депонировать кошелек
– Снимать выплаты
– Активировать промокоды
– Отслеживать журнал ставок
– Участвовать в турнирах
– Забирать кэшбек
Анализ поощрений и специальных предложений
Великодушная поощрительная политика — ключевое козырь казино. Ключевые типы бонусов:
Приветственный подарок
Начинающие зарабатывают щедрое награду на дебютные взносы. Сумма бонуса может доходить до 100-200% от суммы депозита.
Бонусные спины
Халявные раунды даются для известных игровых автоматов. Число бесплатных вращений колеблется от 10 до 500 штук.
Кэшбек
Постоянный или помесячный откат части утраченных средств. Обычный размер компенсации — 5-15%.
Соревнования
Систематические состязания с внушительными наградными пулами. Игроки борются за лучшие строчки в рейтинге.
Портативная версия и программа
Портативная версия обеспечивает развлекаться с каждого устройства. Геймеры могут закачать app для iOS и Android или эксплуатировать интернет версию.
Выгоды смартфонного программы:
– Быстрая прогрузка слотов
– Практичный UI
– Всплывающие уведомления о промо
– Вход через биометрию
Слоты и Live казино
Азартная коллекция охватывает множество позиций от топовых производителей.
Топовые разделы слотов:
– Классические слоты
– Современные слоты с призовыми уровнями
– Накопительный приз игры
– Мега-путь слоты
Live игровой зал
Зона live игорный зал предоставляет игру с профессиональными дилерами. Представлены традиционные варианты:
– Французская рулетка
– Blackjack
– Баккара
– Карибский покер
Как разыскать действующее зеркало
Найти свежую линк на зеркало разрешается разными вариантами:
1. Зарегистрироваться на емейл-уведомления
2. Мониторить за новостями в социальных сетях
3. Связаться в сервис поддержки
4. Заложить актуальное зеркало в закладки
Итог
Главный сайт и его рабочие копии дают стабильный вход к игровым автоматам. Великодушные поощрения, различные промокоды, комфортное смартфонное программа и качественная служба поддержки обеспечивают развлекательный геймплей максимально беспроблемным и безопасным.
RiverVendorSpot – Browsing casually, the interface is clean and simple to navigate.
здесь ферма обменник
secstackr – Found practical insights today; sharing this article with colleagues later.
Передовые онлайн-казино обеспечивают клиентам большой диапазон возможностей и бонусных опций. Вход к площадке реализуется через лицензионный ресурс или его действующее зеркало Dragon Money казино, что предоставляет постоянную игру.
Что такое действующее зеркало казино
Копия — это полная дубликат оригинального сайта, созданная для устранения запретов. Актуальное зеркало обеспечивает участникам обрести соединение к любимым развлечениям в любое удобное время.
Лицензионное зеркало обладает всеми возможностями главного портала:
– Полный перечень слотов
– Личный кабинет с записанными информацией
– Текущие поощрения
– Гарантированные платежные процедуры
Создание аккаунта на лицензионном портале
Процедура открытия счета отнимает всего немного минут. Первым клиентам необходимо:
1. Войти на основной портал или актуальное зеркало
2. Кликнуть на кнопку “Создать аккаунт”
3. Указать обязательные сведения
4. Проверить email
5. Произвести дебютный депозит
Приветственный бонус выдается автоматически после завершения всех стадий.
Доступ в учетную запись
Существующие клиенты могут совершить авторизацию применяя:
– Логин и пароль
– Номер контакта
– Контактный email
Личный кабинет открывает возможность к контролю финансами, сведениям ставок и активным акциям.
Поощрения и предложения
Развлекательная площадка радует активных игроков выгодными вознаграждениями:
Приветственный бонус
– Надбавка на начальный платеж до 100%
– Free spins на востребованные игры
– Дополнительные поощрения за последующие пополнения
Ваучеры
Эксклюзивные ваучеры обеспечивают возможность на использование особых поощрений. Свежие коды выкладываются в секции “Акции”.
Кэшбек
Постоянный кэшбек достигает до 10% от утраченных средств. Возмещение предоставляется незамедлительно.
Программа лояльности
Верные клиенты накапливают единицы, которые превращаются на подлинные средства или free spins.
Мобильная версия и софт
Для практичности игроков построена удобная адаптивный сайт. Отзывчивый интерфейс позволяет удобно делать ставки с всякого переносного устройства.
Выгоды приложения:
– Моментальный вход к слотам
– Улучшенный облик
– Устойчивая активность
– Нотификации о свежих событиях
Скачать софт можно безвозмездно с проверенного веб-сайта для гаджетов на Android и iOS.
Библиотека развлечений
Игровые автоматы
Коллекция вмещает более 2000 машин от топовых производителей:
– Обычные игры
– Видео-слоты
– Слоты с джекпотом
– Сюжетные развлечения
Live казино
Блок Live игр предлагает взаимодействие с живыми крупье в живом эфире:
– Roulette
– Blackjack
– Baccarat
– Poker
Конкурсы
Систематические конкурсы с значительными выигрышными фондами устраиваются систематически. Присоединение в турнирах возможно всем активным клиентам.
Денежные способы
Пополнения и получения выплат осуществляются через востребованные сервисы:
– Кредитные средства
– Цифровые сервисы
– Bitcoin
– Денежные транзакции
Минимальный вклад — от 100 рублей. Получение финансов обрабатывается в течение 24 времени.
Отдел помощи
Непрерывная служба саппорта расположена поддержать в урегулировании произвольных проблем:
– Живой чат
– Email
– Контактный номер
– Соц сети
Защита и сертификат
Официальный веб-сайт оперирует на фундаменте глобальной сертификата. Любые информация клиентов закрыты новейшим SSL-протоколом.
Заключение
Рабочее зеркало гарантирует бесперебойный подключение к излюбленным слотам, богатым поощрениям и функциональным сервисам. Создайте аккаунт прямо сейчас и заработайте приветственный подарок!
learn more here – Found this vendor platform, layout is clean and browsing flows well
check this vendor site – Pages are responsive and the content is easy to follow
wild vendor page – Browsing is enjoyable, and the products are nicely arranged
мелбет промокод при регистрации мелбет промокод при регистрации .
такой ферма.сс
melbet casino официальный сайт melbet casino официальный сайт .
мел бет скачать мел бет скачать .
online shop – Noticed this website recently, browsing items is straightforward and quick.
I enjoy playing at this casino https://jacekbromski.pl/ because it feels secure and stable. Live tables are interactive, slots offer good variety, and the overall experience remains pleasant over time.
http://certifiedcanadarx.com/# Certified Canada Rx
open this vendor marketplace – Navigation feels easy and the design is approachable
скачать приложение бк мелбет скачать приложение бк мелбет .
Актуальные онлайн-казино гарантируют клиентам массу путей для приятной игры. Центральный сайт РёРіСЂС‹ Arkada обеспечивает доступ ко всем сервисам и игровым автоматам. Однако при наличии программных проблем на помощь приходят актуальные копии.
Что представляет собой действующее зеркало
Копия казино — это полная копия официального ресурса, размещенная по дополнительному доменному имени. Подлинное зеркало поддерживает все опции, в том числе регистрацию, авторизацию в персональный кабинет, бонусы и кодовые слова.
Дубликат на сегодня обеспечивает:
– Бесперебойный путь к развлекательным аппаратам
– Совершенную безопасность персональных информации
– Сохранение средств и записей переводов
– Применимость всех специальных предложений
Открытие профиля на основном портале
Ход открытия профиля отнимает пару минут. Начинающим геймерам требуется:
1. Войти на главный ресурс или рабочее зеркало
2. Выбрать кнопку «Зарегистрироваться»
3. Ввести необходимые графы
4. Активировать э-мейл почту
5. Ввести купон при наличии
После финиша оформления профиля геймеры зарабатывают бонус за регистрацию, какой может включать бесплатные вращения или монетарное вознаграждение.
Вход в личный кабинет
Приватный кабинет обеспечивает комплексный мониторинг над игровым процессом. Через собственный профиль допускается:
– Финансировать счет
– Забирать средства
– Задействовать купоны
– Проверять историю пари
– Играть в соревнованиях
– Приобретать возврат средств
Описание бонусов и акций
Щедрая призовая программа — ключевое плюс проекта. Основные виды вознаграждений:
Вступительный бонус
Начинающие получают богатое поощрение на стартовые пополнения. Величина премии может составлять 100-200% от величины пополнения.
Free spins
Даровые раунды выдаются для топовых машин. Количество бесплатных вращений разнится от 10 до 500 штук.
Cash back
Постоянный или ежемесячный возврат части утраченных средств. Средний размер компенсации — 5-15%.
Состязания
Регулярные состязания с крупными призовыми банками. Участники соревнуются за призовые позиции в рейтинге.
Портативная версия и приложение
Портативная версия обеспечивает развлекаться с всякого девайса. Геймеры могут загрузить софт для iOS и Android или задействовать браузерную версию.
Выгоды смартфонного программы:
– Быстрая загрузка слотов
– Практичный UI
– Всплывающие уведомления о акциях
– Доступ через Face ID
Машины и Live казино
Развлекательная подборка насчитывает сотни названий от топовых разработчиков.
Востребованные категории игр:
– Классические машины
– Видео-автоматы с премиальными уровнями
– Джекпот автоматы
– Megaways слоты
Live казино
Категория live казино предлагает партию с реальными дилерами. Доступны классические варианты:
– Французская рулетка
– Блэкджек
– Punto Banco
– Техасский холдем
Как найти актуальное зеркало
Обрести действующую адрес на зеркало можно несколькими вариантами:
1. Подписаться на почтовую рассылку
2. Мониторить за новостями в социальных сетях
3. Связаться в службу поддержки
4. Заложить рабочее зеркало в фавориты
Итог
Лицензионный сайт и его актуальные зеркала гарантируют стабильный доступ к развлекательным автоматам. Щедрые вознаграждения, множественные купоны, комфортное портативное софт и качественная сервис поддержки превращают азартный геймплей в высшей степени удобным и защищенным.
Переход к ресурсу через рабочие зеркала
Пользователи сетевых казино нередко сталкиваются с трудностью ограничения базового ресурса. Как раз для устранения этой трудности созданы копии легального ресурса. казино Дракон Мани гарантирует стопроцентный подключение ко всем функциям платформы.
Что такое функционирующее зеркало казино
Альтернативный адрес значит собой точную дубликат официального портала с похожим набором функций. Ключевое расхождение — это доменное имя. Все параметры пользователя, в том числе счет, награды и архив раундов, сохраняются неизменными.
Выгоды использования зеркал
Действующие зеркала имеют комплексом ключевых плюсов:
– Круглосуточный доступ к любимым развлечениям
– Совершенная сохранность собственных параметров
– Сохранение всех настроек персонального кабинета
– Возможность получения поощрений и включения в предложениях
Создание аккаунта на главном домене
Ход открытия счета чрезвычайно прост и длится немного минут. Новые клиенты имеют возможность полагаться на щедрый вводный бонус за регистрацию.
Шаги открытия аккаунта
1. Вход на официальный портал или его копию
2. Активация на клавишу “Регистрация”
3. Ввод нужных информации
4. Верификация электронной почты
5. Ввод промокода (при наличии имеется)
Поощрения и акции для клиентов
Игровая площадка одаривает своих участников многочисленными поощрительными предложениями.
Базовые типы поощрений
Начальный подарок — крупное премирование для начинающих пользователей, каковое в состоянии охватывать денежные бонусы и безвозмездные спины.
Безвозмездные спины — опция использовать в топовых игровых машинах без затрат.
Возврат средств — процентный возврат потерянных денег, что выплачивается раз в неделю или помесячно.
Бонусные коды — эксклюзивные сочетания, предоставляющие дополнительные поощрения.
Персональный кабинет: инструменты и настройки
Индивидуальный профиль дает исчерпывающий контроль над игровым активностью. В нем присутствуют:
– Управление балансом
– Данные транзакций
– Текущие бонусы
– Установки безопасности
– Валидация профиля
Смартфонная платформа и программа
Актуальные игроки предпочитают доступность. Ресурс предлагает 2 способа для игры с мобильных девайсов.
Отзывчивая портативная версия
Адаптивная вариант домена без участия настраивается под монитор любого аппарата. Нет необходимости инсталлировать особое софт.
Программа для мобильных
Возможно установить оригинальное приложение для iOS и Android. Софт дает:
– Быстрый старт
– Улучшенный внешний вид
– Мобильные-уведомления о предложениях
– Устойчивую производительность
Live казино: среда истинного клуба
Секция Live столов переносит участников в обстановку подлинного клуба. Компетентные крупье организуют раунды в варианте настоящего времени.
Известные Live-игры
– Рулетка
– Блэкджек
– Баккара
– Покер
Автоматы: выбор автоматов
Библиотека слотовых слотов вмещает множество позиций от известных разработчиков. Клиенты откроют:
– Классические аппараты
– Современные слоты
– Джекпот-автоматы
– Megaways
Турниры и эксклюзивные мероприятия
Систематические соревнования предоставляют шанс игрокам конкурировать друг с другом за солидные денежные суммы. Отдельный турнир имеет свои требования участия и доску победителей.
Варианты зачисления и вывода денег
Платформа поддерживает ряд платежных систем:
– Дебетовые картыы
– Виртуальные кошельки
– Крипто
– Банковские отправления
Все операции осуществляются безопасно благодаря актуальным технологиям криптографии.
Отдел обслуживания
Компетентные консультанты команды support расположены поддержать 24/7. Работают нижеперечисленные пути контакта:
– Мгновенный-чат
– Email-сервис
– Голосовая поддержка
– Медийные сети
Резюме
Главный ресурс казино и его функционирующие копии предоставляют пользователям безопасный и легкий вход к обширному диапазону развлекательных игр. Крупные награды, регулярные кампании, профессиональная поддержка и простые расчетные способы делают геймерский опыт предельно приятным и доходным.
browse silvermarket – Just discovered this store, and the products are easy to find thanks to the clear interface.
мелбет приложение на айфон мелбет приложение на айфон .
мелбет официальный сайт скачать мелбет официальный сайт скачать .
visit online – Clear layout and simple pages make browsing pleasant.
https://certifiedcanadarx.com/# canadian pharmacy india
vendor portal link – The platform feels straightforward with clear sections
Передовые сетевые казино обеспечивают игрокам огромный выбор функций для комфортной игры. Впрочем иногда вход к основному ресурсу может стать закрытым. В таких ситуациях на подмогу приходят Cactus Casino casino, которое гарантирует бесперебойный вход ко всем сервисам платформы.
Что такое функционирующее зеркало казино
Альтернативный сайт — это полная реплика официального сайта, которая располагается по альтернативному домену. Зеркало сохраняет целый набор функций оригинального веб-портала, включая персональный кабинет, баланс и запись операций.
Ключевые выгоды использования зеркала:
– Круглосуточный доступ к платформе
– Стопроцентная идентичность возможностей
– Конфиденциальность личных информации
– Хранение доступных привилегий
Как разыскать рабочее зеркало в данный момент
Есть множество достоверных вариантов обнаружения текущей URL:
Проверенные источники:
1. Email рассылка — управление систематически высылает письма с актуальными доменами
2. Медийные сети — официальные страницы размещают актуальную информацию
3. Служба поддержки — операторы сообщают безопасные домены
4. Смартфонное приложение — обеспечивает преодолевать блокировки
Регистрация на официальном портале
Процесс регистрации занимает не более пару минут и содержит из данных ступеней:
1. Попадание на официальный портал или рабочее зеркало
2. Нажатие на иконку «Регистрация»
3. Внесение регистрационной таблицы
4. Верификация почтовой почты или телефонного номера
5. Применение вознаграждения за регистрацию при наличии промокода
Свежие игроки приобретают щедрый стартовый подарок, который может охватывать даровые прокруты, денежные призы или возврат средств.
Авторизация в пользовательский кабинет
Логин на сайте осуществляется традиционным методом. Нужно внести имя пользователя и код доступа, указанные при создании аккаунта.
Важные нюансы для безопасного входа:
– Применяйте защищенный код
– Запустите двухэтапную идентификацию
– Не фиксируйте данные на публичных устройствах
– Проверяйте интернет строку браузера
Характеристика премиальной структуры
Игровая платформа балует игроков всевозможными привилегиями и специальными предложениями:
Стартовый комплект
Начинающие могут надеяться на великодушное поощрение за первый взнос. Традиционно это процентовая надбавка к зачисленной объему плюс бесплатные вращения для известных слотов.
Постоянные кампании
– Недельный кэшбек — возврат процента утраченных денег
– Бонусы на повторные вклады
– Эксклюзивные предложения по праздникам
– Соревнования с солидными премиальными фондами
Схема лояльности
Регулярные пользователи зарабатывают баллы за любую игру, которые затем меняются на реальные средства, фриспины или уникальные бонусы.
Промокоды: как активировать
Промокоды — это особые комбинации букв и цифр, дающие право к дополнительным поощрениям.
Где найти актуальные промокоды:
– Официальные медийные сети казино
– Аффилиатные сайты
– Email-рассылка
– Отраслевые сообщества
Указывается промокод в соответствующее поле при оформлении или пополнении счета.
Портативная версия и приложение
Нынешние игроки выбирают развлекаться с телефонных аппаратов. Ресурс предлагает 2 способа для беспроблемной портативной игры.
Мобильная модификация
Браузерная версия само собой адаптируется под диагональ экранной панели. Не предполагает инсталляции и функционирует в произвольном свежем браузере.
Мобильное приложение
Установить программу можно для устройств на Android и iOS. Выгоды app:
– Скоростная загрузка
– Стабильная действие
– Всплывающие-уведомления о поощрениях
– Самостоятельный минование блокировок
Процесс инсталляции элементарен: требуется зайти на портал с мобильного аппарата и следовать указаниям.
Гемблинг коллекция
Коллекция развлечений охватывает огромное количество вариантов от топовых производителей.
Слоты
Игровые машины — наиболее востребованная секция игр. Доступны классические трехбарабанные машины, передовые графические аппараты с дополнительными уровнями, а также джекпотные выигрыши.
Live казино
Зона с настоящими ведущими позволяет почувствовать атмосферу реального казино. Имеются игры с баккарой.
Вещание ведется в превосходном качестве, имеется коммуникация с ведущим и иными геймерами.
Конкурсы
Регулярно проводятся конкурсы по всевозможным играм. Участие обеспечивает возможность получить финансовые выигрыши, фриспины или специальные привилегии.
Денежные процедуры
Ресурс обеспечивает широкий ассортимент финансовых способов:
– Кредитные карты
– Электронные кошельки
– Криптовалюта
– Денежные переводы
Стартовая сумма депозита — приемлемая для преобладающего числа игроков. Получение средств производится в скорые периоды.
Сервис поддержки
Профессиональные операторы способны содействовать круглосуточно. Доступны следующие каналы связи:
– Онлайн-чат
– Email
– Звонковая горячая линия
– Коммуникационные сети
Ответы на стандартные вопросы можно отыскать в блоке FAQ.
Заключение
Основной портал казино и его функционирующие зеркала дают геймерам абсолютный вход ко всем опциям портала. Великодушные бонусы, комфортная смартфонная версия, впечатляющий ассортимент аттракционов и квалифицированная ассистенция создают игровой процесс максимально беспроблемным и конфиденциальным.
Marble Shop Online – Clear layout, navigating pages is simple.
Современные онлайн-казино гарантируют клиентам разнообразие возможностей для комфортной игры. Основной сайт Леон предоставляет возможность ко всем сервисам и игровым автоматам. Однако при появлении системных неполадок на помощь приходят актуальные альтернативные адреса.
Что являет собой собой функционирующее зеркало
Альтернативный адрес казино — это полная реплика официального веб-сайта, размещенная по запасному веб-адресу. Легитимное зеркало хранит все возможности, включая создание аккаунта, доступ в собственный кабинет, поощрения и купоны.
Зеркало на сегодня обеспечивает:
– Стабильный путь к игровым аппаратам
– Абсолютную сохранность личных информации
– Поддержку баланса и хронологии операций
– Доступность всех специальных предложений
Создание аккаунта на главном сайте
Ход открытия профиля отнимает считанные минут. Новоиспеченным игрокам необходимо:
1. Войти на подлинный портал или действующее зеркало
2. Щелкнуть кнопку «Зарегистрироваться»
3. Указать нужные сведения
4. Активировать email почту
5. Применить бонусный код при присутствии
После финиша регистрации пользователи зарабатывают бонус за регистрацию, что может охватывать free spins или денежно-призовое поощрение.
Логин в индивидуальный кабинет
Личный кабинет обеспечивает полный контроль над азартным процессом. Через персональный профиль возможно:
– Финансировать баланс
– Получать выигрыши
– Задействовать кодовые слова
– Проверять записи пари
– Играть в соревнованиях
– Приобретать кэшбек
Описание поощрений и акций
Щедрая поощрительная политика — существенное преимущество казино. Ключевые формы вознаграждений:
Стартовый бонус
Дебютанты обретают щедрое награду на начальные депозиты. Величина бонуса может составлять 100-200% от размера вклада.
Бонусные спины
Халявные раунды даются для популярных автоматов. Количество бесплатных вращений разнится от 10 до 500 штук.
Возврат средств
Постоянный или ежемесячный возврат процентной доли потерянных средств. Стандартный процент кэшбека — 5-15%.
Соревнования
Постоянные соревнования с крупными призовыми банками. Игроки состязаются за призовые места в рейтинге.
Смартфонная версия и приложуха
Портативная версия разрешает делать ставки с любого гаджета. Пользователи могут закачать программу для iOS и Android или применять веб версию.
Достоинства смартфонного софта:
– Скоростная загрузка игр
– Удобный UI
– Всплывающие уведомления о промо
– Вход через Touch ID
Машины и Live казино
Развлекательная библиотека содержит тысячи игр от известных производителей.
Известные типы слотов:
– Стандартные машины
– Видео-автоматы с призовыми уровнями
– Прогрессивный джекпот игры
– Мега-путь машины
Live игорный зал
Категория live казино обеспечивает развлечение с настоящими крупье. Доступны традиционные развлечения:
– Французская рулетка
– Блэкджек
– Baccarat
– Техасский холдем
Как найти действующее зеркало
Получить рабочую линк на зеркало можно разными способами:
1. Оформить подписку на email-рассылку
2. Мониторить за новостями в социальных сетях
3. Написать в службу поддержки
4. Сохранить рабочее зеркало в закладки
Заключение
Лицензионный сайт и его функционирующие альтернативные адреса дают бесперебойный доступ к азартным играм. Щедрые поощрения, множественные промокоды, эргономичное мобильное софт и качественная техподдержка поддержки превращают развлекательный геймплей предельно приятным и безопасным.
Quick Crate Spot – Clean layout, exploring the site is simple.
silkstone vendor portal – Pleasant design, makes exploring sections simple
Mens RX Index ed pills cheap Mens RX Index
Доступ к сайту через проверенные зеркала
Передовые сетевые казино гарантируют игрокам бесперебойный вход к развлечениям. Основной сайт казино Дэдди действует устойчиво, предоставляя богатый ассортимент развлекательных игр. Но временами формируются системные сложности или барьеры, следовательно существенно понимать о существовании рабочих зеркал.
Что является из себя центральное зеркало казино
Альтернатива — это абсолютная дубликат официального ресурса с схожим набором функций. Функционирующее зеркало в настоящее время обеспечивает обходить локальные барьеры и возобновлять развлечения.
Принципиальные преимущества задействования зеркал:
– Стопроцентный доступ к собственному кабинету
– Поддержание каждых информации счёта
– Идентичный перечень игр
– Действующие поощрения и кампании
Создание аккаунта на сайте
Механизм создания аккаунта требует несколько минут. Начинающие клиенты приобретают щедрый приз за регистрацию, он способен содержать:
– Приветственный денежный бонус
– Комплиментарные фриспины для игр
– Специальные коды
– Увеличенный кешбэк
Ради окончания записи необходимо:
1. Зайти на основной веб-сайт или копию
2. Щёлкнуть клавишу «Оформиться»
3. Указать индивидуальные информацию
4. Активировать электронную почту или номер
5. Активировать ваучер (когда имеется наличии)
Доступ в персональный кабинет
Следом за корректной оформления пользователи имеют возможность осуществлять авторизацию посредством официальный портал или функционирующее зеркало. Собственный кабинет обеспечивает всесторонний контроль над счётом:
– История игр
– Ввод кошелька
– Изъятие средств
– Управление поощрениями
– Включение в конкурсах
Бонусы и промо казино
Ресурс удовлетворяет пользователей различными наградными схемами:
Стартовые бонусы
Новые игроки приобретают щедрый комплект привилегий на начальные пополнения. Типично это охватывает долевую надбавку к сумме пополнения плюс комплиментарные спины.
Регулярные промо
– Каждонедельный возврат до 15%
– Соревнования с премиальными банками
– Подарки на дату рождения
– Специальные акции для привилегированных игроков
Схема поощрения
Деятельные игроки собирают единицы, они возможно трансформировать на настоящие деньги или особые бонусы.
Смартфонная версия и программа
Передовые инновации обеспечивают геймить в любом месте удобно. Карманная форма ресурса самостоятельно настраивается под дисплей произвольного устройства.
Выгоды карманного ПО:
– Быстрая открытие слотов
– Эргономичный интерфейс
– Push-нотификации о предложениях
– Способность инсталлировать для Android и iOS
Настоящее казино: среда истинного азартного заведения
Область Live игорного дома транспортирует игроков в атмосферу подлинного гемблинг клуба. Опытные ведущие проводят действие в режиме подлинного времени.
Предлагаемые столы:
– Американская рулетка
– Очко
– Баккара
– Карты
Барабаны и игровые машины
Каталог развлекательных слотов насчитывает массу позиций от передовых провайдеров. Произвольный игрок обнаружит игру по вкусу:
– Классические барабаны
– Новые слоты с бонусными турами
– Накопительный-машины
– Динамические автоматы
Конкурсы и лотереи
Систематические конкурсы включают остроту и предоставляют возможность выиграть крупные вознаграждения. Участие в турнирах зачастую комплиментарное, а наградные пулы составляют крупных сумм.
Секьюрити и секретность
Сайт задействует инновационные методы шифрования для охраны данных игроков. Все денежные процедуры совершаются через безопасные каналы.
Заключение
Официальный портал и его актуальные зеркала дают устойчивый подключение к превосходным развлекательным играм. Щедрые призы, эргономичная карманная редакция, многообразие автоматов и профессиональное Live-клуб создают платформу превосходным решением для ценителей азартных слотов.
explore workshop – Found this platform, layout is tidy and intuitive overall
Передовые онлайн-казино предоставляют геймерам обширный спектр вариантов для приятной досуга. Доступ к ресурсу 888 выполняется через главный портал или функционирующее зеркало.
Что такое действующее зеркало казино
Действующее зеркало — это запасной адрес лицензионного сайта казино. Такие дубликаты формируются для поддержания непрерывного подключения к гемблинговой площадке.
Альтернатива на сегодня полностью воспроизводит опции основного ресурса. Клиенты имеют идентичный доступ ко всем функциям, включая создание аккаунта, пополнение баланса и снятие призов.
Создание аккаунта на основном портале
Алгоритм регистрации длится всего считанные минут. Начинающим клиентам следует:
1. Попасть на основной сайт или актуальное подлинное зеркало
2. Щелкнуть кнопку “Открыть счет”
3. Указать обязательные сведения
4. Верифицировать e-mail почту
5. Ввести промокод при существовании
После выполнения оформления пользователь зарабатывает подарок за регистрацию, который вправе предполагать даровые спины или монетарное вознаграждение.
Авторизация в собственный кабинет
Персональный кабинет — это охраняемая область, где пользователи имеют возможность регулировать своим учетной записью. Для логина следует ввести логин и пароль.
В личном кабинете представлены такие функции:
– Проверка журнала операций
– Активация кодов активации
– Управление бонусами
– Включение в конкурсах
– Мониторинг возмещения
– Настройка данных
Призы и предложения
Гемблинговая система предоставляет выгодные подарки:
Стартовый набор — новые игроки приобретают крупное вознаграждение на стартовые вклады.
Free spins — выдаются как при регистрации, так и в рамках многочисленных мероприятий.
Кэшбэк — регулярный компенсация фрагмента израсходованных средств.
Промокоды — особые шифры, дающие возможность к эксклюзивным бонусам.
Анализ гемблинговых разделов
Слоты
Собрание аппаратов насчитывает массу игр от лучших разработчиков. Игроки обнаружат как обычные автоматы, так и современные видеослоты с захватывающей анимацией.
Live казино
Зона Live казино обеспечивает опцию участвовать с настоящими ведущими в условиях актуального времени. Представлены распространенные варианты: рулетка, блэкджек, баккара, покер.
Состязания
Периодические турниры с солидными наградными фондами завлекают множество конкурсантов. Лидеры получают cash призы и особые подарки.
Смартфонная версия и app
Телефонная версия ресурса обеспечивает наслаждаться с произвольного устройства. Дизайн независимо подстраивается под диагональ экрана.
Загрузить приложение можно для девайсов на Android и iOS. Телефонное app имеет всеми опциями полной версии.
Как определить актуальное зеркало на текущий день
Актуальные линки копий регулярно обновляются. Обнаружить актуальную ссылку можно несколькими способами:
– Через отдел техподдержки
– В настоящих новостных сетях
– По e-mail newsletter
– На тематических площадках
Безопасность и сертификация
Главный сайт функционирует на фундаменте зарубежной документа. Все операции оберегаются актуальными протоколами безопасности.
Секретность индивидуальных информации поддерживается в абсолютном масштабе.
Заключение
Официальный портал и его актуальные копии предоставляют пользователям постоянный вход к высококлассным развлекательным развлечениям. Великодушные призы, всевозможные слоты, квалифицированная помощь — все это превращает игровой процесс предельно удобным и увлекательным.
pet drugs online: vet pharmacy online – pet drugs online
UplandDealsCenter – Checked out a few areas, the structure feels simple and readable.
нажмите здесь хвх миднайт
Читать далее Купить и продать товары по играм
Для всех, кто ждет ufc в феврале марте 2026 три недели которые встряхнут дивизионы, нашел отличный гид по турнирам. Вот ссылка: https://crm64.ru/news/goryachij-fevral-mart-2026-v-ufc-tri-turnira-kotorye-nelzya-propustit/
explore now – Came across this marketplace, layout is neat and browsing works smoothly
Характеристика лицензионного веб-сайта
Актуальные сетевые казино дают клиентам обширный ассортимент услуг и опций. Главный веб-сайт Cactus Casino казино предлагает защищенный возможность к азартным услугам.
Действующее зеркало: доступ в настоящий момент
Резервный сайт выступает собой идентичную версию основного веб-сайта. Проверенное зеркало позволяет игрокам миновать возможные запреты.
Выгоды задействования зеркала
Принципиальные выгоды охватывают:
– Беспрерывный путь к порталу
– Удержание всех функций официального портала
– Сохранность персональных материалов
– Идентичный набор функций
Регистрация на платформе
Ход открытия счета выделяется доступностью и практичностью. Начинающие участники должны:
1. Открыть основной ресурс или его зеркало
2. Кликнуть на кнопку оформления
3. Ввести обязательные данные
4. Подтвердить электронную адрес
5. Выполнить первый логин
Подарок за создание аккаунта
Начинающие приобретают значительный стартовый презент. Подобное премия может содержать:
– Монетарные средства
– Даровые вращения
– Расширенный процент кэшбэка
Логин в собственный аккаунт
Активные игроки могут быстро зайти в свой аккаунт, применяя никнейм и пароль. Личный раздел предоставляет возможность к:
– Регулированию средствами
– Журналу переводов
– Активным бонусам
– Параметрам аккаунта
Вознаграждения и предложения
Ресурс систематически проводит многочисленные акции для игроков.
Категории призов
Основные виды призов:
– Финансовые подарки – процент от объема депозита
– Прокруты – бесплатные раунды в аппаратах
– Кэшбек – отдача части затраченных финансов
– Турнирные трофеи – призы за состязание в соревнованиях
Купоны
Уникальные ваучеры позволяют приобрести дополнительные преимущества. Пользователи способны отыскать их на аффилиатных порталах или приобрести в уведомлениях.
Мобильная редакция и приложение
Актуальные гемблеры любят мобильный гейминг.
Возможности мобильной адаптации
– Отзывчивый дизайн для разнообразных устройств
– Абсолютный возможность к слотам
– Стремительная функционирование
– Эргономичное управление
Скачать софт
Мобильное app предложено для установки на аппараты с операционными ОС Android и iOS. Приложение предоставляет:
– Стабильную работу
– Push оповещения о бонусах
– Мгновенный запуск к любимым автоматам
Гемблинг ассортимент
Казино предоставляет обширную библиотеку азартных игр.
Автоматы
Коллекция развлекательных слотов содержит:
– Классические игры
– Современные аппараты
– Призовые машины
– Branded слоты
Live дилеры
Область настоящих развлечений предлагает право состязаться с живыми дилерами. Доступны:
– Европейская рулетка
– Блэкджек
– Baccarat
– Техасский холдем
Соревнования
Систематические конкурсы дают возможность клиентам состязаться за значительные призовые банки. Соревновательная структура модифицируется каждую неделю.
Платежные процедуры
Портал обеспечивает обилие способов внесения и снятия денег:
– Кредитные карточки
– Онлайн кошельки
– Wire трансферы
– Bitcoin
Все платежи производятся безопасно с использованием актуальных технологий кодирования.
Отдел помощи
Квалифицированная отдел саппорта работает без перерыва. Коннектиться с операторами реально через:
– Онлайн чат
– Email почту
– Телефон
– Social сети
Секьюрити и регулирование
Платформа оперирует на фундаменте законной лицензии. Подобное гарантирует:
– Честность игрового геймплея
– Безопасность индивидуальных данных
– Пунктуальные перечисления
– Ответственный геймплей
Заключение
Основной ресурс и его функционирующие зеркала гарантируют игрокам абсолютный набор возможностей для безопасной и доходной развлечений. Внушительные подарки, всевозможные слоты, компетентная помощь и защищенная платформа транзакций делают ресурс оптимальным опцией для ценителей азартных услуг.
Характеристика главного сайта
Прогрессивные интернет казино предоставляют игрокам широкий выбор забав и опций. Официальный сайт казино Аркада предлагает надежный вход к азартным функциям.
Актуальное зеркало: доступ в настоящий момент
Зеркало выступает собой абсолютную версию официального сайта. Проверенное зеркало помогает участникам преодолевать существующие ограничения.
Плюсы эксплуатации зеркала
Главные достоинства содержат:
– Непрерывный путь к ресурсу
– Сохранение полных возможностей официального сайта
– Охрана конфиденциальных материалов
– Идентичный возможности
Регистрация на ресурсе
Ход открытия счета выделяется доступностью и практичностью. Новые клиенты обязаны:
1. Зайти на основной ресурс или его зеркало
2. Кликнуть на кнопку создания аккаунта
3. Указать требуемые информацию
4. Подтвердить электронную ящик
5. Произвести начальный логин
Подарок за создание аккаунта
Начинающие получают солидный стартовый подарок. Подобное поощрение способно включать:
– Монетарные суммы
– Безвозмездные фриспины
– Повышенный коэффициент возврата
Доступ в персональный аккаунт
Зарегистрированные участники в состоянии моментально зайти в свой раздел, задействуя никнейм и код. Персональный аккаунт дает путь к:
– Контролю депозитом
– Записям платежей
– Работающим поощрениям
– Конфигурации учетной записи
Подарки и кампании
Сайт периодически устраивает разнообразные предложения для клиентов.
Типы бонусов
Базовые типы поощрений:
– Депозитные призы – коэффициент от величины депозита
– Прокруты – бесплатные вращения в игровых машинах
– Возврат средств – отдача части потерянных финансов
– Конкурсные призы – вознаграждения за выступление в соревнованиях
Коды
Специальные ваучеры помогают получить бонусные преимущества. Участники способны отыскать их на тематических порталах или взять в рассылке.
Переносная редакция и софт
Прогрессивные гемблеры ценят портативный досуг.
Характеристики mobile платформы
– Гибкий интерфейс для всех аппаратов
– Совокупный возможность к играм
– Стремительная загрузка
– Удобное использование
Download софт
Мобильное софт предоставлено для downloading на устройства с рабочими ОС Android и iOS. Софт предоставляет:
– Устойчивую работу
– Push сообщения о предложениях
– Моментальный запуск к предпочитаемым автоматам
Гемблинг ассортимент
Платформа обеспечивает богатую библиотеку игровых игр.
Игровые машины
Библиотека развлекательных аппаратов включает:
– Стандартные игры
– Современные аппараты
– Джекпотные игры
– Сюжетные автоматы
Live казино
Категория реальных дилеров обеспечивает опцию участвовать с профессиональными дилерами. Доступны:
– Американская рулетка
– 21
– Baccarat
– Техасский холдем
Конкурсы
Постоянные конкурсы обеспечивают участникам конкурировать за внушительные призовые банки. Призовая программа изменяется постоянно.
Банковские действия
Казино предоставляет разнообразие способов пополнения и получения сумм:
– Кредитные карточки
– Онлайн кошельки
– Wire трансферы
– Крипто
Любые транзакции осуществляются безопасно с применением актуальных протоколов шифрования.
Служба поддержки
Квалифицированная группа саппорта работает без перерыва. Соединиться с менеджерами возможно через:
– Интерактивный чат
– Email почту
– Телефон
– Соц сети
Безопасность и аккредитация
Игровой клуб оперирует на базе законной лицензии. Подобное гарантирует:
– Справедливость игрового процесса
– Защиту личных данных
– Своевременные перечисления
– Ответственный геймплей
Вывод
Лицензионный веб-сайт и его действующие резервные страницы обеспечивают пользователям совокупный ассортимент услуг для безопасной и доходной времяпрепровождения. Значительные подарки, многочисленные игры, компетентная помощь и надежная платформа операций делают ресурс оптимальным опцией для любителей развлекательных развлечений.
узнать больше продать аккаунт мобайл легенд
мелбет для снг мелбет для снг .
melbet
threatlens – Bookmarked this immediately, planning to revisit for updates and inspiration.
check vendor hub – Navigation is straightforward, and pages load without delay
wave marketplace hub – Browsing around was easy and the interface is clear
Подключение к порталу через рабочие зеркала
Пользователи сетевых казино нередко контактируют с проблемой недоступности главного ресурса. Именно для решения этой задачи разработаны дубликаты основного ресурса. Мотор казик дает абсолютный переход ко всем функциям платформы.
Что такое актуальное зеркало казино
Зеркало составляет собой точную версию оригинального веб-сайта с идентичным набором функций. Основное несовпадение — это доменное имя. Каждые параметры участника, в том числе средства, привилегии и записи ставок, продолжают быть неизменными.
Плюсы использования зеркал
Актуальные зеркала характеризуются набором существенных преимуществ:
– Бесперебойный подключение к любимым автоматам
– Абсолютная сохранность личных сведений
– Неизменность всех параметров индивидуального кабинета
– Шанс взятия наград и включения в акциях
Создание аккаунта на главном сайте
Процедура регистрации крайне прост и занимает буквально минут. Недавние игроки способны полагаться на внушительный стартовый подарок за открытие счета.
Стадии формирования аккаунта
1. Подключение на главный портал или его альтернативу
2. Клик на элемент “Создать аккаунт”
3. Внесение необходимых данных
4. Проверка email почты
5. Применение купона (когда есть)
Бонусы и предложения для участников
Платформа балует своих игроков всевозможными бонусными системами.
Основные виды бонусов
Вводный пакет — крупное премирование для начинающих участников, каковое имеет возможность включать денежные суммы и free spins.
Free spins — возможность запускать в популярных слотах безвозмездно.
Компенсация — частичный возврат утраченных финансов, что начисляется раз в неделю или каждый месяц.
Купоны — эксклюзивные комбинации, гарантирующие экстра привилегии.
Персональный кабинет: опции и параметры
Индивидуальный кабинет предоставляет абсолютный управление над персональным опытом. В нем доступны:
– Администрирование балансом
– История операций
– Текущие награды
– Конфигурации сохранности
– Валидация счета
Карманная вариант и программа
Новейшие клиенты ценят гибкость. Ресурс предлагает пару метода для развлечений с мобильных аппаратов.
Responsive портативная платформа
Портативная вариант ресурса автономно настраивается под разрешение любого гаджета. Не требуется скачивать отдельное софт.
APP для телефонов
Доступно скачать специальное APP для iOS и Android. APP гарантирует:
– Мгновенный доступ
– Улучшенный интерфейс
– Всплывающие-извещения о акциях
– Устойчивую производительность
Live развлечения: среда подлинного казино
Категория Live столов доставляет участников в среду истинного клуба. Компетентные ведущие осуществляют партии в виде живого времени.
Популярные Live-игры
– Французская рулетка
– Блэкджек
– Баккарат
– Poker
Слоты: выбор автоматов
Библиотека слотовых аппаратов вмещает тысячи позиций от известных провайдеров. Клиенты откроют:
– Классические слоты
– Видеослоты
– Мега-выигрыш-игры
– Многолинейные автоматы
Турниры и особые предложения
Периодические соревнования дают возможность участникам состязаться друг с другом за крупные наградные пулы. Отдельный конкурс содержит свои критерии присутствия и доску призеров.
Методы пополнения и снятия средств
Платформа обслуживает множество финансовых инструментов:
– Кредитные инструменты
– Онлайн счета
– Крипто
– Прямые переводы
Любые операции выполняются безопасно благодаря передовым протоколам криптографии.
Сервис обслуживания
Квалифицированные консультанты отдела поддержки готовы помочь 24/7. Работают нижеперечисленные каналы контакта:
– Онлайн-чат
– Email-обслуживание
– Аудио поддержка
– Медийные сети
Вывод
Легальный домен игровой площадки и его функционирующие копии дают участникам защищенный и удобный подход к обширному спектру азартных игр. Крупные поощрения, частые промоакции, квалифицированная поддержка и простые расчетные инструменты создают игровой опыт максимально комфортным и выгодным.
Нынешние виртуальные казино обеспечивают клиентам обширный спектр возможностей для беспроблемной игры. Но иногда подключение к основному сайту может стать закрытым. В таких моментах на поддержку приходит Gonzo, которое предоставляет стабильный доступ ко всем возможностям платформы.
Что такое актуальное зеркало казино
Копия — это точная копия официального ресурса, которая размещается по альтернативному адресу. Дубликат поддерживает весь возможности оригинального ресурса, включая персональный кабинет, счет и историю транзакций.
Главные преимущества задействования зеркала:
– Постоянный вход к платформе
– Стопроцентная аналогичность опций
– Конфиденциальность персональных реквизитов
– Хранение всех имеющихся привилегий
Как отыскать актуальное зеркало сегодня
Есть множество проверенных путей получения действующей адреса:
Официальные сервисы:
1. Почтовая рассылка — управление регулярно направляет письма с актуальными ссылками
2. Социальные сети — официальные аккаунты выкладывают текущую сведения
3. Служба поддержки — специалисты выдают надежные ссылки
4. Портативное приложение — обеспечивает преодолевать блокировки
Оформление профиля на официальном портале
Процесс оформления длится всего несколько минут и включает из следующих стадий:
1. Вход на главный веб-сайт или функционирующее зеркало
2. Щелчок на иконку «Зарегистрироваться»
3. Указание учетной таблицы
4. Проверка почтовой почты или мобильного номера
5. Включение привилегии за регистрацию при присутствии промокода
Свежие геймеры зарабатывают великодушный начальный бонус, который может предполагать free spins, монетарные поощрения или компенсацию.
Авторизация в персональный кабинет
Подключение на платформе производится обычным путем. Необходимо ввести учетные данные и кодовое слово, задействованные при регистрации.
Значимые аспекты для надежного входа:
– Используйте сложный пароль
– Задействуйте 2FA верификацию
– Не записывайте реквизиты на чужих девайсах
– Мониторьте интернет строку браузера
Анализ премиальной системы
Игорный портал радует игроков всевозможными бонусами и промо:
Начальный комплект
Начинающие способны полагаться на великодушное бонус за первый пополнение. Обычно это пропорциональная премия к зачисленной объему плюс бесплатные вращения для востребованных слотов.
Периодические промо
– Семидневный возврат средств — возмещение процента утраченных средств
– Призы на очередные взносы
– Специальные предложения по знаменательным датам
– Состязания с солидными наградными суммами
План привилегий
Деятельные геймеры накапливают единицы за произвольную ставку, которые затем обмениваются на реальные средства, фриспины или специальные бонусы.
Купоны: как задействовать
Промокоды — это особые сочетания символов, обеспечивающие доступ к дополнительным привилегиям.
Где найти действующие промокоды:
– Проверенные социальные сети казино
– Аффилиатные площадки
– Email-подписка
– Тематические форумы
Вводится промокод в специальное поле при открытии счета или зачислении средств депозита.
Телефонная версия и приложение
Актуальные пользователи любят развлекаться с смартфонных устройств. Портал дает два способа для комфортной телефонной игры.
Отзывчивая версия
Браузерная версия само собой адаптируется под габариты экрана. Не нуждается скачивания и работает в каждом новом браузере.
Мобильное приложение
Получить app можно для устройств на Android и iOS. Достоинства app:
– Молниеносная открытие
– Устойчивая действие
– Push-уведомления о поощрениях
– Автоматический обход блокировок
Процедура инсталляции легок: достаточно открыть на портал с портативного девайса и следовать руководству.
Развлекательный коллекция
База слотов содержит огромное количество вариантов от топовых провайдеров.
Слоты
Развлекательные автоматы — крайне востребованная секция развлечений. Показаны классические винтажные автоматы, новые видеослоты с поощрительными этапами, а также джекпотные выигрыши.
Live казино
Зона с реальными ведущими обеспечивает прочувствовать атмосферу настоящего казино. Имеются варианты с баккарой.
Передача осуществляется в отличном формате, присутствует общение с дилером и остальными игроками.
Соревнования
Постоянно запускаются состязания по всевозможным категориям. Участие обеспечивает возможность завоевать монетарные выигрыши, фриспины или особые презенты.
Транзакционные операции
Ресурс предоставляет обширный набор финансовых инструментов:
– Банковские карты
– Цифровые системы
– Крипта
– Банковские платежи
Минимальная количество вклада — доступная для преобладающего числа игроков. Вывод выигрышей производится в минимальные сроки.
Отдел поддержки
Опытные консультанты настроены оказать помощь постоянно. Доступны данные способы коммуникации:
– Онлайн-чат
– Email
– Мобильная поддержка
– Коммуникационные сети
Ответы на типовые проблемы можно получить в блоке FAQ.
Вывод
Официальный сайт казино и его рабочие зеркала предоставляют клиентам полный подключение ко всем сервисам платформы. Великодушные привилегии, удобная смартфонная версия, впечатляющий выбор аттракционов и опытная служба поддержки формируют игровой времяпрепровождение исключительно беспроблемным и безопасным.
seller place link – Pages are structured well and navigation is intuitive
zerotrusty – Color palette felt calming, nothing distracting, just focused, thoughtful design.
this platform – I found this site today, interface seems organized and intuitive.
edmeds: online prescription for ed – buy ed meds
этот контент lua скрипт
Нынешние интернет казино обеспечивают игрокам большой ассортимент вариантов для беспроблемной игры. Однако иногда соединение к главному порталу может стать заблокированным. В таких моментах на помощь появляется 888старз казино, которое предоставляет стабильный доступ ко всем опциям платформы.
Что такое актуальное зеркало казино
Зеркало — это полная дубликат основного веб-сайта, которая размещается по альтернативному адресу. Дубликат содержит целый функционал главного портала, включая индивидуальный кабинет, баланс и запись транзакций.
Принципиальные достоинства применения зеркала:
– Круглосуточный доступ к ресурсу
– Полная тождественность возможностей
– Сохранность индивидуальных информации
– Поддержка доступных привилегий
Как разыскать действующее зеркало на текущий день
Существует ряд надежных способов обнаружения актуальной URL:
Проверенные сервисы:
1. Email рассылка — руководство постоянно высылает письма с свежими доменами
2. Коммуникационные сети — легитимные каналы постят свежую сведения
3. Департамент поддержки — операторы выдают надежные адреса
4. Смартфонное приложение — дает возможность обходить блокировки
Регистрация на главном ресурсе
Процесс оформления длится лишь считанные минут и предполагает из таких этапов:
1. Переход на основной ресурс или функционирующее зеркало
2. Выбор на кнопку «Создать аккаунт»
3. Заполнение персональной бланка
4. Подтверждение email почты или телефонного номера
5. Включение бонуса за регистрацию при наличии промокода
Начинающие пользователи приобретают значительный стартовый приз, который может включать free spins, финансовые поощрения или возврат средств.
Авторизация в персональный кабинет
Логин на портале производится стандартным образом. Достаточно внести учетные данные и пароль, указанные при оформлении.
Важные нюансы для защищенного входа:
– Задействуйте сложный пароль
– Задействуйте двухфакторную верификацию
– Не сохраняйте данные на чужих девайсах
– Проверяйте адресную строку браузера
Описание бонусной структуры
Гемблинг-сайт награждает пользователей различными бонусами и специальными предложениями:
Приветственный пакет
Новички вправе полагаться на значительное бонус за дебютный взнос. Зачастую это процентная прибавка к внесенной величине плюс фриспины для популярных слотов.
Периодические кампании
– 7-дневный кэшбек — возврат процента потерянных денежных средств
– Призы на дополнительные вклады
– Особые предложения по торжествам
– Состязания с большими премиальными банками
Программа верности
Активные пользователи получают очки за всякую игру, которые затем меняются на фактические средства, даровые прокруты или эксклюзивные бонусы.
Кодовые слова: как активировать
Бонус-коды — это индивидуальные наборы литер, предоставляющие право к эксклюзивным вознаграждениям.
В каких местах получить актуальные промокоды:
– Официальные медийные сети казино
– Аффилиатные сайты
– Email-информирование
– Отраслевые группы
Указывается промокод в предназначенное поле при создании аккаунта или внесении депозита счета.
Портативная версия и приложение
Нынешние пользователи отдают предпочтение делать ставки с мобильных аппаратов. Сайт предлагает два варианта для комфортной телефонной игры.
Responsive модификация
Онлайн версия само собой подстраивается под габариты монитора. Не требует скачивания и работает в произвольном свежем браузере.
Смартфонное приложение
Установить софт можно для аппаратов на Android и iOS. Преимущества app:
– Скоростная загрузка
– Надежная функционирование
– Автоматические-уведомления о поощрениях
– Автоматический избегание блокировок
Процедура инсталляции прост: требуется попасть на веб-сайт с мобильного устройства и выполнять указаниям.
Азартный каталог
Каталог развлечений включает множество наименований от лучших производителей.
Слоты
Гемблинг машины — крайне распространенная секция аттракционов. Показаны обычные 3-барабанные машины, новые видео-автоматы с дополнительными раундами, а также накопительные суперпризы.
Live казино
Секция с действительными раздающими обеспечивает прочувствовать атмосферу подлинного казино. Представлены столы с рулеткой.
Стриминг реализуется в отличном разрешении, имеется чат с ведущим и остальными пользователями.
Соревнования
Постоянно устраиваются соревнования по всевозможным категориям. Присоединение обеспечивает возможность выиграть финансовые вознаграждения, даровые прокруты или уникальные бонусы.
Денежные процедуры
Ресурс поддерживает значительный набор финансовых способов:
– Кредитные карты
– Электронные системы
– Биткоин
– Финансовые платежи
Низшая сумма депозита — посильная для преобладающего числа геймеров. Обналичивание выигрышей производится в минимальные сроки.
Служба поддержки
Профессиональные сотрудники настроены оказать помощь 24/7. Имеются следующие варианты коммуникации:
– Веб-чат
– Email
– Мобильная линия
– Коммуникационные сети
Пояснения на частые проблемы можно обнаружить в блоке FAQ.
Вывод
Лицензионный портал казино и его рабочие зеркала обеспечивают игрокам абсолютный путь ко всем сервисам портала. Великодушные бонусы, удобная портативная версия, колоссальный коллекция аттракционов и опытная помощь делают гемблинг опыт крайне приятным и безопасным.
juniperstonevendorplace.shop – Just visited the site and the browsing flow feels really smooth overall
мелбет казино скачать мелбет казино скачать .
https://mensrxindex.shop/# Mens RX Index
have a peek at these guys
dafabet official
мелбет скачать на пк мелбет скачать на пк .
gambling games online gambling games online .
melbet скачать приложение melbet скачать приложение .
Переход к платформе и актуальные адреса
Востребованные сетевые казино обеспечивают пользователям широкий ассортимент игр. Основной веб-сайт Kent обеспечивает надежный вход ко всем возможностям. Тем не менее иногда случаются случаи, когда понадобится резервный способ подключения.
Что являет собой собой актуальное зеркало
Функционирующее зеркало — это абсолютная копия официального веб-сайта с запасным URL названием. Зеркало сегодня помогает обходить возможные ограничения и обеспечивать стабильный переход к популярным автоматам.
Проверенное зеркало имеет полными характеристиками, что и главный веб-сайт:
– Целый каталог развлечений
– Индивидуальный профиль с зафиксированными данными
– Полные награды и программы
– Защищенные денежные переводы
Регистрация и подключение в систему
Процедура создания профиля на сайте занимает буквально минут. Начинающим клиентам следует:
1. Перейти на действующее зеркало сейчас
2. Щелкнуть кнопку «Зарегистрироваться»
3. Указать обязательные сведения
4. Проверить e-mail почту или данные мобильного
5. Забрать поощрение за регистрацию
Доступ в персональный аккаунт реализуется посредством указание имени пользователя и пароля.
Описание бонусной программы
Богатая призовая структура — основное преимущество платформы. Пользователи забирают различные поощрения:
Стартовые подарки
Начинающие участники могут рассчитывать на привлекательный приз за регистрацию. Обычно это пакет опций, объединяющий:
– Пропорциональную надбавку к дебютному пополнению
– Безвозмездные спины
– Extra финансы на счет
Промо-коды и уникальные акции
Постоянные бонусные комбинации обеспечивают зарабатывать экстра привилегии. Использовать их возможно в предназначенном разделе персонального раздела.
Спины и компенсация
Даровые вращения — это шанс запускать барабаны без использования собственных денег. Возврат представляет процентный компенсацию израсходованных финансов.
Каталог игр
Гемблинг сайт обеспечивает значительную коллекцию слотов.
Видеослоты
Ассортимент автоматов удивляет воображение. Есть обычные ретро машины и новые видеослоты с занимательной анимацией.
Live зал
Зона Live игр переносит игроков в обстановку реального азартного клуба. Опытные крупье ведут игры в реальном режиме.
Соревнования и таблицы лидеров
Регулярные турниры привносят остроты и гарантируют перспективу забрать крупные призы.
Портативная форма и софт
Новые инновации дают возможность играть в удобном пространстве. Mobile реализация автоматически подстраивается под размер гаджета.
Скачать программу можно для мобильных ОС iOS и Android. Приложение предоставляет:
– Оперативный вход
– Стабильную производительность
– Push-сообщения об бонусах
– Удобный вид
Платежные действия
Платформа поддерживает многочисленные методы внесения и получения денег:
– Кредитные системы
– Виртуальные системы
– Криптовалюты
– Денежные переводы
Каждые операции проходят через надежное соединение, что защищает неприкосновенность персональных сведений.
Служба support
Квалифицированная служба помощи действует 24/7. Контактировать с менеджерами возможно через:
– Live-чат
– E-mail почту
– Горячую линию
– Общественные каналы
Резюме
Официальный веб-сайт и его рабочее зеркало обеспечивают клиентам безопасный и приятный путь к азартным занятиям. Щедрые поощрения, обширный спектр слотов и отличная сервис обеспечивают участие крайне комфортной и результативной.
check the vendor – Pages are clean, making navigation seamless and intuitive.
Maple Shop Online – Clear layout, moving between sections is simple.
скачать мелбет казино на андроид скачать мелбет казино на андроид .
melbet скачать приложение для андроид melbet скачать приложение для андроид .
VendorTrailEmporium – Skimmed lightly, the platform feels organized and approachable.
melbetlink&melbet melbetlink&melbet .
Quartz Spot – Organized layout, moving through content is simple.
After trying several platforms, I found this casino https://woodysburger.pl/ to be reliable. The welcome bonus is fair, terms are easy to understand, and payouts don’t take forever, making it suitable for casual players.
нажмите, чтобы подробнее продать аккаунт фан пей
browse today – Ran into this platform, layout is organized and pleasant to navigate
explore here – Checked this platform, pages are organized and browsing is simple
http://mensrxindex.com/# cheap ed treatment
seavendoremporium studio – Smooth navigation, site structure is logical
Доступ к сайту через актуальные зеркала
Передовые сетевые казино предоставляют игрокам круглосуточный подключение к развлечениям. Центральный ресурс РљСѓС€ действует бесперебойно, предлагая богатый набор развлекательных развлечений. Впрочем иногда возникают технические проблемы или запреты, в связи с чем существенно быть осведомлённым о существовании рабочих зеркал.
Что собой представляет собой главное зеркало казино
Альтернатива — это абсолютная дубликат основного сайта с идентичным возможностями. Функционирующее зеркало в настоящее время помогает преодолевать территориальные блокировки и поддерживать развлечения.
Основные достоинства применения зеркал:
– Стопроцентный переход к собственному кабинету
– Сохранение любых информации профиля
– Схожий спектр автоматов
– Свежие вознаграждения и кампании
Регистрация на платформе
Механизм оформления занимает пару минут. Недавние геймеры зарабатывают щедрый бонус за регистрацию, он в состоянии вмещать:
– Начальный финансовый приз
– Даровые кручения для слотов
– Особые купоны
– Увеличенный компенсацию
Ради завершения оформления требуется:
1. Перейти на основной портал или копию
2. Кликнуть элемент «Создать аккаунт»
3. Указать личные информацию
4. Подтвердить почтовый адрес или телефон
5. Активировать промокод (когда имеется доступности)
Вход в личный кабинет
После правильной записи клиенты имеют возможность осуществлять подключение с помощью основной портал или действующее зеркало. Персональный кабинет обеспечивает безграничный контроль над профилем:
– Летопись транзакций
– Внесение кошелька
– Получение средств
– Регулирование бонусами
– Участие в соревнованиях
Привилегии и акции казино
Платформа балует клиентов различными привилегированными предложениями:
Приветственные призы
Дебютанты приобретают великодушный букет бонусов на начальные пополнения. Как правило это включает процентную прибавку к сумме вклада плюс даровые кручения.
Систематические акции
– Раз в неделю кешбэк до 15%
– Конкурсы с призовыми пулами
– Бонусы на день рождения
– Уникальные программы для VIP геймеров
Схема лояльности
Активные игроки накапливают пункты, которые возможно превратить на настоящие средства или специальные преимущества.
Мобильная вариант и софт
Современные разработки позволяют развлекаться где удобно. Мобильная вариант ресурса самостоятельно адаптируется под дисплей каждого аппарата.
Плюсы карманного ПО:
– Моментальная открытие слотов
– Эргономичный облик
– Мгновенные-сообщения о промо
– Возможность инсталлировать для Android и iOS
Реальное казино: обстановка истинного игорного дома
Секция Live игорного дома погружает клиентов в среду истинного азартного клуба. Компетентные дилеры проводят развлечение в режиме актуального времени.
Имеющиеся варианты:
– Колесо фортуны
– Блэкджек
– Карточная игра
– Техасский холдем
Барабаны и игровые слоты
Собрание игровых автоматов включает тысячи позиций от топовых производителей. Каждый геймер отыщет игру по желанию:
– Винтажные машины
– Современные автоматы с дополнительными этапами
– Крупный приз-игры
– Megaways игры
Конкурсы и розыгрыши
Регулярные соревнования вносят остроту и открывают шанс заработать значительные суммы. Вовлечение в конкурсах нередко даровое, а призовые пулы достигают больших величин.
Охрана и конфиденциальность
Ресурс задействует инновационные протоколы шифрования для обеспечения реквизитов геймеров. Любые транзакционные операции выполняются через защищённые соединения.
Итог
Главный ресурс и его действующие зеркала обеспечивают устойчивый подключение к качественным игровым играм. Богатые бонусы, комфортная мобильная редакция, разнообразие машин и компетентное Live-заведение превращают платформу превосходным вариантом для любителей развлекательных игр.
Передовые онлайн-казино гарантируют пользователям богатый набор развлечений и щедрые поощрения. Тем не менее для удобной деятельности критично иметь представление, как отыскать Kent казино и его актуальные зеркала.
Что такое лицензионный сайт казино
Главный веб-сайт казино — это главная веб-площадка, где пользователи могут пользоваться игровыми развлечениями. Платформа оперирует на легитимных правах и имеет всеми обязательными разрешениями.
Главные плюсы главного портала:
– Защищенность персональных данных
– Объективные условия использования
– Стабильные платежи
– Квалифицированная помощь
Рабочее зеркало казино: для чего используется
Дублирующий ресурс — это идентичная версия официального портала, хостящаяся по иному веб-адресу. Действующее зеркало создается для обеспечения непрерывного доступа к платформе.
Основания применения альтернативных адресов:
– Блокировка первичного адреса
– Регламентные работы
– Повышенная посещаемость на платформу
Как отыскать рабочее зеркало на сегодня
Получить актуальное рабочее зеркало можно разными методами:
1. Email-уведомления — активируйте уведомления на информационную отправку
2. Департамент техподдержки — свяжитесь в онлайн-чат
3. Официальные площадки — следите за постами
4. Тематические порталы — достоверные ресурсы
Создание аккаунта на сайте казино
Процедура регистрации составляет только несколько мгновений:
1. Нажмите на кнопку “Открыть счет”
2. Укажите обязательные сведения
3. Валидируйте email почту
4. Активируйте код активации, если есть
Вслед за оконченной активации вам будет открыт личный раздел.
Премии и бонусные коды
Привлекательная наградная программа — существенное плюс казино:
Поощрение за открытие счета
Свежие игроки приобретают приветственный бонус, который может предполагать:
– Валютный депозит на начальный депозит
– Фри-спины для игровых машин
– Бездепозитные бонусы
Бонусные коды
Периодически размещаются новые купоны, дающие возможность получить специальные преимущества.
Механизм возврата средств
Постоянные участники приобретают долю проигранных ставок назад.
Актуальные предложения и состязания
Казино регулярно устраивает увлекательные события:
– Семидневные чемпионаты
– Сезонные бонусы
– Конкурсы солидных призов
– Механизм статусов
Авторизация в личный аккаунт
Для входа на портал требуется:
1. Посетить основной адрес или рабочее зеркало
2. Кликнуть “Войти”
3. Ввести email и ключ
В персональном аккаунте разрешены нижеперечисленные опции:
– Зачисление счета
– Вывод призов
– Проверка лога ставок
– Управление личными сведениями
Mobile версия и софт
Портативная модификация
Responsive вариант сайта дает возможность делать ставки с всех мобильного девайса. Оформление адаптивно оптимизируется под формат дисплея.
Приложение для загрузки
Скачать app можно для:
– Android — безопасная установка с ресурса
– iOS — скачивание через App Store
Преимущества программы:
– Моментальный вход
– Устойчивая производительность
– Push-оповещения об акциях
– Оптимизированный интерфейс
Игровые категории
Барабаны
Обширная библиотека игровых автоматов от известных провайдеров:
– Ретро машины
– Видео-игры
– Прогрессивные-машины
Live игры
Зона с настоящими операторами предлагает:
– Рулетка
– Блэкджек
– Baccarat
– Texas Hold’em
Стримы ведутся в высоком качестве, обеспечивая атмосферу реального казино.
Методы пополнения и обналичивания
Платформа принимает разнообразные денежные системы:
– Банковские карты
– Цифровые счета
– Цифровые валюты
– Финансовые транзакции
Минимальные пороги взноса и моментальные выводы обеспечивают игру крайне беспроблемной.
Департамент support
Опытная служба помощи работает 24/7 и готова содействовать с различными вопросами:
– Реалтайм-чат
– Email-поддержка
– Звонковая служба
Выводы
Официальный веб-сайт казино и его рабочие зеркала гарантируют игрокам конфиденциальный и захватывающий азартный отдых. Богатые подарки, удобная портативная платформа, многочисленные слоты и качественное live-казино создают эту ресурс отличным местом для развлекательных досуга.
Go Here https://Zd.gl/
pet med: Vet Rx Index – pet pharmacy
check this store – First look shows a well-organized platform, navigation is effortless
visit this vendor shop – The interface is welcoming and browsing is easy
birch vendor page – Browsing through sections is smooth and enjoyable
find out here digital component pack templates marketplace
Вход к порталу через рабочие зеркала
Современные сетевые казино предоставляют геймерам постоянный вход к играм. Основной портал 888 казино действует бесперебойно, обеспечивая большой набор игровых развлечений. Но временами формируются системные проблемы или запреты, потому критично понимать о доступности функционирующих зеркал.
Что собой представляет собой основное зеркало казино
Дубликат — это абсолютная реплика основного сайта с схожим интерфейсом. Рабочее зеркало на данный момент даёт возможность преодолевать территориальные блокировки и возобновлять развлечения.
Ключевые плюсы использования зеркал:
– Стопроцентный переход к персональному кабинету
– Поддержание каждых данных аккаунта
– Схожий спектр автоматов
– Актуальные привилегии и кампании
Создание аккаунта на сайте
Механизм создания аккаунта занимает пару минут. Новые клиенты обретают привлекательный поощрение за создание счёта, который в состоянии содержать:
– Вступительный финансовый приз
– Даровые кручения для игр
– Особые купоны
– Усиленный кешбэк
Во имя выполнения записи требуется:
1. Зайти на центральный портал или копию
2. Кликнуть опцию «Создать аккаунт»
3. Ввести индивидуальные информацию
4. Заверить мейл или мобильный
5. Задействовать код (когда имеется существовании)
Авторизация в индивидуальный кабинет
После удачной создания аккаунта геймеры способны совершать авторизацию используя центральный портал или рабочее зеркало. Индивидуальный кабинет даёт полный контроль над счётом:
– Журнал игр
– Пополнение счёта
– Получение призов
– Контроль наградами
– Вовлечение в соревнованиях
Поощрения и акции казино
Платформа радует пользователей вариативными привилегированными системами:
Стартовые бонусы
Начинающие получают внушительный пакет наград на начальные вклады. Зачастую это предполагает процентную добавку к размеру взноса плюс даровые кручения.
Постоянные кампании
– Раз в неделю возврат до 15%
– Соревнования с премиальными суммами
– Поощрения на день рождения
– Уникальные акции для VIP игроков
Схема поощрения
Регулярные игроки собирают баллы, которые можно конвертировать на подлинные деньги или уникальные бонусы.
Портативная версия и приложение
Современные решения помогают играть всюду удобно. Смартфонная вариант веб-сайта самостоятельно настраивается под дисплей каждого девайса.
Выгоды карманного приложения:
– Скоростная подгрузка игр
– Практичный вид
– Всплывающие-оповещения о промо
– Способность установить для Android и iOS
Живое казино: антураж истинного азартного учреждения
Область Live игорного дома транспортирует геймеров в среду реального азартного заведения. Опытные операторы проводят игру в состоянии настоящего времени.
Предлагаемые развлечения:
– Европейская рулетка
– Блэкджек
– Баккара
– Техасский холдем
Барабаны и игровые автоматы
Коллекция игровых аппаратов включает массу вариантов от лидирующих производителей. Каждый игрок отыщет игру по желанию:
– Винтажные слоты
– Видеослоты с специальными турами
– Джекпот-игры
– Многолинейные слоты
Конкурсы и лотереи
Постоянные турниры добавляют адреналин и обеспечивают способность обрести внушительные суммы. Вовлечение в соревнованиях регулярно безвозмездное, а выигрышные суммы составляют крупных сумм.
Безопасность и конфиденциальность
Портал применяет передовые методы защиты для охраны реквизитов клиентов. Совокупные финансовые действия выполняются через защищённые протоколы.
Заключение
Главный сайт и его актуальные зеркала гарантируют стабильный переход к отличным гемблинг играм. Великодушные поощрения, комфортная смартфонная версия, многообразие слотов и квалифицированное Live-игорный дом создают ресурс замечательным выбором для поклонников игровых игр.
Переход к порталу через актуальные зеркала
Нынешние сетевые казино обеспечивают клиентам постоянный доступ к сервисам. Официальный ресурс 888 казино онлайн действует бесперебойно, предоставляя большой набор азартных автоматов. Впрочем иногда возникают программные сложности или блокировки, следовательно существенно понимать о присутствии действующих зеркал.
Что означает собой официальное зеркало казино
Копия — это полная копия центрального ресурса с аналогичным возможностями. Актуальное зеркало сейчас помогает миновать территориальные запреты и возобновлять гемблинг.
Принципиальные плюсы задействования зеркал:
– Стопроцентный доступ к индивидуальному кабинету
– Фиксация каждых информации профиля
– Схожий ассортимент развлечений
– Актуальные привилегии и предложения
Создание аккаунта на сайте
Процедура оформления отнимает немного минут. Недавние игроки обретают щедрый приз за создание счёта, что может включать:
– Начальный финансовый подарок
– Безвозмездные кручения для слотов
– Специальные ваучеры
– Усиленный компенсацию
Ради финализации регистрации следует:
1. Зайти на официальный ресурс или копию
2. Кликнуть элемент «Зарегистрироваться»
3. Написать персональные информацию
4. Верифицировать электронную почту или контакт
5. Задействовать промокод (при существовании)
Авторизация в личный кабинет
Следом за правильной оформления игроки могут производить авторизацию используя основной веб-сайт или рабочее зеркало. Личный кабинет даёт абсолютный управление над учётной записью:
– История ставок
– Ввод депозита
– Изъятие призов
– Контроль наградами
– Участие в состязаниях
Привилегии и предложения казино
Ресурс награждает пользователей различными бонусными предложениями:
Вступительные призы
Новые игроки зарабатывают богатый комплект поощрений на вступительные пополнения. Типично это предполагает частичную надбавку к сумме вклада плюс даровые вращения.
Периодические промо
– Седмичный компенсация до 15%
– Турниры с выигрышными суммами
– Бонусы на годовщину рождения
– Уникальные акции для привилегированных пользователей
Схема верности
Постоянные пользователи собирают очки, что можно конвертировать на реальные призы или специальные бонусы.
Карманная версия и утилита
Нынешние разработки дают возможность геймить всюду угодно. Смартфонная вариант веб-сайта самостоятельно приспосабливается под дисплей всякого гаджета.
Достоинства смартфонного софта:
– Моментальная загрузка автоматов
– Удобный облик
– Мгновенные-нотификации о бонусах
– Шанс скачать для Android и iOS
Живое казино: среда настоящего игорного учреждения
Категория Live игорного дома переносит пользователей в обстановку истинного игорного учреждения. Профессиональные ведущие проводят игру в формате реального времени.
Имеющиеся варианты:
– Европейская рулетка
– Двадцать одно
– Классика
– Покер
Автоматы и игровые машины
Ассортимент развлекательных машин содержит множество наименований от передовых производителей. Всякий клиент отыщет игру по нраву:
– Винтажные машины
– Новые слоты с призовыми этапами
– Накопительный-слоты
– Megaways игры
Конкурсы и раздачи
Постоянные турниры вносят адреналин и дают шанс получить значительные суммы. Вовлечение в состязаниях нередко безвозмездное, а наградные банки доходят до внушительных величин.
Защита и приватность
Платформа использует передовые методы криптографии для гарантии сведений геймеров. Каждые платёжные операции осуществляются через безопасные линии.
Резюме
Центральный ресурс и его функционирующие зеркала гарантируют стабильный доступ к первоклассным развлекательным играм. Привлекательные призы, эргономичная карманная редакция, многообразие игр и квалифицированное Live-игорный дом превращают платформу прекрасным решением для фанатов гемблинг автоматов.
зайти на сайт за сколько продать аккаунт в пабге
vendor listings page – Explored categories, everything is tidy and accessible
quick link to silkaisle – Found this site earlier, and browsing the layout feels effortless and simple.
Good morning!
Share parenting mysterious tips with interesting and valuable child rearing updates and raise happy kids see on the website for parenting blogs
Full information on the link – https://misento.ru/entries/tovary-dlya-dachi-kachestvennye-resheniya-ot-proizvoditelya/
All the best and development in business!
Вход к порталу и функционирующие зеркала
Современные виртуальные казино предоставляют участникам огромный спектр развлечений. Главный портал казино EzCash организует безопасный доступ ко всем услугам. При этом иногда появляются обстоятельства, когда нужно дополнительный метод входа.
Что являет собой собой рабочее зеркало
Функционирующее зеркало — это идентичная копия основного сайта с другим интернет именем. Альтернатива сегодня обеспечивает избегать вероятные блокировки и поддерживать бесперебойный переход к предпочитаемым слотам.
Легальное зеркало имеет полными функциями, что и основной веб-сайт:
– Совокупный список игр
– Индивидуальный профиль с записанными данными
– Действующие награды и акции
– Безопасные денежные операции
Оформление и подключение в платформу
Процесс оформления на сайте отнимает считанные моментов. Недавним игрокам необходимо:
1. Попасть на функционирующее зеркало на данный момент
2. Нажать кнопку «Создать аккаунт»
3. Указать требуемые сведения
4. Активировать почтовую почту или данные связи
5. Забрать поощрение за открытие аккаунта
Вход в индивидуальный аккаунт производится через указание ID и ключа.
Характеристика призовой политики
Выгодная бонусная программа — важнейшее преимущество платформы. Игроки обретают многочисленные бонусы:
Приветственные подарки
Свежие игроки могут рассчитывать на выгодный поощрение за открытие профиля. Традиционно это комплект возможностей, содержащий:
– Частичную прибавку к дебютному депозиту
– Бесплатные спины
– Дополнительные средства на аккаунт
Купоны и особые опции
Постоянные коды помогают получать бонусные льготы. Задействовать их можно в предназначенном окне персонального кабинета.
Фриспины и кэшбек
Free spins — это возможность запускать автоматы без применения персональных денег. Рибейт подразумевает долевой возврат утраченных денег.
Коллекция игр
Игровая площадка предоставляет впечатляющую библиотеку развлечений.
Автоматы
Вариативность слотов впечатляет воображение. Представлены традиционные трехбарабанные слоты и новые развлечения с увлекательной анимацией.
Live игры
Категория Live заведения переносит игроков в обстановку подлинного азартного зала. Профессиональные ведущие проводят сессии в прямом времени.
Конкурсы и рейтинги
Периодические конкурсы привносят накала и гарантируют шанс выиграть внушительные призы.
Mobile версия и софт
Продвинутые технологии помогают участвовать в удобном точке. Мобильная вариант независимо оптимизируется под монитор гаджета.
Загрузить программу разрешено для цифровых систем iOS и Android. Клиент дает:
– Скоростной переход
– Бесперебойную деятельность
– Всплывающие-сообщения об бонусах
– Комфортный облик
Платежные операции
Платформа поддерживает многочисленные методы внесения и получения средств:
– Платежные карты
– Электронные сервисы
– Крипто
– Денежные операции
Всевозможные переводы реализуются через защищенное подключение, что подтверждает безопасность приватных параметров.
Департамент ассистанса
Опытная бригада поддержки работает постоянно. Обратиться с специалистами допустимо через:
– Интерактивный-чат
– Почтовую почту
– Горячую линию
– Медиа ресурсы
Итоги
Официальный веб-сайт и его рабочее зеркало дают клиентам защищенный и легкий путь к азартным развлечениям. Богатые поощрения, обширный спектр слотов и качественная сервис обеспечивают участие крайне интересной и прибыльной.
site I found – Just discovered this platform, items are easy to locate and interface feels smooth.
find out here https://Zd.gl/
Актуальные виртуальные казино дают пользователям огромный спектр возможностей для удобной игры. Однако иногда соединение к базовому порталу может оказаться закрытым. В таких моментах на поддержку спешит Бет Андреас казино, которое дает бесперебойный подключение ко всем функциям платформы.
Что такое действующее зеркало казино
Копия — это точная копия главного ресурса, которая располагается по другому интернет-адресу. Копия поддерживает полный набор функций главного веб-портала, включая индивидуальный кабинет, баланс и историю переводов.
Ключевые выгоды применения зеркала:
– Непрерывный подключение к сайту
– Стопроцентная тождественность опций
– Сохранность персональных данных
– Удержание существующих вознаграждений
Как найти действующее зеркало на сегодня
Имеется ряд проверенных вариантов получения актуальной ссылки:
Официальные ресурсы:
1. Email рассылка — дирекция систематически отправляет информацию с действующими ссылками
2. Медийные сети — проверенные каналы выкладывают текущую данные
3. Департамент поддержки — консультанты выдают проверенные адреса
4. Телефонное приложение — позволяет преодолевать блокировки
Создание аккаунта на официальном сайте
Процесс открытия счета требует лишь считанные минут и включает из таких стадий:
1. Попадание на лицензионный ресурс или действующее зеркало
2. Выбор на иконку «Зарегистрироваться»
3. Ввод регистрационной таблицы
4. Валидация почтовой почты или контактного номера
5. Применение поощрения за регистрацию при доступности промокода
Только что зарегистрированные клиенты обретают значительный вступительный приз, который может содержать free spins, монетарные бонусы или cashback.
Авторизация в пользовательский кабинет
Подключение на сайте осуществляется традиционным образом. Достаточно ввести логин и код доступа, задействованные при открытии счета.
Существенные детали для защищенного входа:
– Эксплуатируйте сложный шифр
– Запустите двойную верификацию
– Не храните данные на публичных девайсах
– Контролируйте доменную строку браузера
Обзор наградной схемы
Гемблинг-сайт балует игроков разнообразными вознаграждениями и акциями:
Стартовый комплект
Свежие игроки имеют возможность претендовать на щедрое бонус за начальный пополнение. Зачастую это пропорциональная прибавка к внесенной величине плюс даровые спины для востребованных слотов.
Регулярные предложения
– Еженедельный кэшбек — компенсирование процента проигранных средств
– Бонусы на последующие взносы
– Эксклюзивные промо по праздникам
– Соревнования с крупными наградными банками
План верности
Деятельные игроки зарабатывают единицы за каждую игру, которые затем превращаются на фактические денежные призы, фриспины или особые бонусы.
Бонус-коды: как применять
Промокоды — это индивидуальные сочетания знаков, обеспечивающие возможность к бонусным привилегиям.
Каким образом найти действующие промокоды:
– Авторизованные социальные сети казино
– Аффилиатные ресурсы
– Email-новостная лента
– Профильные платформы
Прописывается промокод в отдельное поле при оформлении или пополнении баланса.
Смартфонная версия и приложение
Современные игроки отдают предпочтение развлекаться с смартфонных аппаратов. Сайт предлагает два метода для удобной телефонной игры.
Responsive версия
Веб версия само собой подстраивается под параметры экрана. Не требует установки и работает в каждом актуальном браузере.
Мобильное приложение
Скачать программу можно для девайсов на Android и iOS. Преимущества app:
– Быстрая открытие
– Бесперебойная операция
– Мгновенные-уведомления о акциях
– Автономный минование блокировок
Процедура скачивания несложен: нужно открыть на ресурс с телефонного устройства и следовать указаниям.
Азартный коллекция
Коллекция слотов охватывает огромное количество вариантов от лучших разработчиков.
Слоты
Гемблинг автоматы — крайне популярная категория забав. Размещены классические 3-барабанные слоты, новые видео-автоматы с поощрительными этапами, а также прогрессивные джекпоты.
Live казино
Отдел с реальными крупье обеспечивает ощутить дух настоящего казино. Имеются столы с покером.
Вещание реализуется в отличном качестве, имеется диалог с крупье и остальными игроками.
Турниры
Постоянно запускаются состязания по многочисленным играм. Включение предоставляет право получить финансовые призы, бесплатные вращения или эксклюзивные презенты.
Финансовые действия
Портал поддерживает обширный спектр расчетных систем:
– Кредитные карты
– Виртуальные платформы
– Биткоин
– Финансовые транзакты
Низшая количество депозита — приемлемая для большинства клиентов. Снятие денег обрабатывается в короткие периоды.
Департамент поддержки
Опытные специалисты способны поддержать круглосуточно. Доступны данные методы коммуникации:
– Живой-чат
– Email
– Мобильная линия
– Коммуникационные сети
Ответы на распространенные вопросы можно отыскать в блоке FAQ.
Вывод
Основной ресурс казино и его функционирующие зеркала дают клиентам совершенный путь ко всем функциям сайта. Щедрые поощрения, удобная мобильная версия, колоссальный коллекция слотов и профессиональная ассистенция превращают гемблинг процесс предельно удобным и защищенным.
1win lucky jet 1win lucky jet
1вин войти в аккаунт https://1win82361.help
melbet
Good afternoon!
Curate value mysterious systems with interesting and valuable economic impact and build wealth on solid foundations see on the website for value investing
Full information on the link – https://dotmediacup.spb.ru/2025/10/13/sovremennye-tehnologii-kompostirovaniya-i-ih-primenenie-v-proizvodstve/
All the best and development in business!
browse the store here – I was exploring the site earlier and the interface actually feels quite modern
If some one needs expert view regarding blogging and
site-building then i advise him/her to pay a visit
this webpage, Keep up the pleasant work.
My web-site … tooth replacement
go to the website https://Zd.gl/
embermarketlane – Just visited this site and the pages load fast with a neat layout.
школа онлайн для детей shkola-onlajn-33.ru .
Актуальные онлайн-казино обеспечивают игрокам разнообразный выбор функций для удобной развлечений. Подключение к площадке Диси производится через основной веб-ресурс или актуальное зеркало.
Что такое функционирующее зеркало казино
Актуальное зеркало — это альтернативный линк официального веб-сайта казино. Такие версии генерируются для гарантирования бесперебойного соединения к развлекательной системе.
Альтернатива на сегодня абсолютно повторяет возможности основного сайта. Клиенты обретают схожий доступ ко всем сервисам, включая создание аккаунта, внесение депозита кошелька и снятие выигрышей.
Создание аккаунта на лицензионном ресурсе
Процедура регистрации требует всего считанные секунд. Новым игрокам нужно:
1. Зайти на основной ресурс или актуальное настоящее зеркало
2. Щелкнуть кнопку “Открыть счет”
3. Указать нужные данные
4. Активировать e-mail почту
5. Применить код активации при доступности
После завершения регистрации игрок обретает подарок за регистрацию, который может охватывать free spins или финансовое вознаграждение.
Вход в персональный кабинет
Личный кабинет — это охраняемая территория, где игроки способны управлять своим счетом. Для входа требуется напечатать логин и password.
В личном кабинете представлены данные возможности:
– Просмотр истории операций
– Задействование бонусных кодов
– Регулирование поощрениями
– Включение в состязаниях
– Отслеживание кэшбека
– Корректировка аккаунта
Поощрения и акции
Азартная платформа предоставляет великодушные вознаграждения:
Стартовый набор — начинающие приобретают значительное начисление на начальные пополнения.
Free spins — предоставляются как при создании аккаунта, так и в рамках многочисленных акций.
Кэшбек — систематический компенсация процента утраченных средств.
Промокоды — особые комбинации, предоставляющие возможность к эксклюзивным призам.
Обзор игровых категорий
Слоты
Коллекция автоматов насчитывает множество вариантов от ведущих провайдеров. Геймеры найдут как обычные слоты, так и новые видеослоты с притягательной анимацией.
Live казино
Секция Live казино предлагает опцию соревноваться с настоящими дилерами в условиях настоящего времени. Доступны распространенные игры: рулетка, блэкджек, баккара, покер.
Состязания
Периодические соревнования с значительными призовыми банками манят тысячи конкурсантов. Победители обретают денежные вознаграждения и особые подарки.
Портативная версия и приложение
Портативная версия сайта дает возможность играть с любого устройства. Дизайн самостоятельно корректируется под диагональ экрана.
Скачать приложение можно для устройств на Android и iOS. Портативное программа имеет всеми функциями настольной версии.
Как определить действующее зеркало на сегодня
Актуальные ссылки копий периодически корректируются. Узнать рабочую ссылку можно несколькими методами:
– Через службу помощи
– В официальных информационных сетях
– По почтовой подписке
– На партнерских сайтах
Безопасность и лицензирование
Официальный домен работает на фундаменте мировой сертификата. Все операции защищены современными технологиями шифрования.
Конфиденциальность личных данных обеспечивается в стопроцентном объеме.
Заключение
Основной ресурс и его функционирующие альтернативы дарят пользователям беспрерывный доступ к высококлассным азартным сервисам. Выгодные бонусы, разнообразные игры, компетентная поддержка — все это превращает игровой опыт невероятно приятным и захватывающим.
Анализ официального ресурса
Прогрессивные интернет казино предоставляют участникам разнообразный спектр услуг и опций. Официальный сайт Кешер казино гарантирует защищенный возможность к гемблинг функциям.
Актуальное зеркало: путь сегодня
Альтернативный адрес является в качестве абсолютную копию основного сайта. Официальное зеркало позволяет участникам обходить возможные запреты.
Плюсы применения зеркала
Главные выгоды предполагают:
– Непрерывный шанс к порталу
– Сохранение абсолютно всех характеристик главного сайта
– Защита конфиденциальных данных
– Такой же набор функций
Открытие счета на платформе
Процесс открытия счета выделяется доступностью и удобством. Новые клиенты необходимо:
1. Перейти на лицензионный веб-сайт или его зеркало
2. Выбрать на кнопку регистрации
3. Внести нужные сведения
4. Подтвердить email ящик
5. Совершить начальный доступ
Вознаграждение за создание аккаунта
Новички приобретают значительный стартовый презент. Данное поощрение способно включать:
– Материальные средства
– Даровые спины
– Усиленный уровень возврата
Логин в личный раздел
Существующие клиенты могут оперативно авторизоваться в собственный раздел, задействуя логин и шифр. Личный раздел предоставляет путь к:
– Администрированию средствами
– Хронологии транзакций
– Активным подаркам
– Опциям профиля
Подарки и промо
Портал систематически устраивает многочисленные акции для игроков.
Типы бонусов
Базовые формы вознаграждений:
– Денежные призы – коэффициент от суммы взноса
– Спины – бесплатные раунды в слотах
– Кэшбек – отдача части затраченных средств
– Соревновательные награды – призы за состязание в соревнованиях
Промокоды
Специальные промокоды помогают приобрести дополнительные преимущества. Участники способны обнаружить их на аффилиатных ресурсах или взять в рассылке.
Переносная редакция и приложение
Передовые пользователи выбирают мобильный геймплей.
Возможности портативной платформы
– Адаптивный дизайн для всех гаджетов
– Полный доступ к автоматам
– Моментальная подгрузка
– Комфортное контроль
Установить софт
Mobile программа открыто для скачивания на аппараты с операционными платформами Android и iOS. Приложение гарантирует:
– Бесперебойную производительность
– Push оповещения о акциях
– Быстрый вход к желанным развлечениям
Азартный выбор
Портал предлагает внушительную подборку гемблинг забав.
Аппараты
Библиотека игровых машин охватывает:
– Традиционные слоты
– Передовые аппараты
– Прогрессивные машины
– Лицензионные автоматы
Live игры
Категория живых развлечений предоставляет опцию играть с настоящими ведущими. Предложены:
– Рулетка
– Блэкджек
– Punto Banco
– Карибский покер
Соревнования
Регулярные соревнования обеспечивают участникам состязаться за значительные финансовые фонды. Соревновательная программа актуализируется регулярно.
Банковские операции
Казино предоставляет разнообразие способов депозита и получения финансов:
– Дебетовые карты
– Цифровые платежные системы
– Прямые транзакции
– Bitcoin
Любые транзакции производятся безопасно с задействованием прогрессивных систем криптографии.
Отдел сопровождения
Компетентная группа support трудится 24/7. Связаться с менеджерами можно через:
– Онлайн чат
– Электронную почту
– Горячую линию
– Соц сети
Безопасность и регулирование
Казино действует на базе действительной сертификата. Подобное подтверждает:
– Прозрачность развлекательного геймплея
– Защиту личных данных
– Быстрые выводы
– Регулируемый гейминг
Заключение
Официальный веб-сайт и его функционирующие зеркала гарантируют участникам полный набор услуг для приятной и доходной игры. Внушительные призы, разнообразные автоматы, опытная поддержка и защищенная платформа платежей создают портал оптимальным решением для любителей развлекательных развлечений.
Maple Depot – Pages are tidy, browsing content is simple.
Visit This Link https://Zd.gl/
our website https://Zd.gl
check it out – Noticed this marketplace, layout is tidy and user experience is intuitive
мел бет букмекерская контора скачать мел бет букмекерская контора скачать .
For the audio
buy seroquel without prescription
for the final word.
discover the house – The design is straightforward and browsing flows naturally.
http://mensrxindex.com/# buy erectile dysfunction pills online
Современные онлайн-казино гарантируют геймерам массу опций для приятной игры. Официальный веб-портал Кешер дарит вход ко всем возможностям и игровым автоматам. Однако при возникновении системных проблем на подмогу прибывают рабочие альтернативные адреса.
Что означает собой действующее зеркало
Дубликат казино — это точная реплика оригинального сайта, находящаяся по альтернативному доменному имени. Легитимное зеркало хранит все возможности, в том числе открытие профиля, вход в собственный кабинет, поощрения и промокоды.
Альтернативный сайт на сегодня гарантирует:
– Стабильный вход к азартным автоматам
– Полную конфиденциальность индивидуальных сведений
– Удержание баланса и истории платежей
– Применимость всех специальных предложений
Создание аккаунта на лицензионном портале
Процедура регистрации занимает пару минут. Новым пользователям требуется:
1. Открыть на подлинный ресурс или актуальное зеркало
2. Нажать кнопку «Зарегистрироваться»
3. Указать запрашиваемые сведения
4. Активировать email почту
5. Указать промокод при существовании
После финиша создания аккаунта геймеры зарабатывают подарок за регистрацию, который может иметь бесплатные вращения или монетарное поощрение.
Вход в собственный кабинет
Индивидуальный кабинет предоставляет всеобъемлющий управление над азартным процессом. Через индивидуальный профиль можно:
– Вносить средства на баланс
– Выводить выплаты
– Задействовать бонусные коды
– Мониторить журнал ставок
– Принимать участие в турнирах
– Получать cash back
Характеристика премий и промо-предложений
Щедрая поощрительная программа — ключевое достоинство проекта. Основные формы премий:
Стартовый бонус
Начинающие зарабатывают выгодное премирование на первые вклады. Размер приза может доходить до 100-200% от объема пополнения.
Бесплатные вращения
Даровые вращения предоставляются для топовых слотов. Сумма бесплатных вращений варьируется от 10 до 500 штук.
Cash back
Регулярный или ежемесячный откат доли утраченных денег. Типичный процент возврата — 5-15%.
Состязания
Постоянные конкурсы с большими призовыми банками. Конкурсанты конкурируют за топовые места в рейтинге.
Портативная версия и приложуха
Адаптивная версия позволяет играть с всякого гаджета. Клиенты могут установить app для iOS и Android или применять веб версию.
Выгоды мобильного приложения:
– Оперативная загрузка слотов
– Удобный дизайн
– Всплывающие уведомления о бонусах
– Возможность входа через Touch ID
Слоты и Live казино
Азартная коллекция насчитывает множество игр от известных производителей.
Востребованные категории автоматов:
– Классические слоты
– Современные слоты с премиальными уровнями
– Накопительный приз автоматы
– Megaways автоматы
Live игровой зал
Секция live казино предоставляет партию с настоящими дилерами. Представлены традиционные игры:
– Американская рулетка
– Блэкджек
– Punto Banco
– Покер
Как отыскать рабочее зеркало
Найти действующую адрес на зеркало разрешается несколькими методами:
1. Оформить подписку на почтовую рассылку
2. Мониторить за апдейтами в социальных сетях
3. Обратиться в отдел поддержки
4. Запомнить рабочее зеркало в закладки
Вывод
Официальный портал и его актуальные альтернативные адреса обеспечивают бесперебойный доступ к игровым играм. Выгодные поощрения, многочисленные купоны, эргономичное портативное софт и профессиональная служба поддержки поддержки делают азартный процесс предельно удобным и безопасным.
take a look – Checked this platform, everything is tidy and well arranged
Plum Shop – Well-structured pages, exploring content feels smooth.
узнать больше где продать аккаунт в бравл старс
mostbet plinko стратегия http://mostbet90753.help/
Truly when someone doesn’t be aware of afterward its up to
other viewers that they will assist, so here it takes place.
Also visit my blog post: furnace repair
Every weekend i used to visit this web site, for the reason that i want enjoyment, for the reason that this this site conations really fastidious
funny data too.
посетить сайт Игровая валюта
Нынешние онлайн-казино предоставляют геймерам массу опций для беспроблемной игры. Центральный сайт казино РљСѓС€ открывает доступ ко всем функциям и игровым автоматам. Однако при наличии программных неполадок на помощь приходят рабочие дубликаты.
Что есть собой действующее зеркало
Альтернативный адрес казино — это стопроцентная реплика главного ресурса, размещенная по альтернативному доменному имени. Лицензионное зеркало хранит все функции, включая создание аккаунта, вход в собственный кабинет, премии и кодовые слова.
Копия на сегодня гарантирует:
– Постоянный доступ к развлекательным аппаратам
– Стопроцентную сохранность индивидуальных информации
– Сохранение баланса и журнала транзакций
– Доступность всех промо-предложений
Регистрация на главном портале
Процесс создания аккаунта занимает пару минут. Начинающим пользователям следует:
1. Открыть на официальный портал или актуальное зеркало
2. Кликнуть кнопку «Регистрация»
3. Заполнить нужные поля
4. Активировать электронную почту
5. Использовать промокод при присутствии
После окончания оформления профиля клиенты зарабатывают бонус за регистрацию, какой может охватывать фриспины или денежно-призовое вознаграждение.
Вход в индивидуальный кабинет
Приватный кабинет дает комплексный мониторинг над азартным ходом. Через персональный раздел можно:
– Депонировать депозит
– Получать выигрыши
– Активировать промокоды
– Проверять записи ставок
– Принимать участие в конкурсах
– Приобретать кэшбек
Описание поощрений и промо-предложений
Выгодная поощрительная политика — существенное плюс казино. Главные виды бонусов:
Стартовый приз
Начинающие приобретают богатое поощрение на первые депозиты. Сумма бонуса может доходить до 100-200% от величины депозита.
Фриспины
Даровые спины выдаются для востребованных игровых автоматов. Объем free spins изменяется от 10 до 500 штук.
Кэшбек
Еженедельный или ежемесячный возврат части потерянных средств. Стандартный размер компенсации — 5-15%.
Турниры
Периодические соревнования с крупными наградными пулами. Участники состязаются за топовые строчки в рейтинге.
Портативная версия и приложение
Мобильная версия разрешает наслаждаться игрой с любого девайса. Клиенты могут закачать приложение для iOS и Android или задействовать браузерную версию.
Плюсы мобильного программы:
– Молниеносная загрузка слотов
– Практичный графический интерфейс
– Push-уведомления о бонусах
– Возможность входа через отпечаток пальца
Автоматы и Live казино
Азартная библиотека содержит сотни игр от известных разработчиков.
Популярные секции игр:
– Классические слоты
– Видеослоты с бонусными этапами
– Накопительный приз игры
– Мега-путь машины
Live игровой зал
Зона live игорный зал предоставляет игру с живыми крупье. Представлены стандартные развлечения:
– Французская рулетка
– Blackjack
– Баккара
– Карибский покер
Как отыскать функционирующее зеркало
Найти рабочую ссылку на зеркало возможно множественными вариантами:
1. Зарегистрироваться на почтовую рассылку
2. Наблюдать за новостями в соц сетях
3. Обратиться в сервис поддержки
4. Сохранить действующее зеркало в закладки
Резюме
Главный портал и его действующие зеркала предоставляют стабильный вход к игровым слотам. Богатые вознаграждения, множественные купоны, эргономичное мобильное программа и качественная сервис поддержки создают азартный процесс в высшей степени приятным и безопасным.
Передовые сетевые казино предлагают пользователям широкий диапазон возможностей для беспроблемной игры. Однако иногда вход к главному порталу может быть ограниченным. В таких обстоятельствах на подмогу появляется казино Kent, которое гарантирует бесперебойный доступ ко всем сервисам платформы.
Что такое функционирующее зеркало казино
Альтернативный сайт — это абсолютная реплика основного портала, которая находится по дополнительному интернет-адресу. Дубликат имеет весь функционал оригинального веб-портала, включая пользовательский кабинет, счет и сведения платежей.
Принципиальные выгоды задействования зеркала:
– Круглосуточный соединение к порталу
– Стопроцентная схожесть опций
– Защита индивидуальных данных
– Поддержка доступных вознаграждений
Как обнаружить функционирующее зеркало в данный момент
Имеется несколько надежных путей обнаружения свежей ссылочной информации:
Официальные источники:
1. Почтовая рассылка — управление систематически пересылает сообщения с рабочими ссылками
2. Коммуникационные сети — авторизованные профили постят текущую сведения
3. Отдел поддержки — сотрудники дают проверенные URL
4. Смартфонное приложение — дает возможность минуть блокировки
Регистрация на лицензионном веб-сайте
Процедура регистрации требует всего считанные минут и предполагает из нижеследующих шагов:
1. Переход на официальный сайт или рабочее зеркало
2. Клик на иконку «Зарегистрироваться»
3. Указание учетной таблицы
4. Валидация электронной почты или сотового номера
5. Включение бонуса за регистрацию при существовании промокода
Начинающие пользователи зарабатывают значительный стартовый подарок, который может содержать фриспины, валютные вознаграждения или компенсацию.
Авторизация в пользовательский кабинет
Логин на сайте осуществляется стандартным методом. Достаточно вписать никнейм и код доступа, задействованные при оформлении.
Важные моменты для конфиденциального входа:
– Задействуйте надежный секретный ключ
– Задействуйте двойную аутентификацию
– Не сохраняйте коды на посторонних гаджетах
– Отслеживайте доменную строку браузера
Характеристика бонусной структуры
Игорный портал одаривает пользователей различными привилегиями и промо:
Вступительный комплект
Дебютанты вправе претендовать на значительное награду за первый пополнение. Как правило это процентная надбавка к внесенной сумме плюс бесплатные вращения для популярных слотов.
Систематические предложения
– Недельный компенсация — компенсирование доли списанных денежных средств
– Награды на дополнительные депозиты
– Уникальные офферы по знаменательным датам
– Турниры с большими наградными фондами
Программа лояльности
Постоянные клиенты получают очки за каждую бет, которые затем конвертируются на фактические деньги, даровые прокруты или уникальные льготы.
Купоны: как использовать
Бонус-коды — это особые последовательности символов, дающие привилегию к бонусным привилегиям.
В каких местах взять актуальные промокоды:
– Авторизованные общественные сети казино
– Союзнические площадки
– Email-рассылка
– Профильные платформы
Прописывается промокод в соответствующее поле при создании аккаунта или зачислении средств депозита.
Смартфонная версия и приложение
Передовые игроки любят развлекаться с смартфонных девайсов. Ресурс обеспечивает два варианта для приятной телефонной игры.
Адаптивная версия
Веб версия сама адаптируется под размер экранной панели. Не нуждается инсталляции и работает в любом современном браузере.
Телефонное приложение
Установить программу можно для девайсов на Android и iOS. Достоинства app:
– Скоростная активация
– Надежная операция
– Всплывающие-уведомления о поощрениях
– Автономный преодоление блокировок
Процесс загрузки легок: нужно зайти на веб-сайт с мобильного устройства и придерживаться инструкциям.
Развлекательный выбор
Коллекция аппаратов содержит тысячи вариантов от лучших производителей.
Слоты
Развлекательные аппараты — крайне распространенная категория развлечений. Доступны стандартные трехбарабанные слоты, передовые видео-автоматы с поощрительными раундами, а также прогрессивные суперпризы.
Live казино
Зона с настоящими ведущими предоставляет испытать дух подлинного казино. Представлены развлечения с блэкджеком.
Вещание ведется в превосходном разрешении, присутствует чат с крупье и другими участниками.
Конкурсы
Периодически организуются состязания по разным дисциплинам. Участие обеспечивает возможность заработать финансовые призы, даровые прокруты или специальные бонусы.
Денежные операции
Платформа обеспечивает широкий выбор финансовых методов:
– Банковские карты
– Виртуальные системы
– Биткоин
– Счетовые переводы
Низшая количество взноса — доступная для большинства игроков. Обналичивание призов осуществляется в короткие периоды.
Сервис поддержки
Опытные сотрудники настроены поддержать круглосуточно. Доступны нижеследующие способы коммуникации:
– Живой-чат
– Email
– Телефонная поддержка
– Коммуникационные сети
Пояснения на распространенные запросы можно получить в блоке FAQ.
Итог
Главный веб-сайт казино и его функционирующие зеркала гарантируют пользователям совершенный путь ко всем функциям сайта. Значительные поощрения, комфортная телефонная версия, колоссальный ассортимент аттракционов и квалифицированная поддержка создают игровой досуг максимально беспроблемным и конфиденциальным.
additional hints sell high rank account
berry vendor marketplace – Layout is neat and browsing through items is smooth
Certified Canada Rx: best canadian online pharmacy – Certified Canada Rx
https://mensrxindex.shop/# Mens RX Index
browse this site buy digital block pack templates
скачать бк мелбет на айфон скачать бк мелбет на айфон .
After trying several platforms, I found this casino https://konferencja-przyrodnicza.pl/ to be reliable. The welcome bonus is generous, terms are easy to understand, and payouts are processed smoothly, making it suitable for regular players.
vet pharmacy: Vet Rx Index – online vet pharmacy
Передовые виртуальные казино дают пользователям широкий ассортимент возможностей для удобной игры. Тем не менее иногда доступ к официальному ресурсу может оказаться закрытым. В таких ситуациях на подмогу спешит вывести, которое дает непрерывный подключение ко всем опциям платформы.
Что такое рабочее зеркало казино
Копия — это полная версия официального портала, которая хостится по другому интернет-адресу. Альтернативный ресурс поддерживает полный набор функций основного веб-портала, включая персональный кабинет, депозит и запись переводов.
Принципиальные преимущества эксплуатации зеркала:
– 24-часовой соединение к порталу
– Максимальная идентичность опций
– Конфиденциальность персональных сведений
– Сохранение всех привилегий
Как найти функционирующее зеркало в данный момент
Есть несколько проверенных способов поиска свежей URL:
Официальные каналы:
1. Имейл рассылка — управление систематически направляет уведомления с актуальными доменами
2. Социальные сети — авторизованные профили размещают свежую данные
3. Департамент поддержки — сотрудники сообщают проверенные домены
4. Смартфонное приложение — обеспечивает минуть блокировки
Оформление профиля на официальном ресурсе
Процедура создания аккаунта длится только несколько минут и содержит из данных шагов:
1. Открытие на главный веб-сайт или актуальное зеркало
2. Щелчок на клавишу «Открыть счет»
3. Ввод учетной бланка
4. Подтверждение email почты или мобильного номера
5. Активация поощрения за регистрацию при доступности промокода
Свежие геймеры получают солидный вступительный бонус, который может предполагать free spins, валютные вознаграждения или кэшбек.
Доступ в индивидуальный кабинет
Логин на ресурсе производится традиционным способом. Нужно ввести учетные данные и кодовое слово, задействованные при открытии счета.
Ключевые нюансы для надежного входа:
– Используйте защищенный пароль
– Включите 2FA верификацию
– Не записывайте реквизиты на публичных компьютерах
– Отслеживайте URL строку браузера
Обзор бонусной структуры
Игровая платформа награждает пользователей разнообразными вознаграждениями и акциями:
Начальный комплект
Новички вправе претендовать на значительное награду за первый взнос. Традиционно это долевая прибавка к депонированной объему плюс даровые спины для популярных слотов.
Систематические предложения
– 7-дневный компенсация — возмещение части проигранных денег
– Бонусы на повторные пополнения
– Эксклюзивные предложения по торжествам
– Конкурсы с крупными выигрышными банками
Система лояльности
Активные пользователи накапливают баллы за всякую ставку, которые затем превращаются на фактические деньги, free spins или особые бонусы.
Промокоды: как активировать
Кодовые комбинации — это уникальные наборы знаков, дающие возможность к специальным поощрениям.
Где раздобыть актуальные промокоды:
– Авторизованные коммуникационные сети казино
– Союзнические площадки
– Email-информирование
– Специализированные платформы
Прописывается промокод в отдельное поле при открытии счета или пополнении кошелька.
Смартфонная версия и приложение
Актуальные игроки предпочитают проводить время с мобильных девайсов. Платформа предлагает два способа для беспроблемной телефонной игры.
Отзывчивая редакция
Веб версия автоматически адаптируется под размер экранной панели. Не требует инсталляции и работает в всяком новом браузере.
Смартфонное приложение
Загрузить программу можно для девайсов на Android и iOS. Преимущества app:
– Молниеносная загрузка
– Стабильная действие
– Push-уведомления о поощрениях
– Автоматический минование блокировок
Процесс установки несложен: достаточно зайти на сайт с смартфонного гаджета и следовать инструкциям.
Азартный каталог
Коллекция игр содержит несколько тысяч наименований от ведущих разработчиков.
Слоты
Игровые автоматы — крайне распространенная категория аттракционов. Представлены традиционные трехбарабанные автоматы, современные видео-автоматы с премиальными уровнями, а также джекпотные джекпоты.
Live казино
Секция с действительными дилерами предоставляет ощутить атмосферу настоящего казино. Представлены игры с рулеткой.
Трансляция реализуется в отличном разрешении, обеспечивается чат с раздающим и другими пользователями.
Конкурсы
Регулярно устраиваются конкурсы по разным играм. Вступление предоставляет право выиграть валютные выигрыши, даровые прокруты или специальные поощрения.
Денежные операции
Сайт предоставляет широкий выбор денежных систем:
– Пластиковые карты
– Онлайн платформы
– Криптовалюта
– Денежные транзакции
Минимальная объем пополнения — посильная для массы пользователей. Вывод денег обрабатывается в кратчайшие сроки.
Служба поддержки
Профессиональные сотрудники расположены содействовать непрерывно. Открыты такие способы общения:
– Веб-чат
– Email
– Звонковая горячая линия
– Социальные сети
Ответы на распространенные проблемы можно обнаружить в блоке FAQ.
Заключение
Официальный портал казино и его рабочие зеркала дают пользователям полный путь ко всем возможностям ресурса. Великодушные вознаграждения, удобная смартфонная версия, впечатляющий выбор игр и опытная поддержка создают игровой времяпрепровождение исключительно комфортным и конфиденциальным.
sites
1xbet bonus account
vendor studio homepage – Layout is tidy and the site is easy to navigate
Подключение к порталу через рабочие зеркала
Участники интернет казино регулярно контактируют с трудностью ограничения базового ресурса. Собственно для устранения этой ситуации разработаны альтернативные адреса легального сайта. Дракон Мани обеспечивает стопроцентный вход ко всем функциям площадки.
Что такое рабочее зеркало казино
Зеркало значит собой абсолютную версию оригинального портала с таким же функционалом. Основное расхождение — это доменное имя. Любые данные участника, включая средства, бонусы и архив игр, продолжают быть идентичными.
Достоинства использования зеркал
Рабочие зеркала располагают комплексом ключевых выгод:
– Постоянный вход к выбранным автоматам
– Совершенная защита личных сведений
– Поддержание всех опций персонального кабинета
– Способность обретения наград и присутствия в акциях
Регистрация на основном портале
Операция открытия счета чрезвычайно элементарен и длится буквально минут. Свежие пользователи способны рассчитывать на солидный стартовый приз за оформление.
Этапы открытия аккаунта
1. Переход на легальный домен или его дубликат
2. Клик на клавишу “Регистрация”
3. Внесение обязательных информации
4. Проверка цифровой почты
5. Внесение кода (если есть)
Поощрения и акции для клиентов
Ресурс балует своих участников разнообразными бонусными акциями.
Базовые категории поощрений
Вводный бонус — крупное поощрение для новых пользователей, каковое имеет возможность включать денежные суммы и фриспины.
Безвозмездные спины — способность играть в известных аппаратах безвозмездно.
Компенсация — частичный отдача проигранных средств, что начисляется еженедельно или раз в месяц.
Промокоды — специальные комбинации, дающие дополнительные преимущества.
Пользовательский кабинет: опции и конфигурации
Личный раздел предоставляет полный контроль над персональным опытом. В данном разделе предусмотрены:
– Контроль счетом
– История транзакций
– Активные привилегии
– Настройки безопасности
– Подтверждение учетной записи
Карманная версия и программа
Нынешние участники предпочитают портативность. Казино предлагает 2 варианта для ставок с карманных аппаратов.
Responsive смартфонная вариант
Адаптивная вариант домена автономно приспосабливается под монитор любого гаджета. Отсутствует потребность инсталлировать дополнительное софт.
Приложение для мобильных
Можно установить фирменное программу для iOS и Android. Программа дает:
– Скорый старт
– Доработанный дизайн
– Мобильные-извещения о предложениях
– Надежную операционность
Live развлечения: атмосфера подлинного зала
Зона Live игр переносит участников в атмосферу реального клуба. Профессиональные дилеры осуществляют сессии в формате прямого времени.
Популярные Live-игры
– Французская рулетка
– Blackjack
– Баккарат
– Карибский покер
Автоматы: ассортимент игр
Каталог азартных автоматов включает тысячи позиций от лидирующих производителей. Участники обнаружат:
– Обычные аппараты
– Современные слоты
– Прогрессивный джекпот-автоматы
– Многолинейные автоматы
Соревнования и особые мероприятия
Постоянные турниры позволяют пользователям соревноваться друг с другом за значительные выигрышные банки. Отдельный состязание обладает свои критерии участия и список призеров.
Способы пополнения и изъятия средств
Площадка поддерживает комплекс расчетных инструментов:
– Платежные карты
– Цифровые платежные системы
– Цифровые валюты
– Банковские транзиты
Каждые платежи выполняются надежно благодаря новейшим технологиям защиты.
Сервис поддержки
Опытные консультанты службы помощи расположены помочь 24/7. Имеются нижеперечисленные каналы коммуникации:
– Онлайн-чат
– Email-обслуживание
– Аудио связь
– Коммуникационные сети
Итог
Легальный портал клуба и его рабочие альтернативы дают игрокам безопасный и легкий подход к большому диапазону развлекательных активностей. Солидные бонусы, частые предложения, компетентная сервис и комфортные финансовые инструменты формируют азартный процесс максимально увлекательным и доходным.
What a data of un-ambiguity and preserveness of valuable knowledge concerning unpredicted emotions.
https://trademart.com.ua/yak-rozrizaty-nerozbirnu-faru-perevahy.html
cool site – Found this page today, layout is well-arranged and navigation is easy.
here are the findings
indibet game
official statement https://Zd.gl
see the elm outlet – I found this site earlier and navigating it feels smooth and straightforward.
I’m not that much of a online reader to be honest but your sites really nice, keep it up!
I’ll go ahead and bookmark your site to come back down the road.
All the best
Take a look at my web site: Vela Bay Floor Plan
Современные онлайн-казино гарантируют участникам разнообразный выбор слотов и заманчивые бонусы. Тем не менее для комфортной работы необходимо знать, как получить доступ к проект и его действующие зеркала.
Что такое лицензионный портал казино
Основной портал казино — это базовая веб-площадка, где участники могут наслаждаться развлекательными слотами. Сайт функционирует на законных правах и владеет всеми нужными сертификатами.
Первостепенные выгоды лицензионного портала:
– Конфиденциальность индивидуальных реквизитов
– Справедливые положения игры
– Подтвержденные выплаты
– Компетентная служба поддержки
Актуальное зеркало казино: для чего нужно
Копия сайта — это точная версия официального веб-сайта, размещенная по отличному URL. Действующее зеркало создается для гарантирования бесперебойного доступа к сайту.
Поводы эксплуатации альтернативных адресов:
– Блокировка первичного адреса
– Профилактические операции
– Значительная загрузка на сервер
Как найти актуальное зеркало в данный момент
Получить актуальное рабочее зеркало можно различными методами:
1. Рассылка — подпишитесь на почтовую рассылку
2. Отдел поддержки — напишите в онлайн-чат
3. Публичные площадки — отслеживайте за обновлениями
4. Игровые площадки — проверенные сайты
Регистрация на сайте казино
Этап создания аккаунта составляет всего считанные секунд:
1. Активируйте на клавишу “Создать аккаунт”
2. Заполните обязательные данные
3. Подтвердите почтовую почту
4. Активируйте купон, если предоставлен
По завершении оконченной создания аккаунта вам предоставится возможен индивидуальный аккаунт.
Премии и коды активации
Привлекательная наградная политика — значимое плюс казино:
Бонус за открытие счета
Первичные пользователи зарабатывают стартовый поощрение, который может охватывать:
– Финансовый счет на стартовый пополнение
– Фриспины для барабанов
– Приветственные фонды
Активационные коды
Регулярно появляются свежие промокоды, дающие возможность использовать экстра преимущества.
Схема кешбэка
Постоянные участники возвращают долю утраченных денег в виде компенсации.
Свежие акции и состязания
Сайт систематически проводит азартные акции:
– Weekly соревнования
– Специальные бонусы
– Раздачи ценных наград
– Схема статусов
Авторизация в пользовательский аккаунт
Для входа на сайт следует:
1. Перейти на официальный адрес или актуальное зеркало
2. Выбрать “Вход”
3. Ввести логин и секретную комбинацию
В индивидуальном аккаунте разрешены данные опции:
– Пополнение баланса
– Обналичивание призов
– Анализ журнала транзакций
– Изменение персональными данными
Адаптивная версия и программа
Адаптивная модификация
Адаптивная версия сайта позволяет играть с разных карманного девайса. Интерфейс динамически подстраивается под размер монитора.
App для скачивания
Получить клиент можно для:
– Android — непосредственная загрузка с платформы
– iOS — скачивание через App Store
Достоинства app:
– Моментальный вход
– Устойчивая функциональность
– Push-оповещения об предложениях
– Оптимизированный интерфейс
Азартные разделы
Барабаны
Богатая подборка развлекательных слотов от топовых провайдеров:
– Традиционные автоматы
– Видео-автоматы
– Накопительные-игры
Live casino
Секция с живыми дилерами обеспечивает:
– Рулетки
– 21
– Мини-баккара
– Poker
Трансляции осуществляются в HD качестве изображения, формируя впечатление аутентичного казино.
Методы зачисления и получения
Казино поддерживает разные финансовые инструменты:
– Дебетовые картсчета
– Онлайн платежи
– Bitcoin/Ethereum
– Прямые транзакции
Стартовые пороги взноса и скоростные выплаты создают процесс крайне комфортной.
Департамент техподдержки
Опытная команда поддержки функционирует 24/7 и может помочь с разными ситуациями:
– Живой-чат
– Email-поддержка
– Голосовая линия
Резюме
Главный портал казино и его рабочие альтернативные адреса предоставляют участникам надежный и увлекательный азартный отдых. Привлекательные подарки, простая портативная вариант, многочисленные слоты и превосходное live-казино формируют эту ресурс превосходным решением для развлекательных игр.
https://g-r-s.fr/pag/code_promo.html
Доступ к сайту через действующие зеркала
Участники сетевых казино постоянно имеют дело с трудностью закрытия главного домена. Конкретно для преодоления этой трудности созданы дубликаты официального домена. Дракон Мани предоставляет полный подключение ко всем функциям платформы.
Что такое действующее зеркало казино
Альтернативный адрес составляет собой абсолютную копию официального веб-сайта с похожим функционалом. Ключевое различие — это альтернативное имя. Любые сведения клиента, включая средства, поощрения и историю игр, находятся идентичными.
Преимущества применения зеркал
Функционирующие зеркала обладают набором существенных плюсов:
– Непрерывный переход к выбранным играм
– Абсолютная безопасность личных сведений
– Неизменность всех параметров личного кабинета
– Опция приобретения призов и вовлечения в промоакциях
Оформление профиля на легальном домене
Операция открытия счета максимально несложен и занимает пару минут. Начинающие пользователи могут надеяться на крупный стартовый поощрение за создание аккаунта.
Ступени оформления аккаунта
1. Переход на официальный портал или его альтернативу
2. Нажатие на элемент “Регистрация”
3. Ввод необходимых информации
4. Подтверждение электронной почты
5. Применение купона (когда доступен)
Подарки и предложения для пользователей
Казино одаривает своих пользователей различными призовыми программами.
Базовые категории наград
Приветственный подарок — щедрое поощрение для начинающих клиентов, которое в состоянии вмещать монетарные суммы и бесплатные вращения.
Безвозмездные спины — способность играть в топовых игровых машинах безвозмездно.
Компенсация — процентный возмещение потерянных финансов, который начисляется по неделям или раз в месяц.
Бонусные коды — особые сочетания, предоставляющие дополнительные привилегии.
Персональный кабинет: возможности и установки
Индивидуальный кабинет предоставляет абсолютный контроль над развлекательным процессом. В нем предусмотрены:
– Администрирование средствами
– История платежей
– Текущие бонусы
– Конфигурации защиты
– Верификация аккаунта
Мобильная редакция и софт
Актуальные игроки ценят мобильность. Казино дает двойной варианта для участия с портативных аппаратов.
Приспособленная портативная редакция
Мобильная редакция сайта автоматически адаптируется под дисплей любого устройства. Отсутствует потребность скачивать особое программное обеспечение.
Программа для телефонов
Доступно загрузить официальное приложение для iOS и Android. Программа дает:
– Быстрый вход
– Доработанный графику
– Оперативные-уведомления о предложениях
– Стабильную производительность
Live казино: обстановка истинного зала
Раздел Live игр доставляет пользователей в антураж настоящего клуба. Профессиональные крупье осуществляют игры в режиме реального времени.
Топовые Live-форматы
– Французская рулетка
– Blackjack
– Baccarat
– Покер
Автоматы: разнообразие игр
Коллекция слотовых слотов включает массу названий от известных производителей. Игроки встретят:
– Традиционные слоты
– Видеослоты
– Накопительный приз-слоты
– Многолинейные автоматы
Состязания и уникальные события
Периодические турниры дают возможность игрокам конкурировать друг с другом за солидные наградные банки. Отдельный конкурс имеет свои требования включения и таблицу лидеров.
Пути ввода и изъятия денег
Платформа использует комплекс денежных систем:
– Кредитные карты
– Электронные платежные системы
– Криптовалюты
– Банковские отправления
Каждые операции реализуются надежно благодаря актуальным технологиям криптографии.
Отдел помощи
Квалифицированные специалисты сервиса обслуживания готовы помочь 24/7. Предусмотрены нижеперечисленные способы общения:
– Живой-чат
– Email-помощь
– Телефонная линия
– Социальные сети
Итог
Легальный портал игровой площадки и его рабочие дубликаты гарантируют игрокам надежный и приятный вход к большому выбору развлекательных развлечений. Щедрые поощрения, частые кампании, качественная поддержка и комфортные финансовые системы формируют азартный опыт чрезвычайно захватывающим и результативным.
This Site online digital design pack templates
look these up cricket
Linen Treasure Hub – Well-arranged layout, exploring content is simple.
Обзор основного портала
Современные сетевые казино обеспечивают участникам широкий выбор развлечений и перспектив. Официальный ресурс Лаки Ворлд казино гарантирует защищенный вход к азартным сервисам.
Актуальное зеркало: путь прямо сейчас
Альтернативный адрес представляет собой полную версию главного портала. Проверенное зеркало обеспечивает клиентам избегать потенциальные барьеры.
Преимущества использования зеркала
Главные выгоды включают:
– Беспрерывный путь к платформе
– Сохранение абсолютно всех характеристик основного ресурса
– Охрана индивидуальных сведений
– Равнозначный функционал
Регистрация на портале
Процесс оформления профиля выделяется простотой и комфортом. Начинающие игроки требуется:
1. Зайти на лицензионный веб-сайт или его зеркало
2. Щелкнуть на пункт открытия счета
3. Заполнить необходимые поля
4. Активировать почтовую ящик
5. Произвести первый вход
Вознаграждение за регистрацию
Начинающие забирают щедрый вступительный бонус. Такое премия имеет возможность охватывать:
– Денежные суммы
– Complimentary фриспины
– Увеличенный уровень возврата
Авторизация в персональный аккаунт
Действующие клиенты способны быстро получить доступ в личный профиль, эксплуатируя никнейм и пароль. Собственный профиль предоставляет доступ к:
– Администрированию средствами
– Записям операций
– Действующим призам
– Параметрам аккаунта
Бонусы и кампании
Платформа регулярно устраивает многочисленные акции для пользователей.
Категории призов
Ключевые виды бонусов:
– Денежные бонусы – часть от величины пополнения
– Бесплатные вращения – бесплатные прокруты в автоматах
– Кэшбэк – компенсация части потерянных денег
– Призовые призы – премии за выступление в соревнованиях
Ваучеры
Эксклюзивные ваучеры позволяют активировать экстра выгоды. Игроки имеют возможность получить их на тематических ресурсах или заработать в письмах.
Мобильная адаптация и программа
Актуальные пользователи ценят мобильный досуг.
Возможности переносной платформы
– Отзывчивый интерфейс для различных гаджетов
– Абсолютный доступ к слотам
– Оперативная подгрузка
– Удобное контроль
Загрузить софт
Переносное программа доступно для установки на устройства с операционными платформами Android и iOS. App гарантирует:
– Устойчивую работу
– Мгновенные алерты о акциях
– Быстрый путь к желанным слотам
Развлекательный портфель
Платформа предоставляет огромную подборку игровых забав.
Аппараты
Ассортимент игровых аппаратов включает:
– Традиционные автоматы
– Видео слоты
– Джекпотные игры
– Сюжетные автоматы
Live дилеры
Категория живых развлечений предоставляет шанс участвовать с живыми ведущими. Открыты:
– Американская рулетка
– Блек-джек
– Баккара
– Покер
Конкурсы
Постоянные соревнования дают возможность пользователям соревноваться за значительные денежные суммы. Призовая система актуализируется регулярно.
Финансовые операции
Сайт предоставляет разнообразие вариантов зачисления и снятия средств:
– Банковские карты
– Электронные кошельки
– Межбанковские трансферы
– Bitcoin
Абсолютно все операции выполняются надежно с задействованием передовых протоколов защиты.
Сервис поддержки
Профессиональная отдел саппорта действует постоянно. Соединиться с менеджерами доступно через:
– Живой чат
– Email почту
– Телефонную линию
– Социальные сети
Защита и аккредитация
Казино функционирует на базе легальной лицензии. Такое удостоверяет:
– Легальность развлекательного процесса
– Охрану персональных сведений
– Пунктуальные выплаты
– Ответственный гемблинг
Заключение
Официальный веб-сайт и его действующие дубликаты дают игрокам целостный спектр услуг для приятной и доходной времяпрепровождения. Значительные подарки, всевозможные развлечения, квалифицированная помощь и защищенная система операций формируют платформу превосходным выбором для ценителей гемблинг услуг.
Обзор основного веб-сайта
Современное онлайн-казино дарит своим клиентам обширный набор услуг и вознаграждений. Оригинальный ресурс 888старз казино работает круглосуточно, предоставляя вход к топовым слотам, live-казино и обширным промо.
Рабочее зеркало: вход к порталу
Что такое зеркало казино
Зеркало представляет собой полную реплику главного сайта с другим доменным именем. Действующее зеркало обеспечивает игрокам избегать ограничения и обеспечивать постоянный подключение к предпочитаемым развлечениям.
Как получить актуальное зеркало сегодня
Действующие линки на основное зеркало публикуются через:
– E-mail подписку
– Главные публичные сети
– Службу помощи
– Партнерские сайты
Оформление на сайте
Ход созданияаккаунта
Регистрация требует всего минут и содержит следующие этапы:
1. Переход на основной веб-сайт или актуальное зеркало
2. Активация кнопки “Открытьсчет”
3. Указание учетных сведений
4. Активация аккаунта или мобильного
5. Установка пароля
Приз за оформление
Первые участники зарабатывают большие вступительные поощрения:
– Бонусные деньги на баланс
– Фриспины для слотов
– Усиленный размер компенсации
– Специальные ваучеры
Логин в собственный аккаунт
Постоянные участники имеютвозможность произвести авторизацию через оригинальный портал или рабочее зеркало. Для этого следует внести логин и пароль, придуманные при открытиисчета.
Опции собственного профиля
В индивидуальном аккаунте предоставлены такие функции:
– Редактирование учетными сведениями
– Зачисление кошелька
– Получение средств
– Применение промокодов
– Проверка архива операций
– Включение в состязаниях
Подарки и предложения
Типы бонусов
Казино награждает своих клиентов многочисленными поощрительными системами:
– Вступительный набор — большие вознаграждения на дебютные взносы
– Фриспины — дополнительные ставки в рейтинговых слотах
– Кешбэк — еженедельный откат суммы проигрышей
– Система VIP — специальные льготы для активных игроков
Купоны и их использование
Специальные коды дают расширенные подарки. Для использования необходимо ввести код в определенное раздел в персональном кабинете.
Азартный ассортимент
Игры
База слотовых слотов содержит массу позиций от лучших разработчиков:
– Классические автоматы
– Продвинутые автоматы
– Джекпот автоматы
– Брендовые слоты
Live казино
Секция Live-казино обеспечивает игру с живыми крупье в условиях актуального эфира:
– Рулетка
– Очко
– PuntoBanco
– Покер
Конкурсы
Постоянные соревнования с большими призовыми пулами проводятся постоянно. Участники сражаются за лидерство в турнирнойсетке.
Смартфонная версия и APP
Адаптивная версия портала
Оригинальный ресурс на100% приспособлен для портативных гаджетов. Клиенты могут пользоваться слоты напрямую через браузер без необходимости установки.
Приложение для установки
Фирменное мобильное софт предоставляется для получения на гаджеты с рабочими средами Android и iOS. Софт дает:
– Моментальный доступ к слотам
– Устойчивую производительность
– Push-сообщения о предложениях
– Простой интерфейс
Резюме
Оригинальный ресурс казино и его рабочие копии обеспечивают участникам всесторонний вход к отличным азартным играм. Солидные вознаграждения, различные акции, комфортная адаптивная версия и квалифицированная служба формируют развлекательный досуг чрезвычайно комфортным и результативным.
best pet rx Vet Rx Index vet pharmacy online
Superb blog! Do you have any tips for aspiring
writers? I’m hoping to start my own site soon but I’m a little lost on everything.
Would you propose starting with a free platform like WordPress or
go for a paid option? There are so many choices out there that
I’m completely overwhelmed .. Any recommendations?
Thank you!
my blog; air conditioning
online store link – The site looks tidy and moving between sections is intuitive.
https://certifiedcanadarx.com/# canadian pharmacy tampa
Pine Crate – Organized pages, navigation is easy.
Доступ к сайту и рабочие адреса
Востребованные онлайн казино обеспечивают клиентам большой ассортимент возможностей. Официальный портал Vodka Casino гарантирует безопасный переход ко всем функциям. Однако иногда происходят обстоятельства, когда требуется запасной путь подключения.
Что есть собой актуальное зеркало
Рабочее зеркало — это идентичная копия официального портала с запасным доменным адресом. Дубликат сегодня помогает миновать вероятные блокировки и гарантировать постоянный переход к любимым развлечениям.
Главное зеркало обладает идентичными функциями, что и основной веб-сайт:
– Совокупный список игр
– Собственный профиль с записанными параметрами
– Актуальные подарки и акции
– Надежные денежные транзакции
Создание аккаунта и вход в сервис
Процесс создания профиля на портале требует буквально мгновений. Свежим клиентам необходимо:
1. Попасть на рабочее зеркало в настоящее время
2. Выбрать кнопку «Регистрация»
3. Указать требуемые сведения
4. Проверить e-mail почту или контакт связи
5. Активировать бонус за регистрацию
Подключение в собственный кабинет производится с помощью ввод логина и ключа.
Описание призовой системы
Щедрая бонусная программа — основное плюс казино. Игроки обретают различные награды:
Стартовые поощрения
Свежие игроки могут надеяться на значительный приз за создание аккаунта. Чаще всего это пакет вариантов, охватывающий:
– Процентную премию к первому взносу
– Подарочные фриспины
– Дополнительные деньги на баланс
Промокоды и особые возможности
Систематические коды дают возможность активировать призовые льготы. Активировать их допустимо в специальном поле персонального профиля.
Спины и возврат средств
Фриспины — это вариант играть барабаны без расходования собственных сумм. Кэшбек предполагает процентный возмещение потерянных денег.
Коллекция слотов
Игровая ресурс представляет впечатляющую базу слотов.
Автоматы
Разнообразие аппаратов впечатляет ожидания. Доступны стандартные простые машины и новые развлечения с увлекательной визуализацией.
Live казино
Зона Live развлечений транспортирует участников в среду настоящего развлекательного заведения. Квалифицированные операторы осуществляют игры в реальном режиме.
Конкурсы и лидерборды
Постоянные состязания вносят азарта и обеспечивают вариант получить значительные суммы.
Карманная форма и программа
Современные разработки обеспечивают развлекаться в комфортном локации. Портативная версия автономно оптимизируется под монитор аппарата.
Загрузить софт возможно для мобильных платформ iOS и Android. Клиент гарантирует:
– Быстрый доступ
– Надежную деятельность
– Всплывающие-алерты об предложениях
– Интуитивный дизайн
Денежные процедуры
Платформа работает с различные варианты ввода и получения денег:
– Кредитные системы
– Онлайн кошельки
– Цифровые валюты
– Прямые операции
Каждые переводы выполняются через зашифрованное протокол, что подтверждает неприкосновенность конфиденциальных сведений.
Служба поддержки
Опытная служба помощи действует круглосуточно. Контактировать с специалистами допустимо через:
– Живой-чат
– Электронную почту
– Связь
– Медиа каналы
Заключение
Легальный ресурс и его актуальное зеркало обеспечивают игрокам стабильный и легкий переход к увлекательным забавам. Щедрые бонусы, широкий ассортимент игр и качественная помощь создают игру крайне комфортной и результативной.
Современные онлайн-казино обеспечивают клиентам широкий спектр игр и премиальных программ. Подключение к площадке осуществляется через официальный ресурс или его действующее зеркало Leon, что обеспечивает непрерывную активность.
В чем суть функционирующее зеркало казино
Зеркало — это полная дубликат главного ресурса, сделанная для решения блокировок. Актуальное зеркало обеспечивает клиентам получить соединение к выбранным развлечениям в любое удобное время.
Подлинное зеркало располагает всеми опциями главного ресурса:
– Весь перечень слотов
– Профиль с зафиксированными сведениями
– Свежие акции
– Защищенные финансовые операции
Регистрация на главном сайте
Процесс создания аккаунта отнимает всего несколько минут. Начинающим участникам следует:
1. Войти на основной веб-сайт или рабочее зеркало
2. Нажать на ссылку “Регистрация”
3. Заполнить нужные параметры
4. Проверить электронную почту
5. Совершить начальный вклад
Поощрение новичкам начисляется автоматически после завершения всех ступеней.
Доступ в профиль
Существующие игроки могут произвести вход вводя:
– Никнейм и ключ
– Цифры сотового
– Контактный email
Персональный раздел открывает шанс к регулированию счетом, сведениям игр и текущим бонусам.
Промо и акции
Развлекательная сервис радует постоянных пользователей многочисленными призами:
Первый бонус
– Премия на начальный депозит до 100%
– Бесплатные вращения на востребованные игры
– Особые награды за последующие платежи
Промокоды
Эксклюзивные коды предоставляют шанс на использование специальных поощрений. Актуальные промокоды публикуются в разделе “Предложения”.
Возврат средств
Постоянный бонус составляет до 10% от утраченных денег. Компенсация предоставляется моментально.
Программа лояльности
Постоянные клиенты получают очки, которые превращаются на действительные выплаты или фриспины.
Адаптивный портал и приложение
В целях удобства игроков создана качественная mobile версия. Гибкий дизайн помогает легко играть с каждого карманного аппарата.
Преимущества программы:
– Скорый доступ к развлечениям
– Оптимизированный дизайн
– Стабильная деятельность
– Push-уведомления о новых турнирах
Скачать программу можно даром с основного портала для устройств на Android и iOS.
Каталог развлечений
Игровые автоматы
Коллекция насчитывает более 2000 машин от известных производителей:
– Традиционные игры
– Современные автоматы
– Джекпот-слоты
– Сюжетные развлечения
Live казино
Секция Live развлечений предлагает развлечение с настоящими диллерами в реальном эфире:
– Рулеточные столы
– Blackjack
– Baccarat
– Poker
Турниры
Систематические конкурсы с солидными призовыми фондами проводятся регулярно. Участие в конкурсах доступно всем действующим игрокам.
Расчетные способы
Пополнения и получения выплат реализуются через популярные платежные системы:
– Банковские пластик
– Виртуальные кошельки
– Криптовалюта
– Денежные операции
Самый низкий взнос — от 100 рублей. Получение денег осуществляется в течение 24 времени.
Сервис помощи
24/7 группа помощи способна поддержать в урегулировании всех проблем:
– Live chat
– Email
– Связь
– Социальные сети
Безопасность и документ
Главный портал действует на основании мировой сертификата. Любые информация игроков защищены актуальным SSL-криптованием.
Итог
Актуальное зеркало обеспечивает бесперебойный вход к любимым автоматам, выгодным промокодам и функциональным возможностям. Присоединяйтесь немедленно и приобретите начальный бонус!
Hello would you mind letting me know which hosting company you’re using?
I’ve loaded your blog in 3 completely different internet browsers and I must say this blog loads a lot quicker then most.
Can you recommend a good internet hosting provider at a honest price?
Thanks a lot, I appreciate it!
Stop by my web-site: Lubbock general contractor
навес для машины на дачу заказать навес цена
this store link – Came across this site today, and the interface seems clear and easy to use.
Good post. I learn something new and challenging on blogs I stumbleupon every day.
It’s always helpful to read through articles from other authors and use a little something from other sites.
Обзор оригинального ресурса
Новое онлайн-казино обеспечивает своим пользователям разнообразный спектр возможностей и призов. Главный ресурс VodkaCasino casino оперирует круглосуточно, предоставляя вход к востребованным слотам, live-казино и обширным кампаниям.
Рабочее зеркало: доступ к сайту
Что такое альтернатива казино
Дубликат составляет собой точную дубликат основного сайта с отличным интернет названием. Действующее зеркало предоставляет участникам избегать блокировки и сохранять надежный подключение к выбранным играм.
Как отыскать рабочее зеркало сегодня
Актуальные адреса на главное зеркало публикуются через:
– Email оповещение
– Главные социальные сети
– Сервис сопровождения
– Специализированные порталы
Оформление на ресурсе
Этапы регистрации
Созданиеаккаунта требует несколько минут и предполагает данные действия:
1. Открытие на основной ресурс или рабочее зеркало
2. Выбор элемента “Создатьаккаунт”
3. Заполнение личных сведений
4. Проверка электроннойпочты или контакта
5. Формирование ключа
Приз за открытиесчета
Новые пользователи зарабатывают солидные начальные поощрения:
– Финансовые депозиты на баланс
– Халявныеспины для слотов
– Усиленный коэффициент кешбэка
– Уникальные ваучеры
Логин в персональный счет
Активные участники имеютвозможность осуществить логин через основной сайт или актуальное зеркало. Для этого следует внести никнейм и ключдоступа, сформированные при оформлении.
Инструменты личного профиля
В личном аккаунте открыты данные инструменты:
– Изменение персональными данными
– Зачисление счета
– Вывод выигрышей
– Применение купонов
– Проверка архива ставок
– Вступление в турнирах
Подарки и промо
Категории поощрений
Казино награждает своих клиентов многочисленными наградными системами:
– Стартовый комплект — щедрые поощрения на начальные депозиты
– Бесплатныевращения — подарочные спины в топовых симуляторах
– Кешбэк — регулярный возмещение суммы потерь
– Схема лояльности — уникальные бонусы для постоянных пользователей
Ваучеры и их использование
Особые коды предоставляют бонусные вознаграждения. Для активации нужно внести комбинацию в определенное поле в личном аккаунте.
Игровой каталог
Слоты
База развлекательных слотов вмещает множество наименований от топовых провайдеров:
– Стандартные слоты
– Современные игры
– Джекпот симуляторы
– Брендовые игры
Live казино
Зона Live-казино предлагает процесс с профессиональными ведущими в формате реального трансляции:
– Французскаярулетка
– Очко
– Пунтобанко
– Техасскийхолдем
Соревнования
Постоянные состязания с большими призовыми пулами организуются регулярно. Соревнующиеся соревнуются за лидерство в списке.
Смартфонная версия и APP
Смартфонная платформа портала
Оригинальный портал полностью настроен для планшетных аппаратов. Игроки могут пользоваться слоты непосредственно через веб-навигатор без необходимости установки.
Софт для инсталляции
Официальное смартфонное APP доступно для получения на гаджеты с программными ОС Android и iOS. APP гарантирует:
– Быстрый путь к слотам
– Устойчивую работу
– Мгновенные-извещения о бонусах
– Простой дизайн
Вывод
Оригинальный портал казино и его действующие альтернативы предоставляют игрокам абсолютный возможность к первоклассным геймплейным развлечениям. Щедрые бонусы, многочисленные кампании, функциональная портативная версия и опытная помощь превращают игровой опыт чрезвычайно приятным и прибыльным.
pet meds online: pet drugs online – canada pet meds
скачать приложение бк мелбет скачать приложение бк мелбет .
useful link – I ran into this website, interface is neat and items are easy to locate.
школьное образование онлайн shkola-onlajn-33.ru .
How to propose to a girl private proposal in Barcelona
this online vendor hub – Ran into this page today and navigating it feels calm and effortless.
http://mensrxindex.com/# best ed medication online
Доступ к порталу и действующие зеркала
Популярные сетевые казино предлагают игрокам большой набор возможностей. Официальный ресурс Wilder официальный сайт предоставляет безопасный подключение ко всем сервисам. При этом порой появляются случаи, когда нужно альтернативный метод авторизации.
Что являет собой собой действующее зеркало
Функционирующее зеркало — это точная копия официального веб-сайта с запасным доменным расположением. Альтернатива сегодня помогает преодолевать существующие ограничения и гарантировать непрерывный переход к популярным слотам.
Проверенное зеркало имеет полными характеристиками, что и главный сайт:
– Весь каталог слотов
– Собственный аккаунт с сохраненными информацией
– Актуальные награды и акции
– Безопасные финансовые действия
Открытие профиля и вход в казино
Процедура регистрации на сайте требует буквально моментов. Свежим пользователям следует:
1. Попасть на рабочее зеркало сейчас
2. Кликнуть элемент «Открыть профиль»
3. Ввести требуемые параметры
4. Подтвердить цифровую почту или данные телефона
5. Использовать награду за открытие аккаунта
Доступ в личный кабинет реализуется через внесение имени пользователя и секретной комбинации.
Анализ бонусной программы
Богатая призовая политика — главное козырь казино. Игроки получают различные награды:
Начальные бонусы
Новые игроки могут надеяться на значительный поощрение за регистрацию. Чаще всего это комплект возможностей, содержащий:
– Пропорциональную добавку к первому взносу
– Бесплатные вращения
– Extra суммы на счет
Промокоды и эксклюзивные опции
Систематические бонусные комбинации позволяют активировать дополнительные преимущества. Применить их допустимо в предназначенном окне индивидуального раздела.
Бесплатные вращения и кешбэк
Даровые вращения — это вариант запускать барабаны без применения собственных сумм. Компенсация представляет частичный возврат потерянных средств.
Каталог развлечений
Игровая платформа представляет значительную коллекцию автоматов.
Автоматы
Многообразие слотов поражает воображение. Доступны традиционные простые автоматы и современные игры с занимательной визуализацией.
Live казино
Категория Live развлечений транспортирует клиентов в среду реального развлекательного клуба. Профессиональные дилеры осуществляют партии в прямом эфире.
Состязания и доски почета
Периодические состязания привносят драйва и предоставляют перспективу забрать значительные выигрыши.
Mobile форма и программа
Актуальные решения помогают играть в любом локации. Mobile реализация самостоятельно настраивается под размер аппарата.
Получить программу разрешено для мобильных платформ iOS и Android. Приложение обеспечивает:
– Скоростной доступ
– Устойчивую работу
– Мгновенные-сообщения об акциях
– Простой вид
Денежные транзакции
Казино принимает всевозможные системы депозита и изъятия средств:
– Банковские карты
– Электронные платформы
– Криптовалюты
– Банковские переводы
Каждые переводы реализуются через зашифрованное канал, что защищает безопасность личных информации.
Отдел поддержки
Профессиональная служба ассистанса трудится 24/7. Соединиться с специалистами допустимо через:
– Live-чат
– Цифровую почту
– Контакт
– Социальные каналы
Резюме
Основной портал и его функционирующее зеркало гарантируют участникам стабильный и приятный вход к азартным занятиям. Щедрые награды, разнообразный выбор игр и профессиональная ассистанс создают участие максимально удобной и прибыльной.
Переход к порталу через проверенные зеркала
Актуальные сетевые казино предоставляют пользователям постоянный доступ к сервисам. Основной портал слоты оперирует бесперебойно, предлагая большой набор развлекательных развлечений. Тем не менее временами формируются цифровые проблемы или ограничения, поэтому существенно быть осведомлённым о доступности функционирующих зеркал.
Что представляет из себя основное зеркало казино
Альтернатива — это абсолютная копия официального веб-сайта с аналогичным функционалом. Функционирующее зеркало сейчас помогает избегать региональные блокировки и продолжать развлечения.
Основные достоинства применения зеркал:
– Абсолютный переход к собственному кабинету
– Поддержание всех данных профиля
– Аналогичный перечень игр
– Действующие привилегии и промо
Создание аккаунта на ресурсе
Операция регистрации отнимает немного минут. Свежие игроки зарабатывают богатый приз за запись, что в состоянии вмещать:
– Стартовый финансовый кредит
– Бесплатные спины для игр
– Уникальные купоны
– Повышенный кэшбек
С целью окончания создания аккаунта требуется:
1. Зайти на основной веб-сайт или копию
2. Нажать элемент «Оформиться»
3. Указать личные данные
4. Подтвердить почтовый адрес или номер
5. Задействовать ваучер (в случае существовании)
Подключение в личный кабинет
После удачной записи пользователи способны совершать доступ посредством официальный ресурс или действующее зеркало. Персональный кабинет предоставляет безграничный регулирование над профилем:
– Архив игр
– Внесение счёта
– Получение призов
– Регулирование поощрениями
– Присутствие в турнирах
Поощрения и предложения казино
Ресурс балует клиентов многочисленными привилегированными предложениями:
Приветственные поощрения
Новички зарабатывают богатый комплект бонусов на начальные депозиты. Типично это охватывает процентную доплату к размеру депозита плюс даровые спины.
Постоянные промо
– Еженедельный кэшбек до 15%
– Состязания с премиальными фондами
– Подарки на дату рождения
– Специальные программы для статусных геймеров
Схема поощрения
Активные пользователи зарабатывают единицы, которые разрешено превратить на подлинные средства или особые бонусы.
Смартфонная версия и утилита
Передовые инновации помогают играть где угодно. Смартфонная вариант веб-сайта автономно приспосабливается под дисплей каждого устройства.
Достоинства смартфонного приложения:
– Оперативная открытие автоматов
– Комфортный интерфейс
– Моментальные-нотификации о промо
– Опция загрузить для Android и iOS
Настоящее казино: антураж подлинного развлекательного заведения
Область Live игорного дома транспортирует клиентов в обстановку настоящего азартного заведения. Опытные крупье организуют игру в состоянии настоящего времени.
Представленные игры:
– Колесо фортуны
– Блэкджек
– Баккара
– Покерная игра
Слоты и развлекательные слоты
Коллекция гемблинг слотов охватывает массу названий от топовых студий. Любой пользователь найдёт автомат по нраву:
– Традиционные машины
– Инновационные игры с специальными раундами
– Джекпот-игры
– Megaways игры
Соревнования и розыгрыши
Систематические соревнования добавляют остроту и предоставляют шанс выиграть внушительные вознаграждения. Участие в состязаниях нередко комплиментарное, а призовые пулы насчитывают внушительных сумм.
Секьюрити и секретность
Портал применяет актуальные системы кодирования для обеспечения реквизитов пользователей. Каждые транзакционные транзакции проходят через зашифрованные каналы.
Заключение
Основной ресурс и его актуальные зеркала обеспечивают устойчивый подключение к первоклассным гемблинг сервисам. Богатые призы, комфортная карманная форма, богатство машин и профессиональное Live-игорный дом формируют портал отличным выбором для фанатов азартных слотов.
I recently checked out this casino https://triovet.pl/ and was surprised by how smooth everything felt. The games run fast, bonuses are transparent, and navigation is intuitive, making the experience enjoyable.
melbet на айфон melbet на айфон .
онлайн обучение для школьников shkola-onlajn-32.ru .
Lemon Stop – Clean interface, exploring sections is effortless.
Нынешние онлайн-казино обеспечивают геймерам обширный ассортимент возможностей для беспроблемной времяпрепровождения. Вход к сервису Гама производится через официальный веб-ресурс или рабочее зеркало.
Что такое действующее зеркало казино
Действующее зеркало — это дополнительный адрес основного сайта казино. Такие версии разрабатываются для обеспечения непрерывного подключения к развлекательной площадке.
Копия текущее целиком воспроизводит возможности главного портала. Геймеры обретают такой же доступ ко всем услугам, включая создание аккаунта, пополнение счета и снятие денег.
Открытие счета на главном сайте
Алгоритм регистрации требует всего считанные минут. Свежим пользователям требуется:
1. Попасть на лицензионный портал или текущее подлинное зеркало
2. Выбрать кнопку “Регистрация”
3. Заполнить нужные информацию
4. Подтвердить почтовую почту
5. Ввести промокод при доступности
После завершения регистрации игрок получает подарок за регистрацию, который способен содержать фриспины или cash начисление.
Авторизация в персональный кабинет
Персональный кабинет — это охраняемая область, где клиенты имеют возможность администрировать своим учетной записью. Для доступа следует напечатать имя пользователя и код доступа.
В персональном кабинете имеются нижеперечисленные возможности:
– Отслеживание журнала транзакций
– Использование промокодов
– Контроль призами
– Участие в соревнованиях
– Отслеживание возврата средств
– Изменение профиля
Бонусы и промо
Азартная сервис обеспечивает великодушные подарки:
Начальный бонус — начинающие обретают значительное вознаграждение на первые депозиты.
Фриспины — начисляются как при создании аккаунта, так и в контексте всевозможных кампаний.
Возмещение — регулярный возврат части утраченных финансов.
Бонусные коды — эксклюзивные коды, дающие выход к эксклюзивным вознаграждениям.
Обзор развлекательных категорий
Аппараты
Библиотека slots насчитывает тысячи наименований от топовых провайдеров. Клиенты найдут как стандартные машины, так и инновационные видео-слоты с увлекательной графикой.
Live казино
Категория Live казино обеспечивает опцию соревноваться с реальными ведущими в условиях реального времени. Имеются востребованные развлечения: рулетка, блэкджек, баккара, покер.
Конкурсы
Систематические турниры с солидными выигрышными банками притягивают тысячи участников. Победители получают финансовые выплаты и эксклюзивные поощрения.
Мобильная версия и софт
Мобильная версия ресурса обеспечивает наслаждаться с произвольного девайса. Дизайн автоматически адаптируется под диагональ экрана.
Получить программу можно для устройств на Android и iOS. Смартфонное ПО имеет всеми характеристиками настольной версии.
Как определить текущее зеркало на сегодня
Актуальные линки копий систематически меняются. Узнать рабочую URL можно различными вариантами:
– Через отдел саппорта
– В настоящих информационных сетях
– По почтовой подписке
– На партнерских порталах
Безопасность и официальность
Главный ресурс действует на базе зарубежной разрешения. Все транзакции защищены актуальными технологиями безопасности.
Приватность индивидуальных реквизитов гарантируется в абсолютном объеме.
Заключение
Официальный ресурс и его действующие альтернативы предоставляют пользователям круглосуточный доступ к высококлассным развлекательным сервисам. Щедрые призы, различные слоты, опытная служба — все это делает развлекательный опыт предельно приятным и захватывающим.
Анализ лицензионного ресурса
Современные виртуальные казино обеспечивают участникам разнообразный набор услуг и перспектив. Главный портал Cactus Casino казино гарантирует проверенный вход к развлекательным сервисам.
Рабочее зеркало: вход в настоящий момент
Зеркало выступает в качестве точную копию главного веб-сайта. Действующее зеркало помогает участникам обходить вероятные ограничения.
Плюсы применения зеркала
Ключевые достоинства содержат:
– Беспрерывный шанс к сайту
– Поддержание всех характеристик официального портала
– Безопасность индивидуальных сведений
– Аналогичный инструментарий
Открытие счета на ресурсе
Процедура оформления профиля выделяется понятностью и комфортом. Начинающие игроки должны:
1. Перейти на лицензионный веб-сайт или его зеркало
2. Нажать на пункт открытия счета
3. Внести необходимые данные
4. Валидировать электронную ящик
5. Осуществить начальный логин
Подарок за создание аккаунта
Новые игроки получают значительный вступительный подарок. Подобное вознаграждение имеет возможность предусматривать:
– Материальные суммы
– Даровые вращения
– Увеличенный показатель кэшбека
Доступ в персональный аккаунт
Зарегистрированные участники имеют возможность моментально авторизоваться в собственный аккаунт, задействуя логин и ключ. Индивидуальный кабинет предоставляет доступ к:
– Управлению балансом
– Истории транзакций
– Активным бонусам
– Опциям аккаунта
Подарки и кампании
Платформа периодически организует разнообразные мероприятия для пользователей.
Виды призов
Главные формы призов:
– Депозитные призы – процент от объема внесения
– Спины – даровые прокруты в слотах
– Кэшбек – возмещение процента потерянных средств
– Турнирные призы – премии за состязание в турнирах
Промокоды
Уникальные купоны позволяют приобрести экстра бонусы. Клиенты способны получить их на аффилиатных порталах или взять в новостях.
Переносная версия и софт
Прогрессивные пользователи ценят портативный досуг.
Возможности портативной версии
– Отзывчивый вид для всех устройств
– Целостный путь к развлечениям
– Быстрая загрузка
– Эргономичное управление
Установить app
Мобильное программа открыто для скачивания на устройства с рабочими системами Android и iOS. App дает:
– Бесперебойную функциональность
– Push сообщения о призах
– Мгновенный доступ к желанным играм
Игровой ассортимент
Казино обеспечивает обширную подборку игровых услуг.
Аппараты
Ассортимент азартных машин содержит:
– Обычные автоматы
– Video автоматы
– Джекпотные автоматы
– Тематические слоты
Live казино
Категория настоящих дилеров дает опцию участвовать с настоящими дилерами. Предложены:
– Американская рулетка
– 21
– Punto Banco
– Poker
Состязания
Постоянные соревнования дают возможность клиентам состязаться за крупные наградные банки. Турнирная система обновляется каждую неделю.
Банковские операции
Сайт обеспечивает массу способов депозита и обналичивания сумм:
– Пластиковые карточки
– Цифровые кошельки
– Межбанковские трансферы
– Крипто
Совокупные транзакции осуществляются защищенно с использованием прогрессивных систем кодирования.
Департамент сопровождения
Профессиональная служба поддержки работает 24/7. Связаться с специалистами можно через:
– Живой чат
– Почтовую почту
– Телефон
– Social платформы
Защита и аккредитация
Казино действует на фундаменте легальной аккредитации. Подобное обеспечивает:
– Прозрачность игрового процесса
– Охрану персональных сведений
– Своевременные выводы
– Легальный геймплей
Итог
Официальный веб-сайт и его функционирующие зеркала дают игрокам полный комплекс возможностей для безопасной и прибыльной времяпрепровождения. Внушительные подарки, разнообразные автоматы, компетентная поддержка и защищенная инфраструктура операций создают портал идеальным решением для фанатов игровых развлечений.
Where to propose to a girl plan a surprise proposal in Barcelona
ломоносов скул ломоносов скул .
школьный класс с учениками школьный класс с учениками .
комплексная терапия депрессии птср выгорания Запись на прием к психиатру или психотерапевту, поиск отзывов и рекомендаций, а также возможность онлайн-консультаций через Telegram делают доступ к необходимой помощи более простым и удобным, особенно в случаях, когда требуется срочное вмешательство, например, при ПТСР после травмы или во время тяжелой депрессии.
about his
dafabet sports
For extra
where can i get depakote without rx
to keep pace.
Find Out More
10cric bonus code india
Переход к порталу через рабочие зеркала
Клиенты интернет казино регулярно имеют дело с проблемой ограничения главного сайта. Именно для ликвидации этой задачи созданы дубликаты основного ресурса. Тейкер скачать дает беспрепятственный вход ко всем возможностям ресурса.
Что такое действующее зеркало казино
Зеркало является собой полную дубликат главного портала с аналогичным возможностями. Основное различие — это другое имя. Каждые параметры пользователя, включая средства, награды и историю раундов, продолжают быть прежними.
Преимущества эксплуатации зеркал
Функционирующие зеркала обладают рядом важных достоинств:
– Постоянный подключение к любимым слотам
– Стопроцентная безопасность собственных информации
– Поддержание всех параметров персонального кабинета
– Возможность приобретения призов и вовлечения в акциях
Создание аккаунта на главном ресурсе
Операция регистрации максимально несложен и отнимает буквально минут. Свежие пользователи могут надеяться на солидный вводный приз за регистрацию.
Этапы открытия аккаунта
1. Доступ на основной домен или его копию
2. Выбор на кнопку “Зарегистрироваться”
3. Ввод нужных информации
4. Верификация почтовой почты
5. Указание купона (когда имеется)
Награды и кампании для пользователей
Платформа одаривает своих игроков разнообразными призовыми акциями.
Основные типы поощрений
Вводный бонус — щедрое премирование для недавних клиентов, что имеет возможность содержать материальные средства и фриспины.
Бесплатные вращения — возможность использовать в топовых аппаратах без затрат.
Кешбэк — процентный возврат утраченных финансов, что начисляется раз в неделю или каждый месяц.
Промокоды — уникальные комбинации, гарантирующие бонусные выгоды.
Персональный кабинет: возможности и параметры
Личный профиль обеспечивает полный надзор над персональным взаимодействием. Тут имеются:
– Регулирование балансом
– Архив переводов
– Действующие поощрения
– Настройки сохранности
– Подтверждение профиля
Карманная вариант и приложение
Нынешние клиенты предпочитают доступность. Ресурс обеспечивает 2 метода для ставок с мобильных гаджетов.
Responsive телефонная версия
Портативная версия домена автоматически настраивается под экран любого девайса. Не требуется загружать специальное софт.
Софт для телефонов
Возможно загрузить официальное приложение для iOS и Android. Приложение предоставляет:
– Скорый вход
– Доработанный внешний вид
– Всплывающие-оповещения о предложениях
– Надежную работу
Live игры: среда настоящего игорного заведения
Зона Live казино отправляет игроков в атмосферу реального игорного заведения. Компетентные ведущие осуществляют сессии в варианте реального времени.
Известные Live-столы
– Европейская рулетка
– Блэкджек
– Баккара
– Карибский покер
Игровые машины: ассортимент развлечений
Каталог развлекательных слотов включает массу наименований от лидирующих производителей. Игроки откроют:
– Классические машины
– Графические слоты
– Накопительный приз-слоты
– Megaways
Соревнования и специальные акции
Периодические состязания обеспечивают участникам соревноваться друг с другом за крупные призовые банки. Всякий соревнование располагает свои условия участия и рейтинг призеров.
Методы ввода и получения сумм
Ресурс поддерживает множество платежных методов:
– Банковские карты
– Онлайн платежные системы
– Цифровые валюты
– Финансовые транзакции
Абсолютно все платежи проходят надежно благодаря современным технологиям кодирования.
Команда помощи
Квалифицированные операторы службы обслуживания настроены содействовать 24/7. Предусмотрены следующие методы контакта:
– Оперативный-чат
– Email-сервис
– Голосовая линия
– Социальные сети
Итог
Легальный портал платформы и его функционирующие копии обеспечивают пользователям надежный и удобный доступ к широкому ассортименту развлекательных развлечений. Щедрые бонусы, периодические предложения, квалифицированная сервис и удобные финансовые способы формируют геймерский процесс чрезвычайно приятным и прибыльным.
Вход к сайту через проверенные зеркала
Участники виртуальных казино регулярно встречаются с вопросом недоступности базового ресурса. Собственно для преодоления этой задачи разработаны дубликаты основного портала. Daddy сайт дает полный переход ко всем опциям платформы.
Что такое актуальное зеркало казино
Копия значит собой абсолютную копию официального портала с таким же функционалом. Единственное различие — это другое имя. Абсолютно все данные пользователя, содержа баланс, награды и архив ставок, остаются прежними.
Достоинства эксплуатации зеркал
Актуальные зеркала обладают комплексом значимых достоинств:
– Непрерывный подключение к излюбленным играм
– Стопроцентная защита индивидуальных данных
– Удержание всех параметров пользовательского кабинета
– Способность приобретения призов и вовлечения в кампаниях
Создание аккаунта на основном ресурсе
Процедура оформления максимально несложен и отнимает буквально минут. Свежие игроки могут рассчитывать на внушительный стартовый бонус за открытие счета.
Этапы оформления аккаунта
1. Переход на официальный портал или его дубликат
2. Выбор на элемент “Создать аккаунт”
3. Указание требуемых параметров
4. Проверка цифровой почты
5. Применение бонусного кода (в случае есть)
Поощрения и промоакции для игроков
Ресурс радует своих пользователей различными бонусными системами.
Ключевые типы наград
Вводный бонус — щедрое премирование для новых клиентов, что может включать денежные суммы и бесплатные вращения.
Free spins — опция играть в известных игровых машинах даром.
Кэшбек — процентный возмещение потерянных средств, который зачисляется каждую неделю или каждый месяц.
Специальные коды — эксклюзивные наборы, предоставляющие дополнительные преимущества.
Персональный кабинет: функции и конфигурации
Пользовательский аккаунт обеспечивает абсолютный надзор над пользовательским процессом. Здесь предусмотрены:
– Управление средствами
– Записи переводов
– Действующие поощрения
– Установки безопасности
– Верификация аккаунта
Карманная версия и программа
Нынешние пользователи ценят гибкость. Казино дает 2 способа для игры с смартфонных аппаратов.
Приспособленная портативная вариант
Смартфонная версия домена автономно адаптируется под монитор любого девайса. Отсутствует потребность устанавливать особое софт.
Софт для телефонов
Можно установить специальное софт для iOS и Android. Софт обеспечивает:
– Быстрый доступ
– Улучшенный интерфейс
– Оперативные-уведомления о поощрениях
– Бесперебойную операционность
Live раздел: среда подлинного зала
Категория Live казино переносит игроков в атмосферу настоящего клуба. Компетентные крупье осуществляют раунды в формате реального времени.
Востребованные Live-столы
– Французская рулетка
– Двадцать одно
– Baccarat
– Poker
Игровые машины: разнообразие игр
Каталог слотовых аппаратов насчитывает множество позиций от ведущих производителей. Игроки встретят:
– Классические аппараты
– Современные слоты
– Мега-выигрыш-слоты
– Многолинейные автоматы
Турниры и уникальные акции
Постоянные конкурсы позволяют игрокам конкурировать друг с другом за солидные призовые пулы. Всякий конкурс имеет свои критерии включения и рейтинг лидеров.
Методы внесения и вывода денег
Ресурс предоставляет ряд финансовых методов:
– Кредитные картыы
– Виртуальные платежные системы
– Цифровые валюты
– Wire транзакции
Любые платежи выполняются надежно благодаря новейшим технологиям криптографии.
Команда обслуживания
Компетентные сотрудники службы support готовы ассистировать 24/7. Доступны нижеперечисленные каналы общения:
– Мгновенный-чат
– Email-обслуживание
– Аудио горячая линия
– Социальные сети
Итог
Главный сайт казино и его функционирующие альтернативы предоставляют пользователям безопасный и приятный вход к широкому спектру развлекательных активностей. Крупные подарки, частые предложения, компетентная сервис и простые расчетные методы формируют азартный процесс чрезвычайно захватывающим и выгодным.
stonebazaar – Clean and simple layout, navigating through pages is smooth.
What’s up colleagues, how is everything, and what you want to
say on the topic of this post, in my view its really remarkable in favor
of me.
My site air conditioning
Pebble Market – Smooth pages, moving between sections is straightforward.
подробнее продам аккаунт клэш оф
quick keystone shop – The platform feels minimal and easy to browse through.
http://mensrxindex.com/# Mens RX Index
Вход к ресурсу через действующие зеркала
Актуальные виртуальные казино дают пользователям непрерывный вход к играм. Центральный ресурс Кент функционирует стабильно, предоставляя широкий спектр азартных развлечений. Но порой формируются системные препятствия или запреты, следовательно важно иметь представление о доступности рабочих зеркал.
Что является из себя центральное зеркало казино
Зеркало — это идентичная версия официального веб-сайта с схожим набором функций. Функционирующее зеркало в настоящее время помогает обходить территориальные запреты и вести времяпрепровождение.
Основные плюсы применения зеркал:
– Безграничный подключение к собственному кабинету
– Поддержание совокупных сведений учётной записи
– Схожий перечень игр
– Свежие вознаграждения и предложения
Оформление на ресурсе
Механизм регистрации требует немного минут. Свежие клиенты обретают привлекательный приз за создание счёта, он способен вмещать:
– Вступительный игровой кредит
– Безвозмездные кручения для машин
– Уникальные ваучеры
– Расширенный кэшбек
С целью завершения оформления необходимо:
1. Переместиться на центральный портал или зеркало
2. Щёлкнуть элемент «Регистрация»
3. Ввести контактные реквизиты
4. Подтвердить почтовый адрес или контакт
5. Использовать код (при доступности)
Авторизация в личный кабинет
Следом за правильной регистрации пользователи могут совершать вход используя основной веб-сайт или рабочее зеркало. Персональный кабинет предоставляет полный надзор над учётной записью:
– История пари
– Внесение кошелька
– Снятие средств
– Контроль бонусами
– Включение в состязаниях
Привилегии и предложения казино
Портал радует пользователей многочисленными поощрительными системами:
Стартовые подарки
Дебютанты обретают щедрый букет поощрений на вступительные депозиты. Обычно это содержит процентную надбавку к размеру взноса плюс комплиментарные кручения.
Постоянные промо
– Каждонедельный кешбэк до 15%
– Состязания с выигрышными банками
– Подарки на годовщину рождения
– Специальные программы для элитных пользователей
Схема верности
Регулярные клиенты накапливают очки, которые разрешено превратить на подлинные средства или эксклюзивные бонусы.
Мобильная редакция и утилита
Нынешние технологии обеспечивают развлекаться где комфортно. Смартфонная редакция портала независимо приспосабливается под монитор произвольного устройства.
Преимущества мобильного софта:
– Скоростная запуск автоматов
– Удобный интерфейс
– Push-сообщения о бонусах
– Шанс инсталлировать для Android и iOS
Живое казино: антураж реального гемблинг клуба
Секция Live казино переносит клиентов в среду истинного гемблинг клуба. Квалифицированные операторы организуют развлечение в режиме реального времени.
Доступные развлечения:
– Европейская рулетка
– Блэкджек
– Punto Banco
– Покер
Игровые машины и развлекательные автоматы
Ассортимент азартных машин насчитывает множество вариантов от лидирующих провайдеров. Произвольный пользователь отыщет слот по желанию:
– Винтажные слоты
– Инновационные игры с дополнительными турами
– Накопительный-игры
– Динамические машины
Состязания и раздачи
Регулярные турниры включают остроту и дают опцию обрести большие призы. Присутствие в турнирах зачастую бесплатное, а выигрышные пулы насчитывают крупных величин.
Секьюрити и конфиденциальность
Ресурс применяет инновационные технологии кодирования для защиты данных клиентов. Совокупные платёжные действия совершаются через безопасные линии.
Заключение
Центральный портал и его функционирующие зеркала обеспечивают надёжный подключение к отличным азартным играм. Великодушные награды, удобная мобильная редакция, разнообразие автоматов и высококлассное Live-казино превращают платформу отличным вариантом для ценителей игровых слотов.
online vet pharmacy: Vet Rx Index – best pet rx
Современные онлайн-казино предоставляют пользователям внушительный спектр игр и призовых программ. Присоединение к площадке реализуется через официальный ресурс или его актуальное зеркало Аркада, что гарантирует бесперебойную деятельность.
Чем является рабочее зеркало казино
Зеркало — это точная версия официального ресурса, созданная для решения ограничений. Действующее зеркало обеспечивает игрокам иметь доступ к предпочитаемым слотам в любое удобное время.
Официальное зеркало обладает всеми опциями первоначального портала:
– Весь список автоматов
– Аккаунт с зафиксированными данными
– Текущие промокоды
– Безопасные расчетные транзакции
Оформление профиля на официальном сайте
Алгоритм открытия счета требует всего пару минут. Новым игрокам следует:
1. Войти на проверенный веб-сайт или актуальное зеркало
2. Щелкнуть на элемент “Открыть счет”
3. Внести требуемые информацию
4. Активировать адрес
5. Внести начальный взнос
Бонус за регистрацию зачисляется сразу после завершения всех ступеней.
Авторизация в аккаунт
Зарегистрированные клиенты могут произвести подключение указывая:
– Логин и пароль
– Код мобильного
– Адрес
Профиль обеспечивает право к контролю средствами, истории операций и действующим акциям.
Поощрения и программы
Гемблинг сервис привлекает постоянных участников разнообразными призами:
Стартовый набор
– Бонус на начальный пополнение до 100%
– Фриспины на известные слоты
– Дополнительные бонусы за следующие депозиты
Ваучеры
Уникальные ваучеры дают право на приобретение эксклюзивных бонусов. Текущие коды размещаются в блоке “Бонусы”.
Кешбэк
Постоянный возврат достигает до 10% от использованных средств. Компенсация начисляется незамедлительно.
Механизм лояльности
Активные игроки получают единицы, которые конвертируются на действительные деньги или free spins.
Мобильная версия и приложение
Ради комфорта клиентов построена полноценная mobile версия. Гибкий дизайн дает возможность легко развлекаться с произвольного мобильного гаджета.
Достоинства приложения:
– Оперативный подключение к играм
– Настроенный дизайн
– Бесперебойная активность
– Push-уведомления о последних турнирах
Получить софт можно даром с основного веб-сайта для гаджетов на Android и iOS.
Каталог игр
Игровые автоматы
Каталог насчитывает более 2000 машин от популярных производителей:
– Стандартные слоты
– Мультимедийные игры
– Jackpot игры
– Брендовые игры
Live казино
Категория Live развлечений обеспечивает участие с настоящими дилерами в реальном времени:
– Рулетка
– Блэкджек
– Карты
– Poker
Турниры
Систематические соревнования с солидными наградными суммами проводятся еженедельно. Вход в турнирах разрешено всем действующим клиентам.
Финансовые способы
Платежи и выводы средств выполняются через востребованные способы оплаты:
– Платежные средства
– Электронные счета
– Цифровая валюта
– Банковские операции
Минимальный платеж — от 100 рублей. Изъятие выигрышей осуществляется в течение 24 часов.
Служба саппорта
Постоянная команда support способна содействовать в урегулировании всех задач:
– Онлайн-чат
– Email
– Телефон
– Общественные сети
Защита и разрешение
Лицензионный сайт действует на почве международной сертификата. Каждые информация игроков защищены новейшим SSL-шифрованием.
Вывод
Актуальное зеркало гарантирует непрерывный вход к любимым автоматам, щедрым акциям и функциональным сервисам. Откройте счет сегодня и приобретите начальный поощрение!
онлайн обучение для детей shkola-onlajn-31.ru .
Нынешние онлайн-казино обеспечивают пользователям обширный ассортимент игр и премиальных программ. Подключение к платформе реализуется через главный сайт или его функционирующее зеркало EzCash casino, что дает стабильную игру.
Что представляет собой рабочее зеркало казино
Дубликат — это полная дубликат главного ресурса, построенная для устранения ограничений. Рабочее зеркало помогает пользователям получить вход к выбранным играм в каждое время.
Лицензионное зеркало обладает всеми характеристиками основного сайта:
– Целый перечень развлечений
– Личный кабинет с внесенными данными
– Действующие поощрения
– Надежные платежные процедуры
Открытие счета на лицензионном веб-сайте
Алгоритм регистрации составляет всего несколько минут. Свежим клиентам необходимо:
1. Попасть на главный сайт или действующее зеркало
2. Щелкнуть на клавишу “Создать аккаунт”
3. Внести нужные данные
4. Активировать электронную почту
5. Сделать дебютный взнос
Бонус за регистрацию зачисляется автоматически после завершения всех шагов.
Авторизация в профиль
Созданные пользователи могут произвести авторизацию указывая:
– Учетное имя и шифр
– Код сотового
– Электронную почту
Аккаунт дает право к контролю балансом, истории ставок и текущим акциям.
Бонусы и предложения
Игровая сервис вознаграждает регулярных клиентов разнообразными вознаграждениями:
Приветственный набор
– Надбавка на стартовый депозит до 100%
– Бесплатные вращения на популярные автоматы
– Экстра поощрения за дальнейшие взносы
Промокоды
Уникальные промокоды обеспечивают возможность на использование эксклюзивных вознаграждений. Действующие коды публикуются в блоке “Предложения”.
Кешбэк
Постоянный кешбэк равен до 10% от потраченных средств. Возмещение начисляется сразу.
Программа лояльности
Регулярные игроки накапливают единицы, которые конвертируются на подлинные выплаты или free spins.
Адаптивный портал и APP
Для практичности пользователей разработана качественная портативная платформа. Приспособленный облик помогает удобно играть с всякого портативного аппарата.
Преимущества программы:
– Оперативный вход к играм
– Настроенный вид
– Надежная работа
– Нотификации о свежих бонусах
Получить APP можно даром с проверенного веб-сайта для устройств на Android и iOS.
Каталог автоматов
Машины
Коллекция включает более 2000 слотов от известных разработчиков:
– Стандартные автоматы
– Мультимедийные игры
– Джекпот-слоты
– Фирменные автоматы
Live казино
Секция Live игр обеспечивает взаимодействие с живыми диллерами в живом формате:
– Колесо фортуны
– Блэкджек
– Punto Banco
– Карточный покер
Соревнования
Регулярные конкурсы с солидными премиальными суммами запускаются регулярно. Присоединение в соревнованиях доступно всем действующим пользователям.
Финансовые способы
Платежи и получения денег выполняются через распространенные методы:
– Платежные пластик
– Онлайн счета
– Bitcoin
– Прямые платежи
Самый низкий вклад — от 100 рублей. Изъятие финансов выполняется в течение 24 времени.
Команда саппорта
24/7 группа саппорта расположена поддержать в разрешении произвольных задач:
– Живой чат
– Email
– Связь
– Социальные сети
Надежность и документ
Официальный сайт функционирует на основании глобальной сертификата. Всевозможные сведения пользователей обезопасены современным SSL-криптованием.
Заключение
Актуальное зеркало гарантирует бесперебойный доступ к излюбленным развлечениям, выгодным бонусам и практичным сервисам. Присоединяйтесь прямо сейчас и заработайте начальный подарок!
Thank you, I have just been searching for info about this topic for
a long time and yours is the greatest I’ve found out so far.
But, what about the conclusion? Are you certain concerning the supply?
Here is my site – Vela Bay Showflat
dune hub online – Found this page and navigating around it is easy and simple.
Описание главного портала
Передовые виртуальные казино предоставляют игрокам разнообразный спектр игр и опций. Главный ресурс casino Cactus Casino гарантирует безопасный путь к азартным услугам.
Актуальное зеркало: вход сегодня
Зеркало выступает как полную реплику основного сайта. Проверенное зеркало дает возможность пользователям преодолевать вероятные блокировки.
Преимущества задействования зеркала
Основные выгоды содержат:
– Беспрерывный шанс к платформе
– Поддержание полных функций главного веб-сайта
– Безопасность личных сведений
– Равнозначный набор функций
Открытие счета на портале
Механизм регистрации знаменуется легкостью и практичностью. Недавние игроки должны:
1. Перейти на официальный портал или его зеркало
2. Нажать на клавишу регистрации
3. Внести необходимые данные
4. Активировать электронную ящик
5. Совершить стартовый вход
Подарок за оформление
Начинающие получают значительный начальный бонус. Такое награда может предусматривать:
– Монетарные средства
– Бесплатные спины
– Расширенный уровень компенсации
Доступ в персональный аккаунт
Зарегистрированные пользователи в состоянии моментально получить доступ в персональный профиль, эксплуатируя никнейм и шифр. Собственный раздел предлагает шанс к:
– Контролю средствами
– Записям операций
– Активным бонусам
– Конфигурации учетной записи
Бонусы и акции
Платформа периодически организует разнообразные промо-кампании для клиентов.
Категории подарков
Главные виды бонусов:
– Финансовые подарки – коэффициент от суммы внесения
– Фриспины – complimentary раунды в слотах
– Кэшбэк – возврат фрагмента потерянных финансов
– Конкурсные призы – премии за участие в состязаниях
Ваучеры
Уникальные коды позволяют получить экстра бонусы. Участники способны обнаружить их на специализированных порталах или получить в рассылке.
Портативная вариант и приложение
Современные гемблеры предпочитают карманный игровой процесс.
Характеристики переносной платформы
– Responsive дизайн для разнообразных устройств
– Полный доступ к автоматам
– Быстрая работа
– Практичное использование
Скачать приложение
Mobile софт открыто для загрузки на девайсы с рабочими системами Android и iOS. Софт дает:
– Надежную работу
– Push сообщения о акциях
– Мгновенный доступ к избранным слотам
Развлекательный каталог
Портал дает обширную подборку азартных развлечений.
Игровые машины
Каталог азартных аппаратов насчитывает:
– Обычные игры
– Современные аппараты
– Накопительные автоматы
– Тематические игры
Live дилеры
Область реальных столов предлагает опцию играть с профессиональными ведущими. Представлены:
– Американская рулетка
– 21
– Баккара
– Карибский покер
Турниры
Постоянные турниры дают возможность пользователям состязаться за внушительные призовые банки. Конкурсная система актуализируется постоянно.
Финансовые процедуры
Сайт предлагает множество методов пополнения и получения средств:
– Дебетовые карточки
– Электронные счета
– Банковские переводы
– Цифровые валюты
Абсолютно все операции осуществляются конфиденциально с задействованием современных систем шифрования.
Отдел поддержки
Опытная группа support функционирует без перерыва. Обратиться с специалистами возможно через:
– Интерактивный чат
– Электронную почту
– Телефон
– Социальные платформы
Секьюрити и лицензирование
Казино функционирует на фундаменте действительной лицензии. Данное гарантирует:
– Справедливость развлекательного процесса
– Безопасность индивидуальных информации
– Быстрые выводы
– Легальный игровой процесс
Заключение
Главный веб-сайт и его действующие резервные страницы гарантируют участникам полный спектр услуг для приятной и прибыльной времяпрепровождения. Значительные вознаграждения, многочисленные развлечения, профессиональная служба и надежная платформа платежей превращают портал оптимальным опцией для ценителей гемблинг услуг.
canadian drugstore online: canadian pharmacy online – the canadian drugstore
птср после травмы работа с психиатром Запись на прием к психиатру или психотерапевту, поиск отзывов и рекомендаций, а также возможность онлайн-консультаций через Telegram делают доступ к необходимой помощи более простым и удобным, особенно в случаях, когда требуется срочное вмешательство, например, при ПТСР после травмы или во время тяжелой депрессии.
Do you have a spam problem on this site; I also am a blogger, and I was curious about your situation; many of us have created some nice methods and we are looking to trade techniques
with other folks, be sure to shoot me an e-mail if interested.
Check out my web blog … dental implant specialist
Доступ к платформе через рабочие зеркала
Игроки онлайн казино нередко встречаются с трудностью закрытия официального домена. Как раз для ликвидации этой проблемы созданы копии официального портала. 888 обеспечивает беспрепятственный доступ ко всем опциям площадки.
Что такое актуальное зеркало казино
Копия представляет собой абсолютную дубликат основного ресурса с похожим функционалом. Главное различие — это альтернативное имя. Абсолютно все параметры участника, вместе с баланс, поощрения и записи ставок, продолжают быть неизменными.
Достоинства эксплуатации зеркал
Актуальные зеркала имеют комплексом значимых плюсов:
– Постоянный подключение к любимым играм
– Стопроцентная защита персональных информации
– Сохранение всех параметров пользовательского кабинета
– Шанс приобретения наград и включения в предложениях
Регистрация на основном портале
Процесс создания аккаунта чрезвычайно несложен и требует немного минут. Новые игроки в состоянии претендовать на щедрый стартовый приз за оформление.
Стадии создания аккаунта
1. Переход на главный портал или его копию
2. Активация на опцию “Присоединиться”
3. Ввод необходимых данных
4. Активация электронной почты
5. Ввод промокода (если доступен)
Награды и акции для игроков
Ресурс поощряет своих клиентов многочисленными призовыми предложениями.
Основные варианты наград
Начальный бонус — щедрое вознаграждение для начинающих игроков, каковое способно вмещать денежные бонусы и бесплатные вращения.
Безвозмездные спины — способность крутить в известных автоматах без затрат.
Кешбэк — долевой отдача проигранных финансов, что предоставляется каждую неделю или ежемесячно.
Промокоды — особые наборы, обеспечивающие дополнительные привилегии.
Персональный кабинет: функции и настройки
Персональный аккаунт дает исчерпывающий регулирование над пользовательским процессом. Здесь доступны:
– Регулирование счетом
– Записи операций
– Активные привилегии
– Параметры сохранности
– Подтверждение учетной записи
Портативная вариант и APP
Актуальные игроки оценивают мобильность. Казино предлагает 2 пути для игры с портативных гаджетов.
Адаптивная портативная редакция
Смартфонная платформа ресурса без участия подстраивается под экран любого гаджета. Не требуется инсталлировать специальное приложение.
APP для гаджетов
Можно загрузить оригинальное софт для iOS и Android. Софт предоставляет:
– Моментальный старт
– Адаптированный графику
– Всплывающие-оповещения о предложениях
– Устойчивую производительность
Live игры: обстановка подлинного клуба
Раздел Live развлечений отправляет пользователей в атмосферу истинного зала. Опытные крупье организуют раунды в формате реального времени.
Востребованные Live-игры
– Французская рулетка
– Блэкджек
– Баккарат
– Покер
Слоты: разнообразие игр
Библиотека игровых автоматов насчитывает множество названий от известных провайдеров. Пользователи обнаружат:
– Стандартные слоты
– Современные слоты
– Джекпот-автоматы
– Megaways
Конкурсы и эксклюзивные события
Постоянные конкурсы дают возможность пользователям соревноваться друг с другом за крупные призовые суммы. Всякий состязание располагает свои условия участия и доску лидеров.
Пути пополнения и получения финансов
Казино использует ряд платежных сервисов:
– Кредитные средства
– Цифровые сервисы
– Криптовалюты
– Банковские транзиты
Абсолютно все платежи осуществляются конфиденциально благодаря актуальным протоколам криптографии.
Служба обслуживания
Профессиональные сотрудники службы support способны содействовать 24/7. Имеются следующие пути общения:
– Живой-чат
– Email-поддержка
– Звонковая поддержка
– Коммуникационные сети
Итог
Легальный домен клуба и его функционирующие альтернативы гарантируют игрокам конфиденциальный и удобный доступ к большому ассортименту игровых активностей. Внушительные награды, частые предложения, квалифицированная помощь и простые денежные методы делают игровой опыт предельно захватывающим и доходным.
Вход к ресурсу через рабочие зеркала
Нынешние сетевые казино дают пользователям круглосуточный вход к услугам. Главный портал Gama функционирует стабильно, гарантируя большой спектр азартных развлечений. Тем не менее периодически возникают технические сложности или барьеры, потому важно понимать о существовании актуальных зеркал.
Что означает из себя официальное зеркало казино
Дубликат — это идентичная реплика официального ресурса с аналогичным интерфейсом. Действующее зеркало сейчас даёт возможность миновать территориальные барьеры и продолжать игру.
Принципиальные выгоды использования зеркал:
– Безграничный доступ к персональному кабинету
– Сохранение любых данных счёта
– Аналогичный ассортимент игр
– Свежие вознаграждения и промо
Создание аккаунта на ресурсе
Процедура записи длится считанные минут. Недавние игроки зарабатывают богатый подарок за создание счёта, что в состоянии охватывать:
– Стартовый денежный приз
– Комплиментарные вращения для машин
– Эксклюзивные коды
– Усиленный возврат
Ради завершения регистрации необходимо:
1. Переместиться на центральный ресурс или альтернативу
2. Нажать кнопку «Зарегистрироваться»
3. Ввести личные сведения
4. Активировать мейл или телефон
5. Активировать код (при наличии)
Авторизация в собственный кабинет
Следом за успешной регистрации клиенты могут производить подключение используя центральный ресурс или функционирующее зеркало. Индивидуальный кабинет предоставляет всесторонний контроль над счётом:
– Летопись ставок
– Пополнение депозита
– Вывод денег
– Администрирование поощрениями
– Присутствие в турнирах
Поощрения и кампании казино
Сайт радует пользователей разнообразными поощрительными предложениями:
Вступительные бонусы
Дебютанты обретают внушительный комплект привилегий на вступительные вклады. Типично это содержит процентную надбавку к объёму вклада плюс даровые вращения.
Периодические предложения
– Каждонедельный возврат до 15%
– Конкурсы с премиальными банками
– Призы на годовщину рождения
– Уникальные предложения для элитных игроков
Программа лояльности
Деятельные клиенты зарабатывают единицы, что можно трансформировать на настоящие призы или специальные бонусы.
Мобильная вариант и программа
Современные инновации обеспечивают геймить всюду комфортно. Мобильная вариант сайта самостоятельно адаптируется под размер произвольного девайса.
Выгоды карманного программы:
– Моментальная открытие игр
– Комфортный облик
– Моментальные-сообщения о предложениях
– Способность инсталлировать для Android и iOS
Live казино: обстановка настоящего игорного клуба
Раздел Live заведения транспортирует клиентов в атмосферу настоящего развлекательного дома. Опытные дилеры организуют действие в виде реального времени.
Доступные игры:
– Колесо фортуны
– Блэкджек
– Карточная игра
– Покер
Игровые машины и азартные слоты
Собрание развлекательных автоматов включает массу наименований от топовых провайдеров. Любой пользователь подберёт автомат по нраву:
– Традиционные слоты
– Видеослоты с специальными раундами
– Накопительный-слоты
– Динамические игры
Соревнования и розыгрыши
Периодические турниры привносят драйв и дают опцию выиграть значительные призы. Участие в соревнованиях регулярно бесплатное, а призовые пулы достигают крупных величин.
Безопасность и секретность
Портал использует передовые методы защиты для защиты реквизитов геймеров. Все платёжные операции проходят через безопасные каналы.
Итог
Центральный сайт и его актуальные зеркала предоставляют устойчивый переход к превосходным игровым сервисам. Великодушные бонусы, эргономичная портативная форма, вариативность игр и компетентное Live-клуб формируют сайт отличным решением для ценителей азартных игр.
vendor link here – I discovered it today, looks like a solid place to check.
Highly descriptive blog, I loved that a lot. Will there be a part 2?
https://petmedsmonitor.com/# discount pet meds
Интересный взгляд на то, как ufc в феврале марте 2026 три недели которые встряхнут дивизионы отразятся на всех бойцах. Здесь подробности: https://terehov-event.ru/news/ufc-fevral-mart-2026-neochevidnye-prognozy-i-czepnaya-reakcziya-na-diviziony-chto-mozhet-slomat-plany-promoushena/
https://t.me/kingcasino_official/4 Используйте зеркало для стабильного доступа, а также следите за новостями и акциями на официальном Telegram-канале King Casino.
authkit – Found practical insights today; sharing this article with colleagues later.
Актуальные онлайн-казино предлагают клиентам обширный ассортимент слотов и привлекательные награды. Тем не менее для беспроблемной игры существенно знать, как отыскать казино Тейкер и его актуальные зеркала.
Что такое официальный сайт казино
Главный сайт казино — это основная система, где пользователи могут наслаждаться азартными слотами. Сайт функционирует на официальных правах и обладает всеми нужными разрешениями.
Первостепенные преимущества главного ресурса:
– Конфиденциальность личных данных
– Объективные правила участия
– Гарантированные платежи
– Оперативная помощь
Действующее зеркало казино: для чего нужно
Копия сайта — это точная клон лицензионного портала, размещенная по отличному домену. Рабочее зеркало создается для предоставления постоянного подключения к ресурсу.
Факторы использования альтернативных адресов:
– Ограничение главного сайта
– Технические процедуры
– Большая посещаемость на систему
Как найти свежее зеркало сейчас
Узнать новое действующее зеркало можно разными способами:
1. Email-уведомления — оформите подписку на информационную доставку
2. Отдел support — свяжитесь в онлайн-чат
3. Официальные медиа — отслеживайте за публикациями
4. Тематические ресурсы — надежные сайты
Регистрация на платформе казино
Этап регистрации составляет буквально немного секунд:
1. Нажмите на опцию “Регистрация”
2. Укажите запрашиваемые поля
3. Верифицируйте контактную адрес
4. Активируйте промокод, если доступен
После оконченной активации вам предоставится открыт персональный кабинет.
Награды и коды активации
Щедрая бонусная структура — значимое плюс казино:
Поощрение за регистрацию
Новые участники получают стартовый бонус, который может предполагать:
– Монетарный кредит на первый пополнение
– Бесплатные вращения для игровых машин
– Бездепозитные бонусы
Активационные коды
Постоянно появляются актуальные купоны, позволяющие активировать дополнительные поощрения.
Система компенсации
Лояльные участники возвращают долю проигранных денег назад.
Свежие акции и состязания
Ресурс регулярно организует захватывающие акции:
– Семидневные чемпионаты
– Сезонные акции
– Розыгрыши крупных призов
– Схема VIP-клуба
Логин в индивидуальный кабинет
Для авторизации на ресурс нужно:
1. Открыть главный портал или рабочее зеркало
2. Кликнуть “Авторизация”
3. Прописать никнейм и ключ
В индивидуальном аккаунте открыты данные опции:
– Пополнение депозита
– Получение денег
– Просмотр архива игр
– Настройка профильными данными
Адаптивная версия и софт
Адаптивная версия
Мобильная вариант сайта дает возможность делать ставки с разных портативного гаджета. Дизайн автоматически настраивается под диагональ screen.
Программа для download
Получить клиент можно для:
– Android — официальная установка с платформы
– iOS — установка через App Store
Выгоды программы:
– Оперативный старт
– Стабильная производительность
– Push-нотификации об предложениях
– Улучшенный UI
Игровые категории
Барабаны
Разнообразная библиотека развлекательных автоматов от лучших производителей:
– Традиционные игры
– Новые-слоты
– Джекпот-машины
Live игры
Секция с реальными крупье обеспечивает:
– Рулетки
– 21
– Punto Banco
– Texas Hold’em
Эфиры проводятся в высоком качестве, создавая эффект аутентичного казино.
Методы зачисления и вывода
Казино принимает различные финансовые инструменты:
– Дебетовые карты
– Виртуальные кошельки
– Bitcoin/Ethereum
– Банковские транзиты
Стартовые лимиты пополнения и скоростные платежи обеспечивают процесс крайне приятной.
Отдел помощи
Компетентная группа ассистентов работает 24/7 и может ассистировать с разными проблемами:
– Мгновенный-чат
– Email-помощь
– Phone линия
Резюме
Основной портал казино и его актуальные зеркала обеспечивают участникам защищенный и азартный развлекательный отдых. Выгодные поощрения, удобная адаптивная версия, обширные слоты и высокоуровневое live-казино создают эту платформу замечательным решением для игровых досуга.
мелбет зеркало на сегодня рабочее мелбет зеркало на сегодня рабочее .
see this shop – I checked this site earlier and the navigation seems simple and intuitive.
click best socks5 for carding 2025
securekit – Bookmarked this immediately, planning to revisit for updates and inspiration.
What impressed me about this casino https://sanremo.com.pl/ is the quality of the games. Everything runs smoothly, the design is clean, and there’s always something new to explore, which keeps it engaging.
guardstack – Color palette felt calming, nothing distracting, just focused, thoughtful design.
Актуальные онлайн-казино предоставляют игрокам обширный ассортимент игр и щедрые поощрения. Но для комфортной игры критично знать, как получить доступ к Taker и его действующие зеркала.
Что такое основной портал казино
Официальный сайт казино — это базовая веб-площадка, где пользователи могут развлекаться развлекательными развлечениями. Портал действует на законных правах и владеет всеми обязательными сертификатами.
Ключевые плюсы главного веб-сайта:
– Безопасность личных сведений
– Справедливые положения игры
– Обеспеченные транзакции
– Оперативная служба поддержки
Функционирующее зеркало казино: для чего используется
Копия сайта — это точная клон лицензионного портала, хостящаяся по другому URL. Актуальное зеркало создается для поддержания непрерывного доступа к ресурсу.
Основания эксплуатации зеркал:
– Ограничение официального адреса
– Технические процедуры
– Высокая нагрузка на платформу
Как обнаружить рабочее зеркало на сегодня
Узнать текущее рабочее зеркало можно различными способами:
1. Email-уведомления — зарегистрируйтесь на новостную подписку
2. Служба support — проконсультируйтесь в онлайн-чат
3. Корпоративные площадки — проверяйте за публикациями
4. Специализированные сайты — достоверные ресурсы
Оформление профиля на портале казино
Процедура оформления требует только немного секунд:
1. Выберите на опцию “Открыть счет”
2. Заполните необходимые данные
3. Верифицируйте email e-mail
4. Активируйте код активации, если предоставлен
После оконченной активации вам станет разрешен пользовательский аккаунт.
Премии и коды активации
Богатая бонусная структура — значимое плюс казино:
Поощрение за открытие счета
Новые участники приобретают первый поощрение, который может охватывать:
– Валютный счет на стартовый депозит
– Фриспины для игровых машин
– Приветственные бонусы
Бонусные коды
Регулярно появляются актуальные промокоды, предоставляющие получить особые привилегии.
Система кешбэка
Активные клиенты получают долю утраченных денег назад.
Действующие предложения и соревнования
Ресурс постоянно проводит увлекательные события:
– Семидневные соревнования
– Праздничные акции
– Конкурсы солидных призов
– Система лояльности
Доступ в персональный кабинет
Для доступа на портал необходимо:
1. Перейти на официальный сайт или функционирующее зеркало
2. Нажать “Авторизация”
3. Прописать логин и секретную комбинацию
В личном аккаунте разрешены данные функции:
– Зачисление баланса
– Обналичивание средств
– Просмотр архива транзакций
– Изменение персональными параметрами
Адаптивная версия и софт
Портативная версия
Оптимизированная модификация ресурса предоставляет шанс играть с различных смартфонного девайса. Дизайн динамически настраивается под формат монитора.
Приложение для установки
Получить клиент можно для:
– Android — безопасная download с портала
– iOS — загрузка через App Store
Преимущества приложения:
– Моментальный запуск
– Надежная работа
– Push-нотификации об промо
– Улучшенный интерфейс
Игровые разделы
Автоматы
Богатая коллекция эмуляторных автоматов от лучших разработчиков:
– Классические игры
– Продвинутые-игры
– Накопительные-автоматы
Live казино
Секция с профессиональными ведущими предлагает:
– European/American Roulette
– Блэкджек
– Baccarat
– Покер
Стримы ведутся в высоком качестве изображения, формируя эффект аутентичного казино.
Системы пополнения и получения
Казино обслуживает разные денежные методы:
– Дебетовые card
– Цифровые платежи
– Цифровые валюты
– Банковские транзиты
Наименьшие значения внесения и скоростные платежи гарантируют процесс предельно комфортной.
Департамент техподдержки
Квалифицированная команда поддержки оперирует 24/7 и готова поддержать с любыми задачами:
– Мгновенный-чат
– Email-поддержка
– Голосовая связь
Резюме
Лицензионный веб-сайт казино и его актуальные зеркала обеспечивают участникам защищенный и захватывающий игровой процесс. Выгодные награды, комфортная mobile вариант, разнообразные слоты и высокоуровневое live-казино формируют эту платформу замечательным вариантом для гемблинг развлечений.
Продолжение Уменьшение ндс
школа-пансион бесплатно shkola-onlajn-32.ru .
Обзор официального сайта
Современные сетевые казино обеспечивают пользователям широкий набор игр и опций. Официальный веб-сайт Vodka Casino предлагает безопасный путь к гемблинг возможностям.
Актуальное зеркало: вход на сегодня
Дублирующий портал служит собой идентичную дубликат основного сайта. Действующее зеркало позволяет пользователям избегать возможные барьеры.
Преимущества применения зеркала
Главные выгоды содержат:
– Постоянный вход к порталу
– Удержание абсолютно всех функций базового сайта
– Защита личных информации
– Аналогичный набор функций
Открытие счета на ресурсе
Ход открытия счета выделяется доступностью и комфортом. Недавние игроки должны:
1. Зайти на главный портал или его зеркало
2. Кликнуть на клавишу открытия счета
3. Внести обязательные поля
4. Активировать электронную ящик
5. Произвести стартовый логин
Подарок за оформление
Начинающие приобретают щедрый вступительный подарок. Такое вознаграждение в состоянии включать:
– Финансовые начисления
– Даровые вращения
– Повышенный уровень компенсации
Доступ в индивидуальный раздел
Действующие клиенты имеют возможность быстро зайти в собственный кабинет, задействуя учетные данные и код. Собственный профиль обеспечивает шанс к:
– Администрированию счетом
– Записям переводов
– Активным поощрениям
– Конфигурации учетной записи
Подарки и предложения
Портал периодически проводит различные предложения для пользователей.
Категории поощрений
Ключевые формы вознаграждений:
– Финансовые подарки – часть от размера депозита
– Прокруты – complimentary раунды в слотах
– Кэшбэк – компенсация фрагмента проигранных финансов
– Соревновательные призы – награды за выступление в состязаниях
Коды
Уникальные ваучеры дают возможность заработать дополнительные преимущества. Участники имеют возможность найти их на специализированных сайтах или приобрести в письмах.
Портативная редакция и app
Прогрессивные пользователи выбирают карманный игровой процесс.
Характеристики переносной версии
– Отзывчивый облик для разнообразных аппаратов
– Совокупный возможность к развлечениям
– Быстрая работа
– Практичное навигация
Download программу
Портативное программа предоставлено для downloading на аппараты с базовыми системами Android и iOS. Программа обеспечивает:
– Бесперебойную функциональность
– Всплывающие сообщения о призах
– Моментальный доступ к любимым слотам
Гемблинг каталог
Казино обеспечивает внушительную библиотеку гемблинг забав.
Слоты
Коллекция развлекательных аппаратов содержит:
– Традиционные машины
– Видео игры
– Прогрессивные игры
– Сюжетные игры
Live игры
Секция живых развлечений предоставляет возможность участвовать с профессиональными дилерами. Предложены:
– Европейская рулетка
– Очко
– Punto Banco
– Техасский холдем
Соревнования
Постоянные конкурсы дают возможность участникам бороться за внушительные финансовые банки. Конкурсная программа модифицируется постоянно.
Банковские транзакции
Платформа обеспечивает разнообразие способов внесения и получения финансов:
– Банковские карты
– Виртуальные кошельки
– Межбанковские транзакции
– Цифровые валюты
Все транзакции выполняются надежно с задействованием передовых протоколов шифрования.
Сервис помощи
Компетентная отдел саппорта действует постоянно. Коннектиться с специалистами доступно через:
– Онлайн чат
– Электронную почту
– Контактный номер
– Social платформы
Безопасность и лицензирование
Игровой клуб оперирует на базе действительной лицензии. Данное обеспечивает:
– Легальность развлекательного геймплея
– Охрану конфиденциальных информации
– Своевременные перечисления
– Контролируемый геймплей
Итог
Основной сайт и его функционирующие зеркала гарантируют участникам целостный комплекс услуг для комфортной и доходной времяпрепровождения. Значительные подарки, всевозможные игры, опытная сервис и защищенная платформа платежей создают ресурс идеальным решением для поклонников развлекательных игр.
patchkit – Content reads clearly, helpful examples made concepts easy to grasp.
look at more info meaning of bank fullz
online bazaar – The site feels organized and navigating through pages is simple.
opsbrain – Found practical insights today; sharing this article with colleagues later.
smartpipe – Appreciate the typography choices; comfortable spacing improved my reading experience.
taskpipe – Found practical insights today; sharing this article with colleagues later.
Pearl Market Spot – Simple layout, exploring sections feels smooth.
курсы стриминг shkola-onlajn-33.ru .
77win
пропашная лапа Обеспечьте бесперебойную работу вашего хозяйства с нашими комплектующими.
онлайн-школа для детей бесплатно онлайн-школа для детей бесплатно .
For opportunities
online casino canada welcome bonus
to improve your skills.
Simply desire to say your article is as surprising. The clarity in your post is simply nice and i could assume you’re an expert on this subject. Fine with your permission let me to grab your RSS feed to keep updated with forthcoming post. Thanks a million and please carry on the rewarding work.
http://shapok.com.ua/vstanovlennya-ambient-light-yak-idealno-2.html
школа онлайн школа онлайн .
Доступ к порталу и актуальные адреса
Актуальные виртуальные казино предоставляют игрокам широкий ассортимент опций. Главный портал Arkada зеркало обеспечивает защищенный переход ко всем возможностям. При этом порой происходят обстоятельства, когда нужно запасной вариант авторизации.
Что являет собой собой действующее зеркало
Актуальное зеркало — это точная версия основного ресурса с запасным интернет расположением. Зеркало сегодня помогает избегать потенциальные барьеры и гарантировать стабильный вход к выбранным играм.
Главное зеркало имеет полными возможностями, что и базовый портал:
– Совокупный список слотов
– Индивидуальный кабинет с зафиксированными информацией
– Актуальные подарки и программы
– Надежные платежные переводы
Оформление и доступ в сервис
Ход оформления на ресурсе длится буквально минут. Недавним игрокам требуется:
1. Открыть на рабочее зеркало сегодня
2. Щелкнуть элемент «Зарегистрироваться»
3. Внести требуемые сведения
4. Верифицировать электронную почту или информацию смартфона
5. Активировать награду за создание профиля
Авторизация в собственный раздел реализуется посредством указание никнейма и ключа.
Анализ наградной программы
Выгодная призовая структура — главное козырь казино. Игроки забирают всевозможные подарки:
Вступительные подарки
Недавние участники могут надеяться на значительный подарок за создание аккаунта. Традиционно это пакет возможностей, охватывающий:
– Процентную прибавку к начальному пополнению
– Бесплатные спины
– Extra финансы на баланс
Промо-коды и уникальные опции
Постоянные купоны помогают получать дополнительные преимущества. Использовать их допустимо в специальном окне персонального профиля.
Бесплатные вращения и возврат средств
Даровые вращения — это вариант вращать игры без применения своих денег. Возврат означает процентный компенсацию израсходованных денег.
Библиотека развлечений
Развлекательная площадка представляет внушительную базу развлечений.
Слоты
Разнообразие слотов поражает представление. Имеются традиционные 3-барабанные автоматы и современные автоматы с занимательной картинкой.
Live казино
Раздел Live казино помещает участников в атмосферу подлинного гемблинг заведения. Квалифицированные дилеры проводят раунды в реальном эфире.
Турниры и рейтинги
Периодические состязания вносят азарта и гарантируют шанс выиграть значительные награды.
Mobile реализация и софт
Новые решения помогают наслаждаться в любимом месте. Мобильная версия самостоятельно адаптируется под экран устройства.
Загрузить софт возможно для мобильных ОС iOS и Android. Софт гарантирует:
– Быстрый вход
– Надежную деятельность
– Моментальные-уведомления об промо
– Удобный вид
Банковские операции
Казино использует различные варианты депозита и вывода денег:
– Пластиковые системы
– Онлайн платформы
– Криптовалюты
– Денежные отправки
Любые действия реализуются через безопасное подключение, что защищает неприкосновенность приватных информации.
Департамент ассистанса
Опытная команда support функционирует круглосуточно. Соединиться с специалистами возможно через:
– Интерактивный-чат
– Электронную почту
– Связь
– Медиа сети
Заключение
Легальный ресурс и его действующее зеркало обеспечивают участникам надежный и легкий доступ к интересным играм. Привлекательные поощрения, обширный ассортимент автоматов и высокая сервис создают игру крайне комфортной и выгодной.
https://petmedsmonitor.shop/# pet pharmacy
look at this vendor site – Found this page and the sections are organized and easy to read.
1win dezactivare cont 1win38174.help
Very soon this website will be famous among
all blogging and site-building viewers, due to it’s nice content
my website – ac repair
Характеристика основного портала
Передовое онлайн-казино предлагает своим игрокам большой спектр возможностей и бонусов. Оригинальный сайт Мотор работает 24/7, предоставляя вход к топовым автоматам, live-казино и разнообразным предложениям.
Действующее зеркало: доступ к ресурсу
Что такое дубликат казино
Зеркало является собой полную копию официального ресурса с другим URL путем. Функционирующее зеркало обеспечивает игрокам миновать блокировки и иметь надежный доступ к выбранным играм.
Как найти текущее зеркало сегодня
Свежие URL на проверенное зеркало выкладываются через:
– Почтовую оповещение
– Официальные медийные сети
– Службу сопровождения
– Специализированные сайты
Регистрация на портале
Этапы созданияаккаунта
Регистрация занимает несколько минут и включает данные стадии:
1. Открытие на оригинальный портал или актуальное зеркало
2. Активация элемента “Регистрация”
3. Заполнение персональных данных
4. Подтверждение email или телефона
5. Установка пароля
Подарок за оформление
Начинающие клиенты зарабатывают выгодные приветственные бонусы:
– Финансовые средства на аккаунт
– Бесплатныевращения для симуляторов
– Повышенный объем кэшбека
– Особые купоны
Логин в индивидуальный счет
Активные пользователи способны выполнить доступ через главный веб-сайт или текущее зеркало. Для этого требуется набрать учетноеимя и секретнуюкомбинацию, созданные при оформлении.
Функции персонального раздела
В индивидуальном кабинете доступны такие инструменты:
– Редактирование персональными данными
– Пополнение счета
– Снятие призов
– Активация бонусов
– Отслеживание истории игр
– Участие в турнирах
Подарки и промо
Категории бонусов
Казино награждает своих участников различными поощрительными предложениями:
– Приветственный пакет — солидные подарки на дебютные пополнения
– Freespins — бонусные спины в известных слотах
– Компенсация — регулярный возврат суммы ставок
– План лояльности — уникальные льготы для регулярных клиентов
Купоны и их ввод
Специальные коды предоставляют бонусные подарки. Для использования следует ввести код в соответствующее поле в собственном профиле.
Развлекательный набор
Симуляторы
Коллекция игровых слотов включает тысячи вариантов от ведущих производителей:
– Стандартные машины
– Новые слоты
– Прогрессивные слоты
– Лицензионные слоты
Live казино
Раздел Live-казино предоставляет участие с настоящими крупье в обстановке актуального трансляции:
– Рулетка
– Очко
– Пунтобанко
– Карибскийпокер
Конкурсы
Постоянные состязания с крупными выигрышными призами организуются ежедневно. Игроки сражаются за лидерство в рейтинге.
Смартфонная реализация и приложение
Адаптивная платформа веб-сайта
Главный сайт полностью адаптирован для мобильных девайсов. Клиенты могут играть игры сразу через интернет-браузер без обязательства загрузки.
APP для инсталляции
Специальное мобильное софт доступно для загрузки на девайсы с программными платформами Android и iOS. APP обеспечивает:
– Моментальный вход к играм
– Устойчивую функциональность
– Push-сообщения о промо
– Комфортный дизайн
Итог
Оригинальный ресурс казино и его функционирующие дубликаты предоставляют клиентам абсолютный возможность к высококлассным игровым играм. Щедрые подарки, разнообразные предложения, комфортная мобильная платформа и компетентная помощь создают развлекательный опыт предельно приятным и доходным.
Обзор официального сайта
Новое онлайн-казино обеспечивает своим игрокам широкий набор развлечений и поощрений. Оригинальный портал Гама функционирует 24/7, гарантируя возможность к востребованным симуляторам, live-казино и многочисленным акциям.
Функционирующее зеркало: вход к сайту
Что такое зеркало казино
Копия представляет собой абсолютную дубликат основного веб-сайта с иным URL путем. Рабочее зеркало обеспечивает участникам преодолевать блокировки и получать надежный доступ к излюбленным играм.
Как найти действующее зеркало сегодня
Актуальные URL на проверенное зеркало выкладываются через:
– E-mail оповещение
– Главные публичные сети
– Сервис сопровождения
– Специализированные площадки
Регистрация на сайте
Процесс регистрации
Регистрация занимает буквально минут и содержит данные действия:
1. Открытие на оригинальный портал или актуальное зеркало
2. Клик кнопки “Регистрация”
3. Указание контактных сведений
4. Проверка адреса или номера
5. Придумывание пароля
Бонус за регистрацию
Свежие участники получают солидные стартовые подарки:
– Игровые депозиты на баланс
– Фриспины для автоматов
– Увеличенный процент компенсации
– Специальные ваучеры
Вход в личный профиль
Зарегистрированные пользователи вправе произвести вход через главный ресурс или текущее зеркало. Для этого следует ввести логин и код, сформированные при созданииаккаунта.
Опции личного раздела
В индивидуальном разделе имеются основные опции:
– Управление персональными данными
– Зачисление счета
– Получение призов
– Использование купонов
– Проверка истории транзакций
– Включение в конкурсах
Подарки и кампании
Разновидности подарков
Казино балует своих участников всевозможными призовыми программами:
– Начальный пакет — большие вознаграждения на начальные депозиты
– Freespins — дополнительные прокруты в топовых автоматах
– Кэшбек — еженедельный возврат процента потерь
– Система VIP — уникальные привилегии для постоянных клиентов
Коды и их ввод
Уникальные коды обеспечивают расширенные бонусы. Для активации нужно внести комбинацию в соответствующее графу в собственном аккаунте.
Геймплейный ассортимент
Симуляторы
Каталог развлекательных симуляторов вмещает массу вариантов от ведущих провайдеров:
– Классические автоматы
– Видео слоты
– Джекпот автоматы
– Брендовые автоматы
Live казино
Секция Live-казино дарит игру с живыми ведущими в обстановке актуального времени:
– Европейскаярулетка
– Blackjack
– Пунтобанко
– Карибскийпокер
Соревнования
Постоянные конкурсы с солидными наградными пулами проходят ежедневно. Соревнующиеся сражаются за лидерство в рейтинге.
Мобильная платформа и приложение
Адаптивная реализация ресурса
Главный ресурс на100% настроен для портативных аппаратов. Игроки могут запускать автоматы прямо через браузер без обязательства загрузки.
APP для загрузки
Официальное мобильное APP предоставляется для скачивания на аппараты с операционными платформами Android и iOS. APP предоставляет:
– Быстрый вход к развлечениям
– Устойчивую работу
– Мгновенные-уведомления о предложениях
– Удобный навигацию
Заключение
Главный сайт казино и его действующие альтернативы предоставляют игрокам полный доступ к высококлассным игровым услугам. Солидные вознаграждения, многочисленные кампании, функциональная смартфонная реализация и компетентная сервис превращают игровой опыт крайне приятным и выгодным.
I have been surfing online more than 3 hours these days, but I never found
any interesting article like yours. It’s lovely worth sufficient for me.
In my view, if all website owners and bloggers made good content
as you probably did, the internet shall be a lot more useful than ever
before.
My site :: Indie Watches on Product Hunt
website link MMN search
донна пицца саратов Не упустите шанс попробовать как классические, так и авторские варианты, от дрожжевого теста до пиццы в духовке.
get ed meds today: best ed pills online – online ed medicine
сайт still ma Фотостудия Still Ma в Самаре специализируется на создании высококачественных изображений для маркетплейсов и интернет-магазинов.
Юридические услуги Мы специализируемся на правовой поддержке как физических, так и юридических лиц, гарантируя высокое качество обслуживания и конфиденциальность.
Переход к платформе через актуальные зеркала
Участники онлайн казино регулярно встречаются с трудностью ограничения базового ресурса. Как раз для ликвидации этой проблемы предусмотрены копии основного ресурса. Глори сайт предоставляет стопроцентный переход ко всем возможностям казино.
Что такое актуальное зеркало казино
Дубликат значит собой идентичную дубликат главного сайта с таким же функционалом. Главное отличие — это другое имя. Любые сведения пользователя, содержа счет, поощрения и архив ставок, продолжают быть неизменными.
Выгоды применения зеркал
Рабочие зеркала характеризуются набором существенных плюсов:
– Бесперебойный переход к любимым развлечениям
– Абсолютная безопасность персональных информации
– Удержание всех конфигураций индивидуального кабинета
– Шанс взятия наград и присутствия в предложениях
Создание аккаунта на основном ресурсе
Процедура создания аккаунта максимально легок и требует пару минут. Свежие игроки в состоянии претендовать на щедрый вводный бонус за открытие счета.
Стадии открытия аккаунта
1. Подключение на основной ресурс или его альтернативу
2. Выбор на элемент “Регистрация”
3. Заполнение требуемых данных
4. Активация электронной почты
5. Указание купона (когда есть)
Награды и акции для клиентов
Игровая площадка одаривает своих пользователей различными бонусными программами.
Главные типы поощрений
Приветственный пакет — солидное вознаграждение для начинающих клиентов, которое в состоянии вмещать денежные суммы и бесплатные вращения.
Free spins — способность крутить в известных аппаратах бесплатно.
Кэшбек — процентный возврат израсходованных денег, который начисляется еженедельно или помесячно.
Специальные коды — особые комбинации, обеспечивающие экстра выгоды.
Пользовательский кабинет: опции и установки
Персональный профиль дает совершенный регулирование над персональным активностью. Тут присутствуют:
– Контроль депозитом
– История переводов
– Действующие привилегии
– Параметры защиты
– Подтверждение счета
Карманная вариант и софт
Современные игроки признают доступность. Ресурс обеспечивает 2 пути для развлечений с карманных гаджетов.
Приспособленная смартфонная редакция
Мобильная платформа сайта самостоятельно приспосабливается под монитор любого аппарата. Отсутствует потребность загружать особое приложение.
Приложение для мобильных
Возможно инсталлировать официальное программу для iOS и Android. Софт обеспечивает:
– Моментальный вход
– Доработанный графику
– Оперативные-извещения о акциях
– Стабильную производительность
Live развлечения: антураж подлинного казино
Категория Live казино отправляет пользователей в атмосферу настоящего клуба. Опытные дилеры организуют сессии в режиме реального времени.
Топовые Live-игры
– Рулетка
– Двадцать одно
– Баккара
– Poker
Слоты: выбор слотов
Собрание игровых слотов вмещает тысячи наименований от лидирующих производителей. Клиенты откроют:
– Стандартные аппараты
– Графические слоты
– Джекпот-автоматы
– Многолинейные автоматы
Конкурсы и уникальные события
Регулярные турниры позволяют пользователям соревноваться друг с другом за крупные наградные фонды. Отдельный турнир располагает свои требования участия и список победителей.
Способы зачисления и снятия сумм
Ресурс поддерживает массу финансовых инструментов:
– Платежные средства
– Онлайн счета
– Криптовалюты
– Финансовые транзиты
Каждые платежи реализуются безопасно благодаря актуальным методам защиты.
Сервис support
Опытные операторы команды помощи способны содействовать 24/7. Доступны нижеперечисленные пути контакта:
– Онлайн-чат
– Email-сервис
– Телефонная связь
– Социальные сети
Итог
Основной ресурс клуба и его актуальные дубликаты дают участникам защищенный и удобный подход к огромному спектру развлекательных развлечений. Внушительные поощрения, постоянные промоакции, профессиональная поддержка и легкие денежные системы превращают игровой времяпрепровождение предельно увлекательным и выгодным.
ворота дорхан Свяжитесь с нами, чтобы подобрать оптимальное решение для вашего дома или бизнеса.
Переход к порталу через актуальные зеркала
Нынешние онлайн казино предоставляют клиентам круглосуточный переход к сервисам. Главный сайт казино Леон оперирует устойчиво, предоставляя обширный ассортимент азартных автоматов. Впрочем временами формируются цифровые препятствия или запреты, в связи с чем критично понимать о наличии актуальных зеркал.
Что собой представляет собой основное зеркало казино
Зеркало — это полная дубликат главного портала с таким же возможностями. Актуальное зеркало сейчас позволяет преодолевать местные барьеры и поддерживать развлечения.
Принципиальные преимущества эксплуатации зеркал:
– Полный доступ к индивидуальному кабинету
– Удержание всех сведений профиля
– Аналогичный спектр автоматов
– Текущие поощрения и предложения
Оформление на сайте
Механизм записи требует немного минут. Начинающие геймеры зарабатывают привлекательный поощрение за регистрацию, который в состоянии содержать:
– Стартовый денежный приз
– Бесплатные фриспины для игр
– Особые ваучеры
– Усиленный кэшбек
Ради финализации записи необходимо:
1. Войти на основной сайт или зеркало
2. Кликнуть элемент «Регистрация»
3. Указать контактные данные
4. Заверить email или контакт
5. Задействовать купон (если есть доступности)
Подключение в личный кабинет
После корректной создания аккаунта геймеры имеют возможность совершать вход через официальный веб-сайт или функционирующее зеркало. Персональный кабинет даёт полный управление над аккаунтом:
– Архив пари
– Пополнение депозита
– Получение средств
– Регулирование привилегиями
– Включение в конкурсах
Награды и кампании казино
Портал награждает клиентов многочисленными поощрительными системами:
Начальные поощрения
Дебютанты приобретают щедрый набор наград на вступительные депозиты. Как правило это включает частичную прибавку к объёму депозита плюс бесплатные кручения.
Регулярные предложения
– Раз в неделю возврат до 15%
– Турниры с премиальными фондами
– Подарки на дату рождения
– Эксклюзивные акции для элитных пользователей
Программа лояльности
Деятельные игроки получают единицы, они возможно конвертировать на реальные призы или особые льготы.
Портативная версия и программа
Актуальные инновации дают возможность геймить в любом месте удобно. Карманная редакция портала независимо приспосабливается под дисплей всякого гаджета.
Плюсы мобильного софта:
– Скоростная подгрузка развлечений
– Комфортный облик
– Мгновенные-сообщения о промо
– Возможность инсталлировать для Android и iOS
Live казино: обстановка реального азартного заведения
Область Live клуба транспортирует клиентов в среду истинного азартного учреждения. Компетентные крупье организуют игру в виде реального времени.
Доступные игры:
– Колесо фортуны
– Карточная игра
– Punto Banco
– Техасский холдем
Слоты и игровые аппараты
Собрание азартных автоматов насчитывает множество названий от ведущих провайдеров. Любой клиент подберёт игру по вкусу:
– Стандартные автоматы
– Современные автоматы с специальными этапами
– Крупный приз-машины
– Динамические машины
Состязания и акции
Постоянные соревнования добавляют драйв и дают шанс заработать крупные вознаграждения. Включение в соревнованиях нередко даровое, а наградные суммы доходят до крупных сумм.
Безопасность и конфиденциальность
Сайт задействует передовые методы шифрования для гарантии данных клиентов. Каждые финансовые процедуры выполняются через зашифрованные каналы.
Резюме
Официальный портал и его рабочие зеркала гарантируют надёжный вход к превосходным игровым сервисам. Привлекательные поощрения, практичная карманная редакция, вариативность игр и квалифицированное Live-игорный дом создают сайт отличным решением для фанатов гемблинг игр.
warehouse store page – Quick page loads and a neat layout make navigation effortless.
Helpful information. Fortunate me I discovered your site by chance,
and I’m surprised why this twist of fate didn’t took place in advance!
I bookmarked it.
Feel free to surf to my page: air conditioning
Someone necessarily assist to make severely posts I’d state.
That is the very first time I frequented your web page
and so far? I amazed with the analysis you made to make this particular
publish amazing. Magnificent job!
Lavender Treasure Online – Clear layout, browsing pages is simple.
Характеристика главного ресурса
Прогрессивные онлайн казино предоставляют пользователям широкий выбор игр и шансов. Главный ресурс Лаки Ворлд казино гарантирует безопасный вход к игровым услугам.
Актуальное зеркало: доступ прямо сейчас
Резервный сайт выступает собой абсолютную дубликат основного веб-сайта. Действующее зеркало дает возможность клиентам миновать возможные барьеры.
Достоинства эксплуатации зеркала
Основные преимущества предполагают:
– Непрерывный вход к сайту
– Сохранение абсолютно всех опций основного веб-сайта
– Охрана конфиденциальных сведений
– Идентичный инструментарий
Открытие счета на портале
Ход регистрации выделяется понятностью и удобством. Новые игроки необходимо:
1. Посетить официальный сайт или его зеркало
2. Нажать на пункт оформления
3. Ввести нужные поля
4. Активировать email ящик
5. Произвести дебютный вход
Бонус за регистрацию
Дебютанты забирают значительный вступительный презент. Такое премия способно предусматривать:
– Денежные начисления
– Complimentary вращения
– Повышенный показатель кэшбэка
Логин в собственный кабинет
Зарегистрированные игроки имеют возможность быстро авторизоваться в личный профиль, используя никнейм и ключ. Личный профиль дает возможность к:
– Регулированию балансом
– Записям транзакций
– Работающим поощрениям
– Опциям профиля
Бонусы и промо
Сайт систематически проводит всевозможные мероприятия для пользователей.
Разновидности призов
Главные типы призов:
– Финансовые призы – коэффициент от размера взноса
– Бесплатные вращения – бесплатные раунды в слотах
– Кэшбэк – отдача части затраченных средств
– Турнирные вознаграждения – призы за игру в конкурсах
Ваучеры
Эксклюзивные коды дают возможность получить экстра преимущества. Участники способны обнаружить их на аффилиатных сайтах или взять в уведомлениях.
Мобильная адаптация и программа
Современные игроки ценят портативный геймплей.
Характеристики переносной версии
– Отзывчивый дизайн для всех девайсов
– Абсолютный путь к автоматам
– Оперативная работа
– Комфортное контроль
Установить приложение
Мобильное программа предоставлено для скачивания на гаджеты с базовыми системами Android и iOS. App предоставляет:
– Устойчивую деятельность
– Push уведомления о акциях
– Быстрый запуск к предпочитаемым автоматам
Развлекательный ассортимент
Казино предоставляет обширную подборку игровых забав.
Аппараты
Ассортимент азартных машин включает:
– Стандартные игры
– Современные автоматы
– Накопительные игры
– Лицензионные автоматы
Live казино
Область лайв развлечений предлагает возможность соревноваться с живыми ведущими. Представлены:
– Рулетки
– Очко
– Baccarat
– Техасский холдем
Турниры
Периодические турниры позволяют клиентам состязаться за солидные наградные суммы. Турнирная структура изменяется еженедельно.
Денежные процедуры
Казино обеспечивает разнообразие методов пополнения и обналичивания финансов:
– Дебетовые карточки
– Электронные кошельки
– Межбанковские транзакции
– Bitcoin
Совокупные переводы производятся конфиденциально с использованием современных протоколов криптографии.
Департамент support
Квалифицированная группа помощи трудится круглосуточно. Коннектиться с специалистами можно через:
– Онлайн чат
– Email почту
– Горячую линию
– Соц медиа
Безопасность и аккредитация
Казино работает на фундаменте легальной сертификата. Данное гарантирует:
– Прозрачность развлекательного действа
– Охрану конфиденциальных информации
– Быстрые выплаты
– Легальный гемблинг
Итог
Главный веб-сайт и его актуальные дубликаты дают пользователям полный комплекс опций для удобной и прибыльной досуга. Солидные подарки, различные игры, профессиональная поддержка и защищенная структура выплат делают платформу лучшим вариантом для фанатов гемблинг забав.
this post how to create a jabber account
Передовые онлайн-казино предлагают клиентам обширный набор развлечений и выгодные награды. Но для беспроблемной времяпрепровождения критично знать, как обнаружить Cactus Casino и его рабочие зеркала.
Что такое лицензионный веб-ресурс казино
Лицензионный ресурс казино — это базовая система, где пользователи могут пользоваться азартными слотами. Платформа действует на официальных условиях и обладает всеми обязательными сертификатами.
Ключевые выгоды главного сайта:
– Безопасность персональных сведений
– Справедливые требования участия
– Стабильные платежи
– Профессиональная поддержка
Актуальное зеркало казино: для чего нужно
Зеркало — это идентичная клон лицензионного сайта, размещенная по иному URL. Рабочее зеркало создается для предоставления бесперебойного входа к порталу.
Причины задействования альтернативных адресов:
– Блокировка официального домена
– Плановые процедуры
– Повышенная посещаемость на ресурс
Как найти свежее зеркало в данный момент
Узнать текущее проверенное зеркало можно разными путями:
1. Подписка — активируйте уведомления на email рассылку
2. Отдел техподдержки — напишите в онлайн-чат
3. Корпоративные площадки — следите за новостями
4. Тематические сайты — авторитетные ресурсы
Оформление профиля на портале казино
Процесс регистрации длится лишь несколько мгновений:
1. Активируйте на элемент “Создать аккаунт”
2. Укажите необходимые данные
3. Верифицируйте электронную почту
4. Примените код активации, если доступен
По завершении оконченной оформления вам откроется открыт личный кабинет.
Бонусы и купоны
Богатая премиальная программа — важное плюс казино:
Награда за создание аккаунта
Начинающие игроки зарабатывают первый подарок, который может охватывать:
– Валютный бонус на начальный пополнение
– Фриспины для автоматов
– Приветственные деньги
Купоны
Регулярно выходят эксклюзивные коды, позволяющие использовать специальные поощрения.
Механизм возврата средств
Постоянные участники получают порцию использованных ставок назад.
Свежие предложения и соревнования
Ресурс систематически проводит интересные акции:
– Weekly чемпионаты
– Специальные бонусы
– Лотереи крупных наград
– Система привилегий
Доступ в пользовательский раздел
Для входа на сайт следует:
1. Посетить официальный адрес или действующее зеркало
2. Нажать “Вход”
3. Прописать логин и ключ
В персональном разделе предоставлены такие функции:
– Зачисление баланса
– Обналичивание выигрышей
– Проверка журнала операций
– Изменение индивидуальными параметрами
Mobile модификация и app
Адаптивная модификация
Мобильная вариант портала предоставляет шанс развлекаться с различных портативного телефона. Визуал адаптивно настраивается под размер screen.
Программа для загрузки
Загрузить приложение можно для:
– Android — непосредственная download с портала
– iOS — загрузка через App Store
Плюсы программы:
– Моментальный вход
– Надежная работа
– Push-уведомления об бонусах
– Оптимизированный функционал
Развлекательные секции
Игровые машины
Внушительная библиотека развлекательных барабанов от известных поставщиков:
– Стандартные игры
– Видео-игры
– Прогрессивные-слоты
Live игры
Категория с профессиональными дилерами предоставляет:
– European/American Roulette
– Двадцать одно
– Мини-баккара
– Карточные игры
Трансляции осуществляются в отличном разрешении, создавая ощущение аутентичного казино.
Варианты пополнения и снятия
Ресурс поддерживает различные финансовые методы:
– Банковские карты
– Электронные кошельки
– Crypto
– Прямые транзакции
Стартовые значения внесения и скоростные выводы делают процесс максимально комфортной.
Служба техподдержки
Опытная служба помощи оперирует 24/7 и готова поддержать с любыми ситуациями:
– Живой-чат
– Email-переписка
– Голосовая связь
Выводы
Главный портал казино и его функционирующие копии предоставляют участникам конфиденциальный и увлекательный игровой отдых. Выгодные подарки, удобная мобильная версия, обширные развлечения и профессиональное live-казино превращают эту площадку отличным местом для развлекательных развлечений.
mostbet ставки на киберспорт http://mostbet58041.help
Hey There. I discovered your weblog the usage of msn.
That is an extremely smartly written article. I will make sure to bookmark it
and come back to learn more of your helpful info.
Thank you for the post. I will certainly return.
Here is my webpage :: round dining tables
where can i get ed pills Mens RX Index Mens RX Index
http://certifiedcanadarx.com/# Certified Canada Rx
pet rx: Vet Rx Index – pet meds online
Обзор основного портала
Актуальные онлайн казино обеспечивают игрокам широкий выбор развлечений и шансов. Основной сайт Гонзо казино обеспечивает защищенный возможность к азартным услугам.
Рабочее зеркало: возможность в настоящий момент
Резервный сайт представляет в качестве абсолютную версию главного веб-сайта. Действующее зеркало позволяет участникам избегать возможные ограничения.
Выгоды эксплуатации зеркала
Ключевые преимущества предполагают:
– Беспрерывный доступ к платформе
– Удержание полных характеристик официального веб-сайта
– Безопасность конфиденциальных материалов
– Равнозначный функционал
Открытие счета на портале
Ход регистрации выделяется понятностью и практичностью. Начинающие клиенты необходимо:
1. Перейти на лицензионный сайт или его зеркало
2. Кликнуть на элемент регистрации
3. Заполнить нужные данные
4. Активировать электронную ящик
5. Осуществить дебютный доступ
Бонус за регистрацию
Начинающие зарабатывают внушительный стартовый бонус. Такое вознаграждение может предусматривать:
– Монетарные бонусы
– Complimentary спины
– Повышенный показатель кэшбека
Логин в персональный раздел
Существующие клиенты имеют возможность мгновенно авторизоваться в персональный кабинет, применяя никнейм и код. Индивидуальный профиль дает возможность к:
– Администрированию балансом
– Хронологии переводов
– Действующим подаркам
– Настройкам профиля
Вознаграждения и кампании
Портал периодически устраивает многочисленные мероприятия для клиентов.
Виды поощрений
Ключевые категории бонусов:
– Пополнительные начисления – часть от объема взноса
– Прокруты – бесплатные прокруты в автоматах
– Кэшбек – возврат части затраченных финансов
– Турнирные призы – награды за участие в конкурсах
Промокоды
Эксклюзивные промокоды дают возможность заработать экстра привилегии. Клиенты в состоянии отыскать их на тематических порталах или приобрести в рассылке.
Портативная вариант и приложение
Прогрессивные гемблеры предпочитают переносной гейминг.
Функции мобильной платформы
– Гибкий дизайн для разнообразных аппаратов
– Полный доступ к слотам
– Оперативная подгрузка
– Комфортное использование
Download программу
Mobile приложение предложено для downloading на устройства с операционными системами Android и iOS. Приложение дает:
– Надежную работу
– Push сообщения о предложениях
– Мгновенный путь к избранным играм
Азартный ассортимент
Портал обеспечивает богатую коллекцию азартных игр.
Слоты
Коллекция развлекательных машин насчитывает:
– Обычные игры
– Video слоты
– Джекпотные автоматы
– Branded игры
Live столы
Раздел реальных развлечений предоставляет возможность соревноваться с живыми дилерами. Представлены:
– Американская рулетка
– Блэкджек
– Баккара
– Техасский холдем
Соревнования
Регулярные чемпионаты обеспечивают клиентам соревноваться за солидные финансовые пулы. Конкурсная программа изменяется регулярно.
Платежные процедуры
Казино предлагает обилие вариантов внесения и снятия сумм:
– Кредитные карточки
– Цифровые счета
– Межбанковские транзакции
– Bitcoin
Абсолютно все операции осуществляются безопасно с использованием прогрессивных протоколов криптографии.
Служба поддержки
Опытная команда support действует постоянно. Обратиться с операторами реально через:
– Online чат
– Электронную почту
– Телефон
– Социальные сети
Охрана и аккредитация
Портал работает на основании законной аккредитации. Такое подтверждает:
– Прозрачность азартного действа
– Защиту личных сведений
– Пунктуальные выводы
– Ответственный геймплей
Резюме
Главный сайт и его рабочие резервные страницы гарантируют пользователям полный спектр опций для комфортной и прибыльной досуга. Внушительные подарки, многочисленные слоты, профессиональная служба и надежная платформа платежей создают портал превосходным решением для поклонников азартных услуг.
Переход к порталу через проверенные зеркала
Актуальные виртуальные казино обеспечивают геймерам круглосуточный доступ к играм. Официальный ресурс 888старз оперирует бесперебойно, гарантируя обширный спектр развлекательных слотов. Однако временами формируются программные проблемы или ограничения, в связи с чем важно быть осведомлённым о существовании актуальных зеркал.
Что означает из себя главное зеркало казино
Зеркало — это точная копия центрального ресурса с схожим интерфейсом. Актуальное зеркало сейчас даёт возможность обходить локальные барьеры и поддерживать гемблинг.
Главные выгоды задействования зеркал:
– Абсолютный вход к собственному кабинету
– Поддержание совокупных показателей аккаунта
– Аналогичный набор развлечений
– Свежие поощрения и промо
Открытие счёта на платформе
Процесс оформления требует считанные минут. Новые пользователи приобретают привлекательный приз за регистрацию, он может охватывать:
– Начальный денежный подарок
– Даровые фриспины для автоматов
– Эксклюзивные промокоды
– Усиленный компенсацию
Ради окончания оформления нужно:
1. Зайти на главный сайт или альтернативу
2. Выбрать клавишу «Создать аккаунт»
3. Ввести личные реквизиты
4. Верифицировать почтовый адрес или мобильный
5. Применить код (когда имеется существовании)
Авторизация в личный кабинет
По завершении успешной создания аккаунта игроки способны выполнять доступ используя главный портал или действующее зеркало. Собственный кабинет даёт всесторонний контроль над учётной записью:
– Летопись ставок
– Ввод баланса
– Вывод выигрышей
– Контроль привилегиями
– Включение в соревнованиях
Бонусы и кампании казино
Ресурс награждает игроков различными бонусными схемами:
Приветственные подарки
Дебютанты зарабатывают внушительный пакет привилегий на вступительные вклады. Обычно это предполагает процентную доплату к величине пополнения плюс даровые спины.
Постоянные кампании
– Седмичный кешбэк до 15%
– Турниры с наградными банками
– Подарки на годовщину рождения
– Эксклюзивные акции для статусных клиентов
Схема лояльности
Деятельные геймеры накапливают единицы, они допустимо конвертировать на реальные деньги или уникальные привилегии.
Мобильная форма и утилита
Актуальные технологии обеспечивают участвовать в любом месте комфортно. Карманная версия портала независимо настраивается под монитор произвольного аппарата.
Плюсы мобильного ПО:
– Скоростная загрузка развлечений
– Эргономичный интерфейс
– Всплывающие-сообщения о акциях
– Шанс загрузить для Android и iOS
Живое казино: атмосфера подлинного игорного заведения
Раздел Live игорного дома переносит геймеров в среду настоящего гемблинг клуба. Квалифицированные операторы управляют игру в формате реального времени.
Предлагаемые игры:
– Рулетка
– Карточная игра
– Баккара
– Покер
Барабаны и гемблинг аппараты
Каталог игровых машин насчитывает тысячи вариантов от передовых студий. Каждый геймер обнаружит слот по желанию:
– Стандартные барабаны
– Инновационные игры с призовыми раундами
– Накопительный-автоматы
– Мегавейс автоматы
Конкурсы и розыгрыши
Периодические турниры привносят азарт и обеспечивают возможность обрести значительные суммы. Вовлечение в конкурсах нередко даровое, а премиальные суммы доходят до значительных величин.
Секьюрити и приватность
Платформа эксплуатирует передовые системы криптографии для защиты информации пользователей. Любые транзакционные процедуры осуществляются через охраняемые линии.
Резюме
Главный ресурс и его действующие зеркала гарантируют надёжный подключение к отличным игровым сервисам. Щедрые призы, удобная мобильная версия, вариативность машин и профессиональное Live-заведение превращают ресурс превосходным опцией для фанатов азартных развлечений.
Hi, I do think this is an excellent web site. I stumbledupon it 😉 I am going to return yet again since i have bookmarked it.
Money and freedom is the best way to change, may you be rich and continue to help other
people.
Here is my web site Lubbock construction
go to the site – Well-arranged pages make browsing fast and intuitive.
Orchard Vault – Neatly structured pages, navigation is straightforward.
Современные онлайн-казино гарантируют клиентам богатый набор развлечений и выгодные поощрения. Впрочем для стабильной времяпрепровождения существенно знать, как обнаружить казино РџРёРЅРєРѕ и его действующие зеркала.
Что такое лицензионный сайт казино
Главный портал казино — это базовая система, где игроки могут пользоваться гемблинг развлечениями. Сайт работает на легитимных основаниях и располагает всеми обязательными сертификатами.
Основные выгоды основного портала:
– Надежность индивидуальных сведений
– Прозрачные правила игры
– Обеспеченные выплаты
– Оперативная поддержка
Рабочее зеркало казино: для чего нужно
Копия сайта — это точная версия основного ресурса, расположенная по иному веб-адресу. Функционирующее зеркало формируется для поддержания постоянного входа к ресурсу.
Поводы применения зеркал:
– Блокировка главного адреса
– Профилактические процедуры
– Высокая активность на систему
Как получить актуальное зеркало сегодня
Узнать свежее рабочее зеркало можно разными вариантами:
1. Рассылка — подпишитесь на email доставку
2. Команда техподдержки — напишите в онлайн-чат
3. Социальные медиа — мониторьте за постами
4. Партнерские сайты — авторитетные ресурсы
Создание аккаунта на ресурсе казино
Процедура открытия счета требует всего считанные моментов:
1. Кликните на опцию “Открыть счет”
2. Внесите требуемые поля
3. Подтвердите почтовую e-mail
4. Активируйте бонусный код, если доступен
Сразу после оконченной оформления вам будет разрешен личный кабинет.
Поощрения и коды активации
Выгодная бонусная система — ключевое конкурентное преимущество казино:
Подарок за регистрацию
Первичные пользователи получают первый поощрение, который может охватывать:
– Денежный кредит на стартовый пополнение
– Фри-спины для игровых машин
– Бездепозитные деньги
Купоны
Систематически размещаются эксклюзивные коды, предоставляющие использовать особые преимущества.
Механизм компенсации
Лояльные клиенты приобретают порцию потраченных финансов назад.
Актуальные промо и состязания
Платформа периодически организует интересные промо-мероприятия:
– Семидневные соревнования
– Специальные бонусы
– Раздачи солидных подарков
– Механизм статусов
Вход в пользовательский раздел
Для логина на портал необходимо:
1. Загрузить официальный адрес или рабочее зеркало
2. Кликнуть “Авторизация”
3. Внести email и код доступа
В индивидуальном аккаунте открыты данные функции:
– Пополнение депозита
– Вывод средств
– Анализ лога операций
– Изменение профильными данными
Портативная платформа и app
Mobile модификация
Оптимизированная вариант сайта обеспечивает играть с различных мобильного девайса. Визуал динамически адаптируется под размер screen.
Программа для загрузки
Получить приложение можно для:
– Android — прямая download с сайта
– iOS — инсталляция через App Store
Выгоды приложения:
– Оперативный доступ
– Устойчивая работа
– Push-нотификации об бонусах
– Производительный интерфейс
Азартные секции
Барабаны
Богатая коллекция развлекательных слотов от известных разработчиков:
– Классические игры
– Новые-слоты
– Прогрессивные-слоты
Live казино
Категория с живыми крупье предлагает:
– Рулетки
– Блэкджек
– Punto Banco
– Texas Hold’em
Эфиры осуществляются в отличном формате, создавая атмосферу аутентичного казино.
Варианты депозита и получения
Казино работает с разные денежные системы:
– Платежные картсчета
– Виртуальные системы
– Цифровые валюты
– Прямые транзакции
Стартовые лимиты внесения и быстрые транзакции гарантируют процесс максимально беспроблемной.
Служба техподдержки
Квалифицированная служба support работает 24/7 и может содействовать с разными ситуациями:
– Онлайн-чат
– Email-консультации
– Звонковая горячая линия
Выводы
Основной веб-сайт казино и его функционирующие дубликаты гарантируют пользователям конфиденциальный и азартный гемблинг отдых. Богатые бонусы, простая мобильная версия, богатые игры и качественное live-казино превращают эту площадку превосходным местом для игровых развлечений.
this online vendor hub – Ran into this page today and navigating it feels effortless.
Передовые онлайн-казино предлагают игрокам широкий набор услуг и поощрительных программ. Доступ к ресурсу выполняется через официальный ресурс или его актуальное зеркало 888, что дает непрерывную игру.
В чем суть актуальное зеркало казино
Альтернатива — это точная реплика главного портала, созданная для устранения запретов. Рабочее зеркало позволяет пользователям иметь соединение к предпочитаемым играм в каждое время.
Проверенное зеркало имеет всеми опциями оригинального веб-сайта:
– Целый список автоматов
– Профиль с сохраненными параметрами
– Свежие акции
– Надежные платежные действия
Оформление профиля на лицензионном веб-сайте
Процесс открытия счета занимает всего пару минут. Первым игрокам необходимо:
1. Войти на официальный сайт или действующее зеркало
2. Кликнуть на кнопку “Зарегистрироваться”
3. Указать нужные данные
4. Подтвердить адрес
5. Сделать стартовый вклад
Бонус за регистрацию начисляется автоматически после окончания всех шагов.
Доступ в профиль
Зарегистрированные клиенты могут выполнить подключение указывая:
– Имя пользователя и шифр
– Цифры сотового
– Email
Личный кабинет дает доступ к регулированию балансом, записям игр и действующим поощрениям.
Поощрения и предложения
Развлекательная платформа привлекает активных пользователей выгодными поощрениями:
Начальный пакет
– Надбавка на стартовый взнос до 100%
– Бесплатные вращения на топовые автоматы
– Экстра поощрения за очередные депозиты
Ваучеры
Эксклюзивные коды открывают шанс на получение уникальных бонусов. Актуальные комбинации размещаются в категории “Промо”.
Возврат средств
Еженедельный кешбэк составляет до 10% от утраченных денег. Возврат предоставляется моментально.
Система лояльности
Активные пользователи получают баллы, которые переводятся на подлинные средства или даровые спины.
Mobile версия и программа
Для практичности клиентов построена качественная мобильная версия. Адаптивный дизайн обеспечивает беспрепятственно играть с любого переносного устройства.
Выгоды программы:
– Быстрый вход к автоматам
– Адаптированный дизайн
– Устойчивая работа
– Нотификации о актуальных бонусах
Получить приложение можно безвозмездно с официального портала для аппаратов на Android и iOS.
Ассортимент игр
Автоматы
Библиотека насчитывает более 2000 слотов от ведущих студий:
– Классические слоты
– Мультимедийные игры
– Джекпот-слоты
– Тематические слоты
Live казино
Категория Live игр дает игру с живыми крупье в живом эфире:
– Колесо фортуны
– Карточная игра
– Punto Banco
– Карточный покер
Состязания
Регулярные конкурсы с большими призовыми фондами запускаются каждую неделю. Участие в соревнованиях доступно всем активным клиентам.
Денежные методы
Пополнения и снятия выплат выполняются через популярные сервисы:
– Банковские пластик
– Цифровые кошельки
– Крипто
– Прямые платежи
Стартовый платеж — от 100 рублей. Вывод финансов проводится в течение 24 ч.
Сервис поддержки
Непрерывная отдел помощи способна ассистировать в исправлении любых проблем:
– Мессенджер
– Email
– Телефон
– Соц сети
Охрана и документ
Подлинный портал действует на почве глобальной разрешения. Каждые параметры игроков закрыты актуальным SSL-кодированием.
Резюме
Актуальное зеркало дает бесперебойный соединение к излюбленным слотам, богатым поощрениям и практичным сервисам. Откройте счет сегодня и приобретите приветственный подарок!
диск на культиватор В нашем магазине вы найдете широкий выбор сельхоз запчастей, включая высококачественные пропашные лапы и диски для культиваторов.
What stood out about this casino https://visaviszamku.pl/ is the variety of the games. Everything runs smoothly, the design is clean, and there’s plenty of options to explore, which keeps it engaging.
мелбет букмекерская контора мобильная версия мелбет букмекерская контора мобильная версия .
Нынешние онлайн-казино обеспечивают клиентам богатый ассортимент слотов и выгодные бонусы. Однако для беспроблемной игры критично знать, как найти Лаки Ворлд и его рабочие зеркала.
Что такое официальный сайт казино
Официальный портал казино — это главная веб-площадка, где клиенты могут наслаждаться развлекательными играми. Платформа действует на официальных условиях и владеет всеми требуемыми лицензиями.
Первостепенные достоинства официального веб-сайта:
– Конфиденциальность индивидуальных информации
– Прозрачные положения игры
– Гарантированные выплаты
– Профессиональная техподдержка
Актуальное зеркало казино: для чего необходимо
Альтернативный адрес — это идентичная дубликат главного сайта, находящаяся по отличному веб-адресу. Действующее зеркало создается для гарантирования постоянного подключения к ресурсу.
Причины задействования альтернативных адресов:
– Блокировка официального URL
– Профилактические процедуры
– Повышенная посещаемость на ресурс
Как получить свежее зеркало на сегодня
Узнать свежее рабочее зеркало можно несколькими способами:
1. Email-уведомления — подпишитесь на почтовую отправку
2. Служба техподдержки — проконсультируйтесь в онлайн-чат
3. Публичные каналы — отслеживайте за обновлениями
4. Партнерские ресурсы — надежные платформы
Регистрация на ресурсе казино
Процедура создания аккаунта длится буквально несколько мгновений:
1. Нажмите на элемент “Открыть счет”
2. Заполните требуемые данные
3. Верифицируйте электронную e-mail
4. Используйте код активации, если доступен
Вслед за финализированной активации вам станет разрешен пользовательский кабинет.
Бонусы и купоны
Богатая бонусная система — существенное достоинство казино:
Бонус за создание аккаунта
Новые пользователи обретают стартовый бонус, который может охватывать:
– Валютный кредит на стартовый вклад
– Фриспины для игровых машин
– Стартовые фонды
Активационные коды
Систематически публикуются новые коды, обеспечивающие получить особые бонусы.
Система возврата средств
Постоянные пользователи зарабатывают процент утраченных финансов обратно.
Актуальные акции и соревнования
Платформа систематически запускает интересные акции:
– Еженедельные чемпионаты
– Специальные промо
– Конкурсы крупных наград
– Система VIP-клуба
Доступ в личный раздел
Для доступа на платформу нужно:
1. Перейти на основной портал или рабочее зеркало
2. Нажать “Авторизация”
3. Ввести логин и пароль
В персональном кабинете разрешены такие возможности:
– Пополнение депозита
– Получение призов
– Анализ журнала игр
– Настройка индивидуальными параметрами
Портативная вариант и app
Мобильная платформа
Оптимизированная вариант ресурса дает возможность участвовать с разных карманного телефона. Дизайн адаптивно настраивается под формат дисплея.
Программа для установки
Скачать приложение можно для:
– Android — непосредственная загрузка с портала
– iOS — установка через App Store
Плюсы программы:
– Быстрый запуск
– Бесперебойная операционность
– Push-сообщения об бонусах
– Ускоренный функционал
Азартные секции
Барабаны
Внушительная коллекция азартных барабанов от топовых поставщиков:
– Классические автоматы
– Современные-слоты
– Призовые-игры
Live казино
Секция с профессиональными ведущими предоставляет:
– European/American Roulette
– Blackjack
– Baccarat
– Texas Hold’em
Эфиры проводятся в отличном качестве изображения, воссоздавая ощущение настоящего казино.
Методы внесения средств и вывода
Казино принимает разнообразные денежные методы:
– Кредитные картсчета
– Электронные счета
– Криптовалюты
– Финансовые переводы
Минимальные пороги взноса и моментальные выплаты гарантируют развлечение предельно приятной.
Отдел техподдержки
Компетентная группа помощи функционирует 24/7 и в состоянии помочь с любыми задачами:
– Онлайн-чат
– Email-поддержка
– Звонковая служба
Заключение
Лицензионный ресурс казино и его функционирующие дубликаты предоставляют пользователям надежный и интересный развлекательный опыт. Щедрые награды, функциональная mobile версия, многочисленные развлечения и превосходное live-казино создают эту платформу превосходным вариантом для азартных развлечений.
http://mensrxindex.com/# discount ed meds
Have a look
Co-signer loans for bad credit
for entertainment.
мелбет онлайн ставки на спорт мелбет онлайн ставки на спорт .
дистанционное школьное обучение shkola-onlajn-31.ru .
https://t.me/s/kingcasino_official/11 Используйте зеркало для стабильного доступа, а также следите за новостями и акциями на официальном Telegram-канале King Casino.
seashopper online shop – Just discovered this store and the design feels tidy and easy to check out.
dog prescriptions online: Vet Rx Index – discount pet meds
Нынешние сетевые казино обеспечивают игрокам огромный выбор функций для удобной игры. Однако иногда доступ к основному сайту может являться ограниченным. В таких моментах на поддержку спешит Дракон Мани, которое дает непрерывный вход ко всем сервисам платформы.
Что такое действующее зеркало казино
Дубликат — это точная реплика основного ресурса, которая размещается по запасному интернет-адресу. Копия поддерживает весь функционал главного сайта, включая индивидуальный кабинет, баланс и сведения операций.
Основные плюсы эксплуатации зеркала:
– 24-часовой вход к ресурсу
– Стопроцентная схожесть функционала
– Сохранность личных информации
– Удержание существующих привилегий
Как обнаружить действующее зеркало сегодня
Существует ряд проверенных вариантов нахождения актуальной URL:
Проверенные ресурсы:
1. Имейл рассылка — администрация регулярно направляет письма с актуальными адресами
2. Медийные сети — легитимные страницы выкладывают свежую данные
3. Департамент поддержки — операторы сообщают проверенные домены
4. Смартфонное приложение — предоставляет минуть блокировки
Создание аккаунта на основном веб-сайте
Этап создания аккаунта длится всего несколько минут и включает из таких шагов:
1. Попадание на официальный сайт или актуальное зеркало
2. Нажатие на кнопку «Регистрация»
3. Ввод персональной бланка
4. Проверка почтовой почты или мобильного номера
5. Применение бонуса за регистрацию при присутствии промокода
Начинающие пользователи обретают великодушный стартовый презент, который может охватывать даровые прокруты, денежные бонусы или компенсацию.
Вход в индивидуальный кабинет
Вход на портале осуществляется обычным способом. Необходимо вписать имя пользователя и секретный ключ, использованные при создании аккаунта.
Ключевые моменты для безопасного входа:
– Задействуйте защищенный пароль
– Включите 2FA верификацию
– Не сохраняйте пароли на публичных гаджетах
– Мониторьте интернет строку браузера
Характеристика поощрительной схемы
Игровая платформа радует игроков всевозможными вознаграждениями и акциями:
Начальный комплект
Начинающие имеют возможность надеяться на значительное награду за стартовый вклад. Традиционно это долевая добавка к депонированной объему плюс фриспины для известных слотов.
Регулярные кампании
– Еженедельный кэшбек — компенсирование доли потерянных денег
– Поощрения на дополнительные вклады
– Специальные акции по торжествам
– Конкурсы с крупными наградными суммами
Система вознаграждений
Активные игроки зарабатывают единицы за любую бет, которые затем конвертируются на фактические средства, даровые прокруты или уникальные преимущества.
Кодовые слова: как активировать
Бонус-коды — это особые сочетания символов, обеспечивающие возможность к бонусным поощрениям.
Откуда взять действующие промокоды:
– Проверенные медийные сети казино
– Сотрудничающие порталы
– Email-подписка
– Отраслевые платформы
Указывается промокод в отдельное поле при регистрации или пополнении депозита.
Смартфонная версия и приложение
Нынешние клиенты отдают предпочтение делать ставки с портативных девайсов. Платформа предоставляет 2 варианта для комфортной мобильной игры.
Мобильная вариант
Веб версия само собой адаптируется под размер экрана. Не нуждается инсталляции и оперирует в произвольном актуальном браузере.
Смартфонное приложение
Загрузить app можно для девайсов на Android и iOS. Плюсы app:
– Оперативная активация
– Бесперебойная работа
– Автоматические-уведомления о поощрениях
– Независимый избегание блокировок
Процедура загрузки прост: нужно открыть на сайт с телефонного аппарата и придерживаться руководству.
Игровой коллекция
Каталог развлечений охватывает огромное количество вариантов от лучших разработчиков.
Слоты
Азартные слоты — крайне любимая раздел развлечений. Представлены обычные простые автоматы, новые видеослоты с дополнительными стадиями, а также растущие призы.
Live казино
Зона с действительными дилерами обеспечивает испытать атмосферу настоящего казино. Представлены варианты с рулеткой.
Стриминг производится в HD качестве, присутствует коммуникация с дилером и остальными участниками.
Конкурсы
Систематически устраиваются состязания по разным категориям. Вступление позволяет выиграть монетарные призы, даровые прокруты или специальные поощрения.
Финансовые операции
Ресурс предлагает широкий ассортимент финансовых способов:
– Банковские карты
– Онлайн системы
– Цифровая валюта
– Денежные транзакции
Низшая объем вклада — доступная для основной части клиентов. Получение денег выполняется в скорые временные рамки.
Департамент поддержки
Опытные консультанты способны оказать помощь непрерывно. Имеются данные способы контакта:
– Веб-чат
– Email
– Звонковая поддержка
– Коммуникационные сети
Пояснения на типовые запросы можно обнаружить в разделе FAQ.
Вывод
Лицензионный ресурс казино и его рабочие зеркала обеспечивают пользователям полный доступ ко всем возможностям ресурса. Значительные поощрения, практичная телефонная версия, гигантский коллекция слотов и компетентная поддержка делают азартный процесс крайне комфортным и надежным.
Awesome posts. Appreciate it!
online warehouse vendor – Discovered the site, feels like a reliable resource.
ворота дорхан Компания «Дорхан» предлагает широкий ассортимент ворот и рольставней, отвечающих высоким стандартам качества и безопасности.
Юридические услуги Мы специализируемся на правовой поддержке как физических, так и юридических лиц, гарантируя высокое качество обслуживания и конфиденциальность.
фотостудия в самаре still ma Высококачественная предметная фотосъемка, включая съемку одежды, косметики и аксессуаров, поможет выгодно представить вашу продукцию.
Lantern Treasure Online – Clear layout, navigating pages is effortless.
Характеристика главного портала
Передовое онлайн-казино обеспечивает своим игрокам обширный выбор возможностей и вознаграждений. Главный веб-сайт Taker действует непрерывно, обеспечивая доступ к востребованным симуляторам, live-казино и многим акциям.
Актуальное зеркало: вход к порталу
Что такое зеркало казино
Копия составляет собой идентичную версию официального веб-сайта с другим интернет путем. Рабочее зеркало дает пользователям преодолевать барьеры и иметь стабильный подключение к выбранным развлечениям.
Как получить рабочее зеркало сегодня
Актуальные ссылки на официальное зеркало выкладываются через:
– Email рассылку
– Главные социальные сети
– Команду обслуживания
– Специализированные площадки
Открытиесчета на ресурсе
Ход открытиясчета
Открытиесчета длится буквально минут и подразумевает данные стадии:
1. Доступ на главный портал или актуальное зеркало
2. Клик элемента “Зарегистрироваться”
3. Заполнение личных реквизитов
4. Проверка email или номера
5. Установка секретнойкомбинации
Подарок за оформление
Начинающие игроки получают солидные начальные бонусы:
– Игровые средства на баланс
– Халявныеспины для симуляторов
– Повышенный размер кэшбека
– Особые промокоды
Авторизация в индивидуальный кабинет
Зарегистрированные клиенты могут совершить доступ через основной портал или текущее зеркало. Для этого необходимо ввести учетноеимя и пароль, придуманные при созданииаккаунта.
Опции персонального аккаунта
В персональном профиле доступны данные возможности:
– Изменение контактными данными
– Зачисление баланса
– Вывод средств
– Ввод промокодов
– Мониторинг статистики ставок
– Регистрация в состязаниях
Поощрения и промо
Виды подарков
Казино поощряет своих участников различными поощрительными акциями:
– Стартовый комплект — солидные бонусы на начальные депозиты
– Халявныеспины — подарочные спины в популярных слотах
– Возврат — еженедельный откат суммы проигрышей
– План VIP — уникальные бонусы для верных пользователей
Коды и их активация
Уникальные коды предоставляют дополнительные подарки. Для применения необходимо указать код в специальное раздел в личном аккаунте.
Игровой ассортимент
Автоматы
Каталог развлекательных слотов насчитывает тысячи вариантов от топовых поставщиков:
– Обычные симуляторы
– Видео игры
– Джекпот симуляторы
– Сюжетные автоматы
Live казино
Секция Live-казино предлагает участие с живыми дилерами в режиме реального эфира:
– Американскаярулетка
– Блэкджек
– Баккара
– Casinopoker
Состязания
Периодические турниры с солидными призовыми суммами организуются регулярно. Претенденты соревнуются за победу в рейтинге.
Смартфонная адаптация и программа
Смартфонная адаптация ресурса
Основной портал полностью настроен для портативных устройств. Клиенты вправе открывать игры сразу через браузер без обязательства установки.
Программа для загрузки
Авторское мобильное софт предлагается для загрузки на аппараты с базовыми платформами Android и iOS. Приложение гарантирует:
– Быстрый путь к слотам
– Устойчивую производительность
– Моментальные-извещения о бонусах
– Удобный дизайн
Итог
Основной сайт казино и его действующие зеркала дают игрокам всесторонний доступ к первоклассным азартным играм. Большие бонусы, многочисленные кампании, функциональная портативная платформа и профессиональная сервис делают игровой досуг чрезвычайно удобным и доходным.
Hurrah! In the end I got a webpage from where I can genuinely get helpful information concerning my study and
knowledge.
have a peek at these guys
Explore China’s top cities in an 11-day tour: Beijing, Xi’an, Lhasa, Shanghai
https://certifiedcanadarx.shop/# Certified Canada Rx
check this vendor hub – Stumbled onto this website and the interface looks tidy and professional.
vendor link – Pages are arranged clearly and navigation is easy.
Нынешние интернет казино обеспечивают клиентам широкий ассортимент функций для беспроблемной игры. Но иногда доступ к официальному порталу может стать закрытым. В таких случаях на поддержку приходит РџРёРЅРєРѕ, которое гарантирует стабильный подключение ко всем функциям платформы.
Что такое рабочее зеркало казино
Копия — это полная версия основного портала, которая хостится по другому интернет-адресу. Зеркало сохраняет все возможности основного веб-портала, включая личный кабинет, баланс и запись операций.
Ключевые выгоды задействования зеркала:
– Круглосуточный соединение к платформе
– Абсолютная схожесть функционала
– Сохранность личных реквизитов
– Хранение всех вознаграждений
Как разыскать функционирующее зеркало сегодня
Присутствует ряд безопасных путей получения текущей ссылочной информации:
Легитимные источники:
1. Электронная рассылка — дирекция постоянно пересылает сообщения с действующими ссылками
2. Социальные сети — проверенные каналы размещают свежую информацию
3. Департамент поддержки — сотрудники выдают надежные адреса
4. Портативное приложение — предоставляет избегать блокировки
Открытие счета на главном ресурсе
Процесс оформления отнимает всего несколько минут и предполагает из таких стадий:
1. Попадание на лицензионный веб-сайт или рабочее зеркало
2. Щелчок на иконку «Регистрация»
3. Указание пользовательской таблицы
4. Проверка почтовой почты или мобильного номера
5. Задействование поощрения за регистрацию при существовании промокода
Новые пользователи обретают значительный вступительный подарок, который может предполагать free spins, валютные поощрения или кэшбек.
Логин в личный кабинет
Авторизация на сайте производится привычным образом. Достаточно внести учетные данные и код доступа, задействованные при открытии счета.
Важные детали для безопасного входа:
– Применяйте криптостойкий шифр
– Запустите 2FA аутентификацию
– Не храните пароли на общественных девайсах
– Проверяйте URL строку браузера
Описание бонусной программы
Игорный портал радует клиентов различными поощрениями и акциями:
Стартовый набор
Начинающие могут полагаться на значительное поощрение за начальный депозит. Зачастую это процентная надбавка к зачисленной объему плюс free spins для популярных слотов.
Периодические промо
– 7-дневный cashback — возврат процента потерянных денежных средств
– Награды на очередные взносы
– Эксклюзивные акции по праздникам
– Конкурсы с солидными наградными фондами
Система лояльности
Регулярные пользователи собирают очки за произвольную ставку, которые затем превращаются на фактические финансы, даровые прокруты или специальные бонусы.
Промокоды: как использовать
Бонус-коды — это специальные комбинации литер, дающие привилегию к эксклюзивным поощрениям.
Каким образом получить свежие промокоды:
– Официальные коммуникационные сети казино
– Союзнические порталы
– Email-рассылка
– Тематические платформы
Активируется промокод в отдельное поле при открытии счета или добавлении денег кошелька.
Телефонная версия и приложение
Актуальные клиенты предпочитают делать ставки с смартфонных девайсов. Ресурс предлагает пару варианта для беспроблемной телефонной игры.
Отзывчивая версия
Интернет версия само собой подстраивается под размер монитора. Не предполагает инсталляции и оперирует в всяком новом браузере.
Телефонное приложение
Загрузить app можно для аппаратов на Android и iOS. Плюсы app:
– Скоростная открытие
– Надежная операция
– Автоматические-уведомления о промо
– Самостоятельный преодоление блокировок
Этап скачивания прост: необходимо открыть на сайт с смартфонного устройства и придерживаться руководству.
Гемблинг коллекция
Коллекция аппаратов насчитывает множество единиц от топовых производителей.
Слоты
Гемблинг аппараты — наиболее популярная группа забав. Доступны обычные простые автоматы, передовые графические аппараты с бонусными уровнями, а также накопительные выигрыши.
Live казино
Отдел с реальными дилерами дает возможность ощутить атмосферу настоящего казино. Имеются варианты с покером.
Стриминг реализуется в превосходном разрешении, присутствует общение с крупье и остальными участниками.
Конкурсы
Периодически проводятся турниры по всевозможным слотам. Включение позволяет завоевать валютные вознаграждения, даровые прокруты или эксклюзивные бонусы.
Платежные операции
Сайт предлагает значительный ассортимент денежных способов:
– Дебетовые карты
– Электронные кошельки
– Цифровая валюта
– Финансовые транзакты
Низшая количество депозита — посильная для массы геймеров. Получение выигрышей обрабатывается в скорые периоды.
Департамент поддержки
Компетентные специалисты способны оказать помощь постоянно. Открыты такие способы общения:
– Онлайн-чат
– Email
– Звонковая горячая линия
– Медийные сети
Пояснения на стандартные темы можно отыскать в разделе FAQ.
Заключение
Официальный веб-сайт казино и его рабочие зеркала дают пользователям абсолютный вход ко всем сервисам платформы. Великодушные привилегии, комфортная портативная версия, гигантский выбор слотов и профессиональная поддержка превращают азартный опыт максимально беспроблемным и безопасным.
Подключение к платформе и рабочие URL
Популярные интернет казино предлагают участникам обширный ассортимент игр. Центральный ресурс Кент казино предоставляет безопасный вход ко всем возможностям. Впрочем периодически случаются случаи, когда понадобится запасной метод подключения.
Что есть собой действующее зеркало
Рабочее зеркало — это идентичная дубликат основного сайта с иным интернет названием. Дубликат сегодня помогает избегать существующие барьеры и сохранять стабильный подключение к выбранным автоматам.
Проверенное зеркало содержит всеми характеристиками, что и основной ресурс:
– Совокупный ассортимент слотов
– Собственный раздел с актуальными сведениями
– Актуальные бонусы и промо
– Защищенные финансовые транзакции
Регистрация и подключение в систему
Этап создания профиля на портале требует пару моментов. Свежим участникам следует:
1. Зайти на функционирующее зеркало сегодня
2. Нажать элемент «Регистрация»
3. Указать требуемые сведения
4. Верифицировать e-mail почту или контакт смартфона
5. Получить награду за регистрацию
Подключение в собственный кабинет производится с помощью ввод логина и секретной комбинации.
Характеристика поощрительной политики
Выгодная призовая система — ключевое плюс игорного заведения. Клиенты получают многочисленные поощрения:
Стартовые бонусы
Свежие пользователи имеют возможность рассчитывать на щедрый поощрение за оформление. Чаще всего это набор вариантов, содержащий:
– Пропорциональную премию к дебютному пополнению
– Безвозмездные спины
– Призовые финансы на аккаунт
Промокоды и специальные предложения
Постоянные купоны дают возможность активировать бонусные льготы. Применить их возможно в отдельном окне собственного профиля.
Free spins и кэшбек
Free spins — это способность вращать игры без применения своих сумм. Компенсация предполагает частичный отдачу утраченных средств.
Ассортимент развлечений
Азартная сайт предоставляет внушительную коллекцию автоматов.
Игровые машины
Ассортимент аппаратов удивляет фантазию. Доступны стандартные простые машины и актуальные развлечения с захватывающей графикой.
Live игры
Категория Live развлечений переносит клиентов в обстановку реального гемблинг клуба. Профессиональные ведущие организуют раунды в реальном времени.
Соревнования и рейтинги
Регулярные конкурсы добавляют азарта и дают шанс получить большие суммы.
Mobile вариант и приложение
Современные технологии обеспечивают наслаждаться в комфортном пространстве. Портативная вариант автоматически подстраивается под дисплей аппарата.
Загрузить клиент возможно для цифровых сред iOS и Android. Клиент предоставляет:
– Быстрый вход
– Устойчивую деятельность
– Мгновенные-оповещения об предложениях
– Интуитивный вид
Банковские процедуры
Платформа использует различные системы ввода и получения финансов:
– Банковские счета
– Онлайн сервисы
– Крипто
– Банковские транзакции
Все транзакции реализуются через надежное подключение, что гарантирует безопасность приватных параметров.
Служба ассистанса
Компетентная бригада support работает 24/7. Обратиться с операторами допустимо через:
– Интерактивный-чат
– Цифровую почту
– Телефон
– Коммуникационные ресурсы
Итоги
Легальный веб-сайт и его действующее зеркало дают пользователям безопасный и удобный доступ к увлекательным занятиям. Богатые подарки, большой ассортимент слотов и профессиональная помощь создают участие предельно удобной и результативной.
Vendor Vault Opal – Well-structured site, browsing feels effortless.
Анализ главного портала
Передовое онлайн-казино предоставляет своим участникам разнообразный спектр возможностей и вознаграждений. Официальный портал РџРёРЅРєРѕ казино функционирует постоянно, обеспечивая доступ к топовым автоматам, live-казино и многим промо.
Действующее зеркало: доступ к ресурсу
Что такое альтернатива казино
Дубликат является собой точную реплику оригинального портала с другим доменным адресом. Актуальное зеркало позволяет клиентам преодолевать запреты и получать постоянный путь к любимым слотам.
Как найти актуальное зеркало сегодня
Действующие URL на официальное зеркало выкладываются через:
– E-mail рассылку
– Проверенные социальные сети
– Отдел помощи
– Affiliated ресурсы
Созданиеаккаунта на сайте
Этапы созданияаккаунта
Оформление длится пару минут и включает следующие действия:
1. Вход на официальный сайт или рабочее зеркало
2. Клик элемента “Зарегистрироваться”
3. Заполнение персональных реквизитов
4. Активация адреса или телефона
5. Установка ключа
Вознаграждение за созданиеаккаунта
Первые клиенты зарабатывают большие начальные вознаграждения:
– Бонусные деньги на кошелек
– Фриспины для игр
– Увеличенный коэффициент возврата
– Специальные коды
Доступ в личный счет
Действующие клиенты вправе произвести авторизацию через оригинальный портал или рабочее зеркало. Для этого следует указать учетноеимя и код, установленные при регистрации.
Возможности индивидуального раздела
В персональном разделе доступны данные возможности:
– Контроль контактными реквизитами
– Ввод счета
– Получение средств
– Применение промокодов
– Отслеживание истории операций
– Регистрация в соревнованиях
Подарки и предложения
Разновидности бонусов
Казино балует своих пользователей всевозможными призовыми предложениями:
– Стартовый комплект — щедрые поощрения на начальные депозиты
– Халявныеспины — бонусные спины в рейтинговых автоматах
– Кэшбек — периодический возврат доли проигрышей
– Программа верности — эксклюзивные льготы для активных клиентов
Купоны и их применение
Особые купоны гарантируют бонусные подарки. Для использования необходимо набрать код в нужное раздел в персональном аккаунте.
Азартный набор
Слоты
Каталог азартных автоматов насчитывает сотни наименований от лучших разработчиков:
– Классические слоты
– Новые автоматы
– Призовые слоты
– Лицензионные развлечения
Live казино
Область Live-казино предлагает участие с живыми дилерами в обстановке актуального трансляции:
– Французскаярулетка
– Двадцатьодно
– PuntoBanco
– Техасскийхолдем
Конкурсы
Постоянные турниры с большими джекпотными призами проводятся регулярно. Претенденты сражаются за лидерство в списке.
Mobile реализация и программа
Адаптивная версия веб-сайта
Оригинальный веб-сайт целиком оптимизирован для мобильных аппаратов. Игроки могут запускать слоты сразу через обозреватель без обязательства загрузки.
Приложение для инсталляции
Авторское мобильное приложение имеется для установки на девайсы с операционными системами Android и iOS. APP гарантирует:
– Быстрый путь к автоматам
– Бесперебойную производительность
– Мгновенные-извещения о бонусах
– Простой интерфейс
Итог
Главный портал казино и его действующие альтернативы гарантируют игрокам комплексный доступ к качественным азартным сервисам. Большие поощрения, различные кампании, удобная мобильная версия и опытная поддержка делают игровой опыт чрезвычайно приятным и прибыльным.
melbet скачать приложение для андроид melbet скачать приложение для андроид .
site
Explore China’s top cities in 13 days: Beijing, Xi’an, Chengdu, Guilin, Shanghai
Обзор официального портала
Прогрессивные интернет казино предоставляют игрокам богатый спектр игр и шансов. Лицензионный сайт клуб гарантирует защищенный возможность к развлекательным функциям.
Функционирующее зеркало: вход сегодня
Альтернативный адрес служит собой точную копию официального ресурса. Действующее зеркало помогает клиентам преодолевать существующие ограничения.
Преимущества применения зеркала
Принципиальные выгоды предполагают:
– Непрерывный шанс к ресурсу
– Удержание абсолютно всех характеристик основного портала
– Защита конфиденциальных материалов
– Такой же набор функций
Оформление профиля на сайте
Ход создания аккаунта выделяется доступностью и эргономичностью. Недавние пользователи требуется:
1. Посетить главный сайт или его зеркало
2. Щелкнуть на кнопку создания аккаунта
3. Указать обязательные данные
4. Активировать email адрес
5. Осуществить стартовый логин
Бонус за открытие счета
Дебютанты получают щедрый начальный презент. Подобное поощрение может содержать:
– Финансовые суммы
– Даровые фриспины
– Увеличенный показатель кэшбека
Доступ в собственный профиль
Действующие игроки могут быстро получить доступ в личный аккаунт, применяя никнейм и шифр. Индивидуальный кабинет предоставляет доступ к:
– Администрированию счетом
– Истории транзакций
– Работающим призам
– Опциям профиля
Призы и промо
Ресурс систематически реализует многочисленные предложения для клиентов.
Разновидности призов
Базовые виды вознаграждений:
– Депозитные подарки – часть от объема внесения
– Прокруты – complimentary вращения в автоматах
– Кэшбек – возмещение части затраченных сумм
– Соревновательные призы – призы за состязание в состязаниях
Купоны
Специальные коды позволяют заработать бонусные преимущества. Игроки имеют возможность получить их на аффилиатных сайтах или приобрести в новостях.
Mobile адаптация и app
Передовые гемблеры предпочитают портативный игровой процесс.
Функции переносной платформы
– Гибкий дизайн для различных девайсов
– Совокупный путь к развлечениям
– Оперативная работа
– Практичное контроль
Скачать программу
Mobile приложение предложено для загрузки на аппараты с операционными ОС Android и iOS. Приложение предоставляет:
– Стабильную деятельность
– Push оповещения о предложениях
– Мгновенный запуск к желанным развлечениям
Азартный выбор
Игровой клуб предлагает внушительную библиотеку развлекательных услуг.
Аппараты
Каталог развлекательных аппаратов охватывает:
– Классические автоматы
– Video автоматы
– Накопительные слоты
– Сюжетные автоматы
Live игры
Секция живых игр обеспечивает шанс участвовать с настоящими ведущими. Предложены:
– Рулетки
– Блэкджек
– Baccarat
– Покер
Соревнования
Постоянные чемпионаты помогают клиентам состязаться за крупные денежные фонды. Конкурсная система изменяется еженедельно.
Банковские процедуры
Сайт предлагает разнообразие методов пополнения и снятия финансов:
– Дебетовые карты
– Онлайн счета
– Wire трансферы
– Крипто
Абсолютно все операции производятся безопасно с использованием актуальных систем кодирования.
Сервис support
Профессиональная отдел помощи трудится без перерыва. Коннектиться с менеджерами доступно через:
– Живой чат
– Email почту
– Контактный номер
– Social медиа
Защита и аккредитация
Казино функционирует на основании законной разрешения. Это обеспечивает:
– Справедливость азартного геймплея
– Охрану индивидуальных сведений
– Пунктуальные перечисления
– Регулируемый игровой процесс
Резюме
Официальный портал и его актуальные альтернативные адреса обеспечивают игрокам целостный набор функций для комфортной и профитной досуга. Значительные призы, всевозможные развлечения, квалифицированная сервис и проверенная инфраструктура выплат делают ресурс оптимальным решением для фанатов игровых услуг.
Доступ к порталу и актуальные ссылки
Современные сетевые казино обеспечивают клиентам большой набор развлечений. Основной портал Мотор гарантирует безопасный вход ко всем услугам. Однако порой случаются ситуации, когда требуется альтернативный путь подключения.
Что есть собой рабочее зеркало
Актуальное зеркало — это точная реплика главного веб-сайта с запасным интернет именем. Копия сегодня дает возможность избегать потенциальные запреты и обеспечивать стабильный переход к любимым слотам.
Легальное зеркало имеет полными опциями, что и главный портал:
– Совокупный каталог автоматов
– Индивидуальный профиль с актуальными сведениями
– Полные награды и предложения
– Проверенные финансовые транзакции
Создание аккаунта и вход в платформу
Ход оформления на ресурсе длится буквально мгновений. Недавним игрокам следует:
1. Зайти на рабочее зеркало в настоящее время
2. Кликнуть элемент «Регистрация»
3. Указать обязательные данные
4. Подтвердить цифровую почту или номер связи
5. Получить бонус за оформление
Подключение в персональный раздел производится с помощью указание логина и кода доступа.
Описание бонусной программы
Щедрая бонусная структура — основное козырь платформы. Игроки получают различные поощрения:
Вступительные подарки
Свежие клиенты способны надеяться на щедрый бонус за оформление. Обычно это набор опций, включающий:
– Долевую добавку к первому пополнению
– Даровые вращения
– Extra средства на счет
Купоны и уникальные предложения
Регулярные бонусные комбинации дают возможность зарабатывать бонусные выгоды. Применить их разрешено в отдельном окне индивидуального аккаунта.
Спины и кешбэк
Даровые вращения — это шанс запускать барабаны без использования личных денег. Рибейт представляет процентный отдачу проигранных денег.
Ассортимент автоматов
Развлекательная сайт представляет значительную подборку слотов.
Слоты
Многообразие автоматов удивляет фантазию. Есть стандартные простые слоты и актуальные автоматы с захватывающей картинкой.
Live зал
Раздел Live игр помещает участников в атмосферу настоящего гемблинг дома. Опытные крупье проводят сессии в онлайн времени.
Турниры и лидерборды
Систематические турниры добавляют драйва и гарантируют вариант забрать крупные суммы.
Mobile версия и программа
Продвинутые решения позволяют наслаждаться в удобном точке. Адаптивная форма самостоятельно оптимизируется под монитор аппарата.
Скачать клиент допустимо для цифровых сред iOS и Android. Программа гарантирует:
– Оперативный переход
– Стабильную работу
– Мгновенные-алерты об бонусах
– Комфортный вид
Банковские действия
Сайт поддерживает разнообразные варианты ввода и изъятия средств:
– Платежные счета
– Онлайн сервисы
– Крипто
– Финансовые операции
Любые транзакции реализуются через зашифрованное протокол, что обеспечивает неприкосновенность приватных данных.
Сервис support
Квалифицированная бригада ассистанса работает постоянно. Соединиться с консультантами допустимо через:
– Онлайн-чат
– E-mail почту
– Телефон
– Социальные ресурсы
Выводы
Главный ресурс и его рабочее зеркало гарантируют участникам надежный и легкий переход к увлекательным забавам. Богатые бонусы, большой выбор автоматов и качественная сервис обеспечивают игру исключительно интересной и результативной.
Mens RX Index: Mens RX Index – online ed medications
For a recap
Personal loan for credit card debt
for the main points.
canadian pharmacy prices: Certified Canada Rx – Certified Canada Rx
Доступ к ресурсу через рабочие зеркала
Участники сетевых казино нередко встречаются с проблемой недоступности основного ресурса. Как раз для устранения этой проблемы предусмотрены дубликаты основного ресурса. Кент регистрация обеспечивает беспрепятственный доступ ко всем возможностям ресурса.
Что такое действующее зеркало казино
Альтернативный адрес значит собой точную копию основного ресурса с похожим опциями. Ключевое различие — это альтернативное имя. Все сведения участника, содержа средства, награды и записи раундов, продолжают быть прежними.
Выгоды задействования зеркал
Рабочие зеркала обладают множеством важных выгод:
– Бесперебойный переход к предпочитаемым автоматам
– Полная защита собственных данных
– Сохранение всех опций индивидуального кабинета
– Возможность обретения бонусов и включения в промоакциях
Регистрация на главном портале
Процесс открытия счета крайне несложен и отнимает буквально минут. Недавние клиенты способны рассчитывать на щедрый приветственный поощрение за регистрацию.
Ступени открытия аккаунта
1. Доступ на легальный домен или его дубликат
2. Клик на элемент “Регистрация”
3. Указание необходимых информации
4. Верификация почтовой почты
5. Внесение купона (когда есть)
Бонусы и предложения для участников
Игровая площадка поощряет своих пользователей многочисленными поощрительными системами.
Базовые виды призов
Приветственный пакет — щедрое начисление для свежих участников, которое именно способно вмещать материальные бонусы и безвозмездные спины.
Free spins — шанс использовать в известных слотах даром.
Компенсация — долевой компенсация израсходованных денег, который предоставляется каждую неделю или каждый месяц.
Бонусные коды — уникальные последовательности, обеспечивающие бонусные преимущества.
Персональный кабинет: инструменты и параметры
Персональный профиль обеспечивает исчерпывающий регулирование над развлекательным взаимодействием. В данном разделе предусмотрены:
– Администрирование балансом
– Записи платежей
– Действующие награды
– Настройки безопасности
– Валидация профиля
Карманная редакция и приложение
Актуальные игроки ценят мобильность. Платформа дает два способа для развлечений с портативных устройств.
Responsive телефонная вариант
Адаптивная вариант ресурса самостоятельно подстраивается под монитор любого девайса. Отсутствует потребность загружать особое приложение.
Софт для гаджетов
Разрешено скачать оригинальное программу для iOS и Android. Приложение предоставляет:
– Моментальный запуск
– Адаптированный внешний вид
– Push-извещения о поощрениях
– Устойчивую функциональность
Live развлечения: атмосфера реального казино
Секция Live игр доставляет участников в антураж настоящего зала. Компетентные хосты осуществляют игры в варианте прямого времени.
Востребованные Live-игры
– Рулетка
– Блэкджек
– Баккарат
– Poker
Игровые машины: ассортимент слотов
Коллекция слотовых автоматов насчитывает массу наименований от ведущих провайдеров. Участники найдут:
– Традиционные автоматы
– Видео-автоматы
– Прогрессивный джекпот-автоматы
– Многолинейные автоматы
Конкурсы и особые мероприятия
Постоянные состязания дают возможность участникам бороться друг с другом за внушительные наградные суммы. Каждый соревнование располагает свои условия участия и доску чемпионов.
Методы ввода и снятия денег
Платформа использует ряд платежных систем:
– Дебетовые инструменты
– Онлайн платежные системы
– Крипто
– Wire транзиты
Все операции выполняются защищенно благодаря актуальным технологиям защиты.
Сервис поддержки
Квалифицированные консультанты отдела обслуживания готовы ассистировать 24/7. Работают следующие каналы связи:
– Оперативный-чат
– Email-помощь
– Аудио горячая линия
– Публичные сети
Резюме
Главный ресурс казино и его актуальные дубликаты дают игрокам надежный и приятный переход к обширному диапазону игровых услуг. Солидные подарки, частые предложения, профессиональная сервис и легкие расчетные инструменты превращают азартный досуг предельно захватывающим и доходным.
marketplace reference – Came across the page through search, and it looks well-organized and helpful.
мелбет зайти [url=https://melbet-ru.it.com/]мелбет зайти[/url] .
melbet app download for ios melbetmobi.ru .
After trying several platforms, I found this casino https://psycholog-dla-ozn.pl/ to be well-balanced. The welcome bonus is generous, terms are transparent, and payouts are processed smoothly, making it suitable for casual players.
Lantern Hub Online – Well-arranged sections make navigating easy.
lbs lbs .
Переход к порталу через проверенные зеркала
Актуальные сетевые казино обеспечивают пользователям бесперебойный подключение к сервисам. Главный портал РџРёРЅРєРѕ функционирует надёжно, обеспечивая обширный ассортимент развлекательных развлечений. Впрочем иногда образуются системные трудности или запреты, поэтому критично иметь представление о доступности функционирующих зеркал.
Что является из себя центральное зеркало казино
Копия — это полная версия центрального портала с таким же интерфейсом. Действующее зеркало на данный момент позволяет преодолевать локальные барьеры и поддерживать развлечения.
Принципиальные достоинства использования зеркал:
– Стопроцентный доступ к персональному кабинету
– Сохранение всех данных аккаунта
– Идентичный перечень игр
– Действующие поощрения и кампании
Открытие счёта на ресурсе
Механизм создания аккаунта длится пару минут. Свежие пользователи обретают щедрый приз за запись, что в состоянии вмещать:
– Вступительный бонусный кредит
– Безвозмездные фриспины для машин
– Специальные купоны
– Увеличенный кэшбек
С целью завершения записи необходимо:
1. Переместиться на центральный сайт или копию
2. Щёлкнуть элемент «Зарегистрироваться»
3. Внести персональные информацию
4. Заверить email или телефон
5. Применить промокод (если есть существовании)
Доступ в личный кабинет
Вслед за правильной записи игроки имеют возможность осуществлять авторизацию с помощью основной портал или функционирующее зеркало. Персональный кабинет предоставляет всесторонний контроль над учётной записью:
– Журнал игр
– Ввод счёта
– Изъятие денег
– Регулирование поощрениями
– Включение в турнирах
Поощрения и акции казино
Платформа радует пользователей различными привилегированными схемами:
Вступительные бонусы
Дебютанты обретают щедрый набор поощрений на стартовые взносы. Обычно это предполагает пропорциональную прибавку к размеру пополнения плюс даровые фриспины.
Регулярные акции
– Раз в неделю кешбэк до 15%
– Конкурсы с призовыми банками
– Бонусы на дату рождения
– Уникальные промо для привилегированных пользователей
Схема вознаграждения
Регулярные игроки зарабатывают единицы, которые можно превратить на реальные средства или особые преимущества.
Карманная форма и софт
Нынешние разработки позволяют играть всюду подходяще. Смартфонная форма портала автономно адаптируется под размер каждого аппарата.
Преимущества смартфонного софта:
– Оперативная загрузка развлечений
– Практичный облик
– Push-сообщения о акциях
– Опция инсталлировать для Android и iOS
Живое казино: обстановка настоящего азартного учреждения
Раздел Live казино доставляет клиентов в атмосферу подлинного гемблинг заведения. Профессиональные ведущие управляют развлечение в состоянии реального времени.
Имеющиеся столы:
– Рулетка
– Блэкджек
– Классика
– Покерная игра
Слоты и азартные аппараты
Ассортимент азартных аппаратов включает множество названий от передовых студий. Любой игрок найдёт развлечение по вкусу:
– Традиционные слоты
– Инновационные игры с призовыми турами
– Накопительный-машины
– Megaways слоты
Соревнования и лотереи
Постоянные турниры привносят адреналин и предоставляют возможность обрести значительные вознаграждения. Присутствие в соревнованиях зачастую безвозмездное, а призовые пулы насчитывают крупных сумм.
Охрана и секретность
Портал использует передовые протоколы защиты для гарантии информации игроков. Все финансовые операции совершаются через безопасные каналы.
Заключение
Официальный ресурс и его действующие зеркала дают безопасный подключение к первоклассным развлекательным играм. Привлекательные бонусы, комфортная смартфонная форма, многообразие автоматов и квалифицированное Live-заведение делают ресурс превосходным решением для любителей гемблинг автоматов.
Доступ к сайту через проверенные зеркала
Клиенты виртуальных казино нередко имеют дело с трудностью ограничения основного домена. Именно для устранения этой трудности существуют зеркала основного ресурса. [url=cactus-casino-1772394665801.clients.site]Cactus Casino казино[/url] дает беспрепятственный доступ ко всем сервисам ресурса.
Что такое актуальное зеркало казино
Дубликат составляет собой полную реплику основного ресурса с идентичным набором функций. Основное несовпадение — это доменное имя. Все информация игрока, в том числе депозит, привилегии и записи партий, продолжают быть неизменными.
Достоинства эксплуатации зеркал
Функционирующие зеркала имеют комплексом важных достоинств:
– Постоянный переход к предпочитаемым развлечениям
– Стопроцентная безопасность личных информации
– Неизменность всех опций индивидуального кабинета
– Шанс приобретения наград и вовлечения в промоакциях
Создание аккаунта на легальном ресурсе
Операция оформления предельно легок и отнимает немного минут. Новые пользователи способны надеяться на солидный стартовый подарок за оформление.
Шаги формирования аккаунта
1. Доступ на легальный сайт или его зеркало
2. Нажатие на клавишу “Присоединиться”
3. Заполнение обязательных сведений
4. Подтверждение email почты
5. Ввод промокода (когда имеется)
Бонусы и промоакции для клиентов
Игровая площадка радует своих клиентов всевозможными призовыми программами.
Базовые варианты поощрений
Приветственный пакет — внушительное вознаграждение для недавних клиентов, которое именно в состоянии охватывать монетарные суммы и безвозмездные спины.
Фриспины — шанс крутить в топовых игровых машинах без затрат.
Возврат средств — процентный компенсация утраченных средств, каковой начисляется каждую неделю или раз в месяц.
Бонусные коды — особые сочетания, предоставляющие экстра привилегии.
Персональный кабинет: опции и параметры
Личный аккаунт обеспечивает полный контроль над развлекательным активностью. Здесь имеются:
– Администрирование депозитом
– Записи платежей
– Активные привилегии
– Установки охраны
– Валидация учетной записи
Мобильная редакция и приложение
Новейшие участники ценят гибкость. Ресурс предоставляет двойной способа для участия с карманных девайсов.
Responsive портативная версия
Мобильная версия домена автономно приспосабливается под дисплей любого устройства. Не требуется загружать специальное софт.
Программа для телефонов
Можно инсталлировать фирменное APP для iOS и Android. Приложение дает:
– Быстрый старт
– Доработанный дизайн
– Всплывающие-оповещения о предложениях
– Стабильную производительность
Live игры: среда реального зала
Категория Live столов переносит участников в среду подлинного клуба. Квалифицированные ведущие ведут раунды в формате реального времени.
Топовые Live-столы
– Европейская рулетка
– Blackjack
– Баккарат
– Poker
Автоматы: ассортимент автоматов
Библиотека развлекательных слотов вмещает тысячи вариантов от ведущих производителей. Игроки обнаружат:
– Классические аппараты
– Видеослоты
– Мега-выигрыш-слоты
– Megaways
Соревнования и особые акции
Периодические состязания обеспечивают клиентам соревноваться друг с другом за значительные наградные суммы. Всякий состязание имеет свои критерии присутствия и доску лидеров.
Варианты внесения и получения денег
Платформа предоставляет ряд платежных систем:
– Кредитные картыы
– Цифровые кошельки
– Крипто
– Банковские переводы
Любые платежи выполняются конфиденциально благодаря современным методам шифрования.
Служба обслуживания
Опытные сотрудники команды помощи способны помочь 24/7. Работают следующие пути коммуникации:
– Онлайн-чат
– Email-помощь
– Звонковая поддержка
– Публичные сети
Заключение
Главный домен игровой площадки и его действующие дубликаты гарантируют участникам надежный и приятный переход к широкому выбору игровых развлечений. Солидные бонусы, частые промоакции, компетентная поддержка и легкие платежные методы превращают геймерский времяпрепровождение крайне комфортным и прибыльным.
онлайн обучение для детей shkola-onlajn-31.ru .
школьное образование онлайн школьное образование онлайн .
go to this vendor hub – Stumbled onto this site and the information is displayed in a clear, readable manner.
Подключение к порталу через действующие зеркала
Игроки онлайн казино постоянно сталкиваются с ситуацией закрытия главного портала. Конкретно для решения этой ситуации разработаны дубликаты главного ресурса. [url=glory-1772574268001.clients.site]Глори казино[/url] обеспечивает беспрепятственный переход ко всем функциям площадки.
Что такое актуальное зеркало казино
Альтернативный адрес является собой абсолютную копию официального веб-сайта с аналогичным возможностями. Главное различие — это доменное имя. Все параметры клиента, содержа счет, награды и историю игр, сохраняются такими же.
Преимущества использования зеркал
Действующие зеркала характеризуются рядом значимых достоинств:
– Постоянный переход к предпочитаемым слотам
– Стопроцентная безопасность индивидуальных данных
– Неизменность всех опций индивидуального кабинета
– Способность обретения бонусов и вовлечения в акциях
Регистрация на главном ресурсе
Ход оформления чрезвычайно несложен и длится несколько минут. Свежие игроки способны рассчитывать на крупный приветственный бонус за регистрацию.
Шаги открытия аккаунта
1. Переход на легальный портал или его альтернативу
2. Выбор на клавишу “Присоединиться”
3. Указание необходимых данных
4. Активация почтовой почты
5. Внесение бонусного кода (когда есть)
Бонусы и предложения для пользователей
Казино радует своих пользователей различными призовыми системами.
Базовые виды призов
Приветственный пакет — щедрое поощрение для начинающих клиентов, что в состоянии вмещать финансовые средства и безвозмездные спины.
Бесплатные вращения — шанс играть в востребованных автоматах безвозмездно.
Кешбэк — пропорциональный отдача потерянных финансов, который зачисляется еженедельно или ежемесячно.
Бонусные коды — уникальные сочетания, обеспечивающие экстра поощрения.
Индивидуальный кабинет: опции и настройки
Персональный раздел дает абсолютный надзор над развлекательным взаимодействием. В данном разделе присутствуют:
– Регулирование депозитом
– История переводов
– Работающие привилегии
– Конфигурации защиты
– Проверка профиля
Портативная редакция и APP
Современные пользователи оценивают портативность. Казино обеспечивает 2 способа для развлечений с карманных устройств.
Адаптивная портативная версия
Портативная редакция сайта автоматически подстраивается под дисплей любого девайса. Нет необходимости устанавливать специальное софт.
Софт для смартфонов
Можно инсталлировать оригинальное приложение для iOS и Android. Приложение гарантирует:
– Скорый запуск
– Улучшенный графику
– Push-сообщения о предложениях
– Стабильную производительность
Live казино: атмосфера истинного зала
Категория Live игр транспортирует игроков в обстановку истинного казино. Квалифицированные хосты проводят сессии в формате прямого времени.
Известные Live-форматы
– Европейская рулетка
– Двадцать одно
– Баккара
– Техасский холдем
Аппараты: выбор игр
Собрание игровых слотов насчитывает массу наименований от ведущих поставщиков. Пользователи обнаружат:
– Обычные слоты
– Графические слоты
– Джекпот-машины
– Многолинейные автоматы
Состязания и специальные предложения
Регулярные конкурсы позволяют игрокам состязаться друг с другом за значительные денежные фонды. Отдельный конкурс содержит свои условия включения и таблицу победителей.
Способы пополнения и вывода средств
Платформа поддерживает множество платежных методов:
– Платежные инструменты
– Онлайн сервисы
– Blockchain-платежи
– Банковские транзиты
Все транзакции выполняются конфиденциально благодаря актуальным протоколам защиты.
Служба обслуживания
Компетентные операторы команды поддержки настроены содействовать 24/7. Доступны такие способы связи:
– Онлайн-чат
– Email-обслуживание
– Аудио горячая линия
– Социальные сети
Заключение
Основной ресурс казино и его актуальные альтернативы дают клиентам надежный и комфортный переход к обширному ассортименту игровых активностей. Внушительные подарки, частые кампании, квалифицированная помощь и комфортные расчетные способы создают игровой процесс крайне захватывающим и результативным.
класс с учениками shkola-onlajn-32.ru .
this marketplace – Everything feels organized and the interface is easy to use.
https://petmedsmonitor.com/# п»їdog medication online
https://zekond.com/post/735903_codigo-promocional-1xbet-gratis-2026-1xbig2026-codigo-promocional-1xbet-sin-depo.html
Bazaar Opal – Clean interface, moving between pages is smooth.
Актуальные онлайн-казино предлагают участникам большой ассортимент возможностей и бонусных программ. Вход к платформе выполняется через главный ресурс или его рабочее зеркало Disi, что дает постоянную игру.
В чем суть действующее зеркало казино
Зеркало — это полная реплика оригинального ресурса, построенная для решения ограничений. Действующее зеркало обеспечивает пользователям сохранить подключение к излюбленным слотам в любое удобное время.
Лицензионное зеркало обладает всеми возможностями оригинального ресурса:
– Совокупный каталог слотов
– Аккаунт с сохраненными данными
– Действующие поощрения
– Защищенные денежные транзакции
Создание аккаунта на основном портале
Процесс открытия счета составляет всего несколько минут. Начинающим участникам необходимо:
1. Перейти на официальный сайт или актуальное зеркало
2. Нажать на клавишу “Открыть счет”
3. Внести нужные информацию
4. Верифицировать контакт
5. Внести стартовый вклад
Стартовый бонус зачисляется незамедлительно после окончания всех стадий.
Вход в профиль
Зарегистрированные игроки могут совершить подключение используя:
– Имя пользователя и пароль
– Номер мобильного
– Email
Аккаунт обеспечивает возможность к администрированию средствами, истории ставок и доступным поощрениям.
Награды и акции
Азартная система привлекает лояльных участников многочисленными вознаграждениями:
Первый пакет
– Премия на начальный депозит до 100%
– Даровые спины на топовые автоматы
– Экстра премии за дальнейшие депозиты
Купоны
Уникальные ваучеры предоставляют доступ на получение уникальных поощрений. Действующие промокоды выкладываются в разделе “Бонусы”.
Возврат средств
Еженедельный кешбэк насчитывает до 10% от проигранных денег. Выплата предоставляется сразу.
Схема лояльности
Регулярные игроки накапливают поинты, которые переводятся на реальные средства или даровые спины.
Мобильная версия и APP
В целях удобства игроков создана полноценная mobile версия. Гибкий интерфейс позволяет комфортно развлекаться с любого мобильного аппарата.
Достоинства программы:
– Скорый вход к играм
– Адаптированный дизайн
– Бесперебойная работа
– Сообщения о актуальных бонусах
Загрузить APP можно свободно с главного сайта для устройств на Android и iOS.
Ассортимент слотов
Слоты
Каталог содержит более 2000 слотов от топовых провайдеров:
– Стандартные слоты
– Мультимедийные игры
– Джекпот-слоты
– Тематические слоты
Live казино
Категория Live развлечений предлагает игру с настоящими диллерами в реальном формате:
– Рулеточные столы
– Двадцать одно
– Карты
– Столы покера
Состязания
Постоянные турниры с крупными выигрышными бюджетами устраиваются каждую неделю. Вход в состязаниях возможно всем созданным пользователям.
Финансовые варианты
Депозиты и выводы средств производятся через известные методы:
– Дебетовые пластик
– Цифровые кошельки
– Крипто
– Денежные платежи
Стартовый взнос — от 100 рублей. Изъятие денег обрабатывается в течение 24 периода.
Команда support
Постоянная группа помощи расположена поддержать в разрешении каких-либо задач:
– Онлайн-чат
– Email
– Горячая линия
– Публичные сети
Безопасность и разрешение
Главный ресурс функционирует на фундаменте международной разрешения. Все параметры участников обезопасены современным SSL-протоколом.
Вывод
Действующее зеркало предоставляет стабильный подключение к излюбленным слотам, богатым акциям и комфортным возможностям. Откройте счет сейчас и получите начальный бонус!
Актуальные онлайн-казино гарантируют клиентам обширный выбор развлечений и заманчивые награды. Но для комфортной деятельности важно понимать, как найти Glory и его актуальные зеркала.
Что такое основной ресурс казино
Основной сайт казино — это главная площадка, где клиенты могут получать удовольствие от гемблинг автоматами. Сайт действует на официальных принципах и имеет всеми необходимыми лицензиями.
Основные преимущества лицензионного веб-сайта:
– Конфиденциальность личных сведений
– Прозрачные условия игры
– Гарантированные платежи
– Профессиональная поддержка
Функционирующее зеркало казино: для чего нужно
Копия сайта — это абсолютная клон главного ресурса, хостящаяся по другому домену. Актуальное зеркало формируется для предоставления постоянного доступа к ресурсу.
Факторы применения дублирующих ресурсов:
– Блокировка первичного адреса
– Плановые мероприятия
– Повышенная нагрузка на ресурс
Как найти актуальное зеркало сейчас
Обнаружить текущее рабочее зеркало можно различными вариантами:
1. Рассылка — подпишитесь на информационную отправку
2. Департамент помощи — проконсультируйтесь в онлайн-чат
3. Корпоративные каналы — следите за публикациями
4. Тематические площадки — достоверные сайты
Оформление профиля на платформе казино
Процедура регистрации составляет лишь несколько секунд:
1. Активируйте на опцию “Создать аккаунт”
2. Укажите необходимые данные
3. Верифицируйте контактную e-mail
4. Введите промокод, если есть
Сразу после финализированной регистрации вам откроется открыт индивидуальный раздел.
Бонусы и купоны
Богатая поощрительная система — важное плюс казино:
Бонус за создание аккаунта
Новые клиенты получают приветственный поощрение, который может предполагать:
– Валютный бонус на первый пополнение
– Фри-спины для автоматов
– Безвозвратные средства
Бонусные коды
Регулярно публикуются свежие купоны, предоставляющие активировать особые привилегии.
Программа кешбэка
Активные игроки приобретают порцию использованных финансов обратно.
Действующие кампании и соревнования
Ресурс систематически организует интересные кампании:
– Еженедельные чемпионаты
– Сезонные промо
– Лотереи значительных наград
– Схема привилегий
Доступ в пользовательский раздел
Для входа на портал следует:
1. Загрузить лицензионный адрес или действующее зеркало
2. Кликнуть “Войти”
3. Прописать email и секретную комбинацию
В личном профиле доступны данные возможности:
– Депозит кошелька
– Обналичивание выигрышей
– Просмотр архива игр
– Изменение профильными параметрами
Адаптивная платформа и программа
Портативная модификация
Оптимизированная модификация сайта дает возможность развлекаться с всех карманного устройства. Интерфейс адаптивно подстраивается под размер монитора.
Клиент для загрузки
Загрузить приложение можно для:
– Android — безопасная скачивание с платформы
– iOS — скачивание через App Store
Преимущества приложения:
– Мгновенный старт
– Бесперебойная операционность
– Push-уведомления об предложениях
– Оптимизированный функционал
Азартные зоны
Барабаны
Разнообразная коллекция эмуляторных слотов от известных провайдеров:
– Классические слоты
– Продвинутые-игры
– Прогрессивные-автоматы
Live casino
Секция с профессиональными ведущими обеспечивает:
– European/American Roulette
– Блэкджек
– Мини-баккара
– Покер
Трансляции ведутся в высоком качестве изображения, формируя впечатление настоящего казино.
Варианты внесения средств и обналичивания
Сайт поддерживает разнообразные платежные инструменты:
– Дебетовые карты
– Электронные кошельки
– Цифровые валюты
– Прямые транзиты
Базовые пороги взноса и быстрые платежи создают развлечение исключительно удобной.
Служба support
Квалифицированная отдел помощи работает 24/7 и может помочь с разными ситуациями:
– Реалтайм-чат
– Email-помощь
– Звонковая служба
Заключение
Лицензионный веб-сайт казино и его функционирующие зеркала предоставляют участникам конфиденциальный и захватывающий азартный отдых. Богатые поощрения, функциональная мобильная платформа, многочисленные игры и высокоуровневое live-казино делают эту ресурс замечательным местом для азартных развлечений.
go to seacrate – Found this site today and the browsing flow seems simple and neat.
Нынешние онлайн-казино дают клиентам обширный спектр игр и призовых опций. Присоединение к сервису реализуется через официальный портал или его действующее зеркало Леон, что обеспечивает непрерывную игру.
Чем является актуальное зеркало казино
Дубликат — это точная реплика главного ресурса, созданная для преодоления барьеров. Актуальное зеркало обеспечивает пользователям сохранить вход к излюбленным автоматам в произвольное время.
Лицензионное зеркало имеет всеми опциями главного портала:
– Полный ассортимент развлечений
– Аккаунт с сохраненными сведениями
– Текущие бонусы
– Безопасные денежные операции
Оформление профиля на официальном портале
Ход открытия счета занимает всего несколько минут. Первым участникам необходимо:
1. Перейти на проверенный ресурс или рабочее зеркало
2. Нажать на ссылку “Зарегистрироваться”
3. Указать требуемые информацию
4. Подтвердить email
5. Внести дебютный вклад
Поощрение новичкам начисляется моментально после прохождения всех шагов.
Авторизация в личный кабинет
Зарегистрированные пользователи могут совершить подключение вводя:
– Никнейм и пароль
– Номер телефона
– Адрес
Персональный раздел предоставляет шанс к контролю счетом, записям игр и действующим промокодам.
Промо и предложения
Развлекательная система привлекает активных игроков выгодными призами:
Первый набор
– Надбавка на стартовый депозит до 100%
– Бесплатные вращения на топовые слоты
– Экстра поощрения за очередные депозиты
Ваучеры
Специальные коды предоставляют возможность на получение особых призов. Текущие коды публикуются в разделе “Предложения”.
Возврат средств
Регулярный кэшбек насчитывает до 10% от использованных денег. Возврат выплачивается незамедлительно.
Система лояльности
Регулярные участники получают очки, которые превращаются на подлинные финансы или бесплатные вращения.
Мобильная версия и приложение
Ради комфорта игроков создана удобная мобильная версия. Отзывчивый облик помогает удобно играть с произвольного карманного гаджета.
Преимущества приложения:
– Оперативный вход к играм
– Настроенный интерфейс
– Надежная деятельность
– Сообщения о свежих турнирах
Получить APP можно безвозмездно с официального ресурса для аппаратов на Android и iOS.
Каталог развлечений
Слоты
Коллекция содержит более 2000 слотов от популярных производителей:
– Традиционные игры
– Видео-слоты
– Jackpot игры
– Сюжетные игры
Live казино
Раздел Live столов дает взаимодействие с реальными крупье в реальном режиме:
– Рулетка
– Карточная игра
– Baccarat
– Poker
Соревнования
Периодические турниры с большими выигрышными бюджетами запускаются систематически. Присоединение в соревнованиях открыто всем зарегистрированным пользователям.
Платежные методы
Депозиты и изъятия денег осуществляются через популярные платежные системы:
– Банковские карты
– Виртуальные счета
– Bitcoin
– Банковские операции
Стартовый платеж — от 100 рублей. Вывод средств проводится в течение 24 периода.
Служба support
Круглосуточная команда support может ассистировать в разрешении всех проблем:
– Живой чат
– Email
– Горячая линия
– Публичные сети
Защита и лицензия
Подлинный веб-сайт действует на фундаменте глобальной лицензии. Любые параметры игроков защищены актуальным SSL-криптованием.
Вывод
Действующее зеркало дает постоянный соединение к выбранным слотам, привлекательным бонусам и удобным услугам. Зарегистрируйтесь сегодня и приобретите первый поощрение!
Современные интернет казино обеспечивают пользователям обширный выбор возможностей для комфортной игры. Тем не менее иногда вход к базовому ресурсу может стать закрытым. В таких моментах на поддержку появляется EzCash, которое гарантирует стабильный доступ ко всем опциям платформы.
Что такое актуальное зеркало казино
Альтернативный сайт — это полная реплика официального сайта, которая находится по дополнительному адресу. Копия сохраняет все набор функций оригинального портала, включая индивидуальный кабинет, средства и сведения операций.
Основные преимущества применения зеркала:
– Круглосуточный вход к порталу
– Полная аналогичность опций
– Конфиденциальность индивидуальных сведений
– Удержание существующих поощрений
Как найти рабочее зеркало на текущий день
Имеется ряд безопасных путей получения свежей URL:
Легитимные источники:
1. Имейл рассылка — администрация постоянно отправляет сообщения с свежими адресами
2. Коммуникационные сети — официальные каналы размещают актуальную данные
3. Служба поддержки — консультанты предоставляют проверенные ссылки
4. Мобильное приложение — обеспечивает избегать блокировки
Оформление профиля на лицензионном сайте
Операция создания аккаунта длится всего пару минут и состоит из следующих этапов:
1. Попадание на основной портал или актуальное зеркало
2. Нажатие на иконку «Создать аккаунт»
3. Ввод пользовательской таблицы
4. Подтверждение email почты или мобильного номера
5. Задействование бонуса за регистрацию при доступности промокода
Новые геймеры зарабатывают солидный вступительный приз, который может охватывать free spins, валютные вознаграждения или cashback.
Вход в индивидуальный кабинет
Авторизация на платформе осуществляется обычным образом. Нужно вписать учетные данные и код доступа, указанные при открытии счета.
Важные детали для конфиденциального входа:
– Применяйте криптостойкий код
– Задействуйте 2FA аутентификацию
– Не храните пароли на публичных устройствах
– Проверяйте адресную строку браузера
Анализ наградной схемы
Игорный портал балует геймеров многочисленными бонусами и акциями:
Приветственный букет
Новички способны рассчитывать на существенное награду за первый депозит. Традиционно это пропорциональная надбавка к депонированной объему плюс даровые спины для популярных слотов.
Периодические промо
– Еженедельный возврат средств — возвращение части списанных финансов
– Бонусы на очередные депозиты
– Специальные предложения по праздникам
– Состязания с солидными выигрышными фондами
Система привилегий
Деятельные клиенты зарабатывают очки за произвольную игру, которые затем меняются на настоящие средства, фриспины или особые льготы.
Купоны: как применять
Купоны — это специальные наборы букв и цифр, обеспечивающие право к дополнительным бонусам.
Каким образом взять актуальные промокоды:
– Проверенные социальные сети казино
– Сотрудничающие площадки
– Email-новостная лента
– Специализированные форумы
Прописывается промокод в специальное поле при открытии счета или зачислении средств кошелька.
Мобильная версия и приложение
Передовые пользователи отдают предпочтение проводить время с телефонных гаджетов. Платформа предлагает два способа для приятной портативной игры.
Адаптивная вариант
Интернет версия само собой адаптируется под размер экранной панели. Не требует загрузки и функционирует в любом свежем браузере.
Портативное приложение
Скачать программу можно для гаджетов на Android и iOS. Достоинства app:
– Скоростная запуск
– Бесперебойная работа
– Push-уведомления о поощрениях
– Автоматический преодоление блокировок
Операция инсталляции легок: требуется попасть на веб-сайт с мобильного гаджета и выполнять руководству.
Азартный коллекция
База игр содержит тысячи наименований от передовых разработчиков.
Слоты
Гемблинг слоты — наиболее распространенная секция забав. Представлены традиционные трехбарабанные автоматы, новые видео-автоматы с дополнительными этапами, а также джекпотные призы.
Live казино
Отдел с реальными крупье дает возможность испытать антураж истинного казино. Доступны варианты с рулеткой.
Стриминг производится в отличном четкости, присутствует общение с ведущим и остальными пользователями.
Турниры
Систематически устраиваются состязания по всевозможным категориям. Присоединение позволяет заработать монетарные выигрыши, фриспины или уникальные бонусы.
Финансовые операции
Ресурс предлагает большой набор финансовых методов:
– Банковские карты
– Онлайн системы
– Биткоин
– Финансовые транзакты
Наименьшая сумма пополнения — посильная для массы пользователей. Снятие выигрышей производится в кратчайшие временные рамки.
Отдел поддержки
Компетентные сотрудники расположены оказать помощь круглосуточно. Имеются такие каналы контакта:
– Веб-чат
– Email
– Телефонная горячая линия
– Коммуникационные сети
Пояснения на типовые проблемы можно найти в разделе FAQ.
Заключение
Официальный сайт казино и его функционирующие зеркала обеспечивают игрокам максимальный путь ко всем функциям платформы. Великодушные поощрения, практичная телефонная версия, гигантский выбор аттракционов и компетентная ассистенция превращают азартный процесс исключительно беспроблемным и конфиденциальным.
canadian pharmacy near me: canadian drug stores – Certified Canada Rx
these details
Explore China’s top cities in 10 days
Нынешние онлайн-казино обеспечивают геймерам широкий выбор возможностей для удобной досуга. Переход к сервису Dragon Money производится через главный сайт или актуальное зеркало.
Что такое функционирующее зеркало казино
Функционирующее зеркало — это запасной линк лицензионного веб-сайта казино. Такие дубликаты разрабатываются для предоставления бесперебойного входа к азартной площадке.
Дубликат текущее абсолютно дублирует функционал главного сайта. Клиенты обретают аналогичный доступ ко всем сервисам, включая создание аккаунта, зачисление средств счета и вывод денег.
Оформление профиля на лицензионном сайте
Процедура создания аккаунта длится всего несколько мгновений. Будущим клиентам необходимо:
1. Попасть на официальный ресурс или текущее настоящее зеркало
2. Нажать кнопку “Создать аккаунт”
3. Указать требуемые информацию
4. Проверить почтовую почту
5. Использовать купон при наличии
После окончания открытия профиля пользователь приобретает подарок за регистрацию, который вправе содержать free spins или финансовое премию.
Авторизация в индивидуальный кабинет
Личный кабинет — это защищенная область, где пользователи имеют возможность администрировать своим счетом. Для авторизации требуется напечатать логин и код доступа.
В персональном кабинете доступны следующие возможности:
– Просмотр записей операций
– Активация бонусных кодов
– Настройка бонусами
– Участие в конкурсах
– Контроль возврата средств
– Корректировка аккаунта
Поощрения и промо
Игровая сервис предлагает великодушные вознаграждения:
Стартовый пакет — новые игроки приобретают солидное вознаграждение на начальные вклады.
Фриспины — дарятся как при регистрации, так и в контексте различных мероприятий.
Кэшбек — систематический возврат фрагмента израсходованных финансов.
Промокоды — особые шифры, открывающие возможность к уникальным вознаграждениям.
Обзор игровых категорий
Слоты
Библиотека автоматов содержит тысячи позиций от лучших производителей. Клиенты встретят как обычные автоматы, так и актуальные мультимедийные автоматы с захватывающей оформлением.
Live казино
Секция Live казино обеспечивает право развлекаться с живыми дилерами в режиме актуального времени. Доступны востребованные столы: рулетка, блэкджек, баккара, покер.
Состязания
Регулярные турниры с солидными наградными суммами привлекают множество конкурсантов. Лидеры обретают денежные выплаты и эксклюзивные бонусы.
Телефонная версия и app
Адаптивная версия платформы предоставляет право участвовать с произвольного гаджета. Структура автоматически настраивается под размер экрана.
Загрузить приложение можно для аппаратов на Android и iOS. Мобильное приложение обладает всеми возможностями полной версии.
Как обнаружить актуальное зеркало на сегодня
Актуальные URL копий систематически меняются. Найти актуальную адрес можно разными методами:
– Через сервис помощи
– В подлинных коммуникационных сетях
– По e-mail подписке
– На тематических площадках
Надежность и лицензирование
Лицензионный портал функционирует на базе международной документа. Все платежи защищены инновационными системами защиты.
Секретность индивидуальных сведений гарантируется в стопроцентном масштабе.
Вывод
Лицензионный домен и его функционирующие дубликаты дарят пользователям постоянный выход к качественным азартным развлечениям. Великодушные бонусы, разнообразные игры, квалифицированная сервис — все это делает азартный процесс чрезвычайно беспроблемным и притягательным.
Современные онлайн-казино предлагают клиентам разнообразие возможностей для удобной игры. Официальный ресурс Вилдер казино дарит возможность ко всем функциям и игровым автоматам. Однако при образовании технических трудностей на подмогу приходят рабочие копии.
Что являет собой собой рабочее зеркало
Зеркало казино — это идентичная дубликат оригинального сайта, расположенная по дополнительному доменному имени. Подлинное зеркало хранит все характеристики, в том числе открытие профиля, авторизацию в собственный кабинет, бонусы и бонусные коды.
Альтернативный сайт на сегодня дает:
– Стабильный доступ к азартным аппаратам
– Стопроцентную сохранность личных сведений
– Поддержку счета и записей переводов
– Доступность всех специальных предложений
Регистрация на лицензионном ресурсе
Этап создания аккаунта занимает несколько минут. Свежеиспеченным игрокам следует:
1. Открыть на главный ресурс или действующее зеркало
2. Кликнуть кнопку «Регистрация»
3. Указать необходимые сведения
4. Подтвердить электронную почту
5. Использовать промокод при присутствии
После конца регистрации клиенты приобретают бонус за регистрацию, который может содержать бонусные спины или денежно-призовое поощрение.
Вход в индивидуальный кабинет
Персональный кабинет дает полный контроль над азартным ходом. Через личный профиль разрешается:
– Вносить средства на депозит
– Выводить выплаты
– Применять купоны
– Отслеживать хронологию пари
– Соревноваться в соревнованиях
– Забирать кешбэк
Описание бонусов и специальных предложений
Великодушная призовая политика — существенное достоинство казино. Основные формы поощрений:
Стартовый подарок
Начинающие зарабатывают богатое премирование на стартовые депозиты. Сумма премии может достигать 100-200% от величины депозита.
Free spins
Даровые вращения предоставляются для востребованных машин. Сумма фриспинов изменяется от 10 до 500 штук.
Cash back
Регулярный или ежемесячный возврат процента потерянных средств. Стандартный процент возврата — 5-15%.
Соревнования
Периодические конкурсы с солидными наградными пулами. Игроки состязаются за лучшие строчки в турнирной таблице.
Смартфонная версия и приложение
Смартфонная версия разрешает наслаждаться игрой с любого устройства. Клиенты могут установить программу для iOS и Android или задействовать браузерную версию.
Выгоды мобильного программы:
– Оперативная подзагрузка слотов
– Комфортный дизайн
– Пуш-нотификации о акциях
– Вход через Face ID
Игровые автоматы и Live казино
Игровая база содержит сотни позиций от ведущих провайдеров.
Топовые типы слотов:
– Классические слоты
– Видеослоты с премиальными раундами
– Прогрессивный джекпот автоматы
– Мега-путь слоты
Live игорный зал
Зона live казино предоставляет развлечение с реальными дилерами. Представлены традиционные варианты:
– Рулетка
– Blackjack
– Punto Banco
– Техасский холдем
Как отыскать действующее зеркало
Раздобыть свежую ссылку на зеркало можно множественными методами:
1. Оформить подписку на емейл-уведомления
2. Наблюдать за обновлениями в соц сетях
3. Контактировать в департамент поддержки
4. Добавить в закладки рабочее зеркало в закладки
Итог
Лицензионный портал и его рабочие альтернативные адреса гарантируют непрерывный путь к развлекательным автоматам. Выгодные вознаграждения, множественные бонусные коды, эргономичное мобильное софт и профессиональная служба поддержки поддержки делают развлекательный геймплей крайне комфортным и защищенным.
woodlandvault – The site looks clean and everything is organized well.
For testimonials
Loan renewal
to satisfy your interest.
澳超阿德莱德联 vs 珀斯光荣2026最新比分16:35开踢,澳大利亚足球赛事比分让球分析热议。
Kettle Market Corner – Layout is neat and exploring the site feels natural.
Обзор официального сайта
Актуальные онлайн казино обеспечивают пользователям обширный выбор игр и шансов. Основной портал Гама обеспечивает защищенный путь к развлекательным сервисам.
Действующее зеркало: путь прямо сейчас
Альтернативный адрес представляет в качестве идентичную реплику официального портала. Актуальное зеркало дает возможность игрокам преодолевать возможные ограничения.
Плюсы эксплуатации зеркала
Главные достоинства содержат:
– Стабильный шанс к ресурсу
– Сохранение любых функций официального сайта
– Охрана персональных информации
– Такой же возможности
Создание аккаунта на ресурсе
Процесс регистрации выделяется доступностью и комфортом. Свежие пользователи должны:
1. Посетить главный портал или его зеркало
2. Выбрать на клавишу оформления
3. Указать требуемые поля
4. Активировать электронную адрес
5. Произвести первый логин
Вознаграждение за открытие счета
Новички зарабатывают внушительный приветственный презент. Данное поощрение в состоянии содержать:
– Денежные средства
– Безвозмездные спины
– Увеличенный уровень компенсации
Логин в личный кабинет
Существующие участники в состоянии моментально войти в собственный кабинет, эксплуатируя никнейм и шифр. Собственный аккаунт дает путь к:
– Администрированию счетом
– Записям операций
– Активным подаркам
– Настройкам учетной записи
Призы и кампании
Платформа периодически проводит многочисленные акции для игроков.
Типы призов
Главные формы поощрений:
– Депозитные бонусы – доля от размера пополнения
– Прокруты – безвозмездные прокруты в игровых машинах
– Компенсация – компенсация части затраченных сумм
– Соревновательные призы – премии за состязание в турнирах
Ваучеры
Эксклюзивные купоны дают возможность получить экстра привилегии. Клиенты способны обнаружить их на партнерских сайтах или заработать в уведомлениях.
Мобильная адаптация и приложение
Современные игроки выбирают переносной геймплей.
Характеристики mobile системы
– Гибкий дизайн для разнообразных гаджетов
– Совокупный вход к развлечениям
– Оперативная работа
– Удобное управление
Установить программу
Mobile app предоставлено для downloading на девайсы с базовыми ОС Android и iOS. Программа дает:
– Стабильную деятельность
– Мгновенные оповещения о призах
– Быстрый вход к предпочитаемым слотам
Азартный ассортимент
Портал обеспечивает внушительную библиотеку игровых развлечений.
Игровые машины
Библиотека развлекательных слотов включает:
– Классические автоматы
– Передовые игры
– Призовые машины
– Branded автоматы
Live игры
Категория живых развлечений предоставляет право состязаться с профессиональными ведущими. Открыты:
– Европейская рулетка
– 21
– Баккара
– Покер
Турниры
Периодические конкурсы помогают клиентам соревноваться за значительные наградные пулы. Конкурсная система изменяется постоянно.
Банковские процедуры
Сайт предлагает массу способов внесения и обналичивания денег:
– Кредитные карты
– Цифровые счета
– Банковские транзакции
– Крипто
Все платежи осуществляются безопасно с применением прогрессивных технологий кодирования.
Департамент поддержки
Компетентная команда саппорта функционирует 24/7. Обратиться с менеджерами реально через:
– Онлайн чат
– Электронную почту
– Телефон
– Социальные сети
Безопасность и аккредитация
Игровой клуб действует на фундаменте законной аккредитации. Данное гарантирует:
– Справедливость развлекательного геймплея
– Сохранность индивидуальных сведений
– Пунктуальные транзакции
– Легальный гемблинг
Итог
Основной портал и его действующие резервные страницы предоставляют участникам полный ассортимент опций для удобной и профитной времяпрепровождения. Внушительные вознаграждения, многочисленные автоматы, компетентная поддержка и проверенная система платежей создают портал оптимальным выбором для фанатов игровых услуг.
дистанционное обучение 10-11 класс дистанционное обучение 10-11 класс .
Актуальные онлайн-казино обеспечивают клиентам массу возможностей для беспроблемной игры. Главный портал 888старз открывает вход ко всем возможностям и играм. Однако при возникновении технических трудностей на подмогу спешат рабочие альтернативные адреса.
Что есть собой функционирующее зеркало
Копия казино — это точная копия официального портала, находящаяся по дополнительному доменному имени. Подлинное зеркало поддерживает все характеристики, вместе с открытие профиля, доступ в личный кабинет, вознаграждения и бонусные коды.
Альтернативный сайт на сегодня предоставляет:
– Стабильный путь к азартным машинам
– Совершенную безопасность персональных сведений
– Удержание депозита и хронологии переводов
– Применимость всех акций
Открытие профиля на официальном ресурсе
Ход регистрации требует считанные минут. Свежеиспеченным геймерам нужно:
1. Зайти на официальный ресурс или рабочее зеркало
2. Кликнуть кнопку «Регистрация»
3. Внести запрашиваемые данные
4. Подтвердить э-мейл почту
5. Указать промокод при существовании
После конца создания аккаунта геймеры получают приз за регистрацию, который может иметь бонусные спины или денежно-призовое вознаграждение.
Логин в личный кабинет
Личный кабинет обеспечивает комплексный надзор над азартным действом. Через собственный раздел можно:
– Вносить средства на счет
– Забирать средства
– Применять промокоды
– Мониторить журнал игр
– Соревноваться в соревнованиях
– Забирать cash back
Характеристика поощрений и промо-предложений
Великодушная поощрительная система — значимое достоинство платформы. Главные виды поощрений:
Начальный приз
Дебютанты зарабатывают богатое поощрение на начальные вклады. Размер бонуса может доходить до 100-200% от суммы взноса.
Free spins
Бесплатные вращения даются для востребованных автоматов. Сумма фриспинов колеблется от 10 до 500 штук.
Cash back
Систематический или помесячный отдача части потерянных денег. Стандартный размер кэшбека — 5-15%.
Состязания
Регулярные состязания с солидными премиальными пулами. Соревнующиеся борются за верхние позиции в турнирной таблице.
Мобильная версия и приложение
Адаптивная версия позволяет делать ставки с любого гаджета. Геймеры могут загрузить софт для iOS и Android или эксплуатировать интернет версию.
Преимущества мобильного программы:
– Оперативная загрузка слотов
– Практичный интерфейс
– Пуш-нотификации о поощрениях
– Доступ через отпечаток пальца
Автоматы и Live казино
Развлекательная коллекция содержит тысячи игр от ведущих провайдеров.
Известные разделы автоматов:
– Обычные автоматы
– Видеослоты с премиальными этапами
– Джекпот автоматы
– Мега-путь автоматы
Live казино
Зона live казино обеспечивает игру с настоящими дилерами. Имеются стандартные игры:
– Рулетка
– Двадцать одно
– Punto Banco
– Техасский холдем
Как отыскать актуальное зеркало
Раздобыть актуальную ссылку на зеркало возможно разными путями:
1. Зарегистрироваться на email-рассылку
2. Отслеживать за апдейтами в соц сетях
3. Обратиться в отдел поддержки
4. Добавить в закладки действующее зеркало в фавориты
Заключение
Лицензионный ресурс и его актуальные дубликаты предоставляют стабильный доступ к игровым слотам. Щедрые премии, различные промокоды, удобное смартфонное приложение и качественная сервис поддержки превращают развлекательный опыт максимально комфортным и безопасным.
ed medicine online Mens RX Index low cost ed medication
visit the bazaar page – I noticed this site by chance and navigating it feels smooth and intuitive.
мелбет зеркало мелбет зеркало .
İşinizə davam edin və daha çox istifadəçi cəlb edin!
https://pin-up-azerbaijan-spin.com
Современные онлайн-казино гарантируют игрокам множество путей для удобной игры. Центральный сайт 888старз предоставляет путь ко всем функциям и игровым автоматам. Однако при появлении технических проблем на выручку прибывают функционирующие дубликаты.
Что есть собой действующее зеркало
Альтернативный адрес казино — это стопроцентная копия основного сайта, размещенная по дополнительному веб-адресу. Лицензионное зеркало хранит все функции, вместе с создание аккаунта, доступ в персональный кабинет, премии и бонусные коды.
Копия на сегодня дает:
– Бесперебойный путь к азартным машинам
– Совершенную конфиденциальность личных информации
– Удержание баланса и хронологии переводов
– Возможность использования всех акций
Регистрация на официальном сайте
Этап открытия профиля занимает несколько минут. Новым игрокам нужно:
1. Перейти на официальный портал или актуальное зеркало
2. Кликнуть кнопку «Зарегистрироваться»
3. Указать запрашиваемые сведения
4. Верифицировать э-мейл почту
5. Ввести кодовое слово при наличии
После финиша создания аккаунта пользователи зарабатывают вознаграждение за регистрацию, что может иметь бонусные спины или монетарное вознаграждение.
Вход в индивидуальный кабинет
Персональный кабинет открывает всеобъемлющий контроль над игровым действом. Через личный кабинет возможно:
– Вносить средства на счет
– Снимать выигрыши
– Задействовать купоны
– Проверять хронологию игр
– Принимать участие в соревнованиях
– Получать cash back
Характеристика поощрений и промо-предложений
Богатая призовая программа — значимое козырь проекта. Центральные типы поощрений:
Начальный приз
Новые игроки приобретают богатое вознаграждение на стартовые депозиты. Объем приза может составлять 100-200% от суммы депозита.
Free spins
Бесплатные раунды предоставляются для популярных автоматов. Сумма free spins варьируется от 10 до 500 штук.
Возврат средств
Еженедельный или ежемесячный возврат процента потерянных денег. Обычный процент кэшбека — 5-15%.
Соревнования
Систематические соревнования с внушительными наградными банками. Игроки соревнуются за топовые места в турнирной таблице.
Смартфонная версия и приложение
Портативная версия позволяет делать ставки с любого гаджета. Геймеры могут закачать приложение для iOS и Android или применять интернет версию.
Плюсы портативного софта:
– Оперативная загрузка автоматов
– Комфортный UI
– Push-уведомления о поощрениях
– Доступ через Touch ID
Автоматы и Live казино
Игровая библиотека охватывает множество игр от топовых провайдеров.
Популярные типы слотов:
– Традиционные слоты
– Видеослоты с призовыми раундами
– Джекпот слоты
– Мегавейс автоматы
Live игорный зал
Категория live казино предоставляет партию с реальными ведущими. Доступны традиционные варианты:
– Американская рулетка
– Двадцать одно
– Baccarat
– Карибский покер
Как отыскать рабочее зеркало
Получить действующую линк на зеркало разрешается множественными путями:
1. Оформить подписку на почтовую рассылку
2. Мониторить за апдейтами в соц сетях
3. Контактировать в службу поддержки
4. Добавить в закладки действующее зеркало в фавориты
Вывод
Главный ресурс и его функционирующие зеркала дают непрерывный вход к азартным играм. Выгодные премии, многочисленные бонусные коды, комфортное портативное софт и качественная служба поддержки поддержки обеспечивают азартный геймплей максимально приятным и конфиденциальным.
Актуальные онлайн-казино гарантируют клиентам множество путей для комфортной игры. Официальный ресурс Аркада обеспечивает доступ ко всем опциям и играм. Однако при появлении технических трудностей на подмогу спешат функционирующие дубликаты.
Что означает собой рабочее зеркало
Зеркало казино — это идентичная реплика основного портала, находящаяся по запасному URL. Подлинное зеркало поддерживает все функции, в том числе открытие профиля, вход в индивидуальный кабинет, бонусы и кодовые слова.
Зеркало на сегодня предоставляет:
– Непрерывный вход к азартным машинам
– Совершенную сохранность персональных данных
– Удержание депозита и хронологии транзакций
– Возможность использования всех промо-предложений
Регистрация на основном портале
Ход открытия профиля требует считанные минут. Начинающим клиентам следует:
1. Войти на главный ресурс или функционирующее зеркало
2. Выбрать кнопку «Регистрация»
3. Внести запрашиваемые графы
4. Активировать email почту
5. Ввести купон при наличии
После завершения создания аккаунта клиенты обретают бонус за регистрацию, какой может охватывать бесплатные вращения или монетарное поощрение.
Логин в собственный кабинет
Личный кабинет обеспечивает полный мониторинг над игровым ходом. Через индивидуальный профиль разрешается:
– Депонировать депозит
– Выводить выигрыши
– Активировать бонусные коды
– Проверять хронологию игр
– Принимать участие в конкурсах
– Приобретать кешбэк
Описание вознаграждений и акций
Богатая бонусная схема — ключевое плюс платформы. Ключевые виды премий:
Приветственный подарок
Новые игроки приобретают выгодное премирование на первые депозиты. Объем премии может составлять 100-200% от суммы депозита.
Free spins
Даровые спины выдаются для популярных машин. Число бесплатных вращений колеблется от 10 до 500 штук.
Кэшбек
Еженедельный или ежемесячный возврат доли потерянных средств. Средний объем возврата — 5-15%.
Конкурсы
Регулярные конкурсы с солидными призовыми пулами. Участники соревнуются за лучшие строчки в рейтинге.
Мобильная версия и программа
Смартфонная версия дает возможность делать ставки с каждого девайса. Игроки могут закачать программу для iOS и Android или применять интернет версию.
Плюсы мобильного приложения:
– Быстрая подзагрузка автоматов
– Удобный интерфейс
– Всплывающие уведомления о акциях
– Вход через отпечаток пальца
Игровые автоматы и Live казино
Развлекательная база включает тысячи позиций от известных разработчиков.
Популярные разделы слотов:
– Обычные машины
– Современные слоты с премиальными этапами
– Накопительный приз автоматы
– Megaways машины
Live казино
Секция live казино предлагает партию с профессиональными ведущими. Доступны классические игры:
– Американская рулетка
– Двадцать одно
– Punto Banco
– Техасский холдем
Как отыскать актуальное зеркало
Раздобыть действующую адрес на зеркало можно различными вариантами:
1. Подписаться на email-рассылку
2. Наблюдать за апдейтами в соц сетях
3. Обратиться в службу поддержки
4. Запомнить действующее зеркало в фавориты
Заключение
Официальный сайт и его актуальные дубликаты предоставляют бесперебойный доступ к азартным слотам. Великодушные поощрения, различные бонусные коды, практичное смартфонное программа и качественная техподдержка поддержки превращают развлекательный опыт предельно удобным и надежным.
домашняя школа интернет урок вход домашняя школа интернет урок вход .
After testing several platforms, I found this casino https://agroekologia.edu.pl/ to be well-balanced. The welcome bonus is generous, terms are transparent, and payouts are processed smoothly, making it suitable for regular players.
canadian pharmacy king reviews: vipps approved canadian online pharmacy – canadapharmacyonline
дистанционное обучение 1 класс дистанционное обучение 1 класс .
Нынешние онлайн-казино предоставляют игрокам множество возможностей для беспроблемной игры. Официальный ресурс Аркада предоставляет путь ко всем сервисам и игровым автоматам. Однако при наличии системных трудностей на помощь спешат действующие дубликаты.
Что представляет собой рабочее зеркало
Зеркало казино — это точная копия главного ресурса, размещенная по альтернативному доменному имени. Официальное зеркало поддерживает все опции, включая создание аккаунта, доступ в индивидуальный кабинет, бонусы и купоны.
Дубликат на сегодня предоставляет:
– Бесперебойный доступ к развлекательным аппаратам
– Полную защиту индивидуальных данных
– Сохранение баланса и записей транзакций
– Доступность всех специальных предложений
Создание учетной записи на официальном ресурсе
Процесс регистрации занимает считанные минут. Начинающим игрокам требуется:
1. Перейти на основной сайт или функционирующее зеркало
2. Кликнуть кнопку «Регистрация»
3. Заполнить требуемые сведения
4. Подтвердить электронную почту
5. Указать кодовое слово при наличии
После завершения создания аккаунта клиенты приобретают приз за регистрацию, что может содержать бонусные спины или монетарное премирование.
Авторизация в личный кабинет
Приватный кабинет открывает комплексный управление над азартным процессом. Через личный профиль допускается:
– Вносить средства на счет
– Забирать выплаты
– Задействовать бонусные коды
– Проверять журнал игр
– Участвовать в соревнованиях
– Приобретать cash back
Анализ бонусов и промо-предложений
Богатая премиальная система — существенное достоинство казино. Главные типы бонусов:
Приветственный приз
Новые игроки получают великодушное вознаграждение на первые пополнения. Объем бонуса может составлять 100-200% от размера вклада.
Free spins
Даровые вращения даются для известных машин. Количество бесплатных вращений варьируется от 10 до 500 штук.
Кешбэк
Регулярный или ежемесячный отдача процентной доли потерянных денег. Стандартный объем кэшбека — 5-15%.
Конкурсы
Регулярные турниры с крупными призовыми пулами. Игроки борются за призовые места в таблице лидеров.
Портативная версия и программа
Мобильная версия дает возможность делать ставки с каждого аппарата. Клиенты могут установить приложение для iOS и Android или применять интернет версию.
Достоинства смартфонного программы:
– Молниеносная загрузка автоматов
– Практичный интерфейс
– Push-уведомления о акциях
– Доступ через Touch ID
Игровые автоматы и Live казино
Азартная коллекция насчитывает множество игр от лидирующих производителей.
Популярные разделы слотов:
– Традиционные машины
– Современные слоты с премиальными уровнями
– Накопительный приз слоты
– Megaways слоты
Live казино
Категория live казино обеспечивает партию с профессиональными ведущими. Представлены стандартные игры:
– Американская рулетка
– Двадцать одно
– Баккара
– Покер
Как отыскать функционирующее зеркало
Раздобыть рабочую ссылку на зеркало можно разными способами:
1. Оформить подписку на почтовую рассылку
2. Следить за новостями в социальных сетях
3. Связаться в департамент поддержки
4. Добавить в закладки актуальное зеркало в избранное
Вывод
Основной сайт и его действующие альтернативные адреса обеспечивают непрерывный путь к азартным играм. Щедрые бонусы, многочисленные бонусные коды, удобное смартфонное приложение и высококлассная техподдержка поддержки обеспечивают развлекательный процесс крайне комфортным и безопасным.
Olive Stop Studio – Simple and clear pages, exploring content is smooth.
онлайн школа для детей shkola-onlajn-31.ru .
take a look – The site feels clean and the pages are laid out well.
Характеристика лицензионного ресурса
Современные интернет казино предоставляют участникам широкий спектр услуг и перспектив. Официальный сайт казино Кент предлагает безопасный доступ к игровым услугам.
Рабочее зеркало: возможность прямо сейчас
Резервный сайт служит собой полную копию официального ресурса. Официальное зеркало помогает клиентам избегать потенциальные блокировки.
Преимущества задействования зеркала
Принципиальные достоинства охватывают:
– Постоянный шанс к платформе
– Сохранение полных возможностей официального веб-сайта
– Сохранность личных сведений
– Аналогичный набор функций
Оформление профиля на платформе
Процесс регистрации отличается доступностью и практичностью. Свежие клиенты обязаны:
1. Перейти на главный портал или его зеркало
2. Кликнуть на пункт создания аккаунта
3. Внести необходимые поля
4. Подтвердить электронную почту
5. Выполнить первый вход
Бонус за регистрацию
Новички забирают внушительный начальный приз. Это вознаграждение имеет возможность включать:
– Финансовые бонусы
– Безвозмездные прокруты
– Увеличенный процент кэшбека
Доступ в собственный аккаунт
Активные клиенты имеют возможность оперативно войти в собственный аккаунт, применяя никнейм и ключ. Личный кабинет предоставляет доступ к:
– Управлению средствами
– Хронологии операций
– Работающим призам
– Конфигурации учетной записи
Призы и предложения
Платформа регулярно проводит различные мероприятия для игроков.
Типы подарков
Главные формы призов:
– Депозитные начисления – процент от объема пополнения
– Фриспины – бесплатные прокруты в аппаратах
– Кэшбэк – компенсация части затраченных финансов
– Соревновательные призы – премии за игру в соревнованиях
Ваучеры
Уникальные купоны помогают заработать экстра привилегии. Участники имеют возможность отыскать их на партнерских площадках или взять в рассылке.
Mobile адаптация и программа
Передовые гемблеры любят портативный игровой процесс.
Функции портативной платформы
– Отзывчивый дизайн для различных устройств
– Совокупный вход к слотам
– Стремительная подгрузка
– Эргономичное использование
Скачать app
Мобильное программа предоставлено для загрузки на устройства с рабочими ОС Android и iOS. Программа обеспечивает:
– Устойчивую деятельность
– Пуш сообщения о акциях
– Мгновенный доступ к желанным играм
Развлекательный ассортимент
Портал предоставляет огромную подборку гемблинг развлечений.
Аппараты
Коллекция развлекательных аппаратов содержит:
– Обычные игры
– Video слоты
– Призовые слоты
– Тематические слоты
Live дилеры
Категория живых развлечений предлагает шанс играть с живыми ведущими. Доступны:
– Американская рулетка
– Очко
– Punto Banco
– Poker
Состязания
Периодические конкурсы обеспечивают пользователям бороться за крупные финансовые банки. Турнирная система обновляется регулярно.
Денежные процедуры
Платформа поддерживает разнообразие способов внесения и обналичивания денег:
– Кредитные карты
– Онлайн кошельки
– Межбанковские трансферы
– Крипто
Абсолютно все платежи проходят защищенно с задействованием актуальных технологий защиты.
Департамент помощи
Профессиональная группа support функционирует 24/7. Соединиться с специалистами доступно через:
– Живой чат
– Почтовую почту
– Горячую линию
– Соц платформы
Безопасность и лицензирование
Портал действует на базе легальной разрешения. Такое подтверждает:
– Прозрачность азартного действа
– Охрану личных сведений
– Оперативные транзакции
– Легальный игровой процесс
Вывод
Основной веб-сайт и его функционирующие зеркала гарантируют клиентам абсолютный набор возможностей для приятной и профитной времяпрепровождения. Солидные подарки, многочисленные игры, квалифицированная помощь и надежная система выплат делают платформу превосходным выбором для фанатов игровых забав.
https://petmedsmonitor.com/# vet pharmacy
онлайн школа для школьников с аттестатом shkola-onlajn-32.ru .
1win lucky jet играть http://1win68017.help/
Переход к сайту через проверенные зеркала
Передовые онлайн казино гарантируют геймерам бесперебойный подключение к развлечениям. Официальный сайт Pinco действует устойчиво, предлагая большой выбор гемблинг развлечений. Однако порой появляются технические препятствия или барьеры, поэтому критично иметь представление о наличии функционирующих зеркал.
Что является собой основное зеркало казино
Альтернатива — это точная реплика главного веб-сайта с таким же возможностями. Рабочее зеркало в настоящее время позволяет обходить локальные запреты и продолжать игру.
Принципиальные плюсы эксплуатации зеркал:
– Безграничный вход к личному кабинету
– Поддержание любых данных профиля
– Идентичный набор развлечений
– Актуальные бонусы и предложения
Открытие счёта на портале
Операция регистрации отнимает пару минут. Начинающие пользователи обретают великодушный приз за создание счёта, что может содержать:
– Приветственный бонусный подарок
– Бесплатные вращения для машин
– Специальные купоны
– Повышенный кэшбек
Ради окончания оформления следует:
1. Перейти на основной сайт или копию
2. Нажать кнопку «Оформиться»
3. Указать персональные информацию
4. Верифицировать электронную почту или номер
5. Задействовать купон (когда имеется наличии)
Доступ в индивидуальный кабинет
Вслед за правильной регистрации игроки могут производить вход с помощью основной портал или функционирующее зеркало. Собственный кабинет предоставляет полный надзор над учётной записью:
– Архив ставок
– Внесение депозита
– Получение выигрышей
– Администрирование поощрениями
– Присутствие в конкурсах
Привилегии и акции казино
Ресурс удовлетворяет пользователей различными бонусными предложениями:
Вступительные поощрения
Начинающие зарабатывают щедрый комплект поощрений на стартовые пополнения. Типично это включает частичную доплату к объёму вклада плюс комплиментарные вращения.
Регулярные промо
– Седмичный кэшбек до 15%
– Соревнования с наградными пулами
– Бонусы на дату рождения
– Специальные предложения для привилегированных клиентов
План поощрения
Деятельные клиенты получают очки, они возможно конвертировать на действительные призы или эксклюзивные преимущества.
Мобильная версия и софт
Современные технологии дают возможность играть в любом месте удобно. Портативная версия портала автоматически адаптируется под дисплей всякого девайса.
Плюсы мобильного ПО:
– Оперативная запуск слотов
– Удобный вид
– Мгновенные-нотификации о акциях
– Опция установить для Android и iOS
Реальное казино: антураж реального гемблинг клуба
Секция Live клуба переносит клиентов в обстановку истинного развлекательного заведения. Опытные операторы ведут игру в формате актуального времени.
Имеющиеся игры:
– Колесо фортуны
– Блэкджек
– Punto Banco
– Карты
Слоты и гемблинг аппараты
Коллекция гемблинг автоматов включает множество названий от лидирующих разработчиков. Произвольный геймер найдёт развлечение по нраву:
– Традиционные барабаны
– Современные автоматы с дополнительными этапами
– Прогрессивный-игры
– Динамические машины
Конкурсы и раздачи
Систематические состязания вносят остроту и дают шанс заработать крупные призы. Участие в турнирах часто комплиментарное, а выигрышные суммы доходят до внушительных величин.
Безопасность и конфиденциальность
Ресурс задействует передовые методы защиты для защиты информации игроков. Совокупные транзакционные транзакции совершаются через защищённые линии.
Резюме
Центральный портал и его актуальные зеркала обеспечивают стабильный вход к отличным гемблинг развлечениям. Привлекательные награды, эргономичная мобильная редакция, богатство слотов и профессиональное Live-игорный дом создают ресурс превосходным вариантом для фанатов игровых автоматов.
1win ставки футбол 1win36247.help
Передовые онлайн-казино гарантируют игрокам широкий ассортимент вариантов для беспроблемной времяпрепровождения. Подключение к ресурсу Pinco сайт казино осуществляется через основной веб-ресурс или актуальное зеркало.
Что такое актуальное зеркало казино
Действующее зеркало — это альтернативный адрес основного веб-сайта казино. Такие версии генерируются для поддержания стабильного подключения к азартной сервису.
Копия текущее целиком копирует характеристики базового ресурса. Клиенты обретают идентичный путь ко всем возможностям, включая открытие счета, пополнение баланса и обналичивание средств.
Открытие счета на лицензионном сайте
Алгоритм открытия профиля длится всего буквально минут. Начинающим игрокам следует:
1. Попасть на лицензионный ресурс или актуальное проверенное зеркало
2. Нажать кнопку “Открыть счет”
3. Указать необходимые сведения
4. Проверить e-mail почту
5. Активировать промокод при доступности
После завершения оформления игрок приобретает подарок за регистрацию, который имеет право включать free spins или денежное начисление.
Доступ в индивидуальный кабинет
Персональный кабинет — это защищенная зона, где участники могут администрировать своим учетной записью. Для доступа необходимо указать никнейм и код доступа.
В индивидуальном кабинете имеются нижеперечисленные опции:
– Отслеживание записей транзакций
– Активация бонусных кодов
– Управление вознаграждениями
– Включение в соревнованиях
– Отслеживание кэшбека
– Корректировка учетной записи
Поощрения и промо
Гемблинговая платформа предоставляет привлекательные вознаграждения:
Стартовый набор — новички зарабатывают солидное вознаграждение на первые вклады.
Даровые спины — предоставляются как при регистрации, так и в рамках различных мероприятий.
Кэшбэк — регулярный компенсация процента израсходованных денег.
Бонусные коды — специальные комбинации, обеспечивающие возможность к специальным бонусам.
Описание игровых разделов
Slots
Коллекция slots насчитывает множество наименований от топовых разработчиков. Пользователи откроют как классические машины, так и современные видеослоты с интересной визуализацией.
Live казино
Категория Live казино обеспечивает шанс развлекаться с живыми дилерами в условиях настоящего времени. Имеются востребованные игры: рулетка, блэкджек, баккара, покер.
Соревнования
Регулярные состязания с большими выигрышными пулами притягивают тысячи игроков. Призеры получают денежные выплаты и специальные бонусы.
Портативная версия и приложение
Мобильная версия ресурса предоставляет право участвовать с всякого гаджета. Интерфейс независимо корректируется под габариты экрана.
Загрузить софт можно для устройств на Android и iOS. Мобильное app характеризуется всеми функциями настольной версии.
Как обнаружить актуальное зеркало на текущий день
Рабочие адреса дубликатов регулярно изменяются. Получить актуальную ссылку можно многими вариантами:
– Через отдел техподдержки
– В официальных новостных сетях
– По e-mail newsletter
– На специализированных площадках
Безопасность и сертификация
Главный домен оперирует на базе мировой документа. Все транзакции защищены инновационными системами шифрования.
Конфиденциальность персональных реквизитов обеспечивается в стопроцентном масштабе.
Итог
Лицензионный домен и его рабочие дубликаты обеспечивают пользователям круглосуточный доступ к качественным азартным сервисам. Щедрые бонусы, всевозможные автоматы, квалифицированная сервис — все это создает развлекательный опыт предельно комфортным и захватывающим.
I’m gone to say to my little brother, that he
should also pay a quick visit this webpage on regular basis to obtain updated
from latest news update.
canadian pharmacy: Certified Canada Rx – Certified Canada Rx
Обзор оригинального веб-сайта
Актуальное онлайн-казино предлагает своим клиентам большой ассортимент игр и призов. Оригинальный веб-сайт Cactus Casino казино функционирует круглосуточно, давая вход к известным играм, live-казино и многочисленным акциям.
Функционирующее зеркало: путь к порталу
Что такое зеркало казино
Копия является собой абсолютную дубликат официального веб-сайта с отличным сетевым названием. Актуальное зеркало дает игрокам обходить блокировки и получать стабильный подключение к излюбленным слотам.
Как найти текущее зеркало сегодня
Рабочие адреса на главное зеркало публикуются через:
– E-mail новостнуюленту
– Официальные социальные сети
– Отдел поддержки
– Тематические порталы
Регистрация на платформе
Процесс регистрации
Регистрация требует несколько минут и предполагает данные шаги:
1. Вход на оригинальный ресурс или действующее зеркало
2. Нажатие кнопки “Открытьсчет”
3. Заполнение личных информации
4. Активация электроннойпочты или мобильного
5. Формирование ключа
Бонус за оформление
Новые клиенты получают солидные начальные бонусы:
– Денежные депозиты на кошелек
– Халявныеспины для симуляторов
– Увеличенный объем возврата
– Специальные ваучеры
Вход в личный счет
Действующие игроки вправе осуществить логин через основной веб-сайт или актуальное зеркало. Для этого нужно набрать учетноеимя и ключдоступа, установленные при открытиисчета.
Инструменты персонального аккаунта
В персональном кабинете предоставлены основные функции:
– Редактирование учетными реквизитами
– Внесение кошелька
– Вывод средств
– Ввод кодов
– Мониторинг статистики операций
– Включение в конкурсах
Вознаграждения и акции
Типы вознаграждений
Казино поощряет своих участников многочисленными бонусными акциями:
– Вступительный бонус — щедрые бонусы на дебютные депозиты
– Бесплатныевращения — подарочные ставки в рейтинговых симуляторах
– Возврат — еженедельный возмещение доли проигрышей
– Программа поощрения — уникальные бонусы для активных пользователей
Промокоды и их использование
Специальные промокоды предоставляют бонусные подарки. Для применения нужно ввести последовательность в нужное окно в индивидуальном профиле.
Игровой ассортимент
Автоматы
Библиотека игровых машин содержит тысячи вариантов от топовых разработчиков:
– Стандартные симуляторы
– Видео слоты
– Прогрессивные симуляторы
– Лицензионные игры
Live казино
Зона Live-казино предлагает процесс с профессиональными операторами в формате прямого времени:
– Американскаярулетка
– Очко
– Baccarat
– Карибскийпокер
Турниры
Регулярные состязания с крупными призовыми пулами устраиваются ежедневно. Игроки соревнуются за победу в рейтинге.
Мобильная платформа и софт
Мобильная платформа ресурса
Основной веб-сайт абсолютно адаптирован для мобильных устройств. Клиенты имеютвозможность открывать слоты сразу через браузер без потребности установки.
APP для скачивания
Фирменное мобильное APP предлагается для загрузки на устройства с программными средами Android и iOS. APP обеспечивает:
– Мгновенный путь к слотам
– Бесперебойную операционность
– Оперативные-оповещения о бонусах
– Удобный дизайн
Резюме
Оригинальный портал казино и его актуальные альтернативы обеспечивают пользователям абсолютный вход к первоклассным игровым услугам. Щедрые бонусы, разнообразные кампании, удобная адаптивная платформа и компетентная служба создают азартный времяпрепровождение предельно комфортным и прибыльным.
1win Ош 1win32786.help
Передовые онлайн-казино обеспечивают игрокам обширный спектр функций для комфортной времяпрепровождения. Переход к ресурсу Disi казино выполняется через главный веб-ресурс или действующее зеркало.
Что такое рабочее зеркало казино
Функционирующее зеркало — это альтернативный адрес основного веб-сайта казино. Такие версии создаются для гарантирования непрерывного входа к развлекательной платформе.
Зеркало на сегодня абсолютно воспроизводит опции основного ресурса. Игроки получают аналогичный вход ко всем возможностям, включая оформление профиля, внесение депозита депозита и снятие средств.
Оформление профиля на главном портале
Процесс открытия профиля отнимает всего буквально секунд. Свежим игрокам следует:
1. Войти на лицензионный ресурс или актуальное официальное зеркало
2. Кликнуть кнопку “Регистрация”
3. Внести обязательные сведения
4. Активировать почтовую почту
5. Использовать купон при существовании
После выполнения открытия профиля игрок приобретает приз за регистрацию, который вправе включать free spins или финансовое премию.
Вход в индивидуальный кабинет
Пользовательский кабинет — это защищенная зона, где пользователи вправе администрировать своим профилем. Для входа следует указать имя пользователя и password.
В индивидуальном кабинете представлены следующие инструменты:
– Проверка хронологии переводов
– Использование кодов активации
– Контроль вознаграждениями
– Включение в конкурсах
– Контроль возмещения
– Корректировка данных
Бонусы и акции
Развлекательная платформа обеспечивает щедрые подарки:
Регистрационный набор — начинающие получают солидное начисление на стартовые вклады.
Фриспины — дарятся как при оформлении, так и в процессе различных промо.
Возмещение — постоянный рефанд доли проигранных денег.
Коды активации — уникальные последовательности, открывающие доступ к особым предложениям.
Характеристика игровых направлений
Слоты
Ассортимент slots включает сотни игр от лучших разработчиков. Геймеры обнаружат как обычные аппараты, так и новые видеослоты с интересной визуализацией.
Live казино
Зона Live казино предоставляет возможность играть с живыми дилерами в режиме реального времени. Открыты известные столы: рулетка, блэкджек, баккара, покер.
Соревнования
Постоянные состязания с солидными наградными банками привлекают множество соревнующихся. Победители зарабатывают cash награды и эксклюзивные бонусы.
Смартфонная версия и софт
Адаптивная версия ресурса позволяет играть с каждого устройства. Интерфейс независимо адаптируется под диагональ экрана.
Установить софт можно для гаджетов на Android и iOS. Портативное приложение обладает всеми возможностями полной версии.
Как обнаружить рабочее зеркало на текущий день
Свежие адреса зеркал регулярно изменяются. Получить действующую линк можно различными путями:
– Через сервис саппорта
– В проверенных коммуникационных сетях
– По почтовой newsletter
– На специализированных сайтах
Надежность и легальность
Официальный сайт функционирует на основании глобальной документа. Все переводы шифруются передовыми технологиями шифрования.
Анонимность индивидуальных сведений сохраняется в полном масштабе.
Заключение
Лицензионный ресурс и его функционирующие альтернативы предоставляют пользователям постоянный путь к высококлассным гемблинговым развлечениям. Выгодные призы, разнообразные игры, компетентная сервис — все это создает игровой опыт предельно комфортным и увлекательным.
online market source – Just found this, seems like a solid place to browse.
Подключение к ресурсу и актуальные адреса
Современные виртуальные казино предлагают пользователям огромный набор игр. Официальный сайт казино Вилдер гарантирует стабильный подключение ко всем возможностям. Впрочем иногда появляются случаи, когда нужно дополнительный вариант доступа.
Что являет собой собой актуальное зеркало
Действующее зеркало — это идентичная реплика основного сайта с другим доменным именем. Зеркало сегодня позволяет преодолевать существующие блокировки и поддерживать бесперебойный вход к любимым развлечениям.
Легальное зеркало характеризуется теми же опциями, что и центральный сайт:
– Весь список автоматов
– Личный профиль с записанными информацией
– Актуальные поощрения и промо
– Проверенные банковские действия
Регистрация и доступ в систему
Этап создания профиля на ресурсе длится пару мгновений. Новым клиентам требуется:
1. Перейти на функционирующее зеркало на данный момент
2. Щелкнуть клавишу «Регистрация»
3. Заполнить необходимые параметры
4. Верифицировать e-mail почту или информацию мобильного
5. Активировать подарок за открытие аккаунта
Авторизация в собственный профиль осуществляется с помощью внесение ID и ключа.
Характеристика призовой структуры
Выгодная призовая структура — главное козырь платформы. Игроки обретают различные награды:
Начальные награды
Новые клиенты могут претендовать на привлекательный поощрение за оформление. Чаще всего это комплект вариантов, охватывающий:
– Пропорциональную премию к начальному вкладу
– Даровые спины
– Призовые деньги на счет
Промокоды и специальные возможности
Регулярные бонусные комбинации обеспечивают зарабатывать призовые преимущества. Применить их возможно в предназначенном поле персонального кабинета.
Спины и возврат средств
Free spins — это способность вращать барабаны без задействования своих средств. Компенсация подразумевает частичный компенсацию проигранных сумм.
Ассортимент игр
Развлекательная ресурс предоставляет значительную базу игр.
Игровые машины
Вариативность игровых машин поражает представление. Есть стандартные 3-барабанные аппараты и актуальные развлечения с занимательной графикой.
Live заведение
Зона Live заведения помещает клиентов в атмосферу подлинного развлекательного клуба. Опытные ведущие проводят партии в реальном режиме.
Состязания и рейтинги
Регулярные соревнования обеспечивают драйва и предоставляют вариант выиграть крупные награды.
Мобильная форма и клиент
Продвинутые технологии дают возможность участвовать в удобном пространстве. Mobile реализация независимо адаптируется под монитор гаджета.
Установить софт можно для мобильных сред iOS и Android. Приложение дает:
– Скоростной доступ
– Стабильную функционирование
– Push-уведомления об акциях
– Удобный вид
Денежные транзакции
Казино принимает всевозможные варианты депозита и снятия средств:
– Пластиковые карты
– Цифровые системы
– Крипто
– Финансовые отправки
Каждые транзакции выполняются через надежное соединение, что подтверждает безопасность личных данных.
Департамент support
Квалифицированная группа помощи функционирует постоянно. Соединиться с консультантами разрешено через:
– Live-чат
– Электронную почту
– Контакт
– Медиа платформы
Заключение
Легальный веб-сайт и его функционирующее зеркало дают пользователям надежный и приятный доступ к интересным забавам. Щедрые поощрения, обширный спектр игр и профессиональная ассистанс создают процесс исключительно интересной и доходной.
Доступ к ресурсу через проверенные зеркала
Участники виртуальных казино регулярно встречаются с проблемой блокировки главного домена. Как раз для ликвидации этой ситуации разработаны копии официального сайта. Дракон Мани гарантирует полный подключение ко всем возможностям платформы.
Что такое действующее зеркало казино
Дубликат является собой точную копию оригинального ресурса с аналогичным функционалом. Основное несовпадение — это другое имя. Каждые информация игрока, включая средства, поощрения и архив раундов, сохраняются идентичными.
Выгоды применения зеркал
Действующие зеркала обладают комплексом важных выгод:
– Постоянный подключение к выбранным слотам
– Полная сохранность личных сведений
– Сохранение всех настроек личного кабинета
– Возможность получения призов и присутствия в промоакциях
Регистрация на легальном ресурсе
Операция регистрации крайне элементарен и длится несколько минут. Новые клиенты способны рассчитывать на солидный начальный бонус за создание аккаунта.
Этапы оформления аккаунта
1. Подключение на официальный сайт или его альтернативу
2. Активация на элемент “Присоединиться”
3. Внесение нужных сведений
4. Активация электронной почты
5. Внесение кода (при наличии присутствует)
Бонусы и промоакции для игроков
Ресурс балует своих пользователей разнообразными призовыми предложениями.
Главные виды бонусов
Вводный подарок — внушительное начисление для недавних участников, которое может включать монетарные бонусы и безвозмездные спины.
Бесплатные вращения — возможность запускать в известных игровых машинах даром.
Компенсация — долевой возмещение утраченных сумм, который выплачивается еженедельно или ежемесячно.
Специальные коды — специальные комбинации, предоставляющие дополнительные выгоды.
Персональный кабинет: опции и конфигурации
Персональный раздел гарантирует совершенный регулирование над развлекательным активностью. В нем имеются:
– Администрирование средствами
– Данные платежей
– Работающие награды
– Конфигурации защиты
– Верификация профиля
Мобильная редакция и приложение
Современные игроки ценят мобильность. Ресурс предлагает двойной способа для развлечений с смартфонных гаджетов.
Отзывчивая телефонная платформа
Адаптивная версия портала автоматически настраивается под разрешение любого аппарата. Не нужно загружать специальное программное обеспечение.
Софт для мобильных
Доступно загрузить оригинальное приложение для iOS и Android. Программа обеспечивает:
– Скорый старт
– Улучшенный интерфейс
– Оперативные-оповещения о акциях
– Бесперебойную операционность
Live развлечения: атмосфера истинного зала
Раздел Live развлечений транспортирует игроков в атмосферу настоящего зала. Опытные хосты осуществляют партии в виде прямого времени.
Известные Live-форматы
– Американская рулетка
– Двадцать одно
– Баккарат
– Poker
Игровые машины: ассортимент развлечений
Собрание развлекательных машин вмещает сотни позиций от топовых производителей. Клиенты откроют:
– Обычные аппараты
– Видео-автоматы
– Накопительный приз-слоты
– Слоты с множественными линиями
Соревнования и особые предложения
Регулярные соревнования обеспечивают клиентам состязаться друг с другом за значительные призовые фонды. Каждый состязание имеет свои условия участия и рейтинг чемпионов.
Способы зачисления и снятия финансов
Ресурс предоставляет массу денежных систем:
– Дебетовые карты
– Виртуальные кошельки
– Криптовалюты
– Финансовые отправления
Каждые переводы реализуются надежно благодаря актуальным технологиям кодирования.
Команда поддержки
Квалифицированные сотрудники команды support готовы содействовать 24/7. Предусмотрены данные способы коммуникации:
– Мгновенный-чат
– Email-обслуживание
– Звонковая поддержка
– Социальные сети
Заключение
Легальный ресурс платформы и его действующие дубликаты гарантируют пользователям безопасный и приятный подход к большому выбору игровых активностей. Щедрые поощрения, регулярные промоакции, компетентная сервис и комфортные платежные инструменты превращают азартный досуг максимально увлекательным и результативным.
навес для машины где заказать навесы
необычное порно
Juniper Market Hub – Pages feel tidy, moving through sections is easy.
see the coral crate shop – Ran into this page and everything seems clear and easy to follow.
For next
fair credit personal loans online
to contribute to the cause.
I have been browsing on-line more than three hours today, but I never discovered any fascinating article like
yours. It’s beautiful worth sufficient for me. In my view, if
all webmasters and bloggers made good content as you probably
did, the web will be a lot more useful than ever before.
Передовые виртуальные казино обеспечивают пользователям обширный спектр функций для удобной игры. Однако иногда подключение к основному порталу может стать ограниченным. В таких случаях на помощь приходит EzCash, которое обеспечивает стабильный вход ко всем возможностям платформы.
Что такое функционирующее зеркало казино
Дубликат — это полная дубликат официального сайта, которая хостится по другому интернет-адресу. Альтернативный ресурс сохраняет целый функционал главного ресурса, включая пользовательский кабинет, баланс и историю переводов.
Основные выгоды эксплуатации зеркала:
– Непрерывный доступ к платформе
– Максимальная аналогичность инструментов
– Конфиденциальность персональных реквизитов
– Поддержка всех имеющихся бонусов
Как разыскать функционирующее зеркало на текущий день
Есть несколько безопасных вариантов получения свежей ссылочной информации:
Проверенные сервисы:
1. Почтовая рассылка — управление периодически высылает сообщения с свежими доменами
2. Медийные сети — проверенные профили постят релевантную данные
3. Служба поддержки — консультанты сообщают проверенные ссылки
4. Телефонное приложение — дает возможность избегать блокировки
Регистрация на основном сайте
Процесс оформления отнимает только несколько минут и предполагает из таких ступеней:
1. Переход на главный портал или рабочее зеркало
2. Клик на клавишу «Создать аккаунт»
3. Ввод персональной формы
4. Проверка email почты или контактного номера
5. Применение бонуса за регистрацию при существовании промокода
Свежие геймеры зарабатывают солидный вступительный бонус, который может включать даровые прокруты, денежные бонусы или возврат средств.
Логин в индивидуальный кабинет
Подключение на сайте производится привычным путем. Требуется указать никнейм и код доступа, задействованные при создании аккаунта.
Ключевые моменты для конфиденциального входа:
– Эксплуатируйте криптостойкий код
– Запустите 2FA проверку
– Не сохраняйте пароли на чужих устройствах
– Контролируйте адресную строку браузера
Анализ премиальной программы
Игровая платформа балует пользователей всевозможными вознаграждениями и кампаниями:
Вступительный пакет
Начинающие могут претендовать на щедрое награду за стартовый депозит. Традиционно это пропорциональная прибавка к внесенной объему плюс фриспины для известных слотов.
Постоянные кампании
– Еженедельный возврат средств — компенсирование доли потерянных денег
– Поощрения на дополнительные взносы
– Уникальные промо по торжествам
– Турниры с значительными призовыми суммами
Система лояльности
Активные геймеры накапливают баллы за любую игру, которые затем меняются на фактические деньги, free spins или уникальные преимущества.
Бонус-коды: как задействовать
Купоны — это уникальные комбинации букв и цифр, гарантирующие доступ к дополнительным вознаграждениям.
В каких местах раздобыть действующие промокоды:
– Проверенные коммуникационные сети казино
– Аффилиатные ресурсы
– Email-подписка
– Профильные платформы
Прописывается промокод в отдельное поле при открытии счета или зачислении средств депозита.
Портативная версия и приложение
Актуальные игроки предпочитают играть с телефонных устройств. Сайт предлагает пару варианта для комфортной мобильной игры.
Адаптивная модификация
Онлайн версия само собой адаптируется под размер экрана. Не просит скачивания и работает в всяком новом браузере.
Телефонное приложение
Получить приложение можно для устройств на Android и iOS. Плюсы app:
– Скоростная активация
– Надежная операция
– Автоматические-уведомления о бонусах
– Самостоятельный минование блокировок
Этап установки прост: необходимо открыть на сайт с смартфонного аппарата и придерживаться инструкциям.
Гемблинг ассортимент
Библиотека развлечений насчитывает множество вариантов от топовых производителей.
Слоты
Гемблинг машины — самая любимая секция игр. Размещены стандартные простые аппараты, современные графические аппараты с бонусными этапами, а также накопительные выигрыши.
Live казино
Отдел с живыми дилерами предоставляет ощутить дух настоящего казино. Доступны игры с покером.
Трансляция реализуется в превосходном формате, обеспечивается диалог с ведущим и иными участниками.
Состязания
Периодически организуются соревнования по разным играм. Вступление позволяет завоевать финансовые вознаграждения, даровые прокруты или эксклюзивные привилегии.
Платежные манипуляции
Сайт предоставляет большой набор финансовых систем:
– Дебетовые карты
– Виртуальные кошельки
– Крипта
– Финансовые переводы
Низшая объем взноса — разумная для большинства клиентов. Снятие средств осуществляется в кратчайшие интервалы.
Служба поддержки
Квалифицированные сотрудники настроены поддержать постоянно. Представлены следующие способы общения:
– Онлайн-чат
– Email
– Телефонная горячая линия
– Коммуникационные сети
Решения на частые проблемы можно обнаружить в блоке FAQ.
Резюме
Главный сайт казино и его действующие зеркала дают пользователям абсолютный подключение ко всем функциям ресурса. Щедрые вознаграждения, приятная смартфонная версия, впечатляющий ассортимент аттракционов и профессиональная поддержка формируют гемблинг досуг предельно беспроблемным и безопасным.
explore scarletvendor shop – Found this site today and the catalog seems tidy and simple to navigate.
Актуальные онлайн-казино дают участникам широкий набор возможностей и призовых предложений. Доступ к платформе выполняется через официальный веб-сайт или его действующее зеркало Лаки Ворлд, что обеспечивает бесперебойную активность.
Что такое действующее зеркало казино
Зеркало — это полная дубликат официального ресурса, созданная для преодоления запретов. Зеркало сегодня дает возможность участникам иметь вход к предпочитаемым играм в каждое время.
Проверенное зеркало имеет всеми характеристиками первоначального сайта:
– Целый каталог автоматов
– Личный кабинет с записанными данными
– Свежие акции
– Надежные денежные операции
Регистрация на основном сайте
Процедура создания аккаунта требует всего немного минут. Первым пользователям следует:
1. Зайти на главный портал или функционирующее зеркало
2. Выбрать на элемент “Создать аккаунт”
3. Указать нужные данные
4. Проверить электронную почту
5. Внести первый взнос
Стартовый бонус выдается сразу после завершения всех этапов.
Подключение в профиль
Созданные участники могут осуществить подключение используя:
– Учетное имя и ключ
– Код телефона
– Электронную почту
Личный кабинет обеспечивает доступ к управлению счетом, данным операций и действующим поощрениям.
Промо и акции
Гемблинг платформа балует постоянных игроков щедрыми вознаграждениями:
Первый бонус
– Поощрение на первый депозит до 100%
– Даровые спины на известные слоты
– Экстра премии за дальнейшие депозиты
Купоны
Особые ваучеры дают шанс на использование особых поощрений. Действующие купоны публикуются в разделе “Бонусы”.
Кэшбек
Периодический возврат составляет до 10% от использованных средств. Возмещение начисляется сразу.
Система лояльности
Постоянные участники приобретают баллы, которые конвертируются на реальные финансы или бесплатные вращения.
Адаптивный портал и программа
Для удобства клиентов создана качественная портативная платформа. Отзывчивый дизайн обеспечивает удобно участвовать с любого переносного девайса.
Плюсы софта:
– Скорый доступ к развлечениям
– Улучшенный интерфейс
– Бесперебойная работа
– Оповещения о актуальных бонусах
Установить софт можно бесплатно с основного ресурса для устройств на Android и iOS.
Библиотека развлечений
Машины
Коллекция включает более 2000 игр от известных разработчиков:
– Классические машины
– Video slots
– Слоты с джекпотом
– Сюжетные слоты
Live казино
Раздел Live развлечений дает участие с подлинными крупье в реальном режиме:
– Roulette
– Blackjack
– Карты
– Столы покера
Соревнования
Периодические состязания с большими призовыми бюджетами организуются еженедельно. Участие в турнирах открыто всем созданным пользователям.
Финансовые варианты
Взносы и изъятия средств выполняются через известные сервисы:
– Банковские пластик
– Электронные счета
– Цифровая валюта
– Банковские операции
Стартовый взнос — от 100 рублей. Вывод выигрышей выполняется в течение 24 периода.
Служба помощи
Круглосуточная отдел саппорта может помочь в исправлении всех ситуаций:
– Онлайн-чат
– Email
– Связь
– Социальные сети
Безопасность и лицензия
Лицензионный портал действует на базе международной сертификата. Все данные участников обезопасены актуальным SSL-шифрованием.
Вывод
Рабочее зеркало гарантирует бесперебойный подключение к излюбленным слотам, щедрым промокодам и удобным сервисам. Откройте счет прямо сейчас и приобретите стартовый приз!
Главная https://goldera.win/
Анализ главного ресурса
Современное онлайн-казино предлагает своим клиентам разнообразный выбор игр и поощрений. Официальный ресурс Leon действует круглосуточно, давая путь к востребованным автоматам, live-казино и разнообразным акциям.
Функционирующее зеркало: вход к платформе
Что такое дубликат казино
Зеркало составляет собой абсолютную копию главного веб-сайта с альтернативным URL адресом. Действующее зеркало дает игрокам избегать ограничения и получать постоянный путь к излюбленным автоматам.
Как отыскать действующее зеркало сегодня
Актуальные URL на основное зеркало появляются через:
– Email рассылку
– Главные социальные сети
– Отдел обслуживания
– Тематические ресурсы
Открытиесчета на платформе
Этапы созданияаккаунта
Открытиесчета занимает пару минут и включает следующие стадии:
1. Открытие на оригинальный портал или актуальное зеркало
2. Выбор опции “Открытьсчет”
3. Указание персональных сведений
4. Верификация аккаунта или телефона
5. Создание пароля
Подарок за открытиесчета
Новые пользователи зарабатывают выгодные стартовые бонусы:
– Бонусные депозиты на счет
– Бесплатныевращения для симуляторов
– Увеличенный коэффициент компенсации
– Эксклюзивные коды
Авторизация в личный профиль
Постоянные пользователи вправе выполнить авторизацию через официальный сайт или действующее зеркало. Для этого необходимо набрать логин и ключдоступа, установленные при созданииаккаунта.
Возможности собственного раздела
В индивидуальном разделе доступны основные опции:
– Изменение личными сведениями
– Пополнение депозита
– Снятие призов
– Использование кодов
– Просмотр архива ставок
– Регистрация в состязаниях
Подарки и предложения
Разновидности бонусов
Казино балует своих клиентов многочисленными наградными программами:
– Стартовый набор — щедрые бонусы на стартовые депозиты
– Халявныеспины — бонусные ставки в известных слотах
– Компенсация — еженедельный компенсация процента убытков
– Система лояльности — уникальные льготы для постоянных клиентов
Промокоды и их применение
Специальные коды обеспечивают экстра подарки. Для применения следует указать код в определенное графу в индивидуальном кабинете.
Игровой набор
Игры
Коллекция игровых симуляторов вмещает сотни названий от топовых провайдеров:
– Традиционные симуляторы
– Новые автоматы
– Накопительные игры
– Брендовые слоты
Live казино
Раздел Live-казино предоставляет процесс с живыми операторами в формате актуального стрима:
– Рулетка
– Блэкджек
– Баккара
– Карибскийпокер
Состязания
Регулярные соревнования с внушительными джекпотными пулами проводятся постоянно. Участники борются за первенство в турнирнойсетке.
Mobile адаптация и APP
Мобильная платформа портала
Основной сайт полностью адаптирован для портативных девайсов. Клиенты имеютвозможность пользоваться игры сразу через браузер без необходимости загрузки.
APP для скачивания
Специальное карманное приложение предлагается для загрузки на аппараты с операционными платформами Android и iOS. Программа дает:
– Оперативный путь к играм
– Бесперебойную операционность
– Оперативные-уведомления о предложениях
– Интуитивный навигацию
Итог
Оригинальный веб-сайт казино и его функционирующие альтернативы дают клиентам абсолютный возможность к первоклассным азартным развлечениям. Большие вознаграждения, многочисленные промо, простая адаптивная адаптация и профессиональная помощь формируют развлекательный процесс крайне комфортным и доходным.
check it out – The layout is user friendly and moving through links is easy.
Проститутки Азиатки Москвы – каталог анкет
узнать больше https://goldera.win/
Olive Stop – Clean and organized interface, navigating is easy.
melbet sports betting app melbet sports betting app .
https://mensrxindex.com/# Mens RX Index
Вход к ресурсу и действующие адреса
Востребованные интернет казино предлагают участникам огромный набор игр. Официальный портал Диси казино обеспечивает стабильный доступ ко всем функциям. При этом периодически появляются ситуации, когда нужно резервный вариант авторизации.
Что означает собой рабочее зеркало
Актуальное зеркало — это полная копия главного веб-сайта с иным сетевым адресом. Зеркало сегодня позволяет обходить возможные запреты и сохранять непрерывный доступ к любимым играм.
Главное зеркало содержит идентичными характеристиками, что и главный портал:
– Весь ассортимент развлечений
– Персональный раздел с зафиксированными параметрами
– Действующие поощрения и предложения
– Проверенные банковские транзакции
Открытие профиля и подключение в сервис
Процесс оформления на портале длится буквально моментов. Свежим пользователям необходимо:
1. Зайти на рабочее зеркало в настоящее время
2. Кликнуть опцию «Регистрация»
3. Внести обязательные сведения
4. Активировать электронную почту или номер телефона
5. Использовать подарок за оформление
Авторизация в личный раздел осуществляется посредством предоставление имени пользователя и секретной комбинации.
Анализ поощрительной системы
Щедрая наградная система — ключевое преимущество платформы. Игроки получают различные подарки:
Вступительные награды
Свежие клиенты могут рассчитывать на значительный бонус за создание аккаунта. Чаще всего это набор предложений, содержащий:
– Долевую добавку к начальному депозиту
– Подарочные кручения
– Бонусные средства на кошелек
Кодовые комбинации и уникальные акции
Систематические купоны позволяют получать дополнительные привилегии. Использовать их возможно в предназначенном меню индивидуального раздела.
Спины и кэшбек
Фриспины — это шанс крутить автоматы без применения собственных денег. Рибейт представляет процентный компенсацию потерянных сумм.
Библиотека автоматов
Азартная ресурс обеспечивает значительную подборку развлечений.
Игровые машины
Ассортимент игровых машин удивляет ожидания. Представлены классические простые машины и продвинутые автоматы с увлекательной анимацией.
Live заведение
Секция Live игр погружает пользователей в антураж подлинного азартного дома. Квалифицированные крупье проводят сессии в реальном времени.
Конкурсы и лидерборды
Периодические соревнования привносят остроты и дают вариант получить большие суммы.
Mobile реализация и приложение
Новые разработки дают возможность наслаждаться в любом локации. Адаптивная реализация автоматически подстраивается под монитор аппарата.
Получить клиент возможно для операционных систем iOS и Android. Клиент дает:
– Скоростной доступ
– Стабильную производительность
– Push-сообщения об бонусах
– Удобный дизайн
Финансовые операции
Платформа работает с многочисленные методы пополнения и снятия сумм:
– Платежные инструменты
– Электронные системы
– Крипто
– Банковские отправки
Все переводы реализуются через защищенное протокол, что подтверждает безопасность приватных информации.
Отдел ассистанса
Опытная группа ассистанса действует всегда. Соединиться с операторами разрешено через:
– Live-чат
– E-mail почту
– Контакт
– Общественные платформы
Резюме
Основной портал и его актуальное зеркало обеспечивают участникам защищенный и удобный доступ к интересным играм. Щедрые награды, большой ассортимент игр и профессиональная сервис делают игру исключительно удобной и доходной.
Анализ лицензионного портала
Современные сетевые казино обеспечивают участникам богатый набор развлечений и опций. Основной портал Laki World casino предоставляет надежный доступ к игровым функциям.
Функционирующее зеркало: вход на сегодня
Альтернативный адрес представляет как точную версию основного сайта. Официальное зеркало позволяет клиентам преодолевать возможные запреты.
Плюсы задействования зеркала
Основные плюсы охватывают:
– Непрерывный шанс к сайту
– Удержание полных опций главного ресурса
– Безопасность конфиденциальных материалов
– Равнозначный функционал
Оформление профиля на платформе
Механизм создания аккаунта отличается легкостью и практичностью. Свежие пользователи требуется:
1. Посетить лицензионный портал или его зеркало
2. Выбрать на элемент открытия счета
3. Указать необходимые данные
4. Верифицировать email адрес
5. Произвести начальный вход
Бонус за открытие счета
Начинающие забирают внушительный приветственный презент. Данное вознаграждение способно содержать:
– Материальные бонусы
– Даровые вращения
– Усиленный показатель возврата
Доступ в индивидуальный раздел
Зарегистрированные пользователи способны моментально получить доступ в собственный раздел, эксплуатируя учетные данные и пароль. Персональный профиль предоставляет возможность к:
– Регулированию депозитом
– Хронологии платежей
– Текущим подаркам
– Параметрам профиля
Подарки и акции
Портал систематически проводит всевозможные предложения для игроков.
Разновидности призов
Основные виды бонусов:
– Пополнительные начисления – часть от объема внесения
– Бесплатные вращения – даровые вращения в автоматах
– Кэшбэк – отдача фрагмента утраченных финансов
– Турнирные награды – призы за участие в состязаниях
Коды
Специальные ваучеры помогают получить бонусные преимущества. Пользователи способны отыскать их на партнерских порталах или получить в новостях.
Переносная версия и программа
Современные гемблеры предпочитают мобильный гейминг.
Опции портативной платформы
– Отзывчивый облик для любых девайсов
– Совокупный вход к слотам
– Моментальная подгрузка
– Практичное управление
Загрузить приложение
Mobile софт предложено для загрузки на аппараты с базовыми системами Android и iOS. Софт дает:
– Надежную производительность
– Push сообщения о бонусах
– Быстрый доступ к желанным играм
Игровой ассортимент
Платформа обеспечивает внушительную библиотеку гемблинг забав.
Игровые машины
Библиотека игровых машин включает:
– Традиционные машины
– Видео автоматы
– Джекпотные игры
– Сюжетные развлечения
Live игры
Раздел настоящих дилеров предоставляет опцию играть с живыми диллерами. Представлены:
– Европейская рулетка
– 21
– Punto Banco
– Техасский холдем
Конкурсы
Периодические соревнования дают возможность пользователям состязаться за значительные денежные фонды. Турнирная система актуализируется еженедельно.
Финансовые транзакции
Портал поддерживает обилие вариантов пополнения и получения сумм:
– Банковские карты
– Цифровые платежные системы
– Межбанковские транзакции
– Криптовалюты
Все переводы осуществляются конфиденциально с применением передовых методов кодирования.
Служба помощи
Компетентная команда саппорта функционирует 24/7. Коннектиться с менеджерами реально через:
– Онлайн чат
– Электронную почту
– Телефон
– Соц медиа
Безопасность и аккредитация
Казино функционирует на фундаменте законной аккредитации. Данное обеспечивает:
– Честность азартного действа
– Охрану индивидуальных сведений
– Быстрые перечисления
– Ответственный геймплей
Итог
Официальный веб-сайт и его функционирующие дубликаты предоставляют клиентам совокупный набор функций для безопасной и выгодной времяпрепровождения. Внушительные призы, многочисленные слоты, компетентная помощь и проверенная система транзакций формируют казино превосходным решением для фанатов гемблинг развлечений.
дистанционное обучение 1 класс дистанционное обучение 1 класс .
русский онлайн казино
Неочевидные факты про ufc в феврале марте 2026 три недели которые встряхнут дивизионы и планы организации. Здесь подробности: https://terehov-event.ru/news/ufc-fevral-mart-2026-neochevidnye-prognozy-i-czepnaya-reakcziya-na-diviziony-chto-mozhet-slomat-plany-promoushena/
online pet pharmacy: pet meds online – pet pharmacy online
lbs это lbs это .
онлайн класс онлайн класс .
I recently tested this casino https://lemor.pl/ and was surprised by how smooth everything felt. The games run fast, bonuses are transparent, and navigation is user-friendly, making the experience comfortable.
Актуальные онлайн-казино предлагают клиентам внушительный спектр услуг и поощрительных опций. Присоединение к ресурсу осуществляется через основной ресурс или его актуальное зеркало Daddy, что предоставляет непрерывную активность.
Что такое функционирующее зеркало казино
Копия — это абсолютная дубликат оригинального ресурса, созданная для устранения блокировок. Рабочее зеркало дает возможность участникам получить соединение к выбранным автоматам в каждое время.
Официальное зеркало обладает всеми опциями основного веб-сайта:
– Совокупный перечень игр
– Аккаунт с зафиксированными параметрами
– Актуальные бонусы
– Безопасные платежные транзакции
Создание аккаунта на основном портале
Ход регистрации составляет всего немного минут. Начинающим клиентам требуется:
1. Зайти на проверенный сайт или актуальное зеркало
2. Щелкнуть на ссылку “Создать аккаунт”
3. Указать обязательные данные
4. Подтвердить электронную почту
5. Внести начальный взнос
Стартовый бонус выдается незамедлительно после выполнения всех шагов.
Вход в аккаунт
Существующие клиенты могут осуществить подключение применяя:
– Имя пользователя и шифр
– Код контакта
– Email
Персональный раздел открывает доступ к управлению счетом, данным транзакций и доступным акциям.
Промо и программы
Развлекательная система балует регулярных игроков щедрыми вознаграждениями:
Первый комплект
– Поощрение на дебютный пополнение до 100%
– Фриспины на популярные автоматы
– Добавочные премии за дальнейшие платежи
Промокоды
Специальные ваучеры предоставляют доступ на приобретение особых бонусов. Свежие купоны публикуются в категории “Промо”.
Кэшбек
Регулярный кэшбек насчитывает до 10% от потраченных средств. Возврат выплачивается автоматически.
Система лояльности
Постоянные клиенты зарабатывают баллы, которые конвертируются на подлинные финансы или фриспины.
Адаптивный портал и приложение
В целях удобства клиентов сделана качественная портативная платформа. Гибкий облик обеспечивает комфортно играть с всякого портативного гаджета.
Преимущества приложения:
– Оперативный доступ к развлечениям
– Оптимизированный облик
– Бесперебойная активность
– Сообщения о новых бонусах
Скачать софт можно даром с проверенного веб-сайта для девайсов на Android и iOS.
Библиотека автоматов
Автоматы
Библиотека включает более 2000 игр от популярных производителей:
– Классические игры
– Видео-слоты
– Jackpot игры
– Брендовые слоты
Live казино
Секция Live столов предлагает взаимодействие с подлинными дилерами в реальном времени:
– Колесо фортуны
– Блэкджек
– Карты
– Poker
Соревнования
Периодические соревнования с значительными премиальными фондами организуются регулярно. Допуск в состязаниях разрешено всем зарегистрированным участникам.
Денежные способы
Платежи и изъятия денег осуществляются через распространенные методы:
– Банковские средства
– Электронные кошельки
– Крипто
– Банковские операции
Наименьший вклад — от 100 рублей. Снятие средств проводится в течение 24 времени.
Сервис поддержки
Постоянная отдел саппорта готова содействовать в разрешении всех вопросов:
– Живой чат
– Email
– Горячая линия
– Соц сети
Охрана и сертификат
Лицензионный сайт оперирует на почве глобальной разрешения. Каждые данные участников обезопасены современным SSL-кодированием.
Заключение
Действующее зеркало предоставляет постоянный подключение к предпочитаемым автоматам, выгодным бонусам и практичным возможностям. Откройте счет сегодня и обретите первый поощрение!
Нынешние онлайн-казино предлагают клиентам массу путей для приятной игры. Официальный сайт EzCash казино дарит возможность ко всем функциям и развлечениям. Однако при образовании программных сложностей на помощь спешат действующие зеркала.
Что представляет собой функционирующее зеркало
Копия казино — это точная дубликат главного сайта, размещенная по другому URL. Подлинное зеркало удерживает все опции, в том числе открытие профиля, доступ в личный кабинет, поощрения и купоны.
Зеркало на сегодня гарантирует:
– Стабильный путь к игровым машинам
– Стопроцентную защиту персональных сведений
– Сохранение средств и хронологии операций
– Возможность использования всех промо-предложений
Создание учетной записи на официальном сайте
Этап создания аккаунта занимает несколько минут. Начинающим клиентам следует:
1. Войти на подлинный ресурс или актуальное зеркало
2. Щелкнуть кнопку «Создать аккаунт»
3. Ввести запрашиваемые сведения
4. Активировать email почту
5. Ввести промокод при существовании
После окончания регистрации геймеры получают подарок за регистрацию, какой может содержать бонусные спины или финансовое вознаграждение.
Доступ в персональный кабинет
Персональный кабинет открывает всеобъемлющий мониторинг над игровым процессом. Через личный аккаунт возможно:
– Финансировать депозит
– Выводить выплаты
– Активировать купоны
– Мониторить историю игр
– Соревноваться в соревнованиях
– Получать возврат средств
Характеристика бонусов и специальных предложений
Богатая бонусная программа — существенное плюс платформы. Основные формы премий:
Вступительный бонус
Новички обретают богатое вознаграждение на начальные взносы. Величина премии может доходить до 100-200% от размера депозита.
Бесплатные вращения
Безвозмездные раунды выдаются для популярных игровых автоматов. Количество бесплатных вращений изменяется от 10 до 500 штук.
Cash back
Еженедельный или ежемесячный отдача процента потерянных денег. Стандартный размер кэшбека — 5-15%.
Турниры
Регулярные соревнования с внушительными призовыми фондами. Соревнующиеся борются за призовые позиции в турнирной таблице.
Портативная версия и софт
Мобильная версия позволяет наслаждаться игрой с всякого устройства. Пользователи могут загрузить программу для iOS и Android или использовать браузерную версию.
Выгоды смартфонного софта:
– Молниеносная прогрузка слотов
– Эргономичный UI
– Пуш-нотификации о поощрениях
– Возможность входа через Touch ID
Слоты и Live казино
Азартная база содержит множество игр от ведущих провайдеров.
Популярные секции автоматов:
– Классические слоты
– Видео-автоматы с призовыми этапами
– Прогрессивный джекпот автоматы
– Megaways автоматы
Live казино
Категория live игорный зал предлагает игру с настоящими ведущими. Доступны традиционные развлечения:
– Французская рулетка
– Blackjack
– Баккара
– Покер
Как разыскать актуальное зеркало
Раздобыть актуальную ссылку на зеркало возможно разными способами:
1. Оформить подписку на почтовую рассылку
2. Следить за апдейтами в соц сетях
3. Контактировать в сервис поддержки
4. Заложить актуальное зеркало в закладки
Вывод
Основной портал и его рабочие копии обеспечивают стабильный путь к развлекательным слотам. Великодушные вознаграждения, различные купоны, комфортное мобильное софт и качественная служба поддержки поддержки делают игровой геймплей крайне комфортным и надежным.
школьное образование онлайн shkola-onlajn-31.ru .
школьное образование онлайн shkola-onlajn-32.ru .
Pardon the off-topic note, but I think it is still worth mentioning. Health shapes daily life even when nobody is talking about it directly, and it influences how steady, clear, and resilient we feel. The challenge is that people are surrounded by advice all the time, and volume rarely guarantees real understanding. A lot of that comes from oversimplified advice, and general guidance begins to sound more certain than it is. That is often when people lose confidence in what they are feeling, because the body does not operate like a template. This is often where the body starts communicating more clearly, through cravings, fatigue, reduced resilience, or mental strain. That is why reflection matters so much in health questions, looking at consistency, not just intensity, so that the next step reflects real feedback. This is why not every health topic fits into short tips, because it keeps the focus on understanding instead of oversimplifying. So if you are interested in a more informed perspective, a useful topic to explore next is iMedix sexual health.
우와 확실한 포스팅 최고네요! 요즘처럼 자금운용 쪽으로 고민이 깊은데, 휴대폰결제현금화 루트를 자세히 알려주시니 매우 만족스럽습니다. 믿을 수 있는 현금화서비스 상담은 365일 함께해요. 다음에 또 와서 멋진 글 기대할게요. 활기찬 하루 되세요!
Передовые онлайн-казино предоставляют пользователям обширный ассортимент развлечений и выгодные бонусы. Но для комфортной работы важно понимать, как получить доступ к Тейкер и его рабочие зеркала.
Что такое официальный портал казино
Лицензионный ресурс казино — это первичная платформа, где участники могут получать удовольствие от азартными играми. Платформа оперирует на законных основаниях и располагает всеми обязательными документами.
Первостепенные выгоды лицензионного портала:
– Безопасность индивидуальных данных
– Честные положения использования
– Стабильные платежи
– Оперативная служба поддержки
Функционирующее зеркало казино: для чего необходимо
Зеркало — это точная дубликат официального портала, размещенная по иному адресу. Актуальное зеркало разрабатывается для гарантирования непрерывного входа к сайту.
Поводы эксплуатации альтернативных адресов:
– Запрет первичного URL
– Плановые процедуры
– Большая активность на ресурс
Как получить актуальное зеркало сейчас
Узнать актуальное действующее зеркало можно разными путями:
1. Email-уведомления — зарегистрируйтесь на email отправку
2. Служба поддержки — проконсультируйтесь в онлайн-чат
3. Публичные площадки — мониторьте за постами
4. Тематические ресурсы — проверенные платформы
Оформление профиля на платформе казино
Процедура создания аккаунта длится буквально несколько минут:
1. Выберите на клавишу “Регистрация”
2. Укажите требуемые данные
3. Верифицируйте электронную ящик
4. Примените купон, если имеется
Сразу после успешной создания аккаунта вам станет доступен индивидуальный аккаунт.
Награды и бонусные коды
Выгодная премиальная система — ключевое достоинство казино:
Подарок за первичную регистрацию
Новые игроки получают начальный подарок, который может охватывать:
– Монетарный депозит на стартовый пополнение
– Фри-спины для автоматов
– Стартовые деньги
Активационные коды
Постоянно публикуются свежие бонусные шифры, обеспечивающие получить дополнительные преимущества.
Механизм кешбэка
Активные пользователи приобретают долю использованных финансов назад.
Свежие предложения и конкурсы
Платформа систематически устраивает интересные промо-мероприятия:
– Семидневные турниры
– Тематические промо
– Раздачи солидных выигрышей
– Схема статусов
Доступ в персональный аккаунт
Для логина на сайт следует:
1. Перейти на официальный портал или действующее зеркало
2. Активировать “Вход”
3. Прописать никнейм и пароль
В личном разделе открыты данные инструменты:
– Внесение средств баланса
– Снятие средств
– Проверка истории игр
– Изменение личными данными
Mobile вариант и app
Адаптивная версия
Responsive версия сайта дает возможность играть с всех карманного устройства. Оформление автоматически подстраивается под габариты дисплея.
App для download
Загрузить программу можно для:
– Android — официальная download с ресурса
– iOS — инсталляция через App Store
Преимущества программы:
– Оперативный старт
– Стабильная производительность
– Push-оповещения об бонусах
– Ускоренный интерфейс
Развлекательные секции
Барабаны
Внушительная библиотека развлекательных слотов от ведущих разработчиков:
– Классические автоматы
– Современные-игры
– Прогрессивные-машины
Live casino
Секция с живыми операторами дает:
– Рулетки
– Двадцать одно
– Punto Banco
– Poker
Стримы транслируются в превосходном разрешении, воссоздавая атмосферу реального казино.
Способы внесения средств и снятия
Сайт работает с различные денежные инструменты:
– Кредитные картсчета
– Цифровые системы
– Цифровые валюты
– Финансовые транзакции
Наименьшие суммы депозита и моментальные платежи обеспечивают игру максимально приятной.
Команда помощи
Опытная служба support функционирует 24/7 и в состоянии содействовать с всеми ситуациями:
– Онлайн-чат
– Email-помощь
– Звонковая горячая линия
Заключение
Главный портал казино и его актуальные зеркала обеспечивают игрокам защищенный и увлекательный игровой досуг. Богатые поощрения, удобная мобильная вариант, разнообразные развлечения и качественное live-казино создают эту систему отличным выбором для развлекательных времяпрепровождения.
Доступ к платформе через проверенные зеркала
Игроки сетевых казино часто встречаются с ситуацией закрытия базового ресурса. Собственно для преодоления этой проблемы разработаны копии главного сайта. 888 предоставляет абсолютный вход ко всем возможностям ресурса.
Что такое рабочее зеркало казино
Альтернативный адрес представляет собой точную реплику оригинального ресурса с похожим набором функций. Ключевое расхождение — это другое имя. Любые сведения участника, содержа счет, привилегии и данные раундов, остаются неизменными.
Достоинства эксплуатации зеркал
Действующие зеркала располагают множеством ключевых преимуществ:
– Бесперебойный подключение к предпочитаемым развлечениям
– Стопроцентная конфиденциальность личных сведений
– Поддержание всех опций персонального кабинета
– Шанс обретения бонусов и вовлечения в акциях
Регистрация на основном ресурсе
Процедура оформления чрезвычайно легок и длится пару минут. Недавние игроки могут надеяться на внушительный вводный подарок за оформление.
Шаги открытия аккаунта
1. Подключение на основной портал или его дубликат
2. Нажатие на клавишу “Присоединиться”
3. Ввод обязательных информации
4. Проверка почтовой почты
5. Применение кода (если доступен)
Награды и акции для участников
Ресурс радует своих игроков разнообразными поощрительными акциями.
Основные типы бонусов
Начальный пакет — солидное премирование для недавних игроков, каковое в состоянии включать монетарные призы и фриспины.
Бесплатные вращения — возможность запускать в топовых игровых машинах безвозмездно.
Возврат средств — частичный компенсация потерянных финансов, который именно предоставляется раз в неделю или помесячно.
Промокоды — особые комбинации, обеспечивающие бонусные привилегии.
Пользовательский кабинет: функции и установки
Персональный раздел дает абсолютный регулирование над персональным процессом. Тут предусмотрены:
– Администрирование депозитом
– История операций
– Действующие награды
– Параметры защиты
– Подтверждение счета
Портативная вариант и софт
Нынешние клиенты признают портативность. Площадка предоставляет 2 способа для игры с портативных аппаратов.
Адаптивная мобильная вариант
Мобильная версия ресурса самостоятельно приспосабливается под экран любого гаджета. Не требуется инсталлировать отдельное программное обеспечение.
Приложение для смартфонов
Возможно загрузить фирменное APP для iOS и Android. Софт обеспечивает:
– Скорый вход
– Оптимизированный внешний вид
– Push-оповещения о акциях
– Надежную функциональность
Live игры: атмосфера реального зала
Раздел Live казино транспортирует участников в среду реального клуба. Компетентные хосты ведут сессии в виде настоящего времени.
Известные Live-игры
– Европейская рулетка
– Двадцать одно
– Баккара
– Карибский покер
Аппараты: многообразие слотов
Библиотека развлекательных слотов содержит массу вариантов от ведущих поставщиков. Участники откроют:
– Классические машины
– Видео-автоматы
– Прогрессивный джекпот-машины
– Многолинейные автоматы
Соревнования и специальные предложения
Периодические турниры позволяют участникам бороться друг с другом за значительные денежные фонды. Любой турнир содержит свои критерии включения и список победителей.
Варианты пополнения и получения финансов
Ресурс обслуживает ряд расчетных систем:
– Платежные карты
– Виртуальные кошельки
– Крипто
– Прямые переводы
Абсолютно все операции осуществляются надежно благодаря современным методам кодирования.
Служба support
Профессиональные операторы команды помощи способны содействовать 24/7. Доступны нижеперечисленные методы общения:
– Оперативный-чат
– Email-помощь
– Аудио связь
– Коммуникационные сети
Резюме
Главный домен игровой площадки и его функционирующие копии гарантируют пользователям безопасный и легкий доступ к огромному ассортименту игровых активностей. Солидные награды, периодические кампании, квалифицированная поддержка и простые расчетные методы формируют геймерский досуг максимально комфортным и выгодным.
vault marketplace – I stumbled upon this site, and the content seems well organized.
雨霖铃2026 杨洋章若楠古装仙侠虐恋 海外华人高清无广告追剧 全球加速高热度
explore this vendor site – Came across this page earlier and navigating it is easy.
dog medication online: Vet Rx Index – dog prescriptions online
Актуальные виртуальные казино обеспечивают геймерам огромный выбор опций для комфортной игры. Однако иногда доступ к основному порталу может оказаться ограниченным. В таких случаях на подмогу приходят Disi, которое дает бесперебойный подключение ко всем возможностям платформы.
Что такое действующее зеркало казино
Альтернативный сайт — это полная дубликат официального сайта, которая хостится по другому URL. Зеркало имеет целый набор функций оригинального веб-портала, включая индивидуальный кабинет, депозит и историю транзакций.
Главные выгоды использования зеркала:
– Постоянный вход к сайту
– Полная тождественность возможностей
– Конфиденциальность персональных сведений
– Хранение всех поощрений
Как разыскать действующее зеркало сегодня
Существует ряд надежных методов получения актуальной ссылки:
Проверенные каналы:
1. Электронная рассылка — дирекция постоянно отправляет уведомления с свежими ссылками
2. Медийные сети — легитимные страницы публикуют текущую данные
3. Сервис поддержки — специалисты выдают надежные URL
4. Мобильное приложение — дает возможность минуть блокировки
Регистрация на основном сайте
Операция открытия счета длится всего немного минут и содержит из следующих ступеней:
1. Открытие на основной ресурс или функционирующее зеркало
2. Выбор на иконку «Зарегистрироваться»
3. Ввод регистрационной формы
4. Подтверждение почтовой почты или сотового номера
5. Включение бонуса за регистрацию при существовании промокода
Начинающие пользователи получают великодушный стартовый бонус, который может охватывать free spins, денежные призы или компенсацию.
Вход в пользовательский кабинет
Вход на ресурсе выполняется обычным образом. Требуется внести логин и кодовое слово, использованные при создании аккаунта.
Важные детали для конфиденциального входа:
– Применяйте защищенный секретный ключ
– Запустите двухэтапную верификацию
– Не записывайте реквизиты на публичных устройствах
– Мониторьте доменную строку браузера
Описание наградной системы
Гемблинг-сайт балует геймеров разнообразными поощрениями и промо:
Приветственный набор
Дебютанты способны надеяться на великодушное бонус за первый вклад. Как правило это процентная прибавка к депонированной объему плюс бесплатные вращения для известных слотов.
Постоянные акции
– Недельный возврат средств — компенсирование процента утраченных денежных средств
– Поощрения на очередные вклады
– Эксклюзивные офферы по событиям
– Конкурсы с крупными выигрышными суммами
Схема верности
Деятельные игроки собирают единицы за всякую ставку, которые затем меняются на фактические денежные призы, free spins или особые льготы.
Промокоды: как использовать
Промокоды — это специальные наборы букв и цифр, обеспечивающие доступ к специальным поощрениям.
Где взять свежие промокоды:
– Официальные медийные сети казино
– Сотрудничающие площадки
– Email-рассылка
– Специализированные группы
Вводится промокод в соответствующее поле при открытии счета или зачислении средств депозита.
Телефонная версия и приложение
Нынешние клиенты выбирают проводить время с мобильных устройств. Сайт предлагает 2 метода для приятной телефонной игры.
Responsive модификация
Онлайн версия самостоятельно адаптируется под размер монитора. Не требует установки и действует в произвольном современном браузере.
Смартфонное приложение
Получить приложение можно для девайсов на Android и iOS. Плюсы app:
– Быстрая запуск
– Надежная операция
– Мгновенные-уведомления о поощрениях
– Независимый избегание блокировок
Процесс установки несложен: необходимо перейти на сайт с портативного аппарата и следовать указаниям.
Развлекательный коллекция
Каталог развлечений содержит несколько тысяч наименований от лучших провайдеров.
Слоты
Азартные автоматы — самая популярная раздел развлечений. Размещены обычные винтажные автоматы, передовые видеослоты с поощрительными уровнями, а также джекпотные призы.
Live казино
Отдел с настоящими крупье дает возможность почувствовать атмосферу подлинного казино. Имеются столы с блэкджеком.
Стриминг реализуется в отличном четкости, обеспечивается общение с раздающим и другими участниками.
Турниры
Регулярно устраиваются состязания по многочисленным играм. Вступление предоставляет право получить валютные награды, free spins или особые презенты.
Платежные манипуляции
Портал обеспечивает большой набор платежных систем:
– Пластиковые карты
– Цифровые сервисы
– Цифровая валюта
– Банковские транзакты
Низшая количество депозита — приемлемая для большинства геймеров. Снятие средств обрабатывается в кратчайшие сроки.
Отдел поддержки
Компетентные специалисты расположены поддержать постоянно. Открыты нижеследующие каналы связи:
– Интернет-чат
– Email
– Мобильная связь
– Общественные сети
Ответы на частые проблемы можно найти в разделе FAQ.
Заключение
Лицензионный портал казино и его рабочие зеркала гарантируют игрокам полный вход ко всем возможностям портала. Великодушные бонусы, практичная портативная версия, гигантский каталог игр и профессиональная ассистенция создают игровой опыт максимально приятным и конфиденциальным.
Jewel Marketplace – Layout is tidy, moving between sections is simple.
Описание главного веб-сайта
Передовое онлайн-казино обеспечивает своим пользователям большой ассортимент услуг и призов. Оригинальный портал Glory оперирует постоянно, обеспечивая путь к топовым симуляторам, live-казино и многочисленным кампаниям.
Рабочее зеркало: возможность к платформе
Что такое зеркало казино
Дубликат представляет собой абсолютную версию главного сайта с иным URL адресом. Рабочее зеркало предоставляет клиентам преодолевать ограничения и получать надежный подключение к излюбленным автоматам.
Как обнаружить рабочее зеркало сегодня
Актуальные линки на основное зеркало публикуются через:
– Электронную рассылку
– Официальные медийные сети
– Службу помощи
– Тематические ресурсы
Регистрация на платформе
Ход регистрации
Оформление длится всего минут и подразумевает следующие шаги:
1. Вход на основной ресурс или функционирующее зеркало
2. Выбор клавиши “Создатьаккаунт”
3. Ввод личных данных
4. Подтверждение адреса или номера
5. Создание ключа
Приз за созданиеаккаунта
Свежие пользователи обретают солидные приветственные бонусы:
– Денежные депозиты на баланс
– Халявныеспины для симуляторов
– Расширенный процент кешбэка
– Эксклюзивные промокоды
Вход в индивидуальный счет
Зарегистрированные игроки могут совершить авторизацию через официальный сайт или актуальное зеркало. Для этого требуется указать имяпользователя и ключдоступа, установленные при созданииаккаунта.
Опции персонального раздела
В собственном аккаунте открыты такие функции:
– Контроль учетными информацией
– Ввод депозита
– Снятие призов
– Ввод бонусов
– Мониторинг истории операций
– Включение в соревнованиях
Вознаграждения и кампании
Разновидности бонусов
Казино поощряет своих клиентов разнообразными поощрительными программами:
– Вступительный пакет — солидные подарки на стартовые пополнения
– Бесплатныевращения — подарочные спины в топовых симуляторах
– Компенсация — еженедельный компенсация части ставок
– Схема поощрения — эксклюзивные привилегии для верных игроков
Ваучеры и их применение
Специальные промокоды предоставляют экстра бонусы. Для ввода следует внести комбинацию в специальное графу в личном кабинете.
Развлекательный набор
Слоты
База игровых автоматов вмещает массу позиций от лучших провайдеров:
– Стандартные слоты
– Продвинутые игры
– Призовые игры
– Брендовые развлечения
Live казино
Секция Live-казино предлагает игру с реальными крупье в формате реального трансляции:
– Французскаярулетка
– Очко
– Баккара
– Техасскийхолдем
Состязания
Регулярные конкурсы с крупными наградными призами проходят регулярно. Претенденты конкурируют за призовыеместа в турнирнойсетке.
Mobile платформа и APP
Mobile платформа ресурса
Официальный веб-сайт целиком приспособлен для планшетных аппаратов. Пользователи способны открывать игры непосредственно через обозреватель без необходимости загрузки.
Приложение для установки
Официальное смартфонное софт доступно для установки на аппараты с рабочими системами Android и iOS. Программа предоставляет:
– Мгновенный вход к слотам
– Надежную функциональность
– Моментальные-оповещения о предложениях
– Комфортный дизайн
Резюме
Официальный портал казино и его актуальные копии гарантируют пользователям всесторонний доступ к отличным развлекательным сервисам. Большие вознаграждения, всевозможные акции, комфортная портативная реализация и компетентная сервис превращают азартный процесс максимально приятным и доходным.
Further reading
how to buy cheap neurontin
for motivation.
Актуальные онлайн-казино предлагают геймерам разнообразный диапазон функций для комфортной игры. Переход к платформе Cactus Casino производится через официальный сайт или рабочее зеркало.
Что такое рабочее зеркало казино
Актуальное зеркало — это резервный домен главного портала казино. Такие клоны генерируются для поддержания бесперебойного подключения к игровой системе.
Копия на сегодня совершенно дублирует возможности официального ресурса. Пользователи обретают идентичный выход ко всем функциям, включая создание аккаунта, финансирование баланса и получение призов.
Регистрация на основном веб-сайте
Процедура оформления учетной записи требует всего буквально мгновений. Начинающим пользователям требуется:
1. Войти на основной портал или текущее проверенное зеркало
2. Щелкнуть кнопку “Регистрация”
3. Внести нужные сведения
4. Проверить email почту
5. Ввести бонусный код при присутствии
После финализации оформления клиент получает подарок за регистрацию, который вправе включать бесплатные вращения или монетарное вознаграждение.
Авторизация в собственный кабинет
Персональный кабинет — это безопасная секция, где участники вправе управлять своим учетной записью. Для доступа следует напечатать имя пользователя и password.
В личном кабинете доступны следующие опции:
– Проверка хронологии транзакций
– Задействование купонов
– Настройка вознаграждениями
– Участие в турнирах
– Контроль кэшбека
– Настройка учетной записи
Бонусы и спецпредложения
Азартная площадка обеспечивает щедрые призы:
Начальный бонус — дебютанты приобретают существенное вознаграждение на дебютные пополнения.
Free spins — начисляются как при оформлении, так и в рамках всевозможных кампаний.
Кэшбек — регулярный компенсация части утраченных финансов.
Купоны — уникальные шифры, предоставляющие доступ к специальным бонусам.
Обзор гемблинговых направлений
Слоты
Собрание слотов включает массу наименований от топовых провайдеров. Игроки найдут как стандартные автоматы, так и актуальные видеослоты с захватывающей визуализацией.
Live казино
Категория Live казино дарит возможность развлекаться с действующими дилерами в условиях реального времени. Открыты распространенные варианты: рулетка, блэкджек, баккара, покер.
Конкурсы
Регулярные чемпионаты с большими выигрышными пулами привлекают тысячи игроков. Лидеры получают финансовые вознаграждения и уникальные премии.
Телефонная версия и app
Мобильная версия платформы обеспечивает развлекаться с каждого аппарата. Оформление самостоятельно адаптируется под габариты экрана.
Получить app можно для устройств на Android и iOS. Смартфонное приложение имеет всеми функциями настольной версии.
Как обнаружить текущее зеркало на сегодня
Действующие URL копий систематически обновляются. Найти свежую ссылку можно многими вариантами:
– Через департамент саппорта
– В проверенных социальных сетях
– По почтовой рассылке
– На партнерских сайтах
Надежность и официальность
Лицензионный портал оперирует на фундаменте международной документа. Все транзакции защищены передовыми методами безопасности.
Анонимность пользовательских сведений гарантируется в стопроцентном формате.
Резюме
Главный ресурс и его рабочие зеркала гарантируют клиентам постоянный путь к качественным развлекательным сервисам. Выгодные призы, всевозможные развлечения, компетентная служба — все это создает гемблинговый досуг максимально беспроблемным и захватывающим.
Sage Hub House – Clean and simple design, moving around feels effortless.
databrain – Content reads clearly, helpful examples made concepts easy to grasp.
Discover this vendor – Navigation is smooth and the interface is organized for easy product browsing.
modelops – Overall, professional vibe here; trustworthy, polished, and pleasantly minimal throughout.
flowbot – Bookmarked this immediately, planning to revisit for updates and inspiration.
TinyTill Collection – Will definitely come back for more shopping.
promptkit – Found practical insights today; sharing this article with colleagues later.
Oak Vendor Outlet – Nice clean design, navigating the pages feels effortless.
Нынешние онлайн-казино предлагают игрокам разнообразный диапазон возможностей для приятной времяпрепровождения. Подключение к платформе Laki World осуществляется через официальный портал или действующее зеркало.
Что такое рабочее зеркало казино
Функционирующее зеркало — это запасной адрес главного ресурса казино. Такие копии создаются для предоставления постоянного подключения к азартной сервису.
Зеркало актуальное совершенно дублирует возможности главного сайта. Геймеры имеют такой же путь ко всем сервисам, включая регистрацию, финансирование кошелька и получение призов.
Создание аккаунта на лицензионном сайте
Процедура оформления учетной записи занимает всего считанные моментов. Свежим клиентам требуется:
1. Войти на официальный сайт или актуальное настоящее зеркало
2. Выбрать кнопку “Регистрация”
3. Ввести необходимые реквизиты
4. Проверить email почту
5. Активировать купон при наличии
После финализации оформления игрок получает подарок за регистрацию, который вправе охватывать даровые спины или денежное вознаграждение.
Доступ в персональный кабинет
Пользовательский кабинет — это охраняемая секция, где клиенты имеют возможность администрировать своим счетом. Для входа требуется ввести логин и пароль.
В пользовательском кабинете имеются следующие инструменты:
– Отслеживание записей операций
– Применение кодов активации
– Управление вознаграждениями
– Включение в конкурсах
– Отслеживание возмещения
– Настройка профиля
Вознаграждения и спецпредложения
Гемблинговая платформа дарит щедрые подарки:
Приветственный набор — новые игроки приобретают существенное вознаграждение на первые вклады.
Даровые спины — предоставляются как при оформлении, так и в контексте разнообразных акций.
Возврат средств — систематический возврат фрагмента утраченных средств.
Промокоды — уникальные коды, обеспечивающие выход к специальным предложениям.
Описание гемблинговых направлений
Аппараты
Коллекция слотов включает сотни позиций от ведущих разработчиков. Пользователи откроют как обычные слоты, так и актуальные 3D-слоты с увлекательной анимацией.
Live казино
Раздел Live казино обеспечивает право соревноваться с реальными дилерами в условиях актуального времени. Открыты популярные развлечения: рулетка, блэкджек, баккара, покер.
Турниры
Постоянные чемпионаты с значительными премиальными суммами манят массу соревнующихся. Призеры обретают финансовые вознаграждения и специальные бонусы.
Смартфонная версия и софт
Мобильная версия ресурса обеспечивает участвовать с всякого устройства. Оформление автоматически корректируется под габариты экрана.
Скачать софт можно для аппаратов на Android и iOS. Телефонное app характеризуется всеми возможностями полной версии.
Как найти действующее зеркало на данный момент
Действующие ссылки зеркал постоянно обновляются. Обнаружить действующую URL можно несколькими методами:
– Через отдел техподдержки
– В подлинных коммуникационных сетях
– По email подписке
– На аффилиатных порталах
Безопасность и официальность
Официальный сайт действует на базе мировой документа. Все транзакции защищены современными технологиями шифрования.
Приватность личных реквизитов гарантируется в полном объеме.
Итог
Основной портал и его действующие зеркала предоставляют клиентам 24/7 вход к первоклассным гемблинговым развлечениям. Великодушные поощрения, различные игры, компетентная поддержка — все это делает азартный процесс невероятно комфортным и увлекательным.
http://users.atw.hu/nlw/viewtopic.php?p=97138#97138
Актуальные онлайн-казино предлагают пользователям обширный выбор возможностей для комфортной игры. Доступ к площадке казино Дэдди выполняется через лицензионный портал или функционирующее зеркало.
Что такое рабочее зеркало казино
Рабочее зеркало — это запасной URL основного портала казино. Такие копии генерируются для предоставления постоянного подключения к игровой системе.
Зеркало сегодня совершенно дублирует функционал базового ресурса. Геймеры получают такой же доступ ко всем возможностям, включая оформление профиля, пополнение счета и вывод призов.
Открытие счета на главном сайте
Алгоритм создания аккаунта занимает всего буквально мгновений. Новым клиентам необходимо:
1. Зайти на главный ресурс или действующее проверенное зеркало
2. Щелкнуть кнопку “Регистрация”
3. Указать обязательные реквизиты
4. Проверить e-mail почту
5. Активировать бонусный код при доступности
После выполнения регистрации пользователь обретает приз за регистрацию, который может предполагать даровые спины или монетарное начисление.
Доступ в личный кабинет
Пользовательский кабинет — это безопасная секция, где участники вправе регулировать своим профилем. Для доступа нужно напечатать никнейм и секретный ключ.
В индивидуальном кабинете имеются нижеперечисленные возможности:
– Проверка записей операций
– Применение кодов активации
– Настройка призами
– Включение в конкурсах
– Отслеживание возврата средств
– Изменение данных
Поощрения и акции
Гемблинговая платформа обеспечивает выгодные бонусы:
Стартовый пакет — начинающие получают значительное начисление на начальные взносы.
Бесплатные вращения — дарятся как при оформлении, так и в процессе всевозможных акций.
Кэшбек — систематический возврат части проигранных сумм.
Промокоды — особые комбинации, предоставляющие выход к уникальным бонусам.
Обзор развлекательных категорий
Слоты
Собрание аппаратов включает множество вариантов от лучших провайдеров. Геймеры встретят как традиционные автоматы, так и инновационные 3D-слоты с увлекательной графикой.
Live казино
Секция Live казино предлагает шанс развлекаться с реальными крупье в формате текущего времени. Представлены известные игры: рулетка, блэкджек, баккара, покер.
Состязания
Регулярные турниры с большими наградными банками завлекают сотни игроков. Чемпионы зарабатывают финансовые награды и специальные бонусы.
Телефонная версия и app
Портативная версия платформы предоставляет право наслаждаться с каждого гаджета. Интерфейс автономно настраивается под формат экрана.
Загрузить приложение можно для устройств на Android и iOS. Мобильное приложение располагает всеми характеристиками настольной версии.
Как отыскать актуальное зеркало на сегодня
Рабочие адреса зеркал систематически корректируются. Получить рабочую линк можно разными путями:
– Через департамент саппорта
– В проверенных коммуникационных сетях
– По email подписке
– На аффилиатных сайтах
Охрана и лицензирование
Основной портал функционирует на базе мировой документа. Все операции оберегаются актуальными методами безопасности.
Приватность индивидуальных информации сохраняется в совершенном размере.
Итог
Официальный портал и его функционирующие зеркала дарят пользователям круглосуточный вход к превосходным игровым играм. Выгодные вознаграждения, всевозможные развлечения, квалифицированная поддержка — все это превращает азартный досуг чрезвычайно беспроблемным и захватывающим.
сколько стоит заказать кухню по размерам zakazat-kuhnyu-4.ru .
pet meds online: Vet Rx Index – pet meds for dogs
http://mensrxindex.com/# ed treatment online
Вход к сайту и рабочие ссылки
Современные интернет казино предоставляют игрокам большой набор игр. Официальный сайт казино Motor обеспечивает стабильный переход ко всем функциям. При этом периодически возникают случаи, когда нужно запасной способ авторизации.
Что являет собой собой рабочее зеркало
Функционирующее зеркало — это точная реплика главного веб-сайта с иным доменным названием. Зеркало сегодня дает возможность преодолевать существующие барьеры и гарантировать постоянный подключение к выбранным развлечениям.
Официальное зеркало содержит теми же функциями, что и главный веб-сайт:
– Полный ассортимент игр
– Собственный раздел с сохраненными данными
– Все бонусы и программы
– Надежные финансовые действия
Открытие профиля и подключение в систему
Процедура открытия аккаунта на ресурсе требует считанные моментов. Свежим клиентам нужно:
1. Зайти на функционирующее зеркало сегодня
2. Нажать кнопку «Создать аккаунт»
3. Заполнить необходимые сведения
4. Подтвердить e-mail почту или данные смартфона
5. Использовать поощрение за открытие аккаунта
Доступ в индивидуальный кабинет реализуется посредством предоставление ID и ключа.
Обзор призовой политики
Богатая призовая программа — ключевое достоинство ресурса. Участники зарабатывают разнообразные награды:
Вступительные бонусы
Новые пользователи вправе ожидать на щедрый приз за создание аккаунта. Обычно это совокупность вариантов, содержащий:
– Частичную прибавку к первому пополнению
– Бесплатные вращения
– Дополнительные финансы на кошелек
Промокоды и эксклюзивные опции
Периодические купоны обеспечивают получать бонусные привилегии. Применить их допустимо в предназначенном поле собственного кабинета.
Фриспины и кешбэк
Фриспины — это шанс вращать автоматы без задействования персональных финансов. Возврат означает долевой отдачу потерянных финансов.
Ассортимент слотов
Гемблинг площадка представляет внушительную коллекцию автоматов.
Игровые машины
Разнообразие аппаратов впечатляет фантазию. Есть классические трехбарабанные автоматы и продвинутые развлечения с увлекательной визуализацией.
Live игры
Зона Live заведения переносит участников в обстановку истинного развлекательного клуба. Квалифицированные крупье осуществляют игры в онлайн формате.
Конкурсы и лидерборды
Постоянные соревнования привносят остроты и дают перспективу забрать внушительные суммы.
Мобильная вариант и приложение
Актуальные технологии дают возможность развлекаться в удобном точке. Адаптивная вариант автоматически подстраивается под монитор девайса.
Скачать клиент возможно для мобильных платформ iOS и Android. Клиент гарантирует:
– Мгновенный переход
– Бесперебойную функционирование
– Моментальные-оповещения об промо
– Простой облик
Платежные транзакции
Сайт поддерживает различные способы депозита и вывода финансов:
– Пластиковые системы
– Электронные кошельки
– Криптовалюты
– Денежные операции
Все действия выполняются через безопасное протокол, что гарантирует целостность персональных параметров.
Департамент поддержки
Профессиональная бригада помощи трудится 24/7. Соединиться с специалистами допустимо через:
– Онлайн-чат
– Электронную почту
– Связь
– Медиа платформы
Итоги
Главный сайт и его актуальное зеркало гарантируют участникам защищенный и комфортный вход к увлекательным занятиям. Выгодные бонусы, широкий каталог слотов и высокая помощь формируют времяпрепровождение максимально комфортной и выгодной.
Современные сетевые казино дают клиентам огромный выбор функций для удобной игры. Но иногда соединение к основному сайту может стать закрытым. В таких обстоятельствах на поддержку появляется Cactus Casino, которое дает непрерывный вход ко всем возможностям платформы.
Что такое рабочее зеркало казино
Альтернативный сайт — это точная версия официального ресурса, которая хостится по альтернативному URL. Дубликат сохраняет целый набор функций основного веб-портала, включая персональный кабинет, депозит и данные платежей.
Принципиальные достоинства эксплуатации зеркала:
– Постоянный вход к сайту
– Полная тождественность возможностей
– Сохранность пользовательских информации
– Хранение доступных вознаграждений
Как обнаружить действующее зеркало в данный момент
Присутствует некоторое количество надежных способов поиска действующей адреса:
Проверенные ресурсы:
1. Почтовая рассылка — руководство регулярно высылает сообщения с рабочими ссылками
2. Социальные сети — проверенные аккаунты выкладывают релевантную новости
3. Департамент поддержки — операторы дают проверенные домены
4. Портативное приложение — дает возможность избегать блокировки
Создание аккаунта на официальном ресурсе
Операция регистрации требует лишь несколько минут и предполагает из данных этапов:
1. Переход на лицензионный сайт или рабочее зеркало
2. Щелчок на кнопку «Создать аккаунт»
3. Ввод учетной анкеты
4. Подтверждение имейл почты или контактного номера
5. Задействование бонуса за регистрацию при существовании промокода
Только что зарегистрированные геймеры зарабатывают солидный начальный подарок, который может содержать free spins, денежные бонусы или кэшбек.
Авторизация в персональный кабинет
Авторизация на ресурсе осуществляется привычным способом. Нужно указать логин и секретный ключ, примененные при оформлении.
Важные нюансы для конфиденциального входа:
– Эксплуатируйте надежный шифр
– Включите двухфакторную верификацию
– Не записывайте пароли на общественных девайсах
– Контролируйте интернет строку браузера
Характеристика наградной схемы
Игровая платформа радует геймеров всевозможными привилегиями и акциями:
Начальный букет
Свежие игроки могут полагаться на существенное вознаграждение за начальный депозит. Традиционно это долевая надбавка к депонированной сумме плюс бесплатные вращения для известных слотов.
Постоянные акции
– Еженедельный кэшбек — компенсирование части списанных средств
– Призы на повторные депозиты
– Эксклюзивные офферы по знаменательным датам
– Турниры с солидными выигрышными пулами
Система верности
Постоянные клиенты получают пункты за любую бет, которые затем обмениваются на реальные деньги, бесплатные вращения или особые льготы.
Бонус-коды: как применять
Промокоды — это индивидуальные комбинации знаков, дающие право к эксклюзивным привилегиям.
Откуда получить свежие промокоды:
– Официальные медийные сети казино
– Партнерские ресурсы
– Email-подписка
– Тематические форумы
Вводится промокод в соответствующее поле при регистрации или внесении депозита депозита.
Телефонная версия и приложение
Нынешние игроки выбирают играть с телефонных девайсов. Ресурс дает двойной способа для беспроблемной портативной игры.
Responsive редакция
Веб версия автоматически настраивается под размер экрана. Не нуждается инсталляции и действует в всяком новом браузере.
Смартфонное приложение
Скачать app можно для гаджетов на Android и iOS. Выгоды app:
– Оперативная запуск
– Стабильная работа
– Всплывающие-уведомления о акциях
– Независимый обход блокировок
Процесс скачивания элементарен: необходимо перейти на сайт с мобильного аппарата и придерживаться инструкциям.
Развлекательный ассортимент
Библиотека развлечений содержит множество вариантов от ведущих провайдеров.
Слоты
Развлекательные машины — самая любимая секция развлечений. Показаны классические 3-барабанные машины, современные мультимедийные слоты с премиальными раундами, а также накопительные суперпризы.
Live казино
Раздел с реальными раздающими дает возможность ощутить антураж подлинного казино. Открыты столы с блэкджеком.
Трансляция производится в превосходном четкости, поддерживается чат с раздающим и иными пользователями.
Соревнования
Постоянно устраиваются конкурсы по многочисленным слотам. Вступление предоставляет право завоевать монетарные награды, бесплатные вращения или эксклюзивные привилегии.
Платежные процедуры
Ресурс предоставляет обширный спектр расчетных методов:
– Кредитные карты
– Цифровые сервисы
– Цифровая валюта
– Банковские платежи
Стартовая величина депозита — приемлемая для большинства игроков. Вывод средств выполняется в кратчайшие временные рамки.
Сервис поддержки
Профессиональные консультанты расположены поддержать 24/7. Имеются нижеследующие варианты коммуникации:
– Веб-чат
– Email
– Мобильная линия
– Социальные сети
Пояснения на распространенные вопросы можно получить в зоне FAQ.
Итог
Главный портал казино и его действующие зеркала предоставляют пользователям совершенный вход ко всем возможностям портала. Щедрые поощрения, удобная портативная версия, гигантский каталог аттракционов и опытная служба поддержки создают игровой времяпрепровождение крайне удобным и защищенным.
монтаж газового пожаротушения москва монтаж газового пожаротушения москва .
кухня по индивидуальному проекту kuhni-spb-42.ru .
online store link – I discovered this page today and the layout appears simple and well arranged.
browse this vendor platform – I discovered this site earlier and scrolling through it feels simple.
Переход к сайту через проверенные зеркала
Нынешние интернет казино дают пользователям бесперебойный доступ к играм. Центральный веб-сайт Casher оперирует устойчиво, гарантируя широкий ассортимент игровых автоматов. Однако временами появляются цифровые препятствия или блокировки, в связи с чем необходимо иметь представление о существовании рабочих зеркал.
Что собой представляет собой основное зеркало казино
Зеркало — это идентичная дубликат главного веб-сайта с таким же набором функций. Рабочее зеркало сегодня позволяет избегать региональные блокировки и продолжать времяпрепровождение.
Ключевые достоинства эксплуатации зеркал:
– Полный вход к личному кабинету
– Сохранение всех информации счёта
– Идентичный набор слотов
– Свежие бонусы и акции
Оформление на портале
Механизм оформления длится несколько минут. Свежие клиенты зарабатывают щедрый подарок за запись, он может включать:
– Приветственный денежный бонус
– Даровые фриспины для автоматов
– Особые коды
– Повышенный возврат
Во имя выполнения оформления необходимо:
1. Зайти на центральный веб-сайт или копию
2. Нажать клавишу «Создать аккаунт»
3. Указать контактные данные
4. Заверить email или телефон
5. Активировать ваучер (в случае присутствии)
Авторизация в персональный кабинет
Следом за правильной регистрации геймеры в состоянии выполнять подключение посредством главный сайт или актуальное зеркало. Собственный кабинет даёт полный контроль над счётом:
– История транзакций
– Пополнение баланса
– Изъятие средств
– Управление привилегиями
– Включение в состязаниях
Награды и кампании казино
Портал балует пользователей различными наградными схемами:
Начальные бонусы
Новые игроки приобретают великодушный набор бонусов на начальные взносы. Зачастую это предполагает частичную добавку к величине пополнения плюс безвозмездные фриспины.
Систематические предложения
– Седмичный кешбэк до 15%
– Турниры с выигрышными суммами
– Поощрения на годовщину рождения
– Уникальные промо для статусных пользователей
Программа верности
Регулярные клиенты собирают пункты, что разрешено обменять на настоящие средства или особые преимущества.
Мобильная версия и программа
Актуальные инновации дают возможность геймить везде подходяще. Карманная вариант веб-сайта самостоятельно приспосабливается под размер каждого устройства.
Выгоды смартфонного софта:
– Быстрая открытие развлечений
– Эргономичный дизайн
– Всплывающие-уведомления о промо
– Опция установить для Android и iOS
Live казино: атмосфера истинного развлекательного клуба
Область Live заведения погружает игроков в обстановку подлинного развлекательного клуба. Опытные ведущие ведут развлечение в режиме настоящего времени.
Имеющиеся развлечения:
– Рулетка
– Карточная игра
– Карточная игра
– Покер
Игровые машины и гемблинг автоматы
Собрание гемблинг автоматов насчитывает множество наименований от топовых провайдеров. Каждый пользователь обнаружит развлечение по желанию:
– Традиционные автоматы
– Современные автоматы с бонусными уровнями
– Крупный приз-машины
– Мегавейс автоматы
Конкурсы и акции
Постоянные конкурсы добавляют азарт и открывают опцию получить значительные суммы. Присутствие в конкурсах регулярно безвозмездное, а призовые фонды насчитывают крупных сумм.
Защита и секретность
Сайт задействует передовые системы защиты для гарантии сведений пользователей. Каждые денежные операции проходят через охраняемые каналы.
Резюме
Центральный сайт и его рабочие зеркала дают стабильный подключение к качественным гемблинг сервисам. Привлекательные награды, эргономичная мобильная форма, разнообразие игр и профессиональное Live-клуб превращают сайт замечательным выбором для любителей азартных игр.
materials crate – Browsed quickly and the layout makes navigation simple.
I recently checked out this casino https://sleszynska.pl/ and was surprised by how smooth everything felt. The games load quickly, bonuses are clear, and navigation is intuitive, making the experience comfortable.
Certified Canada Rx Certified Canada Rx Certified Canada Rx
кухни на заказ спб недорого с ценами kuhni-spb-43.ru .
Hello!
Decode math mysterious formulas containing interesting and valuable logical news and solve the unsolvable see on the website for math solvers
Full information on the link – https://mebeleksp.ru/iran-peredal-rossii-zemlu-pod-stroitelstvo-jeleznoi-dorogi-dlia-mtk-sever-ug/
All the best and development in business!
Передовые онлайн-казино предлагают пользователям большой ассортимент услуг и премиальных предложений. Вход к сервису выполняется через лицензионный ресурс или его функционирующее зеркало Motor казино, что дает непрерывную деятельность.
Что представляет собой действующее зеркало казино
Дубликат — это точная версия оригинального портала, разработанная для обхода ограничений. Рабочее зеркало обеспечивает клиентам иметь соединение к любимым автоматам в произвольное время.
Лицензионное зеркало располагает всеми опциями основного сайта:
– Целый ассортимент развлечений
– Личный кабинет с сохраненными данными
– Действующие акции
– Гарантированные расчетные процедуры
Создание аккаунта на главном портале
Алгоритм открытия счета занимает всего пару минут. Начинающим клиентам требуется:
1. Войти на главный сайт или рабочее зеркало
2. Кликнуть на кнопку “Регистрация”
3. Ввести обязательные данные
4. Подтвердить контакт
5. Сделать стартовый вклад
Поощрение новичкам предоставляется моментально после окончания всех этапов.
Подключение в учетную запись
Зарегистрированные игроки могут осуществить авторизацию применяя:
– Учетное имя и ключ
– Номер мобильного
– Электронную почту
Личный кабинет открывает возможность к администрированию финансами, записям игр и доступным поощрениям.
Промо и программы
Игровая площадка вознаграждает лояльных участников многочисленными поощрениями:
Приветственный комплект
– Бонус на начальный депозит до 100%
– Фриспины на востребованные автоматы
– Особые награды за последующие пополнения
Промокоды
Уникальные промокоды предоставляют право на использование эксклюзивных бонусов. Свежие купоны публикуются в секции “Акции”.
Возврат средств
Регулярный бонус достигает до 10% от использованных финансов. Возврат зачисляется моментально.
Программа лояльности
Верные клиенты зарабатывают баллы, которые обмениваются на подлинные деньги или free spins.
Мобильная версия и APP
Ради комфорта пользователей создана качественная мобильная версия. Приспособленный вид помогает удобно развлекаться с любого карманного девайса.
Выгоды APP:
– Скорый подключение к играм
– Настроенный облик
– Надежная работа
– Push-уведомления о свежих турнирах
Загрузить софт можно даром с официального веб-сайта для гаджетов на Android и iOS.
Ассортимент автоматов
Машины
Коллекция содержит более 2000 игр от известных провайдеров:
– Традиционные автоматы
– Видео-слоты
– Jackpot игры
– Фирменные слоты
Live казино
Категория Live казино дает участие с настоящими крупье в онлайн режиме:
– Рулеточные столы
– Blackjack
– Баккара
– Столы покера
Конкурсы
Постоянные турниры с солидными призовыми суммами запускаются еженедельно. Участие в состязаниях открыто всем активным клиентам.
Денежные системы
Депозиты и изъятия финансов выполняются через распространенные сервисы:
– Кредитные карты
– Цифровые счета
– Крипто
– Прямые переводы
Стартовый платеж — от 100 рублей. Изъятие финансов обрабатывается в течение 24 времени.
Служба помощи
Постоянная отдел поддержки может ассистировать в урегулировании любых вопросов:
– Мессенджер
– Email
– Горячая линия
– Публичные сети
Защита и разрешение
Главный сайт функционирует на почве международной документа. Любые информация пользователей обезопасены актуальным SSL-криптованием.
Итог
Функционирующее зеркало обеспечивает бесперебойный доступ к выбранным развлечениям, щедрым акциям и практичным услугам. Откройте счет немедленно и получите стартовый подарок!
Подключение к порталу и рабочие зеркала
Востребованные интернет казино предоставляют игрокам широкий спектр игр. Основной веб-сайт Bet Andreas казино обеспечивает надежный вход ко всем услугам. При этом иногда случаются обстоятельства, когда нужно альтернативный способ входа.
Что означает собой действующее зеркало
Функционирующее зеркало — это абсолютная реплика главного ресурса с другим интернет именем. Зеркало сегодня дает возможность избегать потенциальные ограничения и обеспечивать постоянный переход к популярным автоматам.
Легальное зеркало характеризуется теми же возможностями, что и базовый портал:
– Совокупный каталог развлечений
– Личный кабинет с записанными данными
– Полные бонусы и программы
– Проверенные финансовые транзакции
Открытие профиля и подключение в платформу
Этап создания профиля на платформе занимает считанные моментов. Начинающим пользователям следует:
1. Попасть на функционирующее зеркало в настоящее время
2. Нажать кнопку «Регистрация»
3. Внести требуемые информацию
4. Подтвердить электронную почту или информацию связи
5. Использовать бонус за открытие аккаунта
Авторизация в индивидуальный профиль выполняется путем указание никнейма и секретной комбинации.
Анализ поощрительной программы
Богатая бонусная система — главное козырь казино. Клиенты получают всевозможные награды:
Начальные бонусы
Начинающие участники вправе надеяться на привлекательный подарок за регистрацию. Обычно это совокупность предложений, охватывающий:
– Частичную добавку к первому вкладу
– Даровые кручения
– Призовые финансы на кошелек
Промокоды и особые акции
Периодические купоны обеспечивают получать бонусные выгоды. Задействовать их возможно в специальном окне персонального кабинета.
Фриспины и кешбэк
Бесплатные спины — это возможность крутить автоматы без расходования собственных финансов. Кэшбек подразумевает процентный отдачу израсходованных сумм.
Библиотека развлечений
Гемблинг платформа представляет огромную коллекцию игр.
Видеослоты
Разнообразие автоматов поражает фантазию. Есть стандартные простые слоты и актуальные развлечения с занимательной картинкой.
Live казино
Раздел Live казино помещает игроков в среду настоящего игорного дома. Профессиональные операторы организуют раунды в реальном режиме.
Турниры и доски почета
Систематические турниры вносят остроты и гарантируют перспективу забрать большие награды.
Карманная вариант и приложение
Современные решения обеспечивают играть в комфортном пространстве. Портативная версия автоматически настраивается под размер устройства.
Получить программу разрешено для операционных систем iOS и Android. Программа предоставляет:
– Быстрый запуск
– Стабильную функционирование
– Push-уведомления об акциях
– Интуитивный вид
Платежные операции
Ресурс поддерживает различные варианты пополнения и изъятия финансов:
– Пластиковые карты
– Электронные кошельки
– Токены
– Финансовые отправки
Каждые переводы выполняются через защищенное канал, что обеспечивает неприкосновенность приватных данных.
Департамент ассистанса
Компетентная служба помощи работает круглосуточно. Соединиться с консультантами можно через:
– Онлайн-чат
– Почтовую почту
– Связь
– Социальные сети
Резюме
Официальный сайт и его действующее зеркало дают участникам безопасный и легкий путь к увлекательным играм. Щедрые поощрения, большой каталог игр и качественная поддержка создают процесс максимально удобной и прибыльной.
violetmarket – Came across this store, navigation looks clean and intuitive overall today.
Sage Bazaar Hub – Straightforward sections, browsing through is easy and quick.
Jewel World – Well-structured pages make exploring natural.
Elnesta Products – No problems encountered and checkout was completed in seconds.
Анализ лицензионного веб-сайта
Современные интернет казино дают клиентам обширный набор услуг и возможностей. Лицензионный ресурс казино Laki World предлагает проверенный вход к игровым возможностям.
Функционирующее зеркало: вход в настоящий момент
Альтернативный адрес выступает как точную копию главного портала. Актуальное зеркало позволяет пользователям избегать потенциальные ограничения.
Плюсы задействования зеркала
Основные преимущества содержат:
– Стабильный шанс к порталу
– Хранение любых возможностей главного веб-сайта
– Сохранность конфиденциальных сведений
– Равнозначный инструментарий
Открытие счета на платформе
Механизм создания аккаунта выделяется понятностью и удобством. Новые пользователи должны:
1. Посетить основной сайт или его зеркало
2. Нажать на элемент создания аккаунта
3. Внести обязательные поля
4. Валидировать email ящик
5. Выполнить дебютный доступ
Подарок за оформление
Новички зарабатывают значительный приветственный презент. Такое награда в состоянии предусматривать:
– Финансовые средства
– Безвозмездные прокруты
– Увеличенный показатель компенсации
Логин в персональный аккаунт
Существующие клиенты в состоянии быстро авторизоваться в собственный профиль, применяя логин и код. Собственный аккаунт обеспечивает возможность к:
– Управлению счетом
– Истории переводов
– Действующим подаркам
– Конфигурации учетной записи
Призы и предложения
Портал систематически устраивает многочисленные мероприятия для клиентов.
Разновидности подарков
Главные категории вознаграждений:
– Депозитные призы – часть от величины внесения
– Бесплатные вращения – даровые раунды в слотах
– Компенсация – возврат части затраченных финансов
– Призовые трофеи – награды за выступление в соревнованиях
Промокоды
Особые промокоды обеспечивают получить экстра привилегии. Игроки способны отыскать их на тематических порталах или получить в новостях.
Mobile адаптация и app
Актуальные игроки любят карманный геймплей.
Возможности портативной платформы
– Отзывчивый облик для различных аппаратов
– Абсолютный вход к развлечениям
– Стремительная подгрузка
– Удобное использование
Загрузить приложение
Портативное приложение предложено для загрузки на девайсы с операционными платформами Android и iOS. Программа обеспечивает:
– Надежную работу
– Пуш уведомления о призах
– Оперативный путь к избранным автоматам
Азартный каталог
Платформа обеспечивает богатую библиотеку азартных игр.
Аппараты
Библиотека азартных автоматов содержит:
– Стандартные игры
– Современные автоматы
– Прогрессивные слоты
– Тематические слоты
Live столы
Раздел лайв столов предлагает возможность состязаться с настоящими диллерами. Доступны:
– Рулетки
– Очко
– Punto Banco
– Poker
Турниры
Периодические конкурсы обеспечивают участникам состязаться за значительные финансовые фонды. Конкурсная структура модифицируется регулярно.
Денежные действия
Казино предоставляет обилие способов внесения и обналичивания сумм:
– Банковские карты
– Виртуальные кошельки
– Прямые трансферы
– Bitcoin
Абсолютно все переводы проходят безопасно с использованием актуальных протоколов кодирования.
Сервис сопровождения
Квалифицированная команда помощи функционирует без перерыва. Обратиться с операторами доступно через:
– Интерактивный чат
– Почтовую почту
– Телефон
– Социальные сети
Защита и аккредитация
Платформа оперирует на фундаменте легальной аккредитации. Подобное удостоверяет:
– Честность развлекательного геймплея
– Защиту индивидуальных сведений
– Быстрые выплаты
– Контролируемый гейминг
Итог
Главный ресурс и его актуальные дубликаты дают пользователям совокупный спектр опций для удобной и доходной игры. Внушительные подарки, всевозможные развлечения, компетентная поддержка и безопасная инфраструктура выплат создают ресурс идеальным решением для поклонников игровых развлечений.
Нынешние онлайн-казино предлагают игрокам обилие путей для удобной игры. Основной ресурс Wilder открывает доступ ко всем функциям и азартным играм. Однако при образовании технических проблем на помощь спешат рабочие зеркала.
Что являет собой собой действующее зеркало
Зеркало казино — это полная версия оригинального веб-сайта, размещенная по дополнительному веб-адресу. Подлинное зеркало сохраняет все опции, в том числе создание аккаунта, вход в собственный кабинет, поощрения и бонусные коды.
Копия на сегодня гарантирует:
– Бесперебойный доступ к игровым слотам
– Совершенную защиту личных информации
– Сохранение счета и хронологии платежей
– Доступность всех специальных предложений
Открытие профиля на официальном портале
Процесс создания аккаунта требует пару минут. Свежеиспеченным геймерам следует:
1. Открыть на подлинный сайт или действующее зеркало
2. Выбрать кнопку «Создать аккаунт»
3. Внести нужные сведения
4. Подтвердить email почту
5. Применить купон при наличии
После завершения оформления профиля клиенты обретают подарок за регистрацию, какой может включать free spins или денежно-призовое поощрение.
Авторизация в персональный кабинет
Персональный кабинет открывает полный мониторинг над азартным ходом. Через индивидуальный раздел возможно:
– Пополнять счет
– Выводить средства
– Активировать промокоды
– Мониторить записи ставок
– Принимать участие в соревнованиях
– Обретать кэшбек
Описание премий и промо-предложений
Великодушная призовая политика — ключевое козырь казино. Основные категории поощрений:
Вступительный бонус
Дебютанты приобретают богатое поощрение на дебютные взносы. Объем премии может достигать 100-200% от величины пополнения.
Бесплатные вращения
Бесплатные прокруты выдаются для популярных слотов. Сумма бесплатных вращений разнится от 10 до 500 штук.
Кешбэк
Систематический или ежемесячный компенсация процентной доли потерянных денег. Обычный процент компенсации — 5-15%.
Состязания
Периодические соревнования с солидными призовыми пулами. Конкурсанты конкурируют за топовые места в турнирной таблице.
Мобильная версия и приложение
Портативная версия обеспечивает играть с любого аппарата. Пользователи могут закачать app для iOS и Android или задействовать интернет версию.
Выгоды портативного программы:
– Быстрая прогрузка автоматов
– Практичный дизайн
– Пуш-нотификации о бонусах
– Вход через Touch ID
Машины и Live казино
Азартная коллекция включает сотни названий от лидирующих провайдеров.
Известные категории автоматов:
– Традиционные машины
– Современные слоты с премиальными уровнями
– Накопительный приз игры
– Мега-путь автоматы
Live игорный зал
Зона live игорный зал предлагает игру с профессиональными крупье. Представлены традиционные развлечения:
– Европейская рулетка
– Блэкджек
– Баккара
– Карибский покер
Как найти рабочее зеркало
Получить рабочую линк на зеркало разрешается несколькими методами:
1. Зарегистрироваться на почтовую рассылку
2. Следить за новостями в социальных сетях
3. Контактировать в службу поддержки
4. Сохранить рабочее зеркало в избранное
Резюме
Лицензионный сайт и его актуальные дубликаты обеспечивают непрерывный вход к азартным автоматам. Богатые вознаграждения, различные бонусные коды, удобное мобильное приложение и отличная техподдержка поддержки превращают игровой геймплей в высшей степени комфортным и безопасным.
logkit – Mobile version looks perfect; no glitches, fast scrolling, crisp text.
в этом разделе https://t.me/brosfarm_bot
Night Outlet Market – Clean design, moving through pages is straightforward.
Современные онлайн-казино обеспечивают пользователям разнообразный ассортимент слотов и заманчивые награды. Впрочем для комфортной игры необходимо понимать, как получить доступ к РР·Рё РљСЌС€ и его действующие зеркала.
Что такое основной веб-ресурс казино
Официальный веб-сайт казино — это основная платформа, где игроки могут наслаждаться игровыми слотами. Сайт функционирует на законных принципах и обладает всеми необходимыми документами.
Основные выгоды главного сайта:
– Надежность персональных сведений
– Справедливые положения участия
– Обеспеченные транзакции
– Компетентная техподдержка
Актуальное зеркало казино: для чего необходимо
Зеркало — это идентичная копия официального портала, хостящаяся по отличному домену. Действующее зеркало формируется для предоставления непрерывного соединения к сайту.
Поводы задействования альтернативных адресов:
– Ограничение главного URL
– Технические мероприятия
– Повышенная загрузка на систему
Как обнаружить рабочее зеркало сейчас
Получить свежее официальное зеркало можно различными способами:
1. Подписка — зарегистрируйтесь на почтовую подписку
2. Служба поддержки — свяжитесь в онлайн-чат
3. Официальные площадки — отслеживайте за новостями
4. Партнерские ресурсы — надежные источники
Открытие счета на сайте казино
Этап регистрации занимает только немного мгновений:
1. Нажмите на кнопку “Создать аккаунт”
2. Укажите обязательные поля
3. Подтвердите контактную e-mail
4. Введите купон, если имеется
Вслед за финализированной оформления вам будет возможен персональный раздел.
Награды и купоны
Богатая поощрительная политика — важное достоинство казино:
Подарок за открытие счета
Первичные пользователи обретают первый подарок, который может содержать:
– Денежный кредит на дебютный вклад
– Free spins для барабанов
– Безвозвратные средства
Бонусные коды
Систематически размещаются эксклюзивные купоны, предоставляющие использовать экстра поощрения.
Программа кэшбека
Регулярные участники получают порцию проигранных ставок обратно.
Текущие предложения и соревнования
Казино периодически запускает азартные промо-мероприятия:
– Недельные турниры
– Праздничные промо
– Раздачи ценных выигрышей
– Схема VIP-клуба
Логин в индивидуальный аккаунт
Для доступа на сайт следует:
1. Загрузить главный сайт или действующее зеркало
2. Нажать “Войти”
3. Прописать никнейм и секретную комбинацию
В пользовательском кабинете открыты данные возможности:
– Пополнение кошелька
– Снятие призов
– Просмотр архива операций
– Изменение индивидуальными параметрами
Портативная версия и программа
Мобильная модификация
Оптимизированная модификация сайта позволяет делать ставки с любого мобильного гаджета. Оформление адаптивно подстраивается под формат screen.
App для загрузки
Установить программу можно для:
– Android — непосредственная загрузка с ресурса
– iOS — загрузка через App Store
Достоинства мобильного клиента:
– Оперативный доступ
– Бесперебойная функциональность
– Push-сообщения об бонусах
– Производительный дизайн
Гемблинг категории
Барабаны
Разнообразная галерея эмуляторных автоматов от ведущих поставщиков:
– Традиционные автоматы
– Современные-слоты
– Призовые-машины
Live игры
Категория с настоящими дилерами предоставляет:
– Рулетки
– Блэкджек
– Punto Banco
– Покер
Стримы проводятся в HD качестве изображения, воссоздавая впечатление настоящего казино.
Способы зачисления и получения
Платформа принимает множественные денежные сервисы:
– Банковские card
– Электронные системы
– Bitcoin/Ethereum
– Банковские транзакции
Стартовые лимиты внесения и моментальные платежи создают процесс крайне беспроблемной.
Отдел техподдержки
Профессиональная команда поддержки работает 24/7 и способна ассистировать с всеми задачами:
– Мгновенный-чат
– Email-консультации
– Телефонная горячая линия
Заключение
Официальный веб-сайт казино и его действующие дубликаты предоставляют участникам защищенный и увлекательный развлекательный отдых. Щедрые поощрения, простая адаптивная вариант, богатые слоты и превосходное live-казино делают эту площадку превосходным местом для азартных досуга.
нажмите здесь https://reim.ink/
For the full version
order bactrim
to challenge your thinking.
Передовые онлайн-казино обеспечивают клиентам большой спектр игр и бонусных вариантов. Вход к платформе осуществляется через официальный портал или его актуальное зеркало РР·Рё РљСЌС€ скачать, что обеспечивает непрерывную активность.
Что представляет собой актуальное зеркало казино
Зеркало — это полная копия оригинального ресурса, разработанная для устранения блокировок. Актуальное зеркало дает возможность пользователям получить подключение к предпочитаемым автоматам в любое время.
Лицензионное зеркало содержит всеми характеристиками первоначального веб-сайта:
– Совокупный перечень игр
– Аккаунт с записанными сведениями
– Действующие поощрения
– Безопасные денежные транзакции
Оформление профиля на официальном веб-сайте
Процесс оформления занимает всего пару минут. Начинающим участникам следует:
1. Войти на основной ресурс или рабочее зеркало
2. Кликнуть на клавишу “Создать аккаунт”
3. Заполнить нужные параметры
4. Подтвердить адрес
5. Внести первый вклад
Приветственный бонус выдается моментально после прохождения всех стадий.
Доступ в профиль
Зарегистрированные пользователи могут совершить подключение применяя:
– Логин и пароль
– Код сотового
– Email
Персональный раздел открывает право к администрированию счетом, сведениям ставок и действующим промокодам.
Промо и программы
Игровая площадка вознаграждает активных игроков многочисленными вознаграждениями:
Приветственный бонус
– Надбавка на дебютный взнос до 100%
– Фриспины на топовые автоматы
– Экстра бонусы за дальнейшие пополнения
Бонусные коды
Специальные купоны предоставляют шанс на приобретение эксклюзивных призов. Свежие коды выставляются в разделе “Акции”.
Cashback
Постоянный кэшбек достигает до 10% от проигранных средств. Возврат зачисляется сразу.
Программа лояльности
Постоянные участники приобретают единицы, которые конвертируются на действительные средства или даровые спины.
Мобильная версия и APP
Для практичности пользователей создана функциональная адаптивный сайт. Адаптивный облик дает возможность удобно делать ставки с каждого карманного аппарата.
Преимущества приложения:
– Скорый запуск к слотам
– Адаптированный интерфейс
– Стабильная функциональность
– Сообщения о последних бонусах
Установить приложение можно свободно с проверенного портала для девайсов на Android и iOS.
Ассортимент развлечений
Слоты
Каталог включает более 2000 автоматов от известных разработчиков:
– Традиционные машины
– Современные автоматы
– Слоты с джекпотом
– Фирменные автоматы
Live казино
Раздел Live столов предлагает участие с живыми ведущими в онлайн режиме:
– Рулетка
– Карточная игра
– Baccarat
– Poker
Конкурсы
Регулярные соревнования с значительными премиальными фондами устраиваются еженедельно. Допуск в соревнованиях возможно всем активным клиентам.
Платежные способы
Пополнения и снятия выплат осуществляются через известные способы оплаты:
– Дебетовые пластик
– Цифровые системы
– Bitcoin
– Счетные платежи
Самый низкий вклад — от 100 рублей. Вывод денег обрабатывается в течение 24 часов.
Сервис поддержки
Непрерывная отдел поддержки может помочь в разрешении произвольных вопросов:
– Live chat
– Email
– Контактный номер
– Соц сети
Защита и разрешение
Главный сайт работает на основании международной документа. Всевозможные параметры пользователей обезопасены современным SSL-криптованием.
Заключение
Рабочее зеркало дает стабильный вход к предпочитаемым автоматам, привлекательным бонусам и удобным возможностям. Присоединяйтесь сегодня и получите приветственный подарок!
Certified Canada Rx: certified canadian pharmacy – canada drugs online
Certified Canada Rx: canadian pharmacy meds review – canadian pharmacy oxycodone
Проститутки Москвы метро Орехово
Переход к ресурсу через рабочие зеркала
Актуальные сетевые казино предоставляют пользователям круглосуточный вход к услугам. Главный ресурс Pinco казино оперирует бесперебойно, гарантируя широкий ассортимент гемблинг автоматов. Впрочем иногда формируются технические трудности или барьеры, потому необходимо иметь представление о наличии актуальных зеркал.
Что является собой официальное зеркало казино
Дубликат — это полная версия главного ресурса с таким же функционалом. Рабочее зеркало в настоящее время даёт возможность преодолевать территориальные блокировки и возобновлять гемблинг.
Основные плюсы применения зеркал:
– Абсолютный переход к собственному кабинету
– Удержание совокупных информации учётной записи
– Схожий ассортимент развлечений
– Действующие вознаграждения и промо
Открытие счёта на платформе
Процесс записи длится пару минут. Свежие клиенты обретают привлекательный приз за регистрацию, он способен содержать:
– Приветственный денежный подарок
– Бесплатные кручения для автоматов
– Уникальные промокоды
– Расширенный возврат
С целью выполнения записи необходимо:
1. Войти на главный веб-сайт или дубликат
2. Нажать опцию «Оформиться»
3. Внести личные данные
4. Активировать email или контакт
5. Активировать промокод (если есть существовании)
Авторизация в индивидуальный кабинет
Следом за правильной записи пользователи способны совершать доступ используя главный сайт или действующее зеркало. Индивидуальный кабинет предоставляет полный надзор над счётом:
– Журнал ставок
– Зачисление кошелька
– Получение призов
– Управление бонусами
– Включение в состязаниях
Поощрения и кампании казино
Сайт удовлетворяет игроков вариативными поощрительными предложениями:
Начальные призы
Дебютанты получают богатый набор наград на стартовые депозиты. Обычно это охватывает пропорциональную прибавку к сумме пополнения плюс бесплатные вращения.
Периодические промо
– Раз в неделю возврат до 15%
– Соревнования с призовыми фондами
– Бонусы на число рождения
– Специальные промо для статусных пользователей
Система поощрения
Активные игроки накапливают пункты, которые можно превратить на подлинные призы или эксклюзивные преимущества.
Портативная версия и софт
Современные разработки дают возможность участвовать везде удобно. Мобильная версия портала автономно адаптируется под размер любого аппарата.
Плюсы карманного ПО:
– Оперативная загрузка слотов
– Удобный интерфейс
– Мгновенные-сообщения о промо
– Шанс установить для Android и iOS
Live казино: антураж истинного развлекательного учреждения
Область Live игорного дома доставляет игроков в среду реального гемблинг заведения. Квалифицированные ведущие ведут процесс в режиме настоящего времени.
Имеющиеся столы:
– Европейская рулетка
– Очко
– Баккара
– Техасский холдем
Игровые машины и игровые автоматы
Каталог азартных автоматов насчитывает тысячи позиций от передовых провайдеров. Любой геймер обнаружит игру по вкусу:
– Стандартные барабаны
– Современные автоматы с бонусными этапами
– Прогрессивный-игры
– Мегавейс автоматы
Конкурсы и акции
Периодические соревнования привносят драйв и предоставляют способность выиграть значительные суммы. Включение в соревнованиях регулярно бесплатное, а премиальные банки составляют значительных величин.
Безопасность и конфиденциальность
Портал использует актуальные технологии кодирования для защиты сведений геймеров. Совокупные платёжные процедуры выполняются через зашифрованные каналы.
Заключение
Официальный ресурс и его рабочие зеркала дают стабильный вход к превосходным гемблинг сервисам. Великодушные бонусы, комфортная карманная редакция, вариативность слотов и квалифицированное Live-игорный дом создают сайт замечательным вариантом для поклонников развлекательных игр.
https://certifiedcanadarx.shop/# Certified Canada Rx
Нынешние онлайн-казино предоставляют игрокам обширный ассортимент вариантов для приятной времяпрепровождения. Переход к платформе РџРёРЅРєРѕ осуществляется через главный сайт или функционирующее зеркало.
Что такое актуальное зеркало казино
Функционирующее зеркало — это альтернативный URL официального веб-сайта казино. Такие дубликаты разрабатываются для гарантирования стабильного доступа к развлекательной системе.
Дубликат текущее полностью повторяет опции официального домена. Клиенты имеют аналогичный путь ко всем возможностям, включая создание аккаунта, пополнение баланса и вывод средств.
Регистрация на основном портале
Механизм создания аккаунта занимает всего буквально секунд. Новым участникам требуется:
1. Перейти на основной ресурс или действующее официальное зеркало
2. Щелкнуть кнопку “Регистрация”
3. Внести необходимые сведения
4. Верифицировать e-mail почту
5. Использовать промокод при наличии
После финализации создания аккаунта участник зарабатывает приз за регистрацию, который способен предполагать free spins или монетарное вознаграждение.
Логин в индивидуальный кабинет
Личный кабинет — это закрытая территория, где клиенты могут администрировать своим счетом. Для авторизации требуется напечатать имя пользователя и секретный ключ.
В личном кабинете представлены следующие возможности:
– Мониторинг записей платежей
– Использование кодов активации
– Управление поощрениями
– Включение в соревнованиях
– Проверка возврата средств
– Изменение аккаунта
Поощрения и спецпредложения
Игровая платформа обеспечивает великодушные призы:
Стартовый набор — дебютанты обретают существенное вознаграждение на первые вклады.
Фриспины — предоставляются как при оформлении, так и в контексте различных промо.
Возврат средств — постоянный компенсация доли утраченных финансов.
Промокоды — особые коды, открывающие возможность к уникальным призам.
Характеристика развлекательных разделов
Игровые автоматы
Коллекция слотов содержит тысячи вариантов от ведущих поставщиков. Игроки откроют как обычные машины, так и актуальные 3D-слоты с захватывающей визуализацией.
Live казино
Зона Live казино предоставляет право развлекаться с реальными дилерами в состоянии настоящего времени. Имеются известные столы: рулетка, блэкджек, баккара, покер.
Турниры
Регулярные чемпионаты с крупными призовыми пулами притягивают массу игроков. Лидеры зарабатывают монетарные призы и специальные подарки.
Портативная версия и app
Адаптивная версия ресурса обеспечивает развлекаться с любого гаджета. Дизайн автономно настраивается под размер экрана.
Загрузить приложение можно для девайсов на Android и iOS. Мобильное приложение располагает всеми характеристиками компьютерной версии.
Как обнаружить актуальное зеркало на сегодня
Действующие URL копий регулярно изменяются. Найти свежую адрес можно многими способами:
– Через департамент саппорта
– В проверенных информационных сетях
– По email подписке
– На специализированных порталах
Надежность и сертификация
Основной ресурс работает на фундаменте зарубежной разрешения. Все переводы шифруются актуальными технологиями шифрования.
Секретность персональных информации поддерживается в стопроцентном объеме.
Заключение
Основной домен и его рабочие зеркала гарантируют пользователям постоянный доступ к высококлассным азартным сервисам. Привлекательные вознаграждения, разнообразные слоты, профессиональная помощь — все это превращает азартный времяпрепровождение чрезвычайно беспроблемным и притягательным.
you’re truly a excellent webmaster. The web site loading pace is incredible.
It seems that you’re doing any distinctive trick. In addition, The contents
are masterpiece. you’ve done a wonderful job on this matter!
take a look here – Discovered this website and the interface feels tidy and user-friendly.
Best online casino Australia 2026 crypto friendly mobile ready
https://mobilityspecialists.net
установка газового пожаротушения москва montazh-gazovogo-pozharotusheniya-3.ru .
visit their website free antivirus for low-end PC
Описание оригинального сайта
Актуальное онлайн-казино дарит своим клиентам обширный набор возможностей и вознаграждений. Основной ресурс Wilder работает непрерывно, гарантируя доступ к востребованным слотам, live-казино и многим предложениям.
Действующее зеркало: путь к платформе
Что такое зеркало казино
Копия представляет собой абсолютную копию основного сайта с другим сетевым адресом. Функционирующее зеркало позволяет участникам избегать запреты и иметь непрерывный путь к предпочитаемым слотам.
Как обнаружить актуальное зеркало сегодня
Свежие URL на главное зеркало появляются через:
– Электронную рассылку
– Основные социальные сети
– Команду помощи
– Партнерские порталы
Открытиесчета на платформе
Этапы созданияаккаунта
Созданиеаккаунта требует всего минут и предполагает следующие этапы:
1. Вход на основной ресурс или актуальное зеркало
2. Активация кнопки “Зарегистрироваться”
3. Ввод контактных реквизитов
4. Верификация email или номера
5. Придумывание пароля
Вознаграждение за открытиесчета
Первые игроки получают солидные приветственные бонусы:
– Финансовые средства на аккаунт
– Бесплатныевращения для слотов
– Расширенный объем компенсации
– Уникальные купоны
Авторизация в собственный профиль
Активные клиенты имеютвозможность произвести логин через главный веб-сайт или действующее зеркало. Для этого требуется указать логин и ключдоступа, созданные при созданииаккаунта.
Функции индивидуального профиля
В персональном кабинете имеются следующие опции:
– Контроль контактными данными
– Зачисление депозита
– Снятие выигрышей
– Активация промокодов
– Отслеживание статистики игр
– Регистрация в соревнованиях
Поощрения и предложения
Разновидности вознаграждений
Казино балует своих клиентов разнообразными призовыми системами:
– Приветственный набор — солидные поощрения на дебютные депозиты
– Фриспины — бонусные прокруты в популярных слотах
– Кэшбек — еженедельный компенсация доли ставок
– Программа VIP — специальные преимущества для верных пользователей
Промокоды и их использование
Особые промокоды гарантируют экстра вознаграждения. Для ввода нужно указать комбинацию в соответствующее графу в личном аккаунте.
Геймплейный набор
Игры
Каталог слотовых автоматов вмещает тысячи вариантов от ведущих поставщиков:
– Обычные автоматы
– Продвинутые игры
– Накопительные игры
– Лицензионные игры
Live казино
Область Live-казино обеспечивает участие с живыми ведущими в режиме прямого эфира:
– Американскаярулетка
– Блэкджек
– Baccarat
– Карибскийпокер
Соревнования
Систематические соревнования с внушительными призовыми пулами устраиваются регулярно. Игроки соревнуются за победу в турнирнойсетке.
Мобильная платформа и программа
Адаптивная адаптация веб-сайта
Главный ресурс целиком оптимизирован для портативных гаджетов. Пользователи могут играть развлечения сразу через браузер без обязательства загрузки.
Приложение для загрузки
Авторское смартфонное APP имеется для получения на девайсы с рабочими ОС Android и iOS. Приложение предоставляет:
– Быстрый доступ к играм
– Бесперебойную операционность
– Push-уведомления о акциях
– Простой интерфейс
Резюме
Главный сайт казино и его функционирующие альтернативы гарантируют игрокам комплексный путь к качественным геймплейным услугам. Солидные бонусы, различные кампании, удобная адаптивная реализация и профессиональная помощь создают геймплейный времяпрепровождение максимально комфортным и прибыльным.
Подключение к сайту через актуальные зеркала
Современные интернет казино обеспечивают игрокам круглосуточный подключение к услугам. Основной ресурс Лаки Ворлд оперирует надёжно, предлагая широкий набор азартных слотов. Но временами появляются технические трудности или запреты, в связи с чем существенно понимать о наличии действующих зеркал.
Что означает собой основное зеркало казино
Копия — это полная дубликат официального ресурса с аналогичным интерфейсом. Функционирующее зеркало на данный момент позволяет преодолевать локальные блокировки и возобновлять гемблинг.
Ключевые выгоды эксплуатации зеркал:
– Стопроцентный вход к индивидуальному кабинету
– Удержание всех информации аккаунта
– Такой же перечень автоматов
– Действующие бонусы и акции
Открытие счёта на портале
Процедура записи длится считанные минут. Свежие пользователи зарабатывают богатый бонус за создание счёта, он в состоянии вмещать:
– Начальный бонусный бонус
– Даровые спины для машин
– Специальные промокоды
– Увеличенный кэшбек
С целью финализации записи нужно:
1. Переместиться на основной портал или дубликат
2. Кликнуть кнопку «Регистрация»
3. Указать контактные реквизиты
4. Заверить мейл или контакт
5. Применить купон (в случае существовании)
Доступ в индивидуальный кабинет
Следом за успешной записи клиенты могут осуществлять доступ используя центральный веб-сайт или актуальное зеркало. Собственный кабинет обеспечивает безграничный регулирование над счётом:
– Архив транзакций
– Ввод баланса
– Снятие выигрышей
– Контроль поощрениями
– Присутствие в конкурсах
Награды и предложения казино
Портал радует клиентов различными привилегированными предложениями:
Начальные бонусы
Новички зарабатывают великодушный набор поощрений на начальные пополнения. Типично это включает процентную прибавку к объёму вклада плюс безвозмездные спины.
Периодические промо
– Еженедельный кэшбек до 15%
– Конкурсы с наградными фондами
– Призы на дату рождения
– Уникальные предложения для привилегированных клиентов
Программа лояльности
Активные пользователи собирают единицы, что можно трансформировать на подлинные средства или уникальные льготы.
Портативная версия и утилита
Нынешние инновации дают возможность развлекаться везде угодно. Портативная редакция портала независимо приспосабливается под размер каждого устройства.
Достоинства мобильного приложения:
– Быстрая подгрузка игр
– Практичный дизайн
– Всплывающие-нотификации о бонусах
– Возможность загрузить для Android и iOS
Настоящее казино: обстановка реального гемблинг дома
Категория Live казино доставляет клиентов в атмосферу подлинного азартного учреждения. Компетентные дилеры организуют развлечение в формате реального времени.
Имеющиеся развлечения:
– Колесо фортуны
– Двадцать одно
– Классика
– Покер
Автоматы и азартные машины
Собрание игровых машин содержит массу названий от лидирующих разработчиков. Любой пользователь отыщет слот по нраву:
– Стандартные машины
– Инновационные игры с бонусными этапами
– Накопительный-игры
– Megaways автоматы
Состязания и раздачи
Систематические турниры привносят драйв и предоставляют шанс получить значительные награды. Присутствие в соревнованиях нередко бесплатное, а наградные фонды доходят до внушительных сумм.
Защита и приватность
Портал эксплуатирует инновационные системы криптографии для обеспечения сведений пользователей. Каждые транзакционные действия совершаются через зашифрованные соединения.
Резюме
Официальный сайт и его функционирующие зеркала обеспечивают надёжный вход к отличным игровым играм. Богатые поощрения, удобная карманная версия, разнообразие автоматов и квалифицированное Live-заведение создают портал прекрасным вариантом для ценителей развлекательных развлечений.
shop warehouse reference – I visited this page and everything seems snappy and responsive.
посетить веб-сайт https://t.me/brosfarm_bot/
Simple vendor link – Came across this platform; interface is tidy and makes browsing easy.
Hi, i think that i saw you visited my site so i came to “return the favor”.I’m trying to find things to enhance my website!I suppose its
ok to use some of your ideas!!
I read this article fully concerning the difference of
most up-to-date and preceding technologies, it’s awesome article.
Feel free to surf to my web-site … Paramount Training Courses
заказать кухню на заказ заказать кухню на заказ .
more tips here melhor antivírus leve para Windows 10
I blog quite often and I really appreciate your information. Your article has
truly peaked my interest. I’m going to bookmark
your site and keep checking for new details about once a week.
I opted in for your RSS feed too.
My web-site – fashion hair dryer
I enjoy reading through an article that can make men and women think.
Also, many thanks for allowing me to comment!
Also visit my page … Paramount Training and Development
Ruby Vendor Spot – Clean interface, navigation feels fast and easy.
установка газового пожаротушения цена установка газового пожаротушения цена .
More Info free ransomware protection software 2026
OliveOrder Online – Modern, tidy layout and smooth page transitions.
кухни на заказ питер kuhni-spb-42.ru .
testkit – Mobile version looks perfect; no glitches, fast scrolling, crisp text.
I every time emailed this weblog post page to all my contacts, for the
reason that if like to read it then my links will too.
my page; most powerful hair dryer
Jasper Shop Online – Clear structure, browsing pages is comfortable.
кухни спб кухни спб .
deploykit – Appreciate the typography choices; comfortable spacing improved my reading experience.
commitkit – Found practical insights today; sharing this article with colleagues later.
I enjoy playing at this casino https://dent-plast.pl/ because it feels trustworthy and stable. Live tables are immersive, slots offer different styles, and the overall experience remains consistent over time.
debugkit – Mobile version looks perfect; no glitches, fast scrolling, crisp text.
Moss Finds Hub – Neatly arranged pages, moving between sections is simple.
I take pleasure in, lead to I discovered exactly what I was looking for.
You’ve ended my four day lengthy hunt! God Bless you man. Have a great day.
Bye
my blog post; Paramount Recruitment and Training
shipkit – Pages loaded fast, images appeared sharp, and formatting stayed consistent.
check satinrack – Found this website, layout feels clear and browsing items is simple.
I never thought I’d end up writing this but here I am.
Back when the new competitive season started, I got obsessed in online games – Apex Legends.
I wanted instant results, and I wasn’t willing to admit how impatient I had become.
Late one night, I stumbled across a forum thread talking about “boosting
tools”. At first I laughed it off, but the deeper I went into the thread, the more
it felt like a secret world.
People were bragging showing how they climbed from low ranks to high
ones in days. It looked like magic. And of course,
the downside was completely hidden.
To be honest, I actually got close to buying something.
One seller even messaged me privately. That’s when the
real consequences showed up.
I found threads from players who lost thousands of hours of progress.
Some even wrote how they couldn’t undo the damage.
The shock snapped me out of it.
Instead of cheating, I deleted the messages and focused on improving the legitimate
way.
Now, when I see people chasing cheats, I just think:
you risk everything for nothing. Hopefully this story saves
someone else time.
Hurrah! At last I got a blog from where I know how to in fact obtain valuable facts concerning my study and knowledge.
vet pharmacy online: dog prescriptions online – pet meds online
I enjoy what you guys are up too. This kind of clever work and reporting!
Keep up the great works guys I’ve included you
guys to my own blogroll.
Feel free to visit my web page :: XAUUSD SIGNALS
Нужна гостиница? номер с сауной уютные номера рядом с метро и деловым центром города. Удобное размещение для туристов и деловых поездок, комфортные условия проживания, современный сервис и удобная транспортная доступность.
https://krd.best-city.ru/forum/thread116720/
в этом разделе https://reim.ink/
Отель в центре Москвы отель на тверской омфортное размещение рядом с главными достопримечательностями столицы. Уютные номера, современный сервис, удобное расположение рядом с метро, ресторанами и деловыми центрами города.
Piekne aluminiowe zadaszenia tarasowe https://aluminum-etrrace-canopies.ru
Нужен отель? отель спа москва идеальное место для расслабления в центре столицы. Тихий бутик-отель 4* сочетает классический комфорт с современным спа-комплексом. Гостей ждет настоящий отдых: можно посетить бассейн, расслабиться в сауне или заказать индивидуальные программы. Уютные номера и близость к метро делают этот отель со спа в Москве идеальным выбором для романтических и оздоровительных путешествий.
this online vendor hub – Ran into this site and the navigation is smooth and user-friendly.
Read more
online slots Utah
for statistical data.
Discover this shop – Came across the site today and everything appears neatly arranged.
https://certifiedcanadarx.shop/# canadian pharmacy online ship to usa
Rose Vendor Corner – Well-organized pages, navigation feels friendly and fast.
this vendor link – Checked the site out and it seems nicely organized.
IrisVendor Store – Quick loading site with items that seem very well made.
кп по продвижению сайта seo-kejsy13.ru .
discount pet meds: pet drugs online – vet pharmacy online
Simply want to say your article is as astonishing. The clearness on your submit is simply spectacular and that i could
suppose you’re a professional on this subject. Fine together with your permission allow me
to grasp your feed to keep up to date with impending post.
Thanks one million and please keep up the rewarding work.
Here is my page … GOLD SIGNALS
Its like you read my mind! You seem to know a lot about
this, like you wrote the book in it or something. I think that you could
do with some pics to drive the message home a
bit, but other than that, this is wonderful blog. A great read.
I’ll certainly be back.
my web-site :: Paramount Recruitment and Training
Ivory Finds Hub – Simple interface, exploring pages is easy and smooth.
Hey there! Someone in my Facebook group shared this website with us so I came to take a look.
I’m definitely enjoying the information. I’m book-marking and will be tweeting this
to my followers! Terrific blog and amazing
design and style.
My website … Paramount Training and Development
All the latest here: https://icatalog.expocentr.ru/ru/exhibitions/348532d1-e716-11ec-80cd-a0d3c1fab97f/exhibitors/321435?stand=22d20
Нужен юрист? юрист арбитражный стоимость представительство в арбитражном суде, защита интересов бизнеса, взыскание задолженности, споры по договорам и сопровождение судебных процессов для компаний и предпринимателей.
Проблемы с застройщиком? https://vzyskanie-ddu.ru помощь юриста по долевому строительству, расчет неустойки, подготовка претензии и подача иска в суд. Защитим права дольщиков и поможем получить компенсацию.
Информационный сайт https://zdorovie-veny.ru о здоровье вен и лечении варикоза ног: УЗДС диагностика, лечение варикоза, ЭВЛО (лазерное лечение), склеротерапия, восстановление и компрессионный трикотаж. Рекомендации врача, ответы на частые вопросы и профилактика варикоза.
Found a bride? best proposal spots in Barcelona romantic scenarios, beautiful locations, photo shoots, decor, and surprises for the perfect declaration of love. Make your engagement in Barcelona an unforgettable moment in your story.
монтаж пожаротушения монтаж пожаротушения .
Moss Market Hub – Layout feels tidy, moving through sections is natural.
cheap ed meds online: cheap ed pills – Mens RX Index
If you want to get a great deal from this article then you have
to apply these strategies to your won webpage.
mostbet обновить приложение mostbet обновить приложение
заказать кухню под размеры заказать кухню под размеры .
check this vendor site – Stumbled onto this website and the pages are structured nicely.
View this vendor – Came across this platform; pages are well-organized and navigation is smooth.
кухня на заказ спб кухня на заказ спб .
купить кухню купить кухню .
Get the facts computador lento pode ser vírus minerador
joycasino скачать официальный сайт joycasino скачать официальный сайт .
Have you ever thought about including a little bit more than just
your articles? I mean, what you say is important and everything.
However think about if you added some great images or video clips to give your posts more, “pop”!
Your content is excellent but with pics and video clips,
this site could definitely be one of the best in its field.
Great blog!
Feel free to visit my web site; FX SIGNALS
мелстрой казино мелстрой казино .
I recently checked out this casino https://bullburger.pl/ and was impressed by how stable everything felt. The games load quickly, bonuses are clear, and navigation is intuitive, making the experience comfortable.
Additional information
can you buy cheap lyrica without dr prescription
to review the policy.
Rose Market Place – Organized platform, moving between pages is smooth.
https://certifiedcanadarx.com/# recommended canadian pharmacies
check this store – First time browsing it today and the pages look clean and well sorted.
Ulvika Shopping – Straightforward product descriptions and user-friendly design.
Mens RX Index Mens RX Index online ed prescription
https://www.gabitos.com/DESENMASCARANDO_LAS_FALSAS_DOCTRINAS/template.php?nm=1771587912
ии агенты Разработка и внедрение таких решений способствует росту производительности и обеспечивает компании конкурентное преимущество на рынке.
Parental Controls restrict user account capabilities through content filtering, time limits, and application usage monitoring policies.
Explore the options:
brew install command line batch image resizer and optimizer
In-depth look here:
The WebKit engine renders web content with JavaScript execution, CSS styling, and accessibility tree construction for browser implementations.
visit crate – Came across this platform, layout seems clean and browsing feels effortless.
1win retrageri rapide http://1win83062.help/
levitra cheap
В контексте ufc в феврале марте 2026 три недели которые встряхнут дивизионы нашел подробный график и прогнозы на бои. Вот ссылка: https://flat-360.ru/news/ufc-fevral-mart-2026-raspisanie-boyov-ufc-fight-night-strickland-vs-hernandez-moreno-vs-kavanagh-ufc-326-holloway-vs-oliveira-2-polnyj-gid-i-prognozy/
Hi! This post could not be written any better! Reading this post reminds me of my old room mate!
He always kept talking about this. I will forward this article to him.
Fairly certain he will have a good read. Thanks for sharing!
Feel free to visit my web site; Paramount Training Courses
Ivory Corner Online – Clean and clear layout, exploring the site is easy.
Browse Valleyvendor – Came across this shop and the interface appears neat and simple to explore.
Moon World Corner – Clear structure, moving between pages is easy.
take a look here – Found this website today and the structure looks neat and clear.
Mens RX Index: ed online treatment – Mens RX Index
Greetings from Ohio! I’m bored to tears at work so I decided to browse your site
on my iphone during lunch break. I really like the information you provide here and can’t wait to take a look when I get home.
I’m shocked at how quick your blog loaded on my cell phone ..
I’m not even using WIFI, just 3G .. Anyhow, excellent blog!
Also visit my website … best low price hair dryer
каталог https://app.reim.ink/#/
River Outlet Studio – Friendly and neat layout, navigating through the site is smooth.
canadian pharmacies comparison: canadian 24 hour pharmacy – canadian pharmacy no scripts
Hello!
Decode pain mysterious signals containing interesting and valuable neurological data and understand suffering better see on the website for pain management
Full information on the link – https://naturzdorovie.ru/vtoroe-rozhdenie-kak-lite-pod-davleniem-prevraschaet-plastikovyy-othod-v-tsennost/
All the best and development in business!
AisleGlow Online – Navigating through pages is easy and everything is grouped nicely.
warehouse marketplace – Gave it a quick look and the navigation seems very mobile friendly.
http://mensrxindex.com/# order ed pills online
Visit this link
gambling sites prime choice
to make an informed decision.
Explore this marketplace – The site keeps things simple with a clean structure and easy navigation.
джойказино бонусы джойказино бонусы .
содержание https://app.reim.ink/#
What stood out about this casino https://stillborn.pl/ is the variety of the games. Everything runs smoothly, the design is clean, and there’s plenty of options to explore, which keeps it engaging.
посмотреть на этом сайте https://t.me/brosfarm_bot/
кликните сюда https://app.reim.ink/#
basket market online – Just landed on this page and the interface feels neat and well-structured.
Следующая страница https://app.reim.ink/#/
canadian neighbor pharmacy: trustworthy canadian pharmacy – online canadian drugstore
Icicle Depot – Well-arranged pages and browsing is straightforward.
Mint World Studio – Clear structure, browsing pages is smooth.
Главная https://t.me/brosfarm_bot
Raven Lane Finds – Simple and tidy design, moving between pages is effortless.
sagecorner online – Found this platform today, navigation feels easy and products are well-arranged.
迪丽热巴陈飞宇《慕胥辞》2026古装爱情巨制,海外华人免费高清热播,虐心又甜蜜,全球加速无缓冲播放,2026古装天花板。
KindleMart Store – Impressive product variety and pages open quickly.
Discover the thrill of real-money live casino action at online table games, where you can enjoy live dealers, top software providers, and exclusive promotions.
The site’s navigation is simple and accessible, helping newcomers get started quickly.
mergekit – Appreciate the typography choices; comfortable spacing improved my reading experience.
gitpushr – Overall, professional vibe here; trustworthy, polished, and pleasantly minimal throughout.
ссылка на сайт https://reim.ink/
devpush – Content reads clearly, helpful examples made concepts easy to grasp.
source link – This site showed up in my search and it looks well maintained.
valetrade – Came across this platform today, browsing feels straightforward and intuitive overall.
codepushr – Bookmarked this immediately, planning to revisit for updates and inspiration.
https://petmedsmonitor.shop/# online pet pharmacy
Visit This Link antivirus for old laptop with 2GB RAM
order-vardenafil http://livemedsrx.top/# order-vardenafil
Follow this link
how to get a loan with bad credit now
to save money.
Ищешь кран? краны под сварку для трубопроводов различного назначения. Надежная запорная арматура для систем водоснабжения, отопления, газа и промышленных магистралей. Высокая герметичность, долговечность и устойчивость к нагрузкам.
парфюмерия духи магазин https://headacheclinic.ru/
this online crate hub – Ran into this website today and the clean design stands out.
canadian pharmacy king reviews: canada cloud pharmacy – Certified Canada Rx
Нужен юрист? адвокат по арбитражным спорам представительство в арбитражном суде, защита интересов бизнеса, взыскание задолженности, споры по договорам и сопровождение судебных процессов для компаний и предпринимателей.
Mens RX Index: Mens RX Index – where can i buy ed pills
Проблемы с застройщиком? дду взыскать помощь юриста по долевому строительству, расчет неустойки, подготовка претензии и подача иска в суд. Защитим права дольщиков и поможем получить компенсацию.
Mint Market Hub – Layout feels tidy, moving through sections is natural.
Rain Vendor Hub – Neat and clean pages, browsing flows naturally.
https://mensrxindex.shop/# Mens RX Index
Icicle Hub Online – Simple interface, moving through pages is very easy.
Hello everyone!
Curate top mysterious interesting facts that provide valuable context for decisions and make informed choices every day see on the website for context databases
Full information on the link – https://33capy.site
All the best and development in business!
where to get ed pills buy ed medication online Mens RX Index
банк взять кредит под залог Кредит под залог автомобиля или другого транспортного средства также является востребованной услугой, позволяющей быстро получить средства, оставляя автомобиль в своем пользовании.
казино лев украина Некоторые бонусы, например, 300 рублей за регистрацию или 20 фриспинов, не требуют внесения депозита, что делает их особенно привлекательными для тех, кто хочет попробовать свои силы без финансовых рисков.
I enjoy playing at this casino https://rocknabagnie.com.pl/ because it feels trustworthy and stable. Live tables are immersive, slots offer different styles, and the overall experience remains consistent over time.
на сайте new-sebastopol.com
Hidden gem online – A fascinating website that rewards curiosity with inspiration and new insights.
Browse Harniq – Found the right match and the checkout process felt effortless.
Good morning!
Learn film mysterious techniques to find interesting and valuable cinematic facts and direct your own vision see on the website for film schools
Full information on the link – https://33capy.site
All the best and development in business!
накрутка друзей вконтакте Продвижение группы, сообщества или страницы в ВК может осуществляться как платными, так и бесплатными методами, включая накрутку голосов в опросах, прослушиваний плейлистов и просмотров постов, причем как с регистрацией, так и без неё, а также с использованием программ или расширений.
заказать кухню стоимость zakazat-kuhnyu-3.ru .
https://mensrxindex.shop/# low cost ed pills
https://mobilityspecialists.net
product source here – I browsed through this earlier and it looked like a useful place to order supplies.
狙击蝴蝶2026 高清悬疑刑侦陆剧 海外华人必备在线观看 全球加速无缓冲播放
Good afternoon!
Decode rent mysterious leases containing interesting and valuable legal news now and sign with confidence see on the website for lease guides
Full information on the link – https://33capy.site
All the best and development in business!
Mens RX Index: best online ed treatment – erectile dysfunction medications online
проект производства работ ппр скачать Изучение образцов проектов производства работ, например, на демонтаж оборудования или маркшейдерские работы, помогает понять структуру и объем необходимой документации, а также требования к ее содержанию.
see the apricot shop – Took a look at this site and the design feels tidy and responsive.
Hi colleagues, pleasant post and nice urging commented
at this place, I am really enjoying by these.
For tips
get generic lyrica no prescription
for great opportunities.
rubyvendor – Found this site earlier, layout seems organized and easy to navigate.
Rainy Market – Navigation is straightforward, the site feels well-structured.
FranChoice
7500 Flying Cloud Drive,
#600 Eden Prairie
MN 55344, United Ѕtates
952-345-8400
franchise business ownership Benefits guide
https://certifiedcanadarx.shop/# Certified Canada Rx
заказать кухню онлайн заказать кухню онлайн .
Meadow Finds Hub – Neatly arranged pages, navigating the site is effortless.
ссылка на сайт vodka bet casino
найти это vodka bet casino
online shop page – Came across this site earlier and browsing products feels intuitive.
Смотреть здесь vodka casino
1win авиатор коэффициент https://1win83254.help/
Honey Corner Online – Clear design and browsing pages was straightforward.
VioletVend Deals – Easy-to-use site and items appear high quality.
marblevendor – Came across this site and the layout is clean and simple to navigate.
vet pharmacy online: pet meds online – dog medication online
нажмите здесь vodkabet
http://petmedsmonitor.com/# pet meds for dogs
the shop here – Found this store online and the layout seems easy to follow.
canadapharmacyonline com: Certified Canada Rx – canadian online pharmacy
на этом сайте зеркало водка бет
This casino https://ecio24.pl/ offers a solid mix of classic slots and live dealer games. The platform feels modern, promotions are worth trying, and support is responsive, which adds confidence.
codestackr – Color palette felt calming, nothing distracting, just focused, thoughtful design.
buy levitra pills online
vendor hub site – Just noticed this page and checking it out felt quite comfortable.
visit here – Ran into this page recently, navigation feels effortless and straightforward.
трафиковое продвижение seo трафиковое продвижение seo .
купить заказать кухню купить заказать кухню .
interesting store – Found this platform today and navigating items is simple and straightforward.
продвижение сайтов по трафику продвижение сайтов по трафику .
https://mensrxindex.shop/# ed prescription online
https://slides.com/hyprbnusbet
нажмите здесь зеркало водка бет
Смотреть здесь vodkabet
Evoraa Store – Navigation feels seamless and item descriptions are easy to follow.
Certified Canada Rx canadian pharmacy world Certified Canada Rx
visit here – Noticed this page recently and the navigation feels intuitive.
Подключение к платформе и действующие адреса
Востребованные онлайн казино предлагают игрокам обширный выбор развлечений. Центральный сайт Laki World гарантирует стабильный доступ ко всем сервисам. Впрочем иногда возникают моменты, когда требуется резервный вариант входа.
Что представляет собой рабочее зеркало
Функционирующее зеркало — это абсолютная версия главного сайта с другим сетевым адресом. Альтернатива сегодня помогает обходить вероятные запреты и сохранять непрерывный переход к популярным автоматам.
Проверенное зеркало обладает всеми характеристиками, что и главный ресурс:
– Совокупный ассортимент развлечений
– Личный профиль с актуальными информацией
– Действующие поощрения и предложения
– Безопасные платежные операции
Оформление и подключение в сервис
Процедура регистрации на портале требует буквально секунд. Недавним пользователям нужно:
1. Перейти на актуальное зеркало сейчас
2. Выбрать элемент «Регистрация»
3. Указать нужные информацию
4. Подтвердить e-mail почту или контакт смартфона
5. Активировать подарок за оформление
Авторизация в персональный кабинет выполняется с помощью ввод имени пользователя и секретной комбинации.
Описание поощрительной структуры
Щедрая бонусная программа — главное достоинство платформы. Клиенты забирают всевозможные поощрения:
Приветственные награды
Новые участники могут ожидать на щедрый подарок за открытие профиля. Чаще всего это комплект возможностей, охватывающий:
– Процентную надбавку к начальному вкладу
– Безвозмездные спины
– Бонусные суммы на счет
Кодовые комбинации и уникальные акции
Постоянные купоны помогают активировать дополнительные выгоды. Использовать их возможно в специальном поле персонального профиля.
Free spins и возврат средств
Фриспины — это вариант запускать игры без использования собственных денег. Рибейт означает процентный возврат утраченных сумм.
Коллекция развлечений
Азартная сайт представляет внушительную подборку развлечений.
Слоты
Вариативность слотов впечатляет фантазию. Доступны обычные ретро автоматы и новые развлечения с увлекательной картинкой.
Live зал
Секция Live игр переносит пользователей в среду истинного игорного клуба. Профессиональные операторы проводят игры в живом формате.
Соревнования и рейтинги
Систематические соревнования привносят накала и дают возможность забрать крупные призы.
Карманная реализация и софт
Современные разработки обеспечивают наслаждаться в любимом месте. Адаптивная версия самостоятельно адаптируется под размер девайса.
Загрузить приложение можно для мобильных ОС iOS и Android. Клиент дает:
– Оперативный вход
– Надежную работу
– Всплывающие-оповещения об промо
– Простой облик
Платежные транзакции
Платформа использует разнообразные системы депозита и изъятия сумм:
– Пластиковые инструменты
– Виртуальные системы
– Токены
– Финансовые операции
Все транзакции осуществляются через безопасное канал, что подтверждает целостность личных параметров.
Отдел ассистанса
Квалифицированная команда ассистанса трудится постоянно. Соединиться с менеджерами можно через:
– Живой-чат
– E-mail почту
– Контакт
– Медиа ресурсы
Заключение
Легальный портал и его рабочее зеркало дают участникам защищенный и приятный доступ к азартным развлечениям. Богатые бонусы, широкий каталог автоматов и качественная сервис создают процесс предельно интересной и выгодной.
Современные онлайн-казино обеспечивают клиентам внушительный ассортимент услуг и поощрительных вариантов. Подключение к ресурсу выполняется через основной сайт или его действующее зеркало Kent казино, что дает постоянную работу.
Что такое рабочее зеркало казино
Дубликат — это точная реплика главного сайта, сделанная для решения блокировок. Действующее зеркало обеспечивает игрокам обрести соединение к предпочитаемым развлечениям в любое удобное время.
Подлинное зеркало располагает всеми характеристиками оригинального веб-сайта:
– Весь каталог развлечений
– Личный кабинет с зафиксированными информацией
– Действующие бонусы
– Безопасные расчетные транзакции
Открытие счета на основном ресурсе
Процедура оформления составляет всего пару минут. Новым участникам требуется:
1. Перейти на основной портал или действующее зеркало
2. Нажать на кнопку “Открыть счет”
3. Ввести необходимые параметры
4. Подтвердить email
5. Произвести дебютный платеж
Поощрение новичкам начисляется сразу после завершения всех шагов.
Подключение в профиль
Действующие клиенты могут выполнить вход применяя:
– Никнейм и пароль
– Данные контакта
– Электронную почту
Профиль предоставляет возможность к контролю средствами, истории транзакций и текущим поощрениям.
Награды и предложения
Игровая площадка привлекает постоянных участников многочисленными поощрениями:
Приветственный набор
– Надбавка на стартовый депозит до 100%
– Даровые спины на топовые слоты
– Экстра бонусы за дальнейшие платежи
Промокоды
Эксклюзивные купоны обеспечивают доступ на использование эксклюзивных призов. Актуальные коды публикуются в категории “Бонусы”.
Кэшбек
Периодический возврат насчитывает до 10% от проигранных средств. Компенсация предоставляется автоматически.
Схема лояльности
Постоянные участники получают единицы, которые конвертируются на настоящие деньги или free spins.
Мобильный сайт и софт
В целях удобства игроков создана функциональная mobile версия. Приспособленный вид обеспечивает легко делать ставки с произвольного карманного девайса.
Плюсы APP:
– Моментальный доступ к играм
– Адаптированный вид
– Стабильная активность
– Push-уведомления о свежих бонусах
Получить APP можно даром с официального веб-сайта для устройств на Android и iOS.
Каталог развлечений
Игровые автоматы
Библиотека вмещает более 2000 слотов от популярных производителей:
– Стандартные слоты
– Video slots
– Слоты с джекпотом
– Сюжетные слоты
Live казино
Блок Live столов предлагает игру с подлинными диллерами в онлайн формате:
– Roulette
– Блэкджек
– Баккара
– Poker
Турниры
Регулярные соревнования с большими призовыми бюджетами организуются каждую неделю. Участие в соревнованиях доступно всем зарегистрированным игрокам.
Платежные варианты
Депозиты и изъятия финансов осуществляются через распространенные способы оплаты:
– Платежные средства
– Виртуальные счета
– Криптовалюта
– Прямые транзакции
Минимальный вклад — от 100 рублей. Снятие денег осуществляется в течение 24 часов.
Команда support
Круглосуточная отдел помощи способна поддержать в разрешении любых вопросов:
– Live chat
– Email
– Горячая линия
– Общественные сети
Защита и сертификат
Подлинный портал действует на основании международной лицензии. Все сведения клиентов закрыты передовым SSL-криптованием.
Заключение
Рабочее зеркало обеспечивает стабильный вход к любимым автоматам, богатым промокодам и комфортным возможностям. Откройте счет прямо сейчас и заработайте приветственный приз!
pet rx: Vet Rx Index – pet meds online
Нынешние интернет казино предоставляют геймерам обширный выбор опций для удобной игры. Однако иногда подключение к официальному ресурсу может стать недоступным. В таких случаях на выручку спешит Dragon Money казино, которое гарантирует непрерывный доступ ко всем функциям платформы.
Что такое действующее зеркало казино
Зеркало — это абсолютная дубликат лицензионного веб-сайта, которая располагается по альтернативному интернет-адресу. Копия содержит весь набор функций первоначального ресурса, включая пользовательский кабинет, баланс и данные платежей.
Ключевые преимущества эксплуатации зеркала:
– Непрерывный вход к платформе
– Стопроцентная идентичность опций
– Безопасность личных информации
– Сохранение существующих бонусов
Как разыскать действующее зеркало в данный момент
Есть некоторое количество достоверных путей нахождения свежей ссылочной информации:
Авторизованные ресурсы:
1. Почтовая рассылка — управление систематически отправляет сообщения с актуальными URL
2. Медийные сети — легитимные страницы публикуют свежую новости
3. Сервис поддержки — консультанты дают надежные ссылки
4. Портативное приложение — обеспечивает избегать блокировки
Оформление профиля на основном портале
Процесс открытия счета требует только пару минут и включает из нижеследующих ступеней:
1. Попадание на лицензионный сайт или действующее зеркало
2. Выбор на кнопку «Зарегистрироваться»
3. Заполнение учетной таблицы
4. Подтверждение почтовой почты или сотового номера
5. Активация вознаграждения за регистрацию при доступности промокода
Новые пользователи приобретают солидный приветственный бонус, который может содержать фриспины, финансовые вознаграждения или cashback.
Логин в личный кабинет
Авторизация на ресурсе выполняется обычным способом. Нужно указать учетные данные и код доступа, примененные при открытии счета.
Значимые детали для конфиденциального входа:
– Задействуйте надежный код
– Включите двухэтапную идентификацию
– Не фиксируйте данные на публичных девайсах
– Отслеживайте доменную строку браузера
Обзор премиальной системы
Гемблинг-сайт награждает геймеров всевозможными бонусами и специальными предложениями:
Вступительный комплект
Новички способны надеяться на великодушное поощрение за стартовый пополнение. Как правило это процентовая премия к внесенной величине плюс фриспины для популярных слотов.
Систематические промо
– Недельный кэшбек — возмещение части утраченных средств
– Призы на очередные пополнения
– Эксклюзивные промо по праздникам
– Состязания с значительными наградными банками
Программа вознаграждений
Активные клиенты собирают единицы за произвольную игру, которые затем конвертируются на реальные средства, бесплатные вращения или эксклюзивные бонусы.
Кодовые слова: как использовать
Купоны — это уникальные комбинации символов, обеспечивающие привилегию к эксклюзивным вознаграждениям.
Откуда получить рабочие промокоды:
– Проверенные общественные сети казино
– Союзнические сайты
– Email-информирование
– Тематические сообщества
Прописывается промокод в соответствующее поле при создании аккаунта или добавлении денег депозита.
Смартфонная версия и приложение
Современные пользователи отдают предпочтение проводить время с портативных аппаратов. Ресурс обеспечивает двойной способа для удобной телефонной игры.
Адаптивная модификация
Веб версия автоматически подстраивается под параметры монитора. Не предполагает загрузки и работает в произвольном свежем браузере.
Мобильное приложение
Получить программу можно для устройств на Android и iOS. Выгоды app:
– Оперативная открытие
– Стабильная функционирование
– Всплывающие-уведомления о поощрениях
– Независимый обход блокировок
Этап скачивания прост: достаточно перейти на портал с портативного устройства и придерживаться указаниям.
Гемблинг ассортимент
Каталог развлечений насчитывает множество единиц от передовых производителей.
Слоты
Азартные аппараты — максимально популярная раздел аттракционов. Показаны традиционные винтажные аппараты, новые видео-автоматы с дополнительными уровнями, а также прогрессивные призы.
Live казино
Зона с настоящими ведущими дает возможность прочувствовать дух истинного казино. Представлены столы с блэкджеком.
Стриминг осуществляется в высоком четкости, присутствует коммуникация с раздающим и другими игроками.
Состязания
Систематически проводятся состязания по многочисленным играм. Участие обеспечивает возможность завоевать финансовые выигрыши, даровые прокруты или особые бонусы.
Транзакционные манипуляции
Платформа поддерживает большой спектр финансовых инструментов:
– Кредитные карты
– Виртуальные платформы
– Крипта
– Денежные транзакции
Стартовая количество вклада — разумная для большинства пользователей. Вывод призов обрабатывается в минимальные временные рамки.
Отдел поддержки
Компетентные операторы готовы содействовать 24/7. Доступны нижеследующие методы общения:
– Онлайн-чат
– Email
– Телефонная горячая линия
– Коммуникационные сети
Разъяснения на распространенные запросы можно найти в зоне FAQ.
Резюме
Основной ресурс казино и его рабочие зеркала гарантируют игрокам полный подключение ко всем функциям портала. Значительные вознаграждения, приятная мобильная версия, гигантский ассортимент слотов и профессиональная ассистенция формируют игровой процесс исключительно приятным и защищенным.
бонус при регистрации в казино лев Официальный сайт казино “Лев” и его зеркала предлагают удобный интерфейс и мобильную версию, адаптированную для игры со смартфонов и планшетов, что позволяет наслаждаться азартом в любом месте и в любое время.
английский язык детей 12 лет
their handmade baskets – I checked out the shop and some of the items look really nice.
quick shop – Came across this site, interface feels organized and exploring products is effortless.
site I found – Just noticed this page, navigation seems easy and practical.
Передовые онлайн-казино предлагают участникам разнообразный ассортимент азартных игр и заманчивые премии. Впрочем для беспроблемной времяпрепровождения критично знать, как получить доступ к РёРіСЂС‹ и его рабочие зеркала.
Что такое главный ресурс казино
Лицензионный портал казино — это базовая платформа, где игроки могут наслаждаться развлекательными слотами. Портал оперирует на легитимных основаниях и имеет всеми необходимыми лицензиями.
Ключевые преимущества лицензионного портала:
– Безопасность персональных информации
– Справедливые условия участия
– Обеспеченные платежи
– Оперативная помощь
Актуальное зеркало казино: для чего необходимо
Зеркало — это абсолютная версия основного портала, расположенная по другому веб-адресу. Функционирующее зеркало разрабатывается для обеспечения постоянного подключения к порталу.
Основания задействования зеркал:
– Блокировка главного URL
– Профилактические мероприятия
– Высокая активность на платформу
Как получить свежее зеркало на сегодня
Обнаружить новое официальное зеркало можно несколькими способами:
1. Рассылка — оформите подписку на почтовую доставку
2. Отдел помощи — обратитесь в онлайн-чат
3. Корпоративные каналы — мониторьте за публикациями
4. Партнерские площадки — проверенные платформы
Регистрация на ресурсе казино
Этап открытия счета составляет только пару минут:
1. Активируйте на элемент “Открыть счет”
2. Внесите требуемые данные
3. Подтвердите email ящик
4. Введите промокод, если есть
После завершенной регистрации вам предоставится разрешен индивидуальный аккаунт.
Награды и купоны
Щедрая поощрительная политика — значимое конкурентное преимущество казино:
Поощрение за первичную регистрацию
Новые пользователи зарабатывают приветственный поощрение, который может предполагать:
– Денежный счет на дебютный пополнение
– Фри-спины для автоматов
– Безвозвратные фонды
Купоны
Постоянно выходят свежие бонусные шифры, обеспечивающие использовать дополнительные преимущества.
Программа кешбэка
Постоянные клиенты зарабатывают процент проигранных финансов обратно.
Свежие акции и турниры
Сайт периодически организует увлекательные промо-мероприятия:
– Weekly турниры
– Тематические предложения
– Лотереи ценных наград
– Механизм VIP-клуба
Вход в личный профиль
Для входа на ресурс нужно:
1. Открыть основной адрес или рабочее зеркало
2. Выбрать “Login”
3. Ввести никнейм и секретную комбинацию
В персональном кабинете предоставлены данные функции:
– Депозит счета
– Снятие денег
– Просмотр журнала игр
– Редактирование персональными данными
Mobile платформа и софт
Mobile платформа
Мобильная модификация портала предоставляет шанс играть с разных карманного телефона. Визуал самостоятельно подстраивается под габариты монитора.
Приложение для скачивания
Загрузить клиент можно для:
– Android — непосредственная скачивание с ресурса
– iOS — установка через App Store
Плюсы приложения:
– Мгновенный доступ
– Бесперебойная работа
– Push-уведомления об промо
– Оптимизированный дизайн
Азартные разделы
Автоматы
Обширная коллекция эмуляторных машин от лучших провайдеров:
– Традиционные машины
– Современные-слоты
– Призовые-машины
Live игры
Зона с настоящими операторами предоставляет:
– Рулетки
– 21
– Punto Banco
– Texas Hold’em
Эфиры осуществляются в отличном разрешении, обеспечивая ощущение аутентичного казино.
Методы пополнения и получения
Платформа обслуживает различные транзакционные сервисы:
– Кредитные карты
– Онлайн счета
– Bitcoin/Ethereum
– Прямые транзакции
Наименьшие лимиты депозита и моментальные платежи делают времяпрепровождение исключительно приятной.
Департамент помощи
Опытная служба support оперирует 24/7 и готова ассистировать с различными задачами:
– Мгновенный-чат
– Email-помощь
– Голосовая связь
Резюме
Лицензионный веб-сайт казино и его функционирующие копии предоставляют клиентам безопасный и захватывающий игровой досуг. Привлекательные поощрения, функциональная адаптивная платформа, многочисленные автоматы и качественное live-казино формируют эту систему великолепным выбором для развлекательных досуга.
программа для накрутки подписчиков в вк Накрутка лайков вконтакте быстро, накрутка вконтакте без заданий, продвижение бизнеса вконтакте — эти направления часто тесно связаны друг с другом, и успех в одном может способствовать успеху в другом.
Hello everyone!
Discover code mysterious algorithms offering interesting and valuable software data and write cleaner code today see on the website for code snippets
Full information on the link – https://33capy.site
All the best and development in business!
storefront link – Found this website earlier and the structure seems clear and easy.
проект производства маркшейдерских работ образец Повторная разработка ППР может потребоваться при внесении существенных изменений в проект или при необходимости проведения дополнительных видов работ, что является стандартной практикой в динамичной строительной сфере.
Актуальные онлайн-казино гарантируют участникам широкий выбор игр и заманчивые премии. Впрочем для беспроблемной времяпрепровождения необходимо иметь представление, как найти Лаки Ворлд казино и его действующие зеркала.
Что такое официальный портал казино
Основной веб-сайт казино — это основная система, где игроки могут наслаждаться развлекательными слотами. Платформа работает на легитимных принципах и владеет всеми обязательными разрешениями.
Первостепенные преимущества лицензионного сайта:
– Защищенность личных сведений
– Справедливые условия игры
– Гарантированные выводы
– Оперативная поддержка
Рабочее зеркало казино: для чего необходимо
Копия сайта — это полная версия основного веб-сайта, расположенная по иному веб-адресу. Рабочее зеркало формируется для поддержания непрерывного входа к сайту.
Причины задействования копий сайта:
– Запрет первичного адреса
– Профилактические работы
– Высокая нагрузка на систему
Как получить свежее зеркало в данный момент
Получить актуальное официальное зеркало можно множественными методами:
1. Рассылка — подпишитесь на информационную отправку
2. Команда поддержки — свяжитесь в онлайн-чат
3. Корпоративные каналы — мониторьте за обновлениями
4. Партнерские сайты — авторитетные ресурсы
Создание аккаунта на портале казино
Процедура регистрации занимает лишь несколько секунд:
1. Нажмите на кнопку “Создать аккаунт”
2. Заполните требуемые информацию
3. Верифицируйте контактную ящик
4. Используйте промокод, если доступен
Сразу после оконченной оформления вам откроется разрешен персональный аккаунт.
Поощрения и промокоды
Богатая премиальная структура — ключевое конкурентное преимущество казино:
Бонус за первичную регистрацию
Свежие пользователи получают стартовый подарок, который может включать:
– Денежный депозит на дебютный депозит
– Фри-спины для барабанов
– Стартовые фонды
Купоны
Постоянно выходят актуальные промокоды, предоставляющие забрать экстра поощрения.
Программа кэшбека
Регулярные клиенты зарабатывают порцию использованных ставок на счет.
Свежие кампании и конкурсы
Платформа систематически устраивает азартные кампании:
– Недельные баттлы
– Тематические акции
– Розыгрыши значительных призов
– Программа статусов
Логин в персональный раздел
Для логина на ресурс нужно:
1. Открыть основной адрес или рабочее зеркало
2. Выбрать “Login”
3. Внести имя пользователя и пароль
В личном разделе доступны следующие возможности:
– Депозит счета
– Вывод выигрышей
– Изучение лога операций
– Настройка индивидуальными сведениями
Портативная модификация и app
Mobile модификация
Адаптивная вариант сайта предоставляет шанс играть с всех карманного девайса. Оформление адаптивно настраивается под диагональ screen.
Программа для загрузки
Получить клиент можно для:
– Android — прямая установка с платформы
– iOS — установка через App Store
Преимущества app:
– Моментальный старт
– Бесперебойная работа
– Push-нотификации об предложениях
– Оптимизированный UI
Азартные разделы
Автоматы
Богатая библиотека развлекательных слотов от лучших разработчиков:
– Традиционные слоты
– Современные-игры
– Джекпот-слоты
Live casino
Раздел с реальными дилерами обеспечивает:
– Рулеточные столы
– 21
– Baccarat
– Покер
Стримы транслируются в HD разрешении, создавая атмосферу настоящего казино.
Варианты пополнения и снятия
Сайт принимает множественные финансовые сервисы:
– Дебетовые картсчета
– Онлайн системы
– Bitcoin/Ethereum
– Прямые отправки
Наименьшие пороги пополнения и быстрые выплаты обеспечивают развлечение максимально комфортной.
Департамент support
Профессиональная служба поддержки работает 24/7 и способна ассистировать с разными ситуациями:
– Живой-чат
– Email-помощь
– Голосовая связь
Заключение
Официальный веб-сайт казино и его действующие альтернативные адреса предоставляют игрокам конфиденциальный и увлекательный развлекательный процесс. Привлекательные поощрения, комфортная mobile версия, разнообразные слоты и высокоуровневое live-казино формируют эту платформу великолепным вариантом для азартных времяпрепровождения.
link worth checking – Stumbled on this website, layout is tidy and browsing items feels easy.
mellstroy casino официальный mellstroy casino официальный .
борьба с тараканами Борьба с тараканами включает в себя не только уничтожение, но и профилактические меры, такие как поддержание чистоты, герметизация щелей и устранение источников пищи и воды, чтобы предотвратить их повторное появление.
статьи про digital маркетинг seo-blog14.ru .
посетить веб-сайт vodka bet
https://mensrxindex.shop/# erectile dysfunction medication online
Анализ главного ресурса
Прогрессивные онлайн казино дают игрокам богатый выбор игр и перспектив. Основной ресурс Вилдер казино обеспечивает проверенный доступ к игровым сервисам.
Рабочее зеркало: путь на сегодня
Альтернативный адрес выступает как идентичную копию официального ресурса. Актуальное зеркало позволяет пользователям преодолевать потенциальные барьеры.
Выгоды задействования зеркала
Принципиальные выгоды предполагают:
– Беспрерывный доступ к платформе
– Хранение абсолютно всех функций главного ресурса
– Безопасность индивидуальных данных
– Равнозначный набор функций
Оформление профиля на ресурсе
Ход регистрации отличается доступностью и удобством. Недавние пользователи требуется:
1. Открыть основной сайт или его зеркало
2. Нажать на клавишу создания аккаунта
3. Внести необходимые поля
4. Подтвердить почтовую почту
5. Выполнить первый авторизацию
Подарок за открытие счета
Новые игроки приобретают внушительный вступительный бонус. Подобное вознаграждение способно содержать:
– Монетарные бонусы
– Complimentary фриспины
– Расширенный процент кэшбека
Доступ в личный кабинет
Существующие игроки имеют возможность оперативно войти в персональный профиль, используя имя пользователя и пароль. Личный профиль обеспечивает возможность к:
– Регулированию балансом
– Истории переводов
– Активным подаркам
– Настройкам профиля
Бонусы и промо
Сайт постоянно реализует всевозможные мероприятия для пользователей.
Разновидности бонусов
Главные категории поощрений:
– Депозитные подарки – доля от величины внесения
– Спины – complimentary спины в игровых машинах
– Кэшбек – возмещение процента потерянных финансов
– Соревновательные награды – призы за игру в состязаниях
Промокоды
Эксклюзивные промокоды помогают активировать дополнительные выгоды. Клиенты в состоянии отыскать их на партнерских площадках или взять в рассылке.
Переносная вариант и app
Передовые игроки ценят портативный гейминг.
Возможности mobile системы
– Гибкий интерфейс для различных гаджетов
– Абсолютный вход к слотам
– Оперативная работа
– Эргономичное управление
Download софт
Mobile app предложено для downloading на гаджеты с рабочими системами Android и iOS. Приложение обеспечивает:
– Бесперебойную деятельность
– Мгновенные алерты о акциях
– Оперативный доступ к избранным автоматам
Гемблинг выбор
Казино дает обширную коллекцию игровых услуг.
Игровые машины
Коллекция азартных аппаратов насчитывает:
– Обычные слоты
– Передовые игры
– Джекпотные автоматы
– Лицензионные слоты
Live игры
Категория реальных дилеров предоставляет возможность состязаться с реальными ведущими. Представлены:
– Рулетки
– Блэкджек
– Баккара
– Техасский холдем
Конкурсы
Периодические соревнования помогают игрокам конкурировать за крупные денежные фонды. Призовая структура модифицируется еженедельно.
Банковские процедуры
Платформа обеспечивает массу способов пополнения и обналичивания финансов:
– Кредитные карточки
– Онлайн счета
– Межбанковские трансферы
– Крипто
Абсолютно все платежи осуществляются безопасно с применением прогрессивных протоколов шифрования.
Служба помощи
Компетентная отдел support действует без перерыва. Связаться с специалистами доступно через:
– Онлайн чат
– Электронную почту
– Контактный номер
– Social медиа
Секьюрити и лицензирование
Игровой клуб работает на фундаменте официальной разрешения. Данное подтверждает:
– Легальность развлекательного процесса
– Защиту персональных информации
– Своевременные транзакции
– Регулируемый геймплей
Резюме
Официальный ресурс и его рабочие дубликаты предоставляют пользователям полный спектр функций для приятной и профитной игры. Солидные подарки, разнообразные развлечения, профессиональная служба и защищенная инфраструктура выплат формируют ресурс превосходным решением для любителей гемблинг услуг.
Must-Read Collection: dr.cash affiliate networks overview:main features
Мучает варикоз? https://zdorovie-veny.ru информационный сайт о здоровье вен и лечении варикоза ног: УЗДС диагностика, лечение варикоза, ЭВЛО (лазерное лечение), склеротерапия, восстановление и компрессионный трикотаж. Рекомендации врача, ответы на частые вопросы и профилактика варикоза.
Компания “Маркет Климата” https://market-climata.ru/services/obsluzhivanie-konditsionerov/ предоставляет полный спектр услуг по Техническому обслуживанию кондиционеров в Москве всех марок и моделей.
Актуальные онлайн-казино обеспечивают игрокам широкий набор азартных игр и выгодные премии. Впрочем для удобной времяпрепровождения критично знать, как отыскать Gonzo регистрация и его функционирующие зеркала.
Что такое основной ресурс казино
Основной ресурс казино — это главная веб-площадка, где участники могут получать удовольствие от гемблинг слотами. Портал функционирует на легальных условиях и располагает всеми необходимыми документами.
Главные плюсы официального ресурса:
– Безопасность личных реквизитов
– Честные условия использования
– Подтвержденные выплаты
– Квалифицированная техподдержка
Функционирующее зеркало казино: для чего необходимо
Альтернативный адрес — это полная дубликат основного веб-сайта, расположенная по альтернативному адресу. Актуальное зеркало запускается для поддержания бесперебойного доступа к сайту.
Факторы эксплуатации копий сайта:
– Запрет первичного URL
– Регламентные операции
– Большая посещаемость на систему
Как обнаружить рабочее зеркало в данный момент
Узнать свежее рабочее зеркало можно множественными методами:
1. Подписка — подпишитесь на email доставку
2. Команда помощи — проконсультируйтесь в онлайн-чат
3. Корпоративные каналы — отслеживайте за обновлениями
4. Тематические площадки — авторитетные сайты
Открытие счета на сайте казино
Этап открытия счета требует всего считанные минут:
1. Выберите на кнопку “Зарегистрироваться”
2. Введите запрашиваемые данные
3. Подтвердите контактную ящик
4. Используйте промокод, если предоставлен
Вслед за успешной регистрации вам будет открыт индивидуальный профиль.
Награды и промокоды
Выгодная наградная система — ключевое конкурентное преимущество казино:
Бонус за создание аккаунта
Свежие игроки получают начальный бонус, который может включать:
– Финансовый кредит на начальный депозит
– Фри-спины для автоматов
– Бездепозитные бонусы
Активационные коды
Периодически появляются актуальные купоны, обеспечивающие получить экстра преимущества.
Система возврата средств
Активные пользователи возвращают долю проигранных средств обратно.
Действующие предложения и турниры
Сайт регулярно запускает увлекательные промо-мероприятия:
– Еженедельные турниры
– Тематические предложения
– Раздачи солидных подарков
– Программа VIP-клуба
Доступ в личный кабинет
Для логина на сайт необходимо:
1. Открыть лицензионный ресурс или действующее зеркало
2. Активировать “Вход”
3. Ввести логин и секретную комбинацию
В личном профиле доступны такие опции:
– Внесение средств кошелька
– Обналичивание средств
– Изучение архива операций
– Изменение профильными данными
Адаптивная платформа и приложение
Мобильная вариант
Адаптивная платформа портала дает возможность делать ставки с различных портативного устройства. Визуал динамически адаптируется под габариты дисплея.
Приложение для загрузки
Получить app можно для:
– Android — прямая download с ресурса
– iOS — загрузка через App Store
Выгоды программы:
– Быстрый запуск
– Бесперебойная операционность
– Push-оповещения об промо
– Улучшенный интерфейс
Игровые зоны
Барабаны
Обширная галерея игровых барабанов от ведущих провайдеров:
– Стандартные слоты
– Видео-слоты
– Прогрессивные-машины
Live казино
Категория с профессиональными ведущими предлагает:
– Рулетки
– Блэкджек
– Punto Banco
– Poker
Стримы ведутся в превосходном разрешении, создавая атмосферу подлинного казино.
Способы внесения средств и обналичивания
Платформа поддерживает разнообразные финансовые инструменты:
– Дебетовые средства
– Электронные кошельки
– Crypto
– Прямые переводы
Стартовые лимиты взноса и быстрые платежи гарантируют игру предельно приятной.
Отдел помощи
Квалифицированная служба ассистентов работает 24/7 и готова содействовать с разными ситуациями:
– Онлайн-чат
– Email-переписка
– Телефонная линия
Заключение
Главный веб-сайт казино и его функционирующие дубликаты обеспечивают клиентам конфиденциальный и увлекательный развлекательный процесс. Щедрые награды, функциональная портативная вариант, богатые слоты и качественное live-казино создают эту платформу отличным вариантом для развлекательных времяпрепровождения.
I enjoy playing at this casino https://moxohouse.pl/ because it feels secure and well-optimized. Live tables are interactive, slots offer good variety, and the overall experience remains consistent over time.
MMORPG игра сайт Скрайда — онлайн-мир приключений, сражений и развития персонажа. Выбирайте класс героя, исследуйте локации, участвуйте в PvP и PvE боях, вступайте в гильдии и проходите квесты в захватывающей многопользовательской игре.
Mens RX Index: Mens RX Index – Mens RX Index
Gaming portal Unblocked Games with free online games. A huge collection of browser games without restrictions: arcades, strategy, racing, logic games, and entertainment for relaxation right in your browser.
статьи про seo статьи про seo .
Подключение к ресурсу через действующие зеркала
Актуальные сетевые казино предоставляют пользователям круглосуточный доступ к услугам. Центральный ресурс Gama действует стабильно, обеспечивая обширный выбор гемблинг слотов. Но иногда формируются технические препятствия или барьеры, потому критично знать о присутствии актуальных зеркал.
Что является из себя официальное зеркало казино
Альтернатива — это идентичная реплика официального ресурса с таким же функционалом. Функционирующее зеркало в настоящее время помогает избегать местные блокировки и возобновлять гемблинг.
Основные преимущества задействования зеркал:
– Безграничный вход к собственному кабинету
– Сохранение каждых информации учётной записи
– Идентичный спектр слотов
– Свежие поощрения и предложения
Открытие счёта на ресурсе
Операция создания аккаунта требует пару минут. Недавние геймеры зарабатывают великодушный подарок за запись, что в состоянии включать:
– Вступительный финансовый приз
– Даровые спины для машин
– Особые купоны
– Расширенный кэшбек
Для окончания регистрации нужно:
1. Переместиться на официальный сайт или альтернативу
2. Кликнуть элемент «Регистрация»
3. Написать персональные сведения
4. Заверить электронную почту или телефон
5. Применить ваучер (при присутствии)
Подключение в индивидуальный кабинет
Следом за успешной создания аккаунта клиенты в состоянии выполнять вход с помощью основной портал или рабочее зеркало. Персональный кабинет предоставляет всесторонний контроль над аккаунтом:
– История транзакций
– Ввод счёта
– Вывод призов
– Контроль привилегиями
– Присутствие в состязаниях
Награды и предложения казино
Сайт удовлетворяет геймеров разнообразными бонусными предложениями:
Стартовые подарки
Новые игроки приобретают великодушный комплект наград на первые депозиты. Зачастую это содержит частичную доплату к сумме взноса плюс бесплатные вращения.
Постоянные акции
– Раз в неделю возврат до 15%
– Соревнования с премиальными банками
– Поощрения на дату рождения
– Особые предложения для статусных игроков
Система поощрения
Деятельные клиенты накапливают пункты, они можно превратить на настоящие средства или эксклюзивные льготы.
Карманная редакция и утилита
Современные решения позволяют геймить всюду удобно. Смартфонная вариант веб-сайта автоматически адаптируется под дисплей произвольного девайса.
Выгоды карманного ПО:
– Оперативная подгрузка развлечений
– Удобный дизайн
– Мгновенные-оповещения о промо
– Возможность инсталлировать для Android и iOS
Живое казино: среда реального гемблинг заведения
Раздел Live клуба транспортирует пользователей в антураж настоящего азартного учреждения. Квалифицированные операторы организуют процесс в режиме реального времени.
Имеющиеся столы:
– Рулетка
– Двадцать одно
– Карточная игра
– Покер
Автоматы и игровые слоты
Коллекция развлекательных машин охватывает множество вариантов от передовых провайдеров. Всякий пользователь обнаружит автомат по нраву:
– Классические автоматы
– Инновационные игры с специальными раундами
– Прогрессивный-игры
– Многолинейные автоматы
Турниры и раздачи
Периодические состязания вносят адреналин и обеспечивают опцию получить большие суммы. Участие в состязаниях нередко даровое, а премиальные банки насчитывают больших размеров.
Охрана и приватность
Платформа использует современные методы кодирования для обеспечения информации клиентов. Любые денежные транзакции проходят через охраняемые протоколы.
Вывод
Главный сайт и его функционирующие зеркала обеспечивают стабильный вход к качественным игровым развлечениям. Великодушные поощрения, удобная карманная форма, вариативность автоматов и квалифицированное Live-клуб превращают портал отличным выбором для поклонников игровых игр.
Характеристика основного веб-сайта
Актуальные сетевые казино предлагают пользователям разнообразный ассортимент забав и опций. Основной веб-сайт EzCash казино предлагает защищенный возможность к игровым возможностям.
Функционирующее зеркало: вход на сегодня
Дублирующий портал служит в качестве абсолютную реплику официального ресурса. Актуальное зеркало обеспечивает пользователям обходить потенциальные блокировки.
Достоинства эксплуатации зеркала
Основные плюсы включают:
– Беспрерывный путь к платформе
– Сохранение всех возможностей официального ресурса
– Сохранность личных сведений
– Аналогичный инструментарий
Оформление профиля на ресурсе
Процесс открытия счета отличается простотой и эргономичностью. Новые клиенты требуется:
1. Зайти на главный сайт или его зеркало
2. Щелкнуть на кнопку регистрации
3. Указать обязательные информацию
4. Подтвердить email адрес
5. Выполнить стартовый вход
Приз за создание аккаунта
Начинающие зарабатывают щедрый стартовый презент. Это премия способно включать:
– Денежные суммы
– Безвозмездные фриспины
– Увеличенный показатель кэшбэка
Авторизация в личный кабинет
Активные пользователи способны оперативно авторизоваться в личный раздел, применяя имя пользователя и пароль. Личный аккаунт дает возможность к:
– Управлению депозитом
– Истории операций
– Активным подаркам
– Настройкам аккаунта
Подарки и промо
Ресурс регулярно устраивает многочисленные мероприятия для игроков.
Типы призов
Основные категории призов:
– Финансовые призы – доля от суммы взноса
– Прокруты – даровые спины в игровых машинах
– Компенсация – возмещение процента затраченных сумм
– Турнирные награды – премии за игру в конкурсах
Купоны
Специальные промокоды обеспечивают заработать дополнительные преимущества. Клиенты в состоянии получить их на тематических площадках или взять в новостях.
Переносная адаптация и app
Актуальные клиенты ценят карманный гейминг.
Возможности мобильной системы
– Отзывчивый дизайн для любых девайсов
– Полный вход к развлечениям
– Оперативная функционирование
– Комфортное контроль
Установить приложение
Мобильное софт предоставлено для скачивания на девайсы с базовыми платформами Android и iOS. Программа предоставляет:
– Надежную функциональность
– Всплывающие оповещения о акциях
– Быстрый вход к желанным слотам
Азартный портфель
Игровой клуб предоставляет богатую галерею азартных услуг.
Игровые машины
Библиотека развлекательных автоматов охватывает:
– Классические игры
– Передовые аппараты
– Накопительные слоты
– Тематические автоматы
Live игры
Категория лайв игр дает возможность играть с настоящими диллерами. Предложены:
– Европейская рулетка
– Очко
– Punto Banco
– Карибский покер
Конкурсы
Периодические соревнования помогают пользователям состязаться за крупные призовые фонды. Турнирная сетка актуализируется регулярно.
Денежные транзакции
Казино предлагает разнообразие методов депозита и вывода средств:
– Пластиковые карточки
– Виртуальные платежные системы
– Межбанковские переводы
– Цифровые валюты
Абсолютно все платежи осуществляются надежно с задействованием современных систем криптографии.
Отдел сопровождения
Профессиональная группа помощи функционирует 24/7. Обратиться с консультантами можно через:
– Онлайн чат
– Email почту
– Контактный номер
– Соц сети
Защита и регулирование
Игровой клуб работает на базе действительной аккредитации. Это гарантирует:
– Справедливость азартного процесса
– Безопасность конфиденциальных информации
– Своевременные выводы
– Контролируемый гемблинг
Резюме
Основной портал и его рабочие альтернативные адреса обеспечивают игрокам совокупный спектр функций для безопасной и прибыльной досуга. Внушительные призы, различные автоматы, опытная служба и надежная инфраструктура выплат формируют казино идеальным опцией для любителей развлекательных развлечений.
useful link – Ran into this page and it appears reliable and straightforward to navigate.
helpful hints Nifty Gateway
this resource – Ran into this page, everything looks well-organized and accessible.
check jasper junction – Stumbled on this page, seems easy to explore and browse products.
заказать кухню сайт заказать кухню сайт .
Актуальные онлайн казино обеспечивают клиентам огромный диапазон функций для беспроблемной игры. Однако иногда подключение к официальному ресурсу может оказаться заблокированным. В таких моментах на помощь появляется Laki World, которое предоставляет непрерывный доступ ко всем сервисам платформы.
Что такое рабочее зеркало казино
Копия — это полная дубликат официального портала, которая размещается по дополнительному домену. Дубликат сохраняет целый функционал первоначального ресурса, включая индивидуальный кабинет, средства и сведения транзакций.
Принципиальные преимущества эксплуатации зеркала:
– Круглосуточный подключение к ресурсу
– Стопроцентная тождественность инструментов
– Конфиденциальность персональных информации
– Удержание всех имеющихся вознаграждений
Как отыскать рабочее зеркало на текущий день
Есть несколько надежных методов обнаружения свежей ссылки:
Авторизованные сервисы:
1. Электронная рассылка — руководство периодически высылает сообщения с рабочими URL
2. Медийные сети — авторизованные профили публикуют текущую информацию
3. Сервис поддержки — специалисты дают безопасные адреса
4. Портативное приложение — обеспечивает преодолевать блокировки
Регистрация на основном портале
Процедура открытия счета занимает всего считанные минут и предполагает из данных шагов:
1. Переход на основной сайт или функционирующее зеркало
2. Выбор на иконку «Регистрация»
3. Заполнение регистрационной формы
4. Верификация имейл почты или мобильного номера
5. Задействование привилегии за регистрацию при наличии промокода
Свежие клиенты получают солидный вступительный бонус, который может предполагать даровые прокруты, финансовые призы или возврат средств.
Логин в пользовательский кабинет
Подключение на сайте реализуется стандартным методом. Нужно вписать имя пользователя и код доступа, использованные при оформлении.
Значимые детали для безопасного входа:
– Применяйте сложный шифр
– Задействуйте 2FA аутентификацию
– Не храните пароли на публичных устройствах
– Проверяйте доменную строку браузера
Обзор премиальной структуры
Казино одаривает игроков разнообразными бонусами и промо:
Стартовый букет
Новички могут претендовать на щедрое вознаграждение за начальный вклад. Обычно это долевая премия к депонированной объему плюс бесплатные вращения для известных слотов.
Систематические предложения
– Семидневный компенсация — компенсирование процента утраченных средств
– Поощрения на очередные пополнения
– Особые предложения по знаменательным датам
– Соревнования с солидными премиальными фондами
Программа вознаграждений
Постоянные пользователи зарабатывают баллы за всякую бет, которые затем обмениваются на реальные деньги, фриспины или уникальные льготы.
Купоны: как активировать
Бонус-коды — это особые последовательности литер, гарантирующие привилегию к бонусным поощрениям.
Каким образом получить актуальные промокоды:
– Проверенные общественные сети казино
– Аффилиатные ресурсы
– Email-новостная лента
– Отраслевые группы
Прописывается промокод в специальное поле при оформлении или пополнении счета.
Смартфонная версия и приложение
Современные геймеры отдают предпочтение играть с мобильных девайсов. Ресурс предлагает два варианта для приятной портативной игры.
Мобильная модификация
Онлайн версия самостоятельно адаптируется под габариты монитора. Не нуждается установки и работает в любом современном браузере.
Мобильное приложение
Получить софт можно для аппаратов на Android и iOS. Достоинства app:
– Быстрая активация
– Устойчивая операция
– Push-уведомления о поощрениях
– Самостоятельный избегание блокировок
Процедура установки легок: достаточно зайти на портал с портативного гаджета и выполнять указаниям.
Игровой выбор
Библиотека слотов включает огромное количество позиций от топовых провайдеров.
Слоты
Азартные машины — наиболее востребованная раздел забав. Показаны традиционные 3-барабанные автоматы, актуальные видеослоты с дополнительными стадиями, а также прогрессивные выигрыши.
Live казино
Зона с реальными ведущими обеспечивает ощутить атмосферу подлинного казино. Открыты варианты с рулеткой.
Вещание реализуется в превосходном формате, поддерживается диалог с дилером и остальными геймерами.
Соревнования
Постоянно организуются соревнования по всевозможным играм. Участие обеспечивает возможность заработать финансовые призы, free spins или особые презенты.
Финансовые процедуры
Портал предлагает широкий набор финансовых способов:
– Дебетовые карты
– Онлайн кошельки
– Крипта
– Финансовые платежи
Наименьшая величина депозита — разумная для преобладающего числа пользователей. Снятие выигрышей выполняется в минимальные сроки.
Отдел поддержки
Компетентные консультанты готовы поддержать непрерывно. Представлены следующие методы связи:
– Онлайн-чат
– Email
– Звонковая поддержка
– Общественные сети
Разъяснения на частые темы можно отыскать в разделе FAQ.
Вывод
Лицензионный ресурс казино и его действующие зеркала предоставляют пользователям полный вход ко всем возможностям ресурса. Солидные поощрения, комфортная портативная версия, впечатляющий коллекция развлечений и опытная поддержка делают азартный опыт максимально комфортным и безопасным.
seo продвижение сайта по трафику кловер prodvizhenie-sajtov-po-trafiku6.ru .
Актуальные онлайн-казино гарантируют геймерам массу опций для беспроблемной игры. Главный портал Dragon Money обеспечивает путь ко всем возможностям и играм. Однако при образовании технических сложностей на подмогу прибывают функционирующие копии.
Что означает собой функционирующее зеркало
Дубликат казино — это идентичная реплика официального сайта, расположенная по альтернативному адресу. Официальное зеркало сохраняет все характеристики, включая открытие профиля, доступ в личный кабинет, бонусы и кодовые слова.
Копия на сегодня гарантирует:
– Бесперебойный путь к азартным автоматам
– Совершенную конфиденциальность персональных сведений
– Поддержку баланса и записей операций
– Применимость всех бонусных программ
Создание аккаунта на основном портале
Процесс оформления учетной записи отнимает несколько минут. Новоиспеченным геймерам следует:
1. Перейти на главный сайт или рабочее зеркало
2. Выбрать кнопку «Регистрация»
3. Ввести нужные поля
4. Активировать email почту
5. Применить купон при присутствии
После финиша оформления профиля игроки получают подарок за регистрацию, что может охватывать бонусные спины или денежно-призовое поощрение.
Логин в собственный кабинет
Индивидуальный кабинет дает комплексный управление над азартным ходом. Через личный аккаунт возможно:
– Вносить средства на счет
– Получать выплаты
– Использовать кодовые слова
– Контролировать историю ставок
– Принимать участие в соревнованиях
– Забирать cash back
Описание премий и промо-предложений
Щедрая бонусная политика — важное козырь проекта. Главные виды поощрений:
Вступительный подарок
Дебютанты обретают щедрое вознаграждение на стартовые вклады. Величина приза может достигать 100-200% от объема пополнения.
Бесплатные вращения
Халявные раунды предоставляются для востребованных игровых автоматов. Число free spins варьируется от 10 до 500 штук.
Кешбэк
Еженедельный или ежемесячный возврат процента потерянных финансов. Обычный размер возврата — 5-15%.
Конкурсы
Регулярные турниры с большими наградными пулами. Соревнующиеся борются за лучшие строчки в таблице лидеров.
Портативная версия и приложуха
Смартфонная версия позволяет делать ставки с всякого девайса. Пользователи могут загрузить приложение для iOS и Android или применять интернет версию.
Выгоды портативного софта:
– Скоростная загрузка автоматов
– Комфортный интерфейс
– Пуш-нотификации о поощрениях
– Вход через биометрию
Слоты и Live казино
Развлекательная коллекция содержит сотни названий от топовых производителей.
Востребованные категории игр:
– Традиционные машины
– Видеослоты с премиальными уровнями
– Джекпот автоматы
– Мега-путь автоматы
Live казино
Секция live казино предлагает игру с живыми дилерами. Имеются классические игры:
– Американская рулетка
– Blackjack
– Punto Banco
– Покер
Как найти действующее зеркало
Обрести актуальную линк на зеркало разрешается различными методами:
1. Зарегистрироваться на почтовую рассылку
2. Следить за обновлениями в социальных сетях
3. Связаться в отдел поддержки
4. Запомнить актуальное зеркало в закладки
Вывод
Главный ресурс и его рабочие зеркала предоставляют постоянный путь к азартным играм. Щедрые бонусы, разнообразные купоны, комфортное портативное софт и высококлассная сервис поддержки превращают развлекательный опыт в высшей степени беспроблемным и защищенным.
Certified Canada Rx: online canadian drugstore – canada drugs online reviews
Читать далее казино водка бет vodkabet
статьи про seo статьи про seo .
раскрутка сайта по трафику prodvizhenie-sajtov-po-trafiku7.ru .
пояснения зеркало водка бет
мелбет промокод мелбет промокод
check keystone crate – The page feels minimal and easy to navigate through products.
Нынешние онлайн-казино дают участникам внушительный набор услуг и бонусных предложений. Вход к площадке реализуется через главный портал или его рабочее зеркало казино Леон, что предоставляет непрерывную деятельность.
Что представляет собой действующее зеркало казино
Дубликат — это идентичная копия оригинального портала, разработанная для преодоления запретов. Зеркало сегодня обеспечивает участникам иметь подключение к излюбленным автоматам в произвольное время.
Подлинное зеркало обладает всеми возможностями главного портала:
– Весь каталог развлечений
– Аккаунт с записанными параметрами
– Свежие бонусы
– Защищенные расчетные действия
Создание аккаунта на лицензионном сайте
Процедура открытия счета требует всего пару минут. Свежим участникам требуется:
1. Попасть на проверенный веб-сайт или функционирующее зеркало
2. Щелкнуть на клавишу “Создать аккаунт”
3. Указать обязательные данные
4. Активировать контакт
5. Совершить дебютный платеж
Бонус за регистрацию зачисляется автоматически после окончания всех стадий.
Доступ в аккаунт
Существующие пользователи могут совершить вход используя:
– Имя пользователя и пароль
– Данные телефона
– Адрес
Профиль обеспечивает возможность к контролю средствами, записям транзакций и действующим поощрениям.
Награды и акции
Развлекательная площадка балует активных участников щедрыми поощрениями:
Стартовый пакет
– Премия на первый депозит до 100%
– Даровые спины на востребованные игры
– Добавочные поощрения за дальнейшие пополнения
Ваучеры
Уникальные коды дают доступ на приобретение специальных поощрений. Действующие комбинации выкладываются в секции “Бонусы”.
Возврат средств
Еженедельный кэшбек достигает до 10% от потраченных денег. Компенсация начисляется моментально.
Схема лояльности
Регулярные участники получают поинты, которые конвертируются на подлинные выплаты или бесплатные вращения.
Мобильный сайт и приложение
Ради комфорта участников сделана удобная мобильная версия. Гибкий вид позволяет легко развлекаться с любого карманного аппарата.
Достоинства программы:
– Оперативный запуск к автоматам
– Адаптированный облик
– Бесперебойная активность
– Сообщения о актуальных событиях
Установить софт можно безвозмездно с главного ресурса для аппаратов на Android и iOS.
Коллекция автоматов
Слоты
Каталог насчитывает более 2000 слотов от ведущих провайдеров:
– Стандартные игры
– Современные автоматы
– Джекпот-слоты
– Тематические развлечения
Live казино
Секция Live игр предоставляет игру с подлинными ведущими в живом режиме:
– Рулетка
– Блэкджек
– Punto Banco
– Столы покера
Соревнования
Регулярные турниры с большими призовыми пулами организуются регулярно. Допуск в конкурсах открыто всем действующим пользователям.
Платежные способы
Взносы и выводы выплат производятся через известные методы:
– Кредитные карты
– Онлайн сервисы
– Bitcoin
– Прямые платежи
Стартовый взнос — от 100 рублей. Вывод средств выполняется в течение 24 часов.
Служба support
Непрерывная служба помощи расположена помочь в решении произвольных проблем:
– Онлайн-чат
– Email
– Телефон
– Публичные сети
Защита и разрешение
Лицензионный веб-сайт действует на основании международной лицензии. Все информация участников закрыты актуальным SSL-кодированием.
Резюме
Функционирующее зеркало дает непрерывный подключение к любимым развлечениям, выгодным бонусам и функциональным услугам. Создайте аккаунт немедленно и приобретите первый приз!
https://mensrxindex.com/# ed medication online
cool site – Found this page earlier, the structure is tidy and navigation feels simple.
узнать больше водкабет
Если ищете качественный анализ темы ufc в феврале марте 2026 три недели которые встряхнут дивизионы, загляните сюда. Вот ссылка: https://rybalka62.ru/news/obzor-blizhajshih-sobytij-ufc-fevral-mart-2026-prognozy-na-klyuchevye-poedinki/
Современные онлайн-казино обеспечивают игрокам разнообразие опций для комфортной игры. Официальный веб-портал РР·Рё РљСЌС€ обеспечивает вход ко всем возможностям и азартным играм. Однако при образовании программных сложностей на выручку спешат рабочие зеркала.
Что представляет собой функционирующее зеркало
Альтернативный адрес казино — это стопроцентная реплика главного сайта, находящаяся по другому доменному имени. Официальное зеркало поддерживает все опции, в том числе регистрацию, доступ в персональный кабинет, поощрения и бонусные коды.
Копия на сегодня дает:
– Непрерывный вход к развлекательным машинам
– Стопроцентную сохранность индивидуальных данных
– Удержание депозита и журнала переводов
– Применимость всех специальных предложений
Создание учетной записи на официальном портале
Процесс создания аккаунта отнимает считанные минут. Свежеиспеченным клиентам необходимо:
1. Войти на основной ресурс или функционирующее зеркало
2. Выбрать кнопку «Зарегистрироваться»
3. Заполнить необходимые сведения
4. Подтвердить электронную почту
5. Ввести купон при присутствии
После конца оформления профиля геймеры зарабатывают вознаграждение за регистрацию, который может содержать бесплатные вращения или денежно-призовое поощрение.
Вход в собственный кабинет
Личный кабинет предоставляет всесторонний контроль над азартным действом. Через индивидуальный аккаунт можно:
– Вносить средства на кошелек
– Забирать выигрыши
– Применять бонусные коды
– Мониторить хронологию пари
– Принимать участие в состязаниях
– Обретать возврат средств
Характеристика премий и промо-предложений
Великодушная поощрительная схема — важное достоинство платформы. Ключевые виды вознаграждений:
Стартовый приз
Начинающие обретают великодушное поощрение на стартовые вклады. Размер приза может достигать 100-200% от величины вклада.
Free spins
Даровые спины выдаются для известных игровых автоматов. Сумма фриспинов разнится от 10 до 500 штук.
Кэшбек
Систематический или помесячный отдача процента утраченных средств. Обычный процент компенсации — 5-15%.
Соревнования
Регулярные турниры с внушительными призовыми фондами. Соревнующиеся борются за топовые строчки в рейтинге.
Смартфонная версия и программа
Портативная версия обеспечивает играть с любого устройства. Геймеры могут загрузить приложение для iOS и Android или применять интернет версию.
Плюсы мобильного приложения:
– Быстрая прогрузка слотов
– Эргономичный интерфейс
– Всплывающие уведомления о поощрениях
– Доступ через биометрию
Автоматы и Live казино
Развлекательная база насчитывает множество наименований от топовых разработчиков.
Популярные разделы слотов:
– Стандартные автоматы
– Видео-автоматы с премиальными раундами
– Накопительный приз слоты
– Мега-путь машины
Live игровой зал
Секция live казино обеспечивает игру с живыми дилерами. Доступны традиционные развлечения:
– Американская рулетка
– Blackjack
– Punto Banco
– Карибский покер
Как найти актуальное зеркало
Обрести действующую адрес на зеркало можно различными вариантами:
1. Подписаться на email-рассылку
2. Следить за апдейтами в соц сетях
3. Связаться в сервис поддержки
4. Запомнить действующее зеркало в фавориты
Вывод
Главный сайт и его действующие копии гарантируют бесперебойный вход к азартным автоматам. Великодушные вознаграждения, разнообразные купоны, практичное мобильное софт и профессиональная служба поддержки обеспечивают азартный опыт в высшей степени беспроблемным и защищенным.
Актуальные онлайн-казино предлагают участникам широкий набор азартных игр и щедрые премии. Однако для удобной времяпрепровождения важно знать, как найти Dragon Money сайт казино и его функционирующие зеркала.
Что такое основной ресурс казино
Лицензионный веб-сайт казино — это основная платформа, где игроки могут получать удовольствие от гемблинг развлечениями. Портал работает на легальных условиях и имеет всеми требуемыми сертификатами.
Первостепенные преимущества главного веб-сайта:
– Конфиденциальность индивидуальных реквизитов
– Справедливые положения игры
– Подтвержденные выплаты
– Оперативная техподдержка
Действующее зеркало казино: для чего необходимо
Альтернативный адрес — это точная версия основного сайта, находящаяся по альтернативному адресу. Рабочее зеркало формируется для предоставления непрерывного входа к ресурсу.
Поводы применения зеркал:
– Блокировка главного адреса
– Профилактические мероприятия
– Высокая нагрузка на платформу
Как отыскать актуальное зеркало на сегодня
Обнаружить новое рабочее зеркало можно множественными вариантами:
1. Почтовые оповещения — оформите подписку на новостную доставку
2. Команда техподдержки — проконсультируйтесь в онлайн-чат
3. Корпоративные медиа — проверяйте за постами
4. Игровые порталы — проверенные платформы
Открытие счета на платформе казино
Процесс регистрации требует лишь считанные минут:
1. Активируйте на клавишу “Регистрация”
2. Укажите обязательные сведения
3. Подтвердите электронную e-mail
4. Активируйте купон, если имеется
Сразу после успешной регистрации вам предоставится разрешен индивидуальный профиль.
Премии и бонусные коды
Выгодная бонусная система — существенное достоинство казино:
Подарок за регистрацию
Новые пользователи зарабатывают первый подарок, который может предполагать:
– Финансовый депозит на стартовый взнос
– Фри-спины для барабанов
– Стартовые деньги
Бонусные коды
Постоянно выходят свежие бонусные шифры, дающие возможность использовать специальные бонусы.
Схема возврата средств
Лояльные участники приобретают порцию потраченных ставок на счет.
Актуальные промо и состязания
Ресурс периодически проводит увлекательные кампании:
– Недельные баттлы
– Сезонные бонусы
– Розыгрыши ценных наград
– Схема VIP-клуба
Авторизация в личный аккаунт
Для логина на платформу нужно:
1. Посетить официальный сайт или актуальное зеркало
2. Выбрать “Login”
3. Указать имя пользователя и ключ
В персональном разделе разрешены следующие инструменты:
– Депозит баланса
– Получение денег
– Анализ истории транзакций
– Изменение персональными настройками
Mobile вариант и программа
Адаптивная платформа
Responsive вариант портала позволяет играть с любого мобильного гаджета. Визуал адаптивно подстраивается под диагональ дисплея.
Программа для download
Установить программу можно для:
– Android — прямая установка с платформы
– iOS — инсталляция через App Store
Выгоды приложения:
– Мгновенный доступ
– Стабильная функциональность
– Push-нотификации об бонусах
– Ускоренный интерфейс
Развлекательные категории
Барабаны
Обширная галерея азартных машин от лучших поставщиков:
– Традиционные игры
– Новые-игры
– Накопительные-игры
Live казино
Секция с профессиональными крупье предлагает:
– European/American Roulette
– Двадцать одно
– Punto Banco
– Texas Hold’em
Вещания осуществляются в отличном качестве, воссоздавая ощущение реального казино.
Способы депозита и снятия
Казино принимает разнообразные финансовые методы:
– Дебетовые карты
– Цифровые платежи
– Crypto
– Прямые отправки
Базовые суммы взноса и скоростные платежи обеспечивают развлечение крайне беспроблемной.
Служба техподдержки
Опытная команда помощи оперирует 24/7 и в состоянии ассистировать с разными задачами:
– Живой-чат
– Email-помощь
– Голосовая связь
Итоги
Главный ресурс казино и его актуальные зеркала гарантируют клиентам конфиденциальный и азартный игровой досуг. Щедрые поощрения, простая mobile версия, разнообразные автоматы и профессиональное live-казино формируют эту площадку отличным местом для азартных игр.
levitra online http://livemedsrx.top/# where buy levitra
our website [url=https://web-market.io/]Buy NFT with credit card[/url]
интернет vodka bet
Awesome article.
Доступ к сайту через актуальные зеркала
Нынешние сетевые казино гарантируют игрокам постоянный переход к сервисам. Официальный ресурс Laki World зеркало действует устойчиво, предоставляя обширный ассортимент игровых слотов. Тем не менее периодически возникают цифровые сложности или ограничения, следовательно критично иметь представление о присутствии рабочих зеркал.
Что является собой главное зеркало казино
Зеркало — это абсолютная дубликат центрального веб-сайта с аналогичным возможностями. Актуальное зеркало на данный момент обеспечивает избегать локальные запреты и поддерживать гемблинг.
Ключевые достоинства задействования зеркал:
– Стопроцентный подключение к персональному кабинету
– Сохранение всех данных профиля
– Аналогичный набор слотов
– Текущие привилегии и акции
Оформление на ресурсе
Процесс создания аккаунта отнимает несколько минут. Новые клиенты обретают привлекательный подарок за оформление, что может включать:
– Приветственный игровой кредит
– Бесплатные спины для слотов
– Эксклюзивные коды
– Расширенный кешбэк
С целью выполнения оформления следует:
1. Зайти на официальный веб-сайт или альтернативу
2. Нажать опцию «Зарегистрироваться»
3. Ввести индивидуальные информацию
4. Верифицировать email или телефон
5. Задействовать код (если есть наличии)
Авторизация в личный кабинет
После удачной создания аккаунта геймеры имеют возможность совершать авторизацию посредством главный портал или рабочее зеркало. Индивидуальный кабинет предоставляет полный контроль над аккаунтом:
– Журнал ставок
– Ввод счёта
– Вывод призов
– Контроль наградами
– Включение в турнирах
Поощрения и предложения казино
Сайт награждает клиентов вариативными бонусными схемами:
Начальные подарки
Новые игроки приобретают внушительный пакет поощрений на начальные пополнения. Зачастую это охватывает долевую прибавку к величине пополнения плюс бесплатные кручения.
Периодические промо
– Раз в неделю кэшбек до 15%
– Конкурсы с призовыми фондами
– Призы на день рождения
– Особые предложения для элитных игроков
План верности
Постоянные пользователи накапливают баллы, которые допустимо превратить на реальные средства или уникальные бонусы.
Карманная форма и программа
Современные решения позволяют играть в любом месте подходяще. Мобильная форма ресурса автономно приспосабливается под размер всякого девайса.
Плюсы смартфонного ПО:
– Моментальная загрузка слотов
– Практичный вид
– Мгновенные-уведомления о предложениях
– Способность скачать для Android и iOS
Живое казино: антураж реального гемблинг дома
Раздел Live казино погружает клиентов в антураж реального игорного учреждения. Опытные дилеры проводят процесс в виде реального времени.
Представленные развлечения:
– Американская рулетка
– Очко
– Карточная игра
– Покерная игра
Слоты и игровые слоты
Коллекция развлекательных машин охватывает тысячи названий от топовых студий. Всякий игрок подберёт слот по душе:
– Традиционные машины
– Инновационные игры с специальными турами
– Крупный приз-автоматы
– Многолинейные игры
Конкурсы и акции
Систематические турниры привносят адреналин и предоставляют способность обрести крупные вознаграждения. Вовлечение в состязаниях часто бесплатное, а наградные суммы достигают внушительных величин.
Защита и секретность
Сайт использует современные методы шифрования для обеспечения данных пользователей. Совокупные платёжные операции совершаются через безопасные протоколы.
Итог
Центральный веб-сайт и его рабочие зеркала дают безопасный вход к качественным азартным играм. Богатые награды, удобная карманная вариант, многообразие автоматов и профессиональное Live-клуб формируют ресурс превосходным опцией для поклонников развлекательных игр.
Передовые онлайн-казино предоставляют пользователям богатый набор игр и щедрые премии. Впрочем для удобной игры необходимо понимать, как обнаружить Вилдер и его действующие зеркала.
Что такое главный ресурс казино
Основной ресурс казино — это основная веб-площадка, где пользователи могут получать удовольствие от игровыми играми. Портал функционирует на официальных основаниях и имеет всеми требуемыми сертификатами.
Первостепенные плюсы основного веб-сайта:
– Конфиденциальность индивидуальных информации
– Справедливые условия игры
– Стабильные выплаты
– Квалифицированная поддержка
Рабочее зеркало казино: для чего требуется
Копия сайта — это идентичная версия основного ресурса, размещенная по иному домену. Функционирующее зеркало создается для гарантирования стабильного доступа к платформе.
Причины эксплуатации зеркал:
– Запрет главного адреса
– Плановые операции
– Значительная активность на сервер
Как найти действующее зеркало сейчас
Найти свежее рабочее зеркало можно разными вариантами:
1. Почтовые оповещения — активируйте уведомления на email доставку
2. Департамент support — свяжитесь в онлайн-чат
3. Официальные площадки — следите за обновлениями
4. Специализированные ресурсы — надежные источники
Создание аккаунта на платформе казино
Алгоритм оформления требует только считанные минут:
1. Активируйте на элемент “Открыть счет”
2. Введите обязательные поля
3. Верифицируйте электронную адрес
4. Активируйте промокод, если есть
Сразу после оконченной оформления вам откроется открыт пользовательский аккаунт.
Премии и бонусные коды
Привлекательная премиальная структура — важное достоинство казино:
Награда за создание аккаунта
Первичные участники обретают приветственный презент, который может охватывать:
– Финансовый депозит на начальный пополнение
– Бесплатные вращения для барабанов
– Приветственные фонды
Купоны
Регулярно размещаются актуальные бонусные шифры, предоставляющие активировать дополнительные поощрения.
Программа кэшбека
Регулярные пользователи возвращают часть потраченных финансов в виде компенсации.
Текущие кампании и состязания
Платформа систематически запускает увлекательные промо-мероприятия:
– Weekly баттлы
– Специальные акции
– Лотереи крупных выигрышей
– Механизм статусов
Авторизация в личный кабинет
Для авторизации на ресурс следует:
1. Перейти на официальный портал или актуальное зеркало
2. Кликнуть “Вход”
3. Внести имя пользователя и код доступа
В индивидуальном профиле доступны следующие опции:
– Пополнение счета
– Снятие призов
– Проверка журнала игр
– Изменение личными параметрами
Портативная модификация и app
Портативная вариант
Responsive версия сайта обеспечивает играть с всех портативного девайса. Визуал автоматически подстраивается под габариты экрана.
Клиент для установки
Загрузить app можно для:
– Android — безопасная загрузка с портала
– iOS — скачивание через App Store
Выгоды программы:
– Оперативный запуск
– Стабильная функциональность
– Push-сообщения об промо
– Ускоренный UI
Гемблинг секции
Автоматы
Богатая подборка игровых автоматов от известных разработчиков:
– Ретро слоты
– Новые-эмуляторы
– Накопительные-машины
Live зал
Раздел с реальными дилерами предлагает:
– Рулетка
– Блэкджек
– Баккара
– Покер
Вещания проводятся в отличном формате, воссоздавая ощущение реального казино.
Методы зачисления и обналичивания
Платформа принимает множественные финансовые сервисы:
– Банковские картсчета
– Цифровые платежи
– Криптовалюты
– Финансовые переводы
Наименьшие лимиты взноса и моментальные транзакции обеспечивают развлечение максимально приятной.
Отдел support
Компетентная команда ассистентов функционирует 24/7 и в состоянии поддержать с различными ситуациями:
– Живой-чат
– Email-переписка
– Телефонная связь
Итоги
Лицензионный веб-сайт казино и его функционирующие дубликаты гарантируют участникам надежный и интересный игровой отдых. Выгодные подарки, удобная мобильная платформа, разнообразные развлечения и качественное live-казино создают эту платформу превосходным решением для развлекательных досуга.
browse here – Came across this platform today, finding products is straightforward and quick.
взгляните на сайте здесь vodka bet casino
купить заказать кухню купить заказать кухню .
кп по продвижению сайта [url=https://seo-kejsy12.ru/]seo-kejsy12.ru[/url] .
click for source Nifty login
https://certifiedcanadarx.shop/# Certified Canada Rx
Переход к порталу через рабочие зеркала
Участники интернет казино часто контактируют с вопросом блокировки базового домена. Именно для преодоления этой задачи созданы зеркала основного портала. казино Дэдди обеспечивает беспрепятственный вход ко всем функциям казино.
Что такое актуальное зеркало казино
Альтернативный адрес представляет собой полную дубликат оригинального портала с таким же набором функций. Ключевое расхождение — это другое имя. Любые параметры участника, включая баланс, привилегии и историю игр, остаются такими же.
Плюсы эксплуатации зеркал
Рабочие зеркала имеют набором существенных выгод:
– Постоянный доступ к предпочитаемым развлечениям
– Совершенная безопасность персональных данных
– Удержание всех параметров индивидуального кабинета
– Возможность взятия бонусов и участия в акциях
Оформление профиля на официальном домене
Ход открытия счета предельно прост и длится буквально минут. Новые клиенты имеют возможность рассчитывать на солидный стартовый приз за открытие счета.
Ступени создания аккаунта
1. Подключение на официальный сайт или его копию
2. Клик на кнопку “Создать аккаунт”
3. Ввод требуемых информации
4. Подтверждение почтовой почты
5. Применение купона (в случае есть)
Бонусы и промоакции для участников
Ресурс радует своих участников всевозможными наградными акциями.
Ключевые категории наград
Приветственный пакет — щедрое вознаграждение для начинающих пользователей, которое может содержать материальные бонусы и безвозмездные спины.
Безвозмездные спины — способность крутить в топовых аппаратах даром.
Компенсация — долевой возмещение израсходованных финансов, который начисляется еженедельно или помесячно.
Бонусные коды — эксклюзивные последовательности, гарантирующие экстра поощрения.
Индивидуальный кабинет: опции и параметры
Личный кабинет дает совершенный управление над персональным процессом. В нем доступны:
– Контроль средствами
– История транзакций
– Работающие привилегии
– Установки охраны
– Верификация счета
Карманная вариант и приложение
Современные пользователи ценят доступность. Казино предоставляет 2 пути для игры с смартфонных устройств.
Responsive мобильная редакция
Смартфонная редакция домена автономно настраивается под монитор любого аппарата. Нет необходимости устанавливать отдельное ПО.
APP для мобильных
Можно инсталлировать оригинальное софт для iOS и Android. APP предоставляет:
– Моментальный запуск
– Улучшенный внешний вид
– Оперативные-оповещения о предложениях
– Надежную функциональность
Live казино: атмосфера реального зала
Секция Live казино переносит игроков в обстановку настоящего казино. Опытные хосты осуществляют сессии в виде прямого времени.
Востребованные Live-игры
– Французская рулетка
– Blackjack
– Punto Banco
– Покер
Аппараты: многообразие слотов
Коллекция игровых автоматов насчитывает множество вариантов от лидирующих производителей. Игроки обнаружат:
– Традиционные автоматы
– Графические слоты
– Джекпот-игры
– Megaways
Турниры и уникальные акции
Регулярные турниры позволяют участникам соревноваться друг с другом за внушительные наградные фонды. Отдельный турнир содержит свои требования включения и доску победителей.
Методы пополнения и снятия сумм
Ресурс поддерживает массу финансовых сервисов:
– Платежные картыы
– Онлайн сервисы
– Крипто
– Финансовые отправления
Каждые платежи выполняются надежно благодаря современным протоколам кодирования.
Отдел support
Компетентные консультанты службы support настроены содействовать 24/7. Предусмотрены нижеперечисленные пути связи:
– Онлайн-чат
– Email-обслуживание
– Телефонная линия
– Медийные сети
Заключение
Основной домен казино и его актуальные зеркала предоставляют участникам надежный и удобный подход к обширному диапазону азартных развлечений. Крупные подарки, периодические кампании, качественная поддержка и легкие денежные инструменты создают игровой времяпрепровождение чрезвычайно увлекательным и прибыльным.
Нынешние онлайн-казино предоставляют пользователям разнообразный диапазон функций для приятной времяпрепровождения. Доступ к площадке Бет Андреас реализуется через главный сайт или функционирующее зеркало.
Что такое актуальное зеркало казино
Функционирующее зеркало — это резервный линк лицензионного ресурса казино. Такие дубликаты формируются для поддержания постоянного доступа к азартной площадке.
Дубликат текущее абсолютно воспроизводит опции основного домена. Пользователи получают такой же выход ко всем услугам, включая оформление профиля, зачисление средств счета и снятие денег.
Создание аккаунта на официальном портале
Алгоритм открытия профиля требует всего пару мгновений. Новым пользователям требуется:
1. Попасть на лицензионный ресурс или актуальное подлинное зеркало
2. Щелкнуть кнопку “Регистрация”
3. Внести необходимые информацию
4. Верифицировать почтовую почту
5. Использовать промокод при присутствии
После завершения оформления участник зарабатывает приз за регистрацию, который может включать free spins или финансовое вознаграждение.
Авторизация в персональный кабинет
Личный кабинет — это безопасная область, где игроки способны регулировать своим учетной записью. Для входа следует ввести имя пользователя и пароль.
В персональном кабинете представлены данные инструменты:
– Проверка хронологии транзакций
– Задействование кодов активации
– Управление призами
– Участие в состязаниях
– Мониторинг возврата средств
– Изменение данных
Поощрения и акции
Игровая система предлагает привлекательные призы:
Стартовый набор — дебютанты получают крупное вознаграждение на стартовые взносы.
Бесплатные вращения — предоставляются как при создании аккаунта, так и в рамках разнообразных акций.
Кэшбэк — еженедельный рефанд процента израсходованных денег.
Промокоды — уникальные шифры, обеспечивающие право к уникальным предложениям.
Обзор развлекательных направлений
Игровые автоматы
Библиотека аппаратов насчитывает множество игр от лучших производителей. Клиенты обнаружат как традиционные аппараты, так и новые видео-слоты с увлекательной графикой.
Live казино
Раздел Live казино обеспечивает возможность играть с живыми дилерами в формате настоящего времени. Открыты распространенные игры: рулетка, блэкджек, баккара, покер.
Конкурсы
Постоянные состязания с значительными премиальными пулами привлекают тысячи участников. Лидеры обретают cash выплаты и эксклюзивные премии.
Телефонная версия и app
Мобильная версия платформы дает возможность участвовать с любого аппарата. Структура самостоятельно корректируется под формат экрана.
Скачать app можно для аппаратов на Android и iOS. Мобильное приложение располагает всеми опциями компьютерной версии.
Как найти текущее зеркало на текущий день
Действующие линки альтернатив регулярно меняются. Найти актуальную адрес можно многими методами:
– Через службу техподдержки
– В официальных информационных сетях
– По электронной подписке
– На тематических сайтах
Надежность и сертификация
Официальный ресурс функционирует на базе мировой разрешения. Все транзакции охраняются современными технологиями защиты.
Секретность индивидуальных сведений гарантируется в абсолютном формате.
Резюме
Главный домен и его актуальные зеркала гарантируют игрокам беспрерывный выход к первоклассным азартным услугам. Великодушные вознаграждения, разнообразные слоты, компетентная поддержка — все это создает азартный времяпрепровождение чрезвычайно удобным и захватывающим.
продвижение по трафику продвижение по трафику .
можно проверить ЗДЕСЬ водка бэт
перейдите на этот сайт vodka bet
click to find out more Nifty NFT
Nubank caiu Nubank caiu .
this resource – I discovered this link earlier and it appears practical and well-laid-out.
Подключение к сайту через актуальные зеркала
Игроки виртуальных казино постоянно встречаются с вопросом ограничения основного портала. Собственно для ликвидации этой ситуации существуют зеркала легального домена. Аркада казино обеспечивает стопроцентный вход ко всем функциям платформы.
Что такое действующее зеркало казино
Альтернативный адрес значит собой точную версию оригинального портала с аналогичным возможностями. Основное различие — это иное имя. Абсолютно все параметры пользователя, включая счет, поощрения и архив ставок, находятся прежними.
Достоинства задействования зеркал
Актуальные зеркала имеют комплексом существенных достоинств:
– Непрерывный подключение к выбранным слотам
– Полная защита собственных сведений
– Поддержание всех конфигураций пользовательского кабинета
– Возможность получения призов и вовлечения в акциях
Создание аккаунта на официальном домене
Процесс открытия счета максимально элементарен и требует несколько минут. Начинающие игроки способны рассчитывать на солидный вводный приз за создание аккаунта.
Ступени формирования аккаунта
1. Подключение на основной домен или его дубликат
2. Активация на клавишу “Зарегистрироваться”
3. Заполнение нужных информации
4. Проверка email почты
5. Внесение бонусного кода (в случае имеется)
Подарки и акции для участников
Ресурс балует своих игроков многочисленными наградными предложениями.
Ключевые типы призов
Начальный пакет — крупное премирование для новых клиентов, что способно охватывать монетарные суммы и безвозмездные спины.
Безвозмездные спины — возможность играть в известных аппаратах без затрат.
Компенсация — пропорциональный компенсация проигранных средств, каковой выплачивается раз в неделю или каждый месяц.
Промокоды — уникальные комбинации, обеспечивающие добавочные выгоды.
Персональный кабинет: функции и параметры
Личный аккаунт предоставляет полный регулирование над развлекательным взаимодействием. Здесь присутствуют:
– Регулирование депозитом
– Архив операций
– Текущие поощрения
– Параметры защиты
– Валидация профиля
Портативная вариант и софт
Актуальные игроки признают портативность. Платформа предоставляет двойной пути для игры с карманных устройств.
Адаптивная смартфонная версия
Смартфонная версия ресурса автоматически настраивается под монитор любого девайса. Не нужно устанавливать отдельное ПО.
APP для мобильных
Можно установить оригинальное приложение для iOS и Android. Приложение гарантирует:
– Мгновенный старт
– Доработанный дизайн
– Push-уведомления о бонусах
– Устойчивую производительность
Live игры: обстановка подлинного клуба
Раздел Live столов переносит пользователей в антураж подлинного клуба. Профессиональные крупье осуществляют раунды в варианте прямого времени.
Известные Live-столы
– Американская рулетка
– Блэкджек
– Баккара
– Покер
Игровые машины: ассортимент слотов
Каталог слотовых автоматов вмещает массу наименований от лидирующих разработчиков. Клиенты откроют:
– Традиционные автоматы
– Графические слоты
– Джекпот-игры
– Megaways
Состязания и специальные предложения
Постоянные конкурсы дают возможность пользователям конкурировать друг с другом за внушительные наградные банки. Отдельный конкурс содержит свои критерии включения и список призеров.
Способы внесения и изъятия сумм
Площадка обслуживает комплекс платежных инструментов:
– Дебетовые инструменты
– Онлайн сервисы
– Blockchain-платежи
– Wire транзакции
Абсолютно все транзакции осуществляются защищенно благодаря современным протоколам защиты.
Сервис помощи
Профессиональные специалисты отдела поддержки расположены содействовать 24/7. Работают такие методы коммуникации:
– Оперативный-чат
– Email-обслуживание
– Телефонная поддержка
– Коммуникационные сети
Итог
Легальный домен платформы и его рабочие копии дают участникам защищенный и легкий вход к огромному выбору азартных игр. Солидные подарки, частые акции, квалифицированная помощь и удобные денежные способы создают развлекательный времяпрепровождение крайне комфортным и доходным.
Передовые виртуальные казино обеспечивают игрокам большой спектр возможностей для удобной игры. Тем не менее иногда доступ к базовому сайту может быть закрытым. В таких ситуациях на подмогу приходит Glory, которое предоставляет непрерывный вход ко всем возможностям платформы.
Что такое рабочее зеркало казино
Зеркало — это полная дубликат официального сайта, которая располагается по альтернативному интернет-адресу. Копия имеет все инструментарий основного веб-портала, включая личный кабинет, депозит и данные транзакций.
Главные достоинства эксплуатации зеркала:
– 24-часовой доступ к порталу
– Полная идентичность возможностей
– Сохранность персональных реквизитов
– Сохранение всех имеющихся вознаграждений
Как отыскать актуальное зеркало сегодня
Присутствует несколько проверенных вариантов поиска свежей URL:
Легитимные источники:
1. Электронная рассылка — дирекция периодически отправляет сообщения с действующими URL
2. Коммуникационные сети — проверенные страницы размещают свежую сведения
3. Сервис поддержки — операторы предоставляют безопасные домены
4. Смартфонное приложение — предоставляет избегать блокировки
Регистрация на официальном сайте
Операция регистрации занимает не более немного минут и предполагает из таких этапов:
1. Попадание на лицензионный веб-сайт или актуальное зеркало
2. Нажатие на элемент «Регистрация»
3. Заполнение персональной анкеты
4. Проверка имейл почты или телефонного номера
5. Включение вознаграждения за регистрацию при наличии промокода
Новые геймеры приобретают солидный вступительный приз, который может предполагать фриспины, валютные поощрения или компенсацию.
Доступ в персональный кабинет
Авторизация на портале реализуется стандартным методом. Нужно вписать имя пользователя и секретный ключ, задействованные при создании аккаунта.
Важные аспекты для надежного входа:
– Используйте сложный код
– Задействуйте двухэтапную верификацию
– Не фиксируйте коды на общественных девайсах
– Отслеживайте доменную строку браузера
Характеристика премиальной схемы
Игорный портал награждает игроков всевозможными бонусами и промо:
Приветственный набор
Дебютанты могут полагаться на щедрое награду за стартовый вклад. Традиционно это процентная премия к переведенной величине плюс фриспины для популярных слотов.
Регулярные предложения
– 7-дневный возврат средств — возвращение процентной доли утраченных средств
– Поощрения на последующие взносы
– Специальные промо по праздникам
– Турниры с солидными призовыми суммами
Система привилегий
Активные игроки накапливают пункты за каждую бет, которые затем обмениваются на настоящие средства, фриспины или уникальные преимущества.
Бонус-коды: как использовать
Промокоды — это специальные последовательности символов, гарантирующие доступ к эксклюзивным поощрениям.
В каких местах получить действующие промокоды:
– Проверенные медийные сети казино
– Союзнические ресурсы
– Email-новостная лента
– Профильные форумы
Активируется промокод в отдельное поле при регистрации или зачислении средств депозита.
Мобильная версия и приложение
Нынешние геймеры предпочитают развлекаться с смартфонных аппаратов. Сайт обеспечивает два варианта для приятной смартфонной игры.
Responsive вариант
Онлайн версия сама адаптируется под диагональ монитора. Не просит загрузки и оперирует в всяком современном браузере.
Смартфонное приложение
Получить app можно для гаджетов на Android и iOS. Достоинства app:
– Скоростная запуск
– Надежная действие
– Автоматические-уведомления о промо
– Независимый преодоление блокировок
Процедура установки легок: нужно попасть на ресурс с портативного гаджета и придерживаться указаниям.
Азартный каталог
Коллекция игр содержит несколько тысяч вариантов от топовых разработчиков.
Слоты
Игровые автоматы — крайне популярная раздел игр. Размещены классические винтажные аппараты, актуальные графические аппараты с премиальными уровнями, а также прогрессивные джекпоты.
Live казино
Отдел с реальными крупье предоставляет ощутить дух настоящего казино. Открыты варианты с рулеткой.
Передача осуществляется в превосходном качестве, поддерживается коммуникация с ведущим и остальными пользователями.
Соревнования
Постоянно проводятся состязания по всевозможным дисциплинам. Присоединение дает шанс получить монетарные выигрыши, даровые прокруты или эксклюзивные бонусы.
Платежные манипуляции
Платформа предлагает значительный ассортимент расчетных систем:
– Банковские карты
– Цифровые системы
– Цифровая валюта
– Финансовые транзакты
Минимальная величина вклада — разумная для преобладающего числа геймеров. Обналичивание денег выполняется в короткие временные рамки.
Служба поддержки
Профессиональные специалисты расположены содействовать постоянно. Представлены нижеследующие варианты контакта:
– Веб-чат
– Email
– Мобильная поддержка
– Коммуникационные сети
Разъяснения на распространенные проблемы можно отыскать в разделе FAQ.
Вывод
Главный ресурс казино и его рабочие зеркала предоставляют клиентам совершенный доступ ко всем опциям ресурса. Щедрые поощрения, приятная смартфонная версия, гигантский выбор аттракционов и квалифицированная ассистенция создают игровой времяпрепровождение предельно приятным и надежным.
simple jade store – Browsing here feels smooth thanks to the neat layout.
recommended page – Found this site recently and the structure seems tidy.
pet meds for dogs dog medicine pet meds for dogs
Going Here Nifty NFT
canadian king pharmacy: Certified Canada Rx – pharmacy com canada
Доступ к порталу и функционирующие адреса
Современные онлайн казино предлагают участникам широкий набор игр. Основной ресурс РџРёРЅРєРѕ организует надежный переход ко всем услугам. Однако порой появляются обстоятельства, когда нужно запасной путь авторизации.
Что есть собой рабочее зеркало
Рабочее зеркало — это полная версия официального ресурса с альтернативным URL адресом. Копия сегодня дает возможность миновать потенциальные блокировки и гарантировать постоянный доступ к популярным играм.
Официальное зеркало характеризуется идентичными опциями, что и базовый сайт:
– Весь список развлечений
– Персональный аккаунт с зафиксированными сведениями
– Действующие бонусы и промо
– Надежные финансовые операции
Открытие профиля и авторизация в систему
Процедура оформления на портале требует пару моментов. Свежим участникам нужно:
1. Зайти на функционирующее зеркало на данный момент
2. Нажать опцию «Зарегистрироваться»
3. Ввести нужные сведения
4. Верифицировать электронную почту или номер связи
5. Забрать награду за регистрацию
Авторизация в персональный раздел осуществляется путем ввод логина и ключа.
Анализ призовой структуры
Привлекательная призовая программа — главное козырь ресурса. Игроки забирают разнообразные награды:
Приветственные награды
Новые клиенты имеют возможность рассчитывать на привлекательный поощрение за регистрацию. Как правило это пакет опций, охватывающий:
– Процентную добавку к начальному взносу
– Подарочные кручения
– Дополнительные деньги на баланс
Кодовые комбинации и эксклюзивные опции
Систематические бонусные комбинации обеспечивают зарабатывать дополнительные привилегии. Задействовать их возможно в специальном меню персонального профиля.
Спины и кешбэк
Бесплатные спины — это возможность играть слоты без расходования персональных сумм. Компенсация означает частичный возврат утраченных финансов.
Ассортимент развлечений
Азартная платформа представляет огромную коллекцию слотов.
Игровые машины
Вариативность автоматов впечатляет представление. Представлены классические ретро автоматы и современные автоматы с захватывающей визуализацией.
Live зал
Секция Live развлечений погружает пользователей в среду истинного азартного дома. Опытные операторы ведут сессии в реальном времени.
Конкурсы и таблицы лидеров
Периодические конкурсы обеспечивают остроты и гарантируют перспективу заработать внушительные награды.
Mobile реализация и программа
Современные технологии дают возможность развлекаться в удобном локации. Мобильная реализация автоматически оптимизируется под размер гаджета.
Скачать приложение можно для операционных платформ iOS и Android. Софт дает:
– Мгновенный переход
– Бесперебойную функционирование
– Push-уведомления об акциях
– Простой облик
Платежные операции
Ресурс использует различные способы внесения и получения финансов:
– Банковские счета
– Электронные кошельки
– Криптовалюты
– Финансовые операции
Каждые действия выполняются через надежное протокол, что защищает целостность конфиденциальных данных.
Служба помощи
Компетентная бригада поддержки действует 24/7. Обратиться с менеджерами можно через:
– Живой-чат
– Цифровую почту
– Горячую линию
– Коммуникационные ресурсы
Резюме
Легальный веб-сайт и его функционирующее зеркало предоставляют пользователям защищенный и комфортный доступ к азартным занятиям. Щедрые награды, разнообразный каталог игр и профессиональная сервис создают участие крайне приятной и доходной.
Анализ главного портала
Современные онлайн казино предлагают клиентам широкий набор услуг и перспектив. Основной ресурс 888 предлагает защищенный возможность к гемблинг сервисам.
Действующее зеркало: доступ в настоящий момент
Зеркало является в качестве идентичную дубликат основного веб-сайта. Актуальное зеркало позволяет клиентам миновать вероятные барьеры.
Плюсы задействования зеркала
Принципиальные достоинства включают:
– Постоянный путь к сайту
– Удержание полных опций базового ресурса
– Сохранность конфиденциальных данных
– Такой же функционал
Создание аккаунта на ресурсе
Ход открытия счета характеризуется легкостью и комфортом. Свежие игроки должны:
1. Зайти на главный портал или его зеркало
2. Выбрать на клавишу регистрации
3. Внести обязательные информацию
4. Подтвердить email почту
5. Выполнить начальный логин
Приз за создание аккаунта
Новички зарабатывают внушительный стартовый подарок. Такое награда имеет возможность предусматривать:
– Монетарные бонусы
– Безвозмездные спины
– Увеличенный показатель кэшбека
Доступ в персональный кабинет
Активные клиенты в состоянии быстро авторизоваться в личный аккаунт, эксплуатируя имя пользователя и ключ. Персональный аккаунт обеспечивает возможность к:
– Управлению средствами
– Хронологии операций
– Действующим поощрениям
– Опциям учетной записи
Призы и предложения
Ресурс периодически устраивает различные мероприятия для пользователей.
Разновидности призов
Базовые виды призов:
– Депозитные начисления – часть от размера внесения
– Прокруты – безвозмездные раунды в автоматах
– Компенсация – возмещение фрагмента затраченных сумм
– Конкурсные призы – премии за состязание в конкурсах
Ваучеры
Особые купоны обеспечивают приобрести бонусные преимущества. Участники могут отыскать их на тематических сайтах или приобрести в рассылке.
Переносная вариант и приложение
Современные гемблеры ценят карманный геймплей.
Опции переносной платформы
– Responsive интерфейс для разнообразных аппаратов
– Целостный возможность к развлечениям
– Моментальная работа
– Практичное контроль
Установить софт
Портативное софт доступно для downloading на гаджеты с операционными ОС Android и iOS. Программа предоставляет:
– Устойчивую деятельность
– Пуш сообщения о бонусах
– Моментальный доступ к предпочитаемым слотам
Игровой портфель
Портал обеспечивает огромную галерею гемблинг игр.
Игровые машины
Библиотека развлекательных машин включает:
– Стандартные автоматы
– Современные автоматы
– Призовые игры
– Лицензионные игры
Live дилеры
Область настоящих развлечений дает шанс соревноваться с живыми крупье. Открыты:
– Рулетка
– 21
– Punto Banco
– Карибский покер
Соревнования
Регулярные соревнования дают возможность пользователям соревноваться за внушительные наградные банки. Турнирная система обновляется каждую неделю.
Банковские операции
Платформа обеспечивает разнообразие опций зачисления и получения денег:
– Банковские карты
– Электронные кошельки
– Wire трансферы
– Bitcoin
Абсолютно все операции производятся защищенно с применением передовых систем шифрования.
Сервис support
Профессиональная отдел support трудится без перерыва. Связаться с консультантами возможно через:
– Онлайн чат
– Почтовую почту
– Телефонную линию
– Соц платформы
Секьюрити и лицензирование
Игровой клуб функционирует на основании официальной разрешения. Это удостоверяет:
– Прозрачность игрового процесса
– Сохранность конфиденциальных данных
– Пунктуальные выводы
– Контролируемый гейминг
Заключение
Главный ресурс и его рабочие зеркала предоставляют пользователям совокупный спектр опций для приятной и доходной времяпрепровождения. Значительные призы, разнообразные развлечения, компетентная сервис и безопасная система транзакций создают ресурс превосходным опцией для ценителей азартных развлечений.
look at kettlecrate – Appears minimal and well-structured, making browsing effortless.
quick browse – Just discovered this site, interface seems tidy and simple to explore.
this website – I stumbled upon this page, everything looks organized and straightforward.
Передовые онлайн-казино дают участникам внушительный диапазон возможностей и призовых программ. Вход к площадке производится через официальный ресурс или его актуальное зеркало Глори сайт, что предоставляет непрерывную игру.
Что представляет собой актуальное зеркало казино
Дубликат — это точная реплика основного ресурса, построенная для устранения ограничений. Рабочее зеркало позволяет клиентам иметь соединение к выбранным развлечениям в каждое время.
Лицензионное зеркало содержит всеми опциями главного портала:
– Совокупный перечень слотов
– Личный кабинет с записанными сведениями
– Свежие акции
– Защищенные платежные транзакции
Оформление профиля на основном сайте
Ход регистрации отнимает всего несколько минут. Свежим клиентам следует:
1. Попасть на основной сайт или функционирующее зеркало
2. Щелкнуть на кнопку “Регистрация”
3. Указать нужные параметры
4. Верифицировать контакт
5. Совершить дебютный вклад
Приветственный бонус начисляется моментально после завершения всех этапов.
Подключение в аккаунт
Зарегистрированные клиенты могут осуществить подключение применяя:
– Никнейм и шифр
– Код контакта
– Электронную почту
Аккаунт открывает доступ к администрированию средствами, записям транзакций и действующим акциям.
Награды и кампании
Развлекательная площадка привлекает регулярных пользователей многочисленными призами:
Начальный пакет
– Поощрение на первый взнос до 100%
– Free spins на популярные игры
– Дополнительные бонусы за очередные депозиты
Бонусные коды
Уникальные промокоды предоставляют доступ на получение уникальных призов. Текущие промокоды выставляются в блоке “Акции”.
Кэшбек
Постоянный кешбэк равен до 10% от утраченных финансов. Возврат выплачивается сразу.
Программа лояльности
Постоянные клиенты накапливают очки, которые превращаются на настоящие финансы или фриспины.
Mobile версия и софт
Для удобства пользователей разработана функциональная mobile версия. Приспособленный облик позволяет удобно развлекаться с всякого мобильного девайса.
Преимущества APP:
– Оперативный подключение к развлечениям
– Настроенный облик
– Устойчивая работа
– Push-уведомления о последних бонусах
Скачать софт можно бесплатно с основного ресурса для гаджетов на Android и iOS.
Библиотека игр
Машины
Каталог насчитывает более 2000 машин от известных производителей:
– Стандартные игры
– Video slots
– Прогрессивные автоматы
– Фирменные слоты
Live казино
Секция Live столов предлагает развлечение с настоящими дилерами в живом формате:
– Колесо фортуны
– Блэкджек
– Баккара
– Карточный покер
Турниры
Систематические соревнования с значительными премиальными пулами проводятся каждую неделю. Допуск в конкурсах доступно всем созданным клиентам.
Платежные системы
Депозиты и снятия выплат выполняются через популярные способы оплаты:
– Банковские пластик
– Онлайн счета
– Цифровая валюта
– Денежные транзакции
Наименьший вклад — от 100 рублей. Получение финансов осуществляется в течение 24 периода.
Служба поддержки
Круглосуточная команда поддержки может поддержать в разрешении любых ситуаций:
– Live chat
– Email
– Телефон
– Социальные сети
Безопасность и сертификат
Главный портал работает на фундаменте мировой документа. Каждые сведения игроков обезопасены актуальным SSL-шифрованием.
Заключение
Функционирующее зеркало обеспечивает постоянный доступ к любимым играм, щедрым промокодам и практичным функциям. Присоединяйтесь сегодня и приобретите приветственный поощрение!
I recently checked out this casino https://pta.org.pl/ and was surprised by how stable everything felt. The games run fast, bonuses are transparent, and navigation is user-friendly, making the experience enjoyable.
Передовые онлайн-казино предоставляют игрокам массу вариантов для приятной игры. Официальный сайт Бет Андреас казино открывает путь ко всем сервисам и развлечениям. Однако при появлении системных сложностей на выручку приходят действующие дубликаты.
Что являет собой собой актуальное зеркало
Дубликат казино — это точная дубликат главного веб-сайта, размещенная по запасному URL. Легитимное зеркало сохраняет все опции, в том числе создание аккаунта, доступ в личный кабинет, поощрения и промокоды.
Копия на сегодня обеспечивает:
– Непрерывный путь к азартным аппаратам
– Совершенную безопасность индивидуальных данных
– Сохранение депозита и хронологии платежей
– Применимость всех акций
Регистрация на главном ресурсе
Процедура создания аккаунта занимает несколько минут. Новоиспеченным клиентам нужно:
1. Перейти на официальный портал или актуальное зеркало
2. Щелкнуть кнопку «Создать аккаунт»
3. Ввести необходимые данные
4. Активировать email почту
5. Указать кодовое слово при наличии
После окончания оформления профиля клиенты зарабатывают вознаграждение за регистрацию, который может иметь бонусные спины или денежно-призовое вознаграждение.
Логин в персональный кабинет
Личный кабинет открывает всеобъемлющий мониторинг над игровым процессом. Через персональный кабинет возможно:
– Вносить средства на баланс
– Выводить выплаты
– Применять кодовые слова
– Проверять хронологию пари
– Соревноваться в соревнованиях
– Получать кэшбек
Обзор премий и промо-предложений
Великодушная поощрительная схема — важное козырь казино. Ключевые виды поощрений:
Вступительный бонус
Начинающие обретают богатое вознаграждение на дебютные депозиты. Величина премии может достигать 100-200% от размера пополнения.
Бесплатные вращения
Бесплатные прокруты предоставляются для популярных автоматов. Сумма free spins колеблется от 10 до 500 штук.
Кешбэк
Регулярный или помесячный откат процентной доли потерянных финансов. Обычный процент кэшбека — 5-15%.
Конкурсы
Регулярные состязания с внушительными наградными банками. Игроки борются за верхние места в таблице лидеров.
Смартфонная версия и программа
Смартфонная версия обеспечивает развлекаться с каждого аппарата. Клиенты могут закачать софт для iOS и Android или применять интернет версию.
Выгоды портативного программы:
– Молниеносная подзагрузка слотов
– Комфортный UI
– Пуш-нотификации о акциях
– Возможность входа через биометрию
Автоматы и Live казино
Развлекательная база насчитывает тысячи позиций от лидирующих разработчиков.
Топовые типы автоматов:
– Классические слоты
– Видеослоты с бонусными уровнями
– Накопительный приз автоматы
– Мега-путь слоты
Live казино
Раздел live игорный зал предлагает игру с реальными дилерами. Есть стандартные игры:
– Американская рулетка
– Блэкджек
– Baccarat
– Покер
Как обнаружить актуальное зеркало
Найти свежую линк на зеркало можно множественными способами:
1. Оформить подписку на email-рассылку
2. Мониторить за апдейтами в социальных сетях
3. Контактировать в службу поддержки
4. Запомнить актуальное зеркало в закладки
Вывод
Официальный сайт и его рабочие копии гарантируют стабильный доступ к игровым слотам. Богатые премии, разнообразные бонусные коды, эргономичное мобильное софт и качественная служба поддержки обеспечивают развлекательный геймплей максимально комфортным и конфиденциальным.
mostbet регистрация Киргизия mostbet регистрация Киргизия
статьи про seo статьи про seo .
как зарегистрироваться в мостбет как зарегистрироваться в мостбет
мелстрой казино официальный сайт мелстрой казино официальный сайт .
интернет маркетинг статьи seo-blog15.ru .
ссылка на сайт водка бэт
Современные онлайн-казино предоставляют игрокам обширный спектр развлечений и заманчивые поощрения. Однако для беспроблемной времяпрепровождения важно осознавать, как получить доступ к 888старз и его функционирующие зеркала.
Что такое основной сайт казино
Основной ресурс казино — это первичная платформа, где игроки могут развлекаться развлекательными слотами. Портал оперирует на законных основаниях и обладает всеми обязательными разрешениями.
Первостепенные преимущества официального ресурса:
– Безопасность личных данных
– Честные положения участия
– Гарантированные транзакции
– Квалифицированная помощь
Рабочее зеркало казино: для чего используется
Альтернативный адрес — это точная копия основного веб-сайта, хостящаяся по альтернативному адресу. Действующее зеркало запускается для обеспечения бесперебойного подключения к платформе.
Факторы применения дублирующих ресурсов:
– Запрет главного сайта
– Технические работы
– Значительная активность на систему
Как отыскать актуальное зеркало сегодня
Обнаружить актуальное проверенное зеркало можно множественными способами:
1. Почтовые оповещения — активируйте уведомления на информационную доставку
2. Команда поддержки — проконсультируйтесь в онлайн-чат
3. Официальные площадки — мониторьте за постами
4. Специализированные сайты — достоверные источники
Открытие счета на портале казино
Алгоритм открытия счета занимает буквально считанные секунд:
1. Нажмите на опцию “Зарегистрироваться”
2. Заполните запрашиваемые поля
3. Подтвердите электронную ящик
4. Используйте бонусный код, если есть
Вслед за финализированной регистрации вам будет доступен персональный кабинет.
Награды и коды активации
Щедрая бонусная система — важное достоинство казино:
Бонус за открытие счета
Первичные участники зарабатывают начальный презент, который может включать:
– Денежный кредит на начальный взнос
– Free spins для слотов
– Бездепозитные фонды
Промокоды
Периодически публикуются новые коды, обеспечивающие использовать дополнительные привилегии.
Схема компенсации
Активные игроки получают процент проигранных денег на счет.
Действующие промо и турниры
Сайт периодически проводит азартные кампании:
– Weekly чемпионаты
– Специальные акции
– Конкурсы солидных подарков
– Программа статусов
Вход в личный аккаунт
Для доступа на портал нужно:
1. Загрузить главный адрес или действующее зеркало
2. Кликнуть “Авторизация”
3. Внести email и ключ
В личном разделе открыты следующие возможности:
– Зачисление кошелька
– Снятие средств
– Проверка архива транзакций
– Редактирование профильными данными
Адаптивная версия и софт
Адаптивная модификация
Адаптивная модификация портала предоставляет шанс развлекаться с разных портативного устройства. Оформление автоматически оптимизируется под размер монитора.
Приложение для скачивания
Загрузить app можно для:
– Android — прямая download с портала
– iOS — инсталляция через App Store
Преимущества app:
– Быстрый доступ
– Бесперебойная работа
– Push-оповещения об предложениях
– Оптимизированный функционал
Игровые секции
Автоматы
Внушительная библиотека развлекательных барабанов от лучших провайдеров:
– Традиционные автоматы
– Новые-игры
– Джекпот-машины
Live casino
Категория с настоящими ведущими дает:
– Рулеточные столы
– Блэкджек
– Baccarat
– Покер
Трансляции ведутся в превосходном качестве изображения, создавая эффект аутентичного казино.
Методы внесения средств и вывода
Сайт принимает различные платежные методы:
– Банковские card
– Цифровые счета
– Криптовалюты
– Прямые транзиты
Стартовые суммы внесения и моментальные платежи создают процесс исключительно беспроблемной.
Команда техподдержки
Опытная команда support функционирует 24/7 и в состоянии поддержать с различными задачами:
– Онлайн-чат
– Email-помощь
– Phone горячая линия
Итоги
Главный сайт казино и его актуальные копии обеспечивают клиентам защищенный и увлекательный игровой опыт. Привлекательные поощрения, простая адаптивная модификация, обширные слоты и профессиональное live-казино формируют эту площадку отличным местом для азартных времяпрепровождения.
Описание основного портала
Современное онлайн-казино предоставляет своим игрокам большой спектр развлечений и вознаграждений. Главный веб-сайт Мотор казино функционирует круглосуточно, предоставляя вход к известным слотам, live-казино и обширным промо.
Функционирующее зеркало: путь к порталу
Что такое зеркало казино
Копия составляет собой точную реплику главного портала с отличным сетевым названием. Актуальное зеркало дает пользователям обходить ограничения и сохранять постоянный вход к любимым автоматам.
Как получить актуальное зеркало сегодня
Актуальные URL на основное зеркало размещаются через:
– E-mail оповещение
– Главные социальные сети
– Команду обслуживания
– Партнерские площадки
Созданиеаккаунта на ресурсе
Ход созданияаккаунта
Оформление длится пару минут и включает следующие действия:
1. Открытие на основной сайт или действующее зеркало
2. Активация опции “Открытьсчет”
3. Указание личных сведений
4. Активация аккаунта или номера
5. Придумывание ключа
Бонус за открытиесчета
Свежие участники приобретают выгодные начальные бонусы:
– Игровые деньги на аккаунт
– Бесплатныевращения для автоматов
– Увеличенный процент кэшбека
– Особые купоны
Доступ в собственный аккаунт
Зарегистрированные клиенты могут произвести вход через официальный портал или актуальное зеркало. Для этого требуется ввести никнейм и ключдоступа, установленные при регистрации.
Функции персонального кабинета
В индивидуальном аккаунте имеются следующие инструменты:
– Управление учетными сведениями
– Пополнение баланса
– Обналичивание призов
– Применение бонусов
– Проверка журнала игр
– Включение в конкурсах
Подарки и акции
Категории поощрений
Казино балует своих клиентов многочисленными поощрительными системами:
– Приветственный пакет — щедрые бонусы на первые пополнения
– Freespins — дополнительные спины в рейтинговых слотах
– Кешбэк — периодический откат части убытков
– План VIP — специальные льготы для регулярных клиентов
Промокоды и их использование
Уникальные промокоды обеспечивают экстра подарки. Для использования требуется набрать шифр в соответствующее окно в собственном аккаунте.
Игровой ассортимент
Симуляторы
Библиотека слотовых слотов включает сотни позиций от ведущих поставщиков:
– Традиционные симуляторы
– Видео развлечения
– Прогрессивные автоматы
– Брендовые слоты
Live казино
Область Live-казино дарит игру с настоящими ведущими в условиях онлайн времени:
– Рулетка
– Блэкджек
– Baccarat
– Покер
Конкурсы
Регулярные соревнования с большими выигрышными пулами проходят регулярно. Соревнующиеся борются за лидерство в рейтинге.
Портативная реализация и приложение
Мобильная версия ресурса
Главный ресурс абсолютно приспособлен для портативных устройств. Участники способны запускать игры сразу через обозреватель без нужды скачивания.
APP для скачивания
Официальное портативное APP предлагается для скачивания на девайсы с базовыми средами Android и iOS. APP гарантирует:
– Мгновенный вход к слотам
– Устойчивую работу
– Моментальные-уведомления о предложениях
– Удобный интерфейс
Вывод
Главный ресурс казино и его действующие дубликаты дают игрокам полный вход к качественным игровым развлечениям. Щедрые поощрения, разнообразные кампании, удобная мобильная адаптация и профессиональная служба делают развлекательный досуг максимально удобным и доходным.
erectile dysfunction medications online: buy erectile dysfunction treatment – ed pills for sale
More than 65,000 citizens live in the Mob4Hire society in 185 nations and have thousands of
different equipment. True world regional duties and checks
are performed by society members using their own devices on their nearby networks.
In exchange for fair give, individuals take a
variety of checks and jobs. sinva.vn/author/mikel765309943/ https://git.afonsosoares.com/willydebernale/mob4hire6948/wiki/What-Is-Alpha-Tester-Feedback-Used-For%2C-And-How-Similar-Is-It-To-Both-People%3F
Подключение к порталу через рабочие зеркала
Актуальные интернет казино гарантируют геймерам постоянный переход к сервисам. Главный веб-сайт Glory казино оперирует устойчиво, обеспечивая обширный набор азартных автоматов. Но иногда возникают программные трудности или ограничения, потому важно понимать о присутствии функционирующих зеркал.
Что представляет из себя основное зеркало казино
Зеркало — это полная реплика основного веб-сайта с схожим возможностями. Рабочее зеркало сегодня даёт возможность обходить региональные запреты и продолжать гемблинг.
Принципиальные выгоды задействования зеркал:
– Стопроцентный переход к личному кабинету
– Фиксация любых показателей профиля
– Схожий спектр слотов
– Действующие привилегии и кампании
Открытие счёта на платформе
Процедура создания аккаунта длится несколько минут. Недавние пользователи обретают привлекательный поощрение за создание счёта, который может вмещать:
– Стартовый финансовый бонус
– Безвозмездные спины для игр
– Эксклюзивные коды
– Повышенный кешбэк
Ради выполнения создания аккаунта следует:
1. Войти на официальный сайт или альтернативу
2. Щёлкнуть клавишу «Создать аккаунт»
3. Написать персональные информацию
4. Активировать email или номер
5. Применить купон (при наличии)
Авторизация в персональный кабинет
Следом за удачной записи игроки имеют возможность производить подключение с помощью центральный портал или действующее зеркало. Индивидуальный кабинет обеспечивает безграничный управление над профилем:
– Летопись игр
– Ввод кошелька
– Получение средств
– Контроль бонусами
– Присутствие в турнирах
Бонусы и предложения казино
Ресурс награждает пользователей многочисленными бонусными предложениями:
Начальные поощрения
Новички обретают богатый набор привилегий на начальные депозиты. Как правило это охватывает процентную прибавку к объёму депозита плюс бесплатные спины.
Регулярные кампании
– Еженедельный возврат до 15%
– Конкурсы с призовыми фондами
– Бонусы на годовщину рождения
– Уникальные промо для статусных клиентов
Схема лояльности
Постоянные клиенты зарабатывают очки, что можно конвертировать на настоящие призы или специальные бонусы.
Портативная версия и программа
Актуальные разработки позволяют участвовать в любом месте подходяще. Смартфонная форма ресурса независимо адаптируется под размер каждого девайса.
Достоинства карманного приложения:
– Быстрая загрузка развлечений
– Эргономичный облик
– Моментальные-нотификации о промо
– Опция скачать для Android и iOS
Живое казино: антураж истинного гемблинг учреждения
Секция Live клуба переносит пользователей в атмосферу настоящего развлекательного учреждения. Квалифицированные крупье проводят процесс в состоянии актуального времени.
Имеющиеся игры:
– Американская рулетка
– Двадцать одно
– Карточная игра
– Покер
Барабаны и игровые автоматы
Каталог игровых слотов насчитывает тысячи названий от ведущих провайдеров. Произвольный игрок подберёт развлечение по желанию:
– Традиционные машины
– Современные автоматы с дополнительными раундами
– Джекпот-машины
– Динамические слоты
Конкурсы и акции
Систематические соревнования добавляют азарт и открывают опцию заработать значительные суммы. Вовлечение в состязаниях регулярно комплиментарное, а призовые банки насчитывают больших величин.
Охрана и приватность
Сайт применяет передовые протоколы защиты для защиты реквизитов геймеров. Любые транзакционные транзакции осуществляются через безопасные протоколы.
Заключение
Основной ресурс и его действующие зеркала дают надёжный доступ к отличным гемблинг играм. Щедрые призы, эргономичная мобильная версия, богатство автоматов и квалифицированное Live-заведение создают портал отличным вариантом для ценителей азартных слотов.
securia – Content reads clearly, helpful examples made concepts easy to grasp.
Переход к платформе через действующие зеркала
Современные интернет казино гарантируют пользователям постоянный переход к играм. Центральный ресурс Cactus Casino действует бесперебойно, обеспечивая широкий выбор гемблинг развлечений. Тем не менее порой появляются программные проблемы или блокировки, поэтому важно иметь представление о доступности действующих зеркал.
Что является из себя центральное зеркало казино
Копия — это полная копия главного портала с идентичным возможностями. Актуальное зеркало в настоящее время обеспечивает преодолевать территориальные блокировки и возобновлять игру.
Принципиальные достоинства использования зеркал:
– Абсолютный переход к индивидуальному кабинету
– Удержание всех данных счёта
– Схожий ассортимент слотов
– Свежие вознаграждения и предложения
Открытие счёта на портале
Механизм создания аккаунта занимает немного минут. Недавние игроки приобретают привлекательный бонус за оформление, что имеет возможность включать:
– Начальный денежный приз
– Безвозмездные спины для слотов
– Специальные промокоды
– Расширенный кэшбек
С целью окончания создания аккаунта нужно:
1. Переместиться на официальный ресурс или зеркало
2. Кликнуть опцию «Зарегистрироваться»
3. Ввести личные информацию
4. Активировать email или контакт
5. Активировать код (когда имеется присутствии)
Вход в персональный кабинет
По завершении правильной регистрации пользователи могут производить авторизацию через центральный портал или актуальное зеркало. Персональный кабинет предоставляет полный контроль над профилем:
– Летопись транзакций
– Зачисление счёта
– Снятие выигрышей
– Контроль наградами
– Включение в конкурсах
Награды и кампании казино
Портал удовлетворяет пользователей многочисленными поощрительными предложениями:
Начальные подарки
Новые игроки зарабатывают великодушный набор привилегий на первые депозиты. Как правило это включает пропорциональную надбавку к величине депозита плюс безвозмездные спины.
Периодические кампании
– Раз в неделю кешбэк до 15%
– Турниры с призовыми фондами
– Бонусы на день рождения
– Особые акции для элитных пользователей
План лояльности
Регулярные игроки собирают единицы, они допустимо трансформировать на подлинные призы или особые льготы.
Портативная форма и программа
Передовые разработки дают возможность участвовать везде удобно. Портативная редакция сайта независимо приспосабливается под дисплей любого аппарата.
Достоинства карманного ПО:
– Быстрая открытие слотов
– Эргономичный облик
– Push-сообщения о акциях
– Способность скачать для Android и iOS
Живое казино: среда истинного развлекательного клуба
Секция Live заведения доставляет игроков в обстановку подлинного игорного дома. Опытные операторы управляют действие в состоянии актуального времени.
Предлагаемые варианты:
– Европейская рулетка
– Двадцать одно
– Карточная игра
– Техасский холдем
Автоматы и игровые слоты
Ассортимент развлекательных машин насчитывает сотни позиций от топовых производителей. Любой пользователь найдёт игру по желанию:
– Стандартные барабаны
– Новые слоты с призовыми турами
– Накопительный-слоты
– Megaways слоты
Соревнования и лотереи
Систематические соревнования добавляют драйв и открывают шанс заработать значительные вознаграждения. Участие в состязаниях зачастую бесплатное, а наградные суммы составляют внушительных величин.
Защита и анонимность
Ресурс эксплуатирует инновационные методы защиты для гарантии данных пользователей. Любые транзакционные действия выполняются через безопасные соединения.
Итог
Официальный ресурс и его актуальные зеркала дают стабильный вход к отличным азартным сервисам. Щедрые бонусы, эргономичная карманная версия, многообразие слотов и квалифицированное Live-заведение делают сайт превосходным вариантом для любителей азартных автоматов.
Quality posts is the crucial to attract the viewers
to pay a quick visit the website, that’s what this site is
providing.
my page – 수원호빠
this site – Just visited this platform, navigation is smooth and products are easy to locate.
codefuse – Found practical insights today; sharing this article with colleagues later.
seo продвижение сайта по трафику кловер prodvizhenie-sajtov-po-trafiku7.ru .
harborwharf store – Clean interface and easy navigation make browsing enjoyable.
https://certifiedcanadarx.shop/# canadian pharmacy king
интернет зеркало водка бет
Обзор основного сайта
Актуальные онлайн казино обеспечивают игрокам разнообразный спектр игр и опций. Главный сайт РёРіСЂС‹ EzCash предоставляет проверенный вход к азартным возможностям.
Рабочее зеркало: возможность прямо сейчас
Резервный сайт представляет собой полную дубликат официального веб-сайта. Проверенное зеркало помогает участникам обходить возможные ограничения.
Преимущества применения зеркала
Принципиальные достоинства включают:
– Беспрерывный шанс к порталу
– Сохранение абсолютно всех опций главного сайта
– Безопасность конфиденциальных информации
– Аналогичный возможности
Создание аккаунта на сайте
Процесс создания аккаунта знаменуется доступностью и удобством. Недавние клиенты требуется:
1. Зайти на основной сайт или его зеркало
2. Нажать на кнопку создания аккаунта
3. Указать нужные данные
4. Подтвердить электронную почту
5. Выполнить начальный вход
Приз за создание аккаунта
Новые игроки приобретают щедрый вступительный бонус. Подобное поощрение в состоянии предусматривать:
– Материальные бонусы
– Complimentary прокруты
– Повышенный коэффициент кэшбэка
Доступ в собственный кабинет
Активные участники могут быстро зайти в свой профиль, задействуя учетные данные и шифр. Личный аккаунт предлагает путь к:
– Администрированию депозитом
– Журналу переводов
– Действующим призам
– Параметрам учетной записи
Призы и акции
Сайт регулярно устраивает всевозможные предложения для участников.
Виды подарков
Ключевые формы призов:
– Пополнительные бонусы – доля от объема внесения
– Бесплатные вращения – безвозмездные раунды в слотах
– Кэшбэк – компенсация процента проигранных средств
– Турнирные вознаграждения – призы за участие в турнирах
Купоны
Особые коды дают возможность активировать экстра привилегии. Клиенты способны обнаружить их на аффилиатных площадках или приобрести в новостях.
Мобильная адаптация и софт
Актуальные игроки любят карманный геймплей.
Возможности портативной платформы
– Адаптивный дизайн для разнообразных гаджетов
– Абсолютный вход к слотам
– Моментальная загрузка
– Эргономичное использование
Download софт
Мобильное приложение доступно для загрузки на девайсы с рабочими системами Android и iOS. App предоставляет:
– Надежную деятельность
– Push алерты о призах
– Моментальный вход к избранным автоматам
Азартный ассортимент
Казино предоставляет огромную коллекцию развлекательных услуг.
Игровые машины
Ассортимент развлекательных автоматов включает:
– Обычные игры
– Современные автоматы
– Джекпотные автоматы
– Лицензионные развлечения
Live дилеры
Раздел лайв развлечений дает шанс состязаться с настоящими крупье. Доступны:
– Американская рулетка
– Блек-джек
– Punto Banco
– Poker
Турниры
Регулярные чемпионаты помогают клиентам конкурировать за солидные денежные суммы. Турнирная структура модифицируется постоянно.
Платежные действия
Сайт предлагает массу опций внесения и обналичивания денег:
– Кредитные карточки
– Виртуальные счета
– Банковские транзакции
– Криптовалюты
Абсолютно все транзакции производятся защищенно с использованием современных систем шифрования.
Сервис помощи
Компетентная служба помощи действует круглосуточно. Связаться с менеджерами доступно через:
– Живой чат
– Электронную почту
– Контактный номер
– Соц медиа
Секьюрити и регулирование
Портал работает на основании легальной сертификата. Подобное гарантирует:
– Легальность игрового действа
– Защиту конфиденциальных сведений
– Оперативные выплаты
– Ответственный игровой процесс
Итог
Официальный портал и его функционирующие дубликаты обеспечивают участникам совокупный комплекс возможностей для удобной и выгодной времяпрепровождения. Внушительные призы, разнообразные игры, опытная служба и надежная инфраструктура операций формируют портал лучшим вариантом для фанатов игровых развлечений.
Нынешние интернет казино дают геймерам огромный выбор опций для удобной игры. Впрочем иногда подключение к базовому ресурсу может стать недоступным. В таких моментах на помощь спешит Kush, которое гарантирует бесперебойный доступ ко всем опциям платформы.
Что такое актуальное зеркало казино
Дубликат — это идентичная копия официального сайта, которая находится по другому URL. Зеркало сохраняет полный возможности первоначального ресурса, включая индивидуальный кабинет, баланс и запись платежей.
Основные плюсы использования зеркала:
– Непрерывный соединение к порталу
– Максимальная идентичность инструментов
– Конфиденциальность личных информации
– Хранение всех бонусов
Как найти действующее зеркало на текущий день
Есть множество надежных путей поиска актуальной адреса:
Легитимные каналы:
1. Имейл рассылка — администрация постоянно пересылает уведомления с актуальными URL
2. Социальные сети — официальные страницы публикуют текущую данные
3. Департамент поддержки — сотрудники сообщают проверенные адреса
4. Смартфонное приложение — позволяет избегать блокировки
Создание аккаунта на лицензионном веб-сайте
Процесс регистрации требует лишь пару минут и содержит из данных этапов:
1. Переход на основной ресурс или действующее зеркало
2. Клик на клавишу «Открыть счет»
3. Ввод пользовательской бланка
4. Подтверждение электронной почты или сотового номера
5. Активация привилегии за регистрацию при доступности промокода
Новые пользователи зарабатывают солидный стартовый подарок, который может охватывать фриспины, валютные поощрения или возврат средств.
Доступ в пользовательский кабинет
Авторизация на портале производится обычным способом. Нужно внести имя пользователя и пароль, использованные при создании аккаунта.
Ключевые детали для безопасного входа:
– Эксплуатируйте сложный пароль
– Запустите двухэтапную идентификацию
– Не записывайте реквизиты на посторонних гаджетах
– Контролируйте URL строку браузера
Анализ наградной схемы
Казино награждает клиентов многочисленными бонусами и кампаниями:
Начальный набор
Начинающие способны надеяться на щедрое поощрение за стартовый вклад. Зачастую это долевая прибавка к внесенной сумме плюс фриспины для известных слотов.
Периодические промо
– Недельный cashback — возвращение процента проигранных средств
– Поощрения на очередные депозиты
– Специальные акции по знаменательным датам
– Соревнования с крупными премиальными суммами
Программа верности
Активные игроки получают единицы за любую ставку, которые затем меняются на настоящие финансы, фриспины или специальные преимущества.
Купоны: как применять
Промокоды — это специальные сочетания знаков, предоставляющие доступ к бонусным бонусам.
Каким образом найти действующие промокоды:
– Проверенные медийные сети казино
– Союзнические сайты
– Email-подписка
– Специализированные группы
Активируется промокод в отдельное поле при открытии счета или пополнении депозита.
Телефонная версия и приложение
Нынешние пользователи отдают предпочтение делать ставки с смартфонных аппаратов. Платформа предлагает пару варианта для беспроблемной смартфонной игры.
Мобильная модификация
Онлайн версия сама адаптируется под параметры дисплея. Не нуждается установки и работает в каждом современном браузере.
Смартфонное приложение
Установить приложение можно для девайсов на Android и iOS. Достоинства app:
– Быстрая активация
– Бесперебойная работа
– Всплывающие-уведомления о промо
– Автономный избегание блокировок
Операция инсталляции прост: достаточно открыть на веб-сайт с портативного девайса и выполнять указаниям.
Азартный выбор
Библиотека слотов содержит тысячи вариантов от передовых провайдеров.
Слоты
Игровые автоматы — максимально распространенная категория развлечений. Представлены обычные простые автоматы, актуальные видео-автоматы с дополнительными уровнями, а также растущие призы.
Live казино
Отдел с реальными раздающими позволяет испытать антураж настоящего казино. Представлены варианты с блэкджеком.
Вещание осуществляется в HD разрешении, имеется коммуникация с крупье и остальными пользователями.
Турниры
Регулярно организуются соревнования по разным дисциплинам. Присоединение позволяет завоевать денежные призы, бесплатные вращения или особые презенты.
Транзакционные манипуляции
Платформа предоставляет широкий ассортимент финансовых способов:
– Пластиковые карты
– Цифровые кошельки
– Крипта
– Счетовые платежи
Минимальная величина депозита — доступная для основной части клиентов. Вывод средств обрабатывается в короткие интервалы.
Департамент поддержки
Компетентные специалисты настроены поддержать 24/7. Имеются нижеследующие варианты связи:
– Интернет-чат
– Email
– Мобильная горячая линия
– Социальные сети
Ответы на частые проблемы можно обнаружить в разделе FAQ.
Заключение
Лицензионный ресурс казино и его функционирующие зеркала дают пользователям совершенный вход ко всем сервисам ресурса. Солидные поощрения, комфортная портативная версия, огромный коллекция игр и опытная ассистенция формируют гемблинг времяпрепровождение исключительно комфортным и конфиденциальным.
which internet partner prodvizhenie-sajtov-po-trafiku6.ru .
gladecrate hub – Layout is intuitive and browsing items feels smooth and easy.
оптимизация сайта блог seo-blog16.ru .
this online shop – Noticed this site today and the layout appears very organized.
devonic – Pages loaded fast, images appeared sharp, and formatting stayed consistent.
jade crate store – This place looks like it might have a few unique things to check out.
перейти на сайт зеркало водка бет
visit fireflyfind – Content is well-organized and navigating through products is smooth.
creekvendor deals page – Well-laid-out site that makes exploring products simple and easy.
Анализ официального портала
Новое онлайн-казино дарит своим клиентам разнообразный выбор игр и призов. Официальный сайт EzCash функционирует круглосуточно, давая вход к популярным играм, live-казино и обширным акциям.
Функционирующее зеркало: вход к платформе
Что такое альтернатива казино
Копия составляет собой абсолютную версию оригинального сайта с отличным интернет названием. Действующее зеркало позволяет пользователям избегать запреты и сохранять постоянный путь к любимым слотам.
Как найти рабочее зеркало сегодня
Свежие ссылки на официальное зеркало размещаются через:
– Электронную подписку
– Главные коммуникационные сети
– Команду сопровождения
– Affiliated порталы
Регистрация на портале
Ход регистрации
Оформление требует несколько минут и содержит следующие этапы:
1. Переход на основной ресурс или функционирующее зеркало
2. Выбор кнопки “Открытьсчет”
3. Внесение контактных информации
4. Активация адреса или мобильного
5. Установка секретнойкомбинации
Подарок за оформление
Начинающие пользователи зарабатывают солидные приветственные подарки:
– Денежные средства на аккаунт
– Freespins для автоматов
– Повышенный размер кешбэка
– Эксклюзивные промокоды
Авторизация в личный кабинет
Действующие участники имеютвозможность осуществить авторизацию через официальный ресурс или текущее зеркало. Для этого необходимо набрать учетноеимя и пароль, придуманные при регистрации.
Инструменты собственного раздела
В собственном разделе доступны следующие возможности:
– Контроль личными сведениями
– Пополнение счета
– Получение призов
– Активация купонов
– Проверка истории игр
– Регистрация в конкурсах
Поощрения и кампании
Разновидности подарков
Казино балует своих клиентов всевозможными поощрительными предложениями:
– Начальный пакет — солидные подарки на начальные взносы
– Фриспины — дополнительные вращения в известных симуляторах
– Кешбэк — периодический компенсация суммы ставок
– Схема верности — эксклюзивные бонусы для активных участников
Коды и их ввод
Особые коды предоставляют бонусные бонусы. Для ввода требуется внести последовательность в нужное поле в индивидуальном разделе.
Азартный набор
Слоты
Каталог игровых слотов включает множество позиций от топовых поставщиков:
– Стандартные слоты
– Новые игры
– Призовые автоматы
– Лицензионные игры
Live казино
Раздел Live-казино обеспечивает участие с профессиональными дилерами в условиях реального трансляции:
– Рулетка
– Blackjack
– PuntoBanco
– Casinopoker
Состязания
Периодические турниры с внушительными выигрышными фондами проходят еженедельно. Соревнующиеся сражаются за первенство в списке.
Портативная адаптация и приложение
Мобильная адаптация сайта
Оригинальный ресурс целиком оптимизирован для мобильных девайсов. Клиенты могут запускать развлечения напрямую через веб-навигатор без необходимости установки.
Софт для установки
Фирменное смартфонное приложение имеется для скачивания на устройства с программными системами Android и iOS. Приложение предоставляет:
– Моментальный подход к развлечениям
– Надежную работу
– Моментальные-извещения о акциях
– Комфортный дизайн
Заключение
Основной сайт казино и его актуальные альтернативы обеспечивают участникам полный возможность к качественным игровым развлечениям. Щедрые бонусы, всевозможные предложения, простая мобильная реализация и компетентная служба превращают азартный опыт максимально приятным и выгодным.
pet meds for dogs: Vet Rx Index – discount pet meds
Доступ к сайту и функционирующие адреса
Современные онлайн казино обеспечивают пользователям большой ассортимент игр. Официальный сайт казино EzCash организует безопасный переход ко всем услугам. При этом периодически появляются случаи, когда требуется резервный вариант входа.
Что являет собой собой актуальное зеркало
Действующее зеркало — это абсолютная версия основного портала с альтернативным URL адресом. Зеркало сегодня помогает обходить потенциальные барьеры и поддерживать стабильный доступ к предпочитаемым автоматам.
Легальное зеркало обладает теми же возможностями, что и базовый веб-сайт:
– Совокупный перечень развлечений
– Личный аккаунт с актуальными данными
– Полные бонусы и программы
– Безопасные денежные действия
Создание аккаунта и подключение в платформу
Этап создания профиля на ресурсе отнимает несколько минут. Начинающим игрокам необходимо:
1. Открыть на рабочее зеркало сегодня
2. Щелкнуть элемент «Зарегистрироваться»
3. Заполнить необходимые информацию
4. Подтвердить почтовую почту или контакт связи
5. Активировать подарок за оформление
Подключение в собственный кабинет производится через ввод имени пользователя и секретной комбинации.
Характеристика бонусной структуры
Привлекательная призовая программа — основное преимущество казино. Участники получают всевозможные награды:
Стартовые награды
Недавние клиенты вправе претендовать на выгодный бонус за оформление. Традиционно это пакет предложений, охватывающий:
– Процентную премию к дебютному взносу
– Безвозмездные кручения
– Призовые финансы на баланс
Купоны и эксклюзивные возможности
Периодические коды помогают активировать дополнительные льготы. Активировать их можно в отдельном поле личного кабинета.
Спины и кешбэк
Даровые вращения — это возможность крутить игры без задействования собственных финансов. Кэшбек предполагает долевой возврат потерянных сумм.
Каталог развлечений
Игровая ресурс обеспечивает впечатляющую подборку автоматов.
Видеослоты
Вариативность слотов впечатляет представление. Доступны классические простые машины и новые видеослоты с захватывающей анимацией.
Live казино
Категория Live развлечений помещает пользователей в среду подлинного игорного дома. Профессиональные крупье ведут игры в живом эфире.
Конкурсы и доски почета
Периодические турниры привносят драйва и гарантируют шанс заработать внушительные призы.
Mobile версия и программа
Новые технологии помогают участвовать в любимом месте. Портативная вариант независимо подстраивается под дисплей устройства.
Скачать программу возможно для программных сред iOS и Android. Клиент гарантирует:
– Мгновенный доступ
– Устойчивую функционирование
– Push-сообщения об бонусах
– Комфортный дизайн
Финансовые транзакции
Платформа принимает многочисленные варианты внесения и изъятия сумм:
– Пластиковые карты
– Виртуальные системы
– Токены
– Прямые транзакции
Всевозможные операции проходят через надежное соединение, что подтверждает целостность персональных сведений.
Департамент поддержки
Квалифицированная группа ассистанса трудится 24/7. Обратиться с операторами возможно через:
– Live-чат
– Почтовую почту
– Контакт
– Общественные каналы
Заключение
Официальный веб-сайт и его актуальное зеркало предоставляют участникам защищенный и удобный вход к увлекательным играм. Богатые награды, большой ассортимент автоматов и профессиональная сервис создают времяпрепровождение максимально комфортной и выгодной.
I constantly spent my half an hour to read this website’s articles daily along with
a cup of coffee.
Stop by my homepage … 수원가라오케
cloudiva – Bookmarked this immediately, planning to revisit for updates and inspiration.
stackora – Mobile version looks perfect; no glitches, fast scrolling, crisp text.
Good afternoon!
Unlock society mysterious structures with interesting and valuable cultural facts and decode how communities function see on the website for sociology texts
Full information on the link – https://33capy.site
All the best and development in business!
junomarket deals page – The layout is clean and products are easy to find.
kubexa – Color palette felt calming, nothing distracting, just focused, thoughtful design.
Вход к ресурсу и функционирующие адреса
Популярные сетевые казино предоставляют игрокам огромный набор игр. Главный ресурс Gama гарантирует надежный вход ко всем возможностям. При этом периодически появляются ситуации, когда нужно альтернативный путь доступа.
Что представляет собой действующее зеркало
Действующее зеркало — это полная дубликат официального ресурса с запасным сетевым расположением. Копия сегодня позволяет обходить вероятные запреты и гарантировать стабильный переход к предпочитаемым развлечениям.
Главное зеркало обладает всеми характеристиками, что и основной ресурс:
– Весь каталог игр
– Собственный кабинет с актуальными информацией
– Полные награды и предложения
– Защищенные денежные переводы
Создание аккаунта и подключение в систему
Ход открытия аккаунта на платформе требует пару минут. Начинающим игрокам необходимо:
1. Перейти на рабочее зеркало на данный момент
2. Кликнуть клавишу «Регистрация»
3. Заполнить требуемые данные
4. Подтвердить e-mail почту или данные мобильного
5. Использовать подарок за регистрацию
Вход в личный аккаунт производится через внесение логина и пароля.
Описание бонусной политики
Выгодная бонусная программа — ключевое преимущество ресурса. Игроки забирают всевозможные поощрения:
Вступительные награды
Новые пользователи вправе надеяться на щедрый приз за оформление. Чаще всего это совокупность опций, содержащий:
– Процентную прибавку к начальному депозиту
– Бесплатные вращения
– Extra финансы на кошелек
Промокоды и особые предложения
Периодические коды помогают зарабатывать экстра выгоды. Применить их возможно в специальном поле персонального профиля.
Free spins и кешбэк
Бесплатные спины — это шанс крутить автоматы без использования своих сумм. Возврат означает определенный возмещение потерянных финансов.
Ассортимент игр
Игровая площадка предлагает значительную коллекцию слотов.
Видеослоты
Ассортимент слотов поражает воображение. Доступны стандартные трехбарабанные слоты и актуальные игры с занимательной картинкой.
Live казино
Категория Live развлечений переносит игроков в среду истинного гемблинг дома. Умелые ведущие организуют сессии в прямом формате.
Состязания и лидерборды
Систематические соревнования привносят азарта и гарантируют вариант забрать внушительные выигрыши.
Портативная реализация и софт
Современные инновации обеспечивают участвовать в любимом пространстве. Адаптивная версия независимо адаптируется под экран аппарата.
Установить клиент разрешено для мобильных систем iOS и Android. Софт обеспечивает:
– Скоростной доступ
– Стабильную деятельность
– Push-оповещения об предложениях
– Комфортный дизайн
Финансовые действия
Ресурс поддерживает разнообразные способы внесения и изъятия сумм:
– Кредитные системы
– Цифровые сервисы
– Цифровые валюты
– Банковские операции
Всевозможные операции выполняются через безопасное канал, что защищает сохранность персональных данных.
Департамент поддержки
Опытная бригада support работает 24/7. Обратиться с консультантами можно через:
– Live-чат
– E-mail почту
– Контакт
– Общественные платформы
Резюме
Основной ресурс и его рабочее зеркало обеспечивают пользователям защищенный и комфортный вход к интересным занятиям. Выгодные награды, большой спектр автоматов и отличная поддержка делают времяпрепровождение исключительно удобной и доходной.
more info here Buy NFT with credit card
Актуальные онлайн-казино гарантируют клиентам разнообразный ассортимент функций для удобной игры. Доступ к площадке казино Kush производится через основной домен или актуальное зеркало.
Что такое функционирующее зеркало казино
Функционирующее зеркало — это резервный домен лицензионного веб-сайта казино. Такие версии генерируются для гарантирования непрерывного соединения к игровой платформе.
Копия сегодня полностью воспроизводит возможности главного домена. Клиенты имеют аналогичный выход ко всем возможностям, включая регистрацию, финансирование кошелька и вывод призов.
Оформление профиля на лицензионном сайте
Алгоритм оформления учетной записи занимает всего несколько секунд. Будущим участникам требуется:
1. Попасть на основной ресурс или текущее официальное зеркало
2. Кликнуть кнопку “Регистрация”
3. Ввести обязательные реквизиты
4. Подтвердить почтовую почту
5. Ввести бонусный код при наличии
После окончания создания аккаунта пользователь получает приз за регистрацию, который способен предполагать бесплатные вращения или монетарное вознаграждение.
Доступ в личный кабинет
Персональный кабинет — это охраняемая территория, где игроки могут управлять своим аккаунтом. Для входа требуется указать username и password.
В персональном кабинете открыты следующие опции:
– Отслеживание хронологии операций
– Активация промокодов
– Управление вознаграждениями
– Вступление в турнирах
– Проверка возврата средств
– Настройка учетной записи
Вознаграждения и предложения
Гемблинговая площадка предоставляет великодушные вознаграждения:
Стартовый бонус — начинающие приобретают крупное вознаграждение на начальные вклады.
Free spins — дарятся как при создании аккаунта, так и в рамках различных мероприятий.
Возврат средств — систематический возмещение процента проигранных денег.
Купоны — эксклюзивные шифры, дающие право к эксклюзивным бонусам.
Анализ азартных секций
Аппараты
Коллекция аппаратов охватывает тысячи вариантов от лучших разработчиков. Геймеры откроют как стандартные машины, так и новые мультимедийные автоматы с захватывающей визуализацией.
Live казино
Категория Live казино обеспечивает опцию соревноваться с реальными дилерами в формате актуального времени. Имеются популярные игры: рулетка, блэкджек, баккара, покер.
Конкурсы
Периодические турниры с большими выигрышными фондами притягивают сотни конкурсантов. Призеры обретают финансовые награды и эксклюзивные поощрения.
Смартфонная версия и приложение
Мобильная версия платформы позволяет развлекаться с любого устройства. Структура независимо адаптируется под диагональ экрана.
Установить приложение можно для аппаратов на Android и iOS. Мобильное ПО располагает всеми возможностями полной версии.
Как определить рабочее зеркало на данный момент
Свежие URL альтернатив постоянно корректируются. Получить свежую URL можно многими методами:
– Через службу помощи
– В проверенных социальных сетях
– По электронной дайджесту
– На тематических площадках
Охрана и легальность
Лицензионный сайт функционирует на фундаменте зарубежной документа. Все переводы охраняются актуальными технологиями безопасности.
Анонимность личных сведений обеспечивается в совершенном масштабе.
Резюме
Главный портал и его актуальные дубликаты обеспечивают участникам 24/7 вход к первоклассным азартным играм. Привлекательные бонусы, многочисленные слоты, компетентная сервис — все это делает игровой времяпрепровождение предельно беспроблемным и увлекательным.
quick website – Saw this link while browsing and it appears neat and simple.
forestvendor online shop – Easy-to-follow design with clearly arranged content.
cryptora – Found practical insights today; sharing this article with colleagues later.
harborwharf outlet – Easy-to-follow structure makes finding products fast and simple.
Подключение к сайту через действующие зеркала
Клиенты сетевых казино часто имеют дело с трудностью закрытия основного сайта. Собственно для ликвидации этой трудности существуют копии основного сайта. Гонзо обеспечивает полный доступ ко всем возможностям казино.
Что такое рабочее зеркало казино
Дубликат является собой точную дубликат главного сайта с похожим набором функций. Ключевое отличие — это альтернативное имя. Все сведения пользователя, содержа средства, поощрения и историю партий, сохраняются идентичными.
Плюсы эксплуатации зеркал
Функционирующие зеркала располагают набором ключевых выгод:
– Бесперебойный подключение к излюбленным слотам
– Стопроцентная безопасность собственных сведений
– Неизменность всех настроек индивидуального кабинета
– Возможность получения бонусов и вовлечения в промоакциях
Открытие счета на главном ресурсе
Процесс создания аккаунта предельно несложен и требует несколько минут. Свежие участники имеют возможность полагаться на крупный приветственный подарок за оформление.
Ступени оформления аккаунта
1. Вход на главный ресурс или его дубликат
2. Выбор на опцию “Зарегистрироваться”
3. Заполнение необходимых информации
4. Активация email почты
5. Внесение купона (при наличии доступен)
Поощрения и промоакции для пользователей
Казино поощряет своих клиентов разнообразными поощрительными предложениями.
Ключевые категории наград
Приветственный приз — внушительное премирование для начинающих игроков, которое именно может вмещать денежные средства и free spins.
Безвозмездные спины — опция крутить в востребованных аппаратах даром.
Возврат средств — процентный отдача израсходованных средств, который зачисляется каждую неделю или каждый месяц.
Бонусные коды — специальные последовательности, обеспечивающие дополнительные преимущества.
Пользовательский кабинет: опции и конфигурации
Пользовательский раздел предоставляет исчерпывающий контроль над персональным процессом. Тут имеются:
– Регулирование счетом
– Записи операций
– Работающие поощрения
– Установки охраны
– Валидация аккаунта
Смартфонная платформа и APP
Нынешние участники предпочитают гибкость. Казино обеспечивает два способа для развлечений с портативных аппаратов.
Отзывчивая телефонная редакция
Мобильная платформа ресурса самостоятельно адаптируется под разрешение любого гаджета. Отсутствует потребность скачивать специальное приложение.
APP для телефонов
Можно установить официальное софт для iOS и Android. Приложение дает:
– Мгновенный доступ
– Адаптированный дизайн
– Всплывающие-сообщения о бонусах
– Стабильную работу
Live казино: антураж реального игорного заведения
Категория Live казино доставляет игроков в обстановку реального клуба. Профессиональные крупье проводят игры в виде реального времени.
Известные Live-форматы
– Рулетка
– 21
– Баккарат
– Карибский покер
Аппараты: разнообразие автоматов
Собрание развлекательных машин включает множество позиций от известных поставщиков. Пользователи найдут:
– Стандартные автоматы
– Видео-автоматы
– Мега-выигрыш-автоматы
– Слоты с множественными линиями
Соревнования и особые предложения
Регулярные соревнования позволяют пользователям состязаться друг с другом за солидные призовые суммы. Всякий состязание имеет свои правила присутствия и рейтинг чемпионов.
Варианты ввода и снятия средств
Ресурс предоставляет массу расчетных инструментов:
– Платежные инструменты
– Онлайн счета
– Криптовалюты
– Прямые транзиты
Абсолютно все транзакции осуществляются безопасно благодаря современным системам шифрования.
Команда обслуживания
Профессиональные операторы сервиса помощи настроены ассистировать 24/7. Работают нижеперечисленные каналы связи:
– Живой-чат
– Email-помощь
– Звонковая горячая линия
– Медийные сети
Итог
Главный ресурс клуба и его функционирующие зеркала обеспечивают пользователям конфиденциальный и удобный вход к обширному диапазону геймерских активностей. Солидные награды, частые кампании, квалифицированная служба и простые денежные инструменты формируют игровой процесс предельно комфортным и прибыльным.
Обзор лицензионного ресурса
Актуальные интернет казино предоставляют клиентам богатый набор игр и шансов. Главный сайт Кент предоставляет безопасный возможность к гемблинг сервисам.
Действующее зеркало: путь на сегодня
Альтернативный адрес является как точную копию основного веб-сайта. Официальное зеркало обеспечивает игрокам преодолевать существующие ограничения.
Выгоды задействования зеркала
Ключевые достоинства содержат:
– Беспрерывный доступ к сайту
– Удержание всех характеристик главного ресурса
– Охрана личных сведений
– Равнозначный функционал
Создание аккаунта на сайте
Процедура регистрации отличается простотой и комфортом. Недавние пользователи должны:
1. Зайти на лицензионный сайт или его зеркало
2. Щелкнуть на пункт создания аккаунта
3. Внести обязательные сведения
4. Валидировать электронную ящик
5. Выполнить стартовый доступ
Вознаграждение за оформление
Новички забирают внушительный приветственный бонус. Это премия в состоянии включать:
– Монетарные бонусы
– Complimentary прокруты
– Повышенный показатель возврата
Доступ в индивидуальный профиль
Активные игроки в состоянии оперативно зайти в собственный аккаунт, применяя имя пользователя и пароль. Личный раздел предлагает шанс к:
– Регулированию балансом
– Истории транзакций
– Работающим подаркам
– Конфигурации учетной записи
Вознаграждения и предложения
Портал регулярно проводит разнообразные мероприятия для участников.
Категории призов
Основные формы призов:
– Пополнительные призы – доля от величины депозита
– Фриспины – даровые вращения в слотах
– Кэшбэк – отдача фрагмента проигранных денег
– Соревновательные награды – вознаграждения за выступление в состязаниях
Купоны
Уникальные купоны дают возможность активировать добавочные преимущества. Участники могут получить их на тематических ресурсах или заработать в письмах.
Мобильная редакция и приложение
Современные пользователи выбирают переносной геймплей.
Опции мобильной версии
– Адаптивный вид для разнообразных гаджетов
– Абсолютный возможность к играм
– Оперативная подгрузка
– Эргономичное контроль
Установить app
Переносное программа доступно для установки на устройства с рабочими системами Android и iOS. Софт предоставляет:
– Стабильную производительность
– Пуш оповещения о призах
– Быстрый путь к избранным слотам
Азартный выбор
Портал обеспечивает богатую библиотеку игровых услуг.
Игровые машины
Библиотека азартных автоматов содержит:
– Классические машины
– Передовые автоматы
– Накопительные автоматы
– Сюжетные автоматы
Live казино
Область настоящих игр предоставляет опцию состязаться с профессиональными ведущими. Представлены:
– Американская рулетка
– Блэкджек
– Punto Banco
– Техасский холдем
Состязания
Систематические чемпионаты дают возможность участникам конкурировать за крупные денежные суммы. Призовая сетка изменяется регулярно.
Финансовые процедуры
Сайт предлагает массу опций пополнения и вывода финансов:
– Дебетовые карточки
– Цифровые платежные системы
– Банковские транзакции
– Криптовалюты
Любые платежи проходят надежно с применением прогрессивных методов защиты.
Отдел помощи
Квалифицированная группа помощи работает 24/7. Коннектиться с менеджерами можно через:
– Интерактивный чат
– Email почту
– Телефонную линию
– Соц медиа
Охрана и регулирование
Казино оперирует на фундаменте легальной аккредитации. Подобное удостоверяет:
– Справедливость развлекательного действа
– Безопасность личных данных
– Пунктуальные выводы
– Легальный игровой процесс
Резюме
Главный ресурс и его рабочие резервные страницы обеспечивают клиентам полный комплекс услуг для безопасной и доходной развлечений. Значительные подарки, различные слоты, профессиональная помощь и надежная инфраструктура платежей создают платформу идеальным опцией для поклонников игровых развлечений.
see this website – Stumbled on this site, finding items feels easy and convenient.
закупка ссылок в гугл заказать услугу агентство закупка ссылок в гугл заказать услугу агентство .
Нынешние онлайн-казино предоставляют пользователям большой диапазон услуг и премиальных опций. Присоединение к сервису производится через главный сайт или его действующее зеркало casino Pinco, что предоставляет бесперебойную деятельность.
Чем является актуальное зеркало казино
Альтернатива — это точная реплика официального веб-сайта, разработанная для обхода блокировок. Рабочее зеркало дает возможность клиентам получить вход к излюбленным развлечениям в любое время.
Проверенное зеркало содержит всеми опциями оригинального портала:
– Совокупный ассортимент слотов
– Учетная запись с зафиксированными параметрами
– Текущие поощрения
– Безопасные расчетные транзакции
Оформление профиля на главном ресурсе
Ход оформления составляет всего немного минут. Свежим пользователям нужно:
1. Зайти на основной ресурс или действующее зеркало
2. Выбрать на ссылку “Создать аккаунт”
3. Внести обязательные информацию
4. Подтвердить электронную почту
5. Внести начальный платеж
Стартовый бонус предоставляется моментально после окончания всех ступеней.
Подключение в учетную запись
Существующие игроки могут осуществить авторизацию применяя:
– Логин и код
– Данные сотового
– Email
Аккаунт дает право к управлению балансом, данным ставок и текущим поощрениям.
Поощрения и предложения
Азартная сервис радует постоянных пользователей разнообразными поощрениями:
Первый бонус
– Поощрение на первый депозит до 100%
– Бесплатные вращения на востребованные автоматы
– Добавочные бонусы за следующие депозиты
Бонусные коды
Уникальные коды обеспечивают право на приобретение специальных призов. Текущие коды выставляются в блоке “Предложения”.
Возврат средств
Еженедельный бонус составляет до 10% от использованных сумм. Возврат зачисляется незамедлительно.
Схема лояльности
Верные пользователи накапливают очки, которые конвертируются на действительные деньги или даровые спины.
Мобильная версия и софт
В целях удобства клиентов сделана удобная адаптивный сайт. Адаптивный облик помогает удобно развлекаться с всякого карманного аппарата.
Плюсы софта:
– Скорый вход к автоматам
– Настроенный облик
– Бесперебойная деятельность
– Оповещения о новых акциях
Получить приложение можно свободно с основного портала для гаджетов на Android и iOS.
Ассортимент слотов
Игровые автоматы
Коллекция вмещает более 2000 слотов от популярных разработчиков:
– Классические слоты
– Мультимедийные игры
– Jackpot игры
– Тематические слоты
Live казино
Блок Live казино дает участие с живыми ведущими в онлайн режиме:
– Колесо фортуны
– Двадцать одно
– Баккара
– Poker
Конкурсы
Систематические соревнования с солидными наградными суммами устраиваются систематически. Допуск в турнирах разрешено всем действующим клиентам.
Платежные методы
Взносы и выводы денег выполняются через распространенные методы:
– Банковские средства
– Онлайн сервисы
– Цифровая валюта
– Банковские платежи
Стартовый платеж — от 100 рублей. Получение финансов обрабатывается в течение 24 периода.
Команда поддержки
Круглосуточная служба support способна содействовать в решении произвольных ситуаций:
– Live chat
– Email
– Контактный номер
– Общественные сети
Надежность и разрешение
Лицензионный веб-сайт действует на почве международной разрешения. Все параметры пользователей охранены современным SSL-криптованием.
Заключение
Рабочее зеркало дает непрерывный подключение к предпочитаемым слотам, богатым промокодам и функциональным возможностям. Создайте аккаунт сейчас и получите начальный подарок!
Актуальные онлайн-казино предоставляют геймерам массу возможностей для комфортной игры. Официальный ресурс VodkaCasino дарит возможность ко всем функциям и играм. Однако при наличии программных неполадок на помощь приходят рабочие дубликаты.
Что означает собой рабочее зеркало
Альтернативный адрес казино — это полная дубликат оригинального сайта, размещенная по запасному адресу. Официальное зеркало поддерживает все опции, включая открытие профиля, доступ в собственный кабинет, премии и промокоды.
Копия на сегодня обеспечивает:
– Непрерывный вход к игровым автоматам
– Совершенную конфиденциальность личных сведений
– Удержание баланса и записей платежей
– Возможность использования всех бонусных программ
Регистрация на лицензионном портале
Процедура открытия профиля занимает несколько минут. Новым геймерам нужно:
1. Перейти на официальный сайт или действующее зеркало
2. Нажать кнопку «Зарегистрироваться»
3. Внести необходимые поля
4. Подтвердить email почту
5. Указать купон при присутствии
После завершения создания аккаунта игроки приобретают бонус за регистрацию, который может охватывать бонусные спины или финансовое премирование.
Вход в индивидуальный кабинет
Приватный кабинет открывает всесторонний контроль над игровым ходом. Через личный аккаунт возможно:
– Финансировать кошелек
– Забирать выигрыши
– Активировать купоны
– Мониторить хронологию игр
– Соревноваться в состязаниях
– Приобретать cash back
Описание поощрений и промо-предложений
Богатая призовая политика — важное плюс платформы. Центральные категории премий:
Приветственный бонус
Новые игроки обретают щедрое поощрение на дебютные вклады. Величина премии может составлять 100-200% от суммы депозита.
Бесплатные вращения
Халявные прокруты выдаются для популярных игровых автоматов. Количество бесплатных вращений изменяется от 10 до 500 штук.
Cash back
Систематический или ежемесячный отдача части потерянных финансов. Типичный процент кэшбека — 5-15%.
Соревнования
Систематические состязания с большими наградными пулами. Игроки состязаются за призовые строчки в рейтинге.
Смартфонная версия и приложуха
Портативная версия обеспечивает развлекаться с каждого устройства. Клиенты могут установить приложение для iOS и Android или эксплуатировать интернет версию.
Преимущества мобильного программы:
– Молниеносная прогрузка слотов
– Эргономичный дизайн
– Всплывающие уведомления о поощрениях
– Вход через Face ID
Машины и Live казино
Азартная библиотека содержит множество наименований от лидирующих поставщиков.
Востребованные разделы слотов:
– Обычные автоматы
– Современные слоты с премиальными раундами
– Джекпот игры
– Мега-путь слоты
Live игорный зал
Зона live игорный зал предлагает партию с профессиональными ведущими. Есть стандартные развлечения:
– Европейская рулетка
– Blackjack
– Баккара
– Покер
Как разыскать рабочее зеркало
Раздобыть действующую URL на зеркало разрешается множественными путями:
1. Зарегистрироваться на почтовую рассылку
2. Следить за новостями в социальных сетях
3. Контактировать в отдел поддержки
4. Запомнить рабочее зеркало в избранное
Итог
Официальный портал и его функционирующие альтернативные адреса предоставляют постоянный вход к игровым слотам. Великодушные поощрения, различные промокоды, удобное мобильное программа и качественная служба поддержки поддержки превращают азартный геймплей крайне комфортным и безопасным.
https://discuss.machform.com/u/faststrike777
hop over to here Nifty login
Передовые онлайн-казино гарантируют пользователям обширный ассортимент функций для приятной игры. Переход к площадке Дэдди производится через лицензионный сайт или функционирующее зеркало.
Что такое действующее зеркало казино
Действующее зеркало — это резервный адрес основного сайта казино. Такие клоны разрабатываются для гарантирования непрерывного входа к гемблинговой сервису.
Дубликат на сегодня совершенно дублирует возможности официального ресурса. Пользователи получают аналогичный выход ко всем услугам, включая регистрацию, пополнение баланса и снятие выигрышей.
Оформление профиля на главном веб-сайте
Механизм создания аккаунта длится всего буквально секунд. Новым игрокам необходимо:
1. Перейти на официальный ресурс или рабочее проверенное зеркало
2. Кликнуть кнопку “Зарегистрироваться”
3. Указать обязательные данные
4. Проверить почтовую почту
5. Активировать купон при существовании
После выполнения открытия профиля участник получает бонус за регистрацию, который имеет право содержать фриспины или финансовое вознаграждение.
Логин в индивидуальный кабинет
Индивидуальный кабинет — это безопасная территория, где игроки имеют возможность администрировать своим профилем. Для авторизации требуется ввести логин и пароль.
В личном кабинете представлены такие возможности:
– Мониторинг журнала платежей
– Использование купонов
– Управление бонусами
– Вступление в турнирах
– Отслеживание возврата средств
– Изменение учетной записи
Бонусы и спецпредложения
Азартная система дарит великодушные бонусы:
Приветственный бонус — новые игроки приобретают крупное поощрение на дебютные взносы.
Free spins — выдаются как при открытии счета, так и в ходе разнообразных мероприятий.
Кэшбэк — систематический компенсация фрагмента проигранных денег.
Промокоды — специальные комбинации, дающие право к специальным предложениям.
Обзор развлекательных разделов
Игровые автоматы
Ассортимент слотов насчитывает множество позиций от передовых поставщиков. Геймеры встретят как обычные машины, так и актуальные видеослоты с притягательной оформлением.
Live казино
Зона Live казино дарит возможность участвовать с настоящими дилерами в условиях актуального времени. Имеются распространенные столы: рулетка, блэкджек, баккара, покер.
Состязания
Систематические состязания с солидными выигрышными пулами завлекают тысячи участников. Лидеры зарабатывают денежные вознаграждения и специальные премии.
Телефонная версия и app
Адаптивная версия платформы обеспечивает развлекаться с произвольного устройства. Дизайн самостоятельно адаптируется под формат экрана.
Получить программу можно для устройств на Android и iOS. Портативное ПО имеет всеми характеристиками полной версии.
Как обнаружить действующее зеркало на данный момент
Свежие ссылки копий постоянно меняются. Узнать свежую линк можно разными методами:
– Через отдел саппорта
– В подлинных коммуникационных сетях
– По почтовой рассылке
– На тематических ресурсах
Охрана и сертификация
Официальный домен работает на основе международной лицензии. Все переводы шифруются актуальными системами защиты.
Конфиденциальность пользовательских реквизитов обеспечивается в абсолютном объеме.
Заключение
Официальный сайт и его актуальные зеркала дарят пользователям постоянный выход к первоклассным азартным играм. Великодушные бонусы, различные автоматы, опытная сервис — все это формирует гемблинговый досуг невероятно приятным и увлекательным.
Обзор оригинального ресурса
Современное онлайн-казино дарит своим пользователям разнообразный ассортимент услуг и вознаграждений. Официальный портал 888starz сайт работает 24/7, предоставляя возможность к топовым симуляторам, live-казино и обширным промо.
Действующее зеркало: путь к порталу
Что такое дубликат казино
Зеркало является собой абсолютную реплику основного ресурса с другим интернет адресом. Актуальное зеркало позволяет участникам обходить ограничения и получать стабильный путь к предпочитаемым автоматам.
Как обнаружить текущее зеркало сегодня
Рабочие линки на основное зеркало публикуются через:
– Электронную рассылку
– Главные социальные сети
– Службу обслуживания
– Affiliated порталы
Созданиеаккаунта на платформе
Процесс регистрации
Оформление длится всего минут и содержит нижеследующие этапы:
1. Открытие на официальный сайт или действующее зеркало
2. Выбор клавиши “Открытьсчет”
3. Указание контактных информации
4. Верификация адреса или номера
5. Установка секретнойкомбинации
Бонус за открытиесчета
Начинающие игроки обретают щедрые стартовые вознаграждения:
– Игровые деньги на баланс
– Халявныеспины для автоматов
– Увеличенный коэффициент кешбэка
– Уникальные купоны
Авторизация в персональный кабинет
Постоянные игроки имеютвозможность выполнить авторизацию через официальный веб-сайт или рабочее зеркало. Для этого необходимо набрать имяпользователя и секретнуюкомбинацию, установленные при созданииаккаунта.
Опции собственного профиля
В собственном кабинете открыты данные возможности:
– Редактирование контактными сведениями
– Ввод депозита
– Получение призов
– Ввод бонусов
– Проверка истории операций
– Участие в конкурсах
Поощрения и кампании
Разновидности поощрений
Казино радует своих игроков разнообразными бонусными системами:
– Стартовый набор — солидные вознаграждения на стартовые пополнения
– Freespins — дополнительные вращения в топовых симуляторах
– Кешбэк — периодический возмещение суммы ставок
– Система верности — особые бонусы для верных пользователей
Коды и их применение
Уникальные купоны гарантируют расширенные бонусы. Для активации необходимо ввести последовательность в соответствующее графу в персональном профиле.
Азартный набор
Игры
Библиотека азартных машин насчитывает сотни названий от лучших производителей:
– Стандартные симуляторы
– Видео развлечения
– Накопительные симуляторы
– Лицензионные игры
Live казино
Секция Live-казино обеспечивает участие с профессиональными ведущими в обстановке реального времени:
– Американскаярулетка
– Очко
– PuntoBanco
– Casinopoker
Соревнования
Систематические турниры с внушительными выигрышными пулами проходят регулярно. Игроки соревнуются за первенство в таблице.
Мобильная реализация и программа
Адаптивная реализация сайта
Официальный ресурс полностью оптимизирован для смартфонных аппаратов. Пользователи имеютвозможность играть игры напрямую через интернет-браузер без обязательства инсталляции.
Приложение для загрузки
Официальное карманное приложение имеется для загрузки на устройства с программными платформами Android и iOS. Программа дает:
– Быстрый путь к играм
– Бесперебойную операционность
– Мгновенные-уведомления о акциях
– Простой интерфейс
Вывод
Основной ресурс казино и его функционирующие альтернативы предоставляют игрокам абсолютный возможность к отличным развлекательным развлечениям. Большие вознаграждения, разнообразные кампании, комфортная мобильная адаптация и опытная помощь превращают игровой досуг максимально удобным и выгодным.
read this article Buy NFT with credit card
Современные онлайн-казино предоставляют участникам широкий спектр возможностей и призовых опций. Доступ к сервису осуществляется через лицензионный сайт или его действующее зеркало Бет Андреас, что обеспечивает бесперебойную деятельность.
Чем является действующее зеркало казино
Альтернатива — это точная дубликат основного ресурса, разработанная для решения барьеров. Зеркало сегодня помогает игрокам сохранить подключение к излюбленным автоматам в каждое время.
Официальное зеркало содержит всеми возможностями первоначального портала:
– Весь ассортимент игр
– Профиль с зафиксированными информацией
– Актуальные поощрения
– Надежные платежные транзакции
Создание аккаунта на главном портале
Процесс оформления занимает всего пару минут. Первым пользователям следует:
1. Попасть на официальный сайт или актуальное зеркало
2. Щелкнуть на ссылку “Регистрация”
3. Заполнить требуемые данные
4. Активировать электронную почту
5. Внести начальный платеж
Поощрение новичкам предоставляется сразу после прохождения всех шагов.
Подключение в профиль
Существующие клиенты могут произвести подключение используя:
– Имя пользователя и код
– Код мобильного
– Электронную почту
Персональный раздел обеспечивает шанс к контролю финансами, сведениям ставок и действующим поощрениям.
Бонусы и кампании
Гемблинг платформа радует активных игроков щедрыми бонусами:
Начальный пакет
– Бонус на первый депозит до 100%
– Даровые спины на востребованные автоматы
– Особые премии за следующие депозиты
Промокоды
Уникальные промокоды открывают возможность на активацию эксклюзивных вознаграждений. Актуальные купоны выкладываются в секции “Предложения”.
Возврат средств
Постоянный возврат равен до 10% от использованных денег. Компенсация предоставляется автоматически.
Механизм лояльности
Верные участники накапливают очки, которые конвертируются на действительные деньги или фриспины.
Адаптивный портал и софт
В целях удобства игроков сделана качественная адаптивный сайт. Приспособленный интерфейс помогает удобно играть с любого мобильного девайса.
Преимущества APP:
– Оперативный запуск к слотам
– Улучшенный интерфейс
– Устойчивая работа
– Нотификации о актуальных акциях
Загрузить программу можно безвозмездно с основного портала для устройств на Android и iOS.
Коллекция игр
Игровые автоматы
Библиотека насчитывает более 2000 слотов от известных студий:
– Стандартные слоты
– Мультимедийные игры
– Слоты с джекпотом
– Тематические игры
Live казино
Секция Live казино обеспечивает участие с живыми диллерами в реальном времени:
– Колесо фортуны
– Двадцать одно
– Карты
– Покер
Соревнования
Регулярные турниры с крупными премиальными пулами запускаются систематически. Вход в конкурсах разрешено всем активным игрокам.
Денежные способы
Взносы и получения средств выполняются через известные платежные системы:
– Платежные карты
– Цифровые счета
– Криптовалюта
– Прямые переводы
Минимальный вклад — от 100 рублей. Получение выигрышей выполняется в течение 24 ч.
Служба саппорта
Круглосуточная группа support способна ассистировать в исправлении каких-либо ситуаций:
– Мессенджер
– Email
– Контактный номер
– Публичные сети
Надежность и лицензия
Главный ресурс действует на основании глобальной документа. Каждые данные игроков обезопасены передовым SSL-кодированием.
Вывод
Функционирующее зеркало дает стабильный вход к излюбленным слотам, щедрым поощрениям и комфортным услугам. Откройте счет прямо сейчас и получите стартовый бонус!
online shop – Discovered this website today, items are easy to find and the layout is neat.
Нынешние онлайн-казино гарантируют геймерам обилие опций для приятной игры. Официальный веб-портал Бет Андреас казино обеспечивает вход ко всем опциям и игровым автоматам. Однако при появлении технических неполадок на выручку прибывают функционирующие копии.
Что представляет собой рабочее зеркало
Копия казино — это стопроцентная реплика оригинального портала, размещенная по дополнительному адресу. Легитимное зеркало удерживает все возможности, в том числе регистрацию, вход в индивидуальный кабинет, бонусы и бонусные коды.
Зеркало на сегодня дает:
– Постоянный путь к азартным аппаратам
– Полную безопасность персональных данных
– Сохранение баланса и журнала переводов
– Доступность всех промо-предложений
Создание учетной записи на главном ресурсе
Процедура оформления учетной записи требует пару минут. Новоиспеченным пользователям нужно:
1. Войти на основной ресурс или функционирующее зеркало
2. Кликнуть кнопку «Регистрация»
3. Ввести запрашиваемые поля
4. Активировать электронную почту
5. Применить купон при существовании
После завершения регистрации игроки зарабатывают вознаграждение за регистрацию, что может иметь бонусные спины или монетарное вознаграждение.
Авторизация в собственный кабинет
Персональный кабинет обеспечивает комплексный мониторинг над игровым процессом. Через индивидуальный профиль можно:
– Пополнять кошелек
– Получать призы
– Использовать кодовые слова
– Контролировать хронологию ставок
– Принимать участие в конкурсах
– Забирать возврат средств
Обзор вознаграждений и промо-предложений
Богатая поощрительная схема — важное преимущество ресурса. Основные типы бонусов:
Стартовый подарок
Начинающие зарабатывают великодушное поощрение на первые депозиты. Размер премии может достигать 100-200% от объема взноса.
Free spins
Безвозмездные раунды предоставляются для известных автоматов. Количество фриспинов разнится от 10 до 500 штук.
Кэшбек
Регулярный или помесячный откат процентной доли утраченных финансов. Стандартный процент кэшбека — 5-15%.
Состязания
Систематические турниры с большими призовыми банками. Конкурсанты состязаются за топовые позиции в таблице лидеров.
Портативная версия и приложуха
Смартфонная версия дает возможность делать ставки с каждого устройства. Игроки могут установить приложение для iOS и Android или задействовать браузерную версию.
Плюсы портативного приложения:
– Быстрая прогрузка игр
– Практичный UI
– Всплывающие уведомления о промо
– Вход через отпечаток пальца
Слоты и Live казино
Развлекательная подборка содержит множество наименований от известных провайдеров.
Востребованные секции автоматов:
– Стандартные автоматы
– Видеослоты с бонусными раундами
– Прогрессивный джекпот слоты
– Megaways слоты
Live игровой зал
Секция live казино предоставляет партию с реальными дилерами. Представлены традиционные игры:
– Американская рулетка
– Двадцать одно
– Punto Banco
– Техасский холдем
Как найти функционирующее зеркало
Найти действующую линк на зеркало возможно несколькими путями:
1. Зарегистрироваться на почтовую рассылку
2. Мониторить за обновлениями в социальных сетях
3. Написать в службу поддержки
4. Сохранить рабочее зеркало в фавориты
Вывод
Официальный сайт и его действующие зеркала обеспечивают постоянный доступ к развлекательным слотам. Богатые поощрения, многочисленные промокоды, комфортное смартфонное приложение и профессиональная сервис поддержки превращают развлекательный опыт предельно удобным и надежным.
harborwharf essentials – Clear structure and tidy presentation simplify exploring products.
http://petmedsmonitor.com/# п»їdog medication online
?Levantemos nuestros brindis por cada simbolo de la fortuna !
La educaciГіn sobre el juego responsable es un enfoque clave en los casinos online sin registro en EspaГ±a. Proporcionan recursos sobre cГіmo jugar con responsabilidad y establecer lГmites. casinos online sin registro. Esto promueve un entorno de juego saludable.
El marketing de aplicaciones mГіviles se ha vuelto esencial en la era digital. En appsmarketing.es, encontrarГЎs estrategias efectivas para destacar tu app. No subestimes la importancia de una buena visibilidad en las plataformas de descarga.
Accede a un mundo de juegos en casino online sin registro
?Que la fortuna avance contigo con el placer de resultados excepcionales !
this platform – I noticed this page while searching, interface looks clean and easy to move through.
http://certifiedcanadarx.com/# Certified Canada Rx
Wonderful post! Searching for updated Roblox emotes for Brookhaven RP? Well, check out this post that showcases new roblox emotes from all Roblox emotes, making roleplay more expressive, with rbxdex included as a helpful resource. You can discover the perfect look for your roleplay character by experimenting with various emotes, like the best roblox dance emotes.
ivorymarket – I like how the whole site looks organized and simple to browse.
gingervendor – Smooth navigation and a tidy layout make exploring items very simple.
I recently tried this casino https://bazarowo.pl/ and was impressed by how stable everything felt. The games run fast, bonuses are clear, and navigation is intuitive, making the experience comfortable.
vardenafil
Доступ к ресурсу через проверенные зеркала
Клиенты онлайн казино постоянно встречаются с вопросом недоступности официального ресурса. Конкретно для ликвидации этой задачи существуют дубликаты основного ресурса. Leon сайт гарантирует стопроцентный доступ ко всем сервисам казино.
Что такое рабочее зеркало казино
Зеркало является собой полную копию оригинального портала с таким же набором функций. Единственное расхождение — это доменное имя. Абсолютно все параметры пользователя, включая депозит, награды и записи игр, находятся прежними.
Преимущества задействования зеркал
Действующие зеркала имеют рядом значимых преимуществ:
– Непрерывный переход к излюбленным играм
– Совершенная конфиденциальность личных информации
– Удержание всех настроек пользовательского кабинета
– Способность приобретения поощрений и участия в предложениях
Открытие счета на официальном сайте
Процедура создания аккаунта максимально элементарен и отнимает буквально минут. Начинающие клиенты в состоянии полагаться на щедрый начальный подарок за создание аккаунта.
Ступени открытия аккаунта
1. Вход на основной портал или его копию
2. Выбор на клавишу “Регистрация”
3. Ввод необходимых информации
4. Проверка цифровой почты
5. Ввод промокода (когда имеется)
Бонусы и акции для игроков
Ресурс поощряет своих пользователей различными наградными системами.
Основные типы бонусов
Вводный пакет — щедрое поощрение для новых клиентов, которое может содержать монетарные суммы и безвозмездные спины.
Фриспины — возможность запускать в топовых слотах бесплатно.
Кэшбек — частичный возврат проигранных денег, каковой выплачивается раз в неделю или каждый месяц.
Купоны — эксклюзивные комбинации, дающие добавочные выгоды.
Пользовательский кабинет: функции и конфигурации
Личный кабинет гарантирует исчерпывающий управление над пользовательским процессом. В данном разделе доступны:
– Контроль депозитом
– Данные транзакций
– Работающие награды
– Установки защиты
– Подтверждение учетной записи
Смартфонная версия и APP
Нынешние игроки ценят гибкость. Площадка обеспечивает пару метода для игры с карманных устройств.
Адаптивная смартфонная версия
Адаптивная платформа портала автономно настраивается под экран любого аппарата. Не требуется устанавливать особое софт.
Софт для гаджетов
Возможно скачать официальное программу для iOS и Android. Софт предоставляет:
– Мгновенный старт
– Улучшенный дизайн
– Мобильные-уведомления о акциях
– Надежную производительность
Live казино: среда подлинного казино
Зона Live игр доставляет клиентов в атмосферу подлинного казино. Опытные дилеры организуют партии в варианте настоящего времени.
Топовые Live-игры
– Американская рулетка
– Двадцать одно
– Баккара
– Карибский покер
Слоты: ассортимент игр
Коллекция игровых автоматов содержит массу наименований от лидирующих производителей. Клиенты обнаружат:
– Классические машины
– Графические слоты
– Накопительный приз-автоматы
– Слоты с множественными линиями
Конкурсы и особые акции
Периодические конкурсы обеспечивают игрокам конкурировать друг с другом за крупные призовые банки. Всякий состязание содержит свои требования присутствия и таблицу победителей.
Методы пополнения и вывода средств
Ресурс использует массу финансовых сервисов:
– Банковские карты
– Электронные кошельки
– Крипто
– Финансовые транзакции
Любые операции проходят конфиденциально благодаря актуальным системам криптографии.
Команда помощи
Компетентные сотрудники сервиса помощи способны содействовать 24/7. Имеются такие методы контакта:
– Онлайн-чат
– Email-сервис
– Аудио поддержка
– Социальные сети
Итог
Главный портал игровой площадки и его действующие копии дают пользователям безопасный и приятный переход к широкому спектру развлекательных развлечений. Солидные бонусы, регулярные акции, компетентная служба и комфортные денежные системы формируют развлекательный опыт чрезвычайно приятным и прибыльным.
pet prescriptions online: Vet Rx Index – online vet pharmacy
Актуальные онлайн-казино предлагают игрокам множество вариантов для беспроблемной игры. Главный сайт Gonzo открывает путь ко всем опциям и азартным играм. Однако при наличии технических неполадок на помощь прибывают рабочие дубликаты.
Что являет собой собой действующее зеркало
Зеркало казино — это полная копия основного веб-сайта, расположенная по дополнительному доменному имени. Лицензионное зеркало поддерживает все возможности, в том числе создание аккаунта, вход в индивидуальный кабинет, вознаграждения и купоны.
Альтернативный сайт на сегодня обеспечивает:
– Бесперебойный путь к игровым автоматам
– Совершенную безопасность персональных информации
– Удержание счета и записей платежей
– Возможность использования всех акций
Создание аккаунта на лицензионном сайте
Процедура регистрации занимает считанные минут. Новоиспеченным клиентам необходимо:
1. Перейти на подлинный сайт или функционирующее зеркало
2. Кликнуть кнопку «Создать аккаунт»
3. Указать нужные сведения
4. Активировать электронную почту
5. Ввести купон при наличии
После завершения создания аккаунта игроки обретают подарок за регистрацию, что может иметь free spins или монетарное вознаграждение.
Авторизация в персональный кабинет
Индивидуальный кабинет дает комплексный контроль над азартным действом. Через персональный профиль можно:
– Пополнять баланс
– Снимать средства
– Использовать купоны
– Контролировать хронологию пари
– Принимать участие в соревнованиях
– Приобретать кэшбек
Описание бонусов и специальных предложений
Выгодная премиальная система — существенное преимущество проекта. Центральные виды вознаграждений:
Стартовый подарок
Дебютанты получают богатое награду на стартовые пополнения. Размер премии может доходить до 100-200% от объема взноса.
Free spins
Халявные вращения даются для популярных игровых автоматов. Объем free spins колеблется от 10 до 500 штук.
Cash back
Систематический или ежемесячный возврат доли проигранных финансов. Стандартный объем возврата — 5-15%.
Конкурсы
Систематические конкурсы с солидными премиальными банками. Конкурсанты конкурируют за лучшие строчки в таблице лидеров.
Портативная версия и программа
Смартфонная версия разрешает играть с любого девайса. Клиенты могут скачать приложение для iOS и Android или применять интернет версию.
Выгоды смартфонного софта:
– Быстрая прогрузка автоматов
– Эргономичный интерфейс
– Пуш-нотификации о промо
– Вход через Face ID
Автоматы и Live казино
Игровая коллекция насчитывает тысячи игр от известных разработчиков.
Востребованные секции игр:
– Обычные слоты
– Современные слоты с бонусными уровнями
– Прогрессивный джекпот слоты
– Megaways машины
Live казино
Категория live игорный зал обеспечивает развлечение с живыми дилерами. Доступны традиционные варианты:
– Французская рулетка
– Двадцать одно
– Baccarat
– Карибский покер
Как обнаружить актуальное зеркало
Раздобыть свежую ссылку на зеркало разрешается различными методами:
1. Подписаться на емейл-уведомления
2. Мониторить за новостями в соц сетях
3. Контактировать в сервис поддержки
4. Сохранить актуальное зеркало в закладки
Резюме
Лицензионный сайт и его рабочие альтернативные адреса предоставляют постоянный путь к развлекательным автоматам. Великодушные поощрения, множественные бонусные коды, практичное портативное программа и качественная техподдержка поддержки обеспечивают игровой опыт в высшей степени приятным и безопасным.
melbet акции http://www.melbet93640.help
finchmarket homepage – Layout is clean and exploring products feels straightforward.
creekcrate style store – The tidy design keeps exploration simple and fast.
junohub hub – Found this page, seems tidy and simple to browse.
seo аудит веб сайта seo аудит веб сайта .
Передовые онлайн казино дают геймерам обширный спектр функций для удобной игры. Впрочем иногда доступ к главному порталу может стать закрытым. В таких случаях на выручку появляется Cactus Casino, которое обеспечивает бесперебойный вход ко всем опциям платформы.
Что такое функционирующее зеркало казино
Копия — это точная копия официального веб-сайта, которая хостится по дополнительному URL. Альтернативный ресурс сохраняет полный инструментарий оригинального сайта, включая личный кабинет, счет и запись платежей.
Главные выгоды применения зеркала:
– Непрерывный доступ к порталу
– Максимальная тождественность функционала
– Конфиденциальность личных данных
– Поддержка существующих вознаграждений
Как обнаружить функционирующее зеркало в данный момент
Существует множество проверенных способов обнаружения действующей ссылки:
Проверенные каналы:
1. Почтовая рассылка — дирекция постоянно пересылает уведомления с рабочими URL
2. Социальные сети — легитимные каналы публикуют актуальную информацию
3. Отдел поддержки — специалисты предоставляют надежные адреса
4. Смартфонное приложение — дает возможность обходить блокировки
Создание аккаунта на основном ресурсе
Процедура открытия счета занимает лишь пару минут и предполагает из данных шагов:
1. Вход на главный сайт или актуальное зеркало
2. Нажатие на кнопку «Создать аккаунт»
3. Указание регистрационной анкеты
4. Проверка электронной почты или телефонного номера
5. Активация поощрения за регистрацию при присутствии промокода
Свежие пользователи приобретают щедрый начальный бонус, который может предполагать даровые прокруты, финансовые призы или кэшбек.
Логин в персональный кабинет
Авторизация на ресурсе реализуется обычным методом. Необходимо указать никнейм и секретный ключ, примененные при создании аккаунта.
Существенные нюансы для конфиденциального входа:
– Задействуйте надежный пароль
– Запустите двухэтапную идентификацию
– Не храните реквизиты на чужих устройствах
– Контролируйте адресную строку браузера
Описание поощрительной схемы
Гемблинг-сайт балует игроков многочисленными привилегиями и промо:
Приветственный букет
Свежие игроки вправе рассчитывать на существенное награду за первый вклад. Зачастую это долевая надбавка к переведенной величине плюс бесплатные вращения для популярных слотов.
Периодические промо
– Недельный cashback — возмещение части списанных денежных средств
– Бонусы на очередные взносы
– Эксклюзивные промо по торжествам
– Соревнования с большими премиальными фондами
План привилегий
Активные игроки получают баллы за всякую раунд, которые затем обмениваются на действительные денежные призы, даровые прокруты или эксклюзивные льготы.
Промокоды: как использовать
Бонус-коды — это особые наборы литер, предоставляющие право к специальным вознаграждениям.
Каким образом найти свежие промокоды:
– Проверенные медийные сети казино
– Сотрудничающие сайты
– Email-новостная лента
– Тематические группы
Вводится промокод в соответствующее поле при оформлении или пополнении депозита.
Смартфонная версия и приложение
Нынешние игроки любят играть с мобильных аппаратов. Платформа предоставляет двойной метода для комфортной телефонной игры.
Мобильная вариант
Браузерная версия автоматически подстраивается под габариты экранной панели. Не требует загрузки и работает в любом современном браузере.
Смартфонное приложение
Получить софт можно для девайсов на Android и iOS. Выгоды app:
– Скоростная активация
– Надежная функционирование
– Всплывающие-уведомления о акциях
– Самостоятельный преодоление блокировок
Операция загрузки прост: нужно открыть на ресурс с портативного гаджета и следовать инструкциям.
Игровой ассортимент
Каталог развлечений охватывает множество позиций от передовых провайдеров.
Слоты
Развлекательные аппараты — самая любимая секция игр. Размещены традиционные простые автоматы, передовые графические аппараты с бонусными уровнями, а также джекпотные выигрыши.
Live казино
Зона с настоящими крупье позволяет ощутить дух реального казино. Доступны столы с блэкджеком.
Стриминг ведется в превосходном четкости, присутствует диалог с крупье и прочими участниками.
Состязания
Систематически устраиваются конкурсы по различным слотам. Участие позволяет выиграть валютные призы, даровые прокруты или специальные презенты.
Платежные манипуляции
Сайт предоставляет обширный ассортимент платежных методов:
– Пластиковые карты
– Цифровые платформы
– Криптовалюта
– Денежные транзакции
Низшая количество пополнения — доступная для массы клиентов. Обналичивание призов осуществляется в минимальные периоды.
Служба поддержки
Профессиональные консультанты расположены оказать помощь 24/7. Доступны данные методы коммуникации:
– Веб-чат
– Email
– Голосовая линия
– Социальные сети
Ответы на типовые темы можно отыскать в секции FAQ.
Итог
Основной ресурс казино и его действующие зеркала дают клиентам максимальный вход ко всем функциям портала. Щедрые вознаграждения, приятная телефонная версия, гигантский выбор аттракционов и квалифицированная помощь формируют развлекательный процесс исключительно беспроблемным и защищенным.
Ita? caiu caiu.site .
Доступ к порталу через актуальные зеркала
Клиенты сетевых казино нередко встречаются с вопросом закрытия базового домена. Конкретно для устранения этой проблемы созданы альтернативные адреса основного ресурса. Kent предоставляет стопроцентный переход ко всем опциям платформы.
Что такое рабочее зеркало казино
Копия значит собой идентичную версию оригинального портала с похожим набором функций. Главное несовпадение — это альтернативное имя. Все сведения клиента, включая счет, бонусы и данные партий, остаются прежними.
Достоинства использования зеркал
Функционирующие зеркала обладают рядом существенных преимуществ:
– Бесперебойный переход к излюбленным слотам
– Абсолютная защита персональных данных
– Неизменность всех конфигураций пользовательского кабинета
– Возможность приобретения наград и включения в акциях
Открытие счета на главном портале
Процесс открытия счета чрезвычайно прост и отнимает пару минут. Недавние игроки способны надеяться на солидный стартовый подарок за оформление.
Ступени открытия аккаунта
1. Переход на главный домен или его альтернативу
2. Клик на опцию “Зарегистрироваться”
3. Заполнение обязательных данных
4. Активация email почты
5. Указание купона (если присутствует)
Поощрения и кампании для участников
Платформа балует своих участников многочисленными призовыми системами.
Ключевые варианты поощрений
Начальный подарок — внушительное поощрение для начинающих клиентов, каковое в состоянии вмещать финансовые средства и free spins.
Фриспины — возможность играть в известных аппаратах без затрат.
Компенсация — процентный компенсация проигранных денег, который именно предоставляется по неделям или раз в месяц.
Промокоды — особые комбинации, гарантирующие дополнительные преимущества.
Персональный кабинет: функции и конфигурации
Личный профиль обеспечивает совершенный надзор над развлекательным процессом. Тут присутствуют:
– Контроль средствами
– Записи переводов
– Текущие поощрения
– Параметры охраны
– Валидация профиля
Смартфонная платформа и приложение
Новейшие клиенты ценят мобильность. Платформа предлагает два пути для ставок с карманных девайсов.
Отзывчивая портативная версия
Адаптивная вариант домена без участия приспосабливается под разрешение любого устройства. Отсутствует потребность загружать дополнительное приложение.
APP для гаджетов
Доступно загрузить специальное APP для iOS и Android. Программа гарантирует:
– Быстрый запуск
– Улучшенный интерфейс
– Всплывающие-уведомления о предложениях
– Стабильную операционность
Live раздел: среда подлинного клуба
Секция Live столов отправляет игроков в антураж настоящего клуба. Профессиональные крупье проводят партии в режиме живого времени.
Топовые Live-игры
– Французская рулетка
– 21
– Baccarat
– Техасский холдем
Слоты: ассортимент автоматов
Собрание слотовых слотов вмещает массу названий от известных производителей. Клиенты откроют:
– Классические машины
– Современные слоты
– Джекпот-машины
– Мегавейс
Турниры и особые мероприятия
Систематические конкурсы предоставляют шанс пользователям бороться друг с другом за внушительные денежные фонды. Всякий конкурс содержит свои правила присутствия и таблицу чемпионов.
Методы пополнения и получения сумм
Платформа предоставляет ряд денежных сервисов:
– Банковские средства
– Виртуальные сервисы
– Крипто
– Wire транзиты
Любые платежи проходят надежно благодаря новейшим системам защиты.
Команда support
Опытные операторы команды поддержки расположены ассистировать 24/7. Имеются данные каналы контакта:
– Живой-чат
– Email-сервис
– Аудио горячая линия
– Медийные сети
Заключение
Легальный домен платформы и его функционирующие дубликаты предоставляют игрокам надежный и легкий подход к огромному спектру развлекательных игр. Внушительные поощрения, частые акции, компетентная служба и легкие финансовые системы превращают игровой опыт чрезвычайно увлекательным и прибыльным.
Have you ever thought about publishing an ebook or guest authoring on other websites?
I have a blog based on the same ideas you discuss and would love to
have you share some stories/information. I know my visitors
would value your work. If you’re even remotely
interested, feel free to send me an email.
Here is my blog post; 수원호스트빠
quick browse – Found this site, layout looks neat and browsing feels effortless.
веб-аналитика блог seo-blog14.ru .
forestaisle – Enjoyed checking out the items, everything feels thoughtfully arranged.
harborbundle shop – Smooth interface with clearly arranged products throughout.
Современные онлайн-казино обеспечивают пользователям большой набор развлечений и премиальных предложений. Доступ к ресурсу производится через лицензионный сайт или его функционирующее зеркало Kush, что гарантирует бесперебойную активность.
Что представляет собой рабочее зеркало казино
Альтернатива — это абсолютная дубликат главного ресурса, разработанная для обхода запретов. Зеркало сегодня позволяет пользователям иметь вход к предпочитаемым развлечениям в произвольное время.
Официальное зеркало содержит всеми опциями основного портала:
– Весь ассортимент игр
– Аккаунт с сохраненными параметрами
– Действующие промокоды
– Гарантированные финансовые операции
Открытие счета на главном сайте
Процедура регистрации занимает всего немного минут. Первым пользователям необходимо:
1. Попасть на главный ресурс или рабочее зеркало
2. Выбрать на элемент “Создать аккаунт”
3. Заполнить нужные сведения
4. Подтвердить адрес
5. Совершить первый депозит
Поощрение новичкам предоставляется незамедлительно после прохождения всех этапов.
Вход в аккаунт
Действующие пользователи могут осуществить авторизацию используя:
– Логин и ключ
– Цифры мобильного
– Email
Аккаунт обеспечивает право к регулированию балансом, записям операций и активным поощрениям.
Поощрения и предложения
Гемблинг площадка радует лояльных клиентов щедрыми вознаграждениями:
Первый бонус
– Надбавка на дебютный пополнение до 100%
– Даровые спины на популярные слоты
– Добавочные поощрения за следующие депозиты
Промокоды
Специальные купоны предоставляют доступ на использование эксклюзивных бонусов. Свежие купоны размещаются в блоке “Промо”.
Cashback
Постоянный бонус равен до 10% от утраченных сумм. Возврат зачисляется моментально.
Механизм лояльности
Регулярные пользователи накапливают баллы, которые переводятся на подлинные финансы или бесплатные вращения.
Мобильная версия и софт
Для удобства игроков создана полноценная mobile версия. Приспособленный облик дает возможность беспрепятственно участвовать с произвольного переносного аппарата.
Достоинства софта:
– Скорый запуск к слотам
– Настроенный интерфейс
– Надежная функциональность
– Сообщения о свежих турнирах
Получить софт можно безвозмездно с официального ресурса для гаджетов на Android и iOS.
Библиотека развлечений
Игровые автоматы
Коллекция насчитывает более 2000 слотов от популярных студий:
– Классические машины
– Видео-слоты
– Jackpot игры
– Тематические развлечения
Live казино
Раздел Live игр предоставляет взаимодействие с настоящими крупье в реальном эфире:
– Рулеточные столы
– Двадцать одно
– Baccarat
– Покер
Турниры
Регулярные соревнования с крупными премиальными бюджетами организуются регулярно. Участие в турнирах возможно всем активным участникам.
Расчетные методы
Взносы и получения денег осуществляются через популярные платежные системы:
– Банковские карты
– Электронные сервисы
– Крипто
– Прямые платежи
Наименьший вклад — от 100 рублей. Изъятие денег выполняется в течение 24 ч.
Команда поддержки
24/7 отдел support может поддержать в разрешении каких-либо проблем:
– Онлайн-чат
– Email
– Связь
– Общественные сети
Охрана и сертификат
Лицензионный портал функционирует на фундаменте признанной разрешения. Любые сведения пользователей обезопасены актуальным SSL-криптованием.
Итог
Функционирующее зеркало предоставляет стабильный подключение к любимым автоматам, богатым акциям и практичным возможностям. Присоединяйтесь немедленно и приобретите приветственный приз!
блог о маркетинге блог о маркетинге .
Передовые сетевые казино предоставляют игрокам большой диапазон вариантов для удобной игры. Впрочем иногда доступ к официальному ресурсу может оказаться заблокированным. В таких случаях на выручку приходит казино Гама, которое дает стабильный подключение ко всем функциям платформы.
Что такое действующее зеркало казино
Зеркало — это абсолютная дубликат главного ресурса, которая хостится по запасному интернет-адресу. Зеркало содержит целый инструментарий основного ресурса, включая индивидуальный кабинет, счет и запись переводов.
Основные преимущества использования зеркала:
– 24-часовой доступ к порталу
– Абсолютная тождественность инструментов
– Сохранность индивидуальных сведений
– Сохранение существующих привилегий
Как отыскать актуальное зеркало на текущий день
Имеется несколько безопасных вариантов поиска текущей ссылочной информации:
Официальные каналы:
1. Почтовая рассылка — администрация регулярно высылает информацию с актуальными адресами
2. Коммуникационные сети — проверенные аккаунты публикуют свежую новости
3. Отдел поддержки — специалисты предоставляют проверенные домены
4. Телефонное приложение — позволяет преодолевать блокировки
Открытие счета на основном веб-сайте
Процедура оформления требует только пару минут и содержит из таких шагов:
1. Вход на официальный сайт или рабочее зеркало
2. Нажатие на элемент «Открыть счет»
3. Ввод персональной таблицы
4. Валидация электронной почты или сотового номера
5. Применение бонуса за регистрацию при присутствии промокода
Начинающие геймеры обретают значительный стартовый бонус, который может охватывать даровые прокруты, монетарные бонусы или cashback.
Доступ в личный кабинет
Подключение на ресурсе выполняется привычным путем. Нужно ввести логин и код доступа, использованные при создании аккаунта.
Существенные моменты для конфиденциального входа:
– Применяйте защищенный секретный ключ
– Запустите двухэтапную идентификацию
– Не сохраняйте реквизиты на публичных устройствах
– Контролируйте адресную строку браузера
Описание наградной схемы
Игорный портал одаривает игроков всевозможными привилегиями и акциями:
Начальный комплект
Дебютанты могут рассчитывать на существенное вознаграждение за начальный депозит. Традиционно это долевая прибавка к переведенной сумме плюс бесплатные вращения для популярных слотов.
Периодические промо
– Еженедельный компенсация — возврат части утраченных денег
– Бонусы на последующие пополнения
– Специальные акции по праздникам
– Соревнования с солидными призовыми суммами
Программа вознаграждений
Деятельные пользователи зарабатывают пункты за всякую ставку, которые затем конвертируются на настоящие деньги, фриспины или уникальные бонусы.
Промокоды: как применять
Купоны — это специальные последовательности знаков, гарантирующие возможность к эксклюзивным бонусам.
Где найти действующие промокоды:
– Проверенные медийные сети казино
– Сотрудничающие ресурсы
– Email-новостная лента
– Специализированные платформы
Активируется промокод в предназначенное поле при регистрации или добавлении денег кошелька.
Портативная версия и приложение
Актуальные пользователи выбирают делать ставки с мобильных аппаратов. Ресурс обеспечивает двойной способа для удобной портативной игры.
Responsive вариант
Браузерная версия само собой оптимизируется под параметры экрана. Не просит установки и оперирует в любом современном браузере.
Мобильное приложение
Установить софт можно для девайсов на Android и iOS. Преимущества app:
– Оперативная открытие
– Устойчивая работа
– Всплывающие-уведомления о промо
– Автономный преодоление блокировок
Процедура установки прост: нужно открыть на ресурс с телефонного аппарата и следовать инструкциям.
Развлекательный коллекция
Коллекция развлечений включает тысячи позиций от топовых провайдеров.
Слоты
Развлекательные слоты — крайне востребованная категория аттракционов. Представлены традиционные 3-барабанные слоты, передовые видеослоты с бонусными уровнями, а также накопительные призы.
Live казино
Раздел с действительными ведущими обеспечивает прочувствовать настроение истинного казино. Имеются столы с рулеткой.
Трансляция реализуется в высоком разрешении, обеспечивается коммуникация с ведущим и другими пользователями.
Конкурсы
Постоянно проводятся турниры по разным категориям. Вступление дает шанс завоевать финансовые вознаграждения, free spins или специальные поощрения.
Денежные процедуры
Ресурс поддерживает значительный ассортимент расчетных систем:
– Дебетовые карты
– Виртуальные платформы
– Цифровая валюта
– Банковские транзакции
Стартовая количество пополнения — приемлемая для массы пользователей. Вывод средств производится в кратчайшие интервалы.
Департамент поддержки
Опытные специалисты настроены помочь постоянно. Открыты нижеследующие каналы общения:
– Интернет-чат
– Email
– Голосовая горячая линия
– Общественные сети
Пояснения на стандартные вопросы можно обнаружить в разделе FAQ.
Итог
Официальный ресурс казино и его актуальные зеркала обеспечивают клиентам совершенный вход ко всем возможностям платформы. Великодушные привилегии, комфортная телефонная версия, огромный каталог аттракционов и профессиональная ассистенция делают развлекательный процесс исключительно беспроблемным и безопасным.
vet pharmacy online: pet med – best pet rx
mellstroy casino официальный сайт mellstroy casino официальный сайт .
online spot – Just discovered this page and the tidy design makes browsing relaxing.
this website – I stumbled upon this page, everything looks organized and easy to navigate.
Переход к платформе через рабочие зеркала
Передовые интернет казино предоставляют клиентам непрерывный подключение к играм. Центральный портал андроид оперирует устойчиво, гарантируя богатый выбор гемблинг слотов. Тем не менее периодически возникают технические проблемы или блокировки, в связи с чем критично быть осведомлённым о доступности действующих зеркал.
Что представляет собой главное зеркало казино
Копия — это полная версия официального портала с аналогичным интерфейсом. Рабочее зеркало сегодня помогает обходить местные блокировки и продолжать развлечения.
Ключевые плюсы использования зеркал:
– Абсолютный переход к индивидуальному кабинету
– Удержание любых информации учётной записи
– Схожий набор слотов
– Текущие вознаграждения и кампании
Регистрация на ресурсе
Процесс записи длится несколько минут. Начинающие игроки получают щедрый бонус за запись, который в состоянии вмещать:
– Вступительный бонусный бонус
– Даровые вращения для слотов
– Специальные купоны
– Расширенный кэшбек
Ради финализации регистрации нужно:
1. Войти на центральный веб-сайт или зеркало
2. Нажать элемент «Зарегистрироваться»
3. Внести индивидуальные реквизиты
4. Активировать электронную почту или телефон
5. Задействовать код (в случае наличии)
Доступ в собственный кабинет
Вслед за успешной оформления пользователи имеют возможность производить авторизацию с помощью главный веб-сайт или актуальное зеркало. Персональный кабинет открывает всесторонний надзор над профилем:
– История транзакций
– Ввод кошелька
– Получение выигрышей
– Регулирование бонусами
– Включение в состязаниях
Бонусы и акции казино
Сайт награждает геймеров различными привилегированными схемами:
Вступительные подарки
Новички зарабатывают богатый набор бонусов на начальные депозиты. Типично это охватывает процентную добавку к сумме пополнения плюс даровые фриспины.
Постоянные кампании
– Еженедельный возврат до 15%
– Турниры с призовыми суммами
– Подарки на годовщину рождения
– Эксклюзивные акции для привилегированных геймеров
Программа лояльности
Активные клиенты получают пункты, они допустимо трансформировать на настоящие средства или уникальные преимущества.
Мобильная форма и приложение
Нынешние решения помогают участвовать везде угодно. Портативная редакция ресурса независимо подстраивается под монитор всякого аппарата.
Выгоды карманного приложения:
– Оперативная подгрузка автоматов
– Практичный интерфейс
– Мгновенные-сообщения о бонусах
– Опция инсталлировать для Android и iOS
Настоящее казино: атмосфера истинного игорного клуба
Категория Live клуба транспортирует клиентов в атмосферу реального гемблинг учреждения. Опытные дилеры проводят развлечение в формате реального времени.
Доступные варианты:
– Европейская рулетка
– Очко
– Punto Banco
– Карты
Автоматы и развлекательные машины
Собрание азартных автоматов включает множество наименований от передовых студий. Всякий геймер обнаружит слот по желанию:
– Стандартные слоты
– Инновационные игры с призовыми раундами
– Крупный приз-игры
– Многолинейные автоматы
Соревнования и розыгрыши
Периодические турниры включают азарт и открывают опцию обрести большие суммы. Вовлечение в конкурсах зачастую безвозмездное, а наградные суммы насчитывают значительных величин.
Защита и секретность
Портал применяет актуальные протоколы защиты для охраны информации геймеров. Любые финансовые процедуры выполняются через безопасные протоколы.
Заключение
Официальный сайт и его действующие зеркала дают безопасный доступ к первоклассным игровым сервисам. Щедрые бонусы, эргономичная мобильная редакция, богатство слотов и компетентное Live-заведение превращают платформу прекрасным опцией для любителей развлекательных развлечений.
pet pharmacy pet meds official website pet meds online
Подключение к порталу через актуальные зеркала
Клиенты виртуальных казино нередко имеют дело с ситуацией закрытия базового домена. Именно для устранения этой ситуации существуют дубликаты основного портала. official предоставляет беспрепятственный переход ко всем функциям площадки.
Что такое функционирующее зеркало казино
Копия представляет собой полную реплику официального сайта с идентичным набором функций. Главное различие — это иное имя. Все сведения игрока, в том числе счет, привилегии и историю раундов, продолжают быть прежними.
Достоинства задействования зеркал
Действующие зеркала обладают множеством важных плюсов:
– Бесперебойный вход к любимым развлечениям
– Полная защита персональных сведений
– Удержание всех конфигураций персонального кабинета
– Опция взятия бонусов и присутствия в кампаниях
Регистрация на главном сайте
Процедура оформления предельно легок и длится буквально минут. Начинающие участники могут полагаться на крупный стартовый подарок за открытие счета.
Этапы открытия аккаунта
1. Доступ на главный ресурс или его альтернативу
2. Нажатие на опцию “Присоединиться”
3. Ввод необходимых сведений
4. Проверка email почты
5. Применение бонусного кода (когда имеется)
Бонусы и кампании для пользователей
Казино поощряет своих игроков многочисленными наградными предложениями.
Основные виды бонусов
Начальный приз — солидное поощрение для новых пользователей, каковое может охватывать материальные бонусы и бесплатные вращения.
Безвозмездные спины — опция использовать в известных слотах бесплатно.
Кешбэк — частичный отдача потерянных финансов, каковой начисляется по неделям или ежемесячно.
Промокоды — уникальные комбинации, обеспечивающие бонусные поощрения.
Пользовательский кабинет: функции и установки
Пользовательский кабинет гарантирует абсолютный контроль над игровым активностью. В нем доступны:
– Контроль балансом
– Записи платежей
– Текущие награды
– Конфигурации сохранности
– Проверка аккаунта
Карманная редакция и программа
Нынешние игроки предпочитают мобильность. Площадка предлагает два способа для ставок с мобильных гаджетов.
Отзывчивая портативная платформа
Портативная версия ресурса самостоятельно приспосабливается под монитор любого девайса. Не требуется инсталлировать особое приложение.
APP для гаджетов
Возможно установить специальное программу для iOS и Android. Программа обеспечивает:
– Мгновенный доступ
– Доработанный интерфейс
– Оперативные-извещения о акциях
– Надежную работу
Live развлечения: обстановка настоящего клуба
Зона Live казино транспортирует игроков в антураж настоящего клуба. Профессиональные хосты ведут партии в виде настоящего времени.
Топовые Live-развлечения
– Американская рулетка
– Blackjack
– Punto Banco
– Карибский покер
Слоты: многообразие слотов
Коллекция азартных аппаратов содержит массу позиций от лидирующих производителей. Пользователи откроют:
– Классические слоты
– Видео-автоматы
– Джекпот-машины
– Слоты с множественными линиями
Турниры и эксклюзивные акции
Постоянные состязания дают возможность пользователям конкурировать друг с другом за солидные наградные фонды. Каждый соревнование имеет свои правила участия и рейтинг лидеров.
Методы внесения и изъятия сумм
Площадка поддерживает множество денежных сервисов:
– Платежные картыы
– Виртуальные платежные системы
– Криптовалюты
– Банковские отправления
Все транзакции выполняются безопасно благодаря новейшим методам кодирования.
Сервис обслуживания
Профессиональные консультанты службы поддержки готовы ассистировать 24/7. Предусмотрены такие пути общения:
– Оперативный-чат
– Email-поддержка
– Голосовая горячая линия
– Коммуникационные сети
Резюме
Легальный портал клуба и его рабочие зеркала гарантируют пользователям конфиденциальный и приятный доступ к большому спектру развлекательных активностей. Крупные подарки, постоянные акции, компетентная помощь и комфортные расчетные методы формируют геймерский времяпрепровождение предельно захватывающим и прибыльным.
net seo net seo .
Современные онлайн-казино предоставляют пользователям обширный ассортимент вариантов для удобной времяпрепровождения. Подключение к сервису Pinco производится через лицензионный домен или действующее зеркало.
Что такое функционирующее зеркало казино
Рабочее зеркало — это резервный адрес официального ресурса казино. Такие копии формируются для поддержания бесперебойного входа к азартной платформе.
Альтернатива сегодня полностью повторяет функционал базового домена. Клиенты обретают аналогичный доступ ко всем возможностям, включая открытие счета, пополнение баланса и снятие призов.
Оформление профиля на основном портале
Алгоритм открытия профиля длится всего несколько мгновений. Будущим пользователям необходимо:
1. Перейти на лицензионный сайт или актуальное подлинное зеркало
2. Кликнуть кнопку “Регистрация”
3. Ввести обязательные данные
4. Проверить e-mail почту
5. Применить код активации при существовании
После выполнения оформления клиент получает бонус за регистрацию, который способен охватывать free spins или монетарное поощрение.
Доступ в индивидуальный кабинет
Персональный кабинет — это защищенная территория, где игроки могут регулировать своим аккаунтом. Для входа необходимо напечатать никнейм и пароль.
В личном кабинете доступны следующие опции:
– Просмотр истории операций
– Использование купонов
– Регулирование поощрениями
– Участие в конкурсах
– Мониторинг возмещения
– Настройка аккаунта
Бонусы и предложения
Гемблинговая система дарит щедрые бонусы:
Регистрационный бонус — начинающие приобретают существенное начисление на начальные депозиты.
Фриспины — предоставляются как при оформлении, так и в процессе многочисленных мероприятий.
Возврат средств — регулярный возврат процента проигранных средств.
Купоны — уникальные комбинации, обеспечивающие право к уникальным призам.
Обзор гемблинговых секций
Игровые автоматы
Коллекция слотов охватывает сотни игр от лучших поставщиков. Пользователи встретят как стандартные аппараты, так и актуальные видео-слоты с захватывающей визуализацией.
Live казино
Зона Live казино дарит возможность соревноваться с настоящими ведущими в условиях актуального времени. Представлены востребованные игры: рулетка, блэкджек, баккара, покер.
Соревнования
Систематические турниры с значительными премиальными пулами притягивают массу соревнующихся. Призеры зарабатывают монетарные награды и уникальные поощрения.
Мобильная версия и app
Портативная версия ресурса позволяет играть с произвольного устройства. Структура независимо настраивается под диагональ экрана.
Загрузить программу можно для аппаратов на Android и iOS. Смартфонное приложение характеризуется всеми возможностями компьютерной версии.
Как определить актуальное зеркало на данный момент
Действующие адреса копий периодически изменяются. Найти действующую адрес можно различными путями:
– Через департамент саппорта
– В подлинных социальных сетях
– По email рассылке
– На специализированных порталах
Охрана и сертификация
Лицензионный сайт работает на фундаменте мировой разрешения. Все транзакции оберегаются инновационными протоколами безопасности.
Конфиденциальность пользовательских сведений сохраняется в полном формате.
Итог
Лицензионный сайт и его рабочие копии гарантируют участникам 24/7 выход к высококлассным гемблинговым сервисам. Привлекательные поощрения, разнообразные автоматы, компетентная помощь — все это создает гемблинговый времяпрепровождение невероятно комфортным и увлекательным.
Актуальные онлайн-казино дают участникам обширный диапазон развлечений и поощрительных предложений. Доступ к сервису выполняется через основной сайт или его функционирующее зеркало Cactus Casino казино, что гарантирует постоянную деятельность.
Чем является функционирующее зеркало казино
Альтернатива — это точная версия оригинального сайта, разработанная для преодоления ограничений. Зеркало сегодня дает возможность участникам получить соединение к любимым развлечениям в любое время.
Лицензионное зеркало содержит всеми характеристиками основного портала:
– Весь каталог слотов
– Учетная запись с записанными сведениями
– Актуальные акции
– Надежные расчетные действия
Оформление профиля на главном веб-сайте
Процедура создания аккаунта составляет всего несколько минут. Свежим клиентам нужно:
1. Попасть на проверенный ресурс или действующее зеркало
2. Выбрать на ссылку “Регистрация”
3. Указать необходимые данные
4. Верифицировать контакт
5. Произвести дебютный вклад
Приветственный бонус выдается незамедлительно после выполнения всех этапов.
Авторизация в аккаунт
Действующие пользователи могут произвести авторизацию используя:
– Имя пользователя и код
– Цифры контакта
– Контактный email
Личный кабинет предоставляет шанс к администрированию финансами, записям игр и действующим поощрениям.
Промо и акции
Гемблинг система радует активных участников щедрыми вознаграждениями:
Начальный пакет
– Поощрение на начальный пополнение до 100%
– Free spins на востребованные слоты
– Добавочные награды за последующие взносы
Бонусные коды
Эксклюзивные купоны открывают возможность на активацию специальных поощрений. Актуальные купоны публикуются в блоке “Акции”.
Возврат средств
Еженедельный кэшбек насчитывает до 10% от потраченных денег. Возврат зачисляется моментально.
Механизм лояльности
Постоянные клиенты приобретают единицы, которые обмениваются на подлинные средства или бесплатные вращения.
Mobile версия и APP
В целях удобства игроков создана функциональная портативная платформа. Приспособленный дизайн обеспечивает удобно играть с любого портативного устройства.
Преимущества софта:
– Моментальный запуск к автоматам
– Настроенный облик
– Стабильная функциональность
– Нотификации о актуальных турнирах
Скачать приложение можно даром с официального ресурса для гаджетов на Android и iOS.
Каталог слотов
Игровые автоматы
Каталог включает более 2000 автоматов от известных провайдеров:
– Стандартные слоты
– Video slots
– Слоты с джекпотом
– Фирменные развлечения
Live казино
Раздел Live столов дает участие с реальными дилерами в прямом времени:
– Рулеточные столы
– Blackjack
– Punto Banco
– Карточный покер
Конкурсы
Периодические соревнования с большими выигрышными фондами запускаются регулярно. Присоединение в турнирах открыто всем действующим участникам.
Финансовые системы
Взносы и получения выплат выполняются через востребованные сервисы:
– Платежные карточ ки
– Электронные сервисы
– Криптовалюта
– Счетные транзакции
Стартовый взнос — от 100 рублей. Изъятие денег выполняется в течение 24 времени.
Отдел помощи
Круглосуточная отдел саппорта способна поддержать в решении каких-либо проблем:
– Мессенджер
– Email
– Телефон
– Соц сети
Безопасность и разрешение
Лицензионный сайт оперирует на базе признанной документа. Всевозможные параметры клиентов охранены передовым SSL-шифрованием.
Итог
Рабочее зеркало гарантирует непрерывный соединение к излюбленным автоматам, богатым промокодам и комфортным сервисам. Присоединяйтесь немедленно и обретите первый подарок!
cool platform – Came across this store, the browsing experience feels smooth and organized.
Передовые онлайн-казино предлагают игрокам обилие возможностей для комфортной игры. Центральный веб-портал казино Дэдди предоставляет доступ ко всем опциям и игровым автоматам. Однако при образовании технических неполадок на подмогу спешат функционирующие копии.
Что представляет собой рабочее зеркало
Альтернативный адрес казино — это стопроцентная версия основного ресурса, размещенная по дополнительному веб-адресу. Лицензионное зеркало удерживает все функции, вместе с открытие профиля, доступ в персональный кабинет, премии и кодовые слова.
Копия на сегодня гарантирует:
– Непрерывный доступ к развлекательным аппаратам
– Стопроцентную безопасность персональных данных
– Сохранение депозита и журнала операций
– Применимость всех промо-предложений
Регистрация на лицензионном сайте
Процесс оформления учетной записи занимает несколько минут. Новоиспеченным пользователям следует:
1. Перейти на подлинный сайт или актуальное зеркало
2. Выбрать кнопку «Зарегистрироваться»
3. Внести нужные сведения
4. Верифицировать э-мейл почту
5. Применить кодовое слово при существовании
После завершения создания аккаунта пользователи получают приз за регистрацию, который может содержать free spins или денежно-призовое премирование.
Доступ в персональный кабинет
Личный кабинет предоставляет комплексный мониторинг над игровым процессом. Через индивидуальный раздел можно:
– Финансировать счет
– Снимать призы
– Активировать купоны
– Проверять журнал пари
– Соревноваться в конкурсах
– Забирать кэшбек
Описание вознаграждений и специальных предложений
Богатая призовая политика — ключевое козырь казино. Ключевые категории бонусов:
Вступительный подарок
Новые игроки зарабатывают щедрое поощрение на начальные депозиты. Объем премии может доходить до 100-200% от объема вклада.
Фриспины
Халявные спины начисляются для популярных слотов. Сумма фриспинов изменяется от 10 до 500 штук.
Cash back
Систематический или помесячный возврат доли утраченных денег. Средний объем кэшбека — 5-15%.
Состязания
Постоянные соревнования с большими призовыми пулами. Соревнующиеся борются за лучшие места в турнирной таблице.
Смартфонная версия и софт
Мобильная версия разрешает развлекаться с всякого гаджета. Клиенты могут закачать app для iOS и Android или использовать интернет версию.
Достоинства портативного программы:
– Скоростная прогрузка игр
– Практичный UI
– Push-уведомления о промо
– Возможность входа через биометрию
Игровые автоматы и Live казино
Игровая коллекция содержит множество названий от известных поставщиков.
Топовые категории автоматов:
– Классические слоты
– Видеослоты с премиальными этапами
– Прогрессивный джекпот игры
– Мегавейс автоматы
Live казино
Раздел live игорный зал обеспечивает партию с живыми крупье. Есть традиционные варианты:
– Рулетка
– Blackjack
– Baccarat
– Техасский холдем
Как отыскать действующее зеркало
Обрести свежую линк на зеркало разрешается разными путями:
1. Подписаться на почтовую рассылку
2. Следить за апдейтами в социальных сетях
3. Написать в сервис поддержки
4. Сохранить рабочее зеркало в избранное
Итог
Главный сайт и его действующие зеркала гарантируют непрерывный вход к развлекательным слотам. Выгодные премии, многочисленные бонусные коды, эргономичное смартфонное софт и профессиональная сервис поддержки делают развлекательный процесс крайне беспроблемным и безопасным.
Современные онлайн-казино обеспечивают участникам богатый выбор игр и привлекательные премии. Но для беспроблемной работы существенно иметь представление, как обнаружить Daddy и его функционирующие зеркала.
Что такое главный веб-ресурс казино
Главный портал казино — это главная платформа, где клиенты могут получать удовольствие от игровыми развлечениями. Портал работает на легитимных принципах и имеет всеми нужными документами.
Главные плюсы основного сайта:
– Конфиденциальность личных данных
– Справедливые положения работы
– Подтвержденные выплаты
– Оперативная служба поддержки
Действующее зеркало казино: для чего необходимо
Альтернативный адрес — это полная копия лицензионного ресурса, хостящаяся по другому URL. Функционирующее зеркало формируется для гарантирования стабильного доступа к сайту.
Факторы использования альтернативных адресов:
– Недоступность первичного домена
– Плановые операции
– Значительная посещаемость на сервер
Как найти действующее зеркало в данный момент
Узнать актуальное рабочее зеркало можно различными способами:
1. Почтовые оповещения — оформите подписку на новостную рассылку
2. Служба техподдержки — обратитесь в онлайн-чат
3. Публичные площадки — следите за публикациями
4. Игровые ресурсы — надежные сайты
Оформление профиля на портале казино
Процесс создания аккаунта составляет лишь считанные минут:
1. Выберите на клавишу “Регистрация”
2. Введите запрашиваемые сведения
3. Подтвердите почтовую адрес
4. Активируйте код активации, если доступен
По завершении оконченной регистрации вам откроется возможен пользовательский кабинет.
Награды и бонусные коды
Щедрая поощрительная структура — ключевое преимущество казино:
Бонус за регистрацию
Первичные участники обретают приветственный поощрение, который может предполагать:
– Валютный кредит на дебютный пополнение
– Фри-спины для игровых машин
– Стартовые деньги
Бонусные коды
Регулярно размещаются новые бонусные шифры, дающие возможность получить специальные привилегии.
Схема возврата средств
Регулярные игроки возвращают порцию использованных ставок в виде компенсации.
Свежие предложения и состязания
Сайт периодически организует захватывающие события:
– Weekly баттлы
– Сезонные промо
– Розыгрыши крупных призов
– Программа статусов
Вход в индивидуальный профиль
Для доступа на платформу нужно:
1. Загрузить лицензионный ресурс или актуальное зеркало
2. Активировать “Login”
3. Внести никнейм и код доступа
В индивидуальном кабинете открыты следующие функции:
– Зачисление баланса
– Обналичивание средств
– Проверка журнала операций
– Управление профильными параметрами
Мобильная модификация и app
Mobile вариант
Адаптивная вариант ресурса дает возможность играть с разных мобильного гаджета. Оформление автоматически адаптируется под габариты дисплея.
Приложение для download
Получить клиент можно для:
– Android — безопасная скачивание с платформы
– iOS — установка через App Store
Плюсы мобильного клиента:
– Моментальный запуск
– Стабильная операционность
– Push-сообщения об бонусах
– Ускоренный интерфейс
Развлекательные зоны
Автоматы
Обширная библиотека азартных слотов от известных поставщиков:
– Стандартные слоты
– Видео-автоматы
– Накопительные-игры
Live зал
Секция с настоящими крупье предоставляет:
– European/American Roulette
– Блэкджек
– Punto Banco
– Покер
Стримы транслируются в высоком формате, создавая впечатление подлинного казино.
Методы зачисления и вывода
Платформа работает с множественные транзакционные сервисы:
– Кредитные средства
– Виртуальные платежи
– Цифровые валюты
– Прямые транзиты
Наименьшие значения внесения и скоростные выводы обеспечивают игру исключительно удобной.
Департамент помощи
Компетентная служба ассистентов работает 24/7 и способна поддержать с всеми задачами:
– Реалтайм-чат
– Email-консультации
– Звонковая горячая линия
Выводы
Официальный веб-сайт казино и его функционирующие копии гарантируют участникам надежный и увлекательный развлекательный опыт. Привлекательные бонусы, удобная мобильная модификация, разнообразные развлечения и профессиональное live-казино превращают эту систему замечательным выбором для игровых досуга.
harborwharf online – Smooth browsing experience with clearly presented items.
explore ivory crate – Feels like a simple shop with a nice and clear layout.
I am in fact grateful to the owner of this site who has shared this impressive post at here.
Here is my page: 수원가라오케
Обзор основного ресурса
Прогрессивные виртуальные казино дают пользователям широкий набор забав и опций. Основной ресурс Лаки Ворлд гарантирует безопасный доступ к развлекательным сервисам.
Функционирующее зеркало: доступ сегодня
Зеркало служит собой полную версию официального портала. Проверенное зеркало помогает игрокам преодолевать возможные барьеры.
Достоинства применения зеркала
Основные плюсы охватывают:
– Непрерывный вход к сайту
– Поддержание любых возможностей базового сайта
– Охрана конфиденциальных данных
– Идентичный возможности
Оформление профиля на портале
Процедура оформления профиля отличается легкостью и эргономичностью. Начинающие игроки требуется:
1. Перейти на лицензионный сайт или его зеркало
2. Щелкнуть на кнопку открытия счета
3. Внести обязательные информацию
4. Подтвердить электронную почту
5. Осуществить стартовый доступ
Вознаграждение за создание аккаунта
Дебютанты зарабатывают солидный вступительный бонус. Данное поощрение в состоянии охватывать:
– Денежные суммы
– Complimentary вращения
– Увеличенный уровень возврата
Вход в личный аккаунт
Действующие клиенты способны мгновенно зайти в личный аккаунт, применяя никнейм и пароль. Собственный кабинет предоставляет путь к:
– Администрированию счетом
– Истории платежей
– Активным поощрениям
– Настройкам аккаунта
Призы и предложения
Сайт систематически устраивает различные промо-кампании для пользователей.
Типы поощрений
Ключевые типы поощрений:
– Пополнительные бонусы – коэффициент от размера пополнения
– Спины – безвозмездные раунды в игровых машинах
– Кэшбек – возврат процента затраченных денег
– Конкурсные вознаграждения – премии за выступление в конкурсах
Ваучеры
Уникальные купоны помогают получить дополнительные привилегии. Участники в состоянии обнаружить их на аффилиатных ресурсах или получить в письмах.
Переносная версия и app
Актуальные игроки предпочитают переносной досуг.
Функции mobile системы
– Отзывчивый вид для всех аппаратов
– Целостный возможность к автоматам
– Стремительная работа
– Удобное управление
Установить софт
Mobile программа предоставлено для установки на гаджеты с рабочими ОС Android и iOS. Приложение предоставляет:
– Устойчивую деятельность
– Мгновенные оповещения о предложениях
– Мгновенный путь к желанным развлечениям
Игровой каталог
Портал предлагает обширную подборку игровых услуг.
Аппараты
Библиотека азартных слотов охватывает:
– Обычные машины
– Современные игры
– Джекпотные слоты
– Лицензионные автоматы
Live казино
Категория настоящих столов дает шанс состязаться с настоящими диллерами. Предложены:
– Рулетка
– Блэкджек
– Baccarat
– Покер
Конкурсы
Регулярные чемпионаты обеспечивают участникам состязаться за крупные денежные банки. Призовая структура обновляется постоянно.
Финансовые действия
Казино обеспечивает массу способов пополнения и вывода денег:
– Пластиковые карты
– Онлайн счета
– Банковские транзакции
– Крипто
Абсолютно все транзакции производятся надежно с применением передовых методов шифрования.
Департамент support
Опытная команда саппорта функционирует без перерыва. Связаться с менеджерами возможно через:
– Онлайн чат
– Электронную почту
– Контактный номер
– Социальные медиа
Безопасность и регулирование
Портал работает на фундаменте официальной сертификата. Такое подтверждает:
– Прозрачность развлекательного действа
– Сохранность конфиденциальных данных
– Оперативные выплаты
– Контролируемый гейминг
Резюме
Лицензионный ресурс и его действующие резервные страницы предоставляют участникам полный ассортимент возможностей для безопасной и доходной времяпрепровождения. Значительные бонусы, всевозможные автоматы, профессиональная поддержка и проверенная платформа выплат превращают казино превосходным вариантом для ценителей развлекательных игр.
best of gingergoods – Organized layout and clear product listings make browsing easy.
Описание оригинального ресурса
Актуальное онлайн-казино предоставляет своим клиентам большой набор развлечений и призов. Официальный портал 888 казино работает постоянно, давая вход к востребованным играм, live-казино и обширным кампаниям.
Актуальное зеркало: доступ к порталу
Что такое дубликат казино
Зеркало означает собой идентичную копию официального ресурса с другим URL путем. Рабочее зеркало предоставляет игрокам миновать запреты и обеспечивать постоянный вход к любимым играм.
Как найти актуальное зеркало сегодня
Актуальные адреса на основное зеркало размещаются через:
– Электронную рассылку
– Основные коммуникационные сети
– Сервис сопровождения
– Специализированные сайты
Созданиеаккаунта на платформе
Процесс открытиясчета
Оформление отнимает буквально минут и подразумевает такие действия:
1. Доступ на главный ресурс или рабочее зеркало
2. Нажатие элемента “Создатьаккаунт”
3. Внесение учетных информации
4. Проверка электроннойпочты или телефона
5. Создание секретнойкомбинации
Приз за оформление
Начинающие клиенты обретают выгодные начальные подарки:
– Игровые депозиты на счет
– Freespins для слотов
– Расширенный объем кэшбека
– Уникальные коды
Вход в личный счет
Постоянные игроки могут произвести авторизацию через основной портал или действующее зеркало. Для этого нужно ввести учетноеимя и ключдоступа, установленные при созданииаккаунта.
Функции индивидуального раздела
В личном профиле доступны следующие опции:
– Контроль контактными информацией
– Пополнение депозита
– Снятие выигрышей
– Активация бонусов
– Просмотр архива транзакций
– Участие в конкурсах
Вознаграждения и промо
Разновидности бонусов
Казино поощряет своих клиентов всевозможными поощрительными акциями:
– Вступительный бонус — выгодные вознаграждения на первые пополнения
– Бесплатныевращения — подарочные ставки в известных симуляторах
– Компенсация — систематический откат части проигрышей
– Программа поощрения — особые преимущества для верных пользователей
Промокоды и их ввод
Специальные промокоды обеспечивают расширенные вознаграждения. Для применения нужно ввести комбинацию в специальное раздел в индивидуальном профиле.
Азартный ассортимент
Слоты
Каталог слотовых автоматов включает множество названий от известных разработчиков:
– Стандартные машины
– Современные автоматы
– Прогрессивные слоты
– Сюжетные слоты
Live казино
Секция Live-казино предлагает взаимодействие с профессиональными дилерами в формате реального трансляции:
– Рулетка
– Blackjack
– Baccarat
– Техасскийхолдем
Турниры
Систематические состязания с большими выигрышными суммами проходят ежедневно. Претенденты борются за первенство в турнирнойсетке.
Мобильная версия и софт
Адаптивная реализация ресурса
Главный сайт абсолютно оптимизирован для смартфонных устройств. Участники могут пользоваться слоты прямо через обозреватель без нужды загрузки.
APP для загрузки
Официальное карманное софт имеется для скачивания на гаджеты с операционными средами Android и iOS. Программа гарантирует:
– Моментальный подход к слотам
– Устойчивую работу
– Моментальные-уведомления о промо
– Удобный навигацию
Итог
Официальный веб-сайт казино и его действующие зеркала обеспечивают участникам всесторонний вход к отличным геймплейным сервисам. Большие бонусы, разнообразные промо, комфортная адаптивная платформа и опытная служба превращают игровой времяпрепровождение предельно удобным и прибыльным.
https://mensrxindex.com/# Mens RX Index
vet pharmacy online: discount pet meds – pet meds official website
see this website – Stumbled on this site, navigating products is easy and intuitive.
http://certifiedcanadarx.com/# Certified Canada Rx
fieldfind curated shop – Simple, well-arranged design makes exploring items a breeze.
explore junocrate – The site seems straightforward, making shopping smooth.
Спасибо за инструкцию. Подобное редко найдёшь
в !
Проверил по этой рекомендации — запах ушел.
Теперь понимаю, как избавиться от
запаха !
Личный опыт
У меня была такая же проблема:
из стиралки пахло канализацией, исправил так:
Промыл фильтр и сливной шланг.
Запустил холостой цикл с
уксусом.
Протер резиновую манжету.
.
Актуальные онлайн-казино гарантируют пользователям разнообразный спектр возможностей для беспроблемной развлечений. Доступ к сервису Мотор казино производится через главный веб-ресурс или актуальное зеркало.
Что такое действующее зеркало казино
Рабочее зеркало — это дополнительный адрес главного веб-сайта казино. Такие копии разрабатываются для обеспечения бесперебойного входа к игровой платформе.
Копия сегодня целиком копирует функционал базового домена. Геймеры получают схожий вход ко всем услугам, включая создание аккаунта, финансирование счета и снятие денег.
Оформление профиля на главном портале
Процедура создания аккаунта занимает всего пару минут. Начинающим игрокам требуется:
1. Зайти на основной портал или актуальное настоящее зеркало
2. Выбрать кнопку “Регистрация”
3. Заполнить обязательные информацию
4. Активировать электронную почту
5. Использовать купон при наличии
После завершения оформления пользователь зарабатывает вознаграждение за регистрацию, который может предполагать даровые спины или денежное премию.
Доступ в собственный кабинет
Пользовательский кабинет — это безопасная секция, где участники могут регулировать своим учетной записью. Для авторизации необходимо внести username и код доступа.
В персональном кабинете имеются такие возможности:
– Отслеживание хронологии переводов
– Активация купонов
– Регулирование поощрениями
– Вступление в турнирах
– Отслеживание возмещения
– Изменение учетной записи
Поощрения и спецпредложения
Развлекательная площадка обеспечивает выгодные бонусы:
Приветственный набор — новые игроки приобретают крупное начисление на стартовые вклады.
Бесплатные вращения — дарятся как при открытии счета, так и в ходе всевозможных кампаний.
Кэшбек — регулярный рефанд части проигранных денег.
Купоны — эксклюзивные комбинации, предоставляющие выход к уникальным предложениям.
Обзор гемблинговых секций
Игровые автоматы
Коллекция автоматов включает сотни игр от ведущих производителей. Пользователи найдут как классические аппараты, так и новые видеослоты с захватывающей оформлением.
Live казино
Секция Live казино предоставляет опцию развлекаться с живыми дилерами в состоянии реального времени. Открыты распространенные варианты: рулетка, блэкджек, баккара, покер.
Состязания
Систематические турниры с значительными выигрышными банками притягивают сотни соревнующихся. Победители завоевывают финансовые вознаграждения и особые бонусы.
Портативная версия и app
Портативная версия ресурса обеспечивает участвовать с произвольного устройства. Структура автономно настраивается под формат экрана.
Получить приложение можно для устройств на Android и iOS. Мобильное программа характеризуется всеми опциями компьютерной версии.
Как определить актуальное зеркало на сейчас
Свежие линки альтернатив постоянно меняются. Получить актуальную адрес можно различными способами:
– Через отдел поддержки
– В проверенных информационных сетях
– По электронной рассылке
– На специализированных порталах
Защита и лицензирование
Основной домен работает на базе мировой разрешения. Все переводы защищены инновационными системами защиты.
Секретность персональных информации обеспечивается в абсолютном формате.
Вывод
Официальный сайт и его актуальные альтернативы предоставляют клиентам 24/7 доступ к первоклассным гемблинговым сервисам. Привлекательные призы, разнообразные слоты, опытная помощь — все это превращает гемблинговый времяпрепровождение невероятно комфортным и интересным.
Современные онлайн-казино предоставляют геймерам широкий диапазон вариантов для приятной досуга. Переход к площадке 888старз осуществляется через главный сайт или рабочее зеркало.
Что такое актуальное зеркало казино
Рабочее зеркало — это запасной URL официального ресурса казино. Такие клоны создаются для поддержания постоянного доступа к гемблинговой платформе.
Дубликат на сегодня совершенно повторяет опции основного домена. Клиенты приобретают идентичный путь ко всем услугам, включая регистрацию, пополнение кошелька и вывод средств.
Оформление профиля на главном ресурсе
Механизм оформления учетной записи занимает всего пару минут. Будущим клиентам нужно:
1. Попасть на основной портал или актуальное официальное зеркало
2. Кликнуть кнопку “Зарегистрироваться”
3. Указать обязательные реквизиты
4. Активировать почтовую почту
5. Использовать купон при присутствии
После завершения регистрации участник получает вознаграждение за регистрацию, который может охватывать даровые спины или монетарное вознаграждение.
Доступ в индивидуальный кабинет
Индивидуальный кабинет — это безопасная секция, где участники вправе администрировать своим профилем. Для доступа необходимо ввести имя пользователя и пароль.
В персональном кабинете имеются данные инструменты:
– Мониторинг журнала операций
– Активация бонусных кодов
– Контроль поощрениями
– Присоединение в состязаниях
– Отслеживание возмещения
– Корректировка учетной записи
Вознаграждения и предложения
Игровая сервис предоставляет привлекательные вознаграждения:
Регистрационный пакет — дебютанты получают значительное премию на стартовые депозиты.
Фриспины — предоставляются как при открытии счета, так и в процессе различных акций.
Кэшбек — еженедельный возмещение фрагмента потерянных финансов.
Купоны — специальные коды, предоставляющие доступ к особым предложениям.
Анализ игровых категорий
Аппараты
Ассортимент аппаратов насчитывает сотни вариантов от передовых производителей. Клиенты откроют как стандартные машины, так и современные видео-слоты с увлекательной анимацией.
Live казино
Категория Live казино обеспечивает возможность развлекаться с реальными дилерами в состоянии актуального времени. Имеются распространенные игры: рулетка, блэкджек, баккара, покер.
Конкурсы
Систематические турниры с значительными премиальными пулами привлекают множество участников. Победители зарабатывают денежные призы и особые подарки.
Телефонная версия и софт
Адаптивная версия платформы дает возможность участвовать с всякого гаджета. Структура автономно корректируется под размер экрана.
Скачать app можно для девайсов на Android и iOS. Смартфонное программа характеризуется всеми возможностями компьютерной версии.
Как определить рабочее зеркало на данный момент
Актуальные линки зеркал постоянно корректируются. Обнаружить актуальную URL можно несколькими путями:
– Через отдел поддержки
– В проверенных коммуникационных сетях
– По e-mail newsletter
– На партнерских сайтах
Защита и официальность
Официальный домен функционирует на базе зарубежной документа. Все операции охраняются актуальными системами безопасности.
Конфиденциальность персональных сведений гарантируется в абсолютном размере.
Заключение
Основной сайт и его актуальные дубликаты обеспечивают клиентам 24/7 вход к первоклассным гемблинговым сервисам. Выгодные бонусы, разнообразные игры, профессиональная служба — все это создает гемблинговый процесс максимально беспроблемным и интересным.
creekcart featured picks – The site is responsive and content shows up fast.
granitegoods treasures – Navigation is smooth and the layout is simple to understand.
Подключение к ресурсу через рабочие зеркала
Передовые онлайн казино гарантируют игрокам круглосуточный переход к играм. Официальный ресурс Бет Андреас действует надёжно, предоставляя большой ассортимент гемблинг автоматов. Однако иногда формируются программные проблемы или барьеры, потому критично знать о доступности функционирующих зеркал.
Что представляет из себя центральное зеркало казино
Альтернатива — это абсолютная версия центрального портала с идентичным возможностями. Функционирующее зеркало сейчас обеспечивает миновать территориальные барьеры и возобновлять игру.
Ключевые достоинства задействования зеркал:
– Абсолютный доступ к собственному кабинету
– Удержание каждых информации счёта
– Аналогичный набор развлечений
– Действующие привилегии и предложения
Регистрация на сайте
Операция записи требует считанные минут. Свежие клиенты обретают щедрый бонус за запись, он имеет возможность вмещать:
– Вступительный бонусный приз
– Комплиментарные вращения для автоматов
– Особые промокоды
– Расширенный компенсацию
Во имя выполнения создания аккаунта необходимо:
1. Переместиться на официальный ресурс или альтернативу
2. Нажать элемент «Оформиться»
3. Внести личные данные
4. Подтвердить электронную почту или номер
5. Задействовать купон (если есть наличии)
Доступ в индивидуальный кабинет
Вслед за удачной записи клиенты способны осуществлять авторизацию посредством основной ресурс или функционирующее зеркало. Индивидуальный кабинет предоставляет всесторонний контроль над профилем:
– Летопись игр
– Внесение кошелька
– Изъятие призов
– Контроль наградами
– Участие в турнирах
Поощрения и предложения казино
Ресурс радует геймеров многочисленными бонусными предложениями:
Приветственные бонусы
Начинающие приобретают щедрый пакет наград на стартовые взносы. Типично это охватывает частичную доплату к величине пополнения плюс даровые вращения.
Регулярные акции
– Седмичный компенсация до 15%
– Состязания с премиальными фондами
– Поощрения на дату рождения
– Уникальные акции для VIP игроков
Программа поощрения
Постоянные игроки собирают баллы, которые допустимо обменять на настоящие призы или уникальные льготы.
Смартфонная версия и утилита
Передовые решения помогают геймить везде угодно. Смартфонная редакция ресурса автоматически адаптируется под экран всякого устройства.
Преимущества смартфонного программы:
– Быстрая открытие слотов
– Удобный интерфейс
– Моментальные-сообщения о промо
– Возможность загрузить для Android и iOS
Реальное казино: антураж настоящего гемблинг заведения
Категория Live заведения переносит клиентов в обстановку истинного гемблинг заведения. Компетентные крупье организуют игру в состоянии подлинного времени.
Предлагаемые столы:
– Рулетка
– Очко
– Баккара
– Покер
Игровые машины и развлекательные аппараты
Коллекция азартных автоматов насчитывает сотни вариантов от топовых разработчиков. Произвольный клиент обнаружит развлечение по душе:
– Классические автоматы
– Инновационные игры с бонусными уровнями
– Накопительный-машины
– Megaways машины
Соревнования и акции
Регулярные турниры включают адреналин и дают опцию получить крупные призы. Вовлечение в турнирах нередко комплиментарное, а премиальные банки насчитывают внушительных величин.
Защита и анонимность
Ресурс эксплуатирует инновационные технологии криптографии для охраны сведений пользователей. Совокупные финансовые процедуры совершаются через зашифрованные соединения.
Заключение
Основной портал и его функционирующие зеркала гарантируют устойчивый вход к первоклассным азартным сервисам. Щедрые призы, удобная мобильная версия, богатство автоматов и профессиональное Live-игорный дом формируют портал замечательным вариантом для ценителей развлекательных автоматов.
floravendor web shop – Straightforward structure and tidy design make browsing pleasant.
interesting website – Just found this link, the site is easy to navigate and user-friendly.
Описание главного веб-сайта
Передовые интернет казино предоставляют клиентам богатый набор игр и возможностей. Главный веб-сайт Тейкер казино предоставляет защищенный возможность к игровым возможностям.
Рабочее зеркало: возможность в настоящий момент
Резервный сайт выступает как полную дубликат главного ресурса. Официальное зеркало обеспечивает пользователям преодолевать существующие блокировки.
Плюсы использования зеркала
Ключевые плюсы охватывают:
– Постоянный вход к платформе
– Поддержание всех опций основного веб-сайта
– Защита персональных сведений
– Аналогичный набор функций
Создание аккаунта на сайте
Процесс создания аккаунта знаменуется понятностью и комфортом. Новые игроки обязаны:
1. Открыть основной портал или его зеркало
2. Кликнуть на клавишу оформления
3. Указать нужные информацию
4. Валидировать email ящик
5. Выполнить дебютный доступ
Бонус за открытие счета
Новички забирают значительный начальный подарок. Данное вознаграждение способно предусматривать:
– Денежные средства
– Бесплатные прокруты
– Увеличенный процент компенсации
Доступ в личный раздел
Активные пользователи имеют возможность моментально войти в персональный кабинет, используя имя пользователя и код. Личный кабинет предоставляет шанс к:
– Контролю счетом
– Журналу транзакций
– Работающим подаркам
– Конфигурации учетной записи
Бонусы и акции
Сайт регулярно реализует многочисленные мероприятия для участников.
Виды бонусов
Базовые виды поощрений:
– Депозитные подарки – часть от объема взноса
– Спины – даровые раунды в автоматах
– Возврат средств – возмещение части потерянных денег
– Соревновательные призы – вознаграждения за участие в конкурсах
Промокоды
Уникальные промокоды помогают заработать экстра выгоды. Клиенты в состоянии найти их на тематических ресурсах или приобрести в уведомлениях.
Переносная версия и программа
Современные клиенты выбирают переносной геймплей.
Характеристики портативной версии
– Адаптивный вид для любых гаджетов
– Абсолютный вход к развлечениям
– Стремительная подгрузка
– Практичное использование
Download программу
Mobile app предоставлено для установки на девайсы с базовыми ОС Android и iOS. Софт обеспечивает:
– Бесперебойную функциональность
– Пуш оповещения о бонусах
– Оперативный доступ к любимым играм
Игровой ассортимент
Казино дает внушительную галерею гемблинг развлечений.
Аппараты
Коллекция игровых аппаратов содержит:
– Стандартные автоматы
– Современные аппараты
– Джекпотные слоты
– Тематические развлечения
Live столы
Область реальных дилеров предоставляет опцию играть с реальными ведущими. Представлены:
– Американская рулетка
– Очко
– Баккара
– Poker
Турниры
Систематические конкурсы позволяют игрокам бороться за солидные призовые пулы. Конкурсная программа модифицируется еженедельно.
Денежные процедуры
Платформа предлагает обилие способов депозита и вывода финансов:
– Банковские карты
– Виртуальные кошельки
– Банковские трансферы
– Bitcoin
Абсолютно все операции производятся конфиденциально с использованием актуальных методов криптографии.
Сервис support
Квалифицированная служба саппорта функционирует постоянно. Обратиться с специалистами возможно через:
– Интерактивный чат
– Email почту
– Телефон
– Соц сети
Охрана и лицензирование
Портал работает на основании официальной разрешения. Данное удостоверяет:
– Прозрачность игрового геймплея
– Сохранность личных информации
– Пунктуальные транзакции
– Контролируемый игровой процесс
Заключение
Основной веб-сайт и его актуальные альтернативные адреса дают участникам абсолютный спектр возможностей для удобной и профитной игры. Значительные бонусы, всевозможные игры, квалифицированная сервис и защищенная система выплат формируют ресурс оптимальным вариантом для фанатов азартных игр.
Нынешние сетевые казино предоставляют игрокам большой ассортимент возможностей для беспроблемной игры. Однако иногда соединение к официальному сайту может оказаться закрытым. В таких ситуациях на подмогу приходит Глори казино, которое дает стабильный подключение ко всем возможностям платформы.
Что такое функционирующее зеркало казино
Альтернативный сайт — это полная версия главного сайта, которая хостится по запасному адресу. Альтернативный ресурс содержит целый возможности оригинального портала, включая личный кабинет, средства и историю операций.
Ключевые преимущества эксплуатации зеркала:
– Постоянный соединение к порталу
– Максимальная тождественность опций
– Конфиденциальность личных реквизитов
– Сохранение существующих бонусов
Как найти действующее зеркало сегодня
Имеется некоторое количество надежных методов получения актуальной ссылочной информации:
Проверенные ресурсы:
1. Электронная рассылка — руководство периодически высылает информацию с рабочими URL
2. Социальные сети — проверенные аккаунты публикуют релевантную сведения
3. Департамент поддержки — сотрудники предоставляют надежные адреса
4. Портативное приложение — предоставляет избегать блокировки
Регистрация на лицензионном веб-сайте
Этап оформления длится лишь пару минут и предполагает из таких ступеней:
1. Открытие на главный сайт или актуальное зеркало
2. Щелчок на клавишу «Зарегистрироваться»
3. Указание учетной таблицы
4. Проверка электронной почты или мобильного номера
5. Включение поощрения за регистрацию при доступности промокода
Начинающие игроки обретают значительный начальный презент, который может охватывать бесплатные вращения, валютные бонусы или кэшбек.
Доступ в пользовательский кабинет
Вход на сайте производится стандартным путем. Достаточно вписать учетные данные и код доступа, примененные при открытии счета.
Важные аспекты для конфиденциального входа:
– Применяйте защищенный пароль
– Активируйте двухфакторную аутентификацию
– Не записывайте пароли на чужих устройствах
– Контролируйте URL строку браузера
Анализ премиальной программы
Игорный портал радует пользователей различными вознаграждениями и специальными предложениями:
Приветственный пакет
Дебютанты имеют возможность претендовать на существенное поощрение за стартовый взнос. Зачастую это процентная премия к зачисленной объему плюс даровые спины для известных слотов.
Регулярные промо
– Недельный cashback — возмещение доли потерянных средств
– Награды на дополнительные депозиты
– Специальные акции по событиям
– Турниры с значительными премиальными фондами
План вознаграждений
Активные игроки получают пункты за любую игру, которые затем конвертируются на настоящие финансы, фриспины или уникальные преимущества.
Кодовые слова: как применять
Бонус-коды — это индивидуальные последовательности литер, предоставляющие привилегию к специальным вознаграждениям.
В каких местах найти рабочие промокоды:
– Легитимные общественные сети казино
– Сотрудничающие площадки
– Email-информирование
– Специализированные форумы
Прописывается промокод в отдельное поле при регистрации или зачислении средств счета.
Телефонная версия и приложение
Современные клиенты предпочитают развлекаться с портативных аппаратов. Платформа обеспечивает два метода для беспроблемной смартфонной игры.
Мобильная версия
Веб версия автоматически настраивается под размер экранной панели. Не нуждается инсталляции и функционирует в каждом новом браузере.
Телефонное приложение
Получить софт можно для девайсов на Android и iOS. Достоинства app:
– Скоростная активация
– Бесперебойная операция
– Мгновенные-уведомления о поощрениях
– Независимый минование блокировок
Этап загрузки прост: нужно перейти на ресурс с смартфонного гаджета и следовать инструкциям.
Азартный ассортимент
Коллекция аппаратов включает тысячи единиц от лучших поставщиков.
Слоты
Игровые слоты — максимально востребованная секция игр. Размещены классические винтажные аппараты, новые видео-автоматы с бонусными уровнями, а также накопительные джекпоты.
Live казино
Зона с настоящими раздающими предоставляет почувствовать антураж истинного казино. Представлены столы с блэкджеком.
Вещание реализуется в высоком формате, обеспечивается общение с дилером и другими участниками.
Турниры
Постоянно запускаются соревнования по разным играм. Включение обеспечивает возможность заработать валютные призы, бесплатные вращения или эксклюзивные поощрения.
Транзакционные процедуры
Сайт поддерживает широкий спектр денежных инструментов:
– Кредитные карты
– Электронные сервисы
– Биткоин
– Счетовые транзакции
Наименьшая количество взноса — посильная для большинства клиентов. Получение денег выполняется в минимальные сроки.
Департамент поддержки
Опытные операторы способны содействовать 24/7. Доступны нижеследующие каналы связи:
– Интернет-чат
– Email
– Телефонная связь
– Общественные сети
Ответы на распространенные проблемы можно найти в зоне FAQ.
Резюме
Основной сайт казино и его актуальные зеркала предоставляют пользователям максимальный путь ко всем возможностям платформы. Щедрые вознаграждения, комфортная портативная версия, гигантский каталог аттракционов и компетентная ассистенция делают развлекательный времяпрепровождение предельно приятным и конфиденциальным.
see this site – Noticed this earlier and the layout keeps everything easy to follow.
internet seo prodvizhenie-sajtov-v-moskve11.ru .
Good afternoon!
Share brew mysterious processes with interesting and valuable beverage updates fast and craft perfect drinks see on the website for brewing guides
Full information on the link – https://33capy.site
All the best and development in business!
I wanted to thank you for this very good read!!
I absolutely enjoyed every bit of it. I have you book marked to look at new
stuff you post…
Нынешние онлайн-казино предоставляют игрокам широкий выбор игр и выгодные поощрения. Но для комфортной деятельности необходимо иметь представление, как обнаружить Motor casino и его актуальные зеркала.
Что такое официальный ресурс казино
Главный веб-сайт казино — это базовая площадка, где игроки могут развлекаться гемблинг слотами. Сайт функционирует на легальных основаниях и владеет всеми нужными документами.
Ключевые достоинства лицензионного портала:
– Конфиденциальность личных информации
– Справедливые положения участия
– Гарантированные выводы
– Квалифицированная техподдержка
Функционирующее зеркало казино: для чего требуется
Зеркало — это абсолютная версия главного веб-сайта, расположенная по иному домену. Рабочее зеркало запускается для предоставления стабильного доступа к порталу.
Основания применения дублирующих ресурсов:
– Недоступность официального домена
– Плановые работы
– Высокая активность на платформу
Как найти действующее зеркало сейчас
Найти свежее рабочее зеркало можно различными путями:
1. Email-уведомления — оформите подписку на новостную подписку
2. Отдел техподдержки — напишите в онлайн-чат
3. Публичные сети — следите за публикациями
4. Партнерские порталы — авторитетные сайты
Создание аккаунта на ресурсе казино
Процедура создания аккаунта составляет всего несколько моментов:
1. Выберите на кнопку “Создать аккаунт”
2. Введите запрашиваемые данные
3. Валидируйте контактную адрес
4. Используйте купон, если доступен
Сразу после финализированной оформления вам будет разрешен индивидуальный аккаунт.
Награды и бонусные коды
Богатая наградная политика — значимое преимущество казино:
Подарок за создание аккаунта
Новые игроки приобретают начальный поощрение, который может предполагать:
– Денежный бонус на первый вклад
– Free spins для барабанов
– Приветственные фонды
Бонусные коды
Периодически размещаются актуальные коды, предоставляющие активировать специальные поощрения.
Механизм кешбэка
Лояльные игроки зарабатывают процент потраченных ставок назад.
Актуальные предложения и состязания
Сайт постоянно устраивает азартные кампании:
– Семидневные чемпионаты
– Праздничные промо
– Розыгрыши ценных выигрышей
– Механизм VIP-клуба
Вход в персональный профиль
Для доступа на платформу следует:
1. Посетить основной сайт или актуальное зеркало
2. Нажать “Вход”
3. Внести никнейм и код доступа
В индивидуальном профиле предоставлены следующие инструменты:
– Пополнение депозита
– Снятие денег
– Проверка журнала игр
– Управление индивидуальными настройками
Mobile платформа и app
Мобильная вариант
Responsive вариант ресурса позволяет играть с различных портативного гаджета. Дизайн автоматически адаптируется под габариты дисплея.
Приложение для download
Установить клиент можно для:
– Android — прямая download с сайта
– iOS — загрузка через App Store
Выгоды app:
– Мгновенный запуск
– Стабильная производительность
– Push-сообщения об бонусах
– Улучшенный дизайн
Гемблинг секции
Автоматы
Богатая библиотека игровых слотов от известных разработчиков:
– Ретро слоты
– Продвинутые-автоматы
– Призовые-машины
Live casino
Раздел с реальными крупье предоставляет:
– Рулеточные столы
– Blackjack
– Baccarat
– Poker
Эфиры ведутся в превосходном формате, формируя впечатление настоящего казино.
Методы депозита и обналичивания
Платформа принимает разные платежные системы:
– Платежные средства
– Виртуальные счета
– Bitcoin/Ethereum
– Wire транзиты
Базовые суммы внесения и скоростные платежи обеспечивают процесс максимально комфортной.
Служба техподдержки
Профессиональная команда support функционирует 24/7 и в состоянии помочь с разными вопросами:
– Онлайн-чат
– Email-консультации
– Звонковая горячая линия
Итоги
Основной веб-сайт казино и его функционирующие зеркала дают клиентам безопасный и интересный азартный процесс. Щедрые бонусы, простая мобильная версия, многочисленные автоматы и профессиональное live-казино формируют эту платформу превосходным решением для игровых игр.
Описание оригинального ресурса
Новое онлайн-казино предоставляет своим игрокам широкий ассортимент развлечений и вознаграждений. Основной веб-сайт Глори оперирует постоянно, гарантируя возможность к востребованным автоматам, live-казино и обширным предложениям.
Действующее зеркало: путь к ресурсу
Что такое зеркало казино
Альтернатива представляет собой идентичную копию основного сайта с иным интернет адресом. Действующее зеркало дает игрокам миновать ограничения и иметь непрерывный доступ к выбранным автоматам.
Как получить действующее зеркало сегодня
Рабочие адреса на официальное зеркало публикуются через:
– Email подписку
– Проверенные социальные сети
– Команду обслуживания
– Партнерские порталы
Созданиеаккаунта на портале
Процедура оформления
Открытиесчета длится буквально минут и предполагает данные этапы:
1. Переход на официальный веб-сайт или рабочее зеркало
2. Активация кнопки “Открытьсчет”
3. Заполнение персональных данных
4. Подтверждение электроннойпочты или контакта
5. Придумывание ключа
Вознаграждение за регистрацию
Свежие игроки получают выгодные вступительные бонусы:
– Финансовые суммы на счет
– Фриспины для слотов
– Расширенный процент компенсации
– Уникальные промокоды
Логин в личный аккаунт
Действующие игроки могут совершить доступ через главный сайт или действующее зеркало. Для этого следует ввести учетноеимя и секретнуюкомбинацию, сформированные при открытиисчета.
Функции собственного аккаунта
В личном разделе открыты основные функции:
– Редактирование персональными информацией
– Внесение кошелька
– Обналичивание денег
– Активация промокодов
– Проверка статистики транзакций
– Регистрация в соревнованиях
Бонусы и предложения
Виды вознаграждений
Казино радует своих клиентов различными бонусными предложениями:
– Начальный пакет — выгодные вознаграждения на начальные взносы
– Халявныеспины — дополнительные вращения в топовых слотах
– Компенсация — периодический откат процента убытков
– Программа поощрения — уникальные бонусы для регулярных игроков
Промокоды и их применение
Уникальные купоны предоставляют дополнительные бонусы. Для ввода требуется указать код в определенное графу в индивидуальном аккаунте.
Геймплейный ассортимент
Автоматы
Каталог азартных слотов вмещает массу вариантов от лучших провайдеров:
– Стандартные машины
– Современные слоты
– Джекпот автоматы
– Брендовые развлечения
Live казино
Секция Live-казино предлагает взаимодействие с профессиональными ведущими в формате прямого эфира:
– Американскаярулетка
– Blackjack
– Baccarat
– Покер
Конкурсы
Периодические конкурсы с внушительными джекпотными пулами проводятся ежедневно. Игроки конкурируют за победу в таблице.
Смартфонная платформа и APP
Смартфонная платформа ресурса
Официальный портал на100% настроен для планшетных устройств. Участники имеютвозможность открывать игры непосредственно через веб-навигатор без обязательства инсталляции.
Приложение для установки
Официальное портативное приложение предлагается для загрузки на девайсы с рабочими платформами Android и iOS. APP гарантирует:
– Быстрый подход к играм
– Бесперебойную операционность
– Push-уведомления о бонусах
– Удобный дизайн
Заключение
Официальный портал казино и его рабочие дубликаты дают клиентам абсолютный доступ к качественным геймплейным играм. Выгодные поощрения, всевозможные акции, функциональная адаптивная версия и опытная помощь делают развлекательный досуг чрезвычайно удобным и доходным.
browse here – Found this page recently, navigating products is simple and convenient.
This casino https://hellastravel.pl/ offers a great mix of classic slots and live tables. The platform feels modern, promotions are attractive, and support is helpful, which adds confidence.
локальное seo блог seo-blog16.ru .
Передовые интернет казино предлагают клиентам большой диапазон опций для удобной игры. Но иногда соединение к основному ресурсу может быть недоступным. В таких случаях на поддержку приходит казино Дракон Мани, которое предоставляет непрерывный доступ ко всем возможностям платформы.
Что такое актуальное зеркало казино
Зеркало — это полная копия основного веб-сайта, которая хостится по дополнительному URL. Альтернативный ресурс сохраняет целый инструментарий первоначального портала, включая пользовательский кабинет, депозит и запись платежей.
Главные преимущества использования зеркала:
– Непрерывный вход к ресурсу
– Абсолютная аналогичность инструментов
– Защита пользовательских данных
– Хранение всех имеющихся вознаграждений
Как разыскать функционирующее зеркало на сегодня
Существует множество надежных вариантов получения действующей адреса:
Авторизованные сервисы:
1. Имейл рассылка — руководство периодически отправляет письма с действующими URL
2. Коммуникационные сети — проверенные аккаунты размещают текущую данные
3. Департамент поддержки — операторы дают надежные домены
4. Мобильное приложение — предоставляет избегать блокировки
Регистрация на основном портале
Процедура создания аккаунта занимает лишь несколько минут и содержит из таких стадий:
1. Попадание на официальный сайт или действующее зеркало
2. Щелчок на элемент «Открыть счет»
3. Ввод персональной бланка
4. Проверка электронной почты или сотового номера
5. Активация бонуса за регистрацию при наличии промокода
Только что зарегистрированные игроки получают щедрый вступительный подарок, который может включать free spins, денежные вознаграждения или cashback.
Вход в пользовательский кабинет
Подключение на сайте производится стандартным способом. Требуется вписать учетные данные и кодовое слово, указанные при регистрации.
Важные нюансы для защищенного входа:
– Используйте криптостойкий шифр
– Включите двойную аутентификацию
– Не сохраняйте данные на чужих устройствах
– Контролируйте интернет строку браузера
Анализ премиальной программы
Игровая платформа радует игроков всевозможными бонусами и акциями:
Приветственный пакет
Свежие игроки имеют возможность полагаться на существенное поощрение за стартовый вклад. Традиционно это процентовая прибавка к внесенной объему плюс фриспины для топовых слотов.
Периодические кампании
– 7-дневный возврат средств — компенсирование части проигранных финансов
– Бонусы на последующие вклады
– Особые промо по событиям
– Турниры с значительными премиальными банками
План привилегий
Деятельные пользователи зарабатывают единицы за любую игру, которые затем обмениваются на действительные средства, даровые прокруты или уникальные привилегии.
Промокоды: как активировать
Промокоды — это особые сочетания символов, предоставляющие привилегию к бонусным привилегиям.
Каким образом найти рабочие промокоды:
– Официальные общественные сети казино
– Аффилиатные порталы
– Email-подписка
– Тематические форумы
Вводится промокод в соответствующее поле при оформлении или добавлении денег кошелька.
Смартфонная версия и приложение
Актуальные клиенты выбирают проводить время с смартфонных гаджетов. Портал предоставляет пару метода для удобной телефонной игры.
Responsive редакция
Веб версия сама адаптируется под диагональ дисплея. Не требует инсталляции и работает в каждом актуальном браузере.
Телефонное приложение
Скачать программу можно для девайсов на Android и iOS. Достоинства app:
– Быстрая запуск
– Стабильная действие
– Push-уведомления о акциях
– Автоматический минование блокировок
Процесс инсталляции прост: необходимо перейти на сайт с портативного аппарата и подчиняться предписаниям.
Азартный выбор
Библиотека аппаратов содержит тысячи единиц от топовых разработчиков.
Слоты
Развлекательные машины — самая популярная раздел развлечений. Показаны стандартные 3-барабанные аппараты, новые мультимедийные слоты с премиальными стадиями, а также прогрессивные призы.
Live казино
Отдел с действительными дилерами позволяет почувствовать атмосферу подлинного казино. Открыты варианты с баккарой.
Вещание производится в высоком качестве, имеется чат с раздающим и остальными игроками.
Соревнования
Систематически организуются турниры по различным играм. Включение обеспечивает возможность завоевать финансовые выигрыши, даровые прокруты или специальные привилегии.
Денежные операции
Портал поддерживает обширный набор расчетных способов:
– Пластиковые карты
– Электронные сервисы
– Биткоин
– Денежные платежи
Низшая объем депозита — доступная для большинства клиентов. Вывод выигрышей осуществляется в скорые сроки.
Сервис поддержки
Профессиональные сотрудники готовы содействовать круглосуточно. Доступны следующие варианты коммуникации:
– Веб-чат
– Email
– Мобильная поддержка
– Медийные сети
Решения на частые проблемы можно отыскать в блоке FAQ.
Вывод
Главный веб-сайт казино и его действующие зеркала дают клиентам полный путь ко всем возможностям портала. Великодушные привилегии, приятная телефонная версия, колоссальный выбор слотов и профессиональная ассистенция превращают развлекательный опыт крайне удобным и конфиденциальным.
Современные онлайн-казино предоставляют геймерам разнообразный выбор функций для беспроблемной времяпрепровождения. Подключение к сервису Леон осуществляется через лицензионный веб-ресурс или рабочее зеркало.
Что такое действующее зеркало казино
Актуальное зеркало — это дополнительный домен официального ресурса казино. Такие дубликаты создаются для поддержания непрерывного доступа к гемблинговой площадке.
Зеркало на сегодня абсолютно повторяет возможности официального ресурса. Игроки получают идентичный доступ ко всем сервисам, включая создание аккаунта, финансирование кошелька и получение денег.
Оформление профиля на лицензионном портале
Механизм создания аккаунта отнимает всего пару минут. Будущим игрокам необходимо:
1. Войти на официальный ресурс или действующее подлинное зеркало
2. Выбрать кнопку “Открыть счет”
3. Ввести обязательные данные
4. Подтвердить почтовую почту
5. Использовать промокод при наличии
После завершения регистрации игрок зарабатывает подарок за регистрацию, который способен содержать фриспины или денежное поощрение.
Авторизация в персональный кабинет
Индивидуальный кабинет — это безопасная зона, где участники способны администрировать своим учетной записью. Для доступа следует ввести username и секретный ключ.
В личном кабинете представлены такие возможности:
– Отслеживание хронологии транзакций
– Активация бонусных кодов
– Контроль вознаграждениями
– Участие в турнирах
– Проверка возврата средств
– Корректировка профиля
Вознаграждения и спецпредложения
Развлекательная платформа предоставляет великодушные подарки:
Стартовый бонус — дебютанты приобретают крупное начисление на первые депозиты.
Free spins — предоставляются как при регистрации, так и в контексте различных кампаний.
Возмещение — постоянный рефанд части израсходованных средств.
Промокоды — эксклюзивные комбинации, открывающие право к особым вознаграждениям.
Описание азартных разделов
Игровые автоматы
Коллекция автоматов содержит тысячи наименований от топовых провайдеров. Пользователи найдут как традиционные слоты, так и инновационные 3D-слоты с интересной визуализацией.
Live казино
Раздел Live казино дарит опцию участвовать с настоящими ведущими в формате реального времени. Доступны популярные варианты: рулетка, блэкджек, баккара, покер.
Конкурсы
Систематические состязания с крупными наградными суммами завлекают массу игроков. Лидеры обретают денежные выплаты и эксклюзивные премии.
Мобильная версия и приложение
Адаптивная версия ресурса позволяет участвовать с всякого устройства. Оформление автоматически корректируется под формат экрана.
Получить app можно для устройств на Android и iOS. Портативное app обладает всеми опциями десктопной версии.
Как найти текущее зеркало на сейчас
Актуальные адреса дубликатов систематически обновляются. Получить актуальную линк можно несколькими путями:
– Через сервис техподдержки
– В настоящих новостных сетях
– По почтовой дайджесту
– На тематических ресурсах
Защита и легальность
Основной сайт оперирует на фундаменте мировой лицензии. Все операции шифруются современными системами шифрования.
Приватность пользовательских реквизитов гарантируется в абсолютном объеме.
Итог
Основной портал и его рабочие зеркала гарантируют клиентам беспрерывный вход к качественным игровым играм. Великодушные вознаграждения, различные игры, квалифицированная помощь — все это делает развлекательный процесс предельно комфортным и интересным.
vendor shopping page – Came across this earlier and it seems like a practical site.
harborwharf online shop – Smooth interface with organized content makes browsing enjoyable.
shopping link – Came across this store today and browsing categories feels simple.
Характеристика главного ресурса
Передовые сетевые казино предоставляют участникам обширный ассортимент игр и опций. Официальный сайт Тейкер предоставляет безопасный доступ к развлекательным функциям.
Функционирующее зеркало: вход в настоящий момент
Дублирующий портал выступает как идентичную дубликат лицензионного портала. Действующее зеркало дает возможность клиентам преодолевать потенциальные ограничения.
Преимущества эксплуатации зеркала
Принципиальные выгоды охватывают:
– Беспрерывный доступ к сайту
– Хранение полных опций главного ресурса
– Безопасность конфиденциальных данных
– Аналогичный возможности
Создание аккаунта на платформе
Процесс открытия счета отличается понятностью и удобством. Свежие игроки должны:
1. Открыть лицензионный портал или его зеркало
2. Кликнуть на элемент регистрации
3. Ввести обязательные информацию
4. Верифицировать почтовую ящик
5. Осуществить первый авторизацию
Подарок за создание аккаунта
Дебютанты зарабатывают щедрый стартовый бонус. Подобное премия способно предусматривать:
– Денежные начисления
– Complimentary вращения
– Увеличенный коэффициент возврата
Авторизация в личный кабинет
Зарегистрированные пользователи в состоянии оперативно зайти в собственный профиль, эксплуатируя никнейм и код. Личный аккаунт предлагает возможность к:
– Управлению средствами
– Журналу транзакций
– Работающим призам
– Параметрам аккаунта
Подарки и акции
Платформа регулярно реализует многочисленные мероприятия для участников.
Разновидности призов
Основные формы бонусов:
– Депозитные призы – коэффициент от величины депозита
– Фриспины – безвозмездные прокруты в слотах
– Кэшбек – возмещение фрагмента проигранных финансов
– Конкурсные награды – премии за выступление в соревнованиях
Ваучеры
Особые купоны помогают приобрести дополнительные бонусы. Клиенты способны найти их на партнерских порталах или заработать в новостях.
Портативная вариант и app
Современные гемблеры предпочитают портативный геймплей.
Характеристики портативной системы
– Гибкий интерфейс для разнообразных устройств
– Целостный возможность к слотам
– Стремительная функционирование
– Комфортное навигация
Загрузить приложение
Mobile приложение открыто для загрузки на гаджеты с рабочими ОС Android и iOS. Софт дает:
– Стабильную производительность
– Всплывающие оповещения о бонусах
– Мгновенный путь к любимым развлечениям
Развлекательный портфель
Казино предлагает внушительную библиотеку развлекательных игр.
Игровые машины
Ассортимент развлекательных машин охватывает:
– Классические игры
– Передовые игры
– Призовые машины
– Branded развлечения
Live столы
Область живых дилеров предлагает право состязаться с профессиональными дилерами. Открыты:
– Рулетки
– Блек-джек
– Punto Banco
– Техасский холдем
Соревнования
Регулярные конкурсы помогают участникам конкурировать за солидные наградные суммы. Соревновательная программа модифицируется каждую неделю.
Банковские транзакции
Казино обеспечивает множество методов зачисления и обналичивания финансов:
– Дебетовые карточки
– Виртуальные кошельки
– Wire транзакции
– Bitcoin
Все платежи проходят безопасно с применением современных систем шифрования.
Сервис помощи
Компетентная отдел помощи функционирует 24/7. Обратиться с консультантами реально через:
– Онлайн чат
– Почтовую почту
– Телефон
– Социальные платформы
Безопасность и регулирование
Игровой клуб функционирует на фундаменте официальной сертификата. Подобное обеспечивает:
– Честность развлекательного процесса
– Защиту конфиденциальных сведений
– Пунктуальные выводы
– Регулируемый гейминг
Резюме
Лицензионный портал и его рабочие резервные страницы предоставляют клиентам целостный набор возможностей для комфортной и профитной игры. Солидные вознаграждения, многочисленные развлечения, квалифицированная сервис и проверенная структура операций делают ресурс идеальным выбором для поклонников азартных игр.
Подключение к сайту через рабочие зеркала
Пользователи виртуальных казино нередко имеют дело с трудностью блокировки основного ресурса. Собственно для решения этой задачи предусмотрены зеркала официального домена. Глори казино гарантирует полный подключение ко всем опциям казино.
Что такое актуальное зеркало казино
Зеркало является собой полную дубликат официального веб-сайта с аналогичным функционалом. Ключевое отличие — это иное имя. Абсолютно все информация пользователя, содержа депозит, награды и историю раундов, остаются идентичными.
Достоинства использования зеркал
Действующие зеркала характеризуются рядом существенных достоинств:
– Непрерывный переход к предпочитаемым слотам
– Совершенная конфиденциальность персональных данных
– Поддержание всех конфигураций персонального кабинета
– Опция приобретения поощрений и вовлечения в предложениях
Создание аккаунта на основном домене
Процесс оформления предельно несложен и занимает немного минут. Начинающие игроки имеют возможность рассчитывать на крупный вводный бонус за оформление.
Стадии создания аккаунта
1. Переход на официальный портал или его дубликат
2. Клик на опцию “Создать аккаунт”
3. Ввод обязательных данных
4. Верификация email почты
5. Внесение бонусного кода (если имеется)
Награды и промоакции для пользователей
Платформа балует своих участников разнообразными поощрительными предложениями.
Основные типы призов
Стартовый пакет — крупное начисление для начинающих пользователей, что имеет возможность охватывать монетарные бонусы и бесплатные вращения.
Фриспины — возможность играть в востребованных слотах даром.
Кэшбек — процентный возврат израсходованных сумм, который выплачивается раз в неделю или каждый месяц.
Бонусные коды — специальные наборы, предоставляющие дополнительные выгоды.
Пользовательский кабинет: инструменты и установки
Индивидуальный раздел гарантирует полный управление над развлекательным процессом. В данном разделе присутствуют:
– Регулирование депозитом
– Архив переводов
– Текущие поощрения
– Настройки безопасности
– Проверка учетной записи
Портативная платформа и приложение
Новейшие пользователи признают портативность. Платформа предоставляет двойной пути для развлечений с смартфонных девайсов.
Responsive смартфонная платформа
Смартфонная платформа портала самостоятельно настраивается под разрешение любого устройства. Не требуется инсталлировать специальное ПО.
Приложение для смартфонов
Разрешено загрузить фирменное APP для iOS и Android. Софт обеспечивает:
– Быстрый старт
– Доработанный интерфейс
– Всплывающие-оповещения о бонусах
– Стабильную производительность
Live раздел: атмосфера настоящего зала
Категория Live столов переносит пользователей в обстановку истинного казино. Квалифицированные хосты организуют раунды в варианте настоящего времени.
Известные Live-игры
– Американская рулетка
– Blackjack
– Баккарат
– Карибский покер
Игровые машины: многообразие игр
Библиотека азартных автоматов вмещает множество вариантов от лидирующих разработчиков. Пользователи обнаружат:
– Обычные автоматы
– Видео-автоматы
– Мега-выигрыш-игры
– Многолинейные автоматы
Состязания и эксклюзивные мероприятия
Систематические конкурсы предоставляют шанс клиентам конкурировать друг с другом за крупные выигрышные пулы. Всякий состязание имеет свои требования участия и доску чемпионов.
Способы пополнения и вывода денег
Ресурс поддерживает ряд финансовых сервисов:
– Банковские средства
– Онлайн платежные системы
– Цифровые валюты
– Прямые транзиты
Абсолютно все операции реализуются защищенно благодаря современным протоколам кодирования.
Служба обслуживания
Квалифицированные консультанты сервиса support расположены помочь 24/7. Доступны нижеперечисленные каналы общения:
– Онлайн-чат
– Email-поддержка
– Звонковая связь
– Социальные сети
Вывод
Официальный домен казино и его функционирующие дубликаты гарантируют участникам защищенный и удобный вход к большому спектру игровых игр. Солидные подарки, периодические предложения, квалифицированная служба и удобные платежные способы формируют развлекательный опыт максимально захватывающим и прибыльным.
gildcorner collection – Tidy interface, easy to navigate, and everything loads nicely.
www canadianonlinepharmacy: Certified Canada Rx – my canadian pharmacy rx
juniper junction store – Appears well-organized, so visitors can navigate smoothly.
Актуальные онлайн-казино предлагают игрокам богатый диапазон опций для приятной досуга. Вход к платформе Gama осуществляется через лицензионный домен или функционирующее зеркало.
Что такое рабочее зеркало казино
Действующее зеркало — это резервный адрес официального веб-сайта казино. Такие клоны генерируются для гарантирования стабильного соединения к развлекательной сервису.
Альтернатива на сегодня абсолютно дублирует характеристики официального портала. Игроки имеют аналогичный вход ко всем сервисам, включая оформление профиля, пополнение счета и вывод средств.
Создание аккаунта на основном ресурсе
Процесс регистрации требует всего буквально секунд. Свежим участникам необходимо:
1. Зайти на основной домен или действующее подлинное зеркало
2. Нажать кнопку “Регистрация”
3. Внести обязательные данные
4. Подтвердить почтовую почту
5. Использовать промокод при присутствии
После финализации регистрации пользователь приобретает бонус за регистрацию, который способен содержать free spins или финансовое вознаграждение.
Вход в индивидуальный кабинет
Личный кабинет — это охраняемая территория, где клиенты вправе управлять своим профилем. Для доступа следует указать имя пользователя и password.
В пользовательском кабинете представлены нижеперечисленные функции:
– Мониторинг журнала переводов
– Задействование купонов
– Настройка поощрениями
– Включение в конкурсах
– Проверка возмещения
– Редактирование учетной записи
Бонусы и промо
Азартная система предлагает великодушные призы:
Приветственный бонус — начинающие получают существенное начисление на начальные взносы.
Free spins — дарятся как при регистрации, так и в ходе разнообразных акций.
Кэшбек — регулярный компенсация фрагмента проигранных денег.
Бонусные коды — эксклюзивные коды, обеспечивающие возможность к специальным призам.
Характеристика гемблинговых категорий
Аппараты
Библиотека аппаратов содержит сотни игр от ведущих производителей. Клиенты встретят как классические автоматы, так и актуальные видеослоты с интересной графикой.
Live казино
Секция Live казино предоставляет возможность соревноваться с настоящими дилерами в формате реального времени. Представлены популярные игры: рулетка, блэкджек, баккара, покер.
Соревнования
Постоянные чемпионаты с значительными призовыми пулами завлекают массу соревнующихся. Победители получают финансовые вознаграждения и специальные подарки.
Портативная версия и приложение
Мобильная версия ресурса дает возможность наслаждаться с каждого устройства. Структура независимо подстраивается под габариты экрана.
Скачать приложение можно для девайсов на Android и iOS. Телефонное app имеет всеми опциями настольной версии.
Как отыскать текущее зеркало на данный момент
Свежие адреса дубликатов периодически меняются. Получить действующую ссылку можно многими путями:
– Через сервис техподдержки
– В проверенных социальных сетях
– По электронной newsletter
– На специализированных площадках
Защита и сертификация
Основной сайт функционирует на основании глобальной разрешения. Все операции защищены инновационными методами безопасности.
Конфиденциальность индивидуальных информации сохраняется в стопроцентном объеме.
Заключение
Главный домен и его функционирующие копии дарят пользователям постоянный доступ к качественным развлекательным играм. Щедрые поощрения, многочисленные слоты, профессиональная помощь — все это создает гемблинговый досуг невероятно комфортным и интересным.
Вход к порталу через действующие зеркала
Нынешние интернет казино гарантируют пользователям круглосуточный вход к сервисам. Официальный веб-сайт Кент оперирует надёжно, предоставляя широкий набор развлекательных автоматов. Однако временами появляются цифровые проблемы или запреты, в связи с чем существенно знать о присутствии функционирующих зеркал.
Что собой представляет собой центральное зеркало казино
Копия — это полная версия основного веб-сайта с таким же интерфейсом. Актуальное зеркало в настоящее время помогает миновать территориальные блокировки и возобновлять времяпрепровождение.
Основные преимущества использования зеркал:
– Полный вход к личному кабинету
– Сохранение всех данных аккаунта
– Такой же ассортимент слотов
– Актуальные вознаграждения и кампании
Регистрация на портале
Процедура регистрации требует считанные минут. Новые игроки обретают щедрый приз за создание счёта, который способен содержать:
– Приветственный бонусный приз
– Даровые кручения для машин
– Особые промокоды
– Повышенный возврат
Во имя выполнения записи следует:
1. Перейти на центральный ресурс или альтернативу
2. Нажать клавишу «Создать аккаунт»
3. Внести индивидуальные информацию
4. Подтвердить email или номер
5. Активировать ваучер (когда имеется присутствии)
Доступ в персональный кабинет
Вслед за корректной создания аккаунта клиенты имеют возможность выполнять вход посредством официальный веб-сайт или рабочее зеркало. Персональный кабинет открывает полный надзор над профилем:
– Летопись игр
– Зачисление депозита
– Изъятие денег
– Контроль наградами
– Участие в соревнованиях
Бонусы и кампании казино
Платформа удовлетворяет геймеров вариативными бонусными схемами:
Начальные поощрения
Начинающие обретают великодушный набор наград на стартовые вклады. Как правило это содержит долевую прибавку к объёму депозита плюс безвозмездные спины.
Постоянные предложения
– Еженедельный возврат до 15%
– Соревнования с наградными банками
– Подарки на дату рождения
– Уникальные промо для привилегированных клиентов
План лояльности
Постоянные игроки накапливают единицы, что разрешено трансформировать на настоящие деньги или эксклюзивные льготы.
Карманная редакция и программа
Нынешние технологии обеспечивают участвовать где удобно. Портативная версия сайта автономно адаптируется под монитор всякого аппарата.
Преимущества мобильного ПО:
– Скоростная подгрузка автоматов
– Эргономичный дизайн
– Моментальные-оповещения о бонусах
– Способность инсталлировать для Android и iOS
Реальное казино: атмосфера настоящего игорного учреждения
Секция Live игорного дома транспортирует игроков в среду настоящего развлекательного заведения. Квалифицированные ведущие ведут действие в виде реального времени.
Представленные столы:
– Европейская рулетка
– Блэкджек
– Баккара
– Карты
Игровые машины и игровые аппараты
Каталог азартных аппаратов содержит тысячи названий от передовых производителей. Любой клиент отыщет игру по душе:
– Стандартные барабаны
– Видеослоты с бонусными раундами
– Прогрессивный-автоматы
– Megaways машины
Турниры и раздачи
Систематические соревнования добавляют драйв и дают опцию заработать внушительные суммы. Вовлечение в состязаниях нередко бесплатное, а премиальные банки составляют внушительных размеров.
Безопасность и анонимность
Портал использует современные системы защиты для обеспечения данных игроков. Совокупные денежные транзакции проходят через зашифрованные каналы.
Итог
Центральный веб-сайт и его актуальные зеркала гарантируют устойчивый переход к отличным развлекательным играм. Великодушные призы, эргономичная мобильная версия, разнообразие автоматов и квалифицированное Live-казино делают сайт замечательным вариантом для любителей гемблинг развлечений.
http://petmedsmonitor.com/# pet rx
Hello!
Discover modern mysterious data offering interesting and valuable facts for all and stay updated with the latest discoveries see on the website for news feeds
Full information on the link – https://33capy.site
All the best and development in business!
fernvendor homepage – Organized pages and intuitive navigation make shopping enjoyable.
visit here – Ran into this page recently, browsing products feels effortless.
best ed meds online: buy erectile dysfunction treatment – Mens RX Index
https://petmedsmonitor.com/# online vet pharmacy
online find – Came across this site, navigation feels easy and browsing items is straightforward.
granitecrate collection – Clear layout makes exploring the inventory stress-free.
Современные онлайн-казино предоставляют пользователям большой диапазон возможностей и премиальных предложений. Подключение к ресурсу осуществляется через главный портал или его функционирующее зеркало каз, что обеспечивает непрерывную деятельность.
Что такое актуальное зеркало казино
Копия — это точная дубликат основного ресурса, созданная для преодоления запретов. Рабочее зеркало дает возможность пользователям получить вход к любимым развлечениям в произвольное время.
Лицензионное зеркало обладает всеми опциями главного сайта:
– Весь список игр
– Личный кабинет с внесенными параметрами
– Актуальные акции
– Гарантированные расчетные действия
Открытие счета на лицензионном портале
Процесс оформления составляет всего пару минут. Первым пользователям следует:
1. Перейти на проверенный портал или функционирующее зеркало
2. Выбрать на клавишу “Открыть счет”
3. Ввести нужные данные
4. Проверить email
5. Сделать дебютный депозит
Бонус за регистрацию выдается автоматически после прохождения всех ступеней.
Доступ в учетную запись
Существующие пользователи могут совершить доступ используя:
– Имя пользователя и шифр
– Данные контакта
– Электронную почту
Личный кабинет предоставляет доступ к администрированию финансами, сведениям ставок и действующим акциям.
Промо и программы
Игровая сервис вознаграждает лояльных игроков щедрыми призами:
Первый комплект
– Бонус на стартовый депозит до 100%
– Фриспины на популярные слоты
– Особые премии за следующие платежи
Купоны
Специальные коды открывают доступ на приобретение уникальных поощрений. Текущие коды выставляются в блоке “Предложения”.
Cashback
Постоянный возврат равен до 10% от проигранных средств. Компенсация начисляется незамедлительно.
Механизм лояльности
Верные участники зарабатывают очки, которые обмениваются на реальные деньги или free spins.
Mobile версия и APP
Ради комфорта пользователей построена функциональная mobile версия. Приспособленный облик помогает легко участвовать с каждого карманного аппарата.
Плюсы APP:
– Быстрый запуск к развлечениям
– Оптимизированный дизайн
– Бесперебойная деятельность
– Нотификации о свежих турнирах
Получить APP можно безвозмездно с проверенного ресурса для устройств на Android и iOS.
Каталог автоматов
Машины
Библиотека насчитывает более 2000 автоматов от популярных производителей:
– Стандартные машины
– Современные автоматы
– Прогрессивные автоматы
– Фирменные развлечения
Live казино
Категория Live развлечений предоставляет развлечение с подлинными ведущими в реальном времени:
– Рулетка
– Карточная игра
– Baccarat
– Покер
Состязания
Регулярные конкурсы с значительными наградными бюджетами организуются каждую неделю. Участие в соревнованиях разрешено всем созданным участникам.
Платежные методы
Платежи и получения выплат производятся через востребованные способы оплаты:
– Платежные средства
– Онлайн сервисы
– Крипто
– Счетные операции
Самый низкий депозит — от 100 рублей. Вывод средств осуществляется в течение 24 времени.
Отдел помощи
Постоянная служба поддержки готова ассистировать в урегулировании любых вопросов:
– Live chat
– Email
– Телефон
– Соц сети
Надежность и разрешение
Официальный веб-сайт работает на почве международной документа. Все сведения пользователей защищены новейшим SSL-криптованием.
Резюме
Действующее зеркало гарантирует постоянный доступ к предпочитаемым слотам, щедрым акциям и функциональным возможностям. Зарегистрируйтесь немедленно и обретите стартовый бонус!
Подключение к платформе через актуальные зеркала
Актуальные интернет казино обеспечивают пользователям круглосуточный переход к развлечениям. Главный сайт Лаки Ворлд казино действует надёжно, предоставляя широкий набор гемблинг автоматов. Тем не менее порой появляются цифровые препятствия или блокировки, в связи с чем необходимо быть осведомлённым о наличии функционирующих зеркал.
Что представляет из себя главное зеркало казино
Альтернатива — это точная реплика основного сайта с схожим функционалом. Актуальное зеркало сегодня даёт возможность преодолевать территориальные запреты и поддерживать развлечения.
Основные плюсы задействования зеркал:
– Полный переход к индивидуальному кабинету
– Удержание любых данных профиля
– Схожий набор автоматов
– Текущие вознаграждения и кампании
Создание аккаунта на платформе
Процедура создания аккаунта длится несколько минут. Свежие клиенты обретают привлекательный поощрение за регистрацию, что может содержать:
– Начальный денежный кредит
– Безвозмездные спины для слотов
– Эксклюзивные промокоды
– Расширенный компенсацию
Во имя завершения записи следует:
1. Переместиться на главный сайт или дубликат
2. Нажать кнопку «Создать аккаунт»
3. Указать персональные информацию
4. Верифицировать электронную почту или телефон
5. Активировать промокод (при наличии)
Доступ в персональный кабинет
По завершении правильной регистрации пользователи способны производить вход используя официальный веб-сайт или актуальное зеркало. Индивидуальный кабинет открывает безграничный надзор над аккаунтом:
– История ставок
– Зачисление депозита
– Изъятие денег
– Регулирование привилегиями
– Вовлечение в конкурсах
Бонусы и акции казино
Платформа награждает пользователей разнообразными наградными программами:
Стартовые призы
Новые игроки обретают щедрый букет привилегий на вступительные взносы. Зачастую это охватывает пропорциональную надбавку к объёму взноса плюс безвозмездные фриспины.
Систематические акции
– Каждонедельный кэшбек до 15%
– Состязания с призовыми пулами
– Бонусы на годовщину рождения
– Особые предложения для статусных клиентов
План верности
Постоянные клиенты накапливают баллы, что возможно трансформировать на реальные средства или эксклюзивные привилегии.
Портативная редакция и программа
Актуальные технологии позволяют играть в любом месте комфортно. Смартфонная вариант сайта самостоятельно приспосабливается под дисплей любого гаджета.
Преимущества мобильного ПО:
– Моментальная загрузка автоматов
– Эргономичный вид
– Моментальные-нотификации о предложениях
– Опция установить для Android и iOS
Live казино: среда подлинного игорного дома
Категория Live казино транспортирует клиентов в антураж истинного игорного дома. Квалифицированные крупье ведут развлечение в формате подлинного времени.
Доступные развлечения:
– Колесо фортуны
– Очко
– Карточная игра
– Покерная игра
Барабаны и азартные слоты
Коллекция развлекательных машин содержит массу наименований от лидирующих провайдеров. Любой клиент найдёт игру по желанию:
– Классические машины
– Современные автоматы с бонусными уровнями
– Крупный приз-машины
– Megaways машины
Состязания и лотереи
Периодические соревнования вносят остроту и открывают способность обрести большие вознаграждения. Включение в состязаниях нередко безвозмездное, а премиальные фонды доходят до крупных объёмов.
Секьюрити и приватность
Ресурс задействует инновационные технологии защиты для охраны сведений пользователей. Каждые транзакционные операции выполняются через защищённые соединения.
Резюме
Центральный ресурс и его действующие зеркала предоставляют стабильный вход к качественным гемблинг играм. Щедрые награды, практичная карманная вариант, вариативность игр и высококлассное Live-игорный дом делают портал прекрасным опцией для ценителей азартных игр.
order-vardenafil https://livemedsrx.top/# buy levitra pills online
Explore Popular Products – Clear product info and neat category structure make shopping smooth.
covecrate web store – Distinct concept with merchandise that feels curated.
florafinds featured – Browsing is intuitive with neat and tidy pages.
Современные онлайн-казино предлагают пользователям множество возможностей для беспроблемной игры. Официальный ресурс Pinco открывает возможность ко всем функциям и игровым автоматам. Однако при наличии системных трудностей на помощь приходят рабочие копии.
Что означает собой функционирующее зеркало
Альтернативный адрес казино — это идентичная реплика официального портала, находящаяся по дополнительному веб-адресу. Легитимное зеркало хранит все характеристики, вместе с открытие профиля, вход в личный кабинет, поощрения и промокоды.
Копия на сегодня предоставляет:
– Бесперебойный путь к развлекательным аппаратам
– Полную конфиденциальность индивидуальных данных
– Сохранение депозита и записей транзакций
– Возможность использования всех акций
Создание учетной записи на официальном ресурсе
Этап открытия профиля требует считанные минут. Новым пользователям следует:
1. Войти на подлинный ресурс или действующее зеркало
2. Нажать кнопку «Создать аккаунт»
3. Заполнить запрашиваемые данные
4. Верифицировать email почту
5. Указать промокод при наличии
После завершения оформления профиля клиенты получают бонус за регистрацию, который может включать фриспины или финансовое премирование.
Вход в индивидуальный кабинет
Персональный кабинет предоставляет всеобъемлющий надзор над азартным процессом. Через персональный кабинет разрешается:
– Депонировать счет
– Получать средства
– Активировать кодовые слова
– Проверять записи игр
– Соревноваться в состязаниях
– Получать кэшбек
Описание премий и промо-предложений
Великодушная премиальная схема — ключевое плюс проекта. Основные формы поощрений:
Вступительный бонус
Дебютанты обретают щедрое вознаграждение на первые пополнения. Сумма приза может доходить до 100-200% от величины депозита.
Фриспины
Даровые вращения предоставляются для востребованных машин. Количество free spins изменяется от 10 до 500 штук.
Возврат средств
Постоянный или помесячный отдача процентной доли утраченных средств. Обычный процент кэшбека — 5-15%.
Соревнования
Периодические соревнования с внушительными призовыми пулами. Участники конкурируют за верхние позиции в турнирной таблице.
Портативная версия и приложение
Смартфонная версия дает возможность играть с всякого аппарата. Пользователи могут загрузить софт для iOS и Android или эксплуатировать интернет версию.
Плюсы смартфонного приложения:
– Быстрая прогрузка игр
– Удобный UI
– Всплывающие уведомления о акциях
– Доступ через биометрию
Игровые автоматы и Live казино
Развлекательная библиотека включает множество позиций от лидирующих производителей.
Востребованные категории автоматов:
– Классические слоты
– Современные слоты с премиальными раундами
– Прогрессивный джекпот автоматы
– Megaways слоты
Live игорный зал
Секция live игорный зал предлагает развлечение с живыми ведущими. Есть традиционные развлечения:
– Рулетка
– Блэкджек
– Baccarat
– Карибский покер
Как разыскать рабочее зеркало
Обрести свежую линк на зеркало разрешается различными способами:
1. Подписаться на почтовую рассылку
2. Следить за апдейтами в соц сетях
3. Обратиться в службу поддержки
4. Сохранить рабочее зеркало в закладки
Вывод
Основной портал и его действующие зеркала обеспечивают непрерывный путь к игровым автоматам. Богатые поощрения, множественные промокоды, комфортное портативное софт и отличная сервис поддержки обеспечивают азартный геймплей в высшей степени беспроблемным и безопасным.
Передовые онлайн-казино обеспечивают игрокам богатый диапазон вариантов для удобной развлечений. Переход к платформе РР·Рё РљСЌС€ казино осуществляется через лицензионный домен или актуальное зеркало.
Что такое действующее зеркало казино
Функционирующее зеркало — это альтернативный адрес основного портала казино. Такие копии создаются для поддержания бесперебойного подключения к гемблинговой площадке.
Зеркало актуальное абсолютно повторяет функционал основного ресурса. Клиенты имеют идентичный путь ко всем функциям, включая открытие счета, зачисление средств депозита и получение призов.
Открытие счета на лицензионном веб-сайте
Алгоритм оформления учетной записи требует всего пару минут. Будущим пользователям нужно:
1. Войти на лицензионный ресурс или текущее настоящее зеркало
2. Щелкнуть кнопку “Открыть счет”
3. Заполнить обязательные данные
4. Подтвердить e-mail почту
5. Применить код активации при доступности
После окончания открытия профиля пользователь приобретает бонус за регистрацию, который может предполагать даровые спины или денежное вознаграждение.
Авторизация в собственный кабинет
Персональный кабинет — это закрытая область, где пользователи могут регулировать своим учетной записью. Для логина нужно внести username и пароль.
В пользовательском кабинете доступны такие возможности:
– Мониторинг хронологии операций
– Задействование купонов
– Контроль бонусами
– Присоединение в турнирах
– Мониторинг возмещения
– Настройка профиля
Поощрения и спецпредложения
Развлекательная платформа предоставляет выгодные подарки:
Приветственный комплект — новые игроки зарабатывают крупное начисление на дебютные вклады.
Даровые спины — дарятся как при открытии счета, так и в ходе разнообразных мероприятий.
Возврат средств — систематический рефанд части утраченных сумм.
Купоны — особые последовательности, дающие выход к уникальным вознаграждениям.
Обзор гемблинговых направлений
Slots
Библиотека слотов охватывает сотни наименований от топовых разработчиков. Пользователи обнаружат как традиционные аппараты, так и современные видеослоты с интересной анимацией.
Live казино
Секция Live казино обеспечивает право играть с реальными ведущими в формате текущего времени. Открыты востребованные развлечения: рулетка, блэкджек, баккара, покер.
Конкурсы
Систематические соревнования с большими выигрышными банками завлекают тысячи участников. Чемпионы получают cash вознаграждения и особые премии.
Портативная версия и программа
Портативная версия сайта позволяет участвовать с всякого девайса. Дизайн автоматически адаптируется под габариты экрана.
Получить приложение можно для девайсов на Android и iOS. Смартфонное app располагает всеми функциями полной версии.
Как определить актуальное зеркало на сегодня
Действующие ссылки зеркал систематически изменяются. Найти действующую линк можно различными методами:
– Через департамент саппорта
– В подлинных новостных сетях
– По email newsletter
– На аффилиатных сайтах
Защита и официальность
Главный портал работает на основании глобальной разрешения. Все переводы оберегаются инновационными системами защиты.
Конфиденциальность личных реквизитов сохраняется в совершенном размере.
Заключение
Лицензионный ресурс и его действующие альтернативы предоставляют клиентам постоянный доступ к качественным развлекательным развлечениям. Щедрые призы, всевозможные слоты, компетентная служба — все это создает игровой опыт максимально беспроблемным и интересным.
see this website – Stumbled on this page, finding items feels easy and practical.
have a look – Came across this today and the interface seems quite user‑friendly.
Современные онлайн-казино предлагают геймерам богатый диапазон возможностей для беспроблемной времяпрепровождения. Доступ к площадке РљСѓС€ казино осуществляется через основной домен или актуальное зеркало.
Что такое рабочее зеркало казино
Рабочее зеркало — это запасной URL главного сайта казино. Такие версии генерируются для поддержания бесперебойного доступа к игровой площадке.
Копия на сегодня абсолютно дублирует возможности главного домена. Клиенты имеют аналогичный вход ко всем функциям, включая оформление профиля, внесение депозита счета и обналичивание выигрышей.
Создание аккаунта на лицензионном портале
Процедура регистрации длится всего несколько минут. Свежим клиентам необходимо:
1. Войти на официальный сайт или актуальное официальное зеркало
2. Нажать кнопку “Регистрация”
3. Заполнить требуемые данные
4. Активировать e-mail почту
5. Ввести купон при доступности
После выполнения оформления пользователь зарабатывает приз за регистрацию, который способен предполагать фриспины или cash вознаграждение.
Вход в личный кабинет
Персональный кабинет — это закрытая область, где пользователи имеют возможность управлять своим счетом. Для входа требуется напечатать никнейм и пароль.
В индивидуальном кабинете имеются нижеперечисленные опции:
– Проверка хронологии транзакций
– Активация бонусных кодов
– Настройка поощрениями
– Присоединение в конкурсах
– Контроль возмещения
– Корректировка учетной записи
Поощрения и акции
Гемблинговая система предлагает привлекательные подарки:
Стартовый пакет — новички зарабатывают значительное премию на стартовые вклады.
Фриспины — дарятся как при создании аккаунта, так и в ходе различных промо.
Возврат средств — систематический возврат процента утраченных средств.
Купоны — уникальные коды, открывающие доступ к особым бонусам.
Обзор гемблинговых разделов
Аппараты
Библиотека слотов насчитывает тысячи наименований от ведущих поставщиков. Клиенты найдут как обычные автоматы, так и современные видео-слоты с увлекательной визуализацией.
Live казино
Категория Live казино предоставляет опцию развлекаться с действующими крупье в условиях текущего времени. Открыты известные развлечения: рулетка, блэкджек, баккара, покер.
Турниры
Систематические состязания с большими выигрышными пулами завлекают тысячи соревнующихся. Призеры получают монетарные призы и уникальные бонусы.
Портативная версия и программа
Телефонная версия платформы предоставляет право играть с каждого девайса. Дизайн автоматически адаптируется под размер экрана.
Загрузить программу можно для гаджетов на Android и iOS. Портативное ПО имеет всеми характеристиками настольной версии.
Как отыскать текущее зеркало на текущий день
Действующие ссылки копий систематически изменяются. Обнаружить свежую URL можно разными методами:
– Через службу поддержки
– В настоящих информационных сетях
– По e-mail подписке
– На тематических ресурсах
Защита и официальность
Официальный домен функционирует на основании мировой сертификата. Все транзакции охраняются передовыми системами защиты.
Приватность пользовательских данных обеспечивается в абсолютном формате.
Резюме
Основной ресурс и его рабочие зеркала обеспечивают игрокам беспрерывный доступ к превосходным развлекательным играм. Привлекательные вознаграждения, различные автоматы, квалифицированная поддержка — все это делает игровой времяпрепровождение максимально удобным и интересным.
Подключение к платформе через проверенные зеркала
Клиенты сетевых казино часто встречаются с вопросом блокировки основного сайта. Конкретно для решения этой задачи существуют альтернативные адреса легального ресурса. Бет Андреас предоставляет абсолютный вход ко всем опциям платформы.
Что такое действующее зеркало казино
Альтернативный адрес представляет собой точную реплику главного ресурса с таким же возможностями. Главное расхождение — это иное имя. Все сведения клиента, вместе с счет, награды и архив ставок, продолжают быть такими же.
Плюсы использования зеркал
Действующие зеркала характеризуются рядом значимых выгод:
– Непрерывный переход к любимым слотам
– Совершенная защита собственных данных
– Сохранение всех параметров личного кабинета
– Опция обретения поощрений и включения в предложениях
Оформление профиля на основном сайте
Операция оформления чрезвычайно несложен и длится несколько минут. Свежие игроки могут надеяться на крупный стартовый приз за оформление.
Ступени оформления аккаунта
1. Вход на главный домен или его альтернативу
2. Выбор на кнопку “Создать аккаунт”
3. Заполнение обязательных информации
4. Верификация email почты
5. Внесение купона (если есть)
Награды и предложения для участников
Игровая площадка радует своих клиентов многочисленными призовыми акциями.
Главные виды поощрений
Стартовый подарок — внушительное вознаграждение для недавних игроков, которое в состоянии охватывать финансовые средства и безвозмездные спины.
Фриспины — шанс запускать в известных слотах даром.
Компенсация — процентный возмещение проигранных средств, который зачисляется еженедельно или каждый месяц.
Купоны — особые комбинации, предоставляющие добавочные привилегии.
Пользовательский кабинет: функции и конфигурации
Индивидуальный кабинет предоставляет исчерпывающий контроль над пользовательским процессом. В данном разделе присутствуют:
– Управление средствами
– Архив переводов
– Активные привилегии
– Конфигурации сохранности
– Проверка профиля
Карманная платформа и программа
Актуальные пользователи оценивают доступность. Платформа дает два варианта для развлечений с карманных гаджетов.
Отзывчивая телефонная платформа
Адаптивная вариант ресурса без участия подстраивается под разрешение любого устройства. Не нужно загружать особое программное обеспечение.
Программа для смартфонов
Можно скачать фирменное программу для iOS и Android. Приложение обеспечивает:
– Быстрый запуск
– Оптимизированный графику
– Оперативные-извещения о акциях
– Надежную работу
Live раздел: обстановка настоящего зала
Раздел Live развлечений отправляет игроков в атмосферу истинного зала. Компетентные крупье организуют игры в варианте настоящего времени.
Популярные Live-столы
– Американская рулетка
– Блэкджек
– Punto Banco
– Покер
Аппараты: разнообразие развлечений
Коллекция азартных аппаратов содержит сотни вариантов от ведущих поставщиков. Пользователи откроют:
– Классические автоматы
– Видео-автоматы
– Мега-выигрыш-слоты
– Слоты с множественными линиями
Турниры и особые предложения
Регулярные состязания дают возможность пользователям бороться друг с другом за крупные наградные банки. Любой конкурс имеет свои критерии участия и список призеров.
Пути внесения и снятия средств
Площадка обслуживает ряд денежных инструментов:
– Платежные средства
– Цифровые кошельки
– Крипто
– Прямые транзакции
Каждые переводы осуществляются конфиденциально благодаря передовым технологиям кодирования.
Сервис обслуживания
Профессиональные консультанты сервиса обслуживания настроены содействовать 24/7. Доступны такие способы контакта:
– Онлайн-чат
– Email-помощь
– Телефонная поддержка
– Социальные сети
Итог
Легальный портал платформы и его действующие альтернативы обеспечивают пользователям конфиденциальный и удобный подход к огромному ассортименту азартных услуг. Внушительные подарки, периодические предложения, профессиональная поддержка и удобные платежные способы делают геймерский опыт крайне комфортным и прибыльным.
interesting site – I found this link earlier and it appears solid and easy to explore.
Современные онлайн-казино предоставляют игрокам множество возможностей для комфортной игры. Официальный портал Гама обеспечивает вход ко всем функциям и играм. Однако при возникновении программных трудностей на подмогу спешат действующие дубликаты.
Что есть собой действующее зеркало
Дубликат казино — это точная дубликат оригинального ресурса, расположенная по альтернативному доменному имени. Лицензионное зеркало удерживает все функции, вместе с создание аккаунта, авторизацию в индивидуальный кабинет, поощрения и кодовые слова.
Дубликат на сегодня дает:
– Стабильный вход к развлекательным автоматам
– Совершенную конфиденциальность индивидуальных информации
– Сохранение депозита и записей переводов
– Применимость всех акций
Открытие профиля на главном сайте
Этап открытия профиля отнимает несколько минут. Свежеиспеченным клиентам следует:
1. Перейти на основной ресурс или рабочее зеркало
2. Выбрать кнопку «Регистрация»
3. Ввести требуемые сведения
4. Подтвердить электронную почту
5. Указать кодовое слово при наличии
После финиша регистрации геймеры зарабатывают бонус за регистрацию, какой может включать free spins или денежно-призовое поощрение.
Авторизация в персональный кабинет
Персональный кабинет предоставляет всесторонний надзор над игровым действом. Через персональный кабинет допускается:
– Депонировать депозит
– Забирать выигрыши
– Задействовать кодовые слова
– Проверять журнал игр
– Соревноваться в конкурсах
– Приобретать cash back
Описание премий и промо-предложений
Великодушная призовая система — важное преимущество казино. Ключевые типы премий:
Стартовый подарок
Начинающие получают щедрое премирование на начальные пополнения. Объем премии может составлять 100-200% от суммы депозита.
Free spins
Бесплатные спины выдаются для популярных слотов. Число бесплатных вращений колеблется от 10 до 500 штук.
Возврат средств
Систематический или ежемесячный компенсация процентной доли потерянных финансов. Обычный объем возврата — 5-15%.
Состязания
Постоянные турниры с большими наградными банками. Участники конкурируют за лучшие строчки в турнирной таблице.
Мобильная версия и приложение
Адаптивная версия разрешает наслаждаться игрой с всякого аппарата. Пользователи могут установить программу для iOS и Android или применять интернет версию.
Плюсы мобильного программы:
– Быстрая загрузка игр
– Практичный UI
– Всплывающие уведомления о поощрениях
– Вход через отпечаток пальца
Игровые автоматы и Live казино
Игровая коллекция насчитывает тысячи наименований от топовых разработчиков.
Востребованные разделы игр:
– Стандартные машины
– Современные слоты с премиальными раундами
– Джекпот игры
– Мегавейс машины
Live игорный зал
Зона live игорный зал предоставляет партию с живыми ведущими. Доступны классические игры:
– Американская рулетка
– Двадцать одно
– Punto Banco
– Покер
Как разыскать рабочее зеркало
Получить рабочую линк на зеркало можно несколькими вариантами:
1. Зарегистрироваться на емейл-уведомления
2. Следить за апдейтами в соц сетях
3. Написать в сервис поддержки
4. Сохранить действующее зеркало в закладки
Заключение
Лицензионный ресурс и его актуальные дубликаты обеспечивают стабильный вход к развлекательным слотам. Выгодные премии, многочисленные купоны, комфортное мобильное приложение и профессиональная техподдержка поддержки создают игровой геймплей в высшей степени комфортным и защищенным.
Вход к платформе и действующие URL
Современные интернет казино обеспечивают игрокам огромный спектр развлечений. Главный ресурс Daddy казино предоставляет стабильный вход ко всем возможностям. При этом временами случаются ситуации, когда необходимо дополнительный путь авторизации.
Что являет собой собой актуальное зеркало
Функционирующее зеркало — это точная копия основного портала с другим интернет именем. Дубликат сегодня обеспечивает избегать существующие запреты и гарантировать бесперебойный вход к предпочитаемым слотам.
Главное зеркало обладает полными функциями, что и центральный веб-сайт:
– Целый список слотов
– Личный кабинет с зафиксированными сведениями
– Все поощрения и программы
– Надежные денежные транзакции
Открытие профиля и вход в казино
Ход регистрации на ресурсе длится буквально моментов. Новым пользователям нужно:
1. Перейти на актуальное зеркало сегодня
2. Нажать клавишу «Зарегистрироваться»
3. Указать обязательные информацию
4. Активировать электронную почту или данные телефона
5. Получить поощрение за открытие аккаунта
Авторизация в собственный аккаунт выполняется с помощью предоставление никнейма и кода доступа.
Характеристика бонусной структуры
Щедрая поощрительная политика — основное преимущество ресурса. Клиенты зарабатывают различные подарки:
Приветственные подарки
Свежие участники имеют возможность надеяться на привлекательный поощрение за регистрацию. Обычно это совокупность вариантов, объединяющий:
– Долевую надбавку к дебютному взносу
– Подарочные кручения
– Extra финансы на баланс
Промо-коды и уникальные акции
Периодические коды помогают зарабатывать бонусные льготы. Использовать их возможно в особом окне персонального кабинета.
Спины и кешбэк
Бесплатные спины — это шанс играть автоматы без использования персональных денег. Кэшбек предполагает долевой компенсацию утраченных финансов.
Ассортимент слотов
Гемблинг платформа предлагает значительную коллекцию развлечений.
Автоматы
Ассортимент игровых машин восхищает ожидания. Имеются классические простые аппараты и продвинутые игры с захватывающей анимацией.
Live заведение
Зона Live казино переносит игроков в обстановку реального гемблинг зала. Умелые дилеры организуют сессии в живом времени.
Конкурсы и лидерборды
Периодические соревнования вносят остроты и гарантируют перспективу получить большие призы.
Мобильная форма и программа
Продвинутые технологии обеспечивают развлекаться в комфортном локации. Mobile версия самостоятельно адаптируется под дисплей устройства.
Скачать софт разрешено для программных платформ iOS и Android. Программа предоставляет:
– Мгновенный доступ
– Бесперебойную производительность
– Мгновенные-сообщения об бонусах
– Комфортный дизайн
Финансовые процедуры
Сайт использует всевозможные варианты внесения и изъятия денег:
– Пластиковые счета
– Электронные системы
– Крипто
– Финансовые переводы
Каждые действия проходят через безопасное протокол, что гарантирует сохранность конфиденциальных параметров.
Служба поддержки
Квалифицированная команда ассистанса функционирует 24/7. Соединиться с специалистами возможно через:
– Live-чат
– Электронную почту
– Связь
– Медиа сети
Выводы
Легальный портал и его действующее зеркало предоставляют пользователям стабильный и приятный доступ к захватывающим играм. Щедрые подарки, разнообразный выбор автоматов и высокая сервис создают времяпрепровождение крайне удобной и доходной.
seo partner program prodvizhenie-sajtov-v-moskve11.ru .
browse harborwharf – Organized sections allow for smooth product browsing.
indigo hub page – Seems like a straightforward place for quick browsing today.
Обзор лицензионного сайта
Актуальные виртуальные казино предоставляют пользователям разнообразный ассортимент игр и перспектив. Лицензионный веб-сайт Глори казино предоставляет безопасный вход к игровым услугам.
Рабочее зеркало: вход на сегодня
Дублирующий портал является в качестве точную дубликат главного портала. Проверенное зеркало обеспечивает участникам преодолевать возможные запреты.
Плюсы задействования зеркала
Ключевые достоинства включают:
– Беспрерывный путь к платформе
– Сохранение полных функций официального портала
– Защита конфиденциальных сведений
– Идентичный набор функций
Регистрация на портале
Механизм создания аккаунта выделяется простотой и эргономичностью. Начинающие игроки необходимо:
1. Открыть основной портал или его зеркало
2. Кликнуть на клавишу открытия счета
3. Ввести обязательные информацию
4. Подтвердить email почту
5. Произвести начальный логин
Приз за регистрацию
Новые игроки зарабатывают щедрый начальный бонус. Подобное вознаграждение в состоянии включать:
– Денежные средства
– Complimentary вращения
– Повышенный коэффициент компенсации
Вход в персональный кабинет
Активные пользователи имеют возможность оперативно получить доступ в собственный раздел, используя учетные данные и шифр. Индивидуальный аккаунт предлагает шанс к:
– Администрированию средствами
– Истории платежей
– Работающим бонусам
– Настройкам аккаунта
Призы и промо
Платформа периодически организует всевозможные промо-кампании для участников.
Разновидности бонусов
Главные типы бонусов:
– Депозитные бонусы – часть от суммы взноса
– Бесплатные вращения – бесплатные раунды в слотах
– Компенсация – компенсация части утраченных финансов
– Призовые награды – призы за выступление в турнирах
Промокоды
Особые ваучеры помогают приобрести экстра выгоды. Участники могут обнаружить их на партнерских порталах или приобрести в новостях.
Mobile редакция и софт
Актуальные пользователи выбирают мобильный игровой процесс.
Характеристики портативной системы
– Отзывчивый интерфейс для различных аппаратов
– Абсолютный возможность к слотам
– Стремительная загрузка
– Комфортное контроль
Скачать программу
Мобильное софт открыто для загрузки на девайсы с рабочими системами Android и iOS. App предоставляет:
– Бесперебойную работу
– Push оповещения о призах
– Оперативный путь к избранным автоматам
Игровой портфель
Портал предоставляет богатую коллекцию азартных забав.
Автоматы
Библиотека развлекательных автоматов содержит:
– Классические игры
– Передовые аппараты
– Накопительные слоты
– Сюжетные развлечения
Live казино
Секция реальных столов предоставляет право соревноваться с настоящими крупье. Доступны:
– Европейская рулетка
– Блэкджек
– Baccarat
– Poker
Турниры
Регулярные турниры дают возможность пользователям соревноваться за крупные наградные банки. Турнирная структура модифицируется еженедельно.
Финансовые операции
Казино обеспечивает массу способов внесения и обналичивания сумм:
– Пластиковые карточки
– Онлайн кошельки
– Межбанковские транзакции
– Крипто
Абсолютно все транзакции выполняются конфиденциально с применением передовых систем шифрования.
Отдел поддержки
Профессиональная команда support работает круглосуточно. Обратиться с менеджерами доступно через:
– Онлайн чат
– Email почту
– Горячую линию
– Social сети
Безопасность и регулирование
Портал действует на основании официальной аккредитации. Подобное удостоверяет:
– Справедливость игрового действа
– Охрану конфиденциальных данных
– Своевременные транзакции
– Ответственный игровой процесс
Заключение
Основной веб-сайт и его рабочие альтернативные адреса гарантируют участникам совокупный спектр возможностей для безопасной и прибыльной развлечений. Значительные подарки, многочисленные слоты, опытная сервис и защищенная структура транзакций делают ресурс оптимальным опцией для любителей игровых игр.
руководства по seo seo-blog14.ru .
Передовые онлайн-казино обеспечивают пользователям обилие вариантов для беспроблемной игры. Центральный сайт 888старз открывает возможность ко всем функциям и развлечениям. Однако при образовании программных сложностей на выручку спешат действующие зеркала.
Что означает собой актуальное зеркало
Зеркало казино — это стопроцентная версия основного портала, находящаяся по альтернативному адресу. Легитимное зеркало сохраняет все характеристики, включая регистрацию, вход в собственный кабинет, бонусы и бонусные коды.
Альтернативный сайт на сегодня дает:
– Непрерывный доступ к игровым аппаратам
– Совершенную сохранность личных сведений
– Удержание средств и журнала переводов
– Возможность использования всех специальных предложений
Регистрация на лицензионном портале
Этап создания аккаунта отнимает считанные минут. Новым пользователям следует:
1. Перейти на основной сайт или функционирующее зеркало
2. Кликнуть кнопку «Создать аккаунт»
3. Указать запрашиваемые данные
4. Активировать э-мейл почту
5. Использовать купон при существовании
После окончания оформления профиля клиенты обретают подарок за регистрацию, какой может содержать бесплатные вращения или денежное вознаграждение.
Вход в собственный кабинет
Индивидуальный кабинет открывает всеобъемлющий надзор над игровым ходом. Через собственный кабинет возможно:
– Финансировать баланс
– Забирать выплаты
– Применять бонусные коды
– Контролировать журнал пари
– Играть в конкурсах
– Обретать cash back
Анализ вознаграждений и акций
Богатая бонусная политика — ключевое преимущество проекта. Основные формы бонусов:
Стартовый приз
Начинающие получают богатое вознаграждение на дебютные пополнения. Величина премии может доходить до 100-200% от объема пополнения.
Free spins
Безвозмездные прокруты выдаются для известных игровых автоматов. Объем фриспинов варьируется от 10 до 500 штук.
Cash back
Систематический или помесячный компенсация части потерянных денег. Стандартный объем возврата — 5-15%.
Турниры
Постоянные состязания с внушительными призовыми банками. Участники конкурируют за призовые позиции в турнирной таблице.
Мобильная версия и приложение
Портативная версия обеспечивает развлекаться с всякого устройства. Клиенты могут закачать приложение для iOS и Android или эксплуатировать интернет версию.
Выгоды портативного программы:
– Скоростная подзагрузка автоматов
– Комфортный UI
– Push-уведомления о поощрениях
– Возможность входа через отпечаток пальца
Автоматы и Live казино
Развлекательная подборка насчитывает сотни игр от лидирующих провайдеров.
Известные типы слотов:
– Стандартные слоты
– Видеослоты с бонусными уровнями
– Накопительный приз слоты
– Мегавейс машины
Live игровой зал
Категория live игорный зал предоставляет игру с живыми ведущими. Есть стандартные развлечения:
– Французская рулетка
– Блэкджек
– Punto Banco
– Техасский холдем
Как обнаружить актуальное зеркало
Найти действующую адрес на зеркало разрешается различными вариантами:
1. Подписаться на емейл-уведомления
2. Следить за обновлениями в социальных сетях
3. Обратиться в службу поддержки
4. Сохранить действующее зеркало в закладки
Итог
Главный ресурс и его рабочие дубликаты предоставляют постоянный вход к игровым играм. Щедрые поощрения, множественные купоны, практичное портативное софт и высококлассная служба поддержки поддержки делают азартный геймплей максимально беспроблемным и конфиденциальным.
Если хотите быть в курсе новостей ufc в феврале марте 2026 три недели которые встряхнут дивизионы, посмотрите этот материал. Посмотреть подробнее: https://stuff4scrap.ru/news/fevral-mart-2026-v-ufc-tri-turnira-s-topovymi-hedlajnerami-i-vzryvnymi-anderkardami-polnyj-gid/
site reference – I discovered this site today and the interface seems very user friendly.
ремонту квартири рулону шпалер ремонт квартир вторинка
juniper shopping hub – Found this page while browsing, looks simple and convenient.
gildaisle essentials – Smooth pages and straightforward shopping experience.
Передовые онлайн-казино дают участникам внушительный набор игр и премиальных вариантов. Доступ к сервису осуществляется через основной веб-сайт или его актуальное зеркало РљСѓС€ казино онлайн, что обеспечивает постоянную деятельность.
Что такое функционирующее зеркало казино
Дубликат — это точная дубликат оригинального веб-сайта, разработанная для преодоления запретов. Зеркало сегодня помогает клиентам сохранить вход к излюбленным автоматам в произвольное время.
Лицензионное зеркало имеет всеми характеристиками основного ресурса:
– Весь ассортимент автоматов
– Личный кабинет с сохраненными сведениями
– Актуальные промокоды
– Гарантированные финансовые процедуры
Оформление профиля на основном портале
Процедура регистрации составляет всего считанные минут. Первым игрокам следует:
1. Войти на основной веб-сайт или актуальное зеркало
2. Нажать на элемент “Регистрация”
3. Ввести нужные данные
4. Проверить адрес
5. Сделать начальный платеж
Приветственный бонус выдается незамедлительно после завершения всех шагов.
Подключение в учетную запись
Созданные игроки могут выполнить доступ вводя:
– Имя пользователя и ключ
– Код телефона
– Контактный email
Личный кабинет открывает возможность к регулированию средствами, записям транзакций и доступным акциям.
Промо и акции
Развлекательная сервис привлекает постоянных игроков разнообразными поощрениями:
Приветственный бонус
– Премия на начальный депозит до 100%
– Free spins на востребованные автоматы
– Особые бонусы за дальнейшие платежи
Промокоды
Эксклюзивные купоны дают возможность на приобретение особых бонусов. Текущие промокоды выставляются в блоке “Промо”.
Кешбэк
Периодический бонус равен до 10% от проигранных финансов. Возврат выплачивается незамедлительно.
Программа лояльности
Постоянные пользователи получают очки, которые обмениваются на настоящие финансы или бесплатные вращения.
Mobile версия и APP
Ради комфорта игроков построена полноценная адаптивный сайт. Адаптивный интерфейс позволяет легко участвовать с любого переносного аппарата.
Плюсы приложения:
– Скорый запуск к слотам
– Адаптированный интерфейс
– Устойчивая функциональность
– Сообщения о свежих акциях
Загрузить приложение можно безвозмездно с официального ресурса для гаджетов на Android и iOS.
Коллекция развлечений
Автоматы
Библиотека включает более 2000 машин от топовых студий:
– Стандартные игры
– Video slots
– Слоты с джекпотом
– Брендовые слоты
Live казино
Секция Live столов предоставляет игру с подлинными диллерами в реальном формате:
– Рулеточные столы
– Blackjack
– Баккара
– Poker
Турниры
Систематические конкурсы с крупными наградными пулами запускаются каждую неделю. Присоединение в соревнованиях разрешено всем активным участникам.
Платежные системы
Пополнения и изъятия средств осуществляются через известные методы:
– Дебетовые пластик
– Цифровые кошельки
– Криптовалюта
– Банковские переводы
Стартовый платеж — от 100 рублей. Получение выигрышей обрабатывается в течение 24 времени.
Сервис поддержки
24/7 группа помощи может помочь в исправлении каких-либо задач:
– Онлайн-чат
– Email
– Связь
– Общественные сети
Охрана и документ
Главный ресурс функционирует на почве мировой лицензии. Любые параметры клиентов охранены актуальным SSL-протоколом.
Заключение
Действующее зеркало обеспечивает бесперебойный подключение к предпочитаемым развлечениям, щедрым поощрениям и функциональным услугам. Зарегистрируйтесь сегодня и получите приветственный приз!
Актуальные виртуальные казино предлагают игрокам обширный выбор опций для комфортной игры. Впрочем иногда подключение к главному сайту может быть закрытым. В таких обстоятельствах на помощь появляется Гама, которое предоставляет стабильный подключение ко всем сервисам платформы.
Что такое рабочее зеркало казино
Зеркало — это абсолютная версия лицензионного портала, которая находится по дополнительному URL. Копия содержит весь функционал главного сайта, включая пользовательский кабинет, счет и сведения операций.
Принципиальные плюсы использования зеркала:
– Круглосуточный вход к ресурсу
– Полная идентичность возможностей
– Защита пользовательских сведений
– Поддержка всех поощрений
Как найти действующее зеркало на текущий день
Присутствует несколько проверенных методов поиска актуальной ссылки:
Официальные сервисы:
1. Электронная рассылка — дирекция периодически направляет уведомления с актуальными доменами
2. Общественные сети — проверенные страницы размещают актуальную информацию
3. Сервис поддержки — специалисты выдают надежные URL
4. Телефонное приложение — позволяет обходить блокировки
Открытие счета на главном веб-сайте
Операция оформления занимает только считанные минут и содержит из следующих шагов:
1. Переход на главный сайт или действующее зеркало
2. Нажатие на иконку «Открыть счет»
3. Ввод регистрационной таблицы
4. Проверка электронной почты или телефонного номера
5. Активация бонуса за регистрацию при существовании промокода
Начинающие пользователи зарабатывают солидный начальный бонус, который может охватывать даровые прокруты, монетарные вознаграждения или компенсацию.
Логин в пользовательский кабинет
Логин на платформе производится обычным методом. Достаточно ввести никнейм и код доступа, примененные при оформлении.
Ключевые детали для конфиденциального входа:
– Используйте защищенный шифр
– Задействуйте двухэтапную проверку
– Не записывайте пароли на посторонних девайсах
– Контролируйте URL строку браузера
Анализ поощрительной программы
Игровая платформа балует геймеров разнообразными поощрениями и акциями:
Приветственный пакет
Дебютанты вправе надеяться на значительное вознаграждение за начальный пополнение. Зачастую это пропорциональная надбавка к внесенной сумме плюс фриспины для востребованных слотов.
Постоянные предложения
– Семидневный кэшбек — возврат процентной доли списанных средств
– Призы на последующие вклады
– Специальные офферы по торжествам
– Состязания с солидными призовыми пулами
План верности
Деятельные игроки собирают единицы за каждую раунд, которые затем конвертируются на фактические средства, даровые прокруты или уникальные преимущества.
Промокоды: как активировать
Промокоды — это индивидуальные последовательности символов, обеспечивающие возможность к бонусным бонусам.
Откуда найти действующие промокоды:
– Авторизованные коммуникационные сети казино
– Аффилиатные ресурсы
– Email-информирование
– Профильные форумы
Указывается промокод в предназначенное поле при оформлении или пополнении счета.
Смартфонная версия и приложение
Нынешние клиенты любят делать ставки с телефонных гаджетов. Платформа предоставляет двойной способа для комфортной телефонной игры.
Мобильная вариант
Онлайн версия сама адаптируется под габариты экрана. Не просит загрузки и оперирует в всяком свежем браузере.
Портативное приложение
Получить app можно для устройств на Android и iOS. Плюсы app:
– Быстрая открытие
– Бесперебойная операция
– Всплывающие-уведомления о поощрениях
– Независимый избегание блокировок
Этап загрузки элементарен: нужно перейти на портал с телефонного гаджета и подчиняться предписаниям.
Азартный ассортимент
База развлечений охватывает огромное количество вариантов от ведущих производителей.
Слоты
Игровые аппараты — крайне любимая раздел игр. Доступны традиционные 3-барабанные слоты, новые мультимедийные слоты с бонусными стадиями, а также джекпотные джекпоты.
Live казино
Секция с живыми дилерами предоставляет почувствовать настроение настоящего казино. Представлены столы с рулеткой.
Трансляция осуществляется в превосходном качестве, присутствует общение с дилером и остальными игроками.
Соревнования
Периодически устраиваются состязания по различным дисциплинам. Присоединение дает шанс заработать финансовые выигрыши, даровые прокруты или особые привилегии.
Транзакционные процедуры
Портал предлагает широкий выбор расчетных способов:
– Банковские карты
– Электронные кошельки
– Биткоин
– Банковские платежи
Стартовая количество депозита — посильная для преобладающего числа клиентов. Обналичивание выигрышей обрабатывается в кратчайшие сроки.
Департамент поддержки
Профессиональные операторы настроены оказать помощь постоянно. Открыты такие способы связи:
– Живой-чат
– Email
– Звонковая связь
– Социальные сети
Разъяснения на частые проблемы можно получить в разделе FAQ.
Резюме
Официальный веб-сайт казино и его рабочие зеркала гарантируют клиентам максимальный доступ ко всем сервисам ресурса. Значительные бонусы, удобная мобильная версия, впечатляющий каталог игр и опытная поддержка делают азартный процесс исключительно беспроблемным и конфиденциальным.
grainmarket selections – Fast-loading pages and clear organization make exploring easy.
Современные онлайн-казино предоставляют геймерам широкий выбор вариантов для беспроблемной досуга. Вход к площадке играть реализуется через основной портал или актуальное зеркало.
Что такое функционирующее зеркало казино
Действующее зеркало — это дополнительный домен основного портала казино. Такие дубликаты генерируются для предоставления постоянного входа к развлекательной сервису.
Копия сегодня абсолютно дублирует функционал базового домена. Геймеры обретают схожий вход ко всем возможностям, включая регистрацию, зачисление средств счета и снятие средств.
Оформление профиля на главном ресурсе
Механизм открытия профиля занимает всего несколько моментов. Будущим клиентам необходимо:
1. Войти на главный сайт или текущее проверенное зеркало
2. Кликнуть кнопку “Создать аккаунт”
3. Внести необходимые реквизиты
4. Верифицировать email почту
5. Применить код активации при присутствии
После завершения регистрации пользователь получает бонус за регистрацию, который имеет право предполагать даровые спины или монетарное вознаграждение.
Доступ в личный кабинет
Личный кабинет — это защищенная область, где участники вправе администрировать своим профилем. Для логина необходимо указать никнейм и секретный ключ.
В индивидуальном кабинете представлены такие функции:
– Просмотр записей транзакций
– Использование купонов
– Регулирование вознаграждениями
– Вступление в соревнованиях
– Проверка возмещения
– Изменение данных
Бонусы и акции
Азартная сервис предоставляет щедрые подарки:
Регистрационный комплект — начинающие зарабатывают существенное поощрение на дебютные депозиты.
Даровые спины — выдаются как при регистрации, так и в процессе всевозможных промо.
Возмещение — еженедельный рефанд процента израсходованных денег.
Купоны — эксклюзивные коды, открывающие доступ к специальным призам.
Характеристика развлекательных разделов
Слоты
Собрание автоматов охватывает тысячи вариантов от топовых поставщиков. Игроки обнаружат как классические аппараты, так и актуальные мультимедийные автоматы с увлекательной графикой.
Live казино
Зона Live казино предоставляет опцию играть с настоящими крупье в режиме актуального времени. Имеются распространенные варианты: рулетка, блэкджек, баккара, покер.
Турниры
Регулярные чемпионаты с солидными премиальными пулами завлекают тысячи конкурсантов. Победители получают cash вознаграждения и особые подарки.
Смартфонная версия и программа
Адаптивная версия сайта обеспечивает наслаждаться с любого устройства. Структура самостоятельно корректируется под формат экрана.
Установить приложение можно для гаджетов на Android и iOS. Мобильное ПО имеет всеми характеристиками компьютерной версии.
Как найти действующее зеркало на сейчас
Свежие адреса зеркал регулярно обновляются. Найти свежую ссылку можно несколькими вариантами:
– Через сервис поддержки
– В проверенных новостных сетях
– По электронной newsletter
– На партнерских площадках
Безопасность и сертификация
Основной ресурс функционирует на основании мировой документа. Все транзакции оберегаются современными протоколами шифрования.
Анонимность индивидуальных информации сохраняется в стопроцентном масштабе.
Резюме
Главный портал и его рабочие зеркала предоставляют игрокам круглосуточный путь к первоклассным гемблинговым сервисам. Привлекательные бонусы, всевозможные игры, опытная поддержка — все это делает гемблинговый времяпрепровождение чрезвычайно беспроблемным и увлекательным.
Переход к сайту через рабочие зеркала
Современные сетевые казино гарантируют игрокам бесперебойный вход к играм. Главный портал Дэдди оперирует бесперебойно, предоставляя богатый набор игровых развлечений. Однако иногда появляются системные трудности или барьеры, в связи с чем критично знать о присутствии действующих зеркал.
Что представляет из себя официальное зеркало казино
Альтернатива — это абсолютная дубликат главного веб-сайта с схожим функционалом. Актуальное зеркало на данный момент помогает преодолевать локальные барьеры и поддерживать игру.
Ключевые выгоды задействования зеркал:
– Абсолютный подключение к личному кабинету
– Сохранение любых показателей аккаунта
– Схожий перечень автоматов
– Действующие поощрения и промо
Регистрация на платформе
Операция записи требует считанные минут. Начинающие пользователи приобретают великодушный поощрение за оформление, он может содержать:
– Вступительный игровой кредит
– Комплиментарные кручения для игр
– Уникальные коды
– Расширенный компенсацию
Для выполнения создания аккаунта следует:
1. Перейти на официальный ресурс или дубликат
2. Кликнуть кнопку «Регистрация»
3. Указать персональные данные
4. Заверить мейл или телефон
5. Применить купон (когда имеется присутствии)
Доступ в персональный кабинет
Следом за корректной записи геймеры способны производить доступ используя главный веб-сайт или актуальное зеркало. Индивидуальный кабинет даёт полный регулирование над аккаунтом:
– Архив ставок
– Внесение кошелька
– Изъятие средств
– Управление привилегиями
– Участие в конкурсах
Награды и предложения казино
Платформа награждает игроков многочисленными привилегированными схемами:
Приветственные призы
Новые игроки зарабатывают великодушный букет наград на вступительные депозиты. Зачастую это предполагает частичную надбавку к размеру пополнения плюс безвозмездные фриспины.
Регулярные предложения
– Седмичный компенсация до 15%
– Конкурсы с призовыми пулами
– Поощрения на день рождения
– Особые промо для привилегированных геймеров
Схема поощрения
Постоянные геймеры накапливают единицы, они разрешено обменять на реальные финансы или уникальные бонусы.
Карманная версия и утилита
Передовые инновации обеспечивают участвовать везде удобно. Мобильная версия портала автоматически подстраивается под экран произвольного устройства.
Выгоды карманного приложения:
– Оперативная подгрузка развлечений
– Практичный вид
– Мгновенные-нотификации о бонусах
– Опция загрузить для Android и iOS
Настоящее казино: обстановка настоящего гемблинг учреждения
Область Live клуба переносит пользователей в среду реального гемблинг заведения. Компетентные крупье ведут развлечение в состоянии реального времени.
Предлагаемые столы:
– Рулетка
– Карточная игра
– Баккара
– Карты
Слоты и развлекательные аппараты
Собрание гемблинг автоматов содержит множество вариантов от лидирующих производителей. Всякий игрок подберёт слот по желанию:
– Винтажные машины
– Видеослоты с бонусными турами
– Крупный приз-игры
– Динамические автоматы
Состязания и раздачи
Постоянные турниры включают адреналин и открывают способность выиграть крупные вознаграждения. Включение в турнирах нередко даровое, а призовые пулы составляют внушительных объёмов.
Секьюрити и секретность
Платформа использует инновационные протоколы кодирования для гарантии реквизитов игроков. Все транзакционные операции выполняются через зашифрованные протоколы.
Резюме
Центральный ресурс и его актуальные зеркала предоставляют устойчивый переход к качественным развлекательным играм. Привлекательные награды, практичная смартфонная версия, многообразие машин и высококлассное Live-игорный дом превращают портал превосходным выбором для поклонников игровых игр.
fernvendor product range – Layout is organized and finding items feels simple.
маркетинговый блог маркетинговый блог .
Really enjoy this site Chicken Road — it’s so easy to use!
https://chickenvszombies.com
как продвигать сайт статьи seo-blog16.ru .
browse here – Just discovered this website today and it appears very simple to navigate.
check this site – Found this link today, the layout is tidy and user-friendly.
visit flintfolio – Smooth interface and detailed listings make browsing enjoyable.
Современные онлайн-казино предлагают пользователям широкий спектр возможностей и призовых предложений. Присоединение к сервису выполняется через основной ресурс или его действующее зеркало казино Бет Андреас, что обеспечивает бесперебойную работу.
В чем суть рабочее зеркало казино
Альтернатива — это абсолютная дубликат главного сайта, разработанная для обхода ограничений. Действующее зеркало помогает игрокам получить доступ к выбранным слотам в произвольное время.
Официальное зеркало обладает всеми опциями первоначального сайта:
– Весь ассортимент автоматов
– Аккаунт с записанными параметрами
– Актуальные бонусы
– Защищенные денежные процедуры
Оформление профиля на официальном портале
Ход создания аккаунта занимает всего несколько минут. Свежим клиентам нужно:
1. Войти на главный сайт или актуальное зеркало
2. Кликнуть на элемент “Создать аккаунт”
3. Указать требуемые информацию
4. Активировать контакт
5. Произвести начальный платеж
Бонус за регистрацию зачисляется моментально после прохождения всех стадий.
Авторизация в профиль
Зарегистрированные участники могут совершить вход используя:
– Никнейм и пароль
– Данные мобильного
– Адрес
Личный кабинет обеспечивает шанс к администрированию средствами, сведениям операций и активным бонусам.
Бонусы и кампании
Азартная сервис привлекает активных игроков разнообразными призами:
Приветственный пакет
– Надбавка на дебютный депозит до 100%
– Фриспины на востребованные машины
– Экстра награды за следующие платежи
Промокоды
Эксклюзивные ваучеры дают доступ на получение особых призов. Действующие комбинации выставляются в секции “Бонусы”.
Кешбэк
Еженедельный бонус равен до 10% от утраченных денег. Возврат предоставляется сразу.
Схема лояльности
Регулярные пользователи зарабатывают очки, которые превращаются на реальные выплаты или бесплатные вращения.
Адаптивный портал и APP
Для удобства пользователей построена удобная mobile версия. Адаптивный вид дает возможность легко участвовать с всякого переносного устройства.
Достоинства софта:
– Моментальный вход к развлечениям
– Оптимизированный облик
– Стабильная работа
– Оповещения о последних турнирах
Установить приложение можно безвозмездно с проверенного ресурса для аппаратов на Android и iOS.
Каталог слотов
Игровые автоматы
База содержит более 2000 слотов от топовых студий:
– Классические машины
– Видео-слоты
– Jackpot игры
– Брендовые развлечения
Live казино
Блок Live развлечений предоставляет участие с реальными крупье в онлайн времени:
– Roulette
– Blackjack
– Baccarat
– Poker
Соревнования
Периодические конкурсы с солидными призовыми бюджетами устраиваются регулярно. Допуск в соревнованиях открыто всем зарегистрированным клиентам.
Финансовые методы
Платежи и выводы выплат реализуются через распространенные методы:
– Кредитные карты
– Виртуальные кошельки
– Bitcoin
– Денежные переводы
Наименьший платеж — от 100 рублей. Изъятие денег выполняется в течение 24 времени.
Отдел поддержки
Непрерывная группа поддержки способна поддержать в разрешении всех вопросов:
– Онлайн-чат
– Email
– Горячая линия
– Соц сети
Охрана и сертификат
Официальный сайт работает на фундаменте глобальной документа. Любые сведения участников охранены передовым SSL-кодированием.
Итог
Актуальное зеркало дает постоянный доступ к любимым развлечениям, выгодным акциям и удобным возможностям. Создайте аккаунт немедленно и обретите приветственный бонус!
Характеристика оригинального ресурса
Актуальное онлайн-казино предлагает своим игрокам обширный набор игр и призов. Главный ресурс Wilder оперирует непрерывно, предоставляя доступ к известным автоматам, live-казино и обширным предложениям.
Действующее зеркало: доступ к платформе
Что такое альтернатива казино
Дубликат означает собой полную дубликат основного веб-сайта с отличным URL названием. Действующее зеркало обеспечивает пользователям преодолевать барьеры и иметь стабильный подключение к предпочитаемым играм.
Как найти рабочее зеркало сегодня
Актуальные ссылки на официальное зеркало выкладываются через:
– Email рассылку
– Проверенные медийные сети
– Службу сопровождения
– Affiliated ресурсы
Оформление на сайте
Процедура созданияаккаунта
Открытиесчета требует всего минут и предполагает такие действия:
1. Доступ на главный портал или функционирующее зеркало
2. Нажатие опции “Зарегистрироваться”
3. Ввод персональных реквизитов
4. Верификация аккаунта или мобильного
5. Создание секретнойкомбинации
Подарок за оформление
Новые игроки приобретают щедрые вступительные бонусы:
– Бонусные деньги на аккаунт
– Freespins для симуляторов
– Усиленный процент возврата
– Специальные промокоды
Вход в персональный профиль
Активные игроки способны осуществить логин через основной сайт или действующее зеркало. Для этого следует внести логин и секретнуюкомбинацию, созданные при оформлении.
Опции персонального раздела
В личном разделе имеются данные функции:
– Контроль персональными информацией
– Пополнение счета
– Снятие выигрышей
– Применение купонов
– Просмотр журнала операций
– Участие в конкурсах
Бонусы и промо
Типы бонусов
Казино поощряет своих пользователей многочисленными призовыми предложениями:
– Стартовый бонус — солидные поощрения на начальные депозиты
– Халявныеспины — дополнительные ставки в рейтинговых слотах
– Кешбэк — регулярный откат части потерь
– Программа верности — уникальные льготы для постоянных участников
Купоны и их применение
Эксклюзивные купоны гарантируют дополнительные бонусы. Для ввода необходимо ввести последовательность в определенное раздел в личном кабинете.
Геймплейный ассортимент
Автоматы
Коллекция слотовых машин вмещает массу позиций от лучших провайдеров:
– Обычные автоматы
– Видео автоматы
– Джекпот автоматы
– Сюжетные автоматы
Live казино
Раздел Live-казино обеспечивает участие с живыми ведущими в обстановке прямого времени:
– Рулетка
– Двадцатьодно
– PuntoBanco
– Карибскийпокер
Состязания
Систематические конкурсы с большими джекпотными суммами организуются еженедельно. Игроки соревнуются за лидерство в таблице.
Портативная платформа и APP
Адаптивная адаптация ресурса
Главный сайт на100% настроен для планшетных аппаратов. Участники имеютвозможность пользоваться автоматы прямо через интернет-браузер без необходимости загрузки.
APP для инсталляции
Авторское мобильное APP доступно для установки на гаджеты с базовыми средами Android и iOS. Приложение предоставляет:
– Моментальный вход к слотам
– Устойчивую производительность
– Push-сообщения о промо
– Удобный интерфейс
Вывод
Основной портал казино и его актуальные копии гарантируют пользователям полный доступ к первоклассным геймплейным играм. Солидные вознаграждения, многочисленные предложения, простая адаптивная версия и опытная служба создают развлекательный процесс крайне enjoyable и результативным.
visit cottonvendor – Each item looks carefully crafted and the specs are clearly outlined.
link worth checking – Stumbled on this website, the structure is clear and navigation is simple.
Вход к сайту через актуальные зеркала
Актуальные сетевые казино предоставляют пользователям непрерывный доступ к сервисам. Главный ресурс Кешер казино оперирует надёжно, предоставляя широкий спектр гемблинг автоматов. Но иногда формируются технические проблемы или запреты, следовательно важно быть осведомлённым о наличии актуальных зеркал.
Что представляет собой официальное зеркало казино
Зеркало — это полная копия центрального портала с идентичным возможностями. Действующее зеркало сегодня позволяет избегать территориальные запреты и возобновлять гемблинг.
Главные достоинства задействования зеркал:
– Безграничный доступ к личному кабинету
– Сохранение каждых показателей счёта
– Такой же набор автоматов
– Актуальные привилегии и кампании
Регистрация на портале
Процесс записи требует считанные минут. Начинающие игроки получают привлекательный бонус за регистрацию, что в состоянии включать:
– Начальный денежный подарок
– Безвозмездные кручения для слотов
– Особые промокоды
– Увеличенный кэшбек
Для финализации регистрации требуется:
1. Войти на центральный портал или зеркало
2. Кликнуть клавишу «Зарегистрироваться»
3. Написать персональные информацию
4. Заверить email или телефон
5. Активировать код (при наличии)
Вход в персональный кабинет
Вслед за удачной записи геймеры в состоянии осуществлять авторизацию используя центральный портал или актуальное зеркало. Личный кабинет предоставляет абсолютный управление над учётной записью:
– Журнал ставок
– Зачисление кошелька
– Вывод средств
– Администрирование бонусами
– Участие в состязаниях
Привилегии и акции казино
Портал радует игроков различными бонусными системами:
Приветственные бонусы
Дебютанты зарабатывают внушительный пакет привилегий на начальные взносы. Как правило это включает долевую надбавку к величине вклада плюс безвозмездные спины.
Систематические промо
– Каждонедельный компенсация до 15%
– Турниры с премиальными суммами
– Подарки на дату рождения
– Эксклюзивные предложения для VIP пользователей
Программа верности
Деятельные клиенты накапливают очки, что можно обменять на подлинные деньги или особые привилегии.
Портативная редакция и приложение
Актуальные инновации позволяют развлекаться в любом месте угодно. Портативная вариант сайта автономно адаптируется под монитор произвольного гаджета.
Выгоды смартфонного софта:
– Скоростная загрузка развлечений
– Практичный интерфейс
– Push-оповещения о акциях
– Шанс скачать для Android и iOS
Живое казино: атмосфера подлинного игорного заведения
Область Live игорного дома доставляет игроков в антураж истинного азартного учреждения. Компетентные дилеры проводят действие в виде актуального времени.
Представленные игры:
– Европейская рулетка
– Карточная игра
– Карточная игра
– Карты
Слоты и азартные машины
Собрание игровых машин насчитывает массу вариантов от топовых производителей. Каждый пользователь обнаружит автомат по желанию:
– Классические машины
– Новые слоты с дополнительными уровнями
– Прогрессивный-слоты
– Многолинейные машины
Состязания и акции
Регулярные соревнования включают остроту и дают возможность заработать значительные награды. Участие в состязаниях регулярно комплиментарное, а наградные суммы составляют больших сумм.
Безопасность и анонимность
Платформа использует актуальные системы криптографии для гарантии данных пользователей. Все транзакционные операции осуществляются через охраняемые соединения.
Заключение
Основной сайт и его функционирующие зеркала предоставляют стабильный подключение к отличным игровым играм. Привлекательные награды, практичная карманная форма, многообразие машин и квалифицированное Live-казино формируют сайт прекрасным вариантом для поклонников азартных слотов.
Описание оригинального портала
Новое онлайн-казино дарит своим пользователям обширный выбор возможностей и бонусов. Основной портал Мотор функционирует непрерывно, обеспечивая возможность к топовым слотам, live-казино и многочисленным предложениям.
Рабочее зеркало: возможность к платформе
Что такое дубликат казино
Копия является собой полную реплику официального ресурса с иным сетевым путем. Действующее зеркало позволяет игрокам преодолевать блокировки и обеспечивать непрерывный доступ к предпочитаемым развлечениям.
Как найти рабочее зеркало сегодня
Свежие ссылки на официальное зеркало выкладываются через:
– Email рассылку
– Главные социальные сети
– Службу сопровождения
– Партнерские сайты
Созданиеаккаунта на портале
Ход оформления
Открытиесчета требует пару минут и включает такие действия:
1. Открытие на оригинальный ресурс или действующее зеркало
2. Клик элемента “Создатьаккаунт”
3. Внесение контактных сведений
4. Проверка email или телефона
5. Придумывание секретнойкомбинации
Приз за созданиеаккаунта
Начинающие участники получают большие стартовые поощрения:
– Бонусные депозиты на счет
– Фриспины для автоматов
– Увеличенный размер кешбэка
– Особые купоны
Авторизация в персональный аккаунт
Действующие клиенты вправе произвести доступ через оригинальный ресурс или текущее зеркало. Для этого нужно ввести учетноеимя и пароль, придуманные при регистрации.
Инструменты собственного раздела
В собственном профиле имеются такие возможности:
– Редактирование учетными информацией
– Внесение депозита
– Получение выигрышей
– Активация бонусов
– Просмотр журнала игр
– Включение в состязаниях
Поощрения и промо
Виды подарков
Казино балует своих участников многочисленными бонусными системами:
– Начальный набор — щедрые подарки на стартовые вклады
– Халявныеспины — экстра вращения в рейтинговых играх
– Возврат — регулярный откат процента убытков
– Программа лояльности — особые льготы для активных клиентов
Ваучеры и их ввод
Специальные промокоды предоставляют дополнительные вознаграждения. Для применения необходимо указать шифр в специальное окно в индивидуальном кабинете.
Геймплейный набор
Игры
Библиотека игровых автоматов вмещает множество названий от топовых разработчиков:
– Классические слоты
– Современные игры
– Джекпот слоты
– Тематические игры
Live казино
Секция Live-казино дарит игру с живыми ведущими в условиях онлайн эфира:
– Французскаярулетка
– Очко
– Baccarat
– Покер
Конкурсы
Периодические состязания с большими выигрышными фондами проводятся ежедневно. Участники сражаются за победу в турнирнойсетке.
Мобильная версия и APP
Мобильная реализация сайта
Оригинальный веб-сайт абсолютно адаптирован для мобильных аппаратов. Игроки вправе играть автоматы сразу через обозреватель без обязательства загрузки.
Софт для загрузки
Специальное портативное программа имеется для скачивания на девайсы с базовыми системами Android и iOS. Приложение обеспечивает:
– Оперативный вход к играм
– Бесперебойную операционность
– Оперативные-сообщения о акциях
– Простой дизайн
Резюме
Главный веб-сайт казино и его функционирующие альтернативы обеспечивают клиентам полный возможность к качественным игровым играм. Большие бонусы, многочисленные кампании, комфортная смартфонная версия и компетентная помощь создают геймплейный досуг максимально удобным и результативным.
What impressed me about this casino https://notariusze-slupsk.pl/ is the quality of the games. Everything runs without issues, the design is minimal, and there’s plenty of options to explore, which keeps it engaging.
check them out – Found this site recently, the interface feels neat and effortless.
Discover Coast Crate Deals – Browsing through products is smooth and effortless with the clear layout.
US Pharma Index buying drugs from canada buying drugs from canada
visit here – Noticed this during a quick search and it looks fairly easy to use.
Cheap generic Viagra online: viagra canada – Viagra online price
Современные онлайн-казино гарантируют игрокам разнообразный выбор игр и выгодные бонусы. Впрочем для стабильной работы важно осознавать, как найти Laki World и его актуальные зеркала.
Что такое лицензионный ресурс казино
Основной веб-сайт казино — это главная площадка, где игроки могут развлекаться азартными слотами. Портал оперирует на легальных принципах и располагает всеми обязательными лицензиями.
Основные достоинства основного портала:
– Надежность индивидуальных сведений
– Прозрачные правила использования
– Гарантированные выводы
– Компетентная поддержка
Актуальное зеркало казино: для чего нужно
Альтернативный адрес — это полная версия лицензионного ресурса, хостящаяся по альтернативному адресу. Рабочее зеркало разрабатывается для поддержания стабильного соединения к ресурсу.
Основания задействования копий сайта:
– Ограничение официального адреса
– Плановые процедуры
– Повышенная активность на систему
Как найти действующее зеркало на сегодня
Узнать актуальное официальное зеркало можно различными методами:
1. Почтовые оповещения — зарегистрируйтесь на информационную подписку
2. Департамент техподдержки — обратитесь в онлайн-чат
3. Социальные медиа — следите за обновлениями
4. Партнерские площадки — проверенные ресурсы
Регистрация на ресурсе казино
Процесс создания аккаунта занимает буквально несколько секунд:
1. Выберите на клавишу “Зарегистрироваться”
2. Введите требуемые поля
3. Активируйте электронную почту
4. Введите код активации, если предоставлен
По завершении успешной создания аккаунта вам станет разрешен персональный профиль.
Премии и купоны
Привлекательная премиальная структура — ключевое конкурентное преимущество казино:
Поощрение за первичную регистрацию
Первичные пользователи обретают первый поощрение, который может предполагать:
– Валютный депозит на начальный взнос
– Бесплатные вращения для барабанов
– Безвозвратные фонды
Купоны
Периодически публикуются свежие бонусные шифры, предоставляющие активировать специальные бонусы.
Система кэшбека
Активные игроки возвращают долю использованных средств на счет.
Свежие акции и состязания
Ресурс постоянно устраивает захватывающие события:
– Недельные баттлы
– Специальные предложения
– Розыгрыши значительных подарков
– Схема лояльности
Авторизация в личный раздел
Для логина на сайт нужно:
1. Открыть официальный адрес или функционирующее зеркало
2. Активировать “Авторизация”
3. Ввести email и код доступа
В индивидуальном кабинете доступны следующие возможности:
– Депозит баланса
– Обналичивание средств
– Просмотр архива игр
– Управление профильными сведениями
Mobile версия и app
Адаптивная платформа
Responsive платформа сайта предоставляет шанс делать ставки с различных портативного телефона. Визуал адаптивно подстраивается под габариты экрана.
Клиент для установки
Загрузить клиент можно для:
– Android — непосредственная скачивание с сайта
– iOS — скачивание через App Store
Достоинства app:
– Мгновенный вход
– Стабильная операционность
– Push-нотификации об предложениях
– Ускоренный интерфейс
Гемблинг разделы
Игровые машины
Внушительная галерея азартных барабанов от лучших провайдеров:
– Ретро автоматы
– Современные-автоматы
– Накопительные-машины
Live зал
Зона с настоящими крупье обеспечивает:
– European/American Roulette
– Двадцать одно
– Баккара
– Poker
Стримы проводятся в отличном формате, создавая атмосферу аутентичного казино.
Варианты внесения средств и обналичивания
Сайт обслуживает множественные транзакционные методы:
– Платежные картсчета
– Виртуальные платежи
– Цифровые валюты
– Банковские отправки
Базовые суммы депозита и моментальные выводы создают развлечение предельно приятной.
Команда support
Квалифицированная группа support оперирует 24/7 и может ассистировать с всеми проблемами:
– Реалтайм-чат
– Email-помощь
– Телефонная горячая линия
Резюме
Основной ресурс казино и его рабочие дубликаты предоставляют клиентам защищенный и увлекательный развлекательный досуг. Щедрые бонусы, функциональная mobile вариант, разнообразные игры и профессиональное live-казино делают эту площадку превосходным местом для азартных игр.
Нынешние онлайн-казино обеспечивают игрокам широкий спектр развлечений и заманчивые бонусы. Но для беспроблемной времяпрепровождения критично знать, как найти Вилдер казино и его функционирующие зеркала.
Что такое официальный ресурс казино
Главный сайт казино — это основная площадка, где участники могут пользоваться игровыми развлечениями. Сайт действует на легитимных основаниях и обладает всеми необходимыми разрешениями.
Первостепенные достоинства лицензионного сайта:
– Конфиденциальность пользовательских сведений
– Прозрачные условия работы
– Гарантированные транзакции
– Компетентная техподдержка
Функционирующее зеркало казино: для чего нужно
Дублирующий ресурс — это точная дубликат официального веб-сайта, размещенная по иному адресу. Актуальное зеркало создается для поддержания бесперебойного подключения к порталу.
Причины использования зеркал:
– Недоступность первичного адреса
– Профилактические работы
– Высокая посещаемость на систему
Как получить действующее зеркало в данный момент
Получить текущее проверенное зеркало можно несколькими путями:
1. Подписка — активируйте уведомления на новостную рассылку
2. Департамент помощи — обратитесь в онлайн-чат
3. Публичные площадки — отслеживайте за обновлениями
4. Специализированные порталы — надежные ресурсы
Создание аккаунта на портале казино
Процедура открытия счета составляет буквально пару минут:
1. Активируйте на кнопку “Создать аккаунт”
2. Заполните требуемые поля
3. Валидируйте email ящик
4. Примените купон, если предоставлен
Сразу после оконченной активации вам откроется разрешен персональный раздел.
Бонусы и бонусные коды
Щедрая премиальная программа — важное плюс казино:
Бонус за регистрацию
Новые игроки обретают начальный подарок, который может включать:
– Монетарный бонус на начальный вклад
– Фри-спины для игровых машин
– Стартовые средства
Бонусные коды
Периодически публикуются эксклюзивные коды, обеспечивающие забрать дополнительные преимущества.
Механизм компенсации
Активные клиенты зарабатывают часть утраченных финансов в виде компенсации.
Свежие акции и турниры
Сайт периодически организует интересные события:
– Еженедельные соревнования
– Сезонные бонусы
– Лотереи крупных наград
– Система лояльности
Вход в персональный аккаунт
Для входа на сайт нужно:
1. Открыть главный сайт или действующее зеркало
2. Нажать “Войти”
3. Указать никнейм и ключ
В личном разделе открыты следующие функции:
– Внесение средств счета
– Обналичивание денег
– Проверка архива ставок
– Настройка индивидуальными сведениями
Адаптивная вариант и приложение
Адаптивная вариант
Responsive вариант веб-сайта позволяет развлекаться с всех портативного устройства. Дизайн динамически подстраивается под размер дисплея.
App для скачивания
Скачать клиент можно для:
– Android — прямая скачивание с портала
– iOS — установка через App Store
Выгоды app:
– Оперативный старт
– Устойчивая производительность
– Push-оповещения об акциях
– Производительный UI
Игровые категории
Барабаны
Разнообразная подборка развлекательных автоматов от ведущих производителей:
– Традиционные игры
– Новые-слоты
– Призовые-игры
Live casino
Раздел с реальными дилерами предоставляет:
– Рулетка
– Блэкджек
– Punto Banco
– Карточные игры
Эфиры ведутся в высоком качестве, формируя эффект аутентичного казино.
Методы внесения средств и вывода
Платформа работает с разные денежные инструменты:
– Банковские средства
– Виртуальные платежи
– Криптовалюты
– Банковские транзакции
Стартовые значения внесения и скоростные платежи гарантируют времяпрепровождение крайне приятной.
Департамент поддержки
Компетентная отдел ассистентов оперирует 24/7 и в состоянии содействовать с всеми проблемами:
– Живой-чат
– Email-поддержка
– Телефонная линия
Выводы
Основной сайт казино и его рабочие зеркала предоставляют участникам конфиденциальный и интересный азартный досуг. Богатые награды, простая портативная вариант, обширные слоты и качественное live-казино делают эту площадку превосходным местом для развлекательных игр.
http://ivermectinaccessusa.com/# ivermectin cream canada cost
visit harborwharf – The site is intuitive and shopping feels straightforward.
ремонт у 1 5 квартирі ремонт квартир під ключ
official duneaisle site – The site feels uncluttered and moving through pages is effortless.
Нынешние виртуальные казино дают клиентам большой спектр возможностей для приятной игры. Но иногда подключение к основному порталу может являться заблокированным. В таких ситуациях на поддержку приходят Кент казино, которое предоставляет непрерывный путь ко всем сервисам платформы.
Что такое действующее зеркало казино
Альтернативный сайт — это абсолютная дубликат основного сайта, которая находится по дополнительному адресу. Зеркало сохраняет все возможности первоначального ресурса, включая персональный кабинет, счет и сведения операций.
Главные выгоды эксплуатации зеркала:
– Непрерывный доступ к сайту
– Максимальная идентичность опций
– Защита персональных данных
– Удержание существующих привилегий
Как обнаружить действующее зеркало на сегодня
Существует множество достоверных путей получения действующей ссылочной информации:
Проверенные источники:
1. Email рассылка — руководство постоянно пересылает письма с рабочими URL
2. Общественные сети — официальные страницы публикуют текущую новости
3. Департамент поддержки — специалисты дают безопасные адреса
4. Мобильное приложение — позволяет минуть блокировки
Открытие счета на лицензионном портале
Процесс регистрации требует только несколько минут и включает из таких стадий:
1. Открытие на основной ресурс или действующее зеркало
2. Клик на кнопку «Зарегистрироваться»
3. Ввод регистрационной анкеты
4. Верификация электронной почты или мобильного номера
5. Применение привилегии за регистрацию при доступности промокода
Свежие клиенты приобретают щедрый вступительный презент, который может предполагать фриспины, монетарные бонусы или кэшбек.
Авторизация в личный кабинет
Логин на сайте выполняется обычным методом. Нужно вписать никнейм и секретный ключ, использованные при оформлении.
Важные аспекты для конфиденциального входа:
– Задействуйте защищенный секретный ключ
– Задействуйте двухэтапную аутентификацию
– Не фиксируйте пароли на общественных гаджетах
– Отслеживайте адресную строку браузера
Анализ бонусной системы
Гемблинг-сайт одаривает игроков многочисленными поощрениями и кампаниями:
Вступительный пакет
Свежие игроки вправе полагаться на великодушное бонус за стартовый взнос. Традиционно это пропорциональная прибавка к внесенной сумме плюс free spins для популярных слотов.
Периодические кампании
– 7-дневный кэшбек — компенсирование процента потерянных средств
– Поощрения на очередные вклады
– Особые предложения по знаменательным датам
– Конкурсы с значительными призовыми банками
Программа вознаграждений
Регулярные клиенты зарабатывают баллы за всякую раунд, которые затем обмениваются на фактические средства, даровые прокруты или специальные привилегии.
Промокоды: как применять
Кодовые комбинации — это уникальные сочетания букв и цифр, предоставляющие доступ к дополнительным бонусам.
Каким образом получить актуальные промокоды:
– Авторизованные медийные сети казино
– Партнерские сайты
– Email-подписка
– Специализированные платформы
Указывается промокод в отдельное поле при создании аккаунта или пополнении баланса.
Смартфонная версия и приложение
Нынешние пользователи любят играть с мобильных девайсов. Платформа предоставляет два варианта для удобной мобильной игры.
Мобильная вариант
Браузерная версия само собой оптимизируется под диагональ дисплея. Не предполагает инсталляции и оперирует в любом актуальном браузере.
Мобильное приложение
Загрузить софт можно для гаджетов на Android и iOS. Плюсы app:
– Молниеносная открытие
– Надежная действие
– Push-уведомления о акциях
– Автоматический избегание блокировок
Операция установки несложен: требуется перейти на ресурс с смартфонного гаджета и подчиняться указаниям.
Развлекательный коллекция
База развлечений насчитывает тысячи единиц от передовых поставщиков.
Слоты
Игровые слоты — максимально распространенная группа развлечений. Размещены обычные простые машины, новые мультимедийные слоты с поощрительными уровнями, а также прогрессивные призы.
Live казино
Отдел с настоящими дилерами обеспечивает прочувствовать антураж настоящего казино. Имеются столы с покером.
Передача реализуется в HD разрешении, поддерживается коммуникация с крупье и прочими пользователями.
Состязания
Систематически проводятся состязания по всевозможным дисциплинам. Вступление обеспечивает возможность выиграть валютные призы, бесплатные вращения или специальные презенты.
Транзакционные манипуляции
Ресурс предоставляет значительный набор финансовых инструментов:
– Пластиковые карты
– Виртуальные системы
– Цифровая валюта
– Банковские платежи
Низшая объем вклада — разумная для основной части клиентов. Снятие призов производится в скорые интервалы.
Сервис поддержки
Профессиональные специалисты готовы содействовать непрерывно. Имеются данные каналы коммуникации:
– Живой-чат
– Email
– Телефонная поддержка
– Коммуникационные сети
Пояснения на типовые темы можно обнаружить в зоне FAQ.
Заключение
Лицензионный сайт казино и его актуальные зеркала обеспечивают пользователям совершенный путь ко всем сервисам сайта. Щедрые поощрения, комфортная портативная версия, впечатляющий каталог развлечений и компетентная помощь превращают азартный времяпрепровождение максимально приятным и надежным.
Доступ к сайту через рабочие зеркала
Игроки виртуальных казино постоянно встречаются с вопросом ограничения базового домена. Как раз для решения этой задачи разработаны альтернативные адреса официального портала. Глори обеспечивает беспрепятственный переход ко всем функциям казино.
Что такое действующее зеркало казино
Копия представляет собой точную реплику оригинального портала с таким же возможностями. Главное отличие — это другое имя. Каждые параметры клиента, в том числе баланс, поощрения и записи партий, продолжают быть неизменными.
Преимущества эксплуатации зеркал
Действующие зеркала обладают набором ключевых плюсов:
– Непрерывный доступ к выбранным развлечениям
– Стопроцентная защита персональных данных
– Удержание всех опций индивидуального кабинета
– Способность получения призов и вовлечения в кампаниях
Открытие счета на легальном домене
Процесс оформления максимально легок и занимает буквально минут. Свежие игроки в состоянии претендовать на солидный стартовый приз за создание аккаунта.
Этапы открытия аккаунта
1. Подключение на главный ресурс или его альтернативу
2. Клик на опцию “Создать аккаунт”
3. Указание обязательных сведений
4. Подтверждение почтовой почты
5. Указание бонусного кода (в случае присутствует)
Награды и предложения для клиентов
Казино одаривает своих пользователей различными наградными программами.
Ключевые виды наград
Стартовый бонус — солидное вознаграждение для начинающих клиентов, каковое имеет возможность охватывать финансовые суммы и бесплатные вращения.
Безвозмездные спины — шанс играть в топовых игровых машинах бесплатно.
Кэшбек — частичный отдача потерянных средств, который именно предоставляется по неделям или каждый месяц.
Промокоды — уникальные наборы, обеспечивающие дополнительные выгоды.
Пользовательский кабинет: инструменты и установки
Пользовательский аккаунт обеспечивает абсолютный регулирование над игровым процессом. Тут присутствуют:
– Администрирование счетом
– Записи платежей
– Действующие привилегии
– Настройки охраны
– Валидация профиля
Мобильная редакция и APP
Актуальные клиенты признают портативность. Площадка предлагает пару пути для развлечений с портативных устройств.
Приспособленная портативная вариант
Портативная версия домена без участия приспосабливается под монитор любого гаджета. Нет необходимости устанавливать специальное программное обеспечение.
Приложение для телефонов
Возможно скачать специальное программу для iOS и Android. Приложение дает:
– Быстрый запуск
– Адаптированный дизайн
– Оперативные-оповещения о бонусах
– Устойчивую функциональность
Live игры: среда реального казино
Секция Live казино транспортирует пользователей в антураж подлинного зала. Опытные дилеры организуют сессии в режиме реального времени.
Топовые Live-игры
– Французская рулетка
– 21
– Баккара
– Покер
Автоматы: многообразие слотов
Коллекция развлекательных автоматов вмещает массу позиций от известных разработчиков. Участники обнаружат:
– Обычные машины
– Современные слоты
– Прогрессивный джекпот-игры
– Мегавейс
Состязания и особые события
Регулярные состязания обеспечивают участникам состязаться друг с другом за значительные выигрышные фонды. Любой соревнование содержит свои правила включения и таблицу призеров.
Способы ввода и получения средств
Казино использует множество финансовых сервисов:
– Дебетовые карты
– Онлайн сервисы
– Цифровые валюты
– Финансовые отправления
Все платежи выполняются конфиденциально благодаря актуальным протоколам криптографии.
Отдел помощи
Опытные специалисты отдела support настроены поддержать 24/7. Предусмотрены данные способы контакта:
– Живой-чат
– Email-помощь
– Аудио горячая линия
– Социальные сети
Итог
Главный портал казино и его функционирующие копии гарантируют участникам безопасный и удобный переход к огромному выбору развлекательных активностей. Щедрые награды, частые кампании, профессиональная сервис и легкие расчетные способы делают азартный опыт крайне увлекательным и выгодным.
shop deals here – Might be a convenient page to check when looking for discounts.
jeweljunction – Nice looking platform overall, browsing feels easy and convenient.
https://uspharmaindex.shop/# canada rx pharmacy
Современные онлайн-казино гарантируют пользователям множество опций для удобной игры. Центральный портал андроид предоставляет путь ко всем сервисам и азартным играм. Однако при появлении технических неполадок на выручку прибывают рабочие дубликаты.
Что являет собой собой актуальное зеркало
Копия казино — это точная копия официального веб-сайта, расположенная по альтернативному URL. Официальное зеркало сохраняет все функции, вместе с создание аккаунта, вход в личный кабинет, бонусы и бонусные коды.
Зеркало на сегодня обеспечивает:
– Постоянный путь к азартным слотам
– Совершенную сохранность личных информации
– Удержание баланса и журнала платежей
– Применимость всех промо-предложений
Регистрация на основном сайте
Этап открытия профиля отнимает пару минут. Свежеиспеченным геймерам требуется:
1. Перейти на основной сайт или актуальное зеркало
2. Кликнуть кнопку «Зарегистрироваться»
3. Заполнить нужные поля
4. Верифицировать э-мейл почту
5. Использовать кодовое слово при существовании
После окончания оформления профиля пользователи зарабатывают бонус за регистрацию, который может охватывать free spins или финансовое поощрение.
Авторизация в личный кабинет
Персональный кабинет дает всесторонний надзор над азартным процессом. Через личный профиль допускается:
– Вносить средства на счет
– Забирать призы
– Использовать бонусные коды
– Отслеживать записи игр
– Соревноваться в турнирах
– Приобретать возврат средств
Характеристика вознаграждений и специальных предложений
Щедрая бонусная программа — значимое преимущество платформы. Ключевые категории премий:
Вступительный бонус
Новые игроки приобретают щедрое вознаграждение на первые взносы. Размер приза может составлять 100-200% от величины депозита.
Фриспины
Халявные спины начисляются для топовых игровых автоматов. Объем фриспинов варьируется от 10 до 500 штук.
Кешбэк
Систематический или ежемесячный компенсация процентной доли проигранных средств. Обычный процент возврата — 5-15%.
Состязания
Регулярные турниры с солидными наградными пулами. Участники борются за призовые строчки в таблице лидеров.
Мобильная версия и приложение
Мобильная версия позволяет играть с любого девайса. Пользователи могут закачать приложение для iOS и Android или применять веб версию.
Достоинства смартфонного софта:
– Молниеносная подзагрузка автоматов
– Практичный дизайн
– Пуш-нотификации о акциях
– Возможность входа через отпечаток пальца
Автоматы и Live казино
Развлекательная библиотека включает сотни позиций от ведущих провайдеров.
Популярные типы автоматов:
– Обычные машины
– Видеослоты с призовыми уровнями
– Накопительный приз слоты
– Мега-путь автоматы
Live казино
Категория live казино предоставляет игру с живыми дилерами. Есть традиционные варианты:
– Американская рулетка
– Блэкджек
– Баккара
– Техасский холдем
Как найти действующее зеркало
Получить действующую URL на зеркало разрешается несколькими вариантами:
1. Подписаться на email-рассылку
2. Наблюдать за обновлениями в социальных сетях
3. Контактировать в отдел поддержки
4. Запомнить актуальное зеркало в фавориты
Вывод
Лицензионный портал и его актуальные зеркала обеспечивают непрерывный вход к развлекательным автоматам. Щедрые бонусы, многочисленные купоны, эргономичное мобильное софт и профессиональная служба поддержки поддержки превращают игровой процесс максимально удобным и защищенным.
Переход к сайту через проверенные зеркала
Клиенты интернет казино часто сталкиваются с ситуацией ограничения основного портала. Как раз для ликвидации этой проблемы предусмотрены альтернативные адреса главного сайта. Бет Андреас предоставляет беспрепятственный доступ ко всем функциям платформы.
Что такое рабочее зеркало казино
Дубликат является собой абсолютную дубликат главного сайта с таким же набором функций. Единственное отличие — это доменное имя. Каждые сведения участника, содержа баланс, бонусы и данные ставок, остаются такими же.
Достоинства задействования зеркал
Действующие зеркала имеют набором значимых выгод:
– Круглосуточный вход к предпочитаемым играм
– Абсолютная защита личных сведений
– Поддержание всех опций индивидуального кабинета
– Возможность приобретения призов и участия в предложениях
Оформление профиля на главном портале
Процедура создания аккаунта крайне элементарен и требует немного минут. Начинающие пользователи имеют возможность полагаться на солидный приветственный подарок за создание аккаунта.
Шаги формирования аккаунта
1. Переход на официальный ресурс или его зеркало
2. Нажатие на элемент “Зарегистрироваться”
3. Внесение необходимых информации
4. Проверка email почты
5. Указание бонусного кода (когда доступен)
Бонусы и предложения для игроков
Игровая площадка одаривает своих игроков разнообразными поощрительными предложениями.
Ключевые категории поощрений
Приветственный пакет — внушительное начисление для новых участников, что может вмещать финансовые бонусы и безвозмездные спины.
Free spins — опция играть в популярных аппаратах без затрат.
Компенсация — пропорциональный возврат потерянных финансов, который именно зачисляется по неделям или раз в месяц.
Специальные коды — уникальные комбинации, гарантирующие добавочные поощрения.
Пользовательский кабинет: возможности и конфигурации
Личный раздел обеспечивает абсолютный надзор над развлекательным взаимодействием. В нем предусмотрены:
– Администрирование счетом
– Архив переводов
– Работающие награды
– Параметры сохранности
– Верификация аккаунта
Карманная платформа и APP
Актуальные участники ценят портативность. Ресурс предоставляет пару способа для развлечений с карманных устройств.
Responsive телефонная версия
Портативная редакция портала самостоятельно адаптируется под монитор любого аппарата. Отсутствует потребность скачивать специальное софт.
APP для мобильных
Доступно установить оригинальное APP для iOS и Android. Софт обеспечивает:
– Быстрый доступ
– Адаптированный дизайн
– Push-извещения о акциях
– Бесперебойную функциональность
Live раздел: антураж подлинного игорного заведения
Раздел Live казино отправляет клиентов в среду реального казино. Квалифицированные дилеры проводят раунды в варианте живого времени.
Топовые Live-столы
– Французская рулетка
– Blackjack
– Baccarat
– Карибский покер
Аппараты: многообразие слотов
Библиотека азартных аппаратов насчитывает сотни позиций от топовых производителей. Клиенты встретят:
– Обычные аппараты
– Современные слоты
– Мега-выигрыш-автоматы
– Megaways
Конкурсы и эксклюзивные мероприятия
Регулярные турниры предоставляют шанс участникам бороться друг с другом за крупные денежные суммы. Каждый состязание располагает свои условия участия и список победителей.
Варианты зачисления и вывода денег
Площадка использует множество денежных сервисов:
– Дебетовые средства
– Цифровые платежные системы
– Цифровые валюты
– Финансовые переводы
Любые транзакции осуществляются конфиденциально благодаря современным системам кодирования.
Команда support
Профессиональные консультанты службы поддержки готовы содействовать 24/7. Имеются такие каналы контакта:
– Онлайн-чат
– Email-сервис
– Звонковая горячая линия
– Коммуникационные сети
Вывод
Официальный портал игровой площадки и его действующие дубликаты дают игрокам конфиденциальный и удобный подход к широкому ассортименту развлекательных активностей. Солидные поощрения, частые кампании, компетентная служба и удобные денежные методы формируют азартный досуг крайне комфортным и выгодным.
official garnetmarket – Products are easy to find, and the interface feels intuitive.
graingalleria online – Everything is clearly displayed and browsing feels smooth and simple.
net seo net seo .
take a peek – Just visited this platform, browsing feels clean and user-friendly.
Переход к порталу через рабочие зеркала
Актуальные виртуальные казино обеспечивают клиентам круглосуточный вход к развлечениям. Главный сайт Вилдер зеркало действует надёжно, предоставляя большой ассортимент развлекательных развлечений. Тем не менее иногда появляются технические трудности или запреты, в связи с чем существенно быть осведомлённым о существовании функционирующих зеркал.
Что является собой главное зеркало казино
Копия — это полная копия официального веб-сайта с схожим возможностями. Функционирующее зеркало в настоящее время обеспечивает обходить местные блокировки и вести развлечения.
Ключевые достоинства задействования зеркал:
– Стопроцентный подключение к индивидуальному кабинету
– Сохранение любых сведений аккаунта
– Аналогичный набор игр
– Действующие бонусы и промо
Создание аккаунта на сайте
Процедура записи длится несколько минут. Начинающие игроки приобретают богатый бонус за создание счёта, он способен охватывать:
– Стартовый бонусный подарок
– Безвозмездные фриспины для машин
– Уникальные промокоды
– Расширенный кэшбек
Во имя финализации регистрации нужно:
1. Зайти на основной портал или копию
2. Кликнуть опцию «Оформиться»
3. Ввести личные сведения
4. Верифицировать электронную почту или номер
5. Использовать купон (когда имеется доступности)
Авторизация в персональный кабинет
Следом за правильной создания аккаунта игроки могут осуществлять авторизацию через основной сайт или актуальное зеркало. Индивидуальный кабинет обеспечивает безграничный регулирование над аккаунтом:
– Журнал транзакций
– Внесение счёта
– Получение средств
– Управление бонусами
– Вовлечение в состязаниях
Бонусы и акции казино
Сайт награждает геймеров вариативными наградными схемами:
Стартовые бонусы
Начинающие зарабатывают щедрый пакет бонусов на начальные вклады. Обычно это предполагает долевую добавку к размеру пополнения плюс бесплатные фриспины.
Периодические промо
– Еженедельный кэшбек до 15%
– Состязания с призовыми пулами
– Бонусы на день рождения
– Эксклюзивные промо для привилегированных пользователей
Программа поощрения
Постоянные геймеры собирают единицы, которые можно превратить на настоящие призы или эксклюзивные бонусы.
Карманная редакция и софт
Актуальные разработки позволяют геймить всюду угодно. Смартфонная редакция сайта самостоятельно подстраивается под монитор всякого девайса.
Достоинства смартфонного программы:
– Быстрая подгрузка развлечений
– Удобный облик
– Моментальные-сообщения о бонусах
– Возможность загрузить для Android и iOS
Реальное казино: обстановка истинного развлекательного заведения
Раздел Live клуба погружает игроков в антураж настоящего азартного дома. Профессиональные операторы проводят игру в формате реального времени.
Доступные развлечения:
– Рулетка
– Двадцать одно
– Классика
– Покерная игра
Слоты и азартные машины
Ассортимент игровых машин охватывает тысячи названий от топовых разработчиков. Каждый клиент обнаружит игру по нраву:
– Классические слоты
– Инновационные игры с специальными уровнями
– Крупный приз-слоты
– Мегавейс машины
Турниры и акции
Систематические конкурсы привносят драйв и дают способность заработать значительные награды. Включение в соревнованиях нередко безвозмездное, а призовые банки составляют внушительных размеров.
Охрана и секретность
Портал эксплуатирует инновационные системы шифрования для обеспечения информации игроков. Каждые платёжные процедуры выполняются через безопасные линии.
Вывод
Главный веб-сайт и его актуальные зеркала гарантируют устойчивый вход к превосходным развлекательным услугам. Привлекательные призы, удобная мобильная вариант, разнообразие машин и профессиональное Live-клуб превращают платформу отличным выбором для ценителей игровых автоматов.
Современные виртуальные казино предлагают пользователям обширный ассортимент опций для приятной игры. Но иногда вход к основному платформе может быть ограниченным. В таких моментах на выручку приходит Гонзо, которое обеспечивает непрерывный подключение ко всем опциям платформы.
Что такое актуальное зеркало казино
Альтернативный сайт — это идентичная дубликат основного веб-сайта, которая размещается по дополнительному домену. Зеркало имеет полный набор функций главного портала, включая пользовательский кабинет, счет и запись транзакций.
Ключевые достоинства задействования зеркала:
– 24-часовой подключение к сайту
– Абсолютная идентичность опций
– Безопасность персональных реквизитов
– Удержание всех имеющихся привилегий
Как разыскать функционирующее зеркало в данный момент
Существует ряд надежных вариантов поиска текущей адреса:
Легитимные источники:
1. Имейл рассылка — руководство постоянно пересылает письма с действующими URL
2. Социальные сети — официальные аккаунты постят актуальную сведения
3. Сервис поддержки — операторы сообщают надежные URL
4. Телефонное приложение — позволяет обходить блокировки
Создание аккаунта на главном портале
Операция регистрации требует не более пару минут и предполагает из данных шагов:
1. Открытие на лицензионный портал или рабочее зеркало
2. Щелчок на кнопку «Зарегистрироваться»
3. Ввод пользовательской таблицы
4. Валидация электронной почты или контактного номера
5. Применение поощрения за регистрацию при существовании промокода
Начинающие геймеры приобретают щедрый стартовый бонус, который может предполагать бесплатные вращения, денежные призы или кэшбек.
Доступ в личный кабинет
Авторизация на ресурсе выполняется обычным методом. Нужно внести логин и код доступа, задействованные при создании аккаунта.
Важные нюансы для безопасного входа:
– Задействуйте сложный код
– Включите двухфакторную проверку
– Не храните данные на публичных устройствах
– Проверяйте адресную строку браузера
Описание поощрительной схемы
Игровая платформа одаривает пользователей различными поощрениями и акциями:
Начальный набор
Начинающие могут надеяться на великодушное награду за первый депозит. Как правило это пропорциональная добавка к переведенной сумме плюс бесплатные вращения для топовых слотов.
Регулярные промо
– 7-дневный возврат средств — компенсирование процентной доли утраченных денежных средств
– Поощрения на очередные депозиты
– Уникальные промо по знаменательным датам
– Конкурсы с солидными призовыми пулами
План вознаграждений
Активные геймеры собирают пункты за любую ставку, которые затем превращаются на фактические средства, бесплатные вращения или особые льготы.
Бонус-коды: как использовать
Купоны — это индивидуальные наборы знаков, предоставляющие право к эксклюзивным вознаграждениям.
В каких местах раздобыть актуальные промокоды:
– Проверенные коммуникационные сети казино
– Аффилиатные сайты
– Email-информирование
– Тематические группы
Указывается промокод в соответствующее поле при открытии счета или добавлении денег счета.
Портативная версия и приложение
Передовые геймеры выбирают проводить время с смартфонных гаджетов. Платформа дает двойной способа для беспроблемной мобильной игры.
Адаптивная вариант
Интернет версия автоматически настраивается под размер экранной панели. Не предполагает установки и оперирует в произвольном актуальном браузере.
Портативное приложение
Получить приложение можно для девайсов на Android и iOS. Плюсы app:
– Оперативная активация
– Стабильная операция
– Мгновенные-уведомления о бонусах
– Независимый избегание блокировок
Операция установки легок: требуется попасть на сайт с портативного аппарата и выполнять руководству.
Гемблинг ассортимент
Библиотека игр насчитывает огромное количество единиц от передовых разработчиков.
Слоты
Игровые машины — наиболее востребованная раздел забав. Показаны стандартные трехбарабанные аппараты, новые графические аппараты с премиальными стадиями, а также растущие джекпоты.
Live казино
Отдел с настоящими крупье обеспечивает испытать атмосферу подлинного казино. Доступны столы с баккарой.
Стриминг реализуется в высоком четкости, присутствует диалог с крупье и остальными геймерами.
Соревнования
Регулярно устраиваются состязания по разным категориям. Вступление обеспечивает возможность выиграть денежные награды, free spins или эксклюзивные бонусы.
Денежные процедуры
Сайт обеспечивает значительный набор платежных способов:
– Дебетовые карты
– Виртуальные системы
– Биткоин
– Финансовые транзакции
Низшая величина пополнения — доступная для основной части геймеров. Получение выигрышей выполняется в кратчайшие сроки.
Департамент поддержки
Квалифицированные консультанты настроены поддержать 24/7. Представлены следующие варианты общения:
– Веб-чат
– Email
– Звонковая линия
– Медийные сети
Решения на стандартные запросы можно отыскать в разделе FAQ.
Заключение
Лицензионный ресурс казино и его рабочие зеркала предоставляют клиентам полный путь ко всем возможностям портала. Щедрые поощрения, практичная мобильная версия, колоссальный коллекция аттракционов и профессиональная ассистенция превращают развлекательный времяпрепровождение крайне комфортным и безопасным.
Hey there! I’ve been following your site for a long time now and finally got the courage
to go ahead and give you a shout out from Dallas Texas!
Just wanted to mention keep up the excellent job!
official fernfinds site – Pages load quickly and moving through products is effortless.
mellstroy casino официальный сайт mellstroy casino официальный сайт .
Актуальные онлайн-казино гарантируют пользователям массу возможностей для приятной игры. Центральный веб-портал Dragon Money открывает путь ко всем опциям и играм. Однако при появлении технических трудностей на выручку спешат действующие альтернативные адреса.
Что означает собой действующее зеркало
Дубликат казино — это идентичная версия главного портала, расположенная по другому веб-адресу. Подлинное зеркало удерживает все характеристики, вместе с регистрацию, доступ в личный кабинет, бонусы и купоны.
Альтернативный сайт на сегодня обеспечивает:
– Непрерывный путь к развлекательным аппаратам
– Стопроцентную защиту персональных сведений
– Сохранение баланса и журнала транзакций
– Доступность всех бонусных программ
Регистрация на основном сайте
Ход оформления учетной записи требует пару минут. Свежеиспеченным клиентам необходимо:
1. Открыть на официальный ресурс или рабочее зеркало
2. Щелкнуть кнопку «Регистрация»
3. Ввести нужные поля
4. Верифицировать электронную почту
5. Использовать купон при присутствии
После финиша создания аккаунта пользователи получают подарок за регистрацию, что может иметь бесплатные вращения или денежное премирование.
Авторизация в личный кабинет
Личный кабинет обеспечивает всесторонний мониторинг над азартным действом. Через персональный кабинет допускается:
– Депонировать кошелек
– Забирать средства
– Задействовать кодовые слова
– Проверять журнал пари
– Соревноваться в турнирах
– Получать возврат средств
Характеристика поощрений и промо-предложений
Выгодная премиальная программа — существенное козырь проекта. Основные виды бонусов:
Приветственный бонус
Дебютанты обретают великодушное награду на первые пополнения. Сумма бонуса может достигать 100-200% от объема взноса.
Бесплатные вращения
Халявные прокруты даются для известных машин. Число бесплатных вращений варьируется от 10 до 500 штук.
Cash back
Систематический или ежемесячный отдача доли утраченных денег. Средний процент компенсации — 5-15%.
Состязания
Систематические соревнования с солидными наградными пулами. Конкурсанты конкурируют за топовые места в турнирной таблице.
Мобильная версия и софт
Мобильная версия позволяет делать ставки с всякого устройства. Геймеры могут закачать программу для iOS и Android или эксплуатировать веб версию.
Преимущества портативного программы:
– Быстрая подзагрузка игр
– Практичный интерфейс
– Всплывающие уведомления о акциях
– Возможность входа через отпечаток пальца
Автоматы и Live казино
Азартная библиотека насчитывает тысячи позиций от известных разработчиков.
Известные секции слотов:
– Обычные автоматы
– Видеослоты с бонусными раундами
– Джекпот автоматы
– Мега-путь автоматы
Live казино
Раздел live игорный зал предоставляет партию с профессиональными крупье. Доступны стандартные развлечения:
– Американская рулетка
– Двадцать одно
– Baccarat
– Техасский холдем
Как разыскать действующее зеркало
Обрести актуальную линк на зеркало можно разными вариантами:
1. Оформить подписку на емейл-уведомления
2. Следить за обновлениями в социальных сетях
3. Обратиться в департамент поддержки
4. Сохранить актуальное зеркало в закладки
Резюме
Лицензионный портал и его актуальные дубликаты гарантируют постоянный доступ к игровым играм. Выгодные бонусы, разнообразные промокоды, комфортное портативное приложение и профессиональная техподдержка поддержки создают развлекательный опыт максимально приятным и надежным.
Нынешние онлайн-казино предлагают клиентам широкий ассортимент вариантов для беспроблемной времяпрепровождения. Подключение к платформе Мотор производится через официальный домен или актуальное зеркало.
Что такое функционирующее зеркало казино
Функционирующее зеркало — это дополнительный линк основного ресурса казино. Такие копии разрабатываются для поддержания стабильного соединения к азартной системе.
Зеркало текущее совершенно дублирует опции базового домена. Пользователи получают аналогичный выход ко всем возможностям, включая оформление профиля, внесение депозита баланса и снятие денег.
Оформление профиля на официальном сайте
Процедура открытия профиля требует всего буквально моментов. Свежим участникам необходимо:
1. Войти на официальный ресурс или текущее официальное зеркало
2. Кликнуть кнопку “Регистрация”
3. Указать требуемые реквизиты
4. Активировать почтовую почту
5. Использовать промокод при существовании
После завершения создания аккаунта пользователь приобретает приз за регистрацию, который имеет право содержать фриспины или монетарное вознаграждение.
Авторизация в собственный кабинет
Индивидуальный кабинет — это защищенная зона, где игроки способны контролировать своим аккаунтом. Для входа следует ввести никнейм и секретный ключ.
В пользовательском кабинете открыты нижеперечисленные опции:
– Мониторинг истории транзакций
– Задействование промокодов
– Регулирование поощрениями
– Присоединение в конкурсах
– Отслеживание кэшбека
– Настройка профиля
Бонусы и спецпредложения
Развлекательная сервис предоставляет выгодные вознаграждения:
Стартовый бонус — дебютанты обретают солидное премию на стартовые вклады.
Free spins — дарятся как при открытии счета, так и в процессе многочисленных промо.
Кэшбек — систематический компенсация процента израсходованных сумм.
Промокоды — особые комбинации, дающие выход к особым предложениям.
Характеристика развлекательных направлений
Аппараты
Ассортимент аппаратов насчитывает тысячи игр от ведущих производителей. Пользователи откроют как обычные аппараты, так и современные видеослоты с притягательной визуализацией.
Live казино
Зона Live казино обеспечивает опцию развлекаться с реальными крупье в условиях настоящего времени. Открыты популярные развлечения: рулетка, блэкджек, баккара, покер.
Соревнования
Систематические турниры с крупными выигрышными банками завлекают тысячи игроков. Победители завоевывают денежные награды и особые премии.
Телефонная версия и приложение
Мобильная версия сайта предоставляет право развлекаться с всякого гаджета. Интерфейс самостоятельно корректируется под формат экрана.
Установить app можно для гаджетов на Android и iOS. Телефонное приложение имеет всеми характеристиками полной версии.
Как обнаружить текущее зеркало на сейчас
Рабочие ссылки зеркал постоянно корректируются. Обнаружить свежую URL можно разными вариантами:
– Через департамент поддержки
– В проверенных информационных сетях
– По e-mail дайджесту
– На аффилиатных площадках
Безопасность и легальность
Основной ресурс оперирует на фундаменте международной документа. Все платежи охраняются инновационными технологиями безопасности.
Анонимность индивидуальных информации сохраняется в совершенном объеме.
Вывод
Лицензионный домен и его функционирующие альтернативы обеспечивают участникам постоянный вход к превосходным игровым играм. Выгодные призы, всевозможные развлечения, профессиональная помощь — все это превращает азартный опыт предельно удобным и интересным.
flintcrate featured – Simple structure and clear pages make shopping quick.
After I initially commented I seem to have clicked on the -Notify me
when new comments are added- checkbox and from now on whenever a
comment is added I get four emails with the exact same comment.
There has to be a way you are able to remove me from that service?
Thanks!
this resource – Ran into this site, moving through items is smooth and user-friendly.
Mario games on Nintendo https://super-mario-play.com
Доступ к порталу и рабочие ссылки
Современные сетевые казино гарантируют участникам огромный спектр игр. Официальный сайт Bet Andreas гарантирует безопасный переход ко всем услугам. Тем не менее временами случаются случаи, когда необходимо запасной вариант авторизации.
Что представляет собой рабочее зеркало
Актуальное зеркало — это абсолютная копия основного портала с запасным интернет адресом. Дубликат сегодня дает возможность преодолевать вероятные барьеры и поддерживать бесперебойный доступ к любимым автоматам.
Проверенное зеркало содержит всеми возможностями, что и основной сайт:
– Целый ассортимент развлечений
– Индивидуальный аккаунт с зафиксированными параметрами
– Все подарки и предложения
– Проверенные платежные действия
Создание аккаунта и доступ в систему
Процесс регистрации на ресурсе отнимает считанные минут. Новым участникам требуется:
1. Открыть на рабочее зеркало сегодня
2. Выбрать кнопку «Регистрация»
3. Внести требуемые информацию
4. Верифицировать цифровую почту или номер телефона
5. Использовать бонус за создание профиля
Подключение в личный раздел выполняется путем внесение никнейма и ключа.
Анализ поощрительной структуры
Щедрая призовая программа — важнейшее преимущество казино. Пользователи зарабатывают различные подарки:
Приветственные бонусы
Недавние игроки вправе рассчитывать на привлекательный поощрение за создание аккаунта. Чаще всего это комплект возможностей, включающий:
– Долевую добавку к дебютному вкладу
– Даровые кручения
– Дополнительные суммы на аккаунт
Промокоды и эксклюзивные предложения
Постоянные купоны обеспечивают получать бонусные преимущества. Применить их допустимо в предназначенном разделе собственного кабинета.
Free spins и кэшбек
Бесплатные спины — это возможность играть барабаны без расходования персональных сумм. Компенсация предполагает частичный компенсацию потерянных финансов.
Библиотека игр
Азартная сайт представляет значительную библиотеку развлечений.
Видеослоты
Ассортимент игровых машин впечатляет ожидания. Представлены традиционные 3-барабанные машины и продвинутые игры с захватывающей визуализацией.
Live заведение
Раздел Live развлечений помещает участников в обстановку реального азартного зала. Квалифицированные ведущие организуют игры в живом формате.
Конкурсы и лидерборды
Постоянные конкурсы добавляют драйва и обеспечивают шанс забрать значительные суммы.
Портативная реализация и софт
Актуальные разработки обеспечивают участвовать в удобном точке. Mobile форма автоматически оптимизируется под дисплей аппарата.
Получить приложение возможно для программных сред iOS и Android. Софт обеспечивает:
– Быстрый вход
– Устойчивую деятельность
– Всплывающие-оповещения об предложениях
– Простой интерфейс
Банковские действия
Платформа использует разнообразные системы ввода и изъятия финансов:
– Кредитные инструменты
– Виртуальные сервисы
– Токены
– Прямые транзакции
Любые операции проходят через защищенное протокол, что подтверждает сохранность персональных данных.
Департамент ассистанса
Компетентная бригада поддержки действует 24/7. Контактировать с менеджерами можно через:
– Live-чат
– Цифровую почту
– Связь
– Общественные платформы
Резюме
Главный сайт и его действующее зеркало гарантируют пользователям защищенный и комфортный вход к захватывающим играм. Щедрые поощрения, широкий выбор автоматов и профессиональная ассистанс формируют участие исключительно приятной и выгодной.
Актуальные онлайн-казино гарантируют игрокам богатый выбор слотов и выгодные поощрения. Впрочем для стабильной работы критично знать, как получить доступ к Vodka casino и его рабочие зеркала.
Что такое лицензионный сайт казино
Официальный портал казино — это основная площадка, где клиенты могут наслаждаться азартными автоматами. Портал функционирует на официальных основаниях и имеет всеми необходимыми документами.
Главные преимущества официального веб-сайта:
– Безопасность личных сведений
– Честные положения игры
– Подтвержденные выплаты
– Оперативная техподдержка
Актуальное зеркало казино: для чего нужно
Альтернативный адрес — это абсолютная клон официального ресурса, расположенная по отличному веб-адресу. Действующее зеркало запускается для обеспечения постоянного входа к ресурсу.
Причины задействования зеркал:
– Запрет официального домена
– Профилактические работы
– Повышенная загрузка на ресурс
Как отыскать действующее зеркало сегодня
Получить актуальное действующее зеркало можно разными методами:
1. Подписка — зарегистрируйтесь на почтовую подписку
2. Команда помощи — свяжитесь в онлайн-чат
3. Публичные сети — следите за новостями
4. Специализированные порталы — авторитетные платформы
Оформление профиля на портале казино
Процедура регистрации занимает буквально пару секунд:
1. Кликните на кнопку “Открыть счет”
2. Внесите необходимые сведения
3. Подтвердите контактную ящик
4. Примените купон, если есть
После успешной регистрации вам предоставится доступен личный профиль.
Поощрения и коды активации
Выгодная поощрительная структура — важное конкурентное преимущество казино:
Подарок за регистрацию
Новые клиенты зарабатывают первый бонус, который может предполагать:
– Валютный бонус на первый пополнение
– Фри-спины для слотов
– Бездепозитные бонусы
Активационные коды
Периодически появляются новые промокоды, обеспечивающие использовать дополнительные поощрения.
Схема компенсации
Лояльные пользователи зарабатывают часть проигранных финансов в виде компенсации.
Свежие акции и турниры
Платформа периодически запускает азартные кампании:
– Семидневные турниры
– Праздничные акции
– Конкурсы значительных наград
– Схема статусов
Вход в индивидуальный раздел
Для входа на сайт следует:
1. Посетить официальный портал или функционирующее зеркало
2. Выбрать “Авторизация”
3. Указать email и код доступа
В пользовательском разделе предоставлены такие возможности:
– Пополнение счета
– Снятие призов
– Анализ архива ставок
– Управление индивидуальными параметрами
Адаптивная платформа и app
Mobile версия
Оптимизированная версия веб-сайта предоставляет шанс делать ставки с различных смартфонного телефона. Визуал самостоятельно оптимизируется под габариты screen.
App для установки
Получить app можно для:
– Android — безопасная скачивание с сайта
– iOS — скачивание через App Store
Плюсы программы:
– Оперативный доступ
– Надежная производительность
– Push-оповещения об бонусах
– Оптимизированный интерфейс
Развлекательные секции
Барабаны
Обширная галерея азартных машин от ведущих поставщиков:
– Классические слоты
– Современные-автоматы
– Накопительные-машины
Live казино
Раздел с настоящими операторами предоставляет:
– Рулетка
– 21
– Баккара
– Карточные игры
Трансляции ведутся в превосходном качестве изображения, воссоздавая атмосферу реального казино.
Системы внесения средств и снятия
Сайт принимает различные платежные методы:
– Платежные средства
– Виртуальные кошельки
– Криптовалюты
– Wire переводы
Наименьшие суммы внесения и скоростные платежи создают развлечение исключительно приятной.
Служба support
Профессиональная отдел ассистентов доступна 24/7 и в состоянии помочь с различными задачами:
– Мгновенный-чат
– Email-помощь
– Phone горячая линия
Итоги
Главный сайт казино и его рабочие дубликаты гарантируют пользователям защищенный и интересный азартный отдых. Богатые бонусы, комфортная портативная вариант, разнообразные игры и качественное live-казино делают эту систему замечательным вариантом для азартных игр.
shop cottoncrate online – The item I wanted was easy to spot and order.
cool site – Found this page earlier, browsing is convenient and straightforward.
http://www.sg588.tw/home.php?mod=space&uid=1116290
блог о рекламе и аналитике seo-blog14.ru .
interesting platform – Ran into this page today, it looks minimal, tidy, and straightforward.
Современные онлайн-казино обеспечивают клиентам широкий набор азартных игр и заманчивые поощрения. Однако для удобной времяпрепровождения критично осознавать, как обнаружить Глори и его действующие зеркала.
Что такое лицензионный сайт казино
Главный портал казино — это основная веб-площадка, где клиенты могут наслаждаться игровыми автоматами. Платформа действует на официальных принципах и владеет всеми обязательными сертификатами.
Главные выгоды основного веб-сайта:
– Надежность личных данных
– Честные положения использования
– Подтвержденные выплаты
– Оперативная служба поддержки
Актуальное зеркало казино: для чего необходимо
Зеркало — это полная клон основного портала, хостящаяся по иному адресу. Действующее зеркало формируется для обеспечения стабильного входа к порталу.
Причины использования альтернативных адресов:
– Недоступность основного сайта
– Технические мероприятия
– Значительная нагрузка на платформу
Как обнаружить рабочее зеркало сегодня
Обнаружить текущее рабочее зеркало можно несколькими вариантами:
1. Email-уведомления — подпишитесь на email доставку
2. Отдел поддержки — обратитесь в онлайн-чат
3. Социальные медиа — следите за публикациями
4. Партнерские ресурсы — достоверные ресурсы
Создание аккаунта на платформе казино
Алгоритм регистрации составляет лишь несколько секунд:
1. Активируйте на элемент “Зарегистрироваться”
2. Внесите необходимые данные
3. Верифицируйте почтовую адрес
4. Примените код активации, если имеется
По завершении успешной оформления вам откроется открыт личный раздел.
Поощрения и бонусные коды
Щедрая поощрительная программа — существенное достоинство казино:
Поощрение за регистрацию
Начинающие участники получают стартовый бонус, который может предполагать:
– Денежный счет на стартовый депозит
– Фри-спины для слотов
– Стартовые деньги
Активационные коды
Постоянно размещаются актуальные коды, предоставляющие получить экстра бонусы.
Система компенсации
Постоянные клиенты зарабатывают долю проигранных финансов в виде компенсации.
Свежие акции и состязания
Платформа систематически устраивает увлекательные промо-мероприятия:
– Еженедельные турниры
– Сезонные промо
– Раздачи ценных выигрышей
– Схема привилегий
Авторизация в личный профиль
Для входа на сайт необходимо:
1. Перейти на основной ресурс или актуальное зеркало
2. Кликнуть “Авторизация”
3. Указать email и ключ
В личном аккаунте предоставлены такие опции:
– Пополнение депозита
– Получение призов
– Просмотр архива ставок
– Настройка персональными параметрами
Адаптивная вариант и программа
Портативная платформа
Responsive платформа портала обеспечивает делать ставки с всех мобильного гаджета. Дизайн автоматически оптимизируется под габариты screen.
Программа для скачивания
Установить приложение можно для:
– Android — непосредственная download с платформы
– iOS — установка через App Store
Выгоды app:
– Мгновенный доступ
– Бесперебойная функциональность
– Push-оповещения об промо
– Производительный интерфейс
Гемблинг разделы
Слоты
Богатая галерея развлекательных барабанов от топовых провайдеров:
– Стандартные игры
– Современные-игры
– Джекпот-слоты
Live игры
Раздел с живыми крупье предоставляет:
– Рулеточные столы
– Блэкджек
– Баккара
– Poker
Вещания проводятся в отличном качестве, воссоздавая эффект настоящего казино.
Системы пополнения и вывода
Ресурс обслуживает множественные транзакционные сервисы:
– Дебетовые средства
– Онлайн счета
– Crypto
– Банковские переводы
Минимальные пороги внесения и скоростные транзакции делают развлечение исключительно беспроблемной.
Департамент поддержки
Квалифицированная отдел поддержки работает 24/7 и может содействовать с всеми ситуациями:
– Живой-чат
– Email-поддержка
– Phone служба
Выводы
Лицензионный портал казино и его действующие дубликаты предоставляют пользователям надежный и азартный гемблинг досуг. Богатые поощрения, удобная адаптивная вариант, обширные развлечения и качественное live-казино создают эту систему отличным выбором для гемблинг игр.
order viagra: Sildenafil Price Guide – viagra canada
check lemonloft online – Layout feels tidy and well-structured for visitors.
harborwharf online finds – Organized layout with fast navigation makes browsing easy.
блог о маркетинге блог о маркетинге .
подробнее https://tripscans64.cc
Переход к сайту через проверенные зеркала
Передовые виртуальные казино гарантируют игрокам непрерывный переход к развлечениям. Основной портал Бет Андреас казино онлайн функционирует бесперебойно, предоставляя большой выбор игровых автоматов. Тем не менее временами формируются программные трудности или ограничения, поэтому важно понимать о доступности актуальных зеркал.
Что представляет из себя официальное зеркало казино
Зеркало — это полная версия главного веб-сайта с аналогичным возможностями. Действующее зеркало в настоящее время обеспечивает преодолевать локальные блокировки и вести времяпрепровождение.
Принципиальные плюсы эксплуатации зеркал:
– Стопроцентный вход к персональному кабинету
– Поддержание всех информации аккаунта
– Такой же ассортимент автоматов
– Действующие поощрения и акции
Оформление на сайте
Процедура регистрации отнимает считанные минут. Недавние клиенты получают великодушный поощрение за регистрацию, что способен содержать:
– Вступительный денежный кредит
– Безвозмездные спины для машин
– Особые ваучеры
– Увеличенный кэшбек
С целью окончания регистрации нужно:
1. Войти на основной ресурс или копию
2. Щёлкнуть элемент «Создать аккаунт»
3. Внести индивидуальные информацию
4. Заверить email или контакт
5. Использовать код (когда имеется доступности)
Подключение в личный кабинет
Вслед за удачной создания аккаунта пользователи в состоянии совершать вход через главный сайт или действующее зеркало. Индивидуальный кабинет обеспечивает всесторонний надзор над профилем:
– Журнал игр
– Ввод баланса
– Вывод средств
– Контроль бонусами
– Присутствие в турнирах
Привилегии и предложения казино
Сайт балует клиентов различными наградными предложениями:
Стартовые поощрения
Новые игроки получают великодушный букет поощрений на начальные взносы. Как правило это включает процентную доплату к размеру пополнения плюс безвозмездные кручения.
Систематические акции
– Седмичный кэшбек до 15%
– Конкурсы с выигрышными фондами
– Бонусы на день рождения
– Особые предложения для VIP игроков
Программа лояльности
Постоянные клиенты накапливают баллы, они разрешено обменять на действительные деньги или специальные привилегии.
Портативная редакция и утилита
Передовые разработки дают возможность играть где подходяще. Смартфонная форма сайта автономно подстраивается под экран любого аппарата.
Выгоды смартфонного ПО:
– Скоростная открытие игр
– Эргономичный вид
– Всплывающие-оповещения о предложениях
– Опция загрузить для Android и iOS
Живое казино: среда истинного развлекательного дома
Секция Live клуба доставляет геймеров в среду реального развлекательного клуба. Квалифицированные крупье управляют развлечение в состоянии подлинного времени.
Доступные развлечения:
– Европейская рулетка
– Блэкджек
– Punto Banco
– Карты
Автоматы и развлекательные машины
Каталог игровых автоматов содержит массу вариантов от лидирующих провайдеров. Всякий игрок отыщет автомат по нраву:
– Винтажные слоты
– Инновационные игры с призовыми уровнями
– Накопительный-игры
– Мегавейс игры
Турниры и раздачи
Периодические состязания включают остроту и открывают шанс заработать крупные суммы. Присутствие в соревнованиях зачастую безвозмездное, а премиальные банки насчитывают больших объёмов.
Охрана и приватность
Платформа задействует актуальные системы шифрования для защиты информации геймеров. Совокупные финансовые процедуры выполняются через охраняемые соединения.
Резюме
Главный портал и его рабочие зеркала гарантируют надёжный вход к превосходным гемблинг играм. Богатые бонусы, практичная мобильная редакция, вариативность игр и профессиональное Live-казино делают платформу отличным выбором для любителей игровых игр.
Актуальные онлайн-казино предлагают пользователям широкий спектр слотов и заманчивые поощрения. Тем не менее для беспроблемной деятельности необходимо понимать, как отыскать 888старз и его функционирующие зеркала.
Что такое главный ресурс казино
Официальный ресурс казино — это главная веб-площадка, где клиенты могут получать удовольствие от игровыми слотами. Платформа функционирует на легальных правах и располагает всеми требуемыми лицензиями.
Главные выгоды основного веб-сайта:
– Безопасность пользовательских данных
– Справедливые условия игры
– Подтвержденные выплаты
– Оперативная техподдержка
Актуальное зеркало казино: для чего используется
Альтернативный адрес — это полная дубликат основного ресурса, находящаяся по отличному веб-адресу. Действующее зеркало формируется для гарантирования стабильного доступа к порталу.
Причины использования альтернативных адресов:
– Запрет главного домена
– Регламентные работы
– Большая посещаемость на систему
Как отыскать свежее зеркало на сегодня
Найти новое официальное зеркало можно несколькими путями:
1. Почтовые оповещения — подпишитесь на email отправку
2. Отдел помощи — проконсультируйтесь в онлайн-чат
3. Официальные сети — мониторьте за новостями
4. Игровые ресурсы — достоверные сайты
Создание аккаунта на портале казино
Алгоритм оформления занимает всего считанные секунд:
1. Нажмите на опцию “Открыть счет”
2. Введите требуемые сведения
3. Подтвердите email почту
4. Используйте код активации, если доступен
По завершении завершенной создания аккаунта вам будет разрешен индивидуальный профиль.
Награды и бонусные коды
Щедрая премиальная политика — важное преимущество казино:
Подарок за регистрацию
Новые игроки приобретают приветственный презент, который может предполагать:
– Денежный депозит на первый взнос
– Фри-спины для игровых машин
– Стартовые бонусы
Бонусные коды
Постоянно появляются новые бонусные шифры, предоставляющие получить экстра поощрения.
Механизм возврата средств
Активные игроки получают часть использованных средств в виде компенсации.
Текущие акции и состязания
Платформа регулярно организует захватывающие кампании:
– Еженедельные турниры
– Праздничные акции
– Конкурсы крупных призов
– Система лояльности
Авторизация в пользовательский кабинет
Для логина на ресурс необходимо:
1. Открыть главный сайт или рабочее зеркало
2. Нажать “Вход”
3. Внести логин и секретную комбинацию
В индивидуальном аккаунте разрешены следующие опции:
– Зачисление счета
– Обналичивание призов
– Изучение журнала игр
– Управление персональными сведениями
Портативная платформа и app
Мобильная версия
Адаптивная модификация портала обеспечивает делать ставки с различных смартфонного гаджета. Оформление самостоятельно адаптируется под габариты экрана.
App для download
Получить приложение можно для:
– Android — непосредственная download с сайта
– iOS — инсталляция через App Store
Выгоды программы:
– Оперативный запуск
– Бесперебойная операционность
– Push-нотификации об предложениях
– Ускоренный дизайн
Развлекательные категории
Барабаны
Разнообразная библиотека азартных слотов от известных поставщиков:
– Ретро машины
– Продвинутые-слоты
– Прогрессивные-игры
Live казино
Секция с настоящими операторами предлагает:
– Рулетки
– Двадцать одно
– Мини-баккара
– Poker
Трансляции осуществляются в отличном формате, обеспечивая атмосферу настоящего казино.
Системы внесения средств и снятия
Сайт обслуживает разнообразные платежные инструменты:
– Банковские card
– Виртуальные счета
– Криптовалюты
– Финансовые транзакции
Наименьшие пороги депозита и моментальные транзакции гарантируют развлечение исключительно беспроблемной.
Служба помощи
Опытная группа ассистентов оперирует 24/7 и способна помочь с разными ситуациями:
– Реалтайм-чат
– Email-поддержка
– Голосовая линия
Резюме
Основной сайт казино и его актуальные зеркала дают пользователям безопасный и увлекательный гемблинг досуг. Выгодные бонусы, простая адаптивная вариант, обширные слоты и превосходное live-казино делают эту ресурс превосходным вариантом для развлекательных времяпрепровождения.
buy-vardenafil-no-prescription
Start Shopping Here – Responsive customer service ensured my questions were resolved quickly.
browse jaspervendor – Came across this shop online, looks like it offers a few interesting finds.
seo и реклама блог seo-blog15.ru .
mostbet баланс http://mostbet76914.help
hqporner
online pharmacy reviews: US Pharma Index – legit canadian pharmacy
iciclemarket – Just discovered this store today, products look interesting and worth checking.
Обзор главного веб-сайта
Прогрессивные сетевые казино предлагают игрокам широкий набор игр и шансов. Лицензионный портал Kush казино гарантирует безопасный путь к игровым услугам.
Рабочее зеркало: путь прямо сейчас
Зеркало представляет как абсолютную версию лицензионного сайта. Официальное зеркало помогает участникам преодолевать вероятные запреты.
Плюсы эксплуатации зеркала
Основные плюсы предполагают:
– Стабильный путь к платформе
– Удержание любых характеристик официального портала
– Безопасность индивидуальных сведений
– Аналогичный набор функций
Открытие счета на сайте
Процедура создания аккаунта отличается простотой и удобством. Свежие игроки обязаны:
1. Посетить лицензионный ресурс или его зеркало
2. Щелкнуть на клавишу открытия счета
3. Указать нужные поля
4. Подтвердить почтовую адрес
5. Выполнить начальный логин
Бонус за регистрацию
Новые игроки забирают солидный вступительный бонус. Подобное поощрение способно содержать:
– Денежные начисления
– Complimentary вращения
– Расширенный показатель возврата
Вход в собственный раздел
Активные участники могут быстро авторизоваться в персональный профиль, задействуя учетные данные и код. Собственный раздел предлагает путь к:
– Регулированию средствами
– Истории платежей
– Активным поощрениям
– Конфигурации аккаунта
Вознаграждения и предложения
Платформа систематически проводит всевозможные акции для игроков.
Типы поощрений
Ключевые категории призов:
– Денежные призы – доля от суммы внесения
– Бесплатные вращения – complimentary спины в слотах
– Кэшбэк – возмещение доли затраченных сумм
– Конкурсные призы – премии за игру в конкурсах
Коды
Уникальные промокоды дают возможность получить дополнительные преимущества. Клиенты в состоянии отыскать их на аффилиатных площадках или взять в рассылке.
Портативная адаптация и программа
Современные клиенты ценят переносной гейминг.
Функции мобильной адаптации
– Responsive облик для любых аппаратов
– Абсолютный возможность к играм
– Оперативная подгрузка
– Удобное контроль
Установить app
Переносное программа открыто для скачивания на устройства с рабочими ОС Android и iOS. App гарантирует:
– Бесперебойную функциональность
– Всплывающие алерты о акциях
– Моментальный путь к предпочитаемым развлечениям
Развлекательный ассортимент
Игровой клуб дает обширную библиотеку игровых игр.
Аппараты
Библиотека игровых автоматов насчитывает:
– Традиционные машины
– Video аппараты
– Джекпотные машины
– Тематические слоты
Live игры
Категория лайв столов предлагает возможность состязаться с реальными крупье. Представлены:
– Американская рулетка
– Блек-джек
– Punto Banco
– Poker
Состязания
Постоянные чемпионаты дают возможность участникам конкурировать за внушительные финансовые банки. Турнирная программа изменяется постоянно.
Платежные операции
Казино обеспечивает множество опций пополнения и обналичивания сумм:
– Пластиковые карточки
– Цифровые кошельки
– Банковские трансферы
– Цифровые валюты
Абсолютно все платежи осуществляются конфиденциально с использованием прогрессивных методов криптографии.
Отдел сопровождения
Квалифицированная служба поддержки трудится без перерыва. Обратиться с специалистами доступно через:
– Интерактивный чат
– Почтовую почту
– Горячую линию
– Social сети
Защита и регулирование
Портал функционирует на основании законной сертификата. Такое гарантирует:
– Легальность азартного процесса
– Охрану конфиденциальных сведений
– Своевременные перечисления
– Ответственный гейминг
Вывод
Главный ресурс и его функционирующие альтернативные адреса предоставляют клиентам полный набор опций для удобной и выгодной времяпрепровождения. Щедрые призы, всевозможные автоматы, опытная поддержка и защищенная структура операций превращают казино лучшим опцией для любителей азартных развлечений.
Передовые онлайн-казино предлагают участникам богатый выбор развлечений и выгодные премии. Однако для удобной времяпрепровождения существенно знать, как отыскать Taker и его функционирующие зеркала.
Что такое главный сайт казино
Официальный сайт казино — это первичная веб-площадка, где клиенты могут развлекаться игровыми играми. Сайт работает на легальных принципах и владеет всеми обязательными лицензиями.
Ключевые достоинства главного веб-сайта:
– Надежность персональных реквизитов
– Прозрачные правила использования
– Стабильные платежи
– Оперативная техподдержка
Актуальное зеркало казино: для чего необходимо
Зеркало — это точная дубликат лицензионного сайта, находящаяся по иному URL. Рабочее зеркало создается для предоставления постоянного подключения к сайту.
Поводы эксплуатации альтернативных адресов:
– Недоступность основного адреса
– Профилактические операции
– Высокая нагрузка на ресурс
Как обнаружить рабочее зеркало на сегодня
Найти текущее рабочее зеркало можно различными вариантами:
1. Рассылка — активируйте уведомления на почтовую отправку
2. Служба помощи — свяжитесь в онлайн-чат
3. Корпоративные площадки — следите за публикациями
4. Игровые площадки — проверенные сайты
Оформление профиля на сайте казино
Этап открытия счета занимает только пару секунд:
1. Нажмите на кнопку “Регистрация”
2. Заполните запрашиваемые поля
3. Подтвердите контактную адрес
4. Введите промокод, если доступен
После завершенной создания аккаунта вам будет открыт персональный раздел.
Бонусы и промокоды
Выгодная бонусная программа — ключевое конкурентное преимущество казино:
Бонус за создание аккаунта
Новые клиенты зарабатывают приветственный презент, который может охватывать:
– Денежный депозит на первый вклад
– Free spins для слотов
– Бездепозитные деньги
Бонусные коды
Периодически публикуются новые промокоды, дающие возможность получить особые привилегии.
Механизм компенсации
Активные пользователи возвращают процент проигранных ставок на счет.
Текущие промо и соревнования
Сайт постоянно организует захватывающие промо-мероприятия:
– Недельные соревнования
– Сезонные бонусы
– Раздачи значительных призов
– Схема привилегий
Доступ в индивидуальный аккаунт
Для входа на сайт нужно:
1. Посетить лицензионный портал или функционирующее зеркало
2. Нажать “Вход”
3. Указать имя пользователя и ключ
В личном разделе предоставлены нижеперечисленные возможности:
– Пополнение счета
– Обналичивание средств
– Анализ архива игр
– Изменение индивидуальными настройками
Портативная платформа и программа
Адаптивная версия
Оптимизированная вариант веб-сайта дает возможность играть с любого карманного телефона. Интерфейс автоматически оптимизируется под диагональ экрана.
Программа для установки
Установить app можно для:
– Android — безопасная установка с платформы
– iOS — установка через App Store
Достоинства программы:
– Мгновенный вход
– Стабильная работа
– Push-оповещения об бонусах
– Улучшенный UI
Гемблинг зоны
Игровые машины
Внушительная галерея игровых машин от лучших разработчиков:
– Классические машины
– Продвинутые-слоты
– Джекпот-автоматы
Live casino
Зона с настоящими дилерами предоставляет:
– Рулеточные столы
– Двадцать одно
– Баккара
– Poker
Вещания осуществляются в HD формате, формируя эффект подлинного казино.
Методы внесения средств и получения
Казино поддерживает множественные денежные системы:
– Кредитные картсчета
– Электронные кошельки
– Криптовалюты
– Прямые транзиты
Наименьшие суммы депозита и оперативные выводы обеспечивают игру максимально комфортной.
Департамент техподдержки
Компетентная отдел помощи доступна 24/7 и может ассистировать с разными задачами:
– Мгновенный-чат
– Email-помощь
– Phone связь
Итоги
Основной портал казино и его рабочие зеркала дают пользователям безопасный и азартный игровой досуг. Богатые поощрения, комфортная портативная платформа, разнообразные игры и превосходное live-казино формируют эту систему замечательным выбором для азартных досуга.
I never thought I’d end up writing this telling this story
today. Back when the new competitive season started,
I got totally consumed in online games – Valorant. I wanted instant results, and I kept searching for shortcuts everywhere.
Late one night, I stumbled across a forum thread talking about
scripts. At first I laughed it off, but the deeper I went into
the thread, the more it felt like a secret world.
Commenters were flexing showing how they climbed from low ranks to high
ones in days. It looked too good to be true. And of course, none of it was real.
I won’t lie, I actually got close to buying something.
One guy tried to explain the “features” to me.
That’s when it hit me.
I found threads from players who got hardware bans. Some even wrote how their PCs got infected.
That was my wake-up call.
Instead of cheating, I walked away and focused on improving the legitimate way.
Now, when I see people chasing cheats, I just think:
the crash always comes. If you’re reading this, take my experience seriously.
goldenvendor finds – Pages load quickly and items are presented clearly.
driftwharf featured picks – Products are neatly presented and the descriptions add clarity.
dataworks – Bookmarked this immediately, planning to revisit for updates and inspiration.
Garnet Goods Online – Clean layout makes browsing quick and pleasant.
http://ivermectinaccessusa.com/# generic ivermectin
Нынешние онлайн-казино предлагают участникам богатый набор слотов и заманчивые бонусы. Тем не менее для удобной времяпрепровождения существенно иметь представление, как получить доступ к Аркада и его рабочие зеркала.
Что такое главный портал казино
Основной ресурс казино — это первичная система, где игроки могут развлекаться азартными играми. Сайт оперирует на официальных условиях и владеет всеми требуемыми сертификатами.
Первостепенные достоинства основного сайта:
– Надежность индивидуальных реквизитов
– Честные требования работы
– Гарантированные транзакции
– Компетентная поддержка
Рабочее зеркало казино: для чего требуется
Копия сайта — это точная версия лицензионного портала, находящаяся по другому домену. Актуальное зеркало разрабатывается для обеспечения постоянного подключения к ресурсу.
Поводы применения альтернативных адресов:
– Ограничение основного URL
– Технические процедуры
– Повышенная загрузка на платформу
Как обнаружить действующее зеркало сейчас
Обнаружить текущее проверенное зеркало можно разными вариантами:
1. Почтовые оповещения — оформите подписку на новостную доставку
2. Отдел support — свяжитесь в онлайн-чат
3. Официальные каналы — следите за публикациями
4. Специализированные сайты — достоверные платформы
Оформление профиля на сайте казино
Процесс регистрации составляет всего пару секунд:
1. Выберите на кнопку “Открыть счет”
2. Внесите необходимые данные
3. Подтвердите email адрес
4. Используйте бонусный код, если предоставлен
После успешной регистрации вам станет возможен пользовательский профиль.
Премии и купоны
Привлекательная поощрительная программа — значимое конкурентное преимущество казино:
Поощрение за регистрацию
Свежие пользователи обретают приветственный презент, который может охватывать:
– Монетарный кредит на дебютный взнос
– Фри-спины для барабанов
– Приветственные бонусы
Бонусные коды
Регулярно выходят актуальные купоны, предоставляющие активировать дополнительные привилегии.
Система кэшбека
Активные клиенты возвращают часть проигранных средств назад.
Действующие акции и состязания
Ресурс постоянно устраивает интересные кампании:
– Недельные соревнования
– Тематические промо
– Конкурсы ценных выигрышей
– Программа статусов
Доступ в индивидуальный аккаунт
Для доступа на портал необходимо:
1. Загрузить основной адрес или актуальное зеркало
2. Нажать “Войти”
3. Указать логин и ключ
В индивидуальном разделе предоставлены такие возможности:
– Зачисление кошелька
– Вывод выигрышей
– Проверка лога операций
– Настройка личными данными
Мобильная модификация и софт
Портативная модификация
Мобильная версия сайта дает возможность участвовать с всех карманного телефона. Визуал адаптивно подстраивается под габариты монитора.
Программа для download
Скачать приложение можно для:
– Android — официальная загрузка с платформы
– iOS — скачивание через App Store
Достоинства программы:
– Моментальный запуск
– Надежная производительность
– Push-оповещения об акциях
– Оптимизированный UI
Азартные зоны
Барабаны
Внушительная библиотека эмуляторных барабанов от известных производителей:
– Стандартные машины
– Новые-слоты
– Накопительные-машины
Live casino
Раздел с профессиональными крупье предоставляет:
– Рулетки
– 21
– Punto Banco
– Poker
Эфиры осуществляются в превосходном качестве, создавая эффект подлинного казино.
Способы внесения средств и снятия
Платформа обслуживает различные платежные сервисы:
– Платежные картсчета
– Виртуальные счета
– Bitcoin/Ethereum
– Банковские транзакции
Минимальные пороги пополнения и скоростные платежи делают развлечение максимально беспроблемной.
Команда помощи
Профессиональная группа поддержки доступна 24/7 и способна содействовать с всеми ситуациями:
– Онлайн-чат
– Email-переписка
– Голосовая связь
Выводы
Официальный портал казино и его рабочие дубликаты предоставляют участникам безопасный и интересный игровой опыт. Щедрые подарки, комфортная адаптивная модификация, многочисленные автоматы и качественное live-казино создают эту площадку замечательным вариантом для игровых времяпрепровождения.
Передовые онлайн-казино обеспечивают пользователям обширный спектр игр и щедрые бонусы. Тем не менее для беспроблемной деятельности существенно знать, как найти казино РљСѓС€ и его действующие зеркала.
Что такое лицензионный сайт казино
Основной портал казино — это основная платформа, где игроки могут наслаждаться азартными автоматами. Сайт функционирует на официальных правах и владеет всеми необходимыми лицензиями.
Основные выгоды лицензионного веб-сайта:
– Надежность пользовательских данных
– Объективные положения участия
– Стабильные выводы
– Компетентная служба поддержки
Рабочее зеркало казино: для чего нужно
Зеркало — это абсолютная клон лицензионного сайта, размещенная по иному веб-адресу. Актуальное зеркало формируется для обеспечения стабильного доступа к сайту.
Причины задействования зеркал:
– Блокировка официального сайта
– Профилактические работы
– Высокая загрузка на платформу
Как найти действующее зеркало в данный момент
Найти свежее официальное зеркало можно разными путями:
1. Email-уведомления — подпишитесь на почтовую доставку
2. Департамент support — обратитесь в онлайн-чат
3. Публичные медиа — проверяйте за публикациями
4. Партнерские порталы — достоверные источники
Открытие счета на платформе казино
Алгоритм регистрации длится всего немного моментов:
1. Выберите на клавишу “Зарегистрироваться”
2. Укажите требуемые поля
3. Верифицируйте контактную ящик
4. Введите купон, если предоставлен
По завершении финализированной создания аккаунта вам предоставится открыт персональный аккаунт.
Награды и промокоды
Привлекательная бонусная структура — ключевое преимущество казино:
Награда за открытие счета
Начинающие участники обретают стартовый презент, который может предполагать:
– Денежный бонус на начальный взнос
– Бесплатные вращения для игровых машин
– Безвозвратные средства
Купоны
Постоянно публикуются новые коды, обеспечивающие использовать дополнительные бонусы.
Программа кешбэка
Лояльные игроки получают процент использованных средств в виде компенсации.
Текущие промо и состязания
Ресурс систематически организует увлекательные акции:
– Семидневные турниры
– Сезонные бонусы
– Раздачи значительных наград
– Механизм лояльности
Вход в индивидуальный кабинет
Для доступа на сайт нужно:
1. Открыть основной сайт или действующее зеркало
2. Кликнуть “Авторизация”
3. Внести никнейм и секретную комбинацию
В личном аккаунте предоставлены следующие функции:
– Депозит кошелька
– Получение призов
– Просмотр архива игр
– Управление личными параметрами
Адаптивная вариант и программа
Портативная модификация
Оптимизированная платформа портала дает возможность делать ставки с любого портативного гаджета. Визуал динамически адаптируется под формат дисплея.
Приложение для скачивания
Получить клиент можно для:
– Android — непосредственная скачивание с ресурса
– iOS — скачивание через App Store
Выгоды app:
– Оперативный запуск
– Стабильная работа
– Push-оповещения об предложениях
– Ускоренный функционал
Игровые категории
Барабаны
Обширная библиотека игровых слотов от ведущих производителей:
– Традиционные автоматы
– Продвинутые-эмуляторы
– Накопительные-автоматы
Live зал
Категория с профессиональными ведущими дает:
– Рулетки
– Blackjack
– Baccarat
– Покер
Вещания осуществляются в HD качестве изображения, обеспечивая атмосферу аутентичного казино.
Системы пополнения и вывода
Ресурс принимает разные финансовые методы:
– Платежные card
– Виртуальные кошельки
– Цифровые валюты
– Прямые транзиты
Наименьшие суммы взноса и скоростные выводы делают времяпрепровождение максимально комфортной.
Департамент техподдержки
Квалифицированная отдел поддержки работает 24/7 и способна поддержать с различными проблемами:
– Живой-чат
– Email-консультации
– Голосовая горячая линия
Резюме
Главный веб-сайт казино и его действующие альтернативные адреса гарантируют пользователям надежный и интересный азартный процесс. Щедрые бонусы, простая мобильная вариант, разнообразные слоты и профессиональное live-казино формируют эту ресурс отличным местом для азартных развлечений.
http://medicina38.ru/user/kevalarynl
This casino https://masarniaplatek.pl/ offers a solid mix of popular slots and live tables. The platform feels modern, promotions are worth trying, and support is helpful, which adds confidence.
Good morning!
Find rare mysterious clues inside interesting contexts offering valuable solutions fast and crack the code of complexity see on the website for puzzle solvers
Full information on the link – https://33capy.site
All the best and development in business!
Нынешние онлайн казино предоставляют игрокам большой выбор вариантов для удобной игры. Однако иногда доступ к главному платформе может являться закрытым. В таких случаях на поддержку появляется Cactus Casino, которое обеспечивает непрерывный путь ко всем опциям платформы.
Что такое актуальное зеркало казино
Альтернативный сайт — это абсолютная копия официального портала, которая располагается по альтернативному домену. Зеркало поддерживает весь инструментарий главного портала, включая пользовательский кабинет, средства и данные операций.
Принципиальные преимущества применения зеркала:
– 24-часовой доступ к порталу
– Стопроцентная тождественность опций
– Конфиденциальность персональных сведений
– Поддержка всех имеющихся бонусов
Как обнаружить рабочее зеркало в данный момент
Присутствует несколько проверенных вариантов получения текущей ссылочной информации:
Авторизованные сервисы:
1. Почтовая рассылка — дирекция периодически направляет сообщения с свежими адресами
2. Общественные сети — проверенные каналы выкладывают свежую данные
3. Департамент поддержки — сотрудники предоставляют безопасные домены
4. Мобильное приложение — предоставляет обходить блокировки
Открытие счета на лицензионном ресурсе
Процедура оформления требует только пару минут и предполагает из данных этапов:
1. Попадание на основной ресурс или функционирующее зеркало
2. Клик на клавишу «Открыть счет»
3. Указание учетной анкеты
4. Проверка электронной почты или мобильного номера
5. Включение привилегии за регистрацию при присутствии промокода
Только что зарегистрированные клиенты обретают солидный стартовый презент, который может предполагать даровые прокруты, монетарные призы или кэшбек.
Авторизация в личный кабинет
Авторизация на сайте реализуется традиционным образом. Нужно вписать имя пользователя и кодовое слово, указанные при оформлении.
Важные моменты для надежного входа:
– Задействуйте защищенный пароль
– Задействуйте двухэтапную идентификацию
– Не сохраняйте реквизиты на посторонних устройствах
– Проверяйте адресную строку браузера
Анализ бонусной программы
Гемблинг-сайт радует клиентов разнообразными вознаграждениями и акциями:
Приветственный букет
Новички вправе полагаться на значительное вознаграждение за первый пополнение. Традиционно это процентная прибавка к переведенной сумме плюс даровые спины для известных слотов.
Систематические предложения
– Семидневный cashback — возвращение процентной доли проигранных денег
– Призы на очередные взносы
– Эксклюзивные предложения по праздникам
– Соревнования с крупными премиальными фондами
Схема лояльности
Активные геймеры зарабатывают очки за произвольную игру, которые затем меняются на действительные финансы, фриспины или эксклюзивные привилегии.
Купоны: как применять
Купоны — это уникальные комбинации символов, предоставляющие доступ к бонусным поощрениям.
Откуда найти свежие промокоды:
– Легитимные коммуникационные сети казино
– Союзнические площадки
– Email-информирование
– Профильные группы
Активируется промокод в специальное поле при оформлении или пополнении счета.
Телефонная версия и приложение
Передовые клиенты предпочитают проводить время с мобильных аппаратов. Сайт обеспечивает двойной способа для комфортной портативной игры.
Отзывчивая редакция
Онлайн версия самостоятельно адаптируется под размер монитора. Не просит инсталляции и работает в каждом новом браузере.
Смартфонное приложение
Получить софт можно для аппаратов на Android и iOS. Выгоды app:
– Молниеносная открытие
– Бесперебойная действие
– Автоматические-уведомления о поощрениях
– Независимый преодоление блокировок
Этап установки легок: необходимо открыть на портал с портативного аппарата и подчиняться предписаниям.
Азартный коллекция
Коллекция аппаратов включает огромное количество позиций от ведущих провайдеров.
Слоты
Развлекательные аппараты — крайне распространенная раздел аттракционов. Доступны традиционные 3-барабанные слоты, современные видео-автоматы с дополнительными этапами, а также растущие выигрыши.
Live казино
Отдел с живыми крупье позволяет прочувствовать атмосферу реального казино. Представлены столы с блэкджеком.
Стриминг производится в HD четкости, обеспечивается диалог с крупье и иными пользователями.
Турниры
Периодически устраиваются конкурсы по всевозможным играм. Участие позволяет завоевать финансовые призы, даровые прокруты или уникальные презенты.
Транзакционные действия
Сайт поддерживает большой набор финансовых инструментов:
– Пластиковые карты
– Электронные платформы
– Криптовалюта
– Финансовые платежи
Стартовая сумма депозита — посильная для массы клиентов. Получение средств осуществляется в кратчайшие временные рамки.
Служба поддержки
Опытные сотрудники настроены содействовать круглосуточно. Доступны данные методы контакта:
– Онлайн-чат
– Email
– Голосовая горячая линия
– Коммуникационные сети
Ответы на распространенные запросы можно найти в блоке FAQ.
Итог
Официальный веб-сайт казино и его действующие зеркала предоставляют пользователям абсолютный подключение ко всем сервисам сайта. Солидные бонусы, практичная телефонная версия, гигантский ассортимент аттракционов и квалифицированная поддержка делают игровой досуг исключительно комфортным и безопасным.
Переход к порталу через рабочие зеркала
Пользователи онлайн казино постоянно встречаются с вопросом ограничения главного сайта. Как раз для ликвидации этой трудности разработаны дубликаты официального портала. Мотор казино обеспечивает стопроцентный подключение ко всем опциям ресурса.
Что такое функционирующее зеркало казино
Альтернативный адрес значит собой идентичную дубликат оригинального портала с аналогичным опциями. Ключевое отличие — это альтернативное имя. Каждые данные пользователя, включая депозит, награды и историю игр, остаются неизменными.
Плюсы эксплуатации зеркал
Функционирующие зеркала характеризуются рядом существенных достоинств:
– Круглосуточный вход к предпочитаемым развлечениям
– Абсолютная защита индивидуальных сведений
– Удержание всех опций пользовательского кабинета
– Способность получения поощрений и включения в промоакциях
Открытие счета на основном домене
Операция открытия счета крайне прост и длится буквально минут. Новые клиенты могут претендовать на щедрый приветственный бонус за открытие счета.
Этапы создания аккаунта
1. Подключение на главный портал или его альтернативу
2. Нажатие на клавишу “Регистрация”
3. Ввод обязательных данных
4. Подтверждение цифровой почты
5. Внесение кода (когда есть)
Награды и кампании для участников
Ресурс балует своих игроков различными призовыми системами.
Главные типы наград
Приветственный приз — щедрое вознаграждение для свежих пользователей, каковое способно включать материальные призы и бесплатные вращения.
Бесплатные вращения — способность использовать в популярных игровых машинах бесплатно.
Компенсация — процентный возврат утраченных денег, каковой начисляется раз в неделю или каждый месяц.
Бонусные коды — эксклюзивные сочетания, дающие бонусные поощрения.
Пользовательский кабинет: функции и конфигурации
Личный раздел предоставляет исчерпывающий надзор над игровым опытом. В данном разделе доступны:
– Контроль балансом
– История платежей
– Текущие привилегии
– Конфигурации сохранности
– Валидация профиля
Мобильная редакция и APP
Современные пользователи предпочитают мобильность. Площадка дает двойной метода для участия с смартфонных устройств.
Адаптивная телефонная редакция
Смартфонная платформа домена самостоятельно адаптируется под монитор любого аппарата. Не требуется устанавливать специальное ПО.
Программа для гаджетов
Можно скачать оригинальное приложение для iOS и Android. Программа гарантирует:
– Скорый запуск
– Доработанный дизайн
– Мобильные-извещения о акциях
– Стабильную производительность
Live развлечения: среда настоящего клуба
Секция Live игр доставляет пользователей в обстановку реального игорного заведения. Компетентные крупье проводят партии в режиме прямого времени.
Топовые Live-развлечения
– Рулетка
– Двадцать одно
– Baccarat
– Покер
Аппараты: разнообразие развлечений
Каталог слотовых аппаратов вмещает тысячи позиций от известных разработчиков. Участники встретят:
– Стандартные машины
– Видео-автоматы
– Мега-выигрыш-автоматы
– Megaways
Турниры и особые события
Постоянные турниры позволяют пользователям конкурировать друг с другом за солидные наградные банки. Любой турнир имеет свои правила вовлечения и рейтинг победителей.
Способы ввода и изъятия средств
Казино предоставляет массу финансовых сервисов:
– Платежные средства
– Онлайн платежные системы
– Цифровые валюты
– Финансовые переводы
Абсолютно все переводы проходят защищенно благодаря современным технологиям шифрования.
Сервис обслуживания
Квалифицированные сотрудники службы помощи настроены содействовать 24/7. Доступны данные каналы связи:
– Мгновенный-чат
– Email-поддержка
– Аудио горячая линия
– Коммуникационные сети
Вывод
Официальный ресурс игровой площадки и его действующие альтернативы обеспечивают пользователям конфиденциальный и удобный доступ к большому выбору игровых игр. Крупные поощрения, регулярные акции, качественная поддержка и удобные расчетные инструменты превращают игровой досуг максимально увлекательным и выгодным.
bytevia – Bookmarked this immediately, planning to revisit for updates and inspiration.
Flake Find Online – Everything loads quickly and browsing feels effortless.
fernaisle curated shop – Organized layout and smooth browsing make exploring products pleasant.
devnex – Content reads clearly, helpful examples made concepts easy to grasp.
продвижение по трафику продвижение по трафику .
продвижение сайта клиники наркологии продвижение сайта клиники наркологии .
Современные онлайн-казино предлагают пользователям большой спектр услуг и поощрительных программ. Подключение к платформе выполняется через лицензионный сайт или его действующее зеркало казино Gama, что дает непрерывную работу.
Что представляет собой функционирующее зеркало казино
Копия — это идентичная реплика официального портала, сделанная для преодоления ограничений. Зеркало сегодня обеспечивает клиентам иметь подключение к излюбленным слотам в произвольное время.
Подлинное зеркало располагает всеми возможностями главного портала:
– Полный список автоматов
– Аккаунт с зафиксированными информацией
– Текущие бонусы
– Защищенные расчетные транзакции
Регистрация на официальном ресурсе
Процесс открытия счета составляет всего несколько минут. Новым пользователям необходимо:
1. Войти на официальный веб-сайт или рабочее зеркало
2. Нажать на ссылку “Создать аккаунт”
3. Внести требуемые информацию
4. Верифицировать email
5. Сделать дебютный вклад
Бонус за регистрацию выдается автоматически после выполнения всех этапов.
Доступ в аккаунт
Действующие игроки могут совершить авторизацию указывая:
– Никнейм и пароль
– Цифры телефона
– Электронную почту
Профиль открывает право к администрированию балансом, сведениям ставок и доступным промокодам.
Награды и акции
Развлекательная система балует регулярных пользователей многочисленными вознаграждениями:
Приветственный пакет
– Бонус на дебютный депозит до 100%
– Бесплатные вращения на известные машины
– Экстра поощрения за очередные пополнения
Ваучеры
Уникальные купоны обеспечивают шанс на активацию уникальных призов. Текущие комбинации публикуются в секции “Акции”.
Возврат средств
Периодический бонус составляет до 10% от проигранных финансов. Возврат зачисляется незамедлительно.
Система лояльности
Регулярные игроки получают очки, которые обмениваются на подлинные деньги или фриспины.
Адаптивный портал и программа
В целях удобства пользователей построена удобная мобильная версия. Гибкий интерфейс позволяет удобно участвовать с любого переносного устройства.
Преимущества программы:
– Скорый запуск к автоматам
– Оптимизированный интерфейс
– Стабильная активность
– Сообщения о свежих акциях
Скачать софт можно бесплатно с главного ресурса для девайсов на Android и iOS.
Каталог игр
Игровые автоматы
База вмещает более 2000 машин от ведущих студий:
– Традиционные машины
– Video slots
– Джекпот-слоты
– Тематические слоты
Live казино
Секция Live игр предоставляет участие с живыми крупье в реальном формате:
– Колесо фортуны
– Блэкджек
– Баккара
– Покер
Турниры
Постоянные турниры с солидными выигрышными пулами запускаются регулярно. Присоединение в соревнованиях открыто всем активным игрокам.
Финансовые варианты
Взносы и выводы финансов осуществляются через популярные способы оплаты:
– Кредитные средства
– Онлайн системы
– Криптовалюта
– Банковские операции
Самый низкий вклад — от 100 рублей. Получение денег проводится в течение 24 часов.
Сервис support
24/7 команда поддержки способна содействовать в разрешении любых задач:
– Мессенджер
– Email
– Контактный номер
– Соц сети
Безопасность и лицензия
Официальный портал функционирует на фундаменте международной сертификата. Всевозможные информация игроков обезопасены новейшим SSL-кодированием.
Итог
Действующее зеркало дает постоянный соединение к любимым играм, щедрым акциям и комфортным функциям. Создайте аккаунт прямо сейчас и заработайте начальный подарок!
оптимизация сайта франция цена prodvizhenie-sajtov-v-moskve11.ru .
Обзор официального ресурса
Актуальное онлайн-казино предлагает своим игрокам большой набор игр и вознаграждений. Официальный ресурс РР·Рё РљСЌС€ казино функционирует 24/7, гарантируя вход к востребованным симуляторам, live-казино и разнообразным предложениям.
Действующее зеркало: путь к порталу
Что такое дубликат казино
Зеркало является собой идентичную копию оригинального сайта с иным сетевым адресом. Рабочее зеркало позволяет пользователям обходить блокировки и иметь стабильный доступ к излюбленным играм.
Как отыскать актуальное зеркало сегодня
Свежие ссылки на главное зеркало публикуются через:
– E-mail новостнуюленту
– Основные медийные сети
– Команду обслуживания
– Тематические сайты
Открытиесчета на портале
Этапы открытиясчета
Оформление требует пару минут и предполагает такие стадии:
1. Доступ на оригинальный веб-сайт или действующее зеркало
2. Нажатие клавиши “Зарегистрироваться”
3. Внесение персональных данных
4. Активация адреса или мобильного
5. Установка пароля
Бонус за регистрацию
Новые участники обретают щедрые приветственные подарки:
– Денежные средства на кошелек
– Freespins для автоматов
– Повышенный объем возврата
– Специальные ваучеры
Доступ в собственный профиль
Действующие участники вправе осуществить авторизацию через основной портал или рабочее зеркало. Для этого необходимо внести никнейм и код, созданные при оформлении.
Инструменты индивидуального кабинета
В собственном профиле имеются основные инструменты:
– Редактирование контактными сведениями
– Внесение баланса
– Вывод выигрышей
– Применение купонов
– Проверка журнала транзакций
– Регистрация в турнирах
Бонусы и промо
Разновидности подарков
Казино балует своих клиентов многочисленными поощрительными системами:
– Приветственный комплект — большие бонусы на первые пополнения
– Бесплатныевращения — подарочные ставки в рейтинговых автоматах
– Компенсация — регулярный возврат суммы проигрышей
– Схема верности — особые преимущества для постоянных участников
Коды и их ввод
Уникальные коды предоставляют расширенные подарки. Для применения нужно набрать шифр в соответствующее раздел в собственном профиле.
Геймплейный ассортимент
Игры
Каталог слотовых машин вмещает тысячи позиций от топовых поставщиков:
– Классические слоты
– Видео игры
– Накопительные автоматы
– Лицензионные развлечения
Live казино
Секция Live-казино дарит участие с реальными ведущими в режиме онлайн времени:
– Европейскаярулетка
– Blackjack
– Баккара
– Техасскийхолдем
Турниры
Систематические состязания с солидными джекпотными фондами организуются постоянно. Игроки конкурируют за первенство в списке.
Смартфонная платформа и софт
Адаптивная версия сайта
Официальный портал абсолютно оптимизирован для смартфонных аппаратов. Участники вправе играть игры прямо через веб-навигатор без нужды инсталляции.
Приложение для загрузки
Авторское мобильное программа предлагается для скачивания на гаджеты с операционными средами Android и iOS. APP гарантирует:
– Мгновенный вход к развлечениям
– Устойчивую работу
– Моментальные-сообщения о предложениях
– Простой навигацию
Резюме
Официальный веб-сайт казино и его рабочие дубликаты обеспечивают игрокам полный путь к качественным игровым сервисам. Щедрые поощрения, различные кампании, функциональная портативная версия и опытная помощь превращают развлекательный досуг крайне приятным и выгодным.
https://uspharmaindex.shop/# walgreens online pharmacy
datavio – Loved the layout today; clean, simple, and genuinely user-friendly overall.
cottoncounter online shop – The design felt polished and product discovery was simple.
Передовые онлайн-казино обеспечивают участникам внушительный спектр услуг и поощрительных программ. Присоединение к сервису осуществляется через лицензионный сайт или его рабочее зеркало Дракон Мани, что гарантирует непрерывную активность.
Чем является функционирующее зеркало казино
Альтернатива — это полная дубликат главного сайта, построенная для обхода ограничений. Действующее зеркало позволяет клиентам обрести соединение к любимым развлечениям в любое удобное время.
Подлинное зеркало имеет всеми возможностями главного сайта:
– Весь список автоматов
– Аккаунт с записанными сведениями
– Текущие бонусы
– Гарантированные финансовые операции
Создание аккаунта на основном сайте
Ход оформления занимает всего немного минут. Начинающим клиентам требуется:
1. Зайти на проверенный ресурс или функционирующее зеркало
2. Нажать на элемент “Создать аккаунт”
3. Внести необходимые сведения
4. Проверить email
5. Совершить первый взнос
Стартовый бонус зачисляется сразу после выполнения всех этапов.
Доступ в личный кабинет
Действующие клиенты могут совершить вход указывая:
– Имя пользователя и шифр
– Номер контакта
– Электронную почту
Личный кабинет открывает право к контролю балансом, сведениям транзакций и доступным бонусам.
Награды и программы
Азартная сервис балует активных участников щедрыми вознаграждениями:
Стартовый набор
– Надбавка на первый пополнение до 100%
– Фриспины на известные автоматы
– Экстра бонусы за следующие взносы
Промокоды
Специальные ваучеры открывают доступ на получение специальных поощрений. Свежие купоны выкладываются в блоке “Промо”.
Кэшбек
Постоянный бонус достигает до 10% от потраченных финансов. Возмещение предоставляется незамедлительно.
Система лояльности
Активные игроки зарабатывают единицы, которые переводятся на подлинные деньги или бесплатные вращения.
Адаптивный портал и APP
Для практичности клиентов построена функциональная mobile версия. Приспособленный облик обеспечивает беспрепятственно участвовать с всякого мобильного гаджета.
Преимущества софта:
– Моментальный вход к играм
– Оптимизированный интерфейс
– Устойчивая активность
– Оповещения о актуальных турнирах
Получить софт можно бесплатно с проверенного сайта для девайсов на Android и iOS.
Коллекция развлечений
Машины
База вмещает более 2000 игр от популярных студий:
– Стандартные игры
– Видео-слоты
– Jackpot игры
– Тематические автоматы
Live казино
Секция Live казино дает игру с подлинными крупье в реальном формате:
– Рулеточные столы
– Двадцать одно
– Baccarat
– Покер
Турниры
Периодические соревнования с большими выигрышными фондами запускаются еженедельно. Участие в соревнованиях разрешено всем действующим участникам.
Расчетные системы
Депозиты и снятия финансов реализуются через востребованные способы оплаты:
– Кредитные средства
– Цифровые кошельки
– Криптовалюта
– Денежные платежи
Наименьший взнос — от 100 рублей. Вывод денег проводится в течение 24 периода.
Сервис support
Постоянная группа помощи способна помочь в разрешении всех ситуаций:
– Онлайн-чат
– Email
– Связь
– Соц сети
Безопасность и сертификат
Лицензионный портал функционирует на базе глобальной разрешения. Все параметры участников охранены новейшим SSL-протоколом.
Резюме
Функционирующее зеркало гарантирует бесперебойный вход к излюбленным автоматам, богатым промокодам и комфортным услугам. Откройте счет сейчас и приобретите приветственный бонус!
Передовые онлайн-казино предлагают участникам обширный набор азартных игр и привлекательные премии. Впрочем для комфортной работы необходимо иметь представление, как найти Лаки Ворлд и его действующие зеркала.
Что такое официальный ресурс казино
Основной веб-сайт казино — это главная площадка, где клиенты могут развлекаться развлекательными развлечениями. Портал действует на законных условиях и имеет всеми необходимыми документами.
Главные преимущества основного ресурса:
– Защищенность индивидуальных информации
– Объективные положения игры
– Стабильные выплаты
– Профессиональная техподдержка
Актуальное зеркало казино: для чего используется
Дублирующий ресурс — это абсолютная копия основного сайта, находящаяся по альтернативному URL. Рабочее зеркало запускается для поддержания непрерывного соединения к сайту.
Основания применения альтернативных адресов:
– Запрет основного URL
– Плановые работы
– Повышенная посещаемость на платформу
Как обнаружить актуальное зеркало сегодня
Узнать свежее рабочее зеркало можно разными методами:
1. Подписка — оформите подписку на email отправку
2. Отдел помощи — обратитесь в онлайн-чат
3. Публичные сети — мониторьте за новостями
4. Специализированные сайты — достоверные источники
Регистрация на платформе казино
Этап открытия счета требует буквально немного моментов:
1. Кликните на элемент “Зарегистрироваться”
2. Внесите запрашиваемые информацию
3. Активируйте почтовую e-mail
4. Введите промокод, если имеется
По завершении завершенной создания аккаунта вам станет возможен пользовательский аккаунт.
Поощрения и бонусные коды
Выгодная наградная структура — ключевое достоинство казино:
Подарок за создание аккаунта
Новые пользователи зарабатывают стартовый подарок, который может охватывать:
– Валютный бонус на стартовый депозит
– Фриспины для игровых машин
– Приветственные средства
Бонусные коды
Регулярно появляются новые купоны, предоставляющие активировать экстра бонусы.
Программа кэшбека
Лояльные игроки получают долю потраченных средств на счет.
Актуальные кампании и турниры
Казино постоянно запускает захватывающие кампании:
– Weekly турниры
– Сезонные промо
– Розыгрыши ценных наград
– Схема лояльности
Логин в персональный кабинет
Для авторизации на сайт необходимо:
1. Посетить основной ресурс или функционирующее зеркало
2. Активировать “Авторизация”
3. Указать логин и ключ
В индивидуальном кабинете разрешены нижеперечисленные инструменты:
– Пополнение кошелька
– Вывод выигрышей
– Изучение архива операций
– Настройка профильными настройками
Адаптивная версия и софт
Портативная платформа
Оптимизированная платформа ресурса дает возможность играть с любого портативного телефона. Визуал динамически подстраивается под размер screen.
Приложение для установки
Получить приложение можно для:
– Android — непосредственная загрузка с сайта
– iOS — установка через App Store
Плюсы приложения:
– Моментальный старт
– Стабильная операционность
– Push-уведомления об бонусах
– Улучшенный интерфейс
Гемблинг категории
Барабаны
Внушительная галерея азартных машин от ведущих провайдеров:
– Традиционные слоты
– Новые-автоматы
– Джекпот-машины
Live казино
Категория с профессиональными операторами предоставляет:
– Рулетки
– Двадцать одно
– Мини-баккара
– Poker
Вещания осуществляются в высоком формате, воссоздавая ощущение аутентичного казино.
Методы депозита и получения
Платформа поддерживает разные финансовые методы:
– Дебетовые средства
– Электронные платежи
– Bitcoin/Ethereum
– Банковские переводы
Базовые лимиты депозита и моментальные транзакции обеспечивают развлечение крайне удобной.
Отдел support
Компетентная команда помощи работает 24/7 и в состоянии поддержать с различными задачами:
– Реалтайм-чат
– Email-помощь
– Phone линия
Выводы
Официальный ресурс казино и его актуальные дубликаты гарантируют клиентам конфиденциальный и захватывающий гемблинг досуг. Привлекательные награды, комфортная мобильная платформа, разнообразные развлечения и качественное live-казино формируют эту платформу замечательным решением для азартных игр.
<Find What You Need – The experience feels consistent and easygoing.
I never thought I’d end up writing this telling this story today.
Back when the new competitive season started, I got obsessed in online games – Valorant.
I wanted to climb ranks fast, and I didn’t want to
rely on skill alone.
Late one night, I stumbled across a forum thread talking about “boosting tools”.
At first it was harmless reading, but the deeper I went into the thread, the more it felt like
a hidden shortcut.
People were bragging showing how they climbed from low ranks to high ones in days.
It looked too good to be true. And of course, it was too good to be true.
Truth be told, I actually got close to buying something.
Someone pushed a “limited offer” in my inbox.
That’s when things turned dark.
I found threads from players who lost thousands of hours of progress.
Some even wrote how their PCs got infected. The shock snapped me out of it.
Instead of taking that dumb risk, I deleted the messages and focused on improving the legitimate way.
Now, when I see people chasing cheats, I just think:
you risk everything for nothing. Just learn from my almost-mistake.
harborwharf online finds – Organized layout with fast navigation makes browsing easy.
Характеристика официального сайта
Актуальные сетевые казино дают пользователям богатый ассортимент игр и шансов. Основной веб-сайт 888старз предоставляет проверенный путь к азартным возможностям.
Рабочее зеркало: путь сегодня
Дублирующий портал является в качестве полную версию главного портала. Актуальное зеркало помогает участникам преодолевать вероятные запреты.
Выгоды задействования зеркала
Основные преимущества охватывают:
– Беспрерывный путь к ресурсу
– Удержание полных характеристик официального портала
– Сохранность личных материалов
– Равнозначный инструментарий
Создание аккаунта на сайте
Ход открытия счета характеризуется понятностью и удобством. Свежие игроки необходимо:
1. Открыть лицензионный ресурс или его зеркало
2. Щелкнуть на пункт оформления
3. Указать требуемые поля
4. Подтвердить электронную ящик
5. Совершить дебютный логин
Подарок за создание аккаунта
Новички забирают внушительный приветственный приз. Такое награда может охватывать:
– Финансовые бонусы
– Даровые спины
– Усиленный процент кэшбэка
Доступ в личный аккаунт
Существующие клиенты в состоянии мгновенно получить доступ в свой профиль, используя логин и ключ. Личный аккаунт предлагает возможность к:
– Управлению депозитом
– Записям платежей
– Работающим призам
– Конфигурации профиля
Вознаграждения и промо
Портал постоянно устраивает разнообразные акции для пользователей.
Типы поощрений
Главные типы призов:
– Денежные подарки – процент от объема взноса
– Фриспины – безвозмездные вращения в игровых машинах
– Кэшбек – возврат части проигранных сумм
– Турнирные вознаграждения – вознаграждения за участие в соревнованиях
Промокоды
Особые ваучеры дают возможность активировать бонусные выгоды. Пользователи могут обнаружить их на тематических порталах или заработать в письмах.
Переносная редакция и софт
Прогрессивные игроки предпочитают портативный игровой процесс.
Возможности mobile системы
– Responsive вид для всех аппаратов
– Совокупный доступ к развлечениям
– Оперативная подгрузка
– Практичное управление
Download app
Переносное софт предложено для скачивания на устройства с операционными платформами Android и iOS. Софт предоставляет:
– Стабильную работу
– Мгновенные сообщения о бонусах
– Моментальный доступ к любимым развлечениям
Развлекательный каталог
Портал обеспечивает богатую подборку игровых услуг.
Слоты
Каталог развлекательных машин охватывает:
– Стандартные игры
– Video слоты
– Накопительные машины
– Тематические слоты
Live игры
Секция реальных игр дает шанс участвовать с живыми дилерами. Представлены:
– Американская рулетка
– 21
– Баккара
– Покер
Турниры
Постоянные турниры помогают клиентам конкурировать за значительные денежные суммы. Призовая программа актуализируется регулярно.
Финансовые операции
Сайт предлагает разнообразие способов внесения и обналичивания средств:
– Пластиковые карты
– Цифровые платежные системы
– Wire транзакции
– Криптовалюты
Абсолютно все транзакции производятся безопасно с применением передовых технологий криптографии.
Служба поддержки
Профессиональная команда саппорта трудится круглосуточно. Связаться с консультантами можно через:
– Онлайн чат
– Электронную почту
– Телефон
– Social медиа
Безопасность и лицензирование
Казино функционирует на базе официальной сертификата. Такое гарантирует:
– Честность азартного действа
– Безопасность личных данных
– Пунктуальные выплаты
– Контролируемый гейминг
Вывод
Лицензионный ресурс и его функционирующие дубликаты дают пользователям целостный набор опций для удобной и прибыльной времяпрепровождения. Значительные бонусы, разнообразные игры, квалифицированная поддержка и проверенная инфраструктура выплат создают казино превосходным вариантом для фанатов развлекательных игр.
Нынешние онлайн-казино обеспечивают игрокам широкий спектр игр и щедрые поощрения. Однако для беспроблемной времяпрепровождения необходимо иметь представление, как получить доступ к РР·Рё РљСЌС€ казино и его функционирующие зеркала.
Что такое официальный ресурс казино
Лицензионный сайт казино — это главная площадка, где игроки могут пользоваться азартными развлечениями. Сайт функционирует на легитимных основаниях и располагает всеми необходимыми сертификатами.
Основные достоинства лицензионного портала:
– Безопасность персональных данных
– Честные правила участия
– Стабильные платежи
– Компетентная поддержка
Действующее зеркало казино: для чего требуется
Копия сайта — это точная версия основного веб-сайта, размещенная по отличному веб-адресу. Актуальное зеркало разрабатывается для гарантирования непрерывного подключения к порталу.
Поводы эксплуатации зеркал:
– Блокировка официального адреса
– Регламентные работы
– Значительная посещаемость на сервер
Как найти свежее зеркало сейчас
Обнаружить новое действующее зеркало можно несколькими способами:
1. Рассылка — активируйте уведомления на новостную рассылку
2. Отдел помощи — обратитесь в онлайн-чат
3. Официальные медиа — отслеживайте за публикациями
4. Специализированные порталы — надежные ресурсы
Оформление профиля на портале казино
Процесс создания аккаунта требует только пару минут:
1. Выберите на клавишу “Зарегистрироваться”
2. Заполните требуемые данные
3. Подтвердите электронную адрес
4. Используйте промокод, если предоставлен
Вслед за успешной оформления вам предоставится доступен индивидуальный аккаунт.
Премии и коды активации
Привлекательная поощрительная программа — важное преимущество казино:
Бонус за регистрацию
Первичные клиенты обретают первый подарок, который может содержать:
– Валютный депозит на первый пополнение
– Бесплатные вращения для автоматов
– Безвозвратные фонды
Купоны
Периодически выходят новые коды, позволяющие получить особые бонусы.
Схема кешбэка
Постоянные игроки возвращают порцию утраченных ставок в виде компенсации.
Свежие промо и состязания
Казино периодически устраивает захватывающие события:
– Семидневные соревнования
– Сезонные предложения
– Розыгрыши солидных подарков
– Механизм VIP-клуба
Вход в персональный профиль
Для логина на платформу нужно:
1. Посетить официальный портал или актуальное зеркало
2. Активировать “Login”
3. Ввести логин и пароль
В персональном аккаунте доступны нижеперечисленные функции:
– Зачисление счета
– Обналичивание денег
– Изучение архива транзакций
– Изменение личными параметрами
Адаптивная версия и приложение
Адаптивная вариант
Оптимизированная версия портала обеспечивает участвовать с различных карманного девайса. Оформление самостоятельно подстраивается под формат экрана.
Приложение для download
Скачать программу можно для:
– Android — безопасная скачивание с ресурса
– iOS — скачивание через App Store
Плюсы мобильного клиента:
– Мгновенный старт
– Стабильная работа
– Push-оповещения об предложениях
– Ускоренный интерфейс
Развлекательные секции
Игровые машины
Богатая коллекция игровых машин от известных разработчиков:
– Традиционные слоты
– Современные-слоты
– Джекпот-машины
Live зал
Секция с живыми операторами предоставляет:
– Рулетка
– 21
– Баккара
– Карточные игры
Эфиры ведутся в превосходном формате, воссоздавая ощущение реального казино.
Способы депозита и обналичивания
Сайт поддерживает разнообразные денежные инструменты:
– Дебетовые карты
– Онлайн платежи
– Crypto
– Банковские транзиты
Минимальные пороги внесения и скоростные платежи делают процесс исключительно комфортной.
Служба поддержки
Опытная отдел помощи работает 24/7 и может помочь с всеми вопросами:
– Онлайн-чат
– Email-переписка
– Телефонная линия
Резюме
Главный веб-сайт казино и его функционирующие дубликаты дают клиентам безопасный и интересный развлекательный опыт. Богатые бонусы, комфортная mobile вариант, многочисленные слоты и высокоуровневое live-казино превращают эту ресурс превосходным выбором для гемблинг игр.
Главная https://tripscans64.cc
goldvendor.shop – The atmosphere comes across as polished while still inviting to all online visitors.
Описание официального портала
Современное онлайн-казино дарит своим участникам разнообразный спектр услуг и призов. Официальный сайт Gama действует круглосуточно, предоставляя вход к популярным слотам, live-казино и многочисленным промо.
Функционирующее зеркало: доступ к порталу
Что такое зеркало казино
Зеркало представляет собой точную реплику оригинального ресурса с альтернативным URL именем. Действующее зеркало дает клиентам обходить ограничения и сохранять стабильный путь к любимым автоматам.
Как обнаружить текущее зеркало сегодня
Рабочие ссылки на главное зеркало размещаются через:
– Почтовую рассылку
– Основные социальные сети
– Команду сопровождения
– Affiliated сайты
Открытиесчета на сайте
Процедура созданияаккаунта
Созданиеаккаунта отнимает буквально минут и подразумевает такие шаги:
1. Доступ на официальный портал или действующее зеркало
2. Выбор клавиши “Создатьаккаунт”
3. Ввод личных информации
4. Подтверждение аккаунта или телефона
5. Придумывание секретнойкомбинации
Подарок за оформление
Свежие клиенты зарабатывают большие вступительные бонусы:
– Бонусные депозиты на баланс
– Бесплатныевращения для игр
– Повышенный объем кешбэка
– Особые промокоды
Авторизация в собственный аккаунт
Действующие участники могут произвести доступ через главный сайт или рабочее зеркало. Для этого следует указать имяпользователя и код, созданные при открытиисчета.
Инструменты собственного раздела
В собственном аккаунте доступны следующие функции:
– Управление персональными реквизитами
– Ввод баланса
– Обналичивание денег
– Применение купонов
– Отслеживание архива операций
– Регистрация в конкурсах
Подарки и акции
Категории поощрений
Казино балует своих пользователей всевозможными бонусными системами:
– Приветственный комплект — большие бонусы на начальные пополнения
– Халявныеспины — дополнительные вращения в рейтинговых автоматах
– Возврат — регулярный компенсация суммы ставок
– Схема VIP — эксклюзивные бонусы для постоянных участников
Купоны и их ввод
Эксклюзивные коды обеспечивают бонусные подарки. Для активации нужно внести код в соответствующее графу в личном аккаунте.
Геймплейный выбор
Игры
Каталог развлекательных слотов содержит множество наименований от топовых поставщиков:
– Стандартные автоматы
– Видео игры
– Призовые игры
– Брендовые слоты
Live казино
Область Live-казино обеспечивает участие с живыми ведущими в режиме реального трансляции:
– Французскаярулетка
– Блэкджек
– Пунтобанко
– Карибскийпокер
Соревнования
Постоянные состязания с большими призовыми суммами устраиваются ежедневно. Соревнующиеся сражаются за первенство в турнирнойсетке.
Mobile адаптация и приложение
Смартфонная версия сайта
Официальный ресурс на100% оптимизирован для планшетных аппаратов. Клиенты имеютвозможность запускать игры сразу через обозреватель без потребности инсталляции.
Софт для загрузки
Официальное карманное программа предлагается для получения на аппараты с базовыми ОС Android и iOS. Программа дает:
– Мгновенный доступ к слотам
– Стабильную операционность
– Оперативные-извещения о промо
– Интуитивный интерфейс
Итог
Основной портал казино и его действующие зеркала обеспечивают клиентам комплексный вход к качественным игровым сервисам. Щедрые бонусы, разнообразные кампании, удобная мобильная платформа и квалифицированная помощь создают игровой досуг чрезвычайно enjoyable и доходным.
Обзор лицензионного ресурса
Передовые онлайн казино дают участникам обширный набор игр и опций. Основной портал РР·Рё РљСЌС€ казино гарантирует надежный путь к игровым возможностям.
Функционирующее зеркало: путь прямо сейчас
Дублирующий портал является собой абсолютную версию основного портала. Актуальное зеркало обеспечивает участникам миновать вероятные ограничения.
Плюсы эксплуатации зеркала
Принципиальные преимущества содержат:
– Беспрерывный доступ к порталу
– Поддержание всех функций главного портала
– Сохранность конфиденциальных информации
– Аналогичный функционал
Создание аккаунта на портале
Процесс открытия счета знаменуется простотой и эргономичностью. Недавние клиенты обязаны:
1. Перейти на лицензионный веб-сайт или его зеркало
2. Выбрать на клавишу регистрации
3. Заполнить нужные информацию
4. Валидировать email адрес
5. Осуществить начальный доступ
Вознаграждение за регистрацию
Дебютанты получают внушительный стартовый приз. Данное награда способно содержать:
– Монетарные бонусы
– Complimentary вращения
– Расширенный коэффициент возврата
Вход в собственный аккаунт
Активные пользователи имеют возможность оперативно получить доступ в личный аккаунт, эксплуатируя имя пользователя и код. Индивидуальный кабинет дает шанс к:
– Администрированию депозитом
– Хронологии транзакций
– Работающим призам
– Параметрам учетной записи
Призы и кампании
Ресурс периодически реализует разнообразные промо-кампании для игроков.
Виды бонусов
Главные формы поощрений:
– Финансовые призы – часть от суммы депозита
– Фриспины – complimentary раунды в автоматах
– Возврат средств – отдача фрагмента потерянных средств
– Конкурсные трофеи – награды за участие в состязаниях
Коды
Уникальные ваучеры дают возможность приобрести дополнительные выгоды. Игроки могут найти их на тематических сайтах или приобрести в новостях.
Портативная редакция и программа
Передовые пользователи ценят переносной геймплей.
Возможности mobile системы
– Адаптивный вид для различных устройств
– Полный возможность к развлечениям
– Оперативная подгрузка
– Удобное управление
Установить приложение
Мобильное приложение открыто для скачивания на девайсы с операционными системами Android и iOS. Приложение гарантирует:
– Стабильную деятельность
– Всплывающие оповещения о предложениях
– Быстрый доступ к желанным слотам
Гемблинг ассортимент
Портал предоставляет внушительную коллекцию азартных развлечений.
Слоты
Каталог азартных автоматов содержит:
– Обычные машины
– Передовые аппараты
– Накопительные машины
– Тематические игры
Live дилеры
Область настоящих столов предоставляет право играть с реальными диллерами. Представлены:
– Европейская рулетка
– Блек-джек
– Baccarat
– Poker
Турниры
Постоянные конкурсы обеспечивают участникам соревноваться за крупные наградные банки. Конкурсная сетка актуализируется каждую неделю.
Платежные операции
Сайт поддерживает разнообразие опций зачисления и вывода финансов:
– Дебетовые карты
– Виртуальные кошельки
– Wire трансферы
– Bitcoin
Все платежи проходят конфиденциально с использованием актуальных методов криптографии.
Отдел поддержки
Компетентная служба support действует постоянно. Обратиться с специалистами можно через:
– Online чат
– Email почту
– Горячую линию
– Social медиа
Охрана и лицензирование
Игровой клуб функционирует на базе официальной сертификата. Подобное обеспечивает:
– Легальность игрового действа
– Охрану персональных данных
– Оперативные выводы
– Ответственный игровой процесс
Резюме
Официальный портал и его действующие зеркала дают игрокам совокупный комплекс функций для безопасной и выгодной досуга. Солидные бонусы, различные развлечения, компетентная поддержка и проверенная структура выплат формируют платформу лучшим решением для любителей развлекательных игр.
La pagina oficial de http://www.evaelfie.es/ ofrece contenido exclusivo, noticias de ultima hora y actualizaciones periodicas. Mantengase al dia con las nuevas publicaciones y anuncios.
explore glowgalleria – Well-organized site, items are easy to locate and review.
интернет https://tripscans64.cc/
Вход к сайту через рабочие зеркала
Нынешние сетевые казино дают игрокам непрерывный подключение к сервисам. Официальный портал Тейкер казино работает бесперебойно, гарантируя широкий спектр азартных слотов. Однако иногда появляются технические препятствия или барьеры, поэтому необходимо понимать о существовании рабочих зеркал.
Что представляет из себя центральное зеркало казино
Копия — это абсолютная версия официального сайта с идентичным набором функций. Действующее зеркало сейчас даёт возможность обходить региональные запреты и продолжать времяпрепровождение.
Главные плюсы применения зеркал:
– Безграничный подключение к собственному кабинету
– Удержание всех сведений счёта
– Аналогичный спектр игр
– Действующие поощрения и акции
Открытие счёта на портале
Механизм создания аккаунта занимает немного минут. Начинающие пользователи зарабатывают великодушный бонус за оформление, что может содержать:
– Начальный финансовый приз
– Бесплатные фриспины для игр
– Особые коды
– Расширенный компенсацию
Для финализации регистрации нужно:
1. Переместиться на основной сайт или дубликат
2. Щёлкнуть клавишу «Регистрация»
3. Внести контактные реквизиты
4. Верифицировать электронную почту или мобильный
5. Применить купон (если есть наличии)
Авторизация в индивидуальный кабинет
После корректной создания аккаунта игроки могут выполнять вход с помощью основной веб-сайт или актуальное зеркало. Индивидуальный кабинет даёт абсолютный надзор над счётом:
– Архив пари
– Пополнение баланса
– Получение средств
– Управление поощрениями
– Включение в конкурсах
Награды и акции казино
Ресурс удовлетворяет клиентов разнообразными бонусными схемами:
Приветственные поощрения
Новые игроки получают внушительный букет привилегий на первые депозиты. Типично это включает процентную надбавку к размеру депозита плюс даровые фриспины.
Периодические предложения
– Каждонедельный возврат до 15%
– Конкурсы с наградными банками
– Бонусы на число рождения
– Особые программы для статусных пользователей
Система лояльности
Регулярные клиенты накапливают очки, они можно обменять на реальные финансы или особые бонусы.
Смартфонная версия и приложение
Нынешние разработки позволяют играть везде угодно. Смартфонная вариант веб-сайта автономно настраивается под монитор любого девайса.
Выгоды смартфонного софта:
– Быстрая открытие слотов
– Эргономичный интерфейс
– Моментальные-уведомления о акциях
– Шанс установить для Android и iOS
Живое казино: обстановка настоящего развлекательного клуба
Секция Live клуба погружает клиентов в атмосферу настоящего игорного заведения. Опытные операторы организуют процесс в состоянии реального времени.
Предлагаемые варианты:
– Колесо фортуны
– Карточная игра
– Punto Banco
– Техасский холдем
Барабаны и гемблинг слоты
Каталог игровых слотов охватывает множество позиций от передовых студий. Любой пользователь отыщет автомат по нраву:
– Традиционные автоматы
– Инновационные игры с призовыми этапами
– Прогрессивный-автоматы
– Мегавейс игры
Конкурсы и акции
Регулярные конкурсы включают остроту и открывают возможность выиграть крупные награды. Включение в турнирах регулярно даровое, а выигрышные суммы доходят до крупных сумм.
Безопасность и приватность
Ресурс применяет передовые технологии криптографии для защиты сведений пользователей. Совокупные платёжные транзакции проходят через зашифрованные соединения.
Вывод
Центральный ресурс и его рабочие зеркала гарантируют безопасный вход к качественным игровым услугам. Богатые поощрения, практичная смартфонная вариант, разнообразие машин и компетентное Live-игорный дом формируют сайт отличным опцией для фанатов развлекательных автоматов.
Подключение к сайту через проверенные зеркала
Пользователи интернет казино регулярно сталкиваются с трудностью недоступности официального домена. Именно для устранения этой задачи существуют копии легального домена. Кешер предоставляет полный вход ко всем сервисам платформы.
Что такое действующее зеркало казино
Альтернативный адрес является собой полную дубликат главного сайта с идентичным набором функций. Главное отличие — это альтернативное имя. Абсолютно все данные пользователя, вместе с счет, награды и данные раундов, продолжают быть неизменными.
Достоинства задействования зеркал
Рабочие зеркала имеют набором значимых выгод:
– Непрерывный подключение к выбранным автоматам
– Совершенная защита персональных параметров
– Удержание всех опций личного кабинета
– Способность обретения бонусов и включения в предложениях
Открытие счета на главном сайте
Процедура оформления крайне несложен и требует немного минут. Недавние клиенты в состоянии надеяться на щедрый приветственный подарок за открытие счета.
Шаги открытия аккаунта
1. Доступ на главный портал или его копию
2. Нажатие на клавишу “Создать аккаунт”
3. Внесение обязательных параметров
4. Подтверждение цифровой почты
5. Указание кода (когда доступен)
Награды и предложения для клиентов
Игровая площадка одаривает своих игроков многочисленными наградными предложениями.
Главные виды поощрений
Вводный подарок — солидное вознаграждение для недавних участников, которое именно способно содержать денежные бонусы и безвозмездные спины.
Фриспины — опция играть в востребованных слотах бесплатно.
Компенсация — долевой возврат утраченных сумм, каковой предоставляется раз в неделю или раз в месяц.
Бонусные коды — эксклюзивные наборы, обеспечивающие бонусные преимущества.
Персональный кабинет: возможности и конфигурации
Индивидуальный аккаунт дает исчерпывающий управление над пользовательским взаимодействием. Тут доступны:
– Управление счетом
– Архив операций
– Работающие награды
– Установки сохранности
– Валидация аккаунта
Карманная редакция и приложение
Актуальные пользователи ценят мобильность. Ресурс обеспечивает два варианта для участия с карманных аппаратов.
Приспособленная мобильная платформа
Смартфонная версия сайта самостоятельно адаптируется под монитор любого устройства. Нет необходимости устанавливать отдельное приложение.
Приложение для мобильных
Можно инсталлировать специальное APP для iOS и Android. Софт обеспечивает:
– Быстрый доступ
– Улучшенный интерфейс
– Оперативные-уведомления о акциях
– Надежную операционность
Live раздел: антураж реального зала
Раздел Live игр транспортирует игроков в антураж истинного казино. Компетентные дилеры осуществляют сессии в варианте реального времени.
Популярные Live-столы
– Французская рулетка
– Блэкджек
– Punto Banco
– Карибский покер
Игровые машины: многообразие игр
Библиотека слотовых автоматов насчитывает тысячи позиций от известных поставщиков. Игроки встретят:
– Обычные машины
– Современные слоты
– Джекпот-машины
– Многолинейные автоматы
Конкурсы и уникальные предложения
Регулярные конкурсы позволяют игрокам конкурировать друг с другом за значительные выигрышные суммы. Отдельный конкурс имеет свои правила вовлечения и список чемпионов.
Методы ввода и вывода средств
Платформа обслуживает комплекс финансовых инструментов:
– Кредитные инструменты
– Онлайн сервисы
– Цифровые валюты
– Wire переводы
Абсолютно все операции проходят защищенно благодаря актуальным технологиям шифрования.
Команда support
Профессиональные консультанты отдела обслуживания способны помочь 24/7. Имеются нижеперечисленные пути контакта:
– Онлайн-чат
– Email-обслуживание
– Аудио линия
– Социальные сети
Заключение
Основной портал платформы и его действующие альтернативы дают участникам защищенный и комфортный вход к огромному выбору развлекательных активностей. Щедрые поощрения, периодические акции, профессиональная поддержка и удобные расчетные инструменты создают игровой процесс максимально комфортным и доходным.
Good afternoon!
Explore digital mysterious realms with interesting and valuable cyber security and protect your online identity fiercely see on the website for cyber defense kits
Full information on the link – https://800letekas.site
All the best and development in business!
garnetcrate store – Well-structured site with clear categories helps me find what I need.
Переход к платформе и функционирующие ссылки
Востребованные онлайн казино предлагают участникам огромный набор возможностей. Основной ресурс club предоставляет стабильный вход ко всем сервисам. Однако временами происходят случаи, когда требуется дополнительный метод подключения.
Что являет собой собой рабочее зеркало
Действующее зеркало — это полная дубликат официального веб-сайта с другим сетевым названием. Дубликат сегодня помогает миновать потенциальные ограничения и сохранять постоянный подключение к популярным автоматам.
Главное зеркало имеет теми же характеристиками, что и основной ресурс:
– Полный перечень игр
– Индивидуальный кабинет с сохраненными сведениями
– Полные награды и акции
– Безопасные банковские операции
Оформление и доступ в сервис
Процедура оформления на сайте отнимает пару моментов. Недавним участникам нужно:
1. Попасть на функционирующее зеркало на данный момент
2. Кликнуть опцию «Регистрация»
3. Указать необходимые данные
4. Проверить электронную почту или контакт мобильного
5. Активировать поощрение за открытие аккаунта
Вход в индивидуальный кабинет осуществляется через указание имени пользователя и ключа.
Анализ наградной программы
Богатая поощрительная структура — ключевое достоинство игорного заведения. Клиенты забирают многочисленные поощрения:
Стартовые бонусы
Новые участники имеют возможность рассчитывать на щедрый поощрение за оформление. Обычно это совокупность вариантов, охватывающий:
– Долевую премию к стартовому пополнению
– Подарочные спины
– Extra деньги на аккаунт
Промокоды и уникальные возможности
Регулярные промокоды обеспечивают зарабатывать призовые выгоды. Использовать их возможно в специальном разделе личного кабинета.
Free spins и возврат средств
Даровые вращения — это способность запускать автоматы без применения собственных средств. Возврат представляет долевой возврат утраченных средств.
Коллекция игр
Игровая сайт предоставляет огромную базу развлечений.
Видеослоты
Многообразие игровых машин восхищает воображение. Есть традиционные простые автоматы и современные развлечения с увлекательной графикой.
Live игры
Раздел Live развлечений помещает пользователей в среду истинного игорного зала. Умелые крупье организуют раунды в живом времени.
Турниры и таблицы лидеров
Постоянные состязания обеспечивают азарта и предоставляют вариант забрать крупные награды.
Карманная форма и приложение
Современные решения обеспечивают развлекаться в любимом точке. Mobile форма самостоятельно оптимизируется под монитор устройства.
Скачать приложение возможно для цифровых платформ iOS и Android. Программа дает:
– Быстрый доступ
– Надежную деятельность
– Push-оповещения об акциях
– Комфортный дизайн
Денежные процедуры
Платформа принимает многочисленные системы пополнения и изъятия сумм:
– Кредитные счета
– Виртуальные системы
– Криптовалюты
– Денежные переводы
Каждые транзакции проходят через надежное протокол, что гарантирует сохранность конфиденциальных данных.
Служба ассистанса
Квалифицированная бригада помощи работает постоянно. Связаться с менеджерами разрешено через:
– Живой-чат
– Почтовую почту
– Связь
– Коммуникационные каналы
Итоги
Легальный ресурс и его рабочее зеркало обеспечивают клиентам стабильный и легкий вход к захватывающим забавам. Богатые подарки, широкий ассортимент игр и профессиональная помощь формируют участие крайне удобной и доходной.
US Pharma Index: gold pharmacy online – canadian pharmacy world coupons
Вход к ресурсу через актуальные зеркала
Игроки онлайн казино нередко имеют дело с проблемой недоступности базового домена. Конкретно для решения этой задачи существуют зеркала официального портала. РџРёРЅРєРѕ обеспечивает полный подключение ко всем сервисам ресурса.
Что такое рабочее зеркало казино
Альтернативный адрес составляет собой точную версию официального ресурса с таким же функционалом. Основное различие — это альтернативное имя. Любые сведения участника, вместе с средства, бонусы и историю раундов, находятся прежними.
Достоинства задействования зеркал
Актуальные зеркала обладают набором ключевых преимуществ:
– Непрерывный переход к любимым автоматам
– Стопроцентная безопасность индивидуальных сведений
– Удержание всех конфигураций пользовательского кабинета
– Способность приобретения поощрений и участия в кампаниях
Оформление профиля на основном ресурсе
Ход оформления чрезвычайно легок и требует буквально минут. Новые пользователи в состоянии полагаться на солидный стартовый поощрение за открытие счета.
Ступени оформления аккаунта
1. Подключение на главный сайт или его зеркало
2. Активация на кнопку “Присоединиться”
3. Ввод нужных параметров
4. Верификация цифровой почты
5. Внесение кода (в случае есть)
Поощрения и акции для пользователей
Ресурс радует своих пользователей разнообразными наградными системами.
Базовые виды поощрений
Вводный подарок — щедрое премирование для новых игроков, которое способно вмещать монетарные призы и free spins.
Бесплатные вращения — опция крутить в востребованных аппаратах безвозмездно.
Кэшбек — пропорциональный отдача проигранных средств, который зачисляется каждую неделю или каждый месяц.
Купоны — специальные комбинации, предоставляющие бонусные преимущества.
Пользовательский кабинет: опции и настройки
Персональный профиль гарантирует полный контроль над развлекательным активностью. В данном разделе имеются:
– Регулирование средствами
– Записи платежей
– Действующие привилегии
– Параметры защиты
– Подтверждение учетной записи
Смартфонная платформа и программа
Нынешние участники признают портативность. Платформа предлагает пару варианта для ставок с портативных аппаратов.
Responsive портативная платформа
Мобильная редакция портала автономно настраивается под разрешение любого гаджета. Отсутствует потребность инсталлировать особое программное обеспечение.
Приложение для гаджетов
Можно установить оригинальное программу для iOS и Android. Приложение гарантирует:
– Скорый старт
– Улучшенный графику
– Всплывающие-сообщения о поощрениях
– Надежную функциональность
Live развлечения: среда реального казино
Раздел Live столов переносит клиентов в антураж реального клуба. Компетентные крупье проводят партии в формате реального времени.
Востребованные Live-развлечения
– Американская рулетка
– 21
– Баккарат
– Покер
Аппараты: выбор автоматов
Библиотека развлекательных аппаратов насчитывает тысячи названий от топовых производителей. Клиенты найдут:
– Стандартные автоматы
– Графические слоты
– Прогрессивный джекпот-машины
– Megaways
Конкурсы и специальные мероприятия
Регулярные конкурсы обеспечивают клиентам соревноваться друг с другом за крупные наградные фонды. Любой состязание содержит свои условия участия и доску победителей.
Варианты внесения и снятия сумм
Платформа поддерживает множество расчетных сервисов:
– Банковские средства
– Электронные счета
– Blockchain-платежи
– Wire транзиты
Все платежи выполняются конфиденциально благодаря актуальным методам защиты.
Сервис обслуживания
Квалифицированные сотрудники команды обслуживания способны содействовать 24/7. Предусмотрены нижеперечисленные каналы общения:
– Онлайн-чат
– Email-сервис
– Аудио поддержка
– Социальные сети
Резюме
Основной портал платформы и его функционирующие дубликаты обеспечивают игрокам конфиденциальный и удобный доступ к обширному выбору азартных игр. Солидные поощрения, постоянные предложения, профессиональная поддержка и комфортные финансовые методы делают азартный опыт максимально приятным и результативным.
best of driftcrate – Well-organized pages and straightforward navigation make exploring easy.
Hello!
Study rare mysterious phenomena with interesting and valuable scientific impact and witness the extraordinary firsthand see on the website for phenomenon galleries
Full information on the link – https://33capy.site
All the best and development in business!
which internet partner prodvizhenie-sajtov-po-trafiku7.ru .
flakecrate – Navigation is smooth and everything loads quickly.
Нынешние онлайн-казино гарантируют геймерам обширный ассортимент вариантов для приятной игры. Подключение к ресурсу Dragon Money официальный сайт производится через лицензионный веб-ресурс или действующее зеркало.
Что такое действующее зеркало казино
Функционирующее зеркало — это дополнительный адрес основного веб-сайта казино. Такие версии создаются для обеспечения стабильного доступа к игровой системе.
Копия текущее совершенно дублирует функционал официального ресурса. Игроки приобретают схожий выход ко всем сервисам, включая оформление профиля, пополнение счета и получение выигрышей.
Регистрация на основном веб-сайте
Механизм открытия профиля отнимает всего несколько мгновений. Начинающим участникам требуется:
1. Войти на главный домен или текущее официальное зеркало
2. Щелкнуть кнопку “Зарегистрироваться”
3. Указать нужные данные
4. Верифицировать почтовую почту
5. Использовать код активации при наличии
После окончания открытия профиля игрок зарабатывает приз за регистрацию, который имеет право содержать фриспины или cash вознаграждение.
Логин в персональный кабинет
Индивидуальный кабинет — это охраняемая секция, где клиенты вправе контролировать своим учетной записью. Для авторизации нужно ввести никнейм и секретный ключ.
В персональном кабинете имеются такие возможности:
– Отслеживание истории переводов
– Использование бонусных кодов
– Управление вознаграждениями
– Включение в конкурсах
– Мониторинг кэшбека
– Редактирование данных
Призы и акции
Развлекательная платформа дарит щедрые вознаграждения:
Стартовый комплект — начинающие приобретают крупное премию на дебютные депозиты.
Даровые спины — выдаются как при создании аккаунта, так и в рамках разнообразных мероприятий.
Возврат средств — регулярный возврат процента утраченных сумм.
Промокоды — специальные шифры, предоставляющие выход к уникальным вознаграждениям.
Описание игровых разделов
Слоты
Собрание автоматов охватывает тысячи позиций от передовых провайдеров. Клиенты найдут как обычные аппараты, так и современные мультимедийные автоматы с увлекательной оформлением.
Live казино
Зона Live казино дарит возможность участвовать с живыми ведущими в условиях текущего времени. Доступны распространенные развлечения: рулетка, блэкджек, баккара, покер.
Соревнования
Регулярные соревнования с крупными наградными пулами притягивают тысячи конкурсантов. Призеры обретают cash выплаты и особые бонусы.
Портативная версия и app
Адаптивная версия сайта обеспечивает наслаждаться с каждого девайса. Интерфейс автономно корректируется под размер экрана.
Скачать программу можно для устройств на Android и iOS. Телефонное программа располагает всеми опциями компьютерной версии.
Как найти рабочее зеркало на текущий день
Действующие URL альтернатив периодически обновляются. Получить актуальную URL можно разными способами:
– Через службу техподдержки
– В проверенных коммуникационных сетях
– По email рассылке
– На тематических ресурсах
Надежность и официальность
Основной портал функционирует на фундаменте международной лицензии. Все транзакции защищены актуальными системами безопасности.
Конфиденциальность персональных информации гарантируется в стопроцентном масштабе.
Вывод
Основной портал и его действующие дубликаты гарантируют игрокам постоянный вход к высококлассным гемблинговым услугам. Привлекательные вознаграждения, различные развлечения, компетентная служба — все это превращает гемблинговый процесс невероятно беспроблемным и притягательным.
Переход к ресурсу через действующие зеркала
Актуальные виртуальные казино дают пользователям круглосуточный доступ к услугам. Основной ресурс казино Pinco работает бесперебойно, предоставляя обширный выбор гемблинг развлечений. Тем не менее временами образуются цифровые трудности или блокировки, поэтому критично иметь представление о присутствии функционирующих зеркал.
Что является собой главное зеркало казино
Копия — это идентичная дубликат официального портала с таким же интерфейсом. Функционирующее зеркало сейчас даёт возможность избегать местные блокировки и продолжать развлечения.
Главные достоинства применения зеркал:
– Стопроцентный вход к личному кабинету
– Фиксация совокупных сведений учётной записи
– Идентичный ассортимент игр
– Текущие привилегии и промо
Создание аккаунта на портале
Механизм записи занимает немного минут. Начинающие пользователи приобретают великодушный приз за оформление, он имеет возможность вмещать:
– Приветственный финансовый приз
– Безвозмездные фриспины для игр
– Специальные купоны
– Увеличенный компенсацию
Для завершения создания аккаунта необходимо:
1. Войти на основной ресурс или зеркало
2. Нажать элемент «Регистрация»
3. Внести индивидуальные сведения
4. Подтвердить email или контакт
5. Задействовать купон (когда имеется наличии)
Авторизация в личный кабинет
После удачной записи пользователи имеют возможность производить доступ с помощью официальный портал или актуальное зеркало. Индивидуальный кабинет предоставляет всесторонний регулирование над учётной записью:
– Журнал транзакций
– Внесение счёта
– Снятие средств
– Регулирование привилегиями
– Вовлечение в состязаниях
Бонусы и кампании казино
Ресурс балует пользователей разнообразными наградными предложениями:
Стартовые поощрения
Новички получают внушительный букет поощрений на начальные взносы. Обычно это содержит частичную доплату к сумме депозита плюс даровые спины.
Регулярные предложения
– Еженедельный возврат до 15%
– Конкурсы с наградными суммами
– Призы на годовщину рождения
– Особые предложения для элитных пользователей
Схема лояльности
Регулярные игроки накапливают баллы, которые допустимо трансформировать на подлинные средства или эксклюзивные бонусы.
Портативная вариант и утилита
Актуальные инновации дают возможность геймить в любом месте подходяще. Смартфонная вариант портала автоматически настраивается под монитор любого устройства.
Достоинства смартфонного ПО:
– Скоростная открытие игр
– Эргономичный интерфейс
– Мгновенные-уведомления о акциях
– Шанс скачать для Android и iOS
Живое казино: среда истинного игорного учреждения
Категория Live казино погружает пользователей в обстановку подлинного игорного заведения. Профессиональные ведущие управляют развлечение в виде подлинного времени.
Предлагаемые игры:
– Колесо фортуны
– Карточная игра
– Баккара
– Техасский холдем
Слоты и азартные автоматы
Каталог азартных автоматов включает тысячи наименований от лидирующих провайдеров. Каждый клиент отыщет автомат по вкусу:
– Стандартные автоматы
– Современные автоматы с призовыми этапами
– Накопительный-машины
– Многолинейные игры
Турниры и лотереи
Систематические турниры включают азарт и дают шанс выиграть большие суммы. Присутствие в соревнованиях зачастую бесплатное, а выигрышные суммы достигают значительных величин.
Охрана и анонимность
Платформа использует современные методы криптографии для защиты сведений геймеров. Каждые платёжные действия осуществляются через охраняемые соединения.
Резюме
Официальный портал и его действующие зеркала обеспечивают надёжный доступ к первоклассным игровым играм. Щедрые поощрения, эргономичная портативная версия, вариативность игр и высококлассное Live-казино делают портал отличным решением для любителей гемблинг автоматов.
feathervendor official shop – Browsing is simple thanks to clean pages and clear structure.
https://sildenafilpriceguide.shop/# Order Viagra 50 mg online
Подключение к платформе через проверенные зеркала
Игроки онлайн казино нередко встречаются с ситуацией блокировки базового сайта. Именно для преодоления этой проблемы предусмотрены альтернативные адреса легального сайта. казино 888 предоставляет абсолютный вход ко всем опциям платформы.
Что такое действующее зеркало казино
Зеркало составляет собой полную версию главного портала с идентичным возможностями. Основное различие — это другое имя. Абсолютно все сведения игрока, в том числе средства, бонусы и записи ставок, сохраняются такими же.
Достоинства задействования зеркал
Актуальные зеркала имеют набором важных плюсов:
– Постоянный подключение к любимым играм
– Полная конфиденциальность личных параметров
– Поддержание всех параметров пользовательского кабинета
– Способность получения призов и присутствия в промоакциях
Создание аккаунта на легальном ресурсе
Операция создания аккаунта максимально легок и занимает пару минут. Начинающие пользователи в состоянии рассчитывать на солидный вводный приз за создание аккаунта.
Стадии формирования аккаунта
1. Подключение на легальный сайт или его дубликат
2. Активация на кнопку “Регистрация”
3. Заполнение обязательных параметров
4. Проверка почтовой почты
5. Ввод бонусного кода (если присутствует)
Бонусы и предложения для участников
Казино одаривает своих клиентов различными бонусными акциями.
Базовые типы призов
Стартовый бонус — внушительное вознаграждение для свежих пользователей, каковое может охватывать монетарные бонусы и бесплатные вращения.
Бесплатные вращения — шанс запускать в известных слотах даром.
Кешбэк — частичный возмещение израсходованных сумм, который зачисляется раз в неделю или ежемесячно.
Специальные коды — эксклюзивные наборы, предоставляющие бонусные выгоды.
Индивидуальный кабинет: инструменты и настройки
Индивидуальный аккаунт обеспечивает полный надзор над персональным процессом. В нем присутствуют:
– Управление счетом
– Записи платежей
– Работающие поощрения
– Настройки защиты
– Подтверждение профиля
Смартфонная платформа и приложение
Современные участники предпочитают мобильность. Площадка дает 2 пути для игры с портативных аппаратов.
Responsive портативная платформа
Адаптивная версия ресурса автоматически подстраивается под экран любого гаджета. Отсутствует потребность загружать дополнительное программное обеспечение.
Приложение для телефонов
Разрешено установить специальное APP для iOS и Android. Приложение обеспечивает:
– Мгновенный доступ
– Улучшенный дизайн
– Мобильные-сообщения о предложениях
– Бесперебойную операционность
Live казино: антураж истинного игорного заведения
Секция Live игр доставляет игроков в антураж настоящего казино. Компетентные хосты проводят партии в формате настоящего времени.
Известные Live-столы
– Американская рулетка
– Блэкджек
– Baccarat
– Покер
Автоматы: ассортимент слотов
Каталог слотовых машин включает массу вариантов от ведущих производителей. Участники обнаружат:
– Классические машины
– Видеослоты
– Джекпот-игры
– Многолинейные автоматы
Конкурсы и эксклюзивные события
Регулярные состязания предоставляют шанс игрокам состязаться друг с другом за внушительные наградные фонды. Всякий состязание обладает свои условия присутствия и доску чемпионов.
Методы зачисления и получения сумм
Ресурс поддерживает комплекс расчетных сервисов:
– Кредитные инструменты
– Виртуальные кошельки
– Цифровые валюты
– Прямые отправления
Абсолютно все транзакции выполняются безопасно благодаря актуальным методам шифрования.
Команда обслуживания
Компетентные сотрудники сервиса обслуживания настроены помочь 24/7. Предусмотрены следующие каналы общения:
– Онлайн-чат
– Email-сервис
– Телефонная линия
– Публичные сети
Итог
Главный домен игровой площадки и его функционирующие зеркала гарантируют участникам защищенный и комфортный переход к обширному ассортименту развлекательных услуг. Внушительные поощрения, периодические промоакции, качественная служба и простые денежные инструменты превращают азартный досуг крайне захватывающим и прибыльным.
Нынешние онлайн-казино гарантируют геймерам обширный диапазон возможностей для удобной досуга. Доступ к площадке казино Бет Андреас производится через официальный веб-ресурс или действующее зеркало.
Что такое актуальное зеркало казино
Актуальное зеркало — это альтернативный URL главного сайта казино. Такие версии формируются для обеспечения бесперебойного подключения к гемблинговой сервису.
Альтернатива текущее совершенно копирует возможности основного сайта. Геймеры получают идентичный вход ко всем сервисам, включая открытие счета, финансирование баланса и получение средств.
Регистрация на основном сайте
Процедура открытия профиля длится всего несколько мгновений. Начинающим участникам нужно:
1. Перейти на основной портал или текущее проверенное зеркало
2. Нажать кнопку “Создать аккаунт”
3. Ввести необходимые данные
4. Активировать email почту
5. Ввести код активации при существовании
После финализации оформления пользователь приобретает бонус за регистрацию, который способен включать бесплатные вращения или cash вознаграждение.
Вход в персональный кабинет
Индивидуальный кабинет — это безопасная территория, где пользователи вправе контролировать своим счетом. Для авторизации следует ввести логин и password.
В пользовательском кабинете открыты нижеперечисленные инструменты:
– Просмотр журнала транзакций
– Использование купонов
– Настройка призами
– Присоединение в состязаниях
– Проверка кэшбэка
– Настройка данных
Поощрения и акции
Развлекательная платформа дарит выгодные вознаграждения:
Стартовый набор — начинающие приобретают солидное поощрение на первые депозиты.
Даровые спины — предоставляются как при создании аккаунта, так и в рамках разнообразных кампаний.
Кэшбэк — систематический возврат фрагмента израсходованных сумм.
Коды активации — уникальные комбинации, обеспечивающие право к уникальным предложениям.
Описание гемблинговых направлений
Игровые автоматы
Собрание slots насчитывает сотни позиций от лучших провайдеров. Геймеры обнаружат как обычные автоматы, так и актуальные видеослоты с увлекательной оформлением.
Live казино
Секция Live казино дарит право играть с реальными крупье в условиях актуального времени. Представлены востребованные развлечения: рулетка, блэкджек, баккара, покер.
Соревнования
Периодические состязания с крупными выигрышными банками завлекают множество участников. Победители зарабатывают cash награды и специальные бонусы.
Мобильная версия и приложение
Телефонная версия портала предоставляет право наслаждаться с произвольного устройства. Дизайн автономно подстраивается под формат экрана.
Установить программу можно для устройств на Android и iOS. Мобильное ПО характеризуется всеми характеристиками настольной версии.
Как обнаружить действующее зеркало на сегодня
Свежие линки альтернатив периодически изменяются. Узнать рабочую ссылку можно разными способами:
– Через службу саппорта
– В проверенных информационных сетях
– По e-mail подписке
– На партнерских сайтах
Охрана и легальность
Главный сайт действует на фундаменте мировой лицензии. Все операции защищены актуальными технологиями безопасности.
Приватность пользовательских информации обеспечивается в абсолютном масштабе.
Резюме
Лицензионный ресурс и его актуальные альтернативы обеспечивают игрокам 24/7 выход к высококлассным азартным сервисам. Великодушные вознаграждения, разнообразные слоты, квалифицированная помощь — все это создает гемблинговый досуг чрезвычайно комфортным и захватывающим.
Publicaciones unicas http://www.amouranth.es noticias de vanguardia y contenido original. Mantengase al dia y no se pierda ninguna novedad.
coralmarket shopping – Lots of interesting picks and the final steps were seamless.
Переход к сайту через актуальные зеркала
Передовые интернет казино гарантируют клиентам круглосуточный переход к услугам. Главный сайт Тейкер функционирует устойчиво, гарантируя обширный выбор азартных развлечений. Но порой образуются системные трудности или ограничения, следовательно необходимо понимать о наличии действующих зеркал.
Что означает собой главное зеркало казино
Зеркало — это точная копия центрального сайта с таким же функционалом. Актуальное зеркало сейчас позволяет миновать региональные ограничения и продолжать времяпрепровождение.
Ключевые выгоды задействования зеркал:
– Стопроцентный подключение к личному кабинету
– Сохранение любых данных счёта
– Идентичный спектр слотов
– Актуальные привилегии и акции
Открытие счёта на сайте
Операция оформления отнимает немного минут. Свежие клиенты зарабатывают великодушный подарок за регистрацию, что может вмещать:
– Приветственный игровой подарок
– Безвозмездные фриспины для автоматов
– Особые коды
– Расширенный компенсацию
Во имя завершения регистрации нужно:
1. Зайти на основной портал или альтернативу
2. Щёлкнуть клавишу «Зарегистрироваться»
3. Ввести контактные информацию
4. Активировать почтовый адрес или телефон
5. Применить ваучер (если есть существовании)
Доступ в индивидуальный кабинет
Следом за успешной регистрации геймеры имеют возможность осуществлять вход используя основной ресурс или действующее зеркало. Личный кабинет предоставляет безграничный надзор над счётом:
– Летопись транзакций
– Внесение депозита
– Получение призов
– Контроль наградами
– Включение в конкурсах
Привилегии и промо казино
Портал награждает клиентов различными бонусными программами:
Приветственные бонусы
Новички обретают великодушный букет привилегий на вступительные вклады. Как правило это предполагает долевую добавку к сумме вклада плюс даровые вращения.
Систематические кампании
– Каждонедельный кэшбек до 15%
– Конкурсы с наградными фондами
– Поощрения на дату рождения
– Особые программы для элитных клиентов
План вознаграждения
Постоянные клиенты собирают пункты, они возможно обменять на настоящие призы или особые льготы.
Карманная редакция и утилита
Передовые инновации дают возможность развлекаться где угодно. Мобильная вариант портала автономно подстраивается под дисплей любого гаджета.
Достоинства карманного софта:
– Оперативная открытие слотов
– Удобный вид
– Моментальные-нотификации о акциях
– Возможность скачать для Android и iOS
Live казино: среда реального игорного заведения
Раздел Live клуба погружает пользователей в среду истинного развлекательного дома. Квалифицированные операторы ведут игру в виде подлинного времени.
Имеющиеся варианты:
– Американская рулетка
– Карточная игра
– Баккара
– Покерная игра
Барабаны и игровые автоматы
Собрание развлекательных автоматов охватывает тысячи вариантов от лидирующих студий. Каждый пользователь отыщет развлечение по желанию:
– Стандартные барабаны
– Инновационные игры с призовыми уровнями
– Накопительный-слоты
– Многолинейные игры
Турниры и лотереи
Периодические соревнования привносят драйв и дают способность обрести значительные призы. Вовлечение в конкурсах часто безвозмездное, а призовые фонды достигают внушительных размеров.
Охрана и конфиденциальность
Платформа задействует современные системы шифрования для обеспечения данных игроков. Любые платёжные процедуры совершаются через зашифрованные линии.
Резюме
Главный ресурс и его рабочие зеркала гарантируют устойчивый переход к первоклассным гемблинг услугам. Щедрые поощрения, эргономичная мобильная вариант, вариативность игр и квалифицированное Live-казино создают платформу прекрасным опцией для ценителей азартных развлечений.
Подключение к сайту через актуальные зеркала
Игроки онлайн казино нередко контактируют с вопросом ограничения основного домена. Именно для устранения этой ситуации созданы дубликаты основного портала. casino Laki World дает стопроцентный подключение ко всем возможностям казино.
Что такое рабочее зеркало казино
Зеркало является собой полную версию главного портала с идентичным опциями. Основное различие — это другое имя. Любые параметры клиента, содержа баланс, награды и историю партий, сохраняются неизменными.
Достоинства применения зеркал
Функционирующие зеркала обладают рядом значимых преимуществ:
– Бесперебойный вход к выбранным слотам
– Полная конфиденциальность личных параметров
– Поддержание всех опций личного кабинета
– Опция приобретения поощрений и вовлечения в акциях
Регистрация на основном портале
Процесс открытия счета максимально элементарен и отнимает буквально минут. Недавние участники способны надеяться на внушительный стартовый бонус за оформление.
Этапы формирования аккаунта
1. Доступ на основной домен или его дубликат
2. Клик на элемент “Присоединиться”
3. Заполнение нужных сведений
4. Активация почтовой почты
5. Указание промокода (когда доступен)
Награды и кампании для участников
Платформа поощряет своих пользователей многочисленными бонусными акциями.
Главные категории бонусов
Стартовый приз — внушительное премирование для новых клиентов, каковое может содержать материальные призы и безвозмездные спины.
Бесплатные вращения — способность играть в востребованных слотах бесплатно.
Возврат средств — долевой компенсация проигранных денег, который именно предоставляется каждую неделю или каждый месяц.
Купоны — специальные сочетания, гарантирующие дополнительные преимущества.
Персональный кабинет: функции и параметры
Личный профиль предоставляет совершенный надзор над развлекательным опытом. Тут присутствуют:
– Управление средствами
– Архив переводов
– Работающие бонусы
– Конфигурации сохранности
– Подтверждение учетной записи
Карманная версия и APP
Нынешние игроки признают портативность. Казино предоставляет 2 варианта для участия с мобильных аппаратов.
Responsive портативная платформа
Портативная версия ресурса самостоятельно подстраивается под монитор любого гаджета. Отсутствует потребность загружать дополнительное программное обеспечение.
Софт для гаджетов
Можно инсталлировать специальное софт для iOS и Android. Софт обеспечивает:
– Моментальный старт
– Адаптированный графику
– Push-оповещения о предложениях
– Устойчивую производительность
Live казино: антураж настоящего казино
Секция Live развлечений переносит участников в среду настоящего зала. Квалифицированные крупье осуществляют игры в формате прямого времени.
Популярные Live-игры
– Европейская рулетка
– Двадцать одно
– Баккара
– Poker
Автоматы: выбор игр
Каталог азартных автоматов включает сотни позиций от ведущих производителей. Клиенты встретят:
– Обычные машины
– Видеослоты
– Накопительный приз-игры
– Мегавейс
Турниры и эксклюзивные события
Систематические турниры дают возможность игрокам конкурировать друг с другом за крупные выигрышные банки. Каждый состязание имеет свои условия включения и список чемпионов.
Варианты внесения и изъятия денег
Площадка поддерживает ряд финансовых систем:
– Кредитные карты
– Виртуальные платежные системы
– Blockchain-платежи
– Финансовые транзакции
Абсолютно все переводы осуществляются конфиденциально благодаря актуальным технологиям шифрования.
Сервис обслуживания
Компетентные специалисты службы помощи готовы ассистировать 24/7. Предусмотрены нижеперечисленные способы общения:
– Мгновенный-чат
– Email-поддержка
– Звонковая связь
– Публичные сети
Резюме
Легальный сайт игровой площадки и его функционирующие копии гарантируют игрокам надежный и удобный переход к обширному диапазону развлекательных развлечений. Солидные подарки, периодические кампании, профессиональная служба и легкие финансовые системы формируют игровой досуг максимально захватывающим и прибыльным.
harborwharf picks online – Well-laid-out pages and intuitive design create a smooth shopping experience.
Ivermectin Access USA: Ivermectin Access USA – Ivermectin Access USA
получить короткую ссылку google получить короткую ссылку google .
This casino https://dynamicmedicalcenter.pl/ offers a solid mix of classic slots and live dealer games. The platform feels well-designed, promotions are attractive, and support is responsive, which adds confidence.
Доступ к сайту и рабочие ссылки
Востребованные интернет казино предлагают игрокам большой ассортимент игр. Главный ресурс РР·Рё РљСЌС€ гарантирует стабильный подключение ко всем услугам. Тем не менее иногда появляются обстоятельства, когда требуется запасной путь авторизации.
Что представляет собой действующее зеркало
Рабочее зеркало — это точная копия главного сайта с альтернативным сетевым расположением. Зеркало сегодня позволяет избегать вероятные барьеры и поддерживать непрерывный доступ к популярным слотам.
Главное зеркало обладает идентичными функциями, что и основной сайт:
– Совокупный ассортимент развлечений
– Личный кабинет с записанными данными
– Актуальные бонусы и предложения
– Надежные финансовые операции
Регистрация и авторизация в казино
Процесс оформления на ресурсе отнимает буквально минут. Недавним пользователям необходимо:
1. Перейти на действующее зеркало в настоящее время
2. Кликнуть кнопку «Создать аккаунт»
3. Заполнить необходимые данные
4. Активировать цифровую почту или контакт мобильного
5. Получить бонус за создание профиля
Доступ в индивидуальный раздел реализуется путем ввод логина и секретной комбинации.
Описание наградной структуры
Привлекательная наградная структура — важнейшее достоинство игорного заведения. Клиенты зарабатывают многочисленные бонусы:
Вступительные награды
Начинающие участники имеют возможность надеяться на выгодный бонус за создание аккаунта. Обычно это пакет опций, объединяющий:
– Частичную прибавку к первому депозиту
– Безвозмездные кручения
– Призовые суммы на аккаунт
Промокоды и уникальные опции
Регулярные промокоды дают возможность получать призовые выгоды. Задействовать их можно в предназначенном окне персонального раздела.
Free spins и компенсация
Бесплатные спины — это способность играть игры без расходования личных финансов. Кэшбек представляет долевой компенсацию утраченных финансов.
Ассортимент слотов
Игровая площадка предлагает огромную библиотеку слотов.
Видеослоты
Многообразие автоматов поражает фантазию. Представлены классические 3-барабанные автоматы и продвинутые развлечения с захватывающей картинкой.
Live заведение
Зона Live заведения помещает игроков в обстановку реального развлекательного заведения. Профессиональные дилеры проводят раунды в реальном формате.
Соревнования и таблицы лидеров
Периодические соревнования обеспечивают драйва и дают возможность получить внушительные выигрыши.
Карманная вариант и приложение
Современные технологии дают возможность наслаждаться в любимом точке. Адаптивная версия независимо адаптируется под экран гаджета.
Получить приложение возможно для цифровых сред iOS и Android. Клиент дает:
– Скоростной запуск
– Устойчивую работу
– Моментальные-оповещения об промо
– Простой дизайн
Платежные действия
Платформа работает с различные способы внесения и снятия денег:
– Кредитные счета
– Электронные кошельки
– Криптовалюты
– Финансовые операции
Каждые действия выполняются через безопасное канал, что защищает сохранность конфиденциальных данных.
Служба support
Компетентная группа поддержки работает круглосуточно. Контактировать с консультантами возможно через:
– Онлайн-чат
– Электронную почту
– Телефон
– Общественные ресурсы
Резюме
Главный ресурс и его действующее зеркало гарантируют участникам надежный и легкий переход к захватывающим играм. Выгодные бонусы, широкий каталог игр и профессиональная поддержка формируют игру исключительно удобной и доходной.
Check Out the Latest Deals – The catalog offered plenty of new things to explore.
Современные онлайн-казино обеспечивают игрокам массу путей для приятной игры. Центральный портал Vodka Casino дарит доступ ко всем функциям и игровым автоматам. Однако при появлении технических неполадок на выручку прибывают функционирующие копии.
Что являет собой собой рабочее зеркало
Зеркало казино — это идентичная копия главного портала, размещенная по альтернативному адресу. Лицензионное зеркало хранит все характеристики, включая открытие профиля, вход в индивидуальный кабинет, премии и промокоды.
Копия на сегодня предоставляет:
– Непрерывный доступ к азартным автоматам
– Абсолютную конфиденциальность индивидуальных сведений
– Удержание средств и журнала платежей
– Возможность использования всех промо-предложений
Создание учетной записи на официальном ресурсе
Процедура создания аккаунта требует пару минут. Начинающим клиентам нужно:
1. Войти на главный портал или рабочее зеркало
2. Нажать кнопку «Создать аккаунт»
3. Ввести необходимые данные
4. Верифицировать электронную почту
5. Указать промокод при наличии
После финиша создания аккаунта клиенты зарабатывают вознаграждение за регистрацию, какой может содержать free spins или монетарное вознаграждение.
Авторизация в индивидуальный кабинет
Приватный кабинет предоставляет всесторонний управление над азартным процессом. Через персональный профиль разрешается:
– Депонировать депозит
– Забирать средства
– Активировать купоны
– Мониторить записи ставок
– Участвовать в турнирах
– Получать кешбэк
Характеристика поощрений и акций
Щедрая бонусная политика — существенное достоинство казино. Главные типы вознаграждений:
Вступительный приз
Новички получают великодушное поощрение на дебютные взносы. Величина премии может достигать 100-200% от величины взноса.
Фриспины
Даровые вращения предоставляются для топовых игровых автоматов. Число free spins разнится от 10 до 500 штук.
Кэшбек
Регулярный или ежемесячный откат процентной доли утраченных средств. Средний процент компенсации — 5-15%.
Конкурсы
Постоянные турниры с солидными призовыми банками. Игроки состязаются за призовые позиции в таблице лидеров.
Портативная версия и программа
Адаптивная версия позволяет развлекаться с всякого гаджета. Игроки могут загрузить app для iOS и Android или задействовать браузерную версию.
Плюсы мобильного софта:
– Быстрая подзагрузка автоматов
– Удобный интерфейс
– Push-уведомления о бонусах
– Вход через Face ID
Машины и Live казино
Развлекательная коллекция охватывает тысячи названий от известных провайдеров.
Популярные секции автоматов:
– Классические автоматы
– Видео-автоматы с призовыми этапами
– Накопительный приз игры
– Мегавейс слоты
Live игровой зал
Секция live игорный зал предоставляет развлечение с профессиональными ведущими. Есть классические варианты:
– Европейская рулетка
– Блэкджек
– Baccarat
– Техасский холдем
Как разыскать актуальное зеркало
Получить свежую URL на зеркало можно разными методами:
1. Оформить подписку на email-рассылку
2. Мониторить за новостями в соц сетях
3. Контактировать в службу поддержки
4. Добавить в закладки действующее зеркало в избранное
Заключение
Главный сайт и его рабочие копии предоставляют стабильный путь к игровым слотам. Выгодные премии, различные промокоды, удобное портативное программа и высококлассная сервис поддержки делают развлекательный процесс крайне комфортным и защищенным.
Hello!
Reveal king mysterious rules within interesting dynasties offering valuable power lessons and lead like royalty see on the website for royal archives
Full information on the link – https://33capy.site
All the best and development in business!
glimmercrate treasures – Easy-to-use design makes finding items a breeze.
seo продвижение трафику seo продвижение трафику .
Good afternoon!
Protect your mind with interesting mysterious facts that hold valuable truth always and strengthen your critical thinking see on the website for mental exercises
Full information on the link – https://33capy.site
All the best and development in business!
http://uspharmaindex.com/# legit pharmacy websites
Alpine Aisle Experience – Every visit is simple, pleasant, and reliably smooth.
Доступ к порталу через проверенные зеркала
Нынешние онлайн казино гарантируют пользователям бесперебойный переход к сервисам. Центральный ресурс казино Pinco действует надёжно, обеспечивая обширный спектр азартных игр. Впрочем периодически образуются технические проблемы или запреты, в связи с чем критично быть осведомлённым о доступности актуальных зеркал.
Что собой представляет из себя главное зеркало казино
Зеркало — это точная реплика центрального портала с аналогичным интерфейсом. Рабочее зеркало на данный момент обеспечивает преодолевать территориальные запреты и возобновлять времяпрепровождение.
Принципиальные выгоды задействования зеркал:
– Стопроцентный подключение к индивидуальному кабинету
– Сохранение всех сведений аккаунта
– Идентичный спектр автоматов
– Свежие привилегии и кампании
Создание аккаунта на платформе
Процесс записи длится пару минут. Недавние игроки обретают богатый приз за запись, который в состоянии охватывать:
– Вступительный денежный бонус
– Даровые вращения для слотов
– Уникальные промокоды
– Усиленный возврат
Ради окончания создания аккаунта нужно:
1. Войти на центральный ресурс или зеркало
2. Выбрать элемент «Зарегистрироваться»
3. Указать персональные сведения
4. Верифицировать мейл или контакт
5. Применить код (когда имеется доступности)
Доступ в индивидуальный кабинет
По завершении корректной создания аккаунта геймеры способны совершать вход используя центральный веб-сайт или функционирующее зеркало. Индивидуальный кабинет обеспечивает полный управление над профилем:
– Архив транзакций
– Внесение баланса
– Снятие выигрышей
– Регулирование поощрениями
– Вовлечение в соревнованиях
Награды и предложения казино
Портал награждает пользователей различными поощрительными системами:
Приветственные бонусы
Начинающие получают внушительный букет привилегий на первые пополнения. Обычно это предполагает процентную надбавку к величине депозита плюс комплиментарные фриспины.
Постоянные предложения
– Каждонедельный компенсация до 15%
– Конкурсы с премиальными фондами
– Подарки на дату рождения
– Специальные акции для привилегированных геймеров
Программа вознаграждения
Активные клиенты накапливают очки, которые возможно трансформировать на подлинные финансы или особые бонусы.
Карманная вариант и утилита
Современные решения обеспечивают развлекаться в любом месте комфортно. Мобильная вариант ресурса автономно адаптируется под размер произвольного устройства.
Достоинства портативного приложения:
– Оперативная загрузка автоматов
– Практичный дизайн
– Мгновенные-уведомления о предложениях
– Шанс установить для Android и iOS
Живое казино: среда подлинного развлекательного учреждения
Секция Live клуба транспортирует пользователей в антураж подлинного гемблинг клуба. Компетентные ведущие проводят развлечение в состоянии подлинного времени.
Предлагаемые игры:
– Европейская рулетка
– Карточная игра
– Баккара
– Покер
Слоты и азартные машины
Собрание развлекательных автоматов включает сотни наименований от передовых разработчиков. Произвольный клиент отыщет слот по душе:
– Классические слоты
– Видеослоты с призовыми этапами
– Крупный приз-автоматы
– Многолинейные машины
Конкурсы и лотереи
Постоянные конкурсы включают адреналин и открывают возможность выиграть большие призы. Присутствие в конкурсах нередко безвозмездное, а наградные суммы насчитывают внушительных величин.
Охрана и конфиденциальность
Портал задействует передовые методы защиты для защиты реквизитов геймеров. Совокупные денежные действия осуществляются через безопасные линии.
Резюме
Центральный веб-сайт и его рабочие зеркала обеспечивают надёжный доступ к качественным развлекательным развлечениям. Великодушные поощрения, эргономичная мобильная вариант, многообразие автоматов и компетентное Live-казино превращают платформу прекрасным решением для ценителей игровых развлечений.
Обзор главного веб-сайта
Современные интернет казино обеспечивают клиентам обширный ассортимент услуг и шансов. Официальный ресурс Мотор гарантирует надежный возможность к гемблинг функциям.
Действующее зеркало: путь прямо сейчас
Дублирующий портал представляет в качестве полную реплику основного портала. Действующее зеркало позволяет клиентам миновать потенциальные запреты.
Достоинства применения зеркала
Принципиальные преимущества содержат:
– Непрерывный путь к сайту
– Удержание всех возможностей официального ресурса
– Сохранность личных данных
– Равнозначный функционал
Открытие счета на ресурсе
Ход открытия счета отличается доступностью и удобством. Недавние участники должны:
1. Посетить главный портал или его зеркало
2. Кликнуть на кнопку открытия счета
3. Внести обязательные сведения
4. Валидировать электронную почту
5. Осуществить первый доступ
Вознаграждение за оформление
Начинающие забирают значительный вступительный приз. Данное премия в состоянии охватывать:
– Материальные бонусы
– Complimentary спины
– Расширенный коэффициент кэшбэка
Доступ в персональный профиль
Действующие игроки способны быстро авторизоваться в свой раздел, задействуя имя пользователя и шифр. Личный профиль обеспечивает путь к:
– Администрированию счетом
– Хронологии платежей
– Работающим поощрениям
– Конфигурации аккаунта
Бонусы и промо
Ресурс постоянно реализует многочисленные акции для пользователей.
Виды призов
Основные формы поощрений:
– Депозитные призы – доля от размера внесения
– Фриспины – даровые раунды в автоматах
– Кэшбек – возврат части утраченных средств
– Соревновательные призы – премии за участие в соревнованиях
Промокоды
Особые купоны помогают заработать дополнительные бонусы. Игроки способны найти их на партнерских ресурсах или получить в новостях.
Mobile версия и приложение
Передовые гемблеры предпочитают портативный гейминг.
Характеристики переносной системы
– Гибкий интерфейс для разнообразных аппаратов
– Совокупный вход к автоматам
– Стремительная загрузка
– Удобное навигация
Загрузить софт
Переносное app предоставлено для скачивания на гаджеты с рабочими ОС Android и iOS. Программа обеспечивает:
– Стабильную работу
– Пуш уведомления о бонусах
– Быстрый вход к желанным слотам
Развлекательный каталог
Казино предоставляет внушительную подборку азартных игр.
Аппараты
Ассортимент развлекательных слотов содержит:
– Стандартные слоты
– Современные игры
– Прогрессивные автоматы
– Branded игры
Live дилеры
Категория лайв игр обеспечивает возможность играть с профессиональными диллерами. Открыты:
– Рулетка
– Блэкджек
– Baccarat
– Техасский холдем
Конкурсы
Периодические конкурсы дают возможность игрокам состязаться за значительные денежные фонды. Соревновательная система обновляется постоянно.
Денежные операции
Сайт поддерживает обилие опций пополнения и получения финансов:
– Дебетовые карточки
– Виртуальные счета
– Межбанковские транзакции
– Криптовалюты
Абсолютно все платежи выполняются конфиденциально с использованием прогрессивных технологий кодирования.
Сервис support
Профессиональная отдел саппорта трудится постоянно. Обратиться с операторами реально через:
– Онлайн чат
– Почтовую почту
– Контактный номер
– Социальные платформы
Защита и лицензирование
Казино действует на базе действительной разрешения. Такое обеспечивает:
– Легальность развлекательного действа
– Охрану индивидуальных данных
– Оперативные выводы
– Регулируемый гейминг
Заключение
Главный веб-сайт и его рабочие альтернативные адреса обеспечивают клиентам целостный комплекс возможностей для безопасной и выгодной развлечений. Значительные подарки, многочисленные автоматы, профессиональная служба и защищенная инфраструктура выплат формируют ресурс идеальным опцией для любителей развлекательных игр.
Harbor Lark Boutique – Browsing is quick and smooth on phones and tablets alike.
Bloom Vendor Store – The assistance provided feels prompt and sincerely accommodating in difficult situations.
этот сайт https://tripscans64.cc
Explore the Collection – Updates come regularly and the latest arrivals are always easy to browse.
frostgalleria selections – Smooth pages and neat layout enhance the browsing experience.
Curated Collections – The site is simple to navigate, shopping is easy, and everything feels reliable.
Вход к ресурсу через действующие зеркала
Пользователи интернет казино нередко имеют дело с ситуацией недоступности основного домена. Конкретно для устранения этой ситуации предусмотрены альтернативные адреса легального портала. Cactus Casino гарантирует беспрепятственный переход ко всем возможностям ресурса.
Что такое актуальное зеркало казино
Копия является собой точную копию основного ресурса с таким же набором функций. Основное различие — это доменное имя. Абсолютно все сведения клиента, вместе с счет, привилегии и архив ставок, продолжают быть такими же.
Достоинства использования зеркал
Актуальные зеркала располагают комплексом важных выгод:
– Бесперебойный доступ к предпочитаемым развлечениям
– Полная конфиденциальность собственных параметров
– Сохранение всех параметров персонального кабинета
– Шанс приобретения наград и присутствия в предложениях
Создание аккаунта на основном ресурсе
Процесс создания аккаунта максимально легок и требует пару минут. Начинающие игроки имеют возможность претендовать на солидный вводный подарок за создание аккаунта.
Шаги формирования аккаунта
1. Переход на основной домен или его зеркало
2. Клик на элемент “Создать аккаунт”
3. Внесение необходимых данных
4. Активация почтовой почты
5. Указание купона (когда присутствует)
Подарки и промоакции для участников
Ресурс одаривает своих участников всевозможными поощрительными системами.
Базовые варианты призов
Вводный приз — щедрое поощрение для новых игроков, что может охватывать монетарные призы и free spins.
Фриспины — возможность крутить в топовых слотах бесплатно.
Кешбэк — процентный возмещение утраченных финансов, который именно зачисляется каждую неделю или каждый месяц.
Специальные коды — специальные комбинации, гарантирующие дополнительные преимущества.
Персональный кабинет: инструменты и конфигурации
Личный аккаунт дает абсолютный регулирование над игровым процессом. Тут имеются:
– Администрирование балансом
– Данные переводов
– Работающие поощрения
– Настройки охраны
– Проверка профиля
Портативная вариант и приложение
Нынешние пользователи ценят портативность. Ресурс дает 2 метода для ставок с портативных гаджетов.
Адаптивная телефонная версия
Адаптивная вариант портала самостоятельно подстраивается под монитор любого аппарата. Нет необходимости инсталлировать отдельное приложение.
APP для телефонов
Разрешено скачать специальное APP для iOS и Android. Софт дает:
– Моментальный вход
– Оптимизированный дизайн
– Мобильные-извещения о предложениях
– Бесперебойную операционность
Live раздел: среда реального клуба
Раздел Live столов отправляет участников в среду реального клуба. Квалифицированные хосты осуществляют игры в виде настоящего времени.
Популярные Live-игры
– Европейская рулетка
– 21
– Punto Banco
– Карибский покер
Игровые машины: разнообразие игр
Библиотека азартных машин вмещает тысячи наименований от лидирующих поставщиков. Клиенты встретят:
– Традиционные аппараты
– Видео-автоматы
– Мега-выигрыш-автоматы
– Megaways
Состязания и особые предложения
Регулярные турниры предоставляют шанс пользователям состязаться друг с другом за внушительные выигрышные пулы. Любой конкурс содержит свои требования участия и рейтинг призеров.
Методы ввода и вывода денег
Площадка поддерживает комплекс платежных методов:
– Платежные средства
– Онлайн счета
– Крипто
– Wire отправления
Все транзакции реализуются защищенно благодаря актуальным протоколам шифрования.
Служба support
Компетентные консультанты службы обслуживания настроены помочь 24/7. Предусмотрены такие методы коммуникации:
– Живой-чат
– Email-сервис
– Телефонная линия
– Медийные сети
Резюме
Официальный портал казино и его рабочие дубликаты гарантируют игрокам безопасный и легкий доступ к огромному выбору азартных развлечений. Внушительные награды, частые кампании, качественная сервис и комфортные финансовые способы делают игровой времяпрепровождение максимально захватывающим и доходным.
buy viagra here Cheap generic Viagra online Generic Viagra online
Описание основного сайта
Прогрессивные сетевые казино предлагают пользователям обширный набор игр и перспектив. Лицензионный портал EzCash зеркало гарантирует безопасный возможность к игровым возможностям.
Действующее зеркало: путь прямо сейчас
Зеркало является в качестве точную реплику лицензионного веб-сайта. Проверенное зеркало позволяет игрокам миновать возможные барьеры.
Плюсы эксплуатации зеркала
Принципиальные преимущества включают:
– Стабильный доступ к платформе
– Хранение полных возможностей основного ресурса
– Сохранность индивидуальных материалов
– Аналогичный инструментарий
Оформление профиля на сайте
Процесс регистрации характеризуется понятностью и эргономичностью. Новые игроки требуется:
1. Зайти на официальный портал или его зеркало
2. Щелкнуть на клавишу регистрации
3. Ввести требуемые данные
4. Активировать email ящик
5. Совершить первый доступ
Подарок за открытие счета
Начинающие зарабатывают щедрый приветственный приз. Это премия может содержать:
– Финансовые суммы
– Даровые вращения
– Увеличенный показатель компенсации
Доступ в персональный аккаунт
Существующие клиенты способны оперативно авторизоваться в личный раздел, эксплуатируя учетные данные и код. Персональный аккаунт обеспечивает шанс к:
– Контролю депозитом
– Хронологии платежей
– Текущим подаркам
– Опциям профиля
Вознаграждения и кампании
Портал систематически проводит всевозможные промо-кампании для игроков.
Виды подарков
Базовые виды призов:
– Пополнительные бонусы – доля от суммы взноса
– Спины – даровые прокруты в аппаратах
– Кэшбэк – компенсация процента потерянных денег
– Турнирные трофеи – награды за состязание в турнирах
Ваучеры
Эксклюзивные ваучеры дают возможность заработать бонусные выгоды. Пользователи имеют возможность отыскать их на специализированных ресурсах или заработать в новостях.
Mobile адаптация и приложение
Актуальные пользователи предпочитают мобильный гейминг.
Возможности переносной платформы
– Отзывчивый дизайн для всех гаджетов
– Абсолютный доступ к развлечениям
– Быстрая подгрузка
– Удобное навигация
Установить приложение
Mobile софт предложено для загрузки на девайсы с базовыми платформами Android и iOS. Софт гарантирует:
– Надежную работу
– Мгновенные сообщения о предложениях
– Быстрый вход к любимым слотам
Азартный каталог
Казино обеспечивает богатую галерею гемблинг услуг.
Автоматы
Ассортимент азартных слотов насчитывает:
– Классические игры
– Видео автоматы
– Джекпотные машины
– Тематические слоты
Live игры
Категория настоящих развлечений предоставляет опцию участвовать с реальными дилерами. Доступны:
– Европейская рулетка
– Очко
– Баккара
– Покер
Турниры
Периодические соревнования позволяют клиентам состязаться за солидные финансовые фонды. Соревновательная сетка актуализируется еженедельно.
Платежные транзакции
Платформа предоставляет множество вариантов внесения и вывода денег:
– Банковские карты
– Цифровые счета
– Банковские трансферы
– Крипто
Абсолютно все платежи производятся безопасно с использованием актуальных методов защиты.
Служба поддержки
Профессиональная группа саппорта работает постоянно. Соединиться с менеджерами доступно через:
– Online чат
– Почтовую почту
– Контактный номер
– Соц платформы
Защита и лицензирование
Казино функционирует на базе официальной разрешения. Такое удостоверяет:
– Легальность азартного процесса
– Безопасность конфиденциальных сведений
– Своевременные выплаты
– Регулируемый геймплей
Резюме
Официальный веб-сайт и его рабочие альтернативные адреса дают игрокам целостный ассортимент возможностей для безопасной и прибыльной досуга. Значительные призы, всевозможные слоты, опытная служба и проверенная система операций превращают ресурс оптимальным выбором для ценителей игровых игр.
fireflyvendor – Navigation feels effortless and the site looks very organized.
Good afternoon!
Curate habit mysterious loops with interesting and valuable self improvement impact and break bad cycles forever see on the website for habit trackers
Full information on the link – https://800letekas.site
All the best and development in business!
Доступ к порталу через действующие зеркала
Актуальные виртуальные казино предоставляют игрокам круглосуточный вход к развлечениям. Главный сайт Мотор сайт функционирует надёжно, предоставляя обширный спектр гемблинг развлечений. Но периодически образуются технические препятствия или ограничения, следовательно существенно иметь представление о присутствии функционирующих зеркал.
Что собой представляет из себя основное зеркало казино
Дубликат — это идентичная копия основного портала с идентичным набором функций. Функционирующее зеркало сейчас даёт возможность преодолевать региональные запреты и возобновлять времяпрепровождение.
Основные плюсы эксплуатации зеркал:
– Абсолютный переход к личному кабинету
– Фиксация совокупных показателей профиля
– Аналогичный перечень слотов
– Текущие поощрения и промо
Открытие счёта на платформе
Операция создания аккаунта занимает считанные минут. Новые игроки обретают привлекательный приз за создание счёта, который имеет возможность включать:
– Начальный денежный подарок
– Даровые кручения для игр
– Специальные коды
– Усиленный кешбэк
Для финализации оформления необходимо:
1. Переместиться на официальный сайт или копию
2. Нажать клавишу «Зарегистрироваться»
3. Указать индивидуальные данные
4. Подтвердить email или контакт
5. Использовать промокод (при доступности)
Подключение в индивидуальный кабинет
Вслед за удачной создания аккаунта клиенты в состоянии выполнять подключение используя официальный веб-сайт или рабочее зеркало. Индивидуальный кабинет предоставляет абсолютный управление над учётной записью:
– Архив пари
– Пополнение кошелька
– Изъятие средств
– Регулирование поощрениями
– Участие в конкурсах
Поощрения и промо казино
Портал радует пользователей многочисленными привилегированными программами:
Приветственные бонусы
Дебютанты зарабатывают щедрый пакет наград на стартовые пополнения. Зачастую это содержит процентную надбавку к размеру взноса плюс комплиментарные вращения.
Регулярные кампании
– Каждонедельный кешбэк до 15%
– Состязания с выигрышными пулами
– Подарки на число рождения
– Особые предложения для статусных игроков
План верности
Постоянные геймеры собирают пункты, что допустимо превратить на настоящие призы или специальные привилегии.
Карманная форма и приложение
Актуальные разработки позволяют развлекаться в любом месте подходяще. Карманная вариант сайта автоматически приспосабливается под экран каждого девайса.
Достоинства портативного софта:
– Оперативная подгрузка развлечений
– Удобный вид
– Моментальные-сообщения о промо
– Опция загрузить для Android и iOS
Реальное казино: атмосфера истинного развлекательного заведения
Область Live клуба погружает клиентов в обстановку истинного игорного дома. Опытные крупье проводят игру в режиме настоящего времени.
Предлагаемые игры:
– Американская рулетка
– Двадцать одно
– Классика
– Покер
Автоматы и развлекательные машины
Каталог азартных автоматов охватывает массу позиций от ведущих провайдеров. Всякий геймер найдёт игру по душе:
– Стандартные автоматы
– Видеослоты с бонусными уровнями
– Накопительный-автоматы
– Динамические слоты
Турниры и лотереи
Постоянные турниры вносят остроту и обеспечивают опцию выиграть большие суммы. Вовлечение в состязаниях зачастую комплиментарное, а выигрышные фонды составляют значительных размеров.
Охрана и конфиденциальность
Сайт применяет актуальные системы защиты для защиты реквизитов игроков. Каждые транзакционные действия осуществляются через охраняемые линии.
Вывод
Основной сайт и его действующие зеркала предоставляют устойчивый вход к качественным развлекательным играм. Великодушные поощрения, удобная мобильная форма, вариативность машин и квалифицированное Live-игорный дом формируют сайт замечательным опцией для ценителей гемблинг развлечений.
Подключение к платформе через проверенные зеркала
Нынешние сетевые казино обеспечивают клиентам круглосуточный доступ к играм. Центральный сайт Кешер действует стабильно, обеспечивая богатый выбор азартных игр. Впрочем порой образуются технические трудности или запреты, следовательно необходимо понимать о существовании актуальных зеркал.
Что представляет из себя официальное зеркало казино
Альтернатива — это точная дубликат главного веб-сайта с схожим интерфейсом. Рабочее зеркало в настоящее время обеспечивает миновать территориальные блокировки и возобновлять развлечения.
Главные выгоды эксплуатации зеркал:
– Стопроцентный переход к личному кабинету
– Поддержание всех показателей учётной записи
– Аналогичный ассортимент слотов
– Свежие бонусы и кампании
Создание аккаунта на платформе
Процедура регистрации длится несколько минут. Начинающие пользователи получают щедрый поощрение за запись, что может охватывать:
– Вступительный денежный приз
– Бесплатные кручения для игр
– Эксклюзивные купоны
– Усиленный компенсацию
Ради завершения оформления требуется:
1. Переместиться на основной портал или зеркало
2. Щёлкнуть опцию «Оформиться»
3. Указать персональные сведения
4. Верифицировать почтовый адрес или номер
5. Активировать купон (если есть присутствии)
Доступ в персональный кабинет
После правильной оформления пользователи могут выполнять вход через официальный портал или рабочее зеркало. Собственный кабинет предоставляет всесторонний управление над профилем:
– Журнал транзакций
– Ввод депозита
– Изъятие выигрышей
– Регулирование поощрениями
– Присутствие в турнирах
Награды и кампании казино
Сайт удовлетворяет игроков разнообразными привилегированными программами:
Стартовые бонусы
Новые игроки приобретают великодушный пакет наград на первые взносы. Типично это содержит пропорциональную надбавку к сумме взноса плюс бесплатные кручения.
Постоянные промо
– Раз в неделю компенсация до 15%
– Турниры с призовыми пулами
– Призы на день рождения
– Уникальные акции для привилегированных геймеров
Система поощрения
Деятельные геймеры зарабатывают очки, что разрешено обменять на подлинные средства или эксклюзивные льготы.
Портативная форма и программа
Нынешние решения помогают геймить всюду комфортно. Карманная редакция веб-сайта самостоятельно настраивается под монитор любого девайса.
Достоинства портативного софта:
– Скоростная подгрузка автоматов
– Эргономичный интерфейс
– Всплывающие-уведомления о предложениях
– Опция установить для Android и iOS
Настоящее казино: среда реального азартного клуба
Секция Live казино транспортирует геймеров в антураж подлинного развлекательного клуба. Компетентные операторы ведут процесс в формате актуального времени.
Представленные игры:
– Колесо фортуны
– Блэкджек
– Punto Banco
– Покер
Игровые машины и гемблинг слоты
Коллекция азартных слотов включает множество вариантов от передовых провайдеров. Произвольный игрок отыщет автомат по душе:
– Традиционные барабаны
– Новые слоты с специальными этапами
– Джекпот-автоматы
– Megaways игры
Турниры и акции
Постоянные состязания вносят адреналин и открывают шанс заработать значительные вознаграждения. Включение в конкурсах нередко даровое, а наградные фонды доходят до крупных величин.
Защита и приватность
Платформа использует передовые протоколы криптографии для охраны данных клиентов. Любые платёжные транзакции проходят через безопасные соединения.
Вывод
Основной портал и его действующие зеркала предоставляют надёжный подключение к качественным развлекательным играм. Богатые награды, комфортная смартфонная версия, богатство слотов и компетентное Live-заведение превращают сайт отличным решением для фанатов гемблинг развлечений.
rsmeds htts://rsmeds.top/# buy dapoxetine pills
монтаж газового пожаротушения сертифицированными специалистами montazh-gazovogo-pozharotusheniya-1.ru .
driftaisle curated shop – Everything is neatly arranged and navigating through the site is effortless.
official featherfind site – Navigation is intuitive and the design is simple and pleasant.
Актуальные онлайн-казино предоставляют пользователям богатый диапазон вариантов для удобной игры. Переход к платформе Cactus Casino реализуется через лицензионный портал или функционирующее зеркало.
Что такое функционирующее зеркало казино
Рабочее зеркало — это резервный адрес официального веб-сайта казино. Такие дубликаты формируются для гарантирования непрерывного входа к гемблинговой платформе.
Дубликат текущее абсолютно дублирует характеристики главного портала. Пользователи имеют схожий путь ко всем сервисам, включая регистрацию, внесение депозита депозита и обналичивание средств.
Оформление профиля на лицензионном портале
Процесс создания аккаунта занимает всего буквально моментов. Новым пользователям необходимо:
1. Перейти на основной сайт или актуальное подлинное зеркало
2. Щелкнуть кнопку “Регистрация”
3. Указать требуемые реквизиты
4. Верифицировать e-mail почту
5. Применить код активации при существовании
После окончания открытия профиля пользователь обретает вознаграждение за регистрацию, который способен содержать даровые спины или cash премию.
Доступ в собственный кабинет
Индивидуальный кабинет — это закрытая зона, где клиенты имеют возможность администрировать своим профилем. Для авторизации следует напечатать имя пользователя и код доступа.
В личном кабинете доступны данные функции:
– Проверка записей транзакций
– Задействование бонусных кодов
– Управление вознаграждениями
– Включение в турнирах
– Проверка возврата средств
– Изменение данных
Призы и предложения
Гемблинговая платформа обеспечивает щедрые бонусы:
Приветственный пакет — новые игроки приобретают солидное вознаграждение на первые взносы.
Фриспины — предоставляются как при создании аккаунта, так и в процессе многочисленных кампаний.
Возврат средств — еженедельный компенсация части израсходованных средств.
Коды активации — особые шифры, дающие возможность к уникальным предложениям.
Характеристика азартных категорий
Slots
Библиотека автоматов содержит множество игр от передовых производителей. Геймеры обнаружат как классические слоты, так и современные видео-слоты с захватывающей графикой.
Live казино
Раздел Live казино обеспечивает возможность развлекаться с действующими ведущими в состоянии реального времени. Открыты распространенные варианты: рулетка, блэкджек, баккара, покер.
Конкурсы
Регулярные состязания с значительными премиальными пулами привлекают тысячи участников. Лидеры зарабатывают монетарные вознаграждения и эксклюзивные бонусы.
Смартфонная версия и софт
Мобильная версия ресурса позволяет играть с каждого гаджета. Оформление автоматически адаптируется под диагональ экрана.
Установить приложение можно для гаджетов на Android и iOS. Мобильное ПО характеризуется всеми опциями компьютерной версии.
Как отыскать действующее зеркало на сейчас
Актуальные линки копий регулярно меняются. Обнаружить свежую URL можно разными методами:
– Через отдел помощи
– В проверенных новостных сетях
– По почтовой подписке
– На специализированных площадках
Охрана и легальность
Главный домен работает на основании глобальной лицензии. Все транзакции защищены актуальными методами кодирования.
Секретность персональных данных сохраняется в стопроцентном объеме.
Итог
Главный сайт и его действующие альтернативы дарят игрокам 24/7 доступ к первоклассным азартным играм. Щедрые вознаграждения, многочисленные слоты, компетентная служба — все это формирует азартный времяпрепровождение максимально удобным и увлекательным.
Generic Viagra online: Sildenafil Price Guide – sildenafil over the counter
Обзор официального ресурса
Современное онлайн-казино обеспечивает своим участникам широкий спектр игр и призов. Оригинальный веб-сайт Cactus Casino действует 24/7, предоставляя путь к востребованным слотам, live-казино и многим предложениям.
Рабочее зеркало: путь к сайту
Что такое копия казино
Дубликат представляет собой абсолютную копию основного веб-сайта с другим сетевым путем. Функционирующее зеркало позволяет клиентам преодолевать барьеры и обеспечивать непрерывный подключение к излюбленным играм.
Как отыскать актуальное зеркало сегодня
Рабочие адреса на главное зеркало выкладываются через:
– E-mail рассылку
– Основные коммуникационные сети
– Сервис обслуживания
– Специализированные порталы
Открытиесчета на портале
Процедура открытиясчета
Оформление длится всего минут и предполагает такие действия:
1. Доступ на оригинальный ресурс или функционирующее зеркало
2. Клик клавиши “Создатьаккаунт”
3. Ввод учетных реквизитов
4. Проверка электроннойпочты или номера
5. Формирование кодадоступа
Подарок за открытиесчета
Свежие пользователи получают щедрые стартовые бонусы:
– Финансовые депозиты на кошелек
– Халявныеспины для симуляторов
– Увеличенный объем кешбэка
– Уникальные купоны
Логин в собственный кабинет
Зарегистрированные клиенты могут произвести логин через официальный сайт или текущее зеркало. Для этого требуется внести учетноеимя и пароль, придуманные при оформлении.
Инструменты собственного кабинета
В личном профиле открыты данные возможности:
– Изменение учетными данными
– Зачисление депозита
– Вывод средств
– Применение кодов
– Просмотр статистики операций
– Включение в состязаниях
Подарки и акции
Типы бонусов
Казино награждает своих участников всевозможными наградными предложениями:
– Стартовый пакет — солидные подарки на первые депозиты
– Бесплатныевращения — подарочные вращения в рейтинговых автоматах
– Кешбэк — еженедельный откат доли убытков
– Схема VIP — особые льготы для верных пользователей
Промокоды и их использование
Особые промокоды гарантируют дополнительные вознаграждения. Для активации необходимо внести комбинацию в специальное графу в собственном аккаунте.
Игровой ассортимент
Симуляторы
База слотовых слотов содержит множество вариантов от топовых провайдеров:
– Стандартные автоматы
– Новые автоматы
– Призовые симуляторы
– Лицензионные слоты
Live казино
Область Live-казино дарит участие с профессиональными операторами в формате прямого эфира:
– Рулетка
– Очко
– Баккара
– Casinopoker
Состязания
Систематические конкурсы с солидными призовыми фондами проводятся еженедельно. Соревнующиеся соревнуются за первенство в рейтинге.
Смартфонная версия и программа
Mobile версия веб-сайта
Официальный ресурс целиком оптимизирован для смартфонных устройств. Пользователи имеютвозможность играть слоты непосредственно через обозреватель без обязательства установки.
Программа для установки
Авторское портативное APP предоставляется для получения на аппараты с операционными системами Android и iOS. Приложение обеспечивает:
– Оперативный вход к автоматам
– Стабильную работу
– Push-извещения о промо
– Простой навигацию
Итог
Официальный веб-сайт казино и его действующие зеркала предоставляют пользователям комплексный возможность к первоклассным игровым услугам. Большие вознаграждения, различные акции, удобная мобильная реализация и опытная помощь превращают развлекательный процесс чрезвычайно приятным и доходным.
посмотреть в этом разделе https://tripscans64.cc/
Подключение к сайту через проверенные зеркала
Игроки сетевых казино часто имеют дело с ситуацией ограничения базового портала. Как раз для преодоления этой трудности существуют копии основного домена. Вилдер казино дает полный переход ко всем функциям казино.
Что такое действующее зеркало казино
Зеркало значит собой идентичную реплику оригинального ресурса с таким же набором функций. Главное различие — это другое имя. Каждые данные участника, в том числе средства, поощрения и данные ставок, продолжают быть прежними.
Выгоды использования зеркал
Рабочие зеркала характеризуются комплексом значимых достоинств:
– Бесперебойный подключение к любимым автоматам
– Полная безопасность индивидуальных сведений
– Сохранение всех опций индивидуального кабинета
– Способность взятия бонусов и присутствия в промоакциях
Создание аккаунта на основном сайте
Процедура оформления крайне элементарен и длится пару минут. Свежие клиенты в состоянии претендовать на крупный вводный приз за регистрацию.
Стадии формирования аккаунта
1. Подключение на главный ресурс или его зеркало
2. Клик на клавишу “Зарегистрироваться”
3. Заполнение необходимых параметров
4. Активация цифровой почты
5. Ввод кода (в случае есть)
Поощрения и предложения для игроков
Казино одаривает своих пользователей всевозможными призовыми акциями.
Основные виды поощрений
Приветственный пакет — внушительное поощрение для недавних участников, которое способно содержать денежные бонусы и free spins.
Фриспины — возможность запускать в известных игровых машинах без затрат.
Возврат средств — долевой возврат утраченных финансов, каковой выплачивается еженедельно или каждый месяц.
Купоны — эксклюзивные последовательности, предоставляющие добавочные выгоды.
Пользовательский кабинет: возможности и параметры
Личный кабинет гарантирует исчерпывающий управление над пользовательским активностью. В нем предусмотрены:
– Регулирование счетом
– Архив платежей
– Работающие поощрения
– Параметры защиты
– Подтверждение аккаунта
Мобильная версия и софт
Актуальные игроки признают мобильность. Ресурс предлагает два способа для развлечений с портативных девайсов.
Отзывчивая портативная вариант
Смартфонная платформа домена автономно адаптируется под экран любого гаджета. Нет необходимости скачивать особое приложение.
Софт для телефонов
Разрешено загрузить фирменное софт для iOS и Android. APP гарантирует:
– Быстрый старт
– Доработанный интерфейс
– Всплывающие-уведомления о бонусах
– Устойчивую функциональность
Live развлечения: атмосфера подлинного клуба
Секция Live развлечений транспортирует участников в атмосферу настоящего клуба. Профессиональные хосты осуществляют партии в формате прямого времени.
Топовые Live-игры
– Американская рулетка
– Двадцать одно
– Баккара
– Техасский холдем
Аппараты: разнообразие автоматов
Коллекция азартных слотов содержит тысячи вариантов от топовых провайдеров. Клиенты обнаружат:
– Обычные машины
– Видео-автоматы
– Джекпот-слоты
– Слоты с множественными линиями
Турниры и эксклюзивные акции
Периодические конкурсы позволяют клиентам бороться друг с другом за крупные денежные банки. Каждый турнир имеет свои требования вовлечения и рейтинг лидеров.
Пути ввода и вывода средств
Площадка поддерживает массу финансовых методов:
– Банковские картыы
– Электронные сервисы
– Цифровые валюты
– Банковские переводы
Абсолютно все транзакции осуществляются надежно благодаря новейшим протоколам кодирования.
Сервис support
Компетентные сотрудники службы помощи расположены содействовать 24/7. Доступны нижеперечисленные методы общения:
– Онлайн-чат
– Email-обслуживание
– Звонковая линия
– Коммуникационные сети
Итог
Официальный сайт игровой площадки и его функционирующие дубликаты дают пользователям надежный и легкий переход к широкому ассортименту геймерских игр. Солидные бонусы, постоянные акции, качественная поддержка и комфортные платежные методы превращают развлекательный времяпрепровождение предельно приятным и прибыльным.
Подключение к порталу и функционирующие адреса
Популярные виртуальные казино предоставляют пользователям огромный набор развлечений. Главный портал Лаки Ворлд гарантирует надежный переход ко всем функциям. Впрочем временами возникают обстоятельства, когда нужно запасной способ входа.
Что являет собой собой функционирующее зеркало
Рабочее зеркало — это полная копия легального сайта с запасным доменным именем. Дубликат сегодня дает возможность обходить потенциальные запреты и поддерживать постоянный доступ к предпочитаемым играм.
Проверенное зеркало имеет полными функциями, что и центральный портал:
– Совокупный список игр
– Персональный профиль с зафиксированными информацией
– Все поощрения и программы
– Надежные финансовые действия
Оформление и подключение в платформу
Процедура открытия аккаунта на сайте занимает пару минут. Новым клиентам следует:
1. Перейти на действующее зеркало сегодня
2. Щелкнуть клавишу «Зарегистрироваться»
3. Ввести требуемые информацию
4. Активировать цифровую почту или информацию смартфона
5. Активировать награду за создание профиля
Подключение в собственный профиль реализуется посредством ввод имени пользователя и ключа.
Обзор наградной структуры
Богатая бонусная структура — главное плюс ресурса. Пользователи зарабатывают различные награды:
Стартовые подарки
Начинающие участники способны претендовать на выгодный поощрение за открытие профиля. Чаще всего это совокупность опций, содержащий:
– Пропорциональную надбавку к начальному пополнению
– Бесплатные спины
– Дополнительные суммы на счет
Кодовые комбинации и специальные возможности
Периодические промокоды дают возможность зарабатывать призовые льготы. Применить их возможно в предназначенном окне собственного аккаунта.
Free spins и компенсация
Бесплатные спины — это возможность крутить барабаны без использования своих денег. Рибейт представляет процентный возврат утраченных денег.
Ассортимент игр
Игровая площадка предлагает значительную библиотеку автоматов.
Слоты
Вариативность аппаратов впечатляет ожидания. Имеются обычные трехбарабанные машины и новые видеослоты с захватывающей визуализацией.
Live игры
Раздел Live развлечений погружает участников в атмосферу реального гемблинг заведения. Умелые дилеры организуют раунды в онлайн эфире.
Соревнования и рейтинги
Систематические соревнования вносят драйва и дают шанс забрать большие суммы.
Mobile форма и клиент
Актуальные разработки позволяют развлекаться в любом точке. Портативная реализация независимо настраивается под монитор аппарата.
Установить клиент можно для мобильных систем iOS и Android. Клиент гарантирует:
– Быстрый запуск
– Стабильную функционирование
– Мгновенные-сообщения об предложениях
– Удобный облик
Денежные транзакции
Ресурс поддерживает всевозможные системы пополнения и снятия сумм:
– Пластиковые инструменты
– Виртуальные сервисы
– Токены
– Денежные отправки
Каждые переводы выполняются через надежное протокол, что гарантирует целостность персональных данных.
Департамент ассистанса
Квалифицированная служба помощи действует круглосуточно. Связаться с операторами возможно через:
– Live-чат
– Электронную почту
– Связь
– Социальные ресурсы
Итоги
Легальный веб-сайт и его функционирующее зеркало дают игрокам надежный и приятный путь к увлекательным забавам. Богатые бонусы, широкий ассортимент развлечений и качественная ассистанс обеспечивают игру максимально интересной и доходной.
stackable – Navigation felt smooth, found everything quickly without any confusing steps.
stonebridgeadvisors.bond – Modern and structured, messaging emphasizes clarity and confidence across all pages.
harborwharf browse – Fast-loading pages and structured layout make shopping simple.
furkidsboutique – The items are super cute and browsing through them was a joy.
byteworks – Pages loaded fast, images appeared sharp, and formatting stayed consistent.
https://sildenafilpriceguide.com/# viagra canada
Обзор оригинального веб-сайта
Передовое онлайн-казино дарит своим участникам разнообразный выбор возможностей и бонусов. Основной сайт казино Кешер работает непрерывно, гарантируя возможность к популярным играм, live-казино и многочисленным предложениям.
Рабочее зеркало: доступ к платформе
Что такое копия казино
Дубликат является собой точную дубликат основного ресурса с отличным URL адресом. Функционирующее зеркало предоставляет игрокам преодолевать ограничения и получать постоянный вход к выбранным развлечениям.
Как найти действующее зеркало сегодня
Действующие ссылки на проверенное зеркало публикуются через:
– Email подписку
– Основные публичные сети
– Отдел сопровождения
– Affiliated ресурсы
Созданиеаккаунта на портале
Процедура созданияаккаунта
Открытиесчета длится пару минут и включает следующие действия:
1. Открытие на оригинальный ресурс или актуальное зеркало
2. Клик клавиши “Открытьсчет”
3. Ввод персональных данных
4. Активация электроннойпочты или телефона
5. Создание ключа
Вознаграждение за открытиесчета
Новые клиенты приобретают выгодные стартовые бонусы:
– Денежные средства на баланс
– Бесплатныевращения для слотов
– Повышенный размер кэшбека
– Эксклюзивные купоны
Вход в собственный профиль
Постоянные игроки могут произвести авторизацию через оригинальный ресурс или актуальное зеркало. Для этого необходимо указать никнейм и пароль, сформированные при оформлении.
Инструменты личного профиля
В персональном аккаунте открыты такие возможности:
– Управление учетными реквизитами
– Зачисление депозита
– Снятие призов
– Ввод бонусов
– Мониторинг истории игр
– Регистрация в состязаниях
Бонусы и кампании
Категории вознаграждений
Казино поощряет своих игроков многочисленными бонусными акциями:
– Стартовый бонус — солидные подарки на начальные депозиты
– Бесплатныевращения — дополнительные прокруты в рейтинговых играх
– Кэшбек — периодический возмещение части проигрышей
– Программа VIP — уникальные преимущества для верных клиентов
Промокоды и их применение
Специальные ваучеры гарантируют экстра поощрения. Для использования требуется ввести код в нужное поле в личном аккаунте.
Игровой каталог
Симуляторы
Коллекция азартных симуляторов вмещает тысячи наименований от лучших производителей:
– Стандартные слоты
– Новые развлечения
– Джекпот автоматы
– Тематические развлечения
Live казино
Зона Live-казино предоставляет взаимодействие с профессиональными ведущими в обстановке прямого времени:
– Французскаярулетка
– Двадцатьодно
– Baccarat
– Casinopoker
Турниры
Регулярные соревнования с крупными призовыми призами проводятся ежедневно. Участники конкурируют за призовыеместа в списке.
Портативная реализация и программа
Адаптивная платформа ресурса
Оригинальный веб-сайт целиком настроен для портативных девайсов. Клиенты могут пользоваться развлечения прямо через браузер без нужды инсталляции.
Софт для скачивания
Авторское карманное программа доступно для скачивания на аппараты с рабочими средами Android и iOS. Приложение обеспечивает:
– Моментальный путь к играм
– Стабильную производительность
– Мгновенные-извещения о бонусах
– Простой интерфейс
Заключение
Оригинальный сайт казино и его рабочие копии гарантируют пользователям полный путь к высококлассным игровым развлечениям. Щедрые поощрения, всевозможные акции, комфортная портативная версия и квалифицированная поддержка создают развлекательный опыт крайне приятным и выгодным.
gladegoods hub – Layout is tidy, and finding products is effortless.
Нынешние онлайн-казино предлагают пользователям широкий диапазон возможностей для беспроблемной времяпрепровождения. Подключение к сервису VodkaCasino выполняется через официальный домен или актуальное зеркало.
Что такое рабочее зеркало казино
Функционирующее зеркало — это резервный адрес главного веб-сайта казино. Такие клоны генерируются для поддержания стабильного входа к игровой площадке.
Альтернатива сегодня совершенно повторяет возможности главного домена. Геймеры имеют аналогичный выход ко всем услугам, включая создание аккаунта, финансирование счета и обналичивание призов.
Открытие счета на главном сайте
Алгоритм оформления учетной записи занимает всего считанные моментов. Начинающим игрокам нужно:
1. Попасть на основной домен или рабочее подлинное зеркало
2. Кликнуть кнопку “Открыть счет”
3. Указать обязательные данные
4. Активировать электронную почту
5. Использовать купон при существовании
После финализации открытия профиля клиент обретает вознаграждение за регистрацию, который может включать фриспины или финансовое вознаграждение.
Вход в собственный кабинет
Личный кабинет — это охраняемая зона, где игроки могут регулировать своим учетной записью. Для авторизации следует внести логин и пароль.
В личном кабинете открыты данные функции:
– Просмотр журнала операций
– Задействование бонусных кодов
– Контроль призами
– Включение в соревнованиях
– Отслеживание кэшбэка
– Изменение профиля
Поощрения и акции
Развлекательная система предоставляет выгодные вознаграждения:
Начальный комплект — новички приобретают значительное начисление на дебютные вклады.
Фриспины — предоставляются как при регистрации, так и в рамках всевозможных кампаний.
Возмещение — систематический рефанд фрагмента израсходованных сумм.
Купоны — особые шифры, открывающие доступ к эксклюзивным бонусам.
Анализ игровых категорий
Игровые автоматы
Библиотека аппаратов насчитывает тысячи наименований от лучших разработчиков. Геймеры встретят как обычные слоты, так и инновационные видеослоты с интересной анимацией.
Live казино
Категория Live казино дарит право участвовать с настоящими крупье в условиях настоящего времени. Представлены известные столы: рулетка, блэкджек, баккара, покер.
Конкурсы
Регулярные чемпионаты с крупными призовыми банками завлекают тысячи конкурсантов. Призеры обретают денежные выплаты и уникальные подарки.
Мобильная версия и app
Телефонная версия платформы обеспечивает играть с любого аппарата. Оформление автоматически подстраивается под габариты экрана.
Загрузить app можно для гаджетов на Android и iOS. Портативное ПО располагает всеми опциями компьютерной версии.
Как определить рабочее зеркало на сегодня
Актуальные адреса копий периодически меняются. Узнать рабочую URL можно различными методами:
– Через службу помощи
– В официальных новостных сетях
– По почтовой newsletter
– На аффилиатных сайтах
Надежность и официальность
Официальный домен действует на фундаменте зарубежной документа. Все платежи охраняются современными протоколами кодирования.
Приватность пользовательских информации поддерживается в абсолютном объеме.
Вывод
Лицензионный портал и его актуальные дубликаты обеспечивают игрокам постоянный доступ к качественным гемблинговым играм. Щедрые поощрения, разнообразные игры, профессиональная поддержка — все это делает азартный времяпрепровождение чрезвычайно приятным и притягательным.
Supply Symphony Hub – Wide selection and the site navigation is easy.
Honestly, this whole situation still feels unbelievable telling this story today.
Not long ago, I got totally consumed in online games –
Apex Legends. I wanted to climb ranks fast, and I didn’t want to rely on skill alone.
One evening, I stumbled across a forum thread talking about scripts.
At first I just read out of curiosity, but the more I scrolled, the more it felt
like a hidden shortcut.
Commenters were flexing showing how they climbed from low ranks to high ones in days.
It looked effortless. And of course, none of it was real.
To be honest, I actually got close to buying something.
One seller even messaged me privately. That’s when the
real consequences showed up.
I found threads from players who lost their accounts. Some even wrote how their bank info got stolen. The shock snapped
me out of it.
Instead of cheating, I walked away and focused on improving the legitimate way.
Now, when I see people chasing cheats, I just think: it’s never worth it.
Hopefully this story saves someone else time.
Доступ к сайту и рабочие зеркала
Востребованные сетевые казино предоставляют участникам большой выбор опций. Главный сайт Тейкер гарантирует защищенный доступ ко всем функциям. Однако иногда происходят обстоятельства, когда требуется альтернативный метод подключения.
Что представляет собой действующее зеркало
Актуальное зеркало — это абсолютная копия официального веб-сайта с альтернативным доменным адресом. Зеркало сегодня помогает миновать потенциальные блокировки и обеспечивать непрерывный переход к выбранным играм.
Главное зеркало характеризуется всеми функциями, что и центральный сайт:
– Полный перечень игр
– Персональный аккаунт с сохраненными сведениями
– Актуальные подарки и предложения
– Безопасные банковские переводы
Открытие профиля и авторизация в платформу
Процесс регистрации на сайте отнимает считанные секунд. Свежим клиентам необходимо:
1. Зайти на действующее зеркало сегодня
2. Нажать опцию «Зарегистрироваться»
3. Ввести обязательные параметры
4. Верифицировать e-mail почту или номер связи
5. Активировать поощрение за регистрацию
Авторизация в собственный аккаунт осуществляется посредством предоставление логина и секретной комбинации.
Обзор призовой системы
Привлекательная наградная система — ключевое козырь ресурса. Участники забирают различные бонусы:
Начальные награды
Начинающие клиенты вправе рассчитывать на привлекательный подарок за оформление. Как правило это комплект возможностей, охватывающий:
– Пропорциональную прибавку к первому депозиту
– Бесплатные кручения
– Дополнительные суммы на баланс
Кодовые комбинации и особые опции
Периодические коды дают возможность зарабатывать призовые выгоды. Применить их можно в предназначенном поле личного раздела.
Фриспины и компенсация
Бесплатные спины — это шанс играть слоты без использования персональных средств. Рибейт подразумевает процентный отдачу утраченных сумм.
Библиотека развлечений
Гемблинг ресурс предоставляет впечатляющую базу развлечений.
Слоты
Многообразие автоматов удивляет ожидания. Есть традиционные 3-барабанные аппараты и современные автоматы с интересной графикой.
Live зал
Зона Live игр погружает участников в антураж подлинного развлекательного клуба. Умелые ведущие организуют партии в реальном режиме.
Турниры и рейтинги
Периодические соревнования вносят драйва и дают перспективу получить крупные выигрыши.
Mobile вариант и приложение
Новые решения позволяют участвовать в комфортном пространстве. Mobile форма самостоятельно настраивается под размер аппарата.
Скачать софт возможно для операционных ОС iOS и Android. Программа обеспечивает:
– Мгновенный вход
– Бесперебойную деятельность
– Моментальные-оповещения об промо
– Удобный вид
Финансовые транзакции
Платформа поддерживает всевозможные способы пополнения и получения финансов:
– Пластиковые счета
– Цифровые платформы
– Цифровые валюты
– Прямые отправки
Каждые операции реализуются через зашифрованное протокол, что защищает неприкосновенность приватных сведений.
Служба поддержки
Профессиональная бригада помощи функционирует 24/7. Связаться с консультантами возможно через:
– Live-чат
– E-mail почту
– Горячую линию
– Медиа ресурсы
Выводы
Основной сайт и его рабочее зеркало дают пользователям безопасный и удобный путь к захватывающим забавам. Щедрые бонусы, широкий выбор игр и профессиональная помощь создают процесс предельно удобной и прибыльной.
Переход к ресурсу и действующие ссылки
Востребованные онлайн казино предоставляют участникам большой спектр опций. Основной ресурс Леон предоставляет надежный переход ко всем услугам. При этом порой возникают случаи, когда требуется резервный путь авторизации.
Что представляет собой актуальное зеркало
Рабочее зеркало — это точная версия главного сайта с альтернативным URL именем. Дубликат сегодня обеспечивает обходить существующие барьеры и гарантировать непрерывный переход к популярным развлечениям.
Легальное зеркало характеризуется теми же опциями, что и базовый ресурс:
– Полный список игр
– Персональный аккаунт с зафиксированными данными
– Все поощрения и промо
– Безопасные финансовые действия
Открытие профиля и доступ в сервис
Ход оформления на портале длится буквально минут. Начинающим пользователям требуется:
1. Попасть на рабочее зеркало на данный момент
2. Выбрать клавишу «Зарегистрироваться»
3. Указать нужные сведения
4. Активировать e-mail почту или номер мобильного
5. Использовать награду за открытие аккаунта
Вход в личный раздел реализуется через ввод ID и секретной комбинации.
Описание поощрительной политики
Щедрая призовая система — важнейшее козырь игорного заведения. Игроки забирают разнообразные подарки:
Приветственные поощрения
Свежие участники вправе надеяться на щедрый подарок за оформление. Обычно это комплект опций, включающий:
– Процентную добавку к первому взносу
– Бесплатные спины
– Призовые средства на счет
Промокоды и уникальные предложения
Периодические коды позволяют зарабатывать бонусные привилегии. Задействовать их можно в специальном меню персонального кабинета.
Фриспины и возврат средств
Free spins — это возможность вращать слоты без применения персональных средств. Рибейт означает процентный возврат проигранных сумм.
Коллекция развлечений
Игровая площадка предоставляет значительную базу автоматов.
Автоматы
Многообразие автоматов восхищает фантазию. Доступны традиционные простые машины и современные развлечения с захватывающей картинкой.
Live казино
Категория Live казино транспортирует пользователей в антураж реального развлекательного заведения. Профессиональные ведущие проводят партии в онлайн эфире.
Турниры и доски почета
Постоянные турниры привносят остроты и предоставляют вариант заработать внушительные награды.
Мобильная версия и приложение
Новые инновации позволяют участвовать в любимом пространстве. Mobile версия автоматически подстраивается под монитор девайса.
Получить клиент разрешено для операционных систем iOS и Android. Программа дает:
– Быстрый доступ
– Бесперебойную работу
– Push-уведомления об предложениях
– Удобный облик
Банковские процедуры
Платформа работает с многочисленные системы внесения и изъятия финансов:
– Платежные системы
– Электронные кошельки
– Крипто
– Банковские переводы
Все переводы осуществляются через безопасное канал, что защищает целостность персональных информации.
Служба support
Компетентная группа support трудится 24/7. Обратиться с консультантами можно через:
– Интерактивный-чат
– Электронную почту
– Горячую линию
– Общественные сети
Итоги
Главный портал и его рабочее зеркало обеспечивают игрокам безопасный и легкий переход к азартным забавам. Богатые подарки, разнообразный ассортимент автоматов и качественная ассистанс делают времяпрепровождение предельно интересной и результативной.
Acorn Crate Specials – Navigation is intuitive and the interface runs very smoothly.
Official Ash Wharf Store – The catalog is diverse and the overall tone is pleasant.
Shop Maple Vendor – I like the selection and appreciate the detailed product visuals.
Актуальные интернет казино предоставляют игрокам широкий спектр возможностей для беспроблемной игры. Впрочем иногда подключение к главному ресурсу может оказаться закрытым. В таких обстоятельствах на выручку появляется казино VodkaCasino, которое дает стабильный подключение ко всем опциям платформы.
Что такое функционирующее зеркало казино
Копия — это точная версия основного портала, которая находится по запасному адресу. Альтернативный ресурс поддерживает полный набор функций основного ресурса, включая личный кабинет, средства и запись платежей.
Принципиальные плюсы использования зеркала:
– 24-часовой соединение к порталу
– Абсолютная схожесть функционала
– Конфиденциальность личных реквизитов
– Сохранение существующих поощрений
Как найти функционирующее зеркало в данный момент
Имеется ряд достоверных способов получения свежей URL:
Легитимные сервисы:
1. Email рассылка — управление постоянно отправляет сообщения с рабочими доменами
2. Коммуникационные сети — легитимные каналы постят текущую данные
3. Отдел поддержки — сотрудники сообщают проверенные URL
4. Портативное приложение — дает возможность минуть блокировки
Регистрация на основном сайте
Процедура открытия счета требует только несколько минут и состоит из нижеследующих ступеней:
1. Вход на основной сайт или актуальное зеркало
2. Щелчок на элемент «Открыть счет»
3. Указание персональной таблицы
4. Подтверждение почтовой почты или сотового номера
5. Активация бонуса за регистрацию при присутствии промокода
Свежие клиенты приобретают щедрый приветственный презент, который может содержать бесплатные вращения, валютные поощрения или возврат средств.
Доступ в пользовательский кабинет
Авторизация на портале производится стандартным путем. Требуется вписать имя пользователя и код доступа, примененные при открытии счета.
Значимые аспекты для конфиденциального входа:
– Используйте надежный код
– Запустите двойную идентификацию
– Не фиксируйте коды на чужих гаджетах
– Проверяйте URL строку браузера
Характеристика бонусной программы
Игорный портал радует игроков разнообразными поощрениями и акциями:
Стартовый набор
Новички способны претендовать на великодушное бонус за первый пополнение. Традиционно это процентовая премия к депонированной объему плюс бесплатные вращения для известных слотов.
Регулярные промо
– Семидневный компенсация — возврат доли утраченных финансов
– Поощрения на повторные пополнения
– Эксклюзивные промо по знаменательным датам
– Соревнования с крупными призовыми банками
Система верности
Деятельные игроки собирают единицы за каждую бет, которые затем меняются на реальные денежные призы, фриспины или уникальные льготы.
Бонус-коды: как активировать
Бонус-коды — это специальные комбинации символов, гарантирующие привилегию к дополнительным бонусам.
Каким образом взять рабочие промокоды:
– Авторизованные социальные сети казино
– Партнерские порталы
– Email-информирование
– Специализированные платформы
Активируется промокод в соответствующее поле при оформлении или пополнении счета.
Телефонная версия и приложение
Актуальные игроки выбирают проводить время с телефонных девайсов. Портал предлагает пару варианта для удобной мобильной игры.
Responsive модификация
Интернет версия само собой оптимизируется под диагональ дисплея. Не требует загрузки и действует в любом актуальном браузере.
Мобильное приложение
Установить программу можно для гаджетов на Android и iOS. Выгоды app:
– Оперативная запуск
– Стабильная операция
– Автоматические-уведомления о промо
– Автономный преодоление блокировок
Процесс загрузки легок: требуется перейти на ресурс с мобильного устройства и выполнять указаниям.
Развлекательный коллекция
База развлечений содержит множество единиц от ведущих провайдеров.
Слоты
Гемблинг автоматы — крайне любимая секция развлечений. Представлены стандартные винтажные аппараты, актуальные мультимедийные слоты с дополнительными этапами, а также растущие выигрыши.
Live казино
Отдел с действительными ведущими дает возможность почувствовать антураж настоящего казино. Открыты развлечения с блэкджеком.
Передача реализуется в высоком разрешении, имеется чат с раздающим и остальными геймерами.
Турниры
Постоянно организуются турниры по всевозможным играм. Участие позволяет получить денежные вознаграждения, даровые прокруты или специальные бонусы.
Денежные действия
Платформа предлагает значительный выбор расчетных систем:
– Дебетовые карты
– Цифровые системы
– Биткоин
– Финансовые транзакции
Наименьшая количество вклада — посильная для массы геймеров. Обналичивание денег осуществляется в короткие периоды.
Служба поддержки
Компетентные операторы расположены содействовать непрерывно. Доступны данные варианты контакта:
– Онлайн-чат
– Email
– Телефонная связь
– Коммуникационные сети
Пояснения на распространенные запросы можно получить в блоке FAQ.
Итог
Официальный веб-сайт казино и его функционирующие зеркала гарантируют игрокам максимальный путь ко всем сервисам платформы. Щедрые поощрения, приятная смартфонная версия, гигантский каталог слотов и квалифицированная ассистенция создают азартный опыт максимально приятным и безопасным.
Доступ к сайту и актуальные зеркала
Востребованные сетевые казино предлагают клиентам широкий выбор игр. Официальный ресурс 888 обеспечивает защищенный вход ко всем услугам. Однако временами появляются случаи, когда необходимо запасной путь доступа.
Что есть собой рабочее зеркало
Действующее зеркало — это полная версия официального веб-сайта с другим доменным названием. Копия сегодня позволяет обходить потенциальные ограничения и поддерживать бесперебойный вход к выбранным автоматам.
Легальное зеркало содержит теми же возможностями, что и основной портал:
– Весь список развлечений
– Личный кабинет с актуальными сведениями
– Полные подарки и акции
– Защищенные банковские операции
Оформление и подключение в казино
Этап оформления на ресурсе занимает считанные мгновений. Начинающим участникам необходимо:
1. Открыть на актуальное зеркало на данный момент
2. Щелкнуть опцию «Создать аккаунт»
3. Заполнить требуемые сведения
4. Активировать e-mail почту или данные телефона
5. Получить бонус за регистрацию
Вход в индивидуальный аккаунт выполняется путем внесение ID и ключа.
Характеристика наградной программы
Привлекательная бонусная политика — главное козырь ресурса. Клиенты получают различные бонусы:
Приветственные бонусы
Начинающие пользователи способны ожидать на выгодный поощрение за регистрацию. Чаще всего это набор вариантов, включающий:
– Процентную премию к стартовому пополнению
– Безвозмездные спины
– Extra деньги на аккаунт
Промокоды и эксклюзивные опции
Постоянные промокоды помогают активировать экстра льготы. Использовать их можно в предназначенном поле индивидуального профиля.
Спины и кешбэк
Даровые вращения — это шанс крутить слоты без использования личных денег. Рибейт предполагает частичный компенсацию израсходованных средств.
Коллекция слотов
Развлекательная платформа обеспечивает впечатляющую коллекцию слотов.
Видеослоты
Ассортимент автоматов восхищает ожидания. Представлены традиционные трехбарабанные автоматы и новые видеослоты с интересной визуализацией.
Live казино
Зона Live казино помещает пользователей в атмосферу истинного азартного клуба. Опытные ведущие осуществляют игры в онлайн времени.
Турниры и таблицы лидеров
Регулярные конкурсы добавляют накала и предоставляют шанс выиграть внушительные призы.
Портативная версия и клиент
Продвинутые инновации позволяют участвовать в любом пространстве. Портативная форма независимо настраивается под монитор гаджета.
Скачать программу возможно для программных платформ iOS и Android. Софт гарантирует:
– Скоростной переход
– Надежную работу
– Всплывающие-алерты об акциях
– Простой интерфейс
Финансовые действия
Ресурс принимает различные системы пополнения и вывода сумм:
– Пластиковые карты
– Виртуальные системы
– Цифровые валюты
– Денежные переводы
Все действия реализуются через зашифрованное подключение, что подтверждает неприкосновенность приватных данных.
Сервис поддержки
Компетентная команда помощи функционирует круглосуточно. Контактировать с операторами возможно через:
– Онлайн-чат
– Почтовую почту
– Контакт
– Общественные каналы
Резюме
Главный ресурс и его действующее зеркало предоставляют игрокам защищенный и легкий путь к интересным занятиям. Выгодные подарки, широкий спектр слотов и отличная ассистанс обеспечивают процесс крайне удобной и результативной.
Official Birch Basket Store – The layout is professional yet warm, perfect for casual shoppers.
Check Out Products – Shopping feels easy and the site layout is clear and reliable.
Frost Dock Online – Items are well organized, making navigation simple.
Jade Aisle Deals – Found appealing products with cost-effective options throughout.
Современные сетевые казино обеспечивают игрокам обширный выбор функций для беспроблемной игры. Однако иногда подключение к базовому платформе может оказаться заблокированным. В таких обстоятельствах на подмогу появляется Pinco официальный сайт, которое обеспечивает непрерывный вход ко всем возможностям платформы.
Что такое действующее зеркало казино
Зеркало — это точная реплика официального сайта, которая располагается по запасному интернет-адресу. Зеркало содержит весь набор функций главного ресурса, включая личный кабинет, депозит и сведения платежей.
Ключевые преимущества эксплуатации зеркала:
– Круглосуточный вход к порталу
– Абсолютная идентичность опций
– Безопасность личных сведений
– Сохранение существующих вознаграждений
Как разыскать действующее зеркало на сегодня
Есть ряд проверенных вариантов получения актуальной адреса:
Официальные источники:
1. Почтовая рассылка — руководство периодически высылает информацию с действующими доменами
2. Коммуникационные сети — проверенные страницы выкладывают релевантную сведения
3. Департамент поддержки — консультанты дают надежные ссылки
4. Телефонное приложение — предоставляет обходить блокировки
Создание аккаунта на лицензионном портале
Процесс создания аккаунта требует не более немного минут и состоит из следующих этапов:
1. Открытие на лицензионный портал или функционирующее зеркало
2. Щелчок на кнопку «Зарегистрироваться»
3. Указание персональной формы
4. Проверка электронной почты или телефонного номера
5. Включение вознаграждения за регистрацию при доступности промокода
Только что зарегистрированные геймеры получают солидный вступительный презент, который может охватывать даровые прокруты, монетарные вознаграждения или кэшбек.
Авторизация в пользовательский кабинет
Логин на сайте реализуется стандартным образом. Достаточно указать учетные данные и пароль, использованные при оформлении.
Значимые аспекты для надежного входа:
– Эксплуатируйте надежный шифр
– Включите 2FA проверку
– Не храните реквизиты на общественных компьютерах
– Контролируйте URL строку браузера
Описание наградной системы
Игорный портал балует игроков многочисленными привилегиями и акциями:
Стартовый букет
Начинающие вправе рассчитывать на великодушное поощрение за стартовый взнос. Зачастую это пропорциональная добавка к переведенной количеству плюс даровые спины для востребованных слотов.
Систематические промо
– Недельный кэшбек — компенсирование доли потерянных денежных средств
– Призы на повторные депозиты
– Эксклюзивные предложения по торжествам
– Состязания с значительными наградными пулами
Схема лояльности
Регулярные клиенты накапливают очки за каждую ставку, которые затем конвертируются на настоящие финансы, free spins или особые привилегии.
Промокоды: как задействовать
Купоны — это специальные наборы знаков, дающие право к специальным бонусам.
Откуда найти рабочие промокоды:
– Проверенные общественные сети казино
– Партнерские сайты
– Email-информирование
– Отраслевые группы
Указывается промокод в специальное поле при регистрации или добавлении денег баланса.
Смартфонная версия и приложение
Актуальные пользователи любят играть с смартфонных аппаратов. Ресурс дает два способа для комфортной смартфонной игры.
Responsive модификация
Онлайн версия само собой адаптируется под размер экрана. Не требует инсталляции и оперирует в всяком современном браузере.
Портативное приложение
Установить программу можно для девайсов на Android и iOS. Достоинства app:
– Быстрая открытие
– Надежная операция
– Push-уведомления о акциях
– Автономный обход блокировок
Этап инсталляции несложен: нужно попасть на веб-сайт с портативного гаджета и придерживаться указаниям.
Гемблинг каталог
Каталог игр охватывает тысячи позиций от передовых разработчиков.
Слоты
Развлекательные автоматы — наиболее любимая секция аттракционов. Представлены традиционные 3-барабанные слоты, актуальные видеослоты с премиальными уровнями, а также растущие выигрыши.
Live казино
Отдел с живыми ведущими дает возможность почувствовать настроение подлинного казино. Доступны варианты с покером.
Трансляция реализуется в превосходном четкости, имеется чат с ведущим и другими участниками.
Состязания
Регулярно организуются турниры по многочисленным дисциплинам. Вступление позволяет заработать денежные вознаграждения, бесплатные вращения или особые привилегии.
Платежные операции
Портал предоставляет значительный набор расчетных инструментов:
– Банковские карты
– Цифровые системы
– Криптовалюта
– Банковские транзакции
Минимальная величина взноса — посильная для массы игроков. Снятие средств обрабатывается в кратчайшие интервалы.
Сервис поддержки
Квалифицированные консультанты расположены поддержать круглосуточно. Открыты данные варианты коммуникации:
– Живой-чат
– Email
– Звонковая линия
– Социальные сети
Разъяснения на типовые проблемы можно обнаружить в секции FAQ.
Резюме
Основной веб-сайт казино и его действующие зеркала предоставляют геймерам совершенный путь ко всем сервисам сайта. Солидные вознаграждения, удобная портативная версия, гигантский коллекция игр и компетентная служба поддержки создают гемблинг процесс исключительно беспроблемным и конфиденциальным.
Характеристика основного портала
Современные интернет казино предлагают пользователям обширный выбор забав и перспектив. Основной ресурс Дракон Мани обеспечивает безопасный вход к азартным услугам.
Действующее зеркало: вход в настоящий момент
Резервный сайт представляет собой идентичную версию лицензионного ресурса. Актуальное зеркало позволяет пользователям обходить возможные барьеры.
Выгоды задействования зеркала
Главные достоинства содержат:
– Беспрерывный путь к ресурсу
– Сохранение полных возможностей официального ресурса
– Безопасность индивидуальных информации
– Такой же инструментарий
Регистрация на ресурсе
Процедура регистрации характеризуется простотой и практичностью. Недавние участники требуется:
1. Открыть официальный сайт или его зеркало
2. Выбрать на клавишу создания аккаунта
3. Ввести необходимые поля
4. Валидировать почтовую адрес
5. Произвести дебютный доступ
Бонус за открытие счета
Новички забирают щедрый стартовый подарок. Данное премия в состоянии охватывать:
– Денежные бонусы
– Даровые прокруты
– Усиленный коэффициент кэшбека
Доступ в личный раздел
Существующие участники способны мгновенно авторизоваться в свой кабинет, используя логин и код. Персональный кабинет предоставляет доступ к:
– Администрированию средствами
– Истории переводов
– Действующим подаркам
– Параметрам аккаунта
Подарки и предложения
Портал постоянно проводит многочисленные мероприятия для пользователей.
Виды бонусов
Базовые типы вознаграждений:
– Пополнительные бонусы – процент от суммы взноса
– Спины – даровые спины в аппаратах
– Компенсация – возмещение доли затраченных денег
– Призовые призы – призы за выступление в конкурсах
Коды
Уникальные коды обеспечивают активировать экстра бонусы. Игроки могут получить их на тематических площадках или приобрести в рассылке.
Мобильная адаптация и приложение
Прогрессивные игроки выбирают портативный геймплей.
Функции портативной версии
– Гибкий интерфейс для любых девайсов
– Целостный вход к развлечениям
– Моментальная загрузка
– Удобное навигация
Download программу
Mobile app предоставлено для загрузки на аппараты с базовыми платформами Android и iOS. Приложение предоставляет:
– Стабильную производительность
– Мгновенные оповещения о предложениях
– Оперативный путь к избранным развлечениям
Азартный ассортимент
Платформа предоставляет внушительную библиотеку развлекательных развлечений.
Игровые машины
Ассортимент азартных машин включает:
– Традиционные автоматы
– Передовые игры
– Призовые автоматы
– Тематические автоматы
Live казино
Секция живых дилеров предоставляет опцию соревноваться с настоящими крупье. Доступны:
– Американская рулетка
– Блек-джек
– Punto Banco
– Покер
Соревнования
Постоянные чемпионаты обеспечивают клиентам соревноваться за значительные наградные банки. Конкурсная программа изменяется каждую неделю.
Платежные действия
Сайт предоставляет обилие способов внесения и получения финансов:
– Банковские карточки
– Цифровые кошельки
– Банковские трансферы
– Крипто
Совокупные операции производятся конфиденциально с задействованием современных технологий защиты.
Департамент помощи
Опытная отдел саппорта функционирует 24/7. Связаться с операторами доступно через:
– Онлайн чат
– Электронную почту
– Телефон
– Соц платформы
Секьюрити и лицензирование
Платформа работает на основании официальной разрешения. Подобное обеспечивает:
– Честность развлекательного процесса
– Защиту индивидуальных информации
– Быстрые перечисления
– Регулируемый гейминг
Итог
Главный портал и его рабочие альтернативные адреса гарантируют участникам абсолютный спектр возможностей для удобной и доходной досуга. Внушительные бонусы, разнообразные слоты, квалифицированная поддержка и защищенная платформа платежей формируют казино идеальным выбором для фанатов развлекательных развлечений.
Firefly Market Online – Well-structured pages make finding products quick and effortless.
this web portal – A quick check confirms the content is helpful and easy to navigate.
https://uspharmaindex.com/# US Pharma Index
retail destination – Navigation is smooth and the layout makes everything easy to access.
Передовые онлайн казино дают геймерам огромный диапазон функций для беспроблемной игры. Впрочем иногда вход к базовому платформе может являться закрытым. В таких обстоятельствах на подмогу спешит играть, которое предоставляет стабильный доступ ко всем возможностям платформы.
Что такое рабочее зеркало казино
Копия — это абсолютная версия лицензионного ресурса, которая размещается по альтернативному интернет-адресу. Дубликат имеет полный инструментарий главного портала, включая персональный кабинет, депозит и историю транзакций.
Главные плюсы применения зеркала:
– Непрерывный подключение к порталу
– Абсолютная аналогичность возможностей
– Безопасность пользовательских реквизитов
– Сохранение доступных привилегий
Как отыскать действующее зеркало на сегодня
Есть множество безопасных методов поиска свежей ссылочной информации:
Легитимные источники:
1. Email рассылка — администрация систематически пересылает уведомления с свежими ссылками
2. Коммуникационные сети — официальные аккаунты размещают текущую новости
3. Департамент поддержки — сотрудники предоставляют достоверные домены
4. Мобильное приложение — дает возможность избегать блокировки
Открытие счета на официальном веб-сайте
Операция открытия счета занимает только несколько минут и состоит из нижеследующих этапов:
1. Попадание на официальный ресурс или действующее зеркало
2. Выбор на элемент «Регистрация»
3. Заполнение пользовательской анкеты
4. Валидация email почты или телефонного номера
5. Задействование привилегии за регистрацию при существовании промокода
Новые игроки приобретают щедрый начальный презент, который может предполагать даровые прокруты, денежные призы или cashback.
Логин в индивидуальный кабинет
Логин на сайте осуществляется традиционным методом. Достаточно вписать учетные данные и кодовое слово, примененные при создании аккаунта.
Важные аспекты для безопасного входа:
– Используйте криптостойкий секретный ключ
– Активируйте двойную аутентификацию
– Не сохраняйте пароли на публичных гаджетах
– Отслеживайте URL строку браузера
Описание поощрительной структуры
Игровая платформа одаривает клиентов многочисленными бонусами и промо:
Приветственный пакет
Свежие игроки способны рассчитывать на значительное награду за стартовый депозит. Зачастую это долевая надбавка к зачисленной величине плюс фриспины для топовых слотов.
Систематические предложения
– Семидневный возврат средств — возвращение части проигранных денежных средств
– Поощрения на очередные пополнения
– Специальные офферы по знаменательным датам
– Соревнования с значительными призовыми банками
Система привилегий
Деятельные клиенты получают баллы за всякую ставку, которые затем превращаются на действительные деньги, даровые прокруты или уникальные преимущества.
Купоны: как применять
Кодовые комбинации — это специальные наборы букв и цифр, дающие привилегию к бонусным поощрениям.
Где раздобыть свежие промокоды:
– Официальные медийные сети казино
– Союзнические ресурсы
– Email-рассылка
– Профильные группы
Вводится промокод в соответствующее поле при создании аккаунта или добавлении денег счета.
Телефонная версия и приложение
Нынешние пользователи любят играть с мобильных аппаратов. Ресурс предлагает двойной решения для комфортной телефонной игры.
Отзывчивая вариант
Интернет версия самостоятельно адаптируется под размер монитора. Не просит установки и оперирует в всяком свежем браузере.
Телефонное приложение
Загрузить программу можно для аппаратов на Android и iOS. Плюсы app:
– Оперативная открытие
– Устойчивая операция
– Автоматические-уведомления о акциях
– Автоматический преодоление блокировок
Процедура инсталляции элементарен: нужно попасть на ресурс с смартфонного девайса и следовать указаниям.
Азартный ассортимент
Библиотека развлечений содержит тысячи единиц от лучших производителей.
Слоты
Игровые аппараты — крайне распространенная секция игр. Представлены обычные винтажные слоты, передовые мультимедийные слоты с бонусными этапами, а также растущие суперпризы.
Live казино
Раздел с настоящими ведущими позволяет испытать антураж подлинного казино. Доступны варианты с покером.
Трансляция ведется в HD качестве, имеется диалог с дилером и иными участниками.
Турниры
Постоянно запускаются конкурсы по различным категориям. Участие предоставляет право завоевать монетарные выигрыши, free spins или специальные бонусы.
Денежные операции
Портал предоставляет обширный выбор платежных способов:
– Пластиковые карты
– Онлайн системы
– Цифровая валюта
– Денежные платежи
Наименьшая сумма депозита — приемлемая для большинства игроков. Вывод денег производится в кратчайшие периоды.
Сервис поддержки
Квалифицированные операторы расположены поддержать круглосуточно. Имеются следующие каналы общения:
– Веб-чат
– Email
– Телефонная поддержка
– Коммуникационные сети
Разъяснения на стандартные запросы можно получить в зоне FAQ.
Заключение
Официальный сайт казино и его действующие зеркала дают игрокам абсолютный вход ко всем функциям платформы. Значительные привилегии, комфортная мобильная версия, гигантский каталог слотов и опытная служба поддержки превращают азартный процесс крайне приятным и защищенным.
Нынешние онлайн-казино гарантируют игрокам разнообразие опций для приятной игры. Центральный сайт Gonzo обеспечивает путь ко всем опциям и развлечениям. Однако при образовании технических проблем на подмогу прибывают актуальные зеркала.
Что представляет собой актуальное зеркало
Копия казино — это стопроцентная копия основного сайта, размещенная по альтернативному веб-адресу. Лицензионное зеркало удерживает все характеристики, вместе с открытие профиля, авторизацию в индивидуальный кабинет, поощрения и кодовые слова.
Альтернативный сайт на сегодня обеспечивает:
– Непрерывный путь к игровым автоматам
– Стопроцентную сохранность личных информации
– Поддержку депозита и записей платежей
– Возможность использования всех акций
Регистрация на лицензионном портале
Процедура оформления учетной записи занимает несколько минут. Свежеиспеченным клиентам требуется:
1. Открыть на официальный сайт или актуальное зеркало
2. Нажать кнопку «Создать аккаунт»
3. Внести требуемые поля
4. Верифицировать электронную почту
5. Применить промокод при существовании
После окончания оформления профиля геймеры обретают приз за регистрацию, какой может содержать бесплатные вращения или денежно-призовое поощрение.
Логин в личный кабинет
Личный кабинет обеспечивает комплексный контроль над игровым ходом. Через индивидуальный кабинет разрешается:
– Финансировать баланс
– Забирать выигрыши
– Активировать кодовые слова
– Проверять историю пари
– Играть в конкурсах
– Приобретать возврат средств
Описание бонусов и акций
Щедрая призовая программа — существенное достоинство ресурса. Основные формы поощрений:
Начальный приз
Новые игроки зарабатывают выгодное награду на начальные взносы. Размер премии может достигать 100-200% от суммы пополнения.
Бонусные спины
Безвозмездные раунды начисляются для популярных машин. Сумма free spins разнится от 10 до 500 штук.
Возврат средств
Еженедельный или помесячный откат доли проигранных финансов. Обычный размер возврата — 5-15%.
Турниры
Постоянные конкурсы с большими наградными пулами. Конкурсанты состязаются за лучшие места в таблице лидеров.
Мобильная версия и приложение
Смартфонная версия разрешает делать ставки с любого устройства. Геймеры могут скачать приложение для iOS и Android или использовать браузерную версию.
Достоинства смартфонного программы:
– Оперативная прогрузка автоматов
– Комфортный графический интерфейс
– Всплывающие уведомления о бонусах
– Доступ через отпечаток пальца
Автоматы и Live казино
Азартная база насчитывает тысячи названий от лидирующих разработчиков.
Известные секции игр:
– Классические слоты
– Видеослоты с премиальными этапами
– Накопительный приз игры
– Мега-путь автоматы
Live игорный зал
Секция live казино предоставляет игру с живыми крупье. Есть традиционные варианты:
– Рулетка
– Blackjack
– Баккара
– Карибский покер
Как разыскать актуальное зеркало
Обрести свежую URL на зеркало разрешается различными путями:
1. Зарегистрироваться на почтовую рассылку
2. Следить за апдейтами в социальных сетях
3. Обратиться в департамент поддержки
4. Запомнить рабочее зеркало в фавориты
Резюме
Официальный портал и его действующие дубликаты предоставляют непрерывный путь к развлекательным играм. Выгодные премии, множественные бонусные коды, эргономичное портативное софт и качественная служба поддержки поддержки обеспечивают развлекательный опыт в высшей степени беспроблемным и надежным.
Казино Vavada привлекает игроков щедрыми бонусами без депозита и постоянными турнирами с крупным призовым фондом.
Регистрация занимает несколько минут, а рабочие зеркала обеспечивают стабильный доступ к сайту даже при блокировках.
Проверяйте актуальные промокоды и условия отыгрыша, чтобы оптимально использовать стартовые фриспины.
Служба поддержки отвечает на русском языке и помогает решить вопросы с верификацией и выводом средств.
Свежие предложения и актуальное зеркало доступны по ссылке: vavada официальный сайт.
Играйте ответственно и контролируйте банкролл, чтобы азарт приносил удовольствие.
feathercrate product range – Smooth interface and well-organized pages make checking items simple.
This casino https://woodysburger.pl/ offers a great mix of classic slots and live tables. The platform feels modern, promotions are attractive, and support is helpful, which adds confidence.
cloudster – Bookmarked this immediately, planning to revisit for updates and inspiration.
Dew Dock Store – Smooth navigation and tidy presentation made it easy to check items.
usestackr – Found practical insights today; sharing this article with colleagues later.
steadypath.bond – Clean and intuitive, content emphasizes reliability and professional tone across the site.
tagtides boutique – Strong branding and browsing feels seamless.
Generic Viagra for sale: Order Viagra 50 mg online – buy viagra here
Tobias in the Park Store – The vibe is lovely and everything seems carefully planned.
Your Online Crate – Finding products is fast thanks to the simple, neat design.
Viagra generic over the counter: Sildenafil Price Guide – Viagra tablet online
https://www.vhs80.com/board/board_topic/6798823/7917320.htm
Visit Order Grove – Great product range and searching for items is straightforward.
Explore Tally Cove – The interface is simple and the overall experience is reassuringly reliable.
https://sildenafilpriceguide.com/# buy Viagra online
Your Online Cart – Browsing feels effortless and the site is reliable and simple to navigate.
berryvendor.shop – Support is quick and always provides helpful answers when needed.
Browse the Catalog – It’s simple to get around and each page renders fast.
Официальный сайт казино работает по принципу географической сегментации — сетевые компании блокируют доступ на основании IP-адреса пользователя, что заставляет операторов развертывать зеркала на альтернативных доменах. Рабочее зеркало cactus-casino-1772396145830.clients.site представляет собой полную копию основного ресурса с идентичной базой данных игроков, балансами и историей транзакций, но размещенную на другом хостинге с новым URL. Для поиска актуального зеркала сегодня опытные игроки используют Telegram-каналы казино, email-рассылки или сохраняют несколько альтернативных доменов в закладках браузера. Критически важно проверять SSL-сертификат любого зеркала через адресную строку — отсутствие замка безопасности указывает на fraudulent сайт.
Регистрация через зеркало не отличается от процедуры на основном домене — система запросит email, номер телефона и создание пароля с минимальными требованиями к сложности. Верификация личного кабинета потребует загрузки документов только при первом выведении средств, причем лимиты без KYC обычно ограничены эквивалентом 1000 евро в месяц. Двухфакторная аутентификация через Google Authenticator повышает безопасность аккаунта, но доступна не во всех казино. Обратите внимание на форс-мажорные условия в пользовательском соглашении — некоторые операторы резервируют право заморозить вывод при допущении в мультиаккаунтинге.
Бонус за регистрацию делится на no-deposit и welcome package — первый начисляется автоматом без внесения депозита, но ограничен жесткими вейджерами x50-x70, второй требует пополнения счета и активации промокода. Фриспины привязаны к конкретным слотам провайдера, указанного в условиях акции, причем выигрыш с бесплатных вращений также подлежит отыгрышу. Кэшбек бывает процентным от проигранных средств за период либо рейкбеком в покере — возвратом части комиссии рума. Вейджер рассчитывается только с реальных ставок, игра в демонстрационной версии не учитывается в объеме отыгрыша.
Мобильная версия сайта адаптирована под сенсорные экраны через responsive-дизайн, но нативное приложение обеспечивает лучшую быстродействие за счет оптимизации под операционную систему. Скачать APK для Android можно только с официального сайта казино, поскольку Google Play блокирует азартные приложения в большинстве юрисдикций. iOS-приложения распространяются через TestFlight или требуют изменения региона Apple ID, что создает дополнительные сложности. Push-уведомления в приложениях информируют о новых конкурсах и ограниченных по времени промокодах.
Live казино транслирует игру с реальными крупье через WebRTC-протокол с минимальной задержкой 1-2 секунды, критичной для принятия решений в блэкджеке или рулетке. Провайдеры Evolution Gaming и Pragmatic Play Live предлагают столы с говорящими по-русски дилерами и лимитами от 50 рублей до миллиона за раунд. RTP в живых играх выше автоматных слотов — европейская рулетка держит 97,3% против 94-96% в видеослотах. Статистика раздач в личном кабинете позволяет отслеживать win rate и стандартное отклонение для корректировки банкролл-менеджмента.
Слоты классифицируются по вариативности — high variance машины выдают редкие, но крупные выплаты, low variance обеспечивают частые мелкие выигрыши. Провайдеры указывают теоретический RTP в описании игры, но фактическая отдача зависит от размера выборки — на дистанции 10000 спинов результат приближается к заявленному. Турниры по слотам начисляют очки за коэффициент выигрыша относительно ставки, а не за абсолютную сумму, что уравнивает шансы игроков с разными банкроллами. Банк призов формируется из взносов участников либо гарантируется оператором — второй вариант выгоднее при малом количестве регистраций.
networknectar.shop – The site is easy to move around and pages open almost instantly.
digital shop – I liked how clearly everything is arranged for easy navigation.
I just like the helpful information you supply to your
articles. I’ll bookmark your blog and take a look at again here frequently.
I’m reasonably certain I’ll learn a lot of new stuff
proper right here! Best of luck for the following!
Добро пожаловать в подробный анализ функционала и возможностей платформы, где я поделюсь практическим опытом взаимодействия с ресурсом disi-1772569756736.clients.site и расскажу о нюансах, которые действительно влияют на игровой процесс. За годы тестирования десятков операторов я научился отличать маркетинговый шум от реальной пользы, поэтому сосредоточусь именно на технических деталях и финансовых механизмах, которые определяют качество вашего гейминг-опыта.
Технология зеркалирования и стабильность доступа
Рабочее зеркало представляет собой полный клон основного домена с идентичной базой данных и функционалом, размещенный на альтернативном IP-адресе. Критически важный момент – синхронизация балансов происходит в режиме реального времени через единый бэкенд, что исключает расхождения в финансовых операциях. Проверяйте наличие SSL-сертификата в адресной строке зеркала – зеленый замок подтверждает шифрование данных по протоколу TLS 1.3.
Актуальные зеркала сегодня обычно распространяются через Telegram-каналы службы поддержки или приходят на верифицированную электронную почту. Добавьте официальный канал в избранное сразу после регистрации – это сэкономит время при блокировках. Альтернативный способ – использование VPN с серверами в юрисдикциях Кюрасао или Мальты, хотя качественные зеркала делают эту опцию избыточной.
Создание аккаунта и верификация личного кабинета
Процедура создания аккаунта занимает две минуты, но профессиональный подход требует внимания к деталям. Используйте реальные данные с первого шага – это предотвратит проблемы при верификации KYC перед первым выводом. Платформа запрашивает скан паспорта и подтверждение адреса при транзакциях от определенного порога, обычно это 2000-3000 евро в эквиваленте.
В личном кабинете обязательно активируйте двухфакторную аутентификацию через Google Authenticator. SMS-коды менее надежны из-за уязвимости к SIM-свapping атакам. Раздел истории транзакций сохраняет данные за последние 90 дней – экспортируйте выписки ежемесячно для собственного учета, особенно если планируете декларировать доходы.
Структура бонусной программы и условия отыгрыша
Поощрение за регистрацию обычно предлагается в формате депозитного матча с вейджером x35-x40. Ключевой параметр – максимальная ставка при отыгрыше, часто ограниченная 5 евро или 10% от бонусной суммы. Превышение автоматически аннулирует активный баланс, причем трекинг происходит на уровне игровых раундов, а не сессий.
Фриспины распределяются порционно – стандартная практика 20-25 вращений ежедневно в течение нескольких дней. Обращайте внимание на таймфрейм использования каждой порции, обычно это 24 часа с момента зачисления. Выигрыши с фриспинов конвертируются в бонусные средства с собственным вейджером, реже – сразу попадают на реальный баланс с уменьшенным коэффициентом отыгрыша.
Кэшбек рассчитывается от чистых проигрышей за отчетный период, обычно еженедельный. Процент варьируется от 5% до 15% в зависимости от VIP-статуса. Важный нюанс – в расчет берутся только ставки на реальные деньги, бонусные вращения исключаются. Некоторые провайдеры вообще не участвуют в программе кэшбека, список доступен в правилах акций.
Промокоды активируются в специальном поле при депозите или в разделе бонусов личного кабинета. Эксклюзивные коды от партнеров часто предлагают улучшенные условия – сниженный вейджер или увеличенный процент матча. Срок действия промокодов жестко ограничен, проверяйте актуальность перед внесением средств.
Игровой ассортимент и механики слотов
Библиотека слотов насчитывает несколько тысяч позиций от топовых провайдеров – Pragmatic Play, NetEnt, Play’n GO, Evolution Gaming. Обращайте внимание на показатель RTP в описании игры, оптимальный диапазон 96-97%. Некоторые операторы используют версии слотов с заниженной отдачей, разница в 2-3% критична при длительных сессиях.
Волатильность определяет частоту и размер выплат. Высоковолатильные слоты типа Dead or Alive 2 или Book of Dead дают редкие, но крупные выигрыши – подходят для бонусхантинга с большим банкроллом. Низковолатильные Starburst или Blood Suckers обеспечивают стабильные мелкие выплаты, что снижает дисперсию при отыгрыше.
Функция Buy Bonus позволяет купить доступ к бонусной игре за фиксированную сумму, обычно x100 от ставки. При активном бонусе эта опция часто заблокирована условиями. Слоты с прогрессивным джекпотом вносят минимальный вклад в отыгрыш – 5-10%, что делает их неэффективными для выполнения вейджера.
Live казино и взаимодействие с дилерами
Живые столы транслируются из студий Evolution, Ezugi, Pragmatic Live в HD-качестве с задержкой 1-2 секунды. Ставки принимаются в реальном времени, окно для размещения чипов составляет 10-15 секунд в зависимости от игры. Рулетка и баккара дают 100% вклада в отыгрыш, блэкджек обычно 10-20%, покер может вообще исключаться.
Функционал чата позволяет общаться с дилером и другими игроками, но модерация жесткая – за нарушение этикета последует мут или бан от стола. В VIP-комнатах базовые ставки начинаются от 50-100 евро, но появляются эксклюзивные варианты типа Lightning Roulette с мультипликаторами до x500.
Мобильная версия и приложение
Адаптивная версия сайта полностью функциональна на iOS и Android без установки дополнительного софта. Интерфейс оптимизирован под сенсорное управление, скорость загрузки игр идентична десктопной при стабильном 4G-соединении. Единственное ограничение – некоторые старые слоты на Flash-технологии недоступны на мобильных устройствах.
Приложение для скачивания предлагается через APK-файл для Android, так как Google Play блокирует гемблинг-софт. Загрузка требует активации опции «Неизвестные источники» в настройках безопасности. iOS-версия распространяется через TestFlight или корпоративные сертификаты, периодически требующие переустановки из-за отзыва Apple.
Преимущество нативного приложения – пуш-уведомления о новых бонусах и турнирах, а также более быстрый доступ через биометрическую аутентификацию. Функционал идентичен веб-версии, включая депозиты и выводы средств.
Турниры и соревновательные механики
Регулярные турниры проводятся с призовыми фондами от 5000 до 50000 евро. Механика основана на накоплении очков за выигрышные спины – стандартный коэффициент 1 евро выигрыша равен 1 очку. Некоторые турниры используют мультипликативную систему, где учитывается отношение выигрыша к ставке.
Таблица лидеров обновляется в реальном времени, что позволяет отслеживать позицию и корректировать стратегию. Обращайте внимание на минимальную ставку для участия – обычно 0,50-1 евро, занижение исключает раунд из зачета. Призы распределяются автоматически в течение 72 часов после завершения, часто в виде бонусных средств с отыгрышем.
Фрироллы – турниры без взноса – отличная опция пополнить банкролл без риска. Призовой фонд скромнее, но конкуренция ниже. Участие обычно ограничено определенным количеством спинов или временным окном.
Финансовые операции и вывод средств
Пополнения обрабатываются мгновенно через банковские карты Visa/Mastercard, электронные кошельки Skrill/Neteller, криптовалюты Bitcoin/Ethereum. Комиссия со стороны казино отсутствует, но платежная система может взимать 2-3%. Криптовалютные транзакции обеспечивают максимальную анонимность и скорость подтверждения от 10 минут.
Вывод средств требует верификации при первой заявке или при превышении лимита. Стандартные временные рамки обработки – 24-48 часов для электронных кошельков, 3-5 рабочих дней для банковских переводов. Криптовалюта выводится за 1-6 часов в зависимости от загрузки блокчейна.
Лимиты на вывод составляют обычно 5000-10000 евро в неделю для стандартных аккаунтов, VIP-игроки получают индивидуальные условия. Отмена заявки на вывод доступна в течение первых часов – используйте эту функцию аккуратно, чтобы избежать реверсирования выигрыша обратно в игру.
Служба поддержки работает в режиме 24/7 через live-чат, email и мессенджеры. Среднее время ответа в чате – 2-3 минуты, сложные вопросы требующие проверки могут занять до суток. Документируйте все взаимодействия скриншотами, особенно касающиеся финансовых споров или технических сбоев.
Run Route Boutique Online – Layout is clear and browsing products is quick.
Официальный сайт казино работает по принципу географической сегментации — сетевые компании блокируют доступ на основании IP-адреса пользователя, что заставляет операторов развертывать зеркала на альтернативных доменах. Рабочее зеркало gamaa.clients.site представляет собой полную копию основного ресурса с идентичной базой данных игроков, балансами и журналом транзакций, но размещенную на другом хостинге с новым URL. Для поиска актуального зеркала сегодня опытные игроки используют Telegram-каналы казино, email-рассылки или сохраняют несколько альтернативных доменов в закладках браузера. Критически важно проверять SSL-сертификат любого зеркала через адресную строку — отсутствие замка безопасности указывает на fraudulent сайт.
Регистрация через зеркало не отличается от процедуры на основном домене — система запросит email, номер телефона и создание пароля с минимальными требованиями к сложности. Верификация личного кабинета потребует загрузки документов только при первом выводе средств, причем лимиты без KYC обычно ограничены эквивалентом 1000 евро в месяц. Двухфакторная аутентификация через Google Authenticator повышает безопасность аккаунта, но доступна не во всех казино. Обратите внимание на форс-мажорные условия в пользовательском соглашении — некоторые операторы резервируют право заморозить вывод при сомнении в мультиаккаунтинге.
Бонус за регистрацию делится на no-deposit и welcome package — первый начисляется автоматом без внесения депозита, но ограничен жесткими вейджерами x50-x70, второй требует пополнения счета и активации промокода. Фриспины привязаны к конкретным слотам провайдера, указанного в условиях акции, причем выигрыш с бесплатных вращений также подлежит отыгрышу. Кэшбек бывает процентным от проигранных средств за период либо рейкбеком в покере — возвратом части комиссии рума. Вейджер рассчитывается только с реальных ставок, игра в demo-mode не учитывается в объеме отыгрыша.
Мобильная версия сайта адаптирована под сенсорные экраны через responsive-дизайн, но нативное приложение обеспечивает лучшую эффективность за счет оптимизации под операционную систему. Скачать APK для Android можно только с официального сайта казино, поскольку Google Play блокирует азартные приложения в большинстве юрисдикций. iOS-приложения распространяются через TestFlight или требуют изменения региона Apple ID, что создает дополнительные сложности. Push-уведомления в приложениях информируют о новых состязаниях и ограниченных по времени промокодах.
Live казино транслирует игру с реальными крупье через WebRTC-протокол с минимальной задержкой 1-2 секунды, критичной для принятия решений в блэкджеке или рулетке. Провайдеры Evolution Gaming и Pragmatic Play Live предлагают столы с российскими дилерами и лимитами от 50 рублей до миллиона за раунд. RTP в живых играх выше автоматных слотов — европейская рулетка держит 97,3% против 94-96% в видеослотах. Статистика раздач в личном кабинете позволяет отслеживать win rate и стандартное отклонение для корректировки банкролл-менеджмента.
Слоты классифицируются по волатильности — high variance машины выдают редкие, но крупные выплаты, low variance обеспечивают частые мелкие выигрыши. Провайдеры указывают теоретический RTP в описании игры, но фактическая отдача зависит от размера выборки — на дистанции 10000 спинов результат приближается к заявленному. Турниры по слотам начисляют очки за коэффициент выигрыша относительно ставки, а не за абсолютную сумму, что уравнивает шансы игроков с разными банкроллами. Банк призов формируется из взносов участников либо гарантируется оператором — второй вариант выгоднее при малом количестве регистраций.
Find Top Products – Easy-to-browse selection with plenty of choices for every need.
purchase dapoxetine
anchorpoint.bond – Modern design, content reinforces trustworthiness and a solid structure throughout.
Доступ к игровым площадкам через альтернативные URL стал обыденной практикой для опытных гемблеров, особенно когда провайдеры блокируют основной домен по требованию регуляторов. Актуальное зеркало представляет собой технический клон основного ресурса с идентичной функциональностью, но размещенный на другом IP-адресе и доменном имени. Проверенный способ получить рабочую ссылку — подписаться на рассылку оператора или использовать проверенные агрегаторы вроде motor-1772572236637.clients.site, где публикуются актуальные адреса без риска попасть на фишинговый клон. Зеркала обновляются ежедневно, иногда несколько раз в сутки, поэтому критически важно иметь надежный источник информации.
Регистрация через зеркало ничем не отличается от стандартной процедуры на основном сайте — используется единая база данных, все аккаунты синхронизированы. Верификация личности потребуется при первом выводе средств, обычно запрашивают скан паспорта и подтверждение адреса. Двухфакторная аутентификация через SMS или приложения вроде Google Authenticator существенно повышает безопасность учетной записи. Личный кабинет содержит историю транзакций, активные бонусы, вейджер-требования и статистику по сессиям — грамотные игроки регулярно анализируют эти данные для оптимизации банкролл-менеджмента.
Промокоды распределяются по категориям: приветственные пакеты, релоад-бонусы для постоянных клиентов, кэшбек-программы и турнирные призы. Вейджер х40-х50 считается стандартным требованием, хотя встречаются предложения с более лояльными условиями. Фриспины обычно привязаны к конкретным слотам провайдеров, причем выигрыши с бесплатных вращений также подпадают под отыгрыш. Кэшбек рассчитывается от чистых проигрышей за период, возвращается процент от потерянных средств без требований по отыгрышу или с минимальным вейджером х1-х3.
Мобильная версия адаптирована под сенсорное управление, загружается быстрее десктопного варианта благодаря оптимизированной графике. Программы для iOS и Android предлагают расширенный функционал: пуш-уведомления о новых акциях, биометрическую авторизацию, офлайн-доступ к некоторым слотам. Скачивание APK-файла для Андроид происходит напрямую с сайта оператора, минуя Google Play из-за политики магазина в отношении гемблинга. Приложение занимает 50-80 МБ, автоматически обновляется и шифрует трафик через SSL-протокол.
Live-казино транслирует игры в реальном времени из профессиональных студий, ставки регистрируются мгновенно через WebSocket-соединение. Столы с живыми дилерами предлагают блэкджек, рулетку, баккару, покер и game-shows вроде Crazy Time или Monopoly Live. Лимиты варьируются от нескольких десятков рублей до VIP-столов с минимальной ставкой от 10000. Стриминг ведется в HD-качестве с несколькими углами обзора, чат позволяет общаться с крупье и другими участниками.
Слоты делятся по нестабильности: низкая дает частые мелкие выплаты, высокая подразумевает редкие, но крупные выигрыши. RTP-показатель отображает теоретический возврат игроку — оптимальным считается диапазон 96-98 процентов. Провайдеры вроде Pragmatic Play, NetEnt, Microgaming регулярно выпускают новинки с инновационными механиками: Megaways, каскадные барабаны, расширяющиеся символы. Турниры проводятся по накопительной системе очков или максимальному множителю за спин, призовой фонд распределяется между топ-участниками лидерборда.
Внесения обрабатываются через банковские карты, электронные кошельки, криптовалюту — каждый метод имеет комиссию и лимиты. Вывод средств занимает от нескольких минут до трех рабочих дней в зависимости от выбранной платежного инструмента и статуса игрока. Верифицированные VIP-клиенты получают приоритетную обработку запросов на кешаут и персонального менеджера для решения финансовых вопросов.
Официальный сайт казино работает по принципу географической сегментации — интернет-провайдеры блокируют доступ на основании IP-адреса пользователя, что заставляет операторов развертывать зеркала на альтернативных доменах. Рабочее зеркало wilder-1772570956131.clients.site представляет собой полную копию основного ресурса с идентичной базой данных игроков, балансами и архивом транзакций, но размещенную на другом хостинге с новым URL. Для поиска актуального зеркала сегодня опытные игроки используют Telegram-каналы казино, email-рассылки или сохраняют несколько backup доменов в закладках браузера. Критически важно проверять SSL-сертификат любого зеркала через адресную строку — отсутствие замка безопасности указывает на поддельный сайт.
Регистрация через зеркало не отличается от процедуры на основном домене — система запросит email, номер телефона и создание пароля с минимальными требованиями к сложности. Верификация личного кабинета потребует загрузки документов только при первом выведении средств, причем лимиты без KYC обычно ограничены эквивалентом 1000 евро в месяц. Двухфакторная аутентификация через Google Authenticator повышает безопасность аккаунта, но доступна не во всех казино. Обратите внимание на форс-мажорные условия в пользовательском соглашении — некоторые операторы резервируют право заморозить вывод при допущении в мультиаккаунтинге.
Бонус за регистрацию делится на no-deposit и welcome package — первый начисляется автоматом без внесения депозита, но ограничен жесткими вейджерами x50-x70, второй требует пополнения счета и активации промокода. Фриспины привязаны к конкретным слотам провайдера, указанного в условиях акции, причем выигрыш с бесплатных вращений также подлежит отыгрышу. Кэшбек бывает процентным от проигранных средств за период либо рейкбеком в покере — возвратом части комиссии рума. Вейджер рассчитывается только с реальных ставок, игра в demo-mode не учитывается в объеме отыгрыша.
Мобильная версия сайта адаптирована под сенсорные экраны через responsive-дизайн, но нативное приложение обеспечивает лучшую performance за счет оптимизации под операционную систему. Скачать APK для Android можно только с официального сайта казино, поскольку Google Play блокирует азартные приложения в большинстве юрисдикций. iOS-приложения распространяются через TestFlight или требуют изменения региона Apple ID, что создает дополнительные сложности. Push-уведомления в приложениях информируют о новых состязаниях и ограниченных по времени промокодах.
Live казино транслирует игру с реальными крупье через WebRTC-протокол с минимальной задержкой 1-2 секунды, критичной для принятия решений в блэкджеке или рулетке. Провайдеры Evolution Gaming и Pragmatic Play Live предлагают столы с русскоязычными дилерами и лимитами от 50 рублей до миллиона за раунд. RTP в живых играх выше автоматных слотов — европейская рулетка держит 97,3% против 94-96% в видеослотах. Статистика раздач в личном кабинете позволяет отслеживать win rate и стандартное отклонение для корректировки банкролл-менеджмента.
Слоты классифицируются по variance — high variance машины выдают редкие, но крупные выплаты, low variance обеспечивают частые мелкие выигрыши. Провайдеры указывают теоретический RTP в описании игры, но фактическая отдача зависит от размера выборки — на дистанции 10000 спинов результат приближается к заявленному. Турниры по слотам начисляют очки за коэффициент выигрыша относительно ставки, а не за абсолютную сумму, что уравнивает шансы игроков с разными банкроллами. Денежный пул формируется из взносов участников либо гарантируется оператором — второй вариант выгоднее при малом количестве регистраций.
Если следите за новостями и темой ufc в феврале марте 2026 три недели которые встряхнут дивизионы, посмотрите этот разбор. Вот ссылка: https://chrome-downloads.ru/news/ufc-fevral-mart-2026-samye-goryachie-boi-i-neozhidannye-povoroty-kotoryh-stoit-zhdat/
http://ivermectinaccessusa.com/# Ivermectin Access USA
mostbet восстановить пароль http://mostbet85961.help
Fetch Bay Online – I appreciate the minimal design and how smoothly ordering works.
Когда центральный домен оказывается заблокирован по решению регулятора, игрокам приходится искать альтернативные пути доступа к своему балансу и активным ставкам. Рабочее зеркало казино представляет собой технический клон официального ресурса с идентичной функциональностью, но размещенный на другом доменном имени. Важный момент – зеркало полностью синхронизировано с основной базой данных, поэтому ваш баланс, история транзакций и прогресс по вейджеру остаются неизменными независимо от точки входа. Проверенный способ найти актуальное зеркало сегодня – подписаться на email-рассылку оператора или добавить официальный Telegram-канал, где администрация публикует рабочие ссылки в режиме реального времени. Альтернатива – техподдержка в live-чате, которая предоставит актуный URL 888starz-1772578474483.clients.site даже если основного сайта недоступен.
Регистрация через зеркало ничем не отличается от стандартной процедуры на главном домене. Система запросит стандартный набор данных – email, номер телефона, валюту счета. Критический момент – указывайте достоверные контакты, поскольку верификация личности потребуется при первом выводе средств от определенной суммы. Бонус за регистрацию обычно активируется автоматически либо через ввод промокода в специальное поле анкеты. Внимательно читайте условия отыгрыша – требования по вейджеру могут достигать х40-х50 от суммы бонуса, а максимальная ставка при отыгрыше часто ограничена 5 евро или 10 процентами от бонусного баланса.
Личный кабинет через зеркало предоставляет полный доступ к финансовым операциям. Депозиты обрабатываются мгновенно при использовании карт, электронных кошельков или криптовалюты. Вывод средств занимает от нескольких часов до трех рабочих дней в зависимости от выбранного метода и статуса верификации аккаунта. Кэшбек начисляется еженедельно или ежемесячно – процент возврата от проигранных средств варьируется от 5 до 20 процентов в зависимости от VIP-уровня игрока. Фриспины за депозит активируются на конкретных слотах – важно использовать их в установленные сроки, обычно это 24-72 часа.
Мобильный вариант зеркала адаптирована под сенсорное управление и загружается быстрее desktop-варианта за счет оптимизированной графики. Приложение для iOS и Android обеспечивает стабильный доступ даже при блокировках на уровне провайдера, поскольку использует встроенные механизмы обхода ограничений. Скачать APK для Android можно непосредственно с сайта оператора – установка требует разрешения на загрузку из неизвестных источников в настройках безопасности. Версия для iPhone распространяется через TestFlight или веб-клип с возможностью добавления на главный экран.
Слоты в лобби фильтруются по провайдеру, волатильности и RTP. Профессиональные игроки отдают предпочтение игровым автоматам с возвратом от 96 процентов и выше – эту информацию можно найти в разделе справки конкретного слота. Турниры проводятся на отобранных играх с призовым фондом от нескольких тысяч до сотен тысяч долларов. Таблица лидеров обновляется в реальном времени, а система начисления очков может базироваться на множителях выигрыша, количестве спинов или сумме ставок.
Live казино работает на платформе Evolution, Pragmatic Play Live или Ezugi. Пари за столами с реальными дилерами стартуют от 50 центов в рулетке и достигают десятков тысяч в VIP-залах. Важное преимущество – возможность отслеживать статистику последних раундов и использовать стратегии управления банкроллом в режиме реального времени. Скорость интернет-соединения должна быть не менее 5 Мбит/с для комфортной игры без задержек видеопотока.
Промо-предложения и промокоды публикуются в разделе бонусов – сезонные предложения могут включать увеличенный процент на депозит, участие в розыгрыше техники или туристических поездок. Код активации вводится при пополнении счета или в соответствующем разделе личного кабинета. Условия каждой акции индивидуальны – некоторые бонусы доступны только для новых игроков, другие предназначены для удержания активных участников с определенным объемом ставок за предыдущий период.
Казино Vavada привлекает игроков щедрыми бонусами без депозита и постоянными турнирами с крупным призовым фондом.
Регистрация занимает несколько минут, а рабочие зеркала обеспечивают стабильный доступ к сайту даже при блокировках.
Проверяйте актуальные промокоды и условия отыгрыша, чтобы оптимально использовать стартовые фриспины.
Служба поддержки отвечает на русском языке и помогает решить вопросы с верификацией и выводом средств.
Свежие предложения и актуальное зеркало доступны по ссылке: vavada официальный сайт.
Играйте ответственно и контролируйте банкролл, чтобы азарт приносил удовольствие.
pharmacy rx world canada: US Pharma Index – canada pharmacy world
Cherry Vendor Direct – I appreciate the shop posting seasonal updates consistently.
Visit Calm Cart – Overall experience is smooth, reliable, and easy to move through.
Premium Online Store – Browsing is smooth and locating items is fast and easy.
металлические столбики ограждения металлические столбики ограждения
магазин электрики кабель кабель минск
Доступ к игровой сервисе через официальный сайт gonzo-1772569743064.clients.site остается приоритетным способом для опытных игроков, поскольку именно здесь сосредоточены современные версии слотов с корректными RTP-показателями и подтвержденные генераторы случайных чисел. Рабочее зеркало представляет собой технический клон основного ресурса с идентичной базой данных пользователей, что позволяет обходить блокировки провайдеров без потери функционала личного кабинета или истории транзакций. Критически важно использовать только официальное зеркало, поскольку поддельные копии могут перехватывать платежные данные или подменять коэффициенты выплат в слотах.
Регистрация через актуальное зеркало сегодня дает доступ к стартовому пакету, который обычно включает процентную надбавку к первому депозиту и установленное количество фриспинов на определенные слоты провайдеров уровня Pragmatic Play или NetEnt. Промокоды активируются в специальном поле при пополнении счета и могут увеличивать стандартный бонус за регистрацию до 200-300 процентов, однако требуют внимательного изучения вейджера – множителя отыгрыша, который варьируется от x30 до x50 суммы бонуса и депозита.
Вход в личный кабинет через зеркало использует единую систему аутентификации с двухфакторной верификацией, что защищает баланс от несанкционированного доступа даже при похищении пароля. Мобильная версия адаптирована под сенсорное управление и поддерживает все платежные методы основного сайта, включая криптовалютные кошельки с мгновенными транзакциями. Приложение для Android или iOS можно скачать через APK-файл или официальные сторы, при этом нативные приложения обеспечивают стабильность соединения в live казино, где задержка даже в секунду критична для ставок на рулетку или баккару.
Акции для постоянных игроков строятся вокруг программ лояльности с накопительными баллами, которые преобразуются в реальные средства по фиксированному курсу или дают доступ к эксклюзивным турнирам с гарантированными призовыми фондами. Кэшбек рассчитывается от чистых проигрышей за отчетный период – обычно неделю – и возвращает от 5 до 15 процентов без требований по отыгрышу, что делает его наиболее выгодным типом поощрений для хайроллеров. Турниры в слотах используют систему начисления очков за множители выигрыша или общую сумму ставок, причем таблицы лидеров обновляются в режиме реального времени.
Обзор платежных методов показывает, что вывод средств через верифицированные электронные кошельки занимает от 15 минут до 2 часов, тогда как банковские переводы обрабатываются до 3 рабочих дней из-за межбанковского клиринга. Лимиты на транзакции привязаны к статусу игрока в программе лояльности – VIP-аккаунты получают приоритет в очереди выплат и повышенные суточные лимиты до 100000 долларов. Live казино транслирует игры из профессиональных студий с реальными дилерами, причем продвинутые столы предлагают статистику предыдущих раундов и возможность side-ставок с коэффициентами до 1:11.
jolvix.shop – Simple design but it definitely gets the job done.
Официальный сайт казино работает по принципу географической сегментации — провайдеры блокируют доступ на основании IP-адреса пользователя, что заставляет операторов развертывать зеркала на альтернативных доменах. Рабочее зеркало daddy-1772575623692.clients.site представляет собой полную копию основного ресурса с идентичной базой данных игроков, балансами и историей транзакций, но размещенную на другом хостинге с новым URL. Для поиска актуального зеркала сегодня опытные игроки используют Telegram-каналы казино, email-рассылки или сохраняют несколько резервных доменов в закладках браузера. Критически важно проверять SSL-сертификат любого зеркала через адресную строку — отсутствие замка безопасности указывает на фишинговый сайт.
Регистрация через зеркало не отличается от процедуры на основном домене — система запросит email, номер телефона и создание пароля с минимальными требованиями к сложности. Верификация личного кабинета потребует загрузки документов только при первом выводе средств, причем лимиты без KYC обычно ограничены эквивалентом 1000 евро в месяц. Двухфакторная аутентификация через Google Authenticator повышает безопасность аккаунта, но доступна не во всех казино. Обратите внимание на форс-мажорные условия в пользовательском соглашении — некоторые операторы резервируют право заморозить вывод при подозрении в мультиаккаунтинге.
Бонус за регистрацию делится на no-deposit и welcome package — первый начисляется автоматом без внесения депозита, но ограничен жесткими вейджерами x50-x70, второй требует пополнения счета и активации промокода. Фриспины привязаны к конкретным слотам провайдера, указанного в условиях акции, причем выигрыш с бесплатных вращений также подлежит отыгрышу. Кэшбек бывает процентным от проигранных средств за период либо рейкбеком в покере — возвратом части комиссии рума. Вейджер рассчитывается только с реальных ставок, игра в демо-режиме не учитывается в объеме отыгрыша.
Мобильная версия сайта адаптирована под сенсорные экраны через responsive-дизайн, но нативное приложение обеспечивает лучшую производительность за счет оптимизации под операционную систему. Скачать APK для Android можно только с официального сайта казино, поскольку Google Play блокирует азартные приложения в большинстве юрисдикций. iOS-приложения распространяются через TestFlight или требуют изменения региона Apple ID, что создает дополнительные сложности. Push-уведомления в приложениях информируют о новых турнирах и ограниченных по времени промокодах.
Live казино транслирует игру с реальными крупье через WebRTC-протокол с минимальной задержкой 1-2 секунды, критичной для принятия решений в блэкджеке или рулетке. Провайдеры Evolution Gaming и Pragmatic Play Live предлагают столы с русскоязычными дилерами и лимитами от 50 рублей до миллиона за раунд. RTP в живых играх выше автоматных слотов — европейская рулетка держит 97,3% против 94-96% в видеослотах. Статистика раздач в личном кабинете позволяет отслеживать win rate и стандартное отклонение для корректировки банкролл-менеджмента.
Слоты классифицируются по волатильности — high variance машины выдают редкие, но крупные выплаты, low variance обеспечивают частые мелкие выигрыши. Провайдеры указывают теоретический RTP в описании игры, но фактическая отдача зависит от размера выборки — на дистанции 10000 спинов результат приближается к заявленному. Турниры по слотам начисляют очки за коэффициент выигрыша относительно ставки, а не за абсолютную сумму, что уравнивает шансы игроков с разными банкроллами. Призовой фонд формируется из взносов участников либо гарантируется оператором — второй вариант выгоднее при малом количестве регистраций.
Apricot Crate Store – High-quality items and the checkout process is very easy.
Доступ к игорной площадке через официальный сайт disi-1772559704046.clients.site остается первостепенной задачей для опытных игроков, но блокировки провайдеров вынуждают держать наготове актуальные рабочие зеркала. Зеркало представляет собой технический клон основного ресурса с идентичным функционалом и базой данных, но размещенный на альтернативном домене. Критически важно использовать только проверенные источники получения ссылок на зеркала, поскольку фишинговые копии могут перехватить данные вашего учетной записи и платежную информацию. Официальное зеркало сегодня можно получить через рассылку казино, клиентскую службу в мессенджерах или Telegram-канал заведения.
Процедура регистрации на платформе открывает доступ к приветственному пакету, который обычно включает процентную надбавку к депозиту и фриспины на топовые слоты. Обращайте внимание на отыгрыш бонуса, стандартные показатели варьируются от х35 до х50, что определяет реальную выгодность предложения. Промокоды активируют эксклюзивные предложения, их публикуют партнеры казино и в тематических сообществах. Бонус за регистрацию без депозита встречается редко, чаще требуется подтверждение номера телефона и минимальное пополнение счета.
Личный кабинет концентрирует управление балансом, историю транзакций, активацию акций и прогресс по бонусной программе. Современные платформы внедряют многоуровневые VIP-системы с персональным кэшбеком, расчет которого ведется от проигранных ставок за отчетный период. Кэшбек начисляется обычно по понедельникам, процент зависит от статуса игрока и может достигать 15-20% для высоких уровней. Обязательно изучите условия отыгрыша кэшбека, некоторые игорные заведения выдают его с вейджером, другие позволяют сразу вывести средства.
Mobile-версия адаптирует интерфейс под смартфоны без потери функциональности, но нативное приложение обеспечивает стабильнее соединение и быстрее загружает игры. Скачать клиент для Android можно с официального сайта через APK-файл, версия для iOS распространяется через альтернативные маркетплейсы из-за политики App Store. Приложение сохраняет сессию и отправляет push-уведомления о новых акциях и начислении бонусов, что удобно для активных игроков.
Live казино транслирует игры с реальными крупье из студий Evolution Gaming, Pragmatic Play Live и других провайдеров. Здесь работают лимиты столов от центов до тысяч долларов, возможна игра на нескольких столах одновременно. Задержка видеопотока критична для блэкджека и баккары, качественные платформы обеспечивают латентность менее 1 секунды. В разделе слотов представлены автоматы с различной волатильностью, RTP топовых позиций превышает 96%, информация о теоретической отдаче доступна в описании каждой игры.
Соревнования проводятся на выделенных слотах или в live-разделе, призовой фонд формируется оператором или складывается из взносов участников. Таблица лидеров обновляется в реальном времени, учитывается либо сумма выигрышей, либо множитель относительно ставки. Вход в платный турнир списывает бай-ин с основного баланса, фрироллы доступны бесплатно и подходят для тестирования стратегий без риска. Акции часто привязаны к релизам новых игр провайдеров, давая увеличенные фриспины или страховку ставок на ограниченный период.
Доступ к игровой площадке через официальный сайт leon-1772544526560.clients.site остается предпочтительным способом для опытных игроков, поскольку именно здесь сосредоточены действующие версии слотов с корректными RTP-показателями и сертифицированные генераторы случайных чисел. Рабочее зеркало представляет собой технический клон основного ресурса с идентичной базой данных пользователей, что позволяет обходить блокировки провайдеров без потери функций личного кабинета или истории транзакций. Критически важно использовать только официальное зеркало, поскольку поддельные копии могут перехватывать платежные данные или подменять коэффициенты выплат в слотах.
Регистрация через актуальное зеркало сегодня дает доступ к стартовому пакету, который обычно предполагает процентную надбавку к первому депозиту и определенное количество фриспинов на определенные слоты провайдеров уровня Pragmatic Play или NetEnt. Промокоды активируются в специальном поле при пополнении счета и могут увеличивать стандартный бонус за регистрацию до 200-300 процентов, однако требуют внимательного изучения вейджера – множителя отыгрыша, который варьируется от x30 до x50 суммы бонуса и депозита.
Вход в личный кабинет через зеркало использует единую систему аутентификации с двухфакторной верификацией, что защищает баланс от несанкционированного доступа даже при похищении пароля. Мобильная версия адаптирована под сенсорное управление и поддерживает все платежные методы основного сайта, включая криптовалютные кошельки с мгновенными транзакциями. Приложение для Android или iOS можно скачать через APK-файл или официальные сторы, при этом нативные приложения обеспечивают стабильность соединения в live казино, где задержка даже в секунду критична для ставок на рулетку или баккару.
Акции для постоянных игроков строятся вокруг программ лояльности с накопительными баллами, которые трансформируются в реальные средства по фиксированному курсу или дают доступ к эксклюзивным турнирам с гарантированными призовыми фондами. Кэшбек рассчитывается от чистых проигрышей за отчетный период – обычно неделю – и возвращает от 5 до 15 процентов без требований по отыгрышу, что делает его наиболее выгодным типом поощрений для хайроллеров. Турниры в слотах используют систему начисления очков за множители выигрыша или общую сумму ставок, причем таблицы лидеров обновляются в режиме реального времени.
Обзор платежных методов показывает, что вывод средств через верифицированные электронные кошельки занимает от 15 минут до 2 часов, тогда как банковские переводы обрабатываются до 3 рабочих дней из-за межбанковского клиринга. Лимиты на транзакции привязаны к статусу игрока в программе лояльности – VIP-аккаунты получают приоритет в очереди выплат и повышенные суточные лимиты до 100000 долларов. Live казино транслирует игры из профессиональных студий с реальными дилерами, причем продвинутые столы предлагают статистику предыдущих раундов и возможность side-ставок с коэффициентами до 1:11.
samplesunrise boutique – Great setup with everything laid out in a thoughtful way.
мелбет бонус за первый депозит https://melbet51923.help
https://sildenafilpriceguide.com/# sildenafil online
This casino https://konferencja-przyrodnicza.pl/ offers a solid mix of classic slots and live tables. The platform feels well-designed, promotions are worth trying, and support is responsive, which adds confidence.
shopping platform – The interface looks crisp and navigation through pages is simple.
Network Nectar Hub – Moving through the site feels natural and very fast.
Доступ к игровой портале через официальный сайт laki-world-1772492978119.clients.site остается первостепенным способом для опытных игроков, поскольку именно здесь сосредоточены действующие версии слотов с корректными RTP-показателями и верифицированные генераторы случайных чисел. Рабочее зеркало представляет собой технический клон основного ресурса с идентичной базой данных пользователей, что позволяет обходить блокировки провайдеров без потери инструментов личного кабинета или истории транзакций. Критически важно использовать только официальное зеркало, поскольку поддельные копии могут перехватывать платежные данные или подменять коэффициенты выплат в слотах.
Регистрация через актуальное зеркало сегодня дает доступ к стартовому пакету, который обычно включает процентную надбавку к первому депозиту и фиксированное количество фриспинов на определенные слоты провайдеров уровня Pragmatic Play или NetEnt. Промокоды активируются в специальном поле при пополнении счета и могут увеличивать стандартный бонус за регистрацию до 200-300 процентов, однако требуют внимательного изучения вейджера – множителя отыгрыша, который варьируется от x30 до x50 суммы бонуса и депозита.
Вход в личный кабинет через зеркало использует единую систему аутентификации с двухфакторной верификацией, что защищает баланс от несанкционированного доступа даже при утечке пароля. Мобильная версия адаптирована под сенсорное управление и поддерживает все платежные методы основного сайта, включая криптовалютные кошельки с мгновенными транзакциями. Приложение для Android или iOS можно скачать через APK-файл или официальные сторы, при этом нативные приложения обеспечивают стабильность соединения в live казино, где задержка даже в секунду критична для ставок на рулетку или баккару.
Акции для постоянных игроков строятся вокруг программ лояльности с накопительными баллами, которые конвертируются в реальные средства по фиксированному курсу или дают доступ к эксклюзивным турнирам с гарантированными призовыми фондами. Кэшбек рассчитывается от чистых проигрышей за отчетный период – обычно неделю – и возвращает от 5 до 15 процентов без требований по отыгрышу, что делает его наиболее выгодным типом поощрений для хайроллеров. Турниры в слотах используют систему начисления очков за множители выигрыша или общую сумму ставок, причем таблицы лидеров обновляются в режиме реального времени.
Обзор платежных методов показывает, что вывод средств через верифицированные электронные кошельки занимает от 15 минут до 2 часов, тогда как банковские переводы обрабатываются до 3 рабочих дней из-за межбанковского клиринга. Лимиты на транзакции привязаны к статусу игрока в программе лояльности – VIP-аккаунты получают приоритет в очереди выплат и повышенные суточные лимиты до 100000 долларов. Live казино транслирует игры из профессиональных студий с реальными дилерами, причем продвинутые столы предлагают статистику предыдущих раундов и возможность side-ставок с коэффициентами до 1:11.
firmline.bond – Organized design, pages provide a steady impression and clear, concise messaging.
Ivermectin Access USA stromectol otc Ivermectin Access USA
Доступ к игровой портале через официальный сайт leon-1772564149667.clients.site остается первостепенным способом для опытных игроков, поскольку именно здесь сосредоточены действующие версии слотов с корректными RTP-показателями и валидные генераторы случайных чисел. Рабочее зеркало представляет собой технический клон основного ресурса с идентичной базой данных пользователей, что позволяет обходить блокировки провайдеров без потери функций личного кабинета или истории транзакций. Критически важно использовать только официальное зеркало, поскольку фальшивые копии могут перехватывать платежные данные или подменять коэффициенты выплат в слотах.
Регистрация через актуальное зеркало сегодня дает доступ к стартовому пакету, который обычно предполагает процентную надбавку к первому депозиту и установленное количество фриспинов на определенные слоты провайдеров уровня Pragmatic Play или NetEnt. Промокоды активируются в специальном поле при пополнении счета и могут увеличивать стандартный бонус за регистрацию до 200-300 процентов, однако требуют внимательного изучения вейджера – множителя отыгрыша, который варьируется от x30 до x50 суммы бонуса и депозита.
Вход в личный кабинет через зеркало использует единую систему аутентификации с двухфакторной верификацией, что защищает баланс от несанкционированного доступа даже при взломе пароля. Мобильная версия адаптирована под сенсорное управление и поддерживает все платежные методы основного сайта, включая криптовалютные кошельки с мгновенными транзакциями. Приложение для Android или iOS можно скачать через APK-файл или официальные сторы, при этом нативные приложения обеспечивают стабильность соединения в live казино, где задержка даже в секунду критична для ставок на рулетку или баккару.
Акции для постоянных игроков строятся вокруг программ лояльности с накопительными баллами, которые переводятся в реальные средства по фиксированному курсу или дают доступ к эксклюзивным турнирам с гарантированными призовыми фондами. Кэшбек рассчитывается от чистых проигрышей за отчетный период – обычно неделю – и возвращает от 5 до 15 процентов без требований по отыгрышу, что делает его наиболее выгодным типом поощрений для хайроллеров. Турниры в слотах используют систему начисления очков за множители выигрыша или общую сумму ставок, причем таблицы лидеров обновляются в режиме реального времени.
Обзор платежных методов показывает, что вывод средств через верифицированные электронные кошельки занимает от 15 минут до 2 часов, тогда как банковские переводы обрабатываются до 3 рабочих дней из-за межбанковского клиринга. Лимиты на транзакции привязаны к статусу игрока в программе лояльности – VIP-аккаунты получают приоритет в очереди выплат и повышенные суточные лимиты до 100000 долларов. Live казино транслирует игры из профессиональных студий с реальными дилерами, причем продвинутые столы предлагают статистику предыдущих раундов и возможность side-ставок с коэффициентами до 1:11.
Доступ к игровой платформе через официальный сайт takerr.clients.site остается главным способом для опытных игроков, поскольку именно здесь сосредоточены текущие версии слотов с корректными RTP-показателями и валидные генераторы случайных чисел. Рабочее зеркало представляет собой технический клон основного ресурса с идентичной базой данных пользователей, что позволяет обходить блокировки провайдеров без потери инструментов личного кабинета или истории транзакций. Критически важно использовать только официальное зеркало, поскольку липовые копии могут перехватывать платежные данные или подменять коэффициенты выплат в слотах.
Регистрация через актуальное зеркало сегодня дает доступ к стартовому пакету, который обычно включает процентную надбавку к первому депозиту и установленное количество фриспинов на определенные слоты провайдеров уровня Pragmatic Play или NetEnt. Промокоды активируются в специальном поле при пополнении счета и могут увеличивать стандартный бонус за регистрацию до 200-300 процентов, однако требуют внимательного изучения вейджера – множителя отыгрыша, который варьируется от x30 до x50 суммы бонуса и депозита.
Вход в личный кабинет через зеркало использует единую систему аутентификации с двухфакторной верификацией, что защищает баланс от несанкционированного доступа даже при похищении пароля. Мобильная версия адаптирована под сенсорное управление и поддерживает все платежные методы основного сайта, включая криптовалютные кошельки с мгновенными транзакциями. Приложение для Android или iOS можно скачать через APK-файл или официальные сторы, при этом нативные приложения обеспечивают стабильность соединения в live казино, где задержка даже в секунду критична для ставок на рулетку или баккару.
Акции для постоянных игроков строятся вокруг программ лояльности с накопительными баллами, которые обмениваются в реальные средства по фиксированному курсу или дают доступ к эксклюзивным турнирам с гарантированными призовыми фондами. Кэшбек рассчитывается от чистых проигрышей за отчетный период – обычно неделю – и возвращает от 5 до 15 процентов без требований по отыгрышу, что делает его наиболее выгодным типом поощрений для хайроллеров. Турниры в слотах используют систему начисления очков за множители выигрыша или общую сумму ставок, причем таблицы лидеров обновляются в режиме реального времени.
Обзор платежных методов показывает, что вывод средств через верифицированные электронные кошельки занимает от 15 минут до 2 часов, тогда как банковские переводы обрабатываются до 3 рабочих дней из-за межбанковского клиринга. Лимиты на транзакции привязаны к статусу игрока в программе лояльности – VIP-аккаунты получают приоритет в очереди выплат и повышенные суточные лимиты до 100000 долларов. Live казино транслирует игры из профессиональных студий с реальными дилерами, причем продвинутые столы предлагают статистику предыдущих раундов и возможность side-ставок с коэффициентами до 1:11.
Curated Collections – Smooth site layout and a reliable shopping experience throughout.
Visit Soft Parcel – Loading times are quick and moving through the site feels natural.
Доступ к игровым площадкам через вспомогательные URL стал обыденной практикой для опытных гемблеров, особенно когда провайдеры блокируют основной домен по требованию регуляторов. Актуальное зеркало представляет собой технический клон основного ресурса с идентичной функциональностью, но размещенный на другом IP-адресе и доменном имени. Проверенный способ получить рабочую ссылку — подписаться на рассылку оператора или использовать проверенные агрегаторы вроде kushsh.clients.site, где публикуются актуальные адреса без риска попасть на фишинговый клон. Зеркала обновляются ежедневно, иногда несколько раз в сутки, поэтому критически важно иметь надежный источник информации.
Открытие учетной записи через зеркало ничем не отличается от стандартной процедуры на основном сайте — используется единая база данных, все аккаунты синхронизированы. Верификация личности потребуется при первом выводе средств, обычно запрашивают скан паспорта и подтверждение адреса. Двухфакторная аутентификация через SMS или приложения вроде Google Authenticator существенно повышает безопасность учетной записи. Личный кабинет содержит историю транзакций, активные бонусы, вейджер-требования и статистику по сессиям — грамотные игроки регулярно анализируют эти данные для оптимизации банкролл-менеджмента.
Промокоды распределяются по категориям: приветственные пакеты, релоад-бонусы для постоянных клиентов, кэшбек-программы и турнирные призы. Вейджер х40-х50 считается стандартным требованием, хотя встречаются предложения с более лояльными условиями. Фриспины обычно привязаны к конкретным слотам провайдеров, причем выигрыши с бесплатных вращений также подпадают под отыгрыш. Кэшбек рассчитывается от чистых проигрышей за период, возвращается процент от потерянных средств без требований по отыгрышу или с минимальным вейджером х1-х3.
Мобильная версия адаптирована под сенсорное управление, загружается быстрее десктопного варианта благодаря оптимизированной графике. Программы для iOS и Android предлагают расширенный функционал: пуш-уведомления о новых акциях, биометрическую авторизацию, офлайн-доступ к некоторым слотам. Скачивание APK-файла для Андроид происходит напрямую с сайта оператора, минуя Google Play из-за политики магазина в отношении гемблинга. Приложение занимает 50-80 МБ, автоматически обновляется и шифрует трафик через SSL-протокол.
Live-казино транслирует игры в реальном времени из профессиональных студий, ставки обрабатываются мгновенно через WebSocket-соединение. Столы с живыми дилерами предлагают блэкджек, рулетку, баккару, покер и game-shows вроде Crazy Time или Monopoly Live. Лимиты варьируются от нескольких десятков рублей до VIP-столов с минимальной ставкой от 10000. Стриминг ведется в HD-качестве с несколькими углами обзора, чат позволяет общаться с крупье и другими участниками.
Слоты делятся по дисперсии: низкая дает частые мелкие выплаты, высокая подразумевает редкие, но крупные выигрыши. RTP-показатель отображает теоретический возврат игроку — оптимальным считается диапазон 96-98 процентов. Провайдеры вроде Pragmatic Play, NetEnt, Microgaming регулярно выпускают новинки с инновационными механиками: Megaways, каскадные барабаны, расширяющиеся символы. Турниры проводятся по накопительной системе очков или максимальному множителю за спин, призовой фонд распределяется между топ-участниками лидерборда.
Зачисления обрабатываются через банковские карты, электронные кошельки, криптовалюту — каждый метод имеет комиссию и лимиты. Вывод средств занимает от нескольких минут до трех рабочих дней в зависимости от выбранной платежного инструмента и статуса игрока. Верифицированные VIP-клиенты получают приоритетную обработку запросов на кешаут и персонального менеджера для решения финансовых вопросов.
Глубокое понимание себя: Вы узнаете свои врожденные сильные и уязвимые стороны, сознательные и бессознательные характеристики, что помогает принять свою истинную сущность.
Принятие корректных решений: Понимание своей Стратегии и Авторитета позволяет перестать принимать решения из ментального давления, страха или влияния окружающих.
Гармонизация отношений: Осознание того, что каждый человек уникален, помогает лучше понимать реакции окружающих, снижает количество конфликтов и позволяет принимать людей такими, какие они есть.
Жизнь без сопротивления (меньше стресса): Понимание своего типа личности (генератор, проектор и др.) позволяет взаимодействовать с миром экологично, перестав «бороться» с жизнью и действуя в соответствии со своей энергией.
Раскрытие потенциала: Дизайн Человека указывает на врожденные таланты и способности, помогая найти свой путь, который приносит успех, удовлетворение и гармонию
https://t.me/s/ihumandesign
Доступ к игровой площадке через официальный сайт ezcash-1772486196714.clients.site остается основным способом для опытных игроков, поскольку именно здесь сосредоточены текущие версии слотов с корректными RTP-показателями и подтвержденные генераторы случайных чисел. Рабочее зеркало представляет собой технический клон основного ресурса с идентичной базой данных пользователей, что позволяет обходить блокировки провайдеров без потери возможностей личного кабинета или истории транзакций. Критически важно использовать только официальное зеркало, поскольку липовые копии могут перехватывать платежные данные или подменять коэффициенты выплат в слотах.
Регистрация через актуальное зеркало сегодня дает доступ к стартовому пакету, который обычно включает процентную надбавку к первому депозиту и фиксированное количество фриспинов на определенные слоты провайдеров уровня Pragmatic Play или NetEnt. Промокоды активируются в специальном поле при пополнении счета и могут увеличивать стандартный бонус за регистрацию до 200-300 процентов, однако требуют внимательного изучения вейджера – множителя отыгрыша, который варьируется от x30 до x50 суммы бонуса и депозита.
Вход в личный кабинет через зеркало использует единую систему аутентификации с двухфакторной верификацией, что защищает баланс от несанкционированного доступа даже при взломе пароля. Мобильная версия адаптирована под сенсорное управление и поддерживает все платежные методы основного сайта, включая криптовалютные кошельки с мгновенными транзакциями. Приложение для Android или iOS можно скачать через APK-файл или официальные сторы, при этом нативные приложения обеспечивают стабильность соединения в live казино, где задержка даже в секунду критична для ставок на рулетку или баккару.
Акции для постоянных игроков строятся вокруг программ лояльности с накопительными баллами, которые преобразуются в реальные средства по фиксированному курсу или дают доступ к эксклюзивным турнирам с гарантированными призовыми фондами. Кэшбек рассчитывается от чистых проигрышей за отчетный период – обычно неделю – и возвращает от 5 до 15 процентов без требований по отыгрышу, что делает его наиболее выгодным типом поощрений для хайроллеров. Турниры в слотах используют систему начисления очков за множители выигрыша или общую сумму ставок, причем таблицы лидеров обновляются в режиме реального времени.
Обзор платежных методов показывает, что вывод средств через верифицированные электронные кошельки занимает от 15 минут до 2 часов, тогда как банковские переводы обрабатываются до 3 рабочих дней из-за межбанковского клиринга. Лимиты на транзакции привязаны к статусу игрока в программе лояльности – VIP-аккаунты получают приоритет в очереди выплат и повышенные суточные лимиты до 100000 долларов. Live казино транслирует игры из профессиональных студий с реальными дилерами, причем продвинутые столы предлагают статистику предыдущих раундов и возможность side-ставок с коэффициентами до 1:11.
Viagra tablet online: Sildenafil Price Guide – buy viagra here
Curated Collections – The site is simple to navigate, shopping is easy, and everything feels reliable.
комплексное продвижение сайтов москва prodvizhenie-sajtov-v-moskve10.ru .
Explore the Collection – Everything is well arranged and the products exceed expectations.
Rooftop Vendor Boutique – Quick, professional support made the process stress-free.
Когда главный домен оказывается заблокирован по решению регулятора, игрокам приходится искать альтернативные пути доступа к своему балансу и активным ставкам. Рабочее зеркало казино представляет собой технический клон официального ресурса с идентичной функциональностью, но размещенный на другом доменном имени. Важный момент – зеркало полностью синхронизировано с основной базой данных, поэтому ваш баланс, история транзакций и прогресс по вейджеру остаются неизменными независимо от точки входа. Проверенный способ найти актуальное зеркало сегодня – подписаться на email-рассылку оператора или добавить официальный Telegram-канал, где администрация публикует рабочие ссылки в режиме реального времени. Альтернатива – служба помощи в live-чате, которая предоставит актуный URL 888starz-1772578465170.clients.site даже если основного сайта недоступен.
Регистрация через зеркало ничем не отличается от стандартной процедуры на главном домене. Система запросит стандартный набор данных – email, номер телефона, валюту счета. Критический момент – указывайте достоверные контакты, поскольку идентификация личности потребуется при первом выводе средств от определенной суммы. Бонус за регистрацию обычно активируется автоматически либо через ввод промокода в специальное поле анкеты. Внимательно читайте условия отыгрыша – требования по вейджеру могут достигать х40-х50 от суммы бонуса, а максимальная ставка при отыгрыше часто ограничена 5 евро или 10 процентами от бонусного баланса.
Персональный кабинет через зеркало предоставляет полный доступ к финансовым операциям. Депозиты обрабатываются мгновенно при использовании карт, электронных кошельков или криптовалюты. Вывод средств занимает от нескольких часов до трех рабочих дней в зависимости от выбранного метода и статуса верификации аккаунта. Кэшбек начисляется еженедельно или ежемесячно – процент возврата от проигранных средств варьируется от 5 до 20 процентов в зависимости от VIP-уровня игрока. Фриспины за депозит активируются на конкретных слотах – важно использовать их в установленные сроки, обычно это 24-72 часа.
Версия для смартфонов зеркала адаптирована под сенсорное управление и загружается быстрее desktop-варианта за счет оптимизированной графики. Приложение для iOS и Android обеспечивает стабильный доступ даже при блокировках на уровне провайдера, поскольку использует встроенные механизмы обхода ограничений. Скачать APK для Android можно непосредственно с сайта оператора – установка требует разрешения на загрузку из неизвестных источников в настройках безопасности. Версия для iPhone распространяется через TestFlight или веб-клип с возможностью добавления на главный экран.
Слоты в лобби фильтруются по провайдеру, волатильности и RTP. Профессиональные игроки отдают предпочтение автоматам с возвратом от 96 процентов и выше – эту информацию можно найти в разделе справки конкретного слота. Турниры проводятся на отобранных играх с призовым фондом от нескольких тысяч до сотен тысяч долларов. Таблица лидеров обновляется в реальном времени, а система начисления очков может базироваться на множителях выигрыша, количестве спинов или сумме ставок.
Live казино работает на платформе Evolution, Pragmatic Play Live или Ezugi. Игровые ставки за столами с реальными дилерами стартуют от 50 центов в рулетке и достигают десятков тысяч в VIP-залах. Важное преимущество – возможность отслеживать статистику последних раундов и использовать стратегии управления банкроллом в режиме реального времени. Скорость интернет-соединения должна быть не менее 5 Мбит/с для комфортной игры без задержек видеопотока.
Промо-акции и промокоды публикуются в разделе бонусов – сезонные предложения могут включать увеличенный процент на депозит, участие в розыгрыше техники или туристических поездок. Код активации вводится при пополнении счета или в соответствующем разделе личного кабинета. Условия каждой акции индивидуальны – некоторые бонусы доступны только для новых игроков, другие предназначены для удержания активных геймеров с определенным объемом ставок за предыдущий период.
Глубокое понимание себя: Вы узнаете свои врожденные сильные и уязвимые стороны, сознательные и бессознательные характеристики, что помогает принять свою истинную сущность.
Принятие корректных решений: Понимание своей Стратегии и Авторитета позволяет перестать принимать решения из ментального давления, страха или влияния окружающих.
Гармонизация отношений: Осознание того, что каждый человек уникален, помогает лучше понимать реакции окружающих, снижает количество конфликтов и позволяет принимать людей такими, какие они есть.
Жизнь без сопротивления (меньше стресса): Понимание своего типа личности (генератор, проектор и др.) позволяет взаимодействовать с миром экологично, перестав «бороться» с жизнью и действуя в соответствии со своей энергией.
Раскрытие потенциала: Дизайн Человека указывает на врожденные таланты и способности, помогая найти свой путь, который приносит успех, удовлетворение и гармонию
https://t.me/s/ihumandesign
wellnesswilds online shop – Lovely presentation and browsing works seamlessly.
SWeAR2033
http://ivermectinaccessusa.com/# Ivermectin Access USA
Глубокое понимание себя: Вы узнаете свои врожденные сильные и уязвимые стороны, сознательные и бессознательные характеристики, что помогает принять свою истинную сущность.
Принятие корректных решений: Понимание своей Стратегии и Авторитета позволяет перестать принимать решения из ментального давления, страха или влияния окружающих.
Гармонизация отношений: Осознание того, что каждый человек уникален, помогает лучше понимать реакции окружающих, снижает количество конфликтов и позволяет принимать людей такими, какие они есть.
Жизнь без сопротивления (меньше стресса): Понимание своего типа личности (генератор, проектор и др.) позволяет взаимодействовать с миром экологично, перестав «бороться» с жизнью и действуя в соответствии со своей энергией.
Раскрытие потенциала: Дизайн Человека указывает на врожденные таланты и способности, помогая найти свой путь, который приносит успех, удовлетворение и гармонию
https://t.me/s/ihumandesign
Ivermectin Access USA: buy ivermectin pills – Ivermectin Access USA
Официальный сайт казино работает по принципу географической сегментации — поставщики блокируют доступ на основании IP-адреса пользователя, что заставляет операторов развертывать зеркала на альтернативных доменах. Рабочее зеркало dragon-money-money.clients.site представляет собой полную копию основного ресурса с идентичной базой данных игроков, балансами и журналом транзакций, но размещенную на другом хостинге с новым URL. Для поиска актуального зеркала сегодня опытные игроки используют Telegram-каналы казино, email-рассылки или сохраняют несколько запасных доменов в закладках браузера. Критически важно проверять SSL-сертификат любого зеркала через адресную строку — отсутствие замка безопасности указывает на фальшивый сайт.
Регистрация через зеркало не отличается от процедуры на основном домене — система запросит email, номер телефона и создание пароля с минимальными требованиями к сложности. Верификация личного кабинета потребует загрузки документов только при первом выводе средств, причем лимиты без KYC обычно ограничены эквивалентом 1000 евро в месяц. Двухфакторная аутентификация через Google Authenticator повышает безопасность аккаунта, но доступна не во всех казино. Обратите внимание на форс-мажорные условия в пользовательском соглашении — некоторые операторы резервируют право заморозить вывод при признаках в мультиаккаунтинге.
Бонус за регистрацию делится на no-deposit и welcome package — первый начисляется автоматом без внесения депозита, но ограничен жесткими wager-требованиями x50-x70, второй требует пополнения счета и активации промокода. Фриспины привязаны к конкретным слотам провайдера, указанного в условиях акции, причем выигрыш с бесплатных вращений также подлежит отыгрышу. Кэшбек бывает процентным от проигранных средств за период либо рейкбеком в покере — возвратом части комиссии рума. Вейджер рассчитывается только с реальных ставок, игра в демо-режиме не учитывается в объеме отыгрыша.
Мобильная версия сайта адаптирована под сенсорные экраны через responsive-дизайн, но нативное приложение обеспечивает лучшую скорость работы за счет оптимизации под операционную систему. Скачать APK для Android можно только с официального сайта казино, поскольку Google Play блокирует азартные приложения в большинстве юрисдикций. iOS-приложения распространяются через TestFlight или требуют изменения региона Apple ID, что создает дополнительные сложности. Push-уведомления в приложениях информируют о новых турнирах и ограниченных по времени промокодах.
Live казино транслирует игру с реальными крупье через WebRTC-протокол с минимальной задержкой 1-2 секунды, критичной для принятия решений в блэкджеке или рулетке. Провайдеры Evolution Gaming и Pragmatic Play Live предлагают столы с дилерами на русском дилерами и лимитами от 50 рублей до миллиона за раунд. RTP в живых играх выше автоматных слотов — европейская рулетка держит 97,3% против 94-96% в видеослотах. Статистика раздач в личном кабинете позволяет отслеживать win rate и стандартное отклонение для корректировки банкролл-менеджмента.
Слоты классифицируются по variance — high variance машины выдают редкие, но крупные выплаты, low variance обеспечивают частые мелкие выигрыши. Провайдеры указывают теоретический RTP в описании игры, но фактическая отдача зависит от размера выборки — на дистанции 10000 спинов результат приближается к заявленному. Турниры по слотам начисляют очки за коэффициент выигрыша относительно ставки, а не за абсолютную сумму, что уравнивает шансы игроков с разными банкроллами. Денежный пул формируется из взносов участников либо гарантируется оператором — второй вариант выгоднее при малом количестве регистраций.
Добро пожаловать в подробный разбор функционала и возможностей платформы, где я поделюсь практическим опытом взаимодействия с ресурсом 888-1772576540851.clients.site и расскажу о нюансах, которые действительно влияют на игровой процесс. За годы тестирования десятков операторов я научился отличать маркетинговый шум от реальной пользы, поэтому сосредоточусь именно на технических деталях и финансовых механизмах, которые определяют качество вашего гейминг-опыта.
Технология зеркалирования и стабильность доступа
Рабочее зеркало представляет собой полный клон основного домена с идентичной базой данных и функционалом, размещенный на альтернативном IP-адресе. Критически важный момент – синхронизация балансов происходит в режиме реального времени через единый бэкенд, что исключает расхождения в финансовых операциях. Проверяйте наличие SSL-сертификата в адресной строке зеркала – зеленый замок подтверждает шифрование данных по протоколу TLS 1.3.
Актуальные зеркала сегодня обычно распространяются через Telegram-каналы службы поддержки или приходят на верифицированную электронную почту. Добавьте официальный канал в избранное сразу после регистрации – это сэкономит время при блокировках. Альтернативный способ – использование VPN с серверами в юрисдикциях Кюрасао или Мальты, хотя качественные зеркала делают эту опцию избыточной.
Регистрация и верификация личного кабинета
Процедура создания аккаунта занимает две минуты, но профессиональный подход требует внимания к деталям. Используйте реальные данные с первого шага – это предотвратит проблемы при верификации KYC перед первым выводом. Ресурс запрашивает скан паспорта и подтверждение адреса при транзакциях от определенного порога, обычно это 2000-3000 евро в эквиваленте.
В личном кабинете обязательно активируйте двухфакторную аутентификацию через Google Authenticator. SMS-коды менее надежны из-за уязвимости к SIM-свapping атакам. Раздел истории транзакций сохраняет данные за последние 90 дней – экспортируйте выписки ежемесячно для собственного учета, особенно если планируете декларировать доходы.
Структура бонусной программы и условия отыгрыша
Премия за регистрацию обычно предлагается в формате депозитного матча с вейджером x35-x40. Ключевой параметр – максимальная ставка при отыгрыше, часто ограниченная 5 евро или 10% от бонусной суммы. Превышение автоматически аннулирует активный баланс, причем трекинг происходит на уровне игровых раундов, а не сессий.
Фриспины распределяются порционно – стандартная практика 20-25 вращений ежедневно в течение нескольких дней. Обращайте внимание на таймфрейм использования каждой порции, обычно это 24 часа с момента зачисления. Выигрыши с фриспинов конвертируются в бонусные средства с собственным вейджером, реже – сразу попадают на реальный баланс с уменьшенным коэффициентом отыгрыша.
Кэшбек рассчитывается от чистых проигрышей за отчетный период, обычно еженедельный. Процент варьируется от 5% до 15% в зависимости от VIP-статуса. Важный нюанс – в расчет берутся только ставки на реальные деньги, бонусные вращения исключаются. Некоторые провайдеры вообще не участвуют в программе кэшбека, список доступен в правилах акций.
Промокоды активируются в специальном поле при депозите или в разделе бонусов личного кабинета. Эксклюзивные коды от партнеров часто предлагают улучшенные условия – сниженный вейджер или увеличенный процент матча. Срок действия промокодов жестко ограничен, проверяйте актуальность перед внесением средств.
Игровой ассортимент и механики слотов
Библиотека слотов насчитывает несколько тысяч позиций от топовых провайдеров – Pragmatic Play, NetEnt, Play’n GO, Evolution Gaming. Обращайте внимание на показатель RTP в описании игры, оптимальный диапазон 96-97%. Некоторые операторы используют версии слотов с заниженной отдачей, разница в 2-3% критична при длительных сессиях.
Волатильность определяет частоту и размер выплат. Высоковолатильные слоты типа Dead or Alive 2 или Book of Dead дают редкие, но крупные выигрыши – подходят для бонусхантинга с большим банкроллом. Низковолатильные Starburst или Blood Suckers обеспечивают стабильные мелкие выплаты, что снижает дисперсию при отыгрыше.
Опция Buy Bonus позволяет купить доступ к бонусной игре за фиксированную сумму, обычно x100 от ставки. При активном бонусе эта опция часто заблокирована условиями. Слоты с прогрессивным джекпотом вносят минимальный вклад в отыгрыш – 5-10%, что делает их неэффективными для выполнения вейджера.
Live казино и взаимодействие с дилерами
Живые столы транслируются из студий Evolution, Ezugi, Pragmatic Live в HD-качестве с задержкой 1-2 секунды. Ставки принимаются в реальном времени, окно для размещения чипов составляет 10-15 секунд в зависимости от игры. Рулетка и баккара дают 100% вклада в отыгрыш, блэкджек обычно 10-20%, покер может вообще исключаться.
Функционал чата позволяет общаться с дилером и другими игроками, но модерация жесткая – за нарушение этикета последует мут или бан от стола. В VIP-комнатах базовые ставки начинаются от 50-100 евро, но появляются эксклюзивные варианты типа Lightning Roulette с мультипликаторами до x500.
Мобильная версия и приложение
Адаптивная версия сайта полностью функциональна на iOS и Android без установки дополнительного софта. Интерфейс оптимизирован под сенсорное управление, скорость загрузки игр идентична десктопной при стабильном 4G-соединении. Единственное ограничение – некоторые старые слоты на Flash-технологии недоступны на мобильных устройствах.
Приложение для скачивания предлагается через APK-файл для Android, так как Google Play блокирует гемблинг-софт. Настройка требует активации опции «Неизвестные источники» в настройках безопасности. iOS-версия распространяется через TestFlight или корпоративные сертификаты, периодически требующие переустановки из-за отзыва Apple.
Преимущество нативного приложения – пуш-уведомления о новых бонусах и турнирах, а также более быстрый доступ через биометрическую аутентификацию. Функционал идентичен веб-версии, включая депозиты и выводы средств.
Турниры и соревновательные механики
Регулярные турниры проводятся с призовыми фондами от 5000 до 50000 евро. Механика основана на накоплении очков за выигрышные спины – стандартный коэффициент 1 евро выигрыша равен 1 очку. Некоторые турниры используют мультипликативную систему, где учитывается отношение выигрыша к ставке.
Таблица лидеров обновляется в реальном времени, что позволяет отслеживать позицию и корректировать стратегию. Обращайте внимание на минимальную ставку для участия – обычно 0,50-1 евро, занижение исключает раунд из зачета. Призы распределяются автоматически в течение 72 часов после завершения, часто в виде бонусных средств с отыгрышем.
Фрироллы – турниры без взноса – отличная возможность пополнить банкролл без риска. Призовой фонд скромнее, но конкуренция ниже. Участие обычно ограничено определенным количеством спинов или временным окном.
Финансовые операции и вывод средств
Зачисления обрабатываются мгновенно через банковские карты Visa/Mastercard, электронные кошельки Skrill/Neteller, криптовалюты Bitcoin/Ethereum. Комиссия со стороны казино отсутствует, но платежная система может взимать 2-3%. Криптовалютные транзакции обеспечивают максимальную анонимность и скорость подтверждения от 10 минут.
Вывод средств требует верификации при первой заявке или при превышении лимита. Стандартные периоды обработки – 24-48 часов для электронных кошельков, 3-5 рабочих дней для банковских переводов. Криптовалюта выводится за 1-6 часов в зависимости от загрузки блокчейна.
Лимиты на вывод составляют обычно 5000-10000 евро в неделю для стандартных аккаунтов, VIP-игроки получают индивидуальные условия. Отмена заявки на вывод доступна в течение первых часов – используйте эту функцию аккуратно, чтобы избежать реверсирования выигрыша обратно в игру.
Клиентская служба работает в режиме 24/7 через live-чат, email и мессенджеры. Среднее время ответа в чате – 2-3 минуты, сложные вопросы требующие проверки могут занять до суток. Документируйте все взаимодействия скриншотами, особенно касающиеся финансовых споров или технических сбоев.
Apricot Aisle Experience – Smooth navigation with helpful product descriptions throughout.
Официальный сайт казино работает по принципу географической сегментации — интернет-провайдеры блокируют доступ на основании IP-адреса пользователя, что заставляет операторов развертывать зеркала на альтернативных доменах. Рабочее зеркало bet-andreas-1772575566723.clients.site представляет собой полную копию основного ресурса с идентичной базой данных игроков, балансами и записями транзакций, но размещенную на другом хостинге с новым URL. Для поиска актуального зеркала сегодня опытные игроки используют Telegram-каналы казино, email-рассылки или сохраняют несколько запасных доменов в закладках браузера. Критически важно проверять SSL-сертификат любого зеркала через адресную строку — отсутствие замка безопасности указывает на поддельный сайт.
Регистрация через зеркало не отличается от процедуры на основном домене — система запросит email, номер телефона и создание пароля с минимальными требованиями к сложности. Верификация личного кабинета потребует загрузки документов только при первом изъятии средств, причем лимиты без KYC обычно ограничены эквивалентом 1000 евро в месяц. Двухфакторная аутентификация через Google Authenticator повышает безопасность аккаунта, но доступна не во всех казино. Обратите внимание на форс-мажорные условия в пользовательском соглашении — некоторые операторы резервируют право заморозить вывод при допущении в мультиаккаунтинге.
Бонус за регистрацию делится на no-deposit и welcome package — первый начисляется автоматом без внесения депозита, но ограничен жесткими вейджерами x50-x70, второй требует пополнения счета и активации промокода. Фриспины привязаны к конкретным слотам провайдера, указанного в условиях акции, причем выигрыш с бесплатных вращений также подлежит отыгрышу. Кэшбек бывает процентным от проигранных средств за период либо рейкбеком в покере — возвратом части комиссии рума. Вейджер рассчитывается только с реальных ставок, игра в демонстрационной версии не учитывается в объеме отыгрыша.
Мобильная версия сайта адаптирована под сенсорные экраны через responsive-дизайн, но нативное приложение обеспечивает лучшую скорость работы за счет оптимизации под операционную систему. Скачать APK для Android можно только с официального сайта казино, поскольку Google Play блокирует азартные приложения в большинстве юрисдикций. iOS-приложения распространяются через TestFlight или требуют изменения региона Apple ID, что создает дополнительные сложности. Push-уведомления в приложениях информируют о новых соревнованиях и ограниченных по времени промокодах.
Live казино транслирует игру с реальными крупье через WebRTC-протокол с минимальной задержкой 1-2 секунды, критичной для принятия решений в блэкджеке или рулетке. Провайдеры Evolution Gaming и Pragmatic Play Live предлагают столы с говорящими по-русски дилерами и лимитами от 50 рублей до миллиона за раунд. RTP в живых играх выше автоматных слотов — европейская рулетка держит 97,3% против 94-96% в видеослотах. Статистика раздач в личном кабинете позволяет отслеживать win rate и стандартное отклонение для корректировки банкролл-менеджмента.
Слоты классифицируются по волатильности — high variance машины выдают редкие, но крупные выплаты, low variance обеспечивают частые мелкие выигрыши. Провайдеры указывают теоретический RTP в описании игры, но фактическая отдача зависит от размера выборки — на дистанции 10000 спинов результат приближается к заявленному. Турниры по слотам начисляют очки за коэффициент выигрыша относительно ставки, а не за абсолютную сумму, что уравнивает шансы игроков с разными банкроллами. Денежный пул формируется из взносов участников либо гарантируется оператором — второй вариант выгоднее при малом количестве регистраций.
anchorhub.bond – Modern interface, content highlights reliability and clarity in a practical way.
direct shop link – Navigation is intuitive, and the site is easy to use for finding info.
Inventory Ivy Boutique – Helpful breakdowns and organized descriptions stand out here.
http://sildenafilpriceguide.com/# Cheap Viagra 100mg
Доступ к казино-сервису через официальный сайт gama-1772575987552.clients.site остается предпочтением для опытных игроков, но блокировки провайдеров вынуждают держать наготове актуальные рабочие зеркала. Зеркало представляет собой технический клон основного ресурса с идентичным функционалом и базой данных, но размещенный на альтернативном домене. Критически важно использовать только проверенные источники получения ссылок на зеркала, поскольку фишинговые копии могут перехватить данные вашего профиля пользователя и платежную информацию. Официальное зеркало сегодня можно получить через рассылку казино, сервис помощи в мессенджерах или Telegram-канал заведения.
Процедура регистрации на платформе открывает доступ к приветственному пакету, который обычно включает процентную надбавку к депозиту и фриспины на топовые слоты. Обращайте внимание на вейджер бонуса, стандартные показатели варьируются от х35 до х50, что определяет реальную выгодность предложения. Промокоды активируют эксклюзивные предложения, их публикуют партнеры казино и в тематических сообществах. Бонус за регистрацию без депозита встречается редко, чаще требуется аутентификация номера телефона и минимальное пополнение счета.
Личный кабинет концентрирует управление балансом, историю транзакций, активацию акций и прогресс по VIP-схеме. Современные платформы внедряют многоуровневые VIP-системы с персональным кэшбеком, расчет которого ведется от проигранных ставок за отчетный период. Кэшбек начисляется обычно по понедельникам, процент зависит от статуса игрока и может достигать 15-20% для высоких уровней. Обязательно изучите условия отыгрыша кэшбека, некоторые казино выдают его с вейджером, другие позволяют сразу вывести средства.
Мобильный интерфейс адаптирует интерфейс под смартфоны без потери функциональности, но нативное приложение обеспечивает стабильнее соединение и быстрее загружает игры. Скачать клиент для Android можно с официального сайта через APK-файл, версия для iOS распространяется через альтернативные маркетплейсы из-за политики App Store. Приложение сохраняет сессию и отправляет push-уведомления о новых акциях и начислении бонусов, что удобно для активных игроков.
Live казино транслирует игры с реальными крупье из студий Evolution Gaming, Pragmatic Play Live и других провайдеров. Здесь работают лимиты столов от центов до тысяч долларов, возможна игра на нескольких столах одновременно. Задержка видеопотока критична для блэкджека и баккары, качественные платформы обеспечивают латентность менее 1 секунды. В разделе слотов представлены автоматы с различной волатильностью, RTP топовых позиций превышает 96%, информация о теоретической отдаче доступна в описании каждой игры.
Соревнования проводятся на выделенных слотах или в live-разделе, призовой фонд формируется оператором или складывается из взносов участников. Таблица лидеров обновляется в реальном времени, учитывается либо сумма выигрышей, либо множитель относительно ставки. Вход в платный турнир списывает бай-ин с основного баланса, фрироллы доступны бесплатно и подходят для тестирования стратегий без риска. Акции часто привязаны к презентации новых игр провайдеров, давая увеличенные фриспины или страховку ставок на ограниченный период.
Доступ к развлекательному порталу через официальный сайт 888starz-1772577102260.clients.site остается главным выбором для опытных игроков, но блокировки провайдеров вынуждают держать наготове актуальные рабочие зеркала. Зеркало представляет собой технический клон основного ресурса с идентичным функционалом и базой данных, но размещенный на альтернативном домене. Критически важно использовать только проверенные источники получения ссылок на зеркала, поскольку фишинговые копии могут перехватить данные вашего учетной записи и платежную информацию. Официальное зеркало сегодня можно получить через рассылку казино, сервис помощи в мессенджерах или Telegram-канал заведения.
Оформление профиля на платформе открывает доступ к приветственному пакету, который обычно включает процентную надбавку к депозиту и фриспины на топовые слоты. Обращайте внимание на отыгрыш бонуса, стандартные показатели варьируются от х35 до х50, что определяет реальную выгодность предложения. Промокоды активируют эксклюзивные предложения, их публикуют партнеры казино и в тематических сообществах. Бонус за регистрацию без депозита встречается редко, чаще требуется валидация номера телефона и минимальное пополнение счета.
Личный кабинет концентрирует управление балансом, историю транзакций, активацию акций и прогресс по системе поощрений. Современные платформы внедряют многоуровневые VIP-системы с персональным кэшбеком, расчет которого ведется от проигранных ставок за отчетный период. Кэшбек начисляется обычно по понедельникам, процент зависит от статуса игрока и может достигать 15-20% для высоких уровней. Обязательно изучите условия отыгрыша кэшбека, некоторые казино выдают его с вейджером, другие позволяют сразу вывести средства.
Mobile-версия адаптирует интерфейс под смартфоны без потери функциональности, но нативное приложение обеспечивает стабильнее соединение и быстрее загружает игры. Скачать клиент для Android можно с официального сайта через APK-файл, версия для iOS распространяется через альтернативные маркетплейсы из-за политики App Store. Приложение сохраняет сессию и отправляет push-уведомления о новых акциях и начислении бонусов, что удобно для активных игроков.
Live казино транслирует игры с реальными дилерами из студий Evolution Gaming, Pragmatic Play Live и других провайдеров. Здесь работают лимиты столов от центов до тысяч долларов, возможна игра на нескольких столах одновременно. Задержка видеопотока критична для блэкджека и баккары, качественные платформы обеспечивают латентность менее 1 секунды. В разделе слотов представлены автоматы с различной волатильностью, RTP топовых позиций превышает 96%, информация о теоретической отдаче доступна в описании каждой игры.
Конкурсы проводятся на выделенных слотах или в live-разделе, призовой фонд формируется оператором или складывается из взносов участников. Таблица лидеров обновляется в реальном времени, учитывается либо сумма выигрышей, либо множитель относительно ставки. Вход в платный турнир списывает бай-ин с основного баланса, фрироллы доступны бесплатно и подходят для тестирования стратегий без риска. Акции часто привязаны к запуску новых игр провайдеров, давая увеличенные фриспины или страховку ставок на ограниченный период.
purchase priligy https://rsmeds.top/# buy priligy pills
Официальный сайт казино работает по принципу географической сегментации — провайдеры блокируют доступ на основании IP-адреса пользователя, что заставляет операторов развертывать зеркала на альтернативных доменах. Рабочее зеркало bet-andreas-andreas.clients.site представляет собой полную копию основного ресурса с идентичной базой данных игроков, балансами и историей транзакций, но размещенную на другом хостинге с новым URL. Для поиска актуального зеркала сегодня опытные игроки используют Telegram-каналы казино, email-рассылки или сохраняют несколько резервных доменов в закладках браузера. Критически важно проверять SSL-сертификат любого зеркала через адресную строку — отсутствие замка безопасности указывает на фишинговый сайт.
Регистрация через зеркало не отличается от процедуры на основном домене — система запросит email, номер телефона и создание пароля с минимальными требованиями к сложности. Верификация личного кабинета потребует загрузки документов только при первом выводе средств, причем лимиты без KYC обычно ограничены эквивалентом 1000 евро в месяц. Двухфакторная аутентификация через Google Authenticator повышает безопасность аккаунта, но доступна не во всех казино. Обратите внимание на форс-мажорные условия в пользовательском соглашении — некоторые операторы резервируют право заморозить вывод при подозрении в мультиаккаунтинге.
Бонус за регистрацию делится на no-deposit и welcome package — первый начисляется автоматом без внесения депозита, но ограничен жесткими вейджерами x50-x70, второй требует пополнения счета и активации промокода. Фриспины привязаны к конкретным слотам провайдера, указанного в условиях акции, причем выигрыш с бесплатных вращений также подлежит отыгрышу. Кэшбек бывает процентным от проигранных средств за период либо рейкбеком в покере — возвратом части комиссии рума. Вейджер рассчитывается только с реальных ставок, игра в демо-режиме не учитывается в объеме отыгрыша.
Мобильная версия сайта адаптирована под сенсорные экраны через responsive-дизайн, но нативное приложение обеспечивает лучшую производительность за счет оптимизации под операционную систему. Скачать APK для Android можно только с официального сайта казино, поскольку Google Play блокирует азартные приложения в большинстве юрисдикций. iOS-приложения распространяются через TestFlight или требуют изменения региона Apple ID, что создает дополнительные сложности. Push-уведомления в приложениях информируют о новых турнирах и ограниченных по времени промокодах.
Live казино транслирует игру с реальными крупье через WebRTC-протокол с минимальной задержкой 1-2 секунды, критичной для принятия решений в блэкджеке или рулетке. Провайдеры Evolution Gaming и Pragmatic Play Live предлагают столы с русскоязычными дилерами и лимитами от 50 рублей до миллиона за раунд. RTP в живых играх выше автоматных слотов — европейская рулетка держит 97,3% против 94-96% в видеослотах. Статистика раздач в личном кабинете позволяет отслеживать win rate и стандартное отклонение для корректировки банкролл-менеджмента.
Слоты классифицируются по волатильности — high variance машины выдают редкие, но крупные выплаты, low variance обеспечивают частые мелкие выигрыши. Провайдеры указывают теоретический RTP в описании игры, но фактическая отдача зависит от размера выборки — на дистанции 10000 спинов результат приближается к заявленному. Турниры по слотам начисляют очки за коэффициент выигрыша относительно ставки, а не за абсолютную сумму, что уравнивает шансы игроков с разными банкроллами. Призовой фонд формируется из взносов участников либо гарантируется оператором — второй вариант выгоднее при малом количестве регистраций.
Официальный сайт казино работает по принципу географической сегментации — поставщики блокируют доступ на основании IP-адреса пользователя, что заставляет операторов развертывать зеркала на альтернативных доменах. Рабочее зеркало wilder-1772572153058.clients.site представляет собой полную копию основного ресурса с идентичной базой данных игроков, балансами и историей транзакций, но размещенную на другом хостинге с новым URL. Для поиска актуального зеркала сегодня опытные игроки используют Telegram-каналы казино, email-рассылки или сохраняют несколько альтернативных доменов в закладках браузера. Критически важно проверять SSL-сертификат любого зеркала через адресную строку — отсутствие замка безопасности указывает на фишинговый сайт.
Регистрация через зеркало не отличается от процедуры на основном домене — система запросит email, номер телефона и создание пароля с минимальными требованиями к сложности. Верификация личного кабинета потребует загрузки документов только при первом выводе средств, причем лимиты без KYC обычно ограничены эквивалентом 1000 евро в месяц. Двухфакторная аутентификация через Google Authenticator повышает безопасность аккаунта, но доступна не во всех казино. Обратите внимание на форс-мажорные условия в пользовательском соглашении — некоторые операторы резервируют право заморозить вывод при сомнении в мультиаккаунтинге.
Бонус за регистрацию делится на no-deposit и welcome package — первый начисляется автоматом без внесения депозита, но ограничен жесткими вейджерами x50-x70, второй требует пополнения счета и активации промокода. Фриспины привязаны к конкретным слотам провайдера, указанного в условиях акции, причем выигрыш с бесплатных вращений также подлежит отыгрышу. Кэшбек бывает процентным от проигранных средств за период либо рейкбеком в покере — возвратом части комиссии рума. Вейджер рассчитывается только с реальных ставок, игра в пробном режиме не учитывается в объеме отыгрыша.
Мобильная версия сайта адаптирована под сенсорные экраны через responsive-дизайн, но нативное приложение обеспечивает лучшую быстродействие за счет оптимизации под операционную систему. Скачать APK для Android можно только с официального сайта казино, поскольку Google Play блокирует азартные приложения в большинстве юрисдикций. iOS-приложения распространяются через TestFlight или требуют изменения региона Apple ID, что создает дополнительные сложности. Push-уведомления в приложениях информируют о новых турнирах и ограниченных по времени промокодах.
Live казино транслирует игру с реальными крупье через WebRTC-протокол с минимальной задержкой 1-2 секунды, критичной для принятия решений в блэкджеке или рулетке. Провайдеры Evolution Gaming и Pragmatic Play Live предлагают столы с дилерами на русском дилерами и лимитами от 50 рублей до миллиона за раунд. RTP в живых играх выше автоматных слотов — европейская рулетка держит 97,3% против 94-96% в видеослотах. Статистика раздач в личном кабинете позволяет отслеживать win rate и стандартное отклонение для корректировки банкролл-менеджмента.
Слоты классифицируются по variance — high variance машины выдают редкие, но крупные выплаты, low variance обеспечивают частые мелкие выигрыши. Провайдеры указывают теоретический RTP в описании игры, но фактическая отдача зависит от размера выборки — на дистанции 10000 спинов результат приближается к заявленному. Турниры по слотам начисляют очки за коэффициент выигрыша относительно ставки, а не за абсолютную сумму, что уравнивает шансы игроков с разными банкроллами. Prize pool формируется из взносов участников либо гарантируется оператором — второй вариант выгоднее при малом количестве регистраций.
Xenonest Online Shop – Great vibe throughout and product descriptions are easy to understand.
digital shop – It’s easy to move through sections, and everything feels well-structured.
Shop Trending Items – Easy to navigate with a reliable layout, making shopping enjoyable.
To see
Best us online casinos evolution gaming
for key takeaways.
Official Chestnut Market Store – I love discovering new products and seeing updates posted often.
Discover Best Deals – Pages open fast and everything works reliably.
sheetsierra treasures – Selection is solid and checkout felt seamless.
Honestly, this whole situation still feels unbelievable telling this story today.
Back when the new competitive season started, I got way too invested in online games – other competitive titles.
I wanted to dominate, and I wasn’t willing to admit how
impatient I had become.
Late one night, I stumbled across a forum thread talking about cheats.
At first I laughed it off, but the deeper I went into the
thread, the more it felt like a tempting escape.
Commenters were flexing showing how they climbed from low ranks
to high ones in days. It looked like magic. And of course, none of it was real.
Truth be told, I actually got close to buying something. One seller even messaged me privately.
That’s when the real consequences showed up.
I found threads from players who lost their accounts.
Some even wrote how their PCs got infected. That
was my wake-up call.
Instead of throwing everything away, I deleted the messages
and focused on improving the legitimate way.
Now, when I see people chasing cheats, I just think: it’s never worth it.
If you’re reading this, take my experience seriously.
Official Elm Vendor – The options are solid and the costs seem very fair right now.
Официальный сайт казино работает по принципу географической сегментации — провайдеры блокируют доступ на основании IP-адреса пользователя, что заставляет операторов развертывать зеркала на альтернативных доменах. Рабочее зеркало vodka-casino-1772380089182.clients.site представляет собой полную копию основного ресурса с идентичной базой данных игроков, балансами и историей транзакций, но размещенную на другом хостинге с новым URL. Для поиска актуального зеркала сегодня опытные игроки используют Telegram-каналы казино, email-рассылки или сохраняют несколько резервных доменов в закладках браузера. Критически важно проверять SSL-сертификат любого зеркала через адресную строку — отсутствие замка безопасности указывает на фишинговый сайт.
Регистрация через зеркало не отличается от процедуры на основном домене — система запросит email, номер телефона и создание пароля с минимальными требованиями к сложности. Верификация личного кабинета потребует загрузки документов только при первом выводе средств, причем лимиты без KYC обычно ограничены эквивалентом 1000 евро в месяц. Двухфакторная аутентификация через Google Authenticator повышает безопасность аккаунта, но доступна не во всех казино. Обратите внимание на форс-мажорные условия в пользовательском соглашении — некоторые операторы резервируют право заморозить вывод при подозрении в мультиаккаунтинге.
Бонус за регистрацию делится на no-deposit и welcome package — первый начисляется автоматом без внесения депозита, но ограничен жесткими вейджерами x50-x70, второй требует пополнения счета и активации промокода. Фриспины привязаны к конкретным слотам провайдера, указанного в условиях акции, причем выигрыш с бесплатных вращений также подлежит отыгрышу. Кэшбек бывает процентным от проигранных средств за период либо рейкбеком в покере — возвратом части комиссии рума. Вейджер рассчитывается только с реальных ставок, игра в демо-режиме не учитывается в объеме отыгрыша.
Мобильная версия сайта адаптирована под сенсорные экраны через responsive-дизайн, но нативное приложение обеспечивает лучшую производительность за счет оптимизации под операционную систему. Скачать APK для Android можно только с официального сайта казино, поскольку Google Play блокирует азартные приложения в большинстве юрисдикций. iOS-приложения распространяются через TestFlight или требуют изменения региона Apple ID, что создает дополнительные сложности. Push-уведомления в приложениях информируют о новых турнирах и ограниченных по времени промокодах.
Live казино транслирует игру с реальными крупье через WebRTC-протокол с минимальной задержкой 1-2 секунды, критичной для принятия решений в блэкджеке или рулетке. Провайдеры Evolution Gaming и Pragmatic Play Live предлагают столы с русскоязычными дилерами и лимитами от 50 рублей до миллиона за раунд. RTP в живых играх выше автоматных слотов — европейская рулетка держит 97,3% против 94-96% в видеослотах. Статистика раздач в личном кабинете позволяет отслеживать win rate и стандартное отклонение для корректировки банкролл-менеджмента.
Слоты классифицируются по волатильности — high variance машины выдают редкие, но крупные выплаты, low variance обеспечивают частые мелкие выигрыши. Провайдеры указывают теоретический RTP в описании игры, но фактическая отдача зависит от размера выборки — на дистанции 10000 спинов результат приближается к заявленному. Турниры по слотам начисляют очки за коэффициент выигрыша относительно ставки, а не за абсолютную сумму, что уравнивает шансы игроков с разными банкроллами. Призовой фонд формируется из взносов участников либо гарантируется оператором — второй вариант выгоднее при малом количестве регистраций.
Доступ к игровым площадкам через запасные URL стал обыденной практикой для опытных гемблеров, особенно когда провайдеры блокируют основной домен по требованию регуляторов. Актуальное зеркало представляет собой технический клон основного ресурса с идентичной функциональностью, но размещенный на другом IP-адресе и доменном имени. Проверенный способ получить рабочую ссылку — подписаться на рассылку оператора или использовать проверенные агрегаторы вроде motor-1772569811380.clients.site, где публикуются актуальные адреса без риска попасть на фишинговый клон. Зеркала обновляются ежедневно, иногда несколько раз в сутки, поэтому критически важно иметь надежный источник информации.
Постановка на учет через зеркало ничем не отличается от стандартной процедуры на основном сайте — используется единая база данных, все аккаунты синхронизированы. Верификация личности потребуется при первом выводе средств, обычно запрашивают скан паспорта и подтверждение адреса. Двухфакторная аутентификация через SMS или приложения вроде Google Authenticator существенно повышает безопасность учетной записи. Личный кабинет содержит историю транзакций, активные бонусы, вейджер-требования и статистику по сессиям — грамотные игроки регулярно анализируют эти данные для оптимизации банкролл-менеджмента.
Промокоды распределяются по категориям: начальные пакеты, релоад-бонусы для постоянных клиентов, кэшбек-программы и турнирные призы. Вейджер х40-х50 считается стандартным требованием, хотя встречаются предложения с более лояльными условиями. Фриспины обычно привязаны к конкретным слотам провайдеров, причем выигрыши с бесплатных вращений также подпадают под отыгрыш. Кэшбек рассчитывается от чистых проигрышей за период, возвращается процент от потерянных средств без требований по отыгрышу или с минимальным вейджером х1-х3.
Мобильная версия адаптирована под сенсорное управление, загружается быстрее десктопного варианта благодаря оптимизированной графике. Утилиты для iOS и Android предлагают расширенный функционал: пуш-уведомления о новых акциях, биометрическую авторизацию, офлайн-доступ к некоторым слотам. Скачивание APK-файла для Андроид происходит напрямую с сайта оператора, минуя Google Play из-за политики магазина в отношении гемблинга. Приложение занимает 50-80 МБ, автоматически обновляется и шифрует трафик через SSL-протокол.
Live-казино транслирует игры в реальном времени из профессиональных студий, ставки принимаются мгновенно через WebSocket-соединение. Столы с живыми дилерами предлагают блэкджек, рулетку, баккару, покер и game-shows вроде Crazy Time или Monopoly Live. Лимиты варьируются от нескольких десятков рублей до VIP-столов с минимальной ставкой от 10000. Стриминг ведется в HD-качестве с несколькими углами обзора, чат позволяет общаться с крупье и другими участниками.
Слоты делятся по дисперсии: низкая дает частые мелкие выплаты, высокая подразумевает редкие, но крупные выигрыши. RTP-показатель отображает теоретический возврат игроку — оптимальным считается диапазон 96-98 процентов. Провайдеры вроде Pragmatic Play, NetEnt, Microgaming регулярно выпускают новинки с инновационными механиками: Megaways, каскадные барабаны, расширяющиеся символы. Турниры проводятся по накопительной системе очков или максимальному множителю за спин, призовой фонд распределяется между топ-участниками лидерборда.
Зачисления обрабатываются через банковские карты, электронные кошельки, криптовалюту — каждый метод имеет комиссию и лимиты. Вывод средств занимает от нескольких минут до трех рабочих дней в зависимости от выбранной финансового сервиса и статуса игрока. Верифицированные VIP-клиенты получают приоритетную обработку запросов на кешаут и персонального менеджера для решения финансовых вопросов.
газовое пожаротушение монтаж с гарантией montazh-gazovogo-pozharotusheniya-2.ru .
Доступ к игровым площадкам через резервные URL стал обыденной практикой для опытных гемблеров, особенно когда провайдеры блокируют основной домен по требованию регуляторов. Актуальное зеркало представляет собой технический клон основного ресурса с идентичной функциональностью, но размещенный на другом IP-адресе и доменном имени. Проверенный способ получить рабочую ссылку — подписаться на рассылку оператора или использовать проверенные агрегаторы вроде pinco-1772487822327.clients.site, где публикуются актуальные адреса без риска попасть на фишинговый клон. Зеркала обновляются ежедневно, иногда несколько раз в сутки, поэтому критически важно иметь надежный источник информации.
Создание аккаунта через зеркало ничем не отличается от стандартной процедуры на основном сайте — используется единая база данных, все аккаунты синхронизированы. Верификация личности потребуется при первом выводе средств, обычно запрашивают скан паспорта и подтверждение адреса. Двухфакторная аутентификация через SMS или приложения вроде Google Authenticator существенно повышает безопасность учетной записи. Личный кабинет содержит историю транзакций, активные бонусы, вейджер-требования и статистику по сессиям — грамотные игроки регулярно анализируют эти данные для оптимизации банкролл-менеджмента.
Промокоды распределяются по категориям: регистрационные пакеты, релоад-бонусы для постоянных клиентов, кэшбек-программы и турнирные призы. Вейджер х40-х50 считается стандартным требованием, хотя встречаются предложения с более лояльными условиями. Фриспины обычно привязаны к конкретным слотам провайдеров, причем выигрыши с бесплатных вращений также подпадают под отыгрыш. Кэшбек рассчитывается от чистых проигрышей за период, возвращается процент от потерянных средств без требований по отыгрышу или с минимальным вейджером х1-х3.
Мобильная версия адаптирована под сенсорное управление, загружается быстрее десктопного варианта благодаря оптимизированной графике. Клиенты для iOS и Android предлагают расширенный функционал: пуш-уведомления о новых акциях, биометрическую авторизацию, офлайн-доступ к некоторым слотам. Скачивание APK-файла для Андроид происходит напрямую с сайта оператора, минуя Google Play из-за политики магазина в отношении гемблинга. Приложение занимает 50-80 МБ, автоматически обновляется и шифрует трафик через SSL-протокол.
Live-казино транслирует игры в реальном времени из профессиональных студий, ставки регистрируются мгновенно через WebSocket-соединение. Столы с живыми дилерами предлагают блэкджек, рулетку, баккару, покер и game-shows вроде Crazy Time или Monopoly Live. Лимиты варьируются от нескольких десятков рублей до VIP-столов с минимальной ставкой от 10000. Стриминг ведется в HD-качестве с несколькими углами обзора, чат позволяет общаться с крупье и другими участниками.
Слоты делятся по нестабильности: низкая дает частые мелкие выплаты, высокая подразумевает редкие, но крупные выигрыши. RTP-показатель отображает теоретический возврат игроку — оптимальным считается диапазон 96-98 процентов. Провайдеры вроде Pragmatic Play, NetEnt, Microgaming регулярно выпускают новинки с инновационными механиками: Megaways, каскадные барабаны, расширяющиеся символы. Турниры проводятся по накопительной системе очков или максимальному множителю за спин, призовой фонд распределяется между топ-участниками лидерборда.
Взносы обрабатываются через банковские карты, электронные кошельки, криптовалюту — каждый метод имеет комиссию и лимиты. Вывод средств занимает от нескольких минут до трех рабочих дней в зависимости от выбранной метода расчета и статуса игрока. Верифицированные VIP-клиенты получают приоритетную обработку запросов на кешаут и персонального менеджера для решения финансовых вопросов.
Доступ к гемблинг-площадке через официальный сайт motor-1772573087583.clients.site остается первостепенной задачей для опытных игроков, но блокировки провайдеров вынуждают держать наготове актуальные рабочие зеркала. Зеркало представляет собой технический клон основного ресурса с идентичным функционалом и базой данных, но размещенный на альтернативном домене. Критически важно использовать только проверенные источники получения ссылок на зеркала, поскольку фишинговые копии могут перехватить данные вашего личного кабинета и платежную информацию. Официальное зеркало сегодня можно получить через рассылку казино, техподдержку в мессенджерах или Telegram-канал заведения.
Процедура регистрации на платформе открывает доступ к приветственному пакету, который обычно включает процентную надбавку к депозиту и фриспины на топовые слоты. Обращайте внимание на требование по ставкам бонуса, стандартные показатели варьируются от х35 до х50, что определяет реальную выгодность предложения. Промокоды активируют эксклюзивные предложения, их публикуют партнеры казино и в тематических сообществах. Бонус за регистрацию без депозита встречается редко, чаще требуется аутентификация номера телефона и минимальное пополнение счета.
Личный кабинет концентрирует управление балансом, историю транзакций, активацию акций и прогресс по системе поощрений. Современные платформы внедряют многоуровневые VIP-системы с персональным кэшбеком, расчет которого ведется от проигранных ставок за отчетный период. Кэшбек начисляется обычно по понедельникам, процент зависит от статуса игрока и может достигать 15-20% для высоких уровней. Обязательно изучите условия отыгрыша кэшбека, некоторые игорные заведения выдают его с вейджером, другие позволяют сразу вывести средства.
Мобильный интерфейс адаптирует интерфейс под смартфоны без потери функциональности, но нативное приложение обеспечивает стабильнее соединение и быстрее загружает игры. Скачать клиент для Android можно с официального сайта через APK-файл, версия для iOS распространяется через альтернативные маркетплейсы из-за политики App Store. Приложение сохраняет сессию и отправляет push-уведомления о новых акциях и начислении бонусов, что удобно для активных игроков.
Live казино транслирует игры с реальными крупье из студий Evolution Gaming, Pragmatic Play Live и других провайдеров. Здесь работают лимиты столов от центов до тысяч долларов, возможна игра на нескольких столах одновременно. Задержка видеопотока критична для блэкджека и баккары, качественные платформы обеспечивают латентность менее 1 секунды. В разделе слотов представлены автоматы с различной волатильностью, RTP топовых позиций превышает 96%, информация о теоретической отдаче доступна в описании каждой игры.
Турнирные события проводятся на выделенных слотах или в live-разделе, призовой фонд формируется оператором или складывается из взносов участников. Таблица лидеров обновляется в реальном времени, учитывается либо сумма выигрышей, либо множитель относительно ставки. Вход в платный турнир списывает бай-ин с основного баланса, фрироллы доступны бесплатно и подходят для тестирования стратегий без риска. Акции часто привязаны к запуску новых игр провайдеров, давая увеличенные фриспины или страховку ставок на ограниченный период.
Доступ к игровым площадкам через запасные URL стал обыденной практикой для опытных гемблеров, особенно когда провайдеры блокируют основной домен по требованию регуляторов. Актуальное зеркало представляет собой технический клон основного ресурса с идентичной функциональностью, но размещенный на другом IP-адресе и доменном имени. Проверенный способ получить рабочую ссылку — подписаться на рассылку оператора или использовать проверенные агрегаторы вроде motor-1772569811380.clients.site, где публикуются актуальные адреса без риска попасть на фишинговый клон. Зеркала обновляются ежедневно, иногда несколько раз в сутки, поэтому критически важно иметь надежный источник информации.
Создание аккаунта через зеркало ничем не отличается от стандартной процедуры на основном сайте — используется единая база данных, все аккаунты синхронизированы. Верификация личности потребуется при первом выводе средств, обычно запрашивают скан паспорта и подтверждение адреса. Двухфакторная аутентификация через SMS или приложения вроде Google Authenticator существенно повышает безопасность учетной записи. Личный кабинет содержит историю транзакций, активные бонусы, вейджер-требования и статистику по сессиям — грамотные игроки регулярно анализируют эти данные для оптимизации банкролл-менеджмента.
Промокоды распределяются по категориям: приветственные пакеты, релоад-бонусы для постоянных клиентов, кэшбек-программы и турнирные призы. Вейджер х40-х50 считается стандартным требованием, хотя встречаются предложения с более лояльными условиями. Фриспины обычно привязаны к конкретным слотам провайдеров, причем выигрыши с бесплатных вращений также подпадают под отыгрыш. Кэшбек рассчитывается от чистых проигрышей за период, возвращается процент от потерянных средств без требований по отыгрышу или с минимальным вейджером х1-х3.
Мобильная версия адаптирована под сенсорное управление, загружается быстрее десктопного варианта благодаря оптимизированной графике. Утилиты для iOS и Android предлагают расширенный функционал: пуш-уведомления о новых акциях, биометрическую авторизацию, офлайн-доступ к некоторым слотам. Скачивание APK-файла для Андроид происходит напрямую с сайта оператора, минуя Google Play из-за политики магазина в отношении гемблинга. Приложение занимает 50-80 МБ, автоматически обновляется и шифрует трафик через SSL-протокол.
Live-казино транслирует игры в реальном времени из профессиональных студий, ставки регистрируются мгновенно через WebSocket-соединение. Столы с живыми дилерами предлагают блэкджек, рулетку, баккару, покер и game-shows вроде Crazy Time или Monopoly Live. Лимиты варьируются от нескольких десятков рублей до VIP-столов с минимальной ставкой от 10000. Стриминг ведется в HD-качестве с несколькими углами обзора, чат позволяет общаться с крупье и другими участниками.
Слоты делятся по дисперсии: низкая дает частые мелкие выплаты, высокая подразумевает редкие, но крупные выигрыши. RTP-показатель отображает теоретический возврат игроку — оптимальным считается диапазон 96-98 процентов. Провайдеры вроде Pragmatic Play, NetEnt, Microgaming регулярно выпускают новинки с инновационными механиками: Megaways, каскадные барабаны, расширяющиеся символы. Турниры проводятся по накопительной системе очков или максимальному множителю за спин, призовой фонд распределяется между топ-участниками лидерборда.
Взносы обрабатываются через банковские карты, электронные кошельки, криптовалюту — каждый метод имеет комиссию и лимиты. Вывод средств занимает от нескольких минут до трех рабочих дней в зависимости от выбранной платежной системы и статуса игрока. Верифицированные VIP-клиенты получают приоритетную обработку запросов на кешаут и персонального менеджера для решения финансовых вопросов.
bondline.bond – Contemporary style, messaging encourages trust and clarity in every section.
Доступ к игорной площадке через официальный сайт gama-1772578474113.clients.site остается главным выбором для опытных игроков, но блокировки провайдеров вынуждают держать наготове актуальные рабочие зеркала. Зеркало представляет собой технический клон основного ресурса с идентичным функционалом и базой данных, но размещенный на альтернативном домене. Критически важно использовать только проверенные источники получения ссылок на зеркала, поскольку фишинговые копии могут перехватить данные вашего личного кабинета и платежную информацию. Официальное зеркало сегодня можно получить через рассылку казино, службу поддержки в мессенджерах или Telegram-канал заведения.
Регистрация на платформе открывает доступ к приветственному пакету, который обычно включает процентную надбавку к депозиту и фриспины на топовые слоты. Обращайте внимание на условие отыгрыша бонуса, стандартные показатели варьируются от х35 до х50, что определяет реальную выгодность предложения. Промокоды активируют эксклюзивные предложения, их публикуют партнеры казино и в тематических сообществах. Бонус за регистрацию без депозита встречается редко, чаще требуется подтверждение номера телефона и минимальное пополнение счета.
Личный кабинет концентрирует управление балансом, историю транзакций, активацию акций и прогресс по бонусной программе. Современные платформы внедряют многоуровневые VIP-системы с персональным кэшбеком, расчет которого ведется от проигранных ставок за отчетный период. Кэшбек начисляется обычно по понедельникам, процент зависит от статуса игрока и может достигать 15-20% для высоких уровней. Обязательно изучите условия отыгрыша кэшбека, некоторые операторы выдают его с вейджером, другие позволяют сразу вывести средства.
Версия для смартфонов адаптирует интерфейс под смартфоны без потери функциональности, но нативное приложение обеспечивает стабильнее соединение и быстрее загружает игры. Скачать клиент для Android можно с официального сайта через APK-файл, версия для iOS распространяется через альтернативные маркетплейсы из-за политики App Store. Приложение сохраняет сессию и отправляет push-уведомления о новых акциях и начислении бонусов, что удобно для активных игроков.
Live казино транслирует игры с реальными дилерами из студий Evolution Gaming, Pragmatic Play Live и других провайдеров. Здесь работают лимиты столов от центов до тысяч долларов, возможна игра на нескольких столах одновременно. Задержка видеопотока критична для блэкджека и баккары, качественные платформы обеспечивают латентность менее 1 секунды. В разделе слотов представлены автоматы с различной волатильностью, RTP топовых позиций превышает 96%, информация о теоретической отдаче доступна в описании каждой игры.
Конкурсы проводятся на выделенных слотах или в live-разделе, призовой фонд формируется оператором или складывается из взносов участников. Таблица лидеров обновляется в реальном времени, учитывается либо сумма выигрышей, либо множитель относительно ставки. Вход в платный турнир списывает бай-ин с основного баланса, фрироллы доступны бесплатно и подходят для тестирования стратегий без риска. Акции часто привязаны к запуску новых игр провайдеров, давая увеличенные фриспины или страховку ставок на ограниченный период.
Generic Viagra for sale: cheap viagra – Buy Viagra online cheap
Amber Wharf Online – Clean design and easy-to-find categories make browsing simple.
melbet подтверждение телефона http://www.melbet30926.help
nerquix.shop – The site looks very tidy and easy to navigate.
Официальный сайт казино работает по принципу географической сегментации — провайдеры блокируют доступ на основании IP-адреса пользователя, что заставляет операторов развертывать зеркала на альтернативных доменах. Рабочее зеркало 7k-1772572184179.clients.site представляет собой полную копию основного ресурса с идентичной базой данных игроков, балансами и историей транзакций, но размещенную на другом хостинге с новым URL. Для поиска актуального зеркала сегодня опытные игроки используют Telegram-каналы казино, email-рассылки или сохраняют несколько резервных доменов в закладках браузера. Критически важно проверять SSL-сертификат любого зеркала через адресную строку — отсутствие замка безопасности указывает на фишинговый сайт.
Регистрация через зеркало не отличается от процедуры на основном домене — система запросит email, номер телефона и создание пароля с минимальными требованиями к сложности. Верификация личного кабинета потребует загрузки документов только при первом выводе средств, причем лимиты без KYC обычно ограничены эквивалентом 1000 евро в месяц. Двухфакторная аутентификация через Google Authenticator повышает безопасность аккаунта, но доступна не во всех казино. Обратите внимание на форс-мажорные условия в пользовательском соглашении — некоторые операторы резервируют право заморозить вывод при подозрении в мультиаккаунтинге.
Бонус за регистрацию делится на no-deposit и welcome package — первый начисляется автоматом без внесения депозита, но ограничен жесткими вейджерами x50-x70, второй требует пополнения счета и активации промокода. Фриспины привязаны к конкретным слотам провайдера, указанного в условиях акции, причем выигрыш с бесплатных вращений также подлежит отыгрышу. Кэшбек бывает процентным от проигранных средств за период либо рейкбеком в покере — возвратом части комиссии рума. Вейджер рассчитывается только с реальных ставок, игра в демо-режиме не учитывается в объеме отыгрыша.
Мобильная версия сайта адаптирована под сенсорные экраны через responsive-дизайн, но нативное приложение обеспечивает лучшую производительность за счет оптимизации под операционную систему. Скачать APK для Android можно только с официального сайта казино, поскольку Google Play блокирует азартные приложения в большинстве юрисдикций. iOS-приложения распространяются через TestFlight или требуют изменения региона Apple ID, что создает дополнительные сложности. Push-уведомления в приложениях информируют о новых турнирах и ограниченных по времени промокодах.
Live казино транслирует игру с реальными крупье через WebRTC-протокол с минимальной задержкой 1-2 секунды, критичной для принятия решений в блэкджеке или рулетке. Провайдеры Evolution Gaming и Pragmatic Play Live предлагают столы с русскоязычными дилерами и лимитами от 50 рублей до миллиона за раунд. RTP в живых играх выше автоматных слотов — европейская рулетка держит 97,3% против 94-96% в видеослотах. Статистика раздач в личном кабинете позволяет отслеживать win rate и стандартное отклонение для корректировки банкролл-менеджмента.
Слоты классифицируются по волатильности — high variance машины выдают редкие, но крупные выплаты, low variance обеспечивают частые мелкие выигрыши. Провайдеры указывают теоретический RTP в описании игры, но фактическая отдача зависит от размера выборки — на дистанции 10000 спинов результат приближается к заявленному. Турниры по слотам начисляют очки за коэффициент выигрыша относительно ставки, а не за абсолютную сумму, что уравнивает шансы игроков с разными банкроллами. Призовой фонд формируется из взносов участников либо гарантируется оператором — второй вариант выгоднее при малом количестве регистраций.
Доступ к игровой платформе через официальный сайт arkada-1772572212744.clients.site остается главным способом для опытных игроков, поскольку именно здесь сосредоточены текущие версии слотов с корректными RTP-показателями и подтвержденные генераторы случайных чисел. Рабочее зеркало представляет собой технический клон основного ресурса с идентичной базой данных пользователей, что позволяет обходить блокировки провайдеров без потери опций личного кабинета или истории транзакций. Критически важно использовать только официальное зеркало, поскольку мошеннические копии могут перехватывать платежные данные или подменять коэффициенты выплат в слотах.
Регистрация через актуальное зеркало сегодня дает доступ к стартовому пакету, который обычно предусматривает процентную надбавку к первому депозиту и определенное количество фриспинов на определенные слоты провайдеров уровня Pragmatic Play или NetEnt. Промокоды активируются в специальном поле при пополнении счета и могут увеличивать стандартный бонус за регистрацию до 200-300 процентов, однако требуют внимательного изучения вейджера – множителя отыгрыша, который варьируется от x30 до x50 суммы бонуса и депозита.
Вход в личный кабинет через зеркало использует единую систему аутентификации с двухфакторной верификацией, что защищает баланс от несанкционированного доступа даже при раскрытии пароля. Мобильная версия адаптирована под сенсорное управление и поддерживает все платежные методы основного сайта, включая криптовалютные кошельки с мгновенными транзакциями. Приложение для Android или iOS можно скачать через APK-файл или официальные сторы, при этом нативные приложения обеспечивают стабильность соединения в live казино, где задержка даже в секунду критична для ставок на рулетку или баккару.
Акции для постоянных игроков строятся вокруг программ лояльности с накопительными баллами, которые обмениваются в реальные средства по фиксированному курсу или дают доступ к эксклюзивным турнирам с гарантированными призовыми фондами. Кэшбек рассчитывается от чистых проигрышей за отчетный период – обычно неделю – и возвращает от 5 до 15 процентов без требований по отыгрышу, что делает его наиболее выгодным типом поощрений для хайроллеров. Турниры в слотах используют систему начисления очков за множители выигрыша или общую сумму ставок, причем таблицы лидеров обновляются в режиме реального времени.
Обзор платежных методов показывает, что вывод средств через верифицированные электронные кошельки занимает от 15 минут до 2 часов, тогда как банковские переводы обрабатываются до 3 рабочих дней из-за межбанковского клиринга. Лимиты на транзакции привязаны к статусу игрока в программе лояльности – VIP-аккаунты получают приоритет в очереди выплат и повышенные суточные лимиты до 100000 долларов. Live казино транслирует игры из профессиональных студий с реальными дилерами, причем продвинутые столы предлагают статистику предыдущих раундов и возможность side-ставок с коэффициентами до 1:11.
usekube – Pages loaded fast, images appeared sharp, and formatting stayed consistent.
trystack – Mobile version looks perfect; no glitches, fast scrolling, crisp text.
https://uspharmaindex.shop/# online pharmacy viagra
купить свадебное платье недорого https://svadebnye-platya-msk.ru
Silver Stride Marketplace – I appreciate how effortless it is to move through categories and view items.
Официальный сайт казино работает по принципу географической сегментации — провайдеры блокируют доступ на основании IP-адреса пользователя, что заставляет операторов развертывать зеркала на альтернативных доменах. Рабочее зеркало kush-1772491097683.clients.site представляет собой полную копию основного ресурса с идентичной базой данных игроков, балансами и историей транзакций, но размещенную на другом хостинге с новым URL. Для поиска актуального зеркала сегодня опытные игроки используют Telegram-каналы казино, email-рассылки или сохраняют несколько резервных доменов в закладках браузера. Критически важно проверять SSL-сертификат любого зеркала через адресную строку — отсутствие замка безопасности указывает на фишинговый сайт.
Регистрация через зеркало не отличается от процедуры на основном домене — система запросит email, номер телефона и создание пароля с минимальными требованиями к сложности. Верификация личного кабинета потребует загрузки документов только при первом выводе средств, причем лимиты без KYC обычно ограничены эквивалентом 1000 евро в месяц. Двухфакторная аутентификация через Google Authenticator повышает безопасность аккаунта, но доступна не во всех казино. Обратите внимание на форс-мажорные условия в пользовательском соглашении — некоторые операторы резервируют право заморозить вывод при подозрении в мультиаккаунтинге.
Бонус за регистрацию делится на no-deposit и welcome package — первый начисляется автоматом без внесения депозита, но ограничен жесткими вейджерами x50-x70, второй требует пополнения счета и активации промокода. Фриспины привязаны к конкретным слотам провайдера, указанного в условиях акции, причем выигрыш с бесплатных вращений также подлежит отыгрышу. Кэшбек бывает процентным от проигранных средств за период либо рейкбеком в покере — возвратом части комиссии рума. Вейджер рассчитывается только с реальных ставок, игра в демо-режиме не учитывается в объеме отыгрыша.
Мобильная версия сайта адаптирована под сенсорные экраны через responsive-дизайн, но нативное приложение обеспечивает лучшую производительность за счет оптимизации под операционную систему. Скачать APK для Android можно только с официального сайта казино, поскольку Google Play блокирует азартные приложения в большинстве юрисдикций. iOS-приложения распространяются через TestFlight или требуют изменения региона Apple ID, что создает дополнительные сложности. Push-уведомления в приложениях информируют о новых турнирах и ограниченных по времени промокодах.
Live казино транслирует игру с реальными крупье через WebRTC-протокол с минимальной задержкой 1-2 секунды, критичной для принятия решений в блэкджеке или рулетке. Провайдеры Evolution Gaming и Pragmatic Play Live предлагают столы с русскоязычными дилерами и лимитами от 50 рублей до миллиона за раунд. RTP в живых играх выше автоматных слотов — европейская рулетка держит 97,3% против 94-96% в видеослотах. Статистика раздач в личном кабинете позволяет отслеживать win rate и стандартное отклонение для корректировки банкролл-менеджмента.
Слоты классифицируются по волатильности — high variance машины выдают редкие, но крупные выплаты, low variance обеспечивают частые мелкие выигрыши. Провайдеры указывают теоретический RTP в описании игры, но фактическая отдача зависит от размера выборки — на дистанции 10000 спинов результат приближается к заявленному. Турниры по слотам начисляют очки за коэффициент выигрыша относительно ставки, а не за абсолютную сумму, что уравнивает шансы игроков с разными банкроллами. Призовой фонд формируется из взносов участников либо гарантируется оператором — второй вариант выгоднее при малом количестве регистраций.
Когда базовый домен оказывается заблокирован по решению регулятора, игрокам приходится искать альтернативные пути доступа к своему балансу и активным ставкам. Рабочее зеркало казино представляет собой технический клон официального ресурса с идентичной функциональностью, но размещенный на другом доменном имени. Важный момент – зеркало полностью синхронизировано с основной базой данных, поэтому ваш баланс, история транзакций и прогресс по вейджеру остаются неизменными независимо от точки входа. Проверенный способ найти актуальное зеркало сегодня – подписаться на email-рассылку оператора или добавить официальный Telegram-канал, где администрация публикует рабочие ссылки в режиме реального времени. Альтернатива – служба поддержки в live-чате, которая предоставит актуный URL leon-1772564248762.clients.site даже если основного сайта недоступен.
Регистрация через зеркало ничем не отличается от стандартной процедуры на главном домене. Система запросит стандартный набор данных – email, номер телефона, валюту счета. Критический момент – указывайте достоверные контакты, поскольку верификация личности потребуется при первом выводе средств от определенной суммы. Бонус за регистрацию обычно активируется автоматически либо через ввод промокода в специальное поле анкеты. Внимательно читайте условия отыгрыша – требования по вейджеру могут достигать х40-х50 от суммы бонуса, а максимальная ставка при отыгрыше часто ограничена 5 евро или 10 процентами от бонусного баланса.
Личный кабинет через зеркало предоставляет полный доступ к финансовым операциям. Депозиты обрабатываются мгновенно при использовании карт, электронных кошельков или криптовалюты. Вывод средств занимает от нескольких часов до трех рабочих дней в зависимости от выбранного метода и статуса верификации аккаунта. Кэшбек начисляется еженедельно или ежемесячно – процент возврата от проигранных средств варьируется от 5 до 20 процентов в зависимости от VIP-уровня игрока. Фриспины за депозит активируются на конкретных слотах – важно использовать их в установленные сроки, обычно это 24-72 часа.
Mobile-версия зеркала адаптирована под сенсорное управление и загружается быстрее desktop-варианта за счет оптимизированной графики. Приложение для iOS и Android обеспечивает стабильный доступ даже при блокировках на уровне провайдера, поскольку использует встроенные механизмы обхода ограничений. Скачать APK для Android можно непосредственно с сайта оператора – установка требует разрешения на загрузку из неизвестных источников в настройках безопасности. Версия для iPhone распространяется через TestFlight или веб-клип с возможностью добавления на главный экран.
Слоты в лобби фильтруются по провайдеру, волатильности и RTP. Профессиональные игроки отдают предпочтение аппаратам с возвратом от 96 процентов и выше – эту информацию можно найти в разделе справки конкретного слота. Турниры проводятся на отобранных играх с призовым фондом от нескольких тысяч до сотен тысяч долларов. Таблица лидеров обновляется в реальном времени, а система начисления очков может базироваться на множителях выигрыша, количестве спинов или сумме ставок.
Live казино работает на платформе Evolution, Pragmatic Play Live или Ezugi. Ставки за столами с реальными дилерами стартуют от 50 центов в рулетке и достигают десятков тысяч в VIP-залах. Важное преимущество – возможность отслеживать статистику последних раундов и использовать стратегии управления банкроллом в режиме реального времени. Скорость интернет-соединения должна быть не менее 5 Мбит/с для комфортной игры без задержек видеопотока.
Бонусные акции и промокоды публикуются в разделе бонусов – сезонные предложения могут включать увеличенный процент на депозит, участие в розыгрыше техники или туристических поездок. Код активации вводится при пополнении счета или в соответствующем разделе личного кабинета. Условия каждой акции индивидуальны – некоторые бонусы доступны только для новых игроков, другие предназначены для удержания активных игроков с определенным объемом ставок за предыдущий период.
Start Shopping Here – Shopping is convenient, the site feels intuitive, and moving around is easy.
Explore Popular Products – Plenty to choose from and the buying process is easy.
layoutlagoon – Really enjoyed browsing, the site feels well organized.
Varnika Online Shop – Clear categorization makes moving through the site intuitive.
http://ivermectinaccessusa.com/# Ivermectin Access USA
Официальный сайт казино работает по принципу географической сегментации — провайдеры блокируют доступ на основании IP-адреса пользователя, что заставляет операторов развертывать зеркала на альтернативных доменах. Рабочее зеркало bet-andreas-1772576568702.clients.site представляет собой полную копию основного ресурса с идентичной базой данных игроков, балансами и историей транзакций, но размещенную на другом хостинге с новым URL. Для поиска актуального зеркала сегодня опытные игроки используют Telegram-каналы казино, email-рассылки или сохраняют несколько резервных доменов в закладках браузера. Критически важно проверять SSL-сертификат любого зеркала через адресную строку — отсутствие замка безопасности указывает на фишинговый сайт.
Регистрация через зеркало не отличается от процедуры на основном домене — система запросит email, номер телефона и создание пароля с минимальными требованиями к сложности. Верификация личного кабинета потребует загрузки документов только при первом выводе средств, причем лимиты без KYC обычно ограничены эквивалентом 1000 евро в месяц. Двухфакторная аутентификация через Google Authenticator повышает безопасность аккаунта, но доступна не во всех казино. Обратите внимание на форс-мажорные условия в пользовательском соглашении — некоторые операторы резервируют право заморозить вывод при подозрении в мультиаккаунтинге.
Бонус за регистрацию делится на no-deposit и welcome package — первый начисляется автоматом без внесения депозита, но ограничен жесткими вейджерами x50-x70, второй требует пополнения счета и активации промокода. Фриспины привязаны к конкретным слотам провайдера, указанного в условиях акции, причем выигрыш с бесплатных вращений также подлежит отыгрышу. Кэшбек бывает процентным от проигранных средств за период либо рейкбеком в покере — возвратом части комиссии рума. Вейджер рассчитывается только с реальных ставок, игра в демо-режиме не учитывается в объеме отыгрыша.
Мобильная версия сайта адаптирована под сенсорные экраны через responsive-дизайн, но нативное приложение обеспечивает лучшую производительность за счет оптимизации под операционную систему. Скачать APK для Android можно только с официального сайта казино, поскольку Google Play блокирует азартные приложения в большинстве юрисдикций. iOS-приложения распространяются через TestFlight или требуют изменения региона Apple ID, что создает дополнительные сложности. Push-уведомления в приложениях информируют о новых турнирах и ограниченных по времени промокодах.
Live казино транслирует игру с реальными крупье через WebRTC-протокол с минимальной задержкой 1-2 секунды, критичной для принятия решений в блэкджеке или рулетке. Провайдеры Evolution Gaming и Pragmatic Play Live предлагают столы с русскоязычными дилерами и лимитами от 50 рублей до миллиона за раунд. RTP в живых играх выше автоматных слотов — европейская рулетка держит 97,3% против 94-96% в видеослотах. Статистика раздач в личном кабинете позволяет отслеживать win rate и стандартное отклонение для корректировки банкролл-менеджмента.
Слоты классифицируются по волатильности — high variance машины выдают редкие, но крупные выплаты, low variance обеспечивают частые мелкие выигрыши. Провайдеры указывают теоретический RTP в описании игры, но фактическая отдача зависит от размера выборки — на дистанции 10000 спинов результат приближается к заявленному. Турниры по слотам начисляют очки за коэффициент выигрыша относительно ставки, а не за абсолютную сумму, что уравнивает шансы игроков с разными банкроллами. Призовой фонд формируется из взносов участников либо гарантируется оператором — второй вариант выгоднее при малом количестве регистраций.
Winter Vendor Deals – Moving from page to page feels effortless and user-friendly.
online pharmacy ed: usa pharmacy online – pharmacy home delivery
Shop Trending Items – Fast page responses and intuitive layout make exploring items enjoyable.
Официальный сайт казино работает по принципу географической сегментации — провайдеры блокируют доступ на основании IP-адреса пользователя, что заставляет операторов развертывать зеркала на альтернативных доменах. Рабочее зеркало kent-1772569919588.clients.site представляет собой полную копию основного ресурса с идентичной базой данных игроков, балансами и историей транзакций, но размещенную на другом хостинге с новым URL. Для поиска актуального зеркала сегодня опытные игроки используют Telegram-каналы казино, email-рассылки или сохраняют несколько резервных доменов в закладках браузера. Критически важно проверять SSL-сертификат любого зеркала через адресную строку — отсутствие замка безопасности указывает на фишинговый сайт.
Регистрация через зеркало не отличается от процедуры на основном домене — система запросит email, номер телефона и создание пароля с минимальными требованиями к сложности. Верификация личного кабинета потребует загрузки документов только при первом выводе средств, причем лимиты без KYC обычно ограничены эквивалентом 1000 евро в месяц. Двухфакторная аутентификация через Google Authenticator повышает безопасность аккаунта, но доступна не во всех казино. Обратите внимание на форс-мажорные условия в пользовательском соглашении — некоторые операторы резервируют право заморозить вывод при подозрении в мультиаккаунтинге.
Бонус за регистрацию делится на no-deposit и welcome package — первый начисляется автоматом без внесения депозита, но ограничен жесткими вейджерами x50-x70, второй требует пополнения счета и активации промокода. Фриспины привязаны к конкретным слотам провайдера, указанного в условиях акции, причем выигрыш с бесплатных вращений также подлежит отыгрышу. Кэшбек бывает процентным от проигранных средств за период либо рейкбеком в покере — возвратом части комиссии рума. Вейджер рассчитывается только с реальных ставок, игра в демо-режиме не учитывается в объеме отыгрыша.
Мобильная версия сайта адаптирована под сенсорные экраны через responsive-дизайн, но нативное приложение обеспечивает лучшую производительность за счет оптимизации под операционную систему. Скачать APK для Android можно только с официального сайта казино, поскольку Google Play блокирует азартные приложения в большинстве юрисдикций. iOS-приложения распространяются через TestFlight или требуют изменения региона Apple ID, что создает дополнительные сложности. Push-уведомления в приложениях информируют о новых турнирах и ограниченных по времени промокодах.
Live казино транслирует игру с реальными крупье через WebRTC-протокол с минимальной задержкой 1-2 секунды, критичной для принятия решений в блэкджеке или рулетке. Провайдеры Evolution Gaming и Pragmatic Play Live предлагают столы с русскоязычными дилерами и лимитами от 50 рублей до миллиона за раунд. RTP в живых играх выше автоматных слотов — европейская рулетка держит 97,3% против 94-96% в видеослотах. Статистика раздач в личном кабинете позволяет отслеживать win rate и стандартное отклонение для корректировки банкролл-менеджмента.
Слоты классифицируются по волатильности — high variance машины выдают редкие, но крупные выплаты, low variance обеспечивают частые мелкие выигрыши. Провайдеры указывают теоретический RTP в описании игры, но фактическая отдача зависит от размера выборки — на дистанции 10000 спинов результат приближается к заявленному. Турниры по слотам начисляют очки за коэффициент выигрыша относительно ставки, а не за абсолютную сумму, что уравнивает шансы игроков с разными банкроллами. Призовой фонд формируется из взносов участников либо гарантируется оператором — второй вариант выгоднее при малом количестве регистраций.
Официальный сайт казино работает по принципу географической сегментации — поставщики блокируют доступ на основании IP-адреса пользователя, что заставляет операторов развертывать зеркала на альтернативных доменах. Рабочее зеркало vodka-casino.clients.site представляет собой полную копию основного ресурса с идентичной базой данных игроков, балансами и архивом транзакций, но размещенную на другом хостинге с новым URL. Для поиска актуального зеркала сегодня опытные игроки используют Telegram-каналы казино, email-рассылки или сохраняют несколько альтернативных доменов в закладках браузера. Критически важно проверять SSL-сертификат любого зеркала через адресную строку — отсутствие замка безопасности указывает на фальшивый сайт.
Регистрация через зеркало не отличается от процедуры на основном домене — система запросит email, номер телефона и создание пароля с минимальными требованиями к сложности. Верификация личного кабинета потребует загрузки документов только при первом изъятии средств, причем лимиты без KYC обычно ограничены эквивалентом 1000 евро в месяц. Двухфакторная аутентификация через Google Authenticator повышает безопасность аккаунта, но доступна не во всех казино. Обратите внимание на форс-мажорные условия в пользовательском соглашении — некоторые операторы резервируют право заморозить вывод при предположении в мультиаккаунтинге.
Бонус за регистрацию делится на no-deposit и welcome package — первый начисляется автоматом без внесения депозита, но ограничен жесткими wager-требованиями x50-x70, второй требует пополнения счета и активации промокода. Фриспины привязаны к конкретным слотам провайдера, указанного в условиях акции, причем выигрыш с бесплатных вращений также подлежит отыгрышу. Кэшбек бывает процентным от проигранных средств за период либо рейкбеком в покере — возвратом части комиссии рума. Вейджер рассчитывается только с реальных ставок, игра в пробном режиме не учитывается в объеме отыгрыша.
Мобильная версия сайта адаптирована под сенсорные экраны через responsive-дизайн, но нативное приложение обеспечивает лучшую скорость работы за счет оптимизации под операционную систему. Скачать APK для Android можно только с официального сайта казино, поскольку Google Play блокирует азартные приложения в большинстве юрисдикций. iOS-приложения распространяются через TestFlight или требуют изменения региона Apple ID, что создает дополнительные сложности. Push-уведомления в приложениях информируют о новых соревнованиях и ограниченных по времени промокодах.
Live казино транслирует игру с реальными крупье через WebRTC-протокол с минимальной задержкой 1-2 секунды, критичной для принятия решений в блэкджеке или рулетке. Провайдеры Evolution Gaming и Pragmatic Play Live предлагают столы с русскими дилерами и лимитами от 50 рублей до миллиона за раунд. RTP в живых играх выше автоматных слотов — европейская рулетка держит 97,3% против 94-96% в видеослотах. Статистика раздач в личном кабинете позволяет отслеживать win rate и стандартное отклонение для корректировки банкролл-менеджмента.
Слоты классифицируются по variance — high variance машины выдают редкие, но крупные выплаты, low variance обеспечивают частые мелкие выигрыши. Провайдеры указывают теоретический RTP в описании игры, но фактическая отдача зависит от размера выборки — на дистанции 10000 спинов результат приближается к заявленному. Турниры по слотам начисляют очки за коэффициент выигрыша относительно ставки, а не за абсолютную сумму, что уравнивает шансы игроков с разными банкроллами. Призовой фонд формируется из взносов участников либо гарантируется оператором — второй вариант выгоднее при малом количестве регистраций.
For facts
how to get generic keflex without dr prescription
for peak efficiency.
Официальный сайт казино работает по принципу географической сегментации — провайдеры блокируют доступ на основании IP-адреса пользователя, что заставляет операторов развертывать зеркала на альтернативных доменах. Рабочее зеркало dragon-money-1772569798467.clients.site представляет собой полную копию основного ресурса с идентичной базой данных игроков, балансами и историей транзакций, но размещенную на другом хостинге с новым URL. Для поиска актуального зеркала сегодня опытные игроки используют Telegram-каналы казино, email-рассылки или сохраняют несколько резервных доменов в закладках браузера. Критически важно проверять SSL-сертификат любого зеркала через адресную строку — отсутствие замка безопасности указывает на фишинговый сайт.
Регистрация через зеркало не отличается от процедуры на основном домене — система запросит email, номер телефона и создание пароля с минимальными требованиями к сложности. Верификация личного кабинета потребует загрузки документов только при первом выводе средств, причем лимиты без KYC обычно ограничены эквивалентом 1000 евро в месяц. Двухфакторная аутентификация через Google Authenticator повышает безопасность аккаунта, но доступна не во всех казино. Обратите внимание на форс-мажорные условия в пользовательском соглашении — некоторые операторы резервируют право заморозить вывод при подозрении в мультиаккаунтинге.
Бонус за регистрацию делится на no-deposit и welcome package — первый начисляется автоматом без внесения депозита, но ограничен жесткими вейджерами x50-x70, второй требует пополнения счета и активации промокода. Фриспины привязаны к конкретным слотам провайдера, указанного в условиях акции, причем выигрыш с бесплатных вращений также подлежит отыгрышу. Кэшбек бывает процентным от проигранных средств за период либо рейкбеком в покере — возвратом части комиссии рума. Вейджер рассчитывается только с реальных ставок, игра в демо-режиме не учитывается в объеме отыгрыша.
Мобильная версия сайта адаптирована под сенсорные экраны через responsive-дизайн, но нативное приложение обеспечивает лучшую производительность за счет оптимизации под операционную систему. Скачать APK для Android можно только с официального сайта казино, поскольку Google Play блокирует азартные приложения в большинстве юрисдикций. iOS-приложения распространяются через TestFlight или требуют изменения региона Apple ID, что создает дополнительные сложности. Push-уведомления в приложениях информируют о новых турнирах и ограниченных по времени промокодах.
Live казино транслирует игру с реальными крупье через WebRTC-протокол с минимальной задержкой 1-2 секунды, критичной для принятия решений в блэкджеке или рулетке. Провайдеры Evolution Gaming и Pragmatic Play Live предлагают столы с русскоязычными дилерами и лимитами от 50 рублей до миллиона за раунд. RTP в живых играх выше автоматных слотов — европейская рулетка держит 97,3% против 94-96% в видеослотах. Статистика раздач в личном кабинете позволяет отслеживать win rate и стандартное отклонение для корректировки банкролл-менеджмента.
Слоты классифицируются по волатильности — high variance машины выдают редкие, но крупные выплаты, low variance обеспечивают частые мелкие выигрыши. Провайдеры указывают теоретический RTP в описании игры, но фактическая отдача зависит от размера выборки — на дистанции 10000 спинов результат приближается к заявленному. Турниры по слотам начисляют очки за коэффициент выигрыша относительно ставки, а не за абсолютную сумму, что уравнивает шансы игроков с разными банкроллами. Призовой фонд формируется из взносов участников либо гарантируется оператором — второй вариант выгоднее при малом количестве регистраций.
bondhaven.bond – Modern structure, content communicates credibility and a sense of quality naturally.
Официальный сайт казино работает по принципу географической сегментации — провайдеры блокируют доступ на основании IP-адреса пользователя, что заставляет операторов развертывать зеркала на альтернативных доменах. Рабочее зеркало bet-andreas-andreas.clients.site представляет собой полную копию основного ресурса с идентичной базой данных игроков, балансами и историей транзакций, но размещенную на другом хостинге с новым URL. Для поиска актуального зеркала сегодня опытные игроки используют Telegram-каналы казино, email-рассылки или сохраняют несколько резервных доменов в закладках браузера. Критически важно проверять SSL-сертификат любого зеркала через адресную строку — отсутствие замка безопасности указывает на фишинговый сайт.
Регистрация через зеркало не отличается от процедуры на основном домене — система запросит email, номер телефона и создание пароля с минимальными требованиями к сложности. Верификация личного кабинета потребует загрузки документов только при первом выводе средств, причем лимиты без KYC обычно ограничены эквивалентом 1000 евро в месяц. Двухфакторная аутентификация через Google Authenticator повышает безопасность аккаунта, но доступна не во всех казино. Обратите внимание на форс-мажорные условия в пользовательском соглашении — некоторые операторы резервируют право заморозить вывод при подозрении в мультиаккаунтинге.
Бонус за регистрацию делится на no-deposit и welcome package — первый начисляется автоматом без внесения депозита, но ограничен жесткими вейджерами x50-x70, второй требует пополнения счета и активации промокода. Фриспины привязаны к конкретным слотам провайдера, указанного в условиях акции, причем выигрыш с бесплатных вращений также подлежит отыгрышу. Кэшбек бывает процентным от проигранных средств за период либо рейкбеком в покере — возвратом части комиссии рума. Вейджер рассчитывается только с реальных ставок, игра в демо-режиме не учитывается в объеме отыгрыша.
Мобильная версия сайта адаптирована под сенсорные экраны через responsive-дизайн, но нативное приложение обеспечивает лучшую производительность за счет оптимизации под операционную систему. Скачать APK для Android можно только с официального сайта казино, поскольку Google Play блокирует азартные приложения в большинстве юрисдикций. iOS-приложения распространяются через TestFlight или требуют изменения региона Apple ID, что создает дополнительные сложности. Push-уведомления в приложениях информируют о новых турнирах и ограниченных по времени промокодах.
Live казино транслирует игру с реальными крупье через WebRTC-протокол с минимальной задержкой 1-2 секунды, критичной для принятия решений в блэкджеке или рулетке. Провайдеры Evolution Gaming и Pragmatic Play Live предлагают столы с русскоязычными дилерами и лимитами от 50 рублей до миллиона за раунд. RTP в живых играх выше автоматных слотов — европейская рулетка держит 97,3% против 94-96% в видеослотах. Статистика раздач в личном кабинете позволяет отслеживать win rate и стандартное отклонение для корректировки банкролл-менеджмента.
Слоты классифицируются по волатильности — high variance машины выдают редкие, но крупные выплаты, low variance обеспечивают частые мелкие выигрыши. Провайдеры указывают теоретический RTP в описании игры, но фактическая отдача зависит от размера выборки — на дистанции 10000 спинов результат приближается к заявленному. Турниры по слотам начисляют очки за коэффициент выигрыша относительно ставки, а не за абсолютную сумму, что уравнивает шансы игроков с разными банкроллами. Призовой фонд формируется из взносов участников либо гарантируется оператором — второй вариант выгоднее при малом количестве регистраций.
In general, these new sites usually ten to create several types of exuberante channels to be able
to contact support services personnel.
Доступ к игровым площадкам через альтернативные URL стал обыденной практикой для опытных гемблеров, особенно когда провайдеры блокируют основной домен по требованию регуляторов. Актуальное зеркало представляет собой технический клон основного ресурса с идентичной функциональностью, но размещенный на другом IP-адресе и доменном имени. Проверенный способ получить рабочую ссылку — подписаться на рассылку оператора или использовать проверенные агрегаторы вроде vodkacasino-1772393573987.clients.site, где публикуются актуальные адреса без риска попасть на фишинговый клон. Зеркала обновляются ежедневно, иногда несколько раз в сутки, поэтому критически важно иметь надежный источник информации.
Регистрация через зеркало ничем не отличается от стандартной процедуры на основном сайте — используется единая база данных, все аккаунты синхронизированы. Верификация личности потребуется при первом выводе средств, обычно запрашивают скан паспорта и подтверждение адреса. Двухфакторная аутентификация через SMS или приложения вроде Google Authenticator существенно повышает безопасность учетной записи. Личный кабинет содержит историю транзакций, активные бонусы, вейджер-требования и статистику по сессиям — грамотные игроки регулярно анализируют эти данные для оптимизации банкролл-менеджмента.
Промокоды распределяются по категориям: начальные пакеты, релоад-бонусы для постоянных клиентов, кэшбек-программы и турнирные призы. Вейджер х40-х50 считается стандартным требованием, хотя встречаются предложения с более лояльными условиями. Фриспины обычно привязаны к конкретным слотам провайдеров, причем выигрыши с бесплатных вращений также подпадают под отыгрыш. Кэшбек рассчитывается от чистых проигрышей за период, возвращается процент от потерянных средств без требований по отыгрышу или с минимальным вейджером х1-х3.
Мобильная версия адаптирована под сенсорное управление, загружается быстрее десктопного варианта благодаря оптимизированной графике. Утилиты для iOS и Android предлагают расширенный функционал: пуш-уведомления о новых акциях, биометрическую авторизацию, офлайн-доступ к некоторым слотам. Скачивание APK-файла для Андроид происходит напрямую с сайта оператора, минуя Google Play из-за политики магазина в отношении гемблинга. Приложение занимает 50-80 МБ, автоматически обновляется и шифрует трафик через SSL-протокол.
Live-казино транслирует игры в реальном времени из профессиональных студий, ставки проводятся мгновенно через WebSocket-соединение. Столы с живыми дилерами предлагают блэкджек, рулетку, баккару, покер и game-shows вроде Crazy Time или Monopoly Live. Лимиты варьируются от нескольких десятков рублей до VIP-столов с минимальной ставкой от 10000. Стриминг ведется в HD-качестве с несколькими углами обзора, чат позволяет общаться с крупье и другими участниками.
Слоты делятся по изменчивости: низкая дает частые мелкие выплаты, высокая подразумевает редкие, но крупные выигрыши. RTP-показатель отображает теоретический возврат игроку — оптимальным считается диапазон 96-98 процентов. Провайдеры вроде Pragmatic Play, NetEnt, Microgaming регулярно выпускают новинки с инновационными механиками: Megaways, каскадные барабаны, расширяющиеся символы. Турниры проводятся по накопительной системе очков или максимальному множителю за спин, призовой фонд распределяется между топ-участниками лидерборда.
Зачисления обрабатываются через банковские карты, электронные кошельки, криптовалюту — каждый метод имеет комиссию и лимиты. Вывод средств занимает от нескольких минут до трех рабочих дней в зависимости от выбранной финансового сервиса и статуса игрока. Верифицированные VIP-клиенты получают приоритетную обработку запросов на кешаут и персонального менеджера для решения финансовых вопросов.
Когда главный домен оказывается заблокирован по решению регулятора, игрокам приходится искать альтернативные пути доступа к своему балансу и активным ставкам. Рабочее зеркало казино представляет собой технический клон официального ресурса с идентичной функциональностью, но размещенный на другом доменном имени. Важный момент – зеркало полностью синхронизировано с основной базой данных, поэтому ваш баланс, история транзакций и прогресс по вейджеру остаются неизменными независимо от точки входа. Проверенный способ найти актуальное зеркало сегодня – подписаться на email-рассылку оператора или добавить официальный Telegram-канал, где администрация публикует рабочие ссылки в режиме реального времени. Альтернатива – техподдержка в live-чате, которая предоставит актуный URL glory-1772574312106.clients.site даже если основного сайта недоступен.
Регистрация через зеркало ничем не отличается от стандартной процедуры на главном домене. Система запросит стандартный набор данных – email, номер телефона, валюту счета. Критический момент – указывайте достоверные контакты, поскольку подтверждение личности потребуется при первом выводе средств от определенной суммы. Бонус за регистрацию обычно активируется автоматически либо через ввод промокода в специальное поле анкеты. Внимательно читайте условия отыгрыша – требования по вейджеру могут достигать х40-х50 от суммы бонуса, а максимальная ставка при отыгрыше часто ограничена 5 евро или 10 процентами от бонусного баланса.
Персональный аккаунт через зеркало предоставляет полный доступ к финансовым операциям. Депозиты обрабатываются мгновенно при использовании карт, электронных кошельков или криптовалюты. Вывод средств занимает от нескольких часов до трех рабочих дней в зависимости от выбранного метода и статуса верификации аккаунта. Кэшбек начисляется еженедельно или ежемесячно – процент возврата от проигранных средств варьируется от 5 до 20 процентов в зависимости от VIP-уровня игрока. Фриспины за депозит активируются на конкретных слотах – важно использовать их в установленные сроки, обычно это 24-72 часа.
Mobile-версия зеркала адаптирована под сенсорное управление и загружается быстрее desktop-варианта за счет оптимизированной графики. Приложение для iOS и Android обеспечивает стабильный доступ даже при блокировках на уровне провайдера, поскольку использует встроенные механизмы обхода ограничений. Скачать APK для Android можно непосредственно с сайта оператора – установка требует разрешения на загрузку из неизвестных источников в настройках безопасности. Версия для iPhone распространяется через TestFlight или веб-клип с возможностью добавления на главный экран.
Слоты в лобби фильтруются по провайдеру, волатильности и RTP. Профессиональные игроки отдают предпочтение слотам с возвратом от 96 процентов и выше – эту информацию можно найти в разделе справки конкретного слота. Турниры проводятся на отобранных играх с призовым фондом от нескольких тысяч до сотен тысяч долларов. Таблица лидеров обновляется в реальном времени, а система начисления очков может базироваться на множителях выигрыша, количестве спинов или сумме ставок.
Live казино работает на платформе Evolution, Pragmatic Play Live или Ezugi. Игровые ставки за столами с реальными дилерами стартуют от 50 центов в рулетке и достигают десятков тысяч в VIP-залах. Важное преимущество – возможность отслеживать статистику последних раундов и использовать стратегии управления банкроллом в режиме реального времени. Скорость интернет-соединения должна быть не менее 5 Мбит/с для комфортной игры без задержек видеопотока.
Акции и промокоды публикуются в разделе бонусов – сезонные предложения могут включать увеличенный процент на депозит, участие в розыгрыше техники или туристических поездок. Код активации вводится при пополнении счета или в соответствующем разделе личного кабинета. Условия каждой акции индивидуальны – некоторые бонусы доступны только для новых игроков, другие предназначены для удержания активных игроков с определенным объемом ставок за предыдущий период.
brisklet.shop – Navigation works perfectly and content is clear to read.
Amber Outpost Hub – Fast, smooth checkout and responsive pages make shopping easy.
browse here – Smooth layout and clear structure make browsing enjoyable.
Доступ к развлекательному порталу через официальный сайт casher-1772569823620.clients.site остается главным выбором для опытных игроков, но блокировки провайдеров вынуждают держать наготове актуальные рабочие зеркала. Зеркало представляет собой технический клон основного ресурса с идентичным функционалом и базой данных, но размещенный на альтернативном домене. Критически важно использовать только проверенные источники получения ссылок на зеркала, поскольку фишинговые копии могут перехватить данные вашего персонального аккаунта и платежную информацию. Официальное зеркало сегодня можно получить через рассылку казино, техподдержку в мессенджерах или Telegram-канал заведения.
Процедура регистрации на платформе открывает доступ к приветственному пакету, который обычно включает процентную надбавку к депозиту и фриспины на топовые слоты. Обращайте внимание на отыгрыш бонуса, стандартные показатели варьируются от х35 до х50, что определяет реальную выгодность предложения. Промокоды активируют эксклюзивные предложения, их публикуют партнеры казино и в тематических сообществах. Бонус за регистрацию без депозита встречается редко, чаще требуется аутентификация номера телефона и минимальное пополнение счета.
Личный кабинет концентрирует управление балансом, историю транзакций, активацию акций и прогресс по бонусной программе. Современные платформы внедряют многоуровневые VIP-системы с персональным кэшбеком, расчет которого ведется от проигранных ставок за отчетный период. Кэшбек начисляется обычно по понедельникам, процент зависит от статуса игрока и может достигать 15-20% для высоких уровней. Обязательно изучите условия отыгрыша кэшбека, некоторые казино выдают его с вейджером, другие позволяют сразу вывести средства.
Адаптивный сайт адаптирует интерфейс под смартфоны без потери функциональности, но нативное приложение обеспечивает стабильнее соединение и быстрее загружает игры. Скачать клиент для Android можно с официального сайта через APK-файл, версия для iOS распространяется через альтернативные маркетплейсы из-за политики App Store. Приложение сохраняет сессию и отправляет push-уведомления о новых акциях и начислении бонусов, что удобно для активных игроков.
Live казино транслирует игры с реальными крупье из студий Evolution Gaming, Pragmatic Play Live и других провайдеров. Здесь работают лимиты столов от центов до тысяч долларов, возможна игра на нескольких столах одновременно. Задержка видеопотока критична для блэкджека и баккары, качественные платформы обеспечивают латентность менее 1 секунды. В разделе слотов представлены автоматы с различной волатильностью, RTP топовых позиций превышает 96%, информация о теоретической отдаче доступна в описании каждой игры.
Соревнования проводятся на выделенных слотах или в live-разделе, призовой фонд формируется оператором или складывается из взносов участников. Таблица лидеров обновляется в реальном времени, учитывается либо сумма выигрышей, либо множитель относительно ставки. Вход в платный турнир списывает бай-ин с основного баланса, фрироллы доступны бесплатно и подходят для тестирования стратегий без риска. Акции часто привязаны к запуску новых игр провайдеров, давая увеличенные фриспины или страховку ставок на ограниченный период.
calmcart.shop – Shopping is simple, convenient, and navigating the site feels effortless.
workbenchwonder online shop – Useful selection and product details are easy to follow.
Официальный сайт казино работает по принципу географической сегментации — интернет-провайдеры блокируют доступ на основании IP-адреса пользователя, что заставляет операторов развертывать зеркала на альтернативных доменах. Рабочее зеркало gama-1772575958289.clients.site представляет собой полную копию основного ресурса с идентичной базой данных игроков, балансами и записями транзакций, но размещенную на другом хостинге с новым URL. Для поиска актуального зеркала сегодня опытные игроки используют Telegram-каналы казино, email-рассылки или сохраняют несколько backup доменов в закладках браузера. Критически важно проверять SSL-сертификат любого зеркала через адресную строку — отсутствие замка безопасности указывает на фишинговый сайт.
Регистрация через зеркало не отличается от процедуры на основном домене — система запросит email, номер телефона и создание пароля с минимальными требованиями к сложности. Верификация личного кабинета потребует загрузки документов только при первом изъятии средств, причем лимиты без KYC обычно ограничены эквивалентом 1000 евро в месяц. Двухфакторная аутентификация через Google Authenticator повышает безопасность аккаунта, но доступна не во всех казино. Обратите внимание на форс-мажорные условия в пользовательском соглашении — некоторые операторы резервируют право заморозить вывод при признаках в мультиаккаунтинге.
Бонус за регистрацию делится на no-deposit и welcome package — первый начисляется автоматом без внесения депозита, но ограничен жесткими коэффициентами ставок x50-x70, второй требует пополнения счета и активации промокода. Фриспины привязаны к конкретным слотам провайдера, указанного в условиях акции, причем выигрыш с бесплатных вращений также подлежит отыгрышу. Кэшбек бывает процентным от проигранных средств за период либо рейкбеком в покере — возвратом части комиссии рума. Вейджер рассчитывается только с реальных ставок, игра в демонстрационной версии не учитывается в объеме отыгрыша.
Мобильная версия сайта адаптирована под сенсорные экраны через responsive-дизайн, но нативное приложение обеспечивает лучшую быстродействие за счет оптимизации под операционную систему. Скачать APK для Android можно только с официального сайта казино, поскольку Google Play блокирует азартные приложения в большинстве юрисдикций. iOS-приложения распространяются через TestFlight или требуют изменения региона Apple ID, что создает дополнительные сложности. Push-уведомления в приложениях информируют о новых конкурсах и ограниченных по времени промокодах.
Live казино транслирует игру с реальными крупье через WebRTC-протокол с минимальной задержкой 1-2 секунды, критичной для принятия решений в блэкджеке или рулетке. Провайдеры Evolution Gaming и Pragmatic Play Live предлагают столы с русскоязычными дилерами и лимитами от 50 рублей до миллиона за раунд. RTP в живых играх выше автоматных слотов — европейская рулетка держит 97,3% против 94-96% в видеослотах. Статистика раздач в личном кабинете позволяет отслеживать win rate и стандартное отклонение для корректировки банкролл-менеджмента.
Слоты классифицируются по variance — high variance машины выдают редкие, но крупные выплаты, low variance обеспечивают частые мелкие выигрыши. Провайдеры указывают теоретический RTP в описании игры, но фактическая отдача зависит от размера выборки — на дистанции 10000 спинов результат приближается к заявленному. Турниры по слотам начисляют очки за коэффициент выигрыша относительно ставки, а не за абсолютную сумму, что уравнивает шансы игроков с разными банкроллами. Банк призов формируется из взносов участников либо гарантируется оператором — второй вариант выгоднее при малом количестве регистраций.
Viagra Tablet price: Sildenafil Price Guide – Cheap Viagra 100mg
Visit Autumn Bay – Browsing feels natural and the descriptions give plenty of helpful information.
Formula Forest Direct – The shopping journey feels polished, especially during the fast checkout stage.
rsmeds
Zipp Aisle Online Shop – The checkout process was simple, quick, and stress-free.
Выбор безопасного гемблинг портала предполагает основательного разбора лицензионных бумаг. Инновационные системы tip top casino гарантируют игрокам абсолютную информацию о своих разрешениях.
Процедура получения доступа включает несколько принудительных фаз проверки. Операторы настаивают справки, устанавливающие идентичность и зрелость. Классический KYC-механизм занимает от 24 до 72 промежутков.
Банкролл-менеджмент инициируется с определения границ на вклады. Опытные клиенты настаивают эксплуатировать установку 5% от итогового казино бюджета на отдельную игру.
Программные запреты операторов вынуждают применять альтернативные адреса. Клоны хранят стопроцентную эффективность базового портала, предусматривая летопись платежей и развлекательный прогресс.
Современные финансовые системы дают оперативные депозиты через цифровые аккаунты. Bitcoin, Ethereum и постоянные токены обеспечивают тайность и символические отчисления. Период проведения извлечений насчитывает 10-30 интервалов.
Программы преданности предусматривают иерархические категории с прогрессивным бонусом. VIP-консультанты дают личные вознаграждения, повышенные ограничения и опережающую помощь.
Official Lark Vendor – Products stand out and the descriptions provide useful details.
Актуальные зеркала легальных gaming-операторов на https://zelenovskoe.ru дают беспрерывный вход к развлекательным системам. Схема копирования формирует эквивалентные дубликаты главного ресурса с консервацией всех функций.
Механизм открытия счета через дублирующий портал на сто процентов копирует основную заявку. Начинающие пользователи вводят активный email, придумывают сложный пароль и определяют операционную курренси.
Аутентификация счета включает предоставления справок в соответствии с KYC-стандартам. Копия ID-карты, подтверждение адреса и банковские сведения подвергаются машинную проверку в течение 24-72 часа.
Логин верифицированных клиентов производится через типовую модуль с 2FA валидацией. Разовые токены доставляются на телефонный гаджет или почтовый ящик.
Функционал входящего модуля через альтернативные домены включает востребованные расчетные сервисы. Visa, Mastercard, электронные портмоне Skrill, Neteller, виртуальные монеты Bitcoin, Ethereum процессируются с минимальными процентами 0-3%.
Гемблинг каталог воспроизводится в точности включая spinning games, традиционные активности, live-операторов и мегавыигрыши. RTP-коэффициенты, волатильность и вейджер сохраняются неизменными.
Подарочная схема работает идентично базовому порталу. Welcome-предложения, free spins, денежный возврат и VIP-системы активируются системно при соблюдении заданных стандартов.
http://ivermectinaccessusa.com/# ivermectin 50ml
Актуальные пользователи обталкиваются с множеством цифровых аспектов при процессах с проверенными площадками. Экспертные источники типа лаки Р±РёСЂ казино обеспечивают свежую материалы о функционировании развлекательных организаций.
Процедура подтверждения счета предполагает набор обязательных шагов. Начальная подтверждение подразумевает отправки справок подтверждающих индивидуальность. Обычный комплект охватывает удостоверение личности, автолицензию или загранпаспорт.
Техническая составляющая записления подразумевает эксплуатацию криптографической защиты и двойной авторизации. Экспертные клиенты советуют задействовать полный набор имеющихся опций безопасности.
Резервные ссылки представляют точные дубликаты центрального портала с сохранением всего арсенала. Основное выгода заключается в схожести расчетных ограничений и норм вейджера.
Механизм нахождения действующих резервных ссылок основывается на мониторинге профессиональных информационных каналов и союзных ресурсов. Квалифицированные участники задействуют анонимайзеры для формирования бесперебойного соединения без оглядки от местных барьеров.
cheapest viagra Sildenafil Price Guide Cheap generic Viagra online
Top Picks Online – Crisp images and a smooth browsing experience make shopping easy.
alignedjourney.bond – Clear visuals, site communicates unity and shared objectives naturally.
https://sildenafilpriceguide.shop/# Cheap Viagra 100mg
Перемещение в секторе проверенных сайтов подразумевает осознания новых решений доступа. Профессиональные геймеры применяют лаки Р±РёСЂ казино для получения новейшей материалов о оперативных URL.
Схема открытия учетной записи в проверенных операторах включает многоуровневую валидацию. Современные организации эксплуатируют KYC-процедуры и AML-нормы. Документооборот требует от 24 до 72 периодов.
Цифровые технологии для преодоления блокировок совершенствуются одновременно с интенсификацией юридических мер. VPN-инструменты типа premium предлагают шифрование AES-256 и протоколы OpenVPN. Устойчивость соединения принципиально актуальна для премиальных игровых периодов.
Альтернативные сайты действуют через пространственно размещенные серверные инфраструктуры. CDN-структуры осуществляют низкую время ответа для азиатских геймеров. Программное переключение инициируется при детекции ограничения базового домена.
Банковские манипуляции в лицензированных зонах следуют конкретным правилам PCI DSS. Цифровые транзакции получают востребованность в результате конфиденциальности и быстроте реализации.
Планшетные клиенты ведущих провайдеров интегрируют отпечатковую подтверждение и push-извещения для критических моментов. Настраиваемый внешний вид программно адаптируется под особенности панели.
Поиск честного игорного ресурса нуждается глубокого разбора правовых разрешений. Новые порталы винити казино гарантируют участникам полную информацию о текущих допусках.
Система открытия аккаунта предусматривает определенное количество принудительных фаз аутентификации. Провайдеры настаивают свидетельства, подтверждающие самобытность и зрелость. Традиционный KYC-алгоритм составляет от 24 до 72 интервалов.
Распоряжение капиталом открывается с фиксации пределов на пополнения. Опытные игроки советуют использовать правило 5% от совокупного азартного резерва на одну игру.
Цифровые препятствия владельцев принуждают использовать резервные маршруты. Зеркала оберегают безусловную функциональность первичного сайта, охватывая архив операций и казино достижения.
Инновационные денежные способы гарантируют быстрые взносы через блокчейн аккаунты. Bitcoin, Ethereum и постоянные токены обеспечивают тайность и минимальные комиссии. Длительность выполнения выводов составляет 10-30 минут.
Алгоритмы постоянства включают градационные уровни с прогрессивным возвратом. VIP-кураторы гарантируют эксклюзивные поощрения, повышенные границы и первоочередную обслуживание.
usebyte – Content reads clearly, helpful examples made concepts easy to grasp.
Visit this link
discover personal loan guide
for an in-depth look.
выберите ресурсы https://slon3-at.com
Беттинговая область являет быстрый прогресс, завлекая массы клиентов. Профессиональные порталы предлагают защищённую пространство для пари. Детальную информацию о данных провайдерах можно изучить на tip top РІС…РѕРґ .
Аккредитация выступает главным показателем подбора платформы. Регуляторы Кюрасао обеспечивают строгий аудит расчётных манипуляций. Всякая аккредитованная платформа проходит плановые ревизии RNG-систем.
Программные особенности современных казино охватывают SSL-защиту финансового ранга. Разработчики компьютерного продукта уровня Microgaming, NetEnt, Pragmatic Play подключают продвинутые модели случайных чисел.
Механизм подтверждения счёта предполагает представления справок KYC-формата. Свидетельство, выписка о прибылях, удостоверение прописки — классический набор для полноценного подключения.
Дублирующие порталы исправляют трудности с запретами провайдеров. Свежие альтернативы корректируются систематически компьютерными группами. Карманные софт регулярно функционируют качественнее сетевых модификаций.
Банкролл-менеджмент устанавливает длительную прибыльность развлекательных циклов. Грамотные беттеры настаивают контролировать сумму ставки до 1-2% от итогового капитала.
Поиск в пространстве проверенных порталов включает представления новых инструментов доступа. Продвинутые геймеры задействуют СЂР° казино для добывания современной сведений о активных доменах.
Процедура регистрации счета в сертифицированных компаниях предполагает многоуровневую аутентификацию. Новейшие провайдеры применяют KYC-системы и AML-стандарты. Документооборот требует от 24 до 72 часов.
Технические методы для прохождения препятствий эволюционируют вместе с усилением юридических инициатив. VPN-платформы типа premium предлагают кодирование AES-256 и системы OpenVPN. Надежность связи fundamentally важна для высокоролловых заходов.
Запасные сайты функционируют через локально разнесенные серверные ресурсы. CDN-структуры гарантируют сокращенную задержку для европейских клиентов. Программное переключение инициируется при распознавании блокировки первичного сайта.
Экономические транзакции в легальных территориях соответствуют четким нормам PCI DSS. Децентрализованные расчеты получают актуальность вследствие конфиденциальности и динамике выполнения.
Планшетные клиенты лучших организаций совмещают физиологическую аутентификацию и push-сообщения для ключевых эпизодов. Настраиваемый интерфейс самостоятельно настраивается под характеристики панели.
getbyte – Navigation felt smooth, found everything quickly without any confusing steps.
online retail site – Pages are visually appealing and the layout is user-friendly.
workbenchwonder online shop – Useful selection and product details are easy to follow.
gobyte – Found practical insights today; sharing this article with colleagues later.
Click to Explore – The interface is easy to use and the overall shopping experience is pleasant.
Гемблинговая отрасль являет активный развитие, привлекая миллионы клиентов. Профессиональные порталы обеспечивают стабильную условия для игры. Полную информацию о таких операторах доступно найти на казино Болливуд .
Сертификация составляет приоритетным аспектом отбора площадки. Контролёры Великобритании предоставляют жёсткий аудит валютных манипуляций. Любая сертифицированная сайт подвергается систематические проверки RNG-алгоритмов.
IT параметры передовых гемблинг-сайтов охватывают SSL-криптографию финансового ранга. Провайдеры программного материала вроде Microgaming, NetEnt, Pragmatic Play добавляют комплексные системы рандомных показателей.
Процесс проверки аккаунта предусматривает направления документов KYC-стандарта. Удостоверение, свидетельство о доходах, подтверждение адреса — стандартный список для полноценного подключения.
Дублирующие URL ликвидируют барьеры с ограничениями поставщиков. Функционирующие зеркала корректируются ежедневно техническими командами. Портативные утилиты зачастую функционируют лучше веб редакций.
Финансовая дисциплина определяет длительную результативность игровых периодов. Квалифицированные беттеры советуют сокращать объём вейджера до 1-2% от общего бюджета.
Amber Bazaar Marketplace – Unique items available and costs are fair.
Online Deals Hub – Browsing is smooth and the discounts are very appealing.
Навигация в мире сертифицированных площадок предполагает знания современных способов подключения. Продвинутые пользователи эксплуатируют Лев сайт для извлечения актуальной сведений о действующих URL.
Алгоритм регистрации личного кабинета в сертифицированных заведениях предполагает комплексную верификацию. Актуальные операторы внедряют KYC-механизмы и AML-правила. Оформление документов занимает от 24 до 72 периодов.
Технические способы для избежания препятствий эволюционируют синхронно с ужесточением регуляторных решений. VPN-службы типа premium гарантируют безопасность AES-256 и методы OpenVPN. Надежность коннекта жизненно актуальна для высокоролловых раундов.
Альтернативные платформы действуют через географически разнесенные цифровые инфраструктуры. CDN-структуры осуществляют минимальную задержку для американских участников. Цифровое переключение срабатывает при детекции препятствия центрального сайта.
Экономические транзакции в лицензированных юрисдикциях отвечают конкретным критериям PCI DSS. Криптовалютные транзакции набирают востребованность вследствие анонимности и скорости процессинга.
Переносные программы топовых организаций интегрируют голосовую аутентификацию и push-оповещения для критических событий. Изменяемый интерфейс автоматически настраивается под особенности экрана.
trycloudy – Pages loaded fast, images appeared sharp, and formatting stayed consistent.
dataops – Overall, professional vibe here; trustworthy, polished, and pleasantly minimal throughout.
applabs – Overall, professional vibe here; trustworthy, polished, and pleasantly minimal throughout.
datadev – Appreciate the typography choices; comfortable spacing improved my reading experience.
Merniva Online Shop – Noticed a few nice items and the pricing feels balanced.
Появился свежий анализ про ufc в феврале марте 2026 три недели которые встряхнут дивизионы, рекомендую ознакомиться. Подробности здесь: https://crm64.ru/news/goryachij-fevral-mart-2026-v-ufc-tri-turnira-kotorye-nelzya-propustit/
Нынешние бетторы натыкаются с сложностью соединения к проверенным ресурсам. Поставщики фильтруют первичные порталы, но грамотные лаки Р±РёСЂ посетители понимают о присутствии дублирующих сайтов.
Параллельный портал формирует абсолютную воспроизведение базового ресурса. Протоколы шифрования работают аналогичными. Платёжные операции реализуются через те же механизмы.
Алгоритм оформления профиля через параллельный ссылку содержит классической верификации. Сотрудники уточняют бумаги для реализации KYC-требований. Паспортные параметры реализуют двухфакторную проверку.
Финансовые ограничения на резервных порталах совпадают базовым условиям. Наименьшие взносы функционируют константными. Растущие джекпоты синхронизируются между множественными адресами.
Льготные планы оперируют полноценно на параллельных порталах. Множитель ставок удерживает стартовые параметры. Тайминг реализации сохраняется.
Сервис обслуживания решает запросы с резервных доменов сходным образом. Мгновенный разговор обеспечивает постоянный график работы.
Действующие резервные адреса официальных азартных клубов на казино аква предоставляют стабильный вход к азартным системам. Методика реплицирования генерирует эквивалентные клоны основного портала с фиксацией всех функций.
Механизм открытия счета через зеркало полностью воспроизводит основную форму. Свежие геймеры заполняют рабочий email, создают защищенный шифр и фиксируют игровую финансовый инструмент.
Верификация профиля предполагает представления свидетельств опираясь на KYC-требованиям. Снимок удостоверения личности, свидетельство регистрации и карточные реквизиты проходят автоматическую валидацию в течение 24-72 часов.
Аутентификация верифицированных клиентов реализуется через обычную интерфейс с расширенной идентификацией. Разовые коды поступают на телефонный гаджет или мейл.
Инструменты депозитного раздела через альтернативные домены включает актуальные денежные платформы. Visa, Mastercard, веб счета Skrill, Neteller, crypto Bitcoin, Ethereum выполняются с низкими сборами 0-3%.
Gaming ассортимент дублируется абсолютно включая машины, традиционные игры, live-операторов и джекпоты. RTP-показатели, дисперсия и вейджер поддерживаются точными.
Бонусная программа оперирует схоже основному ресурсу. Welcome-предложения, даровые прокруты, возврат средств и VIP-программы активируются программно при реализации фиксированных требований.
Official Saucier Studio – The site showcases artistic and one-of-a-kind items beautifully.
Explore Prairie Vendor – Clean visuals and quick page loads make shopping easy.
US Pharma Index: US Pharma Index – US Pharma Index
продолжить сайт kraken darknet
посмотреть в этом разделе https://slon3-at.com
best price for viagra 100mg: Viagra without a doctor prescription Canada – Cheap Viagra 100mg
Азартная сфера являет стремительный расширение, манящая легионы участников. Грамотные платформы обеспечивают надёжную обстановку для игры. Исчерпывающую сведения о указанных компаниях реально отыскать на казино Голд .
Аттестация составляет центральным аспектом селекции портала. Юрисдикции Кюрасао создают качественный аудит финансовых операций. Каждая аккредитованная ресурс выполняет периодические инспекции RNG-систем.
IT особенности новейших казино содержат SSL-кодирование экономического уровня. Провайдеры компьютерного софта наподобие Microgaming, NetEnt, Pragmatic Play добавляют многоуровневые схемы непредсказуемых чисел.
Механизм аутентификации личного кабинета включает подачи удостоверений KYC-типа. ID, документ о средствах, удостоверение проживания — базовый пакет для полноценного активации.
Альтернативные адреса исправляют препятствия с цензурой компаний. Свежие дубли изменяются каждый день программными службами. Планшетные утилиты обычно действуют качественнее сетевых редакций.
Управление банкроллом определяет стратегическую доходность гемблинговых циклов. Экспертные участники настаивают лимитировать величину депозита до 1-2% от полного фонда.
Игровая сфера показывает интенсивный рост, привлекая миллионы клиентов. Квалифицированные порталы дают надёжную атмосферу для пари. Исчерпывающую информацию о подобных компаниях доступно найти на tip top РІС…РѕРґ .
Лицензирование составляет приоритетным элементом отбора платформы. Контролёры Олдерни обеспечивают качественный мониторинг валютных процедур. Каждая сертифицированная площадка выполняет регулярные ревизии RNG-алгоритмов.
Программные параметры современных беттинг-платформ включают SSL-кодирование экономического ранга. Разработчики компьютерного обеспечения вроде Microgaming, NetEnt, Pragmatic Play внедряют продвинутые системы непредсказуемых параметров.
Механизм подтверждения аккаунта подразумевает подачи удостоверений KYC-стандарта. Документ, подтверждение о средствах, верификация регистрации — типичный список для итогового входа.
Параллельные домены исправляют препятствия с фильтрацией провайдеров. Функционирующие зеркала корректируются систематически компьютерными группами. Мобильные утилиты нередко функционируют стабильнее браузерных вариантов.
Распределение капитала устанавливает перспективную доходность беттинговых партий. Профессиональные пользователи рекомендуют лимитировать объём ставки до 1-2% от совокупного капитала.
reliabond.bond – Modern presentation, content conveys security and user confidence.
Нынешние игроки встречаются с массой технологических тонкостей при работе с лицензированными порталами. Профессиональные сайты типа лаки Р±РёСЂ казино дают современную контент о деятельности казино провайдеров.
Процесс верификации аккаунта подразумевает набор необходимых уровней. Базовая аутентификация предполагает загрузки бумаг доказывающих субъект. Типовой набор подразумевает ID, права или международный паспорт.
Программная сторона оформления подразумевает применение зашифрованного канала и 2FA. Квалифицированные участники рекомендуют задействовать максимум предложенных функций охраны.
Альтернативные адреса являются точные реплики первичного домена с хранением всего возможностей. Главное преимущество состоит в тождественности расчетных лимитов и параметров вейджера.
Система обнаружения актуальных резервных ссылок базируется на контроле тематических информационных каналов и аффилированных ресурсов. Квалифицированные клиенты используют прокси-соединения для гарантирования бесперебойного соединения вне зависимости от региональных лимитов.
кран под сварку кран под сварку
Новейшие провайдеры игорных активностей гарантируют пользователям доступ к высококлассному гемблингу через надежные лакибир ресурсы. Лицензированная операционная активность влечет соблюдения жестких регуляторных стандартов.
Система регистрации клиентского учетной записи содержит проверку индивидуальных сведений. Администраторы эксплуатируют углубленные механизмы KYC и AML для пресечения фродовых финансовых действий.
Электронные платформы современных беттинг площадок работают на защищенных хостингах с SSL протоколами. Территориальные ограничения принуждает владельцев разрабатывать резервные домены.
Параллельные порталы являют собой точные репликации базового сайта с фиксацией всех возможностей и данных. Пользователи достигают постоянный связь к счету, азартной истории и персональным установкам.
Банковские процедуры реализуются через встроенные банковские шлюзы. Ограничения на депозиты и изъятия фиксируются в унисон с лицензионными стандартами и организационными политиками контроля угроз.
Квалифицированные клиенты указывают проверять условия аккредитации через государственные регистры развлекательных органов. Статусные критерии содержат оценки на экспертных порталах и отзывы реальных пользователей.
смотреть здесь kraken зеркало
Explore the Collection – Browsing is simple and checkout runs without any issues.
official storefront – Fast page loads and intuitive layout make navigation easy.
Tidal Thimble Hub – Layout is appealing and finding products is hassle-free.
https://uspharmaindex.com/# rx pharmacy online 24
What’s up, yup this post is really good and I have learned lot of
things from it regarding blogging. thanks.
Нынешние геймеры попадают с сложностью соединения к легальным платформам. Организации закрывают стандартные домены, но грамотные Голд казино клиенты знают о функционировании дублирующих площадок.
Резервная ссылка составляет стопроцентную воспроизведение первичного площадки. Системы безопасности поддерживаются аналогичными. Денежные переводы выполняются через сходные сервисы.
Технология заведения учётной записи через альтернативный домен предполагает типовой проверки. Администраторы запрашивают справки для исполнения KYC-правил. Личные информация реализуют двухфакторную подтверждение.
Пополнительные пределы на резервных сайтах соответствуют стандартным требованиям. Стартовые взносы поддерживаются стабильными. Накопительные призовые фонды интегрируются между разными ресурсами.
Бонусные схемы выполняются завершённо на зеркальных площадках. Отыгрышный коэффициент удерживает базовые величины. Длительность использования поддерживается.
Сервис сопровождения рассматривает вопросы с альтернативных порталов сходным образом. Мгновенный разговор осуществляет беспрерывный график функционирования.
https://sildenafilpriceguide.com/# Viagra tablet online
Легальные площадки гэмблинг опций oferuja игрокам вариант к элитному гэмблингу через целевые порталы, включая казино ретро , которые точно следуют глобальные критерии security.
Процедура открытия счёта предполагает ввода верификационных параметров через безопасные SSL-соединения. Операторы просят предоставить документальное доказательство age verification и места residence для исполнения законодательных норм.
Multi-factor проверка считается mandatory aspect актуальных механизмов защиты. Пользователи обретают SMS-коды, push-уведомления или используют dedicated утилиты типа Google Authenticator.
Альтернативные порталы нейтрализуют препятствия региональных барьеров и DDoS-нападений. Технически mirrors формируют копийные реплики основного ресурса с удержанием возможностей и индивидуальных сведений.
Компетентные клиенты призывают keeping свежие каталоги действующих дублей в закладках веб-клиента. Management отправляют обновления о современных ссылках через мейл, Telegram-группы и портативные утилиты.
Финансовые транзакции через лицензионные сайты secured криптографическими протоколами level банковского направления. Получение фондов производится исключительно на верифицированные карты владельца аккаунта.
Discover Best Deals – Browsing is smooth and convenient, and the overall site is easy to use.
Meal Prep Recipes – Layout is tidy and content is straightforward to explore.
check this website – I like how user-friendly the interface is while exploring.
Your Online Destination – Navigation flows naturally and the design is tidy.
Visit Stock Stack – Smooth interface and content is easy to find.
Новейшие клиенты имеют дело с огромным количеством цифровых деталей при операциях с легальными площадками. Профильные ресурсы типа Gold казино выдают современную материалы о работе гэмблинговых операторов.
Система валидации аккаунта предполагает несколько неотъемлемых этапов. Стартовая верификация предполагает предоставления свидетельств верифицирующих персону. Классический перечень предполагает удостоверение личности, автоудостоверение или международное ID.
Техническая часть записления содержит эксплуатацию зашифрованного канала и двойной авторизации. Квалифицированные клиенты предлагают включать все возможных параметров секьюрити.
Зеркала представляют полные отражения центрального сайта с удержанием полного возможностей. Важнейшее бонус состоит в идентичности денежных рамок и условий ставочных требований.
Схема выявления рабочих резервных ссылок опирается на отслеживании специализированных мессенджер групп и сотрудничающих сайтов. Квалифицированные клиенты внедряют виртуальные частные сети для создания надежного соединения невзирая от территориальных блокировок.
visit this platform – The creative theme stands out and navigation feels smooth.
Поиск честного азартного ресурса нуждается основательного рассмотрения регулятивных бумаг. Новые порталы tip top casino предоставляют игрокам безусловную факты о действующих допусках.
Процедура открытия аккаунта содержит различные обязательных шагов проверки. Владельцы просят документы, засвидетельствующие идентичность и зрелость. Стандартный KYC-алгоритм длится от 24 до 72 периодов.
Банкролл-менеджмент запускается с установления пределов на инвестиции. Опытные пользователи предлагают использовать закон 5% от суммарного развлекательного резерва на индивидуальную раунд.
Технические запреты поставщиков принуждают задействовать запасные пути. Зеркала хранят максимальную работоспособность основного ресурса, содержа историю транзакций и развлекательный успех.
Новые денежные инструменты обеспечивают мгновенные депозиты через блокчейн хранилища. Bitcoin, Ethereum и фиксированные активы гарантируют приватность и крошечные комиссии. Продолжительность осуществления выводов составляет 10-30 отрезков.
Схемы постоянства охватывают каскадные степени с прогрессивным бонусом. VIP-менеджеры предоставляют личные подарки, увеличенные пределы и ускоренную поддержку.
Alpine Vendor Collection – Browsing is simple thanks to the clean layout and intuitive navigation.
For services
Pay day loans near me
for curiosity.
Basket Wharf Deals – Browsing feels fluid and the design keeps things simple and clear.
Daisy Crate Specials – Products are appealing and the ordering process is quick and easy.
Беттинговая ниша отображает быстрый прогресс, притягивая тысячи пользователей. Экспертные платформы дают стабильную среду для развлечений. Развёрнутую сведения о данных организациях возможно найти на винити зеркало .
Аттестация представляет основным аспектом определения платформы. Лицензиаты Гибралтара предоставляют серьёзный аудит экономических процедур. Каждая аккредитованная сайт подвергается систематические ревизии RNG-модулей.
IT особенности актуальных гемблинг-сайтов охватывают SSL-защиту экономического уровня. Создатели компьютерного материала класса Microgaming, NetEnt, Pragmatic Play внедряют усовершенствованные модели рандомных параметров.
Механизм подтверждения личного кабинета включает передачи справок KYC-стандарта. Удостоверение, справка о доходах, валидация регистрации — базовый набор для итогового входа.
Резервные порталы ликвидируют препятствия с фильтрацией поставщиков. Действующие дубли модифицируются систематически цифровыми отделами. Смартфонные программы регулярно действуют стабильнее интернет редакций.
Финансовая дисциплина задаёт продолжительную доходность гемблинговых раундов. Грамотные геймеры рекомендуют лимитировать объём вейджера до 1-2% от итогового банкролла.
Гемблинговая ниша отображает активный прогресс, манящая легионы участников. Грамотные сайты дают надёжную среду для пари. Полную данные о данных компаниях возможно отыскать на казино типпи .
Аккредитация остаётся основным элементом отбора площадки. Регуляторы Великобритании предоставляют серьёзный надзор экономических манипуляций. Любая официальная площадка подвергается периодические проверки RNG-систем.
Компьютерные особенности актуальных казино включают SSL-безопасность денежного уровня. Производители цифрового софта уровня Microgaming, NetEnt, Pragmatic Play подключают продвинутые схемы произвольных параметров.
Алгоритм верификации профиля подразумевает направления бумаг KYC-стандарта. Свидетельство, подтверждение о финансах, валидация местожительства — стандартный комплект для завершённого входа.
Зеркальные порталы устраняют сложности с запретами компаний. Рабочие копии модифицируются регулярно компьютерными командами. Смартфонные клиенты регулярно действуют стабильнее интернет редакций.
Распределение капитала задаёт стратегическую прибыльность азартных сессий. Экспертные геймеры советуют ограничивать величину депозита до 1-2% от совокупного бюджета.
Sweet shop online – Layout feels refined and content is easy to find.
buy priligy pills htts://rsmeds.top/# buy dapoxetine online
engine emporium link – Clean structure helps users quickly locate the right info.
Official Captain’s Closet – The selection looks fantastic and ordering never feels complicated.
газоблок d500 газоблок цена за штуку
securepath.bond – Organized navigation, messaging feels dependable and approachable for users.
Нынешние участники встречаются с затруднением соединения к проверенным платформам. Операторы блокируют стандартные URL, но опытные Гризли казино посетители помнят о функционировании параллельных площадок.
Зеркало является идентичную реплику основного сайта. Криптографические алгоритмы сохраняются аналогичными. Банковские операции производятся через равнозначные шлюзы.
Процедура регистрации через дополнительный домен включает обычной проверки. Сотрудники уточняют бумаги для осуществления KYC-регламентов. Идентификационные информация подвергаются многоуровневую верификацию.
Депозитные рамки на зеркальных площадках совпадают основным условиям. Минимальные вклады остаются стабильными. Накопительные выигрышные пулы объединяются между разными доменами.
Стимулирующие планы действуют целостно на зеркальных сайтах. Требования по обороту удерживает первоначальные значения. Длительность оборота не изменяется.
Служба поддержки изучает заявки с резервных порталов равнозначно. Живой переписка предоставляет непрерывный формат оперирования.
Инновационные порталы азартных активностей обеспечивают клиентам вход к высококлассному азарту через надежные казино РЎСѓРєР° сайты. Сертифицированная операционная активность предполагает учета определенных надзорных норм.
Процедура открытия персонального кабинета включает аутентификацию персональных данных. Регуляторы используют многоуровневые процедуры KYC и AML для блокировки нарушающих переводов.
IT платформы новейших казино работают на защищенных дата-центрах с TLS сертификатами. IP-фильтрация побуждает управляющих внедрять дублирующие URL.
Зеркальные домены являют собой идентичные репликации основного сайта с поддержанием всех опций и информации. Клиенты приобретают постоянный доступ к счету, игровой статистике и клиентским опциям.
Платежные действия выполняются через встроенные банковские сервисы. Лимиты на вклады и выводы назначаются в соотношении с законодательными условиями и корпоративными нормами управления рисками.
Компетентные беттеры указывают контролировать состояние лицензии через надзорные регистры азартных структур. Престижные показатели содержат оценки на профильных сервисах и оценки подлинных участников.
bloomvendor.shop – Such a pleasant browsing experience with lovely selections available.
US Pharma Index: US Pharma Index – US Pharma Index
на этом сайте kraken онион
Fabric and textile hub – Organized content with fast-loading pages makes exploring easy.
Узнать больше kraken onion ссылка
Актуальные альтернативные домены лицензированных gaming-операторов на казино миллионъ зеркало создают беспрерывный соединение к гемблинг сервисам. Технология дублирования формирует эквивалентные версии базового ресурса с фиксацией всех функций.
Механизм регистрации через зеркало на сто процентов повторяет главную бланк. Свежие пользователи заполняют валидный email, создают стойкий пароль и назначают основную финансовый инструмент.
Верификация профиля требует загрузки документов согласно KYC-регламенту. Снимок водительских прав, свидетельство адреса и банковские координаты контролируются системой автоматическую анализ в течение 24-72 ч.
Логин существующих клиентов реализуется через стандартную модуль с расширенной идентификацией. Одноразовые шифры отправляются на мобильный аппарат или электронную почту.
Опции денежного модуля через mirror-сайты предлагает популярные банковские инструменты. Visa, Mastercard, веб портмоне Skrill, Neteller, виртуальные монеты Bitcoin, Ethereum выполняются с уменьшенными сборами 0-3%.
Игровая каталог дублируется полностью включая слоты, карточные забавы, live-дилеров и мегавыигрыши. RTP-параметры, вариативность и условия отыгрыша остаются идентичными.
Поощрительная политика функционирует подобно базовому домену. Welcome-пакеты, даровые прокруты, компенсация и VIP-планы запускаются системно при реализации установленных параметров.
Определение качественного игрового портала в нынешних реалиях заставляет повышенного анализа к законному положению. Опытные игроки представляют, что казино Клубника предоставляет актуальную факты о работающих операторах.
Процедура открытия счета в официальных сервисах содержит неизбежную проверку идентичности. KYC-стандарты охраняют как площадку, так и участника от махинаций. Переходные границы на вывод средств до выполнения контроля – типичная процедура.
Программные ограничения на подключение к развлекательным порталам обходятся через дублирующие URL. Рабочие зеркала сохраняют тотальную эффективность основного портала. Денежные операции, развлекательный результаты и льготные планы поддерживаются неизменными.
Экономическая надежность характеризуется степенью используемых расчетных систем. SSL-криптография, PCI DSS подтверждение и расширенная идентификация устанавливают стабильный периметр ограждения.
Интерактивная набор лицензированных сервисов объединяет барабаны от главных студий. RTP-параметры, вариативность и вероятностные формулы претерпевают объективную валидацию в утвержденных организациях.
Механизмы мотивации в достойных казино базируются на открытых условиях ставок. Требования x35-40 расценивается адекватным для барабан-поощрений, в то время как настольные состязания учитываются в счет с минимальным показателем.
Explore Driftwood Collections – Well-organized pages with readable content make browsing seamless.
Проверенные провайдеры гэмблинг опций oferuja игрокам доступ к премиальному гэмблингу через dedicated домены, включая mad casino , которые специально исполняют общепринятые критерии защиты.
Алгоритм открытия счёта включает предоставления идентификационных деталей через encrypted SSL-соединения. Менеджмент требуют письменное verification правоспособности и региона нахождения для соблюдения legal правил.
Двухфакторная проверка считается необходимым aspect новейших архитектур защиты. Пользователи имеют SMS-токены, push-сообщения или эксплуатируют targeted программы в стиле Google Authenticator.
Альтернативные адреса нейтрализуют проблемы региональных санкций и DDoS-нападений. По сути mirrors образуют дублированные копии основного сайта с сохранением опций и пользовательских данных.
Экспертные игроки suggest сохранять current перечни функционирующих mirrors в favourites веб-клиента. Операторы рассылают информацию о fresh доменах через e-mail, Telegram-чаты и мобильные приложения.
Финансовые переводы через надёжные ресурсы гарантированы шифровальными системами уровня банковского области. Получение денег выполняется solely на верифицированные wallets собственника account.
Актуальные операторы азартных активностей предлагают пользователям возможность к элитному беттингу через надежные казино Голд порталы. Авторизованная функционирование влечет учета конкретных законодательных стандартов.
Механизм создания индивидуального учетной записи охватывает аутентификацию персональных показателей. Управляющие используют комплексные системы KYC и AML для предотвращения поддельных операций.
Технические платформы инновационных казино основываются на надежных серверах с SSL алгоритмами. IP-фильтрация заставляет управляющих запускать вспомогательные ссылки.
Резервные сайты формируют точные клоны первичного сайта с удержанием всех сервисов и параметров. Участники приобретают постоянный соединение к средствам, беттинг отчетности и личным установкам.
Денежные транзакции выполняются через интегрированные расчетные агрегаторы. Ограничения на инвестиции и получения регулируются в унисон с нормативными критериями и индивидуальными процедурами снижения потерь.
Квалифицированные беттеры рекомендуют анализировать ситуацию авторизации через контролирующие реестры развлекательных организаций. Репутационные индикаторы предусматривают места на специализированных порталах и оценки подлинных беттеров.
Shop Fig & Fashion – Smooth flow and attractive design make browsing enjoyable.
film showcase – The concept is appealing, with interesting articles to explore.
Чтобы исключить последствия, обусловленные с скамом, и обеспечить себе совершенную охрану, надлежит авторизовываться лишь через оригинальные каналы. Данная методология — самый надежный инструмент оградить личную информацию в защищенном состоянии кракен даркнет маркет зеркала
Рабочие зеркала проверенных азартных клубов на лаки Р±РёСЂ казино обеспечивают постоянный соединение к геймерским системам. Методика копирования формирует полноценные версии корневого портала с поддержанием всех механизмов.
Процедура регистрации через альтернативный домен на сто процентов имитирует основную шаблон. Свежие игроки прописывают действующий email, создают безопасный пароль и определяют базовую курренси.
Подтверждение аккаунта предполагает загрузки документов в соответствии с KYC-политике. Скан национального документа, валидация места жительства и карточные параметры проходят автоматическую анализ в течение 24-72 временных единиц.
Авторизация действующих клиентов происходит через стандартную интерфейс с усиленной валидацией. Временные ключи приходят на мессенджер устройство или email.
Инструменты депозитного компонента через резервные ссылки содержит распространенные денежные сервисы. Visa, Mastercard, онлайн портмоне Skrill, Neteller, цифровые активы Bitcoin, Ethereum реализуются с сокращенными взносами 0-3%.
Азартная коллекция дублируется целиком включая барабаны, карточные геймплей, live-хостов и прогрессивы. RTP-значения, изменчивость и ставочные требования сохраняются такими же.
Поощрительная механизм действует схоже основному порталу. Welcome-комплекты, даровые прокруты, кешбэк и VIP-планы инициируются автоматически при достижении прописанных стандартов.
Активные альтернативные домены проверенных азартных клубов на Клубника официальный сайт создают беспрерывный соединение к азартным порталам. Система клонирования строит полноценные копии основного ресурса с поддержанием всех механизмов.
Алгоритм открытия счета через резервную ссылку в точности копирует оригинальную бланк. Начинающие геймеры регистрируют функционирующий email, генерируют безопасный шифр и устанавливают рабочую валюту.
Идентификация аккаунта подразумевает представления свидетельств согласно KYC-политике. Фото паспорта, верификация регистрации и платежные координаты проверяются через машинную верификацию в течение 24-72 временных единиц.
Вход существующих игроков выполняется через обычную окно с расширенной идентификацией. Краткосрочные токены поступают на смс аппарат или электронную почту.
Функционал денежного модуля через резервные ссылки содержит распространенные банковские платформы. Visa, Mastercard, веб балансы Skrill, Neteller, цифровые активы Bitcoin, Ethereum реализуются с минимальными платежами 0-3%.
Gaming ассортимент дублируется полностью включая слоты, традиционные игры, live-ведущих и накопительные призы. RTP-показатели, изменчивость и вейджер удерживаются такими же.
Бонусная политика выполняется подобно главному домену. Welcome-пакеты, бесплатные вращения, денежный возврат и VIP-курсы инициируются алгоритмически при реализации фиксированных параметров.
https://sildenafilpriceguide.com/# Buy Viagra online cheap
White Noise Sounds Portal – The design is organized and reading the content feels easy.
http://uspharmaindex.com/# US Pharma Index
email tips hub – Clear and professional presentation enhances user experience.
Aw, this was an exceptionally good post. Taking a few minutes and actual effort to produce a very good article… but
what can I say… I hesitate a whole lot and never seem to get anything done.
Гемблинговая ниша демонстрирует активный подъём, манящая легионы игроков. Квалифицированные ресурсы гарантируют стабильную среду для ставок. Детальную сведения о данных брендах допустимо получить на казино Вован .
Аккредитация является приоритетным элементом отбора портала. Лицензиаты Мальты создают строгий надзор финансовых операций. Каждая лицензированная ресурс подвергается систематические контроли RNG-механизмов.
Технические аспекты новейших беттинг-платформ содержат SSL-защиту денежного стандарта. Поставщики программного материала уровня Microgaming, NetEnt, Pragmatic Play интегрируют многоуровневые алгоритмы случайных параметров.
Схема верификации профиля включает подачи бумаг KYC-уровня. Паспорт, свидетельство о средствах, валидация прописки — базовый перечень для итогового авторизации.
Альтернативные домены убирают сложности с фильтрацией провайдеров. Свежие копии корректируются ежедневно компьютерными службами. Смартфонные утилиты регулярно функционируют качественнее онлайн редакций.
Управление банкроллом создаёт долгосрочную успешность гемблинговых партий. Профессиональные геймеры настаивают сокращать размер депозита до 1-2% от полного резерва.
Поиск в пространстве официальных площадок включает представления продвинутых технологий авторизации. Умелые геймеры используют probeg-ag.ru для добывания новейшей информации о работающих URL.
Алгоритм регистрации личного кабинета в надежных учреждениях включает комплексную подтверждение. Передовые организации внедряют KYC-алгоритмы и AML-правила. Документальная процедура отнимает от 24 до 72 периодов.
IT способы для прохождения барьеров прогрессируют синхронно с укреплением регуляторных шагов. VPN-инструменты типа premium предлагают защиту AES-256 и системы OpenVPN. Надежность соединения жизненно важна для элитных игровых периодов.
Резервные домены выполняют задачи через территориально размещенные технические мощности. CDN-системы обеспечивают низкую латентность для американских игроков. Техническое переключение включается при идентификации препятствия основного портала.
Банковские манипуляции в проверенных территориях соответствуют конкретным критериям PCI DSS. Децентрализованные расчеты завоевывают распространение благодаря приватности и быстроте обработки.
Смартфонные приложения ведущих организаций объединяют отпечатковую идентификацию и push-алерты для критических ситуаций. Модифицируемый облик автономно изменяется под характеристики панели.
generic ivermectin: Ivermectin Access USA – Ivermectin Access USA
Visit Clean Cabin – Interface is clean and finding content is effortless.
this online store – Everything is organized clearly, making exploration easy and enjoyable.
Гемблинговая отрасль показывает стремительный подъём, притягивая миллионы пользователей. Грамотные ресурсы обеспечивают надёжную обстановку для развлечений. Полную данные о этих организациях возможно получить на лаки Р±РёСЂ казино .
Аккредитация представляет главным элементом селекции портала. Лицензиаты Мальты гарантируют тщательный контроль валютных действий. Отдельная официальная портал проходит систематические контроли RNG-модулей.
IT аспекты новейших гемблинг-сайтов предусматривают SSL-безопасность банковского стандарта. Поставщики компьютерного софта уровня Microgaming, NetEnt, Pragmatic Play подключают сложные схемы произвольных величин.
Процедура аутентификации учётной записи включает представления бумаг KYC-типа. Удостоверение, документ о финансах, доказательство прописки — обычный пакет для завершённого авторизации.
Альтернативные порталы решают препятствия с блокировками организаций. Рабочие варианты изменяются систематически программными группами. Карманные программы нередко действуют качественнее веб версий.
Управление банкроллом устанавливает долгосрочную успешность игровых сессий. Профессиональные участники советуют контролировать сумму бета до 1-2% от суммарного фонда.
Новейшие участники обталкиваются с массой системных аспектов при процессах с легальными ресурсами. Профильные сайты типа Килограмм казино выдают новую сведения о работе казино брендов.
Процедура аутентификации счета содержит несколько принудительных фаз. Стартовая подтверждение нуждается загрузки справок доказывающих персону. Классический набор подразумевает документ, права или международный паспорт.
Техническая часть записления включает применение зашифрованного канала и многофакторной защиты. Профессиональные геймеры советуют инициировать весь комплекс доступных опций защиты.
Зеркала образуют полные отражения основного портала с хранением полного набора функций. Ключевое плюс содержится в соответствии расчетных ограничений и требований отыгрыша.
Система нахождения актуальных запасных доменов опирается на наблюдении профильных телеграм-каналов и сотрудничающих площадок. Профессиональные пользователи используют туннельные протоколы для создания надежного подключения невзирая от географических ограничений.
Detailed review
how can i get enalapril pills
for business use.
Поиск достойного гемблинг портала в сегодняшних реалиях подразумевает детального рассмотрения к правовому уровню. Опытные участники представляют, что винити казино отображает новую данные о доступных операторах.
Процесс создания аккаунта в проверенных заведениях включает принудительную аутентификацию документов. KYC-требования защищают как заведение, так и геймера от фрода. Временные лимиты на изъятие капитала до окончания подтверждения – привычная подход.
Технические запреты на доступ к азартным сайтам решаются через зеркальные адреса. Доступные клоны сохраняют стопроцентную эффективность главного портала. Банковские переводы, интерактивный результаты и льготные предложения поддерживаются константными.
Экономическая надежность оценивается критерием задействованных платежных систем. SSL-защита, PCI DSS подтверждение и усиленная подтверждение гарантируют прочный щит обороны.
Азартная каталог сертифицированных площадок включает машины от лидирующих разработчиков. RTP-коэффициенты, вариативность и математические принципы получают беспристрастную аудит в аккредитованных институтах.
Программы лояльности в достойных заведениях основываются на прозрачных условиях отыгрыша. Требования x35-40 оценивается адекватным для автомат-бонусов, в то время как стандартные состязания учитываются в счет с уменьшенным показателем.
Viagra online price: Buy Viagra online cheap – Buy Viagra online cheap
Новейшие геймеры попадают с сложностью связи к официальным сайтам. Операторы ограничивают главные порталы, но грамотные казино Bollywood участники учитывают о существовании дублирующих порталов.
Альтернативный адрес формирует полную воспроизведение первичного ресурса. SSL-сертификаты функционируют равнозначными. Расчётные транзакции выполняются через те же шлюзы.
Технология заведения учётной записи через альтернативный ресурс содержит типовой аутентификации. Менеджеры уточняют свидетельства для исполнения KYC-норм. Личные данные реализуют расширенную аутентификацию.
Финансовые лимиты на зеркальных платформах соответствуют основным параметрам. Низшие взносы поддерживаются фиксированными. Растущие джекпоты согласовываются между всеми адресами.
Льготные программы функционируют завершённо на параллельных платформах. Множитель ставок гарантирует оригинальные параметры. Период действия отыгрыша не изменяется.
Сервис помощи изучает обращения с параллельных порталов равнозначно. Онлайн общение обеспечивает беспрерывный формат деятельности.
Kitchen Kite Products – Pages are well organized and navigation is seamless.
Смотреть здесь kraken актуальные ссылки
US Pharma Index US Pharma Index US Pharma Index
storefront link – It stands apart with a look that feels current and clean.
Visit Fork & Foundry – Well-structured pages make browsing easy and intuitive.
Looking for a yacht? premium yacht experiences in Cyprus for unforgettable sea adventures. Charter luxury yachts, catamarans, or motorboats with or without crew. Explore crystal-clear waters, secluded bays, and iconic coastal locations in first-class comfort onboard.
Продолжение https://slon3-at.com/
Отбор безопасного betting ресурса в современных реалиях предполагает тщательного изучения к законному состоянию. Знающие игроки понимают, что лаки Р±РёСЂ казино отображает последнюю факты о активных сервисах.
Процесс оформления профиля в проверенных сервисах объединяет необходимую верификацию личности. KYC-требования защищают как оператора, так и клиента от фрода. Временные ограничения на снятие капитала до выполнения проверки – обычная практика.
Цифровые запреты на подключение к азартным порталам нейтрализуются через дублирующие URL. Доступные дубликаты сохраняют полную производительность главного ресурса. Расчетные переводы, развлекательный достижения и наградные предложения поддерживаются неизменными.
Материальная гарантированность выражается показателем применяемых финансовых механизмов. SSL-криптография, PCI DSS аттестация и расширенная аутентификация обеспечивают прочный барьер безопасности.
Азартная набор сертифицированных операторов объединяет машины от известных провайдеров. RTP-значения, волатильность и математические принципы проходят объективную сертификацию в признанных учреждениях.
Планы поощрения в качественных операторах базируются на четких правилах активности. Условия ставок x35-40 оценивается приемлемым для машина-подарков, в то время как традиционные состязания включаются в счет с уменьшенным коэффициентом.
Навигация в секторе сертифицированных порталов предполагает представления современных методов входа. Умелые геймеры используют лаки Р±РёСЂ казино для обретения релевантной сведений о работающих путях.
Схема оформления профиля в официальных заведениях включает комплексную аутентификацию. Передовые организации применяют KYC-механизмы и AML-нормы. Оформление документов требует от 24 до 72 часов.
Цифровые решения для минования препятствий развиваются синхронно с усилением юридических мер. VPN-платформы типа premium дают кодирование AES-256 и протоколы OpenVPN. Постоянство связи fundamentally важна для элитных игровых периодов.
Запасные ресурсы выполняют задачи через локально размещенные технические системы. CDN-структуры поддерживают оптимальную время ответа для европейских клиентов. Автоматическое роутинг активируется при выявлении блокировки центрального сайта.
Экономические переводы в сертифицированных территориях подпадают под определенным требованиям PCI DSS. Цифровые транзакции набирают актуальность из-за приватности и динамике обработки.
Смартфонные утилиты премиальных компаний интегрируют лицевую проверку и push-оповещения для важных эпизодов. Изменяемый интерфейс автоматически корректируется под особенности матрицы.
fun activity page – Browsing through the sections was quite entertaining.
Explore filtration products – Smooth browsing experience with clearly defined sections.
Игровая отрасль представляет динамичный подъём, притягивая массы участников. Грамотные платформы предлагают стабильную условия для развлечений. Полную материалы о этих провайдерах допустимо обнаружить на Килограмм казино .
Сертификация составляет приоритетным фактором подбора площадки. Регуляторы Олдерни создают тщательный проверку расчётных процедур. Любая легальная ресурс осуществляет регулярные инспекции RNG-механизмов.
Технические параметры актуальных азартных площадок предусматривают SSL-безопасность финансового ранга. Провайдеры компьютерного софта типа Microgaming, NetEnt, Pragmatic Play внедряют многоуровневые модели рандомных значений.
Процедура аутентификации аккаунта предполагает представления удостоверений KYC-типа. ID, справка о финансах, удостоверение местожительства — обычный перечень для полноценного входа.
Зеркальные домены решают трудности с ограничениями провайдеров. Рабочие копии обновляются регулярно цифровыми командами. Мобильные приложения нередко действуют надёжнее сетевых версий.
Распределение капитала определяет перспективную доходность развлекательных сессий. Профессиональные беттеры указывают урезать величину вейджера до 1-2% от совокупного резерва.
Подбор безопасного гемблинг оператора в актуальных обстоятельствах предполагает тщательного анализа к правовому положению. Опытные игроки понимают, что lucky bear казино официальный сайт РІС…РѕРґ включает свежую сведения о функционирующих площадках.
Механизм создания аккаунта в официальных заведениях предусматривает обязательную аутентификацию персональных данных. KYC-нормы гарантируют как оператора, так и клиента от фрода. Краткосрочные границы на получение денег до выполнения верификации – типичная практика.
Технические запреты на доступ к азартным площадкам преодолеваются через резервные адреса. Функционирующие отражения обеспечивают тотальную производительность главного портала. Платежные процедуры, интерактивный статистика и привилегированные схемы поддерживаются постоянными.
Экономическая безопасность выражается качеством эксплуатируемых финансовых инструментов. SSL-защита, PCI DSS сертификация и расширенная аутентификация обеспечивают надежный барьер безопасности.
Развлекательная коллекция официальных заведений предоставляет машины от ведущих разработчиков. RTP-показатели, изменчивость и статистические системы претерпевают внешнюю сертификацию в утвержденных учреждениях.
Программы вознаграждения в надежных площадках базируются на прозрачных требованиях вейджера. Проигрыш x35-40 расценивается приемлемым для спин-поощрений, в то время как классические игры засчитываются в подсчет с редуцированным показателем.
featured emporium – Layout is clean and browsing through products feels effortless.
Mainkan Rtp Slot Hari Ini dengan persentase kemenangan tertinggi! Dapatkan update an Rtp Slot live setiap jam secara real-time. Daftar sekarang dan mainkan game slot gacor raih pelaung menang besar puluhan juta rupiah.
Убеждение – это метод воздействия на сознание, использующий логические аргументы, факты и обоснования для формирования новых установок или изменения текущего поведения человека https://amzn.in/d/07OLqOrw
Как убеждать людей и побеждать в спорах https://amzn.eu/d/04heXQrF
Научитесь управлять даже самыми напряжёнными дискуссиями https://amzn.asia/d/0gu12iX8
Tech Hub Online – Pages load quickly with clear and accessible sections.
Казино Vavada привлекает игроков щедрыми бонусами без депозита и постоянными турнирами с крупным призовым фондом.
Регистрация занимает несколько минут, а рабочие зеркала обеспечивают стабильный доступ к сайту даже при блокировках.
Проверяйте актуальные промокоды и условия отыгрыша, чтобы оптимально использовать стартовые фриспины.
Служба поддержки отвечает на русском языке и помогает решить вопросы с верификацией и выводом средств.
Свежие предложения и актуальное зеркало доступны по ссылке: vavada официальный сайт.
Играйте ответственно и контролируйте банкролл, чтобы азарт приносил удовольствие.
Актуальные игроки оказываются с препятствием входа к легальным платформам. Поставщики фильтруют базовые URL, но грамотные казино СЂР° клиенты понимают о присутствии зеркальных ресурсов.
Альтернативный адрес представляет абсолютную копию первичного сайта. Средства защиты функционируют идентичными. Финансовые действия осуществляются через те же шлюзы.
Схема регистрации через альтернативный ресурс включает привычной аутентификации. Специалисты выясняют удостоверения для реализации KYC-правил. Персональные данные осуществляют расширенную проверку.
Банковские ограничения на зеркальных площадках аналогичны базовым спецификациям. Начальные суммы продолжают стабильными. Возрастающие банки согласовываются между многочисленными ссылками.
Льготные механизмы выполняются завершённо на альтернативных площадках. Коэффициент оборота поддерживает исходные величины. Временные рамки использования сохраняется.
Служба поддержки решает заявки с параллельных ресурсов равнозначно. Живой разговор поддерживает 24-часовой график работы.
Исследование в сфере сертифицированных ресурсов включает понимания передовых способов соединения. Квалифицированные пользователи внедряют Либет казино для извлечения релевантной фактов о функционирующих ссылках.
Процедура создания профиля в проверенных организациях предполагает тщательную валидацию. Продвинутые поставщики эксплуатируют KYC-системы и AML-стандарты. Документооборот требует от 24 до 72 часов.
Технические технологии для избежания запретов совершенствуются сообща с укреплением юридических шагов. VPN-решения класса premium предлагают криптографию AES-256 и протоколы OpenVPN. Постоянство связи критически необходима для высокоролловых партий.
Зеркальные платформы работают через территориально расположенные серверные мощности. CDN-архитектуры гарантируют низкую время ответа для американских игроков. Программное маршрутизация срабатывает при обнаружении блокировки первичного домена.
Банковские транзакции в официальных юрисдикциях отвечают жестким требованиям PCI DSS. Крипто переводы завоевывают распространение благодаря анонимности и быстроте обработки.
Переносные программы лучших брендов совмещают биометрическую авторизацию и push-сообщения для критических происшествий. Гибкий дизайн независимо корректируется под особенности дисплея.
https://doskazaymov.kz/ Кызылорда: Досказаймов – удобный старт, если нужно объединение займов МФО при просрочках и цель навести порядок в платежах.
http://uspharmaindex.com/# US Pharma Index
rsmeds
HazelAisle picks – I’ve had a positive experience navigating the site and finding products easily.
взгляните на сайте здесь kraken onion
authoritylab – Mobile version looks perfect; no glitches, fast scrolling, crisp text.
система управления очередью
Надёжные площадки игровых опций oferuja клиентам вариант к качественному гэмблингу через целевые ресурсы, включая lucky bear казино , которые исполняют глобальные критерии security.
Схема оформления профиля подразумевает указания authentication данных через encrypted SSL-каналы. Операторы просят письменное свидетельство совершеннолетия и места нахождения для поддержания legal стандартов.
Многоуровневая верификация становится required компонентом новейших solutions защиты. Клиенты имеют SMS-токены, push-оповещения или задействуют targeted софт типа Google Authenticator.
Дублирующие адреса решают трудности географических барьеров и DDoS-штурмов. Технически реплики формируют копийные реплики центрального домена с поддержанием функциональности и личных деталей.
Skilled участники предлагают удерживать актуальные каталоги действующих копий в закладках browser. Администрация доставляют обновления о актуальных URL через мейл, Telegram-сообщества и mobile программы.
Финансовые movements через проверенные ресурсы secured защитными methods уровня банковского segment. Extraction капитала осуществляется только на подтверждённые wallets хозяина профиля.
Исследование в мире проверенных ресурсов включает знания новых технологий доступа. Опытные игроки задействуют ДживиСпин казино для приобретения современной данных о активных ссылках.
Процесс формирования личного кабинета в надежных операторах подразумевает тщательную верификацию. Актуальные организации применяют KYC-протоколы и AML-требования. Документальное сопровождение составляет от 24 до 72 периодов.
IT способы для прохождения препятствий прогрессируют синхронно с интенсификацией законодательных решений. VPN-платформы разряда premium предлагают криптографию AES-256 и стандарты OpenVPN. Непрерывность соединения критически необходима для привилегированных раундов.
Зеркальные ресурсы действуют через пространственно распределенные серверные мощности. CDN-структуры гарантируют быструю время ответа для глобальных участников. Цифровое маршрутизация запускается при детекции недоступности центрального ресурса.
Денежные транзакции в проверенных территориях отвечают определенным правилам PCI DSS. Крипто транзакции завоевывают распространение благодаря секретности и темпу осуществления.
Переносные утилиты элитных брендов совмещают голосовую проверку и push-оповещения для критических ситуаций. Настраиваемый облик независимо изменяется под свойства панели.
https://sildenafilpriceguide.com/# Cheapest Sildenafil online
What stood out about this casino https://planeta-gier.pl/ is the variety of the games. Everything runs smoothly, the design is clean, and there’s always something new to explore, which keeps it engaging.
leadvero – Overall, professional vibe here; trustworthy, polished, and pleasantly minimal throughout.
SEO Solutions – Pages are easy to move through, and layout is visually clear.
Проверенные площадки азартных сервисов предоставляют игрокам право к качественному развлечениям через целевые домены, включая типпи , которые исполняют мировые критерии защиты.
Механизм оформления профиля требует заполнения проверочных сведений через криптографические SSL-connection. Провайдеры запрашивают official подтверждение дееспособности и локации residence для выполнения правовых требований.
Двухфакторная аутентификация является mandatory aspect современных механизмов конфиденциальности. Пользователи приобретают SMS-шифры, push-оповещения или эксплуатируют специализированные программы типа Google Authenticator.
Mirror ссылки нейтрализуют вопросы territorial санкций и DDoS-штурмов. Техническим образом реплики образуют копийные реплики основного платформы с обеспечением опций и user данных.
Skilled геймеры советуют сохранять current реестры функционирующих дублей в сохранённых ссылках веб-клиента. Провайдеры доставляют updates о новых доменах через email, Telegram-чаты и телефонные программы.
Платёжные movements через проверенные сайты secured шифровальными алгоритмами категории банковского индустрии. Вывод финансов выполняется единственно на верифицированные данные обладателя учётной записи.
Shop Embroidery Eden – Pages are tidy and content flows naturally.
наклейки на заказ наклейки на заказ .
Актуальные mirror-ссылки лицензированных игорных заведений на тип топ казино официальный сайт создают стабильный соединение к игровым порталам. Схема реплицирования формирует точные версии центрального сайта с поддержанием всех опций.
Алгоритм активации через резервную ссылку целиком дублирует базовую бланк. Новые участники регистрируют рабочий email, создают безопасный код доступа и назначают базовую финансовый инструмент.
Подтверждение личного кабинета предполагает предоставления бумаг согласно KYC-политике. Скан национального документа, валидация проживания и платежные координаты проверяются через алгоритмическую верификацию в течение 24-72 периодов.
Авторизация активных клиентов производится через обычную форму с двухфакторной проверкой. Разовые пароли поступают на телефонный гаджет или мейл.
Возможности финансового раздела через альтернативные домены содержит топовые платежные сервисы. Visa, Mastercard, цифровые хранилища Skrill, Neteller, блокчейн-токены Bitcoin, Ethereum реализуются с низкими процентами 0-3%.
Развлекательная каталог повторяется полностью включая машины, настольные забавы, live-крупье и накопительные призы. RTP-индикаторы, колебания и отыгрыш сохраняются неизменными.
Подарочная схема оперирует аналогично основному сайту. Welcome-предложения, free spins, кешбэк и VIP-программы стартуют системно при исполнении установленных требований.
their shop page – I find the organization clean and uncomplicated to navigate.
Monarch Mosaic Boutique – Clear structure and visually pleasing design throughout.
Подбор легального гемблинг оператора требует глубокого изучения регулятивных сертификатов. Инновационные платформы казино миллионъ предоставляют клиентам максимальную факты о действующих лицензиях.
Алгоритм оформления счета подразумевает ряд необходимых стадий аутентификации. Администраторы настаивают свидетельства, устанавливающие идентичность и совершеннолетие. Обычный KYC-порядок занимает от 24 до 72 периодов.
Контроль средств открывается с фиксации ограничений на инвестиции. Искусные геймеры настаивают использовать закон 5% от итогового развлекательного резерва на конкретную заход.
Цифровые блокировки владельцев принуждают задействовать дополнительные домены. Копии сохраняют абсолютную производительность базового платформы, предусматривая журнал транзакций и азартный результаты.
Инновационные финансовые инструменты гарантируют быстрые взносы через криптовалютные портмоне. Bitcoin, Ethereum и фиксированные активы поддерживают приватность и крошечные взносы. Длительность проведения изъятий насчитывает 10-30 периодов.
Программы приверженности включают каскадные степени с нарастающим бонусом. VIP-координаторы гарантируют личные бонусы, улучшенные границы и приоритетную сервис.
Cheapest Sildenafil online: order viagra – Cheap Sildenafil 100mg
посетить сайт https://slon3-at.com/
Азартная ниша являет стремительный развитие, притягивая тысячи игроков. Профессиональные сайты предоставляют защищённую обстановку для развлечений. Полную информацию о данных операторах допустимо изучить на френдс казино .
Сертификация остаётся главным элементом селекции площадки. Контролёры Гибралтара создают строгий аудит денежных транзакций. Всякая официальная платформа выполняет постоянные ревизии RNG-генераторов.
IT особенности современных казино предусматривают SSL-криптографию банковского стандарта. Поставщики софтового материала уровня Microgaming, NetEnt, Pragmatic Play встраивают продвинутые алгоритмы рандомных чисел.
Алгоритм проверки аккаунта предусматривает передачи справок KYC-класса. Удостоверение, подтверждение о средствах, доказательство местожительства — классический комплект для окончательного подключения.
Резервные ссылки решают сложности с цензурой провайдеров. Функционирующие дубли модифицируются систематически IT группами. Мобильные клиенты регулярно функционируют устойчивее веб модификаций.
Финансовая дисциплина задаёт долгосрочную успешность беттинговых партий. Квалифицированные геймеры советуют ограничивать объём депозита до 1-2% от итогового резерва.
featured festival page – Everything is clearly laid out with straightforward instructions.
ссылка на сайт kraken маркетплейс зеркало
retail website – Organized content with fast-loading pages keeps browsing enjoyable.
Honey & Hustle Boutique – Well-laid-out sections provide a pleasant and intuitive browsing experience.
Надёжные площадки игорных услуг oferuja пользователям право к профессиональному игровому процессу через dedicated платформы, включая lucky bear казино , которые именно придерживаются глобальные требования защиты.
Схема создания аккаунта требует внесения проверочных данных через безопасные SSL-протоколы. Администрация требуют официальное подтверждение дееспособности и адреса регистрации для соблюдения юрисдикционных норм.
Multi-factor аутентификация становится mandatory частью актуальных платформ защиты. Игроки обретают SMS-ключи, push-сообщения или применяют targeted tools в стиле Google Authenticator.
Альтернативные URL устраняют препятствия geographic санкций и DDoS-нападений. Фактически mirrors образуют идентичные клоны главного платформы с поддержанием опций и user параметров.
Экспертные игроки советуют keeping свежие списки активных дублей в bookmark веб-клиента. Management рассылают обновления о актуальных адресах через e-mail, Telegram-группы и mobile софт.
Платёжные транзакции через официальные сайты защищены криптографическими алгоритмами уровня банковского индустрии. Получение капитала производится лишь на аутентифицированные карты собственника профиля.
Развлекательная ниша отображает интенсивный подъём, привлекая тысячи игроков. Экспертные ресурсы дают безопасную среду для ставок. Исчерпывающую информацию о данных организациях доступно обнаружить на лаки Р±РёСЂ .
Аттестация составляет центральным элементом подбора сайта. Юрисдикции Кюрасао гарантируют строгий контроль экономических действий. Конкретная легальная сайт выполняет систематические контроли RNG-систем.
Компьютерные параметры актуальных гемблинг-сайтов объединяют SSL-криптографию денежного уровня. Разработчики софтового ПО типа Microgaming, NetEnt, Pragmatic Play добавляют комплексные алгоритмы случайных параметров.
Процесс верификации профиля предусматривает направления удостоверений KYC-уровня. Свидетельство, подтверждение о средствах, верификация местожительства — обычный пакет для окончательного подключения.
Зеркальные домены убирают проблемы с блокировками операторов. Рабочие копии обновляются каждый день цифровыми командами. Портативные клиенты часто работают лучше интернет редакций.
Управление банкроллом формирует стратегическую результативность развлекательных раундов. Профессиональные пользователи советуют ограничивать сумму вейджера до 1-2% от совокупного фонда.
retail destination – Browsing feels smooth and the layout is easy to follow.
Dive deeper
secure payment methods no deposit casino
for evaluation.
DepotLark storefront – Detailed and accurate descriptions make shopping here straightforward.
Новейшие бетторы натыкаются с барьером подключения к легальным ресурсам. Организации ограничивают первичные URL, но опытные казино лаки Р±РёСЂ участники осознают о доступности параллельных порталов.
Дополнительный домен образует стопроцентную дубликат базового портала. Криптографические алгоритмы сохраняются равнозначными. Финансовые операции выполняются через сходные механизмы.
Методика заведения учётной записи через альтернативный адрес включает классической валидации. Менеджеры запрашивают справки для соблюдения KYC-правил. Индивидуальные сведения подвергаются многоуровневую верификацию.
Пополнительные лимиты на резервных порталах равняются базовым условиям. Низшие вклады сохраняются константными. Прогрессивные банки интегрируются между многочисленными доменами.
Поощрительные планы выполняются завершённо на резервных платформах. Отыгрышный коэффициент поддерживает базовые показатели. Срок активности использования остаётся прежним.
Служба ассистирования рассматривает запросы с параллельных ресурсов сходным образом. Прямой чат поддерживает непрерывный график работы.
Передовые игроки натыкаются с затруднением доступа к легальным сайтам. Операторы ограничивают первичные порталы, но искушённые лаки Р±РёСЂ казино пользователи знают о функционировании резервных платформ.
Параллельный портал составляет полную реплику главного сайта. Системы безопасности остаются аналогичными. Расчётные действия осуществляются через те же каналы.
Процедура заведения учётной записи через резервный ссылку включает классической проверки. Специалисты выясняют справки для выполнения KYC-правил. Паспортные данные выполняют комплексную проверку.
Финансовые рамки на альтернативных ресурсах совпадают стандартным условиям. Минимальные ставки остаются константными. Возрастающие банки интегрируются между различными ресурсами.
Льготные механизмы выполняются полноценно на дополнительных ресурсах. Множитель ставок обеспечивает базовые величины. Период действия оборота сохраняется.
Команда сопровождения решает запросы с резервных доменов таким же способом. Интерактивный диалог осуществляет постоянный формат функционирования.
взгляните на сайте здесь https://slon3-at.com/
canadian pharmacy no prescription: canadian neighbor pharmacy – canadian pharmacy viagra 100mg
melbet бонус киргизия melbet54187.help
Sublime Summit Online Hub – Well-structured layout and professional presentation throughout.
Развлекательная область демонстрирует динамичный расширение, завлекая миллионы пользователей. Экспертные порталы предоставляют защищённую обстановку для пари. Развёрнутую данные о подобных операторах можно отыскать на лаки Р±РёСЂ казино .
Сертификация составляет основным критерием отбора сайта. Лицензиаты Великобритании дают строгий надзор валютных транзакций. Конкретная сертифицированная платформа реализует постоянные проверки RNG-механизмов.
IT аспекты инновационных беттинг-платформ включают SSL-кодирование банковского категории. Поставщики софтового продукта типа Microgaming, NetEnt, Pragmatic Play добавляют комплексные модели произвольных чисел.
Процесс верификации профиля подразумевает направления бумаг KYC-стандарта. Свидетельство, справка о средствах, подтверждение прописки — базовый пакет для завершённого авторизации.
Альтернативные адреса устраняют проблемы с цензурой организаций. Актуальные варианты адаптируются регулярно компьютерными группами. Мобильные программы нередко работают лучше сетевых вариантов.
Контроль средств задаёт перспективную доходность азартных партий. Экспертные геймеры рекомендуют контролировать размер ставки до 1-2% от итогового капитала.
Беттинговая сфера демонстрирует динамичный расширение, притягивая миллионы пользователей. Экспертные порталы дают качественную среду для игры. Исчерпывающую данные о подобных провайдерах можно получить на Голд казино .
Легализация является главным элементом подбора портала. Регуляторы Кюрасао дают серьёзный проверку валютных процедур. Конкретная аккредитованная площадка осуществляет периодические ревизии RNG-систем.
Компьютерные особенности передовых казино включают SSL-кодирование финансового ранга. Разработчики компьютерного материала уровня Microgaming, NetEnt, Pragmatic Play интегрируют многоуровневые системы непредсказуемых значений.
Алгоритм верификации профиля предполагает передачи бумаг KYC-стандарта. Паспорт, свидетельство о прибылях, верификация проживания — обычный набор для итогового доступа.
Дублирующие порталы исправляют барьеры с ограничениями провайдеров. Рабочие зеркала изменяются ежедневно компьютерными группами. Планшетные приложения обычно действуют устойчивее интернет редакций.
Банкролл-менеджмент задаёт длительную результативность игровых раундов. Профессиональные беттеры советуют сокращать величину пари до 1-2% от суммарного капитала.
Finance Fjord Online – Well-laid-out pages and fast, intuitive navigation throughout.
http://ivermectinaccessusa.com/# ivermectin 12 mg
Казино Vavada привлекает игроков щедрыми бонусами без депозита и постоянными турнирами с крупным призовым фондом.
Регистрация занимает несколько минут, а рабочие зеркала обеспечивают стабильный доступ к сайту даже при блокировках.
Проверяйте актуальные промокоды и условия отыгрыша, чтобы оптимально использовать стартовые фриспины.
Служба поддержки отвечает на русском языке и помогает решить вопросы с верификацией и выводом средств.
Свежие предложения и актуальное зеркало доступны по ссылке: https://vluki.net/vavada.
Играйте ответственно и контролируйте банкролл, чтобы азарт приносил удовольствие.
this web store – I like the contemporary interface and the clean layout of the pages.
Беттинговая область отображает активный развитие, заинтересовывая тысячи игроков. Профессиональные сайты дают защищённую пространство для беттинга. Полную информацию о подобных организациях реально найти на proapples.ru .
Легализация составляет центральным аспектом селекции площадки. Регуляторы Мальты гарантируют качественный мониторинг расчётных действий. Любая аккредитованная портал выполняет регулярные проверки RNG-алгоритмов.
Цифровые характеристики актуальных гемблинг-сайтов предусматривают SSL-защиту банковского ранга. Производители виртуального ПО вроде Microgaming, NetEnt, Pragmatic Play добавляют продвинутые схемы случайных показателей.
Механизм валидации аккаунта требует направления свидетельств KYC-класса. Удостоверение, документ о финансах, валидация проживания — типичный список для финального авторизации.
Дублирующие URL устраняют сложности с фильтрацией поставщиков. Функционирующие зеркала адаптируются систематически техническими специалистами. Карманные клиенты регулярно оперируют качественнее браузерных версий.
Управление банкроллом создаёт длительную успешность развлекательных циклов. Грамотные пользователи рекомендуют контролировать размер бета до 1-2% от полного банкролла.
Передовые игроки пересекаются с множеством цифровых нюансов при функционировании с официальными площадками. Экспертные платформы типа винити казино выдают актуальную информацию о функционировании игорных брендов.
Механизм верификации учетной записи предполагает комплекс необходимых этапов. Стартовая валидация предполагает отправки справок доказывающих персону. Типовой пакет подразумевает свидетельство, права или загранпаспорт.
Технологическая сторона регистрации содержит задействование SSL-шифрования и двойной авторизации. Профессиональные игроки подсказывают инициировать совокупность возможных параметров защиты.
Дублирующие порталы формируют точные клоны главного сайта с сохранением всего арсенала. Основное достоинство выражается в идентичности финансовых границ и параметров отыгрыша.
Алгоритм локализации функционирующих запасных доменов опирается на мониторинге профильных уведомительных сервисов и сотрудничающих площадок. Профессиональные геймеры применяют VPN-сервисы для создания постоянного соединения вне зависимости от местных барьеров.
Online thrift store – Well-structured pages and intuitive design make browsing enjoyable.
http://sildenafilpriceguide.com/# Viagra tablet online
Explore Whisk Warehouse – Fast-loading content and clear sections make reading enjoyable.
check this site – It has a natural vibe and everything looks thoughtfully arranged.
Перемещение в сфере легальных платформ требует владения передовых способов доступа. Опытные пользователи внедряют винити официальный сайт для добывания новейшей материалов о работающих адресах.
Алгоритм создания счета в сертифицированных операторах включает комплексную проверку. Новейшие поставщики задействуют KYC-механизмы и AML-правила. Документальное сопровождение составляет от 24 до 72 часов.
Программные способы для преодоления запретов совершенствуются синхронно с интенсификацией регуляторных инициатив. VPN-платформы категории premium предоставляют шифрование AES-256 и методы OpenVPN. Надежность канала кардинально необходима для привилегированных партий.
Резервные ресурсы оперируют через пространственно размещенные технические кластеры. CDN-комплексы поддерживают низкую задержку для глобальных клиентов. Цифровое маршрутизация срабатывает при распознавании препятствия главного ресурса.
Финансовые движения в легальных юрисдикциях подпадают под конкретным нормам PCI DSS. Цифровые расчеты завоевывают распространение из-за анонимности и оперативности осуществления.
Планшетные клиенты лучших провайдеров интегрируют голосовую подтверждение и push-извещения для принципиальных ситуаций. Гибкий дизайн программно адаптируется под настройки дисплея.
Поиск безопасного игрового портала в современных реалиях требует специального рассмотрения к правовому состоянию. Квалифицированные геймеры знают, что Килограмм казино включает актуальную факты о активных площадках.
Механизм открытия счета в сертифицированных площадках объединяет необходимую аутентификацию удостоверения. KYC-правила защищают как площадку, так и игрока от мошенничества. Переходные ограничения на получение финансов до закрытия валидации – обычная практика.
Программные препятствия на соединение к развлекательным ресурсам преодолеваются через дублирующие ссылки. Действующие зеркала сохраняют тотальную возможности главного сервиса. Банковские движения, геймплейный продвижение и бонусные планы продолжают стабильными.
Капитальная безопасность измеряется критерием используемых расчетных способов. SSL-защита, PCI DSS аттестация и многоуровневая проверка гарантируют стабильный барьер защиты.
Игровая набор официальных заведений включает автоматы от ведущих провайдеров. RTP-параметры, изменчивость и статистические модели получают нейтральную аудит в аккредитованных институтах.
Программы стимулирования в качественных площадках формируются на понятных критериях активности. Отыгрыш x35-40 считается приемлемым для спин-подарков, в то время как стандартные активности учитываются в подсчет с редуцированным множителем.
check this website – Easy to navigate with well-organized sections.
Very nice post. I absolutely appreciate this website.
Keep writing!
Cheap generic Viagra: Sildenafil Price Guide – sildenafil online
melbet киберспорт http://melbet76815.help/
Поиск в сфере проверенных ресурсов требует знания новых инструментов авторизации. Продвинутые клиенты задействуют Голд казино для получения релевантной информации о активных доменах.
Процесс формирования аккаунта в надежных компаниях включает многоуровневую верификацию. Современные поставщики эксплуатируют KYC-механизмы и AML-нормы. Оформление документов занимает от 24 до 72 часов.
IT способы для избежания запретов эволюционируют параллельно с ужесточением законодательных действий. VPN-инструменты уровня premium гарантируют кодирование AES-256 и системы OpenVPN. Постоянство подключения критически необходима для элитных игровых периодов.
Альтернативные платформы оперируют через пространственно размещенные цифровые мощности. CDN-системы предоставляют оптимальную пинг для международных участников. Автоматическое редирект срабатывает при распознавании недоступности основного ресурса.
Экономические транзакции в официальных зонах соответствуют строгим критериям PCI DSS. Децентрализованные расчеты приобретают актуальность в результате секретности и быстроте процессинга.
Переносные утилиты ведущих компаний объединяют голосовую авторизацию и push-извещения для принципиальных происшествий. Адаптивный облик самостоятельно настраивается под настройки экрана.
найти это kraken onion зеркала
Развлекательная область являет интенсивный подъём, заинтересовывая массы игроков. Опытные площадки предоставляют качественную условия для беттинга. Развёрнутую сведения о этих организациях допустимо обнаружить на казино Голд .
Легализация составляет ключевым элементом селекции сайта. Юрисдикции Кюрасао дают качественный контроль финансовых операций. Каждая легальная сайт проходит плановые ревизии RNG-алгоритмов.
Цифровые особенности новейших гемблинг-сайтов включают SSL-шифрование расчётного категории. Провайдеры программного обеспечения класса Microgaming, NetEnt, Pragmatic Play интегрируют усовершенствованные модели произвольных показателей.
Механизм верификации личного кабинета предусматривает направления удостоверений KYC-типа. Документ, выписка о прибылях, удостоверение проживания — стандартный перечень для полноценного доступа.
Дублирующие ссылки убирают барьеры с запретами провайдеров. Функционирующие варианты корректируются постоянно цифровыми службами. Планшетные программы зачастую функционируют лучше интернет редакций.
Финансовая дисциплина задаёт перспективную успешность беттинговых партий. Опытные участники настаивают сокращать сумму пари до 1-2% от суммарного бюджета.
What impressed me about this casino https://klubfilmowy.pl/ is the quality of the games. Everything runs without issues, the design is clean, and there’s plenty of options to explore, which keeps it engaging.
SWeAR2033
Item Whisper – A smart and intuitive platform helping you discover hidden gems with ease.
Новейшие порталы гемблинг продуктов предлагают участникам доступ к профессиональному азарту через защищенные Gold зеркало порталы. Лицензированная работа требует следования строгих контролирующих критериев.
Механизм создания пользовательского кабинета включает подтверждение персональных информации. Операторы внедряют комплексные механизмы KYC и AML для предотвращения нарушающих переводов.
Программные инструменты современных развлекательных порталов строятся на защищенных инфраструктурах с HTTPS технологиями. Геоблокировка заставляет управляющих запускать альтернативные адреса.
Резервные домены формируют точные версии базового портала с поддержанием всех опций и данных. Пользователи приобретают беспрепятственный связь к счету, гемблинг данным и персональным конфигурациям.
Финансовые процедуры производятся через подключенные финансовые агрегаторы. Ограничения на пополнения и выводы регулируются в согласии с регуляторными условиями и корпоративными регламентами контроля угроз.
Опытные пользователи настаивают анализировать ситуацию разрешения через государственные регистры беттинг организаций. Имиджевые показатели задействуют места на специализированных сайтах и feedback действительных клиентов.
система электронной очереди
Поиск легального игорного заведения предполагает тщательного изучения официальных свидетельств. Инновационные платформы лаки Р±РёСЂ казино гарантируют игрокам абсолютную информацию о собственных допусках.
Система создания профиля предусматривает множество обязательных ступеней подтверждения. Операторы требуют справки, устанавливающие персону и возраст. Типовой KYC-регламент продолжается от 24 до 72 часов.
Банкролл-менеджмент открывается с определения лимитов на взносы. Квалифицированные участники настаивают эксплуатировать правило 5% от совокупного игорного фонда на отдельную партию.
Технические барьеры владельцев обязывают эксплуатировать запасные адреса. Альтернативы хранят стопроцентную активность главного платформы, охватывая архив переводов и игровой результаты.
Современные расчетные системы поддерживают мгновенные вклады через цифровые хранилища. Bitcoin, Ethereum и устойчивые монеты гарантируют конфиденциальность и минимальные сборы. Срок выполнения получений составляет 10-30 минут.
Алгоритмы лояльности подразумевают ступенчатые уровни с прогрессивным компенсацией. VIP-консультанты дают эксклюзивные поощрения, расширенные пределы и первоочередную обслуживание.
Explore Lotus Loft – Fast-loading pages and organized layout provide a pleasant browsing experience.
More info
how to get a loan with bad credit now
for the main points.
Explore detailed insights on large tuscan wall clocks at TOPCLOCKS, including features, comparisons, and expert recommendations for smarter buying decisions.
rsmeds htts://rsmeds.top/# buy dapoxetine pills
Financial tools store – Logical design and easy-to-access content for users.
Действующие дублирующие порталы надежных азартных клубов на винити казино гарантируют непрерывный доступ к игровым ресурсам. Технология копирования образует эквивалентные клоны корневого домена с фиксацией всех функций.
Процедура активации через зеркало в точности копирует основную бланк. Только пришедшие клиенты указывают функционирующий email, придумывают сложный секретную комбинацию и выбирают игровую платежное средство.
Аутентификация аккаунта содержит представления справок в соответствии с KYC-регламенту. Снимок удостоверения личности, верификация адреса и банковские сведения подвергаются алгоритмическую верификацию в течение 24-72 временных единиц.
Подключение верифицированных участников происходит через классическую форму с расширенной проверкой. Краткосрочные токены передаются на смс номер или мейл.
Опции входящего компонента через дублирующие порталы предлагает востребованные платежные системы. Visa, Mastercard, электронные кошельки Skrill, Neteller, виртуальные монеты Bitcoin, Ethereum процессируются с минимальными платежами 0-3%.
Игровая ассортимент клонируется абсолютно включая автоматы, классические активности, live-дилеров и прогрессивы. RTP-показатели, колебания и проигрыш сохраняются такими же.
Поощрительная политика работает идентично базовому сайту. Welcome-предложения, фриспины, кешбэк и VIP-схемы стартуют автоматически при выполнении определенных требований.
雨霖铃2026 杨洋章若楠古装仙侠虐恋 海外华人高清无广告追剧 全球加速高热度
Актуальные зеркала проверенных азартных клубов на типпи официальный сайт предоставляют постоянный подключение к игровым порталам. Схема зеркалирования генерирует аналогичные реплики главного веб-площадки с фиксацией всех функций.
Алгоритм активации через зеркало целиком копирует основную шаблон. Только пришедшие участники регистрируют активный email, устанавливают безопасный секретную комбинацию и определяют игровую валюту.
Идентификация аккаунта подразумевает отправки удостоверений опираясь на KYC-политике. Снимок водительских прав, верификация проживания и банковские данные анализируются посредством автоматическую валидацию в течение 24-72 часов.
Вход существующих геймеров реализуется через базовую панель с многоступенчатой аутентификацией. Временные шифры поступают на смс девайс или email.
Механизмы депозитного сектора через альтернативные домены поддерживает востребованные финансовые системы. Visa, Mastercard, цифровые портмоне Skrill, Neteller, виртуальные монеты Bitcoin, Ethereum выполняются с минимальными процентами 0-3%.
Игровая библиотека воспроизводится абсолютно включая слоты, классические активности, live-хостов и мегавыигрыши. RTP-коэффициенты, изменчивость и проигрыш сохраняются такими же.
Поощрительная система выполняется похоже основному веб-площадке. Welcome-предложения, free spins, refund и VIP-схемы активируются программно при выполнении установленных стандартов.
Helpful and well written. This answered my question. banana pro
streamsprout.shop – Browsing feels smooth and the pages load quickly.
their shop page – Moving between sections works efficiently and without delays.
Macro Merchant Portal – Clear layout and well-arranged sections make everything easy to find.
знакомства онлайн Знакомства — это волшебный мир, где случайные встречи перерастают в глубокие связи, полные эмоций и открытий. В эпоху цифровых технологий сайт знакомств становится идеальным порталом для поиска родственной души, предлагая удобные инструменты для общения без границ времени и пространства.
Visit Salt & Satin – Interface is tidy and all content is easy to access.
Лицензионные провайдеры развлекательных возможностей дают участникам возможность к премиальному игровому процессу через профильные сайты, включая aqua , что выполняют глобальные регламенты security.
Механизм регистрации предполагает внесения authentication деталей через защищённые SSL-каналы. Провайдеры запрашивают official удостоверение возраста и адреса жительства для соблюдения нормативных норм.
2FA проверка представляет required aspect современных solutions защиты. Users обретают SMS-пароли, push-оповещения или используют targeted софт по типу Google Authenticator.
Зеркальные домены решают проблемы региональных барьеров и DDoS-атак. С технической точки зрения реплики являют тождественные копии центрального платформы с сохранением возможностей и индивидуальных параметров.
Компетентные участники suggest хранить актуальные каталоги действующих mirrors в избранном обозревателя. Операторы направляют новости о современных доменах через электронную почту, Telegram-группы и mobile apps.
Платёжные операции через официальные ресурсы покрыты cryptographic алгоритмами класса банковского сектора. Extraction фондов реализуется исключительно на проверенные счета держателя аккаунта.
Навигация в секторе легальных порталов нуждается осознания новых технологий подключения. Умелые клиенты используют СЌРЅРѕРјРѕ казино для извлечения современной сведений о действующих URL.
Алгоритм регистрации профиля в надежных организациях содержит детальную валидацию. Новейшие организации задействуют KYC-алгоритмы и AML-требования. Документальная процедура требует от 24 до 72 промежутков.
Компьютерные методы для избежания барьеров совершенствуются сообща с повышением юридических решений. VPN-инструменты класса premium дают шифрование AES-256 и протоколы OpenVPN. Устойчивость соединения кардинально актуальна для элитных партий.
Запасные платформы функционируют через пространственно размещенные компьютерные мощности. CDN-сети гарантируют сокращенную время ответа для азиатских участников. Цифровое роутинг активируется при детекции недоступности первичного сайта.
Банковские транзакции в легальных юрисдикциях подчиняются четким критериям PCI DSS. Децентрализованные транзакции завоевывают признание вследствие скрытности и динамике обработки.
Портативные утилиты лучших компаний интегрируют биометрическую проверку и push-оповещения для важных моментов. Гибкий облик автономно корректируется под настройки дисплея.
зайти на сайт сайт kraken darknet
найти это kraken сайт
https://sildenafilpriceguide.com/# sildenafil over the counter
web platform – Seamless performance makes exploring easy.
каталог kraken darknet market
browse here – The layout makes it simple to find items and content.
featured platform – Smooth browsing experience and simple layout overall.
Гемблинговая область демонстрирует стремительный прогресс, заинтересовывая тысячи участников. Экспертные ресурсы предоставляют безопасную обстановку для развлечений. Подробную данные о данных провайдерах реально обнаружить на Килограмм казино .
Легализация выступает главным элементом селекции площадки. Юрисдикции Кюрасао предоставляют жёсткий надзор расчётных действий. Отдельная сертифицированная площадка осуществляет регулярные ревизии RNG-модулей.
Программные особенности современных гемблинг-сайтов охватывают SSL-защиту экономического стандарта. Создатели программного ПО вроде Microgaming, NetEnt, Pragmatic Play подключают усовершенствованные механизмы хаотичных величин.
Схема валидации аккаунта включает направления бумаг KYC-стандарта. Свидетельство, справка о доходах, валидация адреса — стандартный перечень для полноценного подключения.
Резервные домены исправляют проблемы с запретами организаций. Рабочие варианты корректируются каждый день компьютерными отделами. Портативные приложения обычно работают устойчивее интернет форматов.
Управление банкроллом устанавливает перспективную доходность беттинговых раундов. Грамотные пользователи настаивают ограничивать сумму бета до 1-2% от полного бюджета.
Легальные операторы игровых возможностей обеспечивают участникам возможность к профессиональному азартному досугу через профильные ресурсы, включая казино типпи , которые специально придерживаются мировые критерии security.
Механизм открытия счёта требует внесения проверочных параметров через encrypted SSL-протоколы. Администрация просят документальное verification age verification и локации проживания для поддержания legal норм.
Multi-factor верификация считается принудительным компонентом современных систем надёжности. Users обретают SMS-коды, push-notification или задействуют специальные tools вроде Google Authenticator.
Резервные URL ликвидируют вопросы geographic ограничений и DDoS-assault. По сути реплики образуют копийные реплики центрального сайта с удержанием features и клиентских параметров.
Профессиональные клиенты рекомендуют keeping свежие базы действующих дублей в закладках браузера. Операторы отправляют обновления о актуальных адресах через почтовые сервисы, Telegram-группы и mobile программы.
Финансовые movements через legal порталы защищены encryption протоколами level банковского segment. Изъятие финансов производится исключительно на подтверждённые данные обладателя личного кабинета.
无敌第二季2026 海外华人动画超级英雄 高清暴力美学 海外华人首选
веб-сайт kraken ссылка зеркало
Ivermectin Access USA Ivermectin Access USA Ivermectin Access USA
Zarniq online – My package arrived quickly, and everything was safely wrapped.
Поиск проверенного гемблинг портала в сегодняшних обстоятельствах требует повышенного анализа к правовому уровню. Знающие игроки осознают, что ретро регистрация содержит актуальную материалы о действующих провайдерах.
Процедура оформления профиля в официальных заведениях предусматривает обязательную аутентификацию идентичности. KYC-правила гарантируют как заведение, так и участника от обмана. Переходные лимиты на изъятие капитала до выполнения валидации – нормальная система.
Электронные блокировки на соединение к гемблинг порталам устраняются через резервные порталы. Действующие дубликаты обеспечивают абсолютную эффективность центрального платформы. Банковские транзакции, геймплейный достижения и льготные программы продолжают стабильными.
Материальная надежность измеряется критерием эксплуатируемых платежных систем. SSL-шифрование, PCI DSS валидация и дополнительная аутентификация обеспечивают безопасный щит ограждения.
Развлекательная каталог проверенных провайдеров предоставляет автоматы от лидирующих провайдеров. RTP-показатели, волатильность и алгоритмические формулы проходят независимую аудит в авторизованных учреждениях.
Механизмы лояльности в серьезных заведениях основываются на четких параметрах активности. Проигрыш x35-40 оценивается разумным для автомат-поощрений, в то время как традиционные развлечения включаются в счет с редуцированным процентом.
Перемещение в секторе проверенных платформ подразумевает знания актуальных методов авторизации. Квалифицированные пользователи внедряют типпи РІС…РѕРґ для получения новейшей информации о работающих URL.
Схема открытия аккаунта в официальных компаниях предполагает комплексную аутентификацию. Передовые поставщики используют KYC-протоколы и AML-нормы. Документальное сопровождение отнимает от 24 до 72 периодов.
IT решения для прохождения блокировок улучшаются сообща с укреплением нормативных шагов. VPN-платформы разряда premium предлагают безопасность AES-256 и протоколы OpenVPN. Стабильность подключения принципиально важна для VIP игровых периодов.
Резервные ресурсы оперируют через регионально распределенные технические мощности. CDN-системы осуществляют быструю пинг для азиатских пользователей. Техническое маршрутизация включается при идентификации препятствия основного домена.
Платежные манипуляции в официальных юрисдикциях следуют жестким правилам PCI DSS. Децентрализованные операции получают популярность в результате скрытности и быстроте выполнения.
Переносные программы премиальных компаний объединяют лицевую авторизацию и push-сообщения для ключевых эпизодов. Настраиваемый облик самостоятельно изменяется под свойства монитора.
информационные киоски
http://uspharmaindex.com/# US Pharma Index
содержание kra ссылка
sildenafil over the counter: Cheap generic Viagra – Cheapest Sildenafil online
Silk Finds – Smooth browsing with a polished design and organized content.
Официальные операторы азартных опций гарантируют пользователям шанс к премиальному азартному досугу через профильные сайты, включая казино Клубника , что соблюдают общепринятые требования конфиденциальности.
Механизм создания аккаунта предполагает заполнения верификационных параметров через защищённые SSL-каналы. Администрация просят предоставить документальное подтверждение age verification и локации residence для compliance legal критериев.
Двухфакторная authentication становится required элементом передовых систем надёжности. Участники обретают SMS-пароли, push-сообщения или задействуют специализированные софт по типу Google Authenticator.
Зеркальные ссылки нейтрализуют проблемы geographic запретов и DDoS-assault. Фактически реплики формируют идентичные копии базового портала с поддержанием возможностей и индивидуальных данных.
Опытные пользователи рекомендуют keeping свежие каталоги действующих копий в favourites browser. Букмекеры доставляют новости о свежих URL через электронную почту, Telegram-каналы и мобильные софт.
Банковские операции через проверенные площадки secured защитными methods класса банковского segment. Получение денег осуществляется лишь на проверенные счета собственника аккаунта.
Shop Meadow – A peaceful shopping hub featuring handpicked items with natural appeal.
Актуальные резервные адреса официальных игорных заведений на Вован официальный сайт дают устойчивый подключение к игровым сервисам. Технология дублирования строит полноценные копии главного домена с удержанием всех функций.
Механизм регистрации через резервную ссылку абсолютно дублирует стандартную анкету. Начинающие клиенты регистрируют валидный email, придумывают надежный пароль и назначают игровую денежную единицу.
Подтверждение счета подразумевает загрузки удостоверений согласно KYC-регламенту. Копия национального документа, подтверждение адреса и финансовые данные анализируются посредством алгоритмическую контроль в течение 24-72 ч.
Авторизация действующих участников производится через обычную панель с многоступенчатой верификацией. Краткосрочные токены приходят на телефонный аппарат или почтовый ящик.
Механизмы депозитного компонента через альтернативные домены включает востребованные финансовые сервисы. Visa, Mastercard, электронные хранилища Skrill, Neteller, цифровые активы Bitcoin, Ethereum выполняются с низкими сборами 0-3%.
Гемблинг коллекция копируется в точности включая машины, традиционные развлечения, live-крупье и мегавыигрыши. RTP-коэффициенты, дисперсия и вейджер удерживаются аналогичными.
Бонусная механизм выполняется аналогично основному порталу. Welcome-бандлы, фриспины, возврат средств и VIP-планы включаются программно при достижении определенных требований.
US Pharma Index: pharmacy online 365 discount code – online pharmacy no presc uk
Revenue Ridge Resources – Smooth navigation and professional presentation throughout.
Три турнира ufc в феврале марте 2026 три недели которые встряхнут дивизионы могут перевернуть все планы промоушена. Почитать статью: https://turbaza-ladya.ru/news/ufc-fevral-mart-2026-tri-turnira-kotorye-mogut-perevernut-plany-promoushena-s-nog-na-golovu/
Click for Ginger Glory – Clean, fresh interface and content flows naturally.
Активные альтернативные домены проверенных игорных заведений на мад казино обеспечивают стабильный соединение к геймерским ресурсам. Схема зеркалирования формирует точные реплики базового сайта с консервацией всех опций.
Система активации через зеркало на сто процентов копирует главную бланк. Начинающие клиенты заполняют действующий email, формируют защищенный пароль и устанавливают рабочую финансовый инструмент.
Валидация учетной записи включает отправки справок по KYC-регламенту. Снимок удостоверения личности, свидетельство места жительства и банковские параметры контролируются системой алгоритмическую валидацию в течение 24-72 ч.
Аутентификация активных пользователей реализуется через базовую модуль с усиленной валидацией. Сессионные пароли поступают на телефонный номер или почтовый ящик.
Механизмы пополнительного раздела через дублирующие порталы содержит популярные банковские инструменты. Visa, Mastercard, электронные хранилища Skrill, Neteller, виртуальные монеты Bitcoin, Ethereum реализуются с минимальными взносами 0-3%.
Азартная каталог копируется полностью включая слоты, традиционные игры, live-ведущих и накопительные призы. RTP-коэффициенты, вариативность и проигрыш фиксируются такими же.
Промо политика выполняется аналогично базовому веб-площадке. Welcome-предложения, бесплатные вращения, возврат средств и VIP-планы включаются системно при выполнении прописанных стандартов.
Mason Hub – Pages are structured logically, making navigation intuitive.
Ориентирование в области лицензированных площадок подразумевает представления новых решений соединения. Квалифицированные пользователи эксплуатируют винити официальный сайт для приобретения свежей информации о работающих URL.
Схема формирования счета в проверенных операторах охватывает детальную проверку. Современные компании внедряют KYC-протоколы и AML-критерии. Документальное сопровождение занимает от 24 до 72 промежутков.
Компьютерные технологии для избежания препятствий эволюционируют сообща с укреплением юридических мер. VPN-службы разряда premium предлагают кодирование AES-256 и стандарты OpenVPN. Устойчивость связи критически необходима для привилегированных партий.
Запасные платформы работают через пространственно рассредоточенные цифровые инфраструктуры. CDN-сети поддерживают оптимальную латентность для американских пользователей. Автоматическое переключение включается при детекции блокировки главного портала.
Платежные транзакции в сертифицированных областях следуют четким критериям PCI DSS. Блокчейн переводы завоевывают признание по причине приватности и оперативности реализации.
Мобильные клиенты лучших провайдеров совмещают физиологическую аутентификацию и push-сообщения для критических ситуаций. Модифицируемый дизайн программно настраивается под параметры монитора.
Logo design portal – Well-laid-out pages with clear and simple navigation.
Take a look
tegretol cost
for professional growth.
click to explore – Moving around is straightforward and the experience feels good.
посмотреть в этом разделе kraken онион
Игровая сфера являет интенсивный прогресс, заинтересовывая массы игроков. Профессиональные ресурсы предоставляют стабильную условия для игры. Исчерпывающую факты о данных операторах можно изучить на френс казино .
Лицензирование остаётся основным показателем подбора сайта. Регуляторы Великобритании создают серьёзный аудит финансовых операций. Конкретная легальная сайт проходит плановые ревизии RNG-механизмов.
Компьютерные параметры передовых казино содержат SSL-безопасность экономического класса. Поставщики программного обеспечения уровня Microgaming, NetEnt, Pragmatic Play встраивают усовершенствованные системы хаотичных величин.
Механизм подтверждения личного кабинета подразумевает направления свидетельств KYC-типа. Паспорт, справка о прибылях, удостоверение регистрации — обычный комплект для окончательного авторизации.
Дублирующие домены решают проблемы с блокировками организаций. Функционирующие копии адаптируются постоянно цифровыми отделами. Смартфонные софт нередко функционируют надёжнее сетевых вариантов.
Банкролл-менеджмент формирует долгосрочную результативность гемблинговых циклов. Профессиональные пользователи указывают лимитировать величину пари до 1-2% от общего резерва.
каталог https://slon3-at.com/
Исследование в мире проверенных площадок подразумевает знания новых способов доступа. Профессиональные геймеры используют Голд казино для добывания свежей сведений о оперативных доменах.
Процесс оформления учетной записи в надежных организациях подразумевает тщательную проверку. Современные организации используют KYC-системы и AML-правила. Оформление документов составляет от 24 до 72 часов.
Компьютерные способы для избежания барьеров эволюционируют сообща с усилением нормативных решений. VPN-службы разряда premium предлагают безопасность AES-256 и системы OpenVPN. Устойчивость связи критически необходима для привилегированных заходов.
Альтернативные сайты выполняют задачи через географически размещенные технические мощности. CDN-структуры предоставляют оптимальную отклик для международных участников. Системное перенаправление инициируется при детекции недоступности центрального сайта.
Банковские транзакции в лицензированных юрисдикциях подчиняются четким стандартам PCI DSS. Криптовалютные платежи набирают актуальность благодаря приватности и скорости процессинга.
Смартфонные клиенты премиальных компаний интегрируют лицевую аутентификацию и push-извещения для важных ситуаций. Настраиваемый оформление самостоятельно настраивается под параметры матрицы.
featured platform – Content is arranged logically, making it easy to browse.
education platform – Navigation is simple, and all materials are easy to find.
Развлекательная отрасль отображает быстрый расширение, заинтересовывая массы клиентов. Профессиональные сайты предоставляют безопасную среду для пари. Подробную данные о таких компаниях реально найти на аква казино .
Аттестация является основным показателем выбора сайта. Контролёры Гибралтара обеспечивают строгий мониторинг расчётных действий. Конкретная сертифицированная сайт подвергается регулярные аудиты RNG-механизмов.
Технические особенности актуальных азартных площадок объединяют SSL-шифрование экономического класса. Производители виртуального софта наподобие Microgaming, NetEnt, Pragmatic Play добавляют многоуровневые модели случайных значений.
Алгоритм подтверждения счёта требует подачи свидетельств KYC-класса. Документ, выписка о заработке, верификация регистрации — типичный перечень для итогового подключения.
Резервные порталы убирают трудности с цензурой организаций. Актуальные дубли корректируются регулярно программными специалистами. Карманные утилиты зачастую действуют устойчивее веб вариантов.
Контроль средств устанавливает перспективную результативность беттинговых партий. Профессиональные геймеры предлагают контролировать количество пари до 1-2% от суммарного фонда.
Подбор честного азартного площадки требует глубокого разбора официальных разрешений. Инновационные платформы казино типпи предоставляют клиентам максимальную информацию о своих аккредитациях.
Система получения доступа охватывает различные необходимых шагов аутентификации. Провайдеры запрашивают бумаги, доказывающие личность и возраст. Классический KYC-алгоритм составляет от 24 до 72 часов.
Финансовое планирование начинается с назначения границ на инвестиции. Искусные участники советуют применять закон 5% от совокупного казино фонда на единичную игру.
Системные барьеры владельцев обязывают использовать резервные ссылки. Дубликаты сохраняют максимальную эффективность центрального портала, подразумевая летопись операций и гемблинг достижения.
Актуальные финансовые способы поддерживают оперативные инвестиции через цифровые кошельки. Bitcoin, Ethereum и устойчивые монеты гарантируют конфиденциальность и мизерные отчисления. Время выполнения выводов достигает 10-30 промежутков.
Схемы верности включают иерархические ранги с прогрессивным компенсацией. VIP-координаторы предоставляют уникальные подарки, усиленные пределы и первоочередную помощь.
Relvaa online store – Quick checkout and flexible payment choices made buying simple and stress-free.
I recently checked out this casino https://topkamper.pl/ and was surprised by how smooth everything felt. The games run fast, bonuses are transparent, and navigation is user-friendly, making the experience comfortable.
https://sildenafilpriceguide.com/# Sildenafil Citrate Tablets 100mg
Поиск безопасного игорного площадки подразумевает детального разбора официальных документов. Передовые платформы Клубника казино дают участникам полную данные о имеющихся аккредитациях.
Процедура открытия аккаунта подразумевает ряд обязательных фаз валидации. Операторы просят документы, устанавливающие самобытность и правоспособность. Классический KYC-порядок составляет от 24 до 72 интервалов.
Управление банком начинается с фиксации лимитов на пополнения. Квалифицированные участники предлагают внедрять норму 5% от общего азартного резерва на одну сессию.
Цифровые барьеры поставщиков заставляют использовать вспомогательные адреса. Копии хранят безусловную работоспособность основного ресурса, предусматривая летопись переводов и казино прогресс.
Актуальные денежные системы обеспечивают мгновенные взносы через электронные кошельки. Bitcoin, Ethereum и постоянные токены поддерживают анонимность и мизерные взносы. Длительность проведения снятий доходит 10-30 промежутков.
Системы постоянства подразумевают иерархические степени с возрастающим возвратом. VIP-координаторы обеспечивают индивидуальные бонусы, повышенные границы и приоритетную техподдержку.
Decor District Boutique – Clean sections and logical layout provide a pleasant experience.
Нынешние участники пересекаются с изобилием технических тонкостей при функционировании с официальными сайтами. Тематические порталы типа Clubnika casino выдают новую контент о функционировании развлекательных брендов.
Алгоритм аутентификации счета содержит набор обязательных шагов. Исходная проверка нуждается предоставления справок доказывающих индивидуальность. Стандартный набор подразумевает удостоверение личности, автоудостоверение или загранпаспорт.
Системная часть записления содержит задействование SSL-шифрования и 2FA. Профессиональные игроки предлагают задействовать весь комплекс доступных параметров охраны.
Зеркала составляют стопроцентные реплики главного ресурса с поддержанием полного набора функций. Центральное бонус состоит в подобии расчетных рамок и критериев условий прокрутки.
Схема поиска действующих зеркал строится на наблюдении специализированных телеграм-каналов и сотрудничающих сайтов. Экспертные геймеры используют анонимайзеры для создания стабильного входа независимо от географических блокировок.
Wardrobe Wisp Official – Pages are well-organized and browsing is simple and enjoyable.
trafficcrafter – Overall, professional vibe here; trustworthy, polished, and pleasantly minimal throughout.
Современные бетторы встречаются с сложностью подключения к лицензированным площадкам. Операторы ограничивают стандартные домены, но профессиональные Вован казино игроки помнят о доступности альтернативных сайтов.
Параллельный портал составляет точную отображение главного платформы. Криптографические алгоритмы работают такими же. Банковские транзакции выполняются через аналогичные каналы.
Технология регистрации через параллельный адрес подразумевает обычной верификации. Сотрудники просят удостоверения для выполнения KYC-правил. Персональные сведения проходят усиленную аутентификацию.
Депозитные рамки на альтернативных сайтах соответствуют первичным спецификациям. Стартовые вклады функционируют постоянными. Накопительные накопления синхронизируются между многочисленными доменами.
Поощрительные механизмы оперируют целостно на зеркальных ресурсах. Коэффициент оборота обеспечивает первоначальные цифры. Тайминг использования поддерживается.
Служба обслуживания рассматривает тикеты с зеркальных доменов сходным образом. Онлайн диалог предоставляет беспрерывный расписание деятельности.
Heirloom Horizon Products – Browsing is simple with neatly arranged pages.
зайти на сайт https://slon3-at.com
leadspike – Color palette felt calming, nothing distracting, just focused, thoughtful design.
Отбор качественного betting оператора в нынешних рамках требует повышенного рассмотрения к законному режиму. Компетентные клиенты осознают, что аква казино предоставляет новую данные о активных провайдерах.
Алгоритм оформления профиля в сертифицированных платформах охватывает необходимую валидацию персональных данных. KYC-правила охраняют как оператора, так и игрока от мошенничества. Краткосрочные рамки на получение активов до закрытия валидации – привычная процедура.
Технические блокировки на соединение к развлекательным площадкам обходятся через дублирующие ссылки. Активные отражения предоставляют всестороннюю производительность главного портала. Финансовые процедуры, геймплейный продвижение и льготные схемы продолжают постоянными.
Денежная надежность характеризуется качеством применяемых банковских инструментов. SSL-защита, PCI DSS подтверждение и усиленная верификация формируют защищенный барьер охраны.
Игровая коллекция сертифицированных площадок содержит машины от известных создателей. RTP-параметры, дисперсия и статистические модели подвергаются объективную аудит в авторизованных центрах.
Программы поощрения в достойных сервисах опираются на ясных условиях вейджера. Проигрыш x35-40 характеризуется справедливым для спин-подарков, в то время как карточные развлечения включаются в зачет с сниженным фактором.
Workout equipment shop – Everything is clear and easy to locate quickly.
Modern Finds Hub – A stylish online space focused on distinctive and up-to-date selections.
Explore Leather Lane – Nicely structured content that’s easy to navigate.
online pharmacy search: US Pharma Index – US Pharma Index
priligy generic
clickrevamp – Color palette felt calming, nothing distracting, just focused, thoughtful design.
Актуальные бетторы оказываются с сложностью связи к сертифицированным сайтам. Операторы фильтруют первичные URL, но грамотные retro casino пользователи знают о присутствии дублирующих площадок.
Альтернативный адрес образует полную реплику основного платформы. Протоколы шифрования поддерживаются неизменными. Финансовые транзакции реализуются через сходные каналы.
Методика заведения учётной записи через зеркальный домен включает типовой подтверждения. Менеджеры запрашивают документы для реализации KYC-норм. Индивидуальные информация подвергаются двухфакторную аутентификацию.
Пополнительные рамки на дополнительных порталах соответствуют главным параметрам. Стартовые беты сохраняются фиксированными. Растущие призовые фонды координируются между разными ссылками.
Льготные системы работают всесторонне на параллельных площадках. Требования по обороту гарантирует базовые значения. Длительность использования продолжается.
Сервис ассистирования изучает обращения с зеркальных доменов сходным образом. Живой общение предоставляет круглосуточный режим оперирования.
umbera.shop – The design is clean and everything is easy to understand.
product hub – Everything feels well-organized, and moving between sections is effortless.
Азартная ниша показывает активный рост, притягивая множество игроков. Опытные площадки дают качественную условия для игры. Полную факты о указанных организациях возможно обнаружить на лаки Р±РёСЂ казино .
Лицензирование составляет ключевым показателем выбора платформы. Контролёры Гибралтара создают тщательный контроль финансовых транзакций. Каждая сертифицированная площадка проходит систематические ревизии RNG-генераторов.
Цифровые свойства актуальных азартных площадок содержат SSL-защиту банковского категории. Провайдеры софтового материала уровня Microgaming, NetEnt, Pragmatic Play добавляют комплексные модели произвольных чисел.
Механизм проверки счёта предполагает направления свидетельств KYC-класса. Удостоверение, справка о доходах, валидация проживания — классический комплект для завершённого подключения.
Зеркальные порталы устраняют проблемы с блокировками провайдеров. Функционирующие копии модифицируются систематически цифровыми отделами. Планшетные программы часто оперируют устойчивее онлайн форматов.
Финансовая дисциплина формирует длительную эффективность гемблинговых сессий. Профессиональные пользователи предлагают урезать количество бета до 1-2% от совокупного бюджета.
adscatalyst – Found practical insights today; sharing this article with colleagues later.
https://uspharmaindex.shop/# cheapest pharmacy
promoseeder – Pages loaded fast, images appeared sharp, and formatting stayed consistent.
this online store – Everything feels well organized and simple to navigate.
Reference
Desired casino games for money
for a better outcome.
Функционирующие дублирующие порталы официальных игорных заведений на lucky bear казино официальный сайт создают стабильный коннект к развлекательным платформам. Методика копирования формирует идентичные версии основного веб-площадки с удержанием всех возможностей.
Механизм открытия счета через дублирующий портал абсолютно дублирует стандартную заявку. Новые пользователи указывают валидный email, устанавливают безопасный ключ и назначают игровую валюту.
Идентификация аккаунта содержит отправки свидетельств по KYC-политике. Скан удостоверения личности, верификация места жительства и банковские сведения проходят автоматическую проверку в течение 24-72 часа.
Авторизация верифицированных геймеров выполняется через классическую панель с усиленной идентификацией. Сессионные шифры поступают на смс гаджет или e-mail адрес.
Возможности денежного блока через альтернативные домены поддерживает топовые денежные платформы. Visa, Mastercard, виртуальные портмоне Skrill, Neteller, цифровые активы Bitcoin, Ethereum процессируются с минимальными сборами 0-3%.
Игровая ассортимент повторяется на сто процентов включая барабаны, традиционные развлечения, live-дилеров и максимальные награды. RTP-значения, колебания и условия отыгрыша остаются точными.
Поощрительная система работает идентично корневому сайту. Welcome-наборы, фриспины, refund и VIP-курсы инициируются автоматически при реализации заданных требований.
company page – The site feels structured and easy to move around.
Источник https://slon3-at.com
Новейшие игроки оказываются с барьером соединения к проверенным платформам. Операторы закрывают стандартные домены, но грамотные Голд казино посетители осознают о присутствии дублирующих платформ.
Зеркало образует полную отображение базового ресурса. SSL-сертификаты поддерживаются идентичными. Платёжные процедуры реализуются через равнозначные системы.
Процедура открытия счёта через альтернативный домен включает классической верификации. Администраторы требуют справки для осуществления KYC-правил. Личные данные выполняют многоуровневую валидацию.
Депозитные границы на альтернативных площадках идентичны базовым требованиям. Начальные взносы остаются стабильными. Накопительные накопления синхронизируются между различными ресурсами.
Премиальные программы работают всесторонне на параллельных сайтах. Коэффициент оборота гарантирует стартовые показатели. Длительность отыгрыша сохраняется.
Отдел поддержки рассматривает обращения с дополнительных ссылок аналогично. Интерактивный чат поддерживает 24-часовой формат работы.
纽卡斯尔6-1大胜卡拉巴赫2026欧冠附加赛首回合比分,戈登半场大四喜喜鹊锁定淘汰赛,最新足球赛事比分全球关注英超欧战强势表现。
trusted DuneParcel shop – Quick and friendly support made things much easier this week.
Подробнее kraken сайт зеркала
Легальные провайдеры развлекательных услуг oferuja участникам право к профессиональному азартному досугу через специализированные порталы, включая aqua casino , которые специально соблюдают общепринятые стандарты безопасности.
Последовательность регистрации предполагает предоставления идентификационных информации через шифрованные SSL-соединения. Администрация demanded письменное доказательство совершеннолетия и адреса проживания для compliance правовых критериев.
2FA проверка становится обязательным aspect передовых систем надёжности. Клиенты получают SMS-пароли, push-сообщения или внедряют профессиональные приложения типа Google Authenticator.
Зеркальные домены нейтрализуют вопросы локальных блокировок и DDoS-нападений. Фактически реплики формируют идентичные dublicates главного платформы с удержанием функциональности и клиентских деталей.
Skilled геймеры suggest поддерживать актуальные базы working копий в избранном браузера. Провайдеры рассылают информацию о fresh адресах через мейл, Telegram-группы и мобильные утилиты.
Банковские транзакции через надёжные ресурсы покрыты encryption технологиями стандарта банковского индустрии. Вывод финансов происходит единственно на проверенные реквизиты держателя аккаунта.
Легальные площадки игорных услуг oferuja клиентам вариант к премиальному игровому процессу через профильные ресурсы, включая Болливуд казино , которые именно следуют мировые стандарты безопасности.
Механизм создания аккаунта necessita внесения верификационных данных через шифрованные SSL-протоколы. Администрация demanded документальное verification дееспособности и территории нахождения для выполнения правовых критериев.
Multi-factor верификация представляет принудительным aspect современных механизмов безопасности. Игроки получают SMS-ключи, push-сообщения или эксплуатируют специальные приложения в стиле Google Authenticator.
Альтернативные ссылки ликвидируют вопросы региональных ограничений и DDoS-атак. Фактически реплики представляют аналогичные dublicates базового домена с поддержанием функциональности и клиентских деталей.
Экспертные клиенты советуют удерживать обновлённые базы функционирующих mirrors в закладках браузера. Администрация направляют информацию о современных порталах через мейл, Telegram-communities и телефонные программы.
Payment movements через проверенные площадки защищены защитными алгоритмами класса банковского сектора. Изъятие финансов выполняется только на validated карты хозяина учётной записи.
посетить сайт https://slon3-at.com
Luggage Ledger Collections – Browsing is fast and content is neatly organized.
Продолжение kraken онион
potandpetal.shop – Layout is tidy and browsing through pages feels effortless.
太平年2026 白宇周雨彤年代励志历史大剧 海外华人高清央视热播 全球加速无广告追剧
Emporium Goods Online – Clean interface and content is organized clearly.
Передовые клиенты имеют дело с изобилием технологических особенностей при операциях с сертифицированными сайтами. Профессиональные платформы типа Рльдорадо казино предоставляют актуальную информацию о работе гэмблинговых компаний.
Система проверки аккаунта включает ряд обязательных этапов. Базовая аутентификация нуждается предоставления свидетельств валидирующих персону. Привычный комплект включает ID, автоудостоверение или международное ID.
Программная сторона регистрации включает внедрение SSL-шифрования и 2FA. Экспертные игроки рекомендуют запускать все представленных настроек защиты.
Дублирующие порталы составляют точные клоны базового платформы с поддержанием комплексного набора функций. Ключевое достоинство заключается в подобии денежных пределов и параметров ставочных требований.
Система локализации актуальных дублирующих порталов фундируется на проверке профессиональных мессенджер групп и связанных сайтов. Квалифицированные клиенты внедряют VPN-сервисы для предоставления бесперебойного связи безотносительно от локальных барьеров.
Новейшие провайдеры игорных продуктов дают участникам путь к премиальному развлечениям через проверенные типпи сайты. Сертифицированная деятельность влечет учета жестких надзорных стандартов.
Система регистрации индивидуального счета предусматривает подтверждение приватных данных. Управляющие применяют детализированные протоколы KYC и AML для исключения нарушающих транзакций.
Программные инструменты современных беттинг площадок базируются на безопасных облачных системах с HTTPS протоколами. Геоблокировка побуждает владельцев внедрять вспомогательные URL.
Зеркальные платформы представляют идентичные репликации основного домена с удержанием всех инструментов и информации. Пользователи получают непрерывный подключение к депозиту, беттинг записям и пользовательским опциям.
Платежные процедуры выполняются через интегрированные банковские системы. Пределы на вклады и обналичивания фиксируются в унисон с правовыми условиями и организационными правилами контроля угроз.
Компетентные беттеры рекомендуют отслеживать ситуацию разрешения через официальные списки беттинг ведомств. Статусные критерии задействуют оценки на экспертных сайтах и отзывы действительных пользователей.
можно проверить ЗДЕСЬ kraken зеркало
Источник https://slon3-at.com/
Soil and Sun Hub – Pages load quickly and the design is tidy and clear.
Explore Inbox Institute – Nicely arranged content that’s easy to scan and understand.
Поскольку секретность и анонимность считаются базовыми факторами при активности с даркнет-ресурсами, выбор правильного пути авторизации играет первостепенную роль. Управление Kraken рекомендует поддерживать максимальную бдительность. kraken оригинальная ссылка
https://sildenafilpriceguide.com/# Viagra generic over the counter
Легальные площадки игровых предложений предоставляют пользователям доступ к профессиональному времяпрепровождению через dedicated ресурсы, включая lucky bear казино , которые специально исполняют глобальные критерии защиты.
Последовательность активации предполагает указания authentication сведений через encrypted SSL-соединения. Администрация просят предоставить официальное verification совершеннолетия и локации нахождения для соблюдения правовых критериев.
Двухэтапная идентификация представляет mandatory aspect новейших механизмов конфиденциальности. Users приобретают SMS-пароли, push-оповещения или задействуют targeted tools вроде Google Authenticator.
Mirror ссылки нейтрализуют трудности territorial санкций и DDoS-нападений. С технической точки зрения реплики образуют дублированные реплики основного ресурса с maintaining опций и индивидуальных информации.
Опытные клиенты предлагают поддерживать свежие перечни working дублей в сохранённых ссылках интернет-программы. Букмекеры доставляют обновления о современных URL через почтовые сервисы, Telegram-каналы и смартфонные утилиты.
Денежные movements через legal порталы покрыты encryption алгоритмами level банковского области. Снятие денег происходит единственно на аутентифицированные карты обладателя учётной записи.
Cheap generic Viagra: Sildenafil Price Guide – Cheap generic Viagra
Поиск в области легальных платформ требует знания продвинутых технологий соединения. Продвинутые участники задействуют тип топ казино РІС…РѕРґ для приобретения актуальной фактов о действующих доменах.
Схема формирования личного кабинета в официальных заведениях предполагает сложную верификацию. Новейшие операторы внедряют KYC-процедуры и AML-нормы. Документальное сопровождение занимает от 24 до 72 часов.
Программные способы для избежания препятствий эволюционируют вместе с усилением регуляторных мер. VPN-платформы разряда premium предлагают кодирование AES-256 и методы OpenVPN. Устойчивость связи fundamentally важна для привилегированных сессий.
Резервные платформы выполняют задачи через пространственно распределенные компьютерные мощности. CDN-системы осуществляют минимальную задержку для международных игроков. Автоматическое маршрутизация инициируется при детекции недоступности главного адреса.
Финансовые операции в легальных юрисдикциях подпадают под конкретным правилам PCI DSS. Цифровые расчеты приобретают востребованность вследствие конфиденциальности и быстроте осуществления.
Мобильные утилиты ведущих провайдеров содержат биометрическую авторизацию и push-оповещения для существенных эпизодов. Изменяемый оформление автоматически изменяется под настройки панели.
Kind Vendor – A friendly and thoughtful marketplace offering reliable and pleasant service.
browse here – Everything responds instantly, making the experience smooth and easy.
Discover Hyvora – User-friendly design and smooth overall experience.
Новейшие операторы развлекательных игр предлагают игрокам путь к премиальному гемблингу через надежные миллион казино платформы. Авторизованная деятельность подразумевает следования строгих законодательных норм.
Процесс создания персонального учетной записи содержит аутентификацию приватных информации. Регуляторы используют детализированные протоколы KYC и AML для пресечения незаконных транзакций.
Цифровые системы инновационных гемблинг платформ основываются на защищенных инфраструктурах с TLS стандартами. IP-фильтрация вынуждает администраторов внедрять дублирующие домены.
Резервные ресурсы образуют точные клоны базового сайта с поддержанием всех возможностей и параметров. Клиенты достигают устойчивый соединение к депозиту, игровой записям и клиентским настройкам.
Платежные переводы выполняются через связанные финансовые процессоры. Границы на инвестиции и снятия фиксируются в гармонии с нормативными стандартами и внутренними нормами риск-менеджмента.
Опытные пользователи советуют проверять ситуацию авторизации через надзорные списки азартных структур. Репутационные критерии включают оценки на отраслевых сервисах и feedback действительных участников.
Современные гемблеры натыкаются с затруднением соединения к легальным порталам. Поставщики блокируют базовые URL, но искушённые ретро казино игроки учитывают о функционировании дублирующих порталов.
Резервная ссылка является стопроцентную воспроизведение первичного площадки. Системы безопасности поддерживаются аналогичными. Банковские переводы производятся через равнозначные системы.
Методика оформления профиля через резервный домен включает стандартной подтверждения. Менеджеры просят бумаги для осуществления KYC-регламентов. Индивидуальные данные реализуют усиленную проверку.
Вносительные ограничения на альтернативных сайтах идентичны главным параметрам. Наименьшие ставки сохраняются фиксированными. Растущие джекпоты интегрируются между многочисленными ссылками.
Льготные планы оперируют завершённо на параллельных ресурсах. Требования по обороту обеспечивает оригинальные величины. Временные рамки отыгрыша не изменяется.
Команда поддержки изучает запросы с параллельных адресов таким же способом. Мгновенный чат осуществляет круглосуточный расписание функционирования.
Newcastle 6-1 Qarabağ – 2026 Europa League play-off thriller! Gordon’s half-time quadruple sends Magpies flying into knockout stage – latest football scores exploding tonight!
visit this platform – Well-arranged sections make the content accessible and clear.
辛芷蕾林雨申《女神蒙上眼》2026都市悬疑职场大戏,海外华人必备高清陆剧,职场暗战烧脑刺激,全球加速实时更新无广告追剧首选。
辛芷蕾林雨申《女神蒙上眼》2026都市悬疑职场大戏,海外华人必备高清陆剧,职场暗战烧脑刺激,全球加速实时更新无广告追剧首选。
reputable canadian pharmacy: online canadian pharmacy reviews – vipps approved canadian online pharmacy
check this resource – Detailed posts and careful insights make it worth reading.
Yelnix marketplace – Smooth navigation made browsing and locating items a hassle-free experience.
Always enjoy the articles on Glory Casino. Kudos for the useful info!
https://www.google.com.np/url?q=https://glory-casino-malaysia.app
Ориентирование в области лицензированных ресурсов предполагает понимания современных решений подключения. Опытные геймеры применяют лаки ворлд казино для получения релевантной материалов о действующих URL.
Механизм регистрации аккаунта в официальных операторах включает комплексную проверку. Актуальные компании задействуют KYC-механизмы и AML-нормы. Бумажная работа отнимает от 24 до 72 периодов.
Технические методы для преодоления ограничений улучшаются вместе с усилением нормативных инициатив. VPN-службы разряда premium гарантируют криптографию AES-256 и протоколы OpenVPN. Постоянство коннекта жизненно значима для привилегированных сессий.
Дублирующие сайты работают через территориально распределенные IT кластеры. CDN-структуры гарантируют низкую задержку для американских пользователей. Программное редирект инициируется при распознавании блокировки базового ресурса.
Денежные транзакции в сертифицированных территориях подчиняются конкретным требованиям PCI DSS. Блокчейн платежи приобретают популярность по причине приватности и динамике реализации.
Мобильные софт ведущих операторов содержат отпечатковую авторизацию и push-алерты для принципиальных происшествий. Настраиваемый дизайн независимо корректируется под характеристики экрана.
Well spoken really! .
Надёжные платформы игорных сервисов дают участникам шанс к элитному развлечениям через целевые ресурсы, включая Килограмм казино , которые точно исполняют глобальные нормы конфиденциальности.
Процедура оформления профиля necessita внесения верификационных сведений через шифрованные SSL-линии. Провайдеры просят official удостоверение дееспособности и места регистрации для compliance нормативных критериев.
2FA аутентификация является обязательным компонентом актуальных архитектур security. Игроки располагают SMS-токены, push-уведомления или применяют dedicated tools по типу Google Authenticator.
Mirror адреса решают препятствия geographic барьеров и DDoS-нападений. Техническим образом реплики образуют дублированные клоны primary платформы с maintaining инструментария и клиентских параметров.
Экспертные геймеры suggest сохранять обновлённые каталоги активных копий в сохранённых ссылках обозревателя. Администрация доставляют информацию о актуальных URL через мейл, Telegram-каналы и телефонные софт.
Финансовые операции через лицензионные площадки гарантированы encryption технологиями уровня банковского segment. Получение средств происходит лишь на аутентифицированные данные владельца профиля.
For insights
enalapril online
to save time.
Перейти на сайт https://slon3-at.com/
Trail Trek Adventure – Layout feels professional, and exploring the site is effortless.
Best Australian online casino 2026 trusted real money sites
мостбет поддержка 2026 https://www.mostbet39081.help
柏捷顿家族第四季第二部2026 海外华人浪漫古装 高清贵族恋爱 无缓冲播放
After testing several platforms, I found this casino https://hotelmats.pl/ to be well-balanced. The welcome bonus is generous, terms are transparent, and payouts are processed smoothly, making it suitable for regular players.
Новейшие игроки обталкиваются с набором системных нюансов при операциях с легальными площадками. Экспертные ресурсы типа Клубника казино выдают релевантную информацию о деятельности казино организаций.
Механизм проверки профиля включает комплекс принудительных стадий. Стартовая верификация предполагает отправки документов валидирующих индивидуальность. Стандартный набор подразумевает документ, лицензию водителя или международный паспорт.
Цифровая элемент записления включает применение зашифрованного канала и двухфакторной аутентификации. Продвинутые игроки рекомендуют задействовать все имеющихся возможностей обеспечения.
Альтернативные адреса формируют абсолютные реплики основного платформы с хранением комплексного функционала. Главное плюс кроется в идентичности денежных рамок и параметров вейджера.
Система поиска актуальных зеркал фундируется на проверке профильных информационных каналов и связанных порталов. Профессиональные пользователи эксплуатируют виртуальные частные сети для создания устойчивого входа без оглядки от местных запретов.
Spice Craft Storefront – Simple design with natural flow between pages for easy browsing.
Поиск проверенного гемблинг заведения нуждается основательного исследования официальных свидетельств. Инновационные платформы tip top casino предоставляют геймерам безусловную факты о собственных санкциях.
Процесс получения доступа содержит ряд ключевых фаз валидации. Владельцы настаивают справки, доказывающие личность и дееспособность. Классический KYC-порядок занимает от 24 до 72 промежутков.
Управление банком запускается с назначения лимитов на взносы. Искусные клиенты предлагают внедрять закон 5% от суммарного азартного фонда на индивидуальную игру.
Электронные запреты операторов обязывают применять альтернативные домены. Альтернативы хранят абсолютную работоспособность первичного ресурса, содержа историю платежей и развлекательный продвижение.
Передовые финансовые сервисы обеспечивают оперативные вклады через виртуальные хранилища. Bitcoin, Ethereum и стейблкоины поддерживают тайность и минимальные сборы. Длительность осуществления получений насчитывает 10-30 периодов.
Программы верности включают ступенчатые степени с возрастающим возвратом. VIP-кураторы предоставляют персонализированные подарки, расширенные ограничения и приоритетную сервис.
Mainz 05 vs Hamburger SV 2026德甲杯赛20:30最新比分,主茨对阵汉堡,德国足球赛事比分实时比分查询。
https://uspharmaindex.com/# US Pharma Index
Wardrobe Wisp Products – Smooth pages with clearly structured navigation.
нажмите здесь сайт kraken darknet
Click for Birch Boutique – Pleasant site flow and clearly organized content.
Нынешние участники пересекаются с массой цифровых тонкостей при операциях с проверенными порталами. Экспертные ресурсы типа mad casino дают релевантную данные о процессах игорных организаций.
Система проверки учетной записи содержит комплекс неотъемлемых этапов. Начальная подтверждение включает предоставления удостоверений валидирующих личность. Привычный комплект подразумевает свидетельство, права или загранпаспорт.
Системная элемент открытия счета содержит внедрение защищенного протокола и многофакторной защиты. Опытные участники подсказывают задействовать совокупность доступных функций секьюрити.
Запасные домены составляют стопроцентные клоны базового портала с обеспечением комплексного инструментария. Важнейшее достоинство выражается в подобии финансовых ограничений и критериев отыгрыша.
Система нахождения актуальных зеркал фундируется на контроле профессиональных телеграм-каналов и партнерских порталов. Квалифицированные клиенты внедряют VPN-сервисы для формирования надежного подключения без оглядки от территориальных запретов.
Современные геймеры имеют дело с огромным количеством программных тонкостей при деятельности с официальными ресурсами. Тематические порталы типа РЎСѓРєР° казино предоставляют релевантную сведения о деятельности развлекательных провайдеров.
Процесс подтверждения кабинета включает множество необходимых стадий. Исходная проверка подразумевает предоставления бумаг валидирующих гражданство. Обычный список подразумевает паспорт, автоудостоверение или международный паспорт.
Технологическая компонента открытия счета охватывает использование защищенного протокола и двойной авторизации. Продвинутые клиенты предлагают включать все возможных возможностей защиты.
Запасные домены составляют идентичные клоны первичного сайта с поддержанием исчерпывающего арсенала. Центральное достоинство заключается в подобии банковских ограничений и критериев ставочных требований.
Механизм локализации функционирующих зеркал строится на контроле экспертных уведомительных сервисов и партнерских платформ. Опытные геймеры внедряют анонимайзеры для обеспечения бесперебойного входа независимо от географических запретов.
Visit Funnel Foundry – Very smooth interface with content that’s easy to digest.
巴萨达尼·奥尔莫:欧冠需改变很多才能争冠2026足球新闻,最新La Liga比分前瞻巴萨挑战莱万特。
https://businesswits.us/code-promo-1xbet-2026-1x200red-bonus-gratuit-130-e/
visit this platform – Clean design and logical sections make browsing effortless.
夜魔侠重生第二季2026 海外华人超级英雄剧 高清漫威宇宙
1win пополнить баланс элсом 1win91276.help
Современные клиенты пересекаются с огромным количеством технических деталей при процессах с официальными ресурсами. Профессиональные сайты типа СЌРЅРѕРјРѕ казино дают релевантную данные о деятельности развлекательных организаций.
Алгоритм верификации аккаунта включает набор необходимых фаз. Первичная аутентификация включает загрузки свидетельств верифицирующих гражданство. Типовой список включает документ, автоудостоверение или внешний паспорт.
Цифровая часть записления подразумевает использование безопасного соединения и двойной авторизации. Квалифицированные клиенты настаивают инициировать максимум предложенных возможностей безопасности.
Дублирующие порталы представляют абсолютные копии центрального портала с сохранением тотального набора функций. Ключевое достоинство содержится в схожести банковских лимитов и параметров вейджера.
Алгоритм поиска актуальных альтернативных адресов строится на контроле тематических информационных каналов и аффилированных сайтов. Профессиональные игроки задействуют анонимайзеры для формирования надежного связи вне зависимости от региональных лимитов.
Исследование в сфере проверенных площадок предполагает понимания новых инструментов авторизации. Профессиональные пользователи внедряют Болливуд казино для обретения современной фактов о функционирующих адресах.
Процедура создания профиля в лицензированных операторах содержит детальную аутентификацию. Продвинутые провайдеры задействуют KYC-протоколы и AML-критерии. Документальная процедура отнимает от 24 до 72 периодов.
IT способы для прохождения запретов эволюционируют синхронно с ужесточением законодательных инициатив. VPN-инструменты категории premium обеспечивают шифрование AES-256 и технологии OpenVPN. Устойчивость связи критически актуальна для высокоролловых сессий.
Запасные домены действуют через регионально разнесенные IT инфраструктуры. CDN-архитектуры гарантируют сокращенную латентность для глобальных игроков. Системное роутинг активируется при обнаружении недоступности основного ресурса.
Финансовые движения в проверенных территориях отвечают строгим критериям PCI DSS. Криптовалютные платежи увеличивают распространение вследствие конфиденциальности и темпу выполнения.
Переносные утилиты лучших операторов интегрируют биометрическую подтверждение и push-оповещения для критических эпизодов. Адаптивный оформление автоматически подстраивается под настройки монитора.
Order Viagra 50 mg online cheapest viagra buy Viagra online
无敌第二季2026 海外华人动画超级英雄 高清暴力美学 海外华人首选
this online store – What I’ve seen so far feels honest and beneficial for anyone browsing.
Up Vendor – A forward-thinking store built to elevate your everyday shopping experience.
workwhim details – Smooth browsing experience, everything is easy to find.
https://mforum.cari.com.my/home.php?mod=space&uid=3277740&do=blog&id=529184&page=4#comment
Определение безопасного развлекательного портала подразумевает серьезного рассмотрения официальных разрешений. Передовые порталы казино Голд предлагают геймерам стопроцентную данные о своих лицензиях.
Система оформления счета включает ряд ключевых этапов аутентификации. Представители настаивают документы, засвидетельствующие личность и зрелость. Типовой KYC-механизм длится от 24 до 72 интервалов.
Банкролл-менеджмент стартует с фиксации пределов на вклады. Компетентные пользователи настаивают применять закон 5% от общего гемблинг резерва на отдельную сессию.
Технические блокировки операторов побуждают применять дополнительные адреса. Альтернативы хранят безусловную эффективность основного портала, подразумевая архив переводов и гемблинг достижения.
Передовые денежные инструменты предоставляют мгновенные инвестиции через блокчейн счета. Bitcoin, Ethereum и устойчивые монеты гарантируют конфиденциальность и крошечные комиссии. Время реализации извлечений составляет 10-30 интервалов.
Планы постоянства предусматривают каскадные ранги с нарастающим кэшбэком. VIP-координаторы предоставляют индивидуальные награды, расширенные лимиты и приоритетную сервис.
buy dapoxetine https://rsmeds.top/# rsmeds
Активные mirror-ссылки официальных казино на https://proapples.ru/ru-ru/ дают беспрерывный соединение к геймерским платформам. Принцип реплицирования формирует точные клоны центрального сайта с сохранением всех механизмов.
Схема открытия счета через дублирующий портал в точности воспроизводит оригинальную форму. Новые игроки вводят действующий email, формируют сложный пароль и фиксируют базовую денежную единицу.
Верификация личного кабинета подразумевает передачи бумаг по KYC-требованиям. Фото паспорта, свидетельство места жительства и платежные реквизиты контролируются системой программную проверку в течение 24-72 часа.
Вход зарегистрированных пользователей происходит через базовую модуль с многоступенчатой аутентификацией. Сессионные пароли доставляются на сотовый гаджет или почтовый ящик.
Функционал депозитного компонента через альтернативные домены включает актуальные расчетные сервисы. Visa, Mastercard, виртуальные портмоне Skrill, Neteller, виртуальные монеты Bitcoin, Ethereum выполняются с низкими процентами 0-3%.
Gaming коллекция повторяется на сто процентов включая машины, классические игры, live-операторов и максимальные награды. RTP-коэффициенты, дисперсия и условия отыгрыша сохраняются такими же.
Промо механизм выполняется аналогично базовому домену. Welcome-пакеты, безвозмездные спины, refund и VIP-схемы запускаются алгоритмически при достижении установленных параметров.
discover Larnix – Modern layout and simple navigation make browsing enjoyable overall.
http://uspharmaindex.com/# US Pharma Index
Читать далее kraken онион
this organization site – After a quick look, the information seemed clear and valuable.
女神蒙上眼2026 辛芷蕾林雨申都市悬疑职场 海外华人免费高清陆剧 实时更新AI匹配
Browse Wavento – User-friendly layout with intuitive browsing experience.
Перемещение в сфере легальных площадок нуждается представления современных инструментов подключения. Профессиональные участники эксплуатируют lucky bear казино для извлечения свежей материалов о действующих адресах.
Алгоритм оформления учетной записи в лицензированных операторах охватывает многоуровневую валидацию. Современные операторы эксплуатируют KYC-процедуры и AML-стандарты. Документооборот требует от 24 до 72 временных отрезков.
Компьютерные способы для избежания блокировок развиваются синхронно с ужесточением регуляторных решений. VPN-платформы категории premium дают защиту AES-256 и методы OpenVPN. Непрерывность связи fundamentally необходима для привилегированных партий.
Запасные ресурсы функционируют через пространственно рассредоточенные IT ресурсы. CDN-сети осуществляют быструю отклик для международных клиентов. Автоматическое роутинг инициируется при детекции ограничения базового домена.
Денежные манипуляции в проверенных юрисдикциях отвечают жестким критериям PCI DSS. Крипто расчеты завоевывают популярность вследствие конфиденциальности и оперативности выполнения.
Планшетные клиенты элитных организаций совмещают лицевую подтверждение и push-алерты для ключевых моментов. Адаптивный облик автономно адаптируется под свойства панели.
Отбор проверенного гемблинг ресурса в текущих обстоятельствах предполагает специального анализа к правовому режиму. Компетентные пользователи учитывают, что аква казино включает актуальную сведения о доступных провайдерах.
Схема регистрации в официальных сервисах объединяет принудительную аутентификацию идентичности. KYC-требования оберегают как оператора, так и клиента от мошенничества. Кратковременные пределы на вывод капитала до закрытия верификации – стандартная практика.
Электронные препятствия на соединение к развлекательным сервисам обходятся через резервные домены. Рабочие копии обеспечивают полную возможности центрального сайта. Расчетные переводы, интерактивный статистика и наградные системы продолжают устойчивыми.
Капитальная защищенность оценивается критерием применяемых расчетных систем. SSL-криптография, PCI DSS подтверждение и расширенная подтверждение гарантируют стабильный щит ограждения.
Азартная коллекция легальных операторов предоставляет барабаны от топовых провайдеров. RTP-коэффициенты, вариативность и математические схемы проходят внешнюю контроль в утвержденных институтах.
Программы стимулирования в надежных заведениях формируются на понятных условиях отыгрыша. Требования x35-40 считается приемлемым для барабан-подарков, в то время как стандартные развлечения включаются в подсчет с уменьшенным множителем.
buy Viagra online: Sildenafil Price Guide – best price for viagra 100mg
шумоизоляция дверей авто
Современные сервисы гемблинг активностей предоставляют беттерам путь к качественному развлечениям через надежные лаки Р±РёСЂ казино ресурсы. Лицензированная операционная активность влечет исполнения жестких законодательных стандартов.
Система открытия игрового счета включает валидацию конфиденциальных информации. Операторы используют комплексные алгоритмы KYC и AML для пресечения мошеннических платежей.
Технические системы актуальных казино строятся на надежных хостингах с криптографическими протоколами. Территориальные ограничения заставляет операторов запускать альтернативные ссылки.
Альтернативные домены образуют идентичные дубликаты первичного сайта с обеспечением всех функций и информации. Пользователи приобретают непрерывный подключение к балансу, азартной отчетности и индивидуальным конфигурациям.
Банковские транзакции производятся через встроенные финансовые сервисы. Ограничения на взносы и снятия определяются в гармонии с законодательными положениями и собственными нормами снижения потерь.
Компетентные игроки предлагают мониторить условия сертификата через надзорные регистры беттинг структур. Престижные параметры содержат места на экспертных платформах и оценки подлинных пользователей.
For the extended version
Statistical advantage games
for collaborative work.
Новейшие участники попадают с препятствием доступа к проверенным сайтам. Провайдеры ограничивают первичные URL, но знающие lucky bear казино игроки осознают о существовании дублирующих сайтов.
Дополнительный домен составляет полную дубликат оригинального портала. Системы безопасности работают неизменными. Банковские процедуры осуществляются через аналогичные механизмы.
Алгоритм создания аккаунта через дополнительный адрес содержит классической проверки. Менеджеры просят документы для исполнения KYC-регламентов. Идентификационные данные подвергаются усиленную подтверждение.
Вносительные рамки на параллельных порталах равняются первичным характеристикам. Стартовые вклады остаются стабильными. Растущие выигрышные пулы согласовываются между различными ссылками.
Бонусные механизмы работают всесторонне на резервных ресурсах. Отыгрышный коэффициент поддерживает первоначальные величины. Временные рамки отыгрыша поддерживается.
Сервис поддержки изучает тикеты с альтернативных адресов сходным образом. Живой общение осуществляет постоянный график функционирования.
Lormiq Online – Definitely keeping this site bookmarked for future orders.
mafia casino en ligne Decouvrez Mafia Casino avis 2026 : site officiel avec connexion securisee, bonus exclusifs, milliers de jeux et retraits rapides. Inscrivez-vous des maintenant!
шумоизоляция торпеды https://shumoizolyaciya-torpedy-77.ru
купить кабель проводка купить
Нужны столбики? столбики для ограждения с лентами столбики для складов, парковок и общественных пространств. Прочные материалы, устойчивое основание и удобство перемещения обеспечивают безопасность и порядок.
Смотреть здесь kraken ссылка зеркало
Главная кракен онион
Выбор безопасного гемблинг площадки в актуальных реалиях требует повышенного рассмотрения к лицензионному положению. Знающие геймеры осознают, что типпи казино содержит современную данные о действующих ресурсах.
Процесс записи в легальных площадках включает требуемую проверку идентичности. KYC-правила обеспечивают как сервис, так и участника от махинаций. Промежуточные рамки на перечисление активов до финализации верификации – обычная практика.
Технические ограничения на доступ к развлекательным порталам решаются через дублирующие порталы. Доступные копии обеспечивают полную функциональность главного портала. Банковские процедуры, развлекательный достижения и привилегированные схемы остаются постоянными.
Финансовая защищенность характеризуется критерием используемых денежных систем. SSL-криптография, PCI DSS аттестация и усиленная подтверждение создают безопасный барьер защиты.
Азартная библиотека проверенных площадок содержит автоматы от ведущих производителей. RTP-коэффициенты, изменчивость и математические формулы подвергаются внешнюю сертификацию в признанных организациях.
Схемы мотивации в достойных операторах базируются на понятных правилах ставок. Отыгрыш x35-40 характеризуется приемлемым для слот-льгот, в то время как классические состязания принимаются в подсчет с минимальным фактором.
TinyTill Store – Bookmarking this page for my next shopping trip.
Развлекательная ниша демонстрирует динамичный подъём, притягивая миллионы игроков. Квалифицированные площадки предлагают качественную пространство для пари. Детальную сведения о этих провайдерах реально обнаружить на казино аква .
Легализация остаётся центральным элементом подбора ресурса. Лицензиаты Великобритании гарантируют качественный проверку расчётных действий. Всякая легальная платформа реализует постоянные проверки RNG-модулей.
Программные параметры инновационных казино включают SSL-безопасность денежного уровня. Производители компьютерного материала вроде Microgaming, NetEnt, Pragmatic Play встраивают усовершенствованные алгоритмы хаотичных величин.
Процедура валидации счёта требует представления документов KYC-класса. Паспорт, подтверждение о доходах, валидация прописки — стандартный набор для полноценного подключения.
Дублирующие ссылки ликвидируют препятствия с запретами компаний. Актуальные дубли обновляются систематически техническими группами. Смартфонные приложения обычно действуют устойчивее онлайн версий.
Банкролл-менеджмент определяет длительную прибыльность гемблинговых раундов. Квалифицированные пользователи советуют урезать сумму депозита до 1-2% от полного резерва.
shopping page – The navigation is intuitive and the website feels responsive.
Discover Everaisle – This site is going straight into my favorites for future orders.
Ivermectin Access USA: Ivermectin Access USA – Ivermectin Access USA
https://sildenafilpriceguide.com/# cheapest viagra
Актуальные дублирующие порталы лицензированных игорных заведений на Вован казино предоставляют непрерывный коннект к игровым платформам. Методика копирования генерирует аналогичные версии основного сайта с сохранением всех возможностей.
Схема регистрации через альтернативный домен на сто процентов дублирует стандартную заявку. Начинающие клиенты регистрируют рабочий email, создают стойкий ключ и выбирают базовую денежную единицу.
Верификация профиля требует представления документов в соответствии с KYC-политике. Скан ID-карты, верификация проживания и карточные координаты подвергаются автоматическую контроль в течение 24-72 часов.
Логин существующих клиентов выполняется через классическую форму с двухфакторной верификацией. Сессионные ключи передаются на телефонный гаджет или почтовый ящик.
Функционал входящего модуля через альтернативные домены содержит популярные денежные системы. Visa, Mastercard, онлайн счета Skrill, Neteller, виртуальные монеты Bitcoin, Ethereum процессируются с сокращенными процентами 0-3%.
Развлекательная ассортимент дублируется абсолютно включая spinning games, карточные развлечения, live-операторов и максимальные награды. RTP-коэффициенты, волатильность и вейджер фиксируются такими же.
Поощрительная механизм выполняется схоже корневому порталу. Welcome-комплекты, free spins, кешбэк и VIP-программы активируются системно при реализации фиксированных критериев.
Ориентирование в области легальных порталов нуждается владения современных решений авторизации. Профессиональные клиенты внедряют казино типпи для приобретения актуальной сведений о работающих адресах.
Процедура создания личного кабинета в официальных компаниях подразумевает многоуровневую подтверждение. Актуальные провайдеры внедряют KYC-алгоритмы и AML-стандарты. Бумажная работа требует от 24 до 72 периодов.
Компьютерные инструменты для обхода ограничений прогрессируют вместе с укреплением регуляторных действий. VPN-инструменты типа premium предоставляют безопасность AES-256 и стандарты OpenVPN. Стабильность подключения критически важна для элитных партий.
Зеркальные платформы функционируют через регионально рассредоточенные компьютерные инфраструктуры. CDN-комплексы предоставляют оптимальную задержку для азиатских клиентов. Автоматическое роутинг срабатывает при идентификации недоступности главного домена.
Денежные манипуляции в официальных регионах следуют определенным нормам PCI DSS. Блокчейн транзакции увеличивают распространение в результате секретности и динамике реализации.
Мобильные утилиты лучших провайдеров содержат голосовую аутентификацию и push-сообщения для критических моментов. Гибкий дизайн автоматически подстраивается под характеристики панели.
direct store link – Everything was laid out clearly, making navigation a breeze.
на этом сайте актуальные зеркала kraken
https://solo.to/hyprbnusbet
Выбор достойного гемблинг площадки в текущих границах подразумевает специального рассмотрения к юридическому положению. Квалифицированные участники представляют, что Bollywood зеркало содержит новую данные о активных сервисах.
Процесс создания аккаунта в сертифицированных операторах предусматривает обязательную подтверждение персональных данных. KYC-стандарты защищают как казино, так и игрока от махинаций. Промежуточные лимиты на изъятие денег до финализации верификации – обычная методика.
Цифровые блокировки на доступ к игровым сайтам устраняются через параллельные домены. Действующие отражения поддерживают всестороннюю возможности главного портала. Платежные транзакции, игровой прогресс и привилегированные системы продолжают устойчивыми.
Экономическая стабильность выражается показателем используемых денежных систем. SSL-криптография, PCI DSS валидация и усиленная идентификация устанавливают прочный периметр ограждения.
Развлекательная библиотека лицензированных провайдеров содержит спины от лидирующих провайдеров. RTP-показатели, изменчивость и расчетные системы получают объективную контроль в авторизованных институтах.
Схемы вознаграждения в достойных казино формируются на понятных параметрах ставок. Условия ставок x35-40 признается адекватным для спин-привилегий, в то время как стандартные активности включаются в подсчет с минимальным фактором.
Поиск в области официальных порталов подразумевает осознания современных инструментов доступа. Квалифицированные игроки эксплуатируют казино аква для обретения новейшей сведений о оперативных URL.
Алгоритм оформления аккаунта в официальных заведениях предполагает комплексную верификацию. Продвинутые организации эксплуатируют KYC-алгоритмы и AML-критерии. Оформление документов требует от 24 до 72 интервалов.
Цифровые технологии для преодоления блокировок улучшаются сообща с повышением юридических мер. VPN-инструменты типа premium гарантируют кодирование AES-256 и системы OpenVPN. Постоянство соединения принципиально существенна для премиальных игровых периодов.
Резервные ресурсы оперируют через пространственно разнесенные IT ресурсы. CDN-архитектуры предоставляют низкую время ответа для международных игроков. Цифровое переключение включается при идентификации блокировки центрального портала.
Банковские движения в проверенных зонах отвечают жестким правилам PCI DSS. Децентрализованные переводы завоевывают актуальность вследствие скрытности и динамике реализации.
Мобильные утилиты ведущих компаний совмещают физиологическую проверку и push-извещения для ключевых моментов. Адаптивный дизайн независимо подстраивается под параметры матрицы.
Click for Auricly – Product images are attractive and the interface is smooth.
Xerva Hub Online – Overall, the store is organized well and exploring items today felt effortless.
Подбор проверенного азартного площадки нуждается основательного рассмотрения лицензионных разрешений. Инновационные сайты типпи казино предоставляют игрокам абсолютную сведения о имеющихся лицензиях.
Алгоритм оформления счета предусматривает несколько необходимых фаз аутентификации. Представители запрашивают удостоверения, устанавливающие идентичность и зрелость. Классический KYC-порядок продолжается от 24 до 72 промежутков.
Финансовое планирование запускается с фиксации границ на пополнения. Профессиональные клиенты призывают задействовать установку 5% от совокупного азартного средств на единичную сессию.
Технические блокировки администраторов принуждают применять альтернативные ссылки. Альтернативы поддерживают безусловную эффективность центрального сайта, охватывая историю транзакций и азартный результаты.
Передовые расчетные методы поддерживают оперативные инвестиции через электронные счета. Bitcoin, Ethereum и фиксированные активы предоставляют тайность и символические сборы. Длительность осуществления извлечений доходит 10-30 минут.
Системы приверженности охватывают каскадные степени с прогрессивным бонусом. VIP-представители предлагают личные награды, увеличенные ограничения и преимущественную поддержку.
Нынешние игроки обталкиваются с множеством технологических аспектов при работе с сертифицированными сайтами. Специализированные порталы типа лаки Р±РёСЂ казино выдают релевантную контент о операциях казино провайдеров.
Механизм верификации профиля подразумевает множество необходимых шагов. Стартовая валидация нуждается предоставления документов валидирующих персону. Обычный комплект охватывает ID, водительские права или внешний паспорт.
Программная часть регистрации содержит эксплуатацию SSL-шифрования и двойной авторизации. Продвинутые игроки рекомендуют инициировать весь комплекс доступных настроек безопасности.
Резервные ссылки являются точные копии первичного ресурса с поддержанием комплексного возможностей. Ключевое преимущество кроется в тождественности финансовых лимитов и требований проигрыша.
Алгоритм нахождения актуальных дублирующих порталов основывается на проверке тематических новостных лент и сотрудничающих площадок. Квалифицированные участники внедряют анонимайзеры для формирования надежного входа невзирая от региональных лимитов.
Official Olvesta Site – I’m planning to explore more products here soon.
http://ivermectinaccessusa.com/# Ivermectin Access USA
Official VelvetHub Site – Will revisit this store in the future, great experience.
вывод из запоя в клинике в ростове вывод из запоя в клинике в ростове .
quinora.shop – Very user-friendly site, easy to find what I needed.
their shop page – Everything feels professional and simple to navigate.
Отбор проверенного betting площадки в текущих условиях нуждается особого рассмотрения к регулятивному статусу. Профессиональные пользователи знают, что СЌРЅРѕРјРѕ казино предоставляет последнюю материалы о доступных ресурсах.
Схема регистрации в официальных операторах предусматривает требуемую подтверждение персональных данных. KYC-правила защищают как сервис, так и клиента от фрода. Переходные пределы на изъятие капитала до выполнения валидации – нормальная методика.
Цифровые барьеры на соединение к игровым сайтам преодолеваются через дублирующие порталы. Рабочие дубликаты гарантируют тотальную функциональность центрального ресурса. Финансовые процедуры, развлекательный прогресс и льготные программы поддерживаются стабильными.
Материальная защищенность характеризуется уровнем эксплуатируемых финансовых систем. SSL-криптография, PCI DSS подтверждение и многоуровневая верификация устанавливают надежный заслон безопасности.
Развлекательная библиотека проверенных провайдеров объединяет спины от ведущих производителей. RTP-параметры, изменчивость и математические принципы претерпевают внешнюю аудит в авторизованных учреждениях.
Механизмы вознаграждения в достойных заведениях основываются на открытых параметрах вейджера. Вейджер x35-40 оценивается адекватным для машина-поощрений, в то время как карточные активности включаются в расчет с сниженным фактором.
Функционирующие альтернативные домены легальных гемблинг-платформ на типпи казино дают стабильный доступ к азартным порталам. Технология дублирования формирует идентичные копии корневого ресурса с поддержанием всех инструментов.
Система открытия счета через дублирующий портал в точности повторяет главную заявку. Только пришедшие участники вводят рабочий email, придумывают надежный пароль и определяют операционную валюту.
Идентификация личного кабинета подразумевает представления свидетельств следуя KYC-политике. Фото паспорта, доказательство адреса и платежные координаты контролируются системой машинную контроль в течение 24-72 временных единиц.
Подключение верифицированных геймеров производится через классическую модуль с 2FA аутентификацией. Временные коды передаются на сотовый аппарат или электронную почту.
Возможности депозитного сектора через дублирующие порталы предлагает распространенные расчетные системы. Visa, Mastercard, цифровые счета Skrill, Neteller, виртуальные монеты Bitcoin, Ethereum осуществляются с оптимизированными процентами 0-3%.
Гемблинг коллекция копируется целиком включая барабаны, традиционные игры, live-дилеров и мегавыигрыши. RTP-коэффициенты, волатильность и условия отыгрыша сохраняются точными.
Бонусная система выполняется аналогично центральному порталу. Welcome-предложения, безвозмездные спины, кешбэк и VIP-системы запускаются автоматически при соблюдении установленных условий.
ivermectin cost: Ivermectin Access USA – stromectol generic
Elnesta Online – Everything loaded properly and checkout took just a moment.
slot365 xin gửi lời cảm ơn chân thành đến quý khách hàng và cam kết tiếp tục nỗ lực để giữ vững vị thế nhà cái số 1. TONY03-02O
Good morning!
Discover interesting facts hidden in mysterious archives of valuable data streams now and learn how to apply them effectively see on the website for full reports
Full information on the link – https://202fliks.site
All the best and development in business!
Новейшие игроки имеют дело с массой программных нюансов при операциях с легальными площадками. Профессиональные ресурсы типа Вован казино предоставляют новую информацию о работе развлекательных операторов.
Процесс проверки кабинета предполагает несколько требуемых этапов. Первичная проверка включает загрузки документов доказывающих гражданство. Классический список подразумевает ID, автоудостоверение или загранпаспорт.
Технологическая элемент оформления предполагает внедрение защищенного протокола и многофакторной защиты. Опытные участники рекомендуют включать весь комплекс имеющихся опций обеспечения.
Дублирующие порталы представляют полные реплики основного ресурса с хранением всего возможностей. Главное бонус состоит в идентичности банковских рамок и критериев вейджера.
Механизм нахождения рабочих альтернативных адресов основывается на наблюдении тематических мессенджер групп и союзных порталов. Квалифицированные игроки используют прокси-соединения для создания стабильного доступа вне зависимости от локальных лимитов.
https://www.nhat.thanhdong.edu.vn/profile/vip1xbet202637386/profile
Поиск качественного азартного площадки в современных реалиях подразумевает специального внимания к регулятивному уровню. Знающие геймеры знают, что винити казино предоставляет актуальную материалы о работающих ресурсах.
Схема записи в лицензированных платформах охватывает неизбежную верификацию удостоверения. KYC-процедуры защищают как заведение, так и геймера от махинаций. Временные рамки на перечисление денег до закрытия подтверждения – обычная практика.
Программные запреты на вход к гемблинг ресурсам преодолеваются через резервные URL. Действующие зеркала предоставляют тотальную возможности центрального платформы. Финансовые движения, интерактивный статистика и льготные схемы поддерживаются устойчивыми.
Материальная безопасность определяется степенью внедренных финансовых методов. SSL-безопасность, PCI DSS аттестация и расширенная аутентификация обеспечивают надежный контур защиты.
Игровая набор сертифицированных площадок предоставляет машины от известных разработчиков. RTP-коэффициенты, вариативность и расчетные схемы проходят внешнюю контроль в одобренных институтах.
Программы мотивации в качественных площадках строятся на открытых требованиях проигрыша. Проигрыш x35-40 характеризуется приемлемым для барабан-бонусов, в то время как стандартные игры засчитываются в калькуляцию с сниженным процентом.
their shop page – Everything appears organized, and finding what I need is effortless.
Металлический круг купить в Алматы
Merchio Specials – The chic design pairs nicely with items that look expertly made.
this online store – Navigation is smooth and everything is well-organized for a pleasant browsing experience.
Нашел полезный материал про ufc в феврале марте 2026 три недели которые встряхнут дивизионы, делюсь со всеми. Посмотреть подробнее: https://avtoshkola37.ru/news/prognozy-na-ufc-fevral-mart-2026-kto-zaberyot-verh-v-glavnyh-boyah/
Grivor Store – I had a smooth experience and navigating the website was easy.
ссылка на сайт kraken ссылка зеркало
Подбор безопасного игорного площадки предполагает тщательного исследования юридических разрешений. Новые сайты типпи зеркало дают клиентам безусловную информацию о имеющихся санкциях.
Алгоритм регистрации охватывает несколько необходимых стадий верификации. Представители истребуют справки, удостоверяющие персону и зрелость. Стандартный KYC-регламент требует от 24 до 72 часов.
Управление банком открывается с назначения ограничений на пополнения. Квалифицированные клиенты призывают задействовать закон 5% от общего игорного бюджета на отдельную раунд.
Программные запреты владельцев побуждают использовать дополнительные домены. Клоны удерживают стопроцентную производительность основного платформы, содержа летопись переводов и игровой достижения.
Новые денежные методы обеспечивают быстрые депозиты через криптовалютные счета. Bitcoin, Ethereum и постоянные токены дают приватность и мизерные комиссии. Продолжительность обработки получений составляет 10-30 интервалов.
Алгоритмы верности подразумевают ступенчатые степени с прогрессивным возвратом. VIP-кураторы дают индивидуальные награды, улучшенные пределы и приоритетную обслуживание.
Официальные провайдеры игровых сервисов дают игрокам шанс к элитному гэмблингу через профильные домены, включая СЌРЅРѕРјРѕ казино , которые специально придерживаются международные нормы конфиденциальности.
Последовательность оформления профиля предполагает предоставления authentication деталей через защищённые SSL-линии. Провайдеры запрашивают документальное verification совершеннолетия и адреса нахождения для поддержания нормативных норм.
2FA проверка представляет required aspect передовых механизмов надёжности. Users имеют SMS-шифры, push-уведомления или задействуют профессиональные tools вроде Google Authenticator.
Mirror адреса ликвидируют трудности географических запретов и DDoS-нападений. Фактически реплики составляют дублированные клоны базового домена с maintaining features и клиентских деталей.
Экспертные участники советуют сохранять current базы действующих mirrors в сохранённых ссылках интернет-программы. Операторы передают updates о актуальных ссылках через email, Telegram-сообщества и mobile apps.
Банковские movements через надёжные платформы защищены cryptographic протоколами уровня банковского segment. Изъятие денег производится только на аутентифицированные счета держателя личного кабинета.
сайт свадебных платьев каталог свадебных платьев с ценами
посетить сайт кракен даркнет
Abonnement au bulletin d’information Les retraits peuvent être effectués en utilisant les mêmes méthodes de paiement, 12 offres différentes sont disponibles sur le site afin que vous puissiez choisir n’importe qui à votre goût. Suite à la sortie de Cash Blox, Aloha. Des outils logiciels tels que Poker Tracker peuvent considérablement augmenter votre capacité à gagner en jouant à plusieurs tables, des tours gratuits et des symboles wild. Construction and infrastructure Une fois que vous avez passé cette étape, seules les autres licences de paris sportifs restent réservées au cinquième opérateur de casino de Virginias et à une future équipe sportive professionnelle. Amazing Aztecs offre 243 façons remarquables de gagner, ainsi que pour ses exigences sérieuses pour tous les opérateurs qui utilisent sa plate-forme. Est-Ce Que Jouer Aux Machines À Sous Mobiles Quelque Chose Que Vous Aimerez Faire, tombstone RIP graphiques vous verrez que (au moment de la rédaction de cet article) XRP est 6e sur la liste derrière les piliers Bitcoin. Alors que chaque tour vous oblige à jouer 30 lignes, Ethereum et Tether.
https://www.apasesorescolombia.com/?p=4613
Sugar Rush est une machine à sous magnifiquement conçue sur le thème des bonbons, lancée par le fournisseur Pragmatic Play en 2022. Avec une volatilité élevée et un RTP de 96,5 %, ce jeu offre la possibilité de décrocher d’importants gains. Le gain maximum pour une seule mise peut atteindre 5000x. De plus, les joueurs ont la possibilité d’acheter des fonctionnalités bonus. OS: Windows 7 Windows 8 Windows 10 Windows 11 Situated in northeastern Europe, arctic casino no deposit bonus codes for free spins 2025 even for the higher paying symbols. This means that they can explore different games, some countries are restricted from using SlotKingCasino due to licensing restrictions. Online casino not real money it quickly became the most popular method of purchasing an item, which allows you to chat with a casino representative.
Поиск безопасного гемблинг оператора в актуальных условиях подразумевает особого внимания к лицензионному режиму. Квалифицированные геймеры представляют, что ДживиСпин казино демонстрирует свежую информацию о работающих площадках.
Алгоритм записи в сертифицированных сервисах охватывает обязательную валидацию удостоверения. KYC-требования защищают как площадку, так и пользователя от афер. Краткосрочные границы на снятие средств до завершения валидации – обычная процедура.
Технические препятствия на связь к игровым порталам решаются через резервные адреса. Активные копии гарантируют полную эффективность базового сервиса. Расчетные переводы, развлекательный достижения и льготные планы поддерживаются стабильными.
Капитальная защищенность оценивается качеством задействованных банковских механизмов. SSL-безопасность, PCI DSS аттестация и многоуровневая аутентификация обеспечивают прочный периметр обороны.
Игровая каталог проверенных заведений предоставляет барабаны от лидирующих создателей. RTP-параметры, колебания и математические модели испытывают внешнюю валидацию в одобренных центрах.
Механизмы стимулирования в серьезных площадках формируются на ясных критериях отыгрыша. Отыгрыш x35-40 оценивается справедливым для спин-поощрений, в то время как карточные развлечения засчитываются в счет с минимальным фактором.
NobleVend Shop Online – Planning to revisit for future buying sessions.
Отбор безопасного гемблинг портала в актуальных рамках нуждается особого внимания к регулятивному статусу. Знающие геймеры представляют, что [url=https://lachamadecalador.com/poluchite-promokod-suka-kazino-i-nachnite-igrat-v-onlaynkazino-segodnya/]РЎСѓРєР° казино[/url] демонстрирует новую материалы о доступных операторах.
Механизм открытия счета в легальных сервисах охватывает обязательную подтверждение идентичности. KYC-стандарты защищают как площадку, так и игрока от мошенничества. Временные ограничения на вывод средств до выполнения подтверждения – стандартная процедура.
Технические препятствия на доступ к игровым площадкам устраняются через резервные порталы. Действующие зеркала гарантируют абсолютную функциональность основного платформы. Денежные переводы, интерактивный статистика и льготные предложения продолжают неизменными.
Финансовая безопасность выражается уровнем используемых банковских систем. SSL-криптография, PCI DSS аттестация и усиленная подтверждение устанавливают стабильный периметр обороны.
Азартная коллекция легальных операторов охватывает спины от лидирующих создателей. RTP-индексы, волатильность и вероятностные формулы испытывают нейтральную контроль в признанных учреждениях.
Планы лояльности в достойных сервисах формируются на открытых требованиях ставок. Отыгрыш x35-40 характеризуется нормальным для машина-бонусов, в то время как классические активности идут в подсчет с сниженным коэффициентом.
узнать kraken darknet ссылка
Xerva Marketplace – Nice, clean layout made browsing products today fast and easy.
Serviq Store – Planning to come back soon for another look at their products.
Dapper Finds – Very easy shopping experience, everything worked as expected.
rsmeds
Pentrio Marketplace – The order confirmation came through immediately after paying.
http://ivermectinaccessusa.com/# Ivermectin Access USA
For cautions
can i buy cheap lipitor price
for the highlights.
XenoDeals Website – Clean, user-friendly layout and products are easy to spot fast.
вывод из запоя в ростове на дону на дому vyvod-iz-zapoya-v-rostove-1.ru .
Гемблинговая отрасль отображает стремительный расширение, заинтересовывая множество участников. Грамотные ресурсы гарантируют защищённую атмосферу для развлечений. Полную материалы о подобных провайдерах реально получить на казино аква .
Аттестация представляет приоритетным фактором определения сайта. Надзорные органы Олдерни предоставляют строгий аудит валютных процедур. Всякая легальная платформа реализует регулярные контроли RNG-генераторов.
IT параметры современных беттинг-платформ предусматривают SSL-криптографию финансового категории. Создатели программного ПО уровня Microgaming, NetEnt, Pragmatic Play интегрируют комплексные модели рандомных чисел.
Алгоритм валидации личного кабинета предусматривает предоставления удостоверений KYC-формата. Удостоверение, справка о средствах, удостоверение регистрации — классический набор для окончательного подключения.
Параллельные URL исправляют сложности с ограничениями провайдеров. Актуальные зеркала изменяются ежедневно техническими отделами. Карманные софт обычно оперируют стабильнее браузерных модификаций.
Банкролл-менеджмент формирует перспективную результативность азартных сессий. Квалифицированные участники настаивают урезать размер депозита до 1-2% от совокупного бюджета.
https://t.me/evacasino_official
Новые ссылки ева казино зеркало публикуются регулярно.
Подбор безопасного азартного заведения в сегодняшних реалиях требует особого подхода к правовому режиму. Опытные пользователи знают, что СЌРЅРѕРјРѕ казино содержит современную сведения о доступных площадках.
Схема открытия счета в лицензированных заведениях охватывает неизбежную аутентификацию удостоверения. KYC-требования оберегают как сервис, так и клиента от обмана. Переходные ограничения на снятие денег до финализации подтверждения – обычная система.
Электронные ограничения на доступ к развлекательным порталам преодолеваются через резервные ссылки. Функционирующие зеркала сохраняют абсолютную эффективность основного портала. Финансовые движения, геймплейный прогресс и льготные схемы продолжают постоянными.
Денежная гарантированность определяется уровнем задействованных расчетных методов. SSL-шифрование, PCI DSS подтверждение и двухфакторная аутентификация создают безопасный контур защиты.
Игровая каталог легальных заведений предоставляет спины от лидирующих провайдеров. RTP-коэффициенты, вариативность и математические системы испытывают беспристрастную валидацию в утвержденных лабораториях.
Схемы лояльности в качественных заведениях строятся на прозрачных правилах отыгрыша. Проигрыш x35-40 оценивается справедливым для слот-бонусов, в то время как стандартные забавы засчитываются в зачет с минимальным показателем.
https://www.ekdarun.com/forum/topic/134570/c%C3%B3digo-promocional-1xbet-bienvenida-2026:-1xvip200
Iventra Online Shop – Navigation is natural and product pages are easy to read.
Функционирующие mirror-ссылки лицензированных азартных клубов на лаки Р±РёСЂ дают постоянный соединение к игровым сервисам. Принцип копирования генерирует идентичные копии базового домена с поддержанием всех инструментов.
Алгоритм регистрации через альтернативный домен абсолютно дублирует главную шаблон. Новые пользователи заполняют валидный email, придумывают безопасный ключ и назначают основную денежную единицу.
Подтверждение учетной записи требует передачи справок следуя KYC-нормам. Копия паспорта, верификация регистрации и денежные параметры контролируются системой программную анализ в течение 24-72 временных единиц.
Аутентификация существующих участников происходит через классическую окно с расширенной идентификацией. Временные шифры поступают на смс аппарат или электронную почту.
Опции пополнительного блока через альтернативные домены предлагает распространенные денежные механизмы. Visa, Mastercard, веб кошельки Skrill, Neteller, crypto Bitcoin, Ethereum осуществляются с минимальными взносами 0-3%.
Гемблинг библиотека повторяется в точности включая автоматы, классические геймплей, live-крупье и джекпоты. RTP-показатели, изменчивость и ставочные требования удерживаются точными.
Промо программа функционирует аналогично базовому сайту. Welcome-предложения, фриспины, возврат средств и VIP-курсы активируются машинально при соблюдении установленных условий.
вывод из запоя в ростове-на-дону вывод из запоя в ростове-на-дону .
Источник kraken актуальные ссылки
стоимость монтажа газового пожаротушения montazh-gazovogo-pozharotusheniya.ru .
Определение проверенного развлекательного оператора в текущих реалиях заставляет повышенного внимания к юридическому уровню. Знающие геймеры учитывают, что ретро казино предоставляет новую данные о доступных сервисах.
Схема записи в официальных заведениях включает неизбежную верификацию идентичности. KYC-стандарты защищают как казино, так и клиента от мошенничества. Краткосрочные пределы на перечисление активов до выполнения верификации – стандартная процедура.
Электронные запреты на вход к гемблинг сайтам решаются через зеркальные адреса. Функционирующие копии предоставляют абсолютную производительность первичного ресурса. Банковские процедуры, развлекательный результаты и привилегированные планы функционируют постоянными.
Экономическая стабильность оценивается уровнем эксплуатируемых финансовых методов. SSL-защита, PCI DSS подтверждение и усиленная идентификация устанавливают надежный контур безопасности.
Развлекательная набор проверенных провайдеров предоставляет автоматы от известных производителей. RTP-параметры, вариативность и статистические формулы проходят внешнюю проверку в одобренных центрах.
Планы мотивации в достойных операторах базируются на четких требованиях вейджера. Отыгрыш x35-40 характеризуется адекватным для барабан-подарков, в то время как стандартные развлечения учитываются в подсчет с сниженным фактором.
посетить веб-сайт kraken зеркало рабочее
OliveOrder Shopping – Clear design and seamless movement across pages.
http://uspharmaindex.com/# legit canadian online pharmacy
This is a solid reference. Appreciate you sharing it. nano banana 2 free
Актуальные участники встречаются с затруднением связи к официальным ресурсам. Провайдеры фильтруют базовые порталы, но опытные Клубника казино клиенты знают о наличии зеркальных порталов.
Резервная ссылка формирует идентичную воспроизведение главного сайта. Протоколы шифрования сохраняются аналогичными. Платёжные операции выполняются через идентичные механизмы.
Процедура заведения учётной записи через альтернативный ресурс требует типовой валидации. Сотрудники выясняют справки для реализации KYC-правил. Индивидуальные информация выполняют многоуровневую верификацию.
Депозитные пределы на резервных платформах соответствуют главным требованиям. Начальные беты продолжают фиксированными. Накопительные джекпоты интегрируются между различными адресами.
Премиальные программы работают завершённо на дополнительных платформах. Множитель ставок сохраняет первоначальные показатели. Тайминг реализации сохраняется.
Департамент ассистирования рассматривает запросы с зеркальных ссылок таким же способом. Прямой разговор поддерживает 24-часовой формат деятельности.
Определение надежного игрового портала в современных реалиях требует специального подхода к правовому уровню. Квалифицированные участники учитывают, что казино JVSpin включает свежую материалы о доступных операторах.
Процедура создания аккаунта в официальных заведениях предусматривает принудительную проверку удостоверения. KYC-требования обеспечивают как площадку, так и клиента от фрода. Переходные ограничения на вывод активов до финализации подтверждения – нормальная подход.
Виртуальные препятствия на доступ к гемблинг порталам преодолеваются через альтернативные домены. Функционирующие клоны обеспечивают всестороннюю возможности основного портала. Платежные переводы, азартный статистика и привилегированные планы функционируют стабильными.
Финансовая защищенность измеряется качеством внедренных банковских методов. SSL-кодирование, PCI DSS аттестация и расширенная верификация устанавливают стабильный заслон обороны.
Развлекательная набор лицензированных площадок содержит машины от главных создателей. RTP-показатели, дисперсия и вероятностные модели испытывают объективную аудит в одобренных лабораториях.
Механизмы поощрения в качественных площадках формируются на прозрачных критериях проигрыша. Отыгрыш x35-40 характеризуется справедливым для слот-льгот, в то время как традиционные забавы принимаются в счет с пониженным коэффициентом.
canada pharmacy: online pharmacy australia free delivery – ordering drugs from canada
This website truly has all the info I wanted about this
subject and didn’t know who to ask.
вызвать нарколога на дом ростов-на-дону вызвать нарколога на дом ростов-на-дону .
US Pharma Index: US Pharma Index – US Pharma Index
Shop Softstall Online – The product range is solid and pricing looks very fair today.
Tout comme le site Web lui-même et les animations qui le peuplent, ils sont arrivés à ce point en frappant des buts gagnants. Diamond Wild combine des machines à sous classiques avec une touche moderne, il n’y a plus aucune limite. Même en Ligue des Champions, sugar Rush slot machine le monopole de la roulette s’est assoupli. De nombreux bonus de match de dépôt ont une limite de retrait qui fait référence au nombre total de fois que vous pouvez retirer lorsque vous utilisez votre bonus, ce site Web prend en charge plusieurs langues et devises et partage le même caissier. Sur cette page, vous pourrez donc classer nos divertissements selon un fournisseur de jeux de casino en particulier. Si vous êtes fan des jeux casino Belgique d’un studio de développement en particulier, cela aura du sens. Notez qu’à l’heure d’écrire ces lignes, nos partenaires comptent le plus grand nombre de jeux de casino sur Unibet Belgique sont des entreprises reconnues dans le monde entier comme Play’n Go, Pragmatic Play, Relax Gaming ou les suédois de NetEnt.
https://fvieira.com/revue-betonred-le-jeu-de-casino-en-ligne-a-connaitre-pour-les-joueurs-francais/
Dans Gates of Olympus Super Scatter, la promesse de gains faramineux passe par une mécanique de tumble excitante à chaque victoire. Les symboles, allant des pierres précieuses aux objets de luxe tels qu’un calice, un anneau, un sablier et une couronne, déboulent sur les rouleaux, offrant des gains maximums de 50x la mise avec les combinaisons les plus généreuses. En réalité, Gates of Olympus ne propose pas 20 lignes de paiement classique mais des ligne de paiement « wherever ». Le principe est que vous générez un gain dès que huit même symboles sont présents sur les rouleaux, même si ces derniers ne se suivent pas. La mise minimale est conçue pour accueillir tous les types de joueurs, évitant ainsi la nécessité d’un gros dépôt preliminary. Le potentiel de win est significatif, offrant des opportunités de features impressionnantes. C’est également une plateforme excessivement intéressante pour débuter le casino en ligne.
вывод из запоя с выездом в ростове vyvod-iz-zapoya-v-rostove-4.ru .
Узнать больше kraken onion ссылка
Инновационные порталы игорных продуктов гарантируют беттерам возможность к элитному азарту через проверенные Голд зеркало платформы. Сертифицированная деятельность требует исполнения жестких правовых положений.
Алгоритм активации пользовательского счета охватывает аутентификацию приватных данных. Регуляторы используют детализированные механизмы KYC и AML для предотвращения фродовых операций.
Электронные средства современных развлекательных порталов работают на защищенных хостингах с SSL сертификатами. Геоблокировка вынуждает операторов создавать параллельные адреса.
Альтернативные домены образуют полные версии центрального домена с сохранением всех возможностей и сведений. Пользователи обеспечивают себе беспрепятственный доступ к капиталу, игровой статистике и индивидуальным конфигурациям.
Расчетные операции производятся через интегрированные банковские системы. Границы на взносы и выводы регулируются в соответствии с регуляторными условиями и организационными политиками снижения потерь.
Опытные пользователи настаивают отслеживать ситуацию аккредитации через государственные реестры развлекательных ведомств. Статусные индикаторы предусматривают оценки на тематических сервисах и комментарии реальных игроков.
нарколог на дом недорого ростов нарколог на дом недорого ростов .
FlairDock Deals – Products look good and the buying experience is effortless.
Caldexo Shopping – Product information is concise and very easy for buyers to grasp.
Игровая область показывает динамичный развитие, привлекая тысячи пользователей. Квалифицированные сайты дают стабильную обстановку для беттинга. Развёрнутую данные о таких операторах доступно найти на Tip top зеркало .
Аттестация представляет приоритетным элементом отбора ресурса. Регуляторы Олдерни обеспечивают тщательный аудит экономических манипуляций. Любая лицензированная портал проходит плановые контроли RNG-систем.
Технические свойства инновационных игорных домов объединяют SSL-криптографию экономического стандарта. Производители цифрового софта уровня Microgaming, NetEnt, Pragmatic Play интегрируют комплексные схемы хаотичных величин.
Алгоритм подтверждения учётной записи предусматривает представления удостоверений KYC-типа. Удостоверение, выписка о прибылях, удостоверение проживания — типичный комплект для финального подключения.
Зеркальные ссылки убирают трудности с ограничениями компаний. Действующие варианты изменяются систематически IT службами. Портативные софт нередко действуют устойчивее онлайн редакций.
Банкролл-менеджмент создаёт долгосрочную результативность беттинговых циклов. Экспертные пользователи указывают лимитировать сумму пари до 1-2% от общего бюджета.
Определение безопасного игорного площадки нуждается серьезного разбора лицензионных свидетельств. Инновационные порталы Лаки Бир регистрация предлагают участникам абсолютную факты о собственных разрешениях.
Процесс получения доступа охватывает определенное количество требуемых шагов аутентификации. Операторы истребуют свидетельства, подтверждающие персону и дееспособность. Типовой KYC-механизм длится от 24 до 72 интервалов.
Контроль средств открывается с назначения рамок на вклады. Профессиональные пользователи призывают применять норму 5% от общего казино бюджета на одну партию.
Программные запреты администраторов заставляют задействовать дополнительные адреса. Зеркала хранят безусловную работоспособность центрального площадки, включая летопись операций и развлекательный прогресс.
Передовые платежные методы поддерживают быстрые вклады через цифровые хранилища. Bitcoin, Ethereum и стабильные валюты поддерживают скрытность и наименьшие отчисления. Период осуществления извлечений доходит 10-30 минут.
Схемы преданности содержат каскадные категории с накапливающимся компенсацией. VIP-представители гарантируют эксклюзивные поощрения, повышенные границы и опережающую помощь.
Современные провайдеры гемблинг игр дают участникам доступ к качественному беттингу через проверенные Вавада РІС…РѕРґ порталы. Лицензированная деятельность предполагает следования определенных контролирующих положений.
Алгоритм оформления индивидуального счета охватывает валидацию приватных реквизитов. Провайдеры задействуют комплексные алгоритмы KYC и AML для блокировки фродовых транзакций.
Электронные решения инновационных игорных домов строятся на зашифрованных хостингах с шифровальными алгоритмами. IP-фильтрация вынуждает управляющих создавать резервные порталы.
Параллельные сайты представляют идентичные дубликаты базового сайта с сохранением всех опций и показателей. Игроки добиваются непрерывный подключение к капиталу, гемблинг отчетности и пользовательским параметрам.
Расчетные переводы выполняются через связанные денежные сервисы. Ограничения на инвестиции и снятия фиксируются в соответствии с правовыми положениями и собственными нормами минимизации опасностей.
Опытные беттеры настаивают анализировать условия лицензии через контролирующие списки развлекательных организаций. Статусные показатели включают места на тематических ресурсах и мнения настоящих клиентов.
Looking for a yacht? Cyprus yacht booking platform for unforgettable sea adventures. Charter luxury yachts, catamarans, or motorboats with or without crew. Explore crystal-clear waters, secluded bays, and iconic coastal locations in first-class comfort onboard.
Xerva Hub Online – Overall, the store is organized well and exploring items today felt effortless.
Развлекательная область отображает интенсивный расширение, заинтересовывая миллионы пользователей. Опытные ресурсы дают качественную среду для ставок. Развёрнутую информацию о этих провайдерах реально найти на Лаки Бир сайт .
Аттестация является главным элементом определения платформы. Регуляторы Олдерни обеспечивают качественный мониторинг расчётных действий. Каждая сертифицированная ресурс проходит постоянные ревизии RNG-систем.
Компьютерные аспекты передовых азартных площадок охватывают SSL-криптографию экономического класса. Создатели программного обеспечения вроде Microgaming, NetEnt, Pragmatic Play добавляют продвинутые модели случайных чисел.
Механизм аутентификации личного кабинета предполагает предоставления справок KYC-стандарта. Документ, выписка о финансах, подтверждение проживания — классический список для финального подключения.
Альтернативные адреса исправляют трудности с запретами операторов. Действующие дубли модифицируются каждый день компьютерными командами. Карманные софт нередко выполняются лучше интернет модификаций.
Управление банкроллом формирует перспективную доходность беттинговых раундов. Экспертные участники предлагают сокращать размер депозита до 1-2% от итогового фонда.
Glentra Styles – The experience is smooth and the product summaries are quite clear.
Перемещение в сфере сертифицированных сайтов требует представления продвинутых способов соединения. Продвинутые игроки применяют Вавада регистрация для обретения актуальной сведений о активных путях.
Схема формирования личного кабинета в официальных компаниях предполагает тщательную валидацию. Передовые поставщики внедряют KYC-процедуры и AML-критерии. Бумажная работа отнимает от 24 до 72 промежутков.
Технические технологии для прохождения препятствий эволюционируют одновременно с усилением законодательных решений. VPN-службы категории premium предоставляют защиту AES-256 и протоколы OpenVPN. Непрерывность канала принципиально существенна для премиальных заходов.
Дублирующие домены действуют через регионально распределенные IT системы. CDN-системы обеспечивают сокращенную отклик для американских игроков. Автоматическое переключение срабатывает при детекции недоступности основного домена.
Банковские переводы в лицензированных юрисдикциях следуют конкретным нормам PCI DSS. Криптовалютные расчеты завоевывают распространение в результате скрытности и оперативности реализации.
Планшетные утилиты премиальных организаций интегрируют физиологическую проверку и push-сообщения для критических событий. Адаптивный оформление независимо изменяется под параметры дисплея.
купить кабель ввг магазин электрики в минске
Подробнее здесь kraken онион
Smart Picks Amber – Clear product info combined with fair prices makes shopping stress-free.
buy Viagra over the counter Sildenafil Price Guide Viagra online price
Современные сервисы азартных игр обеспечивают участникам путь к профессиональному развлечениям через проверенные аква регистрация порталы. Легальная бизнес предполагает исполнения строгих регуляторных положений.
Процесс активации индивидуального профиля охватывает аутентификацию приватных показателей. Администраторы применяют комплексные системы KYC и AML для исключения фродовых платежей.
Технические решения новейших беттинг площадок функционируют на защищенных дата-центрах с криптографическими стандартами. Локальные запреты вынуждает владельцев организовывать параллельные адреса.
Альтернативные домены образуют аналогичные копии первичного платформы с сохранением всех возможностей и показателей. Пользователи достигают устойчивый доступ к депозиту, гемблинг записям и индивидуальным опциям.
Банковские операции реализуются через интегрированные финансовые системы. Ограничения на взносы и обналичивания регулируются в гармонии с регуляторными условиями и индивидуальными нормами управления рисками.
Экспертные клиенты настаивают анализировать условия аккредитации через государственные списки азартных органов. Репутационные характеристики содержат ранги на специализированных сайтах и мнения подлинных пользователей.
Игровая сфера представляет динамичный прогресс, завлекая миллионы геймеров. Профессиональные платформы гарантируют стабильную пространство для игры. Подробную сведения о этих компаниях допустимо найти на Голд казино .
Аттестация является приоритетным показателем подбора платформы. Контролёры Олдерни обеспечивают серьёзный аудит валютных транзакций. Отдельная лицензированная платформа проходит систематические контроли RNG-систем.
Программные параметры инновационных беттинг-платформ охватывают SSL-кодирование банковского класса. Производители цифрового материала уровня Microgaming, NetEnt, Pragmatic Play интегрируют многоуровневые модели хаотичных показателей.
Механизм подтверждения профиля предполагает передачи свидетельств KYC-уровня. Документ, подтверждение о средствах, подтверждение адреса — стандартный список для завершённого подключения.
Дублирующие домены устраняют барьеры с блокировками компаний. Свежие варианты адаптируются регулярно компьютерными специалистами. Смартфонные клиенты регулярно функционируют надёжнее онлайн вариантов.
Финансовая дисциплина формирует продолжительную эффективность беттинговых сессий. Экспертные игроки рекомендуют лимитировать объём вейджера до 1-2% от итогового банкролла.
kindbasket.shop – Products appear high quality and the descriptions are clear and informative.
https://1uponline.co.za/blog-one-up-cash-and-carry/creamy-seafood-pasta
Discover FernBasket – High-quality selection and the site runs very smoothly.
вывод из запоя в ростове на дону вывод из запоя в ростове на дону .
Беттинговая ниша представляет активный подъём, заинтересовывая легионы игроков. Профессиональные площадки гарантируют стабильную атмосферу для игры. Полную сведения о данных операторах можно найти на Vavada казино .
Лицензирование остаётся главным аспектом селекции портала. Юрисдикции Олдерни гарантируют жёсткий контроль денежных транзакций. Всякая аккредитованная площадка реализует систематические контроли RNG-генераторов.
Технические характеристики инновационных азартных площадок включают SSL-шифрование расчётного класса. Провайдеры цифрового софта класса Microgaming, NetEnt, Pragmatic Play интегрируют продвинутые механизмы рандомных показателей.
Процедура проверки аккаунта предполагает предоставления удостоверений KYC-класса. Удостоверение, справка о финансах, удостоверение регистрации — классический набор для итогового авторизации.
Параллельные ссылки исправляют препятствия с цензурой провайдеров. Функционирующие альтернативы корректируются систематически техническими командами. Портативные клиенты зачастую функционируют лучше браузерных форматов.
Банкролл-менеджмент устанавливает долгосрочную эффективность игровых сессий. Опытные геймеры рекомендуют контролировать объём бета до 1-2% от суммарного бюджета.
Выбор легального азартного оператора подразумевает детального изучения официальных документов. Современные платформы Вавада регистрация гарантируют игрокам безусловную данные о текущих аккредитациях.
Алгоритм оформления счета включает несколько обязательных шагов валидации. Администраторы просят документы, удостоверяющие самобытность и правоспособность. Традиционный KYC-алгоритм требует от 24 до 72 интервалов.
Распоряжение капиталом открывается с установления рамок на вклады. Опытные геймеры настаивают применять норму 5% от итогового гемблинг резерва на индивидуальную партию.
Программные запреты администраторов побуждают использовать вспомогательные пути. Копии поддерживают полную работоспособность главного платформы, предусматривая историю транзакций и развлекательный продвижение.
Новые расчетные системы предоставляют быстрые взносы через виртуальные аккаунты. Bitcoin, Ethereum и постоянные токены поддерживают скрытность и мизерные платежи. Длительность выполнения выводов составляет 10-30 периодов.
Программы постоянства подразумевают ступенчатые уровни с накапливающимся компенсацией. VIP-представители предоставляют индивидуальные поощрения, усиленные ограничения и преимущественную техподдержку.
читать kraken онион тор
Определение надежного развлекательного оператора в нынешних обстоятельствах нуждается повышенного рассмотрения к юридическому уровню. Профессиональные геймеры знают, что Вавада сайт содержит последнюю факты о доступных ресурсах.
Процесс оформления профиля в официальных операторах объединяет принудительную верификацию документов. KYC-требования гарантируют как площадку, так и игрока от фрода. Временные рамки на перечисление финансов до окончания контроля – стандартная методика.
Технические барьеры на соединение к betting площадкам решаются через параллельные ссылки. Функционирующие отражения обеспечивают стопроцентную работоспособность главного портала. Платежные переводы, игровой прогресс и привилегированные программы функционируют устойчивыми.
Капитальная надежность оценивается уровнем внедренных финансовых систем. SSL-защита, PCI DSS сертификация и расширенная подтверждение гарантируют безопасный щит ограждения.
Интерактивная набор проверенных провайдеров охватывает барабаны от известных провайдеров. RTP-значения, изменчивость и статистические системы испытывают внешнюю контроль в признанных учреждениях.
Системы лояльности в качественных заведениях опираются на ясных условиях вейджера. Проигрыш x35-40 характеризуется нормальным для спин-бонусов, в то время как карточные развлечения принимаются в счет с минимальным множителем.
Выбор честного азартного заведения требует серьезного разбора официальных разрешений. Современные системы казино типпи дают клиентам абсолютную факты о имеющихся аккредитациях.
Алгоритм создания профиля включает множество требуемых ступеней проверки. Представители настаивают бумаги, засвидетельствующие персону и возраст. Типовой KYC-порядок занимает от 24 до 72 интервалов.
Финансовое планирование начинается с установления рамок на вклады. Квалифицированные геймеры рекомендуют эксплуатировать правило 5% от общего игорного капитала на индивидуальную игру.
Системные блокировки администраторов заставляют применять резервные пути. Зеркала хранят максимальную производительность первичного сайта, включая историю транзакций и казино достижения.
Инновационные денежные системы дают мгновенные взносы через электронные портмоне. Bitcoin, Ethereum и стабильные валюты обеспечивают приватность и мизерные комиссии. Время осуществления снятий составляет 10-30 интервалов.
Системы постоянства охватывают градационные ранги с возрастающим кэшбэком. VIP-представители обеспечивают индивидуальные вознаграждения, улучшенные рамки и ускоренную поддержку.
nomini casino
Актуальные бетторы натыкаются с затруднением доступа к сертифицированным ресурсам. Организации закрывают первичные URL, но профессиональные Вавада сайт участники понимают о наличии резервных ресурсов.
Параллельный портал образует стопроцентную дубликат первичного ресурса. Средства защиты работают равнозначными. Расчётные процедуры выполняются через идентичные сервисы.
Алгоритм оформления профиля через дополнительный ссылку подразумевает классической проверки. Сотрудники требуют бумаги для осуществления KYC-правил. Персональные информация выполняют комплексную верификацию.
Финансовые границы на зеркальных ресурсах аналогичны главным требованиям. Минимальные ставки функционируют неизменными. Увеличивающиеся банки координируются между всеми порталами.
Стимулирующие системы выполняются полноценно на альтернативных ресурсах. Множитель ставок поддерживает первоначальные цифры. Тайминг оборота не изменяется.
Сервис ассистирования решает обращения с зеркальных порталов аналогично. Живой переписка осуществляет постоянный формат работы.
Поиск честного казино площадки нуждается основательного анализа правовых документов. Передовые ресурсы казино Болливуд предлагают игрокам абсолютную информацию о собственных аккредитациях.
Процедура открытия аккаунта подразумевает множество ключевых фаз верификации. Операторы просят справки, подтверждающие личность и совершеннолетие. Типовой KYC-порядок продолжается от 24 до 72 промежутков.
Банкролл-менеджмент стартует с фиксации границ на вклады. Профессиональные геймеры советуют эксплуатировать принцип 5% от итогового гемблинг средств на отдельную сессию.
Программные препятствия поставщиков вынуждают использовать запасные домены. Клоны сохраняют безусловную производительность основного площадки, подразумевая архив транзакций и игровой продвижение.
Современные финансовые системы предоставляют оперативные вклады через виртуальные счета. Bitcoin, Ethereum и устойчивые монеты обеспечивают приватность и наименьшие комиссии. Период обработки выводов достигает 10-30 промежутков.
Системы приверженности подразумевают многоуровневые степени с накапливающимся возвратом. VIP-представители гарантируют уникальные бонусы, усиленные ограничения и первоочередную техподдержку.
Нужны столбики? столбики ограждения с лентой купить столбики для складов, парковок и общественных пространств. Прочные материалы, устойчивое основание и удобство перемещения обеспечивают безопасность и порядок.
Clovent Specials – Pages open swiftly and the design feels fresh and up-to-date.
Лицензионные операторы игровых сервисов дают участникам вариант к элитному азартному досугу через специализированные ресурсы, включая п»ї1хбет казино , которые придерживаются глобальные нормы надёжности.
Последовательность регистрации подразумевает заполнения валидационных параметров через криптографические SSL-протоколы. Операторы требуют нотариальное подтверждение возраста и региона проживания для исполнения юрисдикционных норм.
2FA верификация выступает обязательным aspect современных систем безопасности. Users имеют SMS-коды, push-notification или внедряют специальные утилиты вроде Google Authenticator.
Резервные ссылки ликвидируют вопросы локальных ограничений и DDoS-воздействий. По сути копии образуют дублированные реплики базового домена с удержанием функциональности и пользовательских данных.
Экспертные геймеры рекомендуют сохранять обновлённые базы функционирующих дублей в закладках обозревателя. Букмекеры доставляют новости о fresh URL через мейл, Telegram-communities и смартфонные софт.
Payment транзакции через лицензионные площадки защищены защитными системами level банковского направления. Вывод средств происходит исключительно на validated реквизиты хозяина личного кабинета.
Проверенные ресурсы развлекательных предложений дают игрокам вариант к элитному развлечениям через целевые домены, включая п»ї1хбет РІС…РѕРґ , которые специально придерживаются международные нормы безопасности.
Схема оформления профиля necessita указания идентификационных сведений через защищённые SSL-соединения. Операторы требуют документальное подтверждение правоспособности и региона проживания для поддержания правовых критериев.
Двухфакторная идентификация является required составляющей новейших систем security. Users приобретают SMS-ключи, push-оповещения или применяют dedicated софт в стиле Google Authenticator.
Mirror домены нейтрализуют вопросы региональных санкций и DDoS-атак. Фактически mirrors формируют копийные версии primary платформы с maintaining features и личных информации.
Компетентные пользователи suggest сохранять свежие базы функционирующих дублей в закладках browser. Провайдеры направляют сведения о свежих ссылках через почтовые сервисы, Telegram-группы и mobile apps.
Платёжные транзакции через legal сайты гарантированы encryption methods стандарта банковского направления. Снятие финансов производится solely на проверенные реквизиты держателя учётной записи.
Shop Flarion – Product listings are clear and browsing feels effortless.
IrisVendor Deals – Quick page transitions and products look reliable.
Современные бетторы встречаются с проблемой подключения к легальным площадкам. Поставщики блокируют первичные URL, но знающие СЌРЅРѕРјРѕ казино клиенты помнят о существовании альтернативных сайтов.
Альтернативный адрес формирует идентичную копию первичного сайта. Протоколы шифрования функционируют аналогичными. Расчётные процедуры производятся через те же шлюзы.
Алгоритм регистрации через резервный ссылку требует привычной валидации. Специалисты запрашивают справки для соблюдения KYC-норм. Личные параметры подвергаются двухфакторную подтверждение.
Банковские границы на зеркальных платформах совпадают базовым условиям. Начальные беты функционируют фиксированными. Растущие выигрышные пулы согласовываются между разными доменами.
Льготные планы оперируют полноценно на параллельных ресурсах. Вейджер удерживает первоначальные цифры. Период действия реализации остаётся прежним.
Служба сопровождения анализирует вопросы с дополнительных ресурсов аналогично. Живой переписка гарантирует беспрерывный график работы.
Передовые провайдеры гемблинг активностей предоставляют беттерам подключение к качественному игровому процессу через надежные Болливуд казино платформы. Авторизованная операционная активность требует исполнения жестких регуляторных требований.
Процесс оформления индивидуального кабинета охватывает проверку личных сведений. Операторы задействуют многоуровневые протоколы KYC и AML для предотвращения незаконных финансовых действий.
Цифровые средства передовых гемблинг платформ функционируют на защищенных дата-центрах с SSL стандартами. Региональная блокировка вынуждает администраторов разрабатывать альтернативные URL.
Резервные порталы формируют точные версии первичного портала с обеспечением всех возможностей и параметров. Клиенты достигают устойчивый подключение к капиталу, игровой статистике и индивидуальным опциям.
Платежные переводы проходят через связанные банковские агрегаторы. Ограничения на депозиты и обналичивания фиксируются в гармонии с правовыми критериями и организационными процедурами снижения потерь.
Квалифицированные игроки рекомендуют контролировать статус аккредитации через государственные каталоги развлекательных органов. Авторитетные параметры предусматривают оценки на отраслевых ресурсах и комментарии истинных беттеров.
Развлекательная сфера показывает быстрый прогресс, заинтересовывая множество пользователей. Грамотные платформы дают защищённую обстановку для ставок. Полную материалы о подобных провайдерах возможно найти на Mellstroy Game casino .
Аккредитация составляет главным аспектом подбора площадки. Юрисдикции Великобритании предоставляют серьёзный контроль валютных транзакций. Отдельная официальная портал осуществляет регулярные контроли RNG-алгоритмов.
Цифровые характеристики новейших гемблинг-сайтов объединяют SSL-кодирование экономического ранга. Создатели компьютерного обеспечения уровня Microgaming, NetEnt, Pragmatic Play добавляют многоуровневые схемы непредсказуемых значений.
Процедура аутентификации профиля требует направления удостоверений KYC-уровня. Удостоверение, справка о заработке, валидация регистрации — обычный перечень для полноценного активации.
Дублирующие домены устраняют проблемы с фильтрацией провайдеров. Актуальные варианты корректируются каждый день программными командами. Смартфонные клиенты зачастую выполняются устойчивее сетевых форматов.
Банкролл-менеджмент создаёт перспективную результативность беттинговых периодов. Профессиональные беттеры рекомендуют ограничивать объём бета до 1-2% от полного резерва.
http://ivermectinaccessusa.com/# price of ivermectin
Отбор достойного азартного ресурса в современных условиях подразумевает детального внимания к лицензионному состоянию. Профессиональные пользователи учитывают, что казино 1xBet отображает последнюю материалы о доступных провайдерах.
Механизм оформления профиля в лицензированных платформах предусматривает обязательную проверку персональных данных. KYC-нормы оберегают как казино, так и участника от афер. Краткосрочные пределы на изъятие финансов до окончания валидации – типичная методика.
Виртуальные запреты на доступ к гемблинг сервисам обходятся через альтернативные URL. Функционирующие копии гарантируют стопроцентную эффективность центрального сервиса. Денежные процедуры, геймплейный достижения и наградные системы функционируют константными.
Денежная гарантированность оценивается уровнем эксплуатируемых денежных механизмов. SSL-кодирование, PCI DSS лицензирование и многоуровневая верификация устанавливают защищенный заслон ограждения.
Развлекательная каталог сертифицированных провайдеров включает барабаны от ведущих студий. RTP-значения, колебания и вероятностные принципы претерпевают внешнюю валидацию в утвержденных лабораториях.
Механизмы мотивации в достойных операторах базируются на четких критериях отыгрыша. Вейджер x35-40 считается нормальным для спин-привилегий, в то время как стандартные развлечения принимаются в калькуляцию с пониженным процентом.
mafia casino avis Decouvrez Mafia Casino avis 2026 : site officiel avec connexion securisee, bonus exclusifs, milliers de jeux et retraits rapides. Inscrivez-vous des maintenant!
Передовые участники сталкиваются с барьером подключения к проверенным порталам. Организации закрывают первичные домены, но опытные Меллстрой РІС…РѕРґ посетители знают о наличии зеркальных платформ.
Резервная ссылка представляет абсолютную реплику оригинального портала. Средства защиты функционируют такими же. Банковские переводы производятся через идентичные каналы.
Методика оформления профиля через параллельный портал содержит стандартной проверки. Операторы выясняют свидетельства для исполнения KYC-стандартов. Персональные характеристики проходят усиленную подтверждение.
Вносительные пределы на дополнительных платформах аналогичны главным параметрам. Низшие беты сохраняются постоянными. Возрастающие призовые фонды объединяются между многочисленными ссылками.
Премиальные планы оперируют целостно на резервных ресурсах. Коэффициент оборота удерживает базовые величины. Период действия оборота продолжается.
Команда помощи рассматривает заявки с параллельных доменов идентично. Живой чат предоставляет непрерывный формат работы.
Современные бетторы оказываются с проблемой связи к проверенным сайтам. Компании блокируют первичные URL, но профессиональные казино Vavada клиенты помнят о присутствии дублирующих порталов.
Параллельный портал представляет стопроцентную отображение главного ресурса. Системы безопасности остаются равнозначными. Расчётные операции выполняются через те же шлюзы.
Схема регистрации через параллельный домен подразумевает привычной аутентификации. Менеджеры запрашивают бумаги для исполнения KYC-правил. Личные параметры реализуют комплексную аутентификацию.
Вносительные рамки на резервных площадках идентичны основным спецификациям. Стартовые беты поддерживаются фиксированными. Прогрессивные призовые фонды объединяются между многочисленными ресурсами.
Поощрительные программы действуют полноценно на резервных сайтах. Множитель ставок удерживает оригинальные цифры. Длительность проигрывания остаётся прежним.
Отдел сопровождения изучает запросы с зеркальных адресов аналогично. Живой общение обеспечивает 24-часовой расписание оперирования.
For those seeking an exceptional online gaming experience, us.com](https://maxispin.us.com/) stands out as a premier destination. At Maxispin Casino, players can enjoy a vast array of pokies, table games, and other thrilling options, all accessible in both demo and real-money modes. The casino offers attractive bonuses, including free spins and a generous welcome offer, along with cashback promotions and engaging tournaments. To ensure a seamless experience, Maxispin provides various payment methods, efficient withdrawal processes, and reliable customer support through live chat. Security is a top priority, with robust safety measures and a strong focus on responsible gambling tools. Players can easily navigate the site, with detailed guides on account creation, verification, and payment methods. Whether you’re interested in high RTP slots, hold and win pokies, or the latest slot releases, Maxispin Casino delivers a user-friendly and secure platform. Explore their terms and conditions, read reviews, and discover why many consider Maxispin a legitimate and trustworthy choice in Australia.
Whether you’re a seasoned copywriter or just starting out, MaxiSpin.us.com provides the resources you need to enhance your content.
**Features of MaxiSpin.us.com**
This makes it a go-to tool for global marketers and businesses.
**Benefits of Using MaxiSpin.us.com**
Businesses benefit greatly from MaxiSpin.us.com as it streamlines the process of creating content.
новости криптовалют Крипта, майнинг, аирдропы и тапалки — всё самое свежее в Smart Money Crypto Зарабатывай на криптоиграх и фармилках прямо в Telegram. Пассивный доход с удовольствием и без вложений! Заходи и забирай свою прибыль. ИЛИ Ищешь где заработать на крипте? Smart Money Crypto Новости, криптоигры с выводом, актуальные аирдропы и майнинг на телефоне. Тапалки и фармилки в Telegram для твоего пассивного дохода. Присоединяйся к команде Smart Money!
Актуальные дублирующие порталы легальных казино на казино Лев дают непрерывный коннект к гемблинг порталам. Система зеркалирования генерирует полноценные реплики базового веб-площадки с консервацией всех функций.
Процедура активации через резервную ссылку абсолютно копирует оригинальную форму. Только пришедшие участники заполняют валидный email, устанавливают стойкий код доступа и определяют рабочую платежное средство.
Валидация аккаунта содержит загрузки удостоверений по KYC-стандартам. Скан удостоверения личности, подтверждение места жительства и карточные координаты проходят цифровую анализ в течение 24-72 временных единиц.
Логин активных игроков реализуется через стандартную интерфейс с многоступенчатой проверкой. Сессионные пароли отправляются на сотовый девайс или мейл.
Возможности пополнительного блока через альтернативные домены обеспечивает востребованные банковские инструменты. Visa, Mastercard, онлайн кошельки Skrill, Neteller, блокчейн-токены Bitcoin, Ethereum осуществляются с минимальными сборами 0-3%.
Gaming ассортимент клонируется полностью включая барабаны, настольные развлечения, live-крупье и прогрессивы. RTP-значения, изменчивость и отыгрыш остаются такими же.
Подарочная механизм действует похоже базовому порталу. Welcome-пакеты, безвозмездные спины, возврат средств и VIP-схемы инициируются алгоритмически при соблюдении установленных условий.
EchoStall Online – Layout is minimalistic and product descriptions are very informative.
Отбор качественного азартного ресурса в актуальных обстоятельствах предполагает специального анализа к законному статусу. Компетентные геймеры понимают, что типпи казино включает актуальную сведения о функционирующих операторах.
Алгоритм записи в сертифицированных сервисах содержит принудительную аутентификацию документов. KYC-процедуры защищают как казино, так и пользователя от обмана. Краткосрочные границы на изъятие активов до финализации контроля – стандартная методика.
Цифровые запреты на соединение к гемблинг сайтам устраняются через зеркальные адреса. Активные клоны предоставляют стопроцентную возможности базового платформы. Расчетные процедуры, игровой прогресс и наградные планы функционируют устойчивыми.
Финансовая надежность характеризуется показателем применяемых финансовых механизмов. SSL-защита, PCI DSS сертификация и многоуровневая идентификация обеспечивают стабильный периметр защиты.
Развлекательная коллекция легальных провайдеров объединяет спины от топовых студий. RTP-параметры, вариативность и математические формулы проходят объективную аудит в авторизованных лабораториях.
Механизмы вознаграждения в серьезных сервисах строятся на прозрачных параметрах ставок. Условия ставок x35-40 считается нормальным для барабан-поощрений, в то время как настольные состязания засчитываются в калькуляцию с минимальным коэффициентом.
Prolfa Outlet – Placing an order was hassle-free and payment methods worked perfectly.
For guidance
where to get cheap trazodone online
to see customer testimonials.
http://sildenafilpriceguide.com/# best price for viagra 100mg
Рабочие альтернативные домены лицензированных казино на Меллстрой казино дают постоянный подключение к азартным порталам. Принцип реплицирования создает эквивалентные дубликаты корневого ресурса с удержанием всех механизмов.
Алгоритм регистрации через mirror-сайт в точности копирует оригинальную форму. Свежие геймеры прописывают валидный email, устанавливают защищенный пароль и выбирают основную валюту.
Идентификация профиля требует отправки справок по KYC-политике. Снимок ID-карты, верификация резиденции и денежные реквизиты подвергаются цифровую верификацию в течение 24-72 ч.
Подключение зарегистрированных игроков осуществляется через стандартную панель с двухфакторной верификацией. Одноразовые ключи поступают на телефонный номер или мейл.
Механизмы денежного блока через альтернативные домены поддерживает востребованные денежные системы. Visa, Mastercard, онлайн портмоне Skrill, Neteller, виртуальные монеты Bitcoin, Ethereum выполняются с сокращенными взносами 0-3%.
Азартная база воспроизводится полностью включая барабаны, столовые забавы, live-ведущих и максимальные награды. RTP-коэффициенты, колебания и отыгрыш поддерживаются точными.
Промо политика выполняется идентично корневому ресурсу. Welcome-предложения, безвозмездные спины, денежный возврат и VIP-курсы стартуют системно при соблюдении установленных требований.
Азартная индустрия отображает активный рост, манящая тысячи геймеров. Опытные площадки дают качественную условия для ставок. Исчерпывающую информацию о таких провайдерах можно найти на казино 1хбет .
Аккредитация выступает приоритетным аспектом выбора площадки. Лицензиаты Гибралтара дают качественный контроль денежных действий. Любая сертифицированная портал реализует регулярные ревизии RNG-механизмов.
Компьютерные характеристики современных игорных домов включают SSL-кодирование финансового уровня. Производители цифрового продукта вроде Microgaming, NetEnt, Pragmatic Play подключают продвинутые схемы непредсказуемых значений.
Алгоритм верификации счёта подразумевает передачи свидетельств KYC-стандарта. Паспорт, выписка о прибылях, удостоверение адреса — классический набор для итогового активации.
Дублирующие ссылки убирают препятствия с блокировками поставщиков. Рабочие альтернативы модифицируются регулярно техническими специалистами. Портативные приложения нередко действуют устойчивее браузерных редакций.
Финансовая дисциплина создаёт перспективную результативность игровых периодов. Опытные пользователи предлагают ограничивать объём депозита до 1-2% от полного банкролла.
https://transcrire.histolab.fr/wiki/index.php?title=Utilisateur:OwenPiguenit8
Полоса стальная горячекатаная купить в Алматы
Ivermectin Access USA: Ivermectin Access USA – Ivermectin Access USA
Современные геймеры пересекаются с множеством технических аспектов при деятельности с проверенными порталами. Специализированные платформы типа Вавада регистрация обеспечивают актуальную контент о работе гэмблинговых компаний.
Система проверки счета подразумевает множество необходимых фаз. Базовая проверка предполагает загрузки справок доказывающих субъект. Привычный комплект содержит паспорт, права или загранпаспорт.
Технологическая элемент создания аккаунта охватывает применение зашифрованного канала и 2FA. Профессиональные игроки подсказывают активировать полный набор возможных опций секьюрити.
Зеркала образуют точные дубликаты центрального портала с хранением полного функционала. Важнейшее бонус выражается в подобии банковских границ и требований отыгрыша.
Механизм выявления активных дублирующих порталов строится на отслеживании тематических мессенджер групп и союзных площадок. Продвинутые участники задействуют анонимайзеры для создания стабильного подключения невзирая от местных запретов.
Xerva Treasures – Layout is user-friendly, and finding products today was quick and easy.
Навигация в пространстве сертифицированных площадок включает представления передовых технологий соединения. Квалифицированные игроки внедряют казино Меллстрой для приобретения свежей материалов о активных путях.
Процесс регистрации учетной записи в сертифицированных операторах охватывает тщательную валидацию. Актуальные поставщики эксплуатируют KYC-механизмы и AML-стандарты. Оформление документов составляет от 24 до 72 интервалов.
Программные технологии для преодоления ограничений совершенствуются синхронно с усилением юридических шагов. VPN-инструменты уровня premium предлагают кодирование AES-256 и методы OpenVPN. Устойчивость канала жизненно важна для элитных игровых периодов.
Запасные адреса функционируют через регионально размещенные IT системы. CDN-комплексы поддерживают быструю латентность для азиатских участников. Цифровое переключение инициируется при выявлении препятствия базового сайта.
Банковские транзакции в официальных регионах соответствуют конкретным нормам PCI DSS. Децентрализованные транзакции набирают популярность благодаря анонимности и быстроте осуществления.
Портативные софт топовых операторов содержат биометрическую идентификацию и push-извещения для ключевых моментов. Гибкий дизайн автономно адаптируется под параметры дисплея.
Гемблинговая сфера являет стремительный развитие, завлекая массы игроков. Квалифицированные ресурсы предлагают качественную пространство для беттинга. Развёрнутую материалы о подобных операторах можно обнаружить на aqua зеркало .
Лицензирование выступает основным элементом подбора ресурса. Контролёры Кюрасао гарантируют качественный контроль финансовых транзакций. Любая официальная портал реализует периодические инспекции RNG-систем.
Программные параметры современных игорных домов содержат SSL-защиту банковского ранга. Разработчики компьютерного обеспечения наподобие Microgaming, NetEnt, Pragmatic Play добавляют многоуровневые механизмы хаотичных величин.
Схема аутентификации счёта включает подачи бумаг KYC-типа. Документ, подтверждение о финансах, удостоверение прописки — типичный перечень для окончательного входа.
Зеркальные ссылки исправляют трудности с запретами организаций. Функционирующие варианты обновляются ежедневно IT службами. Портативные приложения обычно работают стабильнее сетевых форматов.
Распределение капитала устанавливает стратегическую прибыльность гемблинговых партий. Квалифицированные пользователи рекомендуют контролировать сумму депозита до 1-2% от итогового бюджета.
Лицензионные ресурсы игорных предложений дают клиентам возможность к элитному азартному досугу через целевые платформы, включая Клубника зеркало , что следуют международные регламенты безопасности.
Процедура активации предполагает ввода проверочных деталей через защищённые SSL-соединения. Менеджмент просят официальное свидетельство дееспособности и локации проживания для исполнения legal требований.
2FA идентификация выступает обязательным частью актуальных механизмов security. Пользователи обретают SMS-шифры, push-notification или задействуют профессиональные приложения в стиле Google Authenticator.
Зеркальные ссылки нейтрализуют проблемы territorial санкций и DDoS-воздействий. Техническим образом дубли составляют дублированные версии основного сайта с maintaining возможностей и личных деталей.
Skilled пользователи призывают keeping обновлённые перечни действующих дублей в закладках интернет-программы. Букмекеры отправляют новости о свежих порталах через мейл, Telegram-сообщества и мобильные утилиты.
Банковские транзакции через проверенные платформы обеспечены защитными алгоритмами класса банковского направления. Снятие финансов происходит единственно на подтверждённые реквизиты собственника account.
Visit Xyloshop – Sleek layout and mobile navigation feels seamless.
Uplora Specials – Enjoyed looking through the collection and prices seem fair.
Explore Acorn Aisle – Clean layout and easy-to-browse interface make shopping effortless.
eva casino
По eva casino там часто выкладывают полезные обновления.
Официальные ресурсы азартных возможностей oferuja клиентам возможность к элитному гэмблингу через dedicated платформы, включая п»ї1xBet casino , которые специально придерживаются мировые критерии надёжности.
Алгоритм активации требует внесения authentication деталей через encrypted SSL-каналы. Букмекеры просят предоставить official подтверждение age verification и адреса регистрации для выполнения нормативных критериев.
Многоуровневая идентификация представляет обязательным элементом современных платформ security. Клиенты получают SMS-коды, push-алерты или эксплуатируют специализированные софт по типу Google Authenticator.
Резервные домены преодолевают сложности локальных санкций и DDoS-assault. Технически mirrors составляют идентичные реплики основного портала с обеспечением инструментария и личных информации.
Skilled пользователи предлагают keeping свежие списки функционирующих mirrors в закладках интернет-программы. Management передают updates о актуальных ссылках через электронную почту, Telegram-сообщества и мобильные apps.
Payment переводы через лицензионные порталы защищены cryptographic системами level банковского индустрии. Изъятие финансов осуществляется лишь на верифицированные wallets хозяина account.
Отбор проверенного азартного оператора требует глубокого анализа регулятивных документов. Актуальные порталы Меллстрой гарантируют участникам полную данные о собственных санкциях.
Система регистрации подразумевает различные ключевых ступеней аутентификации. Провайдеры истребуют удостоверения, засвидетельствующие индивидуальность и возраст. Классический KYC-процесс требует от 24 до 72 временных отрезков.
Финансовое планирование инициируется с назначения пределов на инвестиции. Опытные участники призывают задействовать правило 5% от суммарного игорного средств на отдельную раунд.
Системные ограничения провайдеров побуждают использовать резервные ссылки. Клоны удерживают стопроцентную производительность базового сайта, охватывая журнал операций и азартный результаты.
Передовые расчетные методы предоставляют оперативные депозиты через виртуальные хранилища. Bitcoin, Ethereum и фиксированные активы дают анонимность и минимальные комиссии. Время обработки изъятий достигает 10-30 минут.
Программы верности предусматривают каскадные степени с нарастающим бонусом. VIP-координаторы предоставляют личные подарки, расширенные рамки и преимущественную обслуживание.
Wardivo Deals – Items are clearly displayed and moving through categories is easy.
XoBasket Marketplace – Moving around the pages feels effortless and intuitive.
Легальные ресурсы азартных опций oferuja клиентам вариант к высококлассному времяпрепровождению через тематические порталы, включая типпи казино , которые специально следуют мировые нормы безопасности.
Последовательность активации necessita указания верификационных данных через шифрованные SSL-протоколы. Провайдеры требуют official удостоверение возраста и адреса нахождения для поддержания законодательных критериев.
Многоуровневая authentication выступает required компонентом актуальных solutions конфиденциальности. Игроки имеют SMS-коды, push-уведомления или внедряют targeted приложения вроде Google Authenticator.
Зеркальные домены преодолевают трудности региональных блокировок и DDoS-assault. Технически реплики образуют аналогичные dublicates центрального домена с maintaining опций и индивидуальных данных.
Экспертные игроки предлагают сохранять current реестры working дублей в закладках браузера. Букмекеры отправляют updates о fresh URL через почтовые сервисы, Telegram-каналы и смартфонные софт.
Payment процедуры через проверенные порталы гарантированы encryption технологиями уровня банковского segment. Получение денег происходит единственно на подтверждённые карты обладателя аккаунта.
Современные провайдеры гемблинг продуктов гарантируют пользователям подключение к премиальному игровому процессу через безопасные казино Вавада ресурсы. Легальная работа нуждается учета строгих надзорных норм.
Система регистрации игрового профиля охватывает подтверждение приватных данных. Операторы применяют расширенные протоколы KYC и AML для исключения фродовых переводов.
Программные системы актуальных казино функционируют на надежных хостингах с TLS сертификатами. Территориальные ограничения вынуждает провайдеров создавать резервные домены.
Зеркальные домены образуют точные версии главного платформы с поддержанием всех функций и данных. Клиенты получают стабильный вход к средствам, игровой отчетности и индивидуальным опциям.
Финансовые процедуры выполняются через подключенные денежные сервисы. Пределы на взносы и выводы фиксируются в унисон с законодательными условиями и корпоративными процедурами снижения потерь.
Опытные пользователи советуют мониторить статус аккредитации через регуляторные регистры развлекательных структур. Репутационные показатели охватывают места на специализированных сервисах и отзывы действительных беттеров.
Исследование в сфере сертифицированных площадок предполагает понимания новых методов подключения. Умелые игроки эксплуатируют lucky bear казино для получения современной информации о работающих доменах.
Механизм оформления аккаунта в официальных компаниях содержит детальную проверку. Современные операторы используют KYC-механизмы и AML-правила. Документальное сопровождение отнимает от 24 до 72 интервалов.
Компьютерные методы для преодоления ограничений прогрессируют одновременно с повышением нормативных инициатив. VPN-платформы типа premium дают шифрование AES-256 и протоколы OpenVPN. Надежность связи принципиально необходима для привилегированных игровых периодов.
Зеркальные сайты работают через географически расположенные IT кластеры. CDN-архитектуры предоставляют быструю пинг для американских геймеров. Программное переключение инициируется при идентификации недоступности главного портала.
Банковские манипуляции в официальных регионах отвечают жестким критериям PCI DSS. Децентрализованные переводы приобретают актуальность благодаря конфиденциальности и быстроте процессинга.
Мобильные утилиты элитных брендов объединяют отпечатковую проверку и push-сообщения для важных событий. Изменяемый внешний вид программно изменяется под свойства монитора.
Рабочие дублирующие порталы легальных казино на п»ї1хбет регистрация гарантируют непрерывный подключение к гемблинг порталам. Методика клонирования генерирует точные копии центрального веб-площадки с удержанием всех механизмов.
Механизм оформления профиля через дублирующий портал полностью имитирует оригинальную шаблон. Свежие игроки регистрируют активный email, формируют надежный секретную комбинацию и устанавливают базовую платежное средство.
Идентификация личного кабинета включает представления свидетельств по KYC-требованиям. Скан паспорта, валидация резиденции и карточные реквизиты контролируются системой алгоритмическую анализ в течение 24-72 периодов.
Подключение верифицированных клиентов происходит через базовую модуль с многоступенчатой верификацией. Сессионные пароли отправляются на сотовый аппарат или e-mail адрес.
Опции денежного модуля через дублирующие порталы включает востребованные платежные системы. Visa, Mastercard, цифровые балансы Skrill, Neteller, криптовалюты Bitcoin, Ethereum реализуются с оптимизированными взносами 0-3%.
Азартная библиотека дублируется полностью включая машины, столовые активности, live-крупье и максимальные награды. RTP-коэффициенты, вариативность и условия отыгрыша фиксируются неизменными.
Акционная программа оперирует схоже базовому веб-площадке. Welcome-комплекты, даровые прокруты, кешбэк и VIP-курсы активируются программно при выполнении фиксированных требований.
Looking well projects a strong first impression.
Your outfit speaks volumes before you even speak a word.
It enhances your own self-esteem and mindset noticeably.
A put-together appearance signals competence in the office.
https://blog.furluxury.ru/brunello-cucinelli-s-commitment-to-sustainable-fashion-478452/
Fashionable choices allow you to showcase your unique identity.
People often judge well-dressed people as more capable and reliable.
Therefore, putting effort in your wardrobe is an valuable step in your personal brand.
Actually when someone doesn’t be aware of after that its up
to other viewers that they will assist, so here it takes place.
Азартная индустрия демонстрирует активный развитие, манящая миллионы участников. Опытные сайты гарантируют стабильную атмосферу для пари. Полную факты о подобных брендах реально обнаружить на Меллстрой РІС…РѕРґ .
Лицензирование остаётся центральным показателем отбора портала. Лицензиаты Великобритании дают жёсткий надзор экономических манипуляций. Всякая аккредитованная платформа проходит регулярные аудиты RNG-алгоритмов.
IT особенности современных игорных домов включают SSL-кодирование банковского стандарта. Производители компьютерного материала типа Microgaming, NetEnt, Pragmatic Play интегрируют продвинутые механизмы случайных показателей.
Процесс верификации учётной записи предусматривает подачи свидетельств KYC-стандарта. Свидетельство, выписка о прибылях, валидация адреса — стандартный перечень для полноценного входа.
Альтернативные URL убирают препятствия с цензурой провайдеров. Актуальные копии обновляются систематически техническими отделами. Смартфонные софт регулярно выполняются устойчивее веб вариантов.
Банкролл-менеджмент создаёт перспективную прибыльность гемблинговых сессий. Опытные участники рекомендуют сокращать величину вейджера до 1-2% от суммарного фонда.
Актуальные гемблеры встречаются с затруднением связи к легальным ресурсам. Поставщики закрывают основные порталы, но знающие Vavada пользователи помнят о наличии альтернативных платформ.
Параллельный портал образует полную дубликат основного портала. SSL-сертификаты поддерживаются неизменными. Расчётные операции осуществляются через сходные каналы.
Алгоритм открытия счёта через резервный ресурс включает обычной проверки. Сотрудники уточняют удостоверения для выполнения KYC-стандартов. Личные информация осуществляют комплексную валидацию.
Пополнительные границы на резервных порталах соответствуют базовым характеристикам. Низшие суммы поддерживаются фиксированными. Возрастающие накопления синхронизируются между разными доменами.
Бонусные механизмы оперируют комплексно на зеркальных площадках. Отыгрышный коэффициент поддерживает оригинальные параметры. Длительность оборота остаётся прежним.
Служба помощи решает обращения с параллельных доменов таким же способом. Онлайн общение осуществляет 24-часовой график работы.
Sovique Online – Nice selection of products and the prices are very competitive.
Беттинговая область являет стремительный расширение, притягивая миллионы пользователей. Экспертные ресурсы обеспечивают надёжную пространство для игры. Исчерпывающую сведения о таких провайдерах доступно найти на Sykaaa casino .
Аттестация составляет главным критерием подбора площадки. Юрисдикции Мальты гарантируют жёсткий надзор финансовых процедур. Любая аккредитованная площадка реализует плановые ревизии RNG-модулей.
Программные свойства новейших азартных площадок охватывают SSL-кодирование экономического стандарта. Поставщики виртуального материала класса Microgaming, NetEnt, Pragmatic Play интегрируют сложные алгоритмы хаотичных показателей.
Процесс подтверждения аккаунта предполагает предоставления удостоверений KYC-уровня. Удостоверение, свидетельство о средствах, доказательство адреса — стандартный список для завершённого доступа.
Дублирующие порталы решают препятствия с блокировками провайдеров. Действующие варианты модифицируются ежедневно компьютерными отделами. Смартфонные приложения обычно работают надёжнее браузерных форматов.
Распределение капитала создаёт долгосрочную доходность игровых циклов. Опытные пользователи предлагают лимитировать объём вейджера до 1-2% от итогового фонда.
Новейшие операторы гемблинг активностей гарантируют участникам подключение к качественному азарту через проверенные ДживиСпин казино платформы. Лицензированная деятельность влечет соблюдения жестких правовых положений.
Механизм открытия игрового профиля содержит аутентификацию конфиденциальных сведений. Регуляторы применяют углубленные системы KYC и AML для предотвращения нарушающих операций.
Цифровые средства новейших казино базируются на защищенных серверах с HTTPS стандартами. Геоблокировка заставляет управляющих создавать дублирующие ссылки.
Параллельные платформы образуют аналогичные версии основного портала с удержанием всех функций и параметров. Игроки достигают непрерывный соединение к счету, развлекательной отчетности и клиентским опциям.
Банковские переводы производятся через встроенные банковские агрегаторы. Пределы на инвестиции и получения регулируются в соотношении с регуляторными положениями и корпоративными политиками контроля угроз.
Опытные игроки советуют контролировать ситуацию сертификата через официальные базы данных развлекательных организаций. Репутационные параметры задействуют места на отраслевых платформах и мнения истинных беттеров.
mostbet acces oglinda mostbet96150.help
Передовые участники сталкиваются с сложностью входа к сертифицированным порталам. Поставщики запрещают стандартные домены, но опытные Вавада официальный сайт игроки понимают о существовании зеркальных ресурсов.
Дополнительный домен представляет стопроцентную реплику оригинального платформы. Криптографические алгоритмы работают равнозначными. Денежные операции выполняются через идентичные системы.
Процедура создания аккаунта через альтернативный портал требует привычной верификации. Операторы выясняют справки для исполнения KYC-норм. Персональные параметры осуществляют многоуровневую верификацию.
Вносительные рамки на дополнительных площадках идентичны основным характеристикам. Начальные вклады сохраняются постоянными. Увеличивающиеся банки объединяются между различными доменами.
Бонусные программы функционируют завершённо на зеркальных сайтах. Вейджер поддерживает исходные значения. Временные рамки использования сохраняется.
Отдел поддержки анализирует заявки с резервных доменов равнозначно. Прямой разговор осуществляет непрерывный график функционирования.
Нынешние бетторы попадают с препятствием связи к лицензированным площадкам. Провайдеры запрещают базовые ссылки, но искушённые Mellstroy Game посетители знают о наличии резервных порталов.
Зеркало составляет точную дубликат базового портала. Криптографические алгоритмы поддерживаются неизменными. Банковские действия выполняются через те же каналы.
Алгоритм заведения учётной записи через дополнительный адрес требует привычной подтверждения. Менеджеры выясняют бумаги для реализации KYC-регламентов. Паспортные характеристики проходят комплексную валидацию.
Депозитные рамки на резервных площадках равняются базовым параметрам. Минимальные суммы поддерживаются постоянными. Накопительные накопления координируются между различными доменами.
Льготные механизмы функционируют целостно на альтернативных сайтах. Требования по обороту гарантирует оригинальные цифры. Срок активности проигрывания продолжается.
Служба помощи изучает запросы с дополнительных ссылок аналогично. Живой диалог поддерживает постоянный режим функционирования.
Click for Ulvika – Useful item details and an easy-to-use interface.
Sage Vendor Hub – Well-structured menus and a tidy layout make shopping stress-free.
Развлекательная отрасль являет интенсивный прогресс, завлекая массы пользователей. Квалифицированные платформы обеспечивают безопасную атмосферу для беттинга. Подробную факты о таких операторах можно получить на казино Меллстрой .
Сертификация выступает основным элементом определения площадки. Юрисдикции Гибралтара предоставляют жёсткий проверку валютных операций. Любая легальная площадка выполняет плановые контроли RNG-модулей.
Компьютерные аспекты актуальных беттинг-платформ охватывают SSL-криптографию денежного класса. Поставщики компьютерного продукта наподобие Microgaming, NetEnt, Pragmatic Play встраивают комплексные модели произвольных показателей.
Схема валидации профиля подразумевает направления бумаг KYC-уровня. ID, документ о заработке, подтверждение местожительства — обычный комплект для завершённого входа.
Дублирующие адреса исправляют проблемы с запретами поставщиков. Функционирующие альтернативы корректируются ежедневно программными отделами. Смартфонные клиенты регулярно работают устойчивее интернет редакций.
Управление банкроллом определяет перспективную успешность беттинговых циклов. Экспертные пользователи настаивают сокращать объём пари до 1-2% от суммарного фонда.
Выбор достойного гемблинг заведения в текущих условиях подразумевает особого анализа к регулятивному состоянию. Знающие участники учитывают, что Меллстрой демонстрирует современную сведения о доступных площадках.
Процедура регистрации в лицензированных операторах содержит необходимую подтверждение идентичности. KYC-процедуры гарантируют как оператора, так и игрока от афер. Краткосрочные пределы на получение денег до завершения проверки – обычная методика.
Электронные запреты на вход к betting ресурсам нейтрализуются через альтернативные адреса. Активные зеркала предоставляют полную производительность первичного сайта. Банковские операции, игровой продвижение и наградные системы поддерживаются неизменными.
Капитальная гарантированность измеряется качеством задействованных платежных механизмов. SSL-шифрование, PCI DSS аттестация и многоуровневая подтверждение формируют стабильный периметр охраны.
Игровая набор проверенных заведений охватывает спины от главных производителей. RTP-коэффициенты, колебания и статистические системы претерпевают нейтральную контроль в утвержденных центрах.
Механизмы поощрения в надежных заведениях основываются на понятных параметрах проигрыша. Проигрыш x35-40 оценивается справедливым для автомат-привилегий, в то время как стандартные забавы учитываются в расчет с уменьшенным фактором.
Новейшие бетторы сталкиваются с затруднением соединения к легальным ресурсам. Организации блокируют первичные ссылки, но грамотные ретро казино пользователи учитывают о присутствии дублирующих порталов.
Зеркало представляет стопроцентную реплику оригинального портала. Протоколы шифрования остаются равнозначными. Финансовые процедуры реализуются через аналогичные шлюзы.
Технология заведения учётной записи через резервный ссылку содержит привычной проверки. Специалисты просят свидетельства для реализации KYC-регламентов. Индивидуальные сведения проходят комплексную верификацию.
Вносительные пределы на параллельных порталах идентичны главным спецификациям. Низшие ставки остаются постоянными. Увеличивающиеся накопления интегрируются между многочисленными доменами.
Бонусные механизмы оперируют целостно на дополнительных ресурсах. Вейджер обеспечивает исходные цифры. Тайминг реализации сохраняется.
Служба поддержки обрабатывает заявки с резервных ссылок идентично. Живой разговор поддерживает постоянный режим обслуживания.
Shop Find Lark – Clear product info and navigating the site is hassle-free.
Volveta Products – Easy to navigate pages and I found my items quickly.
Официальные провайдеры игровых возможностей обеспечивают игрокам шанс к профессиональному времяпрепровождению через тематические сайты, включая РјСЌРґ казино , которые именно выполняют мировые регламенты конфиденциальности.
Последовательность открытия счёта подразумевает указания проверочных деталей через безопасные SSL-протоколы. Букмекеры требуют письменное verification совершеннолетия и локации residence для compliance нормативных норм.
Многоуровневая верификация считается обязательным aspect передовых solutions конфиденциальности. Участники приобретают SMS-шифры, push-уведомления или используют targeted софт наподобие Google Authenticator.
Альтернативные ссылки устраняют проблемы географических барьеров и DDoS-assault. Техническим образом дубли являют идентичные клоны главного домена с сохранением возможностей и user деталей.
Экспертные геймеры призывают сохранять актуальные списки функционирующих зеркал в сохранённых ссылках обозревателя. Букмекеры рассылают информацию о современных ссылках через электронную почту, Telegram-каналы и mobile приложения.
Payment movements через legal платформы покрыты encryption технологиями категории банковского области. Изъятие денег осуществляется единственно на проверенные реквизиты владельца учётной записи.
Поиск в сфере сертифицированных площадок требует знания современных методов входа. Продвинутые клиенты используют п»ї1xBet зеркало для обретения релевантной информации о работающих URL.
Процедура оформления личного кабинета в официальных операторах содержит тщательную аутентификацию. Современные операторы применяют KYC-протоколы и AML-правила. Бумажная работа составляет от 24 до 72 часов.
Технические способы для обхода барьеров улучшаются синхронно с интенсификацией правовых шагов. VPN-решения категории premium предлагают безопасность AES-256 и протоколы OpenVPN. Непрерывность подключения критически необходима для элитных партий.
Резервные адреса оперируют через пространственно распределенные цифровые инфраструктуры. CDN-сети предоставляют минимальную время ответа для глобальных участников. Автоматическое редирект срабатывает при распознавании препятствия основного портала.
Финансовые манипуляции в официальных территориях подчиняются жестким стандартам PCI DSS. Блокчейн расчеты завоевывают популярность в результате приватности и динамике осуществления.
Мобильные приложения элитных компаний интегрируют голосовую авторизацию и push-уведомления для ключевых ситуаций. Гибкий облик самостоятельно корректируется под особенности панели.
Актуальные участники пересекаются с набором системных особенностей при деятельности с сертифицированными порталами. Профильные ресурсы типа п»ї1хбет сайт предоставляют новую данные о работе азартных операторов.
Система аутентификации кабинета подразумевает набор неотъемлемых стадий. Базовая аутентификация требует отправки бумаг удостоверяющих гражданство. Привычный перечень включает ID, водительские права или заграничное удостоверение.
Технологическая сторона регистрации подразумевает задействование SSL-шифрования и многофакторной защиты. Профессиональные игроки рекомендуют активировать максимум имеющихся опций безопасности.
Дублирующие порталы образуют полные клоны базового домена с обеспечением исчерпывающего набора функций. Центральное преимущество содержится в подобии банковских лимитов и параметров вейджера.
Схема локализации действующих резервных ссылок строится на наблюдении специализированных информационных каналов и союзных сайтов. Профессиональные клиенты применяют виртуальные частные сети для обеспечения устойчивого доступа вне зависимости от локальных лимитов.
Hivelane Shopping – The clear arrangement and thoughtful categorization enhance usability.
Cheap Sildenafil 100mg: Sildenafil Price Guide – order viagra
Официальные площадки гэмблинг предложений обеспечивают игрокам возможность к профессиональному гэмблингу через целевые ресурсы, включая Килограмм казино , которые именно исполняют общепринятые требования security.
Алгоритм регистрации включает ввода authentication данных через encrypted SSL-каналы. Администрация demanded документальное свидетельство возраста и территории регистрации для compliance юрисдикционных стандартов.
Многоуровневая authentication является обязательным частью передовых механизмов security. Users приобретают SMS-шифры, push-уведомления или применяют профессиональные приложения вроде Google Authenticator.
Зеркальные адреса решают трудности региональных блокировок и DDoS-нападений. Фактически дубли формируют идентичные реплики primary платформы с сохранением возможностей и user данных.
Компетентные игроки советуют поддерживать обновлённые списки активных альтернатив в закладках обозревателя. Management отправляют новости о fresh ссылках через email, Telegram-чаты и портативные утилиты.
Payment транзакции через legal площадки гарантированы cryptographic системами level банковского направления. Изъятие средств происходит solely на validated счета собственника личного кабинета.
Поиск достойного гемблинг площадки в актуальных реалиях предполагает тщательного подхода к регулятивному режиму. Опытные пользователи учитывают, что Лаки Бир сайт предоставляет свежую факты о доступных ресурсах.
Процедура открытия счета в сертифицированных площадках предусматривает неизбежную проверку личности. KYC-процедуры обеспечивают как площадку, так и участника от махинаций. Промежуточные границы на получение финансов до финализации валидации – стандартная система.
Цифровые запреты на соединение к гемблинг площадкам нейтрализуются через дублирующие порталы. Действующие зеркала сохраняют полную производительность основного сервиса. Банковские операции, игровой достижения и льготные схемы остаются устойчивыми.
Капитальная надежность характеризуется критерием эксплуатируемых финансовых инструментов. SSL-защита, PCI DSS лицензирование и дополнительная верификация устанавливают прочный заслон обороны.
Игровая библиотека проверенных площадок охватывает автоматы от главных студий. RTP-значения, колебания и вероятностные схемы испытывают независимую валидацию в признанных центрах.
Программы поощрения в надежных операторах формируются на открытых правилах отыгрыша. Вейджер x35-40 признается справедливым для спин-поощрений, в то время как карточные состязания учитываются в расчет с редуцированным коэффициентом.
Определение безопасного игрового площадки в нынешних границах заставляет особого подхода к законному уровню. Знающие геймеры осознают, что Рльдорадо казино включает современную данные о доступных операторах.
Алгоритм оформления профиля в проверенных платформах предусматривает требуемую подтверждение удостоверения. KYC-правила обеспечивают как заведение, так и клиента от фрода. Кратковременные пределы на получение финансов до закрытия проверки – привычная подход.
Программные запреты на подключение к betting сервисам устраняются через зеркальные URL. Функционирующие зеркала обеспечивают всестороннюю работоспособность центрального платформы. Денежные процедуры, игровой достижения и наградные программы остаются постоянными.
Материальная защищенность выражается качеством эксплуатируемых финансовых систем. SSL-защита, PCI DSS аттестация и расширенная верификация создают безопасный периметр безопасности.
Игровая каталог проверенных площадок охватывает машины от ведущих студий. RTP-индексы, колебания и статистические схемы проходят внешнюю сертификацию в одобренных организациях.
Планы лояльности в профессиональных сервисах основываются на понятных параметрах ставок. Отыгрыш x35-40 характеризуется приемлемым для машина-подарков, в то время как традиционные состязания идут в калькуляцию с пониженным множителем.
Проверенные провайдеры игорных возможностей дают участникам вариант к качественному игровому процессу через целевые сайты, включая п»ї1хбет зеркало , что выполняют международные критерии безопасности.
Последовательность регистрации necessita предоставления валидационных информации через encrypted SSL-соединения. Букмекеры запрашивают официальное подтверждение дееспособности и территории нахождения для выполнения правовых стандартов.
Двухфакторная идентификация представляет required aspect современных систем защиты. Users имеют SMS-шифры, push-сообщения или эксплуатируют профессиональные утилиты в стиле Google Authenticator.
Резервные порталы ликвидируют сложности territorial барьеров и DDoS-штурмов. Технически зеркала составляют тождественные клоны центрального платформы с поддержанием функциональности и пользовательских сведений.
Skilled игроки предлагают keeping новейшие базы функционирующих копий в favourites интернет-программы. Management направляют новости о современных доменах через электронную почту, Telegram-сообщества и mobile утилиты.
Финансовые процедуры через официальные ресурсы обеспечены защитными протоколами класса банковского segment. Extraction фондов происходит solely на проверенные данные держателя account.
взгляните на сайте здесь kraken onion ссылка
Xerva Picks – The store is well organized, making product browsing a breeze.
LemonVendor Collection – The transaction process was clear and enjoyable throughout.
Zinniazone Deals – Browsing the site was enjoyable and I discovered some cool products.
Browse Fintera – Simple menus and organized categories make it easy to locate items.
Инновационные провайдеры гемблинг продуктов предлагают участникам подключение к качественному беттингу через защищенные казино Меллстрой порталы. Официальная функционирование предполагает следования строгих регуляторных требований.
Алгоритм открытия игрового профиля включает подтверждение индивидуальных сведений. Провайдеры эксплуатируют углубленные алгоритмы KYC и AML для предотвращения поддельных операций.
Программные системы новейших игорных домов основываются на безопасных хостингах с шифровальными стандартами. Территориальные ограничения заставляет владельцев создавать вспомогательные ссылки.
Резервные сайты представляют идентичные версии центрального домена с обеспечением всех сервисов и информации. Пользователи обеспечивают себе беспрепятственный вход к счету, игровой истории и клиентским параметрам.
Денежные транзакции реализуются через подключенные расчетные агрегаторы. Лимиты на вклады и изъятия регулируются в соответствии с регуляторными положениями и внутренними процедурами риск-менеджмента.
Опытные игроки рекомендуют анализировать ситуацию сертификата через государственные регистры азартных органов. Репутационные индикаторы задействуют места на отраслевых платформах и оценки подлинных участников.
https://uspharmaindex.com/# pharmacy online 365 discount code
Проверенные площадки азартных услуг обеспечивают геймерам право к премиальному гэмблингу через целевые домены, включая п»ї1хбет сайт , которые выполняют глобальные требования защиты.
Схема активации требует указания идентификационных сведений через шифрованные SSL-линии. Провайдеры просят предоставить документальное доказательство возраста и территории жительства для поддержания нормативных стандартов.
Двухэтапная проверка становится принудительным компонентом современных механизмов надёжности. Клиенты располагают SMS-пароли, push-notification или применяют dedicated tools в стиле Google Authenticator.
Резервные домены устраняют сложности региональных блокировок и DDoS-штурмов. Фактически дубли образуют дублированные копии главного портала с поддержанием features и клиентских параметров.
Skilled игроки призывают поддерживать новейшие перечни working копий в закладках интернет-программы. Администрация доставляют информацию о свежих URL через мейл, Telegram-группы и мобильные программы.
Платёжные транзакции через проверенные платформы гарантированы cryptographic алгоритмами категории банковского индустрии. Изъятие финансов реализуется только на validated реквизиты держателя account.
Revotoxican nuo parazitu
mavdrix.shop – The site is intuitive, pages load quickly, and checkout was smooth.
Перемещение в мире лицензированных платформ требует понимания продвинутых способов входа. Опытные геймеры задействуют лаки Р±РёСЂ казино официальный сайт для извлечения современной материалов о оперативных ссылках.
Процедура открытия личного кабинета в официальных операторах содержит комплексную валидацию. Новейшие компании внедряют KYC-механизмы и AML-правила. Документооборот потребляет от 24 до 72 часов.
IT технологии для избежания блокировок прогрессируют синхронно с ужесточением правовых мер. VPN-сервисы категории premium дают защиту AES-256 и технологии OpenVPN. Непрерывность связи принципиально значима для VIP раундов.
Резервные домены работают через регионально распределенные цифровые ресурсы. CDN-структуры гарантируют минимальную пинг для азиатских пользователей. Программное редирект срабатывает при обнаружении барьера основного сайта.
Экономические операции в лицензированных зонах подчиняются определенным критериям PCI DSS. Цифровые платежи приобретают востребованность из-за конфиденциальности и оперативности осуществления.
Смартфонные приложения ведущих компаний интегрируют физиологическую проверку и push-оповещения для критических событий. Адаптивный дизайн автономно адаптируется под параметры монитора.
Kiostra Shopping – Fast-loading pages and easy navigation throughout the website.
Определение надежного азартного заведения заставляет основательного изучения правовых документов. Новые ресурсы Клубника официальный сайт обеспечивают геймерам абсолютную информацию о собственных разрешениях.
Механизм регистрации охватывает различные требуемых шагов проверки. Представители требуют свидетельства, удостоверяющие самобытность и дееспособность. Обычный KYC-механизм продолжается от 24 до 72 временных отрезков.
Финансовое планирование начинается с фиксации лимитов на взносы. Опытные игроки рекомендуют эксплуатировать норму 5% от итогового казино бюджета на индивидуальную раунд.
Программные барьеры операторов обязывают использовать запасные адреса. Клоны хранят безусловную функциональность центрального ресурса, подразумевая хронологию сделок и азартный успех.
Новые денежные инструменты дают моментальные взносы через блокчейн портмоне. Bitcoin, Ethereum и фиксированные активы обеспечивают конфиденциальность и наименьшие взносы. Продолжительность обработки получений равно 10-30 отрезков.
Системы приверженности подразумевают градационные степени с прогрессивным возвратом. VIP-менеджеры предоставляют индивидуальные бонусы, усиленные границы и приоритетную обслуживание.
Нынешние бетторы оказываются с барьером связи к проверенным ресурсам. Организации ограничивают первичные порталы, но искушённые Lucky Bear зеркало игроки помнят о доступности зеркальных порталов.
Резервная ссылка представляет абсолютную воспроизведение основного платформы. SSL-сертификаты остаются такими же. Денежные транзакции реализуются через равнозначные каналы.
Схема регистрации через дополнительный адрес требует классической верификации. Сотрудники просят бумаги для исполнения KYC-норм. Личные сведения подвергаются двухфакторную верификацию.
Пополнительные лимиты на дополнительных порталах идентичны первичным требованиям. Минимальные ставки поддерживаются константными. Прогрессивные накопления объединяются между разными ссылками.
Премиальные планы действуют комплексно на параллельных порталах. Множитель ставок сохраняет исходные параметры. Тайминг реализации остаётся прежним.
Команда помощи решает обращения с резервных порталов аналогично. Онлайн переписка предоставляет 24-часовой режим функционирования.
http://sildenafilpriceguide.com/# generic sildenafil
Borvique Collection – The interface is sharp and exploring items is very straightforward.
Определение надежного игрового портала в актуальных обстоятельствах предполагает тщательного изучения к лицензионному состоянию. Компетентные пользователи знают, что казино Lucky Bear предоставляет современную информацию о доступных площадках.
Процедура записи в лицензированных сервисах включает необходимую проверку документов. KYC-процедуры оберегают как площадку, так и клиента от обмана. Временные рамки на вывод денег до финализации подтверждения – типичная практика.
Программные ограничения на вход к гемблинг сайтам преодолеваются через дублирующие адреса. Действующие клоны предоставляют полную производительность базового сервиса. Банковские операции, игровой результаты и льготные планы функционируют стабильными.
Финансовая гарантированность выражается степенью задействованных платежных инструментов. SSL-безопасность, PCI DSS лицензирование и двухфакторная аутентификация обеспечивают стабильный контур охраны.
Интерактивная библиотека сертифицированных площадок предоставляет барабаны от лидирующих производителей. RTP-индексы, изменчивость и математические схемы проходят беспристрастную аудит в аккредитованных центрах.
Механизмы мотивации в серьезных площадках строятся на четких правилах проигрыша. Вейджер x35-40 оценивается справедливым для спин-поощрений, в то время как классические состязания засчитываются в счет с редуцированным множителем.
Ivermectin Access USA: Ivermectin Access USA – ivermectin generic
https://doodleordie.com/profile/validexbet26
Развлекательная ниша показывает динамичный рост, привлекая массы участников. Профессиональные сайты предлагают безопасную условия для пари. Подробную материалы о указанных организациях доступно обнаружить на п»ї1xBet .
Лицензирование выступает главным фактором определения сайта. Регуляторы Великобритании создают тщательный мониторинг денежных операций. Отдельная лицензированная портал подвергается периодические инспекции RNG-систем.
IT особенности новейших беттинг-платформ включают SSL-безопасность денежного категории. Производители компьютерного материала вроде Microgaming, NetEnt, Pragmatic Play подключают усовершенствованные модели хаотичных чисел.
Схема валидации аккаунта требует передачи свидетельств KYC-класса. ID, справка о финансах, подтверждение прописки — обычный пакет для итогового входа.
Зеркальные адреса ликвидируют проблемы с фильтрацией компаний. Функционирующие дубли корректируются систематически техническими группами. Смартфонные утилиты обычно оперируют надёжнее интернет модификаций.
Контроль средств задаёт перспективную прибыльность игровых раундов. Квалифицированные геймеры рекомендуют контролировать размер пари до 1-2% от совокупного резерва.
Исследование в секторе официальных сайтов подразумевает понимания продвинутых методов авторизации. Умелые игроки применяют [url=https://xenercoenergy.com/blog/skachayte-mobilnuyu-versiyu-zolotogo-kazino-i-igrayte-onlayn/]казино Голд[/url] для обретения релевантной материалов о действующих ссылках.
Алгоритм формирования аккаунта в лицензированных операторах охватывает тщательную аутентификацию. Новейшие поставщики внедряют KYC-протоколы и AML-правила. Оформление документов требует от 24 до 72 промежутков.
Цифровые инструменты для прохождения ограничений прогрессируют сообща с повышением регуляторных мер. VPN-сервисы типа premium обеспечивают кодирование AES-256 и методы OpenVPN. Устойчивость канала критически значима для элитных партий.
Резервные платформы оперируют через территориально разнесенные цифровые кластеры. CDN-структуры осуществляют быструю латентность для азиатских пользователей. Автоматическое маршрутизация срабатывает при детекции блокировки первичного домена.
Денежные операции в официальных регионах подчиняются четким правилам PCI DSS. Криптовалютные переводы набирают признание из-за приватности и динамике обработки.
Мобильные софт премиальных операторов интегрируют биометрическую авторизацию и push-алерты для существенных ситуаций. Адаптивный внешний вид самостоятельно настраивается под настройки матрицы.
Hi there, I desire to subscribe for this webpage to get most recent updates, therefore where can i do it please help out.
Передовые пользователи имеют дело с огромным количеством технических нюансов при деятельности с проверенными платформами. Специализированные платформы типа lucky bear казино официальный сайт РІС…РѕРґ предоставляют современную сведения о деятельности развлекательных организаций.
Алгоритм аутентификации профиля подразумевает ряд неотъемлемых фаз. Исходная подтверждение требует загрузки бумаг доказывающих индивидуальность. Типовой комплект подразумевает ID, автоудостоверение или международный паспорт.
Программная элемент регистрации подразумевает задействование зашифрованного канала и многофакторной защиты. Продвинутые пользователи подсказывают задействовать все представленных параметров защиты.
Альтернативные адреса представляют абсолютные отражения основного платформы с хранением полного инструментария. Центральное достоинство заключается в идентичности расчетных рамок и норм условий прокрутки.
Алгоритм нахождения активных запасных доменов строится на наблюдении профильных телеграм-каналов и сотрудничающих ресурсов. Квалифицированные пользователи эксплуатируют прокси-соединения для обеспечения устойчивого связи независимо от территориальных ограничений.
Определение легального казино оператора предполагает основательного разбора регулятивных свидетельств. Современные системы Меллстрой официальный сайт предоставляют клиентам стопроцентную детали о действующих допусках.
Алгоритм получения доступа предусматривает ряд обязательных шагов аутентификации. Провайдеры запрашивают свидетельства, засвидетельствующие персону и совершеннолетие. Стандартный KYC-механизм продолжается от 24 до 72 промежутков.
Контроль средств стартует с определения пределов на взносы. Профессиональные пользователи рекомендуют задействовать принцип 5% от совокупного казино бюджета на одну игру.
Технические блокировки поставщиков побуждают внедрять запасные маршруты. Копии удерживают абсолютную производительность основного платформы, подразумевая журнал переводов и азартный достижения.
Актуальные платежные системы предоставляют скоростные взносы через блокчейн портмоне. Bitcoin, Ethereum и постоянные токены обеспечивают тайность и мизерные сборы. Время выполнения извлечений составляет 10-30 интервалов.
Планы приверженности предусматривают иерархические ранги с нарастающим кэшбэком. VIP-консультанты предоставляют персонализированные поощрения, усиленные рамки и приоритетную сервис.
Cindora Webstore – Browsing is simple and items are categorized effectively.
Поиск в сфере сертифицированных платформ требует знания современных методов соединения. Профессиональные клиенты используют п»ї1xBet зеркало для извлечения новейшей сведений о действующих путях.
Процедура открытия учетной записи в официальных учреждениях подразумевает тщательную подтверждение. Актуальные организации используют KYC-процедуры и AML-критерии. Документооборот требует от 24 до 72 временных отрезков.
Компьютерные методы для преодоления препятствий улучшаются вместе с ужесточением правовых инициатив. VPN-службы разряда premium гарантируют шифрование AES-256 и протоколы OpenVPN. Постоянство соединения принципиально необходима для высокоролловых сессий.
Запасные сайты оперируют через территориально разнесенные цифровые ресурсы. CDN-сети осуществляют оптимальную латентность для азиатских клиентов. Техническое перенаправление включается при обнаружении недоступности первичного ресурса.
Финансовые манипуляции в проверенных регионах подпадают под четким стандартам PCI DSS. Децентрализованные транзакции приобретают актуальность по причине приватности и оперативности обработки.
Смартфонные программы ведущих операторов содержат физиологическую идентификацию и push-уведомления для критических происшествий. Настраиваемый интерфейс самостоятельно настраивается под свойства панели.
ева казино зеркало ева казино регистрация заняла пару минут, всё быстро и без сложностей.
eva casino бонусы
Подбор легального развлекательного площадки требует тщательного изучения правовых бумаг. Новые сайты тип топ казино предоставляют игрокам стопроцентную информацию о действующих лицензиях.
Механизм создания профиля охватывает множество требуемых этапов аутентификации. Провайдеры запрашивают документы, устанавливающие персону и совершеннолетие. Типовой KYC-процесс занимает от 24 до 72 промежутков.
Распоряжение капиталом стартует с фиксации лимитов на инвестиции. Профессиональные игроки настаивают задействовать установку 5% от общего игорного капитала на конкретную раунд.
Системные ограничения провайдеров обязывают задействовать альтернативные домены. Альтернативы поддерживают полную эффективность основного сайта, охватывая журнал переводов и развлекательный продвижение.
Передовые денежные инструменты дают быстрые пополнения через электронные счета. Bitcoin, Ethereum и стабильные валюты предоставляют конфиденциальность и крошечные взносы. Период реализации снятий равно 10-30 минут.
Схемы постоянства охватывают многоуровневые степени с увеличивающимся бонусом. VIP-координаторы предлагают эксклюзивные бонусы, улучшенные границы и опережающую обслуживание.
AisleGlow Store – Easy to move around the site and sections are clearly organized.
Ориентирование в области легальных порталов подразумевает представления актуальных технологий доступа. Профессиональные участники внедряют тип топ казино для добывания современной данных о функционирующих адресах.
Механизм оформления личного кабинета в официальных организациях содержит многоуровневую верификацию. Новейшие провайдеры внедряют KYC-механизмы и AML-правила. Бумажная работа составляет от 24 до 72 временных отрезков.
Программные технологии для избежания барьеров развиваются сообща с усилением законодательных мер. VPN-сервисы уровня premium гарантируют кодирование AES-256 и системы OpenVPN. Стабильность коннекта жизненно существенна для привилегированных заходов.
Зеркальные сайты функционируют через географически расположенные IT мощности. CDN-системы осуществляют сокращенную отклик для глобальных пользователей. Системное роутинг срабатывает при выявлении недоступности центрального ресурса.
Денежные переводы в сертифицированных зонах соответствуют строгим нормам PCI DSS. Децентрализованные расчеты приобретают актуальность из-за скрытности и динамике обработки.
Портативные клиенты топовых провайдеров объединяют лицевую идентификацию и push-сообщения для существенных происшествий. Изменяемый дизайн программно подстраивается под свойства экрана.
Легальные провайдеры развлекательных сервисов предоставляют геймерам вариант к элитному азартному досугу через профильные ресурсы, включая Lucky Bear casino , которые именно выполняют общепринятые регламенты безопасности.
Механизм регистрации требует предоставления проверочных сведений через криптографические SSL-протоколы. Операторы запрашивают нотариальное свидетельство дееспособности и адреса жительства для соблюдения юрисдикционных стандартов.
Двухфакторная authentication представляет mandatory aspect современных систем security. Участники располагают SMS-пароли, push-notification или задействуют targeted приложения в стиле Google Authenticator.
Mirror ссылки нейтрализуют сложности локальных блокировок и DDoS-штурмов. Технически mirrors образуют тождественные клоны основного домена с сохранением инструментария и индивидуальных данных.
Skilled клиенты призывают сохранять новейшие каталоги активных дублей в избранном browser. Букмекеры рассылают новости о свежих порталах через e-mail, Telegram-группы и мобильные утилиты.
Payment транзакции через лицензионные ресурсы гарантированы encryption системами стандарта банковского направления. Extraction финансов производится solely на подтверждённые данные собственника профиля.
Official Jarvico Site – Everything loads quickly and moving between pages is simple.
Выбор проверенного казино оператора заставляет основательного анализа официальных бумаг. Актуальные системы Меллстрой предлагают участникам максимальную информацию о действующих допусках.
Алгоритм получения доступа предусматривает определенное количество обязательных фаз подтверждения. Администраторы истребуют свидетельства, подтверждающие идентичность и зрелость. Традиционный KYC-регламент занимает от 24 до 72 интервалов.
Контроль средств запускается с определения ограничений на вклады. Компетентные клиенты рекомендуют применять закон 5% от итогового азартного резерва на индивидуальную заход.
Электронные блокировки операторов побуждают внедрять дополнительные маршруты. Копии удерживают безусловную работоспособность базового сайта, содержа журнал сделок и казино прогресс.
Актуальные денежные способы обеспечивают мгновенные инвестиции через цифровые счета. Bitcoin, Ethereum и стабильные валюты предоставляют анонимность и символические отчисления. Длительность реализации снятий составляет 10-30 отрезков.
Алгоритмы лояльности подразумевают градационные статусы с возрастающим кэшбэком. VIP-консультанты предоставляют эксклюзивные поощрения, увеличенные лимиты и преимущественную техподдержку.
Дополнительные Крипта, майнинг, аирдропы и тапалки — всё самое свежее в Smart Money Crypto Зарабатывай на криптоиграх и фармилках прямо в Telegram. Пассивный доход с удовольствием и без вложений! Заходи и забирай свою прибыль. ИЛИ Ищешь где заработать на крипте? Smart Money Crypto Новости, криптоигры с выводом, актуальные аирдропы и майнинг на телефоне. Тапалки и фармилки в Telegram для твоего пассивного дохода. Присоединяйся к команде Smart Money!
Spring Crate Store – Really helpful and smooth experience makes me want to come back.
Нынешние гемблеры натыкаются с затруднением соединения к легальным сайтам. Поставщики блокируют основные домены, но грамотные казино Лаки Бир игроки понимают о присутствии альтернативных ресурсов.
Альтернативный адрес формирует абсолютную отображение основного площадки. Протоколы шифрования сохраняются такими же. Финансовые транзакции производятся через аналогичные механизмы.
Алгоритм открытия счёта через зеркальный домен подразумевает типовой аутентификации. Операторы выясняют удостоверения для выполнения KYC-правил. Паспортные параметры реализуют многоуровневую валидацию.
Банковские рамки на резервных сайтах аналогичны основным требованиям. Низшие вклады остаются постоянными. Возрастающие джекпоты координируются между разными ссылками.
Льготные схемы работают комплексно на резервных ресурсах. Множитель ставок гарантирует базовые значения. Срок активности проигрывания сохраняется.
Команда ассистирования решает обращения с зеркальных доменов таким же способом. Онлайн переписка гарантирует непрерывный режим обслуживания.
Передовые участники пересекаются с изобилием технологических аспектов при функционировании с лицензированными платформами. Профессиональные платформы типа п»ї1хбет зеркало обеспечивают новую материалы о операциях развлекательных компаний.
Алгоритм валидации счета содержит комплекс необходимых стадий. Исходная валидация предполагает отправки документов доказывающих субъект. Типовой перечень предполагает ID, автоудостоверение или внешний паспорт.
Цифровая компонента записления включает использование безопасного соединения и 2FA. Профессиональные участники советуют инициировать весь комплекс представленных возможностей безопасности.
Зеркала составляют стопроцентные дубликаты первичного платформы с сохранением исчерпывающего возможностей. Ключевое бонус состоит в подобии расчетных пределов и условий условий прокрутки.
Процедура поиска действующих запасных доменов опирается на мониторинге тематических телеграм-каналов и партнерских площадок. Квалифицированные участники применяют туннельные протоколы для предоставления бесперебойного соединения вне зависимости от локальных барьеров.
Активные mirror-ссылки официальных gaming-операторов на лаки Р±РёСЂ казино официальный сайт обеспечивают стабильный коннект к гемблинг системам. Методика копирования создает полноценные реплики корневого домена с фиксацией всех механизмов.
Алгоритм активации через дублирующий портал абсолютно имитирует главную форму. Дебютные клиенты указывают функционирующий email, придумывают надежный шифр и назначают игровую платежное средство.
Верификация личного кабинета включает представления удостоверений по KYC-требованиям. Скан национального документа, подтверждение резиденции и платежные реквизиты проверяются через цифровую контроль в течение 24-72 часов.
Подключение зарегистрированных игроков реализуется через базовую форму с 2FA верификацией. Временные шифры приходят на сотовый девайс или почтовый ящик.
Механизмы депозитного модуля через зеркала обеспечивает распространенные расчетные платформы. Visa, Mastercard, виртуальные портмоне Skrill, Neteller, crypto Bitcoin, Ethereum выполняются с низкими процентами 0-3%.
Гемблинг коллекция дублируется на сто процентов включая автоматы, карточные забавы, live-ведущих и мегавыигрыши. RTP-показатели, волатильность и ставочные требования поддерживаются неизменными.
Поощрительная схема действует похоже центральному веб-площадке. Welcome-пакеты, фриспины, компенсация и VIP-планы запускаются автоматически при соблюдении фиксированных условий.
Стильный вид создает сильное мнение о вас.
Ваш образ влияет на восприятие вас окружающими мгновенно.
Хорошее самочувствие в подобранном луке повышает личную самооценку.
Он демонстрирует ваш уровень ответственности и уважение к мелочам.
https://s6.superlooks.ru/Q3KPilgrVeYX/
Через одежду вы имеете шанс проявить свою личность и вкус.
Окружающие неосознанно воспринимают опрятных людей как более успешных.
Следовательно, вложения в собственный образ — это вклад в ваше успешное будущее.
Передовые операторы развлекательных услуг обеспечивают игрокам возможность к высококлассному игровому процессу через сертифицированные казино Голд системы. Легальная функционирование подразумевает следования определенных надзорных критериев.
Процедура создания игрового кабинета включает валидацию конфиденциальных реквизитов. Операторы применяют детализированные процедуры KYC и AML для недопущения незаконных финансовых действий.
Электронные системы передовых казино базируются на зашифрованных инфраструктурах с SSL стандартами. Локальные запреты принуждает операторов запускать дублирующие адреса.
Резервные домены представляют идентичные копии центрального портала с сохранением всех инструментов и показателей. Участники обеспечивают себе постоянный подключение к балансу, развлекательной записям и пользовательским настройкам.
Расчетные процедуры выполняются через подключенные финансовые шлюзы. Пределы на депозиты и изъятия назначаются в согласии с лицензионными требованиями и организационными правилами управления рисками.
Опытные игроки советуют анализировать статус лицензии через официальные регистры гемблинг организаций. Репутационные параметры охватывают места на специализированных сервисах и оценки реальных клиентов.
Новейшие геймеры пересекаются с массой цифровых тонкостей при операциях с легальными ресурсами. Профессиональные источники типа Вавада РІС…РѕРґ обеспечивают свежую сведения о процессах гэмблинговых компаний.
Система верификации счета включает набор требуемых стадий. Базовая проверка подразумевает загрузки бумаг валидирующих субъект. Классический перечень предполагает документ, автоудостоверение или загранпаспорт.
Системная элемент оформления включает эксплуатацию криптографической защиты и двухфакторной аутентификации. Экспертные участники советуют включать все доступных функций безопасности.
Дублирующие порталы формируют идентичные отражения первичного портала с поддержанием тотального инструментария. Главное преимущество содержится в соответствии финансовых границ и параметров вейджера.
Алгоритм выявления актуальных запасных доменов фундируется на мониторинге профессиональных телеграм-каналов и связанных ресурсов. Профессиональные геймеры используют туннельные протоколы для формирования бесперебойного соединения вне зависимости от территориальных блокировок.
Looking stylish projects a positive first impression.
Your attire speaks loudly before you actually speak a word.
It boosts your own self-esteem and mindset significantly.
A polished appearance signals professionalism in the office.
https://a6.gucci1.ru/Ysueezd07HoR/
Stylish clothing let you to showcase your individual identity.
Others often perceive stylish people as more successful and reliable.
Therefore, investing in your style is an valuable step in yourself.
Передовые провайдеры игорных игр дают пользователям доступ к элитному гемблингу через сертифицированные Mellstroy Game ресурсы. Официальная бизнес требует учета четких регуляторных положений.
Процесс регистрации персонального профиля охватывает аутентификацию приватных реквизитов. Провайдеры задействуют многоуровневые механизмы KYC и AML для недопущения фродовых финансовых действий.
Программные инструменты инновационных развлекательных порталов строятся на безопасных дата-центрах с шифровальными протоколами. Геоблокировка побуждает администраторов создавать дублирующие порталы.
Резервные сайты образуют точные копии главного сайта с фиксацией всех функций и показателей. Игроки получают устойчивый соединение к капиталу, беттинг истории и пользовательским опциям.
Денежные операции реализуются через синхронизированные денежные шлюзы. Границы на взносы и изъятия регулируются в соотношении с законодательными стандартами и корпоративными нормами контроля угроз.
Экспертные гемблеры рекомендуют мониторить условия авторизации через контролирующие реестры развлекательных комиссий. Статусные характеристики включают оценки на отраслевых ресурсах и feedback реальных клиентов.
Ahaa, its good discussion on the topic of this article here at this web site, I have read all
that, so now me also commenting here.
Quick Shop Xerva – Love the design, navigating through products was super easy today.
GiftMora Specials – Layout feels modern and browsing experience is enjoyable.
Official Knickbay Site – Every listing includes comprehensive details that guide purchasing decisions.
It’s difficult to find well-informed people in this particular topic,
but you seem like you know what you’re talking about!
Thanks
сколько стоит нарколог на дом в ростове narkolog-na-dom-v-rostove-2.ru .
Explore Irvanta – Products look sturdy and prices are reasonable.
Перемещение в секторе лицензированных площадок нуждается представления передовых способов доступа. Продвинутые игроки внедряют Вавада регистрация для обретения свежей данных о активных доменах.
Процедура формирования счета в официальных компаниях включает комплексную аутентификацию. Новейшие поставщики задействуют KYC-алгоритмы и AML-требования. Документальная процедура требует от 24 до 72 периодов.
Программные методы для преодоления ограничений эволюционируют синхронно с ужесточением законодательных мер. VPN-службы категории premium гарантируют безопасность AES-256 и протоколы OpenVPN. Устойчивость коннекта кардинально важна для высокоролловых сессий.
Альтернативные адреса оперируют через пространственно размещенные компьютерные системы. CDN-архитектуры предоставляют быструю отклик для американских участников. Техническое роутинг инициируется при обнаружении барьера базового портала.
Экономические манипуляции в проверенных регионах следуют определенным требованиям PCI DSS. Криптовалютные транзакции завоевывают востребованность по причине анонимности и темпу выполнения.
Планшетные утилиты премиальных компаний объединяют отпечатковую подтверждение и push-сообщения для существенных происшествий. Изменяемый интерфейс программно подстраивается под параметры дисплея.
Shop Irnora – Unique selections make this store stand out from typical online shops.
Актуальные участники попадают с барьером связи к проверенным ресурсам. Провайдеры фильтруют основные домены, но опытные mad casino зеркало пользователи осознают о доступности параллельных порталов.
Альтернативный адрес составляет идентичную воспроизведение первичного платформы. Средства защиты поддерживаются аналогичными. Денежные действия выполняются через те же каналы.
Алгоритм оформления профиля через параллельный домен включает обычной подтверждения. Администраторы запрашивают документы для выполнения KYC-регламентов. Индивидуальные информация реализуют многоуровневую верификацию.
Банковские границы на параллельных ресурсах аналогичны основным условиям. Стартовые вклады продолжают фиксированными. Увеличивающиеся банки интегрируются между разными адресами.
Премиальные программы действуют полноценно на дополнительных сайтах. Множитель ставок обеспечивает исходные параметры. Период действия реализации продолжается.
Служба помощи рассматривает тикеты с альтернативных ссылок таким же способом. Интерактивный диалог предоставляет беспрерывный график деятельности.
Рабочие альтернативные домены лицензированных gaming-операторов на Меллстрой официальный сайт предоставляют постоянный вход к геймерским платформам. Система клонирования создает идентичные реплики базового веб-площадки с консервацией всех механизмов.
Механизм активации через дублирующий портал на сто процентов имитирует оригинальную анкету. Свежие клиенты прописывают валидный email, генерируют сложный шифр и назначают рабочую платежное средство.
Аутентификация личного кабинета предполагает представления справок в соответствии с KYC-политике. Изображение ID-карты, свидетельство резиденции и карточные данные проверяются через машинную анализ в течение 24-72 ч.
Аутентификация существующих клиентов реализуется через обычную форму с расширенной аутентификацией. Краткосрочные шифры доставляются на мессенджер номер или мейл.
Опции депозитного модуля через альтернативные домены поддерживает распространенные денежные механизмы. Visa, Mastercard, веб счета Skrill, Neteller, виртуальные монеты Bitcoin, Ethereum осуществляются с оптимизированными сборами 0-3%.
Развлекательная коллекция воспроизводится абсолютно включая spinning games, столовые игры, live-операторов и максимальные награды. RTP-значения, дисперсия и ставочные требования фиксируются идентичными.
Поощрительная схема действует похоже основному веб-площадке. Welcome-бандлы, бесплатные вращения, возврат средств и VIP-схемы запускаются машинально при выполнении прописанных условий.
Lançamos esta iniciativa com o objetivo de criar um sistema global de autoexclusão, que permitirá que os jogadores vulneráveis bloqueiem o seu acesso a todas as oportunidades de jogo online. As melhores slots gratuitas que deve jogar são Eyes of Horus Megaways, Gates of Olympus 1000, Sweet Bonanza 1000, e Book of Dead. Estes são os jogos mais populares que os jogadores adoram jogar no nosso site. A BETO Slots tem quase 3000 slots de demonstração gratuitas para escolher, por isso temos a certeza de que encontrará um ótimo jogo para se divertir! As slots da Pragmatic Play transportam-nos para universos distintos e com detalhes que contam uma história. A Gates of Olympus, por exemplo, é inspirada na história do rei do Olimpo, o deus Zeus. Se na versão standard a Gates of Olympus já apresentava os deuses do Olimpo cheios de poder, a versão 1000 traz ainda mais poder e… prémios! Nesta versão de uma das melhores slots da Pragmatic Play, Zeus oferece multiplicadores ainda mais elevados até 1000x!
https://mrcustomer.jp/review-do-jogo-betonred-no-casino-online-para-jogadores-de-portugal/
A Gates of Olympus é uma das slots mais emblemáticas da Pragmatic Play e uma referência em volatilidade alta. O bónus com multiplicadores acumulativos é o seu ponto alto, transformando o jogo num espetáculo visual e matemático. This website is using a security service to protect itself from online attacks. The action you just performed triggered the security solution. There are several actions that could trigger this block including submitting a certain word or phrase, a SQL command or malformed data. A aposta mínima e máxima para Gates of Olympus é de $0.20 e $100, respectivamente. Este jogo de cassino online também oferece um recurso de autoplay para jogadores que gostariam de desfrutar de uma pausa necessária. Uma funcionalidade interessante da slot Gates of Olympus é que a mesma oferece multiplicadores aleatórios, que aparecem durante o jogo. Estes multiplicadores variam desde 2x a 500x o valor da aposta.
Гемблинговая область показывает динамичный рост, заинтересовывая легионы игроков. Опытные сайты предоставляют безопасную атмосферу для беттинга. Полную сведения о данных брендах возможно найти на Gold .
Аттестация остаётся основным элементом выбора платформы. Надзорные органы Мальты предоставляют качественный надзор денежных операций. Всякая официальная площадка реализует регулярные аудиты RNG-алгоритмов.
Программные свойства современных беттинг-платформ объединяют SSL-кодирование финансового класса. Поставщики цифрового обеспечения уровня Microgaming, NetEnt, Pragmatic Play добавляют сложные схемы хаотичных чисел.
Схема аутентификации аккаунта подразумевает передачи документов KYC-уровня. ID, подтверждение о финансах, подтверждение адреса — типичный перечень для итогового подключения.
Параллельные ссылки устраняют трудности с цензурой поставщиков. Действующие копии модифицируются систематически компьютерными специалистами. Смартфонные программы зачастую выполняются устойчивее веб версий.
Контроль средств формирует продолжительную успешность развлекательных партий. Квалифицированные игроки предлагают лимитировать размер ставки до 1-2% от общего резерва.
Official Varnelo Site – Descriptions are easy to follow and the website is simple to navigate.
Определение надежного азартного ресурса в актуальных границах заставляет детального внимания к регулятивному уровню. Знающие участники знают, что Лаки Бир казино демонстрирует актуальную сведения о действующих сервисах.
Алгоритм оформления профиля в легальных площадках предусматривает обязательную валидацию документов. KYC-процедуры гарантируют как сервис, так и клиента от мошенничества. Краткосрочные лимиты на изъятие финансов до окончания контроля – нормальная практика.
Электронные препятствия на связь к гемблинг сервисам обходятся через альтернативные ссылки. Активные отражения поддерживают абсолютную эффективность центрального ресурса. Денежные транзакции, азартный результаты и бонусные схемы функционируют константными.
Финансовая гарантированность измеряется уровнем внедренных банковских систем. SSL-криптография, PCI DSS сертификация и дополнительная аутентификация устанавливают стабильный барьер ограждения.
Азартная библиотека сертифицированных площадок охватывает автоматы от ведущих производителей. RTP-параметры, колебания и алгоритмические схемы подвергаются нейтральную проверку в авторизованных центрах.
Схемы вознаграждения в качественных сервисах опираются на открытых условиях ставок. Вейджер x35-40 оценивается адекватным для слот-привилегий, в то время как классические развлечения идут в калькуляцию с минимальным процентом.
Explore PureValueOutlet – A lively and interactive space perfect for discovering ideas.
Навигация в секторе официальных сайтов нуждается знания новых способов входа. Профессиональные игроки эксплуатируют Mellstroy Game для извлечения свежей информации о активных доменах.
Процесс регистрации учетной записи в надежных заведениях подразумевает комплексную проверку. Новейшие операторы используют KYC-системы и AML-нормы. Оформление документов требует от 24 до 72 часов.
IT способы для минования блокировок эволюционируют параллельно с повышением юридических шагов. VPN-платформы типа premium обеспечивают защиту AES-256 и методы OpenVPN. Устойчивость соединения кардинально значима для VIP игровых периодов.
Запасные платформы действуют через регионально размещенные цифровые системы. CDN-сети поддерживают низкую время ответа для американских игроков. Автоматическое переключение активируется при идентификации ограничения базового ресурса.
Платежные операции в легальных территориях следуют жестким критериям PCI DSS. Блокчейн операции увеличивают распространение вследствие анонимности и скорости обработки.
Мобильные клиенты элитных организаций объединяют голосовую подтверждение и push-алерты для принципиальных моментов. Гибкий облик автоматически подстраивается под свойства монитора.
Надёжные платформы азартных предложений предоставляют игрокам возможность к элитному развлечениям через целевые домены, включая СЂР° казино , которые специально следуют мировые стандарты защиты.
Схема открытия счёта подразумевает ввода идентификационных деталей через криптографические SSL-протоколы. Провайдеры просят нотариальное verification правоспособности и места регистрации для соблюдения нормативных критериев.
2FA аутентификация является required элементом актуальных архитектур надёжности. Users располагают SMS-шифры, push-алерты или внедряют dedicated tools вроде Google Authenticator.
Резервные домены ликвидируют проблемы geographic санкций и DDoS-нападений. Фактически зеркала представляют аналогичные клоны базового сайта с удержанием инструментария и клиентских деталей.
Опытные пользователи предлагают сохранять актуальные базы функционирующих mirrors в избранном браузера. Букмекеры передают новости о свежих адресах через электронную почту, Telegram-каналы и телефонные утилиты.
Платёжные операции через лицензионные сайты покрыты cryptographic технологиями уровня банковского направления. Получение фондов реализуется лишь на validated реквизиты владельца учётной записи.
Выбор надежного betting площадки в текущих границах заставляет особого подхода к лицензионному режиму. Квалифицированные геймеры представляют, что ретро сайт содержит последнюю материалы о доступных операторах.
Схема открытия счета в проверенных платформах объединяет обязательную аутентификацию персональных данных. KYC-требования обеспечивают как оператора, так и участника от фрода. Кратковременные пределы на перечисление финансов до закрытия контроля – обычная подход.
Цифровые блокировки на подключение к азартным сервисам устраняются через дублирующие порталы. Доступные дубликаты поддерживают всестороннюю возможности основного ресурса. Финансовые процедуры, геймплейный продвижение и льготные планы остаются устойчивыми.
Капитальная безопасность выражается уровнем задействованных расчетных систем. SSL-шифрование, PCI DSS подтверждение и усиленная аутентификация формируют стабильный заслон обороны.
Геймплейная набор проверенных заведений содержит машины от известных провайдеров. RTP-значения, вариативность и алгоритмические модели претерпевают объективную контроль в одобренных институтах.
Механизмы поощрения в профессиональных операторах основываются на четких требованиях активности. Условия ставок x35-40 считается разумным для барабан-подарков, в то время как классические развлечения включаются в калькуляцию с уменьшенным коэффициентом.
Проверенные провайдеры развлекательных предложений дают игрокам право к профессиональному азартному досугу через целевые сайты, включая п»ї1xBet , которые точно соблюдают мировые регламенты защиты.
Процедура открытия счёта включает предоставления идентификационных параметров через криптографические SSL-соединения. Операторы demanded документальное доказательство совершеннолетия и территории residence для выполнения legal стандартов.
Двухэтапная аутентификация считается required частью актуальных архитектур надёжности. Игроки располагают SMS-ключи, push-алерты или задействуют специальные приложения в стиле Google Authenticator.
Дублирующие домены устраняют сложности локальных санкций и DDoS-атак. С технической точки зрения копии являют аналогичные реплики primary портала с maintaining функциональности и индивидуальных параметров.
Профессиональные пользователи suggest сохранять новейшие списки рабочих дублей в сохранённых ссылках интернет-программы. Операторы передают обновления о fresh порталах через электронную почту, Telegram-группы и смартфонные программы.
Банковские операции через лицензионные площадки secured криптографическими технологиями класса банковского направления. Снятие денег происходит только на подтверждённые счета владельца account.
Развлекательная область демонстрирует динамичный развитие, привлекая миллионы участников. Опытные сайты предлагают надёжную условия для развлечений. Развёрнутую факты о таких компаниях возможно обнаружить на Vavada зеркало .
Аттестация выступает главным показателем подбора портала. Регуляторы Мальты создают жёсткий проверку финансовых транзакций. Отдельная лицензированная портал проходит систематические ревизии RNG-модулей.
Цифровые особенности передовых беттинг-платформ охватывают SSL-защиту банковского ранга. Производители программного ПО уровня Microgaming, NetEnt, Pragmatic Play внедряют комплексные механизмы произвольных показателей.
Схема аутентификации личного кабинета предусматривает передачи свидетельств KYC-формата. ID, свидетельство о прибылях, доказательство адреса — обычный список для итогового подключения.
Дублирующие порталы ликвидируют трудности с цензурой провайдеров. Свежие альтернативы обновляются систематически IT специалистами. Планшетные приложения нередко функционируют устойчивее браузерных модификаций.
Распределение капитала устанавливает долгосрочную прибыльность игровых партий. Экспертные участники указывают сокращать размер вейджера до 1-2% от полного бюджета.
кайт школа кайт школа в крыму
Mistcrate Outlet – Discovered some interesting items here that are worth browsing.
https://whimsical.com/code-promo-1xbet-gratuit-bonus-de-130-1xtapis-RWhdeN9ZHNpvjVWzXKLm7s
http://classichonda.phorum.pl/viewtopic.php?p=187555#187555
Современные игроки пересекаются с изобилием системных деталей при деятельности с официальными порталами. Тематические источники типа п»ї1хбет регистрация выдают новую информацию о процессах казино операторов.
Система верификации профиля охватывает ряд необходимых уровней. Стартовая подтверждение требует передачи свидетельств удостоверяющих индивидуальность. Типовой перечень охватывает свидетельство, лицензию водителя или загранпаспорт.
Цифровая сторона открытия счета подразумевает эксплуатацию безопасного соединения и двойной авторизации. Квалифицированные пользователи рекомендуют задействовать максимум представленных настроек охраны.
Запасные домены формируют стопроцентные дубликаты базового ресурса с поддержанием комплексного возможностей. Важнейшее выгода кроется в схожести расчетных лимитов и критериев проигрыша.
Алгоритм обнаружения рабочих зеркал строится на проверке экспертных уведомительных сервисов и аффилированных сайтов. Экспертные пользователи эксплуатируют анонимайзеры для формирования надежного связи без оглядки от территориальных запретов.
Определение надежного развлекательного оператора в актуальных рамках подразумевает специального анализа к юридическому режиму. Компетентные участники понимают, что Mellstroy Game казино включает современную данные о действующих операторах.
Алгоритм оформления профиля в лицензированных сервисах предусматривает необходимую валидацию идентичности. KYC-процедуры защищают как заведение, так и игрока от афер. Переходные ограничения на изъятие денег до закрытия верификации – привычная процедура.
Электронные запреты на подключение к гемблинг сайтам решаются через альтернативные URL. Функционирующие копии сохраняют полную производительность основного ресурса. Денежные движения, азартный прогресс и поощрительные планы остаются константными.
Капитальная надежность измеряется степенью задействованных банковских систем. SSL-защита, PCI DSS валидация и многоуровневая аутентификация формируют защищенный заслон обороны.
Азартная набор легальных провайдеров объединяет спины от ведущих разработчиков. RTP-коэффициенты, дисперсия и алгоритмические модели подвергаются беспристрастную сертификацию в утвержденных лабораториях.
Схемы поощрения в серьезных операторах базируются на понятных параметрах вейджера. Отыгрыш x35-40 считается нормальным для автомат-привилегий, в то время как настольные состязания идут в зачет с редуцированным коэффициентом.
https://lifeinsys.com/user/dayoc
Развлекательная ниша представляет активный развитие, заинтересовывая множество участников. Опытные сайты предлагают надёжную пространство для ставок. Исчерпывающую материалы о этих провайдерах доступно обнаружить на лаки Р±РёСЂ казино .
Аттестация является приоритетным показателем определения ресурса. Лицензиаты Великобритании дают жёсткий проверку расчётных транзакций. Всякая сертифицированная сайт выполняет периодические контроли RNG-модулей.
Компьютерные особенности передовых казино предусматривают SSL-криптографию денежного стандарта. Производители софтового софта вроде Microgaming, NetEnt, Pragmatic Play добавляют комплексные схемы рандомных параметров.
Алгоритм подтверждения аккаунта требует предоставления бумаг KYC-формата. Документ, выписка о средствах, валидация прописки — типичный пакет для окончательного авторизации.
Дублирующие ссылки ликвидируют трудности с цензурой компаний. Актуальные копии изменяются систематически IT группами. Смартфонные утилиты часто действуют лучше веб модификаций.
Финансовая дисциплина задаёт длительную эффективность игровых циклов. Опытные геймеры советуют сокращать объём бета до 1-2% от итогового капитала.
I do trust all of the ideas you’ve presented to
your post. They are really convincing and will certainly work.
Nonetheless, the posts are very quick for starters.
May you please extend them a bit from next time?
Thank you for the post.
Легальные ресурсы игорных возможностей дают геймерам шанс к элитному развлечениям через специализированные сайты, включая Вован , которые точно придерживаются мировые регламенты надёжности.
Процедура оформления профиля включает заполнения authentication информации через шифрованные SSL-линии. Администрация запрашивают нотариальное подтверждение возраста и региона проживания для поддержания legal требований.
Multi-factor идентификация представляет принудительным элементом современных платформ security. Users располагают SMS-шифры, push-сообщения или внедряют профессиональные программы типа Google Authenticator.
Дублирующие порталы преодолевают вопросы territorial запретов и DDoS-воздействий. Фактически дубли формируют тождественные dublicates главного портала с сохранением возможностей и клиентских деталей.
Опытные пользователи рекомендуют хранить новейшие списки действующих mirrors в избранном веб-клиента. Management доставляют обновления о современных порталах через почтовые сервисы, Telegram-группы и mobile apps.
Банковские операции через проверенные ресурсы защищены encryption системами класса банковского сектора. Вывод финансов происходит лишь на верифицированные реквизиты хозяина личного кабинета.
Official Quistly Site – Lots of choices and the navigation feels seamless.
Walnutware Collection – Found the descriptions very helpful and easy to follow.
https://sildenafilpriceguide.com/# Sildenafil 100mg price
Новейшие игроки встречаются с огромным количеством системных деталей при функционировании с лицензированными площадками. Специализированные порталы типа Лаки Бир регистрация выдают релевантную данные о деятельности игорных операторов.
Система валидации кабинета охватывает несколько неотъемлемых уровней. Первичная аутентификация предполагает загрузки свидетельств подтверждающих личность. Обычный пакет охватывает удостоверение личности, лицензию водителя или заграничное удостоверение.
Цифровая сторона открытия счета подразумевает внедрение SSL-шифрования и двухфакторной аутентификации. Опытные клиенты рекомендуют включать полный набор представленных опций секьюрити.
Резервные ссылки образуют полные копии основного домена с поддержанием комплексного набора функций. Основное плюс выражается в схожести платежных пределов и параметров вейджера.
Схема обнаружения актуальных запасных доменов фундируется на проверке тематических новостных лент и аффилированных площадок. Опытные геймеры внедряют виртуальные частные сети для создания устойчивого соединения без оглядки от локальных ограничений.
http://sildenafilpriceguide.com/# Viagra tablet online
Определение качественного игрового портала в сегодняшних реалиях предполагает детального рассмотрения к правовому положению. Знающие клиенты понимают, что Lucky Bear casino предоставляет актуальную данные о функционирующих операторах.
Процедура оформления профиля в проверенных сервисах охватывает неизбежную подтверждение документов. KYC-правила гарантируют как оператора, так и участника от махинаций. Временные рамки на вывод денег до финализации валидации – обычная процедура.
Цифровые барьеры на вход к игровым порталам преодолеваются через резервные порталы. Доступные зеркала предоставляют всестороннюю функциональность первичного портала. Платежные операции, интерактивный прогресс и бонусные схемы сохраняются неизменными.
Капитальная надежность характеризуется качеством внедренных платежных систем. SSL-защита, PCI DSS подтверждение и расширенная идентификация устанавливают стабильный щит защиты.
Азартная коллекция проверенных операторов включает автоматы от топовых производителей. RTP-параметры, изменчивость и расчетные принципы получают нейтральную сертификацию в авторизованных институтах.
Механизмы стимулирования в достойных операторах опираются на прозрачных правилах активности. Отыгрыш x35-40 признается справедливым для слот-поощрений, в то время как настольные развлечения идут в расчет с редуцированным коэффициентом.
trusted online pharmacy pharmacy rx US Pharma Index
Click for KindleMart – Decent selection available and browsing is lightning quick.
ivermectin 1 cream 45gm: Ivermectin Access USA – Ivermectin Access USA
Ruby Aisle Online – The site layout is clean and makes finding products effortless.
Актуальные бетторы встречаются с проблемой доступа к сертифицированным порталам. Организации ограничивают первичные ссылки, но опытные Вавада зеркало клиенты учитывают о наличии параллельных порталов.
Дополнительный домен формирует полную дубликат главного портала. Средства защиты поддерживаются равнозначными. Финансовые действия производятся через идентичные системы.
Алгоритм оформления профиля через дополнительный домен требует типовой подтверждения. Операторы уточняют справки для осуществления KYC-регламентов. Персональные параметры подвергаются двухфакторную валидацию.
Банковские лимиты на параллельных платформах совпадают базовым условиям. Наименьшие беты поддерживаются стабильными. Накопительные призовые фонды объединяются между всеми адресами.
Льготные системы выполняются завершённо на зеркальных ресурсах. Множитель ставок удерживает оригинальные показатели. Срок активности использования поддерживается.
Команда ассистирования изучает вопросы с альтернативных доменов равнозначно. Мгновенный общение гарантирует постоянный режим оперирования.
Современные геймеры имеют дело с массой технических тонкостей при работе с лицензированными площадками. Тематические ресурсы типа Рльдорадо казино поставляют современную информацию о операциях игорных брендов.
Процесс аутентификации учетной записи охватывает несколько обязательных уровней. Первичная верификация подразумевает передачи свидетельств валидирующих индивидуальность. Привычный комплект содержит паспорт, автоудостоверение или заграничное удостоверение.
Цифровая сторона открытия счета содержит эксплуатацию зашифрованного канала и двойной авторизации. Квалифицированные пользователи предлагают активировать совокупность имеющихся опций безопасности.
Альтернативные адреса составляют идентичные отражения центрального портала с хранением всего инструментария. Главное плюс кроется в схожести расчетных границ и параметров ставочных требований.
Схема нахождения рабочих альтернативных адресов фундируется на проверке профильных новостных лент и партнерских порталов. Профессиональные клиенты задействуют прокси-соединения для формирования устойчивого подключения безотносительно от локальных барьеров.
Передовые платформы азартных игр предоставляют клиентам доступ к качественному азарту через надежные п»ї1xBet системы. Авторизованная функционирование требует следования конкретных законодательных требований.
Система регистрации индивидуального аккаунта включает подтверждение приватных реквизитов. Управляющие внедряют детализированные алгоритмы KYC и AML для блокировки поддельных операций.
Программные средства новейших развлекательных порталов функционируют на стабильных облачных системах с криптографическими протоколами. Локальные запреты обязывает операторов создавать параллельные домены.
Резервные сайты составляют аналогичные дубликаты основного платформы с удержанием всех инструментов и показателей. Клиенты получают непрерывный вход к депозиту, развлекательной записям и персональным настройкам.
Финансовые действия проходят через встроенные денежные шлюзы. Рамки на пополнения и снятия фиксируются в соотношении с регуляторными критериями и собственными политиками риск-менеджмента.
Профессиональные гемблеры советуют мониторить положение лицензии через официальные каталоги игорных структур. Престижные характеристики предусматривают рейтинги на экспертных ресурсах и feedback истинных клиентов.
Go to
easy steps to win real money online casino
to complete your task.
Исследование в сфере лицензированных сайтов требует представления передовых решений авторизации. Профессиональные игроки эксплуатируют Клубника казино для извлечения современной информации о функционирующих адресах.
Механизм создания профиля в сертифицированных учреждениях содержит детальную аутентификацию. Продвинутые провайдеры применяют KYC-механизмы и AML-стандарты. Документальное сопровождение занимает от 24 до 72 часов.
IT способы для прохождения запретов развиваются одновременно с ужесточением законодательных мер. VPN-инструменты класса premium дают шифрование AES-256 и системы OpenVPN. Непрерывность связи принципиально значима для привилегированных партий.
Запасные домены оперируют через географически рассредоточенные серверные мощности. CDN-сети гарантируют быструю задержку для азиатских клиентов. Автоматическое переключение инициируется при обнаружении блокировки основного портала.
Банковские переводы в лицензированных юрисдикциях отвечают конкретным правилам PCI DSS. Блокчейн платежи набирают востребованность по причине скрытности и темпу обработки.
Переносные утилиты топовых организаций содержат голосовую проверку и push-оповещения для принципиальных событий. Адаптивный облик самостоятельно изменяется под свойства экрана.
Новейшие геймеры попадают с проблемой связи к официальным порталам. Компании фильтруют стандартные ссылки, но профессиональные п»ї1хбет официальный сайт посетители понимают о доступности зеркальных сайтов.
Дополнительный домен является полную копию базового сайта. Системы безопасности сохраняются идентичными. Денежные транзакции производятся через сходные каналы.
Схема создания аккаунта через зеркальный портал включает обычной верификации. Сотрудники запрашивают бумаги для выполнения KYC-регламентов. Личные параметры подвергаются двухфакторную верификацию.
Банковские границы на параллельных платформах совпадают стандартным требованиям. Стартовые вклады функционируют константными. Растущие выигрышные пулы синхронизируются между всеми адресами.
Льготные механизмы выполняются целостно на дополнительных порталах. Требования по обороту сохраняет стартовые показатели. Срок активности оборота сохраняется.
Сервис сопровождения обрабатывает обращения с резервных ссылок равнозначно. Онлайн чат поддерживает беспрерывный формат обслуживания.
Ebon Lane Boutique – Navigation is effortless and the layout is visually appealing.
Новейшие сервисы беттинг развлечений гарантируют беттерам доступ к качественному игровому процессу через защищенные Lucky Bear зеркало системы. Сертифицированная работа нуждается исполнения жестких законодательных норм.
Алгоритм оформления пользовательского счета включает подтверждение приватных данных. Операторы внедряют комплексные алгоритмы KYC и AML для исключения незаконных платежей.
Электронные системы новейших беттинг площадок работают на безопасных хостингах с шифровальными протоколами. IP-фильтрация принуждает операторов внедрять альтернативные URL.
Резервные порталы представляют точные репликации базового домена с обеспечением всех инструментов и сведений. Игроки приобретают беспрепятственный вход к депозиту, развлекательной отчетности и клиентским настройкам.
Финансовые действия производятся через подключенные расчетные сервисы. Границы на пополнения и изъятия назначаются в унисон с законодательными условиями и корпоративными процедурами снижения потерь.
Профессиональные клиенты предлагают отслеживать условия лицензии через государственные списки азартных ведомств. Престижные критерии задействуют рейтинги на экспертных сервисах и комментарии истинных клиентов.
Xerva Select – The interface is organized, making it effortless to check out different items.
Передовые провайдеры игорных активностей обеспечивают беттерам подключение к высококлассному развлечениям через надежные tip top casino системы. Авторизованная деятельность подразумевает исполнения строгих правовых требований.
Процесс создания персонального счета задействует валидацию индивидуальных сведений. Операторы эксплуатируют углубленные протоколы KYC и AML для предотвращения незаконных переводов.
Электронные средства инновационных казино работают на зашифрованных дата-центрах с шифровальными алгоритмами. IP-фильтрация обязывает управляющих создавать резервные адреса.
Параллельные домены образуют полные дубликаты базового портала с поддержанием всех функций и параметров. Игроки получают устойчивый доступ к депозиту, беттинг записям и клиентским установкам.
Денежные транзакции осуществляются через синхронизированные денежные агрегаторы. Лимиты на инвестиции и обналичивания регулируются в гармонии с лицензионными требованиями и индивидуальными регламентами минимизации опасностей.
Профессиональные клиенты настаивают проверять состояние аккредитации через государственные каталоги игорных органов. Репутационные показатели задействуют оценки на тематических ресурсах и мнения подлинных пользователей.
Thistletrade Products – Sections are clear and navigating the catalog is simple.
Исследование в области лицензированных порталов включает представления современных технологий доступа. Умелые геймеры эксплуатируют винити официальный сайт для обретения современной материалов о действующих ссылках.
Процесс регистрации личного кабинета в надежных компаниях предполагает детальную проверку. Передовые операторы используют KYC-процедуры и AML-стандарты. Документальная процедура потребляет от 24 до 72 периодов.
Программные способы для прохождения запретов прогрессируют синхронно с повышением законодательных решений. VPN-решения разряда premium обеспечивают безопасность AES-256 и технологии OpenVPN. Непрерывность подключения критически актуальна для премиальных игровых периодов.
Резервные адреса действуют через территориально расположенные серверные ресурсы. CDN-сети гарантируют оптимальную задержку для европейских участников. Программное роутинг запускается при обнаружении препятствия первичного ресурса.
Денежные переводы в сертифицированных областях следуют четким критериям PCI DSS. Криптовалютные операции приобретают распространение благодаря секретности и скорости обработки.
Смартфонные клиенты топовых компаний содержат голосовую подтверждение и push-сообщения для ключевых происшествий. Адаптивный оформление автоматически изменяется под настройки экрана.
Подбор легального игорного ресурса требует основательного рассмотрения регулятивных документов. Актуальные ресурсы казино Вавада гарантируют участникам безусловную сведения о собственных разрешениях.
Процедура открытия аккаунта охватывает различные требуемых этапов верификации. Владельцы запрашивают свидетельства, устанавливающие личность и зрелость. Обычный KYC-процесс продолжается от 24 до 72 часов.
Финансовое планирование запускается с установления рамок на инвестиции. Профессиональные участники советуют использовать правило 5% от итогового игорного фонда на отдельную заход.
Технические запреты поставщиков вынуждают эксплуатировать альтернативные пути. Клоны хранят безусловную активность главного портала, подразумевая архив переводов и игровой результаты.
Актуальные банковские методы обеспечивают скоростные взносы через электронные хранилища. Bitcoin, Ethereum и фиксированные активы обеспечивают тайность и минимальные взносы. Срок реализации извлечений достигает 10-30 интервалов.
Планы постоянства включают ступенчатые ранги с увеличивающимся бонусом. VIP-координаторы обеспечивают персонализированные вознаграждения, повышенные лимиты и ускоренную помощь.
Quickaisle Outlet – The site posts bargains regularly and browsing feels fast and convenient.
Проверенные провайдеры азартных сервисов дают участникам шанс к высококлассному развлечениям через специализированные сайты, включая казино 1хбет , которые именно придерживаются общепринятые критерии защиты.
Алгоритм регистрации necessita предоставления валидационных параметров через encrypted SSL-соединения. Провайдеры запрашивают письменное verification дееспособности и локации нахождения для исполнения нормативных правил.
Многоуровневая проверка представляет обязательным компонентом современных архитектур надёжности. Пользователи обретают SMS-пароли, push-алерты или применяют dedicated утилиты типа Google Authenticator.
Зеркальные порталы устраняют вопросы локальных ограничений и DDoS-нападений. С технической точки зрения реплики образуют аналогичные копии базового портала с поддержанием опций и пользовательских данных.
Компетентные клиенты рекомендуют удерживать current реестры действующих копий в закладках обозревателя. Букмекеры отправляют сведения о актуальных порталах через email, Telegram-группы и mobile утилиты.
Финансовые транзакции через официальные порталы защищены encryption системами класса банковского области. Снятие фондов происходит лишь на проверенные реквизиты хозяина личного кабинета.
Explore Worvix – Simple checkout and reliable payment options made the purchase hassle-free.
buy liquid ivermectin: ivermectin pills human – order stromectol
ZenCartel Shop Online – Modern design and tidy layout make the browsing experience smooth.
Отбор легального казино заведения нуждается тщательного анализа официальных свидетельств. Современные сайты п»ї1xBet зеркало предоставляют клиентам полную данные о собственных лицензиях.
Процесс оформления счета подразумевает несколько необходимых фаз верификации. Владельцы истребуют документы, засвидетельствующие индивидуальность и дееспособность. Классический KYC-порядок составляет от 24 до 72 часов.
Банкролл-менеджмент начинается с установления рамок на взносы. Опытные участники советуют эксплуатировать принцип 5% от совокупного гемблинг средств на единичную раунд.
Электронные ограничения провайдеров побуждают использовать альтернативные пути. Копии оберегают абсолютную работоспособность первичного портала, охватывая хронологию операций и развлекательный продвижение.
Передовые банковские сервисы поддерживают моментальные инвестиции через криптовалютные кошельки. Bitcoin, Ethereum и стейблкоины обеспечивают конфиденциальность и крошечные сборы. Срок осуществления снятий равно 10-30 отрезков.
Планы верности включают многоуровневые ранги с нарастающим кэшбэком. VIP-менеджеры дают индивидуальные бонусы, расширенные пределы и первоочередную сервис.
Ориентирование в пространстве сертифицированных порталов требует осознания передовых инструментов соединения. Умелые участники внедряют Лаки Бир зеркало для получения современной материалов о оперативных доменах.
Процесс регистрации учетной записи в проверенных учреждениях охватывает детальную верификацию. Продвинутые компании эксплуатируют KYC-механизмы и AML-нормы. Документальное сопровождение потребляет от 24 до 72 промежутков.
Цифровые решения для преодоления запретов улучшаются синхронно с интенсификацией правовых мер. VPN-инструменты разряда premium предоставляют защиту AES-256 и методы OpenVPN. Непрерывность связи критически необходима для привилегированных партий.
Резервные ресурсы выполняют задачи через локально расположенные технические ресурсы. CDN-сети предоставляют быструю отклик для международных пользователей. Техническое перенаправление запускается при детекции ограничения первичного ресурса.
Платежные движения в лицензированных юрисдикциях соответствуют конкретным правилам PCI DSS. Цифровые переводы приобретают признание по причине скрытности и быстроте обработки.
Смартфонные программы элитных операторов содержат физиологическую аутентификацию и push-сообщения для существенных эпизодов. Настраиваемый оформление программно адаптируется под особенности монитора.
https://www.inkitt.com/BonoGratis4
Quvera Store – Very smooth browsing experience and checkout is straightforward.
Развлекательная индустрия показывает быстрый прогресс, завлекая легионы игроков. Профессиональные платформы предлагают стабильную обстановку для игры. Развёрнутую данные о таких брендах возможно получить на ретро казино .
Аккредитация представляет главным критерием селекции ресурса. Надзорные органы Кюрасао дают серьёзный контроль экономических операций. Всякая сертифицированная портал реализует постоянные проверки RNG-алгоритмов.
Технические характеристики актуальных казино предусматривают SSL-криптографию денежного ранга. Поставщики программного софта наподобие Microgaming, NetEnt, Pragmatic Play подключают продвинутые модели хаотичных величин.
Алгоритм подтверждения профиля предполагает передачи удостоверений KYC-класса. Свидетельство, подтверждение о заработке, валидация адреса — классический комплект для финального доступа.
Дублирующие адреса убирают препятствия с цензурой организаций. Действующие зеркала адаптируются регулярно программными отделами. Портативные утилиты часто оперируют надёжнее интернет вариантов.
Управление банкроллом создаёт стратегическую успешность игровых партий. Опытные пользователи советуют контролировать размер вейджера до 1-2% от общего банкролла.
Wistro Products – The descriptions are helpful and checkout is quick.
Современные игроки натыкаются с затруднением подключения к лицензированным платформам. Компании закрывают базовые домены, но грамотные Eldorado казино клиенты учитывают о функционировании альтернативных сайтов.
Параллельный портал формирует точную копию первичного сайта. Криптографические алгоритмы поддерживаются неизменными. Банковские транзакции производятся через идентичные шлюзы.
Технология открытия счёта через зеркальный ресурс требует привычной подтверждения. Администраторы просят бумаги для осуществления KYC-стандартов. Идентификационные информация проходят многоуровневую верификацию.
Финансовые границы на резервных площадках совпадают основным условиям. Низшие ставки сохраняются стабильными. Прогрессивные джекпоты объединяются между многочисленными доменами.
Льготные системы оперируют комплексно на альтернативных сайтах. Множитель ставок обеспечивает первоначальные параметры. Срок активности реализации сохраняется.
Сервис ассистирования анализирует обращения с дополнительных ресурсов сходным образом. Онлайн диалог обеспечивает круглосуточный расписание деятельности.
Чтобы исключить риски, связанные с с фишингом, и дать личным данным стопроцентную безопасность, рекомендуется пользоваться исключительно через оригинальные каналы. Данный подход — проверенный способ сохранить приватность в безопасности площадка kraken
Поиск качественного игрового площадки в современных условиях требует особого подхода к лицензионному режиму. Знающие игроки понимают, что казино Меллстрой включает свежую информацию о работающих площадках.
Процедура оформления профиля в легальных площадках объединяет обязательную верификацию идентичности. KYC-требования обеспечивают как казино, так и пользователя от мошенничества. Краткосрочные ограничения на вывод капитала до завершения верификации – обычная практика.
Цифровые запреты на соединение к betting площадкам нейтрализуются через резервные URL. Функционирующие отражения предоставляют стопроцентную эффективность главного портала. Расчетные движения, азартный статистика и поощрительные схемы функционируют устойчивыми.
Экономическая защищенность измеряется качеством используемых платежных методов. SSL-криптография, PCI DSS валидация и многоуровневая проверка формируют надежный барьер ограждения.
Азартная коллекция официальных операторов объединяет автоматы от лидирующих разработчиков. RTP-показатели, изменчивость и расчетные формулы проходят независимую валидацию в аккредитованных центрах.
Механизмы мотивации в достойных казино опираются на четких параметрах ставок. Требования x35-40 считается разумным для слот-бонусов, в то время как стандартные забавы идут в подсчет с пониженным множителем.
Hello everyone!
Learn advanced mysterious techniques for interesting and valuable data mining and extract gold from raw information see on the website for mining tutorials
Full information on the link – https://202fliks.site
All the best and development in business!
Новейшие сервисы игорных развлечений обеспечивают пользователям путь к элитному развлечениям через защищенные п»ї1xBet зеркало сайты. Легальная деятельность требует исполнения строгих надзорных норм.
Механизм создания пользовательского счета включает аутентификацию персональных информации. Регуляторы задействуют детализированные алгоритмы KYC и AML для предотвращения фродовых операций.
IT средства передовых беттинг площадок базируются на стабильных инфраструктурах с SSL протоколами. Региональная блокировка заставляет операторов организовывать вспомогательные URL.
Дублирующие платформы представляют аналогичные версии первичного сайта с сохранением всех сервисов и данных. Участники достигают непрерывный соединение к депозиту, гемблинг истории и персональным конфигурациям.
Денежные действия осуществляются через подключенные денежные сервисы. Границы на депозиты и обналичивания определяются в соответствии с законодательными стандартами и организационными процедурами снижения потерь.
Опытные клиенты предлагают проверять положение аккредитации через государственные базы данных развлекательных органов. Имиджевые показатели задействуют позиции на специализированных сайтах и отзывы действительных клиентов.
this online vendor – Can’t wait to make another purchase soon.
Современные операторы игорных активностей дают беттерам возможность к премиальному гемблингу через надежные Vavada казино системы. Сертифицированная функционирование подразумевает соблюдения жестких регуляторных положений.
Механизм создания игрового кабинета задействует проверку приватных реквизитов. Регуляторы используют детализированные механизмы KYC и AML для предотвращения поддельных переводов.
Электронные системы современных беттинг площадок работают на безопасных дата-центрах с шифровальными сертификатами. IP-фильтрация вынуждает операторов разрабатывать дублирующие URL.
Альтернативные домены представляют идентичные клоны главного ресурса с сохранением всех опций и данных. Участники получают беспрепятственный соединение к счету, беттинг данным и пользовательским конфигурациям.
Платежные переводы производятся через синхронизированные финансовые шлюзы. Пределы на вклады и выводы фиксируются в соотношении с нормативными положениями и внутренними политиками минимизации опасностей.
Квалифицированные гемблеры настаивают проверять статус разрешения через регуляторные базы данных развлекательных организаций. Репутационные критерии задействуют ранги на экспертных сайтах и feedback реальных пользователей.
Ориентирование в мире легальных площадок подразумевает представления современных технологий соединения. Продвинутые клиенты эксплуатируют Vavada для извлечения релевантной материалов о работающих путях.
Алгоритм формирования аккаунта в проверенных учреждениях включает тщательную верификацию. Новейшие компании применяют KYC-механизмы и AML-нормы. Документооборот потребляет от 24 до 72 часов.
Цифровые методы для преодоления барьеров развиваются параллельно с усилением законодательных решений. VPN-платформы типа premium гарантируют криптографию AES-256 и технологии OpenVPN. Надежность подключения fundamentally актуальна для VIP игровых периодов.
Дублирующие сайты работают через территориально размещенные IT системы. CDN-системы гарантируют низкую задержку для европейских клиентов. Цифровое роутинг включается при выявлении ограничения базового адреса.
Денежные движения в лицензированных регионах подчиняются строгим стандартам PCI DSS. Цифровые расчеты завоевывают востребованность вследствие приватности и скорости выполнения.
Мобильные программы лучших брендов включают биометрическую проверку и push-извещения для ключевых событий. Адаптивный интерфейс независимо адаптируется под свойства монитора.
Современные игроки натыкаются с затруднением доступа к легальным порталам. Компании фильтруют первичные порталы, но профессиональные френдс казино игроки помнят о функционировании альтернативных платформ.
Параллельный портал образует абсолютную реплику главного сайта. Криптографические алгоритмы сохраняются идентичными. Банковские процедуры реализуются через те же каналы.
Алгоритм открытия счёта через резервный домен содержит классической валидации. Администраторы требуют свидетельства для осуществления KYC-стандартов. Персональные информация выполняют многоуровневую подтверждение.
Пополнительные рамки на резервных площадках равняются стандартным требованиям. Стартовые ставки поддерживаются стабильными. Растущие накопления согласовываются между всеми адресами.
Стимулирующие механизмы действуют завершённо на дополнительных сайтах. Множитель ставок сохраняет первоначальные параметры. Период действия отыгрыша не изменяется.
Служба поддержки обрабатывает тикеты с резервных ресурсов равнозначно. Прямой общение предоставляет постоянный график работы.
Discover Frentiq – Items seem top-tier and buying was straightforward.
Проверенные провайдеры игорных возможностей гарантируют игрокам возможность к качественному развлечениям через целевые платформы, включая казино СЌРЅРѕРјРѕ , которые следуют общепринятые стандарты конфиденциальности.
Схема открытия счёта требует заполнения идентификационных параметров через криптографические SSL-протоколы. Операторы просят письменное verification age verification и региона жительства для соблюдения правовых правил.
2FA верификация выступает обязательным aspect передовых платформ конфиденциальности. Участники обретают SMS-шифры, push-сообщения или задействуют специальные tools по типу Google Authenticator.
Зеркальные ссылки нейтрализуют сложности региональных санкций и DDoS-штурмов. Технически зеркала представляют аналогичные реплики primary домена с удержанием инструментария и клиентских информации.
Компетентные геймеры предлагают удерживать current каталоги working зеркал в избранном веб-клиента. Management рассылают информацию о fresh порталах через мейл, Telegram-communities и смартфонные apps.
Банковские переводы через официальные сайты защищены cryptographic алгоритмами уровня банковского направления. Extraction денег выполняется единственно на аутентифицированные wallets хозяина личного кабинета.
kubeops – Overall, professional vibe here; trustworthy, polished, and pleasantly minimal throughout.
Visit Marketlume – The variety is impressive and browsing feels fast and easy.
Навигация в области лицензированных сайтов нуждается представления передовых методов доступа. Умелые игроки эксплуатируют Вавада зеркало для обретения современной материалов о оперативных ссылках.
Механизм регистрации личного кабинета в надежных операторах подразумевает комплексную валидацию. Продвинутые организации применяют KYC-процедуры и AML-критерии. Документальное сопровождение отнимает от 24 до 72 периодов.
Технические технологии для преодоления блокировок эволюционируют сообща с повышением регуляторных шагов. VPN-сервисы класса premium обеспечивают безопасность AES-256 и стандарты OpenVPN. Устойчивость соединения кардинально важна для элитных сессий.
Альтернативные адреса работают через географически распределенные цифровые кластеры. CDN-комплексы предоставляют минимальную задержку для американских участников. Автоматическое редирект запускается при обнаружении блокировки центрального портала.
Денежные переводы в сертифицированных регионах следуют четким правилам PCI DSS. Цифровые переводы приобретают востребованность по причине анонимности и быстроте процессинга.
Мобильные софт премиальных провайдеров включают голосовую авторизацию и push-извещения для существенных событий. Модифицируемый дизайн автоматически настраивается под настройки матрицы.
Развлекательная область представляет быстрый прогресс, привлекая тысячи пользователей. Квалифицированные сайты предоставляют качественную атмосферу для игры. Подробную факты о подобных операторах можно обнаружить на Lucky Bear казино .
Лицензирование представляет приоритетным показателем подбора сайта. Регуляторы Мальты предоставляют качественный проверку экономических манипуляций. Любая лицензированная сайт проходит регулярные инспекции RNG-модулей.
IT аспекты передовых азартных площадок охватывают SSL-безопасность банковского стандарта. Производители виртуального продукта типа Microgaming, NetEnt, Pragmatic Play встраивают сложные механизмы хаотичных величин.
Алгоритм подтверждения аккаунта подразумевает передачи удостоверений KYC-типа. Паспорт, документ о финансах, верификация регистрации — классический пакет для завершённого доступа.
Зеркальные URL исправляют препятствия с блокировками провайдеров. Актуальные дубли изменяются систематически техническими службами. Мобильные программы часто оперируют качественнее интернет вариантов.
Финансовая дисциплина формирует продолжительную результативность азартных сессий. Экспертные игроки советуют контролировать сумму ставки до 1-2% от суммарного бюджета.
bloomtill.shop – The layout is neat and pages load very quickly.
Азартная сфера являет интенсивный прогресс, манящая миллионы игроков. Квалифицированные платформы предоставляют надёжную обстановку для игры. Полную информацию о данных брендах допустимо найти на казино Килограмм .
Сертификация составляет главным аспектом определения сайта. Контролёры Великобритании обеспечивают жёсткий проверку валютных манипуляций. Отдельная официальная площадка подвергается систематические ревизии RNG-модулей.
Компьютерные параметры современных азартных площадок предусматривают SSL-шифрование финансового класса. Провайдеры программного ПО уровня Microgaming, NetEnt, Pragmatic Play внедряют многоуровневые системы произвольных показателей.
Алгоритм проверки счёта предполагает направления документов KYC-формата. Удостоверение, выписка о финансах, подтверждение регистрации — обычный пакет для завершённого доступа.
Зеркальные адреса ликвидируют трудности с запретами поставщиков. Актуальные варианты корректируются систематически техническими отделами. Смартфонные утилиты нередко выполняются стабильнее веб вариантов.
Контроль средств формирует продолжительную результативность развлекательных периодов. Профессиональные пользователи советуют ограничивать размер пари до 1-2% от общего бюджета.
Plum Vendor X Marketplace – Well-arranged categories and fast-loading pages make this site convenient.
You actually make it seem so easy with your presentation but I find this topic to be really something which
I think I would never understand. It seems too complicated and extremely broad
for me. I am looking forward for your next post, I will try to get the hang of
it!
Поиск в мире сертифицированных порталов нуждается представления современных инструментов соединения. Продвинутые участники используют тип топ казино для приобретения релевантной данных о работающих ссылках.
Процесс формирования профиля в надежных учреждениях включает многоуровневую аутентификацию. Современные организации применяют KYC-механизмы и AML-критерии. Документооборот требует от 24 до 72 периодов.
Цифровые инструменты для избежания блокировок совершенствуются вместе с интенсификацией регуляторных мер. VPN-решения типа premium гарантируют шифрование AES-256 и протоколы OpenVPN. Стабильность соединения принципиально актуальна для VIP раундов.
Альтернативные платформы действуют через пространственно разнесенные цифровые кластеры. CDN-комплексы поддерживают быструю латентность для глобальных участников. Цифровое переключение активируется при детекции блокировки центрального адреса.
Финансовые переводы в легальных регионах отвечают определенным стандартам PCI DSS. Блокчейн транзакции увеличивают актуальность в результате приватности и быстроте обработки.
Портативные клиенты премиальных брендов содержат отпечатковую проверку и push-сообщения для важных происшествий. Гибкий дизайн программно корректируется под параметры экрана.
Подбор надежного игорного ресурса заставляет серьезного исследования официальных сертификатов. Передовые порталы п»ї1хбет зеркало дают участникам стопроцентную сведения о своих допусках.
Процедура открытия аккаунта охватывает несколько обязательных стадий аутентификации. Операторы настаивают свидетельства, засвидетельствующие личность и возраст. Классический KYC-механизм требует от 24 до 72 интервалов.
Банкролл-менеджмент стартует с фиксации границ на взносы. Компетентные пользователи предлагают применять принцип 5% от полного развлекательного капитала на одну сессию.
Электронные блокировки поставщиков принуждают эксплуатировать резервные ссылки. Дубликаты хранят максимальную функциональность основного ресурса, включая журнал операций и гемблинг достижения.
Передовые платежные способы обеспечивают моментальные инвестиции через виртуальные счета. Bitcoin, Ethereum и стейблкоины дают скрытность и минимальные отчисления. Время обработки получений насчитывает 10-30 интервалов.
Системы верности охватывают градационные ранги с возрастающим бонусом. VIP-представители предлагают эксклюзивные вознаграждения, увеличенные ограничения и приоритетную сервис.
harniq.shop – Located the perfect item and the checkout process was fast.
Актуальные участники попадают с затруднением связи к сертифицированным ресурсам. Организации блокируют стандартные домены, но грамотные казино 1хбет посетители учитывают о присутствии дублирующих платформ.
Параллельный портал формирует стопроцентную воспроизведение первичного платформы. Криптографические алгоритмы работают такими же. Платёжные операции производятся через те же механизмы.
Технология создания аккаунта через альтернативный ссылку требует стандартной верификации. Менеджеры выясняют справки для реализации KYC-норм. Индивидуальные сведения реализуют комплексную проверку.
Вносительные ограничения на параллельных площадках равняются стандартным требованиям. Наименьшие взносы сохраняются фиксированными. Прогрессивные призовые фонды объединяются между всеми доменами.
Бонусные программы выполняются полноценно на параллельных платформах. Вейджер удерживает первоначальные показатели. Срок активности проигрывания поддерживается.
Отдел сопровождения изучает обращения с резервных адресов идентично. Мгновенный разговор предоставляет круглосуточный формат обслуживания.
stackops – Overall, professional vibe here; trustworthy, polished, and pleasantly minimal throughout.
devopsly – Found practical insights today; sharing this article with colleagues later.
Рабочие дублирующие порталы лицензированных игорных заведений на Меллстрой дают устойчивый соединение к гемблинг платформам. Технология копирования строит полноценные версии центрального ресурса с удержанием всех механизмов.
Система оформления профиля через зеркало абсолютно дублирует базовую анкету. Новые клиенты заполняют функционирующий email, устанавливают сложный ключ и выбирают рабочую финансовый инструмент.
Верификация профиля предполагает предоставления справок по KYC-требованиям. Скан ID-карты, валидация резиденции и денежные реквизиты контролируются системой машинную контроль в течение 24-72 ч.
Логин активных игроков осуществляется через базовую модуль с расширенной идентификацией. Одноразовые коды приходят на мессенджер номер или электронную почту.
Опции финансового модуля через mirror-сайты включает распространенные расчетные механизмы. Visa, Mastercard, веб хранилища Skrill, Neteller, криптовалюты Bitcoin, Ethereum выполняются с сокращенными сборами 0-3%.
Gaming библиотека дублируется абсолютно включая автоматы, классические игры, live-хостов и джекпоты. RTP-показатели, вариативность и проигрыш фиксируются аналогичными.
Поощрительная механизм выполняется аналогично основному ресурсу. Welcome-комплекты, free spins, кешбэк и VIP-схемы запускаются машинально при исполнении определенных стандартов.
cloudopsly – Found practical insights today; sharing this article with colleagues later.
Передовые геймеры пересекаются с изобилием программных нюансов при деятельности с официальными платформами. Специализированные ресурсы типа п»ї1хбет регистрация обеспечивают современную информацию о функционировании казино компаний.
Механизм верификации учетной записи содержит набор необходимых уровней. Базовая валидация включает предоставления удостоверений верифицирующих личность. Стандартный пакет охватывает ID, автоудостоверение или международный паспорт.
Технологическая элемент создания аккаунта подразумевает применение безопасного соединения и двухуровневой проверки. Опытные пользователи рекомендуют запускать весь комплекс доступных настроек секьюрити.
Дублирующие порталы представляют точные дубликаты базового сайта с удержанием всего возможностей. Ключевое выгода состоит в тождественности денежных пределов и требований вейджера.
Система поиска рабочих альтернативных адресов опирается на проверке экспертных информационных каналов и сотрудничающих порталов. Опытные пользователи используют VPN-сервисы для создания постоянного связи независимо от региональных блокировок.
Новейшие операторы развлекательных услуг гарантируют участникам путь к премиальному беттингу через сертифицированные лаки ворлд казино платформы. Авторизованная операционная активность нуждается выполнения жестких правовых положений.
Механизм оформления пользовательского учетной записи задействует проверку конфиденциальных информации. Управляющие эксплуатируют расширенные алгоритмы KYC и AML для предотвращения поддельных транзакций.
IT платформы передовых игорных домов работают на безопасных серверах с SSL технологиями. IP-фильтрация обязывает провайдеров создавать вспомогательные порталы.
Резервные платформы составляют полные дубликаты базового сайта с удержанием всех возможностей и данных. Беттеры приобретают беспрепятственный подключение к счету, азартной данным и пользовательским конфигурациям.
Расчетные транзакции осуществляются через интегрированные банковские сервисы. Пределы на депозиты и получения определяются в согласии с лицензионными требованиями и собственными правилами риск-менеджмента.
Компетентные игроки указывают контролировать статус аккредитации через государственные реестры азартных органов. Имиджевые параметры включают ранги на специализированных сервисах и оценки действительных игроков.
Learn More Here https://swaplab.io/
Everyday Xerva – The interface is neat and makes exploring products quick and effortless.
Гемблинговая область являет динамичный рост, притягивая массы пользователей. Профессиональные площадки дают защищённую среду для пари. Полную данные о подобных компаниях можно обнаружить на Голд казино .
Лицензирование является ключевым аспектом определения сайта. Юрисдикции Кюрасао дают тщательный аудит финансовых процедур. Отдельная сертифицированная платформа реализует систематические ревизии RNG-механизмов.
Компьютерные особенности передовых беттинг-платформ включают SSL-шифрование экономического класса. Поставщики компьютерного софта уровня Microgaming, NetEnt, Pragmatic Play интегрируют сложные системы случайных параметров.
Алгоритм верификации аккаунта предполагает представления справок KYC-формата. Свидетельство, справка о заработке, доказательство адреса — классический пакет для финального доступа.
Альтернативные порталы устраняют проблемы с блокировками операторов. Актуальные альтернативы корректируются ежедневно техническими командами. Карманные приложения зачастую функционируют лучше интернет версий.
Финансовая дисциплина задаёт стратегическую успешность развлекательных партий. Опытные пользователи настаивают урезать величину депозита до 1-2% от итогового банкролла.
http://sildenafilpriceguide.com/# cheapest viagra
cloudhq – Pages loaded fast, images appeared sharp, and formatting stayed consistent.
Discover Dervina – Nice selection of items and pages load smoothly and quickly.
Современные игроки встречаются с изобилием технических аспектов при операциях с лицензированными порталами. Тематические сайты типа п»ї1хбет зеркало поставляют свежую материалы о функционировании казино организаций.
Механизм верификации кабинета охватывает ряд обязательных фаз. Базовая подтверждение подразумевает размещения документов верифицирующих гражданство. Обычный пакет включает удостоверение личности, лицензию водителя или загранпаспорт.
Техническая сторона открытия счета включает использование безопасного соединения и двухуровневой проверки. Профессиональные пользователи предлагают включать весь комплекс имеющихся параметров секьюрити.
Запасные домены являются абсолютные клоны первичного портала с хранением исчерпывающего арсенала. Центральное бонус выражается в идентичности банковских рамок и норм условий прокрутки.
Алгоритм нахождения функционирующих альтернативных адресов основывается на отслеживании экспертных телеграм-каналов и связанных площадок. Профессиональные игроки внедряют VPN-сервисы для формирования бесперебойного подключения вне зависимости от местных блокировок.
Viagra without a doctor prescription Canada: Sildenafil Price Guide – Cheap generic Viagra online
Актуальные бетторы оказываются с затруднением соединения к легальным ресурсам. Операторы блокируют базовые адреса, но профессиональные п»ї1xBet зеркало клиенты учитывают о существовании зеркальных сайтов.
Дополнительный домен формирует абсолютную копию основного платформы. Криптографические алгоритмы поддерживаются неизменными. Банковские операции выполняются через аналогичные шлюзы.
Процедура открытия счёта через дополнительный домен предполагает типовой аутентификации. Администраторы уточняют документы для выполнения KYC-стандартов. Паспортные информация выполняют двухфакторную проверку.
Вносительные рамки на параллельных ресурсах соответствуют базовым спецификациям. Стартовые взносы сохраняются фиксированными. Возрастающие выигрышные пулы объединяются между различными адресами.
Льготные системы выполняются завершённо на резервных порталах. Требования по обороту сохраняет оригинальные значения. Временные рамки отыгрыша не изменяется.
Команда сопровождения рассматривает обращения с параллельных ссылок равнозначно. Мгновенный чат обеспечивает 24-часовой порядок функционирования.
Smart Picks Ravlora – Support resolved my issue rapidly and without any stress.
stackhq – Color palette felt calming, nothing distracting, just focused, thoughtful design.
BasketMint Specials – The site is quick to load and moving between sections is very smooth.
Ivory Aisle Hub – The team was fast to respond and very helpful with my requests.
нарколог на дом без постановки на учет ростов narkolog-na-dom-v-rostove-1.ru .
bytehq – Color palette felt calming, nothing distracting, just focused, thoughtful design.
For studies
tegretol
to prepare for the future.
This design is spectacular! You definitely know how to keep
a reader entertained. Between your wit and
your videos, I was almost moved to start my own blog (well, almost…HaHa!) Wonderful job.
I really enjoyed what you had to say, and more
than that, how you presented it. Too cool!
Определение безопасного азартного заведения подразумевает глубокого изучения официальных сертификатов. Инновационные системы п»ї1хбет сайт дают геймерам полную факты о собственных лицензиях.
Система открытия аккаунта содержит множество принудительных этапов валидации. Операторы запрашивают справки, устанавливающие идентичность и правоспособность. Традиционный KYC-процесс требует от 24 до 72 часов.
Распоряжение капиталом запускается с определения ограничений на инвестиции. Опытные геймеры призывают внедрять принцип 5% от общего развлекательного капитала на конкретную заход.
Системные блокировки поставщиков обязывают задействовать альтернативные ссылки. Клоны поддерживают абсолютную производительность первичного платформы, предусматривая историю переводов и казино успех.
Новые финансовые инструменты поддерживают мгновенные инвестиции через криптовалютные хранилища. Bitcoin, Ethereum и стабильные валюты предоставляют приватность и мизерные отчисления. Время осуществления извлечений доходит 10-30 промежутков.
Программы лояльности включают ступенчатые степени с накапливающимся компенсацией. VIP-представители гарантируют эксклюзивные награды, улучшенные рамки и первоочередную сервис.
https://sildenafilpriceguide.com/# sildenafil online
Исследование в мире лицензированных порталов требует владения современных способов подключения. Опытные пользователи задействуют п»ї1хбет зеркало для обретения актуальной данных о работающих ссылках.
Схема создания профиля в официальных организациях содержит детальную аутентификацию. Новейшие провайдеры используют KYC-алгоритмы и AML-нормы. Документальная процедура занимает от 24 до 72 часов.
Программные инструменты для минования барьеров совершенствуются синхронно с укреплением правовых действий. VPN-сервисы разряда premium обеспечивают безопасность AES-256 и системы OpenVPN. Постоянство соединения fundamentally существенна для премиальных партий.
Альтернативные сайты работают через регионально расположенные IT системы. CDN-структуры предоставляют низкую отклик для европейских клиентов. Техническое маршрутизация запускается при распознавании блокировки первичного портала.
Денежные манипуляции в лицензированных областях соответствуют конкретным требованиям PCI DSS. Цифровые переводы завоевывают популярность благодаря анонимности и темпу процессинга.
Портативные приложения лучших организаций содержат биометрическую проверку и push-алерты для существенных происшествий. Настраиваемый интерфейс автономно настраивается под параметры монитора.
Современные геймеры пересекаются с набором технологических особенностей при функционировании с официальными площадками. Экспертные ресурсы типа lova казино дают современную материалы о операциях игорных организаций.
Система аутентификации учетной записи включает ряд принудительных стадий. Начальная верификация нуждается передачи бумаг верифицирующих гражданство. Привычный список включает ID, права или заграничное удостоверение.
Цифровая элемент открытия счета подразумевает эксплуатацию зашифрованного канала и двухуровневой проверки. Экспертные игроки предлагают активировать полный набор представленных опций обеспечения.
Резервные ссылки представляют идентичные копии главного домена с обеспечением комплексного возможностей. Основное преимущество кроется в тождественности расчетных лимитов и норм ставочных требований.
Система поиска актуальных альтернативных адресов фундируется на контроле экспертных телеграм-каналов и союзных порталов. Опытные клиенты используют прокси-соединения для гарантирования надежного соединения безотносительно от локальных барьеров.
Поиск проверенного азартного ресурса подразумевает тщательного анализа регулятивных разрешений. Современные платформы казино Клубника дают геймерам полную информацию о своих лицензиях.
Алгоритм регистрации охватывает определенное количество принудительных шагов аутентификации. Владельцы требуют бумаги, удостоверяющие самобытность и правоспособность. Традиционный KYC-процесс длится от 24 до 72 временных отрезков.
Финансовое планирование инициируется с фиксации границ на вклады. Искусные геймеры настаивают эксплуатировать установку 5% от итогового казино капитала на конкретную раунд.
Цифровые барьеры владельцев побуждают применять вспомогательные домены. Дубликаты сохраняют максимальную активность главного платформы, включая журнал операций и гемблинг результаты.
Инновационные денежные методы дают оперативные инвестиции через виртуальные хранилища. Bitcoin, Ethereum и фиксированные активы дают тайность и минимальные сборы. Время обработки снятий составляет 10-30 минут.
Системы приверженности содержат многоуровневые статусы с прогрессивным возвратом. VIP-кураторы предоставляют индивидуальные поощрения, усиленные пределы и приоритетную обслуживание.
Поиск достойного азартного заведения в нынешних условиях предполагает детального изучения к правовому уровню. Компетентные клиенты учитывают, что Вавада регистрация демонстрирует современную данные о активных сервисах.
Алгоритм записи в проверенных площадках объединяет необходимую подтверждение личности. KYC-требования гарантируют как сервис, так и геймера от мошенничества. Кратковременные лимиты на снятие активов до окончания проверки – типичная подход.
Электронные ограничения на соединение к развлекательным порталам преодолеваются через дублирующие домены. Доступные зеркала гарантируют стопроцентную работоспособность первичного сайта. Финансовые операции, геймплейный достижения и привилегированные схемы продолжают устойчивыми.
Экономическая надежность выражается показателем эксплуатируемых платежных методов. SSL-защита, PCI DSS лицензирование и многоуровневая верификация обеспечивают защищенный контур безопасности.
Игровая коллекция официальных площадок содержит барабаны от главных провайдеров. RTP-коэффициенты, колебания и статистические схемы получают нейтральную валидацию в признанных центрах.
Программы лояльности в серьезных сервисах основываются на четких параметрах ставок. Отыгрыш x35-40 характеризуется нормальным для слот-льгот, в то время как настольные активности засчитываются в подсчет с минимальным процентом.
Нынешние участники встречаются с проблемой доступа к лицензированным платформам. Провайдеры фильтруют базовые домены, но профессиональные Лаки Бир сайт клиенты осознают о функционировании дублирующих площадок.
Резервная ссылка формирует точную дубликат базового площадки. Средства защиты поддерживаются равнозначными. Денежные действия производятся через сходные шлюзы.
Методика заведения учётной записи через альтернативный ресурс подразумевает типовой подтверждения. Операторы запрашивают справки для соблюдения KYC-регламентов. Идентификационные данные выполняют усиленную валидацию.
Депозитные пределы на зеркальных платформах совпадают основным спецификациям. Наименьшие беты поддерживаются фиксированными. Накопительные банки интегрируются между многочисленными порталами.
Поощрительные программы функционируют целостно на параллельных порталах. Множитель ставок сохраняет стартовые значения. Длительность использования не изменяется.
Служба ассистирования анализирует заявки с резервных доменов идентично. Мгновенный общение обеспечивает постоянный порядок обслуживания.
QuartzCart Webstore – The product I needed was easy to spot right away.
this contact form https://daobase.io
Беттинговая область являет интенсивный прогресс, заинтересовывая миллионы пользователей. Квалифицированные сайты предлагают надёжную пространство для пари. Исчерпывающую данные о этих операторах доступно получить на казино лова .
Лицензирование выступает ключевым фактором подбора ресурса. Регуляторы Кюрасао гарантируют качественный мониторинг денежных действий. Любая сертифицированная ресурс выполняет постоянные проверки RNG-модулей.
Программные аспекты передовых казино предусматривают SSL-безопасность финансового уровня. Создатели софтового материала класса Microgaming, NetEnt, Pragmatic Play встраивают многоуровневые алгоритмы случайных величин.
Процедура подтверждения учётной записи предполагает предоставления удостоверений KYC-типа. Свидетельство, свидетельство о средствах, удостоверение адреса — классический список для финального активации.
Резервные домены решают проблемы с блокировками организаций. Свежие зеркала модифицируются каждый день программными группами. Планшетные приложения обычно выполняются надёжнее веб форматов.
Финансовая дисциплина определяет долгосрочную доходность игровых циклов. Профессиональные беттеры настаивают сокращать сумму ставки до 1-2% от общего капитала.
Ulveta Website – The item details are easy to follow and browsing feels effortless.
Исследование в мире лицензированных ресурсов подразумевает владения актуальных методов соединения. Квалифицированные клиенты применяют tip top casino для приобретения актуальной сведений о активных адресах.
Механизм создания аккаунта в лицензированных компаниях включает комплексную верификацию. Современные компании внедряют KYC-протоколы и AML-стандарты. Документальная процедура отнимает от 24 до 72 интервалов.
Программные технологии для преодоления запретов улучшаются одновременно с укреплением законодательных шагов. VPN-службы категории premium предоставляют криптографию AES-256 и стандарты OpenVPN. Непрерывность подключения кардинально значима для привилегированных игровых периодов.
Альтернативные платформы работают через регионально рассредоточенные цифровые кластеры. CDN-системы осуществляют оптимальную задержку для азиатских пользователей. Техническое переключение включается при выявлении препятствия базового домена.
Экономические операции в сертифицированных областях следуют жестким требованиям PCI DSS. Криптовалютные транзакции приобретают распространение в результате конфиденциальности и темпу осуществления.
Мобильные утилиты элитных операторов интегрируют лицевую идентификацию и push-алерты для принципиальных моментов. Модифицируемый интерфейс независимо корректируется под характеристики матрицы.
Новейшие провайдеры азартных развлечений предоставляют беттерам вход к профессиональному азарту через сертифицированные п»ї1xBet casino платформы. Авторизованная деятельность предполагает выполнения строгих контролирующих стандартов.
Процесс открытия игрового профиля включает проверку персональных реквизитов. Администраторы эксплуатируют расширенные алгоритмы KYC и AML для блокировки фродовых операций.
Программные решения актуальных игорных домов работают на защищенных серверах с SSL стандартами. Локальные запреты вынуждает владельцев внедрять резервные URL.
Дублирующие домены являют собой эквивалентные копии базового домена с удержанием всех инструментов и сведений. Пользователи обеспечивают себе непрерывный связь к капиталу, гемблинг истории и персональным установкам.
Расчетные действия реализуются через подключенные денежные процессоры. Лимиты на взносы и изъятия регулируются в гармонии с правовыми положениями и корпоративными политиками управления рисками.
Компетентные гемблеры настаивают контролировать статус разрешения через государственные списки развлекательных структур. Престижные характеристики предусматривают позиции на профильных порталах и отзывы действительных пользователей.
Нынешние участники натыкаются с сложностью подключения к проверенным порталам. Компании ограничивают основные ссылки, но профессиональные Меллстрой казино игроки помнят о присутствии зеркальных платформ.
Зеркало составляет абсолютную дубликат оригинального сайта. Протоколы шифрования остаются аналогичными. Расчётные действия производятся через идентичные каналы.
Методика создания аккаунта через дополнительный ресурс требует классической проверки. Сотрудники запрашивают свидетельства для осуществления KYC-норм. Идентификационные параметры выполняют комплексную аутентификацию.
Банковские пределы на альтернативных сайтах равняются стандартным характеристикам. Начальные беты сохраняются константными. Увеличивающиеся выигрышные пулы синхронизируются между различными доменами.
Льготные механизмы оперируют завершённо на параллельных платформах. Вейджер обеспечивает исходные показатели. Период действия оборота продолжается.
Департамент поддержки изучает тикеты с альтернативных ресурсов равнозначно. Онлайн разговор осуществляет 24-часовой порядок работы.
Easy Carta Deals – Product choices are excellent and placing an order was quick.
Убеждение – это метод воздействия на сознание, использующий логические аргументы, факты и обоснования для формирования новых установок или изменения текущего поведения человека https://a.co/d/0fmSHBTD
Перестанете бояться, что вас поймут неправильно и будете быстрее приходить к компромиссу. Станете смелее высказывать свои идеи дома и на работе https://a.co/d/01RLENxC
Перестанете бояться, что вас поймут неправильно и будете быстрее приходить к компромиссу. Станете смелее высказывать свои идеи дома и на работе https://amzn.eu/d/02Z68o8r
grainvendor.shop – The prices feel reasonable and the products look top-notch.
Отбор надежного игрового оператора в текущих границах нуждается повышенного рассмотрения к законному состоянию. Опытные пользователи представляют, что Вавада содержит последнюю сведения о доступных площадках.
Механизм регистрации в проверенных сервисах охватывает необходимую верификацию удостоверения. KYC-нормы гарантируют как площадку, так и геймера от фрода. Промежуточные пределы на получение денег до окончания валидации – обычная процедура.
Виртуальные ограничения на доступ к betting сервисам решаются через резервные адреса. Рабочие отражения гарантируют стопроцентную производительность основного сайта. Денежные операции, развлекательный прогресс и бонусные системы сохраняются постоянными.
Капитальная гарантированность измеряется степенью задействованных расчетных способов. SSL-безопасность, PCI DSS лицензирование и многоуровневая подтверждение гарантируют защищенный контур ограждения.
Геймплейная набор официальных операторов объединяет машины от топовых провайдеров. RTP-индексы, изменчивость и статистические системы претерпевают объективную аудит в признанных центрах.
Программы лояльности в профессиональных площадках строятся на четких критериях активности. Отыгрыш x35-40 характеризуется нормальным для барабан-поощрений, в то время как традиционные игры принимаются в зачет с пониженным множителем.
Функционирующие резервные адреса лицензированных gaming-операторов на Лаки Бир официальный сайт создают непрерывный соединение к игровым порталам. Система дублирования образует полноценные клоны корневого ресурса с удержанием всех механизмов.
Алгоритм регистрации через mirror-сайт абсолютно повторяет оригинальную форму. Новые пользователи заполняют рабочий email, создают стойкий пароль и выбирают основную денежную единицу.
Подтверждение учетной записи подразумевает представления бумаг в соответствии с KYC-стандартам. Скан ID-карты, подтверждение проживания и банковские сведения анализируются посредством алгоритмическую верификацию в течение 24-72 часов.
Аутентификация активных клиентов осуществляется через классическую интерфейс с многоступенчатой аутентификацией. Разовые коды передаются на мессенджер аппарат или почтовый ящик.
Возможности финансового раздела через альтернативные домены включает топовые банковские механизмы. Visa, Mastercard, виртуальные портмоне Skrill, Neteller, цифровые активы Bitcoin, Ethereum обрабатываются с оптимизированными процентами 0-3%.
Азартная коллекция повторяется на сто процентов включая автоматы, столовые забавы, live-ведущих и джекпоты. RTP-коэффициенты, дисперсия и отыгрыш удерживаются неизменными.
Поощрительная политика функционирует похоже базовому веб-площадке. Welcome-комплекты, free spins, возврат средств и VIP-планы стартуют программно при достижении заданных требований.
Развлекательная ниша показывает динамичный рост, притягивая массы клиентов. Опытные порталы предлагают надёжную пространство для игры. Детальную сведения о указанных провайдерах можно найти на Болливуд казино .
Легализация является приоритетным элементом определения ресурса. Контролёры Мальты дают тщательный проверку денежных операций. Всякая сертифицированная платформа подвергается плановые проверки RNG-систем.
Технические параметры инновационных игорных домов содержат SSL-кодирование расчётного уровня. Разработчики компьютерного софта наподобие Microgaming, NetEnt, Pragmatic Play встраивают продвинутые модели непредсказуемых параметров.
Механизм валидации учётной записи предусматривает подачи документов KYC-класса. Паспорт, документ о финансах, доказательство местожительства — типичный перечень для завершённого входа.
Дублирующие адреса исправляют проблемы с цензурой поставщиков. Рабочие копии обновляются регулярно цифровыми отделами. Мобильные клиенты часто работают качественнее сетевых форматов.
Управление банкроллом устанавливает длительную прибыльность гемблинговых партий. Опытные игроки указывают сокращать сумму пари до 1-2% от итогового капитала.
Новейшие клиенты имеют дело с множеством технологических деталей при операциях с официальными сайтами. Специализированные платформы типа казино Клубника предоставляют современную материалы о процессах азартных организаций.
Процесс проверки профиля подразумевает множество неотъемлемых шагов. Стартовая верификация включает отправки справок верифицирующих индивидуальность. Стандартный перечень предполагает удостоверение личности, права или международный паспорт.
Программная составляющая создания аккаунта включает задействование зашифрованного канала и двухфакторной аутентификации. Квалифицированные клиенты советуют активировать все представленных параметров обеспечения.
Дублирующие порталы образуют идентичные клоны центрального портала с хранением исчерпывающего инструментария. Главное преимущество заключается в тождественности расчетных пределов и условий условий прокрутки.
Система поиска актуальных запасных доменов фундируется на наблюдении профессиональных мессенджер групп и партнерских платформ. Продвинутые клиенты применяют анонимайзеры для создания бесперебойного связи невзирая от региональных барьеров.
Your style is so unique compared to other people I’ve read stuff from.
I appreciate you for posting when you have the opportunity, Guess I will
just bookmark this web site.
Explore Tillora – Very intuitive layout and smooth payment process.
Перемещение в области официальных площадок нуждается понимания продвинутых методов соединения. Умелые участники используют казино Lucky Bear для добывания свежей фактов о активных путях.
Механизм оформления личного кабинета в надежных компаниях включает комплексную валидацию. Актуальные поставщики внедряют KYC-механизмы и AML-критерии. Документооборот составляет от 24 до 72 временных отрезков.
IT инструменты для прохождения блокировок развиваются синхронно с усилением регуляторных мер. VPN-сервисы типа premium предоставляют кодирование AES-256 и системы OpenVPN. Непрерывность канала критически актуальна для VIP игровых периодов.
Запасные ресурсы работают через географически разнесенные IT кластеры. CDN-структуры обеспечивают оптимальную время ответа для азиатских участников. Программное маршрутизация включается при идентификации ограничения первичного сайта.
Платежные транзакции в официальных зонах подчиняются конкретным нормам PCI DSS. Крипто операции получают актуальность из-за анонимности и оперативности выполнения.
Портативные приложения элитных организаций интегрируют физиологическую проверку и push-сообщения для критических ситуаций. Модифицируемый оформление автономно настраивается под свойства дисплея.
shop Stone Vendor online – Support team responded fast and solved my queries efficiently.
Актуальные альтернативные домены лицензированных гемблинг-платформ на Меллстрой регистрация создают стабильный соединение к геймерским ресурсам. Система зеркалирования строит идентичные клоны центрального домена с сохранением всех возможностей.
Алгоритм оформления профиля через альтернативный домен полностью повторяет основную шаблон. Начинающие пользователи регистрируют действующий email, генерируют сложный секретную комбинацию и выбирают игровую денежную единицу.
Валидация профиля подразумевает отправки бумаг в соответствии с KYC-политике. Фото национального документа, подтверждение регистрации и карточные реквизиты подвергаются цифровую проверку в течение 24-72 часа.
Авторизация зарегистрированных геймеров производится через обычную окно с расширенной аутентификацией. Разовые шифры приходят на телефонный устройство или мейл.
Инструменты депозитного блока через зеркала содержит распространенные банковские системы. Visa, Mastercard, цифровые балансы Skrill, Neteller, блокчейн-токены Bitcoin, Ethereum реализуются с сокращенными комиссиями 0-3%.
Азартная коллекция повторяется абсолютно включая spinning games, классические забавы, live-операторов и максимальные награды. RTP-показатели, колебания и ставочные требования фиксируются идентичными.
Поощрительная механизм выполняется похоже главному веб-площадке. Welcome-бандлы, free spins, денежный возврат и VIP-схемы запускаются системно при реализации определенных условий.
you could try here https://mixmy.money/
Parcelbay Shopping – Clean arrangement and completing my order was simple.
VioletVend Products – Easy browsing and items have an appealing design.
OrderWharf Online – Product write-ups were easy to understand and helpful.
You ought to take part in a contest for one of the finest
blogs on the internet. I’m going to highly recommend this web site!
Новейшие гемблеры встречаются с проблемой входа к сертифицированным порталам. Операторы закрывают базовые ссылки, но искушённые п»ї1хбет зеркало игроки понимают о доступности дублирующих платформ.
Резервная ссылка формирует точную отображение базового портала. Системы безопасности поддерживаются аналогичными. Платёжные процедуры выполняются через равнозначные сервисы.
Технология создания аккаунта через альтернативный ссылку подразумевает типовой верификации. Сотрудники уточняют документы для осуществления KYC-норм. Личные данные выполняют расширенную проверку.
Банковские ограничения на зеркальных площадках равняются базовым условиям. Начальные беты поддерживаются постоянными. Растущие выигрышные пулы синхронизируются между многочисленными доменами.
Бонусные механизмы функционируют комплексно на дополнительных площадках. Множитель ставок обеспечивает оригинальные цифры. Тайминг реализации поддерживается.
Отдел ассистирования обрабатывает запросы с альтернативных доменов сходным образом. Интерактивный чат обеспечивает постоянный расписание деятельности.
Новейшие сервисы развлекательных услуг предлагают клиентам подключение к премиальному развлечениям через защищенные тип топ казино порталы. Лицензированная операционная активность требует учета конкретных контролирующих требований.
Процедура регистрации игрового профиля включает валидацию приватных показателей. Администраторы используют расширенные системы KYC и AML для пресечения поддельных финансовых действий.
IT инструменты инновационных развлекательных порталов базируются на зашифрованных хостингах с HTTPS стандартами. Региональная блокировка побуждает операторов запускать параллельные порталы.
Параллельные порталы составляют полные дубликаты центрального сайта с поддержанием всех сервисов и данных. Клиенты получают постоянный подключение к балансу, гемблинг данным и личным опциям.
Расчетные транзакции проходят через встроенные платежные агрегаторы. Границы на пополнения и выводы определяются в соотношении с лицензионными положениями и организационными процедурами управления рисками.
Опытные пользователи советуют контролировать условия сертификата через регуляторные списки азартных ведомств. Имиджевые показатели охватывают позиции на отраслевых платформах и feedback действительных беттеров.
Перемещение в сфере проверенных площадок нуждается представления продвинутых методов входа. Опытные игроки применяют Лаки Бир зеркало для получения актуальной данных о активных URL.
Процесс оформления личного кабинета в сертифицированных компаниях включает сложную верификацию. Актуальные компании задействуют KYC-алгоритмы и AML-критерии. Документальная процедура отнимает от 24 до 72 часов.
Технические технологии для избежания препятствий эволюционируют вместе с укреплением правовых действий. VPN-инструменты уровня premium обеспечивают криптографию AES-256 и стандарты OpenVPN. Надежность соединения критически важна для VIP заходов.
Резервные домены выполняют задачи через пространственно рассредоточенные технические ресурсы. CDN-комплексы осуществляют низкую отклик для азиатских участников. Техническое маршрутизация инициируется при обнаружении ограничения базового сайта.
Банковские операции в официальных юрисдикциях следуют жестким требованиям PCI DSS. Блокчейн операции набирают распространение благодаря секретности и оперативности реализации.
Переносные приложения лучших организаций содержат голосовую подтверждение и push-уведомления для существенных событий. Изменяемый оформление независимо подстраивается под настройки панели.
Актуальные гемблеры встречаются с препятствием соединения к сертифицированным сайтам. Провайдеры блокируют основные адреса, но опытные СЂР° казино игроки учитывают о присутствии резервных площадок.
Зеркало образует точную отображение первичного платформы. SSL-сертификаты сохраняются неизменными. Платёжные переводы производятся через аналогичные сервисы.
Алгоритм регистрации через резервный домен включает классической подтверждения. Специалисты требуют свидетельства для реализации KYC-регламентов. Паспортные информация выполняют двухфакторную проверку.
Вносительные ограничения на зеркальных площадках соответствуют первичным параметрам. Минимальные взносы функционируют константными. Увеличивающиеся накопления согласовываются между многочисленными порталами.
Премиальные планы оперируют комплексно на резервных сайтах. Требования по обороту сохраняет базовые значения. Срок активности использования продолжается.
Департамент поддержки рассматривает обращения с альтернативных доменов таким же способом. Интерактивный диалог поддерживает беспрерывный график функционирования.
Discover Yolkmarket – Smooth, fast, and simple checkout process overall.
Xerva Marketplace – Nice, clean layout made browsing products today fast and easy.
Отбор проверенного гемблинг заведения предполагает основательного анализа юридических сертификатов. Актуальные платформы п»ї1хбет зеркало предоставляют клиентам абсолютную детали о своих лицензиях.
Алгоритм получения доступа охватывает определенное количество требуемых шагов подтверждения. Операторы истребуют документы, засвидетельствующие самобытность и правоспособность. Стандартный KYC-регламент требует от 24 до 72 периодов.
Контроль средств инициируется с задания пределов на пополнения. Профессиональные пользователи рекомендуют применять принцип 5% от полного казино капитала на единичную заход.
Технические запреты поставщиков вынуждают использовать вспомогательные адреса. Зеркала сохраняют абсолютную эффективность первичного портала, предусматривая журнал сделок и игровой достижения.
Новые банковские сервисы обеспечивают быстрые вклады через криптовалютные счета. Bitcoin, Ethereum и фиксированные активы обеспечивают тайность и символические комиссии. Время обработки снятий составляет 10-30 промежутков.
Системы постоянства предусматривают ступенчатые ранги с возрастающим кэшбэком. VIP-консультанты дают персонализированные награды, усиленные рамки и приоритетную сервис.
Нынешние участники обталкиваются с огромным количеством технологических тонкостей при деятельности с сертифицированными сайтами. Профессиональные ресурсы типа Vavada casino дают актуальную сведения о процессах гэмблинговых операторов.
Механизм валидации профиля охватывает комплекс требуемых стадий. Базовая проверка нуждается передачи удостоверений валидирующих личность. Типовой список подразумевает паспорт, права или внешний паспорт.
Цифровая часть регистрации предполагает применение безопасного соединения и двухуровневой проверки. Квалифицированные геймеры советуют запускать полный набор представленных настроек охраны.
Запасные домены являются идентичные копии главного сайта с сохранением полного инструментария. Главное преимущество кроется в идентичности финансовых границ и норм вейджера.
Механизм локализации функционирующих дублирующих порталов базируется на проверке специализированных новостных лент и сотрудничающих площадок. Профессиональные игроки эксплуатируют виртуальные частные сети для гарантирования стабильного подключения безотносительно от территориальных запретов.
Zintera Hub Online – Quick site loading with a fresh, organized design for smooth browsing.
RoseOutlet Marketplace – Great product variety and purchasing worked without any problems.
Нынешние бетторы попадают с барьером доступа к легальным платформам. Поставщики ограничивают основные адреса, но искушённые френдс казино посетители осознают о существовании дублирующих сайтов.
Дополнительный домен представляет идентичную дубликат оригинального сайта. SSL-сертификаты поддерживаются аналогичными. Платёжные переводы осуществляются через идентичные механизмы.
Алгоритм открытия счёта через резервный портал содержит обычной подтверждения. Сотрудники выясняют свидетельства для исполнения KYC-правил. Личные информация проходят комплексную аутентификацию.
Финансовые лимиты на альтернативных ресурсах совпадают главным характеристикам. Стартовые взносы функционируют неизменными. Накопительные джекпоты координируются между разными порталами.
Льготные планы оперируют полноценно на дополнительных площадках. Множитель ставок обеспечивает стартовые цифры. Временные рамки отыгрыша поддерживается.
Сервис ассистирования анализирует тикеты с зеркальных ресурсов сходным образом. Мгновенный общение обеспечивает постоянный формат обслуживания.
расписание автобусов москва луганск
Нынешние игроки встречаются с массой программных тонкостей при деятельности с лицензированными сайтами. Профессиональные порталы типа lucky bear казино выдают свежую информацию о работе игорных операторов.
Процесс верификации кабинета включает множество неотъемлемых стадий. Стартовая проверка требует размещения бумаг валидирующих личность. Привычный набор включает документ, права или международный паспорт.
Программная сторона создания аккаунта охватывает задействование безопасного соединения и двойной авторизации. Экспертные участники советуют задействовать весь комплекс возможных функций обеспечения.
Альтернативные адреса представляют точные клоны основного ресурса с поддержанием исчерпывающего функционала. Главное плюс кроется в идентичности денежных рамок и условий условий прокрутки.
Алгоритм нахождения функционирующих зеркал основывается на наблюдении экспертных уведомительных сервисов и сотрудничающих ресурсов. Профессиональные участники эксплуатируют туннельные протоколы для создания устойчивого соединения вне зависимости от локальных барьеров.
Отбор качественного азартного заведения в нынешних границах требует особого внимания к лицензионному режиму. Квалифицированные пользователи знают, что казино 1хбет отображает свежую факты о работающих сервисах.
Процесс оформления профиля в легальных площадках охватывает необходимую аутентификацию личности. KYC-процедуры гарантируют как казино, так и клиента от мошенничества. Переходные лимиты на изъятие средств до закрытия подтверждения – обычная подход.
Виртуальные запреты на доступ к азартным сайтам обходятся через параллельные порталы. Рабочие копии поддерживают тотальную производительность основного платформы. Расчетные транзакции, азартный достижения и наградные системы функционируют константными.
Материальная защищенность определяется критерием используемых платежных систем. SSL-защита, PCI DSS сертификация и усиленная верификация обеспечивают безопасный щит охраны.
Интерактивная библиотека легальных операторов объединяет автоматы от известных разработчиков. RTP-коэффициенты, волатильность и вероятностные принципы подвергаются объективную аудит в утвержденных институтах.
Планы мотивации в профессиональных заведениях базируются на четких условиях ставок. Проигрыш x35-40 оценивается адекватным для барабан-льгот, в то время как карточные развлечения принимаются в подсчет с редуцированным показателем.
Азартная область являет быстрый подъём, завлекая легионы геймеров. Квалифицированные порталы обеспечивают качественную пространство для ставок. Детальную факты о этих провайдерах можно отыскать на п»ї1xBet .
Сертификация представляет приоритетным аспектом определения сайта. Контролёры Олдерни дают серьёзный мониторинг финансовых транзакций. Любая сертифицированная ресурс реализует периодические инспекции RNG-алгоритмов.
Технические аспекты новейших игорных домов предусматривают SSL-кодирование банковского стандарта. Поставщики компьютерного обеспечения уровня Microgaming, NetEnt, Pragmatic Play интегрируют сложные механизмы рандомных показателей.
Процесс валидации аккаунта требует подачи справок KYC-класса. Документ, подтверждение о прибылях, верификация проживания — базовый перечень для итогового входа.
Параллельные ссылки ликвидируют препятствия с фильтрацией провайдеров. Действующие дубли адаптируются постоянно программными службами. Портативные клиенты зачастую действуют стабильнее сетевых модификаций.
Банкролл-менеджмент устанавливает длительную результативность беттинговых партий. Грамотные участники советуют ограничивать величину пари до 1-2% от полного бюджета.
Discover Artisanza – An impressive catalog to enjoy with excellent speed on phones.
Передовые участники оказываются с затруднением входа к лицензированным ресурсам. Провайдеры запрещают стандартные адреса, но опытные п»ї1хбет официальный сайт посетители понимают о присутствии параллельных ресурсов.
Зеркало является полную копию основного площадки. Протоколы шифрования остаются равнозначными. Денежные действия производятся через аналогичные каналы.
Технология открытия счёта через альтернативный ссылку подразумевает классической верификации. Менеджеры просят свидетельства для соблюдения KYC-стандартов. Идентификационные сведения осуществляют двухфакторную валидацию.
Депозитные ограничения на альтернативных сайтах равняются базовым параметрам. Начальные взносы сохраняются фиксированными. Увеличивающиеся банки координируются между всеми порталами.
Стимулирующие схемы функционируют комплексно на дополнительных сайтах. Множитель ставок сохраняет базовые параметры. Тайминг отыгрыша остаётся прежним.
Служба сопровождения изучает заявки с дополнительных адресов сходным образом. Интерактивный чат гарантирует постоянный формат работы.
Передовые гемблеры оказываются с препятствием доступа к сертифицированным ресурсам. Провайдеры ограничивают первичные порталы, но знающие Меллстрой официальный сайт клиенты учитывают о присутствии дублирующих сайтов.
Параллельный портал является стопроцентную воспроизведение базового сайта. SSL-сертификаты функционируют равнозначными. Финансовые операции проходят через сходные шлюзы.
Алгоритм создания аккаунта через резервный портал требует обычной подтверждения. Специалисты запрашивают документы для выполнения KYC-норм. Идентификационные сведения осуществляют усиленную верификацию.
Депозитные границы на параллельных площадках идентичны стандартным условиям. Минимальные суммы сохраняются константными. Накопительные накопления согласовываются между многочисленными ресурсами.
Льготные схемы функционируют комплексно на параллельных ресурсах. Коэффициент оборота поддерживает исходные цифры. Тайминг отыгрыша поддерживается.
Отдел ассистирования анализирует обращения с альтернативных адресов равнозначно. Мгновенный разговор поддерживает круглосуточный режим оперирования.
Yovique Collection – Quick page loads and a wide variety of items to check out.
Функционирующие резервные адреса лицензированных казино на Клубника казино обеспечивают стабильный коннект к развлекательным ресурсам. Система клонирования генерирует идентичные версии корневого домена с удержанием всех функций.
Процедура создания аккаунта через зеркало абсолютно воспроизводит основную бланк. Новые игроки регистрируют активный email, устанавливают стойкий пароль и фиксируют рабочую валюту.
Аутентификация личного кабинета содержит представления справок согласно KYC-регламенту. Копия удостоверения личности, доказательство проживания и денежные сведения анализируются посредством цифровую анализ в течение 24-72 ч.
Авторизация зарегистрированных геймеров реализуется через классическую панель с расширенной проверкой. Краткосрочные ключи приходят на мобильный гаджет или e-mail адрес.
Возможности входящего сектора через резервные ссылки поддерживает популярные расчетные механизмы. Visa, Mastercard, цифровые счета Skrill, Neteller, криптовалюты Bitcoin, Ethereum реализуются с минимальными сборами 0-3%.
Gaming библиотека повторяется полностью включая барабаны, карточные развлечения, live-дилеров и джекпоты. RTP-коэффициенты, колебания и вейджер остаются аналогичными.
Подарочная политика оперирует схоже базовому сайту. Welcome-наборы, free spins, денежный возврат и VIP-планы запускаются машинально при исполнении прописанных параметров.
Актуальные геймеры обталкиваются с изобилием технических аспектов при работе с проверенными площадками. Тематические порталы типа Килограмм казино выдают свежую материалы о функционировании казино провайдеров.
Процесс валидации кабинета содержит множество требуемых этапов. Первичная верификация подразумевает отправки справок верифицирующих личность. Типовой список охватывает удостоверение личности, автоудостоверение или международное ID.
Технологическая сторона оформления включает задействование криптографической защиты и двойной авторизации. Квалифицированные клиенты рекомендуют инициировать весь комплекс доступных опций охраны.
Зеркала представляют стопроцентные дубликаты базового ресурса с хранением всего возможностей. Основное бонус заключается в схожести расчетных рамок и требований ставочных требований.
Алгоритм выявления активных запасных доменов опирается на контроле специализированных мессенджер групп и партнерских площадок. Продвинутые пользователи применяют туннельные протоколы для обеспечения надежного соединения вне зависимости от географических блокировок.
Upcarton Webstore – The site runs smoothly and is simple to explore.
mostbet paşa bank http://mostbet13670.help/
US Pharma Index: canadian pharmacy cialis – US Pharma Index
US Pharma Index: US Pharma Index – US Pharma Index
http://uspharmaindex.com/# pharmacy orlando
Новейшие бетторы сталкиваются с проблемой доступа к сертифицированным ресурсам. Провайдеры запрещают стандартные домены, но грамотные Меллстрой официальный сайт участники знают о присутствии дублирующих ресурсов.
Зеркало образует точную воспроизведение оригинального сайта. Протоколы шифрования функционируют неизменными. Расчётные транзакции реализуются через идентичные шлюзы.
Методика заведения учётной записи через альтернативный портал включает классической подтверждения. Специалисты требуют свидетельства для выполнения KYC-норм. Личные информация выполняют комплексную подтверждение.
Пополнительные лимиты на зеркальных порталах равняются основным спецификациям. Минимальные взносы сохраняются неизменными. Растущие банки координируются между всеми ссылками.
Бонусные схемы оперируют завершённо на дополнительных сайтах. Отыгрышный коэффициент удерживает оригинальные цифры. Длительность отыгрыша остаётся прежним.
Сервис поддержки анализирует заявки с альтернативных адресов равнозначно. Живой переписка гарантирует круглосуточный расписание обслуживания.
Современные бетторы попадают с затруднением соединения к легальным порталам. Компании закрывают стандартные адреса, но грамотные п»ї1xBet игроки помнят о доступности параллельных ресурсов.
Зеркало представляет точную дубликат оригинального платформы. Протоколы шифрования сохраняются идентичными. Финансовые транзакции производятся через равнозначные сервисы.
Процедура регистрации через дополнительный домен подразумевает обычной валидации. Администраторы выясняют удостоверения для осуществления KYC-регламентов. Персональные характеристики реализуют комплексную проверку.
Финансовые ограничения на параллельных порталах аналогичны первичным требованиям. Начальные ставки продолжают стабильными. Накопительные банки согласовываются между всеми ресурсами.
Поощрительные механизмы действуют целостно на параллельных ресурсах. Отыгрышный коэффициент обеспечивает базовые показатели. Срок активности отыгрыша остаётся прежним.
Сервис ассистирования рассматривает запросы с зеркальных порталов сходным образом. Живой чат обеспечивает круглосуточный расписание обслуживания.
https://ua-tv.net/user/caburgxgke
For the opportunity
get generic zetia pill
for premium features.
Развлекательная область являет интенсивный рост, притягивая миллионы пользователей. Профессиональные сайты предоставляют стабильную условия для пари. Детальную информацию о подобных операторах можно получить на Mellstroy Game .
Аккредитация представляет приоритетным фактором выбора портала. Лицензиаты Великобритании обеспечивают тщательный мониторинг расчётных процедур. Конкретная легальная платформа реализует регулярные ревизии RNG-генераторов.
Технические аспекты современных беттинг-платформ включают SSL-шифрование финансового уровня. Поставщики виртуального ПО уровня Microgaming, NetEnt, Pragmatic Play добавляют усовершенствованные модели хаотичных величин.
Процедура проверки личного кабинета включает передачи бумаг KYC-стандарта. ID, документ о прибылях, подтверждение местожительства — типичный набор для итогового доступа.
Альтернативные адреса убирают сложности с цензурой компаний. Свежие альтернативы изменяются систематически программными группами. Карманные софт обычно работают лучше онлайн версий.
Контроль средств создаёт долгосрочную успешность гемблинговых сессий. Экспертные геймеры настаивают сокращать объём бета до 1-2% от итогового бюджета.
Гемблинговая область показывает активный расширение, заинтересовывая массы игроков. Опытные площадки предоставляют качественную среду для беттинга. Детальную факты о этих провайдерах можно обнаружить на ДживиСпин казино .
Лицензирование остаётся центральным критерием селекции портала. Лицензиаты Гибралтара гарантируют серьёзный аудит расчётных действий. Любая легальная сайт подвергается постоянные ревизии RNG-систем.
Технические параметры передовых азартных площадок объединяют SSL-безопасность финансового ранга. Разработчики компьютерного продукта типа Microgaming, NetEnt, Pragmatic Play внедряют усовершенствованные системы случайных величин.
Схема проверки личного кабинета предусматривает предоставления справок KYC-стандарта. Паспорт, подтверждение о средствах, подтверждение регистрации — стандартный список для завершённого активации.
Дублирующие ссылки исправляют проблемы с ограничениями провайдеров. Действующие дубли обновляются ежедневно IT службами. Портативные софт часто выполняются стабильнее онлайн модификаций.
Финансовая дисциплина определяет перспективную прибыльность игровых раундов. Экспертные участники указывают контролировать количество бета до 1-2% от общего бюджета.
Актуальные гемблеры оказываются с проблемой подключения к легальным ресурсам. Компании фильтруют первичные домены, но знающие казино Mellstroy Game игроки понимают о функционировании параллельных площадок.
Зеркало образует абсолютную копию оригинального портала. SSL-сертификаты поддерживаются такими же. Платёжные действия осуществляются через равнозначные системы.
Технология заведения учётной записи через дополнительный ссылку включает привычной проверки. Сотрудники уточняют удостоверения для реализации KYC-требований. Паспортные сведения осуществляют двухфакторную валидацию.
Финансовые ограничения на резервных платформах идентичны первичным условиям. Низшие ставки поддерживаются неизменными. Накопительные призовые фонды синхронизируются между множественными адресами.
Поощрительные механизмы действуют завершённо на параллельных ресурсах. Вейджер гарантирует оригинальные показатели. Тайминг использования сохраняется.
Сервис помощи изучает обращения с резервных адресов аналогично. Прямой диалог предоставляет непрерывный график оперирования.
Лицензионные провайдеры гэмблинг сервисов oferuja геймерам доступ к качественному игровому процессу через тематические порталы, включая казино mad , что придерживаются общепринятые нормы надёжности.
Механизм активации предполагает внесения верификационных сведений через безопасные SSL-линии. Администрация просят предоставить документальное verification возраста и адреса жительства для поддержания юрисдикционных требований.
Двухфакторная проверка становится принудительным частью современных платформ безопасности. Игроки получают SMS-ключи, push-оповещения или внедряют профессиональные софт в стиле Google Authenticator.
Mirror ссылки нейтрализуют препятствия географических ограничений и DDoS-нападений. По сути дубли являют копийные dublicates основного домена с обеспечением инструментария и индивидуальных информации.
Компетентные игроки suggest поддерживать свежие списки working mirrors в bookmark браузера. Management передают новости о актуальных ссылках через e-mail, Telegram-чаты и mobile утилиты.
Payment транзакции через лицензионные площадки secured шифровальными methods level банковского направления. Получение капитала производится лишь на validated реквизиты обладателя личного кабинета.
Slate Vendor Store – The browsing experience is surprisingly easy and fun.
анонимный нарколог на дом в ростове narkolog-na-dom-v-rostove.ru .
inqora.shop – Smooth browsing, everything loads quickly and products look great.
Подбор безопасного игорного портала заставляет детального исследования юридических разрешений. Современные системы Вавада регистрация предоставляют геймерам абсолютную факты о текущих аккредитациях.
Алгоритм получения доступа содержит определенное количество ключевых фаз аутентификации. Операторы настаивают документы, удостоверяющие индивидуальность и возраст. Стандартный KYC-порядок составляет от 24 до 72 промежутков.
Распоряжение капиталом стартует с определения границ на депозиты. Компетентные пользователи призывают эксплуатировать принцип 5% от полного казино средств на конкретную сессию.
Программные препятствия провайдеров принуждают применять запасные адреса. Альтернативы удерживают абсолютную эффективность базового платформы, содержа историю переводов и игровой достижения.
Передовые расчетные методы гарантируют моментальные инвестиции через электронные аккаунты. Bitcoin, Ethereum и устойчивые монеты предоставляют конфиденциальность и крошечные сборы. Длительность реализации извлечений составляет 10-30 промежутков.
Планы верности охватывают ступенчатые статусы с нарастающим компенсацией. VIP-кураторы дают личные поощрения, повышенные границы и преимущественную сервис.
Нынешние клиенты имеют дело с множеством цифровых особенностей при работе с проверенными ресурсами. Тематические источники типа п»ї1хбет предоставляют современную сведения о работе развлекательных организаций.
Механизм подтверждения счета предполагает ряд обязательных уровней. Первичная верификация нуждается предоставления свидетельств верифицирующих субъект. Стандартный пакет включает ID, водительские права или международное ID.
Системная компонента регистрации содержит использование криптографической защиты и двойной авторизации. Профессиональные геймеры подсказывают инициировать совокупность имеющихся возможностей обеспечения.
Зеркала являются стопроцентные копии центрального портала с удержанием полного функционала. Основное плюс выражается в идентичности финансовых границ и критериев ставочных требований.
Процедура локализации действующих зеркал базируется на наблюдении профессиональных информационных каналов и связанных площадок. Квалифицированные геймеры эксплуатируют туннельные протоколы для формирования бесперебойного доступа невзирая от региональных барьеров.
http://uspharmaindex.com/# US Pharma Index
https://safiyarbij012584.pointblog.net/a-dedication-to-ethical-artificial-intelligence-assistance-90605132
Wild Crate Collections – Sleek interface and fast mobile load times make browsing enjoyable.
LiltStore Online Shop – Quick-loading pages and smooth navigation across all products.
http://aredsoaclus.phorum.pl/viewtopic.php?p=203709#203709
Актуальные порталы азартных игр дают беттерам возможность к элитному беттингу через сертифицированные тип топ казино ресурсы. Авторизованная работа подразумевает учета жестких контролирующих норм.
Алгоритм открытия игрового профиля охватывает аутентификацию приватных показателей. Регуляторы применяют расширенные механизмы KYC и AML для предотвращения фродовых платежей.
Программные системы передовых беттинг площадок работают на надежных серверах с шифровальными стандартами. Геоблокировка принуждает управляющих внедрять параллельные адреса.
Альтернативные платформы формируют точные репликации центрального сайта с сохранением всех инструментов и параметров. Беттеры достигают беспрепятственный вход к балансу, развлекательной статистике и личным опциям.
Расчетные переводы проходят через подключенные денежные системы. Границы на инвестиции и получения регулируются в унисон с правовыми критериями и организационными правилами риск-менеджмента.
Экспертные гемблеры указывают отслеживать положение аккредитации через официальные базы данных азартных организаций. Статусные показатели включают позиции на тематических порталах и feedback настоящих пользователей.
Развлекательная область показывает быстрый прогресс, манящая множество участников. Профессиональные ресурсы предоставляют качественную атмосферу для беттинга. Детальную данные о таких провайдерах можно найти на ретро казино .
Аттестация остаётся главным фактором отбора ресурса. Юрисдикции Олдерни дают качественный надзор расчётных манипуляций. Конкретная аккредитованная портал осуществляет систематические инспекции RNG-механизмов.
Программные особенности инновационных казино предусматривают SSL-криптографию расчётного категории. Поставщики цифрового софта наподобие Microgaming, NetEnt, Pragmatic Play встраивают продвинутые модели рандомных показателей.
Схема подтверждения аккаунта предполагает передачи удостоверений KYC-уровня. Удостоверение, справка о заработке, подтверждение регистрации — обычный комплект для завершённого авторизации.
Резервные порталы ликвидируют препятствия с цензурой компаний. Рабочие дубли адаптируются регулярно программными группами. Мобильные утилиты обычно действуют качественнее браузерных модификаций.
Управление банкроллом устанавливает стратегическую успешность игровых периодов. Профессиональные геймеры советуют лимитировать сумму пари до 1-2% от совокупного капитала.
Официальные ресурсы азартных предложений обеспечивают игрокам шанс к элитному гэмблингу через целевые порталы, включая п»ї1xBet казино , что выполняют глобальные критерии защиты.
Процедура открытия счёта necessita заполнения валидационных деталей через безопасные SSL-connection. Букмекеры просят нотариальное подтверждение возраста и адреса нахождения для поддержания законодательных правил.
2FA идентификация считается принудительным частью актуальных платформ security. Участники имеют SMS-коды, push-уведомления или применяют профессиональные утилиты по типу Google Authenticator.
Mirror ссылки решают препятствия локальных запретов и DDoS-нападений. С технической точки зрения зеркала представляют идентичные реплики главного платформы с поддержанием опций и личных деталей.
Профессиональные пользователи предлагают удерживать current перечни активных зеркал в избранном веб-клиента. Операторы передают обновления о fresh адресах через электронную почту, Telegram-чаты и смартфонные утилиты.
Финансовые процедуры через официальные сайты secured encryption системами уровня банковского направления. Получение финансов осуществляется только на верифицированные реквизиты владельца учётной записи.
http://132.148.13.112/home.php?mod=space&uid=3195784
Visit Evoraa – Very fluid browsing experience with well-presented product pages.
Актуальные операторы беттинг игр предлагают клиентам вход к качественному гемблингу через сертифицированные казино 1хбет ресурсы. Лицензированная бизнес нуждается учета четких контролирующих положений.
Механизм регистрации игрового аккаунта содержит проверку конфиденциальных показателей. Администраторы задействуют углубленные протоколы KYC и AML для исключения мошеннических платежей.
Технические системы актуальных развлекательных порталов функционируют на зашифрованных дата-центрах с TLS протоколами. IP-фильтрация побуждает администраторов разрабатывать параллельные адреса.
Зеркальные ресурсы являют собой эквивалентные репликации базового платформы с фиксацией всех инструментов и показателей. Беттеры достигают устойчивый подключение к счету, развлекательной данным и индивидуальным опциям.
Банковские операции выполняются через связанные платежные шлюзы. Границы на пополнения и получения устанавливаются в унисон с лицензионными критериями и организационными правилами управления рисками.
Квалифицированные клиенты указывают отслеживать ситуацию авторизации через государственные списки азартных структур. Репутационные показатели охватывают места на специализированных сервисах и комментарии действительных беттеров.
Hello everyone!
Investigate food mysterious delicacies offering interesting and valuable taste data and feast like a king see on the website for food guides
Full information on the link – https://101flow.site
All the best and development in business!
Dressing well creates a strong first impression.
A outfit speaks loudly before you even say a single word.
This boosts your own self-esteem and mindset significantly.
A put-together look signals competence in the office.
https://a4.megakazan.ru/sk2k8qp8xdhN/
Fashionable choices let you to showcase your unique personality.
Others often perceive well-dressed people as more capable and reliable.
Ultimately, putting effort in your wardrobe is an valuable step in your personal brand.
Isveta Collection – Found this store not long ago and the range of products is impressive.
Torviq Collection – Found a handful of interesting products while looking around.
Передовые сервисы гемблинг активностей предлагают пользователям вход к качественному азарту через надежные Лаки Бир официальный сайт порталы. Официальная функционирование нуждается учета определенных правовых требований.
Алгоритм регистрации индивидуального аккаунта задействует верификацию персональных данных. Управляющие внедряют многоуровневые механизмы KYC и AML для пресечения незаконных транзакций.
Цифровые платформы передовых игорных домов функционируют на безопасных инфраструктурах с TLS алгоритмами. Локальные запреты принуждает владельцев организовывать дублирующие домены.
Резервные порталы представляют эквивалентные копии центрального ресурса с поддержанием всех инструментов и параметров. Клиенты обеспечивают себе стабильный доступ к балансу, беттинг данным и пользовательским конфигурациям.
Банковские операции реализуются через подключенные денежные шлюзы. Пределы на взносы и получения регулируются в соответствии с законодательными требованиями и корпоративными политиками риск-менеджмента.
Квалифицированные игроки рекомендуют мониторить состояние разрешения через контролирующие реестры гемблинг комиссий. Статусные критерии предусматривают позиции на тематических ресурсах и отзывы настоящих беттеров.
Xerva Finds – Easy-to-navigate store layout made finding products today very simple.
Новейшие игроки имеют дело с набором технологических нюансов при функционировании с проверенными площадками. Профессиональные источники типа п»ї1xBet зеркало выдают современную информацию о работе развлекательных организаций.
Процесс аутентификации аккаунта охватывает множество принудительных этапов. Начальная верификация включает передачи свидетельств верифицирующих личность. Обычный перечень подразумевает свидетельство, права или международное ID.
Программная элемент создания аккаунта включает задействование SSL-шифрования и двухфакторной аутентификации. Продвинутые клиенты предлагают инициировать максимум доступных опций обеспечения.
Альтернативные адреса являются точные копии первичного платформы с удержанием тотального возможностей. Ключевое плюс выражается в тождественности расчетных пределов и требований проигрыша.
Схема обнаружения актуальных альтернативных адресов фундируется на мониторинге экспертных новостных лент и союзных порталов. Опытные участники задействуют VPN-сервисы для обеспечения бесперебойного связи невзирая от локальных ограничений.
Актуальные игроки сталкиваются с множеством программных тонкостей при деятельности с сертифицированными порталами. Специализированные порталы типа казино Вован обеспечивают релевантную контент о деятельности развлекательных провайдеров.
Процесс проверки аккаунта подразумевает множество принудительных стадий. Первичная подтверждение включает размещения бумаг верифицирующих личность. Привычный комплект предполагает ID, лицензию водителя или внешний паспорт.
Программная составляющая открытия счета предполагает использование зашифрованного канала и 2FA. Продвинутые игроки рекомендуют включать совокупность доступных опций обеспечения.
Дублирующие порталы формируют полные копии первичного портала с обеспечением полного инструментария. Основное преимущество заключается в идентичности банковских ограничений и норм вейджера.
Система поиска рабочих запасных доменов строится на наблюдении специализированных уведомительных сервисов и союзных порталов. Профессиональные игроки эксплуатируют виртуальные частные сети для предоставления надежного связи без оглядки от географических барьеров.
Shop Night Vendor – Lots of options available and prices seem very fair overall.
Определение качественного азартного портала в современных условиях предполагает тщательного подхода к законному уровню. Профессиональные игроки понимают, что лаки Р±РёСЂ казино содержит свежую информацию о активных сервисах.
Процесс регистрации в легальных заведениях включает необходимую верификацию удостоверения. KYC-процедуры гарантируют как казино, так и игрока от фрода. Кратковременные рамки на снятие средств до финализации проверки – обычная методика.
Технические ограничения на подключение к игровым сервисам преодолеваются через дублирующие порталы. Активные дубликаты поддерживают абсолютную производительность базового сервиса. Банковские движения, геймплейный продвижение и бонусные схемы продолжают постоянными.
Капитальная надежность выражается качеством применяемых расчетных систем. SSL-криптография, PCI DSS сертификация и двухфакторная подтверждение устанавливают стабильный барьер обороны.
Развлекательная библиотека проверенных заведений включает автоматы от главных студий. RTP-значения, волатильность и расчетные модели получают беспристрастную проверку в авторизованных центрах.
Программы лояльности в достойных площадках строятся на открытых параметрах отыгрыша. Условия ставок x35-40 характеризуется справедливым для спин-поощрений, в то время как настольные игры включаются в расчет с минимальным процентом.
Click for Listaro – Browsing the site is easy and products are clearly shown.
Функционирующие зеркала легальных gaming-операторов на п»ї1хбет официальный сайт гарантируют постоянный вход к игровым сервисам. Схема клонирования генерирует аналогичные дубликаты основного портала с удержанием всех возможностей.
Алгоритм активации через mirror-сайт целиком имитирует стандартную анкету. Начинающие пользователи прописывают функционирующий email, создают безопасный пароль и устанавливают основную курренси.
Валидация учетной записи содержит загрузки бумаг следуя KYC-стандартам. Изображение удостоверения личности, свидетельство резиденции и денежные сведения контролируются системой автоматическую контроль в течение 24-72 временных единиц.
Аутентификация действующих игроков реализуется через базовую форму с многоступенчатой проверкой. Краткосрочные пароли поступают на смс девайс или мейл.
Механизмы денежного модуля через дублирующие порталы предлагает востребованные платежные сервисы. Visa, Mastercard, веб портмоне Skrill, Neteller, виртуальные монеты Bitcoin, Ethereum процессируются с сокращенными взносами 0-3%.
Gaming база дублируется полностью включая spinning games, карточные развлечения, live-дилеров и прогрессивы. RTP-параметры, колебания и вейджер остаются идентичными.
Бонусная механизм работает похоже главному веб-площадке. Welcome-комплекты, даровые прокруты, возврат средств и VIP-планы инициируются программно при выполнении заданных условий.
Выбор безопасного азартного площадки нуждается серьезного исследования юридических свидетельств. Актуальные сайты Вавада сайт обеспечивают клиентам стопроцентную сведения о действующих разрешениях.
Система создания профиля содержит несколько обязательных шагов проверки. Представители запрашивают свидетельства, удостоверяющие индивидуальность и правоспособность. Традиционный KYC-порядок длится от 24 до 72 временных отрезков.
Банкролл-менеджмент стартует с определения ограничений на депозиты. Компетентные геймеры настаивают использовать установку 5% от полного игорного резерва на отдельную заход.
Цифровые барьеры провайдеров побуждают применять резервные домены. Дубликаты оберегают абсолютную производительность центрального портала, подразумевая историю операций и развлекательный успех.
Актуальные финансовые системы гарантируют быстрые пополнения через криптовалютные портмоне. Bitcoin, Ethereum и постоянные токены предоставляют анонимность и наименьшие отчисления. Длительность проведения получений составляет 10-30 отрезков.
Программы верности охватывают многоуровневые ранги с накапливающимся бонусом. VIP-консультанты гарантируют личные награды, улучшенные пределы и первоочередную сервис.
fioriq.shop – Came across several distinctive products and the checkout was quick and simple.
TrendNook Website – Very smooth experience and products are easy to find.
Гемблинговая сфера представляет стремительный расширение, заинтересовывая миллионы пользователей. Квалифицированные сайты предоставляют надёжную пространство для пари. Развёрнутую материалы о данных провайдерах доступно изучить на винити казино .
Лицензирование остаётся центральным фактором отбора портала. Контролёры Мальты дают жёсткий надзор валютных операций. Отдельная аккредитованная сайт выполняет регулярные контроли RNG-модулей.
Цифровые параметры новейших игорных домов предусматривают SSL-защиту экономического категории. Разработчики виртуального обеспечения класса Microgaming, NetEnt, Pragmatic Play встраивают сложные системы хаотичных чисел.
Процесс валидации аккаунта предполагает передачи бумаг KYC-уровня. Свидетельство, подтверждение о заработке, верификация проживания — обычный набор для завершённого подключения.
Дублирующие ссылки исправляют барьеры с цензурой поставщиков. Актуальные дубли изменяются каждый день компьютерными специалистами. Мобильные софт зачастую выполняются качественнее веб форматов.
Финансовая дисциплина формирует стратегическую результативность азартных партий. Грамотные геймеры предлагают контролировать величину депозита до 1-2% от итогового банкролла.
Проверенные площадки игровых сервисов гарантируют участникам право к элитному гэмблингу через специализированные сайты, включая п»ї1xBet , которые специально соблюдают мировые нормы конфиденциальности.
Процедура открытия счёта требует внесения идентификационных деталей через криптографические SSL-протоколы. Администрация demanded official подтверждение правоспособности и адреса residence для выполнения правовых критериев.
2FA аутентификация считается необходимым элементом современных систем конфиденциальности. Игроки имеют SMS-пароли, push-оповещения или задействуют dedicated утилиты по типу Google Authenticator.
Резервные домены ликвидируют вопросы локальных барьеров и DDoS-assault. Техническим образом зеркала представляют копийные копии основного платформы с обеспечением функциональности и клиентских информации.
Компетентные участники suggest keeping актуальные реестры рабочих копий в favourites веб-клиента. Администрация направляют updates о fresh ссылках через e-mail, Telegram-группы и смартфонные приложения.
Финансовые транзакции через проверенные сайты обеспечены cryptographic methods категории банковского сектора. Снятие капитала происходит solely на validated данные хозяина учётной записи.
Функционирующие зеркала официальных гемблинг-платформ на казино Рльдорадо дают беспрерывный коннект к гемблинг платформам. Принцип реплицирования генерирует полноценные копии основного ресурса с удержанием всех инструментов.
Процедура регистрации через зеркало целиком воспроизводит главную заявку. Свежие геймеры вводят рабочий email, создают сложный шифр и назначают рабочую финансовый инструмент.
Аутентификация профиля требует представления бумаг по KYC-политике. Фото ID-карты, подтверждение места жительства и финансовые параметры анализируются посредством машинную анализ в течение 24-72 ч.
Логин зарегистрированных геймеров осуществляется через типовую форму с усиленной валидацией. Краткосрочные пароли приходят на сотовый гаджет или мейл.
Возможности финансового раздела через резервные ссылки поддерживает топовые денежные системы. Visa, Mastercard, онлайн портмоне Skrill, Neteller, crypto Bitcoin, Ethereum выполняются с сокращенными процентами 0-3%.
Gaming каталог клонируется на сто процентов включая барабаны, традиционные игры, live-крупье и джекпоты. RTP-значения, волатильность и проигрыш сохраняются аналогичными.
Бонусная политика работает идентично корневому порталу. Welcome-наборы, безвозмездные спины, возврат средств и VIP-схемы инициируются программно при выполнении заданных критериев.
Развлекательная индустрия представляет быстрый прогресс, завлекая множество игроков. Грамотные сайты предлагают безопасную среду для игры. Исчерпывающую факты о таких провайдерах можно обнаружить на Лаки Бир сайт .
Легализация является приоритетным аспектом отбора площадки. Лицензиаты Гибралтара обеспечивают серьёзный мониторинг экономических действий. Каждая аккредитованная сайт реализует периодические контроли RNG-алгоритмов.
Цифровые особенности передовых казино содержат SSL-защиту денежного класса. Производители софтового обеспечения уровня Microgaming, NetEnt, Pragmatic Play интегрируют многоуровневые модели непредсказуемых величин.
Алгоритм верификации личного кабинета подразумевает предоставления удостоверений KYC-класса. Удостоверение, выписка о финансах, доказательство прописки — обычный пакет для финального авторизации.
Альтернативные ссылки убирают трудности с блокировками организаций. Актуальные зеркала обновляются ежедневно компьютерными службами. Планшетные утилиты часто функционируют устойчивее онлайн редакций.
Финансовая дисциплина создаёт длительную доходность игровых партий. Экспертные участники советуют контролировать размер депозита до 1-2% от совокупного капитала.
For those seeking an exceptional online gaming experience, us.com](https://maxispin.us.com/) stands out as a premier destination. At Maxispin Casino, players can enjoy a vast array of pokies, table games, and other thrilling options, all accessible in both demo and real-money modes. The casino offers attractive bonuses, including free spins and a generous welcome offer, along with cashback promotions and engaging tournaments. To ensure a seamless experience, Maxispin provides various payment methods, efficient withdrawal processes, and reliable customer support through live chat. Security is a top priority, with robust safety measures and a strong focus on responsible gambling tools. Players can easily navigate the site, with detailed guides on account creation, verification, and payment methods. Whether you’re interested in high RTP slots, hold and win pokies, or the latest slot releases, Maxispin Casino delivers a user-friendly and secure platform. Explore their terms and conditions, read reviews, and discover why many consider Maxispin a legitimate and trustworthy choice in Australia.
Its accessibility and ease of use make it suitable for everyone.
**Features of MaxiSpin.us.com**
The platform also features a built-in editor, allowing users to make immediate adjustments for the best outcomes.
**Benefits of Using MaxiSpin.us.com**
The platform’s scalability ensures that it meets the needs of users regardless of their size or industry.
ivermectin lotion cost ivermectin lotion for lice Ivermectin Access USA
Acornmuse Finds – Browsing through the products was fun and all items appear premium.
Hey are using WordPress for your site platform? I’m new to the blog world but I’m trying to get started
and set up my own. Do you require any coding expertise to make
your own blog? Any help would be really appreciated!
Актуальные игроки сталкиваются с сложностью доступа к официальным платформам. Операторы ограничивают основные URL, но опытные Лаки Бир официальный сайт участники понимают о доступности дублирующих ресурсов.
Зеркало формирует идентичную отображение оригинального ресурса. Средства защиты остаются равнозначными. Расчётные операции производятся через равнозначные системы.
Технология регистрации через альтернативный ссылку предполагает типовой валидации. Администраторы запрашивают свидетельства для осуществления KYC-стандартов. Персональные параметры проходят усиленную аутентификацию.
Банковские рамки на параллельных площадках равняются базовым требованиям. Низшие беты функционируют фиксированными. Возрастающие банки интегрируются между множественными адресами.
Поощрительные схемы оперируют полноценно на дополнительных платформах. Отыгрышный коэффициент удерживает стартовые величины. Временные рамки проигрывания сохраняется.
Отдел сопровождения рассматривает запросы с зеркальных ресурсов равнозначно. Онлайн диалог предоставляет постоянный график оперирования.
Официальные платформы азартных сервисов обеспечивают игрокам шанс к элитному гэмблингу через целевые порталы, включая казино Vavada , которые именно придерживаются общепринятые стандарты безопасности.
Механизм открытия счёта требует предоставления верификационных информации через шифрованные SSL-линии. Менеджмент demanded документальное подтверждение совершеннолетия и локации проживания для поддержания правовых требований.
Двухэтапная идентификация считается принудительным составляющей современных платформ надёжности. Users получают SMS-пароли, push-уведомления или эксплуатируют специальные утилиты вроде Google Authenticator.
Зеркальные URL устраняют трудности региональных санкций и DDoS-воздействий. Технически копии составляют аналогичные версии центрального сайта с maintaining возможностей и клиентских информации.
Опытные клиенты советуют поддерживать свежие реестры действующих копий в избранном веб-клиента. Management рассылают обновления о свежих ссылках через почтовые сервисы, Telegram-каналы и телефонные программы.
Платёжные movements через legal порталы secured cryptographic технологиями класса банковского segment. Изъятие средств производится лишь на верифицированные wallets собственника профиля.
Официальные площадки развлекательных услуг предоставляют игрокам вариант к качественному гэмблингу через dedicated порталы, включая Голд казино , которые точно исполняют transnational стандарты security.
Процедура создания аккаунта necessita указания authentication сведений через защищённые SSL-каналы. Менеджмент просят предоставить официальное подтверждение дееспособности и места регистрации для выполнения правовых стандартов.
Двухфакторная идентификация является mandatory элементом передовых solutions security. Игроки располагают SMS-ключи, push-notification или эксплуатируют профессиональные программы наподобие Google Authenticator.
Резервные ссылки преодолевают трудности географических санкций и DDoS-нападений. Техническим образом дубли представляют идентичные dublicates основного сайта с поддержанием опций и индивидуальных данных.
Профессиональные геймеры suggest хранить свежие каталоги рабочих дублей в закладках обозревателя. Management доставляют новости о свежих URL через e-mail, Telegram-communities и телефонные apps.
Payment процедуры через проверенные сайты гарантированы encryption протоколами level банковского индустрии. Extraction денег происходит только на верифицированные реквизиты держателя аккаунта.
buy generic priligy htts://rsmeds.top/# where buy priligy
Определение качественного гемблинг портала в сегодняшних обстоятельствах нуждается повышенного внимания к лицензионному статусу. Квалифицированные игроки понимают, что Голд казино демонстрирует свежую материалы о действующих площадках.
Процесс открытия счета в лицензированных площадках охватывает требуемую аутентификацию персональных данных. KYC-требования оберегают как заведение, так и пользователя от мошенничества. Кратковременные границы на снятие финансов до завершения подтверждения – привычная практика.
Технические блокировки на вход к развлекательным порталам обходятся через альтернативные адреса. Функционирующие дубликаты обеспечивают полную эффективность центрального портала. Расчетные движения, интерактивный продвижение и привилегированные предложения продолжают стабильными.
Экономическая надежность оценивается показателем внедренных финансовых методов. SSL-защита, PCI DSS лицензирование и двухфакторная аутентификация обеспечивают безопасный контур безопасности.
Азартная каталог официальных сервисов охватывает автоматы от главных разработчиков. RTP-коэффициенты, изменчивость и алгоритмические схемы испытывают объективную проверку в признанных центрах.
Программы стимулирования в серьезных заведениях строятся на понятных условиях проигрыша. Вейджер x35-40 считается адекватным для слот-поощрений, в то время как традиционные активности включаются в расчет с уменьшенным показателем.
Определение проверенного азартного заведения в актуальных реалиях заставляет тщательного изучения к лицензионному статусу. Знающие клиенты осознают, что п»ї1хбет регистрация содержит новую материалы о активных провайдерах.
Процесс регистрации в лицензированных площадках предусматривает необходимую верификацию персональных данных. KYC-правила гарантируют как заведение, так и пользователя от обмана. Кратковременные границы на перечисление средств до завершения валидации – нормальная система.
Технические ограничения на подключение к азартным сервисам устраняются через альтернативные URL. Активные зеркала гарантируют стопроцентную эффективность базового платформы. Денежные процедуры, интерактивный статистика и поощрительные предложения функционируют устойчивыми.
Финансовая гарантированность оценивается качеством эксплуатируемых финансовых способов. SSL-шифрование, PCI DSS сертификация и расширенная проверка формируют надежный барьер охраны.
Азартная каталог легальных провайдеров охватывает спины от топовых провайдеров. RTP-индексы, колебания и математические формулы претерпевают независимую валидацию в аккредитованных центрах.
Программы лояльности в качественных операторах базируются на ясных условиях отыгрыша. Вейджер x35-40 признается справедливым для автомат-подарков, в то время как карточные состязания принимаются в подсчет с минимальным процентом.
Современные бетторы встречаются с проблемой соединения к сертифицированным ресурсам. Организации ограничивают стандартные домены, но опытные Меллстрой зеркало клиенты учитывают о функционировании дублирующих сайтов.
Зеркало является идентичную дубликат главного площадки. Криптографические алгоритмы остаются неизменными. Платёжные действия производятся через идентичные сервисы.
Методика создания аккаунта через альтернативный ссылку содержит обычной валидации. Менеджеры требуют бумаги для соблюдения KYC-стандартов. Личные сведения реализуют двухфакторную проверку.
Банковские границы на альтернативных площадках совпадают основным характеристикам. Начальные беты сохраняются фиксированными. Растущие выигрышные пулы координируются между всеми ссылками.
Премиальные программы действуют полноценно на зеркальных порталах. Отыгрышный коэффициент сохраняет базовые цифры. Период действия оборота поддерживается.
Команда обслуживания обрабатывает заявки с параллельных доменов таким же способом. Живой диалог обеспечивает беспрерывный режим оперирования.
Стильный внешний вид создает сильное мнение о человеке.
Он работает на восприятие вас коллегами сразу.
Уверенность в подобранном образе повышает вашу самооценку.
Этот подход подчеркивает высокий уровень профессионализма и внимание к деталям.
https://c.balenciager.ru/Ci6VVdNWCbIH/
Через гардероб вы имеете шанс выразить свою личность и стиль.
Окружающие неосознанно оценивают стильных людей как более компетентных.
Следовательно, инвестиции в свой образ — это инвестиции в ваше будущее.
Механизмы влияния: В отличие от внушения, действующего на подсознание, убеждение обращается к разуму и критическому мышлению, требуя осмысленного принятия информации. https://amzn.eu/d/0dkggXK8
Убеждение – это метод воздействия на сознание, использующий логические аргументы, факты и обоснования для формирования новых установок или изменения текущего поведения человека https://amzn.eu/d/0afMsQdF
Good morning!
Unlock sport mysterious records with interesting and valuable athletic facts today and chase greatness see on the website for record books
Full information on the link – https://202fliks.site
All the best and development in business!
Механизмы влияния: В отличие от внушения, действующего на подсознание, убеждение обращается к разуму и критическому мышлению, требуя осмысленного принятия информации. https://amzn.eu/d/0093pmuI
Выбор надежного развлекательного портала в текущих условиях требует тщательного рассмотрения к юридическому уровню. Компетентные пользователи осознают, что п»ї1хбет включает свежую сведения о действующих провайдерах.
Процесс регистрации в официальных платформах объединяет неизбежную проверку идентичности. KYC-требования охраняют как заведение, так и клиента от обмана. Переходные пределы на получение активов до финализации подтверждения – привычная методика.
Программные препятствия на связь к азартным сервисам преодолеваются через альтернативные URL. Рабочие дубликаты поддерживают стопроцентную эффективность базового платформы. Расчетные движения, геймплейный достижения и наградные схемы поддерживаются константными.
Материальная гарантированность определяется степенью задействованных денежных механизмов. SSL-шифрование, PCI DSS лицензирование и усиленная проверка формируют защищенный щит ограждения.
Геймплейная каталог легальных заведений охватывает автоматы от главных студий. RTP-коэффициенты, вариативность и математические принципы претерпевают беспристрастную сертификацию в признанных институтах.
Схемы поощрения в качественных площадках опираются на четких условиях отыгрыша. Условия ставок x35-40 характеризуется приемлемым для барабан-льгот, в то время как традиционные состязания учитываются в расчет с сниженным фактором.
Проверенные ресурсы развлекательных предложений обеспечивают игрокам доступ к высококлассному развлечениям через целевые порталы, включая https://probeg-ag.ru/ru-ru/ , которые специально следуют общепринятые требования security.
Последовательность оформления профиля требует заполнения верификационных данных через безопасные SSL-connection. Администрация запрашивают письменное подтверждение age verification и региона нахождения для compliance нормативных стандартов.
2FA authentication представляет принудительным элементом современных систем конфиденциальности. Участники получают SMS-токены, push-алерты или задействуют специальные утилиты типа Google Authenticator.
Альтернативные ссылки преодолевают вопросы territorial ограничений и DDoS-assault. По сути mirrors формируют дублированные dublicates центрального сайта с обеспечением функциональности и пользовательских параметров.
Профессиональные участники рекомендуют удерживать свежие базы working копий в закладках обозревателя. Администрация направляют сведения о свежих ссылках через e-mail, Telegram-сообщества и смартфонные программы.
Payment операции через legal порталы защищены криптографическими алгоритмами класса банковского segment. Снятие фондов происходит solely на верифицированные реквизиты собственника профиля.
Browse Tiny Harbor – Some fantastic bargains, adding it to bookmarks right away.
Азартная отрасль отображает активный прогресс, манящая тысячи игроков. Профессиональные порталы дают стабильную пространство для пари. Детальную факты о указанных организациях допустимо найти на п»ї1хбет казино .
Аттестация представляет главным фактором выбора ресурса. Лицензиаты Мальты обеспечивают жёсткий аудит валютных транзакций. Конкретная официальная платформа подвергается плановые аудиты RNG-механизмов.
Программные свойства современных беттинг-платформ предусматривают SSL-безопасность банковского ранга. Поставщики компьютерного материала типа Microgaming, NetEnt, Pragmatic Play подключают усовершенствованные модели рандомных величин.
Процедура подтверждения личного кабинета требует предоставления справок KYC-формата. Паспорт, справка о финансах, подтверждение местожительства — обычный пакет для завершённого активации.
Параллельные ссылки ликвидируют препятствия с ограничениями операторов. Функционирующие варианты изменяются систематически IT группами. Мобильные софт регулярно действуют лучше интернет версий.
Контроль средств задаёт стратегическую успешность игровых периодов. Опытные игроки настаивают ограничивать сумму пари до 1-2% от итогового фонда.
stromectol without prescription: Ivermectin Access USA – stromectol 12mg
Исследование в сфере сертифицированных сайтов включает понимания продвинутых методов подключения. Продвинутые пользователи задействуют РјСЌРґ казино для получения современной материалов о оперативных путях.
Схема регистрации аккаунта в проверенных организациях предполагает комплексную валидацию. Продвинутые поставщики эксплуатируют KYC-системы и AML-правила. Документальная процедура занимает от 24 до 72 промежутков.
Технические технологии для минования запретов эволюционируют параллельно с интенсификацией юридических шагов. VPN-инструменты разряда premium предлагают безопасность AES-256 и технологии OpenVPN. Непрерывность соединения fundamentally актуальна для VIP заходов.
Зеркальные сайты выполняют задачи через географически расположенные серверные кластеры. CDN-архитектуры поддерживают оптимальную отклик для глобальных геймеров. Техническое маршрутизация активируется при выявлении препятствия основного адреса.
Финансовые операции в легальных регионах соответствуют строгим критериям PCI DSS. Криптовалютные платежи приобретают признание по причине секретности и скорости процессинга.
Переносные софт топовых провайдеров содержат лицевую авторизацию и push-уведомления для существенных событий. Гибкий оформление автоматически подстраивается под свойства дисплея.
Silver Vendor Online – Completing my order was simple and very straightforward today.
Good afternoon!
Protect heritage with interesting mysterious data holding valuable tradition keys and honor your ancestors see on the website for heritage sites
Full information on the link – https://101flow.site
All the best and development in business!
https://uspharmaindex.com/# US Pharma Index
Hello!
Master the art of finding interesting mysterious gems of valuable wisdom right now and elevate your personal development see on the website for exclusive masterclasses
Full information on the link – https://101flow.site
All the best and development in business!
Актуальные провайдеры игорных услуг обеспечивают беттерам подключение к профессиональному игровому процессу через надежные п»ї1хбет официальный сайт платформы. Легальная деятельность требует исполнения определенных регуляторных стандартов.
Система оформления персонального кабинета задействует проверку персональных данных. Управляющие применяют комплексные процедуры KYC и AML для пресечения фродовых финансовых действий.
Технические решения современных беттинг площадок базируются на надежных облачных системах с HTTPS протоколами. Территориальные ограничения обязывает владельцев запускать параллельные ссылки.
Параллельные домены формируют полные репликации главного домена с обеспечением всех функций и сведений. Пользователи получают постоянный соединение к средствам, игровой статистике и личным опциям.
Банковские транзакции проходят через связанные денежные системы. Лимиты на пополнения и получения фиксируются в унисон с правовыми требованиями и организационными регламентами снижения потерь.
Профессиональные гемблеры настаивают отслеживать статус сертификата через официальные реестры развлекательных комиссий. Авторитетные параметры задействуют ранги на тематических порталах и отзывы подлинных клиентов.
Активные дублирующие порталы легальных азартных клубов на п»ї1хбет зеркало дают стабильный коннект к азартным платформам. Технология реплицирования генерирует аналогичные клоны основного веб-площадки с поддержанием всех возможностей.
Алгоритм открытия счета через зеркало абсолютно повторяет базовую бланк. Свежие геймеры заполняют активный email, формируют защищенный пароль и устанавливают основную финансовый инструмент.
Аутентификация профиля требует предоставления свидетельств согласно KYC-требованиям. Скан национального документа, доказательство резиденции и карточные сведения проходят цифровую анализ в течение 24-72 периодов.
Аутентификация зарегистрированных игроков реализуется через классическую панель с многоступенчатой проверкой. Временные ключи приходят на сотовый устройство или мейл.
Опции финансового раздела через резервные ссылки поддерживает популярные банковские платформы. Visa, Mastercard, веб кошельки Skrill, Neteller, блокчейн-токены Bitcoin, Ethereum выполняются с низкими платежами 0-3%.
Азартная ассортимент воспроизводится в точности включая слоты, классические игры, live-хостов и накопительные призы. RTP-индикаторы, вариативность и ставочные требования поддерживаются точными.
Акционная механизм оперирует идентично базовому домену. Welcome-наборы, безвозмездные спины, компенсация и VIP-планы инициируются машинально при исполнении определенных стандартов.
For publications
fast poor credit loans
for immediate implementation.
Discover Willowvend – Very tidy layout and navigating the site is straightforward.
I’ve got to share this story about an Italian guy I know, for
privacy, I’ll refer to him as Lorenzo. He wasn’t
a crypto enthusiast at first, but circumstances
forced him into that world. His business in Italy relies heavily on international clients, and
fees, delays, and complications were driving him insane.
Everything went south one stressful afternoon. His business nearly froze because
a payment didn’t go through, and he was left on the phone for hours trying to fix the mess.
He told me it felt like everything he built was slipping away.
Clients got nervous, and he realized banking couldn’t keep being the bottleneck.
In the middle of all this chaos he discovered Paybis,
and he was skeptical at first. Still, he had no other option left.
He finally gave the platform a chance.
He immediately noticed how organized the platform felt.
Everything was explained clearly and simply. He could finally convert and transfer funds without drowning in paperwork.
He later told me the relief was unbelievable.
But the story doesn’t end here. When his bank finally
“found” the missing transfer, it was already too late — Paybis had
saved his operations. He admitted that this crisis was
a turning point for him.
Today, he uses Paybis whenever his business needs fast, clean, and predictable transactions.
He doesn’t talk like a crypto fanboy — he talks like someone who lived through
a disaster and found a tool that actually worked.
So yes — Paybis accomplished exactly what he needed.
Передовые провайдеры игорных продуктов дают беттерам возможность к высококлассному гемблингу через надежные казино Либет ресурсы. Сертифицированная функционирование требует выполнения конкретных правовых критериев.
Процесс создания персонального счета содержит проверку индивидуальных данных. Управляющие применяют расширенные механизмы KYC и AML для исключения фродовых транзакций.
Технические инструменты передовых беттинг площадок функционируют на надежных серверах с SSL технологиями. Территориальные ограничения принуждает операторов создавать вспомогательные адреса.
Альтернативные домены образуют эквивалентные репликации первичного портала с удержанием всех возможностей и сведений. Пользователи добиваются непрерывный соединение к депозиту, беттинг данным и индивидуальным установкам.
Денежные операции проходят через встроенные банковские процессоры. Пределы на пополнения и обналичивания определяются в согласии с законодательными критериями и корпоративными регламентами риск-менеджмента.
Квалифицированные пользователи рекомендуют отслеживать статус лицензии через надзорные списки беттинг структур. Престижные параметры задействуют оценки на специализированных сервисах и оценки реальных беттеров.
https://cc-msk.ru/user/comyazbpve
check this https://letsexchange.cc
Рабочие mirror-ссылки проверенных казино на Голд казино создают непрерывный вход к геймерским платформам. Система реплицирования строит точные версии центрального сайта с поддержанием всех механизмов.
Схема открытия счета через резервную ссылку целиком имитирует базовую заявку. Новые клиенты вводят активный email, генерируют безопасный пароль и назначают основную платежное средство.
Валидация счета включает предоставления справок согласно KYC-нормам. Скан национального документа, верификация адреса и платежные реквизиты проверяются через программную контроль в течение 24-72 временных единиц.
Логин существующих участников реализуется через типовую интерфейс с расширенной верификацией. Временные токены доставляются на мессенджер девайс или email.
Возможности финансового модуля через mirror-сайты предлагает топовые расчетные системы. Visa, Mastercard, веб счета Skrill, Neteller, crypto Bitcoin, Ethereum осуществляются с низкими сборами 0-3%.
Азартная ассортимент воспроизводится абсолютно включая барабаны, столовые игры, live-крупье и мегавыигрыши. RTP-показатели, волатильность и отыгрыш удерживаются идентичными.
Бонусная программа действует похоже главному ресурсу. Welcome-наборы, безвозмездные спины, денежный возврат и VIP-курсы активируются системно при исполнении определенных критериев.
The Zen Spot – Shopping here has been really fluid and straightforward lately.
Brisk Harbor Online Picks – Fast delivery combined with a smooth checkout made the experience excellent.
Urbanparcel Shopping – Smooth layout and the products seem worth checking out.
Беттинговая сфера представляет динамичный развитие, заинтересовывая легионы клиентов. Профессиональные порталы предлагают качественную обстановку для развлечений. Подробную факты о подобных операторах реально изучить на п»ї1хбет казино .
Сертификация остаётся центральным фактором выбора сайта. Регуляторы Мальты гарантируют жёсткий надзор валютных действий. Конкретная сертифицированная сайт проходит плановые контроли RNG-генераторов.
IT характеристики актуальных игорных домов включают SSL-кодирование расчётного уровня. Создатели компьютерного обеспечения класса Microgaming, NetEnt, Pragmatic Play интегрируют комплексные системы рандомных чисел.
Схема валидации профиля требует подачи бумаг KYC-уровня. ID, документ о заработке, доказательство адреса — классический набор для полноценного авторизации.
Параллельные ссылки устраняют препятствия с блокировками операторов. Рабочие зеркала модифицируются каждый день программными командами. Мобильные утилиты зачастую действуют стабильнее интернет редакций.
Распределение капитала задаёт стратегическую успешность игровых периодов. Грамотные геймеры советуют урезать величину депозита до 1-2% от итогового резерва.
Ориентирование в секторе легальных сайтов требует представления новых решений авторизации. Продвинутые участники внедряют казино Лаки Бир для добывания актуальной фактов о активных доменах.
Схема формирования счета в лицензированных компаниях включает детальную подтверждение. Современные операторы используют KYC-протоколы и AML-нормы. Бумажная работа отнимает от 24 до 72 часов.
Компьютерные методы для прохождения блокировок развиваются синхронно с повышением правовых действий. VPN-платформы уровня premium обеспечивают безопасность AES-256 и системы OpenVPN. Постоянство связи fundamentally актуальна для VIP раундов.
Зеркальные домены выполняют задачи через регионально расположенные технические инфраструктуры. CDN-структуры осуществляют оптимальную латентность для американских пользователей. Автоматическое редирект активируется при детекции блокировки базового портала.
Платежные переводы в сертифицированных зонах подпадают под четким критериям PCI DSS. Блокчейн расчеты приобретают распространение вследствие конфиденциальности и скорости реализации.
Переносные приложения элитных операторов объединяют биометрическую авторизацию и push-алерты для важных моментов. Гибкий облик автономно настраивается под настройки экрана.
https://aisharvgf042256.pointblog.net/amphetamine-s-effects-of-amphetamine-salts-90599989
Надёжные провайдеры игровых опций предоставляют клиентам доступ к премиальному времяпрепровождению через целевые домены, включая лаки Р±РёСЂ казино , которые специально следуют глобальные регламенты надёжности.
Процедура оформления профиля включает указания валидационных параметров через безопасные SSL-каналы. Провайдеры просят предоставить письменное доказательство совершеннолетия и места жительства для соблюдения юрисдикционных требований.
Двухэтапная проверка представляет необходимым частью новейших систем конфиденциальности. Участники располагают SMS-коды, push-сообщения или эксплуатируют специальные tools в стиле Google Authenticator.
Резервные URL устраняют проблемы географических санкций и DDoS-assault. Фактически mirrors формируют дублированные dublicates центрального платформы с maintaining возможностей и пользовательских деталей.
Компетентные участники советуют хранить свежие списки working дублей в избранном веб-клиента. Администрация рассылают информацию о свежих URL через почтовые сервисы, Telegram-communities и смартфонные софт.
Payment транзакции через надёжные сайты secured криптографическими алгоритмами level банковского индустрии. Снятие фондов реализуется единственно на аутентифицированные данные владельца account.
Dressing stylish creates a strong first impression.
Your outfit speaks volumes before you actually say a word.
It boosts your personal self-esteem and mindset significantly.
Your polished appearance signals professionalism in the workplace.
https://bookmarks.mvmedia.ru/lNe5ub6d8T3J/
Fashionable choices allow you to express your individual personality.
People often judge well-dressed individuals as more capable and reliable.
Ultimately, putting effort in your wardrobe is an investment in yourself.
Выбор проверенного азартного ресурса подразумевает серьезного изучения официальных бумаг. Новые порталы аква казино обеспечивают игрокам полную данные о собственных лицензиях.
Процедура открытия аккаунта содержит определенное количество требуемых фаз подтверждения. Представители требуют бумаги, устанавливающие самобытность и правоспособность. Традиционный KYC-механизм составляет от 24 до 72 временных отрезков.
Контроль средств открывается с задания границ на депозиты. Профессиональные пользователи предлагают задействовать правило 5% от совокупного казино средств на единичную партию.
Цифровые барьеры провайдеров обязывают внедрять запасные ссылки. Альтернативы поддерживают абсолютную функциональность первичного платформы, подразумевая хронологию транзакций и гемблинг результаты.
Современные платежные системы обеспечивают оперативные взносы через блокчейн хранилища. Bitcoin, Ethereum и фиксированные активы обеспечивают анонимность и наименьшие отчисления. Период реализации снятий доходит 10-30 периодов.
Программы верности охватывают градационные степени с прогрессивным возвратом. VIP-координаторы гарантируют персонализированные поощрения, увеличенные лимиты и преимущественную сервис.
visit the site https://daobase.io/
Rackora Online Shop – The variety impressed me and browsing feels seamless.
https://ivermectinaccessusa.shop/# ivermectin canada
Новейшие операторы гемблинг игр обеспечивают беттерам подключение к элитному игровому процессу через защищенные Меллстрой зеркало ресурсы. Авторизованная деятельность подразумевает учета конкретных надзорных стандартов.
Алгоритм активации игрового учетной записи включает подтверждение конфиденциальных реквизитов. Операторы используют многоуровневые процедуры KYC и AML для предотвращения нарушающих операций.
IT инструменты новейших гемблинг платформ основываются на надежных дата-центрах с криптографическими протоколами. Геоблокировка обязывает управляющих организовывать альтернативные порталы.
Резервные порталы составляют эквивалентные репликации первичного сайта с поддержанием всех возможностей и сведений. Пользователи добиваются постоянный подключение к счету, беттинг данным и пользовательским опциям.
Платежные действия производятся через связанные финансовые шлюзы. Пределы на взносы и изъятия назначаются в соотношении с законодательными требованиями и собственными политиками минимизации опасностей.
Компетентные гемблеры советуют отслеживать статус авторизации через официальные каталоги гемблинг ведомств. Репутационные критерии предусматривают рейтинги на отраслевых сайтах и мнения истинных игроков.
Передовые пользователи имеют дело с набором системных нюансов при работе с официальными ресурсами. Специализированные сайты типа Меллстрой сайт поставляют новую контент о процессах казино операторов.
Алгоритм подтверждения аккаунта содержит комплекс принудительных стадий. Исходная верификация нуждается передачи справок верифицирующих гражданство. Типовой перечень включает ID, водительские права или загранпаспорт.
Техническая составляющая создания аккаунта охватывает применение безопасного соединения и многофакторной защиты. Продвинутые участники советуют активировать все возможных функций безопасности.
Зеркала являются полные отражения основного ресурса с сохранением комплексного арсенала. Важнейшее преимущество состоит в соответствии финансовых пределов и условий проигрыша.
Процедура выявления действующих альтернативных адресов опирается на контроле профильных новостных лент и союзных порталов. Опытные клиенты задействуют туннельные протоколы для создания надежного доступа безотносительно от территориальных запретов.
view publisher site https://tornadocash.app/
Отбор легального азартного ресурса заставляет глубокого рассмотрения лицензионных свидетельств. Новые платформы казино ретро гарантируют пользователям стопроцентную сведения о имеющихся допусках.
Система оформления счета подразумевает множество обязательных ступеней подтверждения. Администраторы запрашивают свидетельства, подтверждающие индивидуальность и зрелость. Обычный KYC-порядок длится от 24 до 72 промежутков.
Финансовое планирование открывается с назначения лимитов на взносы. Опытные участники рекомендуют внедрять норму 5% от общего азартного резерва на отдельную раунд.
Технические препятствия владельцев вынуждают внедрять дополнительные пути. Клоны сохраняют стопроцентную функциональность центрального сайта, содержа летопись переводов и казино продвижение.
Передовые денежные сервисы обеспечивают оперативные пополнения через цифровые кошельки. Bitcoin, Ethereum и стабильные валюты обеспечивают конфиденциальность и минимальные сборы. Период выполнения получений достигает 10-30 промежутков.
Схемы постоянства включают многоуровневые статусы с накапливающимся возвратом. VIP-менеджеры предоставляют уникальные поощрения, улучшенные пределы и преимущественную поддержку.
Функционирующие дублирующие порталы надежных гемблинг-платформ на казино Меллстрой гарантируют стабильный коннект к геймерским системам. Принцип зеркалирования генерирует аналогичные версии главного ресурса с фиксацией всех опций.
Алгоритм активации через альтернативный домен на сто процентов дублирует основную шаблон. Свежие пользователи указывают действующий email, придумывают сложный ключ и фиксируют рабочую денежную единицу.
Идентификация профиля содержит представления документов следуя KYC-требованиям. Фото паспорта, верификация резиденции и карточные параметры проверяются через алгоритмическую контроль в течение 24-72 временных единиц.
Логин существующих игроков происходит через классическую форму с расширенной верификацией. Временные ключи отправляются на смс номер или мейл.
Функционал финансового сектора через mirror-сайты включает распространенные банковские инструменты. Visa, Mastercard, виртуальные хранилища Skrill, Neteller, криптовалюты Bitcoin, Ethereum выполняются с уменьшенными комиссиями 0-3%.
Гемблинг каталог клонируется в точности включая слоты, карточные игры, live-ведущих и максимальные награды. RTP-показатели, вариативность и проигрыш остаются аналогичными.
Бонусная механизм работает похоже корневому порталу. Welcome-пакеты, бесплатные вращения, денежный возврат и VIP-программы стартуют программно при исполнении заданных параметров.
Рабочие резервные адреса официальных гемблинг-платформ на Vavada casino дают постоянный коннект к геймерским сервисам. Технология зеркалирования образует эквивалентные дубликаты корневого портала с сохранением всех опций.
Схема регистрации через mirror-сайт полностью повторяет главную шаблон. Только пришедшие геймеры вводят действующий email, формируют безопасный шифр и устанавливают основную финансовый инструмент.
Аутентификация счета предполагает представления документов опираясь на KYC-нормам. Фото удостоверения личности, свидетельство места жительства и карточные сведения контролируются системой машинную валидацию в течение 24-72 ч.
Подключение зарегистрированных клиентов осуществляется через типовую модуль с усиленной аутентификацией. Краткосрочные шифры отправляются на телефонный аппарат или e-mail адрес.
Функционал денежного компонента через альтернативные домены обеспечивает популярные платежные платформы. Visa, Mastercard, электронные балансы Skrill, Neteller, криптовалюты Bitcoin, Ethereum обрабатываются с низкими комиссиями 0-3%.
Гемблинг коллекция клонируется абсолютно включая spinning games, классические активности, live-дилеров и максимальные награды. RTP-значения, дисперсия и вейджер удерживаются аналогичными.
Подарочная схема действует похоже корневому сайту. Welcome-предложения, фриспины, refund и VIP-системы запускаются программно при достижении фиксированных критериев.
Современные клиенты пересекаются с набором системных тонкостей при работе с проверенными сайтами. Профильные ресурсы типа ретро РІС…РѕРґ дают актуальную контент о операциях азартных организаций.
Система подтверждения учетной записи предполагает ряд неотъемлемых уровней. Исходная верификация нуждается загрузки документов валидирующих гражданство. Обычный перечень предполагает удостоверение личности, лицензию водителя или заграничное удостоверение.
Программная компонента записления охватывает внедрение безопасного соединения и многофакторной защиты. Продвинутые геймеры рекомендуют задействовать все имеющихся опций обеспечения.
Дублирующие порталы составляют полные отражения основного ресурса с обеспечением полного функционала. Основное достоинство кроется в схожести финансовых ограничений и требований условий прокрутки.
Процедура локализации рабочих альтернативных адресов фундируется на контроле профильных телеграм-каналов и союзных порталов. Экспертные игроки задействуют анонимайзеры для создания стабильного доступа безотносительно от локальных ограничений.
Ориентирование в сфере лицензированных платформ включает знания передовых технологий входа. Продвинутые пользователи эксплуатируют п»ї1хбет зеркало для приобретения новейшей фактов о действующих URL.
Алгоритм создания профиля в надежных заведениях охватывает детальную аутентификацию. Передовые операторы внедряют KYC-системы и AML-критерии. Документальная процедура потребляет от 24 до 72 часов.
Цифровые способы для минования блокировок прогрессируют вместе с укреплением юридических шагов. VPN-сервисы класса premium обеспечивают защиту AES-256 и стандарты OpenVPN. Стабильность подключения принципиально актуальна для элитных партий.
Запасные платформы действуют через географически разнесенные технические мощности. CDN-структуры обеспечивают минимальную пинг для глобальных клиентов. Системное редирект срабатывает при обнаружении блокировки центрального портала.
Банковские манипуляции в легальных областях следуют жестким стандартам PCI DSS. Криптовалютные переводы завоевывают популярность по причине анонимности и темпу обработки.
Мобильные клиенты премиальных брендов содержат лицевую аутентификацию и push-сообщения для существенных ситуаций. Настраиваемый интерфейс автономно настраивается под особенности монитора.
Новейшие гемблеры натыкаются с барьером подключения к лицензированным сайтам. Компании фильтруют основные адреса, но грамотные Lucky Bear клиенты учитывают о существовании параллельных платформ.
Зеркало составляет стопроцентную отображение первичного портала. Протоколы шифрования остаются такими же. Денежные переводы осуществляются через равнозначные каналы.
Схема оформления профиля через зеркальный ссылку содержит стандартной подтверждения. Администраторы уточняют справки для соблюдения KYC-норм. Персональные информация выполняют многоуровневую аутентификацию.
Пополнительные лимиты на параллельных порталах совпадают главным спецификациям. Наименьшие взносы остаются константными. Увеличивающиеся призовые фонды интегрируются между всеми ссылками.
Льготные механизмы действуют целостно на резервных порталах. Коэффициент оборота обеспечивает первоначальные значения. Период действия использования поддерживается.
Служба помощи решает заявки с альтернативных доменов идентично. Мгновенный переписка гарантирует непрерывный порядок оперирования.
Передовые бетторы оказываются с проблемой доступа к легальным платформам. Поставщики ограничивают стандартные домены, но знающие Болливуд казино клиенты учитывают о существовании дублирующих сайтов.
Резервная ссылка является стопроцентную копию главного ресурса. Системы безопасности сохраняются аналогичными. Финансовые операции выполняются через аналогичные каналы.
Схема регистрации через дополнительный ресурс содержит привычной аутентификации. Специалисты требуют бумаги для осуществления KYC-требований. Индивидуальные сведения реализуют комплексную аутентификацию.
Банковские границы на зеркальных площадках идентичны главным спецификациям. Низшие вклады остаются постоянными. Возрастающие выигрышные пулы координируются между множественными ссылками.
Стимулирующие планы выполняются полноценно на параллельных площадках. Множитель ставок сохраняет первоначальные величины. Срок активности реализации продолжается.
Команда обслуживания обрабатывает заявки с параллельных адресов идентично. Мгновенный диалог гарантирует 24-часовой порядок оперирования.
Hello everyone!
Discover flight mysterious routes offering interesting and valuable transit insights and fly smarter not harder see on the website for route planners
Full information on the link – https://101flow.site
All the best and development in business!
Передовые участники пересекаются с набором технических тонкостей при операциях с проверенными порталами. Экспертные источники типа казино mad дают свежую материалы о деятельности гэмблинговых операторов.
Механизм аутентификации кабинета включает набор неотъемлемых стадий. Исходная проверка нуждается предоставления документов удостоверяющих персону. Привычный пакет включает удостоверение личности, водительские права или внешний паспорт.
Системная сторона открытия счета охватывает эксплуатацию зашифрованного канала и двухфакторной аутентификации. Продвинутые клиенты предлагают инициировать совокупность имеющихся параметров секьюрити.
Альтернативные адреса являются стопроцентные реплики главного платформы с поддержанием комплексного арсенала. Главное достоинство кроется в тождественности расчетных границ и условий проигрыша.
Система выявления активных зеркал строится на наблюдении профильных новостных лент и связанных платформ. Продвинутые геймеры эксплуатируют VPN-сервисы для обеспечения устойчивого подключения вне зависимости от географических блокировок.
ivermectin oral solution: ivermectin 3 mg tablet dosage – Ivermectin Access USA
try this website https://daobase.info/
Актуальные зеркала легальных казино на Меллстрой дают устойчивый соединение к азартным платформам. Технология зеркалирования создает аналогичные клоны корневого веб-площадки с сохранением всех опций.
Алгоритм оформления профиля через резервную ссылку на сто процентов имитирует базовую бланк. Начинающие геймеры регистрируют функционирующий email, формируют стойкий ключ и назначают игровую валюту.
Валидация профиля включает загрузки удостоверений следуя KYC-требованиям. Копия национального документа, валидация адреса и банковские координаты подвергаются цифровую анализ в течение 24-72 периодов.
Аутентификация существующих клиентов производится через базовую панель с расширенной валидацией. Временные шифры доставляются на сотовый номер или почтовый ящик.
Опции пополнительного компонента через дублирующие порталы включает распространенные денежные инструменты. Visa, Mastercard, веб балансы Skrill, Neteller, виртуальные монеты Bitcoin, Ethereum процессируются с низкими процентами 0-3%.
Игровая каталог воспроизводится целиком включая spinning games, традиционные забавы, live-ведущих и джекпоты. RTP-показатели, изменчивость и ставочные требования поддерживаются идентичными.
Подарочная схема работает схоже центральному домену. Welcome-предложения, безвозмездные спины, денежный возврат и VIP-программы запускаются программно при исполнении заданных требований.
Выбор достойного азартного портала в нынешних условиях подразумевает детального внимания к регулятивному статусу. Профессиональные геймеры знают, что Вавада казино содержит актуальную факты о работающих провайдерах.
Процедура открытия счета в сертифицированных платформах включает неизбежную подтверждение удостоверения. KYC-стандарты защищают как оператора, так и участника от афер. Промежуточные рамки на вывод денег до окончания подтверждения – привычная практика.
Цифровые барьеры на соединение к развлекательным сервисам решаются через резервные порталы. Рабочие клоны поддерживают полную возможности базового сервиса. Денежные операции, азартный достижения и наградные системы продолжают стабильными.
Финансовая надежность оценивается степенью применяемых платежных методов. SSL-криптография, PCI DSS валидация и расширенная верификация формируют защищенный щит обороны.
Игровая каталог легальных операторов объединяет спины от ведущих студий. RTP-значения, вариативность и вероятностные системы проходят беспристрастную контроль в авторизованных лабораториях.
Программы стимулирования в серьезных казино основываются на четких требованиях вейджера. Условия ставок x35-40 признается разумным для барабан-льгот, в то время как традиционные развлечения включаются в счет с редуцированным множителем.
Oak Vendor Selections – Fast loading pages and a clear structure make shopping easy.
Ich bin froh, dass Jan auch die Verantwortung
beim Spielen thematisiert. Auf Glucksspielauswahl finde ich Casinos mit guten Limitierungsmöglichkeiten.
JetStreamMart offers – Shopping here is smooth, relaxing, and very enjoyable.
Отбор надежного игрового ресурса в нынешних реалиях предполагает детального анализа к юридическому состоянию. Знающие игроки знают, что Вавада зеркало включает актуальную материалы о активных провайдерах.
Процесс оформления профиля в лицензированных операторах содержит принудительную подтверждение персональных данных. KYC-процедуры гарантируют как казино, так и игрока от фрода. Кратковременные пределы на вывод средств до финализации подтверждения – стандартная подход.
Виртуальные барьеры на доступ к игровым площадкам обходятся через резервные домены. Рабочие клоны гарантируют тотальную производительность главного сервиса. Финансовые движения, интерактивный статистика и поощрительные предложения поддерживаются устойчивыми.
Финансовая стабильность характеризуется качеством задействованных финансовых способов. SSL-криптография, PCI DSS подтверждение и многоуровневая проверка создают безопасный контур ограждения.
Азартная библиотека сертифицированных операторов охватывает барабаны от топовых создателей. RTP-коэффициенты, вариативность и статистические схемы испытывают беспристрастную контроль в признанных учреждениях.
Схемы поощрения в качественных заведениях опираются на четких условиях активности. Требования x35-40 признается приемлемым для барабан-бонусов, в то время как классические активности включаются в калькуляцию с сниженным коэффициентом.
Функционирующие альтернативные домены надежных гемблинг-платформ на Меллстрой регистрация дают непрерывный соединение к игровым системам. Система клонирования образует идентичные реплики центрального портала с сохранением всех возможностей.
Схема активации через дублирующий портал целиком воспроизводит главную шаблон. Начинающие участники вводят валидный email, создают защищенный пароль и назначают операционную курренси.
Идентификация учетной записи подразумевает отправки удостоверений следуя KYC-стандартам. Снимок национального документа, доказательство резиденции и финансовые реквизиты анализируются посредством автоматическую контроль в течение 24-72 временных единиц.
Вход верифицированных геймеров осуществляется через классическую окно с усиленной проверкой. Сессионные шифры передаются на смс девайс или email.
Механизмы денежного раздела через альтернативные домены поддерживает популярные платежные инструменты. Visa, Mastercard, онлайн кошельки Skrill, Neteller, криптовалюты Bitcoin, Ethereum реализуются с низкими процентами 0-3%.
Gaming коллекция воспроизводится абсолютно включая spinning games, классические развлечения, live-хостов и максимальные награды. RTP-значения, изменчивость и условия отыгрыша остаются аналогичными.
Акционная механизм функционирует схоже основному веб-площадке. Welcome-бандлы, free spins, денежный возврат и VIP-системы активируются программно при выполнении фиксированных требований.
Выбор достойного гемблинг оператора в актуальных реалиях нуждается повышенного подхода к законному уровню. Квалифицированные геймеры учитывают, что Голд казино содержит свежую информацию о работающих сервисах.
Механизм открытия счета в официальных площадках объединяет обязательную верификацию персональных данных. KYC-нормы оберегают как площадку, так и участника от фрода. Переходные границы на получение капитала до финализации валидации – стандартная методика.
Виртуальные препятствия на доступ к гемблинг порталам решаются через дублирующие адреса. Доступные дубликаты предоставляют тотальную функциональность основного ресурса. Банковские движения, интерактивный статистика и поощрительные системы функционируют стабильными.
Материальная гарантированность определяется качеством применяемых финансовых механизмов. SSL-криптография, PCI DSS лицензирование и дополнительная аутентификация формируют прочный контур безопасности.
Азартная библиотека официальных провайдеров охватывает барабаны от главных провайдеров. RTP-коэффициенты, волатильность и расчетные системы подвергаются объективную сертификацию в аккредитованных лабораториях.
Механизмы мотивации в надежных сервисах строятся на прозрачных критериях ставок. Вейджер x35-40 характеризуется разумным для автомат-льгот, в то время как настольные развлечения идут в расчет с минимальным фактором.
Отбор проверенного гемблинг портала в сегодняшних обстоятельствах заставляет детального внимания к лицензионному статусу. Опытные игроки знают, что лаки Р±РёСЂ казино официальный сайт содержит свежую сведения о функционирующих провайдерах.
Схема записи в сертифицированных платформах объединяет неизбежную аутентификацию идентичности. KYC-требования охраняют как казино, так и геймера от махинаций. Кратковременные границы на изъятие средств до выполнения проверки – обычная процедура.
Виртуальные барьеры на связь к игровым порталам обходятся через альтернативные ссылки. Доступные дубликаты поддерживают стопроцентную работоспособность главного портала. Денежные операции, геймплейный прогресс и поощрительные схемы остаются константными.
Капитальная защищенность выражается качеством задействованных расчетных систем. SSL-кодирование, PCI DSS валидация и усиленная верификация обеспечивают стабильный щит безопасности.
Развлекательная ассортимент проверенных сервисов содержит машины от известных создателей. RTP-коэффициенты, вариативность и вероятностные формулы испытывают нейтральную сертификацию в авторизованных центрах.
Системы вознаграждения в профессиональных сервисах строятся на четких требованиях отыгрыша. Условия ставок x35-40 оценивается справедливым для слот-поощрений, в то время как стандартные состязания учитываются в расчет с редуцированным фактором.
Hello everyone!
Protect heart with interesting mysterious data holding valuable emotional keys and heal your inner wounds see on the website for emotional healing
Full information on the link – https://101flow.site
All the best and development in business!
Стильный внешний вид формирует сильное впечатление о человеке.
Ваш образ работает на оценку вас коллегами мгновенно.
Хорошее самочувствие в своем образе повышает личную уверенность.
Он демонстрирует высокий стандарт ответственности и внимание к деталям.
https://n5.sneakero.ru/n5O50fCsSuWl/
Посредством гардероб вы имеете шанс проявить свою индивидуальность и вкус.
Люди неосознанно воспринимают опрятных индивидов как более компетентных.
Поэтому, вложения в свой образ — это инвестиции в свое будущее.
Беттинговая сфера демонстрирует динамичный рост, притягивая легионы участников. Профессиональные ресурсы обеспечивают надёжную среду для беттинга. Полную факты о подобных брендах доступно получить на Вавада зеркало .
Сертификация остаётся ключевым аспектом определения платформы. Лицензиаты Гибралтара создают тщательный аудит финансовых процедур. Любая официальная площадка осуществляет систематические проверки RNG-механизмов.
Компьютерные аспекты новейших игорных домов охватывают SSL-безопасность экономического стандарта. Производители виртуального ПО уровня Microgaming, NetEnt, Pragmatic Play интегрируют многоуровневые модели случайных параметров.
Процедура верификации профиля требует предоставления справок KYC-класса. Свидетельство, подтверждение о финансах, валидация местожительства — типичный комплект для финального входа.
Параллельные URL исправляют барьеры с блокировками операторов. Актуальные дубли корректируются ежедневно техническими отделами. Смартфонные софт обычно функционируют устойчивее браузерных версий.
Контроль средств формирует длительную прибыльность азартных периодов. Опытные игроки настаивают сокращать количество пари до 1-2% от совокупного капитала.
Беттинговая область демонстрирует стремительный рост, манящая легионы геймеров. Грамотные площадки дают безопасную обстановку для игры. Детальную информацию о подобных провайдерах реально найти на Лаки Бир регистрация .
Аттестация является ключевым аспектом селекции платформы. Контролёры Великобритании гарантируют жёсткий проверку финансовых действий. Каждая аккредитованная ресурс осуществляет систематические инспекции RNG-модулей.
Компьютерные особенности современных азартных площадок включают SSL-шифрование финансового класса. Производители компьютерного софта наподобие Microgaming, NetEnt, Pragmatic Play добавляют многоуровневые алгоритмы хаотичных величин.
Процесс аутентификации аккаунта требует подачи свидетельств KYC-класса. ID, справка о прибылях, удостоверение прописки — классический набор для завершённого доступа.
Параллельные домены устраняют проблемы с цензурой поставщиков. Функционирующие альтернативы адаптируются регулярно цифровыми отделами. Смартфонные программы регулярно оперируют надёжнее интернет версий.
Распределение капитала определяет долгосрочную результативность гемблинговых сессий. Экспертные пользователи рекомендуют сокращать сумму депозита до 1-2% от совокупного бюджета.
Indigo Aisle marketplace – Browsing felt effortless and I’m already planning my next visit.
Функционирующие дублирующие порталы легальных игорных заведений на винити казино предоставляют устойчивый вход к геймерским платформам. Система зеркалирования генерирует полноценные дубликаты базового сайта с сохранением всех опций.
Механизм открытия счета через зеркало полностью повторяет оригинальную заявку. Дебютные геймеры заполняют действующий email, придумывают защищенный секретную комбинацию и назначают основную курренси.
Подтверждение личного кабинета содержит передачи документов по KYC-требованиям. Изображение национального документа, верификация проживания и банковские параметры контролируются системой алгоритмическую контроль в течение 24-72 часа.
Логин зарегистрированных игроков происходит через стандартную модуль с двухфакторной валидацией. Временные коды доставляются на сотовый аппарат или почтовый ящик.
Механизмы финансового блока через дублирующие порталы предлагает востребованные банковские сервисы. Visa, Mastercard, цифровые балансы Skrill, Neteller, криптовалюты Bitcoin, Ethereum осуществляются с оптимизированными комиссиями 0-3%.
Gaming коллекция копируется на сто процентов включая слоты, традиционные забавы, live-хостов и прогрессивы. RTP-коэффициенты, колебания и вейджер удерживаются аналогичными.
Акционная политика оперирует идентично основному домену. Welcome-пакеты, безвозмездные спины, возврат средств и VIP-системы инициируются системно при достижении заданных требований.
Нынешние игроки встречаются с изобилием цифровых аспектов при процессах с легальными сайтами. Профессиональные порталы типа СЂР° казино предоставляют релевантную информацию о работе казино компаний.
Алгоритм валидации профиля подразумевает комплекс принудительных этапов. Базовая подтверждение предполагает предоставления свидетельств подтверждающих субъект. Привычный комплект включает свидетельство, водительские права или международный паспорт.
Системная составляющая записления включает применение зашифрованного канала и двухуровневой проверки. Профессиональные участники рекомендуют инициировать все возможных возможностей секьюрити.
Зеркала являются полные реплики основного сайта с хранением исчерпывающего арсенала. Главное выгода состоит в схожести денежных рамок и параметров условий прокрутки.
Механизм нахождения действующих дублирующих порталов базируется на контроле профессиональных уведомительных сервисов и аффилированных ресурсов. Квалифицированные геймеры внедряют прокси-соединения для формирования устойчивого входа независимо от географических лимитов.
Легальные площадки игровых возможностей гарантируют участникам доступ к элитному развлечениям через специализированные платформы, включая п»ї1xBet зеркало , которые выполняют transnational регламенты безопасности.
Алгоритм активации necessita внесения authentication информации через криптографические SSL-протоколы. Менеджмент просят предоставить официальное свидетельство возраста и места проживания для исполнения правовых требований.
Multi-factor аутентификация считается принудительным составляющей актуальных архитектур надёжности. Участники приобретают SMS-пароли, push-алерты или используют dedicated tools наподобие Google Authenticator.
Альтернативные URL устраняют препятствия региональных запретов и DDoS-воздействий. Техническим образом зеркала составляют аналогичные копии центрального сайта с удержанием функциональности и user деталей.
Опытные игроки предлагают сохранять актуальные реестры функционирующих mirrors в favourites веб-клиента. Management доставляют новости о актуальных порталах через почтовые сервисы, Telegram-сообщества и мобильные apps.
Финансовые переводы через официальные платформы защищены encryption системами level банковского индустрии. Extraction капитала реализуется solely на проверенные карты владельца аккаунта.
https://chessdatabase.science/wiki/Cdigo_promocional_de_verificacin_gratuita_1xBet_2026
Официальные площадки азартных предложений oferuja клиентам право к элитному времяпрепровождению через профильные порталы, включая казино Lucky Bear , что придерживаются мировые критерии надёжности.
Процедура активации включает ввода проверочных сведений через encrypted SSL-каналы. Менеджмент просят нотариальное доказательство правоспособности и локации регистрации для выполнения нормативных критериев.
Двухэтапная authentication представляет required элементом современных платформ надёжности. Игроки обретают SMS-токены, push-сообщения или внедряют специальные приложения по типу Google Authenticator.
Альтернативные домены нейтрализуют вопросы geographic санкций и DDoS-нападений. Техническим образом mirrors образуют копийные версии primary сайта с обеспечением возможностей и индивидуальных деталей.
Опытные геймеры рекомендуют удерживать новейшие базы действующих mirrors в favourites обозревателя. Операторы передают обновления о fresh URL через почтовые сервисы, Telegram-чаты и смартфонные программы.
Финансовые переводы через официальные платформы покрыты encryption methods категории банковского направления. Вывод средств реализуется единственно на validated карты владельца учётной записи.
Hi Dear, are you in fact visiting this website on a regular basis,
if so after that you will definitely get nice knowledge.
Ivermectin Access USA: stromectol for humans – ivermectin 1 topical cream
https://rfserial.online/user/gwyneybkeh
Современные порталы азартных услуг предоставляют игрокам вход к высококлассному развлечениям через безопасные Лаки Бир казино системы. Легальная операционная активность подразумевает учета строгих контролирующих критериев.
Процедура открытия индивидуального профиля содержит аутентификацию конфиденциальных данных. Операторы используют расширенные системы KYC и AML для пресечения фродовых операций.
Электронные системы современных развлекательных порталов основываются на надежных серверах с криптографическими алгоритмами. Геоблокировка побуждает управляющих разрабатывать дублирующие адреса.
Зеркальные порталы формируют аналогичные версии основного ресурса с обеспечением всех инструментов и сведений. Участники обеспечивают себе беспрепятственный вход к депозиту, беттинг истории и индивидуальным установкам.
Банковские процедуры осуществляются через синхронизированные расчетные шлюзы. Границы на депозиты и выводы регулируются в соотношении с регуляторными стандартами и организационными процедурами управления рисками.
Профессиональные игроки советуют контролировать ситуацию сертификата через официальные каталоги игорных ведомств. Статусные показатели содержат позиции на специализированных порталах и оценки подлинных клиентов.
Выбор безопасного игорного оператора требует тщательного анализа правовых документов. Актуальные платформы Меллстрой зеркало гарантируют геймерам максимальную информацию о имеющихся лицензиях.
Механизм открытия аккаунта подразумевает различные ключевых шагов валидации. Провайдеры требуют свидетельства, засвидетельствующие персону и совершеннолетие. Классический KYC-регламент длится от 24 до 72 интервалов.
Распоряжение капиталом инициируется с установления лимитов на депозиты. Опытные участники призывают внедрять закон 5% от общего игорного бюджета на одну сессию.
Электронные барьеры операторов побуждают эксплуатировать запасные маршруты. Клоны сохраняют стопроцентную функциональность центрального платформы, включая архив транзакций и гемблинг достижения.
Современные финансовые способы гарантируют оперативные пополнения через цифровые аккаунты. Bitcoin, Ethereum и постоянные токены поддерживают скрытность и мизерные сборы. Длительность обработки извлечений достигает 10-30 минут.
Планы постоянства охватывают ступенчатые степени с увеличивающимся вознаграждением. VIP-консультанты предоставляют личные бонусы, улучшенные лимиты и первоочередную поддержку.
https://ivermectinaccessusa.shop/# Ivermectin Access USA
Отбор безопасного развлекательного портала нуждается детального разбора лицензионных бумаг. Передовые ресурсы Голд казино предоставляют игрокам максимальную данные о текущих аккредитациях.
Система получения доступа предусматривает ряд требуемых ступеней валидации. Представители требуют документы, подтверждающие идентичность и возраст. Классический KYC-регламент требует от 24 до 72 периодов.
Контроль средств запускается с фиксации пределов на депозиты. Профессиональные игроки предлагают внедрять установку 5% от совокупного развлекательного средств на индивидуальную партию.
Цифровые барьеры администраторов заставляют внедрять вспомогательные пути. Клоны сохраняют абсолютную функциональность базового платформы, включая историю операций и игровой прогресс.
Актуальные платежные инструменты поддерживают оперативные взносы через криптовалютные аккаунты. Bitcoin, Ethereum и постоянные токены предоставляют тайность и мизерные платежи. Продолжительность выполнения снятий насчитывает 10-30 периодов.
Планы приверженности подразумевают каскадные категории с возрастающим кэшбэком. VIP-менеджеры предоставляют индивидуальные подарки, повышенные пределы и преимущественную помощь.
Нынешние геймеры встречаются с препятствием подключения к сертифицированным порталам. Провайдеры закрывают главные порталы, но опытные винити казино участники учитывают о наличии дублирующих платформ.
Дополнительный домен составляет полную воспроизведение основного платформы. Системы безопасности сохраняются аналогичными. Платёжные процедуры реализуются через сходные механизмы.
Схема регистрации через альтернативный домен содержит классической верификации. Менеджеры выясняют справки для осуществления KYC-регламентов. Индивидуальные характеристики проходят расширенную аутентификацию.
Депозитные границы на зеркальных порталах соответствуют первичным требованиям. Начальные взносы продолжают неизменными. Увеличивающиеся выигрышные пулы интегрируются между различными ссылками.
Бонусные планы функционируют завершённо на параллельных порталах. Требования по обороту сохраняет исходные показатели. Временные рамки проигрывания не изменяется.
Отдел ассистирования изучает заявки с резервных порталов аналогично. Интерактивный общение предоставляет постоянный расписание работы.
лакмор казино зеркало
Поиск проверенного гемблинг площадки в сегодняшних обстоятельствах требует детального внимания к регулятивному положению. Квалифицированные игроки знают, что Вавада казино включает современную сведения о работающих операторах.
Механизм открытия счета в проверенных сервисах охватывает обязательную подтверждение идентичности. KYC-правила охраняют как площадку, так и пользователя от афер. Временные границы на получение финансов до финализации проверки – привычная подход.
Виртуальные ограничения на доступ к игровым ресурсам решаются через альтернативные порталы. Действующие дубликаты сохраняют полную возможности первичного портала. Финансовые операции, азартный достижения и привилегированные планы поддерживаются константными.
Капитальная защищенность измеряется степенью задействованных платежных способов. SSL-безопасность, PCI DSS подтверждение и многоуровневая подтверждение устанавливают надежный щит безопасности.
Геймплейная набор легальных провайдеров объединяет слоты от главных провайдеров. RTP-индексы, вариативность и расчетные схемы получают нейтральную валидацию в признанных лабораториях.
Программы лояльности в достойных площадках опираются на понятных правилах ставок. Вейджер x35-40 оценивается справедливым для спин-бонусов, в то время как классические игры засчитываются в расчет с минимальным фактором.
Актуальные пользователи встречаются с множеством цифровых деталей при операциях с сертифицированными площадками. Профессиональные платформы типа Лаки Бир сайт дают актуальную материалы о работе развлекательных операторов.
Алгоритм верификации аккаунта включает комплекс обязательных уровней. Стартовая подтверждение предполагает размещения справок удостоверяющих субъект. Стандартный список подразумевает паспорт, водительские права или внешний паспорт.
Программная компонента регистрации включает использование зашифрованного канала и двухуровневой проверки. Продвинутые клиенты советуют задействовать весь комплекс доступных опций охраны.
Запасные домены образуют идентичные отражения основного ресурса с хранением исчерпывающего арсенала. Основное преимущество кроется в тождественности банковских рамок и критериев условий прокрутки.
Алгоритм локализации актуальных зеркал строится на мониторинге профессиональных телеграм-каналов и сотрудничающих порталов. Экспертные геймеры применяют VPN-сервисы для предоставления стабильного соединения без оглядки от территориальных барьеров.
For studies
poor credit small loans
for further details.
Игровая индустрия показывает стремительный рост, манящая легионы геймеров. Экспертные площадки гарантируют безопасную пространство для ставок. Подробную материалы о подобных операторах допустимо найти на казино Вавада .
Сертификация выступает главным критерием селекции ресурса. Контролёры Олдерни гарантируют качественный мониторинг денежных манипуляций. Отдельная аккредитованная ресурс реализует систематические инспекции RNG-генераторов.
Цифровые особенности передовых азартных площадок содержат SSL-шифрование денежного ранга. Провайдеры софтового продукта наподобие Microgaming, NetEnt, Pragmatic Play подключают сложные системы хаотичных параметров.
Схема верификации учётной записи предусматривает предоставления бумаг KYC-уровня. Удостоверение, свидетельство о прибылях, доказательство адреса — базовый перечень для финального подключения.
Параллельные ссылки ликвидируют трудности с запретами организаций. Актуальные альтернативы модифицируются постоянно техническими командами. Мобильные софт зачастую выполняются качественнее онлайн редакций.
Банкролл-менеджмент задаёт долгосрочную эффективность развлекательных периодов. Экспертные участники рекомендуют ограничивать количество депозита до 1-2% от полного резерва.
Отбор надежного betting оператора в актуальных обстоятельствах подразумевает особого внимания к юридическому уровню. Знающие игроки представляют, что казино аква предоставляет актуальную факты о активных сервисах.
Схема записи в легальных заведениях охватывает принудительную подтверждение удостоверения. KYC-нормы охраняют как казино, так и клиента от мошенничества. Переходные рамки на снятие капитала до окончания контроля – обычная система.
Электронные запреты на связь к гемблинг ресурсам преодолеваются через альтернативные адреса. Рабочие дубликаты гарантируют полную функциональность первичного сервиса. Расчетные переводы, азартный достижения и льготные планы функционируют устойчивыми.
Финансовая гарантированность оценивается критерием задействованных платежных инструментов. SSL-шифрование, PCI DSS подтверждение и многоуровневая подтверждение формируют стабильный периметр безопасности.
Азартная набор лицензированных заведений включает спины от ведущих студий. RTP-коэффициенты, волатильность и расчетные системы проходят объективную проверку в аккредитованных организациях.
Программы мотивации в надежных заведениях базируются на четких правилах активности. Вейджер x35-40 считается адекватным для спин-привилегий, в то время как традиционные забавы учитываются в счет с минимальным показателем.
Официальные операторы гэмблинг возможностей гарантируют игрокам доступ к качественному игровому процессу через целевые домены, включая казино Vavada , что исполняют международные требования защиты.
Схема открытия счёта включает заполнения проверочных информации через шифрованные SSL-соединения. Администрация требуют official verification совершеннолетия и адреса residence для compliance законодательных стандартов.
Многоуровневая проверка является mandatory компонентом современных систем security. Клиенты получают SMS-ключи, push-уведомления или внедряют dedicated программы наподобие Google Authenticator.
Зеркальные ссылки устраняют трудности локальных ограничений и DDoS-нападений. Фактически дубли являют тождественные клоны центрального сайта с поддержанием функциональности и клиентских данных.
Экспертные клиенты призывают поддерживать current базы working mirrors в bookmark веб-клиента. Букмекеры рассылают новости о новых URL через электронную почту, Telegram-communities и смартфонные софт.
Финансовые процедуры через проверенные сайты защищены encryption алгоритмами стандарта банковского сектора. Изъятие финансов выполняется только на аутентифицированные счета держателя профиля.
Передовые игроки встречаются с набором технических аспектов при функционировании с официальными площадками. Экспертные порталы типа mad casino как зарегистрироваться дают свежую материалы о процессах азартных провайдеров.
Алгоритм подтверждения счета предполагает множество принудительных уровней. Базовая проверка включает предоставления документов доказывающих гражданство. Стандартный набор включает паспорт, автолицензию или международное ID.
Программная составляющая регистрации охватывает внедрение SSL-шифрования и двухфакторной аутентификации. Продвинутые игроки советуют инициировать весь комплекс доступных настроек обеспечения.
Резервные ссылки образуют точные отражения главного портала с обеспечением комплексного арсенала. Важнейшее преимущество кроется в соответствии расчетных лимитов и требований вейджера.
Система обнаружения активных резервных ссылок базируется на отслеживании профильных телеграм-каналов и аффилированных ресурсов. Экспертные клиенты используют прокси-соединения для создания бесперебойного доступа невзирая от региональных барьеров.
This Site https://bitmix.app
Looking stylish creates a positive first impression.
A outfit communicates volumes before you actually speak a single word.
It boosts your own confidence and mood noticeably.
Your polished look conveys professionalism in the workplace.
https://b2.chenews.ru/6H5vOzfLzRTZ/
Fashionable clothing let you to showcase your individual personality.
People often perceive well-dressed individuals as more capable and reliable.
Therefore, putting effort in your wardrobe is an investment in yourself.
Ориентирование в секторе сертифицированных ресурсов предполагает понимания новых технологий доступа. Умелые участники применяют Mellstroy Game казино для приобретения современной сведений о оперативных адресах.
Механизм открытия счета в проверенных операторах подразумевает детальную аутентификацию. Продвинутые компании используют KYC-процедуры и AML-стандарты. Бумажная работа отнимает от 24 до 72 часов.
Программные методы для обхода запретов развиваются синхронно с повышением юридических действий. VPN-службы уровня premium предоставляют шифрование AES-256 и методы OpenVPN. Постоянство канала жизненно важна для привилегированных игровых периодов.
Резервные сайты оперируют через пространственно расположенные серверные мощности. CDN-комплексы обеспечивают сокращенную латентность для американских пользователей. Программное переключение запускается при детекции барьера основного портала.
Платежные движения в проверенных областях следуют строгим стандартам PCI DSS. Цифровые расчеты приобретают востребованность вследствие секретности и динамике выполнения.
Планшетные программы ведущих компаний совмещают лицевую авторизацию и push-оповещения для ключевых ситуаций. Настраиваемый дизайн самостоятельно изменяется под характеристики экрана.
Современные провайдеры развлекательных услуг гарантируют клиентам доступ к профессиональному игровому процессу через надежные Меллстрой порталы. Легальная бизнес предполагает исполнения конкретных надзорных стандартов.
Процедура активации игрового кабинета предусматривает аутентификацию персональных реквизитов. Провайдеры внедряют комплексные процедуры KYC и AML для исключения фродовых переводов.
IT платформы новейших гемблинг платформ работают на зашифрованных облачных системах с криптографическими стандартами. Геоблокировка заставляет администраторов разрабатывать альтернативные порталы.
Дублирующие домены составляют точные копии главного сайта с фиксацией всех сервисов и параметров. Беттеры обеспечивают себе беспрепятственный доступ к счету, беттинг статистике и личным установкам.
Платежные операции осуществляются через интегрированные расчетные процессоры. Ограничения на пополнения и получения устанавливаются в унисон с законодательными условиями и собственными процедурами снижения потерь.
Профессиональные игроки советуют мониторить ситуацию аккредитации через надзорные каталоги развлекательных органов. Статусные критерии включают рейтинги на профильных сайтах и отзывы истинных участников.
Quartz Vendor Marketplace – Fast-loading pages with a clear structure make shopping pleasant.
Определение достойного игрового портала в нынешних рамках подразумевает повышенного изучения к юридическому режиму. Компетентные клиенты учитывают, что казино РЎСѓРєР° включает свежую факты о функционирующих провайдерах.
Схема оформления профиля в легальных операторах включает необходимую аутентификацию документов. KYC-требования обеспечивают как казино, так и пользователя от обмана. Промежуточные границы на перечисление капитала до финализации контроля – привычная система.
Программные препятствия на доступ к игровым порталам обходятся через резервные домены. Доступные отражения обеспечивают стопроцентную возможности базового сервиса. Денежные движения, геймплейный результаты и привилегированные программы продолжают стабильными.
Финансовая безопасность характеризуется качеством эксплуатируемых финансовых способов. SSL-криптография, PCI DSS аттестация и многоуровневая проверка формируют стабильный периметр обороны.
Интерактивная библиотека лицензированных площадок охватывает автоматы от топовых провайдеров. RTP-показатели, изменчивость и математические принципы проходят беспристрастную контроль в признанных центрах.
Схемы мотивации в надежных сервисах базируются на открытых требованиях проигрыша. Проигрыш x35-40 оценивается разумным для спин-бонусов, в то время как традиционные игры идут в расчет с редуцированным фактором.
Действующие mirror-ссылки легальных азартных клубов на Gold casino предоставляют стабильный подключение к игровым сервисам. Технология дублирования образует полноценные версии главного домена с консервацией всех функций.
Алгоритм создания аккаунта через зеркало целиком имитирует базовую заявку. Свежие участники вводят валидный email, устанавливают надежный секретную комбинацию и назначают рабочую валюту.
Аутентификация счета содержит представления справок опираясь на KYC-политике. Изображение национального документа, валидация резиденции и платежные параметры проходят алгоритмическую проверку в течение 24-72 периодов.
Подключение верифицированных клиентов производится через классическую форму с расширенной проверкой. Разовые токены приходят на мессенджер номер или e-mail адрес.
Возможности депозитного сектора через mirror-сайты включает распространенные финансовые платформы. Visa, Mastercard, онлайн счета Skrill, Neteller, криптовалюты Bitcoin, Ethereum обрабатываются с оптимизированными комиссиями 0-3%.
Развлекательная каталог клонируется в точности включая автоматы, традиционные активности, live-операторов и прогрессивы. RTP-индикаторы, колебания и отыгрыш остаются неизменными.
Поощрительная политика оперирует похоже базовому порталу. Welcome-комплекты, фриспины, денежный возврат и VIP-курсы инициируются машинально при реализации прописанных условий.
Подбор безопасного азартного ресурса в современных рамках заставляет особого подхода к лицензионному состоянию. Компетентные игроки понимают, что казино Меллстрой отображает последнюю сведения о функционирующих ресурсах.
Схема регистрации в сертифицированных сервисах охватывает требуемую проверку удостоверения. KYC-правила гарантируют как оператора, так и клиента от обмана. Временные границы на перечисление финансов до финализации контроля – нормальная система.
Виртуальные барьеры на связь к игровым сайтам преодолеваются через резервные адреса. Функционирующие зеркала гарантируют стопроцентную производительность базового платформы. Банковские движения, азартный статистика и поощрительные системы сохраняются устойчивыми.
Экономическая защищенность характеризуется уровнем внедренных денежных способов. SSL-безопасность, PCI DSS аттестация и дополнительная проверка создают стабильный периметр обороны.
Интерактивная ассортимент легальных операторов охватывает спины от главных разработчиков. RTP-значения, изменчивость и расчетные принципы подвергаются беспристрастную валидацию в утвержденных институтах.
Системы поощрения в надежных площадках строятся на открытых критериях проигрыша. Проигрыш x35-40 оценивается справедливым для автомат-подарков, в то время как стандартные забавы принимаются в расчет с пониженным множителем.
Dorlix offers – Polished design, intuitive layout, and a very professional feel overall.
Беттинговая ниша отображает быстрый рост, привлекая массы пользователей. Квалифицированные ресурсы предлагают безопасную обстановку для беттинга. Развёрнутую данные о таких организациях реально отыскать на Лаки Бир зеркало .
Аттестация представляет главным показателем выбора ресурса. Юрисдикции Мальты гарантируют строгий надзор денежных действий. Каждая легальная ресурс осуществляет постоянные ревизии RNG-модулей.
Программные свойства актуальных гемблинг-сайтов предусматривают SSL-защиту денежного класса. Разработчики программного софта типа Microgaming, NetEnt, Pragmatic Play встраивают многоуровневые механизмы непредсказуемых показателей.
Алгоритм подтверждения личного кабинета подразумевает направления документов KYC-стандарта. ID, подтверждение о прибылях, валидация проживания — обычный список для окончательного входа.
Резервные адреса решают сложности с запретами поставщиков. Рабочие зеркала модифицируются постоянно компьютерными службами. Смартфонные клиенты обычно оперируют надёжнее браузерных версий.
Банкролл-менеджмент устанавливает долгосрочную прибыльность развлекательных периодов. Грамотные участники настаивают сокращать объём ставки до 1-2% от полного бюджета.
Read More Here https://letsexchange.cc
1win как отыграть бонус 1win как отыграть бонус
http://ivermectinaccessusa.com/# Ivermectin Access USA
Перемещение в области лицензированных площадок предполагает представления передовых методов доступа. Опытные пользователи задействуют Меллстрой казино для извлечения актуальной фактов о функционирующих путях.
Схема оформления личного кабинета в официальных организациях содержит детальную проверку. Актуальные провайдеры задействуют KYC-механизмы и AML-требования. Документальное сопровождение требует от 24 до 72 часов.
Компьютерные технологии для избежания ограничений развиваются сообща с укреплением юридических решений. VPN-сервисы уровня premium дают безопасность AES-256 и системы OpenVPN. Стабильность соединения принципиально важна для премиальных игровых периодов.
Дублирующие домены работают через пространственно рассредоточенные IT кластеры. CDN-архитектуры гарантируют сокращенную задержку для американских участников. Программное маршрутизация срабатывает при обнаружении блокировки первичного сайта.
Экономические транзакции в лицензированных юрисдикциях следуют строгим правилам PCI DSS. Цифровые транзакции набирают востребованность благодаря конфиденциальности и скорости осуществления.
Смартфонные софт топовых компаний интегрируют лицевую аутентификацию и push-уведомления для важных происшествий. Настраиваемый дизайн автономно подстраивается под параметры дисплея.
Проверенные операторы гэмблинг опций обеспечивают клиентам право к элитному развлечениям через профильные платформы, включая Mellstroy Game зеркало , которые именно выполняют мировые регламенты security.
Последовательность оформления профиля necessita внесения валидационных параметров через безопасные SSL-каналы. Букмекеры demanded official доказательство совершеннолетия и региона регистрации для поддержания юрисдикционных стандартов.
Двухэтапная аутентификация является mandatory aspect новейших архитектур безопасности. Клиенты имеют SMS-ключи, push-notification или применяют targeted софт наподобие Google Authenticator.
Зеркальные ссылки решают проблемы региональных блокировок и DDoS-нападений. Фактически копии формируют копийные копии центрального платформы с maintaining инструментария и пользовательских сведений.
Профессиональные участники призывают хранить новейшие списки действующих дублей в favourites browser. Management рассылают новости о новых ссылках через электронную почту, Telegram-группы и мобильные приложения.
Банковские операции через проверенные платформы защищены encryption алгоритмами стандарта банковского области. Extraction капитала производится лишь на подтверждённые счета обладателя учётной записи.
Нынешние участники имеют дело с изобилием системных тонкостей при операциях с лицензированными платформами. Экспертные источники типа казино СЂР° дают новую контент о функционировании казино операторов.
Алгоритм подтверждения аккаунта подразумевает набор требуемых этапов. Базовая аутентификация включает размещения документов валидирующих индивидуальность. Обычный список предполагает ID, автолицензию или загранпаспорт.
Программная компонента создания аккаунта охватывает эксплуатацию SSL-шифрования и многофакторной защиты. Опытные геймеры подсказывают инициировать все доступных настроек защиты.
Запасные домены представляют идентичные клоны базового платформы с удержанием полного инструментария. Центральное выгода заключается в тождественности банковских ограничений и критериев ставочных требований.
Процедура нахождения действующих резервных ссылок базируется на мониторинге профессиональных уведомительных сервисов и сотрудничающих площадок. Продвинутые клиенты используют виртуальные частные сети для формирования стабильного доступа вне зависимости от местных запретов.
trusted Werniq shop – Smooth transaction process with multiple ways to pay made shopping easy.
Передовые платформы игорных активностей обеспечивают беттерам вход к высококлассному игровому процессу через безопасные Вован казино порталы. Авторизованная бизнес нуждается следования жестких надзорных положений.
Механизм активации персонального учетной записи включает верификацию индивидуальных показателей. Регуляторы задействуют детализированные процедуры KYC и AML для пресечения фродовых операций.
IT инструменты современных игорных домов работают на надежных дата-центрах с HTTPS технологиями. Локальные запреты принуждает провайдеров организовывать параллельные ссылки.
Параллельные домены образуют аналогичные репликации основного ресурса с удержанием всех возможностей и сведений. Пользователи приобретают стабильный вход к средствам, гемблинг отчетности и персональным параметрам.
Платежные процедуры выполняются через интегрированные финансовые системы. Ограничения на депозиты и изъятия фиксируются в соответствии с лицензионными критериями и собственными политиками снижения потерь.
Квалифицированные гемблеры настаивают контролировать положение аккредитации через контролирующие регистры азартных комиссий. Престижные параметры содержат места на специализированных порталах и комментарии реальных пользователей.
myviagrashop.com
Поиск достойного игрового оператора в текущих обстоятельствах подразумевает тщательного внимания к юридическому режиму. Профессиональные участники учитывают, что Lucky Bear casino содержит современную данные о работающих провайдерах.
Алгоритм записи в проверенных платформах объединяет обязательную верификацию личности. KYC-процедуры обеспечивают как сервис, так и пользователя от фрода. Краткосрочные лимиты на перечисление средств до закрытия верификации – нормальная система.
Электронные препятствия на вход к игровым сайтам решаются через зеркальные домены. Функционирующие отражения поддерживают стопроцентную возможности базового сервиса. Денежные процедуры, развлекательный достижения и привилегированные предложения продолжают неизменными.
Экономическая защищенность определяется степенью применяемых расчетных способов. SSL-шифрование, PCI DSS лицензирование и дополнительная верификация гарантируют надежный барьер охраны.
Геймплейная библиотека проверенных сервисов охватывает спины от ведущих студий. RTP-параметры, дисперсия и статистические модели проходят внешнюю сертификацию в авторизованных институтах.
Схемы лояльности в серьезных сервисах опираются на ясных критериях проигрыша. Отыгрыш x35-40 считается разумным для спин-льгот, в то время как традиционные активности засчитываются в подсчет с сниженным множителем.
Рабочие резервные адреса надежных гемблинг-платформ на Лаки Бир гарантируют постоянный соединение к гемблинг платформам. Методика зеркалирования формирует точные версии корневого домена с консервацией всех возможностей.
Процедура регистрации через mirror-сайт целиком имитирует стандартную форму. Только пришедшие пользователи регистрируют активный email, формируют безопасный код доступа и устанавливают игровую финансовый инструмент.
Верификация счета предполагает представления справок следуя KYC-нормам. Фото паспорта, доказательство регистрации и карточные параметры подвергаются цифровую валидацию в течение 24-72 периодов.
Аутентификация зарегистрированных клиентов осуществляется через типовую модуль с двухфакторной валидацией. Краткосрочные шифры отправляются на мобильный гаджет или мейл.
Инструменты денежного модуля через альтернативные домены содержит актуальные платежные системы. Visa, Mastercard, цифровые счета Skrill, Neteller, блокчейн-токены Bitcoin, Ethereum обрабатываются с оптимизированными комиссиями 0-3%.
Гемблинг коллекция повторяется в точности включая слоты, традиционные игры, live-крупье и прогрессивы. RTP-значения, изменчивость и ставочные требования фиксируются неизменными.
Поощрительная программа действует идентично главному порталу. Welcome-наборы, безвозмездные спины, кешбэк и VIP-схемы включаются программно при соблюдении прописанных требований.
Hello everyone!
Reveal symptom mysterious patterns within interesting cases offering valuable diagnosis and solve medical puzzles see on the website for symptom solvers
Full information on the link – https://101flow.site
All the best and development in business!
Гемблинговая отрасль отображает динамичный прогресс, заинтересовывая миллионы геймеров. Грамотные площадки обеспечивают надёжную обстановку для развлечений. Развёрнутую материалы о подобных операторах реально получить на казино лова .
Аккредитация представляет главным критерием выбора ресурса. Надзорные органы Кюрасао гарантируют жёсткий надзор валютных транзакций. Всякая легальная сайт проходит плановые аудиты RNG-механизмов.
IT параметры новейших беттинг-платформ охватывают SSL-безопасность банковского стандарта. Производители софтового ПО типа Microgaming, NetEnt, Pragmatic Play подключают усовершенствованные схемы хаотичных показателей.
Процесс верификации счёта предусматривает предоставления справок KYC-класса. Документ, подтверждение о финансах, удостоверение прописки — типичный список для итогового подключения.
Параллельные ссылки убирают барьеры с блокировками поставщиков. Актуальные варианты модифицируются ежедневно цифровыми службами. Планшетные приложения зачастую выполняются устойчивее веб редакций.
Финансовая дисциплина устанавливает перспективную доходность азартных партий. Грамотные участники предлагают лимитировать количество ставки до 1-2% от итогового банкролла.
автобус москва луганск билеты купить
Поиск качественного betting ресурса в текущих обстоятельствах заставляет особого анализа к лицензионному положению. Квалифицированные клиенты знают, что казино Лаки Бир включает свежую сведения о функционирующих сервисах.
Процесс регистрации в сертифицированных операторах предусматривает принудительную валидацию персональных данных. KYC-требования обеспечивают как заведение, так и игрока от мошенничества. Краткосрочные пределы на изъятие активов до завершения верификации – нормальная практика.
Электронные препятствия на вход к развлекательным сайтам устраняются через дублирующие адреса. Активные клоны поддерживают полную функциональность основного сервиса. Денежные операции, интерактивный прогресс и поощрительные программы поддерживаются константными.
Материальная стабильность выражается критерием эксплуатируемых финансовых систем. SSL-кодирование, PCI DSS валидация и усиленная подтверждение устанавливают безопасный заслон ограждения.
Геймплейная коллекция легальных сервисов включает слоты от лидирующих провайдеров. RTP-индексы, волатильность и статистические формулы получают внешнюю проверку в аккредитованных институтах.
Планы поощрения в достойных сервисах формируются на прозрачных требованиях вейджера. Вейджер x35-40 оценивается разумным для слот-бонусов, в то время как карточные игры принимаются в подсчет с минимальным коэффициентом.
Передовые геймеры встречаются с проблемой соединения к лицензированным площадкам. Поставщики фильтруют основные порталы, но профессиональные казино Гризли игроки знают о присутствии параллельных платформ.
Дополнительный домен представляет идентичную воспроизведение первичного площадки. SSL-сертификаты функционируют неизменными. Финансовые транзакции выполняются через равнозначные механизмы.
Схема регистрации через резервный домен содержит типовой проверки. Сотрудники просят документы для реализации KYC-регламентов. Паспортные данные выполняют комплексную валидацию.
Пополнительные ограничения на резервных платформах равняются базовым спецификациям. Стартовые ставки сохраняются постоянными. Растущие призовые фонды синхронизируются между всеми порталами.
Премиальные схемы функционируют полноценно на параллельных сайтах. Вейджер обеспечивает первоначальные показатели. Тайминг отыгрыша остаётся прежним.
Департамент ассистирования обрабатывает заявки с зеркальных доменов сходным образом. Прямой общение предоставляет 24-часовой порядок обслуживания.
Стильный вид создает первое впечатление о человеке.
Он влияет на оценку вас окружающими мгновенно.
Хорошее самочувствие в подобранном луке повышает личную самооценку.
Этот подход демонстрирует высокий уровень ответственности и внимание к деталям.
https://links.balenciager.ru/iHjMY9NbFl/
Посредством одежду вы имеете шанс проявить свою индивидуальность и стиль.
Окружающие неосознанно воспринимают стильных индивидов как более успешных.
Поэтому, вложения в собственный стиль — это вклад в свое успешное будущее.
Перемещение в области сертифицированных порталов нуждается знания актуальных решений авторизации. Умелые участники применяют п»ї1хбет казино для добывания свежей материалов о оперативных путях.
Процесс открытия счета в проверенных организациях предполагает детальную валидацию. Актуальные провайдеры внедряют KYC-системы и AML-критерии. Документооборот занимает от 24 до 72 промежутков.
Цифровые инструменты для избежания блокировок прогрессируют сообща с ужесточением законодательных инициатив. VPN-платформы класса premium обеспечивают криптографию AES-256 и системы OpenVPN. Устойчивость соединения fundamentally существенна для привилегированных партий.
Дублирующие адреса выполняют задачи через пространственно разнесенные IT мощности. CDN-структуры обеспечивают быструю отклик для международных игроков. Автоматическое переключение активируется при идентификации препятствия первичного портала.
Банковские операции в сертифицированных территориях подчиняются конкретным требованиям PCI DSS. Децентрализованные транзакции набирают признание благодаря анонимности и оперативности выполнения.
Переносные утилиты премиальных организаций совмещают лицевую идентификацию и push-оповещения для важных моментов. Изменяемый интерфейс автоматически изменяется под особенности панели.
заборы в сергиевом посаде цена с установкой
Легальные ресурсы развлекательных предложений предоставляют игрокам вариант к элитному азартному досугу через профильные платформы, включая Mellstroy Game казино , которые точно выполняют мировые нормы надёжности.
Последовательность регистрации включает предоставления идентификационных информации через криптографические SSL-соединения. Администрация требуют письменное свидетельство дееспособности и места регистрации для соблюдения legal критериев.
2FA authentication считается необходимым элементом актуальных архитектур конфиденциальности. Клиенты имеют SMS-коды, push-алерты или используют специализированные tools наподобие Google Authenticator.
Резервные порталы ликвидируют проблемы geographic блокировок и DDoS-штурмов. С технической точки зрения реплики образуют аналогичные реплики главного платформы с поддержанием возможностей и клиентских деталей.
Опытные участники suggest поддерживать актуальные каталоги рабочих mirrors в bookmark веб-клиента. Management передают обновления о актуальных URL через e-mail, Telegram-сообщества и мобильные утилиты.
Финансовые процедуры через проверенные сайты покрыты encryption алгоритмами класса банковского области. Вывод денег осуществляется лишь на validated wallets держателя учётной записи.
Передовые провайдеры игорных продуктов гарантируют игрокам возможность к профессиональному азарту через проверенные казино Vavada системы. Авторизованная операционная активность нуждается соблюдения строгих контролирующих положений.
Процедура создания персонального аккаунта предусматривает аутентификацию приватных показателей. Управляющие внедряют комплексные протоколы KYC и AML для предотвращения мошеннических платежей.
IT решения актуальных игорных домов строятся на зашифрованных хостингах с HTTPS технологиями. IP-фильтрация заставляет администраторов организовывать вспомогательные адреса.
Резервные домены образуют эквивалентные дубликаты основного сайта с обеспечением всех возможностей и сведений. Клиенты приобретают непрерывный доступ к балансу, азартной данным и личным конфигурациям.
Расчетные действия осуществляются через интегрированные финансовые сервисы. Ограничения на депозиты и обналичивания определяются в согласии с законодательными требованиями и внутренними процедурами управления рисками.
Профессиональные гемблеры настаивают анализировать положение сертификата через регуляторные регистры гемблинг организаций. Статусные характеристики включают ранги на отраслевых сервисах и feedback подлинных беттеров.
helpful resources https://yomix.biz
Развлекательная сфера представляет интенсивный расширение, привлекая множество участников. Квалифицированные платформы обеспечивают стабильную обстановку для игры. Развёрнутую сведения о подобных компаниях реально изучить на tip top casino .
Сертификация является приоритетным фактором селекции платформы. Лицензиаты Гибралтара гарантируют качественный надзор экономических транзакций. Конкретная официальная площадка реализует плановые аудиты RNG-механизмов.
Цифровые свойства новейших игорных домов объединяют SSL-защиту расчётного уровня. Создатели софтового софта класса Microgaming, NetEnt, Pragmatic Play добавляют сложные модели рандомных величин.
Механизм проверки профиля подразумевает представления документов KYC-типа. Свидетельство, выписка о заработке, удостоверение проживания — базовый набор для финального входа.
Дублирующие домены ликвидируют барьеры с ограничениями организаций. Действующие копии корректируются регулярно техническими отделами. Мобильные программы обычно функционируют качественнее интернет версий.
Банкролл-менеджмент устанавливает продолжительную доходность беттинговых периодов. Грамотные пользователи советуют лимитировать величину ставки до 1-2% от итогового банкролла.
Современные бетторы встречаются с препятствием связи к легальным платформам. Организации блокируют основные ссылки, но профессиональные Килограмм зеркало клиенты осознают о присутствии альтернативных ресурсов.
Резервная ссылка образует идентичную воспроизведение основного платформы. Протоколы шифрования функционируют аналогичными. Денежные транзакции выполняются через равнозначные каналы.
Процедура оформления профиля через резервный домен предполагает типовой верификации. Сотрудники выясняют бумаги для исполнения KYC-норм. Паспортные информация проходят усиленную верификацию.
Вносительные лимиты на резервных площадках совпадают главным параметрам. Минимальные взносы функционируют стабильными. Растущие выигрышные пулы координируются между многочисленными адресами.
Поощрительные планы действуют полноценно на зеркальных платформах. Отыгрышный коэффициент поддерживает исходные значения. Период действия реализации не изменяется.
Департамент обслуживания решает запросы с альтернативных адресов идентично. Мгновенный чат гарантирует непрерывный порядок функционирования.
Современные клиенты встречаются с огромным количеством системных тонкостей при деятельности с лицензированными ресурсами. Тематические ресурсы типа Вавада дают релевантную материалы о деятельности гэмблинговых компаний.
Процедура подтверждения счета предполагает несколько неотъемлемых уровней. Исходная аутентификация включает загрузки удостоверений верифицирующих персону. Классический список предполагает паспорт, автолицензию или международное ID.
Техническая сторона создания аккаунта охватывает задействование безопасного соединения и 2FA. Экспертные геймеры подсказывают запускать полный набор предложенных параметров секьюрити.
Резервные ссылки формируют идентичные клоны первичного платформы с хранением исчерпывающего набора функций. Основное преимущество заключается в подобии расчетных границ и критериев отыгрыша.
Процедура выявления рабочих дублирующих порталов строится на мониторинге профильных мессенджер групп и связанных сайтов. Экспертные пользователи эксплуатируют туннельные протоколы для гарантирования бесперебойного доступа без оглядки от региональных ограничений.
Выбор честного азартного оператора заставляет детального изучения юридических разрешений. Новые порталы п»ї1хбет казино дают клиентам абсолютную факты о действующих лицензиях.
Механизм получения доступа подразумевает ряд принудительных этапов верификации. Владельцы запрашивают бумаги, подтверждающие самобытность и возраст. Классический KYC-процесс продолжается от 24 до 72 периодов.
Управление банком начинается с назначения рамок на вклады. Профессиональные участники рекомендуют применять норму 5% от полного развлекательного фонда на отдельную раунд.
Технические барьеры администраторов принуждают эксплуатировать вспомогательные пути. Альтернативы оберегают стопроцентную эффективность базового сайта, предусматривая хронологию платежей и казино результаты.
Современные платежные сервисы предоставляют быстрые взносы через цифровые хранилища. Bitcoin, Ethereum и фиксированные активы предоставляют скрытность и мизерные платежи. Период обработки снятий равно 10-30 отрезков.
Алгоритмы лояльности охватывают градационные степени с прогрессивным бонусом. VIP-координаторы предоставляют эксклюзивные бонусы, усиленные пределы и приоритетную обслуживание.
xarnova product hub – Fresh presentation and thoughtful product selection make browsing easy and reliable.
Актуальные пользователи встречаются с огромным количеством технологических тонкостей при процессах с официальными порталами. Специализированные сайты типа Меллстрой регистрация поставляют современную данные о работе развлекательных компаний.
Механизм верификации профиля включает несколько принудительных шагов. Первичная верификация требует загрузки документов подтверждающих персону. Типовой список предполагает ID, автолицензию или загранпаспорт.
Программная элемент создания аккаунта предполагает эксплуатацию криптографической защиты и многофакторной защиты. Профессиональные игроки рекомендуют запускать все имеющихся настроек обеспечения.
Резервные ссылки представляют стопроцентные клоны центрального портала с удержанием исчерпывающего инструментария. Основное выгода состоит в подобии денежных лимитов и норм условий прокрутки.
Процедура выявления функционирующих альтернативных адресов основывается на проверке специализированных телеграм-каналов и союзных площадок. Профессиональные геймеры применяют VPN-сервисы для формирования постоянного подключения без оглядки от региональных ограничений.
Подбор проверенного игорного портала нуждается основательного разбора правовых бумаг. Современные платформы казино Голд предоставляют геймерам абсолютную данные о действующих разрешениях.
Процесс получения доступа охватывает ряд обязательных стадий подтверждения. Провайдеры требуют справки, устанавливающие персону и правоспособность. Традиционный KYC-алгоритм продолжается от 24 до 72 периодов.
Банкролл-менеджмент начинается с назначения лимитов на инвестиции. Квалифицированные клиенты рекомендуют эксплуатировать принцип 5% от полного игорного средств на отдельную партию.
Цифровые запреты операторов принуждают внедрять альтернативные пути. Клоны хранят максимальную активность базового сайта, содержа архив операций и гемблинг результаты.
Инновационные платежные сервисы гарантируют скоростные пополнения через блокчейн счета. Bitcoin, Ethereum и стейблкоины поддерживают скрытность и мизерные взносы. Продолжительность осуществления извлечений составляет 10-30 периодов.
Программы преданности подразумевают градационные степени с прогрессивным компенсацией. VIP-представители обеспечивают эксклюзивные вознаграждения, расширенные рамки и преимущественную поддержку.
Исследование в сфере легальных порталов подразумевает представления продвинутых решений доступа. Профессиональные клиенты используют Вавада зеркало для добывания современной данных о действующих URL.
Процедура открытия учетной записи в лицензированных организациях предполагает детальную аутентификацию. Актуальные операторы применяют KYC-процедуры и AML-критерии. Документальная процедура требует от 24 до 72 промежутков.
Цифровые решения для обхода блокировок эволюционируют синхронно с интенсификацией регуляторных инициатив. VPN-решения разряда premium предлагают шифрование AES-256 и протоколы OpenVPN. Стабильность коннекта принципиально важна для привилегированных партий.
Запасные сайты функционируют через локально размещенные IT инфраструктуры. CDN-системы обеспечивают сокращенную латентность для американских пользователей. Цифровое редирект включается при выявлении блокировки главного ресурса.
Денежные манипуляции в официальных территориях отвечают конкретным критериям PCI DSS. Криптовалютные транзакции завоевывают признание по причине скрытности и оперативности процессинга.
Переносные программы элитных компаний совмещают лицевую идентификацию и push-сообщения для принципиальных эпизодов. Модифицируемый облик автономно изменяется под настройки экрана.
cheapest viagra: best price for viagra 100mg – Cheap Viagra 100mg
shop Scarlet Crate online – Everything feels organized and navigating through products is fast.
Нынешние участники сталкиваются с массой цифровых особенностей при работе с легальными сайтами. Профессиональные порталы типа Tippy зеркало выдают релевантную информацию о деятельности азартных операторов.
Процесс подтверждения счета охватывает множество принудительных уровней. Исходная верификация нуждается передачи справок верифицирующих индивидуальность. Привычный список включает паспорт, автолицензию или внешний паспорт.
Техническая составляющая регистрации охватывает применение защищенного протокола и многофакторной защиты. Профессиональные игроки подсказывают инициировать весь комплекс представленных настроек секьюрити.
Зеркала являются точные реплики базового домена с сохранением комплексного возможностей. Ключевое выгода заключается в схожести платежных пределов и норм отыгрыша.
Процедура поиска рабочих дублирующих порталов основывается на наблюдении профильных новостных лент и аффилированных ресурсов. Экспертные пользователи эксплуатируют прокси-соединения для формирования бесперебойного доступа независимо от местных барьеров.
Азартная область демонстрирует быстрый рост, манящая миллионы пользователей. Экспертные порталы предлагают стабильную пространство для беттинга. Детальную данные о подобных организациях реально отыскать на Лаки Бир зеркало .
Аттестация представляет приоритетным фактором подбора портала. Регуляторы Олдерни создают серьёзный мониторинг финансовых транзакций. Конкретная сертифицированная площадка проходит постоянные проверки RNG-модулей.
Цифровые характеристики инновационных беттинг-платформ содержат SSL-защиту экономического класса. Разработчики цифрового материала наподобие Microgaming, NetEnt, Pragmatic Play подключают продвинутые схемы произвольных значений.
Алгоритм валидации профиля требует предоставления документов KYC-класса. Удостоверение, выписка о заработке, доказательство прописки — базовый набор для финального активации.
Резервные домены решают барьеры с блокировками провайдеров. Актуальные копии адаптируются систематически программными специалистами. Карманные софт регулярно работают устойчивее браузерных версий.
Финансовая дисциплина определяет длительную доходность игровых периодов. Грамотные пользователи предлагают ограничивать количество депозита до 1-2% от общего резерва.
Игровая ниша представляет динамичный расширение, притягивая массы геймеров. Опытные сайты обеспечивают надёжную атмосферу для пари. Развёрнутую материалы о таких брендах доступно отыскать на Lucky Bear казино .
Лицензирование выступает центральным элементом подбора платформы. Регуляторы Гибралтара создают качественный надзор экономических манипуляций. Отдельная сертифицированная платформа реализует постоянные аудиты RNG-механизмов.
Технические параметры передовых казино включают SSL-безопасность банковского категории. Разработчики виртуального обеспечения уровня Microgaming, NetEnt, Pragmatic Play внедряют усовершенствованные алгоритмы случайных значений.
Процедура проверки профиля предусматривает направления справок KYC-формата. Свидетельство, выписка о заработке, удостоверение местожительства — базовый комплект для окончательного подключения.
Дублирующие порталы убирают трудности с блокировками провайдеров. Функционирующие альтернативы изменяются ежедневно техническими службами. Мобильные софт часто функционируют стабильнее онлайн версий.
Банкролл-менеджмент задаёт стратегическую результативность беттинговых сессий. Опытные участники настаивают ограничивать сумму бета до 1-2% от суммарного капитала.
YoungCrate products – The pricing is fair and in line with many other online options.
https://uspharmaindex.shop/# best rogue online pharmacy
luckmore casino вход
Функционирующие зеркала официальных гемблинг-платформ на Клубника казино предоставляют беспрерывный подключение к развлекательным ресурсам. Технология копирования генерирует полноценные клоны основного портала с консервацией всех инструментов.
Алгоритм создания аккаунта через дублирующий портал целиком копирует базовую шаблон. Новые игроки прописывают функционирующий email, создают безопасный шифр и назначают базовую курренси.
Валидация аккаунта требует загрузки свидетельств опираясь на KYC-политике. Снимок ID-карты, верификация резиденции и банковские параметры проходят автоматическую анализ в течение 24-72 часа.
Авторизация действующих участников реализуется через базовую форму с двухфакторной верификацией. Сессионные шифры передаются на смс аппарат или мейл.
Возможности входящего сектора через дублирующие порталы обеспечивает распространенные платежные механизмы. Visa, Mastercard, электронные хранилища Skrill, Neteller, цифровые активы Bitcoin, Ethereum обрабатываются с низкими платежами 0-3%.
Gaming коллекция воспроизводится на сто процентов включая слоты, классические геймплей, live-операторов и прогрессивы. RTP-коэффициенты, колебания и условия отыгрыша остаются неизменными.
Промо система функционирует аналогично основному домену. Welcome-бандлы, фриспины, refund и VIP-планы включаются программно при реализации установленных параметров.
Dressing stylish creates a strong first impression.
Your attire speaks volumes before a person actually say a word.
It boosts your own confidence and mood noticeably.
A put-together appearance signals professionalism in the office.
https://b4.hypebeasts.ru/X2IPFPK3jllJ/
Stylish clothing let you to express your unique personality.
People often judge stylish people as more successful and trustworthy.
Ultimately, investing in your wardrobe is an investment in your personal brand.
check these guys out https://yomix.biz
Актуальные игроки имеют дело с огромным количеством технологических аспектов при функционировании с официальными сайтами. Профильные источники типа tip top casino выдают свежую контент о работе азартных провайдеров.
Процесс валидации профиля предполагает несколько обязательных фаз. Стартовая аутентификация включает размещения свидетельств верифицирующих индивидуальность. Привычный список подразумевает свидетельство, автолицензию или внешний паспорт.
Технологическая часть регистрации предполагает внедрение безопасного соединения и двухуровневой проверки. Продвинутые игроки рекомендуют активировать совокупность представленных опций защиты.
Альтернативные адреса составляют стопроцентные копии центрального ресурса с обеспечением исчерпывающего функционала. Центральное выгода выражается в соответствии банковских ограничений и требований отыгрыша.
Процедура поиска активных резервных ссылок фундируется на отслеживании профильных мессенджер групп и связанных порталов. Опытные клиенты внедряют туннельные протоколы для создания устойчивого входа вне зависимости от территориальных блокировок.
Передовые пользователи пересекаются с множеством цифровых нюансов при операциях с сертифицированными порталами. Профессиональные платформы типа Меллстрой сайт предоставляют новую информацию о работе развлекательных компаний.
Процедура подтверждения профиля подразумевает несколько требуемых шагов. Исходная верификация требует размещения документов подтверждающих индивидуальность. Стандартный набор включает свидетельство, лицензию водителя или внешний паспорт.
Программная сторона записления подразумевает использование защищенного протокола и 2FA. Квалифицированные клиенты предлагают активировать совокупность возможных опций секьюрити.
Дублирующие порталы образуют точные копии центрального портала с сохранением полного возможностей. Основное преимущество кроется в схожести расчетных пределов и требований отыгрыша.
Процедура поиска активных дублирующих порталов строится на отслеживании профессиональных информационных каналов и партнерских ресурсов. Экспертные пользователи внедряют анонимайзеры для предоставления устойчивого соединения безотносительно от локальных ограничений.
Hello!
Find physical mysterious evidence in interesting cases with valuable forensic details and solve mysteries like a pro see on the website for forensic guides
Full information on the link – https://202fliks.site
All the best and development in business!
Ориентирование в мире лицензированных порталов подразумевает представления современных технологий входа. Квалифицированные игроки используют Лаки Бир казино для получения актуальной материалов о оперативных ссылках.
Процедура регистрации учетной записи в лицензированных заведениях охватывает многоуровневую подтверждение. Актуальные провайдеры применяют KYC-процедуры и AML-правила. Бумажная работа составляет от 24 до 72 интервалов.
IT способы для минования ограничений развиваются синхронно с интенсификацией юридических решений. VPN-решения класса premium обеспечивают защиту AES-256 и методы OpenVPN. Непрерывность канала кардинально значима для премиальных раундов.
Альтернативные ресурсы работают через локально разнесенные IT ресурсы. CDN-архитектуры поддерживают минимальную пинг для европейских пользователей. Системное переключение активируется при детекции ограничения главного портала.
Экономические переводы в сертифицированных регионах подпадают под строгим нормам PCI DSS. Цифровые транзакции завоевывают распространение по причине скрытности и темпу обработки.
Планшетные утилиты элитных провайдеров содержат лицевую подтверждение и push-алерты для существенных происшествий. Модифицируемый оформление самостоятельно изменяется под особенности экрана.
For more
can i order cheap zyrtec without insurance
for crisis management.
KettleCart shopping hub – The structure is intuitive and product details are laid out nicely.
over the counter sildenafil Buy generic 100mg Viagra online buy viagra here
Передовые бетторы оказываются с барьером доступа к легальным платформам. Компании фильтруют первичные порталы, но профессиональные Лаки Бир казино игроки понимают о существовании альтернативных ресурсов.
Дополнительный домен представляет полную воспроизведение базового площадки. Криптографические алгоритмы работают равнозначными. Денежные переводы реализуются через аналогичные каналы.
Технология заведения учётной записи через резервный портал подразумевает обычной подтверждения. Менеджеры запрашивают бумаги для соблюдения KYC-стандартов. Персональные характеристики реализуют расширенную проверку.
Депозитные пределы на параллельных площадках совпадают основным условиям. Начальные вклады остаются постоянными. Накопительные призовые фонды согласовываются между всеми порталами.
Премиальные механизмы выполняются всесторонне на зеркальных площадках. Коэффициент оборота гарантирует оригинальные показатели. Срок активности использования остаётся прежним.
Департамент ассистирования решает тикеты с резервных адресов таким же способом. Прямой разговор гарантирует постоянный порядок оперирования.
Выбор безопасного гемблинг заведения в сегодняшних реалиях нуждается повышенного внимания к правовому статусу. Компетентные клиенты понимают, что Lucky Bear зеркало демонстрирует новую факты о работающих сервисах.
Алгоритм записи в легальных площадках объединяет неизбежную верификацию удостоверения. KYC-процедуры охраняют как оператора, так и участника от махинаций. Временные пределы на снятие капитала до финализации верификации – нормальная подход.
Виртуальные препятствия на соединение к развлекательным ресурсам преодолеваются через резервные порталы. Доступные копии гарантируют полную работоспособность главного портала. Платежные транзакции, геймплейный статистика и льготные системы остаются стабильными.
Материальная защищенность оценивается критерием используемых финансовых инструментов. SSL-криптография, PCI DSS лицензирование и расширенная аутентификация устанавливают безопасный заслон безопасности.
Игровая библиотека официальных площадок объединяет барабаны от лидирующих производителей. RTP-показатели, колебания и статистические системы проходят внешнюю валидацию в одобренных лабораториях.
Программы мотивации в достойных казино базируются на четких критериях вейджера. Требования x35-40 считается нормальным для автомат-льгот, в то время как стандартные развлечения включаются в зачет с пониженным множителем.
Перемещение в секторе лицензированных ресурсов нуждается осознания новых решений авторизации. Квалифицированные клиенты задействуют казино типпи для обретения релевантной данных о действующих URL.
Схема открытия личного кабинета в сертифицированных заведениях подразумевает сложную валидацию. Современные операторы внедряют KYC-алгоритмы и AML-критерии. Документальная процедура требует от 24 до 72 промежутков.
IT решения для прохождения запретов развиваются сообща с ужесточением правовых шагов. VPN-сервисы типа premium дают криптографию AES-256 и системы OpenVPN. Стабильность подключения критически значима для элитных партий.
Запасные адреса действуют через локально размещенные компьютерные системы. CDN-архитектуры обеспечивают оптимальную задержку для азиатских участников. Системное маршрутизация активируется при идентификации барьера первичного адреса.
Платежные операции в официальных зонах подпадают под строгим правилам PCI DSS. Криптовалютные расчеты набирают распространение благодаря секретности и оперативности процессинга.
Переносные клиенты ведущих операторов интегрируют голосовую аутентификацию и push-алерты для важных моментов. Изменяемый облик автоматически корректируется под характеристики экрана.
stromectol where to buy: stromectol ivermectin tablets – buy ivermectin nz
Нынешние пользователи сталкиваются с массой программных особенностей при функционировании с официальными сайтами. Специализированные платформы типа винити казино дают современную контент о функционировании казино провайдеров.
Процедура подтверждения учетной записи содержит множество принудительных уровней. Стартовая проверка требует загрузки удостоверений верифицирующих индивидуальность. Привычный набор подразумевает удостоверение личности, права или загранпаспорт.
Цифровая составляющая создания аккаунта предполагает использование защищенного протокола и двойной авторизации. Квалифицированные участники рекомендуют инициировать совокупность представленных возможностей безопасности.
Зеркала представляют точные отражения первичного платформы с удержанием всего возможностей. Ключевое выгода кроется в соответствии финансовых рамок и критериев вейджера.
Система нахождения актуальных резервных ссылок строится на наблюдении специализированных новостных лент и партнерских ресурсов. Продвинутые игроки задействуют туннельные протоколы для предоставления стабильного входа невзирая от территориальных запретов.
Чтобы элиминировать проблемы, связанные с с фишингом, и дать себе полную сохранность, обязательно заходить лишь через легитимные каналы. Это — самый надежный способ сберечь личную информацию в секретности ссылка на кракен
Современные провайдеры беттинг продуктов предоставляют беттерам доступ к качественному гемблингу через безопасные Mellstroy Game зеркало платформы. Сертифицированная работа предполагает исполнения конкретных контролирующих требований.
Процедура регистрации клиентского кабинета включает верификацию индивидуальных информации. Управляющие используют комплексные системы KYC и AML для предотвращения нарушающих платежей.
Программные решения передовых развлекательных порталов основываются на защищенных облачных системах с SSL стандартами. Региональная блокировка обязывает провайдеров создавать резервные адреса.
Альтернативные платформы образуют аналогичные репликации главного домена с сохранением всех сервисов и сведений. Пользователи достигают беспрепятственный доступ к балансу, беттинг истории и персональным конфигурациям.
Банковские переводы реализуются через встроенные финансовые сервисы. Рамки на пополнения и получения определяются в унисон с правовыми условиями и индивидуальными политиками риск-менеджмента.
Квалифицированные клиенты рекомендуют мониторить статус аккредитации через государственные реестры развлекательных органов. Престижные показатели задействуют позиции на профильных ресурсах и feedback настоящих пользователей.
https://www.gabitos.com/ayudaamistad/template.php?nm=1772019907
Проверенные ресурсы развлекательных услуг предоставляют пользователям шанс к высококлассному гэмблингу через профильные порталы, включая п»ї1xBet казино , что исполняют международные критерии конфиденциальности.
Механизм создания аккаунта necessita внесения проверочных данных через безопасные SSL-connection. Операторы запрашивают документальное свидетельство совершеннолетия и региона нахождения для выполнения юрисдикционных требований.
2FA аутентификация становится обязательным aspect современных механизмов безопасности. Пользователи приобретают SMS-пароли, push-алерты или задействуют специальные tools типа Google Authenticator.
Альтернативные URL преодолевают вопросы локальных запретов и DDoS-assault. Фактически mirrors составляют тождественные версии primary ресурса с maintaining возможностей и индивидуальных данных.
Skilled геймеры рекомендуют поддерживать обновлённые реестры функционирующих альтернатив в избранном браузера. Management рассылают обновления о новых ссылках через email, Telegram-каналы и портативные приложения.
Payment процедуры через лицензионные порталы обеспечены шифровальными системами категории банковского направления. Изъятие денег производится solely на аутентифицированные wallets хозяина личного кабинета.
Гемблинговая область представляет активный рост, завлекая легионы игроков. Грамотные сайты предлагают качественную условия для ставок. Подробную факты о данных операторах реально получить на винити официальный сайт .
Аккредитация является ключевым фактором отбора платформы. Надзорные органы Олдерни гарантируют качественный мониторинг финансовых манипуляций. Каждая легальная платформа выполняет плановые ревизии RNG-алгоритмов.
Цифровые особенности инновационных гемблинг-сайтов объединяют SSL-шифрование экономического уровня. Провайдеры виртуального материала типа Microgaming, NetEnt, Pragmatic Play внедряют многоуровневые схемы рандомных показателей.
Процесс подтверждения учётной записи требует направления удостоверений KYC-формата. Свидетельство, справка о средствах, валидация проживания — типичный комплект для завершённого активации.
Альтернативные порталы решают сложности с цензурой организаций. Действующие зеркала корректируются каждый день программными командами. Карманные утилиты нередко действуют устойчивее браузерных форматов.
Финансовая дисциплина определяет долгосрочную эффективность беттинговых сессий. Экспертные игроки настаивают лимитировать объём ставки до 1-2% от суммарного капитала.
Надёжные ресурсы игорных сервисов гарантируют участникам вариант к высококлассному развлечениям через целевые сайты, включая Лаки Бир зеркало , которые придерживаются transnational регламенты security.
Процедура оформления профиля подразумевает указания проверочных сведений через шифрованные SSL-линии. Администрация demanded official удостоверение дееспособности и территории residence для исполнения юрисдикционных норм.
Двухфакторная authentication является обязательным частью новейших систем security. Пользователи имеют SMS-ключи, push-алерты или эксплуатируют профессиональные программы наподобие Google Authenticator.
Резервные URL ликвидируют препятствия локальных ограничений и DDoS-атак. По сути реплики представляют идентичные клоны центрального ресурса с сохранением инструментария и user информации.
Профессиональные участники призывают поддерживать current списки working зеркал в favourites browser. Администрация направляют новости о актуальных URL через почтовые сервисы, Telegram-группы и mobile приложения.
Денежные операции через проверенные площадки защищены защитными технологиями стандарта банковского сектора. Снятие финансов осуществляется исключительно на validated реквизиты держателя аккаунта.
Актуальные mirror-ссылки официальных гемблинг-платформ на тип топ казино дают непрерывный подключение к развлекательным сервисам. Схема копирования создает точные копии главного ресурса с удержанием всех возможностей.
Схема открытия счета через резервную ссылку в точности имитирует стандартную форму. Новые игроки прописывают действующий email, придумывают защищенный ключ и фиксируют операционную платежное средство.
Валидация профиля подразумевает загрузки удостоверений в соответствии с KYC-регламенту. Изображение водительских прав, подтверждение места жительства и карточные координаты контролируются системой машинную анализ в течение 24-72 часа.
Логин действующих геймеров производится через типовую форму с многоступенчатой аутентификацией. Разовые коды приходят на мессенджер устройство или электронную почту.
Функционал депозитного раздела через дублирующие порталы содержит распространенные денежные системы. Visa, Mastercard, виртуальные балансы Skrill, Neteller, блокчейн-токены Bitcoin, Ethereum процессируются с сокращенными сборами 0-3%.
Игровая библиотека копируется в точности включая барабаны, классические забавы, live-крупье и накопительные призы. RTP-показатели, волатильность и проигрыш поддерживаются неизменными.
Поощрительная программа действует похоже корневому порталу. Welcome-пакеты, безвозмездные спины, компенсация и VIP-системы активируются программно при соблюдении фиксированных критериев.
Инновационные порталы игорных игр гарантируют клиентам возможность к профессиональному азарту через надежные Mellstroy Game зеркало платформы. Лицензированная работа влечет соблюдения строгих правовых положений.
Система регистрации игрового аккаунта предусматривает аутентификацию персональных информации. Администраторы применяют комплексные протоколы KYC и AML для пресечения поддельных переводов.
Цифровые платформы новейших беттинг площадок базируются на зашифрованных инфраструктурах с шифровальными технологиями. Региональная блокировка побуждает владельцев внедрять дублирующие URL.
Зеркальные сайты являют собой точные копии первичного ресурса с сохранением всех возможностей и сведений. Игроки получают устойчивый связь к депозиту, развлекательной отчетности и персональным установкам.
Расчетные транзакции проходят через интегрированные финансовые процессоры. Рамки на взносы и получения устанавливаются в согласии с лицензионными условиями и организационными правилами риск-менеджмента.
Экспертные гемблеры предлагают отслеживать состояние лицензии через государственные реестры беттинг организаций. Авторитетные показатели охватывают места на специализированных платформах и feedback истинных участников.
xxx ?? ???????? ????
http://sildenafilpriceguide.com/# Cheap generic Viagra online
Надёжные платформы игорных опций предоставляют геймерам право к элитному времяпрепровождению через специализированные домены, включая Меллстрой , что соблюдают transnational стандарты security.
Механизм оформления профиля подразумевает заполнения проверочных параметров через защищённые SSL-каналы. Букмекеры просят предоставить official подтверждение возраста и адреса регистрации для исполнения правовых стандартов.
Двухэтапная аутентификация становится required элементом новейших платформ конфиденциальности. Users имеют SMS-коды, push-оповещения или применяют специализированные приложения типа Google Authenticator.
Зеркальные ссылки нейтрализуют вопросы локальных запретов и DDoS-воздействий. По сути дубли являют аналогичные копии базового сайта с поддержанием возможностей и личных параметров.
Опытные геймеры предлагают удерживать актуальные каталоги функционирующих альтернатив в закладках интернет-программы. Администрация направляют updates о fresh ссылках через электронную почту, Telegram-чаты и мобильные программы.
Банковские movements через надёжные сайты обеспечены защитными алгоритмами стандарта банковского сектора. Получение денег осуществляется solely на validated счета владельца аккаунта.
Актуальные геймеры встречаются с проблемой входа к лицензированным порталам. Операторы закрывают первичные URL, но профессиональные казино Вавада клиенты знают о наличии альтернативных площадок.
Резервная ссылка представляет точную дубликат основного платформы. Средства защиты функционируют идентичными. Финансовые операции реализуются через сходные шлюзы.
Процедура оформления профиля через резервный портал требует обычной подтверждения. Менеджеры просят справки для соблюдения KYC-требований. Индивидуальные информация подвергаются двухфакторную верификацию.
Банковские пределы на альтернативных порталах идентичны главным характеристикам. Начальные беты остаются стабильными. Накопительные банки синхронизируются между разными ссылками.
Премиальные схемы оперируют всесторонне на параллельных платформах. Множитель ставок сохраняет стартовые показатели. Тайминг реализации остаётся прежним.
Команда обслуживания рассматривает заявки с альтернативных ресурсов таким же способом. Живой переписка поддерживает постоянный график функционирования.
Передовые бетторы оказываются с сложностью входа к лицензированным платформам. Операторы запрещают базовые ссылки, но опытные lucky bear казино посетители понимают о наличии дублирующих ресурсов.
Параллельный портал формирует полную копию основного платформы. SSL-сертификаты функционируют аналогичными. Платёжные операции реализуются через аналогичные сервисы.
Методика открытия счёта через параллельный ресурс включает обычной валидации. Менеджеры запрашивают бумаги для соблюдения KYC-правил. Индивидуальные данные осуществляют расширенную верификацию.
Вносительные границы на резервных ресурсах совпадают основным требованиям. Низшие ставки сохраняются постоянными. Растущие джекпоты объединяются между множественными порталами.
Бонусные механизмы работают завершённо на параллельных ресурсах. Вейджер гарантирует первоначальные величины. Временные рамки отыгрыша не изменяется.
Департамент помощи решает вопросы с дополнительных ресурсов идентично. Мгновенный общение осуществляет круглосуточный режим деятельности.
Лицензионные ресурсы игровых опций гарантируют клиентам право к высококлассному игровому процессу через тематические сайты, включая enomo казино , что следуют мировые требования надёжности.
Алгоритм открытия счёта предполагает ввода идентификационных сведений через защищённые SSL-соединения. Менеджмент запрашивают документальное доказательство возраста и территории нахождения для compliance правовых стандартов.
Двухфакторная проверка выступает required компонентом новейших механизмов безопасности. Игроки имеют SMS-шифры, push-оповещения или эксплуатируют специализированные приложения по типу Google Authenticator.
Альтернативные ссылки нейтрализуют препятствия territorial санкций и DDoS-атак. Фактически копии образуют тождественные реплики базового сайта с поддержанием опций и индивидуальных деталей.
Профессиональные клиенты предлагают хранить актуальные списки working зеркал в favourites браузера. Букмекеры доставляют updates о современных URL через e-mail, Telegram-чаты и mobile утилиты.
Финансовые переводы через лицензионные сайты защищены криптографическими methods стандарта банковского направления. Получение фондов выполняется исключительно на верифицированные счета хозяина аккаунта.
Поиск в пространстве лицензированных платформ предполагает понимания новых способов доступа. Продвинутые клиенты внедряют Lucky Bear казино для извлечения релевантной материалов о работающих доменах.
Схема оформления счета в сертифицированных организациях охватывает многоуровневую проверку. Актуальные компании используют KYC-системы и AML-критерии. Документальная процедура требует от 24 до 72 временных отрезков.
IT методы для избежания барьеров эволюционируют синхронно с усилением законодательных инициатив. VPN-службы категории premium предлагают шифрование AES-256 и протоколы OpenVPN. Устойчивость канала кардинально актуальна для VIP партий.
Зеркальные адреса работают через регионально распределенные компьютерные инфраструктуры. CDN-структуры гарантируют сокращенную время ответа для международных пользователей. Системное редирект срабатывает при детекции ограничения основного адреса.
Финансовые транзакции в легальных регионах отвечают конкретным нормам PCI DSS. Крипто платежи набирают популярность из-за анонимности и динамике реализации.
Мобильные программы премиальных организаций интегрируют лицевую аутентификацию и push-оповещения для существенных событий. Адаптивный внешний вид самостоятельно корректируется под характеристики панели.
Перемещение в пространстве легальных платформ нуждается осознания новых способов доступа. Квалифицированные клиенты используют п»ї1хбет официальный сайт для обретения актуальной материалов о работающих ссылках.
Схема открытия личного кабинета в официальных организациях подразумевает комплексную проверку. Современные операторы внедряют KYC-механизмы и AML-стандарты. Оформление документов отнимает от 24 до 72 временных отрезков.
Цифровые методы для обхода ограничений развиваются одновременно с усилением регуляторных мер. VPN-сервисы уровня premium дают криптографию AES-256 и методы OpenVPN. Постоянство связи кардинально важна для элитных заходов.
Резервные сайты оперируют через территориально разнесенные цифровые инфраструктуры. CDN-системы осуществляют оптимальную пинг для международных участников. Техническое роутинг срабатывает при детекции недоступности главного адреса.
Финансовые транзакции в сертифицированных областях отвечают определенным нормам PCI DSS. Цифровые платежи набирают распространение вследствие секретности и динамике реализации.
Мобильные утилиты премиальных брендов совмещают биометрическую идентификацию и push-извещения для критических происшествий. Гибкий облик автономно настраивается под свойства дисплея.
Исследование в области проверенных сайтов включает осознания современных методов авторизации. Продвинутые геймеры задействуют Меллстрой для получения свежей материалов о функционирующих ссылках.
Процесс формирования аккаунта в надежных организациях содержит комплексную аутентификацию. Новейшие операторы внедряют KYC-протоколы и AML-правила. Бумажная работа требует от 24 до 72 периодов.
IT инструменты для преодоления ограничений развиваются параллельно с повышением юридических действий. VPN-сервисы класса premium предоставляют кодирование AES-256 и технологии OpenVPN. Стабильность канала принципиально необходима для премиальных сессий.
Дублирующие адреса выполняют задачи через пространственно разнесенные цифровые ресурсы. CDN-системы гарантируют быструю пинг для международных пользователей. Техническое переключение запускается при выявлении ограничения главного сайта.
Денежные операции в официальных регионах отвечают жестким правилам PCI DSS. Цифровые операции увеличивают популярность из-за анонимности и скорости обработки.
Портативные софт премиальных организаций содержат биометрическую авторизацию и push-уведомления для ключевых ситуаций. Адаптивный внешний вид автоматически корректируется под характеристики монитора.
Активные альтернативные домены лицензированных гемблинг-платформ на retro casino дают стабильный соединение к развлекательным системам. Принцип копирования формирует аналогичные клоны базового веб-площадки с фиксацией всех возможностей.
Алгоритм оформления профиля через резервную ссылку полностью дублирует основную форму. Новые игроки вводят функционирующий email, придумывают безопасный шифр и фиксируют базовую курренси.
Валидация личного кабинета предполагает загрузки справок опираясь на KYC-нормам. Скан удостоверения личности, свидетельство места жительства и денежные сведения подвергаются программную анализ в течение 24-72 часов.
Аутентификация зарегистрированных пользователей происходит через стандартную окно с 2FA аутентификацией. Одноразовые ключи приходят на сотовый номер или электронную почту.
Опции финансового сектора через mirror-сайты обеспечивает распространенные денежные платформы. Visa, Mastercard, электронные счета Skrill, Neteller, цифровые активы Bitcoin, Ethereum осуществляются с оптимизированными комиссиями 0-3%.
Развлекательная база клонируется полностью включая слоты, классические игры, live-хостов и максимальные награды. RTP-индикаторы, вариативность и проигрыш сохраняются аналогичными.
Бонусная механизм функционирует схоже корневому порталу. Welcome-комплекты, фриспины, кешбэк и VIP-планы включаются алгоритмически при реализации установленных стандартов.
Исследование в пространстве сертифицированных ресурсов требует представления актуальных технологий авторизации. Опытные участники внедряют п»ї1хбет зеркало для приобретения свежей данных о работающих путях.
Процесс создания личного кабинета в официальных компаниях предполагает детальную проверку. Передовые операторы эксплуатируют KYC-процедуры и AML-стандарты. Бумажная работа требует от 24 до 72 промежутков.
Цифровые решения для минования запретов прогрессируют вместе с усилением законодательных шагов. VPN-платформы категории premium предлагают криптографию AES-256 и методы OpenVPN. Стабильность связи критически значима для элитных игровых периодов.
Альтернативные ресурсы оперируют через пространственно размещенные компьютерные кластеры. CDN-системы предоставляют быструю латентность для американских геймеров. Цифровое маршрутизация срабатывает при распознавании препятствия главного сайта.
Экономические транзакции в лицензированных юрисдикциях следуют четким стандартам PCI DSS. Блокчейн транзакции получают популярность благодаря анонимности и скорости обработки.
Мобильные утилиты лучших компаний включают голосовую авторизацию и push-сообщения для принципиальных эпизодов. Адаптивный облик программно корректируется под свойства матрицы.
Действующие дублирующие порталы лицензированных казино на казино lucky bear гарантируют непрерывный вход к геймерским сервисам. Система дублирования образует точные реплики базового домена с консервацией всех возможностей.
Механизм регистрации через зеркало полностью имитирует базовую бланк. Только пришедшие клиенты прописывают функционирующий email, создают надежный ключ и выбирают игровую курренси.
Аутентификация личного кабинета требует предоставления свидетельств опираясь на KYC-нормам. Изображение удостоверения личности, верификация адреса и платежные сведения проверяются через машинную верификацию в течение 24-72 часа.
Логин верифицированных игроков выполняется через типовую форму с многоступенчатой верификацией. Одноразовые шифры отправляются на телефонный аппарат или email.
Функционал входящего сектора через дублирующие порталы включает востребованные расчетные сервисы. Visa, Mastercard, цифровые портмоне Skrill, Neteller, блокчейн-токены Bitcoin, Ethereum осуществляются с минимальными взносами 0-3%.
Развлекательная библиотека клонируется абсолютно включая автоматы, классические игры, live-операторов и джекпоты. RTP-параметры, изменчивость и вейджер удерживаются такими же.
Промо политика функционирует похоже главному сайту. Welcome-наборы, free spins, возврат средств и VIP-схемы инициируются автоматически при выполнении заданных условий.
loftlark boutique – Easy navigation and intuitive interface ensure smooth browsing.
serplinkrise learning hub – Practical and easy-to-follow tips that help new users optimize effectively.
WovenCart catalog – My package arrived promptly and the packaging was perfect and secure.
Посмотрите разбор про ufc в феврале марте 2026 три недели которые встряхнут дивизионы, там много информации о титульных перспективах. Информация здесь: https://flat-360.ru/news/ufc-fevral-mart-2026-raspisanie-boyov-ufc-fight-night-strickland-vs-hernandez-moreno-vs-kavanagh-ufc-326-holloway-vs-oliveira-2-polnyj-gid-i-prognozy/
Надёжные платформы развлекательных опций обеспечивают клиентам право к элитному времяпрепровождению через тематические домены, включая Vavada зеркало , которые именно выполняют transnational требования конфиденциальности.
Механизм создания аккаунта подразумевает ввода идентификационных информации через encrypted SSL-соединения. Операторы просят предоставить нотариальное удостоверение возраста и территории нахождения для выполнения legal правил.
Двухфакторная проверка является принудительным частью передовых механизмов надёжности. Пользователи получают SMS-шифры, push-алерты или задействуют специальные приложения типа Google Authenticator.
Дублирующие порталы преодолевают трудности territorial запретов и DDoS-нападений. Технически копии формируют дублированные версии primary домена с поддержанием features и личных деталей.
Профессиональные пользователи призывают сохранять новейшие каталоги working копий в закладках интернет-программы. Букмекеры рассылают обновления о свежих доменах через email, Telegram-сообщества и портативные приложения.
Payment переводы через проверенные ресурсы secured cryptographic протоколами уровня банковского segment. Получение капитала производится только на подтверждённые счета собственника учётной записи.
установка заборов ворот цена
pin-up özünü bloklama https://www.pinup09715.help
Howdy! Do you use Twitter? I’d like to follow you if that would be okay.
I’m definitely enjoying your blog and look forward to new posts.
https://www.ocabiancaosteria.it/home-2/98-slide-show/297-tavolino-ocabianca-osteria.html
Good morning!
Share theater mysterious scripts with interesting and valuable dramatic updates and step into the spotlight see on the website for script databases
Full information on the link – https://101flow.site
All the best and development in business!
Современные клиенты сталкиваются с массой технологических деталей при процессах с легальными сайтами. Тематические ресурсы типа казино РЎСѓРєР° обеспечивают современную сведения о операциях казино брендов.
Процедура валидации учетной записи предполагает несколько обязательных уровней. Исходная аутентификация требует предоставления удостоверений подтверждающих субъект. Привычный набор охватывает паспорт, лицензию водителя или международное ID.
Программная элемент создания аккаунта включает задействование защищенного протокола и двухфакторной аутентификации. Экспертные пользователи советуют активировать совокупность имеющихся возможностей охраны.
Запасные домены составляют абсолютные клоны базового портала с удержанием всего набора функций. Основное плюс выражается в тождественности финансовых границ и требований проигрыша.
Система локализации рабочих запасных доменов базируется на мониторинге экспертных уведомительных сервисов и сотрудничающих сайтов. Опытные пользователи эксплуатируют прокси-соединения для гарантирования стабильного связи без оглядки от местных барьеров.
visit Gildcrate today – The package came in record time and the items were outstanding.
Легальные платформы азартных предложений oferuja геймерам вариант к премиальному времяпрепровождению через целевые ресурсы, включая СЌРЅРѕРјРѕ казино , что придерживаются мировые требования защиты.
Алгоритм регистрации включает предоставления верификационных параметров через безопасные SSL-connection. Провайдеры требуют документальное доказательство age verification и адреса residence для поддержания юрисдикционных критериев.
Многоуровневая authentication представляет обязательным частью новейших архитектур security. Клиенты приобретают SMS-токены, push-notification или применяют профессиональные софт типа Google Authenticator.
Резервные адреса решают вопросы territorial запретов и DDoS-атак. По сути копии представляют копийные версии primary портала с maintaining features и user деталей.
Профессиональные геймеры призывают keeping обновлённые реестры working копий в favourites browser. Букмекеры доставляют updates о современных ссылках через e-mail, Telegram-чаты и мобильные apps.
Денежные транзакции через лицензионные ресурсы гарантированы защитными methods level банковского направления. Изъятие фондов производится единственно на аутентифицированные счета хозяина account.
Нынешние клиенты сталкиваются с изобилием технологических деталей при деятельности с проверенными площадками. Тематические платформы типа п»ї1xBet казино выдают релевантную информацию о операциях игорных провайдеров.
Механизм верификации профиля охватывает несколько неотъемлемых этапов. Первичная валидация нуждается отправки удостоверений удостоверяющих индивидуальность. Обычный пакет охватывает документ, лицензию водителя или внешний паспорт.
Программная часть оформления включает задействование безопасного соединения и двухуровневой проверки. Квалифицированные клиенты подсказывают запускать максимум представленных функций охраны.
Альтернативные адреса представляют полные копии основного сайта с обеспечением всего возможностей. Главное достоинство содержится в идентичности банковских рамок и требований условий прокрутки.
Механизм нахождения активных зеркал фундируется на контроле профессиональных информационных каналов и аффилированных сайтов. Опытные участники задействуют VPN-сервисы для гарантирования надежного входа без оглядки от местных запретов.
Официальные операторы игорных возможностей гарантируют пользователям шанс к качественному гэмблингу через целевые сайты, включая п»ї1хбет официальный сайт , которые выполняют мировые стандарты надёжности.
Схема оформления профиля включает указания валидационных данных через защищённые SSL-connection. Операторы запрашивают письменное подтверждение правоспособности и региона жительства для соблюдения правовых норм.
Multi-factor идентификация выступает обязательным aspect современных механизмов конфиденциальности. Игроки получают SMS-токены, push-notification или используют dedicated приложения по типу Google Authenticator.
Альтернативные URL преодолевают сложности territorial барьеров и DDoS-штурмов. По сути копии формируют идентичные клоны главного портала с поддержанием features и клиентских информации.
Профессиональные участники предлагают поддерживать свежие списки рабочих альтернатив в сохранённых ссылках browser. Операторы отправляют updates о fresh ссылках через почтовые сервисы, Telegram-communities и телефонные софт.
Payment операции через проверенные сайты обеспечены шифровальными methods уровня банковского segment. Получение денег выполняется только на проверенные счета обладателя профиля.
Order Viagra 50 mg online: Viagra online price – Cheap generic Viagra
http://downarchive.org/user/CodeValide1xbet08/
Гемблинговая индустрия показывает стремительный рост, притягивая миллионы участников. Квалифицированные ресурсы предлагают стабильную условия для игры. Полную факты о указанных брендах доступно изучить на казино Вавада .
Легализация остаётся ключевым фактором определения портала. Юрисдикции Олдерни предоставляют жёсткий мониторинг финансовых операций. Всякая лицензированная площадка выполняет систематические проверки RNG-модулей.
Компьютерные аспекты передовых беттинг-платформ охватывают SSL-безопасность финансового уровня. Поставщики софтового материала вроде Microgaming, NetEnt, Pragmatic Play добавляют усовершенствованные системы непредсказуемых значений.
Процедура аутентификации профиля предполагает передачи документов KYC-стандарта. Документ, справка о заработке, валидация местожительства — классический пакет для финального доступа.
Резервные домены исправляют проблемы с запретами операторов. Функционирующие копии адаптируются постоянно цифровыми службами. Портативные программы регулярно действуют устойчивее интернет форматов.
Финансовая дисциплина создаёт долгосрочную эффективность развлекательных партий. Квалифицированные пользователи настаивают урезать сумму ставки до 1-2% от полного капитала.
Актуальные участники сталкиваются с сложностью подключения к лицензированным ресурсам. Компании запрещают стандартные порталы, но профессиональные Меллстрой регистрация посетители осознают о доступности альтернативных платформ.
Зеркало является абсолютную дубликат основного сайта. SSL-сертификаты функционируют неизменными. Платёжные переводы реализуются через идентичные механизмы.
Алгоритм заведения учётной записи через зеркальный адрес содержит привычной валидации. Операторы выясняют удостоверения для реализации KYC-регламентов. Персональные сведения подвергаются усиленную проверку.
Финансовые ограничения на резервных ресурсах соответствуют основным спецификациям. Стартовые ставки поддерживаются стабильными. Растущие накопления синхронизируются между разными ресурсами.
Поощрительные механизмы работают полноценно на параллельных ресурсах. Отыгрышный коэффициент удерживает базовые параметры. Период действия проигрывания остаётся прежним.
Служба обслуживания рассматривает обращения с дополнительных порталов идентично. Живой диалог осуществляет 24-часовой порядок оперирования.
Поиск качественного развлекательного оператора в текущих обстоятельствах заставляет детального внимания к законному режиму. Знающие игроки учитывают, что казино Вован включает свежую информацию о доступных операторах.
Алгоритм оформления профиля в сертифицированных платформах предусматривает неизбежную аутентификацию идентичности. KYC-стандарты гарантируют как казино, так и геймера от афер. Переходные рамки на изъятие финансов до выполнения валидации – нормальная методика.
Электронные блокировки на подключение к гемблинг сайтам обходятся через дублирующие порталы. Доступные дубликаты обеспечивают всестороннюю функциональность основного ресурса. Расчетные движения, интерактивный прогресс и бонусные программы сохраняются устойчивыми.
Денежная надежность оценивается качеством задействованных расчетных способов. SSL-кодирование, PCI DSS валидация и расширенная аутентификация создают надежный барьер безопасности.
Азартная библиотека сертифицированных сервисов включает автоматы от лидирующих разработчиков. RTP-коэффициенты, волатильность и алгоритмические схемы проходят внешнюю аудит в одобренных лабораториях.
Схемы поощрения в профессиональных площадках опираются на четких параметрах проигрыша. Проигрыш x35-40 признается справедливым для машина-бонусов, в то время как традиционные активности включаются в калькуляцию с редуцированным множителем.
go to this site https://mixmy.money
Развлекательная сфера являет динамичный подъём, притягивая тысячи клиентов. Грамотные платформы предлагают защищённую атмосферу для беттинга. Исчерпывающую факты о этих брендах допустимо отыскать на казино СЌРЅРѕРјРѕ .
Сертификация остаётся основным показателем выбора портала. Юрисдикции Кюрасао обеспечивают строгий надзор финансовых процедур. Всякая сертифицированная платформа осуществляет плановые проверки RNG-алгоритмов.
Цифровые аспекты передовых беттинг-платформ охватывают SSL-защиту финансового уровня. Разработчики виртуального софта класса Microgaming, NetEnt, Pragmatic Play встраивают многоуровневые модели хаотичных показателей.
Процедура подтверждения счёта требует направления бумаг KYC-типа. Паспорт, подтверждение о доходах, подтверждение прописки — обычный набор для окончательного подключения.
Резервные порталы решают трудности с цензурой поставщиков. Функционирующие копии адаптируются систематически IT командами. Портативные софт обычно оперируют качественнее онлайн вариантов.
Управление банкроллом устанавливает длительную эффективность азартных раундов. Профессиональные геймеры рекомендуют ограничивать количество бета до 1-2% от полного бюджета.
informative post https://daobase.io/
Актуальные бетторы встречаются с сложностью связи к официальным ресурсам. Операторы ограничивают стандартные URL, но грамотные Вавада регистрация посетители понимают о функционировании зеркальных площадок.
Альтернативный адрес образует полную реплику главного сайта. Средства защиты сохраняются равнозначными. Финансовые переводы производятся через идентичные механизмы.
Процедура регистрации через зеркальный ссылку подразумевает типовой валидации. Специалисты требуют бумаги для исполнения KYC-требований. Персональные информация выполняют усиленную аутентификацию.
Пополнительные пределы на зеркальных ресурсах равняются главным характеристикам. Низшие ставки продолжают фиксированными. Возрастающие призовые фонды интегрируются между множественными ссылками.
Бонусные схемы работают комплексно на резервных ресурсах. Множитель ставок обеспечивает исходные величины. Длительность использования поддерживается.
Отдел обслуживания обрабатывает запросы с резервных порталов таким же способом. Прямой чат осуществляет постоянный формат функционирования.
Отбор качественного betting ресурса в нынешних границах требует специального подхода к лицензионному состоянию. Знающие игроки понимают, что Vavada отображает современную данные о активных сервисах.
Процедура оформления профиля в официальных площадках объединяет необходимую аутентификацию персональных данных. KYC-процедуры оберегают как заведение, так и геймера от обмана. Переходные пределы на изъятие денег до завершения верификации – обычная практика.
Технические препятствия на соединение к азартным сервисам преодолеваются через параллельные адреса. Рабочие дубликаты поддерживают стопроцентную функциональность базового ресурса. Денежные движения, развлекательный достижения и поощрительные предложения поддерживаются устойчивыми.
Экономическая стабильность характеризуется качеством применяемых финансовых методов. SSL-защита, PCI DSS подтверждение и усиленная идентификация создают защищенный периметр безопасности.
Игровая каталог лицензированных сервисов объединяет слоты от лидирующих провайдеров. RTP-параметры, волатильность и математические системы получают объективную проверку в утвержденных институтах.
Планы стимулирования в качественных площадках формируются на понятных требованиях проигрыша. Вейджер x35-40 оценивается разумным для барабан-льгот, в то время как стандартные забавы засчитываются в расчет с сниженным коэффициентом.
https://sildenafilpriceguide.shop/# viagra without prescription
For the opportunity
how to get cheap lipitor no prescription
for absolute certainty.
look at this now https://daobase.io
Развлекательная область отображает интенсивный прогресс, притягивая множество пользователей. Опытные порталы дают безопасную атмосферу для беттинга. Полную сведения о подобных компаниях допустимо получить на Лаки Бир .
Легализация выступает основным аспектом отбора ресурса. Юрисдикции Гибралтара гарантируют качественный аудит денежных операций. Каждая лицензированная площадка реализует постоянные контроли RNG-механизмов.
Цифровые свойства инновационных казино содержат SSL-шифрование экономического категории. Разработчики виртуального софта уровня Microgaming, NetEnt, Pragmatic Play внедряют комплексные механизмы произвольных значений.
Схема аутентификации профиля включает передачи удостоверений KYC-формата. Паспорт, справка о финансах, доказательство регистрации — базовый набор для полноценного подключения.
Зеркальные URL решают трудности с цензурой провайдеров. Действующие копии корректируются каждый день IT специалистами. Смартфонные софт зачастую действуют устойчивее веб версий.
Управление банкроллом создаёт перспективную прибыльность гемблинговых циклов. Профессиональные игроки настаивают сокращать величину пари до 1-2% от совокупного резерва.
Новейшие игроки натыкаются с затруднением подключения к лицензированным платформам. Поставщики ограничивают базовые домены, но знающие СЌРЅРѕРјРѕ официальный сайт клиенты учитывают о присутствии дублирующих сайтов.
Дополнительный домен формирует идентичную отображение первичного портала. Средства защиты сохраняются неизменными. Банковские переводы проходят через сходные системы.
Методика регистрации через альтернативный портал подразумевает типовой подтверждения. Сотрудники требуют бумаги для осуществления KYC-правил. Паспортные сведения выполняют многоуровневую валидацию.
Банковские границы на дополнительных ресурсах равняются основным условиям. Низшие суммы остаются фиксированными. Растущие накопления координируются между многочисленными порталами.
Поощрительные механизмы оперируют полноценно на альтернативных ресурсах. Коэффициент оборота поддерживает базовые показатели. Срок активности проигрывания поддерживается.
Отдел поддержки рассматривает тикеты с зеркальных порталов сходным образом. Мгновенный переписка предоставляет круглосуточный формат работы.
пин ап сайт пин ап сайт
Навигация в мире проверенных ресурсов включает знания продвинутых технологий входа. Опытные участники задействуют казино Lucky Bear для получения новейшей информации о действующих доменах.
Процедура регистрации профиля в сертифицированных компаниях подразумевает многоуровневую валидацию. Актуальные провайдеры задействуют KYC-механизмы и AML-нормы. Бумажная работа составляет от 24 до 72 часов.
Программные решения для обхода препятствий эволюционируют сообща с ужесточением нормативных решений. VPN-службы типа premium предлагают защиту AES-256 и технологии OpenVPN. Непрерывность соединения принципиально важна для элитных сессий.
Альтернативные домены оперируют через локально рассредоточенные IT кластеры. CDN-структуры предоставляют минимальную задержку для американских клиентов. Программное маршрутизация включается при обнаружении блокировки главного домена.
Банковские операции в официальных юрисдикциях соответствуют жестким нормам PCI DSS. Децентрализованные расчеты завоевывают актуальность по причине приватности и динамике процессинга.
Смартфонные утилиты топовых провайдеров объединяют отпечатковую авторизацию и push-алерты для ключевых моментов. Изменяемый дизайн автоматически адаптируется под параметры матрицы.
Перемещение в мире официальных порталов подразумевает владения современных способов авторизации. Умелые геймеры используют Tippy casino для получения релевантной материалов о действующих URL.
Процесс открытия аккаунта в лицензированных заведениях содержит многоуровневую валидацию. Новейшие поставщики внедряют KYC-протоколы и AML-требования. Документальное сопровождение отнимает от 24 до 72 часов.
IT методы для прохождения запретов совершенствуются сообща с укреплением правовых решений. VPN-платформы разряда premium дают защиту AES-256 и методы OpenVPN. Устойчивость подключения кардинально необходима для привилегированных сессий.
Зеркальные адреса работают через локально разнесенные цифровые ресурсы. CDN-системы осуществляют минимальную пинг для азиатских участников. Техническое роутинг запускается при идентификации барьера центрального адреса.
Платежные операции в проверенных территориях следуют жестким требованиям PCI DSS. Блокчейн платежи приобретают востребованность вследствие скрытности и темпу реализации.
Переносные софт премиальных компаний интегрируют биометрическую авторизацию и push-уведомления для критических происшествий. Адаптивный внешний вид программно корректируется под особенности дисплея.
Выбор качественного игрового площадки в актуальных рамках подразумевает детального внимания к лицензионному положению. Компетентные игроки понимают, что Lucky Bear включает свежую данные о действующих сервисах.
Процесс оформления профиля в легальных площадках охватывает необходимую аутентификацию персональных данных. KYC-правила защищают как заведение, так и геймера от мошенничества. Переходные пределы на снятие капитала до финализации контроля – привычная практика.
Цифровые барьеры на соединение к развлекательным порталам решаются через резервные порталы. Активные отражения гарантируют полную эффективность первичного ресурса. Денежные операции, интерактивный достижения и привилегированные схемы функционируют устойчивыми.
Материальная гарантированность выражается показателем применяемых финансовых способов. SSL-кодирование, PCI DSS лицензирование и усиленная верификация формируют надежный барьер ограждения.
Азартная коллекция лицензированных операторов предоставляет машины от известных провайдеров. RTP-значения, вариативность и расчетные схемы получают независимую проверку в признанных учреждениях.
Системы вознаграждения в качественных сервисах основываются на ясных правилах проигрыша. Вейджер x35-40 расценивается справедливым для барабан-бонусов, в то время как традиционные игры идут в подсчет с редуцированным фактором.
Выбор проверенного betting портала в актуальных условиях предполагает детального изучения к юридическому режиму. Компетентные геймеры учитывают, что п»ї1хбет зеркало демонстрирует современную информацию о действующих операторах.
Схема оформления профиля в лицензированных площадках охватывает неизбежную проверку персональных данных. KYC-нормы охраняют как заведение, так и геймера от фрода. Промежуточные границы на перечисление активов до финализации валидации – обычная система.
Технические барьеры на связь к развлекательным сайтам преодолеваются через дублирующие адреса. Действующие копии обеспечивают абсолютную эффективность базового платформы. Банковские процедуры, интерактивный статистика и наградные системы сохраняются константными.
Капитальная надежность определяется степенью внедренных платежных механизмов. SSL-кодирование, PCI DSS валидация и многоуровневая идентификация создают стабильный щит охраны.
Геймплейная каталог официальных сервисов предоставляет барабаны от главных провайдеров. RTP-показатели, вариативность и статистические системы получают внешнюю проверку в утвержденных организациях.
Планы поощрения в надежных казино формируются на прозрачных критериях вейджера. Требования x35-40 оценивается разумным для спин-бонусов, в то время как карточные развлечения идут в зачет с пониженным фактором.
find out https://daobase.io
online pharmacy tramadol https://canbaypharm.top/# canadian rx online reviews
Актуальные операторы беттинг продуктов предоставляют клиентам вход к качественному гемблингу через проверенные РјСЌРґ казино ресурсы. Сертифицированная операционная активность нуждается соблюдения строгих регуляторных критериев.
Алгоритм создания персонального аккаунта предусматривает валидацию индивидуальных реквизитов. Администраторы применяют детализированные механизмы KYC и AML для недопущения поддельных финансовых действий.
Программные решения инновационных казино базируются на безопасных облачных системах с HTTPS технологиями. Территориальные ограничения вынуждает операторов организовывать резервные адреса.
Резервные сайты представляют полные клоны первичного ресурса с удержанием всех функций и показателей. Клиенты обеспечивают себе устойчивый связь к капиталу, беттинг отчетности и личным установкам.
Расчетные операции осуществляются через встроенные банковские шлюзы. Ограничения на вклады и выводы определяются в соотношении с нормативными условиями и организационными регламентами минимизации опасностей.
Экспертные гемблеры настаивают отслеживать положение разрешения через контролирующие списки беттинг органов. Имиджевые характеристики охватывают позиции на специализированных ресурсах и комментарии настоящих пользователей.
Навигация в пространстве легальных ресурсов нуждается представления актуальных способов соединения. Профессиональные пользователи эксплуатируют РЎСѓРєР° казино для извлечения свежей данных о оперативных адресах.
Схема оформления счета в надежных организациях подразумевает детальную проверку. Актуальные организации применяют KYC-механизмы и AML-требования. Документальное сопровождение составляет от 24 до 72 интервалов.
Программные способы для минования барьеров развиваются вместе с ужесточением нормативных мер. VPN-службы уровня premium гарантируют шифрование AES-256 и протоколы OpenVPN. Устойчивость подключения кардинально важна для высокоролловых сессий.
Резервные платформы работают через пространственно распределенные компьютерные кластеры. CDN-архитектуры гарантируют сокращенную время ответа для азиатских геймеров. Автоматическое переключение активируется при идентификации барьера основного ресурса.
Банковские переводы в проверенных регионах подчиняются жестким критериям PCI DSS. Крипто расчеты увеличивают востребованность вследствие секретности и динамике обработки.
Смартфонные программы элитных компаний объединяют биометрическую авторизацию и push-извещения для принципиальных событий. Изменяемый облик программно корректируется под свойства матрицы.
Рабочие mirror-ссылки официальных азартных клубов на Лаки Бир казино обеспечивают непрерывный подключение к азартным порталам. Система клонирования создает эквивалентные версии центрального портала с фиксацией всех функций.
Алгоритм регистрации через зеркало абсолютно имитирует стандартную анкету. Только пришедшие игроки указывают действующий email, генерируют стойкий ключ и назначают рабочую платежное средство.
Подтверждение личного кабинета содержит предоставления удостоверений следуя KYC-стандартам. Снимок национального документа, верификация проживания и банковские реквизиты контролируются системой цифровую верификацию в течение 24-72 часа.
Подключение зарегистрированных игроков выполняется через стандартную модуль с 2FA идентификацией. Сессионные токены приходят на мобильный гаджет или e-mail адрес.
Опции финансового сектора через резервные ссылки содержит топовые финансовые инструменты. Visa, Mastercard, цифровые счета Skrill, Neteller, цифровые активы Bitcoin, Ethereum осуществляются с низкими сборами 0-3%.
Игровая коллекция воспроизводится в точности включая барабаны, карточные забавы, live-хостов и максимальные награды. RTP-показатели, колебания и проигрыш поддерживаются точными.
Поощрительная политика работает похоже основному ресурсу. Welcome-бандлы, фриспины, кешбэк и VIP-схемы стартуют машинально при достижении определенных требований.
Проверенные операторы игровых услуг предоставляют игрокам шанс к элитному развлечениям через целевые ресурсы, включая Mellstroy Game зеркало , которые точно исполняют глобальные критерии security.
Схема создания аккаунта necessita внесения верификационных деталей через криптографические SSL-connection. Провайдеры запрашивают нотариальное verification возраста и локации нахождения для исполнения юрисдикционных норм.
Двухэтапная верификация считается required aspect передовых механизмов безопасности. Users получают SMS-ключи, push-notification или применяют профессиональные программы наподобие Google Authenticator.
Резервные порталы нейтрализуют вопросы territorial запретов и DDoS-штурмов. Фактически реплики составляют тождественные dublicates центрального домена с поддержанием возможностей и индивидуальных параметров.
Компетентные клиенты советуют удерживать актуальные каталоги активных зеркал в закладках браузера. Провайдеры направляют информацию о современных ссылках через e-mail, Telegram-каналы и смартфонные apps.
Финансовые процедуры через лицензионные порталы обеспечены encryption methods стандарта банковского направления. Изъятие средств происходит исключительно на validated данные собственника учётной записи.
sex
DahliaNest picks – Descriptions are clear, thorough, and make it easy to understand the products.
Определение достойного развлекательного заведения в текущих реалиях требует детального внимания к лицензионному режиму. Квалифицированные клиенты представляют, что п»ї1хбет содержит последнюю сведения о доступных ресурсах.
Схема создания аккаунта в проверенных заведениях включает необходимую аутентификацию удостоверения. KYC-правила обеспечивают как казино, так и игрока от махинаций. Временные рамки на вывод капитала до закрытия контроля – нормальная система.
Цифровые запреты на доступ к игровым порталам нейтрализуются через резервные ссылки. Рабочие дубликаты сохраняют всестороннюю функциональность базового портала. Банковские процедуры, игровой результаты и наградные планы функционируют константными.
Капитальная защищенность характеризуется уровнем внедренных финансовых способов. SSL-шифрование, PCI DSS сертификация и дополнительная проверка формируют прочный заслон обороны.
Развлекательная библиотека сертифицированных сервисов предоставляет спины от ведущих создателей. RTP-индексы, вариативность и статистические схемы испытывают внешнюю валидацию в авторизованных лабораториях.
Системы лояльности в качественных операторах опираются на четких требованиях активности. Вейджер x35-40 считается адекватным для машина-поощрений, в то время как стандартные состязания принимаются в зачет с сниженным множителем.
Исследование в области легальных ресурсов включает владения новых инструментов входа. Продвинутые клиенты задействуют Меллстрой официальный сайт для извлечения актуальной материалов о работающих URL.
Алгоритм оформления счета в сертифицированных заведениях подразумевает многоуровневую верификацию. Новейшие поставщики применяют KYC-системы и AML-стандарты. Документальная процедура потребляет от 24 до 72 временных отрезков.
Компьютерные способы для избежания препятствий развиваются параллельно с интенсификацией правовых действий. VPN-решения уровня premium гарантируют шифрование AES-256 и технологии OpenVPN. Устойчивость соединения принципиально актуальна для привилегированных раундов.
Запасные ресурсы выполняют задачи через территориально разнесенные серверные мощности. CDN-комплексы гарантируют быструю задержку для глобальных игроков. Программное маршрутизация включается при распознавании блокировки базового портала.
Платежные переводы в лицензированных зонах подчиняются строгим стандартам PCI DSS. Децентрализованные транзакции завоевывают популярность по причине скрытности и скорости осуществления.
Переносные утилиты премиальных операторов совмещают отпечатковую аутентификацию и push-оповещения для ключевых ситуаций. Гибкий оформление программно изменяется под характеристики монитора.
Актуальные альтернативные домены легальных гемблинг-платформ на Gold casino создают устойчивый подключение к гемблинг сервисам. Методика дублирования строит аналогичные версии корневого сайта с фиксацией всех опций.
Процедура активации через зеркало полностью повторяет стандартную форму. Новые игроки прописывают функционирующий email, формируют стойкий шифр и определяют рабочую денежную единицу.
Подтверждение профиля требует представления свидетельств по KYC-стандартам. Копия национального документа, подтверждение резиденции и карточные сведения проверяются через алгоритмическую валидацию в течение 24-72 временных единиц.
Вход верифицированных участников выполняется через обычную форму с расширенной проверкой. Сессионные ключи передаются на телефонный девайс или email.
Инструменты пополнительного сектора через альтернативные домены обеспечивает распространенные платежные инструменты. Visa, Mastercard, онлайн кошельки Skrill, Neteller, блокчейн-токены Bitcoin, Ethereum осуществляются с оптимизированными платежами 0-3%.
Гемблинг коллекция копируется в точности включая машины, классические забавы, live-крупье и прогрессивы. RTP-индикаторы, волатильность и условия отыгрыша сохраняются точными.
Акционная программа функционирует подобно центральному сайту. Welcome-предложения, безвозмездные спины, возврат средств и VIP-схемы активируются алгоритмически при реализации заданных стандартов.
Передовые геймеры встречаются с изобилием программных особенностей при функционировании с проверенными порталами. Специализированные сайты типа казино РЎСѓРєР° обеспечивают свежую контент о функционировании казино организаций.
Механизм проверки профиля содержит комплекс обязательных уровней. Базовая аутентификация предполагает передачи бумаг верифицирующих субъект. Привычный перечень включает документ, автоудостоверение или внешний паспорт.
Системная составляющая записления охватывает внедрение SSL-шифрования и двухфакторной аутентификации. Квалифицированные геймеры настаивают задействовать полный набор предложенных настроек охраны.
Дублирующие порталы представляют полные клоны главного ресурса с поддержанием комплексного возможностей. Важнейшее достоинство кроется в тождественности денежных границ и требований условий прокрутки.
Процедура выявления рабочих зеркал основывается на отслеживании профессиональных телеграм-каналов и сотрудничающих платформ. Опытные геймеры задействуют виртуальные частные сети для формирования устойчивого подключения вне зависимости от территориальных барьеров.
https://uspharmaindex.com/# canadian pharmacy world coupon
securestack tech hub – The platform balances a professional appearance with strong protection measures.
see here now https://daobase.online
visit this website https://yomix.biz/
Lemon Lane collections – So many choices and the site layout makes sense.
Развлекательная сфера представляет интенсивный рост, привлекая легионы игроков. Экспертные ресурсы дают безопасную атмосферу для ставок. Развёрнутую материалы о таких провайдерах возможно найти на Лаки Бир регистрация .
Сертификация представляет центральным аспектом подбора площадки. Регуляторы Олдерни дают тщательный мониторинг финансовых транзакций. Конкретная аккредитованная портал осуществляет плановые проверки RNG-генераторов.
IT особенности современных беттинг-платформ объединяют SSL-защиту расчётного ранга. Создатели компьютерного обеспечения вроде Microgaming, NetEnt, Pragmatic Play добавляют многоуровневые схемы случайных показателей.
Механизм валидации аккаунта подразумевает предоставления удостоверений KYC-стандарта. Документ, документ о финансах, подтверждение адреса — типичный перечень для полноценного входа.
Параллельные URL убирают сложности с запретами операторов. Свежие варианты корректируются ежедневно цифровыми командами. Планшетные софт часто работают лучше сетевых вариантов.
Контроль средств устанавливает долгосрочную результативность гемблинговых раундов. Опытные геймеры указывают сокращать сумму вейджера до 1-2% от итогового банкролла.
Get More Information https://yomix.biz
Передовые платформы азартных услуг дают пользователям возможность к элитному игровому процессу через сертифицированные Вавада регистрация порталы. Лицензированная бизнес подразумевает следования строгих контролирующих стандартов.
Механизм открытия клиентского профиля предусматривает подтверждение приватных сведений. Регуляторы эксплуатируют комплексные механизмы KYC и AML для пресечения нарушающих переводов.
Электронные средства новейших казино работают на безопасных серверах с шифровальными протоколами. Геоблокировка заставляет операторов разрабатывать резервные URL.
Зеркальные домены образуют идентичные дубликаты базового портала с поддержанием всех опций и информации. Игроки обеспечивают себе стабильный соединение к депозиту, азартной истории и персональным опциям.
Денежные действия производятся через синхронизированные денежные шлюзы. Пределы на пополнения и выводы определяются в унисон с законодательными требованиями и корпоративными правилами риск-менеджмента.
Опытные пользователи рекомендуют анализировать статус разрешения через государственные базы данных развлекательных организаций. Престижные критерии задействуют позиции на специализированных сервисах и оценки подлинных клиентов.
москва луганск новоясеневская автобус
browse velvetpick – Sleek presentation with high-quality images makes exploring products enjoyable.
elvorax boutique – User-friendly setup and fresh presentation make it easy to find products.
Определение честного развлекательного площадки заставляет тщательного исследования правовых сертификатов. Современные ресурсы Килограмм казино предлагают участникам максимальную информацию о действующих лицензиях.
Алгоритм регистрации предусматривает определенное количество требуемых ступеней аутентификации. Владельцы истребуют справки, удостоверяющие идентичность и дееспособность. Типовой KYC-алгоритм занимает от 24 до 72 временных отрезков.
Управление банком инициируется с установления границ на пополнения. Искусные геймеры советуют применять принцип 5% от общего казино бюджета на одну раунд.
Системные препятствия поставщиков вынуждают использовать запасные адреса. Копии сохраняют полную работоспособность основного портала, подразумевая архив платежей и развлекательный прогресс.
Инновационные расчетные системы обеспечивают скоростные взносы через цифровые счета. Bitcoin, Ethereum и стабильные валюты гарантируют конфиденциальность и мизерные платежи. Продолжительность проведения выводов составляет 10-30 отрезков.
Системы постоянства подразумевают многоуровневые категории с нарастающим вознаграждением. VIP-кураторы гарантируют индивидуальные бонусы, расширенные пределы и ускоренную техподдержку.
Современные платформы азартных игр предлагают участникам подключение к премиальному игровому процессу через сертифицированные п»ї1хбет регистрация платформы. Лицензированная работа требует выполнения четких законодательных стандартов.
Процедура активации индивидуального учетной записи предусматривает валидацию конфиденциальных данных. Провайдеры внедряют комплексные протоколы KYC и AML для исключения незаконных платежей.
Цифровые решения инновационных развлекательных порталов основываются на безопасных инфраструктурах с криптографическими стандартами. Локальные запреты побуждает администраторов создавать альтернативные адреса.
Зеркальные ресурсы образуют идентичные клоны главного портала с поддержанием всех функций и параметров. Игроки достигают стабильный вход к средствам, азартной истории и клиентским параметрам.
Денежные процедуры проходят через встроенные денежные системы. Лимиты на вклады и выводы фиксируются в согласии с лицензионными стандартами и индивидуальными процедурами минимизации опасностей.
Квалифицированные пользователи рекомендуют контролировать условия авторизации через регуляторные базы данных игорных органов. Имиджевые параметры содержат рейтинги на тематических сайтах и feedback подлинных участников.
Передовые порталы игорных активностей обеспечивают участникам вход к премиальному развлечениям через надежные Вавада зеркало платформы. Лицензированная операционная активность требует учета конкретных надзорных стандартов.
Механизм оформления игрового аккаунта предусматривает верификацию индивидуальных информации. Управляющие внедряют углубленные алгоритмы KYC и AML для пресечения мошеннических финансовых действий.
IT инструменты новейших развлекательных порталов функционируют на защищенных хостингах с шифровальными технологиями. IP-фильтрация обязывает администраторов разрабатывать параллельные URL.
Альтернативные ресурсы составляют полные репликации первичного портала с удержанием всех возможностей и параметров. Участники получают непрерывный вход к капиталу, гемблинг истории и пользовательским конфигурациям.
Денежные транзакции реализуются через интегрированные банковские системы. Пределы на пополнения и изъятия регулируются в соотношении с нормативными стандартами и организационными нормами риск-менеджмента.
Профессиональные беттеры советуют мониторить ситуацию аккредитации через регуляторные базы данных азартных комиссий. Репутационные индикаторы предусматривают оценки на профильных сайтах и мнения подлинных пользователей.
Подбор качественного азартного портала в текущих границах заставляет повышенного анализа к правовому режиму. Знающие игроки представляют, что ДживиСпин зеркало отображает новую факты о функционирующих операторах.
Процедура создания аккаунта в официальных платформах предусматривает требуемую проверку удостоверения. KYC-стандарты оберегают как заведение, так и клиента от обмана. Временные ограничения на вывод финансов до выполнения валидации – стандартная практика.
Электронные блокировки на вход к азартным площадкам обходятся через альтернативные ссылки. Рабочие клоны обеспечивают абсолютную работоспособность главного сайта. Расчетные движения, геймплейный продвижение и наградные предложения продолжают устойчивыми.
Капитальная безопасность определяется уровнем внедренных банковских механизмов. SSL-защита, PCI DSS аттестация и многоуровневая верификация создают безопасный периметр охраны.
Развлекательная коллекция сертифицированных провайдеров объединяет спины от топовых создателей. RTP-значения, вариативность и статистические системы подвергаются нейтральную контроль в признанных центрах.
Системы лояльности в надежных заведениях базируются на понятных параметрах проигрыша. Проигрыш x35-40 характеризуется нормальным для спин-привилегий, в то время как карточные забавы включаются в счет с редуцированным показателем.
blog https://letsexchange.cc
More Info https://bitmix.app
Актуальные зеркала проверенных казино на казино 1xBet обеспечивают непрерывный вход к игровым ресурсам. Схема зеркалирования строит точные версии центрального ресурса с удержанием всех механизмов.
Схема создания аккаунта через дублирующий портал полностью дублирует главную форму. Только пришедшие клиенты указывают валидный email, генерируют безопасный пароль и устанавливают игровую денежную единицу.
Подтверждение профиля требует загрузки бумаг опираясь на KYC-политике. Скан удостоверения личности, подтверждение места жительства и карточные реквизиты контролируются системой машинную верификацию в течение 24-72 временных единиц.
Аутентификация зарегистрированных клиентов осуществляется через базовую модуль с 2FA аутентификацией. Сессионные коды поступают на телефонный аппарат или электронную почту.
Механизмы входящего блока через резервные ссылки предлагает распространенные банковские платформы. Visa, Mastercard, веб кошельки Skrill, Neteller, виртуальные монеты Bitcoin, Ethereum процессируются с низкими взносами 0-3%.
Азартная библиотека копируется в точности включая spinning games, настольные геймплей, live-операторов и накопительные призы. RTP-коэффициенты, волатильность и условия отыгрыша остаются такими же.
Поощрительная схема функционирует похоже главному сайту. Welcome-предложения, фриспины, кешбэк и VIP-курсы активируются программно при реализации установленных параметров.
Нынешние геймеры обталкиваются с огромным количеством системных нюансов при деятельности с сертифицированными сайтами. Профессиональные сайты типа п»ї1xBet казино поставляют современную сведения о операциях азартных провайдеров.
Механизм аутентификации кабинета охватывает множество обязательных стадий. Первичная валидация нуждается отправки документов удостоверяющих индивидуальность. Типовой перечень содержит удостоверение личности, лицензию водителя или международное ID.
Технологическая сторона записления предполагает использование криптографической защиты и двойной авторизации. Продвинутые клиенты советуют задействовать все представленных опций защиты.
Дублирующие порталы составляют полные клоны главного платформы с удержанием комплексного функционала. Важнейшее бонус состоит в схожести денежных ограничений и параметров проигрыша.
Механизм нахождения актуальных дублирующих порталов базируется на наблюдении профессиональных информационных каналов и сотрудничающих площадок. Опытные геймеры эксплуатируют прокси-соединения для гарантирования бесперебойного соединения без оглядки от региональных барьеров.
https://PostEzAds.com/588/posts/1/1/1893763.html
Good morning!
Reveal the mystery behind interesting data that holds valuable secrets for all and uncover the hidden mechanics of reality see on the website for mechanic breakdowns
Full information on the link – https://202fliks.site
All the best and development in business!
Поиск в пространстве легальных сайтов предполагает знания актуальных методов доступа. Продвинутые пользователи эксплуатируют казино Sykaaa для извлечения свежей информации о функционирующих путях.
Процесс формирования аккаунта в лицензированных компаниях охватывает детальную проверку. Продвинутые провайдеры применяют KYC-системы и AML-требования. Документальное сопровождение требует от 24 до 72 периодов.
IT решения для избежания барьеров эволюционируют синхронно с усилением законодательных шагов. VPN-сервисы категории premium гарантируют защиту AES-256 и стандарты OpenVPN. Постоянство подключения принципиально необходима для привилегированных игровых периодов.
Дублирующие домены оперируют через регионально размещенные технические системы. CDN-системы обеспечивают оптимальную латентность для азиатских игроков. Автоматическое переключение запускается при обнаружении блокировки основного ресурса.
Банковские манипуляции в официальных территориях отвечают определенным требованиям PCI DSS. Цифровые платежи увеличивают признание в результате анонимности и темпу выполнения.
Переносные программы топовых брендов включают биометрическую авторизацию и push-сообщения для ключевых событий. Адаптивный облик независимо настраивается под параметры матрицы.
Беттинговая ниша представляет интенсивный прогресс, заинтересовывая тысячи геймеров. Квалифицированные площадки гарантируют надёжную атмосферу для игры. Подробную информацию о данных операторах можно изучить на типпи казино .
Аттестация остаётся главным фактором выбора площадки. Регуляторы Великобритании гарантируют качественный проверку валютных манипуляций. Каждая официальная сайт выполняет регулярные аудиты RNG-механизмов.
Компьютерные свойства новейших казино включают SSL-кодирование расчётного стандарта. Поставщики цифрового обеспечения вроде Microgaming, NetEnt, Pragmatic Play подключают сложные модели случайных параметров.
Схема подтверждения счёта подразумевает подачи свидетельств KYC-типа. Удостоверение, документ о доходах, подтверждение регистрации — типичный комплект для финального активации.
Резервные ссылки ликвидируют трудности с фильтрацией организаций. Актуальные варианты адаптируются регулярно программными специалистами. Смартфонные утилиты нередко оперируют качественнее интернет вариантов.
Финансовая дисциплина задаёт продолжительную прибыльность беттинговых партий. Профессиональные геймеры советуют сокращать сумму бета до 1-2% от общего банкролла.
Актуальные платформы развлекательных развлечений гарантируют пользователям подключение к высококлассному развлечениям через безопасные Mellstroy Game зеркало системы. Официальная бизнес влечет исполнения жестких надзорных требований.
Процесс активации игрового аккаунта охватывает подтверждение приватных сведений. Администраторы используют углубленные процедуры KYC и AML для предотвращения мошеннических платежей.
Технические решения актуальных беттинг площадок функционируют на безопасных облачных системах с HTTPS алгоритмами. Территориальные ограничения заставляет владельцев разрабатывать параллельные домены.
Резервные сайты образуют полные клоны основного платформы с сохранением всех сервисов и параметров. Клиенты обеспечивают себе непрерывный связь к счету, беттинг отчетности и персональным установкам.
Денежные переводы проходят через связанные расчетные системы. Рамки на депозиты и снятия определяются в соответствии с нормативными критериями и внутренними нормами управления рисками.
Квалифицированные клиенты предлагают проверять условия авторизации через государственные каталоги гемблинг организаций. Статусные индикаторы охватывают ранги на экспертных ресурсах и комментарии настоящих участников.
Легальные провайдеры игровых сервисов oferuja геймерам доступ к элитному игровому процессу через целевые платформы, включая п»ї1хбет , которые специально исполняют transnational критерии безопасности.
Механизм создания аккаунта включает ввода валидационных деталей через encrypted SSL-connection. Букмекеры просят предоставить нотариальное verification совершеннолетия и территории регистрации для соблюдения нормативных норм.
Многоуровневая верификация является mandatory aspect передовых систем конфиденциальности. Клиенты располагают SMS-токены, push-сообщения или используют targeted приложения вроде Google Authenticator.
Дублирующие адреса нейтрализуют вопросы локальных блокировок и DDoS-воздействий. Фактически зеркала формируют копийные dublicates центрального платформы с maintaining инструментария и личных сведений.
Профессиональные геймеры советуют удерживать current списки функционирующих дублей в favourites обозревателя. Провайдеры доставляют сведения о свежих ссылках через e-mail, Telegram-communities и mobile софт.
Денежные процедуры через официальные порталы покрыты cryptographic алгоритмами уровня банковского индустрии. Вывод денег происходит исключительно на верифицированные карты держателя личного кабинета.
Big Bass Bonanza has secured its place in the UK casino market through a balanced combination of engaging gameplay, rewarding features, and trustworthy platforms. Whether you are fishing for fun or aiming for real money wins, this Pragmatic Play slot delivers excitement and the potential for sizable payouts. Make sure to play at a credible UK casino site and don’t forget to try the free demo first to familiarize yourself before betting real funds. Cast your line and good luck! COPYRIGHT © 2015 – 2025. All rights reserved to Pragmatic Play, a Veridian (Gibraltar) Limited investment. Any and all content included on this website or incorporated by reference is protected by international copyright laws. This game isn’t loaded with numerous bonus features that’ll complicate the gameplay mechanics for participants. As mentioned previously, straightforward betting was considered when Pragmatic Play developed & launched this Video Slot. Therefore, Wilds and Multiplying Free Spins are exclusively available. But it’ll be noted that bonus features can be won regularly throughout Bigger Bass Bonanza™.
https://hineratrading.ltd/xpokies-casino-experienced-player-tools-advanced-features-for-australians-review/
No system can guarantee wins on the Gates of Olympus slot, but there are ways to play smarter. Whether you’re trying the Gates of Olympus demo or putting real money down at a Gates of Olympus casino, here’s what to focus on. Wild symbols with multipliers in the slot gates of olympus this means that larger symbols count as 2, along with the word Bonus. Keep your mind sharp and critical if you want to collect the big bucks, it stopped the lower-volume skins from doing their jobs. On the flip side, you might prefer to play the Gates of Olympus casino slot for cash. Of course, this means that you’re actually going to have a chance of winning real money. And that’s the one main benefit of the situation. Our opinion: Pragmatic Play is a renowned software provider, and its products are available at many online casinos. We found casinos that host Gates of Olympus offer the best bonuses for new players. Due to the game’s high volatility, it’s advantageous to sign up with these casinos to get the most bang for your buck.
Get More Info https://bitmix.app
Актуальные участники попадают с проблемой доступа к сертифицированным площадкам. Компании ограничивают базовые порталы, но знающие п»ї1xBet казино клиенты понимают о существовании параллельных платформ.
Альтернативный адрес представляет идентичную дубликат первичного площадки. Средства защиты сохраняются такими же. Расчётные действия производятся через сходные шлюзы.
Технология открытия счёта через дополнительный ресурс включает привычной аутентификации. Администраторы требуют свидетельства для исполнения KYC-правил. Персональные характеристики подвергаются комплексную верификацию.
Финансовые пределы на параллельных ресурсах совпадают базовым условиям. Наименьшие ставки продолжают постоянными. Прогрессивные банки интегрируются между многочисленными адресами.
Стимулирующие программы действуют всесторонне на параллельных порталах. Множитель ставок поддерживает стартовые значения. Тайминг проигрывания поддерживается.
Команда обслуживания анализирует вопросы с резервных ссылок таким же способом. Живой переписка поддерживает беспрерывный формат деятельности.
find out here https://daobase.info/
stromectol 3 mg tablets price: Ivermectin Access USA – Ivermectin Access USA
visit this website https://daobase.info/
Передовые участники сталкиваются с проблемой входа к лицензированным площадкам. Компании блокируют первичные порталы, но грамотные Килограмм казино игроки понимают о присутствии зеркальных порталов.
Зеркало составляет идентичную реплику базового сайта. Средства защиты поддерживаются равнозначными. Платёжные действия реализуются через те же шлюзы.
Методика оформления профиля через резервный домен включает привычной проверки. Сотрудники просят удостоверения для соблюдения KYC-норм. Персональные параметры проходят расширенную подтверждение.
Финансовые ограничения на дополнительных ресурсах идентичны стандартным условиям. Стартовые ставки функционируют стабильными. Возрастающие выигрышные пулы синхронизируются между многочисленными порталами.
Стимулирующие механизмы оперируют всесторонне на зеркальных ресурсах. Коэффициент оборота сохраняет исходные показатели. Временные рамки реализации остаётся прежним.
Сервис обслуживания решает запросы с параллельных ресурсов идентично. Прямой диалог гарантирует 24-часовой формат обслуживания.
Выбор проверенного гемблинг заведения нуждается основательного анализа официальных сертификатов. Новые сайты казино Голд предоставляют клиентам абсолютную факты о имеющихся допусках.
Процедура получения доступа подразумевает различные принудительных ступеней подтверждения. Провайдеры истребуют удостоверения, доказывающие самобытность и дееспособность. Традиционный KYC-процесс составляет от 24 до 72 временных отрезков.
Банкролл-менеджмент начинается с задания лимитов на депозиты. Профессиональные участники настаивают эксплуатировать норму 5% от совокупного казино бюджета на отдельную раунд.
Программные препятствия операторов вынуждают применять альтернативные маршруты. Копии удерживают безусловную эффективность базового сайта, подразумевая хронологию переводов и казино продвижение.
Современные платежные системы дают мгновенные пополнения через виртуальные хранилища. Bitcoin, Ethereum и фиксированные активы дают конфиденциальность и мизерные сборы. Период реализации извлечений равно 10-30 промежутков.
Схемы приверженности подразумевают каскадные ранги с возрастающим компенсацией. VIP-представители гарантируют личные вознаграждения, увеличенные рамки и ускоренную техподдержку.
US Pharma Index: US Pharma Index – mail order pharmacy
Рабочие mirror-ссылки легальных gaming-операторов на Лаки Бир сайт гарантируют непрерывный вход к игровым системам. Методика клонирования образует точные копии главного веб-площадки с сохранением всех механизмов.
Процедура оформления профиля через зеркало на сто процентов повторяет основную анкету. Дебютные игроки заполняют активный email, формируют сложный пароль и устанавливают операционную денежную единицу.
Аутентификация профиля подразумевает предоставления документов по KYC-требованиям. Скан национального документа, подтверждение резиденции и платежные реквизиты проверяются через машинную проверку в течение 24-72 ч.
Вход зарегистрированных пользователей реализуется через типовую окно с двухфакторной аутентификацией. Разовые токены доставляются на сотовый аппарат или email.
Инструменты финансового сектора через дублирующие порталы обеспечивает распространенные денежные платформы. Visa, Mastercard, электронные балансы Skrill, Neteller, криптовалюты Bitcoin, Ethereum реализуются с уменьшенными процентами 0-3%.
Развлекательная база дублируется в точности включая барабаны, настольные забавы, live-хостов и мегавыигрыши. RTP-значения, вариативность и условия отыгрыша фиксируются аналогичными.
Поощрительная политика выполняется похоже базовому домену. Welcome-пакеты, безвозмездные спины, возврат средств и VIP-системы включаются системно при исполнении определенных параметров.
Действующие mirror-ссылки проверенных азартных клубов на Вавада сайт обеспечивают постоянный соединение к азартным сервисам. Система клонирования создает аналогичные копии основного домена с консервацией всех функций.
Система создания аккаунта через зеркало полностью дублирует главную заявку. Только пришедшие участники регистрируют активный email, устанавливают надежный шифр и определяют рабочую денежную единицу.
Аутентификация личного кабинета содержит передачи документов согласно KYC-нормам. Фото водительских прав, валидация адреса и финансовые данные контролируются системой алгоритмическую анализ в течение 24-72 периодов.
Вход верифицированных клиентов осуществляется через стандартную панель с двухфакторной верификацией. Разовые токены доставляются на сотовый устройство или электронную почту.
Функционал депозитного сектора через резервные ссылки обеспечивает востребованные платежные сервисы. Visa, Mastercard, электронные портмоне Skrill, Neteller, блокчейн-токены Bitcoin, Ethereum обрабатываются с сокращенными взносами 0-3%.
Gaming библиотека клонируется абсолютно включая барабаны, столовые развлечения, live-операторов и накопительные призы. RTP-параметры, изменчивость и проигрыш остаются такими же.
Бонусная система оперирует идентично центральному домену. Welcome-предложения, даровые прокруты, refund и VIP-планы включаются системно при реализации заданных требований.
For reviews
cheap augmentin price
for presentation slides.
Поиск легального игорного оператора подразумевает основательного разбора лицензионных бумаг. Современные сайты казино Голд предоставляют участникам абсолютную данные о собственных аккредитациях.
Алгоритм получения доступа подразумевает определенное количество требуемых стадий валидации. Владельцы истребуют справки, подтверждающие идентичность и зрелость. Обычный KYC-алгоритм занимает от 24 до 72 часов.
Финансовое планирование запускается с фиксации рамок на депозиты. Профессиональные клиенты настаивают применять установку 5% от совокупного игорного бюджета на единичную игру.
Цифровые блокировки провайдеров побуждают использовать запасные ссылки. Зеркала оберегают безусловную производительность главного ресурса, содержа историю транзакций и казино успех.
Передовые финансовые инструменты дают моментальные депозиты через виртуальные счета. Bitcoin, Ethereum и устойчивые монеты поддерживают конфиденциальность и символические взносы. Срок осуществления изъятий достигает 10-30 интервалов.
Схемы приверженности охватывают ступенчатые статусы с нарастающим компенсацией. VIP-кураторы предлагают персонализированные бонусы, усиленные рамки и первоочередную техподдержку.
Подбор надежного развлекательного портала в нынешних реалиях предполагает детального анализа к юридическому состоянию. Знающие участники представляют, что Клубника казино содержит новую данные о функционирующих сервисах.
Схема создания аккаунта в лицензированных операторах объединяет обязательную валидацию документов. KYC-процедуры гарантируют как казино, так и клиента от афер. Временные лимиты на снятие финансов до завершения подтверждения – нормальная процедура.
Программные блокировки на доступ к гемблинг ресурсам обходятся через дублирующие порталы. Активные дубликаты сохраняют полную производительность базового платформы. Денежные операции, развлекательный достижения и бонусные системы сохраняются стабильными.
Экономическая безопасность оценивается показателем внедренных расчетных способов. SSL-криптография, PCI DSS подтверждение и двухфакторная аутентификация формируют надежный периметр безопасности.
Геймплейная коллекция официальных провайдеров предоставляет спины от топовых разработчиков. RTP-индексы, волатильность и математические формулы получают нейтральную аудит в утвержденных организациях.
Схемы мотивации в серьезных заведениях основываются на прозрачных требованиях проигрыша. Проигрыш x35-40 оценивается адекватным для слот-привилегий, в то время как настольные развлечения идут в счет с сниженным множителем.
BasketBerry collections – I was impressed by the polite and rapid response from customer service yesterday evening.
https://uspharmaindex.com/# US Pharma Index
this social media portal – Engaging strategies and smart content that feel relevant today.
click here for info https://daobase.online
Harlune savings – I got a fast response and the guidance was clear and supportive.
StockLily online – Items are organized clearly and descriptions provide all the necessary details.
Dollyn offers – Fast response from customer service and everything was sorted quickly.
Поиск проверенного азартного площадки подразумевает глубокого исследования правовых сертификатов. Актуальные ресурсы mad casino гарантируют клиентам стопроцентную данные о текущих допусках.
Система оформления счета охватывает определенное количество ключевых этапов проверки. Операторы запрашивают бумаги, удостоверяющие личность и совершеннолетие. Традиционный KYC-алгоритм занимает от 24 до 72 временных отрезков.
Банкролл-менеджмент запускается с назначения рамок на депозиты. Искусные участники советуют внедрять принцип 5% от совокупного казино средств на индивидуальную игру.
Технические барьеры провайдеров заставляют использовать резервные пути. Дубликаты сохраняют полную активность главного платформы, охватывая летопись транзакций и гемблинг прогресс.
Новые платежные методы обеспечивают оперативные вклады через цифровые аккаунты. Bitcoin, Ethereum и стабильные валюты предоставляют анонимность и наименьшие платежи. Время осуществления снятий насчитывает 10-30 периодов.
Планы постоянства содержат иерархические статусы с возрастающим бонусом. VIP-координаторы обеспечивают персонализированные вознаграждения, расширенные пределы и преимущественную обслуживание.
Поиск в области проверенных ресурсов требует знания продвинутых инструментов доступа. Умелые участники внедряют mad casino для обретения свежей сведений о действующих доменах.
Процедура формирования профиля в сертифицированных компаниях охватывает сложную проверку. Актуальные организации эксплуатируют KYC-процедуры и AML-критерии. Документальное сопровождение отнимает от 24 до 72 периодов.
Компьютерные методы для избежания блокировок прогрессируют сообща с усилением нормативных инициатив. VPN-службы разряда premium предоставляют безопасность AES-256 и стандарты OpenVPN. Непрерывность подключения fundamentally актуальна для элитных партий.
Альтернативные адреса оперируют через пространственно расположенные цифровые ресурсы. CDN-комплексы поддерживают оптимальную задержку для международных участников. Техническое переключение активируется при детекции ограничения базового адреса.
Финансовые движения в официальных юрисдикциях отвечают конкретным правилам PCI DSS. Децентрализованные переводы увеличивают распространение по причине скрытности и динамике процессинга.
Планшетные программы премиальных организаций совмещают физиологическую проверку и push-уведомления для ключевых эпизодов. Изменяемый интерфейс автономно изменяется под свойства матрицы.
Делюсь ссылкой на материал про ufc в феврале марте 2026 три недели которые встряхнут дивизионы, будет интересно. Посмотрите сами: https://tut-vse-yasno.ru/news/ufc-fevral-mart-2026-tri-nedeli-gde-favority-mogut-ruhnut-a-diviziony-perezagruzitsya/
check these beach finds – Great maritime feel, plus the pricing appears balanced and accessible.
our website https://daobase.io
visit zephyrmart – Quick and easy navigation, items are simple to locate throughout the store.
Исследование в пространстве проверенных сайтов включает понимания современных технологий доступа. Профессиональные участники эксплуатируют лаки Р±РёСЂ казино для обретения современной сведений о функционирующих доменах.
Механизм формирования учетной записи в официальных организациях включает многоуровневую валидацию. Передовые провайдеры эксплуатируют KYC-протоколы и AML-критерии. Документальное сопровождение отнимает от 24 до 72 периодов.
Цифровые методы для прохождения барьеров прогрессируют синхронно с интенсификацией нормативных действий. VPN-сервисы категории premium предоставляют шифрование AES-256 и протоколы OpenVPN. Стабильность соединения кардинально актуальна для высокоролловых игровых периодов.
Резервные ресурсы выполняют задачи через регионально размещенные серверные системы. CDN-системы осуществляют быструю пинг для глобальных геймеров. Техническое роутинг активируется при распознавании препятствия главного ресурса.
Финансовые транзакции в легальных зонах следуют жестким стандартам PCI DSS. Децентрализованные переводы завоевывают актуальность из-за скрытности и оперативности обработки.
Портативные клиенты премиальных провайдеров содержат лицевую аутентификацию и push-алерты для ключевых ситуаций. Изменяемый внешний вид автоматически подстраивается под особенности панели.
Новейшие геймеры пересекаются с массой технологических тонкостей при функционировании с официальными сайтами. Тематические сайты типа lucky bear казино официальный сайт обеспечивают новую сведения о процессах азартных операторов.
Механизм проверки профиля включает набор принудительных стадий. Начальная аутентификация требует отправки удостоверений подтверждающих персону. Стандартный перечень содержит свидетельство, водительские права или международный паспорт.
Технологическая составляющая регистрации содержит задействование защищенного протокола и двухуровневой проверки. Продвинутые участники рекомендуют запускать все представленных функций секьюрити.
Запасные домены составляют идентичные клоны базового домена с сохранением всего арсенала. Важнейшее бонус выражается в подобии денежных ограничений и критериев условий прокрутки.
Алгоритм нахождения функционирующих дублирующих порталов основывается на контроле профессиональных новостных лент и сотрудничающих платформ. Экспертные клиенты внедряют прокси-соединения для формирования надежного входа независимо от региональных ограничений.
Good morning!
Unlock travel mysterious destinations with interesting and valuable adventure facts and go where few have gone see on the website for travel guides
Full information on the link – https://202fliks.site
All the best and development in business!
have a peek at this site https://daobase.io/
These big fish don’t add to a progressive jackpot but don’t be disappointed. You can reel in a mighty 2,100x your total bet during the bonus free spins round. To get close to the max win amount, you’ll have to get as many wilds as possible during the free spins round. Each wild that lands while you’re spinning free rounds increase the multiplier. One of the major reasons why the slot is so popular is that its bonus round gets triggered quite frequently. No official stat is provided, but this becomes obvious quite quickly. 1-2 scatters show up in almost every other game. Bigger Bass Bonanza demo is always available to test the theory. 18+ | Terms apply The Ante Bet is another feature in Big Bass Bonanza that allows players to increase their stake in exchange for a higher chance of triggering the bonus round. By paying a slightly higher amount per spin, players increase the likelihood of activating the free spins feature, which can result in greater rewards. Both features provide an added layer of excitement for players who enjoy taking a more proactive role in their gameplay. However, it’s important to note that these features are not available to players in the UK, as they are restricted due to local gambling regulations.
https://buchveroeffentlichen.com/raging-bull-the-aussie-casino-game-experience/
Up until the release of Big Bass Bonanza, Sweet Bonanza was one of Pragmatic Play’s most popular slot games. However, that soon all changed, as the friendly fisherman captured players’ hearts. The game features a fairly simple bonus feature, and maybe this is what is appealing to players. Olaf collects fish for big wins and progresses on a bonus trail for bigger win multipliers. As soon as Pragmatic realized that they had a winning formula, they started milking it for all its worth. You can try the Big Bass Bonanza demos in our free demo slot section. Big Bass Bonanza has nice graphics that transport players underwater. Rising bubbles separate the reels and on the reels, the fishing theme continues. High value symbols include fish, tackleboxes, fishing floats, fishermen, fishing rods and dragonflies, while the low value symbols are you’re your standard playing card symbols 10, J, Q, K and A in a variety of colours. As you spin the reels, a lively jingle plays in the background which works very well with the fun fishing theme.
Новейшие геймеры оказываются с проблемой входа к легальным ресурсам. Организации блокируют первичные ссылки, но знающие аква казино клиенты знают о существовании параллельных сайтов.
Дополнительный домен является абсолютную воспроизведение первичного портала. Средства защиты сохраняются равнозначными. Денежные процедуры выполняются через равнозначные шлюзы.
Алгоритм создания аккаунта через параллельный адрес включает классической верификации. Операторы просят бумаги для реализации KYC-стандартов. Персональные характеристики осуществляют двухфакторную аутентификацию.
Депозитные границы на альтернативных платформах равняются основным спецификациям. Низшие ставки сохраняются фиксированными. Возрастающие призовые фонды синхронизируются между множественными порталами.
Стимулирующие программы оперируют полноценно на дополнительных площадках. Отыгрышный коэффициент гарантирует стартовые параметры. Временные рамки отыгрыша не изменяется.
Сервис поддержки решает обращения с резервных ссылок аналогично. Интерактивный чат поддерживает беспрерывный порядок функционирования.
Функционирующие дублирующие порталы легальных игорных заведений на Клубника регистрация обеспечивают беспрерывный коннект к азартным ресурсам. Методика реплицирования генерирует эквивалентные версии основного портала с сохранением всех возможностей.
Схема создания аккаунта через зеркало на сто процентов имитирует стандартную шаблон. Новые клиенты регистрируют действующий email, устанавливают стойкий ключ и устанавливают игровую курренси.
Идентификация профиля подразумевает передачи справок по KYC-стандартам. Копия ID-карты, свидетельство места жительства и банковские реквизиты проверяются через программную верификацию в течение 24-72 временных единиц.
Авторизация существующих пользователей выполняется через классическую интерфейс с 2FA идентификацией. Временные ключи доставляются на сотовый аппарат или электронную почту.
Механизмы депозитного компонента через дублирующие порталы содержит топовые расчетные сервисы. Visa, Mastercard, цифровые балансы Skrill, Neteller, блокчейн-токены Bitcoin, Ethereum выполняются с уменьшенными процентами 0-3%.
Игровая база дублируется полностью включая барабаны, настольные игры, live-крупье и максимальные награды. RTP-параметры, дисперсия и проигрыш остаются такими же.
Подарочная схема функционирует похоже корневому порталу. Welcome-предложения, даровые прокруты, кешбэк и VIP-системы запускаются машинально при исполнении определенных требований.
http://ivermectinaccessusa.com/# stromectol in canada
affordable pharmacy US Pharma Index US Pharma Index
Навигация в секторе проверенных платформ требует знания продвинутых технологий подключения. Профессиональные участники задействуют Клубника казино для добывания актуальной сведений о активных ссылках.
Механизм формирования профиля в проверенных организациях подразумевает тщательную валидацию. Продвинутые операторы эксплуатируют KYC-протоколы и AML-правила. Документооборот занимает от 24 до 72 периодов.
IT методы для избежания блокировок прогрессируют одновременно с ужесточением правовых шагов. VPN-сервисы уровня premium предоставляют шифрование AES-256 и методы OpenVPN. Постоянство соединения жизненно актуальна для VIP заходов.
Резервные ресурсы действуют через регионально размещенные технические кластеры. CDN-архитектуры предоставляют низкую латентность для глобальных пользователей. Автоматическое редирект запускается при идентификации барьера первичного сайта.
Экономические операции в сертифицированных областях подчиняются определенным стандартам PCI DSS. Блокчейн переводы увеличивают признание в результате анонимности и динамике выполнения.
Портативные клиенты топовых операторов включают лицевую проверку и push-оповещения для ключевых эпизодов. Адаптивный интерфейс независимо изменяется под параметры матрицы.
try here https://daobase.io/
Перемещение в секторе проверенных площадок нуждается понимания современных инструментов соединения. Умелые геймеры задействуют тип топ казино для добывания релевантной информации о функционирующих адресах.
Процедура создания счета в лицензированных организациях охватывает сложную верификацию. Современные провайдеры внедряют KYC-алгоритмы и AML-требования. Бумажная работа отнимает от 24 до 72 периодов.
Технические технологии для прохождения запретов эволюционируют одновременно с укреплением регуляторных решений. VPN-сервисы категории premium гарантируют криптографию AES-256 и технологии OpenVPN. Надежность канала кардинально существенна для премиальных заходов.
Альтернативные домены действуют через географически рассредоточенные цифровые системы. CDN-системы гарантируют минимальную отклик для глобальных игроков. Программное переключение активируется при идентификации препятствия базового домена.
Денежные движения в проверенных юрисдикциях следуют конкретным стандартам PCI DSS. Цифровые операции получают признание по причине скрытности и быстроте процессинга.
Портативные программы премиальных компаний включают физиологическую идентификацию и push-сообщения для существенных ситуаций. Настраиваемый облик автономно корректируется под параметры дисплея.
browse sitemapstudio – Intuitive and clean interface helps anyone make sitemaps quickly.
кухни на заказ в спб кухни на заказ в спб .
explanation https://bitmix.app/
additional info https://bitmix.app
HollowCart deals – Browsing was effortless and intuitive, despite using an older mobile phone.
кухни на заказ петербург kuhni-spb-43.ru .
Подбор надежного развлекательного ресурса требует основательного анализа регулятивных разрешений. Современные ресурсы Голд сайт обеспечивают клиентам абсолютную информацию о своих лицензиях.
Механизм открытия аккаунта предусматривает ряд требуемых шагов валидации. Владельцы запрашивают удостоверения, засвидетельствующие персону и зрелость. Стандартный KYC-процесс требует от 24 до 72 периодов.
Банкролл-менеджмент начинается с фиксации ограничений на депозиты. Опытные клиенты предлагают задействовать правило 5% от полного игорного бюджета на индивидуальную партию.
Электронные препятствия администраторов принуждают применять вспомогательные домены. Дубликаты сохраняют стопроцентную производительность основного портала, содержа журнал сделок и игровой продвижение.
Новые денежные способы обеспечивают скоростные депозиты через цифровые аккаунты. Bitcoin, Ethereum и устойчивые монеты обеспечивают анонимность и крошечные отчисления. Период проведения выводов составляет 10-30 отрезков.
Планы приверженности предусматривают ступенчатые категории с прогрессивным вознаграждением. VIP-координаторы обеспечивают персонализированные вознаграждения, усиленные пределы и приоритетную помощь.
Перемещение в секторе лицензированных ресурсов включает знания продвинутых технологий подключения. Продвинутые клиенты применяют million казино для приобретения современной сведений о активных доменах.
Алгоритм открытия личного кабинета в сертифицированных организациях подразумевает сложную верификацию. Продвинутые организации эксплуатируют KYC-алгоритмы и AML-правила. Бумажная работа требует от 24 до 72 интервалов.
Цифровые инструменты для минования препятствий развиваются одновременно с усилением регуляторных мер. VPN-инструменты уровня premium предлагают кодирование AES-256 и методы OpenVPN. Надежность канала fundamentally актуальна для элитных игровых периодов.
Альтернативные платформы функционируют через локально распределенные компьютерные кластеры. CDN-сети поддерживают сокращенную время ответа для международных участников. Техническое переключение запускается при выявлении препятствия главного сайта.
Экономические транзакции в проверенных юрисдикциях подпадают под четким нормам PCI DSS. Блокчейн расчеты набирают актуальность вследствие секретности и темпу обработки.
Мобильные клиенты топовых операторов содержат голосовую проверку и push-алерты для существенных событий. Модифицируемый интерфейс самостоятельно изменяется под настройки монитора.
Jaspercart online store – Reasonable costs and a simple checkout process made buying easy.
the latchbasket website – Wide variety on display, definitely adding this to my favorites.
QuillMarket shop online – Everything is laid out neatly and browsing the catalog is easy.
кухня по индивидуальному заказу спб кухня по индивидуальному заказу спб .
next page https://letsexchange.cc
Superb blog! Do you have any recommendations for aspiring writers?
I’m hoping to start my own site soon but I’m a little lost on everything.
Would you recommend starting with a free platform like WordPress or go for a paid option? There are so many choices out there
that I’m totally confused .. Any ideas? Cheers!
Feel free to visit my page ถ่ายพรีเวดดิ้ง
For pros
get a loan with bad credit
for registration.
US Pharma Index: online pharmacy prescription – canada pharmacy not requiring prescription
Поиск в пространстве официальных платформ требует понимания новых способов входа. Квалифицированные пользователи задействуют ретро сайт для обретения свежей данных о активных адресах.
Процедура регистрации профиля в сертифицированных заведениях подразумевает тщательную верификацию. Новейшие организации внедряют KYC-процедуры и AML-нормы. Документооборот потребляет от 24 до 72 периодов.
Цифровые методы для преодоления блокировок эволюционируют синхронно с усилением нормативных решений. VPN-решения разряда premium обеспечивают шифрование AES-256 и стандарты OpenVPN. Непрерывность подключения принципиально значима для VIP сессий.
Резервные платформы выполняют задачи через локально рассредоточенные серверные мощности. CDN-комплексы поддерживают оптимальную задержку для азиатских участников. Цифровое маршрутизация активируется при обнаружении блокировки главного адреса.
Экономические манипуляции в легальных территориях подпадают под строгим стандартам PCI DSS. Децентрализованные платежи увеличивают популярность из-за конфиденциальности и оперативности процессинга.
Планшетные софт ведущих компаний включают отпечатковую авторизацию и push-оповещения для принципиальных происшествий. Изменяемый облик автоматически адаптируется под настройки экрана.
Поиск честного азартного портала подразумевает основательного анализа регулятивных бумаг. Инновационные порталы Clubnika casino обеспечивают пользователям безусловную факты о собственных разрешениях.
Система открытия аккаунта содержит несколько принудительных шагов верификации. Администраторы просят документы, подтверждающие персону и дееспособность. Типовой KYC-алгоритм составляет от 24 до 72 интервалов.
Распоряжение капиталом запускается с назначения пределов на инвестиции. Квалифицированные клиенты рекомендуют применять норму 5% от полного развлекательного капитала на отдельную заход.
Системные ограничения операторов принуждают применять вспомогательные ссылки. Дубликаты сохраняют безусловную активность базового портала, предусматривая хронологию транзакций и игровой результаты.
Передовые банковские способы предоставляют мгновенные пополнения через блокчейн кошельки. Bitcoin, Ethereum и постоянные токены предоставляют конфиденциальность и мизерные комиссии. Период реализации извлечений достигает 10-30 минут.
Алгоритмы лояльности охватывают ступенчатые уровни с возрастающим возвратом. VIP-координаторы гарантируют личные поощрения, повышенные ограничения и первоочередную помощь.
uk pharmacies
Fantastic info. Cheers!
searchsignal official store – The advice offered appears strategic yet simple to implement.
Определение надежного казино оператора подразумевает глубокого анализа правовых документов. Современные ресурсы типпи казино дают участникам максимальную детали о имеющихся разрешениях.
Алгоритм регистрации подразумевает определенное количество необходимых шагов аутентификации. Владельцы просят бумаги, засвидетельствующие персону и правоспособность. Классический KYC-механизм продолжается от 24 до 72 промежутков.
Распоряжение капиталом запускается с определения границ на пополнения. Профессиональные игроки настаивают применять установку 5% от совокупного игорного резерва на отдельную игру.
Технические ограничения операторов побуждают использовать вспомогательные адреса. Дубликаты хранят полную производительность первичного ресурса, содержа хронологию транзакций и развлекательный достижения.
Новые платежные сервисы поддерживают быстрые инвестиции через виртуальные кошельки. Bitcoin, Ethereum и постоянные токены дают приватность и минимальные платежи. Время осуществления извлечений насчитывает 10-30 отрезков.
Алгоритмы верности охватывают ступенчатые статусы с возрастающим компенсацией. VIP-консультанты обеспечивают индивидуальные награды, увеличенные лимиты и ускоренную помощь.
Официальные операторы азартных предложений oferuja игрокам доступ к элитному времяпрепровождению через тематические платформы, включая Eldorado , которые именно исполняют глобальные нормы безопасности.
Механизм открытия счёта требует указания идентификационных информации через защищённые SSL-соединения. Операторы просят предоставить нотариальное доказательство совершеннолетия и места жительства для соблюдения правовых норм.
Multi-factor аутентификация становится принудительным aspect передовых архитектур конфиденциальности. Клиенты имеют SMS-пароли, push-notification или внедряют dedicated утилиты вроде Google Authenticator.
Зеркальные ссылки преодолевают препятствия региональных ограничений и DDoS-атак. По сути дубли образуют копийные клоны главного платформы с сохранением возможностей и user информации.
Компетентные участники призывают keeping актуальные каталоги действующих копий в bookmark browser. Провайдеры передают updates о новых доменах через e-mail, Telegram-чаты и телефонные утилиты.
Банковские переводы через legal ресурсы обеспечены защитными алгоритмами уровня банковского направления. Получение капитала происходит единственно на аутентифицированные реквизиты хозяина учётной записи.
https://ivermectinaccessusa.shop/# Ivermectin Access USA
the nightcrate website – Good mix of products, I’ll be coming back to explore further.
Рабочие mirror-ссылки легальных гемблинг-платформ на типпи казино обеспечивают непрерывный коннект к развлекательным порталам. Методика копирования строит эквивалентные версии базового портала с поддержанием всех инструментов.
Механизм открытия счета через резервную ссылку полностью повторяет оригинальную анкету. Только пришедшие участники вводят функционирующий email, придумывают стойкий ключ и фиксируют базовую денежную единицу.
Верификация аккаунта подразумевает предоставления бумаг опираясь на KYC-нормам. Снимок национального документа, свидетельство регистрации и финансовые параметры подвергаются алгоритмическую валидацию в течение 24-72 ч.
Подключение действующих игроков осуществляется через классическую модуль с многоступенчатой проверкой. Одноразовые пароли доставляются на мессенджер устройство или почтовый ящик.
Инструменты депозитного компонента через зеркала поддерживает востребованные платежные сервисы. Visa, Mastercard, виртуальные счета Skrill, Neteller, виртуальные монеты Bitcoin, Ethereum обрабатываются с сокращенными платежами 0-3%.
Развлекательная ассортимент клонируется на сто процентов включая слоты, традиционные активности, live-крупье и накопительные призы. RTP-значения, волатильность и вейджер сохраняются идентичными.
Подарочная схема работает схоже корневому веб-площадке. Welcome-наборы, фриспины, денежный возврат и VIP-курсы запускаются программно при соблюдении установленных требований.
Официальные операторы развлекательных услуг обеспечивают клиентам доступ к профессиональному развлечениям через целевые порталы, включая миллион регистрация , что следуют общепринятые нормы безопасности.
Схема оформления профиля подразумевает заполнения проверочных деталей через безопасные SSL-connection. Букмекеры просят нотариальное подтверждение дееспособности и места регистрации для выполнения legal требований.
Multi-factor проверка становится required составляющей новейших платформ конфиденциальности. Участники получают SMS-коды, push-сообщения или используют dedicated утилиты типа Google Authenticator.
Резервные ссылки преодолевают препятствия territorial барьеров и DDoS-штурмов. По сути реплики являют тождественные реплики primary портала с поддержанием features и индивидуальных данных.
Опытные пользователи предлагают keeping новейшие перечни функционирующих зеркал в избранном интернет-программы. Букмекеры передают обновления о новых URL через мейл, Telegram-чаты и смартфонные apps.
Денежные процедуры через проверенные платформы гарантированы cryptographic системами категории банковского сектора. Вывод капитала реализуется только на validated wallets хозяина учётной записи.
sitefixstation guide page – Practical fixes presented in a clear and user-friendly way.
What’s up, just wanted to say, I enjoyed this article.
It was funny. Keep on posting!
Выбор легального казино портала требует детального анализа официальных разрешений. Новые порталы казино СЌРЅРѕРјРѕ дают игрокам стопроцентную сведения о собственных разрешениях.
Процесс оформления счета включает различные ключевых стадий аутентификации. Операторы настаивают удостоверения, доказывающие идентичность и дееспособность. Стандартный KYC-механизм длится от 24 до 72 интервалов.
Распоряжение капиталом начинается с определения лимитов на депозиты. Опытные геймеры предлагают задействовать норму 5% от полного игорного резерва на единичную партию.
Программные ограничения поставщиков обязывают использовать дополнительные домены. Зеркала сохраняют максимальную производительность базового площадки, включая журнал транзакций и азартный достижения.
Актуальные банковские инструменты обеспечивают скоростные вклады через криптовалютные хранилища. Bitcoin, Ethereum и стейблкоины обеспечивают скрытность и наименьшие взносы. Период выполнения выводов составляет 10-30 промежутков.
Системы верности охватывают каскадные категории с прогрессивным возвратом. VIP-кураторы гарантируют личные награды, повышенные рамки и опережающую поддержку.
RavenAisle offers – Spotted unique finds I didn’t notice in other shops.
Zestycrate storefront – Really liked the products and completing my order was hassle-free.
glenvox storefront – Simple navigation and quick checkout make buying stress-free.
ParcelMint shop online – Locating products was easy and the overall experience was seamless.
Cheap Sildenafil 100mg: Viagra without a doctor prescription Canada – buy Viagra over the counter
Подбор достойного азартного ресурса в актуальных границах требует тщательного внимания к законному положению. Компетентные геймеры понимают, что Лев регистрация предоставляет последнюю материалы о действующих сервисах.
Процесс создания аккаунта в лицензированных сервисах содержит принудительную проверку персональных данных. KYC-требования защищают как сервис, так и игрока от афер. Временные границы на перечисление капитала до завершения подтверждения – привычная система.
Программные ограничения на подключение к развлекательным сервисам устраняются через параллельные ссылки. Доступные зеркала обеспечивают полную эффективность базового сайта. Платежные движения, геймплейный достижения и привилегированные планы продолжают устойчивыми.
Материальная надежность характеризуется критерием эксплуатируемых платежных систем. SSL-шифрование, PCI DSS сертификация и расширенная подтверждение формируют защищенный заслон безопасности.
Геймплейная каталог лицензированных площадок объединяет спины от лидирующих провайдеров. RTP-коэффициенты, дисперсия и вероятностные системы претерпевают нейтральную аудит в утвержденных лабораториях.
Системы мотивации в качественных сервисах строятся на открытых требованиях активности. Требования x35-40 характеризуется справедливым для барабан-бонусов, в то время как стандартные развлечения идут в подсчет с редуцированным фактором.
Новейшие геймеры встречаются с препятствием доступа к легальным порталам. Компании фильтруют первичные домены, но опытные казино Килограмм пользователи понимают о присутствии зеркальных платформ.
Альтернативный адрес является точную дубликат первичного платформы. Протоколы шифрования работают неизменными. Расчётные переводы реализуются через сходные сервисы.
Методика открытия счёта через альтернативный ресурс требует классической верификации. Менеджеры требуют бумаги для осуществления KYC-требований. Персональные параметры реализуют двухфакторную проверку.
Финансовые ограничения на зеркальных платформах совпадают базовым характеристикам. Наименьшие беты поддерживаются фиксированными. Растущие джекпоты интегрируются между различными ссылками.
Поощрительные системы функционируют всесторонне на альтернативных площадках. Множитель ставок удерживает исходные значения. Период действия реализации продолжается.
Отдел поддержки обрабатывает обращения с зеркальных ресурсов сходным образом. Интерактивный переписка поддерживает беспрерывный график деятельности.
https://ivermectinaccessusa.com/# Ivermectin Access USA
Развлекательная индустрия демонстрирует быстрый прогресс, завлекая множество игроков. Опытные площадки предлагают качественную атмосферу для развлечений. Развёрнутую информацию о указанных организациях возможно обнаружить на казино Лев .
Аккредитация составляет центральным элементом селекции площадки. Контролёры Олдерни обеспечивают строгий контроль валютных процедур. Каждая легальная сайт реализует периодические проверки RNG-алгоритмов.
Компьютерные характеристики актуальных казино объединяют SSL-шифрование экономического уровня. Провайдеры программного материала уровня Microgaming, NetEnt, Pragmatic Play добавляют сложные схемы рандомных показателей.
Алгоритм верификации личного кабинета предусматривает представления справок KYC-типа. ID, выписка о прибылях, удостоверение местожительства — классический набор для финального подключения.
Параллельные ссылки убирают препятствия с блокировками организаций. Функционирующие дубли обновляются постоянно техническими группами. Мобильные приложения обычно действуют устойчивее браузерных вариантов.
Управление банкроллом формирует продолжительную доходность игровых раундов. Профессиональные игроки рекомендуют сокращать количество вейджера до 1-2% от общего капитала.
Выбор легального развлекательного портала требует серьезного разбора правовых разрешений. Современные ресурсы казино Болливуд предлагают клиентам полную сведения о текущих санкциях.
Алгоритм создания профиля предусматривает ряд принудительных стадий проверки. Провайдеры просят справки, устанавливающие индивидуальность и дееспособность. Типовой KYC-процесс требует от 24 до 72 интервалов.
Финансовое планирование начинается с определения пределов на инвестиции. Компетентные клиенты призывают использовать норму 5% от совокупного игорного бюджета на конкретную партию.
Технические барьеры операторов принуждают внедрять альтернативные ссылки. Дубликаты хранят безусловную функциональность главного портала, включая архив транзакций и развлекательный результаты.
Актуальные платежные системы предоставляют скоростные депозиты через криптовалютные портмоне. Bitcoin, Ethereum и стейблкоины гарантируют тайность и символические платежи. Период обработки выводов равно 10-30 минут.
Программы лояльности предусматривают иерархические ранги с увеличивающимся возвратом. VIP-консультанты предоставляют эксклюзивные бонусы, улучшенные лимиты и ускоренную сервис.
seamstory style hub – A lovely showcase of designs that kept me engaged throughout.
Panathinaikos 2-2 Viktoria Plzen 2026 Europa League draw! Greeks fight back – football scores drama all night long!
http://www.bet-promo-codes.com/sportsbook-reviews/betwinner-registration/
внедрение erp москва внедрение erp москва .
anonymous android pass app
For papers
where buy cheap crestor tablets
to see the complete picture.
Исследование в секторе сертифицированных сайтов требует знания актуальных способов авторизации. Профессиональные пользователи используют Sykaaa зеркало для приобретения современной данных о работающих путях.
Схема регистрации учетной записи в надежных учреждениях охватывает комплексную валидацию. Новейшие компании используют KYC-механизмы и AML-критерии. Документооборот требует от 24 до 72 периодов.
Компьютерные инструменты для минования барьеров эволюционируют сообща с укреплением юридических действий. VPN-инструменты категории premium дают криптографию AES-256 и протоколы OpenVPN. Стабильность соединения принципиально существенна для высокоролловых игровых периодов.
Зеркальные домены функционируют через географически рассредоточенные технические ресурсы. CDN-архитектуры поддерживают низкую отклик для азиатских игроков. Программное роутинг включается при идентификации блокировки главного ресурса.
Денежные транзакции в официальных юрисдикциях подпадают под четким стандартам PCI DSS. Блокчейн расчеты увеличивают актуальность из-за анонимности и оперативности реализации.
Переносные утилиты лучших организаций содержат лицевую подтверждение и push-оповещения для принципиальных ситуаций. Настраиваемый интерфейс автономно корректируется под настройки монитора.
signalstation official store – Clear explanations and actionable strategies for better marketing results.
Определение честного гемблинг ресурса нуждается тщательного анализа лицензионных документов. Новые порталы аква казино гарантируют геймерам максимальную данные о текущих лицензиях.
Система получения доступа содержит определенное количество обязательных этапов аутентификации. Представители требуют бумаги, устанавливающие идентичность и правоспособность. Традиционный KYC-порядок требует от 24 до 72 временных отрезков.
Банкролл-менеджмент стартует с установления границ на инвестиции. Опытные клиенты советуют эксплуатировать норму 5% от полного игорного средств на единичную сессию.
Системные препятствия поставщиков обязывают использовать дополнительные маршруты. Альтернативы поддерживают стопроцентную эффективность главного сайта, предусматривая хронологию сделок и игровой результаты.
Новые платежные методы гарантируют скоростные инвестиции через электронные аккаунты. Bitcoin, Ethereum и стабильные валюты дают скрытность и крошечные сборы. Срок выполнения получений насчитывает 10-30 интервалов.
Системы лояльности подразумевают многоуровневые степени с прогрессивным кэшбэком. VIP-менеджеры дают индивидуальные бонусы, расширенные ограничения и опережающую поддержку.
Appreciate the practical angle. This is actionable. nana banana google
Ivermectin Access USA: ivermectin eye drops – stromectol pills
LagunaVend marketplace – Well-designed aesthetic and modern feel make it a pleasant shopping spot.
Pretty section of content. I just stumbled upon your weblog and in accession capital
to assert that I acquire actually enjoyed account your blog posts.
Anyway I’ll be subscribing to your feeds and even I achievement you access consistently
rapidly.
Актуальные пользователи сталкиваются с изобилием системных нюансов при деятельности с проверенными сайтами. Профильные сайты типа лаки Р±РёСЂ казино предоставляют свежую материалы о функционировании гэмблинговых брендов.
Система проверки счета охватывает ряд требуемых фаз. Первичная верификация подразумевает предоставления свидетельств валидирующих личность. Привычный набор подразумевает паспорт, лицензию водителя или международный паспорт.
Технологическая сторона регистрации содержит эксплуатацию безопасного соединения и двойной авторизации. Профессиональные пользователи предлагают активировать полный набор возможных функций секьюрити.
Зеркала формируют полные клоны центрального портала с обеспечением комплексного возможностей. Главное плюс выражается в тождественности финансовых рамок и критериев вейджера.
Система обнаружения активных зеркал фундируется на отслеживании профильных мессенджер групп и связанных ресурсов. Квалифицированные участники задействуют виртуальные частные сети для формирования надежного соединения невзирая от местных ограничений.
Надёжные платформы игорных сервисов oferuja игрокам возможность к элитному игровому процессу через профильные сайты, включая ретро казино , которые специально исполняют transnational регламенты защиты.
Алгоритм открытия счёта предполагает заполнения authentication данных через криптографические SSL-линии. Операторы запрашивают official verification дееспособности и региона жительства для соблюдения юрисдикционных критериев.
Двухфакторная идентификация выступает обязательным составляющей передовых систем защиты. Пользователи имеют SMS-токены, push-notification или эксплуатируют специализированные tools по типу Google Authenticator.
Альтернативные адреса решают трудности territorial запретов и DDoS-воздействий. Технически реплики являют идентичные версии основного домена с обеспечением features и пользовательских деталей.
Skilled геймеры suggest поддерживать обновлённые реестры активных копий в избранном browser. Букмекеры направляют новости о современных доменах через e-mail, Telegram-чаты и портативные программы.
Финансовые переводы через лицензионные сайты гарантированы криптографическими технологиями уровня банковского направления. Изъятие средств реализуется solely на верифицированные реквизиты владельца account.
top article pass wallet
Plumparcel specials – The simple design and easy-to-navigate categories made shopping enjoyable.
quirkcove.shop – Unique vibe throughout the store, really stands apart visually.
Если вас интересует тема ufc в феврале марте 2026 три недели которые встряхнут дивизионы, советую заглянуть сюда. Здесь подробности: https://avtoshkola37.ru/news/prognozy-na-ufc-fevral-mart-2026-kto-zaberyot-verh-v-glavnyh-boyah/
trusted Wenvix shop – The process of buying was fast, straightforward, and completely smooth.
Современные платформы развлекательных развлечений дают клиентам доступ к качественному игровому процессу через сертифицированные казино Килограмм системы. Лицензированная операционная активность подразумевает выполнения четких правовых норм.
Процесс создания индивидуального счета содержит проверку индивидуальных сведений. Провайдеры задействуют углубленные процедуры KYC и AML для пресечения нарушающих финансовых действий.
Цифровые платформы современных гемблинг платформ основываются на зашифрованных облачных системах с SSL протоколами. Территориальные ограничения обязывает операторов внедрять альтернативные адреса.
Зеркальные домены представляют идентичные копии основного портала с обеспечением всех возможностей и параметров. Пользователи приобретают устойчивый связь к балансу, игровой истории и клиентским опциям.
Финансовые операции выполняются через связанные банковские процессоры. Границы на пополнения и изъятия регулируются в унисон с регуляторными положениями и индивидуальными политиками контроля угроз.
Квалифицированные клиенты предлагают проверять условия аккредитации через контролирующие каталоги гемблинг органов. Авторитетные критерии задействуют рейтинги на отраслевых сайтах и оценки подлинных участников.
https://uspharmaindex.com/# US Pharma Index
FlintCove catalog – Found excellent items and the prices are reasonable compared to other shops.
Навигация в мире легальных ресурсов подразумевает владения современных технологий подключения. Опытные клиенты внедряют лаки Р±РёСЂ казино официальный сайт для извлечения свежей материалов о действующих путях.
Процесс формирования счета в проверенных заведениях предполагает комплексную валидацию. Новейшие операторы применяют KYC-механизмы и AML-требования. Документальное сопровождение составляет от 24 до 72 часов.
IT инструменты для обхода ограничений прогрессируют одновременно с укреплением нормативных шагов. VPN-инструменты уровня premium предлагают криптографию AES-256 и протоколы OpenVPN. Стабильность подключения жизненно значима для VIP заходов.
Запасные сайты выполняют задачи через пространственно рассредоточенные IT системы. CDN-системы обеспечивают сокращенную латентность для американских клиентов. Программное маршрутизация запускается при выявлении ограничения основного адреса.
Экономические переводы в лицензированных зонах подпадают под строгим требованиям PCI DSS. Цифровые платежи получают актуальность из-за анонимности и быстроте реализации.
Смартфонные софт лучших операторов совмещают физиологическую авторизацию и push-оповещения для принципиальных эпизодов. Гибкий интерфейс самостоятельно изменяется под настройки дисплея.
trusted MaplePick shop – A nice range of items with pricing that feels accessible.
Someone shared the details earlier, leaving it here for reference: here
If some one wants expert view about blogging and site-building after that i recommend him/her to visit this web site,
Keep up the good job.
Азартная область демонстрирует активный подъём, привлекая массы геймеров. Профессиональные порталы дают безопасную обстановку для развлечений. Развёрнутую факты о подобных брендах допустимо отыскать на ретро казино .
Аккредитация является главным критерием селекции сайта. Надзорные органы Великобритании обеспечивают тщательный мониторинг финансовых транзакций. Всякая легальная ресурс подвергается систематические проверки RNG-систем.
Программные характеристики актуальных беттинг-платформ охватывают SSL-кодирование денежного уровня. Поставщики компьютерного материала класса Microgaming, NetEnt, Pragmatic Play добавляют продвинутые системы непредсказуемых чисел.
Схема валидации счёта подразумевает направления бумаг KYC-типа. Удостоверение, справка о доходах, доказательство местожительства — стандартный комплект для итогового доступа.
Зеркальные порталы решают барьеры с ограничениями компаний. Рабочие дубли изменяются ежедневно техническими командами. Планшетные программы зачастую работают стабильнее веб редакций.
Контроль средств устанавливает долгосрочную результативность гемблинговых раундов. Опытные пользователи указывают урезать объём вейджера до 1-2% от итогового капитала.
Ориентирование в мире легальных порталов нуждается знания передовых инструментов соединения. Умелые клиенты задействуют типпи казино для получения актуальной сведений о активных URL.
Механизм формирования профиля в проверенных заведениях включает многоуровневую верификацию. Современные организации применяют KYC-алгоритмы и AML-нормы. Оформление документов потребляет от 24 до 72 периодов.
Программные решения для минования запретов улучшаются параллельно с ужесточением законодательных мер. VPN-платформы разряда premium гарантируют кодирование AES-256 и технологии OpenVPN. Надежность канала принципиально существенна для VIP партий.
Дублирующие адреса оперируют через географически распределенные технические кластеры. CDN-архитектуры осуществляют оптимальную латентность для азиатских геймеров. Программное маршрутизация включается при детекции барьера основного домена.
Банковские движения в проверенных зонах следуют определенным критериям PCI DSS. Крипто транзакции приобретают популярность вследствие анонимности и скорости обработки.
Смартфонные утилиты топовых организаций содержат отпечатковую идентификацию и push-оповещения для принципиальных ситуаций. Модифицируемый оформление независимо адаптируется под свойства панели.
Посети официальный сайт компании
Ориентирование в мире лицензированных платформ включает знания передовых способов соединения. Профессиональные игроки задействуют Лев казино для приобретения новейшей фактов о работающих путях.
Процедура оформления аккаунта в сертифицированных заведениях содержит детальную проверку. Передовые организации эксплуатируют KYC-протоколы и AML-стандарты. Оформление документов потребляет от 24 до 72 временных отрезков.
Технические решения для избежания запретов развиваются вместе с ужесточением законодательных шагов. VPN-службы категории premium гарантируют защиту AES-256 и системы OpenVPN. Стабильность соединения кардинально важна для элитных заходов.
Альтернативные домены оперируют через территориально рассредоточенные технические мощности. CDN-системы предоставляют минимальную отклик для европейских геймеров. Автоматическое переключение запускается при обнаружении ограничения центрального сайта.
Банковские транзакции в проверенных юрисдикциях подпадают под четким требованиям PCI DSS. Крипто расчеты завоевывают востребованность в результате скрытности и оперативности осуществления.
Смартфонные программы премиальных провайдеров объединяют биометрическую идентификацию и push-сообщения для принципиальных ситуаций. Адаптивный облик независимо адаптируется под настройки дисплея.
shopnshine boutique – Modern aesthetic paired with approachable prices for all shoppers.
Актуальные зеркала проверенных азартных клубов на enomo казино гарантируют стабильный соединение к геймерским порталам. Система копирования формирует аналогичные копии главного домена с сохранением всех опций.
Механизм создания аккаунта через дублирующий портал полностью дублирует основную анкету. Дебютные участники указывают функционирующий email, устанавливают безопасный пароль и определяют рабочую финансовый инструмент.
Валидация профиля подразумевает предоставления бумаг опираясь на KYC-стандартам. Копия паспорта, доказательство регистрации и денежные координаты контролируются системой машинную валидацию в течение 24-72 часов.
Аутентификация верифицированных участников происходит через классическую модуль с двухфакторной аутентификацией. Временные ключи поступают на смс аппарат или мейл.
Инструменты денежного модуля через mirror-сайты содержит топовые финансовые механизмы. Visa, Mastercard, электронные счета Skrill, Neteller, криптовалюты Bitcoin, Ethereum обрабатываются с уменьшенными процентами 0-3%.
Гемблинг коллекция дублируется в точности включая барабаны, традиционные активности, live-крупье и максимальные награды. RTP-индикаторы, колебания и вейджер остаются неизменными.
Подарочная программа действует идентично базовому веб-площадке. Welcome-бандлы, даровые прокруты, refund и VIP-системы запускаются автоматически при выполнении фиксированных параметров.
I’ve noticed Betwinner mentioned a few times here. This page gives a general overview: bet-promo-codes.com/sportsbook-reviews/betwinner-registration/
their coupon section – Consistent markdowns and specials make budgeting less stressful.
https://www.chordie.com/forum/profile.php?id=2474662
Инновационные провайдеры развлекательных развлечений предоставляют участникам вход к качественному игровому процессу через защищенные казино Вован ресурсы. Лицензированная бизнес требует исполнения четких регуляторных стандартов.
Процесс создания индивидуального профиля содержит верификацию приватных сведений. Провайдеры задействуют многоуровневые системы KYC и AML для недопущения незаконных транзакций.
Технические платформы современных казино строятся на надежных инфраструктурах с TLS протоколами. Локальные запреты принуждает провайдеров разрабатывать резервные порталы.
Дублирующие порталы являют собой аналогичные клоны основного платформы с удержанием всех функций и данных. Беттеры обеспечивают себе непрерывный подключение к средствам, развлекательной записям и пользовательским установкам.
Банковские действия производятся через встроенные денежные агрегаторы. Пределы на вклады и выводы устанавливаются в гармонии с правовыми условиями и корпоративными политиками управления рисками.
Опытные клиенты советуют мониторить статус сертификата через контролирующие базы данных игорных организаций. Престижные параметры охватывают оценки на специализированных платформах и feedback истинных игроков.
Нынешние геймеры попадают с сложностью подключения к проверенным порталам. Организации запрещают базовые ссылки, но искушённые mad casino зеркало игроки осознают о доступности зеркальных сайтов.
Дополнительный домен составляет точную реплику основного портала. Средства защиты сохраняются такими же. Платёжные процедуры производятся через те же каналы.
Алгоритм оформления профиля через параллельный адрес подразумевает типовой валидации. Специалисты требуют справки для исполнения KYC-норм. Персональные параметры подвергаются усиленную проверку.
Финансовые ограничения на резервных площадках идентичны базовым характеристикам. Начальные ставки поддерживаются неизменными. Увеличивающиеся призовые фонды синхронизируются между различными доменами.
Премиальные схемы работают завершённо на альтернативных платформах. Множитель ставок гарантирует оригинальные значения. Тайминг проигрывания продолжается.
Отдел помощи рассматривает обращения с зеркальных ресурсов таким же способом. Живой диалог поддерживает постоянный график деятельности.
Experience the latest version here
https://sildenafilpriceguide.com/# Sildenafil Citrate Tablets 100mg
india generic viagra online pharmacy https://canbaypharm.top/# online-pharmacy
Hello!
Analyze the structure of mysterious interesting data to find valuable patterns fast and visualize complex relationships clearly see on the website for graphing tools
Full information on the link – https://101flow.site
All the best and development in business!
trusted Umbramart shop – Smooth navigation and fast-loading pages made the experience great.
TerVox Products – The support team was friendly and quick to assist.
For a recap
Reviews of casino games for money
to see outcomes.
MeridianBasket Store – Wide selection with competitive pricing that seems fair.
Выбор надежного развлекательного заведения заставляет глубокого изучения официальных сертификатов. Инновационные системы Голд казино гарантируют клиентам стопроцентную данные о действующих допусках.
Процесс оформления счета содержит определенное количество необходимых фаз аутентификации. Владельцы настаивают бумаги, доказывающие персону и совершеннолетие. Типовой KYC-алгоритм длится от 24 до 72 периодов.
Финансовое планирование инициируется с задания рамок на пополнения. Профессиональные клиенты предлагают использовать установку 5% от итогового гемблинг капитала на индивидуальную игру.
Системные ограничения администраторов побуждают эксплуатировать вспомогательные маршруты. Зеркала поддерживают стопроцентную эффективность центрального ресурса, подразумевая журнал платежей и азартный прогресс.
Актуальные финансовые сервисы обеспечивают оперативные взносы через электронные аккаунты. Bitcoin, Ethereum и стабильные валюты предоставляют приватность и символические комиссии. Срок реализации снятий насчитывает 10-30 промежутков.
Программы лояльности содержат иерархические ранги с нарастающим возвратом. VIP-менеджеры предоставляют личные подарки, расширенные границы и преимущественную сервис.
visit briskparcel – Quick and secure checkout, navigating the site is effortless.
Grenvia shop online – Smooth browsing and quick purchasing made the overall experience enjoyable.
The latest version is here
Активные резервные адреса легальных gaming-операторов на казино СЌРЅРѕРјРѕ создают постоянный доступ к геймерским сервисам. Методика зеркалирования генерирует эквивалентные клоны главного домена с удержанием всех возможностей.
Механизм создания аккаунта через зеркало полностью имитирует основную бланк. Только пришедшие игроки указывают действующий email, придумывают надежный пароль и назначают рабочую финансовый инструмент.
Верификация учетной записи подразумевает представления бумаг согласно KYC-требованиям. Фото водительских прав, подтверждение адреса и финансовые данные контролируются системой программную анализ в течение 24-72 часа.
Авторизация существующих пользователей осуществляется через базовую модуль с многоступенчатой верификацией. Краткосрочные токены поступают на сотовый устройство или email.
Опции финансового раздела через mirror-сайты предлагает популярные банковские системы. Visa, Mastercard, цифровые балансы Skrill, Neteller, криптовалюты Bitcoin, Ethereum выполняются с сокращенными сборами 0-3%.
Игровая база копируется целиком включая spinning games, классические развлечения, live-хостов и максимальные награды. RTP-параметры, волатильность и ставочные требования остаются неизменными.
Подарочная механизм выполняется идентично основному порталу. Welcome-предложения, бесплатные вращения, возврат средств и VIP-системы запускаются программно при соблюдении фиксированных требований.
melbet куда вводить промокод http://www.melbet41263.help
JewelAisle collections – I appreciate the organized design and the variety of items available.
NimbusCart online store – Everything moved quickly and confirming my order was easy.
Определение надежного казино заведения подразумевает детального изучения регулятивных бумаг. Передовые ресурсы Болливуд казино обеспечивают пользователям абсолютную информацию о имеющихся санкциях.
Процедура создания профиля содержит определенное количество необходимых ступеней подтверждения. Операторы просят справки, засвидетельствующие идентичность и совершеннолетие. Традиционный KYC-процесс занимает от 24 до 72 временных отрезков.
Финансовое планирование открывается с назначения пределов на пополнения. Искусные пользователи рекомендуют задействовать принцип 5% от итогового развлекательного резерва на конкретную партию.
Технические блокировки поставщиков обязывают использовать дополнительные адреса. Дубликаты поддерживают стопроцентную производительность базового сайта, содержа журнал операций и азартный достижения.
Передовые платежные методы поддерживают мгновенные депозиты через электронные хранилища. Bitcoin, Ethereum и стабильные валюты дают скрытность и символические комиссии. Период реализации выводов равно 10-30 промежутков.
Программы постоянства охватывают ступенчатые степени с нарастающим вознаграждением. VIP-представители предлагают уникальные поощрения, увеличенные границы и приоритетную помощь.
Выбор честного развлекательного портала требует основательного разбора правовых документов. Современные порталы СЌРЅРѕРјРѕ казино гарантируют геймерам стопроцентную факты о текущих лицензиях.
Процесс создания профиля содержит различные принудительных этапов аутентификации. Провайдеры запрашивают бумаги, доказывающие личность и зрелость. Стандартный KYC-алгоритм составляет от 24 до 72 промежутков.
Контроль средств начинается с установления ограничений на пополнения. Опытные игроки настаивают использовать установку 5% от совокупного гемблинг средств на единичную игру.
Электронные препятствия операторов принуждают задействовать альтернативные адреса. Клоны хранят полную работоспособность базового платформы, содержа журнал транзакций и гемблинг результаты.
Инновационные финансовые сервисы гарантируют мгновенные депозиты через виртуальные счета. Bitcoin, Ethereum и фиксированные активы обеспечивают конфиденциальность и мизерные комиссии. Длительность выполнения изъятий составляет 10-30 интервалов.
Планы приверженности содержат каскадные категории с возрастающим бонусом. VIP-менеджеры предоставляют личные поощрения, улучшенные границы и ускоренную техподдержку.
viagra without prescription: cheap viagra – generic sildenafil
Hello!
Explore cook mysterious methods with interesting and valuable heat process features and master the kitchen see on the website for cooking classes
Full information on the link – https://202fliks.site
All the best and development in business!
WhimVendor Products – Excellent reliability, I plan to shop here again soon.
official shield shopper site – The platform conveys reliability and instills visitor trust at first glance.
Легальные платформы гэмблинг сервисов oferuja игрокам шанс к высококлассному азартному досугу через профильные домены, включая Килограмм казино , что следуют глобальные стандарты конфиденциальности.
Механизм активации подразумевает внесения верификационных деталей через encrypted SSL-каналы. Операторы запрашивают письменное доказательство age verification и места residence для поддержания правовых стандартов.
Многоуровневая аутентификация является required частью современных платформ безопасности. Участники получают SMS-токены, push-оповещения или применяют специальные софт типа Google Authenticator.
Зеркальные URL ликвидируют вопросы territorial запретов и DDoS-assault. Техническим образом реплики представляют идентичные реплики центрального домена с сохранением features и индивидуальных данных.
Skilled участники рекомендуют поддерживать свежие каталоги working mirrors в сохранённых ссылках обозревателя. Провайдеры отправляют новости о свежих URL через email, Telegram-чаты и портативные apps.
Финансовые переводы через проверенные порталы secured криптографическими протоколами level банковского направления. Вывод финансов производится исключительно на validated реквизиты хозяина профиля.
Рабочие альтернативные домены надежных гемблинг-платформ на JVSpin создают постоянный доступ к развлекательным порталам. Схема клонирования генерирует аналогичные реплики центрального портала с консервацией всех функций.
Процедура регистрации через зеркало полностью имитирует главную заявку. Свежие игроки регистрируют функционирующий email, устанавливают надежный код доступа и фиксируют базовую валюту.
Верификация счета включает представления справок согласно KYC-требованиям. Фото удостоверения личности, валидация адреса и платежные сведения контролируются системой программную контроль в течение 24-72 периодов.
Вход активных геймеров выполняется через базовую модуль с многоступенчатой валидацией. Краткосрочные шифры доставляются на телефонный номер или почтовый ящик.
Инструменты финансового компонента через дублирующие порталы предлагает востребованные денежные инструменты. Visa, Mastercard, веб портмоне Skrill, Neteller, crypto Bitcoin, Ethereum процессируются с сокращенными процентами 0-3%.
Развлекательная ассортимент клонируется полностью включая барабаны, настольные игры, live-операторов и прогрессивы. RTP-коэффициенты, колебания и вейджер сохраняются идентичными.
Подарочная политика работает похоже главному сайту. Welcome-бандлы, фриспины, возврат средств и VIP-системы включаются системно при исполнении определенных условий.
charming parcel boutique – There’s a welcoming spirit that comes through clearly.
Yield Mart – A practical and value-driven store offering rewarding choices every day.
buy viagra here generic sildenafil viagra canada
кайтсёрфинг кайтинг
Xerva Treasures – Layout is user-friendly, and finding products today was quick and easy.
http://ivermectinaccessusa.com/# ivermectin buy
Определение честного развлекательного оператора заставляет глубокого изучения официальных сертификатов. Новые ресурсы казино Гризли предлагают геймерам безусловную информацию о своих допусках.
Система регистрации включает несколько ключевых шагов подтверждения. Провайдеры просят документы, засвидетельствующие индивидуальность и возраст. Традиционный KYC-алгоритм длится от 24 до 72 временных отрезков.
Контроль средств открывается с фиксации рамок на взносы. Опытные участники настаивают эксплуатировать установку 5% от общего азартного капитала на единичную раунд.
Программные препятствия операторов обязывают эксплуатировать дополнительные домены. Копии поддерживают безусловную активность базового ресурса, охватывая хронологию транзакций и игровой достижения.
Новые расчетные инструменты гарантируют оперативные пополнения через криптовалютные хранилища. Bitcoin, Ethereum и стейблкоины гарантируют приватность и наименьшие комиссии. Период обработки изъятий равно 10-30 интервалов.
Алгоритмы приверженности предусматривают многоуровневые степени с накапливающимся компенсацией. VIP-кураторы предоставляют индивидуальные подарки, улучшенные пределы и ускоренную помощь.
Инновационные платформы развлекательных услуг обеспечивают игрокам путь к профессиональному азарту через безопасные аква казино порталы. Легальная бизнес влечет соблюдения строгих контролирующих норм.
Процесс открытия индивидуального аккаунта задействует проверку приватных данных. Провайдеры внедряют детализированные процедуры KYC и AML для пресечения поддельных переводов.
Электронные средства актуальных гемблинг платформ функционируют на безопасных облачных системах с криптографическими протоколами. Локальные запреты заставляет операторов запускать дублирующие адреса.
Дублирующие порталы являют собой эквивалентные репликации базового домена с обеспечением всех сервисов и показателей. Клиенты приобретают непрерывный подключение к средствам, гемблинг отчетности и пользовательским параметрам.
Денежные операции реализуются через встроенные денежные системы. Ограничения на инвестиции и выводы устанавливаются в гармонии с лицензионными стандартами и индивидуальными политиками контроля угроз.
Компетентные беттеры настаивают анализировать положение аккредитации через контролирующие регистры беттинг комиссий. Авторитетные параметры задействуют рейтинги на отраслевых сервисах и мнения подлинных беттеров.
Cheap generic Viagra: viagra without prescription – cheap viagra
https://www.analitica.com/emprendimiento/noti-tips/disfruta-de-los-juegos-de-casino-obteniendo-el-codigo-promocional-1xbet-1xmax200/
Dapper Picks – Navigation was simple and shopping was surprisingly enjoyable.
ryzen deals hub – Felt immersive and easy to scroll through, definitely a pleasant experience.
Надёжные ресурсы развлекательных услуг гарантируют игрокам возможность к профессиональному гэмблингу через dedicated сайты, включая аква казино , которые точно придерживаются международные регламенты security.
Процедура оформления профиля предполагает заполнения проверочных деталей через шифрованные SSL-каналы. Операторы demanded официальное подтверждение правоспособности и адреса регистрации для выполнения юрисдикционных критериев.
Двухфакторная authentication выступает необходимым частью современных систем конфиденциальности. Users имеют SMS-ключи, push-уведомления или применяют targeted приложения в стиле Google Authenticator.
Дублирующие URL ликвидируют сложности локальных ограничений и DDoS-воздействий. С технической точки зрения реплики формируют аналогичные копии основного домена с обеспечением инструментария и индивидуальных деталей.
Экспертные участники suggest поддерживать обновлённые перечни активных альтернатив в закладках обозревателя. Management направляют обновления о новых ссылках через почтовые сервисы, Telegram-каналы и мобильные приложения.
Финансовые операции через legal платформы покрыты защитными methods категории банковского segment. Получение средств происходит solely на подтверждённые wallets обладателя account.
meridianbasket collection – Nice assortment, and the current pricing seems very fair.
Проверенные провайдеры игровых опций предоставляют участникам шанс к качественному развлечениям через профильные домены, включая казино РЎСѓРєР° , которые специально исполняют международные стандарты конфиденциальности.
Последовательность активации necessita ввода верификационных данных через encrypted SSL-connection. Операторы запрашивают документальное verification age verification и места residence для поддержания законодательных стандартов.
Двухфакторная верификация является обязательным компонентом актуальных систем security. Users обретают SMS-токены, push-уведомления или используют targeted приложения типа Google Authenticator.
Зеркальные порталы ликвидируют сложности географических санкций и DDoS-штурмов. По сути реплики формируют идентичные версии главного портала с обеспечением функциональности и клиентских информации.
Опытные пользователи предлагают keeping обновлённые перечни функционирующих mirrors в избранном браузера. Администрация передают сведения о новых порталах через e-mail, Telegram-каналы и телефонные утилиты.
Финансовые транзакции через проверенные порталы покрыты шифровальными methods уровня банковского segment. Extraction финансов осуществляется только на validated реквизиты держателя account.
sex
https://hoomet.com/forums/topic/129832/code-promo-1xbet-1x200mix-bonus-jusqu-a-130/view/post_id/299800
Выбор качественного гемблинг заведения в современных обстоятельствах нуждается детального рассмотрения к юридическому режиму. Профессиональные пользователи учитывают, что типпи казино предоставляет актуальную сведения о доступных провайдерах.
Алгоритм регистрации в легальных платформах предусматривает принудительную верификацию персональных данных. KYC-правила оберегают как оператора, так и геймера от афер. Краткосрочные границы на изъятие активов до выполнения контроля – типичная методика.
Цифровые ограничения на подключение к гемблинг сервисам устраняются через параллельные домены. Действующие отражения обеспечивают всестороннюю возможности основного сервиса. Денежные операции, азартный продвижение и поощрительные системы остаются стабильными.
Материальная гарантированность оценивается степенью используемых расчетных механизмов. SSL-кодирование, PCI DSS подтверждение и усиленная подтверждение устанавливают прочный щит обороны.
Игровая каталог лицензированных сервисов включает спины от лидирующих студий. RTP-коэффициенты, дисперсия и математические формулы испытывают объективную валидацию в утвержденных учреждениях.
Механизмы лояльности в достойных площадках формируются на открытых требованиях проигрыша. Вейджер x35-40 характеризуется справедливым для автомат-льгот, в то время как карточные состязания включаются в счет с пониженным множителем.
Азартная ниша показывает быстрый рост, завлекая легионы клиентов. Опытные ресурсы дают стабильную условия для игры. Развёрнутую факты о указанных компаниях допустимо отыскать на mad casino зеркало .
Сертификация остаётся приоритетным показателем отбора сайта. Юрисдикции Мальты дают жёсткий контроль экономических операций. Любая сертифицированная портал подвергается постоянные контроли RNG-алгоритмов.
Технические характеристики передовых азартных площадок предусматривают SSL-безопасность экономического категории. Поставщики компьютерного ПО класса Microgaming, NetEnt, Pragmatic Play подключают продвинутые схемы хаотичных параметров.
Схема верификации аккаунта предусматривает направления удостоверений KYC-класса. Паспорт, свидетельство о заработке, подтверждение проживания — классический комплект для полноценного доступа.
Зеркальные домены убирают сложности с фильтрацией компаний. Свежие копии корректируются каждый день компьютерными командами. Карманные софт часто оперируют надёжнее сетевых форматов.
Контроль средств устанавливает стратегическую эффективность беттинговых периодов. Экспертные беттеры предлагают ограничивать сумму депозита до 1-2% от суммарного банкролла.
Kod promocyjny Mostbet umozliwia odebranie lokalnych bonusow. Wpisanie QWERTY555 aktywuje promocje. Promocja Mostbet obejmuje darmowe spiny i freebet. Gracze moga korzystac z szerokiej oferty. To bezpieczna platforma do gry online.
Sprawdz najnowsze zmiany Mostbet https://www.glory-gallery.ru/wp-includes/inc/promokod_mostbet__bonus_125__do_35000_rub_.html
official cometcrate site – Unique concept with items that feel intentionally chosen and enjoyable.
click wallet pass app
Нашел отличный текст про ufc в феврале марте 2026 три недели которые встряхнут дивизионы, рекомендую ознакомиться. Посмотреть статью: https://oakdaily.ru/ufc-%d1%84%d0%b5%d0%b2%d1%80%d0%b0%d0%bb%d1%8c-%d0%bc%d0%b0%d1%80%d1%82-2026-%d1%82%d1%80%d0%b8-%d0%bd%d0%b5%d0%b4%d0%b5%d0%bb%d0%b8-%d0%ba%d0%be%d1%82%d0%be%d1%80%d1%8b%d0%b5-%d0%b2%d1%81%d1%82/
he said pass wallet app for android
SheetStudio shop online – Attractive layouts with modern designs make exploring the templates easy.
Поиск в секторе официальных площадок предполагает осознания продвинутых инструментов авторизации. Умелые пользователи задействуют Килограмм казино для получения свежей данных о действующих адресах.
Процесс открытия счета в надежных организациях подразумевает сложную валидацию. Передовые провайдеры задействуют KYC-протоколы и AML-нормы. Бумажная работа требует от 24 до 72 интервалов.
Программные способы для преодоления барьеров улучшаются вместе с усилением юридических мер. VPN-службы категории premium обеспечивают криптографию AES-256 и технологии OpenVPN. Непрерывность связи жизненно актуальна для премиальных заходов.
Резервные адреса функционируют через пространственно расположенные серверные кластеры. CDN-комплексы обеспечивают минимальную время ответа для азиатских игроков. Системное маршрутизация срабатывает при обнаружении недоступности основного адреса.
Банковские переводы в лицензированных областях соответствуют четким критериям PCI DSS. Крипто расчеты набирают актуальность по причине анонимности и динамике осуществления.
Портативные клиенты премиальных компаний интегрируют лицевую идентификацию и push-алерты для ключевых эпизодов. Модифицируемый оформление автономно подстраивается под особенности дисплея.
JollyVendor Online Shop – Items priced well and the checkout experience was smooth and easy.
Wavlix Hub – Really satisfied with both the variety offered and the smooth online experience.
Нынешние геймеры сталкиваются с препятствием входа к сертифицированным порталам. Организации ограничивают основные порталы, но грамотные лаки Р±РёСЂ казино официальный сайт игроки помнят о присутствии параллельных ресурсов.
Параллельный портал составляет точную воспроизведение главного платформы. Системы безопасности остаются неизменными. Денежные процедуры производятся через идентичные каналы.
Методика создания аккаунта через альтернативный портал предполагает привычной верификации. Менеджеры просят справки для осуществления KYC-стандартов. Личные сведения реализуют двухфакторную подтверждение.
Финансовые лимиты на дополнительных ресурсах идентичны первичным спецификациям. Низшие ставки поддерживаются постоянными. Прогрессивные призовые фонды интегрируются между множественными ссылками.
Премиальные системы действуют комплексно на параллельных порталах. Множитель ставок поддерживает стартовые величины. Период действия проигрывания продолжается.
Сервис поддержки рассматривает обращения с резервных доменов аналогично. Онлайн диалог поддерживает непрерывный формат оперирования.
Please let me know if you’re looking for a writer for your weblog.
You have some really great articles and I believe I would be
a good asset. If you ever want to take some of the load off, I’d absolutely love to write some content for your blog in exchange for a link
back to mine. Please blast me an email if interested. Regards!
https://sildenafilpriceguide.com/# viagra without prescription
Discover More payward trading limited
Icicle Mart – A sharp and efficient marketplace focused on clarity and convenience.
Актуальные участники натыкаются с затруднением подключения к легальным платформам. Поставщики ограничивают базовые URL, но профессиональные винити официальный сайт посетители осознают о функционировании дублирующих ресурсов.
Резервная ссылка представляет полную дубликат базового ресурса. Системы безопасности остаются равнозначными. Банковские операции реализуются через сходные каналы.
Процедура открытия счёта через резервный домен подразумевает привычной проверки. Администраторы запрашивают справки для исполнения KYC-норм. Персональные характеристики подвергаются комплексную подтверждение.
Банковские ограничения на дополнительных порталах аналогичны первичным характеристикам. Начальные вклады остаются неизменными. Прогрессивные накопления согласовываются между разными доменами.
Премиальные системы оперируют комплексно на альтернативных порталах. Требования по обороту сохраняет первоначальные значения. Тайминг использования не изменяется.
Департамент помощи изучает запросы с альтернативных доменов таким же способом. Интерактивный разговор поддерживает круглосуточный порядок деятельности.
Легальные провайдеры игорных возможностей обеспечивают геймерам возможность к высококлассному развлечениям через dedicated порталы, включая лаки беар казино , которые именно следуют transnational требования конфиденциальности.
Последовательность открытия счёта включает указания валидационных данных через безопасные SSL-каналы. Менеджмент просят официальное доказательство правоспособности и локации проживания для compliance legal правил.
Multi-factor проверка считается mandatory составляющей современных solutions security. Участники получают SMS-ключи, push-алерты или применяют профессиональные tools вроде Google Authenticator.
Альтернативные URL решают трудности territorial запретов и DDoS-воздействий. Технически зеркала образуют тождественные dublicates центрального сайта с поддержанием features и user сведений.
Компетентные пользователи призывают сохранять актуальные списки функционирующих mirrors в закладках интернет-программы. Провайдеры рассылают новости о новых порталах через электронную почту, Telegram-группы и mobile утилиты.
Денежные переводы через лицензионные площадки гарантированы encryption технологиями стандарта банковского segment. Получение финансов осуществляется лишь на проверенные счета владельца учётной записи.
Xerva Store – Really like the layout, browsing products today was simple and smooth.
This Site android pass app
Официальные ресурсы игорных возможностей oferuja участникам шанс к высококлассному времяпрепровождению через целевые домены, включая Vavada casino , что придерживаются transnational критерии защиты.
Последовательность регистрации предполагает внесения верификационных деталей через безопасные SSL-соединения. Провайдеры требуют документальное подтверждение дееспособности и адреса проживания для исполнения юрисдикционных требований.
Multi-factor верификация становится mandatory составляющей актуальных solutions надёжности. Игроки приобретают SMS-токены, push-notification или применяют targeted утилиты в стиле Google Authenticator.
Альтернативные домены ликвидируют трудности географических блокировок и DDoS-нападений. С технической точки зрения mirrors представляют тождественные dublicates базового ресурса с обеспечением функциональности и клиентских данных.
Экспертные игроки предлагают сохранять свежие каталоги рабочих копий в сохранённых ссылках веб-клиента. Операторы направляют новости о новых ссылках через мейл, Telegram-communities и мобильные приложения.
Банковские процедуры через надёжные площадки защищены защитными methods уровня банковского сектора. Extraction финансов реализуется единственно на аутентифицированные wallets хозяина account.
Amber Select – Love how pricing is honest and product details are easy to read.
stromectol: Ivermectin Access USA – Ivermectin Access USA
Подбор безопасного гемблинг заведения подразумевает тщательного анализа официальных бумаг. Передовые платформы Меллстрой официальный сайт предлагают участникам максимальную сведения о текущих аккредитациях.
Процесс оформления счета включает различные необходимых стадий аутентификации. Администраторы требуют документы, удостоверяющие индивидуальность и дееспособность. Типовой KYC-процесс длится от 24 до 72 периодов.
Банкролл-менеджмент запускается с фиксации ограничений на вклады. Компетентные игроки призывают задействовать принцип 5% от совокупного казино капитала на единичную заход.
Цифровые ограничения операторов обязывают применять альтернативные ссылки. Клоны поддерживают полную работоспособность главного платформы, включая журнал транзакций и развлекательный успех.
Актуальные расчетные методы предоставляют моментальные пополнения через блокчейн кошельки. Bitcoin, Ethereum и стейблкоины гарантируют скрытность и мизерные отчисления. Срок осуществления изъятий составляет 10-30 интервалов.
Программы лояльности подразумевают ступенчатые степени с прогрессивным компенсацией. VIP-менеджеры гарантируют личные поощрения, повышенные рамки и первоочередную поддержку.
Исследование в пространстве сертифицированных платформ включает представления передовых способов подключения. Умелые пользователи применяют Лаки Бир регистрация для приобретения свежей фактов о действующих доменах.
Процесс регистрации учетной записи в официальных организациях предполагает комплексную подтверждение. Продвинутые поставщики применяют KYC-механизмы и AML-стандарты. Оформление документов составляет от 24 до 72 периодов.
IT способы для прохождения препятствий совершенствуются сообща с укреплением законодательных мер. VPN-платформы класса premium гарантируют кодирование AES-256 и стандарты OpenVPN. Надежность соединения принципиально важна для высокоролловых партий.
Резервные домены работают через локально размещенные цифровые мощности. CDN-системы гарантируют низкую латентность для глобальных игроков. Системное редирект включается при выявлении недоступности первичного сайта.
Платежные движения в легальных зонах подчиняются конкретным критериям PCI DSS. Крипто переводы набирают признание благодаря конфиденциальности и оперативности осуществления.
Портативные клиенты премиальных компаний объединяют физиологическую проверку и push-уведомления для существенных эпизодов. Изменяемый облик независимо подстраивается под настройки панели.
Современные игроки обталкиваются с огромным количеством технологических деталей при деятельности с лицензированными сайтами. Тематические порталы типа lucky bear казино официальный сайт поставляют свежую данные о операциях азартных компаний.
Процедура проверки кабинета содержит набор обязательных фаз. Базовая верификация подразумевает загрузки бумаг доказывающих персону. Привычный перечень подразумевает свидетельство, лицензию водителя или международный паспорт.
Системная элемент открытия счета включает эксплуатацию криптографической защиты и 2FA. Квалифицированные участники подсказывают активировать полный набор имеющихся возможностей безопасности.
Зеркала являются идентичные реплики центрального портала с удержанием комплексного инструментария. Ключевое выгода заключается в идентичности платежных лимитов и условий проигрыша.
Процедура локализации актуальных запасных доменов базируется на мониторинге профильных мессенджер групп и связанных площадок. Экспертные игроки внедряют туннельные протоколы для предоставления надежного входа безотносительно от местных ограничений.
Новейшие пользователи встречаются с набором системных аспектов при функционировании с сертифицированными площадками. Тематические источники типа Килограмм казино дают новую сведения о функционировании игорных компаний.
Механизм валидации кабинета содержит множество необходимых стадий. Первичная верификация предполагает размещения удостоверений верифицирующих личность. Обычный набор охватывает документ, автолицензию или международный паспорт.
Цифровая часть создания аккаунта включает внедрение защищенного протокола и многофакторной защиты. Опытные клиенты настаивают включать весь комплекс имеющихся опций секьюрити.
Зеркала формируют стопроцентные отражения основного платформы с сохранением всего набора функций. Центральное выгода состоит в тождественности финансовых лимитов и норм проигрыша.
Схема локализации действующих дублирующих порталов базируется на наблюдении профессиональных телеграм-каналов и союзных порталов. Профессиональные геймеры внедряют анонимайзеры для гарантирования стабильного подключения невзирая от региональных ограничений.
prenvia official store – Pages load quickly, layout is clear, and exploring products is smooth.
Check out GarnetDock – The interface is tidy and straightforward to use.
telugu sex videos
Новейшие гемблеры встречаются с сложностью соединения к официальным ресурсам. Поставщики блокируют базовые ссылки, но искушённые Mellstroy Game участники учитывают о функционировании параллельных платформ.
Параллельный портал формирует стопроцентную воспроизведение базового платформы. Криптографические алгоритмы работают такими же. Платёжные транзакции производятся через идентичные механизмы.
Схема создания аккаунта через резервный ресурс включает классической валидации. Операторы просят бумаги для реализации KYC-стандартов. Личные параметры выполняют комплексную подтверждение.
Депозитные ограничения на резервных сайтах аналогичны основным характеристикам. Наименьшие взносы остаются константными. Увеличивающиеся банки координируются между разными порталами.
Льготные системы действуют полноценно на зеркальных сайтах. Отыгрышный коэффициент сохраняет первоначальные цифры. Срок активности проигрывания поддерживается.
Команда поддержки обрабатывает вопросы с альтернативных адресов сходным образом. Прямой переписка осуществляет постоянный график обслуживания.
adster – Bookmarked this immediately, planning to revisit for updates and inspiration.
Нынешние пользователи имеют дело с изобилием технологических деталей при работе с легальными ресурсами. Профессиональные платформы типа казино Лаки Бир поставляют современную контент о операциях казино провайдеров.
Процедура подтверждения учетной записи подразумевает набор неотъемлемых стадий. Начальная аутентификация требует передачи документов доказывающих индивидуальность. Стандартный набор включает паспорт, права или международное ID.
Технологическая элемент создания аккаунта охватывает использование зашифрованного канала и двойной авторизации. Квалифицированные геймеры подсказывают запускать максимум представленных настроек безопасности.
Дублирующие порталы представляют полные реплики первичного сайта с обеспечением комплексного инструментария. Важнейшее бонус заключается в подобии расчетных рамок и норм вейджера.
Алгоритм выявления действующих резервных ссылок базируется на наблюдении экспертных мессенджер групп и партнерских платформ. Опытные участники задействуют прокси-соединения для предоставления стабильного входа безотносительно от территориальных ограничений.
revenueharbor official store – A convenient source of guidance for building reliable digital income.
Новейшие участники оказываются с сложностью связи к лицензированным сайтам. Поставщики блокируют стандартные URL, но профессиональные казино аква пользователи осознают о доступности резервных платформ.
Альтернативный адрес формирует стопроцентную дубликат основного портала. Системы безопасности поддерживаются равнозначными. Расчётные операции проходят через аналогичные каналы.
Схема заведения учётной записи через резервный адрес содержит привычной проверки. Сотрудники просят удостоверения для соблюдения KYC-регламентов. Идентификационные данные реализуют расширенную валидацию.
Депозитные границы на параллельных платформах аналогичны стандартным параметрам. Низшие беты функционируют константными. Накопительные накопления координируются между разными адресами.
Льготные планы оперируют всесторонне на дополнительных платформах. Отыгрышный коэффициент удерживает оригинальные величины. Период действия отыгрыша продолжается.
Сервис ассистирования рассматривает вопросы с зеркальных ресурсов аналогично. Живой чат предоставляет круглосуточный формат работы.
online style headquarters – The information is presented in a friendly and accessible way.
Currently it sounds like WordPress is the preferred blogging platform out
there right now. (from what I’ve read) Is that what you’re using on your blog?
Learn More pass.app
Передовые пользователи обталкиваются с огромным количеством программных деталей при деятельности с проверенными сайтами. Профессиональные источники типа Гризли казино обеспечивают новую материалы о процессах гэмблинговых компаний.
Процедура аутентификации профиля включает набор неотъемлемых уровней. Первичная верификация предполагает размещения свидетельств подтверждающих субъект. Классический пакет охватывает свидетельство, права или международный паспорт.
Цифровая сторона записления подразумевает эксплуатацию защищенного протокола и многофакторной защиты. Квалифицированные участники настаивают запускать максимум предложенных настроек обеспечения.
Дублирующие порталы формируют стопроцентные реплики первичного сайта с обеспечением полного арсенала. Главное плюс выражается в идентичности финансовых пределов и критериев ставочных требований.
Схема выявления актуальных альтернативных адресов базируется на контроле профессиональных информационных каналов и союзных ресурсов. Опытные геймеры применяют анонимайзеры для создания надежного входа безотносительно от локальных ограничений.
Современные пользователи сталкиваются с множеством технологических нюансов при деятельности с проверенными платформами. Специализированные порталы типа казино 1xBet дают современную информацию о функционировании азартных брендов.
Механизм верификации профиля охватывает набор требуемых уровней. Стартовая проверка включает предоставления удостоверений подтверждающих индивидуальность. Обычный пакет подразумевает документ, права или внешний паспорт.
Технологическая элемент оформления предполагает использование защищенного протокола и многофакторной защиты. Профессиональные клиенты предлагают запускать весь комплекс предложенных опций охраны.
Дублирующие порталы формируют абсолютные клоны главного ресурса с хранением тотального инструментария. Главное плюс заключается в подобии финансовых рамок и критериев условий прокрутки.
Система обнаружения рабочих резервных ссылок фундируется на наблюдении тематических уведомительных сервисов и связанных порталов. Опытные игроки эксплуатируют прокси-соединения для предоставления постоянного подключения вне зависимости от региональных лимитов.
Поиск в мире официальных порталов подразумевает владения передовых решений подключения. Квалифицированные участники используют Vavada для приобретения релевантной сведений о работающих адресах.
Процесс регистрации счета в официальных операторах включает многоуровневую проверку. Актуальные операторы задействуют KYC-механизмы и AML-критерии. Бумажная работа отнимает от 24 до 72 периодов.
Цифровые технологии для прохождения блокировок улучшаются сообща с ужесточением юридических шагов. VPN-инструменты класса premium предлагают защиту AES-256 и протоколы OpenVPN. Постоянство соединения критически значима для VIP партий.
Зеркальные платформы функционируют через территориально расположенные IT мощности. CDN-комплексы поддерживают оптимальную пинг для глобальных геймеров. Системное роутинг инициируется при идентификации блокировки главного сайта.
Финансовые операции в официальных территориях отвечают четким стандартам PCI DSS. Цифровые переводы получают популярность вследствие приватности и скорости реализации.
Портативные софт элитных брендов совмещают физиологическую идентификацию и push-извещения для ключевых ситуаций. Гибкий облик самостоятельно подстраивается под характеристики монитора.
Kod promocyjny Mostbet darmowy zaklad to jedna z najczesciej wybieranych ofert przez fanow sportu. Dzieki kodowi QWERTY555 nowi gracze moga otrzymac freebet do wykorzystania na dowolne wydarzenia sportowe. Kod promocyjny Mostbet Sports umozliwia obstawianie meczow pilkarskich, koszykowki oraz sportow na zywo bez ryzyka utraty wlasnych srodkow. Bonus powitalny obejmuje rowniez procent od pierwszej wplaty, co zwieksza saldo startowe. To idealne rozwiazanie dla osob, ktore chca sprawdzic oferte bukmachera.
Odwiedz teraz Mostbet http://getkredit.ru/administrator/inc/promokod_mostbet__bonus_125__do_35000_rub_.html
заказать кухню по индивидуальному заказу заказать кухню по индивидуальному заказу .
shakerstation shopping spot – Diverse options and smooth browsing make it easy to find what you want.
https://uspharmaindex.shop/# canadian pharmacy no rx needed
Поиск в мире легальных площадок предполагает представления продвинутых решений входа. Опытные геймеры применяют п»ї1xBet зеркало для приобретения новейшей информации о работающих путях.
Процедура открытия учетной записи в проверенных компаниях содержит многоуровневую аутентификацию. Актуальные операторы эксплуатируют KYC-системы и AML-стандарты. Документальное сопровождение составляет от 24 до 72 промежутков.
Технические методы для избежания запретов совершенствуются синхронно с укреплением нормативных действий. VPN-платформы уровня premium обеспечивают криптографию AES-256 и системы OpenVPN. Устойчивость соединения принципиально существенна для премиальных игровых периодов.
Зеркальные платформы действуют через пространственно распределенные компьютерные мощности. CDN-сети поддерживают минимальную задержку для европейских клиентов. Системное переключение активируется при детекции блокировки центрального портала.
Платежные манипуляции в лицензированных территориях следуют конкретным стандартам PCI DSS. Децентрализованные операции получают распространение благодаря анонимности и темпу осуществления.
Мобильные клиенты премиальных брендов включают отпечатковую проверку и push-уведомления для важных происшествий. Изменяемый дизайн независимо адаптируется под особенности монитора.
Современные пользователи обталкиваются с огромным количеством технических особенностей при деятельности с лицензированными ресурсами. Профильные ресурсы типа Lucky Bear зеркало дают свежую информацию о операциях казино организаций.
Процедура подтверждения профиля охватывает комплекс необходимых этапов. Исходная подтверждение требует загрузки бумаг валидирующих индивидуальность. Типовой перечень предполагает паспорт, права или международное ID.
Цифровая компонента регистрации охватывает использование безопасного соединения и двухуровневой проверки. Продвинутые геймеры предлагают активировать весь комплекс доступных опций безопасности.
Запасные домены формируют стопроцентные реплики базового портала с удержанием тотального инструментария. Важнейшее преимущество содержится в подобии расчетных рамок и условий отыгрыша.
Система локализации активных дублирующих порталов опирается на проверке специализированных мессенджер групп и связанных платформ. Профессиональные клиенты эксплуатируют туннельные протоколы для создания стабильного связи независимо от территориальных ограничений.
Современные операторы азартных услуг гарантируют игрокам путь к элитному гемблингу через сертифицированные Eldorado системы. Лицензированная деятельность предполагает соблюдения жестких надзорных норм.
Процесс оформления индивидуального учетной записи содержит подтверждение индивидуальных реквизитов. Операторы используют детализированные механизмы KYC и AML для исключения нарушающих транзакций.
Программные платформы актуальных казино строятся на зашифрованных серверах с HTTPS сертификатами. Региональная блокировка обязывает владельцев разрабатывать альтернативные порталы.
Параллельные сайты являют собой полные дубликаты основного ресурса с удержанием всех функций и сведений. Игроки добиваются устойчивый вход к капиталу, азартной данным и индивидуальным опциям.
Финансовые процедуры выполняются через связанные платежные процессоры. Рамки на взносы и обналичивания фиксируются в соответствии с правовыми требованиями и внутренними правилами снижения потерь.
Квалифицированные игроки указывают мониторить ситуацию лицензии через регуляторные списки беттинг структур. Репутационные характеристики задействуют места на профильных ресурсах и оценки подлинных пользователей.
Новейшие участники пересекаются с изобилием системных особенностей при процессах с легальными сайтами. Профессиональные ресурсы типа казино Лев дают актуальную сведения о функционировании гэмблинговых компаний.
Механизм аутентификации профиля включает набор неотъемлемых шагов. Базовая валидация предполагает предоставления справок подтверждающих персону. Привычный перечень содержит документ, водительские права или внешний паспорт.
Техническая элемент оформления охватывает задействование криптографической защиты и многофакторной защиты. Квалифицированные участники настаивают запускать все имеющихся параметров безопасности.
Резервные ссылки составляют идентичные клоны первичного сайта с хранением тотального функционала. Центральное плюс содержится в соответствии расчетных рамок и норм вейджера.
Механизм обнаружения актуальных зеркал основывается на мониторинге специализированных новостных лент и партнерских сайтов. Квалифицированные участники внедряют туннельные протоколы для формирования надежного входа вне зависимости от территориальных лимитов.
Velvet Treasure – Quick and secure checkout, made my first purchase easy and comfortable.
http://www.jamesbondexhibition.com
на этом сайте https://slon2-at.com
Good morning!
Protect your mind with interesting mysterious facts that hold valuable truth always and strengthen your critical thinking see on the website for mental exercises
Full information on the link – https://202fliks.site
All the best and development in business!
Официальные операторы развлекательных сервисов oferuja игрокам возможность к премиальному развлечениям через тематические порталы, включая Mellstroy Game casino , которые точно следуют transnational критерии надёжности.
Процедура создания аккаунта necessita заполнения идентификационных параметров через криптографические SSL-каналы. Менеджмент просят official доказательство age verification и адреса жительства для соблюдения правовых критериев.
Многоуровневая аутентификация выступает required aspect новейших архитектур security. Пользователи имеют SMS-токены, push-алерты или применяют dedicated софт по типу Google Authenticator.
Дублирующие ссылки ликвидируют сложности локальных блокировок и DDoS-нападений. С технической точки зрения зеркала формируют аналогичные копии главного ресурса с поддержанием features и пользовательских сведений.
Опытные игроки советуют удерживать актуальные списки действующих альтернатив в избранном браузера. Букмекеры направляют сведения о актуальных ссылках через e-mail, Telegram-сообщества и мобильные софт.
Финансовые операции через legal порталы гарантированы криптографическими технологиями level банковского segment. Вывод капитала выполняется исключительно на подтверждённые данные держателя профиля.
Надёжные операторы развлекательных опций предоставляют пользователям доступ к премиальному развлечениям через dedicated сайты, включая п»ї1хбет казино , что следуют transnational регламенты security.
Схема регистрации подразумевает ввода верификационных параметров через шифрованные SSL-каналы. Администрация запрашивают нотариальное подтверждение age verification и локации жительства для поддержания legal требований.
Multi-factor верификация является принудительным частью актуальных solutions конфиденциальности. Users обретают SMS-токены, push-notification или применяют специальные софт по типу Google Authenticator.
Дублирующие URL решают сложности региональных санкций и DDoS-атак. По сути реплики представляют копийные клоны primary домена с поддержанием возможностей и индивидуальных информации.
Skilled участники предлагают keeping актуальные перечни рабочих дублей в bookmark интернет-программы. Операторы отправляют updates о свежих порталах через мейл, Telegram-сообщества и портативные утилиты.
Платёжные movements через legal сайты secured шифровальными системами категории банковского segment. Получение финансов реализуется только на аутентифицированные счета владельца account.
liltharbor.shop – The layout is neat and it’s easy to locate what I need.
keepcrate.shop – Well-organized collection, browsing through products is effortless and easy.
buy valtrex online without prescription
https://cspacket.com/index.php?route=journal3/blog/post&journal_blog_post_id=11
Современные сервисы гемблинг развлечений гарантируют беттерам возможность к премиальному беттингу через безопасные ДживиСпин казино системы. Авторизованная операционная активность требует исполнения определенных регуляторных стандартов.
Процесс оформления игрового профиля предусматривает подтверждение приватных информации. Администраторы задействуют расширенные протоколы KYC и AML для блокировки мошеннических транзакций.
Цифровые системы актуальных развлекательных порталов работают на надежных дата-центрах с TLS сертификатами. IP-фильтрация обязывает провайдеров внедрять резервные домены.
Альтернативные порталы представляют идентичные дубликаты первичного платформы с обеспечением всех сервисов и сведений. Игроки приобретают устойчивый доступ к капиталу, игровой данным и персональным настройкам.
Платежные переводы осуществляются через синхронизированные расчетные шлюзы. Рамки на взносы и изъятия определяются в соответствии с регуляторными стандартами и внутренними правилами снижения потерь.
Квалифицированные пользователи настаивают анализировать условия сертификата через официальные списки беттинг органов. Имиджевые критерии предусматривают оценки на отраслевых порталах и комментарии действительных пользователей.
Передовые провайдеры гемблинг продуктов обеспечивают игрокам путь к высококлассному игровому процессу через защищенные п»ї1xBet сайты. Сертифицированная операционная активность требует следования жестких надзорных стандартов.
Система активации игрового учетной записи задействует аутентификацию приватных показателей. Провайдеры используют детализированные системы KYC и AML для предотвращения фродовых транзакций.
Технические системы инновационных развлекательных порталов основываются на зашифрованных дата-центрах с SSL протоколами. Территориальные ограничения вынуждает управляющих запускать вспомогательные порталы.
Зеркальные ресурсы формируют полные дубликаты главного портала с сохранением всех сервисов и параметров. Участники достигают беспрепятственный соединение к средствам, беттинг данным и пользовательским конфигурациям.
Финансовые переводы реализуются через интегрированные денежные системы. Лимиты на инвестиции и обналичивания назначаются в гармонии с регуляторными критериями и внутренними регламентами риск-менеджмента.
Квалифицированные гемблеры предлагают анализировать ситуацию авторизации через надзорные базы данных развлекательных органов. Статусные показатели охватывают места на тематических ресурсах и feedback истинных участников.
Развлекательная ниша показывает активный прогресс, притягивая легионы пользователей. Профессиональные порталы гарантируют надёжную среду для ставок. Развёрнутую материалы о этих организациях доступно получить на Вавада сайт .
Лицензирование представляет приоритетным аспектом селекции ресурса. Юрисдикции Мальты обеспечивают жёсткий аудит финансовых процедур. Конкретная лицензированная сайт осуществляет регулярные ревизии RNG-генераторов.
IT характеристики современных беттинг-платформ содержат SSL-кодирование банковского уровня. Разработчики софтового материала наподобие Microgaming, NetEnt, Pragmatic Play внедряют многоуровневые механизмы произвольных параметров.
Процедура проверки счёта включает предоставления справок KYC-формата. Документ, выписка о средствах, удостоверение регистрации — типичный пакет для полноценного входа.
Дублирующие URL убирают барьеры с запретами организаций. Актуальные копии корректируются систематически IT службами. Мобильные программы часто работают устойчивее интернет редакций.
Банкролл-менеджмент устанавливает продолжительную прибыльность азартных циклов. Грамотные игроки рекомендуют ограничивать размер депозита до 1-2% от суммарного банкролла.
Функционирующие альтернативные домены проверенных gaming-операторов на lucky bear казино дают беспрерывный доступ к развлекательным системам. Технология реплицирования строит точные версии центрального сайта с консервацией всех возможностей.
Схема активации через дублирующий портал полностью повторяет оригинальную бланк. Свежие геймеры заполняют действующий email, придумывают надежный шифр и определяют базовую денежную единицу.
Валидация профиля подразумевает передачи удостоверений по KYC-требованиям. Изображение ID-карты, валидация проживания и карточные данные подвергаются алгоритмическую контроль в течение 24-72 временных единиц.
Аутентификация действующих клиентов осуществляется через классическую панель с усиленной валидацией. Временные пароли доставляются на сотовый номер или e-mail адрес.
Инструменты входящего раздела через альтернативные домены обеспечивает востребованные финансовые системы. Visa, Mastercard, электронные счета Skrill, Neteller, виртуальные монеты Bitcoin, Ethereum выполняются с минимальными платежами 0-3%.
Развлекательная база копируется абсолютно включая барабаны, классические забавы, live-операторов и джекпоты. RTP-коэффициенты, изменчивость и условия отыгрыша поддерживаются такими же.
Акционная политика работает аналогично главному веб-площадке. Welcome-бандлы, безвозмездные спины, refund и VIP-системы включаются алгоритмически при выполнении фиксированных параметров.
подробнее здесь https://vodkabet-play.vodkabet-zerkalo.vodka/
вайбовые стимы На стримах можно увидеть разнообразные активности: от игровых сессий до ламповых бесед с аудиторией, всегда поддерживая позитивный настрой.
see it here mtgox claims
содержание https://slon2-at.cc
Elegant Picks – A calm and airy platform showcasing stylish and thoughtfully chosen items.
Mostbet to renomowana platforma, a Promocja Mostbet przyciaga nowych graczy. Aktywacja Kod Mostbet QWERTY555 daje dostep do bonusow. Bonus powitalny Mostbet zwieksza pierwszy depozyt. Oferta obejmuje sport i kasyno. To dobry wybor na start.
Xerva Essentials – Browsing items is hassle-free with the clean and organized layout.
заміна контролера і мотора електросамоката
Подбор проверенного игрового портала в современных обстоятельствах подразумевает детального подхода к юридическому режиму. Опытные пользователи понимают, что п»ї1хбет казино предоставляет современную сведения о активных площадках.
Процесс регистрации в официальных операторах включает требуемую валидацию идентичности. KYC-правила гарантируют как заведение, так и клиента от фрода. Переходные ограничения на изъятие денег до выполнения проверки – обычная методика.
Программные барьеры на подключение к гемблинг сайтам устраняются через зеркальные URL. Доступные дубликаты предоставляют всестороннюю функциональность центрального сервиса. Расчетные транзакции, азартный прогресс и привилегированные программы остаются устойчивыми.
Экономическая защищенность характеризуется критерием применяемых платежных методов. SSL-безопасность, PCI DSS лицензирование и расширенная проверка создают безопасный периметр обороны.
Интерактивная набор официальных провайдеров охватывает слоты от ведущих студий. RTP-значения, волатильность и расчетные принципы подвергаются внешнюю контроль в признанных лабораториях.
Планы мотивации в серьезных сервисах опираются на понятных параметрах проигрыша. Отыгрыш x35-40 характеризуется справедливым для спин-бонусов, в то время как настольные забавы включаются в расчет с сниженным коэффициентом.
Развлекательная область показывает стремительный расширение, манящая тысячи игроков. Грамотные площадки гарантируют стабильную условия для беттинга. Развёрнутую сведения о данных провайдерах реально получить на п»ї[url=https://github.com/1xBet-online-zerkalo]1хбет РІС…РѕРґ[/url] .
Легализация представляет основным критерием выбора сайта. Юрисдикции Мальты дают строгий аудит расчётных манипуляций. Конкретная аккредитованная платформа реализует систематические аудиты RNG-алгоритмов.
Цифровые параметры передовых азартных площадок включают SSL-шифрование банковского класса. Производители программного ПО вроде Microgaming, NetEnt, Pragmatic Play интегрируют комплексные модели хаотичных чисел.
Механизм аутентификации учётной записи включает передачи справок KYC-класса. ID, справка о доходах, подтверждение адреса — стандартный список для итогового входа.
Параллельные URL убирают препятствия с блокировками операторов. Действующие копии обновляются постоянно техническими специалистами. Планшетные утилиты регулярно работают устойчивее интернет модификаций.
Управление банкроллом устанавливает долгосрочную эффективность азартных циклов. Экспертные беттеры настаивают сокращать количество депозита до 1-2% от общего фонда.
Quick Finds Cerlix – A sleek platform for discovering products quickly with ease and enjoyment.
Надёжные операторы развлекательных возможностей oferuja участникам возможность к качественному гэмблингу через целевые порталы, включая tip top casino , что исполняют глобальные критерии безопасности.
Последовательность создания аккаунта necessita указания идентификационных параметров через криптографические SSL-соединения. Менеджмент просят предоставить официальное удостоверение age verification и локации нахождения для выполнения нормативных критериев.
2FA верификация выступает обязательным aspect новейших механизмов конфиденциальности. Пользователи приобретают SMS-шифры, push-notification или используют профессиональные приложения типа Google Authenticator.
Зеркальные домены нейтрализуют сложности geographic барьеров и DDoS-штурмов. Техническим образом реплики представляют копийные клоны primary платформы с обеспечением features и user данных.
Профессиональные игроки призывают удерживать свежие реестры working альтернатив в bookmark веб-клиента. Букмекеры доставляют сведения о свежих доменах через e-mail, Telegram-группы и смартфонные apps.
Финансовые транзакции через legal порталы secured шифровальными протоколами категории банковского индустрии. Вывод средств реализуется единственно на подтверждённые карты собственника профиля.
Официальные операторы игорных возможностей обеспечивают игрокам вариант к качественному гэмблингу через тематические сайты, включая lucky bear казино , которые именно соблюдают мировые регламенты защиты.
Последовательность создания аккаунта включает ввода authentication данных через шифрованные SSL-линии. Операторы просят письменное verification совершеннолетия и региона регистрации для исполнения законодательных правил.
Двухфакторная верификация становится required частью современных solutions надёжности. Участники располагают SMS-коды, push-уведомления или применяют targeted программы типа Google Authenticator.
Альтернативные адреса преодолевают вопросы географических барьеров и DDoS-атак. С технической точки зрения зеркала составляют аналогичные копии главного платформы с поддержанием возможностей и личных деталей.
Опытные игроки советуют хранить обновлённые перечни рабочих копий в favourites веб-клиента. Администрация доставляют сведения о свежих доменах через e-mail, Telegram-communities и mobile apps.
Финансовые транзакции через legal сайты покрыты cryptographic технологиями категории банковского области. Изъятие денег происходит единственно на проверенные реквизиты держателя учётной записи.
Everyday Acorn – Professional and neat layout allows for quick and simple browsing.
Актуальные провайдеры беттинг игр предлагают клиентам доступ к профессиональному гемблингу через проверенные Vavada зеркало ресурсы. Легальная операционная активность нуждается следования определенных законодательных требований.
Алгоритм активации пользовательского аккаунта предусматривает аутентификацию индивидуальных информации. Операторы задействуют комплексные алгоритмы KYC и AML для блокировки поддельных переводов.
Программные инструменты инновационных казино работают на защищенных серверах с SSL алгоритмами. Территориальные ограничения побуждает владельцев создавать дублирующие адреса.
Дублирующие сайты составляют идентичные дубликаты первичного портала с фиксацией всех опций и данных. Пользователи достигают непрерывный связь к балансу, азартной статистике и клиентским конфигурациям.
Расчетные процедуры выполняются через встроенные финансовые сервисы. Лимиты на инвестиции и обналичивания назначаются в гармонии с законодательными условиями и корпоративными процедурами контроля угроз.
Квалифицированные игроки предлагают мониторить положение сертификата через государственные каталоги гемблинг ведомств. Имиджевые параметры предусматривают рейтинги на тематических ресурсах и комментарии действительных клиентов.
согласование перепланировки москва согласование перепланировки москва .
Навигация в пространстве лицензированных платформ включает понимания продвинутых инструментов авторизации. Опытные клиенты используют п»ї1хбет зеркало для обретения современной данных о активных доменах.
Схема открытия счета в сертифицированных компаниях охватывает тщательную валидацию. Передовые операторы эксплуатируют KYC-протоколы и AML-правила. Оформление документов требует от 24 до 72 периодов.
IT технологии для преодоления запретов развиваются синхронно с повышением нормативных действий. VPN-платформы уровня premium обеспечивают безопасность AES-256 и системы OpenVPN. Надежность канала критически важна для премиальных игровых периодов.
Зеркальные домены работают через регионально рассредоточенные компьютерные ресурсы. CDN-комплексы поддерживают оптимальную время ответа для европейских клиентов. Автоматическое перенаправление инициируется при выявлении блокировки базового домена.
Финансовые операции в легальных областях соответствуют определенным правилам PCI DSS. Блокчейн операции набирают распространение из-за анонимности и быстроте осуществления.
Переносные приложения премиальных организаций совмещают лицевую идентификацию и push-извещения для важных происшествий. Изменяемый интерфейс независимо корректируется под свойства монитора.
Have you ever considered about including a little bit more
than just your articles? I mean, what you say is important and all.
However think of if you added some great visuals or
videos to give your posts more, “pop”! Your content is excellent but with
pics and video clips, this website could undeniably be one
of the most beneficial in its niche. Fantastic blog!
kelnix gallery hub – Well-selected products that give a sense of a thoughtfully curated collection.
заказать кухню по индивидуальному проекту zakazat-kuhnyu-2.ru .
кайт школа в крыму кайт
Выбор безопасного гемблинг площадки требует серьезного исследования юридических бумаг. Новые сайты казино Лаки Бир предлагают участникам максимальную данные о собственных санкциях.
Система регистрации охватывает множество обязательных ступеней верификации. Представители просят удостоверения, доказывающие личность и правоспособность. Обычный KYC-порядок длится от 24 до 72 интервалов.
Распоряжение капиталом открывается с задания пределов на пополнения. Компетентные игроки советуют применять установку 5% от суммарного игорного бюджета на отдельную заход.
Электронные ограничения поставщиков обязывают эксплуатировать альтернативные маршруты. Дубликаты сохраняют абсолютную работоспособность первичного платформы, предусматривая архив сделок и казино успех.
Передовые денежные инструменты поддерживают быстрые вклады через электронные хранилища. Bitcoin, Ethereum и фиксированные активы обеспечивают анонимность и минимальные платежи. Период осуществления снятий составляет 10-30 минут.
Планы лояльности предусматривают ступенчатые ранги с возрастающим вознаграждением. VIP-менеджеры предлагают персонализированные награды, увеличенные границы и опережающую помощь.
Новейшие пользователи пересекаются с массой программных аспектов при функционировании с сертифицированными платформами. Специализированные ресурсы типа казино Вавада предоставляют актуальную материалы о функционировании азартных провайдеров.
Механизм верификации профиля подразумевает набор необходимых этапов. Первичная валидация требует предоставления удостоверений удостоверяющих личность. Привычный список охватывает свидетельство, права или внешний паспорт.
Техническая компонента открытия счета включает эксплуатацию безопасного соединения и двойной авторизации. Профессиональные участники советуют запускать полный набор представленных возможностей безопасности.
Запасные домены образуют абсолютные отражения центрального сайта с обеспечением всего возможностей. Главное преимущество заключается в тождественности банковских границ и требований вейджера.
Процедура выявления функционирующих резервных ссылок основывается на проверке тематических новостных лент и связанных порталов. Профессиональные геймеры эксплуатируют туннельные протоколы для формирования стабильного подключения независимо от территориальных запретов.
Новейшие гемблеры натыкаются с затруднением входа к легальным порталам. Поставщики фильтруют базовые URL, но грамотные СЂР° казино игроки учитывают о существовании альтернативных ресурсов.
Резервная ссылка образует абсолютную воспроизведение главного площадки. SSL-сертификаты работают аналогичными. Банковские транзакции реализуются через сходные шлюзы.
Технология регистрации через дополнительный портал содержит привычной аутентификации. Специалисты уточняют справки для осуществления KYC-требований. Индивидуальные данные проходят двухфакторную валидацию.
Вносительные ограничения на параллельных ресурсах соответствуют первичным характеристикам. Минимальные беты продолжают стабильными. Возрастающие призовые фонды интегрируются между различными ссылками.
Премиальные планы оперируют полноценно на дополнительных ресурсах. Отыгрышный коэффициент сохраняет стартовые цифры. Срок активности проигрывания поддерживается.
Служба помощи анализирует заявки с резервных адресов аналогично. Интерактивный чат предоставляет беспрерывный режим обслуживания.
заказать кухню по размерам заказать кухню по размерам .
Определение честного развлекательного заведения заставляет основательного анализа правовых бумаг. Современные платформы РЎСѓРєР° казино предлагают пользователям стопроцентную данные о текущих допусках.
Механизм открытия аккаунта содержит определенное количество принудительных ступеней верификации. Представители запрашивают бумаги, удостоверяющие личность и правоспособность. Классический KYC-процесс требует от 24 до 72 часов.
Банкролл-менеджмент стартует с назначения ограничений на инвестиции. Опытные участники призывают применять закон 5% от полного гемблинг капитала на одну игру.
Системные запреты администраторов вынуждают эксплуатировать дополнительные адреса. Копии поддерживают максимальную работоспособность основного ресурса, подразумевая архив транзакций и развлекательный успех.
Инновационные платежные методы поддерживают быстрые депозиты через цифровые счета. Bitcoin, Ethereum и устойчивые монеты гарантируют скрытность и крошечные взносы. Срок осуществления получений насчитывает 10-30 интервалов.
Планы постоянства включают иерархические ранги с увеличивающимся возвратом. VIP-консультанты предоставляют личные поощрения, увеличенные рамки и преимущественную поддержку.
классические кухни из массива дерева Загляните «на Кухню алгоритмов» — и вы откроете для себя новый, удивительный мир, где креативность и логика идут рука об руку.
Greetings from Idaho! I’m bored to death at work so I decided to check out your blog on my iphone during
lunch break. I really like the knowledge you present here and can’t wait to
take a look when I get home. I’m surprised at how quick your blog loaded on my
cell phone .. I’m not even using WIFI, just 3G ..
Anyhow, superb site!
https://uspharmaindex.shop/# US Pharma Index
Нынешние игроки обталкиваются с набором цифровых особенностей при деятельности с официальными сайтами. Профессиональные платформы типа казино 1хбет поставляют актуальную данные о работе игорных операторов.
Процесс подтверждения учетной записи содержит набор обязательных фаз. Первичная аутентификация требует отправки свидетельств доказывающих личность. Типовой набор включает документ, автоудостоверение или международное ID.
Технологическая сторона открытия счета содержит эксплуатацию SSL-шифрования и двойной авторизации. Экспертные клиенты настаивают запускать совокупность имеющихся функций обеспечения.
Резервные ссылки формируют стопроцентные копии главного ресурса с удержанием полного функционала. Основное бонус заключается в соответствии финансовых лимитов и параметров отыгрыша.
Система локализации действующих резервных ссылок опирается на контроле тематических уведомительных сервисов и сотрудничающих площадок. Профессиональные клиенты применяют прокси-соединения для обеспечения надежного связи вне зависимости от региональных запретов.
Передовые игроки сталкиваются с набором технологических особенностей при операциях с проверенными платформами. Профильные платформы типа Mellstroy Game казино выдают современную данные о деятельности развлекательных компаний.
Механизм проверки профиля подразумевает множество необходимых фаз. Стартовая верификация предполагает предоставления бумаг подтверждающих субъект. Классический список включает паспорт, водительские права или международное ID.
Техническая элемент открытия счета включает использование SSL-шифрования и двухфакторной аутентификации. Квалифицированные участники подсказывают включать полный набор доступных опций обеспечения.
Дублирующие порталы образуют полные отражения основного ресурса с поддержанием тотального арсенала. Основное достоинство кроется в подобии финансовых лимитов и требований проигрыша.
Механизм обнаружения действующих дублирующих порталов фундируется на отслеживании профессиональных новостных лент и союзных сайтов. Опытные пользователи используют виртуальные частные сети для гарантирования постоянного связи невзирая от локальных барьеров.
shadowshowcase collection – A solid variety that’s easy to explore and worth coming back to.
pharmacy online uae: us pharmacy – US Pharma Index
RevenueHarbor marketplace – Worth browsing if you’re focused on boosting your web revenue streams.
Отбор безопасного развлекательного заведения в нынешних условиях заставляет особого анализа к юридическому состоянию. Квалифицированные клиенты понимают, что казино Болливуд демонстрирует актуальную факты о работающих операторах.
Механизм регистрации в лицензированных платформах охватывает необходимую проверку идентичности. KYC-стандарты оберегают как заведение, так и клиента от мошенничества. Переходные границы на изъятие капитала до финализации валидации – нормальная методика.
Электронные препятствия на подключение к развлекательным сервисам преодолеваются через зеркальные порталы. Доступные отражения гарантируют всестороннюю функциональность главного сервиса. Банковские движения, игровой продвижение и привилегированные программы поддерживаются постоянными.
Экономическая безопасность измеряется степенью применяемых денежных механизмов. SSL-защита, PCI DSS подтверждение и дополнительная аутентификация устанавливают стабильный контур защиты.
Развлекательная ассортимент легальных провайдеров предоставляет барабаны от известных разработчиков. RTP-коэффициенты, колебания и вероятностные системы претерпевают беспристрастную сертификацию в авторизованных институтах.
Механизмы вознаграждения в серьезных заведениях формируются на прозрачных параметрах ставок. Проигрыш x35-40 оценивается адекватным для машина-привилегий, в то время как настольные активности засчитываются в счет с пониженным множителем.
Выбор проверенного гемблинг портала в текущих границах заставляет тщательного изучения к законному режиму. Компетентные игроки учитывают, что типпи казино включает актуальную информацию о активных операторах.
Алгоритм регистрации в официальных операторах содержит обязательную подтверждение личности. KYC-стандарты защищают как казино, так и геймера от фрода. Промежуточные пределы на изъятие денег до окончания верификации – привычная подход.
Цифровые запреты на вход к betting сервисам устраняются через альтернативные адреса. Рабочие дубликаты сохраняют полную работоспособность центрального платформы. Платежные переводы, геймплейный результаты и льготные программы функционируют устойчивыми.
Денежная стабильность оценивается качеством задействованных денежных механизмов. SSL-безопасность, PCI DSS сертификация и расширенная проверка создают прочный контур защиты.
Игровая каталог официальных площадок предоставляет барабаны от лидирующих студий. RTP-коэффициенты, колебания и расчетные схемы получают беспристрастную валидацию в авторизованных институтах.
Системы стимулирования в достойных заведениях строятся на ясных критериях вейджера. Условия ставок x35-40 считается нормальным для барабан-подарков, в то время как стандартные игры включаются в расчет с минимальным фактором.
Передовые пользователи сталкиваются с огромным количеством технологических аспектов при функционировании с официальными сайтами. Профессиональные сайты типа Вавада зеркало предоставляют новую материалы о функционировании игорных провайдеров.
Механизм проверки кабинета предполагает несколько обязательных шагов. Базовая подтверждение нуждается передачи справок подтверждающих персону. Классический набор содержит ID, лицензию водителя или внешний паспорт.
Программная сторона оформления охватывает использование безопасного соединения и двухуровневой проверки. Продвинутые геймеры рекомендуют инициировать весь комплекс предложенных возможностей безопасности.
Альтернативные адреса формируют идентичные клоны базового ресурса с хранением исчерпывающего возможностей. Важнейшее выгода кроется в подобии банковских рамок и параметров ставочных требований.
Алгоритм поиска актуальных альтернативных адресов основывается на проверке тематических новостных лент и связанных порталов. Продвинутые клиенты эксплуатируют туннельные протоколы для гарантирования бесперебойного соединения вне зависимости от региональных ограничений.
заказать кухню по размерам zakazat-kuhnyu-1.ru .
Поиск достойного гемблинг площадки в нынешних условиях требует тщательного анализа к законному положению. Квалифицированные пользователи представляют, что Лаки Бир включает современную сведения о работающих провайдерах.
Механизм записи в официальных площадках включает требуемую аутентификацию документов. KYC-требования защищают как площадку, так и игрока от мошенничества. Кратковременные рамки на перечисление денег до закрытия верификации – обычная практика.
Виртуальные препятствия на соединение к игровым сайтам решаются через параллельные домены. Рабочие дубликаты поддерживают всестороннюю эффективность центрального портала. Расчетные движения, азартный прогресс и наградные системы продолжают константными.
Финансовая стабильность характеризуется качеством используемых денежных систем. SSL-безопасность, PCI DSS подтверждение и расширенная верификация обеспечивают защищенный периметр безопасности.
Развлекательная коллекция официальных площадок объединяет машины от лидирующих разработчиков. RTP-значения, вариативность и расчетные системы испытывают беспристрастную аудит в авторизованных центрах.
Программы стимулирования в серьезных сервисах строятся на ясных условиях активности. Требования x35-40 расценивается адекватным для спин-бонусов, в то время как карточные активности засчитываются в расчет с минимальным показателем.
Главная https://slon2-at.cc/
US Pharma Index: canadian world pharmacy – US Pharma Index
Nook Choice – Website design is clean, simple, and perfect for smooth browsing.
смотреть здесь https://slon2-at.cc/
Отбор честного азартного заведения требует детального изучения правовых разрешений. Актуальные порталы Mellstroy Game предоставляют клиентам максимальную факты о своих допусках.
Процедура создания профиля предусматривает определенное количество ключевых стадий верификации. Владельцы настаивают свидетельства, подтверждающие индивидуальность и правоспособность. Традиционный KYC-порядок занимает от 24 до 72 промежутков.
Контроль средств запускается с фиксации рамок на взносы. Квалифицированные игроки советуют применять норму 5% от общего казино фонда на единичную партию.
Программные блокировки операторов обязывают использовать запасные домены. Дубликаты оберегают безусловную активность центрального площадки, подразумевая летопись платежей и казино прогресс.
Инновационные платежные инструменты гарантируют быстрые инвестиции через блокчейн кошельки. Bitcoin, Ethereum и фиксированные активы обеспечивают конфиденциальность и минимальные взносы. Продолжительность обработки изъятий равно 10-30 отрезков.
Системы лояльности подразумевают каскадные уровни с нарастающим кэшбэком. VIP-представители гарантируют уникальные поощрения, улучшенные границы и опережающую сервис.
Ориентирование в секторе сертифицированных платформ предполагает представления актуальных инструментов доступа. Опытные игроки внедряют Вавада РІС…РѕРґ для добывания современной информации о оперативных путях.
Механизм создания учетной записи в надежных организациях включает многоуровневую проверку. Современные поставщики задействуют KYC-алгоритмы и AML-критерии. Бумажная работа занимает от 24 до 72 периодов.
Технические способы для обхода блокировок улучшаются синхронно с ужесточением регуляторных инициатив. VPN-платформы типа premium предоставляют защиту AES-256 и системы OpenVPN. Стабильность канала жизненно значима для привилегированных игровых периодов.
Дублирующие домены работают через географически рассредоточенные серверные системы. CDN-структуры обеспечивают оптимальную пинг для азиатских участников. Цифровое роутинг запускается при детекции ограничения первичного ресурса.
Банковские движения в проверенных областях соответствуют конкретным критериям PCI DSS. Криптовалютные расчеты увеличивают популярность по причине анонимности и скорости обработки.
Переносные приложения премиальных организаций интегрируют лицевую проверку и push-уведомления для важных событий. Гибкий облик программно адаптируется под настройки панели.
Актуальные гемблеры натыкаются с барьером входа к проверенным площадкам. Поставщики запрещают базовые адреса, но искушённые казино Вован участники понимают о существовании дублирующих площадок.
Альтернативный адрес является стопроцентную дубликат оригинального сайта. Средства защиты сохраняются неизменными. Банковские транзакции выполняются через сходные сервисы.
Алгоритм создания аккаунта через резервный ресурс содержит типовой подтверждения. Сотрудники выясняют бумаги для выполнения KYC-требований. Персональные информация подвергаются комплексную аутентификацию.
Вносительные лимиты на альтернативных сайтах совпадают основным параметрам. Минимальные ставки сохраняются фиксированными. Возрастающие призовые фонды согласовываются между множественными ресурсами.
Бонусные схемы действуют полноценно на резервных площадках. Отыгрышный коэффициент гарантирует оригинальные значения. Период действия отыгрыша продолжается.
Служба ассистирования изучает тикеты с резервных адресов идентично. Мгновенный разговор предоставляет непрерывный режим оперирования.
Explore ItemTrail – Fast and efficient assistance from customer service made everything easy.
Подбор безопасного гемблинг ресурса заставляет основательного исследования правовых документов. Современные ресурсы лаки Р±РёСЂ казино гарантируют игрокам стопроцентную детали о собственных аккредитациях.
Процесс оформления счета охватывает ряд необходимых ступеней аутентификации. Представители просят удостоверения, устанавливающие идентичность и правоспособность. Традиционный KYC-порядок длится от 24 до 72 временных отрезков.
Распоряжение капиталом начинается с фиксации границ на вклады. Профессиональные клиенты призывают использовать установку 5% от суммарного казино резерва на одну заход.
Цифровые барьеры владельцев вынуждают использовать резервные пути. Дубликаты удерживают абсолютную эффективность основного площадки, содержа журнал операций и гемблинг прогресс.
Актуальные банковские способы поддерживают моментальные взносы через блокчейн счета. Bitcoin, Ethereum и стейблкоины дают анонимность и крошечные взносы. Длительность обработки снятий доходит 10-30 интервалов.
Алгоритмы преданности включают каскадные статусы с нарастающим кэшбэком. VIP-координаторы предоставляют личные поощрения, улучшенные ограничения и приоритетную техподдержку.
заказать кухню заказать кухню .
Исследование в мире легальных платформ требует понимания актуальных методов доступа. Профессиональные геймеры внедряют Lucky Bear для обретения новейшей данных о действующих URL.
Процесс оформления профиля в официальных организациях подразумевает комплексную подтверждение. Продвинутые провайдеры применяют KYC-протоколы и AML-критерии. Оформление документов отнимает от 24 до 72 часов.
Программные технологии для прохождения блокировок эволюционируют параллельно с повышением регуляторных инициатив. VPN-платформы категории premium дают криптографию AES-256 и технологии OpenVPN. Непрерывность связи кардинально значима для привилегированных сессий.
Альтернативные платформы функционируют через регионально размещенные технические инфраструктуры. CDN-сети предоставляют минимальную пинг для глобальных участников. Техническое переключение срабатывает при идентификации ограничения базового домена.
Банковские переводы в легальных зонах отвечают определенным правилам PCI DSS. Крипто операции набирают распространение благодаря анонимности и динамике реализации.
Переносные программы премиальных организаций совмещают голосовую проверку и push-сообщения для ключевых эпизодов. Изменяемый оформление самостоятельно настраивается под свойства дисплея.
My brother recommended I might like this web site. He
was entirely right. This post actually made my day. You
cann’t imagine simply how much time I had spent for this info!
Thanks!
Новейшие провайдеры беттинг игр предлагают беттерам подключение к элитному азарту через безопасные п»ї1хбет ресурсы. Официальная бизнес требует учета строгих законодательных стандартов.
Система открытия пользовательского аккаунта содержит аутентификацию личных показателей. Управляющие эксплуатируют детализированные алгоритмы KYC и AML для пресечения незаконных операций.
Технические платформы актуальных беттинг площадок основываются на безопасных серверах с шифровальными технологиями. Региональная блокировка обязывает владельцев разрабатывать параллельные ссылки.
Зеркальные порталы формируют идентичные репликации основного портала с сохранением всех опций и данных. Игроки получают постоянный вход к средствам, беттинг записям и персональным параметрам.
Расчетные процедуры проходят через синхронизированные денежные процессоры. Лимиты на инвестиции и получения фиксируются в гармонии с регуляторными стандартами и организационными политиками снижения потерь.
Опытные беттеры рекомендуют контролировать условия сертификата через контролирующие регистры развлекательных комиссий. Престижные индикаторы предусматривают позиции на профильных порталах и оценки истинных игроков.
узнать больше Здесь https://vodkabet-play.vodkabet-zerkalo.vodka
пояснения https://slon2-at.cc/
здесь где можно продать аккаунт
online Yovrisa boutique – My first visit revealed a great mix of items and solid variety.
интернет как продавать цифровые товары на яндекс маркет
Нынешние геймеры пересекаются с изобилием технических особенностей при процессах с официальными ресурсами. Тематические сайты типа казино Вавада поставляют новую данные о процессах казино провайдеров.
Процесс проверки аккаунта подразумевает множество требуемых уровней. Первичная верификация требует загрузки документов подтверждающих персону. Привычный пакет содержит свидетельство, права или заграничное удостоверение.
Программная элемент открытия счета содержит эксплуатацию зашифрованного канала и 2FA. Профессиональные геймеры подсказывают включать максимум возможных настроек секьюрити.
Дублирующие порталы представляют абсолютные дубликаты центрального сайта с обеспечением тотального инструментария. Главное выгода заключается в идентичности платежных лимитов и параметров отыгрыша.
Схема нахождения активных альтернативных адресов базируется на контроле тематических новостных лент и союзных ресурсов. Квалифицированные игроки эксплуатируют виртуальные частные сети для предоставления устойчивого соединения вне зависимости от региональных ограничений.
Передовые порталы азартных игр гарантируют клиентам подключение к премиальному развлечениям через защищенные lucky bear казино платформы. Легальная операционная активность нуждается следования жестких надзорных стандартов.
Процесс оформления индивидуального учетной записи содержит аутентификацию индивидуальных показателей. Администраторы внедряют комплексные протоколы KYC и AML для недопущения поддельных финансовых действий.
IT инструменты новейших казино основываются на надежных хостингах с шифровальными сертификатами. IP-фильтрация вынуждает владельцев организовывать параллельные порталы.
Дублирующие платформы составляют аналогичные клоны основного ресурса с фиксацией всех опций и параметров. Участники достигают непрерывный связь к капиталу, развлекательной данным и персональным настройкам.
Расчетные переводы проходят через встроенные денежные агрегаторы. Рамки на пополнения и обналичивания фиксируются в соотношении с лицензионными стандартами и корпоративными правилами управления рисками.
Квалифицированные беттеры советуют мониторить ситуацию авторизации через контролирующие списки развлекательных органов. Имиджевые параметры включают оценки на отраслевых платформах и отзывы действительных беттеров.
Xerva Select – The interface is organized, making it effortless to check out different items.
этот сайт https://slon2-at.com
Перемещение в пространстве официальных ресурсов нуждается понимания новых инструментов соединения. Квалифицированные геймеры используют Вавада регистрация для приобретения релевантной информации о оперативных ссылках.
Процесс оформления учетной записи в официальных учреждениях подразумевает комплексную валидацию. Передовые провайдеры задействуют KYC-протоколы и AML-критерии. Оформление документов составляет от 24 до 72 временных отрезков.
Программные инструменты для прохождения препятствий совершенствуются синхронно с повышением законодательных действий. VPN-службы класса premium дают безопасность AES-256 и стандарты OpenVPN. Постоянство коннекта жизненно значима для элитных заходов.
Дублирующие домены функционируют через географически разнесенные технические кластеры. CDN-структуры поддерживают оптимальную отклик для американских участников. Техническое переключение активируется при распознавании недоступности главного портала.
Платежные манипуляции в проверенных областях соответствуют жестким критериям PCI DSS. Блокчейн переводы набирают распространение в результате секретности и быстроте процессинга.
Переносные приложения элитных брендов совмещают отпечатковую аутентификацию и push-уведомления для существенных происшествий. Адаптивный внешний вид независимо настраивается под свойства панели.
Функционирующие альтернативные домены лицензированных gaming-операторов на Рльдорадо казино гарантируют постоянный вход к игровым ресурсам. Принцип реплицирования создает полноценные копии центрального сайта с консервацией всех инструментов.
Система открытия счета через альтернативный домен на сто процентов дублирует главную бланк. Свежие игроки заполняют активный email, придумывают сложный шифр и определяют игровую валюту.
Аутентификация личного кабинета предполагает загрузки бумаг опираясь на KYC-стандартам. Копия водительских прав, верификация резиденции и банковские данные проверяются через алгоритмическую анализ в течение 24-72 ч.
Авторизация зарегистрированных участников осуществляется через типовую окно с 2FA валидацией. Одноразовые шифры доставляются на мобильный гаджет или электронную почту.
Возможности денежного компонента через mirror-сайты содержит востребованные платежные механизмы. Visa, Mastercard, цифровые портмоне Skrill, Neteller, блокчейн-токены Bitcoin, Ethereum выполняются с уменьшенными процентами 0-3%.
Азартная каталог воспроизводится в точности включая spinning games, традиционные активности, live-дилеров и накопительные призы. RTP-коэффициенты, дисперсия и проигрыш остаются идентичными.
Промо система работает подобно главному веб-площадке. Welcome-наборы, даровые прокруты, компенсация и VIP-программы запускаются программно при выполнении установленных стандартов.
Orqanta – A sleek online store designed for effortless browsing and discovering unique finds.
узнать больше https://slon2-at.cc
check these products – User-friendly layout with smooth navigation makes browsing pleasant.
веб-сайте https://slon2-at.cc/
Zarnita – A modern and distinctive platform showcasing unique items for curious shoppers.
https://uspharmaindex.shop/# US Pharma Index
Fintera Hub – Intuitive layout with structured categories makes finding products easy.
Поиск проверенного азартного площадки в нынешних границах нуждается повышенного внимания к правовому положению. Опытные пользователи осознают, что Меллстрой РІС…РѕРґ демонстрирует современную факты о функционирующих ресурсах.
Механизм создания аккаунта в сертифицированных площадках содержит требуемую верификацию личности. KYC-правила охраняют как площадку, так и пользователя от фрода. Переходные рамки на изъятие финансов до завершения верификации – стандартная система.
Технические запреты на подключение к развлекательным ресурсам преодолеваются через зеркальные порталы. Доступные копии гарантируют абсолютную возможности центрального портала. Банковские транзакции, интерактивный результаты и поощрительные предложения продолжают стабильными.
Денежная защищенность выражается степенью задействованных платежных способов. SSL-криптография, PCI DSS аттестация и двухфакторная проверка обеспечивают стабильный барьер ограждения.
Геймплейная каталог легальных заведений охватывает слоты от главных производителей. RTP-индексы, вариативность и вероятностные схемы претерпевают объективную аудит в признанных организациях.
Программы лояльности в качественных сервисах строятся на понятных условиях отыгрыша. Проигрыш x35-40 признается нормальным для барабан-льгот, в то время как настольные развлечения засчитываются в калькуляцию с уменьшенным показателем.
Выбор проверенного развлекательного площадки предполагает основательного изучения правовых бумаг. Инновационные системы п»ї[url=https://github.com/1xBet-online-zerkalo]1хбет казино[/url] предлагают геймерам безусловную факты о имеющихся разрешениях.
Алгоритм регистрации охватывает определенное количество необходимых этапов верификации. Владельцы истребуют справки, удостоверяющие индивидуальность и зрелость. Типовой KYC-порядок длится от 24 до 72 интервалов.
Управление банком начинается с задания пределов на взносы. Компетентные участники предлагают использовать закон 5% от общего игорного средств на единичную игру.
Программные блокировки поставщиков обязывают внедрять запасные адреса. Дубликаты поддерживают безусловную функциональность главного сайта, содержа хронологию платежей и гемблинг прогресс.
Инновационные финансовые инструменты дают моментальные взносы через блокчейн портмоне. Bitcoin, Ethereum и постоянные токены гарантируют приватность и мизерные комиссии. Период выполнения извлечений составляет 10-30 минут.
Алгоритмы верности подразумевают многоуровневые статусы с накапливающимся возвратом. VIP-представители предоставляют уникальные подарки, расширенные пределы и первоочередную поддержку.
discover this sell Tarkov account
Shop at GoodsQuarry – The variety stands out and the deals look worthwhile.
Отбор безопасного азартного площадки требует тщательного рассмотрения правовых свидетельств. Новые порталы казино Килограмм гарантируют клиентам стопроцентную детали о собственных разрешениях.
Система оформления счета подразумевает различные обязательных этапов подтверждения. Операторы требуют документы, подтверждающие личность и зрелость. Обычный KYC-процесс требует от 24 до 72 временных отрезков.
Управление банком инициируется с задания пределов на пополнения. Искусные клиенты рекомендуют внедрять закон 5% от полного игорного бюджета на отдельную сессию.
Системные блокировки провайдеров обязывают внедрять альтернативные ссылки. Зеркала оберегают максимальную производительность базового сайта, охватывая историю платежей и казино прогресс.
Передовые расчетные системы поддерживают скоростные депозиты через электронные счета. Bitcoin, Ethereum и стабильные валюты предоставляют тайность и символические комиссии. Период осуществления извлечений составляет 10-30 отрезков.
Схемы преданности содержат многоуровневые ранги с накапливающимся возвратом. VIP-координаторы дают личные подарки, расширенные границы и приоритетную техподдержку.
browse holvex – Neat layout with effortless browsing made shopping enjoyable.
Актуальные провайдеры гемблинг развлечений предоставляют участникам доступ к элитному развлечениям через безопасные винити казино ресурсы. Авторизованная бизнес предполагает учета конкретных регуляторных норм.
Процесс оформления индивидуального учетной записи предусматривает аутентификацию приватных информации. Провайдеры задействуют многоуровневые системы KYC и AML для недопущения незаконных финансовых действий.
Программные платформы новейших игорных домов основываются на безопасных серверах с SSL технологиями. Региональная блокировка обязывает операторов организовывать альтернативные порталы.
Альтернативные сайты образуют эквивалентные версии базового домена с поддержанием всех функций и сведений. Беттеры добиваются устойчивый доступ к балансу, азартной истории и персональным настройкам.
Платежные операции осуществляются через подключенные расчетные процессоры. Границы на пополнения и выводы регулируются в соотношении с лицензионными положениями и индивидуальными правилами управления рисками.
Опытные гемблеры советуют контролировать ситуацию лицензии через государственные каталоги развлекательных органов. Имиджевые критерии содержат рейтинги на отраслевых сайтах и feedback подлинных участников.
Азартная сфера показывает быстрый подъём, притягивая миллионы пользователей. Опытные площадки обеспечивают защищённую среду для игры. Исчерпывающую материалы о подобных организациях можно обнаружить на Vavada зеркало .
Аккредитация составляет центральным показателем отбора сайта. Лицензиаты Великобритании обеспечивают строгий надзор расчётных процедур. Отдельная сертифицированная сайт подвергается плановые инспекции RNG-алгоритмов.
Компьютерные особенности новейших азартных площадок объединяют SSL-кодирование финансового стандарта. Провайдеры программного ПО вроде Microgaming, NetEnt, Pragmatic Play подключают комплексные алгоритмы рандомных показателей.
Алгоритм подтверждения аккаунта включает передачи удостоверений KYC-типа. Удостоверение, подтверждение о средствах, удостоверение регистрации — базовый перечень для завершённого доступа.
Альтернативные URL исправляют барьеры с блокировками организаций. Актуальные дубли корректируются ежедневно IT специалистами. Карманные программы зачастую работают стабильнее сетевых форматов.
Банкролл-менеджмент формирует длительную эффективность игровых циклов. Грамотные геймеры рекомендуют лимитировать количество пари до 1-2% от полного резерва.
Навигация в области сертифицированных платформ предполагает владения актуальных технологий авторизации. Квалифицированные клиенты задействуют казино Меллстрой для получения современной данных о функционирующих адресах.
Механизм создания учетной записи в официальных операторах включает комплексную подтверждение. Новейшие организации внедряют KYC-алгоритмы и AML-нормы. Оформление документов составляет от 24 до 72 периодов.
Программные способы для преодоления блокировок развиваются одновременно с укреплением регуляторных действий. VPN-инструменты класса premium дают безопасность AES-256 и технологии OpenVPN. Устойчивость связи fundamentally важна для высокоролловых партий.
Запасные ресурсы выполняют задачи через локально распределенные серверные инфраструктуры. CDN-системы осуществляют сокращенную латентность для американских участников. Техническое переключение включается при распознавании препятствия главного адреса.
Денежные манипуляции в проверенных юрисдикциях подчиняются конкретным правилам PCI DSS. Криптовалютные расчеты завоевывают признание благодаря конфиденциальности и темпу осуществления.
Мобильные софт элитных операторов включают отпечатковую аутентификацию и push-оповещения для принципиальных эпизодов. Настраиваемый облик самостоятельно настраивается под характеристики матрицы.
browse serverstash – A well-laid-out resource center that feels dependable and professional.
Передовые гемблеры попадают с барьером соединения к проверенным ресурсам. Организации ограничивают первичные домены, но опытные Лаки Бир участники помнят о доступности дублирующих ресурсов.
Дополнительный домен образует идентичную воспроизведение первичного платформы. SSL-сертификаты сохраняются такими же. Расчётные операции производятся через равнозначные шлюзы.
Процедура открытия счёта через дополнительный ресурс подразумевает обычной проверки. Специалисты требуют удостоверения для выполнения KYC-требований. Персональные характеристики проходят многоуровневую проверку.
Финансовые рамки на резервных ресурсах аналогичны главным характеристикам. Стартовые взносы функционируют неизменными. Увеличивающиеся выигрышные пулы интегрируются между многочисленными ресурсами.
Поощрительные системы функционируют комплексно на резервных платформах. Множитель ставок гарантирует исходные цифры. Срок активности оборота остаётся прежним.
Департамент ассистирования решает тикеты с зеркальных ссылок идентично. Живой чат осуществляет непрерывный график обслуживания.
Передовые порталы игорных продуктов гарантируют беттерам возможность к качественному гемблингу через надежные Меллстрой сайт сайты. Официальная операционная активность предполагает исполнения жестких регуляторных критериев.
Механизм оформления клиентского профиля предусматривает подтверждение индивидуальных информации. Управляющие внедряют расширенные протоколы KYC и AML для недопущения незаконных переводов.
Программные системы передовых развлекательных порталов работают на надежных хостингах с криптографическими протоколами. Территориальные ограничения заставляет операторов организовывать вспомогательные домены.
Альтернативные домены представляют точные версии главного сайта с фиксацией всех возможностей и информации. Клиенты достигают непрерывный вход к капиталу, гемблинг статистике и персональным настройкам.
Денежные процедуры осуществляются через связанные денежные агрегаторы. Лимиты на взносы и выводы регулируются в соответствии с нормативными критериями и индивидуальными регламентами минимизации опасностей.
Квалифицированные гемблеры указывают отслеживать ситуацию разрешения через контролирующие списки азартных органов. Престижные показатели включают места на профильных порталах и отзывы подлинных клиентов.
Современные геймеры встречаются с огромным количеством цифровых деталей при процессах с официальными порталами. Профильные платформы типа Килограмм казино предоставляют новую материалы о деятельности казино организаций.
Механизм валидации аккаунта предполагает ряд обязательных фаз. Исходная подтверждение требует отправки бумаг валидирующих гражданство. Типовой пакет содержит удостоверение личности, водительские права или международное ID.
Техническая компонента регистрации включает внедрение зашифрованного канала и 2FA. Профессиональные клиенты настаивают задействовать полный набор возможных возможностей безопасности.
Запасные домены образуют полные клоны основного портала с сохранением комплексного арсенала. Центральное бонус заключается в схожести банковских границ и условий ставочных требований.
Схема локализации действующих резервных ссылок опирается на контроле тематических мессенджер групп и партнерских порталов. Опытные игроки применяют анонимайзеры для формирования надежного доступа вне зависимости от географических запретов.
websites mt gox payout date
Нынешние участники встречаются с изобилием цифровых нюансов при операциях с официальными платформами. Экспертные источники типа Голд казино дают новую информацию о деятельности азартных провайдеров.
Процедура валидации счета включает несколько неотъемлемых фаз. Базовая валидация включает отправки справок верифицирующих личность. Привычный набор охватывает ID, автоудостоверение или международное ID.
Техническая сторона записления охватывает эксплуатацию SSL-шифрования и 2FA. Продвинутые геймеры рекомендуют инициировать все предложенных настроек обеспечения.
Резервные ссылки составляют идентичные реплики главного портала с хранением тотального функционала. Ключевое плюс содержится в тождественности финансовых ограничений и параметров условий прокрутки.
Механизм нахождения функционирующих запасных доменов базируется на проверке экспертных информационных каналов и связанных площадок. Экспертные игроки используют прокси-соединения для гарантирования постоянного связи независимо от местных лимитов.
Смотреть здесь https://slon2-at.com/
Для любителей смешанных единоборств нашел текст про ufc в феврале марте 2026 три недели которые встряхнут дивизионы. Ознакомиться можно тут: https://chrome-downloads.ru/news/ufc-fevral-mart-2026-samye-goryachie-boi-i-neozhidannye-povoroty-kotoryh-stoit-zhdat/
Смотреть здесь https://slon2-at.com
Азартная отрасль демонстрирует интенсивный прогресс, манящая массы игроков. Профессиональные ресурсы обеспечивают защищённую среду для пари. Подробную материалы о указанных операторах допустимо обнаружить на Лаки Бир регистрация .
Лицензирование представляет основным элементом выбора ресурса. Надзорные органы Великобритании создают жёсткий надзор валютных процедур. Конкретная аккредитованная площадка осуществляет плановые аудиты RNG-систем.
Технические свойства современных беттинг-платформ объединяют SSL-кодирование экономического уровня. Поставщики цифрового ПО типа Microgaming, NetEnt, Pragmatic Play добавляют продвинутые системы непредсказуемых чисел.
Алгоритм проверки профиля подразумевает предоставления свидетельств KYC-формата. Свидетельство, документ о финансах, валидация проживания — типичный пакет для завершённого авторизации.
Альтернативные порталы устраняют сложности с блокировками компаний. Действующие дубли адаптируются регулярно IT группами. Карманные программы нередко работают лучше браузерных модификаций.
Банкролл-менеджмент создаёт стратегическую прибыльность беттинговых раундов. Опытные участники настаивают контролировать размер депозита до 1-2% от общего банкролла.
Отбор безопасного betting заведения в текущих рамках нуждается повышенного подхода к правовому уровню. Знающие клиенты представляют, что п»ї1xBet зеркало отображает новую факты о действующих провайдерах.
Механизм открытия счета в официальных сервисах включает обязательную верификацию личности. KYC-правила охраняют как казино, так и клиента от мошенничества. Промежуточные пределы на перечисление денег до окончания контроля – типичная подход.
Виртуальные препятствия на соединение к гемблинг порталам решаются через параллельные ссылки. Доступные клоны поддерживают полную функциональность центрального сайта. Денежные движения, геймплейный продвижение и бонусные программы остаются постоянными.
Финансовая гарантированность определяется качеством задействованных расчетных способов. SSL-криптография, PCI DSS аттестация и двухфакторная аутентификация гарантируют безопасный заслон обороны.
Азартная коллекция сертифицированных сервисов включает барабаны от лидирующих студий. RTP-коэффициенты, изменчивость и статистические модели подвергаются независимую аудит в одобренных лабораториях.
Системы лояльности в качественных казино формируются на открытых правилах ставок. Требования x35-40 характеризуется нормальным для машина-поощрений, в то время как настольные состязания включаются в зачет с уменьшенным процентом.
услуги типографии https://webyourself.eu/blogs/1805413/%D0%9E%D0%B1%D0%B7%D0%BE%D1%80-%D1%80%D1%8B%D0%BD%D0%BA%D0%B0-%D0%BF%D0%BE%D0%BB%D0%B8%D0%B3%D1%80%D0%B0%D1%84%D0%B8%D1%87%D0%B5%D1%81%D0%BA%D0%B8%D1%85-%D1%83%D1%81%D0%BB%D1%83%D0%B3-%D0%9C%D0%BE%D1%81%D0%BA%D0%B2%D1%8B-%D1%82%D1%80%D0%B5%D0%BD%D0%B4%D1%8B-%D0%B8-%D1%86%D0%B5%D0%BD%D1%8B .
вайбовые стимы Свирыч, известный также как SWeAR2033, регулярно устраивает вайбовые стримы, которые собирают большое количество зрителей. Его трансляции отличаются уникальной атмосферой и интересным контентом, что делает каждый стрим ожидаемым событием.
US Pharma Index canadian pharmacy online cialis mexico pharmacy order online
1win no puedo entrar https://1win5771.help
Hi, I do believe this is an excellent site. I stumbledupon it 😉 I may
revisit once again since i have book-marked it.
Money and freedom is the greatest way to change, may you be rich and
continue to help other people.
сервіс мультиварок ціни Львів
Гемблинговая сфера отображает быстрый развитие, привлекая легионы игроков. Грамотные ресурсы предлагают стабильную атмосферу для развлечений. Полную сведения о таких операторах реально обнаружить на Голд казино .
Легализация составляет основным фактором подбора ресурса. Надзорные органы Гибралтара создают строгий мониторинг денежных операций. Любая лицензированная портал проходит плановые проверки RNG-генераторов.
IT параметры актуальных гемблинг-сайтов включают SSL-безопасность банковского категории. Провайдеры цифрового продукта типа Microgaming, NetEnt, Pragmatic Play внедряют сложные системы произвольных параметров.
Процедура аутентификации счёта требует предоставления бумаг KYC-формата. Паспорт, документ о заработке, доказательство прописки — стандартный набор для финального доступа.
Параллельные URL исправляют сложности с блокировками поставщиков. Актуальные дубли изменяются ежедневно техническими службами. Планшетные софт обычно оперируют устойчивее сетевых версий.
Распределение капитала определяет длительную доходность развлекательных сессий. Опытные геймеры настаивают лимитировать объём ставки до 1-2% от итогового фонда.
stylish Birch Vista finds – Pleasant organization and a stress-free shopping flow.
Передовые сервисы игорных активностей предлагают беттерам возможность к премиальному развлечениям через безопасные Лаки Бир казино системы. Официальная работа нуждается соблюдения четких надзорных норм.
Процесс активации пользовательского счета предусматривает валидацию приватных реквизитов. Регуляторы задействуют углубленные системы KYC и AML для недопущения нарушающих транзакций.
Электронные решения современных развлекательных порталов базируются на защищенных серверах с SSL сертификатами. IP-фильтрация обязывает операторов запускать вспомогательные ссылки.
Параллельные домены являют собой полные дубликаты главного сайта с поддержанием всех сервисов и данных. Игроки добиваются стабильный доступ к балансу, беттинг статистике и пользовательским настройкам.
Финансовые операции проходят через подключенные денежные процессоры. Лимиты на инвестиции и изъятия регулируются в соотношении с лицензионными критериями и корпоративными регламентами снижения потерь.
Опытные гемблеры рекомендуют отслеживать ситуацию авторизации через контролирующие реестры беттинг органов. Престижные параметры задействуют ранги на экспертных платформах и отзывы реальных клиентов.
Лицензионные операторы игровых сервисов дают пользователям доступ к профессиональному азартному досугу через специализированные домены, включая казино Болливуд , которые специально соблюдают transnational нормы надёжности.
Механизм создания аккаунта включает предоставления валидационных данных через encrypted SSL-каналы. Букмекеры требуют нотариальное verification возраста и адреса проживания для соблюдения законодательных требований.
Двухфакторная authentication считается required компонентом новейших solutions надёжности. Участники имеют SMS-токены, push-алерты или задействуют targeted программы наподобие Google Authenticator.
Mirror ссылки решают препятствия региональных блокировок и DDoS-атак. Техническим образом mirrors являют тождественные dublicates основного сайта с maintaining функциональности и user параметров.
Экспертные геймеры призывают keeping новейшие базы working зеркал в закладках browser. Букмекеры направляют новости о актуальных доменах через e-mail, Telegram-сообщества и мобильные программы.
Платёжные операции через проверенные порталы secured защитными технологиями level банковского области. Получение средств реализуется единственно на подтверждённые карты владельца профиля.
retarget deals hub – Spotted a few things I liked, planning to come back and explore more.
Гемблинговая область представляет интенсивный развитие, завлекая миллионы игроков. Квалифицированные платформы предоставляют качественную пространство для игры. Детальную сведения о подобных организациях доступно изучить на Lucky Bear casino .
Сертификация остаётся приоритетным аспектом отбора платформы. Надзорные органы Олдерни создают строгий аудит денежных транзакций. Отдельная легальная портал проходит систематические ревизии RNG-алгоритмов.
Программные параметры инновационных беттинг-платформ охватывают SSL-защиту экономического ранга. Производители софтового материала класса Microgaming, NetEnt, Pragmatic Play встраивают комплексные алгоритмы рандомных значений.
Процедура подтверждения аккаунта предусматривает подачи свидетельств KYC-уровня. ID, документ о финансах, доказательство регистрации — типичный набор для полноценного входа.
Зеркальные домены убирают сложности с запретами операторов. Свежие дубли корректируются ежедневно техническими отделами. Карманные приложения регулярно функционируют надёжнее браузерных модификаций.
Финансовая дисциплина формирует продолжительную результативность игровых циклов. Квалифицированные игроки советуют контролировать объём бета до 1-2% от общего резерва.
Go to RippleAisle – Clear product images and good bargains make the site easy to use.
This clarified a few things for me. Thanks for the helpful write-up. nanao banan
Выбор проверенного гемблинг ресурса в актуальных обстоятельствах подразумевает особого анализа к юридическому режиму. Опытные игроки учитывают, что Lucky Bear содержит актуальную данные о функционирующих операторах.
Процедура оформления профиля в легальных операторах объединяет неизбежную аутентификацию личности. KYC-нормы гарантируют как оператора, так и пользователя от мошенничества. Переходные границы на получение активов до финализации контроля – обычная методика.
Виртуальные барьеры на соединение к азартным порталам преодолеваются через зеркальные порталы. Доступные дубликаты гарантируют тотальную производительность центрального портала. Расчетные операции, геймплейный статистика и поощрительные схемы сохраняются стабильными.
Денежная безопасность оценивается уровнем используемых финансовых систем. SSL-шифрование, PCI DSS лицензирование и расширенная идентификация формируют безопасный периметр безопасности.
Геймплейная каталог сертифицированных сервисов включает слоты от ведущих производителей. RTP-коэффициенты, дисперсия и расчетные принципы испытывают беспристрастную сертификацию в авторизованных лабораториях.
Системы поощрения в качественных сервисах строятся на ясных правилах активности. Требования x35-40 считается нормальным для спин-подарков, в то время как классические активности учитываются в подсчет с уменьшенным коэффициентом.
Актуальные провайдеры азартных продуктов обеспечивают клиентам путь к элитному развлечениям через безопасные казино Lucky Bear платформы. Официальная работа влечет выполнения жестких надзорных критериев.
Процесс регистрации игрового счета задействует подтверждение персональных сведений. Провайдеры эксплуатируют многоуровневые алгоритмы KYC и AML для пресечения поддельных финансовых действий.
Программные системы передовых казино строятся на зашифрованных дата-центрах с SSL технологиями. Геоблокировка обязывает операторов запускать вспомогательные ссылки.
Параллельные ресурсы составляют полные версии центрального сайта с удержанием всех сервисов и показателей. Клиенты приобретают устойчивый доступ к средствам, гемблинг записям и пользовательским параметрам.
Финансовые транзакции осуществляются через интегрированные банковские сервисы. Рамки на депозиты и снятия фиксируются в гармонии с регуляторными условиями и организационными политиками контроля угроз.
Экспертные пользователи советуют проверять статус сертификата через регуляторные базы данных беттинг ведомств. Авторитетные критерии охватывают рейтинги на экспертных сервисах и комментарии действительных участников.
Определение надежного азартного заведения в современных рамках предполагает тщательного подхода к юридическому положению. Компетентные пользователи осознают, что казино Вован отображает последнюю материалы о работающих провайдерах.
Процедура открытия счета в официальных платформах включает принудительную проверку документов. KYC-нормы гарантируют как заведение, так и пользователя от обмана. Временные границы на получение средств до окончания верификации – стандартная методика.
Технические запреты на подключение к betting площадкам преодолеваются через параллельные ссылки. Активные копии поддерживают тотальную производительность основного сайта. Денежные процедуры, геймплейный продвижение и наградные системы сохраняются устойчивыми.
Финансовая гарантированность измеряется качеством применяемых банковских инструментов. SSL-защита, PCI DSS аттестация и двухфакторная верификация создают надежный заслон безопасности.
Азартная каталог сертифицированных операторов содержит спины от известных производителей. RTP-показатели, вариативность и математические схемы получают объективную аудит в одобренных лабораториях.
Схемы вознаграждения в серьезных площадках базируются на прозрачных правилах проигрыша. Требования x35-40 расценивается приемлемым для автомат-привилегий, в то время как настольные активности учитываются в счет с уменьшенным коэффициентом.
Browse Silk Basket – Reasonably priced items with impressive quality make browsing pleasant.
Поиск качественного betting ресурса в текущих условиях требует детального анализа к лицензионному положению. Профессиональные клиенты учитывают, что винити официальный сайт содержит новую факты о действующих сервисах.
Процесс создания аккаунта в официальных операторах включает обязательную верификацию персональных данных. KYC-процедуры гарантируют как оператора, так и пользователя от махинаций. Кратковременные ограничения на перечисление средств до окончания контроля – типичная подход.
Электронные препятствия на соединение к развлекательным ресурсам решаются через параллельные ссылки. Доступные клоны предоставляют полную работоспособность первичного сайта. Расчетные операции, азартный прогресс и льготные предложения продолжают устойчивыми.
Материальная защищенность измеряется качеством используемых денежных методов. SSL-безопасность, PCI DSS сертификация и многоуровневая подтверждение гарантируют надежный щит безопасности.
Азартная каталог легальных сервисов предоставляет автоматы от топовых производителей. RTP-индексы, дисперсия и алгоритмические модели претерпевают нейтральную проверку в признанных институтах.
Механизмы мотивации в профессиональных операторах базируются на прозрачных условиях ставок. Проигрыш x35-40 признается нормальным для слот-льгот, в то время как стандартные активности идут в зачет с минимальным фактором.
https://ivermectinaccessusa.com/# Ivermectin Access USA
Visit Your URL payward trading limited
Беттинговая ниша отображает стремительный прогресс, заинтересовывая легионы клиентов. Квалифицированные платформы предлагают надёжную среду для беттинга. Детальную факты о этих провайдерах доступно обнаружить на п»ї1xBet .
Лицензирование является приоритетным критерием выбора ресурса. Лицензиаты Кюрасао создают жёсткий надзор финансовых манипуляций. Каждая аккредитованная сайт реализует постоянные проверки RNG-генераторов.
Технические параметры новейших игорных домов предусматривают SSL-защиту расчётного стандарта. Разработчики программного материала наподобие Microgaming, NetEnt, Pragmatic Play интегрируют многоуровневые алгоритмы непредсказуемых значений.
Процесс валидации учётной записи требует направления удостоверений KYC-типа. Паспорт, документ о доходах, верификация местожительства — типичный перечень для окончательного подключения.
Параллельные адреса устраняют препятствия с фильтрацией компаний. Актуальные зеркала корректируются систематически программными группами. Смартфонные клиенты зачастую функционируют лучше браузерных вариантов.
Контроль средств определяет стратегическую прибыльность азартных циклов. Экспертные пользователи предлагают урезать сумму ставки до 1-2% от суммарного фонда.
Исследование в мире официальных платформ предполагает осознания продвинутых инструментов доступа. Умелые геймеры применяют Вавада официальный сайт для обретения современной материалов о работающих URL.
Схема регистрации личного кабинета в лицензированных компаниях предполагает многоуровневую подтверждение. Актуальные поставщики эксплуатируют KYC-алгоритмы и AML-нормы. Документальное сопровождение потребляет от 24 до 72 периодов.
Компьютерные технологии для преодоления запретов развиваются сообща с ужесточением правовых мер. VPN-платформы категории premium предоставляют защиту AES-256 и протоколы OpenVPN. Стабильность коннекта fundamentally существенна для высокоролловых раундов.
Запасные адреса оперируют через территориально распределенные компьютерные кластеры. CDN-архитектуры предоставляют низкую время ответа для европейских участников. Автоматическое переключение активируется при детекции барьера основного ресурса.
Денежные транзакции в официальных юрисдикциях подчиняются определенным правилам PCI DSS. Цифровые переводы приобретают популярность благодаря конфиденциальности и быстроте процессинга.
Смартфонные утилиты лучших провайдеров содержат голосовую идентификацию и push-алерты для существенных событий. Изменяемый оформление автоматически адаптируется под параметры матрицы.
Gild Vendor – A polished online marketplace offering premium selections and curated deals.
Xerva Choice – Layout is very user-friendly, and checking out products today was simple.
Frost Aisle – A cool and refreshing store presenting crisp deals and clean design.
Cheap Viagra 100mg: Sildenafil Price Guide – buy viagra here
Определение проверенного развлекательного портала требует глубокого исследования официальных бумаг. Актуальные сайты п»ї1хбет регистрация обеспечивают геймерам полную детали о действующих разрешениях.
Процедура регистрации подразумевает определенное количество принудительных этапов подтверждения. Администраторы требуют удостоверения, доказывающие самобытность и совершеннолетие. Типовой KYC-алгоритм составляет от 24 до 72 промежутков.
Управление банком инициируется с назначения лимитов на пополнения. Компетентные геймеры рекомендуют использовать норму 5% от совокупного гемблинг бюджета на конкретную заход.
Технические ограничения операторов побуждают эксплуатировать вспомогательные пути. Альтернативы сохраняют абсолютную эффективность базового портала, содержа хронологию транзакций и развлекательный продвижение.
Современные денежные способы дают моментальные вклады через криптовалютные счета. Bitcoin, Ethereum и стабильные валюты гарантируют конфиденциальность и символические платежи. Период проведения выводов насчитывает 10-30 промежутков.
Алгоритмы постоянства подразумевают ступенчатые статусы с возрастающим кэшбэком. VIP-кураторы обеспечивают индивидуальные вознаграждения, усиленные лимиты и приоритетную поддержку.
Smart Picks Irnora – Really unique products available that you won’t easily find elsewhere.
Актуальные порталы игорных продуктов обеспечивают беттерам путь к высококлассному азарту через защищенные Lucky Bear зеркало ресурсы. Сертифицированная бизнес нуждается исполнения четких правовых критериев.
Алгоритм открытия клиентского кабинета задействует валидацию личных показателей. Провайдеры применяют многоуровневые механизмы KYC и AML для предотвращения нарушающих операций.
Электронные системы актуальных казино работают на зашифрованных инфраструктурах с HTTPS стандартами. Региональная блокировка принуждает владельцев запускать альтернативные домены.
Зеркальные домены формируют полные дубликаты базового ресурса с фиксацией всех инструментов и данных. Беттеры получают постоянный соединение к счету, беттинг статистике и личным настройкам.
Платежные действия осуществляются через связанные расчетные агрегаторы. Рамки на взносы и обналичивания фиксируются в соответствии с лицензионными требованиями и корпоративными регламентами снижения потерь.
Опытные клиенты рекомендуют проверять условия лицензии через государственные реестры азартных ведомств. Статусные показатели задействуют рейтинги на профильных порталах и оценки настоящих игроков.
Азартная индустрия демонстрирует активный развитие, привлекая тысячи пользователей. Опытные порталы обеспечивают надёжную условия для развлечений. Подробную сведения о этих провайдерах можно обнаружить на казино типпи .
Легализация остаётся приоритетным аспектом селекции платформы. Юрисдикции Олдерни гарантируют жёсткий надзор финансовых действий. Конкретная лицензированная ресурс осуществляет регулярные контроли RNG-механизмов.
Цифровые особенности новейших гемблинг-сайтов объединяют SSL-защиту банковского класса. Поставщики цифрового обеспечения типа Microgaming, NetEnt, Pragmatic Play внедряют комплексные системы хаотичных показателей.
Схема верификации счёта предполагает передачи свидетельств KYC-стандарта. Документ, документ о прибылях, верификация регистрации — обычный перечень для финального активации.
Параллельные ссылки решают препятствия с блокировками поставщиков. Актуальные зеркала обновляются ежедневно компьютерными специалистами. Планшетные клиенты обычно работают лучше сетевых форматов.
Распределение капитала задаёт длительную эффективность развлекательных сессий. Грамотные пользователи советуют контролировать величину бета до 1-2% от полного банкролла.
Следующая страница https://vodkabet-play.vodkabet-zerkalo.vodka/
Отбор надежного азартного ресурса в современных обстоятельствах требует особого изучения к правовому положению. Профессиональные игроки знают, что ДживиСпин казино содержит свежую факты о работающих операторах.
Схема открытия счета в лицензированных сервисах предусматривает необходимую верификацию удостоверения. KYC-процедуры гарантируют как сервис, так и игрока от фрода. Переходные пределы на перечисление капитала до выполнения верификации – типичная система.
Технические барьеры на вход к игровым сервисам решаются через резервные URL. Активные клоны предоставляют стопроцентную производительность основного ресурса. Платежные движения, геймплейный статистика и привилегированные схемы функционируют неизменными.
Экономическая надежность оценивается уровнем эксплуатируемых денежных инструментов. SSL-защита, PCI DSS аттестация и дополнительная идентификация обеспечивают стабильный щит обороны.
Интерактивная каталог легальных провайдеров охватывает барабаны от ведущих провайдеров. RTP-коэффициенты, изменчивость и алгоритмические принципы подвергаются независимую контроль в одобренных институтах.
Схемы мотивации в надежных площадках формируются на прозрачных требованиях проигрыша. Отыгрыш x35-40 признается справедливым для машина-поощрений, в то время как классические развлечения учитываются в зачет с сниженным множителем.
Активные резервные адреса проверенных игорных заведений на Лаки Бир казино создают устойчивый подключение к игровым ресурсам. Технология дублирования формирует идентичные клоны главного сайта с поддержанием всех опций.
Система открытия счета через зеркало полностью воспроизводит оригинальную заявку. Начинающие пользователи вводят валидный email, генерируют надежный секретную комбинацию и назначают основную платежное средство.
Идентификация учетной записи содержит представления документов опираясь на KYC-политике. Копия водительских прав, доказательство проживания и карточные реквизиты анализируются посредством машинную анализ в течение 24-72 часа.
Подключение существующих клиентов производится через типовую окно с усиленной валидацией. Краткосрочные коды передаются на смс девайс или электронную почту.
Механизмы депозитного модуля через резервные ссылки поддерживает топовые расчетные инструменты. Visa, Mastercard, виртуальные кошельки Skrill, Neteller, блокчейн-токены Bitcoin, Ethereum процессируются с минимальными процентами 0-3%.
Гемблинг база воспроизводится целиком включая машины, карточные активности, live-крупье и накопительные призы. RTP-параметры, вариативность и ставочные требования фиксируются такими же.
Промо механизм выполняется схоже центральному сайту. Welcome-комплекты, бесплатные вращения, refund и VIP-курсы стартуют автоматически при выполнении прописанных стандартов.
Беттинговая индустрия представляет активный подъём, притягивая массы геймеров. Опытные ресурсы дают качественную обстановку для пари. Детальную материалы о таких операторах допустимо обнаружить на Mellstroy Game зеркало .
Аттестация выступает главным фактором отбора платформы. Юрисдикции Мальты дают тщательный надзор расчётных действий. Всякая аккредитованная портал выполняет регулярные проверки RNG-алгоритмов.
Программные параметры современных казино предусматривают SSL-шифрование финансового категории. Провайдеры софтового ПО класса Microgaming, NetEnt, Pragmatic Play добавляют усовершенствованные модели хаотичных чисел.
Алгоритм валидации счёта подразумевает предоставления свидетельств KYC-класса. ID, выписка о средствах, валидация прописки — классический список для итогового активации.
Резервные ссылки исправляют трудности с блокировками поставщиков. Функционирующие варианты адаптируются ежедневно цифровыми отделами. Мобильные софт нередко действуют качественнее сетевых форматов.
Банкролл-менеджмент создаёт продолжительную доходность игровых раундов. Квалифицированные пользователи советуют сокращать количество депозита до 1-2% от совокупного банкролла.
веб-сайт https://slon2-at.com/
However, the app doesn’t allow you to trim your clips which makes this more of a video maker app or video assembly app rather than a traditional video editing app, but it still has some exciting features. From easily extracting audio to adding text, Splice is one of our top apps for its array of video-enhancing tools. Download our free eBook to get on the right track and create a video to be proud of. Learn how to make a travel video that captures your audience. 12 tips that will earn you likes and shares on social media. Create exciting travel videos for 2021. It’s been a while since I got to analyze a video on the App Store, but to say it isn’t a perfect fit here would be difficult. If you have a video editor, a video showing it in action is a must. Before I even begin my project Splice makes me select the aspect ratio for my video. Options include TikTok, Instagram reel, Instagram story, and YouTube. This is HUGE because I can edit my video knowing that the format is already compatible with the platform I choose to publish to.
http://www.sophiedunerart.com/royal-reels-mobile-casino-play-on-the-go-in-australia/
The setting for this slot is very similar to the other Big Bass games. It takes place underwater, although the water here is a little murkier than we’re used to. This website is operated by Rank Interactive (Gibraltar) Ltd, a company incorporated in Gibraltar with registered number 120385 with its registered address at Suite 3, 2nd Floor, Icom House, 1 5 Irish Town, Gibraltar GX11 1AA. Most definitely! You can play the Bigger Bass Bonanza online slot in most countries, including the USA. Check out our guide to casinos by country to get started with a great welcome bonus. Bigger Bass Bonanza includes a variety of symbols that each bring something unique to the game. Recognizing these symbols will help players understand their significance and potential payouts. The fish symbols, which appear throughout, are crucial in this slot as they represent different values during the game.
Современные операторы гемблинг игр предлагают игрокам подключение к элитному развлечениям через сертифицированные mad casino платформы. Сертифицированная функционирование нуждается следования строгих законодательных стандартов.
Алгоритм оформления индивидуального учетной записи задействует подтверждение приватных данных. Регуляторы используют комплексные алгоритмы KYC и AML для недопущения поддельных транзакций.
Технические решения современных гемблинг платформ функционируют на зашифрованных инфраструктурах с SSL алгоритмами. Территориальные ограничения принуждает владельцев запускать резервные ссылки.
Альтернативные ресурсы формируют точные клоны центрального платформы с поддержанием всех инструментов и сведений. Пользователи получают беспрепятственный доступ к счету, игровой истории и индивидуальным установкам.
Расчетные транзакции производятся через подключенные денежные сервисы. Рамки на инвестиции и получения устанавливаются в соответствии с нормативными требованиями и организационными правилами риск-менеджмента.
Экспертные игроки советуют отслеживать положение аккредитации через официальные каталоги азартных органов. Репутационные характеристики предусматривают оценки на профильных сайтах и feedback действительных участников.
Поиск проверенного азартного ресурса заставляет глубокого рассмотрения лицензионных свидетельств. Новые платформы казино Болливуд обеспечивают геймерам безусловную информацию о действующих санкциях.
Процесс оформления счета содержит множество необходимых ступеней проверки. Провайдеры истребуют свидетельства, подтверждающие индивидуальность и совершеннолетие. Стандартный KYC-механизм длится от 24 до 72 часов.
Распоряжение капиталом начинается с установления ограничений на пополнения. Искусные участники предлагают использовать правило 5% от совокупного азартного бюджета на единичную сессию.
Электронные препятствия администраторов обязывают эксплуатировать дополнительные ссылки. Зеркала оберегают полную функциональность главного сайта, подразумевая архив переводов и игровой достижения.
Новые финансовые системы гарантируют моментальные вклады через блокчейн хранилища. Bitcoin, Ethereum и фиксированные активы предоставляют тайность и символические отчисления. Срок обработки извлечений доходит 10-30 отрезков.
Схемы преданности включают иерархические статусы с возрастающим компенсацией. VIP-консультанты дают эксклюзивные награды, увеличенные ограничения и опережающую поддержку.
Поиск надежного азартного заведения в современных реалиях нуждается повышенного подхода к регулятивному статусу. Опытные клиенты осознают, что Меллстрой отображает современную материалы о функционирующих площадках.
Процедура оформления профиля в лицензированных платформах включает принудительную верификацию персональных данных. KYC-правила оберегают как сервис, так и геймера от мошенничества. Краткосрочные границы на изъятие средств до выполнения верификации – обычная процедура.
Электронные препятствия на соединение к гемблинг площадкам обходятся через зеркальные порталы. Рабочие копии гарантируют полную возможности центрального ресурса. Расчетные переводы, интерактивный результаты и поощрительные программы функционируют неизменными.
Денежная стабильность оценивается критерием используемых денежных систем. SSL-шифрование, PCI DSS аттестация и дополнительная проверка гарантируют стабильный щит ограждения.
Игровая ассортимент сертифицированных провайдеров предоставляет автоматы от топовых создателей. RTP-показатели, дисперсия и расчетные модели претерпевают объективную сертификацию в аккредитованных центрах.
Планы мотивации в серьезных операторах формируются на ясных критериях проигрыша. Вейджер x35-40 признается адекватным для спин-подарков, в то время как карточные забавы учитываются в подсчет с сниженным процентом.
fast deals hub – The site feels stable, and finalizing an order looks quick and easy.
Выбор безопасного развлекательного оператора в сегодняшних условиях требует специального изучения к регулятивному уровню. Компетентные клиенты учитывают, что казино Меллстрой предоставляет актуальную сведения о функционирующих площадках.
Процесс оформления профиля в проверенных операторах объединяет обязательную подтверждение документов. KYC-правила обеспечивают как заведение, так и игрока от обмана. Переходные ограничения на получение денег до окончания подтверждения – типичная система.
Виртуальные барьеры на соединение к азартным порталам обходятся через резервные адреса. Действующие зеркала сохраняют стопроцентную работоспособность основного портала. Платежные транзакции, развлекательный результаты и поощрительные планы сохраняются неизменными.
Денежная гарантированность измеряется показателем внедренных денежных инструментов. SSL-защита, PCI DSS подтверждение и двухфакторная подтверждение гарантируют стабильный контур охраны.
Геймплейная набор легальных сервисов содержит спины от лидирующих производителей. RTP-индексы, дисперсия и расчетные модели проходят внешнюю сертификацию в одобренных организациях.
Программы лояльности в достойных сервисах формируются на открытых требованиях ставок. Проигрыш x35-40 характеризуется приемлемым для машина-привилегий, в то время как традиционные развлечения учитываются в счет с сниженным фактором.
like this mtgox login
smart shopping spot – Wide selection and everything appears immediately with no lag.
Нынешние геймеры натыкаются с барьером доступа к сертифицированным ресурсам. Провайдеры ограничивают базовые адреса, но искушённые Меллстрой РІС…РѕРґ участники понимают о функционировании зеркальных платформ.
Зеркало представляет полную дубликат основного сайта. Системы безопасности сохраняются равнозначными. Банковские процедуры реализуются через аналогичные механизмы.
Процедура оформления профиля через параллельный ссылку подразумевает привычной аутентификации. Операторы просят документы для исполнения KYC-правил. Идентификационные данные подвергаются двухфакторную верификацию.
Депозитные границы на параллельных порталах идентичны первичным характеристикам. Минимальные суммы продолжают константными. Накопительные выигрышные пулы согласовываются между различными ссылками.
Стимулирующие системы действуют комплексно на резервных платформах. Требования по обороту гарантирует оригинальные величины. Период действия реализации продолжается.
Сервис ассистирования решает запросы с параллельных ссылок таким же способом. Онлайн чат предоставляет 24-часовой режим функционирования.
Подбор честного казино заведения нуждается серьезного исследования правовых документов. Новые ресурсы Mellstroy Game casino дают участникам максимальную информацию о собственных допусках.
Система получения доступа включает определенное количество требуемых этапов валидации. Провайдеры требуют свидетельства, засвидетельствующие идентичность и дееспособность. Традиционный KYC-порядок длится от 24 до 72 промежутков.
Распоряжение капиталом запускается с фиксации ограничений на взносы. Искусные участники советуют применять закон 5% от полного азартного средств на отдельную сессию.
Системные ограничения поставщиков вынуждают задействовать запасные адреса. Клоны сохраняют стопроцентную эффективность центрального портала, содержа историю операций и развлекательный результаты.
Инновационные платежные инструменты гарантируют быстрые вклады через блокчейн аккаунты. Bitcoin, Ethereum и стабильные валюты дают тайность и минимальные отчисления. Длительность выполнения выводов составляет 10-30 периодов.
Схемы постоянства предусматривают каскадные степени с нарастающим кэшбэком. VIP-консультанты обеспечивают личные подарки, увеличенные ограничения и первоочередную помощь.
Исследование в области легальных платформ включает представления новых инструментов входа. Опытные геймеры внедряют СЌРЅРѕРјРѕ казино для приобретения релевантной данных о действующих путях.
Механизм регистрации аккаунта в лицензированных организациях предполагает детальную верификацию. Современные провайдеры используют KYC-алгоритмы и AML-требования. Документальная процедура отнимает от 24 до 72 интервалов.
Компьютерные способы для преодоления барьеров совершенствуются одновременно с интенсификацией нормативных шагов. VPN-решения класса premium предоставляют безопасность AES-256 и технологии OpenVPN. Постоянство соединения принципиально необходима для высокоролловых игровых периодов.
Зеркальные домены работают через локально рассредоточенные технические кластеры. CDN-комплексы обеспечивают быструю латентность для азиатских клиентов. Системное переключение запускается при распознавании барьера центрального портала.
Финансовые манипуляции в официальных областях следуют жестким правилам PCI DSS. Цифровые расчеты получают актуальность в результате конфиденциальности и быстроте выполнения.
Портативные утилиты ведущих брендов объединяют голосовую авторизацию и push-сообщения для ключевых происшествий. Настраиваемый дизайн самостоятельно адаптируется под настройки дисплея.
buy valtrex medication https://unipharms.shop/# purchase valtrex
Перемещение в пространстве лицензированных платформ нуждается знания передовых решений подключения. Опытные клиенты применяют lucky bear казино для извлечения свежей данных о оперативных доменах.
Процедура создания счета в надежных компаниях содержит комплексную верификацию. Продвинутые операторы используют KYC-протоколы и AML-стандарты. Документальное сопровождение занимает от 24 до 72 интервалов.
Компьютерные технологии для избежания запретов развиваются параллельно с повышением регуляторных мер. VPN-сервисы типа premium предоставляют защиту AES-256 и технологии OpenVPN. Непрерывность соединения принципиально существенна для привилегированных заходов.
Альтернативные домены выполняют задачи через территориально рассредоточенные технические мощности. CDN-системы обеспечивают быструю пинг для международных участников. Техническое переключение инициируется при детекции блокировки первичного ресурса.
Финансовые движения в официальных зонах отвечают жестким стандартам PCI DSS. Блокчейн операции получают актуальность в результате секретности и динамике процессинга.
Портативные софт ведущих операторов интегрируют лицевую идентификацию и push-алерты для важных происшествий. Адаптивный оформление автономно настраивается под свойства матрицы.
https://ivermectinaccessusa.shop/# stromectol 3mg tablets
Sayt çox yaxşı dizayn olunub. Təşəkkürlər!
http://m.ditao.net/api/device.php?uri=https%3A%2F%2Furlsinfo.com%2Fr%2Fpincoazerbaijancasino.com%2Fdemo-oyunlari
imp source buy EA Sports FC account
Рабочие зеркала надежных игорных заведений на п»ї1xBet обеспечивают стабильный вход к развлекательным системам. Принцип дублирования формирует аналогичные реплики центрального портала с фиксацией всех возможностей.
Система создания аккаунта через альтернативный домен полностью воспроизводит оригинальную бланк. Только пришедшие клиенты прописывают рабочий email, генерируют защищенный код доступа и определяют игровую финансовый инструмент.
Валидация учетной записи требует передачи документов в соответствии с KYC-нормам. Копия ID-карты, свидетельство места жительства и денежные реквизиты проверяются через алгоритмическую проверку в течение 24-72 часов.
Логин существующих пользователей производится через типовую форму с усиленной проверкой. Сессионные шифры доставляются на сотовый гаджет или электронную почту.
Инструменты входящего блока через зеркала предлагает актуальные платежные сервисы. Visa, Mastercard, веб портмоне Skrill, Neteller, цифровые активы Bitcoin, Ethereum реализуются с низкими взносами 0-3%.
Гемблинг база воспроизводится целиком включая машины, столовые забавы, live-дилеров и джекпоты. RTP-значения, изменчивость и проигрыш удерживаются такими же.
Промо система выполняется аналогично корневому домену. Welcome-комплекты, free spins, возврат средств и VIP-системы запускаются машинально при исполнении прописанных условий.
Актуальные операторы развлекательных услуг предоставляют участникам вход к премиальному беттингу через безопасные Вавада зеркало сайты. Авторизованная операционная активность подразумевает следования определенных регуляторных стандартов.
Механизм оформления пользовательского счета предусматривает верификацию конфиденциальных показателей. Регуляторы задействуют многоуровневые системы KYC и AML для недопущения незаконных финансовых действий.
Программные решения актуальных беттинг площадок строятся на защищенных облачных системах с TLS стандартами. Региональная блокировка обязывает владельцев организовывать резервные адреса.
Зеркальные домены представляют аналогичные клоны центрального портала с сохранением всех инструментов и показателей. Клиенты приобретают устойчивый соединение к депозиту, развлекательной записям и индивидуальным конфигурациям.
Расчетные переводы выполняются через подключенные денежные шлюзы. Лимиты на депозиты и выводы фиксируются в гармонии с лицензионными положениями и собственными процедурами минимизации опасностей.
Профессиональные клиенты указывают отслеживать положение лицензии через регуляторные базы данных беттинг органов. Престижные показатели задействуют оценки на специализированных сервисах и оценки реальных участников.
explore Vault Basket – The site’s layout is clear and category structure is helpful.
Zest Vendor – A vibrant shop filled with energetic picks and exciting discoveries.
Discover YarrowCrate – Informative product details made my shopping experience smooth.
Отбор безопасного betting оператора в текущих реалиях требует специального изучения к правовому положению. Компетентные игроки учитывают, что лаки Р±РёСЂ казино предоставляет свежую материалы о функционирующих провайдерах.
Алгоритм регистрации в проверенных сервисах объединяет принудительную подтверждение идентичности. KYC-требования обеспечивают как казино, так и игрока от афер. Временные ограничения на снятие капитала до завершения верификации – стандартная методика.
Электронные ограничения на подключение к развлекательным сервисам решаются через зеркальные URL. Действующие дубликаты обеспечивают стопроцентную возможности первичного ресурса. Финансовые переводы, азартный прогресс и наградные программы сохраняются постоянными.
Экономическая надежность характеризуется степенью задействованных платежных механизмов. SSL-шифрование, PCI DSS валидация и расширенная подтверждение обеспечивают стабильный заслон защиты.
Игровая набор проверенных операторов охватывает слоты от известных провайдеров. RTP-показатели, изменчивость и алгоритмические системы испытывают внешнюю контроль в одобренных учреждениях.
Системы вознаграждения в профессиональных сервисах основываются на прозрачных условиях активности. Условия ставок x35-40 расценивается справедливым для спин-льгот, в то время как стандартные игры включаются в счет с редуцированным процентом.
Современные игроки пересекаются с массой программных особенностей при функционировании с легальными платформами. Профессиональные источники типа Лаки Бир сайт выдают актуальную контент о деятельности гэмблинговых провайдеров.
Процесс валидации аккаунта включает комплекс неотъемлемых этапов. Начальная подтверждение предполагает размещения свидетельств доказывающих гражданство. Типовой список содержит паспорт, автоудостоверение или международный паспорт.
Цифровая элемент открытия счета предполагает внедрение криптографической защиты и многофакторной защиты. Экспертные игроки советуют инициировать полный набор имеющихся параметров обеспечения.
Дублирующие порталы формируют стопроцентные реплики основного домена с обеспечением исчерпывающего возможностей. Важнейшее плюс выражается в соответствии финансовых ограничений и критериев ставочных требований.
Схема нахождения активных дублирующих порталов строится на контроле тематических телеграм-каналов и связанных ресурсов. Опытные геймеры применяют туннельные протоколы для предоставления надежного входа невзирая от местных барьеров.
Исследование в мире легальных площадок нуждается знания новых способов авторизации. Умелые участники эксплуатируют Вован регистрация для обретения актуальной сведений о функционирующих URL.
Схема формирования профиля в официальных операторах предполагает сложную верификацию. Продвинутые компании задействуют KYC-системы и AML-критерии. Документальное сопровождение потребляет от 24 до 72 временных отрезков.
Компьютерные способы для избежания запретов эволюционируют синхронно с укреплением юридических действий. VPN-инструменты типа premium дают криптографию AES-256 и методы OpenVPN. Надежность соединения критически значима для VIP партий.
Запасные домены действуют через территориально рассредоточенные серверные ресурсы. CDN-архитектуры предоставляют минимальную задержку для международных пользователей. Автоматическое роутинг включается при распознавании блокировки первичного домена.
Банковские движения в легальных зонах подпадают под жестким стандартам PCI DSS. Блокчейн расчеты набирают признание из-за секретности и быстроте реализации.
Переносные утилиты лучших провайдеров интегрируют биометрическую авторизацию и push-извещения для критических эпизодов. Изменяемый облик автономно адаптируется под параметры дисплея.
выберите ресурсы https://slon2-at.com
Smart Picks Farniq – Discovered pieces that match my personal style very well.
нажмите здесь https://slon2-at.com
Передовые сервисы беттинг продуктов предлагают игрокам вход к элитному игровому процессу через надежные Lucky Bear казино порталы. Авторизованная работа влечет исполнения конкретных правовых положений.
Алгоритм активации игрового учетной записи содержит подтверждение личных показателей. Операторы применяют многоуровневые протоколы KYC и AML для пресечения нарушающих финансовых действий.
Электронные инструменты новейших игорных домов работают на надежных хостингах с криптографическими алгоритмами. Территориальные ограничения побуждает владельцев запускать резервные ссылки.
Параллельные платформы формируют точные дубликаты основного портала с обеспечением всех инструментов и сведений. Участники обеспечивают себе устойчивый вход к счету, игровой данным и пользовательским конфигурациям.
Расчетные процедуры проходят через связанные банковские сервисы. Пределы на пополнения и изъятия регулируются в согласии с регуляторными положениями и корпоративными политиками риск-менеджмента.
Экспертные игроки рекомендуют отслеживать состояние аккредитации через государственные списки игорных органов. Имиджевые характеристики задействуют ранги на специализированных порталах и отзывы действительных участников.
cost of ivermectin pill: ivermectin price uk – ivermectin 2ml
Современные геймеры встречаются с препятствием подключения к официальным платформам. Операторы фильтруют главные URL, но искушённые Mellstroy Game казино участники понимают о существовании резервных порталов.
Дополнительный домен образует стопроцентную копию оригинального портала. SSL-сертификаты сохраняются равнозначными. Банковские транзакции выполняются через идентичные механизмы.
Алгоритм оформления профиля через зеркальный адрес требует стандартной аутентификации. Менеджеры запрашивают справки для осуществления KYC-регламентов. Паспортные характеристики осуществляют многоуровневую верификацию.
Финансовые ограничения на резервных площадках совпадают основным параметрам. Низшие взносы функционируют фиксированными. Увеличивающиеся джекпоты интегрируются между многочисленными порталами.
Бонусные схемы функционируют всесторонне на дополнительных платформах. Множитель ставок гарантирует стартовые параметры. Срок активности проигрывания остаётся прежним.
Отдел ассистирования анализирует запросы с альтернативных ссылок аналогично. Прямой чат обеспечивает 24-часовой формат оперирования.
other mt gox payout
Xerva Treasures – Layout is user-friendly, and finding products today was quick and easy.
Передовые сервисы гемблинг развлечений предлагают пользователям вход к высококлассному азарту через безопасные казино Gold системы. Легальная операционная активность влечет следования определенных правовых критериев.
Процедура оформления персонального учетной записи охватывает подтверждение индивидуальных реквизитов. Управляющие эксплуатируют детализированные механизмы KYC и AML для блокировки фродовых платежей.
IT платформы инновационных игорных домов строятся на безопасных инфраструктурах с TLS алгоритмами. Геоблокировка вынуждает владельцев создавать альтернативные URL.
Дублирующие платформы представляют идентичные копии главного портала с сохранением всех возможностей и сведений. Пользователи достигают беспрепятственный вход к средствам, игровой записям и пользовательским настройкам.
Платежные операции проходят через синхронизированные банковские агрегаторы. Границы на депозиты и получения определяются в унисон с лицензионными положениями и собственными регламентами риск-менеджмента.
Профессиональные беттеры советуют контролировать статус разрешения через регуляторные реестры беттинг комиссий. Статусные показатели охватывают рейтинги на экспертных сервисах и feedback истинных клиентов.
Inqvera Collection – The user experience is polished and checkout moves along quickly.
Ориентирование в секторе официальных площадок нуждается представления актуальных методов входа. Умелые пользователи используют казино аква для извлечения релевантной информации о оперативных путях.
Механизм оформления учетной записи в официальных заведениях предполагает тщательную аутентификацию. Продвинутые компании внедряют KYC-алгоритмы и AML-критерии. Документооборот отнимает от 24 до 72 временных отрезков.
Технические решения для минования запретов улучшаются вместе с повышением юридических мер. VPN-платформы категории premium предоставляют безопасность AES-256 и стандарты OpenVPN. Непрерывность связи кардинально необходима для VIP заходов.
Дублирующие платформы оперируют через пространственно рассредоточенные технические системы. CDN-архитектуры осуществляют низкую задержку для международных игроков. Цифровое редирект запускается при распознавании барьера центрального адреса.
Банковские переводы в легальных областях соответствуют жестким правилам PCI DSS. Блокчейн платежи набирают признание по причине секретности и быстроте процессинга.
Портативные утилиты ведущих операторов интегрируют отпечатковую идентификацию и push-оповещения для ключевых ситуаций. Настраиваемый оформление независимо корректируется под настройки панели.
Timber Cart – A warm and grounded online shop inspired by rustic charm and practical choices.
Worvix Select – Checkout was clear and payments processed reliably.
Надёжные провайдеры игровых предложений обеспечивают пользователям доступ к премиальному игровому процессу через dedicated сайты, включая Меллстрой регистрация , которые именно выполняют общепринятые критерии безопасности.
Алгоритм регистрации требует указания проверочных деталей через криптографические SSL-connection. Операторы просят официальное свидетельство age verification и адреса проживания для исполнения правовых стандартов.
Двухэтапная аутентификация выступает mandatory элементом новейших архитектур security. Users располагают SMS-токены, push-notification или внедряют dedicated софт типа Google Authenticator.
Резервные домены преодолевают сложности географических запретов и DDoS-атак. С технической точки зрения дубли формируют тождественные dublicates базового сайта с сохранением возможностей и личных информации.
Компетентные игроки предлагают keeping актуальные каталоги working зеркал в закладках browser. Management отправляют updates о современных URL через e-mail, Telegram-сообщества и мобильные программы.
Банковские переводы через надёжные площадки secured криптографическими алгоритмами категории банковского направления. Extraction фондов производится только на подтверждённые счета обладателя личного кабинета.
Выбор легального игорного площадки подразумевает серьезного исследования юридических документов. Новые сайты Vavada casino обеспечивают пользователям абсолютную детали о своих санкциях.
Процесс оформления счета охватывает несколько принудительных ступеней верификации. Провайдеры требуют бумаги, устанавливающие самобытность и зрелость. Типовой KYC-механизм составляет от 24 до 72 временных отрезков.
Банкролл-менеджмент открывается с установления ограничений на взносы. Компетентные клиенты призывают эксплуатировать правило 5% от общего развлекательного средств на одну сессию.
Цифровые препятствия поставщиков принуждают эксплуатировать альтернативные маршруты. Копии сохраняют абсолютную работоспособность первичного ресурса, охватывая архив переводов и развлекательный успех.
Актуальные денежные инструменты обеспечивают быстрые вклады через цифровые хранилища. Bitcoin, Ethereum и стабильные валюты предоставляют приватность и наименьшие взносы. Продолжительность проведения выводов составляет 10-30 интервалов.
Алгоритмы преданности предусматривают иерархические статусы с прогрессивным возвратом. VIP-представители предоставляют персонализированные подарки, расширенные ограничения и ускоренную помощь.
кайтинг кайтинг
This resource contains a vast amount of valuable information.
Visitors can locate comprehensive posts on numerous areas.
All data is presented in a user-friendly format.
This makes it a perfect spot for anyone seeking answers.
https://gladaankan.com/
кликните сюда https://vodkabet-play.vodkabet-zerkalo.vodka
https://www.hionline.bg/blog/classic-watches
Передовые игроки имеют дело с изобилием технологических аспектов при функционировании с сертифицированными сайтами. Специализированные ресурсы типа Mellstroy Game зеркало выдают актуальную контент о работе азартных провайдеров.
Система проверки аккаунта предполагает комплекс неотъемлемых уровней. Стартовая аутентификация предполагает предоставления удостоверений валидирующих гражданство. Классический перечень охватывает документ, автоудостоверение или заграничное удостоверение.
Программная компонента открытия счета подразумевает эксплуатацию безопасного соединения и двухуровневой проверки. Продвинутые игроки предлагают активировать максимум имеющихся параметров обеспечения.
Зеркала составляют точные копии центрального домена с хранением всего арсенала. Основное преимущество выражается в подобии расчетных рамок и критериев отыгрыша.
Алгоритм поиска активных альтернативных адресов базируется на отслеживании экспертных новостных лент и партнерских платформ. Профессиональные клиенты внедряют анонимайзеры для предоставления бесперебойного связи вне зависимости от территориальных барьеров.
Передовые геймеры встречаются с массой системных деталей при операциях с официальными ресурсами. Профильные порталы типа Lucky Bear casino поставляют релевантную информацию о операциях азартных провайдеров.
Процесс аутентификации счета включает несколько неотъемлемых стадий. Стартовая аутентификация требует загрузки свидетельств верифицирующих персону. Типовой пакет включает удостоверение личности, автоудостоверение или международное ID.
Программная составляющая оформления предполагает использование безопасного соединения и многофакторной защиты. Квалифицированные пользователи настаивают задействовать полный набор доступных опций защиты.
Альтернативные адреса составляют точные копии первичного ресурса с удержанием всего возможностей. Главное плюс выражается в схожести финансовых границ и условий ставочных требований.
Схема нахождения рабочих резервных ссылок фундируется на мониторинге профильных новостных лент и связанных платформ. Квалифицированные игроки внедряют анонимайзеры для обеспечения устойчивого входа невзирая от территориальных блокировок.
Гемблинговая ниша являет стремительный подъём, привлекая легионы пользователей. Квалифицированные сайты предлагают качественную условия для развлечений. Развёрнутую информацию о этих брендах можно отыскать на Голд казино .
Лицензирование выступает центральным аспектом селекции сайта. Регуляторы Олдерни обеспечивают строгий проверку финансовых операций. Отдельная сертифицированная ресурс выполняет регулярные контроли RNG-систем.
IT характеристики инновационных казино включают SSL-криптографию денежного ранга. Провайдеры виртуального обеспечения класса Microgaming, NetEnt, Pragmatic Play встраивают комплексные системы случайных показателей.
Процесс валидации личного кабинета требует представления удостоверений KYC-класса. Удостоверение, подтверждение о средствах, подтверждение местожительства — стандартный комплект для полноценного активации.
Дублирующие URL ликвидируют сложности с цензурой провайдеров. Рабочие дубли изменяются постоянно программными специалистами. Мобильные приложения регулярно выполняются лучше интернет форматов.
Контроль средств устанавливает долгосрочную доходность игровых сессий. Грамотные участники указывают лимитировать количество пари до 1-2% от совокупного бюджета.
useful link pass wallet
ремонт кавоварок у Львові ціни
Азартная ниша демонстрирует интенсивный прогресс, притягивая массы игроков. Экспертные платформы обеспечивают стабильную среду для пари. Исчерпывающую факты о подобных компаниях доступно изучить на лаки беар казино .
Лицензирование представляет главным критерием подбора платформы. Юрисдикции Великобритании обеспечивают серьёзный мониторинг валютных процедур. Конкретная аккредитованная площадка проходит плановые контроли RNG-модулей.
IT характеристики инновационных казино охватывают SSL-шифрование финансового ранга. Производители виртуального софта вроде Microgaming, NetEnt, Pragmatic Play подключают многоуровневые механизмы хаотичных показателей.
Механизм аутентификации аккаунта предполагает направления удостоверений KYC-формата. Удостоверение, выписка о прибылях, удостоверение прописки — обычный комплект для полноценного авторизации.
Параллельные ссылки решают проблемы с запретами организаций. Актуальные варианты изменяются регулярно IT специалистами. Мобильные программы нередко функционируют лучше интернет редакций.
Финансовая дисциплина устанавливает стратегическую прибыльность развлекательных раундов. Квалифицированные геймеры рекомендуют сокращать сумму бета до 1-2% от общего фонда.
great site buy digital asset pack templates
стрим Поэтому, когда речь заходит о “вайбовых” стримах, имя SWeAR2033 неизменно всплывает в числе первых, являясь синонимом отличного времяпрепровождения в интернете.
Новейшие сервисы азартных активностей предоставляют клиентам подключение к высококлассному гемблингу через проверенные Vavada казино порталы. Сертифицированная бизнес предполагает исполнения строгих правовых стандартов.
Алгоритм создания игрового кабинета содержит подтверждение конфиденциальных данных. Провайдеры внедряют углубленные процедуры KYC и AML для недопущения мошеннических операций.
Программные платформы инновационных игорных домов основываются на стабильных дата-центрах с HTTPS алгоритмами. Локальные запреты принуждает администраторов запускать резервные порталы.
Зеркальные сайты формируют точные дубликаты основного портала с поддержанием всех функций и параметров. Клиенты достигают устойчивый соединение к депозиту, развлекательной данным и индивидуальным параметрам.
Платежные транзакции реализуются через синхронизированные расчетные системы. Ограничения на вклады и изъятия определяются в соответствии с нормативными условиями и организационными процедурами управления рисками.
Опытные игроки указывают анализировать ситуацию аккредитации через надзорные списки азартных комиссий. Имиджевые критерии включают рейтинги на тематических сайтах и комментарии реальных участников.
Передовые игроки обталкиваются с множеством системных нюансов при функционировании с лицензированными ресурсами. Профессиональные сайты типа Лаки Бир зеркало дают актуальную информацию о деятельности азартных компаний.
Процесс подтверждения кабинета предполагает несколько обязательных шагов. Начальная аутентификация нуждается передачи свидетельств верифицирующих субъект. Стандартный пакет подразумевает документ, водительские права или международный паспорт.
Системная элемент открытия счета предполагает внедрение криптографической защиты и двойной авторизации. Экспертные игроки настаивают запускать все доступных настроек охраны.
Альтернативные адреса представляют полные копии первичного сайта с поддержанием всего функционала. Ключевое достоинство содержится в схожести платежных границ и норм отыгрыша.
Алгоритм поиска функционирующих резервных ссылок основывается на мониторинге специализированных информационных каналов и аффилированных платформ. Экспертные пользователи применяют прокси-соединения для создания стабильного доступа вне зависимости от территориальных барьеров.
Keep on writing, great job!
check out Quelnix – Interface is easy to use and the subtle touches in design are great.
Легальные провайдеры игорных услуг обеспечивают геймерам возможность к элитному игровому процессу через целевые ресурсы, включая ретро казино , которые именно следуют международные нормы безопасности.
Механизм активации включает заполнения authentication информации через encrypted SSL-линии. Операторы просят предоставить нотариальное доказательство совершеннолетия и места проживания для исполнения законодательных стандартов.
2FA authentication представляет необходимым элементом современных механизмов безопасности. Users располагают SMS-коды, push-уведомления или внедряют dedicated софт типа Google Authenticator.
Дублирующие домены устраняют вопросы geographic санкций и DDoS-воздействий. Техническим образом реплики представляют дублированные dublicates основного домена с удержанием инструментария и пользовательских данных.
Опытные участники призывают keeping свежие базы действующих альтернатив в сохранённых ссылках обозревателя. Провайдеры направляют информацию о fresh адресах через мейл, Telegram-группы и портативные программы.
Платёжные переводы через legal порталы защищены encryption methods класса банковского области. Вывод средств выполняется единственно на проверенные карты обладателя аккаунта.
I’ve got to share this story about an Italian guy I know,
whose name we’ll spin as Lorenzo. He’s one of those people who never really
wanted to dive into crypto, but life pushed him into it anyway.
His work depends on cross-border payments from clients,
and bank transfers constantly delayed his operations.
A major issue hit him out of nowhere. A large payment from a
partner abroad got stuck, and his team was left waiting
with no answers. He said he had never felt that much pressure in business before.
Deadlines were shattered, and he had to find a different solution fast.
In the middle of all this chaos he discovered Paybis, he was
unsure whether it was the right path. But the situation was too critical to ignore.
So he checked the platform.
To his surprise, things started moving quickly. Everything was
explained clearly and simply. He managed to get crypto payments settled in minutes instead of days.
He later told me the relief was unbelievable.
But the real drama came later. When his bank finally
“found” the missing transfer, it was already
too late — Paybis had saved his operations. He said that
moment changed the way he looks at modern finance forever.
Now he chooses Paybis because reliability matters more than anything.
He’s not obsessed with crypto — he’s grateful for a platform that did
what it promised.
In the end, he said it straight: Paybis did a great job with his aim.
Поиск в мире сертифицированных ресурсов требует понимания передовых способов соединения. Умелые пользователи применяют лаки Р±РёСЂ казино для извлечения свежей сведений о оперативных доменах.
Механизм создания учетной записи в лицензированных учреждениях содержит сложную подтверждение. Передовые компании задействуют KYC-протоколы и AML-нормы. Оформление документов потребляет от 24 до 72 часов.
Компьютерные способы для минования запретов прогрессируют вместе с повышением регуляторных инициатив. VPN-решения категории premium предоставляют кодирование AES-256 и стандарты OpenVPN. Устойчивость коннекта жизненно значима для элитных партий.
Дублирующие сайты функционируют через географически разнесенные IT кластеры. CDN-сети гарантируют минимальную задержку для азиатских геймеров. Техническое маршрутизация срабатывает при распознавании блокировки первичного ресурса.
Платежные переводы в лицензированных зонах следуют определенным критериям PCI DSS. Децентрализованные операции набирают распространение из-за приватности и динамике обработки.
Портативные утилиты топовых компаний включают физиологическую подтверждение и push-оповещения для принципиальных событий. Адаптивный дизайн программно настраивается под характеристики монитора.
Подбор надежного гемблинг ресурса требует основательного рассмотрения лицензионных бумаг. Инновационные ресурсы п»ї1хбет официальный сайт гарантируют участникам безусловную информацию о имеющихся санкциях.
Механизм создания профиля включает несколько принудительных шагов аутентификации. Провайдеры истребуют свидетельства, устанавливающие самобытность и дееспособность. Обычный KYC-процесс требует от 24 до 72 периодов.
Финансовое планирование запускается с фиксации пределов на депозиты. Опытные клиенты рекомендуют внедрять норму 5% от общего азартного фонда на единичную сессию.
Технические препятствия администраторов принуждают применять дополнительные маршруты. Альтернативы хранят безусловную работоспособность главного сайта, включая историю транзакций и казино достижения.
Современные финансовые методы поддерживают быстрые депозиты через виртуальные портмоне. Bitcoin, Ethereum и стабильные валюты обеспечивают анонимность и мизерные платежи. Продолжительность проведения снятий составляет 10-30 интервалов.
Планы лояльности содержат ступенчатые уровни с увеличивающимся вознаграждением. VIP-кураторы обеспечивают эксклюзивные вознаграждения, повышенные ограничения и приоритетную техподдержку.
Перемещение в мире лицензированных ресурсов подразумевает понимания передовых технологий подключения. Опытные клиенты эксплуатируют п»ї1хбет официальный сайт для приобретения свежей информации о активных адресах.
Схема создания аккаунта в проверенных организациях подразумевает сложную аутентификацию. Новейшие провайдеры эксплуатируют KYC-протоколы и AML-критерии. Документальная процедура составляет от 24 до 72 промежутков.
Программные технологии для прохождения ограничений прогрессируют синхронно с интенсификацией законодательных мер. VPN-решения класса premium предлагают защиту AES-256 и методы OpenVPN. Надежность подключения кардинально существенна для привилегированных заходов.
Резервные домены функционируют через географически рассредоточенные цифровые инфраструктуры. CDN-системы осуществляют оптимальную время ответа для американских участников. Цифровое роутинг инициируется при обнаружении недоступности первичного ресурса.
Денежные манипуляции в сертифицированных юрисдикциях подчиняются четким правилам PCI DSS. Криптовалютные транзакции увеличивают востребованность из-за анонимности и быстроте реализации.
Мобильные приложения топовых провайдеров содержат биометрическую подтверждение и push-алерты для принципиальных ситуаций. Настраиваемый облик независимо подстраивается под параметры монитора.
http://uspharmaindex.com/# US Pharma Index
US Pharma Index: US Pharma Index – online canadian pharmacy reviews
https://alushta-shirak.ru/user/aCodeCasino1xbet3/
Ориентирование в области проверенных ресурсов подразумевает знания продвинутых методов доступа. Умелые клиенты применяют п»ї1xBet зеркало для добывания релевантной фактов о действующих путях.
Механизм формирования счета в лицензированных заведениях включает комплексную валидацию. Новейшие операторы эксплуатируют KYC-системы и AML-критерии. Документальная процедура составляет от 24 до 72 временных отрезков.
Цифровые технологии для прохождения барьеров развиваются вместе с интенсификацией нормативных шагов. VPN-сервисы разряда premium гарантируют кодирование AES-256 и методы OpenVPN. Устойчивость подключения критически существенна для элитных игровых периодов.
Резервные ресурсы функционируют через географически расположенные компьютерные кластеры. CDN-системы обеспечивают низкую отклик для азиатских участников. Системное маршрутизация инициируется при распознавании недоступности первичного адреса.
Банковские транзакции в лицензированных территориях следуют определенным критериям PCI DSS. Криптовалютные переводы набирают популярность вследствие анонимности и темпу осуществления.
Планшетные клиенты лучших организаций совмещают биометрическую авторизацию и push-оповещения для важных событий. Настраиваемый интерфейс автономно настраивается под особенности матрицы.
Отбор проверенного азартного портала требует тщательного анализа правовых сертификатов. Передовые платформы Лаки Бир дают пользователям максимальную факты о своих допусках.
Процесс открытия аккаунта включает множество ключевых стадий верификации. Операторы требуют справки, доказывающие персону и совершеннолетие. Классический KYC-механизм составляет от 24 до 72 периодов.
Управление банком открывается с установления ограничений на взносы. Квалифицированные клиенты призывают применять правило 5% от общего казино средств на отдельную игру.
Программные препятствия поставщиков принуждают внедрять вспомогательные домены. Клоны поддерживают стопроцентную работоспособность центрального сайта, включая хронологию операций и азартный достижения.
Инновационные платежные способы дают мгновенные пополнения через криптовалютные счета. Bitcoin, Ethereum и устойчивые монеты дают скрытность и минимальные отчисления. Продолжительность обработки получений насчитывает 10-30 промежутков.
Системы постоянства предусматривают иерархические степени с прогрессивным бонусом. VIP-менеджеры предоставляют уникальные подарки, увеличенные пределы и преимущественную техподдержку.
Инновационные провайдеры игорных продуктов гарантируют клиентам путь к профессиональному игровому процессу через защищенные lucky bear казино официальный сайт сайты. Легальная бизнес требует выполнения конкретных надзорных критериев.
Алгоритм регистрации персонального учетной записи задействует аутентификацию личных показателей. Операторы внедряют комплексные системы KYC и AML для предотвращения нарушающих операций.
Программные инструменты актуальных казино базируются на надежных инфраструктурах с SSL стандартами. Локальные запреты принуждает администраторов разрабатывать альтернативные домены.
Зеркальные сайты составляют точные клоны главного ресурса с фиксацией всех функций и параметров. Пользователи получают постоянный соединение к средствам, беттинг данным и персональным опциям.
Банковские процедуры реализуются через синхронизированные расчетные процессоры. Ограничения на пополнения и обналичивания определяются в согласии с регуляторными положениями и собственными правилами минимизации опасностей.
Опытные беттеры советуют мониторить условия сертификата через надзорные регистры развлекательных организаций. Статусные характеристики содержат оценки на экспертных ресурсах и мнения действительных игроков.
Поиск в области легальных сайтов подразумевает знания продвинутых технологий соединения. Продвинутые клиенты внедряют Болливуд казино для извлечения актуальной материалов о действующих путях.
Процесс регистрации аккаунта в сертифицированных заведениях охватывает тщательную подтверждение. Передовые поставщики эксплуатируют KYC-процедуры и AML-критерии. Документальная процедура отнимает от 24 до 72 часов.
Программные технологии для прохождения препятствий улучшаются синхронно с повышением правовых действий. VPN-платформы разряда premium дают шифрование AES-256 и протоколы OpenVPN. Стабильность соединения принципиально актуальна для высокоролловых сессий.
Запасные ресурсы выполняют задачи через пространственно рассредоточенные компьютерные системы. CDN-структуры осуществляют оптимальную латентность для европейских геймеров. Техническое роутинг запускается при распознавании барьера базового сайта.
Денежные движения в проверенных областях следуют строгим стандартам PCI DSS. Крипто платежи приобретают актуальность из-за секретности и динамике обработки.
Портативные софт топовых операторов включают отпечатковую аутентификацию и push-уведомления для ключевых событий. Адаптивный оформление самостоятельно настраивается под настройки монитора.
Seriously lots of good info! https://nymand-pilegaard-2.technetbloggers.de/riiwiwcchring-sl-taecchkhph-t-samhrabmuue-aihm
Visit the CraftQuill Shop – Very satisfied with both quality and selection.
Актуальные бетторы встречаются с барьером соединения к официальным сайтам. Организации запрещают основные URL, но знающие Лаки Бир сайт игроки помнят о наличии дублирующих платформ.
Зеркало формирует абсолютную отображение основного платформы. Средства защиты поддерживаются равнозначными. Расчётные действия осуществляются через аналогичные каналы.
Методика открытия счёта через альтернативный ссылку подразумевает классической валидации. Менеджеры требуют удостоверения для исполнения KYC-регламентов. Персональные сведения осуществляют комплексную аутентификацию.
Финансовые границы на параллельных площадках совпадают стандартным требованиям. Низшие ставки сохраняются постоянными. Увеличивающиеся банки координируются между всеми доменами.
Поощрительные программы работают всесторонне на альтернативных сайтах. Вейджер поддерживает стартовые показатели. Срок активности использования продолжается.
Сервис поддержки анализирует тикеты с резервных ресурсов аналогично. Живой общение обеспечивает круглосуточный график оперирования.
Современные операторы игорных активностей обеспечивают беттерам вход к элитному игровому процессу через проверенные Вавада РІС…РѕРґ системы. Лицензированная бизнес нуждается учета определенных контролирующих критериев.
Механизм оформления пользовательского профиля включает верификацию индивидуальных сведений. Администраторы применяют детализированные протоколы KYC и AML для блокировки незаконных переводов.
IT платформы инновационных казино базируются на зашифрованных облачных системах с TLS технологиями. IP-фильтрация побуждает управляющих организовывать вспомогательные порталы.
Дублирующие порталы образуют точные репликации основного портала с фиксацией всех возможностей и данных. Беттеры добиваются непрерывный доступ к счету, азартной статистике и клиентским конфигурациям.
Банковские операции выполняются через связанные банковские агрегаторы. Рамки на вклады и получения регулируются в гармонии с регуляторными положениями и собственными нормами минимизации опасностей.
Опытные беттеры настаивают анализировать ситуацию сертификата через контролирующие списки беттинг организаций. Авторитетные параметры задействуют позиции на экспертных сайтах и feedback истинных игроков.
browse Value Whisper – Good value and descriptions that make products simple to understand.
Нашел полезный материал про ufc в феврале марте 2026 три недели которые встряхнут дивизионы, делюсь со всеми. Посмотреть подробнее: https://avtoshkola37.ru/news/prognozy-na-ufc-fevral-mart-2026-kto-zaberyot-verh-v-glavnyh-boyah/
Silk Vendor – A polished platform delivering quality finds with a touch of elegance.
каталог https://slon2-at.cc
creative writing supplies – The simple design keeps the focus on the products.
Подбор проверенного гемблинг ресурса в актуальных реалиях предполагает специального изучения к правовому режиму. Профессиональные участники осознают, что Лаки Бир официальный сайт предоставляет современную данные о доступных сервисах.
Процесс создания аккаунта в лицензированных площадках содержит неизбежную аутентификацию удостоверения. KYC-стандарты обеспечивают как площадку, так и пользователя от фрода. Временные рамки на вывод денег до выполнения проверки – стандартная методика.
Технические барьеры на подключение к игровым ресурсам преодолеваются через резервные URL. Действующие копии предоставляют стопроцентную работоспособность первичного сайта. Расчетные переводы, геймплейный статистика и поощрительные планы остаются неизменными.
Капитальная надежность характеризуется уровнем задействованных расчетных систем. SSL-шифрование, PCI DSS валидация и расширенная проверка гарантируют безопасный заслон охраны.
Интерактивная ассортимент сертифицированных площадок предоставляет автоматы от топовых производителей. RTP-индексы, дисперсия и вероятностные принципы претерпевают объективную контроль в аккредитованных лабораториях.
Планы поощрения в достойных заведениях основываются на четких требованиях вейджера. Отыгрыш x35-40 расценивается адекватным для слот-бонусов, в то время как стандартные забавы идут в подсчет с уменьшенным показателем.
Trend Marketplace – Categories are structured logically and browsing feels natural.
click here now mtgox claims
Выбор проверенного гемблинг оператора подразумевает основательного исследования юридических сертификатов. Передовые платформы лаки Р±РёСЂ казино обеспечивают геймерам безусловную сведения о текущих допусках.
Механизм открытия аккаунта охватывает несколько ключевых ступеней проверки. Администраторы просят справки, удостоверяющие самобытность и дееспособность. Обычный KYC-механизм продолжается от 24 до 72 часов.
Банкролл-менеджмент стартует с назначения ограничений на вклады. Опытные пользователи призывают применять принцип 5% от полного азартного фонда на индивидуальную партию.
Программные барьеры поставщиков побуждают применять запасные пути. Альтернативы поддерживают максимальную работоспособность главного портала, предусматривая журнал транзакций и развлекательный прогресс.
Передовые платежные сервисы гарантируют быстрые пополнения через блокчейн аккаунты. Bitcoin, Ethereum и стабильные валюты дают конфиденциальность и минимальные сборы. Время реализации получений равно 10-30 промежутков.
Схемы лояльности включают иерархические категории с возрастающим возвратом. VIP-кураторы гарантируют эксклюзивные вознаграждения, повышенные рамки и приоритетную сервис.
Поиск качественного гемблинг портала в современных реалиях подразумевает детального анализа к правовому режиму. Опытные клиенты учитывают, что Lucky Bear казино отображает современную материалы о функционирующих ресурсах.
Процедура записи в официальных сервисах содержит обязательную аутентификацию личности. KYC-стандарты обеспечивают как сервис, так и геймера от фрода. Промежуточные рамки на снятие капитала до финализации верификации – стандартная подход.
Электронные блокировки на подключение к азартным сайтам преодолеваются через дублирующие ссылки. Доступные копии поддерживают стопроцентную возможности основного портала. Расчетные операции, геймплейный прогресс и наградные схемы продолжают стабильными.
Финансовая гарантированность выражается уровнем применяемых денежных механизмов. SSL-криптография, PCI DSS валидация и многоуровневая идентификация устанавливают надежный щит ограждения.
Игровая набор легальных сервисов содержит барабаны от топовых студий. RTP-коэффициенты, вариативность и статистические формулы получают беспристрастную аудит в утвержденных учреждениях.
Программы мотивации в серьезных площадках формируются на открытых критериях проигрыша. Требования x35-40 характеризуется справедливым для спин-бонусов, в то время как карточные развлечения засчитываются в расчет с сниженным множителем.
right here buy NBA 2K VC
hop over to this web-site buy Destiny 2 Silver
Игровая область демонстрирует динамичный прогресс, привлекая миллионы пользователей. Профессиональные сайты дают безопасную атмосферу для беттинга. Исчерпывающую факты о таких провайдерах можно отыскать на tip top casino .
Аккредитация является главным критерием выбора площадки. Регуляторы Великобритании обеспечивают жёсткий надзор финансовых транзакций. Любая аккредитованная портал реализует систематические аудиты RNG-систем.
Цифровые характеристики передовых беттинг-платформ охватывают SSL-защиту денежного класса. Разработчики компьютерного софта наподобие Microgaming, NetEnt, Pragmatic Play встраивают продвинутые механизмы непредсказуемых величин.
Процесс верификации учётной записи предусматривает направления бумаг KYC-уровня. Документ, подтверждение о заработке, удостоверение прописки — базовый комплект для полноценного доступа.
Дублирующие домены ликвидируют трудности с цензурой операторов. Рабочие копии изменяются систематически IT командами. Карманные клиенты часто оперируют стабильнее веб форматов.
Финансовая дисциплина задаёт долгосрочную успешность игровых раундов. Экспертные беттеры указывают сокращать величину бета до 1-2% от суммарного резерва.
Shop Xerva – Nice layout, and exploring items today was very easy.
https://phoenixueor948399.blog-gold.com/56190643/complete-your-request
Инновационные провайдеры развлекательных активностей дают участникам вход к качественному гемблингу через безопасные казино 1xBet сайты. Легальная бизнес требует соблюдения строгих надзорных требований.
Процедура создания игрового профиля предусматривает аутентификацию персональных показателей. Управляющие используют детализированные системы KYC и AML для исключения нарушающих операций.
Программные средства новейших гемблинг платформ основываются на зашифрованных хостингах с шифровальными сертификатами. Региональная блокировка заставляет управляющих разрабатывать дублирующие домены.
Зеркальные платформы формируют полные дубликаты главного сайта с фиксацией всех инструментов и параметров. Пользователи добиваются беспрепятственный соединение к депозиту, игровой статистике и персональным настройкам.
Платежные операции производятся через связанные денежные шлюзы. Ограничения на пополнения и получения определяются в гармонии с лицензионными положениями и индивидуальными правилами контроля угроз.
Опытные гемблеры предлагают проверять положение разрешения через контролирующие каталоги беттинг ведомств. Престижные параметры задействуют оценки на тематических порталах и комментарии реальных беттеров.
Ravlora Select – Quick assistance from customer support made everything smooth.
Актуальные пользователи обталкиваются с множеством системных нюансов при процессах с проверенными ресурсами. Специализированные платформы типа п»ї1хбет казино выдают новую данные о операциях казино организаций.
Механизм аутентификации счета предполагает несколько неотъемлемых уровней. Исходная подтверждение включает отправки бумаг доказывающих личность. Стандартный пакет содержит документ, водительские права или загранпаспорт.
Программная часть создания аккаунта охватывает внедрение криптографической защиты и 2FA. Профессиональные клиенты подсказывают инициировать все имеющихся настроек обеспечения.
Альтернативные адреса представляют полные клоны базового домена с хранением полного возможностей. Главное бонус кроется в тождественности денежных границ и параметров условий прокрутки.
Система нахождения функционирующих дублирующих порталов строится на контроле специализированных телеграм-каналов и аффилированных платформ. Опытные геймеры используют прокси-соединения для гарантирования стабильного связи без оглядки от локальных барьеров.
Продолжение https://slon2-at.cc
Cobalt Crate – A bold and reliable platform delivering standout selections with confidence.
Передовые бетторы оказываются с сложностью доступа к лицензированным сайтам. Операторы фильтруют базовые домены, но профессиональные РЎСѓРєР° казино клиенты понимают о функционировании альтернативных порталов.
Параллельный портал образует стопроцентную воспроизведение первичного сайта. SSL-сертификаты остаются такими же. Денежные процедуры осуществляются через те же сервисы.
Схема открытия счёта через параллельный домен включает обычной аутентификации. Сотрудники уточняют удостоверения для выполнения KYC-стандартов. Персональные характеристики реализуют многоуровневую верификацию.
Пополнительные ограничения на зеркальных площадках соответствуют главным характеристикам. Низшие беты сохраняются константными. Возрастающие призовые фонды синхронизируются между множественными адресами.
Поощрительные схемы оперируют всесторонне на параллельных сайтах. Требования по обороту удерживает первоначальные величины. Длительность оборота сохраняется.
Служба поддержки изучает обращения с альтернативных ресурсов аналогично. Прямой общение предоставляет непрерывный порядок обслуживания.
Современные игроки натыкаются с проблемой подключения к сертифицированным сайтам. Организации запрещают главные URL, но опытные СЌРЅРѕРјРѕ казино клиенты осознают о существовании резервных порталов.
Дополнительный домен является абсолютную отображение основного ресурса. Протоколы шифрования сохраняются аналогичными. Расчётные транзакции проходят через идентичные сервисы.
Процедура заведения учётной записи через параллельный домен требует типовой подтверждения. Операторы требуют справки для выполнения KYC-правил. Личные параметры осуществляют комплексную валидацию.
Пополнительные границы на зеркальных площадках соответствуют стандартным характеристикам. Наименьшие ставки сохраняются константными. Накопительные призовые фонды синхронизируются между разными порталами.
Поощрительные механизмы функционируют всесторонне на параллельных порталах. Отыгрышный коэффициент поддерживает базовые значения. Период действия отыгрыша продолжается.
Команда помощи анализирует запросы с параллельных порталов равнозначно. Прямой общение предоставляет постоянный формат оперирования.
https://ivermectinaccessusa.shop/# ivermectin 2%
Good morning!
Protect valuable information by understanding its mysterious interesting roots deeply and secure your digital assets today see on the website for security guides
Full information on the link – https://202fliks.site
All the best and development in business!
Новейшие провайдеры развлекательных продуктов дают клиентам путь к элитному азарту через защищенные Лаки Бир зеркало системы. Сертифицированная деятельность влечет учета жестких правовых критериев.
Процедура оформления клиентского счета включает проверку индивидуальных реквизитов. Операторы используют углубленные системы KYC и AML для недопущения нарушающих платежей.
Электронные средства актуальных гемблинг платформ функционируют на защищенных хостингах с шифровальными алгоритмами. Региональная блокировка принуждает владельцев запускать вспомогательные адреса.
Альтернативные ресурсы образуют точные версии базового портала с удержанием всех инструментов и сведений. Участники обеспечивают себе беспрепятственный связь к средствам, беттинг статистике и пользовательским параметрам.
Банковские процедуры производятся через связанные финансовые агрегаторы. Рамки на пополнения и снятия устанавливаются в соотношении с нормативными условиями и корпоративными политиками снижения потерь.
Компетентные клиенты рекомендуют мониторить состояние сертификата через государственные базы данных азартных структур. Имиджевые критерии охватывают оценки на экспертных ресурсах и feedback реальных игроков.
в этом разделе https://slon2-at.cc
Инновационные провайдеры развлекательных продуктов гарантируют пользователям подключение к премиальному развлечениям через защищенные п»ї1xBet системы. Официальная деятельность влечет следования четких регуляторных положений.
Процедура оформления клиентского кабинета задействует валидацию личных показателей. Операторы используют комплексные алгоритмы KYC и AML для предотвращения поддельных операций.
Цифровые средства передовых казино основываются на стабильных облачных системах с TLS протоколами. IP-фильтрация вынуждает управляющих создавать дублирующие домены.
Параллельные сайты составляют точные клоны первичного сайта с удержанием всех возможностей и параметров. Пользователи приобретают беспрепятственный соединение к балансу, гемблинг записям и клиентским конфигурациям.
Банковские операции осуществляются через встроенные денежные системы. Пределы на депозиты и выводы регулируются в унисон с лицензионными условиями и индивидуальными процедурами риск-менеджмента.
Профессиональные игроки указывают проверять статус аккредитации через регуляторные базы данных азартных структур. Авторитетные параметры охватывают ранги на профильных сайтах и feedback реальных пользователей.
https://www.uaenews.net/newsr/15847
her comment is here Vauld cryptocurrency
browse around here mt gox payout
look at here buy Destiny 2 account
Подбор качественного гемблинг ресурса в нынешних границах нуждается специального подхода к юридическому уровню. Квалифицированные геймеры учитывают, что Меллстрой РІС…РѕРґ включает новую сведения о активных операторах.
Процесс открытия счета в сертифицированных площадках объединяет необходимую валидацию персональных данных. KYC-правила оберегают как казино, так и игрока от мошенничества. Переходные лимиты на получение денег до закрытия верификации – обычная процедура.
Технические барьеры на подключение к игровым площадкам преодолеваются через дублирующие адреса. Функционирующие клоны гарантируют стопроцентную эффективность первичного сайта. Денежные транзакции, интерактивный статистика и льготные программы остаются стабильными.
Капитальная гарантированность выражается степенью применяемых расчетных инструментов. SSL-кодирование, PCI DSS валидация и многоуровневая аутентификация формируют безопасный периметр защиты.
Развлекательная коллекция лицензированных площадок предоставляет машины от ведущих производителей. RTP-коэффициенты, изменчивость и вероятностные принципы подвергаются независимую аудит в одобренных институтах.
Системы стимулирования в серьезных площадках строятся на открытых правилах отыгрыша. Требования x35-40 считается нормальным для машина-поощрений, в то время как классические игры принимаются в зачет с пониженным коэффициентом.
Новейшие пользователи обталкиваются с массой технических тонкостей при функционировании с официальными площадками. Профессиональные порталы типа Лаки Бир зеркало предоставляют современную контент о процессах гэмблинговых провайдеров.
Процедура подтверждения профиля включает множество неотъемлемых фаз. Исходная подтверждение нуждается размещения справок доказывающих персону. Стандартный комплект содержит свидетельство, автоудостоверение или международное ID.
Техническая часть оформления подразумевает эксплуатацию безопасного соединения и двухуровневой проверки. Профессиональные клиенты предлагают задействовать все доступных возможностей обеспечения.
Запасные домены представляют абсолютные клоны главного ресурса с удержанием комплексного возможностей. Ключевое плюс заключается в соответствии платежных лимитов и требований вейджера.
Механизм выявления функционирующих альтернативных адресов базируется на контроле профильных мессенджер групп и связанных ресурсов. Продвинутые геймеры эксплуатируют анонимайзеры для создания бесперебойного соединения вне зависимости от территориальных блокировок.
Новейшие бетторы встречаются с сложностью соединения к проверенным ресурсам. Компании фильтруют основные адреса, но искушённые Tippy казино игроки понимают о доступности параллельных ресурсов.
Альтернативный адрес является стопроцентную копию основного площадки. Средства защиты сохраняются аналогичными. Банковские транзакции выполняются через равнозначные системы.
Процедура регистрации через дополнительный адрес содержит классической верификации. Операторы просят свидетельства для исполнения KYC-стандартов. Идентификационные параметры осуществляют усиленную верификацию.
Пополнительные пределы на параллельных порталах равняются основным параметрам. Стартовые суммы поддерживаются постоянными. Увеличивающиеся выигрышные пулы интегрируются между множественными ресурсами.
Поощрительные планы выполняются полноценно на дополнительных сайтах. Множитель ставок гарантирует оригинальные величины. Временные рамки отыгрыша продолжается.
Отдел ассистирования решает запросы с резервных ссылок таким же способом. Мгновенный разговор поддерживает беспрерывный порядок обслуживания.
Выбор надежного азартного портала заставляет серьезного исследования лицензионных свидетельств. Новые порталы казино Рльдорадо гарантируют клиентам безусловную детали о собственных допусках.
Система открытия аккаунта подразумевает несколько требуемых этапов проверки. Операторы просят удостоверения, подтверждающие личность и зрелость. Традиционный KYC-регламент составляет от 24 до 72 интервалов.
Управление банком запускается с фиксации лимитов на пополнения. Компетентные геймеры настаивают использовать закон 5% от итогового казино резерва на единичную игру.
Технические препятствия операторов побуждают эксплуатировать резервные домены. Клоны сохраняют полную работоспособность центрального платформы, подразумевая журнал платежей и гемблинг достижения.
Инновационные финансовые сервисы предоставляют мгновенные взносы через виртуальные счета. Bitcoin, Ethereum и фиксированные активы обеспечивают скрытность и крошечные комиссии. Период реализации снятий насчитывает 10-30 периодов.
Системы лояльности содержат градационные уровни с нарастающим возвратом. VIP-консультанты обеспечивают уникальные подарки, усиленные ограничения и первоочередную поддержку.
Good morning!
Explore deep mysterious layers of interesting info with high valuable potential now and dive into the unknown with confidence see on the website for interactive maps
Full information on the link – https://202fliks.site
All the best and development in business!
stylish finds online – Fair value and easy-to-read descriptions make browsing simple.
content Is vauld crypto app safe
Развлекательная индустрия являет стремительный развитие, притягивая тысячи клиентов. Грамотные ресурсы гарантируют безопасную среду для игры. Развёрнутую сведения о указанных операторах можно отыскать на казино 1хбет .
Лицензирование остаётся главным аспектом отбора сайта. Регуляторы Кюрасао гарантируют строгий проверку финансовых действий. Отдельная официальная платформа выполняет плановые ревизии RNG-алгоритмов.
Компьютерные особенности актуальных азартных площадок включают SSL-кодирование экономического ранга. Производители цифрового материала вроде Microgaming, NetEnt, Pragmatic Play встраивают комплексные модели случайных показателей.
Процедура аутентификации счёта предполагает направления справок KYC-уровня. ID, справка о заработке, доказательство адреса — стандартный список для финального подключения.
Альтернативные адреса ликвидируют препятствия с блокировками провайдеров. Рабочие копии обновляются ежедневно программными специалистами. Смартфонные приложения часто функционируют качественнее веб вариантов.
Банкролл-менеджмент устанавливает стратегическую доходность азартных периодов. Грамотные геймеры настаивают контролировать количество вейджера до 1-2% от суммарного бюджета.
Отбор проверенного betting портала в актуальных условиях подразумевает повышенного внимания к законному положению. Квалифицированные участники понимают, что Вавада казино предоставляет свежую факты о работающих операторах.
Механизм регистрации в сертифицированных заведениях содержит необходимую верификацию удостоверения. KYC-нормы охраняют как оператора, так и клиента от махинаций. Кратковременные пределы на изъятие средств до завершения валидации – типичная методика.
Программные ограничения на соединение к развлекательным площадкам обходятся через альтернативные адреса. Действующие дубликаты сохраняют тотальную эффективность базового сервиса. Расчетные переводы, азартный продвижение и бонусные предложения поддерживаются устойчивыми.
Денежная надежность оценивается качеством эксплуатируемых платежных методов. SSL-криптография, PCI DSS лицензирование и дополнительная аутентификация гарантируют стабильный щит обороны.
Развлекательная набор проверенных операторов объединяет слоты от ведущих разработчиков. RTP-значения, вариативность и расчетные формулы подвергаются нейтральную проверку в признанных лабораториях.
Системы мотивации в надежных операторах базируются на четких критериях ставок. Проигрыш x35-40 считается адекватным для барабан-поощрений, в то время как настольные игры засчитываются в расчет с редуцированным фактором.
best site pass app login
helpful site mtgox payout date
their explanation android pass app
Поиск в сфере легальных порталов требует понимания новых инструментов соединения. Умелые клиенты применяют Vavada для обретения современной материалов о действующих путях.
Алгоритм создания учетной записи в надежных операторах содержит тщательную валидацию. Продвинутые провайдеры используют KYC-процедуры и AML-критерии. Документооборот требует от 24 до 72 периодов.
Компьютерные технологии для преодоления барьеров улучшаются сообща с ужесточением законодательных действий. VPN-службы разряда premium обеспечивают защиту AES-256 и стандарты OpenVPN. Стабильность связи кардинально необходима для высокоролловых партий.
Альтернативные платформы действуют через локально разнесенные цифровые мощности. CDN-системы осуществляют сокращенную время ответа для европейских пользователей. Системное перенаправление инициируется при идентификации барьера главного домена.
Денежные операции в легальных областях следуют конкретным правилам PCI DSS. Децентрализованные транзакции набирают популярность благодаря приватности и скорости выполнения.
Смартфонные клиенты премиальных операторов объединяют физиологическую идентификацию и push-сообщения для существенных эпизодов. Гибкий интерфейс автоматически настраивается под характеристики дисплея.
Действующие зеркала легальных гемблинг-платформ на лаки Р±РёСЂ казино обеспечивают постоянный соединение к азартным платформам. Технология клонирования образует полноценные дубликаты главного сайта с фиксацией всех инструментов.
Процедура регистрации через резервную ссылку полностью повторяет основную шаблон. Начинающие пользователи указывают функционирующий email, устанавливают надежный код доступа и назначают операционную денежную единицу.
Идентификация профиля включает передачи справок согласно KYC-политике. Фото удостоверения личности, свидетельство проживания и финансовые данные анализируются посредством программную верификацию в течение 24-72 ч.
Подключение активных пользователей осуществляется через стандартную панель с усиленной валидацией. Краткосрочные пароли передаются на мессенджер девайс или мейл.
Функционал финансового блока через зеркала обеспечивает популярные денежные инструменты. Visa, Mastercard, веб счета Skrill, Neteller, цифровые активы Bitcoin, Ethereum процессируются с оптимизированными сборами 0-3%.
Развлекательная ассортимент клонируется абсолютно включая слоты, традиционные развлечения, live-операторов и прогрессивы. RTP-коэффициенты, дисперсия и вейджер поддерживаются аналогичными.
Поощрительная программа работает похоже главному порталу. Welcome-комплекты, безвозмездные спины, refund и VIP-схемы активируются машинально при реализации прописанных критериев.
Передовые порталы игорных услуг предлагают беттерам возможность к профессиональному развлечениям через проверенные п»ї1хбет казино порталы. Официальная работа влечет следования строгих надзорных требований.
Процедура открытия пользовательского счета включает подтверждение конфиденциальных информации. Управляющие используют детализированные процедуры KYC и AML для пресечения фродовых переводов.
Электронные средства инновационных казино базируются на безопасных хостингах с HTTPS стандартами. Региональная блокировка заставляет управляющих организовывать вспомогательные URL.
Параллельные порталы составляют идентичные копии главного сайта с поддержанием всех сервисов и данных. Клиенты получают устойчивый подключение к капиталу, гемблинг отчетности и клиентским параметрам.
Платежные транзакции реализуются через подключенные денежные агрегаторы. Границы на пополнения и снятия назначаются в согласии с нормативными положениями и собственными нормами риск-менеджмента.
Квалифицированные беттеры советуют проверять положение авторизации через надзорные базы данных гемблинг органов. Авторитетные критерии задействуют позиции на специализированных сервисах и отзывы подлинных участников.
Поиск в пространстве сертифицированных сайтов включает осознания продвинутых технологий соединения. Опытные игроки используют winity casino для приобретения современной сведений о активных доменах.
Механизм оформления счета в официальных операторах подразумевает сложную верификацию. Современные провайдеры эксплуатируют KYC-системы и AML-критерии. Документальное сопровождение занимает от 24 до 72 временных отрезков.
Технические технологии для избежания препятствий улучшаются вместе с интенсификацией правовых действий. VPN-решения уровня premium обеспечивают криптографию AES-256 и технологии OpenVPN. Непрерывность подключения кардинально актуальна для привилегированных сессий.
Дублирующие ресурсы выполняют задачи через локально разнесенные технические мощности. CDN-сети предоставляют низкую латентность для азиатских участников. Автоматическое маршрутизация срабатывает при детекции барьера базового ресурса.
Экономические операции в легальных зонах соответствуют жестким требованиям PCI DSS. Криптовалютные операции набирают популярность благодаря секретности и темпу обработки.
Мобильные приложения топовых компаний включают физиологическую авторизацию и push-алерты для важных моментов. Модифицируемый оформление программно корректируется под параметры экрана.
взгляните на сайте здесь https://vodkabet-play.vodkabet-zerkalo.vodka
зайти на сайт https://vodkabet-play.vodkabet-zerkalo.vodka/
Good afternoon!
Access literature mysterious themes full of interesting and valuable narrative depth and lose yourself in stories see on the website for book clubs
Full information on the link – https://101flow.site
All the best and development in business!
Melvora Store – Modern layout makes browsing categories quick and easy.
Официальные платформы игровых предложений обеспечивают участникам шанс к элитному развлечениям через целевые порталы, включая Меллстрой зеркало , что соблюдают мировые нормы защиты.
Алгоритм регистрации требует указания валидационных сведений через защищённые SSL-протоколы. Администрация запрашивают письменное подтверждение age verification и места жительства для исполнения нормативных требований.
Multi-factor аутентификация представляет mandatory составляющей передовых архитектур security. Игроки располагают SMS-коды, push-уведомления или применяют специализированные софт по типу Google Authenticator.
Резервные ссылки устраняют препятствия географических запретов и DDoS-нападений. Техническим образом копии образуют копийные версии центрального домена с удержанием опций и личных параметров.
Skilled клиенты suggest удерживать обновлённые списки рабочих mirrors в закладках обозревателя. Операторы передают новости о актуальных порталах через почтовые сервисы, Telegram-чаты и mobile apps.
Финансовые процедуры через лицензионные ресурсы гарантированы защитными системами стандарта банковского направления. Extraction капитала реализуется исключительно на верифицированные счета обладателя профиля.
Подбор легального игорного площадки заставляет основательного исследования правовых сертификатов. Инновационные платформы Меллстрой казино предлагают игрокам стопроцентную факты о собственных аккредитациях.
Процесс получения доступа подразумевает множество обязательных стадий верификации. Представители просят бумаги, подтверждающие индивидуальность и зрелость. Обычный KYC-регламент продолжается от 24 до 72 часов.
Распоряжение капиталом инициируется с задания ограничений на вклады. Искусные пользователи советуют задействовать норму 5% от общего казино бюджета на конкретную раунд.
Электронные препятствия администраторов вынуждают эксплуатировать вспомогательные адреса. Зеркала поддерживают абсолютную производительность основного платформы, предусматривая летопись переводов и казино успех.
Современные банковские системы предоставляют скоростные депозиты через блокчейн аккаунты. Bitcoin, Ethereum и фиксированные активы поддерживают анонимность и наименьшие платежи. Длительность осуществления снятий насчитывает 10-30 отрезков.
Программы лояльности подразумевают иерархические статусы с накапливающимся бонусом. VIP-координаторы предоставляют персонализированные вознаграждения, повышенные рамки и преимущественную помощь.
Ivermectin Access USA: Ivermectin Access USA – Ivermectin Access USA
Новейшие бетторы встречаются с сложностью связи к проверенным сайтам. Компании блокируют базовые домены, но искушённые friends casino зеркало пользователи осознают о доступности параллельных ресурсов.
Параллельный портал составляет точную отображение оригинального портала. Протоколы шифрования функционируют равнозначными. Финансовые действия выполняются через сходные каналы.
Алгоритм создания аккаунта через зеркальный ссылку требует привычной подтверждения. Менеджеры требуют свидетельства для реализации KYC-регламентов. Паспортные характеристики осуществляют расширенную проверку.
Вносительные границы на альтернативных порталах идентичны стандартным спецификациям. Стартовые суммы сохраняются постоянными. Увеличивающиеся джекпоты объединяются между многочисленными адресами.
Поощрительные планы оперируют комплексно на альтернативных платформах. Коэффициент оборота сохраняет базовые значения. Временные рамки использования остаётся прежним.
Отдел помощи рассматривает обращения с дополнительных порталов сходным образом. Интерактивный диалог осуществляет круглосуточный формат функционирования.
official Merch Glow site – The selection is impressive and caught my eye immediately.
Беттинговая область являет динамичный рост, притягивая множество участников. Профессиональные ресурсы обеспечивают качественную пространство для ставок. Развёрнутую данные о этих провайдерах можно изучить на типпи казино .
Сертификация выступает ключевым элементом определения площадки. Регуляторы Великобритании обеспечивают качественный контроль денежных действий. Всякая сертифицированная портал подвергается постоянные контроли RNG-систем.
IT параметры актуальных казино содержат SSL-криптографию финансового класса. Создатели компьютерного материала вроде Microgaming, NetEnt, Pragmatic Play внедряют продвинутые системы непредсказуемых величин.
Процесс аутентификации личного кабинета подразумевает направления удостоверений KYC-стандарта. Удостоверение, свидетельство о средствах, подтверждение прописки — типичный набор для итогового подключения.
Альтернативные адреса исправляют сложности с ограничениями компаний. Свежие альтернативы адаптируются регулярно цифровыми отделами. Карманные клиенты нередко действуют устойчивее интернет модификаций.
Распределение капитала определяет стратегическую успешность беттинговых циклов. Квалифицированные игроки рекомендуют ограничивать размер вейджера до 1-2% от итогового резерва.
Топ казино онлайн Топ казино онлайн .
Aisle Whisper – Came across several unique finds that are definitely worth exploring.
Ita? down caiu.site .
click here for info Nifty marketplace
Современные пользователи пересекаются с огромным количеством технологических нюансов при процессах с лицензированными ресурсами. Профильные платформы типа Vavada выдают свежую контент о функционировании игорных брендов.
Алгоритм проверки счета подразумевает комплекс необходимых этапов. Базовая аутентификация включает передачи свидетельств валидирующих субъект. Типовой список подразумевает удостоверение личности, автоудостоверение или международный паспорт.
Цифровая составляющая записления предполагает использование SSL-шифрования и двухфакторной аутентификации. Опытные игроки предлагают запускать весь комплекс представленных параметров безопасности.
Альтернативные адреса формируют абсолютные клоны базового сайта с поддержанием полного функционала. Главное плюс содержится в подобии платежных рамок и требований условий прокрутки.
Система выявления действующих резервных ссылок опирается на проверке профильных новостных лент и аффилированных платформ. Продвинутые игроки задействуют виртуальные частные сети для гарантирования стабильного подключения независимо от географических ограничений.
Развлекательная отрасль отображает стремительный развитие, привлекая тысячи геймеров. Экспертные площадки предоставляют безопасную атмосферу для ставок. Полную факты о данных компаниях возможно обнаружить на Lucky Bear .
Сертификация выступает приоритетным элементом определения площадки. Надзорные органы Мальты гарантируют тщательный контроль экономических операций. Всякая официальная сайт подвергается плановые контроли RNG-алгоритмов.
IT параметры актуальных азартных площадок предусматривают SSL-криптографию денежного категории. Провайдеры программного обеспечения наподобие Microgaming, NetEnt, Pragmatic Play подключают продвинутые механизмы произвольных значений.
Схема верификации учётной записи требует подачи документов KYC-стандарта. Паспорт, подтверждение о доходах, валидация адреса — классический набор для полноценного авторизации.
Альтернативные адреса убирают сложности с блокировками операторов. Актуальные варианты модифицируются регулярно программными специалистами. Карманные программы регулярно работают лучше интернет версий.
Банкролл-менеджмент определяет долгосрочную эффективность беттинговых периодов. Грамотные пользователи настаивают ограничивать величину бета до 1-2% от суммарного капитала.
http://uspharmaindex.com/# generic viagra online canadian pharmacy
этот контент https://vodkabet-play.vodkabet-zerkalo.vodka/
Joy Online – Support team responded fast and resolved my concern quickly.
home Nifty NFT
Cheap Sildenafil 100mg Sildenafil Price Guide sildenafil online
Xerva Marketplace – Nice, clean layout made browsing products today fast and easy.
Нынешние пользователи имеют дело с массой программных деталей при работе с легальными порталами. Специализированные платформы типа п»ї1хбет официальный сайт выдают современную информацию о функционировании развлекательных операторов.
Система верификации учетной записи подразумевает множество обязательных шагов. Начальная валидация требует загрузки свидетельств верифицирующих индивидуальность. Обычный комплект предполагает паспорт, лицензию водителя или международный паспорт.
Техническая элемент оформления предполагает задействование безопасного соединения и двухфакторной аутентификации. Экспертные клиенты настаивают запускать полный набор представленных возможностей обеспечения.
Зеркала представляют точные отражения базового портала с сохранением всего функционала. Важнейшее достоинство выражается в идентичности финансовых рамок и параметров условий прокрутки.
Схема поиска функционирующих дублирующих порталов базируется на мониторинге специализированных мессенджер групп и партнерских сайтов. Профессиональные пользователи эксплуатируют виртуальные частные сети для предоставления постоянного входа безотносительно от локальных блокировок.
Инновационные сервисы азартных услуг обеспечивают клиентам подключение к высококлассному игровому процессу через проверенные казино 1xBet порталы. Авторизованная функционирование подразумевает учета четких регуляторных положений.
Процедура оформления игрового профиля предусматривает подтверждение индивидуальных показателей. Операторы внедряют многоуровневые протоколы KYC и AML для исключения поддельных платежей.
Технические средства новейших игорных домов базируются на защищенных серверах с шифровальными стандартами. IP-фильтрация принуждает управляющих запускать дублирующие URL.
Альтернативные порталы являют собой точные репликации главного портала с обеспечением всех сервисов и сведений. Участники приобретают стабильный соединение к средствам, развлекательной статистике и личным настройкам.
Денежные процедуры осуществляются через подключенные денежные шлюзы. Ограничения на вклады и обналичивания регулируются в соответствии с регуляторными положениями и индивидуальными политиками минимизации опасностей.
Экспертные игроки указывают анализировать условия сертификата через контролирующие регистры развлекательных организаций. Статусные показатели охватывают места на профильных платформах и комментарии настоящих клиентов.
Browse Zintera – Quick load times combined with a neat and updated design.
Harbor Mint – A calm and curated marketplace inspired by coastal charm and clean design.
Новейшие геймеры попадают с проблемой связи к официальным порталам. Операторы ограничивают основные адреса, но опытные tip top casino пользователи осознают о функционировании зеркальных порталов.
Резервная ссылка составляет абсолютную дубликат первичного площадки. Криптографические алгоритмы остаются равнозначными. Финансовые транзакции выполняются через те же системы.
Процедура регистрации через дополнительный портал включает стандартной верификации. Специалисты требуют справки для соблюдения KYC-стандартов. Идентификационные информация реализуют комплексную проверку.
Банковские рамки на альтернативных площадках соответствуют стандартным характеристикам. Низшие ставки остаются стабильными. Возрастающие джекпоты интегрируются между различными доменами.
Стимулирующие системы действуют всесторонне на дополнительных площадках. Вейджер обеспечивает исходные значения. Длительность оборота поддерживается.
Служба ассистирования решает запросы с дополнительных ссылок аналогично. Живой переписка осуществляет 24-часовой режим оперирования.
Легальные площадки азартных опций oferuja геймерам право к элитному азартному досугу через профильные домены, включая Гризли РІС…РѕРґ , которые соблюдают международные стандарты security.
Процедура открытия счёта necessita заполнения authentication информации через шифрованные SSL-протоколы. Администрация просят official verification дееспособности и локации нахождения для соблюдения юрисдикционных правил.
Многоуровневая authentication является необходимым элементом современных механизмов безопасности. Пользователи приобретают SMS-пароли, push-notification или эксплуатируют targeted утилиты вроде Google Authenticator.
Альтернативные ссылки ликвидируют сложности geographic блокировок и DDoS-штурмов. Фактически реплики представляют аналогичные реплики главного платформы с сохранением функциональности и индивидуальных данных.
Экспертные клиенты рекомендуют удерживать новейшие списки рабочих копий в избранном browser. Букмекеры рассылают информацию о новых доменах через мейл, Telegram-чаты и мобильные софт.
Банковские movements через надёжные площадки secured encryption протоколами класса банковского направления. Снятие денег реализуется только на validated реквизиты держателя учётной записи.
you can try these out pass app download
веб-сайте за сколько можно продать аккаунт в геншине
проверить сайт https://vodkabet-play.vodkabet-zerkalo.vodka
Sorniq Boutique – A one-of-a-kind marketplace designed to offer both imaginative and useful selections.
Отбор безопасного betting портала в текущих условиях подразумевает тщательного рассмотрения к юридическому статусу. Компетентные участники знают, что Mellstroy Game казино включает актуальную информацию о работающих ресурсах.
Алгоритм открытия счета в официальных платформах включает необходимую верификацию документов. KYC-правила обеспечивают как площадку, так и пользователя от обмана. Промежуточные границы на изъятие финансов до окончания верификации – обычная система.
Цифровые препятствия на подключение к гемблинг порталам нейтрализуются через альтернативные URL. Активные зеркала предоставляют полную функциональность первичного ресурса. Расчетные процедуры, игровой продвижение и привилегированные системы функционируют стабильными.
Экономическая надежность измеряется показателем эксплуатируемых платежных инструментов. SSL-безопасность, PCI DSS аттестация и усиленная проверка создают надежный щит безопасности.
Азартная библиотека официальных провайдеров включает автоматы от топовых провайдеров. RTP-значения, волатильность и математические системы подвергаются нейтральную контроль в одобренных центрах.
Механизмы лояльности в профессиональных сервисах опираются на четких правилах вейджера. Вейджер x35-40 оценивается приемлемым для барабан-подарков, в то время как стандартные активности включаются в расчет с минимальным показателем.
valacyclovir
Азартная область отображает стремительный подъём, притягивая массы геймеров. Профессиональные ресурсы гарантируют защищённую среду для беттинга. Детальную материалы о подобных операторах возможно изучить на п»ї1хбет регистрация .
Аттестация является центральным фактором выбора платформы. Юрисдикции Великобритании дают жёсткий надзор денежных манипуляций. Каждая сертифицированная площадка реализует систематические контроли RNG-систем.
Программные особенности инновационных казино содержат SSL-безопасность денежного стандарта. Разработчики компьютерного софта класса Microgaming, NetEnt, Pragmatic Play встраивают продвинутые схемы рандомных значений.
Схема проверки личного кабинета требует направления справок KYC-формата. Паспорт, документ о средствах, доказательство прописки — типичный список для итогового авторизации.
Резервные URL убирают барьеры с запретами компаний. Рабочие копии изменяются каждый день IT службами. Планшетные утилиты нередко функционируют качественнее онлайн версий.
Управление банкроллом определяет долгосрочную результативность гемблинговых партий. Опытные игроки предлагают сокращать сумму депозита до 1-2% от итогового фонда.
Рейтинг онлайн казино 2026 Рейтинг онлайн казино 2026 .
Cheap Sildenafil 100mg: Sildenafil Price Guide – Cheap generic Viagra
https://www.tai-ji.net/board/board_topic/4160148/7906469.htm
Передовые клиенты сталкиваются с массой технических аспектов при работе с официальными сайтами. Профессиональные ресурсы типа Рльдорадо казино предоставляют современную данные о операциях гэмблинговых компаний.
Алгоритм подтверждения профиля предполагает комплекс неотъемлемых фаз. Исходная проверка предполагает передачи документов верифицирующих субъект. Стандартный набор включает удостоверение личности, автоудостоверение или международное ID.
Программная компонента создания аккаунта содержит эксплуатацию SSL-шифрования и двухуровневой проверки. Опытные клиенты предлагают активировать весь комплекс возможных опций безопасности.
Резервные ссылки представляют полные клоны главного сайта с обеспечением исчерпывающего инструментария. Центральное достоинство состоит в схожести платежных ограничений и критериев отыгрыша.
Механизм обнаружения активных дублирующих порталов строится на отслеживании профессиональных уведомительных сервисов и союзных порталов. Профессиональные геймеры применяют туннельные протоколы для создания бесперебойного подключения независимо от географических лимитов.
заказать проект перепланировки квартиры в москве teletype.in/@jorik11/proekt-dlya-pereplanirovki .
Проверенные провайдеры игровых сервисов обеспечивают игрокам право к качественному игровому процессу через профильные домены, включая Вавада сайт , которые специально соблюдают общепринятые регламенты security.
Процедура активации предполагает заполнения идентификационных данных через криптографические SSL-протоколы. Букмекеры требуют письменное свидетельство age verification и места проживания для соблюдения legal правил.
Двухэтапная authentication становится required частью передовых архитектур защиты. Пользователи получают SMS-токены, push-оповещения или используют dedicated утилиты наподобие Google Authenticator.
Дублирующие домены решают препятствия региональных барьеров и DDoS-штурмов. По сути зеркала образуют копийные копии главного сайта с maintaining опций и личных информации.
Профессиональные игроки рекомендуют удерживать обновлённые перечни working копий в избранном браузера. Провайдеры отправляют информацию о свежих ссылках через мейл, Telegram-communities и смартфонные apps.
Банковские процедуры через проверенные порталы обеспечены криптографическими methods категории банковского направления. Снятие фондов происходит единственно на подтверждённые данные собственника личного кабинета.
Современные участники обталкиваются с множеством цифровых тонкостей при работе с сертифицированными платформами. Профессиональные платформы типа РЎСѓРєР° казино предоставляют новую сведения о работе развлекательных организаций.
Процедура подтверждения аккаунта охватывает несколько необходимых фаз. Исходная верификация нуждается отправки документов доказывающих личность. Классический перечень предполагает ID, права или загранпаспорт.
Системная элемент открытия счета содержит задействование безопасного соединения и многофакторной защиты. Квалифицированные геймеры настаивают задействовать полный набор представленных настроек безопасности.
Альтернативные адреса представляют идентичные дубликаты первичного платформы с хранением комплексного инструментария. Главное достоинство кроется в подобии банковских границ и параметров проигрыша.
Процедура локализации активных альтернативных адресов основывается на мониторинге профильных уведомительных сервисов и союзных сайтов. Квалифицированные клиенты эксплуатируют VPN-сервисы для гарантирования бесперебойного подключения невзирая от местных лимитов.
Ориентирование в мире официальных платформ нуждается владения новых способов входа. Опытные игроки используют Вавада казино для обретения свежей сведений о оперативных ссылках.
Процесс открытия аккаунта в официальных организациях включает комплексную верификацию. Новейшие компании внедряют KYC-системы и AML-требования. Документальное сопровождение составляет от 24 до 72 временных отрезков.
IT технологии для обхода ограничений эволюционируют сообща с ужесточением нормативных мер. VPN-решения категории premium гарантируют безопасность AES-256 и системы OpenVPN. Стабильность коннекта критически важна для высокоролловых сессий.
Дублирующие платформы выполняют задачи через регионально разнесенные IT ресурсы. CDN-архитектуры поддерживают минимальную отклик для европейских геймеров. Программное редирект инициируется при обнаружении блокировки базового портала.
Финансовые транзакции в сертифицированных территориях соответствуют жестким правилам PCI DSS. Криптовалютные операции завоевывают востребованность благодаря секретности и темпу реализации.
Смартфонные приложения лучших компаний интегрируют лицевую проверку и push-алерты для ключевых эпизодов. Модифицируемый облик автоматически адаптируется под настройки матрицы.
http://sildenafilpriceguide.com/# Viagra tablet online
кухни из массива дерева от производителя Загляните «на Кухню алгоритмов» — и вы откроете для себя новый, удивительный мир, где креативность и логика идут рука об руку.
wikipedia reference digital resource pack templates marketplace
discover Nook Harbor – Inviting site and enjoyable browsing experience overall.
unique Yorventa marketplace – Fascinating range of items that immediately made me want to explore more.
Актуальные геймеры обталкиваются с изобилием технологических нюансов при функционировании с легальными сайтами. Специализированные ресурсы типа п»ї1хбет РІС…РѕРґ предоставляют релевантную данные о работе казино брендов.
Процесс проверки профиля подразумевает несколько принудительных фаз. Начальная верификация подразумевает отправки свидетельств подтверждающих персону. Типовой список охватывает свидетельство, лицензию водителя или международное ID.
Системная часть создания аккаунта содержит использование защищенного протокола и двухфакторной аутентификации. Профессиональные геймеры подсказывают активировать максимум имеющихся функций защиты.
Зеркала образуют точные дубликаты базового сайта с сохранением тотального арсенала. Основное бонус заключается в идентичности финансовых лимитов и параметров отыгрыша.
Алгоритм нахождения рабочих альтернативных адресов фундируется на проверке тематических новостных лент и союзных порталов. Опытные клиенты задействуют анонимайзеры для формирования постоянного соединения независимо от местных лимитов.
Легальные платформы развлекательных опций дают клиентам вариант к премиальному развлечениям через специализированные сайты, включая Vavada зеркало , что следуют transnational нормы конфиденциальности.
Схема создания аккаунта подразумевает указания валидационных информации через encrypted SSL-connection. Администрация demanded нотариальное свидетельство дееспособности и локации регистрации для соблюдения legal критериев.
2FA проверка становится mandatory компонентом современных solutions защиты. Клиенты имеют SMS-пароли, push-уведомления или задействуют специальные приложения в стиле Google Authenticator.
Альтернативные URL нейтрализуют трудности territorial санкций и DDoS-нападений. Техническим образом дубли являют идентичные реплики главного портала с поддержанием инструментария и индивидуальных деталей.
Профессиональные пользователи предлагают поддерживать актуальные базы working дублей в избранном браузера. Операторы направляют информацию о новых адресах через почтовые сервисы, Telegram-группы и смартфонные софт.
Банковские транзакции через проверенные платформы secured защитными системами стандарта банковского направления. Снятие капитала реализуется лишь на аутентифицированные wallets владельца личного кабинета.
see here mt.gox claim
Официальные платформы азартных услуг гарантируют клиентам право к профессиональному времяпрепровождению через профильные домены, включая Вован казино , которые точно выполняют мировые требования конфиденциальности.
Схема активации требует внесения верификационных сведений через безопасные SSL-протоколы. Операторы просят предоставить письменное свидетельство age verification и региона residence для compliance legal норм.
2FA идентификация выступает принудительным aspect передовых механизмов конфиденциальности. Пользователи обретают SMS-шифры, push-алерты или эксплуатируют специальные tools вроде Google Authenticator.
Зеркальные домены преодолевают проблемы territorial санкций и DDoS-штурмов. Техническим образом копии являют копийные клоны базового портала с maintaining features и user информации.
Skilled участники рекомендуют поддерживать current каталоги working дублей в favourites интернет-программы. Букмекеры передают обновления о современных ссылках через e-mail, Telegram-каналы и mobile утилиты.
Платёжные переводы через legal платформы защищены encryption технологиями категории банковского направления. Extraction денег производится только на validated wallets владельца профиля.
Выбор надежного гемблинг оператора в сегодняшних условиях подразумевает особого изучения к лицензионному режиму. Квалифицированные геймеры осознают, что казино типпи содержит современную материалы о работающих ресурсах.
Механизм регистрации в проверенных сервисах охватывает неизбежную подтверждение персональных данных. KYC-нормы обеспечивают как казино, так и участника от мошенничества. Временные рамки на вывод денег до выполнения контроля – типичная процедура.
Электронные блокировки на связь к игровым сайтам решаются через резервные URL. Доступные зеркала сохраняют всестороннюю производительность первичного ресурса. Платежные операции, развлекательный результаты и льготные планы остаются стабильными.
Материальная надежность выражается степенью эксплуатируемых денежных способов. SSL-кодирование, PCI DSS валидация и двухфакторная проверка создают безопасный периметр защиты.
Геймплейная каталог проверенных площадок предоставляет барабаны от лидирующих студий. RTP-индексы, колебания и математические схемы подвергаются объективную контроль в одобренных институтах.
Механизмы мотивации в качественных операторах опираются на понятных параметрах проигрыша. Условия ставок x35-40 считается адекватным для машина-привилегий, в то время как настольные активности идут в зачет с редуцированным фактором.
browse around this site buy unboxed account
Передовые платформы гемблинг продуктов предлагают участникам возможность к элитному беттингу через надежные казино Lucky Bear системы. Официальная функционирование предполагает следования строгих правовых положений.
Система активации клиентского аккаунта содержит верификацию конфиденциальных сведений. Управляющие применяют детализированные алгоритмы KYC и AML для исключения фродовых операций.
Программные решения актуальных беттинг площадок строятся на зашифрованных дата-центрах с HTTPS сертификатами. Региональная блокировка вынуждает операторов внедрять вспомогательные адреса.
Параллельные порталы являют собой аналогичные копии базового сайта с обеспечением всех возможностей и сведений. Клиенты добиваются устойчивый соединение к счету, игровой истории и персональным конфигурациям.
Банковские процедуры выполняются через связанные платежные агрегаторы. Ограничения на вклады и выводы определяются в соотношении с правовыми условиями и собственными правилами риск-менеджмента.
Профессиональные клиенты настаивают анализировать состояние лицензии через надзорные списки азартных организаций. Авторитетные параметры охватывают оценки на отраслевых сайтах и feedback истинных беттеров.
Передовые гемблеры попадают с сложностью доступа к официальным порталам. Поставщики запрещают стандартные домены, но грамотные казино Vavada пользователи учитывают о наличии параллельных порталов.
Зеркало является идентичную воспроизведение главного площадки. SSL-сертификаты остаются такими же. Платёжные транзакции осуществляются через идентичные шлюзы.
Алгоритм создания аккаунта через параллельный адрес подразумевает классической валидации. Менеджеры выясняют свидетельства для осуществления KYC-норм. Паспортные информация реализуют многоуровневую проверку.
Вносительные границы на альтернативных платформах идентичны главным параметрам. Начальные ставки остаются неизменными. Прогрессивные джекпоты интегрируются между различными ресурсами.
Премиальные схемы функционируют комплексно на параллельных ресурсах. Множитель ставок удерживает первоначальные значения. Срок активности проигрывания остаётся прежним.
Департамент ассистирования решает обращения с альтернативных адресов идентично. Прямой диалог предоставляет беспрерывный формат обслуживания.
http://www.carlscorona.com
подробнее здесь продать аккаунт стим с играми
Легальные площадки игорных опций обеспечивают участникам шанс к элитному игровому процессу через целевые ресурсы, включая Лаки Бир РІС…РѕРґ , которые следуют transnational требования безопасности.
Механизм создания аккаунта подразумевает внесения authentication данных через защищённые SSL-протоколы. Провайдеры требуют документальное удостоверение совершеннолетия и территории жительства для поддержания legal критериев.
Двухэтапная проверка становится required элементом актуальных платформ конфиденциальности. Участники получают SMS-шифры, push-уведомления или эксплуатируют специальные приложения в стиле Google Authenticator.
Mirror адреса устраняют проблемы territorial барьеров и DDoS-воздействий. Фактически копии составляют аналогичные версии центрального ресурса с сохранением инструментария и пользовательских данных.
Опытные пользователи призывают keeping current перечни активных зеркал в закладках интернет-программы. Management передают новости о новых URL через электронную почту, Telegram-чаты и mobile приложения.
Платёжные операции через legal ресурсы secured шифровальными methods level банковского индустрии. Вывод средств осуществляется лишь на подтверждённые счета владельца профиля.
Отбор честного азартного портала требует серьезного изучения лицензионных документов. Передовые системы п»ї1хбет сайт дают игрокам максимальную данные о имеющихся аккредитациях.
Система регистрации включает различные обязательных шагов подтверждения. Провайдеры запрашивают справки, устанавливающие личность и зрелость. Классический KYC-регламент требует от 24 до 72 интервалов.
Финансовое планирование инициируется с установления рамок на вклады. Профессиональные клиенты предлагают эксплуатировать установку 5% от итогового развлекательного фонда на одну игру.
Цифровые блокировки операторов принуждают внедрять дополнительные ссылки. Альтернативы удерживают максимальную функциональность главного портала, охватывая хронологию транзакций и гемблинг результаты.
Современные финансовые методы гарантируют быстрые депозиты через электронные портмоне. Bitcoin, Ethereum и фиксированные активы гарантируют скрытность и минимальные комиссии. Период обработки изъятий равно 10-30 интервалов.
Программы приверженности предусматривают иерархические уровни с нарастающим компенсацией. VIP-кураторы предоставляют индивидуальные вознаграждения, улучшенные лимиты и первоочередную техподдержку.
Определение проверенного развлекательного оператора в сегодняшних условиях требует повышенного рассмотрения к юридическому уровню. Квалифицированные клиенты представляют, что казино типпи включает новую информацию о доступных сервисах.
Схема создания аккаунта в сертифицированных заведениях включает неизбежную подтверждение документов. KYC-стандарты охраняют как сервис, так и пользователя от мошенничества. Промежуточные пределы на перечисление капитала до окончания проверки – типичная практика.
Цифровые препятствия на вход к развлекательным ресурсам решаются через зеркальные домены. Действующие отражения предоставляют всестороннюю эффективность базового сайта. Финансовые движения, азартный статистика и льготные предложения сохраняются неизменными.
Финансовая гарантированность характеризуется критерием применяемых финансовых механизмов. SSL-криптография, PCI DSS валидация и усиленная подтверждение обеспечивают защищенный барьер охраны.
Интерактивная ассортимент лицензированных площадок предоставляет автоматы от топовых разработчиков. RTP-значения, вариативность и вероятностные схемы претерпевают независимую контроль в утвержденных центрах.
Системы лояльности в качественных операторах формируются на четких правилах активности. Отыгрыш x35-40 оценивается нормальным для автомат-подарков, в то время как карточные состязания идут в калькуляцию с минимальным процентом.
Гемблинговая индустрия представляет быстрый прогресс, завлекая тысячи игроков. Экспертные площадки предоставляют надёжную обстановку для беттинга. Развёрнутую сведения о подобных организациях доступно обнаружить на retro casino .
Аттестация остаётся основным критерием отбора платформы. Контролёры Кюрасао предоставляют серьёзный надзор расчётных процедур. Каждая официальная платформа проходит постоянные аудиты RNG-модулей.
Программные параметры инновационных гемблинг-сайтов содержат SSL-кодирование банковского стандарта. Провайдеры компьютерного продукта класса Microgaming, NetEnt, Pragmatic Play добавляют продвинутые механизмы случайных показателей.
Алгоритм аутентификации учётной записи предполагает предоставления свидетельств KYC-класса. Документ, выписка о прибылях, валидация местожительства — классический перечень для итогового входа.
Зеркальные порталы решают препятствия с цензурой компаний. Актуальные дубли корректируются постоянно IT отделами. Планшетные утилиты часто оперируют стабильнее веб форматов.
Банкролл-менеджмент задаёт долгосрочную прибыльность игровых сессий. Опытные игроки указывают урезать размер депозита до 1-2% от совокупного бюджета.
здесь в каких играх продают аккаунты
Visit the Quick Wharf Shop – Easy checkout and my order arrived sooner than I imagined.
Подробнее здесь https://slon2-at.com
Определение честного азартного площадки требует детального разбора правовых бумаг. Передовые ресурсы п»ї1xBet casino гарантируют игрокам безусловную детали о текущих аккредитациях.
Система оформления счета охватывает несколько необходимых этапов аутентификации. Провайдеры запрашивают справки, устанавливающие идентичность и возраст. Обычный KYC-процесс длится от 24 до 72 часов.
Контроль средств инициируется с установления пределов на взносы. Опытные участники предлагают задействовать принцип 5% от общего азартного бюджета на индивидуальную заход.
Системные барьеры провайдеров заставляют применять дополнительные маршруты. Копии поддерживают абсолютную работоспособность базового площадки, содержа журнал сделок и азартный продвижение.
Актуальные платежные инструменты гарантируют моментальные пополнения через виртуальные аккаунты. Bitcoin, Ethereum и фиксированные активы предоставляют анонимность и наименьшие комиссии. Срок реализации выводов достигает 10-30 отрезков.
Схемы постоянства содержат иерархические категории с возрастающим кэшбэком. VIP-консультанты предоставляют личные поощрения, усиленные рамки и первоочередную поддержку.
Поиск проверенного игрового портала в сегодняшних условиях требует детального подхода к лицензионному уровню. Знающие игроки знают, что п»ї1хбет содержит последнюю сведения о доступных ресурсах.
Механизм оформления профиля в проверенных площадках содержит неизбежную аутентификацию личности. KYC-стандарты охраняют как площадку, так и игрока от обмана. Временные границы на изъятие активов до выполнения контроля – обычная система.
Цифровые препятствия на подключение к betting сайтам решаются через дублирующие порталы. Функционирующие отражения предоставляют полную производительность базового портала. Расчетные процедуры, интерактивный статистика и наградные программы продолжают константными.
Финансовая надежность определяется степенью применяемых денежных инструментов. SSL-криптография, PCI DSS подтверждение и двухфакторная аутентификация обеспечивают защищенный контур безопасности.
Интерактивная ассортимент проверенных сервисов включает машины от лидирующих производителей. RTP-значения, дисперсия и расчетные модели испытывают нейтральную валидацию в аккредитованных организациях.
Программы вознаграждения в достойных заведениях строятся на ясных правилах проигрыша. Условия ставок x35-40 считается справедливым для автомат-бонусов, в то время как настольные развлечения учитываются в зачет с уменьшенным множителем.
посетить сайт https://slon2-at.com/
Buy Viagra online cheap: generic sildenafil – Buy Viagra online cheap
продолжить продать аккаунт товар
Cart Online – Deals were great and the delivery was impressively speedy.
узнать больше продать аккаунты почты
Официальные площадки игровых предложений oferuja участникам шанс к качественному азартному досугу через профильные ресурсы, включая лаки Р±РёСЂ казино , которые именно следуют международные нормы безопасности.
Процедура регистрации предполагает внесения проверочных деталей через encrypted SSL-соединения. Администрация просят нотариальное удостоверение age verification и адреса residence для поддержания юрисдикционных критериев.
Multi-factor идентификация выступает необходимым aspect передовых механизмов надёжности. Игроки располагают SMS-токены, push-сообщения или эксплуатируют targeted tools типа Google Authenticator.
Дублирующие ссылки преодолевают сложности geographic барьеров и DDoS-атак. Фактически mirrors представляют идентичные версии основного платформы с поддержанием инструментария и клиентских деталей.
Опытные пользователи рекомендуют хранить актуальные списки функционирующих дублей в bookmark веб-клиента. Букмекеры отправляют новости о fresh ссылках через мейл, Telegram-communities и портативные софт.
Денежные транзакции через надёжные ресурсы обеспечены cryptographic methods стандарта банковского segment. Вывод капитала реализуется единственно на аутентифицированные счета хозяина профиля.
modern Sernix store – Fast site performance makes shopping smooth and easy.
Выбор проверенного гемблинг портала в текущих границах заставляет повышенного внимания к юридическому режиму. Опытные участники представляют, что Лаки Бир РІС…РѕРґ содержит свежую материалы о работающих сервисах.
Процесс создания аккаунта в проверенных заведениях предусматривает требуемую аутентификацию удостоверения. KYC-процедуры обеспечивают как заведение, так и участника от махинаций. Краткосрочные ограничения на вывод капитала до окончания проверки – обычная методика.
Технические запреты на подключение к гемблинг площадкам устраняются через зеркальные адреса. Активные дубликаты обеспечивают абсолютную работоспособность главного платформы. Платежные переводы, развлекательный достижения и поощрительные программы поддерживаются устойчивыми.
Денежная надежность определяется показателем внедренных денежных способов. SSL-шифрование, PCI DSS сертификация и многоуровневая идентификация устанавливают надежный барьер безопасности.
Интерактивная коллекция проверенных заведений охватывает машины от известных студий. RTP-значения, дисперсия и вероятностные модели испытывают беспристрастную проверку в аккредитованных центрах.
Механизмы поощрения в надежных операторах опираются на ясных правилах ставок. Условия ставок x35-40 расценивается нормальным для спин-льгот, в то время как классические активности идут в расчет с сниженным фактором.
Беттинговая отрасль показывает активный развитие, привлекая тысячи участников. Грамотные порталы дают стабильную обстановку для игры. Полную сведения о этих организациях допустимо отыскать на [url=https://www.courseset.com/poluchayte-ezhenedelnyy-keshbek-v-luchshem-onlaynkazino-tiptop-kazino-i-igrayte-v-igry-s-udovolstviem/]tip top casino[/url] .
Аттестация выступает приоритетным аспектом селекции ресурса. Лицензиаты Гибралтара предоставляют тщательный проверку расчётных процедур. Отдельная легальная портал реализует систематические инспекции RNG-алгоритмов.
Цифровые аспекты актуальных игорных домов охватывают SSL-защиту банковского ранга. Поставщики виртуального материала типа Microgaming, NetEnt, Pragmatic Play встраивают комплексные механизмы рандомных параметров.
Процесс проверки личного кабинета предполагает представления свидетельств KYC-типа. Документ, выписка о средствах, валидация прописки — обычный перечень для завершённого авторизации.
Зеркальные порталы ликвидируют трудности с блокировками компаний. Функционирующие зеркала адаптируются каждый день техническими группами. Планшетные утилиты обычно работают устойчивее веб версий.
Банкролл-менеджмент определяет перспективную результативность развлекательных циклов. Экспертные участники рекомендуют ограничивать сумму вейджера до 1-2% от общего банкролла.
Night Finds – Products are diverse and prices seem very fair right now.
Xerva Essentials – Browsing items is hassle-free with the clean and organized layout.
https://uspharmaindex.com/# reputable canadian online pharmacy
узнать больше Здесь https://slon2-at.cc
Нынешние гемблеры встречаются с затруднением связи к официальным ресурсам. Компании запрещают основные домены, но опытные п»ї1хбет РІС…РѕРґ посетители учитывают о существовании дублирующих ресурсов.
Зеркало является идентичную реплику основного площадки. Системы безопасности функционируют такими же. Финансовые транзакции выполняются через идентичные каналы.
Технология заведения учётной записи через альтернативный ресурс включает привычной подтверждения. Администраторы просят свидетельства для соблюдения KYC-регламентов. Идентификационные параметры выполняют комплексную валидацию.
Вносительные лимиты на дополнительных платформах аналогичны основным спецификациям. Стартовые суммы функционируют константными. Возрастающие банки координируются между разными доменами.
Поощрительные системы оперируют целостно на зеркальных порталах. Отыгрышный коэффициент обеспечивает оригинальные величины. Длительность реализации остаётся прежним.
Департамент помощи анализирует обращения с зеркальных адресов идентично. Онлайн переписка гарантирует непрерывный формат функционирования.
Hello everyone!
Learn old mysterious methods to find interesting and valuable info in big data and combine tradition with technology see on the website for method comparisons
Full information on the link – https://101flow.site
All the best and development in business!
Актуальные mirror-ссылки проверенных азартных клубов на Меллстрой официальный сайт гарантируют беспрерывный вход к гемблинг сервисам. Система клонирования образует точные клоны центрального ресурса с удержанием всех функций.
Алгоритм создания аккаунта через зеркало в точности имитирует оригинальную анкету. Дебютные игроки прописывают рабочий email, формируют сложный ключ и определяют основную финансовый инструмент.
Идентификация личного кабинета предполагает предоставления справок опираясь на KYC-требованиям. Копия водительских прав, подтверждение резиденции и карточные параметры подвергаются автоматическую валидацию в течение 24-72 периодов.
Аутентификация действующих пользователей производится через классическую модуль с расширенной верификацией. Одноразовые пароли отправляются на мессенджер номер или e-mail адрес.
Опции входящего раздела через зеркала обеспечивает востребованные платежные инструменты. Visa, Mastercard, онлайн портмоне Skrill, Neteller, crypto Bitcoin, Ethereum осуществляются с низкими сборами 0-3%.
Азартная библиотека дублируется целиком включая spinning games, классические активности, live-дилеров и накопительные призы. RTP-показатели, колебания и условия отыгрыша остаются идентичными.
Бонусная система оперирует схоже центральному сайту. Welcome-бандлы, free spins, кешбэк и VIP-программы инициируются машинально при исполнении фиксированных критериев.
Лицензионные платформы гэмблинг услуг обеспечивают участникам право к профессиональному игровому процессу через dedicated ресурсы, включая enomo casino , которые именно соблюдают общепринятые нормы конфиденциальности.
Схема оформления профиля требует заполнения валидационных деталей через шифрованные SSL-соединения. Операторы demanded официальное verification возраста и локации проживания для поддержания законодательных стандартов.
2FA аутентификация является обязательным элементом актуальных архитектур безопасности. Клиенты приобретают SMS-пароли, push-notification или задействуют targeted приложения наподобие Google Authenticator.
Альтернативные URL преодолевают проблемы geographic санкций и DDoS-атак. Техническим образом реплики формируют идентичные версии центрального домена с удержанием опций и клиентских параметров.
Профессиональные клиенты предлагают keeping новейшие реестры working дублей в bookmark browser. Management передают сведения о fresh доменах через почтовые сервисы, Telegram-группы и mobile apps.
Payment транзакции через надёжные площадки покрыты защитными протоколами уровня банковского области. Вывод денег производится единственно на проверенные карты собственника личного кабинета.
Xolveta Shop – A fresh online destination focused on innovative products and smooth browsing.
Официальные операторы игровых возможностей обеспечивают участникам вариант к высококлассному игровому процессу через тематические сайты, включая Голд казино , которые специально следуют мировые нормы защиты.
Процедура оформления профиля включает заполнения проверочных данных через криптографические SSL-соединения. Букмекеры требуют official свидетельство age verification и территории проживания для compliance нормативных стандартов.
Multi-factor аутентификация считается принудительным элементом современных solutions безопасности. Users имеют SMS-пароли, push-алерты или применяют targeted утилиты в стиле Google Authenticator.
Альтернативные URL нейтрализуют проблемы локальных блокировок и DDoS-штурмов. Фактически копии формируют копийные копии основного домена с удержанием функциональности и user деталей.
Экспертные пользователи призывают поддерживать свежие каталоги рабочих альтернатив в favourites обозревателя. Администрация отправляют обновления о современных URL через e-mail, Telegram-каналы и телефонные софт.
Платёжные операции через надёжные сайты обеспечены cryptographic methods класса банковского области. Снятие средств реализуется только на проверенные реквизиты обладателя аккаунта.
Pebble Vendor – A thoughtfully curated marketplace featuring compact yet impactful products.
Поиск в области сертифицированных площадок нуждается представления передовых решений авторизации. Умелые участники внедряют Лаки Бир для обретения современной материалов о действующих ссылках.
Процедура создания личного кабинета в надежных учреждениях предполагает комплексную верификацию. Новейшие поставщики используют KYC-системы и AML-критерии. Бумажная работа занимает от 24 до 72 временных отрезков.
Технические решения для обхода препятствий эволюционируют вместе с повышением правовых шагов. VPN-платформы категории premium предоставляют криптографию AES-256 и технологии OpenVPN. Надежность соединения кардинально значима для VIP сессий.
Альтернативные домены оперируют через территориально рассредоточенные технические системы. CDN-структуры осуществляют низкую время ответа для американских игроков. Программное редирект запускается при выявлении препятствия базового адреса.
Денежные операции в легальных зонах подпадают под жестким нормам PCI DSS. Децентрализованные операции увеличивают распространение благодаря скрытности и темпу процессинга.
Портативные утилиты элитных операторов объединяют голосовую аутентификацию и push-уведомления для критических ситуаций. Модифицируемый оформление самостоятельно подстраивается под особенности монитора.
кликните сюда https://slon2-at.com/
Нынешние участники встречаются с набором программных особенностей при функционировании с проверенными площадками. Профильные сайты типа п»ї1хбет сайт поставляют актуальную материалы о операциях казино провайдеров.
Механизм проверки аккаунта содержит несколько обязательных шагов. Исходная подтверждение включает отправки свидетельств валидирующих персону. Стандартный список предполагает паспорт, водительские права или заграничное удостоверение.
Техническая компонента оформления содержит задействование SSL-шифрования и двухуровневой проверки. Опытные клиенты настаивают включать все предложенных опций обеспечения.
Дублирующие порталы формируют стопроцентные отражения базового портала с хранением исчерпывающего набора функций. Центральное выгода состоит в идентичности денежных ограничений и требований отыгрыша.
Схема локализации функционирующих дублирующих порталов базируется на мониторинге тематических информационных каналов и связанных ресурсов. Квалифицированные участники применяют туннельные протоколы для создания постоянного соединения без оглядки от региональных барьеров.
my link Vauld login
Выбор качественного betting портала в текущих обстоятельствах нуждается тщательного рассмотрения к регулятивному уровню. Опытные игроки понимают, что Вавада официальный сайт отображает последнюю информацию о активных площадках.
Механизм записи в легальных операторах содержит неизбежную проверку идентичности. KYC-нормы обеспечивают как площадку, так и геймера от обмана. Переходные рамки на изъятие активов до выполнения проверки – обычная подход.
Цифровые запреты на доступ к betting сайтам решаются через резервные адреса. Рабочие клоны сохраняют абсолютную возможности базового платформы. Финансовые движения, интерактивный статистика и привилегированные предложения функционируют константными.
Денежная гарантированность характеризуется уровнем задействованных платежных систем. SSL-кодирование, PCI DSS сертификация и усиленная подтверждение формируют надежный щит охраны.
Азартная коллекция сертифицированных сервисов предоставляет слоты от ведущих производителей. RTP-параметры, дисперсия и расчетные системы претерпевают беспристрастную проверку в аккредитованных организациях.
Планы поощрения в достойных сервисах формируются на четких требованиях отыгрыша. Условия ставок x35-40 характеризуется нормальным для спин-поощрений, в то время как настольные состязания принимаются в калькуляцию с редуцированным коэффициентом.
Лицензионные платформы развлекательных услуг предоставляют участникам возможность к профессиональному игровому процессу через специализированные домены, включая Меллстрой казино , что придерживаются глобальные регламенты защиты.
Схема активации подразумевает заполнения верификационных информации через encrypted SSL-connection. Администрация demanded нотариальное свидетельство правоспособности и адреса residence для исполнения legal правил.
2FA верификация считается принудительным компонентом новейших архитектур security. Users располагают SMS-коды, push-оповещения или задействуют профессиональные софт в стиле Google Authenticator.
Резервные порталы ликвидируют проблемы географических ограничений и DDoS-assault. Фактически дубли представляют аналогичные реплики главного домена с поддержанием опций и индивидуальных информации.
Профессиональные участники suggest удерживать новейшие перечни активных дублей в избранном обозревателя. Операторы передают новости о новых доменах через мейл, Telegram-communities и портативные приложения.
Финансовые movements через надёжные сайты гарантированы защитными технологиями стандарта банковского области. Получение капитала реализуется только на аутентифицированные карты собственника личного кабинета.
check out Cormira – Nice visual style and the overall experience is easy and pleasant.
Поиск легального развлекательного площадки требует серьезного анализа регулятивных сертификатов. Инновационные ресурсы казино Килограмм предлагают геймерам стопроцентную факты о действующих допусках.
Процедура оформления счета подразумевает ряд необходимых этапов верификации. Владельцы просят справки, засвидетельствующие персону и возраст. Классический KYC-процесс продолжается от 24 до 72 периодов.
Банкролл-менеджмент стартует с задания пределов на пополнения. Квалифицированные клиенты предлагают внедрять принцип 5% от полного азартного капитала на единичную раунд.
Электронные запреты провайдеров заставляют внедрять дополнительные ссылки. Альтернативы удерживают безусловную эффективность главного портала, охватывая хронологию сделок и развлекательный прогресс.
Актуальные расчетные сервисы обеспечивают быстрые взносы через блокчейн кошельки. Bitcoin, Ethereum и стабильные валюты гарантируют тайность и наименьшие взносы. Длительность осуществления снятий составляет 10-30 промежутков.
Программы верности подразумевают градационные статусы с нарастающим кэшбэком. VIP-координаторы дают эксклюзивные поощрения, повышенные границы и ускоренную поддержку.
Актуальные гемблеры оказываются с проблемой связи к сертифицированным площадкам. Операторы запрещают основные URL, но профессиональные типпи сайт участники учитывают о наличии дублирующих платформ.
Дополнительный домен составляет идентичную дубликат оригинального портала. Криптографические алгоритмы сохраняются аналогичными. Расчётные операции осуществляются через равнозначные шлюзы.
Методика оформления профиля через альтернативный адрес содержит обычной проверки. Операторы запрашивают справки для выполнения KYC-стандартов. Индивидуальные данные реализуют комплексную верификацию.
Финансовые рамки на резервных площадках соответствуют основным характеристикам. Наименьшие вклады поддерживаются постоянными. Прогрессивные выигрышные пулы синхронизируются между множественными адресами.
Премиальные схемы оперируют всесторонне на параллельных площадках. Вейджер гарантирует базовые величины. Срок активности использования продолжается.
Департамент помощи изучает вопросы с альтернативных адресов идентично. Интерактивный чат гарантирует 24-часовой режим оперирования.
https://sildenafilpriceguide.com/# Viagra online price
Good day! Do you know if they make any plugins to safeguard against hackers?
I’m kinda paranoid about losing everything I’ve worked
hard on. Any suggestions?
Игровая ниша представляет динамичный расширение, привлекая массы участников. Опытные ресурсы обеспечивают надёжную среду для развлечений. Детальную данные о подобных брендах допустимо найти на Вавада .
Легализация составляет ключевым аспектом отбора площадки. Надзорные органы Олдерни обеспечивают качественный контроль экономических процедур. Отдельная легальная платформа подвергается периодические контроли RNG-механизмов.
Программные характеристики инновационных казино охватывают SSL-кодирование экономического категории. Провайдеры программного ПО класса Microgaming, NetEnt, Pragmatic Play добавляют комплексные модели рандомных чисел.
Процесс верификации личного кабинета требует подачи удостоверений KYC-формата. Паспорт, документ о доходах, валидация адреса — классический набор для окончательного авторизации.
Параллельные ссылки устраняют сложности с цензурой компаний. Рабочие дубли обновляются регулярно программными командами. Мобильные утилиты регулярно функционируют лучше сетевых версий.
Распределение капитала создаёт стратегическую результативность азартных циклов. Грамотные беттеры указывают лимитировать величину пари до 1-2% от совокупного фонда.
Рабочие альтернативные домены лицензированных азартных клубов на Лаки Бир зеркало предоставляют непрерывный доступ к гемблинг системам. Система клонирования генерирует эквивалентные клоны базового сайта с консервацией всех механизмов.
Алгоритм открытия счета через зеркало на сто процентов воспроизводит оригинальную заявку. Свежие геймеры регистрируют действующий email, придумывают безопасный секретную комбинацию и устанавливают основную финансовый инструмент.
Подтверждение профиля содержит отправки справок по KYC-регламенту. Фото водительских прав, валидация регистрации и карточные параметры анализируются посредством цифровую проверку в течение 24-72 часа.
Логин зарегистрированных геймеров осуществляется через типовую панель с расширенной валидацией. Временные шифры передаются на мобильный устройство или email.
Возможности финансового сектора через альтернативные домены включает востребованные платежные механизмы. Visa, Mastercard, цифровые счета Skrill, Neteller, блокчейн-токены Bitcoin, Ethereum процессируются с сокращенными взносами 0-3%.
Гемблинг ассортимент клонируется полностью включая spinning games, классические геймплей, live-дилеров и мегавыигрыши. RTP-показатели, дисперсия и условия отыгрыша остаются аналогичными.
Акционная схема функционирует подобно основному сайту. Welcome-наборы, даровые прокруты, refund и VIP-программы активируются машинально при выполнении установленных условий.
go right here Vauld withdrawal
check here sell OSRS gold
Very good post. I definitely love this site. Keep
it up!
Отбор проверенного игрового заведения в сегодняшних обстоятельствах предполагает тщательного изучения к юридическому уровню. Знающие пользователи знают, что Рльдорадо казино демонстрирует новую сведения о доступных ресурсах.
Процесс записи в сертифицированных операторах объединяет принудительную аутентификацию документов. KYC-правила обеспечивают как оператора, так и пользователя от афер. Промежуточные границы на снятие капитала до завершения верификации – привычная практика.
Цифровые препятствия на связь к игровым порталам нейтрализуются через дублирующие URL. Доступные копии обеспечивают полную работоспособность первичного платформы. Банковские транзакции, игровой статистика и бонусные схемы функционируют стабильными.
Материальная защищенность характеризуется степенью внедренных финансовых методов. SSL-криптография, PCI DSS аттестация и расширенная проверка устанавливают безопасный контур охраны.
Геймплейная коллекция официальных провайдеров объединяет барабаны от главных студий. RTP-индексы, вариативность и вероятностные схемы испытывают независимую проверку в утвержденных лабораториях.
Планы лояльности в достойных казино основываются на прозрачных параметрах ставок. Отыгрыш x35-40 считается справедливым для автомат-льгот, в то время как настольные активности включаются в счет с минимальным фактором.
Определение безопасного betting оператора в сегодняшних рамках требует тщательного внимания к юридическому статусу. Опытные пользователи осознают, что п»ї1хбет РІС…РѕРґ отображает новую факты о активных ресурсах.
Процесс регистрации в сертифицированных заведениях охватывает неизбежную верификацию удостоверения. KYC-процедуры защищают как площадку, так и клиента от мошенничества. Переходные ограничения на перечисление средств до выполнения контроля – стандартная практика.
Цифровые ограничения на связь к азартным порталам решаются через зеркальные ссылки. Рабочие зеркала предоставляют стопроцентную функциональность центрального платформы. Денежные транзакции, азартный продвижение и привилегированные предложения сохраняются стабильными.
Капитальная безопасность выражается уровнем применяемых платежных инструментов. SSL-кодирование, PCI DSS валидация и расширенная верификация обеспечивают защищенный контур защиты.
Игровая ассортимент официальных операторов охватывает машины от топовых студий. RTP-индексы, вариативность и математические системы претерпевают внешнюю проверку в признанных лабораториях.
Схемы мотивации в профессиональных заведениях формируются на ясных параметрах проигрыша. Проигрыш x35-40 характеризуется разумным для барабан-поощрений, в то время как классические развлечения включаются в зачет с пониженным коэффициентом.
Важный отрезок ufc в феврале марте 2026 три недели которые встряхнут дивизионы: прогнозы на ключевые поединки. Вот ссылка: https://rybalka62.ru/news/obzor-blizhajshih-sobytij-ufc-fevral-mart-2026-prognozy-na-klyuchevye-poedinki/
Выбор достойного гемблинг заведения в нынешних обстоятельствах заставляет детального подхода к регулятивному положению. Компетентные геймеры учитывают, что Лаки Бир казино демонстрирует актуальную информацию о функционирующих ресурсах.
Алгоритм регистрации в сертифицированных платформах объединяет принудительную аутентификацию удостоверения. KYC-требования охраняют как казино, так и игрока от мошенничества. Переходные рамки на изъятие денег до выполнения верификации – типичная процедура.
Электронные барьеры на связь к азартным сайтам устраняются через альтернативные URL. Активные клоны гарантируют стопроцентную эффективность основного портала. Платежные движения, геймплейный достижения и наградные программы поддерживаются константными.
Экономическая безопасность определяется критерием применяемых финансовых инструментов. SSL-шифрование, PCI DSS валидация и многоуровневая подтверждение формируют надежный щит охраны.
Интерактивная библиотека сертифицированных заведений объединяет барабаны от известных производителей. RTP-параметры, вариативность и алгоритмические принципы претерпевают нейтральную проверку в одобренных организациях.
Схемы вознаграждения в достойных казино опираются на ясных параметрах отыгрыша. Проигрыш x35-40 оценивается разумным для слот-бонусов, в то время как стандартные активности принимаются в расчет с пониженным процентом.
Современные участники оказываются с препятствием связи к лицензированным сайтам. Провайдеры закрывают главные порталы, но искушённые mad casino пользователи осознают о функционировании зеркальных порталов.
Дополнительный домен формирует стопроцентную дубликат основного платформы. Протоколы шифрования сохраняются аналогичными. Финансовые процедуры производятся через сходные механизмы.
Схема регистрации через зеркальный ссылку содержит стандартной валидации. Менеджеры просят документы для выполнения KYC-правил. Личные характеристики реализуют усиленную проверку.
Вносительные ограничения на резервных площадках аналогичны базовым спецификациям. Наименьшие суммы поддерживаются постоянными. Накопительные призовые фонды координируются между различными ресурсами.
Стимулирующие схемы выполняются комплексно на параллельных сайтах. Множитель ставок сохраняет оригинальные параметры. Тайминг оборота продолжается.
Сервис обслуживания решает тикеты с дополнительных порталов аналогично. Прямой переписка осуществляет постоянный формат работы.
Лицензионные провайдеры гэмблинг опций гарантируют клиентам право к высококлассному азартному досугу через тематические сайты, включая Лаки Бир казино , которые именно выполняют мировые критерии защиты.
Процедура создания аккаунта включает внесения проверочных данных через шифрованные SSL-connection. Операторы просят предоставить документальное verification возраста и локации жительства для compliance законодательных норм.
Multi-factor authentication считается необходимым частью актуальных архитектур конфиденциальности. Пользователи обретают SMS-коды, push-сообщения или эксплуатируют профессиональные приложения вроде Google Authenticator.
Альтернативные ссылки преодолевают трудности geographic блокировок и DDoS-воздействий. Техническим образом дубли составляют тождественные реплики базового ресурса с maintaining опций и клиентских сведений.
Опытные участники советуют хранить актуальные реестры действующих mirrors в закладках обозревателя. Management отправляют сведения о fresh адресах через почтовые сервисы, Telegram-каналы и телефонные утилиты.
Payment процедуры через legal порталы защищены cryptographic технологиями уровня банковского сектора. Снятие денег выполняется исключительно на верифицированные wallets собственника учётной записи.
Азартная индустрия демонстрирует интенсивный развитие, манящая массы игроков. Опытные площадки предлагают качественную обстановку для пари. Исчерпывающую сведения о этих операторах допустимо обнаружить на Меллстрой РІС…РѕРґ .
Сертификация представляет приоритетным фактором отбора сайта. Регуляторы Великобритании создают тщательный мониторинг финансовых действий. Любая аккредитованная ресурс проходит регулярные проверки RNG-алгоритмов.
Программные аспекты актуальных казино объединяют SSL-криптографию экономического класса. Провайдеры цифрового софта уровня Microgaming, NetEnt, Pragmatic Play подключают продвинутые схемы произвольных показателей.
Алгоритм верификации личного кабинета включает представления свидетельств KYC-класса. Свидетельство, выписка о доходах, валидация проживания — обычный комплект для окончательного авторизации.
Зеркальные ссылки ликвидируют барьеры с блокировками провайдеров. Рабочие варианты адаптируются регулярно IT командами. Мобильные утилиты обычно функционируют лучше браузерных версий.
Финансовая дисциплина определяет долгосрочную результативность развлекательных раундов. Опытные игроки предлагают контролировать количество бета до 1-2% от суммарного бюджета.
Visit OpalVendor – Impressive product range and browsing felt simple and quick.
that site exchange mt gox
http://aredsoaclus.phorum.pl/viewtopic.php?p=203969#203969
Official OrbitCrate Site – Pages respond quickly and the layout is easy to follow.
Новейшие платформы беттинг активностей обеспечивают игрокам путь к премиальному азарту через проверенные Болливуд казино сайты. Сертифицированная деятельность влечет исполнения определенных надзорных стандартов.
Алгоритм регистрации персонального аккаунта охватывает аутентификацию персональных информации. Операторы эксплуатируют многоуровневые механизмы KYC и AML для недопущения поддельных платежей.
IT средства новейших казино базируются на безопасных инфраструктурах с HTTPS алгоритмами. IP-фильтрация обязывает управляющих организовывать вспомогательные URL.
Резервные платформы формируют полные копии главного платформы с обеспечением всех сервисов и сведений. Клиенты получают беспрепятственный подключение к капиталу, беттинг отчетности и пользовательским настройкам.
Финансовые транзакции осуществляются через подключенные платежные сервисы. Рамки на инвестиции и обналичивания устанавливаются в унисон с законодательными положениями и корпоративными политиками минимизации опасностей.
Квалифицированные гемблеры советуют контролировать ситуацию разрешения через государственные реестры игорных структур. Статусные характеристики содержат оценки на профильных порталах и мнения истинных пользователей.
узнать можно ли продавать аккаунты на фанпей
Передовые операторы гемблинг игр предлагают игрокам подключение к премиальному беттингу через защищенные типпи казино порталы. Официальная функционирование нуждается соблюдения четких регуляторных стандартов.
Система создания клиентского аккаунта задействует верификацию личных сведений. Операторы применяют расширенные механизмы KYC и AML для предотвращения поддельных транзакций.
Программные платформы инновационных беттинг площадок основываются на надежных серверах с шифровальными технологиями. Региональная блокировка побуждает провайдеров разрабатывать вспомогательные домены.
Дублирующие ресурсы являют собой аналогичные копии первичного домена с сохранением всех возможностей и информации. Пользователи приобретают постоянный соединение к балансу, гемблинг данным и личным опциям.
Платежные действия выполняются через встроенные платежные шлюзы. Ограничения на инвестиции и снятия назначаются в соотношении с регуляторными критериями и организационными правилами управления рисками.
Профессиональные клиенты настаивают контролировать статус авторизации через официальные списки развлекательных структур. Престижные характеристики включают оценки на профильных ресурсах и оценки подлинных клиентов.
http://www.carlscorona.com
Ориентирование в секторе легальных сайтов требует знания новых способов соединения. Квалифицированные пользователи внедряют Вавада для обретения релевантной фактов о действующих адресах.
Процедура оформления профиля в лицензированных компаниях охватывает комплексную валидацию. Продвинутые поставщики применяют KYC-механизмы и AML-критерии. Оформление документов занимает от 24 до 72 промежутков.
Цифровые технологии для минования барьеров улучшаются одновременно с укреплением регуляторных решений. VPN-сервисы класса premium обеспечивают защиту AES-256 и протоколы OpenVPN. Непрерывность канала критически существенна для VIP заходов.
Резервные домены оперируют через пространственно размещенные цифровые мощности. CDN-архитектуры поддерживают сокращенную латентность для глобальных пользователей. Программное роутинг запускается при детекции недоступности первичного сайта.
Банковские транзакции в проверенных территориях подпадают под конкретным критериям PCI DSS. Децентрализованные расчеты набирают признание благодаря конфиденциальности и оперативности реализации.
Планшетные утилиты элитных компаний совмещают отпечатковую аутентификацию и push-сообщения для существенных событий. Модифицируемый дизайн программно изменяется под характеристики матрицы.
Подбор легального азартного заведения заставляет тщательного разбора официальных документов. Актуальные платформы Vavada казино дают пользователям безусловную детали о имеющихся санкциях.
Процедура получения доступа содержит множество принудительных фаз верификации. Операторы просят документы, удостоверяющие самобытность и зрелость. Стандартный KYC-процесс длится от 24 до 72 промежутков.
Финансовое планирование стартует с фиксации лимитов на инвестиции. Квалифицированные клиенты предлагают эксплуатировать закон 5% от итогового казино фонда на одну раунд.
Технические блокировки операторов принуждают задействовать резервные маршруты. Зеркала сохраняют безусловную работоспособность центрального портала, подразумевая архив платежей и игровой результаты.
Инновационные банковские системы обеспечивают моментальные взносы через блокчейн портмоне. Bitcoin, Ethereum и устойчивые монеты предоставляют скрытность и мизерные отчисления. Период проведения изъятий равно 10-30 интервалов.
Планы приверженности включают многоуровневые ранги с прогрессивным возвратом. VIP-представители предоставляют индивидуальные поощрения, увеличенные пределы и ускоренную поддержку.
easy find online – The experience is seamless and the cost seems fair for the items.
ivermectin otc: Ivermectin Access USA – Ivermectin Access USA
Quick Shop Amber – Browsing items was fun and completing the purchase was effortless.
address sell digital material pack templates store
Zen Finds – The browsing experience is easy and streamlined for users.
trendy online marketplace – The products look appealing and exploring them further seems worthwhile.
Гемблинговая ниша демонстрирует активный подъём, привлекая массы клиентов. Опытные ресурсы обеспечивают качественную среду для ставок. Исчерпывающую сведения о указанных организациях допустимо получить на Vavada зеркало .
Аккредитация остаётся центральным фактором подбора платформы. Юрисдикции Гибралтара обеспечивают жёсткий контроль денежных действий. Всякая лицензированная сайт выполняет регулярные аудиты RNG-алгоритмов.
Технические особенности современных игорных домов предусматривают SSL-шифрование финансового категории. Производители программного продукта наподобие Microgaming, NetEnt, Pragmatic Play добавляют усовершенствованные алгоритмы непредсказуемых показателей.
Процесс аутентификации счёта включает представления справок KYC-типа. Документ, подтверждение о средствах, валидация адреса — базовый пакет для окончательного авторизации.
Альтернативные URL решают трудности с запретами организаций. Актуальные варианты корректируются постоянно программными командами. Портативные клиенты зачастую действуют лучше онлайн вариантов.
Финансовая дисциплина устанавливает долгосрочную доходность игровых раундов. Опытные беттеры советуют сокращать величину бета до 1-2% от суммарного бюджета.
Действующие альтернативные домены лицензированных гемблинг-платформ на Vavada casino дают беспрерывный подключение к геймерским порталам. Технология клонирования строит идентичные клоны основного сайта с фиксацией всех инструментов.
Процедура регистрации через альтернативный домен полностью повторяет основную анкету. Только пришедшие участники прописывают функционирующий email, создают защищенный пароль и выбирают рабочую платежное средство.
Валидация счета подразумевает предоставления свидетельств в соответствии с KYC-регламенту. Снимок паспорта, валидация регистрации и карточные координаты проверяются через автоматическую контроль в течение 24-72 периодов.
Вход зарегистрированных участников происходит через типовую интерфейс с 2FA проверкой. Разовые шифры приходят на мессенджер гаджет или почтовый ящик.
Опции депозитного модуля через резервные ссылки включает востребованные платежные инструменты. Visa, Mastercard, виртуальные хранилища Skrill, Neteller, блокчейн-токены Bitcoin, Ethereum обрабатываются с низкими взносами 0-3%.
Азартная ассортимент повторяется на сто процентов включая барабаны, настольные игры, live-крупье и джекпоты. RTP-значения, вариативность и ставочные требования остаются аналогичными.
Подарочная политика выполняется подобно базовому сайту. Welcome-комплекты, free spins, компенсация и VIP-схемы запускаются системно при выполнении установленных условий.
about his Vauld withdrawal
over the counter sildenafil: Viagra generic over the counter – sildenafil 50 mg price
Xerva Essentials – Browsing items is hassle-free with the clean and organized layout.
their website Is vauld crypto app safe
Гемблинговая индустрия представляет активный подъём, заинтересовывая миллионы игроков. Грамотные порталы обеспечивают надёжную обстановку для ставок. Развёрнутую сведения о подобных операторах можно отыскать на Рльдорадо казино .
Аккредитация представляет приоритетным критерием селекции платформы. Юрисдикции Мальты дают строгий контроль расчётных действий. Всякая аккредитованная площадка осуществляет постоянные аудиты RNG-систем.
Программные аспекты современных гемблинг-сайтов объединяют SSL-защиту расчётного ранга. Провайдеры софтового материала класса Microgaming, NetEnt, Pragmatic Play встраивают усовершенствованные схемы хаотичных величин.
Механизм проверки профиля предполагает подачи бумаг KYC-стандарта. Паспорт, выписка о доходах, удостоверение регистрации — базовый перечень для финального активации.
Параллельные домены ликвидируют проблемы с цензурой поставщиков. Рабочие альтернативы корректируются ежедневно IT службами. Карманные софт часто функционируют надёжнее онлайн модификаций.
Контроль средств определяет перспективную успешность азартных циклов. Опытные игроки рекомендуют лимитировать сумму бета до 1-2% от полного капитала.
Bilgiler fena değilmiş.
Ben de Van eskort bayan için araştırıyordum.
İşime yaradı.
Here is my webpage https://naijanews.tdreport.com/groups/olgun-bayan-escort/
Подбор проверенного казино площадки заставляет тщательного рассмотрения юридических свидетельств. Новые сайты Гризли казино обеспечивают участникам максимальную детали о действующих разрешениях.
Процесс получения доступа содержит несколько принудительных шагов валидации. Провайдеры просят удостоверения, устанавливающие идентичность и дееспособность. Классический KYC-регламент требует от 24 до 72 временных отрезков.
Финансовое планирование запускается с задания лимитов на инвестиции. Компетентные геймеры призывают применять установку 5% от полного развлекательного бюджета на одну сессию.
Системные барьеры администраторов вынуждают эксплуатировать альтернативные пути. Клоны хранят стопроцентную работоспособность первичного ресурса, предусматривая архив сделок и азартный успех.
Инновационные финансовые инструменты обеспечивают скоростные депозиты через электронные портмоне. Bitcoin, Ethereum и постоянные токены обеспечивают конфиденциальность и мизерные сборы. Время осуществления изъятий равно 10-30 отрезков.
Программы верности предусматривают иерархические статусы с увеличивающимся возвратом. VIP-менеджеры предоставляют эксклюзивные вознаграждения, улучшенные рамки и ускоренную помощь.
I’ve got to share this story about an Italian guy I know, let’s call him Lorenzo.
He wasn’t a crypto enthusiast at first, but circumstances forced him into that world.
He runs a company that receives payments
from different countries, and traditional banking kept failing him.
Everything went south one stressful afternoon. A
crucial transaction disappeared inside the banking system, and his team was left waiting with no answers.
He told me it felt like everything he built was slipping away.
Deadlines were shattered, and he realized banking couldn’t keep being the
bottleneck.
That’s when someone mentioned Paybis to him, he was unsure whether it was the
right path. Still, he had no other option left. So he opened an account.
To his surprise, things started moving quickly. Verification was fast.
He was finally able to stabilize his cash flow. He said it felt like a heavy
weight was removed from his shoulders.
But the story doesn’t end here. When his bank finally “found” the missing transfer, it was already too late — Paybis had
saved his operations. He admitted that this crisis was
a turning point for him.
Today, he uses Paybis whenever his business needs fast, clean, and
predictable transactions. He’s not obsessed with crypto
— he’s grateful for a platform that did what it promised.
At the end of the day, Paybis truly fulfilled his goal.
читать https://vodkabet-play.vodkabet-zerkalo.vodka/
Gild Vendor – A polished online marketplace offering premium selections and curated deals.
Актуальные провайдеры гемблинг продуктов предлагают беттерам вход к качественному азарту через проверенные Vavada ресурсы. Официальная работа влечет учета четких законодательных критериев.
Система активации персонального аккаунта задействует подтверждение персональных реквизитов. Администраторы применяют расширенные системы KYC и AML для блокировки мошеннических финансовых действий.
Программные инструменты передовых гемблинг платформ основываются на стабильных дата-центрах с TLS алгоритмами. IP-фильтрация побуждает провайдеров внедрять альтернативные порталы.
Дублирующие ресурсы представляют идентичные копии центрального платформы с удержанием всех сервисов и информации. Клиенты приобретают постоянный соединение к счету, игровой записям и индивидуальным установкам.
Денежные операции выполняются через синхронизированные банковские сервисы. Лимиты на взносы и получения назначаются в согласии с законодательными условиями и внутренними регламентами управления рисками.
Компетентные беттеры советуют отслеживать условия разрешения через официальные реестры беттинг ведомств. Репутационные параметры включают ранги на профильных порталах и оценки истинных беттеров.
Актуальные платформы игорных активностей предлагают игрокам подключение к премиальному развлечениям через сертифицированные Mellstroy Game зеркало ресурсы. Легальная бизнес требует исполнения определенных надзорных стандартов.
Система оформления персонального счета предусматривает валидацию приватных информации. Регуляторы эксплуатируют комплексные системы KYC и AML для недопущения поддельных платежей.
Технические системы передовых казино работают на защищенных дата-центрах с SSL сертификатами. Геоблокировка побуждает провайдеров разрабатывать резервные URL.
Альтернативные домены являют собой аналогичные клоны центрального портала с удержанием всех инструментов и данных. Игроки добиваются устойчивый подключение к депозиту, гемблинг данным и индивидуальным конфигурациям.
Платежные процедуры проходят через связанные денежные процессоры. Ограничения на пополнения и обналичивания фиксируются в согласии с нормативными требованиями и организационными регламентами минимизации опасностей.
Квалифицированные пользователи рекомендуют отслеживать состояние разрешения через официальные регистры развлекательных ведомств. Репутационные параметры задействуют места на специализированных платформах и мнения подлинных пользователей.
https://uspharmaindex.com/# US Pharma Index
Kovique Curated – A stylish marketplace delivering trendy and unique selections.
Поиск в пространстве проверенных платформ требует осознания передовых методов входа. Умелые клиенты внедряют лакибир для получения свежей данных о активных адресах.
Механизм формирования личного кабинета в официальных операторах включает тщательную верификацию. Современные компании задействуют KYC-протоколы и AML-стандарты. Бумажная работа занимает от 24 до 72 промежутков.
Технические технологии для избежания блокировок улучшаются одновременно с интенсификацией регуляторных шагов. VPN-платформы уровня premium предоставляют кодирование AES-256 и системы OpenVPN. Непрерывность канала fundamentally существенна для привилегированных раундов.
Резервные сайты функционируют через пространственно распределенные серверные системы. CDN-комплексы гарантируют минимальную латентность для международных участников. Техническое перенаправление запускается при обнаружении блокировки первичного портала.
Денежные операции в легальных территориях подпадают под жестким нормам PCI DSS. Цифровые операции завоевывают распространение по причине приватности и темпу процессинга.
Портативные программы премиальных компаний содержат биометрическую подтверждение и push-оповещения для принципиальных моментов. Изменяемый облик самостоятельно изменяется под параметры матрицы.
Новейшие порталы беттинг услуг предлагают клиентам вход к премиальному беттингу через сертифицированные п»ї1хбет РІС…РѕРґ ресурсы. Официальная функционирование предполагает учета четких регуляторных критериев.
Система оформления клиентского профиля охватывает аутентификацию личных информации. Управляющие задействуют детализированные алгоритмы KYC и AML для блокировки нарушающих переводов.
Технические платформы инновационных развлекательных порталов работают на надежных дата-центрах с SSL стандартами. Геоблокировка заставляет администраторов организовывать вспомогательные URL.
Зеркальные домены формируют идентичные копии первичного платформы с сохранением всех опций и показателей. Пользователи обеспечивают себе беспрепятственный подключение к средствам, гемблинг данным и клиентским конфигурациям.
Платежные процедуры производятся через синхронизированные расчетные агрегаторы. Лимиты на инвестиции и получения определяются в унисон с лицензионными критериями и корпоративными правилами минимизации опасностей.
Опытные игроки указывают контролировать ситуацию аккредитации через регуляторные базы данных азартных структур. Статусные параметры содержат оценки на специализированных ресурсах и комментарии реальных беттеров.
Dapper Aisle – A sleek and modern shopping space offering refined selections for everyday style.
Азартная сфера представляет активный рост, притягивая легионы клиентов. Экспертные площадки предоставляют надёжную пространство для игры. Развёрнутую факты о данных компаниях реально обнаружить на п»ї1xBet казино .
Легализация выступает основным показателем селекции портала. Юрисдикции Мальты дают жёсткий контроль денежных действий. Всякая аккредитованная ресурс осуществляет постоянные аудиты RNG-генераторов.
Цифровые особенности передовых беттинг-платформ охватывают SSL-кодирование денежного класса. Провайдеры компьютерного обеспечения наподобие Microgaming, NetEnt, Pragmatic Play интегрируют продвинутые механизмы непредсказуемых значений.
Механизм подтверждения личного кабинета предусматривает направления документов KYC-типа. Удостоверение, выписка о средствах, верификация местожительства — классический перечень для завершённого входа.
Параллельные URL убирают трудности с запретами компаний. Функционирующие варианты адаптируются систематически цифровыми специалистами. Мобильные утилиты регулярно оперируют устойчивее интернет версий.
Управление банкроллом устанавливает перспективную эффективность беттинговых циклов. Экспертные геймеры предлагают ограничивать размер пари до 1-2% от общего резерва.
Современные геймеры попадают с затруднением подключения к лицензированным платформам. Организации блокируют первичные ссылки, но искушённые ретро казино посетители знают о наличии зеркальных платформ.
Альтернативный адрес составляет полную воспроизведение основного сайта. Средства защиты работают неизменными. Платёжные действия производятся через сходные каналы.
Методика открытия счёта через зеркальный домен включает типовой подтверждения. Менеджеры запрашивают удостоверения для выполнения KYC-стандартов. Паспортные параметры выполняют многоуровневую проверку.
Вносительные лимиты на зеркальных порталах идентичны стандартным условиям. Начальные беты функционируют константными. Прогрессивные накопления интегрируются между всеми адресами.
Премиальные механизмы работают всесторонне на резервных сайтах. Требования по обороту сохраняет исходные значения. Тайминг отыгрыша остаётся прежним.
Команда сопровождения изучает заявки с зеркальных ресурсов таким же способом. Мгновенный чат осуществляет беспрерывный формат деятельности.
browse Xernita – Crisp images with organized categories make finding products simple.
Перестанете бояться, что вас поймут неправильно и будете быстрее приходить к компромиссу. Станете смелее высказывать свои идеи дома и на работе https://tinyurl.com/29o2mlt8
Read Full Report Buy NFT with credit card
Viagra tablet online sildenafil online sildenafil online
Найти общий язык с коллегами и создать благоприятную атмосферу в коллективе https://tinyurl.com/24of7vw2
Читать далее https://vodkabet-play.vodkabet-zerkalo.vodka
Познакомитесь с распространёнными тактиками аргументации и научитесь ими пользоваться https://tinyurl.com/2yb4o28y
Актуальные игроки сталкиваются с барьером доступа к лицензированным ресурсам. Организации ограничивают первичные порталы, но искушённые п»ї1хбет РІС…РѕРґ игроки знают о существовании параллельных площадок.
Резервная ссылка формирует стопроцентную воспроизведение главного платформы. Системы безопасности работают аналогичными. Финансовые переводы осуществляются через равнозначные механизмы.
Технология открытия счёта через резервный домен содержит типовой верификации. Специалисты запрашивают бумаги для осуществления KYC-стандартов. Идентификационные характеристики выполняют усиленную аутентификацию.
Финансовые рамки на резервных платформах аналогичны первичным параметрам. Начальные взносы продолжают константными. Увеличивающиеся выигрышные пулы объединяются между различными доменами.
Поощрительные системы выполняются комплексно на зеркальных порталах. Требования по обороту сохраняет стартовые цифры. Период действия проигрывания поддерживается.
Служба ассистирования обрабатывает вопросы с параллельных ссылок равнозначно. Живой диалог гарантирует непрерывный расписание обслуживания.
Выбор честного азартного оператора подразумевает детального разбора регулятивных документов. Передовые ресурсы казино Vavada предоставляют геймерам полную детали о действующих лицензиях.
Процесс открытия аккаунта содержит несколько обязательных шагов верификации. Провайдеры запрашивают справки, доказывающие самобытность и совершеннолетие. Классический KYC-механизм требует от 24 до 72 часов.
Банкролл-менеджмент начинается с фиксации пределов на депозиты. Компетентные геймеры призывают применять норму 5% от суммарного игорного фонда на единичную раунд.
Программные ограничения поставщиков принуждают эксплуатировать альтернативные адреса. Дубликаты поддерживают безусловную эффективность центрального платформы, подразумевая летопись сделок и развлекательный успех.
Современные расчетные сервисы поддерживают моментальные взносы через цифровые аккаунты. Bitcoin, Ethereum и фиксированные активы предоставляют приватность и наименьшие отчисления. Продолжительность осуществления извлечений составляет 10-30 промежутков.
Алгоритмы преданности включают многоуровневые статусы с прогрессивным возвратом. VIP-кураторы дают персонализированные награды, повышенные лимиты и ускоренную помощь.
Let me tell you a story about an Italian guy I once met,
whose name we’ll spin as Lorenzo. He’s one of those people who
never really wanted to dive into crypto, but life
pushed him into it anyway. His business in Italy relies heavily on international clients, and traditional banking kept failing him.
One day things got really intense. A large payment from a partner abroad got stuck, and he was left on the phone for hours trying
to fix the mess. He confessed that those days nearly broke him.
Time-sensitive deals were jeopardized, and he realized banking
couldn’t keep being the bottleneck.
A colleague recommended he try Paybis, he was unsure whether it was the right path.
But the situation was too critical to ignore.
So he opened an account.
To his surprise, things started moving quickly. Support didn’t leave him hanging.
He managed to get crypto payments settled in minutes instead of days.
He said it felt like a heavy weight was removed from his shoulders.
But the story doesn’t end here. The bank eventually apologized, but Paybis had already done the job the system failed
to handle. He said that moment changed the way he looks at modern finance forever.
Now he chooses Paybis because reliability matters more than anything.
He’s not obsessed with crypto — he’s grateful for a platform that
did what it promised.
So yes — Paybis accomplished exactly what he needed.
Современные игроки оказываются с проблемой доступа к официальным ресурсам. Провайдеры блокируют главные ссылки, но профессиональные казино лова клиенты понимают о существовании альтернативных порталов.
Резервная ссылка составляет идентичную реплику главного ресурса. Системы безопасности работают равнозначными. Платёжные транзакции осуществляются через идентичные механизмы.
Схема создания аккаунта через зеркальный портал включает классической верификации. Сотрудники просят документы для соблюдения KYC-требований. Паспортные данные подвергаются двухфакторную подтверждение.
Банковские лимиты на параллельных платформах совпадают стандартным характеристикам. Минимальные взносы продолжают стабильными. Накопительные банки согласовываются между множественными доменами.
Бонусные планы функционируют комплексно на зеркальных сайтах. Отыгрышный коэффициент обеспечивает первоначальные показатели. Срок активности отыгрыша сохраняется.
Команда поддержки обрабатывает обращения с дополнительных ссылок аналогично. Онлайн переписка осуществляет 24-часовой расписание функционирования.
Отбор честного развлекательного площадки подразумевает основательного исследования официальных разрешений. Новые сайты аква казино предоставляют участникам абсолютную данные о действующих допусках.
Система оформления счета включает ряд обязательных стадий верификации. Представители требуют свидетельства, доказывающие идентичность и дееспособность. Обычный KYC-процесс продолжается от 24 до 72 интервалов.
Контроль средств инициируется с определения пределов на вклады. Искусные игроки предлагают эксплуатировать закон 5% от суммарного игорного средств на отдельную заход.
Цифровые препятствия провайдеров вынуждают применять дополнительные домены. Дубликаты удерживают стопроцентную активность базового портала, предусматривая летопись операций и игровой достижения.
Актуальные платежные методы дают скоростные вклады через блокчейн кошельки. Bitcoin, Ethereum и стабильные валюты обеспечивают анонимность и наименьшие отчисления. Период выполнения изъятий равно 10-30 интервалов.
Планы постоянства содержат градационные уровни с прогрессивным компенсацией. VIP-кураторы предлагают персонализированные подарки, расширенные границы и ускоренную обслуживание.
Навигация в сфере сертифицированных сайтов нуждается осознания продвинутых инструментов соединения. Квалифицированные участники задействуют п»ї1xBet casino для добывания свежей информации о функционирующих адресах.
Схема формирования личного кабинета в проверенных учреждениях включает сложную верификацию. Современные операторы внедряют KYC-процедуры и AML-правила. Бумажная работа потребляет от 24 до 72 часов.
Цифровые методы для минования барьеров развиваются одновременно с укреплением регуляторных мер. VPN-сервисы класса premium гарантируют безопасность AES-256 и методы OpenVPN. Постоянство соединения кардинально существенна для элитных раундов.
Запасные сайты оперируют через пространственно расположенные технические кластеры. CDN-системы осуществляют оптимальную отклик для европейских клиентов. Цифровое переключение запускается при обнаружении препятствия центрального сайта.
Банковские переводы в проверенных юрисдикциях следуют строгим стандартам PCI DSS. Цифровые расчеты завоевывают популярность в результате анонимности и оперативности обработки.
Мобильные приложения премиальных брендов включают биометрическую проверку и push-оповещения для ключевых моментов. Изменяемый дизайн самостоятельно изменяется под параметры экрана.
https://luckystorm.co.uk/promocional-de-1xbet-codigo-2026-1x200mix/
May I just say what a comfort to uncover someone
that actually knows what they are talking about on the internet.
You definitely know how to bring an issue to light and make it important.
More people ought to look at this and understand this side of your story.
I was surprised you’re not more popular given that you surely have the
gift.
Выбор безопасного игорного ресурса подразумевает глубокого исследования лицензионных документов. Современные платформы п»ї1хбет обеспечивают участникам абсолютную информацию о своих аккредитациях.
Механизм оформления счета включает определенное количество необходимых стадий подтверждения. Владельцы запрашивают бумаги, устанавливающие личность и совершеннолетие. Традиционный KYC-процесс составляет от 24 до 72 временных отрезков.
Финансовое планирование открывается с определения рамок на вклады. Искусные пользователи рекомендуют внедрять норму 5% от итогового игорного средств на единичную заход.
Цифровые препятствия владельцев принуждают задействовать вспомогательные маршруты. Зеркала хранят безусловную производительность первичного портала, предусматривая историю операций и игровой достижения.
Передовые денежные методы дают мгновенные депозиты через криптовалютные кошельки. Bitcoin, Ethereum и постоянные токены поддерживают конфиденциальность и наименьшие отчисления. Продолжительность выполнения снятий доходит 10-30 промежутков.
Системы приверженности охватывают иерархические степени с прогрессивным компенсацией. VIP-консультанты предоставляют индивидуальные вознаграждения, расширенные границы и первоочередную поддержку.
http://uspharmaindex.com/# US Pharma Index
Нынешние бетторы оказываются с барьером доступа к проверенным платформам. Провайдеры ограничивают главные порталы, но искушённые Lucky Bear зеркало посетители понимают о наличии параллельных ресурсов.
Параллельный портал образует идентичную копию базового площадки. Криптографические алгоритмы поддерживаются равнозначными. Расчётные транзакции производятся через идентичные системы.
Технология регистрации через дополнительный ссылку подразумевает привычной подтверждения. Специалисты выясняют удостоверения для соблюдения KYC-регламентов. Личные данные выполняют расширенную проверку.
Финансовые границы на резервных платформах соответствуют стандартным условиям. Стартовые суммы продолжают постоянными. Накопительные банки синхронизируются между разными ссылками.
Бонусные схемы выполняются целостно на зеркальных ресурсах. Коэффициент оборота удерживает оригинальные показатели. Тайминг проигрывания сохраняется.
Отдел поддержки обрабатывает вопросы с дополнительных ресурсов равнозначно. Прямой диалог осуществляет 24-часовой график обслуживания.
buy valtrex 500 mg https://unipharms.shop/# buy generic valtrex
Игровая отрасль демонстрирует активный подъём, завлекая легионы геймеров. Экспертные площадки дают безопасную пространство для беттинга. Детальную сведения о указанных компаниях можно изучить на Меллстрой зеркало .
Аттестация является основным критерием селекции площадки. Контролёры Мальты предоставляют жёсткий контроль денежных манипуляций. Любая лицензированная портал реализует регулярные контроли RNG-модулей.
Компьютерные аспекты современных игорных домов включают SSL-кодирование денежного категории. Разработчики софтового софта вроде Microgaming, NetEnt, Pragmatic Play встраивают продвинутые модели рандомных величин.
Процедура проверки личного кабинета подразумевает передачи удостоверений KYC-стандарта. ID, справка о доходах, доказательство регистрации — стандартный набор для полноценного входа.
Зеркальные домены исправляют барьеры с блокировками поставщиков. Рабочие варианты адаптируются каждый день техническими службами. Планшетные программы нередко работают надёжнее интернет вариантов.
Управление банкроллом создаёт перспективную успешность развлекательных циклов. Экспертные геймеры предлагают урезать величину депозита до 1-2% от общего фонда.
http://www.kandisblog.com
Выбор безопасного игрового портала в актуальных рамках предполагает особого анализа к правовому режиму. Знающие игроки знают, что Вован сайт включает актуальную данные о активных площадках.
Процедура создания аккаунта в официальных операторах охватывает требуемую проверку документов. KYC-стандарты охраняют как сервис, так и пользователя от афер. Краткосрочные лимиты на вывод активов до окончания подтверждения – типичная система.
Виртуальные запреты на связь к гемблинг сайтам обходятся через зеркальные адреса. Рабочие отражения поддерживают стопроцентную функциональность базового портала. Расчетные операции, игровой статистика и наградные программы поддерживаются устойчивыми.
Финансовая стабильность оценивается степенью используемых денежных механизмов. SSL-безопасность, PCI DSS валидация и расширенная проверка устанавливают защищенный щит охраны.
Игровая ассортимент сертифицированных сервисов предоставляет слоты от известных разработчиков. RTP-показатели, дисперсия и математические принципы проходят беспристрастную сертификацию в авторизованных центрах.
Планы поощрения в качественных операторах базируются на четких критериях проигрыша. Условия ставок x35-40 характеризуется приемлемым для автомат-подарков, в то время как стандартные игры принимаются в подсчет с редуцированным показателем.
Перемещение в секторе проверенных сайтов подразумевает осознания передовых способов входа. Опытные пользователи эксплуатируют аква казино для обретения новейшей материалов о активных доменах.
Процесс создания личного кабинета в надежных заведениях включает тщательную валидацию. Актуальные поставщики задействуют KYC-механизмы и AML-критерии. Документальная процедура занимает от 24 до 72 часов.
Технические инструменты для избежания препятствий эволюционируют вместе с ужесточением регуляторных решений. VPN-инструменты разряда premium дают криптографию AES-256 и методы OpenVPN. Постоянство канала кардинально существенна для VIP игровых периодов.
Альтернативные сайты действуют через пространственно размещенные технические кластеры. CDN-системы предоставляют низкую латентность для глобальных участников. Программное маршрутизация срабатывает при выявлении недоступности основного ресурса.
Банковские транзакции в официальных территориях отвечают определенным правилам PCI DSS. Цифровые платежи набирают популярность в результате секретности и скорости процессинга.
Портативные софт лучших операторов включают отпечатковую аутентификацию и push-оповещения для важных ситуаций. Гибкий оформление автоматически настраивается под настройки монитора.
visit the website Vauld crypto
Актуальные бетторы сталкиваются с затруднением доступа к лицензированным платформам. Операторы закрывают базовые ссылки, но профессиональные [url=https://github.com/Lucky-Bear-zerkalo]Лаки Бир официальный сайт[/url] пользователи помнят о присутствии зеркальных платформ.
Зеркало образует полную воспроизведение основного портала. Средства защиты работают идентичными. Банковские действия реализуются через сходные системы.
Технология открытия счёта через дополнительный домен содержит обычной подтверждения. Операторы требуют документы для реализации KYC-правил. Идентификационные характеристики подвергаются двухфакторную валидацию.
Финансовые рамки на зеркальных сайтах совпадают главным параметрам. Начальные вклады поддерживаются неизменными. Накопительные банки объединяются между различными ссылками.
Поощрительные схемы действуют полноценно на альтернативных платформах. Коэффициент оборота поддерживает базовые показатели. Длительность оборота остаётся прежним.
Отдел сопровождения изучает вопросы с альтернативных доменов сходным образом. Мгновенный разговор гарантирует непрерывный режим функционирования.
Hello everyone!
Share new mysterious findings that bring interesting and valuable insights to light and collaborate with global experts see on the website for collaboration platforms
Full information on the link – https://202fliks.site
All the best and development in business!
Азартная область являет интенсивный прогресс, заинтересовывая легионы клиентов. Опытные сайты дают защищённую условия для развлечений. Детальную факты о этих организациях допустимо обнаружить на Vavada зеркало .
Лицензирование представляет основным аспектом селекции площадки. Лицензиаты Олдерни дают серьёзный контроль денежных процедур. Каждая сертифицированная платформа подвергается плановые аудиты RNG-систем.
Технические характеристики новейших азартных площадок включают SSL-безопасность расчётного стандарта. Провайдеры программного обеспечения класса Microgaming, NetEnt, Pragmatic Play добавляют комплексные алгоритмы хаотичных параметров.
Механизм валидации счёта подразумевает представления документов KYC-класса. Паспорт, подтверждение о заработке, верификация регистрации — обычный комплект для завершённого доступа.
Резервные порталы ликвидируют препятствия с цензурой провайдеров. Функционирующие варианты корректируются регулярно цифровыми службами. Смартфонные приложения регулярно оперируют лучше браузерных вариантов.
Финансовая дисциплина формирует долгосрочную результативность беттинговых периодов. Грамотные участники указывают ограничивать размер ставки до 1-2% от полного капитала.
заказать кухню в Пскове Мы используем только высококачественные материалы и современное оборудование, чтобы ваша мебель на заказ в Пскове служила вам долгие годы, радуя своей функциональностью и превосходным внешним видом.
нажмите здесь кастеты из метала
US Pharma Index: US Pharma Index – online pharmacy without insurance
Азартная область отображает стремительный прогресс, притягивая легионы пользователей. Экспертные платформы предлагают стабильную обстановку для ставок. Развёрнутую материалы о таких провайдерах допустимо отыскать на Лев казино .
Аккредитация представляет приоритетным аспектом селекции площадки. Надзорные органы Гибралтара дают тщательный контроль валютных операций. Отдельная аккредитованная ресурс реализует постоянные контроли RNG-модулей.
Технические особенности актуальных игорных домов предусматривают SSL-защиту банковского стандарта. Разработчики программного продукта типа Microgaming, NetEnt, Pragmatic Play интегрируют сложные системы произвольных чисел.
Процедура проверки счёта включает представления свидетельств KYC-стандарта. Паспорт, свидетельство о прибылях, валидация адреса — обычный перечень для полноценного активации.
Альтернативные ссылки убирают препятствия с ограничениями поставщиков. Актуальные копии модифицируются систематически IT командами. Мобильные утилиты часто оперируют лучше веб форматов.
Контроль средств формирует длительную результативность гемблинговых раундов. Квалифицированные игроки указывают сокращать размер депозита до 1-2% от итогового резерва.
Функционирующие дублирующие порталы надежных казино на Вавада официальный сайт предоставляют постоянный вход к геймерским порталам. Схема зеркалирования создает аналогичные дубликаты центрального ресурса с консервацией всех инструментов.
Схема открытия счета через mirror-сайт полностью повторяет основную анкету. Дебютные игроки указывают функционирующий email, устанавливают безопасный шифр и устанавливают базовую финансовый инструмент.
Подтверждение аккаунта включает передачи документов следуя KYC-стандартам. Снимок ID-карты, валидация адреса и банковские координаты проверяются через автоматическую верификацию в течение 24-72 временных единиц.
Подключение существующих геймеров реализуется через обычную окно с усиленной проверкой. Временные шифры поступают на телефонный девайс или email.
Опции пополнительного блока через резервные ссылки содержит востребованные расчетные платформы. Visa, Mastercard, веб балансы Skrill, Neteller, блокчейн-токены Bitcoin, Ethereum осуществляются с минимальными процентами 0-3%.
Развлекательная каталог дублируется полностью включая машины, столовые активности, live-крупье и накопительные призы. RTP-параметры, вариативность и условия отыгрыша остаются точными.
Поощрительная политика функционирует идентично главному ресурсу. Welcome-предложения, безвозмездные спины, возврат средств и VIP-схемы запускаются программно при выполнении заданных стандартов.
Нынешние клиенты имеют дело с множеством цифровых особенностей при деятельности с лицензированными сайтами. Профильные ресурсы типа Вавада РІС…РѕРґ выдают актуальную контент о деятельности игорных организаций.
Система проверки профиля подразумевает комплекс принудительных стадий. Начальная верификация предполагает отправки бумаг валидирующих гражданство. Обычный список содержит паспорт, лицензию водителя или международный паспорт.
Системная компонента записления включает применение безопасного соединения и двойной авторизации. Квалифицированные геймеры подсказывают инициировать совокупность возможных настроек секьюрити.
Зеркала являются точные отражения главного портала с поддержанием всего возможностей. Важнейшее выгода состоит в подобии расчетных пределов и норм вейджера.
Система поиска рабочих зеркал основывается на контроле тематических телеграм-каналов и аффилированных порталов. Опытные клиенты используют виртуальные частные сети для создания бесперебойного входа вне зависимости от территориальных ограничений.
Активные дублирующие порталы проверенных gaming-операторов на retro casino создают стабильный вход к игровым платформам. Система реплицирования формирует точные клоны главного сайта с сохранением всех механизмов.
Алгоритм открытия счета через дублирующий портал полностью воспроизводит главную заявку. Дебютные пользователи указывают рабочий email, устанавливают сложный пароль и назначают основную курренси.
Верификация учетной записи требует предоставления справок согласно KYC-стандартам. Скан ID-карты, валидация резиденции и платежные сведения анализируются посредством цифровую верификацию в течение 24-72 часов.
Вход действующих пользователей реализуется через типовую интерфейс с двухфакторной аутентификацией. Сессионные ключи доставляются на сотовый устройство или мейл.
Механизмы пополнительного блока через резервные ссылки поддерживает распространенные финансовые инструменты. Visa, Mastercard, электронные счета Skrill, Neteller, криптовалюты Bitcoin, Ethereum выполняются с уменьшенными комиссиями 0-3%.
Азартная база копируется абсолютно включая автоматы, столовые активности, live-дилеров и максимальные награды. RTP-значения, колебания и ставочные требования сохраняются аналогичными.
Подарочная политика работает идентично корневому веб-площадке. Welcome-предложения, бесплатные вращения, денежный возврат и VIP-планы стартуют системно при исполнении прописанных параметров.
Luster Marketplace – Really liked checking the recent additions to see what’s new.
Good afternoon!
Analyze exp mysterious results to find interesting and valuable proof depth now and validate your hypotheses see on the website for result analyzers
Full information on the link – https://101flow.site
All the best and development in business!
подробнее здесь краш тест кастета
Loft Crate store – Simple and organized design makes shopping straightforward.
Поиск достойного игрового ресурса в актуальных реалиях подразумевает детального анализа к лицензионному статусу. Опытные игроки учитывают, что п»ї1хбет регистрация демонстрирует современную факты о активных сервисах.
Процесс записи в лицензированных заведениях включает принудительную подтверждение документов. KYC-процедуры обеспечивают как казино, так и участника от афер. Временные пределы на получение активов до закрытия валидации – типичная система.
Программные блокировки на связь к развлекательным ресурсам преодолеваются через зеркальные порталы. Рабочие зеркала сохраняют полную функциональность первичного портала. Денежные операции, развлекательный результаты и привилегированные планы остаются константными.
Материальная гарантированность оценивается уровнем применяемых финансовых инструментов. SSL-безопасность, PCI DSS валидация и усиленная проверка гарантируют прочный периметр безопасности.
Игровая библиотека проверенных провайдеров содержит автоматы от известных производителей. RTP-коэффициенты, вариативность и алгоритмические формулы проходят внешнюю проверку в аккредитованных институтах.
Схемы стимулирования в профессиональных сервисах строятся на открытых требованиях вейджера. Условия ставок x35-40 признается разумным для спин-бонусов, в то время как классические состязания учитываются в зачет с уменьшенным процентом.
Передовые порталы азартных продуктов предоставляют участникам подключение к элитному гемблингу через проверенные Mellstroy Game casino ресурсы. Авторизованная бизнес влечет соблюдения жестких надзорных требований.
Процесс регистрации пользовательского счета задействует аутентификацию персональных реквизитов. Регуляторы используют расширенные системы KYC и AML для недопущения поддельных операций.
Программные средства передовых казино основываются на защищенных облачных системах с HTTPS сертификатами. Территориальные ограничения принуждает операторов внедрять вспомогательные ссылки.
Резервные платформы представляют эквивалентные копии центрального ресурса с сохранением всех сервисов и показателей. Игроки добиваются устойчивый подключение к счету, беттинг статистике и личным опциям.
Расчетные переводы проходят через интегрированные банковские процессоры. Рамки на депозиты и обналичивания устанавливаются в соотношении с правовыми требованиями и индивидуальными правилами снижения потерь.
Профессиональные клиенты указывают проверять положение сертификата через контролирующие реестры гемблинг структур. Авторитетные индикаторы включают позиции на экспертных платформах и комментарии истинных пользователей.
Перемещение в области лицензированных сайтов включает понимания продвинутых методов подключения. Квалифицированные клиенты внедряют лаки Р±РёСЂ казино для извлечения новейшей сведений о функционирующих доменах.
Механизм открытия профиля в официальных учреждениях включает детальную проверку. Современные провайдеры задействуют KYC-процедуры и AML-стандарты. Документооборот потребляет от 24 до 72 периодов.
Цифровые решения для обхода барьеров развиваются сообща с интенсификацией юридических решений. VPN-решения категории premium предлагают безопасность AES-256 и методы OpenVPN. Непрерывность коннекта принципиально важна для элитных игровых периодов.
Запасные платформы функционируют через географически расположенные IT инфраструктуры. CDN-сети поддерживают низкую пинг для американских участников. Техническое переключение запускается при идентификации блокировки базового сайта.
Денежные переводы в проверенных областях подчиняются четким нормам PCI DSS. Цифровые переводы приобретают признание в результате конфиденциальности и быстроте реализации.
Планшетные клиенты лучших брендов включают биометрическую аутентификацию и push-уведомления для существенных событий. Настраиваемый внешний вид автоматически изменяется под настройки панели.
https://www.carlscorona.com
Беттинговая отрасль демонстрирует стремительный расширение, привлекая легионы пользователей. Экспертные порталы предоставляют стабильную среду для ставок. Исчерпывающую информацию о подобных брендах допустимо получить на казино Клубника .
Аккредитация составляет центральным показателем селекции ресурса. Юрисдикции Гибралтара гарантируют качественный надзор финансовых операций. Всякая лицензированная платформа выполняет плановые проверки RNG-алгоритмов.
Компьютерные параметры актуальных беттинг-платформ охватывают SSL-безопасность расчётного класса. Разработчики компьютерного ПО наподобие Microgaming, NetEnt, Pragmatic Play интегрируют продвинутые модели произвольных параметров.
Алгоритм подтверждения учётной записи подразумевает передачи удостоверений KYC-класса. Свидетельство, выписка о доходах, удостоверение прописки — стандартный список для итогового доступа.
Дублирующие ссылки исправляют трудности с блокировками провайдеров. Функционирующие варианты корректируются каждый день IT командами. Портативные клиенты обычно оперируют качественнее браузерных версий.
Финансовая дисциплина устанавливает продолжительную результативность развлекательных раундов. Опытные беттеры настаивают урезать величину вейджера до 1-2% от итогового резерва.
Нынешние участники натыкаются с сложностью соединения к сертифицированным платформам. Операторы закрывают базовые домены, но профессиональные казино Лаки Бир клиенты помнят о функционировании параллельных ресурсов.
Резервная ссылка является идентичную отображение базового сайта. Средства защиты остаются такими же. Денежные транзакции производятся через равнозначные механизмы.
Процедура открытия счёта через зеркальный адрес включает классической аутентификации. Администраторы просят бумаги для осуществления KYC-требований. Личные информация подвергаются комплексную подтверждение.
Депозитные рамки на резервных ресурсах идентичны базовым спецификациям. Минимальные вклады сохраняются константными. Накопительные выигрышные пулы синхронизируются между различными порталами.
Поощрительные схемы выполняются завершённо на альтернативных ресурсах. Требования по обороту сохраняет оригинальные цифры. Тайминг использования остаётся прежним.
Сервис поддержки изучает заявки с дополнительных порталов таким же способом. Живой переписка предоставляет непрерывный график функционирования.
Отбор достойного развлекательного портала в актуальных условиях заставляет повышенного внимания к юридическому статусу. Опытные пользователи знают, что Вавада официальный сайт предоставляет новую факты о действующих операторах.
Механизм оформления профиля в проверенных сервисах предусматривает требуемую проверку документов. KYC-требования охраняют как казино, так и участника от фрода. Переходные рамки на перечисление капитала до завершения контроля – привычная подход.
Электронные препятствия на подключение к развлекательным порталам обходятся через резервные ссылки. Рабочие зеркала гарантируют стопроцентную производительность главного сервиса. Расчетные переводы, игровой статистика и бонусные предложения сохраняются константными.
Денежная надежность измеряется уровнем эксплуатируемых финансовых систем. SSL-кодирование, PCI DSS валидация и многоуровневая подтверждение обеспечивают безопасный периметр защиты.
Игровая набор проверенных сервисов объединяет автоматы от лидирующих создателей. RTP-коэффициенты, вариативность и вероятностные схемы получают нейтральную аудит в утвержденных центрах.
Схемы лояльности в надежных операторах основываются на ясных требованиях вейджера. Проигрыш x35-40 считается адекватным для барабан-поощрений, в то время как настольные развлечения включаются в расчет с сниженным множителем.
https://gaimogilev.by/articles/promokod-888starz-bonus-pri-registraczii
Перейти на сайт https://slon2-at.com
this online shop – Lots of interesting products and checkout is easy and secure.
Главная https://vodkabet-play.vodkabet-zerkalo.vodka/
Определение надежного развлекательного ресурса в сегодняшних обстоятельствах предполагает повышенного внимания к правовому уровню. Опытные клиенты осознают, что п»ї1хбет казино содержит современную данные о доступных ресурсах.
Механизм открытия счета в лицензированных площадках предусматривает необходимую проверку личности. KYC-стандарты обеспечивают как заведение, так и игрока от мошенничества. Краткосрочные лимиты на получение денег до окончания проверки – обычная подход.
Электронные ограничения на соединение к азартным сервисам устраняются через зеркальные ссылки. Активные дубликаты гарантируют тотальную эффективность первичного сайта. Банковские операции, развлекательный продвижение и бонусные программы продолжают постоянными.
Капитальная защищенность характеризуется уровнем эксплуатируемых расчетных методов. SSL-кодирование, PCI DSS аттестация и дополнительная аутентификация гарантируют защищенный периметр ограждения.
Азартная библиотека лицензированных площадок включает барабаны от известных студий. RTP-показатели, дисперсия и алгоритмические модели испытывают объективную проверку в авторизованных институтах.
Системы мотивации в достойных заведениях строятся на ясных параметрах вейджера. Проигрыш x35-40 расценивается справедливым для автомат-бонусов, в то время как классические забавы идут в расчет с минимальным фактором.
Поиск в пространстве легальных сайтов включает знания актуальных методов авторизации. Профессиональные игроки задействуют Vavada для обретения новейшей материалов о функционирующих URL.
Схема формирования аккаунта в официальных операторах содержит сложную аутентификацию. Продвинутые провайдеры задействуют KYC-процедуры и AML-критерии. Документальная процедура требует от 24 до 72 промежутков.
Компьютерные методы для прохождения барьеров эволюционируют параллельно с ужесточением правовых шагов. VPN-инструменты уровня premium предлагают шифрование AES-256 и системы OpenVPN. Стабильность связи fundamentally важна для элитных сессий.
Резервные домены функционируют через географически размещенные IT кластеры. CDN-комплексы поддерживают сокращенную задержку для европейских геймеров. Программное переключение инициируется при распознавании блокировки базового портала.
Экономические операции в сертифицированных зонах подпадают под конкретным стандартам PCI DSS. Криптовалютные платежи увеличивают популярность по причине конфиденциальности и динамике обработки.
Планшетные утилиты премиальных брендов совмещают отпечатковую подтверждение и push-оповещения для важных эпизодов. Модифицируемый интерфейс программно изменяется под характеристики монитора.
https://uspharmaindex.com/# reliable canadian pharmacy
unique coastal shop – The presentation has personality and everything looks thoughtfully arranged.
Навигация в пространстве лицензированных ресурсов подразумевает понимания продвинутых технологий авторизации. Продвинутые участники применяют лаки Р±РёСЂ казино официальный сайт для добывания свежей данных о функционирующих адресах.
Механизм оформления учетной записи в лицензированных операторах включает детальную подтверждение. Новейшие операторы применяют KYC-механизмы и AML-нормы. Документальная процедура составляет от 24 до 72 промежутков.
Программные решения для преодоления блокировок улучшаются синхронно с повышением правовых инициатив. VPN-сервисы класса premium обеспечивают защиту AES-256 и системы OpenVPN. Постоянство коннекта критически актуальна для элитных заходов.
Альтернативные ресурсы оперируют через географически распределенные технические системы. CDN-структуры обеспечивают низкую латентность для азиатских пользователей. Цифровое редирект активируется при выявлении препятствия главного сайта.
Экономические движения в проверенных юрисдикциях отвечают четким стандартам PCI DSS. Крипто транзакции завоевывают признание вследствие скрытности и оперативности выполнения.
Портативные приложения премиальных организаций объединяют лицевую подтверждение и push-оповещения для принципиальных моментов. Гибкий оформление независимо адаптируется под особенности матрицы.
Определение надежного гемблинг заведения требует глубокого анализа правовых документов. Передовые системы Вован казино обеспечивают геймерам безусловную данные о собственных лицензиях.
Алгоритм регистрации подразумевает множество требуемых шагов аутентификации. Операторы требуют справки, доказывающие личность и дееспособность. Классический KYC-регламент составляет от 24 до 72 интервалов.
Финансовое планирование стартует с фиксации границ на вклады. Опытные пользователи советуют задействовать установку 5% от совокупного азартного капитала на конкретную партию.
Электронные барьеры администраторов принуждают внедрять альтернативные ссылки. Альтернативы удерживают абсолютную активность базового площадки, предусматривая историю транзакций и гемблинг прогресс.
Новые банковские инструменты предоставляют моментальные инвестиции через блокчейн кошельки. Bitcoin, Ethereum и фиксированные активы предоставляют конфиденциальность и наименьшие отчисления. Время проведения выводов доходит 10-30 отрезков.
Схемы постоянства охватывают ступенчатые категории с увеличивающимся компенсацией. VIP-консультанты гарантируют эксклюзивные подарки, увеличенные границы и приоритетную помощь.
DepotGlow Store – Loved the reasonable prices and reliable product quality today.
Развлекательная область отображает быстрый рост, завлекая миллионы игроков. Квалифицированные порталы обеспечивают безопасную обстановку для игры. Подробную материалы о данных провайдерах можно обнаружить на Вавада казино .
Аттестация представляет приоритетным фактором определения ресурса. Контролёры Великобритании гарантируют тщательный контроль расчётных манипуляций. Всякая аккредитованная сайт подвергается постоянные контроли RNG-алгоритмов.
Технические свойства передовых гемблинг-сайтов предусматривают SSL-криптографию экономического уровня. Производители компьютерного обеспечения уровня Microgaming, NetEnt, Pragmatic Play добавляют сложные алгоритмы хаотичных значений.
Схема верификации учётной записи включает подачи удостоверений KYC-уровня. Документ, документ о доходах, верификация регистрации — классический пакет для полноценного входа.
Дублирующие адреса убирают сложности с фильтрацией компаний. Рабочие альтернативы корректируются систематически компьютерными специалистами. Мобильные софт регулярно выполняются стабильнее веб вариантов.
Управление банкроллом определяет продолжительную доходность азартных партий. Профессиональные пользователи настаивают лимитировать размер депозита до 1-2% от полного банкролла.
Исследование в мире проверенных платформ подразумевает владения современных способов авторизации. Умелые участники задействуют п»ї1xBet для приобретения современной информации о действующих ссылках.
Алгоритм формирования аккаунта в надежных компаниях охватывает многоуровневую валидацию. Передовые компании задействуют KYC-системы и AML-стандарты. Документальное сопровождение занимает от 24 до 72 часов.
Программные технологии для прохождения блокировок эволюционируют вместе с интенсификацией правовых мер. VPN-инструменты класса premium гарантируют защиту AES-256 и протоколы OpenVPN. Устойчивость связи критически существенна для высокоролловых раундов.
Дублирующие домены действуют через регионально размещенные IT инфраструктуры. CDN-архитектуры обеспечивают минимальную отклик для американских клиентов. Программное редирект запускается при обнаружении барьера основного портала.
Экономические операции в официальных территориях следуют жестким стандартам PCI DSS. Криптовалютные транзакции приобретают признание по причине секретности и скорости процессинга.
Мобильные утилиты элитных провайдеров совмещают биометрическую аутентификацию и push-уведомления для ключевых моментов. Адаптивный дизайн самостоятельно адаптируется под особенности панели.
Отбор легального азартного ресурса требует детального рассмотрения правовых документов. Новые системы казино Голд предоставляют геймерам стопроцентную информацию о своих допусках.
Механизм получения доступа предусматривает множество требуемых ступеней аутентификации. Представители запрашивают удостоверения, доказывающие персону и дееспособность. Классический KYC-регламент требует от 24 до 72 периодов.
Контроль средств открывается с фиксации лимитов на депозиты. Компетентные участники призывают эксплуатировать норму 5% от общего азартного резерва на одну раунд.
Электронные барьеры администраторов побуждают эксплуатировать дополнительные пути. Клоны хранят максимальную производительность центрального ресурса, предусматривая журнал платежей и азартный прогресс.
Передовые финансовые сервисы гарантируют быстрые депозиты через блокчейн счета. Bitcoin, Ethereum и фиксированные активы дают конфиденциальность и наименьшие комиссии. Срок осуществления изъятий насчитывает 10-30 интервалов.
Алгоритмы верности содержат ступенчатые категории с накапливающимся вознаграждением. VIP-координаторы предоставляют индивидуальные поощрения, повышенные рамки и первоочередную сервис.
Исследование в пространстве проверенных ресурсов требует знания продвинутых методов подключения. Опытные пользователи внедряют Меллстрой зеркало для обретения новейшей фактов о работающих доменах.
Процедура оформления учетной записи в сертифицированных операторах подразумевает тщательную валидацию. Продвинутые поставщики задействуют KYC-системы и AML-критерии. Оформление документов отнимает от 24 до 72 промежутков.
Технические способы для преодоления запретов улучшаются синхронно с усилением регуляторных решений. VPN-платформы класса premium предлагают защиту AES-256 и методы OpenVPN. Устойчивость связи fundamentally важна для премиальных заходов.
Зеркальные платформы выполняют задачи через регионально рассредоточенные цифровые системы. CDN-сети поддерживают быструю латентность для международных клиентов. Системное редирект запускается при распознавании ограничения первичного сайта.
Финансовые операции в легальных регионах подчиняются определенным требованиям PCI DSS. Цифровые операции увеличивают популярность из-за скрытности и динамике обработки.
Планшетные софт топовых провайдеров содержат физиологическую авторизацию и push-извещения для важных эпизодов. Гибкий оформление автоматически настраивается под особенности матрицы.
трансы омск Это музыка, которая вдохновляет, исцеляет и дает почувствовать себя частью чего-то большего.
Нынешние игроки встречаются с массой технических нюансов при процессах с легальными платформами. Профессиональные источники типа Mellstroy Game поставляют современную сведения о процессах гэмблинговых компаний.
Процедура аутентификации учетной записи подразумевает комплекс необходимых шагов. Первичная валидация предполагает отправки удостоверений удостоверяющих гражданство. Типовой список охватывает удостоверение личности, водительские права или международный паспорт.
Цифровая составляющая открытия счета содержит использование защищенного протокола и двойной авторизации. Опытные пользователи советуют инициировать полный набор доступных возможностей защиты.
Дублирующие порталы составляют абсолютные дубликаты основного сайта с поддержанием комплексного функционала. Ключевое достоинство состоит в тождественности финансовых границ и критериев ставочных требований.
Механизм поиска функционирующих дублирующих порталов опирается на мониторинге профильных мессенджер групп и связанных ресурсов. Продвинутые клиенты задействуют VPN-сервисы для гарантирования постоянного входа без оглядки от региональных ограничений.
Актуальные резервные адреса легальных азартных клубов на Голд казино обеспечивают беспрерывный доступ к гемблинг системам. Схема зеркалирования строит полноценные реплики главного домена с сохранением всех функций.
Алгоритм регистрации через резервную ссылку полностью повторяет стандартную анкету. Свежие участники регистрируют функционирующий email, генерируют сложный секретную комбинацию и назначают основную курренси.
Идентификация счета подразумевает загрузки удостоверений опираясь на KYC-требованиям. Копия паспорта, свидетельство адреса и денежные данные проверяются через программную верификацию в течение 24-72 временных единиц.
Авторизация действующих участников производится через обычную модуль с многоступенчатой проверкой. Краткосрочные коды передаются на мобильный устройство или почтовый ящик.
Функционал пополнительного компонента через альтернативные домены содержит востребованные денежные инструменты. Visa, Mastercard, онлайн хранилища Skrill, Neteller, виртуальные монеты Bitcoin, Ethereum выполняются с минимальными сборами 0-3%.
Развлекательная ассортимент воспроизводится в точности включая барабаны, столовые активности, live-дилеров и накопительные призы. RTP-индикаторы, вариативность и ставочные требования поддерживаются такими же.
Поощрительная программа выполняется схоже корневому ресурсу. Welcome-наборы, даровые прокруты, денежный возврат и VIP-системы включаются программно при достижении заданных критериев.
Shop Lemon Crate – Fair pricing and solid quality, I’ll definitely browse again.
http://uspharmaindex.com/# US Pharma Index
pin up казино https://games-pinup.ru
Выбор проверенного азартного оператора в текущих условиях предполагает особого анализа к юридическому режиму. Компетентные пользователи учитывают, что Mellstroy Game зеркало предоставляет новую материалы о доступных площадках.
Схема регистрации в сертифицированных операторах охватывает обязательную аутентификацию идентичности. KYC-нормы защищают как площадку, так и пользователя от махинаций. Промежуточные лимиты на перечисление средств до закрытия валидации – нормальная методика.
Программные препятствия на доступ к азартным площадкам решаются через альтернативные ссылки. Действующие дубликаты гарантируют стопроцентную производительность главного сайта. Расчетные процедуры, интерактивный прогресс и привилегированные схемы продолжают устойчивыми.
Финансовая защищенность характеризуется критерием внедренных расчетных механизмов. SSL-кодирование, PCI DSS аттестация и дополнительная аутентификация устанавливают прочный периметр безопасности.
Азартная каталог легальных площадок включает спины от ведущих разработчиков. RTP-параметры, вариативность и вероятностные формулы проходят объективную проверку в утвержденных лабораториях.
Системы мотивации в профессиональных заведениях базируются на прозрачных критериях ставок. Проигрыш x35-40 считается разумным для слот-подарков, в то время как карточные развлечения идут в расчет с минимальным множителем.
Функционирующие mirror-ссылки проверенных гемблинг-платформ на Меллстрой РІС…РѕРґ обеспечивают постоянный вход к развлекательным порталам. Схема копирования генерирует аналогичные реплики основного веб-площадки с сохранением всех функций.
Процедура регистрации через резервную ссылку целиком имитирует оригинальную анкету. Начинающие участники указывают функционирующий email, формируют защищенный секретную комбинацию и устанавливают рабочую курренси.
Валидация аккаунта содержит передачи документов по KYC-нормам. Копия национального документа, доказательство адреса и банковские данные анализируются посредством машинную верификацию в течение 24-72 часов.
Аутентификация верифицированных пользователей осуществляется через обычную форму с усиленной валидацией. Сессионные токены доставляются на мобильный аппарат или email.
Механизмы денежного раздела через зеркала поддерживает распространенные денежные сервисы. Visa, Mastercard, веб счета Skrill, Neteller, блокчейн-токены Bitcoin, Ethereum выполняются с оптимизированными комиссиями 0-3%.
Развлекательная ассортимент повторяется в точности включая машины, традиционные геймплей, live-дилеров и накопительные призы. RTP-значения, колебания и отыгрыш удерживаются аналогичными.
Подарочная механизм работает идентично корневому ресурсу. Welcome-пакеты, даровые прокруты, refund и VIP-системы активируются машинально при соблюдении прописанных условий.
chiccheckout.shop – Checkout is easy and the layout keeps shopping simple and fast.
Если вас интересует тема ufc в феврале марте 2026 три недели которые встряхнут дивизионы, советую заглянуть сюда. Здесь подробности: https://avtoshkola37.ru/news/prognozy-na-ufc-fevral-mart-2026-kto-zaberyot-verh-v-glavnyh-boyah/
Инновационные порталы беттинг услуг предоставляют игрокам вход к элитному развлечениям через сертифицированные типпи казино ресурсы. Лицензированная деятельность требует исполнения строгих регуляторных требований.
Механизм активации персонального профиля охватывает аутентификацию персональных информации. Управляющие задействуют углубленные системы KYC и AML для блокировки нарушающих операций.
Электронные средства современных беттинг площадок строятся на зашифрованных инфраструктурах с HTTPS алгоритмами. Территориальные ограничения обязывает управляющих запускать резервные домены.
Дублирующие платформы являют собой эквивалентные версии главного сайта с обеспечением всех функций и данных. Беттеры получают беспрепятственный подключение к депозиту, беттинг истории и индивидуальным установкам.
Платежные операции реализуются через подключенные денежные шлюзы. Границы на депозиты и обналичивания фиксируются в гармонии с регуляторными требованиями и внутренними регламентами контроля угроз.
Квалифицированные игроки советуют контролировать положение авторизации через официальные каталоги беттинг комиссий. Престижные показатели охватывают ранги на профильных платформах и отзывы истинных беттеров.
мостбет покер https://www.mostbet52718.help
Современные игроки пересекаются с изобилием технических деталей при работе с лицензированными сайтами. Профильные платформы типа lucky bear казино дают современную сведения о деятельности казино организаций.
Процесс подтверждения кабинета предполагает ряд обязательных шагов. Базовая проверка подразумевает передачи свидетельств доказывающих гражданство. Классический список предполагает ID, лицензию водителя или заграничное удостоверение.
Технологическая часть оформления охватывает эксплуатацию зашифрованного канала и двухфакторной аутентификации. Продвинутые участники рекомендуют задействовать полный набор возможных опций обеспечения.
Зеркала формируют полные реплики базового ресурса с поддержанием исчерпывающего функционала. Важнейшее плюс заключается в подобии банковских пределов и условий условий прокрутки.
Процедура поиска активных запасных доменов фундируется на мониторинге экспертных новостных лент и партнерских площадок. Профессиональные игроки задействуют прокси-соединения для предоставления бесперебойного входа вне зависимости от географических лимитов.
Новейшие сервисы гемблинг развлечений предоставляют участникам доступ к премиальному беттингу через безопасные Lucky Bear зеркало порталы. Лицензированная операционная активность подразумевает исполнения строгих законодательных требований.
Алгоритм активации пользовательского счета предусматривает валидацию конфиденциальных информации. Администраторы используют углубленные механизмы KYC и AML для недопущения поддельных транзакций.
Электронные платформы передовых казино строятся на безопасных дата-центрах с TLS технологиями. Территориальные ограничения принуждает управляющих организовывать резервные ссылки.
Зеркальные платформы составляют точные версии базового сайта с поддержанием всех сервисов и данных. Игроки получают устойчивый доступ к капиталу, беттинг данным и личным установкам.
Расчетные операции выполняются через синхронизированные расчетные процессоры. Лимиты на инвестиции и получения устанавливаются в соотношении с регуляторными требованиями и собственными правилами контроля угроз.
Квалифицированные клиенты рекомендуют контролировать состояние лицензии через государственные списки игорных органов. Авторитетные показатели предусматривают ранги на экспертных сервисах и отзывы подлинных беттеров.
US Pharma Index: US Pharma Index – pharmaceuticals online australia
North Vendor Store – Browsing was simple and each product has great, detailed info.
Frost Shopping Spot – Items were exactly as described and placing my order was simple and easy.
Cheap Sildenafil 100mg: Sildenafil Price Guide – best price for viagra 100mg
Новейшие участники натыкаются с препятствием подключения к сертифицированным платформам. Компании закрывают стандартные URL, но опытные Вавада казино участники помнят о функционировании дублирующих порталов.
Зеркало образует абсолютную воспроизведение основного портала. Системы безопасности функционируют неизменными. Расчётные переводы осуществляются через равнозначные сервисы.
Алгоритм открытия счёта через дополнительный портал требует стандартной подтверждения. Администраторы просят свидетельства для соблюдения KYC-регламентов. Индивидуальные информация реализуют расширенную проверку.
Депозитные рамки на резервных площадках идентичны главным характеристикам. Стартовые вклады остаются постоянными. Растущие банки объединяются между множественными доменами.
Премиальные схемы работают комплексно на резервных ресурсах. Коэффициент оборота сохраняет первоначальные цифры. Период действия отыгрыша сохраняется.
Отдел поддержки изучает обращения с дополнительных ссылок таким же способом. Интерактивный переписка осуществляет постоянный формат обслуживания.
Официальные платформы игровых опций гарантируют пользователям право к премиальному азартному досугу через тематические ресурсы, включая tip top casino , которые точно выполняют глобальные регламенты конфиденциальности.
Алгоритм создания аккаунта предполагает предоставления проверочных данных через безопасные SSL-соединения. Операторы требуют официальное доказательство правоспособности и адреса жительства для compliance legal требований.
2FA верификация представляет обязательным составляющей новейших платформ security. Участники имеют SMS-пароли, push-уведомления или используют профессиональные приложения в стиле Google Authenticator.
Резервные ссылки решают сложности географических барьеров и DDoS-воздействий. Техническим образом mirrors являют копийные версии базового платформы с поддержанием features и индивидуальных параметров.
Skilled пользователи советуют сохранять новейшие каталоги активных копий в bookmark обозревателя. Провайдеры отправляют обновления о актуальных доменах через почтовые сервисы, Telegram-сообщества и mobile софт.
Денежные транзакции через legal ресурсы покрыты криптографическими технологиями стандарта банковского segment. Получение капитала реализуется только на аутентифицированные счета владельца аккаунта.
luxury jewelry marketplace – Images are crisp and give a professional feel to the site.
Передовые игроки встречаются с барьером подключения к проверенным платформам. Операторы закрывают главные адреса, но искушённые Болливуд казино посетители осознают о наличии параллельных площадок.
Параллельный портал образует абсолютную дубликат основного площадки. Средства защиты работают идентичными. Финансовые действия проходят через сходные каналы.
Технология регистрации через альтернативный портал содержит привычной валидации. Администраторы требуют свидетельства для выполнения KYC-требований. Личные характеристики выполняют двухфакторную валидацию.
Пополнительные ограничения на дополнительных площадках совпадают базовым спецификациям. Минимальные вклады продолжают константными. Возрастающие призовые фонды интегрируются между многочисленными ссылками.
Поощрительные схемы оперируют всесторонне на альтернативных порталах. Коэффициент оборота удерживает первоначальные величины. Временные рамки проигрывания остаётся прежним.
Департамент сопровождения обрабатывает вопросы с параллельных порталов сходным образом. Живой диалог обеспечивает 24-часовой расписание работы.
Leaf Vendor Picks – Items feel solid and the pricing is fair across the store.
Активные зеркала проверенных gaming-операторов на казино Лаки Бир предоставляют постоянный подключение к гемблинг системам. Схема реплицирования строит точные реплики главного портала с удержанием всех опций.
Схема оформления профиля через резервную ссылку полностью повторяет базовую бланк. Новые игроки регистрируют активный email, генерируют стойкий шифр и фиксируют игровую курренси.
Идентификация профиля включает предоставления бумаг по KYC-требованиям. Скан паспорта, валидация резиденции и карточные координаты проверяются через автоматическую верификацию в течение 24-72 часов.
Вход активных геймеров осуществляется через базовую панель с многоступенчатой верификацией. Разовые ключи передаются на сотовый гаджет или e-mail адрес.
Опции пополнительного раздела через дублирующие порталы поддерживает актуальные денежные сервисы. Visa, Mastercard, онлайн портмоне Skrill, Neteller, криптовалюты Bitcoin, Ethereum реализуются с сокращенными процентами 0-3%.
Развлекательная библиотека копируется полностью включая автоматы, классические геймплей, live-операторов и максимальные награды. RTP-коэффициенты, дисперсия и вейджер поддерживаются аналогичными.
Подарочная система работает схоже корневому сайту. Welcome-предложения, фриспины, возврат средств и VIP-программы запускаются программно при достижении заданных условий.
Действующие дублирующие порталы легальных казино на п»ї1xBet зеркало предоставляют беспрерывный подключение к гемблинг порталам. Принцип реплицирования формирует полноценные реплики корневого портала с сохранением всех инструментов.
Механизм регистрации через mirror-сайт в точности повторяет основную анкету. Дебютные геймеры заполняют функционирующий email, создают надежный ключ и фиксируют основную платежное средство.
Аутентификация аккаунта содержит передачи документов по KYC-нормам. Скан удостоверения личности, верификация проживания и платежные параметры контролируются системой алгоритмическую верификацию в течение 24-72 периодов.
Авторизация существующих геймеров осуществляется через базовую панель с 2FA проверкой. Сессионные токены передаются на сотовый устройство или почтовый ящик.
Возможности пополнительного сектора через зеркала предлагает популярные расчетные сервисы. Visa, Mastercard, веб портмоне Skrill, Neteller, блокчейн-токены Bitcoin, Ethereum выполняются с минимальными платежами 0-3%.
Gaming коллекция повторяется в точности включая автоматы, классические развлечения, live-хостов и джекпоты. RTP-параметры, дисперсия и отыгрыш остаются точными.
Поощрительная система оперирует идентично корневому сайту. Welcome-комплекты, даровые прокруты, компенсация и VIP-курсы активируются алгоритмически при реализации прописанных параметров.
shop Timber Vendor – Rustic feel is lovely, with smooth navigation across pages.
Нынешние игроки сталкиваются с массой технологических деталей при процессах с проверенными площадками. Тематические ресурсы типа Gold выдают современную материалы о операциях казино операторов.
Система валидации кабинета подразумевает набор необходимых стадий. Базовая верификация включает загрузки справок верифицирующих гражданство. Стандартный перечень содержит ID, автоудостоверение или заграничное удостоверение.
Технологическая компонента оформления включает использование защищенного протокола и двухуровневой проверки. Продвинутые геймеры предлагают инициировать полный набор возможных параметров безопасности.
Дублирующие порталы формируют абсолютные реплики главного домена с сохранением всего арсенала. Главное бонус выражается в соответствии денежных пределов и параметров отыгрыша.
Алгоритм нахождения функционирующих дублирующих порталов опирается на контроле экспертных новостных лент и союзных порталов. Квалифицированные клиенты внедряют туннельные протоколы для гарантирования стабильного связи без оглядки от региональных запретов.
готовая кухня из мдф На «канале Кухня алгоритмов», а также «на канале Кухня алгоритмов» и «посмотрите на Кухне алгоритмов», мы приглашаем вас окунуться в мир, где каждая строка кода — это приправа, а каждый цикл — это новый уровень сложности.
Актуальные участники натыкаются с проблемой соединения к сертифицированным ресурсам. Операторы закрывают первичные порталы, но грамотные Лаки Бир РІС…РѕРґ участники помнят о наличии альтернативных сайтов.
Дополнительный домен образует абсолютную реплику базового портала. Криптографические алгоритмы работают такими же. Финансовые процедуры проходят через сходные механизмы.
Технология заведения учётной записи через параллельный портал содержит классической подтверждения. Менеджеры просят удостоверения для осуществления KYC-регламентов. Паспортные характеристики осуществляют двухфакторную верификацию.
Пополнительные пределы на альтернативных сайтах идентичны первичным характеристикам. Наименьшие вклады остаются константными. Прогрессивные накопления интегрируются между многочисленными ресурсами.
Бонусные механизмы выполняются всесторонне на дополнительных платформах. Множитель ставок сохраняет стартовые показатели. Срок активности использования продолжается.
Сервис поддержки обрабатывает заявки с параллельных ссылок идентично. Мгновенный общение осуществляет круглосуточный порядок обслуживания.
Нынешние игроки встречаются с препятствием подключения к легальным ресурсам. Организации закрывают стандартные домены, но знающие lucky bear казино участники учитывают о доступности резервных порталов.
Зеркало формирует абсолютную дубликат первичного портала. Криптографические алгоритмы сохраняются идентичными. Платёжные операции реализуются через идентичные механизмы.
Методика открытия счёта через зеркальный домен содержит обычной верификации. Специалисты просят удостоверения для соблюдения KYC-правил. Персональные информация реализуют двухфакторную аутентификацию.
Пополнительные границы на зеркальных площадках соответствуют стандартным спецификациям. Наименьшие вклады поддерживаются фиксированными. Накопительные накопления согласовываются между разными ресурсами.
Бонусные схемы работают завершённо на дополнительных платформах. Требования по обороту гарантирует первоначальные значения. Период действия реализации продолжается.
Департамент сопровождения обрабатывает обращения с параллельных порталов сходным образом. Прямой диалог гарантирует 24-часовой режим функционирования.
https://www.pexels.com/@1xbet-vip2026-2158597733/
Новейшие игроки попадают с барьером доступа к лицензированным платформам. Провайдеры блокируют стандартные порталы, но профессиональные Mellstroy Game casino посетители знают о наличии альтернативных ресурсов.
Резервная ссылка формирует стопроцентную воспроизведение основного платформы. SSL-сертификаты поддерживаются идентичными. Банковские транзакции производятся через аналогичные каналы.
Технология регистрации через зеркальный домен требует стандартной проверки. Сотрудники выясняют свидетельства для осуществления KYC-регламентов. Идентификационные сведения выполняют расширенную аутентификацию.
Пополнительные ограничения на дополнительных площадках идентичны стандартным спецификациям. Начальные суммы функционируют константными. Прогрессивные джекпоты координируются между множественными ресурсами.
Премиальные механизмы выполняются полноценно на резервных площадках. Коэффициент оборота обеспечивает стартовые цифры. Срок активности отыгрыша продолжается.
Департамент помощи решает обращения с альтернативных порталов равнозначно. Прямой диалог предоставляет непрерывный порядок работы.
Coast Vendor Boutique – I plan on shopping here again, so it’s safely bookmarked.
https://propterest.com.au/user/73440/AfriqueVip
Lumvanta Boutique – User-friendly design and products are simple to find.
CelNova Corner – Easy to browse and items are displayed clearly, really enjoyable.
Ориентирование в секторе сертифицированных сайтов предполагает понимания продвинутых технологий входа. Квалифицированные участники внедряют Lucky Bear зеркало для извлечения свежей материалов о функционирующих адресах.
Схема регистрации счета в лицензированных операторах подразумевает тщательную проверку. Продвинутые организации используют KYC-алгоритмы и AML-стандарты. Бумажная работа занимает от 24 до 72 часов.
Технические технологии для минования препятствий прогрессируют сообща с укреплением нормативных шагов. VPN-решения типа premium гарантируют криптографию AES-256 и технологии OpenVPN. Надежность соединения fundamentally необходима для VIP игровых периодов.
Альтернативные домены выполняют задачи через пространственно распределенные IT кластеры. CDN-архитектуры поддерживают сокращенную латентность для азиатских клиентов. Программное перенаправление срабатывает при идентификации блокировки основного портала.
Банковские операции в официальных зонах подчиняются определенным нормам PCI DSS. Криптовалютные операции завоевывают актуальность по причине анонимности и динамике реализации.
Мобильные утилиты ведущих компаний совмещают физиологическую проверку и push-алерты для важных моментов. Настраиваемый облик автоматически подстраивается под свойства дисплея.
Рабочие зеркала официальных азартных клубов на Меллстрой официальный сайт обеспечивают непрерывный коннект к азартным ресурсам. Методика клонирования формирует полноценные версии основного веб-площадки с консервацией всех опций.
Алгоритм активации через резервную ссылку полностью имитирует основную заявку. Свежие участники регистрируют активный email, устанавливают стойкий секретную комбинацию и выбирают игровую финансовый инструмент.
Подтверждение профиля подразумевает передачи справок по KYC-регламенту. Фото паспорта, доказательство места жительства и денежные параметры анализируются посредством цифровую верификацию в течение 24-72 периодов.
Аутентификация существующих участников происходит через типовую панель с двухфакторной проверкой. Сессионные шифры поступают на телефонный номер или электронную почту.
Механизмы финансового раздела через зеркала включает популярные денежные механизмы. Visa, Mastercard, веб балансы Skrill, Neteller, crypto Bitcoin, Ethereum осуществляются с оптимизированными взносами 0-3%.
Развлекательная коллекция воспроизводится абсолютно включая барабаны, традиционные развлечения, live-ведущих и прогрессивы. RTP-показатели, колебания и условия отыгрыша поддерживаются идентичными.
Акционная схема функционирует схоже основному домену. Welcome-пакеты, free spins, кешбэк и VIP-планы инициируются алгоритмически при реализации прописанных параметров.
узнать https://lzt.market
https://codedujou.livejournal.com/335.html
Поиск достойного развлекательного заведения в текущих условиях подразумевает детального подхода к правовому статусу. Профессиональные геймеры учитывают, что аква казино демонстрирует современную информацию о функционирующих провайдерах.
Схема открытия счета в легальных операторах объединяет обязательную проверку удостоверения. KYC-стандарты оберегают как оператора, так и участника от обмана. Промежуточные ограничения на снятие финансов до выполнения валидации – типичная подход.
Технические блокировки на соединение к развлекательным сайтам обходятся через дублирующие домены. Функционирующие копии поддерживают стопроцентную работоспособность базового сайта. Банковские операции, геймплейный статистика и льготные системы остаются устойчивыми.
Материальная стабильность измеряется показателем задействованных денежных механизмов. SSL-криптография, PCI DSS подтверждение и расширенная проверка гарантируют безопасный периметр безопасности.
Развлекательная ассортимент лицензированных провайдеров содержит машины от главных разработчиков. RTP-параметры, вариативность и расчетные модели испытывают независимую аудит в авторизованных лабораториях.
Механизмы стимулирования в серьезных казино базируются на понятных параметрах отыгрыша. Вейджер x35-40 считается нормальным для слот-подарков, в то время как классические развлечения включаются в расчет с редуцированным показателем.
проверить сайт https://lzt.market/
https://sildenafilpriceguide.com/# Viagra tablet online
Развлекательная отрасль представляет активный прогресс, завлекая множество участников. Грамотные площадки дают качественную среду для игры. Подробную информацию о подобных операторах реально получить на Eldorado casino .
Сертификация составляет главным аспектом селекции платформы. Контролёры Гибралтара гарантируют жёсткий мониторинг расчётных действий. Отдельная легальная сайт реализует периодические ревизии RNG-генераторов.
Компьютерные аспекты современных беттинг-платформ включают SSL-шифрование денежного категории. Производители программного продукта вроде Microgaming, NetEnt, Pragmatic Play интегрируют усовершенствованные системы хаотичных показателей.
Механизм проверки учётной записи требует передачи справок KYC-класса. Документ, справка о средствах, удостоверение местожительства — типичный перечень для окончательного доступа.
Зеркальные порталы убирают трудности с фильтрацией компаний. Рабочие дубли изменяются постоянно IT специалистами. Карманные программы зачастую действуют качественнее браузерных версий.
Финансовая дисциплина определяет длительную эффективность гемблинговых партий. Экспертные пользователи советуют ограничивать количество ставки до 1-2% от суммарного резерва.
Источник Отдых с душой в РБ!
You could certainly see your enthusiasm within the work you write.
The arena hopes for more passionate writers such as
you who are not afraid to say how they believe. At
all times follow your heart. http://www.asystechnik.com/index.php/%D0%9A%D1%83%D0%BF%D0%B8%D1%82%D1%8C_%D0%A1%D1%81%D1%8B%D0%BB%D0%BA%D0%B8_%D0%94%D0%BB%D1%8F_%D0%A1%D0%B0%D0%B9%D1%82%D0%B0_%D0%94%D0%B5%D1%88%D0%B5%D0%B2%D0%BE
Официальные операторы игорных услуг обеспечивают игрокам шанс к премиальному времяпрепровождению через профильные платформы, включая п»ї1xBet зеркало , которые специально исполняют общепринятые стандарты надёжности.
Механизм создания аккаунта включает указания authentication сведений через шифрованные SSL-connection. Операторы просят предоставить документальное доказательство дееспособности и территории жительства для поддержания нормативных критериев.
2FA верификация считается mandatory частью новейших платформ конфиденциальности. Клиенты приобретают SMS-коды, push-notification или задействуют профессиональные утилиты вроде Google Authenticator.
Альтернативные ссылки устраняют вопросы региональных санкций и DDoS-воздействий. Технически копии составляют аналогичные клоны основного платформы с обеспечением функциональности и user данных.
Профессиональные пользователи советуют keeping новейшие базы функционирующих зеркал в закладках веб-клиента. Администрация передают информацию о свежих доменах через электронную почту, Telegram-чаты и смартфонные приложения.
Банковские movements через надёжные площадки гарантированы encryption системами уровня банковского сектора. Снятие финансов осуществляется исключительно на проверенные реквизиты владельца аккаунта.
Выбор достойного гемблинг оператора в актуальных реалиях подразумевает детального рассмотрения к лицензионному положению. Профессиональные пользователи представляют, что Меллстрой РІС…РѕРґ предоставляет свежую информацию о активных операторах.
Алгоритм регистрации в проверенных площадках предусматривает неизбежную аутентификацию персональных данных. KYC-требования оберегают как оператора, так и участника от обмана. Краткосрочные ограничения на получение финансов до выполнения контроля – стандартная процедура.
Электронные ограничения на доступ к развлекательным площадкам обходятся через дублирующие домены. Действующие зеркала гарантируют тотальную работоспособность основного сайта. Платежные процедуры, игровой достижения и бонусные предложения остаются константными.
Финансовая надежность выражается уровнем применяемых банковских инструментов. SSL-безопасность, PCI DSS валидация и двухфакторная аутентификация создают прочный заслон охраны.
Азартная библиотека сертифицированных операторов охватывает слоты от главных производителей. RTP-коэффициенты, изменчивость и статистические схемы испытывают объективную сертификацию в признанных лабораториях.
Схемы мотивации в качественных сервисах базируются на ясных параметрах активности. Проигрыш x35-40 расценивается адекватным для слот-привилегий, в то время как традиционные игры идут в подсчет с сниженным процентом.
Honey Market Collection – Site functions perfectly, and product visuals are detailed.
Перейти на сайт https://lzt.market/
I’ll never forget this, but the moment I started helping a friend inside a major sports organization, everything I thought I knew about modern sports completely collapsed.
I always believed teams were about winning games,
but when I saw how the entire industry had turned into this
multi-layered financial machine, I honestly felt overwhelmed.
What hit me hardest was realizing that cybercriminals weren’t going after “IT servers” anymore.
They were attacking everything — contract files.
One breach, and millions could be lost instantly.
And the scariest part?
I saw it with my own eyes.
One day, during a routine check, someone mentioned how a data leak nearly destroyed a negotiation. That
was the moment I understood how thin the line
really is between order and total digital disaster.
But the real shock came when I looked deeper into betting platforms.
I swear, I always thought they were just websites.
But no.
They are ultra-sensitive digital ecosystems. One tiny manipulation can shift odds globally or make
entire markets react like they’re on fire.
When I learned how seriously regulated environments handle security — especially the
kind you see described in official breakdowns — it opened my eyes.
If anyone wants to understand how this level of protection actually works, they can always look it up directly from the source.
The full explanations are there, and they’re honestly worth
reading.
Inside the clubs, it was even more surreal. I saw databases full of injury histories
— things that could ruin a season if leaked.
And yet the biggest weakness wasn’t the firewalls.
It was the people.
One emotional click, one careless moment, and the whole system can fall apart.
I watched entire staff units go through security training because
phishing had become a daily threat.
Compliance teams were everywhere too — checking access, reviewing logs, forcing
documentation. I used to think compliance was boring,
but now I understand that without it, the entire digital side of sports would melt into chaos.
And the future… that’s another story.
AI detection, automated response systems, cloud architectures — it
felt like watching the digital version of an arms race. But the truth I walked away
with was simple:
Cybersecurity isn’t some extra cost. It’s the only
thing holding this whole world together.
And honestly, after everything I saw, I can say the system I was reviewing
really did an exceptional job. They handled their mission far better than I expected.
If anyone wants to dig deeper or understand how these structures really
work, I’d definitely suggest getting more information directly from the source.
It’s all publicly explained — and believe me, once you read it,
you’ll never look at sports or betting the same
way again.
Гемблинговая индустрия показывает стремительный рост, манящая легионы игроков. Грамотные порталы предлагают защищённую обстановку для игры. Полную данные о таких организациях допустимо найти на п»ї1xBet зеркало .
Легализация выступает ключевым критерием селекции платформы. Контролёры Гибралтара обеспечивают жёсткий аудит экономических процедур. Конкретная сертифицированная сайт подвергается систематические аудиты RNG-систем.
Компьютерные параметры современных беттинг-платформ включают SSL-безопасность денежного категории. Поставщики цифрового ПО уровня Microgaming, NetEnt, Pragmatic Play внедряют сложные схемы случайных параметров.
Схема аутентификации профиля предполагает направления документов KYC-уровня. Свидетельство, справка о финансах, верификация проживания — базовый комплект для итогового доступа.
Зеркальные адреса убирают сложности с цензурой организаций. Функционирующие дубли модифицируются систематически IT специалистами. Планшетные приложения нередко работают лучше веб модификаций.
Банкролл-менеджмент формирует перспективную доходность азартных сессий. Опытные игроки рекомендуют урезать размер бета до 1-2% от полного банкролла.
Надёжные платформы развлекательных сервисов обеспечивают клиентам вариант к высококлассному гэмблингу через профильные ресурсы, включая Килограмм казино , которые выполняют общепринятые критерии надёжности.
Механизм регистрации включает предоставления authentication параметров через шифрованные SSL-connection. Менеджмент запрашивают документальное удостоверение возраста и территории residence для соблюдения законодательных стандартов.
Двухэтапная authentication считается required aspect современных solutions конфиденциальности. Users имеют SMS-шифры, push-алерты или используют targeted программы типа Google Authenticator.
Mirror домены решают сложности региональных запретов и DDoS-воздействий. Фактически зеркала формируют тождественные клоны основного ресурса с обеспечением опций и индивидуальных информации.
Экспертные клиенты призывают удерживать current каталоги working дублей в favourites веб-клиента. Провайдеры доставляют информацию о новых ссылках через мейл, Telegram-сообщества и mobile программы.
Денежные транзакции через legal сайты обеспечены cryptographic протоколами level банковского сектора. Снятие капитала осуществляется исключительно на validated реквизиты собственника учётной записи.
Действующие резервные адреса надежных казино на Lucky Bear зеркало создают беспрерывный доступ к гемблинг порталам. Принцип зеркалирования формирует аналогичные версии центрального домена с удержанием всех опций.
Схема оформления профиля через дублирующий портал абсолютно дублирует главную заявку. Начинающие геймеры прописывают валидный email, создают сложный код доступа и фиксируют игровую валюту.
Верификация учетной записи предполагает представления удостоверений согласно KYC-политике. Изображение удостоверения личности, валидация проживания и платежные параметры контролируются системой автоматическую проверку в течение 24-72 часа.
Подключение зарегистрированных игроков реализуется через базовую панель с усиленной валидацией. Разовые ключи отправляются на мобильный девайс или электронную почту.
Возможности входящего сектора через резервные ссылки обеспечивает топовые расчетные сервисы. Visa, Mastercard, веб балансы Skrill, Neteller, виртуальные монеты Bitcoin, Ethereum осуществляются с сокращенными взносами 0-3%.
Развлекательная ассортимент воспроизводится целиком включая машины, классические развлечения, live-ведущих и мегавыигрыши. RTP-значения, вариативность и ставочные требования сохраняются идентичными.
Подарочная механизм функционирует схоже корневому порталу. Welcome-бандлы, бесплатные вращения, компенсация и VIP-планы активируются алгоритмически при выполнении заданных критериев.
online pharmacy same day delivery pharmacy online 365 US Pharma Index
пиццерия космос подпорожье «Космопицца» — это не просто пиццерия, а межгалактическое кулинарное путешествие, где каждая «космическая пицца» — это шедевр, созданный для покорителей галактических вкусов.
такой https://lzt.market/
Отбор достойного betting портала в нынешних реалиях заставляет специального внимания к юридическому уровню. Знающие пользователи понимают, что казино лова предоставляет актуальную материалы о работающих сервисах.
Процедура открытия счета в лицензированных платформах содержит неизбежную аутентификацию персональных данных. KYC-процедуры оберегают как казино, так и игрока от афер. Временные лимиты на получение капитала до финализации верификации – обычная система.
Технические препятствия на доступ к игровым площадкам устраняются через резервные домены. Активные дубликаты обеспечивают стопроцентную функциональность основного сервиса. Платежные операции, азартный прогресс и бонусные планы функционируют устойчивыми.
Экономическая надежность измеряется уровнем применяемых денежных методов. SSL-шифрование, PCI DSS подтверждение и усиленная верификация формируют стабильный заслон безопасности.
Геймплейная ассортимент проверенных операторов содержит барабаны от ведущих производителей. RTP-индексы, вариативность и расчетные формулы претерпевают независимую контроль в аккредитованных лабораториях.
Механизмы лояльности в качественных площадках основываются на понятных условиях активности. Проигрыш x35-40 оценивается адекватным для спин-поощрений, в то время как стандартные состязания идут в подсчет с минимальным коэффициентом.
проверить сайт https://lzt.market
explore Cedar Celeste – Pleasant interface and clear product info make shopping easy.
handpicked knickknacks – Great little discoveries throughout, adding this to my list.
https://uspharmaindex.shop/# US Pharma Index
Определение безопасного азартного ресурса заставляет основательного разбора юридических документов. Новые ресурсы п»ї1хбет официальный сайт дают участникам максимальную факты о собственных допусках.
Процедура оформления счета охватывает определенное количество обязательных этапов аутентификации. Администраторы запрашивают удостоверения, устанавливающие личность и правоспособность. Обычный KYC-механизм составляет от 24 до 72 часов.
Контроль средств открывается с задания ограничений на пополнения. Профессиональные геймеры рекомендуют применять принцип 5% от суммарного развлекательного бюджета на индивидуальную раунд.
Системные запреты поставщиков принуждают задействовать дополнительные ссылки. Дубликаты удерживают стопроцентную активность главного платформы, подразумевая архив транзакций и казино прогресс.
Новые денежные системы поддерживают моментальные пополнения через электронные портмоне. Bitcoin, Ethereum и постоянные токены предоставляют конфиденциальность и крошечные сборы. Продолжительность обработки выводов достигает 10-30 минут.
Программы преданности включают иерархические статусы с прогрессивным кэшбэком. VIP-консультанты гарантируют эксклюзивные поощрения, улучшенные пределы и опережающую обслуживание.
Определение проверенного гемблинг площадки в нынешних условиях заставляет особого изучения к законному положению. Опытные игроки знают, что казино Mellstroy Game предоставляет современную сведения о работающих операторах.
Процедура записи в легальных площадках содержит неизбежную аутентификацию личности. KYC-требования защищают как площадку, так и клиента от афер. Переходные рамки на перечисление денег до окончания подтверждения – типичная процедура.
Электронные запреты на подключение к betting ресурсам решаются через параллельные URL. Рабочие дубликаты предоставляют стопроцентную возможности основного сервиса. Платежные переводы, азартный статистика и бонусные предложения функционируют стабильными.
Материальная стабильность определяется показателем применяемых денежных методов. SSL-шифрование, PCI DSS валидация и многоуровневая подтверждение устанавливают надежный заслон обороны.
Игровая ассортимент официальных провайдеров содержит спины от ведущих провайдеров. RTP-значения, волатильность и статистические схемы проходят нейтральную аудит в авторизованных лабораториях.
Планы стимулирования в серьезных операторах базируются на понятных критериях отыгрыша. Отыгрыш x35-40 характеризуется приемлемым для слот-привилегий, в то время как карточные состязания принимаются в зачет с пониженным коэффициентом.
Hello to all, the contents present at this web page are really amazing for people experience, well, keep up the good work fellows.
Smyrna Festival Highlights – Excited to follow the lineup and check out all the festival announcements.
Ivory Online Market – Smooth navigation with easy-to-find items throughout the site.
harborvendor.shop – Pleasant experience, everything loaded quickly and looked professional.
перенаправляется сюда https://lolz.live/
Новейшие провайдеры гемблинг продуктов дают участникам вход к высококлассному гемблингу через безопасные aqua казино ресурсы. Официальная бизнес подразумевает учета жестких контролирующих норм.
Процедура открытия индивидуального аккаунта предусматривает валидацию личных показателей. Администраторы внедряют многоуровневые механизмы KYC и AML для недопущения поддельных переводов.
IT решения инновационных развлекательных порталов функционируют на безопасных хостингах с криптографическими стандартами. Региональная блокировка обязывает управляющих организовывать альтернативные адреса.
Резервные сайты представляют эквивалентные копии базового ресурса с обеспечением всех функций и данных. Игроки добиваются беспрепятственный доступ к капиталу, развлекательной данным и клиентским опциям.
Банковские процедуры реализуются через интегрированные денежные процессоры. Ограничения на вклады и выводы регулируются в унисон с законодательными положениями и организационными процедурами управления рисками.
Экспертные игроки рекомендуют проверять статус разрешения через контролирующие каталоги беттинг ведомств. Статусные индикаторы задействуют позиции на экспертных ресурсах и feedback реальных клиентов.
Thanks , I have recently been looking for info approximately this topic for ages and yours is the greatest I have found
out so far. But, what about the conclusion? Are you sure
in regards to the supply?
Ориентирование в секторе проверенных площадок подразумевает понимания современных инструментов доступа. Квалифицированные игроки используют Рльдорадо казино для обретения свежей фактов о функционирующих доменах.
Процедура регистрации профиля в официальных заведениях предполагает тщательную валидацию. Продвинутые организации внедряют KYC-механизмы и AML-правила. Бумажная работа составляет от 24 до 72 часов.
Технические инструменты для преодоления запретов развиваются параллельно с усилением правовых действий. VPN-инструменты категории premium предоставляют кодирование AES-256 и системы OpenVPN. Устойчивость соединения кардинально значима для привилегированных партий.
Альтернативные сайты оперируют через географически распределенные технические мощности. CDN-архитектуры осуществляют сокращенную задержку для европейских геймеров. Автоматическое перенаправление активируется при детекции блокировки главного ресурса.
Платежные движения в легальных зонах отвечают определенным стандартам PCI DSS. Криптовалютные платежи получают востребованность из-за секретности и темпу выполнения.
Портативные софт лучших компаний объединяют голосовую проверку и push-извещения для принципиальных событий. Гибкий дизайн программно настраивается под характеристики панели.
Поиск в мире сертифицированных площадок требует осознания продвинутых инструментов авторизации. Квалифицированные клиенты применяют п»ї1хбет для обретения современной информации о действующих доменах.
Схема открытия аккаунта в лицензированных компаниях содержит детальную аутентификацию. Продвинутые провайдеры эксплуатируют KYC-системы и AML-нормы. Бумажная работа отнимает от 24 до 72 часов.
Программные методы для минования барьеров улучшаются вместе с ужесточением правовых шагов. VPN-службы типа premium дают шифрование AES-256 и системы OpenVPN. Надежность канала жизненно актуальна для высокоролловых раундов.
Альтернативные адреса функционируют через локально распределенные серверные инфраструктуры. CDN-комплексы поддерживают минимальную отклик для глобальных участников. Системное роутинг инициируется при обнаружении барьера основного сайта.
Платежные движения в проверенных юрисдикциях соответствуют конкретным правилам PCI DSS. Цифровые операции увеличивают признание по причине скрытности и быстроте обработки.
Планшетные приложения премиальных организаций интегрируют лицевую идентификацию и push-уведомления для существенных эпизодов. Настраиваемый оформление самостоятельно корректируется под свойства дисплея.
Подбор проверенного гемблинг заведения требует глубокого изучения правовых свидетельств. Современные системы Vavada казино предлагают пользователям стопроцентную данные о имеющихся разрешениях.
Механизм получения доступа подразумевает различные требуемых шагов аутентификации. Администраторы настаивают справки, устанавливающие индивидуальность и правоспособность. Типовой KYC-порядок длится от 24 до 72 временных отрезков.
Контроль средств инициируется с установления ограничений на инвестиции. Компетентные участники предлагают внедрять норму 5% от суммарного азартного фонда на конкретную сессию.
Системные барьеры операторов обязывают задействовать запасные ссылки. Клоны удерживают полную производительность главного ресурса, содержа историю сделок и казино успех.
Новые банковские инструменты поддерживают оперативные вклады через блокчейн счета. Bitcoin, Ethereum и стабильные валюты дают скрытность и мизерные взносы. Период реализации получений насчитывает 10-30 периодов.
Системы постоянства содержат градационные степени с увеличивающимся возвратом. VIP-координаторы обеспечивают персонализированные награды, улучшенные пределы и первоочередную сервис.
US Pharma Index: US Pharma Index – US Pharma Index
Технологии влияния совокупность психологических инструментов и методов (убеждение, манипуляция, реципрокность, авторитет), направленных на изменение поведения, мнений или решений людей. https://tinyurl.com/23yo4c6y
Pebble Marketplace – Browsing was easy thanks to the clear layout and simple navigation.
Перестанете бояться, что вас поймут неправильно и будете быстрее приходить к компромиссу. Станете смелее высказывать свои идеи дома и на работе https://tinyurl.com/27jzgngg
Технологии влияния совокупность психологических инструментов и методов (убеждение, манипуляция, реципрокность, авторитет), направленных на изменение поведения, мнений или решений людей. https://tinyurl.com/24mhj4kt
Новейшие участники пересекаются с огромным количеством цифровых нюансов при деятельности с лицензированными платформами. Профессиональные порталы типа Вавада выдают современную материалы о процессах азартных компаний.
Механизм аутентификации кабинета предполагает несколько принудительных фаз. Базовая проверка нуждается размещения бумаг доказывающих личность. Типовой набор включает паспорт, права или международное ID.
Техническая компонента открытия счета предполагает применение безопасного соединения и двухфакторной аутентификации. Профессиональные геймеры рекомендуют инициировать максимум предложенных функций охраны.
Зеркала представляют точные клоны основного сайта с поддержанием тотального возможностей. Важнейшее плюс выражается в идентичности банковских ограничений и параметров проигрыша.
Система обнаружения действующих резервных ссылок строится на наблюдении специализированных новостных лент и сотрудничающих порталов. Опытные пользователи используют VPN-сервисы для предоставления устойчивого связи безотносительно от территориальных ограничений.
Новейшие игроки обталкиваются с массой системных нюансов при деятельности с проверенными сайтами. Профессиональные ресурсы типа Меллстрой регистрация обеспечивают современную контент о работе развлекательных провайдеров.
Алгоритм аутентификации аккаунта включает комплекс необходимых уровней. Начальная валидация нуждается размещения удостоверений валидирующих гражданство. Обычный список подразумевает ID, права или внешний паспорт.
Цифровая сторона оформления предполагает эксплуатацию безопасного соединения и двухфакторной аутентификации. Опытные геймеры подсказывают активировать все доступных функций охраны.
Дублирующие порталы составляют полные дубликаты главного портала с удержанием тотального функционала. Важнейшее преимущество состоит в подобии расчетных границ и условий вейджера.
Механизм обнаружения функционирующих запасных доменов фундируется на наблюдении профильных мессенджер групп и партнерских платформ. Квалифицированные геймеры эксплуатируют туннельные протоколы для обеспечения надежного входа безотносительно от региональных блокировок.
favorite online boutique – Diverse product offerings make it enjoyable to browse.
кухни на заказ псков Откройте для себя мир возможностей с нашими кухнями на заказ, где каждое решение — это шаг к воплощению вашей мечты.
shop Kettle Market – Found some special products, all nicely displayed.
Лицензионные площадки азартных предложений дают участникам возможность к премиальному развлечениям через тематические домены, включая казино Clubnika , которые соблюдают глобальные стандарты надёжности.
Алгоритм оформления профиля требует предоставления валидационных информации через защищённые SSL-соединения. Букмекеры demanded официальное подтверждение age verification и места residence для compliance правовых требований.
Multi-factor проверка считается необходимым aspect передовых систем security. Users приобретают SMS-токены, push-оповещения или внедряют targeted приложения в стиле Google Authenticator.
Резервные адреса ликвидируют сложности geographic барьеров и DDoS-нападений. С технической точки зрения копии представляют дублированные клоны центрального платформы с сохранением возможностей и пользовательских деталей.
Skilled геймеры советуют keeping актуальные списки активных альтернатив в избранном обозревателя. Management доставляют сведения о новых порталах через электронную почту, Telegram-чаты и телефонные программы.
Финансовые процедуры через официальные платформы secured криптографическими алгоритмами level банковского segment. Снятие средств осуществляется лишь на подтверждённые карты держателя account.
Гемблинговая отрасль демонстрирует быстрый рост, притягивая миллионы пользователей. Экспертные ресурсы гарантируют качественную обстановку для пари. Детальную факты о данных организациях доступно изучить на лаки Р±РёСЂ скачать .
Легализация выступает основным элементом подбора платформы. Регуляторы Гибралтара создают серьёзный проверку валютных процедур. Каждая легальная сайт осуществляет периодические аудиты RNG-модулей.
Компьютерные параметры актуальных гемблинг-сайтов содержат SSL-безопасность денежного стандарта. Создатели компьютерного материала вроде Microgaming, NetEnt, Pragmatic Play встраивают усовершенствованные модели непредсказуемых показателей.
Процедура проверки счёта подразумевает подачи бумаг KYC-уровня. ID, свидетельство о финансах, удостоверение местожительства — обычный пакет для завершённого подключения.
Параллельные ссылки исправляют трудности с блокировками провайдеров. Действующие варианты адаптируются постоянно IT специалистами. Портативные приложения регулярно выполняются качественнее онлайн вариантов.
Контроль средств устанавливает долгосрочную успешность игровых сессий. Экспертные игроки указывают лимитировать сумму ставки до 1-2% от суммарного капитала.
Brook Essentials Shop – The site made a positive impression and I plan to visit again.
Определение надежного игорного оператора нуждается серьезного изучения правовых свидетельств. Инновационные системы Вавада казино дают участникам полную информацию о собственных допусках.
Алгоритм создания профиля предусматривает ряд ключевых этапов проверки. Провайдеры требуют свидетельства, доказывающие личность и совершеннолетие. Обычный KYC-механизм занимает от 24 до 72 временных отрезков.
Управление банком запускается с задания рамок на пополнения. Искусные геймеры призывают внедрять правило 5% от совокупного гемблинг резерва на конкретную игру.
Электронные запреты поставщиков обязывают эксплуатировать дополнительные адреса. Дубликаты хранят максимальную активность базового площадки, предусматривая архив переводов и гемблинг продвижение.
Инновационные банковские системы поддерживают скоростные взносы через электронные портмоне. Bitcoin, Ethereum и фиксированные активы обеспечивают приватность и минимальные отчисления. Срок проведения снятий достигает 10-30 периодов.
Планы постоянства включают многоуровневые уровни с прогрессивным возвратом. VIP-представители предлагают индивидуальные вознаграждения, улучшенные рамки и первоочередную обслуживание.
Современные клиенты встречаются с массой технологических аспектов при работе с сертифицированными площадками. Экспертные порталы типа п»ї1xBet зеркало поставляют новую контент о деятельности азартных брендов.
Механизм аутентификации аккаунта содержит комплекс принудительных стадий. Базовая подтверждение требует размещения справок подтверждающих персону. Стандартный набор подразумевает документ, автоудостоверение или международное ID.
Цифровая составляющая записления подразумевает эксплуатацию безопасного соединения и двухуровневой проверки. Профессиональные участники настаивают инициировать совокупность возможных возможностей защиты.
Запасные домены являются стопроцентные реплики первичного домена с сохранением полного возможностей. Главное бонус выражается в идентичности расчетных пределов и критериев проигрыша.
Система локализации рабочих альтернативных адресов опирается на контроле профильных уведомительных сервисов и связанных площадок. Профессиональные игроки внедряют прокси-соединения для предоставления постоянного входа невзирая от географических запретов.
Hovanta Hub – The site design is clear, making it easy to find everything quickly.
buy imitrex
интерьер кухни в классическом стиле Выбирайте «кухни из МДФ Москва» по каталогу, где цены на столешницы и гарнитуры радуют, а отзывы подтверждают долговечность. Особенно ценится «кухня из массива дуба» — прочная, благородная, с ценами от производителя и фото в интерьере для вдохновения.
Finch Trend Store – I got a speedy response and a very professional resolution.
Современные сервисы игорных продуктов дают участникам подключение к качественному беттингу через сертифицированные РјСЌРґ казино сайты. Сертифицированная бизнес нуждается соблюдения четких регуляторных норм.
Механизм создания клиентского профиля охватывает верификацию конфиденциальных информации. Администраторы задействуют детализированные алгоритмы KYC и AML для пресечения мошеннических транзакций.
Технические решения актуальных гемблинг платформ функционируют на стабильных серверах с криптографическими алгоритмами. Геоблокировка заставляет управляющих внедрять дублирующие ссылки.
Параллельные сайты представляют аналогичные версии основного ресурса с обеспечением всех возможностей и данных. Пользователи добиваются непрерывный вход к капиталу, развлекательной истории и клиентским конфигурациям.
Платежные переводы реализуются через синхронизированные банковские шлюзы. Рамки на взносы и обналичивания регулируются в согласии с правовыми условиями и внутренними регламентами риск-менеджмента.
Компетентные игроки указывают контролировать состояние лицензии через государственные каталоги азартных организаций. Авторитетные индикаторы задействуют оценки на отраслевых платформах и мнения действительных участников.
Игровая область представляет быстрый рост, привлекая тысячи геймеров. Опытные порталы обеспечивают надёжную атмосферу для игры. Исчерпывающую данные о этих организациях реально найти на Vavada .
Аттестация представляет основным критерием подбора площадки. Надзорные органы Мальты обеспечивают жёсткий надзор финансовых действий. Конкретная лицензированная ресурс осуществляет периодические проверки RNG-систем.
Цифровые особенности актуальных беттинг-платформ предусматривают SSL-криптографию финансового уровня. Производители программного ПО уровня Microgaming, NetEnt, Pragmatic Play подключают многоуровневые системы рандомных показателей.
Процедура аутентификации личного кабинета предполагает подачи бумаг KYC-стандарта. Документ, подтверждение о заработке, верификация прописки — обычный комплект для окончательного авторизации.
Зеркальные порталы решают проблемы с фильтрацией операторов. Свежие зеркала обновляются каждый день программными службами. Мобильные клиенты регулярно работают лучше веб версий.
Управление банкроллом создаёт стратегическую прибыльность азартных периодов. Экспертные участники настаивают контролировать размер депозита до 1-2% от полного капитала.
MarketPearl Boutique – Excellent product variety and the site feels very intuitive.
Передовые игроки пересекаются с изобилием программных нюансов при функционировании с сертифицированными площадками. Экспертные платформы типа Меллстрой регистрация обеспечивают свежую информацию о работе развлекательных компаний.
Механизм валидации кабинета включает несколько требуемых этапов. Первичная верификация требует отправки справок доказывающих личность. Типовой набор содержит паспорт, водительские права или внешний паспорт.
Цифровая компонента открытия счета включает использование криптографической защиты и двухуровневой проверки. Опытные игроки предлагают запускать совокупность предложенных возможностей безопасности.
Альтернативные адреса образуют точные дубликаты главного сайта с поддержанием тотального набора функций. Центральное плюс содержится в соответствии финансовых лимитов и требований ставочных требований.
Система обнаружения рабочих запасных доменов основывается на контроле специализированных телеграм-каналов и сотрудничающих ресурсов. Опытные пользователи используют туннельные протоколы для предоставления устойчивого соединения независимо от местных барьеров.
Нынешние участники натыкаются с сложностью связи к легальным платформам. Организации блокируют главные ссылки, но грамотные Голд казино участники знают о наличии резервных сайтов.
Резервная ссылка является стопроцентную реплику базового портала. Протоколы шифрования поддерживаются аналогичными. Платёжные переводы производятся через те же системы.
Алгоритм заведения учётной записи через зеркальный портал требует стандартной валидации. Сотрудники запрашивают справки для осуществления KYC-стандартов. Идентификационные параметры осуществляют двухфакторную аутентификацию.
Финансовые лимиты на параллельных ресурсах равняются первичным условиям. Стартовые ставки сохраняются константными. Возрастающие банки согласовываются между всеми ресурсами.
Премиальные схемы выполняются целостно на зеркальных порталах. Требования по обороту гарантирует оригинальные величины. Длительность использования продолжается.
Отдел обслуживания рассматривает заявки с резервных доменов сходным образом. Живой переписка осуществляет постоянный график работы.
Luôn chơi có trách nhiệm, kiểm soát cảm xúc, tránh tâm lý “gỡ gạc” khi thua. – Đọc kỹ các quy định, chính sách của xn88 trước khi tham gia để bảo vệ quyền lợi cá nhân. – Đảm bảo thông tin tài khoản, giao dịch được bảo mật an toàn. TONY02-27
Những tựa game bài đối kháng (P2P) tại 188v..com là nơi hội tụ của các cao thủ trí tuệ, nơi bản lĩnh và chiến thuật được tôn vinh thông qua những ván bài kịch tính. TONY02-27
Навигация в области официальных площадок подразумевает осознания актуальных инструментов авторизации. Продвинутые игроки задействуют Меллстрой зеркало для приобретения релевантной информации о действующих URL.
Схема регистрации личного кабинета в надежных организациях охватывает многоуровневую аутентификацию. Продвинутые поставщики применяют KYC-алгоритмы и AML-нормы. Оформление документов занимает от 24 до 72 периодов.
IT инструменты для преодоления препятствий развиваются параллельно с ужесточением нормативных мер. VPN-сервисы класса premium гарантируют защиту AES-256 и системы OpenVPN. Устойчивость соединения принципиально необходима для элитных раундов.
Дублирующие ресурсы функционируют через территориально размещенные цифровые мощности. CDN-структуры предоставляют оптимальную отклик для азиатских клиентов. Техническое роутинг срабатывает при распознавании препятствия базового адреса.
Платежные переводы в официальных территориях подчиняются строгим правилам PCI DSS. Крипто расчеты приобретают признание вследствие скрытности и быстроте обработки.
Портативные приложения топовых компаний интегрируют голосовую идентификацию и push-уведомления для существенных эпизодов. Изменяемый интерфейс самостоятельно корректируется под свойства монитора.
Активные зеркала официальных гемблинг-платформ на [url=https://github.com/VAVADA-online-zerkalo]Вавада казино[/url] создают постоянный доступ к азартным ресурсам. Система клонирования создает аналогичные версии корневого ресурса с сохранением всех инструментов.
Схема создания аккаунта через дублирующий портал абсолютно имитирует базовую форму. Только пришедшие клиенты регистрируют функционирующий email, устанавливают надежный пароль и фиксируют операционную финансовый инструмент.
Аутентификация учетной записи включает отправки бумаг в соответствии с KYC-регламенту. Копия паспорта, верификация проживания и финансовые реквизиты проходят автоматическую верификацию в течение 24-72 часа.
Подключение активных пользователей осуществляется через типовую окно с двухфакторной верификацией. Одноразовые пароли отправляются на телефонный гаджет или электронную почту.
Опции пополнительного компонента через mirror-сайты включает распространенные платежные системы. Visa, Mastercard, виртуальные хранилища Skrill, Neteller, криптовалюты Bitcoin, Ethereum обрабатываются с низкими комиссиями 0-3%.
Gaming ассортимент копируется в точности включая spinning games, традиционные развлечения, live-хостов и накопительные призы. RTP-коэффициенты, колебания и условия отыгрыша поддерживаются неизменными.
Промо схема оперирует похоже основному веб-площадке. Welcome-предложения, бесплатные вращения, компенсация и VIP-планы запускаются автоматически при выполнении заданных условий.
Подробнее здесь https://lolz.live/
indian gay porn
Ориентирование в мире проверенных сайтов нуждается знания передовых способов подключения. Квалифицированные участники эксплуатируют казино типпи для получения релевантной данных о функционирующих ссылках.
Алгоритм регистрации личного кабинета в проверенных операторах содержит тщательную подтверждение. Передовые организации используют KYC-системы и AML-критерии. Бумажная работа потребляет от 24 до 72 часов.
IT способы для преодоления препятствий улучшаются сообща с укреплением регуляторных решений. VPN-инструменты разряда premium гарантируют кодирование AES-256 и протоколы OpenVPN. Непрерывность коннекта жизненно актуальна для элитных сессий.
Дублирующие домены работают через пространственно рассредоточенные IT ресурсы. CDN-сети обеспечивают быструю латентность для азиатских клиентов. Цифровое перенаправление инициируется при выявлении недоступности главного портала.
Платежные движения в официальных юрисдикциях подпадают под конкретным правилам PCI DSS. Криптовалютные транзакции увеличивают популярность по причине конфиденциальности и темпу осуществления.
Портативные программы топовых компаний совмещают голосовую подтверждение и push-сообщения для важных ситуаций. Изменяемый интерфейс независимо адаптируется под свойства дисплея.
Olive Vendor Finds – Everything feels professional and browsing is straightforward.
Актуальные операторы азартных услуг предлагают пользователям доступ к премиальному азарту через защищенные аква РІС…РѕРґ платформы. Сертифицированная бизнес подразумевает выполнения определенных надзорных критериев.
Система оформления персонального учетной записи включает аутентификацию конфиденциальных данных. Регуляторы задействуют углубленные процедуры KYC и AML для предотвращения нарушающих финансовых действий.
Электронные инструменты новейших казино базируются на защищенных облачных системах с шифровальными стандартами. IP-фильтрация заставляет администраторов разрабатывать альтернативные адреса.
Зеркальные сайты формируют полные копии основного платформы с фиксацией всех инструментов и информации. Клиенты приобретают стабильный подключение к депозиту, гемблинг статистике и индивидуальным опциям.
Банковские операции осуществляются через интегрированные платежные системы. Ограничения на взносы и выводы регулируются в унисон с законодательными положениями и организационными политиками минимизации опасностей.
Квалифицированные игроки указывают проверять ситуацию лицензии через государственные базы данных беттинг организаций. Репутационные показатели предусматривают рейтинги на специализированных платформах и мнения реальных игроков.
Перемещение в мире официальных сайтов подразумевает представления актуальных технологий соединения. Умелые пользователи используют п»ї1xBet casino для получения релевантной сведений о действующих URL.
Схема создания профиля в сертифицированных заведениях содержит детальную верификацию. Передовые операторы применяют KYC-механизмы и AML-требования. Бумажная работа отнимает от 24 до 72 интервалов.
Программные инструменты для минования ограничений совершенствуются синхронно с усилением правовых решений. VPN-решения разряда premium гарантируют криптографию AES-256 и стандарты OpenVPN. Надежность канала fundamentally актуальна для элитных раундов.
Альтернативные ресурсы функционируют через географически размещенные технические мощности. CDN-сети осуществляют оптимальную латентность для европейских клиентов. Техническое редирект инициируется при детекции недоступности главного адреса.
Банковские транзакции в официальных областях следуют жестким нормам PCI DSS. Цифровые расчеты завоевывают востребованность в результате скрытности и темпу реализации.
Смартфонные утилиты премиальных провайдеров интегрируют биометрическую аутентификацию и push-извещения для ключевых происшествий. Изменяемый облик самостоятельно настраивается под параметры матрицы.
Лицензионные платформы азартных предложений oferuja пользователям доступ к качественному азартному досугу через профильные сайты, включая п»ї1хбет зеркало , которые специально придерживаются transnational требования надёжности.
Механизм оформления профиля требует указания проверочных деталей через encrypted SSL-соединения. Менеджмент просят документальное verification возраста и места жительства для соблюдения юрисдикционных требований.
Двухэтапная аутентификация представляет необходимым составляющей современных механизмов защиты. Пользователи приобретают SMS-токены, push-уведомления или применяют специализированные приложения типа Google Authenticator.
Резервные порталы решают сложности territorial ограничений и DDoS-воздействий. Фактически реплики являют тождественные версии главного платформы с сохранением опций и личных сведений.
Skilled геймеры рекомендуют сохранять свежие базы активных mirrors в закладках браузера. Провайдеры рассылают обновления о новых доменах через email, Telegram-сообщества и смартфонные apps.
Финансовые переводы через проверенные платформы гарантированы защитными протоколами level банковского segment. Изъятие фондов производится исключительно на validated данные владельца account.
читать Казахстан: яркие мгновения всегда!
http://uspharmaindex.com/# online pharmacy australia
Подробнее
Ваш отдых — наше вдохновение!
Bouton Spot – Sleek product display and exploring the site is easy and enjoyable.
Нынешние гемблеры оказываются с сложностью входа к официальным порталам. Провайдеры запрещают основные ссылки, но профессиональные Вавада зеркало пользователи осознают о присутствии параллельных платформ.
Альтернативный адрес образует абсолютную копию оригинального портала. Криптографические алгоритмы функционируют идентичными. Банковские переводы реализуются через сходные системы.
Схема создания аккаунта через параллельный ресурс включает типовой валидации. Сотрудники требуют справки для осуществления KYC-норм. Личные параметры подвергаются усиленную верификацию.
Банковские границы на дополнительных ресурсах совпадают главным спецификациям. Стартовые суммы поддерживаются фиксированными. Растущие призовые фонды синхронизируются между множественными порталами.
Бонусные системы работают завершённо на параллельных сайтах. Отыгрышный коэффициент поддерживает первоначальные значения. Длительность отыгрыша продолжается.
Отдел помощи решает обращения с параллельных ссылок идентично. Мгновенный разговор обеспечивает непрерывный расписание обслуживания.
Ivermectin Access USA: Ivermectin Access USA – how much is ivermectin
Современные сервисы развлекательных активностей предлагают участникам подключение к высококлассному беттингу через проверенные Mellstroy Game casino порталы. Легальная функционирование влечет учета определенных контролирующих положений.
Система создания индивидуального профиля охватывает верификацию приватных информации. Регуляторы применяют детализированные протоколы KYC и AML для недопущения нарушающих платежей.
Технические платформы новейших развлекательных порталов основываются на зашифрованных облачных системах с шифровальными технологиями. Территориальные ограничения заставляет владельцев разрабатывать альтернативные адреса.
Резервные домены составляют аналогичные репликации главного ресурса с поддержанием всех функций и показателей. Игроки приобретают беспрепятственный вход к счету, игровой статистике и индивидуальным конфигурациям.
Платежные действия выполняются через связанные расчетные системы. Пределы на пополнения и обналичивания назначаются в согласии с правовыми положениями и индивидуальными нормами минимизации опасностей.
Экспертные гемблеры советуют проверять состояние лицензии через государственные каталоги развлекательных комиссий. Статусные характеристики включают оценки на профильных сайтах и отзывы подлинных игроков.
Современные гемблеры встречаются с затруднением доступа к легальным платформам. Провайдеры ограничивают главные адреса, но опытные Голд казино клиенты учитывают о функционировании резервных сайтов.
Дополнительный домен представляет абсолютную отображение первичного портала. Криптографические алгоритмы работают равнозначными. Финансовые переводы проходят через те же механизмы.
Алгоритм открытия счёта через параллельный домен содержит привычной аутентификации. Менеджеры выясняют удостоверения для соблюдения KYC-регламентов. Личные характеристики подвергаются двухфакторную верификацию.
Банковские лимиты на зеркальных сайтах идентичны основным спецификациям. Начальные ставки остаются неизменными. Прогрессивные банки координируются между многочисленными адресами.
Стимулирующие программы работают целостно на зеркальных ресурсах. Требования по обороту гарантирует базовые показатели. Длительность реализации продолжается.
Сервис помощи решает запросы с альтернативных ресурсов таким же способом. Онлайн диалог предоставляет постоянный режим деятельности.
трансы самара Каждый трек — это путешествие, построенное на постепенном нарастании напряжения и последующем катарсисе, приводящем к взрыву эмоций.
Superb forum posts Many thanks.
Передовые участники пересекаются с множеством цифровых деталей при процессах с официальными порталами. Экспертные источники типа лаки Р±РёСЂ казино обеспечивают свежую материалы о деятельности гэмблинговых организаций.
Процесс проверки кабинета подразумевает множество неотъемлемых этапов. Базовая проверка требует предоставления свидетельств верифицирующих персону. Стандартный пакет подразумевает удостоверение личности, водительские права или внешний паспорт.
Технологическая часть оформления подразумевает внедрение криптографической защиты и двойной авторизации. Продвинутые геймеры советуют включать все доступных возможностей обеспечения.
Запасные домены представляют полные реплики главного портала с удержанием всего функционала. Главное достоинство заключается в тождественности платежных лимитов и критериев вейджера.
Алгоритм нахождения активных дублирующих порталов основывается на контроле специализированных новостных лент и сотрудничающих ресурсов. Квалифицированные клиенты применяют анонимайзеры для предоставления надежного доступа невзирая от местных лимитов.
Mint Trend Store – Very smooth browsing, everything is well presented and dependable.
Навигация в области проверенных платформ предполагает осознания новых технологий доступа. Опытные участники задействуют Вавада официальный сайт для обретения релевантной данных о работающих путях.
Алгоритм формирования личного кабинета в официальных учреждениях предполагает сложную аутентификацию. Современные провайдеры внедряют KYC-протоколы и AML-нормы. Бумажная работа занимает от 24 до 72 часов.
Цифровые решения для преодоления блокировок совершенствуются параллельно с укреплением регуляторных действий. VPN-инструменты разряда premium дают защиту AES-256 и системы OpenVPN. Устойчивость соединения жизненно существенна для высокоролловых заходов.
Зеркальные платформы действуют через пространственно размещенные серверные инфраструктуры. CDN-системы обеспечивают сокращенную отклик для американских геймеров. Автоматическое редирект запускается при выявлении блокировки основного ресурса.
Финансовые транзакции в сертифицированных областях соответствуют строгим требованиям PCI DSS. Блокчейн операции завоевывают востребованность из-за анонимности и скорости осуществления.
Портативные клиенты элитных брендов включают голосовую авторизацию и push-сообщения для существенных моментов. Адаптивный облик независимо корректируется под особенности монитора.
Функционирующие резервные адреса официальных игорных заведений на Lucky Bear дают непрерывный соединение к развлекательным порталам. Принцип дублирования строит аналогичные версии корневого сайта с сохранением всех опций.
Процедура создания аккаунта через резервную ссылку полностью имитирует стандартную заявку. Дебютные геймеры регистрируют валидный email, генерируют сложный пароль и выбирают базовую денежную единицу.
Валидация счета включает передачи свидетельств в соответствии с KYC-политике. Снимок национального документа, верификация регистрации и платежные параметры контролируются системой программную валидацию в течение 24-72 часа.
Авторизация действующих пользователей производится через типовую окно с многоступенчатой валидацией. Разовые пароли приходят на мобильный девайс или мейл.
Опции денежного компонента через зеркала обеспечивает актуальные платежные механизмы. Visa, Mastercard, виртуальные кошельки Skrill, Neteller, crypto Bitcoin, Ethereum осуществляются с низкими сборами 0-3%.
Развлекательная ассортимент воспроизводится на сто процентов включая автоматы, настольные активности, live-хостов и мегавыигрыши. RTP-параметры, колебания и ставочные требования остаются неизменными.
Подарочная схема выполняется аналогично корневому ресурсу. Welcome-предложения, free spins, денежный возврат и VIP-планы активируются алгоритмически при реализации прописанных критериев.
Explore Key Deals – Items arrived quickly and the overall quality is excellent.
нажмите здесь https://lolz.live
https://uspharmaindex.shop/# online pharmacy ordering
Hall for Judge Resource – The background and platform information are easy to follow and very clear.
Maple Product Hub – Really enjoyed exploring, lots of unique items listed today.
Подбор честного развлекательного площадки предполагает детального рассмотрения юридических сертификатов. Актуальные сайты казино Килограмм гарантируют игрокам максимальную данные о действующих допусках.
Механизм регистрации содержит множество обязательных стадий проверки. Операторы требуют документы, доказывающие самобытность и зрелость. Традиционный KYC-процесс продолжается от 24 до 72 часов.
Контроль средств стартует с установления лимитов на депозиты. Искусные клиенты предлагают внедрять правило 5% от полного казино средств на конкретную раунд.
Программные блокировки владельцев заставляют эксплуатировать резервные адреса. Копии оберегают стопроцентную работоспособность первичного ресурса, подразумевая хронологию операций и азартный достижения.
Новые денежные методы поддерживают быстрые депозиты через цифровые аккаунты. Bitcoin, Ethereum и фиксированные активы поддерживают анонимность и крошечные отчисления. Длительность выполнения получений составляет 10-30 минут.
Системы верности содержат градационные ранги с нарастающим кэшбэком. VIP-кураторы предлагают личные награды, повышенные лимиты и преимущественную техподдержку.
Гемблинговая отрасль являет стремительный расширение, заинтересовывая миллионы пользователей. Грамотные платформы предоставляют безопасную условия для беттинга. Развёрнутую данные о указанных организациях можно отыскать на Лаки Бир сайт .
Сертификация выступает главным критерием отбора ресурса. Контролёры Олдерни обеспечивают тщательный надзор финансовых процедур. Конкретная лицензированная сайт подвергается плановые проверки RNG-систем.
Технические характеристики новейших азартных площадок охватывают SSL-безопасность экономического ранга. Провайдеры программного софта уровня Microgaming, NetEnt, Pragmatic Play добавляют продвинутые модели непредсказуемых величин.
Алгоритм валидации учётной записи требует передачи справок KYC-класса. Паспорт, подтверждение о прибылях, доказательство адреса — базовый комплект для итогового подключения.
Резервные адреса решают проблемы с запретами организаций. Функционирующие дубли модифицируются регулярно техническими специалистами. Мобильные программы нередко функционируют лучше сетевых редакций.
Управление банкроллом формирует перспективную эффективность азартных периодов. Экспертные беттеры советуют сокращать размер бета до 1-2% от итогового бюджета.
можно проверить ЗДЕСЬ https://lolz.live/
Активные резервные адреса лицензированных игорных заведений на Mellstroy Game зеркало предоставляют непрерывный вход к гемблинг системам. Принцип реплицирования образует идентичные копии центрального домена с консервацией всех функций.
Алгоритм оформления профиля через альтернативный домен в точности воспроизводит главную форму. Только пришедшие игроки заполняют валидный email, создают надежный пароль и фиксируют основную валюту.
Аутентификация профиля подразумевает предоставления удостоверений опираясь на KYC-регламенту. Снимок удостоверения личности, свидетельство резиденции и банковские параметры проверяются через машинную валидацию в течение 24-72 ч.
Подключение зарегистрированных клиентов выполняется через базовую окно с многоступенчатой валидацией. Краткосрочные ключи приходят на сотовый девайс или e-mail адрес.
Механизмы денежного блока через зеркала предлагает востребованные финансовые сервисы. Visa, Mastercard, онлайн балансы Skrill, Neteller, блокчейн-токены Bitcoin, Ethereum процессируются с уменьшенными комиссиями 0-3%.
Развлекательная библиотека дублируется абсолютно включая spinning games, классические игры, live-ведущих и максимальные награды. RTP-параметры, дисперсия и отыгрыш удерживаются аналогичными.
Поощрительная политика действует похоже базовому ресурсу. Welcome-комплекты, безвозмездные спины, денежный возврат и VIP-программы запускаются алгоритмически при выполнении определенных условий.
US Pharma Index: US Pharma Index – US Pharma Index
Ориентирование в области лицензированных площадок нуждается знания современных инструментов подключения. Опытные участники используют казино ДживиСпин для приобретения новейшей информации о функционирующих URL.
Схема создания профиля в официальных заведениях включает детальную верификацию. Новейшие компании эксплуатируют KYC-алгоритмы и AML-требования. Документальное сопровождение составляет от 24 до 72 промежутков.
Цифровые решения для обхода блокировок прогрессируют вместе с повышением нормативных решений. VPN-платформы типа premium дают кодирование AES-256 и методы OpenVPN. Устойчивость коннекта жизненно необходима для высокоролловых заходов.
Зеркальные домены действуют через географически размещенные цифровые ресурсы. CDN-сети обеспечивают низкую пинг для азиатских клиентов. Техническое перенаправление включается при выявлении препятствия первичного адреса.
Экономические переводы в лицензированных зонах подчиняются определенным требованиям PCI DSS. Криптовалютные операции получают признание в результате конфиденциальности и темпу процессинга.
Мобильные софт премиальных брендов совмещают голосовую аутентификацию и push-уведомления для существенных событий. Модифицируемый дизайн программно подстраивается под особенности матрицы.
нажмите здесь купить самооборону
1win slotlar demo 1win slotlar demo
My brother recommended I might like this blog.
He was totally right. This post truly made my day. You cann’t
imagine simply how much time I had spent for this information! Thanks!
Have a look at my website; 아파트 사전점검
Well voiced without a doubt! ! https://pad.karuka.tech/s/YmKbCCu2b
official Velvet Vendor X site – Sleek layout makes exploring and shopping very easy.
1win məxfilik https://1win5763.help/
Quick Meadow Online Spot – Smooth experience overall with well-presented products and easy navigation.
Легальные операторы азартных предложений обеспечивают участникам доступ к высококлассному игровому процессу через целевые платформы, включая п»ї1хбет казино , которые именно выполняют международные нормы защиты.
Алгоритм создания аккаунта включает предоставления authentication данных через encrypted SSL-протоколы. Букмекеры demanded документальное удостоверение age verification и локации жительства для выполнения правовых требований.
Двухэтапная верификация становится mandatory компонентом новейших платформ конфиденциальности. Клиенты обретают SMS-ключи, push-сообщения или эксплуатируют специальные приложения по типу Google Authenticator.
Резервные ссылки ликвидируют проблемы territorial запретов и DDoS-assault. Техническим образом копии образуют идентичные dublicates основного ресурса с сохранением возможностей и индивидуальных сведений.
Компетентные клиенты suggest keeping актуальные реестры активных дублей в избранном браузера. Букмекеры направляют обновления о свежих доменах через email, Telegram-группы и смартфонные утилиты.
Платёжные процедуры через официальные сайты защищены cryptographic технологиями level банковского индустрии. Снятие финансов происходит исключительно на проверенные счета собственника аккаунта.
Актуальные провайдеры азартных игр предлагают беттерам вход к премиальному азарту через сертифицированные Вавада зеркало платформы. Сертифицированная операционная активность нуждается учета конкретных регуляторных норм.
Процесс регистрации пользовательского счета задействует валидацию личных реквизитов. Провайдеры эксплуатируют многоуровневые процедуры KYC и AML для блокировки фродовых транзакций.
Программные инструменты актуальных казино базируются на зашифрованных серверах с шифровальными сертификатами. IP-фильтрация обязывает администраторов запускать вспомогательные адреса.
Дублирующие ресурсы формируют аналогичные версии главного домена с поддержанием всех инструментов и параметров. Клиенты добиваются стабильный связь к капиталу, развлекательной записям и пользовательским конфигурациям.
Денежные переводы осуществляются через синхронизированные денежные сервисы. Рамки на депозиты и получения фиксируются в унисон с лицензионными требованиями и организационными регламентами контроля угроз.
Компетентные игроки советуют мониторить статус аккредитации через контролирующие регистры азартных комиссий. Престижные критерии включают оценки на специализированных сайтах и оценки настоящих игроков.
modern Item Cove store – Checked the offerings and the deals seem valuable.
Have you ever considered publishing an e-book or guest authoring on other blogs?
I have a blog based on the same subjects you discuss and would really like to have you share some stories/information. I know
my viewers would appreciate your work. If you are even remotely interested,
feel free to send me an e mail.
Also visit my web blog; 하자진단
Узнать больше Уникальные товары только сейчас!
Нынешние игроки встречаются с препятствием доступа к официальным ресурсам. Провайдеры запрещают базовые ссылки, но профессиональные СЌРЅРѕРјРѕ казино пользователи учитывают о функционировании альтернативных площадок.
Альтернативный адрес формирует полную воспроизведение первичного сайта. Системы безопасности работают равнозначными. Банковские процедуры осуществляются через равнозначные сервисы.
Алгоритм оформления профиля через альтернативный ссылку предполагает обычной аутентификации. Операторы требуют удостоверения для соблюдения KYC-норм. Персональные информация осуществляют комплексную валидацию.
Пополнительные лимиты на дополнительных порталах аналогичны базовым параметрам. Наименьшие вклады функционируют фиксированными. Накопительные джекпоты интегрируются между многочисленными доменами.
Бонусные механизмы работают всесторонне на зеркальных платформах. Вейджер поддерживает стартовые параметры. Длительность оборота сохраняется.
Департамент сопровождения анализирует заявки с дополнительных порталов сходным образом. Живой общение осуществляет непрерывный график работы.
Noble Aisle store – I discovered it today and the product quality looks impressive.
Актуальные провайдеры беттинг услуг предлагают участникам возможность к качественному беттингу через безопасные Килограмм казино платформы. Легальная работа предполагает следования четких регуляторных норм.
Процесс открытия персонального счета предусматривает валидацию персональных сведений. Администраторы используют расширенные процедуры KYC и AML для предотвращения поддельных транзакций.
Программные инструменты новейших игорных домов основываются на стабильных инфраструктурах с TLS алгоритмами. Локальные запреты обязывает провайдеров организовывать резервные адреса.
Зеркальные сайты представляют идентичные дубликаты базового ресурса с обеспечением всех возможностей и информации. Пользователи добиваются постоянный вход к балансу, гемблинг данным и личным опциям.
Расчетные процедуры проходят через связанные банковские агрегаторы. Рамки на вклады и изъятия регулируются в соотношении с регуляторными условиями и организационными нормами управления рисками.
Квалифицированные клиенты предлагают мониторить статус разрешения через надзорные реестры азартных органов. Статусные показатели предусматривают ранги на тематических сервисах и оценки действительных игроков.
Лицензионные провайдеры азартных возможностей oferuja участникам возможность к премиальному развлечениям через целевые ресурсы, включая п»ї1хбет сайт , которые точно исполняют transnational регламенты конфиденциальности.
Механизм оформления профиля требует указания проверочных параметров через безопасные SSL-соединения. Операторы запрашивают документальное доказательство правоспособности и региона жительства для выполнения законодательных критериев.
2FA проверка выступает обязательным элементом актуальных механизмов конфиденциальности. Пользователи располагают SMS-ключи, push-сообщения или используют профессиональные tools в стиле Google Authenticator.
Резервные порталы ликвидируют сложности региональных ограничений и DDoS-assault. С технической точки зрения mirrors представляют аналогичные клоны основного ресурса с maintaining функциональности и индивидуальных сведений.
Профессиональные пользователи призывают keeping актуальные перечни working mirrors в favourites обозревателя. Букмекеры передают новости о новых порталах через электронную почту, Telegram-communities и портативные утилиты.
Банковские процедуры через legal сайты покрыты криптографическими технологиями категории банковского области. Получение фондов осуществляется лишь на аутентифицированные счета собственника account.
Проверенные провайдеры игровых услуг гарантируют игрокам возможность к высококлассному азартному досугу через целевые ресурсы, включая Лаки Бир официальный сайт , которые придерживаются общепринятые стандарты защиты.
Процедура оформления профиля требует предоставления идентификационных сведений через encrypted SSL-протоколы. Операторы demanded нотариальное свидетельство age verification и региона регистрации для compliance правовых критериев.
Двухфакторная проверка представляет необходимым составляющей новейших механизмов безопасности. Игроки приобретают SMS-токены, push-уведомления или внедряют dedicated утилиты типа Google Authenticator.
Резервные URL решают вопросы локальных блокировок и DDoS-штурмов. Технически дубли формируют тождественные клоны центрального портала с поддержанием функциональности и клиентских информации.
Компетентные клиенты suggest поддерживать обновлённые реестры действующих дублей в закладках веб-клиента. Администрация рассылают обновления о современных порталах через email, Telegram-communities и смартфонные утилиты.
Платёжные процедуры через официальные сайты гарантированы encryption системами класса банковского направления. Снятие финансов выполняется лишь на аутентифицированные карты держателя учётной записи.
нажмите, чтобы подробнее https://lolz.live
Explore Blossom Vendor – Great breakdowns of features and I like seeing new info posted frequently.
Visit Drift Vendor – The site is easy to navigate and the item details are helpful.
Актуальные провайдеры гемблинг развлечений предлагают беттерам подключение к высококлассному игровому процессу через проверенные казино Mellstroy Game системы. Официальная операционная активность подразумевает выполнения строгих правовых норм.
Процесс создания индивидуального счета включает аутентификацию индивидуальных реквизитов. Операторы эксплуатируют углубленные протоколы KYC и AML для предотвращения поддельных финансовых действий.
Технические системы инновационных беттинг площадок строятся на надежных серверах с SSL алгоритмами. IP-фильтрация заставляет администраторов запускать вспомогательные ссылки.
Резервные сайты формируют полные версии первичного портала с сохранением всех инструментов и данных. Участники приобретают стабильный доступ к капиталу, беттинг статистике и пользовательским конфигурациям.
Платежные процедуры выполняются через синхронизированные денежные системы. Пределы на вклады и обналичивания регулируются в соответствии с лицензионными положениями и собственными регламентами контроля угроз.
Профессиональные гемблеры рекомендуют мониторить положение лицензии через контролирующие списки гемблинг организаций. Репутационные характеристики содержат рейтинги на экспертных ресурсах и мнения истинных участников.
взгляните на сайте здесь https://lzt.market/
Беттинговая индустрия представляет активный подъём, притягивая миллионы игроков. Профессиональные ресурсы предоставляют стабильную атмосферу для ставок. Подробную данные о данных операторах реально отыскать на Лаки Бир .
Лицензирование является основным аспектом определения сайта. Юрисдикции Кюрасао дают строгий контроль экономических процедур. Отдельная легальная площадка реализует систематические проверки RNG-систем.
Технические параметры передовых азартных площадок охватывают SSL-безопасность финансового стандарта. Провайдеры компьютерного ПО класса Microgaming, NetEnt, Pragmatic Play добавляют усовершенствованные механизмы произвольных показателей.
Алгоритм проверки профиля предполагает передачи свидетельств KYC-уровня. Свидетельство, подтверждение о прибылях, доказательство проживания — обычный пакет для окончательного активации.
Альтернативные URL исправляют барьеры с запретами организаций. Свежие зеркала изменяются регулярно компьютерными службами. Смартфонные софт обычно действуют стабильнее сетевых версий.
Распределение капитала устанавливает продолжительную доходность беттинговых сессий. Опытные пользователи предлагают урезать размер ставки до 1-2% от итогового банкролла.
ко ланта ко ланта пляжи
ссылка на сайт https://lolz.live/
I was recommended this web site by my cousin. I’m not sure whether this
post is written by him as nobody else know such detailed about my trouble.
You’re incredible! Thanks!
Look at my blog post DNS propagation test
Современные игроки встречаются с набором цифровых аспектов при деятельности с официальными порталами. Профильные порталы типа казино KiloGram поставляют релевантную информацию о процессах казино провайдеров.
Алгоритм верификации аккаунта предполагает несколько неотъемлемых шагов. Начальная верификация нуждается размещения удостоверений подтверждающих гражданство. Типовой список предполагает ID, лицензию водителя или заграничное удостоверение.
Техническая часть создания аккаунта содержит применение криптографической защиты и многофакторной защиты. Профессиональные игроки рекомендуют запускать все возможных возможностей безопасности.
Резервные ссылки формируют стопроцентные отражения основного портала с хранением всего инструментария. Главное плюс состоит в схожести денежных лимитов и требований вейджера.
Система обнаружения действующих дублирующих порталов опирается на контроле профильных новостных лент и сотрудничающих платформ. Опытные клиенты внедряют прокси-соединения для гарантирования постоянного доступа вне зависимости от локальных ограничений.
Инновационные провайдеры азартных развлечений гарантируют клиентам доступ к элитному игровому процессу через надежные СЂР° казино порталы. Лицензированная деятельность предполагает исполнения четких регуляторных норм.
Процесс оформления индивидуального профиля содержит валидацию персональных сведений. Операторы используют расширенные алгоритмы KYC и AML для исключения нарушающих финансовых действий.
Электронные средства инновационных гемблинг платформ базируются на защищенных дата-центрах с шифровальными стандартами. Территориальные ограничения заставляет администраторов разрабатывать параллельные ссылки.
Зеркальные сайты формируют точные клоны центрального домена с поддержанием всех функций и информации. Пользователи приобретают постоянный вход к балансу, гемблинг истории и индивидуальным установкам.
Расчетные переводы проходят через синхронизированные платежные шлюзы. Пределы на вклады и обналичивания устанавливаются в унисон с законодательными стандартами и корпоративными нормами риск-менеджмента.
Компетентные игроки советуют проверять статус сертификата через регуляторные базы данных гемблинг организаций. Репутационные характеристики охватывают оценки на тематических порталах и мнения действительных клиентов.
пояснения https://lzt.market
Надёжные ресурсы азартных услуг обеспечивают пользователям возможность к элитному гэмблингу через специализированные сайты, включая казино Mellstroy Game , которые именно выполняют глобальные регламенты security.
Механизм регистрации включает указания верификационных сведений через безопасные SSL-соединения. Операторы просят предоставить документальное удостоверение совершеннолетия и территории residence для выполнения законодательных правил.
Двухэтапная верификация считается необходимым частью современных механизмов безопасности. Клиенты получают SMS-коды, push-уведомления или внедряют профессиональные утилиты типа Google Authenticator.
Зеркальные ссылки решают проблемы географических блокировок и DDoS-assault. Фактически зеркала представляют дублированные клоны центрального ресурса с удержанием функциональности и личных деталей.
Профессиональные пользователи призывают сохранять обновлённые перечни working зеркал в закладках обозревателя. Management направляют обновления о актуальных порталах через e-mail, Telegram-сообщества и mobile программы.
Payment операции через legal ресурсы покрыты encryption протоколами уровня банковского направления. Снятие капитала выполняется лишь на верифицированные wallets держателя учётной записи.
В контексте ufc в феврале марте 2026 три недели которые встряхнут дивизионы нашел подробный график и прогнозы на бои. Смотрите подробности: https://flat-360.ru/news/ufc-fevral-mart-2026-raspisanie-boyov-ufc-fight-night-strickland-vs-hernandez-moreno-vs-kavanagh-ufc-326-holloway-vs-oliveira-2-polnyj-gid-i-prognozy/
готовим алгоритмы пошагово Здесь мы «разбираем в Кухне алгоритмов» самые интересные задачи, превращая их в понятные и доступные инструкции. Мы верим, что создание «идеального алгоритма» — это такой же творческий процесс, как приготовление изысканного блюда, требующий внимания к деталям, подбора правильных «ингредиентов» и, конечно же, любви к своему делу.
Актуальные дублирующие порталы надежных gaming-операторов на казино Mellstroy Game гарантируют непрерывный доступ к гемблинг системам. Методика реплицирования строит полноценные версии базового веб-площадки с консервацией всех возможностей.
Система открытия счета через mirror-сайт в точности имитирует оригинальную анкету. Новые пользователи заполняют активный email, генерируют сложный секретную комбинацию и фиксируют рабочую финансовый инструмент.
Аутентификация личного кабинета предполагает передачи свидетельств по KYC-стандартам. Копия ID-карты, валидация проживания и денежные координаты контролируются системой автоматическую проверку в течение 24-72 временных единиц.
Аутентификация зарегистрированных геймеров реализуется через стандартную форму с усиленной проверкой. Сессионные пароли передаются на смс номер или почтовый ящик.
Возможности финансового модуля через альтернативные домены содержит актуальные денежные системы. Visa, Mastercard, веб хранилища Skrill, Neteller, блокчейн-токены Bitcoin, Ethereum осуществляются с сокращенными комиссиями 0-3%.
Развлекательная база повторяется в точности включая слоты, карточные забавы, live-крупье и максимальные награды. RTP-значения, вариативность и отыгрыш сохраняются неизменными.
Подарочная политика функционирует подобно центральному веб-площадке. Welcome-комплекты, даровые прокруты, refund и VIP-программы запускаются машинально при соблюдении заданных параметров.
Mist Vendor Spot – Pleasant overall experience with clear descriptions on all items.
подробнее https://lzt.market
Функционирующие mirror-ссылки легальных gaming-операторов на Mellstroy Game казино создают беспрерывный коннект к азартным системам. Схема дублирования формирует идентичные клоны центрального портала с удержанием всех инструментов.
Механизм оформления профиля через резервную ссылку в точности воспроизводит стандартную форму. Дебютные игроки вводят валидный email, создают стойкий шифр и фиксируют операционную денежную единицу.
Идентификация аккаунта требует отправки документов следуя KYC-требованиям. Снимок ID-карты, верификация резиденции и карточные сведения проходят автоматическую проверку в течение 24-72 часов.
Подключение верифицированных геймеров происходит через стандартную форму с 2FA проверкой. Одноразовые пароли доставляются на смс номер или e-mail адрес.
Инструменты входящего раздела через альтернативные домены содержит распространенные банковские системы. Visa, Mastercard, цифровые портмоне Skrill, Neteller, crypto Bitcoin, Ethereum осуществляются с минимальными процентами 0-3%.
Азартная база копируется абсолютно включая автоматы, традиционные игры, live-крупье и джекпоты. RTP-коэффициенты, изменчивость и отыгрыш сохраняются точными.
Бонусная система действует идентично центральному веб-площадке. Welcome-наборы, даровые прокруты, кешбэк и VIP-схемы включаются программно при соблюдении прописанных параметров.
Исследование в секторе официальных платформ нуждается понимания передовых решений авторизации. Квалифицированные клиенты задействуют п»ї1хбет казино для получения новейшей данных о действующих URL.
Алгоритм открытия счета в проверенных операторах содержит сложную аутентификацию. Новейшие организации задействуют KYC-системы и AML-стандарты. Документальное сопровождение занимает от 24 до 72 промежутков.
IT инструменты для минования барьеров развиваются синхронно с усилением регуляторных шагов. VPN-сервисы разряда premium дают защиту AES-256 и методы OpenVPN. Устойчивость коннекта жизненно важна для привилегированных игровых периодов.
Резервные адреса действуют через пространственно разнесенные серверные мощности. CDN-системы осуществляют минимальную отклик для американских пользователей. Системное перенаправление срабатывает при обнаружении недоступности базового сайта.
Банковские движения в легальных регионах следуют конкретным стандартам PCI DSS. Криптовалютные платежи приобретают распространение в результате скрытности и темпу выполнения.
Переносные утилиты элитных провайдеров включают лицевую аутентификацию и push-сообщения для существенных эпизодов. Адаптивный дизайн автоматически адаптируется под свойства матрицы.
Передовые порталы гемблинг развлечений обеспечивают беттерам вход к элитному беттингу через надежные lucky bear казино порталы. Легальная деятельность предполагает исполнения определенных контролирующих критериев.
Алгоритм активации индивидуального учетной записи задействует проверку индивидуальных показателей. Управляющие применяют углубленные процедуры KYC и AML для исключения незаконных транзакций.
Технические средства передовых гемблинг платформ работают на защищенных серверах с криптографическими протоколами. Региональная блокировка обязывает владельцев запускать дублирующие порталы.
Альтернативные платформы являют собой идентичные дубликаты базового сайта с обеспечением всех функций и данных. Участники получают непрерывный подключение к счету, гемблинг отчетности и личным установкам.
Банковские действия выполняются через подключенные платежные процессоры. Рамки на инвестиции и обналичивания фиксируются в гармонии с правовыми условиями и корпоративными процедурами риск-менеджмента.
Экспертные гемблеры настаивают контролировать условия сертификата через регуляторные списки игорных органов. Репутационные индикаторы содержат оценки на экспертных сайтах и feedback реальных клиентов.
космо пицца свободный В Саратове, Энгельсе и Балаково «Космопицца» — синоним «хорошей пиццы» и «отличной пиццы», будь то «пицца Малевич» или «Донна пицца».
NestVendor deals – The site feels neatly arranged, and I located everything without trouble.
Перемещение в пространстве проверенных порталов нуждается владения актуальных решений авторизации. Квалифицированные клиенты применяют лаки Р±РёСЂ казино официальный сайт для приобретения современной сведений о активных путях.
Схема создания профиля в проверенных компаниях содержит детальную валидацию. Актуальные провайдеры внедряют KYC-алгоритмы и AML-стандарты. Документальная процедура потребляет от 24 до 72 временных отрезков.
IT технологии для минования ограничений улучшаются синхронно с повышением юридических шагов. VPN-сервисы категории premium предоставляют криптографию AES-256 и технологии OpenVPN. Устойчивость подключения кардинально необходима для премиальных игровых периодов.
Запасные ресурсы действуют через регионально размещенные технические инфраструктуры. CDN-структуры обеспечивают низкую задержку для азиатских игроков. Системное маршрутизация запускается при распознавании недоступности главного домена.
Финансовые операции в легальных регионах подпадают под конкретным требованиям PCI DSS. Блокчейн переводы увеличивают актуальность вследствие скрытности и оперативности реализации.
Планшетные приложения лучших брендов объединяют голосовую проверку и push-сообщения для ключевых эпизодов. Настраиваемый облик самостоятельно подстраивается под свойства дисплея.
где заказать пиццу воронеж «Купить пиццу в Воронеже» еще никогда не было так просто, как с нашим сервисом «заказ пиццы воронеж».
Excellent goods from you, man. I’ve understand your
stuff previous to and you’re just extremely
excellent. I really like what you’ve acquired here, really like
what you are stating and the way in which you say it. You make it entertaining and you still care for to keep it smart.
I can not wait to read much more from you. This is really a tremendous site.
1win aplicatie android 1win aplicatie android
космо пицца свободный «Пицца телефон» и «Пицца Саратов сайт» – все детали для вашего удобства.
Отбор честного гемблинг ресурса подразумевает глубокого рассмотрения регулятивных бумаг. Инновационные системы Vavada casino предлагают клиентам полную данные о текущих аккредитациях.
Процесс оформления счета подразумевает несколько обязательных стадий аутентификации. Операторы требуют бумаги, засвидетельствующие самобытность и зрелость. Обычный KYC-регламент требует от 24 до 72 часов.
Банкролл-менеджмент запускается с задания границ на вклады. Компетентные пользователи настаивают эксплуатировать закон 5% от совокупного игорного резерва на конкретную сессию.
Системные барьеры администраторов вынуждают внедрять дополнительные ссылки. Зеркала удерживают безусловную активность основного платформы, включая хронологию операций и гемблинг продвижение.
Новые банковские инструменты дают оперативные депозиты через блокчейн счета. Bitcoin, Ethereum и постоянные токены гарантируют тайность и минимальные комиссии. Длительность проведения выводов составляет 10-30 промежутков.
Программы преданности охватывают ступенчатые ранги с накапливающимся компенсацией. VIP-координаторы дают персонализированные подарки, увеличенные границы и опережающую поддержку.
Игровая сфера являет активный развитие, заинтересовывая тысячи участников. Опытные площадки обеспечивают безопасную среду для развлечений. Подробную данные о указанных компаниях возможно обнаружить на Vavada .
Лицензирование является ключевым фактором отбора платформы. Лицензиаты Мальты обеспечивают серьёзный контроль валютных транзакций. Конкретная аккредитованная сайт осуществляет периодические проверки RNG-генераторов.
IT характеристики актуальных гемблинг-сайтов предусматривают SSL-безопасность экономического стандарта. Производители цифрового ПО наподобие Microgaming, NetEnt, Pragmatic Play подключают усовершенствованные модели рандомных значений.
Процедура валидации аккаунта предусматривает направления бумаг KYC-уровня. Свидетельство, выписка о прибылях, валидация регистрации — обычный перечень для окончательного входа.
Дублирующие адреса устраняют препятствия с фильтрацией организаций. Актуальные копии изменяются регулярно компьютерными группами. Смартфонные клиенты зачастую выполняются надёжнее интернет редакций.
Контроль средств задаёт перспективную доходность гемблинговых партий. Квалифицированные беттеры предлагают урезать размер ставки до 1-2% от совокупного фонда.
https://uspharmaindex.shop/# canadian drug pharmacy
мелстрой гейм Mellstroy Game — обновлённая платформа с новым дизайном и расширенным каталогом Описание: Mellstroy Game открылся заново после полной переработки. Добавлены новые провайдеры, обновлённая система бонусов, ускоренная обработка запросов и улучшенная безопасность. Платформа стала удобнее и быстрее — рекомендую зайти и посмотреть.
Shore Vendor Online – Very easy to browse and the layout is clean and organized.
Поиск в сфере официальных площадок нуждается представления передовых технологий подключения. Опытные клиенты применяют Килограмм казино для обретения актуальной фактов о активных адресах.
Схема регистрации личного кабинета в официальных учреждениях содержит комплексную верификацию. Продвинутые поставщики внедряют KYC-протоколы и AML-критерии. Оформление документов требует от 24 до 72 часов.
Программные технологии для прохождения препятствий улучшаются сообща с усилением регуляторных решений. VPN-платформы уровня premium обеспечивают криптографию AES-256 и методы OpenVPN. Постоянство соединения fundamentally существенна для премиальных игровых периодов.
Зеркальные сайты действуют через пространственно распределенные серверные инфраструктуры. CDN-архитектуры осуществляют минимальную задержку для американских геймеров. Автоматическое переключение инициируется при детекции блокировки центрального сайта.
Банковские транзакции в легальных областях следуют жестким критериям PCI DSS. Блокчейн расчеты набирают популярность вследствие приватности и скорости процессинга.
Мобильные программы ведущих организаций объединяют голосовую подтверждение и push-уведомления для существенных происшествий. Адаптивный дизайн автономно подстраивается под параметры монитора.
Shop Floral Collection – Enjoyed browsing, everything is neatly organized and easy to find.
Подбор достойного betting ресурса в текущих условиях заставляет детального анализа к лицензионному статусу. Знающие пользователи представляют, что mad казино зеркало предоставляет свежую сведения о доступных площадках.
Процесс создания аккаунта в лицензированных платформах включает необходимую подтверждение персональных данных. KYC-стандарты охраняют как площадку, так и участника от мошенничества. Промежуточные рамки на изъятие капитала до окончания контроля – стандартная практика.
Виртуальные ограничения на соединение к betting сервисам нейтрализуются через резервные порталы. Действующие отражения обеспечивают всестороннюю работоспособность главного платформы. Платежные переводы, развлекательный достижения и наградные предложения продолжают устойчивыми.
Экономическая гарантированность измеряется степенью внедренных расчетных инструментов. SSL-криптография, PCI DSS сертификация и дополнительная верификация обеспечивают безопасный щит ограждения.
Интерактивная коллекция лицензированных площадок содержит слоты от топовых студий. RTP-значения, вариативность и вероятностные принципы подвергаются независимую сертификацию в утвержденных центрах.
Планы стимулирования в качественных казино основываются на четких требованиях отыгрыша. Условия ставок x35-40 оценивается нормальным для машина-бонусов, в то время как настольные состязания принимаются в подсчет с редуцированным фактором.
веб-сайте https://lolz.live
Современные клиенты имеют дело с набором технологических деталей при деятельности с лицензированными ресурсами. Специализированные платформы типа п»ї1хбет зеркало поставляют современную сведения о функционировании казино компаний.
Механизм аутентификации аккаунта предполагает несколько принудительных стадий. Первичная подтверждение включает загрузки свидетельств валидирующих субъект. Стандартный набор содержит ID, автолицензию или внешний паспорт.
Техническая сторона записления содержит задействование SSL-шифрования и многофакторной защиты. Экспертные клиенты настаивают включать весь комплекс возможных настроек охраны.
Резервные ссылки образуют стопроцентные дубликаты основного ресурса с сохранением исчерпывающего инструментария. Основное преимущество заключается в подобии банковских рамок и критериев проигрыша.
Система выявления действующих запасных доменов базируется на контроле тематических мессенджер групп и сотрудничающих ресурсов. Опытные клиенты используют прокси-соединения для гарантирования стабильного доступа без оглядки от локальных ограничений.
Официальные платформы развлекательных предложений предоставляют игрокам шанс к элитному игровому процессу через тематические сайты, включая п»ї1хбет зеркало , которые специально соблюдают международные регламенты security.
Механизм регистрации требует внесения идентификационных деталей через encrypted SSL-соединения. Операторы demanded письменное verification age verification и места нахождения для соблюдения нормативных требований.
Multi-factor верификация является required компонентом передовых систем конфиденциальности. Клиенты имеют SMS-токены, push-уведомления или внедряют targeted утилиты типа Google Authenticator.
Дублирующие домены решают вопросы geographic блокировок и DDoS-атак. С технической точки зрения mirrors образуют тождественные dublicates центрального платформы с поддержанием функциональности и пользовательских информации.
Skilled игроки призывают удерживать обновлённые списки working дублей в сохранённых ссылках браузера. Букмекеры направляют обновления о актуальных адресах через электронную почту, Telegram-сообщества и телефонные приложения.
Денежные переводы через надёжные ресурсы покрыты криптографическими алгоритмами категории банковского направления. Изъятие капитала производится исключительно на подтверждённые данные обладателя аккаунта.
Walnut Favorites – Ordering was seamless and the site feels very well organized.
Icicle Crate Corner – Happy with the overall experience, fast delivery and great products.
TranquilGoods – Everything is so readable, and the minimalist style is perfect.
трансы пермь Погрузитесь в этот звуковой океан и позвольте себе унестись на волнах транса.
Функционирующие резервные адреса официальных игорных заведений на Vavada казино обеспечивают беспрерывный соединение к геймерским порталам. Методика копирования генерирует идентичные реплики главного домена с консервацией всех возможностей.
Алгоритм открытия счета через резервную ссылку на сто процентов повторяет базовую шаблон. Дебютные участники вводят активный email, формируют стойкий ключ и назначают основную платежное средство.
Идентификация личного кабинета содержит представления документов опираясь на KYC-требованиям. Скан паспорта, верификация адреса и банковские параметры проверяются через цифровую верификацию в течение 24-72 часов.
Подключение действующих геймеров осуществляется через обычную форму с 2FA валидацией. Временные ключи передаются на смс аппарат или email.
Механизмы депозитного компонента через альтернативные домены предлагает популярные расчетные инструменты. Visa, Mastercard, веб балансы Skrill, Neteller, блокчейн-токены Bitcoin, Ethereum реализуются с уменьшенными процентами 0-3%.
Развлекательная база копируется полностью включая машины, столовые развлечения, live-крупье и прогрессивы. RTP-параметры, изменчивость и условия отыгрыша остаются аналогичными.
Поощрительная схема действует похоже корневому веб-площадке. Welcome-бандлы, бесплатные вращения, денежный возврат и VIP-системы инициируются программно при выполнении установленных требований.
Лицензионные провайдеры азартных сервисов предоставляют пользователям шанс к высококлассному азартному досугу через dedicated платформы, включая Mellstroy Game , что исполняют международные стандарты надёжности.
Механизм регистрации предполагает заполнения проверочных деталей через криптографические SSL-линии. Администрация просят предоставить нотариальное verification age verification и локации регистрации для compliance законодательных норм.
2FA верификация представляет mandatory aspect актуальных механизмов security. Users получают SMS-токены, push-сообщения или внедряют dedicated софт наподобие Google Authenticator.
Дублирующие ссылки устраняют трудности локальных блокировок и DDoS-воздействий. Фактически зеркала являют аналогичные копии основного портала с maintaining возможностей и user данных.
Экспертные геймеры предлагают хранить current базы функционирующих зеркал в закладках браузера. Провайдеры доставляют updates о современных URL через email, Telegram-communities и мобильные софт.
Финансовые операции через проверенные сайты гарантированы encryption methods уровня банковского segment. Вывод денег реализуется исключительно на верифицированные данные обладателя личного кабинета.
Беттинговая отрасль демонстрирует быстрый рост, манящая легионы геймеров. Профессиональные платформы обеспечивают надёжную атмосферу для ставок. Исчерпывающую данные о подобных брендах можно изучить на Голд казино .
Аттестация составляет главным аспектом выбора платформы. Юрисдикции Олдерни дают серьёзный мониторинг денежных манипуляций. Любая легальная сайт реализует периодические аудиты RNG-генераторов.
Компьютерные характеристики актуальных азартных площадок содержат SSL-безопасность денежного класса. Производители цифрового продукта наподобие Microgaming, NetEnt, Pragmatic Play встраивают многоуровневые модели хаотичных параметров.
Механизм валидации аккаунта включает представления свидетельств KYC-типа. ID, выписка о заработке, удостоверение адреса — классический комплект для окончательного подключения.
Альтернативные ссылки решают сложности с фильтрацией провайдеров. Свежие варианты модифицируются каждый день компьютерными специалистами. Мобильные утилиты зачастую действуют устойчивее онлайн редакций.
Управление банкроллом формирует продолжительную прибыльность игровых сессий. Опытные геймеры советуют контролировать объём вейджера до 1-2% от суммарного банкролла.
Hagins Campaign Hub – Transparent goals and a clear sense of purpose are well communicated here.
With a strong focus on performance and professionalism, RRF Construction Solution supports residential, commercial, and industrial projects across the UAE. Transparent management, technical expertise, and attention to detail make every project durable and dependable from start to finish.
Поиск в пространстве официальных площадок нуждается владения продвинутых решений входа. Профессиональные клиенты применяют mad casino для добывания новейшей информации о функционирующих доменах.
Алгоритм формирования профиля в лицензированных учреждениях подразумевает тщательную верификацию. Современные поставщики используют KYC-процедуры и AML-правила. Документальная процедура требует от 24 до 72 интервалов.
Цифровые методы для преодоления блокировок развиваются вместе с усилением законодательных мер. VPN-инструменты категории premium предоставляют кодирование AES-256 и протоколы OpenVPN. Устойчивость коннекта критически важна для элитных заходов.
Зеркальные сайты функционируют через локально рассредоточенные технические системы. CDN-системы обеспечивают сокращенную время ответа для международных геймеров. Системное перенаправление активируется при выявлении блокировки основного ресурса.
Экономические манипуляции в официальных регионах подчиняются определенным критериям PCI DSS. Криптовалютные переводы завоевывают популярность по причине скрытности и быстроте процессинга.
Планшетные утилиты ведущих компаний интегрируют биометрическую идентификацию и push-оповещения для принципиальных моментов. Гибкий облик программно подстраивается под характеристики экрана.
Поиск безопасного игрового портала в нынешних реалиях нуждается детального внимания к законному режиму. Квалифицированные участники знают, что Mellstroy Game демонстрирует последнюю данные о доступных сервисах.
Схема записи в легальных платформах объединяет принудительную валидацию удостоверения. KYC-правила гарантируют как площадку, так и клиента от мошенничества. Промежуточные границы на получение активов до окончания контроля – обычная методика.
Цифровые барьеры на доступ к игровым сервисам обходятся через зеркальные домены. Действующие клоны сохраняют стопроцентную работоспособность базового платформы. Денежные переводы, развлекательный достижения и льготные планы поддерживаются стабильными.
Экономическая надежность определяется степенью используемых денежных инструментов. SSL-шифрование, PCI DSS подтверждение и усиленная верификация гарантируют стабильный барьер безопасности.
Геймплейная библиотека легальных операторов включает автоматы от топовых студий. RTP-параметры, колебания и статистические формулы испытывают нейтральную валидацию в аккредитованных учреждениях.
Механизмы лояльности в качественных заведениях базируются на открытых требованиях вейджера. Вейджер x35-40 признается справедливым для барабан-льгот, в то время как классические забавы идут в калькуляцию с пониженным коэффициентом.
Перемещение в секторе лицензированных площадок подразумевает знания передовых методов доступа. Профессиональные геймеры используют Mellstroy Game casino для приобретения новейшей данных о активных URL.
Алгоритм создания счета в официальных заведениях содержит сложную аутентификацию. Современные организации используют KYC-протоколы и AML-требования. Документооборот требует от 24 до 72 интервалов.
IT технологии для обхода блокировок улучшаются параллельно с усилением законодательных инициатив. VPN-решения уровня premium гарантируют кодирование AES-256 и технологии OpenVPN. Непрерывность канала жизненно существенна для элитных игровых периодов.
Зеркальные домены работают через пространственно разнесенные серверные мощности. CDN-архитектуры гарантируют минимальную задержку для американских участников. Цифровое редирект включается при идентификации блокировки базового портала.
Платежные переводы в проверенных областях подпадают под конкретным стандартам PCI DSS. Цифровые операции приобретают популярность по причине приватности и скорости выполнения.
Мобильные приложения элитных организаций совмещают физиологическую аутентификацию и push-уведомления для ключевых происшествий. Адаптивный оформление самостоятельно подстраивается под особенности панели.
https://certicanpharmacy.com/# CertiCanPharmacy
tamil sex videos
Best of Raven Crate – Smooth navigation and a clean structure make it easy to shop with confidence.
Актуальные клиенты обталкиваются с массой технических тонкостей при процессах с официальными площадками. Специализированные ресурсы типа Лаки Бир официальный сайт обеспечивают актуальную материалы о операциях развлекательных организаций.
Алгоритм подтверждения счета охватывает несколько принудительных уровней. Базовая валидация предполагает загрузки удостоверений подтверждающих индивидуальность. Классический перечень охватывает паспорт, лицензию водителя или загранпаспорт.
Системная сторона оформления содержит использование криптографической защиты и двухфакторной аутентификации. Продвинутые клиенты рекомендуют запускать максимум предложенных опций защиты.
Дублирующие порталы формируют полные отражения главного портала с обеспечением полного инструментария. Центральное достоинство состоит в соответствии банковских границ и параметров ставочных требований.
Схема обнаружения актуальных дублирующих порталов фундируется на наблюдении тематических телеграм-каналов и связанных площадок. Профессиональные геймеры применяют туннельные протоколы для формирования надежного связи независимо от географических запретов.
Актуальные геймеры сталкиваются с затруднением соединения к официальным платформам. Поставщики ограничивают базовые адреса, но грамотные Рльдорадо регистрация участники понимают о существовании параллельных порталов.
Параллельный портал является точную реплику главного платформы. Криптографические алгоритмы остаются равнозначными. Платёжные переводы осуществляются через идентичные каналы.
Технология заведения учётной записи через резервный ресурс содержит обычной верификации. Администраторы выясняют удостоверения для соблюдения KYC-правил. Личные параметры подвергаются комплексную валидацию.
Вносительные пределы на альтернативных сайтах соответствуют базовым параметрам. Начальные беты продолжают фиксированными. Растущие накопления согласовываются между многочисленными доменами.
Поощрительные системы действуют комплексно на альтернативных платформах. Вейджер поддерживает оригинальные значения. Срок активности использования сохраняется.
Департамент помощи рассматривает обращения с зеркальных порталов аналогично. Мгновенный общение осуществляет 24-часовой режим функционирования.
Нынешние геймеры встречаются с множеством цифровых особенностей при функционировании с официальными порталами. Тематические ресурсы типа Lucky Bear casino поставляют новую материалы о функционировании развлекательных провайдеров.
Процесс аутентификации профиля содержит ряд принудительных уровней. Базовая проверка включает загрузки документов подтверждающих личность. Классический пакет включает свидетельство, лицензию водителя или загранпаспорт.
Техническая элемент создания аккаунта предполагает эксплуатацию защищенного протокола и двойной авторизации. Продвинутые пользователи советуют инициировать весь комплекс имеющихся параметров секьюрити.
Дублирующие порталы являются стопроцентные реплики основного портала с хранением комплексного арсенала. Важнейшее выгода состоит в соответствии денежных лимитов и норм ставочных требований.
Механизм нахождения актуальных зеркал строится на мониторинге профильных уведомительных сервисов и союзных площадок. Профессиональные геймеры эксплуатируют прокси-соединения для гарантирования бесперебойного подключения независимо от территориальных лимитов.
QuickCarton Online – Easy to navigate and product selection is very clear and appealing.
Поиск проверенного игорного оператора нуждается детального анализа лицензионных сертификатов. Новые ресурсы РЎСѓРєР° казино гарантируют клиентам безусловную сведения о действующих лицензиях.
Система создания профиля содержит различные требуемых фаз подтверждения. Администраторы настаивают справки, устанавливающие личность и правоспособность. Стандартный KYC-алгоритм составляет от 24 до 72 периодов.
Финансовое планирование открывается с назначения пределов на инвестиции. Профессиональные участники рекомендуют внедрять принцип 5% от общего казино резерва на одну игру.
Цифровые ограничения провайдеров обязывают эксплуатировать резервные адреса. Альтернативы поддерживают полную функциональность центрального площадки, включая журнал сделок и развлекательный достижения.
Современные финансовые инструменты дают оперативные инвестиции через цифровые хранилища. Bitcoin, Ethereum и фиксированные активы гарантируют анонимность и крошечные платежи. Продолжительность осуществления изъятий доходит 10-30 периодов.
Схемы приверженности подразумевают каскадные ранги с увеличивающимся компенсацией. VIP-консультанты гарантируют личные вознаграждения, усиленные рамки и первоочередную сервис.
Актуальные операторы азартных игр предлагают клиентам путь к профессиональному развлечениям через надежные Лаки Бир РІС…РѕРґ ресурсы. Сертифицированная бизнес требует выполнения определенных законодательных критериев.
Процесс создания пользовательского профиля включает валидацию конфиденциальных данных. Провайдеры эксплуатируют расширенные процедуры KYC и AML для блокировки мошеннических операций.
Технические инструменты актуальных гемблинг платформ строятся на зашифрованных дата-центрах с SSL алгоритмами. Геоблокировка принуждает операторов внедрять параллельные порталы.
Резервные порталы образуют полные репликации первичного домена с поддержанием всех инструментов и сведений. Игроки добиваются стабильный вход к балансу, игровой отчетности и личным конфигурациям.
Платежные процедуры выполняются через интегрированные денежные агрегаторы. Рамки на депозиты и обналичивания устанавливаются в унисон с регуляторными стандартами и организационными нормами снижения потерь.
Компетентные беттеры предлагают мониторить статус сертификата через надзорные реестры игорных организаций. Репутационные индикаторы включают позиции на специализированных платформах и отзывы подлинных пользователей.
Birch Deals Online – Clear layout and organized products make the site feel reliable.
Передовые бетторы натыкаются с препятствием соединения к проверенным ресурсам. Провайдеры ограничивают базовые ссылки, но профессиональные Лаки Бир казино игроки понимают о существовании параллельных сайтов.
Дополнительный домен образует точную воспроизведение базового платформы. SSL-сертификаты остаются идентичными. Платёжные транзакции проходят через сходные сервисы.
Методика регистрации через параллельный портал содержит классической подтверждения. Менеджеры выясняют справки для выполнения KYC-стандартов. Личные информация реализуют усиленную подтверждение.
Депозитные ограничения на дополнительных порталах равняются стандартным спецификациям. Стартовые взносы остаются константными. Растущие накопления интегрируются между разными доменами.
Бонусные схемы оперируют всесторонне на дополнительных порталах. Требования по обороту сохраняет стартовые значения. Тайминг оборота остаётся прежним.
Отдел обслуживания обрабатывает заявки с альтернативных адресов идентично. Живой разговор предоставляет круглосуточный график функционирования.
Lunar Vendor Corner – Support team is very responsive and easy to communicate with.
Броу-бары Мы стремимся к тому, чтобы каждая клиентка уходила с чувством уверенности в себе и неотразимости.
Hmm is anyone else having problems with the
images on this blog loading? I’m trying to find out if its a problem on my end or if it’s the blog.
Any suggestions would be greatly appreciated.
Инновационные платформы игорных активностей обеспечивают клиентам доступ к высококлассному беттингу через проверенные винити казино порталы. Официальная функционирование влечет соблюдения конкретных регуляторных критериев.
Процесс оформления персонального счета содержит аутентификацию конфиденциальных информации. Операторы эксплуатируют детализированные системы KYC и AML для недопущения поддельных транзакций.
Цифровые инструменты инновационных развлекательных порталов основываются на защищенных инфраструктурах с SSL алгоритмами. Территориальные ограничения обязывает администраторов создавать резервные адреса.
Дублирующие порталы образуют полные версии первичного сайта с фиксацией всех инструментов и информации. Беттеры обеспечивают себе устойчивый связь к капиталу, развлекательной истории и пользовательским опциям.
Денежные переводы осуществляются через связанные финансовые агрегаторы. Рамки на взносы и изъятия определяются в согласии с регуляторными положениями и внутренними политиками минимизации опасностей.
Профессиональные пользователи советуют анализировать положение авторизации через регуляторные базы данных игорных структур. Авторитетные параметры задействуют оценки на тематических платформах и отзывы реальных клиентов.
Действующие зеркала легальных азартных клубов на Килограмм казино предоставляют устойчивый доступ к азартным платформам. Методика дублирования формирует полноценные клоны главного ресурса с фиксацией всех механизмов.
Механизм открытия счета через дублирующий портал на сто процентов имитирует базовую форму. Начинающие геймеры указывают действующий email, создают сложный шифр и выбирают операционную финансовый инструмент.
Подтверждение личного кабинета требует загрузки документов по KYC-нормам. Снимок удостоверения личности, доказательство резиденции и финансовые данные подвергаются автоматическую анализ в течение 24-72 часов.
Вход существующих пользователей выполняется через обычную интерфейс с усиленной аутентификацией. Разовые ключи приходят на смс устройство или почтовый ящик.
Функционал депозитного блока через зеркала поддерживает топовые финансовые механизмы. Visa, Mastercard, цифровые кошельки Skrill, Neteller, криптовалюты Bitcoin, Ethereum выполняются с уменьшенными сборами 0-3%.
Азартная ассортимент клонируется полностью включая машины, традиционные игры, live-хостов и максимальные награды. RTP-коэффициенты, изменчивость и условия отыгрыша сохраняются точными.
Промо схема функционирует идентично центральному ресурсу. Welcome-наборы, безвозмездные спины, возврат средств и VIP-системы запускаются системно при исполнении установленных параметров.
Игровая сфера отображает интенсивный рост, завлекая множество геймеров. Профессиональные площадки гарантируют безопасную условия для пари. Детальную сведения о таких организациях допустимо отыскать на Лаки Бир официальный сайт .
Легализация представляет ключевым критерием отбора ресурса. Контролёры Мальты гарантируют серьёзный аудит валютных операций. Любая официальная платформа реализует регулярные аудиты RNG-модулей.
Компьютерные параметры актуальных казино объединяют SSL-криптографию финансового стандарта. Разработчики софтового материала типа Microgaming, NetEnt, Pragmatic Play встраивают усовершенствованные алгоритмы хаотичных значений.
Процесс проверки счёта включает направления свидетельств KYC-типа. Паспорт, свидетельство о доходах, доказательство проживания — обычный список для итогового авторизации.
Зеркальные домены ликвидируют барьеры с ограничениями провайдеров. Рабочие альтернативы корректируются каждый день компьютерными отделами. Портативные утилиты регулярно действуют устойчивее браузерных модификаций.
Банкролл-менеджмент устанавливает долгосрочную результативность азартных циклов. Грамотные беттеры указывают ограничивать объём депозита до 1-2% от суммарного капитала.
Лицензионные ресурсы игорных опций предоставляют игрокам право к профессиональному азартному досугу через специализированные домены, включая Лаки Бир сайт , что следуют глобальные критерии конфиденциальности.
Схема оформления профиля necessita ввода валидационных информации через криптографические SSL-линии. Администрация просят нотариальное свидетельство совершеннолетия и локации жительства для соблюдения правовых критериев.
Multi-factor authentication становится mandatory частью современных платформ надёжности. Users получают SMS-пароли, push-уведомления или используют профессиональные tools по типу Google Authenticator.
Зеркальные URL ликвидируют вопросы региональных блокировок и DDoS-assault. С технической точки зрения mirrors формируют дублированные dublicates главного домена с maintaining функциональности и пользовательских параметров.
Компетентные участники призывают keeping новейшие списки рабочих зеркал в избранном интернет-программы. Операторы доставляют новости о современных URL через email, Telegram-communities и смартфонные приложения.
Платёжные транзакции через проверенные ресурсы secured cryptographic технологиями класса банковского индустрии. Вывод фондов производится исключительно на аутентифицированные данные обладателя учётной записи.
Источник https://lzt.market/
Greetings! Very useful advice within this article! It’s the
little changes which will make the largest
changes. Thanks for sharing!
My web site – Crypto market
Нынешние участники имеют дело с огромным количеством цифровых нюансов при деятельности с лицензированными платформами. Профильные порталы типа mad casino зеркало поставляют современную информацию о работе гэмблинговых операторов.
Процедура подтверждения аккаунта подразумевает ряд неотъемлемых этапов. Первичная аутентификация подразумевает отправки документов верифицирующих гражданство. Классический набор охватывает документ, автолицензию или заграничное удостоверение.
Системная сторона оформления содержит задействование безопасного соединения и двойной авторизации. Квалифицированные геймеры советуют включать полный набор доступных функций защиты.
Зеркала представляют стопроцентные копии центрального домена с удержанием комплексного инструментария. Главное достоинство выражается в соответствии банковских лимитов и требований вейджера.
Система поиска активных дублирующих порталов опирается на проверке специализированных телеграм-каналов и союзных площадок. Экспертные геймеры внедряют прокси-соединения для обеспечения постоянного входа без оглядки от региональных блокировок.
Shore Vendor Hub – Layout is clear and it’s easy to find everything you need.
Исследование в сфере лицензированных ресурсов подразумевает понимания современных технологий авторизации. Опытные игроки используют mad casino для обретения свежей сведений о оперативных URL.
Процесс регистрации аккаунта в надежных компаниях предполагает многоуровневую подтверждение. Новейшие операторы задействуют KYC-протоколы и AML-критерии. Документальная процедура потребляет от 24 до 72 промежутков.
Программные методы для прохождения запретов прогрессируют синхронно с ужесточением регуляторных мер. VPN-службы уровня premium гарантируют безопасность AES-256 и технологии OpenVPN. Постоянство коннекта принципиально актуальна для привилегированных раундов.
Резервные домены функционируют через географически расположенные IT мощности. CDN-системы предоставляют минимальную время ответа для американских участников. Автоматическое роутинг срабатывает при выявлении препятствия центрального портала.
Банковские движения в сертифицированных зонах подпадают под строгим нормам PCI DSS. Крипто расчеты приобретают популярность вследствие конфиденциальности и оперативности обработки.
Мобильные утилиты лучших организаций включают голосовую идентификацию и push-уведомления для принципиальных ситуаций. Модифицируемый интерфейс независимо подстраивается под свойства экрана.
https://whimsical.com/codigo-promocional-de-ano-nuevo-1xbet-2026-1xhasard-LyE3HxuKXdSAuMn7fzFapx
buy imitrex https://imitrexpharm.top/# buy imitrex medication
My Mexican Pharmacy: My Mexican Pharmacy – My Mexican Pharmacy
Hazel Picks Hub – Everything was seamless and customer support was attentive and quick.
Oak Market online – Clean, inviting site design makes exploring products a pleasure.
JollyMart Spot Online – Very accessible layout and items are easy to browse and explore.
Thistle Marketplace – Plenty of items to choose from and the descriptions are very thorough.
Современные сервисы гемблинг услуг предоставляют пользователям возможность к премиальному азарту через надежные винити казино ресурсы. Авторизованная бизнес подразумевает соблюдения определенных законодательных норм.
Процедура создания пользовательского аккаунта предусматривает аутентификацию конфиденциальных информации. Управляющие внедряют многоуровневые алгоритмы KYC и AML для недопущения поддельных платежей.
Электронные решения инновационных игорных домов базируются на стабильных облачных системах с TLS сертификатами. Региональная блокировка принуждает операторов организовывать альтернативные URL.
Параллельные порталы являют собой идентичные репликации центрального домена с удержанием всех инструментов и данных. Клиенты получают непрерывный соединение к капиталу, игровой отчетности и пользовательским установкам.
Денежные процедуры осуществляются через встроенные денежные системы. Лимиты на взносы и снятия устанавливаются в соответствии с законодательными требованиями и собственными политиками управления рисками.
Компетентные гемблеры рекомендуют анализировать положение сертификата через официальные списки азартных комиссий. Престижные критерии охватывают позиции на отраслевых ресурсах и оценки реальных беттеров.
Передовые игроки имеют дело с массой системных нюансов при процессах с лицензированными площадками. Профильные порталы типа Bollywood дают современную сведения о работе азартных провайдеров.
Алгоритм аутентификации аккаунта включает ряд неотъемлемых уровней. Первичная валидация подразумевает отправки справок удостоверяющих индивидуальность. Стандартный комплект содержит удостоверение личности, лицензию водителя или заграничное удостоверение.
Системная компонента оформления подразумевает использование защищенного протокола и двойной авторизации. Квалифицированные клиенты подсказывают включать все предложенных настроек безопасности.
Запасные домены формируют абсолютные дубликаты основного ресурса с сохранением всего арсенала. Основное плюс выражается в идентичности банковских ограничений и параметров условий прокрутки.
Схема выявления актуальных резервных ссылок фундируется на отслеживании профессиональных телеграм-каналов и партнерских порталов. Профессиональные геймеры внедряют VPN-сервисы для предоставления бесперебойного доступа независимо от территориальных блокировок.
Hello, i think that i saw you visited my weblog so i came to “return the
favor”.I am trying to find things to improve my web
site!I suppose its ok to use some of your ideas!!
my web-site – 하자진단
Актуальные дублирующие порталы лицензированных гемблинг-платформ на казино Килограмм обеспечивают стабильный подключение к азартным платформам. Схема зеркалирования образует идентичные копии корневого веб-площадки с фиксацией всех функций.
Процедура оформления профиля через альтернативный домен полностью имитирует оригинальную форму. Свежие игроки указывают рабочий email, устанавливают стойкий пароль и фиксируют основную валюту.
Верификация счета предполагает предоставления свидетельств следуя KYC-стандартам. Скан паспорта, свидетельство проживания и карточные параметры проверяются через цифровую контроль в течение 24-72 периодов.
Авторизация верифицированных пользователей происходит через стандартную форму с 2FA верификацией. Временные токены доставляются на мессенджер аппарат или мейл.
Опции депозитного модуля через альтернативные домены включает актуальные банковские механизмы. Visa, Mastercard, онлайн кошельки Skrill, Neteller, цифровые активы Bitcoin, Ethereum выполняются с низкими сборами 0-3%.
Гемблинг коллекция копируется в точности включая слоты, карточные активности, live-операторов и мегавыигрыши. RTP-параметры, вариативность и проигрыш сохраняются аналогичными.
Бонусная схема выполняется аналогично главному ресурсу. Welcome-пакеты, безвозмездные спины, кешбэк и VIP-схемы запускаются системно при достижении заданных критериев.
Современные геймеры сталкиваются с изобилием цифровых тонкостей при функционировании с сертифицированными платформами. Профильные сайты типа казино Болливуд предоставляют релевантную информацию о операциях казино брендов.
Механизм подтверждения профиля включает ряд необходимых стадий. Стартовая подтверждение предполагает загрузки удостоверений доказывающих гражданство. Обычный пакет содержит свидетельство, автоудостоверение или внешний паспорт.
Технологическая часть оформления содержит эксплуатацию SSL-шифрования и двухуровневой проверки. Продвинутые клиенты настаивают задействовать совокупность возможных опций секьюрити.
Дублирующие порталы образуют точные реплики центрального сайта с обеспечением комплексного инструментария. Ключевое бонус состоит в подобии финансовых ограничений и критериев отыгрыша.
Процедура нахождения рабочих дублирующих порталов опирается на проверке тематических мессенджер групп и аффилированных ресурсов. Продвинутые пользователи применяют туннельные протоколы для обеспечения постоянного подключения невзирая от географических блокировок.
N3rd Market Spot – The fun vibe and interesting selections make bookmarking essential.
EmberBasket Collections – Clear product info and smooth navigation make browsing satisfying.
Top Juniper Products – The turnaround time was short and the wrapping kept it secure.
pet rx: pet med – pet meds official website
https://vetfreemeds.com/# pet rx
Гемблинговая ниша являет быстрый развитие, заинтересовывая легионы игроков. Квалифицированные сайты обеспечивают качественную среду для беттинга. Развёрнутую факты о подобных провайдерах доступно обнаружить на казино Голд .
Аттестация выступает основным фактором селекции платформы. Надзорные органы Кюрасао дают строгий аудит денежных транзакций. Всякая лицензированная ресурс проходит периодические аудиты RNG-генераторов.
IT особенности инновационных казино объединяют SSL-безопасность расчётного категории. Производители виртуального обеспечения вроде Microgaming, NetEnt, Pragmatic Play добавляют комплексные схемы непредсказуемых показателей.
Процедура подтверждения личного кабинета включает предоставления документов KYC-типа. Документ, справка о заработке, валидация адреса — классический комплект для полноценного доступа.
Резервные URL устраняют сложности с цензурой поставщиков. Функционирующие копии обновляются систематически IT командами. Портативные приложения регулярно функционируют устойчивее браузерных редакций.
Банкролл-менеджмент устанавливает перспективную эффективность развлекательных раундов. Экспертные участники указывают ограничивать размер бета до 1-2% от совокупного капитала.
Актуальные участники встречаются с набором технологических нюансов при функционировании с официальными площадками. Тематические ресурсы типа казино Килограмм обеспечивают актуальную материалы о деятельности гэмблинговых операторов.
Процесс подтверждения аккаунта включает ряд принудительных шагов. Начальная валидация включает отправки справок подтверждающих индивидуальность. Стандартный список включает документ, автоудостоверение или международный паспорт.
Цифровая сторона регистрации предполагает внедрение зашифрованного канала и двухуровневой проверки. Квалифицированные пользователи предлагают активировать весь комплекс возможных функций безопасности.
Резервные ссылки образуют абсолютные отражения центрального портала с удержанием исчерпывающего набора функций. Главное преимущество заключается в подобии расчетных рамок и параметров проигрыша.
Процедура локализации функционирующих резервных ссылок основывается на контроле экспертных новостных лент и сотрудничающих порталов. Профессиональные пользователи эксплуатируют прокси-соединения для формирования бесперебойного подключения невзирая от локальных блокировок.
Grove Aisle Collection – Easy-to-use site and the pages load without delay.
кликните сюда https://lolz.live
Студия бровей и ресниц Откройте для себя мир идеальных бровей и манящих ресниц – мир, созданный специально для вас.
d-amphetamine salt combo 10mg tab
Ocean Online Shop – Fast-loading pages and a good variety of products make browsing easy.
Подбор качественного азартного заведения в текущих границах заставляет специального рассмотрения к регулятивному статусу. Профессиональные геймеры представляют, что РЎСѓРєР° зеркало отображает новую материалы о доступных сервисах.
Алгоритм открытия счета в лицензированных площадках включает обязательную проверку личности. KYC-нормы оберегают как оператора, так и геймера от обмана. Переходные лимиты на изъятие денег до закрытия валидации – нормальная система.
Электронные препятствия на доступ к игровым сервисам устраняются через резервные адреса. Активные клоны обеспечивают абсолютную возможности главного ресурса. Платежные движения, азартный результаты и наградные программы сохраняются стабильными.
Денежная защищенность выражается показателем используемых платежных инструментов. SSL-безопасность, PCI DSS валидация и дополнительная подтверждение создают надежный периметр ограждения.
Развлекательная библиотека сертифицированных площадок включает слоты от топовых разработчиков. RTP-коэффициенты, дисперсия и вероятностные модели получают независимую валидацию в утвержденных учреждениях.
Программы поощрения в достойных операторах базируются на прозрачных правилах ставок. Требования x35-40 признается разумным для барабан-поощрений, в то время как карточные развлечения включаются в счет с минимальным фактором.
Подбор качественного гемблинг заведения в актуальных обстоятельствах предполагает детального рассмотрения к юридическому уровню. Компетентные участники понимают, что lucky bear казино официальный сайт демонстрирует последнюю сведения о действующих ресурсах.
Механизм открытия счета в легальных заведениях объединяет обязательную аутентификацию личности. KYC-стандарты оберегают как оператора, так и пользователя от махинаций. Краткосрочные границы на изъятие средств до окончания валидации – нормальная методика.
Электронные препятствия на связь к азартным сайтам решаются через альтернативные адреса. Рабочие копии обеспечивают полную возможности базового сайта. Финансовые переводы, развлекательный продвижение и поощрительные системы сохраняются константными.
Экономическая защищенность определяется показателем внедренных банковских способов. SSL-защита, PCI DSS сертификация и двухфакторная верификация гарантируют стабильный барьер безопасности.
Азартная коллекция легальных площадок объединяет спины от известных создателей. RTP-параметры, дисперсия и расчетные формулы испытывают объективную валидацию в одобренных институтах.
Планы вознаграждения в серьезных площадках основываются на ясных требованиях ставок. Требования x35-40 расценивается справедливым для слот-подарков, в то время как классические забавы учитываются в счет с сниженным процентом.
http://vetfreemeds.com/# online vet pharmacy
Для всех, кто ждет ufc в феврале марте 2026 три недели которые встряхнут дивизионы, нашел отличный гид по турнирам. Ссылка на обзор: https://crm64.ru/news/goryachij-fevral-mart-2026-v-ufc-tri-turnira-kotorye-nelzya-propustit/
Morning Crate Essentials Hub – Fast and effortless shopping, all products were easy to find.
Wicker Lane Market – Items were clearly displayed, site loads quickly, and checkout was easy.
These are truly enormous ideas in on the topic
of blogging. You have touched some nice factors here.
Any way keep up wrinting.
Feel free to visit my web-site – emergency loans
CrateSunShop – Definitely keeping this bookmarked for future purchases, easy to use.
Clear Online Market – The layout makes browsing easy and the items are quite engaging.
Нынешние геймеры обталкиваются с набором цифровых нюансов при процессах с легальными порталами. Профессиональные платформы типа lucky bear казино предоставляют релевантную контент о работе казино организаций.
Система аутентификации кабинета предполагает ряд необходимых уровней. Первичная проверка предполагает предоставления свидетельств валидирующих субъект. Стандартный пакет подразумевает ID, права или заграничное удостоверение.
Программная сторона записления охватывает задействование SSL-шифрования и двухуровневой проверки. Профессиональные игроки настаивают включать полный набор представленных возможностей охраны.
Альтернативные адреса представляют идентичные копии базового сайта с сохранением исчерпывающего инструментария. Ключевое плюс кроется в схожести финансовых пределов и параметров условий прокрутки.
Система выявления функционирующих альтернативных адресов основывается на наблюдении профессиональных уведомительных сервисов и аффилированных ресурсов. Экспертные геймеры задействуют туннельные протоколы для гарантирования стабильного доступа невзирая от территориальных запретов.
Функционирующие зеркала лицензированных игорных заведений на казино лова предоставляют устойчивый доступ к развлекательным системам. Схема клонирования создает точные клоны корневого портала с сохранением всех функций.
Система регистрации через зеркало полностью дублирует базовую шаблон. Только пришедшие клиенты регистрируют действующий email, формируют безопасный код доступа и выбирают основную курренси.
Подтверждение аккаунта предполагает отправки бумаг опираясь на KYC-требованиям. Скан национального документа, свидетельство резиденции и денежные данные анализируются посредством машинную верификацию в течение 24-72 временных единиц.
Аутентификация зарегистрированных игроков производится через базовую форму с многоступенчатой верификацией. Временные пароли приходят на мобильный устройство или мейл.
Опции пополнительного блока через дублирующие порталы поддерживает популярные банковские сервисы. Visa, Mastercard, виртуальные счета Skrill, Neteller, виртуальные монеты Bitcoin, Ethereum обрабатываются с сокращенными процентами 0-3%.
Развлекательная библиотека повторяется на сто процентов включая слоты, классические забавы, live-операторов и максимальные награды. RTP-индикаторы, дисперсия и проигрыш остаются идентичными.
Бонусная политика выполняется идентично корневому домену. Welcome-комплекты, бесплатные вращения, денежный возврат и VIP-программы активируются программно при выполнении прописанных критериев.
shop Orchid Aisle now – A curated assortment and smooth browsing make this site enjoyable.
Top Flora Products – Very user-friendly design that makes shopping stress-free.
нажмите здесь https://lzt.market/
Pine Vendor products – Fast, responsive, and well-designed pages make shopping effortless.
Определение качественного игрового оператора в актуальных рамках заставляет специального внимания к регулятивному режиму. Знающие игроки знают, что РЎСѓРєР° регистрация предоставляет актуальную факты о работающих провайдерах.
Схема создания аккаунта в лицензированных заведениях включает обязательную подтверждение идентичности. KYC-нормы обеспечивают как площадку, так и геймера от фрода. Промежуточные рамки на снятие денег до окончания контроля – обычная методика.
Электронные барьеры на доступ к гемблинг сервисам обходятся через зеркальные домены. Рабочие дубликаты сохраняют тотальную функциональность главного сервиса. Финансовые процедуры, геймплейный статистика и наградные системы сохраняются устойчивыми.
Финансовая стабильность определяется степенью задействованных платежных инструментов. SSL-кодирование, PCI DSS аттестация и дополнительная аутентификация гарантируют прочный контур обороны.
Интерактивная коллекция проверенных провайдеров содержит машины от известных производителей. RTP-коэффициенты, дисперсия и алгоритмические модели подвергаются внешнюю валидацию в одобренных организациях.
Планы лояльности в профессиональных площадках строятся на четких условиях вейджера. Отыгрыш x35-40 характеризуется адекватным для спин-льгот, в то время как карточные игры принимаются в расчет с сниженным процентом.
Действующие альтернативные домены проверенных казино на lucky bear казино официальный сайт создают непрерывный доступ к геймерским платформам. Принцип зеркалирования генерирует точные дубликаты основного портала с консервацией всех инструментов.
Процедура регистрации через mirror-сайт абсолютно воспроизводит главную бланк. Новые клиенты прописывают валидный email, формируют защищенный секретную комбинацию и устанавливают рабочую валюту.
Подтверждение счета содержит представления бумаг согласно KYC-политике. Изображение паспорта, доказательство проживания и банковские параметры проходят автоматическую контроль в течение 24-72 ч.
Авторизация активных пользователей осуществляется через базовую окно с усиленной аутентификацией. Сессионные коды поступают на мессенджер гаджет или почтовый ящик.
Инструменты финансового сектора через зеркала обеспечивает популярные расчетные механизмы. Visa, Mastercard, веб балансы Skrill, Neteller, виртуальные монеты Bitcoin, Ethereum осуществляются с уменьшенными сборами 0-3%.
Гемблинг коллекция клонируется целиком включая машины, традиционные активности, live-крупье и прогрессивы. RTP-показатели, колебания и проигрыш удерживаются такими же.
Промо программа оперирует похоже базовому порталу. Welcome-бандлы, фриспины, денежный возврат и VIP-системы запускаются системно при соблюдении заданных критериев.
http://jamesbondexhibition.com
пояснения https://lolz.live/
Just completed my registration on 8xbet and received the welcome offer, really impressed so far. Looking forward to exploring more exciting features on the platform.
My programmer is trying to persuade me to move to .net from PHP.
I have always disliked the idea because of the costs.
But he’s tryiong none the less. I’ve been using Movable-type
on several websites for about a year and am anxious about
switching to another platform. I have heard good things
about blogengine.net. Is there a way I can import all my wordpress content into it?
Any help would be really appreciated!
my site :: 아파트 사전점검
WhimHarbor Hub – Pages load quickly and the layout makes browsing enjoyable.
Лицензионные ресурсы игровых предложений обеспечивают участникам шанс к элитному игровому процессу через профильные платформы, включая тип топ казино , которые выполняют международные критерии защиты.
Последовательность создания аккаунта necessita заполнения идентификационных данных через encrypted SSL-connection. Администрация требуют официальное доказательство возраста и адреса residence для исполнения законодательных критериев.
Двухфакторная проверка является необходимым aspect современных платформ защиты. Users обретают SMS-коды, push-уведомления или применяют dedicated приложения типа Google Authenticator.
Резервные адреса ликвидируют сложности региональных санкций и DDoS-нападений. Техническим образом дубли составляют дублированные копии главного ресурса с удержанием возможностей и личных информации.
Опытные участники советуют удерживать current реестры функционирующих копий в закладках browser. Операторы направляют сведения о современных ссылках через e-mail, Telegram-сообщества и mobile приложения.
Финансовые операции через legal ресурсы обеспечены cryptographic технологиями категории банковского направления. Extraction денег происходит только на верифицированные счета хозяина учётной записи.
Нынешние участники сталкиваются с сложностью доступа к проверенным ресурсам. Операторы закрывают стандартные адреса, но грамотные СЌРЅРѕРјРѕ пользователи осознают о доступности зеркальных платформ.
Параллельный портал представляет точную реплику основного площадки. SSL-сертификаты поддерживаются аналогичными. Денежные транзакции производятся через идентичные шлюзы.
Схема оформления профиля через альтернативный ресурс предполагает привычной валидации. Администраторы выясняют бумаги для выполнения KYC-правил. Личные данные осуществляют двухфакторную проверку.
Вносительные пределы на параллельных порталах совпадают основным параметрам. Наименьшие беты сохраняются стабильными. Накопительные джекпоты координируются между множественными ресурсами.
Стимулирующие механизмы действуют целостно на параллельных площадках. Вейджер гарантирует первоначальные показатели. Длительность реализации остаётся прежним.
Сервис сопровождения изучает тикеты с зеркальных доменов таким же способом. Онлайн переписка осуществляет непрерывный режим функционирования.
Jasper Aisle Market – The pricing structure appears honest and the platform seems reliable.
O’Neill Justice Hub – The site offers easy access to information and a carefully presented vision.
Tide Vendor Corner Online – Site navigation is effortless and browsing is enjoyable.
Выбор безопасного игрового ресурса в актуальных границах нуждается детального изучения к лицензионному положению. Знающие клиенты учитывают, что mad casino отображает последнюю информацию о действующих сервисах.
Механизм создания аккаунта в проверенных заведениях объединяет неизбежную валидацию персональных данных. KYC-правила обеспечивают как заведение, так и игрока от фрода. Переходные ограничения на вывод капитала до закрытия подтверждения – нормальная методика.
Технические барьеры на соединение к азартным площадкам обходятся через альтернативные адреса. Функционирующие дубликаты предоставляют полную производительность основного сервиса. Банковские транзакции, геймплейный продвижение и льготные планы функционируют неизменными.
Финансовая гарантированность оценивается качеством используемых денежных систем. SSL-безопасность, PCI DSS сертификация и дополнительная проверка создают надежный щит обороны.
Игровая набор официальных операторов охватывает спины от лидирующих студий. RTP-индексы, дисперсия и алгоритмические схемы подвергаются внешнюю проверку в одобренных учреждениях.
Планы мотивации в качественных сервисах строятся на понятных правилах ставок. Проигрыш x35-40 характеризуется справедливым для автомат-льгот, в то время как традиционные забавы принимаются в подсчет с минимальным процентом.
Исследование в секторе лицензированных порталов нуждается представления актуальных решений соединения. Умелые участники внедряют mad казино для получения актуальной сведений о активных ссылках.
Механизм формирования учетной записи в проверенных организациях охватывает комплексную верификацию. Передовые компании используют KYC-алгоритмы и AML-стандарты. Оформление документов отнимает от 24 до 72 часов.
Программные способы для избежания барьеров развиваются параллельно с ужесточением нормативных решений. VPN-сервисы категории premium предлагают кодирование AES-256 и технологии OpenVPN. Надежность коннекта кардинально необходима для VIP заходов.
Дублирующие сайты действуют через географически размещенные IT системы. CDN-системы поддерживают быструю пинг для азиатских участников. Программное маршрутизация срабатывает при идентификации недоступности главного адреса.
Платежные манипуляции в лицензированных территориях отвечают жестким стандартам PCI DSS. Децентрализованные операции приобретают популярность вследствие приватности и динамике обработки.
Планшетные клиенты премиальных брендов включают отпечатковую аутентификацию и push-алерты для существенных происшествий. Адаптивный облик независимо корректируется под настройки панели.
pet drugs online: pet pharmacy – п»їdog medication online
FrostTrack Official – Very user-friendly layout and smooth navigation made browsing a pleasure.
гадание таро онлайн бесплатно
Brass Trend Store – Great clarity in listings and the pages respond very fast.
Explore Pebble Deals – Very pleasant experience scrolling through the available items online.
http://vetfreemeds.com/# pet pharmacy
Современные операторы азартных игр предоставляют пользователям подключение к высококлассному гемблингу через защищенные аква зеркало системы. Легальная операционная активность нуждается следования четких законодательных положений.
Процедура активации клиентского профиля предусматривает проверку приватных сведений. Провайдеры эксплуатируют детализированные механизмы KYC и AML для пресечения мошеннических переводов.
Цифровые инструменты инновационных беттинг площадок основываются на надежных хостингах с SSL протоколами. Территориальные ограничения принуждает администраторов организовывать параллельные адреса.
Параллельные сайты представляют эквивалентные копии главного сайта с сохранением всех возможностей и параметров. Участники добиваются постоянный подключение к капиталу, беттинг данным и персональным настройкам.
Денежные действия осуществляются через синхронизированные финансовые агрегаторы. Ограничения на инвестиции и получения регулируются в соответствии с регуляторными условиями и внутренними политиками снижения потерь.
Компетентные гемблеры советуют контролировать положение лицензии через регуляторные базы данных беттинг ведомств. Престижные критерии задействуют ранги на профильных платформах и оценки настоящих пользователей.
Активные альтернативные домены лицензированных игорных заведений на Клубника казино обеспечивают непрерывный коннект к гемблинг платформам. Технология клонирования генерирует эквивалентные клоны базового веб-площадки с консервацией всех возможностей.
Схема открытия счета через резервную ссылку полностью имитирует оригинальную заявку. Дебютные геймеры указывают валидный email, создают защищенный секретную комбинацию и устанавливают рабочую платежное средство.
Валидация личного кабинета содержит предоставления документов следуя KYC-регламенту. Скан ID-карты, верификация резиденции и денежные сведения проходят автоматическую валидацию в течение 24-72 часа.
Подключение зарегистрированных участников происходит через типовую окно с двухфакторной идентификацией. Одноразовые шифры отправляются на мессенджер аппарат или мейл.
Механизмы входящего модуля через mirror-сайты поддерживает популярные банковские платформы. Visa, Mastercard, онлайн портмоне Skrill, Neteller, виртуальные монеты Bitcoin, Ethereum осуществляются с минимальными сборами 0-3%.
Гемблинг коллекция копируется целиком включая барабаны, традиционные активности, live-операторов и джекпоты. RTP-индикаторы, дисперсия и проигрыш удерживаются такими же.
Акционная схема функционирует подобно главному ресурсу. Welcome-наборы, бесплатные вращения, возврат средств и VIP-курсы запускаются алгоритмически при выполнении установленных требований.
http://olo.phorum.pl/viewtopic.php?p=448253#448253
Acorn Collection Hub – Navigation is smooth and all items are accessible online.
check out Sola Isle – Products are displayed attractively, giving the site a polished feel.
West Deals Online – Pages load quickly and everything feels organized and user-friendly.
Лицензионные провайдеры игровых сервисов дают пользователям право к качественному гэмблингу через целевые сайты, включая казино Голд , которые именно соблюдают мировые нормы надёжности.
Процедура создания аккаунта включает заполнения валидационных сведений через шифрованные SSL-соединения. Провайдеры demanded official verification возраста и локации жительства для выполнения законодательных требований.
2FA аутентификация выступает необходимым элементом новейших платформ security. Пользователи имеют SMS-пароли, push-сообщения или используют профессиональные приложения наподобие Google Authenticator.
Зеркальные URL устраняют вопросы geographic барьеров и DDoS-воздействий. По сути дубли составляют идентичные dublicates центрального платформы с поддержанием функциональности и клиентских сведений.
Экспертные игроки призывают хранить обновлённые базы функционирующих дублей в избранном browser. Операторы передают информацию о свежих адресах через e-mail, Telegram-чаты и телефонные софт.
Денежные операции через проверенные платформы защищены шифровальными системами уровня банковского сектора. Получение капитала происходит только на подтверждённые карты держателя учётной записи.
Современные геймеры обталкиваются с массой технических аспектов при операциях с проверенными ресурсами. Специализированные порталы типа Килограмм зеркало выдают современную информацию о деятельности развлекательных организаций.
Механизм валидации учетной записи подразумевает несколько принудительных шагов. Исходная подтверждение подразумевает размещения документов доказывающих индивидуальность. Стандартный перечень предполагает документ, автолицензию или загранпаспорт.
Программная составляющая оформления предполагает задействование зашифрованного канала и двухуровневой проверки. Продвинутые участники предлагают активировать совокупность предложенных опций обеспечения.
Альтернативные адреса образуют полные реплики основного портала с обеспечением тотального набора функций. Главное преимущество выражается в идентичности расчетных пределов и требований условий прокрутки.
Процедура выявления действующих запасных доменов базируется на проверке профильных мессенджер групп и союзных порталов. Профессиональные геймеры эксплуатируют туннельные протоколы для обеспечения надежного соединения независимо от территориальных лимитов.
My Mexican Pharmacy: My Mexican Pharmacy – My Mexican Pharmacy
https://vetfreemeds.com/# pet drugs online
order antibiotics from mexico My Mexican Pharmacy mexico pharmacy price list
Передовые участники пересекаются с огромным количеством технических аспектов при функционировании с сертифицированными ресурсами. Специализированные порталы типа retro casino выдают свежую материалы о функционировании казино провайдеров.
Алгоритм подтверждения учетной записи охватывает несколько требуемых шагов. Начальная проверка подразумевает передачи бумаг валидирующих гражданство. Обычный набор предполагает свидетельство, водительские права или внешний паспорт.
Цифровая часть записления содержит задействование криптографической защиты и многофакторной защиты. Экспертные геймеры советуют включать все доступных настроек безопасности.
Дублирующие порталы составляют идентичные дубликаты основного портала с сохранением комплексного инструментария. Ключевое выгода кроется в идентичности платежных границ и параметров условий прокрутки.
Процедура локализации функционирующих резервных ссылок базируется на наблюдении специализированных новостных лент и связанных площадок. Экспертные геймеры эксплуатируют VPN-сервисы для гарантирования надежного подключения без оглядки от региональных запретов.
Поиск надежного развлекательного оператора подразумевает тщательного рассмотрения лицензионных разрешений. Инновационные платформы Grizzly предоставляют клиентам максимальную факты о своих допусках.
Процесс оформления счета содержит ряд требуемых ступеней подтверждения. Представители настаивают документы, доказывающие персону и дееспособность. Стандартный KYC-порядок требует от 24 до 72 временных отрезков.
Контроль средств стартует с определения границ на вклады. Квалифицированные игроки предлагают эксплуатировать принцип 5% от общего развлекательного капитала на индивидуальную сессию.
Программные ограничения операторов побуждают внедрять запасные домены. Альтернативы сохраняют безусловную функциональность центрального площадки, подразумевая летопись транзакций и игровой достижения.
Актуальные банковские методы дают моментальные взносы через криптовалютные счета. Bitcoin, Ethereum и фиксированные активы обеспечивают тайность и мизерные отчисления. Продолжительность реализации изъятий достигает 10-30 минут.
Схемы лояльности включают иерархические уровни с накапливающимся компенсацией. VIP-координаторы обеспечивают эксклюзивные бонусы, улучшенные границы и ускоренную сервис.
Shop PlumVendor – Browsing was simple and I found all the items I wanted without issues.
EmberAisle marketplace – Unique selections caught my attention, worth returning for more.
Field Marketplace – Shopping here made it incredibly easy to get what I came for.
Легальные ресурсы азартных предложений предоставляют клиентам шанс к качественному гэмблингу через профильные сайты, включая казино Килограмм , что соблюдают общепринятые стандарты надёжности.
Схема активации требует указания верификационных деталей через encrypted SSL-каналы. Менеджмент demanded official подтверждение правоспособности и места проживания для соблюдения legal стандартов.
2FA верификация является mandatory частью современных платформ безопасности. Игроки имеют SMS-токены, push-сообщения или применяют специализированные приложения по типу Google Authenticator.
Резервные ссылки решают вопросы territorial запретов и DDoS-нападений. Фактически дубли составляют копийные версии центрального платформы с поддержанием features и индивидуальных данных.
Профессиональные клиенты рекомендуют удерживать актуальные списки функционирующих копий в bookmark обозревателя. Провайдеры передают новости о современных URL через мейл, Telegram-сообщества и телефонные софт.
Платёжные movements через legal порталы обеспечены cryptographic протоколами класса банковского сектора. Extraction финансов выполняется лишь на подтверждённые данные хозяина личного кабинета.
Определение безопасного развлекательного портала требует основательного изучения лицензионных разрешений. Новые сайты казино Килограмм предоставляют клиентам стопроцентную сведения о действующих допусках.
Система регистрации включает ряд требуемых этапов верификации. Провайдеры запрашивают документы, устанавливающие идентичность и правоспособность. Типовой KYC-регламент продолжается от 24 до 72 временных отрезков.
Управление банком запускается с назначения границ на депозиты. Компетентные клиенты рекомендуют применять закон 5% от итогового гемблинг капитала на одну сессию.
Системные ограничения операторов побуждают использовать запасные пути. Зеркала оберегают максимальную эффективность первичного платформы, подразумевая летопись переводов и игровой прогресс.
Передовые расчетные способы обеспечивают мгновенные пополнения через виртуальные счета. Bitcoin, Ethereum и стабильные валюты обеспечивают скрытность и минимальные комиссии. Срок проведения выводов равно 10-30 интервалов.
Программы верности охватывают градационные статусы с возрастающим бонусом. VIP-представители обеспечивают эксклюзивные поощрения, усиленные ограничения и ускоренную поддержку.
Sensory branding Strategy, scent technologies and successful implementation across all product stages by Aromamedia
fairvendor.shop – Found exactly what I needed, site feels trustworthy overall today.
Opal Wharf Picks – Layout is clean and finding products is straightforward.
白鹿丞磊《莫离》2026古装大女主权谋剧,海外华人必备高清陆剧,智斗爽感拉满,全球加速无广告实时更新。
Cycle for Sci Campaign – Helpful and well-structured information makes understanding the initiative simple.
Новейшие бетторы оказываются с сложностью связи к проверенным сайтам. Поставщики блокируют первичные адреса, но искушённые Рльдорадо клиенты учитывают о функционировании параллельных сайтов.
Параллельный портал образует идентичную отображение первичного площадки. Средства защиты остаются такими же. Платёжные действия производятся через сходные механизмы.
Методика заведения учётной записи через альтернативный портал содержит типовой аутентификации. Менеджеры уточняют удостоверения для осуществления KYC-регламентов. Индивидуальные сведения реализуют многоуровневую верификацию.
Пополнительные пределы на параллельных ресурсах равняются стандартным требованиям. Стартовые беты остаются стабильными. Увеличивающиеся джекпоты интегрируются между многочисленными ссылками.
Льготные системы функционируют завершённо на резервных сайтах. Требования по обороту обеспечивает базовые величины. Период действия использования поддерживается.
Департамент обслуживания изучает тикеты с дополнительных адресов равнозначно. Прямой переписка гарантирует 24-часовой порядок работы.
purchase sumatriptan
Развлекательная сфера показывает активный развитие, привлекая массы игроков. Опытные ресурсы гарантируют надёжную атмосферу для развлечений. Развёрнутую факты о подобных организациях доступно получить на казино Болливуд .
Легализация представляет приоритетным фактором определения сайта. Контролёры Великобритании гарантируют жёсткий проверку экономических манипуляций. Каждая официальная ресурс подвергается регулярные ревизии RNG-алгоритмов.
Цифровые свойства передовых гемблинг-сайтов объединяют SSL-криптографию экономического ранга. Производители программного софта уровня Microgaming, NetEnt, Pragmatic Play подключают комплексные алгоритмы случайных величин.
Процесс подтверждения личного кабинета подразумевает представления документов KYC-стандарта. Удостоверение, документ о прибылях, валидация местожительства — обычный набор для полноценного авторизации.
Зеркальные URL убирают проблемы с ограничениями провайдеров. Рабочие зеркала адаптируются постоянно техническими командами. Планшетные утилиты обычно функционируют лучше интернет вариантов.
Финансовая дисциплина формирует продолжительную прибыльность развлекательных циклов. Квалифицированные беттеры настаивают урезать объём депозита до 1-2% от общего капитала.
CreekCorner – Fast page loads make shopping simple, and the layout is straightforward.
Caramel Trend Store – Very intuitive pages and the layout is clean and appealing.
Перемещение в секторе сертифицированных сайтов включает знания новых методов соединения. Опытные игроки применяют Bollywood для получения релевантной материалов о функционирующих ссылках.
Процесс создания профиля в надежных заведениях охватывает многоуровневую верификацию. Передовые поставщики задействуют KYC-системы и AML-стандарты. Документальное сопровождение составляет от 24 до 72 промежутков.
Цифровые технологии для избежания препятствий улучшаются одновременно с ужесточением законодательных мер. VPN-сервисы типа premium гарантируют шифрование AES-256 и методы OpenVPN. Устойчивость коннекта fundamentally необходима для элитных заходов.
Зеркальные ресурсы функционируют через пространственно распределенные технические инфраструктуры. CDN-архитектуры поддерживают оптимальную отклик для глобальных участников. Автоматическое роутинг активируется при обнаружении барьера центрального сайта.
Финансовые манипуляции в легальных областях отвечают строгим стандартам PCI DSS. Блокчейн платежи завоевывают признание по причине конфиденциальности и скорости реализации.
Планшетные приложения элитных операторов интегрируют физиологическую подтверждение и push-оповещения для принципиальных ситуаций. Модифицируемый облик самостоятельно адаптируется под свойства монитора.
Подбор безопасного азартного ресурса предполагает тщательного исследования регулятивных сертификатов. Актуальные системы аква казино предоставляют игрокам абсолютную данные о собственных допусках.
Алгоритм регистрации предусматривает множество необходимых шагов верификации. Представители истребуют справки, засвидетельствующие идентичность и зрелость. Традиционный KYC-порядок требует от 24 до 72 промежутков.
Банкролл-менеджмент открывается с задания пределов на вклады. Профессиональные клиенты настаивают внедрять правило 5% от совокупного гемблинг резерва на индивидуальную раунд.
Электронные запреты администраторов обязывают внедрять альтернативные ссылки. Альтернативы поддерживают полную производительность основного платформы, включая журнал переводов и гемблинг прогресс.
Актуальные платежные системы гарантируют мгновенные депозиты через цифровые портмоне. Bitcoin, Ethereum и стабильные валюты дают анонимность и наименьшие комиссии. Период осуществления получений достигает 10-30 интервалов.
Программы постоянства подразумевают иерархические степени с накапливающимся возвратом. VIP-представители дают эксклюзивные бонусы, улучшенные границы и первоочередную обслуживание.
Indigo Trend Store – The site feels uncluttered and the products seem thoughtfully organized.
Ash Market storefront – Nicely arranged pages with a reliable and quick checkout.
Lavender Favorites – Unique finds and a trustworthy shopping experience overall.
Shop Zen Collection – Easy-to-use layout with product info that really helps while shopping.
buying from canadian pharmacies: legal canadian pharmacy online – CertiCanPharmacy
Игровая ниша демонстрирует быстрый расширение, притягивая тысячи геймеров. Экспертные сайты гарантируют надёжную среду для игры. Подробную информацию о указанных компаниях можно отыскать на lucky bear казино .
Аттестация выступает главным аспектом селекции портала. Лицензиаты Великобритании предоставляют строгий аудит финансовых операций. Каждая легальная сайт реализует периодические проверки RNG-алгоритмов.
Цифровые характеристики инновационных беттинг-платформ включают SSL-защиту расчётного класса. Производители компьютерного материала наподобие Microgaming, NetEnt, Pragmatic Play добавляют сложные алгоритмы рандомных чисел.
Процесс верификации счёта подразумевает направления бумаг KYC-класса. ID, свидетельство о заработке, валидация прописки — типичный набор для полноценного доступа.
Параллельные порталы решают сложности с ограничениями компаний. Действующие варианты корректируются систематически техническими специалистами. Карманные клиенты зачастую работают качественнее интернет редакций.
Управление банкроллом формирует перспективную результативность гемблинговых партий. Грамотные пользователи рекомендуют лимитировать величину пари до 1-2% от полного бюджета.
https://network-1797707.mn.co/posts/98495738?utm_source=manual
Лицензионные операторы развлекательных предложений гарантируют геймерам право к качественному времяпрепровождению через dedicated ресурсы, включая РЎСѓРєР° казино , которые соблюдают международные критерии security.
Механизм создания аккаунта предполагает заполнения верификационных информации через защищённые SSL-протоколы. Операторы требуют нотариальное verification правоспособности и локации регистрации для поддержания законодательных норм.
Многоуровневая проверка становится необходимым составляющей передовых платформ безопасности. Users приобретают SMS-коды, push-уведомления или эксплуатируют специальные утилиты типа Google Authenticator.
Резервные URL нейтрализуют сложности territorial санкций и DDoS-атак. С технической точки зрения реплики представляют тождественные dublicates базового домена с обеспечением функциональности и user деталей.
Профессиональные пользователи предлагают сохранять свежие каталоги действующих копий в favourites browser. Администрация доставляют updates о современных доменах через мейл, Telegram-каналы и смартфонные приложения.
Банковские транзакции через официальные сайты гарантированы защитными алгоритмами level банковского направления. Extraction капитала осуществляется лишь на проверенные данные хозяина личного кабинета.
https://mymexicanpharmacy.shop/# mexican rx pharm
EmberVendor Select – Nice assortment of products and checkout went very smoothly.
Актуальные провайдеры беттинг услуг дают участникам вход к профессиональному азарту через защищенные казино РјСЌРґ платформы. Авторизованная бизнес нуждается соблюдения четких законодательных положений.
Процесс активации персонального аккаунта охватывает валидацию персональных данных. Управляющие применяют расширенные механизмы KYC и AML для предотвращения мошеннических транзакций.
Технические системы современных игорных домов работают на надежных хостингах с SSL протоколами. Геоблокировка заставляет владельцев создавать дублирующие адреса.
Зеркальные платформы составляют идентичные репликации основного портала с обеспечением всех сервисов и данных. Участники получают непрерывный доступ к балансу, беттинг истории и персональным параметрам.
Платежные процедуры проходят через синхронизированные денежные агрегаторы. Ограничения на вклады и обналичивания фиксируются в соотношении с лицензионными условиями и индивидуальными правилами снижения потерь.
Профессиональные клиенты рекомендуют контролировать ситуацию сертификата через надзорные регистры беттинг органов. Авторитетные показатели содержат позиции на тематических ресурсах и feedback реальных пользователей.
http://www.activewin.com/user.asp?Action=Read&UserIndex=4826478
Определение проверенного развлекательного портала в нынешних условиях предполагает особого изучения к законному положению. Компетентные пользователи понимают, что казино аква предоставляет новую данные о доступных ресурсах.
Алгоритм записи в лицензированных платформах содержит обязательную проверку удостоверения. KYC-требования защищают как казино, так и игрока от обмана. Переходные лимиты на снятие финансов до финализации валидации – привычная методика.
Электронные запреты на вход к игровым ресурсам решаются через зеркальные ссылки. Функционирующие зеркала предоставляют всестороннюю производительность центрального портала. Финансовые транзакции, интерактивный статистика и льготные системы функционируют константными.
Материальная надежность измеряется показателем эксплуатируемых финансовых инструментов. SSL-безопасность, PCI DSS сертификация и многоуровневая верификация обеспечивают безопасный контур обороны.
Игровая ассортимент проверенных сервисов объединяет автоматы от лидирующих производителей. RTP-коэффициенты, колебания и математические модели получают внешнюю сертификацию в авторизованных организациях.
Планы поощрения в достойных заведениях базируются на четких условиях вейджера. Проигрыш x35-40 считается справедливым для слот-бонусов, в то время как настольные игры учитываются в зачет с сниженным показателем.
bs2best at blsp at
Ridge Deals Online – Products arrived in excellent condition and support was very helpful.
Retail Glow Picks – Fast site, intuitive navigation, and checkout was very straightforward.
Wave Vendor Corner – Smooth browsing and the checkout steps were simple to follow.
http://www.citikliniken.com
Беттинговая отрасль представляет интенсивный подъём, притягивая массы участников. Опытные сайты предоставляют качественную условия для беттинга. Подробную материалы о подобных операторах реально отыскать на Килограмм казино .
Аттестация выступает приоритетным элементом выбора платформы. Лицензиаты Кюрасао предоставляют серьёзный аудит расчётных действий. Каждая лицензированная сайт реализует систематические контроли RNG-модулей.
Компьютерные характеристики передовых казино объединяют SSL-криптографию финансового категории. Поставщики компьютерного ПО типа Microgaming, NetEnt, Pragmatic Play интегрируют усовершенствованные схемы хаотичных величин.
Алгоритм проверки аккаунта включает подачи удостоверений KYC-типа. Удостоверение, свидетельство о прибылях, валидация адреса — стандартный перечень для окончательного доступа.
Зеркальные ссылки устраняют трудности с блокировками компаний. Актуальные зеркала изменяются каждый день техническими службами. Карманные софт нередко оперируют лучше онлайн модификаций.
Распределение капитала устанавливает стратегическую результативность игровых циклов. Квалифицированные геймеры настаивают лимитировать величину вейджера до 1-2% от итогового банкролла.
shop at LinenVendor – Clean presentation and quick purchase process make shopping effortless.
нажмите, чтобы подробнее https://lzt.market
Подбор надежного развлекательного портала в текущих реалиях предполагает детального анализа к регулятивному статусу. Квалифицированные пользователи учитывают, что Килограмм казино содержит новую материалы о активных сервисах.
Схема оформления профиля в проверенных сервисах охватывает требуемую верификацию документов. KYC-стандарты оберегают как казино, так и участника от обмана. Промежуточные пределы на изъятие финансов до завершения валидации – нормальная практика.
Технические блокировки на вход к развлекательным площадкам преодолеваются через параллельные домены. Активные дубликаты поддерживают полную работоспособность первичного платформы. Расчетные операции, игровой результаты и льготные схемы функционируют устойчивыми.
Финансовая защищенность измеряется критерием используемых расчетных инструментов. SSL-шифрование, PCI DSS подтверждение и двухфакторная аутентификация устанавливают надежный щит защиты.
Интерактивная коллекция официальных площадок объединяет автоматы от ведущих создателей. RTP-значения, вариативность и алгоритмические модели подвергаются нейтральную проверку в аккредитованных институтах.
Системы стимулирования в надежных площадках основываются на прозрачных критериях ставок. Отыгрыш x35-40 расценивается нормальным для машина-подарков, в то время как традиционные игры учитываются в подсчет с пониженным процентом.
Если хотите быть в курсе новостей ufc в феврале марте 2026 три недели которые встряхнут дивизионы, посмотрите этот материал. Информация по ссылке: https://stuff4scrap.ru/news/fevral-mart-2026-v-ufc-tri-turnira-s-topovymi-hedlajnerami-i-vzryvnymi-anderkardami-polnyj-gid/
Bay Online Shop – Nice assortment of products and checkout was fast and simple.
https://certicanpharmacy.shop/# canadian pharmacy 365
NJ Vaccine Resource Hub – Simple directions and consistent updates make it easy for residents to navigate.
Передовые гемблеры попадают с препятствием подключения к сертифицированным платформам. Провайдеры блокируют первичные порталы, но опытные лаки ворлд казино клиенты учитывают о наличии резервных платформ.
Параллельный портал формирует точную дубликат главного платформы. SSL-сертификаты поддерживаются идентичными. Финансовые действия выполняются через идентичные механизмы.
Алгоритм регистрации через зеркальный домен предполагает классической подтверждения. Специалисты просят документы для исполнения KYC-регламентов. Идентификационные данные подвергаются многоуровневую валидацию.
Банковские рамки на зеркальных платформах равняются первичным требованиям. Минимальные ставки поддерживаются неизменными. Растущие призовые фонды согласовываются между множественными порталами.
Премиальные системы оперируют комплексно на параллельных площадках. Требования по обороту обеспечивает исходные параметры. Длительность реализации продолжается.
Департамент обслуживания решает обращения с резервных порталов сходным образом. Интерактивный общение осуществляет беспрерывный график деятельности.
Легальные операторы развлекательных сервисов предоставляют геймерам возможность к высококлассному времяпрепровождению через специализированные ресурсы, включая лаки Р±РёСЂ казино официальный сайт , что соблюдают transnational критерии надёжности.
Последовательность создания аккаунта требует заполнения проверочных информации через шифрованные SSL-линии. Провайдеры запрашивают official verification совершеннолетия и региона residence для соблюдения нормативных норм.
Двухэтапная проверка считается обязательным aspect передовых платформ защиты. Игроки располагают SMS-коды, push-уведомления или применяют профессиональные tools вроде Google Authenticator.
Зеркальные адреса устраняют трудности локальных ограничений и DDoS-нападений. По сути дубли формируют дублированные клоны primary портала с обеспечением features и user данных.
Опытные участники suggest удерживать обновлённые списки функционирующих mirrors в сохранённых ссылках веб-клиента. Операторы отправляют новости о современных URL через e-mail, Telegram-каналы и мобильные apps.
Payment переводы через надёжные порталы покрыты cryptographic протоколами категории банковского области. Изъятие средств выполняется только на аутентифицированные реквизиты собственника аккаунта.
this online shop – Noticed some pretty cool selections, worth checking out again later.
нажмите здесь сайт трипскан
Aurora Vendor Boutique – Well-structured site and easy navigation make shopping quick.
Vale Vendor Boutique – Enjoyed exploring the items and paying for them was easy.
Функционирующие mirror-ссылки проверенных азартных клубов на винити казино дают устойчивый соединение к геймерским сервисам. Методика реплицирования создает эквивалентные версии основного портала с фиксацией всех возможностей.
Схема открытия счета через mirror-сайт полностью имитирует главную форму. Новые игроки прописывают активный email, устанавливают безопасный код доступа и выбирают базовую курренси.
Валидация личного кабинета включает представления справок согласно KYC-стандартам. Снимок паспорта, верификация проживания и денежные сведения проверяются через автоматическую проверку в течение 24-72 часа.
Вход действующих участников производится через стандартную модуль с 2FA проверкой. Одноразовые пароли отправляются на мобильный аппарат или электронную почту.
Функционал депозитного сектора через mirror-сайты включает востребованные банковские системы. Visa, Mastercard, цифровые кошельки Skrill, Neteller, цифровые активы Bitcoin, Ethereum выполняются с низкими взносами 0-3%.
Гемблинг база дублируется в точности включая автоматы, традиционные развлечения, live-крупье и максимальные награды. RTP-коэффициенты, волатильность и вейджер поддерживаются неизменными.
Акционная политика выполняется аналогично основному сайту. Welcome-комплекты, безвозмездные спины, refund и VIP-системы запускаются алгоритмически при соблюдении прописанных стандартов.
Delta Shopping Spot – The items look great and placing an order was quick and easy.
Навигация в секторе лицензированных платформ включает понимания продвинутых способов соединения. Опытные участники внедряют СЌРЅРѕРјРѕ казино для добывания современной материалов о работающих ссылках.
Процесс открытия учетной записи в сертифицированных операторах включает многоуровневую верификацию. Передовые компании используют KYC-процедуры и AML-стандарты. Документальная процедура составляет от 24 до 72 часов.
Цифровые решения для обхода ограничений эволюционируют параллельно с интенсификацией правовых инициатив. VPN-службы класса premium обеспечивают шифрование AES-256 и системы OpenVPN. Постоянство канала fundamentally важна для высокоролловых игровых периодов.
Зеркальные адреса действуют через территориально размещенные цифровые кластеры. CDN-архитектуры обеспечивают сокращенную латентность для европейских участников. Автоматическое маршрутизация активируется при детекции ограничения первичного ресурса.
Банковские движения в легальных юрисдикциях следуют четким критериям PCI DSS. Крипто операции приобретают востребованность по причине конфиденциальности и быстроте процессинга.
Смартфонные программы элитных операторов интегрируют отпечатковую аутентификацию и push-сообщения для существенных происшествий. Изменяемый внешний вид программно адаптируется под параметры дисплея.
Before downloading any new utility, review its permissions carefully; some tools request broad accessibility access that isn’t strictly necessary for their core functionality, posing potential privacy concerns.
Give it a go:
optimizing media editing workflow with GPU acceleration on Big Sur
In-depth look here:
While both methods preserve data, a cloned backup to an external drive offers immediate bootability in case of total system failure, whereas Time Machine provides granular version history for individual file recovery over time.
Лицензионные платформы развлекательных возможностей обеспечивают пользователям шанс к элитному времяпрепровождению через специализированные ресурсы, включая Килограмм казино , которые точно соблюдают общепринятые регламенты защиты.
Последовательность оформления профиля подразумевает внесения проверочных информации через encrypted SSL-connection. Провайдеры требуют official доказательство совершеннолетия и места нахождения для исполнения юрисдикционных критериев.
Двухэтапная проверка становится необходимым частью актуальных архитектур безопасности. Клиенты получают SMS-ключи, push-сообщения или используют targeted софт по типу Google Authenticator.
Альтернативные домены ликвидируют препятствия territorial запретов и DDoS-атак. Технически дубли составляют копийные dublicates primary домена с maintaining инструментария и индивидуальных сведений.
Skilled клиенты рекомендуют поддерживать обновлённые базы working mirrors в favourites браузера. Management передают информацию о современных адресах через email, Telegram-communities и мобильные программы.
Платёжные переводы через лицензионные сайты защищены шифровальными протоколами стандарта банковского segment. Снятие средств выполняется лишь на верифицированные карты владельца учётной записи.
Jovenix Online Hub – Easy to find products and browsing feels simple and pleasant.
Поиск безопасного игрового портала в современных рамках нуждается специального изучения к лицензионному положению. Компетентные геймеры осознают, что тип топ казино демонстрирует современную данные о доступных провайдерах.
Схема создания аккаунта в лицензированных сервисах предусматривает неизбежную аутентификацию удостоверения. KYC-нормы обеспечивают как сервис, так и клиента от афер. Промежуточные лимиты на вывод активов до закрытия верификации – типичная система.
Виртуальные запреты на подключение к betting площадкам решаются через дублирующие адреса. Доступные отражения обеспечивают всестороннюю функциональность базового платформы. Платежные транзакции, азартный продвижение и бонусные планы сохраняются неизменными.
Финансовая безопасность оценивается уровнем эксплуатируемых расчетных систем. SSL-безопасность, PCI DSS аттестация и многоуровневая верификация устанавливают безопасный барьер обороны.
Развлекательная каталог легальных провайдеров содержит спины от топовых производителей. RTP-показатели, дисперсия и алгоритмические системы подвергаются беспристрастную проверку в одобренных организациях.
Программы вознаграждения в серьезных площадках опираются на прозрачных требованиях ставок. Вейджер x35-40 признается адекватным для машина-привилегий, в то время как карточные забавы принимаются в счет с сниженным фактором.
ссылка на сайт tripskan
Teal Vendor Finds – Pleasant shopping, items easy to locate, and checkout was smooth.
Ridge Vendor Store – Really impressed by the high-quality products and friendly support team.
Современные порталы беттинг игр гарантируют беттерам вход к премиальному гемблингу через сертифицированные enomo ресурсы. Легальная работа влечет выполнения четких правовых норм.
Процедура открытия клиентского аккаунта предусматривает подтверждение персональных сведений. Операторы задействуют комплексные процедуры KYC и AML для исключения незаконных операций.
Технические решения новейших игорных домов базируются на защищенных хостингах с SSL технологиями. Геоблокировка вынуждает провайдеров организовывать параллельные домены.
Параллельные платформы составляют полные дубликаты базового сайта с обеспечением всех опций и данных. Пользователи достигают непрерывный вход к средствам, игровой истории и личным опциям.
Банковские процедуры реализуются через связанные финансовые сервисы. Лимиты на вклады и снятия определяются в унисон с лицензионными стандартами и собственными регламентами снижения потерь.
Экспертные клиенты предлагают анализировать ситуацию разрешения через контролирующие списки беттинг комиссий. Имиджевые характеристики задействуют рейтинги на профильных сайтах и мнения подлинных клиентов.
Функционирующие зеркала лицензированных гемблинг-платформ на казино СЂР° предоставляют непрерывный соединение к игровым ресурсам. Схема копирования строит полноценные клоны базового веб-площадки с фиксацией всех механизмов.
Схема оформления профиля через резервную ссылку полностью имитирует оригинальную форму. Новые пользователи заполняют функционирующий email, создают надежный шифр и выбирают базовую валюту.
Валидация аккаунта включает отправки свидетельств опираясь на KYC-политике. Скан удостоверения личности, валидация проживания и денежные реквизиты проверяются через автоматическую валидацию в течение 24-72 временных единиц.
Аутентификация существующих клиентов осуществляется через обычную интерфейс с 2FA проверкой. Разовые токены поступают на смс устройство или почтовый ящик.
Функционал финансового раздела через дублирующие порталы поддерживает популярные банковские платформы. Visa, Mastercard, цифровые хранилища Skrill, Neteller, виртуальные монеты Bitcoin, Ethereum выполняются с минимальными комиссиями 0-3%.
Игровая библиотека повторяется на сто процентов включая барабаны, столовые активности, live-дилеров и прогрессивы. RTP-индикаторы, волатильность и условия отыгрыша удерживаются точными.
Бонусная система выполняется похоже главному порталу. Welcome-предложения, безвозмездные спины, кешбэк и VIP-программы инициируются программно при выполнении определенных параметров.
pet meds for dogs: VetFree Meds – online vet pharmacy
Top Ginger Crate – Navigation is seamless and everything is easy to explore.
Ash Vendor Online – The site is easy to navigate and I could locate products quickly.
CertiCanPharmacy: canada ed drugs – CertiCanPharmacy
веб-сайт tripscan
Выбор проверенного betting площадки в актуальных границах подразумевает особого рассмотрения к лицензионному статусу. Квалифицированные участники знают, что тип топ казино демонстрирует свежую факты о функционирующих операторах.
Механизм регистрации в официальных площадках предусматривает обязательную аутентификацию идентичности. KYC-нормы защищают как сервис, так и геймера от фрода. Кратковременные ограничения на изъятие средств до окончания контроля – нормальная методика.
Виртуальные ограничения на вход к игровым площадкам решаются через резервные домены. Функционирующие копии гарантируют тотальную функциональность главного ресурса. Финансовые процедуры, интерактивный продвижение и льготные программы сохраняются стабильными.
Материальная защищенность оценивается качеством внедренных денежных способов. SSL-защита, PCI DSS валидация и многоуровневая идентификация гарантируют прочный заслон ограждения.
Азартная набор официальных площадок объединяет слоты от топовых провайдеров. RTP-параметры, колебания и вероятностные принципы проходят внешнюю сертификацию в признанных организациях.
Механизмы стимулирования в достойных заведениях строятся на понятных критериях ставок. Проигрыш x35-40 расценивается разумным для автомат-поощрений, в то время как карточные активности включаются в счет с минимальным фактором.
Подбор надежного гемблинг оператора предполагает глубокого изучения регулятивных бумаг. Новые системы френдс казино дают клиентам безусловную данные о текущих допусках.
Механизм оформления счета охватывает ряд обязательных ступеней проверки. Провайдеры требуют бумаги, доказывающие личность и дееспособность. Типовой KYC-порядок занимает от 24 до 72 интервалов.
Банкролл-менеджмент начинается с назначения ограничений на взносы. Опытные геймеры призывают внедрять установку 5% от общего гемблинг фонда на конкретную раунд.
Системные барьеры поставщиков побуждают эксплуатировать резервные домены. Копии оберегают безусловную эффективность главного платформы, содержа летопись сделок и азартный прогресс.
Передовые платежные методы дают мгновенные взносы через криптовалютные аккаунты. Bitcoin, Ethereum и постоянные токены предоставляют приватность и крошечные отчисления. Срок осуществления снятий составляет 10-30 периодов.
Схемы преданности предусматривают ступенчатые степени с увеличивающимся вознаграждением. VIP-представители дают индивидуальные вознаграждения, расширенные пределы и преимущественную обслуживание.
продолжить https://lolz.live
Granite Shopping Spot – Smooth experience overall, items are well arranged and look great.
страница https://lolz.live/
узнать больше tripscan
https://mymexicanpharmacy.shop/# My Mexican Pharmacy
visit this store – Clear design and easy navigation make shopping effortless.
telugu sex videos
visit this store – Straightforward design that removes any guesswork while browsing.
Sea Product Hub – Really like the wide selection and checkout was smooth.
Поиск безопасного казино площадки заставляет глубокого анализа юридических свидетельств. Актуальные ресурсы Sykaaa дают пользователям абсолютную факты о собственных аккредитациях.
Система открытия аккаунта охватывает различные требуемых ступеней подтверждения. Провайдеры требуют свидетельства, засвидетельствующие самобытность и зрелость. Традиционный KYC-механизм длится от 24 до 72 часов.
Банкролл-менеджмент инициируется с фиксации лимитов на депозиты. Профессиональные клиенты рекомендуют применять установку 5% от полного азартного резерва на отдельную партию.
Программные препятствия владельцев вынуждают внедрять резервные адреса. Дубликаты поддерживают максимальную производительность основного сайта, предусматривая журнал операций и азартный продвижение.
Актуальные финансовые инструменты дают скоростные инвестиции через виртуальные портмоне. Bitcoin, Ethereum и фиксированные активы поддерживают скрытность и крошечные комиссии. Длительность выполнения извлечений достигает 10-30 периодов.
Алгоритмы приверженности содержат ступенчатые категории с нарастающим кэшбэком. VIP-менеджеры гарантируют личные подарки, улучшенные границы и ускоренную помощь.
https://www.mioola.com/mioola23311523/post/54777978/
Актуальные участники сталкиваются с барьером входа к сертифицированным сайтам. Организации ограничивают стандартные домены, но профессиональные лаки Р±РёСЂ казино пользователи учитывают о доступности зеркальных сайтов.
Дополнительный домен является полную отображение главного портала. Средства защиты функционируют аналогичными. Денежные переводы осуществляются через сходные каналы.
Технология заведения учётной записи через альтернативный портал требует обычной верификации. Администраторы выясняют свидетельства для выполнения KYC-правил. Идентификационные информация подвергаются двухфакторную подтверждение.
Пополнительные границы на резервных порталах соответствуют базовым спецификациям. Стартовые беты остаются фиксированными. Возрастающие накопления объединяются между множественными ссылками.
Поощрительные механизмы выполняются целостно на зеркальных сайтах. Отыгрышный коэффициент сохраняет стартовые параметры. Тайминг реализации сохраняется.
Сервис сопровождения изучает обращения с параллельных доменов аналогично. Живой общение обеспечивает круглосуточный формат обслуживания.
Remi PHL Updates Center – Clean design and accessible information create a pleasant experience.
NuPurple Simple Pricing – Concise and transparent explanations ensure visitors understand all options.
Top Nectar Products – Smooth interface and found all the products I was looking for.
https://lazosdeamormariano.net/modules/pages/?1win_promo_code_bonus_code.html
Актуальные сервисы развлекательных услуг дают пользователям путь к премиальному игровому процессу через защищенные лаки беар казино системы. Лицензированная функционирование влечет выполнения жестких регуляторных критериев.
Система создания пользовательского счета включает верификацию индивидуальных реквизитов. Регуляторы применяют детализированные протоколы KYC и AML для блокировки фродовых финансовых действий.
Технические средства передовых казино работают на зашифрованных инфраструктурах с HTTPS технологиями. Геоблокировка побуждает провайдеров создавать дублирующие ссылки.
Альтернативные домены образуют эквивалентные дубликаты главного портала с поддержанием всех функций и показателей. Беттеры обеспечивают себе стабильный соединение к депозиту, развлекательной истории и клиентским параметрам.
Финансовые операции реализуются через подключенные финансовые сервисы. Рамки на взносы и получения определяются в гармонии с регуляторными стандартами и внутренними процедурами управления рисками.
Профессиональные клиенты советуют мониторить состояние аккредитации через контролирующие реестры гемблинг ведомств. Престижные показатели предусматривают рейтинги на тематических сервисах и оценки подлинных пользователей.
Violet Vendor Boutique – Smooth experience overall and products are easy to find and explore.
Нынешние игроки сталкиваются с барьером доступа к проверенным сайтам. Компании запрещают первичные URL, но опытные аква казино пользователи помнят о присутствии зеркальных сайтов.
Альтернативный адрес формирует абсолютную воспроизведение базового ресурса. Протоколы шифрования остаются равнозначными. Платёжные действия производятся через равнозначные сервисы.
Алгоритм заведения учётной записи через альтернативный домен содержит стандартной подтверждения. Сотрудники выясняют удостоверения для исполнения KYC-регламентов. Персональные информация реализуют комплексную валидацию.
Вносительные границы на дополнительных площадках аналогичны стандартным условиям. Низшие вклады функционируют константными. Возрастающие джекпоты координируются между многочисленными адресами.
Премиальные системы функционируют завершённо на параллельных порталах. Требования по обороту гарантирует стартовые величины. Временные рамки отыгрыша продолжается.
Команда ассистирования обрабатывает обращения с альтернативных порталов сходным образом. Интерактивный переписка предоставляет непрерывный график работы.
Sensory branding Strategy, scent technologies and successful implementation across all product stages by Aromamedia
Useful information. Lucky me I found your site unintentionally, and I am shocked why this coincidence did not took place in advance!
I bookmarked it.
https://vetfreemeds.shop/# discount pet meds
Азартная индустрия являет интенсивный рост, манящая легионы игроков. Профессиональные порталы дают надёжную условия для развлечений. Полную данные о подобных организациях реально обнаружить на казино million .
Легализация остаётся главным показателем подбора сайта. Регуляторы Великобритании предоставляют жёсткий контроль денежных процедур. Всякая легальная портал реализует периодические проверки RNG-генераторов.
Компьютерные аспекты инновационных игорных домов охватывают SSL-защиту банковского класса. Разработчики цифрового продукта наподобие Microgaming, NetEnt, Pragmatic Play подключают продвинутые алгоритмы случайных показателей.
Механизм верификации профиля предполагает подачи удостоверений KYC-формата. Документ, документ о прибылях, верификация регистрации — стандартный комплект для итогового авторизации.
Параллельные домены исправляют проблемы с блокировками провайдеров. Актуальные варианты адаптируются систематически цифровыми специалистами. Мобильные программы нередко функционируют качественнее браузерных версий.
Контроль средств формирует длительную прибыльность гемблинговых периодов. Профессиональные геймеры указывают лимитировать объём бета до 1-2% от совокупного фонда.
Новейшие участники обталкиваются с множеством системных тонкостей при функционировании с легальными ресурсами. Профильные источники типа Клубника регистрация выдают свежую сведения о процессах игорных организаций.
Механизм аутентификации аккаунта охватывает множество неотъемлемых стадий. Первичная валидация включает предоставления справок верифицирующих гражданство. Классический перечень предполагает паспорт, права или заграничное удостоверение.
Цифровая компонента оформления предполагает задействование защищенного протокола и многофакторной защиты. Продвинутые участники настаивают включать весь комплекс имеющихся функций защиты.
Дублирующие порталы образуют полные клоны основного домена с сохранением тотального набора функций. Главное бонус состоит в тождественности финансовых ограничений и норм вейджера.
Схема нахождения актуальных альтернативных адресов основывается на проверке профессиональных уведомительных сервисов и союзных ресурсов. Квалифицированные игроки используют VPN-сервисы для предоставления надежного подключения вне зависимости от географических ограничений.
buy erection pills https://elixiumhealth.digital/# pills for erection
Online Home Finds – The selection looks fantastic and ordering took only a few simple clicks.
I all the time used to study paragraph in news
papers but now as I am a user of web thus from now I am using net for articles, thanks to web.
узнать больше Здесь https://lolz.live
Актуальные операторы азартных продуктов дают беттерам доступ к высококлассному игровому процессу через сертифицированные типпи казино ресурсы. Легальная операционная активность подразумевает выполнения строгих регуляторных стандартов.
Механизм оформления индивидуального учетной записи содержит подтверждение приватных реквизитов. Администраторы применяют многоуровневые механизмы KYC и AML для недопущения нарушающих переводов.
Технические средства современных казино работают на безопасных дата-центрах с TLS технологиями. Геоблокировка вынуждает управляющих запускать альтернативные ссылки.
Дублирующие ресурсы составляют полные клоны главного домена с сохранением всех опций и данных. Пользователи приобретают устойчивый соединение к депозиту, азартной отчетности и персональным установкам.
Платежные транзакции выполняются через интегрированные денежные сервисы. Ограничения на пополнения и изъятия определяются в гармонии с правовыми критериями и внутренними политиками управления рисками.
Профессиональные пользователи настаивают анализировать состояние авторизации через контролирующие каталоги азартных организаций. Статусные индикаторы охватывают позиции на профильных сервисах и оценки реальных пользователей.
Беттинговая сфера представляет активный расширение, манящая массы участников. Экспертные платформы предлагают стабильную обстановку для ставок. Детальную сведения о подобных операторах реально найти на Болливуд РІС…РѕРґ .
Лицензирование выступает основным элементом определения ресурса. Контролёры Великобритании обеспечивают серьёзный проверку финансовых операций. Каждая легальная портал реализует регулярные контроли RNG-механизмов.
IT особенности передовых гемблинг-сайтов охватывают SSL-криптографию денежного стандарта. Провайдеры программного обеспечения наподобие Microgaming, NetEnt, Pragmatic Play внедряют многоуровневые алгоритмы хаотичных значений.
Схема проверки учётной записи включает предоставления документов KYC-типа. Свидетельство, выписка о доходах, удостоверение проживания — базовый перечень для окончательного подключения.
Зеркальные адреса убирают сложности с запретами операторов. Действующие копии изменяются систематически цифровыми специалистами. Смартфонные утилиты зачастую выполняются надёжнее браузерных форматов.
Управление банкроллом устанавливает длительную прибыльность беттинговых раундов. Грамотные игроки рекомендуют ограничивать количество вейджера до 1-2% от общего капитала.
explore Glow Vendor – The luminous, modern setup keeps everything visually engaging and easy to browse.
Актуальные сервисы азартных продуктов дают клиентам подключение к высококлассному гемблингу через надежные СЂР° казино сайты. Официальная работа нуждается выполнения определенных регуляторных положений.
Механизм открытия игрового кабинета предусматривает верификацию персональных информации. Операторы задействуют многоуровневые алгоритмы KYC и AML для блокировки поддельных платежей.
Цифровые средства современных казино работают на защищенных дата-центрах с TLS протоколами. Региональная блокировка вынуждает управляющих внедрять альтернативные порталы.
Резервные ресурсы представляют аналогичные версии главного платформы с обеспечением всех инструментов и параметров. Игроки обеспечивают себе беспрепятственный соединение к балансу, развлекательной статистике и пользовательским опциям.
Денежные операции реализуются через связанные платежные сервисы. Ограничения на пополнения и выводы назначаются в соответствии с регуляторными условиями и организационными политиками риск-менеджмента.
Компетентные игроки рекомендуют контролировать положение сертификата через регуляторные списки развлекательных организаций. Престижные параметры задействуют места на профильных порталах и комментарии реальных клиентов.
Развлекательная ниша являет стремительный расширение, привлекая тысячи игроков. Профессиональные ресурсы обеспечивают надёжную атмосферу для пари. Развёрнутую данные о данных операторах реально получить на Килограмм казино .
Легализация является приоритетным фактором определения сайта. Лицензиаты Великобритании дают тщательный аудит валютных действий. Конкретная аккредитованная платформа подвергается плановые ревизии RNG-алгоритмов.
Программные аспекты новейших игорных домов объединяют SSL-защиту банковского ранга. Создатели компьютерного ПО уровня Microgaming, NetEnt, Pragmatic Play интегрируют комплексные системы случайных чисел.
Процедура подтверждения аккаунта требует представления справок KYC-стандарта. Паспорт, справка о прибылях, верификация регистрации — типичный комплект для окончательного входа.
Дублирующие адреса ликвидируют проблемы с блокировками операторов. Свежие зеркала обновляются каждый день техническими службами. Планшетные клиенты обычно работают лучше сетевых вариантов.
Контроль средств создаёт длительную прибыльность гемблинговых партий. Квалифицированные геймеры настаивают ограничивать количество вейджера до 1-2% от совокупного банкролла.
sms activation github.com/SMS-Activate-Alternatives .
События ufc в феврале марте 2026 три недели которые встряхнут дивизионы обещают быть по-настоящему захватывающими. Вот ссылка: https://inter-comfort.ru/news/fevral-mart-2026-ufc-zazhigaet-tri-turnira-polnye-intrig-i-vozmozhnyh-sensaczij/
this online shop – Clear product info and quality items make browsing straightforward.
discount pet meds п»їdog medication online п»їdog medication online
Подбор проверенного развлекательного площадки заставляет серьезного исследования юридических документов. Инновационные порталы лаки Р±РёСЂ казино дают геймерам абсолютную сведения о своих разрешениях.
Процесс открытия аккаунта охватывает множество принудительных фаз аутентификации. Провайдеры требуют удостоверения, устанавливающие идентичность и правоспособность. Обычный KYC-алгоритм требует от 24 до 72 интервалов.
Финансовое планирование стартует с фиксации ограничений на вклады. Опытные клиенты предлагают внедрять правило 5% от суммарного развлекательного средств на единичную партию.
Электронные ограничения операторов заставляют применять запасные адреса. Дубликаты удерживают стопроцентную активность первичного платформы, включая архив операций и развлекательный результаты.
Новые банковские способы поддерживают оперативные пополнения через виртуальные счета. Bitcoin, Ethereum и стабильные валюты гарантируют приватность и крошечные отчисления. Длительность обработки снятий достигает 10-30 отрезков.
Алгоритмы постоянства включают каскадные категории с увеличивающимся возвратом. VIP-консультанты предоставляют индивидуальные подарки, увеличенные ограничения и опережающую обслуживание.
Как убеждать людей и побеждать в спорах https://tinyurl.com/25ztldq3
Развлекательная сфера демонстрирует динамичный подъём, привлекая массы геймеров. Опытные порталы гарантируют надёжную атмосферу для развлечений. Исчерпывающую данные о этих операторах реально отыскать на ретро казино .
Аккредитация является ключевым фактором селекции платформы. Лицензиаты Олдерни обеспечивают качественный контроль экономических действий. Отдельная сертифицированная платформа выполняет плановые инспекции RNG-генераторов.
Цифровые параметры передовых казино включают SSL-криптографию экономического класса. Провайдеры цифрового материала наподобие Microgaming, NetEnt, Pragmatic Play интегрируют сложные модели случайных чисел.
Процесс подтверждения профиля предусматривает предоставления справок KYC-стандарта. Паспорт, свидетельство о заработке, доказательство регистрации — базовый перечень для итогового авторизации.
Альтернативные порталы исправляют проблемы с фильтрацией провайдеров. Функционирующие варианты адаптируются систематически компьютерными специалистами. Портативные утилиты обычно функционируют лучше веб вариантов.
Контроль средств устанавливает длительную успешность беттинговых циклов. Квалифицированные участники настаивают лимитировать величину ставки до 1-2% от общего банкролла.
Научитесь работать с давлением на эмоции и сохранять холодную голову при разговоре с манипуляторами и мошенниками https://tinyurl.com/27zu9ecp
https://dveri-ot-zavoda.ru/
Убеждение – это метод воздействия на сознание, использующий логические аргументы, факты и обоснования для формирования новых установок или изменения текущего поведения человека https://tinyurl.com/23yo4c6y
My Mexican Pharmacy: mexican online pharmacy wegovy – My Mexican Pharmacy
Перемещение в сфере лицензированных платформ предполагает представления новых способов авторизации. Квалифицированные пользователи внедряют lucky bear казино играть для получения свежей фактов о функционирующих путях.
Алгоритм формирования учетной записи в официальных заведениях подразумевает сложную проверку. Современные компании используют KYC-алгоритмы и AML-стандарты. Документальное сопровождение составляет от 24 до 72 промежутков.
Технические инструменты для минования препятствий улучшаются одновременно с повышением регуляторных действий. VPN-службы разряда premium предлагают безопасность AES-256 и протоколы OpenVPN. Стабильность коннекта принципиально важна для премиальных заходов.
Резервные адреса работают через регионально разнесенные компьютерные ресурсы. CDN-структуры предоставляют оптимальную время ответа для международных участников. Системное переключение запускается при обнаружении ограничения главного адреса.
Денежные переводы в официальных областях отвечают определенным критериям PCI DSS. Криптовалютные операции приобретают распространение в результате конфиденциальности и скорости процессинга.
Переносные программы премиальных операторов объединяют биометрическую подтверждение и push-алерты для важных моментов. Модифицируемый дизайн самостоятельно адаптируется под свойства панели.
Действующие дублирующие порталы официальных казино на аква казино гарантируют беспрерывный коннект к развлекательным платформам. Схема клонирования генерирует полноценные версии главного сайта с удержанием всех инструментов.
Алгоритм создания аккаунта через дублирующий портал в точности копирует главную шаблон. Новые геймеры заполняют рабочий email, создают защищенный ключ и определяют операционную финансовый инструмент.
Идентификация учетной записи подразумевает загрузки бумаг в соответствии с KYC-регламенту. Снимок удостоверения личности, валидация места жительства и финансовые данные проходят автоматическую валидацию в течение 24-72 часа.
Логин активных участников осуществляется через базовую форму с расширенной валидацией. Краткосрочные шифры поступают на мессенджер гаджет или почтовый ящик.
Механизмы пополнительного модуля через дублирующие порталы включает распространенные денежные платформы. Visa, Mastercard, виртуальные портмоне Skrill, Neteller, криптовалюты Bitcoin, Ethereum процессируются с оптимизированными взносами 0-3%.
Гемблинг коллекция клонируется целиком включая машины, карточные забавы, live-дилеров и джекпоты. RTP-значения, изменчивость и отыгрыш поддерживаются неизменными.
Акционная политика функционирует идентично корневому домену. Welcome-комплекты, безвозмездные спины, refund и VIP-программы запускаются системно при реализации установленных параметров.
VendorLoftShop – It’s simple to find items with the intuitive layout and filter options.
https://certicanpharmacy.shop/# CertiCanPharmacy
Актуальные дублирующие порталы легальных gaming-операторов на Gold casino обеспечивают непрерывный доступ к азартным ресурсам. Система дублирования образует аналогичные реплики базового домена с сохранением всех инструментов.
Процедура оформления профиля через mirror-сайт абсолютно повторяет стандартную заявку. Свежие геймеры указывают валидный email, устанавливают сложный пароль и выбирают операционную денежную единицу.
Идентификация профиля подразумевает представления удостоверений следуя KYC-требованиям. Фото паспорта, подтверждение регистрации и платежные данные контролируются системой программную проверку в течение 24-72 ч.
Аутентификация активных клиентов реализуется через классическую интерфейс с 2FA валидацией. Разовые пароли доставляются на смс девайс или почтовый ящик.
Механизмы денежного сектора через альтернативные домены включает актуальные финансовые системы. Visa, Mastercard, виртуальные портмоне Skrill, Neteller, виртуальные монеты Bitcoin, Ethereum выполняются с минимальными процентами 0-3%.
Gaming база копируется на сто процентов включая spinning games, карточные забавы, live-крупье и прогрессивы. RTP-значения, волатильность и проигрыш фиксируются неизменными.
Подарочная программа действует схоже основному домену. Welcome-наборы, бесплатные вращения, компенсация и VIP-системы стартуют машинально при соблюдении определенных условий.
Local Nightlife Hub – I appreciate the innovative idea and the content feels vibrant and current.
Современные провайдеры азартных активностей дают беттерам путь к качественному гемблингу через проверенные казино Килограмм сайты. Лицензированная работа нуждается исполнения конкретных законодательных стандартов.
Система открытия персонального учетной записи задействует подтверждение конфиденциальных информации. Операторы эксплуатируют многоуровневые механизмы KYC и AML для недопущения мошеннических переводов.
IT платформы актуальных развлекательных порталов основываются на защищенных дата-центрах с TLS стандартами. Региональная блокировка принуждает операторов создавать альтернативные ссылки.
Резервные порталы формируют полные дубликаты базового домена с поддержанием всех инструментов и информации. Участники добиваются непрерывный подключение к средствам, азартной отчетности и личным конфигурациям.
Финансовые переводы выполняются через подключенные финансовые шлюзы. Ограничения на вклады и снятия определяются в соотношении с лицензионными условиями и индивидуальными политиками управления рисками.
Профессиональные клиенты советуют проверять условия сертификата через надзорные каталоги беттинг структур. Авторитетные индикаторы включают позиции на специализированных сервисах и отзывы настоящих пользователей.
Читать далее https://lzt.market
Инновационные операторы азартных развлечений обеспечивают игрокам путь к элитному беттингу через сертифицированные Лаки Бир казино системы. Легальная функционирование предполагает учета конкретных надзорных положений.
Механизм активации индивидуального профиля предусматривает валидацию приватных информации. Провайдеры эксплуатируют расширенные протоколы KYC и AML для блокировки мошеннических платежей.
Цифровые системы инновационных беттинг площадок строятся на защищенных инфраструктурах с криптографическими алгоритмами. IP-фильтрация принуждает администраторов разрабатывать дублирующие домены.
Альтернативные платформы являют собой эквивалентные репликации главного сайта с поддержанием всех опций и показателей. Беттеры достигают устойчивый связь к счету, гемблинг статистике и личным опциям.
Финансовые переводы выполняются через интегрированные финансовые сервисы. Границы на пополнения и выводы регулируются в унисон с лицензионными положениями и корпоративными правилами управления рисками.
Профессиональные пользователи указывают проверять состояние разрешения через регуляторные базы данных азартных структур. Авторитетные показатели содержат оценки на экспертных сайтах и комментарии реальных беттеров.
Актуальные участники попадают с препятствием доступа к сертифицированным сайтам. Провайдеры блокируют главные домены, но искушённые казино Вавада игроки знают о доступности альтернативных площадок.
Зеркало образует точную отображение первичного портала. Средства защиты сохраняются неизменными. Финансовые процедуры выполняются через сходные сервисы.
Алгоритм регистрации через резервный домен подразумевает типовой верификации. Менеджеры уточняют документы для выполнения KYC-стандартов. Индивидуальные параметры подвергаются расширенную аутентификацию.
Банковские лимиты на дополнительных площадках совпадают базовым требованиям. Низшие суммы поддерживаются константными. Возрастающие джекпоты согласовываются между всеми ссылками.
Льготные системы функционируют целостно на зеркальных платформах. Множитель ставок гарантирует оригинальные значения. Длительность оборота продолжается.
Отдел обслуживания рассматривает вопросы с резервных адресов таким же способом. Онлайн диалог предоставляет непрерывный расписание деятельности.
Attractive component of content. I simply stumbled upon your web site and in accession capital to
assert that I acquire actually enjoyed account your blog posts.
Any way I’ll be subscribing in your augment or even I success you get admission to persistently quickly.
можно проверить ЗДЕСЬ трипскан вход
сайт https://lolz.live
Новейшие сервисы гемблинг услуг предлагают клиентам путь к премиальному беттингу через сертифицированные лаки Р±РёСЂ ресурсы. Легальная бизнес нуждается соблюдения строгих контролирующих критериев.
Алгоритм активации пользовательского аккаунта содержит проверку приватных сведений. Провайдеры задействуют детализированные протоколы KYC и AML для предотвращения мошеннических финансовых действий.
Цифровые платформы новейших казино строятся на стабильных хостингах с криптографическими протоколами. Региональная блокировка вынуждает администраторов запускать резервные URL.
Альтернативные ресурсы представляют полные клоны центрального ресурса с удержанием всех инструментов и данных. Беттеры получают непрерывный соединение к капиталу, беттинг данным и личным настройкам.
Банковские процедуры производятся через интегрированные платежные шлюзы. Пределы на пополнения и изъятия назначаются в согласии с лицензионными стандартами и индивидуальными регламентами контроля угроз.
Квалифицированные клиенты настаивают проверять состояние аккредитации через надзорные регистры беттинг органов. Статусные параметры задействуют позиции на экспертных порталах и комментарии подлинных игроков.
shop Sage Vendor online – Overall navigation is smooth and the site feels trustworthy.
shop Feather Market now – It’s clear this place focuses on unique and interesting goods.
Исследование в пространстве легальных площадок предполагает понимания актуальных решений соединения. Профессиональные геймеры применяют Болливуд казино для получения новейшей данных о активных адресах.
Процедура оформления учетной записи в надежных организациях охватывает многоуровневую валидацию. Продвинутые провайдеры задействуют KYC-алгоритмы и AML-правила. Документооборот занимает от 24 до 72 часов.
Цифровые инструменты для прохождения барьеров развиваются параллельно с усилением юридических инициатив. VPN-сервисы класса premium дают защиту AES-256 и методы OpenVPN. Устойчивость коннекта жизненно значима для премиальных раундов.
Запасные домены работают через географически распределенные технические инфраструктуры. CDN-сети поддерживают быструю время ответа для европейских геймеров. Автоматическое маршрутизация запускается при обнаружении препятствия центрального адреса.
Денежные движения в сертифицированных территориях подчиняются строгим правилам PCI DSS. Криптовалютные расчеты приобретают признание вследствие скрытности и темпу осуществления.
Мобильные программы премиальных брендов объединяют отпечатковую проверку и push-алерты для критических моментов. Модифицируемый оформление автоматически подстраивается под характеристики монитора.
Передовые бетторы оказываются с препятствием доступа к официальным сайтам. Компании фильтруют главные порталы, но профессиональные казино Вавада участники учитывают о доступности резервных ресурсов.
Резервная ссылка составляет стопроцентную воспроизведение основного площадки. SSL-сертификаты остаются идентичными. Платёжные процедуры производятся через те же сервисы.
Методика заведения учётной записи через параллельный домен содержит типовой верификации. Менеджеры уточняют свидетельства для исполнения KYC-правил. Индивидуальные данные реализуют двухфакторную верификацию.
Вносительные ограничения на альтернативных ресурсах аналогичны основным условиям. Минимальные беты сохраняются неизменными. Накопительные накопления синхронизируются между всеми доменами.
Поощрительные механизмы оперируют полноценно на параллельных платформах. Множитель ставок удерживает первоначальные показатели. Тайминг использования остаётся прежним.
Сервис поддержки анализирует тикеты с альтернативных адресов равнозначно. Интерактивный общение поддерживает круглосуточный порядок работы.
Отбор проверенного betting площадки в нынешних границах требует детального рассмотрения к законному положению. Квалифицированные игроки знают, что Вавада казино включает свежую информацию о действующих площадках.
Процедура оформления профиля в официальных заведениях содержит требуемую подтверждение документов. KYC-правила охраняют как заведение, так и клиента от обмана. Переходные пределы на снятие денег до закрытия проверки – нормальная методика.
Технические блокировки на доступ к гемблинг ресурсам решаются через альтернативные ссылки. Активные отражения обеспечивают полную работоспособность главного сайта. Денежные движения, игровой статистика и бонусные программы продолжают константными.
Денежная гарантированность характеризуется показателем эксплуатируемых расчетных способов. SSL-кодирование, PCI DSS подтверждение и расширенная подтверждение обеспечивают прочный барьер безопасности.
Интерактивная ассортимент лицензированных сервисов содержит спины от ведущих разработчиков. RTP-коэффициенты, вариативность и статистические модели подвергаются нейтральную сертификацию в одобренных учреждениях.
Системы поощрения в достойных сервисах строятся на открытых параметрах проигрыша. Требования x35-40 признается приемлемым для барабан-поощрений, в то время как стандартные состязания учитываются в счет с редуцированным показателем.
опубликовано здесь https://lolz.live
https://vetfreemeds.shop/# pet drugs online
Беттинговая отрасль отображает динамичный прогресс, привлекая тысячи игроков. Профессиональные площадки предоставляют стабильную атмосферу для ставок. Исчерпывающую сведения о указанных провайдерах допустимо изучить на Vavada .
Лицензирование остаётся ключевым показателем определения платформы. Контролёры Мальты создают строгий надзор валютных процедур. Любая аккредитованная портал проходит постоянные инспекции RNG-алгоритмов.
Программные свойства инновационных азартных площадок содержат SSL-криптографию денежного ранга. Производители софтового софта класса Microgaming, NetEnt, Pragmatic Play внедряют усовершенствованные алгоритмы рандомных показателей.
Процедура аутентификации счёта предполагает подачи справок KYC-стандарта. Паспорт, документ о финансах, удостоверение местожительства — классический набор для финального доступа.
Дублирующие адреса убирают барьеры с цензурой операторов. Свежие варианты модифицируются систематически техническими специалистами. Планшетные софт часто действуют надёжнее веб модификаций.
Распределение капитала определяет перспективную результативность азартных циклов. Профессиональные пользователи советуют сокращать объём бета до 1-2% от итогового резерва.
Перемещение в секторе официальных порталов подразумевает знания современных решений доступа. Профессиональные пользователи задействуют казино Лаки Бир для извлечения современной фактов о работающих ссылках.
Алгоритм открытия счета в лицензированных заведениях охватывает многоуровневую подтверждение. Передовые поставщики используют KYC-протоколы и AML-требования. Оформление документов занимает от 24 до 72 периодов.
Компьютерные технологии для избежания барьеров прогрессируют синхронно с усилением регуляторных мер. VPN-сервисы разряда premium гарантируют шифрование AES-256 и протоколы OpenVPN. Постоянство коннекта жизненно существенна для премиальных раундов.
Запасные домены функционируют через территориально размещенные серверные кластеры. CDN-комплексы поддерживают быструю время ответа для американских участников. Автоматическое роутинг инициируется при распознавании ограничения главного адреса.
Денежные переводы в официальных регионах следуют четким критериям PCI DSS. Крипто платежи приобретают актуальность вследствие секретности и скорости осуществления.
Планшетные приложения топовых брендов объединяют биометрическую подтверждение и push-сообщения для ключевых событий. Изменяемый интерфейс автоматически изменяется под параметры матрицы.
Перемещение в области проверенных ресурсов нуждается владения современных решений входа. Умелые игроки эксплуатируют lucky bear казино для извлечения современной материалов о действующих доменах.
Схема регистрации аккаунта в лицензированных учреждениях содержит многоуровневую аутентификацию. Продвинутые поставщики применяют KYC-протоколы и AML-правила. Документооборот составляет от 24 до 72 периодов.
IT методы для минования барьеров совершенствуются синхронно с укреплением правовых инициатив. VPN-решения категории premium обеспечивают криптографию AES-256 и системы OpenVPN. Устойчивость канала fundamentally существенна для элитных партий.
Зеркальные адреса функционируют через регионально разнесенные технические кластеры. CDN-системы осуществляют быструю латентность для азиатских пользователей. Автоматическое роутинг включается при идентификации блокировки базового адреса.
Экономические переводы в официальных областях следуют четким критериям PCI DSS. Крипто расчеты набирают признание из-за приватности и динамике обработки.
Портативные программы ведущих брендов включают голосовую идентификацию и push-оповещения для существенных событий. Гибкий облик программно адаптируется под свойства матрицы.
Поиск проверенного игорного площадки подразумевает основательного изучения юридических разрешений. Современные сайты лаки ворлд сайт дают участникам абсолютную данные о собственных допусках.
Процедура регистрации охватывает ряд ключевых стадий проверки. Провайдеры истребуют бумаги, доказывающие персону и зрелость. Типовой KYC-регламент занимает от 24 до 72 периодов.
Контроль средств стартует с установления лимитов на взносы. Квалифицированные геймеры советуют применять правило 5% от суммарного развлекательного фонда на отдельную сессию.
Цифровые блокировки поставщиков заставляют использовать вспомогательные маршруты. Дубликаты поддерживают стопроцентную работоспособность основного портала, включая журнал платежей и гемблинг достижения.
Новые финансовые инструменты предоставляют мгновенные вклады через цифровые хранилища. Bitcoin, Ethereum и устойчивые монеты гарантируют скрытность и минимальные комиссии. Продолжительность обработки изъятий доходит 10-30 минут.
Планы приверженности охватывают каскадные статусы с прогрессивным кэшбэком. VIP-координаторы гарантируют индивидуальные подарки, повышенные границы и опережающую сервис.
My Mexican Pharmacy: mexican online pharmacies – My Mexican Pharmacy
https://www.kandisblog.com
Функционирующие mirror-ссылки надежных gaming-операторов на Меллстрой регистрация предоставляют стабильный доступ к развлекательным платформам. Технология дублирования строит точные реплики корневого веб-площадки с консервацией всех функций.
Механизм открытия счета через резервную ссылку полностью имитирует стандартную анкету. Только пришедшие пользователи заполняют действующий email, формируют сложный шифр и устанавливают игровую денежную единицу.
Подтверждение профиля требует загрузки документов по KYC-стандартам. Снимок паспорта, верификация резиденции и денежные координаты подвергаются автоматическую анализ в течение 24-72 часа.
Авторизация существующих участников производится через классическую панель с расширенной валидацией. Временные токены передаются на сотовый девайс или e-mail адрес.
Механизмы финансового компонента через резервные ссылки предлагает популярные расчетные системы. Visa, Mastercard, онлайн портмоне Skrill, Neteller, цифровые активы Bitcoin, Ethereum выполняются с низкими процентами 0-3%.
Игровая база копируется полностью включая слоты, традиционные забавы, live-крупье и прогрессивы. RTP-индикаторы, колебания и проигрыш удерживаются неизменными.
Бонусная программа выполняется похоже центральному домену. Welcome-бандлы, free spins, возврат средств и VIP-схемы запускаются программно при соблюдении определенных критериев.
Новейшие гемблеры сталкиваются с барьером соединения к сертифицированным порталам. Поставщики блокируют основные URL, но знающие Вавада сайт участники осознают о присутствии параллельных площадок.
Резервная ссылка составляет стопроцентную реплику базового сайта. Протоколы шифрования функционируют аналогичными. Финансовые транзакции выполняются через сходные сервисы.
Методика регистрации через дополнительный домен требует привычной проверки. Администраторы запрашивают справки для исполнения KYC-требований. Идентификационные характеристики реализуют двухфакторную проверку.
Финансовые границы на дополнительных платформах равняются стандартным условиям. Низшие ставки остаются константными. Увеличивающиеся выигрышные пулы координируются между всеми ресурсами.
Льготные планы оперируют полноценно на дополнительных площадках. Коэффициент оборота поддерживает стартовые параметры. Тайминг отыгрыша сохраняется.
Команда поддержки обрабатывает обращения с альтернативных ссылок таким же способом. Живой диалог предоставляет 24-часовой порядок оперирования.
prague 420 hemp for sale in prague
Duftmarketing Strategy, scent technologies and successful implementation across all product stages by Aromamedia
Определение безопасного betting заведения в текущих обстоятельствах подразумевает тщательного рассмотрения к регулятивному режиму. Компетентные пользователи представляют, что Вавада зеркало предоставляет актуальную информацию о доступных провайдерах.
Схема создания аккаунта в сертифицированных платформах объединяет неизбежную валидацию идентичности. KYC-нормы гарантируют как оператора, так и пользователя от обмана. Временные пределы на снятие капитала до финализации контроля – нормальная практика.
Технические ограничения на доступ к развлекательным сервисам устраняются через зеркальные ссылки. Доступные копии сохраняют абсолютную функциональность базового ресурса. Банковские процедуры, интерактивный достижения и бонусные предложения сохраняются постоянными.
Материальная защищенность характеризуется степенью применяемых расчетных механизмов. SSL-кодирование, PCI DSS подтверждение и дополнительная проверка гарантируют защищенный контур обороны.
Игровая набор официальных операторов объединяет машины от ведущих студий. RTP-индексы, вариативность и алгоритмические принципы испытывают нейтральную контроль в признанных организациях.
Системы поощрения в профессиональных площадках базируются на ясных критериях активности. Вейджер x35-40 оценивается разумным для машина-бонусов, в то время как стандартные развлечения идут в калькуляцию с редуцированным процентом.
Навигация в пространстве сертифицированных порталов предполагает осознания продвинутых решений соединения. Профессиональные клиенты эксплуатируют Лаки Бир официальный сайт для обретения актуальной данных о оперативных адресах.
Процесс регистрации личного кабинета в надежных организациях предполагает многоуровневую верификацию. Продвинутые провайдеры внедряют KYC-протоколы и AML-нормы. Документальное сопровождение потребляет от 24 до 72 периодов.
Компьютерные решения для преодоления блокировок прогрессируют одновременно с интенсификацией правовых решений. VPN-решения категории premium предлагают защиту AES-256 и стандарты OpenVPN. Постоянство канала критически актуальна для привилегированных заходов.
Альтернативные платформы работают через регионально распределенные цифровые ресурсы. CDN-сети гарантируют минимальную время ответа для американских пользователей. Системное перенаправление срабатывает при обнаружении недоступности центрального портала.
Денежные транзакции в лицензированных территориях отвечают определенным нормам PCI DSS. Криптовалютные операции получают популярность в результате анонимности и быстроте реализации.
Портативные софт лучших провайдеров интегрируют лицевую проверку и push-алерты для важных моментов. Настраиваемый оформление автоматически адаптируется под параметры дисплея.
Подбор проверенного betting площадки в нынешних рамках предполагает особого подхода к законному режиму. Квалифицированные участники представляют, что Килограмм казино демонстрирует последнюю материалы о доступных операторах.
Процедура регистрации в сертифицированных заведениях предусматривает обязательную проверку личности. KYC-требования защищают как заведение, так и геймера от афер. Кратковременные лимиты на вывод финансов до закрытия валидации – нормальная процедура.
Программные препятствия на соединение к развлекательным ресурсам обходятся через дублирующие адреса. Рабочие зеркала поддерживают тотальную эффективность первичного портала. Банковские переводы, геймплейный продвижение и бонусные программы остаются стабильными.
Капитальная гарантированность оценивается уровнем внедренных денежных способов. SSL-защита, PCI DSS подтверждение и расширенная проверка гарантируют прочный барьер охраны.
Развлекательная библиотека лицензированных заведений содержит слоты от ведущих провайдеров. RTP-коэффициенты, изменчивость и статистические системы претерпевают независимую валидацию в аккредитованных учреждениях.
Механизмы стимулирования в серьезных операторах базируются на четких условиях вейджера. Вейджер x35-40 считается нормальным для барабан-бонусов, в то время как классические игры учитываются в подсчет с пониженным коэффициентом.
browse Rose Crate here – Easy and enjoyable shopping, planning another visit.
discover Bronze Vendor – Quick checkout, good layout, and the site seems dependable.
Функционирующие альтернативные домены проверенных игорных заведений на аква дают беспрерывный подключение к игровым порталам. Методика клонирования генерирует точные версии главного ресурса с консервацией всех инструментов.
Схема открытия счета через mirror-сайт на сто процентов имитирует базовую форму. Новые пользователи заполняют активный email, придумывают сложный пароль и назначают игровую курренси.
Верификация учетной записи включает загрузки свидетельств согласно KYC-политике. Фото удостоверения личности, валидация адреса и карточные данные подвергаются программную проверку в течение 24-72 периодов.
Подключение существующих пользователей производится через классическую модуль с расширенной проверкой. Сессионные пароли передаются на мессенджер девайс или мейл.
Возможности денежного модуля через дублирующие порталы содержит распространенные денежные платформы. Visa, Mastercard, электронные кошельки Skrill, Neteller, блокчейн-токены Bitcoin, Ethereum обрабатываются с низкими платежами 0-3%.
Гемблинг ассортимент дублируется полностью включая машины, настольные активности, live-крупье и мегавыигрыши. RTP-показатели, дисперсия и проигрыш поддерживаются аналогичными.
Подарочная схема выполняется аналогично базовому сайту. Welcome-бандлы, free spins, денежный возврат и VIP-системы стартуют машинально при достижении фиксированных параметров.
xxx video
Определение проверенного betting портала в сегодняшних реалиях нуждается специального подхода к лицензионному уровню. Знающие игроки осознают, что Лаки Бир казино демонстрирует новую данные о активных сервисах.
Процедура открытия счета в проверенных операторах предусматривает неизбежную проверку персональных данных. KYC-стандарты обеспечивают как казино, так и геймера от мошенничества. Кратковременные пределы на перечисление денег до выполнения подтверждения – нормальная процедура.
Цифровые барьеры на подключение к гемблинг порталам обходятся через дублирующие порталы. Доступные дубликаты поддерживают абсолютную производительность основного ресурса. Денежные процедуры, геймплейный достижения и льготные схемы продолжают константными.
Финансовая гарантированность оценивается уровнем задействованных платежных инструментов. SSL-криптография, PCI DSS лицензирование и дополнительная верификация создают надежный барьер ограждения.
Геймплейная библиотека лицензированных площадок охватывает слоты от ведущих провайдеров. RTP-индексы, колебания и расчетные формулы подвергаются независимую контроль в авторизованных лабораториях.
Системы лояльности в достойных операторах строятся на открытых требованиях отыгрыша. Требования x35-40 оценивается приемлемым для автомат-подарков, в то время как настольные состязания принимаются в калькуляцию с редуцированным процентом.
Перемещение в области проверенных платформ включает осознания продвинутых технологий входа. Квалифицированные участники внедряют Lucky Bear casino для получения новейшей материалов о работающих URL.
Механизм формирования личного кабинета в надежных учреждениях подразумевает тщательную верификацию. Продвинутые операторы используют KYC-протоколы и AML-критерии. Бумажная работа требует от 24 до 72 периодов.
Компьютерные способы для минования запретов эволюционируют одновременно с интенсификацией юридических решений. VPN-платформы уровня premium предлагают кодирование AES-256 и системы OpenVPN. Непрерывность соединения fundamentally значима для VIP раундов.
Зеркальные ресурсы работают через регионально разнесенные серверные кластеры. CDN-структуры предоставляют быструю пинг для американских пользователей. Цифровое переключение инициируется при идентификации препятствия первичного ресурса.
Банковские операции в официальных регионах подчиняются строгим требованиям PCI DSS. Крипто платежи набирают распространение по причине скрытности и темпу выполнения.
Планшетные утилиты лучших провайдеров интегрируют физиологическую идентификацию и push-оповещения для существенных эпизодов. Гибкий дизайн программно изменяется под характеристики панели.
sms activate service sms activate service .
Гемблинговая индустрия являет быстрый расширение, манящая тысячи пользователей. Грамотные ресурсы предлагают стабильную обстановку для развлечений. Детальную факты о этих компаниях реально изучить на РјСЌРґ казино .
Аккредитация составляет приоритетным аспектом подбора портала. Юрисдикции Мальты создают тщательный аудит экономических операций. Всякая аккредитованная ресурс выполняет периодические проверки RNG-генераторов.
IT аспекты инновационных беттинг-платформ объединяют SSL-защиту денежного класса. Создатели цифрового обеспечения вроде Microgaming, NetEnt, Pragmatic Play подключают многоуровневые алгоритмы случайных величин.
Процедура проверки личного кабинета предполагает предоставления документов KYC-формата. Удостоверение, документ о заработке, валидация проживания — классический пакет для окончательного авторизации.
Резервные адреса устраняют препятствия с фильтрацией компаний. Рабочие зеркала обновляются постоянно цифровыми отделами. Мобильные утилиты обычно действуют качественнее веб форматов.
Банкролл-менеджмент формирует долгосрочную прибыльность азартных периодов. Экспертные участники рекомендуют сокращать объём пари до 1-2% от общего резерва.
купить квартиру в сарове Купить квартиру в Сарове – значит сделать выгодное инвестиционное вложение в недвижимость
Определение качественного азартного ресурса в текущих границах требует тщательного изучения к лицензионному статусу. Квалифицированные пользователи осознают, что тип топ казино предоставляет свежую материалы о активных площадках.
Алгоритм открытия счета в легальных сервисах объединяет обязательную верификацию персональных данных. KYC-требования обеспечивают как площадку, так и участника от фрода. Переходные ограничения на снятие финансов до выполнения подтверждения – обычная система.
Цифровые блокировки на соединение к гемблинг сайтам устраняются через альтернативные ссылки. Действующие отражения поддерживают полную работоспособность базового сервиса. Денежные операции, геймплейный достижения и привилегированные программы продолжают постоянными.
Капитальная гарантированность определяется критерием внедренных платежных способов. SSL-безопасность, PCI DSS сертификация и двухфакторная верификация обеспечивают надежный щит безопасности.
Развлекательная коллекция официальных заведений объединяет спины от топовых провайдеров. RTP-коэффициенты, колебания и алгоритмические модели претерпевают независимую сертификацию в утвержденных лабораториях.
Системы мотивации в достойных казино опираются на понятных параметрах проигрыша. Отыгрыш x35-40 признается нормальным для слот-льгот, в то время как настольные забавы принимаются в калькуляцию с минимальным показателем.
Активные дублирующие порталы официальных игорных заведений на казино Лаки Бир обеспечивают беспрерывный подключение к игровым сервисам. Система реплицирования строит полноценные копии базового домена с сохранением всех инструментов.
Процедура регистрации через mirror-сайт полностью повторяет основную заявку. Свежие игроки регистрируют действующий email, формируют сложный шифр и назначают основную финансовый инструмент.
Подтверждение личного кабинета включает загрузки удостоверений согласно KYC-политике. Снимок паспорта, свидетельство резиденции и банковские координаты контролируются системой программную валидацию в течение 24-72 временных единиц.
Вход активных геймеров реализуется через стандартную интерфейс с усиленной аутентификацией. Одноразовые ключи поступают на телефонный номер или e-mail адрес.
Механизмы депозитного раздела через mirror-сайты предлагает популярные денежные системы. Visa, Mastercard, виртуальные счета Skrill, Neteller, crypto Bitcoin, Ethereum реализуются с уменьшенными сборами 0-3%.
Развлекательная библиотека копируется абсолютно включая слоты, традиционные геймплей, live-ведущих и максимальные награды. RTP-показатели, колебания и проигрыш фиксируются аналогичными.
Акционная политика работает аналогично основному порталу. Welcome-комплекты, даровые прокруты, refund и VIP-схемы активируются автоматически при исполнении заданных условий.
Передовые геймеры оказываются с препятствием подключения к сертифицированным порталам. Провайдеры ограничивают базовые домены, но профессиональные Вавада сайт участники осознают о наличии дублирующих ресурсов.
Зеркало формирует полную воспроизведение первичного сайта. Протоколы шифрования остаются неизменными. Платёжные действия производятся через идентичные сервисы.
Технология регистрации через альтернативный домен содержит обычной подтверждения. Операторы уточняют документы для исполнения KYC-регламентов. Паспортные характеристики подвергаются многоуровневую проверку.
Финансовые лимиты на параллельных ресурсах идентичны первичным характеристикам. Низшие взносы сохраняются постоянными. Возрастающие накопления объединяются между разными доменами.
Льготные системы оперируют полноценно на дополнительных платформах. Коэффициент оборота поддерживает стартовые значения. Тайминг проигрывания остаётся прежним.
Команда сопровождения анализирует запросы с резервных доменов таким же способом. Прямой чат предоставляет 24-часовой расписание работы.
Ryzen Rocket Store – Great selection of gadgets and browsing feels smooth and easy.
https://atesoglusogutma.com/user/C%C3%B3digoBono08/
My Mexican Pharmacy: mexico pharmacy – My Mexican Pharmacy
Перемещение в секторе сертифицированных платформ предполагает осознания продвинутых технологий подключения. Продвинутые геймеры эксплуатируют Вавада сайт для получения свежей данных о действующих адресах.
Механизм регистрации аккаунта в официальных компаниях охватывает комплексную аутентификацию. Новейшие компании задействуют KYC-алгоритмы и AML-стандарты. Документальное сопровождение отнимает от 24 до 72 интервалов.
Технические технологии для обхода запретов развиваются параллельно с интенсификацией нормативных действий. VPN-решения типа premium предоставляют защиту AES-256 и методы OpenVPN. Непрерывность связи жизненно значима для премиальных партий.
Запасные адреса оперируют через территориально распределенные серверные системы. CDN-структуры предоставляют сокращенную латентность для глобальных пользователей. Системное переключение включается при распознавании ограничения базового ресурса.
Экономические движения в официальных регионах подпадают под жестким требованиям PCI DSS. Крипто расчеты завоевывают популярность вследствие конфиденциальности и оперативности выполнения.
Смартфонные программы топовых брендов интегрируют отпечатковую проверку и push-уведомления для критических ситуаций. Адаптивный интерфейс программно подстраивается под параметры экрана.
Выбор надежного развлекательного заведения нуждается серьезного разбора официальных разрешений. Новые ресурсы Вавада сайт предлагают игрокам стопроцентную сведения о текущих разрешениях.
Механизм получения доступа включает множество необходимых стадий проверки. Владельцы просят удостоверения, подтверждающие индивидуальность и дееспособность. Обычный KYC-механизм занимает от 24 до 72 временных отрезков.
Управление банком начинается с установления ограничений на пополнения. Компетентные клиенты предлагают внедрять норму 5% от суммарного азартного средств на единичную заход.
Системные препятствия администраторов обязывают использовать запасные домены. Альтернативы удерживают полную производительность центрального платформы, предусматривая летопись операций и игровой достижения.
Новые финансовые инструменты гарантируют быстрые взносы через криптовалютные аккаунты. Bitcoin, Ethereum и устойчивые монеты поддерживают тайность и наименьшие сборы. Срок обработки выводов доходит 10-30 промежутков.
Схемы верности охватывают ступенчатые степени с прогрессивным компенсацией. VIP-консультанты предоставляют персонализированные поощрения, расширенные рамки и преимущественную помощь.
Ценю информацию, которую вы публикуете на kazino olimp.
Большое спасибо!
играть в Olimp Casino
Нынешние пользователи встречаются с изобилием цифровых особенностей при работе с проверенными платформами. Тематические источники типа лаки Р±РёСЂ казино обеспечивают свежую сведения о процессах гэмблинговых провайдеров.
Алгоритм подтверждения кабинета включает несколько требуемых фаз. Первичная аутентификация подразумевает предоставления удостоверений верифицирующих личность. Классический перечень подразумевает ID, права или международный паспорт.
Технологическая компонента создания аккаунта предполагает задействование SSL-шифрования и двухуровневой проверки. Продвинутые пользователи советуют включать совокупность представленных настроек обеспечения.
Резервные ссылки формируют стопроцентные дубликаты центрального сайта с удержанием полного набора функций. Важнейшее выгода заключается в схожести платежных ограничений и условий вейджера.
Процедура поиска рабочих дублирующих порталов основывается на отслеживании профессиональных телеграм-каналов и аффилированных платформ. Квалифицированные игроки эксплуатируют VPN-сервисы для гарантирования стабильного входа независимо от локальных ограничений.
Нынешние игроки оказываются с сложностью связи к лицензированным ресурсам. Провайдеры фильтруют первичные адреса, но знающие lucky bear казино игроки знают о функционировании резервных площадок.
Резервная ссылка составляет идентичную реплику оригинального сайта. Системы безопасности остаются неизменными. Платёжные операции производятся через аналогичные системы.
Схема открытия счёта через дополнительный домен требует типовой валидации. Администраторы запрашивают справки для исполнения KYC-стандартов. Индивидуальные параметры проходят усиленную валидацию.
Финансовые пределы на параллельных платформах соответствуют базовым характеристикам. Минимальные ставки продолжают фиксированными. Возрастающие накопления согласовываются между разными ссылками.
Бонусные механизмы функционируют всесторонне на резервных ресурсах. Вейджер гарантирует первоначальные цифры. Длительность проигрывания остаётся прежним.
Департамент сопровождения изучает запросы с параллельных порталов таким же способом. Прямой общение поддерживает беспрерывный формат деятельности.
flow криптовалюта новости новости тг
find great items here – Appears trustworthy and I want to look at more of the offerings.
Азартная сфера представляет быстрый подъём, заинтересовывая массы пользователей. Опытные порталы предлагают стабильную пространство для пари. Полную материалы о данных брендах возможно найти на казино Mellstroy Game .
Аттестация представляет приоритетным показателем подбора площадки. Лицензиаты Олдерни дают тщательный мониторинг расчётных действий. Каждая легальная портал осуществляет постоянные ревизии RNG-генераторов.
IT аспекты инновационных беттинг-платформ охватывают SSL-шифрование банковского класса. Производители софтового материала наподобие Microgaming, NetEnt, Pragmatic Play внедряют сложные модели непредсказуемых значений.
Процесс подтверждения учётной записи требует представления справок KYC-уровня. Паспорт, свидетельство о доходах, валидация регистрации — базовый комплект для завершённого авторизации.
Альтернативные порталы устраняют трудности с ограничениями провайдеров. Функционирующие копии модифицируются каждый день компьютерными командами. Смартфонные софт регулярно действуют качественнее браузерных форматов.
Финансовая дисциплина устанавливает длительную результативность азартных сессий. Грамотные беттеры настаивают сокращать размер пари до 1-2% от суммарного банкролла.
Iron Vendor collections – The products feel solid and functional, a well-made assortment.
Официальные провайдеры игорных услуг дают игрокам право к профессиональному игровому процессу через целевые сайты, включая Вавада регистрация , которые точно следуют мировые стандарты защиты.
Алгоритм активации предполагает ввода валидационных параметров через защищённые SSL-каналы. Администрация просят официальное свидетельство age verification и адреса нахождения для соблюдения юрисдикционных требований.
Многоуровневая аутентификация становится необходимым элементом актуальных механизмов security. Users приобретают SMS-коды, push-оповещения или эксплуатируют специальные приложения вроде Google Authenticator.
Зеркальные ссылки ликвидируют трудности territorial запретов и DDoS-нападений. Фактически копии формируют дублированные клоны центрального домена с удержанием features и user данных.
Skilled клиенты призывают хранить свежие списки working альтернатив в закладках обозревателя. Management отправляют информацию о современных адресах через e-mail, Telegram-сообщества и телефонные программы.
Банковские транзакции через официальные порталы покрыты cryptographic methods стандарта банковского segment. Снятие средств реализуется solely на проверенные данные собственника учётной записи.
visit Spring Crate – I’ll save this site for later because it’s easy to navigate and reliable.
Работаешь с авито? авито прайс лист профессиональное создание и оформление Авито-магазина, настройка бизнес-аккаунта и комплексное ведение. Поможем увеличить охват, повысить конверсию и масштабировать продажи.
Новейшие платформы гемблинг услуг обеспечивают клиентам подключение к качественному игровому процессу через защищенные Vavada ресурсы. Легальная функционирование подразумевает соблюдения жестких законодательных положений.
Алгоритм создания персонального аккаунта содержит аутентификацию конфиденциальных данных. Администраторы применяют комплексные системы KYC и AML для пресечения мошеннических транзакций.
Технические инструменты актуальных гемблинг платформ базируются на зашифрованных облачных системах с шифровальными технологиями. Региональная блокировка принуждает администраторов создавать параллельные порталы.
Параллельные сайты являют собой точные репликации главного сайта с сохранением всех возможностей и сведений. Пользователи приобретают устойчивый вход к балансу, гемблинг отчетности и пользовательским настройкам.
Расчетные операции производятся через связанные платежные агрегаторы. Лимиты на взносы и получения регулируются в унисон с регуляторными критериями и индивидуальными регламентами контроля угроз.
Экспертные гемблеры настаивают контролировать состояние сертификата через надзорные базы данных гемблинг ведомств. Авторитетные индикаторы задействуют позиции на специализированных платформах и мнения действительных клиентов.
Официальные ресурсы азартных сервисов предоставляют участникам возможность к высококлассному гэмблингу через dedicated домены, включая ДживиСпин казино , которые соблюдают transnational критерии безопасности.
Процедура активации подразумевает ввода authentication данных через криптографические SSL-каналы. Администрация просят предоставить документальное подтверждение возраста и региона residence для выполнения нормативных стандартов.
Multi-factor верификация выступает принудительным частью передовых архитектур надёжности. Пользователи имеют SMS-коды, push-уведомления или используют dedicated утилиты по типу Google Authenticator.
Mirror URL нейтрализуют вопросы региональных санкций и DDoS-воздействий. Фактически дубли представляют аналогичные реплики primary платформы с обеспечением возможностей и личных сведений.
Компетентные игроки suggest сохранять обновлённые списки активных копий в закладках веб-клиента. Букмекеры рассылают новости о современных доменах через почтовые сервисы, Telegram-сообщества и телефонные софт.
Платёжные переводы через надёжные платформы обеспечены криптографическими системами стандарта банковского сектора. Extraction фондов выполняется исключительно на подтверждённые данные держателя account.
Проверенные провайдеры гэмблинг возможностей дают участникам право к элитному развлечениям через профильные платформы, включая Лаки Бир сайт , которые специально выполняют общепринятые стандарты security.
Схема активации necessita указания верификационных информации через безопасные SSL-линии. Администрация просят документальное удостоверение совершеннолетия и территории проживания для поддержания законодательных стандартов.
2FA проверка выступает required элементом новейших механизмов безопасности. Игроки обретают SMS-токены, push-notification или эксплуатируют targeted программы вроде Google Authenticator.
Зеркальные домены ликвидируют трудности региональных блокировок и DDoS-assault. С технической точки зрения дубли являют аналогичные клоны основного домена с обеспечением функциональности и индивидуальных параметров.
Skilled игроки призывают хранить новейшие каталоги действующих копий в favourites browser. Администрация передают новости о современных адресах через почтовые сервисы, Telegram-группы и телефонные утилиты.
Денежные процедуры через проверенные площадки гарантированы cryptographic протоколами уровня банковского области. Изъятие капитала осуществляется solely на подтверждённые реквизиты собственника account.
Современные геймеры попадают с затруднением подключения к сертифицированным ресурсам. Операторы блокируют базовые адреса, но грамотные лаки Р±РёСЂ посетители помнят о существовании зеркальных порталов.
Зеркало составляет точную отображение базового портала. Системы безопасности работают равнозначными. Финансовые процедуры производятся через равнозначные сервисы.
Технология открытия счёта через зеркальный домен подразумевает стандартной верификации. Специалисты уточняют бумаги для соблюдения KYC-норм. Персональные сведения осуществляют комплексную подтверждение.
Вносительные лимиты на параллельных платформах совпадают первичным требованиям. Стартовые ставки поддерживаются стабильными. Накопительные джекпоты интегрируются между различными доменами.
Бонусные механизмы оперируют завершённо на резервных сайтах. Требования по обороту поддерживает базовые показатели. Временные рамки проигрывания продолжается.
Департамент сопровождения обрабатывает тикеты с резервных ресурсов идентично. Интерактивный диалог осуществляет 24-часовой расписание оперирования.
https://vetfreemeds.com/# п»їdog medication online
blacksprut blacksprut
best over counter erectile dysfunction pills
Annual Beer Celebration News – Eager for the annual gathering and thankful for the informative update.
Лицензионные провайдеры игорных предложений предоставляют геймерам вариант к элитному развлечениям через целевые сайты, включая Лаки Бир официальный сайт , которые исполняют transnational нормы security.
Алгоритм активации necessita внесения authentication сведений через криптографические SSL-линии. Провайдеры требуют official удостоверение дееспособности и региона регистрации для выполнения законодательных требований.
2FA аутентификация становится mandatory компонентом актуальных систем security. Участники обретают SMS-коды, push-notification или внедряют targeted софт по типу Google Authenticator.
Резервные домены преодолевают трудности географических ограничений и DDoS-assault. С технической точки зрения зеркала составляют тождественные dublicates основного ресурса с обеспечением инструментария и пользовательских деталей.
Skilled игроки советуют сохранять обновлённые списки действующих mirrors в сохранённых ссылках веб-клиента. Операторы рассылают информацию о fresh ссылках через e-mail, Telegram-группы и телефонные программы.
Банковские переводы через официальные сайты гарантированы криптографическими methods класса банковского индустрии. Вывод средств осуществляется исключительно на аутентифицированные данные обладателя account.
Проверенные провайдеры игорных услуг обеспечивают клиентам право к профессиональному развлечениям через тематические домены, включая п»ї1хбет , которые точно исполняют transnational регламенты надёжности.
Алгоритм регистрации предполагает указания проверочных информации через криптографические SSL-connection. Операторы просят письменное свидетельство правоспособности и адреса нахождения для поддержания юрисдикционных правил.
Многоуровневая authentication становится принудительным элементом новейших механизмов защиты. Игроки располагают SMS-коды, push-notification или внедряют профессиональные приложения вроде Google Authenticator.
Зеркальные домены ликвидируют проблемы географических барьеров и DDoS-нападений. По сути копии являют идентичные копии центрального домена с maintaining опций и личных параметров.
Опытные игроки призывают keeping обновлённые списки активных mirrors в избранном браузера. Операторы отправляют обновления о актуальных адресах через email, Telegram-communities и портативные утилиты.
Финансовые операции через проверенные порталы защищены криптографическими системами уровня банковского segment. Extraction фондов осуществляется лишь на подтверждённые wallets хозяина личного кабинета.
Walnut Aisle Marketplace – Attractive products and an easy-to-use site make shopping a pleasure.
I’m extremely inspired together with your writing skills and also with the layout on your blog.
Is that this a paid theme or did you modify it yourself?
Anyway stay up the nice high quality writing, it’s
uncommon to see a nice blog like this one today..
satinvendor.shop – I’ll be saving this for my next shopping trip.
Передовые платформы развлекательных активностей обеспечивают игрокам вход к высококлассному азарту через надежные казино Голд ресурсы. Легальная бизнес требует учета жестких надзорных критериев.
Процесс оформления пользовательского профиля охватывает подтверждение персональных данных. Управляющие эксплуатируют многоуровневые механизмы KYC и AML для предотвращения нарушающих транзакций.
IT системы современных игорных домов строятся на стабильных облачных системах с криптографическими протоколами. Территориальные ограничения заставляет операторов запускать вспомогательные порталы.
Зеркальные сайты представляют точные копии основного ресурса с поддержанием всех опций и параметров. Пользователи получают постоянный соединение к балансу, азартной истории и персональным опциям.
Денежные операции производятся через подключенные денежные агрегаторы. Границы на инвестиции и изъятия фиксируются в соотношении с законодательными условиями и внутренними нормами контроля угроз.
Профессиональные гемблеры предлагают мониторить статус сертификата через контролирующие реестры игорных структур. Авторитетные индикаторы охватывают позиции на экспертных сайтах и оценки истинных пользователей.
Нужен промокод казино? https://promocodenastavki.ru получите бесплатные вращения в популярных слотах. Актуальные бонус-коды, условия активации и пошаговая инструкция по использованию для новых и действующих игроков.
IM và TF Gaming chắc chắn sẽ không làm bạn thất vọng khi cung cấp hơn 35+ tựa game cá cược Thể thao điện tử cực kỳ hấp dẫn. 888slot Bạn có thể xem nhanh tỷ lệ cược sớm – trước trận đấu để bắt ngay kèo thơm cho riêng mình: Kèo chấp bản đồ, kèo tổng số Round, kèo Chẵn/Lẻ,… TONY02-26H
Исследование в области легальных сайтов нуждается знания передовых способов входа. Опытные клиенты задействуют лаки Р±РёСЂ для приобретения современной фактов о работающих путях.
Алгоритм создания аккаунта в проверенных организациях содержит многоуровневую валидацию. Новейшие провайдеры эксплуатируют KYC-процедуры и AML-критерии. Документальное сопровождение составляет от 24 до 72 временных отрезков.
Программные технологии для минования ограничений развиваются параллельно с повышением правовых действий. VPN-инструменты типа premium предлагают безопасность AES-256 и протоколы OpenVPN. Стабильность соединения fundamentally актуальна для высокоролловых партий.
Резервные платформы действуют через географически расположенные цифровые кластеры. CDN-системы предоставляют оптимальную отклик для американских участников. Программное маршрутизация активируется при выявлении ограничения главного домена.
Финансовые манипуляции в легальных зонах следуют конкретным правилам PCI DSS. Криптовалютные транзакции приобретают признание в результате конфиденциальности и оперативности осуществления.
Мобильные программы лучших операторов объединяют физиологическую аутентификацию и push-оповещения для принципиальных моментов. Гибкий оформление программно изменяется под параметры монитора.
Moss Vendor website – I’ll keep this saved for new arrivals and future shopping trips.
Современные геймеры сталкиваются с изобилием цифровых особенностей при функционировании с легальными площадками. Экспертные платформы типа казино Mellstroy Game обеспечивают свежую сведения о функционировании казино брендов.
Процесс валидации счета содержит комплекс необходимых стадий. Базовая валидация требует отправки справок удостоверяющих личность. Привычный перечень включает документ, автолицензию или международный паспорт.
Технологическая часть регистрации предполагает эксплуатацию защищенного протокола и многофакторной защиты. Продвинутые пользователи подсказывают активировать совокупность имеющихся опций секьюрити.
Альтернативные адреса составляют полные отражения главного портала с обеспечением всего набора функций. Центральное выгода содержится в соответствии расчетных ограничений и условий ставочных требований.
Алгоритм локализации актуальных запасных доменов базируется на отслеживании профильных телеграм-каналов и аффилированных порталов. Опытные клиенты внедряют виртуальные частные сети для создания устойчивого входа без оглядки от локальных барьеров.
Лицензионные провайдеры гэмблинг сервисов гарантируют геймерам право к профессиональному игровому процессу через тематические домены, включая п»ї1хбет регистрация , которые именно исполняют международные критерии security.
Схема создания аккаунта включает указания проверочных сведений через encrypted SSL-соединения. Провайдеры demanded official подтверждение совершеннолетия и региона нахождения для исполнения legal критериев.
Multi-factor authentication представляет обязательным компонентом современных систем защиты. Пользователи получают SMS-шифры, push-notification или задействуют dedicated программы вроде Google Authenticator.
Дублирующие порталы ликвидируют вопросы региональных ограничений и DDoS-нападений. Фактически mirrors являют копийные dublicates главного сайта с поддержанием features и user деталей.
Skilled участники советуют удерживать current списки рабочих mirrors в favourites веб-клиента. Администрация рассылают информацию о актуальных URL через e-mail, Telegram-сообщества и мобильные утилиты.
Payment транзакции через надёжные ресурсы гарантированы cryptographic технологиями стандарта банковского направления. Снятие капитала реализуется лишь на верифицированные карты держателя профиля.
смотреть здесь https://lzt.market/
Reed Vendor Hub – Very intuitive navigation with all products logically arranged.
official Bright Bloomy hub – Friendly design and bright visuals make browsing effortless.
Играешь в казино? пин ап казино популярная онлайн-платформа с большим выбором слотов, настольных игр и лайв-казино. Бонусы для новых игроков, регулярные акции и удобные способы пополнения доступны круглосуточно.
Its like you learn my mind! You appear to understand so much approximately this,
like you wrote the ebook in it or something. I think that you simply can do with some % to force
the message house a bit, but instead of that, this is wonderful blog.
A fantastic read. I’ll certainly be back.
Актуальные игроки сталкиваются с массой системных деталей при функционировании с сертифицированными платформами. Профессиональные сайты типа Lucky Bear casino выдают свежую данные о операциях гэмблинговых операторов.
Процедура проверки аккаунта подразумевает ряд неотъемлемых шагов. Базовая подтверждение нуждается отправки свидетельств доказывающих субъект. Привычный пакет предполагает паспорт, права или международный паспорт.
Программная сторона записления предполагает использование SSL-шифрования и двухфакторной аутентификации. Квалифицированные геймеры предлагают включать максимум возможных возможностей безопасности.
Зеркала формируют стопроцентные копии первичного сайта с удержанием исчерпывающего набора функций. Главное бонус состоит в идентичности расчетных рамок и критериев ставочных требований.
Система обнаружения активных зеркал базируется на отслеживании специализированных мессенджер групп и партнерских платформ. Квалифицированные пользователи применяют анонимайзеры для гарантирования постоянного входа невзирая от географических запретов.
VendorLilacShop – Fast and smooth resolution from customer service, no delays.
Нынешние геймеры встречаются с препятствием соединения к лицензированным площадкам. Организации ограничивают первичные порталы, но грамотные Lucky Bear посетители помнят о существовании параллельных площадок.
Дополнительный домен представляет идентичную реплику оригинального сайта. Средства защиты остаются неизменными. Расчётные операции производятся через аналогичные каналы.
Технология создания аккаунта через зеркальный портал содержит стандартной проверки. Сотрудники выясняют свидетельства для исполнения KYC-стандартов. Индивидуальные данные выполняют двухфакторную верификацию.
Финансовые рамки на альтернативных площадках идентичны базовым спецификациям. Низшие суммы функционируют неизменными. Накопительные выигрышные пулы интегрируются между всеми доменами.
Стимулирующие схемы работают комплексно на дополнительных платформах. Вейджер обеспечивает исходные параметры. Срок активности реализации остаётся прежним.
Сервис поддержки изучает обращения с зеркальных ресурсов таким же способом. Интерактивный разговор гарантирует 24-часовой формат работы.
Новейшие участники имеют дело с множеством системных деталей при функционировании с легальными платформами. Профильные сайты типа Вован казино обеспечивают новую контент о деятельности развлекательных провайдеров.
Алгоритм аутентификации счета включает множество принудительных фаз. Начальная проверка включает предоставления удостоверений подтверждающих личность. Классический комплект включает ID, автоудостоверение или заграничное удостоверение.
Программная сторона открытия счета содержит использование криптографической защиты и двойной авторизации. Экспертные геймеры рекомендуют активировать весь комплекс предложенных функций безопасности.
Альтернативные адреса представляют абсолютные отражения главного портала с поддержанием всего инструментария. Центральное преимущество кроется в соответствии расчетных рамок и требований отыгрыша.
Алгоритм локализации функционирующих запасных доменов опирается на проверке профессиональных информационных каналов и партнерских порталов. Квалифицированные пользователи применяют VPN-сервисы для предоставления постоянного соединения вне зависимости от географических лимитов.
Thanks a lot, An abundance of data.
Развлекательная отрасль демонстрирует интенсивный расширение, притягивая массы пользователей. Квалифицированные платформы обеспечивают качественную обстановку для ставок. Подробную материалы о данных операторах возможно обнаружить на лаки Р±РёСЂ казино .
Аккредитация остаётся главным аспектом выбора портала. Лицензиаты Великобритании обеспечивают жёсткий надзор денежных манипуляций. Конкретная лицензированная сайт осуществляет плановые проверки RNG-модулей.
Технические параметры инновационных азартных площадок предусматривают SSL-защиту банковского класса. Поставщики компьютерного ПО уровня Microgaming, NetEnt, Pragmatic Play встраивают сложные механизмы произвольных чисел.
Процесс аутентификации профиля предполагает представления удостоверений KYC-типа. Удостоверение, подтверждение о доходах, верификация местожительства — типичный список для окончательного авторизации.
Резервные ссылки устраняют барьеры с цензурой операторов. Свежие альтернативы адаптируются каждый день техническими командами. Портативные приложения часто работают стабильнее интернет форматов.
Управление банкроллом определяет стратегическую доходность игровых циклов. Опытные беттеры предлагают лимитировать сумму вейджера до 1-2% от совокупного фонда.
Подготовка домашнего работ закрепляет темы, пройденный в классе.
Такая практика тренирует навыки самостоятельной работы и поиска информации.
Систематическое делание домашних заданий воспитывает чувство самодисциплины и планирования.
Домашние работа дают взрослым понимать прогресс и трудности ученика в учёбе.
Русский язык 2 класс Канакина: ответы
Нынешние участники оказываются с проблемой входа к лицензированным платформам. Организации запрещают главные URL, но знающие Mellstroy Game казино участники учитывают о наличии дублирующих платформ.
Параллельный портал является полную реплику первичного ресурса. Криптографические алгоритмы поддерживаются аналогичными. Расчётные процедуры реализуются через равнозначные каналы.
Технология создания аккаунта через дополнительный адрес включает стандартной валидации. Специалисты запрашивают бумаги для осуществления KYC-стандартов. Индивидуальные характеристики осуществляют усиленную верификацию.
Депозитные ограничения на альтернативных ресурсах идентичны главным спецификациям. Наименьшие взносы поддерживаются неизменными. Прогрессивные призовые фонды интегрируются между множественными доменами.
Поощрительные системы функционируют комплексно на резервных площадках. Отыгрышный коэффициент обеспечивает базовые цифры. Тайминг оборота сохраняется.
Сервис ассистирования анализирует вопросы с резервных адресов аналогично. Мгновенный разговор поддерживает 24-часовой расписание деятельности.
CrystalAisle specials – A carefully arranged range of items with some nice surprises.
https://mymexicanpharmacy.com/# My Mexican Pharmacy
Новейшие геймеры обталкиваются с огромным количеством программных особенностей при операциях с лицензированными платформами. Тематические порталы типа Mellstroy Game casino выдают свежую информацию о функционировании развлекательных провайдеров.
Процесс проверки учетной записи подразумевает ряд неотъемлемых этапов. Стартовая валидация включает размещения документов верифицирующих персону. Обычный комплект включает удостоверение личности, водительские права или внешний паспорт.
Цифровая элемент создания аккаунта содержит задействование защищенного протокола и многофакторной защиты. Квалифицированные геймеры подсказывают инициировать полный набор представленных возможностей защиты.
Зеркала формируют идентичные клоны центрального домена с удержанием исчерпывающего арсенала. Важнейшее достоинство выражается в схожести денежных рамок и требований ставочных требований.
Механизм выявления рабочих зеркал основывается на контроле экспертных уведомительных сервисов и сотрудничающих площадок. Профессиональные клиенты задействуют прокси-соединения для обеспечения устойчивого подключения без оглядки от региональных лимитов.
skilletstreet – Loved the wide selection and navigating the site was seamless.
Игровая отрасль показывает активный подъём, заинтересовывая массы клиентов. Экспертные ресурсы предоставляют надёжную среду для игры. Подробную информацию о этих брендах реально обнаружить на п»ї1хбет казино .
Лицензирование является приоритетным показателем выбора платформы. Лицензиаты Мальты дают жёсткий контроль финансовых транзакций. Всякая лицензированная портал осуществляет регулярные инспекции RNG-механизмов.
IT аспекты новейших азартных площадок включают SSL-кодирование денежного класса. Разработчики софтового софта уровня Microgaming, NetEnt, Pragmatic Play подключают усовершенствованные схемы непредсказуемых параметров.
Процедура аутентификации аккаунта подразумевает направления бумаг KYC-стандарта. Свидетельство, выписка о прибылях, удостоверение проживания — классический перечень для завершённого подключения.
Альтернативные адреса ликвидируют трудности с цензурой поставщиков. Свежие дубли корректируются систематически компьютерными отделами. Планшетные приложения зачастую функционируют устойчивее интернет модификаций.
Банкролл-менеджмент задаёт стратегическую доходность гемблинговых партий. Грамотные беттеры рекомендуют сокращать сумму бета до 1-2% от совокупного банкролла.
Новейшие геймеры сталкиваются с множеством цифровых тонкостей при процессах с официальными сайтами. Специализированные платформы типа п»ї1xBet казино поставляют современную контент о функционировании казино организаций.
Алгоритм верификации счета охватывает набор обязательных фаз. Базовая верификация включает передачи свидетельств удостоверяющих индивидуальность. Классический набор предполагает удостоверение личности, права или заграничное удостоверение.
Системная компонента записления включает внедрение SSL-шифрования и 2FA. Экспертные игроки предлагают включать максимум имеющихся параметров защиты.
Резервные ссылки являются стопроцентные клоны базового портала с сохранением исчерпывающего возможностей. Главное выгода кроется в идентичности расчетных лимитов и критериев вейджера.
Система обнаружения рабочих запасных доменов строится на наблюдении профильных информационных каналов и связанных площадок. Экспертные клиенты эксплуатируют виртуальные частные сети для гарантирования постоянного доступа вне зависимости от местных барьеров.
Официальные ресурсы развлекательных предложений oferuja пользователям доступ к качественному развлечениям через тематические домены, включая казино типпи , которые точно соблюдают transnational требования защиты.
Алгоритм создания аккаунта necessita внесения идентификационных информации через безопасные SSL-connection. Менеджмент требуют официальное verification age verification и адреса жительства для соблюдения законодательных стандартов.
Двухфакторная верификация является необходимым элементом современных платформ конфиденциальности. Участники располагают SMS-коды, push-оповещения или эксплуатируют специальные приложения наподобие Google Authenticator.
Mirror URL нейтрализуют трудности geographic санкций и DDoS-воздействий. Технически зеркала составляют аналогичные реплики базового сайта с maintaining опций и личных информации.
Экспертные геймеры советуют сохранять current перечни активных копий в закладках веб-клиента. Провайдеры передают новости о свежих ссылках через электронную почту, Telegram-каналы и телефонные софт.
Платёжные транзакции через официальные площадки покрыты cryptographic протоколами стандарта банковского сектора. Изъятие средств выполняется лишь на аутентифицированные wallets держателя личного кабинета.
Новейшие участники встречаются с массой технических особенностей при деятельности с проверенными ресурсами. Специализированные источники типа Лев регистрация поставляют актуальную данные о процессах развлекательных брендов.
Алгоритм проверки аккаунта предполагает набор неотъемлемых уровней. Стартовая верификация нуждается предоставления бумаг валидирующих личность. Стандартный перечень охватывает удостоверение личности, водительские права или заграничное удостоверение.
Системная сторона оформления предполагает внедрение SSL-шифрования и двухуровневой проверки. Опытные геймеры рекомендуют запускать максимум имеющихся опций обеспечения.
Запасные домены являются полные клоны базового портала с хранением полного возможностей. Ключевое преимущество выражается в соответствии расчетных лимитов и условий вейджера.
Процедура поиска действующих резервных ссылок фундируется на мониторинге экспертных мессенджер групп и союзных ресурсов. Продвинутые участники задействуют прокси-соединения для создания надежного доступа без оглядки от региональных ограничений.
Bench Breeze Finds – Navigation is intuitive and site experience feels very easy.
shop the Apricot Market brand – Clean interface and easy-to-use filters make exploring products easy.
Лицензионные ресурсы игровых предложений обеспечивают игрокам возможность к качественному развлечениям через dedicated сайты, включая п»ї1хбет казино , которые точно следуют общепринятые нормы защиты.
Механизм открытия счёта подразумевает внесения идентификационных сведений через криптографические SSL-линии. Провайдеры просят предоставить документальное свидетельство age verification и территории residence для поддержания legal требований.
Двухэтапная проверка считается необходимым aspect передовых архитектур надёжности. Users располагают SMS-токены, push-алерты или внедряют специализированные tools наподобие Google Authenticator.
Mirror ссылки преодолевают сложности региональных блокировок и DDoS-нападений. По сути копии формируют тождественные реплики базового домена с сохранением возможностей и индивидуальных деталей.
Экспертные игроки suggest хранить current каталоги действующих копий в закладках веб-клиента. Провайдеры рассылают новости о современных порталах через e-mail, Telegram-сообщества и смартфонные программы.
Банковские транзакции через лицензионные площадки secured encryption алгоритмами категории банковского индустрии. Изъятие средств осуществляется лишь на верифицированные wallets владельца профиля.
перепланировка квартиры в москве sostav.ru/blogs/286398/77663 .
Новейшие сервисы развлекательных развлечений обеспечивают участникам путь к высококлассному игровому процессу через безопасные Меллстрой казино сайты. Авторизованная операционная активность подразумевает следования конкретных регуляторных критериев.
Процедура регистрации пользовательского счета содержит верификацию конфиденциальных реквизитов. Операторы эксплуатируют комплексные механизмы KYC и AML для исключения незаконных переводов.
Технические системы инновационных игорных домов основываются на зашифрованных хостингах с SSL технологиями. Территориальные ограничения побуждает управляющих организовывать вспомогательные URL.
Параллельные порталы образуют точные дубликаты первичного сайта с обеспечением всех инструментов и информации. Игроки добиваются беспрепятственный вход к балансу, игровой данным и пользовательским установкам.
Финансовые процедуры выполняются через встроенные платежные шлюзы. Рамки на взносы и снятия назначаются в гармонии с правовыми положениями и индивидуальными политиками минимизации опасностей.
Компетентные игроки настаивают проверять состояние разрешения через регуляторные реестры гемблинг комиссий. Репутационные параметры содержат места на тематических платформах и оценки истинных участников.
check out Charm Vendor – Such a sweet variety of products, it made shopping entertaining.
cedaraisle.shop – Love the overall vibe and easy ordering process here today.
find Ruby Aisle products – Everything is arranged logically and very easy to browse.
Инновационные сервисы беттинг продуктов предоставляют участникам подключение к элитному беттингу через защищенные казино типпи сайты. Авторизованная операционная активность предполагает выполнения определенных надзорных положений.
Процесс создания игрового кабинета охватывает проверку индивидуальных реквизитов. Провайдеры задействуют комплексные алгоритмы KYC и AML для исключения поддельных операций.
IT средства инновационных гемблинг платформ основываются на стабильных облачных системах с шифровальными сертификатами. Региональная блокировка заставляет провайдеров организовывать вспомогательные домены.
Дублирующие платформы образуют аналогичные репликации основного домена с поддержанием всех инструментов и сведений. Клиенты получают устойчивый соединение к балансу, азартной истории и персональным настройкам.
Финансовые действия проходят через синхронизированные платежные шлюзы. Границы на депозиты и получения определяются в соотношении с нормативными стандартами и индивидуальными нормами управления рисками.
Экспертные клиенты рекомендуют мониторить состояние сертификата через государственные регистры гемблинг организаций. Авторитетные показатели включают рейтинги на тематических сервисах и мнения действительных беттеров.
Актуальные гемблеры встречаются с сложностью доступа к сертифицированным порталам. Провайдеры ограничивают основные домены, но профессиональные Голд казино участники осознают о доступности параллельных ресурсов.
Зеркало формирует полную отображение первичного ресурса. Средства защиты работают равнозначными. Финансовые процедуры выполняются через аналогичные сервисы.
Схема открытия счёта через альтернативный ресурс требует типовой верификации. Менеджеры выясняют справки для выполнения KYC-правил. Персональные сведения подвергаются усиленную валидацию.
Вносительные лимиты на зеркальных площадках совпадают главным условиям. Стартовые суммы сохраняются постоянными. Увеличивающиеся накопления синхронизируются между многочисленными порталами.
Стимулирующие схемы функционируют всесторонне на параллельных платформах. Коэффициент оборота обеспечивает первоначальные величины. Временные рамки проигрывания сохраняется.
Департамент поддержки рассматривает запросы с резервных ресурсов таким же способом. Прямой переписка предоставляет непрерывный расписание оперирования.
Современные порталы игорных развлечений предлагают клиентам вход к премиальному беттингу через надежные Вавада официальный сайт порталы. Авторизованная функционирование влечет учета определенных регуляторных положений.
Процедура регистрации индивидуального учетной записи задействует валидацию персональных сведений. Администраторы задействуют детализированные протоколы KYC и AML для недопущения нарушающих переводов.
IT решения актуальных беттинг площадок базируются на стабильных хостингах с HTTPS технологиями. IP-фильтрация обязывает управляющих создавать дублирующие URL.
Альтернативные домены образуют полные дубликаты первичного портала с поддержанием всех опций и параметров. Клиенты получают беспрепятственный связь к капиталу, беттинг записям и личным конфигурациям.
Платежные переводы проходят через интегрированные финансовые агрегаторы. Пределы на инвестиции и выводы определяются в соответствии с правовыми стандартами и собственными регламентами управления рисками.
Квалифицированные пользователи указывают мониторить ситуацию аккредитации через государственные каталоги гемблинг организаций. Авторитетные характеристики содержат места на специализированных ресурсах и отзывы действительных пользователей.
http://www.citikliniken.com
Проверенные ресурсы игровых возможностей дают игрокам возможность к профессиональному развлечениям через dedicated сайты, включая п»ї1хбет сайт , что следуют глобальные критерии безопасности.
Схема регистрации предполагает предоставления проверочных сведений через encrypted SSL-каналы. Администрация запрашивают official удостоверение возраста и территории регистрации для compliance правовых критериев.
Двухфакторная authentication представляет обязательным составляющей новейших механизмов безопасности. Участники обретают SMS-шифры, push-уведомления или внедряют targeted софт типа Google Authenticator.
Зеркальные порталы ликвидируют сложности geographic санкций и DDoS-assault. С технической точки зрения реплики формируют дублированные реплики базового платформы с сохранением features и индивидуальных параметров.
Компетентные участники suggest удерживать актуальные реестры рабочих mirrors в bookmark веб-клиента. Management направляют новости о современных доменах через электронную почту, Telegram-группы и портативные apps.
Платёжные movements через legal порталы покрыты шифровальными алгоритмами стандарта банковского индустрии. Получение капитала происходит исключительно на аутентифицированные карты собственника личного кабинета.
продолжить https://lzt.market/
События ufc в феврале марте 2026 три недели которые встряхнут дивизионы могут серьезно изменить титульную гонку. Ссылка здесь: https://tresh-lordfilm.ru/news/goryachaya-seriya-ufc-fevral-mart-2026-boi-kotorye-mogut-izmenit-vsyo-v-divizionah/
Действующие альтернативные домены официальных азартных клубов на Vavada создают постоянный коннект к игровым системам. Технология зеркалирования генерирует полноценные клоны главного веб-площадки с сохранением всех функций.
Система активации через дублирующий портал абсолютно копирует стандартную заявку. Начинающие игроки вводят действующий email, создают сложный код доступа и устанавливают базовую платежное средство.
Валидация профиля требует предоставления документов согласно KYC-требованиям. Фото водительских прав, верификация проживания и финансовые реквизиты проверяются через цифровую верификацию в течение 24-72 периодов.
Подключение существующих пользователей осуществляется через базовую интерфейс с 2FA аутентификацией. Разовые ключи передаются на смс аппарат или почтовый ящик.
Опции финансового сектора через mirror-сайты предлагает популярные расчетные сервисы. Visa, Mastercard, веб портмоне Skrill, Neteller, crypto Bitcoin, Ethereum выполняются с минимальными сборами 0-3%.
Игровая каталог дублируется в точности включая spinning games, классические геймплей, live-крупье и джекпоты. RTP-коэффициенты, дисперсия и отыгрыш остаются аналогичными.
Поощрительная программа действует аналогично основному домену. Welcome-наборы, фриспины, кешбэк и VIP-планы включаются программно при достижении установленных условий.
Легальные площадки игровых опций oferuja пользователям возможность к высококлассному времяпрепровождению через тематические домены, включая п»ї1xBet casino , которые именно исполняют международные стандарты защиты.
Механизм оформления профиля требует ввода верификационных данных через шифрованные SSL-каналы. Операторы просят official verification совершеннолетия и региона нахождения для исполнения нормативных норм.
Двухэтапная верификация становится mandatory aspect актуальных механизмов security. Пользователи приобретают SMS-ключи, push-уведомления или эксплуатируют специальные приложения вроде Google Authenticator.
Резервные домены преодолевают сложности geographic запретов и DDoS-штурмов. Фактически реплики образуют тождественные копии основного ресурса с удержанием опций и личных сведений.
Компетентные игроки советуют удерживать актуальные реестры working альтернатив в favourites обозревателя. Management доставляют новости о новых доменах через почтовые сервисы, Telegram-каналы и портативные apps.
Платёжные movements через официальные сайты secured encryption methods level банковского segment. Вывод средств осуществляется solely на подтверждённые данные владельца учётной записи.
this online market – The layout is streamlined and very approachable.
shop Iris Crate online – Everything is organized neatly and browsing is effortless.
Актуальные альтернативные домены лицензированных гемблинг-платформ на лова сайт гарантируют устойчивый доступ к развлекательным ресурсам. Схема копирования формирует идентичные версии главного домена с фиксацией всех возможностей.
Схема активации через зеркало целиком повторяет главную бланк. Свежие игроки прописывают валидный email, устанавливают надежный шифр и выбирают игровую платежное средство.
Аутентификация личного кабинета включает предоставления удостоверений следуя KYC-политике. Копия паспорта, подтверждение места жительства и банковские реквизиты контролируются системой автоматическую анализ в течение 24-72 часов.
Логин активных игроков осуществляется через обычную модуль с расширенной верификацией. Временные ключи приходят на смс девайс или почтовый ящик.
Механизмы входящего блока через mirror-сайты обеспечивает топовые финансовые механизмы. Visa, Mastercard, виртуальные балансы Skrill, Neteller, блокчейн-токены Bitcoin, Ethereum выполняются с низкими взносами 0-3%.
Развлекательная коллекция копируется целиком включая spinning games, карточные игры, live-хостов и накопительные призы. RTP-параметры, волатильность и ставочные требования поддерживаются идентичными.
Поощрительная механизм действует идентично корневому порталу. Welcome-бандлы, фриспины, возврат средств и VIP-программы стартуют программно при реализации заданных параметров.
Wheat Market Goods – The products are appealing and clearly curated with attention to detail.
My Mexican Pharmacy: My Mexican Pharmacy – order medicine from mexico
Подбор безопасного развлекательного заведения в нынешних условиях предполагает специального анализа к регулятивному статусу. Опытные игроки учитывают, что винити зеркало включает новую материалы о доступных площадках.
Процесс открытия счета в легальных заведениях охватывает обязательную проверку персональных данных. KYC-стандарты оберегают как сервис, так и геймера от обмана. Промежуточные рамки на перечисление денег до закрытия подтверждения – нормальная процедура.
Программные запреты на вход к развлекательным площадкам решаются через альтернативные порталы. Функционирующие клоны гарантируют абсолютную работоспособность центрального сайта. Платежные процедуры, интерактивный достижения и льготные предложения поддерживаются устойчивыми.
Материальная гарантированность определяется уровнем применяемых банковских способов. SSL-шифрование, PCI DSS валидация и расширенная проверка устанавливают стабильный контур обороны.
Геймплейная коллекция официальных операторов охватывает барабаны от известных создателей. RTP-показатели, дисперсия и статистические формулы испытывают независимую аудит в аккредитованных центрах.
Системы вознаграждения в надежных площадках формируются на понятных параметрах проигрыша. Требования x35-40 считается разумным для барабан-бонусов, в то время как карточные развлечения включаются в калькуляцию с сниженным фактором.
Лицензионные ресурсы игорных сервисов предоставляют участникам доступ к профессиональному гэмблингу через профильные сайты, включая п»ї1хбет сайт , которые соблюдают transnational требования безопасности.
Механизм активации требует внесения валидационных информации через защищённые SSL-линии. Провайдеры запрашивают нотариальное доказательство возраста и локации проживания для поддержания юрисдикционных правил.
2FA верификация считается mandatory элементом актуальных solutions безопасности. Игроки располагают SMS-коды, push-сообщения или эксплуатируют специальные программы типа Google Authenticator.
Mirror домены нейтрализуют сложности geographic блокировок и DDoS-атак. С технической точки зрения дубли образуют идентичные реплики базового домена с maintaining опций и пользовательских сведений.
Опытные клиенты suggest сохранять актуальные списки working копий в избранном обозревателя. Администрация рассылают updates о современных порталах через e-mail, Telegram-каналы и мобильные софт.
Денежные операции через официальные платформы защищены encryption протоколами класса банковского направления. Изъятие финансов выполняется исключительно на validated карты владельца профиля.
https://www.whiskyrecension.se
Современные гемблеры встречаются с затруднением подключения к проверенным ресурсам. Организации фильтруют основные порталы, но искушённые Lucky Bear пользователи осознают о наличии резервных площадок.
Альтернативный адрес составляет абсолютную отображение главного ресурса. Средства защиты работают аналогичными. Банковские операции осуществляются через идентичные шлюзы.
Процедура регистрации через дополнительный домен предполагает стандартной подтверждения. Менеджеры просят удостоверения для осуществления KYC-норм. Персональные сведения осуществляют многоуровневую проверку.
Финансовые пределы на параллельных порталах равняются основным требованиям. Стартовые вклады продолжают стабильными. Растущие банки интегрируются между различными адресами.
Бонусные системы функционируют комплексно на резервных сайтах. Отыгрышный коэффициент поддерживает оригинальные значения. Период действия проигрывания сохраняется.
Служба обслуживания анализирует вопросы с альтернативных ссылок сходным образом. Живой переписка предоставляет круглосуточный режим обслуживания.
Yes! Finally something about 강남 쩜오 구구단 구구단.
The energy of passion RomiRain sincerity, and private access. Unique publications created for those who appreciate a personalized and bold format.
Hill Vendor Selections – Layout is modern and fresh, giving users a positive browsing experience.
Fly88
https://dveri-ot-zavoda.ru/
Bright Bento Boutique Online – Excellent selection with descriptions that help understand each product.
Hi there it’s me, I am also visiting this site daily, this web page
is really pleasant and the people are really sharing good thoughts.
My page – 优塔娱乐城
Нынешние клиенты пересекаются с массой программных особенностей при процессах с лицензированными ресурсами. Специализированные порталы типа казино Меллстрой дают новую данные о процессах игорных брендов.
Механизм валидации учетной записи охватывает ряд обязательных этапов. Стартовая верификация требует размещения бумаг подтверждающих гражданство. Привычный набор предполагает паспорт, автолицензию или загранпаспорт.
Технологическая элемент оформления охватывает эксплуатацию криптографической защиты и двойной авторизации. Квалифицированные игроки советуют задействовать полный набор предложенных функций секьюрити.
Альтернативные адреса образуют стопроцентные реплики основного сайта с хранением тотального инструментария. Ключевое достоинство состоит в идентичности денежных границ и условий проигрыша.
Система обнаружения функционирующих альтернативных адресов опирается на проверке экспертных новостных лент и сотрудничающих ресурсов. Опытные игроки внедряют VPN-сервисы для обеспечения постоянного связи без оглядки от локальных лимитов.
Современные игроки попадают с препятствием входа к лицензированным сайтам. Операторы закрывают первичные домены, но профессиональные Вавада зеркало пользователи осознают о функционировании дублирующих сайтов.
Резервная ссылка составляет полную воспроизведение основного площадки. Средства защиты работают идентичными. Платёжные операции выполняются через идентичные каналы.
Технология открытия счёта через дополнительный домен включает классической валидации. Операторы уточняют удостоверения для исполнения KYC-правил. Личные информация выполняют комплексную верификацию.
Финансовые пределы на параллельных порталах аналогичны главным условиям. Начальные вклады функционируют неизменными. Возрастающие джекпоты координируются между разными ресурсами.
Льготные планы функционируют целостно на дополнительных ресурсах. Требования по обороту сохраняет оригинальные параметры. Длительность оборота сохраняется.
Департамент поддержки решает вопросы с резервных ресурсов сходным образом. Онлайн чат осуществляет беспрерывный формат деятельности.
Действующие альтернативные домены легальных азартных клубов на казино Lev гарантируют постоянный вход к развлекательным порталам. Принцип копирования генерирует идентичные копии основного ресурса с удержанием всех возможностей.
Процедура регистрации через резервную ссылку целиком имитирует основную шаблон. Только пришедшие геймеры регистрируют функционирующий email, устанавливают надежный пароль и устанавливают игровую денежную единицу.
Аутентификация учетной записи подразумевает передачи документов следуя KYC-политике. Скан ID-карты, подтверждение места жительства и финансовые параметры проверяются через программную анализ в течение 24-72 часа.
Логин зарегистрированных геймеров выполняется через типовую форму с двухфакторной проверкой. Одноразовые пароли передаются на смс девайс или почтовый ящик.
Функционал денежного блока через зеркала поддерживает распространенные денежные системы. Visa, Mastercard, веб счета Skrill, Neteller, виртуальные монеты Bitcoin, Ethereum осуществляются с низкими взносами 0-3%.
Азартная библиотека клонируется в точности включая spinning games, настольные забавы, live-дилеров и джекпоты. RTP-значения, волатильность и отыгрыш удерживаются аналогичными.
Бонусная политика функционирует подобно базовому домену. Welcome-комплекты, бесплатные вращения, денежный возврат и VIP-курсы включаются программно при исполнении заданных параметров.
Игровая сфера представляет динамичный расширение, привлекая множество игроков. Экспертные платформы дают качественную пространство для игры. Полную факты о подобных операторах можно получить на лаки Р±РёСЂ казино .
Аккредитация остаётся приоритетным элементом отбора портала. Регуляторы Олдерни гарантируют серьёзный проверку валютных действий. Конкретная сертифицированная платформа осуществляет плановые ревизии RNG-алгоритмов.
Программные особенности передовых азартных площадок содержат SSL-безопасность экономического уровня. Разработчики программного ПО уровня Microgaming, NetEnt, Pragmatic Play встраивают многоуровневые алгоритмы произвольных величин.
Процедура аутентификации счёта требует представления удостоверений KYC-уровня. ID, справка о заработке, подтверждение регистрации — базовый список для полноценного активации.
Резервные адреса ликвидируют трудности с ограничениями организаций. Свежие копии корректируются ежедневно программными отделами. Портативные клиенты обычно функционируют устойчивее интернет версий.
Контроль средств формирует длительную успешность развлекательных периодов. Квалифицированные беттеры настаивают лимитировать размер вейджера до 1-2% от итогового банкролла.
Frank emotions RaeLilBlac Officiall captivating aesthetics, and a personalized format. Content without unnecessary filters—directly from the author.
A bold image LunaOkko strong charisma, and a personal communication format. Private publications and special materials revealed only to our audience.
An intimate atmosphere Mia Marin sensual presentation, and signature style. Exclusive materials available exclusively in this space.
Maximum candor Princesslsi vibrant energy, and a private atmosphere. Exclusive content is personally created and available only here—for those ready for a truly unique experience.
Надёжные провайдеры развлекательных сервисов обеспечивают геймерам шанс к премиальному гэмблингу через тематические домены, включая Меллстрой , которые специально выполняют transnational требования конфиденциальности.
Процедура регистрации necessita предоставления идентификационных данных через encrypted SSL-соединения. Операторы просят документальное свидетельство age verification и адреса жительства для исполнения нормативных норм.
Двухэтапная аутентификация становится обязательным компонентом новейших архитектур security. Клиенты приобретают SMS-коды, push-notification или применяют специальные софт по типу Google Authenticator.
Резервные адреса преодолевают трудности territorial санкций и DDoS-воздействий. По сути копии формируют дублированные реплики базового ресурса с поддержанием функциональности и user деталей.
Skilled пользователи советуют удерживать свежие каталоги функционирующих альтернатив в favourites обозревателя. Букмекеры рассылают updates о актуальных доменах через мейл, Telegram-группы и телефонные приложения.
Payment транзакции через legal ресурсы покрыты encryption methods level банковского сектора. Extraction денег производится единственно на validated счета держателя аккаунта.
What a stuff of un-ambiguity and preserveness of precious know-how regarding unpredicted emotions.
Also visit my blog: 优塔娱乐城
Действующие резервные адреса официальных игорных заведений на казино Mellstroy Game предоставляют непрерывный подключение к гемблинг платформам. Схема клонирования создает эквивалентные копии центрального сайта с сохранением всех инструментов.
Схема регистрации через mirror-сайт на сто процентов воспроизводит основную форму. Новые клиенты прописывают действующий email, создают защищенный шифр и определяют основную денежную единицу.
Идентификация аккаунта требует представления документов опираясь на KYC-стандартам. Фото национального документа, верификация места жительства и платежные координаты анализируются посредством программную верификацию в течение 24-72 часа.
Авторизация существующих клиентов осуществляется через типовую окно с многоступенчатой аутентификацией. Сессионные шифры передаются на смс гаджет или мейл.
Механизмы входящего модуля через альтернативные домены содержит распространенные денежные платформы. Visa, Mastercard, онлайн портмоне Skrill, Neteller, криптовалюты Bitcoin, Ethereum выполняются с низкими сборами 0-3%.
Гемблинг база воспроизводится абсолютно включая слоты, классические забавы, live-операторов и максимальные награды. RTP-параметры, дисперсия и проигрыш остаются аналогичными.
Промо программа оперирует подобно центральному сайту. Welcome-пакеты, бесплатные вращения, refund и VIP-планы запускаются автоматически при выполнении определенных стандартов.
pet pharmacy: pet prescriptions online – discount pet meds
https://mymexicanpharmacy.com/# mexican mail order pharmacy
Выбор легального гемблинг ресурса предполагает серьезного разбора регулятивных свидетельств. Современные порталы аква РІС…РѕРґ предоставляют геймерам полную детали о своих аккредитациях.
Механизм открытия аккаунта включает определенное количество необходимых ступеней подтверждения. Операторы настаивают справки, доказывающие личность и правоспособность. Обычный KYC-механизм длится от 24 до 72 часов.
Финансовое планирование запускается с назначения лимитов на депозиты. Квалифицированные игроки рекомендуют внедрять правило 5% от итогового игорного фонда на индивидуальную игру.
Системные блокировки операторов заставляют задействовать альтернативные маршруты. Копии хранят максимальную производительность центрального ресурса, включая историю операций и азартный достижения.
Передовые банковские инструменты дают оперативные депозиты через электронные кошельки. Bitcoin, Ethereum и устойчивые монеты предоставляют анонимность и крошечные сборы. Длительность обработки получений равно 10-30 промежутков.
Схемы приверженности охватывают градационные степени с прогрессивным возвратом. VIP-менеджеры предоставляют персонализированные вознаграждения, улучшенные лимиты и преимущественную обслуживание.
Moe’s Coastal Fun Hub – The lively posts and friendly updates make this a site worth visiting.
illustrationinn studio – Creative showcase and pages are easy to browse.
Рабочие дублирующие порталы легальных азартных клубов на казино типпи создают непрерывный коннект к геймерским ресурсам. Технология реплицирования генерирует эквивалентные копии центрального веб-площадки с сохранением всех инструментов.
Процедура активации через зеркало в точности копирует главную бланк. Свежие игроки указывают рабочий email, устанавливают сложный шифр и выбирают операционную денежную единицу.
Валидация профиля включает представления свидетельств согласно KYC-регламенту. Фото водительских прав, доказательство регистрации и банковские реквизиты проверяются через программную проверку в течение 24-72 часа.
Вход действующих участников реализуется через типовую окно с двухфакторной аутентификацией. Краткосрочные ключи передаются на мобильный девайс или email.
Механизмы денежного компонента через зеркала содержит распространенные финансовые системы. Visa, Mastercard, веб портмоне Skrill, Neteller, блокчейн-токены Bitcoin, Ethereum процессируются с минимальными комиссиями 0-3%.
Гемблинг коллекция повторяется полностью включая слоты, классические забавы, live-крупье и максимальные награды. RTP-коэффициенты, вариативность и ставочные требования сохраняются такими же.
Акционная схема действует похоже базовому сайту. Welcome-пакеты, даровые прокруты, кешбэк и VIP-программы стартуют программно при соблюдении заданных критериев.
Развлекательная ниша представляет быстрый прогресс, заинтересовывая легионы геймеров. Экспертные порталы предоставляют надёжную условия для пари. Развёрнутую информацию о этих операторах реально обнаружить на Лаки Бир регистрация .
Легализация является приоритетным показателем селекции площадки. Регуляторы Олдерни дают тщательный аудит валютных операций. Всякая официальная ресурс реализует систематические аудиты RNG-алгоритмов.
IT свойства передовых азартных площадок предусматривают SSL-кодирование экономического ранга. Создатели виртуального ПО класса Microgaming, NetEnt, Pragmatic Play подключают продвинутые алгоритмы случайных величин.
Схема валидации профиля предусматривает передачи свидетельств KYC-уровня. Документ, выписка о прибылях, удостоверение регистрации — стандартный пакет для завершённого доступа.
Дублирующие домены убирают сложности с запретами организаций. Свежие варианты корректируются ежедневно программными группами. Портативные софт регулярно работают надёжнее веб модификаций.
Контроль средств задаёт продолжительную прибыльность гемблинговых сессий. Экспертные геймеры настаивают контролировать количество бета до 1-2% от полного бюджета.
нажмите https://lzt.market
другие https://lzt.market/
Игровая ниша показывает стремительный подъём, манящая множество участников. Опытные сайты предлагают качественную обстановку для развлечений. Развёрнутую данные о данных операторах доступно изучить на Lucky Bear .
Аттестация остаётся ключевым элементом селекции платформы. Контролёры Великобритании обеспечивают строгий проверку расчётных действий. Любая сертифицированная портал реализует систематические ревизии RNG-генераторов.
Цифровые особенности новейших азартных площадок содержат SSL-кодирование банковского ранга. Создатели софтового обеспечения вроде Microgaming, NetEnt, Pragmatic Play внедряют усовершенствованные алгоритмы произвольных показателей.
Процесс аутентификации аккаунта включает предоставления бумаг KYC-стандарта. Удостоверение, документ о финансах, доказательство проживания — стандартный перечень для окончательного доступа.
Зеркальные домены устраняют трудности с цензурой провайдеров. Актуальные копии адаптируются систематически программными службами. Смартфонные приложения обычно работают стабильнее сетевых вариантов.
Распределение капитала задаёт длительную прибыльность азартных партий. Грамотные геймеры рекомендуют лимитировать размер пари до 1-2% от суммарного резерва.
I blog quite often and I truly thank you for your information. This article has truly peaked my interest.
I am going to book mark your website and keep checking for new information about once
per week. I opted in for your RSS feed too.
My web site :: stem cell clinic
Quartz Aisle storefront – Everything feels structured and easy to browse.
My Mexican Pharmacy My Mexican Pharmacy purple pharmacy mexico
Wind Vendor online store – Checkout process was simple, clear, and fast.
Легальные площадки игровых опций предоставляют участникам право к высококлассному гэмблингу через тематические домены, включая п»ї1xBet , которые точно следуют общепринятые регламенты безопасности.
Последовательность создания аккаунта включает внесения проверочных данных через encrypted SSL-соединения. Менеджмент требуют официальное доказательство дееспособности и региона residence для соблюдения законодательных норм.
Двухфакторная верификация является необходимым aspect передовых систем надёжности. Пользователи обретают SMS-токены, push-сообщения или используют targeted софт наподобие Google Authenticator.
Зеркальные домены нейтрализуют вопросы territorial санкций и DDoS-атак. По сути mirrors представляют аналогичные версии базового ресурса с поддержанием опций и пользовательских данных.
Профессиональные участники suggest сохранять current базы активных альтернатив в bookmark обозревателя. Провайдеры отправляют updates о актуальных ссылках через электронную почту, Telegram-каналы и смартфонные программы.
Платёжные операции через надёжные платформы обеспечены защитными системами уровня банковского segment. Extraction денег производится только на validated счета владельца профиля.
Передовые сервисы беттинг активностей предоставляют пользователям вход к высококлассному игровому процессу через защищенные п»ї1xBet casino порталы. Лицензированная функционирование подразумевает соблюдения строгих надзорных норм.
Процедура открытия игрового аккаунта охватывает проверку персональных реквизитов. Регуляторы задействуют углубленные протоколы KYC и AML для блокировки нарушающих переводов.
Программные средства новейших беттинг площадок функционируют на зашифрованных дата-центрах с HTTPS алгоритмами. Локальные запреты обязывает администраторов создавать альтернативные ссылки.
Дублирующие сайты являют собой точные версии центрального домена с фиксацией всех инструментов и информации. Игроки обеспечивают себе беспрепятственный подключение к счету, игровой истории и персональным опциям.
Денежные операции производятся через связанные платежные процессоры. Рамки на вклады и изъятия фиксируются в соответствии с регуляторными критериями и организационными политиками снижения потерь.
Профессиональные пользователи предлагают проверять статус авторизации через официальные регистры азартных ведомств. Статусные критерии предусматривают места на специализированных ресурсах и комментарии действительных беттеров.
Woodland Crate Store – The selection has a warm, inviting feel and items seem carefully chosen.
Поиск надежного игорного площадки предполагает основательного анализа лицензионных документов. Новые сайты казино Tippy гарантируют клиентам максимальную данные о собственных лицензиях.
Процесс получения доступа включает несколько необходимых ступеней проверки. Владельцы просят удостоверения, доказывающие идентичность и совершеннолетие. Классический KYC-механизм требует от 24 до 72 промежутков.
Контроль средств инициируется с задания пределов на инвестиции. Квалифицированные пользователи настаивают эксплуатировать правило 5% от общего развлекательного фонда на индивидуальную игру.
Технические блокировки провайдеров заставляют задействовать альтернативные домены. Зеркала сохраняют максимальную работоспособность центрального площадки, предусматривая летопись транзакций и гемблинг прогресс.
Новые расчетные сервисы дают оперативные инвестиции через цифровые аккаунты. Bitcoin, Ethereum и стабильные валюты дают тайность и символические отчисления. Срок осуществления получений равно 10-30 отрезков.
Системы преданности подразумевают ступенчатые ранги с нарастающим бонусом. VIP-консультанты предоставляют индивидуальные вознаграждения, повышенные рамки и опережающую техподдержку.
explore Hollow Vendor shop – The advice is practical and written in plain language.
Подбор достойного betting заведения в актуальных обстоятельствах заставляет особого анализа к лицензионному уровню. Компетентные участники знают, что Вован зеркало отображает актуальную информацию о активных ресурсах.
Механизм создания аккаунта в легальных операторах предусматривает обязательную подтверждение личности. KYC-процедуры гарантируют как сервис, так и пользователя от фрода. Временные границы на вывод капитала до окончания верификации – обычная система.
Программные препятствия на доступ к азартным сервисам устраняются через резервные домены. Доступные зеркала сохраняют абсолютную возможности основного сайта. Платежные переводы, азартный прогресс и наградные планы сохраняются стабильными.
Капитальная надежность характеризуется критерием эксплуатируемых банковских механизмов. SSL-шифрование, PCI DSS сертификация и расширенная проверка гарантируют прочный щит безопасности.
Игровая коллекция официальных площадок предоставляет автоматы от главных создателей. RTP-коэффициенты, волатильность и математические формулы претерпевают нейтральную валидацию в авторизованных учреждениях.
Программы лояльности в профессиональных сервисах формируются на понятных условиях ставок. Отыгрыш x35-40 признается справедливым для барабан-поощрений, в то время как классические активности засчитываются в счет с уменьшенным процентом.
seo продвижение сайтов продвижение сайтов сео
check Plum Vendor X – The website layout is intuitive, making it simple to locate products.
Функционирующие зеркала проверенных gaming-операторов на Меллстрой РІС…РѕРґ дают устойчивый доступ к геймерским платформам. Схема копирования формирует аналогичные дубликаты центрального портала с сохранением всех механизмов.
Механизм открытия счета через резервную ссылку полностью копирует основную форму. Дебютные клиенты прописывают активный email, устанавливают стойкий код доступа и фиксируют рабочую финансовый инструмент.
Аутентификация аккаунта требует передачи документов опираясь на KYC-нормам. Фото паспорта, подтверждение регистрации и платежные координаты проверяются через машинную валидацию в течение 24-72 часов.
Авторизация существующих игроков осуществляется через обычную модуль с расширенной верификацией. Сессионные токены доставляются на телефонный номер или почтовый ящик.
Механизмы входящего компонента через резервные ссылки включает распространенные финансовые сервисы. Visa, Mastercard, цифровые кошельки Skrill, Neteller, криптовалюты Bitcoin, Ethereum процессируются с низкими процентами 0-3%.
Развлекательная база воспроизводится целиком включая машины, настольные развлечения, live-дилеров и накопительные призы. RTP-параметры, колебания и вейджер фиксируются такими же.
Поощрительная система функционирует схоже основному веб-площадке. Welcome-бандлы, free spins, refund и VIP-схемы запускаются программно при исполнении установленных стандартов.
Легальные провайдеры игорных предложений oferuja пользователям вариант к премиальному времяпрепровождению через специализированные сайты, включая Вавада сайт , которые точно выполняют transnational регламенты security.
Схема активации necessita предоставления валидационных деталей через криптографические SSL-каналы. Букмекеры просят документальное verification age verification и локации проживания для выполнения правовых стандартов.
Двухэтапная идентификация становится mandatory частью новейших платформ security. Участники приобретают SMS-шифры, push-оповещения или применяют специализированные программы по типу Google Authenticator.
Зеркальные порталы преодолевают трудности региональных запретов и DDoS-воздействий. Техническим образом зеркала образуют тождественные dublicates primary ресурса с поддержанием возможностей и пользовательских деталей.
Компетентные геймеры предлагают сохранять новейшие реестры действующих альтернатив в favourites обозревателя. Администрация доставляют новости о современных порталах через email, Telegram-каналы и mobile apps.
Финансовые транзакции через надёжные платформы гарантированы защитными системами уровня банковского сектора. Вывод средств происходит исключительно на подтверждённые wallets владельца account.
цены на квартиры в сарове Купить квартиру в Сарове – значит сделать выгодное инвестиционное вложение в недвижимость
check this store out – Such a tidy space online, it makes shopping enjoyable.
Willow Vendor Collections – A fresh aesthetic and very easy-to-navigate menus.
Boldness and sincerity LunaOkkoOfficiall maximum intimacy. Personal content without intermediaries—only here and only directly from me.
https://vetfreemeds.com/# pet meds for dogs
сайт https://lzt.market/
Vivid revelations Sweetiefox Officiall sensual aesthetics, and a signature format. Private materials created without boundaries or templates—available only in one place.
Candid style DianaRiderOfficiall vibrant passion, and a unique atmosphere. Private publications and unique materials that you’ll find exclusively in this space.
Поиск надежного гемблинг площадки в актуальных границах подразумевает повышенного анализа к законному уровню. Профессиональные клиенты знают, что Меллстрой сайт демонстрирует новую сведения о действующих операторах.
Схема открытия счета в лицензированных площадках охватывает неизбежную верификацию личности. KYC-нормы охраняют как казино, так и участника от махинаций. Временные лимиты на снятие капитала до закрытия верификации – стандартная методика.
Виртуальные барьеры на подключение к азартным сервисам решаются через резервные адреса. Доступные копии сохраняют стопроцентную функциональность базового платформы. Денежные движения, интерактивный достижения и бонусные предложения продолжают постоянными.
Материальная стабильность измеряется критерием задействованных денежных механизмов. SSL-шифрование, PCI DSS сертификация и многоуровневая подтверждение гарантируют надежный периметр обороны.
Интерактивная коллекция лицензированных сервисов предоставляет спины от известных создателей. RTP-показатели, колебания и расчетные модели получают беспристрастную контроль в признанных институтах.
Схемы поощрения в профессиональных площадках формируются на понятных требованиях вейджера. Требования x35-40 характеризуется приемлемым для слот-поощрений, в то время как классические активности учитываются в счет с уменьшенным процентом.
Передовые игроки имеют дело с набором системных нюансов при процессах с сертифицированными порталами. Профильные порталы типа Болливуд казино дают актуальную данные о операциях гэмблинговых брендов.
Процедура валидации профиля содержит набор принудительных этапов. Исходная верификация включает отправки свидетельств доказывающих индивидуальность. Типовой список подразумевает документ, лицензию водителя или международный паспорт.
Системная сторона создания аккаунта подразумевает применение зашифрованного канала и многофакторной защиты. Профессиональные участники подсказывают активировать совокупность представленных функций защиты.
Резервные ссылки образуют идентичные дубликаты центрального сайта с удержанием тотального арсенала. Центральное плюс кроется в соответствии расчетных ограничений и критериев ставочных требований.
Процедура локализации действующих запасных доменов базируется на проверке экспертных уведомительных сервисов и партнерских сайтов. Профессиональные геймеры используют виртуальные частные сети для формирования надежного соединения без оглядки от локальных запретов.
Pure emotion Reislin bold presentation, and a private format without boundaries. Exclusive content, personally created and available only here—for those who appreciate true energy.
Поиск в области официальных ресурсов включает осознания продвинутых технологий доступа. Профессиональные клиенты эксплуатируют Вавада РІС…РѕРґ для получения актуальной данных о оперативных доменах.
Схема создания счета в проверенных заведениях включает детальную проверку. Продвинутые организации задействуют KYC-протоколы и AML-правила. Документооборот занимает от 24 до 72 интервалов.
Технические решения для минования блокировок эволюционируют сообща с усилением юридических инициатив. VPN-платформы разряда premium гарантируют кодирование AES-256 и стандарты OpenVPN. Постоянство соединения критически актуальна для VIP раундов.
Запасные адреса оперируют через локально разнесенные цифровые мощности. CDN-сети осуществляют оптимальную отклик для азиатских геймеров. Системное перенаправление активируется при распознавании ограничения главного ресурса.
Финансовые транзакции в официальных областях отвечают четким нормам PCI DSS. Децентрализованные расчеты увеличивают распространение вследствие анонимности и скорости обработки.
Планшетные клиенты элитных компаний интегрируют лицевую идентификацию и push-алерты для ключевых событий. Гибкий оформление автономно подстраивается под свойства панели.
Официальные ресурсы развлекательных сервисов oferuja клиентам доступ к высококлассному азартному досугу через dedicated сайты, включая лаки Р±РёСЂ казино , которые точно исполняют transnational критерии security.
Последовательность оформления профиля предполагает заполнения проверочных сведений через криптографические SSL-линии. Операторы запрашивают официальное свидетельство возраста и места жительства для compliance правовых требований.
2FA верификация становится обязательным компонентом передовых механизмов надёжности. Users имеют SMS-коды, push-сообщения или используют специальные софт по типу Google Authenticator.
Зеркальные ссылки ликвидируют проблемы географических запретов и DDoS-нападений. С технической точки зрения реплики представляют дублированные dublicates базового платформы с поддержанием возможностей и пользовательских данных.
Опытные геймеры предлагают удерживать новейшие перечни рабочих копий в bookmark browser. Операторы доставляют информацию о современных URL через мейл, Telegram-communities и портативные софт.
Банковские переводы через проверенные порталы покрыты cryptographic системами категории банковского индустрии. Изъятие денег происходит лишь на аутентифицированные данные собственника аккаунта.
shop the Bright Aisle brand – The entire process feels smooth and uncomplicated.
Opal Aisle Official – Love the beautiful product selection and how easy it is to browse.
продать криптовалюту продать криптовалюту
Передовые геймеры встречаются с затруднением доступа к официальным порталам. Провайдеры запрещают базовые адреса, но искушённые Mellstroy Game казино пользователи знают о доступности параллельных площадок.
Дополнительный домен составляет полную реплику оригинального портала. Средства защиты сохраняются идентичными. Банковские операции реализуются через те же механизмы.
Алгоритм создания аккаунта через зеркальный портал подразумевает типовой валидации. Администраторы уточняют документы для соблюдения KYC-правил. Паспортные сведения проходят усиленную аутентификацию.
Финансовые ограничения на параллельных площадках идентичны основным условиям. Начальные ставки остаются неизменными. Накопительные призовые фонды координируются между множественными доменами.
Премиальные механизмы работают всесторонне на резервных порталах. Отыгрышный коэффициент обеспечивает базовые величины. Срок активности оборота продолжается.
Команда обслуживания изучает заявки с параллельных порталов сходным образом. Интерактивный диалог обеспечивает беспрерывный график деятельности.
криптовалюта последние новости крипто новости 2026
explore Chestnut Vendor – Help was prompt, friendly, and resolved everything efficiently.
Bloom Beacon Boutique Online – Easy-to-navigate site and pleasant shopping experience.
browse Autumn Crate items – User interface is smooth and visually clean for easy browsing.
Поиск надежного betting заведения в нынешних рамках нуждается детального изучения к правовому статусу. Опытные участники представляют, что тип топ казино предоставляет новую сведения о функционирующих провайдерах.
Алгоритм открытия счета в официальных операторах содержит необходимую валидацию персональных данных. KYC-процедуры охраняют как площадку, так и клиента от афер. Краткосрочные границы на перечисление средств до завершения верификации – обычная подход.
Электронные блокировки на связь к игровым площадкам решаются через зеркальные ссылки. Действующие дубликаты гарантируют стопроцентную эффективность основного сайта. Платежные переводы, развлекательный результаты и бонусные системы сохраняются константными.
Капитальная стабильность характеризуется показателем эксплуатируемых банковских систем. SSL-безопасность, PCI DSS валидация и многоуровневая верификация формируют прочный заслон охраны.
Игровая ассортимент лицензированных операторов объединяет машины от главных провайдеров. RTP-показатели, дисперсия и статистические системы испытывают объективную валидацию в авторизованных организациях.
Программы мотивации в достойных площадках основываются на открытых требованиях ставок. Требования x35-40 признается справедливым для слот-бонусов, в то время как стандартные состязания идут в калькуляцию с пониженным коэффициентом.
Нынешние пользователи сталкиваются с набором технологических тонкостей при деятельности с лицензированными сайтами. Экспертные порталы типа Болливуд официальный сайт обеспечивают релевантную информацию о операциях азартных организаций.
Механизм проверки аккаунта предполагает набор обязательных шагов. Первичная проверка нуждается загрузки бумаг удостоверяющих личность. Обычный перечень предполагает удостоверение личности, автоудостоверение или международное ID.
Системная сторона создания аккаунта подразумевает эксплуатацию SSL-шифрования и двухуровневой проверки. Продвинутые клиенты советуют активировать совокупность представленных функций обеспечения.
Запасные домены представляют идентичные дубликаты главного ресурса с удержанием комплексного набора функций. Главное выгода кроется в соответствии денежных границ и требований вейджера.
Механизм выявления функционирующих дублирующих порталов опирается на наблюдении профессиональных информационных каналов и аффилированных ресурсов. Профессиональные участники внедряют анонимайзеры для обеспечения бесперебойного входа безотносительно от региональных барьеров.
Навигация в секторе официальных платформ предполагает знания современных решений соединения. Опытные клиенты применяют Vavada для получения релевантной фактов о работающих адресах.
Механизм оформления профиля в надежных организациях предполагает детальную аутентификацию. Современные провайдеры задействуют KYC-процедуры и AML-стандарты. Оформление документов потребляет от 24 до 72 временных отрезков.
Цифровые технологии для обхода запретов улучшаются вместе с укреплением юридических мер. VPN-решения уровня premium обеспечивают криптографию AES-256 и протоколы OpenVPN. Стабильность связи принципиально актуальна для привилегированных игровых периодов.
Дублирующие адреса оперируют через пространственно размещенные цифровые ресурсы. CDN-архитектуры осуществляют сокращенную задержку для европейских клиентов. Техническое роутинг включается при идентификации недоступности главного адреса.
Финансовые манипуляции в лицензированных регионах следуют определенным правилам PCI DSS. Криптовалютные платежи приобретают распространение в результате секретности и скорости осуществления.
Портативные клиенты элитных брендов объединяют биометрическую авторизацию и push-извещения для важных событий. Изменяемый облик программно корректируется под характеристики экрана.
Действующие альтернативные домены легальных gaming-операторов на Вавада официальный сайт дают постоянный доступ к азартным ресурсам. Методика реплицирования образует эквивалентные дубликаты базового портала с удержанием всех инструментов.
Механизм оформления профиля через альтернативный домен в точности повторяет оригинальную шаблон. Новые пользователи регистрируют рабочий email, придумывают безопасный код доступа и устанавливают рабочую денежную единицу.
Идентификация личного кабинета содержит загрузки свидетельств по KYC-регламенту. Фото удостоверения личности, валидация резиденции и платежные координаты анализируются посредством автоматическую контроль в течение 24-72 временных единиц.
Вход действующих пользователей происходит через обычную окно с двухфакторной проверкой. Временные коды отправляются на телефонный девайс или мейл.
Опции пополнительного компонента через резервные ссылки включает востребованные финансовые инструменты. Visa, Mastercard, виртуальные хранилища Skrill, Neteller, цифровые активы Bitcoin, Ethereum реализуются с уменьшенными взносами 0-3%.
Азартная база повторяется полностью включая автоматы, классические геймплей, live-операторов и накопительные призы. RTP-показатели, вариативность и ставочные требования сохраняются такими же.
Бонусная механизм оперирует подобно базовому ресурсу. Welcome-пакеты, безвозмездные спины, компенсация и VIP-планы включаются программно при достижении заданных параметров.
Howdy! Do you know if they make any plugins to safeguard against hackers?
I’m kinda paranoid about losing everything I’ve worked hard on. Any suggestions?
Feel free to surf to my website … รับดูแลรายปี ระบบดับเพลิง
bs2best at bs2best at
Передовые геймеры сталкиваются с набором системных особенностей при функционировании с лицензированными платформами. Специализированные сайты типа п»ї1xBet зеркало обеспечивают свежую сведения о функционировании развлекательных брендов.
Процедура аутентификации профиля содержит ряд неотъемлемых фаз. Начальная аутентификация включает предоставления бумаг удостоверяющих личность. Стандартный пакет включает ID, водительские права или загранпаспорт.
Технологическая сторона открытия счета содержит использование защищенного протокола и двойной авторизации. Экспертные пользователи подсказывают запускать максимум возможных параметров безопасности.
Зеркала представляют идентичные клоны основного домена с удержанием всего набора функций. Основное преимущество состоит в идентичности финансовых пределов и параметров проигрыша.
Процедура обнаружения активных резервных ссылок опирается на проверке экспертных информационных каналов и партнерских сайтов. Продвинутые игроки применяют анонимайзеры для предоставления надежного связи невзирая от географических барьеров.
обменник продать криптовалюту
There’s certainly a great deal to find out about this
topic. I really like all of the points you
have made.
Here is my web blog … fire alarm
Развлекательная область являет динамичный подъём, манящая массы клиентов. Квалифицированные площадки предоставляют защищённую условия для развлечений. Подробную информацию о данных провайдерах можно найти на Лаки Бир зеркало .
Аттестация выступает центральным элементом подбора сайта. Контролёры Великобритании обеспечивают жёсткий мониторинг денежных транзакций. Всякая лицензированная ресурс реализует периодические проверки RNG-систем.
Технические параметры актуальных гемблинг-сайтов охватывают SSL-криптографию банковского уровня. Производители виртуального материала вроде Microgaming, NetEnt, Pragmatic Play интегрируют продвинутые алгоритмы случайных параметров.
Процесс подтверждения учётной записи предполагает направления удостоверений KYC-формата. Удостоверение, подтверждение о средствах, удостоверение проживания — классический пакет для итогового активации.
Дублирующие домены убирают препятствия с ограничениями поставщиков. Свежие дубли адаптируются регулярно компьютерными командами. Мобильные клиенты часто работают стабильнее веб форматов.
Финансовая дисциплина устанавливает длительную успешность гемблинговых периодов. Экспертные пользователи рекомендуют ограничивать количество вейджера до 1-2% от суммарного фонда.
Действующие дублирующие порталы проверенных гемблинг-платформ на казино Голд создают стабильный доступ к развлекательным ресурсам. Принцип копирования формирует аналогичные реплики основного сайта с сохранением всех опций.
Механизм регистрации через резервную ссылку абсолютно копирует стандартную анкету. Начинающие геймеры вводят функционирующий email, генерируют стойкий ключ и выбирают игровую финансовый инструмент.
Подтверждение профиля включает представления бумаг по KYC-регламенту. Фото паспорта, валидация резиденции и финансовые данные анализируются посредством программную валидацию в течение 24-72 ч.
Логин верифицированных игроков осуществляется через стандартную модуль с усиленной проверкой. Краткосрочные коды доставляются на мобильный номер или email.
Опции денежного раздела через резервные ссылки содержит востребованные расчетные платформы. Visa, Mastercard, электронные хранилища Skrill, Neteller, виртуальные монеты Bitcoin, Ethereum процессируются с оптимизированными взносами 0-3%.
Гемблинг база клонируется абсолютно включая машины, столовые геймплей, live-крупье и максимальные награды. RTP-коэффициенты, дисперсия и отыгрыш сохраняются аналогичными.
Поощрительная программа оперирует подобно центральному ресурсу. Welcome-предложения, бесплатные вращения, refund и VIP-системы инициируются системно при выполнении прописанных условий.
телеграм новости телеграм каналы новости
Исследование в пространстве легальных площадок включает знания передовых технологий входа. Опытные геймеры используют казино РЎСѓРєР° для приобретения релевантной информации о действующих путях.
Алгоритм формирования аккаунта в официальных организациях содержит детальную валидацию. Новейшие поставщики применяют KYC-системы и AML-требования. Документальная процедура требует от 24 до 72 временных отрезков.
Цифровые методы для прохождения блокировок совершенствуются параллельно с повышением регуляторных решений. VPN-сервисы категории premium предоставляют кодирование AES-256 и методы OpenVPN. Постоянство подключения fundamentally актуальна для высокоролловых партий.
Запасные платформы действуют через пространственно рассредоточенные серверные ресурсы. CDN-системы поддерживают минимальную время ответа для глобальных участников. Цифровое редирект инициируется при выявлении барьера первичного сайта.
Экономические операции в легальных зонах подчиняются определенным нормам PCI DSS. Децентрализованные переводы приобретают признание благодаря скрытности и динамике обработки.
Мобильные клиенты ведущих провайдеров интегрируют лицевую аутентификацию и push-уведомления для важных моментов. Настраиваемый интерфейс самостоятельно адаптируется под особенности дисплея.
shop Copper Aisle online – The website performs well and mobile browsing is effortless.
Передовые геймеры имеют дело с изобилием программных деталей при процессах с легальными сайтами. Специализированные источники типа Vavada казино предоставляют актуальную данные о операциях казино операторов.
Механизм проверки аккаунта охватывает множество принудительных фаз. Первичная аутентификация предполагает передачи справок удостоверяющих гражданство. Классический перечень включает паспорт, права или внешний паспорт.
Техническая элемент открытия счета предполагает эксплуатацию криптографической защиты и 2FA. Экспертные пользователи рекомендуют запускать весь комплекс предложенных параметров охраны.
Резервные ссылки представляют абсолютные реплики основного платформы с удержанием всего функционала. Главное бонус выражается в тождественности денежных лимитов и параметров ставочных требований.
Система поиска действующих альтернативных адресов строится на наблюдении профессиональных новостных лент и сотрудничающих сайтов. Опытные участники внедряют анонимайзеры для формирования постоянного связи без оглядки от географических запретов.
best mexican online pharmacy: mexican pharmacies – My Mexican Pharmacy
Определение надежного развлекательного портала требует серьезного исследования официальных сертификатов. Передовые порталы казино 1хбет гарантируют пользователям стопроцентную факты о имеющихся лицензиях.
Процедура регистрации включает определенное количество обязательных этапов верификации. Провайдеры настаивают бумаги, удостоверяющие индивидуальность и дееспособность. Типовой KYC-регламент продолжается от 24 до 72 промежутков.
Контроль средств запускается с установления пределов на депозиты. Компетентные пользователи предлагают применять норму 5% от совокупного казино фонда на одну заход.
Программные ограничения провайдеров обязывают внедрять запасные адреса. Зеркала сохраняют безусловную производительность основного ресурса, предусматривая журнал платежей и развлекательный успех.
Передовые денежные методы поддерживают оперативные взносы через цифровые счета. Bitcoin, Ethereum и стейблкоины дают скрытность и крошечные сборы. Период обработки извлечений насчитывает 10-30 периодов.
Системы лояльности предусматривают ступенчатые категории с прогрессивным бонусом. VIP-консультанты предоставляют эксклюзивные награды, повышенные лимиты и приоритетную сервис.
ed meds online without doctor prescription https://elixiumhealth.digital/# ed meds
Cup & Craft Finds – Simple navigation and product details are easy to read.
一骑士七王国2026 海外华人中世纪奇幻 高清HBO史诗剧
Передовые геймеры пересекаются с массой системных деталей при функционировании с легальными сайтами. Профильные сайты типа Vavada зеркало поставляют релевантную материалы о операциях игорных провайдеров.
Процедура аутентификации счета содержит множество необходимых уровней. Стартовая аутентификация требует загрузки документов удостоверяющих персону. Классический комплект охватывает документ, автоудостоверение или международный паспорт.
Техническая компонента оформления охватывает эксплуатацию зашифрованного канала и многофакторной защиты. Квалифицированные пользователи подсказывают активировать максимум доступных функций безопасности.
Дублирующие порталы представляют точные отражения центрального сайта с хранением тотального набора функций. Основное выгода кроется в идентичности расчетных пределов и условий отыгрыша.
Алгоритм поиска активных резервных ссылок фундируется на проверке экспертных мессенджер групп и сотрудничающих площадок. Опытные клиенты внедряют VPN-сервисы для формирования устойчивого доступа независимо от географических блокировок.
Новейшие операторы гемблинг активностей гарантируют клиентам вход к высококлассному игровому процессу через надежные aqua casino платформы. Официальная бизнес нуждается соблюдения жестких законодательных стандартов.
Механизм открытия клиентского счета охватывает подтверждение приватных реквизитов. Администраторы используют комплексные механизмы KYC и AML для блокировки нарушающих финансовых действий.
Электронные платформы современных казино базируются на безопасных серверах с TLS стандартами. Территориальные ограничения обязывает операторов запускать вспомогательные ссылки.
Альтернативные домены являют собой точные копии главного портала с поддержанием всех сервисов и показателей. Участники достигают постоянный подключение к балансу, беттинг статистике и клиентским параметрам.
Денежные процедуры выполняются через встроенные банковские процессоры. Пределы на инвестиции и изъятия определяются в согласии с нормативными стандартами и организационными правилами управления рисками.
Компетентные беттеры советуют мониторить состояние сертификата через регуляторные реестры беттинг структур. Статусные характеристики охватывают ранги на профильных платформах и комментарии настоящих игроков.
Проверенные провайдеры азартных предложений дают пользователям шанс к профессиональному времяпрепровождению через dedicated сайты, включая п»ї1xBet casino , которые точно исполняют международные регламенты безопасности.
Механизм открытия счёта требует предоставления идентификационных сведений через защищённые SSL-протоколы. Букмекеры просят нотариальное подтверждение дееспособности и региона residence для compliance правовых норм.
Multi-factor верификация является required составляющей современных механизмов защиты. Клиенты обретают SMS-ключи, push-сообщения или внедряют dedicated программы в стиле Google Authenticator.
Mirror ссылки устраняют трудности territorial блокировок и DDoS-атак. С технической точки зрения дубли являют копийные dublicates главного сайта с удержанием функциональности и пользовательских параметров.
Профессиональные пользователи рекомендуют поддерживать новейшие реестры функционирующих зеркал в избранном браузера. Management направляют обновления о новых адресах через электронную почту, Telegram-сообщества и мобильные утилиты.
Платёжные переводы через надёжные платформы обеспечены cryptographic methods класса банковского индустрии. Изъятие капитала осуществляется единственно на подтверждённые счета собственника учётной записи.
Передовые геймеры встречаются с сложностью подключения к проверенным платформам. Провайдеры ограничивают главные домены, но знающие казино Sykaaa клиенты понимают о существовании дублирующих порталов.
Резервная ссылка составляет точную дубликат первичного портала. Системы безопасности поддерживаются неизменными. Финансовые переводы реализуются через те же системы.
Технология оформления профиля через параллельный портал содержит привычной верификации. Операторы требуют документы для соблюдения KYC-норм. Идентификационные характеристики осуществляют многоуровневую аутентификацию.
Финансовые рамки на зеркальных платформах идентичны главным условиям. Наименьшие ставки продолжают неизменными. Возрастающие призовые фонды интегрируются между многочисленными ресурсами.
Премиальные планы работают завершённо на резервных сайтах. Вейджер удерживает стартовые цифры. Тайминг отыгрыша не изменяется.
Команда ассистирования анализирует запросы с резервных порталов аналогично. Онлайн диалог гарантирует 24-часовой расписание деятельности.
official Wood Vendor page – Things have gone perfectly and I plan to shop here again.
check out Glade Vendor – Very easy to browse products and complete my order securely.
Источник https://lolz.live/
Новейшие клиенты сталкиваются с огромным количеством программных тонкостей при процессах с легальными платформами. Специализированные порталы типа Лаки Бир поставляют релевантную сведения о деятельности казино провайдеров.
Механизм проверки профиля предполагает несколько неотъемлемых шагов. Исходная аутентификация включает отправки удостоверений валидирующих субъект. Обычный перечень подразумевает удостоверение личности, лицензию водителя или международное ID.
Программная элемент открытия счета содержит задействование SSL-шифрования и двухфакторной аутентификации. Квалифицированные клиенты подсказывают включать все возможных возможностей обеспечения.
Зеркала являются точные клоны первичного платформы с сохранением полного инструментария. Важнейшее достоинство выражается в соответствии банковских ограничений и норм проигрыша.
Процедура обнаружения функционирующих альтернативных адресов опирается на наблюдении профессиональных новостных лент и союзных сайтов. Квалифицированные клиенты внедряют прокси-соединения для обеспечения бесперебойного соединения без оглядки от локальных запретов.
Актуальные провайдеры гемблинг игр гарантируют игрокам вход к профессиональному развлечениям через надежные Vavada ресурсы. Лицензированная бизнес предполагает исполнения определенных правовых стандартов.
Процедура создания персонального счета содержит аутентификацию конфиденциальных реквизитов. Операторы внедряют расширенные протоколы KYC и AML для блокировки фродовых операций.
Электронные системы новейших развлекательных порталов функционируют на безопасных серверах с криптографическими технологиями. Геоблокировка принуждает управляющих создавать резервные домены.
Альтернативные платформы формируют полные копии основного сайта с фиксацией всех инструментов и показателей. Игроки добиваются стабильный соединение к счету, азартной отчетности и персональным установкам.
Расчетные процедуры выполняются через подключенные банковские системы. Ограничения на взносы и выводы регулируются в гармонии с законодательными стандартами и организационными нормами снижения потерь.
Экспертные гемблеры рекомендуют отслеживать положение аккредитации через государственные каталоги развлекательных структур. Престижные показатели содержат ранги на тематических сервисах и мнения истинных беттеров.
Stone Vendor Items – Helpful and responsive support made the whole experience smooth.
Игровая сфера являет стремительный подъём, заинтересовывая тысячи клиентов. Экспертные платформы гарантируют стабильную среду для беттинга. Развёрнутую материалы о таких провайдерах доступно обнаружить на типпи казино .
Лицензирование остаётся основным элементом отбора сайта. Юрисдикции Кюрасао обеспечивают жёсткий надзор расчётных процедур. Каждая легальная площадка реализует регулярные проверки RNG-систем.
Программные параметры новейших казино охватывают SSL-кодирование экономического уровня. Поставщики цифрового материала наподобие Microgaming, NetEnt, Pragmatic Play подключают продвинутые механизмы рандомных показателей.
Механизм подтверждения аккаунта подразумевает передачи документов KYC-типа. Паспорт, выписка о средствах, подтверждение проживания — стандартный список для финального доступа.
Резервные адреса исправляют сложности с цензурой поставщиков. Актуальные дубли изменяются ежедневно IT группами. Карманные софт зачастую функционируют устойчивее онлайн вариантов.
Банкролл-менеджмент формирует длительную доходность азартных партий. Квалифицированные геймеры советуют урезать количество вейджера до 1-2% от общего резерва.
Актуальные платформы азартных услуг обеспечивают игрокам путь к высококлассному игровому процессу через надежные лаки Р±РёСЂ порталы. Лицензированная работа требует следования строгих правовых стандартов.
Процедура открытия клиентского учетной записи задействует проверку индивидуальных сведений. Регуляторы задействуют детализированные системы KYC и AML для пресечения фродовых транзакций.
Программные средства новейших гемблинг платформ базируются на стабильных инфраструктурах с шифровальными алгоритмами. Геоблокировка побуждает владельцев организовывать дублирующие ссылки.
Дублирующие порталы образуют идентичные копии центрального ресурса с сохранением всех инструментов и параметров. Пользователи достигают стабильный вход к счету, развлекательной статистике и пользовательским установкам.
Платежные транзакции производятся через связанные банковские сервисы. Границы на вклады и изъятия определяются в соотношении с законодательными критериями и корпоративными правилами снижения потерь.
Компетентные гемблеры советуют анализировать статус сертификата через государственные регистры гемблинг структур. Имиджевые параметры задействуют места на тематических ресурсах и комментарии истинных участников.
Современные провайдеры азартных развлечений предлагают пользователям вход к высококлассному беттингу через проверенные п»ї1xBet casino системы. Авторизованная деятельность нуждается выполнения четких законодательных требований.
Система регистрации игрового аккаунта включает проверку индивидуальных реквизитов. Администраторы задействуют углубленные системы KYC и AML для предотвращения незаконных операций.
IT средства актуальных развлекательных порталов функционируют на стабильных хостингах с TLS сертификатами. Локальные запреты побуждает администраторов создавать дублирующие домены.
Параллельные сайты составляют аналогичные дубликаты основного платформы с фиксацией всех функций и параметров. Пользователи приобретают непрерывный вход к депозиту, игровой отчетности и клиентским настройкам.
Расчетные транзакции осуществляются через встроенные банковские агрегаторы. Пределы на вклады и получения определяются в унисон с регуляторными стандартами и внутренними процедурами минимизации опасностей.
Опытные пользователи предлагают контролировать положение сертификата через регуляторные регистры беттинг комиссий. Имиджевые индикаторы охватывают ранги на отраслевых сайтах и оценки истинных пользователей.
Определение надежного азартного оператора требует глубокого изучения правовых разрешений. Новые системы казино Вавада обеспечивают клиентам абсолютную факты о действующих аккредитациях.
Алгоритм открытия аккаунта подразумевает множество необходимых шагов верификации. Провайдеры просят справки, удостоверяющие личность и правоспособность. Классический KYC-процесс продолжается от 24 до 72 временных отрезков.
Контроль средств открывается с фиксации пределов на взносы. Компетентные геймеры призывают эксплуатировать установку 5% от итогового развлекательного фонда на единичную партию.
Электронные запреты провайдеров принуждают применять вспомогательные адреса. Зеркала хранят максимальную активность центрального площадки, охватывая журнал переводов и развлекательный достижения.
Актуальные денежные системы обеспечивают мгновенные взносы через электронные кошельки. Bitcoin, Ethereum и фиксированные активы обеспечивают анонимность и символические отчисления. Время осуществления извлечений равно 10-30 минут.
Планы лояльности включают градационные ранги с прогрессивным вознаграждением. VIP-координаторы дают уникальные подарки, расширенные лимиты и первоочередную обслуживание.
shop Robin Market online – I received quick assistance and helpful answers.
https://certicanpharmacy.shop/# canadian pharmacy phone number
denimdusk picks – Stylish selection and everything loads quickly and clearly.
https://www.kandisblog.com
нажмите здесь https://lzt.market/
Отбор достойного гемблинг площадки в нынешних обстоятельствах подразумевает повышенного анализа к юридическому состоянию. Профессиональные геймеры представляют, что Lucky Bear зеркало отображает свежую сведения о действующих операторах.
Схема открытия счета в лицензированных сервисах охватывает неизбежную аутентификацию удостоверения. KYC-процедуры оберегают как казино, так и участника от махинаций. Кратковременные границы на вывод средств до финализации валидации – обычная процедура.
Технические запреты на связь к гемблинг сайтам обходятся через резервные адреса. Рабочие копии сохраняют полную функциональность центрального сайта. Платежные операции, интерактивный достижения и поощрительные программы сохраняются неизменными.
Денежная защищенность измеряется показателем эксплуатируемых денежных систем. SSL-шифрование, PCI DSS аттестация и дополнительная верификация обеспечивают стабильный контур обороны.
Игровая библиотека сертифицированных площадок объединяет барабаны от главных студий. RTP-показатели, колебания и алгоритмические схемы испытывают независимую контроль в авторизованных учреждениях.
Программы стимулирования в серьезных сервисах основываются на понятных требованиях проигрыша. Условия ставок x35-40 считается приемлемым для автомат-бонусов, в то время как настольные состязания учитываются в подсчет с сниженным показателем.
Creative STEM for Youth – A vibrant destination that blends inspiration with interactive lessons.
Современные порталы игорных активностей дают игрокам путь к элитному беттингу через сертифицированные Вавада казино системы. Официальная функционирование влечет следования строгих контролирующих положений.
Система регистрации индивидуального учетной записи задействует валидацию конфиденциальных данных. Управляющие применяют углубленные протоколы KYC и AML для исключения незаконных операций.
IT платформы новейших казино функционируют на стабильных инфраструктурах с криптографическими протоколами. Геоблокировка принуждает владельцев разрабатывать альтернативные ссылки.
Альтернативные платформы являют собой эквивалентные копии главного домена с обеспечением всех сервисов и параметров. Клиенты получают постоянный подключение к балансу, азартной данным и индивидуальным опциям.
Финансовые действия выполняются через интегрированные банковские шлюзы. Лимиты на пополнения и выводы устанавливаются в соотношении с правовыми критериями и внутренними нормами риск-менеджмента.
Опытные клиенты указывают контролировать условия авторизации через официальные регистры азартных структур. Имиджевые параметры включают ранги на профильных платформах и комментарии действительных игроков.
FernCrate Deals – Wide variety and intuitive navigation make this store a pleasure.
Hearth Vendor Online – The site responds fast and moving between sections is smooth.
Актуальные порталы развлекательных развлечений обеспечивают клиентам вход к качественному игровому процессу через защищенные СЌРЅРѕРјРѕ официальный сайт ресурсы. Сертифицированная бизнес требует исполнения жестких регуляторных критериев.
Механизм открытия индивидуального кабинета содержит проверку приватных сведений. Регуляторы используют детализированные механизмы KYC и AML для недопущения поддельных операций.
Программные системы современных казино базируются на стабильных хостингах с TLS стандартами. Геоблокировка принуждает провайдеров организовывать вспомогательные URL.
Зеркальные платформы являют собой полные репликации базового ресурса с обеспечением всех функций и параметров. Участники получают постоянный подключение к средствам, беттинг данным и индивидуальным параметрам.
Платежные переводы осуществляются через связанные финансовые агрегаторы. Границы на депозиты и выводы определяются в соотношении с законодательными критериями и корпоративными регламентами минимизации опасностей.
Экспертные игроки предлагают мониторить условия сертификата через регуляторные списки гемблинг комиссий. Статусные показатели включают рейтинги на тематических платформах и оценки реальных игроков.
Для любителей смешанных единоборств нашел текст про ufc в феврале марте 2026 три недели которые встряхнут дивизионы. Посмотрите сами: https://chrome-downloads.ru/news/ufc-fevral-mart-2026-samye-goryachie-boi-i-neozhidannye-povoroty-kotoryh-stoit-zhdat/
Нынешние геймеры встречаются с изобилием системных деталей при операциях с сертифицированными ресурсами. Профильные сайты типа казино Болливуд предоставляют релевантную сведения о операциях гэмблинговых брендов.
Процесс аутентификации счета охватывает набор обязательных уровней. Исходная верификация нуждается предоставления документов верифицирующих индивидуальность. Обычный пакет подразумевает удостоверение личности, автоудостоверение или внешний паспорт.
Цифровая составляющая создания аккаунта включает задействование безопасного соединения и многофакторной защиты. Опытные игроки рекомендуют запускать полный набор доступных возможностей охраны.
Резервные ссылки образуют полные реплики главного домена с сохранением тотального арсенала. Важнейшее преимущество состоит в подобии денежных пределов и норм отыгрыша.
Алгоритм локализации рабочих резервных ссылок фундируется на отслеживании профильных уведомительных сервисов и партнерских ресурсов. Квалифицированные участники внедряют виртуальные частные сети для гарантирования надежного входа безотносительно от местных блокировок.
Blanket Bay Shop Hub – Inviting layout with fast, effortless browsing.
Актуальные операторы развлекательных развлечений предоставляют игрокам вход к высококлассному игровому процессу через надежные Вавада сайт сайты. Лицензированная бизнес предполагает исполнения определенных надзорных стандартов.
Процедура регистрации пользовательского кабинета содержит подтверждение приватных реквизитов. Провайдеры задействуют расширенные алгоритмы KYC и AML для недопущения фродовых платежей.
Цифровые решения передовых развлекательных порталов основываются на стабильных дата-центрах с SSL стандартами. Локальные запреты заставляет администраторов запускать параллельные адреса.
Резервные порталы являют собой точные клоны центрального платформы с сохранением всех сервисов и показателей. Клиенты получают беспрепятственный соединение к капиталу, развлекательной данным и персональным опциям.
Платежные транзакции проходят через синхронизированные денежные системы. Границы на депозиты и изъятия назначаются в унисон с регуляторными требованиями и корпоративными правилами минимизации опасностей.
Компетентные гемблеры рекомендуют анализировать условия разрешения через государственные списки игорных структур. Авторитетные параметры задействуют места на отраслевых порталах и feedback действительных участников.
Исследование в области официальных ресурсов требует владения продвинутых способов подключения. Опытные пользователи внедряют Меллстрой РІС…РѕРґ для приобретения новейшей данных о оперативных доменах.
Механизм регистрации аккаунта в сертифицированных компаниях включает многоуровневую верификацию. Продвинутые компании внедряют KYC-алгоритмы и AML-требования. Документальная процедура занимает от 24 до 72 периодов.
Программные способы для минования ограничений прогрессируют одновременно с интенсификацией правовых мер. VPN-службы класса premium предлагают защиту AES-256 и стандарты OpenVPN. Непрерывность подключения жизненно существенна для элитных игровых периодов.
Альтернативные ресурсы действуют через локально разнесенные цифровые кластеры. CDN-структуры поддерживают минимальную пинг для азиатских игроков. Системное перенаправление запускается при обнаружении препятствия первичного сайта.
Экономические операции в официальных территориях подчиняются четким правилам PCI DSS. Цифровые переводы приобретают распространение вследствие приватности и скорости реализации.
Планшетные утилиты премиальных операторов содержат биометрическую авторизацию и push-алерты для важных моментов. Изменяемый интерфейс независимо настраивается под параметры дисплея.
Перейти на сайт https://lzt.market/
七王国的骑士第一季2026 海外华人权游衍生 高清史诗冒险 HBO高清
кликните сюда https://lolz.live/
Активные зеркала легальных гемблинг-платформ на Килограмм казино предоставляют стабильный доступ к игровым платформам. Принцип копирования формирует аналогичные копии основного портала с сохранением всех инструментов.
Система активации через альтернативный домен полностью повторяет главную форму. Начинающие геймеры прописывают активный email, устанавливают безопасный ключ и выбирают операционную валюту.
Валидация аккаунта подразумевает представления удостоверений следуя KYC-стандартам. Скан паспорта, свидетельство регистрации и банковские параметры проходят алгоритмическую контроль в течение 24-72 ч.
Вход зарегистрированных пользователей производится через классическую панель с расширенной верификацией. Сессионные токены передаются на мобильный аппарат или email.
Возможности депозитного раздела через дублирующие порталы включает топовые расчетные системы. Visa, Mastercard, электронные кошельки Skrill, Neteller, crypto Bitcoin, Ethereum обрабатываются с низкими взносами 0-3%.
Гемблинг библиотека клонируется целиком включая spinning games, настольные забавы, live-ведущих и максимальные награды. RTP-индикаторы, вариативность и вейджер сохраняются идентичными.
Акционная схема действует аналогично главному домену. Welcome-предложения, фриспины, refund и VIP-программы стартуют машинально при исполнении фиксированных условий.
Игровая отрасль показывает интенсивный подъём, притягивая миллионы игроков. Грамотные площадки гарантируют стабильную пространство для развлечений. Развёрнутую сведения о таких провайдерах реально изучить на п»ї1хбет .
Аккредитация остаётся главным показателем выбора платформы. Регуляторы Олдерни предоставляют серьёзный аудит расчётных операций. Конкретная официальная портал проходит регулярные аудиты RNG-механизмов.
Цифровые характеристики инновационных гемблинг-сайтов содержат SSL-шифрование денежного категории. Провайдеры цифрового ПО класса Microgaming, NetEnt, Pragmatic Play встраивают усовершенствованные алгоритмы хаотичных значений.
Схема подтверждения аккаунта требует предоставления удостоверений KYC-уровня. Удостоверение, подтверждение о финансах, подтверждение адреса — обычный комплект для завершённого авторизации.
Зеркальные порталы решают сложности с цензурой провайдеров. Свежие дубли модифицируются систематически компьютерными специалистами. Карманные клиенты обычно выполняются качественнее интернет вариантов.
Управление банкроллом формирует долгосрочную прибыльность азартных сессий. Квалифицированные участники предлагают сокращать размер депозита до 1-2% от совокупного резерва.
Гемблинговая область отображает интенсивный рост, заинтересовывая легионы клиентов. Экспертные порталы дают стабильную условия для игры. Развёрнутую факты о подобных брендах можно найти на казино 1хбет .
Аттестация остаётся приоритетным элементом подбора ресурса. Регуляторы Мальты обеспечивают строгий надзор денежных транзакций. Отдельная официальная площадка выполняет плановые контроли RNG-систем.
Технические особенности актуальных азартных площадок объединяют SSL-защиту финансового ранга. Разработчики софтового ПО типа Microgaming, NetEnt, Pragmatic Play встраивают комплексные механизмы рандомных чисел.
Схема аутентификации профиля включает направления свидетельств KYC-стандарта. ID, документ о средствах, удостоверение регистрации — базовый набор для финального входа.
Зеркальные адреса исправляют препятствия с запретами поставщиков. Актуальные альтернативы адаптируются ежедневно цифровыми службами. Планшетные приложения нередко работают надёжнее браузерных модификаций.
Распределение капитала устанавливает стратегическую результативность беттинговых циклов. Профессиональные пользователи советуют ограничивать количество бета до 1-2% от общего фонда.
Подбор достойного игрового заведения в современных реалиях предполагает особого анализа к лицензионному положению. Профессиональные пользователи понимают, что лова РІС…РѕРґ отображает свежую факты о работающих ресурсах.
Процесс открытия счета в официальных платформах охватывает требуемую проверку персональных данных. KYC-стандарты охраняют как оператора, так и участника от афер. Краткосрочные границы на снятие активов до окончания проверки – обычная система.
Электронные барьеры на соединение к развлекательным площадкам нейтрализуются через альтернативные домены. Рабочие копии гарантируют абсолютную работоспособность главного сервиса. Платежные движения, интерактивный результаты и наградные предложения продолжают постоянными.
Финансовая надежность характеризуется уровнем задействованных финансовых способов. SSL-защита, PCI DSS подтверждение и усиленная аутентификация устанавливают защищенный заслон безопасности.
Интерактивная коллекция проверенных площадок содержит барабаны от известных провайдеров. RTP-показатели, колебания и алгоритмические системы подвергаются беспристрастную валидацию в одобренных центрах.
Программы вознаграждения в профессиональных сервисах основываются на понятных правилах вейджера. Требования x35-40 оценивается адекватным для слот-поощрений, в то время как классические активности учитываются в калькуляцию с редуцированным фактором.
The platform has a vast amount of valuable content.
Users may locate comprehensive posts on diverse areas.
The information is organized in a clear format.
It’s a ideal place for people wanting insights.
gladaankan.com
этот сайт https://lolz.live
http://certicanpharmacy.com/# canada pharmacy world
Новейшие сервисы развлекательных активностей гарантируют клиентам вход к высококлассному беттингу через надежные п»ї1xBet зеркало ресурсы. Легальная деятельность влечет выполнения четких контролирующих стандартов.
Процесс регистрации игрового профиля охватывает подтверждение индивидуальных сведений. Администраторы применяют расширенные алгоритмы KYC и AML для недопущения фродовых операций.
Цифровые инструменты новейших гемблинг платформ основываются на стабильных хостингах с SSL технологиями. Геоблокировка обязывает провайдеров разрабатывать вспомогательные домены.
Дублирующие платформы являют собой идентичные репликации базового ресурса с фиксацией всех возможностей и параметров. Участники достигают стабильный доступ к средствам, беттинг данным и личным параметрам.
Банковские транзакции производятся через подключенные расчетные сервисы. Границы на взносы и обналичивания устанавливаются в соответствии с правовыми критериями и организационными процедурами управления рисками.
Экспертные клиенты предлагают мониторить состояние аккредитации через надзорные реестры развлекательных органов. Имиджевые характеристики охватывают оценки на отраслевых порталах и оценки подлинных игроков.
shop Harbor Aisle online – Clear labeling and helpful details make browsing simple.
Передовые провайдеры азартных игр гарантируют пользователям вход к высококлассному азарту через защищенные Меллстрой официальный сайт ресурсы. Легальная операционная активность предполагает выполнения конкретных регуляторных требований.
Механизм открытия индивидуального кабинета предусматривает проверку персональных реквизитов. Операторы используют расширенные механизмы KYC и AML для блокировки фродовых переводов.
Технические средства актуальных казино работают на стабильных хостингах с TLS стандартами. Геоблокировка принуждает операторов организовывать дублирующие домены.
Альтернативные домены образуют идентичные дубликаты базового ресурса с сохранением всех функций и показателей. Игроки добиваются постоянный соединение к средствам, беттинг истории и пользовательским опциям.
Платежные процедуры производятся через интегрированные расчетные процессоры. Рамки на инвестиции и снятия устанавливаются в унисон с лицензионными положениями и внутренними регламентами снижения потерь.
Экспертные гемблеры настаивают анализировать условия разрешения через официальные базы данных беттинг ведомств. Статусные индикаторы предусматривают ранги на тематических порталах и отзывы реальных игроков.
Игровая область показывает стремительный прогресс, заинтересовывая множество игроков. Экспертные порталы предоставляют надёжную пространство для пари. Детальную сведения о указанных брендах возможно отыскать на Tippy казино .
Аккредитация является ключевым критерием отбора площадки. Юрисдикции Великобритании создают жёсткий аудит финансовых транзакций. Любая официальная площадка выполняет периодические инспекции RNG-алгоритмов.
Программные параметры современных азартных площадок включают SSL-безопасность денежного класса. Создатели софтового продукта типа Microgaming, NetEnt, Pragmatic Play внедряют комплексные системы рандомных величин.
Алгоритм проверки аккаунта предполагает передачи документов KYC-формата. Удостоверение, выписка о средствах, подтверждение местожительства — стандартный список для финального авторизации.
Дублирующие адреса убирают сложности с цензурой компаний. Действующие копии модифицируются регулярно программными службами. Карманные приложения зачастую действуют надёжнее браузерных вариантов.
Банкролл-менеджмент определяет стратегическую эффективность развлекательных партий. Опытные игроки рекомендуют сокращать объём вейджера до 1-2% от суммарного резерва.
Актуальные участники оказываются с барьером входа к лицензированным порталам. Операторы запрещают первичные ссылки, но грамотные KiloGram casino клиенты понимают о наличии альтернативных площадок.
Дополнительный домен формирует абсолютную реплику оригинального сайта. SSL-сертификаты поддерживаются такими же. Расчётные действия проходят через сходные механизмы.
Технология оформления профиля через альтернативный адрес содержит привычной проверки. Администраторы запрашивают справки для осуществления KYC-правил. Персональные информация реализуют комплексную аутентификацию.
Финансовые ограничения на параллельных сайтах идентичны основным характеристикам. Начальные суммы функционируют константными. Растущие накопления синхронизируются между всеми ссылками.
Стимулирующие программы действуют всесторонне на альтернативных сайтах. Отыгрышный коэффициент сохраняет базовые параметры. Длительность оборота остаётся прежним.
Сервис сопровождения решает обращения с дополнительных адресов таким же способом. Живой чат гарантирует 24-часовой порядок работы.
shop the Trail Vendor brand – Navigation is smooth and product info is genuinely useful.
top sms activate services http://www.linkedin.com/pulse/top-5-sms-activate-services-ultimate-guide-virtual-phone-mike-davis-gnhre/ .
Поиск надежного игрового ресурса в современных обстоятельствах предполагает повышенного изучения к лицензионному режиму. Компетентные игроки учитывают, что п»ї1хбет регистрация содержит свежую информацию о функционирующих операторах.
Процесс регистрации в официальных заведениях включает принудительную аутентификацию удостоверения. KYC-правила гарантируют как площадку, так и участника от обмана. Промежуточные ограничения на снятие денег до закрытия подтверждения – обычная процедура.
Цифровые ограничения на связь к развлекательным порталам обходятся через альтернативные ссылки. Рабочие дубликаты поддерживают всестороннюю производительность основного ресурса. Денежные переводы, геймплейный продвижение и поощрительные планы продолжают устойчивыми.
Капитальная стабильность характеризуется критерием эксплуатируемых банковских инструментов. SSL-криптография, PCI DSS сертификация и дополнительная проверка устанавливают безопасный периметр обороны.
Развлекательная коллекция сертифицированных сервисов содержит машины от главных студий. RTP-значения, волатильность и математические принципы получают независимую валидацию в одобренных институтах.
Программы вознаграждения в качественных заведениях базируются на понятных критериях активности. Требования x35-40 расценивается адекватным для спин-льгот, в то время как настольные развлечения засчитываются в калькуляцию с уменьшенным показателем.
fitfuelshop picks – Navigation is intuitive and checkout worked perfectly.
Беттинговая область являет динамичный рост, притягивая тысячи геймеров. Экспертные платформы обеспечивают стабильную пространство для беттинга. Исчерпывающую факты о этих брендах допустимо найти на Лаки Бир РІС…РѕРґ .
Аккредитация составляет приоритетным элементом селекции платформы. Регуляторы Гибралтара гарантируют тщательный проверку валютных манипуляций. Всякая сертифицированная портал проходит регулярные инспекции RNG-модулей.
IT параметры инновационных игорных домов включают SSL-кодирование финансового класса. Провайдеры программного материала наподобие Microgaming, NetEnt, Pragmatic Play встраивают многоуровневые системы непредсказуемых параметров.
Схема подтверждения аккаунта предусматривает передачи бумаг KYC-уровня. ID, выписка о прибылях, доказательство адреса — классический комплект для полноценного активации.
Дублирующие домены убирают трудности с цензурой организаций. Свежие копии адаптируются систематически программными отделами. Смартфонные софт регулярно выполняются надёжнее сетевых редакций.
Контроль средств создаёт продолжительную успешность игровых партий. Грамотные беттеры указывают лимитировать величину ставки до 1-2% от общего фонда.
выберите ресурсы https://lolz.live
Dune Vendor marketplace – The interface is clean and the sections are clearly labeled.
другие https://lolz.live/
discover Woodland Vendor – Fast-loading pages and an organized setup make browsing easy.
pharmacy mexico: medicine mexico – My Mexican Pharmacy
Актуальные альтернативные домены надежных азартных клубов на Лаки Бир регистрация гарантируют стабильный доступ к азартным платформам. Система зеркалирования генерирует полноценные версии корневого веб-площадки с консервацией всех функций.
Процедура оформления профиля через альтернативный домен в точности дублирует стандартную бланк. Начинающие участники прописывают функционирующий email, создают защищенный код доступа и определяют базовую курренси.
Подтверждение счета подразумевает отправки документов по KYC-политике. Фото паспорта, верификация места жительства и карточные координаты проверяются через программную анализ в течение 24-72 ч.
Авторизация верифицированных клиентов производится через стандартную интерфейс с усиленной верификацией. Временные пароли передаются на телефонный номер или почтовый ящик.
Опции финансового раздела через альтернативные домены поддерживает топовые финансовые сервисы. Visa, Mastercard, электронные хранилища Skrill, Neteller, crypto Bitcoin, Ethereum осуществляются с низкими процентами 0-3%.
Развлекательная ассортимент воспроизводится абсолютно включая слоты, классические игры, live-ведущих и накопительные призы. RTP-коэффициенты, дисперсия и вейджер удерживаются неизменными.
Подарочная механизм выполняется подобно корневому веб-площадке. Welcome-наборы, бесплатные вращения, возврат средств и VIP-курсы стартуют программно при соблюдении определенных параметров.
Поиск честного игорного оператора подразумевает глубокого разбора регулятивных документов. Актуальные сайты Mellstroy Game обеспечивают клиентам безусловную факты о своих санкциях.
Механизм получения доступа охватывает ряд ключевых этапов подтверждения. Операторы истребуют удостоверения, подтверждающие идентичность и совершеннолетие. Типовой KYC-процесс длится от 24 до 72 интервалов.
Финансовое планирование инициируется с установления лимитов на вклады. Квалифицированные геймеры призывают использовать принцип 5% от общего азартного бюджета на единичную сессию.
Программные блокировки владельцев заставляют эксплуатировать альтернативные домены. Зеркала поддерживают стопроцентную производительность основного площадки, подразумевая хронологию платежей и азартный результаты.
Новые расчетные сервисы обеспечивают скоростные взносы через криптовалютные аккаунты. Bitcoin, Ethereum и стейблкоины дают приватность и наименьшие сборы. Длительность осуществления извлечений равно 10-30 периодов.
Программы приверженности подразумевают иерархические категории с прогрессивным компенсацией. VIP-кураторы предлагают персонализированные вознаграждения, увеличенные границы и приоритетную помощь.
browse Wild Crate items – Fast-loading pages and modern layout make everything easy to navigate.
Определение честного развлекательного оператора требует основательного анализа лицензионных сертификатов. Актуальные порталы казино Gold гарантируют клиентам полную факты о имеющихся санкциях.
Процесс получения доступа предусматривает ряд обязательных шагов аутентификации. Провайдеры требуют бумаги, удостоверяющие самобытность и зрелость. Обычный KYC-алгоритм продолжается от 24 до 72 временных отрезков.
Контроль средств начинается с установления рамок на инвестиции. Компетентные геймеры настаивают задействовать правило 5% от суммарного гемблинг капитала на конкретную сессию.
Электронные ограничения провайдеров побуждают задействовать альтернативные домены. Копии сохраняют полную эффективность центрального ресурса, включая журнал сделок и гемблинг успех.
Новые расчетные методы гарантируют моментальные вклады через блокчейн кошельки. Bitcoin, Ethereum и устойчивые монеты поддерживают приватность и крошечные взносы. Срок реализации изъятий составляет 10-30 периодов.
Алгоритмы приверженности охватывают ступенчатые степени с нарастающим вознаграждением. VIP-консультанты гарантируют персонализированные бонусы, улучшенные границы и ускоренную сервис.
Определение достойного игрового заведения в текущих рамках заставляет повышенного рассмотрения к регулятивному состоянию. Компетентные клиенты учитывают, что Килограмм казино включает последнюю материалы о работающих сервисах.
Схема записи в лицензированных платформах объединяет неизбежную проверку личности. KYC-требования оберегают как сервис, так и участника от обмана. Временные рамки на вывод средств до финализации контроля – обычная практика.
Электронные запреты на соединение к развлекательным порталам устраняются через альтернативные порталы. Функционирующие зеркала предоставляют абсолютную производительность базового сайта. Банковские движения, развлекательный статистика и наградные схемы остаются постоянными.
Материальная надежность измеряется качеством применяемых финансовых механизмов. SSL-шифрование, PCI DSS подтверждение и усиленная проверка гарантируют безопасный щит обороны.
Геймплейная набор сертифицированных операторов предоставляет автоматы от известных провайдеров. RTP-значения, изменчивость и математические формулы подвергаются независимую сертификацию в одобренных учреждениях.
Планы поощрения в серьезных операторах базируются на открытых правилах проигрыша. Проигрыш x35-40 оценивается адекватным для автомат-поощрений, в то время как традиционные активности идут в зачет с уменьшенным коэффициентом.
http://www.studenternas.nu
dog prescriptions online: online vet pharmacy – dog medicine
Подбор надежного игорного портала предполагает детального разбора официальных бумаг. Актуальные ресурсы Меллстрой официальный сайт дают геймерам стопроцентную данные о своих аккредитациях.
Система регистрации подразумевает несколько принудительных этапов верификации. Администраторы просят бумаги, доказывающие личность и дееспособность. Обычный KYC-механизм занимает от 24 до 72 периодов.
Финансовое планирование стартует с определения границ на взносы. Квалифицированные участники рекомендуют использовать принцип 5% от совокупного казино фонда на конкретную сессию.
Программные блокировки операторов заставляют задействовать запасные домены. Дубликаты удерживают полную производительность главного ресурса, включая летопись сделок и казино продвижение.
Новые денежные методы дают моментальные взносы через виртуальные портмоне. Bitcoin, Ethereum и стабильные валюты дают приватность и мизерные отчисления. Срок осуществления снятий насчитывает 10-30 минут.
Схемы верности включают многоуровневые категории с увеличивающимся возвратом. VIP-кураторы гарантируют уникальные поощрения, увеличенные пределы и первоочередную помощь.
Подбор надежного игорного ресурса требует тщательного анализа лицензионных разрешений. Современные платформы Лаки Бир зеркало предоставляют игрокам стопроцентную данные о текущих допусках.
Процедура оформления счета содержит несколько принудительных этапов подтверждения. Операторы запрашивают документы, устанавливающие личность и возраст. Классический KYC-процесс занимает от 24 до 72 временных отрезков.
Управление банком инициируется с назначения границ на вклады. Искусные клиенты советуют эксплуатировать норму 5% от общего гемблинг фонда на одну сессию.
Системные блокировки администраторов вынуждают эксплуатировать запасные ссылки. Копии хранят безусловную эффективность центрального сайта, охватывая архив сделок и развлекательный результаты.
Актуальные финансовые методы дают скоростные инвестиции через виртуальные хранилища. Bitcoin, Ethereum и постоянные токены дают конфиденциальность и мизерные взносы. Период проведения получений составляет 10-30 интервалов.
Схемы верности включают многоуровневые ранги с возрастающим возвратом. VIP-координаторы обеспечивают персонализированные подарки, увеличенные лимиты и опережающую обслуживание.
find great products here – Pages load rapidly and the layout is refreshingly clear.
Genuine emotions GirthmasterrOfficiall bold visual presentation, and personal communication. Exclusive content revealed only to its audience.
Candid style DianaRider vibrant passion, and a unique atmosphere. Private publications and unique materials that you’ll find exclusively in this space.
Pure emotion ReislinOfficiall bold presentation, and a private format without boundaries. Exclusive content, personally created and available only here—for those who appreciate true energy.
http://www.qrv-fm.se
Актуальные резервные адреса проверенных игорных заведений на винити казино гарантируют стабильный подключение к гемблинг сервисам. Принцип клонирования образует аналогичные версии корневого веб-площадки с поддержанием всех опций.
Механизм активации через дублирующий портал абсолютно имитирует оригинальную анкету. Дебютные участники заполняют рабочий email, создают сложный ключ и выбирают рабочую валюту.
Подтверждение личного кабинета содержит предоставления документов следуя KYC-политике. Копия водительских прав, доказательство места жительства и платежные сведения проверяются через автоматическую контроль в течение 24-72 часа.
Аутентификация существующих игроков осуществляется через типовую форму с расширенной валидацией. Одноразовые шифры передаются на смс девайс или email.
Возможности финансового модуля через альтернативные домены включает актуальные платежные инструменты. Visa, Mastercard, цифровые портмоне Skrill, Neteller, криптовалюты Bitcoin, Ethereum обрабатываются с минимальными взносами 0-3%.
Gaming библиотека клонируется в точности включая spinning games, столовые игры, live-ведущих и максимальные награды. RTP-значения, вариативность и вейджер остаются неизменными.
Подарочная политика работает подобно основному порталу. Welcome-предложения, free spins, денежный возврат и VIP-планы активируются автоматически при выполнении прописанных критериев.
citikliniken.com
Glassify – The site runs fast on mobile and completing a transaction is very easy.
Рабочие резервные адреса надежных гемблинг-платформ на lucky bear казино дают непрерывный подключение к азартным сервисам. Методика клонирования формирует эквивалентные копии базового веб-площадки с сохранением всех функций.
Механизм создания аккаунта через зеркало целиком воспроизводит основную анкету. Новые геймеры прописывают рабочий email, формируют стойкий код доступа и устанавливают базовую курренси.
Валидация личного кабинета содержит передачи документов следуя KYC-нормам. Скан удостоверения личности, свидетельство адреса и финансовые реквизиты контролируются системой алгоритмическую проверку в течение 24-72 периодов.
Вход активных клиентов осуществляется через базовую панель с усиленной проверкой. Разовые пароли отправляются на мобильный девайс или электронную почту.
Опции пополнительного модуля через mirror-сайты обеспечивает распространенные денежные инструменты. Visa, Mastercard, цифровые хранилища Skrill, Neteller, цифровые активы Bitcoin, Ethereum обрабатываются с сокращенными комиссиями 0-3%.
Развлекательная библиотека воспроизводится на сто процентов включая барабаны, традиционные забавы, live-ведущих и накопительные призы. RTP-значения, волатильность и отыгрыш удерживаются неизменными.
Поощрительная программа функционирует аналогично основному домену. Welcome-наборы, безвозмездные спины, refund и VIP-планы включаются алгоритмически при соблюдении прописанных критериев.
Проверенные провайдеры игорных опций oferuja пользователям шанс к премиальному игровому процессу через специализированные сайты, включая п»ї1хбет сайт , что придерживаются мировые стандарты безопасности.
Схема оформления профиля necessita внесения валидационных информации через encrypted SSL-соединения. Букмекеры просят письменное verification совершеннолетия и адреса нахождения для поддержания законодательных норм.
Multi-factor authentication является принудительным составляющей новейших solutions безопасности. Пользователи располагают SMS-шифры, push-notification или применяют специализированные tools вроде Google Authenticator.
Альтернативные адреса ликвидируют препятствия локальных ограничений и DDoS-штурмов. С технической точки зрения дубли формируют тождественные клоны основного портала с удержанием возможностей и индивидуальных деталей.
Экспертные геймеры рекомендуют хранить обновлённые реестры рабочих альтернатив в bookmark браузера. Администрация направляют информацию о свежих URL через почтовые сервисы, Telegram-чаты и портативные приложения.
Платёжные movements через legal площадки защищены шифровальными methods level банковского segment. Получение фондов осуществляется только на validated wallets владельца аккаунта.
Актуальные провайдеры игорных активностей гарантируют участникам путь к премиальному беттингу через защищенные Меллстрой РІС…РѕРґ системы. Авторизованная деятельность подразумевает учета определенных контролирующих положений.
Система оформления игрового счета содержит валидацию персональных реквизитов. Администраторы применяют многоуровневые протоколы KYC и AML для исключения незаконных транзакций.
Программные инструменты актуальных развлекательных порталов базируются на зашифрованных серверах с шифровальными технологиями. Территориальные ограничения заставляет администраторов запускать резервные домены.
Зеркальные платформы представляют полные репликации центрального ресурса с удержанием всех функций и параметров. Беттеры приобретают стабильный вход к капиталу, азартной записям и пользовательским настройкам.
Банковские процедуры осуществляются через подключенные банковские агрегаторы. Границы на депозиты и снятия устанавливаются в соответствии с нормативными требованиями и индивидуальными нормами снижения потерь.
Компетентные клиенты рекомендуют анализировать статус авторизации через государственные каталоги беттинг комиссий. Статусные характеристики предусматривают ранги на специализированных сайтах и feedback реальных игроков.
visit Dew Vendor – Everything loads fast and the interface feels very user-friendly.
Natalia Kerbabian Stories – The content is engaging and the information shared is very insightful.
продать квартиру в сарове Хотите найти идеальное жилье? Однокомнатные и двухкомнатные квартиры в Сарове ждут своих владельцев. Мы предлагаем широкий выбор недвижимости в Сарове, который удовлетворит любые потребности и бюджет. Желаете продать квартиру в Сарове? Наша команда поможет вам выйти на рынок с максимальной выгодой. Ознакомьтесь с актуальными ценами на квартиры в Сарове и убедитесь, что мечта о собственном доме или выгодной инвестиции становится реальностью. Мы поможем вам на каждом этапе, от поиска до оформления сделки.
cutandsewcove boutique – Enjoyed browsing, everything is clearly labeled and simple to understand.
personal revelations EvaElfieOfficially powerful energy and private publications. Unique content, available exclusively here—directly from me.
Blanket Bay Picks – Cozy designs and the interface loads fast and easily.
Отбор надежного азартного оператора требует основательного рассмотрения лицензионных разрешений. Актуальные порталы Vavada дают пользователям стопроцентную факты о своих лицензиях.
Алгоритм получения доступа содержит несколько принудительных ступеней верификации. Провайдеры запрашивают документы, доказывающие персону и зрелость. Традиционный KYC-порядок занимает от 24 до 72 периодов.
Управление банком открывается с назначения пределов на вклады. Опытные геймеры призывают задействовать установку 5% от суммарного развлекательного средств на одну раунд.
Электронные блокировки владельцев обязывают применять альтернативные пути. Клоны сохраняют максимальную функциональность центрального сайта, предусматривая журнал сделок и казино результаты.
Инновационные финансовые сервисы гарантируют моментальные вклады через электронные хранилища. Bitcoin, Ethereum и стабильные валюты предоставляют тайность и символические платежи. Продолжительность осуществления снятий равно 10-30 отрезков.
Схемы приверженности охватывают ступенчатые степени с возрастающим возвратом. VIP-консультанты предоставляют личные поощрения, расширенные ограничения и ускоренную сервис.
Подбор безопасного казино портала предполагает серьезного разбора правовых документов. Новые сайты п»ї1хбет РІС…РѕРґ дают пользователям полную факты о своих допусках.
Механизм создания профиля содержит различные ключевых шагов валидации. Операторы требуют бумаги, подтверждающие самобытность и зрелость. Обычный KYC-регламент составляет от 24 до 72 временных отрезков.
Финансовое планирование стартует с установления пределов на пополнения. Квалифицированные клиенты призывают использовать правило 5% от итогового азартного капитала на одну сессию.
Электронные ограничения администраторов обязывают применять дополнительные маршруты. Дубликаты удерживают стопроцентную работоспособность основного портала, предусматривая журнал платежей и развлекательный прогресс.
Новые расчетные методы поддерживают мгновенные взносы через цифровые кошельки. Bitcoin, Ethereum и постоянные токены дают анонимность и мизерные сборы. Длительность проведения снятий равно 10-30 отрезков.
Схемы преданности содержат многоуровневые уровни с нарастающим возвратом. VIP-консультанты предоставляют личные подарки, улучшенные границы и опережающую техподдержку.
When someone writes an article he/she maintains the image of
a user in his/her mind that how a user can be aware of it.
Thus that’s why this piece of writing is amazing. Thanks!
Навигация в мире легальных ресурсов требует осознания современных методов входа. Продвинутые игроки внедряют казино Гризли для добывания новейшей материалов о функционирующих путях.
Схема оформления аккаунта в сертифицированных учреждениях включает комплексную валидацию. Актуальные поставщики эксплуатируют KYC-механизмы и AML-критерии. Документооборот составляет от 24 до 72 промежутков.
IT методы для обхода ограничений улучшаются сообща с ужесточением юридических шагов. VPN-сервисы класса premium предоставляют шифрование AES-256 и методы OpenVPN. Устойчивость связи жизненно актуальна для VIP раундов.
Дублирующие платформы действуют через локально распределенные IT инфраструктуры. CDN-архитектуры обеспечивают быструю пинг для европейских геймеров. Автоматическое маршрутизация включается при распознавании ограничения центрального портала.
Платежные манипуляции в проверенных регионах подчиняются строгим требованиям PCI DSS. Децентрализованные расчеты увеличивают распространение в результате приватности и динамике выполнения.
Портативные программы ведущих компаний интегрируют голосовую подтверждение и push-алерты для принципиальных происшествий. Гибкий облик независимо настраивается под параметры экрана.
Активные альтернативные домены легальных gaming-операторов на Болливуд казино дают постоянный вход к игровым сервисам. Система реплицирования строит полноценные реплики главного домена с сохранением всех опций.
Алгоритм активации через резервную ссылку абсолютно имитирует оригинальную бланк. Дебютные игроки вводят валидный email, создают сложный ключ и выбирают операционную курренси.
Подтверждение профиля подразумевает отправки свидетельств по KYC-нормам. Копия национального документа, верификация регистрации и финансовые координаты подвергаются машинную валидацию в течение 24-72 часов.
Логин действующих геймеров производится через базовую форму с усиленной верификацией. Одноразовые коды поступают на сотовый номер или email.
Механизмы входящего блока через зеркала предлагает востребованные банковские платформы. Visa, Mastercard, электронные балансы Skrill, Neteller, цифровые активы Bitcoin, Ethereum осуществляются с уменьшенными взносами 0-3%.
Азартная библиотека клонируется полностью включая машины, классические геймплей, live-ведущих и накопительные призы. RTP-значения, дисперсия и отыгрыш сохраняются такими же.
Акционная программа действует подобно основному домену. Welcome-бандлы, бесплатные вращения, компенсация и VIP-схемы стартуют алгоритмически при реализации определенных требований.
Лицензионные площадки гэмблинг услуг предоставляют клиентам возможность к профессиональному времяпрепровождению через тематические ресурсы, включая Lucky Bear casino , которые специально следуют transnational нормы конфиденциальности.
Схема открытия счёта подразумевает внесения валидационных информации через шифрованные SSL-connection. Менеджмент просят нотариальное verification совершеннолетия и места нахождения для выполнения нормативных правил.
Двухэтапная верификация является необходимым составляющей передовых архитектур конфиденциальности. Игроки обретают SMS-шифры, push-notification или используют специализированные утилиты по типу Google Authenticator.
Резервные адреса решают трудности локальных барьеров и DDoS-штурмов. Техническим образом копии формируют идентичные версии главного платформы с удержанием функциональности и индивидуальных информации.
Опытные участники советуют сохранять свежие реестры функционирующих mirrors в bookmark веб-клиента. Management рассылают updates о актуальных ссылках через мейл, Telegram-чаты и mobile программы.
Payment операции через официальные платформы покрыты шифровальными протоколами level банковского индустрии. Изъятие капитала происходит solely на аутентифицированные реквизиты собственника учётной записи.
Следующая страница https://lzt.market
Новейшие геймеры попадают с препятствием соединения к проверенным порталам. Поставщики блокируют главные URL, но опытные п»ї1xBet зеркало игроки осознают о существовании зеркальных площадок.
Альтернативный адрес представляет стопроцентную воспроизведение базового ресурса. Средства защиты работают идентичными. Финансовые переводы осуществляются через идентичные шлюзы.
Схема заведения учётной записи через дополнительный ссылку включает привычной подтверждения. Специалисты просят бумаги для соблюдения KYC-требований. Паспортные параметры подвергаются многоуровневую валидацию.
Финансовые лимиты на дополнительных сайтах идентичны первичным характеристикам. Наименьшие беты поддерживаются фиксированными. Прогрессивные призовые фонды координируются между различными порталами.
Премиальные механизмы выполняются завершённо на зеркальных порталах. Вейджер удерживает базовые цифры. Временные рамки оборота сохраняется.
Команда поддержки решает запросы с параллельных ссылок аналогично. Живой переписка осуществляет круглосуточный формат деятельности.
Compared to basic screenshot shortcuts, dedicated screen capture tools provide finer control over formats, destinations, and annotations, which is invaluable for creating clear tutorials or documentation.
Explore the options:
best system utilities compatible with macOS Sonoma 14
Explore the specifics:
The Swift Playgrounds environment provides an interactive coding interface for learning programming concepts and prototyping Swift code snippets.
https://mymexicanpharmacy.shop/# best pharmacy in mexico
https://buyerseller.xyz/user/betandyou243/
Поиск надежного игорного оператора нуждается тщательного анализа регулятивных бумаг. Современные порталы Mellstroy Game казино предлагают клиентам стопроцентную детали о действующих санкциях.
Механизм регистрации подразумевает несколько обязательных ступеней валидации. Администраторы требуют свидетельства, засвидетельствующие личность и совершеннолетие. Обычный KYC-алгоритм длится от 24 до 72 часов.
Банкролл-менеджмент открывается с назначения лимитов на инвестиции. Компетентные пользователи советуют задействовать правило 5% от общего развлекательного бюджета на единичную сессию.
Электронные запреты владельцев заставляют использовать вспомогательные адреса. Клоны поддерживают безусловную эффективность основного площадки, охватывая историю платежей и развлекательный успех.
Актуальные расчетные методы обеспечивают оперативные взносы через электронные портмоне. Bitcoin, Ethereum и фиксированные активы гарантируют приватность и символические комиссии. Срок реализации выводов достигает 10-30 интервалов.
Программы преданности охватывают ступенчатые ранги с прогрессивным возвратом. VIP-консультанты гарантируют персонализированные бонусы, усиленные рамки и опережающую техподдержку.
Поиск честного развлекательного оператора подразумевает детального анализа регулятивных разрешений. Инновационные платформы Болливуд сайт обеспечивают клиентам абсолютную факты о текущих санкциях.
Процесс создания профиля включает ряд обязательных ступеней проверки. Владельцы просят свидетельства, засвидетельствующие персону и дееспособность. Типовой KYC-механизм требует от 24 до 72 периодов.
Контроль средств начинается с фиксации пределов на вклады. Искусные участники советуют применять принцип 5% от суммарного азартного бюджета на одну сессию.
Технические запреты поставщиков побуждают применять вспомогательные пути. Альтернативы хранят абсолютную активность главного платформы, предусматривая летопись переводов и азартный результаты.
Актуальные денежные способы обеспечивают мгновенные взносы через цифровые кошельки. Bitcoin, Ethereum и стабильные валюты дают приватность и наименьшие комиссии. Срок обработки извлечений составляет 10-30 периодов.
Алгоритмы преданности включают многоуровневые степени с прогрессивным возвратом. VIP-кураторы дают персонализированные бонусы, повышенные рамки и преимущественную поддержку.
Подбор надежного betting оператора в нынешних границах заставляет повышенного анализа к лицензионному режиму. Профессиональные участники знают, что Вавада регистрация включает актуальную информацию о действующих операторах.
Алгоритм оформления профиля в проверенных площадках включает неизбежную верификацию документов. KYC-требования обеспечивают как сервис, так и игрока от мошенничества. Переходные границы на вывод средств до завершения валидации – нормальная подход.
Программные барьеры на соединение к гемблинг сайтам нейтрализуются через резервные URL. Рабочие отражения предоставляют абсолютную возможности первичного портала. Финансовые переводы, игровой продвижение и бонусные схемы продолжают неизменными.
Материальная стабильность оценивается показателем эксплуатируемых расчетных механизмов. SSL-защита, PCI DSS подтверждение и расширенная верификация формируют безопасный барьер защиты.
Интерактивная набор сертифицированных сервисов охватывает слоты от ведущих создателей. RTP-параметры, колебания и вероятностные формулы испытывают беспристрастную аудит в аккредитованных институтах.
Схемы стимулирования в профессиональных сервисах опираются на четких правилах активности. Проигрыш x35-40 признается разумным для барабан-поощрений, в то время как настольные забавы учитываются в калькуляцию с редуцированным множителем.
https://liveruscams.ru/
Рабочие mirror-ссылки легальных gaming-операторов на СЌРЅРѕРјРѕ казино дают непрерывный соединение к геймерским системам. Система клонирования строит эквивалентные версии главного сайта с консервацией всех возможностей.
Алгоритм регистрации через зеркало абсолютно имитирует главную анкету. Новые участники прописывают функционирующий email, создают стойкий ключ и устанавливают операционную платежное средство.
Подтверждение профиля содержит передачи документов следуя KYC-стандартам. Снимок удостоверения личности, доказательство резиденции и денежные параметры проходят автоматическую валидацию в течение 24-72 временных единиц.
Логин существующих участников осуществляется через типовую модуль с многоступенчатой верификацией. Временные коды доставляются на мобильный аппарат или электронную почту.
Инструменты пополнительного блока через резервные ссылки поддерживает распространенные платежные инструменты. Visa, Mastercard, электронные хранилища Skrill, Neteller, блокчейн-токены Bitcoin, Ethereum обрабатываются с оптимизированными взносами 0-3%.
Гемблинг библиотека воспроизводится абсолютно включая слоты, карточные игры, live-ведущих и максимальные награды. RTP-параметры, дисперсия и вейджер удерживаются точными.
Подарочная схема функционирует похоже центральному домену. Welcome-наборы, безвозмездные спины, денежный возврат и VIP-схемы запускаются программно при реализации заданных параметров.
Marble Aisle shopping hub – Navigation is smooth and the layout is modern and tidy.
https://angelok.ru/forum/messages/forum36/topic2994/message205824/?result=new#message205824
shop Zena Aisle – Fast loading and everything adapts perfectly to mobile devices.
https://enrichment.cehd.gmu.edu/wp-comments-post.php?wpe-comment-post=enrichcehdgmu
sms activate sms activate .
this online vendor – Clean layout and simple menus make finding products a breeze.
Lake Vendor resources – Everything is laid out cleanly and details are easy to absorb.
PP4FDR Advocacy Page – Clear explanations and heartfelt purpose make the goals very easy to follow.
bold format Big Titty Goth Egg sincere emotions and expressive images. Private materials and special publications that you’ll only see here.
Новейшие участники попадают с барьером соединения к лицензированным ресурсам. Провайдеры запрещают главные порталы, но знающие Меллстрой регистрация игроки помнят о наличии резервных ресурсов.
Альтернативный адрес образует абсолютную дубликат главного портала. Протоколы шифрования поддерживаются аналогичными. Платёжные операции проходят через равнозначные каналы.
Процедура создания аккаунта через параллельный портал подразумевает стандартной валидации. Менеджеры уточняют удостоверения для осуществления KYC-норм. Паспортные параметры реализуют двухфакторную верификацию.
Депозитные лимиты на резервных порталах равняются главным характеристикам. Минимальные ставки остаются неизменными. Накопительные призовые фонды согласовываются между всеми доменами.
Поощрительные схемы работают всесторонне на альтернативных сайтах. Коэффициент оборота поддерживает первоначальные значения. Длительность реализации сохраняется.
Команда обслуживания анализирует тикеты с дополнительных порталов таким же способом. Мгновенный общение обеспечивает непрерывный режим функционирования.
passionate atmosphere AmadaniOfficiall openness and a personal format of communication. Exclusive content, created without intermediaries—only for those who want more.
honest revelations AlinaRai vivid emotions and a sensual atmosphere. Unique private content, available only on this page—directly from me.
Развлекательная ниша отображает стремительный развитие, притягивая миллионы пользователей. Грамотные сайты предоставляют безопасную среду для ставок. Развёрнутую факты о подобных брендах можно изучить на Лаки Бир .
Аккредитация составляет ключевым показателем селекции платформы. Регуляторы Великобритании предоставляют тщательный аудит расчётных манипуляций. Отдельная лицензированная ресурс подвергается регулярные ревизии RNG-систем.
Цифровые характеристики инновационных игорных домов предусматривают SSL-безопасность денежного ранга. Поставщики цифрового материала уровня Microgaming, NetEnt, Pragmatic Play внедряют комплексные механизмы хаотичных параметров.
Процедура подтверждения аккаунта требует представления удостоверений KYC-стандарта. ID, подтверждение о прибылях, валидация проживания — базовый комплект для полноценного доступа.
Альтернативные домены убирают проблемы с запретами операторов. Актуальные альтернативы изменяются регулярно программными группами. Карманные программы зачастую оперируют стабильнее веб модификаций.
Банкролл-менеджмент формирует стратегическую прибыльность игровых периодов. Профессиональные пользователи указывают лимитировать сумму депозита до 1-2% от итогового бюджета.
exclusive revelations MonalitaOfficial genuine passion and bold aesthetics. Private content you’ll find only here—directly from the author, without filters or unnecessary boundaries.
посмотреть в этом разделе https://lolz.live/
fitfuelshop essentials – Clean layout and placing an order felt effortless.
Исследование в мире официальных площадок требует понимания новых решений доступа. Продвинутые игроки используют лаки Р±РёСЂ для извлечения свежей материалов о оперативных URL.
Алгоритм регистрации учетной записи в сертифицированных заведениях содержит комплексную аутентификацию. Передовые поставщики используют KYC-протоколы и AML-нормы. Документальная процедура занимает от 24 до 72 промежутков.
Технические решения для обхода запретов развиваются синхронно с усилением нормативных инициатив. VPN-платформы класса premium предлагают защиту AES-256 и системы OpenVPN. Стабильность коннекта принципиально значима для премиальных сессий.
Зеркальные сайты работают через географически расположенные IT ресурсы. CDN-комплексы обеспечивают быструю пинг для азиатских клиентов. Системное перенаправление активируется при детекции недоступности центрального ресурса.
Финансовые переводы в легальных территориях подчиняются строгим критериям PCI DSS. Блокчейн транзакции получают признание по причине анонимности и быстроте выполнения.
Планшетные приложения премиальных организаций объединяют физиологическую авторизацию и push-сообщения для существенных эпизодов. Настраиваемый оформление независимо подстраивается под настройки панели.
buy ed meds
Актуальные бетторы попадают с препятствием подключения к сертифицированным порталам. Компании запрещают основные порталы, но опытные миллион казино игроки помнят о существовании резервных платформ.
Дополнительный домен представляет точную дубликат первичного платформы. Системы безопасности сохраняются неизменными. Банковские переводы выполняются через идентичные каналы.
Методика оформления профиля через альтернативный домен подразумевает обычной аутентификации. Операторы запрашивают свидетельства для соблюдения KYC-требований. Персональные данные осуществляют двухфакторную подтверждение.
Вносительные границы на параллельных сайтах идентичны главным спецификациям. Минимальные беты остаются постоянными. Растущие банки интегрируются между всеми порталами.
Стимулирующие механизмы оперируют комплексно на зеркальных порталах. Вейджер сохраняет оригинальные величины. Тайминг проигрывания поддерживается.
Сервис сопровождения анализирует запросы с дополнительных ссылок идентично. Интерактивный переписка обеспечивает 24-часовой режим функционирования.
Новейшие порталы игорных продуктов предоставляют пользователям подключение к элитному беттингу через безопасные п»ї1xBet casino платформы. Сертифицированная операционная активность влечет соблюдения определенных регуляторных стандартов.
Механизм создания индивидуального аккаунта предусматривает аутентификацию личных показателей. Операторы внедряют многоуровневые системы KYC и AML для недопущения поддельных транзакций.
IT системы актуальных беттинг площадок базируются на зашифрованных хостингах с криптографическими протоколами. IP-фильтрация побуждает провайдеров запускать резервные URL.
Альтернативные домены представляют эквивалентные копии главного ресурса с поддержанием всех возможностей и данных. Участники добиваются непрерывный подключение к счету, гемблинг отчетности и пользовательским конфигурациям.
Банковские транзакции реализуются через подключенные банковские процессоры. Рамки на инвестиции и получения устанавливаются в гармонии с лицензионными критериями и собственными процедурами управления рисками.
Экспертные клиенты настаивают отслеживать состояние аккредитации через официальные списки развлекательных ведомств. Репутационные критерии включают места на экспертных сайтах и мнения подлинных беттеров.
Игровая ниша являет динамичный расширение, привлекая миллионы участников. Грамотные сайты дают качественную атмосферу для развлечений. Развёрнутую сведения о таких операторах возможно изучить на казино Vavada .
Лицензирование составляет ключевым элементом определения площадки. Надзорные органы Великобритании дают качественный проверку денежных манипуляций. Всякая легальная площадка осуществляет постоянные проверки RNG-модулей.
Цифровые свойства актуальных гемблинг-сайтов содержат SSL-шифрование денежного уровня. Создатели программного ПО уровня Microgaming, NetEnt, Pragmatic Play встраивают продвинутые механизмы произвольных параметров.
Процедура аутентификации счёта подразумевает направления свидетельств KYC-формата. Свидетельство, подтверждение о средствах, доказательство адреса — обычный пакет для итогового доступа.
Параллельные порталы решают сложности с блокировками компаний. Функционирующие зеркала обновляются каждый день компьютерными командами. Мобильные клиенты обычно оперируют устойчивее браузерных версий.
Распределение капитала создаёт длительную эффективность игровых сессий. Экспертные игроки рекомендуют лимитировать размер ставки до 1-2% от общего банкролла.
узнать больше https://lzt.market/
explore Silver Vendor – Checkout is simple and navigation during payment is effortless.
this online vendor – Found several appealing items that seem like good picks.
Передовые геймеры попадают с проблемой входа к сертифицированным сайтам. Провайдеры ограничивают базовые URL, но профессиональные п»ї1xBet зеркало посетители знают о существовании параллельных ресурсов.
Резервная ссылка образует идентичную копию первичного ресурса. Протоколы шифрования функционируют аналогичными. Финансовые транзакции реализуются через те же системы.
Алгоритм оформления профиля через резервный адрес подразумевает привычной верификации. Сотрудники просят справки для исполнения KYC-стандартов. Идентификационные сведения осуществляют расширенную верификацию.
Вносительные ограничения на параллельных ресурсах идентичны главным характеристикам. Начальные вклады остаются фиксированными. Увеличивающиеся банки интегрируются между разными адресами.
Поощрительные планы оперируют комплексно на параллельных площадках. Коэффициент оборота гарантирует стартовые цифры. Срок активности реализации продолжается.
Департамент помощи обрабатывает запросы с альтернативных доменов идентично. Онлайн чат обеспечивает непрерывный порядок деятельности.
Современные пользователи встречаются с массой программных особенностей при процессах с сертифицированными площадками. Специализированные платформы типа казино 1хбет поставляют новую контент о функционировании казино брендов.
Механизм подтверждения кабинета подразумевает набор принудительных стадий. Базовая валидация включает передачи справок верифицирующих индивидуальность. Привычный перечень включает ID, автолицензию или международный паспорт.
Техническая составляющая регистрации подразумевает эксплуатацию SSL-шифрования и двухфакторной аутентификации. Квалифицированные игроки подсказывают инициировать максимум представленных опций охраны.
Запасные домены формируют стопроцентные копии центрального сайта с поддержанием тотального арсенала. Ключевое бонус состоит в идентичности денежных пределов и норм проигрыша.
Схема нахождения актуальных дублирующих порталов основывается на проверке профильных новостных лент и партнерских сайтов. Продвинутые геймеры внедряют виртуальные частные сети для формирования постоянного входа без оглядки от региональных лимитов.
Актуальные бетторы встречаются с проблемой связи к сертифицированным порталам. Провайдеры закрывают главные порталы, но знающие Вован сайт участники учитывают о наличии альтернативных сайтов.
Резервная ссылка представляет полную отображение главного сайта. Системы безопасности поддерживаются идентичными. Денежные операции реализуются через равнозначные механизмы.
Схема заведения учётной записи через параллельный домен подразумевает обычной валидации. Менеджеры требуют свидетельства для выполнения KYC-регламентов. Индивидуальные сведения проходят двухфакторную валидацию.
Пополнительные пределы на альтернативных площадках равняются стандартным спецификациям. Стартовые беты остаются постоянными. Возрастающие накопления объединяются между множественными ресурсами.
Бонусные планы работают целостно на альтернативных платформах. Отыгрышный коэффициент обеспечивает исходные цифры. Временные рамки оборота не изменяется.
Служба поддержки анализирует запросы с резервных ссылок идентично. Интерактивный переписка осуществляет постоянный график функционирования.
Ориентирование в мире сертифицированных площадок требует понимания новых решений авторизации. Квалифицированные клиенты внедряют аква для добывания новейшей фактов о функционирующих путях.
Механизм регистрации аккаунта в лицензированных заведениях предполагает сложную валидацию. Продвинутые компании применяют KYC-алгоритмы и AML-стандарты. Документальная процедура составляет от 24 до 72 интервалов.
Программные технологии для прохождения барьеров совершенствуются сообща с усилением юридических мер. VPN-службы категории premium обеспечивают защиту AES-256 и методы OpenVPN. Постоянство соединения fundamentally актуальна для VIP раундов.
Дублирующие платформы работают через географически разнесенные IT кластеры. CDN-структуры предоставляют оптимальную латентность для азиатских геймеров. Системное роутинг запускается при выявлении препятствия базового домена.
Денежные операции в лицензированных юрисдикциях соответствуют жестким правилам PCI DSS. Блокчейн операции увеличивают популярность благодаря скрытности и быстроте обработки.
Планшетные приложения элитных компаний совмещают физиологическую авторизацию и push-сообщения для важных эпизодов. Изменяемый внешний вид программно настраивается под особенности дисплея.
https://www.centralentuvida.cl/informate-educacion-financiera/2024/banco-central-publica-el-pib-del-2023-y–central-en-tu-vida–facilita-su-comprensi%C3%B3n-a-trav%C3%A9s-de-una-infografia?Mainpage=24
http://certicanpharmacy.com/# vipps canadian pharmacy
bs2we at
https://www.zazzle.com/mbr/238237960645956664
Актуальные платформы игорных игр дают игрокам доступ к высококлассному азарту через надежные Lucky Bear ресурсы. Авторизованная работа подразумевает исполнения определенных правовых стандартов.
Механизм оформления персонального профиля включает верификацию конфиденциальных реквизитов. Администраторы эксплуатируют детализированные механизмы KYC и AML для блокировки поддельных переводов.
Технические средства инновационных беттинг площадок основываются на надежных серверах с криптографическими сертификатами. Геоблокировка вынуждает администраторов разрабатывать альтернативные URL.
Альтернативные платформы представляют точные клоны центрального платформы с фиксацией всех сервисов и показателей. Игроки добиваются беспрепятственный доступ к депозиту, игровой статистике и индивидуальным настройкам.
Банковские переводы производятся через встроенные финансовые системы. Рамки на депозиты и изъятия определяются в соответствии с нормативными критериями и внутренними регламентами контроля угроз.
Экспертные игроки предлагают контролировать статус лицензии через регуляторные реестры беттинг органов. Репутационные индикаторы охватывают позиции на специализированных порталах и мнения реальных беттеров.
Поиск легального игорного площадки предполагает глубокого изучения правовых бумаг. Передовые системы казино 1xBet предлагают клиентам абсолютную сведения о действующих разрешениях.
Процесс получения доступа содержит ряд ключевых фаз верификации. Администраторы запрашивают бумаги, устанавливающие индивидуальность и возраст. Обычный KYC-алгоритм составляет от 24 до 72 временных отрезков.
Распоряжение капиталом инициируется с определения рамок на инвестиции. Искусные участники настаивают эксплуатировать правило 5% от суммарного развлекательного капитала на конкретную раунд.
Программные ограничения поставщиков заставляют эксплуатировать вспомогательные домены. Клоны оберегают абсолютную активность основного портала, охватывая хронологию операций и гемблинг достижения.
Новые денежные способы предоставляют оперативные взносы через блокчейн счета. Bitcoin, Ethereum и стабильные валюты гарантируют анонимность и крошечные комиссии. Время проведения снятий насчитывает 10-30 интервалов.
Планы постоянства предусматривают ступенчатые уровни с нарастающим бонусом. VIP-менеджеры гарантируют эксклюзивные поощрения, повышенные лимиты и приоритетную обслуживание.
visit Garnet Aisle store – Pages load quickly and shopping is straightforward.
Philly Beer Fest Info Hub – Fun energy and well-presented updates make this event exciting.
Отбор легального казино оператора заставляет глубокого рассмотрения регулятивных бумаг. Новые ресурсы казино Килограмм предлагают клиентам абсолютную сведения о своих разрешениях.
Система регистрации предусматривает несколько принудительных стадий проверки. Представители запрашивают документы, подтверждающие личность и дееспособность. Классический KYC-механизм длится от 24 до 72 временных отрезков.
Распоряжение капиталом открывается с задания ограничений на взносы. Профессиональные участники предлагают задействовать закон 5% от общего игорного капитала на конкретную заход.
Технические препятствия операторов заставляют применять запасные ссылки. Клоны оберегают стопроцентную производительность базового портала, предусматривая хронологию переводов и азартный результаты.
Передовые денежные системы гарантируют скоростные инвестиции через электронные кошельки. Bitcoin, Ethereum и фиксированные активы дают конфиденциальность и минимальные сборы. Время обработки снятий составляет 10-30 интервалов.
Программы постоянства подразумевают каскадные ранги с нарастающим бонусом. VIP-консультанты обеспечивают индивидуальные вознаграждения, увеличенные рамки и преимущественную обслуживание.
Актуальные резервные адреса лицензированных gaming-операторов на Lucky Bear casino предоставляют стабильный соединение к развлекательным платформам. Схема дублирования генерирует аналогичные клоны корневого веб-площадки с удержанием всех возможностей.
Система создания аккаунта через дублирующий портал полностью воспроизводит основную бланк. Дебютные пользователи регистрируют действующий email, устанавливают сложный пароль и определяют рабочую платежное средство.
Идентификация учетной записи требует отправки справок следуя KYC-политике. Скан национального документа, валидация адреса и денежные координаты подвергаются цифровую проверку в течение 24-72 временных единиц.
Аутентификация зарегистрированных пользователей производится через базовую интерфейс с расширенной верификацией. Сессионные токены приходят на телефонный аппарат или мейл.
Функционал депозитного компонента через резервные ссылки обеспечивает востребованные расчетные механизмы. Visa, Mastercard, цифровые портмоне Skrill, Neteller, криптовалюты Bitcoin, Ethereum осуществляются с уменьшенными платежами 0-3%.
Игровая каталог копируется полностью включая слоты, настольные развлечения, live-операторов и прогрессивы. RTP-показатели, дисперсия и отыгрыш сохраняются неизменными.
Акционная схема действует схоже центральному домену. Welcome-предложения, безвозмездные спины, возврат средств и VIP-схемы активируются машинально при реализации фиксированных стандартов.
Birch Bounty Favorites – Easy to explore and the items look carefully selected.
Актуальные зеркала легальных игорных заведений на казино Лаки Бир предоставляют беспрерывный соединение к игровым порталам. Система дублирования образует эквивалентные реплики центрального сайта с удержанием всех механизмов.
Система регистрации через альтернативный домен целиком воспроизводит стандартную заявку. Начинающие пользователи вводят функционирующий email, создают защищенный шифр и устанавливают операционную курренси.
Валидация счета содержит передачи бумаг следуя KYC-политике. Скан национального документа, верификация проживания и платежные параметры анализируются посредством машинную валидацию в течение 24-72 часа.
Авторизация зарегистрированных игроков выполняется через обычную окно с 2FA идентификацией. Сессионные коды доставляются на мессенджер устройство или e-mail адрес.
Механизмы пополнительного модуля через альтернативные домены обеспечивает топовые денежные механизмы. Visa, Mastercard, виртуальные портмоне Skrill, Neteller, виртуальные монеты Bitcoin, Ethereum осуществляются с оптимизированными взносами 0-3%.
Развлекательная ассортимент дублируется на сто процентов включая машины, традиционные игры, live-ведущих и мегавыигрыши. RTP-индикаторы, изменчивость и проигрыш сохраняются неизменными.
Бонусная программа функционирует аналогично основному порталу. Welcome-пакеты, бесплатные вращения, компенсация и VIP-системы инициируются автоматически при достижении фиксированных стандартов.
Актуальные бетторы сталкиваются с барьером входа к официальным площадкам. Поставщики фильтруют первичные ссылки, но опытные Клубника регистрация посетители понимают о доступности дублирующих платформ.
Зеркало формирует точную дубликат главного ресурса. SSL-сертификаты остаются равнозначными. Денежные действия реализуются через равнозначные системы.
Схема регистрации через зеркальный адрес содержит типовой валидации. Специалисты уточняют удостоверения для исполнения KYC-стандартов. Личные параметры подвергаются многоуровневую аутентификацию.
Банковские пределы на альтернативных платформах совпадают главным требованиям. Минимальные беты сохраняются постоянными. Прогрессивные накопления координируются между различными адресами.
Бонусные планы действуют полноценно на дополнительных ресурсах. Множитель ставок сохраняет базовые значения. Тайминг отыгрыша сохраняется.
Департамент поддержки обрабатывает запросы с параллельных ресурсов идентично. Интерактивный общение осуществляет круглосуточный формат работы.
CertiCanPharmacy: CertiCanPharmacy – CertiCanPharmacy
emery essentials corner shop – Products are clearly displayed and buying is straightforward.
Надёжные платформы развлекательных предложений oferuja геймерам вариант к высококлассному развлечениям через специализированные платформы, включая п»ї1хбет РІС…РѕРґ , которые именно исполняют transnational критерии security.
Механизм активации necessita предоставления authentication деталей через криптографические SSL-протоколы. Провайдеры просят письменное удостоверение дееспособности и региона жительства для выполнения юрисдикционных стандартов.
Multi-factor идентификация считается обязательным частью современных механизмов security. Users обретают SMS-коды, push-сообщения или применяют targeted tools вроде Google Authenticator.
Mirror URL ликвидируют препятствия географических ограничений и DDoS-штурмов. Фактически копии представляют идентичные клоны главного портала с сохранением опций и user деталей.
Экспертные участники рекомендуют хранить новейшие списки working альтернатив в favourites browser. Администрация отправляют сведения о современных доменах через электронную почту, Telegram-чаты и мобильные софт.
Payment операции через лицензионные ресурсы покрыты защитными протоколами категории банковского индустрии. Снятие денег выполняется лишь на аутентифицированные wallets обладателя account.
Лицензионные операторы игровых предложений предоставляют участникам вариант к элитному времяпрепровождению через тематические платформы, включая Lucky Bear зеркало , которые именно соблюдают мировые требования защиты.
Последовательность открытия счёта подразумевает ввода authentication данных через безопасные SSL-connection. Менеджмент просят предоставить нотариальное verification age verification и региона жительства для соблюдения юрисдикционных требований.
Многоуровневая проверка считается принудительным составляющей актуальных архитектур надёжности. Клиенты обретают SMS-шифры, push-сообщения или внедряют targeted приложения наподобие Google Authenticator.
Mirror домены решают вопросы локальных запретов и DDoS-нападений. По сути зеркала составляют идентичные реплики основного ресурса с maintaining features и клиентских параметров.
Профессиональные геймеры призывают keeping current списки действующих альтернатив в сохранённых ссылках обозревателя. Администрация отправляют сведения о новых адресах через мейл, Telegram-communities и смартфонные утилиты.
Финансовые операции через legal платформы покрыты cryptographic methods стандарта банковского области. Вывод средств осуществляется исключительно на проверенные реквизиты собственника личного кабинета.
Передовые гемблеры встречаются с барьером входа к легальным сайтам. Операторы закрывают базовые ссылки, но знающие лаки Р±РёСЂ казино игроки знают о существовании альтернативных порталов.
Резервная ссылка представляет точную дубликат оригинального сайта. Системы безопасности поддерживаются идентичными. Финансовые переводы осуществляются через сходные механизмы.
Процедура заведения учётной записи через резервный ресурс подразумевает стандартной верификации. Специалисты выясняют бумаги для исполнения KYC-регламентов. Персональные параметры проходят расширенную верификацию.
Депозитные лимиты на зеркальных сайтах совпадают базовым спецификациям. Начальные беты функционируют константными. Прогрессивные призовые фонды координируются между разными ссылками.
Льготные планы работают завершённо на резервных площадках. Требования по обороту сохраняет исходные значения. Временные рамки оборота остаётся прежним.
Сервис поддержки анализирует запросы с зеркальных адресов сходным образом. Интерактивный разговор поддерживает беспрерывный расписание работы.
Актуальные бетторы натыкаются с сложностью входа к проверенным платформам. Провайдеры фильтруют основные порталы, но знающие винити официальный сайт посетители осознают о присутствии резервных порталов.
Зеркало образует полную копию первичного площадки. Системы безопасности поддерживаются неизменными. Платёжные процедуры выполняются через аналогичные каналы.
Процедура создания аккаунта через альтернативный ресурс включает привычной проверки. Операторы требуют справки для выполнения KYC-регламентов. Паспортные характеристики осуществляют многоуровневую аутентификацию.
Финансовые пределы на зеркальных платформах аналогичны первичным условиям. Минимальные взносы поддерживаются постоянными. Растущие выигрышные пулы согласовываются между многочисленными порталами.
Льготные планы функционируют всесторонне на резервных порталах. Отыгрышный коэффициент гарантирует первоначальные параметры. Временные рамки оборота остаётся прежним.
Отдел сопровождения рассматривает вопросы с альтернативных порталов таким же способом. Мгновенный переписка обеспечивает круглосуточный порядок оперирования.
Berry Aisle online store – Quick response from support made everything very easy to understand.
meadowaisle.shop – The site is easy to move through and shopping feels relaxed.
Действующие альтернативные домены надежных игорных заведений на Mellstroy Game зеркало предоставляют устойчивый соединение к развлекательным сервисам. Принцип реплицирования генерирует идентичные версии основного ресурса с консервацией всех механизмов.
Схема активации через альтернативный домен полностью воспроизводит главную форму. Дебютные игроки прописывают рабочий email, генерируют стойкий шифр и выбирают рабочую курренси.
Аутентификация личного кабинета требует предоставления свидетельств опираясь на KYC-требованиям. Копия паспорта, верификация резиденции и денежные координаты подвергаются программную верификацию в течение 24-72 ч.
Подключение зарегистрированных геймеров осуществляется через типовую интерфейс с усиленной аутентификацией. Краткосрочные коды приходят на мессенджер девайс или e-mail адрес.
Опции депозитного блока через альтернативные домены содержит распространенные денежные инструменты. Visa, Mastercard, виртуальные портмоне Skrill, Neteller, crypto Bitcoin, Ethereum реализуются с низкими взносами 0-3%.
Gaming библиотека дублируется целиком включая spinning games, карточные активности, live-дилеров и прогрессивы. RTP-параметры, вариативность и ставочные требования сохраняются точными.
Поощрительная система выполняется подобно базовому сайту. Welcome-комплекты, даровые прокруты, refund и VIP-программы запускаются системно при исполнении фиксированных параметров.
Отбор качественного азартного ресурса в актуальных обстоятельствах подразумевает специального рассмотрения к законному состоянию. Квалифицированные геймеры представляют, что Меллстрой официальный сайт отображает новую сведения о действующих сервисах.
Механизм записи в официальных сервисах охватывает требуемую проверку личности. KYC-процедуры гарантируют как казино, так и пользователя от фрода. Переходные рамки на вывод средств до финализации контроля – стандартная методика.
Цифровые барьеры на доступ к азартным ресурсам устраняются через резервные домены. Рабочие клоны предоставляют стопроцентную работоспособность центрального ресурса. Финансовые переводы, азартный продвижение и наградные системы сохраняются константными.
Материальная стабильность определяется степенью внедренных платежных методов. SSL-криптография, PCI DSS лицензирование и расширенная проверка гарантируют защищенный периметр обороны.
Развлекательная коллекция официальных провайдеров объединяет автоматы от ведущих студий. RTP-значения, дисперсия и математические модели получают объективную контроль в признанных центрах.
Механизмы лояльности в достойных заведениях базируются на ясных требованиях проигрыша. Условия ставок x35-40 характеризуется приемлемым для спин-льгот, в то время как настольные развлечения включаются в подсчет с минимальным множителем.
this online vendor – Help came fast and my issue was handled efficiently.
Поиск легального азартного ресурса заставляет серьезного анализа лицензионных разрешений. Новые ресурсы п»ї1xBet казино гарантируют игрокам безусловную детали о имеющихся санкциях.
Алгоритм открытия аккаунта охватывает ряд ключевых фаз проверки. Администраторы истребуют удостоверения, доказывающие самобытность и дееспособность. Стандартный KYC-алгоритм длится от 24 до 72 временных отрезков.
Банкролл-менеджмент открывается с фиксации ограничений на пополнения. Компетентные пользователи призывают задействовать установку 5% от суммарного развлекательного резерва на индивидуальную партию.
Программные препятствия администраторов вынуждают применять вспомогательные пути. Копии сохраняют абсолютную производительность центрального портала, включая архив транзакций и азартный успех.
Актуальные финансовые системы поддерживают моментальные взносы через блокчейн счета. Bitcoin, Ethereum и фиксированные активы предоставляют приватность и символические отчисления. Длительность выполнения снятий равно 10-30 периодов.
Программы лояльности включают иерархические уровни с прогрессивным бонусом. VIP-консультанты дают уникальные бонусы, увеличенные пределы и ускоренную обслуживание.
Легальные платформы развлекательных услуг предоставляют участникам право к премиальному игровому процессу через целевые ресурсы, включая п»ї1хбет , что соблюдают общепринятые критерии security.
Механизм оформления профиля требует заполнения идентификационных параметров через безопасные SSL-connection. Администрация demanded official свидетельство дееспособности и адреса жительства для выполнения нормативных стандартов.
Двухфакторная верификация выступает принудительным частью современных solutions безопасности. Клиенты имеют SMS-пароли, push-оповещения или задействуют targeted программы по типу Google Authenticator.
Резервные адреса устраняют проблемы territorial ограничений и DDoS-нападений. Фактически зеркала образуют тождественные клоны основного ресурса с обеспечением features и клиентских деталей.
Опытные геймеры рекомендуют сохранять свежие списки действующих копий в избранном интернет-программы. Операторы направляют новости о современных URL через e-mail, Telegram-каналы и телефонные приложения.
Payment movements через проверенные платформы гарантированы шифровальными алгоритмами уровня банковского segment. Получение фондов выполняется исключительно на верифицированные данные обладателя учётной записи.
Cove Vendor collections – Quick-loading pages and intuitive navigation make shopping easy.
Лицензионные платформы игровых сервисов гарантируют геймерам право к качественному времяпрепровождению через специализированные домены, включая СЌРЅРѕРјРѕ казино , которые соблюдают глобальные стандарты конфиденциальности.
Схема регистрации включает указания валидационных информации через криптографические SSL-connection. Букмекеры просят письменное verification совершеннолетия и региона нахождения для поддержания законодательных критериев.
Двухэтапная идентификация представляет необходимым составляющей новейших механизмов надёжности. Users приобретают SMS-пароли, push-уведомления или эксплуатируют targeted софт наподобие Google Authenticator.
Альтернативные порталы устраняют проблемы geographic блокировок и DDoS-штурмов. Технически дубли формируют аналогичные реплики базового домена с поддержанием features и индивидуальных сведений.
Skilled геймеры рекомендуют keeping обновлённые базы активных копий в избранном веб-клиента. Провайдеры отправляют обновления о современных порталах через мейл, Telegram-каналы и телефонные apps.
Денежные movements через официальные ресурсы гарантированы защитными технологиями класса банковского segment. Extraction финансов осуществляется единственно на верифицированные данные собственника профиля.
Азартная отрасль представляет интенсивный прогресс, манящая множество геймеров. Квалифицированные порталы гарантируют надёжную условия для ставок. Детальную сведения о подобных компаниях возможно обнаружить на п»ї1xBet казино .
Легализация является основным критерием подбора портала. Лицензиаты Мальты предоставляют серьёзный мониторинг экономических операций. Отдельная сертифицированная сайт осуществляет периодические инспекции RNG-систем.
Программные особенности инновационных азартных площадок содержат SSL-кодирование денежного категории. Производители цифрового софта наподобие Microgaming, NetEnt, Pragmatic Play добавляют комплексные схемы рандомных параметров.
Механизм верификации счёта включает передачи удостоверений KYC-формата. ID, документ о прибылях, верификация регистрации — типичный комплект для окончательного подключения.
Зеркальные домены устраняют проблемы с цензурой операторов. Действующие альтернативы корректируются ежедневно IT службами. Портативные программы обычно оперируют лучше онлайн редакций.
Управление банкроллом создаёт перспективную результативность развлекательных периодов. Квалифицированные пользователи советуют контролировать количество пари до 1-2% от суммарного банкролла.
Определение надежного развлекательного оператора требует детального исследования юридических бумаг. Передовые ресурсы Vavada казино обеспечивают участникам максимальную информацию о своих разрешениях.
Процедура открытия аккаунта включает различные принудительных шагов аутентификации. Представители просят документы, устанавливающие идентичность и возраст. Традиционный KYC-процесс требует от 24 до 72 интервалов.
Контроль средств запускается с задания границ на пополнения. Профессиональные клиенты советуют использовать правило 5% от полного азартного бюджета на единичную раунд.
Цифровые препятствия владельцев принуждают задействовать запасные ссылки. Клоны оберегают полную активность главного платформы, содержа журнал сделок и игровой прогресс.
Передовые расчетные системы дают моментальные инвестиции через виртуальные кошельки. Bitcoin, Ethereum и устойчивые монеты поддерживают тайность и символические взносы. Время обработки снятий насчитывает 10-30 интервалов.
Системы приверженности содержат многоуровневые уровни с нарастающим возвратом. VIP-кураторы обеспечивают личные поощрения, повышенные рамки и приоритетную обслуживание.
headlinehub today’s news – Articles are insightful and pages respond immediately.
Oak Vendor Selections – Fast loading pages and a clear structure make shopping easy.
Terra Vendor online store – The variety is solid and the pricing feels fair.
Поиск в сфере легальных платформ подразумевает владения актуальных инструментов авторизации. Умелые игроки внедряют казино типпи для получения новейшей сведений о оперативных адресах.
Механизм формирования учетной записи в официальных учреждениях содержит сложную проверку. Современные поставщики внедряют KYC-алгоритмы и AML-требования. Документальная процедура занимает от 24 до 72 периодов.
Технические решения для избежания препятствий совершенствуются сообща с укреплением регуляторных решений. VPN-платформы категории premium предоставляют безопасность AES-256 и стандарты OpenVPN. Непрерывность соединения жизненно важна для привилегированных сессий.
Резервные адреса оперируют через географически разнесенные технические инфраструктуры. CDN-сети осуществляют оптимальную отклик для азиатских клиентов. Техническое переключение включается при распознавании недоступности главного портала.
Экономические операции в официальных регионах подчиняются жестким критериям PCI DSS. Крипто операции приобретают распространение в результате анонимности и скорости выполнения.
Переносные софт лучших компаний объединяют отпечатковую авторизацию и push-уведомления для существенных эпизодов. Настраиваемый оформление независимо изменяется под характеристики монитора.
SeasideHarbor – Fast-loading pages and clear design make finding items effortless.
Развлекательная индустрия представляет динамичный прогресс, заинтересовывая миллионы клиентов. Квалифицированные порталы предлагают безопасную пространство для пари. Детальную информацию о таких организациях реально найти на Mellstroy Game зеркало .
Легализация представляет центральным критерием подбора портала. Контролёры Мальты создают серьёзный проверку денежных операций. Каждая лицензированная платформа осуществляет систематические ревизии RNG-алгоритмов.
Компьютерные свойства передовых казино предусматривают SSL-защиту банковского категории. Производители программного софта вроде Microgaming, NetEnt, Pragmatic Play внедряют усовершенствованные механизмы хаотичных чисел.
Алгоритм валидации учётной записи подразумевает представления документов KYC-стандарта. Паспорт, подтверждение о доходах, валидация проживания — базовый комплект для окончательного авторизации.
Резервные URL устраняют проблемы с фильтрацией провайдеров. Функционирующие зеркала обновляются регулярно IT отделами. Мобильные утилиты регулярно функционируют стабильнее интернет версий.
Распределение капитала формирует продолжительную успешность гемблинговых партий. Опытные беттеры советуют сокращать объём ставки до 1-2% от итогового бюджета.
Развлекательная ниша являет динамичный подъём, привлекая миллионы клиентов. Экспертные площадки обеспечивают стабильную среду для игры. Полную информацию о данных операторах реально найти на казино СЌРЅРѕРјРѕ .
Аккредитация составляет основным показателем подбора площадки. Надзорные органы Гибралтара дают серьёзный контроль финансовых операций. Каждая сертифицированная ресурс реализует постоянные ревизии RNG-механизмов.
Технические свойства современных казино включают SSL-безопасность банковского ранга. Поставщики компьютерного софта вроде Microgaming, NetEnt, Pragmatic Play добавляют продвинутые системы рандомных показателей.
Алгоритм аутентификации личного кабинета требует передачи документов KYC-формата. Паспорт, справка о прибылях, подтверждение проживания — обычный перечень для завершённого активации.
Дублирующие URL ликвидируют препятствия с фильтрацией провайдеров. Актуальные копии обновляются ежедневно цифровыми специалистами. Смартфонные софт часто выполняются лучше веб модификаций.
Управление банкроллом устанавливает долгосрочную успешность гемблинговых сессий. Опытные участники рекомендуют ограничивать объём бета до 1-2% от общего фонда.
Подбор честного казино портала нуждается тщательного анализа регулятивных документов. Инновационные платформы Меллстрой сайт дают игрокам стопроцентную информацию о имеющихся допусках.
Процедура оформления счета предусматривает определенное количество необходимых фаз проверки. Администраторы требуют свидетельства, удостоверяющие индивидуальность и возраст. Стандартный KYC-механизм занимает от 24 до 72 периодов.
Распоряжение капиталом начинается с установления ограничений на депозиты. Опытные клиенты рекомендуют применять установку 5% от полного гемблинг резерва на конкретную игру.
Программные ограничения владельцев побуждают применять дополнительные маршруты. Зеркала поддерживают максимальную работоспособность главного платформы, предусматривая историю сделок и игровой результаты.
Современные банковские способы обеспечивают моментальные взносы через виртуальные хранилища. Bitcoin, Ethereum и фиксированные активы обеспечивают скрытность и наименьшие платежи. Срок реализации выводов составляет 10-30 промежутков.
Программы преданности подразумевают каскадные статусы с нарастающим кэшбэком. VIP-координаторы предоставляют персонализированные подарки, улучшенные лимиты и ускоренную поддержку.
https://vetfreemeds.com/# dog medicine
водные экскурсии в санкт петербурге СПб экскурсии где? Везде: центр, пригороды, парки — гид подскажет идеальный старт.
Подбор надежного игрового ресурса в сегодняшних рамках заставляет повышенного подхода к правовому состоянию. Опытные геймеры понимают, что Лаки Бир регистрация предоставляет актуальную сведения о доступных площадках.
Процедура оформления профиля в сертифицированных площадках охватывает требуемую валидацию удостоверения. KYC-правила охраняют как сервис, так и геймера от мошенничества. Временные границы на изъятие финансов до окончания верификации – привычная система.
Виртуальные блокировки на связь к азартным сайтам решаются через дублирующие домены. Активные дубликаты предоставляют полную эффективность центрального ресурса. Банковские переводы, игровой продвижение и бонусные программы функционируют неизменными.
Материальная надежность оценивается уровнем задействованных платежных инструментов. SSL-защита, PCI DSS лицензирование и многоуровневая аутентификация устанавливают стабильный периметр ограждения.
Азартная каталог сертифицированных площадок содержит спины от лидирующих производителей. RTP-параметры, изменчивость и математические формулы претерпевают независимую контроль в аккредитованных центрах.
Системы лояльности в качественных заведениях основываются на понятных параметрах активности. Условия ставок x35-40 расценивается справедливым для барабан-привилегий, в то время как классические активности засчитываются в расчет с уменьшенным множителем.
Полная информация про ufc в феврале марте 2026 три недели которые встряхнут дивизионы уже доступна в этом обзоре. Посмотрите сами: https://iphoneservice59.ru/news/fevral-mart-2026-v-ufc-tri-turnira-s-topovymi-boyami-i-kuchej-skrytyh-intrig/
Перемещение в пространстве легальных ресурсов предполагает владения продвинутых инструментов входа. Профессиональные игроки применяют казино Меллстрой для обретения актуальной информации о активных адресах.
Механизм создания профиля в лицензированных учреждениях охватывает сложную подтверждение. Актуальные операторы применяют KYC-механизмы и AML-критерии. Бумажная работа отнимает от 24 до 72 интервалов.
Программные решения для избежания запретов прогрессируют сообща с усилением регуляторных действий. VPN-решения категории premium дают защиту AES-256 и стандарты OpenVPN. Непрерывность связи fundamentally важна для привилегированных партий.
Альтернативные ресурсы оперируют через пространственно разнесенные технические мощности. CDN-структуры обеспечивают быструю задержку для глобальных геймеров. Автоматическое перенаправление включается при выявлении препятствия первичного портала.
Денежные переводы в проверенных регионах соответствуют определенным нормам PCI DSS. Криптовалютные операции набирают признание в результате приватности и динамике выполнения.
Портативные клиенты лучших операторов включают голосовую аутентификацию и push-сообщения для ключевых событий. Модифицируемый облик автономно подстраивается под особенности панели.
visit North Crate – The checkout steps are easy to follow and very fast.
My Mexican Pharmacy: My Mexican Pharmacy – My Mexican Pharmacy
Выбор проверенного игорного оператора подразумевает серьезного разбора юридических сертификатов. Инновационные системы лаки Р±РёСЂ предлагают пользователям безусловную сведения о имеющихся лицензиях.
Система оформления счета содержит несколько обязательных стадий верификации. Представители просят справки, засвидетельствующие индивидуальность и возраст. Стандартный KYC-механизм длится от 24 до 72 интервалов.
Контроль средств начинается с установления границ на взносы. Компетентные геймеры призывают задействовать установку 5% от полного гемблинг средств на отдельную игру.
Системные ограничения поставщиков вынуждают эксплуатировать вспомогательные адреса. Дубликаты сохраняют максимальную производительность основного портала, включая журнал переводов и игровой продвижение.
Актуальные расчетные системы поддерживают оперативные взносы через криптовалютные аккаунты. Bitcoin, Ethereum и устойчивые монеты обеспечивают анонимность и символические взносы. Длительность выполнения извлечений составляет 10-30 промежутков.
Алгоритмы постоянства содержат многоуровневые категории с нарастающим вознаграждением. VIP-консультанты предоставляют личные награды, расширенные пределы и приоритетную поддержку.
Проверенные провайдеры игорных услуг обеспечивают клиентам возможность к высококлассному азартному досугу через dedicated сайты, включая Клубника казино , которые точно придерживаются общепринятые нормы security.
Механизм регистрации necessita внесения идентификационных данных через криптографические SSL-connection. Менеджмент просят письменное свидетельство правоспособности и территории проживания для исполнения законодательных норм.
Многоуровневая проверка выступает mandatory компонентом передовых платформ безопасности. Участники приобретают SMS-шифры, push-алерты или применяют специализированные софт вроде Google Authenticator.
Альтернативные порталы нейтрализуют трудности territorial запретов и DDoS-воздействий. Технически дубли являют копийные реплики главного ресурса с поддержанием features и пользовательских параметров.
Экспертные геймеры suggest поддерживать актуальные каталоги working зеркал в favourites браузера. Провайдеры отправляют сведения о актуальных порталах через электронную почту, Telegram-группы и смартфонные приложения.
Платёжные операции через надёжные ресурсы secured cryptographic алгоритмами класса банковского индустрии. Изъятие денег реализуется исключительно на верифицированные карты держателя личного кабинета.
Выбор достойного развлекательного ресурса в современных условиях нуждается детального рассмотрения к законному режиму. Компетентные геймеры понимают, что Mellstroy Game казино демонстрирует последнюю сведения о доступных площадках.
Процедура открытия счета в официальных операторах предусматривает требуемую валидацию личности. KYC-нормы обеспечивают как оператора, так и клиента от мошенничества. Промежуточные ограничения на вывод капитала до финализации проверки – нормальная подход.
Виртуальные барьеры на связь к развлекательным площадкам обходятся через зеркальные ссылки. Активные копии предоставляют абсолютную функциональность базового ресурса. Платежные операции, азартный статистика и льготные системы остаются стабильными.
Денежная защищенность определяется уровнем внедренных финансовых систем. SSL-кодирование, PCI DSS сертификация и двухфакторная идентификация устанавливают безопасный барьер охраны.
Интерактивная коллекция проверенных операторов содержит барабаны от топовых разработчиков. RTP-параметры, изменчивость и алгоритмические формулы испытывают независимую валидацию в утвержденных центрах.
Системы мотивации в профессиональных сервисах формируются на открытых правилах вейджера. Условия ставок x35-40 считается разумным для барабан-привилегий, в то время как традиционные активности идут в подсчет с редуцированным коэффициентом.
Новейшие платформы игорных услуг предлагают клиентам возможность к высококлассному азарту через защищенные Лаки Бир официальный сайт ресурсы. Лицензированная работа предполагает учета конкретных законодательных требований.
Система регистрации индивидуального аккаунта предусматривает проверку индивидуальных информации. Управляющие применяют расширенные протоколы KYC и AML для исключения поддельных операций.
Программные решения новейших казино функционируют на надежных инфраструктурах с HTTPS стандартами. Локальные запреты заставляет провайдеров внедрять альтернативные URL.
Параллельные платформы являют собой идентичные дубликаты первичного сайта с удержанием всех опций и показателей. Клиенты получают постоянный вход к счету, гемблинг данным и пользовательским настройкам.
Платежные операции производятся через интегрированные расчетные агрегаторы. Пределы на инвестиции и снятия определяются в согласии с законодательными положениями и корпоративными нормами контроля угроз.
Профессиональные игроки настаивают анализировать статус сертификата через контролирующие реестры гемблинг структур. Имиджевые критерии содержат места на профильных платформах и мнения действительных игроков.
Writer’s Creative Space – Each article feels insightful, complemented by a beautifully arranged presentation.
O’Rourke Philly Hub – Clear layout and accessible content make browsing straightforward.
do over the counter erectile dysfunction pills work https://elixiumhealth.digital/# erectile dysfunction drugs
Beard Barge Shop Hub – Nice assortment with product information that helps guide decisions.
visit this trusted shop – Quality stands out and the pricing structure makes sense.
Актуальные порталы игорных игр дают клиентам вход к высококлассному беттингу через безопасные Lucky Bear зеркало порталы. Авторизованная деятельность влечет исполнения четких законодательных критериев.
Механизм регистрации игрового аккаунта содержит подтверждение индивидуальных данных. Регуляторы задействуют углубленные протоколы KYC и AML для пресечения фродовых транзакций.
IT платформы современных казино основываются на зашифрованных облачных системах с HTTPS протоколами. Локальные запреты заставляет владельцев запускать параллельные адреса.
Зеркальные ресурсы формируют аналогичные копии центрального сайта с сохранением всех функций и данных. Клиенты обеспечивают себе стабильный соединение к средствам, гемблинг отчетности и клиентским конфигурациям.
Расчетные действия осуществляются через связанные платежные сервисы. Лимиты на депозиты и получения устанавливаются в соответствии с правовыми критериями и корпоративными правилами контроля угроз.
Экспертные игроки настаивают контролировать положение лицензии через надзорные списки игорных структур. Статусные показатели предусматривают позиции на тематических порталах и мнения реальных пользователей.
Подбор качественного развлекательного оператора в современных обстоятельствах нуждается тщательного анализа к лицензионному режиму. Компетентные геймеры осознают, что казино Mellstroy Game отображает новую информацию о активных операторах.
Процедура записи в сертифицированных платформах объединяет обязательную проверку удостоверения. KYC-нормы гарантируют как оператора, так и клиента от махинаций. Временные границы на изъятие денег до окончания подтверждения – нормальная практика.
Технические барьеры на связь к betting сайтам обходятся через дублирующие URL. Доступные дубликаты гарантируют абсолютную работоспособность центрального сайта. Платежные движения, геймплейный продвижение и наградные планы остаются константными.
Финансовая стабильность характеризуется качеством внедренных платежных методов. SSL-криптография, PCI DSS подтверждение и усиленная подтверждение обеспечивают безопасный периметр защиты.
Геймплейная ассортимент легальных площадок охватывает автоматы от лидирующих создателей. RTP-показатели, колебания и математические схемы испытывают беспристрастную валидацию в одобренных учреждениях.
Планы мотивации в достойных заведениях основываются на ясных параметрах активности. Проигрыш x35-40 оценивается нормальным для спин-бонусов, в то время как традиционные забавы идут в подсчет с редуцированным фактором.
Актуальные провайдеры беттинг игр предлагают беттерам возможность к профессиональному азарту через проверенные казино Килограмм ресурсы. Авторизованная операционная активность требует исполнения конкретных надзорных положений.
Процесс регистрации персонального аккаунта охватывает подтверждение личных данных. Провайдеры применяют детализированные механизмы KYC и AML для предотвращения фродовых операций.
Электронные средства современных беттинг площадок функционируют на защищенных инфраструктурах с SSL алгоритмами. Территориальные ограничения побуждает операторов запускать дублирующие домены.
Резервные ресурсы представляют аналогичные клоны главного платформы с поддержанием всех функций и данных. Пользователи достигают постоянный доступ к средствам, беттинг отчетности и персональным конфигурациям.
Платежные транзакции производятся через синхронизированные банковские системы. Пределы на инвестиции и получения фиксируются в согласии с нормативными условиями и организационными нормами контроля угроз.
Экспертные гемблеры настаивают проверять состояние разрешения через надзорные базы данных игорных организаций. Статусные показатели охватывают оценки на тематических порталах и отзывы реальных клиентов.
visit Zinc Vendor – Excellent deals and a nice variety of products available.
Актуальные дублирующие порталы официальных игорных заведений на Килограмм казино создают постоянный доступ к игровым сервисам. Система зеркалирования образует идентичные копии корневого веб-площадки с поддержанием всех функций.
Процедура открытия счета через mirror-сайт абсолютно имитирует основную бланк. Начинающие участники прописывают действующий email, генерируют стойкий секретную комбинацию и устанавливают рабочую платежное средство.
Верификация учетной записи предполагает загрузки бумаг в соответствии с KYC-стандартам. Фото паспорта, валидация проживания и финансовые сведения анализируются посредством цифровую валидацию в течение 24-72 часов.
Логин активных участников происходит через стандартную окно с усиленной верификацией. Краткосрочные токены доставляются на сотовый устройство или почтовый ящик.
Инструменты входящего модуля через mirror-сайты содержит распространенные финансовые сервисы. Visa, Mastercard, виртуальные счета Skrill, Neteller, цифровые активы Bitcoin, Ethereum процессируются с уменьшенными сборами 0-3%.
Gaming ассортимент копируется целиком включая слоты, столовые активности, live-крупье и накопительные призы. RTP-индикаторы, колебания и условия отыгрыша фиксируются такими же.
Промо механизм оперирует похоже корневому сайту. Welcome-наборы, фриспины, кешбэк и VIP-планы активируются системно при выполнении определенных стандартов.
1win зеркало 1win зеркало
Dyed & Dandelion Hub – Engaging layout and navigation feels effortless.
Новейшие бетторы натыкаются с сложностью связи к лицензированным площадкам. Операторы ограничивают первичные ссылки, но искушённые казино 1хбет клиенты знают о функционировании резервных сайтов.
Дополнительный домен образует абсолютную воспроизведение основного сайта. Протоколы шифрования работают идентичными. Расчётные переводы производятся через те же шлюзы.
Процедура регистрации через параллельный домен содержит классической аутентификации. Администраторы уточняют документы для исполнения KYC-норм. Идентификационные информация осуществляют двухфакторную аутентификацию.
Вносительные границы на альтернативных ресурсах совпадают стандартным параметрам. Минимальные беты остаются фиксированными. Накопительные банки интегрируются между многочисленными ресурсами.
Льготные схемы работают комплексно на параллельных ресурсах. Требования по обороту удерживает оригинальные величины. Временные рамки проигрывания поддерживается.
Департамент ассистирования обрабатывает тикеты с параллельных адресов аналогично. Живой переписка поддерживает постоянный режим работы.
Игровая ниша показывает динамичный рост, манящая легионы участников. Грамотные сайты дают стабильную среду для игры. Подробную материалы о таких брендах доступно изучить на Mellstroy Game казино .
Аттестация представляет основным критерием выбора ресурса. Надзорные органы Кюрасао гарантируют тщательный проверку экономических процедур. Любая официальная платформа подвергается постоянные инспекции RNG-механизмов.
Цифровые параметры актуальных гемблинг-сайтов предусматривают SSL-безопасность банковского категории. Поставщики софтового обеспечения типа Microgaming, NetEnt, Pragmatic Play встраивают продвинутые системы случайных значений.
Процесс аутентификации профиля требует направления документов KYC-формата. Удостоверение, справка о финансах, удостоверение проживания — обычный перечень для окончательного авторизации.
Резервные адреса решают проблемы с цензурой организаций. Актуальные альтернативы адаптируются постоянно цифровыми командами. Карманные утилиты зачастую оперируют качественнее браузерных версий.
Контроль средств определяет длительную прибыльность гемблинговых периодов. Квалифицированные игроки рекомендуют контролировать количество вейджера до 1-2% от полного резерва.
https://mymexicanpharmacy.com/# mexico online pharmacy
Современные игроки пересекаются с набором системных нюансов при операциях с сертифицированными сайтами. Тематические ресурсы типа Голд РІС…РѕРґ обеспечивают новую сведения о функционировании игорных провайдеров.
Система подтверждения аккаунта предполагает ряд необходимых фаз. Исходная подтверждение включает загрузки свидетельств удостоверяющих персону. Привычный перечень охватывает документ, автолицензию или загранпаспорт.
Технологическая составляющая регистрации предполагает эксплуатацию защищенного протокола и 2FA. Профессиональные геймеры рекомендуют задействовать весь комплекс возможных возможностей охраны.
Запасные домены представляют стопроцентные отражения основного сайта с обеспечением исчерпывающего набора функций. Основное достоинство содержится в схожести финансовых рамок и критериев условий прокрутки.
Механизм выявления активных запасных доменов основывается на мониторинге профессиональных информационных каналов и партнерских платформ. Опытные клиенты используют прокси-соединения для обеспечения устойчивого входа безотносительно от местных запретов.
Выбор надежного игрового площадки в актуальных рамках предполагает особого внимания к лицензионному статусу. Профессиональные геймеры осознают, что mad casino содержит новую материалы о работающих провайдерах.
Схема записи в проверенных платформах включает неизбежную аутентификацию документов. KYC-нормы защищают как площадку, так и клиента от афер. Промежуточные ограничения на вывод средств до финализации верификации – обычная методика.
Электронные ограничения на подключение к игровым площадкам устраняются через параллельные порталы. Рабочие дубликаты поддерживают всестороннюю возможности первичного платформы. Денежные транзакции, игровой статистика и бонусные планы продолжают устойчивыми.
Материальная надежность выражается уровнем внедренных расчетных способов. SSL-защита, PCI DSS подтверждение и дополнительная идентификация создают стабильный барьер защиты.
Интерактивная набор легальных провайдеров объединяет машины от топовых производителей. RTP-индексы, колебания и вероятностные схемы испытывают объективную проверку в авторизованных институтах.
Планы мотивации в достойных казино опираются на ясных параметрах проигрыша. Отыгрыш x35-40 расценивается адекватным для барабан-льгот, в то время как настольные активности идут в калькуляцию с сниженным процентом.
find great items here – The process of paying was fast and hassle-free.
Новейшие игроки натыкаются с препятствием связи к проверенным порталам. Поставщики запрещают главные домены, но искушённые п»ї1хбет сайт игроки понимают о функционировании параллельных сайтов.
Параллельный портал составляет стопроцентную отображение оригинального ресурса. Средства защиты остаются аналогичными. Банковские процедуры осуществляются через идентичные сервисы.
Технология оформления профиля через дополнительный домен требует типовой подтверждения. Сотрудники требуют бумаги для осуществления KYC-требований. Идентификационные параметры осуществляют расширенную валидацию.
Финансовые границы на дополнительных платформах соответствуют стандартным спецификациям. Наименьшие суммы функционируют неизменными. Возрастающие призовые фонды координируются между всеми адресами.
Премиальные механизмы действуют целостно на зеркальных площадках. Требования по обороту сохраняет исходные показатели. Период действия оборота не изменяется.
Отдел ассистирования изучает заявки с параллельных порталов идентично. Живой переписка предоставляет постоянный формат функционирования.
Навигация в сфере сертифицированных порталов нуждается знания передовых способов входа. Квалифицированные клиенты задействуют п»ї[url=https://github.com/1xBet-online-zerkalo]1хбет регистрация[/url] для обретения современной информации о оперативных путях.
Процесс регистрации учетной записи в официальных организациях охватывает тщательную верификацию. Новейшие компании эксплуатируют KYC-алгоритмы и AML-стандарты. Документальная процедура отнимает от 24 до 72 временных отрезков.
IT технологии для прохождения ограничений развиваются синхронно с интенсификацией нормативных мер. VPN-решения разряда premium дают криптографию AES-256 и методы OpenVPN. Устойчивость подключения кардинально важна для привилегированных партий.
Зеркальные сайты действуют через географически разнесенные компьютерные ресурсы. CDN-архитектуры осуществляют минимальную латентность для американских участников. Системное переключение активируется при выявлении препятствия главного домена.
Банковские манипуляции в сертифицированных зонах следуют четким стандартам PCI DSS. Крипто транзакции завоевывают актуальность вследствие секретности и темпу реализации.
Мобильные программы ведущих провайдеров объединяют голосовую подтверждение и push-уведомления для критических моментов. Модифицируемый интерфейс самостоятельно подстраивается под особенности матрицы.
check out Firefly Crate – The products appear organized and thoughtfully presented.
vet pharmacy: best pet rx – pet meds official website
Развлекательная ниша демонстрирует стремительный подъём, притягивая множество участников. Экспертные сайты предлагают защищённую обстановку для игры. Развёрнутую данные о указанных брендах доступно найти на п»ї1хбет сайт .
Аттестация является приоритетным аспектом выбора платформы. Регуляторы Мальты создают тщательный проверку финансовых действий. Отдельная официальная сайт выполняет постоянные контроли RNG-модулей.
Цифровые параметры передовых беттинг-платформ объединяют SSL-криптографию денежного стандарта. Поставщики цифрового материала типа Microgaming, NetEnt, Pragmatic Play интегрируют продвинутые механизмы произвольных величин.
Процесс аутентификации счёта предполагает направления удостоверений KYC-стандарта. Удостоверение, документ о прибылях, валидация регистрации — базовый набор для финального активации.
Альтернативные ссылки убирают проблемы с запретами операторов. Актуальные дубли адаптируются каждый день компьютерными группами. Портативные софт часто выполняются качественнее веб редакций.
Распределение капитала создаёт перспективную эффективность гемблинговых партий. Экспертные участники советуют урезать объём пари до 1-2% от полного резерва.
Отбор безопасного развлекательного площадки заставляет детального разбора юридических документов. Актуальные сайты п»ї1хбет предоставляют игрокам безусловную данные о действующих аккредитациях.
Система получения доступа включает множество необходимых шагов валидации. Провайдеры просят документы, доказывающие личность и возраст. Классический KYC-порядок составляет от 24 до 72 периодов.
Распоряжение капиталом запускается с установления пределов на депозиты. Искусные клиенты настаивают задействовать закон 5% от полного развлекательного средств на единичную заход.
Программные барьеры владельцев обязывают эксплуатировать резервные маршруты. Альтернативы удерживают абсолютную активность первичного портала, содержа хронологию сделок и развлекательный успех.
Актуальные финансовые сервисы предоставляют моментальные депозиты через электронные аккаунты. Bitcoin, Ethereum и постоянные токены гарантируют конфиденциальность и минимальные сборы. Длительность проведения извлечений равно 10-30 отрезков.
Схемы верности включают градационные категории с нарастающим бонусом. VIP-кураторы предлагают персонализированные подарки, расширенные рамки и ускоренную сервис.
Действующие резервные адреса надежных азартных клубов на казино Килограмм создают стабильный вход к игровым сервисам. Методика зеркалирования строит идентичные копии основного портала с сохранением всех возможностей.
Алгоритм регистрации через резервную ссылку полностью дублирует оригинальную форму. Начинающие пользователи указывают валидный email, формируют стойкий код доступа и фиксируют операционную валюту.
Аутентификация счета содержит отправки свидетельств по KYC-нормам. Скан национального документа, верификация проживания и платежные сведения контролируются системой алгоритмическую контроль в течение 24-72 ч.
Авторизация действующих пользователей производится через классическую модуль с 2FA проверкой. Временные пароли передаются на мобильный устройство или e-mail адрес.
Возможности входящего модуля через альтернативные домены предлагает актуальные платежные платформы. Visa, Mastercard, виртуальные счета Skrill, Neteller, блокчейн-токены Bitcoin, Ethereum реализуются с минимальными взносами 0-3%.
Азартная каталог воспроизводится в точности включая слоты, карточные забавы, live-операторов и максимальные награды. RTP-коэффициенты, вариативность и вейджер фиксируются точными.
Промо схема оперирует идентично базовому домену. Welcome-комплекты, free spins, компенсация и VIP-программы запускаются машинально при выполнении определенных требований.
Актуальные геймеры сталкиваются с изобилием программных аспектов при деятельности с лицензированными порталами. Профессиональные сайты типа РЎСѓРєР° казино выдают свежую информацию о операциях развлекательных брендов.
Механизм верификации кабинета подразумевает ряд требуемых этапов. Начальная валидация нуждается передачи удостоверений подтверждающих персону. Привычный перечень включает удостоверение личности, права или международное ID.
Системная сторона открытия счета предполагает внедрение зашифрованного канала и двухуровневой проверки. Профессиональные участники рекомендуют запускать весь комплекс возможных настроек защиты.
Дублирующие порталы образуют точные копии центрального ресурса с хранением исчерпывающего арсенала. Главное преимущество кроется в схожести платежных лимитов и условий условий прокрутки.
Алгоритм выявления активных альтернативных адресов базируется на мониторинге профильных информационных каналов и сотрудничающих ресурсов. Квалифицированные игроки внедряют VPN-сервисы для предоставления надежного входа безотносительно от региональных блокировок.
see Orchard Crate products – It’s simple to explore and everything works smoothly.
official chairchic shop – Smooth navigation and product details are clear and helpful.
leadora site – Navigation felt smooth, found everything quickly without any confusing steps.
Quartz Vendor Online – The site layout is simple, making it easy to browse and locate items.
Инновационные провайдеры игорных активностей дают пользователям путь к элитному беттингу через защищенные Lucky Bear зеркало ресурсы. Сертифицированная работа предполагает исполнения определенных законодательных норм.
Процесс регистрации игрового аккаунта включает проверку конфиденциальных реквизитов. Провайдеры внедряют многоуровневые процедуры KYC и AML для предотвращения нарушающих транзакций.
IT системы новейших беттинг площадок работают на зашифрованных серверах с криптографическими алгоритмами. Региональная блокировка вынуждает провайдеров организовывать параллельные URL.
Резервные ресурсы являют собой полные клоны главного сайта с удержанием всех возможностей и показателей. Участники обеспечивают себе беспрепятственный соединение к балансу, беттинг истории и индивидуальным опциям.
Платежные переводы осуществляются через синхронизированные платежные системы. Ограничения на взносы и снятия определяются в соответствии с законодательными условиями и собственными политиками риск-менеджмента.
Опытные гемблеры рекомендуют проверять положение лицензии через официальные каталоги беттинг структур. Имиджевые характеристики задействуют места на профильных ресурсах и отзывы истинных пользователей.
Современные операторы развлекательных развлечений предлагают беттерам доступ к качественному беттингу через надежные Вавада казино ресурсы. Сертифицированная функционирование влечет соблюдения конкретных законодательных стандартов.
Процедура оформления игрового аккаунта задействует проверку конфиденциальных сведений. Регуляторы задействуют расширенные протоколы KYC и AML для предотвращения фродовых операций.
Технические инструменты передовых игорных домов базируются на стабильных инфраструктурах с шифровальными протоколами. Геоблокировка заставляет управляющих внедрять вспомогательные адреса.
Параллельные сайты представляют полные клоны базового портала с обеспечением всех инструментов и показателей. Пользователи достигают беспрепятственный вход к счету, беттинг статистике и персональным настройкам.
Денежные операции выполняются через встроенные платежные сервисы. Ограничения на инвестиции и получения определяются в унисон с законодательными требованиями и организационными политиками контроля угроз.
Компетентные гемблеры рекомендуют анализировать состояние разрешения через надзорные регистры гемблинг структур. Репутационные критерии содержат места на специализированных ресурсах и оценки подлинных клиентов.
Актуальные сервисы игорных активностей предлагают беттерам подключение к высококлассному гемблингу через защищенные френц казино сайты. Лицензированная функционирование предполагает учета конкретных правовых положений.
Механизм оформления индивидуального профиля включает верификацию личных реквизитов. Управляющие применяют расширенные механизмы KYC и AML для пресечения поддельных финансовых действий.
Программные системы новейших беттинг площадок базируются на безопасных хостингах с криптографическими алгоритмами. Региональная блокировка побуждает провайдеров создавать резервные порталы.
Зеркальные порталы формируют точные репликации главного ресурса с поддержанием всех сервисов и информации. Беттеры добиваются устойчивый связь к капиталу, развлекательной записям и персональным конфигурациям.
Денежные операции проходят через синхронизированные финансовые шлюзы. Ограничения на депозиты и получения устанавливаются в соответствии с законодательными положениями и внутренними регламентами риск-менеджмента.
Опытные игроки указывают анализировать состояние лицензии через регуляторные базы данных беттинг ведомств. Имиджевые показатели содержат места на тематических порталах и комментарии истинных клиентов.
Нынешние участники встречаются с множеством технологических аспектов при деятельности с официальными платформами. Специализированные сайты типа Вавада поставляют актуальную данные о работе казино операторов.
Механизм валидации кабинета охватывает ряд неотъемлемых уровней. Базовая верификация включает загрузки справок удостоверяющих индивидуальность. Типовой перечень подразумевает ID, права или международное ID.
Программная компонента оформления содержит применение зашифрованного канала и двойной авторизации. Продвинутые пользователи советуют задействовать весь комплекс представленных параметров безопасности.
Запасные домены составляют абсолютные копии первичного домена с сохранением всего инструментария. Ключевое бонус заключается в подобии расчетных пределов и параметров отыгрыша.
Процедура нахождения активных зеркал фундируется на проверке профессиональных телеграм-каналов и аффилированных ресурсов. Квалифицированные клиенты эксплуатируют прокси-соединения для создания надежного входа независимо от местных запретов.
Lantern Market Store – The website is neat, user-friendly, and the product variety is solid.
Подбор легального казино площадки нуждается серьезного разбора лицензионных документов. Инновационные системы казино Голд дают участникам абсолютную факты о действующих допусках.
Система оформления счета включает множество требуемых шагов валидации. Провайдеры истребуют документы, доказывающие персону и возраст. Обычный KYC-процесс занимает от 24 до 72 промежутков.
Контроль средств начинается с фиксации границ на взносы. Искусные участники советуют эксплуатировать норму 5% от полного азартного капитала на индивидуальную игру.
Цифровые ограничения владельцев принуждают внедрять резервные адреса. Клоны сохраняют максимальную активность первичного сайта, включая журнал сделок и гемблинг результаты.
Передовые денежные инструменты предоставляют оперативные взносы через блокчейн портмоне. Bitcoin, Ethereum и фиксированные активы предоставляют скрытность и наименьшие отчисления. Длительность осуществления снятий доходит 10-30 промежутков.
Схемы лояльности включают каскадные категории с увеличивающимся кэшбэком. VIP-представители обеспечивают личные бонусы, увеличенные рамки и ускоренную помощь.
Проверенные ресурсы игровых сервисов дают пользователям право к высококлассному игровому процессу через специализированные платформы, включая Вавада казино , которые выполняют глобальные критерии надёжности.
Схема оформления профиля necessita ввода верификационных деталей через криптографические SSL-каналы. Операторы просят документальное доказательство дееспособности и места нахождения для поддержания правовых требований.
Multi-factor проверка выступает mandatory частью передовых архитектур безопасности. Клиенты располагают SMS-ключи, push-оповещения или используют специальные приложения в стиле Google Authenticator.
Дублирующие URL нейтрализуют препятствия territorial запретов и DDoS-assault. С технической точки зрения mirrors являют тождественные версии главного платформы с обеспечением возможностей и пользовательских сведений.
Опытные геймеры рекомендуют хранить current базы рабочих альтернатив в сохранённых ссылках интернет-программы. Операторы направляют информацию о свежих адресах через e-mail, Telegram-чаты и mobile приложения.
Банковские movements через официальные порталы защищены защитными алгоритмами уровня банковского segment. Изъятие капитала осуществляется solely на верифицированные wallets хозяина учётной записи.
reachly site – Appreciate the typography choices; comfortable spacing improved my reading experience.
leadzo site – Loved the layout today; clean, simple, and genuinely user-friendly overall.
nicheninja site – Color palette felt calming, nothing distracting, just focused, thoughtful design.
Snow Vendor shopping hub – Quick and helpful response from the team fixed my issue immediately.
Подбор качественного азартного площадки в актуальных обстоятельствах подразумевает повышенного рассмотрения к правовому состоянию. Компетентные геймеры учитывают, что Mellstroy Game предоставляет последнюю сведения о функционирующих операторах.
Механизм записи в официальных площадках содержит необходимую верификацию личности. KYC-процедуры защищают как оператора, так и участника от махинаций. Временные пределы на перечисление средств до завершения контроля – нормальная процедура.
Программные барьеры на подключение к игровым порталам нейтрализуются через зеркальные URL. Активные зеркала предоставляют тотальную работоспособность центрального ресурса. Банковские транзакции, геймплейный прогресс и бонусные предложения сохраняются неизменными.
Экономическая надежность определяется уровнем внедренных платежных механизмов. SSL-криптография, PCI DSS сертификация и двухфакторная подтверждение гарантируют прочный щит охраны.
Игровая каталог легальных провайдеров предоставляет слоты от главных студий. RTP-значения, волатильность и статистические формулы подвергаются нейтральную контроль в авторизованных организациях.
Механизмы стимулирования в качественных заведениях базируются на четких параметрах отыгрыша. Вейджер x35-40 расценивается приемлемым для машина-поощрений, в то время как стандартные развлечения идут в зачет с уменьшенным коэффициентом.
Передовые геймеры имеют дело с изобилием технологических тонкостей при процессах с проверенными ресурсами. Специализированные порталы типа Вавада предоставляют актуальную контент о деятельности игорных операторов.
Процесс валидации аккаунта подразумевает набор неотъемлемых этапов. Исходная верификация требует размещения удостоверений удостоверяющих гражданство. Привычный список охватывает удостоверение личности, водительские права или международное ID.
Программная элемент записления подразумевает применение SSL-шифрования и двухфакторной аутентификации. Экспертные геймеры рекомендуют инициировать максимум предложенных настроек безопасности.
Дублирующие порталы являются полные дубликаты главного домена с поддержанием полного арсенала. Основное плюс кроется в тождественности финансовых границ и критериев проигрыша.
Механизм обнаружения рабочих альтернативных адресов основывается на отслеживании тематических информационных каналов и аффилированных порталов. Опытные геймеры эксплуатируют анонимайзеры для создания бесперебойного соединения без оглядки от региональных ограничений.
Echo Aisle shopping hub – Navigation works flawlessly and the interface feels clean.
Действующие зеркала проверенных игорных заведений на винити казино обеспечивают постоянный вход к азартным платформам. Принцип копирования строит точные дубликаты базового сайта с фиксацией всех возможностей.
Система создания аккаунта через дублирующий портал в точности имитирует главную форму. Свежие пользователи заполняют рабочий email, придумывают сложный код доступа и фиксируют базовую финансовый инструмент.
Подтверждение счета подразумевает представления удостоверений опираясь на KYC-регламенту. Копия водительских прав, доказательство проживания и карточные сведения проходят машинную анализ в течение 24-72 часа.
Логин существующих геймеров происходит через классическую интерфейс с расширенной идентификацией. Временные токены отправляются на сотовый аппарат или email.
Инструменты денежного блока через альтернативные домены содержит топовые денежные сервисы. Visa, Mastercard, онлайн кошельки Skrill, Neteller, цифровые активы Bitcoin, Ethereum осуществляются с оптимизированными процентами 0-3%.
Азартная ассортимент воспроизводится целиком включая автоматы, традиционные активности, live-ведущих и мегавыигрыши. RTP-значения, волатильность и условия отыгрыша сохраняются точными.
Поощрительная программа оперирует похоже корневому сайту. Welcome-пакеты, free spins, компенсация и VIP-курсы стартуют программно при выполнении установленных критериев.
Выбор надежного гемблинг площадки в сегодняшних рамках подразумевает тщательного рассмотрения к законному режиму. Опытные пользователи понимают, что СЌРЅРѕРјРѕ казино предоставляет современную данные о активных операторах.
Процедура регистрации в лицензированных операторах объединяет принудительную подтверждение персональных данных. KYC-нормы охраняют как площадку, так и клиента от фрода. Промежуточные пределы на вывод денег до завершения верификации – привычная методика.
Цифровые запреты на доступ к игровым ресурсам устраняются через альтернативные порталы. Рабочие клоны поддерживают всестороннюю работоспособность базового ресурса. Платежные движения, геймплейный продвижение и наградные схемы остаются константными.
Капитальная надежность выражается степенью эксплуатируемых платежных систем. SSL-шифрование, PCI DSS сертификация и многоуровневая аутентификация обеспечивают прочный заслон ограждения.
Азартная ассортимент проверенных сервисов охватывает барабаны от главных производителей. RTP-показатели, дисперсия и расчетные системы проходят нейтральную сертификацию в аккредитованных организациях.
Схемы вознаграждения в профессиональных заведениях базируются на понятных требованиях вейджера. Условия ставок x35-40 расценивается разумным для барабан-бонусов, в то время как классические игры включаются в расчет с минимальным фактором.
Bay Biscuit Favorites – Sweet selection and checkout is fast and intuitive.
Cateria McCabe Campaign – The details are thorough and transparency is evident in every section.
Передовые участники сталкиваются с изобилием технологических деталей при работе с лицензированными площадками. Профильные сайты типа Mellstroy Game предоставляют релевантную материалы о процессах казино провайдеров.
Механизм проверки кабинета включает несколько необходимых этапов. Базовая подтверждение предполагает загрузки бумаг валидирующих персону. Привычный набор включает удостоверение личности, права или заграничное удостоверение.
Техническая сторона регистрации охватывает эксплуатацию SSL-шифрования и двухуровневой проверки. Квалифицированные участники настаивают запускать максимум возможных параметров секьюрити.
Запасные домены формируют полные дубликаты базового портала с удержанием тотального функционала. Ключевое бонус выражается в соответствии платежных границ и условий вейджера.
Механизм поиска функционирующих дублирующих порталов фундируется на мониторинге профессиональных уведомительных сервисов и партнерских платформ. Профессиональные участники используют прокси-соединения для создания бесперебойного связи вне зависимости от региональных блокировок.
Актуальные порталы гемблинг игр предлагают клиентам доступ к высококлассному развлечениям через защищенные Меллстрой официальный сайт системы. Официальная операционная активность подразумевает исполнения жестких законодательных положений.
Процесс открытия персонального счета включает валидацию приватных показателей. Провайдеры применяют комплексные алгоритмы KYC и AML для недопущения фродовых переводов.
Цифровые средства передовых казино основываются на надежных хостингах с криптографическими технологиями. Территориальные ограничения обязывает провайдеров разрабатывать параллельные порталы.
Зеркальные порталы составляют полные клоны базового сайта с фиксацией всех опций и параметров. Пользователи добиваются беспрепятственный соединение к средствам, беттинг записям и персональным конфигурациям.
Платежные действия осуществляются через интегрированные расчетные шлюзы. Рамки на пополнения и получения фиксируются в унисон с законодательными условиями и внутренними процедурами управления рисками.
Опытные пользователи предлагают контролировать ситуацию сертификата через контролирующие списки беттинг структур. Имиджевые показатели задействуют оценки на профильных платформах и комментарии настоящих беттеров.
Поиск в сфере официальных площадок подразумевает осознания передовых методов доступа. Опытные пользователи используют Mellstroy Game зеркало для приобретения свежей информации о оперативных доменах.
Процедура оформления счета в проверенных компаниях охватывает тщательную верификацию. Современные организации используют KYC-механизмы и AML-нормы. Оформление документов занимает от 24 до 72 периодов.
Цифровые инструменты для минования запретов улучшаются параллельно с укреплением законодательных действий. VPN-решения разряда premium предоставляют шифрование AES-256 и стандарты OpenVPN. Устойчивость связи принципиально актуальна для привилегированных игровых периодов.
Запасные платформы оперируют через локально размещенные цифровые мощности. CDN-комплексы обеспечивают сокращенную латентность для американских участников. Программное переключение активируется при детекции барьера главного домена.
Финансовые транзакции в лицензированных регионах подпадают под жестким требованиям PCI DSS. Блокчейн расчеты приобретают популярность благодаря приватности и динамике обработки.
Переносные софт премиальных организаций интегрируют физиологическую подтверждение и push-алерты для ключевых эпизодов. Модифицируемый оформление независимо изменяется под характеристики матрицы.
Развлекательная ниша являет стремительный прогресс, привлекая массы пользователей. Грамотные ресурсы гарантируют безопасную пространство для пари. Детальную материалы о указанных операторах реально найти на казино Lucky Bear .
Аккредитация является центральным аспектом выбора сайта. Лицензиаты Великобритании предоставляют строгий аудит расчётных транзакций. Всякая сертифицированная платформа подвергается постоянные ревизии RNG-модулей.
Компьютерные свойства актуальных игорных домов охватывают SSL-защиту расчётного уровня. Разработчики программного обеспечения наподобие Microgaming, NetEnt, Pragmatic Play встраивают сложные модели непредсказуемых значений.
Механизм подтверждения учётной записи подразумевает представления бумаг KYC-уровня. Удостоверение, документ о доходах, удостоверение адреса — обычный комплект для завершённого подключения.
Параллельные порталы устраняют сложности с блокировками компаний. Свежие зеркала корректируются систематически цифровыми службами. Мобильные приложения часто работают лучше браузерных вариантов.
Контроль средств задаёт стратегическую доходность гемблинговых раундов. Квалифицированные пользователи указывают урезать размер бета до 1-2% от общего капитала.
Актуальные гемблеры сталкиваются с препятствием доступа к легальным ресурсам. Поставщики ограничивают основные адреса, но грамотные https://zelenovskoe.ru/ru-ru/ клиенты знают о существовании параллельных порталов.
Резервная ссылка составляет абсолютную копию первичного сайта. Системы безопасности работают такими же. Финансовые операции проходят через те же системы.
Технология заведения учётной записи через зеркальный ссылку включает типовой проверки. Администраторы просят бумаги для реализации KYC-стандартов. Индивидуальные сведения осуществляют двухфакторную аутентификацию.
Вносительные рамки на зеркальных порталах совпадают основным спецификациям. Начальные ставки продолжают фиксированными. Возрастающие призовые фонды объединяются между различными доменами.
Премиальные системы работают целостно на параллельных платформах. Требования по обороту обеспечивает исходные величины. Период действия отыгрыша остаётся прежним.
Сервис помощи решает обращения с дополнительных порталов сходным образом. Мгновенный общение осуществляет круглосуточный режим работы.
https://mymexicanpharmacy.com/# mexico pharmacy
Актуальные зеркала лицензированных казино на Голд казино дают стабильный доступ к игровым системам. Технология копирования строит эквивалентные клоны базового портала с консервацией всех механизмов.
Процедура открытия счета через mirror-сайт на сто процентов воспроизводит стандартную анкету. Свежие клиенты прописывают валидный email, генерируют защищенный пароль и фиксируют игровую курренси.
Подтверждение аккаунта подразумевает предоставления справок опираясь на KYC-политике. Копия ID-карты, доказательство резиденции и банковские параметры проверяются через машинную контроль в течение 24-72 часов.
Аутентификация активных игроков осуществляется через обычную интерфейс с двухфакторной аутентификацией. Сессионные токены передаются на сотовый аппарат или электронную почту.
Функционал входящего блока через резервные ссылки обеспечивает популярные платежные инструменты. Visa, Mastercard, электронные хранилища Skrill, Neteller, криптовалюты Bitcoin, Ethereum процессируются с уменьшенными платежами 0-3%.
Gaming коллекция повторяется на сто процентов включая автоматы, карточные активности, live-ведущих и прогрессивы. RTP-показатели, изменчивость и вейджер фиксируются аналогичными.
Промо система работает похоже основному домену. Welcome-предложения, free spins, кешбэк и VIP-курсы инициируются программно при исполнении заданных критериев.
click to explore – Each product page is easy to follow and visually tidy.
Актуальные пользователи пересекаются с массой технических особенностей при функционировании с проверенными платформами. Экспертные платформы типа Mellstroy Game казино дают релевантную сведения о процессах казино брендов.
Алгоритм проверки счета охватывает множество неотъемлемых фаз. Стартовая подтверждение требует отправки бумаг доказывающих персону. Стандартный набор охватывает удостоверение личности, автоудостоверение или загранпаспорт.
Технологическая сторона записления подразумевает использование SSL-шифрования и двойной авторизации. Опытные пользователи предлагают задействовать все предложенных опций защиты.
Зеркала составляют точные отражения основного домена с поддержанием полного инструментария. Основное бонус кроется в соответствии платежных ограничений и параметров условий прокрутки.
Схема обнаружения рабочих запасных доменов строится на контроле специализированных новостных лент и союзных сайтов. Квалифицированные участники внедряют анонимайзеры для гарантирования стабильного соединения вне зависимости от географических лимитов.
visit Clover Crate today – Smooth navigation and simple interface make this site a pleasure to use.
https://savelist.co/profile/users/promogratis1
Современные сервисы беттинг продуктов обеспечивают пользователям вход к элитному развлечениям через сертифицированные Меллстрой регистрация ресурсы. Легальная операционная активность влечет соблюдения четких контролирующих стандартов.
Механизм открытия персонального аккаунта задействует валидацию личных сведений. Управляющие задействуют детализированные процедуры KYC и AML для пресечения незаконных платежей.
IT платформы современных казино базируются на защищенных инфраструктурах с шифровальными стандартами. Локальные запреты заставляет владельцев внедрять вспомогательные домены.
Альтернативные платформы образуют точные клоны центрального сайта с обеспечением всех возможностей и показателей. Беттеры обеспечивают себе непрерывный доступ к балансу, азартной статистике и клиентским конфигурациям.
Денежные процедуры осуществляются через связанные платежные системы. Лимиты на взносы и выводы определяются в унисон с лицензионными условиями и организационными регламентами риск-менеджмента.
Профессиональные пользователи советуют отслеживать условия авторизации через государственные каталоги игорных органов. Имиджевые характеристики содержат позиции на отраслевых порталах и отзывы подлинных игроков.
explore Topaz Aisle shop – Found a few unique items that align perfectly with what I wanted.
Перемещение в сфере лицензированных ресурсов нуждается осознания продвинутых методов соединения. Профессиональные пользователи эксплуатируют СЂР° казино для получения актуальной материалов о работающих ссылках.
Процесс формирования личного кабинета в официальных операторах предполагает тщательную проверку. Новейшие поставщики внедряют KYC-процедуры и AML-нормы. Бумажная работа требует от 24 до 72 периодов.
Технические методы для обхода барьеров совершенствуются параллельно с укреплением нормативных решений. VPN-службы категории premium гарантируют шифрование AES-256 и протоколы OpenVPN. Постоянство коннекта кардинально необходима для премиальных заходов.
Дублирующие ресурсы работают через локально расположенные серверные ресурсы. CDN-комплексы поддерживают низкую латентность для американских игроков. Программное роутинг срабатывает при распознавании барьера первичного домена.
Денежные транзакции в проверенных зонах следуют определенным стандартам PCI DSS. Децентрализованные расчеты набирают востребованность в результате конфиденциальности и быстроте выполнения.
Переносные клиенты ведущих брендов совмещают биометрическую подтверждение и push-оповещения для принципиальных происшествий. Модифицируемый облик автоматически подстраивается под свойства монитора.
Philly Outreach Hub – The community-driven approach and practical updates make a difference.
PrimeDepot – Finding what I want is easy, thanks to the clean and logical layout.
Winter Aisle marketplace – Finding items is simple thanks to the clear layout.
https://www.postfreeclassifiedads.com/thread-120712.htm
what is the best erectile dysfunction pill over the counter
Поиск достойного азартного портала в актуальных границах требует детального рассмотрения к юридическому статусу. Опытные участники знают, что Меллстрой казино содержит актуальную сведения о работающих площадках.
Процесс создания аккаунта в проверенных операторах содержит требуемую проверку персональных данных. KYC-правила гарантируют как оператора, так и пользователя от мошенничества. Переходные пределы на перечисление средств до окончания валидации – привычная процедура.
Программные барьеры на доступ к гемблинг сайтам обходятся через дублирующие адреса. Доступные отражения поддерживают полную производительность главного сайта. Расчетные движения, интерактивный результаты и наградные предложения поддерживаются постоянными.
Материальная стабильность оценивается критерием внедренных расчетных методов. SSL-защита, PCI DSS сертификация и усиленная верификация гарантируют прочный барьер обороны.
Геймплейная коллекция легальных операторов содержит автоматы от лидирующих разработчиков. RTP-значения, вариативность и математические схемы претерпевают объективную валидацию в признанных организациях.
Планы вознаграждения в достойных сервисах строятся на четких правилах активности. Отыгрыш x35-40 расценивается разумным для машина-подарков, в то время как классические забавы принимаются в расчет с редуцированным множителем.
discover Scarlet Crate – The site is neat and browsing products is effortless.
Действующие зеркала лицензированных игорных заведений на Вавада РІС…РѕРґ гарантируют стабильный доступ к азартным порталам. Методика зеркалирования образует эквивалентные дубликаты центрального веб-площадки с фиксацией всех механизмов.
Система регистрации через зеркало на сто процентов дублирует стандартную анкету. Дебютные клиенты прописывают валидный email, придумывают защищенный секретную комбинацию и фиксируют основную валюту.
Подтверждение аккаунта предполагает передачи документов следуя KYC-стандартам. Снимок удостоверения личности, валидация регистрации и банковские координаты проверяются через алгоритмическую контроль в течение 24-72 периодов.
Аутентификация активных игроков происходит через базовую панель с двухфакторной идентификацией. Разовые коды поступают на сотовый гаджет или email.
Механизмы пополнительного раздела через дублирующие порталы предлагает топовые платежные инструменты. Visa, Mastercard, цифровые хранилища Skrill, Neteller, виртуальные монеты Bitcoin, Ethereum выполняются с уменьшенными сборами 0-3%.
Gaming база клонируется полностью включая барабаны, столовые геймплей, live-операторов и прогрессивы. RTP-показатели, волатильность и ставочные требования удерживаются такими же.
Акционная схема выполняется схоже корневому порталу. Welcome-предложения, безвозмездные спины, денежный возврат и VIP-схемы инициируются алгоритмически при исполнении заданных требований.
Bench Bazaar Online – Layout is clear and finding what I need was simple.
Активные зеркала легальных игорных заведений на tip top casino дают устойчивый вход к развлекательным ресурсам. Методика копирования создает идентичные клоны основного портала с фиксацией всех возможностей.
Механизм оформления профиля через альтернативный домен в точности имитирует стандартную форму. Дебютные участники прописывают активный email, формируют безопасный пароль и определяют основную денежную единицу.
Подтверждение профиля содержит загрузки свидетельств следуя KYC-нормам. Скан паспорта, валидация резиденции и банковские координаты проверяются через алгоритмическую контроль в течение 24-72 периодов.
Логин зарегистрированных клиентов осуществляется через стандартную окно с расширенной валидацией. Временные коды передаются на сотовый номер или e-mail адрес.
Возможности денежного блока через зеркала предлагает популярные расчетные инструменты. Visa, Mastercard, онлайн хранилища Skrill, Neteller, криптовалюты Bitcoin, Ethereum обрабатываются с сокращенными платежами 0-3%.
Gaming коллекция воспроизводится полностью включая spinning games, традиционные геймплей, live-крупье и мегавыигрыши. RTP-значения, изменчивость и отыгрыш фиксируются идентичными.
Бонусная программа действует похоже центральному порталу. Welcome-предложения, даровые прокруты, возврат средств и VIP-системы запускаются программно при реализации заданных стандартов.
Перемещение в пространстве официальных сайтов нуждается знания передовых методов соединения. Квалифицированные геймеры внедряют РјСЌРґ казино для добывания релевантной информации о работающих путях.
Процедура формирования личного кабинета в лицензированных заведениях подразумевает комплексную верификацию. Актуальные организации задействуют KYC-протоколы и AML-нормы. Документальная процедура требует от 24 до 72 часов.
Программные способы для преодоления блокировок совершенствуются синхронно с ужесточением нормативных шагов. VPN-сервисы класса premium предоставляют шифрование AES-256 и стандарты OpenVPN. Устойчивость связи жизненно значима для элитных сессий.
Дублирующие ресурсы оперируют через локально распределенные IT системы. CDN-системы поддерживают оптимальную пинг для американских клиентов. Цифровое роутинг активируется при выявлении ограничения первичного адреса.
Финансовые движения в проверенных регионах подпадают под определенным стандартам PCI DSS. Цифровые расчеты набирают востребованность вследствие конфиденциальности и оперативности обработки.
Мобильные утилиты элитных операторов интегрируют отпечатковую подтверждение и push-извещения для критических ситуаций. Настраиваемый интерфейс автоматически адаптируется под свойства дисплея.
River Vendor online store – The products were easy to find and the ordering process was quick.
Cobalt Vendor Online – Really enjoying the clean layout and easy navigation throughout the site.
Выбор безопасного игорного заведения предполагает серьезного анализа юридических бумаг. Актуальные порталы Вавада РІС…РѕРґ обеспечивают участникам максимальную факты о действующих санкциях.
Процесс создания профиля включает ряд требуемых ступеней аутентификации. Представители настаивают справки, засвидетельствующие персону и совершеннолетие. Стандартный KYC-порядок длится от 24 до 72 промежутков.
Контроль средств инициируется с установления ограничений на пополнения. Искусные игроки советуют эксплуатировать принцип 5% от совокупного казино капитала на одну партию.
Технические ограничения администраторов обязывают задействовать вспомогательные маршруты. Зеркала удерживают максимальную эффективность центрального ресурса, содержа журнал транзакций и игровой успех.
Современные расчетные методы поддерживают оперативные пополнения через цифровые счета. Bitcoin, Ethereum и постоянные токены поддерживают скрытность и крошечные сборы. Время реализации снятий доходит 10-30 отрезков.
Схемы лояльности подразумевают многоуровневые ранги с возрастающим вознаграждением. VIP-менеджеры обеспечивают эксклюзивные подарки, расширенные пределы и первоочередную техподдержку.
Нынешние клиенты обталкиваются с массой системных деталей при деятельности с официальными порталами. Тематические порталы типа Вавада поставляют релевантную материалы о работе игорных компаний.
Система аутентификации счета содержит несколько необходимых шагов. Стартовая валидация подразумевает размещения удостоверений верифицирующих личность. Классический набор включает ID, водительские права или загранпаспорт.
Системная часть открытия счета охватывает применение криптографической защиты и двойной авторизации. Продвинутые клиенты подсказывают запускать весь комплекс представленных параметров обеспечения.
Зеркала образуют точные реплики основного платформы с обеспечением всего инструментария. Главное выгода состоит в тождественности финансовых пределов и критериев проигрыша.
Механизм локализации активных запасных доменов основывается на мониторинге экспертных информационных каналов и союзных платформ. Профессиональные участники применяют VPN-сервисы для предоставления постоянного подключения невзирая от местных блокировок.
https://certicanpharmacy.com/# canadian online pharmacy reviews
Timber Aisle Products – Layout is neat and browsing is fast and convenient.
I enjoy what you guys are usually up too. This sort of
clever work and reporting! Keep up the wonderful
works guys I’ve incorporated you guys to my own blogroll.
Надёжные операторы гэмблинг предложений обеспечивают клиентам возможность к премиальному гэмблингу через dedicated ресурсы, включая казино Килограмм , которые специально соблюдают глобальные критерии надёжности.
Схема создания аккаунта предполагает ввода идентификационных информации через защищённые SSL-connection. Операторы просят предоставить official удостоверение age verification и места регистрации для исполнения legal правил.
2FA проверка считается mandatory частью актуальных платформ защиты. Игроки получают SMS-пароли, push-notification или используют targeted утилиты по типу Google Authenticator.
Дублирующие URL устраняют препятствия локальных ограничений и DDoS-нападений. Технически копии формируют аналогичные клоны базового сайта с поддержанием опций и пользовательских параметров.
Skilled геймеры советуют хранить свежие списки функционирующих дублей в закладках веб-клиента. Провайдеры направляют новости о свежих URL через e-mail, Telegram-каналы и смартфонные софт.
Платёжные транзакции через лицензионные ресурсы secured шифровальными алгоритмами level банковского области. Вывод финансов реализуется только на проверенные реквизиты держателя профиля.
mexipharmacy reviews: My Mexican Pharmacy – My Mexican Pharmacy
Bath Breeze Store – High-quality items and a clean, easy-to-navigate layout.
Поиск в пространстве лицензированных площадок предполагает понимания актуальных методов авторизации. Продвинутые пользователи применяют Меллстрой регистрация для извлечения новейшей фактов о оперативных URL.
Механизм регистрации счета в надежных компаниях подразумевает многоуровневую верификацию. Передовые провайдеры эксплуатируют KYC-алгоритмы и AML-требования. Документальное сопровождение составляет от 24 до 72 периодов.
Технические способы для прохождения препятствий эволюционируют сообща с ужесточением законодательных действий. VPN-службы уровня premium гарантируют безопасность AES-256 и методы OpenVPN. Устойчивость коннекта критически значима для премиальных раундов.
Резервные сайты функционируют через пространственно разнесенные IT системы. CDN-системы гарантируют сокращенную латентность для глобальных клиентов. Цифровое переключение включается при распознавании барьера центрального адреса.
Платежные переводы в сертифицированных областях следуют жестким критериям PCI DSS. Цифровые переводы получают популярность благодаря приватности и быстроте обработки.
Портативные клиенты топовых компаний включают биометрическую авторизацию и push-извещения для принципиальных моментов. Настраиваемый дизайн самостоятельно адаптируется под параметры матрицы.
АВторынок ЛНР Авторынок ДНР предлагает широкий выбор автомобилей с пробегом, включая отечественные и зарубежные марки, а также запчасти и аксессуары в наличии и под заказ.
Навигация в секторе официальных сайтов требует осознания продвинутых решений соединения. Профессиональные участники используют Меллстрой зеркало для обретения актуальной сведений о работающих адресах.
Механизм создания личного кабинета в проверенных учреждениях подразумевает сложную аутентификацию. Продвинутые операторы внедряют KYC-механизмы и AML-правила. Бумажная работа требует от 24 до 72 интервалов.
Компьютерные инструменты для обхода запретов улучшаются параллельно с повышением регуляторных действий. VPN-сервисы уровня premium предлагают безопасность AES-256 и протоколы OpenVPN. Стабильность связи fundamentally значима для привилегированных раундов.
Резервные ресурсы выполняют задачи через территориально расположенные IT кластеры. CDN-сети поддерживают быструю время ответа для глобальных участников. Техническое маршрутизация инициируется при распознавании блокировки первичного ресурса.
Экономические транзакции в официальных зонах подпадают под конкретным нормам PCI DSS. Децентрализованные операции набирают популярность по причине секретности и темпу процессинга.
Портативные софт премиальных операторов включают отпечатковую авторизацию и push-алерты для существенных моментов. Модифицируемый облик автономно настраивается под настройки монитора.
Gary Masino Portal – Clean design and well-explained content make understanding the message simple.
Uncommitted NJ Official Site – Transparency and clarity make it easy to grasp the site’s purpose.
Новейшие геймеры обталкиваются с массой системных деталей при работе с проверенными площадками. Тематические платформы типа Gold зеркало выдают актуальную сведения о функционировании развлекательных провайдеров.
Процедура аутентификации учетной записи охватывает ряд обязательных шагов. Базовая проверка нуждается предоставления документов удостоверяющих субъект. Стандартный пакет предполагает ID, автолицензию или внешний паспорт.
Технологическая часть записления включает использование защищенного протокола и 2FA. Продвинутые клиенты подсказывают активировать все представленных настроек безопасности.
Альтернативные адреса образуют полные дубликаты основного портала с хранением всего арсенала. Центральное бонус кроется в соответствии финансовых пределов и условий условий прокрутки.
Механизм поиска активных резервных ссылок опирается на проверке специализированных мессенджер групп и партнерских сайтов. Экспертные участники применяют VPN-сервисы для предоставления постоянного соединения без оглядки от местных блокировок.
Перемещение в секторе лицензированных сайтов требует знания продвинутых инструментов входа. Профессиональные игроки применяют казино СЌРЅРѕРјРѕ для приобретения релевантной фактов о оперативных URL.
Схема оформления профиля в официальных заведениях включает сложную верификацию. Передовые компании эксплуатируют KYC-алгоритмы и AML-правила. Документальная процедура потребляет от 24 до 72 промежутков.
Цифровые способы для обхода запретов эволюционируют синхронно с интенсификацией законодательных инициатив. VPN-платформы класса premium обеспечивают защиту AES-256 и методы OpenVPN. Непрерывность соединения жизненно значима для высокоролловых игровых периодов.
Альтернативные адреса функционируют через географически разнесенные компьютерные ресурсы. CDN-архитектуры обеспечивают минимальную пинг для международных геймеров. Системное редирект запускается при обнаружении блокировки первичного домена.
Денежные операции в сертифицированных областях соответствуют определенным требованиям PCI DSS. Криптовалютные платежи получают актуальность по причине секретности и быстроте реализации.
Переносные утилиты элитных провайдеров включают лицевую подтверждение и push-алерты для существенных событий. Гибкий внешний вид самостоятельно изменяется под параметры матрицы.
Если ищете качественный анализ темы ufc в феврале марте 2026 три недели которые встряхнут дивизионы, загляните сюда. Ссылка на статью: https://rybalka62.ru/news/obzor-blizhajshih-sobytij-ufc-fevral-mart-2026-prognozy-na-klyuchevye-poedinki/
The best of MilaSolana – sharing all the most interesting content in one channel. Behind-the-scenes atmosphere, provocative mood, and personal snippets. Stay tuned and don’t miss any new releases.
Descubre el mundo de Lia Lin: historias tras bambalinas, provocaciones audaces y videos personales. Todo el contenido mas interesante reunido en un solo lugar con actualizaciones periodicas.
Современные сервисы азартных услуг предоставляют игрокам доступ к профессиональному развлечениям через безопасные п»ї1хбет регистрация ресурсы. Лицензированная функционирование подразумевает соблюдения жестких надзорных положений.
Процесс оформления пользовательского учетной записи предусматривает валидацию приватных информации. Администраторы эксплуатируют расширенные протоколы KYC и AML для исключения поддельных платежей.
Цифровые платформы новейших развлекательных порталов строятся на зашифрованных облачных системах с HTTPS протоколами. Территориальные ограничения заставляет управляющих разрабатывать вспомогательные ссылки.
Резервные сайты представляют аналогичные дубликаты основного портала с удержанием всех сервисов и информации. Участники получают постоянный подключение к балансу, игровой отчетности и персональным конфигурациям.
Расчетные операции осуществляются через встроенные расчетные агрегаторы. Лимиты на пополнения и снятия фиксируются в согласии с регуляторными критериями и корпоративными регламентами управления рисками.
Квалифицированные пользователи предлагают отслеживать ситуацию аккредитации через государственные каталоги развлекательных структур. Престижные показатели задействуют места на профильных сайтах и оценки настоящих беттеров.
CertiCanPharmacy: CertiCanPharmacy – CertiCanPharmacy
Проверенные операторы игорных предложений дают геймерам доступ к высококлассному гэмблингу через целевые сайты, включая казино Лаки Бир , которые именно выполняют общепринятые нормы безопасности.
Последовательность оформления профиля подразумевает заполнения authentication сведений через безопасные SSL-протоколы. Администрация demanded письменное удостоверение возраста и адреса регистрации для выполнения legal стандартов.
Многоуровневая идентификация становится required элементом новейших solutions защиты. Users приобретают SMS-ключи, push-notification или эксплуатируют dedicated софт типа Google Authenticator.
Зеркальные адреса устраняют сложности territorial санкций и DDoS-assault. Техническим образом реплики являют тождественные копии основного портала с maintaining опций и клиентских деталей.
Экспертные игроки советуют хранить актуальные списки функционирующих копий в закладках браузера. Management передают новости о свежих адресах через почтовые сервисы, Telegram-группы и смартфонные софт.
Банковские процедуры через лицензионные сайты защищены encryption системами стандарта банковского области. Вывод капитала реализуется лишь на подтверждённые реквизиты собственника учётной записи.
成何体统2026 丞磊王楚然双穿书 高清现代甜宠 无广告高清观看
Официальные платформы развлекательных услуг oferuja пользователям вариант к высококлассному гэмблингу через тематические домены, включая казино KiloGram , что придерживаются мировые регламенты защиты.
Механизм создания аккаунта включает заполнения идентификационных информации через криптографические SSL-соединения. Букмекеры требуют документальное verification возраста и территории нахождения для поддержания правовых норм.
Multi-factor верификация становится принудительным частью передовых архитектур security. Игроки приобретают SMS-коды, push-сообщения или внедряют targeted программы типа Google Authenticator.
Зеркальные ссылки преодолевают вопросы географических барьеров и DDoS-атак. Технически зеркала составляют идентичные копии основного портала с обеспечением опций и личных информации.
Экспертные пользователи советуют поддерживать свежие списки действующих mirrors в закладках обозревателя. Операторы рассылают новости о новых ссылках через электронную почту, Telegram-communities и портативные apps.
Денежные операции через лицензионные порталы обеспечены encryption протоколами level банковского индустрии. Получение фондов реализуется исключительно на подтверждённые реквизиты держателя учётной записи.
Инновационные операторы развлекательных игр предлагают игрокам подключение к качественному игровому процессу через проверенные Vavada ресурсы. Сертифицированная работа влечет учета конкретных надзорных норм.
Алгоритм создания игрового счета охватывает подтверждение приватных данных. Операторы используют комплексные системы KYC и AML для предотвращения мошеннических транзакций.
Программные средства актуальных беттинг площадок строятся на надежных серверах с шифровальными протоколами. Региональная блокировка побуждает операторов разрабатывать альтернативные URL.
Зеркальные платформы формируют полные клоны главного домена с сохранением всех инструментов и информации. Игроки достигают стабильный соединение к счету, беттинг статистике и клиентским параметрам.
Денежные действия осуществляются через интегрированные финансовые сервисы. Ограничения на вклады и выводы устанавливаются в согласии с лицензионными условиями и организационными нормами снижения потерь.
Компетентные беттеры предлагают мониторить статус авторизации через официальные каталоги гемблинг комиссий. Репутационные критерии предусматривают рейтинги на тематических порталах и мнения истинных беттеров.
纽卡斯尔6-1大胜卡拉巴赫2026欧冠附加赛首回合比分,戈登半场大四喜喜鹊锁定淘汰赛,最新足球赛事比分全球关注英超欧战强势表现。
browse Heather Market items – Simple and well-organized, the site feels very welcoming.
爱一帆会员多少钱海外版2026 高清平台 灵活定价
Актуальные пользователи сталкиваются с множеством технических тонкостей при деятельности с официальными порталами. Специализированные сайты типа Килограмм казино предоставляют современную данные о операциях казино компаний.
Процедура валидации счета подразумевает комплекс необходимых уровней. Первичная валидация включает отправки справок подтверждающих индивидуальность. Стандартный комплект подразумевает ID, водительские права или международный паспорт.
Технологическая часть записления подразумевает задействование защищенного протокола и многофакторной защиты. Продвинутые пользователи рекомендуют инициировать совокупность предложенных функций секьюрити.
Дублирующие порталы представляют точные дубликаты первичного ресурса с сохранением тотального арсенала. Главное бонус выражается в соответствии банковских рамок и критериев проигрыша.
Механизм локализации активных дублирующих порталов основывается на проверке специализированных новостных лент и связанных порталов. Квалифицированные клиенты внедряют прокси-соединения для формирования устойчивого входа невзирая от локальных блокировок.
бурение скважин обратной промывкой vodoponizhenie-iglofiltrami-moskva.ru .
bs2best at
see Flake Vendor products – Browsing is fast and the interface is clean.
Проверенные платформы азартных опций oferuja клиентам возможность к качественному развлечениям через тематические порталы, включая Лаки Бир регистрация , которые точно придерживаются глобальные регламенты безопасности.
Процедура открытия счёта включает заполнения authentication информации через encrypted SSL-соединения. Менеджмент запрашивают official свидетельство дееспособности и локации residence для соблюдения нормативных критериев.
Multi-factor проверка выступает обязательным aspect актуальных систем security. Игроки имеют SMS-пароли, push-notification или используют специальные tools типа Google Authenticator.
Альтернативные адреса ликвидируют вопросы territorial барьеров и DDoS-атак. По сути копии формируют аналогичные копии primary сайта с сохранением функциональности и user информации.
Профессиональные геймеры предлагают keeping обновлённые каталоги действующих дублей в favourites браузера. Management передают сведения о новых URL через e-mail, Telegram-сообщества и mobile софт.
Денежные переводы через проверенные сайты secured криптографическими протоколами класса банковского индустрии. Снятие фондов выполняется исключительно на аутентифицированные wallets хозяина учётной записи.
Современные провайдеры игорных продуктов предлагают клиентам возможность к профессиональному игровому процессу через защищенные Лаки Бир официальный сайт платформы. Сертифицированная операционная активность подразумевает исполнения определенных контролирующих стандартов.
Процесс открытия пользовательского аккаунта содержит верификацию личных реквизитов. Администраторы внедряют детализированные механизмы KYC и AML для исключения незаконных операций.
IT решения новейших игорных домов основываются на стабильных хостингах с криптографическими сертификатами. Геоблокировка вынуждает владельцев запускать альтернативные URL.
Зеркальные сайты представляют точные копии базового портала с обеспечением всех опций и параметров. Пользователи получают устойчивый связь к балансу, гемблинг отчетности и индивидуальным параметрам.
Банковские переводы производятся через интегрированные платежные системы. Лимиты на пополнения и снятия регулируются в гармонии с нормативными критериями и собственными политиками контроля угроз.
Компетентные гемблеры предлагают анализировать состояние аккредитации через надзорные регистры игорных ведомств. Имиджевые показатели охватывают рейтинги на тематических ресурсах и мнения подлинных пользователей.
check out toytrader – The site is intuitive, and the toy categories are easy to explore.
https://roskurer.ru
official Canyon Market page – Just noticed this and the presentation looks great.
Discover the world of MickLiterOfficial: behind-the-scenes stories, bold provocations, and personal footage. All the most interesting content gathered in one place with regular updates.
Нынешние участники натыкаются с проблемой соединения к легальным порталам. Компании фильтруют стандартные домены, но искушённые Клубника казино клиенты учитывают о существовании альтернативных порталов.
Параллельный портал составляет абсолютную копию оригинального платформы. Криптографические алгоритмы функционируют равнозначными. Финансовые операции реализуются через те же шлюзы.
Схема оформления профиля через зеркальный адрес включает обычной аутентификации. Сотрудники уточняют документы для реализации KYC-стандартов. Индивидуальные информация реализуют двухфакторную проверку.
Депозитные пределы на параллельных площадках аналогичны стандартным спецификациям. Наименьшие ставки поддерживаются постоянными. Возрастающие банки интегрируются между всеми доменами.
Премиальные схемы работают целостно на альтернативных площадках. Требования по обороту поддерживает базовые значения. Тайминг использования поддерживается.
Сервис обслуживания анализирует обращения с зеркальных ссылок таким же способом. Мгновенный чат осуществляет непрерывный график деятельности.
Актуальные платформы развлекательных активностей гарантируют клиентам подключение к качественному гемблингу через сертифицированные tip top casino порталы. Лицензированная бизнес нуждается учета жестких контролирующих норм.
Система оформления игрового аккаунта предусматривает аутентификацию приватных реквизитов. Управляющие используют углубленные процедуры KYC и AML для предотвращения мошеннических финансовых действий.
Электронные средства инновационных казино основываются на зашифрованных серверах с шифровальными сертификатами. Региональная блокировка заставляет операторов разрабатывать альтернативные порталы.
Дублирующие платформы являют собой идентичные версии центрального домена с фиксацией всех инструментов и данных. Пользователи получают непрерывный доступ к капиталу, беттинг статистике и персональным конфигурациям.
Денежные действия осуществляются через подключенные банковские системы. Границы на депозиты и изъятия назначаются в унисон с правовыми условиями и внутренними политиками риск-менеджмента.
Профессиональные беттеры указывают анализировать условия авторизации через государственные базы данных развлекательных комиссий. Престижные критерии предусматривают оценки на тематических ресурсах и feedback настоящих беттеров.
Передовые платформы гемблинг услуг предлагают беттерам подключение к профессиональному развлечениям через безопасные Lucky Bear casino ресурсы. Легальная операционная активность влечет выполнения строгих контролирующих норм.
Процесс оформления индивидуального аккаунта предусматривает валидацию персональных информации. Регуляторы применяют расширенные протоколы KYC и AML для предотвращения нарушающих платежей.
Электронные решения новейших игорных домов функционируют на надежных инфраструктурах с криптографическими стандартами. Региональная блокировка обязывает провайдеров разрабатывать вспомогательные адреса.
Параллельные платформы формируют точные клоны первичного ресурса с удержанием всех сервисов и показателей. Пользователи приобретают устойчивый доступ к депозиту, игровой истории и пользовательским параметрам.
Финансовые операции выполняются через интегрированные денежные системы. Рамки на депозиты и изъятия назначаются в соотношении с регуляторными требованиями и индивидуальными нормами контроля угроз.
Опытные гемблеры советуют мониторить положение сертификата через контролирующие списки гемблинг организаций. Статусные критерии содержат места на тематических ресурсах и комментарии настоящих участников.
Pearl Vendor marketplace – Pages are well-organized and the advice provided is practical.
Современные гемблеры сталкиваются с затруднением входа к лицензированным сайтам. Компании закрывают главные порталы, но грамотные Меллстрой сайт игроки осознают о наличии дублирующих сайтов.
Параллельный портал образует абсолютную реплику главного портала. Криптографические алгоритмы функционируют равнозначными. Финансовые операции производятся через аналогичные системы.
Алгоритм регистрации через зеркальный портал подразумевает классической верификации. Менеджеры просят бумаги для реализации KYC-правил. Идентификационные параметры осуществляют расширенную проверку.
Банковские пределы на параллельных порталах равняются стандартным параметрам. Низшие беты функционируют стабильными. Накопительные накопления объединяются между множественными адресами.
Поощрительные системы выполняются комплексно на альтернативных порталах. Множитель ставок сохраняет первоначальные значения. Длительность оборота продолжается.
Департамент обслуживания анализирует тикеты с зеркальных адресов аналогично. Интерактивный диалог гарантирует беспрерывный график деятельности.
водопонижение строительное xn—77-eddkgagrc5cdhbap.xn--p1ai .
Skillet Street Marketplace – Loved the product options and the site feels seamless to explore.
Беттинговая ниша демонстрирует активный развитие, привлекая массы геймеров. Экспертные сайты предоставляют безопасную атмосферу для игры. Детальную данные о данных провайдерах можно обнаружить на Lucky Bear .
Аттестация является приоритетным фактором подбора площадки. Регуляторы Мальты обеспечивают серьёзный проверку расчётных процедур. Всякая официальная портал проходит плановые ревизии RNG-алгоритмов.
Технические особенности передовых игорных домов содержат SSL-защиту банковского стандарта. Поставщики виртуального ПО наподобие Microgaming, NetEnt, Pragmatic Play добавляют сложные алгоритмы рандомных чисел.
Схема подтверждения личного кабинета включает предоставления документов KYC-уровня. Паспорт, подтверждение о доходах, верификация местожительства — обычный список для полноценного доступа.
Дублирующие порталы исправляют барьеры с блокировками поставщиков. Действующие копии обновляются регулярно программными службами. Планшетные программы зачастую выполняются качественнее сетевых вариантов.
Управление банкроллом определяет долгосрочную эффективность игровых сессий. Профессиональные участники советуют сокращать сумму депозита до 1-2% от суммарного капитала.
我独自升级真人版2026 海外华人漫改韩剧 高清跨次元视觉 全球加速
Отбор качественного развлекательного портала в нынешних рамках требует тщательного анализа к правовому режиму. Знающие пользователи знают, что казино Vavada включает актуальную сведения о функционирующих ресурсах.
Процедура открытия счета в лицензированных операторах включает обязательную верификацию личности. KYC-нормы обеспечивают как площадку, так и пользователя от афер. Краткосрочные рамки на получение средств до закрытия верификации – нормальная методика.
Электронные запреты на доступ к азартным площадкам решаются через дублирующие домены. Действующие зеркала обеспечивают стопроцентную производительность первичного сервиса. Расчетные операции, геймплейный статистика и поощрительные системы остаются устойчивыми.
Материальная надежность выражается критерием задействованных расчетных способов. SSL-кодирование, PCI DSS лицензирование и многоуровневая верификация обеспечивают прочный контур безопасности.
Геймплейная библиотека проверенных операторов объединяет барабаны от известных разработчиков. RTP-параметры, волатильность и расчетные системы получают беспристрастную сертификацию в утвержденных учреждениях.
Механизмы лояльности в профессиональных казино основываются на ясных правилах вейджера. Отыгрыш x35-40 характеризуется приемлемым для барабан-подарков, в то время как классические активности принимаются в подсчет с сниженным фактором.
http://mymexicanpharmacy.com/# My Mexican Pharmacy
The official delux_girl channel features daily hot content, private selfies, and exclusive videos. Intriguing real-life moments and regular updates for those who want to get closer.
crypto ai system Привет всем в Телеграме! Добро пожаловать в топовый крипто-канал Телеграмма! У нас есть всё необходимое: AI Crypto и Crypto AI Trading Limited — ИИ для эффективной торговли криптой. Бесплатный скринер монет, скринер по объёмам, скринер плотности и скринер спредов. Скринер фандинга для крипты и инструмент для скальпинга. Телеграм-бот для крипты, ТГ-боты и другие крипто-боты в Телеграме. Отслеживаем свежие новости крипторынка и разбираем ключевые тенденции. Применяем современные алгоритмы для поиска аномалий. Есть собственный скринер ботов, чтобы находить многообещающие монеты. Самые крутые скринеры крипты в паре с ИИ для трейдинга Crypto Trading AI. Подписывайся на наши крипто-каналы и получай криптовалюту в Телеграме с максимальной точностью! Вступай в крипто-марафон в Телеграме уже сегодня!
Определение проверенного betting портала в текущих условиях нуждается тщательного подхода к правовому состоянию. Квалифицированные игроки знают, что Лаки Бир официальный сайт отображает актуальную материалы о работающих операторах.
Механизм записи в легальных площадках объединяет требуемую аутентификацию идентичности. KYC-процедуры охраняют как заведение, так и клиента от фрода. Временные рамки на перечисление средств до окончания верификации – типичная система.
Программные ограничения на подключение к развлекательным сайтам решаются через дублирующие URL. Функционирующие копии гарантируют тотальную работоспособность базового ресурса. Расчетные процедуры, геймплейный результаты и бонусные системы функционируют устойчивыми.
Экономическая надежность измеряется уровнем эксплуатируемых денежных способов. SSL-безопасность, PCI DSS лицензирование и усиленная подтверждение формируют защищенный барьер обороны.
Развлекательная ассортимент официальных заведений предоставляет барабаны от лидирующих студий. RTP-параметры, колебания и статистические формулы подвергаются независимую валидацию в аккредитованных организациях.
Программы поощрения в серьезных казино базируются на открытых требованиях вейджера. Требования x35-40 характеризуется приемлемым для спин-привилегий, в то время как классические состязания учитываются в калькуляцию с редуцированным множителем.
Лицензионные площадки развлекательных возможностей дают геймерам право к высококлассному гэмблингу через целевые ресурсы, включая Vavada casino , которые специально выполняют международные требования надёжности.
Процедура создания аккаунта требует указания верификационных данных через защищённые SSL-линии. Провайдеры требуют письменное доказательство правоспособности и территории жительства для исполнения законодательных критериев.
2FA идентификация считается required компонентом современных архитектур безопасности. Users имеют SMS-токены, push-оповещения или задействуют targeted софт вроде Google Authenticator.
Зеркальные адреса ликвидируют препятствия географических блокировок и DDoS-нападений. Фактически копии формируют тождественные версии основного платформы с поддержанием функциональности и личных данных.
Профессиональные пользователи призывают удерживать новейшие базы working mirrors в bookmark веб-клиента. Провайдеры отправляют updates о актуальных адресах через мейл, Telegram-группы и портативные приложения.
Финансовые movements через официальные сайты обеспечены защитными methods стандарта банковского сектора. Изъятие фондов осуществляется solely на аутентифицированные данные владельца аккаунта.
страница кастеты купить
экскурсии спб санкт петербург Сайт экскурсии СПб — ваш гид в мир приключений: каталог, отзывы, цены и мгновенное бронирование.
Community Support at MDC – The blend of practical resources and friendly communication works really well.
Basket Bliss Product Hub – Stylish selection with smooth, easy-to-use browsing.
Поиск качественного игрового ресурса в нынешних рамках требует тщательного рассмотрения к правовому состоянию. Профессиональные участники понимают, что РЎСѓРєР° казино демонстрирует свежую материалы о функционирующих площадках.
Алгоритм регистрации в легальных платформах объединяет неизбежную подтверждение личности. KYC-нормы обеспечивают как площадку, так и клиента от мошенничества. Краткосрочные рамки на изъятие финансов до закрытия проверки – типичная система.
Цифровые запреты на доступ к азартным ресурсам обходятся через дублирующие адреса. Рабочие копии гарантируют абсолютную возможности основного портала. Денежные переводы, интерактивный статистика и наградные программы поддерживаются неизменными.
Денежная гарантированность измеряется степенью задействованных платежных способов. SSL-криптография, PCI DSS подтверждение и расширенная верификация формируют безопасный барьер защиты.
Игровая ассортимент проверенных заведений охватывает спины от топовых разработчиков. RTP-значения, вариативность и математические формулы проходят беспристрастную сертификацию в аккредитованных организациях.
Схемы мотивации в достойных казино основываются на открытых требованиях активности. Условия ставок x35-40 расценивается справедливым для автомат-подарков, в то время как карточные активности засчитываются в зачет с пониженным процентом.
Перемещение в пространстве сертифицированных ресурсов включает знания продвинутых методов авторизации. Квалифицированные пользователи внедряют казино Mellstroy Game для обретения актуальной фактов о действующих доменах.
Процесс создания профиля в сертифицированных организациях охватывает тщательную валидацию. Актуальные операторы задействуют KYC-протоколы и AML-правила. Документооборот занимает от 24 до 72 промежутков.
Цифровые решения для обхода препятствий развиваются вместе с усилением законодательных действий. VPN-инструменты класса premium гарантируют кодирование AES-256 и системы OpenVPN. Устойчивость связи кардинально существенна для VIP игровых периодов.
Резервные ресурсы работают через регионально размещенные цифровые инфраструктуры. CDN-комплексы поддерживают сокращенную время ответа для международных клиентов. Системное роутинг срабатывает при выявлении барьера главного домена.
Финансовые движения в официальных регионах следуют определенным правилам PCI DSS. Крипто платежи завоевывают востребованность вследствие приватности и динамике выполнения.
Мобильные приложения топовых операторов совмещают лицевую авторизацию и push-уведомления для принципиальных событий. Настраиваемый внешний вид программно корректируется под свойства матрицы.
Do you mind if I quote a couple of your posts as
long as I provide credit and sources back to your weblog?
My website is in the exact same area of interest as yours and my visitors would
truly benefit from a lot of the information you present here.
Please let me know if this alright with you. Cheers!
Feel free to visit my page: free DNS tools online
Лицензионные провайдеры гэмблинг возможностей предоставляют пользователям возможность к элитному азартному досугу через специализированные сайты, включая казино лова , которые точно следуют глобальные критерии security.
Алгоритм создания аккаунта предполагает предоставления проверочных деталей через защищённые SSL-каналы. Букмекеры требуют official свидетельство правоспособности и территории проживания для поддержания нормативных правил.
Multi-factor проверка становится required aspect новейших систем конфиденциальности. Users получают SMS-токены, push-уведомления или используют targeted приложения в стиле Google Authenticator.
Зеркальные порталы нейтрализуют сложности географических запретов и DDoS-нападений. С технической точки зрения зеркала являют дублированные dublicates основного портала с обеспечением features и user деталей.
Профессиональные клиенты предлагают хранить current перечни активных дублей в сохранённых ссылках браузера. Операторы рассылают обновления о свежих адресах через email, Telegram-чаты и смартфонные apps.
Банковские процедуры через проверенные площадки secured защитными алгоритмами уровня банковского сектора. Получение денег осуществляется единственно на проверенные wallets держателя учётной записи.
Рабочие резервные адреса легальных гемблинг-платформ на казино Mellstroy Game гарантируют непрерывный вход к геймерским сервисам. Технология клонирования создает точные версии центрального ресурса с удержанием всех опций.
Схема активации через альтернативный домен на сто процентов дублирует базовую заявку. Свежие участники заполняют валидный email, генерируют стойкий секретную комбинацию и выбирают рабочую платежное средство.
Верификация аккаунта содержит предоставления документов в соответствии с KYC-нормам. Копия водительских прав, верификация места жительства и банковские сведения контролируются системой алгоритмическую валидацию в течение 24-72 часов.
Авторизация действующих участников осуществляется через базовую интерфейс с двухфакторной проверкой. Разовые коды поступают на мобильный гаджет или мейл.
Инструменты входящего раздела через зеркала предлагает распространенные денежные сервисы. Visa, Mastercard, онлайн кошельки Skrill, Neteller, криптовалюты Bitcoin, Ethereum выполняются с уменьшенными процентами 0-3%.
Игровая база воспроизводится на сто процентов включая слоты, карточные активности, live-дилеров и джекпоты. RTP-индикаторы, колебания и условия отыгрыша фиксируются аналогичными.
Подарочная схема работает аналогично главному порталу. Welcome-наборы, даровые прокруты, refund и VIP-курсы активируются программно при реализации определенных стандартов.
I am really enjoying the theme/design of your site.
Do you ever run into any internet browser compatibility
problems? A couple of my blog readers have complained about my website
not operating correctly in Explorer but looks great in Safari.
Do you have any recommendations to help fix this problem?
Here is my web-site – Roofing Contractors
PHL Market Official – Love seeing new local products and staying informed with recent posts.
多瑙高清完整版2026 海外华人免费最新热播剧集
范德沃克高清完整版2026 海外华人免费最新热播剧集
I think this is among the most vital information for me.
And i’m glad reading your article. But should remark on some general
things, The site style is wonderful, the articles
is really great : D. Good job, cheers
Review my web site :: Austin Roofers
Актуальные порталы гемблинг активностей гарантируют беттерам возможность к высококлассному игровому процессу через сертифицированные Меллстрой официальный сайт системы. Официальная деятельность требует соблюдения четких регуляторных норм.
Алгоритм активации игрового учетной записи содержит подтверждение персональных показателей. Провайдеры задействуют углубленные системы KYC и AML для блокировки мошеннических финансовых действий.
IT системы передовых беттинг площадок работают на стабильных дата-центрах с HTTPS алгоритмами. Геоблокировка заставляет управляющих организовывать дублирующие адреса.
Зеркальные домены формируют идентичные версии базового ресурса с удержанием всех сервисов и сведений. Пользователи обеспечивают себе беспрепятственный доступ к счету, развлекательной истории и персональным параметрам.
Расчетные переводы производятся через синхронизированные расчетные сервисы. Ограничения на пополнения и обналичивания устанавливаются в гармонии с лицензионными критериями и индивидуальными нормами риск-менеджмента.
Экспертные беттеры предлагают отслеживать статус разрешения через регуляторные реестры азартных ведомств. Имиджевые критерии предусматривают места на профильных платформах и комментарии подлинных беттеров.
Игровая область являет быстрый подъём, привлекая миллионы участников. Опытные порталы дают надёжную обстановку для пари. Исчерпывающую материалы о этих компаниях доступно изучить на Лаки Бир казино .
Аккредитация составляет приоритетным критерием отбора платформы. Лицензиаты Кюрасао предоставляют жёсткий проверку финансовых действий. Любая аккредитованная портал реализует постоянные контроли RNG-генераторов.
Программные характеристики инновационных казино объединяют SSL-шифрование экономического уровня. Поставщики программного продукта типа Microgaming, NetEnt, Pragmatic Play подключают комплексные модели произвольных чисел.
Схема аутентификации личного кабинета предполагает передачи бумаг KYC-формата. Удостоверение, подтверждение о доходах, верификация проживания — базовый пакет для завершённого входа.
Параллельные порталы решают трудности с фильтрацией провайдеров. Актуальные варианты модифицируются постоянно компьютерными группами. Карманные утилиты часто функционируют устойчивее интернет форматов.
Распределение капитала формирует перспективную доходность игровых партий. Квалифицированные игроки рекомендуют урезать размер пари до 1-2% от совокупного бюджета.
вакуумное водопонижение вакуумное водопонижение .
DiBruno Fine Wines – Excellent product variety and informative updates keep me coming back.
Поиск безопасного азартного заведения в современных условиях требует особого рассмотрения к юридическому режиму. Опытные участники понимают, что [url=https://wanted.iarazi.com/ofitsialnyy-sayt-vovan-kazino-igrayte-v-onlayn-kazino-segodnya/]казино Вован[/url] содержит свежую данные о активных ресурсах.
Схема регистрации в лицензированных заведениях объединяет обязательную аутентификацию идентичности. KYC-требования гарантируют как оператора, так и клиента от махинаций. Временные лимиты на изъятие капитала до выполнения валидации – типичная процедура.
Технические блокировки на вход к гемблинг ресурсам нейтрализуются через зеркальные домены. Функционирующие клоны сохраняют стопроцентную производительность центрального платформы. Расчетные движения, игровой достижения и поощрительные предложения продолжают устойчивыми.
Денежная защищенность оценивается уровнем внедренных финансовых механизмов. SSL-шифрование, PCI DSS подтверждение и расширенная верификация устанавливают прочный контур охраны.
Азартная ассортимент лицензированных сервисов предоставляет слоты от главных производителей. RTP-показатели, волатильность и расчетные модели проходят независимую сертификацию в утвержденных институтах.
Схемы поощрения в достойных казино опираются на ясных критериях активности. Условия ставок x35-40 оценивается приемлемым для машина-льгот, в то время как карточные забавы засчитываются в подсчет с уменьшенным показателем.
Легальные операторы азартных услуг oferuja пользователям вариант к качественному развлечениям через тематические домены, включая https://zelenovskoe.ru/ru-ru/ , которые специально выполняют международные регламенты security.
Схема оформления профиля включает ввода проверочных деталей через защищённые SSL-connection. Провайдеры demanded документальное verification совершеннолетия и локации регистрации для выполнения законодательных критериев.
Двухэтапная верификация считается mandatory составляющей современных платформ безопасности. Участники получают SMS-коды, push-notification или применяют специализированные приложения вроде Google Authenticator.
Зеркальные домены решают проблемы geographic санкций и DDoS-воздействий. С технической точки зрения дубли представляют идентичные клоны главного сайта с maintaining features и пользовательских параметров.
Компетентные пользователи suggest keeping обновлённые каталоги working зеркал в закладках browser. Операторы отправляют информацию о новых URL через почтовые сервисы, Telegram-сообщества и портативные приложения.
Денежные переводы через надёжные платформы secured защитными протоколами стандарта банковского индустрии. Снятие фондов выполняется solely на подтверждённые реквизиты владельца account.
https://certicanpharmacy.shop/# CertiCanPharmacy
Отбор качественного азартного заведения в сегодняшних обстоятельствах требует тщательного внимания к правовому уровню. Опытные геймеры осознают, что Lucky Bear казино содержит актуальную факты о активных сервисах.
Механизм регистрации в официальных операторах включает необходимую аутентификацию личности. KYC-нормы обеспечивают как казино, так и пользователя от мошенничества. Краткосрочные границы на снятие финансов до окончания валидации – нормальная подход.
Электронные запреты на подключение к развлекательным сервисам нейтрализуются через резервные порталы. Активные дубликаты обеспечивают абсолютную работоспособность основного сервиса. Финансовые переводы, геймплейный результаты и льготные системы остаются константными.
Денежная гарантированность оценивается степенью задействованных денежных методов. SSL-шифрование, PCI DSS сертификация и дополнительная проверка гарантируют надежный щит ограждения.
Игровая коллекция легальных сервисов объединяет слоты от известных студий. RTP-параметры, изменчивость и алгоритмические формулы испытывают внешнюю валидацию в аккредитованных институтах.
Схемы лояльности в надежных казино формируются на понятных условиях вейджера. Проигрыш x35-40 расценивается адекватным для автомат-бонусов, в то время как классические состязания засчитываются в зачет с редуцированным фактором.
https://www.diigo.com/item/note/b05aq/toxv?k=c5d69e9443a5361d9b1fa05fdaf52f9e
Hi are using WordPress for your blog platform? I’m new to the
blog world but I’m trying to get started and set up my own.
Do you need any coding knowledge to make your
own blog? Any help would be really appreciated!
Here is my web-site – local roofing company
Активные mirror-ссылки легальных игорных заведений на Лаки Бир официальный сайт создают стабильный соединение к развлекательным платформам. Схема реплицирования генерирует точные копии главного портала с сохранением всех возможностей.
Схема открытия счета через альтернативный домен абсолютно имитирует базовую анкету. Свежие клиенты указывают активный email, устанавливают защищенный код доступа и фиксируют операционную платежное средство.
Верификация личного кабинета требует предоставления свидетельств согласно KYC-стандартам. Фото ID-карты, верификация места жительства и банковские сведения анализируются посредством алгоритмическую валидацию в течение 24-72 часов.
Подключение существующих геймеров реализуется через базовую модуль с 2FA идентификацией. Сессионные токены доставляются на мобильный аппарат или почтовый ящик.
Механизмы денежного раздела через mirror-сайты включает востребованные расчетные механизмы. Visa, Mastercard, цифровые хранилища Skrill, Neteller, виртуальные монеты Bitcoin, Ethereum выполняются с низкими сборами 0-3%.
Игровая каталог повторяется в точности включая spinning games, карточные геймплей, live-операторов и прогрессивы. RTP-показатели, колебания и ставочные требования фиксируются такими же.
Промо политика действует аналогично корневому порталу. Welcome-наборы, бесплатные вращения, денежный возврат и VIP-курсы активируются машинально при соблюдении прописанных критериев.
Exclusive from SkyBri Officiall – daily reviews, new publications, and direct communication. Subscribe to stay up-to-date and in the know.
Learn about Play-Brary – Explore well-presented ideas delivered in an approachable and cheerful way.
Discover the world of CandyLove Officiall: exclusive content, daily reviews, and direct communication. Subscribe to receive the latest updates and stay up-to-date with new publications.
Immerse yourself in the world of CrystalLust: unique content, daily reviews, and direct interaction. Here you’ll find not only content but also live, informal communication.
canada drug pharmacy: safe reliable canadian pharmacy – CertiCanPharmacy
Contenido exclusivo de KarelyRuiz Officially: resenas diarias, nuevos materiales y la oportunidad de interactuar personalmente. Mantengase conectado y acceda a las ultimas publicaciones.
Unique content from Gattouz0 – daily reviews, new materials, and the opportunity for personal interaction. Stay connected and get access to the latest publications.
Действующие дублирующие порталы проверенных игорных заведений на п»ї1хбет сайт гарантируют устойчивый вход к гемблинг порталам. Технология клонирования создает точные клоны главного ресурса с консервацией всех функций.
Схема открытия счета через зеркало целиком воспроизводит главную форму. Новые геймеры заполняют активный email, создают безопасный код доступа и определяют базовую платежное средство.
Валидация профиля включает представления документов опираясь на KYC-стандартам. Фото паспорта, верификация регистрации и финансовые координаты подвергаются цифровую верификацию в течение 24-72 ч.
Аутентификация верифицированных игроков осуществляется через базовую форму с усиленной идентификацией. Одноразовые ключи отправляются на мобильный аппарат или электронную почту.
Функционал денежного сектора через mirror-сайты поддерживает актуальные финансовые системы. Visa, Mastercard, цифровые балансы Skrill, Neteller, crypto Bitcoin, Ethereum осуществляются с уменьшенными платежами 0-3%.
Развлекательная каталог дублируется в точности включая барабаны, столовые активности, live-хостов и прогрессивы. RTP-индикаторы, изменчивость и проигрыш удерживаются неизменными.
Подарочная система действует похоже главному ресурсу. Welcome-наборы, фриспины, refund и VIP-программы запускаются программно при соблюдении заданных стандартов.
Игровая сфера отображает динамичный рост, заинтересовывая массы игроков. Профессиональные порталы гарантируют стабильную пространство для ставок. Исчерпывающую данные о таких организациях реально найти на казино Лаки Бир .
Лицензирование остаётся главным показателем выбора площадки. Юрисдикции Гибралтара предоставляют серьёзный надзор финансовых действий. Каждая легальная сайт подвергается регулярные аудиты RNG-алгоритмов.
Программные особенности актуальных гемблинг-сайтов охватывают SSL-безопасность экономического класса. Производители компьютерного материала наподобие Microgaming, NetEnt, Pragmatic Play добавляют усовершенствованные модели произвольных значений.
Алгоритм аутентификации учётной записи предусматривает предоставления документов KYC-класса. ID, документ о доходах, удостоверение регистрации — базовый набор для итогового подключения.
Резервные адреса ликвидируют трудности с блокировками провайдеров. Действующие альтернативы адаптируются ежедневно цифровыми службами. Планшетные приложения часто выполняются устойчивее браузерных редакций.
Распределение капитала определяет продолжительную эффективность азартных раундов. Профессиональные участники предлагают сокращать количество депозита до 1-2% от итогового капитала.
Современные гемблеры встречаются с сложностью подключения к официальным платформам. Поставщики фильтруют основные ссылки, но грамотные Голд зеркало посетители помнят о наличии зеркальных сайтов.
Параллельный портал представляет стопроцентную воспроизведение оригинального платформы. SSL-сертификаты функционируют равнозначными. Денежные операции реализуются через те же системы.
Методика оформления профиля через альтернативный адрес предполагает типовой валидации. Менеджеры уточняют свидетельства для осуществления KYC-требований. Личные сведения осуществляют комплексную верификацию.
Вносительные лимиты на резервных платформах совпадают основным условиям. Наименьшие ставки функционируют неизменными. Накопительные выигрышные пулы координируются между разными порталами.
Стимулирующие программы работают всесторонне на параллельных площадках. Вейджер гарантирует оригинальные цифры. Тайминг реализации не изменяется.
Департамент ассистирования рассматривает вопросы с резервных ссылок равнозначно. Живой чат осуществляет непрерывный расписание оперирования.
Легальные ресурсы игорных предложений гарантируют геймерам шанс к элитному развлечениям через специализированные ресурсы, включая тип топ казино , что придерживаются международные нормы security.
Механизм регистрации necessita предоставления проверочных деталей через шифрованные SSL-каналы. Провайдеры запрашивают официальное удостоверение age verification и региона residence для исполнения законодательных норм.
Двухэтапная authentication выступает required составляющей современных механизмов безопасности. Участники имеют SMS-шифры, push-уведомления или применяют профессиональные tools наподобие Google Authenticator.
Альтернативные ссылки решают вопросы географических санкций и DDoS-атак. Техническим образом копии формируют аналогичные версии базового ресурса с maintaining инструментария и user информации.
Опытные игроки suggest сохранять актуальные базы функционирующих зеркал в favourites веб-клиента. Операторы отправляют updates о свежих URL через почтовые сервисы, Telegram-чаты и mobile программы.
Денежные транзакции через официальные сайты покрыты cryptographic технологиями стандарта банковского области. Получение средств реализуется только на верифицированные реквизиты обладателя личного кабинета.
WOW just what I was looking for. Came here by searching for natural supplements for anxiety
мегафон перейти со своим номером Выбор подходящего тарифа интернета от Мегафон или другого провайдера важен для комфортного пользования услугами, будь то для работы, развлечений или телевидения.
explore sweet springs shop – The presentation is clean, charming, and easy to navigate.
Ориентирование в пространстве легальных порталов включает понимания новых способов авторизации. Квалифицированные игроки внедряют Лаки Бир казино для обретения свежей данных о функционирующих URL.
Механизм создания счета в лицензированных учреждениях содержит комплексную валидацию. Продвинутые операторы эксплуатируют KYC-системы и AML-критерии. Документооборот составляет от 24 до 72 часов.
IT способы для прохождения препятствий прогрессируют синхронно с ужесточением законодательных действий. VPN-платформы уровня premium предлагают шифрование AES-256 и протоколы OpenVPN. Постоянство соединения критически необходима для привилегированных раундов.
Альтернативные сайты работают через локально рассредоточенные технические инфраструктуры. CDN-комплексы поддерживают низкую латентность для азиатских клиентов. Программное роутинг активируется при идентификации препятствия первичного адреса.
Финансовые операции в сертифицированных областях следуют конкретным требованиям PCI DSS. Блокчейн расчеты завоевывают популярность вследствие приватности и оперативности обработки.
Портативные клиенты ведущих компаний объединяют отпечатковую авторизацию и push-алерты для важных происшествий. Гибкий дизайн независимо изменяется под настройки панели.
Отбор честного развлекательного ресурса подразумевает тщательного рассмотрения юридических разрешений. Актуальные сайты п»ї1хбет казино предоставляют пользователям максимальную информацию о текущих лицензиях.
Процедура открытия аккаунта подразумевает несколько требуемых стадий проверки. Провайдеры запрашивают бумаги, устанавливающие самобытность и дееспособность. Стандартный KYC-регламент составляет от 24 до 72 периодов.
Контроль средств начинается с задания рамок на депозиты. Квалифицированные клиенты советуют внедрять принцип 5% от итогового азартного резерва на одну партию.
Электронные запреты администраторов принуждают эксплуатировать альтернативные пути. Клоны сохраняют полную эффективность первичного платформы, включая архив сделок и развлекательный прогресс.
Актуальные банковские сервисы обеспечивают мгновенные депозиты через блокчейн аккаунты. Bitcoin, Ethereum и устойчивые монеты обеспечивают конфиденциальность и мизерные отчисления. Время проведения получений достигает 10-30 промежутков.
Планы лояльности предусматривают многоуровневые статусы с увеличивающимся бонусом. VIP-представители дают личные вознаграждения, повышенные ограничения и опережающую поддержку.
Planner Port Tools Hub – Great resources and moving around the site is effortless.
Передовые гемблеры встречаются с сложностью соединения к легальным площадкам. Провайдеры запрещают первичные ссылки, но опытные казино Lucky Bear пользователи понимают о присутствии параллельных площадок.
Параллельный портал образует абсолютную дубликат главного ресурса. Криптографические алгоритмы работают аналогичными. Платёжные операции реализуются через идентичные каналы.
Технология регистрации через резервный домен содержит классической подтверждения. Администраторы запрашивают свидетельства для осуществления KYC-правил. Личные сведения реализуют комплексную валидацию.
Депозитные пределы на зеркальных ресурсах соответствуют первичным требованиям. Начальные беты продолжают неизменными. Возрастающие выигрышные пулы координируются между всеми порталами.
Поощрительные схемы функционируют завершённо на параллельных сайтах. Множитель ставок удерживает первоначальные цифры. Тайминг оборота продолжается.
Департамент поддержки обрабатывает запросы с альтернативных ссылок идентично. Интерактивный чат поддерживает постоянный режим деятельности.
Ориентирование в области лицензированных ресурсов предполагает понимания продвинутых методов соединения. Опытные клиенты используют retro casino для получения новейшей фактов о действующих путях.
Процедура создания аккаунта в официальных компаниях содержит сложную проверку. Современные организации используют KYC-системы и AML-нормы. Документальное сопровождение требует от 24 до 72 временных отрезков.
IT способы для прохождения препятствий совершенствуются сообща с укреплением правовых шагов. VPN-инструменты типа premium предоставляют кодирование AES-256 и протоколы OpenVPN. Стабильность подключения кардинально актуальна для VIP раундов.
Зеркальные домены действуют через географически рассредоточенные IT кластеры. CDN-структуры предоставляют сокращенную задержку для европейских участников. Системное маршрутизация включается при выявлении ограничения базового портала.
Платежные движения в лицензированных областях подпадают под определенным нормам PCI DSS. Цифровые платежи набирают востребованность благодаря секретности и темпу обработки.
Мобильные утилиты элитных компаний включают физиологическую подтверждение и push-алерты для важных эпизодов. Адаптивный внешний вид независимо подстраивается под свойства дисплея.
Легальные платформы азартных возможностей дают клиентам вариант к элитному развлечениям через dedicated сайты, включая казино Mellstroy Game , которые точно следуют мировые критерии конфиденциальности.
Схема активации требует внесения идентификационных данных через безопасные SSL-соединения. Менеджмент просят official подтверждение дееспособности и территории нахождения для compliance юрисдикционных требований.
Двухфакторная верификация считается обязательным частью передовых solutions конфиденциальности. Пользователи получают SMS-коды, push-оповещения или внедряют dedicated tools в стиле Google Authenticator.
Дублирующие порталы устраняют проблемы geographic барьеров и DDoS-штурмов. С технической точки зрения дубли образуют аналогичные клоны главного портала с сохранением инструментария и клиентских деталей.
Профессиональные участники призывают сохранять обновлённые списки активных зеркал в favourites browser. Операторы доставляют новости о fresh URL через email, Telegram-сообщества и портативные софт.
Финансовые переводы через legal площадки гарантированы cryptographic технологиями категории банковского segment. Extraction денег реализуется лишь на верифицированные счета собственника учётной записи.
Актуальные геймеры обталкиваются с множеством технических нюансов при процессах с сертифицированными площадками. Профессиональные источники типа Голд казино поставляют свежую материалы о работе азартных провайдеров.
Процесс проверки аккаунта включает ряд принудительных уровней. Стартовая валидация включает размещения справок валидирующих субъект. Привычный набор включает ID, лицензию водителя или внешний паспорт.
Технологическая сторона оформления включает использование зашифрованного канала и многофакторной защиты. Квалифицированные пользователи настаивают запускать максимум возможных параметров секьюрити.
Резервные ссылки представляют точные копии базового сайта с сохранением исчерпывающего арсенала. Центральное преимущество заключается в подобии расчетных лимитов и параметров условий прокрутки.
Механизм обнаружения рабочих зеркал базируется на мониторинге тематических мессенджер групп и партнерских платформ. Опытные клиенты задействуют VPN-сервисы для обеспечения устойчивого входа безотносительно от региональных лимитов.
машинное обучение креативы reklamnyj-kreativ8.ru .
Нынешние бетторы оказываются с барьером связи к легальным площадкам. Провайдеры закрывают базовые адреса, но знающие п»ї1xBet зеркало игроки учитывают о наличии альтернативных платформ.
Дополнительный домен является идентичную дубликат оригинального сайта. SSL-сертификаты функционируют равнозначными. Платёжные процедуры производятся через аналогичные системы.
Схема заведения учётной записи через альтернативный портал содержит обычной верификации. Менеджеры требуют бумаги для соблюдения KYC-требований. Индивидуальные данные выполняют расширенную проверку.
Пополнительные пределы на зеркальных платформах аналогичны базовым спецификациям. Минимальные взносы продолжают константными. Возрастающие джекпоты согласовываются между многочисленными порталами.
Льготные схемы выполняются завершённо на зеркальных сайтах. Требования по обороту удерживает первоначальные значения. Период действия использования продолжается.
Команда обслуживания анализирует обращения с параллельных доменов идентично. Мгновенный разговор поддерживает круглосуточный формат функционирования.
Can I simply just say what a relief to find someone
that really knows what they are discussing on the web.
You actually understand how to bring an issue to light and make it important.
A lot more people have to look at this and understand this side of the story.
I can’t believe you’re not more popular because you surely possess the gift.
Also visit my website :: Roofing companies
Актуальные mirror-ссылки легальных азартных клубов на п»ї1xBet casino обеспечивают постоянный подключение к гемблинг платформам. Методика клонирования формирует полноценные копии корневого домена с поддержанием всех опций.
Процедура регистрации через зеркало полностью повторяет стандартную заявку. Начинающие игроки вводят функционирующий email, устанавливают стойкий секретную комбинацию и выбирают операционную платежное средство.
Верификация аккаунта предполагает загрузки бумаг по KYC-регламенту. Копия национального документа, верификация адреса и карточные параметры проходят машинную контроль в течение 24-72 ч.
Аутентификация зарегистрированных участников происходит через классическую модуль с расширенной аутентификацией. Разовые шифры поступают на телефонный устройство или мейл.
Механизмы финансового блока через дублирующие порталы поддерживает распространенные банковские инструменты. Visa, Mastercard, виртуальные портмоне Skrill, Neteller, цифровые активы Bitcoin, Ethereum обрабатываются с минимальными процентами 0-3%.
Gaming коллекция клонируется на сто процентов включая слоты, классические игры, live-хостов и джекпоты. RTP-значения, изменчивость и проигрыш сохраняются идентичными.
Промо программа функционирует подобно базовому порталу. Welcome-предложения, даровые прокруты, компенсация и VIP-курсы инициируются алгоритмически при достижении заданных критериев.
Официальные ресурсы игровых возможностей обеспечивают участникам возможность к профессиональному игровому процессу через dedicated ресурсы, включая тип топ казино РІС…РѕРґ , которые именно выполняют transnational регламенты надёжности.
Алгоритм оформления профиля подразумевает предоставления идентификационных деталей через защищённые SSL-connection. Провайдеры требуют документальное verification age verification и территории регистрации для исполнения юрисдикционных правил.
Двухфакторная верификация становится mandatory aspect передовых механизмов надёжности. Пользователи обретают SMS-коды, push-notification или задействуют профессиональные приложения по типу Google Authenticator.
Mirror порталы преодолевают препятствия territorial ограничений и DDoS-нападений. По сути зеркала формируют копийные клоны главного платформы с maintaining опций и индивидуальных данных.
Компетентные игроки suggest хранить обновлённые реестры активных дублей в сохранённых ссылках интернет-программы. Операторы отправляют обновления о новых URL через электронную почту, Telegram-communities и телефонные apps.
Payment movements через официальные платформы обеспечены cryptographic системами категории банковского segment. Снятие фондов реализуется единственно на validated данные владельца учётной записи.
Исследование в секторе сертифицированных порталов нуждается осознания актуальных инструментов доступа. Умелые участники используют лаки Р±РёСЂ казино для извлечения актуальной сведений о оперативных адресах.
Схема создания профиля в надежных операторах подразумевает комплексную проверку. Современные компании эксплуатируют KYC-механизмы и AML-стандарты. Документальное сопровождение составляет от 24 до 72 интервалов.
Технические способы для обхода блокировок развиваются параллельно с ужесточением юридических действий. VPN-инструменты класса premium предлагают кодирование AES-256 и стандарты OpenVPN. Устойчивость коннекта fundamentally значима для высокоролловых партий.
Альтернативные сайты действуют через пространственно распределенные цифровые инфраструктуры. CDN-системы предоставляют сокращенную время ответа для азиатских игроков. Системное редирект инициируется при распознавании блокировки основного ресурса.
Экономические транзакции в легальных областях подчиняются жестким критериям PCI DSS. Крипто платежи приобретают распространение благодаря анонимности и оперативности осуществления.
Мобильные софт премиальных операторов содержат физиологическую авторизацию и push-извещения для ключевых ситуаций. Адаптивный облик независимо корректируется под характеристики матрицы.
Hi there! Quick question that’s completely off topic.
Do you know how to make your site mobile friendly? My website looks weird when browsing from my
iphone4. I’m trying to find a template or plugin that might
be able to correct this issue. If you have any recommendations, please share.
Thank you!
Check out my web-site … Austin Texas roofers
Best Value Selection – Smooth pages and well-displayed products make shopping pleasant.
Легальные операторы азартных опций дают клиентам право к высококлассному развлечениям через специализированные сайты, включая Меллстрой сайт , которые именно исполняют международные стандарты надёжности.
Механизм активации требует ввода валидационных параметров через безопасные SSL-протоколы. Операторы просят нотариальное свидетельство age verification и места регистрации для исполнения правовых правил.
Многоуровневая аутентификация становится необходимым aspect актуальных платформ защиты. Участники получают SMS-пароли, push-сообщения или используют targeted приложения по типу Google Authenticator.
Альтернативные ссылки решают проблемы territorial барьеров и DDoS-нападений. Технически дубли составляют дублированные копии primary сайта с удержанием features и пользовательских сведений.
Профессиональные клиенты призывают поддерживать актуальные базы действующих копий в избранном обозревателя. Букмекеры передают информацию о новых URL через e-mail, Telegram-сообщества и смартфонные apps.
Платёжные процедуры через лицензионные сайты гарантированы encryption methods уровня банковского сектора. Extraction капитала выполняется solely на validated wallets хозяина личного кабинета.
Перемещение в сфере проверенных площадок подразумевает знания современных инструментов соединения. Квалифицированные участники эксплуатируют п»ї1хбет сайт для добывания современной информации о функционирующих URL.
Процедура формирования личного кабинета в проверенных компаниях охватывает сложную валидацию. Современные провайдеры задействуют KYC-механизмы и AML-правила. Документальное сопровождение потребляет от 24 до 72 интервалов.
Цифровые инструменты для преодоления запретов улучшаются одновременно с интенсификацией нормативных решений. VPN-сервисы типа premium предлагают защиту AES-256 и методы OpenVPN. Надежность коннекта критически важна для премиальных заходов.
Резервные адреса оперируют через локально размещенные цифровые ресурсы. CDN-комплексы осуществляют оптимальную пинг для глобальных участников. Автоматическое редирект инициируется при обнаружении препятствия базового портала.
Банковские операции в лицензированных юрисдикциях следуют строгим нормам PCI DSS. Децентрализованные платежи приобретают востребованность вследствие конфиденциальности и динамике реализации.
Мобильные клиенты лучших операторов совмещают лицевую идентификацию и push-оповещения для ключевых моментов. Гибкий облик автономно адаптируется под параметры дисплея.
https://electroswingthing.com/profile/CodigoVip1/
Игровая область представляет интенсивный подъём, притягивая миллионы игроков. Квалифицированные площадки гарантируют качественную атмосферу для развлечений. Детальную данные о указанных организациях можно отыскать на Lucky Bear зеркало .
Сертификация выступает основным аспектом отбора портала. Регуляторы Великобритании создают жёсткий аудит валютных действий. Любая легальная сайт подвергается периодические инспекции RNG-модулей.
Цифровые особенности современных беттинг-платформ предусматривают SSL-шифрование банковского класса. Провайдеры виртуального ПО типа Microgaming, NetEnt, Pragmatic Play подключают многоуровневые алгоритмы случайных значений.
Процесс подтверждения личного кабинета требует передачи бумаг KYC-типа. Документ, справка о финансах, валидация адреса — типичный набор для окончательного входа.
Резервные URL решают сложности с цензурой провайдеров. Свежие альтернативы адаптируются каждый день компьютерными командами. Карманные утилиты нередко оперируют лучше интернет редакций.
Банкролл-менеджмент определяет продолжительную результативность азартных циклов. Квалифицированные геймеры предлагают контролировать количество бета до 1-2% от суммарного капитала.
Актуальные пользователи встречаются с массой системных тонкостей при деятельности с официальными порталами. Специализированные платформы типа п»ї1хбет официальный сайт дают актуальную контент о процессах развлекательных компаний.
Механизм проверки аккаунта подразумевает набор обязательных фаз. Стартовая проверка включает размещения документов доказывающих личность. Типовой список предполагает документ, права или международное ID.
Техническая элемент регистрации предполагает задействование защищенного протокола и 2FA. Экспертные клиенты настаивают включать совокупность представленных параметров секьюрити.
Альтернативные адреса формируют точные дубликаты основного сайта с обеспечением тотального функционала. Основное плюс состоит в идентичности платежных ограничений и параметров отыгрыша.
Алгоритм обнаружения функционирующих зеркал фундируется на мониторинге профессиональных информационных каналов и сотрудничающих платформ. Квалифицированные пользователи задействуют виртуальные частные сети для предоставления бесперебойного входа вне зависимости от территориальных блокировок.
Нужны ЖБИ? https://postroi-ka.by широкий ассортимент ЖБИ, прочные конструкции и оперативная доставка на объект. Консультации специалистов и индивидуальные условия сотрудничества.
Легальные платформы игорных возможностей дают пользователям шанс к элитному времяпрепровождению через профильные ресурсы, включая казино Гризли , которые точно следуют общепринятые стандарты security.
Схема открытия счёта включает указания authentication деталей через encrypted SSL-протоколы. Администрация требуют письменное удостоверение дееспособности и локации жительства для соблюдения юрисдикционных правил.
Двухфакторная идентификация выступает принудительным aspect современных механизмов безопасности. Игроки имеют SMS-ключи, push-сообщения или внедряют профессиональные софт по типу Google Authenticator.
Резервные порталы ликвидируют трудности географических ограничений и DDoS-атак. Фактически mirrors составляют тождественные копии главного домена с поддержанием инструментария и user информации.
Компетентные клиенты рекомендуют поддерживать свежие реестры функционирующих альтернатив в избранном браузера. Администрация отправляют updates о fresh URL через почтовые сервисы, Telegram-группы и телефонные программы.
Платёжные movements через legal ресурсы покрыты шифровальными methods уровня банковского сектора. Вывод денег производится лишь на аутентифицированные счета собственника аккаунта.
Нужен газоблок? https://gazobeton-krasnodar.ru/katalog/ каталог газоблоков и газобетона в Краснодаре: размеры, характеристики и цены на газобетонные блоки КСМК. Можно купить газоблоки с доставкой по Краснодару, краю и СКФО. Актуальная цена газоблоков, помощь в подборе, расчет объема и заказ с завода
Visiting pin-up registration link gives you access to a legitimate gaming platform with clear terms and conditions regarding bonuses. The registration is fast, and the verification process didn’t take more than a few hours in my case.
Строишь дом или забор? https://gazobeton-krasnodar.ru продажа газобетона и газоблоков в Краснодаре с доставкой по Краснодарскому краю и СКФО. В наличии автоклавные газобетонные блоки D400, D500, D600, опт и розница, расчет объема, цены от производителя, доставка на объект манипулятором
Подбор надежного игорного площадки предполагает глубокого разбора официальных разрешений. Инновационные платформы казино миллионъ предоставляют пользователям абсолютную информацию о текущих допусках.
Процедура получения доступа предусматривает множество требуемых шагов верификации. Провайдеры истребуют удостоверения, доказывающие личность и возраст. Традиционный KYC-алгоритм составляет от 24 до 72 периодов.
Контроль средств открывается с установления границ на депозиты. Квалифицированные игроки советуют задействовать установку 5% от итогового гемблинг капитала на отдельную партию.
Системные запреты поставщиков побуждают задействовать запасные домены. Копии оберегают стопроцентную функциональность главного портала, включая архив платежей и казино достижения.
Передовые финансовые методы дают скоростные вклады через виртуальные хранилища. Bitcoin, Ethereum и стабильные валюты предоставляют тайность и крошечные комиссии. Срок проведения извлечений равно 10-30 периодов.
Планы преданности предусматривают каскадные уровни с прогрессивным вознаграждением. VIP-менеджеры дают персонализированные поощрения, повышенные лимиты и первоочередную техподдержку.
At legal gaming site you can enjoy a very immersive atmosphere with localized themes that resonate well with the Spanish audience. The bonuses are transparent and easy to track within your personal account.
https://certicanpharmacy.com/# CertiCanPharmacy
Good day! I could have sworn I’ve been to this web site before but after going
through many of the posts I realized it’s new to me.
Regardless, I’m certainly pleased I stumbled upon it and I’ll be bookmarking it and checking back often!
Here is my web blog … Austin Handyman
PMA Joe 4 Council portal – Navigate a platform with thoughtfully organized pages and community-oriented messaging.
Нынешние пользователи встречаются с огромным количеством технологических деталей при функционировании с лицензированными ресурсами. Специализированные ресурсы типа п»ї1хбет зеркало выдают современную данные о функционировании азартных брендов.
Механизм верификации счета предполагает ряд неотъемлемых этапов. Базовая валидация требует передачи справок валидирующих индивидуальность. Типовой список содержит документ, права или международный паспорт.
Техническая часть открытия счета подразумевает задействование криптографической защиты и 2FA. Продвинутые участники подсказывают запускать весь комплекс имеющихся настроек секьюрити.
Дублирующие порталы являются идентичные клоны первичного сайта с обеспечением полного арсенала. Главное преимущество состоит в идентичности денежных рамок и норм условий прокрутки.
Схема поиска актуальных резервных ссылок базируется на мониторинге профильных уведомительных сервисов и партнерских платформ. Квалифицированные геймеры внедряют виртуальные частные сети для гарантирования бесперебойного подключения без оглядки от географических лимитов.
Азартная отрасль представляет быстрый подъём, завлекая массы пользователей. Экспертные ресурсы предлагают надёжную среду для ставок. Подробную факты о этих организациях допустимо получить на Vavada казино .
Аттестация остаётся главным фактором выбора площадки. Юрисдикции Олдерни предоставляют строгий надзор финансовых процедур. Каждая аккредитованная сайт проходит плановые аудиты RNG-генераторов.
IT характеристики передовых гемблинг-сайтов охватывают SSL-шифрование финансового уровня. Поставщики софтового обеспечения класса Microgaming, NetEnt, Pragmatic Play подключают комплексные модели хаотичных чисел.
Механизм верификации учётной записи требует передачи документов KYC-формата. ID, подтверждение о заработке, верификация адреса — типичный набор для завершённого авторизации.
Резервные домены устраняют трудности с фильтрацией поставщиков. Функционирующие дубли адаптируются ежедневно программными отделами. Планшетные клиенты обычно выполняются качественнее интернет версий.
Банкролл-менеджмент определяет продолжительную успешность игровых партий. Профессиональные участники предлагают контролировать количество пари до 1-2% от итогового бюджета.
https://xjj3.cc/home.php?mod=space&uid=497606
Coral Crate Finds – Well-organized products and site loads quickly.
Поиск надежного развлекательного площадки предполагает тщательного изучения регулятивных документов. Новые системы СЌРЅРѕРјРѕ казино предоставляют клиентам максимальную информацию о текущих аккредитациях.
Процесс получения доступа предусматривает множество ключевых шагов подтверждения. Операторы требуют удостоверения, подтверждающие личность и правоспособность. Классический KYC-порядок продолжается от 24 до 72 временных отрезков.
Банкролл-менеджмент инициируется с назначения границ на инвестиции. Компетентные геймеры рекомендуют использовать правило 5% от общего развлекательного резерва на отдельную раунд.
Технические препятствия владельцев обязывают задействовать вспомогательные домены. Копии оберегают максимальную производительность базового площадки, предусматривая летопись сделок и гемблинг результаты.
Современные денежные сервисы гарантируют оперативные инвестиции через цифровые портмоне. Bitcoin, Ethereum и стабильные валюты предоставляют приватность и минимальные комиссии. Период выполнения изъятий насчитывает 10-30 интервалов.
Алгоритмы приверженности содержат градационные степени с нарастающим вознаграждением. VIP-консультанты гарантируют личные подарки, усиленные пределы и преимущественную поддержку.
Fairy Magic and Miracles – The heartfelt messages and lovely tales always lift my spirits.
Актуальные платформы азартных услуг гарантируют беттерам доступ к качественному игровому процессу через защищенные Вавада регистрация ресурсы. Легальная деятельность подразумевает учета четких контролирующих требований.
Система оформления пользовательского учетной записи включает аутентификацию конфиденциальных информации. Провайдеры применяют детализированные системы KYC и AML для предотвращения мошеннических транзакций.
Цифровые системы инновационных развлекательных порталов базируются на зашифрованных серверах с HTTPS технологиями. Региональная блокировка побуждает владельцев разрабатывать вспомогательные адреса.
Дублирующие домены составляют эквивалентные версии основного сайта с поддержанием всех инструментов и информации. Беттеры получают стабильный соединение к балансу, развлекательной записям и пользовательским опциям.
Денежные процедуры проходят через связанные расчетные шлюзы. Ограничения на инвестиции и выводы регулируются в соотношении с нормативными стандартами и индивидуальными политиками контроля угроз.
Профессиональные беттеры предлагают анализировать состояние сертификата через государственные реестры развлекательных ведомств. Статусные параметры предусматривают места на специализированных сервисах и мнения настоящих игроков.
Азартная ниша являет динамичный прогресс, привлекая легионы геймеров. Опытные порталы предоставляют качественную обстановку для игры. Исчерпывающую сведения о указанных провайдерах доступно обнаружить на ДживиСпин казино .
Аккредитация составляет приоритетным критерием определения площадки. Контролёры Гибралтара предоставляют жёсткий проверку денежных действий. Любая сертифицированная платформа выполняет постоянные аудиты RNG-модулей.
Программные характеристики передовых игорных домов предусматривают SSL-шифрование финансового категории. Создатели виртуального обеспечения наподобие Microgaming, NetEnt, Pragmatic Play добавляют сложные механизмы хаотичных значений.
Процедура верификации учётной записи требует подачи справок KYC-класса. Удостоверение, подтверждение о средствах, валидация местожительства — классический пакет для финального активации.
Резервные адреса решают трудности с блокировками организаций. Актуальные дубли модифицируются ежедневно IT командами. Мобильные клиенты обычно действуют лучше веб вариантов.
Контроль средств задаёт длительную прибыльность беттинговых циклов. Профессиональные геймеры предлагают лимитировать количество ставки до 1-2% от совокупного фонда.
Выбор безопасного гемблинг ресурса нуждается основательного исследования регулятивных разрешений. Современные платформы Меллстрой обеспечивают пользователям максимальную информацию о имеющихся допусках.
Механизм регистрации включает множество ключевых этапов верификации. Владельцы настаивают бумаги, удостоверяющие самобытность и совершеннолетие. Стандартный KYC-механизм составляет от 24 до 72 интервалов.
Банкролл-менеджмент стартует с определения лимитов на взносы. Профессиональные клиенты предлагают задействовать норму 5% от суммарного азартного резерва на индивидуальную заход.
Программные препятствия владельцев заставляют использовать резервные домены. Копии сохраняют стопроцентную эффективность базового платформы, охватывая архив платежей и развлекательный достижения.
Актуальные платежные системы дают мгновенные взносы через виртуальные аккаунты. Bitcoin, Ethereum и постоянные токены гарантируют анонимность и наименьшие сборы. Длительность выполнения извлечений достигает 10-30 отрезков.
Системы верности содержат многоуровневые степени с прогрессивным возвратом. VIP-кураторы предлагают индивидуальные поощрения, увеличенные пределы и первоочередную сервис.
https://loret.se
Реально недорогой и качественный ремонт стиральных машин в СПб наконец-то нашелся. Мастер РБТ-Сервис приехал уже со всеми необходимыми запчастями под мою модель. Быстро заменил ТЭН, и машинка снова греет воду как надо. Отличный сервис и отличный результат! https://rbt-servis-remont-stiralnyh-mashin-spb.clients.site/
Действующие резервные адреса легальных gaming-операторов на казино 1xBet создают устойчивый вход к развлекательным системам. Методика дублирования образует эквивалентные версии корневого портала с поддержанием всех механизмов.
Алгоритм регистрации через mirror-сайт абсолютно дублирует основную заявку. Свежие пользователи указывают активный email, устанавливают защищенный ключ и определяют игровую платежное средство.
Верификация профиля содержит передачи документов согласно KYC-нормам. Фото удостоверения личности, верификация проживания и финансовые координаты проверяются через автоматическую контроль в течение 24-72 часа.
Подключение верифицированных клиентов производится через классическую интерфейс с двухфакторной идентификацией. Одноразовые шифры отправляются на сотовый устройство или почтовый ящик.
Инструменты финансового раздела через дублирующие порталы поддерживает популярные расчетные системы. Visa, Mastercard, цифровые хранилища Skrill, Neteller, криптовалюты Bitcoin, Ethereum осуществляются с уменьшенными комиссиями 0-3%.
Развлекательная каталог повторяется целиком включая автоматы, настольные геймплей, live-дилеров и максимальные награды. RTP-индикаторы, изменчивость и вейджер поддерживаются неизменными.
Акционная схема работает идентично основному порталу. Welcome-бандлы, бесплатные вращения, компенсация и VIP-планы инициируются машинально при исполнении определенных стандартов.
ева казино вход Eva — это площадка для азартных игр онлайн, имеющая понятный сайт и огромный выбор развлечений: слоты, рулетка, блэкджек и игры с живыми крупье. Приветственный бонус для начинающих, а также регулярные акции делают игровой процесс еще увлекательнее. Создание аккаунта и пополнение счета — быстрая процедура, а правила вывода выигрышей — четкие. Eva — идеальный вариант для искателей надежных азартных игр в интернете.
Актуальные игроки оказываются с препятствием входа к легальным ресурсам. Организации блокируют базовые URL, но искушённые Меллстрой зеркало посетители понимают о присутствии резервных порталов.
Резервная ссылка является абсолютную реплику первичного портала. SSL-сертификаты поддерживаются идентичными. Финансовые переводы проходят через сходные каналы.
Процедура оформления профиля через зеркальный ресурс требует типовой аутентификации. Администраторы выясняют документы для соблюдения KYC-регламентов. Паспортные сведения реализуют расширенную аутентификацию.
Вносительные лимиты на зеркальных ресурсах совпадают первичным требованиям. Наименьшие суммы остаются постоянными. Возрастающие банки интегрируются между всеми адресами.
Премиальные планы работают полноценно на резервных платформах. Множитель ставок сохраняет оригинальные величины. Период действия проигрывания сохраняется.
Команда обслуживания решает вопросы с параллельных доменов аналогично. Мгновенный переписка поддерживает круглосуточный расписание работы.
vet pharmacy: pet rx – discount pet meds
ryzenrocket devices – Navigation is simple and purchasing works without complications.
Поиск в пространстве сертифицированных сайтов требует знания новых решений входа. Опытные геймеры применяют Голд для получения новейшей фактов о действующих ссылках.
Алгоритм формирования счета в надежных операторах охватывает детальную аутентификацию. Актуальные операторы задействуют KYC-алгоритмы и AML-критерии. Оформление документов занимает от 24 до 72 промежутков.
Компьютерные методы для обхода ограничений улучшаются сообща с усилением правовых инициатив. VPN-платформы типа premium обеспечивают кодирование AES-256 и системы OpenVPN. Стабильность связи принципиально важна для привилегированных раундов.
Запасные ресурсы функционируют через регионально рассредоточенные серверные мощности. CDN-структуры осуществляют быструю отклик для европейских участников. Техническое роутинг запускается при выявлении препятствия главного адреса.
Банковские манипуляции в сертифицированных областях соответствуют строгим критериям PCI DSS. Цифровые платежи получают признание из-за конфиденциальности и динамике осуществления.
Смартфонные приложения лучших компаний включают физиологическую проверку и push-оповещения для критических происшествий. Изменяемый интерфейс автономно адаптируется под характеристики монитора.
SkilletStreet Today – Products look appealing and browsing is quick and simple.
Выбор проверенного азартного ресурса подразумевает детального изучения юридических свидетельств. Инновационные системы типпи казино предлагают пользователям стопроцентную детали о собственных лицензиях.
Процедура оформления счета подразумевает множество необходимых шагов валидации. Владельцы требуют справки, устанавливающие идентичность и зрелость. Традиционный KYC-порядок требует от 24 до 72 часов.
Банкролл-менеджмент начинается с назначения пределов на инвестиции. Компетентные игроки предлагают применять закон 5% от полного развлекательного фонда на индивидуальную игру.
Программные барьеры поставщиков побуждают эксплуатировать альтернативные пути. Клоны сохраняют абсолютную функциональность основного сайта, предусматривая историю платежей и казино успех.
Актуальные банковские способы дают моментальные пополнения через виртуальные хранилища. Bitcoin, Ethereum и постоянные токены дают анонимность и мизерные взносы. Период выполнения извлечений насчитывает 10-30 интервалов.
Алгоритмы преданности подразумевают многоуровневые категории с увеличивающимся бонусом. VIP-координаторы гарантируют уникальные вознаграждения, увеличенные рамки и опережающую обслуживание.
Определение безопасного развлекательного заведения в актуальных реалиях предполагает повышенного подхода к регулятивному состоянию. Профессиональные клиенты знают, что Вавада отображает новую данные о действующих площадках.
Алгоритм открытия счета в лицензированных заведениях включает требуемую аутентификацию удостоверения. KYC-нормы оберегают как площадку, так и пользователя от обмана. Кратковременные границы на снятие финансов до окончания подтверждения – типичная система.
Программные запреты на соединение к betting сайтам нейтрализуются через зеркальные URL. Доступные копии поддерживают абсолютную функциональность центрального портала. Платежные движения, геймплейный продвижение и привилегированные предложения функционируют постоянными.
Финансовая надежность характеризуется уровнем задействованных банковских систем. SSL-кодирование, PCI DSS лицензирование и многоуровневая проверка обеспечивают безопасный контур обороны.
Развлекательная набор лицензированных операторов предоставляет спины от главных производителей. RTP-коэффициенты, колебания и математические системы испытывают внешнюю валидацию в утвержденных лабораториях.
Программы стимулирования в надежных операторах формируются на ясных параметрах отыгрыша. Отыгрыш x35-40 характеризуется нормальным для барабан-льгот, в то время как стандартные игры учитываются в счет с редуцированным процентом.
Игровая индустрия отображает интенсивный подъём, манящая массы игроков. Профессиональные сайты предоставляют надёжную условия для пари. Детальную сведения о таких провайдерах допустимо изучить на Лаки Бир сайт .
Аттестация остаётся основным элементом селекции ресурса. Надзорные органы Мальты гарантируют жёсткий контроль финансовых действий. Каждая легальная ресурс подвергается периодические ревизии RNG-алгоритмов.
Технические параметры актуальных казино включают SSL-кодирование экономического уровня. Провайдеры софтового ПО типа Microgaming, NetEnt, Pragmatic Play встраивают сложные схемы случайных чисел.
Схема аутентификации аккаунта подразумевает представления удостоверений KYC-класса. Свидетельство, справка о финансах, доказательство адреса — обычный список для итогового входа.
Резервные адреса убирают проблемы с запретами поставщиков. Действующие дубли адаптируются регулярно программными службами. Карманные софт зачастую выполняются качественнее онлайн вариантов.
Банкролл-менеджмент устанавливает продолжительную результативность беттинговых циклов. Грамотные пользователи рекомендуют контролировать размер пари до 1-2% от суммарного резерва.
Amazing! Its actually awesome article, I have got much clear idea
concerning from this post.
Feel free to surf to my site; roof repair near me
Brest vs Marseille 2026 Ligue 1焦点战20:45开踢,马赛客场挑战布雷斯特,法国足球最新赛事比分预测分析。
http://mymexicanpharmacy.com/# My Mexican Pharmacy
canadian online pharmacy reviews: CertiCanPharmacy – CertiCanPharmacy
Ароматизация помещений Аромамашины являются ключевым элементом этих стратегий, обеспечивая равномерную и эффективную диффузию ароматов в пространстве.
Hello I am so excited I found your website, I really found
you by error, while I was searching on Askjeeve for something else, Anyhow I am here now and would just like to say cheers for a marvelous post and
a all round exciting blog (I also love the theme/design), I don’t have time to read through it all at the minute but I have saved it and also included
your RSS feeds, so when I have time I will be back to read
much more, Please do keep up the fantastic job.
Here is my homepage :: port scan tool
Отбор надежного азартного заведения в текущих условиях нуждается тщательного внимания к лицензионному положению. Компетентные участники осознают, что казино Меллстрой включает свежую факты о активных площадках.
Алгоритм открытия счета в легальных заведениях включает неизбежную валидацию личности. KYC-требования защищают как сервис, так и участника от фрода. Промежуточные границы на перечисление средств до выполнения верификации – обычная система.
Технические барьеры на связь к гемблинг сервисам обходятся через зеркальные домены. Рабочие дубликаты обеспечивают всестороннюю работоспособность главного ресурса. Платежные операции, игровой прогресс и поощрительные планы остаются устойчивыми.
Экономическая стабильность выражается степенью задействованных финансовых методов. SSL-криптография, PCI DSS лицензирование и многоуровневая подтверждение формируют безопасный периметр защиты.
Геймплейная каталог легальных площадок объединяет спины от известных разработчиков. RTP-показатели, дисперсия и математические схемы проходят внешнюю проверку в авторизованных лабораториях.
Планы вознаграждения в профессиональных казино формируются на понятных требованиях проигрыша. Требования x35-40 характеризуется справедливым для спин-подарков, в то время как настольные состязания идут в зачет с минимальным процентом.
Поиск проверенного betting площадки в актуальных условиях нуждается детального внимания к законному положению. Профессиональные игроки понимают, что казино Лаки Бир включает новую материалы о функционирующих сервисах.
Алгоритм создания аккаунта в официальных заведениях охватывает требуемую проверку удостоверения. KYC-процедуры гарантируют как сервис, так и игрока от мошенничества. Временные ограничения на снятие средств до финализации валидации – привычная методика.
Цифровые запреты на доступ к азартным сервисам обходятся через резервные адреса. Доступные зеркала поддерживают абсолютную возможности главного сайта. Финансовые переводы, геймплейный прогресс и привилегированные системы остаются неизменными.
Материальная безопасность характеризуется степенью внедренных финансовых методов. SSL-шифрование, PCI DSS сертификация и дополнительная верификация гарантируют защищенный щит обороны.
Интерактивная библиотека проверенных заведений включает барабаны от лидирующих разработчиков. RTP-параметры, колебания и алгоритмические модели получают нейтральную проверку в авторизованных лабораториях.
Программы поощрения в качественных заведениях базируются на понятных критериях вейджера. Условия ставок x35-40 считается приемлемым для слот-бонусов, в то время как классические состязания включаются в зачет с минимальным фактором.
Поиск проверенного гемблинг оператора в актуальных границах заставляет тщательного рассмотрения к лицензионному положению. Профессиональные пользователи знают, что миллионъ казино включает актуальную материалы о работающих сервисах.
Процесс записи в сертифицированных сервисах объединяет необходимую валидацию документов. KYC-процедуры гарантируют как заведение, так и участника от обмана. Кратковременные границы на получение активов до закрытия верификации – нормальная процедура.
Цифровые препятствия на подключение к азартным сервисам устраняются через дублирующие порталы. Активные дубликаты обеспечивают абсолютную возможности главного сайта. Расчетные переводы, развлекательный продвижение и льготные системы функционируют устойчивыми.
Экономическая гарантированность измеряется показателем используемых банковских систем. SSL-кодирование, PCI DSS лицензирование и усиленная подтверждение гарантируют безопасный контур обороны.
Интерактивная коллекция сертифицированных площадок охватывает слоты от топовых создателей. RTP-коэффициенты, изменчивость и алгоритмические модели получают беспристрастную контроль в утвержденных организациях.
Системы мотивации в качественных операторах опираются на прозрачных условиях проигрыша. Требования x35-40 считается приемлемым для барабан-льгот, в то время как традиционные активности принимаются в расчет с пониженным множителем.
Гемблинговая индустрия представляет активный подъём, привлекая миллионы игроков. Профессиональные площадки предлагают надёжную пространство для игры. Детальную факты о этих брендах реально найти на казино типпи .
Сертификация выступает центральным показателем определения платформы. Надзорные органы Мальты обеспечивают тщательный проверку экономических действий. Отдельная аккредитованная площадка подвергается плановые ревизии RNG-генераторов.
Программные параметры актуальных беттинг-платформ предусматривают SSL-криптографию денежного стандарта. Создатели программного материала типа Microgaming, NetEnt, Pragmatic Play внедряют сложные модели рандомных параметров.
Процедура верификации счёта предусматривает передачи документов KYC-уровня. Паспорт, выписка о заработке, валидация адреса — обычный перечень для итогового доступа.
Резервные URL ликвидируют барьеры с ограничениями организаций. Действующие варианты модифицируются регулярно IT группами. Карманные софт обычно действуют надёжнее веб версий.
Финансовая дисциплина формирует перспективную прибыльность развлекательных партий. Опытные пользователи указывают контролировать объём ставки до 1-2% от суммарного резерва.
Here’s the newest update
Для любителей смешанных единоборств нашел текст про ufc в феврале марте 2026 три недели которые встряхнут дивизионы. Вот ссылка: https://chrome-downloads.ru/news/ufc-fevral-mart-2026-samye-goryachie-boi-i-neozhidannye-povoroty-kotoryh-stoit-zhdat/
Looking well projects a positive first impression.
Your outfit communicates volumes before you even speak a word.
It boosts your own self-esteem and mindset noticeably.
A put-together appearance conveys professionalism in the office.
https://bm6.irkpress.ru/yjQhuRjHDz0L/
Stylish clothing allow you to showcase your unique identity.
People often perceive stylish individuals as more successful and reliable.
Ultimately, putting effort in your wardrobe is an investment in yourself.
мегафон Подключить интернет дома, будь то кабельный или Wi-Fi, теперь можно быстро и легко, а Мегафон активно развивает свою сеть для предоставления качественных интернет-услуг.
Действующие mirror-ссылки легальных гемблинг-платформ на Mellstroy Game обеспечивают устойчивый коннект к гемблинг порталам. Система клонирования образует эквивалентные копии главного сайта с консервацией всех механизмов.
Процедура регистрации через mirror-сайт целиком воспроизводит базовую шаблон. Начинающие участники указывают функционирующий email, создают надежный секретную комбинацию и фиксируют базовую денежную единицу.
Аутентификация учетной записи содержит передачи удостоверений по KYC-нормам. Фото удостоверения личности, верификация места жительства и денежные реквизиты проверяются через программную контроль в течение 24-72 временных единиц.
Подключение зарегистрированных пользователей производится через классическую модуль с 2FA идентификацией. Разовые токены поступают на мобильный устройство или e-mail адрес.
Инструменты финансового блока через альтернативные домены предлагает актуальные банковские платформы. Visa, Mastercard, электронные счета Skrill, Neteller, виртуальные монеты Bitcoin, Ethereum реализуются с низкими взносами 0-3%.
Игровая коллекция копируется на сто процентов включая слоты, традиционные активности, live-ведущих и накопительные призы. RTP-индикаторы, дисперсия и условия отыгрыша поддерживаются такими же.
Бонусная политика действует схоже корневому порталу. Welcome-бандлы, безвозмездные спины, денежный возврат и VIP-курсы активируются системно при соблюдении определенных условий.
Навигация в области лицензированных площадок требует знания актуальных способов входа. Опытные участники используют Лаки Бир зеркало для добывания свежей материалов о активных ссылках.
Процедура регистрации учетной записи в проверенных организациях включает комплексную валидацию. Актуальные компании эксплуатируют KYC-протоколы и AML-правила. Документальная процедура потребляет от 24 до 72 временных отрезков.
IT методы для прохождения блокировок улучшаются сообща с укреплением правовых шагов. VPN-службы категории premium дают безопасность AES-256 и методы OpenVPN. Устойчивость подключения критически важна для премиальных сессий.
Альтернативные адреса работают через регионально размещенные компьютерные кластеры. CDN-структуры гарантируют сокращенную отклик для американских игроков. Системное роутинг активируется при обнаружении препятствия первичного домена.
Финансовые движения в официальных регионах подчиняются определенным требованиям PCI DSS. Блокчейн операции завоевывают распространение из-за скрытности и скорости выполнения.
Смартфонные программы премиальных брендов объединяют лицевую подтверждение и push-оповещения для существенных ситуаций. Модифицируемый интерфейс автоматически изменяется под особенности монитора.
Отбор надежного развлекательного оператора заставляет детального изучения официальных бумаг. Инновационные платформы лаки Р±РёСЂ казино дают участникам стопроцентную сведения о действующих санкциях.
Процесс регистрации включает определенное количество обязательных фаз верификации. Представители запрашивают свидетельства, удостоверяющие самобытность и возраст. Традиционный KYC-механизм продолжается от 24 до 72 периодов.
Финансовое планирование запускается с определения ограничений на взносы. Опытные геймеры советуют эксплуатировать установку 5% от совокупного азартного резерва на конкретную раунд.
Технические препятствия поставщиков обязывают использовать резервные домены. Копии сохраняют полную работоспособность главного портала, включая летопись транзакций и казино продвижение.
Современные денежные инструменты предоставляют скоростные пополнения через виртуальные портмоне. Bitcoin, Ethereum и устойчивые монеты предоставляют скрытность и символические отчисления. Продолжительность осуществления снятий достигает 10-30 промежутков.
Планы постоянства подразумевают ступенчатые категории с прогрессивным кэшбэком. VIP-консультанты дают уникальные подарки, улучшенные ограничения и преимущественную обслуживание.
Передовые операторы гемблинг активностей гарантируют беттерам вход к профессиональному беттингу через проверенные Голд сайт ресурсы. Легальная бизнес требует исполнения определенных регуляторных положений.
Алгоритм оформления персонального кабинета включает верификацию индивидуальных данных. Операторы задействуют расширенные протоколы KYC и AML для предотвращения поддельных финансовых действий.
Цифровые платформы инновационных гемблинг платформ работают на защищенных дата-центрах с криптографическими протоколами. Локальные запреты обязывает управляющих разрабатывать альтернативные домены.
Зеркальные домены представляют аналогичные версии первичного портала с поддержанием всех возможностей и сведений. Клиенты добиваются непрерывный вход к средствам, игровой данным и индивидуальным опциям.
Денежные операции производятся через интегрированные денежные процессоры. Ограничения на взносы и получения регулируются в гармонии с правовыми критериями и организационными нормами контроля угроз.
Квалифицированные пользователи рекомендуют контролировать положение лицензии через регуляторные базы данных азартных ведомств. Репутационные индикаторы предусматривают ранги на профильных платформах и мнения настоящих игроков.
Актуальные операторы игорных развлечений предоставляют игрокам доступ к качественному развлечениям через надежные Vavada сайты. Официальная деятельность требует выполнения определенных регуляторных положений.
Механизм создания индивидуального профиля охватывает подтверждение индивидуальных сведений. Операторы эксплуатируют многоуровневые протоколы KYC и AML для блокировки нарушающих операций.
Электронные средства новейших игорных домов работают на защищенных инфраструктурах с шифровальными технологиями. Территориальные ограничения обязывает владельцев внедрять вспомогательные URL.
Параллельные домены являют собой точные дубликаты центрального портала с удержанием всех функций и информации. Игроки обеспечивают себе беспрепятственный доступ к капиталу, гемблинг записям и индивидуальным опциям.
Финансовые транзакции производятся через интегрированные финансовые системы. Границы на пополнения и обналичивания регулируются в соответствии с лицензионными требованиями и собственными правилами минимизации опасностей.
Экспертные беттеры указывают проверять условия разрешения через надзорные списки гемблинг органов. Авторитетные показатели охватывают позиции на профильных сервисах и feedback действительных пользователей.
Определение проверенного игрового портала в нынешних обстоятельствах нуждается тщательного анализа к лицензионному статусу. Компетентные пользователи учитывают, что Вавада официальный сайт включает последнюю сведения о активных площадках.
Процесс открытия счета в официальных операторах включает обязательную проверку идентичности. KYC-процедуры обеспечивают как оператора, так и геймера от махинаций. Временные рамки на получение активов до окончания валидации – обычная практика.
Технические блокировки на соединение к игровым порталам решаются через альтернативные домены. Рабочие копии сохраняют стопроцентную работоспособность первичного сервиса. Платежные переводы, геймплейный прогресс и наградные программы остаются константными.
Финансовая стабильность определяется показателем задействованных денежных механизмов. SSL-защита, PCI DSS валидация и расширенная идентификация устанавливают надежный заслон обороны.
Игровая набор лицензированных операторов включает спины от топовых создателей. RTP-параметры, колебания и статистические модели претерпевают внешнюю контроль в утвержденных центрах.
Механизмы лояльности в достойных сервисах основываются на открытых правилах ставок. Требования x35-40 характеризуется справедливым для автомат-льгот, в то время как карточные развлечения засчитываются в расчет с пониженным множителем.
Ryzen Rocket Devices – Organized design and a fast, simple purchasing experience.
Check Natasha for Judge online – Read insightful content presented clearly with a professional voice.
bs market
Активные дублирующие порталы проверенных азартных клубов на Mellstroy Game casino дают беспрерывный доступ к гемблинг платформам. Система копирования строит идентичные клоны корневого домена с фиксацией всех механизмов.
Алгоритм оформления профиля через mirror-сайт полностью повторяет основную шаблон. Только пришедшие геймеры вводят функционирующий email, устанавливают стойкий пароль и назначают базовую валюту.
Подтверждение аккаунта требует загрузки документов следуя KYC-требованиям. Скан паспорта, подтверждение проживания и карточные координаты проверяются через программную верификацию в течение 24-72 часа.
Авторизация верифицированных клиентов происходит через базовую форму с расширенной валидацией. Одноразовые коды приходят на телефонный девайс или почтовый ящик.
Механизмы депозитного компонента через дублирующие порталы содержит актуальные расчетные механизмы. Visa, Mastercard, веб счета Skrill, Neteller, криптовалюты Bitcoin, Ethereum выполняются с оптимизированными процентами 0-3%.
Gaming библиотека копируется полностью включая барабаны, классические активности, live-хостов и прогрессивы. RTP-индикаторы, вариативность и ставочные требования поддерживаются идентичными.
Акционная схема выполняется схоже основному домену. Welcome-комплекты, бесплатные вращения, денежный возврат и VIP-курсы инициируются алгоритмически при выполнении определенных требований.
Развлекательная сфера показывает динамичный развитие, завлекая тысячи игроков. Грамотные платформы предоставляют безопасную атмосферу для пари. Детальную информацию о указанных брендах допустимо обнаружить на Lucky Bear зеркало .
Аттестация остаётся главным критерием отбора портала. Регуляторы Мальты предоставляют жёсткий мониторинг денежных манипуляций. Любая лицензированная портал осуществляет периодические инспекции RNG-алгоритмов.
Технические особенности передовых казино охватывают SSL-шифрование финансового категории. Поставщики софтового продукта наподобие Microgaming, NetEnt, Pragmatic Play интегрируют многоуровневые алгоритмы случайных величин.
Алгоритм верификации счёта требует представления удостоверений KYC-уровня. Удостоверение, свидетельство о доходах, верификация регистрации — обычный список для завершённого подключения.
Зеркальные адреса устраняют трудности с блокировками поставщиков. Актуальные альтернативы изменяются ежедневно техническими отделами. Смартфонные приложения часто функционируют стабильнее сетевых версий.
Управление банкроллом определяет перспективную эффективность азартных периодов. Профессиональные участники рекомендуют ограничивать размер бета до 1-2% от совокупного банкролла.
Try the new version here
It’s very trouble-free to find out any topic on net as compared to books, as I found this paragraph
at this website.
Новейшие геймеры сталкиваются с препятствием подключения к сертифицированным ресурсам. Операторы закрывают главные URL, но искушённые лаки ворлд сайт посетители осознают о доступности параллельных площадок.
Резервная ссылка образует полную реплику оригинального платформы. Протоколы шифрования поддерживаются равнозначными. Платёжные переводы производятся через равнозначные механизмы.
Методика регистрации через зеркальный домен включает классической валидации. Сотрудники выясняют удостоверения для реализации KYC-требований. Личные сведения проходят усиленную верификацию.
Депозитные рамки на резервных ресурсах аналогичны главным характеристикам. Начальные беты сохраняются фиксированными. Накопительные выигрышные пулы объединяются между различными ссылками.
Стимулирующие программы оперируют комплексно на резервных порталах. Множитель ставок гарантирует первоначальные параметры. Тайминг использования сохраняется.
Департамент ассистирования обрабатывает заявки с альтернативных порталов идентично. Интерактивный разговор обеспечивает постоянный порядок функционирования.
Передовые сервисы азартных игр предоставляют беттерам возможность к качественному беттингу через надежные Вован казино ресурсы. Авторизованная работа подразумевает исполнения четких законодательных стандартов.
Система оформления клиентского кабинета содержит проверку индивидуальных показателей. Операторы внедряют комплексные алгоритмы KYC и AML для блокировки поддельных финансовых действий.
Программные системы передовых беттинг площадок базируются на стабильных дата-центрах с криптографическими сертификатами. Локальные запреты обязывает управляющих внедрять вспомогательные ссылки.
Зеркальные ресурсы представляют точные дубликаты базового платформы с удержанием всех сервисов и информации. Игроки обеспечивают себе постоянный вход к депозиту, игровой данным и персональным опциям.
Платежные транзакции осуществляются через связанные денежные системы. Лимиты на взносы и изъятия определяются в согласии с нормативными требованиями и собственными регламентами риск-менеджмента.
Экспертные гемблеры советуют анализировать состояние лицензии через контролирующие каталоги беттинг ведомств. Престижные характеристики включают оценки на профильных платформах и отзывы реальных участников.
https://phijkchu.com/a/betconvertercom/video-channels
Выбор качественного игрового оператора в нынешних границах заставляет специального анализа к лицензионному режиму. Знающие геймеры понимают, что Лаки Бир зеркало предоставляет новую материалы о функционирующих ресурсах.
Алгоритм создания аккаунта в проверенных площадках содержит требуемую аутентификацию идентичности. KYC-стандарты гарантируют как заведение, так и клиента от фрода. Краткосрочные пределы на получение денег до закрытия валидации – нормальная методика.
Технические блокировки на связь к гемблинг порталам решаются через альтернативные ссылки. Действующие отражения сохраняют абсолютную работоспособность главного сервиса. Расчетные операции, геймплейный достижения и наградные системы остаются константными.
Финансовая защищенность характеризуется критерием применяемых банковских способов. SSL-кодирование, PCI DSS лицензирование и многоуровневая аутентификация устанавливают надежный щит ограждения.
Игровая набор проверенных заведений содержит автоматы от ведущих провайдеров. RTP-параметры, волатильность и математические принципы проходят внешнюю сертификацию в одобренных центрах.
Механизмы лояльности в серьезных сервисах базируются на четких условиях отыгрыша. Проигрыш x35-40 оценивается справедливым для спин-льгот, в то время как настольные развлечения включаются в счет с редуцированным коэффициентом.
I recently checked out this casino https://yasishop.pl/ and was impressed by how stable everything felt. The games run fast, bonuses are transparent, and navigation is intuitive, making the experience enjoyable.
Легальные провайдеры игорных сервисов предоставляют клиентам шанс к качественному времяпрепровождению через dedicated сайты, включая Lucky Bear casino , которые специально соблюдают общепринятые критерии конфиденциальности.
Последовательность оформления профиля требует ввода authentication параметров через защищённые SSL-линии. Провайдеры просят предоставить письменное verification age verification и адреса жительства для исполнения юрисдикционных требований.
Многоуровневая аутентификация является required частью новейших систем защиты. Users располагают SMS-шифры, push-notification или задействуют специализированные программы по типу Google Authenticator.
Зеркальные адреса нейтрализуют трудности региональных запретов и DDoS-атак. Технически копии формируют копийные dublicates основного сайта с сохранением возможностей и пользовательских информации.
Профессиональные игроки призывают удерживать свежие списки working зеркал в сохранённых ссылках обозревателя. Management отправляют обновления о современных доменах через мейл, Telegram-группы и телефонные утилиты.
Payment процедуры через официальные ресурсы защищены шифровальными протоколами level банковского segment. Снятие фондов происходит только на подтверждённые данные обладателя личного кабинета.
https://alex-neil.ru/index.php/cb-profile/pluginclass/cbblogs?action=blogs&func=show&id=1297
страница металл кастеты
Discover what’s new here
устройство водопонижения устройство водопонижения .
Исследование в секторе сертифицированных порталов требует понимания актуальных способов соединения. Профессиональные участники эксплуатируют СЌРЅРѕРјРѕ казино для добывания свежей фактов о функционирующих ссылках.
Алгоритм создания профиля в надежных компаниях подразумевает тщательную аутентификацию. Передовые операторы внедряют KYC-алгоритмы и AML-правила. Документальная процедура составляет от 24 до 72 промежутков.
IT способы для преодоления блокировок прогрессируют сообща с повышением юридических решений. VPN-службы категории premium гарантируют шифрование AES-256 и технологии OpenVPN. Надежность коннекта fundamentally существенна для привилегированных сессий.
Резервные адреса работают через территориально расположенные серверные мощности. CDN-системы осуществляют минимальную отклик для американских пользователей. Системное роутинг инициируется при распознавании блокировки центрального портала.
Финансовые манипуляции в лицензированных регионах следуют конкретным критериям PCI DSS. Крипто операции увеличивают распространение благодаря анонимности и быстроте реализации.
Портативные клиенты лучших организаций интегрируют биометрическую проверку и push-оповещения для важных моментов. Изменяемый внешний вид независимо подстраивается под параметры монитора.
Надёжные платформы гэмблинг опций oferuja клиентам вариант к профессиональному времяпрепровождению через целевые порталы, включая Mellstroy Game casino , которые специально следуют мировые требования security.
Схема активации подразумевает ввода верификационных данных через шифрованные SSL-соединения. Администрация просят нотариальное подтверждение дееспособности и региона нахождения для исполнения legal стандартов.
Многоуровневая проверка становится необходимым aspect передовых платформ конфиденциальности. Users приобретают SMS-пароли, push-уведомления или используют специальные софт по типу Google Authenticator.
Mirror ссылки устраняют сложности локальных барьеров и DDoS-штурмов. Технически дубли формируют копийные реплики центрального платформы с обеспечением инструментария и user деталей.
Опытные пользователи рекомендуют удерживать новейшие базы действующих зеркал в bookmark обозревателя. Провайдеры рассылают updates о новых адресах через мейл, Telegram-каналы и телефонные программы.
Финансовые транзакции через лицензионные порталы покрыты защитными технологиями класса банковского индустрии. Extraction средств происходит исключительно на аутентифицированные данные собственника учётной записи.
Подбор легального азартного заведения заставляет тщательного исследования официальных разрешений. Актуальные ресурсы Голд казино предоставляют клиентам безусловную информацию о действующих санкциях.
Алгоритм регистрации включает несколько требуемых шагов валидации. Владельцы настаивают документы, подтверждающие самобытность и дееспособность. Традиционный KYC-процесс продолжается от 24 до 72 временных отрезков.
Распоряжение капиталом открывается с задания границ на депозиты. Опытные пользователи рекомендуют использовать установку 5% от общего казино бюджета на отдельную заход.
Электронные блокировки владельцев вынуждают применять резервные пути. Зеркала хранят абсолютную эффективность главного портала, подразумевая историю платежей и азартный результаты.
Новые расчетные системы дают скоростные взносы через блокчейн аккаунты. Bitcoin, Ethereum и стабильные валюты дают скрытность и мизерные платежи. Время осуществления изъятий достигает 10-30 отрезков.
Программы постоянства содержат иерархические ранги с прогрессивным бонусом. VIP-кураторы предлагают уникальные награды, расширенные рамки и опережающую поддержку.
Развлекательная отрасль демонстрирует активный развитие, заинтересовывая миллионы клиентов. Грамотные ресурсы предоставляют стабильную атмосферу для беттинга. Развёрнутую факты о таких организациях доступно изучить на Меллстрой казино .
Сертификация выступает центральным фактором определения ресурса. Регуляторы Мальты дают жёсткий проверку расчётных транзакций. Отдельная сертифицированная платформа реализует регулярные ревизии RNG-генераторов.
Компьютерные характеристики передовых азартных площадок включают SSL-защиту денежного стандарта. Разработчики софтового ПО класса Microgaming, NetEnt, Pragmatic Play встраивают продвинутые системы произвольных параметров.
Схема аутентификации аккаунта предполагает передачи свидетельств KYC-класса. Документ, свидетельство о заработке, верификация регистрации — стандартный пакет для завершённого авторизации.
Параллельные порталы ликвидируют проблемы с ограничениями провайдеров. Актуальные варианты адаптируются ежедневно программными отделами. Карманные программы нередко работают надёжнее браузерных версий.
Управление банкроллом устанавливает долгосрочную прибыльность гемблинговых сессий. Профессиональные участники настаивают сокращать объём вейджера до 1-2% от совокупного резерва.
Нужна плитка? тротуарная плитка купить большой ассортимент, современные формы и долговечные материалы. Подходит для мощения тротуаров, площадок и придомовых территорий.
проект на водопонижение vse-o-vodoponizhenii.ru .
Read democracy updates here – Stay informed with thoughtfully curated reports and opinions.
X战警97续季2026 海外华人经典动画回归 高清变种人战斗
Инновационные провайдеры беттинг активностей обеспечивают беттерам возможность к элитному игровому процессу через проверенные казино Меллстрой платформы. Официальная работа предполагает исполнения конкретных законодательных критериев.
Процесс создания индивидуального аккаунта содержит аутентификацию приватных показателей. Провайдеры эксплуатируют комплексные механизмы KYC и AML для исключения мошеннических платежей.
IT решения актуальных гемблинг платформ строятся на стабильных дата-центрах с SSL сертификатами. Локальные запреты принуждает владельцев организовывать параллельные ссылки.
Резервные домены формируют идентичные версии главного домена с сохранением всех возможностей и параметров. Беттеры приобретают беспрепятственный соединение к средствам, азартной истории и пользовательским конфигурациям.
Платежные процедуры проходят через подключенные финансовые системы. Пределы на взносы и обналичивания регулируются в унисон с регуляторными критериями и внутренними политиками минимизации опасностей.
Экспертные клиенты предлагают контролировать ситуацию лицензии через официальные базы данных игорных комиссий. Престижные индикаторы задействуют позиции на экспертных сервисах и мнения настоящих участников.
Sassuolo vs Hellas Verona 2026 Serie A 19:45最新比分,意甲维罗纳客场挑战萨索洛,意大利足球比分直播更新。
Передовые платформы развлекательных развлечений гарантируют участникам подключение к высококлассному гемблингу через безопасные Вавада казино платформы. Официальная деятельность требует выполнения четких контролирующих положений.
Механизм регистрации индивидуального аккаунта задействует подтверждение приватных информации. Управляющие задействуют углубленные процедуры KYC и AML для блокировки мошеннических переводов.
Цифровые платформы инновационных беттинг площадок основываются на зашифрованных инфраструктурах с TLS протоколами. Территориальные ограничения заставляет администраторов разрабатывать резервные адреса.
Дублирующие домены являют собой аналогичные репликации базового платформы с обеспечением всех возможностей и информации. Игроки обеспечивают себе непрерывный доступ к депозиту, гемблинг данным и пользовательским опциям.
Финансовые действия осуществляются через подключенные расчетные сервисы. Лимиты на пополнения и выводы назначаются в соотношении с законодательными критериями и корпоративными регламентами минимизации опасностей.
Экспертные беттеры настаивают анализировать условия лицензии через официальные каталоги развлекательных органов. Статусные показатели охватывают ранги на профильных ресурсах и feedback действительных игроков.
Blackburn Rovers vs Preston North End 2026英冠21:00开踢,最新足球比分英格兰二级联赛焦点,赔率Evs看好主队。
范德沃克高清完整版2026 海外华人免费最新热播剧集
逐玉2026 张凌赫田曦薇古装甜宠权谋 海外华人高清在线追剧 全球加速个性化推荐
Panathinaikos 2-2 Viktoria Plzen 2026 Europa League draw! Greeks fight back – football scores drama all night long!
https://certicanpharmacy.shop/# legal canadian pharmacy online
Действующие резервные адреса лицензированных gaming-операторов на lucky bear казино предоставляют беспрерывный вход к развлекательным системам. Технология зеркалирования образует точные реплики корневого ресурса с поддержанием всех инструментов.
Алгоритм активации через альтернативный домен целиком дублирует оригинальную заявку. Начинающие участники вводят активный email, генерируют надежный шифр и устанавливают основную валюту.
Подтверждение учетной записи предполагает передачи справок по KYC-политике. Копия ID-карты, доказательство места жительства и карточные параметры проверяются через автоматическую верификацию в течение 24-72 временных единиц.
Логин активных игроков производится через типовую модуль с расширенной идентификацией. Одноразовые ключи приходят на сотовый номер или email.
Функционал депозитного раздела через альтернативные домены обеспечивает топовые расчетные инструменты. Visa, Mastercard, цифровые балансы Skrill, Neteller, цифровые активы Bitcoin, Ethereum выполняются с сокращенными сборами 0-3%.
Игровая база дублируется полностью включая машины, традиционные забавы, live-дилеров и максимальные награды. RTP-параметры, дисперсия и ставочные требования поддерживаются неизменными.
Промо политика выполняется идентично корневому веб-площадке. Welcome-комплекты, фриспины, refund и VIP-планы стартуют алгоритмически при реализации заданных условий.
The official website of MiniTina minitinah com your virtual friend with exclusive publications, personal updates, and exciting content. Follow the news and stay connected in a cozy online space.
Discover the world of Comatozze comatozze exclusive content on OnlyFans and active updates on social media. Subscribe to stay up-to-date on new publications and exciting projects.
Get to know JakKnife https://www.jakknife.online and discover unique content. Regular updates, special publications, and timely announcements are available to subscribers.
Karely Ruiz http://www.karelyruiz.mx/ comparte contenido exclusivo y actualizaciones periodicas. Siguela en Instagram, Twitter y Telegram para estar al tanto de sus proyectos creativos y eventos inspiradores.
Гемблинговая отрасль отображает динамичный рост, манящая множество геймеров. Опытные ресурсы предлагают защищённую условия для развлечений. Подробную сведения о подобных провайдерах доступно получить на mad казино .
Сертификация представляет основным показателем отбора ресурса. Регуляторы Кюрасао создают серьёзный контроль денежных манипуляций. Всякая аккредитованная сайт реализует периодические ревизии RNG-алгоритмов.
IT характеристики инновационных беттинг-платформ объединяют SSL-безопасность денежного ранга. Поставщики софтового продукта вроде Microgaming, NetEnt, Pragmatic Play встраивают комплексные модели хаотичных значений.
Алгоритм валидации счёта подразумевает представления удостоверений KYC-уровня. Свидетельство, выписка о доходах, удостоверение прописки — базовый набор для полноценного авторизации.
Зеркальные порталы ликвидируют трудности с блокировками компаний. Актуальные зеркала адаптируются каждый день техническими группами. Смартфонные приложения обычно функционируют качественнее интернет форматов.
Распределение капитала задаёт длительную эффективность развлекательных циклов. Опытные игроки рекомендуют контролировать количество вейджера до 1-2% от итогового резерва.
pet med pet rx online vet pharmacy
сюда ручная работа кастет
Современные порталы беттинг развлечений обеспечивают пользователям возможность к качественному игровому процессу через безопасные казино Lucky Bear системы. Авторизованная деятельность предполагает соблюдения четких контролирующих стандартов.
Процесс открытия клиентского учетной записи содержит подтверждение личных информации. Управляющие внедряют расширенные процедуры KYC и AML для блокировки нарушающих транзакций.
Технические системы передовых гемблинг платформ функционируют на защищенных облачных системах с HTTPS алгоритмами. IP-фильтрация заставляет администраторов создавать дублирующие ссылки.
Зеркальные платформы образуют точные клоны первичного ресурса с фиксацией всех возможностей и сведений. Игроки обеспечивают себе стабильный соединение к депозиту, игровой статистике и клиентским установкам.
Денежные операции выполняются через интегрированные денежные процессоры. Рамки на пополнения и изъятия фиксируются в соответствии с регуляторными требованиями и индивидуальными нормами риск-менеджмента.
Экспертные беттеры настаивают отслеживать состояние авторизации через государственные списки беттинг ведомств. Авторитетные индикаторы предусматривают места на тематических платформах и feedback реальных клиентов.
Официальные провайдеры развлекательных опций oferuja игрокам возможность к профессиональному игровому процессу через dedicated платформы, включая п»ї1хбет зеркало , которые придерживаются transnational требования надёжности.
Алгоритм создания аккаунта подразумевает заполнения верификационных деталей через защищённые SSL-connection. Букмекеры просят предоставить official свидетельство правоспособности и локации residence для соблюдения законодательных норм.
Двухэтапная верификация представляет required составляющей передовых механизмов конфиденциальности. Users располагают SMS-шифры, push-оповещения или применяют targeted программы вроде Google Authenticator.
Зеркальные порталы устраняют препятствия локальных барьеров и DDoS-атак. Технически mirrors образуют копийные версии главного портала с обеспечением опций и user деталей.
Экспертные пользователи suggest удерживать обновлённые реестры функционирующих зеркал в сохранённых ссылках обозревателя. Букмекеры доставляют новости о свежих адресах через почтовые сервисы, Telegram-группы и телефонные программы.
Payment транзакции через лицензионные платформы защищены защитными системами level банковского области. Изъятие средств реализуется исключительно на проверенные карты обладателя личного кабинета.
Определение качественного развлекательного заведения в нынешних обстоятельствах требует тщательного рассмотрения к законному режиму. Квалифицированные клиенты знают, что Вавада регистрация демонстрирует современную данные о работающих сервисах.
Механизм регистрации в проверенных сервисах включает принудительную подтверждение идентичности. KYC-стандарты оберегают как казино, так и игрока от афер. Временные лимиты на перечисление денег до завершения проверки – обычная процедура.
Программные ограничения на доступ к гемблинг сервисам преодолеваются через зеркальные порталы. Активные отражения поддерживают полную работоспособность центрального сервиса. Платежные процедуры, интерактивный достижения и наградные системы остаются неизменными.
Денежная стабильность определяется показателем применяемых финансовых способов. SSL-шифрование, PCI DSS сертификация и двухфакторная аутентификация гарантируют стабильный щит защиты.
Интерактивная библиотека проверенных провайдеров содержит автоматы от ведущих разработчиков. RTP-параметры, изменчивость и вероятностные схемы получают нейтральную валидацию в одобренных лабораториях.
Планы мотивации в профессиональных площадках строятся на четких параметрах отыгрыша. Требования x35-40 признается приемлемым для барабан-бонусов, в то время как традиционные забавы принимаются в счет с редуцированным множителем.
Перемещение в сфере проверенных сайтов требует понимания новых технологий подключения. Опытные участники эксплуатируют lucky bear казино официальный сайт для приобретения современной материалов о работающих путях.
Алгоритм открытия личного кабинета в надежных заведениях включает сложную проверку. Современные организации внедряют KYC-протоколы и AML-требования. Оформление документов потребляет от 24 до 72 периодов.
Компьютерные способы для избежания ограничений прогрессируют параллельно с укреплением регуляторных решений. VPN-платформы категории premium гарантируют шифрование AES-256 и методы OpenVPN. Постоянство подключения fundamentally существенна для привилегированных сессий.
Зеркальные ресурсы функционируют через пространственно расположенные цифровые инфраструктуры. CDN-структуры осуществляют быструю пинг для азиатских игроков. Системное переключение включается при обнаружении ограничения первичного портала.
Банковские транзакции в проверенных регионах подчиняются четким критериям PCI DSS. Блокчейн транзакции завоевывают распространение по причине секретности и динамике осуществления.
Портативные клиенты ведущих операторов включают физиологическую идентификацию и push-извещения для важных моментов. Адаптивный внешний вид автономно подстраивается под характеристики панели.
Легальные провайдеры развлекательных сервисов обеспечивают клиентам вариант к профессиональному игровому процессу через dedicated сайты, включая п»ї1xBet , которые следуют общепринятые нормы security.
Алгоритм регистрации включает заполнения верификационных информации через encrypted SSL-линии. Букмекеры demanded нотариальное удостоверение правоспособности и адреса регистрации для поддержания юрисдикционных правил.
Multi-factor проверка представляет обязательным составляющей передовых solutions защиты. Участники получают SMS-коды, push-сообщения или внедряют targeted утилиты наподобие Google Authenticator.
Альтернативные порталы устраняют вопросы локальных запретов и DDoS-воздействий. Технически копии формируют тождественные клоны главного платформы с maintaining функциональности и индивидуальных сведений.
Skilled пользователи советуют keeping актуальные каталоги функционирующих зеркал в favourites браузера. Management доставляют updates о современных ссылках через электронную почту, Telegram-группы и мобильные приложения.
Payment процедуры через лицензионные ресурсы гарантированы cryptographic системами категории банковского области. Получение капитала реализуется исключительно на верифицированные счета собственника account.
ulayjasa resource center – Explore a user-friendly space offering reliable references.
Поиск в секторе сертифицированных ресурсов нуждается владения передовых решений подключения. Умелые клиенты применяют винити официальный сайт для приобретения современной данных о оперативных URL.
Схема регистрации счета в сертифицированных заведениях включает тщательную проверку. Передовые поставщики задействуют KYC-процедуры и AML-критерии. Оформление документов требует от 24 до 72 часов.
Программные технологии для прохождения ограничений прогрессируют параллельно с усилением нормативных мер. VPN-инструменты класса premium предоставляют безопасность AES-256 и стандарты OpenVPN. Непрерывность соединения жизненно актуальна для высокоролловых раундов.
Дублирующие домены выполняют задачи через регионально размещенные IT системы. CDN-сети осуществляют низкую пинг для глобальных геймеров. Техническое роутинг активируется при обнаружении препятствия центрального портала.
Платежные переводы в официальных юрисдикциях соответствуют конкретным нормам PCI DSS. Цифровые платежи увеличивают востребованность по причине скрытности и динамике реализации.
Переносные утилиты элитных организаций объединяют физиологическую идентификацию и push-оповещения для важных событий. Модифицируемый интерфейс независимо настраивается под особенности панели.
Источник подарок на 14 февраля купить
长风少年词2026 高清古装青春 海外华人免费观看 高清无广告
1911 PHL info portal – Access clear and organized content with useful insights.
Copper Citrine Essentials – Layout is clear and product selection feels high quality.
Новейшие геймеры имеют дело с изобилием технических тонкостей при процессах с легальными платформами. Тематические ресурсы типа п»ї1xBet поставляют современную сведения о функционировании игорных брендов.
Алгоритм подтверждения кабинета предполагает ряд принудительных шагов. Исходная аутентификация подразумевает загрузки удостоверений верифицирующих персону. Привычный перечень предполагает паспорт, права или внешний паспорт.
Программная компонента регистрации содержит использование SSL-шифрования и двухуровневой проверки. Квалифицированные пользователи советуют запускать совокупность предложенных настроек охраны.
Зеркала являются точные дубликаты первичного платформы с поддержанием полного функционала. Основное преимущество выражается в тождественности финансовых границ и норм условий прокрутки.
Система нахождения действующих запасных доменов основывается на контроле специализированных информационных каналов и союзных платформ. Экспертные пользователи эксплуатируют анонимайзеры для создания стабильного связи вне зависимости от локальных блокировок.
Поиск проверенного игорного заведения заставляет серьезного изучения официальных разрешений. Современные ресурсы Меллстрой регистрация предлагают клиентам полную сведения о текущих допусках.
Механизм открытия аккаунта подразумевает множество ключевых фаз верификации. Администраторы настаивают свидетельства, устанавливающие самобытность и зрелость. Классический KYC-процесс продолжается от 24 до 72 часов.
Распоряжение капиталом стартует с установления ограничений на вклады. Компетентные участники призывают внедрять норму 5% от совокупного азартного бюджета на одну заход.
Цифровые барьеры владельцев принуждают эксплуатировать запасные пути. Альтернативы оберегают стопроцентную активность центрального площадки, охватывая историю операций и азартный достижения.
Передовые расчетные сервисы гарантируют мгновенные инвестиции через виртуальные кошельки. Bitcoin, Ethereum и стабильные валюты предоставляют тайность и символические отчисления. Продолжительность выполнения выводов насчитывает 10-30 промежутков.
Программы приверженности подразумевают иерархические статусы с накапливающимся вознаграждением. VIP-консультанты обеспечивают уникальные поощрения, повышенные рамки и преимущественную техподдержку.
Dressing well creates a strong first impression.
Your attire speaks loudly before a person even say a single word.
This enhances your personal self-esteem and mood significantly.
A polished look conveys professionalism in the office.
https://n3.sneakero.ru/f53q9pmbIQYX/
Fashionable choices let you to showcase your individual identity.
People often perceive stylish people as more successful and reliable.
Therefore, investing in your wardrobe is an investment in yourself.
CertiCanPharmacy: CertiCanPharmacy – CertiCanPharmacy
Современные участники обталкиваются с огромным количеством цифровых нюансов при работе с сертифицированными сайтами. Специализированные порталы типа Вован казино выдают актуальную контент о работе гэмблинговых компаний.
Механизм верификации учетной записи содержит набор принудительных уровней. Базовая валидация требует загрузки бумаг подтверждающих персону. Классический набор охватывает удостоверение личности, автоудостоверение или международное ID.
Техническая часть записления содержит применение зашифрованного канала и двойной авторизации. Опытные игроки советуют активировать весь комплекс возможных функций безопасности.
Резервные ссылки образуют точные копии центрального портала с сохранением тотального инструментария. Главное плюс заключается в идентичности расчетных ограничений и критериев отыгрыша.
Алгоритм поиска действующих зеркал базируется на контроле профессиональных телеграм-каналов и партнерских платформ. Продвинутые геймеры эксплуатируют туннельные протоколы для формирования устойчивого доступа независимо от региональных запретов.
https://vetfreemeds.com/# pet meds official website
Нынешние игроки имеют дело с массой технических аспектов при функционировании с лицензированными ресурсами. Тематические ресурсы типа Килограмм казино дают релевантную информацию о деятельности азартных брендов.
Система верификации счета подразумевает множество обязательных шагов. Исходная валидация включает предоставления бумаг верифицирующих гражданство. Типовой перечень предполагает удостоверение личности, права или загранпаспорт.
Программная элемент открытия счета предполагает применение криптографической защиты и двойной авторизации. Экспертные игроки советуют задействовать все имеющихся настроек охраны.
Дублирующие порталы являются точные дубликаты базового ресурса с удержанием полного возможностей. Основное бонус содержится в схожести денежных ограничений и норм отыгрыша.
Схема поиска рабочих альтернативных адресов строится на мониторинге экспертных телеграм-каналов и связанных платформ. Профессиональные участники используют VPN-сервисы для создания стабильного входа невзирая от территориальных барьеров.
成何体统2026 丞磊王楚然 双穿书甜宠 高清现代穿越恋爱 无广告高清追剧
Купить квартиру https://sbpdomik.ru актуальные предложения на рынке недвижимости. Новостройки и вторичное жильё, удобный поиск по цене, району и площади. Подберите идеальную квартиру для жизни или инвестиций.
Актуальные операторы развлекательных игр предоставляют клиентам возможность к премиальному игровому процессу через сертифицированные казино Лаки Бир ресурсы. Официальная работа влечет выполнения жестких надзорных норм.
Система регистрации индивидуального профиля охватывает верификацию приватных сведений. Регуляторы внедряют детализированные системы KYC и AML для исключения нарушающих операций.
IT системы современных беттинг площадок основываются на защищенных инфраструктурах с криптографическими алгоритмами. Территориальные ограничения принуждает владельцев разрабатывать параллельные URL.
Альтернативные домены образуют аналогичные дубликаты главного сайта с поддержанием всех возможностей и параметров. Клиенты приобретают непрерывный связь к капиталу, беттинг статистике и личным настройкам.
Платежные транзакции выполняются через встроенные платежные процессоры. Пределы на инвестиции и обналичивания устанавливаются в соотношении с нормативными критериями и собственными нормами контроля угроз.
Профессиональные игроки указывают анализировать статус авторизации через государственные реестры гемблинг ведомств. Авторитетные показатели задействуют места на отраслевых ресурсах и комментарии реальных участников.
我欲为人第二季平台2026 海外华人 高清视频直播
Передовые гемблеры попадают с проблемой связи к проверенным ресурсам. Провайдеры блокируют базовые ссылки, но грамотные Лаки Бир РІС…РѕРґ участники осознают о доступности альтернативных сайтов.
Параллельный портал представляет точную реплику первичного портала. Средства защиты функционируют аналогичными. Платёжные переводы проходят через идентичные сервисы.
Методика открытия счёта через зеркальный портал подразумевает привычной верификации. Операторы уточняют документы для реализации KYC-требований. Паспортные информация реализуют комплексную валидацию.
Пополнительные ограничения на альтернативных платформах идентичны первичным требованиям. Стартовые ставки продолжают неизменными. Увеличивающиеся накопления интегрируются между всеми адресами.
Поощрительные схемы действуют всесторонне на резервных площадках. Вейджер сохраняет базовые значения. Временные рамки отыгрыша поддерживается.
Служба ассистирования решает запросы с альтернативных порталов таким же способом. Прямой общение гарантирует круглосуточный формат функционирования.
Узнать больше коллекционные кастеты
To watch
Reviews pay day loans
for workshop resources.
blsp at
Отбор честного игорного площадки предполагает тщательного разбора юридических сертификатов. Инновационные сайты Голд казино гарантируют участникам максимальную факты о имеющихся лицензиях.
Процесс открытия аккаунта включает определенное количество принудительных стадий подтверждения. Провайдеры истребуют бумаги, засвидетельствующие самобытность и правоспособность. Традиционный KYC-порядок составляет от 24 до 72 часов.
Управление банком стартует с определения рамок на депозиты. Опытные пользователи рекомендуют применять установку 5% от общего казино резерва на индивидуальную заход.
Системные запреты владельцев принуждают использовать запасные ссылки. Копии удерживают максимальную работоспособность основного площадки, содержа хронологию транзакций и развлекательный успех.
Инновационные денежные способы гарантируют оперативные вклады через электронные кошельки. Bitcoin, Ethereum и постоянные токены поддерживают конфиденциальность и наименьшие сборы. Время обработки извлечений достигает 10-30 периодов.
Программы верности включают градационные степени с увеличивающимся вознаграждением. VIP-менеджеры предлагают эксклюзивные поощрения, увеличенные лимиты и первоочередную техподдержку.
Отбор проверенного казино оператора предполагает серьезного исследования юридических свидетельств. Инновационные системы Клубника казино предлагают пользователям полную информацию о своих лицензиях.
Процесс создания профиля подразумевает множество требуемых стадий аутентификации. Операторы запрашивают свидетельства, устанавливающие идентичность и правоспособность. Традиционный KYC-регламент требует от 24 до 72 часов.
Управление банком начинается с задания пределов на депозиты. Профессиональные участники настаивают применять установку 5% от суммарного казино резерва на единичную раунд.
Технические блокировки администраторов вынуждают использовать альтернативные маршруты. Клоны хранят безусловную работоспособность главного сайта, содержа журнал платежей и казино достижения.
Передовые платежные способы дают оперативные вклады через электронные портмоне. Bitcoin, Ethereum и стабильные валюты предоставляют конфиденциальность и символические взносы. Длительность проведения снятий доходит 10-30 интервалов.
Планы преданности охватывают градационные степени с нарастающим вознаграждением. VIP-менеджеры предлагают индивидуальные вознаграждения, расширенные лимиты и преимущественную техподдержку.
Serenity Cox https://serenitycox.ing shares exclusive content and regular updates. Follow her on Instagram, Twitter, and Telegram to stay up-to-date on creative projects and inspiring events.
Dive into the world of Dolly Little https://dollylittle-official.online/ original videos, exclusive photos, and unique content available on OnlyFans and other services. Regular updates and fresh publications for subscribers.
Discover the world of LexiLore lexi lore exclusive videos, original photos, and vibrant content. Regular updates, new publications, and special content for subscribers.
Только лучшее здесь: оборудование конференц залов
this creative supply store – Diverse product choices with a streamlined checkout system.
Reinventing Gap info portal – Find concise and approachable resources covering essential subjects.
Let me tell you a story about an Italian guy I once met, whose name we’ll spin as
Gianni. He never expected crypto to become part of his job, yet destiny had
different plans. His work depends on cross-border payments from clients,
and traditional banking kept failing him.
Everything went south one stressful afternoon. His business nearly froze because a payment didn’t go through,
and his team was left waiting with no answers.
He confessed that those days nearly broke him.
Clients got nervous, and he desperately needed an alternative.
A colleague recommended he try Paybis, he honestly didn’t trust anything crypto-related.
With everything falling apart, he knew he had to try something new.
So he checked the platform.
The process was way smoother than he expected.
Everything was explained clearly and simply. He was finally able to
stabilize his cash flow. He said it felt like a heavy weight was removed from his shoulders.
But the story doesn’t end here. He finally realized how unreliable traditional methods were
compared to what he experienced. He realized that sometimes
innovation is the only path forward.
Today, he uses Paybis whenever his business needs fast,
clean, and predictable transactions. He doesn’t talk like
a crypto fanboy — he talks like someone who lived through a disaster and found a tool that actually worked.
At the end of the day, Paybis truly fulfilled his goal.
Главная подарок на 14 февраля купить
暗夜情报员第三季2026 海外华人动作爽剧 Netflix全季上架 全球加速
https://bn.quora.com/profile/Betconverter1
莫离2026 白鹿丞磊 高清古装大女主 海外华人必备 无广告高清体验
戏台在线免费在线观看2026 海外华人专属 高清无广告
Действующие альтернативные домены лицензированных гемблинг-платформ на Вован казино дают непрерывный вход к гемблинг порталам. Методика зеркалирования строит идентичные дубликаты центрального веб-площадки с фиксацией всех опций.
Механизм оформления профиля через mirror-сайт абсолютно дублирует оригинальную заявку. Начинающие геймеры указывают валидный email, генерируют стойкий секретную комбинацию и определяют рабочую курренси.
Верификация аккаунта предполагает передачи справок следуя KYC-нормам. Фото паспорта, свидетельство места жительства и платежные данные анализируются посредством автоматическую контроль в течение 24-72 временных единиц.
Авторизация верифицированных геймеров производится через стандартную модуль с 2FA аутентификацией. Краткосрочные шифры отправляются на мобильный гаджет или email.
Функционал входящего модуля через альтернативные домены содержит топовые расчетные инструменты. Visa, Mastercard, виртуальные портмоне Skrill, Neteller, цифровые активы Bitcoin, Ethereum выполняются с сокращенными процентами 0-3%.
Азартная коллекция повторяется полностью включая автоматы, столовые забавы, live-хостов и накопительные призы. RTP-параметры, дисперсия и проигрыш поддерживаются точными.
Акционная политика выполняется похоже базовому ресурсу. Welcome-предложения, безвозмездные спины, refund и VIP-системы включаются программно при достижении установленных требований.
Athletic Bilbao vs Elche 2026 La Liga最新比分即将开踢21:00,主场毕尔巴鄂强势迎战升班马,西班牙足球比分直播实时更新。
Отбор надежного betting оператора в текущих границах подразумевает повышенного подхода к юридическому уровню. Квалифицированные игроки учитывают, что тип топ казино отображает новую информацию о функционирующих ресурсах.
Процедура регистрации в официальных операторах содержит обязательную валидацию персональных данных. KYC-правила защищают как казино, так и участника от обмана. Промежуточные рамки на перечисление денег до закрытия контроля – типичная практика.
Виртуальные препятствия на подключение к игровым площадкам преодолеваются через альтернативные порталы. Доступные клоны обеспечивают полную производительность главного сайта. Платежные процедуры, игровой результаты и бонусные программы функционируют стабильными.
Экономическая безопасность выражается показателем задействованных платежных методов. SSL-криптография, PCI DSS валидация и усиленная подтверждение устанавливают безопасный контур ограждения.
Азартная коллекция лицензированных сервисов предоставляет барабаны от топовых производителей. RTP-коэффициенты, дисперсия и вероятностные принципы проходят беспристрастную аудит в аккредитованных лабораториях.
Механизмы поощрения в качественных площадках формируются на понятных требованиях отыгрыша. Условия ставок x35-40 оценивается приемлемым для автомат-бонусов, в то время как карточные игры принимаются в подсчет с уменьшенным множителем.
Let me tell you a story about an Italian guy I once met, whose
name we’ll spin as Marco. He wasn’t a crypto enthusiast
at first, but circumstances forced him into that world.
His work depends on cross-border payments from clients, and bank transfers constantly delayed his operations.
Everything went south one stressful afternoon. His business nearly froze
because a payment didn’t go through, and he was left
on the phone for hours trying to fix the mess. He said he had never felt
that much pressure in business before. Time-sensitive deals were jeopardized, and he desperately
needed an alternative.
A colleague recommended he try Paybis, he was unsure whether it was the right path.
Still, he had no other option left. So he opened an account.
The process was way smoother than he expected. Verification was fast.
He could finally convert and transfer funds without drowning in paperwork.
He genuinely didn’t expect such a turnaround.
But the story doesn’t end here. The bank eventually apologized,
but Paybis had already done the job the system failed to handle.
He said that moment changed the way he looks at modern finance forever.
Now he chooses Paybis because reliability matters more than anything.
He doesn’t talk like a crypto fanboy — he talks like someone who lived through a disaster and found a tool that
actually worked.
In the end, he said it straight: Paybis did a great job with his aim.
Pepplish Central – The structure keeps things interesting without feeling cluttered.
Перемещение в пространстве проверенных платформ предполагает понимания современных решений авторизации. Умелые клиенты применяют Tippy казино для обретения свежей материалов о активных ссылках.
Алгоритм создания профиля в сертифицированных операторах охватывает тщательную верификацию. Новейшие компании задействуют KYC-механизмы и AML-нормы. Документальное сопровождение потребляет от 24 до 72 временных отрезков.
IT технологии для прохождения ограничений прогрессируют вместе с интенсификацией правовых мер. VPN-платформы разряда premium предоставляют безопасность AES-256 и методы OpenVPN. Устойчивость связи fundamentally важна для VIP партий.
Дублирующие платформы оперируют через локально расположенные серверные инфраструктуры. CDN-комплексы осуществляют минимальную задержку для европейских пользователей. Автоматическое редирект инициируется при распознавании блокировки главного портала.
Денежные транзакции в легальных территориях соответствуют конкретным требованиям PCI DSS. Цифровые транзакции увеличивают популярность из-за секретности и скорости осуществления.
Портативные софт премиальных провайдеров содержат голосовую авторизацию и push-уведомления для принципиальных происшествий. Адаптивный дизайн программно корректируется под особенности дисплея.
Исследование в мире сертифицированных ресурсов нуждается знания передовых решений подключения. Профессиональные клиенты эксплуатируют СЌРЅРѕРјРѕ казино для извлечения новейшей информации о действующих доменах.
Механизм открытия счета в сертифицированных операторах содержит тщательную верификацию. Актуальные поставщики эксплуатируют KYC-алгоритмы и AML-нормы. Бумажная работа потребляет от 24 до 72 часов.
IT решения для прохождения запретов эволюционируют параллельно с укреплением правовых решений. VPN-сервисы разряда premium предоставляют кодирование AES-256 и стандарты OpenVPN. Постоянство канала принципиально актуальна для VIP партий.
Резервные ресурсы оперируют через регионально распределенные цифровые инфраструктуры. CDN-системы осуществляют сокращенную отклик для американских геймеров. Автоматическое редирект инициируется при идентификации ограничения первичного адреса.
Денежные операции в проверенных территориях подчиняются четким требованиям PCI DSS. Блокчейн переводы получают актуальность по причине приватности и динамике выполнения.
Переносные приложения премиальных компаний совмещают физиологическую проверку и push-сообщения для принципиальных эпизодов. Гибкий внешний вид самостоятельно адаптируется под особенности экрана.
best pet rx: VetFree Meds – vet pharmacy
проект водопонижения vodoponizhenie-msk.ru .
Visit Kionna West – Enjoy the warm, personal approach and well-crafted content throughout the site.
benchbreeze depot – Pages are easy to browse and the interface feels polished.
Johnny Sins johnny-sins is the official channel for news, media updates, and exclusive content. Be the first to know about new releases and stay up-to-date on current events.
Die Welt von Monalita http://www.monalita.de/ bietet exklusive Videos, ausdrucksstarke Fotos und Premium-Inhalte auf OnlyFans und anderen beliebten Plattformen. Abonniere den Kanal, um als Erster neue Inhalte und besondere Updates zu erhalten.
Discover Avi Love’s https://avilove.online world: exclusive videos, photos, and premium content on OnlyFans and other platforms.
official Ardenzo hub – Products are well arranged, making it easy to browse.
Scarlett Jones scarlettjones shares exclusive content and the latest updates. Follow her on Twitter to stay up-to-date with new publications and participate in exciting media events.
Jill Kassidy Exclusives jillkassidy-official.online featuring original content, media updates, and special announcements.
What stood out about this casino https://zerioncc.pl/ is the variety of the games. Everything runs smoothly, the design is minimal, and there’s plenty of options to explore, which keeps it engaging.
Выбор безопасного гемблинг площадки предполагает основательного исследования официальных разрешений. Инновационные системы лаки Р±РёСЂ казино предоставляют участникам полную информацию о действующих санкциях.
Процедура получения доступа содержит множество требуемых фаз подтверждения. Владельцы требуют документы, удостоверяющие индивидуальность и возраст. Традиционный KYC-алгоритм продолжается от 24 до 72 периодов.
Распоряжение капиталом начинается с установления пределов на вклады. Опытные клиенты призывают эксплуатировать закон 5% от суммарного гемблинг резерва на конкретную партию.
Программные запреты поставщиков обязывают эксплуатировать запасные ссылки. Зеркала хранят полную функциональность основного ресурса, охватывая хронологию сделок и азартный успех.
Инновационные платежные сервисы обеспечивают мгновенные пополнения через блокчейн хранилища. Bitcoin, Ethereum и стабильные валюты дают тайность и символические комиссии. Длительность проведения получений достигает 10-30 минут.
Программы приверженности включают каскадные категории с увеличивающимся компенсацией. VIP-представители предоставляют личные награды, повышенные рамки и первоочередную сервис.
Skillet Street Marketplace Hub – Products are appealing and browsing feels easy and smooth.
Нынешние гемблеры попадают с проблемой входа к сертифицированным сайтам. Операторы запрещают стандартные ссылки, но искушённые казино Болливуд посетители помнят о функционировании параллельных ресурсов.
Альтернативный адрес формирует полную воспроизведение главного портала. Системы безопасности сохраняются аналогичными. Денежные транзакции проходят через аналогичные шлюзы.
Технология оформления профиля через зеркальный адрес предполагает классической подтверждения. Специалисты просят справки для выполнения KYC-стандартов. Персональные параметры подвергаются двухфакторную валидацию.
Вносительные лимиты на параллельных ресурсах совпадают первичным требованиям. Начальные суммы остаются фиксированными. Накопительные банки объединяются между множественными ресурсами.
Поощрительные механизмы работают полноценно на альтернативных платформах. Множитель ставок обеспечивает исходные параметры. Длительность проигрывания поддерживается.
Служба ассистирования анализирует обращения с дополнительных доменов идентично. Интерактивный переписка осуществляет беспрерывный формат обслуживания.
bs2best at
Важный отрезок ufc в феврале марте 2026 три недели которые встряхнут дивизионы: прогнозы на ключевые поединки. Вот ссылка: https://rybalka62.ru/news/obzor-blizhajshih-sobytij-ufc-fevral-mart-2026-prognozy-na-klyuchevye-poedinki/
http://vetfreemeds.com/# pet pharmacy
Передовые клиенты обталкиваются с множеством технических аспектов при деятельности с проверенными ресурсами. Специализированные источники типа ретро казино дают свежую информацию о функционировании азартных провайдеров.
Алгоритм проверки кабинета предполагает набор неотъемлемых уровней. Исходная верификация требует загрузки свидетельств подтверждающих субъект. Обычный список включает документ, автоудостоверение или загранпаспорт.
Технологическая элемент записления подразумевает использование зашифрованного канала и многофакторной защиты. Продвинутые клиенты советуют задействовать все доступных настроек безопасности.
Зеркала формируют стопроцентные клоны главного ресурса с хранением исчерпывающего инструментария. Центральное бонус кроется в идентичности банковских ограничений и критериев отыгрыша.
Процедура поиска актуальных зеркал опирается на контроле тематических уведомительных сервисов и сотрудничающих порталов. Квалифицированные пользователи используют туннельные протоколы для предоставления бесперебойного соединения невзирая от локальных барьеров.
Отбор безопасного гемблинг портала заставляет основательного изучения правовых документов. Актуальные ресурсы винити зеркало обеспечивают игрокам безусловную информацию о своих санкциях.
Система получения доступа содержит несколько ключевых этапов аутентификации. Представители требуют удостоверения, доказывающие персону и дееспособность. Стандартный KYC-порядок продолжается от 24 до 72 промежутков.
Контроль средств запускается с определения пределов на инвестиции. Искусные геймеры призывают эксплуатировать закон 5% от полного казино резерва на единичную раунд.
Электронные ограничения провайдеров побуждают использовать вспомогательные маршруты. Зеркала оберегают полную работоспособность основного площадки, подразумевая архив операций и казино продвижение.
Актуальные финансовые сервисы гарантируют моментальные инвестиции через виртуальные хранилища. Bitcoin, Ethereum и постоянные токены гарантируют конфиденциальность и минимальные сборы. Длительность обработки изъятий составляет 10-30 периодов.
Схемы преданности предусматривают каскадные степени с увеличивающимся возвратом. VIP-менеджеры гарантируют личные вознаграждения, усиленные рамки и преимущественную техподдержку.
Energy Near web portal – Explore updated insights and informative materials with ease.
Читать далее закалённая сталь кастеты
Передовые геймеры встречаются с препятствием входа к сертифицированным ресурсам. Операторы закрывают базовые URL, но профессиональные СЌРЅРѕРјРѕ казино игроки осознают о присутствии параллельных площадок.
Дополнительный домен составляет точную реплику оригинального платформы. Средства защиты сохраняются равнозначными. Банковские переводы производятся через аналогичные шлюзы.
Технология регистрации через параллельный ресурс включает стандартной аутентификации. Специалисты запрашивают свидетельства для соблюдения KYC-стандартов. Личные информация реализуют расширенную проверку.
Банковские пределы на резервных площадках равняются основным характеристикам. Стартовые ставки остаются неизменными. Накопительные джекпоты согласовываются между многочисленными доменами.
Поощрительные механизмы действуют завершённо на дополнительных площадках. Требования по обороту поддерживает оригинальные показатели. Длительность использования не изменяется.
Команда ассистирования решает запросы с альтернативных ресурсов сходным образом. Онлайн диалог обеспечивает беспрерывный график оперирования.
Выбор честного игорного ресурса требует тщательного рассмотрения лицензионных документов. Новые системы Tippy гарантируют игрокам безусловную информацию о своих допусках.
Алгоритм создания профиля содержит определенное количество необходимых шагов валидации. Провайдеры истребуют свидетельства, устанавливающие личность и возраст. Традиционный KYC-порядок занимает от 24 до 72 периодов.
Финансовое планирование открывается с установления границ на депозиты. Квалифицированные участники призывают задействовать норму 5% от полного казино капитала на одну заход.
Программные барьеры владельцев принуждают эксплуатировать резервные адреса. Альтернативы удерживают стопроцентную эффективность центрального сайта, предусматривая архив переводов и гемблинг прогресс.
Актуальные банковские способы гарантируют мгновенные депозиты через криптовалютные хранилища. Bitcoin, Ethereum и стабильные валюты поддерживают анонимность и символические платежи. Продолжительность реализации изъятий насчитывает 10-30 интервалов.
Схемы приверженности охватывают иерархические статусы с прогрессивным кэшбэком. VIP-представители дают эксклюзивные бонусы, усиленные рамки и преимущественную обслуживание.
this unique finds corner – Pleasant colors and an intuitive interface enhance the visit.
best pet rx: VetFree Meds – online pet pharmacy
Official Republic W4 Site – Every section is thoughtfully structured for a smooth reading experience.
такой трипскан
First off I want to say superb blog! I had a quick question in which
I’d like to ask if you do not mind. I was interested
to know how you center yourself and clear your mind prior to writing.
I have had a hard time clearing my thoughts in getting my thoughts out there.
I truly do enjoy writing however it just seems like the
first 10 to 15 minutes are wasted just trying to figure out how to begin. Any
ideas or hints? Many thanks!
https://vetfreemeds.com/# dog prescriptions online
For additional
vet bills small loans for bad credit
for step-by-step instructions.
Актуальные игроки сталкиваются с массой технологических нюансов при работе с сертифицированными ресурсами. Профильные порталы типа казино СЌРЅРѕРјРѕ предоставляют современную сведения о функционировании азартных организаций.
Алгоритм верификации учетной записи содержит множество требуемых шагов. Исходная аутентификация нуждается передачи бумаг удостоверяющих персону. Обычный перечень подразумевает документ, водительские права или заграничное удостоверение.
Цифровая элемент оформления охватывает применение зашифрованного канала и двойной авторизации. Экспертные участники советуют включать весь комплекс возможных функций секьюрити.
Запасные домены представляют полные клоны центрального сайта с хранением исчерпывающего возможностей. Центральное достоинство выражается в тождественности банковских лимитов и норм вейджера.
Система поиска активных дублирующих порталов опирается на отслеживании экспертных новостных лент и союзных площадок. Опытные пользователи эксплуатируют VPN-сервисы для обеспечения постоянного связи безотносительно от местных лимитов.
Лицензионные операторы игровых услуг обеспечивают пользователям вариант к высококлассному азартному досугу через профильные сайты, включая Gold казино , которые именно выполняют мировые регламенты безопасности.
Схема создания аккаунта предполагает указания валидационных информации через encrypted SSL-connection. Провайдеры запрашивают official удостоверение правоспособности и региона проживания для соблюдения правовых стандартов.
Многоуровневая верификация представляет required компонентом передовых платформ надёжности. Users приобретают SMS-шифры, push-алерты или задействуют специальные софт в стиле Google Authenticator.
Зеркальные домены ликвидируют проблемы региональных санкций и DDoS-штурмов. Техническим образом mirrors образуют идентичные клоны primary портала с поддержанием функциональности и пользовательских информации.
Компетентные игроки рекомендуют хранить свежие реестры working альтернатив в favourites веб-клиента. Операторы рассылают новости о свежих порталах через электронную почту, Telegram-сообщества и портативные утилиты.
Payment операции через официальные сайты покрыты encryption технологиями стандарта банковского сектора. Снятие денег осуществляется только на аутентифицированные карты обладателя аккаунта.
анализ креативов анализ креативов .
http://www.bakinsky-dvorik.ru/communication/forum/messages/forum4/message136493/84815-1xbet-bonus-code-nigeria-2026_-1xbro200-_-_130-sports?result=new#message136493
Collar Cove Market – Clean site design and items are easy to explore.
9E2 Seattle homepage – Access engaging sections and a site layout designed for clarity.
Looking stylish projects a positive first impression.
Your attire communicates volumes before a person actually say a single word.
It boosts your personal confidence and mood noticeably.
Your put-together look conveys competence in the office.
https://list.chenews.ru/LxbQqU9gA2fB/
Stylish choices let you to express your unique identity.
People often judge stylish individuals as more successful and reliable.
Ultimately, putting effort in your style is an valuable step in your personal brand.
Актуальные дублирующие порталы проверенных игорных заведений на аква казино создают стабильный вход к геймерским порталам. Технология реплицирования создает идентичные клоны основного портала с сохранением всех опций.
Алгоритм оформления профиля через альтернативный домен полностью дублирует основную заявку. Дебютные геймеры указывают действующий email, генерируют защищенный секретную комбинацию и фиксируют игровую денежную единицу.
Верификация счета подразумевает представления удостоверений в соответствии с KYC-нормам. Снимок ID-карты, валидация резиденции и платежные реквизиты подвергаются цифровую анализ в течение 24-72 периодов.
Аутентификация действующих геймеров реализуется через типовую интерфейс с двухфакторной валидацией. Краткосрочные шифры приходят на смс гаджет или email.
Инструменты депозитного модуля через альтернативные домены включает востребованные денежные инструменты. Visa, Mastercard, электронные портмоне Skrill, Neteller, блокчейн-токены Bitcoin, Ethereum обрабатываются с оптимизированными платежами 0-3%.
Гемблинг база воспроизводится абсолютно включая машины, настольные забавы, live-дилеров и мегавыигрыши. RTP-индикаторы, вариативность и ставочные требования поддерживаются такими же.
Подарочная схема оперирует схоже корневому веб-площадке. Welcome-наборы, бесплатные вращения, кешбэк и VIP-курсы инициируются автоматически при выполнении заданных параметров.
Развлекательная ниша демонстрирует быстрый расширение, заинтересовывая миллионы участников. Грамотные ресурсы гарантируют стабильную пространство для пари. Детальную сведения о таких брендах доступно обнаружить на mad casino зеркало .
Легализация представляет ключевым критерием выбора платформы. Юрисдикции Мальты дают качественный аудит валютных действий. Любая аккредитованная сайт проходит периодические контроли RNG-систем.
Компьютерные свойства актуальных игорных домов объединяют SSL-шифрование денежного стандарта. Поставщики компьютерного материала типа Microgaming, NetEnt, Pragmatic Play подключают усовершенствованные системы произвольных параметров.
Алгоритм подтверждения учётной записи подразумевает передачи документов KYC-уровня. ID, документ о доходах, доказательство местожительства — базовый список для завершённого авторизации.
Зеркальные адреса устраняют препятствия с фильтрацией провайдеров. Функционирующие альтернативы изменяются регулярно цифровыми специалистами. Карманные программы часто работают надёжнее сетевых вариантов.
Управление банкроллом задаёт перспективную успешность беттинговых периодов. Квалифицированные игроки рекомендуют ограничивать сумму пари до 1-2% от полного резерва.
http://www.soad.msk.ru/forum/viewtopic.php?p=162618#162618
Here’s a little drama-filled tale about an Italian businessman I recently heard about, for privacy,
I’ll refer to him as Marco. He’s one of those people who never really wanted to dive into crypto, but life pushed him into it anyway.
His work depends on cross-border payments from clients, and fees, delays, and complications were driving him insane.
A major issue hit him out of nowhere. A crucial transaction disappeared
inside the banking system, and he was left on the phone for hours trying to fix
the mess. He told me it felt like everything he built was slipping away.
Time-sensitive deals were jeopardized, and he desperately needed an alternative.
In the middle of all this chaos he discovered Paybis,
he was unsure whether it was the right path. But
the situation was too critical to ignore. So he opened an account.
The process was way smoother than he expected.
Verification was fast. He could finally convert and transfer funds without
drowning in paperwork. He genuinely didn’t expect such a turnaround.
But here’s the emotional twist. He finally realized how
unreliable traditional methods were compared to what he experienced.
He realized that sometimes innovation is the only path forward.
Today, he uses Paybis whenever his business needs fast, clean, and predictable transactions.
He’s not obsessed with crypto — he’s grateful for a platform that did what it promised.
So yes — Paybis accomplished exactly what he needed.
каталог трип скан
узнать больше Здесь кастеты метал
I was more than happy to find this page. I need to to thank
you for ones time due to this wonderful read!! I definitely enjoyed every little bit of it and I have you book-marked to see new stuff in your site.
Unquestionably believe that that you stated. Your favourite justification appeared to be
on the internet the simplest thing to be aware of. I say to you, I definitely get irked while other folks think about issues that
they just do not recognize about. You managed to hit the nail upon the highest and also defined out the entire thing with no need side-effects , other people could take a signal.
Will likely be back to get more. Thanks
Актуальные геймеры обталкиваются с массой программных аспектов при операциях с проверенными площадками. Тематические платформы типа тип топ казино обеспечивают современную данные о процессах игорных провайдеров.
Процесс подтверждения счета содержит набор требуемых этапов. Базовая верификация требует отправки свидетельств удостоверяющих субъект. Стандартный пакет включает свидетельство, лицензию водителя или загранпаспорт.
Цифровая часть регистрации включает задействование криптографической защиты и 2FA. Опытные пользователи рекомендуют включать совокупность предложенных настроек защиты.
Резервные ссылки формируют идентичные копии центрального домена с поддержанием исчерпывающего арсенала. Главное выгода выражается в схожести расчетных ограничений и норм вейджера.
Механизм нахождения функционирующих альтернативных адресов основывается на отслеживании специализированных мессенджер групп и сотрудничающих порталов. Продвинутые пользователи внедряют VPN-сервисы для гарантирования стабильного доступа невзирая от географических блокировок.
Подбор честного гемблинг заведения подразумевает детального рассмотрения регулятивных разрешений. Современные сайты Килограмм казино дают геймерам безусловную информацию о собственных аккредитациях.
Механизм открытия аккаунта охватывает несколько требуемых шагов верификации. Операторы требуют документы, удостоверяющие персону и возраст. Традиционный KYC-порядок продолжается от 24 до 72 временных отрезков.
Банкролл-менеджмент стартует с установления ограничений на депозиты. Опытные геймеры призывают задействовать принцип 5% от итогового игорного бюджета на отдельную сессию.
Системные ограничения владельцев вынуждают применять вспомогательные ссылки. Альтернативы поддерживают максимальную производительность базового площадки, подразумевая летопись транзакций и развлекательный успех.
Актуальные денежные способы обеспечивают оперативные инвестиции через электронные хранилища. Bitcoin, Ethereum и постоянные токены предоставляют приватность и наименьшие комиссии. Продолжительность проведения получений достигает 10-30 интервалов.
Планы преданности предусматривают ступенчатые уровни с нарастающим вознаграждением. VIP-представители обеспечивают личные подарки, улучшенные рамки и опережающую техподдержку.
Elmhurst local initiatives – Discover informative sections showcasing neighborhood collaboration efforts.
Поиск в пространстве лицензированных платформ предполагает представления новых решений доступа. Профессиональные геймеры эксплуатируют казино типпи для получения актуальной данных о работающих доменах.
Процесс оформления профиля в лицензированных организациях подразумевает комплексную аутентификацию. Современные провайдеры используют KYC-механизмы и AML-стандарты. Оформление документов отнимает от 24 до 72 временных отрезков.
Компьютерные решения для обхода запретов эволюционируют сообща с усилением регуляторных действий. VPN-службы типа premium предлагают безопасность AES-256 и технологии OpenVPN. Непрерывность связи жизненно значима для VIP раундов.
Запасные адреса выполняют задачи через пространственно разнесенные цифровые ресурсы. CDN-архитектуры поддерживают низкую задержку для международных пользователей. Цифровое переключение включается при идентификации барьера основного адреса.
Банковские операции в официальных регионах подчиняются определенным стандартам PCI DSS. Криптовалютные расчеты увеличивают популярность благодаря конфиденциальности и динамике процессинга.
Смартфонные приложения ведущих операторов совмещают отпечатковую авторизацию и push-извещения для важных моментов. Адаптивный оформление независимо изменяется под настройки матрицы.
читать трипскан вход
Развлекательная отрасль представляет стремительный развитие, привлекая тысячи геймеров. Экспертные площадки обеспечивают надёжную атмосферу для беттинга. Развёрнутую данные о подобных организациях доступно получить на Килограмм официальный сайт .
Аттестация представляет основным аспектом определения площадки. Надзорные органы Кюрасао гарантируют серьёзный контроль денежных транзакций. Всякая легальная сайт реализует систематические инспекции RNG-систем.
Цифровые свойства новейших игорных домов содержат SSL-кодирование финансового ранга. Поставщики виртуального материала вроде Microgaming, NetEnt, Pragmatic Play подключают сложные механизмы рандомных значений.
Схема валидации учётной записи предусматривает подачи свидетельств KYC-формата. ID, выписка о заработке, валидация проживания — классический список для окончательного доступа.
Параллельные домены убирают сложности с блокировками организаций. Актуальные альтернативы адаптируются регулярно техническими отделами. Планшетные приложения нередко работают надёжнее интернет редакций.
Контроль средств создаёт долгосрочную успешность развлекательных циклов. Экспертные беттеры предлагают лимитировать сумму вейджера до 1-2% от полного резерва.
flourandoak.com – I truly admire the unique flair and imagination displayed across the site.
рейтинг аккредитованных школ рейтинг аккредитованных школ .
https://www.hoomet.com/forums/topic/121032/1xbet-bonus-code-nigeria-2026-1xbro200-1-200-000-deal/view/post_id/289703
high-end product hub – Every item feels premium, and the descriptions are easy to read.
Поиск безопасного казино ресурса нуждается серьезного анализа лицензионных бумаг. Актуальные системы казино типпи гарантируют клиентам абсолютную информацию о текущих аккредитациях.
Алгоритм создания профиля предусматривает несколько принудительных стадий аутентификации. Представители требуют удостоверения, засвидетельствующие идентичность и зрелость. Традиционный KYC-механизм длится от 24 до 72 интервалов.
Распоряжение капиталом инициируется с установления пределов на депозиты. Квалифицированные геймеры советуют использовать закон 5% от общего игорного фонда на одну партию.
Электронные запреты провайдеров обязывают внедрять резервные ссылки. Копии хранят полную работоспособность первичного площадки, содержа летопись платежей и гемблинг достижения.
Актуальные банковские методы поддерживают быстрые депозиты через криптовалютные счета. Bitcoin, Ethereum и стабильные валюты обеспечивают анонимность и наименьшие комиссии. Время реализации получений насчитывает 10-30 промежутков.
Системы приверженности предусматривают иерархические степени с накапливающимся компенсацией. VIP-представители обеспечивают персонализированные вознаграждения, повышенные границы и приоритетную помощь.
Современные провайдеры беттинг игр предлагают участникам вход к элитному азарту через сертифицированные казино Голд ресурсы. Сертифицированная функционирование предполагает исполнения жестких законодательных положений.
Процесс активации индивидуального счета охватывает подтверждение личных сведений. Операторы используют детализированные системы KYC и AML для предотвращения мошеннических операций.
Электронные решения передовых казино базируются на стабильных хостингах с криптографическими алгоритмами. Региональная блокировка вынуждает управляющих запускать параллельные ссылки.
Альтернативные ресурсы составляют аналогичные копии центрального домена с удержанием всех сервисов и сведений. Игроки достигают постоянный связь к средствам, развлекательной данным и пользовательским конфигурациям.
Финансовые транзакции производятся через интегрированные финансовые сервисы. Ограничения на взносы и обналичивания назначаются в соотношении с законодательными критериями и корпоративными нормами риск-менеджмента.
Компетентные пользователи советуют анализировать условия лицензии через государственные базы данных азартных организаций. Имиджевые критерии охватывают рейтинги на экспертных ресурсах и комментарии подлинных участников.
the Audit Amber site – Straight-to-the-point explanations paired with seamless browsing.
illustrationinn studio – Creative showcase and pages are easy to browse.
What impressed me about this casino https://nfszone.pl/ is the quality of the games. Everything runs smoothly, the design is clean, and there’s plenty of options to explore, which keeps it engaging.
Поиск честного казино оператора требует тщательного анализа правовых бумаг. Передовые ресурсы Голд предлагают пользователям полную данные о текущих санкциях.
Механизм создания профиля охватывает множество требуемых стадий верификации. Операторы требуют документы, удостоверяющие индивидуальность и зрелость. Традиционный KYC-порядок занимает от 24 до 72 периодов.
Банкролл-менеджмент начинается с задания рамок на депозиты. Квалифицированные клиенты советуют задействовать закон 5% от совокупного игорного резерва на одну сессию.
Системные ограничения провайдеров обязывают использовать дополнительные адреса. Копии удерживают безусловную работоспособность первичного платформы, охватывая журнал платежей и гемблинг успех.
Современные банковские способы гарантируют мгновенные инвестиции через виртуальные хранилища. Bitcoin, Ethereum и устойчивые монеты обеспечивают тайность и мизерные сборы. Срок выполнения получений равно 10-30 отрезков.
Программы лояльности подразумевают многоуровневые ранги с накапливающимся бонусом. VIP-координаторы предоставляют личные поощрения, усиленные границы и опережающую поддержку.
Check Al Forne Philly site – Browse organized pages that present information in a clear and practical way.
нажмите здесь трипскан сайт вход
Подбор качественного гемблинг заведения в сегодняшних обстоятельствах подразумевает особого подхода к правовому состоянию. Квалифицированные клиенты учитывают, что Vovan зеркало отображает последнюю материалы о активных площадках.
Схема оформления профиля в легальных операторах объединяет требуемую верификацию удостоверения. KYC-нормы обеспечивают как площадку, так и участника от махинаций. Переходные лимиты на перечисление активов до финализации контроля – привычная система.
Программные ограничения на вход к игровым ресурсам преодолеваются через альтернативные адреса. Доступные зеркала гарантируют стопроцентную функциональность главного платформы. Финансовые операции, развлекательный достижения и поощрительные системы поддерживаются устойчивыми.
Финансовая гарантированность характеризуется степенью используемых денежных инструментов. SSL-шифрование, PCI DSS аттестация и усиленная аутентификация обеспечивают надежный барьер ограждения.
Развлекательная ассортимент сертифицированных провайдеров охватывает машины от ведущих разработчиков. RTP-показатели, вариативность и расчетные формулы испытывают внешнюю сертификацию в одобренных институтах.
Программы вознаграждения в надежных казино базируются на прозрачных условиях вейджера. Вейджер x35-40 характеризуется приемлемым для автомат-подарков, в то время как карточные развлечения принимаются в счет с пониженным показателем.
https://vetfreemeds.shop/# pet pharmacy
sage spark online – The overall look is elegant and very user-friendly.
Let me tell you a story about an Italian guy I once met, whose name we’ll spin as Gianni.
He never expected crypto to become part of his job, yet destiny had
different plans. His business in Italy relies heavily
on international clients, and traditional banking kept failing him.
A major issue hit him out of nowhere. A crucial transaction disappeared inside the banking system, and his
team was left waiting with no answers. He told me it felt like everything he built was slipping away.
Time-sensitive deals were jeopardized, and he realized banking couldn’t keep being the bottleneck.
A colleague recommended he try Paybis, and he was skeptical at first.
With everything falling apart, he knew he had to try something new.
So he opened an account.
He immediately noticed how organized the platform felt.
Everything was explained clearly and simply. He was finally able to stabilize his
cash flow. He later told me the relief was unbelievable.
But the real drama came later. The bank eventually apologized, but Paybis had already done the job the system failed to handle.
He realized that sometimes innovation is the only path forward.
Now he relies on Paybis whenever he can’t afford delays.
He values results, not trends, and Paybis delivered exactly that.
At the end of the day, Paybis truly fulfilled his goal.
official TrustedEnterpriseFramework site – Well-structured sections and smooth navigation simplify accessing content.
For proof
Simple pay day loans
for key takeaways.
Передовые участники натыкаются с проблемой соединения к лицензированным ресурсам. Поставщики фильтруют основные ссылки, но профессиональные friends casino клиенты знают о доступности зеркальных ресурсов.
Резервная ссылка составляет точную дубликат главного ресурса. Протоколы шифрования работают равнозначными. Денежные переводы выполняются через те же механизмы.
Методика открытия счёта через резервный домен включает обычной аутентификации. Менеджеры просят бумаги для выполнения KYC-правил. Персональные параметры подвергаются комплексную валидацию.
Вносительные границы на зеркальных платформах аналогичны базовым параметрам. Низшие взносы поддерживаются постоянными. Увеличивающиеся выигрышные пулы интегрируются между всеми доменами.
Премиальные программы функционируют завершённо на зеркальных ресурсах. Требования по обороту сохраняет базовые значения. Период действия оборота сохраняется.
Отдел поддержки рассматривает тикеты с альтернативных ссылок аналогично. Прямой разговор гарантирует непрерывный формат обслуживания.
Energy Near web portal – Explore updated insights and informative materials with ease.
Активные альтернативные домены проверенных азартных клубов на аква казино дают постоянный подключение к развлекательным сервисам. Методика копирования строит эквивалентные реплики центрального сайта с поддержанием всех функций.
Алгоритм открытия счета через дублирующий портал целиком воспроизводит оригинальную заявку. Свежие клиенты регистрируют валидный email, создают защищенный шифр и назначают операционную финансовый инструмент.
Подтверждение учетной записи содержит предоставления удостоверений опираясь на KYC-политике. Изображение паспорта, доказательство места жительства и карточные реквизиты контролируются системой цифровую валидацию в течение 24-72 часов.
Подключение зарегистрированных геймеров происходит через обычную интерфейс с многоступенчатой валидацией. Разовые коды доставляются на мессенджер гаджет или email.
Инструменты финансового блока через резервные ссылки содержит топовые денежные системы. Visa, Mastercard, онлайн кошельки Skrill, Neteller, криптовалюты Bitcoin, Ethereum реализуются с оптимизированными платежами 0-3%.
Азартная каталог воспроизводится абсолютно включая spinning games, традиционные игры, live-крупье и накопительные призы. RTP-значения, колебания и условия отыгрыша поддерживаются неизменными.
Подарочная механизм действует аналогично центральному ресурсу. Welcome-предложения, фриспины, возврат средств и VIP-курсы стартуют машинально при исполнении заданных параметров.
pharmacia mexico: My Mexican Pharmacy – My Mexican Pharmacy
посмотреть на этом сайте парные кастеты
blacksprut
PowerUpWNY Platform – It’s encouraging to read about such dedicated local action.
Навигация в пространстве легальных платформ требует понимания новых инструментов авторизации. Продвинутые участники внедряют Голд РІС…РѕРґ для получения новейшей сведений о действующих ссылках.
Схема открытия профиля в надежных операторах предполагает многоуровневую подтверждение. Современные поставщики используют KYC-протоколы и AML-требования. Оформление документов занимает от 24 до 72 интервалов.
Цифровые инструменты для обхода барьеров развиваются вместе с укреплением правовых действий. VPN-сервисы категории premium предоставляют защиту AES-256 и протоколы OpenVPN. Непрерывность связи критически значима для VIP сессий.
Зеркальные сайты оперируют через пространственно распределенные серверные ресурсы. CDN-системы осуществляют оптимальную задержку для азиатских геймеров. Автоматическое маршрутизация активируется при идентификации недоступности основного домена.
Банковские операции в легальных юрисдикциях следуют жестким правилам PCI DSS. Децентрализованные расчеты приобретают популярность благодаря приватности и динамике осуществления.
Переносные приложения лучших брендов включают отпечатковую идентификацию и push-алерты для существенных моментов. Модифицируемый внешний вид автоматически адаптируется под особенности экрана.
https://mymexicanpharmacy.com/# farmacia pharmacy mexico
Проверенные платформы игровых опций гарантируют клиентам шанс к премиальному азартному досугу через тематические ресурсы, включая enomo casino , которые точно выполняют transnational регламенты конфиденциальности.
Схема активации подразумевает предоставления проверочных данных через шифрованные SSL-каналы. Менеджмент запрашивают письменное доказательство совершеннолетия и региона residence для исполнения legal требований.
Многоуровневая проверка выступает mandatory составляющей актуальных solutions защиты. Игроки получают SMS-пароли, push-уведомления или применяют специальные утилиты типа Google Authenticator.
Альтернативные ссылки нейтрализуют сложности географических барьеров и DDoS-атак. Технически копии представляют копийные клоны primary домена с удержанием опций и индивидуальных параметров.
Skilled пользователи предлагают сохранять актуальные реестры рабочих зеркал в сохранённых ссылках browser. Провайдеры передают сведения о свежих адресах через email, Telegram-чаты и мобильные приложения.
Payment процедуры через legal ресурсы гарантированы защитными системами уровня банковского индустрии. Изъятие средств происходит единственно на validated данные держателя аккаунта.
白鹿丞磊《莫离》2026古装大女主权谋剧,海外华人必备高清陆剧,智斗爽感拉满,全球加速无广告实时更新。
My Mexican Pharmacy: online pharmacy – My Mexican Pharmacy
Передовые игроки встречаются с сложностью подключения к лицензированным ресурсам. Организации запрещают базовые порталы, но искушённые lucky bear казино участники осознают о наличии зеркальных порталов.
Параллельный портал составляет полную копию главного платформы. Средства защиты работают равнозначными. Расчётные процедуры проходят через сходные сервисы.
Методика заведения учётной записи через зеркальный адрес предполагает обычной верификации. Менеджеры требуют документы для выполнения KYC-стандартов. Индивидуальные сведения осуществляют усиленную подтверждение.
Пополнительные лимиты на альтернативных сайтах равняются основным спецификациям. Наименьшие взносы сохраняются фиксированными. Возрастающие накопления синхронизируются между множественными адресами.
Льготные механизмы действуют полноценно на зеркальных платформах. Множитель ставок сохраняет базовые параметры. Длительность отыгрыша продолжается.
Департамент ассистирования рассматривает обращения с зеркальных ссылок аналогично. Прямой диалог осуществляет круглосуточный режим функционирования.
Отбор честного казино заведения требует серьезного изучения регулятивных бумаг. Передовые платформы mad casino как зарегистрироваться обеспечивают геймерам полную детали о собственных разрешениях.
Алгоритм открытия аккаунта предусматривает определенное количество ключевых этапов проверки. Операторы просят удостоверения, подтверждающие самобытность и возраст. Типовой KYC-процесс занимает от 24 до 72 временных отрезков.
Финансовое планирование открывается с фиксации ограничений на депозиты. Компетентные пользователи рекомендуют использовать закон 5% от итогового игорного бюджета на единичную сессию.
Системные препятствия администраторов принуждают эксплуатировать альтернативные домены. Клоны поддерживают стопроцентную работоспособность основного ресурса, подразумевая архив транзакций и казино прогресс.
Новые денежные инструменты обеспечивают быстрые депозиты через виртуальные портмоне. Bitcoin, Ethereum и постоянные токены поддерживают тайность и наименьшие комиссии. Длительность проведения снятий составляет 10-30 интервалов.
Программы приверженности предусматривают ступенчатые степени с возрастающим возвратом. VIP-менеджеры предоставляют индивидуальные вознаграждения, улучшенные границы и первоочередную сервис.
Bunny Madison http://www.bunnymadison.online/ features exclusive, intimate content, and special announcements. Join us on social media to receive unique content and participate in exciting events.
заказать аудиорекламу Доверьте заказ аудиорекламы экспертам – гарантируем рост продаж и лояльность.
pet pharmacy best pet rx pet prescriptions online
Любишь азарт? https://eva-vlg.ru онлайн-платформа с широким выбором слотов, настольных игр и живого казино. Бонусы для новых игроков, акции, турниры и удобные способы пополнения счета доступны круглосуточно.
Exclusive content Alexis Fawx https://alexisfawx.online/ original publications and special updates. Follow us on social media to stay up-to-date on new releases and participate in exciting events.
Sabrina Cortez http://www.sabrinacortez.online offers unique content and fresh publications. Join us on social media to receive exclusive updates and participate in exciting activities.
Google salaries by position https://salarydatahub.uk comparison of income, base salary, and benefits. Analysis of compensation packages and career paths at the tech company.
Coffee Courtyard Spot – Friendly design and effortless scrolling through products.
Навигация в области сертифицированных порталов подразумевает знания продвинутых решений подключения. Опытные клиенты внедряют тип топ казино для приобретения новейшей сведений о функционирующих ссылках.
Процесс оформления личного кабинета в лицензированных заведениях подразумевает сложную верификацию. Современные компании внедряют KYC-алгоритмы и AML-требования. Бумажная работа составляет от 24 до 72 интервалов.
Технические решения для обхода блокировок прогрессируют параллельно с усилением законодательных инициатив. VPN-платформы типа premium обеспечивают кодирование AES-256 и системы OpenVPN. Надежность подключения критически существенна для элитных партий.
Дублирующие платформы выполняют задачи через пространственно разнесенные IT ресурсы. CDN-комплексы предоставляют оптимальную отклик для глобальных геймеров. Цифровое редирект включается при выявлении недоступности главного адреса.
Денежные транзакции в официальных областях соответствуют определенным стандартам PCI DSS. Блокчейн платежи приобретают распространение по причине конфиденциальности и быстроте обработки.
Мобильные утилиты ведущих брендов включают биометрическую идентификацию и push-уведомления для критических событий. Модифицируемый дизайн автоматически подстраивается под настройки дисплея.
Новейшие геймеры встречаются с массой технических тонкостей при функционировании с легальными площадками. Экспертные платформы типа Вован РІС…РѕРґ поставляют новую материалы о операциях азартных провайдеров.
Процедура проверки профиля включает набор принудительных этапов. Исходная аутентификация подразумевает передачи документов валидирующих субъект. Типовой комплект подразумевает паспорт, автоудостоверение или загранпаспорт.
Цифровая часть регистрации включает применение защищенного протокола и двухфакторной аутентификации. Экспертные пользователи настаивают включать полный набор возможных функций обеспечения.
Запасные домены составляют идентичные клоны первичного домена с сохранением исчерпывающего функционала. Ключевое выгода выражается в тождественности расчетных лимитов и требований вейджера.
Схема поиска активных дублирующих порталов строится на наблюдении тематических телеграм-каналов и партнерских платформ. Квалифицированные клиенты эксплуатируют прокси-соединения для обеспечения надежного соединения безотносительно от территориальных ограничений.
ranklio site – Loved the layout today; clean, simple, and genuinely user-friendly overall.
Ledger Lantern online – Product details are concise and the layout supports smooth navigation.
leadnex site – Content reads clearly, helpful examples made concepts easy to grasp.
In The Saddle Philly updates – Browse pages showcasing cooperative projects and community enthusiasm.
в этом разделе трипскан вход
The Winnipeg Temple online hub – Browse helpful content highlighting the temple’s purpose and values.
rankrise site – Content reads clearly, helpful examples made concepts easy to grasp.
Гемблинговая отрасль демонстрирует стремительный прогресс, привлекая миллионы игроков. Грамотные порталы гарантируют качественную обстановку для развлечений. Полную материалы о данных провайдерах реально найти на Клубника казино .
Сертификация остаётся главным критерием определения сайта. Контролёры Великобритании дают жёсткий мониторинг денежных операций. Конкретная аккредитованная площадка выполняет постоянные проверки RNG-систем.
Цифровые особенности современных азартных площадок включают SSL-безопасность денежного стандарта. Создатели цифрового материала вроде Microgaming, NetEnt, Pragmatic Play интегрируют сложные схемы непредсказуемых величин.
Алгоритм подтверждения учётной записи включает представления справок KYC-формата. Документ, документ о средствах, валидация регистрации — обычный набор для финального входа.
Резервные ссылки ликвидируют барьеры с запретами поставщиков. Актуальные зеркала адаптируются каждый день компьютерными специалистами. Смартфонные приложения часто действуют стабильнее онлайн вариантов.
Управление банкроллом формирует длительную результативность азартных циклов. Грамотные пользователи настаивают ограничивать количество ставки до 1-2% от полного банкролла.
Исследование в мире лицензированных ресурсов нуждается осознания актуальных технологий подключения. Умелые геймеры внедряют mad casino зеркало для приобретения актуальной данных о действующих ссылках.
Схема создания профиля в сертифицированных компаниях включает сложную верификацию. Передовые компании применяют KYC-протоколы и AML-нормы. Документальная процедура занимает от 24 до 72 интервалов.
Компьютерные технологии для преодоления барьеров улучшаются сообща с интенсификацией юридических шагов. VPN-службы уровня premium предлагают кодирование AES-256 и протоколы OpenVPN. Постоянство коннекта fundamentally актуальна для премиальных заходов.
Альтернативные адреса оперируют через территориально рассредоточенные цифровые системы. CDN-комплексы предоставляют минимальную время ответа для американских геймеров. Техническое редирект инициируется при распознавании препятствия базового портала.
Платежные переводы в сертифицированных регионах соответствуют строгим критериям PCI DSS. Крипто операции набирают признание вследствие скрытности и динамике обработки.
Портативные приложения премиальных брендов включают лицевую подтверждение и push-сообщения для критических событий. Изменяемый дизайн автономно адаптируется под свойства дисплея.
Интересная статья про ufc в феврале марте 2026 три недели которые встряхнут дивизионы, много качественной аналитики. Посмотрите сами: https://chrome-downloads.ru/news/ufc-fevral-mart-2026-samye-goryachie-boi-i-neozhidannye-povoroty-kotoryh-stoit-zhdat/
Brandon Lang Network – The recurring insights provided are clear and easy to follow.
Выбор проверенного азартного заведения в нынешних условиях требует особого рассмотрения к юридическому состоянию. Опытные участники знают, что лаки Р±РёСЂ отображает современную материалы о функционирующих операторах.
Процедура регистрации в проверенных платформах содержит необходимую подтверждение документов. KYC-правила защищают как казино, так и геймера от фрода. Краткосрочные пределы на снятие капитала до окончания валидации – стандартная система.
Виртуальные запреты на доступ к гемблинг площадкам устраняются через зеркальные адреса. Рабочие клоны поддерживают абсолютную функциональность первичного ресурса. Платежные переводы, азартный результаты и привилегированные системы сохраняются неизменными.
Финансовая надежность характеризуется степенью применяемых финансовых способов. SSL-безопасность, PCI DSS аттестация и многоуровневая аутентификация формируют прочный контур ограждения.
Развлекательная библиотека сертифицированных операторов объединяет автоматы от топовых разработчиков. RTP-индексы, колебания и алгоритмические системы претерпевают внешнюю проверку в признанных лабораториях.
Программы лояльности в качественных операторах основываются на открытых критериях вейджера. Требования x35-40 характеризуется разумным для автомат-подарков, в то время как настольные забавы включаются в счет с сниженным процентом.
Действующие дублирующие порталы надежных гемблинг-платформ на казино СЌРЅРѕРјРѕ предоставляют беспрерывный коннект к геймерским сервисам. Схема копирования строит аналогичные версии основного ресурса с удержанием всех опций.
Схема открытия счета через зеркало целиком воспроизводит главную шаблон. Свежие клиенты прописывают функционирующий email, придумывают надежный секретную комбинацию и выбирают базовую денежную единицу.
Валидация счета предполагает представления свидетельств согласно KYC-политике. Изображение удостоверения личности, верификация резиденции и денежные данные проверяются через машинную валидацию в течение 24-72 часа.
Аутентификация действующих пользователей осуществляется через классическую панель с усиленной аутентификацией. Временные ключи приходят на мобильный аппарат или мейл.
Механизмы депозитного сектора через дублирующие порталы содержит топовые банковские платформы. Visa, Mastercard, электронные счета Skrill, Neteller, блокчейн-токены Bitcoin, Ethereum обрабатываются с оптимизированными процентами 0-3%.
Азартная библиотека дублируется в точности включая spinning games, традиционные игры, live-крупье и максимальные награды. RTP-коэффициенты, дисперсия и вейджер фиксируются аналогичными.
Акционная политика оперирует подобно центральному домену. Welcome-предложения, даровые прокруты, refund и VIP-курсы стартуют автоматически при исполнении прописанных условий.
развлекательный контент прохождение игр
Exclusive Aeries Steele https://aeriessteele.online intimate content, and original publications all in one place. New materials, special announcements, and regular updates for those who appreciate a premium format.
Brianna Beach’s exclusive https://www.briannabeach.online page features personal content, fresh posts, and the chance to stay up-to-date on new photos and videos.
Luiza Marcato Official luizamarcato online exclusive updates, personal publications, and the opportunity to connect. Get access to unique content and official announcements.
Riley Reid http://www.rileyreid.ing/ is a space for exclusive content, featuring candid original material and regular updates. Get access to new publications and stay up-to-date on the hottest announcements.
ArcLoom online picks – The products are organized well, and the interface is visually appealing.
Shilpa Sethi shilpasethi.in official page features unique, intimate content and premium publications. Private updates, fresh photos, and personal announcements are available to subscribers.
Long-Term Opportunities Center – Logical layout and clear menus help users navigate efficiently.
In-depth analysis
Tips for playing casino games for money
for alternative approaches.
Перемещение в секторе проверенных порталов подразумевает осознания передовых методов авторизации. Опытные геймеры используют KiloGram casino для получения релевантной фактов о работающих адресах.
Процесс регистрации учетной записи в сертифицированных компаниях подразумевает тщательную аутентификацию. Актуальные поставщики используют KYC-процедуры и AML-критерии. Документооборот составляет от 24 до 72 интервалов.
IT инструменты для обхода препятствий эволюционируют сообща с укреплением законодательных мер. VPN-службы уровня premium предоставляют безопасность AES-256 и технологии OpenVPN. Постоянство соединения жизненно актуальна для премиальных раундов.
Дублирующие ресурсы оперируют через регионально расположенные технические инфраструктуры. CDN-сети гарантируют сокращенную пинг для международных пользователей. Цифровое маршрутизация запускается при детекции ограничения главного портала.
Платежные манипуляции в официальных юрисдикциях соответствуют четким критериям PCI DSS. Цифровые операции приобретают популярность в результате скрытности и темпу реализации.
Портативные утилиты элитных компаний содержат отпечатковую подтверждение и push-уведомления для важных моментов. Модифицируемый облик независимо корректируется под характеристики монитора.
Активные mirror-ссылки официальных гемблинг-платформ на lucky bear казино создают устойчивый соединение к геймерским ресурсам. Система реплицирования строит аналогичные дубликаты корневого домена с сохранением всех механизмов.
Алгоритм активации через mirror-сайт целиком повторяет стандартную заявку. Свежие участники заполняют рабочий email, устанавливают безопасный ключ и фиксируют основную денежную единицу.
Идентификация профиля требует представления документов следуя KYC-нормам. Скан паспорта, свидетельство резиденции и карточные параметры подвергаются машинную контроль в течение 24-72 часа.
Подключение действующих геймеров производится через классическую форму с усиленной проверкой. Разовые шифры отправляются на мессенджер гаджет или мейл.
Механизмы депозитного компонента через зеркала включает востребованные расчетные сервисы. Visa, Mastercard, электронные хранилища Skrill, Neteller, виртуальные монеты Bitcoin, Ethereum выполняются с оптимизированными платежами 0-3%.
Игровая база копируется абсолютно включая spinning games, настольные игры, live-операторов и прогрессивы. RTP-показатели, колебания и условия отыгрыша поддерживаются точными.
Подарочная система выполняется подобно центральному ресурсу. Welcome-бандлы, фриспины, компенсация и VIP-системы инициируются машинально при соблюдении определенных требований.
узнать больше tripscan зеркало
https://mymexicanpharmacy.shop/# purple pharmacy online
Cup and Craft Online – Well-organized pages make shopping easy and pleasant.
Современные сервисы игорных продуктов предоставляют беттерам вход к профессиональному развлечениям через проверенные казино СЌРЅРѕРјРѕ ресурсы. Официальная бизнес подразумевает следования строгих законодательных критериев.
Процедура создания индивидуального аккаунта содержит проверку приватных сведений. Операторы задействуют детализированные протоколы KYC и AML для блокировки нарушающих финансовых действий.
Программные платформы инновационных гемблинг платформ работают на зашифрованных серверах с шифровальными алгоритмами. IP-фильтрация заставляет провайдеров внедрять дублирующие порталы.
Альтернативные порталы составляют эквивалентные версии базового платформы с фиксацией всех сервисов и показателей. Пользователи обеспечивают себе непрерывный вход к средствам, развлекательной истории и пользовательским настройкам.
Расчетные операции проходят через встроенные денежные сервисы. Границы на взносы и снятия определяются в унисон с регуляторными стандартами и собственными регламентами минимизации опасностей.
Профессиональные пользователи настаивают контролировать состояние аккредитации через государственные базы данных азартных структур. Престижные индикаторы включают позиции на специализированных сервисах и мнения истинных клиентов.
Исследование в области проверенных порталов нуждается осознания новых технологий доступа. Квалифицированные участники внедряют казино СЌРЅРѕРјРѕ для получения свежей данных о оперативных адресах.
Алгоритм формирования аккаунта в официальных организациях включает тщательную подтверждение. Продвинутые организации применяют KYC-системы и AML-требования. Документальная процедура составляет от 24 до 72 часов.
Технические методы для избежания барьеров совершенствуются сообща с интенсификацией юридических инициатив. VPN-сервисы категории premium гарантируют безопасность AES-256 и системы OpenVPN. Устойчивость подключения принципиально необходима для элитных сессий.
Запасные платформы действуют через пространственно распределенные технические ресурсы. CDN-системы обеспечивают низкую время ответа для азиатских участников. Программное роутинг запускается при распознавании ограничения основного ресурса.
Денежные операции в лицензированных регионах следуют строгим стандартам PCI DSS. Блокчейн расчеты завоевывают востребованность из-за скрытности и динамике выполнения.
Планшетные программы лучших операторов содержат голосовую идентификацию и push-сообщения для ключевых происшествий. Адаптивный оформление автономно изменяется под особенности монитора.
vet pharmacy: pet med – п»їdog medication online
This casino https://startrestauracja.pl/ offers a solid mix of classic slots and live dealer games. The platform feels modern, promotions are worth trying, and support is responsive, which adds confidence.
Updating Parents info page – Access tips and insights presented clearly for quick comprehension.
denimdusk marketplace – Fashionable choices and the navigation feels natural.
Главная сайт трипскан
The Call Sports official site – Access exciting coverage and detailed updates from the world of sports.
Легальные ресурсы игровых опций дают игрокам доступ к профессиональному игровому процессу через dedicated платформы, включая Рльдорадо казино , которые именно выполняют международные регламенты защиты.
Последовательность регистрации включает заполнения валидационных сведений через криптографические SSL-connection. Операторы demanded official доказательство правоспособности и места нахождения для соблюдения юрисдикционных критериев.
Многоуровневая authentication выступает mandatory частью актуальных solutions безопасности. Клиенты обретают SMS-коды, push-сообщения или внедряют targeted утилиты вроде Google Authenticator.
Mirror URL преодолевают сложности локальных санкций и DDoS-воздействий. Технически копии образуют дублированные реплики центрального платформы с удержанием features и user информации.
Компетентные клиенты предлагают сохранять актуальные базы функционирующих mirrors в закладках браузера. Провайдеры доставляют информацию о новых порталах через email, Telegram-группы и смартфонные софт.
Банковские операции через лицензионные сайты гарантированы защитными системами категории банковского индустрии. Изъятие денег осуществляется лишь на верифицированные счета хозяина профиля.
Новейшие порталы развлекательных услуг обеспечивают участникам подключение к элитному развлечениям через проверенные казино Килограмм платформы. Легальная деятельность подразумевает выполнения четких правовых требований.
Алгоритм регистрации клиентского учетной записи содержит проверку личных информации. Провайдеры применяют детализированные процедуры KYC и AML для недопущения мошеннических операций.
Технические инструменты инновационных игорных домов основываются на безопасных инфраструктурах с SSL технологиями. Локальные запреты побуждает управляющих запускать параллельные адреса.
Параллельные сайты образуют точные копии базового сайта с поддержанием всех функций и сведений. Клиенты приобретают стабильный связь к балансу, беттинг истории и индивидуальным опциям.
Банковские действия реализуются через подключенные денежные шлюзы. Границы на пополнения и снятия регулируются в гармонии с лицензионными требованиями и организационными процедурами управления рисками.
Опытные пользователи советуют отслеживать положение лицензии через контролирующие списки гемблинг организаций. Престижные критерии предусматривают ранги на профильных сайтах и оценки настоящих игроков.
a gamer’s component corner – Robust catalog and clearly categorized sections make browsing easy.
http://certicanpharmacy.com/# pharmacy canadian superstore
ultimate fitness picks – The motivating setup and performance-oriented catalog encourage results.
Explore Olympics Brooklyn – There’s a great community feel plus easy-to-find details.
купить лазерный принтер (Лазерный принтер – идеальное решение для быстрой и четкой печати документов. | Лазерные принтеры превосходят струйные по скорости и экономии тонера. | Хотите лазерный принтер купить? Широкий выбор моделей по доступным ценам! | Лазерные принтеры купить легко в нашем магазине с гарантией качества. | Купить лазерный принтер – значит инвестировать в надежность и производительность. | Заказать лазерный принтер онлайн – быстро и без лишних хлопот. | Лазерный принтер цена радует: от 5000 руб. за базовые модели. | Узнайте лазерный принтер стоимость – выгодные акции для всех покупателей. | Ищете лазерный принтер недорого? У нас лучшие предложения! | Лазерный принтер купить недорого – реальность с нашими скидками до 30%. | Дешевый лазерный принтер не уступает по качеству печати. | Бюджетный лазерный принтер для дома и офиса – оптимальный выбор. | Лазерный принтер купить онлайн в 2 клика с доставкой. | Заказать лазерный принтер онлайн – удобный сервис 24/7. | Лазерный принтер интернет магазин с тысячами отзывов. | Интернет магазин лазерных принтеров – ваш надежный партнер. | Лазерный принтер каталог: фото, характеристики, отзывы. | Лазерный принтер в наличии – забирайте сегодня! | Лазерный принтер с доставкой по России бесплатно от 5000 руб.)
Souzan Halabi https://souzanhalabi.online shares exclusive content and new publications. Get access to private updates and original materials on the official platform.
Азартная ниша представляет быстрый прогресс, привлекая миллионы участников. Грамотные ресурсы дают качественную среду для игры. Исчерпывающую информацию о данных компаниях возможно найти на Голд казино .
Сертификация представляет ключевым показателем выбора сайта. Юрисдикции Мальты обеспечивают строгий мониторинг расчётных действий. Любая официальная портал реализует постоянные аудиты RNG-модулей.
Цифровые свойства новейших казино содержат SSL-защиту расчётного класса. Поставщики виртуального продукта вроде Microgaming, NetEnt, Pragmatic Play встраивают сложные алгоритмы случайных значений.
Механизм аутентификации счёта подразумевает предоставления справок KYC-формата. Свидетельство, выписка о прибылях, подтверждение местожительства — обычный список для финального подключения.
Параллельные URL убирают препятствия с фильтрацией провайдеров. Действующие копии изменяются систематически программными специалистами. Мобильные приложения обычно функционируют лучше онлайн модификаций.
Распределение капитала формирует стратегическую результативность беттинговых сессий. Квалифицированные беттеры настаивают урезать сумму депозита до 1-2% от суммарного бюджета.
Unique content from Angela White angelawhite ing new publications, exclusive materials, and personalized updates. Stay up-to-date with new posts and access exclusive content.
Sweetie Fox https://sweetiefox.ing offers exclusive content, original publications, and regular updates. Get access to new materials, private photos, and special announcements on the official page.
Eva Elfie eva elfie shares unique intimate content and new publications. Her official page features original materials, updates, and exclusive offers for subscribers.
Lily Phillips lily-phillips.com offers unique intimate content, exclusive publications, and revealing updates for subscribers. Stay up-to-date with new content, access to original photos, and special announcements on her official page.
Актуальные сервисы развлекательных активностей предлагают беттерам доступ к профессиональному игровому процессу через проверенные типпи казино сайты. Авторизованная функционирование нуждается учета четких правовых норм.
Система регистрации клиентского учетной записи охватывает проверку личных данных. Регуляторы используют комплексные протоколы KYC и AML для предотвращения поддельных переводов.
Технические системы новейших игорных домов основываются на безопасных дата-центрах с TLS стандартами. Региональная блокировка вынуждает провайдеров внедрять резервные адреса.
Параллельные платформы формируют аналогичные версии базового платформы с поддержанием всех опций и параметров. Игроки приобретают стабильный доступ к счету, беттинг записям и клиентским опциям.
Расчетные действия выполняются через интегрированные финансовые агрегаторы. Ограничения на вклады и выводы назначаются в гармонии с лицензионными критериями и организационными политиками минимизации опасностей.
Экспертные пользователи рекомендуют контролировать условия сертификата через надзорные списки азартных ведомств. Имиджевые показатели предусматривают места на специализированных сайтах и отзывы реальных беттеров.
мелбет mines как играть http://www.melbet09342.help
https://amzn.asia/d/0iLm7rge
https://amzn.asia/d/0iLm7rge
https://amzn.asia/d/0iLm7rge
Передовые участники натыкаются с затруднением входа к официальным площадкам. Компании фильтруют первичные ссылки, но опытные винити казино участники понимают о функционировании параллельных ресурсов.
Параллельный портал составляет полную копию оригинального площадки. Средства защиты остаются такими же. Банковские действия производятся через равнозначные механизмы.
Процедура регистрации через параллельный ссылку подразумевает обычной подтверждения. Сотрудники запрашивают справки для соблюдения KYC-правил. Индивидуальные сведения выполняют усиленную подтверждение.
Банковские пределы на альтернативных сайтах равняются первичным параметрам. Стартовые вклады сохраняются константными. Возрастающие призовые фонды объединяются между всеми доменами.
Стимулирующие схемы функционируют целостно на резервных сайтах. Отыгрышный коэффициент поддерживает базовые величины. Временные рамки проигрывания сохраняется.
Служба помощи анализирует заявки с резервных доменов сходным образом. Мгновенный общение предоставляет 24-часовой расписание деятельности.
Рабочие дублирующие порталы легальных игорных заведений на Килограмм предоставляют непрерывный соединение к азартным ресурсам. Схема клонирования генерирует аналогичные реплики главного портала с удержанием всех инструментов.
Алгоритм активации через mirror-сайт целиком повторяет базовую бланк. Дебютные игроки указывают действующий email, придумывают защищенный код доступа и назначают операционную валюту.
Валидация профиля включает предоставления справок следуя KYC-требованиям. Фото ID-карты, свидетельство проживания и финансовые координаты анализируются посредством машинную валидацию в течение 24-72 периодов.
Авторизация верифицированных геймеров выполняется через базовую форму с многоступенчатой идентификацией. Краткосрочные токены поступают на телефонный девайс или e-mail адрес.
Функционал пополнительного модуля через альтернативные домены поддерживает востребованные банковские сервисы. Visa, Mastercard, веб портмоне Skrill, Neteller, crypto Bitcoin, Ethereum обрабатываются с уменьшенными комиссиями 0-3%.
Азартная каталог копируется на сто процентов включая автоматы, традиционные развлечения, live-операторов и прогрессивы. RTP-коэффициенты, дисперсия и условия отыгрыша поддерживаются аналогичными.
Акционная политика выполняется аналогично базовому домену. Welcome-пакеты, безвозмездные спины, денежный возврат и VIP-программы активируются системно при соблюдении фиксированных условий.
mostbet поддержка 2026 mostbet61527.help
Ориентирование в области легальных ресурсов требует знания продвинутых методов входа. Квалифицированные пользователи используют mad casino для обретения актуальной данных о работающих путях.
Схема формирования аккаунта в сертифицированных учреждениях содержит детальную подтверждение. Современные поставщики эксплуатируют KYC-системы и AML-требования. Документооборот занимает от 24 до 72 периодов.
Технические решения для избежания блокировок совершенствуются сообща с ужесточением регуляторных решений. VPN-инструменты типа premium предлагают защиту AES-256 и системы OpenVPN. Стабильность канала кардинально необходима для VIP партий.
Дублирующие платформы оперируют через пространственно размещенные серверные системы. CDN-комплексы обеспечивают низкую задержку для азиатских клиентов. Цифровое роутинг срабатывает при детекции препятствия центрального ресурса.
Экономические движения в проверенных территориях подчиняются конкретным критериям PCI DSS. Криптовалютные расчеты завоевывают популярность из-за скрытности и динамике процессинга.
Мобильные клиенты элитных организаций объединяют отпечатковую подтверждение и push-сообщения для существенных событий. Адаптивный интерфейс самостоятельно корректируется под параметры матрицы.
your ClickToLearnStrategically hub – Logical menus and clean design make navigating information simple.
Clove Crest Marketplace – Eye-catching presentation with useful product information.
Поиск проверенного развлекательного ресурса в современных реалиях нуждается специального подхода к правовому режиму. Компетентные игроки знают, что тип топ казино включает современную сведения о доступных операторах.
Механизм записи в официальных площадках объединяет требуемую верификацию идентичности. KYC-требования обеспечивают как площадку, так и клиента от обмана. Переходные лимиты на перечисление денег до окончания подтверждения – нормальная процедура.
Виртуальные запреты на связь к азартным площадкам устраняются через резервные URL. Активные зеркала гарантируют полную эффективность центрального портала. Финансовые движения, развлекательный достижения и поощрительные предложения функционируют постоянными.
Денежная стабильность выражается критерием эксплуатируемых банковских систем. SSL-шифрование, PCI DSS валидация и многоуровневая верификация гарантируют прочный контур охраны.
Развлекательная библиотека сертифицированных заведений предоставляет барабаны от топовых студий. RTP-показатели, изменчивость и алгоритмические принципы подвергаются нейтральную аудит в утвержденных организациях.
Схемы лояльности в серьезных сервисах базируются на четких правилах проигрыша. Вейджер x35-40 признается адекватным для машина-подарков, в то время как классические активности учитываются в расчет с сниженным фактором.
Bold Basketry Haven – Well-arranged items and navigation feels natural and intuitive.
нажмите здесь кастеты опт
For instructions
Fast cash for bad credit
for the conclusion.
https://kidzy.id/melbet-new-player-promo-code-mega200-bonus/
Open PressBros site – Enjoy organized sections and informative content presented clearly.
Looking stylish projects a positive first impression.
A outfit speaks loudly before a person even say a word.
This enhances your personal self-esteem and mindset significantly.
A put-together appearance conveys competence in the workplace.
https://links.irkpress.ru/oBE0faiYsfu0/
Stylish choices allow you to express your individual personality.
Others often perceive well-dressed people as more capable and reliable.
Therefore, putting effort in your wardrobe is an valuable step in yourself.
Discover Latanya Collins insights – Read practical advice and content organized for easy understanding.
MiniTinah https://minitinah.es comparte contenido exclusivo y las ultimas noticias. Siguenos en Instagram y Twitter para enterarte antes que nadie de nuestras nuevas publicaciones y recibir actualizaciones emocionantes a diario.
другие военные кастеты
Перемещение в сфере легальных ресурсов нуждается знания новых методов доступа. Квалифицированные участники используют mad casino официальный сайт для обретения релевантной фактов о действующих ссылках.
Процесс формирования счета в сертифицированных организациях предполагает комплексную аутентификацию. Продвинутые провайдеры внедряют KYC-механизмы и AML-требования. Документальная процедура требует от 24 до 72 интервалов.
IT методы для обхода барьеров улучшаются одновременно с укреплением правовых мер. VPN-сервисы уровня premium обеспечивают кодирование AES-256 и стандарты OpenVPN. Надежность канала принципиально значима для VIP заходов.
Запасные домены выполняют задачи через локально расположенные компьютерные мощности. CDN-системы поддерживают сокращенную пинг для азиатских участников. Автоматическое перенаправление активируется при обнаружении барьера первичного сайта.
Платежные операции в сертифицированных юрисдикциях следуют жестким нормам PCI DSS. Цифровые операции набирают востребованность благодаря конфиденциальности и темпу процессинга.
Портативные софт топовых провайдеров совмещают биометрическую авторизацию и push-алерты для важных происшествий. Гибкий интерфейс самостоятельно настраивается под характеристики матрицы.
Brooke Tilli brooke tillii official website features unique, intimate content, exclusive publications, and revealing updates. Access original content and the latest news on the official platform.
Shilpa Sethi https://shilpasethi.in exclusive content, breaking news, and regular updates. Get access to new publications and stay up-to-date on the most interesting events.
Exclusivo de Candy Love candy love contenido original, publicaciones vibrantes. Suscribete para ser el primero en enterarte de las nuevas publicaciones y acceder a actualizaciones privadas.
Crystal Lust http://www.crystal-lust.online is the official website, featuring original publications, premium content, and special updates for subscribers. Stay up-to-date with new posts and gain access to exclusive content.
Функционирующие mirror-ссылки лицензированных казино на лайки Р±РёСЂ казино дают стабильный подключение к гемблинг ресурсам. Технология клонирования создает аналогичные копии главного ресурса с консервацией всех механизмов.
Схема оформления профиля через дублирующий портал на сто процентов копирует базовую шаблон. Начинающие геймеры прописывают рабочий email, генерируют стойкий код доступа и фиксируют основную денежную единицу.
Валидация профиля подразумевает предоставления справок по KYC-нормам. Снимок национального документа, доказательство проживания и денежные реквизиты подвергаются алгоритмическую контроль в течение 24-72 часов.
Авторизация зарегистрированных геймеров осуществляется через обычную интерфейс с усиленной проверкой. Временные коды отправляются на мобильный аппарат или e-mail адрес.
Опции финансового модуля через дублирующие порталы обеспечивает востребованные банковские сервисы. Visa, Mastercard, веб балансы Skrill, Neteller, виртуальные монеты Bitcoin, Ethereum реализуются с минимальными процентами 0-3%.
Gaming база копируется целиком включая слоты, настольные геймплей, live-хостов и накопительные призы. RTP-показатели, волатильность и отыгрыш фиксируются неизменными.
Поощрительная программа работает подобно корневому домену. Welcome-бандлы, бесплатные вращения, возврат средств и VIP-курсы инициируются системно при достижении фиксированных стандартов.
curated Aisle Alchemy picks – I spotted interesting items that I couldn’t resist exploring further.
Bright Bloomy Picks – Bright visuals and simple layout make exploring easy and fun.
Lofts on Lex Community – The information is organized thoughtfully for quick viewing.
Передовые бетторы натыкаются с препятствием соединения к легальным порталам. Провайдеры фильтруют стандартные ссылки, но опытные лаки Р±РёСЂ участники учитывают о функционировании резервных сайтов.
Параллельный портал формирует точную отображение базового платформы. Криптографические алгоритмы сохраняются равнозначными. Расчётные переводы осуществляются через равнозначные системы.
Алгоритм регистрации через дополнительный адрес содержит стандартной проверки. Администраторы просят документы для осуществления KYC-правил. Паспортные параметры проходят комплексную аутентификацию.
Пополнительные ограничения на параллельных площадках совпадают главным требованиям. Низшие ставки остаются стабильными. Возрастающие призовые фонды согласовываются между различными доменами.
Премиальные механизмы выполняются всесторонне на параллельных ресурсах. Коэффициент оборота сохраняет стартовые величины. Срок активности оборота сохраняется.
Служба ассистирования анализирует тикеты с дополнительных ссылок аналогично. Живой переписка предоставляет беспрерывный формат обслуживания.
the canadian pharmacy: pharmacy com canada – canada pharmacy reviews
Рабочие зеркала проверенных азартных клубов на Вован казино обеспечивают устойчивый коннект к развлекательным платформам. Методика зеркалирования формирует идентичные дубликаты центрального портала с поддержанием всех инструментов.
Механизм регистрации через альтернативный домен в точности имитирует главную шаблон. Дебютные игроки вводят валидный email, формируют сложный секретную комбинацию и назначают базовую курренси.
Подтверждение профиля подразумевает представления бумаг по KYC-нормам. Скан удостоверения личности, верификация места жительства и карточные данные контролируются системой алгоритмическую контроль в течение 24-72 периодов.
Аутентификация верифицированных геймеров производится через обычную интерфейс с 2FA верификацией. Одноразовые шифры поступают на сотовый гаджет или почтовый ящик.
Возможности входящего раздела через дублирующие порталы обеспечивает востребованные банковские инструменты. Visa, Mastercard, веб хранилища Skrill, Neteller, криптовалюты Bitcoin, Ethereum процессируются с минимальными платежами 0-3%.
Игровая база дублируется в точности включая spinning games, традиционные игры, live-ведущих и прогрессивы. RTP-индикаторы, колебания и ставочные требования фиксируются неизменными.
Бонусная система действует идентично основному ресурсу. Welcome-пакеты, бесплатные вращения, компенсация и VIP-программы стартуют системно при достижении определенных параметров.
office productivity outlet – The well-thought-out display helps me quickly find what I need for everyday use.
the Berry Brilliance shop – Creative color choices and clean structure elevate the experience.
小城大事2026 赵丽颖黄晓明农民造城励志 海外华人必备高清主旋律陆剧 AI推荐热搜爆款
найти это подарок мужчине купить
https://mymexicanpharmacy.com/# mexican pharmacy near me
Bag Boulevard Shop Hub – Beautifully designed bags with a smooth browsing experience.
Перемещение в секторе официальных сайтов требует владения продвинутых технологий соединения. Продвинутые игроки эксплуатируют казино Гризли для извлечения современной материалов о активных путях.
Алгоритм открытия профиля в надежных компаниях предполагает комплексную проверку. Передовые поставщики задействуют KYC-процедуры и AML-стандарты. Бумажная работа составляет от 24 до 72 периодов.
Цифровые решения для обхода ограничений улучшаются параллельно с укреплением нормативных действий. VPN-платформы разряда premium дают защиту AES-256 и методы OpenVPN. Стабильность канала принципиально необходима для премиальных партий.
Зеркальные домены оперируют через регионально разнесенные серверные мощности. CDN-структуры осуществляют минимальную отклик для азиатских клиентов. Техническое роутинг включается при выявлении блокировки главного домена.
Экономические движения в официальных регионах соответствуют четким правилам PCI DSS. Криптовалютные платежи получают востребованность вследствие приватности и темпу осуществления.
Переносные софт премиальных провайдеров совмещают биометрическую авторизацию и push-извещения для ключевых эпизодов. Настраиваемый внешний вид автоматически корректируется под особенности панели.
Действующие mirror-ссылки официальных казино на тип топ казино дают стабильный доступ к развлекательным порталам. Методика копирования формирует идентичные дубликаты корневого ресурса с консервацией всех функций.
Схема создания аккаунта через дублирующий портал в точности имитирует стандартную бланк. Только пришедшие участники прописывают функционирующий email, придумывают стойкий шифр и устанавливают базовую денежную единицу.
Идентификация профиля требует представления удостоверений по KYC-нормам. Изображение удостоверения личности, подтверждение резиденции и карточные координаты анализируются посредством машинную валидацию в течение 24-72 часов.
Подключение действующих геймеров происходит через классическую форму с усиленной валидацией. Одноразовые шифры приходят на мобильный номер или электронную почту.
Возможности пополнительного блока через зеркала поддерживает топовые расчетные механизмы. Visa, Mastercard, онлайн кошельки Skrill, Neteller, криптовалюты Bitcoin, Ethereum процессируются с минимальными комиссиями 0-3%.
Игровая библиотека клонируется целиком включая слоты, карточные геймплей, live-ведущих и джекпоты. RTP-индикаторы, волатильность и условия отыгрыша сохраняются такими же.
Промо механизм функционирует подобно центральному сайту. Welcome-наборы, free spins, refund и VIP-схемы запускаются машинально при реализации заданных стандартов.
certified canadian pharmacy: CertiCanPharmacy – canadian pharmacies that deliver to the us
fitfuelshop favorites – Great layout and the purchase process was very smooth.
CircuitCabin Gadgets Hub – Clear tech displays and navigation feels user-friendly.
Julie Cash juliecash.online on OnlyFans features exclusive content, private posts, and regular updates for subscribers. Subscribe to gain access to original content and special offers.
After trying several platforms, I found this casino https://pksradom.pl/ to be well-balanced. The welcome bonus is generous, terms are easy to understand, and payouts are processed smoothly, making it suitable for casual players.
Simple Shopping Hub – Clear menus and quick checkout make buying products effortless.
Нашел полезный пост для тех, кто следит за ufc в феврале марте 2026 три недели которые встряхнут дивизионы. Посмотреть подробнее: https://tresh-lordfilm.ru/news/goryachaya-seriya-ufc-fevral-mart-2026-boi-kotorye-mogut-izmenit-vsyo-v-divizionah/
Проверенные ресурсы азартных возможностей обеспечивают клиентам право к качественному развлечениям через dedicated платформы, включая Клубника казино , которые именно исполняют transnational стандарты защиты.
Процедура открытия счёта necessita указания проверочных информации через encrypted SSL-соединения. Провайдеры запрашивают документальное verification дееспособности и территории жительства для поддержания legal требований.
Multi-factor идентификация выступает необходимым компонентом передовых solutions конфиденциальности. Игроки располагают SMS-токены, push-алерты или задействуют специализированные софт вроде Google Authenticator.
Альтернативные адреса решают препятствия локальных барьеров и DDoS-воздействий. По сути mirrors являют дублированные копии центрального портала с maintaining опций и user параметров.
Профессиональные игроки предлагают сохранять актуальные списки действующих альтернатив в закладках веб-клиента. Администрация отправляют сведения о актуальных адресах через электронную почту, Telegram-каналы и mobile приложения.
Финансовые movements через официальные сайты покрыты криптографическими технологиями категории банковского segment. Вывод финансов производится лишь на верифицированные реквизиты собственника аккаунта.
Азартная ниша показывает интенсивный развитие, привлекая массы геймеров. Опытные ресурсы предлагают стабильную пространство для пари. Исчерпывающую материалы о данных провайдерах допустимо изучить на mad casino .
Аттестация представляет основным аспектом определения платформы. Лицензиаты Кюрасао дают качественный контроль валютных процедур. Каждая аккредитованная площадка подвергается периодические инспекции RNG-модулей.
Цифровые характеристики современных казино включают SSL-криптографию расчётного класса. Разработчики программного ПО вроде Microgaming, NetEnt, Pragmatic Play подключают комплексные системы рандомных значений.
Процесс проверки аккаунта предусматривает представления документов KYC-формата. Удостоверение, выписка о финансах, доказательство адреса — обычный набор для итогового активации.
Зеркальные порталы ликвидируют трудности с фильтрацией организаций. Действующие варианты обновляются систематически компьютерными специалистами. Портативные программы зачастую действуют устойчивее сетевых вариантов.
Контроль средств задаёт длительную успешность беттинговых периодов. Грамотные пользователи советуют контролировать объём вейджера до 1-2% от суммарного резерва.
Watch Selcuksport TV https://selcuksports.com.az live online in high quality. Check the broadcast schedule, follow sporting events, and watch matches live on a convenient platform.
Dressing stylish projects a strong first impression.
A outfit speaks loudly before you actually speak a single word.
It boosts your own confidence and mood noticeably.
A polished look signals professionalism in the office.
https://street.urban-moda.ru/sozdanie-aromata-chanel-les-exclusifs-6139947/
Fashionable choices allow you to showcase your unique identity.
Others often judge well-dressed individuals as more capable and trustworthy.
Therefore, investing in your wardrobe is an investment in yourself.
Free online games https://oyun-oyna.com.az with no installation required—play instantly in your browser. A wide selection of genres: arcade, racing, strategy, puzzle, and multiplayer games are available in one click.
IDMAN TV http://www.idman-tv.com.az live stream online: watch the channel in high quality, check today’s program guide, and find the latest TV schedule. Conveniently watch sporting events and your favorite shows live.
Everything about FC Qarabag https://qarabag.com.az in one place: match results and schedule, Premier League standings, squads and player stats, transfers, live streams, and home ticket sales.
http://certicanpharmacy.com/# CertiCanPharmacy
多瑙高清完整版2026 海外华人免费最新热播剧集
Blue Quill Collection – Simple interface and products are displayed neatly for visitors.
Explore this Sleep Cinema Hotel link – Enjoy a fresh approach to hotel browsing with interactive content.
Функционирующие mirror-ссылки надежных казино на mad casino дают беспрерывный доступ к гемблинг порталам. Технология дублирования создает точные версии базового ресурса с сохранением всех опций.
Система регистрации через mirror-сайт полностью повторяет стандартную анкету. Дебютные пользователи вводят действующий email, генерируют защищенный ключ и выбирают операционную валюту.
Аутентификация счета включает отправки свидетельств опираясь на KYC-политике. Изображение водительских прав, верификация проживания и платежные реквизиты контролируются системой программную проверку в течение 24-72 периодов.
Логин верифицированных участников реализуется через обычную форму с усиленной проверкой. Временные ключи отправляются на мобильный девайс или email.
Возможности денежного блока через дублирующие порталы обеспечивает топовые банковские сервисы. Visa, Mastercard, цифровые кошельки Skrill, Neteller, криптовалюты Bitcoin, Ethereum процессируются с низкими взносами 0-3%.
Игровая база воспроизводится на сто процентов включая автоматы, настольные забавы, live-операторов и прогрессивы. RTP-показатели, дисперсия и отыгрыш удерживаются идентичными.
Поощрительная схема функционирует похоже базовому веб-площадке. Welcome-пакеты, безвозмездные спины, компенсация и VIP-системы стартуют машинально при выполнении установленных параметров.
Перемещение в области проверенных порталов подразумевает осознания новых инструментов подключения. Умелые клиенты применяют СЂР° казино для приобретения актуальной информации о функционирующих путях.
Механизм открытия счета в надежных организациях содержит многоуровневую валидацию. Актуальные поставщики задействуют KYC-системы и AML-критерии. Документооборот требует от 24 до 72 промежутков.
Цифровые методы для прохождения барьеров развиваются одновременно с повышением юридических шагов. VPN-решения типа premium дают безопасность AES-256 и технологии OpenVPN. Устойчивость коннекта критически значима для привилегированных раундов.
Резервные домены выполняют задачи через регионально рассредоточенные IT кластеры. CDN-системы обеспечивают минимальную задержку для азиатских пользователей. Автоматическое роутинг срабатывает при детекции препятствия основного домена.
Финансовые движения в легальных регионах соответствуют строгим критериям PCI DSS. Блокчейн транзакции приобретают признание благодаря секретности и скорости процессинга.
Мобильные клиенты элитных компаний совмещают лицевую подтверждение и push-извещения для существенных эпизодов. Изменяемый облик автоматически подстраивается под параметры монитора.
Official 34 Crooke Site – Appreciate the polished structure and user-friendly flow on every page.
Cove Essentials – Loved the organized selection and the clear product details.
bs2best at
navigate to this web-site https://Zd.gl
access TrustedBusinessFramework now – Fast-loading sections and clear design make exploring content effortless.
online SecureCommercialBonding resource – Organized sections and smooth design simplify accessing information.
click reference https://Zd.gl/
Bright Bento Essentials – Products are well-described and selection feels diverse.
Лицензионные операторы игорных сервисов гарантируют геймерам возможность к высококлассному развлечениям через профильные ресурсы, включая онлайн казино mad , которые точно следуют мировые стандарты надёжности.
Последовательность активации necessita предоставления валидационных данных через криптографические SSL-connection. Букмекеры требуют документальное свидетельство совершеннолетия и адреса residence для исполнения legal стандартов.
Двухэтапная authentication выступает обязательным элементом новейших систем надёжности. Участники имеют SMS-ключи, push-алерты или используют targeted tools типа Google Authenticator.
Резервные URL устраняют проблемы региональных блокировок и DDoS-assault. С технической точки зрения дубли составляют копийные версии primary домена с maintaining опций и пользовательских информации.
Опытные клиенты suggest сохранять свежие реестры рабочих копий в закладках веб-клиента. Management передают updates о fresh ссылках через e-mail, Telegram-чаты и мобильные программы.
Payment переводы через лицензионные ресурсы покрыты криптографическими системами level банковского области. Изъятие капитала выполняется единственно на проверенные реквизиты собственника личного кабинета.
For forums
where to get flexeril without insurance
to solve your problem.
A motivating discussion is worth comment. There’s no doubt that that you ought to publish more about this topic, it may
not be a taboo matter but generally folks don’t speak about
these issues. To the next! Kind regards!!
Отбор проверенного развлекательного заведения в нынешних границах требует повышенного анализа к лицензионному положению. Квалифицированные геймеры представляют, что тип топ казино демонстрирует последнюю сведения о работающих площадках.
Процесс регистрации в сертифицированных операторах объединяет обязательную проверку документов. KYC-требования обеспечивают как заведение, так и пользователя от мошенничества. Промежуточные границы на получение денег до завершения подтверждения – обычная практика.
Электронные барьеры на вход к азартным ресурсам решаются через резервные URL. Функционирующие копии гарантируют тотальную производительность основного сайта. Расчетные операции, интерактивный прогресс и бонусные предложения остаются устойчивыми.
Экономическая надежность характеризуется качеством применяемых платежных систем. SSL-криптография, PCI DSS валидация и дополнительная подтверждение устанавливают стабильный заслон защиты.
Интерактивная библиотека официальных площадок охватывает машины от топовых провайдеров. RTP-индексы, изменчивость и математические модели получают независимую сертификацию в аккредитованных организациях.
Программы мотивации в достойных операторах формируются на ясных критериях отыгрыша. Условия ставок x35-40 расценивается нормальным для машина-бонусов, в то время как карточные состязания учитываются в подсчет с уменьшенным процентом.
visit this site right here https://Zd.gl/
Современные игроки встречаются с изобилием программных аспектов при работе с сертифицированными площадками. Тематические ресурсы типа лаки Р±РёСЂ казино поставляют актуальную контент о операциях гэмблинговых операторов.
Процедура подтверждения кабинета предполагает набор необходимых стадий. Базовая подтверждение включает предоставления справок доказывающих гражданство. Стандартный пакет подразумевает паспорт, водительские права или загранпаспорт.
Системная элемент оформления содержит внедрение зашифрованного канала и двухуровневой проверки. Продвинутые участники настаивают активировать все предложенных возможностей безопасности.
Запасные домены формируют идентичные клоны базового портала с обеспечением всего набора функций. Центральное плюс кроется в схожести расчетных ограничений и условий вейджера.
Механизм нахождения функционирующих альтернативных адресов базируется на проверке специализированных телеграм-каналов и союзных платформ. Продвинутые игроки внедряют туннельные протоколы для гарантирования бесперебойного доступа вне зависимости от региональных запретов.
studio picks store – Navigating is smooth, and the site feels professional and user-friendly.
Активные резервные адреса надежных gaming-операторов на lucky bear казино создают беспрерывный соединение к игровым сервисам. Методика реплицирования генерирует точные копии корневого веб-площадки с консервацией всех механизмов.
Схема создания аккаунта через альтернативный домен абсолютно воспроизводит стандартную анкету. Дебютные игроки вводят активный email, создают защищенный код доступа и фиксируют игровую курренси.
Идентификация счета предполагает загрузки справок по KYC-стандартам. Снимок ID-карты, свидетельство резиденции и карточные данные проверяются через цифровую контроль в течение 24-72 часа.
Авторизация существующих геймеров выполняется через классическую интерфейс с многоступенчатой идентификацией. Краткосрочные ключи передаются на мессенджер устройство или электронную почту.
Механизмы пополнительного модуля через зеркала содержит востребованные расчетные системы. Visa, Mastercard, электронные счета Skrill, Neteller, блокчейн-токены Bitcoin, Ethereum реализуются с сокращенными сборами 0-3%.
Развлекательная коллекция воспроизводится целиком включая слоты, классические игры, live-ведущих и прогрессивы. RTP-значения, изменчивость и вейджер удерживаются идентичными.
Бонусная механизм функционирует аналогично корневому веб-площадке. Welcome-наборы, фриспины, компенсация и VIP-курсы включаются машинально при выполнении определенных параметров.
Crystal Corner Gems – Neat design and products are presented in a clear way.
this stylish clothing hub – Urban fashion pieces that feel fresh and relevant.
Auto Aisle Favorites – Plenty of choices and filters simplify finding exactly what you want.
CinnamonCorner Essentials – Relaxed vibe with clear navigation makes shopping enjoyable.
Рабочие дублирующие порталы надежных игорных заведений на ретро казино предоставляют устойчивый подключение к игровым сервисам. Схема дублирования генерирует аналогичные дубликаты центрального портала с поддержанием всех опций.
Алгоритм создания аккаунта через зеркало абсолютно имитирует главную шаблон. Новые игроки прописывают активный email, устанавливают безопасный код доступа и устанавливают основную финансовый инструмент.
Идентификация счета подразумевает загрузки документов следуя KYC-стандартам. Копия ID-карты, подтверждение проживания и карточные координаты контролируются системой машинную контроль в течение 24-72 ч.
Подключение зарегистрированных клиентов выполняется через классическую интерфейс с 2FA аутентификацией. Одноразовые токены поступают на сотовый гаджет или мейл.
Функционал денежного сектора через mirror-сайты поддерживает популярные финансовые инструменты. Visa, Mastercard, электронные балансы Skrill, Neteller, виртуальные монеты Bitcoin, Ethereum осуществляются с оптимизированными сборами 0-3%.
Азартная каталог копируется на сто процентов включая машины, классические забавы, live-хостов и максимальные награды. RTP-показатели, дисперсия и вейджер удерживаются неизменными.
Бонусная программа выполняется аналогично центральному порталу. Welcome-наборы, free spins, компенсация и VIP-курсы стартуют автоматически при реализации установленных условий.
CertiCanPharmacy legitimate canadian online pharmacies CertiCanPharmacy
Modern Purchase Platform Online Hub – Intuitive design and clear sections simplify the shopping experience.
Функционирующие зеркала надежных игорных заведений на казино Килограмм гарантируют непрерывный вход к игровым сервисам. Система зеркалирования создает точные копии основного ресурса с консервацией всех опций.
Система открытия счета через дублирующий портал абсолютно воспроизводит базовую заявку. Только пришедшие игроки указывают функционирующий email, создают защищенный пароль и определяют базовую валюту.
Подтверждение личного кабинета содержит отправки документов по KYC-политике. Скан водительских прав, свидетельство проживания и карточные данные анализируются посредством автоматическую анализ в течение 24-72 временных единиц.
Подключение зарегистрированных пользователей осуществляется через классическую окно с 2FA аутентификацией. Краткосрочные ключи поступают на мобильный гаджет или email.
Возможности входящего сектора через альтернативные домены обеспечивает востребованные платежные системы. Visa, Mastercard, веб кошельки Skrill, Neteller, цифровые активы Bitcoin, Ethereum реализуются с минимальными сборами 0-3%.
Гемблинг база клонируется абсолютно включая слоты, традиционные геймплей, live-хостов и джекпоты. RTP-параметры, дисперсия и проигрыш остаются такими же.
Промо схема выполняется похоже основному сайту. Welcome-бандлы, фриспины, возврат средств и VIP-планы стартуют программно при выполнении заданных критериев.
Xorya Essentials – Sleek design and well-structured layout make finding products straightforward.
жулькан стоматология в китае
Explore The Front Room Chicago – Enjoy an inviting environment with interesting details and helpful information.
Cloud Curio Express – Unique catalog and fast performance create a pleasant visit.
заказать аудиоролик Нужен запоминающийся аудиоролик? Наши специалисты воплотят любую идею в звук.
See SpiritOfTheAerodrome – The articles are informative and make learning enjoyable.
экономия в путешествиях стримы
подробнее Бухгалтерские услуги
this enterprise bonds hub – Intuitive design and quick page loads make finding information simple.
blog link https://Zd.gl
vet pharmacy: vet pharmacy – pet meds for dogs
http://certicanpharmacy.com/# legit canadian pharmacy online
Bloom Beacon Selections – Simple layout and seamless browsing every time.
Fit Fuel Select – Products are easy to explore and checkout completed without issues.
explore ClickToExploreInnovations – Clear pages and intuitive design make reading content effortless.
What impressed me about this casino https://visaviszamku.pl/ is the quality of the games. Everything runs smoothly, the design is clean, and there’s always something new to explore, which keeps it engaging.
supplysymphony marketplace – Strong product range and the interface runs smoothly.
Crisp Crate Store – Organized display makes browsing straightforward and enjoyable.
https://pagvip.com.br/codigo-promocional-actual-1xbet-bonus-130-eur/
https://certicanpharmacy.shop/# CertiCanPharmacy
your CartCatalyst hub – Pages load quickly and the interface is easy to use for all products.
лазерный принтер в наличии (Лазерный принтер – идеальное решение для быстрой и четкой печати документов. | Лазерные принтеры превосходят струйные по скорости и экономии тонера. | Хотите лазерный принтер купить? Широкий выбор моделей по доступным ценам! | Лазерные принтеры купить легко в нашем магазине с гарантией качества. | Купить лазерный принтер – значит инвестировать в надежность и производительность. | Заказать лазерный принтер онлайн – быстро и без лишних хлопот. | Лазерный принтер цена радует: от 5000 руб. за базовые модели. | Узнайте лазерный принтер стоимость – выгодные акции для всех покупателей. | Ищете лазерный принтер недорого? У нас лучшие предложения! | Лазерный принтер купить недорого – реальность с нашими скидками до 30%. | Дешевый лазерный принтер не уступает по качеству печати. | Бюджетный лазерный принтер для дома и офиса – оптимальный выбор. | Лазерный принтер купить онлайн в 2 клика с доставкой. | Заказать лазерный принтер онлайн – удобный сервис 24/7. | Лазерный принтер интернет магазин с тысячами отзывов. | Интернет магазин лазерных принтеров – ваш надежный партнер. | Лазерный принтер каталог: фото, характеристики, отзывы. | Лазерный принтер в наличии – забирайте сегодня! | Лазерный принтер с доставкой по России бесплатно от 5000 руб.)
the ultimate arcade stop – So many choices and such a fun setting always keep me exploring.
ChicChisel Boutique Online – Trendy design and product details enhance overall navigation.
Auroriv Product Hub – Easy-to-use layout with modern design keeps shopping efficient.
爱壹帆海外版2026 海外华人高清视频平台 全球加速无广告
Ludogorets 2-1 Ferencvaros 2026 Europa League result! Bulgarians edge Hungarians – latest match results from Europa play-offs!
You can find it here
how can i get allopurinol online
for academic purposes.
explore Long Term Value Hub – Clear headings and organized pages simplify accessing content.
Надёжные ресурсы азартных возможностей дают пользователям возможность к качественному игровому процессу через тематические домены, включая Вавада РІС…РѕРґ , которые именно выполняют международные нормы security.
Последовательность регистрации включает внесения проверочных информации через защищённые SSL-connection. Операторы требуют official свидетельство дееспособности и места проживания для выполнения юрисдикционных требований.
Multi-factor authentication становится mandatory элементом актуальных платформ защиты. Игроки приобретают SMS-пароли, push-алерты или внедряют targeted tools вроде Google Authenticator.
Дублирующие домены преодолевают трудности territorial ограничений и DDoS-воздействий. По сути копии являют копийные копии главного ресурса с обеспечением features и пользовательских параметров.
Компетентные пользователи рекомендуют удерживать новейшие каталоги функционирующих копий в favourites интернет-программы. Операторы направляют сведения о актуальных доменах через мейл, Telegram-communities и телефонные программы.
Финансовые movements через legal порталы гарантированы криптографическими methods level банковского segment. Изъятие денег производится лишь на подтверждённые wallets владельца account.
投行风云第四季2026 海外华人职场高压剧 高清在线观看 AI推荐
Watch Wildwood Essentials Shop – Attractive presentation and browsing feels smooth overall.
Новейшие пользователи встречаются с набором программных тонкостей при работе с официальными платформами. Тематические платформы типа п»ї1xBet казино предоставляют современную контент о операциях гэмблинговых брендов.
Процесс проверки учетной записи содержит множество необходимых фаз. Исходная верификация предполагает размещения свидетельств верифицирующих индивидуальность. Классический пакет включает удостоверение личности, права или внешний паспорт.
Технологическая сторона регистрации содержит внедрение зашифрованного канала и двухуровневой проверки. Экспертные пользователи подсказывают задействовать максимум предложенных опций безопасности.
Зеркала образуют абсолютные реплики основного платформы с сохранением тотального арсенала. Основное бонус выражается в идентичности банковских пределов и норм вейджера.
Система нахождения активных резервных ссылок строится на проверке специализированных новостных лент и связанных ресурсов. Продвинутые участники используют VPN-сервисы для предоставления стабильного доступа вне зависимости от местных блокировок.
Sassuolo vs Hellas Verona – 2026 Serie A 19:45 kick-off! Italian football latest results – don’t miss the drama!
Подбор безопасного гемблинг оператора заставляет основательного разбора правовых сертификатов. Передовые сайты казино Mellstroy Game предлагают геймерам полную факты о имеющихся санкциях.
Алгоритм регистрации включает ряд ключевых стадий аутентификации. Операторы требуют удостоверения, устанавливающие персону и правоспособность. Типовой KYC-процесс требует от 24 до 72 интервалов.
Банкролл-менеджмент открывается с задания лимитов на пополнения. Профессиональные пользователи настаивают применять правило 5% от общего развлекательного средств на одну сессию.
Цифровые блокировки поставщиков принуждают применять запасные маршруты. Копии поддерживают абсолютную производительность центрального платформы, содержа журнал операций и гемблинг прогресс.
Передовые финансовые системы дают моментальные пополнения через электронные кошельки. Bitcoin, Ethereum и стейблкоины дают конфиденциальность и крошечные платежи. Длительность проведения выводов достигает 10-30 интервалов.
Программы постоянства подразумевают многоуровневые степени с прогрессивным вознаграждением. VIP-кураторы предоставляют уникальные награды, повышенные рамки и первоочередную сервис.
https://amzn.asia/d/0iLm7rge
CertiCanPharmacy: adderall canadian pharmacy – recommended canadian pharmacies
Qulavo Holdings – Easy to navigate and website performance feels seamless.
https://amzn.asia/d/0iLm7rge
https://amzn.asia/d/0iLm7rge
другие Оптимизация налогооблажения
emery essentials collection – Layout is tidy and completing a purchase is quick.
Business Growth Partnerships Resources – Clear design and structured layout improve the online experience.
Активные mirror-ссылки лицензированных казино на п»ї1xBet дают устойчивый коннект к гемблинг порталам. Методика клонирования строит точные дубликаты базового портала с удержанием всех возможностей.
Процедура создания аккаунта через альтернативный домен полностью копирует оригинальную анкету. Новые пользователи регистрируют функционирующий email, формируют безопасный секретную комбинацию и устанавливают игровую валюту.
Валидация личного кабинета содержит передачи свидетельств согласно KYC-стандартам. Фото национального документа, валидация места жительства и денежные данные подвергаются программную контроль в течение 24-72 временных единиц.
Подключение активных игроков происходит через обычную интерфейс с усиленной верификацией. Разовые шифры поступают на мобильный гаджет или мейл.
Функционал депозитного компонента через зеркала обеспечивает распространенные финансовые инструменты. Visa, Mastercard, онлайн портмоне Skrill, Neteller, цифровые активы Bitcoin, Ethereum выполняются с низкими процентами 0-3%.
Гемблинг библиотека воспроизводится полностью включая автоматы, классические развлечения, live-крупье и мегавыигрыши. RTP-коэффициенты, дисперсия и отыгрыш остаются такими же.
Поощрительная механизм функционирует похоже корневому порталу. Welcome-комплекты, безвозмездные спины, возврат средств и VIP-программы запускаются алгоритмически при исполнении установленных стандартов.
Актуальные гемблеры встречаются с сложностью входа к официальным сайтам. Компании фильтруют базовые порталы, но искушённые казино Меллстрой участники учитывают о функционировании зеркальных ресурсов.
Резервная ссылка представляет точную воспроизведение базового сайта. Системы безопасности поддерживаются неизменными. Финансовые действия производятся через сходные шлюзы.
Схема открытия счёта через зеркальный адрес подразумевает типовой валидации. Сотрудники выясняют свидетельства для соблюдения KYC-регламентов. Персональные параметры реализуют расширенную верификацию.
Депозитные пределы на резервных платформах равняются основным параметрам. Низшие вклады сохраняются неизменными. Возрастающие призовые фонды согласовываются между разными адресами.
Льготные механизмы работают целостно на зеркальных платформах. Отыгрышный коэффициент гарантирует первоначальные величины. Срок активности проигрывания остаётся прежним.
Служба поддержки изучает обращения с альтернативных доменов идентично. Интерактивный чат предоставляет беспрерывный расписание деятельности.
веб-сайт Поиск информации
爱一帆下载海外版2026 安卓iOS app 全球加速下载
Нынешние участники оказываются с сложностью связи к проверенным порталам. Компании ограничивают главные URL, но грамотные казино Mellstroy Game посетители учитывают о присутствии альтернативных сайтов.
Зеркало представляет стопроцентную воспроизведение главного площадки. Системы безопасности сохраняются равнозначными. Финансовые транзакции реализуются через равнозначные механизмы.
Схема заведения учётной записи через параллельный портал включает привычной валидации. Специалисты запрашивают удостоверения для выполнения KYC-стандартов. Индивидуальные параметры осуществляют многоуровневую верификацию.
Пополнительные лимиты на зеркальных ресурсах аналогичны стандартным требованиям. Наименьшие суммы функционируют константными. Прогрессивные накопления синхронизируются между разными порталами.
Стимулирующие механизмы выполняются полноценно на зеркальных сайтах. Вейджер поддерживает первоначальные цифры. Длительность отыгрыша остаётся прежним.
Сервис помощи анализирует заявки с дополнительных порталов идентично. Мгновенный диалог предоставляет постоянный режим деятельности.
Актуальные игроки встречаются с затруднением входа к легальным порталам. Поставщики запрещают первичные адреса, но профессиональные Vavada клиенты понимают о наличии зеркальных ресурсов.
Параллельный портал составляет стопроцентную копию основного сайта. Криптографические алгоритмы функционируют неизменными. Денежные действия производятся через те же шлюзы.
Процедура регистрации через дополнительный адрес включает стандартной валидации. Операторы уточняют бумаги для осуществления KYC-норм. Личные информация подвергаются расширенную аутентификацию.
Депозитные границы на дополнительных порталах равняются главным требованиям. Минимальные суммы сохраняются фиксированными. Прогрессивные призовые фонды интегрируются между разными доменами.
Бонусные схемы работают завершённо на альтернативных сайтах. Коэффициент оборота гарантирует стартовые величины. Срок активности оборота остаётся прежним.
Сервис помощи обрабатывает заявки с зеркальных ресурсов равнозначно. Интерактивный диалог поддерживает беспрерывный расписание работы.
七王国的骑士第一季2026 海外华人权游衍生剧 高清史诗冒险
Blackburn Rovers vs Preston North End 2026英冠21:00开踢,最新足球比分英格兰二级联赛焦点,赔率Evs看好主队。
Blanket Bay Boutique Online – Cozy atmosphere and smooth navigation everywhere.
Yavex Design Hub – Content loads quickly, and the site feels seamless to explore.
魏大勋孙千《有罪之身》2026悬疑绑架矿难题材,海外华人高清在线观看,社会议题深度探讨,全球加速AI内容匹配。
杨紫《家业》2026古装经商大女主励志剧,海外华人高清非遗题材热播,创业奋斗燃到爆,全球加速AI推荐2026必追。
真实的人类第三季高清完整版2026 海外华人科幻高清剧
Новейшие бетторы встречаются с барьером подключения к легальным платформам. Провайдеры запрещают первичные порталы, но знающие Меллстрой регистрация участники знают о функционировании резервных сайтов.
Зеркало формирует точную копию оригинального сайта. Криптографические алгоритмы функционируют такими же. Денежные транзакции производятся через сходные каналы.
Технология оформления профиля через дополнительный ресурс включает классической проверки. Сотрудники уточняют справки для выполнения KYC-норм. Паспортные параметры выполняют расширенную верификацию.
Вносительные лимиты на альтернативных порталах совпадают первичным характеристикам. Низшие беты остаются неизменными. Увеличивающиеся накопления координируются между разными ресурсами.
Льготные механизмы работают целостно на дополнительных ресурсах. Требования по обороту сохраняет базовые параметры. Длительность проигрывания сохраняется.
Департамент обслуживания решает запросы с зеркальных доменов таким же способом. Мгновенный диалог поддерживает 24-часовой формат оперирования.
Лицензионные площадки игорных услуг предоставляют клиентам право к премиальному времяпрепровождению через dedicated платформы, включая Вавада казино , что придерживаются международные стандарты защиты.
Механизм создания аккаунта necessita внесения идентификационных информации через безопасные SSL-протоколы. Букмекеры просят письменное удостоверение age verification и локации residence для выполнения нормативных норм.
Multi-factor идентификация становится принудительным составляющей актуальных архитектур безопасности. Участники имеют SMS-коды, push-сообщения или применяют targeted tools наподобие Google Authenticator.
Зеркальные адреса преодолевают вопросы geographic санкций и DDoS-assault. По сути зеркала образуют тождественные клоны primary платформы с сохранением инструментария и пользовательских параметров.
Экспертные пользователи рекомендуют удерживать свежие базы активных альтернатив в закладках интернет-программы. Администрация отправляют сведения о актуальных доменах через мейл, Telegram-группы и смартфонные программы.
Денежные процедуры через надёжные платформы покрыты защитными технологиями level банковского направления. Вывод финансов реализуется лишь на validated реквизиты собственника профиля.
tagtides shop – Polished layout and moving through items is simple.
Crisp Collective Hub – Easy to navigate and the product display is clear and neat.
Новейшие пользователи сталкиваются с набором технических нюансов при операциях с проверенными порталами. Экспертные платформы типа Меллстрой официальный сайт предоставляют релевантную данные о работе игорных брендов.
Механизм валидации профиля подразумевает несколько необходимых фаз. Исходная верификация требует размещения документов доказывающих гражданство. Привычный перечень содержит документ, лицензию водителя или международный паспорт.
Технологическая компонента открытия счета охватывает использование зашифрованного канала и многофакторной защиты. Продвинутые игроки советуют включать все имеющихся функций обеспечения.
Запасные домены формируют идентичные реплики первичного портала с удержанием всего функционала. Основное выгода содержится в идентичности расчетных рамок и норм проигрыша.
Процедура поиска рабочих зеркал опирается на мониторинге профильных телеграм-каналов и аффилированных порталов. Продвинутые участники применяют VPN-сервисы для обеспечения бесперебойного соединения невзирая от географических барьеров.
Ориентирование в секторе сертифицированных сайтов включает владения передовых технологий подключения. Умелые пользователи применяют Mellstroy Game для получения новейшей данных о активных доменах.
Процесс создания счета в проверенных операторах охватывает сложную подтверждение. Современные провайдеры применяют KYC-системы и AML-требования. Бумажная работа составляет от 24 до 72 часов.
Компьютерные технологии для прохождения барьеров развиваются параллельно с усилением законодательных действий. VPN-решения типа premium гарантируют шифрование AES-256 и технологии OpenVPN. Стабильность подключения жизненно важна для привилегированных партий.
Зеркальные домены работают через пространственно расположенные серверные инфраструктуры. CDN-структуры осуществляют быструю задержку для европейских пользователей. Автоматическое переключение запускается при идентификации недоступности центрального ресурса.
Банковские манипуляции в легальных территориях отвечают конкретным правилам PCI DSS. Блокчейн транзакции приобретают актуальность благодаря приватности и темпу выполнения.
Планшетные утилиты элитных провайдеров включают лицевую авторизацию и push-извещения для ключевых моментов. Гибкий внешний вид автономно корректируется под особенности матрицы.
their Cardamom Cove store – A cozy atmosphere with clear information on all products.
CalmCrest Product Hub – Relaxing visual style and smooth navigation keep browsing simple.
Отбор легального игорного заведения предполагает серьезного рассмотрения правовых свидетельств. Передовые порталы Лаки Бир РІС…РѕРґ дают клиентам безусловную данные о собственных лицензиях.
Алгоритм оформления счета подразумевает различные требуемых этапов верификации. Провайдеры требуют свидетельства, засвидетельствующие персону и возраст. Типовой KYC-процесс продолжается от 24 до 72 интервалов.
Управление банком запускается с определения пределов на депозиты. Искусные игроки предлагают задействовать закон 5% от общего гемблинг резерва на отдельную игру.
Программные барьеры провайдеров вынуждают эксплуатировать вспомогательные пути. Клоны оберегают максимальную активность базового сайта, предусматривая летопись операций и гемблинг успех.
Современные банковские методы обеспечивают оперативные депозиты через блокчейн счета. Bitcoin, Ethereum и стейблкоины обеспечивают конфиденциальность и символические комиссии. Срок обработки извлечений составляет 10-30 интервалов.
Планы преданности подразумевают градационные ранги с накапливающимся возвратом. VIP-кураторы дают личные подарки, расширенные пределы и приоритетную поддержку.
access ClickForBusinessLearning now – Fast-loading sections and intuitive layout make finding information simple.
Отбор проверенного азартного ресурса предполагает основательного исследования юридических сертификатов. Новые ресурсы Лаки Бир зеркало обеспечивают пользователям максимальную факты о имеющихся допусках.
Система создания профиля охватывает несколько ключевых шагов аутентификации. Администраторы истребуют справки, удостоверяющие индивидуальность и правоспособность. Типовой KYC-порядок требует от 24 до 72 временных отрезков.
Распоряжение капиталом начинается с назначения ограничений на депозиты. Квалифицированные клиенты советуют внедрять правило 5% от общего казино средств на индивидуальную заход.
Электронные препятствия владельцев обязывают применять резервные адреса. Альтернативы удерживают стопроцентную эффективность базового портала, подразумевая историю транзакций и развлекательный прогресс.
Современные банковские сервисы гарантируют моментальные пополнения через блокчейн счета. Bitcoin, Ethereum и стабильные валюты поддерживают приватность и минимальные платежи. Длительность проведения извлечений достигает 10-30 отрезков.
Системы верности охватывают многоуровневые уровни с нарастающим вознаграждением. VIP-консультанты предоставляют уникальные подарки, расширенные лимиты и ускоренную сервис.
Aurora Avenue Top Picks – Well-organized pages and carefully chosen items create a pleasant experience.
chrome style central – I appreciate the minimalist shine and the clearly labeled sections.
Если интересуетесь темой ufc в феврале марте 2026 три недели которые встряхнут дивизионы, этот гид будет вам полезен. Вот ссылка: https://flat-360.ru/news/ufc-fevral-mart-2026-raspisanie-boyov-ufc-fight-night-strickland-vs-hernandez-moreno-vs-kavanagh-ufc-326-holloway-vs-oliveira-2-polnyj-gid-i-prognozy/
My Mexican Pharmacy: mexican pharmacy ship to usa – prescriptions from mexico
a href=”https://findyournextdirection.shop/” />access FindYourNextDirection now – Fast navigation and well-structured resources simplify the experience.
Актуальные порталы азартных продуктов дают игрокам путь к элитному гемблингу через надежные казино Меллстрой системы. Официальная операционная активность нуждается учета конкретных контролирующих норм.
Процедура оформления индивидуального аккаунта содержит верификацию приватных данных. Провайдеры задействуют комплексные системы KYC и AML для пресечения поддельных переводов.
Электронные платформы актуальных гемблинг платформ базируются на зашифрованных дата-центрах с SSL технологиями. Региональная блокировка побуждает управляющих запускать альтернативные адреса.
Дублирующие платформы представляют идентичные версии главного домена с удержанием всех возможностей и показателей. Участники добиваются непрерывный доступ к депозиту, гемблинг отчетности и индивидуальным опциям.
Расчетные транзакции проходят через интегрированные финансовые сервисы. Ограничения на депозиты и обналичивания фиксируются в гармонии с правовыми критериями и внутренними процедурами снижения потерь.
Компетентные пользователи советуют анализировать ситуацию разрешения через государственные каталоги гемблинг комиссий. Статусные параметры охватывают места на тематических платформах и feedback настоящих беттеров.
A convenient car catalog http://www.auto.ae/catalog brands, models, specifications, and current prices. Compare engines, fuel consumption, trim levels, and equipment to find the car that meets your needs.
Ориентирование в пространстве официальных ресурсов предполагает владения новых решений авторизации. Квалифицированные геймеры задействуют казино Lucky Bear для обретения актуальной сведений о действующих ссылках.
Алгоритм формирования профиля в лицензированных организациях предполагает тщательную верификацию. Современные поставщики эксплуатируют KYC-процедуры и AML-нормы. Документальное сопровождение составляет от 24 до 72 промежутков.
Программные инструменты для минования барьеров прогрессируют одновременно с усилением регуляторных действий. VPN-инструменты типа premium предлагают безопасность AES-256 и системы OpenVPN. Непрерывность канала принципиально актуальна для премиальных заходов.
Резервные адреса оперируют через локально размещенные IT системы. CDN-структуры обеспечивают быструю задержку для европейских пользователей. Техническое редирект срабатывает при обнаружении ограничения центрального ресурса.
Банковские операции в легальных зонах отвечают четким стандартам PCI DSS. Крипто переводы увеличивают актуальность благодаря секретности и скорости реализации.
Смартфонные клиенты премиальных провайдеров совмещают голосовую подтверждение и push-алерты для ключевых эпизодов. Гибкий дизайн автономно адаптируется под параметры экрана.
超人和露易斯第四季高清完整版2026 海外华人超级英雄剧
家业2026 杨紫古装经商大女主 海外华人首选高清非遗题材陆剧 AI智能推荐爆款
Click Courier Express Online – Information is displayed neatly and navigation feels user-friendly.
https://certicanpharmacy.shop/# canadian mail order pharmacy
Check Out Your URL https://Zd.gl
Активные mirror-ссылки проверенных gaming-операторов на п»ї1хбет обеспечивают стабильный коннект к геймерским порталам. Методика зеркалирования формирует точные дубликаты базового веб-площадки с удержанием всех механизмов.
Система регистрации через альтернативный домен целиком копирует главную анкету. Свежие геймеры заполняют активный email, создают защищенный секретную комбинацию и определяют операционную денежную единицу.
Валидация учетной записи требует загрузки справок следуя KYC-регламенту. Копия ID-карты, валидация резиденции и денежные координаты проходят автоматическую контроль в течение 24-72 периодов.
Логин существующих участников происходит через типовую окно с двухфакторной аутентификацией. Временные пароли передаются на смс устройство или почтовый ящик.
Опции депозитного компонента через зеркала предлагает актуальные расчетные сервисы. Visa, Mastercard, электронные счета Skrill, Neteller, цифровые активы Bitcoin, Ethereum реализуются с уменьшенными процентами 0-3%.
Gaming коллекция дублируется полностью включая spinning games, настольные игры, live-хостов и максимальные награды. RTP-показатели, вариативность и отыгрыш сохраняются аналогичными.
Промо схема функционирует подобно базовому сайту. Welcome-наборы, даровые прокруты, денежный возврат и VIP-системы запускаются алгоритмически при достижении прописанных стандартов.
一骑士七王国2026 海外华人中世纪奇幻 高清HBO史诗剧
Развлекательная область отображает динамичный расширение, привлекая легионы клиентов. Грамотные площадки предоставляют защищённую пространство для ставок. Полную информацию о подобных операторах возможно найти на казино 1хбет .
Легализация является главным элементом отбора сайта. Лицензиаты Великобритании обеспечивают строгий надзор денежных действий. Всякая лицензированная площадка выполняет плановые контроли RNG-систем.
Технические параметры передовых беттинг-платформ объединяют SSL-кодирование расчётного ранга. Производители виртуального обеспечения уровня Microgaming, NetEnt, Pragmatic Play подключают сложные системы случайных чисел.
Схема подтверждения аккаунта предусматривает представления свидетельств KYC-уровня. Паспорт, справка о доходах, валидация регистрации — базовый список для итогового входа.
Резервные адреса убирают барьеры с запретами провайдеров. Рабочие копии модифицируются каждый день IT специалистами. Смартфонные клиенты обычно функционируют качественнее интернет форматов.
Управление банкроллом определяет продолжительную эффективность азартных периодов. Профессиональные беттеры рекомендуют ограничивать величину депозита до 1-2% от общего бюджета.
博德闪耀3-1血洗国米!2026欧冠最新比分震惊足坛,挪威黑马主场不败神话继续,意甲豪门崩盘,足球新闻瞬间爆炸!
Wolves 2-2 Arsenal 2026 Premier League draw madness! Gunners slip – football scores update shakes title chase!
Sunset Stitch Studio Shop – Beautiful items and checkout experience was very easy.
Qulavo Zone – Smooth browsing and content appears quickly without issues.
LongTermCommercialBonds Portal – User-friendly design and intuitive navigation make browsing quick.
骄阳似我2026 宋威龙赵今麦 高清现偶甜宠爆款 海外华人高清在线 AI智能匹配
Актуальные сервисы гемблинг игр предоставляют игрокам доступ к качественному игровому процессу через защищенные Лаки Бир казино сайты. Легальная деятельность нуждается учета определенных надзорных критериев.
Механизм регистрации персонального учетной записи включает верификацию приватных сведений. Операторы внедряют расширенные процедуры KYC и AML для блокировки фродовых финансовых действий.
Программные инструменты инновационных беттинг площадок работают на надежных серверах с TLS сертификатами. Территориальные ограничения вынуждает управляющих запускать резервные ссылки.
Параллельные порталы образуют идентичные копии главного домена с фиксацией всех функций и информации. Клиенты достигают беспрепятственный подключение к средствам, игровой истории и индивидуальным настройкам.
Денежные процедуры производятся через встроенные финансовые агрегаторы. Ограничения на депозиты и выводы назначаются в соответствии с регуляторными положениями и корпоративными регламентами минимизации опасностей.
Квалифицированные беттеры указывают проверять положение аккредитации через официальные регистры азартных организаций. Авторитетные показатели задействуют рейтинги на отраслевых порталах и комментарии настоящих игроков.
Поиск безопасного гемблинг заведения в актуальных обстоятельствах предполагает детального внимания к правовому положению. Знающие участники осознают, что п»ї1xBet casino содержит новую данные о работающих площадках.
Схема записи в легальных сервисах объединяет требуемую валидацию личности. KYC-требования защищают как площадку, так и участника от мошенничества. Кратковременные границы на получение капитала до окончания верификации – типичная подход.
Электронные блокировки на доступ к betting сервисам обходятся через параллельные URL. Доступные отражения гарантируют тотальную работоспособность основного портала. Банковские транзакции, геймплейный продвижение и поощрительные планы поддерживаются константными.
Денежная стабильность выражается уровнем применяемых финансовых методов. SSL-кодирование, PCI DSS аттестация и многоуровневая идентификация обеспечивают стабильный щит обороны.
Игровая коллекция легальных сервисов предоставляет автоматы от известных разработчиков. RTP-показатели, волатильность и алгоритмические схемы испытывают беспристрастную валидацию в одобренных учреждениях.
Планы вознаграждения в профессиональных площадках строятся на прозрачных параметрах ставок. Вейджер x35-40 расценивается разумным для автомат-подарков, в то время как карточные игры идут в счет с пониженным показателем.
For community
reliable gambling sites
to read user reviews.
Australian online casino PayID 2026 instant deposits withdrawals
Jan Blachowicz janblachowicz to polski zawodnik MMA i byly mistrz UFC w wadze polciezkiej. Pelna biografia, historia kariery, statystyki zwyciestw i porazek, najlepsze walki i aktualne wyniki.
headlinehub today’s news – Articles are insightful and pages respond immediately.
Передовые порталы азартных активностей дают участникам путь к качественному гемблингу через безопасные казино Mellstroy Game ресурсы. Лицензированная функционирование нуждается исполнения конкретных законодательных стандартов.
Система регистрации пользовательского счета предусматривает аутентификацию персональных реквизитов. Администраторы используют расширенные протоколы KYC и AML для предотвращения незаконных платежей.
Технические инструменты инновационных гемблинг платформ основываются на зашифрованных облачных системах с SSL технологиями. Локальные запреты побуждает операторов разрабатывать вспомогательные порталы.
Резервные порталы составляют эквивалентные копии первичного сайта с обеспечением всех инструментов и сведений. Игроки получают постоянный доступ к счету, азартной данным и клиентским конфигурациям.
Расчетные переводы проходят через связанные расчетные шлюзы. Рамки на депозиты и выводы назначаются в унисон с правовыми положениями и индивидуальными регламентами риск-менеджмента.
Профессиональные беттеры предлагают отслеживать ситуацию разрешения через регуляторные базы данных развлекательных организаций. Престижные критерии охватывают оценки на тематических сайтах и мнения настоящих клиентов.
https://vetfreemeds.shop/# pet meds for dogs
After testing several platforms, I found this casino https://podles.pl/ to be well-balanced. The welcome bonus is generous, terms are transparent, and payouts don’t take forever, making it suitable for regular players.
Новейшие платформы развлекательных активностей дают клиентам подключение к высококлассному игровому процессу через безопасные Лаки Бир казино платформы. Лицензированная бизнес нуждается учета определенных законодательных критериев.
Механизм открытия игрового аккаунта включает аутентификацию индивидуальных данных. Провайдеры внедряют многоуровневые протоколы KYC и AML для блокировки фродовых финансовых действий.
Электронные платформы инновационных гемблинг платформ строятся на стабильных хостингах с криптографическими технологиями. IP-фильтрация принуждает операторов организовывать параллельные домены.
Резервные порталы образуют точные копии основного платформы с сохранением всех сервисов и сведений. Пользователи получают стабильный доступ к средствам, беттинг статистике и персональным настройкам.
Банковские транзакции реализуются через связанные расчетные процессоры. Пределы на пополнения и снятия фиксируются в согласии с правовыми требованиями и организационными регламентами управления рисками.
Профессиональные пользователи настаивают мониторить ситуацию аккредитации через контролирующие списки развлекательных комиссий. Репутационные параметры включают оценки на профильных сервисах и feedback истинных участников.
一骑士七王国2026 海外华人中世纪奇幻 高清HBO史诗剧
Blanket Bay Collections – Warm and cozy feel with fast, effortless navigation.
Koszykowka https://koszykowkanews.pl najnowsze wiadomosci, PLK, transfery i wyniki meczow. Sledz polska lige, turnieje miedzynarodowe i postepy zawodnikow, dowiedz sie o transferach, statystykach i najwazniejszych wydarzeniach sezonu.
run route marketplace online – Easy-to-navigate design and locating items is smooth.
Siatkowka w Polsce https://siatkowkanews.pl/ najnowsze wiadomosci, wyniki meczow, terminarze i transfery druzyn. Sledz PlusLige, wystepy reprezentacji narodowych i najwazniejsze wydarzenia sezonu w jednej wygodnej sekcji sportowej.
Активные резервные адреса надежных гемблинг-платформ на п»ї1xBet дают постоянный доступ к развлекательным ресурсам. Технология зеркалирования образует полноценные версии основного сайта с фиксацией всех инструментов.
Алгоритм регистрации через альтернативный домен абсолютно копирует главную форму. Новые пользователи прописывают действующий email, создают стойкий пароль и выбирают основную денежную единицу.
Верификация личного кабинета подразумевает загрузки бумаг опираясь на KYC-нормам. Изображение водительских прав, валидация места жительства и платежные данные контролируются системой автоматическую контроль в течение 24-72 ч.
Аутентификация зарегистрированных игроков осуществляется через стандартную интерфейс с усиленной идентификацией. Краткосрочные ключи поступают на мобильный девайс или мейл.
Функционал депозитного блока через зеркала содержит популярные банковские платформы. Visa, Mastercard, цифровые счета Skrill, Neteller, crypto Bitcoin, Ethereum обрабатываются с уменьшенными взносами 0-3%.
Игровая коллекция повторяется целиком включая машины, столовые развлечения, live-хостов и мегавыигрыши. RTP-параметры, вариативность и вейджер поддерживаются такими же.
Поощрительная схема действует похоже главному домену. Welcome-наборы, free spins, refund и VIP-программы стартуют системно при выполнении заданных условий.
Современные сервисы игорных услуг предоставляют клиентам подключение к профессиональному беттингу через защищенные Lucky Bear казино платформы. Официальная функционирование влечет соблюдения конкретных регуляторных требований.
Система оформления персонального кабинета содержит проверку индивидуальных реквизитов. Провайдеры эксплуатируют расширенные процедуры KYC и AML для исключения поддельных финансовых действий.
Технические решения актуальных игорных домов строятся на защищенных дата-центрах с HTTPS протоколами. IP-фильтрация побуждает владельцев внедрять параллельные адреса.
Зеркальные ресурсы представляют эквивалентные клоны главного сайта с фиксацией всех функций и сведений. Клиенты приобретают устойчивый подключение к средствам, развлекательной отчетности и персональным параметрам.
Финансовые переводы выполняются через связанные платежные шлюзы. Пределы на взносы и снятия назначаются в унисон с регуляторными условиями и внутренними политиками минимизации опасностей.
Квалифицированные игроки предлагают отслеживать условия авторизации через надзорные каталоги азартных органов. Авторитетные индикаторы задействуют ранги на профильных порталах и оценки настоящих игроков.
一骑士七王国2026 海外华人中世纪奇幻 高清HBO史诗剧
Crate Cosmos Hub – Easy to navigate and all pages load really fast.
Новейшие геймеры попадают с затруднением соединения к сертифицированным ресурсам. Компании ограничивают главные адреса, но знающие п»ї1хбет официальный сайт игроки знают о функционировании резервных порталов.
Зеркало формирует точную реплику оригинального портала. Системы безопасности работают такими же. Платёжные транзакции реализуются через те же системы.
Технология создания аккаунта через альтернативный ресурс подразумевает классической проверки. Администраторы требуют справки для реализации KYC-правил. Идентификационные характеристики реализуют расширенную подтверждение.
Финансовые лимиты на зеркальных сайтах аналогичны первичным параметрам. Стартовые беты остаются фиксированными. Прогрессивные джекпоты координируются между разными ресурсами.
Премиальные системы действуют завершённо на параллельных площадках. Коэффициент оборота гарантирует базовые значения. Тайминг использования остаётся прежним.
Служба сопровождения анализирует обращения с альтернативных доменов сходным образом. Прямой общение поддерживает беспрерывный режим оперирования.
Передовые пользователи встречаются с изобилием системных тонкостей при деятельности с сертифицированными порталами. Профессиональные платформы типа казино Lucky Bear выдают новую информацию о деятельности гэмблинговых организаций.
Процедура верификации кабинета предполагает множество принудительных уровней. Начальная аутентификация включает передачи документов подтверждающих личность. Привычный комплект включает удостоверение личности, водительские права или заграничное удостоверение.
Системная составляющая создания аккаунта включает эксплуатацию защищенного протокола и двойной авторизации. Экспертные клиенты советуют задействовать все возможных настроек обеспечения.
Альтернативные адреса образуют точные отражения основного домена с удержанием всего арсенала. Важнейшее плюс кроется в соответствии банковских границ и условий ставочных требований.
Механизм нахождения актуальных дублирующих порталов фундируется на проверке тематических уведомительных сервисов и аффилированных площадок. Экспертные участники внедряют прокси-соединения для формирования постоянного доступа вне зависимости от местных запретов.
凯伦皮里第二季高清完整版2026 海外华人悬疑剧集
马赛客场硬刚布雷斯特!2026法甲20:45生死战,姆巴佩旧将能否带队翻盘?法国足球最新赛事比分火热预测中!
39bet
стример твич донаты
Caldoria Product Hub – Browsing is intuitive and every item is easy to view.
online Calveria boutique – Graceful design touches and easy navigation enhance the shopping journey.
Нынешние участники сталкиваются с затруднением доступа к официальным сайтам. Компании запрещают главные порталы, но искушённые Лаки Бир официальный сайт игроки учитывают о функционировании дублирующих платформ.
Альтернативный адрес образует стопроцентную копию первичного портала. Средства защиты работают такими же. Финансовые транзакции осуществляются через те же сервисы.
Методика создания аккаунта через зеркальный ссылку включает классической валидации. Операторы требуют справки для реализации KYC-правил. Паспортные информация подвергаются многоуровневую верификацию.
Вносительные пределы на резервных ресурсах аналогичны базовым условиям. Низшие суммы поддерживаются константными. Прогрессивные выигрышные пулы согласовываются между разными ссылками.
Бонусные системы оперируют полноценно на зеркальных ресурсах. Множитель ставок гарантирует исходные величины. Длительность использования сохраняется.
Департамент ассистирования анализирует вопросы с альтернативных ссылок сходным образом. Живой переписка обеспечивает постоянный график работы.
Лицензионные платформы развлекательных предложений дают игрокам доступ к элитному времяпрепровождению через тематические домены, включая казино Лаки Бир , которые специально придерживаются глобальные регламенты безопасности.
Схема открытия счёта включает ввода проверочных сведений через защищённые SSL-каналы. Провайдеры просят official свидетельство дееспособности и места residence для исполнения законодательных требований.
2FA верификация представляет принудительным элементом актуальных solutions защиты. Игроки располагают SMS-пароли, push-оповещения или используют dedicated утилиты в стиле Google Authenticator.
Mirror домены нейтрализуют трудности territorial санкций и DDoS-штурмов. По сути дубли составляют тождественные копии главного платформы с maintaining возможностей и user информации.
Компетентные пользователи suggest удерживать актуальные каталоги функционирующих mirrors в закладках интернет-программы. Провайдеры доставляют новости о новых ссылках через почтовые сервисы, Telegram-каналы и мобильные приложения.
Денежные movements через надёжные сайты защищены cryptographic технологиями категории банковского области. Extraction фондов реализуется лишь на верифицированные данные обладателя профиля.
Aurora Atlas Showcase – Fast performance and a wide selection of items make the experience enjoyable.
modern dashboard shop – I rely on the structured features to keep everything on track.
your Corporate Unity Solutions – Smooth navigation and clear page structure make finding services simple.
Актуальные клиенты пересекаются с изобилием технологических тонкостей при процессах с проверенными платформами. Профессиональные платформы типа п»ї1хбет сайт выдают актуальную информацию о работе игорных организаций.
Механизм подтверждения аккаунта охватывает набор необходимых шагов. Первичная аутентификация предполагает предоставления свидетельств подтверждающих персону. Классический список содержит удостоверение личности, права или заграничное удостоверение.
Цифровая компонента открытия счета подразумевает применение защищенного протокола и 2FA. Профессиональные пользователи рекомендуют задействовать совокупность представленных возможностей охраны.
Запасные домены формируют стопроцентные реплики основного портала с удержанием полного инструментария. Главное бонус заключается в идентичности платежных пределов и параметров вейджера.
Механизм выявления рабочих резервных ссылок базируется на мониторинге профессиональных мессенджер групп и связанных сайтов. Квалифицированные геймеры эксплуатируют туннельные протоколы для формирования надежного подключения независимо от региональных лимитов.
Выбор честного азартного оператора подразумевает тщательного разбора правовых бумаг. Инновационные платформы п»ї1хбет зеркало предлагают игрокам полную факты о своих лицензиях.
Механизм оформления счета охватывает определенное количество обязательных стадий проверки. Операторы настаивают справки, засвидетельствующие идентичность и совершеннолетие. Типовой KYC-порядок составляет от 24 до 72 периодов.
Управление банком начинается с задания рамок на взносы. Компетентные геймеры настаивают внедрять принцип 5% от полного гемблинг резерва на одну заход.
Электронные барьеры провайдеров обязывают эксплуатировать дополнительные домены. Зеркала удерживают полную работоспособность первичного портала, включая летопись транзакций и казино достижения.
Передовые платежные сервисы обеспечивают быстрые инвестиции через электронные кошельки. Bitcoin, Ethereum и стабильные валюты предоставляют приватность и крошечные комиссии. Время осуществления снятий равно 10-30 интервалов.
Программы преданности включают градационные ранги с прогрессивным вознаграждением. VIP-консультанты предлагают персонализированные вознаграждения, расширенные границы и преимущественную сервис.
лазерный принтер каталог (Лазерный принтер – идеальное решение для быстрой и четкой печати документов. | Лазерные принтеры превосходят струйные по скорости и экономии тонера. | Хотите лазерный принтер купить? Широкий выбор моделей по доступным ценам! | Лазерные принтеры купить легко в нашем магазине с гарантией качества. | Купить лазерный принтер – значит инвестировать в надежность и производительность. | Заказать лазерный принтер онлайн – быстро и без лишних хлопот. | Лазерный принтер цена радует: от 5000 руб. за базовые модели. | Узнайте лазерный принтер стоимость – выгодные акции для всех покупателей. | Ищете лазерный принтер недорого? У нас лучшие предложения! | Лазерный принтер купить недорого – реальность с нашими скидками до 30%. | Дешевый лазерный принтер не уступает по качеству печати. | Бюджетный лазерный принтер для дома и офиса – оптимальный выбор. | Лазерный принтер купить онлайн в 2 клика с доставкой. | Заказать лазерный принтер онлайн – удобный сервис 24/7. | Лазерный принтер интернет магазин с тысячами отзывов. | Интернет магазин лазерных принтеров – ваш надежный партнер. | Лазерный принтер каталог: фото, характеристики, отзывы. | Лазерный принтер в наличии – забирайте сегодня! | Лазерный принтер с доставкой по России бесплатно от 5000 руб.)
Strategic Growth Alliances Hub – Clear layout and fast-loading pages make browsing information effortless.
Xorya Curated Store – Minimal design with a contemporary feel makes the site easy to explore.
Актуальные операторы гемблинг развлечений предоставляют пользователям путь к премиальному игровому процессу через защищенные п»ї1хбет РІС…РѕРґ порталы. Сертифицированная функционирование влечет следования жестких правовых положений.
Система регистрации индивидуального аккаунта охватывает валидацию личных показателей. Провайдеры задействуют комплексные алгоритмы KYC и AML для предотвращения мошеннических переводов.
IT платформы новейших гемблинг платформ основываются на надежных серверах с HTTPS технологиями. Геоблокировка вынуждает владельцев разрабатывать параллельные порталы.
Дублирующие порталы составляют эквивалентные клоны основного портала с сохранением всех инструментов и параметров. Пользователи получают устойчивый связь к капиталу, азартной записям и личным настройкам.
Платежные операции производятся через интегрированные платежные агрегаторы. Рамки на вклады и изъятия фиксируются в унисон с правовыми положениями и корпоративными процедурами риск-менеджмента.
Компетентные игроки рекомендуют проверять условия авторизации через надзорные списки беттинг ведомств. Престижные критерии включают позиции на отраслевых сервисах и комментарии реальных беттеров.
Подбор проверенного игрового заведения в сегодняшних реалиях заставляет тщательного рассмотрения к юридическому уровню. Знающие геймеры знают, что Vavada демонстрирует новую материалы о действующих операторах.
Процесс записи в легальных платформах предусматривает требуемую проверку персональных данных. KYC-правила оберегают как сервис, так и участника от фрода. Кратковременные ограничения на снятие денег до закрытия контроля – типичная практика.
Виртуальные блокировки на подключение к развлекательным сервисам нейтрализуются через дублирующие URL. Действующие зеркала поддерживают тотальную возможности первичного ресурса. Расчетные операции, интерактивный статистика и бонусные системы сохраняются неизменными.
Экономическая защищенность оценивается качеством эксплуатируемых банковских систем. SSL-безопасность, PCI DSS аттестация и расширенная идентификация устанавливают стабильный заслон обороны.
Развлекательная каталог официальных провайдеров содержит спины от главных провайдеров. RTP-коэффициенты, вариативность и вероятностные системы подвергаются независимую контроль в одобренных центрах.
Системы поощрения в профессиональных казино основываются на четких параметрах отыгрыша. Условия ставок x35-40 оценивается справедливым для спин-бонусов, в то время как классические активности принимаются в подсчет с пониженным фактором.
Dyed & Dandy Studio – Really like the colorful style and intuitive layout.
Ravion Hub – Professional look and site navigation is intuitive and smooth.
online BusinessTrustInfrastructure site – Logical layout and responsive pages make content easy to find.
заказать аудиоролик Аудиоролики для радио, подкастов или соцсетей: от сценария до финального микса.
schemasalon treasures – Clear content and browsing the website is effortless and pleasant.
blsp at
Отбор безопасного гемблинг оператора заставляет глубокого рассмотрения лицензионных сертификатов. Актуальные ресурсы Вавада регистрация обеспечивают игрокам стопроцентную сведения о действующих лицензиях.
Механизм создания профиля охватывает определенное количество требуемых этапов подтверждения. Администраторы запрашивают свидетельства, устанавливающие индивидуальность и дееспособность. Обычный KYC-порядок требует от 24 до 72 промежутков.
Управление банком открывается с назначения пределов на пополнения. Искусные геймеры призывают задействовать норму 5% от совокупного игорного фонда на одну партию.
Системные препятствия провайдеров заставляют эксплуатировать дополнительные маршруты. Зеркала сохраняют стопроцентную производительность базового площадки, включая историю транзакций и казино прогресс.
Передовые платежные методы предоставляют моментальные пополнения через электронные хранилища. Bitcoin, Ethereum и устойчивые монеты дают приватность и наименьшие сборы. Период выполнения выводов равно 10-30 промежутков.
Планы верности предусматривают ступенчатые уровни с накапливающимся компенсацией. VIP-координаторы гарантируют уникальные подарки, усиленные ограничения и приоритетную техподдержку.
Новейшие операторы игорных услуг предлагают игрокам доступ к элитному беттингу через проверенные Lucky Bear казино системы. Легальная операционная активность влечет соблюдения четких регуляторных требований.
Процедура оформления индивидуального кабинета предусматривает аутентификацию приватных сведений. Операторы используют расширенные протоколы KYC и AML для пресечения мошеннических финансовых действий.
Технические средства современных игорных домов работают на стабильных серверах с HTTPS технологиями. Территориальные ограничения побуждает операторов запускать резервные адреса.
Резервные ресурсы являют собой точные копии центрального платформы с поддержанием всех функций и показателей. Беттеры обеспечивают себе стабильный доступ к балансу, развлекательной данным и индивидуальным установкам.
Финансовые операции осуществляются через связанные денежные агрегаторы. Лимиты на вклады и обналичивания фиксируются в гармонии с правовыми критериями и внутренними регламентами управления рисками.
Опытные игроки указывают мониторить статус аккредитации через регуляторные базы данных гемблинг органов. Статусные индикаторы предусматривают рейтинги на отраслевых ресурсах и комментарии подлинных игроков.
https://msk.metallobazav.ru/
Отбор проверенного азартного ресурса в современных реалиях заставляет специального изучения к лицензионному состоянию. Квалифицированные участники представляют, что Вавада РІС…РѕРґ предоставляет свежую информацию о работающих ресурсах.
Процесс открытия счета в проверенных сервисах предусматривает принудительную верификацию документов. KYC-требования обеспечивают как площадку, так и геймера от мошенничества. Временные пределы на перечисление средств до выполнения валидации – стандартная практика.
Технические препятствия на доступ к развлекательным сайтам нейтрализуются через резервные URL. Доступные отражения сохраняют стопроцентную производительность первичного платформы. Финансовые движения, игровой прогресс и бонусные программы поддерживаются неизменными.
Материальная безопасность оценивается качеством внедренных банковских механизмов. SSL-криптография, PCI DSS подтверждение и усиленная аутентификация обеспечивают безопасный периметр охраны.
Геймплейная набор лицензированных заведений включает спины от известных производителей. RTP-показатели, вариативность и вероятностные принципы подвергаются объективную аудит в признанных организациях.
Программы лояльности в серьезных операторах основываются на четких критериях проигрыша. Проигрыш x35-40 оценивается адекватным для машина-подарков, в то время как традиционные состязания включаются в калькуляцию с редуцированным множителем.
Актуальные сервисы гемблинг активностей обеспечивают беттерам путь к элитному азарту через надежные Vavada casino сайты. Легальная функционирование нуждается соблюдения определенных правовых стандартов.
Механизм открытия игрового кабинета задействует аутентификацию индивидуальных данных. Провайдеры задействуют углубленные алгоритмы KYC и AML для исключения мошеннических финансовых действий.
Цифровые системы новейших гемблинг платформ работают на надежных серверах с шифровальными протоколами. Геоблокировка принуждает администраторов создавать дублирующие адреса.
Резервные домены являют собой полные дубликаты первичного портала с поддержанием всех сервисов и сведений. Пользователи обеспечивают себе устойчивый подключение к балансу, гемблинг отчетности и личным параметрам.
Банковские действия осуществляются через синхронизированные платежные системы. Границы на пополнения и изъятия регулируются в унисон с лицензионными критериями и внутренними нормами снижения потерь.
Квалифицированные беттеры рекомендуют отслеживать статус сертификата через регуляторные базы данных развлекательных организаций. Престижные характеристики содержат места на профильных ресурсах и комментарии реальных участников.
小城大事2026 赵丽颖黄晓明 高清农民造城励志 海外华人免费热播 全球加速
Sample Sunrise Essentials Online – Attractive concept and all sections are arranged thoughtfully.
骄阳似我2026 宋威龙赵今麦现偶甜宠爆款 海外华人高清在线观看 全球加速无广告体验
My Mexican Pharmacy: My Mexican Pharmacy – mexican pharmacies that ship to us
Best online casino Australia 2026 crypto friendly mobile ready
Birch Bounty Boutique Online – Simple navigation with a collection that feels carefully arranged.
чат знакомств Мелитополь Откройте для себя новые знакомства в Мелитополе – пусть ваша жизнь заиграет новыми красками!
戏台在线免费在线观看2026 海外华人专属 高清无广告
Передовые гемблеры оказываются с сложностью соединения к официальным ресурсам. Операторы запрещают базовые URL, но знающие Меллстрой РІС…РѕРґ пользователи осознают о доступности параллельных порталов.
Зеркало формирует стопроцентную воспроизведение оригинального ресурса. SSL-сертификаты работают неизменными. Платёжные операции осуществляются через идентичные шлюзы.
Процедура заведения учётной записи через резервный ресурс предполагает классической верификации. Администраторы запрашивают документы для соблюдения KYC-требований. Личные данные подвергаются расширенную валидацию.
Депозитные ограничения на дополнительных ресурсах соответствуют основным требованиям. Наименьшие ставки продолжают стабильными. Растущие джекпоты координируются между разными порталами.
Бонусные планы функционируют полноценно на параллельных сайтах. Вейджер обеспечивает базовые значения. Временные рамки реализации продолжается.
Служба помощи обрабатывает обращения с параллельных ссылок таким же способом. Онлайн общение поддерживает беспрерывный график обслуживания.
Современные провайдеры беттинг развлечений дают клиентам подключение к элитному гемблингу через проверенные п»ї1хбет регистрация сайты. Легальная работа предполагает выполнения определенных контролирующих норм.
Система открытия клиентского счета включает подтверждение индивидуальных реквизитов. Операторы используют углубленные алгоритмы KYC и AML для исключения фродовых финансовых действий.
Электронные платформы инновационных гемблинг платформ функционируют на надежных инфраструктурах с HTTPS технологиями. Геоблокировка побуждает администраторов организовывать вспомогательные домены.
Зеркальные платформы формируют точные репликации центрального домена с поддержанием всех функций и сведений. Игроки добиваются беспрепятственный соединение к средствам, развлекательной истории и личным опциям.
Финансовые переводы осуществляются через синхронизированные денежные процессоры. Ограничения на вклады и снятия регулируются в унисон с правовыми условиями и корпоративными процедурами риск-менеджмента.
Компетентные пользователи советуют проверять статус авторизации через регуляторные каталоги развлекательных ведомств. Авторитетные параметры охватывают ранги на специализированных сервисах и комментарии действительных беттеров.
https://invest.permraion.ru/js/inc/1xbet_promokod_pri_registracii_na_segodnya_besplatno.html
Craft Curio Picks – User-friendly interface and the site feels nicely organized.
凯伦皮里第二季高清完整版2026 海外华人悬疑剧集
For comments
discover personal loan best rates
for professional opinions.
https://certicanpharmacy.com/# canadian pharmacy store
Инновационные провайдеры гемблинг развлечений гарантируют игрокам возможность к элитному беттингу через защищенные Лаки Бир РІС…РѕРґ системы. Сертифицированная функционирование предполагает выполнения строгих контролирующих стандартов.
Процесс регистрации клиентского аккаунта задействует валидацию конфиденциальных информации. Регуляторы внедряют расширенные механизмы KYC и AML для предотвращения нарушающих платежей.
Цифровые средства современных игорных домов базируются на защищенных облачных системах с криптографическими стандартами. Локальные запреты побуждает администраторов запускать вспомогательные домены.
Альтернативные ресурсы представляют аналогичные копии основного сайта с удержанием всех инструментов и сведений. Участники приобретают беспрепятственный связь к балансу, гемблинг данным и пользовательским опциям.
Расчетные операции осуществляются через связанные банковские шлюзы. Рамки на инвестиции и получения назначаются в согласии с лицензионными требованиями и внутренними процедурами риск-менеджмента.
Квалифицированные клиенты указывают мониторить ситуацию лицензии через официальные регистры развлекательных комиссий. Авторитетные показатели задействуют рейтинги на специализированных сайтах и оценки истинных беттеров.
Рабочие дублирующие порталы надежных gaming-операторов на Вавада зеркало предоставляют непрерывный коннект к игровым порталам. Технология реплицирования образует идентичные дубликаты основного домена с сохранением всех механизмов.
Механизм открытия счета через резервную ссылку целиком воспроизводит главную шаблон. Начинающие игроки заполняют действующий email, создают сложный шифр и устанавливают операционную платежное средство.
Аутентификация учетной записи содержит представления бумаг по KYC-политике. Скан ID-карты, свидетельство адреса и карточные реквизиты проходят цифровую контроль в течение 24-72 временных единиц.
Вход существующих клиентов реализуется через обычную форму с двухфакторной аутентификацией. Одноразовые шифры отправляются на мобильный устройство или email.
Инструменты финансового компонента через резервные ссылки включает актуальные финансовые платформы. Visa, Mastercard, веб кошельки Skrill, Neteller, блокчейн-токены Bitcoin, Ethereum выполняются с минимальными комиссиями 0-3%.
Азартная база повторяется полностью включая автоматы, карточные игры, live-хостов и прогрессивы. RTP-индикаторы, вариативность и ставочные требования поддерживаются неизменными.
Бонусная политика функционирует похоже корневому ресурсу. Welcome-бандлы, безвозмездные спины, денежный возврат и VIP-программы стартуют алгоритмически при соблюдении заданных требований.
My Mexican Pharmacy: mexican pharma – mexican pharmacy online
My Mexican Pharmacy My Mexican Pharmacy My Mexican Pharmacy
TabTower Essentials Hub – Simple, organized pages and clear product explanations improve the experience.
Как бороться с тараканами – эффективные методы и советы
this BuildBay boutique – Quality items paired with a simple checkout process make buying effortless.
Casa Cable Gear – A tidy design paired with helpful product info makes browsing easy.
Подбор достойного развлекательного площадки в современных рамках нуждается специального внимания к лицензионному положению. Квалифицированные геймеры представляют, что Вавада зеркало содержит современную данные о функционирующих сервисах.
Алгоритм оформления профиля в легальных площадках предусматривает принудительную аутентификацию идентичности. KYC-правила гарантируют как площадку, так и клиента от махинаций. Временные рамки на получение капитала до окончания верификации – типичная методика.
Электронные препятствия на связь к betting площадкам преодолеваются через резервные URL. Действующие копии сохраняют абсолютную работоспособность базового портала. Платежные переводы, интерактивный статистика и поощрительные программы остаются неизменными.
Капитальная стабильность определяется уровнем задействованных финансовых механизмов. SSL-безопасность, PCI DSS лицензирование и расширенная идентификация формируют прочный щит безопасности.
Интерактивная набор лицензированных провайдеров включает спины от главных разработчиков. RTP-индексы, колебания и статистические принципы подвергаются объективную валидацию в признанных лабораториях.
Системы стимулирования в качественных площадках строятся на открытых условиях вейджера. Вейджер x35-40 считается адекватным для слот-льгот, в то время как классические развлечения засчитываются в калькуляцию с сниженным множителем.
Поиск в сфере проверенных площадок включает знания современных инструментов соединения. Умелые пользователи используют Меллстрой сайт для извлечения современной сведений о работающих адресах.
Процедура оформления профиля в лицензированных операторах охватывает сложную верификацию. Новейшие провайдеры внедряют KYC-протоколы и AML-стандарты. Документальная процедура требует от 24 до 72 периодов.
IT инструменты для минования ограничений улучшаются параллельно с усилением правовых решений. VPN-службы типа premium гарантируют безопасность AES-256 и протоколы OpenVPN. Надежность канала кардинально необходима для элитных раундов.
Дублирующие адреса действуют через территориально рассредоточенные IT инфраструктуры. CDN-структуры обеспечивают сокращенную задержку для азиатских участников. Техническое переключение срабатывает при выявлении недоступности базового портала.
Финансовые манипуляции в легальных юрисдикциях отвечают строгим критериям PCI DSS. Децентрализованные расчеты получают актуальность по причине анонимности и оперативности осуществления.
Мобильные программы ведущих компаний совмещают лицевую идентификацию и push-оповещения для ключевых эпизодов. Изменяемый интерфейс независимо изменяется под настройки матрицы.
Wiadomosci tenisowe http://www.teniswiadomosci.pl z Polski i ze swiata: najnowsze wyniki meczow, rankingi zawodniczek, analizy turniejow i wywiady z zawodniczkami. Sledz wydarzenia ATP i WTA, dowiedz sie o zwyciestwach, niespodziankach i najwazniejszych meczach sezonu.
Clever Cove Direct – Simple layout and clear product organization make browsing effortless.
Howdy! I know this is kinda off topic but I was wondering if you
knew where I could find a captcha plugin for my comment form?
I’m using the same blog platform as yours and I’m having trouble finding one?
Thanks a lot!
https://forum.amzgame.com/thread/detail?id=576693
Auracrest Picks – Clean layout and detailed product info make exploring simple.
artful card boutique – The streamlined navigation enhances the experience of finding unique designs.
visit Corporate Partnership Network – The interface is straightforward and exploring pages is hassle-free.
Перемещение в пространстве лицензированных площадок включает представления продвинутых инструментов подключения. Умелые клиенты эксплуатируют Вавада казино для извлечения свежей материалов о активных доменах.
Схема оформления личного кабинета в надежных учреждениях охватывает многоуровневую проверку. Продвинутые компании эксплуатируют KYC-процедуры и AML-стандарты. Документальное сопровождение потребляет от 24 до 72 промежутков.
Компьютерные способы для прохождения барьеров развиваются одновременно с усилением законодательных решений. VPN-сервисы категории premium предлагают защиту AES-256 и технологии OpenVPN. Постоянство коннекта критически необходима для элитных заходов.
Альтернативные адреса функционируют через пространственно разнесенные компьютерные кластеры. CDN-системы обеспечивают оптимальную отклик для глобальных геймеров. Автоматическое переключение включается при обнаружении недоступности главного ресурса.
Экономические манипуляции в лицензированных зонах следуют строгим критериям PCI DSS. Цифровые операции приобретают распространение вследствие анонимности и быстроте выполнения.
Портативные софт лучших провайдеров совмещают отпечатковую авторизацию и push-уведомления для существенных ситуаций. Модифицируемый дизайн автоматически настраивается под свойства матрицы.
Перемещение в области официальных платформ включает знания современных решений входа. Опытные клиенты внедряют Лаки Бир регистрация для приобретения свежей сведений о функционирующих путях.
Алгоритм создания счета в проверенных операторах подразумевает многоуровневую аутентификацию. Актуальные поставщики эксплуатируют KYC-алгоритмы и AML-критерии. Документальная процедура требует от 24 до 72 интервалов.
Компьютерные способы для избежания препятствий улучшаются одновременно с ужесточением нормативных шагов. VPN-инструменты уровня premium предоставляют безопасность AES-256 и системы OpenVPN. Постоянство связи жизненно существенна для премиальных заходов.
Альтернативные домены выполняют задачи через регионально разнесенные компьютерные системы. CDN-сети гарантируют минимальную отклик для азиатских клиентов. Программное переключение активируется при обнаружении недоступности основного адреса.
Платежные переводы в легальных областях соответствуют строгим правилам PCI DSS. Децентрализованные платежи завоевывают актуальность из-за секретности и динамике выполнения.
Смартфонные софт премиальных операторов содержат биометрическую авторизацию и push-оповещения для критических эпизодов. Адаптивный дизайн автоматически подстраивается под особенности монитора.
https://mymexicanpharmacy.shop/# My Mexican Pharmacy
Dzisiejsze mecze mecze dzis pl aktualny harmonogram z dokladnymi godzinami rozpoczecia. Dowiedz sie, jakie mecze pilki noznej, hokeja i koszykowki odbeda sie dzisiaj, i sledz turnieje, ligi i druzyny w jednym wygodnym kalendarzu.
chairchic collection – Items are easy to browse and the interface feels intuitive.
Выбор надежного развлекательного портала в нынешних реалиях требует специального изучения к лицензионному положению. Опытные игроки учитывают, что п»ї1xBet зеркало включает свежую материалы о доступных операторах.
Алгоритм регистрации в лицензированных площадках включает требуемую аутентификацию персональных данных. KYC-требования обеспечивают как площадку, так и игрока от мошенничества. Временные лимиты на перечисление средств до выполнения верификации – привычная подход.
Цифровые препятствия на соединение к игровым сайтам преодолеваются через параллельные домены. Доступные клоны поддерживают всестороннюю производительность основного сервиса. Расчетные движения, игровой результаты и наградные планы сохраняются неизменными.
Денежная стабильность измеряется качеством эксплуатируемых расчетных систем. SSL-кодирование, PCI DSS подтверждение и дополнительная аутентификация создают стабильный барьер обороны.
Развлекательная набор официальных площадок предоставляет автоматы от топовых создателей. RTP-индексы, изменчивость и статистические принципы подвергаются нейтральную контроль в авторизованных организациях.
Программы стимулирования в серьезных площадках формируются на понятных параметрах вейджера. Проигрыш x35-40 оценивается разумным для слот-привилегий, в то время как настольные забавы принимаются в подсчет с сниженным фактором.
Передовые гемблеры натыкаются с барьером доступа к проверенным порталам. Провайдеры ограничивают базовые порталы, но профессиональные п»ї1xBet зеркало участники учитывают о доступности резервных сайтов.
Зеркало составляет стопроцентную копию главного площадки. Системы безопасности работают равнозначными. Банковские переводы осуществляются через равнозначные механизмы.
Методика оформления профиля через дополнительный домен подразумевает стандартной проверки. Администраторы запрашивают справки для исполнения KYC-правил. Персональные сведения осуществляют расширенную подтверждение.
Пополнительные рамки на дополнительных ресурсах аналогичны первичным характеристикам. Начальные ставки сохраняются фиксированными. Растущие призовые фонды координируются между многочисленными ссылками.
Поощрительные планы выполняются завершённо на дополнительных платформах. Отыгрышный коэффициент сохраняет стартовые величины. Временные рамки проигрывания остаётся прежним.
Департамент сопровождения анализирует запросы с зеркальных доменов аналогично. Живой чат осуществляет круглосуточный порядок функционирования.
Trusted Business Resources – Organized content and intuitive navigation make accessing information simple.
Dorvani Studio Hub – Fast-loading content and smooth navigation for all users.
Хороший анализ по теме ufc в феврале марте 2026 три недели которые встряхнут дивизионы, делюсь ссылкой на источник. Почитать подробнее: https://inter-comfort.ru/news/fevral-mart-2026-ufc-zazhigaet-tri-turnira-polnye-intrig-i-vozmozhnyh-sensaczij/
Venverra Collections – Looks polished and trustworthy, ideal for online purchases.
Выбор надежного развлекательного портала в актуальных условиях требует специального рассмотрения к юридическому уровню. Опытные участники понимают, что Vavada казино содержит актуальную материалы о действующих сервисах.
Процедура регистрации в официальных сервисах включает принудительную аутентификацию документов. KYC-нормы обеспечивают как площадку, так и геймера от махинаций. Кратковременные рамки на получение денег до завершения валидации – привычная подход.
Цифровые ограничения на вход к азартным сервисам нейтрализуются через дублирующие ссылки. Функционирующие дубликаты обеспечивают всестороннюю возможности центрального портала. Платежные операции, азартный результаты и поощрительные планы остаются константными.
Финансовая стабильность измеряется показателем задействованных денежных систем. SSL-кодирование, PCI DSS аттестация и дополнительная подтверждение обеспечивают стабильный периметр обороны.
Игровая каталог официальных площадок предоставляет барабаны от ведущих производителей. RTP-значения, колебания и алгоритмические системы получают нейтральную аудит в авторизованных институтах.
Схемы стимулирования в качественных площадках строятся на ясных критериях проигрыша. Условия ставок x35-40 признается справедливым для спин-подарков, в то время как стандартные состязания включаются в зачет с минимальным фактором.
Новейшие клиенты сталкиваются с набором технологических аспектов при процессах с проверенными сайтами. Профильные порталы типа казино Mellstroy Game выдают релевантную контент о операциях гэмблинговых брендов.
Процесс валидации кабинета подразумевает набор принудительных фаз. Базовая верификация подразумевает предоставления бумаг удостоверяющих индивидуальность. Стандартный перечень включает паспорт, водительские права или международное ID.
Технологическая часть оформления подразумевает задействование SSL-шифрования и 2FA. Продвинутые игроки настаивают включать полный набор представленных опций безопасности.
Альтернативные адреса образуют стопроцентные клоны первичного платформы с обеспечением полного арсенала. Ключевое плюс состоит в подобии расчетных рамок и требований проигрыша.
Система поиска актуальных зеркал основывается на контроле профессиональных мессенджер групп и союзных сайтов. Опытные клиенты эксплуатируют анонимайзеры для обеспечения постоянного соединения невзирая от региональных запретов.
sleepsanctuary studio shop – Pages are organized nicely and browsing feels easy and relaxing.
Bond Solutions Resources – Clean design and structured pages make accessing information simple.
What impressed me about this casino https://ecio24.pl/ is the quality of the games. Everything runs smoothly, the design is minimal, and there’s always something new to explore, which keeps it engaging.
Wellness Wilds Essentials Online – Soothing layout and navigation works perfectly.
Отбор качественного гемблинг площадки в современных обстоятельствах подразумевает детального подхода к законному положению. Компетентные клиенты осознают, что Lucky Bear зеркало предоставляет свежую факты о активных операторах.
Механизм записи в официальных платформах предусматривает принудительную подтверждение личности. KYC-правила гарантируют как оператора, так и участника от махинаций. Кратковременные пределы на снятие капитала до завершения проверки – типичная практика.
Электронные запреты на вход к развлекательным сайтам нейтрализуются через резервные порталы. Действующие дубликаты сохраняют всестороннюю функциональность главного ресурса. Денежные переводы, игровой статистика и наградные программы функционируют постоянными.
Капитальная защищенность выражается уровнем применяемых денежных способов. SSL-кодирование, PCI DSS подтверждение и усиленная подтверждение формируют безопасный щит охраны.
Геймплейная набор легальных операторов предоставляет автоматы от главных создателей. RTP-показатели, колебания и математические схемы подвергаются беспристрастную аудит в утвержденных институтах.
Механизмы поощрения в надежных сервисах базируются на ясных критериях активности. Требования x35-40 признается адекватным для автомат-льгот, в то время как карточные игры включаются в калькуляцию с минимальным коэффициентом.
best site https://Zd.gl/
Поиск в сфере сертифицированных платформ требует понимания передовых решений подключения. Умелые пользователи внедряют Меллстрой для добывания новейшей данных о работающих URL.
Алгоритм создания аккаунта в лицензированных компаниях содержит детальную подтверждение. Новейшие поставщики эксплуатируют KYC-протоколы и AML-стандарты. Документооборот требует от 24 до 72 промежутков.
Технические способы для преодоления ограничений прогрессируют вместе с интенсификацией юридических шагов. VPN-решения категории premium дают криптографию AES-256 и стандарты OpenVPN. Непрерывность канала критически необходима для премиальных игровых периодов.
Зеркальные домены работают через географически размещенные серверные инфраструктуры. CDN-комплексы поддерживают минимальную задержку для европейских клиентов. Автоматическое роутинг включается при выявлении барьера основного домена.
Платежные операции в официальных регионах соответствуют жестким нормам PCI DSS. Крипто платежи набирают признание вследствие конфиденциальности и скорости процессинга.
Мобильные клиенты ведущих организаций объединяют физиологическую авторизацию и push-извещения для важных происшествий. Гибкий внешний вид автоматически настраивается под свойства монитора.
https://vnbit.org/members/melbetcode9.83482/#about
Beard Barge Online Picks – Solid selection with helpful product details for easier browsing.
Un sito web https://www.sopicks.it per trovare abbigliamento, accessori e prodotti alla moda con un motore di ricerca intelligente. Trova articoli per foto, marca, stile o tendenza, confronta le offerte dei negozi e crea look personalizzati in modo rapido e semplice.
Рабочие альтернативные домены официальных гемблинг-платформ на Вавада дают устойчивый доступ к азартным платформам. Система копирования формирует эквивалентные реплики главного домена с консервацией всех возможностей.
Механизм открытия счета через дублирующий портал в точности имитирует основную шаблон. Свежие клиенты указывают функционирующий email, генерируют безопасный ключ и определяют базовую валюту.
Идентификация аккаунта включает передачи справок по KYC-стандартам. Копия ID-карты, доказательство резиденции и денежные реквизиты контролируются системой автоматическую контроль в течение 24-72 часов.
Подключение верифицированных клиентов реализуется через типовую окно с расширенной идентификацией. Краткосрочные шифры отправляются на мессенджер аппарат или мейл.
Инструменты депозитного сектора через альтернативные домены обеспечивает распространенные денежные платформы. Visa, Mastercard, веб балансы Skrill, Neteller, цифровые активы Bitcoin, Ethereum процессируются с оптимизированными процентами 0-3%.
Азартная каталог клонируется целиком включая слоты, настольные геймплей, live-хостов и мегавыигрыши. RTP-параметры, дисперсия и отыгрыш фиксируются неизменными.
Промо система действует схоже главному домену. Welcome-пакеты, безвозмездные спины, компенсация и VIP-схемы активируются системно при соблюдении прописанных условий.
Исследование в пространстве лицензированных площадок требует понимания актуальных инструментов авторизации. Квалифицированные клиенты эксплуатируют казино Vavada для извлечения свежей фактов о действующих путях.
Механизм регистрации профиля в надежных компаниях подразумевает детальную проверку. Передовые операторы задействуют KYC-механизмы и AML-стандарты. Документооборот отнимает от 24 до 72 периодов.
Программные способы для обхода блокировок совершенствуются одновременно с ужесточением нормативных инициатив. VPN-сервисы типа premium предлагают шифрование AES-256 и технологии OpenVPN. Стабильность связи кардинально актуальна для премиальных сессий.
Альтернативные домены функционируют через пространственно разнесенные серверные кластеры. CDN-структуры поддерживают минимальную пинг для европейских геймеров. Системное маршрутизация запускается при детекции барьера первичного сайта.
Денежные манипуляции в официальных территориях подпадают под жестким стандартам PCI DSS. Децентрализованные транзакции увеличивают актуальность из-за секретности и быстроте процессинга.
Смартфонные клиенты лучших организаций включают лицевую идентификацию и push-уведомления для важных событий. Гибкий облик программно подстраивается под параметры панели.
Really enjoyed this clear and informative post. The insights are helpful. Looking forward to more. graffiti letter
Craft Cabin Lane – User-friendly design and product details are easy to follow.
All About ColorCairn – Colorful and playful selections stand out beautifully at first glance.
https://msk.metallobazav.ru/
Does your site have a contact page? I’m having a tough time locating it but, I’d like to
send you an email. I’ve got some suggestions for your blog you might be interested in hearing.
Either way, great website and I look forward to
seeing it improve over time.
Yavex Curated Picks – Smooth site operation and fast-loading content make browsing simple.
Выбор безопасного гемблинг ресурса в текущих реалиях предполагает тщательного внимания к регулятивному статусу. Компетентные геймеры представляют, что Меллстрой РІС…РѕРґ предоставляет современную материалы о функционирующих операторах.
Процесс записи в проверенных площадках охватывает принудительную подтверждение личности. KYC-процедуры гарантируют как площадку, так и геймера от афер. Переходные лимиты на вывод финансов до завершения проверки – стандартная практика.
Технические барьеры на соединение к betting сайтам обходятся через альтернативные ссылки. Действующие зеркала обеспечивают стопроцентную производительность основного сайта. Расчетные транзакции, интерактивный статистика и привилегированные схемы остаются константными.
Материальная надежность выражается критерием эксплуатируемых денежных механизмов. SSL-криптография, PCI DSS подтверждение и дополнительная идентификация гарантируют безопасный барьер защиты.
Игровая каталог проверенных заведений объединяет машины от лидирующих разработчиков. RTP-параметры, изменчивость и статистические модели испытывают независимую контроль в признанных центрах.
Системы стимулирования в серьезных сервисах строятся на четких условиях проигрыша. Требования x35-40 признается приемлемым для барабан-бонусов, в то время как стандартные развлечения принимаются в зачет с уменьшенным фактором.
Исследование в сфере проверенных площадок нуждается понимания актуальных решений подключения. Профессиональные геймеры применяют Вавада регистрация для добывания релевантной фактов о работающих ссылках.
Процесс формирования счета в сертифицированных организациях охватывает комплексную аутентификацию. Современные операторы используют KYC-алгоритмы и AML-правила. Документальное сопровождение отнимает от 24 до 72 интервалов.
Компьютерные способы для преодоления барьеров улучшаются вместе с ужесточением правовых мер. VPN-инструменты класса premium предлагают кодирование AES-256 и методы OpenVPN. Постоянство канала принципиально существенна для высокоролловых игровых периодов.
Запасные платформы работают через географически размещенные компьютерные кластеры. CDN-сети гарантируют оптимальную латентность для американских игроков. Системное переключение срабатывает при выявлении недоступности центрального ресурса.
Банковские манипуляции в проверенных зонах подпадают под конкретным требованиям PCI DSS. Блокчейн переводы получают признание благодаря секретности и динамике выполнения.
Переносные клиенты премиальных операторов объединяют физиологическую идентификацию и push-алерты для существенных происшествий. Настраиваемый оформление автономно подстраивается под свойства монитора.
Brondyra Online – Modern aesthetic and clear navigation enhance the shopping flow.
camping essentials – Navigation is straightforward and locating items is quick.
Современные участники сталкиваются с огромным количеством программных деталей при функционировании с проверенными сайтами. Тематические сайты типа Вавада официальный сайт предоставляют актуальную материалы о процессах казино компаний.
Процедура подтверждения учетной записи охватывает комплекс необходимых шагов. Базовая валидация включает передачи справок доказывающих личность. Типовой комплект подразумевает паспорт, водительские права или внешний паспорт.
Технологическая составляющая записления содержит задействование SSL-шифрования и 2FA. Квалифицированные пользователи подсказывают инициировать совокупность предложенных функций секьюрити.
Дублирующие порталы составляют абсолютные клоны основного домена с удержанием комплексного инструментария. Важнейшее достоинство заключается в подобии денежных границ и условий отыгрыша.
Алгоритм выявления активных запасных доменов опирается на контроле экспертных телеграм-каналов и союзных порталов. Квалифицированные клиенты используют виртуальные частные сети для предоставления стабильного подключения независимо от региональных барьеров.
Легальные ресурсы игорных сервисов гарантируют пользователям право к профессиональному игровому процессу через dedicated порталы, включая Vavada , которые исполняют глобальные регламенты security.
Механизм оформления профиля подразумевает указания верификационных сведений через безопасные SSL-каналы. Провайдеры demanded официальное доказательство age verification и места регистрации для поддержания legal стандартов.
Двухэтапная верификация становится mandatory aspect передовых механизмов security. Игроки имеют SMS-пароли, push-сообщения или применяют профессиональные софт вроде Google Authenticator.
Mirror ссылки преодолевают препятствия региональных ограничений и DDoS-атак. С технической точки зрения реплики являют идентичные версии главного портала с maintaining функциональности и клиентских сведений.
Skilled клиенты suggest хранить актуальные базы действующих mirrors в избранном браузера. Провайдеры передают новости о свежих порталах через e-mail, Telegram-communities и мобильные apps.
Платёжные переводы через legal ресурсы гарантированы encryption технологиями уровня банковского segment. Вывод средств происходит лишь на проверенные счета держателя личного кабинета.
Aura Arcade Essentials Store – Smooth browsing and straightforward checkout enhance the overall experience.
explore LongTermBusinessPartnerships – Well-organized content and easy navigation help users access information quickly.
handmade wool corner – Browsing feels relaxed thanks to the soft aesthetic and clear product categories.
Новейшие участники имеют дело с массой технологических тонкостей при процессах с сертифицированными ресурсами. Профильные порталы типа Меллстрой РІС…РѕРґ обеспечивают актуальную информацию о работе развлекательных организаций.
Механизм аутентификации кабинета включает ряд обязательных фаз. Начальная аутентификация нуждается отправки удостоверений подтверждающих гражданство. Типовой набор охватывает паспорт, автоудостоверение или заграничное удостоверение.
Программная сторона оформления предполагает использование безопасного соединения и двойной авторизации. Квалифицированные пользователи рекомендуют включать полный набор предложенных настроек секьюрити.
Альтернативные адреса формируют абсолютные клоны главного сайта с удержанием полного функционала. Главное выгода состоит в схожести расчетных рамок и условий вейджера.
Система обнаружения действующих дублирующих порталов основывается на контроле профильных информационных каналов и связанных сайтов. Квалифицированные геймеры используют анонимайзеры для предоставления стабильного связи невзирая от локальных запретов.
Актуальные платформы азартных услуг предоставляют участникам доступ к профессиональному развлечениям через защищенные Vavada казино платформы. Лицензированная работа влечет соблюдения конкретных регуляторных стандартов.
Процесс создания пользовательского кабинета охватывает верификацию конфиденциальных реквизитов. Провайдеры используют комплексные алгоритмы KYC и AML для предотвращения нарушающих транзакций.
Цифровые системы инновационных развлекательных порталов работают на стабильных хостингах с SSL технологиями. Территориальные ограничения побуждает владельцев создавать резервные URL.
Резервные порталы представляют точные клоны главного сайта с сохранением всех возможностей и показателей. Клиенты обеспечивают себе непрерывный вход к счету, развлекательной записям и пользовательским настройкам.
Денежные операции производятся через связанные финансовые системы. Лимиты на пополнения и изъятия регулируются в унисон с нормативными условиями и индивидуальными нормами управления рисками.
Профессиональные гемблеры рекомендуют анализировать условия разрешения через регуляторные реестры беттинг органов. Авторитетные критерии содержат позиции на специализированных сайтах и мнения настоящих участников.
For clarification
how can i get cheap zetia without prescription
for research purposes.
vet pharmacy: pet meds official website – online pet pharmacy
check this online store – The pages load neatly and the details are presented well.
Надёжные площадки развлекательных сервисов дают участникам доступ к премиальному гэмблингу через тематические порталы, включая казино 1хбет , которые специально выполняют мировые регламенты security.
Алгоритм открытия счёта necessita указания верификационных информации через шифрованные SSL-линии. Операторы demanded нотариальное свидетельство дееспособности и территории residence для выполнения правовых требований.
Multi-factor authentication становится required элементом передовых solutions security. Пользователи приобретают SMS-пароли, push-notification или задействуют профессиональные софт типа Google Authenticator.
Дублирующие URL устраняют вопросы географических блокировок и DDoS-нападений. С технической точки зрения дубли составляют дублированные реплики центрального платформы с удержанием инструментария и клиентских параметров.
Профессиональные игроки рекомендуют удерживать актуальные базы working дублей в закладках обозревателя. Операторы передают информацию о fresh доменах через почтовые сервисы, Telegram-каналы и телефонные apps.
Payment переводы через лицензионные площадки обеспечены защитными технологиями стандарта банковского индустрии. Вывод средств выполняется solely на проверенные wallets хозяина профиля.
your ClickForActionableInsights hub – User-friendly interface and quick page loads make browsing smooth.
Актуальные игроки сталкиваются с массой технических особенностей при процессах с проверенными ресурсами. Тематические ресурсы типа Меллстрой РІС…РѕРґ предоставляют новую сведения о операциях азартных компаний.
Процедура валидации кабинета включает множество необходимых шагов. Исходная подтверждение предполагает передачи свидетельств подтверждающих личность. Стандартный комплект предполагает удостоверение личности, права или внешний паспорт.
Системная компонента создания аккаунта подразумевает применение защищенного протокола и двухуровневой проверки. Опытные игроки предлагают задействовать максимум представленных опций защиты.
Запасные домены являются абсолютные копии базового сайта с сохранением полного возможностей. Важнейшее бонус кроется в соответствии расчетных границ и норм отыгрыша.
Система обнаружения актуальных дублирующих порталов опирается на отслеживании экспертных мессенджер групп и сотрудничающих платформ. Опытные геймеры внедряют VPN-сервисы для создания постоянного доступа невзирая от местных блокировок.
hop over to this web-site https://Zd.gl
Vendor Velvet Online Store – Easy navigation and modern styling make exploring the site seamless.
Decordock Nook – Excellent variety and product information is easy to follow.
click this https://Zd.gl/
Выбор достойного азартного площадки в текущих реалиях требует повышенного анализа к законному статусу. Знающие клиенты представляют, что Вавада сайт предоставляет современную данные о работающих провайдерах.
Процедура записи в официальных платформах объединяет требуемую аутентификацию персональных данных. KYC-нормы защищают как сервис, так и геймера от фрода. Временные рамки на изъятие капитала до окончания подтверждения – типичная подход.
Технические запреты на вход к betting ресурсам обходятся через зеркальные домены. Рабочие отражения обеспечивают стопроцентную эффективность базового ресурса. Финансовые процедуры, развлекательный продвижение и поощрительные системы функционируют неизменными.
Денежная безопасность выражается критерием внедренных денежных систем. SSL-кодирование, PCI DSS лицензирование и усиленная подтверждение создают прочный щит защиты.
Геймплейная коллекция легальных площадок предоставляет слоты от топовых провайдеров. RTP-значения, дисперсия и алгоритмические принципы получают внешнюю валидацию в признанных организациях.
Схемы поощрения в надежных сервисах базируются на открытых требованиях ставок. Отыгрыш x35-40 расценивается нормальным для автомат-привилегий, в то время как стандартные состязания включаются в зачет с пониженным показателем.
Передовые клиенты пересекаются с множеством программных особенностей при функционировании с проверенными ресурсами. Экспертные порталы типа п»ї1xBet зеркало предоставляют новую материалы о процессах развлекательных провайдеров.
Алгоритм верификации кабинета предполагает набор принудительных уровней. Стартовая аутентификация предполагает отправки свидетельств доказывающих гражданство. Стандартный пакет подразумевает свидетельство, автоудостоверение или международный паспорт.
Технологическая составляющая оформления содержит эксплуатацию защищенного протокола и двойной авторизации. Профессиональные клиенты предлагают инициировать совокупность имеющихся функций охраны.
Дублирующие порталы являются полные отражения основного ресурса с обеспечением всего функционала. Важнейшее преимущество кроется в идентичности платежных границ и критериев отыгрыша.
Система локализации функционирующих зеркал основывается на контроле экспертных мессенджер групп и связанных платформ. Экспертные пользователи внедряют анонимайзеры для гарантирования надежного подключения невзирая от локальных запретов.
sketchstation digital – Creative presentation is excellent and browsing is smooth.
http://vetfreemeds.com/# online vet pharmacy
sheetsierra treasures – Selection is solid and checkout felt seamless.
перейдите на этот сайт Купить ип
Актуальные бетторы натыкаются с барьером связи к официальным площадкам. Операторы ограничивают базовые порталы, но грамотные Lucky Bear казино пользователи помнят о присутствии альтернативных сайтов.
Альтернативный адрес образует стопроцентную дубликат оригинального площадки. Протоколы шифрования остаются неизменными. Расчётные процедуры выполняются через аналогичные сервисы.
Технология создания аккаунта через зеркальный адрес предполагает типовой подтверждения. Операторы просят справки для осуществления KYC-стандартов. Паспортные данные подвергаются комплексную аутентификацию.
Финансовые лимиты на параллельных порталах соответствуют первичным требованиям. Наименьшие суммы функционируют фиксированными. Растущие выигрышные пулы согласовываются между множественными порталами.
Бонусные планы выполняются комплексно на альтернативных платформах. Требования по обороту удерживает стартовые показатели. Тайминг отыгрыша остаётся прежним.
Служба сопровождения изучает вопросы с параллельных адресов сходным образом. Интерактивный чат предоставляет 24-часовой порядок обслуживания.
Беттинговая отрасль являет активный рост, привлекая массы клиентов. Опытные площадки гарантируют защищённую обстановку для ставок. Исчерпывающую материалы о подобных операторах доступно изучить на Vavada казино .
Аккредитация выступает приоритетным элементом подбора сайта. Регуляторы Кюрасао предоставляют тщательный аудит валютных операций. Конкретная лицензированная платформа проходит систематические аудиты RNG-систем.
Технические параметры актуальных казино охватывают SSL-шифрование экономического ранга. Поставщики программного ПО типа Microgaming, NetEnt, Pragmatic Play внедряют комплексные механизмы непредсказуемых чисел.
Процедура подтверждения аккаунта требует направления документов KYC-класса. Паспорт, документ о финансах, валидация местожительства — базовый набор для окончательного авторизации.
Дублирующие ссылки убирают трудности с ограничениями компаний. Актуальные варианты корректируются постоянно техническими отделами. Мобильные программы зачастую оперируют устойчивее онлайн форматов.
Управление банкроллом устанавливает перспективную результативность игровых партий. Грамотные геймеры советуют урезать размер пари до 1-2% от полного фонда.
https://anotepad.com/notes/yn389jix
blsp at
на этом сайте Бухгалтерские услуги
NauticalNarrative Essentials Hub – Beautiful oceanic pieces and smooth, intuitive browsing.
your ProfessionalCollaborationHub hub – Smooth interface and structured sections simplify reading.
Bay Biscuit Top Picks – Adorable collection and purchasing works without hassle.
Cozy Copper Gallery – User-friendly navigation and products appear carefully selected.
Отбор безопасного гемблинг портала подразумевает серьезного исследования правовых свидетельств. Современные порталы Лаки Бир казино дают пользователям абсолютную детали о действующих санкциях.
Система создания профиля подразумевает ряд обязательных ступеней валидации. Провайдеры просят удостоверения, доказывающие идентичность и совершеннолетие. Традиционный KYC-регламент длится от 24 до 72 интервалов.
Контроль средств инициируется с задания ограничений на взносы. Искусные игроки рекомендуют применять установку 5% от суммарного казино фонда на индивидуальную раунд.
Электронные препятствия владельцев обязывают использовать альтернативные пути. Зеркала хранят полную активность основного сайта, содержа журнал сделок и развлекательный достижения.
Актуальные финансовые системы обеспечивают оперативные взносы через виртуальные счета. Bitcoin, Ethereum и фиксированные активы дают приватность и символические взносы. Время проведения извлечений доходит 10-30 интервалов.
Планы постоянства подразумевают многоуровневые степени с прогрессивным вознаграждением. VIP-координаторы гарантируют личные награды, улучшенные ограничения и приоритетную сервис.
Определение надежного игрового портала в текущих обстоятельствах нуждается специального подхода к законному режиму. Опытные участники осознают, что п»ї1xBet казино содержит новую факты о действующих площадках.
Схема оформления профиля в лицензированных платформах охватывает принудительную верификацию документов. KYC-процедуры обеспечивают как заведение, так и участника от махинаций. Промежуточные пределы на снятие средств до завершения валидации – привычная процедура.
Электронные барьеры на подключение к игровым порталам обходятся через резервные ссылки. Рабочие зеркала обеспечивают стопроцентную производительность центрального портала. Расчетные транзакции, игровой статистика и наградные планы функционируют стабильными.
Денежная стабильность выражается качеством внедренных расчетных механизмов. SSL-кодирование, PCI DSS аттестация и многоуровневая проверка обеспечивают безопасный контур защиты.
Геймплейная коллекция официальных заведений охватывает спины от известных создателей. RTP-индексы, колебания и статистические формулы претерпевают нейтральную сертификацию в авторизованных учреждениях.
Планы мотивации в достойных площадках опираются на ясных требованиях проигрыша. Проигрыш x35-40 считается приемлемым для машина-льгот, в то время как традиционные развлечения включаются в калькуляцию с пониженным коэффициентом.
http://certicanpharmacy.com/# cheap canadian pharmacy online
Следующая страница Как Не платить налоги законно
melbet скачать melbet скачать .
Многие ищут правду об игре в этом контексте, но не находят.
Лицензионные провайдеры азартных услуг oferuja клиентам право к премиальному азартному досугу через dedicated домены, включая п»ї1xBet , которые точно следуют transnational критерии security.
Процедура регистрации предполагает заполнения верификационных деталей через шифрованные SSL-линии. Провайдеры просят предоставить нотариальное подтверждение age verification и региона residence для поддержания legal стандартов.
Многоуровневая authentication считается required aspect новейших платформ безопасности. Users располагают SMS-шифры, push-оповещения или внедряют targeted утилиты типа Google Authenticator.
Mirror порталы нейтрализуют сложности региональных санкций и DDoS-assault. По сути реплики являют тождественные клоны основного платформы с обеспечением features и пользовательских деталей.
Опытные клиенты предлагают поддерживать новейшие списки активных mirrors в bookmark обозревателя. Операторы отправляют updates о fresh URL через мейл, Telegram-чаты и портативные приложения.
Payment транзакции через надёжные ресурсы гарантированы cryptographic протоколами класса банковского segment. Получение финансов производится только на проверенные карты хозяина учётной записи.
Clever Checkout Portal – Simple browsing and quick purchase options make the process smooth.
briovista.shop – Very clean layout and everything loads fast without lag.
Азартная отрасль демонстрирует активный развитие, привлекая массы игроков. Профессиональные платформы гарантируют безопасную среду для беттинга. Подробную информацию о таких брендах возможно обнаружить на [url=https://github.com/Mellstroy-Game-zerkalo]Меллстрой казино[/url] .
Лицензирование составляет центральным фактором селекции платформы. Лицензиаты Гибралтара гарантируют качественный надзор экономических процедур. Конкретная официальная площадка реализует систематические проверки RNG-модулей.
Компьютерные характеристики передовых казино предусматривают SSL-безопасность денежного ранга. Производители программного продукта вроде Microgaming, NetEnt, Pragmatic Play подключают многоуровневые системы хаотичных параметров.
Процедура подтверждения личного кабинета включает передачи свидетельств KYC-типа. Документ, справка о заработке, удостоверение регистрации — стандартный пакет для завершённого доступа.
Альтернативные домены устраняют трудности с цензурой провайдеров. Рабочие дубли корректируются ежедневно техническими специалистами. Карманные программы нередко оперируют устойчивее онлайн версий.
Банкролл-менеджмент определяет длительную доходность игровых раундов. Опытные игроки предлагают сокращать сумму пари до 1-2% от общего капитала.
company website https://Zd.gl/
check it out here – The selection is diverse and the website responds instantly.
Современные сервисы развлекательных развлечений дают участникам доступ к элитному беттингу через проверенные п»ї1хбет регистрация сайты. Сертифицированная работа требует соблюдения определенных регуляторных критериев.
Процедура регистрации клиентского профиля охватывает аутентификацию приватных показателей. Провайдеры задействуют комплексные процедуры KYC и AML для исключения фродовых транзакций.
IT средства актуальных беттинг площадок работают на безопасных инфраструктурах с шифровальными протоколами. Территориальные ограничения принуждает провайдеров внедрять параллельные порталы.
Резервные ресурсы являют собой эквивалентные клоны главного ресурса с обеспечением всех инструментов и информации. Беттеры обеспечивают себе устойчивый подключение к балансу, игровой отчетности и пользовательским настройкам.
Финансовые действия реализуются через подключенные платежные процессоры. Ограничения на взносы и выводы фиксируются в соотношении с законодательными требованиями и внутренними политиками минимизации опасностей.
Профессиональные беттеры настаивают мониторить ситуацию лицензии через контролирующие списки развлекательных структур. Имиджевые индикаторы содержат ранги на тематических сервисах и мнения действительных игроков.
Активные зеркала лицензированных gaming-операторов на п»ї1xBet зеркало создают постоянный коннект к геймерским системам. Технология клонирования создает идентичные версии основного веб-площадки с фиксацией всех функций.
Механизм создания аккаунта через дублирующий портал на сто процентов имитирует оригинальную форму. Новые участники вводят активный email, генерируют защищенный пароль и фиксируют основную курренси.
Аутентификация профиля содержит предоставления справок опираясь на KYC-нормам. Фото водительских прав, доказательство места жительства и денежные координаты контролируются системой автоматическую проверку в течение 24-72 периодов.
Подключение существующих пользователей осуществляется через типовую интерфейс с 2FA идентификацией. Временные пароли отправляются на смс устройство или почтовый ящик.
Инструменты финансового компонента через mirror-сайты обеспечивает распространенные банковские инструменты. Visa, Mastercard, онлайн кошельки Skrill, Neteller, цифровые активы Bitcoin, Ethereum выполняются с низкими платежами 0-3%.
Игровая ассортимент копируется целиком включая слоты, классические забавы, live-хостов и мегавыигрыши. RTP-показатели, вариативность и отыгрыш фиксируются точными.
Бонусная политика работает подобно базовому ресурсу. Welcome-комплекты, даровые прокруты, компенсация и VIP-схемы включаются программно при выполнении установленных условий.
official benchbazaar site – Easy navigation and product details are very helpful.
mostbet стратегия lucky jet https://mostbet43926.help
ChargeCharm Online – Easy-to-use interface and a great selection of gadgets make shopping smooth.
Attic Amber Essentials – Simple, welcoming design and easy-to-use interface make exploring seamless.
Новейшие операторы развлекательных развлечений предоставляют игрокам возможность к профессиональному развлечениям через надежные п»ї1xBet казино сайты. Сертифицированная функционирование требует исполнения конкретных законодательных положений.
Алгоритм создания клиентского кабинета задействует валидацию персональных сведений. Операторы применяют детализированные процедуры KYC и AML для пресечения фродовых финансовых действий.
IT инструменты передовых гемблинг платформ основываются на надежных серверах с HTTPS сертификатами. IP-фильтрация принуждает операторов создавать резервные URL.
Альтернативные сайты представляют аналогичные репликации основного сайта с обеспечением всех функций и сведений. Игроки добиваются постоянный подключение к средствам, гемблинг данным и персональным опциям.
Финансовые действия реализуются через интегрированные денежные агрегаторы. Границы на взносы и получения устанавливаются в согласии с законодательными условиями и индивидуальными регламентами минимизации опасностей.
Квалифицированные игроки указывают отслеживать статус лицензии через регуляторные базы данных азартных организаций. Репутационные показатели задействуют рейтинги на экспертных сайтах и мнения настоящих клиентов.
Рабочие дублирующие порталы надежных gaming-операторов на Меллстрой РІС…РѕРґ обеспечивают стабильный коннект к азартным системам. Принцип реплицирования создает аналогичные дубликаты базового домена с сохранением всех возможностей.
Механизм регистрации через зеркало в точности имитирует стандартную заявку. Только пришедшие игроки указывают действующий email, генерируют стойкий секретную комбинацию и фиксируют рабочую денежную единицу.
Валидация профиля включает загрузки свидетельств в соответствии с KYC-политике. Изображение водительских прав, подтверждение резиденции и денежные координаты проверяются через алгоритмическую проверку в течение 24-72 ч.
Подключение действующих геймеров реализуется через стандартную форму с расширенной проверкой. Разовые коды поступают на мессенджер девайс или электронную почту.
Механизмы денежного модуля через резервные ссылки включает распространенные финансовые инструменты. Visa, Mastercard, онлайн счета Skrill, Neteller, блокчейн-токены Bitcoin, Ethereum осуществляются с минимальными платежами 0-3%.
Развлекательная ассортимент дублируется на сто процентов включая барабаны, карточные развлечения, live-крупье и прогрессивы. RTP-значения, колебания и вейджер остаются точными.
Акционная программа оперирует подобно центральному веб-площадке. Welcome-комплекты, фриспины, refund и VIP-планы инициируются машинально при выполнении установленных критериев.
premium PolyPerfect outlet – Everything is organized nicely, and the checkout steps are straightforward.
на этом сайте Оптимизация налогооблажения
Go to Velvet Vendor 2 – Definitely returning here, the range of products is quite unusual and interesting.
Trusted Commercial Network Hub – Professional design and clear navigation make exploring content simple.
Игровая ниша демонстрирует динамичный расширение, манящая миллионы участников. Грамотные порталы предоставляют защищённую пространство для игры. Полную материалы о подобных организациях допустимо получить на п»ї1хбет зеркало .
Лицензирование является основным критерием выбора площадки. Регуляторы Гибралтара дают тщательный аудит финансовых действий. Любая лицензированная площадка выполняет периодические проверки RNG-алгоритмов.
Цифровые характеристики новейших гемблинг-сайтов охватывают SSL-кодирование экономического стандарта. Создатели программного материала наподобие Microgaming, NetEnt, Pragmatic Play встраивают многоуровневые модели рандомных параметров.
Механизм проверки аккаунта предполагает направления документов KYC-класса. Удостоверение, справка о доходах, валидация местожительства — классический перечень для окончательного подключения.
Параллельные ссылки убирают сложности с фильтрацией операторов. Действующие копии адаптируются каждый день техническими группами. Планшетные утилиты зачастую действуют качественнее сетевых вариантов.
Финансовая дисциплина устанавливает продолжительную результативность игровых периодов. Грамотные геймеры предлагают ограничивать количество ставки до 1-2% от полного резерва.
Новейшие бетторы попадают с препятствием доступа к проверенным платформам. Провайдеры закрывают первичные ссылки, но профессиональные п»ї1хбет казино пользователи осознают о функционировании зеркальных порталов.
Зеркало составляет стопроцентную отображение базового площадки. Системы безопасности остаются неизменными. Денежные действия реализуются через сходные сервисы.
Схема регистрации через параллельный ресурс содержит классической верификации. Менеджеры уточняют удостоверения для осуществления KYC-регламентов. Идентификационные параметры подвергаются двухфакторную валидацию.
Пополнительные ограничения на альтернативных платформах идентичны главным спецификациям. Стартовые взносы функционируют константными. Накопительные выигрышные пулы интегрируются между различными ресурсами.
Льготные системы действуют всесторонне на зеркальных платформах. Коэффициент оборота удерживает оригинальные значения. Срок активности отыгрыша остаётся прежним.
Отдел сопровождения изучает тикеты с резервных порталов сходным образом. Онлайн диалог осуществляет непрерывный расписание деятельности.
опубликовано здесь Камеральная, выездная проверка
What stood out about this casino https://serwis-tomaszewski.pl/ is the quality of the games. Everything runs without issues, the design is clean, and there’s plenty of options to explore, which keeps it engaging.
Dalvanta Corner – Clean design and browsing feels effortless.
Активные дублирующие порталы официальных игорных заведений на п»ї1хбет официальный сайт создают непрерывный подключение к развлекательным системам. Методика клонирования генерирует аналогичные дубликаты основного ресурса с поддержанием всех инструментов.
Процедура создания аккаунта через резервную ссылку целиком повторяет стандартную заявку. Дебютные участники регистрируют активный email, устанавливают надежный ключ и назначают операционную денежную единицу.
Верификация личного кабинета включает передачи документов по KYC-требованиям. Снимок удостоверения личности, доказательство резиденции и карточные данные проходят цифровую проверку в течение 24-72 ч.
Аутентификация действующих пользователей выполняется через типовую панель с двухфакторной аутентификацией. Краткосрочные коды передаются на смс девайс или e-mail адрес.
Механизмы входящего компонента через mirror-сайты содержит распространенные расчетные механизмы. Visa, Mastercard, виртуальные хранилища Skrill, Neteller, блокчейн-токены Bitcoin, Ethereum реализуются с сокращенными взносами 0-3%.
Развлекательная ассортимент воспроизводится абсолютно включая барабаны, карточные геймплей, live-дилеров и джекпоты. RTP-коэффициенты, волатильность и проигрыш сохраняются неизменными.
Акционная механизм работает похоже корневому веб-площадке. Welcome-предложения, фриспины, денежный возврат и VIP-программы запускаются алгоритмически при выполнении фиксированных стандартов.
CertiCanPharmacy: escrow pharmacy canada – canadian pharmacy 365
layout lagoon treasures – The site is tidy and browsing through pages is easy.
Развлекательная ниша представляет стремительный подъём, привлекая тысячи участников. Профессиональные платформы обеспечивают стабильную пространство для ставок. Исчерпывающую данные о данных компаниях допустимо отыскать на Mellstroy Game зеркало .
Легализация остаётся центральным критерием подбора площадки. Надзорные органы Гибралтара гарантируют жёсткий надзор денежных процедур. Конкретная аккредитованная платформа проходит систематические проверки RNG-систем.
Компьютерные аспекты инновационных беттинг-платформ содержат SSL-шифрование экономического класса. Производители софтового ПО типа Microgaming, NetEnt, Pragmatic Play подключают комплексные модели хаотичных чисел.
Схема подтверждения учётной записи подразумевает представления бумаг KYC-формата. Удостоверение, подтверждение о финансах, доказательство регистрации — базовый перечень для полноценного активации.
Параллельные домены ликвидируют сложности с цензурой поставщиков. Актуальные варианты обновляются ежедневно техническими командами. Карманные программы нередко оперируют качественнее веб версий.
Контроль средств задаёт длительную успешность азартных партий. Грамотные игроки рекомендуют лимитировать размер депозита до 1-2% от совокупного банкролла.
CourierCraft Picks – Love the originality of the items and the uncomplicated ordering process.
curated Rosemary Roost picks – The aesthetic appeal and careful curation immediately stand out.
Full story
where to get generic bactrim without dr prescription
for additional context.
journaljetty treasures – Nice variety and product details make choosing easy.
Актуальные игроки обталкиваются с набором технических особенностей при работе с лицензированными платформами. Профильные платформы типа п»ї1хбет зеркало поставляют актуальную данные о деятельности азартных организаций.
Алгоритм валидации учетной записи включает несколько принудительных шагов. Базовая аутентификация нуждается загрузки бумаг удостоверяющих персону. Стандартный пакет охватывает удостоверение личности, автоудостоверение или заграничное удостоверение.
Системная компонента создания аккаунта охватывает эксплуатацию зашифрованного канала и двухфакторной аутентификации. Экспертные пользователи настаивают включать совокупность имеющихся возможностей секьюрити.
Запасные домены образуют абсолютные дубликаты основного ресурса с хранением полного возможностей. Ключевое бонус заключается в тождественности расчетных лимитов и критериев проигрыша.
Процедура локализации действующих резервных ссылок основывается на контроле специализированных информационных каналов и сотрудничающих порталов. Продвинутые игроки применяют виртуальные частные сети для предоставления постоянного соединения вне зависимости от местных ограничений.
Действующие альтернативные домены проверенных азартных клубов на п»ї1хбет сайт гарантируют беспрерывный вход к гемблинг ресурсам. Схема копирования строит идентичные копии основного сайта с удержанием всех функций.
Алгоритм открытия счета через резервную ссылку полностью дублирует базовую шаблон. Дебютные геймеры прописывают рабочий email, создают стойкий код доступа и фиксируют основную платежное средство.
Валидация учетной записи требует загрузки удостоверений по KYC-нормам. Скан паспорта, валидация адреса и платежные реквизиты подвергаются программную верификацию в течение 24-72 часов.
Авторизация существующих геймеров выполняется через классическую панель с 2FA идентификацией. Сессионные токены поступают на телефонный устройство или почтовый ящик.
Опции денежного раздела через зеркала поддерживает востребованные платежные инструменты. Visa, Mastercard, веб хранилища Skrill, Neteller, блокчейн-токены Bitcoin, Ethereum обрабатываются с минимальными процентами 0-3%.
Гемблинг каталог дублируется целиком включая слоты, настольные игры, live-операторов и прогрессивы. RTP-коэффициенты, дисперсия и вейджер остаются аналогичными.
Акционная политика работает похоже базовому домену. Welcome-наборы, фриспины, кешбэк и VIP-системы включаются системно при достижении определенных требований.
Cozy Carton Nook – Pleasant design with items clearly displayed.
CertiCanPharmacy: onlinepharmaciescanada com – CertiCanPharmacy
Поиск надежного гемблинг площадки в актуальных реалиях требует повышенного рассмотрения к регулятивному положению. Компетентные участники знают, что Mellstroy Game зеркало предоставляет новую материалы о активных ресурсах.
Процедура создания аккаунта в легальных заведениях охватывает требуемую проверку персональных данных. KYC-процедуры гарантируют как оператора, так и пользователя от обмана. Временные рамки на вывод денег до закрытия проверки – нормальная методика.
Виртуальные ограничения на доступ к развлекательным площадкам решаются через дублирующие порталы. Действующие зеркала предоставляют тотальную работоспособность главного сервиса. Денежные процедуры, интерактивный статистика и наградные схемы продолжают стабильными.
Денежная защищенность характеризуется степенью внедренных расчетных систем. SSL-безопасность, PCI DSS сертификация и двухфакторная идентификация гарантируют надежный барьер обороны.
Игровая ассортимент лицензированных заведений содержит барабаны от ведущих производителей. RTP-параметры, изменчивость и математические системы проходят внешнюю валидацию в авторизованных организациях.
Системы поощрения в надежных операторах базируются на открытых критериях ставок. Отыгрыш x35-40 характеризуется приемлемым для барабан-поощрений, в то время как классические активности учитываются в счет с уменьшенным фактором.
Выбор проверенного betting ресурса в текущих обстоятельствах нуждается детального внимания к регулятивному состоянию. Профессиональные клиенты представляют, что Лаки Бир регистрация предоставляет новую материалы о действующих провайдерах.
Алгоритм записи в лицензированных сервисах объединяет требуемую проверку персональных данных. KYC-процедуры защищают как казино, так и игрока от фрода. Промежуточные рамки на получение средств до завершения валидации – привычная практика.
Виртуальные препятствия на соединение к развлекательным ресурсам нейтрализуются через зеркальные ссылки. Активные дубликаты предоставляют полную возможности основного сервиса. Денежные процедуры, развлекательный продвижение и бонусные планы функционируют устойчивыми.
Финансовая гарантированность измеряется качеством применяемых платежных способов. SSL-кодирование, PCI DSS валидация и расширенная аутентификация обеспечивают защищенный заслон безопасности.
Азартная набор сертифицированных площадок содержит машины от лидирующих разработчиков. RTP-значения, дисперсия и статистические модели получают независимую сертификацию в утвержденных лабораториях.
Планы поощрения в надежных площадках формируются на ясных требованиях проигрыша. Вейджер x35-40 считается адекватным для машина-привилегий, в то время как традиционные активности учитываются в расчет с пониженным фактором.
We stumbled over here coming from a different web page and thought I should
check things out. I like what I see so i am just following you.
Look forward to going over your web page repeatedly.
Bath Breeze Top Picks – Quality products and a layout that makes exploring smooth.
Актуальные альтернативные домены проверенных азартных клубов на казино Mellstroy Game обеспечивают постоянный коннект к развлекательным ресурсам. Технология клонирования генерирует аналогичные копии базового портала с удержанием всех функций.
Схема активации через альтернативный домен целиком имитирует базовую анкету. Только пришедшие участники заполняют действующий email, устанавливают надежный ключ и выбирают игровую валюту.
Аутентификация личного кабинета подразумевает передачи документов согласно KYC-нормам. Снимок ID-карты, подтверждение адреса и платежные сведения проверяются через автоматическую анализ в течение 24-72 часа.
Вход верифицированных геймеров осуществляется через базовую форму с 2FA идентификацией. Временные токены передаются на мобильный аппарат или мейл.
Инструменты депозитного сектора через дублирующие порталы содержит распространенные денежные механизмы. Visa, Mastercard, цифровые балансы Skrill, Neteller, блокчейн-токены Bitcoin, Ethereum процессируются с уменьшенными комиссиями 0-3%.
Gaming коллекция дублируется абсолютно включая автоматы, классические развлечения, live-дилеров и джекпоты. RTP-показатели, дисперсия и отыгрыш удерживаются такими же.
Акционная система оперирует похоже корневому сайту. Welcome-пакеты, бесплатные вращения, возврат средств и VIP-схемы стартуют системно при соблюдении определенных стандартов.
Передовые геймеры пересекаются с изобилием системных тонкостей при деятельности с легальными ресурсами. Тематические ресурсы типа Лаки Бир официальный сайт обеспечивают современную материалы о функционировании казино компаний.
Механизм проверки профиля подразумевает набор необходимых этапов. Стартовая валидация требует загрузки бумаг доказывающих гражданство. Типовой список включает паспорт, автолицензию или внешний паспорт.
Техническая компонента регистрации охватывает задействование SSL-шифрования и многофакторной защиты. Экспертные геймеры настаивают включать весь комплекс доступных параметров защиты.
Запасные домены составляют стопроцентные клоны основного домена с удержанием комплексного арсенала. Главное преимущество содержится в схожести финансовых ограничений и требований проигрыша.
Механизм нахождения актуальных зеркал фундируется на контроле специализированных новостных лент и связанных площадок. Экспертные игроки задействуют туннельные протоколы для создания постоянного подключения вне зависимости от географических лимитов.
When someone writes an piece of writing he/she keeps the thought of a user in his/her
brain that how a user can understand it. Thus that’s why this paragraph
is perfect. Thanks!
briovista.shop – Very clean layout and everything loads fast without lag.
https://certicanpharmacy.com/# canadian pharmacy cheap
Проверенные ресурсы гэмблинг услуг обеспечивают участникам шанс к элитному времяпрепровождению через целевые домены, включая Вавада РІС…РѕРґ , которые следуют глобальные требования security.
Механизм создания аккаунта предполагает указания проверочных деталей через криптографические SSL-connection. Провайдеры просят предоставить письменное verification age verification и региона регистрации для выполнения правовых правил.
2FA идентификация считается required компонентом новейших платформ безопасности. Users обретают SMS-коды, push-notification или эксплуатируют специализированные софт вроде Google Authenticator.
Mirror ссылки решают трудности локальных запретов и DDoS-нападений. По сути зеркала представляют дублированные реплики главного платформы с поддержанием инструментария и личных сведений.
Skilled клиенты рекомендуют keeping обновлённые базы функционирующих зеркал в сохранённых ссылках интернет-программы. Операторы передают обновления о fresh порталах через мейл, Telegram-communities и мобильные apps.
Платёжные операции через legal платформы покрыты cryptographic технологиями категории банковского направления. Получение средств выполняется единственно на верифицированные реквизиты хозяина account.
Выбор безопасного игорного оператора заставляет серьезного изучения юридических разрешений. Инновационные платформы Vavada казино дают геймерам абсолютную данные о имеющихся разрешениях.
Алгоритм оформления счета охватывает множество обязательных шагов верификации. Владельцы настаивают бумаги, доказывающие индивидуальность и дееспособность. Классический KYC-алгоритм занимает от 24 до 72 периодов.
Распоряжение капиталом инициируется с назначения рамок на пополнения. Компетентные геймеры советуют эксплуатировать правило 5% от итогового казино фонда на одну заход.
Технические барьеры операторов заставляют внедрять дополнительные домены. Клоны поддерживают безусловную работоспособность главного ресурса, подразумевая архив транзакций и азартный достижения.
Актуальные расчетные системы обеспечивают мгновенные вклады через виртуальные портмоне. Bitcoin, Ethereum и фиксированные активы поддерживают приватность и крошечные отчисления. Время проведения извлечений составляет 10-30 периодов.
Планы верности охватывают каскадные статусы с накапливающимся вознаграждением. VIP-кураторы дают личные вознаграждения, расширенные лимиты и опережающую обслуживание.
discover Strategic Trust Solutions – Clear headings and smooth design help users find information quickly.
Go to VeroVista – Quick and smooth loading, with product descriptions that are very clear.
Astrevio Online Outlet – Straightforward structure ensures products are displayed without clutter.
https://amzn.asia/d/0iLm7rge
Рабочие mirror-ссылки лицензированных gaming-операторов на Vavada casino предоставляют беспрерывный соединение к развлекательным сервисам. Схема реплицирования образует полноценные дубликаты корневого ресурса с сохранением всех опций.
Система активации через зеркало абсолютно воспроизводит базовую заявку. Дебютные клиенты вводят функционирующий email, генерируют сложный шифр и устанавливают операционную валюту.
Валидация профиля содержит передачи документов опираясь на KYC-стандартам. Скан ID-карты, доказательство регистрации и денежные координаты подвергаются машинную проверку в течение 24-72 временных единиц.
Аутентификация существующих игроков выполняется через классическую окно с усиленной верификацией. Краткосрочные шифры поступают на сотовый устройство или электронную почту.
Опции финансового раздела через зеркала предлагает топовые банковские сервисы. Visa, Mastercard, электронные счета Skrill, Neteller, виртуальные монеты Bitcoin, Ethereum осуществляются с сокращенными комиссиями 0-3%.
Gaming база копируется полностью включая автоматы, столовые забавы, live-хостов и прогрессивы. RTP-индикаторы, изменчивость и условия отыгрыша удерживаются точными.
Бонусная программа оперирует аналогично основному домену. Welcome-бандлы, free spins, денежный возврат и VIP-планы стартуют программно при исполнении установленных критериев.
https://amzn.asia/d/0iLm7rge
Актуальные mirror-ссылки проверенных азартных клубов на Лаки Бир РІС…РѕРґ обеспечивают стабильный подключение к азартным ресурсам. Система зеркалирования формирует точные клоны центрального портала с консервацией всех возможностей.
Алгоритм регистрации через mirror-сайт абсолютно воспроизводит основную заявку. Новые участники вводят валидный email, устанавливают надежный пароль и назначают рабочую валюту.
Верификация учетной записи подразумевает отправки удостоверений следуя KYC-политике. Изображение удостоверения личности, свидетельство резиденции и финансовые параметры проходят цифровую проверку в течение 24-72 часа.
Подключение существующих клиентов осуществляется через обычную окно с расширенной идентификацией. Временные шифры поступают на мобильный девайс или email.
Инструменты депозитного раздела через резервные ссылки содержит топовые банковские сервисы. Visa, Mastercard, виртуальные портмоне Skrill, Neteller, виртуальные монеты Bitcoin, Ethereum реализуются с низкими платежами 0-3%.
Игровая коллекция воспроизводится на сто процентов включая слоты, столовые игры, live-операторов и максимальные награды. RTP-индикаторы, вариативность и ставочные требования фиксируются неизменными.
Бонусная система оперирует похоже центральному ресурсу. Welcome-бандлы, бесплатные вращения, кешбэк и VIP-программы инициируются машинально при исполнении установленных стандартов.
https://amzn.asia/d/0iLm7rge
https://vetfreemeds.com/# pet meds official website
my favorite toy shop – Navigation is clear, and the toy selection is extensive.
your Click for Actionable Insights – Clear sections and smooth navigation make finding data easy.
professional billing store – The modern aesthetic makes each item look thoughtfully developed.
Гемблинговая индустрия отображает быстрый подъём, привлекая легионы участников. Грамотные площадки предоставляют стабильную пространство для беттинга. Развёрнутую материалы о этих операторах реально отыскать на Lucky Bear casino .
Аккредитация составляет приоритетным элементом селекции платформы. Лицензиаты Великобритании гарантируют тщательный проверку денежных действий. Отдельная аккредитованная площадка выполняет периодические инспекции RNG-систем.
Программные характеристики современных азартных площадок объединяют SSL-защиту расчётного категории. Поставщики цифрового продукта наподобие Microgaming, NetEnt, Pragmatic Play встраивают усовершенствованные механизмы хаотичных чисел.
Схема верификации учётной записи предусматривает подачи свидетельств KYC-уровня. Свидетельство, свидетельство о финансах, удостоверение прописки — классический пакет для итогового подключения.
Дублирующие ссылки исправляют барьеры с фильтрацией поставщиков. Свежие альтернативы модифицируются каждый день цифровыми группами. Карманные утилиты нередко работают качественнее браузерных редакций.
Контроль средств создаёт долгосрочную доходность гемблинговых сессий. Грамотные пользователи рекомендуют контролировать величину депозита до 1-2% от совокупного капитала.
dog medicine VetFree Meds vet pharmacy
Поиск безопасного игрового ресурса в актуальных условиях предполагает детального изучения к регулятивному статусу. Компетентные клиенты знают, что п»ї1хбет казино демонстрирует последнюю данные о действующих ресурсах.
Процесс создания аккаунта в официальных площадках охватывает требуемую аутентификацию документов. KYC-нормы охраняют как площадку, так и клиента от афер. Кратковременные рамки на снятие финансов до выполнения контроля – обычная подход.
Технические запреты на подключение к азартным порталам преодолеваются через резервные порталы. Действующие отражения гарантируют тотальную возможности базового сайта. Расчетные переводы, развлекательный результаты и льготные программы продолжают устойчивыми.
Денежная надежность измеряется степенью эксплуатируемых денежных механизмов. SSL-шифрование, PCI DSS аттестация и расширенная проверка создают безопасный щит охраны.
Геймплейная каталог сертифицированных провайдеров содержит спины от лидирующих создателей. RTP-значения, дисперсия и математические модели получают нейтральную аудит в утвержденных лабораториях.
Механизмы поощрения в профессиональных операторах опираются на четких критериях ставок. Условия ставок x35-40 характеризуется нормальным для барабан-подарков, в то время как настольные состязания учитываются в подсчет с минимальным множителем.
Интересная статья про ufc в феврале марте 2026 три недели которые встряхнут дивизионы, много качественной аналитики. Источник здесь: https://chrome-downloads.ru/news/ufc-fevral-mart-2026-samye-goryachie-boi-i-neozhidannye-povoroty-kotoryh-stoit-zhdat/
Chair Chase Hub – Stylish furniture is easy to find thanks to clear navigation and layout.
CypressCircle Finds – Neat organization and smooth site flow make shopping easy.
workbenchwonder online shop – Useful selection and product details are easy to follow.
Boutique Lane – Clear design with effortless site navigation.
Отбор достойного развлекательного портала в современных границах требует особого рассмотрения к правовому статусу. Знающие пользователи учитывают, что Меллстрой казино предоставляет свежую информацию о функционирующих площадках.
Схема записи в лицензированных площадках предусматривает неизбежную верификацию документов. KYC-требования обеспечивают как сервис, так и геймера от фрода. Кратковременные рамки на изъятие денег до завершения контроля – стандартная процедура.
Виртуальные запреты на доступ к развлекательным ресурсам решаются через дублирующие адреса. Функционирующие клоны поддерживают полную возможности первичного сайта. Расчетные транзакции, интерактивный прогресс и льготные планы поддерживаются стабильными.
Экономическая гарантированность характеризуется степенью эксплуатируемых денежных инструментов. SSL-безопасность, PCI DSS подтверждение и дополнительная подтверждение гарантируют стабильный щит защиты.
Геймплейная каталог лицензированных операторов включает спины от ведущих провайдеров. RTP-коэффициенты, вариативность и математические формулы проходят нейтральную валидацию в одобренных институтах.
Системы лояльности в профессиональных операторах строятся на ясных параметрах ставок. Требования x35-40 оценивается адекватным для машина-бонусов, в то время как классические активности включаются в зачет с пониженным коэффициентом.
Актуальные геймеры натыкаются с сложностью доступа к лицензированным порталам. Компании блокируют основные ссылки, но искушённые п»ї1хбет сайт участники осознают о существовании зеркальных ресурсов.
Параллельный портал представляет стопроцентную воспроизведение первичного площадки. SSL-сертификаты сохраняются такими же. Расчётные транзакции проходят через идентичные каналы.
Технология оформления профиля через резервный портал требует обычной аутентификации. Операторы запрашивают бумаги для осуществления KYC-правил. Идентификационные сведения осуществляют расширенную аутентификацию.
Вносительные пределы на параллельных площадках идентичны основным спецификациям. Наименьшие беты поддерживаются константными. Возрастающие призовые фонды координируются между различными доменами.
Бонусные схемы действуют целостно на зеркальных платформах. Отыгрышный коэффициент поддерживает стартовые цифры. Тайминг реализации не изменяется.
Департамент ассистирования рассматривает тикеты с дополнительных ресурсов идентично. Прямой общение гарантирует круглосуточный режим работы.
Cypress Chic Boutique – Easy-to-use interface and products are well organized.
Гемблинговая область отображает активный расширение, завлекая миллионы участников. Экспертные ресурсы предоставляют надёжную условия для беттинга. Подробную информацию о указанных операторах допустимо отыскать на п»ї1хбет казино .
Легализация составляет центральным показателем отбора платформы. Лицензиаты Кюрасао обеспечивают тщательный контроль расчётных действий. Конкретная аккредитованная ресурс проходит периодические инспекции RNG-механизмов.
Технические особенности новейших беттинг-платформ охватывают SSL-защиту денежного уровня. Провайдеры компьютерного материала класса Microgaming, NetEnt, Pragmatic Play встраивают многоуровневые механизмы случайных величин.
Процедура аутентификации профиля требует передачи удостоверений KYC-типа. Паспорт, справка о заработке, валидация местожительства — стандартный перечень для окончательного входа.
Дублирующие адреса устраняют проблемы с цензурой организаций. Рабочие дубли модифицируются ежедневно цифровыми отделами. Мобильные утилиты нередко оперируют качественнее веб версий.
Управление банкроллом создаёт долгосрочную прибыльность игровых раундов. Квалифицированные геймеры настаивают урезать количество вейджера до 1-2% от совокупного фонда.
tablettulip shop – Attractive design and all content loads rapidly.
Официальные ресурсы игорных возможностей дают геймерам право к профессиональному азартному досугу через тематические платформы, включая казино Вавада , которые соблюдают transnational регламенты защиты.
Алгоритм открытия счёта включает указания верификационных информации через encrypted SSL-линии. Букмекеры запрашивают письменное удостоверение правоспособности и адреса регистрации для выполнения правовых норм.
Двухфакторная верификация выступает required частью передовых архитектур безопасности. Пользователи располагают SMS-токены, push-оповещения или внедряют targeted утилиты наподобие Google Authenticator.
Резервные URL решают трудности географических санкций и DDoS-штурмов. По сути дубли являют аналогичные реплики центрального домена с удержанием возможностей и пользовательских параметров.
Компетентные геймеры suggest keeping новейшие базы функционирующих дублей в сохранённых ссылках обозревателя. Management направляют обновления о современных адресах через почтовые сервисы, Telegram-сообщества и портативные утилиты.
Денежные транзакции через надёжные ресурсы обеспечены защитными системами level банковского segment. Получение денег реализуется единственно на аутентифицированные данные хозяина аккаунта.
Cove Crimson Boutique – Attractive presentation and exploring products is effortless.
Передовые игроки оказываются с препятствием подключения к официальным ресурсам. Поставщики ограничивают главные ссылки, но искушённые Меллстрой регистрация пользователи учитывают о присутствии зеркальных платформ.
Резервная ссылка формирует полную реплику оригинального платформы. Протоколы шифрования сохраняются аналогичными. Банковские действия осуществляются через сходные каналы.
Процедура создания аккаунта через зеркальный ссылку предполагает стандартной валидации. Менеджеры уточняют свидетельства для реализации KYC-регламентов. Идентификационные информация подвергаются комплексную валидацию.
Пополнительные пределы на параллельных ресурсах совпадают стандартным условиям. Начальные беты остаются стабильными. Прогрессивные джекпоты интегрируются между множественными ссылками.
Поощрительные планы выполняются целостно на дополнительных платформах. Вейджер поддерживает исходные параметры. Временные рамки оборота сохраняется.
Команда обслуживания обрабатывает тикеты с параллельных ресурсов таким же способом. Интерактивный чат поддерживает беспрерывный формат обслуживания.
Игровая отрасль показывает стремительный рост, притягивая множество игроков. Квалифицированные сайты предоставляют стабильную обстановку для ставок. Развёрнутую факты о указанных компаниях возможно изучить на Vavada казино .
Аккредитация выступает главным критерием подбора площадки. Надзорные органы Мальты обеспечивают серьёзный мониторинг расчётных манипуляций. Конкретная легальная ресурс выполняет периодические аудиты RNG-механизмов.
IT особенности инновационных беттинг-платформ объединяют SSL-защиту денежного класса. Создатели компьютерного продукта уровня Microgaming, NetEnt, Pragmatic Play подключают сложные схемы хаотичных величин.
Механизм валидации учётной записи включает подачи удостоверений KYC-класса. Паспорт, справка о доходах, удостоверение адреса — стандартный набор для окончательного активации.
Параллельные адреса убирают проблемы с цензурой поставщиков. Действующие альтернативы корректируются систематически техническими службами. Смартфонные софт часто оперируют лучше онлайн вариантов.
Финансовая дисциплина устанавливает продолжительную эффективность беттинговых циклов. Квалифицированные игроки советуют сокращать сумму депозита до 1-2% от итогового фонда.
Clarvesta Online Hub – Items are clearly displayed and navigation feels smooth.
Skillet Street Marketplace Hub – Products are appealing and browsing feels easy and smooth.
Source
can i get depakote price
for motivation.
Аналогов по динамике у джет х практически нет, это уникальный продукт на рынке гемблинга.
CertiCanPharmacy: online canadian pharmacy – CertiCanPharmacy
Функционирующие mirror-ссылки официальных гемблинг-платформ на Vavada casino предоставляют беспрерывный соединение к развлекательным платформам. Принцип копирования строит полноценные реплики основного сайта с сохранением всех функций.
Алгоритм открытия счета через зеркало целиком имитирует основную бланк. Только пришедшие геймеры вводят функционирующий email, устанавливают защищенный код доступа и устанавливают операционную финансовый инструмент.
Валидация личного кабинета подразумевает предоставления бумаг следуя KYC-требованиям. Изображение водительских прав, свидетельство проживания и платежные сведения анализируются посредством алгоритмическую верификацию в течение 24-72 часов.
Вход действующих пользователей происходит через обычную модуль с 2FA идентификацией. Сессионные пароли поступают на смс номер или e-mail адрес.
Функционал входящего раздела через дублирующие порталы предлагает востребованные расчетные инструменты. Visa, Mastercard, цифровые кошельки Skrill, Neteller, криптовалюты Bitcoin, Ethereum процессируются с минимальными взносами 0-3%.
Азартная каталог клонируется целиком включая слоты, классические забавы, live-дилеров и накопительные призы. RTP-показатели, колебания и отыгрыш фиксируются аналогичными.
Акционная схема выполняется похоже главному сайту. Welcome-бандлы, free spins, возврат средств и VIP-системы запускаются алгоритмически при исполнении прописанных условий.
Подбор проверенного казино площадки требует тщательного анализа регулятивных свидетельств. Актуальные порталы п»ї1хбет сайт предлагают геймерам максимальную сведения о действующих допусках.
Алгоритм регистрации включает ряд требуемых фаз подтверждения. Представители запрашивают документы, устанавливающие личность и возраст. Стандартный KYC-алгоритм длится от 24 до 72 часов.
Управление банком открывается с задания пределов на инвестиции. Опытные игроки советуют использовать правило 5% от суммарного развлекательного средств на индивидуальную партию.
Системные барьеры владельцев заставляют использовать резервные маршруты. Копии оберегают полную эффективность основного площадки, содержа журнал операций и азартный достижения.
Актуальные платежные инструменты обеспечивают быстрые депозиты через криптовалютные хранилища. Bitcoin, Ethereum и постоянные токены поддерживают анонимность и наименьшие сборы. Период обработки извлечений доходит 10-30 интервалов.
Системы лояльности содержат градационные степени с возрастающим возвратом. VIP-консультанты предоставляют личные поощрения, увеличенные лимиты и ускоренную техподдержку.
Wagon Wildflower Boutique – Charming layout makes online shopping feel fun and intuitive.
Подбор качественного игрового оператора в сегодняшних рамках требует детального внимания к лицензионному состоянию. Квалифицированные участники осознают, что Меллстрой зеркало содержит современную факты о работающих операторах.
Процесс открытия счета в легальных заведениях охватывает обязательную валидацию личности. KYC-правила оберегают как сервис, так и пользователя от обмана. Кратковременные ограничения на получение денег до выполнения подтверждения – обычная подход.
Программные препятствия на связь к betting сайтам преодолеваются через резервные домены. Действующие зеркала обеспечивают абсолютную работоспособность первичного портала. Расчетные операции, интерактивный продвижение и поощрительные предложения остаются стабильными.
Финансовая защищенность определяется критерием эксплуатируемых денежных систем. SSL-безопасность, PCI DSS подтверждение и дополнительная проверка создают защищенный заслон ограждения.
Интерактивная ассортимент легальных площадок содержит слоты от ведущих провайдеров. RTP-значения, вариативность и расчетные системы подвергаются объективную валидацию в признанных институтах.
Программы стимулирования в серьезных площадках строятся на открытых критериях ставок. Вейджер x35-40 признается разумным для автомат-поощрений, в то время как карточные игры учитываются в зачет с уменьшенным множителем.
Basket Bliss Curated Store – Neatly arranged items and intuitive navigation create a seamless experience.
Актуальные игроки имеют дело с массой технических деталей при процессах с сертифицированными сайтами. Специализированные платформы типа Вавада официальный сайт обеспечивают релевантную сведения о работе игорных брендов.
Механизм валидации счета содержит множество неотъемлемых уровней. Стартовая валидация включает передачи свидетельств верифицирующих персону. Стандартный комплект содержит паспорт, водительские права или международный паспорт.
Системная сторона оформления включает эксплуатацию криптографической защиты и двухуровневой проверки. Опытные пользователи предлагают инициировать весь комплекс возможных опций охраны.
Дублирующие порталы представляют абсолютные реплики главного домена с поддержанием комплексного функционала. Основное преимущество выражается в подобии расчетных границ и требований проигрыша.
Механизм локализации активных запасных доменов строится на проверке специализированных мессенджер групп и связанных порталов. Опытные игроки задействуют прокси-соединения для обеспечения стабильного соединения независимо от географических лимитов.
Art Attic Showcase – Browsing flows naturally with a wide, creative selection of items.
bs market
Отбор надежного азартного ресурса в текущих границах требует детального рассмотрения к лицензионному положению. Профессиональные участники понимают, что Lucky Bear зеркало отображает свежую данные о функционирующих площадках.
Схема открытия счета в легальных сервисах объединяет обязательную подтверждение идентичности. KYC-процедуры оберегают как казино, так и клиента от фрода. Краткосрочные ограничения на снятие активов до закрытия подтверждения – нормальная система.
Электронные препятствия на доступ к betting площадкам обходятся через зеркальные адреса. Действующие клоны поддерживают всестороннюю эффективность базового сервиса. Банковские движения, азартный продвижение и наградные предложения поддерживаются стабильными.
Денежная надежность оценивается степенью задействованных финансовых механизмов. SSL-криптография, PCI DSS лицензирование и многоуровневая проверка гарантируют стабильный контур безопасности.
Азартная каталог официальных площадок предоставляет барабаны от главных провайдеров. RTP-параметры, дисперсия и математические схемы претерпевают внешнюю валидацию в аккредитованных центрах.
Механизмы мотивации в качественных площадках формируются на ясных правилах ставок. Требования x35-40 считается разумным для машина-подарков, в то время как стандартные игры включаются в расчет с уменьшенным процентом.
Отбор проверенного гемблинг заведения заставляет серьезного изучения правовых документов. Современные системы Вавада РІС…РѕРґ предлагают клиентам безусловную детали о имеющихся аккредитациях.
Процесс создания профиля подразумевает множество ключевых этапов проверки. Провайдеры просят бумаги, засвидетельствующие идентичность и возраст. Классический KYC-порядок требует от 24 до 72 временных отрезков.
Управление банком начинается с задания ограничений на вклады. Профессиональные игроки советуют использовать принцип 5% от суммарного гемблинг фонда на единичную раунд.
Электронные запреты поставщиков заставляют задействовать вспомогательные адреса. Альтернативы поддерживают полную эффективность центрального площадки, подразумевая архив сделок и гемблинг успех.
Передовые денежные методы гарантируют мгновенные вклады через виртуальные аккаунты. Bitcoin, Ethereum и устойчивые монеты дают приватность и символические платежи. Срок реализации выводов равно 10-30 отрезков.
Схемы лояльности предусматривают градационные статусы с накапливающимся возвратом. VIP-кураторы предоставляют эксклюзивные награды, усиленные пределы и ускоренную помощь.
Yoga Yard Boutique Online – Tranquil atmosphere and soothing products make the experience refreshing.
RubyRoost Boutique – Delightful items shown beautifully with clear, attractive visuals.
https://www.theafricanews.net/newsr/15813
https://mymexicanpharmacy.com/# reputable mexican pharmacy
This casino https://serwiskomorek.pl/ offers a solid mix of classic slots and live dealer games. The platform feels modern, promotions are attractive, and support is helpful, which adds confidence.
Workspace Wagon picks – The layout is intuitive and all items are useful for everyday tasks.
Функционирующие mirror-ссылки надежных gaming-операторов на п»ї1хбет РІС…РѕРґ дают стабильный доступ к геймерским системам. Система копирования генерирует идентичные клоны корневого ресурса с удержанием всех функций.
Схема активации через mirror-сайт в точности имитирует основную заявку. Начинающие участники прописывают действующий email, генерируют защищенный шифр и назначают операционную платежное средство.
Валидация аккаунта предполагает представления свидетельств по KYC-политике. Копия удостоверения личности, свидетельство регистрации и банковские сведения контролируются системой программную контроль в течение 24-72 периодов.
Логин активных игроков реализуется через стандартную модуль с двухфакторной валидацией. Временные токены поступают на мессенджер номер или e-mail адрес.
Инструменты пополнительного раздела через дублирующие порталы включает популярные банковские платформы. Visa, Mastercard, онлайн кошельки Skrill, Neteller, блокчейн-токены Bitcoin, Ethereum осуществляются с минимальными комиссиями 0-3%.
Гемблинг ассортимент дублируется в точности включая автоматы, столовые игры, live-хостов и мегавыигрыши. RTP-параметры, дисперсия и отыгрыш удерживаются точными.
Подарочная схема действует идентично главному ресурсу. Welcome-наборы, бесплатные вращения, refund и VIP-курсы активируются машинально при реализации прописанных условий.
https://schnaeppchenforum.com/1xbet-promo-code-nigeria-2026-%e2%82%a61950000-150-free-spins/
Подбор проверенного казино заведения заставляет основательного разбора правовых бумаг. Инновационные платформы Vavada обеспечивают геймерам стопроцентную детали о имеющихся разрешениях.
Алгоритм создания профиля включает ряд ключевых шагов верификации. Провайдеры требуют удостоверения, удостоверяющие индивидуальность и совершеннолетие. Классический KYC-алгоритм занимает от 24 до 72 часов.
Распоряжение капиталом запускается с фиксации границ на взносы. Искусные клиенты настаивают внедрять закон 5% от итогового развлекательного средств на конкретную игру.
Цифровые блокировки поставщиков обязывают задействовать резервные маршруты. Зеркала поддерживают стопроцентную эффективность основного портала, подразумевая летопись переводов и гемблинг продвижение.
Новые расчетные способы дают быстрые пополнения через виртуальные портмоне. Bitcoin, Ethereum и фиксированные активы поддерживают тайность и минимальные сборы. Продолжительность выполнения извлечений составляет 10-30 периодов.
Программы верности содержат градационные категории с прогрессивным бонусом. VIP-представители предлагают личные подарки, улучшенные границы и приоритетную поддержку.
workbenchwonder digital shop – Practical products and the descriptions make browsing simple.
http://mymexicanpharmacy.com/# My Mexican Pharmacy
Действующие альтернативные домены проверенных gaming-операторов на п»ї1хбет казино гарантируют беспрерывный коннект к азартным сервисам. Схема клонирования строит точные клоны центрального сайта с удержанием всех механизмов.
Система оформления профиля через альтернативный домен в точности копирует базовую форму. Дебютные клиенты вводят активный email, генерируют надежный пароль и устанавливают базовую финансовый инструмент.
Идентификация аккаунта включает отправки документов согласно KYC-стандартам. Копия национального документа, подтверждение регистрации и денежные сведения проверяются через алгоритмическую анализ в течение 24-72 ч.
Вход действующих геймеров реализуется через стандартную модуль с многоступенчатой аутентификацией. Одноразовые токены отправляются на мессенджер номер или e-mail адрес.
Опции депозитного раздела через mirror-сайты поддерживает востребованные денежные платформы. Visa, Mastercard, цифровые хранилища Skrill, Neteller, криптовалюты Bitcoin, Ethereum реализуются с минимальными сборами 0-3%.
Развлекательная коллекция повторяется в точности включая машины, настольные забавы, live-ведущих и накопительные призы. RTP-коэффициенты, дисперсия и проигрыш поддерживаются неизменными.
Промо программа действует схоже базовому ресурсу. Welcome-предложения, даровые прокруты, refund и VIP-программы запускаются программно при достижении фиксированных требований.
Актуальные игроки пересекаются с набором системных деталей при процессах с лицензированными платформами. Тематические сайты типа Lucky Bear казино обеспечивают актуальную сведения о процессах казино брендов.
Процедура валидации учетной записи предполагает несколько неотъемлемых фаз. Исходная валидация нуждается размещения справок верифицирующих персону. Привычный набор подразумевает документ, автоудостоверение или внешний паспорт.
Техническая часть оформления подразумевает использование SSL-шифрования и двухуровневой проверки. Продвинутые клиенты рекомендуют задействовать полный набор имеющихся опций безопасности.
Резервные ссылки образуют стопроцентные отражения основного платформы с поддержанием всего набора функций. Основное бонус выражается в тождественности расчетных лимитов и требований ставочных требований.
Механизм выявления функционирующих запасных доменов базируется на наблюдении экспертных мессенджер групп и аффилированных сайтов. Профессиональные участники используют туннельные протоколы для обеспечения постоянного соединения невзирая от территориальных блокировок.
pharmacy delivery: farmacia mexicana en linea – My Mexican Pharmacy
A catalog of cars https://www.auto.ae/catalog/ across all brands and generations—specs, engines, trim levels, and real market prices. Compare models and choose the best option.
Активные дублирующие порталы официальных гемблинг-платформ на Меллстрой зеркало предоставляют постоянный вход к геймерским системам. Система копирования строит точные версии центрального домена с удержанием всех возможностей.
Алгоритм открытия счета через mirror-сайт полностью воспроизводит основную форму. Начинающие пользователи регистрируют действующий email, устанавливают защищенный пароль и определяют игровую платежное средство.
Идентификация счета подразумевает передачи удостоверений в соответствии с KYC-требованиям. Копия удостоверения личности, верификация места жительства и банковские данные анализируются посредством машинную валидацию в течение 24-72 периодов.
Подключение зарегистрированных игроков производится через стандартную модуль с многоступенчатой верификацией. Одноразовые коды поступают на мессенджер гаджет или e-mail адрес.
Механизмы финансового компонента через дублирующие порталы поддерживает актуальные платежные платформы. Visa, Mastercard, цифровые портмоне Skrill, Neteller, crypto Bitcoin, Ethereum реализуются с оптимизированными комиссиями 0-3%.
Развлекательная ассортимент дублируется в точности включая spinning games, столовые активности, live-операторов и накопительные призы. RTP-параметры, волатильность и ставочные требования сохраняются такими же.
Бонусная система функционирует похоже главному порталу. Welcome-пакеты, безвозмездные спины, кешбэк и VIP-системы активируются автоматически при исполнении определенных критериев.
Лицензионные операторы игорных возможностей гарантируют игрокам шанс к качественному игровому процессу через тематические порталы, включая Вавада зеркало , что придерживаются мировые стандарты надёжности.
Алгоритм открытия счёта necessita внесения проверочных деталей через encrypted SSL-протоколы. Менеджмент просят нотариальное свидетельство совершеннолетия и региона регистрации для compliance нормативных норм.
Двухфакторная аутентификация представляет необходимым компонентом новейших solutions надёжности. Участники обретают SMS-пароли, push-алерты или задействуют профессиональные tools вроде Google Authenticator.
Резервные порталы устраняют сложности региональных санкций и DDoS-нападений. Фактически дубли формируют дублированные dublicates главного сайта с сохранением инструментария и user информации.
Компетентные участники призывают keeping актуальные базы активных копий в favourites веб-клиента. Букмекеры направляют информацию о свежих URL через email, Telegram-чаты и мобильные приложения.
Payment переводы через официальные ресурсы покрыты криптографическими технологиями стандарта банковского сектора. Снятие денег реализуется только на проверенные карты владельца личного кабинета.
Отбор качественного азартного площадки в сегодняшних условиях требует повышенного подхода к законному положению. Квалифицированные пользователи знают, что п»ї1xBet зеркало содержит современную сведения о функционирующих провайдерах.
Механизм регистрации в сертифицированных платформах объединяет неизбежную проверку личности. KYC-правила охраняют как заведение, так и геймера от махинаций. Промежуточные пределы на вывод средств до выполнения проверки – привычная система.
Виртуальные запреты на подключение к азартным площадкам нейтрализуются через зеркальные ссылки. Активные отражения поддерживают абсолютную работоспособность первичного портала. Денежные процедуры, азартный достижения и привилегированные системы продолжают стабильными.
Финансовая защищенность характеризуется степенью задействованных банковских способов. SSL-безопасность, PCI DSS сертификация и двухфакторная подтверждение создают безопасный контур охраны.
Интерактивная коллекция официальных провайдеров предоставляет машины от ведущих создателей. RTP-показатели, изменчивость и вероятностные системы испытывают внешнюю контроль в авторизованных лабораториях.
Системы поощрения в надежных операторах формируются на открытых параметрах вейджера. Условия ставок x35-40 расценивается нормальным для спин-бонусов, в то время как карточные активности включаются в калькуляцию с сниженным коэффициентом.
Поиск надежного гемблинг заведения в текущих обстоятельствах подразумевает повышенного внимания к правовому режиму. Компетентные игроки понимают, что казино Lucky Bear демонстрирует последнюю данные о активных операторах.
Схема записи в легальных заведениях объединяет требуемую проверку персональных данных. KYC-правила охраняют как казино, так и клиента от обмана. Краткосрочные ограничения на перечисление финансов до закрытия верификации – привычная процедура.
Технические препятствия на связь к гемблинг сервисам преодолеваются через дублирующие адреса. Активные зеркала сохраняют всестороннюю работоспособность главного платформы. Расчетные операции, азартный прогресс и наградные планы остаются константными.
Экономическая защищенность характеризуется критерием внедренных банковских механизмов. SSL-шифрование, PCI DSS сертификация и расширенная подтверждение создают надежный барьер защиты.
Интерактивная библиотека официальных заведений охватывает спины от главных производителей. RTP-индексы, изменчивость и математические принципы претерпевают независимую сертификацию в авторизованных учреждениях.
Планы вознаграждения в серьезных заведениях основываются на прозрачных критериях активности. Проигрыш x35-40 характеризуется справедливым для автомат-бонусов, в то время как стандартные игры принимаются в подсчет с редуцированным коэффициентом.
vividvendor.shop – Bright colors and vivid images make browsing fun and engaging.
задвижка стальная фланцевая 30с15нж https://sibzta.su/catalog/zadvizhki-klinovye/zadvizhki-stalnye/30s15nzh/
Действующие резервные адреса официальных азартных клубов на Mellstroy Game casino обеспечивают устойчивый подключение к азартным ресурсам. Схема копирования формирует эквивалентные версии главного домена с фиксацией всех функций.
Механизм активации через mirror-сайт целиком воспроизводит базовую заявку. Дебютные геймеры вводят активный email, генерируют безопасный код доступа и выбирают рабочую валюту.
Аутентификация профиля содержит предоставления документов в соответствии с KYC-требованиям. Фото удостоверения личности, подтверждение места жительства и банковские данные проверяются через автоматическую контроль в течение 24-72 временных единиц.
Подключение активных клиентов осуществляется через базовую форму с усиленной идентификацией. Одноразовые токены передаются на смс аппарат или e-mail адрес.
Механизмы пополнительного блока через резервные ссылки предлагает распространенные денежные системы. Visa, Mastercard, веб счета Skrill, Neteller, виртуальные монеты Bitcoin, Ethereum реализуются с уменьшенными взносами 0-3%.
Развлекательная каталог повторяется целиком включая spinning games, традиционные игры, live-дилеров и накопительные призы. RTP-значения, волатильность и отыгрыш сохраняются такими же.
Акционная политика оперирует аналогично корневому домену. Welcome-наборы, бесплатные вращения, денежный возврат и VIP-схемы активируются программно при выполнении определенных требований.
Нынешние участники имеют дело с изобилием цифровых деталей при деятельности с официальными платформами. Профессиональные платформы типа казино Vavada выдают релевантную информацию о операциях азартных компаний.
Механизм аутентификации профиля охватывает множество требуемых шагов. Стартовая проверка подразумевает размещения бумаг верифицирующих личность. Привычный список охватывает документ, автоудостоверение или международный паспорт.
Технологическая элемент создания аккаунта подразумевает эксплуатацию безопасного соединения и двухфакторной аутентификации. Опытные геймеры предлагают задействовать максимум предложенных опций обеспечения.
Запасные домены образуют точные отражения главного ресурса с хранением всего инструментария. Ключевое выгода кроется в схожести банковских ограничений и параметров проигрыша.
Схема локализации актуальных дублирующих порталов фундируется на мониторинге профильных новостных лент и союзных платформ. Квалифицированные клиенты используют виртуальные частные сети для гарантирования надежного соединения без оглядки от географических блокировок.
a unique greeting shop – Clever designs and an efficient checkout make shopping pleasant.
progreso mexico pharmacy online: My Mexican Pharmacy – pharmacia mexico
БПЛА Волгоград Добро пожаловать на новостной портал Волгограда. Мы публикуем последние и главные новости региона, происшествия и криминальную хронику.
Актуальные провайдеры азартных игр гарантируют игрокам подключение к профессиональному азарту через проверенные Вавада сайт платформы. Официальная бизнес влечет исполнения конкретных регуляторных положений.
Процесс регистрации клиентского профиля содержит валидацию личных реквизитов. Регуляторы применяют углубленные системы KYC и AML для предотвращения нарушающих платежей.
Программные системы современных казино базируются на стабильных облачных системах с криптографическими сертификатами. Территориальные ограничения побуждает администраторов внедрять дублирующие домены.
Альтернативные платформы представляют полные дубликаты центрального ресурса с поддержанием всех возможностей и информации. Беттеры достигают беспрепятственный связь к капиталу, беттинг статистике и клиентским параметрам.
Денежные действия производятся через связанные платежные сервисы. Пределы на пополнения и снятия устанавливаются в соотношении с правовыми положениями и корпоративными нормами снижения потерь.
Профессиональные игроки рекомендуют проверять состояние сертификата через государственные каталоги развлекательных организаций. Репутационные критерии охватывают ранги на экспертных порталах и оценки действительных беттеров.
SableAndSon Picks – Premium products with clear, helpful explanations for each item.
Подбор надежного развлекательного заведения заставляет тщательного изучения лицензионных свидетельств. Новые сайты Лаки Бир РІС…РѕРґ предлагают геймерам стопроцентную факты о имеющихся разрешениях.
Алгоритм получения доступа включает ряд требуемых шагов верификации. Представители истребуют документы, доказывающие идентичность и возраст. Обычный KYC-алгоритм составляет от 24 до 72 временных отрезков.
Управление банком стартует с назначения пределов на пополнения. Искусные пользователи призывают внедрять правило 5% от суммарного казино бюджета на отдельную партию.
Электронные блокировки владельцев вынуждают внедрять запасные маршруты. Зеркала удерживают безусловную эффективность основного портала, подразумевая журнал транзакций и казино продвижение.
Передовые денежные системы предоставляют скоростные вклады через электронные счета. Bitcoin, Ethereum и стейблкоины предоставляют скрытность и минимальные сборы. Время выполнения выводов насчитывает 10-30 отрезков.
Алгоритмы преданности предусматривают каскадные степени с возрастающим возвратом. VIP-консультанты обеспечивают личные бонусы, расширенные пределы и первоочередную техподдержку.
Поиск в мире сертифицированных порталов нуждается представления новых способов соединения. Квалифицированные пользователи эксплуатируют п»ї1xBet зеркало для приобретения современной фактов о оперативных путях.
Механизм открытия учетной записи в сертифицированных заведениях подразумевает тщательную подтверждение. Новейшие компании применяют KYC-процедуры и AML-критерии. Бумажная работа занимает от 24 до 72 временных отрезков.
IT инструменты для обхода ограничений совершенствуются синхронно с повышением нормативных инициатив. VPN-сервисы категории premium обеспечивают криптографию AES-256 и технологии OpenVPN. Устойчивость подключения жизненно актуальна для элитных заходов.
Зеркальные ресурсы выполняют задачи через географически расположенные серверные кластеры. CDN-архитектуры предоставляют низкую отклик для американских геймеров. Техническое редирект инициируется при распознавании ограничения главного сайта.
Денежные движения в сертифицированных юрисдикциях подпадают под строгим критериям PCI DSS. Крипто платежи приобретают распространение в результате анонимности и динамике осуществления.
Мобильные программы лучших брендов совмещают голосовую аутентификацию и push-алерты для принципиальных эпизодов. Изменяемый дизайн программно настраивается под настройки монитора.
For white papers
Personal loan offer near me
for research purposes.
Поиск надежного гемблинг заведения предполагает глубокого разбора юридических свидетельств. Передовые системы Vavada дают участникам полную данные о своих разрешениях.
Процедура открытия аккаунта предусматривает определенное количество ключевых фаз подтверждения. Администраторы требуют удостоверения, засвидетельствующие индивидуальность и дееспособность. Типовой KYC-порядок составляет от 24 до 72 интервалов.
Банкролл-менеджмент инициируется с установления лимитов на депозиты. Профессиональные клиенты рекомендуют внедрять закон 5% от совокупного азартного резерва на конкретную раунд.
Цифровые блокировки провайдеров обязывают использовать запасные домены. Зеркала хранят максимальную производительность центрального ресурса, охватывая архив переводов и казино результаты.
Инновационные денежные системы дают мгновенные депозиты через цифровые счета. Bitcoin, Ethereum и постоянные токены дают анонимность и символические отчисления. Длительность проведения снятий доходит 10-30 минут.
Схемы приверженности подразумевают многоуровневые статусы с накапливающимся возвратом. VIP-координаторы предлагают персонализированные награды, усиленные пределы и первоочередную обслуживание.
Подбор надежного азартного ресурса в сегодняшних условиях требует специального подхода к юридическому статусу. Знающие пользователи осознают, что Вавада официальный сайт предоставляет актуальную данные о действующих провайдерах.
Процесс записи в лицензированных сервисах предусматривает обязательную валидацию идентичности. KYC-требования оберегают как заведение, так и участника от афер. Временные пределы на снятие финансов до окончания подтверждения – привычная подход.
Виртуальные барьеры на доступ к betting сервисам нейтрализуются через резервные URL. Действующие клоны предоставляют тотальную работоспособность центрального сайта. Финансовые процедуры, интерактивный достижения и бонусные планы сохраняются неизменными.
Материальная защищенность определяется показателем внедренных расчетных систем. SSL-безопасность, PCI DSS сертификация и двухфакторная аутентификация устанавливают стабильный щит ограждения.
Интерактивная ассортимент лицензированных заведений предоставляет спины от известных провайдеров. RTP-значения, колебания и вероятностные схемы претерпевают внешнюю аудит в утвержденных учреждениях.
Программы лояльности в профессиональных заведениях строятся на ясных условиях отыгрыша. Требования x35-40 признается нормальным для машина-привилегий, в то время как традиционные забавы принимаются в зачет с уменьшенным коэффициентом.
Выбор проверенного развлекательного портала в текущих обстоятельствах предполагает особого анализа к регулятивному состоянию. Профессиональные геймеры учитывают, что Mellstroy Game демонстрирует актуальную материалы о работающих сервисах.
Механизм записи в легальных площадках включает обязательную проверку идентичности. KYC-процедуры защищают как сервис, так и игрока от обмана. Кратковременные пределы на получение денег до завершения проверки – привычная система.
Программные препятствия на соединение к игровым сайтам решаются через дублирующие домены. Действующие копии сохраняют тотальную функциональность первичного сервиса. Банковские процедуры, азартный прогресс и поощрительные системы поддерживаются стабильными.
Денежная надежность измеряется показателем применяемых расчетных способов. SSL-шифрование, PCI DSS сертификация и двухфакторная подтверждение обеспечивают защищенный контур обороны.
Развлекательная коллекция проверенных площадок объединяет автоматы от топовых разработчиков. RTP-индексы, колебания и расчетные модели испытывают беспристрастную сертификацию в одобренных институтах.
Системы поощрения в профессиональных операторах строятся на открытых условиях активности. Проигрыш x35-40 оценивается разумным для барабан-бонусов, в то время как карточные забавы принимаются в расчет с минимальным коэффициентом.
Лицензионные провайдеры азартных сервисов обеспечивают игрокам возможность к качественному гэмблингу через целевые домены, включая Lucky Bear зеркало , которые придерживаются общепринятые регламенты безопасности.
Последовательность оформления профиля предполагает ввода верификационных сведений через безопасные SSL-протоколы. Букмекеры запрашивают нотариальное подтверждение age verification и локации регистрации для выполнения legal требований.
Multi-factor идентификация представляет required компонентом актуальных платформ безопасности. Клиенты имеют SMS-коды, push-сообщения или внедряют dedicated tools типа Google Authenticator.
Резервные адреса решают сложности локальных запретов и DDoS-атак. Техническим образом реплики образуют копийные реплики центрального портала с удержанием функциональности и user информации.
Экспертные пользователи рекомендуют удерживать обновлённые реестры активных дублей в favourites браузера. Management отправляют сведения о актуальных порталах через электронную почту, Telegram-каналы и портативные apps.
Финансовые переводы через legal порталы гарантированы cryptographic системами категории банковского индустрии. Снятие фондов осуществляется единственно на проверенные wallets собственника личного кабинета.
https://www.atlasobscura.com/users/melbetwin26
https://mymexicanpharmacy.com/# pharmacy in mexico that ships to us
Развлекательная ниша демонстрирует интенсивный рост, притягивая массы пользователей. Опытные ресурсы дают качественную среду для пари. Подробную данные о указанных брендах доступно обнаружить на казино 1хбет .
Лицензирование является главным аспектом определения платформы. Надзорные органы Великобритании дают качественный мониторинг финансовых операций. Отдельная легальная ресурс проходит регулярные ревизии RNG-алгоритмов.
Программные особенности новейших гемблинг-сайтов охватывают SSL-безопасность банковского класса. Поставщики цифрового ПО класса Microgaming, NetEnt, Pragmatic Play встраивают многоуровневые механизмы случайных значений.
Процесс валидации профиля включает передачи бумаг KYC-типа. ID, документ о средствах, удостоверение прописки — обычный комплект для финального авторизации.
Резервные адреса ликвидируют проблемы с ограничениями компаний. Свежие альтернативы корректируются каждый день IT специалистами. Карманные софт нередко оперируют качественнее онлайн модификаций.
Финансовая дисциплина устанавливает перспективную прибыльность азартных сессий. Экспертные игроки предлагают контролировать количество бета до 1-2% от совокупного фонда.
Нынешние игроки сталкиваются с препятствием соединения к легальным сайтам. Организации фильтруют главные адреса, но искушённые Меллстрой официальный сайт участники знают о функционировании резервных платформ.
Резервная ссылка образует точную отображение основного сайта. Средства защиты остаются идентичными. Финансовые транзакции реализуются через сходные системы.
Методика оформления профиля через параллельный ссылку предполагает типовой подтверждения. Менеджеры запрашивают справки для выполнения KYC-требований. Личные характеристики подвергаются двухфакторную проверку.
Вносительные пределы на параллельных платформах равняются основным требованиям. Низшие вклады функционируют стабильными. Растущие призовые фонды синхронизируются между многочисленными ссылками.
Премиальные системы функционируют завершённо на резервных ресурсах. Множитель ставок поддерживает исходные показатели. Тайминг использования поддерживается.
Отдел ассистирования обрабатывает вопросы с резервных адресов аналогично. Живой разговор предоставляет круглосуточный расписание работы.
https://certicanpharmacy.com/# CertiCanPharmacy
Посмотрите этот обзор про ufc в феврале марте 2026 три недели которые встряхнут дивизионы, там собраны все главные интриги. Подробности здесь: https://crm64.ru/news/goryachij-fevral-mart-2026-v-ufc-tri-turnira-kotorye-nelzya-propustit/
Voltvessel Store – The site is clean and intuitive, perfect for quick exploration.
Online reputation management is the strategic process of influencing public perceptions of a brand or person.
It involves continuously tracking what is being said about you on the internet.
The primary aim is to promote favorable information and address any negative comments or criticism.
This often includes responding to customer reviews on various websites.
https://hearthis.at/group/525348/repuhouse/
A key part is managing search engine listings for relevant queries.
Effective ORM helps establish credibility and safeguard a positive brand image.
Ultimately, it is an essential practice for any modern organization or professional.
Актуальные сервисы беттинг игр предоставляют пользователям вход к профессиональному игровому процессу через проверенные Лаки Бир зеркало порталы. Официальная работа подразумевает следования определенных надзорных положений.
Механизм открытия игрового профиля предусматривает валидацию приватных информации. Операторы внедряют детализированные системы KYC и AML для недопущения фродовых платежей.
Технические инструменты передовых развлекательных порталов базируются на стабильных облачных системах с SSL стандартами. Региональная блокировка заставляет операторов внедрять резервные порталы.
Резервные сайты являют собой эквивалентные репликации первичного сайта с сохранением всех инструментов и показателей. Игроки добиваются устойчивый подключение к балансу, беттинг статистике и персональным конфигурациям.
Расчетные процедуры проходят через подключенные расчетные сервисы. Пределы на взносы и выводы устанавливаются в гармонии с регуляторными критериями и организационными правилами управления рисками.
Экспертные пользователи указывают анализировать статус разрешения через контролирующие реестры азартных организаций. Имиджевые критерии содержат позиции на профильных порталах и feedback подлинных пользователей.
Действующие альтернативные домены легальных гемблинг-платформ на Вавада зеркало дают непрерывный подключение к развлекательным порталам. Технология зеркалирования образует эквивалентные дубликаты базового портала с фиксацией всех возможностей.
Схема оформления профиля через зеркало абсолютно имитирует оригинальную форму. Начинающие игроки вводят функционирующий email, устанавливают безопасный секретную комбинацию и фиксируют рабочую денежную единицу.
Подтверждение учетной записи содержит отправки документов согласно KYC-политике. Изображение ID-карты, свидетельство регистрации и платежные реквизиты проверяются через алгоритмическую контроль в течение 24-72 периодов.
Авторизация верифицированных пользователей реализуется через классическую панель с усиленной валидацией. Временные шифры передаются на смс аппарат или почтовый ящик.
Опции депозитного сектора через дублирующие порталы предлагает актуальные финансовые механизмы. Visa, Mastercard, веб портмоне Skrill, Neteller, виртуальные монеты Bitcoin, Ethereum осуществляются с сокращенными сборами 0-3%.
Гемблинг каталог копируется целиком включая автоматы, традиционные игры, live-крупье и накопительные призы. RTP-параметры, вариативность и ставочные требования остаются точными.
Бонусная политика работает схоже центральному сайту. Welcome-комплекты, бесплатные вращения, кешбэк и VIP-программы включаются машинально при соблюдении определенных требований.
mexico online pharmacy pharmacy in mexico My Mexican Pharmacy
Стратегия игры в jetx довольно проста: нужно вовремя забрать выигрыш до падения самолета.
Рабочие mirror-ссылки лицензированных игорных заведений на Lucky Bear casino предоставляют стабильный подключение к азартным порталам. Схема зеркалирования генерирует эквивалентные дубликаты базового портала с сохранением всех инструментов.
Схема создания аккаунта через mirror-сайт абсолютно повторяет оригинальную форму. Начинающие участники заполняют действующий email, создают надежный шифр и определяют базовую платежное средство.
Валидация счета требует передачи свидетельств опираясь на KYC-регламенту. Изображение водительских прав, верификация резиденции и карточные параметры контролируются системой алгоритмическую верификацию в течение 24-72 временных единиц.
Подключение верифицированных пользователей происходит через обычную окно с усиленной идентификацией. Временные токены отправляются на сотовый гаджет или email.
Опции денежного сектора через дублирующие порталы включает топовые денежные системы. Visa, Mastercard, веб портмоне Skrill, Neteller, цифровые активы Bitcoin, Ethereum выполняются с минимальными сборами 0-3%.
Азартная каталог дублируется полностью включая spinning games, столовые геймплей, live-дилеров и джекпоты. RTP-параметры, изменчивость и вейджер сохраняются неизменными.
Поощрительная программа выполняется аналогично основному веб-площадке. Welcome-предложения, бесплатные вращения, денежный возврат и VIP-программы запускаются автоматически при выполнении определенных требований.
ChairAndChalk Finds – Love the creativity in their products and the effortless checkout.
Проверенные операторы гэмблинг возможностей предоставляют игрокам доступ к качественному развлечениям через специализированные домены, включая Mellstroy Game казино , которые выполняют мировые требования безопасности.
Процедура активации предполагает внесения проверочных информации через encrypted SSL-линии. Менеджмент запрашивают официальное удостоверение правоспособности и места проживания для соблюдения legal требований.
Многоуровневая проверка представляет required частью современных solutions конфиденциальности. Игроки приобретают SMS-токены, push-оповещения или эксплуатируют targeted приложения вроде Google Authenticator.
Зеркальные порталы ликвидируют проблемы географических блокировок и DDoS-нападений. Фактически mirrors образуют дублированные версии базового портала с обеспечением опций и пользовательских информации.
Профессиональные участники призывают keeping новейшие реестры working копий в закладках обозревателя. Операторы рассылают обновления о fresh ссылках через почтовые сервисы, Telegram-каналы и телефонные программы.
Финансовые процедуры через официальные сайты покрыты cryptographic системами категории банковского сектора. Extraction средств реализуется только на validated карты собственника аккаунта.
This casino https://noclegijan.com.pl/ offers a great mix of popular slots and live tables. The platform feels modern, promotions are worth trying, and support is responsive, which adds confidence.
Актуальные зеркала проверенных казино на п»ї1хбет зеркало обеспечивают непрерывный коннект к гемблинг сервисам. Принцип дублирования формирует идентичные клоны основного ресурса с фиксацией всех инструментов.
Схема открытия счета через дублирующий портал целиком дублирует основную форму. Начинающие игроки прописывают действующий email, генерируют сложный код доступа и определяют основную финансовый инструмент.
Подтверждение учетной записи требует предоставления справок опираясь на KYC-политике. Снимок водительских прав, верификация проживания и денежные реквизиты контролируются системой машинную анализ в течение 24-72 временных единиц.
Подключение существующих участников осуществляется через обычную панель с усиленной аутентификацией. Одноразовые токены отправляются на мессенджер девайс или мейл.
Функционал входящего сектора через зеркала содержит востребованные платежные инструменты. Visa, Mastercard, виртуальные хранилища Skrill, Neteller, блокчейн-токены Bitcoin, Ethereum выполняются с низкими комиссиями 0-3%.
Игровая база дублируется абсолютно включая слоты, традиционные игры, live-ведущих и накопительные призы. RTP-параметры, изменчивость и отыгрыш остаются точными.
Бонусная политика оперирует похоже главному сайту. Welcome-наборы, безвозмездные спины, возврат средств и VIP-программы стартуют системно при исполнении заданных стандартов.
1win ставки на баскетбол 1win50742.help
Подбор честного игорного портала предполагает основательного изучения лицензионных сертификатов. Новые ресурсы п»ї1xBet казино предоставляют клиентам полную факты о действующих допусках.
Система оформления счета включает различные требуемых фаз верификации. Операторы настаивают справки, засвидетельствующие самобытность и правоспособность. Обычный KYC-процесс длится от 24 до 72 временных отрезков.
Распоряжение капиталом начинается с фиксации пределов на вклады. Искусные участники предлагают применять норму 5% от совокупного игорного средств на отдельную раунд.
Технические запреты провайдеров вынуждают внедрять дополнительные ссылки. Копии удерживают безусловную активность центрального площадки, предусматривая архив сделок и гемблинг прогресс.
Новые банковские инструменты обеспечивают оперативные пополнения через криптовалютные кошельки. Bitcoin, Ethereum и стабильные валюты поддерживают тайность и мизерные комиссии. Период проведения получений равно 10-30 промежутков.
Планы приверженности предусматривают ступенчатые категории с увеличивающимся бонусом. VIP-консультанты обеспечивают уникальные бонусы, усиленные ограничения и ускоренную помощь.
Der Online-Slot https://zeusvshades250.com/de/ bietet eine olympische Atmosphare, thematisch passende Symbole und ein dynamisches Spielformat. Erfahren Sie mehr uber die Spielregeln und -funktionen.
Excellent article. Keep posting such kind of information on your page.
Im really impressed by your site.
Hello there, You’ve done an excellent job. I’ll definitely digg it and in my view recommend
to my friends. I am sure they’ll be benefited from this web site.
https://amzn.asia/d/0iLm7rge
https://amzn.asia/d/0iLm7rge
Cotton Cascade marketplace – Elegant cloth choices with a distinctly premium appearance.
My Mexican Pharmacy: My Mexican Pharmacy – mexico pharmacy price list
https://amzn.asia/d/0iLm7rge
Современные участники имеют дело с множеством цифровых аспектов при функционировании с лицензированными платформами. Профильные источники типа Vavada зеркало поставляют свежую данные о операциях казино организаций.
Процесс проверки аккаунта предполагает комплекс требуемых стадий. Первичная проверка нуждается передачи справок валидирующих гражданство. Классический перечень включает документ, автоудостоверение или загранпаспорт.
Цифровая компонента оформления подразумевает внедрение зашифрованного канала и двойной авторизации. Профессиональные участники советуют задействовать максимум возможных возможностей безопасности.
Резервные ссылки представляют абсолютные клоны базового портала с удержанием комплексного инструментария. Главное бонус кроется в тождественности финансовых границ и параметров условий прокрутки.
Алгоритм нахождения активных резервных ссылок фундируется на отслеживании профессиональных мессенджер групп и аффилированных платформ. Опытные клиенты внедряют туннельные протоколы для обеспечения бесперебойного входа без оглядки от географических барьеров.
Подбор надежного азартного площадки в нынешних обстоятельствах предполагает особого подхода к юридическому статусу. Профессиональные клиенты понимают, что Vavada содержит новую факты о доступных ресурсах.
Механизм регистрации в официальных сервисах объединяет неизбежную подтверждение идентичности. KYC-правила оберегают как оператора, так и игрока от махинаций. Промежуточные пределы на перечисление финансов до закрытия валидации – типичная практика.
Электронные блокировки на подключение к гемблинг сервисам устраняются через резервные URL. Рабочие отражения обеспечивают тотальную эффективность основного ресурса. Денежные транзакции, геймплейный результаты и бонусные планы остаются устойчивыми.
Материальная стабильность выражается критерием задействованных расчетных систем. SSL-криптография, PCI DSS валидация и многоуровневая аутентификация создают надежный периметр обороны.
Геймплейная каталог легальных операторов объединяет спины от главных создателей. RTP-коэффициенты, изменчивость и математические формулы испытывают независимую аудит в аккредитованных институтах.
Планы поощрения в достойных сервисах основываются на открытых параметрах проигрыша. Требования x35-40 признается справедливым для барабан-подарков, в то время как стандартные забавы включаются в расчет с сниженным фактором.
nutmeg central shop – A distinctive concept combined with smooth and enjoyable navigation.
Навигация в мире легальных площадок требует осознания современных решений доступа. Профессиональные участники используют казино Mellstroy Game для извлечения релевантной материалов о активных адресах.
Алгоритм открытия учетной записи в сертифицированных организациях содержит тщательную проверку. Передовые поставщики применяют KYC-системы и AML-нормы. Документальная процедура отнимает от 24 до 72 периодов.
Цифровые решения для минования блокировок эволюционируют синхронно с усилением законодательных решений. VPN-инструменты категории premium предоставляют безопасность AES-256 и протоколы OpenVPN. Постоянство коннекта fundamentally существенна для премиальных сессий.
Зеркальные ресурсы выполняют задачи через географически расположенные цифровые кластеры. CDN-архитектуры предоставляют сокращенную отклик для глобальных клиентов. Цифровое перенаправление включается при детекции препятствия первичного сайта.
Платежные движения в проверенных юрисдикциях соответствуют определенным стандартам PCI DSS. Цифровые операции приобретают популярность по причине анонимности и скорости реализации.
Мобильные клиенты топовых провайдеров содержат физиологическую подтверждение и push-алерты для существенных происшествий. Изменяемый интерфейс самостоятельно настраивается под свойства матрицы.
Гемблинговая ниша демонстрирует интенсивный прогресс, привлекая множество участников. Экспертные сайты обеспечивают стабильную условия для ставок. Детальную факты о этих операторах доступно изучить на п»ї1хбет .
Лицензирование составляет ключевым аспектом отбора платформы. Контролёры Гибралтара гарантируют качественный аудит валютных действий. Отдельная легальная сайт подвергается регулярные контроли RNG-алгоритмов.
Компьютерные параметры новейших игорных домов объединяют SSL-криптографию экономического класса. Создатели программного софта класса Microgaming, NetEnt, Pragmatic Play встраивают сложные модели рандомных значений.
Механизм подтверждения счёта включает подачи справок KYC-класса. Документ, свидетельство о доходах, удостоверение адреса — обычный список для итогового доступа.
Альтернативные ссылки решают препятствия с цензурой операторов. Рабочие варианты модифицируются систематически программными группами. Карманные программы нередко выполняются стабильнее онлайн редакций.
Управление банкроллом устанавливает перспективную успешность гемблинговых партий. Опытные участники предлагают сокращать объём ставки до 1-2% от полного банкролла.
rail favorites – Layout is tidy, and finding items is quick and easy.
Перейти на сайт Камеральная, выездная проверка
Активные mirror-ссылки лицензированных игорных заведений на Вавада зеркало гарантируют устойчивый подключение к азартным ресурсам. Принцип зеркалирования строит идентичные дубликаты центрального портала с удержанием всех механизмов.
Процедура оформления профиля через mirror-сайт в точности дублирует главную анкету. Новые игроки прописывают рабочий email, генерируют безопасный ключ и устанавливают операционную финансовый инструмент.
Идентификация учетной записи требует отправки свидетельств следуя KYC-политике. Фото удостоверения личности, верификация резиденции и финансовые данные анализируются посредством программную проверку в течение 24-72 временных единиц.
Авторизация активных игроков выполняется через базовую панель с многоступенчатой идентификацией. Разовые коды приходят на телефонный гаджет или мейл.
Инструменты входящего компонента через альтернативные домены включает актуальные платежные механизмы. Visa, Mastercard, виртуальные портмоне Skrill, Neteller, crypto Bitcoin, Ethereum реализуются с сокращенными комиссиями 0-3%.
Игровая каталог дублируется абсолютно включая барабаны, столовые забавы, live-дилеров и прогрессивы. RTP-параметры, волатильность и отыгрыш фиксируются аналогичными.
Акционная программа действует подобно базовому домену. Welcome-пакеты, free spins, кешбэк и VIP-схемы стартуют программно при исполнении определенных условий.
Reference
newest casino websites
to move forward.
Подбор легального гемблинг площадки заставляет детального анализа официальных сертификатов. Современные системы Lucky Bear casino предоставляют пользователям стопроцентную факты о своих разрешениях.
Процесс регистрации подразумевает различные обязательных этапов подтверждения. Администраторы просят бумаги, подтверждающие персону и совершеннолетие. Стандартный KYC-механизм составляет от 24 до 72 промежутков.
Управление банком начинается с фиксации границ на пополнения. Профессиональные пользователи предлагают задействовать норму 5% от общего гемблинг фонда на отдельную игру.
Системные препятствия администраторов принуждают использовать вспомогательные ссылки. Зеркала сохраняют безусловную функциональность центрального платформы, содержа летопись транзакций и казино продвижение.
Новые банковские методы поддерживают скоростные вклады через цифровые счета. Bitcoin, Ethereum и устойчивые монеты гарантируют анонимность и наименьшие платежи. Срок проведения изъятий достигает 10-30 интервалов.
Системы приверженности охватывают ступенчатые степени с накапливающимся вознаграждением. VIP-кураторы предоставляют личные подарки, увеличенные границы и преимущественную помощь.
CertiCanPharmacy: canadian pharmacy drugs online – CertiCanPharmacy
Pretty nice post. I just stumbled upon your weblog and wished to say that I have truly enjoyed browsing your blog posts.
In any case I’ll be subscribing to your rss feed and I hope you
write again soon!
Sparks Tow Shopping – Adorable store, I quickly located a few key products.
Актуальные участники встречаются с препятствием входа к сертифицированным сайтам. Поставщики запрещают первичные адреса, но знающие Лаки Бир зеркало клиенты помнят о функционировании резервных порталов.
Дополнительный домен формирует точную дубликат оригинального портала. SSL-сертификаты сохраняются такими же. Банковские процедуры осуществляются через идентичные механизмы.
Процедура создания аккаунта через параллельный адрес требует привычной валидации. Операторы выясняют документы для осуществления KYC-регламентов. Личные данные реализуют двухфакторную аутентификацию.
Финансовые ограничения на альтернативных платформах совпадают базовым требованиям. Наименьшие беты поддерживаются неизменными. Увеличивающиеся накопления согласовываются между множественными доменами.
Льготные механизмы работают завершённо на альтернативных платформах. Коэффициент оборота удерживает базовые параметры. Временные рамки отыгрыша сохраняется.
Департамент обслуживания обрабатывает обращения с дополнительных адресов идентично. Онлайн разговор осуществляет беспрерывный режим работы.
Активные альтернативные домены официальных гемблинг-платформ на Вавада регистрация создают постоянный вход к геймерским платформам. Технология дублирования формирует эквивалентные версии базового домена с поддержанием всех возможностей.
Процедура регистрации через резервную ссылку на сто процентов копирует оригинальную анкету. Только пришедшие геймеры вводят рабочий email, формируют защищенный секретную комбинацию и устанавливают рабочую платежное средство.
Подтверждение профиля предполагает загрузки справок в соответствии с KYC-стандартам. Фото водительских прав, доказательство резиденции и финансовые реквизиты проходят машинную контроль в течение 24-72 часов.
Подключение верифицированных геймеров осуществляется через обычную панель с многоступенчатой верификацией. Сессионные токены приходят на сотовый номер или электронную почту.
Опции денежного модуля через дублирующие порталы обеспечивает востребованные платежные системы. Visa, Mastercard, виртуальные хранилища Skrill, Neteller, криптовалюты Bitcoin, Ethereum реализуются с уменьшенными процентами 0-3%.
Азартная база повторяется в точности включая барабаны, классические геймплей, live-крупье и джекпоты. RTP-коэффициенты, волатильность и отыгрыш остаются неизменными.
Подарочная программа выполняется аналогично главному домену. Welcome-предложения, free spins, refund и VIP-планы включаются системно при реализации установленных критериев.
Fantastic goods from you, man. I’ve understand your stuff previous
to and you’re just too excellent. I really like what you have acquired here, certainly like what
you’re stating and the way in which you say it. You make
it enjoyable and you still care for to keep it wise.
I can not wait to read much more from you. This is really a wonderful website.
bs2we at
market insights hub – Tools and resources organized to simplify financial tracking.
Отбор проверенного развлекательного портала в актуальных границах заставляет повышенного внимания к законному состоянию. Опытные игроки знают, что Меллстрой зеркало предоставляет современную факты о активных ресурсах.
Механизм оформления профиля в официальных площадках включает принудительную аутентификацию персональных данных. KYC-требования обеспечивают как заведение, так и клиента от обмана. Переходные ограничения на вывод активов до финализации подтверждения – стандартная система.
Виртуальные барьеры на вход к развлекательным сайтам преодолеваются через параллельные домены. Доступные копии сохраняют абсолютную производительность первичного сайта. Расчетные процедуры, игровой статистика и бонусные планы функционируют неизменными.
Экономическая безопасность оценивается степенью применяемых платежных систем. SSL-защита, PCI DSS подтверждение и усиленная подтверждение гарантируют защищенный барьер ограждения.
Геймплейная библиотека официальных провайдеров содержит машины от ведущих создателей. RTP-коэффициенты, изменчивость и алгоритмические принципы получают внешнюю сертификацию в признанных учреждениях.
Схемы поощрения в профессиональных заведениях базируются на понятных критериях ставок. Проигрыш x35-40 расценивается адекватным для слот-бонусов, в то время как настольные состязания включаются в подсчет с уменьшенным показателем.
Смотреть здесь Оптимизация налогооблажения
Нынешние бетторы встречаются с затруднением доступа к лицензированным ресурсам. Поставщики запрещают базовые адреса, но искушённые Лаки Бир регистрация пользователи знают о присутствии дублирующих платформ.
Параллельный портал формирует полную копию оригинального ресурса. Криптографические алгоритмы функционируют неизменными. Банковские переводы реализуются через сходные каналы.
Алгоритм создания аккаунта через альтернативный ссылку требует привычной проверки. Операторы требуют справки для исполнения KYC-требований. Паспортные данные выполняют усиленную аутентификацию.
Пополнительные пределы на дополнительных сайтах равняются первичным требованиям. Минимальные беты остаются стабильными. Увеличивающиеся выигрышные пулы объединяются между всеми адресами.
Стимулирующие механизмы работают комплексно на параллельных ресурсах. Коэффициент оборота сохраняет базовые значения. Длительность отыгрыша сохраняется.
Отдел ассистирования изучает заявки с параллельных доменов равнозначно. Прямой чат предоставляет непрерывный формат оперирования.
проверить сайт водка бет
https://certicanpharmacy.shop/# best mail order pharmacy canada
Top Sea Breeze Salon – Peaceful vibes across the pages make shopping smooth and relaxing.
http://mymexicanpharmacy.com/# mexican rx pharm
Поиск качественного игрового оператора в современных реалиях предполагает специального рассмотрения к правовому режиму. Профессиональные участники учитывают, что Vavada casino отображает последнюю материалы о действующих ресурсах.
Алгоритм записи в сертифицированных операторах объединяет принудительную подтверждение личности. KYC-нормы охраняют как заведение, так и геймера от афер. Переходные границы на получение финансов до финализации верификации – обычная методика.
Программные барьеры на вход к азартным сервисам решаются через резервные URL. Функционирующие копии гарантируют всестороннюю производительность первичного платформы. Финансовые движения, геймплейный статистика и поощрительные схемы поддерживаются стабильными.
Капитальная гарантированность измеряется показателем эксплуатируемых банковских инструментов. SSL-кодирование, PCI DSS лицензирование и расширенная верификация создают защищенный барьер защиты.
Развлекательная набор легальных заведений включает спины от главных разработчиков. RTP-значения, вариативность и статистические системы подвергаются внешнюю валидацию в утвержденных институтах.
Механизмы стимулирования в качественных операторах строятся на открытых правилах вейджера. Проигрыш x35-40 характеризуется нормальным для спин-привилегий, в то время как карточные забавы идут в зачет с уменьшенным коэффициентом.
Современные платформы игорных игр предлагают пользователям путь к профессиональному развлечениям через проверенные Вавада официальный сайт ресурсы. Авторизованная бизнес влечет выполнения строгих правовых требований.
Процедура открытия индивидуального аккаунта содержит аутентификацию индивидуальных сведений. Провайдеры используют углубленные процедуры KYC и AML для предотвращения фродовых платежей.
Цифровые платформы новейших казино работают на надежных хостингах с SSL сертификатами. Территориальные ограничения принуждает управляющих организовывать дублирующие ссылки.
Резервные ресурсы составляют полные репликации базового ресурса с сохранением всех возможностей и данных. Клиенты обеспечивают себе непрерывный соединение к счету, гемблинг истории и личным опциям.
Банковские операции реализуются через подключенные банковские шлюзы. Рамки на пополнения и получения фиксируются в согласии с правовыми требованиями и внутренними нормами риск-менеджмента.
Опытные игроки предлагают мониторить статус разрешения через регуляторные каталоги азартных структур. Статусные показатели предусматривают оценки на отраслевых сайтах и мнения истинных беттеров.
https://www.azerbaijannews.net/newsr/15744
Right now it appears like WordPress is the preferred blogging
platform available right now. (from what I’ve read) Is that what you are using on your blog?
Good post! We will be linking to this great content on our
site. Keep up the good writing.
Исследование в секторе сертифицированных ресурсов предполагает владения продвинутых технологий соединения. Профессиональные пользователи внедряют казино Меллстрой для извлечения релевантной фактов о действующих URL.
Процесс регистрации личного кабинета в лицензированных учреждениях подразумевает детальную верификацию. Актуальные провайдеры используют KYC-системы и AML-правила. Документальное сопровождение отнимает от 24 до 72 периодов.
Компьютерные способы для обхода препятствий улучшаются синхронно с повышением правовых шагов. VPN-службы разряда premium предлагают защиту AES-256 и технологии OpenVPN. Непрерывность коннекта принципиально важна для элитных раундов.
Резервные домены функционируют через локально рассредоточенные цифровые системы. CDN-структуры осуществляют быструю время ответа для глобальных пользователей. Системное перенаправление запускается при обнаружении барьера основного адреса.
Банковские транзакции в легальных областях следуют четким требованиям PCI DSS. Блокчейн расчеты завоевывают признание благодаря анонимности и быстроте осуществления.
Мобильные утилиты лучших операторов содержат отпечатковую подтверждение и push-извещения для существенных эпизодов. Настраиваемый интерфейс автоматически настраивается под параметры монитора.
Very good article! We will be linking to this great post on our website.
Keep up the good writing.
Официальные платформы игровых возможностей oferuja участникам право к элитному азартному досугу через тематические ресурсы, включая Лаки Бир казино , которые именно соблюдают международные регламенты security.
Алгоритм открытия счёта предполагает внесения идентификационных деталей через криптографические SSL-линии. Администрация просят official свидетельство правоспособности и региона жительства для поддержания юрисдикционных правил.
Двухэтапная верификация представляет required частью современных solutions безопасности. Users имеют SMS-шифры, push-сообщения или используют специализированные утилиты вроде Google Authenticator.
Mirror домены ликвидируют сложности региональных ограничений и DDoS-атак. С технической точки зрения реплики являют идентичные реплики базового портала с maintaining инструментария и пользовательских деталей.
Профессиональные пользователи призывают хранить актуальные каталоги функционирующих альтернатив в bookmark обозревателя. Провайдеры рассылают информацию о новых URL через электронную почту, Telegram-чаты и смартфонные софт.
Денежные переводы через лицензионные площадки обеспечены encryption протоколами класса банковского segment. Вывод денег происходит только на проверенные wallets обладателя личного кабинета.
Winter Walk Store – Products are well displayed and the site runs seamlessly.
https://ukauk.ru/filemanager/articles/1xbet_promokod_pri_registracii_bonus.html
Новейшие геймеры сталкиваются с массой системных нюансов при деятельности с официальными порталами. Тематические ресурсы типа казино Лаки Бир выдают свежую контент о процессах казино провайдеров.
Система верификации профиля охватывает ряд неотъемлемых шагов. Первичная подтверждение подразумевает отправки свидетельств верифицирующих гражданство. Привычный перечень охватывает ID, водительские права или международный паспорт.
Цифровая часть оформления охватывает эксплуатацию зашифрованного канала и 2FA. Опытные пользователи предлагают инициировать все имеющихся возможностей безопасности.
Зеркала представляют точные отражения центрального сайта с поддержанием полного арсенала. Ключевое бонус заключается в тождественности расчетных ограничений и критериев отыгрыша.
Система обнаружения функционирующих альтернативных адресов строится на отслеживании тематических телеграм-каналов и союзных ресурсов. Продвинутые участники задействуют прокси-соединения для обеспечения бесперебойного доступа вне зависимости от географических запретов.
Рабочие резервные адреса лицензированных игорных заведений на Vavada casino обеспечивают непрерывный подключение к развлекательным порталам. Технология клонирования генерирует аналогичные версии основного портала с поддержанием всех инструментов.
Процедура активации через резервную ссылку в точности повторяет основную бланк. Новые пользователи заполняют активный email, устанавливают защищенный ключ и назначают базовую курренси.
Подтверждение аккаунта содержит загрузки документов опираясь на KYC-политике. Копия удостоверения личности, доказательство регистрации и платежные реквизиты контролируются системой алгоритмическую анализ в течение 24-72 периодов.
Аутентификация существующих геймеров производится через классическую интерфейс с двухфакторной проверкой. Временные шифры передаются на мессенджер гаджет или почтовый ящик.
Функционал входящего сектора через mirror-сайты поддерживает топовые денежные инструменты. Visa, Mastercard, виртуальные портмоне Skrill, Neteller, блокчейн-токены Bitcoin, Ethereum выполняются с минимальными сборами 0-3%.
Гемблинг база клонируется целиком включая слоты, традиционные забавы, live-операторов и джекпоты. RTP-коэффициенты, колебания и проигрыш фиксируются идентичными.
Акционная политика действует аналогично корневому домену. Welcome-комплекты, бесплатные вращения, refund и VIP-схемы инициируются программно при достижении прописанных условий.
Studio Supply marketplace – Broad selection and a seamless purchase flow make it convenient.
topaztrail – The overall experience is seamless and the navigation feels natural.
mexican drug stores: My Mexican Pharmacy – my mexican pharmacy
Lanús vs Flamengo – 2026 South American Super Cup 08:30! Epic clash – latest football scores from South America!
Sea Shell Studio – Clean layout and navigating items feels smooth and effortless.
Нынешние геймеры встречаются с затруднением подключения к лицензированным платформам. Операторы запрещают основные домены, но искушённые п»ї1хбет сайт клиенты учитывают о доступности зеркальных платформ.
Резервная ссылка образует полную воспроизведение оригинального ресурса. Протоколы шифрования функционируют такими же. Финансовые транзакции производятся через аналогичные сервисы.
Схема открытия счёта через дополнительный ресурс включает типовой валидации. Операторы уточняют удостоверения для исполнения KYC-регламентов. Индивидуальные информация подвергаются комплексную аутентификацию.
Банковские лимиты на альтернативных платформах совпадают основным характеристикам. Наименьшие взносы функционируют неизменными. Увеличивающиеся выигрышные пулы координируются между всеми доменами.
Поощрительные механизмы выполняются полноценно на дополнительных порталах. Вейджер сохраняет исходные показатели. Временные рамки реализации поддерживается.
Служба обслуживания решает заявки с зеркальных порталов сходным образом. Прямой переписка предоставляет круглосуточный расписание оперирования.
приточная установка установка систем вентиляции Доверьте установку вентиляции профессионалам. Гарантируем правильный монтаж и долговечность системы.
Современные игроки встречаются с препятствием входа к лицензированным порталам. Организации ограничивают стандартные домены, но опытные казино Lucky Bear пользователи помнят о функционировании параллельных ресурсов.
Дополнительный домен образует точную копию основного ресурса. Протоколы шифрования остаются равнозначными. Банковские переводы проходят через сходные каналы.
Методика регистрации через дополнительный портал требует классической верификации. Сотрудники выясняют документы для выполнения KYC-стандартов. Индивидуальные характеристики выполняют комплексную подтверждение.
Вносительные ограничения на резервных порталах аналогичны первичным требованиям. Наименьшие ставки остаются стабильными. Возрастающие накопления интегрируются между различными адресами.
Поощрительные планы выполняются завершённо на зеркальных ресурсах. Множитель ставок поддерживает стартовые параметры. Длительность проигрывания остаётся прежним.
Отдел помощи изучает обращения с дополнительных адресов равнозначно. Мгновенный разговор поддерживает непрерывный формат функционирования.
продолжить Камеральная, выездная проверка
Winter Walk Marketplace – Excellent assortment and navigation feels seamless.
1win timp retragere http://1win5807.help
Print Parlor Online Store – Easy to browse and well-organized, making the shopping experience seamless.
Перемещение в пространстве официальных порталов подразумевает понимания новых методов доступа. Профессиональные участники задействуют казино Lucky Bear для добывания современной сведений о оперативных путях.
Механизм открытия профиля в сертифицированных учреждениях охватывает сложную аутентификацию. Современные компании применяют KYC-механизмы и AML-требования. Документальная процедура требует от 24 до 72 временных отрезков.
Цифровые способы для минования препятствий развиваются сообща с интенсификацией регуляторных шагов. VPN-сервисы типа premium обеспечивают шифрование AES-256 и методы OpenVPN. Стабильность подключения критически актуальна для привилегированных игровых периодов.
Дублирующие ресурсы работают через географически расположенные серверные системы. CDN-системы предоставляют сокращенную отклик для азиатских геймеров. Цифровое перенаправление инициируется при выявлении ограничения базового портала.
Финансовые переводы в сертифицированных территориях подпадают под определенным стандартам PCI DSS. Крипто операции получают актуальность по причине секретности и быстроте обработки.
Планшетные приложения премиальных брендов совмещают голосовую проверку и push-сообщения для существенных ситуаций. Настраиваемый интерфейс программно подстраивается под характеристики матрицы.
Легальные площадки игорных возможностей гарантируют участникам шанс к профессиональному времяпрепровождению через целевые домены, включая Лаки Бир регистрация , которые придерживаются общепринятые стандарты защиты.
Механизм оформления профиля требует предоставления проверочных параметров через защищённые SSL-connection. Администрация demanded документальное доказательство возраста и региона регистрации для поддержания законодательных норм.
2FA верификация считается mandatory элементом современных solutions защиты. Users приобретают SMS-токены, push-сообщения или внедряют dedicated программы типа Google Authenticator.
Зеркальные домены устраняют вопросы geographic санкций и DDoS-штурмов. С технической точки зрения зеркала составляют тождественные версии primary портала с поддержанием опций и индивидуальных параметров.
Skilled пользователи предлагают поддерживать current перечни действующих зеркал в сохранённых ссылках веб-клиента. Провайдеры направляют информацию о fresh URL через почтовые сервисы, Telegram-группы и смартфонные софт.
Денежные movements через проверенные сайты secured cryptographic алгоритмами level банковского индустрии. Получение фондов реализуется исключительно на проверенные wallets владельца аккаунта.
страница vodkabet
нажмите здесь vodka bet
patternparlor – The layout is tidy, and browsing products is smooth and enjoyable.
browse Warehouse Whim online – Layout is organized, and moving through products feels effortless.
Рабочие дублирующие порталы надежных гемблинг-платформ на Лаки Бир обеспечивают устойчивый соединение к азартным сервисам. Система клонирования образует аналогичные копии главного портала с сохранением всех опций.
Схема регистрации через дублирующий портал абсолютно копирует оригинальную шаблон. Свежие пользователи указывают валидный email, устанавливают надежный шифр и фиксируют операционную курренси.
Идентификация аккаунта предполагает загрузки справок по KYC-регламенту. Снимок удостоверения личности, верификация регистрации и финансовые сведения анализируются посредством цифровую анализ в течение 24-72 часа.
Логин действующих участников осуществляется через стандартную форму с двухфакторной аутентификацией. Временные пароли отправляются на сотовый аппарат или email.
Механизмы денежного блока через mirror-сайты предлагает популярные платежные механизмы. Visa, Mastercard, электронные портмоне Skrill, Neteller, криптовалюты Bitcoin, Ethereum осуществляются с минимальными сборами 0-3%.
Gaming база копируется полностью включая машины, столовые развлечения, live-операторов и прогрессивы. RTP-индикаторы, волатильность и отыгрыш сохраняются точными.
Подарочная механизм оперирует подобно главному порталу. Welcome-пакеты, даровые прокруты, refund и VIP-курсы запускаются машинально при соблюдении заданных требований.
Определение надежного betting портала в нынешних границах подразумевает тщательного подхода к законному положению. Квалифицированные участники представляют, что казино Lucky Bear отображает актуальную факты о работающих ресурсах.
Механизм открытия счета в официальных сервисах предусматривает требуемую валидацию личности. KYC-требования обеспечивают как заведение, так и игрока от фрода. Кратковременные ограничения на изъятие финансов до финализации контроля – привычная практика.
Цифровые запреты на доступ к азартным площадкам обходятся через параллельные домены. Доступные зеркала сохраняют тотальную возможности базового сервиса. Платежные переводы, интерактивный прогресс и поощрительные схемы поддерживаются постоянными.
Финансовая защищенность оценивается критерием применяемых банковских систем. SSL-безопасность, PCI DSS сертификация и дополнительная проверка устанавливают надежный контур охраны.
Геймплейная ассортимент сертифицированных провайдеров содержит спины от топовых создателей. RTP-показатели, вариативность и статистические формулы подвергаются нейтральную сертификацию в аккредитованных лабораториях.
Программы стимулирования в профессиональных сервисах основываются на прозрачных критериях отыгрыша. Проигрыш x35-40 признается нормальным для автомат-подарков, в то время как традиционные состязания идут в подсчет с редуцированным показателем.
https://msk.metallobazav.ru/
For the webinar
where to buy cheap plavix prices
to begin your journey.
This casino https://hondagrudzinski.pl/ offers a great mix of classic slots and live dealer games. The platform feels modern, promotions are worth trying, and support is helpful, which adds confidence.
SuedeSalon Essentials Hub – Stylish visuals and thoughtfully selected items make browsing smooth.
Передовые участники натыкаются с сложностью входа к официальным площадкам. Операторы запрещают первичные адреса, но искушённые казино Лаки Бир пользователи помнят о функционировании альтернативных ресурсов.
Альтернативный адрес составляет полную воспроизведение основного сайта. Средства защиты поддерживаются такими же. Финансовые процедуры осуществляются через идентичные каналы.
Схема создания аккаунта через параллельный портал содержит классической валидации. Администраторы уточняют бумаги для соблюдения KYC-норм. Индивидуальные информация реализуют усиленную проверку.
Вносительные лимиты на альтернативных сайтах идентичны главным характеристикам. Минимальные ставки сохраняются постоянными. Растущие джекпоты синхронизируются между разными ссылками.
Поощрительные схемы функционируют комплексно на альтернативных платформах. Требования по обороту гарантирует первоначальные показатели. Временные рамки проигрывания не изменяется.
Сервис обслуживания анализирует вопросы с альтернативных ссылок таким же способом. Интерактивный чат поддерживает постоянный формат оперирования.
Отбор достойного гемблинг оператора в нынешних реалиях заставляет тщательного внимания к правовому положению. Компетентные участники понимают, что п»ї1хбет официальный сайт включает современную данные о действующих провайдерах.
Механизм оформления профиля в проверенных площадках объединяет обязательную верификацию идентичности. KYC-нормы гарантируют как оператора, так и игрока от фрода. Временные лимиты на получение активов до закрытия контроля – типичная система.
Технические барьеры на соединение к развлекательным сайтам решаются через резервные ссылки. Функционирующие копии обеспечивают стопроцентную работоспособность основного сервиса. Банковские транзакции, геймплейный результаты и привилегированные системы сохраняются неизменными.
Материальная надежность выражается качеством внедренных финансовых систем. SSL-кодирование, PCI DSS подтверждение и дополнительная идентификация создают стабильный периметр ограждения.
Игровая каталог сертифицированных площадок включает автоматы от топовых провайдеров. RTP-коэффициенты, вариативность и расчетные системы подвергаются внешнюю проверку в аккредитованных организациях.
Схемы вознаграждения в надежных заведениях базируются на прозрачных параметрах активности. Условия ставок x35-40 оценивается адекватным для барабан-льгот, в то время как классические активности включаются в калькуляцию с редуцированным множителем.
перейти на сайт водка бэт
Shipshape Solutions Hub – Clear service descriptions and a polished, dependable presentation.
Актуальные геймеры сталкиваются с сложностью доступа к лицензированным платформам. Поставщики ограничивают основные домены, но профессиональные п»ї1хбет сайт пользователи понимают о доступности резервных ресурсов.
Зеркало образует стопроцентную реплику оригинального ресурса. SSL-сертификаты функционируют неизменными. Расчётные действия реализуются через сходные каналы.
Методика оформления профиля через альтернативный ссылку включает привычной валидации. Администраторы уточняют документы для соблюдения KYC-правил. Индивидуальные информация осуществляют расширенную аутентификацию.
Пополнительные пределы на дополнительных платформах аналогичны главным условиям. Начальные вклады продолжают постоянными. Прогрессивные призовые фонды интегрируются между множественными ресурсами.
Бонусные схемы работают завершённо на резервных порталах. Отыгрышный коэффициент поддерживает базовые параметры. Тайминг проигрывания сохраняется.
Сервис помощи изучает запросы с альтернативных ресурсов сходным образом. Онлайн общение обеспечивает 24-часовой порядок функционирования.
Новейшие игроки встречаются с барьером подключения к проверенным сайтам. Компании блокируют базовые домены, но опытные Lucky Bear casino посетители знают о функционировании резервных площадок.
Параллельный портал является абсолютную отображение главного платформы. SSL-сертификаты сохраняются такими же. Расчётные действия проходят через идентичные шлюзы.
Технология заведения учётной записи через альтернативный портал требует классической подтверждения. Специалисты требуют удостоверения для реализации KYC-регламентов. Персональные информация осуществляют двухфакторную аутентификацию.
Пополнительные лимиты на зеркальных площадках равняются базовым спецификациям. Минимальные беты остаются фиксированными. Прогрессивные накопления синхронизируются между всеми ссылками.
Поощрительные программы функционируют полноценно на резервных платформах. Требования по обороту обеспечивает оригинальные цифры. Срок активности реализации не изменяется.
Служба сопровождения обрабатывает обращения с альтернативных ссылок идентично. Живой диалог обеспечивает 24-часовой порядок оперирования.
Winter Walk Online – Items are clearly organized and browsing feels fast and simple.
Discover the mine drop—an online slot with engaging mechanics and interesting gameplay features. Learn more about the rules and format.
https://certicanpharmacy.shop/# canadian pharmacy antibiotics
Игровая ниша представляет стремительный прогресс, притягивая массы участников. Грамотные сайты предлагают стабильную атмосферу для пари. Подробную материалы о этих брендах допустимо обнаружить на п»ї1хбет официальный сайт .
Лицензирование представляет приоритетным показателем определения платформы. Надзорные органы Олдерни обеспечивают серьёзный мониторинг финансовых процедур. Отдельная аккредитованная сайт осуществляет плановые проверки RNG-систем.
Технические параметры инновационных гемблинг-сайтов объединяют SSL-безопасность банковского ранга. Производители программного продукта уровня Microgaming, NetEnt, Pragmatic Play внедряют усовершенствованные алгоритмы случайных значений.
Процесс проверки личного кабинета включает предоставления свидетельств KYC-формата. Паспорт, документ о доходах, верификация местожительства — классический список для итогового входа.
Зеркальные URL исправляют препятствия с блокировками провайдеров. Действующие зеркала корректируются систематически IT командами. Мобильные софт обычно действуют надёжнее веб модификаций.
Банкролл-менеджмент задаёт перспективную результативность игровых партий. Профессиональные пользователи советуют сокращать размер ставки до 1-2% от совокупного фонда.
Современные порталы развлекательных игр предлагают участникам подключение к высококлассному азарту через надежные Mellstroy Game казино сайты. Легальная операционная активность подразумевает выполнения жестких надзорных норм.
Процесс создания пользовательского профиля охватывает проверку индивидуальных реквизитов. Операторы внедряют комплексные механизмы KYC и AML для пресечения нарушающих платежей.
Цифровые инструменты инновационных развлекательных порталов строятся на стабильных серверах с TLS стандартами. Локальные запреты обязывает администраторов организовывать вспомогательные адреса.
Альтернативные платформы являют собой эквивалентные клоны первичного ресурса с фиксацией всех инструментов и информации. Клиенты обеспечивают себе беспрепятственный доступ к балансу, игровой записям и клиентским опциям.
Денежные операции реализуются через интегрированные банковские агрегаторы. Ограничения на инвестиции и снятия устанавливаются в унисон с правовыми стандартами и организационными регламентами контроля угроз.
Профессиональные пользователи советуют проверять ситуацию разрешения через государственные списки игорных органов. Статусные параметры включают рейтинги на экспертных сервисах и оценки истинных пользователей.
https://vetfreemeds.shop/# п»їdog medication online
кайтинг кайт школа
Проверенные провайдеры развлекательных опций гарантируют игрокам вариант к премиальному развлечениям через специализированные сайты, включая казино 1xBet , которые точно выполняют международные стандарты security.
Процедура оформления профиля подразумевает внесения идентификационных сведений через криптографические SSL-каналы. Менеджмент просят официальное доказательство age verification и локации регистрации для поддержания законодательных требований.
Multi-factor проверка представляет необходимым aspect новейших систем надёжности. Участники располагают SMS-пароли, push-оповещения или применяют профессиональные программы в стиле Google Authenticator.
Mirror адреса решают препятствия региональных ограничений и DDoS-штурмов. Фактически реплики являют тождественные dublicates базового платформы с сохранением возможностей и пользовательских сведений.
Экспертные пользователи предлагают хранить current реестры рабочих дублей в favourites браузера. Администрация доставляют updates о новых порталах через почтовые сервисы, Telegram-каналы и mobile apps.
Банковские переводы через проверенные площадки гарантированы защитными methods уровня банковского индустрии. Получение денег происходит лишь на аутентифицированные карты держателя учётной записи.
Надёжные платформы гэмблинг опций oferuja геймерам право к премиальному времяпрепровождению через специализированные сайты, включая Лаки Бир , которые выполняют transnational регламенты security.
Последовательность активации предполагает указания идентификационных данных через защищённые SSL-линии. Администрация запрашивают нотариальное свидетельство возраста и территории регистрации для выполнения правовых требований.
Multi-factor верификация является mandatory элементом новейших solutions защиты. Users располагают SMS-пароли, push-уведомления или эксплуатируют профессиональные утилиты по типу Google Authenticator.
Альтернативные ссылки устраняют сложности territorial барьеров и DDoS-нападений. Техническим образом дубли составляют дублированные реплики primary домена с поддержанием функциональности и клиентских информации.
Экспертные пользователи советуют сохранять обновлённые базы активных копий в избранном веб-клиента. Management рассылают updates о новых ссылках через email, Telegram-группы и смартфонные приложения.
Финансовые переводы через лицензионные площадки гарантированы защитными methods стандарта банковского области. Вывод капитала реализуется единственно на аутентифицированные wallets обладателя профиля.
Logo Lighthouse Deals – User-friendly site and browsing for items is a pleasure.
Подробнее vodkabet
discover winterwalkshop – Good assortment and navigation is smooth throughout.
Подбор надежного азартного портала в актуальных обстоятельствах требует специального анализа к лицензионному статусу. Квалифицированные участники осознают, что казино Vavada предоставляет новую сведения о активных операторах.
Процесс создания аккаунта в сертифицированных сервисах охватывает обязательную подтверждение идентичности. KYC-требования охраняют как площадку, так и участника от обмана. Временные пределы на получение финансов до окончания проверки – привычная практика.
Технические препятствия на подключение к гемблинг сайтам решаются через резервные адреса. Рабочие зеркала сохраняют стопроцентную работоспособность центрального сайта. Расчетные транзакции, игровой прогресс и привилегированные системы продолжают устойчивыми.
Экономическая надежность измеряется качеством используемых расчетных способов. SSL-криптография, PCI DSS сертификация и многоуровневая аутентификация устанавливают защищенный барьер охраны.
Азартная библиотека легальных операторов охватывает барабаны от известных создателей. RTP-показатели, изменчивость и вероятностные формулы проходят внешнюю контроль в аккредитованных учреждениях.
Программы поощрения в серьезных сервисах основываются на четких параметрах активности. Вейджер x35-40 считается адекватным для слот-льгот, в то время как стандартные состязания идут в расчет с редуцированным множителем.
Перемещение в секторе сертифицированных платформ предполагает знания современных способов соединения. Квалифицированные геймеры применяют Вавада казино для обретения релевантной сведений о активных URL.
Механизм регистрации счета в надежных учреждениях подразумевает тщательную подтверждение. Современные операторы внедряют KYC-механизмы и AML-нормы. Оформление документов занимает от 24 до 72 промежутков.
IT инструменты для избежания блокировок развиваются одновременно с интенсификацией правовых действий. VPN-сервисы категории premium дают шифрование AES-256 и системы OpenVPN. Постоянство подключения жизненно необходима для премиальных партий.
Дублирующие адреса выполняют задачи через территориально расположенные IT инфраструктуры. CDN-архитектуры гарантируют низкую время ответа для европейских участников. Цифровое редирект запускается при детекции барьера базового домена.
Финансовые операции в сертифицированных территориях подпадают под жестким требованиям PCI DSS. Крипто переводы завоевывают популярность вследствие конфиденциальности и темпу осуществления.
Переносные клиенты ведущих брендов включают биометрическую аутентификацию и push-уведомления для принципиальных ситуаций. Гибкий интерфейс программно подстраивается под особенности панели.
online pharmacies in mexico My Mexican Pharmacy My Mexican Pharmacy
CertiCanPharmacy: CertiCanPharmacy – canadapharmacyonline legit
I’m not that much of a internet reader to be honest but
your blogs really nice, keep it up! I’ll go ahead and bookmark your website to come back later
on. Cheers
browse barbellblossom items – The interface is clean, and finding products is effortless.
Современные пользователи пересекаются с массой технологических нюансов при процессах с проверенными сайтами. Тематические ресурсы типа п»ї1хбет казино поставляют релевантную материалы о процессах гэмблинговых организаций.
Система аутентификации счета охватывает множество принудительных стадий. Начальная валидация требует отправки бумаг удостоверяющих гражданство. Стандартный перечень предполагает ID, лицензию водителя или международный паспорт.
Программная элемент создания аккаунта подразумевает внедрение зашифрованного канала и 2FA. Профессиональные участники подсказывают включать максимум доступных возможностей безопасности.
Альтернативные адреса составляют абсолютные копии первичного домена с удержанием комплексного функционала. Основное достоинство содержится в тождественности денежных ограничений и условий вейджера.
Схема выявления рабочих зеркал основывается на мониторинге профильных телеграм-каналов и партнерских ресурсов. Опытные игроки используют VPN-сервисы для формирования постоянного подключения невзирая от географических блокировок.
Функционирующие резервные адреса легальных гемблинг-платформ на Меллстрой создают постоянный соединение к азартным сервисам. Технология копирования образует идентичные реплики основного портала с сохранением всех возможностей.
Процедура создания аккаунта через дублирующий портал абсолютно воспроизводит стандартную анкету. Новые клиенты указывают действующий email, устанавливают стойкий пароль и фиксируют базовую валюту.
Верификация профиля включает предоставления бумаг следуя KYC-регламенту. Копия национального документа, верификация проживания и банковские координаты проверяются через алгоритмическую валидацию в течение 24-72 ч.
Вход активных геймеров реализуется через стандартную окно с 2FA аутентификацией. Временные шифры приходят на мессенджер гаджет или почтовый ящик.
Возможности финансового модуля через mirror-сайты поддерживает топовые денежные платформы. Visa, Mastercard, виртуальные кошельки Skrill, Neteller, виртуальные монеты Bitcoin, Ethereum обрабатываются с низкими комиссиями 0-3%.
Гемблинг база воспроизводится на сто процентов включая spinning games, карточные забавы, live-ведущих и джекпоты. RTP-показатели, изменчивость и отыгрыш фиксируются аналогичными.
Поощрительная механизм оперирует похоже центральному порталу. Welcome-комплекты, безвозмездные спины, компенсация и VIP-схемы запускаются автоматически при соблюдении прописанных требований.
online pet pharmacy: pet meds for dogs – pet meds online
cottage checkout hub – Smooth navigation and well-organized listings make shopping simple.
click to explore Warehouse Whim – Selection is wide, and navigation feels smooth and simple.
Нашел отличный обзор про ufc в феврале марте 2026 три недели которые встряхнут дивизионы, рекомендую фанатам спорта. Вот ссылка: https://stuff4scrap.ru/news/fevral-mart-2026-v-ufc-tri-turnira-s-topovymi-hedlajnerami-i-vzryvnymi-anderkardami-polnyj-gid/
Нынешние участники имеют дело с множеством технических тонкостей при функционировании с сертифицированными ресурсами. Специализированные платформы типа п»ї1хбет зеркало обеспечивают релевантную сведения о деятельности развлекательных брендов.
Процедура подтверждения кабинета подразумевает набор принудительных стадий. Начальная валидация подразумевает отправки свидетельств верифицирующих гражданство. Классический перечень содержит паспорт, автолицензию или внешний паспорт.
Цифровая компонента оформления охватывает внедрение защищенного протокола и 2FA. Профессиональные геймеры рекомендуют инициировать совокупность предложенных возможностей обеспечения.
Запасные домены являются абсолютные отражения центрального ресурса с поддержанием комплексного арсенала. Основное достоинство содержится в соответствии расчетных пределов и требований отыгрыша.
Алгоритм поиска функционирующих резервных ссылок основывается на контроле тематических мессенджер групп и аффилированных порталов. Продвинутые игроки используют анонимайзеры для формирования устойчивого подключения вне зависимости от локальных ограничений.
Ориентирование в мире сертифицированных площадок включает знания новых методов доступа. Профессиональные клиенты эксплуатируют Меллстрой сайт для получения современной информации о оперативных адресах.
Схема формирования учетной записи в лицензированных организациях включает детальную верификацию. Современные поставщики применяют KYC-системы и AML-стандарты. Документальная процедура требует от 24 до 72 промежутков.
IT инструменты для преодоления барьеров совершенствуются синхронно с повышением нормативных инициатив. VPN-сервисы уровня premium гарантируют безопасность AES-256 и стандарты OpenVPN. Непрерывность канала жизненно необходима для VIP игровых периодов.
Резервные сайты работают через регионально рассредоточенные технические системы. CDN-архитектуры обеспечивают сокращенную пинг для европейских клиентов. Автоматическое роутинг срабатывает при обнаружении препятствия основного портала.
Денежные манипуляции в легальных юрисдикциях отвечают четким нормам PCI DSS. Криптовалютные переводы получают популярность в результате секретности и темпу выполнения.
Смартфонные софт премиальных организаций интегрируют отпечатковую подтверждение и push-оповещения для важных моментов. Изменяемый дизайн самостоятельно подстраивается под характеристики дисплея.
можно проверить ЗДЕСЬ водкабет
explore apparelambergris collection – The pages are organized well, and browsing feels natural.
ссылка на сайт водкабет
Ориентирование в пространстве лицензированных площадок подразумевает осознания современных технологий подключения. Опытные пользователи задействуют Vavada казино для получения актуальной информации о активных ссылках.
Схема оформления профиля в надежных учреждениях содержит детальную верификацию. Актуальные провайдеры используют KYC-алгоритмы и AML-нормы. Оформление документов занимает от 24 до 72 интервалов.
Цифровые методы для избежания ограничений совершенствуются синхронно с ужесточением нормативных решений. VPN-службы уровня premium предоставляют безопасность AES-256 и системы OpenVPN. Непрерывность канала жизненно важна для высокоролловых игровых периодов.
Дублирующие ресурсы действуют через регионально расположенные технические ресурсы. CDN-системы поддерживают минимальную задержку для американских геймеров. Автоматическое переключение срабатывает при выявлении недоступности центрального портала.
Денежные переводы в официальных территориях подчиняются строгим критериям PCI DSS. Крипто платежи увеличивают признание вследствие конфиденциальности и оперативности осуществления.
Смартфонные приложения премиальных операторов содержат физиологическую аутентификацию и push-алерты для существенных событий. Изменяемый дизайн автоматически адаптируется под свойства экрана.
bs market
Актуальные платформы игорных развлечений предлагают беттерам подключение к профессиональному развлечениям через сертифицированные Лаки Бир РІС…РѕРґ ресурсы. Лицензированная бизнес влечет выполнения жестких контролирующих положений.
Система регистрации индивидуального кабинета охватывает подтверждение конфиденциальных информации. Операторы внедряют углубленные алгоритмы KYC и AML для исключения фродовых платежей.
Технические средства современных развлекательных порталов работают на зашифрованных хостингах с HTTPS алгоритмами. Геоблокировка принуждает провайдеров внедрять резервные ссылки.
Резервные домены составляют аналогичные версии центрального домена с фиксацией всех возможностей и информации. Игроки достигают стабильный вход к средствам, беттинг истории и индивидуальным конфигурациям.
Финансовые переводы проходят через связанные денежные шлюзы. Границы на пополнения и получения назначаются в соответствии с законодательными критериями и индивидуальными политиками контроля угроз.
Профессиональные пользователи рекомендуют анализировать условия лицензии через государственные базы данных игорных организаций. Авторитетные параметры охватывают места на профильных платформах и оценки настоящих клиентов.
Get details
generic lipitor online
for pros and cons.
https://www.jamaicanews.net/newsr/15850
Современные сервисы игорных продуктов обеспечивают пользователям доступ к профессиональному азарту через проверенные Vavada зеркало сайты. Официальная функционирование влечет следования строгих надзорных стандартов.
Процесс регистрации персонального счета предусматривает подтверждение индивидуальных данных. Провайдеры внедряют расширенные процедуры KYC и AML для блокировки фродовых операций.
Программные решения передовых казино базируются на защищенных дата-центрах с HTTPS сертификатами. IP-фильтрация принуждает операторов организовывать параллельные порталы.
Параллельные ресурсы образуют идентичные версии базового платформы с поддержанием всех инструментов и параметров. Участники приобретают стабильный соединение к капиталу, беттинг истории и личным установкам.
Банковские переводы проходят через интегрированные банковские процессоры. Границы на инвестиции и изъятия фиксируются в унисон с лицензионными требованиями и индивидуальными нормами снижения потерь.
Экспертные игроки рекомендуют мониторить условия лицензии через официальные регистры развлекательных органов. Имиджевые критерии включают оценки на экспертных сервисах и отзывы реальных игроков.
Reputation management is the strategic process of shaping public perception of a company or individual.
It involves actively tracking what is being discussed about you on the internet.
The goal is to promote positive information and address any negative feedback or criticism.
This often includes engaging with online reviews on different platforms.
https://www.storeboard.com/repuhouse2
A key component is managing search engine listings for associated search terms.
Effective reputation management helps build credibility and safeguard a strong digital image.
Ultimately, it is an essential practice for any contemporary organization or professional.
premium Fiber Fountain – Navigation is clear, and browsing the variety is very pleasant.
Передовые игроки пересекаются с огромным количеством технологических тонкостей при функционировании с лицензированными ресурсами. Профильные сайты типа Лаки Бир регистрация выдают современную сведения о деятельности развлекательных операторов.
Механизм проверки аккаунта включает набор принудительных этапов. Базовая аутентификация подразумевает передачи удостоверений верифицирующих индивидуальность. Классический набор подразумевает ID, автоудостоверение или заграничное удостоверение.
Системная сторона оформления содержит использование зашифрованного канала и двухуровневой проверки. Квалифицированные участники рекомендуют включать все имеющихся функций обеспечения.
Альтернативные адреса формируют абсолютные дубликаты базового сайта с хранением тотального набора функций. Главное выгода заключается в подобии денежных рамок и норм проигрыша.
Процедура обнаружения активных запасных доменов базируется на наблюдении тематических информационных каналов и сотрудничающих платформ. Квалифицированные игроки используют туннельные протоколы для обеспечения стабильного соединения без оглядки от региональных ограничений.
explore winterwalkshop – Layout is clean and everything loads quickly without delays.
здесь зеркало водка бет
Исследование в пространстве сертифицированных площадок подразумевает осознания новых способов соединения. Продвинутые пользователи используют Меллстрой РІС…РѕРґ для приобретения свежей сведений о активных URL.
Механизм формирования учетной записи в проверенных компаниях содержит тщательную проверку. Передовые поставщики эксплуатируют KYC-механизмы и AML-требования. Документооборот требует от 24 до 72 промежутков.
Программные методы для прохождения запретов улучшаются синхронно с укреплением законодательных действий. VPN-сервисы типа premium предоставляют безопасность AES-256 и методы OpenVPN. Стабильность канала принципиально необходима для элитных заходов.
Запасные адреса действуют через географически распределенные IT системы. CDN-архитектуры обеспечивают сокращенную отклик для глобальных геймеров. Автоматическое маршрутизация активируется при идентификации блокировки первичного адреса.
Денежные переводы в сертифицированных регионах следуют четким правилам PCI DSS. Цифровые платежи увеличивают актуальность благодаря секретности и скорости обработки.
Смартфонные клиенты лучших провайдеров включают физиологическую идентификацию и push-уведомления для принципиальных событий. Настраиваемый внешний вид автоматически корректируется под параметры монитора.
Актуальные порталы гемблинг продуктов предлагают клиентам подключение к элитному гемблингу через защищенные Лаки Бир РІС…РѕРґ системы. Сертифицированная операционная активность подразумевает учета конкретных правовых требований.
Процесс регистрации клиентского учетной записи включает подтверждение персональных показателей. Операторы используют многоуровневые механизмы KYC и AML для недопущения нарушающих финансовых действий.
Электронные системы передовых игорных домов функционируют на зашифрованных серверах с HTTPS протоколами. Территориальные ограничения обязывает владельцев запускать вспомогательные URL.
Параллельные сайты являют собой эквивалентные версии главного сайта с поддержанием всех возможностей и сведений. Беттеры обеспечивают себе непрерывный соединение к балансу, игровой статистике и клиентским параметрам.
Денежные операции реализуются через встроенные банковские процессоры. Границы на депозиты и изъятия устанавливаются в унисон с правовыми положениями и организационными процедурами управления рисками.
Профессиональные гемблеры предлагают проверять условия лицензии через надзорные базы данных гемблинг структур. Имиджевые индикаторы задействуют позиции на специализированных порталах и комментарии подлинных пользователей.
explore ramrapids – User-friendly navigation makes shopping items easy today.
wrap and wonder corner – Lovely displays and thoughtfully chosen products make gifting effortless.
Новейшие клиенты пересекаются с огромным количеством цифровых особенностей при работе с легальными ресурсами. Специализированные платформы типа Lucky Bear casino обеспечивают актуальную данные о деятельности азартных операторов.
Система верификации счета предполагает множество необходимых шагов. Начальная подтверждение предполагает предоставления справок валидирующих субъект. Типовой перечень охватывает документ, водительские права или загранпаспорт.
Техническая составляющая оформления подразумевает задействование зашифрованного канала и двухуровневой проверки. Опытные геймеры рекомендуют запускать максимум представленных параметров защиты.
Зеркала формируют точные реплики базового сайта с поддержанием комплексного функционала. Центральное выгода кроется в тождественности финансовых пределов и условий условий прокрутки.
Система локализации активных запасных доменов опирается на наблюдении экспертных телеграм-каналов и связанных сайтов. Продвинутые пользователи внедряют прокси-соединения для гарантирования стабильного подключения без оглядки от региональных барьеров.
Перемещение в сфере проверенных платформ требует представления современных методов доступа. Опытные пользователи используют п»ї1хбет зеркало для обретения современной материалов о оперативных доменах.
Схема открытия профиля в лицензированных заведениях содержит сложную аутентификацию. Передовые организации используют KYC-алгоритмы и AML-требования. Бумажная работа потребляет от 24 до 72 периодов.
Цифровые технологии для прохождения ограничений прогрессируют одновременно с ужесточением регуляторных решений. VPN-решения разряда premium дают шифрование AES-256 и методы OpenVPN. Надежность соединения принципиально существенна для премиальных партий.
Дублирующие адреса оперируют через географически разнесенные компьютерные системы. CDN-структуры предоставляют сокращенную задержку для азиатских пользователей. Системное редирект инициируется при детекции препятствия базового ресурса.
Финансовые переводы в сертифицированных областях соответствуют четким нормам PCI DSS. Цифровые операции увеличивают распространение из-за скрытности и оперативности процессинга.
Портативные клиенты топовых компаний содержат биометрическую идентификацию и push-извещения для существенных происшествий. Модифицируемый оформление независимо изменяется под свойства монитора.
winterwalkshop – Nice variety and everything loads smoothly without any issues here.
нажмите водка бет
Перейти на сайт casino vodka
http://vetfreemeds.com/# pet pharmacy
интернет водка бэт
https://mymexicanpharmacy.com/# My Mexican Pharmacy
explore jacketjunction collection – Items are well organized, and the interface makes shopping enjoyable.
Рабочие дублирующие порталы легальных gaming-операторов на п»ї1xBet гарантируют устойчивый коннект к развлекательным системам. Принцип клонирования формирует точные дубликаты центрального ресурса с поддержанием всех инструментов.
Алгоритм создания аккаунта через mirror-сайт полностью дублирует оригинальную форму. Свежие пользователи регистрируют валидный email, устанавливают надежный пароль и определяют операционную курренси.
Верификация счета включает отправки свидетельств опираясь на KYC-регламенту. Изображение ID-карты, подтверждение места жительства и финансовые координаты проверяются через автоматическую анализ в течение 24-72 временных единиц.
Логин активных клиентов реализуется через стандартную интерфейс с двухфакторной верификацией. Разовые коды передаются на мессенджер номер или email.
Механизмы депозитного блока через зеркала включает востребованные расчетные платформы. Visa, Mastercard, веб счета Skrill, Neteller, виртуальные монеты Bitcoin, Ethereum реализуются с уменьшенными процентами 0-3%.
Гемблинг база воспроизводится абсолютно включая spinning games, классические развлечения, live-дилеров и накопительные призы. RTP-показатели, волатильность и отыгрыш остаются идентичными.
Бонусная механизм работает подобно базовому порталу. Welcome-комплекты, безвозмездные спины, refund и VIP-курсы инициируются машинально при выполнении прописанных стандартов.
беспилотники Волгоград Смертельное ДТП Волгоград: хроника трагических происшествий на дорогах, информация о погибших и расследованиях.
Рабочие mirror-ссылки легальных gaming-операторов на Лаки Бир казино дают стабильный соединение к геймерским платформам. Методика копирования создает эквивалентные версии центрального портала с консервацией всех возможностей.
Механизм создания аккаунта через резервную ссылку в точности дублирует оригинальную бланк. Дебютные игроки прописывают функционирующий email, придумывают стойкий пароль и назначают базовую денежную единицу.
Подтверждение аккаунта требует представления свидетельств в соответствии с KYC-стандартам. Снимок удостоверения личности, свидетельство адреса и платежные реквизиты контролируются системой алгоритмическую контроль в течение 24-72 часа.
Аутентификация активных участников происходит через стандартную панель с 2FA аутентификацией. Сессионные шифры отправляются на мессенджер устройство или мейл.
Опции пополнительного блока через зеркала включает популярные расчетные сервисы. Visa, Mastercard, веб балансы Skrill, Neteller, криптовалюты Bitcoin, Ethereum обрабатываются с минимальными процентами 0-3%.
Gaming библиотека воспроизводится абсолютно включая spinning games, классические игры, live-дилеров и прогрессивы. RTP-коэффициенты, волатильность и условия отыгрыша остаются точными.
Акционная политика функционирует аналогично корневому веб-площадке. Welcome-бандлы, даровые прокруты, денежный возврат и VIP-курсы включаются алгоритмически при исполнении установленных стандартов.
affordable domains hub – The interface is straightforward and browsing feels effortless.
Awesome website you have here but I was wondering if you
knew of any discussion boards that cover the same topics talked about here?
I’d really love to be a part of group where I can get comments from other experienced individuals that share the
same interest. If you have any recommendations, please let me know.
Thank you!
whim favorites – Products are well displayed, and navigation feels smooth and simple.
pet meds official website: VetFree Meds – pet med
Навигация в сфере проверенных платформ включает владения продвинутых решений доступа. Опытные пользователи используют казино Mellstroy Game для приобретения новейшей материалов о активных ссылках.
Механизм регистрации счета в официальных учреждениях включает тщательную проверку. Современные поставщики внедряют KYC-системы и AML-критерии. Бумажная работа требует от 24 до 72 периодов.
Компьютерные способы для прохождения блокировок прогрессируют параллельно с усилением правовых решений. VPN-инструменты уровня premium обеспечивают криптографию AES-256 и технологии OpenVPN. Непрерывность подключения жизненно существенна для привилегированных игровых периодов.
Резервные сайты действуют через регионально размещенные серверные мощности. CDN-системы обеспечивают низкую латентность для европейских пользователей. Техническое переключение активируется при детекции ограничения центрального портала.
Экономические переводы в лицензированных юрисдикциях следуют жестким требованиям PCI DSS. Цифровые переводы увеличивают востребованность благодаря секретности и оперативности реализации.
Мобильные программы элитных операторов содержат физиологическую авторизацию и push-извещения для ключевых ситуаций. Изменяемый интерфейс автономно адаптируется под свойства экрана.
Актуальные пользователи имеют дело с набором программных особенностей при деятельности с сертифицированными сайтами. Тематические платформы типа п»ї1xBet зеркало выдают актуальную данные о деятельности игорных компаний.
Механизм верификации счета включает комплекс требуемых стадий. Стартовая проверка предполагает предоставления бумаг валидирующих персону. Привычный набор содержит ID, лицензию водителя или международное ID.
Технологическая составляющая регистрации включает применение защищенного протокола и двухфакторной аутентификации. Профессиональные пользователи советуют включать совокупность возможных возможностей обеспечения.
Альтернативные адреса представляют абсолютные копии центрального платформы с обеспечением полного арсенала. Центральное выгода заключается в соответствии денежных рамок и норм условий прокрутки.
Механизм нахождения действующих альтернативных адресов базируется на наблюдении специализированных новостных лент и партнерских порталов. Продвинутые клиенты применяют анонимайзеры для обеспечения надежного входа независимо от территориальных ограничений.
1win одиночная ставка http://www.1win52609.help
Актуальные бетторы оказываются с затруднением соединения к проверенным площадкам. Провайдеры закрывают главные домены, но грамотные п»ї1хбет сайт клиенты помнят о присутствии параллельных платформ.
Зеркало представляет точную копию базового платформы. Протоколы шифрования функционируют неизменными. Денежные операции производятся через те же системы.
Процедура регистрации через альтернативный портал требует типовой валидации. Менеджеры просят справки для исполнения KYC-регламентов. Персональные данные осуществляют усиленную валидацию.
Депозитные границы на зеркальных порталах аналогичны стандартным требованиям. Минимальные взносы функционируют фиксированными. Возрастающие призовые фонды согласовываются между множественными ресурсами.
Стимулирующие системы оперируют комплексно на дополнительных площадках. Требования по обороту удерживает первоначальные цифры. Срок активности использования сохраняется.
Департамент сопровождения обрабатывает вопросы с зеркальных адресов идентично. Живой разговор предоставляет круглосуточный порядок функционирования.
Just completed my registration on 8xbet and received the welcome offer, really impressed so far. Looking forward to exploring more exciting features on the platform.
продолжить vodka bet
When some one searches for his necessary thing, therefore he/she needs to be available that
in detail, therefore that thing is maintained
over here.
Here is my site; heating and air conditioning
Передовые операторы развлекательных развлечений гарантируют беттерам вход к элитному игровому процессу через надежные Вавада официальный сайт платформы. Официальная функционирование влечет выполнения жестких надзорных положений.
Система активации индивидуального учетной записи задействует валидацию индивидуальных показателей. Операторы применяют комплексные механизмы KYC и AML для пресечения фродовых платежей.
Цифровые платформы новейших беттинг площадок работают на стабильных облачных системах с криптографическими сертификатами. Локальные запреты обязывает провайдеров запускать параллельные URL.
Альтернативные сайты составляют точные копии центрального ресурса с сохранением всех возможностей и сведений. Пользователи достигают постоянный соединение к депозиту, развлекательной данным и персональным конфигурациям.
Банковские действия производятся через синхронизированные расчетные сервисы. Рамки на взносы и обналичивания устанавливаются в гармонии с регуляторными условиями и внутренними нормами риск-менеджмента.
Компетентные игроки советуют контролировать статус разрешения через надзорные списки развлекательных комиссий. Репутационные параметры предусматривают позиции на отраслевых сайтах и отзывы действительных беттеров.
Лицензионные платформы игровых сервисов oferuja геймерам возможность к премиальному азартному досугу через целевые домены, включая Mellstroy Game зеркало , которые специально исполняют transnational регламенты безопасности.
Схема регистрации подразумевает предоставления идентификационных данных через безопасные SSL-протоколы. Провайдеры demanded официальное свидетельство age verification и территории жительства для соблюдения законодательных правил.
Двухфакторная верификация считается обязательным составляющей передовых платформ безопасности. Пользователи располагают SMS-коды, push-оповещения или внедряют профессиональные софт типа Google Authenticator.
Резервные домены ликвидируют трудности territorial санкций и DDoS-assault. Фактически mirrors составляют копийные dublicates базового платформы с поддержанием возможностей и клиентских деталей.
Компетентные пользователи suggest удерживать обновлённые базы активных зеркал в сохранённых ссылках обозревателя. Администрация доставляют информацию о актуальных порталах через мейл, Telegram-группы и mobile приложения.
Банковские процедуры через надёжные порталы обеспечены encryption технологиями стандарта банковского индустрии. Вывод денег производится единственно на validated реквизиты хозяина account.
island ink digital shop – Memorable visuals and a creative identity that shines.
discover stitchandsell – Finding items is simple, and purchasing feels quick and effortless.
Winter Walk Online – Items are clearly organized and browsing feels fast and simple.
This casino https://kamgranit.pl/ offers a solid mix of classic slots and live tables. The platform feels well-designed, promotions are worth trying, and support is helpful, which adds confidence.
see Search Smith content – Navigation is simple, and all sections are clearly labeled.
ссылка на сайт casino vodka
Подбор надежного развлекательного портала в современных обстоятельствах подразумевает повышенного подхода к лицензионному режиму. Профессиональные клиенты представляют, что Вавада зеркало содержит современную материалы о работающих операторах.
Процедура записи в легальных заведениях охватывает требуемую аутентификацию персональных данных. KYC-нормы защищают как площадку, так и участника от фрода. Временные пределы на вывод активов до завершения верификации – типичная процедура.
Электронные ограничения на соединение к игровым ресурсам решаются через альтернативные URL. Рабочие клоны предоставляют полную возможности центрального сервиса. Финансовые операции, азартный продвижение и наградные программы сохраняются константными.
Капитальная защищенность выражается качеством используемых расчетных методов. SSL-шифрование, PCI DSS валидация и многоуровневая подтверждение обеспечивают надежный заслон безопасности.
Азартная каталог легальных операторов предоставляет барабаны от лидирующих студий. RTP-коэффициенты, изменчивость и математические принципы претерпевают внешнюю проверку в авторизованных институтах.
Программы вознаграждения в качественных заведениях опираются на прозрачных критериях проигрыша. Отыгрыш x35-40 признается разумным для слот-бонусов, в то время как карточные игры включаются в расчет с редуцированным процентом.
Определение достойного игрового оператора в современных обстоятельствах подразумевает тщательного анализа к лицензионному положению. Знающие геймеры представляют, что Меллстрой сайт демонстрирует современную данные о доступных площадках.
Механизм оформления профиля в сертифицированных сервисах объединяет неизбежную аутентификацию личности. KYC-стандарты обеспечивают как оператора, так и игрока от махинаций. Краткосрочные пределы на перечисление капитала до завершения проверки – привычная процедура.
Технические блокировки на соединение к гемблинг площадкам устраняются через параллельные ссылки. Функционирующие отражения гарантируют стопроцентную производительность центрального платформы. Банковские переводы, азартный продвижение и бонусные системы поддерживаются неизменными.
Денежная защищенность характеризуется показателем внедренных расчетных способов. SSL-шифрование, PCI DSS валидация и двухфакторная аутентификация обеспечивают надежный заслон защиты.
Игровая ассортимент официальных заведений охватывает слоты от топовых производителей. RTP-значения, вариативность и статистические формулы претерпевают нейтральную валидацию в авторизованных институтах.
Механизмы вознаграждения в качественных казино формируются на понятных критериях активности. Условия ставок x35-40 расценивается разумным для автомат-привилегий, в то время как классические игры засчитываются в счет с уменьшенным процентом.
нажмите, чтобы подробнее casino vodka
explore Backpack Boutique Finds – Beautifully displayed products and the layout keeps everything easy to explore.
Навигация в сфере официальных площадок включает представления актуальных методов подключения. Квалифицированные пользователи внедряют Лаки Бир зеркало для добывания релевантной информации о работающих адресах.
Схема формирования счета в надежных организациях предполагает тщательную аутентификацию. Современные операторы эксплуатируют KYC-протоколы и AML-требования. Оформление документов потребляет от 24 до 72 часов.
IT решения для прохождения запретов развиваются параллельно с укреплением регуляторных действий. VPN-сервисы класса premium обеспечивают кодирование AES-256 и методы OpenVPN. Постоянство связи принципиально актуальна для VIP игровых периодов.
Зеркальные сайты выполняют задачи через территориально расположенные цифровые ресурсы. CDN-комплексы обеспечивают минимальную латентность для американских участников. Техническое роутинг запускается при распознавании барьера первичного портала.
Экономические операции в сертифицированных зонах отвечают четким стандартам PCI DSS. Цифровые расчеты получают распространение благодаря конфиденциальности и динамике выполнения.
Переносные приложения элитных операторов совмещают отпечатковую проверку и push-извещения для критических происшествий. Адаптивный оформление самостоятельно адаптируется под особенности матрицы.
Современные гемблеры встречаются с сложностью соединения к лицензированным площадкам. Операторы закрывают главные адреса, но знающие Вавада официальный сайт участники осознают о доступности резервных ресурсов.
Альтернативный адрес составляет идентичную копию основного ресурса. Средства защиты работают идентичными. Платёжные действия производятся через равнозначные сервисы.
Алгоритм заведения учётной записи через зеркальный домен содержит типовой подтверждения. Специалисты выясняют справки для исполнения KYC-правил. Паспортные характеристики выполняют усиленную верификацию.
Банковские рамки на дополнительных площадках аналогичны главным условиям. Наименьшие вклады продолжают константными. Растущие накопления согласовываются между различными доменами.
Льготные системы функционируют полноценно на резервных платформах. Коэффициент оборота сохраняет базовые цифры. Период действия оборота продолжается.
Департамент помощи обрабатывает обращения с зеркальных ресурсов сходным образом. Живой разговор осуществляет круглосуточный режим деятельности.
Winter Walk Marketplace – Excellent assortment and navigation feels seamless.
Many thanks, I enjoy this!
see the Caffeine Corner catalog – Products look appealing and finding items is effortless.
For alternatives
online casino real money no deposit award-winning
for future predictions.
Гемблинговая отрасль демонстрирует быстрый расширение, притягивая миллионы геймеров. Экспертные порталы предлагают защищённую среду для беттинга. Детальную данные о данных брендах доступно найти на Лаки Бир РІС…РѕРґ .
Сертификация представляет главным элементом определения платформы. Контролёры Олдерни обеспечивают тщательный контроль экономических транзакций. Отдельная лицензированная портал выполняет постоянные контроли RNG-генераторов.
IT аспекты новейших беттинг-платформ предусматривают SSL-криптографию финансового уровня. Разработчики софтового ПО уровня Microgaming, NetEnt, Pragmatic Play подключают сложные схемы произвольных параметров.
Процесс аутентификации счёта предусматривает направления свидетельств KYC-типа. Свидетельство, свидетельство о финансах, верификация адреса — базовый набор для окончательного активации.
Параллельные URL ликвидируют проблемы с ограничениями операторов. Рабочие альтернативы корректируются каждый день IT группами. Смартфонные софт регулярно действуют надёжнее онлайн вариантов.
Финансовая дисциплина задаёт длительную эффективность азартных периодов. Экспертные участники указывают урезать количество пари до 1-2% от общего резерва.
Новейшие участники обталкиваются с изобилием технологических аспектов при операциях с легальными платформами. Тематические сайты типа Vavada зеркало дают актуальную сведения о работе игорных организаций.
Процесс аутентификации учетной записи подразумевает комплекс требуемых фаз. Начальная проверка предполагает размещения бумаг подтверждающих индивидуальность. Обычный список содержит ID, водительские права или международное ID.
Системная компонента создания аккаунта содержит внедрение зашифрованного канала и двойной авторизации. Продвинутые участники настаивают активировать весь комплекс доступных возможностей охраны.
Зеркала составляют абсолютные реплики базового сайта с сохранением исчерпывающего арсенала. Ключевое достоинство состоит в соответствии денежных пределов и условий отыгрыша.
Схема поиска функционирующих резервных ссылок основывается на отслеживании экспертных информационных каналов и партнерских ресурсов. Экспертные участники используют анонимайзеры для предоставления надежного соединения независимо от местных ограничений.
https://info-realty.ru/bitrix/pages/promo_kod_1xbet_na_segodnya_pri_registracii.html
minimal treasures store – Items are displayed clearly and the simple style enhances browsing.
Погрузитесь в minecraft слот — тематический онлайн-автомат с ярким оформлением и дополнительными возможностями. Обзор правил и бонусных раундов.
roastandroute – The branding is stylish and browsing the site on mobile is effortless.
Нынешние геймеры попадают с проблемой связи к официальным платформам. Операторы ограничивают базовые ссылки, но знающие Вавада сайт игроки помнят о функционировании параллельных ресурсов.
Зеркало представляет полную копию главного платформы. SSL-сертификаты работают неизменными. Банковские операции реализуются через равнозначные системы.
Технология открытия счёта через параллельный портал подразумевает классической валидации. Администраторы просят справки для реализации KYC-норм. Индивидуальные параметры подвергаются усиленную валидацию.
Финансовые ограничения на резервных порталах совпадают основным характеристикам. Низшие ставки поддерживаются постоянными. Прогрессивные призовые фонды согласовываются между различными порталами.
Премиальные схемы функционируют комплексно на дополнительных платформах. Вейджер гарантирует первоначальные показатели. Период действия реализации продолжается.
Департамент сопровождения анализирует обращения с альтернативных доменов равнозначно. Прямой чат поддерживает беспрерывный режим деятельности.
Передовые операторы игорных развлечений предлагают клиентам доступ к качественному игровому процессу через сертифицированные Lucky Bear казино сайты. Авторизованная бизнес требует исполнения конкретных контролирующих критериев.
Система создания персонального счета задействует подтверждение приватных данных. Операторы эксплуатируют комплексные системы KYC и AML для блокировки фродовых транзакций.
Цифровые средства актуальных казино основываются на зашифрованных инфраструктурах с криптографическими алгоритмами. IP-фильтрация обязывает владельцев запускать параллельные порталы.
Параллельные ресурсы представляют идентичные дубликаты первичного домена с удержанием всех функций и сведений. Участники обеспечивают себе устойчивый подключение к депозиту, игровой данным и индивидуальным настройкам.
Расчетные транзакции осуществляются через связанные банковские процессоры. Лимиты на пополнения и обналичивания фиксируются в согласии с законодательными критериями и организационными правилами снижения потерь.
Квалифицированные пользователи настаивают контролировать статус разрешения через государственные базы данных игорных комиссий. Статусные критерии задействуют оценки на профильных ресурсах и оценки истинных пользователей.
click to explore Warehouse Whim – Selection is wide, and navigation feels smooth and simple.
http://mymexicanpharmacy.com/# mexican pharmacy menu
Новейшие бетторы натыкаются с препятствием соединения к официальным ресурсам. Провайдеры запрещают первичные URL, но грамотные Vavada пользователи помнят о наличии дублирующих площадок.
Дополнительный домен является полную реплику оригинального портала. Протоколы шифрования сохраняются равнозначными. Платёжные операции выполняются через аналогичные системы.
Методика заведения учётной записи через дополнительный адрес включает стандартной подтверждения. Специалисты требуют свидетельства для выполнения KYC-стандартов. Личные сведения осуществляют расширенную подтверждение.
Финансовые рамки на альтернативных платформах идентичны стандартным параметрам. Наименьшие ставки функционируют стабильными. Прогрессивные выигрышные пулы координируются между разными доменами.
Стимулирующие системы работают полноценно на альтернативных сайтах. Коэффициент оборота поддерживает первоначальные показатели. Период действия использования не изменяется.
Служба поддержки рассматривает запросы с резервных порталов равнозначно. Интерактивный общение обеспечивает беспрерывный расписание обслуживания.
CertiCanPharmacy: CertiCanPharmacy – CertiCanPharmacy
Навигация в мире проверенных площадок включает осознания продвинутых технологий доступа. Продвинутые участники задействуют Vavada для получения современной сведений о работающих URL.
Процедура формирования личного кабинета в проверенных организациях охватывает сложную верификацию. Современные провайдеры эксплуатируют KYC-процедуры и AML-правила. Бумажная работа требует от 24 до 72 часов.
Цифровые способы для обхода блокировок эволюционируют вместе с интенсификацией правовых инициатив. VPN-инструменты уровня premium гарантируют криптографию AES-256 и протоколы OpenVPN. Непрерывность канала жизненно значима для премиальных игровых периодов.
Резервные платформы функционируют через пространственно разнесенные технические системы. CDN-архитектуры гарантируют быструю латентность для глобальных геймеров. Программное редирект запускается при детекции недоступности первичного портала.
Финансовые операции в сертифицированных зонах соответствуют строгим стандартам PCI DSS. Цифровые платежи получают признание вследствие скрытности и оперативности реализации.
Портативные программы элитных провайдеров интегрируют биометрическую аутентификацию и push-оповещения для важных событий. Настраиваемый интерфейс самостоятельно изменяется под настройки матрицы.
http://mymexicanpharmacy.com/# mexican farmacia
My Mexican Pharmacy: My Mexican Pharmacy – My Mexican Pharmacy
мелбет скачать андроид мелбет скачать андроид .
Надёжные операторы гэмблинг возможностей дают участникам вариант к премиальному развлечениям через тематические платформы, включая Вавада регистрация , которые точно соблюдают международные регламенты защиты.
Процедура оформления профиля necessita ввода валидационных сведений через защищённые SSL-протоколы. Букмекеры запрашивают документальное удостоверение правоспособности и места жительства для поддержания законодательных стандартов.
Двухфакторная верификация выступает mandatory частью новейших механизмов security. Пользователи обретают SMS-токены, push-оповещения или задействуют профессиональные утилиты в стиле Google Authenticator.
Mirror порталы устраняют препятствия региональных ограничений и DDoS-assault. По сути зеркала представляют копийные копии центрального платформы с сохранением возможностей и user информации.
Профессиональные участники предлагают удерживать обновлённые списки рабочих альтернатив в favourites веб-клиента. Провайдеры рассылают новости о свежих доменах через электронную почту, Telegram-каналы и mobile программы.
Банковские процедуры через официальные платформы покрыты защитными протоколами категории банковского направления. Вывод средств выполняется исключительно на validated счета хозяина аккаунта.
Новейшие игроки обталкиваются с изобилием программных аспектов при деятельности с легальными сайтами. Профильные сайты типа Вавада зеркало предоставляют актуальную сведения о процессах игорных организаций.
Процедура валидации учетной записи подразумевает множество обязательных фаз. Исходная проверка нуждается загрузки свидетельств подтверждающих персону. Стандартный перечень содержит удостоверение личности, права или внешний паспорт.
Техническая сторона создания аккаунта предполагает задействование зашифрованного канала и многофакторной защиты. Квалифицированные пользователи настаивают включать совокупность доступных параметров безопасности.
Альтернативные адреса образуют точные дубликаты основного домена с поддержанием всего арсенала. Главное выгода выражается в идентичности денежных границ и требований условий прокрутки.
Процедура локализации актуальных альтернативных адресов строится на контроле профессиональных уведомительных сервисов и сотрудничающих сайтов. Квалифицированные участники внедряют прокси-соединения для формирования надежного входа вне зависимости от территориальных запретов.
Актуальные резервные адреса официальных азартных клубов на Вавада сайт гарантируют беспрерывный соединение к гемблинг платформам. Система клонирования формирует эквивалентные клоны корневого веб-площадки с сохранением всех инструментов.
Процедура регистрации через резервную ссылку на сто процентов воспроизводит базовую заявку. Дебютные клиенты заполняют действующий email, формируют стойкий секретную комбинацию и фиксируют рабочую финансовый инструмент.
Идентификация профиля содержит предоставления свидетельств следуя KYC-регламенту. Изображение водительских прав, свидетельство места жительства и карточные сведения проходят алгоритмическую верификацию в течение 24-72 часов.
Вход активных игроков происходит через стандартную форму с усиленной проверкой. Сессионные ключи поступают на мобильный номер или мейл.
Возможности входящего блока через зеркала предлагает популярные платежные сервисы. Visa, Mastercard, онлайн хранилища Skrill, Neteller, crypto Bitcoin, Ethereum процессируются с сокращенными процентами 0-3%.
Игровая коллекция дублируется на сто процентов включая барабаны, столовые забавы, live-хостов и мегавыигрыши. RTP-значения, вариативность и условия отыгрыша поддерживаются точными.
Подарочная политика работает идентично главному сайту. Welcome-бандлы, даровые прокруты, возврат средств и VIP-курсы активируются системно при соблюдении фиксированных критериев.
Современные игроки сталкиваются с сложностью доступа к легальным сайтам. Организации ограничивают базовые порталы, но знающие Mellstroy Game casino посетители понимают о функционировании резервных сайтов.
Дополнительный домен формирует идентичную реплику оригинального портала. Средства защиты поддерживаются неизменными. Денежные действия реализуются через те же механизмы.
Процедура оформления профиля через альтернативный домен предполагает привычной валидации. Сотрудники уточняют документы для исполнения KYC-регламентов. Индивидуальные данные осуществляют комплексную подтверждение.
Вносительные рамки на резервных сайтах аналогичны главным спецификациям. Стартовые ставки продолжают постоянными. Увеличивающиеся джекпоты координируются между всеми ссылками.
Поощрительные механизмы действуют полноценно на альтернативных сайтах. Вейджер гарантирует стартовые цифры. Срок активности использования сохраняется.
Департамент обслуживания обрабатывает обращения с дополнительных ссылок равнозначно. Живой общение обеспечивает беспрерывный порядок деятельности.
profit pavilion digital shop – The information provided is straightforward and well organized.
If an external drive isn’t appearing on your desktop or in Finder, first verify the cable connection and port, then open Disk Utility to see if the drive is listed there but requires mounting or first aid repairs.
You should see:
best system tools for Intel Mac running Ventura
Dive into the details:
While both methods preserve data, a cloned backup to an external drive offers immediate bootability in case of total system failure, whereas Time Machine provides granular version history for individual file recovery over time.
Winter Walk Finds – Interface is polished and shopping through products is easy and enjoyable.
My Mexican Pharmacy mexican rx pharm order medicine from mexico
Анализ рейтинга перед ufc в феврале марте 2026 три недели которые встряхнут дивизионы: кто станет новым лидером? Смотрите здесь: https://turbaza-ladya.ru/news/goryachaya-seriya-ufc-fevral-mart-2026-boi-kotorye-mogut-izmenit-vsyo-v-rejtingah-i-divizionah/
see the Pine Path collection – Navigation is intuitive, and products are displayed nicely.
Определение безопасного игорного заведения требует основательного анализа лицензионных разрешений. Инновационные ресурсы п»ї1xBet казино дают клиентам безусловную детали о собственных допусках.
Процесс создания профиля охватывает ряд принудительных шагов валидации. Владельцы просят свидетельства, подтверждающие персону и возраст. Классический KYC-порядок занимает от 24 до 72 промежутков.
Распоряжение капиталом открывается с назначения ограничений на пополнения. Опытные клиенты советуют эксплуатировать правило 5% от итогового азартного фонда на отдельную партию.
Цифровые блокировки поставщиков побуждают задействовать вспомогательные ссылки. Копии поддерживают полную работоспособность центрального ресурса, охватывая летопись платежей и развлекательный прогресс.
Современные денежные инструменты поддерживают быстрые инвестиции через электронные портмоне. Bitcoin, Ethereum и постоянные токены дают конфиденциальность и наименьшие взносы. Время выполнения выводов доходит 10-30 отрезков.
Программы преданности включают каскадные ранги с прогрессивным вознаграждением. VIP-менеджеры гарантируют индивидуальные поощрения, улучшенные рамки и первоочередную помощь.
Поиск проверенного гемблинг ресурса предполагает серьезного рассмотрения правовых свидетельств. Передовые системы Mellstroy Game зеркало предоставляют участникам абсолютную сведения о имеющихся допусках.
Процесс создания профиля включает несколько необходимых шагов верификации. Владельцы требуют свидетельства, устанавливающие личность и дееспособность. Классический KYC-алгоритм составляет от 24 до 72 интервалов.
Контроль средств стартует с установления ограничений на депозиты. Искусные геймеры настаивают задействовать норму 5% от итогового игорного капитала на индивидуальную раунд.
Системные запреты владельцев принуждают внедрять дополнительные ссылки. Альтернативы поддерживают максимальную производительность основного ресурса, охватывая летопись операций и развлекательный продвижение.
Современные платежные методы обеспечивают скоростные взносы через виртуальные кошельки. Bitcoin, Ethereum и постоянные токены поддерживают приватность и символические отчисления. Время обработки изъятий составляет 10-30 минут.
Схемы постоянства включают каскадные уровни с возрастающим кэшбэком. VIP-менеджеры предлагают личные бонусы, увеличенные границы и преимущественную обслуживание.
Night Nectar Store – The overall style looks fantastic and the presentation feels polished.
интернет vodka casino
surfacespark – Clean interface and browsing through items feels intuitive very easy.
corner favorites – Layout is neat, and browsing items is effortless and enjoyable.
на этом сайте водка бет
premium restrelay – The interface is clear, and browsing through products is effortless.
Winter Walk Marketplace – Excellent assortment and navigation feels seamless.
Hi, yes this article is genuinely good and I have learned lot
of things from it on the topic of blogging. thanks.
перейдите на этот сайт vodkabet
browse warehousewhim items – Layout is tidy, making it easy to move through products.
Fabric Falcon Store – Great selection of items with helpful and easy-to-read descriptions.
изготовление вентиляции из оцинкованной стали Профессиональная установка и монтаж систем вентиляции. Гарантия качества, доступные цены и быстрый выезд специалиста.
http://mymexicanpharmacy.com/# mexico pet pharmacy
canada pet meds: VetFree Meds – pet pharmacy online
For easy
how to buy cheap plavix without insurance
for registration.
I’ve been surfing online more than three hours today, yet I never found any
interesting article like yours. It is pretty worth enough for me.
In my opinion, if all site owners and bloggers made good content as you did, the
net will be much more useful than ever before.
My website – ac repair
home office chairs hub – Well-constructed chairs providing comfort and durability for daily use.
https://certicanpharmacy.shop/# reputable canadian online pharmacy
https://www.site-lady.ru/content/pgs/1xbet_promokod_registraciya.html
прокуратура Волгоград Актуальные новости Волгограда сегодня: главные события, срочные сообщения и сводки происшествий. Все, что нужно знать жителям города и области.
веб-сайте vodka casino
Anchor & Aisle Hub – The structure is clear and browsing around feels enjoyable.
узнать больше casino vodka
Word Warehouse Store – Everything is well structured and finding information is simple.
Fantastic goods from you, man. I’ve understand your
stuff previous to and you’re just extremely wonderful. I actually like what you have acquired
here, really like what you are saying and the way in which you say it.
You make it entertaining and you still take care
of to keep it smart. I cant wait to read far more from you.
This is actually a tremendous website.
Review my site; ac repair
https://rc88.tech/
Winter Walk Selections – Clean design and browsing items is quick and user-friendly.
I enjoy playing at this casino https://dommuz.pl/ because it feels secure and stable. Live tables are interactive, slots offer different styles, and the overall experience remains consistent over time.
shop packagepioneer – Nice selection and navigating through items is straightforward today.
click to explore ergonomic finds – Layout is simple, and understanding product features is quick.
https://www.pondexperts.ca/wp-content/pages/1xbet_bangladesh_promo_code_for_registration_on_200__first_deposit.html
https://montaury.com.br/emails/pages/code_promo_gratuit_2.html
discover winterwalkshop – Good assortment and navigation is smooth throughout.
http://liligrass.ru/images/pages/melbet_fribet_pri_registracii_2020.html
здесь vodka bet
What a material of un-ambiguity and preserveness
of precious familiarity about unpredicted feelings.
peachparlor picks – Sweet and inviting design combined with a smooth shopping experience.
http://hostingfinder.ru/wp-content/pgs/1hbet_promokod_besplatno.html
каталог vodka bet casino
browse Ruby Rail online – Everything is presented neatly, and exploring products is simple.
browse Warehouse Whim online – Layout is organized, and moving through products feels effortless.
shoeshrine – The styles feel modern and the pricing looks reasonable.
Venverra Hub – The site feels polished and reliable, perfect for online buying.
Легальные провайдеры игровых возможностей обеспечивают участникам вариант к профессиональному гэмблингу через тематические сайты, включая Вавада , которые специально выполняют общепринятые критерии безопасности.
Алгоритм создания аккаунта подразумевает указания authentication сведений через безопасные SSL-протоколы. Провайдеры просят документальное свидетельство дееспособности и места жительства для исполнения legal требований.
Multi-factor идентификация становится mandatory aspect передовых solutions security. Участники получают SMS-пароли, push-сообщения или применяют специализированные программы вроде Google Authenticator.
Mirror домены ликвидируют вопросы geographic запретов и DDoS-штурмов. По сути зеркала представляют аналогичные реплики центрального сайта с maintaining функциональности и user деталей.
Профессиональные геймеры призывают хранить новейшие перечни активных альтернатив в favourites browser. Букмекеры рассылают информацию о новых ссылках через email, Telegram-чаты и смартфонные приложения.
Денежные операции через лицензионные ресурсы защищены криптографическими технологиями level банковского сектора. Получение денег происходит исключительно на проверенные счета владельца профиля.
Азартная ниша представляет активный подъём, притягивая тысячи пользователей. Квалифицированные порталы предлагают безопасную среду для развлечений. Развёрнутую факты о таких компаниях можно отыскать на п»ї1xBet казино .
Сертификация выступает приоритетным критерием подбора платформы. Регуляторы Мальты обеспечивают серьёзный контроль расчётных процедур. Всякая сертифицированная платформа реализует периодические проверки RNG-модулей.
Компьютерные свойства инновационных азартных площадок включают SSL-кодирование расчётного ранга. Производители виртуального продукта типа Microgaming, NetEnt, Pragmatic Play внедряют усовершенствованные алгоритмы случайных значений.
Процедура проверки профиля включает передачи документов KYC-класса. Свидетельство, выписка о прибылях, удостоверение регистрации — типичный пакет для завершённого доступа.
Зеркальные домены ликвидируют препятствия с запретами операторов. Функционирующие зеркала модифицируются систематически программными службами. Карманные софт часто работают стабильнее веб редакций.
Банкролл-менеджмент задаёт долгосрочную эффективность гемблинговых раундов. Экспертные пользователи советуют сокращать размер депозита до 1-2% от совокупного резерва.
bayou fitness shop – Clear product categories and informative descriptions make shopping simple.
Sample Suite Marketplace Online – Organized structure and navigation feels intuitive and smooth.
click for ssdsanctuary – Products are appealing and the interface makes browsing simple.
Передовые игроки попадают с проблемой подключения к сертифицированным порталам. Организации блокируют первичные адреса, но знающие Vavada участники помнят о наличии резервных порталов.
Параллельный портал формирует абсолютную копию первичного платформы. SSL-сертификаты поддерживаются идентичными. Расчётные процедуры выполняются через равнозначные системы.
Процедура открытия счёта через альтернативный портал включает типовой верификации. Сотрудники требуют документы для выполнения KYC-норм. Личные параметры реализуют комплексную проверку.
Финансовые ограничения на альтернативных ресурсах идентичны главным требованиям. Низшие суммы поддерживаются неизменными. Растущие джекпоты синхронизируются между разными адресами.
Поощрительные планы функционируют всесторонне на альтернативных площадках. Коэффициент оборота удерживает оригинальные цифры. Длительность проигрывания продолжается.
Отдел помощи обрабатывает запросы с параллельных адресов аналогично. Онлайн общение поддерживает круглосуточный график обслуживания.
Азартная отрасль показывает активный подъём, завлекая массы игроков. Профессиональные сайты дают качественную обстановку для развлечений. Полную данные о указанных брендах возможно получить на казино Меллстрой .
Аттестация выступает ключевым аспектом отбора платформы. Надзорные органы Великобритании обеспечивают жёсткий контроль расчётных действий. Конкретная официальная платформа проходит систематические ревизии RNG-модулей.
Программные особенности актуальных гемблинг-сайтов содержат SSL-защиту банковского класса. Производители компьютерного продукта наподобие Microgaming, NetEnt, Pragmatic Play интегрируют многоуровневые схемы произвольных показателей.
Схема проверки профиля подразумевает подачи удостоверений KYC-формата. ID, справка о средствах, верификация прописки — классический пакет для итогового входа.
Параллельные адреса ликвидируют трудности с ограничениями операторов. Действующие варианты корректируются каждый день IT группами. Смартфонные клиенты обычно оперируют стабильнее веб модификаций.
Контроль средств формирует стратегическую результативность развлекательных сессий. Экспертные беттеры настаивают контролировать размер пари до 1-2% от общего капитала.
quartz quiver hub online – Neat arrangement and descriptions that provide solid context.
смотреть здесь зеркало водка бет
explore Winter Walk Gear – Layout is intuitive and pages load fast without any hiccups.
Развлекательная индустрия показывает быстрый развитие, завлекая множество участников. Грамотные платформы гарантируют безопасную атмосферу для игры. Детальную информацию о подобных провайдерах можно получить на п»ї1хбет .
Аккредитация составляет главным фактором выбора сайта. Надзорные органы Гибралтара создают качественный мониторинг экономических операций. Любая официальная площадка реализует плановые контроли RNG-механизмов.
Программные параметры передовых азартных площадок объединяют SSL-шифрование денежного категории. Создатели программного обеспечения типа Microgaming, NetEnt, Pragmatic Play подключают многоуровневые механизмы хаотичных чисел.
Процедура проверки аккаунта включает представления удостоверений KYC-стандарта. Свидетельство, справка о финансах, верификация прописки — классический пакет для окончательного авторизации.
Зеркальные домены убирают препятствия с блокировками поставщиков. Свежие копии изменяются систематически IT группами. Портативные приложения обычно выполняются качественнее сетевых форматов.
Банкролл-менеджмент задаёт перспективную эффективность беттинговых сессий. Опытные геймеры указывают урезать сумму депозита до 1-2% от итогового резерва.
Trim Tulip Store – Polished design and navigating the site is fast and intuitive.
Актуальные платформы гемблинг продуктов предлагают пользователям возможность к высококлассному гемблингу через проверенные п»ї1хбет порталы. Лицензированная деятельность нуждается соблюдения конкретных контролирующих норм.
Процедура активации персонального аккаунта включает подтверждение конфиденциальных информации. Администраторы применяют расширенные процедуры KYC и AML для предотвращения фродовых транзакций.
Программные средства актуальных гемблинг платформ функционируют на стабильных серверах с криптографическими алгоритмами. Региональная блокировка заставляет владельцев создавать альтернативные порталы.
Альтернативные сайты представляют эквивалентные репликации базового платформы с сохранением всех функций и информации. Клиенты обеспечивают себе беспрепятственный вход к счету, развлекательной записям и личным установкам.
Платежные транзакции осуществляются через синхронизированные платежные шлюзы. Лимиты на взносы и обналичивания определяются в соответствии с законодательными положениями и внутренними нормами контроля угроз.
Экспертные игроки указывают контролировать состояние авторизации через регуляторные базы данных азартных органов. Престижные критерии охватывают рейтинги на профильных сервисах и комментарии реальных пользователей.
check out winterwalkshop – Strong lineup of items and pages load quickly every time.
sweet bake shop – Everything looks inviting, and the shopping process is easy.
узнать больше зеркало водка бет
Передовые гемблеры сталкиваются с проблемой доступа к легальным площадкам. Провайдеры запрещают базовые URL, но грамотные Вавада РІС…РѕРґ посетители учитывают о доступности резервных порталов.
Резервная ссылка представляет точную реплику базового сайта. Криптографические алгоритмы сохраняются такими же. Расчётные процедуры выполняются через равнозначные шлюзы.
Схема регистрации через дополнительный ссылку включает обычной проверки. Операторы просят справки для выполнения KYC-стандартов. Персональные сведения осуществляют расширенную аутентификацию.
Пополнительные ограничения на зеркальных ресурсах идентичны главным параметрам. Низшие беты поддерживаются константными. Увеличивающиеся накопления объединяются между множественными доменами.
Стимулирующие программы действуют полноценно на зеркальных порталах. Коэффициент оборота поддерживает первоначальные показатели. Временные рамки проигрывания продолжается.
Команда помощи решает тикеты с резервных доменов идентично. Живой чат гарантирует 24-часовой порядок обслуживания.
Актуальные сервисы азартных развлечений гарантируют беттерам доступ к качественному гемблингу через надежные Вавада зеркало порталы. Лицензированная операционная активность требует следования конкретных законодательных норм.
Алгоритм регистрации клиентского кабинета предусматривает подтверждение личных данных. Управляющие эксплуатируют многоуровневые механизмы KYC и AML для недопущения фродовых транзакций.
IT платформы современных развлекательных порталов базируются на надежных облачных системах с шифровальными стандартами. IP-фильтрация побуждает провайдеров создавать резервные адреса.
Резервные платформы представляют точные клоны первичного портала с удержанием всех возможностей и параметров. Клиенты добиваются стабильный вход к средствам, азартной истории и личным настройкам.
Расчетные операции реализуются через встроенные банковские процессоры. Ограничения на инвестиции и снятия устанавливаются в соответствии с нормативными положениями и собственными правилами минимизации опасностей.
Компетентные игроки предлагают контролировать условия аккредитации через контролирующие регистры азартных ведомств. Престижные индикаторы задействуют позиции на специализированных порталах и отзывы подлинных клиентов.
For results
Local long term payday loans
for guidance and advice.
содержание водка бет
https://clockfase.com/auth/elmn/?1xbet_promokod_pri_registracii_7.html
Выбор проверенного игрового ресурса в актуальных условиях предполагает повышенного внимания к регулятивному статусу. Профессиональные участники учитывают, что Вавада регистрация включает последнюю материалы о действующих сервисах.
Схема оформления профиля в официальных сервисах содержит требуемую подтверждение персональных данных. KYC-правила оберегают как площадку, так и игрока от махинаций. Краткосрочные пределы на снятие средств до закрытия контроля – нормальная методика.
Виртуальные блокировки на подключение к развлекательным ресурсам решаются через альтернативные ссылки. Доступные дубликаты поддерживают абсолютную работоспособность главного сайта. Финансовые процедуры, геймплейный результаты и льготные предложения сохраняются постоянными.
Материальная гарантированность измеряется степенью используемых платежных систем. SSL-шифрование, PCI DSS подтверждение и многоуровневая идентификация устанавливают безопасный щит безопасности.
Азартная коллекция лицензированных заведений включает машины от топовых создателей. RTP-индексы, вариативность и алгоритмические системы подвергаются нейтральную валидацию в авторизованных лабораториях.
Схемы мотивации в серьезных казино строятся на ясных параметрах отыгрыша. Вейджер x35-40 расценивается разумным для машина-бонусов, в то время как настольные забавы засчитываются в зачет с уменьшенным процентом.
кликните сюда vodkabet
Поиск проверенного betting площадки в текущих рамках предполагает тщательного анализа к законному уровню. Компетентные клиенты учитывают, что Mellstroy Game содержит свежую данные о активных сервисах.
Процедура оформления профиля в сертифицированных платформах включает принудительную проверку документов. KYC-правила защищают как площадку, так и клиента от махинаций. Кратковременные пределы на получение денег до выполнения верификации – привычная практика.
Технические запреты на подключение к азартным сервисам обходятся через альтернативные домены. Действующие клоны поддерживают стопроцентную работоспособность первичного ресурса. Финансовые переводы, игровой достижения и наградные программы продолжают неизменными.
Денежная надежность характеризуется качеством задействованных расчетных методов. SSL-кодирование, PCI DSS подтверждение и двухфакторная верификация обеспечивают надежный барьер ограждения.
Геймплейная библиотека легальных провайдеров включает автоматы от лидирующих провайдеров. RTP-параметры, волатильность и статистические модели испытывают объективную контроль в авторизованных организациях.
Механизмы мотивации в качественных сервисах основываются на ясных параметрах проигрыша. Требования x35-40 признается справедливым для автомат-привилегий, в то время как настольные игры принимаются в калькуляцию с уменьшенным коэффициентом.
Hello, yes this article is in fact pleasant and I have learned lot of things from it concerning blogging.
thanks.
Подбор качественного игрового оператора в сегодняшних обстоятельствах подразумевает тщательного внимания к лицензионному уровню. Компетентные пользователи понимают, что Вавада казино отображает последнюю данные о работающих сервисах.
Алгоритм записи в легальных операторах предусматривает необходимую валидацию персональных данных. KYC-требования гарантируют как оператора, так и участника от мошенничества. Временные границы на перечисление средств до завершения верификации – привычная подход.
Программные барьеры на вход к betting сервисам преодолеваются через резервные URL. Рабочие копии гарантируют всестороннюю эффективность первичного портала. Банковские движения, геймплейный результаты и поощрительные предложения продолжают неизменными.
Финансовая безопасность определяется качеством используемых расчетных методов. SSL-шифрование, PCI DSS сертификация и многоуровневая проверка обеспечивают прочный щит охраны.
Игровая ассортимент официальных провайдеров предоставляет машины от главных студий. RTP-индексы, вариативность и алгоритмические принципы проходят независимую контроль в признанных институтах.
Системы мотивации в серьезных казино формируются на четких условиях вейджера. Требования x35-40 расценивается нормальным для спин-поощрений, в то время как настольные активности идут в калькуляцию с уменьшенным коэффициентом.
visit warehousewhim – Items are well organized, making browsing simple and enjoyable.
Передовые провайдеры беттинг активностей дают участникам вход к профессиональному азарту через сертифицированные казино Меллстрой системы. Официальная работа влечет исполнения определенных законодательных критериев.
Процедура создания пользовательского профиля содержит подтверждение приватных сведений. Регуляторы эксплуатируют углубленные протоколы KYC и AML для исключения поддельных операций.
IT решения современных гемблинг платформ строятся на безопасных серверах с шифровальными алгоритмами. Геоблокировка заставляет операторов разрабатывать вспомогательные ссылки.
Зеркальные порталы образуют полные версии главного ресурса с поддержанием всех опций и сведений. Участники приобретают непрерывный вход к счету, гемблинг истории и персональным параметрам.
Расчетные переводы проходят через интегрированные платежные шлюзы. Лимиты на пополнения и обналичивания назначаются в гармонии с регуляторными требованиями и индивидуальными правилами минимизации опасностей.
Квалифицированные гемблеры советуют мониторить условия аккредитации через государственные списки гемблинг ведомств. Статусные показатели содержат ранги на профильных сервисах и оценки реальных пользователей.
ссылка на сайт водка бэт
мельбет мельбет .
An interesting discussion is definitely worth comment.
There’s no doubt that that you ought to write more on this issue, it may not be a taboo matter but generally people do not
discuss these subjects. To the next! Cheers!!
click to explore Label Lilac – Layout is simple, and product descriptions help me decide fast.
Современные провайдеры азартных развлечений обеспечивают игрокам вход к высококлассному игровому процессу через проверенные Меллстрой официальный сайт сайты. Официальная работа влечет выполнения определенных правовых критериев.
Процесс оформления пользовательского счета включает верификацию личных информации. Управляющие внедряют детализированные алгоритмы KYC и AML для предотвращения фродовых переводов.
Программные средства передовых развлекательных порталов функционируют на надежных облачных системах с шифровальными сертификатами. Геоблокировка принуждает администраторов создавать параллельные ссылки.
Резервные сайты представляют полные копии основного платформы с фиксацией всех сервисов и показателей. Беттеры получают стабильный связь к балансу, гемблинг данным и индивидуальным опциям.
Платежные процедуры выполняются через встроенные денежные агрегаторы. Пределы на пополнения и получения определяются в унисон с правовыми условиями и корпоративными правилами контроля угроз.
Компетентные игроки настаивают проверять положение авторизации через надзорные каталоги игорных организаций. Репутационные индикаторы охватывают ранги на экспертных сайтах и мнения настоящих пользователей.
Гемблинговая область показывает активный расширение, завлекая множество игроков. Экспертные сайты дают качественную среду для беттинга. Исчерпывающую факты о этих брендах можно обнаружить на Vavada .
Лицензирование выступает приоритетным показателем селекции платформы. Регуляторы Кюрасао создают тщательный мониторинг расчётных операций. Каждая сертифицированная портал осуществляет регулярные проверки RNG-систем.
Компьютерные характеристики современных азартных площадок содержат SSL-защиту экономического категории. Поставщики программного материала класса Microgaming, NetEnt, Pragmatic Play внедряют многоуровневые схемы произвольных значений.
Процесс подтверждения профиля включает представления свидетельств KYC-уровня. Паспорт, справка о заработке, верификация адреса — типичный список для итогового авторизации.
Резервные порталы исправляют проблемы с фильтрацией провайдеров. Функционирующие альтернативы обновляются ежедневно компьютерными специалистами. Смартфонные софт зачастую оперируют надёжнее сетевых модификаций.
Управление банкроллом формирует длительную доходность азартных периодов. Экспертные геймеры предлагают ограничивать количество депозита до 1-2% от полного банкролла.
Stable Supply Online – Products are well organized and the shopping process is effortless.
в этом разделе зеркало водка бет
Подбор честного азартного оператора предполагает глубокого исследования лицензионных разрешений. Современные порталы п»ї1xBet casino гарантируют клиентам безусловную данные о действующих лицензиях.
Процесс создания профиля подразумевает различные ключевых этапов подтверждения. Владельцы запрашивают бумаги, засвидетельствующие идентичность и дееспособность. Обычный KYC-процесс длится от 24 до 72 промежутков.
Распоряжение капиталом инициируется с определения лимитов на взносы. Опытные игроки советуют эксплуатировать норму 5% от совокупного игорного бюджета на индивидуальную игру.
Технические препятствия администраторов заставляют задействовать альтернативные пути. Клоны оберегают абсолютную производительность базового ресурса, содержа архив платежей и игровой успех.
Современные денежные системы обеспечивают быстрые взносы через блокчейн портмоне. Bitcoin, Ethereum и устойчивые монеты гарантируют скрытность и символические взносы. Длительность реализации снятий насчитывает 10-30 промежутков.
Планы приверженности содержат ступенчатые степени с нарастающим вознаграждением. VIP-представители предоставляют индивидуальные поощрения, усиленные пределы и ускоренную техподдержку.
insightaurora boutique – Clear tutorials and resources simplify understanding complex subjects.
Официальные платформы игровых опций гарантируют геймерам право к профессиональному развлечениям через dedicated порталы, включая Mellstroy Game , что соблюдают общепринятые требования надёжности.
Алгоритм регистрации требует предоставления верификационных сведений через защищённые SSL-протоколы. Администрация просят предоставить нотариальное verification age verification и адреса нахождения для compliance legal норм.
2FA authentication представляет mandatory элементом передовых систем конфиденциальности. Клиенты располагают SMS-коды, push-оповещения или используют специализированные программы в стиле Google Authenticator.
Альтернативные домены устраняют трудности географических запретов и DDoS-штурмов. Техническим образом зеркала представляют копийные версии базового сайта с удержанием features и пользовательских информации.
Skilled игроки suggest хранить current каталоги рабочих дублей в сохранённых ссылках обозревателя. Администрация рассылают новости о современных порталах через почтовые сервисы, Telegram-каналы и mobile приложения.
Payment транзакции через legal ресурсы secured шифровальными технологиями уровня банковского индустрии. Получение фондов реализуется лишь на верифицированные счета хозяина личного кабинета.
мелбет для снг мелбет для снг .
Действующие альтернативные домены проверенных gaming-операторов на п»ї1xBet casino предоставляют устойчивый вход к геймерским порталам. Принцип зеркалирования строит аналогичные клоны основного веб-площадки с фиксацией всех механизмов.
Система регистрации через зеркало в точности дублирует главную заявку. Свежие геймеры вводят активный email, устанавливают надежный ключ и фиксируют игровую платежное средство.
Аутентификация профиля включает предоставления удостоверений опираясь на KYC-требованиям. Изображение национального документа, подтверждение места жительства и платежные параметры проверяются через машинную контроль в течение 24-72 временных единиц.
Аутентификация активных клиентов выполняется через типовую модуль с двухфакторной проверкой. Разовые ключи поступают на мобильный девайс или почтовый ящик.
Инструменты пополнительного сектора через зеркала обеспечивает распространенные финансовые инструменты. Visa, Mastercard, электронные портмоне Skrill, Neteller, криптовалюты Bitcoin, Ethereum процессируются с низкими взносами 0-3%.
Гемблинг база повторяется на сто процентов включая барабаны, карточные развлечения, live-дилеров и мегавыигрыши. RTP-параметры, волатильность и вейджер остаются идентичными.
Подарочная схема работает аналогично корневому сайту. Welcome-бандлы, фриспины, денежный возврат и VIP-планы активируются автоматически при исполнении фиксированных условий.
HushHarvest Selects – Fresh items came quickly and packaging was excellent.
Современные пользователи обталкиваются с огромным количеством системных аспектов при работе с официальными площадками. Профессиональные платформы типа Меллстрой РІС…РѕРґ обеспечивают релевантную сведения о процессах азартных провайдеров.
Алгоритм проверки кабинета подразумевает ряд неотъемлемых уровней. Стартовая проверка требует передачи свидетельств валидирующих субъект. Классический перечень подразумевает документ, водительские права или заграничное удостоверение.
Технологическая часть оформления подразумевает внедрение криптографической защиты и двухфакторной аутентификации. Опытные участники настаивают включать совокупность доступных функций безопасности.
Дублирующие порталы являются полные реплики главного платформы с поддержанием всего набора функций. Важнейшее выгода содержится в тождественности денежных лимитов и условий вейджера.
Механизм поиска рабочих альтернативных адресов строится на отслеживании экспертных уведомительных сервисов и союзных порталов. Опытные клиенты внедряют виртуальные частные сети для гарантирования надежного соединения безотносительно от географических блокировок.
copper crown digital shop – One-of-a-kind selection and a checkout that runs smoothly.
vps essentials hub – Plans are clear, competitive, and easy to browse for different needs.
pen pavilion shop – Love the originality of the items and the attention to detail is clear.
Winter Walk Essentials – Easy to navigate and shopping experience is very smooth.
Sweater Station Online Deals – Everything loads quickly and browsing items feels effortless.
заказ букетов с доставкой в москве – Скидки для постоянных покупателей букетов
discover Winter Walk Gear – Diverse products and everything functions smoothly.
Если следите за новостями и темой ufc в феврале марте 2026 три недели которые встряхнут дивизионы, посмотрите этот разбор. Источник здесь: https://chrome-downloads.ru/news/ufc-fevral-mart-2026-samye-goryachie-boi-i-neozhidannye-povoroty-kotoryh-stoit-zhdat/
Поиск в пространстве сертифицированных площадок предполагает понимания актуальных способов авторизации. Профессиональные клиенты применяют Меллстрой для приобретения свежей фактов о действующих ссылках.
Процесс открытия профиля в официальных компаниях предполагает сложную верификацию. Актуальные провайдеры эксплуатируют KYC-алгоритмы и AML-правила. Документальное сопровождение требует от 24 до 72 интервалов.
Компьютерные технологии для прохождения препятствий совершенствуются синхронно с ужесточением юридических решений. VPN-службы категории premium обеспечивают кодирование AES-256 и стандарты OpenVPN. Устойчивость канала критически существенна для привилегированных игровых периодов.
Альтернативные домены работают через регионально рассредоточенные IT кластеры. CDN-комплексы осуществляют быструю латентность для глобальных клиентов. Техническое маршрутизация запускается при обнаружении ограничения главного портала.
Платежные переводы в официальных областях отвечают жестким правилам PCI DSS. Децентрализованные переводы увеличивают востребованность из-за секретности и динамике реализации.
Мобильные приложения ведущих операторов объединяют голосовую проверку и push-сообщения для существенных моментов. Модифицируемый дизайн программно адаптируется под особенности панели.
Проверенные платформы развлекательных предложений гарантируют клиентам возможность к качественному развлечениям через dedicated домены, включая Lucky Bear казино , которые именно следуют международные стандарты безопасности.
Последовательность оформления профиля necessita указания проверочных параметров через безопасные SSL-соединения. Операторы требуют письменное verification age verification и места проживания для соблюдения нормативных норм.
2FA верификация считается required частью новейших систем надёжности. Игроки имеют SMS-ключи, push-алерты или используют специализированные утилиты наподобие Google Authenticator.
Резервные домены ликвидируют трудности региональных блокировок и DDoS-атак. С технической точки зрения реплики формируют копийные версии базового домена с удержанием опций и user деталей.
Экспертные клиенты предлагают удерживать актуальные реестры функционирующих зеркал в favourites browser. Администрация рассылают информацию о свежих ссылках через электронную почту, Telegram-группы и мобильные apps.
Финансовые переводы через проверенные платформы обеспечены криптографическими системами уровня банковского области. Снятие фондов выполняется только на аутентифицированные реквизиты собственника профиля.
I enjoy playing at this casino https://agroekologia.edu.pl/ because it feels trustworthy and well-optimized. Live tables are immersive, slots offer good variety, and the overall experience remains consistent over time.
生命树2026 海外华人高原守护剧 杨紫胡歌主演 高清燃哭剧情 AI匹配
Cardio Cart Online – The selection is impressive and navigating through categories feels effortless.
https://turbokom.ru/import/pages/promokod_283.html
Подбор надежного развлекательного портала в актуальных реалиях заставляет тщательного анализа к законному режиму. Профессиональные клиенты представляют, что Lucky Bear демонстрирует свежую материалы о доступных сервисах.
Механизм записи в проверенных платформах объединяет неизбежную подтверждение личности. KYC-процедуры гарантируют как казино, так и участника от афер. Временные ограничения на получение средств до закрытия проверки – типичная подход.
Электронные ограничения на соединение к азартным ресурсам решаются через зеркальные URL. Активные дубликаты сохраняют полную производительность базового портала. Денежные движения, игровой прогресс и наградные программы поддерживаются устойчивыми.
Материальная безопасность оценивается показателем применяемых банковских механизмов. SSL-кодирование, PCI DSS валидация и расширенная верификация устанавливают безопасный барьер охраны.
Игровая библиотека сертифицированных провайдеров включает автоматы от известных создателей. RTP-коэффициенты, колебания и алгоритмические принципы испытывают независимую сертификацию в признанных институтах.
Схемы поощрения в профессиональных заведениях основываются на ясных правилах отыгрыша. Требования x35-40 считается разумным для спин-поощрений, в то время как стандартные развлечения идут в счет с пониженным множителем.
Проверенные площадки гэмблинг возможностей oferuja пользователям доступ к качественному игровому процессу через тематические ресурсы, включая казино 1xBet , которые именно соблюдают transnational критерии конфиденциальности.
Процедура оформления профиля подразумевает предоставления проверочных информации через безопасные SSL-соединения. Операторы запрашивают письменное подтверждение возраста и места проживания для compliance юрисдикционных правил.
Многоуровневая проверка считается required частью актуальных solutions конфиденциальности. Пользователи получают SMS-шифры, push-сообщения или эксплуатируют профессиональные приложения по типу Google Authenticator.
Альтернативные домены устраняют трудности локальных санкций и DDoS-штурмов. С технической точки зрения дубли формируют аналогичные клоны базового платформы с maintaining опций и клиентских данных.
Компетентные геймеры suggest сохранять current базы working альтернатив в bookmark browser. Management отправляют новости о новых адресах через почтовые сервисы, Telegram-чаты и мобильные софт.
Банковские операции через проверенные порталы покрыты cryptographic алгоритмами уровня банковского направления. Вывод фондов осуществляется лишь на аутентифицированные wallets держателя учётной записи.
Vendor Velvet Essentials – Clean, contemporary design makes navigation straightforward and simple.
best mocha finds – Nice variety of products and the payment process was smooth.
Действующие резервные адреса легальных азартных клубов на Вавада гарантируют беспрерывный доступ к азартным платформам. Система клонирования генерирует идентичные дубликаты главного ресурса с поддержанием всех инструментов.
Механизм открытия счета через альтернативный домен абсолютно имитирует базовую шаблон. Новые клиенты указывают валидный email, придумывают стойкий пароль и устанавливают операционную курренси.
Идентификация счета предполагает предоставления бумаг согласно KYC-политике. Скан паспорта, свидетельство проживания и финансовые параметры контролируются системой алгоритмическую верификацию в течение 24-72 ч.
Аутентификация зарегистрированных клиентов выполняется через обычную окно с 2FA верификацией. Краткосрочные коды поступают на сотовый устройство или email.
Инструменты пополнительного блока через альтернативные домены обеспечивает популярные финансовые платформы. Visa, Mastercard, веб хранилища Skrill, Neteller, виртуальные монеты Bitcoin, Ethereum процессируются с минимальными взносами 0-3%.
Азартная коллекция копируется на сто процентов включая машины, карточные активности, live-хостов и мегавыигрыши. RTP-индикаторы, колебания и условия отыгрыша удерживаются неизменными.
Подарочная политика выполняется аналогично корневому веб-площадке. Welcome-бандлы, безвозмездные спины, компенсация и VIP-программы запускаются программно при выполнении заданных требований.
Нынешние геймеры пересекаются с изобилием программных деталей при работе с проверенными сайтами. Специализированные платформы типа Меллстрой РІС…РѕРґ выдают новую материалы о функционировании игорных организаций.
Система верификации кабинета охватывает комплекс обязательных шагов. Исходная аутентификация нуждается предоставления справок верифицирующих индивидуальность. Привычный перечень охватывает паспорт, права или международное ID.
Цифровая элемент оформления охватывает применение криптографической защиты и 2FA. Продвинутые участники рекомендуют задействовать совокупность имеющихся параметров обеспечения.
Альтернативные адреса формируют точные дубликаты базового сайта с хранением исчерпывающего набора функций. Ключевое плюс выражается в схожести платежных лимитов и норм условий прокрутки.
Процедура обнаружения функционирующих запасных доменов основывается на контроле профессиональных мессенджер групп и сотрудничающих площадок. Квалифицированные клиенты задействуют прокси-соединения для обеспечения устойчивого связи независимо от региональных барьеров.
подробнее водка бэт
whim favorites – Products are well displayed, and navigation feels smooth and simple.
внедрение 1с москва внедрение 1с москва .
Современные игроки натыкаются с барьером доступа к проверенным сайтам. Компании фильтруют главные URL, но опытные п»ї1xBet casino участники понимают о существовании дублирующих платформ.
Зеркало формирует идентичную отображение основного портала. SSL-сертификаты сохраняются идентичными. Банковские транзакции выполняются через равнозначные шлюзы.
Схема открытия счёта через резервный домен предполагает классической аутентификации. Сотрудники выясняют документы для реализации KYC-правил. Индивидуальные характеристики проходят комплексную подтверждение.
Депозитные ограничения на дополнительных порталах аналогичны стандартным параметрам. Наименьшие ставки остаются константными. Увеличивающиеся накопления синхронизируются между различными адресами.
Стимулирующие планы функционируют целостно на параллельных сайтах. Отыгрышный коэффициент сохраняет первоначальные цифры. Длительность реализации не изменяется.
Департамент поддержки анализирует обращения с резервных ссылок равнозначно. Живой переписка осуществляет непрерывный расписание обслуживания.
Игровая отрасль демонстрирует быстрый подъём, притягивая множество пользователей. Экспертные порталы предоставляют качественную пространство для игры. Детальную факты о подобных организациях доступно получить на Меллстрой РІС…РѕРґ .
Аккредитация составляет центральным аспектом подбора портала. Регуляторы Гибралтара гарантируют качественный проверку расчётных действий. Конкретная официальная портал проходит плановые проверки RNG-модулей.
Программные характеристики инновационных азартных площадок включают SSL-криптографию расчётного класса. Создатели цифрового продукта класса Microgaming, NetEnt, Pragmatic Play встраивают продвинутые модели рандомных значений.
Механизм валидации счёта предусматривает представления свидетельств KYC-типа. Удостоверение, свидетельство о финансах, валидация адреса — базовый комплект для окончательного доступа.
Зеркальные URL убирают сложности с ограничениями операторов. Актуальные зеркала адаптируются ежедневно программными службами. Портативные софт зачастую оперируют устойчивее онлайн версий.
Банкролл-менеджмент устанавливает долгосрочную успешность развлекательных партий. Грамотные участники настаивают ограничивать размер ставки до 1-2% от суммарного банкролла.
Игровой автомат https://chickenroadgames.top — современный слот с интересной концепцией и бонусами. Подробности о механике и особенностях геймплея.
explore Metric Meadow – Navigation is intuitive and exploring products is simple and fast.
As an example
Best us online casinos unbeatable
to read the full article.
Современные геймеры сталкиваются с барьером соединения к проверенным ресурсам. Компании фильтруют стандартные порталы, но профессиональные п»ї1хбет регистрация клиенты осознают о функционировании параллельных ресурсов.
Параллельный портал формирует стопроцентную воспроизведение базового ресурса. Средства защиты поддерживаются такими же. Денежные действия производятся через равнозначные каналы.
Алгоритм регистрации через дополнительный домен содержит обычной проверки. Администраторы выясняют бумаги для соблюдения KYC-норм. Личные характеристики проходят расширенную верификацию.
Вносительные лимиты на резервных сайтах равняются базовым условиям. Низшие вклады продолжают постоянными. Возрастающие джекпоты интегрируются между множественными порталами.
Льготные программы действуют комплексно на альтернативных сайтах. Отыгрышный коэффициент обеспечивает оригинальные параметры. Длительность оборота сохраняется.
Сервис поддержки обрабатывает вопросы с дополнительных ресурсов сходным образом. Онлайн разговор предоставляет круглосуточный график деятельности.
Беттинговая область показывает динамичный расширение, притягивая массы игроков. Квалифицированные ресурсы обеспечивают надёжную обстановку для ставок. Подробную сведения о подобных компаниях реально изучить на казино Lucky Bear .
Аккредитация остаётся главным критерием отбора сайта. Юрисдикции Олдерни дают строгий контроль расчётных манипуляций. Отдельная аккредитованная ресурс осуществляет регулярные инспекции RNG-генераторов.
Технические параметры актуальных казино охватывают SSL-кодирование финансового категории. Провайдеры софтового обеспечения типа Microgaming, NetEnt, Pragmatic Play подключают сложные схемы произвольных показателей.
Механизм проверки учётной записи включает направления справок KYC-уровня. Документ, выписка о средствах, верификация проживания — стандартный пакет для итогового подключения.
Резервные адреса решают препятствия с запретами компаний. Рабочие альтернативы адаптируются систематически цифровыми командами. Карманные софт обычно выполняются лучше веб версий.
Финансовая дисциплина создаёт длительную результативность беттинговых периодов. Опытные игроки указывают лимитировать объём ставки до 1-2% от итогового капитала.
мостбет служба поддержки http://mostbet26148.help/
explore Citrus Canopy – Everything is arranged nicely, making browsing very easy.
mariners treasures hub – Locally sourced and fresh items make browsing the store satisfying.
Азартная отрасль демонстрирует динамичный развитие, привлекая множество участников. Экспертные ресурсы предлагают качественную условия для развлечений. Полную материалы о этих брендах допустимо найти на Лаки Бир .
Лицензирование остаётся главным элементом отбора ресурса. Контролёры Кюрасао предоставляют серьёзный проверку валютных транзакций. Всякая легальная площадка подвергается плановые проверки RNG-модулей.
Программные свойства современных казино включают SSL-шифрование финансового категории. Создатели программного материала типа Microgaming, NetEnt, Pragmatic Play встраивают усовершенствованные механизмы произвольных значений.
Процесс аутентификации личного кабинета подразумевает представления удостоверений KYC-уровня. Свидетельство, документ о средствах, верификация проживания — типичный набор для окончательного авторизации.
Резервные домены устраняют сложности с ограничениями поставщиков. Функционирующие копии адаптируются постоянно цифровыми службами. Планшетные софт регулярно оперируют надёжнее онлайн вариантов.
Управление банкроллом формирует стратегическую успешность гемблинговых периодов. Опытные игроки советуют сокращать величину вейджера до 1-2% от итогового фонда.
Определение безопасного игорного площадки заставляет тщательного рассмотрения правовых свидетельств. Современные платформы п»ї1xBet гарантируют игрокам полную информацию о текущих допусках.
Процедура получения доступа охватывает определенное количество обязательных стадий верификации. Владельцы требуют документы, засвидетельствующие персону и зрелость. Типовой KYC-механизм занимает от 24 до 72 часов.
Управление банком начинается с фиксации пределов на взносы. Профессиональные участники советуют задействовать закон 5% от полного игорного средств на конкретную сессию.
Программные блокировки администраторов принуждают применять дополнительные маршруты. Альтернативы хранят полную активность базового портала, охватывая хронологию платежей и азартный успех.
Передовые платежные сервисы дают моментальные депозиты через виртуальные хранилища. Bitcoin, Ethereum и стабильные валюты предоставляют скрытность и наименьшие сборы. Срок проведения получений достигает 10-30 интервалов.
Схемы приверженности подразумевают многоуровневые категории с увеличивающимся бонусом. VIP-представители обеспечивают уникальные бонусы, улучшенные пределы и ускоренную техподдержку.
проект перепланировки квартиры для согласования проект перепланировки квартиры для согласования .
Willow Workroom Hub – Clear product descriptions and organized layout enhance the shopping process.
Определение проверенного развлекательного заведения в нынешних условиях требует тщательного изучения к регулятивному состоянию. Знающие участники осознают, что Vavada предоставляет актуальную сведения о работающих сервисах.
Схема записи в легальных заведениях предусматривает необходимую проверку идентичности. KYC-стандарты оберегают как оператора, так и клиента от махинаций. Переходные лимиты на изъятие финансов до закрытия подтверждения – привычная система.
Программные препятствия на вход к развлекательным ресурсам обходятся через резервные порталы. Активные дубликаты обеспечивают стопроцентную эффективность первичного сайта. Банковские переводы, геймплейный прогресс и наградные предложения функционируют постоянными.
Капитальная стабильность характеризуется критерием эксплуатируемых финансовых инструментов. SSL-безопасность, PCI DSS аттестация и усиленная проверка обеспечивают надежный барьер ограждения.
Геймплейная набор легальных сервисов охватывает автоматы от главных студий. RTP-значения, изменчивость и математические модели получают беспристрастную проверку в признанных учреждениях.
Системы стимулирования в надежных операторах основываются на понятных критериях ставок. Условия ставок x35-40 оценивается приемлемым для машина-бонусов, в то время как настольные забавы принимаются в зачет с сниженным множителем.
Определение надежного развлекательного заведения в нынешних реалиях требует специального рассмотрения к юридическому состоянию. Профессиональные игроки понимают, что казино Меллстрой содержит современную сведения о действующих сервисах.
Процедура записи в проверенных заведениях предусматривает обязательную аутентификацию удостоверения. KYC-процедуры защищают как казино, так и геймера от мошенничества. Переходные лимиты на снятие капитала до окончания валидации – типичная методика.
Электронные ограничения на подключение к азартным порталам преодолеваются через альтернативные адреса. Функционирующие зеркала гарантируют стопроцентную работоспособность основного сервиса. Денежные движения, интерактивный прогресс и бонусные программы поддерживаются стабильными.
Финансовая безопасность определяется качеством применяемых банковских методов. SSL-криптография, PCI DSS аттестация и усиленная верификация гарантируют стабильный щит охраны.
Азартная каталог легальных сервисов объединяет спины от главных создателей. RTP-параметры, изменчивость и вероятностные формулы испытывают внешнюю сертификацию в авторизованных учреждениях.
Системы стимулирования в профессиональных площадках формируются на ясных условиях вейджера. Проигрыш x35-40 считается разумным для автомат-бонусов, в то время как классические развлечения учитываются в подсчет с редуцированным показателем.
discover Marker Market Deals – Smooth interface and navigating the catalog is simple.
brightbanyan – Really clean design and pages load quickly on mobile.
Winter Walk Gear – Plenty of choices and the site runs seamlessly.
browse winterwalkshop – Everything runs smoothly and descriptions make finding items simple.
согласование перепланировки цена согласование перепланировки цена .
заказать букет цветов в москве с доставкой на дом недорого – Звонок оператора для уточнения деталей букета
Передовые участники сталкиваются с препятствием входа к официальным площадкам. Поставщики блокируют базовые URL, но знающие п»ї1хбет регистрация пользователи учитывают о присутствии резервных ресурсов.
Зеркало образует абсолютную реплику оригинального сайта. Криптографические алгоритмы работают аналогичными. Банковские транзакции выполняются через аналогичные шлюзы.
Схема заведения учётной записи через параллельный портал содержит обычной проверки. Менеджеры запрашивают справки для исполнения KYC-правил. Паспортные данные осуществляют расширенную верификацию.
Финансовые ограничения на дополнительных ресурсах соответствуют основным параметрам. Стартовые взносы поддерживаются константными. Прогрессивные накопления интегрируются между множественными порталами.
Стимулирующие схемы выполняются комплексно на параллельных ресурсах. Вейджер обеспечивает базовые показатели. Длительность реализации сохраняется.
Департамент сопровождения анализирует вопросы с дополнительных адресов аналогично. Прямой переписка обеспечивает постоянный порядок деятельности.
Подбор качественного азартного площадки в текущих границах предполагает повышенного внимания к законному статусу. Компетентные игроки осознают, что Вавада отображает современную сведения о действующих провайдерах.
Процесс оформления профиля в легальных операторах охватывает необходимую проверку персональных данных. KYC-правила охраняют как площадку, так и клиента от махинаций. Промежуточные границы на перечисление финансов до выполнения контроля – стандартная подход.
Виртуальные препятствия на связь к betting ресурсам устраняются через альтернативные порталы. Функционирующие копии предоставляют тотальную производительность центрального платформы. Банковские процедуры, игровой достижения и привилегированные предложения поддерживаются стабильными.
Финансовая надежность оценивается уровнем используемых финансовых систем. SSL-шифрование, PCI DSS аттестация и многоуровневая проверка устанавливают стабильный щит охраны.
Азартная коллекция легальных провайдеров объединяет спины от лидирующих студий. RTP-коэффициенты, вариативность и алгоритмические системы подвергаются объективную контроль в признанных лабораториях.
Схемы стимулирования в серьезных заведениях строятся на прозрачных критериях ставок. Вейджер x35-40 оценивается разумным для автомат-бонусов, в то время как карточные забавы засчитываются в зачет с пониженным фактором.
All About TabTower – Easy-to-follow layout with helpful information makes browsing quick.
Parcel Paradise Hub Online – Shipping options are simple to navigate and checkout works seamlessly.
premium Olive Orchard – Pages are tidy, and shopping flows smoothly from start to finish.
Новейшие игроки оказываются с затруднением входа к официальным ресурсам. Поставщики ограничивают первичные порталы, но знающие Mellstroy Game казино посетители помнят о функционировании зеркальных порталов.
Параллельный портал составляет полную воспроизведение оригинального сайта. Протоколы шифрования поддерживаются идентичными. Финансовые действия производятся через аналогичные механизмы.
Схема оформления профиля через дополнительный домен включает стандартной проверки. Специалисты уточняют документы для реализации KYC-норм. Личные характеристики проходят усиленную валидацию.
Финансовые ограничения на альтернативных площадках совпадают стандартным параметрам. Наименьшие ставки сохраняются постоянными. Увеличивающиеся призовые фонды интегрируются между различными ссылками.
Премиальные схемы работают комплексно на альтернативных сайтах. Отыгрышный коэффициент удерживает исходные величины. Срок активности реализации не изменяется.
Отдел обслуживания анализирует обращения с зеркальных порталов равнозначно. Живой переписка обеспечивает беспрерывный график функционирования.
Ориентирование в области легальных ресурсов предполагает знания новых решений подключения. Профессиональные геймеры применяют п»ї1хбет РІС…РѕРґ для обретения релевантной данных о функционирующих URL.
Схема создания счета в официальных организациях содержит тщательную аутентификацию. Новейшие организации задействуют KYC-системы и AML-требования. Документооборот составляет от 24 до 72 часов.
Технические технологии для обхода препятствий развиваются синхронно с укреплением юридических действий. VPN-инструменты разряда premium обеспечивают защиту AES-256 и протоколы OpenVPN. Постоянство связи критически актуальна для элитных раундов.
Альтернативные ресурсы выполняют задачи через локально распределенные технические ресурсы. CDN-сети предоставляют минимальную время ответа для европейских игроков. Цифровое перенаправление включается при детекции барьера центрального портала.
Финансовые переводы в сертифицированных юрисдикциях соответствуют строгим нормам PCI DSS. Цифровые транзакции набирают актуальность в результате анонимности и темпу процессинга.
Планшетные софт премиальных операторов включают физиологическую проверку и push-уведомления для важных происшествий. Адаптивный внешний вид независимо корректируется под особенности матрицы.
sipandsupply corner online – Lovely assortment and the site feels professional and clean.
Лицензионные площадки развлекательных услуг дают участникам шанс к элитному игровому процессу через целевые домены, включая Вавада , которые именно придерживаются общепринятые нормы надёжности.
Процедура регистрации necessita заполнения идентификационных параметров через защищённые SSL-connection. Менеджмент требуют official свидетельство дееспособности и адреса регистрации для исполнения нормативных критериев.
Двухэтапная аутентификация становится mandatory aspect современных solutions защиты. Users получают SMS-пароли, push-алерты или эксплуатируют специальные tools в стиле Google Authenticator.
Дублирующие домены нейтрализуют трудности локальных барьеров и DDoS-воздействий. Фактически реплики образуют копийные клоны базового платформы с сохранением features и клиентских информации.
Опытные геймеры советуют keeping свежие списки working зеркал в bookmark веб-клиента. Букмекеры отправляют сведения о новых адресах через мейл, Telegram-communities и мобильные приложения.
Платёжные процедуры через надёжные сайты обеспечены encryption алгоритмами класса банковского segment. Вывод финансов реализуется solely на верифицированные wallets хозяина личного кабинета.
Исследование в мире легальных ресурсов предполагает представления современных решений соединения. Продвинутые участники применяют Меллстрой зеркало для приобретения свежей информации о работающих ссылках.
Процедура регистрации личного кабинета в лицензированных компаниях включает сложную валидацию. Актуальные компании используют KYC-механизмы и AML-нормы. Бумажная работа отнимает от 24 до 72 интервалов.
Компьютерные технологии для преодоления барьеров совершенствуются синхронно с повышением законодательных действий. VPN-решения разряда premium предлагают шифрование AES-256 и методы OpenVPN. Стабильность связи жизненно важна для элитных партий.
Зеркальные платформы оперируют через пространственно распределенные цифровые системы. CDN-архитектуры осуществляют оптимальную задержку для международных участников. Программное роутинг срабатывает при детекции ограничения базового сайта.
Денежные операции в официальных юрисдикциях подчиняются жестким правилам PCI DSS. Крипто переводы приобретают распространение в результате секретности и быстроте осуществления.
Переносные программы топовых организаций совмещают физиологическую авторизацию и push-оповещения для важных моментов. Настраиваемый интерфейс самостоятельно корректируется под параметры дисплея.
shop Cleair Cove – Wide variety of items, and the interface is very intuitive.
Онлайн покер Покер онлайн покерок — регулярные турниры, кеш-игры и специальные предложения для игроков. Обзоры возможностей платформы и условий участия.
shop Warehouse Whim – Selection is impressive, and moving through products is effortless.
Лицензионные операторы игровых возможностей обеспечивают игрокам возможность к профессиональному игровому процессу через dedicated ресурсы, включая п»ї1хбет , которые специально соблюдают transnational нормы защиты.
Процедура активации necessita указания authentication деталей через защищённые SSL-соединения. Операторы просят предоставить нотариальное свидетельство дееспособности и локации жительства для compliance нормативных стандартов.
Multi-factor верификация представляет необходимым aspect современных механизмов надёжности. Users располагают SMS-токены, push-оповещения или эксплуатируют специальные приложения по типу Google Authenticator.
Зеркальные домены преодолевают проблемы географических блокировок и DDoS-атак. Техническим образом реплики представляют тождественные копии базового сайта с сохранением опций и пользовательских деталей.
Экспертные пользователи suggest поддерживать обновлённые каталоги активных копий в избранном интернет-программы. Администрация направляют информацию о fresh доменах через мейл, Telegram-каналы и портативные софт.
Денежные транзакции через надёжные порталы secured защитными methods уровня банковского segment. Вывод фондов производится исключительно на подтверждённые реквизиты обладателя аккаунта.
Беттинговая область представляет динамичный рост, притягивая массы пользователей. Экспертные платформы дают надёжную условия для беттинга. Исчерпывающую данные о этих организациях реально изучить на Меллстрой регистрация .
Аккредитация представляет приоритетным элементом выбора платформы. Регуляторы Олдерни дают качественный аудит финансовых манипуляций. Любая официальная ресурс подвергается плановые проверки RNG-генераторов.
Цифровые параметры новейших гемблинг-сайтов объединяют SSL-шифрование банковского класса. Производители виртуального ПО вроде Microgaming, NetEnt, Pragmatic Play встраивают комплексные системы произвольных параметров.
Механизм проверки профиля включает передачи документов KYC-типа. ID, справка о средствах, подтверждение адреса — классический комплект для полноценного доступа.
Резервные домены исправляют трудности с цензурой компаний. Функционирующие дубли модифицируются каждый день техническими командами. Смартфонные приложения регулярно функционируют лучше сетевых редакций.
Управление банкроллом определяет перспективную успешность гемблинговых партий. Экспертные беттеры настаивают ограничивать величину депозита до 1-2% от общего капитала.
Актуальные геймеры натыкаются с барьером подключения к лицензированным платформам. Компании ограничивают базовые домены, но знающие Вавада регистрация участники знают о наличии зеркальных сайтов.
Резервная ссылка является стопроцентную реплику основного портала. Протоколы шифрования остаются равнозначными. Платёжные действия осуществляются через идентичные каналы.
Схема открытия счёта через параллельный ресурс требует привычной проверки. Менеджеры выясняют свидетельства для исполнения KYC-регламентов. Индивидуальные данные реализуют усиленную аутентификацию.
Депозитные пределы на дополнительных площадках соответствуют базовым требованиям. Стартовые суммы поддерживаются фиксированными. Растущие призовые фонды согласовываются между всеми ссылками.
Поощрительные схемы работают целостно на параллельных сайтах. Множитель ставок обеспечивает стартовые величины. Период действия использования не изменяется.
Отдел обслуживания обрабатывает вопросы с параллельных ссылок таким же способом. Живой переписка поддерживает круглосуточный порядок оперирования.
Современные бетторы попадают с барьером связи к проверенным платформам. Организации запрещают базовые порталы, но знающие п»ї1хбет посетители понимают о наличии параллельных площадок.
Дополнительный домен образует точную дубликат базового площадки. SSL-сертификаты функционируют неизменными. Расчётные действия проходят через аналогичные механизмы.
Технология создания аккаунта через параллельный ссылку содержит обычной подтверждения. Менеджеры запрашивают бумаги для реализации KYC-норм. Личные характеристики осуществляют усиленную проверку.
Банковские рамки на зеркальных ресурсах аналогичны первичным параметрам. Начальные ставки поддерживаются константными. Накопительные выигрышные пулы интегрируются между всеми ссылками.
Бонусные программы действуют целостно на дополнительных ресурсах. Требования по обороту сохраняет оригинальные цифры. Период действия реализации остаётся прежним.
Департамент поддержки решает обращения с резервных доменов аналогично. Интерактивный чат осуществляет беспрерывный график деятельности.
этот сайт vodka bet
https://bcrpremium.ru/wp-content/pgs/promokod_fonbet_bonus_2.html
нажмите здесь vodkabet
sugarsummit sweets – Delicious confections and treats presented beautifully for easy selection.
Velvet Vendor 2 Online – Bookmarking this, they have some rare and standout items.
Explore VanillaView – Clean, appealing site design and simple navigation keep shopping stress-free.
vista vps hub – Transparent plan details with impressive performance data throughout.
Легальные ресурсы игровых возможностей предоставляют игрокам доступ к профессиональному игровому процессу через специализированные платформы, включая Vavada , что придерживаются мировые нормы надёжности.
Алгоритм оформления профиля necessita внесения валидационных сведений через криптографические SSL-протоколы. Операторы запрашивают документальное подтверждение дееспособности и адреса residence для compliance legal правил.
Многоуровневая верификация выступает обязательным компонентом современных систем надёжности. Users приобретают SMS-шифры, push-notification или внедряют targeted программы по типу Google Authenticator.
Зеркальные домены устраняют проблемы geographic ограничений и DDoS-атак. С технической точки зрения копии формируют дублированные реплики основного сайта с обеспечением features и клиентских параметров.
Экспертные пользователи рекомендуют keeping актуальные реестры функционирующих mirrors в favourites browser. Операторы доставляют новости о актуальных ссылках через мейл, Telegram-communities и портативные apps.
Банковские операции через надёжные площадки обеспечены encryption протоколами level банковского направления. Изъятие фондов осуществляется только на верифицированные карты хозяина account.
flex and flow boutique – The energy stands out and everything appears fresh and polished.
Поиск в секторе сертифицированных сайтов требует понимания современных способов подключения. Опытные участники применяют казино Вавада для приобретения современной данных о действующих ссылках.
Алгоритм оформления аккаунта в надежных заведениях охватывает детальную подтверждение. Продвинутые операторы задействуют KYC-алгоритмы и AML-требования. Бумажная работа составляет от 24 до 72 интервалов.
Цифровые решения для минования ограничений прогрессируют параллельно с ужесточением нормативных решений. VPN-сервисы класса premium обеспечивают защиту AES-256 и методы OpenVPN. Стабильность соединения кардинально актуальна для привилегированных раундов.
Запасные адреса действуют через регионально распределенные серверные мощности. CDN-системы осуществляют оптимальную задержку для европейских игроков. Автоматическое маршрутизация запускается при выявлении препятствия главного домена.
Банковские переводы в сертифицированных территориях подпадают под четким нормам PCI DSS. Крипто переводы увеличивают распространение по причине приватности и динамике выполнения.
Переносные программы элитных провайдеров совмещают физиологическую подтверждение и push-извещения для принципиальных происшествий. Гибкий дизайн программно изменяется под настройки матрицы.
Study this
moving best personal loan rates
for practical demonstrations.
cute finds await – I appreciate how everything is arranged so neatly and attractively.
check out fiberforge – User-friendly interface and exploring products is enjoyable.
на этом сайте зеркало водка бет
click for warehousewhim – The pages are tidy, and exploring products feels effortless.
Беттинговая область отображает активный рост, притягивая тысячи геймеров. Экспертные ресурсы обеспечивают стабильную пространство для развлечений. Исчерпывающую факты о этих организациях допустимо отыскать на п»ї1хбет регистрация .
Лицензирование остаётся главным показателем селекции сайта. Лицензиаты Олдерни создают строгий надзор экономических транзакций. Отдельная легальная портал проходит систематические проверки RNG-алгоритмов.
Программные особенности современных гемблинг-сайтов включают SSL-криптографию денежного класса. Производители софтового продукта вроде Microgaming, NetEnt, Pragmatic Play внедряют сложные алгоритмы хаотичных чисел.
Процесс валидации профиля предусматривает предоставления документов KYC-типа. ID, документ о финансах, подтверждение прописки — стандартный список для итогового активации.
Параллельные порталы исправляют барьеры с цензурой провайдеров. Рабочие копии адаптируются систематически IT группами. Смартфонные утилиты часто функционируют стабильнее браузерных вариантов.
Финансовая дисциплина устанавливает перспективную прибыльность игровых раундов. Экспертные пользователи предлагают контролировать количество ставки до 1-2% от полного резерва.
I enjoy playing at this casino https://springo.pl/ because it feels secure and stable. Live tables are interactive, slots offer good variety, and the overall experience remains consistent over time.
Winter Walk Storefront – Plenty to choose from and the site runs without glitches.
Подбор качественного развлекательного площадки в актуальных обстоятельствах заставляет особого подхода к правовому уровню. Опытные игроки осознают, что п»ї1xBet казино содержит актуальную информацию о действующих ресурсах.
Алгоритм регистрации в сертифицированных заведениях включает неизбежную аутентификацию личности. KYC-процедуры обеспечивают как оператора, так и клиента от фрода. Кратковременные пределы на вывод капитала до завершения верификации – стандартная практика.
Программные барьеры на соединение к игровым сайтам решаются через резервные порталы. Доступные клоны обеспечивают полную эффективность базового портала. Финансовые процедуры, интерактивный прогресс и поощрительные схемы функционируют неизменными.
Капитальная надежность выражается критерием эксплуатируемых денежных методов. SSL-криптография, PCI DSS подтверждение и расширенная идентификация формируют надежный барьер защиты.
Игровая коллекция лицензированных сервисов охватывает спины от известных разработчиков. RTP-показатели, волатильность и статистические модели испытывают нейтральную сертификацию в аккредитованных центрах.
Схемы стимулирования в профессиональных казино основываются на четких критериях активности. Проигрыш x35-40 считается приемлемым для спин-привилегий, в то время как карточные активности включаются в расчет с пониженным фактором.
Wander Warehouse Store – Plenty of choices here and the layout feels nicely organized.
vpsvista corner store – Clear hosting information and competitive plans make choices simpler.
Winter Walk Online – Items are clearly organized and browsing feels fast and simple.
каталог vodka casino
Новейшие сервисы гемблинг активностей гарантируют пользователям доступ к высококлассному беттингу через сертифицированные Mellstroy Game casino сайты. Авторизованная функционирование требует следования конкретных надзорных положений.
Система создания персонального счета задействует валидацию персональных реквизитов. Операторы эксплуатируют многоуровневые системы KYC и AML для блокировки фродовых транзакций.
Цифровые средства новейших игорных домов базируются на стабильных дата-центрах с криптографическими технологиями. Региональная блокировка побуждает администраторов запускать резервные порталы.
Альтернативные ресурсы являют собой эквивалентные копии главного портала с фиксацией всех инструментов и показателей. Участники добиваются стабильный вход к средствам, игровой отчетности и личным установкам.
Денежные процедуры выполняются через подключенные финансовые сервисы. Границы на пополнения и получения назначаются в соответствии с законодательными положениями и организационными нормами риск-менеджмента.
Опытные беттеры рекомендуют мониторить положение лицензии через контролирующие базы данных азартных комиссий. Имиджевые показатели содержат рейтинги на специализированных сервисах и комментарии истинных клиентов.
Нынешние гемблеры встречаются с затруднением связи к проверенным площадкам. Операторы закрывают стандартные порталы, но опытные Vavada зеркало участники осознают о доступности параллельных порталов.
Альтернативный адрес образует стопроцентную воспроизведение первичного платформы. SSL-сертификаты работают неизменными. Платёжные действия осуществляются через сходные механизмы.
Схема заведения учётной записи через резервный ссылку содержит обычной аутентификации. Менеджеры запрашивают свидетельства для выполнения KYC-норм. Идентификационные параметры проходят комплексную подтверждение.
Пополнительные границы на альтернативных платформах соответствуют стандартным параметрам. Низшие беты продолжают постоянными. Прогрессивные выигрышные пулы объединяются между множественными порталами.
Льготные схемы действуют целостно на дополнительных площадках. Коэффициент оборота удерживает первоначальные параметры. Период действия оборота не изменяется.
Сервис ассистирования рассматривает вопросы с альтернативных порталов идентично. Живой переписка осуществляет беспрерывный порядок оперирования.
see Iron Ivy products – Navigation is simple, and ordering was fast and easy.
http://ferienportugal.net/ice_media/robots/1xbet_promokod_pri_registracii_12.html
PlannerPort Tools – Great materials and pages load quickly for easy navigation.
https://atlaspamatek.info/pages/?kak_oformity_svadybu_v_krughevnom_stile.html
my favorite Map & Marker – Website looks neat, and exploring products is smooth and simple.
страница https://bestchangesru.com/
Нынешние игроки оказываются с сложностью связи к лицензированным порталам. Организации закрывают главные URL, но искушённые Меллстрой официальный сайт посетители помнят о наличии зеркальных сайтов.
Резервная ссылка формирует полную отображение оригинального сайта. Криптографические алгоритмы остаются равнозначными. Платёжные операции осуществляются через сходные шлюзы.
Технология создания аккаунта через резервный ссылку предполагает стандартной проверки. Сотрудники требуют справки для выполнения KYC-норм. Индивидуальные данные осуществляют комплексную верификацию.
Банковские рамки на альтернативных порталах равняются главным требованиям. Начальные суммы продолжают постоянными. Накопительные джекпоты синхронизируются между многочисленными адресами.
Премиальные программы работают целостно на резервных сайтах. Коэффициент оборота сохраняет оригинальные величины. Тайминг проигрывания продолжается.
Команда обслуживания изучает тикеты с параллельных доменов сходным образом. Мгновенный разговор осуществляет постоянный график функционирования.
Легальные ресурсы игровых опций oferuja участникам возможность к профессиональному времяпрепровождению через dedicated сайты, включая Вавада РІС…РѕРґ , которые точно следуют общепринятые регламенты надёжности.
Процедура оформления профиля necessita предоставления проверочных информации через шифрованные SSL-connection. Операторы просят официальное verification возраста и территории нахождения для выполнения legal норм.
2FA проверка представляет mandatory элементом передовых архитектур конфиденциальности. Users располагают SMS-коды, push-уведомления или эксплуатируют профессиональные утилиты в стиле Google Authenticator.
Дублирующие домены устраняют препятствия geographic санкций и DDoS-атак. Фактически зеркала составляют тождественные dublicates основного ресурса с поддержанием функциональности и пользовательских параметров.
Экспертные игроки советуют keeping current базы действующих дублей в favourites интернет-программы. Провайдеры отправляют сведения о новых URL через email, Telegram-группы и mobile софт.
Денежные транзакции через официальные ресурсы обеспечены encryption алгоритмами level банковского сектора. Изъятие фондов выполняется единственно на аутентифицированные карты владельца учётной записи.
bandwidth insight hub – Useful materials and clear directions make the browsing experience smooth.
Важный отрезок ufc в феврале марте 2026 три недели которые встряхнут дивизионы: прогнозы на ключевые поединки. Подробности тут: https://rybalka62.ru/news/obzor-blizhajshih-sobytij-ufc-fevral-mart-2026-prognozy-na-klyuchevye-poedinki/
Проверенные площадки игорных предложений обеспечивают клиентам доступ к элитному развлечениям через целевые домены, включая казино Lucky Bear , которые именно придерживаются мировые стандарты конфиденциальности.
Схема регистрации necessita предоставления верификационных информации через защищённые SSL-протоколы. Провайдеры просят нотариальное удостоверение дееспособности и региона residence для поддержания юрисдикционных норм.
2FA проверка является принудительным aspect актуальных платформ защиты. Пользователи обретают SMS-шифры, push-уведомления или используют targeted приложения по типу Google Authenticator.
Дублирующие URL ликвидируют проблемы локальных ограничений и DDoS-штурмов. Фактически реплики являют копийные dublicates главного платформы с сохранением функциональности и личных деталей.
Экспертные игроки советуют удерживать обновлённые каталоги активных альтернатив в закладках браузера. Администрация доставляют новости о свежих URL через e-mail, Telegram-communities и портативные apps.
Payment movements через официальные площадки обеспечены encryption протоколами категории банковского segment. Вывод капитала осуществляется единственно на аутентифицированные реквизиты хозяина аккаунта.
Выбор качественного betting оператора в нынешних обстоятельствах требует специального внимания к юридическому режиму. Квалифицированные участники осознают, что Лаки Бир официальный сайт включает свежую факты о функционирующих ресурсах.
Механизм создания аккаунта в лицензированных площадках включает необходимую верификацию персональных данных. KYC-правила гарантируют как площадку, так и пользователя от фрода. Кратковременные лимиты на изъятие финансов до закрытия контроля – типичная практика.
Программные препятствия на доступ к азартным площадкам решаются через зеркальные порталы. Доступные зеркала обеспечивают абсолютную функциональность базового сервиса. Финансовые операции, геймплейный продвижение и наградные программы продолжают устойчивыми.
Финансовая гарантированность выражается степенью используемых финансовых механизмов. SSL-шифрование, PCI DSS лицензирование и многоуровневая проверка создают прочный заслон обороны.
Развлекательная набор лицензированных операторов включает барабаны от известных студий. RTP-значения, дисперсия и алгоритмические схемы подвергаются независимую аудит в аккредитованных институтах.
Схемы стимулирования в профессиональных площадках опираются на открытых параметрах ставок. Проигрыш x35-40 расценивается адекватным для барабан-льгот, в то время как стандартные состязания включаются в счет с пониженным фактором.
ColorCairn Essentials – Fun, vivid products give a fresh, energetic vibe to browsing.
see the Warehouse Whim catalog – Browsing is smooth, and everything is presented clearly.
Phone Fix Shop Boutique – Informative service info and booking process worked smoothly.
Современные сервисы развлекательных услуг предлагают участникам доступ к качественному беттингу через сертифицированные Меллстрой платформы. Лицензированная функционирование предполагает выполнения жестких регуляторных положений.
Процесс открытия индивидуального кабинета задействует верификацию приватных реквизитов. Управляющие эксплуатируют комплексные системы KYC и AML для блокировки мошеннических операций.
Технические средства современных беттинг площадок базируются на стабильных инфраструктурах с SSL алгоритмами. Геоблокировка вынуждает провайдеров создавать вспомогательные порталы.
Дублирующие сайты представляют аналогичные копии центрального домена с поддержанием всех функций и сведений. Участники получают постоянный связь к капиталу, беттинг данным и клиентским установкам.
Денежные действия реализуются через синхронизированные банковские сервисы. Ограничения на инвестиции и обналичивания устанавливаются в гармонии с лицензионными условиями и индивидуальными регламентами минимизации опасностей.
Компетентные гемблеры советуют мониторить ситуацию лицензии через регуляторные списки гемблинг структур. Статусные индикаторы предусматривают позиции на экспертных сайтах и мнения настоящих беттеров.
Инновационные платформы гемблинг услуг дают клиентам путь к качественному развлечениям через защищенные п»ї1xBet казино порталы. Официальная функционирование подразумевает соблюдения конкретных законодательных критериев.
Процедура регистрации персонального кабинета задействует аутентификацию приватных данных. Администраторы внедряют многоуровневые механизмы KYC и AML для блокировки мошеннических финансовых действий.
IT платформы инновационных развлекательных порталов функционируют на стабильных инфраструктурах с HTTPS сертификатами. Локальные запреты заставляет владельцев организовывать резервные домены.
Дублирующие сайты составляют аналогичные копии основного сайта с поддержанием всех опций и информации. Участники обеспечивают себе непрерывный подключение к капиталу, азартной данным и клиентским параметрам.
Денежные операции осуществляются через интегрированные платежные сервисы. Рамки на взносы и обналичивания регулируются в соответствии с правовыми требованиями и организационными нормами минимизации опасностей.
Экспертные пользователи предлагают контролировать ситуацию сертификата через официальные реестры беттинг комиссий. Репутационные индикаторы предусматривают оценки на профильных сервисах и feedback истинных пользователей.
陈星旭卢昱晓《轧戏》2026高口碑都市情感陆剧,海外华人无广告高清体验,真实生活代入感强,全球加速热播中。
For most up-to-date news you have to visit the web and on web I found this web page
as a finest web site for newest updates.
MaverickMint Online – Cool desk accessories and stationery that inspire productivity.
Исследование в мире официальных платформ требует владения современных инструментов подключения. Квалифицированные участники задействуют Меллстрой регистрация для получения актуальной данных о функционирующих путях.
Схема открытия учетной записи в официальных учреждениях охватывает сложную проверку. Продвинутые провайдеры используют KYC-протоколы и AML-критерии. Оформление документов отнимает от 24 до 72 временных отрезков.
Компьютерные технологии для минования запретов прогрессируют синхронно с укреплением правовых действий. VPN-инструменты типа premium гарантируют безопасность AES-256 и технологии OpenVPN. Стабильность соединения критически существенна для высокоролловых заходов.
Резервные сайты оперируют через географически размещенные цифровые системы. CDN-системы поддерживают сокращенную пинг для европейских игроков. Техническое переключение инициируется при распознавании недоступности базового сайта.
Экономические операции в легальных территориях подчиняются определенным критериям PCI DSS. Криптовалютные транзакции увеличивают признание вследствие конфиденциальности и скорости реализации.
Портативные программы лучших организаций объединяют биометрическую авторизацию и push-алерты для принципиальных моментов. Настраиваемый оформление автоматически изменяется под настройки матрицы.
Нынешние игроки обталкиваются с изобилием программных особенностей при работе с легальными сайтами. Профессиональные ресурсы типа п»ї1хбет казино предоставляют современную данные о операциях гэмблинговых провайдеров.
Система проверки профиля подразумевает несколько необходимых стадий. Первичная аутентификация включает загрузки удостоверений доказывающих субъект. Классический комплект охватывает ID, права или международное ID.
Системная составляющая оформления включает задействование зашифрованного канала и 2FA. Продвинутые пользователи рекомендуют инициировать совокупность представленных возможностей обеспечения.
Альтернативные адреса формируют полные клоны базового портала с хранением тотального функционала. Центральное бонус заключается в идентичности платежных рамок и норм отыгрыша.
Механизм выявления действующих запасных доменов строится на контроле тематических мессенджер групп и связанных порталов. Экспертные игроки внедряют анонимайзеры для обеспечения постоянного соединения независимо от местных блокировок.
Игровая сфера показывает стремительный расширение, манящая тысячи участников. Квалифицированные порталы дают надёжную условия для игры. Полную данные о этих брендах реально изучить на казино Лаки Бир .
Аттестация составляет основным фактором выбора ресурса. Надзорные органы Мальты обеспечивают тщательный проверку расчётных процедур. Всякая аккредитованная площадка проходит плановые контроли RNG-систем.
IT особенности передовых игорных домов содержат SSL-кодирование финансового класса. Создатели программного софта вроде Microgaming, NetEnt, Pragmatic Play добавляют сложные схемы хаотичных чисел.
Процесс аутентификации учётной записи предусматривает предоставления свидетельств KYC-класса. Свидетельство, свидетельство о средствах, доказательство проживания — обычный пакет для окончательного входа.
Альтернативные URL ликвидируют проблемы с цензурой организаций. Действующие варианты корректируются регулярно компьютерными группами. Планшетные утилиты нередко действуют стабильнее интернет модификаций.
Управление банкроллом задаёт длительную эффективность беттинговых циклов. Квалифицированные геймеры предлагают лимитировать сумму пари до 1-2% от общего банкролла.
Подбор проверенного игрового оператора в актуальных обстоятельствах требует особого подхода к законному уровню. Квалифицированные игроки осознают, что Вавада демонстрирует актуальную данные о активных операторах.
Схема создания аккаунта в лицензированных заведениях содержит требуемую верификацию документов. KYC-правила защищают как казино, так и участника от мошенничества. Временные границы на изъятие средств до выполнения валидации – типичная подход.
Электронные запреты на связь к betting сервисам решаются через резервные порталы. Действующие дубликаты обеспечивают тотальную возможности центрального ресурса. Платежные операции, азартный прогресс и наградные программы продолжают устойчивыми.
Финансовая безопасность характеризуется показателем эксплуатируемых расчетных инструментов. SSL-криптография, PCI DSS подтверждение и расширенная верификация обеспечивают стабильный щит ограждения.
Игровая библиотека лицензированных площадок предоставляет спины от лидирующих разработчиков. RTP-показатели, дисперсия и статистические модели испытывают нейтральную аудит в аккредитованных центрах.
Планы лояльности в достойных сервисах основываются на ясных параметрах проигрыша. Условия ставок x35-40 характеризуется разумным для барабан-привилегий, в то время как настольные состязания включаются в подсчет с редуцированным коэффициентом.
нейросеть для рефератов нейросеть для рефератов .
Linen Lantern Hub – The assortment appears curated with care and displayed attractively.
https://www.apelsin.su/wp-includes/articles/promokod_240.html
Актуальные участники имеют дело с огромным количеством цифровых деталей при функционировании с проверенными ресурсами. Профильные ресурсы типа п»ї1хбет регистрация поставляют современную контент о работе азартных организаций.
Механизм валидации аккаунта включает ряд обязательных стадий. Стартовая аутентификация нуждается размещения справок подтверждающих субъект. Стандартный перечень включает документ, водительские права или международное ID.
Цифровая сторона записления предполагает задействование защищенного протокола и 2FA. Продвинутые геймеры предлагают задействовать максимум имеющихся функций секьюрити.
Резервные ссылки представляют стопроцентные реплики основного домена с удержанием тотального функционала. Важнейшее выгода кроется в идентичности расчетных рамок и норм условий прокрутки.
Процедура поиска рабочих дублирующих порталов фундируется на отслеживании экспертных телеграм-каналов и связанных порталов. Профессиональные участники эксплуатируют туннельные протоколы для создания стабильного соединения независимо от региональных барьеров.
Передовые операторы азартных игр дают пользователям подключение к премиальному гемблингу через безопасные Вавада регистрация порталы. Авторизованная операционная активность подразумевает следования четких надзорных критериев.
Механизм создания персонального кабинета включает верификацию индивидуальных реквизитов. Регуляторы используют детализированные процедуры KYC и AML для пресечения фродовых транзакций.
Электронные инструменты передовых игорных домов строятся на защищенных облачных системах с SSL технологиями. Локальные запреты побуждает управляющих создавать вспомогательные URL.
Альтернативные домены являют собой точные копии основного сайта с поддержанием всех возможностей и сведений. Участники обеспечивают себе беспрепятственный связь к депозиту, развлекательной данным и личным установкам.
Финансовые операции выполняются через синхронизированные платежные процессоры. Ограничения на инвестиции и обналичивания назначаются в соотношении с законодательными требованиями и организационными регламентами риск-менеджмента.
Профессиональные клиенты предлагают мониторить положение аккредитации через государственные базы данных беттинг организаций. Имиджевые показатели предусматривают рейтинги на экспертных порталах и мнения действительных беттеров.
ссылка на сайт vodka bet casino
my favorite catalog site – The design is clear, and shopping through products is simple.
Передовые сервисы гемблинг развлечений предлагают беттерам вход к элитному развлечениям через сертифицированные Лаки Бир казино платформы. Официальная функционирование требует следования четких надзорных норм.
Процесс оформления игрового аккаунта охватывает подтверждение приватных сведений. Управляющие задействуют детализированные системы KYC и AML для исключения нарушающих платежей.
Программные средства передовых развлекательных порталов основываются на стабильных хостингах с шифровальными сертификатами. IP-фильтрация вынуждает провайдеров внедрять параллельные домены.
Параллельные сайты формируют точные дубликаты основного сайта с поддержанием всех функций и показателей. Пользователи достигают непрерывный соединение к счету, развлекательной отчетности и клиентским настройкам.
Денежные действия производятся через интегрированные платежные агрегаторы. Рамки на пополнения и получения назначаются в унисон с нормативными требованиями и индивидуальными процедурами минимизации опасностей.
Профессиональные клиенты предлагают мониторить условия лицензии через официальные списки гемблинг структур. Авторитетные показатели предусматривают оценки на профильных сервисах и мнения настоящих участников.
Поиск надежного развлекательного оператора в сегодняшних реалиях заставляет специального внимания к лицензионному состоянию. Знающие клиенты знают, что Лаки Бир сайт отображает свежую факты о работающих площадках.
Процесс создания аккаунта в легальных площадках содержит неизбежную валидацию идентичности. KYC-нормы обеспечивают как заведение, так и участника от мошенничества. Кратковременные рамки на изъятие средств до завершения проверки – привычная методика.
Виртуальные препятствия на доступ к азартным площадкам нейтрализуются через альтернативные адреса. Доступные дубликаты сохраняют стопроцентную функциональность базового платформы. Платежные переводы, интерактивный продвижение и привилегированные программы функционируют неизменными.
Материальная надежность измеряется качеством применяемых банковских механизмов. SSL-кодирование, PCI DSS сертификация и дополнительная аутентификация устанавливают стабильный периметр безопасности.
Интерактивная библиотека легальных площадок охватывает барабаны от лидирующих создателей. RTP-значения, волатильность и вероятностные системы проходят объективную аудит в признанных организациях.
Механизмы вознаграждения в серьезных операторах базируются на понятных критериях активности. Проигрыш x35-40 оценивается приемлемым для слот-привилегий, в то время как классические активности засчитываются в калькуляцию с минимальным процентом.
explore setupsummit collection – The interface is smooth, and everything is easy to navigate.
mostbet купон экспресс https://mostbet72413.help
Перемещение в сфере лицензированных платформ предполагает представления современных решений доступа. Квалифицированные игроки эксплуатируют Лаки Бир сайт для получения новейшей материалов о действующих путях.
Процедура создания профиля в надежных операторах включает детальную валидацию. Продвинутые организации задействуют KYC-системы и AML-критерии. Документальное сопровождение требует от 24 до 72 периодов.
Цифровые решения для преодоления запретов развиваются сообща с укреплением регуляторных действий. VPN-службы класса premium дают кодирование AES-256 и методы OpenVPN. Непрерывность связи fundamentally необходима для привилегированных игровых периодов.
Зеркальные сайты оперируют через локально рассредоточенные цифровые инфраструктуры. CDN-архитектуры гарантируют сокращенную время ответа для глобальных пользователей. Системное редирект срабатывает при обнаружении недоступности первичного адреса.
Денежные операции в официальных зонах отвечают четким критериям PCI DSS. Децентрализованные переводы получают распространение вследствие анонимности и скорости осуществления.
Планшетные программы лучших брендов интегрируют отпечатковую авторизацию и push-уведомления для критических происшествий. Адаптивный дизайн автоматически настраивается под особенности матрицы.
For FAQs
Debt consolidation loans
for exclusive content.
Определение проверенного развлекательного ресурса в сегодняшних реалиях предполагает специального рассмотрения к лицензионному режиму. Профессиональные клиенты учитывают, что п»ї1хбет регистрация содержит актуальную материалы о активных ресурсах.
Схема регистрации в сертифицированных заведениях включает обязательную аутентификацию личности. KYC-нормы защищают как площадку, так и геймера от махинаций. Краткосрочные границы на снятие денег до завершения подтверждения – нормальная система.
Цифровые запреты на соединение к betting ресурсам обходятся через альтернативные домены. Активные дубликаты сохраняют стопроцентную возможности главного портала. Платежные движения, интерактивный статистика и наградные схемы остаются устойчивыми.
Капитальная надежность измеряется показателем задействованных платежных механизмов. SSL-шифрование, PCI DSS лицензирование и расширенная идентификация обеспечивают стабильный заслон ограждения.
Геймплейная ассортимент лицензированных провайдеров объединяет автоматы от ведущих создателей. RTP-параметры, дисперсия и расчетные принципы претерпевают беспристрастную аудит в одобренных организациях.
Системы поощрения в качественных операторах опираются на четких условиях отыгрыша. Проигрыш x35-40 оценивается справедливым для спин-бонусов, в то время как карточные состязания включаются в расчет с минимальным фактором.
curated kitchen treasures – The offerings appear unique and leave a strong first impression.
Новейшие участники сталкиваются с массой технологических деталей при деятельности с официальными ресурсами. Профильные источники типа Вавада казино поставляют свежую контент о работе казино операторов.
Система валидации аккаунта подразумевает множество требуемых фаз. Первичная подтверждение требует передачи удостоверений валидирующих личность. Обычный пакет подразумевает документ, автоудостоверение или внешний паспорт.
Техническая сторона создания аккаунта включает внедрение криптографической защиты и многофакторной защиты. Профессиональные геймеры рекомендуют инициировать полный набор предложенных опций безопасности.
Дублирующие порталы образуют полные дубликаты базового сайта с обеспечением полного набора функций. Ключевое преимущество кроется в тождественности банковских рамок и критериев отыгрыша.
Система обнаружения рабочих зеркал фундируется на проверке профессиональных информационных каналов и аффилированных порталов. Квалифицированные клиенты эксплуатируют виртуальные частные сети для обеспечения надежного входа вне зависимости от локальных запретов.
Новейшие платформы развлекательных активностей гарантируют клиентам путь к высококлассному игровому процессу через сертифицированные Lucky Bear казино сайты. Официальная бизнес влечет учета строгих регуляторных норм.
Алгоритм регистрации индивидуального аккаунта предусматривает проверку приватных сведений. Управляющие внедряют многоуровневые механизмы KYC и AML для предотвращения мошеннических платежей.
Электронные решения новейших развлекательных порталов работают на зашифрованных дата-центрах с криптографическими технологиями. IP-фильтрация вынуждает провайдеров разрабатывать вспомогательные адреса.
Альтернативные ресурсы составляют точные репликации первичного домена с поддержанием всех возможностей и параметров. Игроки приобретают устойчивый подключение к счету, игровой статистике и пользовательским установкам.
Расчетные переводы проходят через синхронизированные финансовые сервисы. Рамки на пополнения и изъятия назначаются в согласии с законодательными условиями и индивидуальными правилами риск-менеджмента.
Компетентные клиенты настаивают проверять состояние разрешения через государственные списки развлекательных ведомств. Авторитетные критерии охватывают позиции на профильных порталах и комментарии реальных клиентов.
桑乔85m曼联梦碎?2026转会新闻爆料,他考虑重返德甲,曼联损失惨重,足球比分圈炸锅了!
data dashboard shop – Smooth interface and simple navigation enhance the overall browsing experience.
Перемещение в области легальных порталов включает понимания продвинутых технологий соединения. Продвинутые геймеры задействуют Vavada casino для извлечения релевантной информации о действующих ссылках.
Процедура создания личного кабинета в официальных операторах включает детальную верификацию. Актуальные организации эксплуатируют KYC-протоколы и AML-правила. Бумажная работа отнимает от 24 до 72 временных отрезков.
Технические технологии для обхода запретов развиваются одновременно с ужесточением правовых действий. VPN-инструменты разряда premium дают криптографию AES-256 и системы OpenVPN. Постоянство соединения жизненно значима для элитных партий.
Альтернативные адреса оперируют через регионально разнесенные технические кластеры. CDN-структуры поддерживают минимальную время ответа для азиатских участников. Цифровое редирект активируется при обнаружении блокировки первичного портала.
Платежные манипуляции в официальных областях подпадают под конкретным требованиям PCI DSS. Блокчейн переводы приобретают признание вследствие анонимности и скорости процессинга.
Планшетные приложения топовых компаний совмещают физиологическую идентификацию и push-извещения для принципиальных ситуаций. Адаптивный интерфейс независимо адаптируется под параметры экрана.
Актуальные участники оказываются с проблемой соединения к официальным площадкам. Организации ограничивают основные адреса, но знающие Lucky Bear посетители учитывают о функционировании дублирующих порталов.
Зеркало является стопроцентную дубликат оригинального сайта. Криптографические алгоритмы остаются равнозначными. Платёжные транзакции проходят через те же шлюзы.
Схема оформления профиля через дополнительный домен включает типовой верификации. Специалисты уточняют свидетельства для осуществления KYC-требований. Паспортные сведения подвергаются многоуровневую валидацию.
Вносительные лимиты на дополнительных ресурсах идентичны базовым условиям. Начальные вклады поддерживаются константными. Накопительные банки координируются между всеми ресурсами.
Стимулирующие планы действуют всесторонне на резервных сайтах. Вейджер обеспечивает первоначальные цифры. Срок активности проигрывания остаётся прежним.
Команда обслуживания обрабатывает заявки с параллельных доменов таким же способом. Прямой диалог обеспечивает круглосуточный график оперирования.
vaultvoyage online – Smooth browsing experience with a visually appealing layout.
I recently tested this casino https://16mm.pl/ and was surprised by how stable everything felt. The games load quickly, bonuses are clear, and navigation is intuitive, making the experience enjoyable.
Азартная отрасль демонстрирует интенсивный подъём, завлекая легионы клиентов. Опытные сайты гарантируют защищённую обстановку для ставок. Исчерпывающую факты о указанных провайдерах можно обнаружить на Лаки Бир сайт .
Аттестация составляет главным показателем подбора сайта. Юрисдикции Кюрасао обеспечивают строгий мониторинг экономических манипуляций. Конкретная легальная ресурс реализует регулярные инспекции RNG-систем.
Программные характеристики инновационных гемблинг-сайтов включают SSL-защиту денежного ранга. Разработчики цифрового материала вроде Microgaming, NetEnt, Pragmatic Play добавляют сложные механизмы рандомных параметров.
Механизм верификации личного кабинета включает подачи документов KYC-стандарта. ID, свидетельство о средствах, доказательство прописки — типичный комплект для завершённого входа.
Альтернативные ссылки решают барьеры с ограничениями провайдеров. Действующие альтернативы корректируются регулярно цифровыми отделами. Карманные программы регулярно оперируют надёжнее браузерных модификаций.
Управление банкроллом формирует длительную эффективность азартных сессий. Профессиональные геймеры предлагают контролировать размер депозита до 1-2% от полного банкролла.
Top Nautical Narrative – Ocean-themed products paired with a very pleasant browsing experience.
нейросеть реферат онлайн нейросеть реферат онлайн .
tidalthimble treasures – Clean pages and browsing through items is convenient.
Выбор честного казино ресурса нуждается серьезного рассмотрения лицензионных свидетельств. Новые системы казино Lucky Bear дают участникам максимальную сведения о текущих разрешениях.
Процедура регистрации предусматривает множество ключевых этапов аутентификации. Администраторы запрашивают удостоверения, подтверждающие самобытность и совершеннолетие. Типовой KYC-механизм продолжается от 24 до 72 часов.
Управление банком инициируется с определения границ на депозиты. Профессиональные участники настаивают внедрять установку 5% от общего гемблинг капитала на одну сессию.
Электронные барьеры провайдеров вынуждают задействовать резервные маршруты. Альтернативы хранят полную производительность базового портала, охватывая архив операций и игровой прогресс.
Передовые банковские сервисы дают моментальные взносы через электронные портмоне. Bitcoin, Ethereum и фиксированные активы гарантируют приватность и наименьшие комиссии. Период осуществления изъятий насчитывает 10-30 отрезков.
Алгоритмы лояльности включают каскадные уровни с возрастающим возвратом. VIP-представители гарантируют индивидуальные вознаграждения, расширенные пределы и преимущественную помощь.
Выбор надежного казино портала нуждается серьезного рассмотрения юридических свидетельств. Современные ресурсы Lucky Bear казино гарантируют пользователям полную данные о действующих санкциях.
Механизм регистрации подразумевает определенное количество принудительных этапов валидации. Провайдеры запрашивают документы, засвидетельствующие идентичность и совершеннолетие. Традиционный KYC-процесс длится от 24 до 72 промежутков.
Финансовое планирование открывается с задания ограничений на взносы. Опытные клиенты советуют применять закон 5% от совокупного азартного резерва на одну сессию.
Программные запреты администраторов заставляют эксплуатировать запасные маршруты. Копии оберегают стопроцентную эффективность главного платформы, подразумевая хронологию переводов и азартный успех.
Передовые денежные инструменты поддерживают мгновенные вклады через криптовалютные аккаунты. Bitcoin, Ethereum и фиксированные активы гарантируют конфиденциальность и мизерные сборы. Длительность проведения снятий составляет 10-30 отрезков.
Планы постоянства охватывают ступенчатые уровни с возрастающим бонусом. VIP-менеджеры обеспечивают уникальные поощрения, расширенные ограничения и опережающую помощь.
ии для школьников и студентов nejroset-dlya-ucheby-6.ru .
продолжить vodkabet
pepper parlor boutique – The vibe stands out and browsing around feels relaxed.
такой водка бет
Определение достойного betting заведения в актуальных рамках подразумевает специального подхода к юридическому статусу. Профессиональные участники учитывают, что Lucky Bear казино предоставляет последнюю факты о функционирующих ресурсах.
Процедура оформления профиля в сертифицированных заведениях включает обязательную верификацию персональных данных. KYC-нормы оберегают как площадку, так и игрока от фрода. Временные ограничения на изъятие активов до завершения контроля – стандартная подход.
Технические запреты на связь к азартным площадкам устраняются через альтернативные URL. Активные зеркала обеспечивают стопроцентную функциональность первичного портала. Платежные переводы, интерактивный статистика и наградные планы сохраняются константными.
Капитальная безопасность оценивается качеством эксплуатируемых платежных систем. SSL-безопасность, PCI DSS аттестация и расширенная аутентификация устанавливают безопасный барьер обороны.
Азартная коллекция легальных площадок содержит автоматы от известных студий. RTP-коэффициенты, волатильность и алгоритмические модели претерпевают внешнюю контроль в утвержденных учреждениях.
Механизмы поощрения в серьезных казино строятся на ясных требованиях активности. Проигрыш x35-40 оценивается справедливым для автомат-привилегий, в то время как традиционные развлечения принимаются в калькуляцию с сниженным множителем.
Поиск надежного развлекательного площадки в нынешних условиях подразумевает особого внимания к законному положению. Опытные участники знают, что Vavada зеркало отображает современную информацию о работающих операторах.
Процесс открытия счета в легальных платформах объединяет принудительную подтверждение идентичности. KYC-процедуры охраняют как казино, так и клиента от махинаций. Краткосрочные лимиты на снятие денег до финализации валидации – типичная система.
Цифровые запреты на доступ к развлекательным площадкам устраняются через резервные ссылки. Функционирующие зеркала обеспечивают полную эффективность первичного портала. Денежные операции, азартный результаты и бонусные планы функционируют устойчивыми.
Финансовая надежность оценивается качеством эксплуатируемых денежных механизмов. SSL-кодирование, PCI DSS сертификация и многоуровневая проверка создают стабильный заслон охраны.
Интерактивная коллекция легальных провайдеров включает барабаны от известных создателей. RTP-индексы, вариативность и математические системы получают независимую валидацию в признанных лабораториях.
Механизмы стимулирования в надежных операторах опираются на открытых критериях вейджера. Условия ставок x35-40 расценивается адекватным для машина-бонусов, в то время как традиционные развлечения включаются в зачет с минимальным процентом.
驕陽似我续集2026 高清现偶甜宠 海外华人必备 AI推荐个性化观看
Поиск безопасного развлекательного заведения заставляет основательного рассмотрения официальных бумаг. Передовые системы Меллстрой сайт дают геймерам безусловную детали о собственных санкциях.
Механизм открытия аккаунта охватывает ряд необходимых стадий подтверждения. Операторы просят справки, устанавливающие персону и совершеннолетие. Традиционный KYC-механизм продолжается от 24 до 72 промежутков.
Финансовое планирование стартует с задания пределов на вклады. Искусные геймеры настаивают применять норму 5% от общего казино резерва на индивидуальную партию.
Технические запреты администраторов побуждают внедрять запасные пути. Копии оберегают стопроцентную функциональность главного площадки, охватывая историю платежей и казино успех.
Передовые финансовые сервисы предоставляют оперативные депозиты через криптовалютные счета. Bitcoin, Ethereum и устойчивые монеты гарантируют анонимность и минимальные комиссии. Срок осуществления выводов насчитывает 10-30 отрезков.
Программы лояльности охватывают многоуровневые категории с нарастающим вознаграждением. VIP-консультанты предлагают индивидуальные вознаграждения, увеличенные пределы и приоритетную сервис.
Подбор надежного азартного заведения в актуальных рамках подразумевает специального подхода к правовому статусу. Профессиональные участники представляют, что Lucky Bear содержит современную сведения о работающих площадках.
Процесс открытия счета в официальных сервисах включает необходимую подтверждение документов. KYC-стандарты оберегают как заведение, так и геймера от махинаций. Краткосрочные лимиты на изъятие активов до выполнения контроля – привычная подход.
Виртуальные барьеры на соединение к betting сервисам устраняются через резервные ссылки. Активные дубликаты обеспечивают стопроцентную функциональность главного ресурса. Денежные процедуры, геймплейный результаты и наградные схемы остаются постоянными.
Капитальная надежность определяется показателем используемых денежных способов. SSL-безопасность, PCI DSS аттестация и многоуровневая верификация создают прочный заслон безопасности.
Игровая набор сертифицированных площадок охватывает барабаны от главных разработчиков. RTP-параметры, изменчивость и расчетные принципы получают беспристрастную аудит в авторизованных организациях.
Механизмы поощрения в профессиональных заведениях строятся на прозрачных критериях ставок. Отыгрыш x35-40 считается приемлемым для машина-льгот, в то время как карточные развлечения включаются в калькуляцию с пониженным коэффициентом.
узнать больше Здесь vodkabet
MoneyMagnolia Finds Online – Practical money tips and tools presented clearly to help with managing finances.
Инновационные сервисы игорных продуктов дают беттерам вход к профессиональному беттингу через защищенные Вавада официальный сайт порталы. Лицензированная работа подразумевает выполнения конкретных регуляторных требований.
Процесс регистрации игрового кабинета содержит аутентификацию приватных реквизитов. Управляющие задействуют углубленные протоколы KYC и AML для пресечения поддельных операций.
Технические средства новейших игорных домов базируются на надежных дата-центрах с TLS стандартами. Территориальные ограничения побуждает владельцев внедрять параллельные ссылки.
Параллельные сайты образуют эквивалентные копии главного сайта с обеспечением всех инструментов и данных. Беттеры получают беспрепятственный вход к депозиту, игровой истории и персональным установкам.
Финансовые транзакции реализуются через подключенные банковские сервисы. Пределы на депозиты и снятия определяются в согласии с законодательными критериями и индивидуальными правилами управления рисками.
Экспертные гемблеры рекомендуют контролировать условия лицензии через надзорные списки азартных ведомств. Имиджевые характеристики охватывают рейтинги на специализированных платформах и feedback подлинных клиентов.
Определение достойного азартного портала в текущих реалиях предполагает особого внимания к правовому положению. Знающие пользователи понимают, что Лаки Бир РІС…РѕРґ демонстрирует новую материалы о работающих операторах.
Процесс создания аккаунта в официальных платформах включает принудительную верификацию персональных данных. KYC-стандарты охраняют как сервис, так и участника от афер. Кратковременные пределы на получение активов до окончания контроля – типичная практика.
Программные блокировки на доступ к азартным сервисам решаются через дублирующие домены. Рабочие зеркала сохраняют полную производительность первичного сервиса. Банковские переводы, азартный продвижение и поощрительные системы сохраняются стабильными.
Денежная гарантированность оценивается критерием задействованных финансовых механизмов. SSL-безопасность, PCI DSS лицензирование и многоуровневая идентификация формируют защищенный заслон обороны.
Интерактивная ассортимент сертифицированных сервисов содержит слоты от главных провайдеров. RTP-коэффициенты, колебания и алгоритмические принципы проходят внешнюю сертификацию в признанных институтах.
Планы лояльности в надежных операторах строятся на открытых условиях активности. Условия ставок x35-40 считается нормальным для автомат-поощрений, в то время как настольные забавы принимаются в расчет с пониженным множителем.
шумоизоляция авто https://vikar-auto.ru
Передовые операторы развлекательных игр предлагают беттерам доступ к элитному беттингу через безопасные п»ї1хбет сайт системы. Легальная деятельность подразумевает следования определенных законодательных требований.
Алгоритм активации клиентского профиля предусматривает валидацию персональных данных. Операторы задействуют комплексные механизмы KYC и AML для пресечения нарушающих транзакций.
Технические решения передовых игорных домов работают на защищенных инфраструктурах с TLS алгоритмами. IP-фильтрация побуждает операторов разрабатывать дублирующие URL.
Параллельные ресурсы формируют точные версии главного ресурса с сохранением всех инструментов и сведений. Пользователи получают постоянный соединение к средствам, азартной статистике и клиентским конфигурациям.
Денежные операции проходят через подключенные расчетные агрегаторы. Лимиты на депозиты и снятия фиксируются в гармонии с законодательными стандартами и собственными нормами риск-менеджмента.
Компетентные беттеры предлагают контролировать статус аккредитации через надзорные реестры гемблинг ведомств. Репутационные характеристики задействуют рейтинги на тематических порталах и мнения реальных клиентов.
Здравствуйте дорогие друзья! Стоит заранее разобрать — протечки в паркинге. По моему мнению крыша гаража — особый случай. Хочешь решить проблему — могу рекомендовать: https://montazh-membrannoj-krovli-spb.ru. Какие результаты можно достичь: укладывают мембрану — вода не проходит. Опять же полимерное покрытие — устойчива к химии. Если сам разбираешься: праймирование. Что в итоге: удаётся достигать классных результатов.
Навигация в сфере проверенных порталов включает знания продвинутых инструментов соединения. Умелые участники задействуют Mellstroy Game для приобретения релевантной сведений о функционирующих путях.
Механизм открытия аккаунта в официальных организациях содержит комплексную валидацию. Продвинутые провайдеры применяют KYC-процедуры и AML-нормы. Оформление документов требует от 24 до 72 промежутков.
Цифровые инструменты для избежания барьеров улучшаются синхронно с усилением юридических действий. VPN-сервисы класса premium предлагают безопасность AES-256 и технологии OpenVPN. Надежность соединения критически существенна для VIP игровых периодов.
Зеркальные платформы работают через географически расположенные цифровые ресурсы. CDN-структуры обеспечивают быструю задержку для американских геймеров. Системное редирект инициируется при обнаружении ограничения центрального ресурса.
Денежные переводы в официальных территориях соответствуют четким критериям PCI DSS. Крипто платежи завоевывают актуальность вследствие анонимности и быстроте реализации.
Переносные софт топовых организаций содержат биометрическую аутентификацию и push-оповещения для критических событий. Адаптивный оформление самостоятельно настраивается под характеристики панели.
заказать доставку цветов домой – Закажите свежие цветы с доставкой за 2 часа в Москве
Передовые операторы игорных развлечений предоставляют участникам путь к качественному игровому процессу через надежные Меллстрой официальный сайт платформы. Лицензированная деятельность предполагает соблюдения конкретных регуляторных критериев.
Процесс регистрации индивидуального кабинета содержит проверку конфиденциальных сведений. Администраторы эксплуатируют детализированные механизмы KYC и AML для предотвращения поддельных переводов.
Электронные платформы передовых развлекательных порталов функционируют на безопасных дата-центрах с криптографическими стандартами. Региональная блокировка вынуждает управляющих внедрять резервные URL.
Параллельные платформы являют собой точные дубликаты первичного домена с фиксацией всех возможностей и информации. Беттеры приобретают устойчивый соединение к депозиту, развлекательной истории и клиентским конфигурациям.
Финансовые действия осуществляются через встроенные финансовые сервисы. Рамки на взносы и снятия регулируются в унисон с регуляторными критериями и индивидуальными правилами риск-менеджмента.
Компетентные игроки настаивают мониторить состояние лицензии через государственные регистры игорных комиссий. Репутационные параметры задействуют позиции на тематических сервисах и комментарии истинных клиентов.
Нынешние бетторы сталкиваются с препятствием подключения к лицензированным платформам. Организации ограничивают главные ссылки, но профессиональные Вавада игроки знают о функционировании зеркальных площадок.
Параллельный портал является абсолютную отображение оригинального площадки. Системы безопасности сохраняются идентичными. Банковские процедуры выполняются через аналогичные системы.
Методика заведения учётной записи через альтернативный ссылку подразумевает стандартной подтверждения. Операторы выясняют справки для осуществления KYC-стандартов. Персональные характеристики проходят расширенную подтверждение.
Депозитные ограничения на альтернативных платформах аналогичны первичным требованиям. Наименьшие взносы остаются стабильными. Растущие призовые фонды согласовываются между множественными порталами.
Стимулирующие схемы работают целостно на резервных площадках. Требования по обороту обеспечивает оригинальные показатели. Длительность использования продолжается.
Департамент поддержки решает обращения с дополнительных порталов таким же способом. Интерактивный диалог обеспечивает постоянный формат деятельности.
For details
personal loan best rates
for helpful resources.
report raven media – Insightful reporting backed by solid research gives confidence in the material.
лучшая нейросеть для учебы nejroset-dlya-ucheby-5.ru .
official trust temple site – The interface is tidy and moving through pages is smooth, had a pleasant visit.
Новейшие участники сталкиваются с массой технических деталей при процессах с сертифицированными ресурсами. Тематические порталы типа п»ї1хбет регистрация предоставляют свежую контент о функционировании азартных брендов.
Алгоритм проверки аккаунта охватывает несколько необходимых уровней. Исходная верификация предполагает передачи свидетельств валидирующих персону. Классический список охватывает свидетельство, автоудостоверение или загранпаспорт.
Технологическая компонента открытия счета включает задействование безопасного соединения и многофакторной защиты. Экспертные участники рекомендуют запускать все доступных опций охраны.
Дублирующие порталы составляют абсолютные дубликаты центрального портала с обеспечением всего функционала. Центральное достоинство выражается в соответствии банковских рамок и параметров отыгрыша.
Алгоритм обнаружения рабочих резервных ссылок строится на мониторинге тематических телеграм-каналов и аффилированных ресурсов. Квалифицированные клиенты используют туннельные протоколы для предоставления устойчивого соединения вне зависимости от региональных запретов.
Передовые сервисы беттинг услуг обеспечивают пользователям доступ к профессиональному гемблингу через безопасные Vavada порталы. Лицензированная операционная активность подразумевает следования строгих контролирующих критериев.
Процедура открытия игрового аккаунта предусматривает верификацию индивидуальных показателей. Администраторы применяют расширенные процедуры KYC и AML для блокировки нарушающих финансовых действий.
Технические средства новейших развлекательных порталов основываются на надежных хостингах с криптографическими технологиями. Территориальные ограничения заставляет провайдеров разрабатывать альтернативные домены.
Параллельные сайты формируют эквивалентные репликации центрального платформы с сохранением всех функций и параметров. Клиенты обеспечивают себе беспрепятственный соединение к счету, азартной данным и пользовательским настройкам.
Финансовые процедуры выполняются через синхронизированные денежные сервисы. Границы на взносы и выводы определяются в гармонии с нормативными положениями и внутренними политиками минимизации опасностей.
Профессиональные беттеры советуют отслеживать состояние авторизации через контролирующие каталоги гемблинг структур. Авторитетные индикаторы предусматривают ранги на отраслевых платформах и feedback действительных клиентов.
Новейшие бетторы сталкиваются с проблемой входа к проверенным платформам. Компании ограничивают первичные адреса, но профессиональные Меллстрой пользователи помнят о функционировании резервных платформ.
Резервная ссылка образует полную воспроизведение базового площадки. Системы безопасности поддерживаются аналогичными. Банковские действия проходят через те же сервисы.
Методика открытия счёта через альтернативный ссылку включает типовой подтверждения. Менеджеры уточняют документы для осуществления KYC-норм. Личные сведения выполняют комплексную проверку.
Финансовые ограничения на зеркальных ресурсах идентичны стандартным параметрам. Стартовые ставки поддерживаются константными. Прогрессивные джекпоты интегрируются между множественными адресами.
Стимулирующие программы действуют целостно на зеркальных площадках. Вейджер удерживает исходные цифры. Временные рамки использования остаётся прежним.
Команда сопровождения обрабатывает заявки с дополнительных адресов сходным образом. Мгновенный общение предоставляет постоянный расписание оперирования.
Актуальные геймеры натыкаются с сложностью подключения к легальным порталам. Организации ограничивают первичные URL, но профессиональные Vavada посетители понимают о присутствии дублирующих платформ.
Резервная ссылка формирует полную воспроизведение первичного ресурса. Протоколы шифрования поддерживаются равнозначными. Финансовые действия реализуются через те же механизмы.
Алгоритм оформления профиля через резервный домен включает стандартной аутентификации. Сотрудники уточняют свидетельства для соблюдения KYC-правил. Персональные параметры проходят комплексную проверку.
Вносительные рамки на параллельных платформах равняются основным условиям. Минимальные ставки продолжают константными. Накопительные накопления согласовываются между разными ссылками.
Поощрительные механизмы функционируют целостно на дополнительных площадках. Требования по обороту обеспечивает базовые цифры. Период действия оборота поддерживается.
Команда поддержки анализирует запросы с резервных адресов таким же способом. Интерактивный переписка обеспечивает 24-часовой график оперирования.
Spatula Station Store – Handy kitchen utensils are well-priced and functional.
Определение безопасного гемблинг оператора в нынешних рамках подразумевает детального подхода к юридическому состоянию. Компетентные игроки знают, что Меллстрой предоставляет последнюю факты о действующих площадках.
Процесс оформления профиля в официальных площадках включает неизбежную валидацию идентичности. KYC-требования защищают как казино, так и геймера от мошенничества. Временные рамки на изъятие активов до завершения контроля – типичная система.
Технические барьеры на подключение к betting сайтам обходятся через дублирующие URL. Активные отражения поддерживают полную производительность главного сервиса. Расчетные операции, развлекательный прогресс и привилегированные схемы поддерживаются стабильными.
Капитальная стабильность характеризуется критерием задействованных банковских методов. SSL-безопасность, PCI DSS валидация и двухфакторная подтверждение формируют стабильный барьер защиты.
Геймплейная каталог официальных сервисов предоставляет слоты от лидирующих производителей. RTP-коэффициенты, колебания и алгоритмические формулы подвергаются беспристрастную валидацию в авторизованных институтах.
Системы лояльности в профессиональных казино базируются на прозрачных критериях ставок. Условия ставок x35-40 расценивается нормальным для автомат-льгот, в то время как стандартные состязания учитываются в подсчет с уменьшенным коэффициентом.
Легальные ресурсы азартных опций дают клиентам доступ к качественному гэмблингу через тематические сайты, включая Вавада официальный сайт , которые следуют общепринятые требования безопасности.
Последовательность создания аккаунта предполагает внесения authentication данных через encrypted SSL-каналы. Администрация требуют official свидетельство правоспособности и адреса регистрации для исполнения legal стандартов.
2FA authentication становится mandatory частью современных solutions защиты. Users обретают SMS-ключи, push-алерты или используют dedicated tools вроде Google Authenticator.
Резервные домены решают проблемы geographic блокировок и DDoS-assault. По сути копии являют аналогичные dublicates центрального домена с сохранением возможностей и пользовательских информации.
Компетентные пользователи советуют keeping актуальные реестры действующих копий в favourites браузера. Букмекеры направляют updates о fresh порталах через мейл, Telegram-каналы и мобильные приложения.
Payment транзакции через проверенные ресурсы secured encryption алгоритмами категории банковского направления. Вывод финансов осуществляется solely на подтверждённые счета владельца аккаунта.
seamsecret – Sewing essentials are organized well and easy to find.
CourierCraft Picks – Love the originality of the items and the uncomplicated ordering process.
CarryOn Corner Store – Well-organized travel supplies and efficient delivery impressed me.
https://atlaspamatek.info/pages/?kogda_roghaty_pervogo_rebenka.html
马赛客场硬刚布雷斯特!2026法甲20:45生死战,姆巴佩旧将能否带队翻盘?法国足球最新赛事比分火热预测中!
EmberAndOnyx Marketplace – Elegant items and clear product info make shopping effortless.
emailelm essentials – Easy-to-navigate interface with features that help streamline marketing.
Новейшие бетторы встречаются с проблемой подключения к проверенным ресурсам. Организации блокируют главные URL, но профессиональные Lucky Bear казино пользователи помнят о присутствии альтернативных ресурсов.
Дополнительный домен образует полную воспроизведение основного платформы. SSL-сертификаты поддерживаются идентичными. Денежные транзакции выполняются через сходные сервисы.
Схема открытия счёта через параллельный ресурс предполагает обычной подтверждения. Администраторы просят документы для выполнения KYC-норм. Идентификационные информация подвергаются многоуровневую аутентификацию.
Пополнительные лимиты на параллельных порталах соответствуют базовым условиям. Начальные беты остаются константными. Прогрессивные призовые фонды согласовываются между разными адресами.
Премиальные планы функционируют целостно на резервных сайтах. Коэффициент оборота обеспечивает базовые значения. Тайминг использования продолжается.
Команда поддержки обрабатывает тикеты с резервных ресурсов таким же способом. Мгновенный диалог гарантирует беспрерывный формат оперирования.
Исследование в секторе легальных ресурсов требует понимания продвинутых инструментов доступа. Умелые пользователи внедряют п»ї1xBet casino для приобретения свежей данных о функционирующих путях.
Схема регистрации личного кабинета в лицензированных организациях включает сложную проверку. Новейшие операторы используют KYC-алгоритмы и AML-нормы. Документальное сопровождение потребляет от 24 до 72 временных отрезков.
IT методы для избежания запретов развиваются сообща с ужесточением правовых инициатив. VPN-решения типа premium предоставляют криптографию AES-256 и стандарты OpenVPN. Стабильность коннекта кардинально необходима для привилегированных партий.
Альтернативные платформы оперируют через пространственно расположенные серверные ресурсы. CDN-комплексы обеспечивают минимальную задержку для азиатских игроков. Системное роутинг срабатывает при обнаружении барьера базового сайта.
Экономические манипуляции в лицензированных областях соответствуют жестким правилам PCI DSS. Криптовалютные расчеты приобретают актуальность вследствие скрытности и динамике осуществления.
Мобильные программы премиальных операторов совмещают голосовую проверку и push-извещения для критических происшествий. Модифицируемый внешний вид самостоятельно изменяется под особенности матрицы.
http://autofs.ru/documents/pages/melbet_promokod_pri_registracii_2020.html
https://mcv26.ru/news/melbet_promokod_2020___pri_registracii_bonus_9100_rubley.html
нейросеть для рефератов нейросеть для рефератов .
jewel pocket hub – Gorgeous jewelry showcased with crisp, detailed product photography.
Разбор ситуации в промоушене перед ufc в феврале марте 2026 три недели которые встряхнут дивизионы. Подробности тут: https://rybalka62.ru/news/obzor-blizhajshih-sobytij-ufc-fevral-mart-2026-prognozy-na-klyuchevye-poedinki/
Рабочие зеркала надежных азартных клубов на Меллстрой зеркало дают стабильный подключение к гемблинг платформам. Схема зеркалирования формирует эквивалентные версии базового портала с удержанием всех опций.
Схема активации через дублирующий портал абсолютно дублирует стандартную форму. Только пришедшие пользователи прописывают валидный email, придумывают стойкий код доступа и назначают игровую денежную единицу.
Идентификация аккаунта предполагает представления удостоверений в соответствии с KYC-нормам. Скан удостоверения личности, подтверждение резиденции и финансовые координаты анализируются посредством автоматическую анализ в течение 24-72 периодов.
Вход существующих геймеров выполняется через типовую панель с двухфакторной аутентификацией. Сессионные коды поступают на смс номер или электронную почту.
Опции финансового компонента через альтернативные домены обеспечивает топовые денежные платформы. Visa, Mastercard, онлайн балансы Skrill, Neteller, блокчейн-токены Bitcoin, Ethereum обрабатываются с сокращенными взносами 0-3%.
Развлекательная каталог дублируется полностью включая слоты, традиционные игры, live-ведущих и мегавыигрыши. RTP-значения, колебания и отыгрыш поддерживаются неизменными.
Поощрительная система функционирует похоже корневому сайту. Welcome-наборы, бесплатные вращения, кешбэк и VIP-планы запускаются алгоритмически при исполнении прописанных условий.
Актуальные участники обталкиваются с огромным количеством технических нюансов при операциях с сертифицированными площадками. Специализированные порталы типа п»ї1хбет сайт обеспечивают актуальную информацию о операциях азартных организаций.
Процесс валидации учетной записи содержит ряд неотъемлемых шагов. Начальная подтверждение требует размещения документов валидирующих личность. Обычный комплект предполагает ID, автоудостоверение или внешний паспорт.
Технологическая составляющая открытия счета включает задействование криптографической защиты и 2FA. Профессиональные участники настаивают инициировать совокупность доступных настроек защиты.
Запасные домены формируют точные реплики центрального портала с поддержанием полного инструментария. Центральное достоинство содержится в тождественности платежных границ и критериев вейджера.
Процедура локализации активных запасных доменов строится на контроле профессиональных телеграм-каналов и связанных порталов. Опытные игроки внедряют VPN-сервисы для предоставления бесперебойного связи безотносительно от территориальных ограничений.
http://collect-computer.ru/uploads/pages/1xbet_besplatnuy_promokod_pri_registracii_bonus_6500_rubley.html
где дешево купить цветы – Цветы для признаний в любви готовы
http://classichonda.phorum.pl/viewtopic.php?p=185222#185222
Определение проверенного гемблинг портала в нынешних обстоятельствах нуждается детального изучения к правовому статусу. Профессиональные пользователи осознают, что Mellstroy Game казино содержит актуальную информацию о функционирующих провайдерах.
Процесс записи в официальных платформах включает необходимую проверку персональных данных. KYC-нормы обеспечивают как казино, так и геймера от махинаций. Краткосрочные пределы на получение активов до завершения валидации – нормальная практика.
Технические блокировки на связь к азартным сервисам решаются через дублирующие адреса. Активные отражения обеспечивают полную эффективность базового сервиса. Платежные транзакции, развлекательный продвижение и бонусные системы сохраняются постоянными.
Капитальная стабильность определяется качеством эксплуатируемых денежных систем. SSL-шифрование, PCI DSS аттестация и дополнительная подтверждение создают надежный заслон ограждения.
Развлекательная коллекция сертифицированных заведений включает спины от лидирующих разработчиков. RTP-коэффициенты, колебания и статистические модели претерпевают внешнюю проверку в авторизованных организациях.
Планы поощрения в серьезных операторах базируются на прозрачных требованиях отыгрыша. Требования x35-40 признается нормальным для барабан-льгот, в то время как карточные состязания идут в калькуляцию с минимальным показателем.
This casino https://cass-software.pl/ offers a solid mix of popular slots and live tables. The platform feels well-designed, promotions are attractive, and support is helpful, which adds confidence.
Инновационные порталы развлекательных услуг предоставляют игрокам возможность к качественному азарту через сертифицированные Лаки Бир РІС…РѕРґ платформы. Легальная функционирование требует соблюдения жестких регуляторных требований.
Процедура активации клиентского аккаунта задействует верификацию персональных сведений. Провайдеры внедряют расширенные системы KYC и AML для предотвращения мошеннических транзакций.
IT решения новейших игорных домов основываются на стабильных хостингах с SSL алгоритмами. Локальные запреты вынуждает владельцев разрабатывать параллельные URL.
Параллельные домены образуют точные репликации основного домена с поддержанием всех сервисов и показателей. Клиенты получают устойчивый доступ к счету, гемблинг данным и персональным параметрам.
Денежные транзакции осуществляются через встроенные расчетные сервисы. Ограничения на пополнения и выводы регулируются в согласии с законодательными стандартами и корпоративными правилами снижения потерь.
Компетентные игроки настаивают анализировать условия аккредитации через регуляторные базы данных азартных органов. Престижные индикаторы задействуют оценки на профильных платформах и комментарии реальных клиентов.
перейдите на этот сайт зеркало водка бет
Надёжные платформы гэмблинг возможностей дают участникам право к премиальному игровому процессу через целевые ресурсы, включая Лаки Бир казино , которые точно придерживаются общепринятые критерии security.
Схема активации necessita ввода проверочных данных через безопасные SSL-соединения. Менеджмент просят предоставить official удостоверение правоспособности и локации регистрации для compliance законодательных правил.
2FA authentication считается принудительным aspect новейших solutions security. Клиенты приобретают SMS-ключи, push-оповещения или внедряют специализированные софт по типу Google Authenticator.
Дублирующие URL ликвидируют сложности географических блокировок и DDoS-assault. Техническим образом копии являют аналогичные реплики базового сайта с поддержанием опций и user параметров.
Опытные пользователи suggest хранить свежие реестры working копий в закладках интернет-программы. Провайдеры передают сведения о современных адресах через мейл, Telegram-каналы и мобильные софт.
Payment переводы через legal платформы обеспечены шифровальными протоколами категории банковского области. Extraction средств выполняется исключительно на верифицированные карты собственника аккаунта.
Беттинговая сфера демонстрирует интенсивный развитие, манящая массы клиентов. Опытные порталы дают защищённую среду для развлечений. Исчерпывающую информацию о данных компаниях доступно получить на Меллстрой регистрация .
Аккредитация составляет основным показателем подбора платформы. Лицензиаты Великобритании дают качественный мониторинг расчётных операций. Любая лицензированная портал реализует постоянные аудиты RNG-механизмов.
Цифровые особенности новейших казино предусматривают SSL-кодирование экономического ранга. Провайдеры цифрового ПО уровня Microgaming, NetEnt, Pragmatic Play интегрируют многоуровневые схемы непредсказуемых показателей.
Процесс валидации личного кабинета подразумевает направления бумаг KYC-формата. Паспорт, подтверждение о средствах, доказательство проживания — классический комплект для полноценного подключения.
Зеркальные URL убирают препятствия с запретами поставщиков. Свежие альтернативы изменяются ежедневно цифровыми командами. Мобильные программы часто функционируют стабильнее браузерных редакций.
Контроль средств определяет долгосрочную прибыльность развлекательных циклов. Опытные пользователи настаивают лимитировать величину вейджера до 1-2% от итогового бюджета.
Отбор безопасного игорного ресурса подразумевает основательного анализа официальных бумаг. Актуальные платформы казино 1xBet обеспечивают геймерам максимальную данные о действующих аккредитациях.
Алгоритм получения доступа подразумевает множество необходимых ступеней проверки. Владельцы настаивают бумаги, доказывающие индивидуальность и правоспособность. Традиционный KYC-порядок требует от 24 до 72 интервалов.
Банкролл-менеджмент открывается с установления границ на депозиты. Опытные игроки настаивают применять закон 5% от общего игорного фонда на одну игру.
Программные препятствия владельцев вынуждают использовать запасные ссылки. Дубликаты хранят абсолютную функциональность основного сайта, включая хронологию сделок и казино успех.
Инновационные расчетные методы гарантируют быстрые инвестиции через цифровые хранилища. Bitcoin, Ethereum и стейблкоины обеспечивают скрытность и минимальные сборы. Продолжительность осуществления извлечений равно 10-30 интервалов.
Планы лояльности охватывают градационные степени с накапливающимся вознаграждением. VIP-менеджеры предлагают личные поощрения, расширенные лимиты и преимущественную помощь.
Ориентирование в области лицензированных ресурсов требует представления актуальных способов подключения. Квалифицированные участники внедряют Вавада для добывания релевантной сведений о активных путях.
Механизм оформления счета в проверенных операторах охватывает комплексную подтверждение. Новейшие операторы используют KYC-протоколы и AML-нормы. Документальное сопровождение требует от 24 до 72 промежутков.
Цифровые технологии для обхода блокировок прогрессируют параллельно с укреплением регуляторных шагов. VPN-платформы уровня premium предлагают кодирование AES-256 и системы OpenVPN. Непрерывность подключения принципиально важна для высокоролловых заходов.
Альтернативные адреса оперируют через территориально разнесенные серверные ресурсы. CDN-системы осуществляют оптимальную отклик для глобальных геймеров. Системное переключение срабатывает при детекции барьера первичного адреса.
Денежные переводы в лицензированных областях подпадают под жестким стандартам PCI DSS. Децентрализованные платежи приобретают актуальность благодаря анонимности и быстроте реализации.
Мобильные программы премиальных провайдеров объединяют голосовую идентификацию и push-алерты для критических событий. Адаптивный дизайн независимо изменяется под параметры панели.
CyberShield Shop Online – Security services and tools are presented with clarity and confidence.
coral curated shop – Enjoying the product variety and navigation feels seamless.
CityStroll Essentials Hub – Chic items that make everyday commuting smooth and stylish.
Гемблинговая сфера показывает быстрый рост, заинтересовывая легионы геймеров. Квалифицированные сайты дают стабильную среду для беттинга. Подробную информацию о этих компаниях возможно найти на Mellstroy Game casino .
Сертификация является приоритетным фактором селекции сайта. Надзорные органы Мальты создают качественный надзор денежных транзакций. Отдельная лицензированная сайт реализует регулярные инспекции RNG-механизмов.
Цифровые характеристики современных игорных домов содержат SSL-безопасность экономического стандарта. Поставщики программного материала вроде Microgaming, NetEnt, Pragmatic Play добавляют комплексные системы случайных чисел.
Процедура валидации счёта подразумевает подачи удостоверений KYC-стандарта. Документ, выписка о доходах, валидация прописки — обычный набор для окончательного активации.
Дублирующие ссылки устраняют трудности с блокировками операторов. Функционирующие дубли адаптируются каждый день программными отделами. Планшетные утилиты нередко выполняются стабильнее онлайн вариантов.
Распределение капитала создаёт перспективную доходность азартных раундов. Квалифицированные беттеры настаивают сокращать объём пари до 1-2% от итогового резерва.
ZipperZone Finds – Assortment of high-quality zippers makes crafting easier and more enjoyable.
Новейшие пользователи пересекаются с огромным количеством системных тонкостей при операциях с легальными порталами. Профессиональные ресурсы типа Меллстрой зеркало выдают актуальную сведения о деятельности игорных операторов.
Алгоритм валидации аккаунта предполагает множество неотъемлемых уровней. Стартовая валидация предполагает предоставления удостоверений доказывающих гражданство. Обычный пакет предполагает свидетельство, права или внешний паспорт.
Технологическая составляющая записления подразумевает использование защищенного протокола и многофакторной защиты. Профессиональные участники настаивают запускать совокупность доступных возможностей секьюрити.
Резервные ссылки формируют абсолютные копии первичного домена с поддержанием всего инструментария. Важнейшее выгода состоит в тождественности банковских пределов и требований проигрыша.
Схема нахождения активных альтернативных адресов опирается на отслеживании экспертных информационных каналов и союзных сайтов. Экспертные пользователи задействуют туннельные протоколы для создания постоянного подключения независимо от локальных барьеров.
Shop Dahlia Domain – Elegant blooms and home accents that brighten interiors easily.
Explore Mug and Merchant – Well-crafted mugs help you pick the perfect present.
Передовые участники пересекаются с набором цифровых аспектов при процессах с лицензированными платформами. Тематические сайты типа Vavada зеркало обеспечивают релевантную материалы о операциях азартных операторов.
Процедура аутентификации счета предполагает несколько требуемых уровней. Базовая проверка требует загрузки документов валидирующих гражданство. Стандартный набор содержит документ, права или международное ID.
Технологическая составляющая оформления подразумевает задействование зашифрованного канала и двухфакторной аутентификации. Опытные клиенты настаивают задействовать все доступных функций защиты.
Запасные домены представляют стопроцентные дубликаты первичного платформы с сохранением тотального функционала. Основное бонус выражается в тождественности финансовых пределов и параметров отыгрыша.
Схема выявления актуальных альтернативных адресов базируется на наблюдении тематических информационных каналов и союзных порталов. Опытные клиенты используют VPN-сервисы для формирования устойчивого доступа без оглядки от территориальных лимитов.
Top Berry Bazaar – Fast-loading pages with a broad selection of products.
Новейшие операторы игорных развлечений обеспечивают игрокам вход к высококлассному беттингу через безопасные п»ї1хбет официальный сайт порталы. Официальная бизнес нуждается соблюдения конкретных надзорных стандартов.
Механизм открытия пользовательского аккаунта включает аутентификацию индивидуальных реквизитов. Провайдеры применяют комплексные алгоритмы KYC и AML для исключения нарушающих транзакций.
Программные системы современных развлекательных порталов работают на защищенных инфраструктурах с HTTPS протоколами. Региональная блокировка обязывает операторов организовывать резервные домены.
Альтернативные ресурсы составляют эквивалентные клоны главного портала с удержанием всех функций и показателей. Игроки получают устойчивый связь к средствам, гемблинг статистике и персональным параметрам.
Денежные операции производятся через связанные банковские процессоры. Ограничения на депозиты и обналичивания фиксируются в соотношении с правовыми условиями и индивидуальными правилами снижения потерь.
Экспертные пользователи предлагают мониторить состояние лицензии через контролирующие каталоги азартных организаций. Имиджевые индикаторы включают рейтинги на тематических порталах и мнения настоящих беттеров.
For cautions
no credit check loans
for connection.
Поиск качественного развлекательного портала в сегодняшних рамках нуждается особого подхода к регулятивному режиму. Профессиональные участники учитывают, что п»ї1xBet казино предоставляет последнюю данные о функционирующих ресурсах.
Механизм создания аккаунта в проверенных площадках включает неизбежную проверку личности. KYC-требования обеспечивают как оператора, так и пользователя от фрода. Временные лимиты на изъятие активов до финализации верификации – обычная методика.
Технические препятствия на доступ к развлекательным площадкам решаются через зеркальные ссылки. Доступные дубликаты обеспечивают всестороннюю производительность базового ресурса. Платежные переводы, развлекательный продвижение и привилегированные схемы функционируют постоянными.
Капитальная гарантированность характеризуется степенью применяемых денежных способов. SSL-защита, PCI DSS подтверждение и усиленная верификация формируют стабильный барьер ограждения.
Геймплейная каталог сертифицированных сервисов предоставляет машины от главных производителей. RTP-показатели, вариативность и расчетные модели проходят независимую валидацию в утвержденных организациях.
Планы лояльности в качественных площадках формируются на открытых условиях ставок. Отыгрыш x35-40 характеризуется разумным для машина-бонусов, в то время как классические игры идут в расчет с редуцированным процентом.
Отбор безопасного азартного ресурса требует глубокого рассмотрения правовых разрешений. Новые системы Меллстрой РІС…РѕРґ предлагают игрокам абсолютную сведения о собственных аккредитациях.
Алгоритм оформления счета содержит множество ключевых шагов валидации. Провайдеры просят бумаги, доказывающие идентичность и дееспособность. Традиционный KYC-порядок составляет от 24 до 72 временных отрезков.
Распоряжение капиталом стартует с определения рамок на инвестиции. Компетентные участники призывают применять правило 5% от общего гемблинг средств на конкретную игру.
Электронные препятствия провайдеров принуждают использовать запасные домены. Зеркала поддерживают безусловную эффективность главного площадки, включая архив операций и азартный продвижение.
Актуальные платежные сервисы обеспечивают оперативные депозиты через блокчейн портмоне. Bitcoin, Ethereum и стабильные валюты предоставляют скрытность и мизерные сборы. Время выполнения получений насчитывает 10-30 промежутков.
Алгоритмы постоянства предусматривают ступенчатые статусы с возрастающим компенсацией. VIP-координаторы предоставляют индивидуальные вознаграждения, улучшенные лимиты и ускоренную сервис.
pearl picks hub – Jewelry pieces are showcased with detailed images, making choices easier.
скачать игры без торрента скачать игры без торрента
content creation marketplace – I discovered great tools here and the navigation is smooth.
“аренда инструмента в слуцке – выгодные условия и широкий выбор инструментов для любых задач.”
Покупка профессионального оборудования требует больших затрат, а аренда дает доступ к качественному инструменту без лишних расходов.
Такой подход особенно удобен для строителей и мастеров. Многие профессионалы предпочитают брать инструмент напрокат, так как это снижает затраты на выполнение работ.
#### **2. Какой инструмент можно взять в аренду?**
В Слуцке доступен широкий ассортимент оборудования для разных задач. В прокате представлены бензопилы, газонокосилки и другая садовая техника.
Кроме того, в аренду сдают и специализированную технику. Для укладки плитки можно взять плиткорезы, а для покраски – краскопульты.
#### **3. Преимущества аренды инструмента**
Главный плюс – экономия на обслуживании и хранении. Вам не придется беспокоиться о ремонте инструмента, так как за ним следят специалисты.
Дополнительный бонус – помощь в выборе подходящего оборудования. Консультанты помогут подобрать инструмент под конкретные задачи.
#### **4. Как оформить аренду в Слуцке?**
Процедура аренды максимально проста и прозрачна. Вы можете приехать в офис, чтобы лично выбрать подходящий инструмент.
Условия проката выгодны для всех клиентов. На длительные периоды предоставляются скидки и специальные предложения.
—
### **Спин-шаблон статьи**
#### **1. Почему аренда инструмента – это выгодно?**
Аренда инструмента в Слуцке позволяет сэкономить деньги и время . Вместо того чтобы покупать инструмент, который может понадобиться всего несколько раз, выгоднее взять его в аренду по доступной цене.
Такой подход особенно удобен для компаний и частных клиентов. Даже любители ремонта выбирают прокат инструмента, потому что это проще и дешевле.
#### **2. Какой инструмент можно взять в аренду?**
В Слуцке доступен широкий ассортимент оборудования для разных задач . В прокате представлены бензопилы, газонокосилки и другая садовая техника .
Кроме того, в аренду сдают и оборудование для узких задач. Для укладки плитки можно взять плиткорезы, а для покраски – краскопульты .
#### **3. Преимущества аренды инструмента**
Главный плюс – экономия на обслуживании и хранении . Вам не придется беспокоиться о ремонте инструмента, так как за ним следят специалисты .
Дополнительный бонус – помощь в выборе подходящего оборудования . Если вы не уверены в выборе, специалисты дадут профессиональный совет.
#### **4. Как оформить аренду в Слуцке?**
Процедура аренды не требует сложных формальностей . Для оформления понадобится только паспорт и небольшой залог.
Условия проката выгодны для всех клиентов . Доставка оборудования возможна в любой район Слуцка.
Актуальные участники сталкиваются с затруднением входа к лицензированным порталам. Поставщики ограничивают главные домены, но опытные Vavada игроки знают о функционировании дублирующих ресурсов.
Дополнительный домен образует стопроцентную воспроизведение оригинального площадки. Системы безопасности сохраняются неизменными. Финансовые действия выполняются через те же механизмы.
Процедура регистрации через резервный адрес включает обычной подтверждения. Сотрудники требуют документы для осуществления KYC-норм. Паспортные параметры выполняют двухфакторную валидацию.
Банковские пределы на альтернативных порталах идентичны главным требованиям. Низшие взносы остаются константными. Увеличивающиеся накопления согласовываются между множественными ссылками.
Поощрительные системы действуют завершённо на дополнительных порталах. Коэффициент оборота обеспечивает исходные цифры. Срок активности проигрывания не изменяется.
Служба обслуживания обрабатывает тикеты с параллельных ресурсов равнозначно. Онлайн переписка гарантирует беспрерывный формат функционирования.
Перемещение в мире легальных сайтов нуждается представления новых методов подключения. Квалифицированные клиенты эксплуатируют Lucky Bear зеркало для извлечения свежей сведений о активных путях.
Схема регистрации счета в лицензированных операторах охватывает многоуровневую проверку. Актуальные организации эксплуатируют KYC-процедуры и AML-стандарты. Документальное сопровождение занимает от 24 до 72 периодов.
Технические технологии для обхода ограничений развиваются синхронно с укреплением правовых мер. VPN-сервисы категории premium предоставляют кодирование AES-256 и стандарты OpenVPN. Постоянство связи принципиально необходима для премиальных сессий.
Зеркальные домены оперируют через локально расположенные цифровые системы. CDN-сети поддерживают оптимальную время ответа для американских игроков. Техническое маршрутизация срабатывает при распознавании блокировки первичного домена.
Банковские операции в официальных областях отвечают определенным правилам PCI DSS. Блокчейн операции приобретают признание из-за анонимности и быстроте обработки.
Планшетные программы премиальных организаций объединяют лицевую подтверждение и push-сообщения для ключевых происшествий. Настраиваемый облик автономно корректируется под особенности экрана.
CypressCircle Collection – Well-structured design and effortless navigation make shopping convenient.
Wolves 2-2 Arsenal 2026 Premier League draw madness! Gunners slip – football scores update shakes title chase!
Азартная отрасль являет стремительный прогресс, завлекая легионы участников. Экспертные ресурсы предоставляют защищённую среду для развлечений. Подробную данные о подобных операторах реально обнаружить на Lucky Bear казино .
Лицензирование составляет ключевым фактором селекции площадки. Юрисдикции Мальты дают качественный контроль экономических действий. Любая аккредитованная портал выполняет плановые аудиты RNG-систем.
Программные аспекты новейших беттинг-платформ охватывают SSL-защиту расчётного категории. Поставщики виртуального продукта наподобие Microgaming, NetEnt, Pragmatic Play внедряют комплексные алгоритмы произвольных величин.
Механизм валидации профиля включает представления справок KYC-формата. Свидетельство, выписка о доходах, верификация прописки — классический перечень для полноценного авторизации.
Дублирующие адреса устраняют барьеры с ограничениями организаций. Рабочие варианты изменяются систематически цифровыми службами. Смартфонные приложения зачастую действуют лучше сетевых версий.
Управление банкроллом определяет перспективную доходность игровых раундов. Квалифицированные беттеры указывают ограничивать размер бета до 1-2% от полного банкролла.
Подбор безопасного казино ресурса предполагает основательного рассмотрения лицензионных документов. Передовые сайты Меллстрой предлагают пользователям максимальную сведения о действующих допусках.
Механизм оформления счета содержит множество необходимых ступеней подтверждения. Операторы просят документы, удостоверяющие идентичность и совершеннолетие. Обычный KYC-механизм требует от 24 до 72 интервалов.
Контроль средств начинается с задания рамок на взносы. Искусные пользователи рекомендуют внедрять установку 5% от полного гемблинг фонда на индивидуальную сессию.
Технические запреты владельцев побуждают применять альтернативные ссылки. Клоны сохраняют максимальную работоспособность первичного ресурса, включая журнал переводов и казино результаты.
Передовые банковские способы гарантируют мгновенные пополнения через электронные портмоне. Bitcoin, Ethereum и фиксированные активы гарантируют тайность и крошечные отчисления. Срок проведения получений доходит 10-30 отрезков.
Планы приверженности содержат каскадные уровни с прогрессивным компенсацией. VIP-представители гарантируют персонализированные награды, усиленные границы и опережающую сервис.
2026足球新闻:英超六队欧冠晋级基本锁定,纽卡大胜卡拉巴赫创历史,最新足球赛事比分英超欧战强势。
逐玉2026 张凌赫田曦薇 高清古装甜宠权谋 海外华人高清在线 全球加速AI推荐
PC Parts Pavilion – Got all the components I needed for my custom rig.
Нынешние клиенты встречаются с набором цифровых аспектов при операциях с сертифицированными площадками. Тематические ресурсы типа п»ї1xBet казино выдают современную контент о функционировании гэмблинговых компаний.
Процедура проверки аккаунта охватывает набор обязательных этапов. Базовая валидация требует загрузки бумаг валидирующих персону. Классический набор подразумевает документ, права или заграничное удостоверение.
Программная компонента оформления содержит внедрение SSL-шифрования и 2FA. Опытные игроки советуют инициировать полный набор имеющихся возможностей секьюрити.
Альтернативные адреса образуют абсолютные дубликаты первичного платформы с хранением тотального набора функций. Центральное бонус кроется в соответствии банковских ограничений и требований проигрыша.
Система выявления рабочих зеркал фундируется на проверке тематических информационных каналов и партнерских порталов. Продвинутые пользователи применяют прокси-соединения для обеспечения постоянного подключения без оглядки от локальных лимитов.
Подбор легального казино оператора требует основательного изучения юридических бумаг. Передовые ресурсы Mellstroy Game зеркало обеспечивают пользователям абсолютную информацию о своих допусках.
Процесс создания профиля содержит ряд необходимых этапов аутентификации. Провайдеры настаивают документы, удостоверяющие персону и правоспособность. Обычный KYC-регламент продолжается от 24 до 72 часов.
Финансовое планирование открывается с установления пределов на депозиты. Компетентные игроки предлагают использовать норму 5% от полного игорного капитала на индивидуальную сессию.
Цифровые препятствия поставщиков заставляют применять вспомогательные пути. Копии удерживают максимальную эффективность базового сайта, охватывая историю транзакций и развлекательный результаты.
Новые расчетные системы предоставляют быстрые инвестиции через виртуальные кошельки. Bitcoin, Ethereum и стейблкоины обеспечивают приватность и символические сборы. Длительность обработки выводов равно 10-30 интервалов.
Алгоритмы приверженности охватывают ступенчатые категории с нарастающим возвратом. VIP-представители предлагают уникальные награды, расширенные лимиты и приоритетную поддержку.
塔尔萨之王第三季高清完整版2026 海外华人美剧新季
https://www.thepartyservicesweb.com/board/board_topic/3929364/7884800.htm
читать водкабет
Panathinaikos 2-2 Viktoria Plzen 2026 Europa League draw! Greeks fight back – football scores drama all night long!
Нынешние бетторы встречаются с барьером подключения к официальным ресурсам. Компании ограничивают основные URL, но профессиональные казино Mellstroy Game пользователи понимают о наличии зеркальных ресурсов.
Дополнительный домен представляет стопроцентную отображение базового сайта. Протоколы шифрования работают такими же. Денежные процедуры производятся через сходные системы.
Методика открытия счёта через дополнительный ресурс предполагает типовой аутентификации. Сотрудники уточняют свидетельства для осуществления KYC-правил. Идентификационные информация реализуют комплексную подтверждение.
Вносительные ограничения на параллельных платформах аналогичны главным параметрам. Начальные вклады поддерживаются фиксированными. Накопительные накопления интегрируются между всеми ресурсами.
Премиальные схемы функционируют полноценно на альтернативных сайтах. Вейджер гарантирует оригинальные показатели. Срок активности отыгрыша не изменяется.
Сервис сопровождения изучает вопросы с параллельных порталов таким же способом. Прямой диалог гарантирует 24-часовой расписание обслуживания.
Активные зеркала проверенных gaming-операторов на Вавада казино гарантируют стабильный вход к геймерским порталам. Методика клонирования генерирует идентичные дубликаты главного портала с сохранением всех опций.
Система активации через дублирующий портал целиком дублирует стандартную бланк. Начинающие участники регистрируют рабочий email, формируют стойкий секретную комбинацию и фиксируют базовую валюту.
Верификация счета включает передачи бумаг опираясь на KYC-политике. Изображение национального документа, доказательство регистрации и карточные координаты проверяются через автоматическую контроль в течение 24-72 ч.
Логин зарегистрированных клиентов происходит через базовую модуль с усиленной верификацией. Краткосрочные пароли поступают на мессенджер номер или электронную почту.
Возможности депозитного компонента через mirror-сайты содержит востребованные финансовые механизмы. Visa, Mastercard, онлайн портмоне Skrill, Neteller, криптовалюты Bitcoin, Ethereum процессируются с минимальными процентами 0-3%.
Азартная коллекция копируется на сто процентов включая слоты, классические активности, live-операторов и накопительные призы. RTP-показатели, дисперсия и вейджер сохраняются идентичными.
Поощрительная схема работает идентично центральному порталу. Welcome-наборы, безвозмездные спины, компенсация и VIP-курсы включаются программно при соблюдении прописанных требований.
龙之家族第三季2026 海外华人奇幻巨制 高清龙焰对决 全球加速
布里奇顿新季2026 海外华人浪漫古装 高清贵族恋爱 无缓冲播放
ProteinPort Deals – Supplement choices are transparent, making them ideal for health-conscious buyers.
杨紫《家业》2026古装经商大女主励志剧,海外华人高清非遗题材热播,创业奋斗燃到爆,全球加速AI推荐2026必追。
怪奇物语第五季2026 海外华人科幻恐怖终章 高清最终季 Netflix必备
Навигация в пространстве проверенных платформ подразумевает владения новых методов авторизации. Умелые участники задействуют казино 1хбет для приобретения современной данных о действующих ссылках.
Алгоритм создания учетной записи в проверенных учреждениях подразумевает тщательную верификацию. Передовые поставщики внедряют KYC-протоколы и AML-нормы. Документальное сопровождение требует от 24 до 72 промежутков.
Технические технологии для обхода барьеров эволюционируют параллельно с повышением юридических действий. VPN-сервисы категории premium предоставляют защиту AES-256 и технологии OpenVPN. Постоянство подключения принципиально актуальна для VIP партий.
Зеркальные ресурсы действуют через пространственно распределенные компьютерные ресурсы. CDN-комплексы поддерживают оптимальную задержку для американских игроков. Системное роутинг активируется при обнаружении недоступности главного ресурса.
Банковские манипуляции в лицензированных зонах отвечают жестким нормам PCI DSS. Крипто платежи получают популярность по причине анонимности и скорости осуществления.
Переносные приложения топовых организаций содержат отпечатковую аутентификацию и push-алерты для критических моментов. Настраиваемый внешний вид независимо изменяется под свойства экрана.
FitFuel Fjord Online Shop – Healthy snacks and powders are easy to navigate and order quickly.
Беттинговая отрасль представляет стремительный расширение, притягивая миллионы геймеров. Опытные порталы дают качественную атмосферу для ставок. Полную сведения о данных брендах доступно получить на Меллстрой РІС…РѕРґ .
Аттестация представляет центральным элементом отбора платформы. Надзорные органы Кюрасао гарантируют качественный проверку денежных транзакций. Каждая аккредитованная ресурс подвергается систематические аудиты RNG-модулей.
Цифровые свойства передовых азартных площадок охватывают SSL-кодирование банковского стандарта. Провайдеры цифрового продукта класса Microgaming, NetEnt, Pragmatic Play интегрируют комплексные схемы рандомных параметров.
Процесс верификации личного кабинета предусматривает подачи справок KYC-стандарта. Свидетельство, документ о прибылях, доказательство прописки — базовый список для полноценного подключения.
Альтернативные порталы ликвидируют проблемы с запретами компаний. Функционирующие альтернативы корректируются систематически программными службами. Планшетные утилиты зачастую действуют лучше сетевых редакций.
Управление банкроллом задаёт продолжительную успешность развлекательных раундов. Профессиональные беттеры рекомендуют ограничивать сумму ставки до 1-2% от суммарного резерва.
iyf.tv海外华人首选2026 最新剧集 高清在线 AI内容匹配
Best Australian online casino 2026 trusted real money sites
Explore SnowySteps – Cozy winter collection with fair pricing throughout.
Veranda Secure Access – Packages and included features are explained in a clear and concise manner.
Активные альтернативные домены официальных gaming-операторов на Vavada казино предоставляют постоянный соединение к гемблинг ресурсам. Принцип копирования строит полноценные дубликаты основного веб-площадки с сохранением всех возможностей.
Алгоритм регистрации через резервную ссылку в точности имитирует основную бланк. Начинающие участники указывают валидный email, генерируют сложный секретную комбинацию и выбирают рабочую валюту.
Идентификация учетной записи содержит отправки бумаг по KYC-политике. Копия паспорта, верификация адреса и платежные сведения контролируются системой цифровую анализ в течение 24-72 часов.
Логин зарегистрированных геймеров происходит через стандартную окно с усиленной валидацией. Краткосрочные коды отправляются на сотовый номер или e-mail адрес.
Инструменты пополнительного компонента через mirror-сайты обеспечивает востребованные денежные механизмы. Visa, Mastercard, онлайн портмоне Skrill, Neteller, блокчейн-токены Bitcoin, Ethereum обрабатываются с низкими сборами 0-3%.
Игровая ассортимент повторяется в точности включая автоматы, традиционные игры, live-хостов и мегавыигрыши. RTP-показатели, волатильность и проигрыш фиксируются аналогичными.
Бонусная механизм оперирует схоже центральному сайту. Welcome-пакеты, фриспины, денежный возврат и VIP-курсы инициируются системно при реализации установленных критериев.
Активные дублирующие порталы легальных азартных клубов на Меллстрой РІС…РѕРґ обеспечивают стабильный доступ к геймерским системам. Методика копирования строит точные версии основного ресурса с сохранением всех инструментов.
Механизм оформления профиля через альтернативный домен полностью воспроизводит основную форму. Новые геймеры указывают валидный email, генерируют надежный секретную комбинацию и определяют операционную валюту.
Валидация учетной записи предполагает передачи справок согласно KYC-стандартам. Изображение паспорта, валидация проживания и финансовые параметры анализируются посредством автоматическую валидацию в течение 24-72 часа.
Авторизация активных пользователей осуществляется через обычную интерфейс с двухфакторной проверкой. Разовые шифры поступают на сотовый девайс или мейл.
Возможности депозитного компонента через альтернативные домены предлагает востребованные платежные платформы. Visa, Mastercard, онлайн хранилища Skrill, Neteller, блокчейн-токены Bitcoin, Ethereum осуществляются с оптимизированными комиссиями 0-3%.
Игровая база клонируется на сто процентов включая машины, настольные забавы, live-хостов и мегавыигрыши. RTP-значения, вариативность и проигрыш поддерживаются такими же.
Подарочная механизм оперирует идентично центральному домену. Welcome-комплекты, free spins, денежный возврат и VIP-программы включаются алгоритмически при достижении фиксированных требований.
реферат через нейросеть реферат через нейросеть .
перепланировка в москве pereplanirovka-kvartir9.ru .
Надёжные платформы игровых сервисов обеспечивают игрокам право к профессиональному развлечениям через dedicated сайты, включая Vavada казино , что выполняют мировые требования защиты.
Процедура активации подразумевает заполнения authentication данных через защищённые SSL-соединения. Менеджмент просят нотариальное verification правоспособности и территории нахождения для выполнения legal правил.
2FA проверка выступает необходимым составляющей современных механизмов надёжности. Участники располагают SMS-ключи, push-алерты или задействуют профессиональные приложения в стиле Google Authenticator.
Дублирующие адреса устраняют сложности географических запретов и DDoS-штурмов. Технически зеркала представляют дублированные dublicates главного платформы с удержанием опций и клиентских деталей.
Экспертные игроки рекомендуют keeping свежие каталоги рабочих копий в сохранённых ссылках интернет-программы. Операторы направляют обновления о новых URL через email, Telegram-каналы и mobile apps.
Финансовые movements через надёжные платформы защищены защитными methods класса банковского области. Вывод капитала реализуется solely на проверенные данные обладателя аккаунта.
Современные сервисы игорных развлечений гарантируют пользователям вход к элитному беттингу через безопасные п»ї1xBet casino системы. Официальная операционная активность влечет выполнения жестких регуляторных стандартов.
Система создания индивидуального аккаунта задействует аутентификацию конфиденциальных сведений. Провайдеры задействуют углубленные алгоритмы KYC и AML для предотвращения мошеннических транзакций.
IT средства актуальных казино основываются на зашифрованных инфраструктурах с TLS технологиями. Региональная блокировка заставляет управляющих организовывать вспомогательные домены.
Резервные ресурсы составляют аналогичные клоны основного домена с удержанием всех инструментов и показателей. Беттеры достигают непрерывный связь к депозиту, игровой данным и клиентским опциям.
Платежные транзакции производятся через связанные расчетные сервисы. Рамки на взносы и обналичивания назначаются в гармонии с лицензионными критериями и индивидуальными правилами риск-менеджмента.
Опытные игроки советуют контролировать состояние разрешения через надзорные каталоги беттинг структур. Имиджевые параметры охватывают позиции на отраслевых сервисах и комментарии реальных клиентов.
budgetbreeze online – Smooth ordering and fast delivery made buying products a breeze.
Проверенные площадки игорных предложений oferuja геймерам возможность к профессиональному гэмблингу через целевые сайты, включая казино Вавада , которые именно придерживаются международные критерии security.
Схема активации предполагает заполнения верификационных информации через криптографические SSL-протоколы. Менеджмент запрашивают документальное свидетельство дееспособности и места нахождения для выполнения нормативных требований.
Multi-factor проверка является принудительным составляющей современных механизмов конфиденциальности. Пользователи получают SMS-коды, push-оповещения или внедряют специализированные софт типа Google Authenticator.
Зеркальные URL устраняют препятствия географических ограничений и DDoS-воздействий. С технической точки зрения дубли формируют аналогичные копии базового домена с поддержанием функциональности и user деталей.
Компетентные геймеры suggest keeping current базы функционирующих зеркал в bookmark browser. Операторы направляют сведения о современных URL через почтовые сервисы, Telegram-сообщества и смартфонные apps.
Денежные операции через лицензионные ресурсы secured шифровальными протоколами класса банковского индустрии. Вывод средств производится исключительно на проверенные карты владельца учётной записи.
Инновационные платформы беттинг активностей гарантируют клиентам путь к премиальному азарту через защищенные Лаки Бир РІС…РѕРґ системы. Авторизованная функционирование влечет соблюдения конкретных регуляторных стандартов.
Процесс активации клиентского счета предусматривает валидацию конфиденциальных показателей. Провайдеры задействуют расширенные механизмы KYC и AML для блокировки мошеннических транзакций.
Цифровые решения актуальных развлекательных порталов работают на защищенных дата-центрах с SSL сертификатами. Территориальные ограничения побуждает владельцев запускать вспомогательные URL.
Параллельные платформы составляют аналогичные копии основного платформы с обеспечением всех сервисов и сведений. Беттеры обеспечивают себе беспрепятственный доступ к капиталу, игровой записям и личным настройкам.
Банковские процедуры реализуются через связанные денежные системы. Границы на депозиты и обналичивания фиксируются в соотношении с правовыми условиями и корпоративными правилами контроля угроз.
Компетентные гемблеры настаивают отслеживать условия авторизации через контролирующие реестры игорных комиссий. Репутационные индикаторы предусматривают ранги на отраслевых порталах и feedback реальных клиентов.
What impressed me about this casino https://kantynaportowa.pl/ is the quality of the games. Everything runs without issues, the design is minimal, and there’s plenty of options to explore, which keeps it engaging.
Spruce & Style Designs – I like how the simple layout keeps everything clear and user-friendly.
Оперативный выкуп машин становится всё очень популярной опцией.
Данный сервис позволяет владельцу моментально получить наличные за автомобиль.
Многих подкупает необходимость тратить времени на долгие переговоры с клиентами.
Фирмы осматривают авто на месте и называют адекватную стоимость.
Такой метод освобождает от сложностей с оформлением и обещает безопасность операции.
https://web.ggather.com/kenigauto39
狙击蝴蝶2026 高清悬疑刑侦陆剧 海外华人必备在线观看 全球加速无缓冲播放
PlannerPrairie Marketplace – Handy planners that make keeping track of events and notes easier.
For the rest
bad credit small loans
to read the full article.
Новейшие сервисы беттинг развлечений обеспечивают участникам путь к профессиональному игровому процессу через защищенные Вавада сайт порталы. Сертифицированная бизнес предполагает следования жестких законодательных положений.
Система открытия пользовательского аккаунта предусматривает проверку персональных показателей. Регуляторы эксплуатируют многоуровневые системы KYC и AML для блокировки фродовых операций.
Цифровые средства современных гемблинг платформ основываются на надежных серверах с шифровальными сертификатами. Локальные запреты обязывает операторов запускать альтернативные адреса.
Резервные сайты образуют идентичные клоны базового портала с поддержанием всех возможностей и параметров. Клиенты достигают стабильный подключение к балансу, гемблинг отчетности и персональным параметрам.
Денежные процедуры осуществляются через связанные платежные шлюзы. Лимиты на депозиты и изъятия определяются в унисон с регуляторными условиями и собственными процедурами риск-менеджмента.
Квалифицированные игроки рекомендуют мониторить положение сертификата через государственные списки развлекательных организаций. Престижные параметры охватывают оценки на экспертных сайтах и отзывы истинных беттеров.
Определение проверенного казино оператора подразумевает глубокого разбора регулятивных бумаг. Инновационные сайты Вавада РІС…РѕРґ дают игрокам стопроцентную информацию о имеющихся разрешениях.
Система регистрации содержит определенное количество обязательных стадий валидации. Администраторы истребуют бумаги, подтверждающие идентичность и правоспособность. Традиционный KYC-регламент занимает от 24 до 72 интервалов.
Управление банком запускается с определения лимитов на взносы. Искусные участники призывают задействовать принцип 5% от совокупного развлекательного фонда на индивидуальную игру.
Системные ограничения провайдеров побуждают использовать резервные домены. Копии хранят максимальную работоспособность главного платформы, охватывая архив переводов и азартный продвижение.
Передовые расчетные системы гарантируют быстрые вклады через электронные хранилища. Bitcoin, Ethereum и постоянные токены поддерживают конфиденциальность и крошечные отчисления. Время обработки изъятий доходит 10-30 отрезков.
Схемы лояльности включают градационные ранги с увеличивающимся бонусом. VIP-менеджеры предлагают индивидуальные награды, расширенные ограничения и приоритетную сервис.
First of all I want to say terrific blog! I had a quick question which I’d like to
ask if you do not mind. I was interested to find out how you center yourself and clear your mind prior to
writing. I have had difficulty clearing my mind in getting my ideas out there.
I truly do take pleasure in writing however it just seems like the first 10 to 15 minutes tend to
be lost simply just trying to figure out how to begin. Any ideas or tips?
Appreciate it!
Если вас интересуют прогнозы на ufc в феврале марте 2026 три недели которые встряхнут дивизионы, этот текст для вас. Подробности по ссылке: https://turbaza-ladya.ru/news/goryachaya-seriya-ufc-fevral-mart-2026-boi-kotorye-mogut-izmenit-vsyo-v-rejtingah-i-divizionah/
Поиск надежного азартного заведения заставляет основательного разбора правовых бумаг. Инновационные сайты Vavada casino предоставляют участникам абсолютную данные о своих разрешениях.
Система регистрации охватывает несколько обязательных фаз проверки. Операторы требуют справки, удостоверяющие личность и дееспособность. Традиционный KYC-порядок составляет от 24 до 72 временных отрезков.
Управление банком запускается с задания ограничений на взносы. Искусные геймеры призывают применять норму 5% от общего гемблинг бюджета на единичную заход.
Программные блокировки владельцев принуждают использовать запасные маршруты. Зеркала хранят стопроцентную производительность главного сайта, охватывая архив платежей и азартный прогресс.
Актуальные финансовые способы обеспечивают оперативные взносы через цифровые портмоне. Bitcoin, Ethereum и фиксированные активы предоставляют тайность и наименьшие комиссии. Длительность обработки извлечений доходит 10-30 интервалов.
Алгоритмы верности предусматривают ступенчатые степени с увеличивающимся возвратом. VIP-представители обеспечивают уникальные награды, улучшенные лимиты и преимущественную поддержку.
Передовые операторы гемблинг продуктов обеспечивают участникам подключение к элитному развлечениям через защищенные казино 1хбет ресурсы. Официальная функционирование подразумевает соблюдения четких надзорных положений.
Процедура создания клиентского счета включает верификацию персональных информации. Администраторы используют многоуровневые системы KYC и AML для предотвращения поддельных финансовых действий.
IT средства передовых казино работают на зашифрованных облачных системах с SSL технологиями. IP-фильтрация вынуждает провайдеров запускать дублирующие адреса.
Альтернативные платформы формируют точные репликации основного платформы с удержанием всех возможностей и параметров. Пользователи приобретают непрерывный доступ к капиталу, азартной отчетности и персональным конфигурациям.
Платежные переводы осуществляются через синхронизированные денежные процессоры. Лимиты на вклады и получения регулируются в соответствии с лицензионными положениями и индивидуальными нормами управления рисками.
Квалифицированные игроки предлагают проверять статус сертификата через надзорные базы данных развлекательных структур. Престижные индикаторы задействуют ранги на профильных платформах и отзывы настоящих участников.
RubyRoost Finds Online – Charming products with clear and attractive visuals enhance the shopping experience.
Перемещение в мире сертифицированных площадок подразумевает осознания новых способов входа. Умелые участники применяют Lucky Bear зеркало для добывания релевантной информации о активных адресах.
Алгоритм открытия счета в сертифицированных компаниях охватывает детальную подтверждение. Современные организации задействуют KYC-механизмы и AML-критерии. Документальная процедура составляет от 24 до 72 интервалов.
Технические способы для минования барьеров совершенствуются вместе с укреплением юридических действий. VPN-службы типа premium предоставляют защиту AES-256 и системы OpenVPN. Устойчивость связи принципиально актуальна для VIP сессий.
Резервные ресурсы выполняют задачи через регионально расположенные компьютерные ресурсы. CDN-комплексы осуществляют низкую время ответа для европейских геймеров. Цифровое перенаправление запускается при выявлении ограничения центрального ресурса.
Экономические транзакции в лицензированных областях отвечают определенным критериям PCI DSS. Блокчейн операции увеличивают распространение в результате приватности и темпу реализации.
Мобильные софт топовых компаний содержат лицевую подтверждение и push-извещения для критических происшествий. Гибкий оформление автономно подстраивается под настройки экрана.
Выбор надежного игрового портала в текущих обстоятельствах заставляет повышенного рассмотрения к лицензионному статусу. Знающие пользователи представляют, что Лаки Бир официальный сайт включает новую информацию о активных ресурсах.
Процедура регистрации в лицензированных площадках включает требуемую подтверждение личности. KYC-процедуры охраняют как казино, так и пользователя от мошенничества. Переходные лимиты на снятие активов до окончания контроля – типичная методика.
Электронные барьеры на связь к развлекательным ресурсам нейтрализуются через резервные URL. Активные копии гарантируют абсолютную работоспособность главного портала. Банковские переводы, азартный достижения и наградные схемы продолжают стабильными.
Экономическая защищенность характеризуется степенью используемых финансовых систем. SSL-защита, PCI DSS подтверждение и двухфакторная подтверждение формируют безопасный барьер безопасности.
Игровая библиотека сертифицированных заведений объединяет слоты от ведущих производителей. RTP-параметры, дисперсия и расчетные принципы претерпевают независимую проверку в одобренных лабораториях.
Программы лояльности в надежных сервисах базируются на прозрачных параметрах отыгрыша. Проигрыш x35-40 признается адекватным для спин-подарков, в то время как традиционные активности идут в подсчет с сниженным процентом.
Collar & Corner Picks – High-quality pet gear is crafted with attention to detail.
Sticker Stadium Designs – Quick delivery and colorful designs make adding stickers enjoyable.
All About CreativeCrate – Interesting items and one-of-a-kind gifts make shopping fun.
Беттинговая ниша являет стремительный рост, завлекая массы пользователей. Грамотные ресурсы гарантируют надёжную обстановку для ставок. Детальную информацию о указанных брендах можно получить на Vavada зеркало .
Легализация остаётся ключевым критерием отбора сайта. Юрисдикции Олдерни дают тщательный надзор экономических процедур. Всякая лицензированная сайт проходит плановые аудиты RNG-модулей.
Технические параметры современных азартных площадок объединяют SSL-кодирование расчётного класса. Провайдеры программного ПО уровня Microgaming, NetEnt, Pragmatic Play интегрируют сложные механизмы хаотичных значений.
Механизм подтверждения счёта предполагает направления удостоверений KYC-типа. Паспорт, документ о средствах, подтверждение адреса — базовый пакет для итогового активации.
Альтернативные порталы решают сложности с цензурой поставщиков. Функционирующие альтернативы корректируются ежедневно цифровыми отделами. Портативные клиенты нередко выполняются надёжнее интернет версий.
Банкролл-менеджмент формирует долгосрочную прибыльность развлекательных сессий. Квалифицированные участники предлагают ограничивать количество пари до 1-2% от совокупного банкролла.
Нынешние геймеры натыкаются с барьером входа к легальным площадкам. Компании ограничивают основные домены, но профессиональные Вавада РІС…РѕРґ участники осознают о наличии дублирующих площадок.
Зеркало составляет точную реплику базового портала. SSL-сертификаты поддерживаются идентичными. Банковские процедуры производятся через равнозначные механизмы.
Технология оформления профиля через резервный адрес требует классической валидации. Сотрудники уточняют бумаги для выполнения KYC-норм. Личные данные выполняют расширенную проверку.
Финансовые границы на дополнительных порталах идентичны главным параметрам. Наименьшие ставки сохраняются постоянными. Накопительные накопления интегрируются между многочисленными доменами.
Льготные системы действуют целостно на альтернативных платформах. Коэффициент оборота удерживает исходные значения. Длительность реализации продолжается.
Служба сопровождения решает вопросы с параллельных доменов аналогично. Прямой диалог обеспечивает беспрерывный порядок работы.
authentic saffron finds – Every product includes useful details and represents high-quality sourcing.
Charm Your Charger – Functional charging items laid out with neat visuals.
Инновационные провайдеры азартных продуктов предоставляют участникам путь к профессиональному игровому процессу через сертифицированные Меллстрой зеркало ресурсы. Авторизованная бизнес влечет выполнения жестких надзорных стандартов.
Механизм открытия индивидуального профиля предусматривает аутентификацию личных информации. Управляющие используют многоуровневые механизмы KYC и AML для пресечения незаконных транзакций.
Программные средства инновационных казино основываются на защищенных облачных системах с криптографическими протоколами. Территориальные ограничения вынуждает управляющих запускать параллельные URL.
Резервные домены представляют эквивалентные клоны базового ресурса с фиксацией всех опций и параметров. Беттеры добиваются постоянный доступ к балансу, игровой статистике и личным установкам.
Финансовые процедуры осуществляются через встроенные денежные агрегаторы. Ограничения на инвестиции и изъятия устанавливаются в соотношении с регуляторными требованиями и индивидуальными правилами риск-менеджмента.
Квалифицированные гемблеры советуют проверять условия разрешения через контролирующие реестры развлекательных структур. Статусные критерии предусматривают позиции на тематических сервисах и оценки настоящих участников.
Определение безопасного азартного заведения нуждается основательного разбора лицензионных документов. Новые платформы Mellstroy Game зеркало дают пользователям стопроцентную детали о текущих допусках.
Система регистрации охватывает несколько требуемых стадий проверки. Операторы требуют документы, удостоверяющие личность и совершеннолетие. Классический KYC-порядок занимает от 24 до 72 временных отрезков.
Управление банком стартует с установления ограничений на взносы. Искусные участники настаивают применять закон 5% от суммарного развлекательного резерва на индивидуальную заход.
Технические ограничения владельцев обязывают внедрять дополнительные пути. Копии поддерживают максимальную производительность центрального площадки, подразумевая историю операций и азартный успех.
Актуальные денежные инструменты предоставляют моментальные вклады через цифровые счета. Bitcoin, Ethereum и устойчивые монеты дают скрытность и символические сборы. Продолжительность выполнения получений равно 10-30 интервалов.
Программы приверженности включают каскадные статусы с нарастающим вознаграждением. VIP-координаторы обеспечивают персонализированные подарки, расширенные рамки и первоочередную техподдержку.
контракт участника сво
Aviator India is a guide site on how to play Aviator: download the Aviator app or Aviator APK, log in, claim bonuses, and use UPI deposits via Paytm, PhonePe, or GPay. It also covers KYC, withdrawals, and warning signs of Aviator predictor scam.
एविएटर डाउनलोड करके ऑनलाइन खेलें
Проверенные операторы игровых опций гарантируют геймерам вариант к качественному гэмблингу через целевые сайты, включая Меллстрой официальный сайт , которые именно придерживаются международные требования security.
Схема регистрации necessita заполнения идентификационных деталей через защищённые SSL-connection. Букмекеры требуют официальное verification правоспособности и места residence для поддержания legal правил.
Multi-factor идентификация представляет required компонентом новейших платформ конфиденциальности. Игроки приобретают SMS-ключи, push-оповещения или применяют targeted утилиты по типу Google Authenticator.
Зеркальные ссылки решают вопросы territorial барьеров и DDoS-штурмов. Техническим образом mirrors составляют тождественные версии центрального домена с сохранением инструментария и индивидуальных параметров.
Опытные игроки призывают удерживать новейшие списки действующих зеркал в favourites browser. Провайдеры отправляют новости о fresh адресах через почтовые сервисы, Telegram-каналы и mobile софт.
Денежные процедуры через legal ресурсы secured cryptographic технологиями стандарта банковского индустрии. Получение денег производится единственно на validated реквизиты собственника учётной записи.
trellis essentials shop – Clear information combined with an intuitive layout improves browsing.
modern lace essentials – I was happy with how quickly it came and how nicely it was boxed.
Актуальные участники встречаются с огромным количеством системных нюансов при операциях с легальными платформами. Профильные порталы типа Вавада казино выдают новую информацию о процессах игорных брендов.
Алгоритм валидации учетной записи содержит несколько требуемых этапов. Начальная подтверждение нуждается отправки справок валидирующих персону. Типовой набор предполагает ID, автолицензию или внешний паспорт.
Программная компонента открытия счета подразумевает эксплуатацию защищенного протокола и двухфакторной аутентификации. Опытные клиенты подсказывают инициировать весь комплекс предложенных функций секьюрити.
Зеркала образуют точные отражения первичного портала с поддержанием полного инструментария. Основное достоинство заключается в схожести банковских лимитов и условий отыгрыша.
Механизм обнаружения действующих резервных ссылок строится на отслеживании экспертных уведомительных сервисов и партнерских платформ. Продвинутые пользователи задействуют анонимайзеры для обеспечения надежного подключения безотносительно от локальных запретов.
Актуальные провайдеры игорных развлечений гарантируют игрокам вход к профессиональному азарту через надежные казино 1xBet порталы. Легальная функционирование требует соблюдения четких контролирующих норм.
Процесс создания пользовательского кабинета задействует верификацию приватных реквизитов. Администраторы используют расширенные алгоритмы KYC и AML для блокировки мошеннических переводов.
Электронные инструменты актуальных гемблинг платформ работают на надежных облачных системах с SSL стандартами. Территориальные ограничения вынуждает операторов запускать параллельные адреса.
Альтернативные платформы составляют эквивалентные версии базового платформы с обеспечением всех возможностей и данных. Игроки добиваются постоянный подключение к балансу, азартной записям и пользовательским настройкам.
Платежные операции реализуются через подключенные денежные сервисы. Рамки на депозиты и получения фиксируются в унисон с лицензионными положениями и внутренними процедурами управления рисками.
Профессиональные клиенты указывают анализировать статус авторизации через регуляторные регистры азартных организаций. Имиджевые критерии предусматривают позиции на экспертных сервисах и feedback реальных пользователей.
Онлайн ігри казино онлайн – великий вибір автоматів, рулетки та покеру з бонусами та акціями. Огляди, новинки та спеціальні пропозиції.
нажмите здесь зеркало водка бет
Грати в грати слоти – великий каталог автоматів, бонуси за реєстрацію та регулярні турніри. Інформація про умови та можливості для гравців.
Современные бетторы встречаются с затруднением связи к проверенным платформам. Поставщики ограничивают базовые адреса, но профессиональные Меллстрой посетители осознают о присутствии дублирующих сайтов.
Зеркало формирует абсолютную отображение оригинального ресурса. Системы безопасности остаются аналогичными. Банковские переводы выполняются через равнозначные сервисы.
Методика оформления профиля через резервный ссылку требует привычной подтверждения. Специалисты выясняют удостоверения для реализации KYC-норм. Персональные сведения осуществляют комплексную валидацию.
Финансовые ограничения на альтернативных площадках совпадают главным требованиям. Начальные суммы поддерживаются постоянными. Увеличивающиеся джекпоты согласовываются между различными доменами.
Поощрительные схемы действуют всесторонне на резервных сайтах. Отыгрышный коэффициент гарантирует исходные цифры. Длительность проигрывания поддерживается.
Служба обслуживания обрабатывает запросы с резервных порталов сходным образом. Живой чат обеспечивает беспрерывный расписание оперирования.
https://www.gabitos.com/ayudaamistad/template.php?nm=1771668499
Азартная сфера демонстрирует стремительный расширение, притягивая миллионы участников. Грамотные площадки предоставляют защищённую условия для пари. Исчерпывающую информацию о подобных провайдерах доступно найти на казино Лаки Бир .
Аккредитация остаётся приоритетным аспектом отбора платформы. Лицензиаты Гибралтара гарантируют строгий надзор расчётных операций. Отдельная легальная портал реализует систематические контроли RNG-систем.
IT параметры инновационных игорных домов охватывают SSL-шифрование банковского класса. Поставщики софтового софта наподобие Microgaming, NetEnt, Pragmatic Play интегрируют многоуровневые модели хаотичных показателей.
Алгоритм валидации личного кабинета предусматривает представления справок KYC-класса. Документ, документ о доходах, доказательство регистрации — классический перечень для полноценного авторизации.
Альтернативные домены ликвидируют трудности с запретами компаний. Рабочие копии адаптируются каждый день цифровыми службами. Смартфонные программы нередко выполняются надёжнее сетевых форматов.
Распределение капитала определяет долгосрочную доходность развлекательных периодов. Квалифицированные геймеры предлагают ограничивать размер вейджера до 1-2% от общего бюджета.
нейросеть для школьников и студентов нейросеть для школьников и студентов .
Проверенные площадки азартных сервисов дают пользователям шанс к премиальному игровому процессу через dedicated ресурсы, включая п»ї1xBet казино , что выполняют мировые стандарты защиты.
Схема создания аккаунта подразумевает внесения верификационных деталей через защищённые SSL-connection. Администрация demanded письменное свидетельство правоспособности и региона регистрации для поддержания нормативных требований.
Двухэтапная верификация представляет принудительным составляющей современных систем конфиденциальности. Users получают SMS-ключи, push-оповещения или внедряют специальные утилиты типа Google Authenticator.
Зеркальные адреса решают сложности географических запретов и DDoS-воздействий. С технической точки зрения дубли являют копийные копии главного сайта с удержанием features и индивидуальных данных.
Компетентные клиенты suggest keeping свежие реестры активных копий в избранном веб-клиента. Операторы доставляют информацию о современных порталах через почтовые сервисы, Telegram-communities и телефонные приложения.
Платёжные операции через legal площадки гарантированы encryption технологиями класса банковского области. Extraction финансов реализуется лишь на аутентифицированные данные хозяина профиля.
Stretch Studio Depot – Workout essentials clearly displayed with a layout that’s easy to use.
Подбор безопасного развлекательного площадки в текущих обстоятельствах нуждается повышенного внимания к юридическому уровню. Опытные клиенты представляют, что п»ї1хбет сайт содержит новую материалы о доступных сервисах.
Процедура открытия счета в официальных сервисах охватывает неизбежную аутентификацию персональных данных. KYC-требования оберегают как заведение, так и игрока от фрода. Переходные ограничения на вывод средств до финализации валидации – стандартная методика.
Электронные запреты на доступ к азартным порталам обходятся через резервные домены. Функционирующие дубликаты сохраняют тотальную функциональность первичного ресурса. Расчетные переводы, развлекательный продвижение и льготные программы сохраняются устойчивыми.
Материальная стабильность выражается критерием внедренных финансовых способов. SSL-защита, PCI DSS подтверждение и расширенная идентификация гарантируют прочный заслон безопасности.
Интерактивная ассортимент проверенных операторов объединяет автоматы от топовых студий. RTP-показатели, дисперсия и алгоритмические системы испытывают независимую контроль в утвержденных учреждениях.
Системы поощрения в серьезных операторах основываются на четких правилах вейджера. Отыгрыш x35-40 расценивается справедливым для барабан-привилегий, в то время как стандартные забавы засчитываются в калькуляцию с пониженным коэффициентом.
Отбор проверенного казино ресурса подразумевает серьезного изучения правовых документов. Передовые ресурсы п»ї1xBet casino предлагают пользователям абсолютную информацию о своих санкциях.
Алгоритм оформления счета предусматривает определенное количество принудительных фаз подтверждения. Владельцы истребуют удостоверения, доказывающие личность и правоспособность. Традиционный KYC-процесс составляет от 24 до 72 промежутков.
Управление банком начинается с фиксации лимитов на депозиты. Квалифицированные клиенты предлагают задействовать норму 5% от совокупного гемблинг средств на индивидуальную партию.
Программные ограничения поставщиков принуждают внедрять вспомогательные маршруты. Клоны хранят максимальную работоспособность базового площадки, включая историю сделок и игровой прогресс.
Современные расчетные инструменты обеспечивают скоростные депозиты через блокчейн счета. Bitcoin, Ethereum и фиксированные активы предоставляют конфиденциальность и символические комиссии. Период выполнения выводов равно 10-30 промежутков.
Планы лояльности содержат иерархические степени с увеличивающимся бонусом. VIP-кураторы обеспечивают уникальные награды, повышенные пределы и приоритетную техподдержку.
Thread Thrive Hub – Impressive textile quality and vivid colors enhance every project.
For the infographic
purchase loans
to choose the best option.
Remote Ranch Hub – Niche items displayed cleanly and browsing feels smooth.
SableAndSon Essentials – High-quality pieces accompanied by detailed and useful descriptions.
Современные гемблеры встречаются с проблемой соединения к легальным площадкам. Организации фильтруют базовые URL, но профессиональные Вавада РІС…РѕРґ пользователи помнят о наличии параллельных площадок.
Дополнительный домен образует стопроцентную воспроизведение базового сайта. Системы безопасности поддерживаются аналогичными. Расчётные действия проходят через те же сервисы.
Методика регистрации через альтернативный портал включает классической валидации. Операторы запрашивают удостоверения для соблюдения KYC-норм. Персональные информация осуществляют комплексную верификацию.
Пополнительные границы на зеркальных сайтах аналогичны основным требованиям. Низшие ставки функционируют стабильными. Возрастающие призовые фонды интегрируются между различными ресурсами.
Стимулирующие системы работают завершённо на альтернативных площадках. Требования по обороту обеспечивает базовые параметры. Срок активности проигрывания остаётся прежним.
Служба поддержки обрабатывает тикеты с зеркальных доменов таким же способом. Мгновенный чат обеспечивает беспрерывный режим функционирования.
seamsaffire fabrics – Beautiful textiles and sewing tools arrived safely and ready to use.
strength gear corner – A curated selection of items perfect for building strength and stamina.
Creative Mug Corner – Fun and artistic drinkware makes gifting effortless.
MicrobrandMagnet Essentials Hub – Timepieces arranged neatly with clear and helpful product info.
педиатрический справочник
Новейшие участники сталкиваются с сложностью входа к официальным порталам. Операторы запрещают основные порталы, но искушённые Меллстрой сайт клиенты понимают о присутствии дублирующих ресурсов.
Альтернативный адрес составляет точную воспроизведение базового портала. SSL-сертификаты работают неизменными. Расчётные процедуры проходят через равнозначные механизмы.
Методика регистрации через альтернативный ресурс предполагает стандартной верификации. Менеджеры запрашивают документы для выполнения KYC-стандартов. Индивидуальные сведения подвергаются многоуровневую верификацию.
Вносительные границы на зеркальных платформах совпадают первичным условиям. Низшие ставки поддерживаются стабильными. Растущие выигрышные пулы синхронизируются между разными ресурсами.
Поощрительные программы выполняются комплексно на резервных порталах. Требования по обороту гарантирует стартовые показатели. Временные рамки оборота остаётся прежним.
Команда обслуживания решает запросы с дополнительных порталов сходным образом. Онлайн разговор поддерживает круглосуточный формат обслуживания.
Urban Unison Styles – Modern selection paired with an attractive display makes shopping fun.
urban chic picks – The seasonal lineup brings a bold and fashionable flair.
работа риэлтором в Сарове
Актуальные игроки имеют дело с множеством технологических особенностей при работе с сертифицированными сайтами. Экспертные ресурсы типа винити официальный сайт обеспечивают свежую данные о деятельности азартных провайдеров.
Процесс верификации счета включает набор принудительных стадий. Начальная верификация предполагает отправки справок доказывающих индивидуальность. Обычный комплект подразумевает удостоверение личности, водительские права или заграничное удостоверение.
Цифровая сторона создания аккаунта охватывает использование SSL-шифрования и 2FA. Продвинутые участники подсказывают инициировать максимум доступных настроек охраны.
Зеркала представляют идентичные дубликаты главного домена с сохранением исчерпывающего инструментария. Ключевое плюс содержится в подобии платежных лимитов и критериев условий прокрутки.
Механизм локализации активных дублирующих порталов базируется на мониторинге профильных новостных лент и партнерских площадок. Профессиональные игроки эксплуатируют анонимайзеры для обеспечения устойчивого доступа безотносительно от локальных ограничений.
Передовые клиенты встречаются с огромным количеством системных особенностей при операциях с проверенными ресурсами. Тематические порталы типа tip top casino выдают свежую сведения о работе казино компаний.
Механизм валидации счета подразумевает ряд неотъемлемых этапов. Базовая аутентификация предполагает передачи справок удостоверяющих субъект. Обычный набор подразумевает ID, лицензию водителя или международный паспорт.
Техническая элемент оформления охватывает использование безопасного соединения и 2FA. Продвинутые пользователи настаивают задействовать полный набор имеющихся опций защиты.
Альтернативные адреса являются точные отражения базового ресурса с поддержанием тотального инструментария. Ключевое достоинство состоит в схожести банковских ограничений и требований проигрыша.
Механизм обнаружения действующих альтернативных адресов опирается на наблюдении профильных информационных каналов и союзных сайтов. Экспертные пользователи используют анонимайзеры для формирования устойчивого связи невзирая от местных барьеров.
Определение легального гемблинг площадки подразумевает основательного анализа юридических свидетельств. Современные системы казино Lucky Bear предоставляют участникам стопроцентную сведения о своих санкциях.
Процедура создания профиля подразумевает определенное количество принудительных стадий проверки. Представители запрашивают документы, доказывающие персону и зрелость. Стандартный KYC-регламент продолжается от 24 до 72 часов.
Управление банком инициируется с назначения лимитов на депозиты. Компетентные участники советуют внедрять установку 5% от итогового развлекательного бюджета на единичную раунд.
Системные препятствия администраторов обязывают использовать альтернативные домены. Клоны оберегают полную эффективность центрального портала, включая архив платежей и гемблинг продвижение.
Новые платежные системы дают быстрые инвестиции через цифровые хранилища. Bitcoin, Ethereum и стабильные валюты гарантируют конфиденциальность и наименьшие сборы. Период обработки изъятий доходит 10-30 интервалов.
Алгоритмы лояльности предусматривают градационные ранги с увеличивающимся кэшбэком. VIP-представители предлагают личные подарки, повышенные пределы и преимущественную помощь.
Новейшие пользователи имеют дело с массой системных особенностей при процессах с официальными площадками. Профильные сайты типа п»ї1хбет казино выдают актуальную материалы о деятельности игорных провайдеров.
Система валидации аккаунта охватывает комплекс необходимых фаз. Первичная подтверждение предполагает отправки бумаг валидирующих личность. Привычный набор включает свидетельство, лицензию водителя или заграничное удостоверение.
Системная составляющая записления предполагает использование зашифрованного канала и 2FA. Профессиональные клиенты рекомендуют активировать полный набор предложенных параметров секьюрити.
Резервные ссылки являются точные отражения базового платформы с сохранением комплексного возможностей. Центральное бонус содержится в подобии банковских лимитов и критериев ставочных требований.
Процедура обнаружения активных запасных доменов основывается на наблюдении тематических информационных каналов и союзных сайтов. Экспертные геймеры эксплуатируют анонимайзеры для обеспечения надежного доступа невзирая от местных лимитов.
After testing several platforms, I found this casino https://gratoria.pl/ to be well-balanced. The welcome bonus is generous, terms are transparent, and payouts don’t take forever, making it suitable for regular players.
Передовые операторы азартных игр гарантируют беттерам доступ к высококлассному беттингу через защищенные п»ї1хбет официальный сайт ресурсы. Лицензированная функционирование требует исполнения конкретных законодательных норм.
Система активации индивидуального аккаунта задействует аутентификацию индивидуальных данных. Регуляторы внедряют комплексные системы KYC и AML для исключения фродовых финансовых действий.
Электронные платформы актуальных гемблинг платформ основываются на надежных дата-центрах с HTTPS стандартами. Локальные запреты заставляет управляющих разрабатывать параллельные ссылки.
Дублирующие порталы представляют эквивалентные репликации основного платформы с сохранением всех опций и сведений. Беттеры достигают устойчивый связь к средствам, игровой истории и личным параметрам.
Расчетные транзакции реализуются через подключенные банковские системы. Ограничения на вклады и выводы определяются в соотношении с правовыми требованиями и корпоративными правилами снижения потерь.
Профессиональные беттеры советуют мониторить статус авторизации через регуляторные базы данных игорных структур. Авторитетные параметры содержат места на тематических платформах и мнения подлинных беттеров.
Нынешние гемблеры натыкаются с препятствием связи к официальным платформам. Поставщики ограничивают основные порталы, но грамотные [url=https://github.com/VAVADA-online-zerkalo]Вавада РІС…РѕРґ[/url] посетители учитывают о существовании зеркальных ресурсов.
Резервная ссылка составляет точную дубликат первичного платформы. SSL-сертификаты работают равнозначными. Платёжные транзакции проходят через идентичные каналы.
Методика заведения учётной записи через альтернативный портал требует стандартной верификации. Специалисты запрашивают удостоверения для осуществления KYC-правил. Паспортные сведения осуществляют двухфакторную валидацию.
Пополнительные рамки на зеркальных сайтах совпадают главным характеристикам. Стартовые ставки продолжают неизменными. Увеличивающиеся накопления синхронизируются между множественными ссылками.
Премиальные планы выполняются комплексно на дополнительных порталах. Отыгрышный коэффициент гарантирует оригинальные цифры. Тайминг проигрывания продолжается.
Отдел обслуживания изучает тикеты с альтернативных доменов равнозначно. Живой общение предоставляет 24-часовой формат оперирования.
Передовые платформы беттинг развлечений дают игрокам подключение к профессиональному развлечениям через защищенные лаки Р±РёСЂ казино ресурсы. Авторизованная деятельность нуждается соблюдения строгих законодательных критериев.
Процедура регистрации индивидуального кабинета охватывает подтверждение личных данных. Управляющие эксплуатируют расширенные процедуры KYC и AML для пресечения фродовых операций.
Технические решения современных игорных домов функционируют на защищенных дата-центрах с HTTPS стандартами. Региональная блокировка заставляет провайдеров запускать параллельные адреса.
Зеркальные порталы представляют эквивалентные версии базового платформы с поддержанием всех сервисов и показателей. Клиенты обеспечивают себе беспрепятственный связь к депозиту, беттинг данным и персональным установкам.
Денежные действия проходят через подключенные банковские агрегаторы. Ограничения на депозиты и получения регулируются в соответствии с нормативными стандартами и собственными политиками минимизации опасностей.
Компетентные игроки советуют контролировать ситуацию сертификата через контролирующие списки беттинг организаций. Имиджевые индикаторы включают места на специализированных платформах и feedback подлинных пользователей.
Современные порталы азартных активностей предоставляют пользователям путь к премиальному игровому процессу через надежные https://zelenovskoe.ru сайты. Авторизованная операционная активность подразумевает выполнения конкретных контролирующих критериев.
Алгоритм создания игрового счета предусматривает валидацию приватных данных. Управляющие применяют детализированные алгоритмы KYC и AML для исключения нарушающих операций.
IT инструменты передовых беттинг площадок функционируют на зашифрованных дата-центрах с TLS стандартами. Территориальные ограничения принуждает операторов организовывать вспомогательные адреса.
Зеркальные ресурсы являют собой точные клоны первичного сайта с удержанием всех возможностей и показателей. Пользователи получают стабильный доступ к средствам, гемблинг отчетности и клиентским конфигурациям.
Банковские действия производятся через синхронизированные финансовые агрегаторы. Границы на вклады и выводы регулируются в соответствии с правовыми требованиями и индивидуальными процедурами минимизации опасностей.
Профессиональные игроки предлагают анализировать ситуацию лицензии через государственные регистры игорных органов. Репутационные индикаторы охватывают рейтинги на тематических сайтах и оценки реальных игроков.
trafficy.click – Color palette felt calming, nothing distracting, just focused, thoughtful design.
Исследование в пространстве лицензированных сайтов предполагает знания актуальных методов соединения. Квалифицированные пользователи используют казино Lucky Bear для получения современной фактов о функционирующих путях.
Механизм открытия аккаунта в надежных заведениях подразумевает комплексную валидацию. Современные операторы используют KYC-системы и AML-критерии. Документальное сопровождение отнимает от 24 до 72 периодов.
IT способы для обхода запретов прогрессируют одновременно с повышением регуляторных инициатив. VPN-инструменты уровня premium предоставляют шифрование AES-256 и протоколы OpenVPN. Надежность связи кардинально значима для элитных игровых периодов.
Альтернативные домены действуют через территориально разнесенные цифровые системы. CDN-комплексы предоставляют быструю время ответа для азиатских участников. Техническое роутинг запускается при обнаружении ограничения главного портала.
Экономические переводы в официальных юрисдикциях отвечают жестким нормам PCI DSS. Децентрализованные платежи приобретают распространение вследствие конфиденциальности и скорости осуществления.
Портативные утилиты топовых брендов совмещают голосовую подтверждение и push-извещения для ключевых ситуаций. Модифицируемый дизайн автоматически корректируется под характеристики матрицы.
Легальные ресурсы гэмблинг опций предоставляют игрокам право к профессиональному азартному досугу через специализированные сайты, включая казино Vavada , которые точно придерживаются общепринятые требования security.
Механизм создания аккаунта включает заполнения верификационных сведений через безопасные SSL-протоколы. Букмекеры просят нотариальное доказательство совершеннолетия и территории регистрации для соблюдения правовых правил.
Многоуровневая идентификация представляет required частью актуальных систем защиты. Пользователи имеют SMS-ключи, push-алерты или внедряют dedicated приложения вроде Google Authenticator.
Mirror ссылки нейтрализуют трудности локальных ограничений и DDoS-атак. Технически реплики составляют копийные реплики центрального ресурса с обеспечением features и индивидуальных деталей.
Skilled клиенты советуют удерживать новейшие реестры активных дублей в сохранённых ссылках браузера. Администрация направляют updates о актуальных порталах через почтовые сервисы, Telegram-чаты и портативные приложения.
Финансовые процедуры через проверенные порталы гарантированы криптографическими протоколами стандарта банковского направления. Получение денег производится лишь на аутентифицированные реквизиты собственника аккаунта.
Беттинговая отрасль показывает стремительный развитие, завлекая легионы геймеров. Опытные платформы гарантируют качественную условия для беттинга. Подробную сведения о этих брендах допустимо отыскать на РЎСѓРєР° казино .
Лицензирование является приоритетным элементом выбора сайта. Юрисдикции Великобритании гарантируют качественный надзор экономических операций. Каждая аккредитованная портал реализует систематические инспекции RNG-механизмов.
Цифровые аспекты актуальных игорных домов предусматривают SSL-шифрование экономического стандарта. Создатели софтового софта класса Microgaming, NetEnt, Pragmatic Play встраивают усовершенствованные механизмы непредсказуемых чисел.
Механизм аутентификации счёта включает подачи справок KYC-стандарта. Паспорт, документ о доходах, удостоверение местожительства — базовый набор для итогового входа.
Параллельные ссылки решают препятствия с блокировками поставщиков. Функционирующие альтернативы корректируются систематически компьютерными службами. Карманные приложения нередко действуют качественнее веб вариантов.
Банкролл-менеджмент устанавливает стратегическую результативность гемблинговых сессий. Квалифицированные геймеры предлагают сокращать сумму депозита до 1-2% от совокупного фонда.
Беттинговая сфера отображает интенсивный рост, заинтересовывая миллионы геймеров. Опытные платформы обеспечивают качественную пространство для игры. Развёрнутую факты о этих провайдерах возможно отыскать на винити казино .
Лицензирование представляет центральным аспектом отбора платформы. Юрисдикции Гибралтара создают строгий контроль экономических манипуляций. Конкретная официальная сайт подвергается регулярные ревизии RNG-систем.
Технические аспекты современных гемблинг-сайтов предусматривают SSL-безопасность экономического стандарта. Провайдеры виртуального продукта класса Microgaming, NetEnt, Pragmatic Play добавляют комплексные алгоритмы непредсказуемых чисел.
Процесс проверки аккаунта предусматривает предоставления бумаг KYC-уровня. Свидетельство, справка о средствах, удостоверение регистрации — классический список для финального входа.
Альтернативные порталы решают проблемы с цензурой провайдеров. Свежие варианты корректируются регулярно программными службами. Портативные утилиты зачастую работают стабильнее веб вариантов.
Банкролл-менеджмент устанавливает длительную результативность гемблинговых периодов. Квалифицированные пользователи указывают контролировать сумму депозита до 1-2% от полного фонда.
Передовые игроки пересекаются с огромным количеством технологических аспектов при процессах с сертифицированными платформами. Экспертные источники типа Mellstroy Game casino дают свежую материалы о процессах игорных организаций.
Процедура верификации кабинета охватывает несколько неотъемлемых стадий. Исходная валидация включает загрузки удостоверений подтверждающих личность. Типовой перечень предполагает свидетельство, лицензию водителя или международное ID.
Технологическая сторона записления охватывает применение безопасного соединения и двойной авторизации. Профессиональные геймеры советуют задействовать полный набор доступных возможностей безопасности.
Дублирующие порталы образуют идентичные дубликаты главного сайта с удержанием тотального функционала. Центральное плюс заключается в соответствии финансовых пределов и требований проигрыша.
Механизм выявления действующих зеркал фундируется на контроле специализированных новостных лент и сотрудничающих площадок. Экспертные пользователи используют VPN-сервисы для предоставления стабильного доступа безотносительно от локальных барьеров.
Lamp Lattice Treasures – Each lighting piece is described well and makes shopping simple.
скачать игры с облака mail скачать игры с яндекс диска
https://vhearts.net/forums/thread/21797/
怪奇物语终章2026 海外华人科幻恐怖剧 高清最终季 海外必备
Snippet Studio Zone – The content here is full of inspiration for designers, writers, and creators.
Ludogorets 2-1 Ferencvaros 2026 Europa League result! Bulgarians edge Hungarians – latest match results from Europa play-offs!
Brann 0-1 Bologna 2026 Europa League tight win! Italians steal it late – latest results heating up knockout race!
BerryBazaar Shop Online – Fast-loading mobile site with a variety of items to browse.
Развлекательная сфера демонстрирует активный расширение, привлекая легионы клиентов. Опытные площадки дают надёжную обстановку для беттинга. Исчерпывающую сведения о этих брендах можно найти на п»ї1хбет зеркало .
Легализация представляет центральным показателем выбора ресурса. Регуляторы Гибралтара гарантируют качественный мониторинг финансовых процедур. Каждая сертифицированная портал выполняет регулярные контроли RNG-алгоритмов.
Технические аспекты новейших азартных площадок охватывают SSL-шифрование экономического стандарта. Поставщики программного ПО класса Microgaming, NetEnt, Pragmatic Play добавляют многоуровневые схемы хаотичных значений.
Схема аутентификации счёта предполагает направления документов KYC-типа. Свидетельство, справка о средствах, верификация местожительства — обычный набор для полноценного авторизации.
Дублирующие порталы решают барьеры с фильтрацией поставщиков. Свежие зеркала изменяются постоянно техническими специалистами. Планшетные софт часто оперируют качественнее онлайн форматов.
Финансовая дисциплина создаёт продолжительную успешность развлекательных циклов. Профессиональные пользователи рекомендуют лимитировать объём пари до 1-2% от полного банкролла.
Поиск безопасного казино ресурса требует детального исследования юридических сертификатов. Современные ресурсы Vavada казино дают участникам безусловную детали о своих допусках.
Система регистрации подразумевает ряд принудительных ступеней проверки. Операторы настаивают справки, подтверждающие личность и правоспособность. Типовой KYC-механизм составляет от 24 до 72 временных отрезков.
Банкролл-менеджмент запускается с фиксации лимитов на инвестиции. Квалифицированные игроки призывают внедрять правило 5% от суммарного азартного средств на единичную сессию.
Электронные барьеры поставщиков принуждают задействовать запасные адреса. Копии оберегают максимальную производительность центрального площадки, предусматривая хронологию переводов и гемблинг прогресс.
Передовые платежные инструменты гарантируют мгновенные вклады через блокчейн аккаунты. Bitcoin, Ethereum и стейблкоины предоставляют тайность и наименьшие комиссии. Длительность реализации извлечений доходит 10-30 периодов.
Планы приверженности содержат градационные статусы с возрастающим кэшбэком. VIP-менеджеры гарантируют уникальные подарки, увеличенные рамки и приоритетную обслуживание.
contemporary style shop – Effortless browsing paired with modern design makes it a standout.
匹兹堡医护前线第二季2026 海外华人免费高清医疗剧 全球加速无广告
Лицензионные ресурсы гэмблинг услуг обеспечивают участникам возможность к премиальному развлечениям через тематические порталы, включая казино Килограмм , что выполняют мировые критерии защиты.
Последовательность открытия счёта предполагает заполнения валидационных сведений через шифрованные SSL-соединения. Букмекеры просят документальное подтверждение age verification и адреса жительства для поддержания правовых требований.
2FA authentication является принудительным составляющей передовых платформ безопасности. Пользователи имеют SMS-ключи, push-алерты или эксплуатируют специализированные утилиты по типу Google Authenticator.
Дублирующие URL устраняют сложности локальных санкций и DDoS-атак. Технически дубли являют тождественные dublicates центрального ресурса с обеспечением опций и клиентских деталей.
Профессиональные участники рекомендуют поддерживать свежие списки действующих дублей в избранном browser. Management отправляют обновления о свежих адресах через e-mail, Telegram-чаты и телефонные софт.
Денежные транзакции через лицензионные ресурсы гарантированы защитными алгоритмами класса банковского направления. Снятие капитала осуществляется единственно на проверенные карты собственника личного кабинета.
Инновационные сервисы беттинг продуктов дают игрокам путь к профессиональному развлечениям через безопасные Клубника казино платформы. Лицензированная функционирование влечет исполнения жестких контролирующих положений.
Процесс создания пользовательского профиля задействует верификацию персональных реквизитов. Операторы задействуют комплексные процедуры KYC и AML для предотвращения незаконных операций.
Цифровые средства актуальных игорных домов основываются на безопасных серверах с TLS стандартами. Региональная блокировка обязывает управляющих организовывать альтернативные домены.
Дублирующие сайты представляют полные копии первичного сайта с обеспечением всех сервисов и данных. Беттеры получают непрерывный доступ к счету, развлекательной истории и клиентским настройкам.
Финансовые действия выполняются через встроенные платежные агрегаторы. Рамки на депозиты и выводы назначаются в соотношении с законодательными условиями и собственными процедурами снижения потерь.
Профессиональные беттеры предлагают контролировать условия разрешения через государственные регистры беттинг организаций. Статусные параметры предусматривают оценки на специализированных порталах и комментарии настоящих пользователей.
https://www.bc3research.org/images/pages/?melbet_promo_code__bangladesh_2022__bonus_up_to____130.html
艾一帆海外版2026 高清视频平台 全球加速 动漫专区
Pearl Parade Collection Hub – Everything was clearly shown, making the selection process smooth.
Развлекательная сфера демонстрирует стремительный подъём, завлекая миллионы клиентов. Профессиональные порталы обеспечивают надёжную среду для развлечений. Подробную сведения о таких компаниях можно обнаружить на Lucky Bear казино .
Сертификация выступает центральным элементом выбора платформы. Юрисдикции Мальты предоставляют качественный проверку экономических транзакций. Всякая официальная портал осуществляет систематические контроли RNG-механизмов.
Цифровые аспекты современных беттинг-платформ включают SSL-криптографию банковского уровня. Поставщики виртуального материала уровня Microgaming, NetEnt, Pragmatic Play добавляют усовершенствованные системы рандомных показателей.
Механизм верификации профиля предусматривает предоставления справок KYC-класса. ID, подтверждение о финансах, удостоверение прописки — обычный список для итогового авторизации.
Альтернативные URL решают препятствия с блокировками организаций. Действующие копии изменяются ежедневно IT командами. Мобильные софт регулярно работают стабильнее онлайн вариантов.
Распределение капитала задаёт долгосрочную эффективность развлекательных сессий. Грамотные пользователи указывают урезать количество пари до 1-2% от совокупного фонда.
Передовые клиенты имеют дело с массой технологических особенностей при процессах с лицензированными ресурсами. Профильные ресурсы типа Vavada casino дают современную данные о функционировании гэмблинговых провайдеров.
Процедура валидации счета предполагает ряд обязательных уровней. Начальная аутентификация предполагает загрузки свидетельств валидирующих гражданство. Классический список содержит паспорт, лицензию водителя или международный паспорт.
Программная компонента открытия счета подразумевает внедрение защищенного протокола и двойной авторизации. Продвинутые участники предлагают активировать все возможных функций защиты.
Альтернативные адреса являются абсолютные клоны первичного ресурса с хранением исчерпывающего функционала. Ключевое бонус состоит в схожести платежных рамок и требований условий прокрутки.
Алгоритм нахождения активных дублирующих порталов основывается на отслеживании профильных уведомительных сервисов и партнерских сайтов. Профессиональные игроки внедряют VPN-сервисы для создания постоянного доступа вне зависимости от географических лимитов.
All About SockSyndicate – Funky looks and cozy textures turn simple socks into favorites.
читать водка бет
Активные mirror-ссылки проверенных азартных клубов на Гризли казино гарантируют стабильный подключение к гемблинг порталам. Схема зеркалирования строит точные копии центрального ресурса с фиксацией всех возможностей.
Алгоритм оформления профиля через зеркало целиком дублирует стандартную форму. Новые клиенты прописывают действующий email, создают безопасный секретную комбинацию и устанавливают рабочую курренси.
Аутентификация личного кабинета предполагает передачи документов опираясь на KYC-регламенту. Фото национального документа, подтверждение резиденции и банковские данные проходят машинную контроль в течение 24-72 часа.
Подключение верифицированных пользователей происходит через обычную окно с двухфакторной аутентификацией. Краткосрочные ключи доставляются на телефонный гаджет или e-mail адрес.
Опции пополнительного модуля через альтернативные домены включает актуальные платежные платформы. Visa, Mastercard, электронные кошельки Skrill, Neteller, виртуальные монеты Bitcoin, Ethereum реализуются с оптимизированными платежами 0-3%.
Игровая каталог повторяется целиком включая spinning games, классические игры, live-хостов и джекпоты. RTP-коэффициенты, вариативность и ставочные требования удерживаются точными.
Подарочная система работает подобно корневому веб-площадке. Welcome-комплекты, бесплатные вращения, компенсация и VIP-программы стартуют программно при достижении фиксированных стандартов.
Актуальные участники попадают с затруднением доступа к лицензированным порталам. Компании запрещают базовые адреса, но искушённые Vavada казино участники помнят о существовании параллельных платформ.
Параллельный портал составляет стопроцентную отображение базового площадки. Криптографические алгоритмы поддерживаются такими же. Денежные процедуры производятся через сходные механизмы.
Методика заведения учётной записи через альтернативный портал включает классической подтверждения. Операторы выясняют свидетельства для исполнения KYC-регламентов. Идентификационные информация подвергаются расширенную аутентификацию.
Депозитные пределы на параллельных площадках аналогичны первичным спецификациям. Наименьшие ставки функционируют постоянными. Накопительные призовые фонды согласовываются между многочисленными ресурсами.
Льготные схемы работают завершённо на зеркальных сайтах. Множитель ставок удерживает базовые параметры. Временные рамки использования поддерживается.
Команда сопровождения рассматривает тикеты с альтернативных ресурсов идентично. Интерактивный диалог обеспечивает непрерывный график функционирования.
Проверенные платформы игорных опций дают игрокам доступ к премиальному времяпрепровождению через профильные платформы, включая лаки Р±РёСЂ казино , что придерживаются общепринятые нормы security.
Алгоритм оформления профиля подразумевает ввода идентификационных деталей через криптографические SSL-протоколы. Администрация требуют письменное удостоверение совершеннолетия и адреса регистрации для поддержания правовых норм.
Многоуровневая аутентификация представляет необходимым частью актуальных архитектур безопасности. Пользователи приобретают SMS-коды, push-сообщения или используют специализированные утилиты типа Google Authenticator.
Резервные URL решают проблемы territorial барьеров и DDoS-атак. Техническим образом реплики являют идентичные реплики базового сайта с обеспечением features и клиентских данных.
Skilled участники рекомендуют поддерживать актуальные списки функционирующих mirrors в закладках веб-клиента. Management передают сведения о fresh ссылках через email, Telegram-чаты и мобильные софт.
Платёжные операции через лицензионные платформы гарантированы encryption алгоритмами класса банковского сектора. Получение денег осуществляется лишь на аутентифицированные данные держателя учётной записи.
Выбор надежного игорного оператора заставляет тщательного разбора правовых бумаг. Инновационные платформы Меллстрой сайт гарантируют клиентам стопроцентную данные о действующих разрешениях.
Механизм создания профиля предусматривает различные ключевых ступеней проверки. Провайдеры запрашивают свидетельства, устанавливающие самобытность и зрелость. Обычный KYC-алгоритм продолжается от 24 до 72 интервалов.
Распоряжение капиталом инициируется с определения пределов на взносы. Компетентные геймеры советуют эксплуатировать правило 5% от итогового казино фонда на отдельную сессию.
Цифровые препятствия администраторов обязывают эксплуатировать резервные ссылки. Копии удерживают полную активность базового ресурса, содержа историю переводов и игровой результаты.
Современные банковские инструменты предоставляют скоростные взносы через электронные хранилища. Bitcoin, Ethereum и постоянные токены поддерживают анонимность и символические отчисления. Период реализации изъятий доходит 10-30 минут.
Алгоритмы приверженности включают иерархические степени с увеличивающимся возвратом. VIP-менеджеры гарантируют эксклюзивные награды, повышенные границы и преимущественную техподдержку.
成何体统2026 丞磊王楚然双穿书 高清现代甜宠 无广告高清观看
Discover more
no deposit bonus time limits
for offline viewing.
ChairAndChalk Online – Unique designs and easy shopping make browsing enjoyable.
塔尔萨之王第三季高清完整版2026 海外华人美剧新季
pinup lucky jet pul yechish pinup lucky jet pul yechish
Новейшие гемблеры сталкиваются с препятствием доступа к сертифицированным платформам. Операторы запрещают главные домены, но искушённые Лаки Бир сайт игроки осознают о наличии дублирующих сайтов.
Дополнительный домен является идентичную дубликат основного платформы. Криптографические алгоритмы функционируют равнозначными. Платёжные операции проходят через те же каналы.
Схема открытия счёта через зеркальный адрес предполагает обычной проверки. Администраторы запрашивают справки для осуществления KYC-требований. Паспортные параметры проходят усиленную аутентификацию.
Финансовые границы на альтернативных порталах соответствуют основным параметрам. Минимальные вклады сохраняются постоянными. Растущие призовые фонды согласовываются между множественными ссылками.
Поощрительные системы работают завершённо на дополнительных порталах. Множитель ставок обеспечивает оригинальные показатели. Тайминг использования не изменяется.
Служба помощи анализирует заявки с альтернативных доменов сходным образом. Прямой диалог осуществляет постоянный расписание работы.
creative blog lab – Perfect for exploring innovative approaches to content creation.
Гемблинговая отрасль показывает динамичный рост, манящая массы участников. Опытные площадки предоставляют надёжную среду для развлечений. Подробную информацию о указанных операторах можно обнаружить на Лаки Бир официальный сайт .
Аттестация составляет центральным аспектом выбора портала. Регуляторы Мальты гарантируют тщательный надзор финансовых операций. Всякая лицензированная площадка проходит регулярные инспекции RNG-алгоритмов.
Технические аспекты современных беттинг-платформ включают SSL-защиту банковского категории. Создатели софтового обеспечения уровня Microgaming, NetEnt, Pragmatic Play встраивают усовершенствованные механизмы хаотичных величин.
Схема валидации счёта включает направления бумаг KYC-уровня. Документ, документ о доходах, удостоверение прописки — классический список для полноценного подключения.
Зеркальные домены убирают барьеры с ограничениями провайдеров. Действующие альтернативы адаптируются регулярно IT группами. Планшетные клиенты регулярно функционируют лучше онлайн вариантов.
Контроль средств устанавливает долгосрочную успешность гемблинговых циклов. Экспертные геймеры настаивают ограничивать сумму пари до 1-2% от итогового фонда.
optimizr.click – Color palette felt calming, nothing distracting, just focused, thoughtful design.
Актуальные геймеры встречаются с массой технических тонкостей при процессах с проверенными ресурсами. Тематические платформы типа тип топ казино обеспечивают релевантную информацию о функционировании азартных провайдеров.
Процесс подтверждения профиля подразумевает набор принудительных фаз. Базовая верификация предполагает размещения справок подтверждающих личность. Классический набор предполагает удостоверение личности, водительские права или международное ID.
Системная элемент регистрации включает внедрение безопасного соединения и многофакторной защиты. Профессиональные участники подсказывают инициировать совокупность представленных возможностей секьюрити.
Резервные ссылки составляют идентичные отражения базового домена с обеспечением комплексного набора функций. Главное достоинство кроется в соответствии денежных границ и норм проигрыша.
Алгоритм нахождения активных альтернативных адресов фундируется на проверке специализированных новостных лент и партнерских порталов. Профессиональные геймеры используют туннельные протоколы для предоставления надежного соединения безотносительно от региональных барьеров.
Передовые гемблеры сталкиваются с затруднением доступа к лицензированным ресурсам. Провайдеры закрывают основные URL, но искушённые Голд казино пользователи понимают о существовании резервных ресурсов.
Зеркало составляет полную реплику главного ресурса. Протоколы шифрования работают равнозначными. Финансовые действия реализуются через аналогичные сервисы.
Технология заведения учётной записи через зеркальный домен требует привычной верификации. Операторы запрашивают бумаги для выполнения KYC-норм. Персональные данные проходят комплексную аутентификацию.
Пополнительные ограничения на резервных сайтах совпадают стандартным условиям. Начальные ставки продолжают константными. Накопительные джекпоты объединяются между всеми порталами.
Премиальные планы работают полноценно на резервных платформах. Коэффициент оборота обеспечивает оригинальные показатели. Длительность отыгрыша остаётся прежним.
Сервис ассистирования рассматривает обращения с дополнительных порталов сходным образом. Интерактивный разговор обеспечивает 24-часовой порядок работы.
It’s going to be end of mine day, except before ending I am reading
this enormous piece of writing to increase my experience.
Определение качественного игрового портала в текущих реалиях требует тщательного рассмотрения к регулятивному статусу. Опытные пользователи представляют, что Lucky Bear зеркало отображает свежую сведения о доступных ресурсах.
Процедура регистрации в официальных площадках предусматривает необходимую верификацию удостоверения. KYC-процедуры оберегают как сервис, так и игрока от фрода. Промежуточные ограничения на получение финансов до выполнения верификации – стандартная процедура.
Программные барьеры на соединение к азартным площадкам решаются через дублирующие порталы. Активные клоны обеспечивают тотальную функциональность главного сервиса. Банковские движения, азартный достижения и привилегированные схемы остаются устойчивыми.
Капитальная стабильность характеризуется критерием задействованных платежных систем. SSL-криптография, PCI DSS валидация и усиленная подтверждение устанавливают надежный заслон безопасности.
Азартная каталог легальных провайдеров охватывает спины от лидирующих провайдеров. RTP-параметры, изменчивость и математические формулы испытывают внешнюю сертификацию в одобренных учреждениях.
Системы лояльности в серьезных казино строятся на понятных требованиях ставок. Условия ставок x35-40 расценивается приемлемым для спин-льгот, в то время как настольные состязания включаются в счет с уменьшенным множителем.
this privacy hub – Tools are intuitive and helpful for daily online protection.
Игровая отрасль демонстрирует интенсивный прогресс, завлекая легионы геймеров. Экспертные порталы предлагают безопасную среду для игры. Развёрнутую сведения о данных компаниях можно найти на Вавада регистрация .
Сертификация остаётся центральным аспектом выбора платформы. Юрисдикции Кюрасао обеспечивают качественный надзор расчётных процедур. Каждая сертифицированная площадка проходит регулярные аудиты RNG-систем.
Программные параметры инновационных гемблинг-сайтов объединяют SSL-безопасность расчётного стандарта. Поставщики софтового материала наподобие Microgaming, NetEnt, Pragmatic Play встраивают сложные алгоритмы произвольных показателей.
Схема валидации аккаунта подразумевает направления бумаг KYC-уровня. Удостоверение, справка о заработке, доказательство регистрации — классический набор для полноценного авторизации.
Параллельные ссылки убирают проблемы с цензурой провайдеров. Рабочие зеркала модифицируются регулярно техническими службами. Смартфонные клиенты нередко действуют стабильнее браузерных версий.
Управление банкроллом устанавливает перспективную доходность игровых раундов. Квалифицированные геймеры рекомендуют урезать объём бета до 1-2% от общего фонда.
health tools hub – I plan to check back soon for new updates.
Лицензионные площадки игорных предложений предоставляют клиентам доступ к премиальному гэмблингу через тематические ресурсы, включая Лаки Бир зеркало , которые именно соблюдают глобальные требования security.
Механизм открытия счёта подразумевает внесения authentication информации через encrypted SSL-соединения. Провайдеры требуют документальное доказательство дееспособности и региона проживания для соблюдения правовых стандартов.
Multi-factor идентификация является необходимым элементом современных платформ безопасности. Пользователи обретают SMS-коды, push-notification или задействуют специальные приложения наподобие Google Authenticator.
Mirror ссылки ликвидируют вопросы geographic барьеров и DDoS-assault. Технически реплики образуют копийные версии главного платформы с поддержанием функциональности и user информации.
Компетентные клиенты suggest удерживать обновлённые реестры рабочих зеркал в сохранённых ссылках браузера. Провайдеры доставляют информацию о актуальных URL через мейл, Telegram-communities и mobile утилиты.
Payment процедуры через legal порталы обеспечены криптографическими methods стандарта банковского индустрии. Extraction средств выполняется только на validated карты держателя личного кабинета.
growthly.click – Bookmarked this immediately, planning to revisit for updates and inspiration.
Передовые провайдеры гемблинг услуг гарантируют клиентам подключение к качественному беттингу через безопасные Меллстрой зеркало платформы. Легальная деятельность предполагает учета конкретных надзорных критериев.
Система оформления клиентского аккаунта предусматривает валидацию персональных данных. Провайдеры внедряют детализированные алгоритмы KYC и AML для блокировки поддельных платежей.
Программные решения передовых игорных домов основываются на защищенных серверах с криптографическими стандартами. Территориальные ограничения обязывает администраторов запускать альтернативные ссылки.
Параллельные домены представляют точные версии базового ресурса с удержанием всех функций и показателей. Пользователи обеспечивают себе непрерывный подключение к счету, беттинг истории и пользовательским опциям.
Расчетные действия осуществляются через подключенные расчетные процессоры. Границы на пополнения и получения регулируются в соответствии с правовыми критериями и внутренними нормами контроля угроз.
Экспертные клиенты указывают отслеживать статус авторизации через контролирующие регистры азартных организаций. Престижные критерии содержат рейтинги на профильных порталах и комментарии подлинных игроков.
Полная информация про ufc в феврале марте 2026 три недели которые встряхнут дивизионы уже доступна в этом обзоре. Вот тут подробнее: https://iphoneservice59.ru/news/fevral-mart-2026-v-ufc-tri-turnira-s-topovymi-boyami-i-kuchej-skrytyh-intrig/
Современные клиенты обталкиваются с множеством технических деталей при деятельности с официальными ресурсами. Экспертные ресурсы типа миллион казино поставляют релевантную сведения о процессах игорных брендов.
Процесс верификации профиля охватывает комплекс неотъемлемых уровней. Первичная проверка подразумевает отправки бумаг удостоверяющих личность. Привычный набор включает документ, лицензию водителя или заграничное удостоверение.
Цифровая часть записления содержит эксплуатацию SSL-шифрования и двойной авторизации. Продвинутые игроки советуют запускать максимум доступных параметров секьюрити.
Зеркала формируют идентичные отражения базового сайта с сохранением комплексного инструментария. Главное плюс выражается в подобии банковских ограничений и требований вейджера.
Механизм нахождения актуальных запасных доменов строится на отслеживании профессиональных мессенджер групп и связанных платформ. Продвинутые геймеры задействуют виртуальные частные сети для гарантирования устойчивого входа невзирая от региональных лимитов.
Передовые платформы развлекательных развлечений дают пользователям подключение к высококлассному беттингу через защищенные zelenovskoe.ru сайты. Легальная работа нуждается выполнения конкретных правовых норм.
Процесс открытия персонального кабинета включает валидацию личных данных. Провайдеры задействуют детализированные протоколы KYC и AML для предотвращения мошеннических транзакций.
IT системы актуальных гемблинг платформ базируются на стабильных облачных системах с SSL алгоритмами. Локальные запреты вынуждает операторов запускать вспомогательные домены.
Параллельные платформы являют собой аналогичные клоны базового ресурса с удержанием всех сервисов и параметров. Беттеры достигают непрерывный вход к средствам, развлекательной данным и пользовательским конфигурациям.
Расчетные транзакции реализуются через подключенные расчетные агрегаторы. Ограничения на взносы и изъятия определяются в соответствии с лицензионными критериями и индивидуальными процедурами риск-менеджмента.
Опытные гемблеры указывают контролировать статус лицензии через официальные регистры беттинг организаций. Авторитетные характеристики включают ранги на отраслевых сайтах и отзывы истинных клиентов.
Tech Pack Terra Hub – Tech accessories are well organized with clear product descriptions for easier browsing.
Top PhoneForge – Accessories designed to fit accurately and perform reliably.
paprikaplace spices – Quality herbs and spices enhanced my cooking effortlessly today.
Поиск в области официальных ресурсов предполагает владения передовых технологий подключения. Умелые геймеры используют Mellstroy Game casino для обретения новейшей сведений о действующих URL.
Процедура регистрации личного кабинета в проверенных организациях охватывает тщательную подтверждение. Новейшие операторы задействуют KYC-системы и AML-стандарты. Документальное сопровождение требует от 24 до 72 часов.
Компьютерные методы для обхода запретов совершенствуются параллельно с повышением правовых действий. VPN-сервисы класса premium обеспечивают безопасность AES-256 и стандарты OpenVPN. Стабильность соединения критически существенна для премиальных раундов.
Альтернативные адреса выполняют задачи через пространственно расположенные технические системы. CDN-структуры обеспечивают сокращенную латентность для азиатских геймеров. Программное маршрутизация активируется при обнаружении препятствия базового портала.
Платежные манипуляции в лицензированных регионах отвечают строгим требованиям PCI DSS. Криптовалютные расчеты набирают популярность из-за анонимности и оперативности реализации.
Смартфонные программы ведущих брендов включают физиологическую аутентификацию и push-сообщения для ключевых эпизодов. Адаптивный интерфейс автономно изменяется под настройки экрана.
Нынешние игроки встречаются с препятствием соединения к проверенным порталам. Поставщики блокируют первичные ссылки, но искушённые Mellstroy Game casino посетители учитывают о существовании дублирующих ресурсов.
Зеркало представляет точную отображение базового сайта. Криптографические алгоритмы поддерживаются неизменными. Денежные операции проходят через аналогичные шлюзы.
Схема регистрации через зеркальный портал содержит классической верификации. Специалисты уточняют бумаги для исполнения KYC-норм. Личные сведения подвергаются многоуровневую подтверждение.
Финансовые лимиты на параллельных ресурсах аналогичны главным условиям. Наименьшие ставки остаются неизменными. Возрастающие джекпоты интегрируются между разными ресурсами.
Льготные системы выполняются всесторонне на резервных ресурсах. Коэффициент оборота обеспечивает первоначальные значения. Временные рамки отыгрыша поддерживается.
Отдел помощи анализирует тикеты с дополнительных ресурсов сходным образом. Онлайн общение осуществляет беспрерывный порядок обслуживания.
admark.click – Content reads clearly, helpful examples made concepts easy to grasp.
shore style corner – The overall aesthetic is clean, modern, and well thought out.
опубликовано здесь vodkabet
Sender Sanctuary – Support answered fast and resolved my problem smoothly.
stitchstarlight.shop – Lovely fabrics displayed clearly with vibrant imagery.
Передовые участники натыкаются с препятствием входа к легальным площадкам. Операторы запрещают первичные ссылки, но грамотные Рльдорадо казино участники знают о функционировании зеркальных сайтов.
Дополнительный домен составляет стопроцентную реплику основного портала. Протоколы шифрования работают такими же. Финансовые процедуры выполняются через те же системы.
Методика создания аккаунта через параллельный портал подразумевает привычной аутентификации. Администраторы требуют справки для соблюдения KYC-стандартов. Индивидуальные сведения выполняют усиленную верификацию.
Депозитные пределы на резервных ресурсах соответствуют главным спецификациям. Начальные суммы продолжают стабильными. Прогрессивные призовые фонды синхронизируются между разными адресами.
Льготные механизмы действуют завершённо на альтернативных ресурсах. Отыгрышный коэффициент обеспечивает исходные параметры. Временные рамки проигрывания поддерживается.
Команда ассистирования изучает вопросы с альтернативных адресов сходным образом. Живой разговор предоставляет непрерывный формат обслуживания.
Tea Time Trader Essentials – Detailed product info and a wide tea variety make shopping enjoyable.
Навигация в пространстве лицензированных площадок включает владения современных инструментов авторизации. Квалифицированные участники эксплуатируют тип топ казино для обретения актуальной фактов о активных доменах.
Алгоритм регистрации профиля в сертифицированных заведениях предполагает комплексную верификацию. Новейшие поставщики эксплуатируют KYC-протоколы и AML-правила. Документальная процедура составляет от 24 до 72 периодов.
Цифровые решения для прохождения барьеров развиваются параллельно с ужесточением законодательных мер. VPN-решения типа premium гарантируют защиту AES-256 и методы OpenVPN. Надежность подключения кардинально важна для VIP раундов.
Резервные ресурсы действуют через территориально распределенные компьютерные инфраструктуры. CDN-системы осуществляют сокращенную латентность для глобальных геймеров. Техническое переключение инициируется при распознавании недоступности первичного сайта.
Финансовые движения в легальных регионах соответствуют конкретным критериям PCI DSS. Блокчейн платежи получают востребованность вследствие приватности и темпу процессинга.
Планшетные приложения элитных компаний интегрируют физиологическую идентификацию и push-извещения для важных происшествий. Гибкий внешний вид автономно подстраивается под свойства экрана.
Астрология Карты Таро Юлиана, созданные под влиянием ее интуиции, станут вашим надежным проводником в мире самопознания.
Нынешние клиенты встречаются с набором цифровых аспектов при работе с сертифицированными сайтами. Специализированные ресурсы типа Lucky Bear casino предоставляют новую информацию о деятельности гэмблинговых компаний.
Процедура подтверждения кабинета подразумевает множество необходимых фаз. Первичная аутентификация подразумевает загрузки бумаг подтверждающих персону. Типовой пакет содержит свидетельство, лицензию водителя или внешний паспорт.
Цифровая часть оформления охватывает задействование защищенного протокола и двухуровневой проверки. Экспертные участники рекомендуют запускать полный набор предложенных опций секьюрити.
Альтернативные адреса составляют идентичные отражения главного домена с поддержанием полного арсенала. Важнейшее достоинство содержится в тождественности денежных ограничений и критериев условий прокрутки.
Механизм нахождения активных дублирующих порталов базируется на отслеживании специализированных телеграм-каналов и партнерских порталов. Профессиональные игроки используют туннельные протоколы для создания надежного входа безотносительно от территориальных барьеров.
funnely.click – Appreciate the typography choices; comfortable spacing improved my reading experience.
Действующие дублирующие порталы легальных казино на Mellstroy Game казино создают устойчивый вход к игровым системам. Система клонирования формирует полноценные реплики основного ресурса с поддержанием всех инструментов.
Процедура оформления профиля через mirror-сайт абсолютно повторяет стандартную заявку. Свежие пользователи указывают активный email, генерируют защищенный секретную комбинацию и устанавливают рабочую финансовый инструмент.
Идентификация счета включает отправки удостоверений опираясь на KYC-стандартам. Изображение водительских прав, подтверждение регистрации и платежные сведения анализируются посредством машинную проверку в течение 24-72 часа.
Вход зарегистрированных игроков происходит через типовую интерфейс с усиленной проверкой. Сессионные ключи приходят на смс номер или e-mail адрес.
Возможности входящего раздела через дублирующие порталы поддерживает распространенные денежные сервисы. Visa, Mastercard, электронные счета Skrill, Neteller, цифровые активы Bitcoin, Ethereum реализуются с низкими взносами 0-3%.
Игровая библиотека копируется на сто процентов включая автоматы, традиционные активности, live-крупье и джекпоты. RTP-показатели, колебания и условия отыгрыша фиксируются аналогичными.
Бонусная система функционирует подобно главному порталу. Welcome-пакеты, free spins, компенсация и VIP-схемы запускаются машинально при соблюдении фиксированных стандартов.
adlify.click – Loved the layout today; clean, simple, and genuinely user-friendly overall.
Актуальные платформы азартных услуг гарантируют беттерам доступ к элитному гемблингу через надежные Меллстрой регистрация порталы. Легальная бизнес влечет исполнения четких регуляторных стандартов.
Процесс активации персонального кабинета задействует валидацию личных реквизитов. Операторы эксплуатируют углубленные протоколы KYC и AML для блокировки фродовых переводов.
Программные решения актуальных игорных домов основываются на зашифрованных облачных системах с TLS алгоритмами. Геоблокировка вынуждает администраторов создавать альтернативные URL.
Параллельные ресурсы образуют аналогичные репликации центрального домена с поддержанием всех возможностей и информации. Пользователи достигают непрерывный соединение к капиталу, азартной статистике и личным настройкам.
Финансовые процедуры осуществляются через встроенные денежные системы. Ограничения на пополнения и получения фиксируются в гармонии с законодательными условиями и внутренними процедурами управления рисками.
Компетентные гемблеры указывают проверять условия лицензии через контролирующие регистры азартных комиссий. Имиджевые критерии задействуют позиции на отраслевых сайтах и feedback настоящих пользователей.
mugandmerchant – The mug styles are charming and make thoughtful presents.
Современные клиенты обталкиваются с массой цифровых особенностей при работе с легальными платформами. Тематические ресурсы типа казино Вавада выдают свежую информацию о работе развлекательных организаций.
Процесс проверки аккаунта содержит множество необходимых фаз. Стартовая проверка нуждается размещения свидетельств доказывающих личность. Классический перечень предполагает ID, автоудостоверение или международное ID.
Программная компонента записления подразумевает внедрение безопасного соединения и многофакторной защиты. Экспертные участники рекомендуют задействовать все возможных функций защиты.
Резервные ссылки являются точные реплики основного портала с удержанием тотального функционала. Важнейшее плюс кроется в тождественности денежных лимитов и критериев условий прокрутки.
Схема обнаружения актуальных альтернативных адресов строится на мониторинге профессиональных уведомительных сервисов и аффилированных площадок. Экспертные геймеры внедряют прокси-соединения для предоставления стабильного входа без оглядки от территориальных лимитов.
Подбор проверенного казино портала заставляет основательного разбора регулятивных разрешений. Современные порталы friends casino зеркало дают клиентам максимальную сведения о текущих лицензиях.
Алгоритм регистрации охватывает несколько требуемых шагов аутентификации. Операторы запрашивают бумаги, подтверждающие личность и дееспособность. Типовой KYC-механизм занимает от 24 до 72 часов.
Банкролл-менеджмент открывается с фиксации лимитов на взносы. Искусные игроки настаивают задействовать норму 5% от итогового казино бюджета на одну сессию.
Системные ограничения поставщиков заставляют применять альтернативные ссылки. Альтернативы оберегают безусловную работоспособность первичного сайта, предусматривая летопись платежей и казино прогресс.
Передовые банковские методы поддерживают оперативные вклады через блокчейн счета. Bitcoin, Ethereum и стабильные валюты дают приватность и наименьшие комиссии. Длительность осуществления получений равно 10-30 интервалов.
Схемы преданности предусматривают каскадные статусы с накапливающимся возвратом. VIP-кураторы обеспечивают уникальные награды, усиленные пределы и первоочередную поддержку.
Современные провайдеры игорных услуг дают пользователям возможность к премиальному игровому процессу через защищенные Tip top зеркало платформы. Лицензированная операционная активность влечет учета конкретных законодательных стандартов.
Механизм регистрации персонального аккаунта предусматривает валидацию персональных реквизитов. Провайдеры эксплуатируют расширенные процедуры KYC и AML для исключения мошеннических переводов.
Технические инструменты новейших казино функционируют на зашифрованных облачных системах с TLS стандартами. Локальные запреты обязывает управляющих внедрять дублирующие ссылки.
Параллельные домены являют собой точные версии первичного ресурса с обеспечением всех опций и информации. Участники получают постоянный подключение к счету, беттинг истории и личным настройкам.
Расчетные транзакции осуществляются через интегрированные денежные процессоры. Пределы на пополнения и снятия назначаются в гармонии с регуляторными положениями и корпоративными правилами минимизации опасностей.
Компетентные пользователи рекомендуют контролировать статус разрешения через официальные базы данных игорных комиссий. Престижные параметры задействуют места на экспертных ресурсах и комментарии действительных клиентов.
my favorite spice shop – Packages arrived neatly and each spice smelled amazing.
Азартная индустрия показывает быстрый расширение, притягивая множество пользователей. Грамотные платформы дают качественную атмосферу для пари. Детальную факты о таких брендах возможно найти на п»ї1xBet .
Аккредитация выступает приоритетным элементом отбора площадки. Контролёры Олдерни обеспечивают строгий надзор денежных операций. Любая аккредитованная сайт проходит периодические инспекции RNG-алгоритмов.
IT параметры новейших гемблинг-сайтов включают SSL-защиту экономического класса. Поставщики компьютерного обеспечения наподобие Microgaming, NetEnt, Pragmatic Play встраивают продвинутые модели случайных значений.
Механизм подтверждения аккаунта подразумевает представления документов KYC-класса. Паспорт, подтверждение о средствах, подтверждение местожительства — базовый список для итогового доступа.
Параллельные URL устраняют трудности с цензурой организаций. Действующие дубли адаптируются ежедневно техническими группами. Мобильные софт нередко действуют стабильнее онлайн редакций.
Банкролл-менеджмент формирует стратегическую эффективность игровых раундов. Грамотные беттеры рекомендуют ограничивать величину бета до 1-2% от совокупного капитала.
Гемблинговая отрасль показывает стремительный развитие, завлекая массы участников. Грамотные площадки дают надёжную атмосферу для ставок. Подробную информацию о этих операторах допустимо изучить на Лаки Бир .
Аттестация выступает ключевым фактором выбора платформы. Юрисдикции Олдерни обеспечивают серьёзный надзор расчётных манипуляций. Каждая аккредитованная ресурс осуществляет регулярные инспекции RNG-модулей.
Компьютерные свойства актуальных казино содержат SSL-криптографию финансового класса. Создатели виртуального материала типа Microgaming, NetEnt, Pragmatic Play встраивают продвинутые механизмы случайных величин.
Механизм валидации личного кабинета предполагает представления документов KYC-стандарта. Удостоверение, свидетельство о финансах, удостоверение местожительства — типичный перечень для завершённого подключения.
Параллельные порталы решают сложности с запретами организаций. Актуальные зеркала изменяются систематически IT специалистами. Планшетные утилиты часто выполняются лучше браузерных редакций.
Управление банкроллом создаёт длительную результативность гемблинговых раундов. Грамотные участники указывают сокращать размер бета до 1-2% от общего банкролла.
Легальные площадки азартных услуг обеспечивают участникам шанс к премиальному времяпрепровождению через целевые порталы, включая tip top casino , что следуют общепринятые критерии защиты.
Последовательность открытия счёта требует предоставления идентификационных сведений через защищённые SSL-connection. Администрация просят письменное verification дееспособности и локации residence для поддержания legal требований.
Многоуровневая верификация считается required компонентом современных архитектур защиты. Игроки приобретают SMS-шифры, push-сообщения или задействуют специальные утилиты наподобие Google Authenticator.
Альтернативные ссылки ликвидируют препятствия territorial санкций и DDoS-нападений. По сути mirrors составляют копийные клоны primary сайта с обеспечением features и клиентских параметров.
Компетентные игроки призывают keeping актуальные базы функционирующих mirrors в закладках обозревателя. Букмекеры доставляют информацию о актуальных адресах через email, Telegram-сообщества и мобильные софт.
Финансовые транзакции через legal платформы secured cryptographic methods категории банковского индустрии. Изъятие фондов осуществляется лишь на validated счета держателя аккаунта.
Актуальные участники натыкаются с препятствием подключения к проверенным ресурсам. Компании блокируют основные домены, но профессиональные Меллстрой РІС…РѕРґ участники помнят о доступности параллельных сайтов.
Параллельный портал представляет абсолютную дубликат первичного портала. Средства защиты поддерживаются аналогичными. Денежные процедуры проходят через равнозначные системы.
Процедура оформления профиля через зеркальный адрес подразумевает стандартной верификации. Сотрудники запрашивают бумаги для выполнения KYC-норм. Индивидуальные данные реализуют комплексную аутентификацию.
Финансовые лимиты на зеркальных ресурсах аналогичны базовым параметрам. Минимальные беты поддерживаются неизменными. Увеличивающиеся банки согласовываются между разными порталами.
Бонусные программы работают целостно на резервных площадках. Множитель ставок сохраняет оригинальные показатели. Срок активности реализации поддерживается.
Департамент сопровождения изучает тикеты с зеркальных порталов идентично. Живой разговор осуществляет непрерывный расписание деятельности.
布里奇顿新季2026 海外华人浪漫古装 高清贵族恋爱 无缓冲播放
侠之盗高清完整版2026 海外华人免费最新热播剧集
Актуальные порталы беттинг развлечений дают пользователям подключение к премиальному гемблингу через защищенные [url=https://github.com/VAVADA-online-zerkalo]Вавада сайт[/url] порталы. Авторизованная функционирование предполагает выполнения четких законодательных положений.
Алгоритм создания индивидуального кабинета охватывает валидацию конфиденциальных сведений. Администраторы применяют детализированные протоколы KYC и AML для недопущения незаконных переводов.
Программные решения передовых развлекательных порталов работают на безопасных инфраструктурах с HTTPS сертификатами. IP-фильтрация заставляет владельцев запускать параллельные порталы.
Параллельные платформы формируют точные дубликаты базового ресурса с фиксацией всех возможностей и информации. Беттеры обеспечивают себе непрерывный доступ к балансу, гемблинг отчетности и личным установкам.
Банковские операции выполняются через интегрированные денежные процессоры. Пределы на взносы и обналичивания назначаются в соответствии с лицензионными условиями и организационными нормами риск-менеджмента.
Экспертные пользователи настаивают мониторить ситуацию разрешения через официальные каталоги азартных комиссий. Репутационные критерии охватывают позиции на профильных порталах и отзывы настоящих участников.
Беттинговая отрасль показывает стремительный развитие, притягивая тысячи клиентов. Опытные ресурсы предлагают защищённую обстановку для пари. Детальную факты о этих провайдерах доступно получить на mad casino .
Сертификация является основным фактором подбора сайта. Лицензиаты Гибралтара обеспечивают строгий мониторинг финансовых действий. Любая аккредитованная сайт осуществляет регулярные проверки RNG-систем.
Технические характеристики инновационных казино предусматривают SSL-шифрование расчётного уровня. Провайдеры софтового софта вроде Microgaming, NetEnt, Pragmatic Play интегрируют продвинутые алгоритмы хаотичных величин.
Схема аутентификации аккаунта включает представления удостоверений KYC-формата. Документ, документ о средствах, удостоверение прописки — классический набор для завершённого авторизации.
Дублирующие домены решают проблемы с ограничениями компаний. Рабочие копии адаптируются регулярно IT командами. Карманные приложения регулярно действуют устойчивее браузерных форматов.
Управление банкроллом устанавливает стратегическую результативность беттинговых раундов. Экспертные участники указывают ограничивать размер вейджера до 1-2% от полного резерва.
charming type hub – A delightful mix of fonts displayed neatly for easy selection.
This casino https://elektryk.expert/ offers a solid mix of popular slots and live tables. The platform feels modern, promotions are worth trying, and support is responsive, which adds confidence.
the Battery Borough collection – Items arrived quickly and functioned perfectly out of the box.
辛芷蕾林雨申《女神蒙上眼》2026都市悬疑职场大戏,海外华人必备高清陆剧,职场暗战烧脑刺激,全球加速实时更新无广告追剧首选。
林肯律师第四季2026 海外华人悬疑律政剧 高清法庭对决 无广告
多瑙高清完整版2026 海外华人免费最新热播剧集
подробнее здесь vodkabet
chic comfort collection – The atmosphere feels intimate and carefully assembled.
посетить веб-сайт водка бет
Действующие альтернативные домены проверенных казино на Вавада сайт создают непрерывный соединение к игровым ресурсам. Методика клонирования формирует идентичные копии главного домена с сохранением всех инструментов.
Система активации через резервную ссылку целиком имитирует главную шаблон. Дебютные пользователи регистрируют действующий email, устанавливают защищенный шифр и определяют основную валюту.
Аутентификация личного кабинета подразумевает предоставления документов следуя KYC-политике. Фото паспорта, валидация адреса и платежные сведения проходят машинную анализ в течение 24-72 временных единиц.
Вход верифицированных участников выполняется через типовую форму с многоступенчатой валидацией. Разовые коды передаются на смс девайс или e-mail адрес.
Функционал входящего блока через зеркала включает популярные платежные инструменты. Visa, Mastercard, веб балансы Skrill, Neteller, криптовалюты Bitcoin, Ethereum реализуются с низкими сборами 0-3%.
Развлекательная коллекция повторяется целиком включая слоты, традиционные забавы, live-хостов и накопительные призы. RTP-показатели, дисперсия и условия отыгрыша фиксируются такими же.
Бонусная система функционирует аналогично базовому сайту. Welcome-наборы, даровые прокруты, кешбэк и VIP-курсы включаются системно при исполнении прописанных критериев.
Выбор легального азартного портала подразумевает тщательного исследования лицензионных свидетельств. Передовые платформы Вавада зеркало гарантируют игрокам максимальную информацию о своих допусках.
Процедура открытия аккаунта предусматривает определенное количество ключевых этапов аутентификации. Владельцы истребуют документы, засвидетельствующие персону и дееспособность. Типовой KYC-процесс продолжается от 24 до 72 промежутков.
Банкролл-менеджмент начинается с назначения рамок на взносы. Профессиональные участники настаивают внедрять норму 5% от общего казино средств на единичную партию.
Технические препятствия владельцев обязывают использовать вспомогательные ссылки. Альтернативы удерживают безусловную работоспособность первичного платформы, охватывая архив транзакций и казино успех.
Передовые платежные инструменты предоставляют моментальные инвестиции через цифровые кошельки. Bitcoin, Ethereum и постоянные токены дают конфиденциальность и символические отчисления. Время выполнения изъятий доходит 10-30 минут.
Алгоритмы лояльности содержат многоуровневые категории с увеличивающимся возвратом. VIP-координаторы обеспечивают индивидуальные бонусы, повышенные ограничения и первоочередную техподдержку.
Best Australian online casino 2026 trusted real money sites
SeaBreezeSalon Shop Online – Tranquil design with easy navigation makes browsing a pleasure.
For reports
instant approval fast loans
to gain a better understanding.
Актуальные сервисы гемблинг активностей обеспечивают пользователям путь к премиальному беттингу через защищенные казино СЌРЅРѕРјРѕ системы. Лицензированная работа нуждается учета конкретных правовых положений.
Алгоритм регистрации пользовательского кабинета задействует аутентификацию индивидуальных информации. Администраторы внедряют комплексные протоколы KYC и AML для исключения мошеннических платежей.
Технические инструменты новейших беттинг площадок функционируют на надежных хостингах с SSL стандартами. Локальные запреты вынуждает провайдеров создавать дублирующие домены.
Дублирующие платформы формируют аналогичные дубликаты основного сайта с фиксацией всех инструментов и данных. Клиенты получают постоянный вход к балансу, игровой статистике и личным настройкам.
Финансовые операции проходят через подключенные платежные системы. Лимиты на инвестиции и изъятия назначаются в соотношении с правовыми условиями и корпоративными процедурами риск-менеджмента.
Опытные пользователи рекомендуют проверять условия аккредитации через официальные реестры беттинг ведомств. Статусные индикаторы охватывают места на экспертных ресурсах и мнения реальных игроков.
Действующие дублирующие порталы лицензированных gaming-операторов на СЌРЅРѕРјРѕ казино создают непрерывный доступ к гемблинг порталам. Методика реплицирования создает аналогичные версии основного домена с сохранением всех механизмов.
Система открытия счета через альтернативный домен на сто процентов воспроизводит базовую форму. Начинающие пользователи прописывают активный email, формируют безопасный ключ и определяют операционную курренси.
Подтверждение профиля подразумевает предоставления свидетельств опираясь на KYC-требованиям. Фото водительских прав, валидация регистрации и банковские реквизиты контролируются системой автоматическую анализ в течение 24-72 временных единиц.
Авторизация верифицированных игроков происходит через обычную форму с двухфакторной верификацией. Краткосрочные коды поступают на телефонный аппарат или мейл.
Инструменты входящего раздела через альтернативные домены содержит актуальные финансовые инструменты. Visa, Mastercard, онлайн балансы Skrill, Neteller, crypto Bitcoin, Ethereum реализуются с уменьшенными процентами 0-3%.
Gaming коллекция воспроизводится на сто процентов включая слоты, столовые активности, live-крупье и накопительные призы. RTP-коэффициенты, вариативность и отыгрыш сохраняются такими же.
Акционная политика работает подобно центральному веб-площадке. Welcome-пакеты, free spins, refund и VIP-программы инициируются автоматически при реализации установленных критериев.
Identity Isle Creations Online – Each item feels unique, personalized, and carefully crafted for buyers.
Рабочие альтернативные домены надежных казино на Лаки Бир обеспечивают устойчивый соединение к геймерским системам. Схема реплицирования генерирует полноценные дубликаты центрального ресурса с поддержанием всех механизмов.
Механизм оформления профиля через дублирующий портал в точности повторяет основную заявку. Начинающие пользователи заполняют активный email, генерируют сложный пароль и назначают игровую валюту.
Аутентификация профиля предполагает представления документов по KYC-требованиям. Снимок национального документа, доказательство адреса и денежные координаты анализируются посредством машинную верификацию в течение 24-72 часа.
Логин верифицированных геймеров производится через классическую окно с усиленной проверкой. Сессионные коды доставляются на мессенджер устройство или e-mail адрес.
Инструменты финансового модуля через дублирующие порталы включает популярные расчетные сервисы. Visa, Mastercard, веб балансы Skrill, Neteller, криптовалюты Bitcoin, Ethereum осуществляются с уменьшенными платежами 0-3%.
Игровая библиотека клонируется в точности включая барабаны, столовые игры, live-операторов и накопительные призы. RTP-показатели, дисперсия и проигрыш фиксируются идентичными.
Бонусная схема действует аналогично базовому веб-площадке. Welcome-предложения, free spins, refund и VIP-планы стартуют алгоритмически при выполнении заданных параметров.
Нынешние игроки встречаются с набором системных особенностей при работе с лицензированными порталами. Экспертные порталы типа казино Lucky Bear дают свежую сведения о процессах азартных провайдеров.
Процесс валидации аккаунта предполагает ряд необходимых шагов. Базовая аутентификация нуждается отправки бумаг удостоверяющих гражданство. Обычный список включает удостоверение личности, автолицензию или международное ID.
Техническая составляющая открытия счета включает задействование безопасного соединения и двухуровневой проверки. Профессиональные участники подсказывают инициировать все доступных опций охраны.
Резервные ссылки составляют точные дубликаты центрального портала с удержанием полного арсенала. Важнейшее плюс заключается в идентичности финансовых лимитов и критериев проигрыша.
Процедура нахождения рабочих альтернативных адресов основывается на отслеживании профильных уведомительных сервисов и сотрудничающих платформ. Профессиональные участники внедряют туннельные протоколы для гарантирования надежного подключения вне зависимости от региональных блокировок.
riceridge picks store – The site layout is clean and simple, making it easy to explore products.
Velvet Verge Trends – This season’s selection feels modern and affordable.
Актуальные дублирующие порталы официальных игорных заведений на п»ї1хбет создают непрерывный соединение к геймерским ресурсам. Схема зеркалирования строит точные версии корневого домена с удержанием всех механизмов.
Система открытия счета через альтернативный домен на сто процентов воспроизводит стандартную форму. Начинающие участники прописывают функционирующий email, создают стойкий шифр и назначают рабочую денежную единицу.
Верификация счета требует отправки удостоверений по KYC-стандартам. Изображение национального документа, свидетельство регистрации и карточные сведения контролируются системой алгоритмическую проверку в течение 24-72 временных единиц.
Авторизация активных игроков выполняется через базовую панель с расширенной проверкой. Разовые пароли приходят на мобильный аппарат или мейл.
Механизмы финансового модуля через дублирующие порталы предлагает актуальные банковские инструменты. Visa, Mastercard, электронные кошельки Skrill, Neteller, цифровые активы Bitcoin, Ethereum обрабатываются с низкими процентами 0-3%.
Gaming каталог клонируется на сто процентов включая spinning games, карточные забавы, live-крупье и мегавыигрыши. RTP-показатели, вариативность и условия отыгрыша сохраняются неизменными.
Акционная механизм оперирует подобно главному ресурсу. Welcome-наборы, free spins, возврат средств и VIP-системы включаются системно при исполнении определенных параметров.
MacroMountain Selects – Art and craft items that are inspiring and perfect for imaginative work.
Современные геймеры попадают с сложностью входа к легальным ресурсам. Провайдеры фильтруют базовые адреса, но искушённые Лаки Бир участники знают о существовании резервных сайтов.
Параллельный портал формирует идентичную дубликат оригинального платформы. Системы безопасности функционируют аналогичными. Финансовые действия производятся через сходные шлюзы.
Методика открытия счёта через параллельный адрес включает стандартной валидации. Сотрудники выясняют свидетельства для соблюдения KYC-требований. Индивидуальные информация проходят двухфакторную аутентификацию.
Депозитные рамки на зеркальных ресурсах соответствуют первичным параметрам. Наименьшие вклады сохраняются постоянными. Растущие накопления согласовываются между многочисленными ресурсами.
Поощрительные системы выполняются завершённо на дополнительных площадках. Вейджер обеспечивает оригинальные величины. Длительность использования не изменяется.
Команда поддержки анализирует тикеты с зеркальных ресурсов идентично. Живой общение предоставляет непрерывный расписание работы.
Актуальные геймеры встречаются с множеством технических тонкостей при операциях с сертифицированными порталами. Тематические порталы типа лаки Р±РёСЂ казино предоставляют новую контент о деятельности гэмблинговых провайдеров.
Алгоритм аутентификации учетной записи содержит комплекс требуемых стадий. Стартовая валидация нуждается отправки удостоверений подтверждающих субъект. Обычный перечень подразумевает свидетельство, права или заграничное удостоверение.
Технологическая составляющая записления предполагает использование безопасного соединения и двухфакторной аутентификации. Продвинутые геймеры предлагают задействовать все доступных параметров обеспечения.
Запасные домены образуют полные дубликаты основного ресурса с сохранением исчерпывающего функционала. Центральное бонус кроется в тождественности финансовых границ и условий отыгрыша.
Механизм поиска активных резервных ссылок строится на наблюдении профильных информационных каналов и связанных сайтов. Квалифицированные клиенты применяют прокси-соединения для предоставления стабильного подключения независимо от территориальных ограничений.
Игровая область показывает динамичный прогресс, завлекая массы клиентов. Грамотные платформы гарантируют защищённую обстановку для развлечений. Полную данные о таких организациях доступно изучить на mad casino .
Легализация остаётся приоритетным фактором подбора платформы. Надзорные органы Великобритании гарантируют тщательный мониторинг финансовых действий. Каждая лицензированная ресурс выполняет плановые ревизии RNG-систем.
Программные аспекты новейших азартных площадок объединяют SSL-защиту денежного уровня. Создатели программного софта наподобие Microgaming, NetEnt, Pragmatic Play интегрируют сложные механизмы непредсказуемых значений.
Процедура подтверждения личного кабинета предполагает направления документов KYC-формата. Документ, выписка о прибылях, доказательство регистрации — типичный перечень для завершённого активации.
Альтернативные ссылки решают сложности с ограничениями провайдеров. Рабочие копии адаптируются каждый день компьютерными специалистами. Портативные программы нередко функционируют качественнее браузерных модификаций.
Контроль средств определяет долгосрочную прибыльность беттинговых периодов. Экспертные геймеры предлагают контролировать объём депозита до 1-2% от итогового бюджета.
Sneaker Studio Hub – Latest sneaker drops are exciting and the navigation is very smooth.
ссылка на сайт водкабет
Отбор проверенного азартного портала нуждается серьезного анализа правовых бумаг. Инновационные платформы казино 1хбет предлагают игрокам безусловную детали о собственных санкциях.
Процедура открытия аккаунта подразумевает множество принудительных шагов валидации. Владельцы настаивают документы, устанавливающие индивидуальность и зрелость. Классический KYC-механизм длится от 24 до 72 периодов.
Управление банком начинается с установления рамок на взносы. Компетентные пользователи рекомендуют применять принцип 5% от полного игорного резерва на единичную партию.
Системные барьеры операторов побуждают задействовать вспомогательные пути. Клоны сохраняют стопроцентную работоспособность центрального сайта, охватывая хронологию сделок и азартный достижения.
Передовые банковские способы гарантируют скоростные взносы через цифровые портмоне. Bitcoin, Ethereum и устойчивые монеты обеспечивают скрытность и мизерные взносы. Время осуществления получений составляет 10-30 отрезков.
Алгоритмы преданности предусматривают ступенчатые степени с прогрессивным возвратом. VIP-кураторы предоставляют персонализированные награды, увеличенные границы и ускоренную техподдержку.
Перемещение в сфере проверенных ресурсов включает осознания актуальных решений авторизации. Профессиональные клиенты эксплуатируют казино Lucky Bear для получения свежей сведений о оперативных доменах.
Алгоритм оформления личного кабинета в проверенных учреждениях включает сложную аутентификацию. Продвинутые компании задействуют KYC-протоколы и AML-стандарты. Бумажная работа занимает от 24 до 72 часов.
Технические технологии для минования ограничений эволюционируют вместе с укреплением нормативных инициатив. VPN-платформы разряда premium предлагают безопасность AES-256 и стандарты OpenVPN. Надежность соединения кардинально значима для VIP сессий.
Альтернативные платформы работают через географически разнесенные технические системы. CDN-комплексы поддерживают сокращенную отклик для азиатских пользователей. Цифровое маршрутизация срабатывает при обнаружении препятствия базового адреса.
Банковские транзакции в сертифицированных зонах подпадают под строгим нормам PCI DSS. Крипто платежи получают распространение благодаря секретности и темпу осуществления.
Смартфонные клиенты топовых операторов интегрируют биометрическую авторизацию и push-извещения для критических моментов. Изменяемый интерфейс автономно адаптируется под особенности монитора.
Современные Умные рулонные шторы 7 (499) 638-25-37 не только облегчают контроль освещенности в помещении, но и добавляют комфорта в ваш интерьер.
Управление шторами осуществляется просто и удобно, с помощью пульта или смартфона.
Поиск честного игорного ресурса подразумевает детального исследования лицензионных разрешений. Современные ресурсы Голд зеркало гарантируют геймерам максимальную данные о имеющихся разрешениях.
Механизм оформления счета включает множество ключевых стадий аутентификации. Владельцы настаивают свидетельства, устанавливающие персону и зрелость. Традиционный KYC-механизм продолжается от 24 до 72 периодов.
Распоряжение капиталом запускается с установления пределов на вклады. Опытные игроки призывают внедрять принцип 5% от суммарного азартного капитала на индивидуальную партию.
Программные барьеры операторов вынуждают применять дополнительные адреса. Альтернативы поддерживают полную функциональность базового сайта, подразумевая журнал операций и игровой продвижение.
Новые банковские сервисы обеспечивают оперативные взносы через криптовалютные счета. Bitcoin, Ethereum и постоянные токены гарантируют анонимность и мизерные отчисления. Продолжительность проведения извлечений составляет 10-30 периодов.
Схемы постоянства охватывают иерархические степени с накапливающимся бонусом. VIP-представители обеспечивают персонализированные бонусы, усиленные ограничения и ускоренную сервис.
Современные геймеры обталкиваются с массой системных нюансов при процессах с проверенными сайтами. Специализированные сайты типа лаки Р±РёСЂ казино выдают новую сведения о операциях казино компаний.
Система валидации профиля охватывает комплекс необходимых уровней. Стартовая подтверждение включает предоставления документов подтверждающих личность. Обычный перечень подразумевает свидетельство, водительские права или загранпаспорт.
Программная компонента создания аккаунта включает эксплуатацию зашифрованного канала и 2FA. Продвинутые игроки настаивают инициировать все имеющихся опций защиты.
Резервные ссылки являются полные копии базового сайта с удержанием тотального арсенала. Важнейшее выгода состоит в схожести расчетных лимитов и условий условий прокрутки.
Алгоритм выявления активных запасных доменов фундируется на проверке специализированных телеграм-каналов и аффилированных платформ. Продвинутые участники применяют туннельные протоколы для предоставления надежного подключения вне зависимости от локальных барьеров.
One-Stop Bundle Shop – Grouped essentials make planning purchases easier.
Функционирующие mirror-ссылки легальных казино на п»ї1хбет регистрация обеспечивают устойчивый подключение к геймерским платформам. Схема дублирования формирует полноценные версии базового домена с фиксацией всех функций.
Процедура активации через mirror-сайт полностью имитирует оригинальную бланк. Новые клиенты регистрируют рабочий email, придумывают защищенный ключ и фиксируют базовую платежное средство.
Подтверждение аккаунта включает представления свидетельств следуя KYC-стандартам. Снимок паспорта, верификация резиденции и карточные данные проходят цифровую проверку в течение 24-72 часа.
Аутентификация верифицированных клиентов реализуется через классическую модуль с 2FA идентификацией. Временные токены поступают на мессенджер гаджет или почтовый ящик.
Опции денежного раздела через mirror-сайты обеспечивает востребованные денежные механизмы. Visa, Mastercard, виртуальные балансы Skrill, Neteller, crypto Bitcoin, Ethereum обрабатываются с уменьшенными комиссиями 0-3%.
Азартная ассортимент дублируется целиком включая барабаны, столовые геймплей, live-хостов и джекпоты. RTP-индикаторы, вариативность и ставочные требования фиксируются неизменными.
Промо политика выполняется схоже базовому сайту. Welcome-комплекты, фриспины, возврат средств и VIP-программы запускаются программно при достижении установленных критериев.
Лицензионные операторы игровых возможностей предоставляют клиентам доступ к премиальному гэмблингу через целевые платформы, включая казино Лаки Бир , которые специально соблюдают transnational требования конфиденциальности.
Механизм активации включает внесения идентификационных информации через защищённые SSL-каналы. Провайдеры требуют письменное доказательство совершеннолетия и места нахождения для compliance юрисдикционных требований.
Двухэтапная authentication выступает принудительным компонентом актуальных solutions конфиденциальности. Users имеют SMS-пароли, push-уведомления или внедряют специализированные приложения по типу Google Authenticator.
Дублирующие URL решают проблемы geographic барьеров и DDoS-воздействий. Техническим образом зеркала представляют аналогичные клоны базового сайта с maintaining опций и клиентских данных.
Экспертные пользователи советуют поддерживать current реестры рабочих дублей в bookmark browser. Букмекеры передают сведения о актуальных URL через электронную почту, Telegram-чаты и смартфонные apps.
Финансовые movements через надёжные площадки secured криптографическими methods стандарта банковского segment. Вывод финансов происходит только на validated счета хозяина личного кабинета.
Азартная ниша демонстрирует динамичный рост, манящая массы участников. Экспертные площадки предлагают качественную обстановку для пари. Подробную информацию о данных организациях возможно изучить на Меллстрой зеркало .
Аттестация является основным элементом определения портала. Надзорные органы Кюрасао дают качественный аудит экономических манипуляций. Отдельная сертифицированная сайт проходит регулярные аудиты RNG-модулей.
Цифровые аспекты новейших игорных домов содержат SSL-шифрование финансового уровня. Разработчики софтового софта уровня Microgaming, NetEnt, Pragmatic Play встраивают комплексные модели непредсказуемых параметров.
Процедура аутентификации счёта требует предоставления бумаг KYC-типа. Свидетельство, подтверждение о заработке, подтверждение адреса — классический список для завершённого входа.
Альтернативные URL убирают барьеры с ограничениями организаций. Свежие копии изменяются каждый день техническими группами. Портативные программы часто оперируют качественнее сетевых версий.
Финансовая дисциплина задаёт длительную результативность игровых периодов. Грамотные участники советуют урезать сумму пари до 1-2% от суммарного фонда.
Актуальные платформы азартных активностей предлагают игрокам путь к профессиональному развлечениям через защищенные Меллстрой казино сайты. Лицензированная функционирование подразумевает соблюдения определенных законодательных норм.
Система активации индивидуального аккаунта задействует аутентификацию приватных показателей. Регуляторы внедряют углубленные механизмы KYC и AML для пресечения незаконных операций.
Технические системы инновационных игорных домов основываются на стабильных инфраструктурах с HTTPS стандартами. Территориальные ограничения принуждает провайдеров разрабатывать вспомогательные адреса.
Параллельные домены являют собой точные копии базового домена с обеспечением всех возможностей и показателей. Участники достигают беспрепятственный доступ к депозиту, гемблинг отчетности и персональным установкам.
Денежные операции проходят через подключенные банковские шлюзы. Пределы на инвестиции и снятия назначаются в гармонии с лицензионными требованиями и корпоративными процедурами риск-менеджмента.
Опытные беттеры рекомендуют мониторить состояние сертификата через государственные реестры игорных организаций. Имиджевые параметры содержат места на тематических платформах и отзывы действительных игроков.
Грати в найкраще найкращі онлайн казино — широкий вибір автоматів та настільних ігор, вітальні бонуси та спеціальні пропозиції. Дізнайтеся про умови участі та актуальні акції.
Перемещение в сфере сертифицированных платформ включает представления современных инструментов соединения. Профессиональные геймеры используют СЌРЅРѕРјРѕ казино для приобретения актуальной сведений о работающих URL.
Процесс регистрации личного кабинета в официальных организациях подразумевает детальную подтверждение. Новейшие поставщики используют KYC-протоколы и AML-требования. Оформление документов занимает от 24 до 72 временных отрезков.
Программные решения для преодоления запретов совершенствуются сообща с усилением юридических инициатив. VPN-сервисы разряда premium гарантируют шифрование AES-256 и технологии OpenVPN. Постоянство канала кардинально важна для VIP игровых периодов.
Зеркальные сайты действуют через территориально разнесенные серверные системы. CDN-архитектуры поддерживают низкую время ответа для азиатских клиентов. Техническое маршрутизация включается при обнаружении недоступности главного ресурса.
Платежные транзакции в легальных регионах отвечают строгим правилам PCI DSS. Децентрализованные переводы приобретают популярность благодаря приватности и темпу осуществления.
Портативные утилиты ведущих провайдеров интегрируют голосовую аутентификацию и push-алерты для существенных ситуаций. Адаптивный внешний вид самостоятельно настраивается под характеристики панели.
Современные игроки натыкаются с затруднением доступа к официальным площадкам. Организации запрещают первичные ссылки, но искушённые лаки Р±РёСЂ казино участники понимают о функционировании альтернативных сайтов.
Резервная ссылка образует абсолютную воспроизведение основного ресурса. Протоколы шифрования функционируют равнозначными. Банковские процедуры осуществляются через аналогичные шлюзы.
Технология открытия счёта через альтернативный адрес содержит привычной валидации. Операторы выясняют свидетельства для осуществления KYC-регламентов. Личные сведения подвергаются расширенную валидацию.
Вносительные лимиты на дополнительных ресурсах равняются первичным условиям. Стартовые беты поддерживаются константными. Накопительные банки синхронизируются между многочисленными ссылками.
Бонусные программы выполняются комплексно на резервных площадках. Отыгрышный коэффициент обеспечивает исходные параметры. Длительность использования продолжается.
Служба ассистирования анализирует тикеты с дополнительных адресов идентично. Интерактивный чат гарантирует непрерывный режим работы.
Найкращі бонуси казино — депозитні акції, бездепозитні пропозиції та турніри із призами. Огляди та порівняння умов участі.
Отличная платформа kazino olimp — люблю заходить сюда!
https://pin-up-kazakhstan-spins.com/how-to-play
CourierCorner Online – Diverse products and a clean layout make shopping simple.
Развлекательная отрасль представляет стремительный развитие, заинтересовывая легионы геймеров. Квалифицированные порталы дают надёжную условия для игры. Подробную факты о данных брендах можно изучить на Mellstroy Game .
Аккредитация представляет ключевым критерием определения площадки. Контролёры Мальты обеспечивают качественный мониторинг финансовых транзакций. Каждая легальная платформа подвергается плановые аудиты RNG-механизмов.
IT параметры современных игорных домов предусматривают SSL-шифрование банковского ранга. Провайдеры софтового обеспечения наподобие Microgaming, NetEnt, Pragmatic Play встраивают многоуровневые механизмы рандомных параметров.
Процесс аутентификации личного кабинета подразумевает предоставления удостоверений KYC-типа. ID, свидетельство о средствах, верификация прописки — обычный пакет для итогового доступа.
Резервные домены исправляют проблемы с блокировками провайдеров. Действующие варианты корректируются ежедневно программными службами. Карманные утилиты часто действуют стабильнее сетевых форматов.
Контроль средств формирует стратегическую прибыльность гемблинговых партий. Квалифицированные геймеры указывают сокращать размер пари до 1-2% от совокупного капитала.
Активные зеркала проверенных gaming-операторов на Меллстрой предоставляют устойчивый подключение к азартным порталам. Принцип копирования создает точные клоны центрального ресурса с консервацией всех возможностей.
Алгоритм регистрации через mirror-сайт целиком имитирует основную бланк. Дебютные клиенты прописывают активный email, генерируют защищенный шифр и определяют игровую курренси.
Идентификация учетной записи требует передачи удостоверений опираясь на KYC-стандартам. Изображение национального документа, свидетельство адреса и банковские реквизиты анализируются посредством машинную валидацию в течение 24-72 часа.
Подключение действующих геймеров производится через стандартную окно с 2FA аутентификацией. Краткосрочные токены доставляются на мобильный устройство или электронную почту.
Возможности депозитного блока через дублирующие порталы обеспечивает популярные банковские системы. Visa, Mastercard, электронные хранилища Skrill, Neteller, цифровые активы Bitcoin, Ethereum процессируются с низкими комиссиями 0-3%.
Gaming коллекция дублируется на сто процентов включая барабаны, столовые развлечения, live-крупье и джекпоты. RTP-показатели, волатильность и вейджер фиксируются неизменными.
Поощрительная система функционирует схоже базовому ресурсу. Welcome-пакеты, безвозмездные спины, денежный возврат и VIP-системы стартуют системно при соблюдении заданных условий.
the Beanie Bazaar storefront – Cozy headwear with colors that make winter outfits pop.
https://pavpos.ezpp.ru/
Гемблинговая индустрия демонстрирует активный рост, заинтересовывая тысячи участников. Опытные сайты гарантируют качественную среду для беттинга. Полную материалы о таких провайдерах можно изучить на Килограмм казино .
Аттестация является основным показателем селекции ресурса. Лицензиаты Олдерни гарантируют строгий контроль финансовых процедур. Каждая легальная ресурс подвергается плановые аудиты RNG-модулей.
Программные особенности инновационных беттинг-платформ предусматривают SSL-безопасность экономического категории. Разработчики цифрового софта наподобие Microgaming, NetEnt, Pragmatic Play внедряют продвинутые системы произвольных параметров.
Механизм валидации счёта предполагает направления справок KYC-формата. Свидетельство, свидетельство о доходах, доказательство адреса — обычный пакет для финального активации.
Дублирующие порталы исправляют трудности с блокировками организаций. Действующие варианты изменяются регулярно техническими специалистами. Планшетные утилиты зачастую работают качественнее веб версий.
Управление банкроллом задаёт долгосрочную прибыльность азартных циклов. Квалифицированные участники настаивают ограничивать величину вейджера до 1-2% от совокупного бюджета.
doggearshop collection – High-quality accessories that handle our daily park trips effortlessly.
Выбор честного игорного заведения предполагает детального рассмотрения правовых свидетельств. Передовые сайты Mellstroy Game казино обеспечивают игрокам максимальную сведения о действующих допусках.
Система оформления счета охватывает ряд ключевых ступеней верификации. Администраторы истребуют удостоверения, устанавливающие идентичность и дееспособность. Классический KYC-процесс составляет от 24 до 72 промежутков.
Распоряжение капиталом начинается с определения границ на депозиты. Профессиональные игроки рекомендуют эксплуатировать закон 5% от полного азартного капитала на отдельную заход.
Электронные блокировки поставщиков обязывают использовать альтернативные адреса. Зеркала хранят полную активность базового портала, предусматривая историю сделок и азартный результаты.
Инновационные банковские методы предоставляют быстрые инвестиции через виртуальные кошельки. Bitcoin, Ethereum и стейблкоины гарантируют тайность и крошечные взносы. Продолжительность обработки изъятий насчитывает 10-30 отрезков.
Схемы постоянства охватывают градационные ранги с нарастающим возвратом. VIP-кураторы дают индивидуальные вознаграждения, улучшенные пределы и преимущественную поддержку.
digital tech pack shop – Clear guidance and an intuitive interface make browsing effortless.
Ориентирование в пространстве официальных сайтов нуждается знания продвинутых решений авторизации. Умелые клиенты используют mad casino для извлечения актуальной сведений о функционирующих адресах.
Механизм создания личного кабинета в надежных компаниях содержит детальную подтверждение. Современные провайдеры задействуют KYC-системы и AML-нормы. Бумажная работа составляет от 24 до 72 часов.
IT решения для прохождения запретов улучшаются сообща с усилением правовых шагов. VPN-инструменты уровня premium предоставляют безопасность AES-256 и протоколы OpenVPN. Устойчивость связи критически существенна для VIP сессий.
Дублирующие адреса оперируют через территориально разнесенные серверные мощности. CDN-системы осуществляют низкую задержку для американских участников. Программное перенаправление включается при выявлении ограничения первичного ресурса.
Платежные переводы в сертифицированных юрисдикциях подпадают под конкретным стандартам PCI DSS. Крипто платежи получают признание по причине секретности и быстроте реализации.
Планшетные приложения премиальных брендов включают биометрическую идентификацию и push-оповещения для критических происшествий. Модифицируемый облик программно подстраивается под особенности монитора.
Roti Roost Bakery – Tasty bread varieties and recipes displayed nicely for home bakers.
Действующие зеркала надежных игорных заведений на п»ї1хбет зеркало гарантируют непрерывный подключение к гемблинг ресурсам. Схема реплицирования формирует аналогичные копии центрального веб-площадки с удержанием всех опций.
Алгоритм оформления профиля через дублирующий портал на сто процентов воспроизводит главную анкету. Новые пользователи указывают функционирующий email, придумывают сложный шифр и выбирают базовую валюту.
Подтверждение учетной записи требует загрузки справок опираясь на KYC-регламенту. Изображение удостоверения личности, верификация регистрации и денежные сведения анализируются посредством автоматическую контроль в течение 24-72 ч.
Подключение существующих участников реализуется через типовую панель с 2FA валидацией. Сессионные токены поступают на сотовый номер или email.
Опции пополнительного блока через альтернативные домены обеспечивает топовые денежные инструменты. Visa, Mastercard, электронные хранилища Skrill, Neteller, виртуальные монеты Bitcoin, Ethereum осуществляются с сокращенными комиссиями 0-3%.
Игровая коллекция клонируется в точности включая машины, традиционные игры, live-крупье и прогрессивы. RTP-коэффициенты, дисперсия и ставочные требования остаются точными.
Бонусная схема оперирует схоже базовому домену. Welcome-бандлы, free spins, возврат средств и VIP-схемы активируются машинально при соблюдении прописанных стандартов.
coastal deals marketplace – It’s refreshing to see such variety paired with an easy payment flow.
steel sonnet hub – Every item feels well-presented and the descriptions are informative.
tablet deals shop – Helpful specs and affordable options made shopping effortless.
Поиск в мире проверенных ресурсов предполагает владения современных решений доступа. Опытные участники задействуют п»ї1xBet casino для обретения релевантной данных о работающих путях.
Схема регистрации аккаунта в проверенных компаниях охватывает тщательную подтверждение. Современные поставщики эксплуатируют KYC-системы и AML-критерии. Документальная процедура составляет от 24 до 72 промежутков.
Программные методы для прохождения препятствий эволюционируют сообща с повышением правовых инициатив. VPN-платформы класса premium дают защиту AES-256 и технологии OpenVPN. Надежность подключения fundamentally важна для VIP раундов.
Дублирующие ресурсы действуют через пространственно расположенные серверные системы. CDN-структуры гарантируют оптимальную задержку для глобальных клиентов. Техническое переключение инициируется при распознавании препятствия основного сайта.
Банковские операции в сертифицированных территориях следуют конкретным стандартам PCI DSS. Крипто транзакции завоевывают актуальность вследствие скрытности и скорости реализации.
Портативные утилиты элитных провайдеров интегрируют отпечатковую подтверждение и push-алерты для существенных моментов. Настраиваемый облик автоматически корректируется под свойства экрана.
Игровая отрасль являет быстрый прогресс, притягивая множество пользователей. Опытные сайты предлагают безопасную обстановку для развлечений. Исчерпывающую сведения о подобных компаниях можно изучить на Vavada casino .
Легализация является ключевым критерием определения площадки. Надзорные органы Гибралтара гарантируют тщательный аудит расчётных манипуляций. Отдельная легальная сайт реализует регулярные проверки RNG-алгоритмов.
Программные параметры актуальных беттинг-платформ предусматривают SSL-криптографию банковского категории. Создатели цифрового софта класса Microgaming, NetEnt, Pragmatic Play интегрируют комплексные механизмы случайных величин.
Механизм аутентификации личного кабинета включает направления справок KYC-стандарта. ID, документ о средствах, подтверждение прописки — классический комплект для итогового авторизации.
Дублирующие порталы решают трудности с ограничениями провайдеров. Актуальные варианты изменяются постоянно техническими отделами. Смартфонные клиенты часто выполняются устойчивее браузерных редакций.
Финансовая дисциплина задаёт длительную эффективность азартных партий. Профессиональные игроки советуют урезать сумму депозита до 1-2% от совокупного фонда.
Поиск надежного азартного оператора подразумевает тщательного исследования юридических бумаг. Современные ресурсы лаки Р±РёСЂ казино обеспечивают игрокам безусловную детали о собственных разрешениях.
Система оформления счета включает ряд обязательных стадий подтверждения. Провайдеры требуют бумаги, удостоверяющие персону и совершеннолетие. Обычный KYC-алгоритм занимает от 24 до 72 интервалов.
Распоряжение капиталом начинается с установления ограничений на депозиты. Профессиональные игроки советуют задействовать установку 5% от общего казино капитала на индивидуальную партию.
Электронные препятствия операторов обязывают задействовать дополнительные ссылки. Альтернативы сохраняют максимальную производительность первичного платформы, содержа журнал переводов и казино продвижение.
Инновационные денежные способы гарантируют быстрые взносы через криптовалютные хранилища. Bitcoin, Ethereum и фиксированные активы дают скрытность и наименьшие платежи. Период реализации изъятий достигает 10-30 минут.
Схемы постоянства содержат ступенчатые ранги с нарастающим кэшбэком. VIP-кураторы предлагают уникальные награды, расширенные границы и опережающую техподдержку.
https://mushlovesocial.com/blogs/151914/Code-promo-1xBet-Bonus-de-bienvenue-100-130
Visit DeviceDockyard – Great selection of tech tools with clear specs and prices.
Активные альтернативные домены проверенных игорных заведений на казино ретро гарантируют стабильный подключение к развлекательным ресурсам. Система зеркалирования строит полноценные копии корневого сайта с фиксацией всех инструментов.
Механизм создания аккаунта через зеркало полностью имитирует основную форму. Только пришедшие клиенты прописывают действующий email, придумывают надежный код доступа и назначают операционную курренси.
Идентификация личного кабинета предполагает представления бумаг согласно KYC-политике. Скан удостоверения личности, верификация резиденции и карточные данные проходят автоматическую верификацию в течение 24-72 временных единиц.
Авторизация верифицированных клиентов выполняется через типовую окно с расширенной аутентификацией. Одноразовые коды отправляются на телефонный гаджет или почтовый ящик.
Механизмы входящего компонента через дублирующие порталы обеспечивает распространенные банковские сервисы. Visa, Mastercard, онлайн балансы Skrill, Neteller, виртуальные монеты Bitcoin, Ethereum процессируются с низкими платежами 0-3%.
Развлекательная ассортимент копируется абсолютно включая барабаны, классические игры, live-хостов и мегавыигрыши. RTP-параметры, изменчивость и вейджер остаются аналогичными.
Поощрительная схема выполняется подобно основному сайту. Welcome-комплекты, безвозмездные спины, возврат средств и VIP-программы активируются машинально при достижении прописанных критериев.
this artistic marketplace – The supplies arrived fast and the colors are more vivid than I imagined.
Поиск надежного игорного площадки предполагает основательного разбора официальных сертификатов. Актуальные ресурсы п»ї1xBet casino гарантируют участникам полную информацию о своих допусках.
Процесс регистрации охватывает различные необходимых этапов аутентификации. Владельцы просят бумаги, доказывающие индивидуальность и дееспособность. Стандартный KYC-процесс длится от 24 до 72 временных отрезков.
Финансовое планирование инициируется с задания ограничений на взносы. Опытные игроки призывают эксплуатировать установку 5% от совокупного развлекательного фонда на отдельную партию.
Программные запреты операторов заставляют применять альтернативные адреса. Клоны оберегают безусловную функциональность главного платформы, содержа архив платежей и азартный продвижение.
Современные банковские системы обеспечивают мгновенные пополнения через виртуальные портмоне. Bitcoin, Ethereum и стабильные валюты поддерживают скрытность и наименьшие платежи. Продолжительность реализации выводов доходит 10-30 периодов.
Программы приверженности подразумевают градационные ранги с возрастающим кэшбэком. VIP-представители дают персонализированные бонусы, улучшенные границы и опережающую сервис.
Поиск в сфере сертифицированных площадок включает осознания продвинутых решений авторизации. Опытные участники задействуют Lucky Bear казино для добывания актуальной материалов о работающих доменах.
Процедура регистрации профиля в проверенных операторах содержит детальную валидацию. Актуальные компании внедряют KYC-протоколы и AML-критерии. Документальное сопровождение потребляет от 24 до 72 временных отрезков.
IT инструменты для преодоления запретов совершенствуются синхронно с интенсификацией законодательных решений. VPN-решения типа premium гарантируют криптографию AES-256 и системы OpenVPN. Стабильность соединения принципиально существенна для элитных сессий.
Резервные домены функционируют через территориально расположенные технические кластеры. CDN-комплексы гарантируют оптимальную отклик для глобальных участников. Цифровое перенаправление инициируется при обнаружении ограничения главного сайта.
Финансовые движения в лицензированных зонах подпадают под конкретным критериям PCI DSS. Децентрализованные расчеты набирают распространение в результате анонимности и оперативности обработки.
Смартфонные софт топовых брендов объединяют физиологическую аутентификацию и push-сообщения для ключевых эпизодов. Гибкий интерфейс автономно подстраивается под свойства матрицы.
SuedeSalon Collection – Sleek visuals and carefully curated products make exploring seamless.
For discussion
where to buy cheap zetia tablets
for the original publication.
DIYDepot Finds – Handy and reliable tools simplify weekend craft and home improvement projects.
Передовые бетторы оказываются с проблемой доступа к проверенным ресурсам. Компании блокируют главные домены, но знающие Лаки Бир пользователи учитывают о наличии дублирующих сайтов.
Зеркало является идентичную отображение базового платформы. Средства защиты функционируют идентичными. Денежные операции производятся через равнозначные системы.
Схема создания аккаунта через зеркальный ссылку подразумевает классической верификации. Администраторы уточняют справки для исполнения KYC-регламентов. Паспортные информация подвергаются расширенную подтверждение.
Банковские рамки на параллельных порталах равняются главным характеристикам. Начальные взносы сохраняются константными. Растущие джекпоты интегрируются между разными адресами.
Стимулирующие программы функционируют всесторонне на параллельных ресурсах. Вейджер гарантирует оригинальные значения. Длительность оборота поддерживается.
Отдел сопровождения решает тикеты с альтернативных порталов идентично. Онлайн общение поддерживает непрерывный формат деятельности.
Хороший обзор турниров ufc в феврале марте 2026 три недели которые встряхнут дивизионы, делюсь ссылкой. Вот ссылка: https://tresh-lordfilm.ru/news/goryachaya-seriya-ufc-fevral-mart-2026-boi-kotorye-mogut-izmenit-vsyo-v-divizionah/
Выбор легального гемблинг портала предполагает глубокого исследования официальных свидетельств. Передовые порталы миллион казино гарантируют клиентам стопроцентную детали о текущих допусках.
Алгоритм оформления счета содержит несколько принудительных шагов аутентификации. Провайдеры истребуют справки, засвидетельствующие самобытность и зрелость. Традиционный KYC-процесс длится от 24 до 72 периодов.
Финансовое планирование открывается с установления лимитов на депозиты. Опытные игроки предлагают внедрять правило 5% от суммарного игорного резерва на одну раунд.
Программные барьеры владельцев побуждают внедрять дополнительные пути. Альтернативы оберегают безусловную работоспособность первичного сайта, охватывая архив переводов и развлекательный успех.
Инновационные банковские методы гарантируют оперативные вклады через криптовалютные аккаунты. Bitcoin, Ethereum и постоянные токены гарантируют скрытность и мизерные отчисления. Длительность выполнения выводов доходит 10-30 минут.
Системы приверженности предусматривают многоуровневые степени с накапливающимся бонусом. VIP-представители предлагают персонализированные бонусы, увеличенные рамки и первоочередную поддержку.
Поиск в мире лицензированных порталов включает понимания передовых технологий подключения. Квалифицированные пользователи эксплуатируют п»ї1xBet casino для приобретения свежей материалов о активных URL.
Процедура открытия аккаунта в лицензированных организациях предполагает сложную аутентификацию. Современные операторы применяют KYC-процедуры и AML-критерии. Документальная процедура составляет от 24 до 72 периодов.
Компьютерные способы для обхода блокировок прогрессируют вместе с укреплением нормативных шагов. VPN-сервисы класса premium гарантируют защиту AES-256 и системы OpenVPN. Постоянство подключения жизненно значима для VIP заходов.
Запасные платформы работают через пространственно рассредоточенные компьютерные кластеры. CDN-архитектуры поддерживают оптимальную пинг для американских геймеров. Техническое переключение срабатывает при распознавании блокировки центрального сайта.
Финансовые операции в проверенных зонах подчиняются строгим нормам PCI DSS. Цифровые расчеты увеличивают актуальность в результате секретности и скорости обработки.
Переносные утилиты элитных брендов объединяют лицевую аутентификацию и push-оповещения для важных происшествий. Модифицируемый облик независимо подстраивается под характеристики панели.
Новейшие участники сталкиваются с набором технических аспектов при деятельности с лицензированными порталами. Экспертные сайты типа казино Лев поставляют свежую контент о процессах казино провайдеров.
Процесс верификации профиля включает ряд принудительных этапов. Стартовая аутентификация нуждается размещения удостоверений валидирующих гражданство. Обычный набор подразумевает удостоверение личности, автолицензию или внешний паспорт.
Программная сторона оформления предполагает использование безопасного соединения и 2FA. Квалифицированные игроки настаивают активировать полный набор представленных опций обеспечения.
Резервные ссылки являются абсолютные реплики центрального портала с обеспечением комплексного возможностей. Важнейшее плюс заключается в схожести финансовых границ и норм отыгрыша.
Процедура обнаружения рабочих резервных ссылок основывается на контроле экспертных информационных каналов и сотрудничающих порталов. Продвинутые геймеры эксплуатируют прокси-соединения для создания стабильного входа без оглядки от территориальных блокировок.
нажмите водкабет
ArtAisle Inspirations – Contemporary art pieces and décor ideas feel refreshing and one of a kind.
Надёжные платформы игровых услуг обеспечивают игрокам возможность к качественному времяпрепровождению через dedicated домены, включая Лаки Бир зеркало , которые точно соблюдают мировые нормы security.
Процедура активации предполагает ввода валидационных деталей через encrypted SSL-каналы. Администрация запрашивают official доказательство дееспособности и территории residence для соблюдения законодательных требований.
2FA authentication является required составляющей современных систем надёжности. Игроки имеют SMS-токены, push-оповещения или используют dedicated утилиты вроде Google Authenticator.
Mirror порталы нейтрализуют препятствия локальных ограничений и DDoS-assault. Фактически зеркала формируют аналогичные реплики primary сайта с удержанием опций и user данных.
Экспертные клиенты советуют поддерживать новейшие перечни функционирующих альтернатив в bookmark браузера. Букмекеры доставляют обновления о современных порталах через почтовые сервисы, Telegram-группы и смартфонные софт.
Payment операции через legal ресурсы обеспечены криптографическими технологиями уровня банковского segment. Изъятие средств происходит исключительно на аутентифицированные wallets обладателя личного кабинета.
Современные пользователи обталкиваются с набором цифровых тонкостей при работе с сертифицированными порталами. Профильные платформы типа п»ї1хбет обеспечивают новую контент о операциях гэмблинговых компаний.
Система проверки счета предполагает набор принудительных фаз. Исходная валидация включает загрузки справок валидирующих личность. Типовой набор включает документ, автолицензию или международное ID.
Технологическая сторона регистрации включает задействование безопасного соединения и двухуровневой проверки. Экспертные пользователи рекомендуют инициировать весь комплекс имеющихся функций безопасности.
Альтернативные адреса являются полные копии первичного домена с хранением полного возможностей. Главное выгода кроется в схожести расчетных границ и норм проигрыша.
Алгоритм выявления рабочих резервных ссылок основывается на мониторинге экспертных новостных лент и аффилированных порталов. Опытные игроки эксплуатируют VPN-сервисы для гарантирования бесперебойного соединения без оглядки от местных блокировок.
http://nowapilka.phorum.pl/viewtopic.php?p=688676#688676
Передовые клиенты сталкиваются с множеством программных нюансов при деятельности с лицензированными платформами. Экспертные источники типа казино Клубника предоставляют современную контент о деятельности развлекательных организаций.
Процедура валидации профиля предполагает комплекс принудительных фаз. Базовая подтверждение нуждается размещения справок валидирующих личность. Привычный пакет включает свидетельство, лицензию водителя или международный паспорт.
Техническая сторона открытия счета подразумевает задействование криптографической защиты и 2FA. Продвинутые геймеры настаивают задействовать полный набор доступных функций обеспечения.
Зеркала образуют точные реплики первичного ресурса с хранением исчерпывающего возможностей. Ключевое бонус заключается в идентичности финансовых пределов и параметров вейджера.
Алгоритм выявления актуальных альтернативных адресов базируется на отслеживании тематических информационных каналов и сотрудничающих сайтов. Экспертные геймеры внедряют прокси-соединения для гарантирования стабильного доступа вне зависимости от географических блокировок.
Современные гемблеры натыкаются с препятствием подключения к сертифицированным ресурсам. Поставщики запрещают главные адреса, но искушённые лаки Р±РёСЂ казино клиенты помнят о функционировании зеркальных площадок.
Параллельный портал формирует точную копию основного платформы. SSL-сертификаты сохраняются неизменными. Финансовые процедуры проходят через идентичные механизмы.
Алгоритм создания аккаунта через зеркальный портал включает стандартной аутентификации. Менеджеры просят бумаги для исполнения KYC-регламентов. Личные информация осуществляют двухфакторную валидацию.
Банковские рамки на зеркальных порталах аналогичны главным требованиям. Начальные ставки сохраняются неизменными. Возрастающие банки согласовываются между множественными порталами.
Бонусные программы оперируют целостно на резервных ресурсах. Множитель ставок поддерживает первоначальные величины. Длительность использования остаётся прежним.
Команда обслуживания рассматривает вопросы с резервных доменов сходным образом. Живой диалог поддерживает круглосуточный порядок оперирования.
Новейшие порталы беттинг активностей дают игрокам доступ к элитному азарту через надежные Вавада зеркало сайты. Лицензированная функционирование требует учета строгих законодательных критериев.
Механизм оформления индивидуального профиля включает аутентификацию приватных показателей. Управляющие эксплуатируют детализированные системы KYC и AML для пресечения нарушающих операций.
Цифровые платформы новейших развлекательных порталов функционируют на защищенных облачных системах с HTTPS технологиями. IP-фильтрация вынуждает владельцев запускать резервные порталы.
Параллельные домены являют собой эквивалентные версии базового сайта с фиксацией всех сервисов и сведений. Беттеры достигают стабильный связь к балансу, игровой данным и пользовательским настройкам.
Банковские действия выполняются через интегрированные банковские процессоры. Лимиты на депозиты и изъятия назначаются в соотношении с лицензионными условиями и собственными нормами риск-менеджмента.
Квалифицированные гемблеры указывают анализировать статус лицензии через регуляторные каталоги гемблинг органов. Репутационные показатели содержат ранги на тематических сервисах и отзывы настоящих беттеров.
Исследование в области сертифицированных сайтов подразумевает владения передовых технологий соединения. Квалифицированные участники задействуют Меллстрой сайт для приобретения актуальной данных о функционирующих доменах.
Алгоритм создания учетной записи в проверенных компаниях содержит многоуровневую верификацию. Современные организации внедряют KYC-системы и AML-критерии. Документооборот отнимает от 24 до 72 промежутков.
Технические технологии для обхода препятствий улучшаются сообща с ужесточением регуляторных инициатив. VPN-инструменты уровня premium предлагают шифрование AES-256 и протоколы OpenVPN. Устойчивость соединения жизненно актуальна для премиальных партий.
Резервные домены оперируют через пространственно размещенные компьютерные инфраструктуры. CDN-сети обеспечивают низкую задержку для азиатских участников. Техническое переключение включается при выявлении недоступности основного сайта.
Платежные движения в проверенных юрисдикциях подчиняются строгим требованиям PCI DSS. Крипто транзакции получают востребованность по причине скрытности и скорости выполнения.
Планшетные утилиты ведущих операторов интегрируют биометрическую идентификацию и push-уведомления для важных ситуаций. Гибкий облик автономно корректируется под особенности дисплея.
зайти на сайт водка бет
pantrystoreplus – High-quality pantry items arrived safely and helped streamline my daily cooking.
this gadget hub – Devices worked as promised and setup was very easy.
шуко Откройте для себя мир безупречного качества и непревзойденного стиля с окнами от Шуко.
Wool Warehouse Store – Great yarn collection and clear guides to assist with any project.
Азартная индустрия представляет быстрый подъём, заинтересовывая массы клиентов. Грамотные сайты предлагают защищённую обстановку для развлечений. Детальную сведения о таких провайдерах допустимо изучить на tip top casino .
Легализация составляет главным критерием подбора площадки. Надзорные органы Кюрасао гарантируют строгий надзор валютных процедур. Конкретная аккредитованная площадка осуществляет систематические проверки RNG-генераторов.
Цифровые параметры передовых беттинг-платформ содержат SSL-защиту расчётного класса. Провайдеры цифрового продукта наподобие Microgaming, NetEnt, Pragmatic Play добавляют сложные алгоритмы случайных параметров.
Алгоритм проверки учётной записи подразумевает представления удостоверений KYC-уровня. Удостоверение, выписка о доходах, доказательство местожительства — обычный комплект для итогового авторизации.
Дублирующие ссылки ликвидируют барьеры с запретами поставщиков. Свежие альтернативы адаптируются каждый день IT службами. Планшетные приложения регулярно выполняются стабильнее сетевых модификаций.
Распределение капитала задаёт перспективную доходность развлекательных раундов. Грамотные участники советуют лимитировать сумму бета до 1-2% от итогового резерва.
Подбор проверенного казино ресурса заставляет основательного исследования лицензионных бумаг. Инновационные сайты Килограмм казино гарантируют пользователям абсолютную сведения о действующих разрешениях.
Механизм регистрации включает определенное количество обязательных этапов проверки. Владельцы просят справки, удостоверяющие личность и правоспособность. Обычный KYC-регламент длится от 24 до 72 временных отрезков.
Контроль средств открывается с определения пределов на пополнения. Квалифицированные участники рекомендуют использовать принцип 5% от полного развлекательного бюджета на единичную партию.
Технические барьеры провайдеров обязывают внедрять дополнительные адреса. Альтернативы хранят безусловную производительность центрального площадки, охватывая хронологию переводов и азартный продвижение.
Современные платежные методы дают моментальные вклады через криптовалютные кошельки. Bitcoin, Ethereum и стабильные валюты обеспечивают анонимность и мизерные комиссии. Срок проведения выводов равно 10-30 промежутков.
Схемы верности охватывают каскадные статусы с прогрессивным компенсацией. VIP-кураторы обеспечивают эксклюзивные бонусы, увеличенные границы и приоритетную сервис.
latte charm shop – Warm vibes and carefully chosen items make browsing enjoyable.
Wrap Wonderland Collection – Lots of colorful and playful wraps make packing gifts enjoyable.
What impressed me about this casino https://sklepstradale.pl/ is the variety of the games. Everything runs smoothly, the design is clean, and there’s always something new to explore, which keeps it engaging.
Подбор достойного гемблинг ресурса в сегодняшних реалиях предполагает повышенного рассмотрения к лицензионному положению. Квалифицированные участники представляют, что Лаки Бир казино содержит современную данные о функционирующих сервисах.
Процедура регистрации в сертифицированных заведениях охватывает принудительную подтверждение удостоверения. KYC-правила оберегают как площадку, так и пользователя от мошенничества. Временные ограничения на перечисление денег до закрытия подтверждения – типичная методика.
Электронные ограничения на доступ к развлекательным порталам преодолеваются через альтернативные URL. Доступные клоны поддерживают абсолютную возможности базового портала. Финансовые операции, игровой достижения и льготные планы остаются неизменными.
Экономическая защищенность характеризуется критерием задействованных расчетных механизмов. SSL-шифрование, PCI DSS аттестация и усиленная аутентификация гарантируют защищенный заслон защиты.
Азартная ассортимент легальных заведений объединяет слоты от известных производителей. RTP-показатели, колебания и вероятностные формулы подвергаются нейтральную сертификацию в утвержденных лабораториях.
Схемы лояльности в достойных заведениях строятся на четких правилах ставок. Требования x35-40 характеризуется нормальным для слот-подарков, в то время как настольные развлечения включаются в зачет с пониженным фактором.
Надёжные платформы развлекательных возможностей обеспечивают участникам шанс к премиальному игровому процессу через тематические ресурсы, включая Лаки Бир зеркало , которые следуют мировые критерии конфиденциальности.
Процедура регистрации necessita ввода authentication параметров через encrypted SSL-линии. Администрация просят документальное доказательство age verification и территории регистрации для поддержания законодательных критериев.
Multi-factor authentication выступает required частью новейших solutions конфиденциальности. Участники обретают SMS-токены, push-оповещения или задействуют специализированные tools типа Google Authenticator.
Резервные ссылки решают трудности territorial барьеров и DDoS-штурмов. Технически mirrors формируют дублированные реплики primary платформы с сохранением возможностей и user данных.
Компетентные участники советуют поддерживать новейшие перечни действующих копий в закладках обозревателя. Операторы рассылают информацию о актуальных доменах через электронную почту, Telegram-communities и смартфонные утилиты.
Банковские movements через лицензионные ресурсы обеспечены cryptographic протоколами level банковского сектора. Вывод финансов происходит исключительно на аутентифицированные карты обладателя личного кабинета.
1win bitcoin yechish http://1win5769.help/
Подбор безопасного развлекательного оператора в современных границах подразумевает детального подхода к регулятивному режиму. Компетентные геймеры представляют, что казино 1хбет отображает актуальную информацию о активных сервисах.
Алгоритм записи в официальных заведениях предусматривает требуемую валидацию документов. KYC-стандарты защищают как сервис, так и геймера от махинаций. Промежуточные рамки на вывод капитала до закрытия контроля – стандартная подход.
Цифровые запреты на связь к игровым сайтам нейтрализуются через дублирующие ссылки. Рабочие дубликаты гарантируют полную функциональность базового ресурса. Финансовые транзакции, развлекательный результаты и наградные программы сохраняются неизменными.
Материальная стабильность измеряется степенью используемых финансовых систем. SSL-кодирование, PCI DSS валидация и двухфакторная верификация обеспечивают надежный щит защиты.
Игровая ассортимент проверенных провайдеров охватывает спины от известных провайдеров. RTP-индексы, колебания и статистические модели претерпевают беспристрастную проверку в одобренных центрах.
Программы мотивации в профессиональных площадках опираются на открытых критериях проигрыша. Вейджер x35-40 расценивается адекватным для спин-бонусов, в то время как классические развлечения принимаются в калькуляцию с пониженным процентом.
Review my website … GameBeat High RTP Slots You Can Play Now
Легальные операторы гэмблинг опций предоставляют игрокам доступ к премиальному игровому процессу через целевые ресурсы, включая Mellstroy Game casino , которые именно выполняют общепринятые стандарты безопасности.
Схема открытия счёта necessita указания authentication параметров через шифрованные SSL-соединения. Менеджмент запрашивают официальное удостоверение правоспособности и территории регистрации для исполнения законодательных требований.
Multi-factor проверка становится необходимым aspect новейших solutions конфиденциальности. Участники получают SMS-пароли, push-сообщения или эксплуатируют dedicated tools вроде Google Authenticator.
Дублирующие URL ликвидируют проблемы географических блокировок и DDoS-assault. Фактически реплики формируют дублированные копии главного домена с сохранением возможностей и индивидуальных данных.
Профессиональные участники предлагают keeping новейшие перечни working альтернатив в bookmark браузера. Букмекеры передают updates о новых ссылках через e-mail, Telegram-группы и мобильные утилиты.
Платёжные переводы через legal ресурсы обеспечены защитными протоколами level банковского направления. Снятие фондов выполняется лишь на подтверждённые wallets собственника аккаунта.
Актуальные пользователи сталкиваются с изобилием цифровых деталей при процессах с проверенными ресурсами. Тематические платформы типа Клубника казино предоставляют свежую материалы о работе развлекательных провайдеров.
Процедура аутентификации учетной записи предполагает набор необходимых фаз. Начальная аутентификация подразумевает отправки свидетельств верифицирующих субъект. Привычный пакет содержит паспорт, лицензию водителя или внешний паспорт.
Цифровая сторона открытия счета содержит внедрение защищенного протокола и 2FA. Квалифицированные пользователи предлагают задействовать весь комплекс возможных функций защиты.
Запасные домены являются полные отражения базового сайта с обеспечением всего возможностей. Важнейшее преимущество кроется в подобии платежных пределов и требований условий прокрутки.
Процедура выявления функционирующих запасных доменов фундируется на отслеживании тематических информационных каналов и сотрудничающих площадок. Продвинутые клиенты задействуют виртуальные частные сети для создания устойчивого соединения независимо от локальных ограничений.
Передовые клиенты встречаются с огромным количеством технических аспектов при деятельности с проверенными порталами. Экспертные сайты типа РЎСѓРєР° казино выдают новую сведения о функционировании казино организаций.
Механизм подтверждения счета включает множество принудительных этапов. Исходная проверка нуждается загрузки справок подтверждающих индивидуальность. Обычный список предполагает ID, лицензию водителя или внешний паспорт.
Цифровая компонента записления включает задействование защищенного протокола и двойной авторизации. Квалифицированные участники рекомендуют активировать весь комплекс представленных опций защиты.
Запасные домены формируют абсолютные реплики основного домена с сохранением тотального набора функций. Основное выгода содержится в тождественности финансовых ограничений и условий вейджера.
Процедура выявления рабочих запасных доменов основывается на отслеживании тематических мессенджер групп и партнерских ресурсов. Продвинутые пользователи задействуют виртуальные частные сети для предоставления постоянного доступа невзирая от местных ограничений.
Visit ElmExchange – Layout is simple and product offerings feel carefully curated.
Игровая область демонстрирует активный развитие, притягивая массы геймеров. Квалифицированные порталы предлагают качественную среду для игры. Подробную данные о подобных операторах можно изучить на Vavada casino .
Лицензирование выступает основным аспектом подбора ресурса. Юрисдикции Великобритании предоставляют строгий аудит расчётных действий. Конкретная официальная площадка проходит периодические ревизии RNG-механизмов.
Технические свойства актуальных гемблинг-сайтов охватывают SSL-безопасность финансового ранга. Поставщики программного ПО типа Microgaming, NetEnt, Pragmatic Play интегрируют продвинутые алгоритмы случайных значений.
Процесс проверки личного кабинета требует подачи удостоверений KYC-уровня. Документ, свидетельство о средствах, валидация прописки — стандартный пакет для завершённого авторизации.
Резервные адреса исправляют барьеры с цензурой провайдеров. Действующие дубли корректируются систематически техническими командами. Мобильные утилиты регулярно оперируют лучше интернет версий.
Управление банкроллом устанавливает стратегическую успешность развлекательных периодов. Экспертные участники настаивают ограничивать размер ставки до 1-2% от общего банкролла.
Всё про строительство https://hotimsvoydom.ru и ремонт — проекты домов, фундаменты, кровля, инженерные системы и отделка. Практичные советы, инструкции и современные технологии.
Надёжные площадки развлекательных услуг дают пользователям доступ к высококлассному времяпрепровождению через dedicated платформы, включая казино Vavada , которые соблюдают глобальные требования безопасности.
Процедура создания аккаунта подразумевает внесения валидационных данных через encrypted SSL-протоколы. Провайдеры просят предоставить нотариальное verification правоспособности и места residence для соблюдения нормативных требований.
Многоуровневая проверка является необходимым элементом современных solutions конфиденциальности. Участники приобретают SMS-токены, push-notification или эксплуатируют специализированные софт вроде Google Authenticator.
Альтернативные домены решают препятствия geographic санкций и DDoS-нападений. С технической точки зрения зеркала являют идентичные реплики базового портала с обеспечением возможностей и клиентских данных.
Опытные игроки предлагают сохранять обновлённые реестры активных дублей в bookmark браузера. Management передают информацию о свежих URL через электронную почту, Telegram-communities и мобильные программы.
Платёжные movements через официальные ресурсы гарантированы encryption протоколами уровня банковского области. Вывод капитала производится только на проверенные карты собственника учётной записи.
watercolor kit shop – The selection allows for easy access to all essential painting supplies.
профессии на удаленке с хорошим заработком удаленная работа где
Действующие дублирующие порталы лицензированных игорных заведений на РЎСѓРєР° казино дают непрерывный коннект к развлекательным порталам. Технология реплицирования строит точные копии корневого домена с сохранением всех инструментов.
Схема регистрации через зеркало целиком дублирует базовую заявку. Только пришедшие клиенты регистрируют действующий email, придумывают надежный пароль и определяют операционную денежную единицу.
Идентификация личного кабинета предполагает передачи документов согласно KYC-стандартам. Фото паспорта, подтверждение места жительства и финансовые реквизиты проходят программную анализ в течение 24-72 периодов.
Вход активных геймеров выполняется через стандартную модуль с 2FA проверкой. Краткосрочные ключи отправляются на смс гаджет или электронную почту.
Опции депозитного компонента через резервные ссылки поддерживает распространенные платежные платформы. Visa, Mastercard, цифровые счета Skrill, Neteller, цифровые активы Bitcoin, Ethereum выполняются с уменьшенными сборами 0-3%.
Gaming каталог повторяется целиком включая автоматы, карточные развлечения, live-операторов и прогрессивы. RTP-индикаторы, колебания и условия отыгрыша фиксируются такими же.
Бонусная программа выполняется схоже основному порталу. Welcome-пакеты, фриспины, refund и VIP-программы активируются автоматически при реализации установленных требований.
BarbellBayou Shop Online – Quality fitness tools with pricing that stands out positively.
Отбор безопасного развлекательного оператора в нынешних реалиях предполагает специального анализа к юридическому уровню. Опытные пользователи осознают, что СЌРЅРѕРјРѕ сайт включает современную материалы о доступных сервисах.
Механизм регистрации в сертифицированных платформах содержит требуемую подтверждение персональных данных. KYC-правила обеспечивают как площадку, так и пользователя от мошенничества. Переходные границы на перечисление денег до окончания проверки – стандартная методика.
Технические ограничения на связь к азартным сайтам решаются через альтернативные URL. Доступные зеркала обеспечивают стопроцентную функциональность главного ресурса. Финансовые операции, азартный достижения и поощрительные предложения сохраняются константными.
Материальная надежность характеризуется показателем внедренных банковских способов. SSL-криптография, PCI DSS лицензирование и усиленная верификация формируют прочный контур защиты.
Азартная библиотека лицензированных операторов включает автоматы от ведущих студий. RTP-параметры, колебания и статистические модели получают беспристрастную валидацию в одобренных организациях.
Программы стимулирования в качественных операторах опираются на открытых параметрах ставок. Проигрыш x35-40 расценивается нормальным для автомат-поощрений, в то время как стандартные активности включаются в счет с сниженным множителем.
крипто казино для игроков из Казахстана
Актуальные гемблеры попадают с проблемой связи к легальным ресурсам. Организации запрещают стандартные адреса, но опытные Вавада РІС…РѕРґ участники учитывают о существовании дублирующих ресурсов.
Резервная ссылка образует идентичную дубликат основного ресурса. Системы безопасности функционируют неизменными. Расчётные процедуры осуществляются через аналогичные сервисы.
Методика заведения учётной записи через параллельный портал подразумевает стандартной валидации. Администраторы запрашивают бумаги для реализации KYC-требований. Идентификационные параметры осуществляют усиленную аутентификацию.
Банковские пределы на дополнительных платформах аналогичны главным параметрам. Наименьшие вклады остаются фиксированными. Возрастающие накопления интегрируются между различными ресурсами.
Льготные программы действуют комплексно на альтернативных платформах. Коэффициент оборота поддерживает оригинальные параметры. Временные рамки оборота поддерживается.
Департамент поддержки рассматривает запросы с параллельных ресурсов идентично. Онлайн разговор гарантирует круглосуточный режим обслуживания.
Игровая сфера отображает стремительный прогресс, заинтересовывая множество игроков. Квалифицированные порталы обеспечивают стабильную пространство для пари. Полную материалы о указанных компаниях возможно получить на казино 1xBet .
Аттестация является ключевым фактором селекции сайта. Надзорные органы Великобритании гарантируют тщательный надзор расчётных действий. Конкретная сертифицированная сайт осуществляет регулярные инспекции RNG-механизмов.
IT параметры современных азартных площадок предусматривают SSL-безопасность денежного категории. Поставщики цифрового софта наподобие Microgaming, NetEnt, Pragmatic Play добавляют комплексные алгоритмы случайных величин.
Схема подтверждения аккаунта предполагает направления свидетельств KYC-стандарта. Удостоверение, выписка о прибылях, доказательство местожительства — типичный список для окончательного входа.
Альтернативные URL исправляют препятствия с фильтрацией поставщиков. Функционирующие альтернативы обновляются ежедневно программными специалистами. Мобильные приложения зачастую действуют стабильнее интернет модификаций.
Банкролл-менеджмент устанавливает долгосрочную эффективность гемблинговых сессий. Опытные беттеры указывают контролировать количество бета до 1-2% от совокупного капитала.
Женская магия Юлиана Он поможет вам раскрыть свой потенциал.
Best Australian online casino 2026 trusted real money sites
Беттинговая индустрия показывает динамичный рост, привлекая массы пользователей. Грамотные площадки обеспечивают безопасную среду для игры. Полную сведения о таких компаниях можно получить на п»ї1xBet казино .
Лицензирование составляет приоритетным аспектом отбора платформы. Лицензиаты Олдерни предоставляют жёсткий надзор финансовых манипуляций. Конкретная сертифицированная площадка подвергается постоянные проверки RNG-генераторов.
Цифровые свойства новейших азартных площадок охватывают SSL-криптографию банковского стандарта. Разработчики цифрового обеспечения типа Microgaming, NetEnt, Pragmatic Play внедряют многоуровневые схемы произвольных параметров.
Процесс аутентификации аккаунта требует направления документов KYC-класса. Документ, выписка о средствах, валидация проживания — классический пакет для полноценного подключения.
Дублирующие ссылки устраняют трудности с запретами поставщиков. Свежие дубли модифицируются ежедневно техническими специалистами. Смартфонные приложения зачастую выполняются стабильнее интернет версий.
Финансовая дисциплина формирует долгосрочную эффективность игровых циклов. Опытные участники рекомендуют ограничивать объём вейджера до 1-2% от общего капитала.
Современные провайдеры беттинг активностей гарантируют пользователям путь к профессиональному азарту через сертифицированные п»ї1хбет официальный сайт ресурсы. Легальная деятельность предполагает соблюдения жестких контролирующих норм.
Система создания пользовательского счета охватывает аутентификацию приватных показателей. Управляющие задействуют многоуровневые механизмы KYC и AML для исключения поддельных платежей.
IT средства новейших гемблинг платформ базируются на стабильных хостингах с TLS технологиями. Территориальные ограничения вынуждает операторов создавать дублирующие ссылки.
Резервные порталы образуют эквивалентные репликации основного домена с удержанием всех функций и параметров. Пользователи получают беспрепятственный вход к депозиту, азартной данным и пользовательским установкам.
Финансовые операции выполняются через встроенные платежные системы. Рамки на взносы и изъятия устанавливаются в соотношении с законодательными положениями и корпоративными регламентами риск-менеджмента.
Профессиональные игроки советуют отслеживать состояние аккредитации через официальные базы данных азартных комиссий. Престижные характеристики содержат места на профильных порталах и комментарии реальных пользователей.
SoleSaga Online – The chic selection of shoes instantly drew my attention.
smart sundial gear – Loved how effortlessly the gadgets help me manage my daily schedule.
Новейшие участники натыкаются с сложностью входа к лицензированным порталам. Организации блокируют первичные домены, но опытные казино Голд участники учитывают о присутствии резервных ресурсов.
Дополнительный домен составляет идентичную отображение оригинального ресурса. Средства защиты функционируют неизменными. Банковские транзакции проходят через идентичные шлюзы.
Схема заведения учётной записи через дополнительный ссылку включает типовой валидации. Администраторы запрашивают бумаги для осуществления KYC-требований. Индивидуальные информация выполняют комплексную верификацию.
Пополнительные ограничения на зеркальных порталах равняются стандартным параметрам. Стартовые вклады функционируют стабильными. Возрастающие банки синхронизируются между многочисленными доменами.
Поощрительные системы оперируют всесторонне на альтернативных платформах. Коэффициент оборота гарантирует стартовые величины. Временные рамки отыгрыша сохраняется.
Департамент поддержки анализирует обращения с зеркальных ресурсов идентично. Онлайн чат поддерживает непрерывный формат обслуживания.
Подбор надежного гемблинг портала подразумевает глубокого разбора официальных сертификатов. Современные сайты ДживиСпин казино дают участникам полную информацию о своих санкциях.
Алгоритм открытия аккаунта предусматривает определенное количество необходимых ступеней проверки. Владельцы запрашивают бумаги, удостоверяющие индивидуальность и зрелость. Классический KYC-порядок длится от 24 до 72 интервалов.
Банкролл-менеджмент стартует с определения ограничений на инвестиции. Опытные пользователи настаивают задействовать принцип 5% от итогового развлекательного резерва на конкретную раунд.
Технические барьеры провайдеров заставляют использовать вспомогательные ссылки. Альтернативы хранят полную активность базового платформы, предусматривая летопись переводов и азартный прогресс.
Передовые денежные сервисы предоставляют мгновенные взносы через электронные портмоне. Bitcoin, Ethereum и фиксированные активы обеспечивают тайность и наименьшие платежи. Продолжительность осуществления выводов составляет 10-30 периодов.
Схемы постоянства содержат каскадные уровни с возрастающим компенсацией. VIP-представители дают личные поощрения, повышенные лимиты и преимущественную техподдержку.
Выбор безопасного развлекательного площадки в нынешних реалиях нуждается специального внимания к лицензионному статусу. Знающие игроки понимают, что казино Лаки Бир предоставляет новую сведения о функционирующих сервисах.
Процесс открытия счета в легальных заведениях включает обязательную валидацию идентичности. KYC-нормы гарантируют как заведение, так и участника от фрода. Переходные лимиты на получение капитала до окончания подтверждения – стандартная подход.
Электронные запреты на связь к betting сервисам устраняются через дублирующие URL. Действующие копии обеспечивают тотальную производительность первичного сайта. Финансовые транзакции, геймплейный прогресс и привилегированные системы продолжают константными.
Финансовая защищенность характеризуется показателем применяемых финансовых механизмов. SSL-кодирование, PCI DSS валидация и усиленная проверка гарантируют прочный щит охраны.
Игровая ассортимент легальных сервисов объединяет автоматы от главных производителей. RTP-значения, колебания и расчетные формулы претерпевают объективную валидацию в одобренных лабораториях.
Программы поощрения в серьезных площадках основываются на открытых критериях вейджера. Условия ставок x35-40 признается нормальным для автомат-льгот, в то время как традиционные состязания принимаются в зачет с сниженным показателем.
Инновационные провайдеры развлекательных продуктов дают беттерам возможность к высококлассному развлечениям через сертифицированные Меллстрой казино системы. Легальная операционная активность предполагает исполнения жестких правовых положений.
Процесс оформления индивидуального кабинета предусматривает подтверждение приватных сведений. Управляющие используют углубленные механизмы KYC и AML для исключения незаконных операций.
Электронные решения новейших беттинг площадок строятся на зашифрованных облачных системах с криптографическими стандартами. Территориальные ограничения принуждает операторов запускать вспомогательные домены.
Параллельные порталы образуют аналогичные копии центрального платформы с сохранением всех инструментов и данных. Беттеры приобретают постоянный вход к капиталу, гемблинг данным и индивидуальным параметрам.
Денежные действия производятся через встроенные расчетные сервисы. Лимиты на пополнения и получения регулируются в соотношении с законодательными требованиями и собственными политиками минимизации опасностей.
Компетентные клиенты указывают контролировать состояние лицензии через контролирующие списки беттинг ведомств. Авторитетные показатели предусматривают ранги на тематических платформах и отзывы настоящих пользователей.
For simple
online casino canada practice mode
for professional opinions.
turmeric trove store – High-quality turmeric and spices made my recipes flavorful and easy to prepare.
this nutrition store – Wide selection of reliable supplements that support overall wellness.
exceleclipse tech corner – Browsing is effortless thanks to a sleek layout and diverse items.
the Hosting Hollow hub – Even with no prior experience, I got everything running in no time.
Отбор безопасного betting заведения в сегодняшних границах нуждается детального внимания к законному уровню. Профессиональные игроки осознают, что Голд казино содержит новую факты о активных операторах.
Схема оформления профиля в официальных сервисах включает необходимую подтверждение идентичности. KYC-процедуры защищают как казино, так и пользователя от мошенничества. Промежуточные пределы на вывод средств до выполнения верификации – стандартная практика.
Цифровые препятствия на соединение к развлекательным сервисам устраняются через дублирующие URL. Функционирующие клоны предоставляют всестороннюю возможности базового сайта. Платежные движения, игровой прогресс и поощрительные системы остаются устойчивыми.
Экономическая безопасность определяется степенью эксплуатируемых банковских способов. SSL-шифрование, PCI DSS аттестация и усиленная верификация гарантируют надежный щит ограждения.
Интерактивная ассортимент легальных операторов содержит автоматы от ведущих создателей. RTP-параметры, дисперсия и расчетные системы испытывают независимую сертификацию в признанных учреждениях.
Системы поощрения в качественных заведениях основываются на понятных требованиях проигрыша. Отыгрыш x35-40 характеризуется нормальным для машина-подарков, в то время как традиционные активности учитываются в подсчет с редуцированным коэффициентом.
Современные операторы игорных активностей предоставляют клиентам доступ к качественному игровому процессу через безопасные казино Меллстрой системы. Сертифицированная операционная активность нуждается учета четких регуляторных критериев.
Процесс регистрации клиентского аккаунта содержит проверку конфиденциальных сведений. Провайдеры эксплуатируют многоуровневые механизмы KYC и AML для пресечения поддельных переводов.
Программные системы современных развлекательных порталов базируются на безопасных серверах с SSL стандартами. Локальные запреты обязывает владельцев организовывать альтернативные домены.
Зеркальные ресурсы представляют аналогичные клоны центрального портала с удержанием всех сервисов и параметров. Клиенты добиваются устойчивый соединение к балансу, гемблинг данным и индивидуальным настройкам.
Финансовые процедуры выполняются через связанные финансовые системы. Рамки на взносы и выводы определяются в гармонии с лицензионными стандартами и собственными процедурами минимизации опасностей.
Профессиональные игроки предлагают проверять ситуацию лицензии через государственные базы данных азартных организаций. Репутационные параметры охватывают ранги на отраслевых порталах и оценки подлинных участников.
Передовые порталы беттинг развлечений предоставляют участникам вход к премиальному игровому процессу через проверенные Лаки Бир РІС…РѕРґ сайты. Сертифицированная работа влечет исполнения конкретных надзорных положений.
Алгоритм открытия пользовательского аккаунта включает подтверждение конфиденциальных сведений. Регуляторы эксплуатируют расширенные процедуры KYC и AML для недопущения мошеннических финансовых действий.
Технические инструменты новейших развлекательных порталов работают на безопасных дата-центрах с криптографическими алгоритмами. Геоблокировка заставляет операторов внедрять параллельные ссылки.
Альтернативные платформы образуют точные версии основного ресурса с поддержанием всех возможностей и параметров. Игроки достигают постоянный вход к капиталу, беттинг истории и клиентским опциям.
Финансовые процедуры реализуются через интегрированные денежные агрегаторы. Рамки на депозиты и изъятия назначаются в гармонии с правовыми положениями и корпоративными регламентами контроля угроз.
Профессиональные игроки советуют мониторить состояние лицензии через государственные регистры беттинг ведомств. Статусные характеристики задействуют позиции на тематических ресурсах и feedback реальных клиентов.
Перемещение в области лицензированных сайтов включает представления передовых способов соединения. Продвинутые участники эксплуатируют казино Клубника для извлечения современной сведений о функционирующих ссылках.
Процесс открытия личного кабинета в лицензированных операторах предполагает детальную аутентификацию. Современные провайдеры используют KYC-алгоритмы и AML-нормы. Бумажная работа составляет от 24 до 72 интервалов.
IT технологии для избежания запретов совершенствуются параллельно с укреплением нормативных шагов. VPN-решения категории premium предоставляют кодирование AES-256 и системы OpenVPN. Надежность канала fundamentally важна для VIP раундов.
Дублирующие домены оперируют через географически расположенные IT мощности. CDN-сети гарантируют сокращенную время ответа для глобальных игроков. Цифровое переключение инициируется при обнаружении барьера базового домена.
Экономические манипуляции в официальных юрисдикциях соответствуют жестким нормам PCI DSS. Криптовалютные транзакции получают востребованность из-за приватности и скорости выполнения.
Смартфонные приложения лучших организаций объединяют отпечатковую подтверждение и push-уведомления для критических происшествий. Изменяемый облик программно подстраивается под настройки монитора.
этот контент зеркало водка бет
design toolkit shop – Clear instructions and an intuitive layout make navigation seamless.
grilltoolhub – Tools arrived promptly and helped me cook delicious meals easily.
Навигация в области сертифицированных сайтов подразумевает знания передовых технологий авторизации. Профессиональные участники применяют Mellstroy Game казино для извлечения релевантной информации о оперативных адресах.
Процедура формирования аккаунта в проверенных учреждениях подразумевает детальную валидацию. Современные операторы задействуют KYC-алгоритмы и AML-стандарты. Документальная процедура составляет от 24 до 72 временных отрезков.
Программные технологии для преодоления блокировок прогрессируют синхронно с ужесточением юридических решений. VPN-сервисы класса premium обеспечивают криптографию AES-256 и стандарты OpenVPN. Непрерывность подключения принципиально важна для привилегированных сессий.
Зеркальные домены действуют через пространственно распределенные технические кластеры. CDN-структуры поддерживают сокращенную время ответа для международных участников. Цифровое редирект включается при обнаружении барьера первичного сайта.
Экономические переводы в лицензированных зонах подчиняются строгим критериям PCI DSS. Крипто транзакции набирают распространение вследствие секретности и оперативности обработки.
Планшетные софт лучших операторов совмещают лицевую проверку и push-алерты для существенных ситуаций. Гибкий интерфейс автоматически адаптируется под свойства матрицы.
Перемещение в секторе проверенных ресурсов требует осознания современных способов доступа. Опытные игроки задействуют Меллстрой официальный сайт для извлечения современной информации о функционирующих адресах.
Механизм регистрации аккаунта в лицензированных организациях содержит многоуровневую валидацию. Современные компании эксплуатируют KYC-механизмы и AML-стандарты. Документальное сопровождение составляет от 24 до 72 интервалов.
IT способы для обхода барьеров прогрессируют вместе с интенсификацией правовых мер. VPN-сервисы разряда premium дают защиту AES-256 и системы OpenVPN. Устойчивость коннекта жизненно необходима для привилегированных партий.
Резервные адреса оперируют через географически рассредоточенные компьютерные ресурсы. CDN-сети обеспечивают низкую время ответа для американских клиентов. Автоматическое редирект запускается при выявлении барьера центрального адреса.
Платежные переводы в лицензированных юрисдикциях отвечают конкретным нормам PCI DSS. Криптовалютные расчеты завоевывают признание в результате анонимности и скорости осуществления.
Переносные клиенты премиальных операторов содержат лицевую аутентификацию и push-сообщения для критических эпизодов. Гибкий дизайн автоматически изменяется под свойства экрана.
ии реферат ии реферат .
printablepulse boutique – Found some unique and clever resources perfect for personal use.
Поиск проверенного азартного заведения в нынешних границах заставляет детального изучения к лицензионному уровню. Компетентные клиенты представляют, что казино типпи включает актуальную сведения о активных площадках.
Процедура оформления профиля в сертифицированных площадках охватывает обязательную валидацию личности. KYC-правила гарантируют как площадку, так и клиента от фрода. Переходные пределы на снятие денег до завершения контроля – стандартная подход.
Электронные блокировки на доступ к betting площадкам преодолеваются через альтернативные домены. Функционирующие дубликаты поддерживают стопроцентную функциональность базового ресурса. Финансовые движения, игровой продвижение и наградные программы продолжают постоянными.
Материальная надежность определяется степенью применяемых денежных инструментов. SSL-шифрование, PCI DSS аттестация и расширенная подтверждение формируют защищенный заслон обороны.
Азартная каталог легальных провайдеров предоставляет автоматы от известных разработчиков. RTP-значения, изменчивость и алгоритмические модели проходят беспристрастную сертификацию в признанных лабораториях.
Планы лояльности в надежных операторах основываются на понятных требованиях вейджера. Условия ставок x35-40 характеризуется справедливым для автомат-подарков, в то время как стандартные забавы учитываются в расчет с минимальным процентом.
Нынешние бетторы встречаются с затруднением подключения к сертифицированным сайтам. Организации фильтруют главные адреса, но опытные ретро казино игроки учитывают о присутствии зеркальных платформ.
Альтернативный адрес формирует полную реплику оригинального ресурса. Криптографические алгоритмы поддерживаются неизменными. Денежные действия производятся через равнозначные системы.
Методика оформления профиля через резервный ссылку содержит стандартной подтверждения. Специалисты просят справки для выполнения KYC-норм. Персональные информация реализуют многоуровневую валидацию.
Финансовые рамки на резервных ресурсах аналогичны стандартным характеристикам. Низшие вклады сохраняются неизменными. Накопительные выигрышные пулы согласовываются между множественными доменами.
Льготные системы выполняются комплексно на параллельных платформах. Отыгрышный коэффициент удерживает оригинальные показатели. Срок активности отыгрыша не изменяется.
Служба поддержки рассматривает вопросы с параллельных ссылок таким же способом. Интерактивный чат обеспечивает круглосуточный порядок функционирования.
Выбор безопасного развлекательного площадки нуждается детального изучения лицензионных документов. Современные системы п»ї1хбет зеркало предоставляют геймерам максимальную детали о собственных лицензиях.
Алгоритм оформления счета охватывает ряд ключевых ступеней валидации. Операторы запрашивают свидетельства, удостоверяющие идентичность и правоспособность. Стандартный KYC-алгоритм составляет от 24 до 72 интервалов.
Банкролл-менеджмент открывается с назначения рамок на депозиты. Профессиональные клиенты советуют эксплуатировать принцип 5% от совокупного казино фонда на индивидуальную раунд.
Технические ограничения администраторов принуждают применять запасные адреса. Копии хранят абсолютную эффективность основного ресурса, содержа архив сделок и развлекательный продвижение.
Актуальные финансовые методы предоставляют скоростные взносы через виртуальные портмоне. Bitcoin, Ethereum и постоянные токены предоставляют приватность и минимальные взносы. Время обработки снятий равно 10-30 промежутков.
Системы постоянства подразумевают ступенчатые уровни с прогрессивным бонусом. VIP-менеджеры обеспечивают личные вознаграждения, усиленные лимиты и приоритетную сервис.
Современные сервисы развлекательных продуктов предлагают беттерам возможность к качественному гемблингу через безопасные Лаки Бир казино ресурсы. Авторизованная операционная активность влечет учета определенных регуляторных требований.
Процедура открытия клиентского профиля содержит валидацию личных реквизитов. Провайдеры применяют расширенные алгоритмы KYC и AML для предотвращения мошеннических платежей.
Технические платформы новейших казино работают на надежных дата-центрах с шифровальными алгоритмами. Региональная блокировка обязывает управляющих создавать альтернативные домены.
Резервные ресурсы формируют точные версии основного сайта с удержанием всех сервисов и показателей. Игроки достигают непрерывный связь к балансу, гемблинг отчетности и клиентским конфигурациям.
Банковские транзакции выполняются через интегрированные денежные агрегаторы. Ограничения на депозиты и обналичивания фиксируются в унисон с законодательными стандартами и корпоративными правилами минимизации опасностей.
Профессиональные пользователи указывают проверять положение авторизации через государственные реестры азартных комиссий. Статусные критерии предусматривают ранги на профильных сайтах и feedback истинных участников.
1win лигаи қаҳрамонҳо шартгузорӣ 1win лигаи қаҳрамонҳо шартгузорӣ
Современные участники попадают с препятствием связи к легальным порталам. Операторы ограничивают основные URL, но грамотные Vavada участники знают о функционировании зеркальных платформ.
Резервная ссылка является точную копию основного площадки. Средства защиты сохраняются идентичными. Расчётные переводы выполняются через те же шлюзы.
Алгоритм создания аккаунта через дополнительный портал подразумевает типовой подтверждения. Администраторы уточняют бумаги для соблюдения KYC-регламентов. Персональные параметры реализуют многоуровневую аутентификацию.
Вносительные лимиты на зеркальных сайтах совпадают первичным требованиям. Начальные беты функционируют константными. Увеличивающиеся призовые фонды координируются между всеми адресами.
Льготные программы оперируют целостно на дополнительных порталах. Требования по обороту поддерживает исходные параметры. Период действия оборота не изменяется.
Отдел помощи рассматривает заявки с дополнительных адресов сходным образом. Интерактивный разговор предоставляет постоянный режим функционирования.
Навигация в мире официальных платформ включает владения продвинутых инструментов доступа. Квалифицированные игроки используют Mellstroy Game зеркало для приобретения новейшей данных о оперативных доменах.
Процесс регистрации личного кабинета в официальных организациях содержит детальную валидацию. Продвинутые провайдеры задействуют KYC-протоколы и AML-стандарты. Бумажная работа занимает от 24 до 72 промежутков.
Цифровые инструменты для избежания блокировок улучшаются синхронно с усилением юридических действий. VPN-службы уровня premium предлагают шифрование AES-256 и системы OpenVPN. Устойчивость связи критически актуальна для привилегированных раундов.
Резервные платформы выполняют задачи через географически расположенные IT системы. CDN-системы поддерживают низкую пинг для европейских игроков. Техническое редирект запускается при обнаружении барьера первичного домена.
Экономические переводы в официальных регионах соответствуют четким стандартам PCI DSS. Крипто платежи набирают востребованность по причине секретности и быстроте осуществления.
Мобильные программы премиальных брендов включают физиологическую подтверждение и push-извещения для принципиальных происшествий. Изменяемый оформление самостоятельно изменяется под характеристики экрана.
Современные операторы игорных развлечений гарантируют игрокам вход к элитному азарту через проверенные типпи казино ресурсы. Лицензированная деятельность предполагает соблюдения определенных регуляторных требований.
Алгоритм активации персонального учетной записи предусматривает верификацию персональных информации. Администраторы внедряют комплексные процедуры KYC и AML для предотвращения незаконных транзакций.
Технические решения инновационных гемблинг платформ основываются на защищенных инфраструктурах с SSL стандартами. Геоблокировка побуждает провайдеров создавать резервные адреса.
Альтернативные порталы формируют точные версии центрального портала с фиксацией всех опций и параметров. Участники обеспечивают себе беспрепятственный подключение к средствам, игровой статистике и клиентским опциям.
Денежные операции проходят через синхронизированные банковские шлюзы. Пределы на взносы и выводы регулируются в соответствии с регуляторными требованиями и индивидуальными нормами контроля угроз.
Компетентные игроки предлагают отслеживать ситуацию авторизации через контролирующие каталоги беттинг организаций. Репутационные критерии задействуют рейтинги на отраслевых платформах и feedback подлинных клиентов.
Актуальные платформы беттинг игр предлагают пользователям вход к профессиональному гемблингу через сертифицированные Голд зеркало ресурсы. Лицензированная деятельность требует следования определенных регуляторных критериев.
Алгоритм оформления игрового аккаунта задействует верификацию личных показателей. Управляющие задействуют многоуровневые процедуры KYC и AML для недопущения поддельных транзакций.
Технические системы инновационных развлекательных порталов функционируют на безопасных хостингах с TLS стандартами. IP-фильтрация принуждает провайдеров внедрять резервные адреса.
Параллельные платформы формируют аналогичные копии базового платформы с фиксацией всех возможностей и параметров. Беттеры достигают беспрепятственный подключение к депозиту, развлекательной записям и клиентским параметрам.
Финансовые процедуры реализуются через встроенные финансовые процессоры. Границы на взносы и изъятия определяются в соответствии с правовыми критериями и корпоративными правилами контроля угроз.
Опытные пользователи рекомендуют отслеживать состояние аккредитации через государственные регистры игорных организаций. Статусные характеристики содержат места на отраслевых порталах и комментарии подлинных игроков.
mealprep essentials hub – Clear recipes and ready-to-go meal kits simplify mealtime decisions.
paperpalette – High-quality supplies that helped me finish projects faster.
Смотреть здесь vodka bet casino
Актуальные игроки обталкиваются с набором программных нюансов при деятельности с официальными порталами. Специализированные порталы типа Меллстрой регистрация поставляют релевантную контент о операциях гэмблинговых компаний.
Процесс подтверждения аккаунта предполагает набор неотъемлемых фаз. Первичная валидация предполагает размещения документов доказывающих субъект. Типовой пакет содержит удостоверение личности, лицензию водителя или загранпаспорт.
Цифровая сторона открытия счета содержит внедрение SSL-шифрования и многофакторной защиты. Экспертные пользователи подсказывают включать все доступных опций охраны.
Зеркала представляют идентичные отражения центрального платформы с поддержанием полного арсенала. Ключевое преимущество состоит в тождественности платежных лимитов и требований условий прокрутки.
Схема локализации функционирующих альтернативных адресов опирается на наблюдении профессиональных мессенджер групп и связанных порталов. Продвинутые пользователи эксплуатируют туннельные протоколы для обеспечения бесперебойного соединения невзирая от местных лимитов.
Отбор надежного азартного ресурса в текущих реалиях заставляет особого внимания к лицензионному режиму. Квалифицированные участники понимают, что Лаки Бир казино содержит новую факты о доступных провайдерах.
Схема создания аккаунта в лицензированных площадках охватывает требуемую валидацию персональных данных. KYC-нормы охраняют как заведение, так и участника от афер. Промежуточные пределы на вывод денег до закрытия верификации – нормальная подход.
Виртуальные запреты на связь к гемблинг площадкам нейтрализуются через зеркальные домены. Действующие зеркала гарантируют тотальную возможности первичного платформы. Расчетные процедуры, игровой статистика и бонусные системы поддерживаются неизменными.
Финансовая безопасность определяется качеством применяемых платежных способов. SSL-защита, PCI DSS подтверждение и двухфакторная подтверждение устанавливают стабильный барьер безопасности.
Геймплейная каталог официальных сервисов объединяет слоты от главных студий. RTP-параметры, колебания и алгоритмические модели испытывают беспристрастную контроль в аккредитованных центрах.
Схемы мотивации в достойных сервисах базируются на открытых требованиях активности. Условия ставок x35-40 считается разумным для машина-привилегий, в то время как традиционные игры принимаются в расчет с редуцированным процентом.
crafted with passion – The detailed work in each listing makes browsing a pleasure.
Зарубежная недвижимость https://realtyz.ru актуальные предложения в Европе, Азии и на побережье. Информация о ценах, налогах, ВНЖ и инвестиционных возможностях.
Все о ремонте квартир https://belstroyteh.ru и отделке помещений — практические инструкции, обзоры материалов и современные решения для интерьера.
Инновационные операторы игорных игр дают участникам возможность к элитному гемблингу через проверенные аква казино ресурсы. Легальная деятельность требует следования конкретных законодательных требований.
Механизм открытия клиентского профиля включает аутентификацию персональных данных. Управляющие задействуют многоуровневые протоколы KYC и AML для блокировки фродовых финансовых действий.
Цифровые решения актуальных беттинг площадок работают на зашифрованных дата-центрах с HTTPS сертификатами. Территориальные ограничения заставляет провайдеров создавать резервные адреса.
Альтернативные сайты составляют аналогичные версии основного портала с сохранением всех инструментов и данных. Клиенты обеспечивают себе непрерывный доступ к капиталу, развлекательной записям и пользовательским опциям.
Расчетные действия проходят через интегрированные денежные шлюзы. Лимиты на инвестиции и выводы фиксируются в согласии с регуляторными требованиями и внутренними политиками контроля угроз.
Профессиональные гемблеры предлагают отслеживать статус сертификата через официальные списки гемблинг органов. Престижные характеристики охватывают позиции на профильных сервисах и оценки действительных пользователей.
Актуальные провайдеры азартных услуг предлагают участникам вход к высококлассному игровому процессу через сертифицированные тип топ казино сайты. Сертифицированная работа требует выполнения определенных контролирующих критериев.
Алгоритм создания персонального учетной записи охватывает верификацию индивидуальных информации. Операторы эксплуатируют комплексные алгоритмы KYC и AML для блокировки мошеннических финансовых действий.
Программные инструменты новейших гемблинг платформ базируются на надежных инфраструктурах с TLS алгоритмами. Региональная блокировка принуждает владельцев организовывать альтернативные адреса.
Дублирующие платформы формируют аналогичные версии центрального платформы с поддержанием всех опций и параметров. Участники получают непрерывный доступ к балансу, игровой данным и клиентским установкам.
Расчетные транзакции проходят через подключенные денежные агрегаторы. Ограничения на взносы и изъятия определяются в унисон с правовыми условиями и организационными правилами управления рисками.
Опытные пользователи советуют контролировать условия разрешения через контролирующие реестры игорных структур. Репутационные характеристики предусматривают позиции на тематических ресурсах и оценки истинных пользователей.
Актуальные mirror-ссылки легальных игорных заведений на казино Лаки Бир обеспечивают непрерывный коннект к азартным ресурсам. Технология копирования создает идентичные клоны базового сайта с фиксацией всех опций.
Система создания аккаунта через дублирующий портал полностью повторяет оригинальную бланк. Начинающие геймеры регистрируют действующий email, придумывают надежный секретную комбинацию и устанавливают рабочую платежное средство.
Подтверждение аккаунта подразумевает передачи свидетельств в соответствии с KYC-политике. Копия национального документа, свидетельство адреса и финансовые данные анализируются посредством цифровую контроль в течение 24-72 временных единиц.
Авторизация зарегистрированных пользователей осуществляется через обычную форму с 2FA валидацией. Временные токены отправляются на мобильный гаджет или почтовый ящик.
Функционал входящего сектора через mirror-сайты предлагает распространенные расчетные инструменты. Visa, Mastercard, онлайн портмоне Skrill, Neteller, криптовалюты Bitcoin, Ethereum выполняются с низкими сборами 0-3%.
Азартная библиотека копируется на сто процентов включая слоты, карточные активности, live-крупье и джекпоты. RTP-показатели, дисперсия и проигрыш сохраняются точными.
Бонусная система работает подобно базовому ресурсу. Welcome-комплекты, free spins, возврат средств и VIP-курсы включаются системно при исполнении заданных условий.
Новейшие пользователи имеют дело с изобилием цифровых нюансов при работе с официальными платформами. Профильные порталы типа казино Lucky Bear поставляют новую информацию о функционировании гэмблинговых операторов.
Механизм подтверждения профиля включает ряд неотъемлемых фаз. Первичная валидация подразумевает отправки бумаг верифицирующих личность. Обычный список содержит ID, водительские права или загранпаспорт.
Системная составляющая создания аккаунта содержит применение зашифрованного канала и двухуровневой проверки. Продвинутые пользователи подсказывают задействовать все представленных настроек безопасности.
Запасные домены формируют точные копии основного платформы с обеспечением всего набора функций. Важнейшее достоинство содержится в соответствии банковских границ и критериев условий прокрутки.
Процедура локализации функционирующих резервных ссылок строится на проверке профильных новостных лент и связанных порталов. Квалифицированные геймеры задействуют прокси-соединения для обеспечения постоянного подключения вне зависимости от локальных ограничений.
little ones’ boutique – Unique toys and items make this a fun browsing experience.
Подбор качественного развлекательного заведения в текущих рамках предполагает повышенного рассмотрения к правовому состоянию. Квалифицированные участники учитывают, что Lucky Bear зеркало отображает актуальную данные о функционирующих площадках.
Процедура создания аккаунта в официальных заведениях предусматривает обязательную верификацию удостоверения. KYC-процедуры обеспечивают как казино, так и геймера от обмана. Временные границы на получение капитала до выполнения валидации – обычная методика.
Электронные блокировки на доступ к азартным сайтам преодолеваются через дублирующие URL. Действующие зеркала обеспечивают тотальную эффективность главного ресурса. Денежные переводы, развлекательный результаты и льготные программы остаются стабильными.
Экономическая гарантированность определяется критерием применяемых финансовых инструментов. SSL-безопасность, PCI DSS лицензирование и дополнительная аутентификация формируют прочный контур охраны.
Интерактивная набор официальных площадок охватывает машины от ведущих создателей. RTP-показатели, дисперсия и математические модели подвергаются независимую контроль в одобренных организациях.
Программы стимулирования в серьезных заведениях строятся на ясных параметрах вейджера. Условия ставок x35-40 характеризуется адекватным для спин-подарков, в то время как карточные забавы засчитываются в калькуляцию с пониженным множителем.
my favorite spice shop – Spices are fresh, aromatic, and match the online listing exactly.
Ориентирование в области лицензированных порталов предполагает владения продвинутых решений входа. Умелые геймеры задействуют Вавада казино для получения актуальной фактов о оперативных адресах.
Алгоритм формирования аккаунта в проверенных компаниях содержит многоуровневую подтверждение. Передовые операторы внедряют KYC-системы и AML-стандарты. Документальное сопровождение составляет от 24 до 72 временных отрезков.
Цифровые методы для обхода блокировок эволюционируют сообща с ужесточением нормативных решений. VPN-решения категории premium гарантируют кодирование AES-256 и протоколы OpenVPN. Надежность канала принципиально необходима для VIP заходов.
Альтернативные платформы действуют через локально разнесенные компьютерные мощности. CDN-комплексы поддерживают низкую время ответа для международных геймеров. Автоматическое переключение запускается при обнаружении ограничения центрального портала.
Экономические переводы в сертифицированных зонах подчиняются конкретным нормам PCI DSS. Децентрализованные переводы приобретают признание в результате секретности и оперативности процессинга.
Планшетные софт элитных организаций содержат лицевую подтверждение и push-уведомления для ключевых моментов. Адаптивный дизайн автоматически корректируется под характеристики дисплея.
Современные клиенты встречаются с огромным количеством технологических аспектов при операциях с лицензированными сайтами. Специализированные ресурсы типа тип топ казино предоставляют новую данные о операциях игорных организаций.
Механизм аутентификации профиля включает комплекс необходимых уровней. Исходная валидация требует размещения удостоверений валидирующих гражданство. Привычный пакет содержит паспорт, водительские права или международное ID.
Технологическая часть открытия счета включает эксплуатацию SSL-шифрования и многофакторной защиты. Опытные клиенты рекомендуют включать максимум представленных функций безопасности.
Альтернативные адреса являются точные реплики главного портала с поддержанием комплексного инструментария. Центральное бонус выражается в тождественности платежных пределов и критериев проигрыша.
Процедура локализации рабочих зеркал опирается на контроле профессиональных уведомительных сервисов и союзных сайтов. Продвинутые клиенты используют VPN-сервисы для формирования надежного связи независимо от территориальных ограничений.
passportparlor favorites online – Essentials are functional, attractive, and perfect for organized travel.
Excellent way of explaining, and pleasant article to get facts on the topic
of my presentation subject matter, which i am going to convey in academy.
Передовые гемблеры натыкаются с сложностью связи к легальным платформам. Операторы блокируют основные URL, но грамотные Килограмм казино клиенты понимают о присутствии дублирующих порталов.
Альтернативный адрес составляет точную реплику основного площадки. SSL-сертификаты поддерживаются идентичными. Платёжные действия производятся через равнозначные сервисы.
Технология создания аккаунта через зеркальный адрес требует стандартной валидации. Сотрудники выясняют документы для исполнения KYC-регламентов. Личные параметры проходят многоуровневую проверку.
Вносительные лимиты на зеркальных площадках идентичны базовым параметрам. Наименьшие ставки сохраняются стабильными. Увеличивающиеся призовые фонды синхронизируются между различными доменами.
Бонусные программы работают целостно на зеркальных площадках. Отыгрышный коэффициент удерживает стартовые цифры. Период действия отыгрыша остаётся прежним.
Служба обслуживания обрабатывает тикеты с параллельных доменов равнозначно. Интерактивный разговор поддерживает беспрерывный расписание деятельности.
Поиск в области проверенных ресурсов предполагает понимания актуальных решений входа. Умелые геймеры эксплуатируют п»ї1хбет сайт для получения новейшей информации о оперативных адресах.
Процедура формирования аккаунта в сертифицированных заведениях предполагает комплексную аутентификацию. Современные организации задействуют KYC-протоколы и AML-стандарты. Бумажная работа требует от 24 до 72 периодов.
Технические способы для преодоления запретов улучшаются параллельно с ужесточением законодательных решений. VPN-службы разряда premium дают безопасность AES-256 и стандарты OpenVPN. Постоянство подключения жизненно существенна для высокоролловых партий.
Запасные адреса оперируют через географически расположенные компьютерные кластеры. CDN-системы гарантируют оптимальную время ответа для глобальных игроков. Системное маршрутизация запускается при выявлении недоступности главного портала.
Денежные операции в проверенных зонах подчиняются жестким требованиям PCI DSS. Цифровые операции завоевывают актуальность вследствие скрытности и оперативности выполнения.
Планшетные клиенты ведущих операторов совмещают лицевую авторизацию и push-оповещения для важных событий. Гибкий облик автономно настраивается под настройки экрана.
Перемещение в секторе официальных сайтов требует знания современных инструментов авторизации. Опытные участники задействуют Lucky Bear казино для добывания актуальной сведений о функционирующих путях.
Алгоритм формирования счета в официальных компаниях подразумевает комплексную подтверждение. Новейшие операторы эксплуатируют KYC-протоколы и AML-нормы. Документооборот потребляет от 24 до 72 часов.
Компьютерные технологии для избежания препятствий развиваются вместе с усилением законодательных инициатив. VPN-инструменты разряда premium предоставляют защиту AES-256 и протоколы OpenVPN. Надежность канала fundamentally необходима для привилегированных заходов.
Альтернативные сайты выполняют задачи через географически распределенные технические ресурсы. CDN-системы осуществляют быструю латентность для европейских геймеров. Автоматическое роутинг включается при выявлении недоступности главного ресурса.
Банковские манипуляции в лицензированных зонах следуют четким стандартам PCI DSS. Криптовалютные переводы приобретают востребованность в результате конфиденциальности и оперативности реализации.
Смартфонные утилиты лучших компаний содержат биометрическую авторизацию и push-алерты для критических событий. Адаптивный дизайн автоматически адаптируется под параметры дисплея.
https://cq.x7cq.vip/home.php?mod=space&uid=9468649
I enjoy playing at this casino https://woodysburger.pl/ because it feels trustworthy and well-optimized. Live tables are interactive, slots offer different styles, and the overall experience remains pleasant over time.
шуко Окна Шуко – это воплощение немецкого качества и инженерной мысли.
Современные гемблеры встречаются с проблемой связи к легальным порталам. Поставщики фильтруют главные адреса, но знающие лаки Р±РёСЂ казино игроки помнят о наличии альтернативных ресурсов.
Резервная ссылка образует полную отображение базового площадки. Системы безопасности остаются такими же. Финансовые транзакции производятся через те же каналы.
Процедура регистрации через дополнительный домен содержит обычной подтверждения. Операторы выясняют бумаги для осуществления KYC-стандартов. Паспортные характеристики осуществляют многоуровневую аутентификацию.
Вносительные границы на резервных платформах совпадают базовым спецификациям. Начальные взносы поддерживаются неизменными. Прогрессивные джекпоты согласовываются между разными ресурсами.
Поощрительные планы выполняются полноценно на альтернативных ресурсах. Коэффициент оборота обеспечивает первоначальные показатели. Период действия оборота поддерживается.
Сервис обслуживания решает тикеты с резервных ссылок сходным образом. Мгновенный разговор предоставляет непрерывный порядок работы.
Действующие резервные адреса официальных азартных клубов на п»ї1хбет создают стабильный подключение к игровым платформам. Система зеркалирования образует точные реплики корневого домена с фиксацией всех опций.
Процедура открытия счета через резервную ссылку на сто процентов копирует оригинальную форму. Начинающие геймеры прописывают действующий email, устанавливают безопасный пароль и выбирают базовую валюту.
Верификация учетной записи содержит загрузки бумаг по KYC-стандартам. Скан паспорта, доказательство места жительства и платежные координаты анализируются посредством программную валидацию в течение 24-72 часа.
Вход активных геймеров реализуется через базовую панель с усиленной верификацией. Одноразовые ключи поступают на мобильный аппарат или мейл.
Опции депозитного компонента через зеркала поддерживает популярные банковские инструменты. Visa, Mastercard, веб балансы Skrill, Neteller, блокчейн-токены Bitcoin, Ethereum обрабатываются с сокращенными комиссиями 0-3%.
Gaming база копируется абсолютно включая машины, карточные активности, live-дилеров и джекпоты. RTP-коэффициенты, волатильность и ставочные требования остаются идентичными.
Бонусная механизм работает схоже главному веб-площадке. Welcome-наборы, free spins, refund и VIP-системы запускаются автоматически при исполнении прописанных условий.
Актуальные геймеры попадают с затруднением доступа к лицензированным порталам. Организации блокируют первичные ссылки, но профессиональные п»ї1хбет РІС…РѕРґ пользователи учитывают о наличии зеркальных ресурсов.
Резервная ссылка формирует полную воспроизведение основного сайта. Криптографические алгоритмы функционируют неизменными. Платёжные переводы осуществляются через идентичные каналы.
Алгоритм оформления профиля через дополнительный домен включает классической аутентификации. Администраторы запрашивают свидетельства для выполнения KYC-правил. Личные данные реализуют расширенную аутентификацию.
Вносительные границы на альтернативных порталах аналогичны первичным спецификациям. Начальные беты функционируют константными. Возрастающие выигрышные пулы объединяются между различными ресурсами.
Стимулирующие программы работают комплексно на альтернативных платформах. Вейджер гарантирует стартовые значения. Длительность использования остаётся прежним.
Служба помощи обрабатывает вопросы с дополнительных адресов аналогично. Интерактивный разговор обеспечивает круглосуточный режим оперирования.
Рабочие mirror-ссылки лицензированных игорных заведений на казино ДживиСпин создают устойчивый подключение к игровым ресурсам. Схема дублирования формирует аналогичные версии главного ресурса с удержанием всех механизмов.
Схема регистрации через резервную ссылку абсолютно дублирует оригинальную анкету. Новые пользователи вводят валидный email, генерируют стойкий ключ и устанавливают основную денежную единицу.
Идентификация учетной записи требует передачи справок следуя KYC-регламенту. Изображение удостоверения личности, доказательство адреса и банковские параметры анализируются посредством программную проверку в течение 24-72 временных единиц.
Авторизация зарегистрированных пользователей осуществляется через обычную форму с двухфакторной аутентификацией. Одноразовые пароли приходят на сотовый аппарат или почтовый ящик.
Возможности финансового раздела через mirror-сайты предлагает распространенные банковские платформы. Visa, Mastercard, виртуальные балансы Skrill, Neteller, crypto Bitcoin, Ethereum выполняются с низкими платежами 0-3%.
Игровая база копируется целиком включая барабаны, настольные геймплей, live-дилеров и прогрессивы. RTP-параметры, изменчивость и условия отыгрыша остаются неизменными.
Акционная механизм оперирует подобно корневому порталу. Welcome-бандлы, фриспины, возврат средств и VIP-планы активируются алгоритмически при реализации определенных условий.
dreamdocktreasures – Home accessories came on time and are well made, artistic, and beautiful.
Лицензионные платформы игорных сервисов гарантируют геймерам шанс к элитному гэмблингу через тематические сайты, включая Lucky Bear казино , которые именно выполняют transnational нормы надёжности.
Схема регистрации предполагает заполнения идентификационных сведений через криптографические SSL-соединения. Администрация просят документальное свидетельство правоспособности и региона жительства для исполнения нормативных правил.
Двухэтапная верификация выступает обязательным частью современных платформ конфиденциальности. Клиенты имеют SMS-коды, push-notification или применяют специализированные софт в стиле Google Authenticator.
Mirror ссылки решают трудности региональных барьеров и DDoS-assault. Технически дубли представляют копийные dublicates базового ресурса с поддержанием инструментария и индивидуальных данных.
Профессиональные пользователи советуют удерживать current перечни функционирующих зеркал в избранном веб-клиента. Провайдеры доставляют обновления о fresh доменах через мейл, Telegram-группы и мобильные софт.
Финансовые переводы через надёжные порталы покрыты шифровальными системами уровня банковского индустрии. Получение финансов осуществляется лишь на верифицированные wallets держателя account.
Further reading
cost of depakote no prescription
for legal information.
charcoalcharm BBQ – My grill performs better with this steady and clean-burning charcoal.
Выбор достойного betting площадки в текущих условиях заставляет тщательного изучения к законному режиму. Квалифицированные игроки представляют, что Вавада содержит последнюю материалы о активных площадках.
Механизм оформления профиля в легальных платформах включает неизбежную верификацию персональных данных. KYC-нормы оберегают как казино, так и пользователя от обмана. Кратковременные границы на изъятие средств до финализации проверки – нормальная методика.
Цифровые барьеры на подключение к гемблинг сервисам решаются через зеркальные URL. Действующие зеркала поддерживают тотальную функциональность центрального портала. Денежные транзакции, азартный результаты и привилегированные планы поддерживаются стабильными.
Экономическая стабильность выражается качеством используемых платежных механизмов. SSL-безопасность, PCI DSS сертификация и расширенная подтверждение создают защищенный периметр охраны.
Игровая набор официальных сервисов включает барабаны от ведущих студий. RTP-показатели, дисперсия и алгоритмические модели испытывают независимую сертификацию в одобренных лабораториях.
Системы мотивации в качественных заведениях строятся на открытых параметрах активности. Условия ставок x35-40 признается справедливым для машина-привилегий, в то время как стандартные развлечения принимаются в зачет с пониженным коэффициентом.
hydrationcentral – Items arrived quickly and make staying hydrated effortless.
Актуальные участники пересекаются с набором технических деталей при работе с легальными платформами. Профессиональные порталы типа казино СЌРЅРѕРјРѕ обеспечивают релевантную данные о операциях игорных компаний.
Процедура аутентификации профиля содержит ряд необходимых этапов. Первичная верификация подразумевает предоставления удостоверений валидирующих персону. Обычный пакет включает паспорт, права или заграничное удостоверение.
Программная часть записления подразумевает внедрение зашифрованного канала и многофакторной защиты. Квалифицированные игроки предлагают задействовать полный набор представленных опций охраны.
Зеркала формируют идентичные дубликаты основного домена с удержанием всего арсенала. Важнейшее бонус состоит в тождественности финансовых пределов и параметров вейджера.
Система обнаружения актуальных резервных ссылок строится на отслеживании профессиональных новостных лент и сотрудничающих порталов. Профессиональные геймеры используют туннельные протоколы для создания стабильного связи безотносительно от территориальных лимитов.
Нынешние участники сталкиваются с массой технических деталей при деятельности с проверенными ресурсами. Профильные ресурсы типа казино Либет предоставляют новую материалы о функционировании гэмблинговых провайдеров.
Механизм верификации аккаунта включает набор неотъемлемых уровней. Стартовая подтверждение предполагает предоставления бумаг доказывающих гражданство. Классический список содержит документ, автоудостоверение или международный паспорт.
Технологическая сторона регистрации включает использование безопасного соединения и многофакторной защиты. Продвинутые геймеры настаивают задействовать полный набор представленных параметров защиты.
Резервные ссылки составляют абсолютные дубликаты основного портала с поддержанием исчерпывающего инструментария. Основное преимущество заключается в тождественности платежных лимитов и условий условий прокрутки.
Схема обнаружения действующих зеркал фундируется на контроле профессиональных информационных каналов и связанных площадок. Экспертные участники задействуют прокси-соединения для формирования стабильного соединения безотносительно от географических запретов.
Отбор честного развлекательного площадки предполагает серьезного анализа регулятивных документов. Инновационные системы п»ї1хбет сайт гарантируют клиентам максимальную факты о своих санкциях.
Процедура открытия аккаунта предусматривает ряд обязательных шагов валидации. Владельцы запрашивают свидетельства, подтверждающие личность и зрелость. Обычный KYC-регламент составляет от 24 до 72 периодов.
Контроль средств открывается с задания пределов на инвестиции. Квалифицированные пользователи советуют внедрять установку 5% от итогового игорного капитала на индивидуальную заход.
Электронные ограничения владельцев побуждают эксплуатировать запасные пути. Клоны поддерживают стопроцентную работоспособность первичного сайта, подразумевая журнал платежей и казино достижения.
Современные расчетные способы дают оперативные вклады через блокчейн портмоне. Bitcoin, Ethereum и постоянные токены поддерживают приватность и минимальные платежи. Срок осуществления изъятий насчитывает 10-30 интервалов.
Системы преданности включают иерархические ранги с накапливающимся возвратом. VIP-представители гарантируют личные вознаграждения, увеличенные границы и преимущественную сервис.
Нынешние участники встречаются с препятствием входа к легальным площадкам. Операторы закрывают базовые URL, но профессиональные Лаки Бир официальный сайт пользователи знают о существовании резервных платформ.
Альтернативный адрес образует идентичную отображение первичного ресурса. Средства защиты работают идентичными. Финансовые операции производятся через идентичные шлюзы.
Схема регистрации через резервный ссылку включает привычной подтверждения. Специалисты просят документы для реализации KYC-стандартов. Идентификационные параметры реализуют двухфакторную аутентификацию.
Банковские ограничения на резервных ресурсах аналогичны главным условиям. Минимальные взносы поддерживаются постоянными. Прогрессивные призовые фонды координируются между всеми ресурсами.
Премиальные механизмы оперируют завершённо на резервных платформах. Отыгрышный коэффициент сохраняет базовые цифры. Временные рамки реализации остаётся прежним.
Служба помощи рассматривает обращения с зеркальных доменов аналогично. Интерактивный диалог обеспечивает беспрерывный режим деятельности.
phish merch boutique – Shopping for music items is smooth with a nice variety available.
the air frying marketplace – It makes planning easy, tasty meals much simpler.
Если следите за новостями и темой ufc в феврале марте 2026 три недели которые встряхнут дивизионы, посмотрите этот разбор. Ознакомиться можно тут: https://chrome-downloads.ru/news/ufc-fevral-mart-2026-samye-goryachie-boi-i-neozhidannye-povoroty-kotoryh-stoit-zhdat/
Портал о жизни в ЖК https://pioneer-volgograd.ru инфраструктура, паркинг, детские площадки, охрана и сервисы. Информация для будущих и действующих жителей.
Все о фундаменте https://rus-fundament.ru виды оснований, расчет нагрузки, выбор материалов и этапы строительства. Практичные советы по заливке ленточного, плитного и свайного фундамента.
the premium leather corner – Each product looks amazing and is packed neatly.
prismdecorhub – Well-crafted home accents that instantly improved my space.
Отбор надежного betting ресурса в нынешних рамках заставляет специального изучения к лицензионному уровню. Профессиональные геймеры учитывают, что Лаки Бир зеркало включает актуальную данные о действующих сервисах.
Механизм оформления профиля в проверенных площадках содержит необходимую валидацию персональных данных. KYC-требования защищают как заведение, так и пользователя от мошенничества. Промежуточные пределы на снятие денег до финализации проверки – стандартная система.
Технические ограничения на соединение к развлекательным сайтам нейтрализуются через зеркальные порталы. Функционирующие копии сохраняют тотальную эффективность главного портала. Платежные транзакции, интерактивный статистика и привилегированные планы остаются константными.
Экономическая надежность измеряется качеством применяемых финансовых методов. SSL-криптография, PCI DSS аттестация и дополнительная аутентификация устанавливают стабильный барьер обороны.
Азартная набор проверенных площадок содержит слоты от топовых разработчиков. RTP-значения, дисперсия и статистические формулы подвергаются внешнюю валидацию в авторизованных организациях.
Программы вознаграждения в надежных площадках базируются на открытых критериях отыгрыша. Условия ставок x35-40 характеризуется приемлемым для барабан-подарков, в то время как стандартные развлечения принимаются в счет с сниженным коэффициентом.
Азартная область являет интенсивный рост, завлекая миллионы игроков. Грамотные ресурсы гарантируют надёжную среду для ставок. Развёрнутую данные о подобных организациях возможно получить на Лаки Бир .
Аттестация остаётся приоритетным фактором подбора площадки. Контролёры Мальты гарантируют серьёзный контроль расчётных действий. Любая сертифицированная портал реализует периодические ревизии RNG-алгоритмов.
Технические параметры инновационных беттинг-платформ включают SSL-кодирование банковского стандарта. Поставщики программного ПО класса Microgaming, NetEnt, Pragmatic Play интегрируют многоуровневые схемы случайных показателей.
Процедура проверки личного кабинета предполагает представления бумаг KYC-уровня. Свидетельство, выписка о доходах, валидация прописки — типичный перечень для окончательного доступа.
Зеркальные ссылки убирают препятствия с запретами провайдеров. Рабочие зеркала обновляются систематически техническими командами. Мобильные утилиты регулярно функционируют надёжнее браузерных форматов.
Банкролл-менеджмент устанавливает долгосрочную прибыльность гемблинговых партий. Грамотные беттеры указывают сокращать сумму депозита до 1-2% от совокупного фонда.
Беттинговая отрасль являет активный рост, манящая массы геймеров. Профессиональные платформы предлагают надёжную пространство для игры. Детальную материалы о указанных компаниях реально найти на РЎСѓРєР° казино .
Сертификация составляет ключевым фактором селекции сайта. Юрисдикции Олдерни создают серьёзный аудит экономических манипуляций. Всякая официальная портал подвергается систематические инспекции RNG-механизмов.
Программные характеристики актуальных азартных площадок предусматривают SSL-безопасность экономического уровня. Производители программного материала наподобие Microgaming, NetEnt, Pragmatic Play подключают многоуровневые механизмы непредсказуемых значений.
Механизм подтверждения личного кабинета предполагает представления свидетельств KYC-уровня. ID, выписка о доходах, валидация регистрации — базовый перечень для финального входа.
Дублирующие домены решают проблемы с блокировками операторов. Действующие альтернативы адаптируются ежедневно цифровыми специалистами. Планшетные программы часто оперируют лучше веб форматов.
Банкролл-менеджмент формирует продолжительную прибыльность беттинговых раундов. Профессиональные пользователи предлагают урезать размер бета до 1-2% от общего фонда.
chewchest boutique – My pets immediately loved the toys and enjoyed every treat.
Поиск в мире официальных порталов включает понимания передовых решений подключения. Умелые геймеры эксплуатируют Вован казино для приобретения свежей данных о действующих ссылках.
Алгоритм создания счета в проверенных компаниях содержит сложную верификацию. Передовые операторы внедряют KYC-системы и AML-правила. Оформление документов занимает от 24 до 72 интервалов.
Цифровые инструменты для минования ограничений развиваются синхронно с повышением законодательных решений. VPN-инструменты категории premium гарантируют кодирование AES-256 и технологии OpenVPN. Устойчивость подключения жизненно значима для элитных заходов.
Запасные сайты оперируют через локально рассредоточенные технические инфраструктуры. CDN-системы обеспечивают сокращенную латентность для международных геймеров. Программное переключение инициируется при детекции препятствия основного сайта.
Финансовые манипуляции в проверенных юрисдикциях отвечают четким критериям PCI DSS. Крипто расчеты увеличивают востребованность в результате конфиденциальности и динамике обработки.
Переносные клиенты топовых брендов интегрируют отпечатковую авторизацию и push-сообщения для принципиальных ситуаций. Гибкий оформление автоматически настраивается под свойства экрана.
как играть в онлайн казино из Казахстана
夜色正浓2026 江疏影佟大为 高清都市婚姻职场 海外华人无广告观看 实时更新
布里奇顿新季2026 海外华人浪漫古装 高清贵族恋爱 无缓冲播放
Ориентирование в пространстве лицензированных платформ нуждается владения передовых технологий доступа. Умелые клиенты внедряют Вавада регистрация для добывания новейшей сведений о функционирующих путях.
Механизм оформления аккаунта в проверенных учреждениях включает многоуровневую аутентификацию. Современные компании внедряют KYC-протоколы и AML-стандарты. Документооборот требует от 24 до 72 промежутков.
Цифровые решения для преодоления барьеров прогрессируют синхронно с интенсификацией правовых решений. VPN-платформы класса premium обеспечивают шифрование AES-256 и протоколы OpenVPN. Стабильность канала fundamentally значима для VIP сессий.
Запасные сайты оперируют через территориально размещенные серверные инфраструктуры. CDN-архитектуры обеспечивают низкую отклик для европейских игроков. Техническое перенаправление активируется при идентификации блокировки центрального портала.
Денежные переводы в легальных юрисдикциях соответствуют определенным нормам PCI DSS. Криптовалютные расчеты увеличивают признание по причине секретности и оперативности выполнения.
Мобильные софт топовых компаний совмещают лицевую аутентификацию и push-алерты для принципиальных эпизодов. Модифицируемый внешний вид самостоятельно адаптируется под свойства матрицы.
glove essentials store – Trendy and practical, the selection is perfect for regular wear.
vanilla goodies outlet – The assortment is delightful, and I’m surprised by the good deals.
Гемблинговая область показывает активный рост, привлекая тысячи клиентов. Грамотные порталы предлагают защищённую условия для игры. Подробную факты о указанных провайдерах доступно отыскать на Лаки Бир .
Аттестация составляет ключевым критерием выбора ресурса. Юрисдикции Великобритании предоставляют серьёзный контроль экономических манипуляций. Каждая официальная платформа реализует систематические ревизии RNG-систем.
Цифровые свойства новейших игорных домов предусматривают SSL-безопасность расчётного стандарта. Создатели компьютерного ПО уровня Microgaming, NetEnt, Pragmatic Play внедряют продвинутые системы непредсказуемых параметров.
Алгоритм валидации аккаунта подразумевает передачи свидетельств KYC-уровня. Удостоверение, документ о заработке, верификация прописки — стандартный пакет для полноценного активации.
Дублирующие ссылки ликвидируют препятствия с ограничениями организаций. Свежие альтернативы модифицируются постоянно программными специалистами. Смартфонные утилиты зачастую действуют надёжнее сетевых вариантов.
Распределение капитала задаёт долгосрочную доходность беттинговых периодов. Грамотные участники рекомендуют сокращать размер вейджера до 1-2% от итогового капитала.
莫离2026 白鹿丞磊 高清古装大女主 海外华人必备 无广告高清体验
南美超杯拉努斯 vs 弗拉门戈08:30激战!2026足球比分南美豪门碰撞,让球分析火爆,绝不能错过!
女神蒙上眼2026 辛芷蕾林雨申都市悬疑职场 海外华人免费高清陆剧 实时更新AI匹配
the Signal Summit collection – Excellent tech tools that improve efficiency and daily workflow.
Актуальные провайдеры азартных активностей предлагают беттерам путь к премиальному азарту через защищенные винити казино системы. Официальная бизнес предполагает соблюдения строгих контролирующих норм.
Алгоритм оформления персонального учетной записи включает верификацию конфиденциальных данных. Управляющие эксплуатируют комплексные алгоритмы KYC и AML для предотвращения фродовых операций.
IT средства современных развлекательных порталов функционируют на надежных хостингах с HTTPS стандартами. Территориальные ограничения принуждает администраторов организовывать параллельные ссылки.
Дублирующие ресурсы составляют полные клоны центрального ресурса с поддержанием всех функций и информации. Клиенты добиваются устойчивый доступ к депозиту, развлекательной статистике и пользовательским установкам.
Платежные транзакции проходят через встроенные финансовые шлюзы. Пределы на взносы и обналичивания устанавливаются в согласии с законодательными критериями и организационными нормами управления рисками.
Профессиональные пользователи указывают отслеживать условия разрешения через государственные регистры беттинг органов. Статусные индикаторы задействуют места на профильных сервисах и отзывы настоящих беттеров.
Активные дублирующие порталы надежных игорных заведений на Gold casino обеспечивают устойчивый вход к азартным сервисам. Принцип дублирования генерирует полноценные версии основного портала с поддержанием всех возможностей.
Алгоритм создания аккаунта через зеркало полностью дублирует базовую форму. Новые пользователи указывают активный email, устанавливают безопасный секретную комбинацию и назначают базовую платежное средство.
Валидация учетной записи предполагает отправки удостоверений опираясь на KYC-требованиям. Копия паспорта, верификация регистрации и платежные реквизиты проверяются через программную контроль в течение 24-72 ч.
Подключение активных геймеров происходит через обычную модуль с двухфакторной валидацией. Сессионные пароли приходят на мобильный гаджет или email.
Инструменты пополнительного блока через альтернативные домены содержит актуальные платежные инструменты. Visa, Mastercard, цифровые хранилища Skrill, Neteller, виртуальные монеты Bitcoin, Ethereum реализуются с минимальными сборами 0-3%.
Игровая библиотека клонируется полностью включая автоматы, традиционные геймплей, live-крупье и накопительные призы. RTP-показатели, вариативность и вейджер удерживаются аналогичными.
Бонусная механизм функционирует аналогично корневому порталу. Welcome-бандлы, бесплатные вращения, возврат средств и VIP-программы включаются машинально при соблюдении определенных критериев.
Исследование в секторе легальных сайтов нуждается представления актуальных технологий доступа. Умелые игроки задействуют п»ї1xBet зеркало для извлечения новейшей информации о оперативных доменах.
Процесс регистрации профиля в надежных учреждениях подразумевает тщательную валидацию. Новейшие организации применяют KYC-алгоритмы и AML-критерии. Документооборот занимает от 24 до 72 интервалов.
Программные инструменты для преодоления препятствий прогрессируют вместе с укреплением правовых решений. VPN-решения типа premium предлагают безопасность AES-256 и технологии OpenVPN. Постоянство коннекта критически значима для премиальных заходов.
Альтернативные сайты выполняют задачи через регионально расположенные компьютерные инфраструктуры. CDN-архитектуры обеспечивают быструю латентность для европейских геймеров. Цифровое роутинг включается при обнаружении ограничения базового ресурса.
Финансовые операции в проверенных территориях соответствуют определенным стандартам PCI DSS. Крипто операции набирают популярность вследствие скрытности и быстроте осуществления.
Мобильные софт топовых брендов объединяют физиологическую идентификацию и push-оповещения для существенных событий. Настраиваемый внешний вид автономно подстраивается под настройки монитора.
爱一番海外版2026 高清视频平台 全球加速 大数据AI分析
Актуальные участники встречаются с препятствием входа к легальным порталам. Операторы запрещают стандартные ссылки, но профессиональные Меллстрой сайт посетители осознают о присутствии альтернативных порталов.
Зеркало является стопроцентную отображение основного сайта. Протоколы шифрования функционируют аналогичными. Денежные транзакции реализуются через те же сервисы.
Технология создания аккаунта через параллельный ссылку предполагает стандартной проверки. Администраторы требуют документы для реализации KYC-стандартов. Личные информация подвергаются комплексную подтверждение.
Финансовые ограничения на альтернативных площадках идентичны стандартным параметрам. Стартовые ставки продолжают неизменными. Возрастающие накопления согласовываются между разными адресами.
Премиальные схемы выполняются комплексно на альтернативных платформах. Вейджер гарантирует оригинальные величины. Длительность оборота сохраняется.
Команда сопровождения изучает заявки с параллельных адресов идентично. Интерактивный диалог осуществляет беспрерывный график деятельности.
нажмите здесь https://krab6a.cc
Поиск безопасного казино портала нуждается глубокого разбора правовых сертификатов. Инновационные сайты казино Vavada гарантируют клиентам безусловную детали о своих допусках.
Алгоритм открытия аккаунта содержит несколько принудительных стадий валидации. Администраторы истребуют свидетельства, засвидетельствующие личность и совершеннолетие. Стандартный KYC-регламент требует от 24 до 72 часов.
Финансовое планирование стартует с назначения пределов на депозиты. Квалифицированные геймеры предлагают эксплуатировать установку 5% от итогового игорного капитала на отдельную заход.
Цифровые блокировки поставщиков заставляют применять альтернативные пути. Зеркала сохраняют стопроцентную работоспособность основного ресурса, содержа архив сделок и гемблинг прогресс.
Новые платежные методы гарантируют мгновенные пополнения через цифровые портмоне. Bitcoin, Ethereum и стейблкоины предоставляют анонимность и символические комиссии. Длительность обработки изъятий достигает 10-30 периодов.
Алгоритмы лояльности предусматривают ступенчатые ранги с увеличивающимся компенсацией. VIP-менеджеры предоставляют личные бонусы, улучшенные лимиты и ускоренную поддержку.
Нынешние геймеры оказываются с препятствием подключения к легальным платформам. Организации фильтруют базовые порталы, но грамотные Меллстрой казино пользователи осознают о функционировании резервных сайтов.
Альтернативный адрес представляет точную отображение первичного ресурса. SSL-сертификаты функционируют равнозначными. Банковские транзакции реализуются через аналогичные каналы.
Схема регистрации через альтернативный ссылку подразумевает типовой аутентификации. Сотрудники просят справки для реализации KYC-норм. Персональные параметры осуществляют расширенную валидацию.
Банковские лимиты на параллельных площадках равняются стандартным требованиям. Минимальные ставки поддерживаются константными. Растущие призовые фонды объединяются между разными порталами.
Бонусные схемы действуют комплексно на дополнительных сайтах. Отыгрышный коэффициент сохраняет стартовые цифры. Временные рамки проигрывания продолжается.
Департамент ассистирования рассматривает заявки с зеркальных ресурсов аналогично. Живой общение предоставляет постоянный режим оперирования.
tax prep hub – Very fast loading and everything operates seamlessly.
tortuga casino Naviguez sans crainte vers Tortuga Casino, un repaire de divertissement ou l’adrenaline et les opportunites de gains sont au rendez-vous.
Игровая индустрия представляет стремительный расширение, завлекая множество клиентов. Профессиональные порталы дают стабильную условия для пари. Полную материалы о этих операторах можно найти на типпи регистрация .
Аттестация остаётся основным фактором отбора портала. Надзорные органы Великобритании гарантируют строгий проверку экономических действий. Всякая аккредитованная сайт осуществляет систематические контроли RNG-модулей.
Цифровые характеристики актуальных гемблинг-сайтов включают SSL-защиту финансового класса. Производители софтового продукта наподобие Microgaming, NetEnt, Pragmatic Play интегрируют многоуровневые схемы непредсказуемых величин.
Механизм аутентификации профиля включает представления удостоверений KYC-формата. Свидетельство, справка о доходах, верификация проживания — типичный пакет для финального авторизации.
Дублирующие адреса устраняют сложности с фильтрацией провайдеров. Актуальные дубли адаптируются постоянно техническими отделами. Мобильные софт нередко выполняются надёжнее браузерных форматов.
Банкролл-менеджмент формирует длительную прибыльность азартных периодов. Грамотные беттеры советуют сокращать объём бета до 1-2% от совокупного капитала.
Азартная ниша являет динамичный расширение, привлекая множество игроков. Грамотные сайты обеспечивают надёжную атмосферу для беттинга. Исчерпывающую данные о этих провайдерах возможно обнаружить на лаки Р±РёСЂ .
Легализация составляет основным показателем определения площадки. Юрисдикции Мальты гарантируют жёсткий надзор финансовых манипуляций. Каждая сертифицированная площадка реализует постоянные аудиты RNG-алгоритмов.
Программные характеристики инновационных игорных домов предусматривают SSL-кодирование банковского ранга. Производители программного продукта вроде Microgaming, NetEnt, Pragmatic Play внедряют комплексные схемы произвольных чисел.
Механизм верификации личного кабинета предполагает предоставления удостоверений KYC-стандарта. ID, документ о средствах, валидация прописки — классический перечень для итогового активации.
Дублирующие домены исправляют сложности с блокировками организаций. Актуальные дубли корректируются систематически программными группами. Смартфонные приложения обычно выполняются качественнее веб вариантов.
Банкролл-менеджмент задаёт долгосрочную доходность беттинговых циклов. Профессиональные беттеры советуют ограничивать объём вейджера до 1-2% от общего капитала.
опыт удаленной работы официальная удаленная работа
the cozy collection corner – Lovely accents that instantly added comfort to my room.
окна шуко Ищете надежные и стильные окна для вашего дома? Шуко предлагает инновационные решения, сочетающие в себе высочайшее качество, энергоэффективность и элегантный дизайн.
女神蒙上眼2026 辛芷蕾林雨申 高清都市悬疑职场 海外华人必备 无缓冲播放
Активные зеркала надежных гемблинг-платформ на казино Вавада гарантируют стабильный доступ к геймерским платформам. Система дублирования формирует точные реплики базового портала с фиксацией всех функций.
Процедура регистрации через зеркало абсолютно дублирует оригинальную анкету. Только пришедшие клиенты прописывают валидный email, создают защищенный пароль и назначают игровую курренси.
Идентификация учетной записи подразумевает отправки бумаг по KYC-стандартам. Копия водительских прав, свидетельство резиденции и денежные реквизиты анализируются посредством машинную анализ в течение 24-72 периодов.
Авторизация активных геймеров реализуется через базовую окно с многоступенчатой аутентификацией. Разовые шифры приходят на телефонный аппарат или e-mail адрес.
Опции финансового компонента через зеркала обеспечивает популярные финансовые сервисы. Visa, Mastercard, онлайн кошельки Skrill, Neteller, криптовалюты Bitcoin, Ethereum выполняются с сокращенными взносами 0-3%.
Развлекательная ассортимент клонируется полностью включая автоматы, настольные геймплей, live-операторов и мегавыигрыши. RTP-индикаторы, колебания и условия отыгрыша остаются идентичными.
Бонусная схема оперирует схоже корневому ресурсу. Welcome-пакеты, бесплатные вращения, refund и VIP-планы активируются программно при достижении прописанных условий.
Отбор честного игорного ресурса нуждается серьезного исследования официальных документов. Передовые системы Lucky Bear casino предлагают игрокам безусловную данные о текущих аккредитациях.
Процедура регистрации подразумевает определенное количество ключевых этапов проверки. Администраторы истребуют документы, подтверждающие самобытность и дееспособность. Традиционный KYC-порядок составляет от 24 до 72 часов.
Контроль средств стартует с задания границ на инвестиции. Квалифицированные игроки предлагают применять правило 5% от суммарного развлекательного средств на одну раунд.
Цифровые ограничения провайдеров побуждают внедрять запасные ссылки. Клоны удерживают абсолютную активность центрального площадки, включая журнал платежей и казино результаты.
Передовые банковские методы поддерживают моментальные депозиты через блокчейн хранилища. Bitcoin, Ethereum и стейблкоины дают анонимность и минимальные взносы. Длительность выполнения выводов достигает 10-30 интервалов.
Системы приверженности предусматривают многоуровневые категории с прогрессивным бонусом. VIP-менеджеры обеспечивают индивидуальные бонусы, повышенные границы и первоочередную поддержку.
真实的人类第三季高清完整版2026 海外华人科幻高清剧
成何体统2026 丞磊王楚然 双穿书甜宠 高清现代穿越恋爱 无广告高清追剧
mediamosaic media – Project organization became simpler with these handy creative tools.
Ритуал на изобилие на успех Загляните в свой персональный Гороскоп, составленный профессиональным астрологом, чтобы узнать, какие космические течения направляют вашу судьбу.
一饭封神在线免费观看2026 海外华人专属 高清无广告
storagemagic – Items arrived on time and made decluttering my space straightforward.
Актуальные пользователи обталкиваются с изобилием технических особенностей при деятельности с лицензированными сайтами. Профильные ресурсы типа типпи казино дают современную материалы о процессах казино компаний.
Система подтверждения учетной записи подразумевает множество необходимых этапов. Базовая аутентификация нуждается загрузки документов валидирующих личность. Классический список включает паспорт, автоудостоверение или загранпаспорт.
Программная сторона открытия счета подразумевает внедрение защищенного протокола и 2FA. Продвинутые игроки рекомендуют инициировать максимум представленных параметров защиты.
Зеркала являются точные отражения базового сайта с поддержанием полного инструментария. Основное выгода выражается в соответствии банковских границ и условий ставочных требований.
Процедура обнаружения актуальных запасных доменов строится на наблюдении тематических информационных каналов и союзных порталов. Опытные игроки эксплуатируют туннельные протоколы для обеспечения стабильного входа без оглядки от территориальных лимитов.
Легальные ресурсы гэмблинг предложений предоставляют участникам возможность к качественному игровому процессу через dedicated домены, включая Вавада , которые исполняют глобальные критерии надёжности.
Алгоритм создания аккаунта включает заполнения проверочных деталей через шифрованные SSL-линии. Менеджмент demanded official удостоверение дееспособности и места нахождения для compliance законодательных правил.
Многоуровневая authentication считается принудительным компонентом новейших механизмов безопасности. Пользователи получают SMS-коды, push-notification или задействуют профессиональные программы вроде Google Authenticator.
Mirror ссылки нейтрализуют вопросы географических ограничений и DDoS-воздействий. Фактически дубли формируют дублированные dublicates основного платформы с сохранением features и личных данных.
Экспертные участники призывают keeping свежие базы действующих mirrors в сохранённых ссылках интернет-программы. Букмекеры отправляют сведения о fresh порталах через электронную почту, Telegram-каналы и телефонные утилиты.
Банковские movements через legal платформы защищены криптографическими системами категории банковского области. Вывод фондов осуществляется исключительно на проверенные wallets хозяина аккаунта.
Актуальные операторы развлекательных развлечений гарантируют игрокам вход к профессиональному развлечениям через защищенные п»ї1хбет РІС…РѕРґ платформы. Авторизованная деятельность подразумевает исполнения жестких правовых стандартов.
Процесс создания пользовательского кабинета предусматривает аутентификацию персональных информации. Регуляторы применяют комплексные механизмы KYC и AML для пресечения незаконных операций.
Электронные системы инновационных беттинг площадок базируются на зашифрованных дата-центрах с TLS технологиями. Геоблокировка заставляет администраторов создавать дублирующие домены.
Зеркальные порталы формируют идентичные репликации основного домена с обеспечением всех сервисов и параметров. Пользователи добиваются устойчивый соединение к средствам, азартной отчетности и пользовательским параметрам.
Денежные действия выполняются через синхронизированные денежные шлюзы. Ограничения на депозиты и получения фиксируются в соответствии с правовыми положениями и индивидуальными нормами контроля угроз.
Компетентные пользователи указывают отслеживать ситуацию аккредитации через государственные каталоги азартных органов. Авторитетные критерии охватывают оценки на профильных сервисах и оценки истинных игроков.
pinup Buxoro https://www.pinup91324.help
Передовые операторы гемблинг развлечений предлагают игрокам вход к качественному игровому процессу через проверенные казино Болливуд сайты. Легальная функционирование нуждается учета конкретных регуляторных требований.
Процедура оформления персонального счета предусматривает валидацию приватных реквизитов. Провайдеры применяют расширенные процедуры KYC и AML для исключения поддельных транзакций.
IT платформы передовых казино функционируют на надежных серверах с SSL стандартами. Локальные запреты побуждает управляющих разрабатывать альтернативные порталы.
Зеркальные платформы представляют точные дубликаты главного сайта с фиксацией всех возможностей и данных. Пользователи получают устойчивый связь к средствам, гемблинг статистике и личным опциям.
Банковские операции проходят через встроенные финансовые шлюзы. Рамки на инвестиции и обналичивания определяются в соответствии с правовыми требованиями и корпоративными правилами управления рисками.
Профессиональные клиенты настаивают контролировать условия лицензии через государственные списки азартных органов. Престижные характеристики охватывают места на экспертных ресурсах и комментарии действительных игроков.
爱一帆会员多少钱海外版2026 高清平台 灵活定价
捕风追影在线平台2026 AI推荐 海外华人高清影视直播
porch of supplements – Great assortment of protein powders and nutrition aids for easy selection.
Поиск легального азартного портала нуждается детального разбора официальных разрешений. Современные системы казино Lucky Bear обеспечивают геймерам полную детали о имеющихся санкциях.
Процесс создания профиля предусматривает определенное количество необходимых этапов валидации. Операторы требуют удостоверения, засвидетельствующие личность и зрелость. Стандартный KYC-процесс занимает от 24 до 72 промежутков.
Распоряжение капиталом стартует с фиксации пределов на взносы. Опытные пользователи призывают эксплуатировать принцип 5% от суммарного игорного фонда на конкретную партию.
Системные ограничения администраторов принуждают применять вспомогательные ссылки. Альтернативы удерживают полную эффективность центрального платформы, содержа журнал транзакций и гемблинг продвижение.
Инновационные денежные сервисы поддерживают моментальные пополнения через блокчейн кошельки. Bitcoin, Ethereum и стейблкоины гарантируют тайность и крошечные отчисления. Продолжительность проведения снятий насчитывает 10-30 интервалов.
Алгоритмы приверженности подразумевают каскадные степени с возрастающим возвратом. VIP-менеджеры предоставляют эксклюзивные поощрения, увеличенные лимиты и приоритетную техподдержку.
Инновационные провайдеры развлекательных игр предоставляют пользователям возможность к высококлассному развлечениям через надежные казино Vavada сайты. Сертифицированная операционная активность влечет исполнения жестких контролирующих стандартов.
Процесс регистрации персонального счета задействует подтверждение личных показателей. Управляющие задействуют расширенные алгоритмы KYC и AML для блокировки поддельных платежей.
Электронные решения современных гемблинг платформ функционируют на защищенных дата-центрах с TLS стандартами. Геоблокировка побуждает администраторов запускать альтернативные адреса.
Альтернативные сайты образуют эквивалентные дубликаты первичного домена с фиксацией всех опций и сведений. Участники добиваются непрерывный доступ к депозиту, гемблинг статистике и личным параметрам.
Платежные транзакции производятся через встроенные платежные процессоры. Лимиты на вклады и изъятия назначаются в согласии с законодательными требованиями и внутренними регламентами риск-менеджмента.
Экспертные гемблеры советуют проверять положение лицензии через надзорные базы данных азартных структур. Репутационные показатели задействуют ранги на тематических сервисах и оценки настоящих пользователей.
https://www.pondexperts.ca/wp-content/pages/1xbet_free_promo_code_bonus.html
tankgearplus – Aquarium tools arrived safely and made setup and maintenance easy.
BreezeBorough online – I love how effortless it is to browse and buy here.
Лицензионные площадки гэмблинг возможностей предоставляют клиентам возможность к премиальному гэмблингу через специализированные ресурсы, включая lucky bear казино , которые именно исполняют общепринятые требования безопасности.
Алгоритм открытия счёта предполагает внесения authentication параметров через безопасные SSL-соединения. Администрация demanded официальное подтверждение правоспособности и адреса нахождения для поддержания правовых критериев.
Двухфакторная верификация выступает необходимым компонентом современных solutions конфиденциальности. Игроки имеют SMS-коды, push-уведомления или применяют профессиональные софт в стиле Google Authenticator.
Резервные ссылки устраняют сложности географических запретов и DDoS-assault. По сути дубли составляют дублированные реплики основного домена с maintaining features и индивидуальных информации.
Опытные геймеры suggest keeping новейшие перечни функционирующих mirrors в сохранённых ссылках browser. Операторы направляют updates о новых доменах через e-mail, Telegram-communities и mobile утилиты.
Финансовые операции через проверенные сайты обеспечены cryptographic протоколами level банковского индустрии. Изъятие средств реализуется лишь на верифицированные данные владельца аккаунта.
Актуальные геймеры встречаются с проблемой соединения к лицензированным ресурсам. Организации ограничивают стандартные URL, но опытные казино лаки ворлд клиенты учитывают о присутствии параллельных порталов.
Параллельный портал представляет стопроцентную реплику первичного ресурса. Протоколы шифрования поддерживаются аналогичными. Финансовые переводы проходят через идентичные системы.
Алгоритм открытия счёта через дополнительный ссылку подразумевает обычной валидации. Специалисты уточняют бумаги для исполнения KYC-норм. Индивидуальные сведения реализуют комплексную аутентификацию.
Вносительные лимиты на альтернативных площадках аналогичны стандартным характеристикам. Наименьшие вклады продолжают неизменными. Растущие банки интегрируются между различными адресами.
Премиальные схемы выполняются комплексно на зеркальных платформах. Требования по обороту удерживает исходные значения. Период действия оборота не изменяется.
Департамент сопровождения анализирует заявки с дополнительных ресурсов аналогично. Прямой диалог осуществляет постоянный график обслуживания.
dappergear – Trendy items arrived on time and look even better in person.
Поиск достойного игрового ресурса в актуальных рамках заставляет специального анализа к юридическому уровню. Профессиональные участники осознают, что Лаки Бир зеркало предоставляет свежую данные о работающих сервисах.
Механизм записи в лицензированных операторах охватывает принудительную проверку удостоверения. KYC-правила охраняют как оператора, так и клиента от махинаций. Временные лимиты на снятие денег до завершения проверки – нормальная практика.
Программные блокировки на подключение к betting площадкам решаются через альтернативные URL. Действующие дубликаты поддерживают тотальную работоспособность основного портала. Платежные операции, интерактивный статистика и поощрительные планы сохраняются константными.
Капитальная гарантированность определяется показателем применяемых расчетных способов. SSL-шифрование, PCI DSS подтверждение и усиленная проверка гарантируют стабильный контур защиты.
Азартная ассортимент сертифицированных заведений включает машины от ведущих создателей. RTP-показатели, колебания и алгоритмические модели претерпевают беспристрастную проверку в утвержденных учреждениях.
Системы лояльности в профессиональных казино основываются на четких параметрах активности. Проигрыш x35-40 характеризуется разумным для машина-льгот, в то время как карточные активности засчитываются в подсчет с минимальным показателем.
杨洋章若楠《雨霖铃》2026古装仙侠虐恋神剧,海外华人高清无广告追剧,仙侠世界浪漫动人,全球加速AI智能推荐爆款。
Действующие альтернативные домены надежных казино на п»ї1хбет зеркало предоставляют устойчивый подключение к развлекательным порталам. Принцип дублирования генерирует эквивалентные копии корневого домена с удержанием всех механизмов.
Процедура открытия счета через дублирующий портал в точности повторяет основную шаблон. Новые клиенты регистрируют активный email, генерируют безопасный пароль и выбирают игровую денежную единицу.
Валидация личного кабинета включает представления бумаг опираясь на KYC-регламенту. Копия водительских прав, свидетельство места жительства и карточные координаты подвергаются цифровую валидацию в течение 24-72 периодов.
Подключение активных участников осуществляется через стандартную интерфейс с усиленной проверкой. Сессионные коды отправляются на сотовый аппарат или электронную почту.
Механизмы депозитного модуля через mirror-сайты поддерживает популярные финансовые инструменты. Visa, Mastercard, виртуальные балансы Skrill, Neteller, криптовалюты Bitcoin, Ethereum осуществляются с оптимизированными процентами 0-3%.
Развлекательная коллекция воспроизводится на сто процентов включая spinning games, столовые активности, live-ведущих и накопительные призы. RTP-коэффициенты, дисперсия и условия отыгрыша поддерживаются аналогичными.
Подарочная политика действует подобно корневому домену. Welcome-пакеты, бесплатные вращения, возврат средств и VIP-схемы инициируются машинально при реализации фиксированных условий.
найти это https://krab6a.cc
cluster finds hub – The variety is appealing and I plan to revisit soon for a closer look.
Revenue Roost picks – Useful products and tips for anyone growing digital income streams.
For discussion
best personal loan rates instant approval
for training materials.
Актуальные участники сталкиваются с массой программных аспектов при операциях с сертифицированными порталами. Профильные платформы типа Mellstroy Game дают свежую сведения о функционировании казино организаций.
Алгоритм подтверждения счета подразумевает комплекс требуемых фаз. Базовая верификация нуждается отправки документов верифицирующих индивидуальность. Стандартный пакет охватывает паспорт, водительские права или загранпаспорт.
Цифровая составляющая создания аккаунта содержит использование защищенного протокола и двухфакторной аутентификации. Экспертные игроки рекомендуют включать максимум представленных настроек охраны.
Дублирующие порталы образуют идентичные копии основного платформы с удержанием исчерпывающего инструментария. Важнейшее выгода состоит в идентичности денежных рамок и параметров условий прокрутки.
Механизм обнаружения функционирующих запасных доменов основывается на наблюдении экспертных информационных каналов и союзных сайтов. Экспертные геймеры эксплуатируют VPN-сервисы для формирования устойчивого соединения безотносительно от региональных барьеров.
Hello very nice website!! Man .. Excellent .. Superb ..
I’ll bookmark your blog and take the feeds also? I
am satisfied to find so many helpful info right here within the post, we want develop more strategies in this regard, thank you for sharing.
. . . . .
Активные дублирующие порталы лицензированных gaming-операторов на казино Меллстрой гарантируют устойчивый доступ к гемблинг порталам. Методика реплицирования создает точные клоны центрального портала с удержанием всех инструментов.
Процедура оформления профиля через альтернативный домен на сто процентов имитирует стандартную бланк. Дебютные игроки указывают рабочий email, создают сложный код доступа и устанавливают операционную валюту.
Подтверждение аккаунта включает передачи справок по KYC-стандартам. Изображение ID-карты, доказательство резиденции и финансовые координаты проверяются через машинную анализ в течение 24-72 часов.
Авторизация активных игроков происходит через типовую панель с усиленной идентификацией. Разовые пароли доставляются на смс девайс или email.
Возможности финансового сектора через резервные ссылки поддерживает востребованные финансовые системы. Visa, Mastercard, цифровые хранилища Skrill, Neteller, блокчейн-токены Bitcoin, Ethereum осуществляются с минимальными комиссиями 0-3%.
Игровая библиотека воспроизводится целиком включая барабаны, карточные активности, live-дилеров и прогрессивы. RTP-значения, дисперсия и вейджер сохраняются точными.
Поощрительная механизм функционирует подобно центральному порталу. Welcome-комплекты, даровые прокруты, денежный возврат и VIP-схемы запускаются алгоритмически при соблюдении определенных параметров.
Современные геймеры пересекаются с огромным количеством программных особенностей при операциях с сертифицированными площадками. Профильные ресурсы типа ретро казино обеспечивают актуальную сведения о деятельности казино организаций.
Процедура аутентификации аккаунта подразумевает комплекс неотъемлемых уровней. Исходная валидация требует размещения удостоверений верифицирующих личность. Классический список охватывает свидетельство, права или международное ID.
Системная составляющая оформления подразумевает задействование безопасного соединения и двухуровневой проверки. Экспертные участники предлагают инициировать совокупность представленных функций защиты.
Зеркала составляют полные реплики главного ресурса с удержанием всего инструментария. Ключевое бонус кроется в тождественности финансовых пределов и норм проигрыша.
Процедура выявления функционирующих дублирующих порталов фундируется на наблюдении тематических информационных каналов и связанных ресурсов. Квалифицированные игроки эксплуатируют VPN-сервисы для предоставления постоянного подключения независимо от территориальных блокировок.
the creative crafts boutique – Beautifully made items with a personal, handmade touch.
Определение проверенного игрового заведения в нынешних рамках предполагает особого анализа к лицензионному уровню. Знающие геймеры осознают, что френдс казино предоставляет актуальную информацию о активных площадках.
Механизм записи в лицензированных платформах включает неизбежную верификацию идентичности. KYC-правила защищают как оператора, так и участника от махинаций. Переходные пределы на изъятие средств до завершения контроля – привычная подход.
Цифровые запреты на вход к гемблинг площадкам нейтрализуются через резервные адреса. Рабочие копии поддерживают тотальную возможности центрального сервиса. Финансовые движения, интерактивный продвижение и льготные системы продолжают неизменными.
Финансовая гарантированность характеризуется степенью задействованных банковских систем. SSL-шифрование, PCI DSS сертификация и дополнительная проверка устанавливают защищенный периметр ограждения.
Геймплейная ассортимент легальных сервисов предоставляет барабаны от главных студий. RTP-показатели, дисперсия и алгоритмические системы претерпевают независимую контроль в авторизованных учреждениях.
Планы вознаграждения в достойных заведениях основываются на четких условиях активности. Требования x35-40 признается разумным для автомат-подарков, в то время как классические развлечения идут в подсчет с пониженным показателем.
http://lawshare.tw/home.php?mod=space&uid=1129676
杨紫《家业》2026古装经商大女主励志剧,海外华人高清非遗题材热播,创业奋斗燃到爆,全球加速AI推荐2026必追。
2026 football news: Forest’s 3-0 masterclass in Europa League sets tone – latest match results show Premier League clubs dominating Europe!
君主计划第二季2026 海外华人怪兽宇宙衍生 高清泰坦巨兽登场 Apple TV+
Развлекательная ниша демонстрирует динамичный прогресс, завлекая легионы игроков. Профессиональные платформы предлагают качественную пространство для развлечений. Подробную сведения о данных операторах доступно изучить на казино 1xBet .
Аккредитация остаётся ключевым критерием выбора портала. Надзорные органы Олдерни дают качественный надзор валютных действий. Всякая официальная портал осуществляет постоянные аудиты RNG-систем.
Технические особенности новейших азартных площадок предусматривают SSL-кодирование финансового ранга. Поставщики компьютерного софта уровня Microgaming, NetEnt, Pragmatic Play внедряют усовершенствованные механизмы хаотичных величин.
Процедура подтверждения профиля предполагает предоставления документов KYC-стандарта. Паспорт, выписка о финансах, верификация регистрации — классический комплект для финального доступа.
Зеркальные ссылки ликвидируют проблемы с фильтрацией провайдеров. Действующие альтернативы корректируются каждый день техническими специалистами. Портативные приложения нередко оперируют лучше сетевых форматов.
Финансовая дисциплина создаёт длительную успешность гемблинговых раундов. Профессиональные беттеры настаивают сокращать объём бета до 1-2% от суммарного капитала.
This casino https://16mm.pl/ offers a solid mix of classic slots and live tables. The platform feels well-designed, promotions are worth trying, and support is responsive, which adds confidence.
Исследование в области проверенных площадок предполагает владения новых способов доступа. Квалифицированные клиенты эксплуатируют Вавада РІС…РѕРґ для получения релевантной данных о функционирующих ссылках.
Процесс формирования аккаунта в сертифицированных операторах подразумевает комплексную валидацию. Новейшие организации применяют KYC-системы и AML-критерии. Оформление документов потребляет от 24 до 72 промежутков.
Цифровые инструменты для минования ограничений улучшаются одновременно с укреплением юридических шагов. VPN-службы класса premium предоставляют шифрование AES-256 и стандарты OpenVPN. Надежность соединения fundamentally значима для VIP партий.
Запасные ресурсы выполняют задачи через пространственно расположенные компьютерные мощности. CDN-структуры осуществляют оптимальную латентность для американских пользователей. Техническое роутинг запускается при обнаружении препятствия центрального адреса.
Банковские операции в официальных юрисдикциях подпадают под конкретным критериям PCI DSS. Цифровые транзакции завоевывают актуальность вследствие конфиденциальности и оперативности реализации.
Планшетные софт ведущих брендов совмещают лицевую подтверждение и push-извещения для важных происшествий. Адаптивный облик самостоятельно подстраивается под характеристики экрана.
modern soles collection – Each listing is thoughtfully crafted to engage and inspire shoppers.
Sassuolo vs Hellas Verona 2026 Serie A 19:45最新比分,意甲维罗纳客场挑战萨索洛,意大利足球比分直播更新。
https://alfa.edu.rs/pages/1xbet_promo_code_india_27.html
Поиск в пространстве сертифицированных ресурсов нуждается знания передовых решений доступа. Квалифицированные игроки эксплуатируют казино типпи для добывания современной фактов о активных доменах.
Механизм регистрации счета в официальных учреждениях подразумевает сложную подтверждение. Актуальные поставщики используют KYC-протоколы и AML-требования. Документооборот потребляет от 24 до 72 временных отрезков.
Компьютерные инструменты для обхода препятствий эволюционируют синхронно с повышением регуляторных мер. VPN-платформы уровня premium гарантируют безопасность AES-256 и методы OpenVPN. Стабильность соединения критически значима для привилегированных заходов.
Резервные домены действуют через регионально расположенные цифровые мощности. CDN-архитектуры гарантируют быструю задержку для глобальных пользователей. Программное переключение активируется при выявлении препятствия первичного ресурса.
Денежные манипуляции в лицензированных юрисдикциях отвечают четким требованиям PCI DSS. Цифровые платежи получают популярность по причине скрытности и оперативности осуществления.
Портативные клиенты элитных операторов содержат биометрическую идентификацию и push-сообщения для критических эпизодов. Изменяемый дизайн независимо корректируется под особенности монитора.
ImportIsle selections – I’m able to get worldwide items without heavy shipping charges.
Подбор надежного игорного заведения предполагает основательного рассмотрения регулятивных свидетельств. Инновационные ресурсы Лаки Бир зеркало гарантируют участникам максимальную детали о своих санкциях.
Механизм открытия аккаунта охватывает различные требуемых фаз подтверждения. Владельцы истребуют удостоверения, подтверждающие идентичность и зрелость. Обычный KYC-механизм длится от 24 до 72 периодов.
Финансовое планирование открывается с задания ограничений на вклады. Опытные игроки настаивают использовать установку 5% от суммарного развлекательного фонда на одну раунд.
Технические ограничения операторов обязывают задействовать дополнительные маршруты. Копии удерживают абсолютную функциональность главного платформы, подразумевая летопись транзакций и гемблинг достижения.
Передовые денежные сервисы предоставляют быстрые взносы через электронные кошельки. Bitcoin, Ethereum и постоянные токены предоставляют приватность и символические платежи. Срок выполнения изъятий равно 10-30 отрезков.
Программы постоянства предусматривают градационные статусы с возрастающим кэшбэком. VIP-кураторы гарантируют личные награды, расширенные лимиты и опережающую поддержку.
Определение достойного гемблинг ресурса в нынешних реалиях нуждается детального подхода к лицензионному режиму. Профессиональные клиенты осознают, что mad casino зеркало демонстрирует современную материалы о действующих провайдерах.
Механизм записи в официальных заведениях предусматривает требуемую проверку удостоверения. KYC-стандарты гарантируют как площадку, так и геймера от фрода. Переходные границы на получение финансов до выполнения контроля – нормальная процедура.
Технические запреты на доступ к азартным площадкам устраняются через альтернативные домены. Доступные клоны поддерживают стопроцентную работоспособность базового ресурса. Платежные переводы, геймплейный статистика и льготные планы остаются стабильными.
Денежная надежность выражается критерием внедренных финансовых способов. SSL-безопасность, PCI DSS подтверждение и усиленная верификация формируют защищенный контур охраны.
Азартная каталог сертифицированных операторов объединяет слоты от ведущих создателей. RTP-индексы, изменчивость и вероятностные принципы проходят независимую контроль в аккредитованных лабораториях.
Схемы поощрения в профессиональных заведениях формируются на четких параметрах активности. Вейджер x35-40 считается справедливым для машина-льгот, в то время как стандартные активности засчитываются в подсчет с редуцированным коэффициентом.
Активные альтернативные домены надежных азартных клубов на п»ї1хбет РІС…РѕРґ обеспечивают непрерывный коннект к азартным ресурсам. Система копирования создает точные реплики центрального веб-площадки с фиксацией всех механизмов.
Система создания аккаунта через зеркало в точности дублирует основную анкету. Только пришедшие пользователи регистрируют валидный email, устанавливают сложный шифр и устанавливают игровую финансовый инструмент.
Верификация профиля требует предоставления удостоверений согласно KYC-политике. Изображение водительских прав, верификация резиденции и денежные параметры проходят автоматическую проверку в течение 24-72 часов.
Авторизация активных пользователей реализуется через базовую окно с расширенной идентификацией. Временные токены приходят на телефонный аппарат или электронную почту.
Функционал входящего компонента через альтернативные домены поддерживает распространенные платежные инструменты. Visa, Mastercard, онлайн портмоне Skrill, Neteller, цифровые активы Bitcoin, Ethereum обрабатываются с уменьшенными платежами 0-3%.
Gaming база повторяется в точности включая spinning games, традиционные забавы, live-крупье и прогрессивы. RTP-показатели, волатильность и отыгрыш удерживаются неизменными.
Акционная политика выполняется идентично корневому сайту. Welcome-комплекты, фриспины, refund и VIP-системы инициируются алгоритмически при реализации заданных требований.
adzio.click – Loved the layout today; clean, simple, and genuinely user-friendly overall.
Выбор легального гемблинг портала заставляет серьезного анализа официальных сертификатов. Актуальные платформы Меллстрой предоставляют игрокам абсолютную сведения о имеющихся разрешениях.
Алгоритм создания профиля предусматривает множество ключевых фаз подтверждения. Операторы требуют справки, подтверждающие самобытность и совершеннолетие. Стандартный KYC-процесс продолжается от 24 до 72 промежутков.
Контроль средств инициируется с определения лимитов на вклады. Компетентные клиенты настаивают внедрять норму 5% от итогового гемблинг капитала на единичную сессию.
Программные блокировки провайдеров вынуждают применять альтернативные маршруты. Альтернативы оберегают максимальную эффективность первичного платформы, включая историю сделок и азартный успех.
Передовые денежные сервисы поддерживают моментальные депозиты через блокчейн аккаунты. Bitcoin, Ethereum и устойчивые монеты гарантируют приватность и минимальные платежи. Период выполнения выводов составляет 10-30 минут.
Схемы лояльности предусматривают каскадные уровни с возрастающим вознаграждением. VIP-кураторы предоставляют персонализированные награды, повышенные рамки и приоритетную техподдержку.
Инновационные порталы игорных игр гарантируют беттерам подключение к премиальному игровому процессу через надежные Mellstroy Game casino сайты. Сертифицированная работа требует исполнения конкретных правовых стандартов.
Процесс создания клиентского счета включает валидацию индивидуальных показателей. Провайдеры внедряют многоуровневые процедуры KYC и AML для пресечения незаконных платежей.
Технические инструменты актуальных казино основываются на надежных хостингах с TLS стандартами. Геоблокировка вынуждает операторов внедрять резервные ссылки.
Альтернативные сайты образуют идентичные копии базового платформы с обеспечением всех возможностей и параметров. Беттеры достигают беспрепятственный подключение к депозиту, азартной отчетности и личным конфигурациям.
Платежные действия производятся через встроенные расчетные системы. Лимиты на депозиты и изъятия определяются в соотношении с нормативными стандартами и собственными регламентами риск-менеджмента.
Компетентные пользователи рекомендуют мониторить условия лицензии через надзорные каталоги игорных комиссий. Имиджевые параметры предусматривают места на тематических сайтах и оценки действительных игроков.
voyagekit – Smart packing solutions for fast trips.
adapterzone – Fast shipping and gadgets function exactly as expected.
Online casino Australia real money 2026 pokies crypto PayID
Проверенные провайдеры азартных возможностей предоставляют участникам шанс к качественному азартному досугу через dedicated платформы, включая лакибир казино , которые выполняют мировые критерии надёжности.
Алгоритм открытия счёта necessita внесения верификационных сведений через шифрованные SSL-connection. Провайдеры просят предоставить официальное подтверждение age verification и адреса жительства для поддержания юрисдикционных требований.
2FA идентификация считается mandatory компонентом актуальных систем безопасности. Клиенты приобретают SMS-пароли, push-алерты или используют специальные софт по типу Google Authenticator.
Дублирующие URL устраняют трудности географических запретов и DDoS-assault. Фактически mirrors составляют дублированные копии базового ресурса с maintaining функциональности и личных информации.
Профессиональные участники советуют сохранять обновлённые каталоги рабочих дублей в сохранённых ссылках browser. Провайдеры доставляют updates о современных адресах через электронную почту, Telegram-сообщества и mobile программы.
Платёжные переводы через надёжные платформы гарантированы защитными системами стандарта банковского индустрии. Extraction фондов производится только на validated счета хозяина аккаунта.
ArtisanAster online – Unique handcrafted items that add personality to my rooms.
Выбор качественного betting площадки в нынешних реалиях нуждается тщательного анализа к законному состоянию. Опытные пользователи представляют, что казино Болливуд предоставляет новую данные о действующих операторах.
Процедура регистрации в сертифицированных заведениях включает обязательную подтверждение документов. KYC-процедуры гарантируют как площадку, так и игрока от махинаций. Переходные лимиты на снятие капитала до выполнения подтверждения – стандартная практика.
Технические препятствия на доступ к betting ресурсам решаются через дублирующие домены. Рабочие дубликаты предоставляют абсолютную работоспособность основного платформы. Банковские транзакции, геймплейный продвижение и бонусные планы сохраняются стабильными.
Материальная гарантированность оценивается показателем используемых расчетных инструментов. SSL-кодирование, PCI DSS подтверждение и дополнительная проверка обеспечивают стабильный периметр защиты.
Азартная ассортимент сертифицированных сервисов содержит спины от известных производителей. RTP-значения, вариативность и вероятностные модели проходят нейтральную сертификацию в одобренных учреждениях.
Программы поощрения в достойных заведениях основываются на понятных условиях активности. Условия ставок x35-40 расценивается разумным для барабан-привилегий, в то время как настольные активности учитываются в зачет с пониженным процентом.
辛芷蕾林雨申《女神蒙上眼》2026都市悬疑职场大戏,海外华人必备高清陆剧,职场暗战烧脑刺激,全球加速实时更新无广告追剧首选。
посмотреть на этом сайте https://krab6at-cc.com/
Беттинговая индустрия являет интенсивный рост, заинтересовывая миллионы пользователей. Экспертные сайты гарантируют надёжную пространство для ставок. Полную сведения о подобных компаниях возможно получить на Вавада .
Легализация представляет ключевым критерием определения портала. Контролёры Мальты гарантируют строгий контроль экономических транзакций. Конкретная легальная сайт выполняет систематические ревизии RNG-алгоритмов.
Программные свойства современных беттинг-платформ содержат SSL-безопасность расчётного класса. Разработчики цифрового обеспечения типа Microgaming, NetEnt, Pragmatic Play добавляют сложные системы случайных показателей.
Процедура подтверждения учётной записи требует представления удостоверений KYC-стандарта. ID, свидетельство о доходах, подтверждение проживания — обычный перечень для полноценного входа.
Альтернативные порталы ликвидируют препятствия с цензурой операторов. Функционирующие альтернативы модифицируются регулярно техническими специалистами. Смартфонные софт регулярно функционируют качественнее сетевых редакций.
Банкролл-менеджмент устанавливает длительную результативность игровых партий. Опытные участники советуют ограничивать размер депозита до 1-2% от общего бюджета.
iyf.tv海外华人首选2026 最新剧集 高清在线 AI内容匹配
Поиск честного развлекательного площадки предполагает тщательного разбора официальных документов. Актуальные порталы Лаки Бир РІС…РѕРґ предлагают пользователям безусловную данные о действующих лицензиях.
Механизм регистрации содержит ряд требуемых этапов проверки. Представители истребуют справки, подтверждающие персону и дееспособность. Классический KYC-порядок составляет от 24 до 72 временных отрезков.
Контроль средств начинается с фиксации ограничений на вклады. Искусные клиенты предлагают использовать правило 5% от общего азартного фонда на индивидуальную партию.
Электронные препятствия поставщиков заставляют задействовать дополнительные пути. Дубликаты хранят абсолютную функциональность базового площадки, содержа журнал операций и гемблинг продвижение.
Инновационные расчетные системы обеспечивают скоростные депозиты через электронные кошельки. Bitcoin, Ethereum и устойчивые монеты предоставляют конфиденциальность и крошечные платежи. Длительность выполнения изъятий доходит 10-30 отрезков.
Планы верности охватывают каскадные ранги с прогрессивным возвратом. VIP-кураторы обеспечивают эксклюзивные бонусы, усиленные рамки и ускоренную обслуживание.
my cedar compass – Sturdy outdoor products arrived quickly and worked perfectly on my hike.
Athletic Bilbao vs Elche 2026 La Liga live – 21:00 kick-off thriller! Lions hungry for goals – Spanish football scores incoming hot!
Нынешние геймеры натыкаются с проблемой входа к сертифицированным сайтам. Компании закрывают базовые URL, но грамотные Вавада казино пользователи осознают о доступности параллельных сайтов.
Параллельный портал является абсолютную воспроизведение первичного площадки. Протоколы шифрования функционируют идентичными. Денежные операции реализуются через аналогичные системы.
Схема оформления профиля через альтернативный ссылку включает стандартной верификации. Специалисты запрашивают справки для исполнения KYC-требований. Паспортные данные осуществляют усиленную валидацию.
Вносительные пределы на дополнительных платформах идентичны базовым условиям. Стартовые ставки остаются фиксированными. Растущие призовые фонды координируются между всеми порталами.
Премиальные схемы выполняются комплексно на параллельных ресурсах. Коэффициент оборота поддерживает стартовые величины. Тайминг оборота поддерживается.
Служба ассистирования обрабатывает заявки с зеркальных ссылок сходным образом. Мгновенный диалог гарантирует беспрерывный формат деятельности.
Инновационные провайдеры беттинг развлечений дают беттерам путь к премиальному развлечениям через надежные п»ї1хбет зеркало ресурсы. Сертифицированная работа нуждается учета строгих регуляторных стандартов.
Процесс активации игрового профиля охватывает проверку индивидуальных показателей. Управляющие внедряют многоуровневые алгоритмы KYC и AML для предотвращения фродовых финансовых действий.
Программные системы современных развлекательных порталов основываются на надежных дата-центрах с шифровальными стандартами. Локальные запреты вынуждает владельцев разрабатывать вспомогательные порталы.
Альтернативные домены представляют идентичные репликации первичного домена с сохранением всех функций и данных. Беттеры приобретают беспрепятственный подключение к средствам, игровой отчетности и индивидуальным параметрам.
Платежные операции производятся через связанные денежные сервисы. Лимиты на пополнения и снятия фиксируются в соотношении с законодательными условиями и собственными правилами снижения потерь.
Квалифицированные клиенты предлагают анализировать условия сертификата через официальные регистры азартных органов. Статусные характеристики задействуют позиции на тематических платформах и мнения подлинных участников.
Нынешние геймеры обталкиваются с множеством цифровых нюансов при операциях с сертифицированными сайтами. Специализированные порталы типа ДживиСпин казино выдают новую данные о работе гэмблинговых организаций.
Процедура валидации учетной записи содержит множество требуемых стадий. Начальная верификация подразумевает загрузки свидетельств удостоверяющих гражданство. Привычный набор включает паспорт, права или международный паспорт.
Системная элемент регистрации включает внедрение безопасного соединения и двухфакторной аутентификации. Профессиональные геймеры предлагают запускать максимум предложенных настроек безопасности.
Запасные домены составляют абсолютные клоны первичного домена с удержанием комплексного инструментария. Основное выгода содержится в идентичности денежных лимитов и параметров ставочных требований.
Механизм выявления рабочих альтернативных адресов базируется на проверке профессиональных информационных каналов и аффилированных площадок. Опытные участники используют VPN-сервисы для создания устойчивого входа независимо от локальных запретов.
this online business hub – Great strategies and products for growing revenue through digital channels.
Гемблинговая сфера являет стремительный прогресс, привлекая массы геймеров. Квалифицированные порталы гарантируют защищённую пространство для игры. Исчерпывающую информацию о подобных операторах можно изучить на probeg-ag.ru .
Сертификация является основным критерием селекции платформы. Надзорные органы Кюрасао гарантируют строгий надзор валютных операций. Каждая лицензированная ресурс проходит постоянные ревизии RNG-алгоритмов.
Цифровые свойства инновационных игорных домов охватывают SSL-безопасность финансового категории. Создатели софтового продукта класса Microgaming, NetEnt, Pragmatic Play интегрируют многоуровневые схемы хаотичных показателей.
Алгоритм аутентификации учётной записи требует направления удостоверений KYC-формата. Паспорт, документ о прибылях, верификация проживания — типичный пакет для окончательного доступа.
Дублирующие адреса убирают трудности с фильтрацией поставщиков. Свежие дубли модифицируются регулярно IT командами. Портативные клиенты часто выполняются лучше браузерных редакций.
Банкролл-менеджмент создаёт перспективную успешность азартных циклов. Опытные игроки предлагают ограничивать размер бета до 1-2% от полного банкролла.
Lock & Luxe picks – Stylish, quality pieces that are built to last.
savvybloom – Budget-friendly products that were well-made and delivered promptly.
Актуальные пользователи сталкиваются с массой технических аспектов при функционировании с проверенными порталами. Специализированные ресурсы типа п»ї1хбет казино обеспечивают актуальную сведения о процессах казино операторов.
Процедура аутентификации аккаунта подразумевает комплекс требуемых этапов. Начальная подтверждение включает передачи удостоверений доказывающих субъект. Обычный список содержит документ, водительские права или внешний паспорт.
Программная элемент создания аккаунта подразумевает эксплуатацию криптографической защиты и двухфакторной аутентификации. Продвинутые пользователи рекомендуют активировать весь комплекс имеющихся параметров защиты.
Дублирующие порталы представляют полные отражения главного портала с сохранением всего набора функций. Основное преимущество кроется в соответствии платежных границ и критериев вейджера.
Схема поиска функционирующих резервных ссылок строится на проверке тематических мессенджер групп и партнерских порталов. Экспертные клиенты используют виртуальные частные сети для гарантирования стабильного связи независимо от локальных запретов.
Активные резервные адреса официальных игорных заведений на Lucky Bear казино предоставляют беспрерывный доступ к гемблинг порталам. Схема дублирования создает идентичные реплики основного домена с сохранением всех опций.
Процедура оформления профиля через дублирующий портал целиком воспроизводит основную форму. Начинающие участники заполняют функционирующий email, придумывают надежный пароль и выбирают базовую валюту.
Аутентификация личного кабинета требует отправки удостоверений согласно KYC-требованиям. Скан водительских прав, свидетельство места жительства и платежные координаты проходят цифровую контроль в течение 24-72 часов.
Аутентификация существующих пользователей происходит через стандартную модуль с расширенной аутентификацией. Временные ключи отправляются на мессенджер девайс или e-mail адрес.
Функционал денежного компонента через резервные ссылки поддерживает актуальные финансовые системы. Visa, Mastercard, веб хранилища Skrill, Neteller, блокчейн-токены Bitcoin, Ethereum выполняются с уменьшенными комиссиями 0-3%.
Развлекательная база дублируется абсолютно включая машины, традиционные игры, live-ведущих и джекпоты. RTP-параметры, колебания и ставочные требования удерживаются идентичными.
Поощрительная система оперирует подобно основному порталу. Welcome-пакеты, даровые прокруты, кешбэк и VIP-схемы включаются алгоритмически при соблюдении установленных условий.
Установите удобный электрокарниз двухрядный цена для идеального управления шторами в вашем доме.
Он позволяет управлять текстилем на окнах с помощью пульта дистанционного управления.
Такие системы становятся все популярнее благодаря своему удобству и функциональности. Они особенно востребованы в помещениях с высокими окнами или труднодоступными карнизами.
#### **2. Преимущества электрокарнизов**
Главное достоинство электрокарниза — это удобство использования. Вы можете запрограммировать автоматическое открытие штор утром и закрытие вечером.
Кроме того, электрокарнизы отличаются высокой надежностью и долговечностью. Современные модели оснащены защитой от перегрузок и коротких замыканий.
#### **3. Установка и настройка**
Монтаж электрокарниза требует определенных навыков и точности. Важно правильно рассчитать нагрузку, чтобы система работала исправно долгое время.
После установки нужно правильно настроить систему управления. В некоторых моделях можно задавать индивидуальные сценарии работы.
#### **4. Выбор подходящей модели**
При покупке электрокарниза важно учитывать несколько факторов. Немаловажным критерием является дизайн, который должен гармонировать с интерьером.
На рынке представлены модели разных ценовых категорий. Бюджетные варианты обладают базовым функционалом, но надежны в эксплуатации.
—
### **Спин-шаблон**
#### **1. Введение**
Это устройство позволяет легко контролировать положение штор с помощью рук.
#### **2. Преимущества электрокарнизов**
Вы можете запрограммировать автоматическое открытие штор утром и закрытие вечером.
#### **3. Установка и настройка**
Лучше доверить эту работу профессионалам, чтобы избежать ошибок.
#### **4. Выбор подходящей модели**
На рынке представлены модели разных ценовых категорий.
stashhub – Stickers arrived colorful and high quality, making my scrapbooks and journals look amazing.
https://waysidechapel.org/wp-content/pgs/?codigo-promocional-1xbet_apuestas-deportivas.html
Официальные ресурсы развлекательных сервисов предоставляют пользователям возможность к профессиональному гэмблингу через целевые порталы, включая казино Рльдорадо , что выполняют мировые требования надёжности.
Алгоритм активации включает внесения идентификационных параметров через безопасные SSL-соединения. Провайдеры запрашивают official подтверждение дееспособности и адреса жительства для выполнения нормативных требований.
2FA идентификация является принудительным частью современных архитектур надёжности. Игроки приобретают SMS-токены, push-алерты или используют специальные утилиты наподобие Google Authenticator.
Mirror ссылки решают проблемы geographic ограничений и DDoS-штурмов. Техническим образом реплики представляют дублированные dublicates центрального платформы с поддержанием возможностей и личных деталей.
Профессиональные участники рекомендуют поддерживать current каталоги рабочих дублей в сохранённых ссылках browser. Букмекеры рассылают updates о актуальных URL через email, Telegram-communities и смартфонные софт.
Денежные переводы через надёжные сайты гарантированы криптографическими технологиями level банковского segment. Получение финансов реализуется solely на аутентифицированные данные держателя account.
Silver Spire Store – Elegant pieces paired with friendly support made my shopping experience great.
长风少年词2026 高清古装青春陆剧 海外华人免费高清体验 AI推荐个性化观看
Новейшие игроки попадают с препятствием связи к проверенным ресурсам. Компании блокируют главные ссылки, но грамотные лаки Р±РёСЂ казино клиенты понимают о присутствии резервных платформ.
Зеркало образует точную дубликат базового платформы. Криптографические алгоритмы функционируют аналогичными. Финансовые переводы реализуются через те же сервисы.
Алгоритм заведения учётной записи через резервный ссылку предполагает классической проверки. Администраторы запрашивают документы для реализации KYC-правил. Личные параметры реализуют двухфакторную подтверждение.
Пополнительные лимиты на резервных платформах совпадают стандартным условиям. Наименьшие вклады сохраняются неизменными. Увеличивающиеся накопления интегрируются между различными порталами.
Премиальные планы работают полноценно на зеркальных площадках. Коэффициент оборота удерживает оригинальные параметры. Длительность использования поддерживается.
Сервис сопровождения анализирует заявки с дополнительных ресурсов аналогично. Мгновенный общение предоставляет беспрерывный порядок деятельности.
интернет https://krab6a.cc
Проверенные провайдеры азартных возможностей обеспечивают пользователям возможность к профессиональному гэмблингу через dedicated ресурсы, включая Вавада сайт , которые именно следуют общепринятые нормы конфиденциальности.
Схема регистрации включает заполнения идентификационных деталей через криптографические SSL-connection. Провайдеры просят предоставить официальное подтверждение возраста и места нахождения для поддержания правовых требований.
Многоуровневая идентификация является required частью актуальных платформ security. Users располагают SMS-пароли, push-notification или эксплуатируют dedicated софт по типу Google Authenticator.
Зеркальные домены нейтрализуют вопросы локальных блокировок и DDoS-штурмов. По сути mirrors представляют аналогичные копии главного портала с сохранением инструментария и индивидуальных деталей.
Skilled клиенты suggest удерживать обновлённые реестры активных mirrors в bookmark веб-клиента. Букмекеры направляют сведения о современных URL через email, Telegram-communities и смартфонные приложения.
Банковские операции через официальные площадки покрыты шифровальными системами level банковского направления. Изъятие фондов реализуется единственно на подтверждённые данные хозяина профиля.
Беттинговая отрасль являет интенсивный расширение, завлекая легионы участников. Профессиональные площадки обеспечивают безопасную пространство для пари. Детальную информацию о данных организациях можно обнаружить на Лаки Бир РІС…РѕРґ .
Аттестация выступает ключевым аспектом подбора ресурса. Лицензиаты Великобритании создают качественный проверку экономических процедур. Любая лицензированная сайт выполняет регулярные инспекции RNG-модулей.
Компьютерные параметры инновационных беттинг-платформ объединяют SSL-защиту экономического категории. Разработчики программного софта наподобие Microgaming, NetEnt, Pragmatic Play подключают сложные алгоритмы произвольных чисел.
Алгоритм валидации профиля предполагает подачи справок KYC-формата. Удостоверение, выписка о заработке, доказательство адреса — классический набор для полноценного активации.
Параллельные адреса исправляют барьеры с цензурой провайдеров. Функционирующие дубли адаптируются ежедневно техническими группами. Портативные софт регулярно оперируют качественнее веб версий.
Контроль средств устанавливает стратегическую прибыльность гемблинговых периодов. Профессиональные игроки предлагают лимитировать количество пари до 1-2% от суммарного резерва.
https://www.sociomix.com/c/ugc/best-1xbet-promo-code-2026-1xlune-bonus-130/1074531771241334
I’m often to blogging and i really appreciate your content. The article has actually peaks my interest. I am going to bookmark your web site and maintain checking for new information.
Если ищете качественный анализ темы ufc в феврале марте 2026 три недели которые встряхнут дивизионы, загляните сюда. Почитать можно здесь: https://rybalka62.ru/news/obzor-blizhajshih-sobytij-ufc-fevral-mart-2026-prognozy-na-klyuchevye-poedinki/
爱一番海外版2026 高清视频平台 全球加速 大数据AI分析
Беттинговая отрасль демонстрирует интенсивный расширение, притягивая легионы пользователей. Профессиональные порталы предоставляют безопасную атмосферу для игры. Исчерпывающую данные о этих организациях допустимо обнаружить на Вавада РІС…РѕРґ .
Аттестация выступает приоритетным критерием выбора ресурса. Контролёры Олдерни создают жёсткий проверку финансовых процедур. Отдельная сертифицированная платформа подвергается плановые инспекции RNG-механизмов.
Программные свойства передовых гемблинг-сайтов охватывают SSL-безопасность денежного категории. Производители виртуального софта вроде Microgaming, NetEnt, Pragmatic Play интегрируют комплексные системы случайных параметров.
Схема подтверждения личного кабинета предусматривает передачи удостоверений KYC-класса. ID, свидетельство о прибылях, подтверждение прописки — стандартный набор для окончательного доступа.
Параллельные URL исправляют проблемы с цензурой поставщиков. Свежие альтернативы адаптируются постоянно цифровыми группами. Смартфонные программы зачастую выполняются лучше онлайн вариантов.
Банкролл-менеджмент задаёт длительную результативность азартных раундов. Квалифицированные пользователи указывают контролировать величину ставки до 1-2% от итогового резерва.
Развлекательная область представляет быстрый подъём, манящая легионы клиентов. Грамотные платформы гарантируют надёжную атмосферу для беттинга. Полную данные о таких организациях возможно изучить на Меллстрой сайт .
Аккредитация представляет центральным показателем отбора портала. Юрисдикции Мальты создают строгий мониторинг расчётных транзакций. Каждая официальная платформа реализует плановые ревизии RNG-механизмов.
Компьютерные особенности передовых игорных домов предусматривают SSL-кодирование финансового уровня. Поставщики компьютерного ПО уровня Microgaming, NetEnt, Pragmatic Play добавляют комплексные модели хаотичных показателей.
Схема валидации личного кабинета требует направления бумаг KYC-стандарта. ID, выписка о финансах, доказательство местожительства — обычный список для окончательного входа.
Параллельные URL ликвидируют препятствия с фильтрацией компаний. Действующие копии обновляются регулярно цифровыми группами. Портативные софт нередко действуют устойчивее браузерных модификаций.
Банкролл-менеджмент создаёт стратегическую эффективность развлекательных партий. Опытные пользователи указывают сокращать сумму пари до 1-2% от общего капитала.
Надёжные площадки игровых возможностей гарантируют пользователям шанс к профессиональному азартному досугу через профильные платформы, включая казино Gold , которые точно следуют мировые нормы безопасности.
Механизм создания аккаунта требует внесения валидационных деталей через шифрованные SSL-линии. Провайдеры просят official подтверждение правоспособности и адреса нахождения для compliance юрисдикционных стандартов.
Многоуровневая аутентификация выступает необходимым компонентом актуальных платформ надёжности. Клиенты приобретают SMS-токены, push-алерты или задействуют специализированные софт наподобие Google Authenticator.
Альтернативные порталы ликвидируют сложности локальных блокировок и DDoS-штурмов. По сути mirrors являют дублированные версии основного ресурса с обеспечением опций и user сведений.
Опытные игроки призывают keeping current базы действующих mirrors в favourites браузера. Операторы направляют сведения о свежих ссылках через мейл, Telegram-communities и мобильные приложения.
Payment процедуры через официальные сайты покрыты защитными технологиями level банковского сектора. Изъятие капитала производится единственно на проверенные реквизиты хозяина account.
Нынешние клиенты имеют дело с массой технических особенностей при функционировании с официальными сайтами. Тематические источники типа Килограмм регистрация предоставляют релевантную материалы о функционировании гэмблинговых брендов.
Механизм подтверждения кабинета предполагает несколько требуемых шагов. Начальная аутентификация подразумевает отправки свидетельств верифицирующих индивидуальность. Типовой комплект подразумевает ID, лицензию водителя или международный паспорт.
Технологическая часть оформления включает использование защищенного протокола и 2FA. Опытные пользователи рекомендуют запускать полный набор доступных настроек охраны.
Запасные домены образуют идентичные реплики центрального портала с поддержанием тотального арсенала. Важнейшее выгода выражается в подобии денежных ограничений и критериев ставочных требований.
Система выявления актуальных запасных доменов фундируется на отслеживании профильных новостных лент и аффилированных платформ. Профессиональные геймеры используют виртуальные частные сети для обеспечения устойчивого связи вне зависимости от региональных барьеров.
龚俊姜武孙怡《风过留痕》2026刑侦痕迹检验悬疑陆剧,海外华人首选高清探案,细节烧脑高能,全球加速无广告AI匹配推荐。
Tag Thread Shop – The variety here is impressive and prices seem fair.
Активные альтернативные домены легальных азартных клубов на Вавада официальный сайт предоставляют постоянный вход к гемблинг ресурсам. Система клонирования формирует полноценные клоны базового портала с удержанием всех опций.
Схема создания аккаунта через зеркало в точности воспроизводит главную анкету. Начинающие участники регистрируют функционирующий email, создают стойкий код доступа и устанавливают игровую финансовый инструмент.
Аутентификация личного кабинета требует загрузки документов согласно KYC-нормам. Копия ID-карты, доказательство регистрации и карточные сведения проходят программную анализ в течение 24-72 часов.
Авторизация верифицированных игроков выполняется через типовую интерфейс с многоступенчатой верификацией. Одноразовые токены поступают на мессенджер номер или мейл.
Механизмы входящего сектора через зеркала поддерживает распространенные финансовые платформы. Visa, Mastercard, онлайн кошельки Skrill, Neteller, блокчейн-токены Bitcoin, Ethereum обрабатываются с уменьшенными сборами 0-3%.
Гемблинг ассортимент дублируется полностью включая spinning games, настольные игры, live-ведущих и максимальные награды. RTP-показатели, вариативность и условия отыгрыша остаются такими же.
Промо механизм действует подобно основному сайту. Welcome-наборы, free spins, денежный возврат и VIP-планы запускаются автоматически при выполнении установленных стандартов.
Ориентирование в области легальных ресурсов требует осознания передовых инструментов соединения. Опытные клиенты используют п»ї1xBet для добывания новейшей информации о активных адресах.
Процесс регистрации аккаунта в надежных компаниях содержит детальную аутентификацию. Актуальные операторы используют KYC-алгоритмы и AML-стандарты. Документальное сопровождение требует от 24 до 72 промежутков.
Технические методы для избежания препятствий совершенствуются синхронно с повышением правовых решений. VPN-инструменты разряда premium обеспечивают криптографию AES-256 и методы OpenVPN. Постоянство соединения критически необходима для привилегированных партий.
Запасные адреса действуют через локально рассредоточенные технические инфраструктуры. CDN-архитектуры обеспечивают быструю время ответа для азиатских игроков. Системное маршрутизация инициируется при идентификации недоступности центрального ресурса.
Денежные манипуляции в лицензированных территориях следуют четким стандартам PCI DSS. Криптовалютные операции увеличивают актуальность из-за конфиденциальности и динамике реализации.
Мобильные софт премиальных организаций совмещают биометрическую аутентификацию и push-алерты для ключевых моментов. Гибкий оформление программно подстраивается под свойства монитора.
boutique boot styles – It’s great to see such original designs gathered together.
https://buscamed.do/ad/pgs/?codigo_promocional_de_la_casa_de_apuestas_1xbet_para_el_registro.html
Athletic Bilbao vs Elche 2026 La Liga最新比分即将开踢21:00,主场毕尔巴鄂强势迎战升班马,西班牙足球比分直播实时更新。
launchly.click – Loved the layout today; clean, simple, and genuinely user-friendly overall.
In-depth analysis
commercial loans for poor credit
for statistical data.
homewellness – Fast delivery of health items that helped me stay consistent with daily wellness.
airpure arc shop – Purifiers run silently and improved air quality in my home immediately.
Передовые геймеры сталкиваются с барьером входа к сертифицированным ресурсам. Организации ограничивают базовые URL, но искушённые казино типпи игроки знают о наличии параллельных сайтов.
Дополнительный домен является полную дубликат базового сайта. Криптографические алгоритмы сохраняются идентичными. Расчётные действия выполняются через аналогичные каналы.
Технология оформления профиля через зеркальный ресурс подразумевает стандартной аутентификации. Операторы уточняют удостоверения для осуществления KYC-регламентов. Паспортные характеристики проходят двухфакторную валидацию.
Вносительные пределы на альтернативных платформах равняются главным характеристикам. Начальные беты продолжают фиксированными. Возрастающие джекпоты интегрируются между различными ссылками.
Бонусные планы выполняются целостно на резервных площадках. Множитель ставок сохраняет исходные параметры. Период действия отыгрыша остаётся прежним.
Команда сопровождения изучает тикеты с резервных ссылок равнозначно. Интерактивный разговор гарантирует 24-часовой график обслуживания.
Нынешние клиенты имеют дело с изобилием технологических тонкостей при операциях с лицензированными сайтами. Специализированные порталы типа Вавада РІС…РѕРґ обеспечивают свежую сведения о операциях игорных организаций.
Процесс валидации профиля содержит комплекс требуемых фаз. Исходная верификация предполагает загрузки свидетельств верифицирующих персону. Классический перечень включает удостоверение личности, права или международное ID.
Программная сторона открытия счета включает эксплуатацию криптографической защиты и многофакторной защиты. Опытные игроки советуют включать полный набор представленных настроек безопасности.
Альтернативные адреса представляют стопроцентные копии основного платформы с удержанием всего инструментария. Главное плюс заключается в подобии денежных границ и параметров условий прокрутки.
Система выявления функционирующих альтернативных адресов основывается на мониторинге экспертных новостных лент и связанных порталов. Экспертные клиенты применяют VPN-сервисы для формирования постоянного доступа невзирая от географических ограничений.
Поиск проверенного игрового портала в сегодняшних реалиях требует повышенного подхода к лицензионному уровню. Профессиональные участники осознают, что п»ї1xBet casino содержит свежую информацию о функционирующих площадках.
Процесс открытия счета в легальных площадках объединяет требуемую верификацию личности. KYC-требования охраняют как площадку, так и игрока от фрода. Промежуточные границы на получение денег до закрытия контроля – типичная процедура.
Цифровые препятствия на доступ к игровым сервисам преодолеваются через зеркальные URL. Доступные копии гарантируют полную производительность центрального сервиса. Платежные движения, геймплейный достижения и льготные системы остаются константными.
Финансовая безопасность оценивается качеством задействованных платежных систем. SSL-криптография, PCI DSS подтверждение и дополнительная проверка формируют защищенный контур охраны.
Интерактивная набор сертифицированных заведений содержит автоматы от известных разработчиков. RTP-значения, вариативность и статистические принципы претерпевают беспристрастную аудит в аккредитованных учреждениях.
Системы стимулирования в профессиональных площадках строятся на четких требованиях ставок. Проигрыш x35-40 признается нормальным для машина-подарков, в то время как карточные забавы засчитываются в подсчет с уменьшенным коэффициентом.
Развлекательная сфера отображает динамичный развитие, манящая тысячи клиентов. Грамотные сайты обеспечивают безопасную атмосферу для игры. Развёрнутую материалы о данных операторах возможно изучить на казино Gold .
Сертификация составляет главным показателем определения платформы. Юрисдикции Кюрасао гарантируют тщательный аудит денежных манипуляций. Всякая сертифицированная платформа выполняет регулярные аудиты RNG-генераторов.
Компьютерные аспекты новейших беттинг-платформ объединяют SSL-безопасность денежного класса. Создатели софтового софта вроде Microgaming, NetEnt, Pragmatic Play внедряют многоуровневые механизмы рандомных чисел.
Алгоритм аутентификации личного кабинета включает направления бумаг KYC-класса. ID, подтверждение о средствах, доказательство регистрации — стандартный набор для финального активации.
Параллельные домены устраняют трудности с фильтрацией операторов. Актуальные дубли адаптируются систематически техническими командами. Портативные приложения регулярно функционируют стабильнее сетевых версий.
Контроль средств определяет стратегическую результативность азартных партий. Квалифицированные пользователи предлагают ограничивать количество пари до 1-2% от полного фонда.
杨紫《家业》2026古装经商大女主励志剧,海外华人高清非遗题材热播,创业奋斗燃到爆,全球加速AI推荐2026必追。
проверить сайт https://krab6at-cc.com/
the Revenue Roost collection – Tools and advice that make generating online income simple.
rankora.click – Overall, professional vibe here; trustworthy, polished, and pleasantly minimal throughout.
Актуальные дублирующие порталы лицензированных гемблинг-платформ на Меллстрой предоставляют постоянный доступ к игровым системам. Технология реплицирования генерирует точные версии корневого веб-площадки с фиксацией всех возможностей.
Алгоритм активации через альтернативный домен в точности воспроизводит основную заявку. Новые участники заполняют валидный email, генерируют сложный пароль и фиксируют операционную курренси.
Подтверждение счета содержит загрузки документов по KYC-требованиям. Скан ID-карты, свидетельство регистрации и карточные сведения проверяются через программную верификацию в течение 24-72 часа.
Аутентификация зарегистрированных игроков осуществляется через базовую панель с расширенной верификацией. Временные токены поступают на сотовый аппарат или e-mail адрес.
Функционал финансового модуля через зеркала предлагает востребованные денежные сервисы. Visa, Mastercard, веб хранилища Skrill, Neteller, виртуальные монеты Bitcoin, Ethereum реализуются с низкими взносами 0-3%.
Gaming коллекция клонируется на сто процентов включая spinning games, карточные геймплей, live-операторов и джекпоты. RTP-показатели, изменчивость и проигрыш поддерживаются идентичными.
Акционная программа выполняется подобно главному ресурсу. Welcome-наборы, бесплатные вращения, refund и VIP-схемы включаются алгоритмически при соблюдении установленных критериев.
Watch Warden online – Reliable platform with well-written and informative product details.
Определение безопасного betting заведения в нынешних условиях предполагает повышенного рассмотрения к законному статусу. Опытные клиенты учитывают, что Лаки Бир казино демонстрирует актуальную данные о действующих ресурсах.
Процедура открытия счета в официальных платформах объединяет принудительную подтверждение идентичности. KYC-требования защищают как площадку, так и игрока от фрода. Временные пределы на получение капитала до завершения проверки – нормальная подход.
Технические запреты на вход к гемблинг площадкам решаются через параллельные ссылки. Действующие дубликаты предоставляют стопроцентную функциональность главного ресурса. Банковские процедуры, азартный результаты и привилегированные предложения остаются постоянными.
Материальная стабильность выражается степенью используемых платежных способов. SSL-шифрование, PCI DSS лицензирование и многоуровневая подтверждение создают прочный заслон обороны.
Развлекательная коллекция сертифицированных площадок охватывает слоты от лидирующих студий. RTP-показатели, дисперсия и алгоритмические модели испытывают беспристрастную проверку в утвержденных учреждениях.
Программы поощрения в достойных казино базируются на четких критериях проигрыша. Требования x35-40 оценивается разумным для спин-привилегий, в то время как традиционные развлечения идут в подсчет с минимальным фактором.
late hours outlet – Exciting ambiance and interesting items that make browsing enjoyable.
Подбор надежного игорного заведения подразумевает серьезного анализа правовых свидетельств. Инновационные сайты Рльдорадо казино обеспечивают геймерам максимальную данные о действующих лицензиях.
Система получения доступа охватывает определенное количество ключевых шагов валидации. Представители требуют документы, засвидетельствующие личность и совершеннолетие. Традиционный KYC-порядок составляет от 24 до 72 часов.
Финансовое планирование стартует с фиксации лимитов на взносы. Искусные пользователи советуют внедрять установку 5% от общего азартного резерва на индивидуальную раунд.
Программные блокировки администраторов обязывают эксплуатировать запасные пути. Альтернативы оберегают безусловную производительность основного платформы, включая хронологию сделок и гемблинг успех.
Передовые платежные инструменты гарантируют моментальные взносы через блокчейн аккаунты. Bitcoin, Ethereum и фиксированные активы гарантируют приватность и минимальные комиссии. Длительность обработки получений насчитывает 10-30 промежутков.
Алгоритмы приверженности предусматривают иерархические ранги с нарастающим бонусом. VIP-представители гарантируют индивидуальные награды, расширенные пределы и преимущественную техподдержку.
the cinnamon boutique – Fragrant cinnamon sticks that brought out the best in my baking.
Гемблинговая ниша отображает динамичный рост, привлекая миллионы геймеров. Квалифицированные сайты гарантируют защищённую пространство для развлечений. Детальную данные о данных провайдерах возможно отыскать на казино Гризли .
Легализация представляет основным фактором определения портала. Юрисдикции Кюрасао создают строгий проверку финансовых транзакций. Каждая лицензированная площадка проходит постоянные аудиты RNG-механизмов.
IT свойства актуальных беттинг-платформ объединяют SSL-криптографию расчётного ранга. Создатели компьютерного материала типа Microgaming, NetEnt, Pragmatic Play внедряют усовершенствованные алгоритмы хаотичных значений.
Процесс подтверждения счёта требует направления свидетельств KYC-стандарта. Свидетельство, выписка о средствах, подтверждение проживания — стандартный перечень для финального входа.
Альтернативные URL убирают сложности с блокировками операторов. Функционирующие варианты модифицируются систематически техническими специалистами. Портативные приложения обычно функционируют качественнее веб редакций.
Финансовая дисциплина определяет перспективную доходность беттинговых партий. Квалифицированные геймеры предлагают урезать сумму пари до 1-2% от совокупного банкролла.
Определение проверенного развлекательного портала подразумевает глубокого исследования юридических бумаг. Современные порталы казино 1хбет дают игрокам полную информацию о своих лицензиях.
Процесс оформления счета включает различные требуемых этапов верификации. Администраторы требуют документы, устанавливающие личность и совершеннолетие. Классический KYC-алгоритм требует от 24 до 72 интервалов.
Банкролл-менеджмент запускается с назначения рамок на пополнения. Опытные игроки рекомендуют внедрять принцип 5% от общего игорного фонда на одну сессию.
Цифровые барьеры операторов побуждают задействовать запасные пути. Альтернативы сохраняют максимальную активность основного сайта, подразумевая журнал сделок и казино прогресс.
Инновационные денежные системы гарантируют мгновенные вклады через электронные хранилища. Bitcoin, Ethereum и стейблкоины предоставляют скрытность и минимальные отчисления. Время обработки изъятий достигает 10-30 периодов.
Схемы преданности подразумевают иерархические категории с нарастающим бонусом. VIP-представители дают уникальные поощрения, улучшенные границы и приоритетную помощь.
Проверенные платформы развлекательных возможностей предоставляют геймерам возможность к элитному азартному досугу через целевые порталы, включая Lucky Bear casino , которые точно придерживаются международные критерии безопасности.
Последовательность создания аккаунта necessita внесения валидационных данных через безопасные SSL-каналы. Провайдеры demanded нотариальное verification дееспособности и локации регистрации для исполнения правовых критериев.
2FA проверка является обязательным составляющей современных систем надёжности. Пользователи обретают SMS-шифры, push-алерты или внедряют специализированные tools по типу Google Authenticator.
Mirror URL устраняют вопросы локальных блокировок и DDoS-воздействий. Технически дубли образуют копийные версии центрального ресурса с поддержанием функциональности и user параметров.
Опытные игроки предлагают поддерживать свежие базы рабочих дублей в закладках browser. Операторы передают информацию о fresh адресах через e-mail, Telegram-сообщества и смартфонные apps.
Платёжные транзакции через надёжные площадки защищены криптографическими системами стандарта банковского направления. Изъятие капитала выполняется исключительно на проверенные реквизиты владельца account.
狼队2-2绝平阿森纳2026英超最新比分,主帅称感觉像胜利,足球比分新闻枪手领先优势缩小。
Adventure Aisle Store – I constantly discover fresh inspiration for future trips here.
this creative pattern corner – Amazing patterns that fit my project perfectly.
allergysmart – High-quality items that made daily allergy management easier.
Функционирующие дублирующие порталы проверенных азартных клубов на п»ї1хбет казино дают непрерывный соединение к игровым порталам. Система реплицирования создает аналогичные клоны корневого веб-площадки с консервацией всех функций.
Схема регистрации через резервную ссылку на сто процентов дублирует базовую шаблон. Свежие пользователи указывают действующий email, устанавливают безопасный пароль и устанавливают операционную денежную единицу.
Подтверждение счета содержит передачи справок по KYC-требованиям. Фото водительских прав, верификация резиденции и денежные сведения проходят цифровую контроль в течение 24-72 ч.
Логин существующих геймеров осуществляется через стандартную интерфейс с усиленной проверкой. Временные токены доставляются на телефонный номер или мейл.
Механизмы пополнительного модуля через дублирующие порталы включает топовые денежные платформы. Visa, Mastercard, цифровые хранилища Skrill, Neteller, виртуальные монеты Bitcoin, Ethereum процессируются с минимальными сборами 0-3%.
Азартная библиотека клонируется абсолютно включая машины, традиционные игры, live-хостов и мегавыигрыши. RTP-индикаторы, дисперсия и условия отыгрыша фиксируются неизменными.
Бонусная схема функционирует идентично главному ресурсу. Welcome-бандлы, безвозмездные спины, refund и VIP-курсы включаются программно при исполнении определенных условий.
Отбор безопасного гемблинг портала в современных границах нуждается особого анализа к правовому уровню. Квалифицированные игроки знают, что Вавада зеркало предоставляет последнюю материалы о активных площадках.
Процедура открытия счета в проверенных сервисах предусматривает требуемую аутентификацию личности. KYC-требования оберегают как заведение, так и геймера от фрода. Кратковременные границы на снятие капитала до завершения валидации – стандартная методика.
Технические ограничения на соединение к азартным порталам преодолеваются через зеркальные адреса. Активные дубликаты гарантируют всестороннюю функциональность базового сайта. Денежные транзакции, игровой достижения и бонусные схемы поддерживаются устойчивыми.
Экономическая гарантированность характеризуется критерием применяемых финансовых систем. SSL-криптография, PCI DSS лицензирование и многоуровневая идентификация гарантируют защищенный контур защиты.
Игровая набор проверенных провайдеров включает слоты от лидирующих студий. RTP-индексы, колебания и вероятностные системы претерпевают внешнюю сертификацию в утвержденных организациях.
Планы стимулирования в профессиональных сервисах строятся на понятных параметрах активности. Вейджер x35-40 считается адекватным для автомат-поощрений, в то время как традиционные активности включаются в счет с минимальным коэффициентом.
Отбор честного гемблинг портала требует детального анализа лицензионных бумаг. Новые платформы аква казино предоставляют пользователям стопроцентную детали о своих лицензиях.
Процедура регистрации содержит множество необходимых ступеней валидации. Операторы истребуют справки, засвидетельствующие индивидуальность и возраст. Традиционный KYC-порядок продолжается от 24 до 72 часов.
Распоряжение капиталом стартует с определения пределов на пополнения. Искусные клиенты рекомендуют эксплуатировать закон 5% от итогового игорного капитала на отдельную раунд.
Электронные препятствия администраторов вынуждают внедрять резервные адреса. Альтернативы удерживают безусловную работоспособность первичного портала, подразумевая архив операций и игровой продвижение.
Инновационные расчетные способы гарантируют оперативные взносы через блокчейн кошельки. Bitcoin, Ethereum и стабильные валюты предоставляют анонимность и мизерные платежи. Время обработки изъятий равно 10-30 минут.
Планы постоянства предусматривают ступенчатые уровни с нарастающим компенсацией. VIP-менеджеры предлагают эксклюзивные награды, увеличенные границы и опережающую обслуживание.
This casino https://freeenergy.pl/ offers a solid mix of popular slots and live tables. The platform feels well-designed, promotions are attractive, and support is responsive, which adds confidence.
Поиск качественного гемблинг оператора в сегодняшних обстоятельствах подразумевает специального изучения к правовому состоянию. Профессиональные участники знают, что mad casino отображает свежую факты о доступных сервисах.
Механизм оформления профиля в лицензированных площадках содержит необходимую верификацию персональных данных. KYC-стандарты обеспечивают как казино, так и игрока от мошенничества. Промежуточные рамки на снятие капитала до выполнения проверки – нормальная процедура.
Цифровые блокировки на соединение к азартным сервисам устраняются через зеркальные порталы. Доступные зеркала гарантируют стопроцентную возможности базового ресурса. Платежные операции, развлекательный продвижение и привилегированные планы сохраняются стабильными.
Капитальная гарантированность измеряется критерием эксплуатируемых финансовых способов. SSL-кодирование, PCI DSS валидация и усиленная подтверждение обеспечивают прочный барьер охраны.
Азартная библиотека легальных операторов охватывает слоты от топовых студий. RTP-индексы, изменчивость и статистические системы подвергаются объективную проверку в признанных организациях.
Системы стимулирования в надежных сервисах базируются на открытых требованиях ставок. Отыгрыш x35-40 характеризуется нормальным для автомат-поощрений, в то время как карточные состязания включаются в калькуляцию с пониженным фактором.
Отбор достойного игрового заведения в актуальных границах требует особого анализа к лицензионному статусу. Знающие игроки знают, что п»ї1xBet казино демонстрирует современную информацию о работающих площадках.
Процесс регистрации в лицензированных операторах включает принудительную валидацию персональных данных. KYC-требования защищают как заведение, так и клиента от фрода. Кратковременные ограничения на перечисление капитала до окончания контроля – обычная методика.
Программные барьеры на подключение к betting сайтам нейтрализуются через резервные порталы. Активные отражения обеспечивают абсолютную возможности основного платформы. Денежные движения, геймплейный продвижение и бонусные предложения поддерживаются устойчивыми.
Финансовая защищенность определяется уровнем используемых платежных систем. SSL-защита, PCI DSS аттестация и дополнительная проверка гарантируют прочный барьер обороны.
Азартная каталог лицензированных заведений предоставляет слоты от главных студий. RTP-значения, изменчивость и математические системы подвергаются независимую сертификацию в одобренных центрах.
Программы вознаграждения в надежных операторах строятся на понятных условиях проигрыша. Вейджер x35-40 характеризуется приемлемым для автомат-поощрений, в то время как настольные состязания учитываются в подсчет с уменьшенным фактором.
Определение надежного развлекательного оператора нуждается серьезного рассмотрения юридических свидетельств. Современные платформы Меллстрой официальный сайт предлагают игрокам безусловную детали о своих санкциях.
Механизм открытия аккаунта включает множество ключевых фаз верификации. Операторы требуют документы, доказывающие персону и возраст. Обычный KYC-регламент составляет от 24 до 72 промежутков.
Финансовое планирование начинается с фиксации рамок на инвестиции. Опытные участники советуют внедрять закон 5% от общего игорного капитала на индивидуальную заход.
Цифровые запреты поставщиков вынуждают применять резервные домены. Клоны хранят абсолютную эффективность главного сайта, предусматривая архив платежей и развлекательный прогресс.
Инновационные финансовые системы обеспечивают моментальные депозиты через блокчейн счета. Bitcoin, Ethereum и фиксированные активы поддерживают приватность и крошечные сборы. Период обработки изъятий насчитывает 10-30 интервалов.
Схемы верности охватывают ступенчатые уровни с прогрессивным кэшбэком. VIP-кураторы обеспечивают уникальные награды, улучшенные ограничения и первоочередную помощь.
интернет https://krab6a.cc/
mailerboost.click – Mobile version looks perfect; no glitches, fast scrolling, crisp text.
monetly.click – Mobile version looks perfect; no glitches, fast scrolling, crisp text.
harbornutplus – Nuts came on time, crunchy and delicious, perfect for cooking or snacking anytime.
Bayern boss Kompany calls Leroy Sané “the funniest guy in the squad” – 2026 football news gem – Bundesliga scores + vibes!
Развлекательная отрасль показывает интенсивный рост, привлекая тысячи геймеров. Грамотные площадки предоставляют безопасную атмосферу для ставок. Развёрнутую факты о этих организациях можно отыскать на казино Клубника .
Аккредитация представляет центральным фактором выбора сайта. Контролёры Олдерни дают тщательный проверку финансовых операций. Любая сертифицированная площадка проходит регулярные контроли RNG-механизмов.
Компьютерные свойства передовых гемблинг-сайтов включают SSL-криптографию расчётного уровня. Создатели виртуального материала класса Microgaming, NetEnt, Pragmatic Play интегрируют усовершенствованные механизмы хаотичных параметров.
Процедура верификации личного кабинета включает предоставления документов KYC-класса. Паспорт, документ о прибылях, верификация регистрации — обычный набор для окончательного активации.
Дублирующие домены исправляют барьеры с блокировками провайдеров. Действующие копии изменяются каждый день IT командами. Мобильные приложения регулярно работают стабильнее онлайн вариантов.
Распределение капитала формирует перспективную прибыльность игровых партий. Профессиональные участники предлагают урезать объём пари до 1-2% от общего бюджета.
здесь https://krab6at-cc.com
Надёжные операторы игровых сервисов обеспечивают пользователям шанс к качественному игровому процессу через специализированные сайты, включая лаки Р±РёСЂ казино , которые точно соблюдают глобальные стандарты защиты.
Процедура создания аккаунта подразумевает указания верификационных параметров через encrypted SSL-connection. Операторы просят official подтверждение совершеннолетия и места residence для выполнения правовых норм.
Двухфакторная верификация является обязательным компонентом передовых платформ защиты. Клиенты получают SMS-ключи, push-алерты или внедряют специализированные софт вроде Google Authenticator.
Mirror порталы решают препятствия territorial блокировок и DDoS-штурмов. Фактически реплики формируют дублированные клоны primary портала с maintaining функциональности и личных сведений.
Экспертные пользователи suggest хранить новейшие каталоги working альтернатив в сохранённых ссылках browser. Management доставляют сведения о актуальных ссылках через почтовые сервисы, Telegram-сообщества и мобильные приложения.
Денежные movements через официальные платформы обеспечены encryption протоколами уровня банковского segment. Снятие финансов осуществляется единственно на аутентифицированные реквизиты владельца личного кабинета.
Нынешние участники встречаются с сложностью подключения к лицензированным сайтам. Поставщики закрывают главные домены, но искушённые казино Lucky Bear пользователи знают о функционировании дублирующих ресурсов.
Параллельный портал представляет абсолютную копию главного портала. Криптографические алгоритмы работают неизменными. Расчётные процедуры выполняются через равнозначные системы.
Алгоритм регистрации через резервный домен требует привычной валидации. Операторы запрашивают справки для исполнения KYC-стандартов. Паспортные данные выполняют расширенную валидацию.
Пополнительные лимиты на резервных порталах идентичны основным характеристикам. Низшие взносы функционируют постоянными. Растущие накопления согласовываются между многочисленными ссылками.
Премиальные программы функционируют целостно на альтернативных порталах. Вейджер гарантирует первоначальные показатели. Длительность отыгрыша остаётся прежним.
Департамент ассистирования обрабатывает запросы с дополнительных ресурсов равнозначно. Прямой чат осуществляет постоянный график оперирования.
生命树2026 海外华人高原守护剧 杨紫胡歌主演 高清燃哭剧情 AI匹配
Актуальные игроки сталкиваются с огромным количеством технических аспектов при деятельности с официальными сайтами. Профильные платформы типа Вавада РІС…РѕРґ дают актуальную сведения о функционировании игорных организаций.
Процесс верификации учетной записи предполагает набор неотъемлемых этапов. Исходная аутентификация подразумевает отправки удостоверений подтверждающих персону. Классический список предполагает свидетельство, автоудостоверение или международный паспорт.
Программная элемент открытия счета охватывает внедрение зашифрованного канала и 2FA. Экспертные участники советуют включать весь комплекс представленных возможностей обеспечения.
Резервные ссылки составляют полные клоны основного портала с сохранением полного функционала. Ключевое плюс содержится в схожести денежных границ и условий отыгрыша.
Механизм поиска активных зеркал фундируется на наблюдении экспертных информационных каналов и аффилированных сайтов. Профессиональные геймеры применяют виртуальные частные сети для предоставления постоянного соединения безотносительно от географических блокировок.
Wow, incredible weblog structure! How long have you ever been running
a blog for? you made blogging glance easy. The whole look of your website is great, as neatly
as the content!
Here is my webpage; slon5 cc
посмотреть в этом разделе https://krab6at-cc.com
Проверенные площадки развлекательных предложений гарантируют игрокам возможность к высококлассному времяпрепровождению через тематические платформы, включая Mellstroy Game казино , которые специально исполняют общепринятые регламенты защиты.
Схема открытия счёта necessita ввода идентификационных сведений через криптографические SSL-линии. Провайдеры требуют письменное доказательство совершеннолетия и территории проживания для compliance нормативных стандартов.
Многоуровневая authentication выступает required компонентом передовых solutions защиты. Users имеют SMS-шифры, push-алерты или используют dedicated софт типа Google Authenticator.
Резервные ссылки устраняют трудности territorial барьеров и DDoS-воздействий. По сути зеркала образуют копийные клоны primary домена с сохранением возможностей и user деталей.
Экспертные геймеры suggest удерживать актуальные реестры функционирующих копий в bookmark browser. Букмекеры направляют информацию о fresh доменах через мейл, Telegram-сообщества и телефонные apps.
Денежные movements через лицензионные сайты обеспечены шифровальными технологиями уровня банковского сектора. Extraction денег происходит лишь на верифицированные wallets обладателя личного кабинета.
almondessence – Freshly packaged snacks arrived safely and were delicious.
Ориентирование в мире сертифицированных сайтов включает осознания современных инструментов соединения. Умелые игроки внедряют Вавада казино для обретения свежей фактов о активных ссылках.
Схема формирования счета в надежных компаниях подразумевает детальную верификацию. Современные поставщики задействуют KYC-системы и AML-требования. Документальная процедура требует от 24 до 72 промежутков.
Технические методы для прохождения блокировок совершенствуются параллельно с интенсификацией законодательных мер. VPN-сервисы уровня premium дают кодирование AES-256 и протоколы OpenVPN. Устойчивость канала принципиально существенна для премиальных заходов.
Запасные платформы функционируют через пространственно распределенные IT системы. CDN-комплексы обеспечивают быструю время ответа для азиатских клиентов. Системное переключение активируется при детекции препятствия центрального ресурса.
Экономические переводы в лицензированных юрисдикциях соответствуют определенным правилам PCI DSS. Криптовалютные транзакции набирают признание благодаря скрытности и скорости процессинга.
Переносные утилиты премиальных компаний совмещают отпечатковую подтверждение и push-извещения для принципиальных эпизодов. Изменяемый дизайн автономно изменяется под параметры матрицы.
this digital growth hub – Great strategies and products for expanding web-based earnings.
电影网站推荐2026 海外华人 中英双语 全球加速
freightfable online – My shipping supplies were delivered quickly and helped keep everything organized.
Передовые пользователи обталкиваются с изобилием технологических особенностей при процессах с официальными сайтами. Профильные порталы типа лаки Р±РёСЂ казино поставляют свежую данные о деятельности азартных операторов.
Система подтверждения кабинета включает набор требуемых уровней. Базовая верификация требует предоставления справок удостоверяющих гражданство. Обычный набор охватывает удостоверение личности, права или внешний паспорт.
Программная часть регистрации предполагает задействование зашифрованного канала и многофакторной защиты. Опытные участники подсказывают активировать максимум предложенных возможностей секьюрити.
Альтернативные адреса образуют полные отражения базового сайта с хранением комплексного инструментария. Важнейшее преимущество выражается в тождественности денежных пределов и условий вейджера.
Механизм нахождения активных зеркал основывается на мониторинге экспертных информационных каналов и аффилированных сайтов. Опытные пользователи применяют анонимайзеры для предоставления стабильного входа безотносительно от территориальных лимитов.
Развлекательная ниша представляет интенсивный подъём, притягивая тысячи геймеров. Грамотные порталы предоставляют надёжную условия для развлечений. Исчерпывающую сведения о подобных организациях реально обнаружить на Либет казино .
Лицензирование представляет ключевым фактором селекции портала. Регуляторы Великобритании дают жёсткий контроль расчётных действий. Конкретная легальная портал выполняет регулярные контроли RNG-модулей.
Компьютерные характеристики актуальных беттинг-платформ объединяют SSL-шифрование денежного категории. Поставщики компьютерного продукта вроде Microgaming, NetEnt, Pragmatic Play интегрируют комплексные алгоритмы рандомных значений.
Схема подтверждения личного кабинета подразумевает представления документов KYC-стандарта. Паспорт, выписка о доходах, верификация местожительства — типичный пакет для полноценного подключения.
Параллельные ссылки исправляют сложности с цензурой операторов. Функционирующие копии модифицируются систематически IT службами. Портативные программы часто работают надёжнее браузерных редакций.
Банкролл-менеджмент формирует стратегическую эффективность беттинговых периодов. Грамотные пользователи указывают урезать величину вейджера до 1-2% от совокупного банкролла.
digestivedock nutrition – Health products arrived on time and provided noticeable results.
Подробнее https://krab6a.cc/
Следующая страница https://krab6a.cc
Актуальные платформы беттинг игр дают беттерам подключение к профессиональному развлечениям через защищенные Вавада регистрация системы. Сертифицированная работа нуждается соблюдения жестких законодательных положений.
Механизм оформления игрового аккаунта включает подтверждение индивидуальных реквизитов. Провайдеры внедряют углубленные процедуры KYC и AML для пресечения фродовых финансовых действий.
Технические платформы передовых гемблинг платформ работают на зашифрованных дата-центрах с SSL протоколами. Геоблокировка заставляет владельцев организовывать альтернативные ссылки.
Зеркальные порталы являют собой эквивалентные версии основного портала с поддержанием всех возможностей и сведений. Пользователи достигают устойчивый связь к депозиту, развлекательной отчетности и индивидуальным конфигурациям.
Платежные процедуры осуществляются через встроенные финансовые сервисы. Границы на пополнения и получения регулируются в соответствии с регуляторными требованиями и индивидуальными нормами снижения потерь.
Компетентные пользователи настаивают проверять положение аккредитации через контролирующие списки игорных органов. Имиджевые критерии содержат ранги на специализированных сайтах и мнения настоящих беттеров.
Беттинговая сфера являет динамичный рост, заинтересовывая тысячи участников. Экспертные сайты дают стабильную условия для беттинга. Детальную информацию о указанных операторах реально получить на Меллстрой официальный сайт .
Лицензирование представляет приоритетным показателем выбора ресурса. Юрисдикции Великобритании создают строгий проверку расчётных операций. Отдельная легальная сайт реализует периодические контроли RNG-механизмов.
Компьютерные особенности новейших беттинг-платформ содержат SSL-защиту расчётного класса. Поставщики цифрового обеспечения уровня Microgaming, NetEnt, Pragmatic Play интегрируют продвинутые модели рандомных показателей.
Схема подтверждения профиля подразумевает представления справок KYC-формата. ID, справка о доходах, верификация адреса — базовый комплект для окончательного входа.
Зеркальные домены решают препятствия с запретами провайдеров. Актуальные дубли обновляются систематически IT отделами. Смартфонные софт нередко действуют надёжнее онлайн версий.
Контроль средств формирует стратегическую эффективность игровых партий. Профессиональные геймеры настаивают лимитировать сумму депозита до 1-2% от совокупного капитала.
Hello! This is kind of off topic but I need some help from an established blog.
Is it very difficult to set up your own blog? I’m not very
techincal but I can figure things out pretty fast. I’m thinking about setting up my
own but I’m not sure where to start. Do you have any ideas or suggestions?
Cheers
my web site slon1 at
Онлайн покер сайт покерок — турниры с крупными гарантиями, кеш-игры и специальные предложения для игроков. Обзоры форматов и условий участия.
Перемещение в сфере проверенных ресурсов предполагает знания новых способов соединения. Умелые геймеры эксплуатируют п»ї1хбет РІС…РѕРґ для добывания современной материалов о работающих ссылках.
Процедура создания счета в официальных учреждениях подразумевает комплексную верификацию. Новейшие организации задействуют KYC-системы и AML-нормы. Оформление документов отнимает от 24 до 72 часов.
Программные методы для избежания ограничений эволюционируют сообща с повышением юридических инициатив. VPN-службы категории premium предоставляют шифрование AES-256 и протоколы OpenVPN. Надежность связи fundamentally существенна для VIP игровых периодов.
Запасные ресурсы выполняют задачи через пространственно разнесенные технические мощности. CDN-комплексы осуществляют быструю время ответа для международных пользователей. Техническое редирект активируется при идентификации барьера первичного портала.
Экономические переводы в проверенных регионах соответствуют строгим правилам PCI DSS. Блокчейн платежи увеличивают востребованность из-за скрытности и скорости процессинга.
Мобильные клиенты лучших брендов объединяют голосовую подтверждение и push-извещения для принципиальных ситуаций. Модифицируемый интерфейс программно изменяется под свойства матрицы.
Нужны казино бонусы? промокоды казино — бонусы за регистрацию и пополнение счета. Обзоры предложений и подробные правила использования кодов.
Новейшие гемблеры оказываются с проблемой соединения к проверенным площадкам. Компании ограничивают основные порталы, но знающие Vavada зеркало клиенты учитывают о наличии альтернативных платформ.
Резервная ссылка образует абсолютную дубликат первичного платформы. Протоколы шифрования работают аналогичными. Финансовые действия производятся через равнозначные механизмы.
Методика заведения учётной записи через зеркальный ссылку включает привычной верификации. Администраторы выясняют свидетельства для исполнения KYC-стандартов. Идентификационные параметры выполняют расширенную проверку.
Финансовые ограничения на параллельных ресурсах идентичны первичным характеристикам. Минимальные ставки функционируют неизменными. Накопительные накопления координируются между разными порталами.
Поощрительные программы выполняются завершённо на параллельных порталах. Вейджер обеспечивает базовые цифры. Длительность отыгрыша остаётся прежним.
Сервис обслуживания анализирует запросы с резервных ресурсов аналогично. Онлайн общение обеспечивает непрерывный расписание деятельности.
https://clubgti.com/wp-includes/articles/?1xbet_promokod_na_freebet.html
https://cascadeclimbers.com/content/pgs/888starz_promo_code_for_registration.html
https://justinekeptcalmandwentvegan.com/wp-content/pages/code-promo-1win-bonus-500.html
For quick
Loan today near me
for presentation slides.
Ориентирование в мире легальных сайтов нуждается понимания актуальных решений авторизации. Продвинутые клиенты эксплуатируют п»ї1xBet для получения релевантной данных о работающих путях.
Процедура оформления профиля в сертифицированных заведениях подразумевает сложную верификацию. Новейшие провайдеры используют KYC-системы и AML-критерии. Бумажная работа занимает от 24 до 72 промежутков.
Программные решения для минования ограничений совершенствуются параллельно с интенсификацией правовых инициатив. VPN-решения типа premium гарантируют защиту AES-256 и стандарты OpenVPN. Непрерывность подключения fundamentally актуальна для высокоролловых сессий.
Альтернативные ресурсы выполняют задачи через географически разнесенные цифровые мощности. CDN-комплексы предоставляют сокращенную отклик для глобальных пользователей. Цифровое роутинг запускается при выявлении недоступности главного сайта.
Платежные переводы в официальных зонах подчиняются четким правилам PCI DSS. Крипто транзакции увеличивают востребованность благодаря скрытности и оперативности процессинга.
Планшетные программы элитных провайдеров содержат лицевую авторизацию и push-сообщения для ключевых эпизодов. Настраиваемый дизайн самостоятельно корректируется под свойства монитора.
https://sermonquotes.com/news/?code-promo-22bet.html
Гемблинговая ниша отображает быстрый прогресс, заинтересовывая тысячи игроков. Опытные ресурсы предоставляют качественную атмосферу для развлечений. Полную данные о таких провайдерах возможно обнаружить на Lucky Bear зеркало .
Аккредитация представляет основным фактором определения сайта. Юрисдикции Гибралтара дают качественный аудит денежных операций. Отдельная легальная площадка осуществляет систематические ревизии RNG-алгоритмов.
IT параметры передовых гемблинг-сайтов объединяют SSL-кодирование экономического уровня. Создатели цифрового ПО наподобие Microgaming, NetEnt, Pragmatic Play интегрируют сложные алгоритмы хаотичных значений.
Процесс аутентификации учётной записи предполагает предоставления бумаг KYC-класса. ID, выписка о заработке, удостоверение адреса — типичный комплект для завершённого авторизации.
Резервные ссылки ликвидируют проблемы с блокировками провайдеров. Действующие дубли адаптируются ежедневно IT специалистами. Карманные программы обычно работают надёжнее онлайн форматов.
Управление банкроллом определяет длительную результативность игровых циклов. Квалифицированные участники указывают контролировать величину пари до 1-2% от совокупного капитала.
this innovation marketplace – A reliable source of supplies and tips for creators.
the online Cypress corner – Browsing was smooth and my order arrived sooner than planned.
Hello there! Do you use Twitter? I’d like to follow you if that would be okay.
I’m absolutely enjoying your blog and look forward to new posts.
Visit my webpage :: Businesses for sale
https://didichat.ru/
https://exclusive-promo-code.com/megapari-promo-code.html
Warehouse Wave marketplace – Layout is simple and browsing is fast and smooth.
Официальные операторы развлекательных предложений oferuja участникам возможность к профессиональному развлечениям через целевые домены, включая Вавада сайт , что придерживаются мировые нормы безопасности.
Схема оформления профиля подразумевает заполнения проверочных данных через безопасные SSL-каналы. Менеджмент требуют документальное доказательство age verification и места регистрации для соблюдения правовых требований.
2FA идентификация становится необходимым компонентом новейших платформ security. Пользователи получают SMS-токены, push-notification или применяют специализированные утилиты по типу Google Authenticator.
Дублирующие адреса нейтрализуют препятствия географических запретов и DDoS-нападений. По сути копии составляют дублированные копии центрального домена с сохранением возможностей и индивидуальных информации.
Опытные клиенты suggest хранить свежие перечни working mirrors в bookmark браузера. Букмекеры рассылают обновления о fresh адресах через электронную почту, Telegram-communities и портативные утилиты.
Платёжные операции через legal площадки защищены защитными methods стандарта банковского индустрии. Изъятие финансов выполняется исключительно на проверенные счета обладателя личного кабинета.
herbdelights – Items arrived perfectly and added amazing flavor to my meals.
Легальные площадки игровых опций обеспечивают геймерам доступ к высококлассному гэмблингу через тематические сайты, включая п»ї1xBet казино , которые выполняют международные регламенты безопасности.
Механизм оформления профиля включает внесения authentication данных через encrypted SSL-протоколы. Администрация запрашивают official доказательство совершеннолетия и территории нахождения для исполнения нормативных стандартов.
Двухфакторная authentication представляет required составляющей современных архитектур надёжности. Участники обретают SMS-шифры, push-notification или задействуют targeted приложения наподобие Google Authenticator.
Альтернативные ссылки преодолевают трудности локальных блокировок и DDoS-штурмов. Техническим образом mirrors являют идентичные версии центрального портала с maintaining опций и пользовательских информации.
Skilled игроки предлагают удерживать current каталоги функционирующих mirrors в избранном веб-клиента. Букмекеры отправляют обновления о новых адресах через электронную почту, Telegram-сообщества и mobile приложения.
Денежные транзакции через проверенные сайты обеспечены шифровальными технологиями level банковского segment. Extraction капитала выполняется лишь на подтверждённые данные хозяина account.
Thanks for sharing your thoughts about nettside uten salg for rørlegger.
Regards
江疏影佟大为《夜色正浓》2026都市婚姻职场情感剧,海外华人无广告高清观看,真实婚姻探讨引发共鸣,全球加速热播更新中。
七王国的骑士第一季2026 海外华人权游衍生 高清史诗冒险 HBO高清
Hi there to all, it’s genuinely a nice business for sale me to pay a quick visit this website, it includes
helpful Information.
Новейшие геймеры встречаются с затруднением доступа к проверенным ресурсам. Компании ограничивают базовые домены, но грамотные казино Lucky Bear посетители учитывают о функционировании зеркальных платформ.
Резервная ссылка образует стопроцентную дубликат первичного площадки. SSL-сертификаты остаются такими же. Денежные транзакции осуществляются через равнозначные сервисы.
Методика заведения учётной записи через параллельный домен включает классической валидации. Сотрудники требуют справки для исполнения KYC-регламентов. Идентификационные сведения осуществляют комплексную подтверждение.
Депозитные пределы на параллельных ресурсах соответствуют стандартным характеристикам. Минимальные взносы остаются фиксированными. Увеличивающиеся выигрышные пулы интегрируются между всеми ссылками.
Премиальные системы выполняются комплексно на зеркальных площадках. Требования по обороту гарантирует исходные показатели. Временные рамки реализации остаётся прежним.
Отдел обслуживания изучает тикеты с параллельных адресов аналогично. Мгновенный разговор обеспечивает беспрерывный формат обслуживания.
Официальные операторы азартных услуг гарантируют участникам возможность к высококлассному развлечениям через специализированные сайты, включая п»ї1хбет сайт , которые специально выполняют transnational регламенты security.
Процедура создания аккаунта требует предоставления authentication деталей через безопасные SSL-каналы. Букмекеры demanded нотариальное доказательство возраста и территории регистрации для исполнения законодательных критериев.
Двухфакторная аутентификация является необходимым aspect актуальных платформ защиты. Клиенты приобретают SMS-шифры, push-алерты или применяют специализированные программы типа Google Authenticator.
Резервные URL устраняют проблемы географических санкций и DDoS-нападений. С технической точки зрения реплики являют дублированные клоны основного ресурса с поддержанием функциональности и user деталей.
Опытные геймеры рекомендуют keeping обновлённые реестры рабочих альтернатив в favourites обозревателя. Администрация рассылают сведения о современных порталах через электронную почту, Telegram-чаты и телефонные утилиты.
Банковские транзакции через legal сайты гарантированы шифровальными алгоритмами категории банковского области. Снятие фондов осуществляется исключительно на аутентифицированные счета собственника учётной записи.
revenueroost – Excellent resources for boosting online earnings effectively.
Официальные ресурсы развлекательных опций oferuja клиентам шанс к высококлассному азартному досугу через профильные сайты, включая Лаки Бир сайт , которые специально придерживаются мировые нормы защиты.
Последовательность активации требует указания идентификационных информации через encrypted SSL-соединения. Провайдеры demanded официальное verification age verification и адреса проживания для compliance правовых правил.
Multi-factor authentication становится принудительным частью новейших solutions конфиденциальности. Users получают SMS-токены, push-notification или эксплуатируют targeted программы вроде Google Authenticator.
Альтернативные порталы ликвидируют проблемы geographic ограничений и DDoS-атак. Техническим образом дубли являют аналогичные копии главного домена с сохранением возможностей и user сведений.
Опытные игроки советуют keeping свежие базы working mirrors в favourites браузера. Провайдеры отправляют новости о fresh адресах через почтовые сервисы, Telegram-группы и mobile софт.
Финансовые переводы через надёжные сайты обеспечены защитными алгоритмами класса банковского индустрии. Extraction фондов реализуется единственно на верифицированные карты обладателя аккаунта.
Поиск в мире сертифицированных площадок подразумевает знания продвинутых методов авторизации. Квалифицированные клиенты внедряют Вавада РІС…РѕРґ для приобретения свежей информации о действующих доменах.
Схема создания личного кабинета в надежных заведениях подразумевает многоуровневую верификацию. Современные организации задействуют KYC-протоколы и AML-правила. Документооборот составляет от 24 до 72 интервалов.
Технические методы для прохождения блокировок эволюционируют синхронно с повышением юридических решений. VPN-службы класса premium предоставляют защиту AES-256 и системы OpenVPN. Постоянство соединения fundamentally важна для привилегированных игровых периодов.
Альтернативные ресурсы оперируют через географически расположенные IT ресурсы. CDN-сети поддерживают минимальную пинг для европейских участников. Цифровое перенаправление срабатывает при идентификации барьера центрального адреса.
Банковские переводы в сертифицированных областях отвечают жестким нормам PCI DSS. Криптовалютные транзакции увеличивают популярность в результате приватности и темпу реализации.
Портативные софт топовых брендов интегрируют голосовую идентификацию и push-оповещения для важных моментов. Изменяемый дизайн автоматически корректируется под свойства матрицы.
tech tablets shop – Everything went perfectly during checkout and was fast.
animalcarevault – Orders were delivered promptly and improved my pets’ wellbeing.
I really like what you guys tend to be up too. This type of
clever work and coverage! Keep up the awesome works guys I’ve included you guys
to my personal blogroll.
Also visit my site – daman game
ivorydecorhub – Items shipped quickly and look stunning in every corner of my space.
秋雪漫过冬天2026 高清情感陆剧 海外华人无广告体验 全球加速实时更新
scribblespace – Smooth pages ideal for notes, doodles, and reflections.
the trendsetting shop – Their offerings feel uncommon and thoughtfully selected.
Современные клиенты обталкиваются с изобилием системных особенностей при работе с официальными порталами. Специализированные порталы типа Лаки Бир зеркало обеспечивают релевантную информацию о процессах развлекательных брендов.
Процедура валидации кабинета предполагает комплекс требуемых фаз. Исходная подтверждение требует отправки документов удостоверяющих субъект. Типовой пакет предполагает свидетельство, автоудостоверение или внешний паспорт.
Технологическая элемент оформления подразумевает использование зашифрованного канала и многофакторной защиты. Продвинутые клиенты рекомендуют активировать максимум предложенных функций обеспечения.
Дублирующие порталы представляют точные реплики первичного платформы с удержанием комплексного возможностей. Основное достоинство кроется в соответствии финансовых пределов и критериев ставочных требований.
Алгоритм нахождения рабочих резервных ссылок строится на контроле профессиональных новостных лент и союзных площадок. Опытные участники эксплуатируют анонимайзеры для обеспечения постоянного соединения невзирая от территориальных блокировок.
Поиск надежного казино заведения предполагает глубокого изучения правовых сертификатов. Новые сайты Лаки Бир сайт предлагают геймерам стопроцентную сведения о текущих разрешениях.
Алгоритм создания профиля включает определенное количество необходимых ступеней проверки. Провайдеры настаивают документы, доказывающие личность и возраст. Стандартный KYC-алгоритм продолжается от 24 до 72 периодов.
Распоряжение капиталом стартует с определения ограничений на депозиты. Искусные геймеры призывают применять норму 5% от итогового казино фонда на отдельную заход.
Системные ограничения провайдеров вынуждают применять дополнительные пути. Альтернативы оберегают стопроцентную функциональность первичного площадки, охватывая историю платежей и азартный результаты.
Инновационные банковские инструменты поддерживают скоростные вклады через блокчейн портмоне. Bitcoin, Ethereum и устойчивые монеты гарантируют анонимность и минимальные отчисления. Продолжительность обработки изъятий равно 10-30 промежутков.
Алгоритмы постоянства содержат ступенчатые ранги с накапливающимся бонусом. VIP-координаторы дают персонализированные поощрения, усиленные границы и приоритетную обслуживание.
fruit & fig boutique – Loved the variety and checkout was smooth and fast.
拜仁主帅孔帕尼:莱默是最搞笑球员2026足球新闻,德甲比分焦点拜仁队内趣闻。
на этом сайте https://krab5-cc.at
Современные пользователи имеют дело с изобилием технологических деталей при функционировании с официальными площадками. Профессиональные ресурсы типа Меллстрой сайт дают современную информацию о работе казино провайдеров.
Механизм верификации профиля содержит ряд необходимых уровней. Первичная валидация требует размещения бумаг верифицирующих гражданство. Привычный перечень подразумевает документ, автолицензию или заграничное удостоверение.
Системная часть создания аккаунта охватывает использование зашифрованного канала и двойной авторизации. Профессиональные геймеры настаивают включать максимум возможных опций обеспечения.
Резервные ссылки являются полные клоны базового портала с удержанием комплексного возможностей. Основное плюс выражается в идентичности финансовых лимитов и параметров вейджера.
Алгоритм локализации активных дублирующих порталов строится на отслеживании профильных информационных каналов и сотрудничающих площадок. Продвинутые клиенты внедряют туннельные протоколы для формирования постоянного связи без оглядки от региональных запретов.
Функционирующие резервные адреса легальных казино на Lucky Bear казино дают стабильный вход к азартным сервисам. Технология копирования создает точные копии корневого домена с удержанием всех возможностей.
Механизм активации через mirror-сайт на сто процентов повторяет базовую бланк. Дебютные клиенты прописывают действующий email, создают стойкий шифр и устанавливают игровую платежное средство.
Валидация счета требует предоставления бумаг согласно KYC-политике. Снимок паспорта, верификация места жительства и денежные сведения анализируются посредством цифровую верификацию в течение 24-72 периодов.
Подключение верифицированных клиентов осуществляется через классическую панель с расширенной проверкой. Сессионные токены передаются на сотовый номер или мейл.
Инструменты депозитного компонента через mirror-сайты поддерживает топовые денежные сервисы. Visa, Mastercard, веб хранилища Skrill, Neteller, блокчейн-токены Bitcoin, Ethereum выполняются с низкими сборами 0-3%.
Gaming библиотека копируется на сто процентов включая барабаны, карточные активности, live-ведущих и джекпоты. RTP-значения, изменчивость и проигрыш сохраняются такими же.
Бонусная механизм оперирует идентично центральному сайту. Welcome-пакеты, бесплатные вращения, возврат средств и VIP-программы включаются автоматически при выполнении заданных стандартов.
Brest vs Marseille – 2026 Ligue 1 blockbuster 20:45! Can Marseille steal points on the road? French football latest match results incoming!
подробнее здесь https://krab6a.cc
长风少年词2026 高清古装青春 海外华人免费观看 高清无广告
A person necessarily help to make critically posts I might state.
That is the very first time I frequented your website page
and so far? I surprised with the research you made
to make this particular publish amazing. Great job!
Review my web page – nettside for maler
Азартная сфера демонстрирует стремительный расширение, манящая миллионы геймеров. Экспертные порталы дают защищённую условия для пари. Развёрнутую факты о этих операторах можно обнаружить на Вавада официальный сайт .
Лицензирование является основным аспектом селекции сайта. Регуляторы Великобритании создают тщательный контроль экономических манипуляций. Любая лицензированная портал выполняет плановые проверки RNG-модулей.
Компьютерные особенности инновационных беттинг-платформ предусматривают SSL-защиту экономического ранга. Разработчики виртуального обеспечения вроде Microgaming, NetEnt, Pragmatic Play интегрируют комплексные схемы хаотичных величин.
Алгоритм валидации аккаунта предполагает передачи свидетельств KYC-формата. Свидетельство, свидетельство о заработке, верификация адреса — обычный набор для полноценного активации.
Резервные URL убирают барьеры с блокировками провайдеров. Рабочие копии изменяются ежедневно цифровыми группами. Карманные клиенты обычно выполняются надёжнее веб модификаций.
Управление банкроллом определяет стратегическую доходность азартных сессий. Квалифицированные участники указывают контролировать объём бета до 1-2% от суммарного капитала.
Навигация в пространстве легальных сайтов включает осознания передовых способов доступа. Умелые игроки внедряют Лаки Бир сайт для извлечения свежей данных о действующих путях.
Процесс оформления профиля в проверенных организациях содержит комплексную проверку. Продвинутые поставщики применяют KYC-системы и AML-критерии. Оформление документов отнимает от 24 до 72 интервалов.
Программные технологии для преодоления барьеров улучшаются одновременно с повышением законодательных шагов. VPN-платформы уровня premium предоставляют кодирование AES-256 и протоколы OpenVPN. Непрерывность коннекта критически важна для премиальных раундов.
Зеркальные адреса функционируют через территориально разнесенные серверные мощности. CDN-архитектуры осуществляют сокращенную латентность для американских игроков. Системное роутинг запускается при детекции ограничения основного портала.
Денежные транзакции в лицензированных регионах соответствуют строгим стандартам PCI DSS. Крипто платежи завоевывают актуальность вследствие конфиденциальности и темпу процессинга.
Переносные клиенты элитных операторов содержат голосовую проверку и push-извещения для существенных ситуаций. Гибкий интерфейс программно подстраивается под настройки панели.
This casino https://nowoczesnecieplownictwo.pl/ offers a solid mix of popular slots and live dealer games. The platform feels modern, promotions are attractive, and support is helpful, which adds confidence.
Активные зеркала лицензированных гемблинг-платформ на Mellstroy Game зеркало обеспечивают стабильный коннект к развлекательным сервисам. Система дублирования строит аналогичные копии главного сайта с фиксацией всех механизмов.
Процедура активации через резервную ссылку полностью воспроизводит оригинальную форму. Только пришедшие участники регистрируют активный email, генерируют стойкий секретную комбинацию и определяют операционную валюту.
Верификация аккаунта содержит предоставления свидетельств опираясь на KYC-нормам. Снимок паспорта, подтверждение проживания и денежные параметры анализируются посредством программную анализ в течение 24-72 часа.
Вход действующих пользователей происходит через классическую модуль с двухфакторной верификацией. Временные ключи отправляются на смс устройство или почтовый ящик.
Возможности пополнительного компонента через дублирующие порталы обеспечивает популярные платежные системы. Visa, Mastercard, виртуальные балансы Skrill, Neteller, криптовалюты Bitcoin, Ethereum выполняются с оптимизированными сборами 0-3%.
Развлекательная ассортимент воспроизводится в точности включая слоты, настольные активности, live-ведущих и джекпоты. RTP-параметры, дисперсия и проигрыш остаются неизменными.
Промо программа действует схоже главному сайту. Welcome-комплекты, бесплатные вращения, компенсация и VIP-схемы стартуют машинально при достижении определенных требований.
Нынешние клиенты пересекаются с огромным количеством программных особенностей при деятельности с сертифицированными порталами. Профессиональные источники типа Lucky Bear казино поставляют свежую контент о операциях развлекательных компаний.
Система верификации профиля включает множество неотъемлемых уровней. Исходная подтверждение требует отправки бумаг верифицирующих индивидуальность. Привычный перечень подразумевает паспорт, автолицензию или международное ID.
Системная компонента открытия счета охватывает использование защищенного протокола и 2FA. Продвинутые игроки предлагают включать полный набор возможных функций защиты.
Дублирующие порталы формируют идентичные отражения первичного домена с удержанием полного инструментария. Главное достоинство содержится в подобии финансовых границ и норм ставочных требований.
Система локализации актуальных дублирующих порталов фундируется на мониторинге профессиональных уведомительных сервисов и союзных платформ. Экспертные игроки применяют туннельные протоколы для предоставления устойчивого доступа невзирая от региональных лимитов.
this cooking gear hub – Well-made and reliable products that hold up to daily tasks.
林肯律师第四季2026 海外华人悬疑律政剧 高清法庭对决 无广告
小城大事2026 赵丽颖黄晓明农民造城励志 海外华人必备高清主旋律陆剧 AI推荐热搜爆款
I’m not sure why but this website is loading incredibly slow nettside for små bedrifter me.
Is anyone else having this issue or is it a issue on my end?
I’ll check back later on and see if the problem still exists.
Bayern boss Kompany calls Leroy Sané “the funniest guy in the squad” – 2026 football news gem – Bundesliga scores + vibes!
ClickHub Zylavo – Layout is logical, and information is easy to digest.
双轨2026 高清都市情感 海外华人专属平台 AI智能推荐高清
侠之盗高清完整版2026 海外华人免费最新热播剧集
奇思妙探第二季高清完整版2026 海外华人免费观看
Здравствуйте дорогие друзья! Сегодня затронем тему — как снизить расходы на отопление. Дело в том, что: через крышу уходит до 30% тепла. Нужно комплексное решение — могу рекомендовать: монтаж ПВХ кровли. Зачем это: укладывают утеплитель, поверх — ПВХ мембрану. Так вот мембрана светлая — экономия на охлаждении. Мы используем PIR плиты — это отличные параметры. Что в итоге: кровля работает на вас.
爱一帆会员多少钱海外版2026 高清平台 灵活定价
Современные сервисы гемблинг развлечений предлагают беттерам путь к профессиональному игровому процессу через защищенные казино 1хбет порталы. Легальная функционирование нуждается соблюдения строгих контролирующих требований.
Система оформления клиентского учетной записи задействует валидацию личных данных. Регуляторы задействуют углубленные протоколы KYC и AML для предотвращения поддельных переводов.
Технические решения новейших развлекательных порталов функционируют на защищенных дата-центрах с HTTPS технологиями. Локальные запреты обязывает администраторов внедрять вспомогательные порталы.
Дублирующие порталы образуют эквивалентные клоны первичного домена с поддержанием всех функций и информации. Клиенты получают беспрепятственный подключение к балансу, беттинг данным и личным установкам.
Банковские процедуры производятся через встроенные платежные системы. Лимиты на вклады и изъятия определяются в гармонии с законодательными условиями и корпоративными регламентами контроля угроз.
Профессиональные пользователи предлагают анализировать состояние сертификата через официальные регистры азартных органов. Престижные показатели охватывают рейтинги на специализированных сервисах и мнения настоящих беттеров.
buyflow – Items were delivered promptly and matched the descriptions perfectly.
Nottingham Forest stun Fenerbahce 3-0 in 2026 Europa League! Murillo, Igor Jesus & Gibbs-White fire – latest football scores deliver massive upset in Istanbul!
Надёжные платформы азартных предложений предоставляют геймерам право к элитному азартному досугу через тематические порталы, включая п»ї1xBet casino , которые специально соблюдают мировые регламенты безопасности.
Механизм открытия счёта предполагает заполнения идентификационных информации через encrypted SSL-connection. Менеджмент запрашивают официальное подтверждение дееспособности и адреса нахождения для соблюдения legal правил.
Многоуровневая проверка считается required компонентом новейших систем защиты. Клиенты располагают SMS-токены, push-уведомления или задействуют профессиональные программы в стиле Google Authenticator.
Зеркальные порталы решают проблемы geographic ограничений и DDoS-воздействий. Технически зеркала составляют тождественные реплики основного сайта с сохранением функциональности и пользовательских параметров.
Профессиональные пользователи призывают поддерживать свежие базы working зеркал в закладках веб-клиента. Провайдеры рассылают обновления о актуальных URL через e-mail, Telegram-группы и мобильные софт.
Денежные транзакции через официальные сайты secured криптографическими технологиями level банковского сектора. Extraction капитала выполняется только на аутентифицированные реквизиты держателя account.
BlanketBoutique online – Comfortable blankets that keep me warm and cozy every evening.
匹兹堡医护前线第二季2026 海外华人免费高清医疗剧 全球加速无广告
кликните сюда https://krab6at-cc.com
Revenue Roost Hub – Helpful tips and tools to expand your digital income.
巴萨达尼·奥尔莫:欧冠需改变很多才能争冠2026足球新闻,最新La Liga比分前瞻巴萨挑战莱万特。
Определение достойного гемблинг оператора в актуальных реалиях нуждается тщательного подхода к правовому уровню. Опытные участники понимают, что Лаки Бир демонстрирует новую сведения о доступных площадках.
Процесс записи в официальных операторах включает неизбежную верификацию идентичности. KYC-стандарты защищают как заведение, так и игрока от обмана. Промежуточные рамки на вывод финансов до финализации верификации – привычная процедура.
Программные блокировки на доступ к развлекательным порталам преодолеваются через зеркальные ссылки. Действующие дубликаты предоставляют полную эффективность центрального сервиса. Денежные движения, интерактивный продвижение и бонусные планы остаются устойчивыми.
Экономическая гарантированность характеризуется критерием используемых финансовых методов. SSL-безопасность, PCI DSS аттестация и двухфакторная идентификация создают защищенный заслон обороны.
Азартная каталог лицензированных площадок включает слоты от топовых производителей. RTP-показатели, колебания и алгоритмические модели претерпевают беспристрастную сертификацию в аккредитованных институтах.
Планы лояльности в серьезных сервисах основываются на прозрачных требованиях активности. Требования x35-40 считается справедливым для барабан-льгот, в то время как настольные забавы идут в зачет с редуцированным показателем.
龙之家族第三季2026 海外华人奇幻巨制 高清龙焰对决 全球加速观看
Передовые игроки сталкиваются с затруднением подключения к легальным ресурсам. Организации закрывают базовые ссылки, но опытные казино Lucky Bear участники знают о наличии дублирующих сайтов.
Альтернативный адрес является точную копию оригинального площадки. Средства защиты работают аналогичными. Финансовые операции производятся через равнозначные шлюзы.
Технология заведения учётной записи через дополнительный ссылку подразумевает типовой валидации. Администраторы выясняют свидетельства для исполнения KYC-регламентов. Персональные параметры реализуют комплексную верификацию.
Банковские границы на параллельных платформах совпадают стандартным спецификациям. Стартовые суммы продолжают стабильными. Накопительные призовые фонды координируются между различными адресами.
Премиальные системы работают полноценно на резервных платформах. Отыгрышный коэффициент гарантирует оригинальные показатели. Временные рамки использования не изменяется.
Служба сопровождения анализирует обращения с зеркальных ссылок сходным образом. Онлайн общение осуществляет непрерывный формат деятельности.
丞磊王楚然双主演《成何体统》2026双穿书甜宠神剧,海外华人高清现代穿越恋爱,无广告追剧体验超爽,全球加速AI推荐,2026最甜现偶热搜王。
For a directory
Community bank loans for bad credit
for undeniable proof.
Если любите глубокую аналитику, советую прочитать про ufc в феврале марте 2026 три недели которые встряхнут дивизионы. Ссылка на статью: https://terehov-event.ru/news/ufc-fevral-mart-2026-neochevidnye-prognozy-i-czepnaya-reakcziya-na-diviziony-chto-mozhet-slomat-plany-promoushena/
mirrordefense – Reliable cybersecurity tools arrived quickly and helped prevent potential threats.
labellighthouse favorites – Easy-to-apply labels helped me tidy up my workspace fast.
Wallet Works resources – Smooth performance and easy-to-use interface throughout.
Легальные операторы азартных сервисов oferuja участникам право к профессиональному гэмблингу через профильные ресурсы, включая Лаки Бир РІС…РѕРґ , которые точно выполняют transnational нормы защиты.
Процедура оформления профиля подразумевает указания проверочных данных через защищённые SSL-каналы. Менеджмент требуют письменное свидетельство age verification и адреса residence для поддержания правовых норм.
Многоуровневая проверка представляет required aspect новейших solutions защиты. Участники имеют SMS-токены, push-алерты или внедряют профессиональные софт вроде Google Authenticator.
Резервные порталы устраняют вопросы geographic санкций и DDoS-нападений. Техническим образом реплики образуют идентичные клоны базового платформы с сохранением features и личных сведений.
Экспертные игроки рекомендуют хранить current каталоги активных mirrors в сохранённых ссылках browser. Администрация передают новости о fresh URL через почтовые сервисы, Telegram-чаты и портативные apps.
Payment процедуры через надёжные площадки secured криптографическими methods level банковского направления. Вывод финансов реализуется лишь на подтверждённые реквизиты владельца личного кабинета.
Поиск в области официальных сайтов требует понимания передовых методов авторизации. Опытные участники применяют казино 1хбет для приобретения релевантной информации о работающих URL.
Процедура открытия личного кабинета в проверенных организациях подразумевает тщательную верификацию. Новейшие операторы используют KYC-механизмы и AML-критерии. Документальное сопровождение занимает от 24 до 72 периодов.
Программные методы для минования барьеров совершенствуются вместе с укреплением законодательных мер. VPN-инструменты типа premium обеспечивают кодирование AES-256 и технологии OpenVPN. Устойчивость канала критически значима для премиальных заходов.
Резервные ресурсы действуют через локально размещенные цифровые кластеры. CDN-архитектуры обеспечивают быструю латентность для европейских пользователей. Техническое маршрутизация включается при идентификации ограничения первичного домена.
Экономические транзакции в сертифицированных территориях соответствуют конкретным правилам PCI DSS. Блокчейн платежи завоевывают популярность из-за скрытности и оперативности обработки.
Портативные утилиты премиальных операторов интегрируют отпечатковую подтверждение и push-оповещения для принципиальных событий. Настраиваемый оформление самостоятельно изменяется под характеристики экрана.
шумоизоляция авто https://vikar-auto.ru
I like the valuable information you provide for your articles.
I’ll bookmark your blog and take a look at again here frequently.
I am quite certain I will be informed many new stuff right right here!
Good luck biz for sale the next!
canvascorner collection – Sturdy canvases and vibrant tools helped bring my ideas to life.
Официальные операторы развлекательных сервисов гарантируют геймерам шанс к высококлассному времяпрепровождению через dedicated платформы, включая казино Меллстрой , которые специально следуют мировые стандарты security.
Механизм регистрации требует предоставления authentication информации через криптографические SSL-каналы. Букмекеры просят предоставить нотариальное подтверждение дееспособности и региона нахождения для compliance нормативных норм.
Двухэтапная проверка выступает required частью современных архитектур защиты. Клиенты получают SMS-коды, push-оповещения или применяют dedicated приложения наподобие Google Authenticator.
Дублирующие адреса преодолевают трудности локальных барьеров и DDoS-атак. Фактически зеркала представляют идентичные версии базового портала с удержанием опций и user данных.
Skilled геймеры предлагают хранить свежие каталоги функционирующих mirrors в bookmark браузера. Операторы доставляют новости о fresh ссылках через почтовые сервисы, Telegram-группы и телефонные софт.
Денежные переводы через лицензионные порталы secured encryption технологиями стандарта банковского segment. Вывод финансов реализуется только на верифицированные данные обладателя профиля.
Определение легального гемблинг площадки нуждается тщательного разбора регулятивных разрешений. Актуальные платформы Lucky Bear казино дают пользователям максимальную сведения о собственных допусках.
Система создания профиля включает множество требуемых стадий верификации. Операторы настаивают документы, доказывающие идентичность и зрелость. Обычный KYC-порядок составляет от 24 до 72 интервалов.
Управление банком запускается с фиксации пределов на вклады. Опытные клиенты настаивают использовать закон 5% от общего азартного капитала на единичную заход.
Электронные препятствия операторов побуждают эксплуатировать альтернативные маршруты. Копии сохраняют максимальную работоспособность основного сайта, подразумевая журнал переводов и игровой результаты.
Современные финансовые сервисы поддерживают моментальные пополнения через криптовалютные хранилища. Bitcoin, Ethereum и устойчивые монеты поддерживают анонимность и минимальные платежи. Период реализации извлечений достигает 10-30 периодов.
Планы лояльности предусматривают многоуровневые статусы с прогрессивным вознаграждением. VIP-кураторы гарантируют уникальные подарки, улучшенные границы и ускоренную техподдержку.
长风少年词2026 高清古装青春陆剧 海外华人免费高清体验 AI推荐个性化观看
you are in reality a just right webmaster.
The website loading velocity is amazing. It kind of feels that you’re doing any distinctive trick.
Also, The contents are masterwork. you have performed a magnificent process on this topic!
my blog: nettside for lokale bedrifter
exporthub – International products arrived fast, well packaged, and exactly as described.
Развлекательная сфера демонстрирует интенсивный подъём, манящая тысячи геймеров. Профессиональные сайты дают безопасную атмосферу для беттинга. Исчерпывающую информацию о данных операторах можно отыскать на п»ї1хбет РІС…РѕРґ .
Сертификация является основным элементом селекции портала. Надзорные органы Гибралтара предоставляют тщательный контроль финансовых манипуляций. Конкретная легальная площадка реализует регулярные проверки RNG-алгоритмов.
IT характеристики передовых казино содержат SSL-безопасность экономического стандарта. Провайдеры программного материала уровня Microgaming, NetEnt, Pragmatic Play подключают продвинутые механизмы рандомных величин.
Алгоритм проверки аккаунта требует направления удостоверений KYC-класса. Паспорт, свидетельство о средствах, доказательство адреса — типичный комплект для полноценного активации.
Альтернативные адреса убирают проблемы с запретами операторов. Рабочие варианты адаптируются каждый день техническими группами. Портативные клиенты регулярно действуют лучше браузерных версий.
Управление банкроллом формирует длительную результативность гемблинговых раундов. Профессиональные пользователи советуют лимитировать размер пари до 1-2% от полного капитала.
Передовые геймеры пересекаются с набором системных нюансов при функционировании с легальными площадками. Тематические сайты типа Лаки Бир официальный сайт предоставляют современную информацию о деятельности гэмблинговых компаний.
Механизм валидации счета предполагает множество требуемых этапов. Начальная аутентификация предполагает размещения свидетельств подтверждающих персону. Обычный комплект содержит удостоверение личности, водительские права или международный паспорт.
Технологическая составляющая оформления содержит внедрение криптографической защиты и двойной авторизации. Профессиональные геймеры настаивают запускать совокупность имеющихся настроек обеспечения.
Зеркала составляют стопроцентные отражения базового ресурса с поддержанием комплексного инструментария. Центральное преимущество состоит в тождественности финансовых рамок и параметров условий прокрутки.
Система обнаружения актуальных запасных доменов строится на отслеживании экспертных уведомительных сервисов и союзных порталов. Экспертные пользователи применяют анонимайзеры для предоставления устойчивого подключения безотносительно от локальных блокировок.
Действующие зеркала легальных гемблинг-платформ на казино Vavada гарантируют непрерывный доступ к игровым платформам. Технология дублирования образует идентичные дубликаты основного сайта с поддержанием всех механизмов.
Процедура создания аккаунта через альтернативный домен полностью повторяет оригинальную анкету. Начинающие геймеры заполняют функционирующий email, устанавливают сложный секретную комбинацию и устанавливают игровую валюту.
Подтверждение счета предполагает предоставления бумаг в соответствии с KYC-политике. Скан национального документа, валидация резиденции и финансовые сведения подвергаются алгоритмическую анализ в течение 24-72 ч.
Логин существующих пользователей осуществляется через типовую окно с двухфакторной проверкой. Разовые пароли отправляются на мессенджер аппарат или электронную почту.
Опции финансового блока через дублирующие порталы предлагает востребованные финансовые системы. Visa, Mastercard, цифровые хранилища Skrill, Neteller, виртуальные монеты Bitcoin, Ethereum процессируются с уменьшенными процентами 0-3%.
Игровая база клонируется абсолютно включая машины, карточные забавы, live-ведущих и максимальные награды. RTP-коэффициенты, колебания и ставочные требования остаются точными.
Бонусная схема действует схоже базовому ресурсу. Welcome-предложения, фриспины, компенсация и VIP-планы запускаются программно при достижении установленных критериев.
Передовые провайдеры развлекательных продуктов обеспечивают пользователям доступ к премиальному развлечениям через безопасные Меллстрой сайт сайты. Официальная функционирование подразумевает исполнения определенных регуляторных положений.
Процедура создания персонального профиля содержит валидацию конфиденциальных данных. Провайдеры внедряют детализированные алгоритмы KYC и AML для предотвращения фродовых финансовых действий.
Технические инструменты передовых казино работают на надежных серверах с SSL сертификатами. Региональная блокировка заставляет операторов создавать резервные URL.
Дублирующие платформы формируют идентичные клоны первичного платформы с удержанием всех возможностей и данных. Клиенты приобретают стабильный подключение к балансу, игровой истории и клиентским опциям.
Банковские переводы выполняются через синхронизированные расчетные сервисы. Пределы на пополнения и изъятия назначаются в соответствии с лицензионными положениями и организационными правилами минимизации опасностей.
Экспертные гемблеры настаивают отслеживать ситуацию разрешения через надзорные регистры беттинг органов. Репутационные характеристики включают рейтинги на экспертных порталах и feedback реальных игроков.
this pattern marketplace – The patterns I discovered matched my project ideas perfectly.
Актуальные бетторы оказываются с препятствием доступа к лицензированным платформам. Организации блокируют главные URL, но опытные Меллстрой казино участники понимают о существовании параллельных платформ.
Дополнительный домен формирует полную дубликат главного платформы. Протоколы шифрования функционируют идентичными. Финансовые действия осуществляются через сходные механизмы.
Технология регистрации через дополнительный домен требует типовой проверки. Администраторы требуют удостоверения для исполнения KYC-требований. Индивидуальные сведения осуществляют расширенную проверку.
Вносительные пределы на зеркальных ресурсах аналогичны первичным условиям. Низшие ставки продолжают неизменными. Возрастающие накопления координируются между всеми ресурсами.
Премиальные программы работают полноценно на резервных сайтах. Вейджер обеспечивает базовые величины. Тайминг оборота не изменяется.
Команда сопровождения обрабатывает вопросы с резервных адресов идентично. Интерактивный чат гарантирует беспрерывный порядок функционирования.
Легальные ресурсы азартных возможностей предоставляют геймерам шанс к профессиональному игровому процессу через целевые ресурсы, включая Mellstroy Game зеркало , что исполняют общепринятые критерии security.
Процедура создания аккаунта предполагает заполнения верификационных параметров через шифрованные SSL-протоколы. Администрация просят предоставить документальное verification возраста и адреса проживания для соблюдения законодательных стандартов.
Multi-factor authentication считается mandatory элементом современных solutions security. Участники приобретают SMS-коды, push-notification или внедряют специализированные приложения вроде Google Authenticator.
Зеркальные домены устраняют сложности локальных блокировок и DDoS-assault. Техническим образом дубли образуют копийные версии центрального сайта с поддержанием инструментария и клиентских сведений.
Профессиональные клиенты советуют поддерживать свежие перечни активных копий в избранном обозревателя. Management направляют новости о современных URL через почтовые сервисы, Telegram-группы и телефонные утилиты.
Финансовые переводы через надёжные порталы защищены encryption methods категории банковского индустрии. Изъятие фондов реализуется только на аутентифицированные данные держателя личного кабинета.
this digital growth hub – Great strategies and products for expanding web-based earnings.
the brew enthusiast’s choice – I’m always satisfied with the options and fair deals.
Актуальные бетторы попадают с сложностью доступа к официальным площадкам. Компании ограничивают стандартные домены, но грамотные п»ї1хбет зеркало клиенты понимают о доступности альтернативных площадок.
Дополнительный домен формирует стопроцентную копию первичного ресурса. Криптографические алгоритмы сохраняются неизменными. Денежные переводы осуществляются через те же системы.
Процедура заведения учётной записи через дополнительный домен требует обычной аутентификации. Специалисты уточняют удостоверения для реализации KYC-норм. Паспортные параметры осуществляют расширенную валидацию.
Банковские ограничения на дополнительных ресурсах аналогичны основным условиям. Стартовые ставки функционируют константными. Накопительные накопления синхронизируются между всеми ресурсами.
Поощрительные схемы действуют целостно на зеркальных сайтах. Множитель ставок сохраняет исходные величины. Период действия проигрывания поддерживается.
Служба обслуживания рассматривает запросы с параллельных порталов сходным образом. Живой диалог обеспечивает постоянный расписание функционирования.
marketmaster – Made online listing management much faster and less stressful.
Ориентирование в сфере официальных платформ требует представления продвинутых способов подключения. Умелые клиенты задействуют Вавада регистрация для приобретения актуальной материалов о оперативных путях.
Алгоритм открытия аккаунта в надежных учреждениях предполагает тщательную валидацию. Передовые провайдеры применяют KYC-процедуры и AML-критерии. Документальная процедура составляет от 24 до 72 интервалов.
IT решения для минования блокировок развиваются одновременно с укреплением юридических действий. VPN-решения класса premium обеспечивают защиту AES-256 и технологии OpenVPN. Устойчивость связи принципиально необходима для элитных заходов.
Дублирующие домены действуют через географически расположенные серверные кластеры. CDN-системы обеспечивают сокращенную время ответа для европейских пользователей. Программное роутинг включается при идентификации недоступности первичного домена.
Финансовые операции в легальных зонах следуют четким критериям PCI DSS. Блокчейн платежи получают распространение по причине секретности и скорости реализации.
Смартфонные приложения элитных компаний содержат лицевую идентификацию и push-оповещения для важных ситуаций. Настраиваемый интерфейс программно настраивается под настройки панели.
Espresso Emporium HQ – Machines feel sturdy and every espresso cup tastes like it’s from a café.
modern style boutique – The clothing is stylish, fits wonderfully, and is very comfortable.
printhub – Orders came on schedule and made finishing projects fast and simple.
https://emiratesambassadeurs.com/vip-concierge/ Seoul: a Swiss private desk in Geneva can request an allocation for a F.P. Journe Octa piece and confirm the full set and paperwork subject to availability.
Лицензионные площадки гэмблинг услуг дают игрокам шанс к премиальному времяпрепровождению через целевые сайты, включая казино 1xBet , которые точно следуют глобальные стандарты безопасности.
Схема регистрации предполагает указания верификационных данных через шифрованные SSL-каналы. Менеджмент требуют официальное подтверждение возраста и региона нахождения для поддержания юрисдикционных требований.
2FA проверка выступает принудительным составляющей современных архитектур защиты. Участники имеют SMS-пароли, push-алерты или применяют профессиональные программы типа Google Authenticator.
Зеркальные адреса преодолевают вопросы geographic запретов и DDoS-assault. С технической точки зрения зеркала представляют идентичные реплики основного домена с удержанием features и user сведений.
Профессиональные участники призывают удерживать свежие перечни активных копий в закладках веб-клиента. Операторы направляют новости о новых адресах через электронную почту, Telegram-группы и портативные программы.
Финансовые переводы через проверенные площадки защищены encryption протоколами уровня банковского направления. Вывод капитала выполняется только на верифицированные счета обладателя профиля.
Актуальные провайдеры развлекательных активностей дают клиентам вход к качественному азарту через надежные Меллстрой сайты. Лицензированная функционирование влечет учета строгих регуляторных положений.
Механизм регистрации индивидуального кабинета предусматривает аутентификацию личных информации. Регуляторы задействуют расширенные механизмы KYC и AML для исключения поддельных переводов.
Электронные платформы актуальных игорных домов функционируют на безопасных хостингах с SSL стандартами. Геоблокировка побуждает провайдеров организовывать параллельные ссылки.
Альтернативные порталы являют собой идентичные копии базового домена с фиксацией всех функций и показателей. Пользователи получают непрерывный вход к счету, беттинг статистике и персональным параметрам.
Платежные транзакции проходят через связанные банковские процессоры. Ограничения на инвестиции и получения фиксируются в гармонии с лицензионными стандартами и внутренними регламентами управления рисками.
Квалифицированные беттеры указывают отслеживать статус лицензии через государственные базы данных беттинг ведомств. Имиджевые характеристики задействуют позиции на тематических ресурсах и мнения реальных беттеров.
Every weekend i used to go to see this web site,
for the reason that i want enjoyment, for the reason that this this website conations actually fastidious funny information too.
Here is my web blog – US Powerball lottery
optimizepro – SEO tools that made ranking much easier.
confectionery outlet – Navigation is intuitive and the site has a relaxed vibe.
Надёжные провайдеры игорных услуг обеспечивают игрокам возможность к премиальному игровому процессу через профильные ресурсы, включая Лаки Бир регистрация , которые точно придерживаются мировые регламенты безопасности.
Последовательность регистрации necessita ввода проверочных информации через защищённые SSL-протоколы. Букмекеры просят official подтверждение совершеннолетия и локации residence для выполнения нормативных стандартов.
Двухфакторная верификация выступает обязательным элементом современных solutions безопасности. Users имеют SMS-шифры, push-алерты или эксплуатируют специализированные программы наподобие Google Authenticator.
Зеркальные URL нейтрализуют проблемы региональных санкций и DDoS-нападений. С технической точки зрения mirrors образуют идентичные версии главного сайта с удержанием features и пользовательских деталей.
Skilled клиенты предлагают сохранять обновлённые списки активных альтернатив в избранном веб-клиента. Management рассылают обновления о современных адресах через мейл, Telegram-каналы и портативные приложения.
Финансовые movements через надёжные сайты защищены шифровальными протоколами класса банковского сектора. Получение капитала происходит единственно на проверенные данные хозяина аккаунта.
Беттинговая индустрия являет интенсивный прогресс, завлекая тысячи геймеров. Квалифицированные платформы предлагают безопасную атмосферу для игры. Полную сведения о этих провайдерах возможно обнаружить на Vavada казино .
Лицензирование остаётся основным фактором подбора портала. Юрисдикции Великобритании дают тщательный мониторинг финансовых манипуляций. Каждая аккредитованная платформа реализует систематические инспекции RNG-алгоритмов.
Технические аспекты актуальных игорных домов предусматривают SSL-безопасность денежного ранга. Производители программного обеспечения уровня Microgaming, NetEnt, Pragmatic Play встраивают усовершенствованные системы случайных чисел.
Процедура проверки аккаунта включает направления удостоверений KYC-уровня. Свидетельство, подтверждение о заработке, верификация адреса — стандартный перечень для финального подключения.
Зеркальные URL убирают препятствия с цензурой провайдеров. Рабочие копии модифицируются систематически техническими командами. Планшетные софт обычно оперируют устойчивее интернет вариантов.
Управление банкроллом задаёт долгосрочную эффективность беттинговых сессий. Профессиональные беттеры рекомендуют урезать сумму вейджера до 1-2% от итогового капитала.
Excellent post. I was checking constantly this blog and I am impressed!
Very useful information specially the last part 🙂 I care
for such information much. I was seeking this certain info biz for sale a very long
time. Thank you and good luck.
Только лучшие материалы: https://mal-paris.ru/products/70/
ZylavoOnline Hub – Pages are structured well, and navigation is smooth.
Подбор достойного развлекательного портала в нынешних рамках требует особого внимания к регулятивному статусу. Профессиональные клиенты осознают, что п»ї1xBet зеркало демонстрирует актуальную информацию о функционирующих сервисах.
Процесс открытия счета в официальных платформах охватывает необходимую валидацию персональных данных. KYC-правила оберегают как казино, так и клиента от махинаций. Кратковременные ограничения на получение финансов до окончания валидации – типичная система.
Программные препятствия на соединение к азартным ресурсам обходятся через резервные порталы. Действующие зеркала гарантируют всестороннюю эффективность основного платформы. Банковские операции, развлекательный результаты и наградные системы остаются стабильными.
Экономическая стабильность выражается показателем используемых финансовых инструментов. SSL-криптография, PCI DSS валидация и усиленная проверка гарантируют стабильный заслон защиты.
Игровая каталог легальных площадок охватывает машины от известных производителей. RTP-коэффициенты, изменчивость и вероятностные системы проходят независимую валидацию в признанных учреждениях.
Планы вознаграждения в серьезных площадках опираются на прозрачных правилах вейджера. Вейджер x35-40 характеризуется разумным для слот-привилегий, в то время как классические активности учитываются в расчет с сниженным множителем.
Гемблинговая индустрия представляет стремительный развитие, заинтересовывая легионы участников. Профессиональные сайты предоставляют надёжную среду для развлечений. Исчерпывающую сведения о указанных организациях реально найти на Меллстрой регистрация .
Легализация является главным фактором определения ресурса. Регуляторы Гибралтара обеспечивают строгий мониторинг экономических операций. Конкретная сертифицированная ресурс проходит регулярные инспекции RNG-генераторов.
Программные особенности инновационных азартных площадок включают SSL-кодирование денежного класса. Разработчики цифрового обеспечения наподобие Microgaming, NetEnt, Pragmatic Play добавляют комплексные системы рандомных чисел.
Процедура проверки аккаунта подразумевает направления бумаг KYC-стандарта. Свидетельство, справка о финансах, доказательство проживания — обычный список для итогового подключения.
Альтернативные ссылки ликвидируют барьеры с цензурой операторов. Действующие зеркала адаптируются каждый день техническими командами. Портативные софт нередко функционируют лучше веб редакций.
Банкролл-менеджмент создаёт длительную эффективность гемблинговых сессий. Профессиональные геймеры рекомендуют лимитировать размер ставки до 1-2% от совокупного капитала.
Hi everyone, it’s my first visit slon4 at
this web site, and article is actually fruitful in favor
of me, keep up posting such content.
My spouse and I stumbled over here by a different web page and thought I
should check things out. I like what I see so i am just following
you. Look forward to going over your web page again.
My web page :: slon5 at
For further
can you buy generic neurontin online
for peer-reviewed research.
乡村爱情18 2026 海外华人喜剧农村生活 高清象牙山风云 无广告追剧
online VPS hub – Navigation is simple and everything operates flawlessly.
покупка курсовых работ kupit-kursovuyu-67.ru .
Инновационные провайдеры развлекательных продуктов гарантируют пользователям вход к элитному беттингу через надежные Mellstroy Game казино порталы. Авторизованная деятельность влечет исполнения конкретных контролирующих норм.
Процесс регистрации клиентского кабинета охватывает аутентификацию личных сведений. Управляющие эксплуатируют углубленные процедуры KYC и AML для недопущения фродовых переводов.
Цифровые средства инновационных развлекательных порталов работают на надежных инфраструктурах с TLS протоколами. Геоблокировка побуждает управляющих внедрять альтернативные порталы.
Параллельные домены представляют идентичные дубликаты основного портала с обеспечением всех сервисов и сведений. Клиенты достигают стабильный доступ к капиталу, развлекательной статистике и персональным установкам.
Денежные транзакции осуществляются через связанные финансовые процессоры. Границы на взносы и получения назначаются в соответствии с правовыми условиями и внутренними правилами контроля угроз.
Квалифицированные гемблеры настаивают проверять положение авторизации через надзорные базы данных беттинг органов. Репутационные индикаторы включают позиции на тематических сервисах и оценки реальных игроков.
Поиск в пространстве лицензированных сайтов подразумевает осознания современных инструментов входа. Продвинутые пользователи задействуют казино Меллстрой для извлечения актуальной материалов о оперативных доменах.
Алгоритм создания аккаунта в сертифицированных компаниях охватывает сложную валидацию. Продвинутые провайдеры используют KYC-алгоритмы и AML-требования. Документальное сопровождение требует от 24 до 72 промежутков.
Компьютерные способы для прохождения запретов развиваются одновременно с ужесточением законодательных действий. VPN-решения уровня premium предоставляют шифрование AES-256 и стандарты OpenVPN. Надежность коннекта кардинально важна для премиальных партий.
Зеркальные домены выполняют задачи через регионально распределенные IT ресурсы. CDN-системы осуществляют низкую задержку для международных клиентов. Техническое перенаправление срабатывает при выявлении блокировки первичного адреса.
Денежные манипуляции в проверенных зонах отвечают строгим нормам PCI DSS. Децентрализованные операции приобретают востребованность в результате скрытности и быстроте осуществления.
Мобильные утилиты элитных брендов объединяют биометрическую идентификацию и push-оповещения для принципиальных происшествий. Изменяемый интерфейс программно корректируется под параметры панели.
Hello! Would you mind if I share your blog with my facebook group?
There’s a lot of people that I think would really enjoy your content.
Please let me know. Cheers
Also visit my site :: Biz Listings
sprucestudiohub – Tools came well packaged and immediately elevated my creative workflow.
the Revenue Roost portal – Great resources to boost online business earnings quickly.
Актуальные сервисы азартных услуг гарантируют участникам путь к элитному азарту через сертифицированные Вавада регистрация ресурсы. Лицензированная бизнес предполагает учета определенных правовых норм.
Алгоритм оформления персонального кабинета задействует аутентификацию личных данных. Провайдеры используют детализированные системы KYC и AML для пресечения мошеннических платежей.
Электронные системы новейших игорных домов строятся на надежных серверах с криптографическими алгоритмами. IP-фильтрация вынуждает владельцев организовывать параллельные URL.
Дублирующие платформы составляют эквивалентные клоны базового домена с поддержанием всех функций и параметров. Участники получают устойчивый связь к балансу, азартной статистике и персональным настройкам.
Банковские переводы реализуются через встроенные финансовые шлюзы. Пределы на инвестиции и обналичивания назначаются в соотношении с нормативными стандартами и корпоративными правилами контроля угроз.
Профессиональные пользователи настаивают отслеживать условия лицензии через надзорные базы данных беттинг структур. Статусные показатели предусматривают позиции на отраслевых ресурсах и мнения подлинных участников.
Определение безопасного игорного портала предполагает основательного изучения регулятивных свидетельств. Передовые сайты п»ї1хбет сайт обеспечивают пользователям максимальную сведения о текущих допусках.
Механизм получения доступа подразумевает различные требуемых шагов валидации. Владельцы настаивают бумаги, доказывающие индивидуальность и зрелость. Обычный KYC-механизм составляет от 24 до 72 периодов.
Банкролл-менеджмент инициируется с установления лимитов на депозиты. Искусные игроки предлагают эксплуатировать правило 5% от общего казино бюджета на отдельную партию.
Электронные запреты поставщиков заставляют задействовать запасные ссылки. Дубликаты хранят стопроцентную функциональность главного площадки, предусматривая хронологию сделок и игровой успех.
Инновационные финансовые инструменты дают моментальные пополнения через цифровые счета. Bitcoin, Ethereum и стабильные валюты обеспечивают анонимность и наименьшие комиссии. Продолжительность выполнения изъятий равно 10-30 отрезков.
Схемы преданности содержат иерархические степени с накапливающимся кэшбэком. VIP-менеджеры предлагают эксклюзивные поощрения, повышенные ограничения и приоритетную обслуживание.
Майнинг Исследуйте мир криптовалют с помощью этих инструментов и находите наиболее подходящие для вас способы заработка.
the shine and sparkle shop – Products look amazing and all details are clearly listed.
Надёжные провайдеры игровых услуг предоставляют геймерам вариант к профессиональному развлечениям через целевые порталы, включая Меллстрой официальный сайт , что выполняют международные стандарты конфиденциальности.
Схема оформления профиля включает предоставления authentication информации через защищённые SSL-линии. Операторы запрашивают нотариальное доказательство совершеннолетия и локации регистрации для выполнения правовых требований.
Двухфакторная проверка выступает необходимым элементом актуальных платформ защиты. Пользователи обретают SMS-коды, push-notification или применяют специализированные софт в стиле Google Authenticator.
Зеркальные URL устраняют вопросы региональных санкций и DDoS-воздействий. Технически зеркала составляют копийные копии центрального ресурса с поддержанием опций и клиентских сведений.
Компетентные клиенты призывают хранить свежие списки активных дублей в сохранённых ссылках browser. Букмекеры направляют обновления о актуальных адресах через email, Telegram-сообщества и телефонные программы.
Банковские процедуры через лицензионные площадки покрыты cryptographic алгоритмами уровня банковского сектора. Вывод фондов выполняется только на подтверждённые карты держателя профиля.
Отбор безопасного игорного заведения заставляет тщательного разбора юридических разрешений. Передовые ресурсы Лаки Бир зеркало дают клиентам максимальную факты о действующих лицензиях.
Механизм регистрации включает определенное количество необходимых шагов проверки. Администраторы истребуют справки, подтверждающие личность и правоспособность. Типовой KYC-механизм составляет от 24 до 72 временных отрезков.
Распоряжение капиталом инициируется с назначения пределов на инвестиции. Профессиональные участники призывают использовать принцип 5% от полного азартного фонда на единичную сессию.
Электронные ограничения владельцев побуждают задействовать запасные пути. Клоны поддерживают безусловную работоспособность основного площадки, предусматривая хронологию операций и казино достижения.
Актуальные финансовые методы гарантируют моментальные взносы через блокчейн аккаунты. Bitcoin, Ethereum и устойчивые монеты поддерживают тайность и крошечные отчисления. Время выполнения снятий доходит 10-30 промежутков.
Планы преданности охватывают градационные категории с увеличивающимся кэшбэком. VIP-консультанты обеспечивают эксклюзивные вознаграждения, усиленные лимиты и приоритетную помощь.
turmeric trove store – High-quality turmeric and spices made my recipes flavorful and easy to prepare.
This casino https://pojados.pl/ offers a solid mix of popular slots and live tables. The platform feels modern, promotions are worth trying, and support is helpful, which adds confidence.
Беттинговая ниша показывает стремительный расширение, привлекая тысячи игроков. Опытные порталы обеспечивают надёжную пространство для игры. Детальную материалы о указанных провайдерах возможно найти на Vavada .
Лицензирование выступает приоритетным аспектом отбора сайта. Юрисдикции Олдерни обеспечивают строгий мониторинг валютных манипуляций. Каждая официальная ресурс подвергается систематические проверки RNG-модулей.
Технические особенности передовых игорных домов содержат SSL-безопасность денежного уровня. Разработчики программного ПО вроде Microgaming, NetEnt, Pragmatic Play встраивают комплексные модели случайных значений.
Схема проверки счёта включает подачи бумаг KYC-формата. ID, свидетельство о средствах, подтверждение регистрации — стандартный пакет для итогового подключения.
Зеркальные порталы решают проблемы с ограничениями операторов. Рабочие копии модифицируются систематически IT службами. Мобильные утилиты нередко работают лучше браузерных форматов.
Банкролл-менеджмент определяет стратегическую эффективность беттинговых периодов. Профессиональные геймеры предлагают контролировать сумму ставки до 1-2% от общего банкролла.
birdhaven – Lovely decorative pieces that bring nature’s beauty indoors.
skyprintexpress – Prints arrived vibrant and professional, making me very satisfied with the results.
Официальные ресурсы игорных возможностей дают игрокам право к профессиональному развлечениям через тематические порталы, включая Лаки Бир сайт , что выполняют transnational нормы security.
Процедура создания аккаунта включает ввода authentication данных через encrypted SSL-connection. Операторы запрашивают официальное verification age verification и региона residence для выполнения законодательных критериев.
2FA идентификация выступает required составляющей новейших solutions защиты. Пользователи получают SMS-пароли, push-оповещения или задействуют профессиональные приложения вроде Google Authenticator.
Mirror домены преодолевают сложности локальных санкций и DDoS-воздействий. С технической точки зрения дубли формируют дублированные реплики основного портала с maintaining инструментария и user деталей.
Компетентные клиенты рекомендуют удерживать свежие списки активных дублей в избранном интернет-программы. Провайдеры доставляют информацию о новых адресах через email, Telegram-сообщества и mobile программы.
Банковские процедуры через legal порталы гарантированы шифровальными технологиями категории банковского направления. Вывод денег происходит лишь на проверенные счета хозяина учётной записи.
I really like your blog.. very nice colors & theme.
Did you design this website yourself or did you hire someone to do it for
you? Plz answer back as I’m looking to create my own blog and would
like to find out where u got this from. thanks
狼队2-2绝平枪手!2026英超比分神剧情,主帅直呼“像赢了”,阿森纳领先优势告急,足球新闻太刺激!
mostbet пополнение mostbet пополнение
Функционирующие mirror-ссылки проверенных gaming-операторов на Меллстрой казино создают постоянный подключение к геймерским сервисам. Технология зеркалирования формирует аналогичные реплики базового домена с удержанием всех возможностей.
Механизм регистрации через mirror-сайт абсолютно повторяет главную бланк. Только пришедшие пользователи указывают действующий email, устанавливают стойкий ключ и выбирают базовую курренси.
Аутентификация учетной записи требует отправки бумаг по KYC-стандартам. Снимок водительских прав, подтверждение адреса и банковские данные анализируются посредством автоматическую валидацию в течение 24-72 временных единиц.
Авторизация активных пользователей производится через стандартную форму с расширенной аутентификацией. Одноразовые пароли отправляются на мессенджер номер или электронную почту.
Возможности пополнительного блока через mirror-сайты содержит топовые денежные системы. Visa, Mastercard, электронные кошельки Skrill, Neteller, виртуальные монеты Bitcoin, Ethereum обрабатываются с минимальными сборами 0-3%.
Гемблинг база копируется абсолютно включая барабаны, карточные геймплей, live-крупье и джекпоты. RTP-индикаторы, изменчивость и проигрыш удерживаются аналогичными.
Бонусная программа выполняется подобно главному порталу. Welcome-наборы, free spins, refund и VIP-курсы запускаются машинально при достижении фиксированных критериев.
Отбор честного гемблинг портала предполагает основательного исследования официальных бумаг. Актуальные системы Вавада официальный сайт предоставляют клиентам полную информацию о своих лицензиях.
Процедура оформления счета подразумевает определенное количество ключевых ступеней проверки. Провайдеры требуют документы, удостоверяющие личность и совершеннолетие. Классический KYC-алгоритм занимает от 24 до 72 промежутков.
Распоряжение капиталом открывается с установления пределов на вклады. Искусные участники настаивают внедрять принцип 5% от совокупного азартного капитала на одну сессию.
Программные препятствия провайдеров принуждают эксплуатировать альтернативные домены. Альтернативы сохраняют стопроцентную эффективность базового сайта, охватывая хронологию сделок и азартный результаты.
Передовые финансовые сервисы предоставляют быстрые пополнения через блокчейн хранилища. Bitcoin, Ethereum и постоянные токены дают скрытность и крошечные комиссии. Продолжительность проведения извлечений достигает 10-30 интервалов.
Планы преданности включают градационные статусы с нарастающим кэшбэком. VIP-менеджеры дают личные награды, усиленные лимиты и приоритетную техподдержку.
I have been surfing online more than 3 hours
today, yet I never discovered any attention-grabbing article like yours.
It’s beautiful value sufficient for me. In my opinion, if all webmasters
and bloggers made good content material as you did, the web can be a lot more helpful than ever before.
Here is my homepage :: slon3 at
慢慢地强烈地2026 宋慧乔孔刘神级卡司 高清韩剧情感大作 Netflix首选
cocoacove store – Fresh cocoa powders and chocolates that made baking extra special today.
the creative corner shop – Found everything I needed to make my art projects run smoothly.
龙之家族第三季2026 海外华人奇幻巨制 高清龙焰对决 全球加速
Нынешние игроки обталкиваются с массой системных тонкостей при процессах с легальными ресурсами. Экспертные платформы типа Vavada казино выдают актуальную информацию о процессах казино организаций.
Механизм проверки счета предполагает ряд обязательных стадий. Исходная валидация нуждается загрузки справок верифицирующих субъект. Типовой список включает свидетельство, автоудостоверение или заграничное удостоверение.
Цифровая сторона оформления включает внедрение защищенного протокола и двойной авторизации. Квалифицированные игроки настаивают активировать весь комплекс имеющихся функций обеспечения.
Альтернативные адреса формируют стопроцентные клоны первичного домена с хранением комплексного инструментария. Важнейшее преимущество содержится в соответствии финансовых границ и параметров отыгрыша.
Схема поиска функционирующих зеркал основывается на проверке профессиональных информационных каналов и партнерских ресурсов. Квалифицированные пользователи применяют туннельные протоколы для формирования устойчивого связи без оглядки от территориальных ограничений.
Беттинговая индустрия демонстрирует быстрый расширение, манящая миллионы клиентов. Квалифицированные площадки дают безопасную условия для ставок. Детальную информацию о данных провайдерах реально изучить на Лаки Бир регистрация .
Аккредитация остаётся приоритетным показателем отбора портала. Контролёры Гибралтара дают строгий проверку экономических операций. Любая лицензированная площадка осуществляет систематические инспекции RNG-механизмов.
Программные параметры новейших азартных площадок охватывают SSL-криптографию расчётного класса. Провайдеры софтового продукта наподобие Microgaming, NetEnt, Pragmatic Play подключают многоуровневые схемы хаотичных показателей.
Процесс верификации личного кабинета предусматривает подачи свидетельств KYC-уровня. Документ, документ о доходах, верификация местожительства — стандартный набор для итогового подключения.
Дублирующие ссылки ликвидируют проблемы с цензурой провайдеров. Рабочие варианты модифицируются регулярно техническими группами. Портативные софт регулярно действуют надёжнее онлайн версий.
Распределение капитала задаёт длительную доходность беттинговых раундов. Квалифицированные беттеры предлагают сокращать размер депозита до 1-2% от полного бюджета.
I don’t know if it’s just me or if perhaps everybody else encountering problems with your website.
It seems like some of the text on your posts are running off the
screen. Can somebody else please comment and let me know if this
is happening to them as well? This could be a problem with my web
browser because I’ve had this happen previously.
Thank you
Also visit my webpage: daman
Инновационные сервисы азартных продуктов обеспечивают беттерам возможность к высококлассному развлечениям через защищенные казино Меллстрой системы. Сертифицированная операционная активность подразумевает выполнения жестких контролирующих требований.
Система регистрации индивидуального счета охватывает проверку индивидуальных данных. Регуляторы эксплуатируют комплексные системы KYC и AML для блокировки незаконных транзакций.
IT средства инновационных казино функционируют на безопасных дата-центрах с TLS алгоритмами. Региональная блокировка обязывает администраторов разрабатывать параллельные адреса.
Резервные домены представляют аналогичные копии базового портала с поддержанием всех сервисов и информации. Клиенты достигают устойчивый подключение к средствам, игровой отчетности и индивидуальным установкам.
Финансовые процедуры выполняются через интегрированные платежные процессоры. Ограничения на вклады и снятия определяются в соотношении с законодательными условиями и внутренними регламентами управления рисками.
Квалифицированные клиенты указывают анализировать положение авторизации через контролирующие списки азартных структур. Репутационные характеристики задействуют позиции на тематических сайтах и мнения реальных игроков.
Передовые игроки сталкиваются с барьером доступа к сертифицированным сайтам. Поставщики закрывают первичные домены, но искушённые казино Vavada участники помнят о присутствии альтернативных порталов.
Дополнительный домен составляет точную воспроизведение основного ресурса. Системы безопасности сохраняются равнозначными. Финансовые процедуры осуществляются через идентичные сервисы.
Процедура регистрации через зеркальный домен содержит привычной валидации. Администраторы уточняют справки для реализации KYC-требований. Индивидуальные данные проходят усиленную проверку.
Банковские пределы на параллельных ресурсах аналогичны базовым требованиям. Начальные беты продолжают константными. Прогрессивные банки объединяются между всеми порталами.
Бонусные схемы действуют целостно на дополнительных площадках. Требования по обороту обеспечивает оригинальные значения. Временные рамки использования продолжается.
Служба поддержки анализирует тикеты с дополнительных ресурсов таким же способом. Прямой диалог поддерживает 24-часовой режим функционирования.
this refined fashion outlet – The items were excellent and the packaging added a luxury touch.
Если вас интересует тема ufc в феврале марте 2026 три недели которые встряхнут дивизионы, советую заглянуть сюда. Ссылка на статью: https://avtoshkola37.ru/news/prognozy-na-ufc-fevral-mart-2026-kto-zaberyot-verh-v-glavnyh-boyah/
RevenueRoost online – Practical guides and products for building successful income streams.
Fortuna Sittard vs Excelsior – 2026 Eredivisie 19:00! Dutch football scores live – fireworks expected!
Проверенные платформы развлекательных сервисов обеспечивают участникам шанс к элитному развлечениям через специализированные домены, включая Вавада регистрация , которые специально выполняют глобальные критерии безопасности.
Механизм открытия счёта требует заполнения проверочных данных через защищённые SSL-connection. Администрация demanded письменное свидетельство совершеннолетия и территории residence для соблюдения правовых требований.
Multi-factor authentication выступает mandatory элементом передовых solutions security. Пользователи имеют SMS-пароли, push-notification или внедряют специализированные программы в стиле Google Authenticator.
Дублирующие домены решают препятствия geographic барьеров и DDoS-атак. По сути mirrors формируют копийные версии главного домена с сохранением функциональности и клиентских информации.
Компетентные клиенты рекомендуют keeping обновлённые перечни действующих дублей в сохранённых ссылках веб-клиента. Операторы направляют информацию о новых ссылках через почтовые сервисы, Telegram-чаты и портативные программы.
Финансовые movements через надёжные порталы защищены защитными системами класса банковского segment. Получение финансов происходит исключительно на validated счета держателя аккаунта.
Современные клиенты обталкиваются с изобилием системных аспектов при функционировании с сертифицированными площадками. Профессиональные источники типа п»ї1хбет зеркало выдают актуальную данные о деятельности игорных операторов.
Механизм валидации аккаунта включает комплекс принудительных этапов. Первичная верификация предполагает предоставления удостоверений доказывающих субъект. Обычный набор включает документ, водительские права или заграничное удостоверение.
Цифровая часть создания аккаунта содержит использование защищенного протокола и двухфакторной аутентификации. Экспертные пользователи подсказывают задействовать все предложенных функций защиты.
Альтернативные адреса являются полные дубликаты базового портала с удержанием полного функционала. Главное плюс выражается в подобии банковских рамок и норм отыгрыша.
Схема обнаружения функционирующих дублирующих порталов базируется на отслеживании экспертных информационных каналов и аффилированных площадок. Квалифицированные участники внедряют анонимайзеры для создания надежного входа независимо от локальных блокировок.
Нынешние игроки имеют дело с массой технологических тонкостей при работе с проверенными платформами. Экспертные ресурсы типа Лаки Бир зеркало предоставляют релевантную информацию о работе казино организаций.
Система подтверждения учетной записи подразумевает комплекс принудительных этапов. Начальная проверка предполагает отправки бумаг валидирующих персону. Классический список включает ID, лицензию водителя или загранпаспорт.
Цифровая часть создания аккаунта предполагает задействование безопасного соединения и 2FA. Опытные клиенты рекомендуют инициировать весь комплекс возможных параметров обеспечения.
Резервные ссылки формируют точные копии основного портала с хранением полного функционала. Главное преимущество состоит в идентичности расчетных рамок и критериев отыгрыша.
Схема выявления рабочих дублирующих порталов опирается на мониторинге профильных новостных лент и сотрудничающих платформ. Экспертные геймеры внедряют виртуальные частные сети для создания стабильного соединения безотносительно от местных блокировок.
Современные участники пересекаются с изобилием цифровых тонкостей при функционировании с легальными платформами. Тематические сайты типа п»ї1хбет сайт обеспечивают новую материалы о процессах развлекательных компаний.
Процесс проверки счета подразумевает множество неотъемлемых фаз. Базовая верификация предполагает передачи бумаг валидирующих субъект. Классический список охватывает паспорт, лицензию водителя или международный паспорт.
Техническая элемент записления предполагает задействование SSL-шифрования и двойной авторизации. Квалифицированные клиенты советуют задействовать все представленных параметров обеспечения.
Резервные ссылки формируют стопроцентные отражения центрального платформы с обеспечением тотального инструментария. Основное выгода заключается в подобии денежных рамок и требований ставочных требований.
Система поиска актуальных альтернативных адресов строится на контроле профильных новостных лент и союзных площадок. Квалифицированные игроки внедряют туннельные протоколы для гарантирования стабильного соединения безотносительно от локальных ограничений.
To evaluate
how can i get cheap keflex tablets
for innovative ideas.
minty mornings hub – Loved the fresh layout and the store felt calm and energizing.
secure VPN hub – Setup is straightforward and choices are easy to navigate.
the cottage tech marketplace – Easy browsing and an impressive assortment of electronics make it a favorite.
cablecorner – Cables arrived quickly and are sturdy, making setups simple and smooth.
沙丘预言第二季2026 海外华人科幻巨制 高清沙漠传奇 全球加速
This piece of writing is genuinely a good one it helps new net
viewers, who are wishing for blogging.
My blog post: daman game
My partner and I stumbled over here coming
from a different web page and thought I might as well check things out.
I like what I see so i am just following you. Look forward to looking
at your web page for a second time.
Актуальные участники попадают с затруднением соединения к легальным платформам. Операторы блокируют стандартные ссылки, но опытные казино 1хбет посетители помнят о функционировании резервных площадок.
Резервная ссылка формирует стопроцентную дубликат первичного платформы. Средства защиты остаются равнозначными. Банковские операции проходят через идентичные каналы.
Технология создания аккаунта через альтернативный домен требует обычной валидации. Операторы выясняют справки для исполнения KYC-стандартов. Индивидуальные характеристики проходят двухфакторную валидацию.
Финансовые границы на параллельных платформах идентичны первичным условиям. Низшие беты поддерживаются неизменными. Накопительные призовые фонды согласовываются между различными доменами.
Бонусные программы функционируют завершённо на резервных ресурсах. Требования по обороту сохраняет первоначальные величины. Длительность использования не изменяется.
Сервис обслуживания обрабатывает обращения с резервных адресов аналогично. Мгновенный разговор обеспечивает постоянный расписание функционирования.
Инновационные операторы развлекательных развлечений предлагают игрокам путь к премиальному гемблингу через надежные Лаки Бир порталы. Официальная функционирование предполагает выполнения определенных регуляторных критериев.
Процедура открытия персонального профиля включает проверку индивидуальных информации. Управляющие внедряют многоуровневые системы KYC и AML для пресечения нарушающих транзакций.
Цифровые платформы актуальных гемблинг платформ основываются на зашифрованных серверах с HTTPS стандартами. IP-фильтрация заставляет владельцев запускать дублирующие порталы.
Альтернативные сайты формируют точные репликации главного платформы с поддержанием всех инструментов и информации. Игроки обеспечивают себе постоянный вход к средствам, азартной истории и пользовательским установкам.
Финансовые процедуры реализуются через интегрированные банковские системы. Границы на инвестиции и получения назначаются в согласии с нормативными критериями и собственными процедурами минимизации опасностей.
Опытные беттеры предлагают контролировать положение сертификата через надзорные каталоги гемблинг органов. Авторитетные индикаторы задействуют позиции на специализированных сайтах и оценки истинных участников.
Rank In Charge premium collection – Useful, high-quality SEO tools that help boost traffic effectively.
fitnessequip – Durable home workout tools arrived on time and help me stay fit efficiently.
Fortuna Sittard vs Excelsior – 2026 Eredivisie 19:00! Dutch football scores live – fireworks expected!
handmadeluxe – Stunning items that impressed me with their quality and presentation.
Поиск в пространстве сертифицированных платформ подразумевает знания передовых инструментов авторизации. Умелые участники задействуют Lucky Bear casino для получения актуальной фактов о активных ссылках.
Процедура открытия аккаунта в надежных учреждениях содержит многоуровневую валидацию. Продвинутые поставщики эксплуатируют KYC-процедуры и AML-правила. Оформление документов отнимает от 24 до 72 временных отрезков.
Технические методы для прохождения препятствий развиваются вместе с повышением регуляторных инициатив. VPN-инструменты класса premium предлагают безопасность AES-256 и технологии OpenVPN. Стабильность соединения принципиально важна для премиальных партий.
Зеркальные домены действуют через географически размещенные IT ресурсы. CDN-структуры поддерживают быструю время ответа для азиатских игроков. Автоматическое редирект включается при обнаружении препятствия первичного ресурса.
Экономические операции в проверенных областях подпадают под конкретным критериям PCI DSS. Блокчейн платежи приобретают распространение в результате секретности и оперативности процессинга.
Планшетные клиенты топовых компаний объединяют физиологическую авторизацию и push-алерты для важных происшествий. Гибкий оформление программно изменяется под настройки дисплея.
Современные геймеры пересекаются с огромным количеством технологических деталей при операциях с официальными платформами. Экспертные ресурсы типа Вавада дают релевантную данные о функционировании азартных провайдеров.
Механизм проверки счета подразумевает множество принудительных уровней. Начальная подтверждение требует размещения документов удостоверяющих субъект. Привычный перечень содержит свидетельство, водительские права или международное ID.
Программная составляющая записления подразумевает применение SSL-шифрования и многофакторной защиты. Экспертные участники рекомендуют запускать все имеющихся параметров обеспечения.
Запасные домены формируют полные клоны центрального платформы с сохранением всего инструментария. Важнейшее преимущество состоит в схожести банковских ограничений и условий отыгрыша.
Процедура поиска рабочих запасных доменов основывается на отслеживании специализированных уведомительных сервисов и связанных сайтов. Опытные пользователи внедряют VPN-сервисы для формирования стабильного подключения без оглядки от территориальных лимитов.
ремонт жд вагоны От Воронежа до дальних регионов, ремонт ЖД путей необщего пользования и путей общего пользования требует специализированных знаний и техники.
ZylavoPortal – Pages are easy to scan, with a clean and user-friendly interface.
Проект бассейна под ключ https://atlapool.ru
новые промокоды казино Устали от пустых обещаний? Получи реальный шанс выиграть, активировав промокод на бездепозитный бонус – играй на деньги казино, не рискуя собственными!
大生意人2026 陈晓古装大作 海外华人高清热搜爆款 实时更新AI匹配追剧
clovercove home – The decorations feel high-quality and truly elevate my interior.
https://www.elephantjournal.com/profile/hddjejedhdhhsbs/
Беттинговая область демонстрирует активный подъём, притягивая массы участников. Квалифицированные площадки дают защищённую среду для пари. Развёрнутую сведения о указанных провайдерах можно отыскать на Лаки Бир сайт .
Аккредитация выступает основным аспектом отбора площадки. Лицензиаты Мальты предоставляют серьёзный контроль финансовых операций. Отдельная лицензированная портал подвергается систематические инспекции RNG-механизмов.
IT параметры актуальных беттинг-платформ предусматривают SSL-безопасность расчётного категории. Провайдеры программного софта класса Microgaming, NetEnt, Pragmatic Play добавляют продвинутые схемы произвольных параметров.
Механизм аутентификации профиля предполагает подачи справок KYC-формата. Паспорт, документ о доходах, подтверждение прописки — стандартный список для окончательного активации.
Дублирующие адреса ликвидируют препятствия с ограничениями поставщиков. Функционирующие зеркала адаптируются каждый день техническими службами. Портативные клиенты зачастую функционируют качественнее браузерных вариантов.
Управление банкроллом создаёт продолжительную результативность гемблинговых периодов. Квалифицированные участники настаивают сокращать объём пари до 1-2% от суммарного фонда.
Новейшие пользователи имеют дело с изобилием программных аспектов при функционировании с проверенными сайтами. Профильные платформы типа Вавада официальный сайт дают свежую информацию о деятельности развлекательных брендов.
Система аутентификации аккаунта содержит множество необходимых стадий. Первичная верификация нуждается отправки удостоверений доказывающих субъект. Обычный комплект содержит удостоверение личности, права или заграничное удостоверение.
Программная компонента открытия счета включает применение SSL-шифрования и двухуровневой проверки. Продвинутые игроки предлагают запускать совокупность представленных параметров безопасности.
Зеркала образуют полные реплики главного платформы с обеспечением исчерпывающего функционала. Центральное бонус выражается в схожести денежных пределов и критериев проигрыша.
Механизм локализации действующих зеркал фундируется на проверке тематических мессенджер групп и союзных ресурсов. Продвинутые игроки внедряют VPN-сервисы для создания бесперебойного соединения безотносительно от локальных барьеров.
supply depot shop – The products are displayed neatly and the explanations are very informative.
太平年2026 高清年代励志剧 海外华人免费观看 全球加速 剧情燃点满满
Актуальные сервисы беттинг продуктов предлагают пользователям подключение к премиальному беттингу через безопасные Вавада казино сайты. Сертифицированная работа влечет следования строгих контролирующих требований.
Механизм открытия индивидуального кабинета предусматривает верификацию персональных показателей. Управляющие применяют углубленные протоколы KYC и AML для недопущения поддельных операций.
Цифровые платформы новейших развлекательных порталов функционируют на безопасных инфраструктурах с шифровальными алгоритмами. Локальные запреты заставляет провайдеров внедрять вспомогательные порталы.
Зеркальные платформы составляют полные дубликаты основного домена с поддержанием всех функций и данных. Пользователи добиваются устойчивый соединение к капиталу, гемблинг записям и индивидуальным конфигурациям.
Банковские транзакции реализуются через встроенные финансовые системы. Лимиты на взносы и изъятия устанавливаются в унисон с законодательными критериями и собственными правилами контроля угроз.
Профессиональные игроки предлагают проверять статус аккредитации через официальные каталоги беттинг ведомств. Имиджевые индикаторы предусматривают места на профильных порталах и мнения реальных пользователей.
the online business corner – Resources here helped me improve my online revenue significantly.
Передовые пользователи сталкиваются с изобилием системных аспектов при деятельности с проверенными ресурсами. Тематические платформы типа Лаки Бир зеркало дают релевантную материалы о функционировании гэмблинговых брендов.
Процесс верификации счета подразумевает комплекс принудительных шагов. Исходная аутентификация требует предоставления справок подтверждающих субъект. Привычный пакет содержит паспорт, автоудостоверение или международное ID.
Цифровая часть записления включает внедрение криптографической защиты и двойной авторизации. Профессиональные клиенты подсказывают активировать все предложенных опций обеспечения.
Зеркала формируют полные реплики главного домена с сохранением полного арсенала. Ключевое бонус состоит в подобии денежных рамок и норм вейджера.
Механизм поиска актуальных дублирующих порталов опирается на контроле экспертных уведомительных сервисов и сотрудничающих порталов. Квалифицированные клиенты эксплуатируют прокси-соединения для создания бесперебойного подключения независимо от местных блокировок.
the coffee boutique – Rich, aromatic beans that made my mornings better.
Mainz 05 vs Hamburger SV – 2026 DFB-Pokal clash 20:30! German football scores live – who advances tonight?
Функционирующие альтернативные домены легальных казино на Vavada зеркало дают постоянный подключение к геймерским ресурсам. Схема дублирования генерирует эквивалентные клоны базового домена с фиксацией всех функций.
Система регистрации через резервную ссылку полностью имитирует основную шаблон. Только пришедшие пользователи заполняют валидный email, придумывают надежный пароль и устанавливают рабочую валюту.
Аутентификация профиля требует представления свидетельств в соответствии с KYC-политике. Снимок водительских прав, свидетельство проживания и карточные параметры проходят автоматическую верификацию в течение 24-72 временных единиц.
Авторизация действующих клиентов осуществляется через классическую интерфейс с многоступенчатой идентификацией. Одноразовые ключи отправляются на мессенджер устройство или мейл.
Возможности пополнительного компонента через дублирующие порталы включает востребованные платежные механизмы. Visa, Mastercard, виртуальные портмоне Skrill, Neteller, виртуальные монеты Bitcoin, Ethereum осуществляются с минимальными платежами 0-3%.
Азартная база повторяется абсолютно включая слоты, настольные забавы, live-ведущих и джекпоты. RTP-параметры, вариативность и отыгрыш фиксируются такими же.
Бонусная система действует схоже центральному ресурсу. Welcome-пакеты, бесплатные вращения, денежный возврат и VIP-планы включаются автоматически при достижении установленных параметров.
Новейшие пользователи имеют дело с изобилием цифровых деталей при операциях с легальными порталами. Профессиональные платформы типа Vavada казино дают свежую сведения о работе игорных брендов.
Система проверки учетной записи содержит набор обязательных уровней. Начальная верификация включает передачи справок доказывающих персону. Стандартный пакет охватывает паспорт, автолицензию или загранпаспорт.
Технологическая часть регистрации подразумевает использование безопасного соединения и многофакторной защиты. Квалифицированные участники подсказывают включать весь комплекс доступных настроек безопасности.
Альтернативные адреса формируют стопроцентные клоны главного домена с поддержанием всего возможностей. Важнейшее достоинство кроется в тождественности платежных пределов и критериев отыгрыша.
Алгоритм выявления актуальных дублирующих порталов опирается на проверке экспертных новостных лент и партнерских платформ. Опытные участники внедряют туннельные протоколы для обеспечения устойчивого связи без оглядки от территориальных барьеров.
казино без депозита Каждый игрок достоин возможности выиграть, и “казино без депозита” делает эту мечту реальностью.
驕陽似我续集2026 高清现偶甜宠 海外华人必备 AI推荐个性化观看
Новейшие клиенты имеют дело с огромным количеством технологических особенностей при работе с официальными сайтами. Экспертные источники типа Лаки Бир сайт дают новую материалы о деятельности развлекательных компаний.
Процесс верификации учетной записи подразумевает набор необходимых фаз. Начальная валидация нуждается передачи свидетельств верифицирующих индивидуальность. Привычный перечень подразумевает документ, водительские права или международное ID.
Программная сторона открытия счета содержит задействование SSL-шифрования и многофакторной защиты. Экспертные пользователи рекомендуют задействовать полный набор предложенных параметров обеспечения.
Запасные домены формируют точные копии первичного ресурса с хранением исчерпывающего набора функций. Основное достоинство состоит в соответствии финансовых лимитов и условий проигрыша.
Механизм нахождения рабочих зеркал фундируется на отслеживании профессиональных информационных каналов и партнерских площадок. Профессиональные участники используют виртуальные частные сети для создания стабильного доступа безотносительно от региональных барьеров.
Передовые геймеры имеют дело с массой цифровых особенностей при деятельности с легальными сайтами. Экспертные источники типа Меллстрой зеркало поставляют новую контент о работе казино операторов.
Система проверки кабинета содержит набор принудительных этапов. Базовая аутентификация подразумевает предоставления удостоверений удостоверяющих личность. Привычный пакет предполагает документ, лицензию водителя или внешний паспорт.
Техническая составляющая создания аккаунта подразумевает применение безопасного соединения и 2FA. Опытные геймеры подсказывают включать полный набор возможных возможностей охраны.
Альтернативные адреса образуют идентичные копии базового домена с удержанием исчерпывающего возможностей. Важнейшее бонус кроется в соответствии банковских пределов и норм отыгрыша.
Процедура обнаружения рабочих запасных доменов базируется на мониторинге профильных мессенджер групп и сотрудничающих порталов. Опытные геймеры эксплуатируют прокси-соединения для формирования устойчивого доступа без оглядки от территориальных лимитов.
It’s awesome to pay a visit this website and reading the views
of all friends concerning this post, while I am also zealous
of getting know-how.
Have a look at my page … slon2 at
pivotpalace.shop – Clean design and effortless navigation throughout the site.
the spring solutions store – Fast delivery and reliable products made everything simple.
Very clear and informative content. I appreciate how easy it is to follow. Hope to see more soon. graffiti logo generator
Официальные провайдеры игорных услуг oferuja участникам вариант к профессиональному времяпрепровождению через целевые порталы, включая п»ї1хбет зеркало , которые соблюдают мировые регламенты security.
Механизм регистрации требует предоставления идентификационных параметров через encrypted SSL-соединения. Менеджмент просят предоставить документальное удостоверение дееспособности и адреса нахождения для выполнения legal требований.
Двухфакторная проверка выступает принудительным частью новейших платформ надёжности. Users получают SMS-токены, push-notification или применяют специальные софт типа Google Authenticator.
Альтернативные домены устраняют проблемы geographic санкций и DDoS-атак. Фактически копии образуют копийные клоны главного портала с удержанием возможностей и индивидуальных информации.
Профессиональные игроки suggest удерживать свежие реестры рабочих копий в закладках веб-клиента. Администрация доставляют информацию о fresh доменах через почтовые сервисы, Telegram-каналы и портативные приложения.
Финансовые процедуры через официальные платформы защищены encryption methods класса банковского области. Снятие финансов осуществляется лишь на validated реквизиты собственника account.
mostbet не открывается https://mostbet39571.help
Современные сервисы гемблинг продуктов предлагают клиентам подключение к высококлассному гемблингу через безопасные п»ї1хбет сайт платформы. Сертифицированная операционная активность предполагает выполнения четких надзорных критериев.
Механизм создания игрового счета включает валидацию конфиденциальных сведений. Провайдеры применяют многоуровневые процедуры KYC и AML для недопущения фродовых транзакций.
Цифровые инструменты передовых развлекательных порталов базируются на безопасных серверах с SSL технологиями. IP-фильтрация обязывает провайдеров запускать параллельные домены.
Дублирующие ресурсы составляют точные клоны основного ресурса с фиксацией всех инструментов и сведений. Участники приобретают беспрепятственный связь к средствам, азартной записям и индивидуальным конфигурациям.
Платежные переводы осуществляются через интегрированные банковские агрегаторы. Рамки на инвестиции и снятия определяются в соотношении с правовыми критериями и внутренними регламентами риск-менеджмента.
Компетентные клиенты рекомендуют отслеживать состояние лицензии через надзорные регистры гемблинг структур. Репутационные характеристики задействуют позиции на специализированных порталах и комментарии настоящих участников.
this coffee gear hub – A fantastic range of equipment at very fair prices.
Подбор безопасного азартного ресурса предполагает глубокого рассмотрения регулятивных сертификатов. Актуальные платформы Вавада казино дают геймерам стопроцентную детали о имеющихся санкциях.
Механизм создания профиля охватывает различные обязательных ступеней аутентификации. Администраторы запрашивают свидетельства, удостоверяющие личность и совершеннолетие. Типовой KYC-порядок требует от 24 до 72 промежутков.
Управление банком стартует с назначения рамок на пополнения. Искусные пользователи предлагают использовать правило 5% от совокупного казино резерва на одну заход.
Технические барьеры операторов заставляют внедрять резервные маршруты. Клоны поддерживают безусловную функциональность базового ресурса, подразумевая журнал транзакций и казино продвижение.
Новые финансовые инструменты поддерживают оперативные инвестиции через электронные хранилища. Bitcoin, Ethereum и фиксированные активы поддерживают приватность и мизерные комиссии. Время обработки получений доходит 10-30 минут.
Программы лояльности содержат каскадные уровни с возрастающим бонусом. VIP-менеджеры дают персонализированные бонусы, увеличенные рамки и первоочередную помощь.
CobaltCorner picks – The browsing experience is pleasant and paying is effortless.
Looking well creates a positive first impression.
Your outfit speaks volumes before you even say a word.
It boosts your personal confidence and mindset significantly.
Your polished look signals competence in the office.
https://moda.megakazan.ru/muzhskie-aromaty-versace-2026-gid-po-samym-yarkim-novinkam-i-bestselleram/
Stylish choices allow you to express your individual identity.
Others often judge stylish individuals as more capable and trustworthy.
Ultimately, investing in your wardrobe is an valuable step in yourself.
linkladder.click – Appreciate the typography choices; comfortable spacing improved my reading experience.
龙之家族第三季2026 海外华人奇幻巨制 高清龙焰对决 全球加速观看
Hello, I log on to your new stuff on a regular basis. Your story-telling style is witty,
keep it up!
Here is my web site … slon4 at
有罪之身2026 魏大勋孙千悬疑绑架矿难 海外华人免费高清陆剧 全球加速无广告
Attractive section of content. I just stumbled upon your web
site and in accession capital to assert that I acquire in fact enjoyed account your blog posts.
Any way I will be subscribing to your feeds and even I achievement you
access consistently rapidly.
Feel free to visit my site … AI UI design tool free
Piece of writing writing is also a excitement, if you
be acquainted with after that you can write or else it is complex to write.
Also visit my web page; Mega Millions lottery
惊奇女士第二季2026 海外华人漫威青春剧 高清超级英雄少女
无敌第二季2026 海外华人动画超级英雄 高清暴力美学 海外华人首选
Visa Travel resources – Intuitive interface and helpful details make preparing for travel simple.
I enjoy playing at this casino https://maciejsasin.pl/ because it feels secure and stable. Live tables are immersive, slots offer good variety, and the overall experience remains consistent over time.
sparkdex ai SparkDex is redefining decentralized trading with speed, security, and real earning potential. On spark dex, you keep full control of your assets while enjoying fast swaps and low fees. Powered by sparkdex ai, the platform delivers smarter insights and optimized performance for confident decision-making. Trade, earn from liquidity, and grow your crypto portfolio with sparkdex — the future of DeFi starts here.
Актуальные операторы азартных продуктов дают клиентам путь к качественному игровому процессу через безопасные [url=https://github.com/Mellstroy-Game-zerkalo]Mellstroy Game[/url] порталы. Лицензированная деятельность влечет выполнения конкретных контролирующих критериев.
Процедура создания пользовательского профиля содержит проверку индивидуальных информации. Администраторы используют детализированные алгоритмы KYC и AML для предотвращения незаконных финансовых действий.
IT системы современных игорных домов функционируют на безопасных инфраструктурах с шифровальными протоколами. Локальные запреты вынуждает администраторов запускать дублирующие ссылки.
Зеркальные домены формируют эквивалентные дубликаты центрального портала с сохранением всех сервисов и сведений. Пользователи достигают беспрепятственный соединение к депозиту, беттинг статистике и личным конфигурациям.
Денежные операции выполняются через подключенные денежные сервисы. Лимиты на вклады и обналичивания фиксируются в соотношении с правовыми стандартами и индивидуальными регламентами управления рисками.
Профессиональные игроки настаивают контролировать положение аккредитации через государственные каталоги беттинг органов. Престижные показатели содержат рейтинги на экспертных порталах и отзывы действительных клиентов.
Нынешние участники сталкиваются с проблемой подключения к сертифицированным сайтам. Организации запрещают стандартные домены, но опытные Лаки Бир казино игроки понимают о присутствии резервных платформ.
Дополнительный домен составляет идентичную воспроизведение базового платформы. Средства защиты функционируют неизменными. Расчётные транзакции выполняются через те же сервисы.
Процедура оформления профиля через параллельный ресурс включает классической проверки. Администраторы уточняют удостоверения для осуществления KYC-стандартов. Персональные характеристики проходят многоуровневую верификацию.
Вносительные пределы на резервных ресурсах аналогичны базовым условиям. Низшие вклады поддерживаются фиксированными. Накопительные банки интегрируются между различными ссылками.
Премиальные программы выполняются целостно на альтернативных платформах. Вейджер поддерживает базовые цифры. Длительность отыгрыша продолжается.
Отдел поддержки обрабатывает обращения с резервных порталов равнозначно. Интерактивный чат гарантирует круглосуточный график деятельности.
Исследование в сфере сертифицированных сайтов предполагает знания передовых способов авторизации. Продвинутые игроки применяют ДживиСпин казино для добывания релевантной фактов о оперативных ссылках.
Схема создания личного кабинета в сертифицированных операторах подразумевает комплексную проверку. Продвинутые операторы внедряют KYC-процедуры и AML-нормы. Документальное сопровождение составляет от 24 до 72 периодов.
IT инструменты для прохождения препятствий эволюционируют параллельно с интенсификацией законодательных мер. VPN-платформы категории premium гарантируют кодирование AES-256 и методы OpenVPN. Непрерывность связи fundamentally актуальна для высокоролловых сессий.
Альтернативные домены функционируют через географически размещенные компьютерные инфраструктуры. CDN-комплексы гарантируют быструю задержку для европейских клиентов. Цифровое роутинг инициируется при детекции барьера главного ресурса.
Экономические транзакции в проверенных юрисдикциях отвечают строгим критериям PCI DSS. Крипто переводы набирают актуальность в результате скрытности и оперативности обработки.
Портативные программы премиальных операторов объединяют голосовую проверку и push-оповещения для существенных ситуаций. Настраиваемый внешний вид самостоятельно настраивается под свойства дисплея.
Новейшие порталы развлекательных развлечений гарантируют беттерам возможность к элитному гемблингу через сертифицированные казино миллион сайты. Легальная функционирование предполагает соблюдения жестких надзорных положений.
Процесс регистрации персонального профиля задействует аутентификацию приватных информации. Операторы применяют многоуровневые системы KYC и AML для предотвращения мошеннических транзакций.
IT средства передовых развлекательных порталов строятся на защищенных инфраструктурах с TLS технологиями. Геоблокировка принуждает провайдеров разрабатывать альтернативные домены.
Дублирующие ресурсы представляют точные дубликаты главного портала с фиксацией всех возможностей и показателей. Клиенты получают непрерывный подключение к депозиту, азартной данным и пользовательским опциям.
Банковские процедуры реализуются через встроенные денежные шлюзы. Лимиты на вклады и обналичивания назначаются в унисон с регуляторными условиями и индивидуальными процедурами контроля угроз.
Квалифицированные пользователи предлагают мониторить положение лицензии через надзорные каталоги гемблинг ведомств. Имиджевые критерии содержат оценки на отраслевых сайтах и отзывы подлинных пользователей.
Thanks for sharing your thoughts about Dewatogel.
Regards
https://humanlove.stream/wiki/Cdigo_promocional_1xBet_instantneo_2026_1XBRO200
真实的人类第三季高清完整版2026 海外华人科幻高清剧
Новейшие игроки встречаются с огромным количеством программных тонкостей при деятельности с сертифицированными платформами. Тематические ресурсы типа Лаки Бир регистрация предоставляют актуальную данные о работе гэмблинговых компаний.
Процедура валидации счета предполагает несколько требуемых уровней. Начальная аутентификация предполагает передачи документов доказывающих индивидуальность. Обычный пакет охватывает свидетельство, автолицензию или международный паспорт.
Цифровая составляющая открытия счета подразумевает использование SSL-шифрования и двойной авторизации. Экспертные игроки рекомендуют задействовать все предложенных функций охраны.
Запасные домены являются абсолютные копии основного домена с обеспечением полного набора функций. Главное достоинство выражается в тождественности финансовых ограничений и условий ставочных требований.
Процедура поиска функционирующих альтернативных адресов основывается на отслеживании тематических новостных лент и аффилированных площадок. Продвинутые геймеры используют VPN-сервисы для предоставления надежного соединения вне зависимости от региональных блокировок.
Свежие новости SEO https://seovestnik.ru и IT-индустрии — алгоритмы, ранжирование, веб-разработка, кибербезопасность и цифровые инструменты для бизнеса.
Подбор качественного гемблинг заведения в современных условиях требует тщательного изучения к правовому режиму. Компетентные игроки знают, что казино Вавада включает новую сведения о доступных ресурсах.
Процедура регистрации в сертифицированных сервисах охватывает принудительную валидацию персональных данных. KYC-процедуры гарантируют как площадку, так и игрока от обмана. Переходные пределы на получение активов до выполнения проверки – типичная система.
Виртуальные ограничения на подключение к игровым сайтам устраняются через параллельные домены. Действующие зеркала сохраняют полную функциональность главного сервиса. Расчетные транзакции, развлекательный прогресс и привилегированные предложения сохраняются стабильными.
Материальная безопасность выражается уровнем задействованных денежных инструментов. SSL-безопасность, PCI DSS подтверждение и многоуровневая верификация формируют защищенный щит защиты.
Развлекательная коллекция официальных площадок включает автоматы от известных создателей. RTP-коэффициенты, волатильность и математические системы подвергаются независимую валидацию в утвержденных организациях.
Планы стимулирования в качественных сервисах формируются на ясных критериях проигрыша. Отыгрыш x35-40 расценивается разумным для спин-льгот, в то время как настольные развлечения учитываются в подсчет с пониженным коэффициентом.
小城大事2026 赵丽颖黄晓明 高清农民造城励志 海外华人免费热播 全球加速
Neospin online casino 2026 expert reviews huge bonuses Aussies
These are actually great ideas in regarding blogging.
You have touched some fastidious factors here.
Any way keep up wrinting.
Here is my site – Powerball results
There is definately a great deal to find out about this subject.
I like all the points you have made.
Азартная индустрия отображает стремительный подъём, привлекая массы геймеров. Грамотные платформы обеспечивают надёжную обстановку для игры. Исчерпывающую данные о подобных операторах допустимо получить на казино ретро .
Аккредитация является ключевым показателем определения сайта. Юрисдикции Олдерни дают жёсткий проверку расчётных процедур. Любая легальная сайт осуществляет регулярные проверки RNG-механизмов.
Компьютерные особенности передовых казино охватывают SSL-криптографию расчётного категории. Провайдеры программного продукта класса Microgaming, NetEnt, Pragmatic Play подключают комплексные алгоритмы произвольных показателей.
Схема аутентификации счёта предполагает представления документов KYC-уровня. Удостоверение, выписка о средствах, удостоверение регистрации — базовый комплект для финального подключения.
Дублирующие домены исправляют проблемы с цензурой операторов. Свежие альтернативы обновляются систематически IT специалистами. Смартфонные клиенты обычно функционируют лучше веб вариантов.
Распределение капитала задаёт стратегическую прибыльность гемблинговых периодов. Квалифицированные участники советуют ограничивать величину ставки до 1-2% от совокупного капитала.
慕胥辞2026 迪丽热巴陈飞宇古装爱情巨制 海外华人必备高清热播 实时更新AI推荐
Поиск в секторе сертифицированных платформ включает представления актуальных инструментов авторизации. Продвинутые клиенты используют Голд казино для получения современной данных о активных доменах.
Схема оформления счета в проверенных учреждениях содержит комплексную верификацию. Актуальные операторы внедряют KYC-алгоритмы и AML-стандарты. Документооборот потребляет от 24 до 72 временных отрезков.
Компьютерные технологии для обхода ограничений прогрессируют вместе с ужесточением нормативных инициатив. VPN-сервисы класса premium предлагают безопасность AES-256 и протоколы OpenVPN. Стабильность канала критически актуальна для VIP игровых периодов.
Дублирующие ресурсы оперируют через пространственно разнесенные серверные инфраструктуры. CDN-архитектуры поддерживают сокращенную задержку для глобальных геймеров. Техническое редирект включается при выявлении барьера основного портала.
Банковские операции в проверенных юрисдикциях отвечают строгим требованиям PCI DSS. Крипто расчеты набирают популярность вследствие скрытности и динамике реализации.
Портативные клиенты элитных провайдеров совмещают физиологическую аутентификацию и push-алерты для важных моментов. Изменяемый внешний вид автономно адаптируется под характеристики монитора.
Беттинговая индустрия отображает активный рост, заинтересовывая легионы игроков. Опытные площадки дают стабильную условия для беттинга. Развёрнутую материалы о этих компаниях допустимо найти на Mellstroy Game casino .
Аккредитация остаётся приоритетным критерием определения площадки. Контролёры Гибралтара дают серьёзный проверку финансовых манипуляций. Отдельная официальная платформа подвергается постоянные проверки RNG-механизмов.
Цифровые свойства передовых азартных площадок содержат SSL-защиту финансового категории. Поставщики компьютерного материала типа Microgaming, NetEnt, Pragmatic Play внедряют продвинутые алгоритмы рандомных чисел.
Алгоритм подтверждения учётной записи включает представления справок KYC-уровня. Паспорт, выписка о прибылях, удостоверение проживания — классический перечень для итогового доступа.
Резервные порталы исправляют сложности с цензурой организаций. Свежие копии корректируются каждый день программными специалистами. Мобильные клиенты часто оперируют надёжнее браузерных форматов.
Распределение капитала определяет продолжительную эффективность гемблинговых раундов. Опытные беттеры советуют ограничивать объём ставки до 1-2% от итогового капитала.
Передовые игроки попадают с затруднением доступа к официальным порталам. Операторы закрывают главные ссылки, но знающие Lucky Bear казино пользователи знают о наличии резервных порталов.
Параллельный портал составляет идентичную воспроизведение базового портала. Средства защиты функционируют равнозначными. Банковские транзакции осуществляются через те же каналы.
Процедура регистрации через дополнительный ссылку предполагает типовой аутентификации. Сотрудники выясняют документы для соблюдения KYC-стандартов. Личные параметры реализуют многоуровневую аутентификацию.
Банковские ограничения на параллельных платформах аналогичны основным условиям. Низшие ставки продолжают константными. Накопительные джекпоты интегрируются между всеми ресурсами.
Премиальные системы выполняются всесторонне на параллельных площадках. Вейджер обеспечивает первоначальные показатели. Тайминг проигрывания остаётся прежним.
Команда помощи изучает тикеты с параллельных порталов равнозначно. Живой разговор обеспечивает беспрерывный порядок оперирования.
spice haven boutique – Loved the rich aromas and freshness of the spices for cooking.
convertio.click – Content reads clearly, helpful examples made concepts easy to grasp.
Protein Pantry daily finds – Affordable and high-quality protein variety perfect for daily use.
Проверенные платформы игорных возможностей обеспечивают пользователям доступ к высококлассному времяпрепровождению через профильные сайты, включая Лаки Бир официальный сайт , что исполняют глобальные нормы защиты.
Механизм оформления профиля предполагает внесения верификационных сведений через защищённые SSL-connection. Администрация demanded official свидетельство совершеннолетия и региона жительства для поддержания законодательных правил.
Двухфакторная аутентификация представляет обязательным компонентом современных систем security. Users приобретают SMS-коды, push-оповещения или внедряют targeted tools по типу Google Authenticator.
Зеркальные домены устраняют трудности региональных барьеров и DDoS-assault. По сути зеркала формируют идентичные клоны базового портала с удержанием опций и пользовательских деталей.
Компетентные игроки рекомендуют keeping актуальные каталоги рабочих mirrors в избранном интернет-программы. Операторы отправляют updates о современных порталах через почтовые сервисы, Telegram-каналы и смартфонные приложения.
Финансовые операции через legal ресурсы покрыты encryption алгоритмами стандарта банковского segment. Extraction денег реализуется solely на подтверждённые данные владельца account.
написание студенческих работ на заказ kupit-kursovuyu-68.ru .
Подбор проверенного игрового заведения в текущих рамках требует тщательного рассмотрения к лицензионному положению. Профессиональные участники учитывают, что Lucky Bear зеркало демонстрирует свежую данные о работающих провайдерах.
Схема записи в лицензированных заведениях включает требуемую подтверждение идентичности. KYC-требования защищают как оператора, так и пользователя от мошенничества. Временные пределы на изъятие денег до завершения подтверждения – стандартная подход.
Виртуальные запреты на вход к развлекательным ресурсам обходятся через параллельные адреса. Рабочие копии поддерживают стопроцентную функциональность центрального портала. Денежные движения, интерактивный результаты и поощрительные планы остаются постоянными.
Экономическая стабильность характеризуется степенью внедренных платежных систем. SSL-кодирование, PCI DSS подтверждение и расширенная идентификация устанавливают прочный щит охраны.
Игровая набор легальных операторов предоставляет машины от известных разработчиков. RTP-коэффициенты, изменчивость и статистические формулы получают беспристрастную сертификацию в признанных учреждениях.
Программы лояльности в надежных сервисах формируются на понятных критериях активности. Условия ставок x35-40 расценивается справедливым для машина-привилегий, в то время как классические развлечения принимаются в расчет с уменьшенным фактором.
Man United flop Sancho eyes Borussia Dortmund return – 2026 transfer news bombshell – latest football scores & rumors!
Актуальные операторы азартных активностей дают беттерам возможность к элитному беттингу через безопасные типпи казино ресурсы. Авторизованная бизнес нуждается выполнения четких контролирующих норм.
Процесс создания игрового кабинета задействует аутентификацию конфиденциальных данных. Провайдеры применяют многоуровневые механизмы KYC и AML для недопущения поддельных операций.
Технические средства передовых казино базируются на надежных серверах с SSL алгоритмами. Региональная блокировка принуждает администраторов запускать параллельные адреса.
Параллельные домены составляют аналогичные дубликаты центрального портала с сохранением всех опций и данных. Пользователи получают стабильный связь к депозиту, гемблинг данным и персональным параметрам.
Денежные переводы выполняются через синхронизированные расчетные процессоры. Ограничения на взносы и получения фиксируются в соотношении с регуляторными критериями и внутренними правилами снижения потерь.
Профессиональные беттеры предлагают мониторить ситуацию сертификата через контролирующие реестры беттинг организаций. Авторитетные индикаторы включают рейтинги на специализированных порталах и оценки подлинных участников.
Telegram Каждая из этих сфер – майнинг, аирдропы, тапалки, фармилки – предлагает свой уникальный путь к заработку криптовалюты, а интеграция с Telegram делает их доступными каждому.
Visit Moss Mingle – Came across this site by chance and it exceeded my expectations.
Передовые участники оказываются с проблемой соединения к официальным платформам. Организации ограничивают базовые порталы, но опытные казино типпи пользователи учитывают о функционировании резервных ресурсов.
Зеркало образует стопроцентную реплику главного площадки. Системы безопасности работают неизменными. Финансовые транзакции осуществляются через сходные сервисы.
Технология создания аккаунта через параллельный портал требует привычной проверки. Операторы просят справки для реализации KYC-правил. Идентификационные данные осуществляют многоуровневую проверку.
Финансовые ограничения на дополнительных сайтах соответствуют базовым требованиям. Начальные ставки функционируют неизменными. Увеличивающиеся призовые фонды синхронизируются между различными порталами.
Бонусные механизмы функционируют полноценно на резервных порталах. Отыгрышный коэффициент удерживает оригинальные показатели. Длительность оборота продолжается.
Департамент ассистирования анализирует тикеты с параллельных порталов таким же способом. Онлайн переписка осуществляет беспрерывный порядок функционирования.
Thanks for sharing your thoughts. I truly appreciate your efforts and
I will be waiting for your further post thank you once again.
Азартная индустрия демонстрирует интенсивный развитие, заинтересовывая миллионы геймеров. Профессиональные сайты предоставляют надёжную атмосферу для развлечений. Развёрнутую информацию о данных брендах возможно обнаружить на Vavada .
Легализация остаётся основным фактором выбора ресурса. Юрисдикции Гибралтара предоставляют строгий надзор расчётных процедур. Конкретная официальная сайт проходит регулярные инспекции RNG-модулей.
Программные характеристики современных игорных домов охватывают SSL-безопасность расчётного ранга. Создатели программного софта типа Microgaming, NetEnt, Pragmatic Play добавляют многоуровневые системы рандомных значений.
Механизм аутентификации счёта требует передачи свидетельств KYC-типа. Документ, справка о средствах, удостоверение регистрации — базовый пакет для завершённого подключения.
Резервные домены решают сложности с цензурой провайдеров. Актуальные копии адаптируются каждый день компьютерными отделами. Мобильные приложения часто действуют лучше сетевых редакций.
Банкролл-менеджмент формирует долгосрочную успешность азартных циклов. Опытные беттеры предлагают сокращать сумму пари до 1-2% от совокупного бюджета.
clickrly.click – Color palette felt calming, nothing distracting, just focused, thoughtful design.
Актуальные геймеры пересекаются с изобилием цифровых тонкостей при работе с официальными ресурсами. Профессиональные источники типа Меллстрой регистрация поставляют свежую материалы о работе гэмблинговых операторов.
Алгоритм аутентификации учетной записи содержит несколько обязательных этапов. Стартовая аутентификация требует размещения справок доказывающих индивидуальность. Стандартный пакет содержит удостоверение личности, лицензию водителя или международное ID.
Технологическая часть регистрации содержит задействование SSL-шифрования и 2FA. Профессиональные участники настаивают задействовать совокупность возможных настроек секьюрити.
Резервные ссылки образуют точные отражения базового платформы с поддержанием полного функционала. Центральное выгода содержится в тождественности банковских границ и требований условий прокрутки.
Механизм выявления функционирующих дублирующих порталов основывается на наблюдении экспертных мессенджер групп и связанных сайтов. Экспертные пользователи внедряют прокси-соединения для обеспечения устойчивого соединения безотносительно от территориальных барьеров.
best virtual number service linkedin.com/pulse/top-5-sms-activate-services-ultimate-guide-virtual-phone-mike-davis-gnhre .
sms activator github.com/sms-activate-login .
sms activate service sms activate service .
Легальные ресурсы гэмблинг предложений предоставляют клиентам право к качественному игровому процессу через тематические сайты, включая Меллстрой РІС…РѕРґ , которые именно следуют международные стандарты безопасности.
Алгоритм активации necessita внесения authentication сведений через encrypted SSL-протоколы. Администрация запрашивают нотариальное удостоверение возраста и территории регистрации для выполнения legal требований.
Двухфакторная идентификация представляет необходимым компонентом новейших платформ security. Игроки приобретают SMS-шифры, push-notification или применяют профессиональные tools вроде Google Authenticator.
Mirror адреса преодолевают препятствия geographic запретов и DDoS-штурмов. Техническим образом дубли формируют копийные реплики главного ресурса с удержанием инструментария и клиентских параметров.
Опытные геймеры призывают поддерживать новейшие реестры рабочих зеркал в favourites интернет-программы. Management отправляют сведения о новых URL через мейл, Telegram-группы и телефонные программы.
Платёжные movements через лицензионные площадки secured защитными алгоритмами категории банковского segment. Получение фондов осуществляется только на аутентифицированные wallets хозяина личного кабинета.
Передовые сервисы развлекательных развлечений дают клиентам подключение к элитному развлечениям через надежные friends casino зеркало сегодня ресурсы. Сертифицированная работа влечет выполнения строгих контролирующих требований.
Процесс открытия пользовательского профиля включает верификацию личных сведений. Регуляторы используют детализированные механизмы KYC и AML для исключения фродовых операций.
Технические инструменты актуальных гемблинг платформ основываются на стабильных инфраструктурах с криптографическими протоколами. Локальные запреты принуждает провайдеров создавать резервные ссылки.
Параллельные домены являют собой точные версии первичного сайта с фиксацией всех сервисов и информации. Клиенты добиваются беспрепятственный подключение к счету, развлекательной записям и персональным конфигурациям.
Финансовые транзакции проходят через встроенные платежные агрегаторы. Ограничения на инвестиции и выводы регулируются в согласии с нормативными положениями и индивидуальными политиками управления рисками.
Компетентные беттеры предлагают проверять состояние сертификата через регуляторные списки беттинг комиссий. Престижные параметры включают ранги на экспертных сайтах и feedback истинных пользователей.
Актуальные геймеры встречаются с массой технологических деталей при работе с официальными платформами. Профильные порталы типа Лаки Бир РІС…РѕРґ предоставляют релевантную информацию о операциях казино операторов.
Процесс подтверждения аккаунта содержит несколько неотъемлемых стадий. Стартовая верификация нуждается отправки свидетельств удостоверяющих гражданство. Стандартный перечень предполагает документ, лицензию водителя или заграничное удостоверение.
Техническая элемент регистрации подразумевает внедрение криптографической защиты и двойной авторизации. Экспертные пользователи настаивают активировать весь комплекс представленных опций защиты.
Альтернативные адреса являются полные дубликаты главного портала с поддержанием полного набора функций. Центральное плюс содержится в подобии банковских ограничений и параметров отыгрыша.
Механизм локализации активных резервных ссылок фундируется на контроле профильных новостных лент и союзных площадок. Профессиональные игроки задействуют VPN-сервисы для обеспечения постоянного соединения независимо от территориальных лимитов.
Выбор проверенного гемблинг портала подразумевает основательного рассмотрения юридических разрешений. Инновационные платформы Вован казино предоставляют клиентам полную сведения о действующих санкциях.
Процесс создания профиля охватывает ряд необходимых стадий верификации. Владельцы запрашивают свидетельства, засвидетельствующие идентичность и дееспособность. Обычный KYC-регламент занимает от 24 до 72 интервалов.
Управление банком запускается с установления пределов на инвестиции. Искусные участники рекомендуют применять закон 5% от суммарного азартного капитала на отдельную сессию.
Программные барьеры операторов побуждают применять вспомогательные адреса. Альтернативы поддерживают абсолютную работоспособность центрального платформы, содержа журнал операций и игровой прогресс.
Современные банковские методы дают скоростные инвестиции через цифровые кошельки. Bitcoin, Ethereum и фиксированные активы поддерживают конфиденциальность и мизерные платежи. Период осуществления снятий составляет 10-30 периодов.
Планы лояльности подразумевают каскадные уровни с возрастающим компенсацией. VIP-представители предоставляют личные бонусы, расширенные пределы и ускоренную поддержку.
adsfactory.click – Found practical insights today; sharing this article with colleagues later.
轧戏2026 陈星旭卢昱晓高口碑陆剧 海外华人高清在线 全球加速AI推荐
Современные операторы беттинг продуктов предоставляют игрокам путь к качественному беттингу через проверенные казино Lucky Bear сайты. Легальная деятельность предполагает исполнения строгих регуляторных критериев.
Механизм создания персонального аккаунта включает проверку персональных данных. Администраторы внедряют детализированные механизмы KYC и AML для пресечения нарушающих переводов.
Программные инструменты инновационных развлекательных порталов работают на надежных хостингах с криптографическими протоколами. Локальные запреты побуждает провайдеров создавать вспомогательные порталы.
Альтернативные порталы составляют аналогичные клоны основного портала с фиксацией всех сервисов и сведений. Пользователи получают беспрепятственный связь к счету, развлекательной статистике и пользовательским настройкам.
Финансовые действия проходят через связанные платежные системы. Лимиты на депозиты и получения назначаются в согласии с законодательными критериями и организационными правилами снижения потерь.
Профессиональные гемблеры указывают анализировать статус сертификата через надзорные базы данных развлекательных ведомств. Авторитетные параметры включают рейтинги на экспертных платформах и feedback настоящих пользователей.
Актуальные сервисы гемблинг развлечений обеспечивают пользователям возможность к профессиональному развлечениям через безопасные Меллстрой сайт порталы. Легальная операционная активность влечет учета жестких контролирующих критериев.
Процесс оформления персонального профиля задействует верификацию индивидуальных реквизитов. Администраторы используют расширенные алгоритмы KYC и AML для блокировки поддельных переводов.
Технические решения передовых беттинг площадок основываются на стабильных хостингах с SSL алгоритмами. Региональная блокировка вынуждает провайдеров разрабатывать дублирующие адреса.
Резервные домены представляют эквивалентные версии центрального ресурса с сохранением всех инструментов и информации. Игроки получают постоянный вход к средствам, гемблинг записям и клиентским опциям.
Банковские переводы осуществляются через интегрированные финансовые шлюзы. Пределы на вклады и получения определяются в согласии с правовыми положениями и корпоративными процедурами контроля угроз.
Компетентные пользователи рекомендуют контролировать состояние разрешения через государственные регистры беттинг органов. Репутационные критерии включают места на профильных ресурсах и оценки подлинных игроков.
Надёжные провайдеры развлекательных возможностей обеспечивают геймерам шанс к высококлассному азартному досугу через специализированные сайты, включая казино типпи , которые точно исполняют мировые стандарты защиты.
Последовательность регистрации включает предоставления authentication параметров через encrypted SSL-соединения. Провайдеры запрашивают письменное доказательство совершеннолетия и адреса нахождения для compliance правовых норм.
Multi-factor проверка считается обязательным компонентом новейших систем надёжности. Пользователи располагают SMS-токены, push-алерты или используют профессиональные утилиты наподобие Google Authenticator.
Зеркальные порталы устраняют вопросы geographic запретов и DDoS-штурмов. Техническим образом реплики представляют дублированные реплики центрального ресурса с сохранением возможностей и user параметров.
Компетентные пользователи suggest keeping свежие списки действующих дублей в сохранённых ссылках веб-клиента. Букмекеры передают новости о актуальных URL через e-mail, Telegram-communities и смартфонные программы.
Финансовые переводы через лицензионные платформы обеспечены защитными алгоритмами категории банковского области. Снятие денег выполняется лишь на проверенные данные хозяина личного кабинета.
Подбор проверенного гемблинг оператора нуждается серьезного изучения официальных разрешений. Инновационные порталы казино Килограмм дают геймерам абсолютную информацию о собственных разрешениях.
Система открытия аккаунта предусматривает различные требуемых ступеней валидации. Операторы настаивают свидетельства, доказывающие личность и зрелость. Классический KYC-регламент занимает от 24 до 72 временных отрезков.
Контроль средств инициируется с определения рамок на взносы. Опытные игроки советуют задействовать установку 5% от общего игорного фонда на конкретную партию.
Технические запреты администраторов принуждают применять запасные домены. Зеркала удерживают максимальную функциональность главного сайта, включая историю сделок и гемблинг достижения.
Передовые банковские сервисы поддерживают моментальные взносы через цифровые хранилища. Bitcoin, Ethereum и стабильные валюты предоставляют приватность и мизерные сборы. Период реализации снятий доходит 10-30 интервалов.
Планы постоянства охватывают ступенчатые статусы с нарастающим бонусом. VIP-представители дают индивидуальные поощрения, расширенные пределы и приоритетную поддержку.
暗夜情报员第三季2026 海外华人动作爽剧 Netflix全季上架 全球加速
Проверенные платформы гэмблинг предложений гарантируют участникам шанс к элитному гэмблингу через тематические сайты, включая Вавада казино , что придерживаются глобальные регламенты защиты.
Механизм регистрации предполагает ввода authentication сведений через шифрованные SSL-connection. Букмекеры просят предоставить нотариальное доказательство возраста и адреса нахождения для выполнения нормативных стандартов.
Двухэтапная аутентификация представляет необходимым aspect современных архитектур конфиденциальности. Участники располагают SMS-пароли, push-сообщения или используют targeted tools вроде Google Authenticator.
Дублирующие адреса ликвидируют вопросы territorial барьеров и DDoS-нападений. Технически mirrors представляют аналогичные клоны центрального домена с поддержанием инструментария и личных сведений.
Профессиональные пользователи suggest удерживать актуальные реестры working mirrors в сохранённых ссылках браузера. Операторы передают сведения о современных ссылках через e-mail, Telegram-communities и телефонные программы.
Платёжные movements через legal порталы secured encryption алгоритмами категории банковского segment. Снятие средств осуществляется лишь на аутентифицированные карты обладателя личного кабинета.
scalewave.click – Found practical insights today; sharing this article with colleagues later.
Актуальные гемблеры сталкиваются с барьером доступа к сертифицированным ресурсам. Организации закрывают базовые адреса, но профессиональные Лаки Бир зеркало участники знают о существовании резервных площадок.
Резервная ссылка представляет стопроцентную дубликат оригинального площадки. SSL-сертификаты функционируют аналогичными. Банковские переводы реализуются через равнозначные механизмы.
Алгоритм создания аккаунта через дополнительный ссылку содержит обычной подтверждения. Специалисты уточняют свидетельства для выполнения KYC-регламентов. Личные параметры проходят комплексную подтверждение.
Депозитные лимиты на альтернативных сайтах идентичны основным параметрам. Минимальные взносы поддерживаются стабильными. Растущие накопления объединяются между различными адресами.
Бонусные системы действуют всесторонне на резервных площадках. Множитель ставок обеспечивает первоначальные значения. Период действия оборота не изменяется.
Сервис обслуживания рассматривает тикеты с резервных ресурсов идентично. Интерактивный общение гарантирует постоянный порядок оперирования.
I am genuinely pleased to glance at this webpage posts which includes plenty of helpful information, thanks for providing these kinds of data.
Here is my site: slon5 cc
trendfunnel.click – Color palette felt calming, nothing distracting, just focused, thoughtful design.
Функционирующие mirror-ссылки надежных игорных заведений на п»ї1хбет казино гарантируют беспрерывный вход к геймерским ресурсам. Технология зеркалирования строит аналогичные копии базового портала с удержанием всех механизмов.
Система оформления профиля через дублирующий портал абсолютно копирует главную бланк. Начинающие игроки указывают рабочий email, придумывают стойкий секретную комбинацию и определяют игровую курренси.
Аутентификация профиля подразумевает отправки справок в соответствии с KYC-политике. Фото водительских прав, свидетельство резиденции и платежные сведения анализируются посредством алгоритмическую анализ в течение 24-72 часа.
Авторизация зарегистрированных клиентов реализуется через обычную форму с расширенной проверкой. Краткосрочные токены приходят на сотовый устройство или email.
Возможности финансового блока через дублирующие порталы поддерживает топовые расчетные сервисы. Visa, Mastercard, виртуальные хранилища Skrill, Neteller, виртуальные монеты Bitcoin, Ethereum реализуются с оптимизированными комиссиями 0-3%.
Азартная база клонируется полностью включая барабаны, классические забавы, live-хостов и джекпоты. RTP-индикаторы, колебания и отыгрыш фиксируются идентичными.
Бонусная программа функционирует подобно основному домену. Welcome-наборы, безвозмездные спины, refund и VIP-курсы инициируются машинально при достижении определенных параметров.
Определение достойного игрового портала в сегодняшних обстоятельствах заставляет повышенного внимания к законному уровню. Знающие клиенты осознают, что Лаки Бир сайт предоставляет современную данные о работающих операторах.
Процесс создания аккаунта в лицензированных площадках охватывает требуемую валидацию идентичности. KYC-стандарты гарантируют как оператора, так и пользователя от афер. Кратковременные пределы на перечисление средств до выполнения верификации – типичная система.
Технические блокировки на подключение к азартным сайтам нейтрализуются через зеркальные ссылки. Рабочие отражения обеспечивают полную работоспособность главного сайта. Расчетные транзакции, геймплейный статистика и наградные системы функционируют стабильными.
Финансовая гарантированность характеризуется показателем используемых финансовых механизмов. SSL-криптография, PCI DSS валидация и расширенная аутентификация формируют защищенный барьер обороны.
Интерактивная коллекция проверенных операторов объединяет барабаны от топовых создателей. RTP-значения, колебания и вероятностные схемы получают объективную сертификацию в признанных лабораториях.
Схемы поощрения в качественных площадках формируются на понятных правилах отыгрыша. Проигрыш x35-40 признается разумным для машина-поощрений, в то время как карточные забавы включаются в расчет с уменьшенным фактором.
Передовые сервисы беттинг игр предоставляют пользователям подключение к элитному игровому процессу через защищенные Гризли казино системы. Официальная операционная активность подразумевает следования конкретных регуляторных стандартов.
Процедура активации пользовательского аккаунта задействует валидацию индивидуальных показателей. Провайдеры внедряют углубленные протоколы KYC и AML для блокировки нарушающих транзакций.
Программные платформы современных игорных домов строятся на надежных серверах с криптографическими алгоритмами. Региональная блокировка обязывает управляющих создавать альтернативные порталы.
Дублирующие домены формируют точные клоны центрального домена с фиксацией всех возможностей и информации. Пользователи получают беспрепятственный связь к депозиту, азартной статистике и индивидуальным настройкам.
Банковские процедуры производятся через связанные платежные шлюзы. Ограничения на пополнения и изъятия определяются в унисон с законодательными условиями и индивидуальными регламентами управления рисками.
Профессиональные клиенты рекомендуют мониторить условия разрешения через контролирующие реестры игорных комиссий. Авторитетные показатели содержат позиции на экспертных сервисах и оценки подлинных игроков.
Азартная сфера представляет стремительный рост, заинтересовывая легионы клиентов. Опытные платформы предлагают защищённую атмосферу для развлечений. Подробную информацию о данных компаниях реально получить на казино Килограмм .
Легализация составляет приоритетным критерием селекции портала. Контролёры Олдерни дают жёсткий надзор расчётных процедур. Отдельная лицензированная сайт осуществляет систематические проверки RNG-систем.
Цифровые характеристики современных беттинг-платформ содержат SSL-шифрование расчётного стандарта. Поставщики программного обеспечения типа Microgaming, NetEnt, Pragmatic Play встраивают комплексные модели непредсказуемых показателей.
Процедура валидации личного кабинета предполагает передачи свидетельств KYC-класса. Свидетельство, выписка о средствах, удостоверение прописки — типичный набор для полноценного авторизации.
Резервные URL убирают сложности с фильтрацией организаций. Действующие варианты адаптируются ежедневно IT отделами. Карманные программы зачастую выполняются устойчивее браузерных модификаций.
Контроль средств создаёт долгосрочную доходность азартных раундов. Экспертные пользователи настаивают сокращать сумму ставки до 1-2% от полного капитала.
https://emiratesambassadeurs.com/vip-concierge/ Looking for GMT-Master II 126710BLRO in Dubai? our Geneva-based private watch desk can help with a ready piece and confirm year, condition, and final price once availability is confirmed.
Для поклонников ММА нашел подробный материал про ufc в феврале марте 2026 три недели которые встряхнут дивизионы. Источник здесь: https://tut-vse-yasno.ru/news/ufc-fevral-mart-2026-polnyj-gid-po-tryom-turniram-ot-hyustona-do-las-vegasa/
Современные игроки оказываются с сложностью подключения к лицензированным платформам. Провайдеры запрещают стандартные URL, но знающие казино 1хбет посетители помнят о существовании дублирующих ресурсов.
Зеркало образует полную копию главного сайта. Системы безопасности поддерживаются такими же. Банковские процедуры выполняются через сходные системы.
Схема оформления профиля через параллельный ссылку подразумевает обычной верификации. Специалисты требуют удостоверения для выполнения KYC-норм. Паспортные данные подвергаются усиленную аутентификацию.
Вносительные границы на альтернативных ресурсах соответствуют главным требованиям. Наименьшие беты поддерживаются фиксированными. Возрастающие призовые фонды синхронизируются между множественными адресами.
Бонусные системы оперируют завершённо на зеркальных площадках. Множитель ставок поддерживает исходные показатели. Тайминг отыгрыша остаётся прежним.
Отдел ассистирования рассматривает вопросы с альтернативных доменов таким же способом. Онлайн общение осуществляет круглосуточный формат функционирования.
Thanks , I have recently been searching for info approximately this topic for a long time and yours is the best I’ve came upon so far. However, what in regards to the bottom line? Are you sure in regards to the supply?
bandacasino9.xyz
Гемблинговая сфера демонстрирует активный развитие, манящая множество клиентов. Квалифицированные порталы дают стабильную среду для пари. Детальную данные о подобных провайдерах допустимо получить на Меллстрой официальный сайт .
Сертификация составляет ключевым элементом определения площадки. Контролёры Гибралтара гарантируют жёсткий аудит экономических процедур. Любая аккредитованная портал осуществляет постоянные контроли RNG-генераторов.
IT параметры передовых гемблинг-сайтов охватывают SSL-кодирование экономического стандарта. Производители программного софта вроде Microgaming, NetEnt, Pragmatic Play подключают многоуровневые системы непредсказуемых параметров.
Схема подтверждения учётной записи включает направления бумаг KYC-типа. Удостоверение, справка о средствах, верификация местожительства — базовый пакет для полноценного доступа.
Резервные ссылки исправляют препятствия с ограничениями организаций. Функционирующие альтернативы обновляются ежедневно техническими командами. Портативные приложения нередко оперируют стабильнее браузерных модификаций.
Управление банкроллом определяет длительную доходность беттинговых сессий. Профессиональные пользователи настаивают сокращать объём ставки до 1-2% от суммарного капитала.
Carbon credits https://offset8capital.com and natural capital – climate projects, ESG analytics and transparent emission compensation mechanisms with long-term impact.
Развлекательная сфера представляет интенсивный расширение, манящая тысячи игроков. Опытные платформы предоставляют качественную среду для ставок. Полную материалы о данных компаниях можно отыскать на казино Голд .
Аттестация составляет центральным аспектом определения сайта. Регуляторы Мальты обеспечивают серьёзный проверку валютных транзакций. Всякая аккредитованная платформа реализует систематические аудиты RNG-генераторов.
IT характеристики актуальных гемблинг-сайтов предусматривают SSL-безопасность экономического стандарта. Разработчики виртуального материала класса Microgaming, NetEnt, Pragmatic Play внедряют многоуровневые схемы случайных чисел.
Процедура аутентификации личного кабинета включает представления бумаг KYC-формата. ID, документ о финансах, удостоверение прописки — классический пакет для финального авторизации.
Альтернативные адреса устраняют трудности с ограничениями поставщиков. Свежие зеркала обновляются каждый день цифровыми группами. Карманные приложения часто работают лучше интернет редакций.
Банкролл-менеджмент создаёт долгосрочную доходность азартных партий. Профессиональные игроки указывают сокращать количество бета до 1-2% от итогового резерва.
Действующие резервные адреса лицензированных азартных клубов на казино миллион предоставляют устойчивый доступ к геймерским сервисам. Методика реплицирования создает аналогичные копии центрального домена с фиксацией всех возможностей.
Система активации через дублирующий портал абсолютно повторяет оригинальную бланк. Новые геймеры указывают валидный email, создают стойкий шифр и выбирают операционную курренси.
Идентификация профиля требует представления документов согласно KYC-нормам. Скан ID-карты, валидация проживания и финансовые данные анализируются посредством программную анализ в течение 24-72 ч.
Вход существующих игроков выполняется через типовую окно с усиленной валидацией. Сессионные токены приходят на мобильный девайс или мейл.
Механизмы денежного раздела через зеркала обеспечивает топовые расчетные инструменты. Visa, Mastercard, веб счета Skrill, Neteller, crypto Bitcoin, Ethereum обрабатываются с сокращенными сборами 0-3%.
Развлекательная ассортимент дублируется абсолютно включая автоматы, столовые забавы, live-хостов и джекпоты. RTP-индикаторы, волатильность и отыгрыш сохраняются идентичными.
Подарочная механизм функционирует аналогично базовому сайту. Welcome-предложения, безвозмездные спины, денежный возврат и VIP-планы включаются машинально при выполнении установленных параметров.
Беттинговая область показывает динамичный развитие, заинтересовывая массы клиентов. Квалифицированные сайты предоставляют безопасную условия для ставок. Подробную информацию о данных брендах реально найти на Меллстрой зеркало .
Лицензирование составляет ключевым аспектом селекции платформы. Надзорные органы Олдерни дают строгий контроль валютных манипуляций. Каждая официальная ресурс подвергается периодические контроли RNG-алгоритмов.
Цифровые параметры новейших казино содержат SSL-безопасность расчётного стандарта. Создатели цифрового материала наподобие Microgaming, NetEnt, Pragmatic Play подключают усовершенствованные алгоритмы хаотичных показателей.
Процедура аутентификации аккаунта подразумевает подачи свидетельств KYC-стандарта. Удостоверение, выписка о средствах, удостоверение проживания — типичный перечень для итогового доступа.
Резервные ссылки устраняют препятствия с блокировками поставщиков. Свежие дубли изменяются систематически программными группами. Смартфонные приложения зачастую действуют надёжнее браузерных вариантов.
Контроль средств задаёт длительную прибыльность азартных сессий. Опытные участники рекомендуют урезать объём пари до 1-2% от итогового капитала.
Букеты заказать в москве Цветы в знак уважения начальству
Подбор качественного азартного портала в нынешних рамках нуждается тщательного изучения к регулятивному режиму. Опытные игроки понимают, что Mellstroy Game зеркало отображает последнюю данные о работающих сервисах.
Алгоритм создания аккаунта в сертифицированных площадках предусматривает требуемую подтверждение личности. KYC-процедуры охраняют как оператора, так и игрока от мошенничества. Кратковременные пределы на изъятие средств до закрытия подтверждения – обычная методика.
Цифровые ограничения на доступ к игровым сайтам устраняются через зеркальные ссылки. Функционирующие копии предоставляют стопроцентную функциональность первичного сервиса. Платежные операции, игровой прогресс и поощрительные программы продолжают неизменными.
Материальная надежность оценивается критерием применяемых банковских систем. SSL-криптография, PCI DSS лицензирование и дополнительная идентификация гарантируют прочный контур ограждения.
Геймплейная набор проверенных операторов предоставляет слоты от известных студий. RTP-индексы, изменчивость и алгоритмические схемы подвергаются беспристрастную контроль в утвержденных институтах.
Системы мотивации в достойных казино формируются на понятных критериях вейджера. Проигрыш x35-40 характеризуется адекватным для слот-подарков, в то время как карточные активности засчитываются в расчет с редуцированным коэффициентом.
нейросеть для студентов nejroset-dlya-ucheby.ru .
Hi i am kavin, its my first occasion to commenting anyplace, when i read this paragraph i thought i could also
make comment due to this brilliant piece of writing.
написание курсовых на заказ написание курсовых на заказ .
Определение надежного азартного площадки заставляет тщательного разбора правовых сертификатов. Инновационные платформы Лаки Бир зеркало гарантируют игрокам абсолютную факты о текущих разрешениях.
Процедура регистрации охватывает различные обязательных шагов верификации. Операторы запрашивают удостоверения, устанавливающие личность и совершеннолетие. Стандартный KYC-механизм составляет от 24 до 72 интервалов.
Банкролл-менеджмент открывается с фиксации пределов на пополнения. Профессиональные участники предлагают задействовать принцип 5% от полного азартного капитала на одну сессию.
Программные блокировки администраторов побуждают эксплуатировать дополнительные домены. Зеркала хранят стопроцентную эффективность центрального сайта, включая журнал транзакций и игровой успех.
Передовые расчетные способы предоставляют мгновенные пополнения через криптовалютные портмоне. Bitcoin, Ethereum и постоянные токены обеспечивают скрытность и крошечные комиссии. Длительность осуществления изъятий достигает 10-30 интервалов.
Системы преданности включают иерархические категории с возрастающим кэшбэком. VIP-представители обеспечивают уникальные бонусы, усиленные лимиты и приоритетную помощь.
Современные геймеры оказываются с затруднением связи к лицензированным порталам. Поставщики фильтруют основные URL, но знающие Меллстрой посетители понимают о существовании альтернативных площадок.
Резервная ссылка является стопроцентную копию оригинального сайта. Средства защиты сохраняются неизменными. Расчётные процедуры осуществляются через равнозначные системы.
Методика заведения учётной записи через дополнительный домен требует обычной подтверждения. Менеджеры уточняют бумаги для соблюдения KYC-правил. Персональные характеристики реализуют расширенную аутентификацию.
Депозитные рамки на параллельных сайтах аналогичны основным характеристикам. Стартовые суммы поддерживаются фиксированными. Возрастающие выигрышные пулы объединяются между многочисленными доменами.
Стимулирующие планы работают комплексно на резервных ресурсах. Требования по обороту удерживает исходные значения. Длительность реализации сохраняется.
Департамент обслуживания обрабатывает тикеты с параллельных ссылок таким же способом. Прямой разговор гарантирует 24-часовой расписание оперирования.
Актуальные гемблеры оказываются с сложностью входа к легальным площадкам. Операторы блокируют стандартные ссылки, но профессиональные казино типпи участники учитывают о наличии дублирующих ресурсов.
Параллельный портал представляет стопроцентную отображение оригинального площадки. Криптографические алгоритмы функционируют равнозначными. Банковские процедуры проходят через идентичные системы.
Методика открытия счёта через альтернативный портал содержит обычной проверки. Операторы запрашивают бумаги для реализации KYC-норм. Индивидуальные сведения выполняют двухфакторную подтверждение.
Банковские рамки на альтернативных платформах аналогичны основным характеристикам. Начальные ставки сохраняются фиксированными. Возрастающие призовые фонды координируются между многочисленными адресами.
Бонусные схемы оперируют целостно на зеркальных порталах. Требования по обороту сохраняет стартовые значения. Период действия проигрывания остаётся прежним.
Команда ассистирования обрабатывает вопросы с дополнительных порталов сходным образом. Онлайн чат осуществляет круглосуточный график обслуживания.
indoor plant boutique – Healthy greenery came carefully packed and looking great.
Передовые участники сталкиваются с изобилием системных деталей при операциях с легальными ресурсами. Специализированные порталы типа лаки Р±РёСЂ казино обеспечивают современную информацию о процессах азартных провайдеров.
Процесс подтверждения счета включает ряд обязательных стадий. Начальная аутентификация включает предоставления документов удостоверяющих индивидуальность. Классический список предполагает паспорт, автоудостоверение или международный паспорт.
Технологическая сторона создания аккаунта охватывает внедрение защищенного протокола и двойной авторизации. Экспертные клиенты предлагают инициировать совокупность имеющихся настроек охраны.
Альтернативные адреса составляют идентичные отражения базового сайта с поддержанием исчерпывающего возможностей. Основное бонус заключается в схожести платежных рамок и норм отыгрыша.
Схема нахождения активных альтернативных адресов базируется на контроле профессиональных информационных каналов и сотрудничающих площадок. Опытные пользователи задействуют прокси-соединения для создания постоянного подключения без оглядки от территориальных запретов.
Hmm is anyone else having problems with the images on this blog loading? I’m trying to figure out if its a problem on my end or if it’s the blog. Any responses would be greatly appreciated.
вход leebet
Передовые игроки встречаются с огромным количеством программных нюансов при операциях с лицензированными ресурсами. Экспертные платформы типа Lucky Bear выдают релевантную информацию о функционировании гэмблинговых провайдеров.
Процедура подтверждения счета охватывает ряд принудительных стадий. Начальная подтверждение требует загрузки бумаг доказывающих персону. Типовой список содержит паспорт, автолицензию или внешний паспорт.
Цифровая составляющая оформления предполагает эксплуатацию безопасного соединения и многофакторной защиты. Опытные клиенты подсказывают задействовать полный набор представленных функций защиты.
Зеркала формируют идентичные клоны главного сайта с сохранением всего функционала. Ключевое плюс выражается в тождественности денежных рамок и требований отыгрыша.
Процедура локализации актуальных зеркал базируется на наблюдении экспертных телеграм-каналов и связанных платформ. Профессиональные геймеры внедряют прокси-соединения для формирования постоянного связи вне зависимости от территориальных ограничений.
Надёжные провайдеры гэмблинг сервисов гарантируют пользователям доступ к высококлассному развлечениям через профильные платформы, включая Лаки Бир официальный сайт , что следуют мировые нормы защиты.
Схема открытия счёта требует указания authentication данных через шифрованные SSL-линии. Букмекеры просят нотариальное подтверждение дееспособности и адреса регистрации для compliance legal норм.
Multi-factor верификация выступает обязательным элементом современных solutions защиты. Участники получают SMS-токены, push-алерты или задействуют профессиональные утилиты типа Google Authenticator.
Резервные адреса устраняют трудности региональных санкций и DDoS-атак. Фактически зеркала формируют аналогичные копии основного портала с удержанием инструментария и личных информации.
Профессиональные клиенты предлагают keeping актуальные каталоги действующих дублей в сохранённых ссылках browser. Букмекеры направляют информацию о современных порталах через электронную почту, Telegram-группы и телефонные программы.
Финансовые movements через надёжные сайты защищены cryptographic methods уровня банковского segment. Получение финансов происходит solely на аутентифицированные счета обладателя аккаунта.
romantic bouquet source – I appreciated the artistic arrangements and the quick confirmation at checkout.
Nearby Needs popular items – Practical and intuitive design for efficient browsing.
一帆视频海外华人首选2026 华语美剧日剧 高清在线观看
Беттинговая область отображает динамичный расширение, завлекая массы клиентов. Экспертные порталы дают надёжную среду для пари. Подробную факты о таких операторах реально отыскать на казино Гризли .
Сертификация остаётся ключевым аспектом отбора площадки. Юрисдикции Мальты обеспечивают качественный проверку экономических процедур. Конкретная сертифицированная ресурс проходит постоянные проверки RNG-систем.
Компьютерные свойства передовых гемблинг-сайтов включают SSL-криптографию расчётного категории. Провайдеры программного ПО наподобие Microgaming, NetEnt, Pragmatic Play подключают комплексные алгоритмы хаотичных чисел.
Процесс аутентификации личного кабинета предусматривает передачи бумаг KYC-типа. Документ, справка о доходах, удостоверение регистрации — классический перечень для окончательного подключения.
Альтернативные ссылки решают барьеры с запретами операторов. Функционирующие зеркала изменяются регулярно компьютерными командами. Карманные клиенты часто оперируют устойчивее сетевых вариантов.
Финансовая дисциплина устанавливает долгосрочную прибыльность развлекательных сессий. Профессиональные игроки настаивают ограничивать количество бета до 1-2% от совокупного бюджета.
Актуальные дублирующие порталы проверенных игорных заведений на Mellstroy Game казино предоставляют непрерывный соединение к игровым ресурсам. Технология копирования образует полноценные клоны центрального сайта с удержанием всех функций.
Схема регистрации через альтернативный домен целиком повторяет главную бланк. Дебютные игроки заполняют рабочий email, формируют сложный ключ и определяют операционную финансовый инструмент.
Валидация профиля включает предоставления документов следуя KYC-требованиям. Изображение ID-карты, верификация адреса и карточные сведения контролируются системой цифровую валидацию в течение 24-72 ч.
Авторизация действующих участников осуществляется через стандартную окно с 2FA верификацией. Одноразовые коды приходят на мобильный девайс или мейл.
Опции депозитного компонента через зеркала содержит актуальные платежные инструменты. Visa, Mastercard, виртуальные счета Skrill, Neteller, криптовалюты Bitcoin, Ethereum процессируются с сокращенными взносами 0-3%.
Игровая ассортимент воспроизводится на сто процентов включая машины, традиционные геймплей, live-дилеров и накопительные призы. RTP-индикаторы, изменчивость и вейджер поддерживаются аналогичными.
Поощрительная схема оперирует подобно центральному домену. Welcome-пакеты, безвозмездные спины, refund и VIP-системы стартуют системно при реализации прописанных стандартов.
Рабочие зеркала легальных gaming-операторов на казино Vavada гарантируют беспрерывный коннект к азартным сервисам. Технология дублирования образует идентичные копии корневого сайта с консервацией всех инструментов.
Система открытия счета через зеркало полностью дублирует главную форму. Только пришедшие клиенты вводят валидный email, создают защищенный пароль и устанавливают рабочую курренси.
Подтверждение профиля включает загрузки документов следуя KYC-требованиям. Изображение национального документа, доказательство адреса и финансовые сведения контролируются системой цифровую контроль в течение 24-72 часов.
Аутентификация активных участников осуществляется через базовую интерфейс с 2FA идентификацией. Краткосрочные ключи отправляются на сотовый номер или e-mail адрес.
Механизмы финансового модуля через mirror-сайты обеспечивает распространенные финансовые инструменты. Visa, Mastercard, онлайн балансы Skrill, Neteller, блокчейн-токены Bitcoin, Ethereum реализуются с минимальными сборами 0-3%.
Азартная база воспроизводится полностью включая автоматы, классические игры, live-ведущих и накопительные призы. RTP-показатели, вариативность и вейджер поддерживаются идентичными.
Промо программа выполняется аналогично основному веб-площадке. Welcome-пакеты, даровые прокруты, refund и VIP-схемы инициируются машинально при достижении фиксированных параметров.
Гемблинговая отрасль показывает активный прогресс, завлекая тысячи геймеров. Профессиональные порталы обеспечивают стабильную пространство для ставок. Детальную факты о указанных брендах возможно получить на винити казино .
Аккредитация остаётся ключевым фактором селекции площадки. Контролёры Кюрасао обеспечивают тщательный мониторинг финансовых манипуляций. Всякая легальная ресурс реализует периодические ревизии RNG-алгоритмов.
Компьютерные свойства современных беттинг-платформ включают SSL-шифрование экономического уровня. Создатели программного ПО класса Microgaming, NetEnt, Pragmatic Play внедряют комплексные схемы произвольных чисел.
Механизм верификации счёта предполагает направления удостоверений KYC-уровня. Удостоверение, свидетельство о прибылях, валидация адреса — типичный перечень для окончательного активации.
Резервные ссылки исправляют барьеры с цензурой провайдеров. Рабочие зеркала изменяются регулярно программными специалистами. Портативные приложения зачастую выполняются устойчивее онлайн модификаций.
Контроль средств устанавливает длительную доходность азартных раундов. Квалифицированные пользователи рекомендуют контролировать объём ставки до 1-2% от общего резерва.
Looking well creates a positive first impression.
Your outfit speaks volumes before a person actually speak a word.
This boosts your own self-esteem and mood significantly.
A polished look conveys professionalism in the workplace.
https://info.sochidaily.ru/stalnoy-kharakter-gid-po-kultovym-modelyam-tissot/
Fashionable choices allow you to express your unique identity.
People often judge stylish individuals as more successful and trustworthy.
Therefore, investing in your wardrobe is an valuable step in your personal brand.
казино бонусы без депозита “Бездепозитные бонусы” – это не просто подарок, это приглашение исследовать мир казино и открыть для себя новые возможности для выигрыша.
What stood out about this casino https://pizzapancake.pl/ is the quality of the games. Everything runs smoothly, the design is minimal, and there’s always something new to explore, which keeps it engaging.
royal timber shop – The quality is exceptional and craftsmanship really stands out.
Актуальные клиенты обталкиваются с множеством системных деталей при функционировании с сертифицированными сайтами. Специализированные сайты типа казино Mellstroy Game дают актуальную сведения о операциях развлекательных операторов.
Процесс проверки учетной записи включает ряд неотъемлемых шагов. Начальная аутентификация предполагает отправки свидетельств удостоверяющих индивидуальность. Стандартный комплект охватывает документ, водительские права или международное ID.
Программная составляющая открытия счета включает эксплуатацию SSL-шифрования и двухфакторной аутентификации. Экспертные игроки настаивают инициировать весь комплекс возможных настроек защиты.
Дублирующие порталы составляют точные клоны первичного портала с сохранением исчерпывающего функционала. Центральное бонус заключается в идентичности банковских рамок и критериев условий прокрутки.
Алгоритм локализации функционирующих альтернативных адресов строится на контроле профессиональных новостных лент и сотрудничающих площадок. Опытные игроки эксплуатируют анонимайзеры для формирования надежного доступа без оглядки от региональных запретов.
Поиск в секторе лицензированных платформ подразумевает осознания передовых методов входа. Профессиональные геймеры внедряют Vavada для приобретения современной данных о активных адресах.
Процесс открытия учетной записи в лицензированных заведениях подразумевает сложную валидацию. Новейшие поставщики применяют KYC-механизмы и AML-стандарты. Документальная процедура потребляет от 24 до 72 интервалов.
IT решения для избежания запретов улучшаются вместе с интенсификацией законодательных инициатив. VPN-инструменты типа premium гарантируют шифрование AES-256 и протоколы OpenVPN. Стабильность связи принципиально необходима для привилегированных партий.
Резервные ресурсы работают через локально расположенные компьютерные инфраструктуры. CDN-структуры обеспечивают сокращенную время ответа для международных игроков. Цифровое редирект запускается при детекции препятствия центрального адреса.
Денежные операции в официальных территориях отвечают строгим критериям PCI DSS. Крипто транзакции завоевывают популярность в результате конфиденциальности и оперативности реализации.
Мобильные софт лучших операторов интегрируют отпечатковую подтверждение и push-алерты для критических происшествий. Гибкий облик независимо подстраивается под параметры матрицы.
Propeller Plaza featured items – Excellent options and fast, informative responses from customer service.
I think the admin of this site is genuinely working hard in favor of his web page, because here every information is quality based material.
Проверенные платформы азартных возможностей предоставляют клиентам право к высококлассному развлечениям через целевые платформы, включая ретро официальный сайт , которые специально исполняют глобальные регламенты security.
Последовательность регистрации necessita предоставления валидационных деталей через шифрованные SSL-протоколы. Провайдеры просят предоставить официальное свидетельство возраста и локации жительства для выполнения правовых правил.
Multi-factor идентификация представляет принудительным частью передовых архитектур защиты. Игроки получают SMS-шифры, push-уведомления или эксплуатируют специальные софт вроде Google Authenticator.
Mirror домены нейтрализуют препятствия географических блокировок и DDoS-assault. С технической точки зрения зеркала составляют копийные реплики основного домена с удержанием функциональности и личных информации.
Экспертные клиенты предлагают keeping свежие базы активных дублей в bookmark интернет-программы. Букмекеры рассылают обновления о fresh доменах через электронную почту, Telegram-чаты и mobile утилиты.
Платёжные процедуры через лицензионные сайты защищены cryptographic технологиями level банковского индустрии. Получение средств производится только на проверенные счета хозяина учётной записи.
Инновационные провайдеры азартных продуктов обеспечивают пользователям доступ к качественному беттингу через защищенные enomo casino ресурсы. Легальная операционная активность влечет выполнения конкретных контролирующих требований.
Система оформления персонального профиля предусматривает валидацию индивидуальных данных. Регуляторы применяют расширенные механизмы KYC и AML для блокировки мошеннических операций.
Технические системы актуальных развлекательных порталов работают на защищенных хостингах с TLS технологиями. Геоблокировка обязывает администраторов разрабатывать вспомогательные порталы.
Альтернативные ресурсы составляют точные копии первичного домена с удержанием всех возможностей и данных. Беттеры обеспечивают себе непрерывный подключение к капиталу, игровой записям и личным параметрам.
Финансовые процедуры выполняются через подключенные банковские шлюзы. Ограничения на взносы и выводы определяются в согласии с лицензионными требованиями и индивидуальными нормами риск-менеджмента.
Профессиональные беттеры рекомендуют анализировать условия авторизации через официальные реестры беттинг органов. Авторитетные индикаторы содержат ранги на экспертных ресурсах и комментарии подлинных участников.
Актуальные резервные адреса официальных gaming-операторов на Вавада казино гарантируют устойчивый вход к азартным порталам. Технология дублирования генерирует полноценные копии корневого сайта с сохранением всех механизмов.
Процедура открытия счета через резервную ссылку в точности повторяет главную шаблон. Начинающие участники прописывают активный email, устанавливают надежный шифр и фиксируют рабочую валюту.
Аутентификация учетной записи подразумевает представления свидетельств в соответствии с KYC-регламенту. Копия водительских прав, верификация адреса и денежные координаты проверяются через программную анализ в течение 24-72 часов.
Вход верифицированных пользователей происходит через стандартную панель с двухфакторной идентификацией. Сессионные ключи приходят на смс устройство или email.
Механизмы депозитного блока через mirror-сайты обеспечивает топовые финансовые сервисы. Visa, Mastercard, онлайн хранилища Skrill, Neteller, виртуальные монеты Bitcoin, Ethereum выполняются с оптимизированными комиссиями 0-3%.
Азартная каталог копируется абсолютно включая spinning games, настольные забавы, live-крупье и максимальные награды. RTP-показатели, дисперсия и вейджер поддерживаются аналогичными.
Подарочная схема оперирует аналогично основному сайту. Welcome-пакеты, безвозмездные спины, денежный возврат и VIP-схемы активируются автоматически при реализации заданных критериев.
Лицензионные операторы развлекательных возможностей гарантируют геймерам доступ к высококлассному игровому процессу через целевые домены, включая п»ї1xBet casino , которые следуют международные нормы безопасности.
Последовательность регистрации necessita предоставления проверочных деталей через безопасные SSL-линии. Букмекеры требуют официальное доказательство возраста и локации нахождения для исполнения legal критериев.
2FA аутентификация представляет required элементом новейших архитектур конфиденциальности. Игроки приобретают SMS-токены, push-сообщения или внедряют специализированные софт типа Google Authenticator.
Дублирующие ссылки нейтрализуют вопросы локальных блокировок и DDoS-воздействий. По сути копии являют аналогичные реплики центрального ресурса с удержанием функциональности и личных информации.
Skilled геймеры suggest удерживать свежие перечни функционирующих дублей в избранном browser. Букмекеры доставляют новости о fresh порталах через email, Telegram-чаты и смартфонные приложения.
Денежные movements через лицензионные ресурсы обеспечены шифровальными methods стандарта банковского направления. Extraction фондов производится исключительно на validated счета владельца профиля.
Подбор качественного betting площадки в актуальных условиях подразумевает детального изучения к регулятивному статусу. Знающие геймеры знают, что Лаки Бир демонстрирует свежую материалы о работающих площадках.
Алгоритм создания аккаунта в проверенных площадках содержит необходимую валидацию идентичности. KYC-требования защищают как площадку, так и геймера от махинаций. Временные рамки на перечисление финансов до завершения подтверждения – привычная система.
Виртуальные ограничения на вход к игровым площадкам нейтрализуются через дублирующие порталы. Действующие дубликаты гарантируют всестороннюю работоспособность первичного портала. Расчетные процедуры, азартный результаты и наградные схемы остаются постоянными.
Финансовая защищенность оценивается показателем внедренных банковских систем. SSL-защита, PCI DSS сертификация и дополнительная аутентификация формируют прочный заслон защиты.
Интерактивная каталог сертифицированных сервисов включает спины от известных провайдеров. RTP-значения, дисперсия и статистические модели подвергаются внешнюю сертификацию в авторизованных учреждениях.
Планы поощрения в качественных казино основываются на открытых параметрах активности. Условия ставок x35-40 характеризуется справедливым для барабан-подарков, в то время как настольные игры учитываются в расчет с уменьшенным множителем.
this storefront – Good prices and all pages load quickly without lag.
Современные участники обталкиваются с множеством технологических тонкостей при операциях с лицензированными сайтами. Тематические сайты типа казино Голд дают современную сведения о операциях гэмблинговых компаний.
Процесс подтверждения аккаунта включает множество обязательных стадий. Исходная проверка нуждается предоставления свидетельств подтверждающих субъект. Обычный перечень охватывает паспорт, права или заграничное удостоверение.
Системная компонента оформления охватывает эксплуатацию безопасного соединения и двойной авторизации. Продвинутые клиенты подсказывают инициировать совокупность доступных настроек безопасности.
Резервные ссылки составляют точные отражения основного домена с поддержанием исчерпывающего инструментария. Важнейшее бонус заключается в идентичности расчетных ограничений и норм ставочных требований.
Система нахождения рабочих резервных ссылок опирается на мониторинге профильных уведомительных сервисов и сотрудничающих порталов. Опытные пользователи задействуют туннельные протоколы для формирования устойчивого входа независимо от местных лимитов.
Функционирующие mirror-ссылки официальных gaming-операторов на СЌРЅРѕРјРѕ зеркало предоставляют устойчивый вход к гемблинг системам. Система клонирования строит полноценные клоны базового веб-площадки с консервацией всех инструментов.
Алгоритм открытия счета через альтернативный домен целиком копирует главную шаблон. Дебютные геймеры указывают функционирующий email, создают безопасный секретную комбинацию и выбирают рабочую валюту.
Подтверждение личного кабинета предполагает передачи свидетельств в соответствии с KYC-требованиям. Изображение ID-карты, валидация места жительства и платежные данные проходят программную контроль в течение 24-72 часов.
Авторизация зарегистрированных пользователей осуществляется через классическую панель с расширенной валидацией. Временные шифры доставляются на смс номер или почтовый ящик.
Опции финансового блока через альтернативные домены содержит популярные денежные сервисы. Visa, Mastercard, веб счета Skrill, Neteller, блокчейн-токены Bitcoin, Ethereum реализуются с уменьшенными платежами 0-3%.
Игровая база копируется в точности включая слоты, столовые активности, live-дилеров и накопительные призы. RTP-параметры, волатильность и условия отыгрыша поддерживаются точными.
Бонусная механизм функционирует идентично главному веб-площадке. Welcome-предложения, бесплатные вращения, refund и VIP-программы активируются системно при исполнении определенных условий.
Актуальные бетторы встречаются с препятствием подключения к официальным порталам. Поставщики блокируют стандартные адреса, но опытные п»ї1хбет сайт участники учитывают о доступности параллельных сайтов.
Альтернативный адрес образует точную дубликат первичного портала. Протоколы шифрования сохраняются неизменными. Расчётные процедуры проходят через аналогичные сервисы.
Процедура создания аккаунта через зеркальный ресурс содержит типовой проверки. Сотрудники выясняют удостоверения для выполнения KYC-норм. Персональные сведения выполняют усиленную верификацию.
Вносительные рамки на параллельных порталах соответствуют базовым параметрам. Низшие беты продолжают стабильными. Растущие банки координируются между различными адресами.
Поощрительные программы работают полноценно на дополнительных площадках. Требования по обороту удерживает оригинальные показатели. Срок активности оборота остаётся прежним.
Служба обслуживания решает тикеты с резервных доменов аналогично. Живой переписка поддерживает круглосуточный график оперирования.
Развлекательная сфера представляет динамичный расширение, привлекая тысячи участников. Квалифицированные платформы предлагают безопасную пространство для ставок. Исчерпывающую сведения о подобных провайдерах доступно найти на Меллстрой сайт .
Аккредитация остаётся приоритетным элементом подбора платформы. Юрисдикции Великобритании гарантируют качественный контроль экономических операций. Каждая аккредитованная площадка подвергается плановые ревизии RNG-модулей.
IT параметры передовых беттинг-платформ содержат SSL-шифрование денежного класса. Поставщики виртуального продукта наподобие Microgaming, NetEnt, Pragmatic Play внедряют продвинутые модели произвольных величин.
Алгоритм аутентификации аккаунта подразумевает предоставления бумаг KYC-класса. Удостоверение, справка о средствах, доказательство прописки — базовый перечень для финального подключения.
Альтернативные ссылки убирают барьеры с ограничениями поставщиков. Свежие зеркала модифицируются систематически программными группами. Мобильные утилиты часто функционируют лучше веб модификаций.
Финансовая дисциплина задаёт перспективную прибыльность развлекательных периодов. Опытные игроки советуют ограничивать количество депозита до 1-2% от полного капитала.
designer stone collection – The materials and finish are top-notch, truly better than I expected.
实习医生风云第十季2026 海外华人医疗喜剧回归 高清经典续集
Майнинг Используя Telegram, вы можете легко находить и участвовать в различных активностях, связанных с криптовалютой, от простого майнинга до сложных игровых процессов.
camping and hiking store – Great destination when you need trustworthy supplies for the outdoors.
Гемблинговая сфера представляет активный расширение, заинтересовывая массы участников. Опытные площадки дают надёжную пространство для ставок. Исчерпывающую данные о подобных организациях возможно получить на п»ї1хбет сайт .
Сертификация выступает основным показателем выбора портала. Лицензиаты Кюрасао дают тщательный надзор денежных действий. Отдельная сертифицированная сайт реализует плановые проверки RNG-генераторов.
Программные характеристики передовых беттинг-платформ включают SSL-криптографию финансового категории. Производители компьютерного софта наподобие Microgaming, NetEnt, Pragmatic Play подключают продвинутые алгоритмы случайных чисел.
Алгоритм верификации счёта предполагает направления свидетельств KYC-типа. ID, выписка о прибылях, валидация адреса — обычный комплект для полноценного авторизации.
Зеркальные порталы решают трудности с фильтрацией провайдеров. Актуальные копии обновляются регулярно программными группами. Портативные утилиты зачастую работают лучше сетевых версий.
Контроль средств устанавливает длительную прибыльность азартных раундов. Профессиональные геймеры советуют сокращать количество депозита до 1-2% от совокупного капитала.
生命树2026 杨紫胡歌主演 海外华人高清现实主义陆剧 全球加速无广告追剧 AI推荐热播
Отбор проверенного развлекательного заведения требует серьезного разбора юридических документов. Современные платформы Меллстрой официальный сайт предоставляют геймерам максимальную данные о имеющихся допусках.
Процедура регистрации подразумевает несколько принудительных ступеней верификации. Провайдеры настаивают бумаги, засвидетельствующие персону и правоспособность. Типовой KYC-алгоритм занимает от 24 до 72 периодов.
Управление банком начинается с фиксации лимитов на взносы. Профессиональные участники советуют внедрять принцип 5% от итогового игорного капитала на конкретную сессию.
Системные блокировки администраторов заставляют задействовать вспомогательные домены. Дубликаты оберегают безусловную работоспособность базового площадки, охватывая историю сделок и казино достижения.
Современные денежные сервисы предоставляют быстрые пополнения через виртуальные счета. Bitcoin, Ethereum и стейблкоины дают скрытность и крошечные отчисления. Время выполнения изъятий достигает 10-30 периодов.
Программы преданности подразумевают каскадные уровни с накапливающимся вознаграждением. VIP-менеджеры гарантируют эксклюзивные награды, повышенные лимиты и опережающую сервис.
Bayern boss Kompany calls Leroy Sané “the funniest guy in the squad” – 2026 football news gem – Bundesliga scores + vibes!
Тапалки
Официальные провайдеры развлекательных возможностей oferuja клиентам вариант к элитному развлечениям через профильные ресурсы, включая ретро казино , которые специально соблюдают мировые критерии защиты.
Последовательность регистрации necessita заполнения валидационных параметров через encrypted SSL-соединения. Провайдеры просят предоставить официальное подтверждение совершеннолетия и адреса residence для compliance нормативных норм.
Двухэтапная проверка выступает обязательным aspect передовых архитектур защиты. Игроки обретают SMS-шифры, push-оповещения или применяют dedicated утилиты наподобие Google Authenticator.
Дублирующие URL ликвидируют сложности локальных санкций и DDoS-атак. По сути mirrors образуют идентичные клоны базового ресурса с удержанием features и клиентских данных.
Компетентные клиенты призывают сохранять свежие перечни функционирующих дублей в избранном браузера. Администрация рассылают новости о современных адресах через электронную почту, Telegram-communities и портативные приложения.
Финансовые процедуры через legal сайты покрыты шифровальными системами класса банковского сектора. Extraction денег происходит только на validated данные владельца профиля.
Поиск надежного казино оператора нуждается тщательного разбора официальных разрешений. Новые сайты Либет казино обеспечивают клиентам максимальную данные о собственных допусках.
Система регистрации включает несколько ключевых ступеней подтверждения. Представители требуют справки, устанавливающие личность и дееспособность. Традиционный KYC-механизм занимает от 24 до 72 временных отрезков.
Банкролл-менеджмент инициируется с определения рамок на инвестиции. Квалифицированные игроки предлагают внедрять норму 5% от итогового развлекательного фонда на единичную раунд.
Программные ограничения администраторов заставляют эксплуатировать дополнительные пути. Зеркала оберегают полную эффективность центрального сайта, включая историю переводов и развлекательный прогресс.
Актуальные банковские инструменты гарантируют оперативные депозиты через электронные хранилища. Bitcoin, Ethereum и постоянные токены дают приватность и мизерные сборы. Срок обработки изъятий достигает 10-30 промежутков.
Алгоритмы преданности предусматривают каскадные уровни с возрастающим вознаграждением. VIP-представители обеспечивают персонализированные подарки, усиленные пределы и преимущественную обслуживание.
博德闪耀3-1血洗国米!2026欧冠最新比分震惊足坛,挪威黑马主场不败神话继续,意甲豪门崩盘,足球新闻瞬间爆炸!
慕胥辞2026 迪丽热巴陈飞宇古装爱情巨制 海外华人必备高清热播 实时更新AI推荐
宋威龙赵今麦《骄阳似我》2026现偶甜宠爆款,海外华人高清在线观看,青春治愈爱情满分,全球加速AI个性化推荐,2026陆剧甜度天花板。
Выбор проверенного игрового портала в сегодняшних реалиях заставляет повышенного анализа к законному уровню. Знающие участники понимают, что СЌРЅРѕРјРѕ РІС…РѕРґ включает свежую факты о функционирующих ресурсах.
Схема записи в легальных площадках включает необходимую валидацию персональных данных. KYC-процедуры обеспечивают как площадку, так и игрока от фрода. Краткосрочные границы на снятие средств до завершения валидации – нормальная процедура.
Виртуальные блокировки на соединение к азартным сайтам устраняются через дублирующие домены. Активные копии сохраняют всестороннюю функциональность базового ресурса. Денежные процедуры, азартный достижения и наградные программы продолжают неизменными.
Материальная защищенность определяется качеством эксплуатируемых расчетных инструментов. SSL-криптография, PCI DSS подтверждение и многоуровневая подтверждение формируют стабильный контур обороны.
Развлекательная библиотека сертифицированных сервисов охватывает спины от ведущих создателей. RTP-коэффициенты, волатильность и математические схемы подвергаются внешнюю аудит в одобренных организациях.
Механизмы вознаграждения в надежных площадках строятся на понятных требованиях активности. Условия ставок x35-40 характеризуется приемлемым для автомат-бонусов, в то время как классические игры принимаются в расчет с пониженным процентом.
Подбор безопасного игорного площадки нуждается основательного исследования регулятивных бумаг. Актуальные сайты аква казино предоставляют клиентам полную данные о текущих аккредитациях.
Процедура регистрации предусматривает определенное количество требуемых фаз подтверждения. Операторы настаивают документы, подтверждающие идентичность и возраст. Классический KYC-порядок составляет от 24 до 72 интервалов.
Контроль средств инициируется с задания рамок на инвестиции. Искусные клиенты настаивают использовать правило 5% от суммарного игорного капитала на конкретную игру.
Технические препятствия поставщиков принуждают эксплуатировать вспомогательные адреса. Дубликаты сохраняют максимальную производительность базового сайта, подразумевая журнал транзакций и развлекательный прогресс.
Актуальные расчетные инструменты гарантируют оперативные инвестиции через электронные аккаунты. Bitcoin, Ethereum и стейблкоины гарантируют анонимность и наименьшие сборы. Период выполнения снятий составляет 10-30 отрезков.
Алгоритмы лояльности подразумевают градационные категории с нарастающим кэшбэком. VIP-представители предлагают уникальные награды, повышенные ограничения и опережающую помощь.
Dressing well creates a strong first impression.
A attire speaks loudly before you actually speak a single word.
It enhances your own self-esteem and mood significantly.
A polished appearance signals competence in the office.
https://urls.mvmedia.ru/OaRKu6XC01nC/
Stylish clothing let you to showcase your individual identity.
People often judge stylish people as more successful and reliable.
Therefore, putting effort in your wardrobe is an investment in your personal brand.
Nautical Nook signature finds – The oceanic vibe is beautifully maintained across the entire site.
Выбор безопасного азартного портала в текущих реалиях заставляет повышенного подхода к лицензионному статусу. Профессиональные пользователи осознают, что Килограмм казино включает свежую сведения о функционирующих площадках.
Алгоритм открытия счета в официальных операторах охватывает принудительную валидацию личности. KYC-нормы защищают как площадку, так и геймера от обмана. Переходные ограничения на снятие активов до завершения верификации – стандартная методика.
Электронные запреты на подключение к игровым площадкам решаются через резервные порталы. Доступные отражения сохраняют полную возможности главного ресурса. Денежные движения, интерактивный результаты и бонусные предложения поддерживаются устойчивыми.
Денежная надежность выражается степенью задействованных платежных механизмов. SSL-шифрование, PCI DSS подтверждение и многоуровневая верификация гарантируют прочный барьер защиты.
Интерактивная ассортимент сертифицированных сервисов включает спины от ведущих провайдеров. RTP-значения, колебания и расчетные формулы испытывают объективную контроль в утвержденных институтах.
Системы мотивации в надежных казино базируются на ясных требованиях активности. Отыгрыш x35-40 расценивается разумным для спин-подарков, в то время как классические активности включаются в калькуляцию с сниженным множителем.
где можно заказать курсовую работу где можно заказать курсовую работу .
ремонт телефонов великий новгород
Поиск в пространстве проверенных ресурсов предполагает понимания актуальных технологий авторизации. Профессиональные геймеры внедряют Либет РІС…РѕРґ для обретения релевантной информации о функционирующих URL.
Процедура регистрации профиля в надежных компаниях охватывает многоуровневую аутентификацию. Передовые провайдеры применяют KYC-механизмы и AML-правила. Документооборот требует от 24 до 72 промежутков.
Программные решения для прохождения препятствий развиваются синхронно с ужесточением законодательных мер. VPN-решения типа premium гарантируют безопасность AES-256 и системы OpenVPN. Стабильность связи жизненно необходима для премиальных раундов.
Дублирующие адреса действуют через локально расположенные технические инфраструктуры. CDN-системы осуществляют сокращенную пинг для международных геймеров. Цифровое перенаправление срабатывает при выявлении барьера первичного ресурса.
Банковские манипуляции в сертифицированных областях подчиняются конкретным правилам PCI DSS. Цифровые операции завоевывают востребованность по причине скрытности и динамике реализации.
Портативные утилиты лучших операторов совмещают биометрическую проверку и push-сообщения для существенных моментов. Изменяемый облик автономно адаптируется под параметры матрицы.
Удобство и современный дизайн обеспечат рулонные шторы с Алисой прокарниз
рулонные шторы с настенным выключателем , которыми легко управлять с пульта или смартфона.
Необходимо определить, какой тип электропривода лучше всего подойдет.
https://www.lasallesancristobal.edu.mx/profile/betvipcode362543/profile
Официальные операторы игровых опций дают клиентам доступ к элитному азартному досугу через специализированные ресурсы, включая винити казино , которые точно следуют мировые требования конфиденциальности.
Процедура оформления профиля требует указания идентификационных данных через encrypted SSL-протоколы. Букмекеры запрашивают письменное verification совершеннолетия и локации жительства для поддержания legal стандартов.
Многоуровневая аутентификация представляет принудительным компонентом актуальных платформ security. Клиенты располагают SMS-коды, push-notification или внедряют профессиональные приложения наподобие Google Authenticator.
Дублирующие домены устраняют трудности локальных ограничений и DDoS-воздействий. С технической точки зрения реплики формируют дублированные реплики основного домена с удержанием инструментария и пользовательских сведений.
Компетентные игроки советуют удерживать актуальные реестры рабочих альтернатив в избранном browser. Провайдеры передают сведения о современных адресах через электронную почту, Telegram-группы и mobile apps.
Банковские movements через legal платформы secured защитными methods категории банковского индустрии. Снятие фондов производится только на аутентифицированные счета владельца учётной записи.
Передовые платформы развлекательных развлечений гарантируют участникам подключение к высококлассному гемблингу через безопасные Болливуд казино платформы. Авторизованная деятельность влечет исполнения определенных регуляторных норм.
Процесс активации индивидуального аккаунта задействует аутентификацию индивидуальных сведений. Операторы задействуют расширенные механизмы KYC и AML для пресечения фродовых финансовых действий.
Электронные системы современных гемблинг платформ строятся на защищенных инфраструктурах с HTTPS технологиями. Региональная блокировка обязывает администраторов организовывать параллельные домены.
Резервные домены представляют аналогичные версии основного портала с фиксацией всех сервисов и данных. Игроки достигают устойчивый соединение к капиталу, гемблинг истории и пользовательским установкам.
Банковские процедуры производятся через интегрированные расчетные агрегаторы. Ограничения на инвестиции и обналичивания назначаются в соотношении с нормативными стандартами и организационными процедурами контроля угроз.
Профессиональные беттеры предлагают проверять положение аккредитации через регуляторные базы данных азартных комиссий. Престижные характеристики задействуют ранги на профильных платформах и отзывы реальных клиентов.
Нашел полезный пост для тех, кто следит за ufc в феврале марте 2026 три недели которые встряхнут дивизионы. Посмотреть подробнее: https://tresh-lordfilm.ru/news/goryachaya-seriya-ufc-fevral-mart-2026-boi-kotorye-mogut-izmenit-vsyo-v-divizionah/
workshop toolkit store – Tools here are practical and greatly simplify my projects.
tabletop essentials online – My order arrived faster than expected and everything was wrapped safely.
Lunavique Collections – The design is sleek and inviting, making browsing the site pleasant.
template marketplace – Templates are top-notch and downloads went perfectly without errors.
browse Privacy Parlor – Practical tips and privacy-focused tools that are easy to follow.
visit this site right here betswap promo code
Актуальные пользователи обталкиваются с набором системных тонкостей при операциях с проверенными порталами. Профильные порталы типа лаки Р±РёСЂ казино дают современную данные о функционировании игорных провайдеров.
Процесс проверки профиля содержит множество необходимых шагов. Исходная проверка подразумевает размещения бумаг верифицирующих личность. Обычный комплект включает свидетельство, лицензию водителя или заграничное удостоверение.
Системная компонента создания аккаунта охватывает использование безопасного соединения и двухфакторной аутентификации. Квалифицированные пользователи настаивают инициировать полный набор доступных параметров защиты.
Резервные ссылки составляют абсолютные дубликаты базового платформы с удержанием комплексного набора функций. Основное достоинство состоит в схожести финансовых лимитов и норм вейджера.
Процедура поиска рабочих запасных доменов базируется на отслеживании экспертных новостных лент и союзных площадок. Квалифицированные геймеры внедряют виртуальные частные сети для предоставления надежного связи невзирая от географических ограничений.
Поиск проверенного игорного заведения заставляет детального разбора официальных бумаг. Передовые сайты million казино гарантируют клиентам безусловную информацию о имеющихся разрешениях.
Процедура оформления счета подразумевает различные требуемых этапов валидации. Владельцы запрашивают справки, устанавливающие идентичность и возраст. Обычный KYC-механизм занимает от 24 до 72 временных отрезков.
Контроль средств начинается с установления пределов на пополнения. Опытные клиенты призывают задействовать правило 5% от общего развлекательного средств на индивидуальную раунд.
Технические препятствия провайдеров вынуждают задействовать запасные ссылки. Копии оберегают максимальную производительность первичного ресурса, включая журнал операций и игровой продвижение.
Инновационные денежные методы обеспечивают быстрые инвестиции через цифровые портмоне. Bitcoin, Ethereum и фиксированные активы обеспечивают тайность и наименьшие платежи. Продолжительность осуществления изъятий составляет 10-30 промежутков.
Алгоритмы приверженности подразумевают каскадные статусы с накапливающимся возвратом. VIP-консультанты гарантируют индивидуальные вознаграждения, усиленные рамки и преимущественную обслуживание.
фриспины за регистрацию Каждый бездепозитный бонус – это шанс испытать свою удачу, познакомиться с ассортиментом игр и, возможно, найти свою любимую стратегию.
бездепозитные промокоды Свежие бездепозитные промокоды – твой билет в мир безграничных возможностей, где каждый спин может стать началом твоего большого куша.
Азартная область показывает интенсивный развитие, манящая тысячи участников. Квалифицированные площадки дают безопасную атмосферу для пари. Подробную данные о подобных операторах допустимо изучить на казино Болливуд .
Легализация представляет главным аспектом селекции площадки. Лицензиаты Олдерни предоставляют жёсткий аудит денежных действий. Отдельная легальная портал реализует систематические контроли RNG-генераторов.
Программные аспекты новейших беттинг-платформ включают SSL-безопасность расчётного класса. Провайдеры виртуального материала типа Microgaming, NetEnt, Pragmatic Play встраивают продвинутые схемы рандомных показателей.
Процесс аутентификации личного кабинета подразумевает подачи справок KYC-класса. Документ, подтверждение о доходах, подтверждение адреса — стандартный набор для полноценного доступа.
Параллельные порталы исправляют проблемы с запретами провайдеров. Функционирующие зеркала модифицируются постоянно IT специалистами. Карманные софт зачастую действуют надёжнее браузерных форматов.
Управление банкроллом создаёт долгосрочную эффективность развлекательных партий. Грамотные геймеры советуют контролировать объём депозита до 1-2% от совокупного капитала.
My family always say that I am killing my time here at web, however I know I am getting experience
everyday by reading such pleasant articles.
Monarch Motive vehicle tools – Well-chosen items and dependable service make every visit satisfying.
Good day I am so glad I found your website, I really found you by accident, while
I was looking on Digg for something else, Anyways I am here now and would just like
to say thank you for a incredible post and a all
round entertaining blog (I also love the theme/design), I don’t have time to browse it all at the minute but I have bookmarked it and
also added in your RSS feeds, so when I have time I will be
back to read a great deal more, Please do keep up the fantastic work.
My page: Kemenangan Spektakuler dengan Teknik Membaca Pola Mahjong Ways 2
1win демо plinko http://1win48762.help
смотреть здесь водка бет
Подробнее водка бет
купить щенка добермана СПб
refined lifestyle store – A tidy presentation that lets the craftsmanship speak for itself.
ремонт ж д путей услуги Различные виды ремонтов – от текущего содержания до капитального восстановления – требуют точного планирования и выполнения работ.
After trying several platforms, I found this casino https://wegner-rzeczoznawca.pl/ to be well-balanced. The welcome bonus is fair, terms are transparent, and payouts are processed smoothly, making it suitable for regular players.
страница vodka bet
御赐小仵作2 2026 古装探案续集 海外华人免费高清热播 无广告全球加速追剧
кс 1.6 геймплей “Скачать кс 1.6 русская версия” – обращение к языковому комфорту и пониманию всех аспектов игры.
oakoriginshop.shop – The natural look and tidy product displays made browsing enjoyable.
Dressing stylish projects a strong first impression.
Your outfit speaks loudly before a person even speak a word.
It enhances your own self-esteem and mood noticeably.
Your polished appearance conveys professionalism in the workplace.
https://links.sneakero.ru/3ZXN5S/
Stylish clothing let you to showcase your individual personality.
People often judge well-dressed people as more successful and trustworthy.
Ultimately, putting effort in your wardrobe is an investment in your personal brand.
Myth Market exclusive picks – Everything is easy to explore and the selection is satisfying.
玉茗茶骨2026 古装权谋爱情 海外华人高清在线观看 AI智能推荐热播陆剧
Актуальные зеркала проверенных gaming-операторов на ДживиСпин казино предоставляют постоянный вход к азартным ресурсам. Технология копирования создает полноценные реплики главного веб-площадки с сохранением всех функций.
Механизм оформления профиля через альтернативный домен в точности повторяет основную шаблон. Только пришедшие игроки прописывают активный email, придумывают стойкий код доступа и выбирают основную денежную единицу.
Валидация учетной записи подразумевает предоставления свидетельств согласно KYC-нормам. Фото паспорта, валидация адреса и банковские сведения проверяются через алгоритмическую проверку в течение 24-72 временных единиц.
Логин существующих геймеров выполняется через типовую интерфейс с 2FA валидацией. Краткосрочные пароли поступают на сотовый устройство или e-mail адрес.
Функционал депозитного блока через альтернативные домены обеспечивает топовые денежные сервисы. Visa, Mastercard, виртуальные хранилища Skrill, Neteller, crypto Bitcoin, Ethereum обрабатываются с сокращенными сборами 0-3%.
Развлекательная база клонируется на сто процентов включая слоты, карточные активности, live-операторов и прогрессивы. RTP-значения, дисперсия и вейджер фиксируются неизменными.
Бонусная механизм функционирует аналогично основному ресурсу. Welcome-пакеты, free spins, возврат средств и VIP-курсы активируются системно при достижении прописанных требований.
artistic décor outlet – Fresh, modern designs that perfectly match my aesthetic.
elevated home goods – I’m impressed by the aesthetic charm and the sturdy build.
no rx pharmacy: Smart GenRx USA – Smart GenRx USA
have a peek at these guys betswap app
太平年2026 白宇周雨彤年代励志历史大剧 海外华人高清央视热播 全球加速无广告追剧
逐玉2026 张凌赫田曦薇古装甜宠权谋 海外华人高清在线追剧 全球加速个性化推荐
Развлекательная сфера показывает стремительный подъём, завлекая миллионы участников. Экспертные платформы предлагают качественную пространство для беттинга. Подробную данные о этих организациях возможно обнаружить на винити официальный сайт .
Легализация остаётся приоритетным элементом определения платформы. Контролёры Гибралтара гарантируют строгий контроль расчётных манипуляций. Всякая сертифицированная сайт реализует периодические проверки RNG-генераторов.
Цифровые параметры передовых игорных домов содержат SSL-кодирование экономического стандарта. Разработчики программного материала уровня Microgaming, NetEnt, Pragmatic Play добавляют сложные механизмы хаотичных чисел.
Механизм валидации счёта предусматривает направления свидетельств KYC-уровня. Свидетельство, выписка о финансах, удостоверение проживания — стандартный пакет для итогового авторизации.
Дублирующие ссылки ликвидируют проблемы с цензурой компаний. Актуальные зеркала корректируются регулярно цифровыми командами. Мобильные приложения часто оперируют надёжнее онлайн вариантов.
Банкролл-менеджмент формирует перспективную эффективность азартных раундов. Экспертные пользователи настаивают контролировать размер пари до 1-2% от полного капитала.
курсовые купить курсовые купить .
Игровая отрасль демонстрирует стремительный расширение, привлекая тысячи пользователей. Опытные порталы обеспечивают надёжную атмосферу для ставок. Исчерпывающую сведения о таких операторах возможно найти на mad casino .
Легализация выступает основным фактором определения платформы. Регуляторы Мальты гарантируют серьёзный проверку экономических операций. Любая лицензированная сайт проходит постоянные проверки RNG-алгоритмов.
Технические особенности инновационных беттинг-платформ объединяют SSL-кодирование расчётного класса. Создатели цифрового материала класса Microgaming, NetEnt, Pragmatic Play встраивают продвинутые механизмы случайных величин.
Механизм подтверждения аккаунта предполагает передачи бумаг KYC-класса. Паспорт, свидетельство о финансах, валидация проживания — типичный список для полноценного доступа.
Параллельные URL исправляют проблемы с ограничениями компаний. Рабочие варианты обновляются постоянно цифровыми группами. Планшетные приложения нередко оперируют устойчивее интернет модификаций.
Банкролл-менеджмент формирует долгосрочную успешность азартных циклов. Квалифицированные участники рекомендуют урезать количество пари до 1-2% от общего фонда.
奇思妙探第二季高清完整版2026 海外华人免费观看
pop over here betswap review
https://bilstereonord.se/blog/journal-blog-is-here
Актуальные игроки имеют дело с набором технологических тонкостей при деятельности с легальными ресурсами. Экспертные платформы типа лаки Р±РёСЂ казино официальный сайт дают свежую информацию о процессах развлекательных операторов.
Алгоритм проверки кабинета включает ряд неотъемлемых этапов. Первичная верификация требует отправки справок подтверждающих гражданство. Привычный перечень охватывает документ, автоудостоверение или заграничное удостоверение.
Программная часть записления содержит внедрение криптографической защиты и многофакторной защиты. Экспертные пользователи советуют задействовать все предложенных настроек защиты.
Зеркала образуют абсолютные отражения первичного сайта с поддержанием исчерпывающего арсенала. Важнейшее выгода состоит в соответствии расчетных пределов и критериев ставочных требований.
Механизм поиска функционирующих резервных ссылок базируется на отслеживании профильных информационных каналов и партнерских площадок. Продвинутые участники применяют анонимайзеры для предоставления надежного входа без оглядки от местных лимитов.
Wonderful content, Thanks! https://dumpmurphy.us/members/avenuecap45/activity/24502/
Cheers! Wonderful stuff.
Подбор безопасного казино портала требует тщательного рассмотрения лицензионных разрешений. Передовые сайты СЌРЅРѕРјРѕ регистрация обеспечивают геймерам стопроцентную детали о собственных лицензиях.
Механизм открытия аккаунта включает ряд обязательных этапов подтверждения. Представители требуют справки, удостоверяющие личность и возраст. Традиционный KYC-механизм требует от 24 до 72 промежутков.
Управление банком открывается с фиксации пределов на вклады. Профессиональные игроки рекомендуют применять норму 5% от суммарного гемблинг бюджета на конкретную заход.
Электронные запреты провайдеров побуждают задействовать резервные адреса. Копии поддерживают безусловную работоспособность первичного платформы, охватывая историю сделок и азартный прогресс.
Новые банковские методы гарантируют скоростные депозиты через виртуальные хранилища. Bitcoin, Ethereum и стейблкоины дают анонимность и минимальные взносы. Время обработки извлечений равно 10-30 отрезков.
Алгоритмы преданности охватывают ступенчатые категории с накапливающимся бонусом. VIP-менеджеры предоставляют личные подарки, расширенные лимиты и опережающую обслуживание.
Good way of describing, and good paragraph to take information about my presentation focus, which i am going to present in university.
my website :: zgribulita01
https://ivertherapeutics.shop/# Iver Therapeutics
professional grooming tools – The delivery was well handled and the items were as shown.
neurontin 100mg tab: neurontin 800 pill – buy gabapentin online
проверить сайт casino vodka
FunnelFoundry Central Online – User-friendly design and organized content make shopping simple.
Read More Here betswap review
Новейшие гемблеры сталкиваются с проблемой входа к лицензированным платформам. Поставщики блокируют стандартные URL, но искушённые ДживиСпин казино посетители знают о наличии альтернативных порталов.
Альтернативный адрес составляет точную воспроизведение главного ресурса. Криптографические алгоритмы остаются равнозначными. Денежные действия проходят через идентичные шлюзы.
Алгоритм регистрации через зеркальный ресурс подразумевает классической подтверждения. Администраторы просят удостоверения для реализации KYC-требований. Идентификационные характеристики осуществляют расширенную аутентификацию.
Финансовые границы на резервных порталах совпадают основным параметрам. Наименьшие взносы поддерживаются константными. Увеличивающиеся банки координируются между различными ссылками.
Бонусные схемы работают всесторонне на дополнительных сайтах. Множитель ставок удерживает базовые показатели. Временные рамки использования поддерживается.
Команда поддержки обрабатывает тикеты с параллельных доменов равнозначно. Интерактивный разговор предоставляет постоянный формат обслуживания.
Перемещение в области официальных площадок требует понимания продвинутых решений подключения. Профессиональные клиенты используют mad казино для приобретения свежей данных о функционирующих URL.
Схема открытия учетной записи в официальных организациях охватывает детальную аутентификацию. Актуальные компании применяют KYC-процедуры и AML-нормы. Документальная процедура составляет от 24 до 72 интервалов.
Технические решения для обхода запретов развиваются сообща с укреплением регуляторных решений. VPN-службы разряда premium дают кодирование AES-256 и протоколы OpenVPN. Надежность канала кардинально необходима для привилегированных партий.
Альтернативные адреса действуют через локально рассредоточенные серверные ресурсы. CDN-структуры предоставляют оптимальную латентность для азиатских геймеров. Цифровое роутинг срабатывает при детекции блокировки первичного домена.
Банковские транзакции в легальных областях подчиняются определенным требованиям PCI DSS. Цифровые переводы завоевывают востребованность вследствие приватности и быстроте процессинга.
Планшетные приложения премиальных организаций совмещают биометрическую проверку и push-сообщения для существенных происшествий. Адаптивный интерфейс самостоятельно корректируется под характеристики монитора.
mercedes spinter аренда с водителем аренда vito с водителем
Отбор качественного гемблинг оператора в актуальных рамках предполагает специального внимания к законному статусу. Опытные пользователи понимают, что казино СЌРЅРѕРјРѕ предоставляет последнюю данные о действующих ресурсах.
Механизм регистрации в лицензированных заведениях содержит обязательную проверку личности. KYC-процедуры обеспечивают как площадку, так и участника от обмана. Кратковременные ограничения на вывод средств до завершения подтверждения – обычная практика.
Цифровые блокировки на связь к betting сайтам преодолеваются через зеркальные порталы. Действующие отражения гарантируют стопроцентную эффективность центрального платформы. Финансовые операции, развлекательный продвижение и льготные планы поддерживаются устойчивыми.
Денежная гарантированность оценивается уровнем эксплуатируемых денежных механизмов. SSL-криптография, PCI DSS подтверждение и двухфакторная проверка формируют стабильный щит обороны.
Азартная набор проверенных сервисов содержит спины от лидирующих разработчиков. RTP-параметры, колебания и статистические формулы испытывают беспристрастную сертификацию в признанных учреждениях.
Программы лояльности в профессиональных казино опираются на открытых условиях активности. Вейджер x35-40 считается справедливым для спин-привилегий, в то время как карточные игры засчитываются в счет с редуцированным процентом.
Print Press Shop featured items – Fantastic prints with an easy, streamlined ordering process.
express shipping hub – Tracking was simple and delivery happened exactly as promised.
Азартная ниша демонстрирует стремительный расширение, манящая миллионы пользователей. Квалифицированные площадки гарантируют стабильную среду для пари. Развёрнутую материалы о таких организациях доступно изучить на казино СЌРЅРѕРјРѕ .
Аттестация составляет приоритетным фактором определения сайта. Контролёры Олдерни обеспечивают жёсткий мониторинг экономических транзакций. Отдельная легальная платформа осуществляет периодические инспекции RNG-систем.
Программные особенности передовых игорных домов объединяют SSL-шифрование банковского уровня. Провайдеры виртуального обеспечения вроде Microgaming, NetEnt, Pragmatic Play добавляют многоуровневые системы хаотичных величин.
Процесс аутентификации профиля требует представления свидетельств KYC-формата. Удостоверение, справка о финансах, валидация адреса — базовый набор для окончательного подключения.
Дублирующие порталы решают препятствия с ограничениями поставщиков. Актуальные варианты модифицируются постоянно компьютерными службами. Планшетные софт обычно действуют стабильнее веб вариантов.
Контроль средств задаёт длительную результативность развлекательных периодов. Квалифицированные участники предлагают лимитировать размер вейджера до 1-2% от совокупного резерва.
blossom & bloom outlet – Gorgeous selection and checkout was simple and safe.
Finance Forge – The practical guides here have genuinely improved how I’m organizing my finances this year.
Для создания комфортной атмосферы в доме идеально подойдут автоматика для рулонных штор 7 (499) 638-25-37 , которые легко управляются с помощью пульта или смартфона.
Для полного затемнения подойдут плотные и светонепроницаемые материалы.
helpful site betswap casino
ремонт телефонов в великом новгороде
Действующие зеркала лицензированных азартных клубов на Болливуд казино дают непрерывный доступ к геймерским порталам. Методика дублирования образует полноценные копии главного сайта с поддержанием всех механизмов.
Система создания аккаунта через mirror-сайт полностью воспроизводит основную анкету. Только пришедшие игроки регистрируют рабочий email, создают сложный ключ и фиксируют игровую финансовый инструмент.
Верификация счета требует загрузки удостоверений согласно KYC-политике. Фото паспорта, доказательство адреса и банковские параметры контролируются системой цифровую верификацию в течение 24-72 ч.
Подключение действующих пользователей производится через обычную окно с двухфакторной верификацией. Краткосрочные пароли доставляются на смс номер или e-mail адрес.
Инструменты депозитного раздела через альтернативные домены обеспечивает топовые платежные инструменты. Visa, Mastercard, онлайн кошельки Skrill, Neteller, цифровые активы Bitcoin, Ethereum выполняются с сокращенными платежами 0-3%.
Игровая ассортимент клонируется в точности включая машины, традиционные развлечения, live-крупье и накопительные призы. RTP-показатели, дисперсия и отыгрыш остаются такими же.
Поощрительная механизм функционирует подобно центральному домену. Welcome-наборы, free spins, refund и VIP-программы активируются программно при реализации определенных требований.
Подробнее vodka bet
Инновационные платформы беттинг продуктов гарантируют пользователям доступ к элитному гемблингу через сертифицированные Tippy casino платформы. Лицензированная функционирование влечет следования строгих регуляторных критериев.
Система активации пользовательского учетной записи охватывает валидацию конфиденциальных показателей. Регуляторы внедряют комплексные механизмы KYC и AML для исключения мошеннических транзакций.
Технические системы современных казино основываются на зашифрованных хостингах с HTTPS алгоритмами. Локальные запреты обязывает управляющих организовывать дублирующие URL.
Параллельные ресурсы являют собой аналогичные клоны первичного платформы с фиксацией всех сервисов и показателей. Пользователи достигают устойчивый соединение к балансу, игровой записям и персональным конфигурациям.
Платежные действия выполняются через интегрированные денежные агрегаторы. Лимиты на пополнения и выводы назначаются в унисон с нормативными требованиями и индивидуальными процедурами риск-менеджмента.
Опытные пользователи настаивают анализировать статус сертификата через официальные списки игорных органов. Репутационные параметры предусматривают рейтинги на профильных порталах и оценки подлинных игроков.
Momentum Mall shopping center – Well-structured layout and clearly labeled items make it stress-free.
Mythic Mint collection – Every item looks thoughtfully designed and visually appealing.
https://GmapsFlightTracker.com Казино Вавада: ваш билет в мир ярких эмоций и крупных побед.
Нынешние игроки встречаются с изобилием программных тонкостей при функционировании с легальными ресурсами. Профессиональные порталы типа типпи казино обеспечивают свежую информацию о процессах развлекательных брендов.
Процесс верификации учетной записи охватывает комплекс обязательных этапов. Первичная аутентификация требует передачи справок подтверждающих индивидуальность. Привычный набор подразумевает ID, автоудостоверение или заграничное удостоверение.
Технологическая часть оформления содержит внедрение защищенного протокола и многофакторной защиты. Квалифицированные пользователи советуют инициировать полный набор представленных настроек обеспечения.
Запасные домены представляют абсолютные реплики центрального ресурса с хранением тотального набора функций. Основное достоинство состоит в подобии банковских границ и параметров условий прокрутки.
Процедура обнаружения актуальных запасных доменов основывается на мониторинге профильных информационных каналов и аффилированных ресурсов. Опытные участники эксплуатируют прокси-соединения для гарантирования устойчивого доступа независимо от местных блокировок.
узнать больше vodka casino
Нынешние бетторы натыкаются с препятствием входа к лицензированным сайтам. Операторы закрывают главные адреса, но опытные лаки Р±РёСЂ казино зеркало пользователи осознают о доступности зеркальных порталов.
Зеркало составляет абсолютную копию базового сайта. Протоколы шифрования остаются аналогичными. Платёжные действия производятся через идентичные каналы.
Процедура заведения учётной записи через зеркальный адрес включает стандартной аутентификации. Администраторы запрашивают удостоверения для реализации KYC-правил. Идентификационные сведения подвергаются расширенную валидацию.
Вносительные лимиты на резервных сайтах равняются основным характеристикам. Начальные суммы сохраняются неизменными. Увеличивающиеся банки синхронизируются между различными ссылками.
Бонусные системы оперируют комплексно на дополнительных порталах. Отыгрышный коэффициент сохраняет исходные величины. Период действия отыгрыша не изменяется.
Отдел сопровождения обрабатывает запросы с дополнительных адресов аналогично. Живой чат поддерживает постоянный режим обслуживания.
certified mold removal company
this eco-friendly shop – The minimalist style combined with simple browsing is very appealing.
Truvella Network – Content looks carefully chosen and the site feels inviting.
useful link betswap casino
https://emiratesambassadeurs.com/vip-concierge/ If you are comparing Audemars Piguet prices in Taipei, our Geneva-based private watch desk can arrange Royal Oak 16202ST with full set confirmed.
Blackburn vs Preston 2026 Championship 21:00 – Rovers favored! English football scores & betting buzz live now!
Новейшие операторы беттинг услуг гарантируют участникам возможность к высококлассному беттингу через проверенные СЌРЅРѕРјРѕ казино ресурсы. Лицензированная деятельность нуждается исполнения строгих контролирующих положений.
Процесс активации персонального счета предусматривает верификацию личных данных. Регуляторы применяют комплексные механизмы KYC и AML для пресечения фродовых платежей.
Цифровые платформы инновационных игорных домов функционируют на защищенных дата-центрах с HTTPS сертификатами. Локальные запреты побуждает владельцев организовывать вспомогательные порталы.
Альтернативные сайты являют собой идентичные копии центрального платформы с поддержанием всех опций и информации. Клиенты обеспечивают себе беспрепятственный соединение к депозиту, гемблинг данным и пользовательским конфигурациям.
Платежные транзакции выполняются через синхронизированные денежные шлюзы. Лимиты на вклады и снятия назначаются в соотношении с законодательными стандартами и индивидуальными нормами риск-менеджмента.
Опытные беттеры предлагают контролировать статус лицензии через надзорные регистры азартных организаций. Имиджевые параметры предусматривают ранги на отраслевых порталах и оценки реальных игроков.
Современные порталы гемблинг игр предоставляют беттерам вход к качественному азарту через проверенные Килограмм казино ресурсы. Лицензированная функционирование влечет исполнения строгих контролирующих критериев.
Процедура регистрации персонального учетной записи включает верификацию личных информации. Регуляторы эксплуатируют многоуровневые алгоритмы KYC и AML для пресечения незаконных платежей.
Программные средства новейших гемблинг платформ функционируют на зашифрованных инфраструктурах с шифровальными стандартами. IP-фильтрация принуждает операторов запускать дублирующие домены.
Альтернативные порталы представляют идентичные клоны основного домена с фиксацией всех инструментов и параметров. Игроки добиваются непрерывный подключение к счету, гемблинг отчетности и индивидуальным установкам.
Платежные процедуры реализуются через синхронизированные платежные процессоры. Лимиты на взносы и выводы устанавливаются в унисон с нормативными критериями и собственными правилами риск-менеджмента.
Опытные игроки рекомендуют мониторить состояние аккредитации через надзорные каталоги гемблинг органов. Авторитетные характеристики предусматривают позиции на специализированных порталах и комментарии истинных клиентов.
code de promo 1xbet
you could try this out betswap app
http://ivertherapeutics.com/# Iver Therapeutics
https://bresdel.com/blogs/1425194/Planbet-Promo-Code-Free-Bet-PLANVIP-Bonus-130
secure shopping page – Monitoring products and checking costs was straightforward and fast.
Looking well projects a positive first impression.
A outfit communicates volumes before a person even speak a word.
This boosts your own confidence and mood significantly.
A put-together look conveys competence in the workplace.
https://a1.megakazan.ru/N8tkoy7K/
Stylish clothing allow you to express your unique identity.
People often perceive stylish people as more capable and trustworthy.
Ultimately, putting effort in your style is an investment in your personal brand.
玉茗茶骨2026 古装权谋爱情 海外华人高清在线观看 AI智能推荐热播陆剧
Инновационные порталы беттинг услуг дают пользователям подключение к премиальному игровому процессу через безопасные Рльдорадо казино платформы. Сертифицированная работа предполагает исполнения четких правовых стандартов.
Механизм открытия персонального кабинета содержит подтверждение индивидуальных реквизитов. Провайдеры эксплуатируют многоуровневые процедуры KYC и AML для недопущения нарушающих переводов.
Электронные платформы новейших казино базируются на защищенных серверах с криптографическими сертификатами. Геоблокировка побуждает провайдеров внедрять дублирующие адреса.
Дублирующие платформы образуют точные версии центрального сайта с поддержанием всех инструментов и сведений. Пользователи достигают постоянный связь к средствам, гемблинг статистике и пользовательским настройкам.
Банковские действия проходят через связанные платежные сервисы. Пределы на депозиты и снятия регулируются в согласии с нормативными критериями и корпоративными процедурами управления рисками.
Опытные клиенты рекомендуют анализировать статус разрешения через официальные базы данных беттинг организаций. Авторитетные индикаторы содержат позиции на профильных платформах и отзывы реальных беттеров.
What impressed me about this casino https://pokochajgada.pl/ is the quality of the games. Everything runs smoothly, the design is clean, and there’s always something new to explore, which keeps it engaging.
Беттинговая область отображает активный расширение, манящая легионы пользователей. Профессиональные платформы дают безопасную среду для игры. Детальную факты о указанных организациях возможно найти на lucky bear казино онлайн скачать .
Аккредитация является центральным фактором выбора платформы. Регуляторы Кюрасао дают качественный надзор экономических операций. Любая официальная сайт выполняет регулярные ревизии RNG-систем.
Программные особенности современных беттинг-платформ охватывают SSL-шифрование экономического класса. Производители компьютерного обеспечения вроде Microgaming, NetEnt, Pragmatic Play внедряют многоуровневые системы рандомных чисел.
Алгоритм валидации личного кабинета подразумевает представления справок KYC-уровня. ID, свидетельство о заработке, доказательство местожительства — обычный перечень для полноценного подключения.
Альтернативные ссылки убирают препятствия с блокировками операторов. Функционирующие альтернативы изменяются регулярно IT группами. Мобильные программы нередко работают надёжнее онлайн редакций.
Банкролл-менеджмент формирует долгосрочную доходность развлекательных периодов. Квалифицированные игроки рекомендуют лимитировать сумму депозита до 1-2% от общего резерва.
DIY tool store – The store offers practical tools and detailed product info is very helpful.
useful reference betswaps
Iver Therapeutics ivermectin iv ivermectin usa
Logo Laboratory – Their branding designs feel modern, creative, and carefully crafted.
陈星旭卢昱晓《轧戏》2026高口碑都市情感陆剧,海外华人无广告高清体验,真实生活代入感强,全球加速热播中。
zoloft without dr prescription: sertraline – zoloft generic
狼队2-2绝平枪手!2026英超比分神剧情,主帅直呼“像赢了”,阿森纳领先优势告急,足球新闻太刺激!
Посмотрите разбор про ufc в феврале марте 2026 три недели которые встряхнут дивизионы, там много информации о титульных перспективах. Смотрите подробности: https://flat-360.ru/news/ufc-fevral-mart-2026-raspisanie-boyov-ufc-fight-night-strickland-vs-hernandez-moreno-vs-kavanagh-ufc-326-holloway-vs-oliveira-2-polnyj-gid-i-prognozy/
Iver Therapeutics: Iver Therapeutics – stromectol for humans
实习医生风云第十季2026 海外华人医疗喜剧回归 高清经典续集 AI推荐
Adelaide United vs Perth Glory – 2026 A-League 16:35 kick-off! Australian football scores & betting buzz live now!
Современные игроки оказываются с сложностью связи к легальным площадкам. Операторы ограничивают базовые домены, но профессиональные казино Рльдорадо участники помнят о наличии дублирующих порталов.
Зеркало составляет абсолютную реплику основного площадки. Средства защиты поддерживаются равнозначными. Расчётные действия выполняются через те же каналы.
Схема регистрации через зеркальный ресурс подразумевает типовой аутентификации. Менеджеры уточняют удостоверения для соблюдения KYC-стандартов. Паспортные сведения проходят многоуровневую подтверждение.
Пополнительные рамки на дополнительных ресурсах равняются основным условиям. Минимальные взносы продолжают постоянными. Прогрессивные призовые фонды синхронизируются между множественными адресами.
Бонусные системы функционируют всесторонне на параллельных ресурсах. Вейджер поддерживает оригинальные значения. Временные рамки оборота сохраняется.
Команда поддержки анализирует тикеты с альтернативных порталов идентично. Прямой разговор осуществляет круглосуточный расписание функционирования.
Актуальные геймеры сталкиваются с сложностью связи к лицензированным платформам. Организации закрывают главные URL, но искушённые mad casino зеркало участники помнят о существовании альтернативных ресурсов.
Дополнительный домен образует точную дубликат главного ресурса. Криптографические алгоритмы остаются неизменными. Расчётные процедуры проходят через сходные системы.
Технология регистрации через зеркальный ресурс требует классической верификации. Сотрудники требуют бумаги для осуществления KYC-требований. Идентификационные характеристики реализуют двухфакторную подтверждение.
Депозитные лимиты на альтернативных ресурсах соответствуют базовым характеристикам. Наименьшие вклады остаются постоянными. Увеличивающиеся выигрышные пулы интегрируются между различными ссылками.
Бонусные планы функционируют комплексно на резервных ресурсах. Множитель ставок гарантирует оригинальные параметры. Длительность проигрывания продолжается.
Команда сопровождения анализирует запросы с параллельных адресов идентично. Живой диалог поддерживает постоянный формат оперирования.
海外华人必备的yifan平台运用AI智能推荐算法,提供最新高清电影、电视剧,无广告观看体验。
FreightFriendly Online Store – Easy navigation and clear product details make shopping straightforward.
Актуальные геймеры оказываются с проблемой соединения к лицензированным платформам. Организации блокируют первичные адреса, но грамотные РЎСѓРєР° казино игроки осознают о присутствии зеркальных площадок.
Дополнительный домен является идентичную отображение оригинального платформы. Системы безопасности остаются такими же. Денежные переводы реализуются через те же системы.
Схема создания аккаунта через резервный адрес содержит привычной подтверждения. Менеджеры уточняют бумаги для осуществления KYC-требований. Идентификационные информация осуществляют двухфакторную валидацию.
Финансовые границы на зеркальных платформах соответствуют первичным требованиям. Наименьшие вклады поддерживаются стабильными. Увеличивающиеся накопления согласовываются между многочисленными ресурсами.
Стимулирующие схемы функционируют целостно на резервных платформах. Вейджер удерживает базовые значения. Период действия реализации продолжается.
Сервис ассистирования рассматривает вопросы с дополнительных ссылок равнозначно. Прямой разговор обеспечивает круглосуточный порядок функционирования.
Навигация в области легальных площадок требует владения современных технологий авторизации. Квалифицированные геймеры применяют лаки Р±РёСЂ казино для добывания свежей информации о оперативных ссылках.
Механизм создания аккаунта в лицензированных компаниях подразумевает комплексную верификацию. Продвинутые провайдеры задействуют KYC-протоколы и AML-критерии. Документооборот составляет от 24 до 72 временных отрезков.
Цифровые методы для преодоления запретов прогрессируют вместе с укреплением законодательных шагов. VPN-инструменты типа premium предлагают криптографию AES-256 и технологии OpenVPN. Устойчивость коннекта критически необходима для премиальных сессий.
Дублирующие сайты оперируют через географически расположенные цифровые инфраструктуры. CDN-структуры осуществляют быструю отклик для европейских клиентов. Цифровое редирект включается при идентификации блокировки первичного портала.
Платежные операции в сертифицированных регионах подпадают под конкретным стандартам PCI DSS. Децентрализованные переводы получают популярность из-за приватности и темпу обработки.
Планшетные клиенты премиальных организаций объединяют голосовую идентификацию и push-оповещения для критических происшествий. Модифицируемый интерфейс программно корректируется под особенности монитора.
夜班医生第四季高清完整官方版,海外华人可免费观看最新热播剧集。
Explore Charge Charm – The design is appealing and I’m excited to see more soon.
Актуальные участники пересекаются с огромным количеством цифровых нюансов при операциях с проверенными ресурсами. Профильные платформы типа Меллстрой регистрация предоставляют релевантную контент о процессах казино провайдеров.
Алгоритм проверки счета охватывает набор принудительных этапов. Начальная валидация предполагает предоставления справок доказывающих субъект. Классический пакет предполагает паспорт, права или заграничное удостоверение.
Системная часть открытия счета охватывает задействование SSL-шифрования и двухуровневой проверки. Квалифицированные участники предлагают задействовать весь комплекс предложенных параметров безопасности.
Альтернативные адреса составляют стопроцентные реплики первичного сайта с сохранением полного арсенала. Центральное преимущество содержится в тождественности расчетных ограничений и условий ставочных требований.
Алгоритм локализации рабочих зеркал опирается на контроле профильных телеграм-каналов и союзных площадок. Квалифицированные игроки применяют анонимайзеры для формирования стабильного входа без оглядки от географических запретов.
http://neuroreliefusa.com/# neurontin singapore
Навигация в области проверенных порталов нуждается владения продвинутых способов авторизации. Продвинутые клиенты эксплуатируют Меллстрой регистрация для приобретения свежей сведений о активных доменах.
Механизм создания профиля в проверенных операторах предполагает детальную подтверждение. Передовые поставщики внедряют KYC-системы и AML-нормы. Документальная процедура требует от 24 до 72 часов.
Цифровые технологии для преодоления блокировок прогрессируют сообща с интенсификацией регуляторных решений. VPN-платформы категории premium обеспечивают шифрование AES-256 и стандарты OpenVPN. Непрерывность связи жизненно значима для премиальных игровых периодов.
Запасные платформы работают через пространственно размещенные IT инфраструктуры. CDN-комплексы осуществляют минимальную задержку для европейских клиентов. Системное перенаправление активируется при идентификации ограничения базового адреса.
Денежные транзакции в легальных юрисдикциях следуют жестким требованиям PCI DSS. Криптовалютные расчеты увеличивают актуальность в результате конфиденциальности и оперативности выполнения.
Портативные клиенты лучших операторов интегрируют лицевую аутентификацию и push-извещения для существенных происшествий. Настраиваемый оформление автономно адаптируется под параметры матрицы.
check my blog betswap review
cookwarecrescent.shop – The variety is impressive and the product details are genuinely useful.
Передовые операторы беттинг продуктов предоставляют участникам вход к элитному развлечениям через защищенные Лаки Бир зеркало системы. Авторизованная бизнес подразумевает выполнения конкретных правовых критериев.
Механизм открытия клиентского учетной записи содержит подтверждение личных информации. Провайдеры применяют углубленные протоколы KYC и AML для предотвращения фродовых переводов.
Технические решения современных гемблинг платформ работают на защищенных облачных системах с криптографическими сертификатами. Региональная блокировка вынуждает операторов запускать дублирующие ссылки.
Альтернативные платформы формируют аналогичные копии главного домена с фиксацией всех возможностей и параметров. Пользователи приобретают непрерывный соединение к капиталу, беттинг данным и индивидуальным опциям.
Расчетные процедуры выполняются через подключенные финансовые агрегаторы. Пределы на взносы и обналичивания фиксируются в согласии с лицензионными положениями и корпоративными нормами риск-менеджмента.
Экспертные клиенты указывают контролировать статус разрешения через государственные списки развлекательных ведомств. Статусные характеристики охватывают оценки на специализированных порталах и комментарии истинных игроков.
Навигация в сфере сертифицированных порталов подразумевает представления новых способов доступа. Продвинутые пользователи используют Vavada для добывания актуальной фактов о оперативных адресах.
Механизм формирования аккаунта в лицензированных заведениях включает многоуровневую подтверждение. Передовые поставщики используют KYC-системы и AML-критерии. Оформление документов требует от 24 до 72 интервалов.
IT технологии для минования ограничений развиваются одновременно с повышением нормативных действий. VPN-платформы уровня premium гарантируют криптографию AES-256 и методы OpenVPN. Стабильность соединения кардинально важна для элитных партий.
Резервные адреса выполняют задачи через регионально расположенные серверные мощности. CDN-структуры поддерживают низкую задержку для европейских игроков. Техническое роутинг запускается при распознавании недоступности основного адреса.
Платежные движения в сертифицированных зонах следуют определенным критериям PCI DSS. Крипто операции увеличивают востребованность из-за приватности и скорости обработки.
Мобильные утилиты элитных операторов интегрируют голосовую подтверждение и push-сообщения для существенных эпизодов. Гибкий облик самостоятельно изменяется под свойства экрана.
Азартная область являет интенсивный прогресс, привлекая тысячи клиентов. Профессиональные сайты обеспечивают защищённую пространство для пари. Исчерпывающую сведения о этих провайдерах можно отыскать на винити казино .
Легализация является ключевым фактором отбора площадки. Лицензиаты Кюрасао предоставляют серьёзный надзор финансовых операций. Отдельная лицензированная площадка реализует плановые аудиты RNG-генераторов.
Цифровые параметры актуальных азартных площадок объединяют SSL-безопасность денежного стандарта. Провайдеры программного продукта уровня Microgaming, NetEnt, Pragmatic Play подключают усовершенствованные схемы рандомных показателей.
Механизм верификации счёта предполагает передачи удостоверений KYC-формата. Свидетельство, свидетельство о средствах, валидация местожительства — стандартный список для финального подключения.
Альтернативные ссылки убирают барьеры с ограничениями компаний. Рабочие дубли корректируются систематически IT специалистами. Смартфонные программы регулярно работают надёжнее сетевых форматов.
Управление банкроллом задаёт долгосрочную прибыльность азартных периодов. Грамотные геймеры предлагают ограничивать величину вейджера до 1-2% от общего бюджета.
Проверенные ресурсы игорных сервисов обеспечивают игрокам возможность к качественному времяпрепровождению через тематические ресурсы, включая казино Sykaaa , которые точно следуют глобальные требования security.
Схема регистрации включает ввода проверочных деталей через безопасные SSL-connection. Менеджмент просят предоставить нотариальное удостоверение возраста и локации residence для исполнения юрисдикционных стандартов.
2FA проверка выступает mandatory составляющей современных механизмов защиты. Users обретают SMS-шифры, push-алерты или эксплуатируют профессиональные софт вроде Google Authenticator.
Дублирующие адреса решают вопросы локальных барьеров и DDoS-атак. Технически дубли являют идентичные реплики центрального портала с обеспечением features и пользовательских данных.
Опытные геймеры рекомендуют сохранять актуальные перечни активных копий в сохранённых ссылках обозревателя. Администрация доставляют новости о свежих порталах через электронную почту, Telegram-сообщества и мобильные софт.
Финансовые movements через надёжные ресурсы обеспечены encryption алгоритмами категории банковского сектора. Получение финансов выполняется единственно на проверенные wallets собственника account.
Present Parlor curated picks – Thoughtful presents with packaging that felt elegant and premium.
Mystery Muse artful picks – Products that invite curiosity and inspire playful creativity.
growth engine shop – Practical tools that genuinely enhance daily operations and efficiency.
一饭封神在线免费在线观看,海外华人专属平台采用机器学习个性化推荐,高清无广告体验。
Новейшие бетторы встречаются с барьером соединения к сертифицированным порталам. Провайдеры закрывают базовые URL, но знающие Mellstroy Game казино клиенты помнят о доступности дублирующих платформ.
Дополнительный домен формирует идентичную копию оригинального площадки. Системы безопасности остаются идентичными. Платёжные действия производятся через те же каналы.
Процедура регистрации через параллельный адрес подразумевает классической подтверждения. Сотрудники просят документы для соблюдения KYC-требований. Индивидуальные характеристики выполняют многоуровневую валидацию.
Пополнительные лимиты на параллельных порталах идентичны основным параметрам. Низшие беты сохраняются фиксированными. Накопительные джекпоты координируются между многочисленными ссылками.
Поощрительные механизмы работают всесторонне на дополнительных площадках. Отыгрышный коэффициент обеспечивает оригинальные величины. Период действия проигрывания не изменяется.
Департамент помощи обрабатывает обращения с альтернативных ссылок таким же способом. Интерактивный диалог обеспечивает беспрерывный режим деятельности.
Нынешние игроки сталкиваются с огромным количеством технологических особенностей при деятельности с лицензированными площадками. Профильные источники типа казино Vavada поставляют релевантную информацию о функционировании игорных компаний.
Механизм проверки профиля включает комплекс обязательных стадий. Базовая аутентификация нуждается предоставления справок верифицирующих гражданство. Стандартный комплект содержит удостоверение личности, лицензию водителя или загранпаспорт.
Техническая часть регистрации предполагает использование SSL-шифрования и многофакторной защиты. Опытные геймеры советуют включать все представленных настроек секьюрити.
Резервные ссылки образуют идентичные дубликаты основного платформы с сохранением комплексного арсенала. Ключевое достоинство состоит в подобии финансовых границ и условий отыгрыша.
Механизм поиска рабочих дублирующих порталов базируется на наблюдении тематических уведомительных сервисов и связанных платформ. Квалифицированные пользователи внедряют виртуальные частные сети для формирования бесперебойного связи невзирая от территориальных блокировок.
真实的人类第一季高清完整版,海外华人可免费观看最新热播剧集。
Надёжные платформы игровых услуг oferuja клиентам доступ к элитному гэмблингу через целевые сайты, включая казино mad , которые именно соблюдают международные регламенты защиты.
Процедура создания аккаунта требует заполнения валидационных параметров через криптографические SSL-линии. Администрация требуют документальное доказательство дееспособности и региона residence для соблюдения нормативных правил.
Двухфакторная верификация считается mandatory частью новейших solutions security. Пользователи располагают SMS-коды, push-оповещения или применяют targeted приложения типа Google Authenticator.
Зеркальные домены преодолевают вопросы geographic блокировок и DDoS-нападений. С технической точки зрения копии составляют копийные dublicates центрального сайта с сохранением функциональности и user информации.
Профессиональные пользователи suggest удерживать обновлённые списки working альтернатив в favourites обозревателя. Management передают обновления о новых URL через email, Telegram-сообщества и мобильные утилиты.
Payment movements через legal ресурсы защищены encryption methods level банковского сектора. Изъятие капитала происходит лишь на аутентифицированные карты держателя учётной записи.
愛海外版,专为华人打造的高清视频官方认证平台,支持全球加速观看。
Ориентирование в секторе сертифицированных сайтов предполагает представления актуальных способов подключения. Квалифицированные пользователи внедряют тип топ казино регистрация для приобретения новейшей информации о работающих адресах.
Схема оформления профиля в официальных организациях подразумевает тщательную проверку. Новейшие поставщики внедряют KYC-протоколы и AML-критерии. Документооборот потребляет от 24 до 72 периодов.
Цифровые способы для преодоления препятствий эволюционируют параллельно с усилением законодательных мер. VPN-службы категории premium дают защиту AES-256 и протоколы OpenVPN. Устойчивость связи fundamentally значима для премиальных заходов.
Альтернативные домены оперируют через регионально распределенные IT кластеры. CDN-архитектуры гарантируют оптимальную пинг для азиатских игроков. Программное перенаправление активируется при обнаружении недоступности основного сайта.
Денежные манипуляции в проверенных юрисдикциях подчиняются конкретным стандартам PCI DSS. Цифровые расчеты набирают распространение благодаря конфиденциальности и динамике реализации.
Смартфонные приложения ведущих брендов включают лицевую идентификацию и push-уведомления для принципиальных ситуаций. Гибкий интерфейс автоматически адаптируется под параметры панели.
Современные участники встречаются с множеством цифровых нюансов при операциях с проверенными платформами. Профильные источники типа Вавада зеркало поставляют релевантную контент о операциях азартных брендов.
Система подтверждения учетной записи подразумевает несколько обязательных стадий. Первичная верификация нуждается отправки свидетельств верифицирующих гражданство. Обычный пакет охватывает документ, лицензию водителя или загранпаспорт.
Техническая компонента открытия счета охватывает эксплуатацию криптографической защиты и многофакторной защиты. Профессиональные участники подсказывают инициировать весь комплекс доступных функций охраны.
Зеркала представляют полные клоны первичного домена с хранением тотального возможностей. Важнейшее бонус кроется в соответствии денежных границ и параметров ставочных требований.
Схема выявления действующих альтернативных адресов строится на контроле экспертных уведомительных сервисов и союзных ресурсов. Опытные игроки эксплуатируют туннельные протоколы для формирования постоянного доступа без оглядки от географических лимитов.
Перемещение в секторе проверенных ресурсов предполагает знания продвинутых методов подключения. Опытные пользователи применяют п»ї1хбет регистрация для добывания релевантной сведений о работающих URL.
Процесс формирования счета в надежных компаниях включает многоуровневую валидацию. Новейшие организации эксплуатируют KYC-протоколы и AML-нормы. Документальная процедура требует от 24 до 72 интервалов.
Цифровые инструменты для прохождения барьеров эволюционируют сообща с ужесточением нормативных действий. VPN-инструменты класса premium предоставляют шифрование AES-256 и стандарты OpenVPN. Надежность подключения жизненно значима для привилегированных игровых периодов.
Альтернативные адреса оперируют через регионально распределенные цифровые мощности. CDN-структуры поддерживают минимальную задержку для азиатских пользователей. Автоматическое перенаправление запускается при распознавании блокировки главного сайта.
Финансовые переводы в официальных регионах подчиняются жестким требованиям PCI DSS. Децентрализованные переводы получают востребованность в результате анонимности и динамике реализации.
Планшетные программы ведущих компаний интегрируют лицевую подтверждение и push-оповещения для принципиальных событий. Модифицируемый дизайн автономно изменяется под настройки дисплея.
gaming monitor outlet – Lots of monitors available and the tech details are well presented.
comfortable sandal boutique – High-quality design and the team was friendly and helpful when I reached out.
Toast Trek Store – Navigation was easy and all product details were clearly displayed.
Отбор честного азартного портала заставляет глубокого исследования лицензионных сертификатов. Актуальные сайты п»ї1хбет сайт предоставляют игрокам абсолютную сведения о текущих лицензиях.
Алгоритм получения доступа содержит различные принудительных этапов валидации. Владельцы требуют справки, удостоверяющие самобытность и правоспособность. Стандартный KYC-порядок длится от 24 до 72 интервалов.
Распоряжение капиталом стартует с установления лимитов на инвестиции. Квалифицированные клиенты советуют задействовать правило 5% от полного гемблинг капитала на единичную заход.
Электронные препятствия владельцев вынуждают применять дополнительные домены. Клоны поддерживают безусловную работоспособность главного площадки, охватывая журнал сделок и гемблинг продвижение.
Инновационные денежные сервисы предоставляют моментальные вклады через блокчейн счета. Bitcoin, Ethereum и постоянные токены дают скрытность и минимальные отчисления. Длительность обработки снятий насчитывает 10-30 интервалов.
Системы верности включают ступенчатые категории с возрастающим кэшбэком. VIP-координаторы гарантируют уникальные награды, улучшенные лимиты и первоочередную сервис.
艾一帆海外版,专为华人打造的高清视频官方认证平台,支持全球加速观看。
Отбор проверенного гемблинг портала подразумевает тщательного рассмотрения юридических сертификатов. Современные сайты Лаки Бир официальный сайт гарантируют участникам полную информацию о имеющихся санкциях.
Алгоритм открытия аккаунта включает несколько обязательных стадий подтверждения. Провайдеры просят документы, устанавливающие персону и правоспособность. Обычный KYC-порядок требует от 24 до 72 периодов.
Управление банком открывается с назначения пределов на взносы. Квалифицированные клиенты предлагают эксплуатировать правило 5% от совокупного азартного резерва на индивидуальную сессию.
Цифровые ограничения провайдеров заставляют применять дополнительные пути. Зеркала удерживают максимальную производительность центрального ресурса, подразумевая историю переводов и игровой результаты.
Современные денежные сервисы предоставляют быстрые вклады через блокчейн аккаунты. Bitcoin, Ethereum и постоянные токены дают приватность и крошечные взносы. Длительность выполнения изъятий составляет 10-30 минут.
Алгоритмы приверженности содержат градационные уровни с накапливающимся вознаграждением. VIP-координаторы дают персонализированные награды, расширенные пределы и первоочередную техподдержку.
Навигация в сфере проверенных платформ включает знания продвинутых технологий авторизации. Квалифицированные пользователи применяют аква казино для получения новейшей данных о функционирующих путях.
Процесс регистрации личного кабинета в надежных организациях подразумевает тщательную аутентификацию. Новейшие провайдеры используют KYC-системы и AML-критерии. Бумажная работа потребляет от 24 до 72 часов.
Программные решения для минования блокировок совершенствуются сообща с повышением законодательных действий. VPN-сервисы разряда premium дают защиту AES-256 и системы OpenVPN. Надежность связи кардинально актуальна для премиальных сессий.
Запасные ресурсы выполняют задачи через территориально расположенные технические системы. CDN-сети осуществляют сокращенную время ответа для международных клиентов. Системное маршрутизация активируется при выявлении недоступности основного ресурса.
Банковские операции в проверенных территориях отвечают жестким нормам PCI DSS. Цифровые операции получают популярность благодаря скрытности и скорости реализации.
Портативные софт элитных брендов включают физиологическую подтверждение и push-алерты для принципиальных событий. Настраиваемый интерфейс автономно настраивается под свойства матрицы.
Современные игроки сталкиваются с изобилием программных нюансов при работе с легальными порталами. Экспертные сайты типа Килограмм казино дают релевантную информацию о функционировании гэмблинговых операторов.
Процедура аутентификации кабинета содержит набор обязательных шагов. Начальная проверка требует отправки удостоверений подтверждающих гражданство. Обычный комплект подразумевает удостоверение личности, водительские права или международное ID.
Техническая часть открытия счета предполагает внедрение безопасного соединения и двухуровневой проверки. Экспертные пользователи советуют задействовать совокупность возможных возможностей обеспечения.
Дублирующие порталы формируют точные отражения основного портала с поддержанием всего арсенала. Важнейшее бонус содержится в идентичности платежных пределов и норм вейджера.
Схема обнаружения рабочих резервных ссылок базируется на мониторинге специализированных мессенджер групп и аффилированных сайтов. Квалифицированные геймеры используют виртуальные частные сети для предоставления устойчивого входа безотносительно от территориальных лимитов.
посмотреть в этом разделе vodkabet
https://ivertherapeutics.com/# Iver Therapeutics
custom mosaic creations – Fun combinations and straightforward browsing make shopping enjoyable.
Подбор надежного гемблинг площадки в современных обстоятельствах предполагает тщательного подхода к регулятивному статусу. Знающие игроки понимают, что Вавада РІС…РѕРґ включает современную данные о активных ресурсах.
Алгоритм регистрации в проверенных площадках предусматривает необходимую подтверждение документов. KYC-правила обеспечивают как казино, так и геймера от афер. Краткосрочные ограничения на снятие финансов до окончания подтверждения – стандартная процедура.
Цифровые препятствия на связь к азартным ресурсам решаются через дублирующие домены. Доступные дубликаты поддерживают всестороннюю эффективность основного платформы. Финансовые транзакции, развлекательный статистика и бонусные системы продолжают постоянными.
Денежная надежность выражается степенью задействованных финансовых инструментов. SSL-безопасность, PCI DSS аттестация и дополнительная верификация гарантируют защищенный заслон охраны.
Геймплейная набор легальных провайдеров включает автоматы от топовых студий. RTP-показатели, дисперсия и статистические модели получают беспристрастную аудит в одобренных лабораториях.
Программы поощрения в достойных заведениях базируются на ясных параметрах вейджера. Проигрыш x35-40 признается нормальным для автомат-бонусов, в то время как карточные активности засчитываются в расчет с редуцированным множителем.
Отбор безопасного развлекательного оператора в актуальных границах заставляет тщательного подхода к юридическому положению. Квалифицированные геймеры понимают, что Меллстрой сайт содержит свежую материалы о активных провайдерах.
Алгоритм оформления профиля в проверенных платформах охватывает требуемую валидацию личности. KYC-процедуры гарантируют как площадку, так и клиента от обмана. Переходные лимиты на снятие средств до выполнения контроля – стандартная практика.
Цифровые ограничения на доступ к гемблинг сайтам преодолеваются через резервные URL. Функционирующие зеркала сохраняют полную возможности основного сервиса. Расчетные транзакции, игровой продвижение и привилегированные системы поддерживаются устойчивыми.
Денежная стабильность определяется критерием применяемых банковских инструментов. SSL-шифрование, PCI DSS аттестация и двухфакторная идентификация создают стабильный заслон охраны.
Азартная набор официальных заведений включает слоты от лидирующих студий. RTP-значения, волатильность и статистические системы подвергаются объективную аудит в признанных институтах.
Планы мотивации в серьезных площадках опираются на открытых правилах активности. Вейджер x35-40 расценивается справедливым для машина-льгот, в то время как классические активности идут в расчет с минимальным множителем.
ссылка на сайт vodka bet
Современные электрические жалюзи на окна внутренние купить 7 (499) 638-25-37 обеспечивают удобство управления светом в вашем доме с помощью дистанционного пульта.
Первый плюс – это экономия времени и усилий.
—
Основное преимущество в том, что они существенно упрощают процесс управления освещением.
you could try this out betswap
Современные сервисы развлекательных услуг гарантируют участникам вход к профессиональному беттингу через безопасные тип топ казино системы. Авторизованная деятельность нуждается соблюдения конкретных контролирующих критериев.
Процедура регистрации клиентского счета предусматривает валидацию личных показателей. Управляющие эксплуатируют углубленные системы KYC и AML для недопущения фродовых финансовых действий.
Электронные инструменты новейших гемблинг платформ базируются на зашифрованных хостингах с шифровальными протоколами. Региональная блокировка вынуждает владельцев организовывать резервные адреса.
Зеркальные порталы формируют точные дубликаты базового ресурса с сохранением всех опций и сведений. Пользователи добиваются устойчивый подключение к капиталу, развлекательной статистике и личным настройкам.
Денежные действия выполняются через встроенные денежные агрегаторы. Ограничения на взносы и получения устанавливаются в соответствии с нормативными условиями и корпоративными нормами контроля угроз.
Профессиональные клиенты настаивают анализировать ситуацию авторизации через надзорные базы данных игорных организаций. Авторитетные параметры задействуют рейтинги на специализированных сервисах и feedback подлинных пользователей.
Гемблинговая сфера являет динамичный развитие, манящая множество клиентов. Профессиональные сайты гарантируют надёжную обстановку для пари. Подробную сведения о этих провайдерах можно отыскать на п»ї1хбет казино .
Сертификация представляет основным элементом подбора ресурса. Регуляторы Кюрасао предоставляют серьёзный аудит экономических транзакций. Всякая легальная площадка выполняет регулярные проверки RNG-генераторов.
Технические аспекты новейших гемблинг-сайтов охватывают SSL-шифрование финансового уровня. Поставщики программного обеспечения типа Microgaming, NetEnt, Pragmatic Play добавляют комплексные схемы рандомных параметров.
Процесс проверки аккаунта подразумевает передачи справок KYC-уровня. Паспорт, документ о доходах, верификация регистрации — обычный комплект для финального доступа.
Зеркальные домены ликвидируют сложности с цензурой провайдеров. Свежие зеркала корректируются ежедневно IT службами. Портативные приложения часто оперируют надёжнее браузерных редакций.
Распределение капитала определяет долгосрочную успешность азартных сессий. Грамотные геймеры указывают контролировать величину депозита до 1-2% от итогового капитала.
Функционирующие альтернативные домены лицензированных азартных клубов на Лаки Бир обеспечивают непрерывный подключение к игровым порталам. Методика клонирования формирует полноценные версии главного портала с фиксацией всех возможностей.
Процедура активации через альтернативный домен в точности имитирует главную анкету. Свежие участники указывают рабочий email, устанавливают сложный шифр и устанавливают базовую курренси.
Верификация личного кабинета предполагает отправки справок следуя KYC-регламенту. Снимок удостоверения личности, доказательство адреса и денежные сведения контролируются системой машинную контроль в течение 24-72 периодов.
Авторизация существующих геймеров происходит через стандартную интерфейс с многоступенчатой идентификацией. Разовые ключи отправляются на мобильный аппарат или email.
Функционал денежного раздела через альтернативные домены содержит востребованные денежные платформы. Visa, Mastercard, электронные счета Skrill, Neteller, виртуальные монеты Bitcoin, Ethereum осуществляются с минимальными комиссиями 0-3%.
Gaming каталог дублируется целиком включая слоты, столовые забавы, live-крупье и максимальные награды. RTP-индикаторы, волатильность и ставочные требования фиксируются идентичными.
Поощрительная схема оперирует подобно главному ресурсу. Welcome-комплекты, безвозмездные спины, кешбэк и VIP-системы стартуют автоматически при реализации прописанных параметров.
Передовые порталы игорных активностей обеспечивают участникам доступ к профессиональному игровому процессу через защищенные mad casino порталы. Сертифицированная работа влечет следования определенных регуляторных норм.
Алгоритм открытия игрового счета задействует проверку индивидуальных показателей. Администраторы задействуют многоуровневые алгоритмы KYC и AML для пресечения поддельных платежей.
Цифровые платформы передовых развлекательных порталов работают на надежных дата-центрах с SSL протоколами. Территориальные ограничения заставляет администраторов запускать вспомогательные ссылки.
Резервные домены формируют полные версии главного домена с поддержанием всех опций и информации. Пользователи получают беспрепятственный соединение к средствам, беттинг истории и пользовательским конфигурациям.
Финансовые процедуры производятся через синхронизированные денежные системы. Пределы на вклады и снятия назначаются в гармонии с правовыми стандартами и внутренними регламентами минимизации опасностей.
Экспертные пользователи рекомендуют отслеживать ситуацию разрешения через официальные каталоги беттинг органов. Статусные параметры предусматривают позиции на тематических сайтах и мнения реальных участников.
visit Maker Marmot – There are truly distinctive products here you won’t easily find elsewhere.
Функционирующие резервные адреса официальных азартных клубов на Mellstroy Game зеркало предоставляют стабильный подключение к развлекательным ресурсам. Технология реплицирования строит полноценные версии главного домена с консервацией всех инструментов.
Схема регистрации через резервную ссылку в точности воспроизводит главную форму. Только пришедшие участники вводят действующий email, генерируют надежный секретную комбинацию и назначают базовую платежное средство.
Верификация учетной записи предполагает представления документов следуя KYC-нормам. Копия водительских прав, валидация проживания и финансовые координаты контролируются системой программную валидацию в течение 24-72 часа.
Логин верифицированных клиентов происходит через типовую форму с многоступенчатой проверкой. Одноразовые токены поступают на мобильный номер или почтовый ящик.
Механизмы денежного сектора через дублирующие порталы содержит актуальные банковские механизмы. Visa, Mastercard, виртуальные счета Skrill, Neteller, виртуальные монеты Bitcoin, Ethereum реализуются с низкими взносами 0-3%.
Gaming ассортимент дублируется абсолютно включая машины, настольные забавы, live-крупье и мегавыигрыши. RTP-параметры, волатильность и вейджер остаются точными.
Промо механизм выполняется идентично корневому ресурсу. Welcome-пакеты, фриспины, кешбэк и VIP-курсы включаются машинально при соблюдении фиксированных условий.
Современные клиенты пересекаются с множеством системных деталей при функционировании с официальными порталами. Тематические сайты типа Меллстрой регистрация выдают свежую контент о функционировании игорных компаний.
Механизм проверки аккаунта включает ряд неотъемлемых этапов. Начальная верификация включает отправки бумаг доказывающих личность. Классический перечень содержит ID, автолицензию или загранпаспорт.
Цифровая компонента записления содержит задействование зашифрованного канала и 2FA. Квалифицированные участники рекомендуют запускать максимум представленных возможностей безопасности.
Запасные домены представляют идентичные реплики первичного платформы с обеспечением тотального возможностей. Основное преимущество заключается в идентичности банковских пределов и норм ставочных требований.
Система нахождения активных альтернативных адресов базируется на проверке профильных новостных лент и союзных площадок. Опытные клиенты используют прокси-соединения для формирования устойчивого входа вне зависимости от территориальных барьеров.
Определение надежного betting портала в нынешних условиях нуждается тщательного рассмотрения к законному режиму. Квалифицированные клиенты понимают, что Голд казино содержит свежую факты о функционирующих провайдерах.
Процедура открытия счета в легальных операторах включает неизбежную верификацию личности. KYC-процедуры гарантируют как оператора, так и пользователя от мошенничества. Кратковременные границы на получение активов до финализации подтверждения – стандартная практика.
Цифровые ограничения на связь к азартным порталам нейтрализуются через зеркальные URL. Доступные отражения обеспечивают всестороннюю возможности главного сервиса. Денежные операции, интерактивный продвижение и поощрительные системы функционируют устойчивыми.
Финансовая защищенность измеряется степенью используемых платежных инструментов. SSL-безопасность, PCI DSS валидация и дополнительная проверка устанавливают прочный периметр безопасности.
Интерактивная ассортимент лицензированных площадок содержит барабаны от топовых производителей. RTP-значения, колебания и расчетные принципы подвергаются внешнюю аудит в авторизованных центрах.
Программы стимулирования в серьезных площадках основываются на четких условиях вейджера. Вейджер x35-40 признается справедливым для слот-льгот, в то время как классические активности учитываются в расчет с минимальным множителем.
Iver Therapeutics: ivermectin lotion for lice – Iver Therapeutics
Инновационные сервисы игорных развлечений обеспечивают клиентам путь к профессиональному гемблингу через безопасные казино аква ресурсы. Авторизованная деятельность требует исполнения конкретных контролирующих требований.
Механизм оформления индивидуального кабинета охватывает проверку конфиденциальных информации. Администраторы используют комплексные процедуры KYC и AML для исключения фродовых операций.
Цифровые инструменты новейших игорных домов функционируют на защищенных серверах с HTTPS сертификатами. Территориальные ограничения принуждает управляющих запускать вспомогательные домены.
Альтернативные сайты представляют идентичные версии базового сайта с обеспечением всех инструментов и информации. Пользователи достигают постоянный подключение к счету, гемблинг статистике и клиентским настройкам.
Банковские действия проходят через интегрированные финансовые агрегаторы. Ограничения на инвестиции и получения устанавливаются в соответствии с нормативными критериями и внутренними нормами управления рисками.
Профессиональные гемблеры советуют отслеживать ситуацию лицензии через официальные регистры гемблинг комиссий. Престижные индикаторы включают ранги на профильных сервисах и отзывы настоящих участников.
Передовые операторы беттинг развлечений обеспечивают игрокам вход к профессиональному игровому процессу через защищенные Vavada зеркало ресурсы. Авторизованная бизнес требует следования конкретных регуляторных норм.
Система открытия персонального счета включает верификацию конфиденциальных информации. Операторы применяют многоуровневые механизмы KYC и AML для недопущения поддельных операций.
Цифровые решения актуальных беттинг площадок строятся на стабильных инфраструктурах с SSL стандартами. IP-фильтрация побуждает операторов создавать дублирующие домены.
Зеркальные порталы являют собой аналогичные клоны базового платформы с обеспечением всех функций и информации. Участники достигают беспрепятственный доступ к счету, развлекательной записям и индивидуальным параметрам.
Финансовые транзакции производятся через синхронизированные банковские сервисы. Границы на взносы и выводы назначаются в соотношении с правовыми стандартами и внутренними процедурами контроля угроз.
Опытные игроки настаивают анализировать состояние аккредитации через надзорные регистры азартных органов. Статусные критерии задействуют оценки на профильных платформах и оценки истинных пользователей.
Навигация в пространстве проверенных платформ предполагает владения новых инструментов соединения. Профессиональные геймеры задействуют п»ї1хбет официальный сайт для добывания актуальной сведений о действующих URL.
Схема создания аккаунта в проверенных операторах охватывает многоуровневую аутентификацию. Новейшие организации используют KYC-системы и AML-критерии. Документооборот составляет от 24 до 72 временных отрезков.
Компьютерные методы для преодоления запретов прогрессируют сообща с укреплением правовых инициатив. VPN-инструменты категории premium обеспечивают безопасность AES-256 и системы OpenVPN. Устойчивость соединения жизненно актуальна для премиальных заходов.
Запасные сайты оперируют через территориально расположенные серверные ресурсы. CDN-архитектуры предоставляют оптимальную задержку для международных клиентов. Автоматическое перенаправление срабатывает при распознавании барьера основного ресурса.
Финансовые манипуляции в сертифицированных территориях соответствуют конкретным стандартам PCI DSS. Крипто транзакции завоевывают распространение из-за скрытности и динамике реализации.
Смартфонные утилиты элитных брендов совмещают голосовую подтверждение и push-сообщения для существенных происшествий. Изменяемый оформление программно подстраивается под настройки панели.
Trip Tides Store – Well-organized travel inspiration that looks great and is easy to follow.
http://yokei.com/2026/02/05/slots-siti-kazino-dialogovyy/
Нынешние геймеры встречаются с изобилием технологических деталей при процессах с проверенными порталами. Специализированные источники типа Меллстрой официальный сайт поставляют актуальную сведения о работе азартных операторов.
Процесс проверки кабинета предполагает комплекс обязательных этапов. Исходная валидация требует передачи документов валидирующих персону. Стандартный список охватывает свидетельство, автоудостоверение или международное ID.
Техническая составляющая регистрации подразумевает задействование зашифрованного канала и двухуровневой проверки. Опытные пользователи предлагают активировать совокупность представленных функций секьюрити.
Дублирующие порталы формируют точные клоны центрального сайта с хранением комплексного набора функций. Главное плюс выражается в идентичности денежных ограничений и критериев отыгрыша.
Механизм поиска активных зеркал опирается на мониторинге тематических информационных каналов и союзных сайтов. Продвинутые клиенты применяют туннельные протоколы для предоставления надежного входа невзирая от географических барьеров.
Подбор качественного betting портала в современных обстоятельствах предполагает специального изучения к законному уровню. Знающие клиенты знают, что Lucky Bear casino предоставляет свежую данные о доступных операторах.
Алгоритм открытия счета в официальных заведениях объединяет требуемую валидацию идентичности. KYC-стандарты обеспечивают как площадку, так и геймера от махинаций. Промежуточные пределы на перечисление капитала до закрытия валидации – обычная подход.
Программные запреты на вход к развлекательным сайтам обходятся через резервные порталы. Действующие клоны поддерживают тотальную производительность центрального сервиса. Финансовые процедуры, интерактивный прогресс и бонусные планы сохраняются неизменными.
Материальная гарантированность выражается качеством внедренных денежных механизмов. SSL-защита, PCI DSS сертификация и расширенная подтверждение устанавливают прочный контур охраны.
Геймплейная каталог лицензированных сервисов объединяет спины от лидирующих разработчиков. RTP-параметры, волатильность и вероятностные схемы претерпевают независимую сертификацию в аккредитованных организациях.
Системы поощрения в качественных заведениях формируются на ясных условиях ставок. Условия ставок x35-40 считается адекватным для машина-бонусов, в то время как классические игры учитываются в счет с редуцированным множителем.
Отбор легального игорного площадки заставляет тщательного изучения юридических бумаг. Новые ресурсы Голд казино гарантируют пользователям безусловную сведения о своих санкциях.
Система открытия аккаунта содержит множество ключевых стадий верификации. Владельцы запрашивают удостоверения, устанавливающие личность и возраст. Типовой KYC-механизм продолжается от 24 до 72 временных отрезков.
Распоряжение капиталом открывается с определения границ на инвестиции. Профессиональные игроки настаивают использовать правило 5% от совокупного развлекательного капитала на конкретную сессию.
Технические ограничения владельцев вынуждают задействовать дополнительные адреса. Дубликаты оберегают безусловную функциональность базового платформы, включая архив операций и азартный прогресс.
Современные расчетные сервисы поддерживают мгновенные взносы через виртуальные счета. Bitcoin, Ethereum и устойчивые монеты предоставляют скрытность и мизерные комиссии. Длительность реализации снятий доходит 10-30 периодов.
Схемы верности включают градационные степени с увеличивающимся кэшбэком. VIP-консультанты гарантируют личные подарки, увеличенные границы и опережающую поддержку.
Официальные платформы игорных предложений oferuja клиентам возможность к профессиональному игровому процессу через специализированные порталы, включая казино Вован , которые именно соблюдают общепринятые стандарты конфиденциальности.
Последовательность создания аккаунта требует внесения authentication сведений через криптографические SSL-линии. Провайдеры demanded нотариальное свидетельство дееспособности и территории нахождения для исполнения legal требований.
2FA верификация считается обязательным компонентом современных архитектур безопасности. Клиенты обретают SMS-коды, push-сообщения или задействуют специальные tools типа Google Authenticator.
Зеркальные порталы устраняют сложности локальных запретов и DDoS-воздействий. С технической точки зрения копии представляют копийные реплики главного сайта с maintaining опций и личных сведений.
Профессиональные геймеры рекомендуют сохранять новейшие перечни функционирующих зеркал в bookmark обозревателя. Букмекеры направляют обновления о современных порталах через электронную почту, Telegram-communities и портативные приложения.
Денежные movements через официальные порталы покрыты encryption системами категории банковского направления. Вывод капитала происходит лишь на аутентифицированные счета собственника учётной записи.
trusted fitness store – Gear feels premium and the shipping process is straightforward and clear.
sparkdex ai SparkDex is redefining decentralized trading with speed, security, and real earning potential. On spark dex, you keep full control of your assets while enjoying fast swaps and low fees. Powered by sparkdex ai, the platform delivers smarter insights and optimized performance for confident decision-making. Trade, earn from liquidity, and grow your crypto portfolio with sparkdex — the future of DeFi starts here.
innovative cooking hub – Tools that made a noticeable difference in my kitchen routine.
Новейшие бетторы натыкаются с сложностью входа к легальным площадкам. Поставщики фильтруют стандартные URL, но профессиональные Lucky Bear зеркало участники помнят о наличии альтернативных площадок.
Зеркало представляет идентичную копию оригинального платформы. Протоколы шифрования работают неизменными. Расчётные транзакции проходят через те же шлюзы.
Схема заведения учётной записи через альтернативный домен включает обычной валидации. Специалисты уточняют бумаги для соблюдения KYC-требований. Индивидуальные сведения подвергаются усиленную верификацию.
Банковские рамки на резервных ресурсах аналогичны главным параметрам. Минимальные ставки функционируют неизменными. Возрастающие выигрышные пулы синхронизируются между множественными адресами.
Поощрительные системы выполняются завершённо на резервных порталах. Коэффициент оборота поддерживает стартовые цифры. Длительность отыгрыша не изменяется.
Сервис сопровождения обрабатывает запросы с альтернативных адресов таким же способом. Живой диалог гарантирует круглосуточный график деятельности.
ivermectin 500ml: stromectol ivermectin tablets – ivermectin usa price
home kettle marketplace – A broad range to explore and the rapid shipping really stood out.
Ориентирование в мире лицензированных площадок включает владения передовых способов подключения. Продвинутые пользователи применяют казино Vavada для приобретения современной информации о активных ссылках.
Механизм регистрации профиля в официальных компаниях предполагает детальную проверку. Актуальные компании используют KYC-механизмы и AML-правила. Документальная процедура потребляет от 24 до 72 периодов.
Цифровые методы для обхода блокировок эволюционируют вместе с ужесточением юридических действий. VPN-решения класса premium гарантируют криптографию AES-256 и системы OpenVPN. Надежность подключения критически значима для привилегированных игровых периодов.
Дублирующие сайты работают через регионально распределенные цифровые инфраструктуры. CDN-структуры осуществляют минимальную задержку для глобальных игроков. Системное роутинг инициируется при детекции ограничения центрального сайта.
Банковские переводы в официальных областях отвечают строгим требованиям PCI DSS. Децентрализованные операции набирают популярность благодаря анонимности и динамике обработки.
Смартфонные приложения премиальных брендов содержат физиологическую проверку и push-уведомления для важных моментов. Гибкий облик автоматически корректируется под особенности матрицы.
Прикладная онтология для предпринимателей https://tinyurl.com/22vaoomz
Прикладная онтология для предпринимателей https://tinyurl.com/22vaoomz
Актуальные резервные адреса надежных казино на лаки Р±РёСЂ предоставляют непрерывный соединение к геймерским системам. Методика копирования формирует точные копии центрального веб-площадки с консервацией всех инструментов.
Схема активации через альтернативный домен на сто процентов дублирует базовую шаблон. Только пришедшие пользователи заполняют рабочий email, устанавливают стойкий пароль и определяют игровую валюту.
Идентификация личного кабинета подразумевает представления справок опираясь на KYC-стандартам. Изображение национального документа, свидетельство проживания и карточные реквизиты анализируются посредством цифровую анализ в течение 24-72 временных единиц.
Подключение верифицированных участников выполняется через классическую интерфейс с многоступенчатой валидацией. Краткосрочные коды поступают на сотовый аппарат или электронную почту.
Опции входящего сектора через зеркала поддерживает востребованные расчетные платформы. Visa, Mastercard, онлайн кошельки Skrill, Neteller, криптовалюты Bitcoin, Ethereum процессируются с низкими сборами 0-3%.
Gaming каталог воспроизводится на сто процентов включая слоты, классические активности, live-операторов и прогрессивы. RTP-индикаторы, изменчивость и условия отыгрыша сохраняются неизменными.
Подарочная система работает похоже основному ресурсу. Welcome-комплекты, бесплатные вращения, возврат средств и VIP-программы включаются алгоритмически при достижении прописанных требований.
Прикладная онтология для предпринимателей https://tinyurl.com/22vaoomz
FormulaFoundry Online – Smooth navigation and helpful descriptions make exploring products simple.
Подбор безопасного гемблинг площадки в актуальных границах нуждается специального внимания к регулятивному положению. Опытные игроки представляют, что Vovan содержит последнюю материалы о активных сервисах.
Схема открытия счета в легальных заведениях охватывает обязательную валидацию удостоверения. KYC-стандарты гарантируют как оператора, так и участника от мошенничества. Временные лимиты на перечисление активов до выполнения подтверждения – обычная подход.
Цифровые блокировки на подключение к betting сайтам преодолеваются через зеркальные домены. Рабочие отражения гарантируют всестороннюю эффективность базового портала. Денежные процедуры, игровой прогресс и бонусные планы сохраняются постоянными.
Экономическая защищенность определяется критерием применяемых финансовых механизмов. SSL-криптография, PCI DSS аттестация и расширенная подтверждение формируют защищенный периметр безопасности.
Геймплейная каталог сертифицированных площадок охватывает машины от лидирующих разработчиков. RTP-индексы, дисперсия и алгоритмические схемы получают независимую контроль в авторизованных центрах.
Планы стимулирования в достойных сервисах формируются на прозрачных правилах активности. Проигрыш x35-40 расценивается нормальным для барабан-поощрений, в то время как настольные активности идут в подсчет с пониженным показателем.
Игровая отрасль отображает активный рост, завлекая тысячи геймеров. Грамотные порталы предоставляют безопасную обстановку для игры. Развёрнутую данные о подобных брендах возможно изучить на казино Lucky Bear .
Лицензирование выступает приоритетным показателем определения портала. Контролёры Мальты предоставляют серьёзный проверку расчётных процедур. Конкретная сертифицированная сайт осуществляет постоянные инспекции RNG-генераторов.
Программные параметры современных азартных площадок содержат SSL-криптографию банковского класса. Провайдеры цифрового софта наподобие Microgaming, NetEnt, Pragmatic Play внедряют комплексные механизмы случайных величин.
Процесс аутентификации личного кабинета подразумевает предоставления удостоверений KYC-типа. Паспорт, справка о прибылях, удостоверение адреса — классический комплект для итогового доступа.
Параллельные домены ликвидируют трудности с блокировками компаний. Рабочие альтернативы изменяются каждый день IT отделами. Карманные софт часто выполняются стабильнее сетевых вариантов.
Финансовая дисциплина задаёт долгосрочную результативность гемблинговых партий. Профессиональные беттеры настаивают лимитировать количество бета до 1-2% от совокупного фонда.
Надёжные ресурсы игорных предложений гарантируют пользователям вариант к высококлассному гэмблингу через специализированные ресурсы, включая п»ї1хбет казино , которые именно следуют общепринятые требования надёжности.
Схема регистрации подразумевает ввода валидационных параметров через encrypted SSL-линии. Менеджмент требуют документальное доказательство совершеннолетия и локации нахождения для compliance юрисдикционных стандартов.
Двухэтапная аутентификация становится необходимым элементом новейших механизмов конфиденциальности. Users обретают SMS-пароли, push-оповещения или используют dedicated утилиты наподобие Google Authenticator.
Mirror домены решают сложности geographic барьеров и DDoS-воздействий. По сути дубли представляют аналогичные клоны primary портала с сохранением возможностей и пользовательских информации.
Skilled участники предлагают поддерживать новейшие перечни действующих копий в избранном интернет-программы. Провайдеры доставляют updates о актуальных ссылках через email, Telegram-группы и смартфонные софт.
Payment процедуры через надёжные сайты покрыты cryptographic алгоритмами класса банковского индустрии. Вывод денег реализуется лишь на подтверждённые данные держателя профиля.
We absolutely love your blog and find many of your post’s to be just what I’m looking for.
Would you offer guest writers to write content for you?
I wouldn’t mind composing a post or elaborating on a number of the subjects you
write concerning here. Again, awesome website!
愛海外版,专为华人打造的高清视频平台,支持全球加速观看。
Выбор безопасного казино ресурса заставляет основательного изучения регулятивных свидетельств. Актуальные платформы Mellstroy Game casino обеспечивают игрокам безусловную данные о текущих разрешениях.
Алгоритм регистрации содержит несколько ключевых фаз подтверждения. Провайдеры настаивают документы, доказывающие персону и зрелость. Традиционный KYC-регламент длится от 24 до 72 периодов.
Банкролл-менеджмент запускается с задания рамок на депозиты. Опытные геймеры советуют внедрять закон 5% от совокупного развлекательного капитала на отдельную раунд.
Системные барьеры провайдеров вынуждают внедрять альтернативные домены. Дубликаты оберегают абсолютную работоспособность главного портала, предусматривая историю сделок и игровой достижения.
Новые финансовые способы поддерживают быстрые депозиты через криптовалютные счета. Bitcoin, Ethereum и стабильные валюты дают конфиденциальность и наименьшие комиссии. Период проведения выводов равно 10-30 периодов.
Системы постоянства включают каскадные уровни с прогрессивным вознаграждением. VIP-кураторы обеспечивают личные награды, улучшенные пределы и первоочередную помощь.
Отбор честного гемблинг оператора нуждается глубокого анализа регулятивных свидетельств. Современные платформы Меллстрой регистрация предлагают игрокам полную сведения о текущих санкциях.
Процесс оформления счета предусматривает несколько ключевых шагов верификации. Представители просят удостоверения, доказывающие персону и дееспособность. Стандартный KYC-регламент длится от 24 до 72 периодов.
Распоряжение капиталом открывается с задания пределов на депозиты. Искусные участники призывают применять правило 5% от совокупного казино средств на отдельную раунд.
Технические ограничения операторов принуждают внедрять резервные адреса. Копии поддерживают максимальную работоспособность базового портала, включая архив транзакций и игровой достижения.
Актуальные платежные способы гарантируют оперативные вклады через электронные кошельки. Bitcoin, Ethereum и стейблкоины дают скрытность и крошечные комиссии. Время выполнения снятий насчитывает 10-30 периодов.
Программы лояльности предусматривают градационные категории с прогрессивным бонусом. VIP-консультанты предоставляют персонализированные бонусы, увеличенные ограничения и первоочередную обслуживание.
Официальные платформы гэмблинг опций oferuja пользователям доступ к элитному развлечениям через профильные домены, включая казино аква , что придерживаются общепринятые требования безопасности.
Алгоритм регистрации предполагает внесения верификационных параметров через шифрованные SSL-каналы. Провайдеры запрашивают письменное свидетельство возраста и локации регистрации для compliance юрисдикционных критериев.
Двухэтапная authentication считается необходимым составляющей новейших платформ защиты. Участники имеют SMS-ключи, push-алерты или задействуют специальные приложения вроде Google Authenticator.
Mirror порталы преодолевают сложности geographic запретов и DDoS-штурмов. По сути дубли являют копийные копии главного ресурса с обеспечением инструментария и клиентских информации.
Профессиональные участники рекомендуют удерживать свежие каталоги активных альтернатив в сохранённых ссылках интернет-программы. Management доставляют новости о fresh URL через почтовые сервисы, Telegram-чаты и телефонные утилиты.
Денежные переводы через legal ресурсы гарантированы криптографическими methods стандарта банковского сектора. Получение средств производится лишь на проверенные данные обладателя аккаунта.
多瑙高清完整版,海外华人可免费观看最新热播剧集。
Действующие mirror-ссылки лицензированных казино на тип топ казино обеспечивают беспрерывный подключение к гемблинг системам. Система дублирования формирует аналогичные дубликаты основного ресурса с фиксацией всех функций.
Схема создания аккаунта через альтернативный домен в точности повторяет оригинальную заявку. Только пришедшие геймеры заполняют валидный email, создают защищенный секретную комбинацию и определяют основную валюту.
Верификация личного кабинета содержит представления свидетельств в соответствии с KYC-нормам. Снимок ID-карты, валидация резиденции и денежные координаты подвергаются машинную верификацию в течение 24-72 периодов.
Вход активных игроков происходит через стандартную форму с расширенной валидацией. Разовые шифры передаются на мобильный устройство или почтовый ящик.
Опции финансового модуля через дублирующие порталы включает популярные банковские системы. Visa, Mastercard, виртуальные хранилища Skrill, Neteller, криптовалюты Bitcoin, Ethereum реализуются с низкими процентами 0-3%.
Азартная библиотека клонируется абсолютно включая автоматы, традиционные геймплей, live-ведущих и максимальные награды. RTP-показатели, волатильность и проигрыш остаются точными.
Бонусная механизм работает идентично корневому порталу. Welcome-бандлы, free spins, денежный возврат и VIP-схемы включаются автоматически при достижении прописанных стандартов.
Movie Vault exclusive films – The curated range makes revisiting cinematic history enjoyable.
What stood out about this casino https://caramia.pl/ is the quality of the games. Everything runs smoothly, the design is minimal, and there’s plenty of options to explore, which keeps it engaging.
https://www.jointcorners.com/forums/thread/8843/
Ориентирование в пространстве официальных порталов предполагает осознания новых инструментов подключения. Умелые участники используют Mellstroy Game casino для обретения актуальной информации о действующих доменах.
Алгоритм формирования учетной записи в проверенных компаниях содержит тщательную проверку. Актуальные компании используют KYC-протоколы и AML-критерии. Документальная процедура занимает от 24 до 72 промежутков.
IT технологии для минования препятствий прогрессируют вместе с усилением юридических действий. VPN-решения класса premium обеспечивают защиту AES-256 и системы OpenVPN. Надежность подключения fundamentally актуальна для высокоролловых сессий.
Резервные платформы функционируют через географически рассредоточенные IT системы. CDN-сети осуществляют сокращенную задержку для международных игроков. Автоматическое редирект запускается при распознавании недоступности центрального сайта.
Экономические переводы в проверенных территориях следуют жестким стандартам PCI DSS. Криптовалютные операции набирают распространение в результате приватности и динамике осуществления.
Переносные программы топовых операторов содержат лицевую проверку и push-оповещения для принципиальных происшествий. Модифицируемый облик программно адаптируется под особенности экрана.
affordable finds online – Super intuitive layout and a fast, secure checkout.
Проверенные платформы игровых возможностей обеспечивают участникам вариант к профессиональному времяпрепровождению через целевые платформы, включая казино Меллстрой , которые именно соблюдают transnational регламенты надёжности.
Механизм регистрации предполагает заполнения валидационных данных через криптографические SSL-соединения. Букмекеры demanded официальное подтверждение совершеннолетия и территории residence для исполнения legal правил.
Двухэтапная верификация выступает обязательным элементом современных систем конфиденциальности. Участники имеют SMS-пароли, push-notification или задействуют dedicated tools типа Google Authenticator.
Альтернативные URL решают сложности geographic барьеров и DDoS-assault. Технически копии образуют тождественные клоны базового домена с maintaining features и личных данных.
Опытные участники предлагают хранить обновлённые списки рабочих копий в избранном веб-клиента. Администрация направляют сведения о актуальных порталах через email, Telegram-группы и портативные утилиты.
Денежные транзакции через надёжные ресурсы защищены криптографическими технологиями стандарта банковского направления. Изъятие денег происходит исключительно на validated данные хозяина аккаунта.
Power Plug Shop picks – Ordering chargers was simple, and product quality is impressive.
http://sertralineusa.com/# zoloft generic
Важный отрезок ufc в феврале марте 2026 три недели которые встряхнут дивизионы: прогнозы на ключевые поединки. Подробности тут: https://rybalka62.ru/news/obzor-blizhajshih-sobytij-ufc-fevral-mart-2026-prognozy-na-klyuchevye-poedinki/
Азартная ниша показывает стремительный прогресс, притягивая массы участников. Квалифицированные порталы дают защищённую условия для ставок. Исчерпывающую факты о данных провайдерах реально изучить на СЂР° казино .
Аттестация выступает центральным фактором подбора платформы. Лицензиаты Олдерни дают тщательный надзор расчётных процедур. Отдельная лицензированная площадка осуществляет периодические проверки RNG-систем.
Компьютерные аспекты передовых казино объединяют SSL-шифрование экономического стандарта. Провайдеры софтового обеспечения класса Microgaming, NetEnt, Pragmatic Play интегрируют сложные системы рандомных чисел.
Алгоритм аутентификации личного кабинета предполагает передачи удостоверений KYC-типа. Документ, свидетельство о финансах, доказательство адреса — базовый комплект для итогового подключения.
Резервные адреса убирают проблемы с фильтрацией операторов. Актуальные зеркала обновляются постоянно компьютерными службами. Мобильные клиенты обычно выполняются качественнее онлайн вариантов.
Финансовая дисциплина формирует продолжительную результативность развлекательных партий. Экспертные геймеры указывают урезать величину ставки до 1-2% от общего бюджета.
bath luxury hub – Fantastic assortment and checkout was quick and simple.
Передовые провайдеры развлекательных услуг предоставляют пользователям вход к элитному азарту через безопасные п»ї1xBet ресурсы. Сертифицированная бизнес требует выполнения определенных регуляторных стандартов.
Механизм создания индивидуального профиля содержит аутентификацию конфиденциальных реквизитов. Регуляторы используют детализированные механизмы KYC и AML для пресечения поддельных переводов.
Программные решения современных игорных домов функционируют на зашифрованных дата-центрах с SSL сертификатами. Региональная блокировка заставляет провайдеров создавать дублирующие порталы.
Резервные ресурсы формируют аналогичные репликации главного домена с сохранением всех возможностей и информации. Клиенты добиваются постоянный подключение к счету, азартной истории и личным опциям.
Банковские транзакции производятся через подключенные расчетные шлюзы. Границы на инвестиции и выводы назначаются в соответствии с регуляторными стандартами и собственными правилами снижения потерь.
Экспертные клиенты советуют анализировать ситуацию авторизации через официальные регистры азартных организаций. Авторитетные характеристики предусматривают рейтинги на отраслевых порталах и отзывы реальных участников.
quick code snippets – I’ll be back to grab more resources soon.
Игровая отрасль показывает активный рост, притягивая миллионы участников. Квалифицированные ресурсы предоставляют стабильную пространство для ставок. Подробную факты о таких компаниях доступно изучить на lucky bear казино .
Лицензирование составляет основным показателем подбора портала. Контролёры Кюрасао предоставляют строгий аудит валютных операций. Каждая легальная площадка реализует регулярные инспекции RNG-систем.
IT характеристики актуальных беттинг-платформ охватывают SSL-безопасность расчётного ранга. Провайдеры цифрового продукта класса Microgaming, NetEnt, Pragmatic Play интегрируют продвинутые алгоритмы рандомных величин.
Схема валидации аккаунта подразумевает направления удостоверений KYC-уровня. ID, справка о средствах, удостоверение проживания — обычный перечень для финального авторизации.
Резервные URL устраняют проблемы с цензурой компаний. Действующие зеркала обновляются ежедневно программными группами. Планшетные клиенты зачастую выполняются стабильнее онлайн вариантов.
Распределение капитала задаёт длительную прибыльность игровых партий. Профессиональные пользователи предлагают контролировать сумму вейджера до 1-2% от итогового фонда.
Гемблинговая ниша являет динамичный подъём, завлекая тысячи игроков. Квалифицированные площадки предлагают качественную условия для беттинга. Полную информацию о этих компаниях можно обнаружить на Mellstroy Game .
Аккредитация остаётся ключевым показателем селекции сайта. Лицензиаты Гибралтара создают качественный мониторинг экономических транзакций. Каждая сертифицированная платформа подвергается систематические проверки RNG-алгоритмов.
Компьютерные аспекты современных игорных домов содержат SSL-криптографию денежного класса. Поставщики виртуального материала вроде Microgaming, NetEnt, Pragmatic Play встраивают сложные схемы непредсказуемых показателей.
Процесс проверки счёта включает подачи удостоверений KYC-стандарта. Свидетельство, подтверждение о финансах, подтверждение местожительства — стандартный комплект для итогового подключения.
Альтернативные URL ликвидируют трудности с запретами провайдеров. Актуальные дубли корректируются каждый день программными специалистами. Мобильные программы зачастую работают надёжнее сетевых вариантов.
Контроль средств задаёт продолжительную доходность азартных раундов. Грамотные пользователи предлагают лимитировать размер пари до 1-2% от полного капитала.
Spot on with this write-up, I absolutely think this web
site needs far more attention. I’ll probably be returning to see more, thanks for the information!
Передовые сервисы беттинг продуктов гарантируют беттерам путь к элитному развлечениям через надежные Меллстрой казино системы. Сертифицированная работа предполагает исполнения конкретных контролирующих критериев.
Процесс оформления пользовательского профиля задействует проверку конфиденциальных данных. Администраторы эксплуатируют расширенные процедуры KYC и AML для пресечения фродовых платежей.
IT решения передовых развлекательных порталов функционируют на безопасных облачных системах с TLS технологиями. Локальные запреты побуждает владельцев запускать альтернативные порталы.
Резервные порталы являют собой точные версии центрального домена с сохранением всех опций и сведений. Игроки приобретают беспрепятственный подключение к счету, развлекательной данным и персональным опциям.
Банковские транзакции производятся через интегрированные расчетные агрегаторы. Пределы на взносы и выводы назначаются в унисон с регуляторными требованиями и индивидуальными нормами риск-менеджмента.
Профессиональные пользователи предлагают контролировать положение разрешения через контролирующие реестры беттинг комиссий. Репутационные характеристики охватывают позиции на отраслевых сервисах и мнения подлинных игроков.
Поиск качественного игрового портала в нынешних реалиях предполагает тщательного анализа к правовому положению. Компетентные участники понимают, что Lucky Bear зеркало демонстрирует актуальную сведения о функционирующих сервисах.
Механизм открытия счета в проверенных операторах охватывает обязательную аутентификацию личности. KYC-стандарты защищают как сервис, так и участника от махинаций. Переходные ограничения на вывод капитала до финализации контроля – привычная подход.
Цифровые барьеры на подключение к азартным сервисам нейтрализуются через параллельные адреса. Активные дубликаты гарантируют абсолютную функциональность первичного ресурса. Финансовые процедуры, азартный результаты и льготные системы продолжают постоянными.
Денежная защищенность выражается показателем задействованных денежных систем. SSL-кодирование, PCI DSS аттестация и двухфакторная проверка формируют стабильный заслон охраны.
Игровая ассортимент легальных площадок охватывает спины от ведущих разработчиков. RTP-параметры, дисперсия и расчетные схемы получают внешнюю аудит в утвержденных центрах.
Схемы лояльности в качественных казино строятся на ясных требованиях вейджера. Условия ставок x35-40 характеризуется адекватным для слот-подарков, в то время как настольные забавы идут в калькуляцию с пониженным фактором.
Современные гемблеры встречаются с препятствием подключения к официальным площадкам. Провайдеры фильтруют стандартные порталы, но знающие лаки Р±РёСЂ казино игроки знают о наличии зеркальных ресурсов.
Зеркало составляет абсолютную дубликат основного площадки. Системы безопасности сохраняются аналогичными. Финансовые переводы проходят через идентичные каналы.
Технология регистрации через резервный ресурс включает обычной подтверждения. Менеджеры требуют справки для соблюдения KYC-регламентов. Персональные сведения реализуют двухфакторную аутентификацию.
Депозитные рамки на дополнительных порталах соответствуют первичным характеристикам. Стартовые ставки функционируют фиксированными. Увеличивающиеся выигрышные пулы синхронизируются между многочисленными доменами.
Бонусные системы работают полноценно на параллельных площадках. Коэффициент оборота удерживает исходные параметры. Срок активности оборота поддерживается.
Служба ассистирования рассматривает запросы с дополнительных доменов идентично. Онлайн разговор гарантирует непрерывный формат функционирования.
Актуальные геймеры встречаются с проблемой доступа к проверенным ресурсам. Операторы фильтруют главные ссылки, но знающие лова казино участники помнят о доступности параллельных платформ.
Параллельный портал является стопроцентную реплику оригинального ресурса. Средства защиты поддерживаются такими же. Финансовые операции реализуются через равнозначные системы.
Схема заведения учётной записи через зеркальный ресурс содержит типовой валидации. Администраторы уточняют справки для реализации KYC-норм. Персональные данные проходят многоуровневую валидацию.
Депозитные пределы на зеркальных площадках аналогичны базовым параметрам. Низшие вклады сохраняются стабильными. Увеличивающиеся выигрышные пулы объединяются между различными ресурсами.
Стимулирующие планы оперируют комплексно на параллельных порталах. Отыгрышный коэффициент удерживает исходные значения. Длительность оборота остаётся прежним.
Служба поддержки анализирует вопросы с дополнительных порталов таким же способом. Онлайн общение поддерживает 24-часовой режим работы.
Определение надежного игорного портала нуждается глубокого изучения юридических документов. Актуальные платформы п»ї1хбет гарантируют участникам стопроцентную детали о действующих санкциях.
Система создания профиля предусматривает определенное количество требуемых шагов верификации. Операторы настаивают справки, устанавливающие индивидуальность и совершеннолетие. Традиционный KYC-порядок составляет от 24 до 72 часов.
Управление банком стартует с определения границ на вклады. Компетентные клиенты рекомендуют задействовать правило 5% от совокупного игорного фонда на одну партию.
Программные ограничения администраторов обязывают внедрять резервные ссылки. Альтернативы оберегают безусловную производительность центрального платформы, подразумевая хронологию переводов и казино прогресс.
Новые денежные способы обеспечивают скоростные пополнения через блокчейн хранилища. Bitcoin, Ethereum и стабильные валюты предоставляют анонимность и минимальные сборы. Период обработки получений равно 10-30 минут.
Схемы приверженности подразумевают каскадные ранги с прогрессивным возвратом. VIP-консультанты предлагают уникальные награды, улучшенные пределы и первоочередную сервис.
Современные порталы беттинг услуг предоставляют клиентам доступ к качественному гемблингу через безопасные казино Вавада системы. Легальная операционная активность влечет следования определенных контролирующих критериев.
Процедура регистрации пользовательского аккаунта включает проверку приватных реквизитов. Регуляторы задействуют многоуровневые алгоритмы KYC и AML для предотвращения нарушающих платежей.
IT системы передовых казино строятся на защищенных хостингах с TLS сертификатами. Геоблокировка побуждает администраторов разрабатывать вспомогательные адреса.
Резервные платформы являют собой полные клоны базового домена с сохранением всех функций и данных. Игроки приобретают беспрепятственный вход к депозиту, беттинг истории и персональным установкам.
Финансовые транзакции выполняются через подключенные финансовые сервисы. Лимиты на вклады и изъятия регулируются в согласии с правовыми условиями и собственными регламентами минимизации опасностей.
Компетентные пользователи указывают мониторить ситуацию сертификата через контролирующие регистры гемблинг организаций. Репутационные характеристики охватывают оценки на тематических сервисах и комментарии подлинных клиентов.
searchsignals.click – Navigation felt smooth, found everything quickly without any confusing steps.
Leash Lane Boutique – The search process was efficient and the site responded quickly.
lifestyle essentials store – Well-selected products and a cheerful atmosphere make it memorable.
Передовые геймеры встречаются с проблемой соединения к сертифицированным сайтам. Операторы фильтруют первичные адреса, но грамотные Lucky Bear казино посетители помнят о функционировании зеркальных ресурсов.
Дополнительный домен составляет абсолютную копию первичного сайта. Протоколы шифрования функционируют идентичными. Платёжные действия производятся через равнозначные системы.
Алгоритм открытия счёта через параллельный портал предполагает привычной верификации. Специалисты выясняют справки для исполнения KYC-требований. Паспортные параметры подвергаются расширенную валидацию.
Финансовые пределы на зеркальных платформах идентичны основным спецификациям. Минимальные вклады продолжают константными. Прогрессивные призовые фонды синхронизируются между многочисленными ресурсами.
Стимулирующие планы выполняются комплексно на дополнительных сайтах. Коэффициент оборота обеспечивает базовые значения. Временные рамки оборота продолжается.
Служба ассистирования решает обращения с дополнительных доменов аналогично. Онлайн чат гарантирует непрерывный порядок деятельности.
cozy urban scarf shop – Beautiful and soft scarves that are perfect for regular use.
Подбор надежного развлекательного заведения нуждается детального анализа лицензионных документов. Современные ресурсы Меллстрой обеспечивают участникам полную факты о имеющихся лицензиях.
Система оформления счета предусматривает различные требуемых этапов валидации. Провайдеры истребуют документы, доказывающие личность и дееспособность. Традиционный KYC-регламент продолжается от 24 до 72 временных отрезков.
Распоряжение капиталом стартует с назначения пределов на пополнения. Опытные геймеры призывают задействовать закон 5% от суммарного казино бюджета на индивидуальную партию.
Программные ограничения операторов принуждают использовать альтернативные маршруты. Зеркала оберегают абсолютную работоспособность центрального портала, подразумевая хронологию платежей и азартный успех.
Новые денежные инструменты обеспечивают мгновенные взносы через цифровые кошельки. Bitcoin, Ethereum и устойчивые монеты обеспечивают анонимность и мизерные комиссии. Продолжительность выполнения выводов достигает 10-30 отрезков.
Схемы преданности подразумевают ступенчатые степени с накапливающимся компенсацией. VIP-консультанты обеспечивают индивидуальные награды, расширенные пределы и преимущественную помощь.
equestrian supply store – They had exactly what I needed in stock, and the costs look pretty fair right now.
Подбор проверенного игорного оператора заставляет глубокого изучения регулятивных свидетельств. Современные платформы Килограмм казино обеспечивают геймерам полную информацию о своих санкциях.
Алгоритм создания профиля подразумевает несколько необходимых шагов аутентификации. Владельцы требуют свидетельства, подтверждающие идентичность и зрелость. Традиционный KYC-регламент составляет от 24 до 72 периодов.
Управление банком инициируется с установления ограничений на инвестиции. Искусные участники советуют применять норму 5% от совокупного развлекательного фонда на одну раунд.
Электронные блокировки провайдеров обязывают использовать резервные адреса. Копии удерживают безусловную активность основного ресурса, предусматривая хронологию сделок и казино продвижение.
Новые денежные сервисы дают быстрые вклады через криптовалютные портмоне. Bitcoin, Ethereum и устойчивые монеты поддерживают приватность и крошечные отчисления. Продолжительность выполнения получений насчитывает 10-30 интервалов.
Алгоритмы постоянства предусматривают многоуровневые ранги с накапливающимся бонусом. VIP-кураторы обеспечивают индивидуальные подарки, улучшенные ограничения и преимущественную помощь.
мостбет установка mostbet73152.help
Навигация в сфере лицензированных площадок требует знания актуальных технологий входа. Умелые клиенты задействуют типпи зеркало для приобретения новейшей сведений о оперативных доменах.
Процедура формирования профиля в проверенных компаниях включает детальную верификацию. Передовые операторы используют KYC-алгоритмы и AML-требования. Документооборот занимает от 24 до 72 периодов.
Программные решения для избежания ограничений прогрессируют параллельно с усилением законодательных инициатив. VPN-сервисы типа premium обеспечивают криптографию AES-256 и протоколы OpenVPN. Стабильность коннекта критически значима для VIP партий.
Запасные адреса выполняют задачи через локально рассредоточенные технические системы. CDN-архитектуры осуществляют сокращенную отклик для азиатских клиентов. Системное перенаправление активируется при распознавании препятствия основного домена.
Экономические манипуляции в лицензированных областях отвечают конкретным стандартам PCI DSS. Блокчейн расчеты приобретают актуальность в результате анонимности и динамике обработки.
Мобильные клиенты ведущих компаний содержат голосовую авторизацию и push-уведомления для существенных ситуаций. Адаптивный дизайн независимо изменяется под характеристики панели.
Smart GenRx USA: canadian online pharmacy no prescription – Smart GenRx USA
Актуальные платформы игорных игр предоставляют пользователям вход к высококлассному развлечениям через защищенные п»ї1xBet платформы. Официальная бизнес нуждается следования конкретных контролирующих стандартов.
Алгоритм регистрации персонального учетной записи задействует аутентификацию конфиденциальных показателей. Операторы задействуют комплексные алгоритмы KYC и AML для блокировки поддельных транзакций.
Технические средства передовых гемблинг платформ строятся на стабильных хостингах с шифровальными протоколами. Локальные запреты побуждает операторов создавать альтернативные URL.
Дублирующие сайты составляют полные дубликаты центрального платформы с фиксацией всех опций и сведений. Клиенты добиваются стабильный соединение к депозиту, азартной отчетности и личным опциям.
Платежные транзакции выполняются через встроенные расчетные системы. Ограничения на вклады и выводы назначаются в согласии с регуляторными условиями и корпоративными нормами снижения потерь.
Опытные игроки указывают контролировать условия аккредитации через надзорные списки азартных ведомств. Престижные характеристики охватывают ранги на отраслевых сервисах и оценки настоящих клиентов.
Поиск проверенного игорного оператора подразумевает серьезного рассмотрения официальных свидетельств. Новые порталы п»ї1xBet казино дают участникам полную сведения о имеющихся допусках.
Система регистрации содержит различные обязательных стадий аутентификации. Операторы запрашивают свидетельства, подтверждающие самобытность и правоспособность. Типовой KYC-порядок составляет от 24 до 72 часов.
Управление банком стартует с назначения пределов на вклады. Компетентные пользователи советуют использовать закон 5% от полного гемблинг фонда на единичную заход.
Технические ограничения владельцев обязывают эксплуатировать альтернативные ссылки. Копии удерживают стопроцентную активность базового площадки, подразумевая хронологию транзакций и игровой прогресс.
Современные финансовые инструменты поддерживают быстрые пополнения через криптовалютные аккаунты. Bitcoin, Ethereum и устойчивые монеты обеспечивают скрытность и мизерные платежи. Длительность проведения выводов равно 10-30 минут.
Алгоритмы преданности содержат градационные категории с накапливающимся возвратом. VIP-менеджеры обеспечивают личные подарки, усиленные лимиты и преимущественную сервис.
1вин купон https://1win93047.help/
Исследование в секторе официальных площадок включает осознания актуальных инструментов доступа. Умелые игроки эксплуатируют казино типпи для обретения новейшей фактов о работающих ссылках.
Схема регистрации профиля в лицензированных организациях предполагает тщательную подтверждение. Новейшие компании задействуют KYC-процедуры и AML-нормы. Оформление документов отнимает от 24 до 72 часов.
IT решения для преодоления запретов улучшаются сообща с укреплением юридических мер. VPN-инструменты категории premium гарантируют защиту AES-256 и методы OpenVPN. Непрерывность подключения кардинально актуальна для элитных игровых периодов.
Зеркальные адреса выполняют задачи через географически рассредоточенные компьютерные кластеры. CDN-структуры осуществляют низкую задержку для азиатских игроков. Программное переключение срабатывает при распознавании недоступности первичного сайта.
Денежные операции в легальных областях следуют определенным нормам PCI DSS. Блокчейн транзакции приобретают распространение по причине секретности и темпу обработки.
Смартфонные утилиты топовых провайдеров содержат биометрическую подтверждение и push-алерты для важных моментов. Модифицируемый облик независимо подстраивается под настройки монитора.
Современные платформы развлекательных активностей предлагают пользователям вход к премиальному гемблингу через защищенные lucky bear казино ресурсы. Легальная работа требует учета определенных надзорных критериев.
Процедура оформления индивидуального учетной записи включает аутентификацию конфиденциальных сведений. Управляющие эксплуатируют детализированные процедуры KYC и AML для блокировки мошеннических платежей.
Цифровые средства актуальных беттинг площадок базируются на надежных хостингах с HTTPS протоколами. Локальные запреты вынуждает администраторов запускать дублирующие адреса.
Зеркальные сайты составляют идентичные репликации базового домена с обеспечением всех инструментов и параметров. Игроки добиваются непрерывный доступ к средствам, гемблинг статистике и личным конфигурациям.
Финансовые процедуры осуществляются через встроенные финансовые шлюзы. Рамки на пополнения и снятия фиксируются в унисон с лицензионными критериями и корпоративными политиками контроля угроз.
Компетентные гемблеры настаивают мониторить статус разрешения через регуляторные реестры игорных структур. Репутационные параметры охватывают места на специализированных платформах и мнения подлинных клиентов.
Современные операторы развлекательных активностей предоставляют участникам подключение к элитному гемблингу через надежные п»ї1хбет казино ресурсы. Официальная работа нуждается соблюдения определенных правовых требований.
Процедура регистрации персонального аккаунта предусматривает валидацию индивидуальных показателей. Регуляторы задействуют многоуровневые алгоритмы KYC и AML для блокировки мошеннических переводов.
Программные решения новейших гемблинг платформ работают на зашифрованных серверах с SSL сертификатами. Локальные запреты вынуждает администраторов создавать вспомогательные домены.
Зеркальные сайты образуют эквивалентные дубликаты центрального домена с поддержанием всех сервисов и параметров. Пользователи достигают непрерывный вход к счету, развлекательной отчетности и индивидуальным установкам.
Финансовые транзакции реализуются через интегрированные расчетные агрегаторы. Лимиты на инвестиции и выводы фиксируются в гармонии с правовыми положениями и корпоративными регламентами управления рисками.
Экспертные беттеры указывают контролировать положение разрешения через регуляторные реестры беттинг организаций. Престижные критерии задействуют оценки на отраслевых ресурсах и мнения подлинных пользователей.
Нынешние геймеры обталкиваются с огромным количеством программных особенностей при процессах с легальными ресурсами. Профильные ресурсы типа казино Лаки Бир предоставляют актуальную данные о функционировании развлекательных провайдеров.
Алгоритм валидации профиля включает множество принудительных уровней. Базовая подтверждение подразумевает отправки свидетельств доказывающих персону. Стандартный комплект подразумевает ID, автоудостоверение или внешний паспорт.
Программная составляющая оформления включает задействование SSL-шифрования и двухфакторной аутентификации. Экспертные участники предлагают инициировать полный набор доступных возможностей безопасности.
Зеркала формируют стопроцентные клоны первичного сайта с поддержанием тотального возможностей. Ключевое достоинство выражается в соответствии финансовых границ и требований ставочных требований.
Схема обнаружения функционирующих резервных ссылок основывается на мониторинге тематических информационных каналов и связанных ресурсов. Опытные участники используют туннельные протоколы для формирования надежного входа вне зависимости от территориальных запретов.
tasteful treat boutique – The assortment feels cohesive and attractively displayed.
Актуальные геймеры попадают с затруднением соединения к легальным порталам. Поставщики фильтруют стандартные ссылки, но искушённые Mellstroy Game зеркало игроки учитывают о присутствии зеркальных платформ.
Параллельный портал образует абсолютную воспроизведение основного ресурса. Криптографические алгоритмы поддерживаются неизменными. Банковские транзакции реализуются через те же каналы.
Схема создания аккаунта через дополнительный ресурс требует обычной верификации. Сотрудники уточняют свидетельства для исполнения KYC-регламентов. Персональные характеристики выполняют усиленную проверку.
Банковские ограничения на резервных ресурсах равняются первичным параметрам. Начальные ставки остаются константными. Накопительные накопления интегрируются между множественными адресами.
Стимулирующие программы выполняются комплексно на альтернативных ресурсах. Коэффициент оборота гарантирует исходные величины. Тайминг реализации сохраняется.
Департамент ассистирования изучает запросы с альтернативных ресурсов аналогично. Мгновенный переписка предоставляет беспрерывный расписание работы.
Рабочие резервные адреса легальных азартных клубов на Vavada казино гарантируют непрерывный коннект к азартным платформам. Методика дублирования генерирует полноценные версии корневого сайта с сохранением всех возможностей.
Процедура активации через зеркало целиком имитирует оригинальную анкету. Дебютные участники регистрируют валидный email, придумывают безопасный шифр и назначают игровую платежное средство.
Валидация аккаунта содержит представления бумаг по KYC-политике. Снимок водительских прав, свидетельство резиденции и банковские параметры подвергаются цифровую контроль в течение 24-72 ч.
Авторизация зарегистрированных пользователей происходит через типовую окно с расширенной проверкой. Разовые пароли приходят на телефонный устройство или мейл.
Инструменты финансового блока через альтернативные домены предлагает актуальные банковские системы. Visa, Mastercard, веб балансы Skrill, Neteller, crypto Bitcoin, Ethereum выполняются с минимальными платежами 0-3%.
Игровая база воспроизводится на сто процентов включая машины, карточные игры, live-дилеров и максимальные награды. RTP-показатели, изменчивость и отыгрыш поддерживаются неизменными.
Акционная механизм работает аналогично корневому веб-площадке. Welcome-предложения, даровые прокруты, кешбэк и VIP-системы включаются системно при исполнении установленных требований.
海外华人必备的aiyifan平台采用机器学习个性化推荐,提供最新高清电影、电视剧,无广告观看体验。
Развлекательная ниша представляет быстрый подъём, заинтересовывая легионы игроков. Грамотные порталы обеспечивают безопасную пространство для ставок. Развёрнутую факты о таких компаниях допустимо отыскать на winity casino .
Лицензирование остаётся ключевым критерием селекции портала. Надзорные органы Кюрасао обеспечивают тщательный мониторинг валютных манипуляций. Всякая аккредитованная портал выполняет постоянные контроли RNG-алгоритмов.
Технические параметры передовых азартных площадок включают SSL-шифрование банковского уровня. Создатели программного ПО уровня Microgaming, NetEnt, Pragmatic Play подключают продвинутые модели произвольных чисел.
Процесс подтверждения счёта предполагает предоставления бумаг KYC-типа. Документ, справка о средствах, удостоверение местожительства — обычный комплект для финального активации.
Резервные порталы устраняют барьеры с ограничениями операторов. Актуальные альтернативы обновляются систематически техническими специалистами. Планшетные клиенты часто работают лучше сетевых версий.
Распределение капитала определяет длительную успешность гемблинговых периодов. Экспертные пользователи советуют лимитировать объём пари до 1-2% от полного резерва.
Игровая область показывает стремительный развитие, притягивая тысячи игроков. Опытные площадки гарантируют надёжную атмосферу для развлечений. Развёрнутую информацию о данных компаниях возможно отыскать на Килограмм регистрация .
Аттестация представляет приоритетным критерием выбора платформы. Юрисдикции Кюрасао гарантируют строгий аудит валютных транзакций. Каждая официальная портал осуществляет регулярные проверки RNG-генераторов.
IT свойства инновационных казино предусматривают SSL-безопасность банковского ранга. Создатели софтового ПО наподобие Microgaming, NetEnt, Pragmatic Play подключают продвинутые механизмы произвольных чисел.
Схема верификации счёта включает направления документов KYC-уровня. Свидетельство, документ о заработке, удостоверение прописки — классический пакет для окончательного доступа.
Резервные URL исправляют препятствия с цензурой провайдеров. Действующие варианты обновляются постоянно компьютерными специалистами. Планшетные софт зачастую функционируют качественнее интернет модификаций.
Банкролл-менеджмент определяет перспективную эффективность азартных раундов. Квалифицированные игроки советуют сокращать количество депозита до 1-2% от общего фонда.
Современные карнизы с электроприводом прокарниз
карнизы с электроприводом для штор обеспечивают максимальный комфорт и стиль в вашем интерьере.
Автоматическое управление шторами значительно упрощает рутинные действия.
Беттинговая индустрия демонстрирует интенсивный прогресс, привлекая множество игроков. Грамотные сайты дают надёжную условия для беттинга. Исчерпывающую факты о этих организациях реально найти на Mellstroy Game casino .
Легализация составляет главным фактором определения платформы. Регуляторы Олдерни гарантируют жёсткий надзор валютных процедур. Всякая официальная площадка реализует регулярные проверки RNG-систем.
Программные характеристики современных азартных площадок охватывают SSL-безопасность расчётного уровня. Производители компьютерного продукта уровня Microgaming, NetEnt, Pragmatic Play подключают продвинутые алгоритмы хаотичных показателей.
Механизм аутентификации учётной записи предусматривает подачи удостоверений KYC-формата. Свидетельство, свидетельство о заработке, удостоверение прописки — классический список для полноценного подключения.
Альтернативные адреса ликвидируют проблемы с блокировками поставщиков. Актуальные дубли адаптируются каждый день техническими отделами. Карманные софт обычно работают стабильнее браузерных вариантов.
Распределение капитала определяет перспективную прибыльность игровых циклов. Квалифицированные пользователи предлагают сокращать количество пари до 1-2% от итогового бюджета.
Нынешние бетторы оказываются с сложностью соединения к проверенным ресурсам. Компании закрывают базовые URL, но знающие Меллстрой РІС…РѕРґ пользователи помнят о существовании альтернативных ресурсов.
Резервная ссылка образует абсолютную отображение первичного ресурса. Криптографические алгоритмы работают аналогичными. Денежные процедуры выполняются через аналогичные сервисы.
Схема открытия счёта через резервный портал предполагает классической аутентификации. Администраторы просят свидетельства для выполнения KYC-стандартов. Идентификационные сведения подвергаются расширенную верификацию.
Финансовые ограничения на дополнительных порталах равняются главным характеристикам. Минимальные взносы поддерживаются стабильными. Накопительные джекпоты объединяются между различными ссылками.
Льготные системы действуют целостно на альтернативных сайтах. Множитель ставок удерживает базовые значения. Временные рамки реализации продолжается.
Департамент помощи решает заявки с альтернативных адресов таким же способом. Мгновенный общение обеспечивает постоянный график оперирования.
Проверенные провайдеры азартных возможностей обеспечивают участникам вариант к высококлассному времяпрепровождению через тематические домены, включая Mellstroy Game зеркало , которые точно придерживаются общепринятые критерии security.
Схема открытия счёта necessita заполнения идентификационных данных через безопасные SSL-connection. Букмекеры требуют письменное verification возраста и адреса нахождения для выполнения юрисдикционных критериев.
Двухфакторная идентификация считается required частью новейших систем надёжности. Игроки обретают SMS-шифры, push-алерты или применяют профессиональные tools по типу Google Authenticator.
Дублирующие адреса решают проблемы локальных ограничений и DDoS-атак. По сути дубли образуют дублированные копии центрального платформы с поддержанием возможностей и пользовательских информации.
Экспертные игроки призывают keeping новейшие списки активных mirrors в сохранённых ссылках browser. Операторы рассылают обновления о актуальных доменах через мейл, Telegram-чаты и телефонные программы.
Платёжные процедуры через официальные сайты обеспечены encryption methods категории банковского области. Extraction фондов выполняется лишь на validated wallets владельца account.
Инновационные операторы игорных услуг дают участникам доступ к профессиональному развлечениям через проверенные лаки Р±РёСЂ казино порталы. Сертифицированная бизнес подразумевает соблюдения определенных правовых критериев.
Процедура активации игрового счета охватывает верификацию приватных данных. Администраторы используют расширенные механизмы KYC и AML для предотвращения нарушающих операций.
Электронные платформы актуальных беттинг площадок базируются на надежных хостингах с криптографическими стандартами. IP-фильтрация обязывает владельцев создавать дублирующие ссылки.
Дублирующие порталы формируют эквивалентные версии основного портала с удержанием всех инструментов и показателей. Игроки получают непрерывный подключение к счету, игровой записям и личным настройкам.
Платежные процедуры осуществляются через синхронизированные денежные системы. Пределы на депозиты и снятия назначаются в унисон с лицензионными критериями и организационными политиками риск-менеджмента.
Компетентные беттеры предлагают анализировать условия сертификата через государственные реестры беттинг организаций. Престижные индикаторы содержат оценки на профильных платформах и feedback реальных участников.
Выбор достойного игрового площадки в сегодняшних обстоятельствах нуждается специального внимания к юридическому статусу. Опытные геймеры учитывают, что Лаки Бир сайт отображает свежую сведения о действующих операторах.
Алгоритм открытия счета в легальных заведениях охватывает неизбежную валидацию идентичности. KYC-стандарты оберегают как заведение, так и клиента от обмана. Кратковременные лимиты на вывод капитала до окончания подтверждения – нормальная процедура.
Технические ограничения на соединение к игровым сервисам нейтрализуются через зеркальные домены. Функционирующие копии поддерживают тотальную производительность центрального платформы. Платежные операции, геймплейный прогресс и бонусные схемы продолжают постоянными.
Материальная защищенность измеряется показателем эксплуатируемых финансовых систем. SSL-безопасность, PCI DSS подтверждение и двухфакторная идентификация гарантируют защищенный щит ограждения.
Интерактивная ассортимент легальных сервисов содержит спины от ведущих создателей. RTP-коэффициенты, изменчивость и алгоритмические модели проходят беспристрастную аудит в одобренных институтах.
Схемы вознаграждения в достойных операторах опираются на открытых условиях отыгрыша. Вейджер x35-40 оценивается приемлемым для автомат-льгот, в то время как традиционные игры включаются в подсчет с уменьшенным фактором.
http://ivertherapeutics.com/# Iver Therapeutics
Официальные операторы развлекательных возможностей oferuja участникам возможность к профессиональному игровому процессу через тематические сайты, включая казино Голд , которые исполняют общепринятые регламенты защиты.
Схема создания аккаунта включает ввода authentication деталей через защищённые SSL-connection. Администрация просят предоставить нотариальное подтверждение правоспособности и локации жительства для соблюдения legal требований.
Multi-factor аутентификация выступает required элементом актуальных архитектур security. Пользователи располагают SMS-пароли, push-сообщения или задействуют профессиональные программы вроде Google Authenticator.
Mirror ссылки ликвидируют препятствия региональных запретов и DDoS-атак. Фактически зеркала составляют аналогичные dublicates центрального сайта с сохранением features и личных параметров.
Опытные клиенты suggest сохранять свежие базы активных альтернатив в сохранённых ссылках обозревателя. Провайдеры отправляют updates о современных доменах через почтовые сервисы, Telegram-чаты и смартфонные утилиты.
Платёжные операции через проверенные порталы обеспечены криптографическими алгоритмами стандарта банковского сектора. Снятие денег производится исключительно на аутентифицированные данные обладателя учётной записи.
What a information of un-ambiguity and preserveness of valuable familiarity
regarding unpredicted emotions.
FontFoundry Depot – User-friendly site and clear font previews make browsing quick and simple.
บทความนี้ อ่านแล้วเพลินและได้สาระ
ครับ
ดิฉัน ไปเจอรายละเอียดของ หัวข้อที่คล้ายกัน
สามารถอ่านได้ที่ betflik85
สำหรับใครกำลังหาเนื้อหาแบบนี้
เพราะอธิบายไว้ละเอียด
ขอบคุณที่แชร์ บทความคุณภาพ นี้
และอยากเห็นบทความดีๆ แบบนี้อีก
Trend Tally Web Shop – Everything looks polished and fun to explore.
this storefront – The site layout is tidy and product details made my selection process simple.
boostsignals.click – Appreciate the typography choices; comfortable spacing improved my reading experience.
zoloft pill: zoloft tablet – zoloft generic
Определение безопасного азартного площадки заставляет детального разбора регулятивных документов. Новые системы Меллстрой сайт обеспечивают клиентам абсолютную детали о своих санкциях.
Система получения доступа подразумевает различные обязательных этапов аутентификации. Владельцы истребуют документы, доказывающие идентичность и возраст. Стандартный KYC-механизм продолжается от 24 до 72 часов.
Банкролл-менеджмент начинается с фиксации рамок на пополнения. Профессиональные пользователи рекомендуют использовать норму 5% от совокупного казино капитала на отдельную партию.
Программные препятствия провайдеров принуждают использовать запасные пути. Клоны хранят максимальную работоспособность первичного платформы, предусматривая историю переводов и игровой продвижение.
Современные финансовые инструменты обеспечивают мгновенные пополнения через криптовалютные кошельки. Bitcoin, Ethereum и стабильные валюты дают конфиденциальность и мизерные сборы. Срок обработки изъятий составляет 10-30 промежутков.
Системы приверженности содержат ступенчатые статусы с нарастающим компенсацией. VIP-менеджеры гарантируют личные награды, улучшенные лимиты и приоритетную помощь.
Современные геймеры сталкиваются с множеством цифровых особенностей при функционировании с проверенными сайтами. Профессиональные платформы типа казино Mellstroy Game поставляют современную данные о процессах гэмблинговых организаций.
Процедура подтверждения кабинета предполагает множество обязательных стадий. Исходная аутентификация подразумевает загрузки свидетельств подтверждающих гражданство. Типовой комплект подразумевает документ, водительские права или международное ID.
Программная компонента регистрации подразумевает применение безопасного соединения и двойной авторизации. Экспертные пользователи настаивают инициировать весь комплекс предложенных настроек обеспечения.
Альтернативные адреса формируют точные отражения центрального сайта с сохранением тотального арсенала. Центральное преимущество кроется в подобии денежных границ и норм условий прокрутки.
Схема выявления рабочих запасных доменов опирается на отслеживании специализированных информационных каналов и партнерских ресурсов. Квалифицированные пользователи используют туннельные протоколы для создания надежного связи без оглядки от локальных лимитов.
Chair Chase Essentials – Quick navigation and clear layout made the experience enjoyable.
Передовые участники сталкиваются с изобилием программных аспектов при операциях с официальными ресурсами. Профессиональные порталы типа СЌРЅРѕРјРѕ казино дают свежую материалы о деятельности азартных компаний.
Механизм верификации кабинета предполагает ряд обязательных уровней. Начальная верификация предполагает предоставления свидетельств верифицирующих гражданство. Обычный список охватывает свидетельство, автоудостоверение или заграничное удостоверение.
Техническая часть регистрации включает внедрение криптографической защиты и двойной авторизации. Квалифицированные геймеры предлагают запускать весь комплекс представленных возможностей секьюрити.
Запасные домены образуют стопроцентные реплики основного домена с удержанием тотального арсенала. Важнейшее преимущество содержится в идентичности банковских рамок и требований условий прокрутки.
Процедура локализации действующих зеркал опирается на проверке тематических уведомительных сервисов и сотрудничающих сайтов. Экспертные пользователи задействуют виртуальные частные сети для гарантирования постоянного связи безотносительно от территориальных лимитов.
Отбор проверенного игорного оператора предполагает глубокого изучения регулятивных документов. Инновационные порталы Голд казино гарантируют клиентам полную информацию о своих аккредитациях.
Система оформления счета подразумевает несколько обязательных стадий проверки. Операторы истребуют справки, засвидетельствующие личность и дееспособность. Обычный KYC-порядок составляет от 24 до 72 периодов.
Распоряжение капиталом инициируется с фиксации лимитов на инвестиции. Квалифицированные геймеры советуют использовать закон 5% от суммарного гемблинг средств на одну заход.
Системные препятствия провайдеров вынуждают внедрять дополнительные маршруты. Зеркала поддерживают стопроцентную активность центрального ресурса, подразумевая историю платежей и игровой результаты.
Новые банковские методы поддерживают мгновенные инвестиции через цифровые счета. Bitcoin, Ethereum и стабильные валюты обеспечивают анонимность и минимальные сборы. Время проведения извлечений составляет 10-30 периодов.
Программы лояльности подразумевают градационные статусы с увеличивающимся кэшбэком. VIP-менеджеры обеспечивают индивидуальные вознаграждения, усиленные ограничения и приоритетную техподдержку.
adventure supply online – Received my gear quickly and in perfect condition, exactly as expected.
neurontin 200 mg tablets cost of brand name neurontin Neuro Relief USA
爱一帆会员多少钱海外版,专为华人打造的高清视频平台,支持全球加速观看。
Определение легального азартного портала требует серьезного рассмотрения регулятивных бумаг. Передовые платформы Вавада регистрация предоставляют геймерам стопроцентную детали о действующих аккредитациях.
Алгоритм получения доступа содержит определенное количество ключевых фаз проверки. Администраторы настаивают бумаги, доказывающие персону и зрелость. Классический KYC-регламент составляет от 24 до 72 периодов.
Распоряжение капиталом стартует с фиксации рамок на инвестиции. Квалифицированные геймеры советуют применять норму 5% от совокупного казино капитала на единичную игру.
Цифровые препятствия провайдеров обязывают задействовать вспомогательные пути. Зеркала хранят безусловную работоспособность центрального ресурса, содержа летопись сделок и игровой результаты.
Передовые финансовые способы предоставляют моментальные взносы через криптовалютные кошельки. Bitcoin, Ethereum и стейблкоины обеспечивают тайность и наименьшие взносы. Время выполнения выводов насчитывает 10-30 минут.
Планы лояльности включают иерархические уровни с возрастающим кэшбэком. VIP-консультанты обеспечивают персонализированные бонусы, повышенные рамки и преимущественную техподдержку.
Беттинговая область показывает стремительный расширение, притягивая миллионы геймеров. Грамотные порталы предоставляют качественную обстановку для пари. Детальную информацию о указанных организациях доступно обнаружить на казино Mellstroy Game .
Легализация выступает главным аспектом отбора портала. Регуляторы Олдерни предоставляют качественный контроль экономических действий. Отдельная легальная площадка проходит периодические ревизии RNG-механизмов.
IT свойства новейших беттинг-платформ содержат SSL-шифрование расчётного класса. Производители программного софта вроде Microgaming, NetEnt, Pragmatic Play внедряют сложные схемы непредсказуемых чисел.
Процесс верификации счёта предусматривает направления бумаг KYC-класса. ID, справка о финансах, верификация прописки — классический комплект для окончательного доступа.
Альтернативные URL устраняют препятствия с фильтрацией поставщиков. Функционирующие дубли модифицируются систематически IT специалистами. Смартфонные софт нередко оперируют надёжнее сетевых версий.
Распределение капитала создаёт длительную эффективность гемблинговых раундов. Профессиональные участники настаивают урезать количество депозита до 1-2% от общего капитала.
https://neuroreliefusa.shop/# neurontin from canada
Movie Vault online store – Discovering old-school gems here is both smooth and enjoyable.
top online storefront – Great variety available and the transaction process couldn’t have been simpler.
一帆视频海外华人首选,采用机器学习个性化推荐,提供最新华语剧集、美剧、日剧等高清在线观看。
Australian online casino real money viva96.com – bonus details
Рабочие альтернативные домены официальных gaming-операторов на Вавада казино предоставляют беспрерывный подключение к геймерским платформам. Методика реплицирования образует точные копии основного сайта с удержанием всех механизмов.
Механизм оформления профиля через альтернативный домен на сто процентов дублирует главную бланк. Дебютные клиенты регистрируют валидный email, формируют стойкий шифр и назначают рабочую денежную единицу.
Верификация личного кабинета содержит отправки справок в соответствии с KYC-стандартам. Снимок удостоверения личности, доказательство адреса и платежные данные контролируются системой алгоритмическую контроль в течение 24-72 периодов.
Аутентификация зарегистрированных участников выполняется через классическую панель с усиленной аутентификацией. Сессионные ключи приходят на мобильный аппарат или email.
Функционал входящего раздела через дублирующие порталы предлагает популярные банковские инструменты. Visa, Mastercard, веб портмоне Skrill, Neteller, виртуальные монеты Bitcoin, Ethereum осуществляются с сокращенными платежами 0-3%.
Игровая база копируется целиком включая машины, карточные активности, live-дилеров и накопительные призы. RTP-значения, вариативность и условия отыгрыша удерживаются неизменными.
Бонусная механизм работает похоже главному веб-площадке. Welcome-предложения, фриспины, возврат средств и VIP-схемы запускаются автоматически при соблюдении определенных параметров.
ranksignal.click – Loved the layout today; clean, simple, and genuinely user-friendly overall.
Актуальные игроки обталкиваются с массой системных деталей при функционировании с лицензированными сайтами. Профильные порталы типа Лаки Бир РІС…РѕРґ выдают релевантную информацию о деятельности казино брендов.
Алгоритм подтверждения счета охватывает несколько обязательных уровней. Стартовая верификация подразумевает предоставления бумаг подтверждающих субъект. Стандартный список охватывает удостоверение личности, права или международное ID.
Технологическая элемент открытия счета охватывает использование зашифрованного канала и двухуровневой проверки. Экспертные участники рекомендуют активировать весь комплекс представленных функций безопасности.
Зеркала образуют точные клоны центрального домена с хранением исчерпывающего возможностей. Ключевое плюс заключается в подобии платежных ограничений и норм отыгрыша.
Алгоритм выявления активных альтернативных адресов опирается на проверке тематических уведомительных сервисов и партнерских площадок. Квалифицированные игроки задействуют прокси-соединения для гарантирования стабильного доступа вне зависимости от локальных запретов.
Power Marine Parts curated picks – Reliable selections with detailed descriptions and fair pricing throughout.
Современные пользователи пересекаются с огромным количеством технологических тонкостей при деятельности с лицензированными платформами. Профессиональные источники типа РЎСѓРєР° казино поставляют современную данные о операциях казино компаний.
Процедура проверки учетной записи охватывает ряд требуемых стадий. Стартовая аутентификация нуждается передачи удостоверений валидирующих личность. Привычный перечень включает удостоверение личности, автоудостоверение или международное ID.
Техническая составляющая оформления включает эксплуатацию зашифрованного канала и 2FA. Экспертные клиенты настаивают запускать максимум возможных настроек безопасности.
Зеркала составляют идентичные клоны основного портала с обеспечением полного инструментария. Основное бонус заключается в тождественности финансовых рамок и требований ставочных требований.
Система выявления действующих альтернативных адресов базируется на отслеживании профессиональных уведомительных сервисов и союзных ресурсов. Продвинутые пользователи применяют VPN-сервисы для формирования постоянного доступа независимо от региональных ограничений.
Исследование в мире официальных сайтов подразумевает знания актуальных инструментов авторизации. Опытные участники задействуют аква казино для извлечения современной сведений о активных адресах.
Процесс создания счета в проверенных операторах включает многоуровневую проверку. Новейшие операторы эксплуатируют KYC-протоколы и AML-критерии. Документальное сопровождение занимает от 24 до 72 интервалов.
IT методы для преодоления барьеров прогрессируют синхронно с повышением правовых инициатив. VPN-инструменты категории premium гарантируют шифрование AES-256 и протоколы OpenVPN. Постоянство соединения кардинально значима для высокоролловых заходов.
Альтернативные сайты действуют через географически размещенные серверные ресурсы. CDN-архитектуры поддерживают быструю отклик для глобальных игроков. Цифровое роутинг включается при детекции недоступности основного портала.
Финансовые движения в официальных зонах следуют определенным критериям PCI DSS. Цифровые платежи увеличивают актуальность вследствие приватности и оперативности выполнения.
Мобильные клиенты лучших компаний содержат голосовую аутентификацию и push-оповещения для ключевых моментов. Модифицируемый внешний вид самостоятельно изменяется под параметры дисплея.
https://auto.ae/showrooms/all/
convertcraft.click – Found practical insights today; sharing this article with colleagues later.
marketingninja.click – Color palette felt calming, nothing distracting, just focused, thoughtful design.
beautiful blooms and more – I had a great experience and will be coming back soon.
Поиск проверенного развлекательного оператора предполагает детального разбора лицензионных разрешений. Современные платформы п»ї1хбет официальный сайт обеспечивают участникам полную информацию о текущих разрешениях.
Алгоритм открытия аккаунта включает множество обязательных этапов валидации. Владельцы просят удостоверения, устанавливающие самобытность и правоспособность. Традиционный KYC-процесс длится от 24 до 72 временных отрезков.
Контроль средств инициируется с определения пределов на пополнения. Квалифицированные игроки настаивают использовать принцип 5% от итогового гемблинг фонда на отдельную игру.
Программные препятствия администраторов заставляют применять дополнительные адреса. Альтернативы хранят максимальную активность центрального сайта, охватывая журнал операций и казино достижения.
Новые финансовые системы дают скоростные инвестиции через цифровые портмоне. Bitcoin, Ethereum и стейблкоины гарантируют тайность и наименьшие взносы. Время выполнения получений насчитывает 10-30 отрезков.
Системы приверженности включают ступенчатые ранги с возрастающим возвратом. VIP-координаторы предоставляют уникальные подарки, расширенные ограничения и преимущественную обслуживание.
Надёжные площадки развлекательных предложений предоставляют пользователям шанс к премиальному гэмблингу через профильные ресурсы, включая п»ї1хбет казино , которые специально следуют transnational стандарты надёжности.
Схема оформления профиля требует заполнения верификационных сведений через криптографические SSL-линии. Букмекеры просят official подтверждение возраста и места нахождения для выполнения законодательных критериев.
Multi-factor проверка выступает обязательным компонентом современных архитектур защиты. Пользователи располагают SMS-коды, push-оповещения или задействуют специальные софт по типу Google Authenticator.
Mirror URL преодолевают вопросы региональных ограничений и DDoS-атак. С технической точки зрения копии составляют аналогичные клоны primary домена с обеспечением опций и клиентских параметров.
Опытные клиенты рекомендуют удерживать актуальные реестры working копий в сохранённых ссылках обозревателя. Провайдеры доставляют updates о новых ссылках через email, Telegram-сообщества и телефонные программы.
Банковские транзакции через надёжные платформы гарантированы криптографическими технологиями класса банковского направления. Вывод фондов происходит исключительно на validated wallets обладателя личного кабинета.
Актуальные гемблеры сталкиваются с барьером входа к официальным площадкам. Организации закрывают главные адреса, но грамотные Голд казино пользователи учитывают о присутствии зеркальных порталов.
Резервная ссылка образует полную воспроизведение основного площадки. Системы безопасности остаются неизменными. Денежные действия осуществляются через те же каналы.
Методика создания аккаунта через параллельный портал требует классической верификации. Менеджеры выясняют бумаги для реализации KYC-норм. Идентификационные параметры проходят расширенную валидацию.
Финансовые лимиты на резервных сайтах совпадают главным характеристикам. Стартовые взносы функционируют неизменными. Прогрессивные банки синхронизируются между всеми порталами.
Бонусные механизмы выполняются завершённо на дополнительных ресурсах. Множитель ставок сохраняет стартовые цифры. Срок активности проигрывания сохраняется.
Отдел ассистирования обрабатывает вопросы с дополнительных ресурсов идентично. Мгновенный диалог гарантирует круглосуточный режим функционирования.
Беттинговая отрасль демонстрирует интенсивный развитие, заинтересовывая множество клиентов. Экспертные платформы предоставляют качественную обстановку для ставок. Исчерпывающую факты о таких организациях можно найти на Вавада зеркало .
Аттестация представляет приоритетным аспектом селекции сайта. Надзорные органы Олдерни создают жёсткий мониторинг валютных транзакций. Каждая аккредитованная платформа реализует периодические ревизии RNG-систем.
Технические характеристики инновационных беттинг-платформ включают SSL-защиту расчётного уровня. Разработчики цифрового материала класса Microgaming, NetEnt, Pragmatic Play встраивают усовершенствованные схемы хаотичных значений.
Процедура подтверждения личного кабинета включает направления документов KYC-уровня. Документ, подтверждение о финансах, верификация адреса — стандартный пакет для полноценного активации.
Альтернативные адреса ликвидируют проблемы с фильтрацией компаний. Рабочие варианты адаптируются каждый день IT службами. Планшетные клиенты зачастую функционируют устойчивее браузерных модификаций.
Контроль средств определяет длительную прибыльность игровых партий. Профессиональные геймеры рекомендуют лимитировать объём бета до 1-2% от полного банкролла.
Новейшие пользователи пересекаются с огромным количеством системных тонкостей при работе с официальными сайтами. Профессиональные источники типа РЎСѓРєР° казино поставляют свежую информацию о процессах развлекательных провайдеров.
Система аутентификации счета предполагает набор необходимых стадий. Базовая подтверждение нуждается передачи свидетельств верифицирующих персону. Привычный перечень охватывает удостоверение личности, автолицензию или внешний паспорт.
Программная сторона регистрации содержит задействование криптографической защиты и 2FA. Продвинутые клиенты рекомендуют активировать весь комплекс возможных настроек безопасности.
Резервные ссылки представляют абсолютные клоны главного сайта с сохранением комплексного инструментария. Главное преимущество содержится в тождественности банковских лимитов и условий проигрыша.
Механизм поиска рабочих альтернативных адресов основывается на мониторинге тематических телеграм-каналов и партнерских площадок. Профессиональные участники эксплуатируют виртуальные частные сети для создания бесперебойного подключения без оглядки от локальных блокировок.
Подбор безопасного гемблинг ресурса подразумевает тщательного исследования регулятивных бумаг. Современные сайты Вавада регистрация дают игрокам максимальную сведения о имеющихся аккредитациях.
Алгоритм создания профиля охватывает несколько обязательных шагов верификации. Владельцы просят удостоверения, засвидетельствующие личность и дееспособность. Традиционный KYC-алгоритм длится от 24 до 72 промежутков.
Контроль средств начинается с фиксации ограничений на инвестиции. Опытные пользователи предлагают задействовать установку 5% от полного игорного капитала на конкретную раунд.
Программные препятствия провайдеров побуждают использовать запасные пути. Копии хранят максимальную эффективность первичного платформы, охватывая архив сделок и гемблинг достижения.
Актуальные финансовые методы обеспечивают скоростные взносы через криптовалютные счета. Bitcoin, Ethereum и постоянные токены гарантируют скрытность и символические сборы. Срок осуществления выводов доходит 10-30 минут.
Планы преданности содержат многоуровневые уровни с возрастающим возвратом. VIP-консультанты предоставляют личные поощрения, повышенные границы и приоритетную техподдержку.
Dressing stylish projects a positive first impression.
A outfit speaks volumes before a person even speak a word.
This enhances your own self-esteem and mindset significantly.
A put-together look signals competence in the workplace.
https://bm6.irkpress.ru/WeyKLQ/
Stylish choices let you to express your unique personality.
People often judge well-dressed people as more capable and reliable.
Ultimately, putting effort in your wardrobe is an valuable step in your personal brand.
I enjoy playing at this casino https://wandanowicka.pl/ because it feels trustworthy and stable. Live tables are interactive, slots offer different styles, and the overall experience remains consistent over time.
Новейшие геймеры пересекаются с изобилием программных аспектов при функционировании с сертифицированными площадками. Профессиональные порталы типа п»ї1xBet казино выдают актуальную данные о процессах азартных брендов.
Процесс верификации кабинета предполагает ряд обязательных фаз. Стартовая проверка подразумевает отправки свидетельств верифицирующих персону. Обычный пакет подразумевает свидетельство, автоудостоверение или международное ID.
Системная компонента оформления предполагает задействование защищенного протокола и многофакторной защиты. Экспертные игроки предлагают запускать весь комплекс доступных настроек безопасности.
Альтернативные адреса представляют абсолютные дубликаты центрального платформы с хранением полного возможностей. Важнейшее преимущество состоит в подобии платежных лимитов и требований отыгрыша.
Механизм обнаружения функционирующих запасных доменов фундируется на проверке профессиональных информационных каналов и связанных площадок. Продвинутые игроки задействуют анонимайзеры для обеспечения надежного доступа без оглядки от локальных барьеров.
generic zoloft: zoloft tablet – zoloft without dr prescription
Подбор достойного развлекательного заведения в актуальных границах предполагает детального анализа к правовому положению. Компетентные игроки учитывают, что Вавада зеркало предоставляет новую материалы о работающих провайдерах.
Процесс создания аккаунта в сертифицированных площадках содержит необходимую проверку документов. KYC-процедуры защищают как заведение, так и игрока от обмана. Временные ограничения на получение активов до закрытия контроля – типичная методика.
Программные препятствия на связь к гемблинг сервисам обходятся через резервные домены. Доступные копии обеспечивают полную функциональность первичного сервиса. Финансовые операции, интерактивный достижения и бонусные предложения функционируют устойчивыми.
Денежная гарантированность оценивается уровнем применяемых платежных инструментов. SSL-безопасность, PCI DSS подтверждение и усиленная верификация формируют стабильный периметр безопасности.
Азартная библиотека официальных операторов охватывает спины от ведущих провайдеров. RTP-параметры, изменчивость и алгоритмические модели претерпевают внешнюю проверку в одобренных организациях.
Планы вознаграждения в серьезных операторах основываются на понятных условиях вейджера. Вейджер x35-40 характеризуется разумным для машина-бонусов, в то время как настольные состязания принимаются в зачет с пониженным фактором.
Актуальные геймеры попадают с сложностью входа к официальным платформам. Поставщики фильтруют базовые порталы, но грамотные РЎСѓРєР° казино клиенты учитывают о присутствии дублирующих порталов.
Дополнительный домен является точную дубликат первичного портала. Средства защиты работают идентичными. Банковские процедуры реализуются через равнозначные системы.
Процедура открытия счёта через зеркальный портал включает привычной валидации. Специалисты выясняют бумаги для исполнения KYC-норм. Личные информация выполняют многоуровневую проверку.
Депозитные лимиты на резервных сайтах соответствуют стандартным параметрам. Стартовые суммы сохраняются постоянными. Прогрессивные банки координируются между множественными ссылками.
Поощрительные планы работают комплексно на дополнительных платформах. Отыгрышный коэффициент обеспечивает базовые параметры. Длительность отыгрыша продолжается.
Сервис сопровождения обрабатывает заявки с зеркальных доменов сходным образом. Живой диалог осуществляет 24-часовой расписание обслуживания.
rankstrategy.click – Content reads clearly, helpful examples made concepts easy to grasp.
ecommerce platform link – The overall feel suggests a dependable and user-friendly shop.
Рабочие альтернативные домены проверенных казино на казино Килограмм дают стабильный подключение к игровым платформам. Методика дублирования генерирует полноценные реплики основного домена с фиксацией всех механизмов.
Механизм активации через дублирующий портал целиком имитирует базовую шаблон. Свежие участники прописывают рабочий email, формируют защищенный ключ и выбирают базовую валюту.
Аутентификация личного кабинета содержит передачи свидетельств в соответствии с KYC-регламенту. Фото национального документа, свидетельство проживания и платежные данные подвергаются программную валидацию в течение 24-72 ч.
Подключение активных клиентов выполняется через типовую интерфейс с многоступенчатой верификацией. Одноразовые пароли передаются на мессенджер аппарат или почтовый ящик.
Опции входящего модуля через альтернативные домены поддерживает топовые финансовые механизмы. Visa, Mastercard, веб счета Skrill, Neteller, виртуальные монеты Bitcoin, Ethereum обрабатываются с низкими взносами 0-3%.
Гемблинг ассортимент дублируется целиком включая автоматы, традиционные забавы, live-хостов и джекпоты. RTP-коэффициенты, волатильность и условия отыгрыша удерживаются идентичными.
Поощрительная система оперирует похоже корневому домену. Welcome-предложения, безвозмездные спины, компенсация и VIP-планы стартуют автоматически при исполнении заданных критериев.
seomagnet.click – Content reads clearly, helpful examples made concepts easy to grasp.
Активные зеркала надежных gaming-операторов на Лаки Бир РІС…РѕРґ гарантируют непрерывный доступ к геймерским порталам. Принцип дублирования строит эквивалентные версии центрального домена с поддержанием всех инструментов.
Процедура открытия счета через резервную ссылку на сто процентов копирует оригинальную анкету. Начинающие клиенты вводят активный email, придумывают защищенный секретную комбинацию и фиксируют игровую валюту.
Подтверждение учетной записи предполагает отправки бумаг следуя KYC-требованиям. Копия паспорта, валидация проживания и банковские сведения проходят цифровую валидацию в течение 24-72 часа.
Аутентификация активных игроков осуществляется через стандартную интерфейс с расширенной верификацией. Разовые пароли отправляются на смс девайс или мейл.
Возможности депозитного блока через зеркала предлагает распространенные финансовые системы. Visa, Mastercard, веб портмоне Skrill, Neteller, crypto Bitcoin, Ethereum реализуются с оптимизированными платежами 0-3%.
Азартная ассортимент дублируется полностью включая spinning games, столовые забавы, live-крупье и мегавыигрыши. RTP-индикаторы, изменчивость и вейджер остаются точными.
Промо программа работает аналогично основному сайту. Welcome-комплекты, даровые прокруты, денежный возврат и VIP-планы включаются автоматически при достижении заданных требований.
Исследование в сфере проверенных сайтов нуждается понимания продвинутых решений подключения. Умелые пользователи используют Lucky Bear casino для приобретения новейшей материалов о работающих доменах.
Алгоритм оформления счета в надежных операторах содержит детальную подтверждение. Продвинутые провайдеры задействуют KYC-механизмы и AML-правила. Оформление документов требует от 24 до 72 промежутков.
Цифровые решения для минования барьеров совершенствуются одновременно с ужесточением правовых действий. VPN-платформы класса premium предлагают безопасность AES-256 и протоколы OpenVPN. Непрерывность связи критически существенна для VIP игровых периодов.
Запасные домены функционируют через территориально рассредоточенные компьютерные ресурсы. CDN-сети осуществляют оптимальную латентность для глобальных игроков. Цифровое переключение инициируется при идентификации недоступности базового адреса.
Экономические операции в официальных областях соответствуют строгим нормам PCI DSS. Цифровые платежи увеличивают популярность из-за скрытности и динамике реализации.
Мобильные утилиты премиальных операторов объединяют лицевую проверку и push-оповещения для принципиальных событий. Гибкий облик самостоятельно корректируется под свойства экрана.
designer-inspired microbrands – Unique designs paired with sensible prices keep me impressed.
For predictions
Best live baccarat online
for curiosity.
Chic Fashion Stop – The checkout steps were minimal and simple to complete.
Азартная индустрия демонстрирует стремительный рост, манящая миллионы клиентов. Опытные площадки гарантируют стабильную условия для пари. Исчерпывающую материалы о таких брендах можно отыскать на Lucky Bear зеркало .
Лицензирование составляет центральным аспектом отбора площадки. Юрисдикции Кюрасао предоставляют тщательный проверку валютных операций. Отдельная официальная ресурс подвергается систематические ревизии RNG-модулей.
Компьютерные свойства современных азартных площадок предусматривают SSL-кодирование денежного стандарта. Провайдеры виртуального ПО наподобие Microgaming, NetEnt, Pragmatic Play добавляют усовершенствованные схемы рандомных показателей.
Механизм валидации учётной записи подразумевает направления удостоверений KYC-типа. ID, документ о доходах, подтверждение проживания — базовый комплект для полноценного подключения.
Резервные домены исправляют проблемы с блокировками организаций. Актуальные копии адаптируются ежедневно цифровыми службами. Карманные утилиты нередко функционируют устойчивее сетевых форматов.
Контроль средств определяет стратегическую результативность развлекательных периодов. Опытные пользователи настаивают урезать размер бета до 1-2% от общего резерва.
Отбор безопасного развлекательного заведения в текущих обстоятельствах предполагает повышенного анализа к регулятивному статусу. Профессиональные игроки учитывают, что казино 1xBet демонстрирует актуальную факты о доступных сервисах.
Алгоритм записи в сертифицированных заведениях предусматривает необходимую валидацию персональных данных. KYC-нормы оберегают как заведение, так и клиента от обмана. Промежуточные лимиты на вывод капитала до выполнения верификации – типичная система.
Электронные препятствия на соединение к игровым порталам преодолеваются через зеркальные адреса. Действующие клоны обеспечивают всестороннюю функциональность первичного ресурса. Денежные движения, геймплейный достижения и льготные планы сохраняются неизменными.
Денежная стабильность оценивается показателем используемых расчетных способов. SSL-шифрование, PCI DSS лицензирование и многоуровневая аутентификация устанавливают безопасный контур ограждения.
Азартная ассортимент официальных операторов объединяет слоты от главных студий. RTP-индексы, колебания и математические системы претерпевают объективную контроль в одобренных лабораториях.
Системы стимулирования в надежных заведениях формируются на понятных условиях ставок. Проигрыш x35-40 признается справедливым для спин-льгот, в то время как традиционные развлечения идут в расчет с сниженным показателем.
Актуальные клиенты обталкиваются с набором технических нюансов при деятельности с легальными площадками. Профессиональные сайты типа казино ДживиСпин предоставляют современную контент о процессах игорных компаний.
Алгоритм валидации аккаунта подразумевает ряд неотъемлемых уровней. Исходная подтверждение включает загрузки удостоверений валидирующих субъект. Классический комплект охватывает свидетельство, лицензию водителя или загранпаспорт.
Технологическая составляющая регистрации включает задействование зашифрованного канала и многофакторной защиты. Профессиональные клиенты предлагают включать все доступных настроек безопасности.
Резервные ссылки составляют стопроцентные отражения центрального сайта с хранением исчерпывающего возможностей. Центральное преимущество состоит в подобии расчетных пределов и норм вейджера.
Механизм выявления актуальных дублирующих порталов основывается на отслеживании профессиональных уведомительных сервисов и сотрудничающих площадок. Профессиональные геймеры задействуют VPN-сервисы для создания устойчивого доступа безотносительно от географических ограничений.
Беттинговая область являет активный прогресс, завлекая тысячи клиентов. Экспертные порталы гарантируют безопасную обстановку для ставок. Развёрнутую сведения о данных организациях доступно найти на лаки Р±РёСЂ казино официальный сайт .
Легализация остаётся приоритетным критерием отбора сайта. Надзорные органы Кюрасао создают серьёзный аудит денежных операций. Отдельная легальная площадка подвергается систематические инспекции RNG-систем.
Цифровые свойства актуальных беттинг-платформ содержат SSL-криптографию денежного ранга. Разработчики виртуального обеспечения класса Microgaming, NetEnt, Pragmatic Play интегрируют комплексные модели хаотичных параметров.
Процесс подтверждения личного кабинета требует передачи свидетельств KYC-уровня. Удостоверение, справка о средствах, доказательство адреса — стандартный пакет для окончательного подключения.
Дублирующие URL ликвидируют сложности с запретами провайдеров. Действующие копии корректируются постоянно программными отделами. Портативные утилиты регулярно оперируют устойчивее интернет модификаций.
Управление банкроллом формирует стратегическую эффективность игровых раундов. Экспертные игроки настаивают контролировать размер пари до 1-2% от совокупного капитала.
Купить букет онлайн – Цветы ко Дню учителя с доставкой
https://neuroreliefusa.com/# Neuro Relief USA
Рабочие резервные адреса надежных казино на Меллстрой регистрация гарантируют устойчивый вход к развлекательным порталам. Методика зеркалирования создает эквивалентные клоны основного сайта с сохранением всех функций.
Схема создания аккаунта через mirror-сайт целиком дублирует основную анкету. Новые игроки вводят валидный email, устанавливают стойкий шифр и устанавливают базовую курренси.
Идентификация счета содержит отправки бумаг согласно KYC-требованиям. Изображение национального документа, доказательство резиденции и банковские реквизиты подвергаются алгоритмическую валидацию в течение 24-72 периодов.
Авторизация верифицированных пользователей происходит через обычную окно с многоступенчатой проверкой. Разовые ключи приходят на смс гаджет или мейл.
Возможности входящего сектора через дублирующие порталы поддерживает востребованные денежные платформы. Visa, Mastercard, цифровые хранилища Skrill, Neteller, crypto Bitcoin, Ethereum выполняются с уменьшенными взносами 0-3%.
Развлекательная база воспроизводится полностью включая spinning games, настольные активности, live-хостов и накопительные призы. RTP-значения, колебания и вейджер поддерживаются точными.
Подарочная политика работает похоже основному ресурсу. Welcome-пакеты, даровые прокруты, компенсация и VIP-программы стартуют алгоритмически при соблюдении установленных требований.
Рабочие альтернативные домены лицензированных gaming-операторов на Vavada casino обеспечивают устойчивый подключение к азартным ресурсам. Принцип зеркалирования образует идентичные реплики базового домена с сохранением всех инструментов.
Процедура оформления профиля через дублирующий портал на сто процентов дублирует стандартную анкету. Свежие игроки вводят валидный email, создают стойкий секретную комбинацию и определяют базовую валюту.
Верификация аккаунта предполагает предоставления документов опираясь на KYC-требованиям. Копия удостоверения личности, валидация адреса и финансовые параметры анализируются посредством автоматическую анализ в течение 24-72 временных единиц.
Вход активных пользователей осуществляется через базовую окно с усиленной проверкой. Сессионные токены отправляются на сотовый девайс или электронную почту.
Функционал пополнительного блока через mirror-сайты содержит распространенные платежные механизмы. Visa, Mastercard, цифровые балансы Skrill, Neteller, криптовалюты Bitcoin, Ethereum процессируются с низкими комиссиями 0-3%.
Gaming база воспроизводится на сто процентов включая автоматы, карточные игры, live-крупье и прогрессивы. RTP-показатели, колебания и ставочные требования поддерживаются неизменными.
Подарочная программа работает подобно основному ресурсу. Welcome-предложения, фриспины, refund и VIP-программы активируются автоматически при выполнении определенных критериев.
website layout studio – The flow of pages makes exploring stress-free and intuitive.
Поиск легального игорного площадки подразумевает серьезного разбора правовых разрешений. Современные платформы казино Килограмм дают участникам стопроцентную информацию о своих лицензиях.
Процедура оформления счета включает несколько ключевых фаз проверки. Владельцы настаивают удостоверения, устанавливающие самобытность и правоспособность. Традиционный KYC-алгоритм длится от 24 до 72 периодов.
Управление банком запускается с фиксации границ на пополнения. Опытные геймеры советуют внедрять установку 5% от итогового игорного средств на одну заход.
Цифровые препятствия поставщиков обязывают эксплуатировать резервные домены. Дубликаты сохраняют полную активность центрального ресурса, подразумевая летопись операций и казино успех.
Новые расчетные системы поддерживают мгновенные пополнения через виртуальные кошельки. Bitcoin, Ethereum и фиксированные активы обеспечивают скрытность и наименьшие отчисления. Время проведения получений равно 10-30 интервалов.
Алгоритмы преданности включают каскадные ранги с увеличивающимся кэшбэком. VIP-кураторы дают уникальные бонусы, улучшенные ограничения и приоритетную помощь.
Новейшие провайдеры игорных игр дают беттерам подключение к элитному азарту через защищенные казино Голд платформы. Сертифицированная деятельность требует следования определенных контролирующих критериев.
Процесс активации пользовательского аккаунта включает проверку индивидуальных данных. Операторы используют комплексные протоколы KYC и AML для блокировки нарушающих платежей.
Электронные платформы актуальных беттинг площадок функционируют на стабильных дата-центрах с HTTPS протоколами. Региональная блокировка побуждает администраторов внедрять альтернативные адреса.
Дублирующие домены образуют полные дубликаты основного сайта с поддержанием всех инструментов и данных. Беттеры обеспечивают себе устойчивый подключение к депозиту, гемблинг статистике и индивидуальным параметрам.
Денежные транзакции производятся через синхронизированные платежные системы. Ограничения на пополнения и выводы фиксируются в гармонии с регуляторными положениями и организационными политиками управления рисками.
Квалифицированные игроки предлагают анализировать статус авторизации через регуляторные каталоги азартных органов. Авторитетные параметры предусматривают места на экспертных платформах и оценки подлинных пользователей.
Выбор проверенного развлекательного ресурса нуждается детального изучения юридических свидетельств. Инновационные платформы п»ї1xBet casino предоставляют геймерам абсолютную сведения о своих аккредитациях.
Процесс открытия аккаунта предусматривает определенное количество ключевых ступеней валидации. Провайдеры настаивают свидетельства, доказывающие идентичность и правоспособность. Традиционный KYC-процесс продолжается от 24 до 72 периодов.
Банкролл-менеджмент запускается с назначения пределов на депозиты. Квалифицированные геймеры советуют использовать закон 5% от полного гемблинг фонда на отдельную партию.
Технические ограничения поставщиков обязывают внедрять вспомогательные маршруты. Зеркала сохраняют максимальную производительность центрального платформы, предусматривая историю переводов и казино результаты.
Новые денежные способы дают оперативные вклады через блокчейн портмоне. Bitcoin, Ethereum и фиксированные активы дают анонимность и наименьшие сборы. Срок проведения извлечений доходит 10-30 минут.
Программы приверженности предусматривают градационные статусы с возрастающим компенсацией. VIP-консультанты обеспечивают эксклюзивные вознаграждения, улучшенные пределы и ускоренную помощь.
essential supply hub – Fast delivery and high-quality items that last.
Подбор качественного азартного портала в современных условиях требует детального внимания к лицензионному статусу. Квалифицированные игроки учитывают, что п»ї1хбет сайт содержит свежую факты о работающих операторах.
Процедура записи в лицензированных операторах предусматривает принудительную аутентификацию идентичности. KYC-процедуры обеспечивают как сервис, так и участника от махинаций. Переходные границы на изъятие активов до окончания верификации – стандартная практика.
Электронные блокировки на соединение к гемблинг сервисам обходятся через резервные домены. Рабочие отражения гарантируют абсолютную эффективность центрального ресурса. Финансовые процедуры, интерактивный продвижение и наградные системы функционируют постоянными.
Материальная надежность оценивается уровнем используемых банковских инструментов. SSL-защита, PCI DSS аттестация и усиленная подтверждение создают прочный барьер ограждения.
Игровая каталог проверенных сервисов включает спины от главных разработчиков. RTP-значения, изменчивость и расчетные модели испытывают беспристрастную проверку в одобренных центрах.
Системы стимулирования в достойных площадках основываются на ясных критериях активности. Требования x35-40 оценивается адекватным для спин-бонусов, в то время как традиционные игры учитываются в зачет с уменьшенным показателем.
Hmm is anyone else having problems with the images
on this blog loading? I’m trying to determine if its a problem
on my end or if it’s the blog. Any feed-back would be greatly appreciated.
Everything is very open with a very clear explanation of the issues.
It was definitely informative. Your site is very helpful.
Many thanks for sharing!
戏台在线免费在线观看,海外华人专属平台,高清无广告体验。
Новейшие игроки имеют дело с изобилием технологических аспектов при деятельности с официальными порталами. Профессиональные ресурсы типа Vavada зеркало выдают современную информацию о операциях игорных операторов.
Система валидации учетной записи предполагает комплекс неотъемлемых стадий. Первичная проверка подразумевает передачи удостоверений верифицирующих гражданство. Обычный пакет подразумевает документ, лицензию водителя или внешний паспорт.
Техническая часть регистрации охватывает задействование безопасного соединения и 2FA. Экспертные игроки рекомендуют инициировать все предложенных опций охраны.
Запасные домены формируют стопроцентные клоны первичного домена с обеспечением исчерпывающего арсенала. Основное выгода выражается в идентичности платежных ограничений и параметров отыгрыша.
Механизм поиска активных дублирующих порталов основывается на проверке тематических информационных каналов и партнерских площадок. Экспертные участники внедряют виртуальные частные сети для гарантирования надежного подключения невзирая от географических блокировок.
Ориентирование в мире официальных ресурсов включает владения продвинутых методов авторизации. Квалифицированные клиенты задействуют Вавада зеркало для извлечения свежей данных о действующих ссылках.
Схема открытия счета в лицензированных операторах содержит комплексную аутентификацию. Продвинутые компании эксплуатируют KYC-процедуры и AML-нормы. Документальное сопровождение требует от 24 до 72 временных отрезков.
IT методы для обхода запретов улучшаются вместе с укреплением законодательных решений. VPN-инструменты класса premium дают кодирование AES-256 и технологии OpenVPN. Надежность коннекта критически существенна для привилегированных партий.
Запасные сайты работают через пространственно разнесенные серверные инфраструктуры. CDN-комплексы предоставляют сокращенную пинг для американских игроков. Программное перенаправление запускается при распознавании блокировки центрального ресурса.
Денежные операции в проверенных регионах подпадают под строгим стандартам PCI DSS. Блокчейн платежи получают признание в результате скрытности и темпу обработки.
Планшетные программы элитных компаний объединяют физиологическую авторизацию и push-извещения для важных происшествий. Модифицируемый оформление самостоятельно настраивается под характеристики матрицы.
аренда mercedes v class с водителем из москвы в рыбинск аренда sprinter с водителем
Отбор надежного betting заведения в сегодняшних обстоятельствах нуждается тщательного рассмотрения к правовому режиму. Квалифицированные игроки знают, что aqua зеркало предоставляет современную факты о действующих площадках.
Процедура создания аккаунта в лицензированных площадках содержит неизбежную верификацию персональных данных. KYC-правила защищают как площадку, так и клиента от обмана. Кратковременные границы на перечисление капитала до выполнения подтверждения – типичная процедура.
Программные ограничения на вход к гемблинг порталам преодолеваются через параллельные порталы. Действующие дубликаты предоставляют абсолютную возможности базового платформы. Денежные переводы, геймплейный статистика и бонусные предложения поддерживаются устойчивыми.
Экономическая гарантированность оценивается показателем применяемых денежных механизмов. SSL-защита, PCI DSS лицензирование и дополнительная подтверждение обеспечивают стабильный щит защиты.
Игровая каталог легальных операторов предоставляет слоты от главных разработчиков. RTP-индексы, волатильность и алгоритмические модели проходят независимую сертификацию в признанных институтах.
Планы лояльности в качественных казино формируются на ясных условиях проигрыша. Отыгрыш x35-40 считается адекватным для спин-привилегий, в то время как настольные забавы принимаются в подсчет с редуцированным множителем.
Действующие альтернативные домены надежных игорных заведений на лаки Р±РёСЂ казино создают беспрерывный вход к развлекательным сервисам. Технология копирования строит аналогичные дубликаты центрального портала с поддержанием всех возможностей.
Алгоритм открытия счета через резервную ссылку целиком повторяет основную форму. Дебютные участники вводят функционирующий email, генерируют безопасный ключ и определяют операционную валюту.
Верификация профиля подразумевает отправки справок в соответствии с KYC-регламенту. Снимок удостоверения личности, верификация резиденции и финансовые параметры подвергаются алгоритмическую верификацию в течение 24-72 временных единиц.
Аутентификация существующих игроков выполняется через обычную модуль с двухфакторной валидацией. Краткосрочные ключи доставляются на сотовый девайс или email.
Механизмы денежного блока через резервные ссылки содержит востребованные расчетные механизмы. Visa, Mastercard, виртуальные хранилища Skrill, Neteller, криптовалюты Bitcoin, Ethereum процессируются с низкими процентами 0-3%.
Игровая коллекция дублируется полностью включая машины, классические забавы, live-ведущих и максимальные награды. RTP-параметры, колебания и условия отыгрыша поддерживаются такими же.
Поощрительная программа функционирует схоже главному сайту. Welcome-бандлы, безвозмездные спины, refund и VIP-системы стартуют машинально при соблюдении установленных условий.
Полная информация про ufc в феврале марте 2026 три недели которые встряхнут дивизионы уже доступна в этом обзоре. Вот тут подробнее: https://iphoneservice59.ru/news/fevral-mart-2026-v-ufc-tri-turnira-s-topovymi-boyami-i-kuchej-skrytyh-intrig/
FixItFactory Market – Clean design and clear descriptions make navigation effortless.
Отбор достойного гемблинг оператора в современных обстоятельствах требует повышенного рассмотрения к лицензионному состоянию. Знающие геймеры осознают, что п»ї1хбет сайт включает свежую информацию о доступных площадках.
Схема оформления профиля в легальных заведениях охватывает обязательную аутентификацию удостоверения. KYC-требования охраняют как казино, так и клиента от мошенничества. Временные границы на изъятие финансов до финализации верификации – типичная подход.
Виртуальные запреты на соединение к гемблинг ресурсам решаются через дублирующие порталы. Действующие дубликаты гарантируют полную производительность главного платформы. Платежные движения, игровой результаты и поощрительные схемы остаются стабильными.
Капитальная защищенность выражается качеством используемых финансовых методов. SSL-шифрование, PCI DSS сертификация и многоуровневая подтверждение создают безопасный контур защиты.
Азартная ассортимент официальных операторов включает машины от лидирующих студий. RTP-показатели, дисперсия и алгоритмические схемы получают независимую аудит в признанных институтах.
Механизмы вознаграждения в профессиональных сервисах опираются на понятных условиях ставок. Требования x35-40 признается разумным для слот-привилегий, в то время как классические развлечения принимаются в подсчет с минимальным фактором.
Выбор надежного азартного заведения нуждается серьезного изучения регулятивных сертификатов. Инновационные порталы Vavada предлагают пользователям абсолютную сведения о собственных допусках.
Механизм открытия аккаунта содержит определенное количество необходимых ступеней подтверждения. Провайдеры истребуют удостоверения, подтверждающие идентичность и правоспособность. Обычный KYC-алгоритм длится от 24 до 72 часов.
Финансовое планирование начинается с задания лимитов на пополнения. Искусные геймеры предлагают эксплуатировать закон 5% от итогового игорного средств на одну партию.
Технические барьеры провайдеров заставляют использовать альтернативные пути. Альтернативы хранят полную функциональность основного сайта, содержа журнал сделок и азартный результаты.
Новые платежные инструменты поддерживают быстрые депозиты через виртуальные хранилища. Bitcoin, Ethereum и стейблкоины дают конфиденциальность и крошечные платежи. Длительность осуществления получений равно 10-30 минут.
Системы приверженности предусматривают ступенчатые степени с возрастающим вознаграждением. VIP-кураторы предлагают индивидуальные награды, повышенные пределы и первоочередную сервис.
https://chsp.hispanichealth.info/members/1xbetfreebet7/activity/1415580/
Подбор честного азартного площадки заставляет детального анализа регулятивных сертификатов. Актуальные системы п»ї1хбет РІС…РѕРґ дают клиентам полную сведения о собственных разрешениях.
Процедура создания профиля охватывает ряд ключевых ступеней подтверждения. Администраторы запрашивают удостоверения, подтверждающие идентичность и дееспособность. Классический KYC-порядок длится от 24 до 72 промежутков.
Банкролл-менеджмент запускается с назначения пределов на депозиты. Искусные пользователи настаивают внедрять принцип 5% от итогового азартного бюджета на конкретную заход.
Цифровые ограничения администраторов заставляют задействовать альтернативные адреса. Альтернативы удерживают стопроцентную производительность первичного сайта, охватывая историю операций и азартный продвижение.
Инновационные финансовые способы поддерживают мгновенные депозиты через электронные хранилища. Bitcoin, Ethereum и устойчивые монеты гарантируют приватность и крошечные сборы. Время реализации извлечений доходит 10-30 интервалов.
Планы постоянства предусматривают многоуровневые категории с нарастающим возвратом. VIP-менеджеры обеспечивают эксклюзивные вознаграждения, расширенные ограничения и ускоренную поддержку.
Навигация в секторе легальных площадок предполагает владения новых технологий доступа. Продвинутые пользователи применяют мад казино для добывания актуальной фактов о действующих доменах.
Схема регистрации профиля в проверенных заведениях охватывает сложную проверку. Передовые поставщики внедряют KYC-протоколы и AML-критерии. Бумажная работа отнимает от 24 до 72 интервалов.
Цифровые технологии для прохождения препятствий прогрессируют сообща с усилением законодательных действий. VPN-сервисы уровня premium предлагают шифрование AES-256 и системы OpenVPN. Постоянство связи принципиально актуальна для высокоролловых сессий.
Запасные домены функционируют через пространственно распределенные цифровые системы. CDN-архитектуры предоставляют минимальную латентность для американских клиентов. Программное переключение включается при распознавании блокировки первичного портала.
Банковские транзакции в легальных зонах отвечают четким критериям PCI DSS. Децентрализованные транзакции завоевывают признание по причине конфиденциальности и оперативности обработки.
Мобильные софт лучших брендов объединяют лицевую подтверждение и push-уведомления для важных событий. Изменяемый внешний вид программно подстраивается под свойства матрицы.
Подбор надежного гемблинг заведения в современных границах подразумевает тщательного анализа к законному положению. Компетентные геймеры учитывают, что п»ї1хбет зеркало предоставляет актуальную материалы о действующих операторах.
Процесс записи в лицензированных платформах предусматривает обязательную аутентификацию документов. KYC-правила защищают как площадку, так и клиента от фрода. Временные лимиты на перечисление активов до выполнения верификации – привычная процедура.
Технические барьеры на соединение к игровым сервисам обходятся через дублирующие домены. Действующие отражения обеспечивают тотальную работоспособность первичного сервиса. Банковские движения, азартный прогресс и привилегированные предложения остаются устойчивыми.
Капитальная защищенность выражается уровнем используемых платежных систем. SSL-шифрование, PCI DSS валидация и многоуровневая проверка гарантируют безопасный барьер охраны.
Игровая ассортимент официальных операторов включает спины от главных производителей. RTP-коэффициенты, вариативность и расчетные схемы испытывают объективную контроль в авторизованных лабораториях.
Системы поощрения в достойных сервисах основываются на открытых параметрах активности. Требования x35-40 характеризуется приемлемым для слот-привилегий, в то время как классические развлечения идут в подсчет с минимальным показателем.
Современные участники попадают с проблемой соединения к официальным сайтам. Операторы фильтруют главные домены, но знающие Рльдорадо казино игроки учитывают о присутствии параллельных площадок.
Параллельный портал представляет точную воспроизведение базового портала. Протоколы шифрования поддерживаются идентичными. Банковские действия проходят через равнозначные сервисы.
Технология оформления профиля через резервный ресурс содержит обычной валидации. Менеджеры требуют свидетельства для выполнения KYC-стандартов. Личные данные проходят двухфакторную аутентификацию.
Пополнительные рамки на дополнительных сайтах соответствуют стандартным условиям. Стартовые беты функционируют константными. Возрастающие банки согласовываются между разными порталами.
Льготные программы оперируют комплексно на параллельных порталах. Множитель ставок гарантирует исходные параметры. Длительность реализации не изменяется.
Служба сопровождения рассматривает вопросы с альтернативных доменов сходным образом. Онлайн диалог осуществляет непрерывный формат функционирования.
pharmaceutical online: Smart GenRx USA – Smart GenRx USA
Новейшие порталы игорных игр предоставляют пользователям подключение к элитному гемблингу через безопасные казино Меллстрой платформы. Официальная бизнес нуждается исполнения строгих правовых требований.
Процедура регистрации клиентского счета содержит аутентификацию приватных показателей. Регуляторы эксплуатируют многоуровневые протоколы KYC и AML для недопущения мошеннических операций.
Программные платформы инновационных казино основываются на безопасных облачных системах с TLS стандартами. Территориальные ограничения заставляет управляющих разрабатывать дублирующие порталы.
Параллельные сайты являют собой полные клоны центрального ресурса с сохранением всех функций и информации. Пользователи приобретают беспрепятственный соединение к депозиту, азартной отчетности и индивидуальным настройкам.
Расчетные процедуры осуществляются через связанные финансовые агрегаторы. Рамки на пополнения и получения регулируются в унисон с законодательными условиями и внутренними регламентами риск-менеджмента.
Профессиональные игроки указывают мониторить ситуацию разрешения через официальные каталоги беттинг ведомств. Статусные индикаторы задействуют позиции на профильных сайтах и оценки настоящих клиентов.
Выбор легального гемблинг оператора нуждается основательного анализа регулятивных бумаг. Инновационные платформы Mellstroy Game casino предоставляют клиентам абсолютную факты о имеющихся санкциях.
Процесс создания профиля охватывает несколько принудительных фаз валидации. Провайдеры просят бумаги, устанавливающие самобытность и правоспособность. Типовой KYC-порядок продолжается от 24 до 72 часов.
Финансовое планирование открывается с назначения лимитов на пополнения. Профессиональные участники настаивают применять принцип 5% от суммарного гемблинг средств на одну партию.
Электронные барьеры поставщиков обязывают эксплуатировать дополнительные маршруты. Альтернативы поддерживают максимальную работоспособность главного портала, содержа архив транзакций и казино успех.
Новые финансовые сервисы обеспечивают моментальные пополнения через виртуальные кошельки. Bitcoin, Ethereum и стабильные валюты предоставляют тайность и мизерные отчисления. Период обработки выводов равно 10-30 периодов.
Планы преданности предусматривают градационные статусы с нарастающим компенсацией. VIP-представители гарантируют личные вознаграждения, усиленные границы и преимущественную обслуживание.
sparkdex ai SparkDex is redefining decentralized trading with speed, security, and real earning potential. On spark dex, you keep full control of your assets while enjoying fast swaps and low fees. Powered by sparkdex ai, the platform delivers smarter insights and optimized performance for confident decision-making. Trade, earn from liquidity, and grow your crypto portfolio with sparkdex — the future of DeFi starts here.
Для современного интерьера идеально подойдет электрокарнизы для штор заказать Прокарниз , который обеспечит удобство и стиль в управлении шторами.
Такое решение значительно упрощает жизнь пользователю. Он особенно удобен в больших помещениях, где нужно одновременно регулировать множество полотен. Кроме того, электрокарниз может быть интегрирован в систему “умный дом”.
Принцип работы электрокарниза основан на электрическом приводе, который движет гардины по направляющим. Пульт дистанционного управления позволяет открывать и закрывать шторы без усилий. Это делает устройство идеальным для использования в офисах, гостиницах и домах с современным дизайном. Автоматический привод позволяет быстро и легко регулировать положение штор.
Выбор электрокарниза зависит от размеров окна, веса штор и типа крепления. Важно учитывать мощность двигателя, которой будет достаточно для вашего полотна. Также стоит обратить внимание на материал направляющей и качество комплектующих. Надежные материалы гарантируют долговечность и бесперебойную работу устройства.
Установка электрокарниза требует аккуратности и точного соблюдения инструкции. Профессиональная установка обеспечит правильную работу системы и долгий срок эксплуатации. Регулярное техническое обслуживание поможет продлить срок службы устройства. Своевременная профилактика увеличит срок службы электрокарниза.
Спин-шаблон:
Это делает устройство идеальным для использования в офисах, гостиницах и домах с современным дизайном.
click to browse – Lots of items to choose from and the checkout experience was seamless.
Рядом цветочный магазин со мной – Купите монобукеты из роз, лилий, орхидей
Определение безопасного гемблинг портала подразумевает тщательного разбора лицензионных сертификатов. Современные порталы казино Килограмм дают игрокам безусловную данные о текущих санкциях.
Механизм создания профиля охватывает различные ключевых фаз проверки. Владельцы настаивают удостоверения, устанавливающие самобытность и дееспособность. Обычный KYC-процесс требует от 24 до 72 интервалов.
Управление банком запускается с задания границ на вклады. Опытные клиенты настаивают задействовать установку 5% от полного гемблинг средств на конкретную игру.
Системные запреты владельцев заставляют внедрять альтернативные ссылки. Клоны сохраняют максимальную эффективность главного платформы, включая хронологию транзакций и гемблинг достижения.
Новые расчетные сервисы обеспечивают оперативные депозиты через виртуальные кошельки. Bitcoin, Ethereum и устойчивые монеты дают скрытность и мизерные сборы. Время выполнения выводов составляет 10-30 периодов.
Системы приверженности содержат иерархические ранги с увеличивающимся бонусом. VIP-представители обеспечивают личные поощрения, расширенные границы и опережающую помощь.
Travel Trolley Gear – Thoughtful organization makes things easier to plan.
Ориентирование в области легальных площадок требует осознания продвинутых решений соединения. Квалифицированные геймеры применяют РЎСѓРєР° казино для извлечения релевантной информации о активных URL.
Процесс регистрации счета в официальных операторах содержит многоуровневую подтверждение. Актуальные поставщики применяют KYC-механизмы и AML-нормы. Документальное сопровождение составляет от 24 до 72 временных отрезков.
IT методы для минования блокировок эволюционируют одновременно с усилением юридических инициатив. VPN-службы уровня premium дают кодирование AES-256 и протоколы OpenVPN. Устойчивость канала принципиально необходима для высокоролловых игровых периодов.
Альтернативные платформы выполняют задачи через географически разнесенные цифровые мощности. CDN-структуры осуществляют низкую отклик для азиатских клиентов. Программное редирект срабатывает при распознавании препятствия основного адреса.
Платежные манипуляции в сертифицированных юрисдикциях отвечают строгим критериям PCI DSS. Крипто платежи приобретают актуальность по причине приватности и быстроте реализации.
Мобильные приложения премиальных провайдеров совмещают лицевую подтверждение и push-извещения для ключевых ситуаций. Адаптивный интерфейс автономно изменяется под свойства экрана.
this retail site – The process from cart to confirmation was simple, with great shipping updates.
Инновационные сервисы игорных игр гарантируют клиентам путь к качественному беттингу через сертифицированные Mellstroy Game зеркало системы. Авторизованная работа подразумевает следования четких надзорных критериев.
Алгоритм создания персонального аккаунта охватывает проверку индивидуальных показателей. Провайдеры используют комплексные протоколы KYC и AML для блокировки поддельных финансовых действий.
Электронные инструменты современных развлекательных порталов строятся на безопасных серверах с TLS протоколами. Территориальные ограничения принуждает операторов разрабатывать резервные ссылки.
Параллельные платформы представляют эквивалентные клоны основного портала с обеспечением всех функций и данных. Пользователи приобретают постоянный вход к средствам, гемблинг отчетности и персональным настройкам.
Банковские действия проходят через подключенные платежные шлюзы. Лимиты на вклады и снятия определяются в унисон с правовыми стандартами и внутренними политиками управления рисками.
Экспертные беттеры советуют проверять условия разрешения через официальные реестры игорных органов. Престижные параметры включают позиции на отраслевых платформах и feedback действительных клиентов.
Новейшие геймеры имеют дело с множеством программных аспектов при работе с сертифицированными сайтами. Профессиональные порталы типа Вавада казино предоставляют свежую информацию о операциях гэмблинговых компаний.
Процедура верификации аккаунта охватывает ряд неотъемлемых уровней. Базовая верификация подразумевает отправки бумаг валидирующих личность. Привычный набор включает ID, лицензию водителя или международный паспорт.
Системная составляющая открытия счета содержит использование зашифрованного канала и двухфакторной аутентификации. Профессиональные игроки советуют активировать весь комплекс представленных возможностей секьюрити.
Резервные ссылки представляют абсолютные отражения базового ресурса с хранением исчерпывающего функционала. Важнейшее выгода содержится в схожести банковских ограничений и норм ставочных требований.
Система обнаружения рабочих дублирующих порталов фундируется на мониторинге экспертных телеграм-каналов и связанных ресурсов. Продвинутые игроки применяют VPN-сервисы для гарантирования стабильного связи вне зависимости от местных ограничений.
Looking stylish creates a positive first impression.
A attire speaks volumes before a person even say a single word.
It boosts your own self-esteem and mood noticeably.
Your polished look conveys professionalism in the office.
https://links.hypebeasts.ru/bzHU50r5GCp/
Stylish choices allow you to express your individual personality.
Others often perceive well-dressed people as more capable and reliable.
Therefore, investing in your wardrobe is an investment in your personal brand.
Поиск проверенного игорного площадки подразумевает детального анализа правовых свидетельств. Новые системы Вавада сайт предоставляют игрокам абсолютную данные о собственных допусках.
Механизм получения доступа охватывает различные требуемых стадий валидации. Администраторы требуют документы, устанавливающие личность и дееспособность. Обычный KYC-алгоритм продолжается от 24 до 72 временных отрезков.
Распоряжение капиталом открывается с задания границ на взносы. Искусные пользователи настаивают использовать норму 5% от общего гемблинг фонда на индивидуальную раунд.
Технические ограничения владельцев заставляют эксплуатировать альтернативные домены. Альтернативы сохраняют абсолютную функциональность первичного площадки, содержа летопись платежей и азартный прогресс.
Передовые платежные способы обеспечивают скоростные депозиты через цифровые портмоне. Bitcoin, Ethereum и постоянные токены гарантируют тайность и крошечные сборы. Период проведения получений доходит 10-30 промежутков.
Схемы постоянства предусматривают градационные категории с возрастающим вознаграждением. VIP-координаторы предоставляют личные подарки, увеличенные границы и приоритетную сервис.
Нынешние игроки встречаются с множеством технических аспектов при операциях с сертифицированными сайтами. Экспертные сайты типа казино 1хбет поставляют свежую материалы о операциях азартных организаций.
Процедура валидации учетной записи подразумевает множество принудительных фаз. Первичная валидация подразумевает передачи удостоверений удостоверяющих личность. Обычный набор предполагает свидетельство, лицензию водителя или заграничное удостоверение.
Системная компонента регистрации охватывает эксплуатацию криптографической защиты и двойной авторизации. Экспертные клиенты советуют активировать весь комплекс возможных возможностей защиты.
Зеркала представляют идентичные отражения базового портала с поддержанием тотального набора функций. Важнейшее преимущество выражается в соответствии платежных ограничений и критериев ставочных требований.
Схема обнаружения действующих резервных ссылок основывается на наблюдении профессиональных информационных каналов и партнерских порталов. Квалифицированные участники задействуют анонимайзеры для гарантирования стабильного доступа независимо от местных запретов.
Smart GenRx USA: canadian pharmacy mall – Smart GenRx USA
visit this store – Everything loads quickly and the selection of tech is excellent.
Отбор легального игорного заведения заставляет тщательного исследования официальных документов. Новые сайты лаки Р±РёСЂ казино гарантируют пользователям абсолютную информацию о текущих допусках.
Процесс оформления счета содержит множество ключевых этапов верификации. Представители запрашивают справки, засвидетельствующие персону и совершеннолетие. Стандартный KYC-регламент составляет от 24 до 72 промежутков.
Распоряжение капиталом запускается с назначения границ на вклады. Профессиональные геймеры предлагают использовать закон 5% от итогового гемблинг фонда на одну партию.
Системные блокировки операторов побуждают эксплуатировать резервные домены. Копии сохраняют абсолютную производительность первичного площадки, включая летопись переводов и игровой достижения.
Передовые банковские системы поддерживают мгновенные вклады через электронные счета. Bitcoin, Ethereum и фиксированные активы предоставляют скрытность и символические сборы. Период реализации снятий доходит 10-30 минут.
Схемы преданности подразумевают градационные статусы с нарастающим возвратом. VIP-координаторы предлагают уникальные бонусы, расширенные лимиты и приоритетную сервис.
Современные бетторы натыкаются с барьером доступа к сертифицированным сайтам. Организации фильтруют главные URL, но грамотные казино аква игроки понимают о наличии альтернативных ресурсов.
Параллельный портал образует стопроцентную копию базового платформы. SSL-сертификаты сохраняются такими же. Банковские транзакции проходят через равнозначные сервисы.
Процедура регистрации через параллельный ресурс подразумевает типовой верификации. Менеджеры просят бумаги для исполнения KYC-норм. Персональные информация реализуют расширенную валидацию.
Депозитные пределы на зеркальных сайтах аналогичны первичным требованиям. Минимальные суммы сохраняются стабильными. Накопительные накопления синхронизируются между всеми адресами.
Премиальные схемы работают полноценно на зеркальных платформах. Вейджер сохраняет исходные параметры. Срок активности реализации остаётся прежним.
Команда помощи обрабатывает заявки с зеркальных порталов равнозначно. Мгновенный общение обеспечивает круглосуточный расписание обслуживания.
Передовые игроки сталкиваются с сложностью соединения к проверенным ресурсам. Компании ограничивают базовые адреса, но грамотные п»ї1хбет казино пользователи помнят о доступности резервных платформ.
Альтернативный адрес составляет стопроцентную копию главного сайта. Криптографические алгоритмы работают аналогичными. Банковские действия осуществляются через сходные сервисы.
Процедура заведения учётной записи через дополнительный ресурс подразумевает типовой проверки. Сотрудники требуют бумаги для осуществления KYC-регламентов. Персональные характеристики осуществляют многоуровневую проверку.
Банковские лимиты на зеркальных сайтах соответствуют основным параметрам. Начальные вклады поддерживаются стабильными. Прогрессивные призовые фонды согласовываются между многочисленными адресами.
Стимулирующие планы оперируют завершённо на альтернативных площадках. Вейджер удерживает исходные показатели. Период действия оборота продолжается.
Служба поддержки анализирует вопросы с резервных ссылок идентично. Живой общение гарантирует беспрерывный порядок работы.
Определение надежного игорного ресурса подразумевает глубокого изучения юридических документов. Новые системы Лаки Бир казино обеспечивают участникам стопроцентную данные о действующих лицензиях.
Механизм регистрации охватывает определенное количество обязательных этапов аутентификации. Владельцы требуют свидетельства, подтверждающие личность и возраст. Стандартный KYC-процесс занимает от 24 до 72 интервалов.
Финансовое планирование стартует с назначения ограничений на вклады. Квалифицированные клиенты советуют применять установку 5% от общего гемблинг резерва на отдельную заход.
Технические барьеры владельцев заставляют использовать альтернативные ссылки. Клоны сохраняют максимальную эффективность центрального портала, охватывая летопись транзакций и казино продвижение.
Новые банковские сервисы гарантируют оперативные взносы через виртуальные кошельки. Bitcoin, Ethereum и устойчивые монеты дают конфиденциальность и минимальные платежи. Продолжительность проведения изъятий доходит 10-30 минут.
Программы преданности подразумевают градационные категории с прогрессивным вознаграждением. VIP-кураторы обеспечивают эксклюзивные поощрения, улучшенные границы и преимущественную техподдержку.
Hello There. I found your blog the usage of msn. That is a really smartly written article.
I’ll make sure to bookmark it and return to read extra of your useful information. Thanks for the
post. I’ll definitely comeback.
For examples
Online loans for bad credit for home repair
for partnership.
Nicely put. Thank you.
一帆平台智能AI观看体验优化,专为海外华人设计,提供高清视频和直播服务。
https://neuroreliefusa.shop/# neurontin tablets
Выбор безопасного казино ресурса нуждается тщательного исследования официальных бумаг. Передовые платформы mad casino обеспечивают участникам стопроцентную детали о имеющихся аккредитациях.
Процедура получения доступа содержит различные необходимых шагов проверки. Администраторы запрашивают бумаги, засвидетельствующие личность и совершеннолетие. Традиционный KYC-алгоритм требует от 24 до 72 интервалов.
Контроль средств инициируется с установления рамок на депозиты. Опытные участники рекомендуют использовать принцип 5% от совокупного азартного бюджета на единичную раунд.
Электронные запреты администраторов принуждают использовать дополнительные ссылки. Зеркала оберегают безусловную работоспособность основного платформы, охватывая архив переводов и развлекательный продвижение.
Актуальные платежные сервисы обеспечивают оперативные взносы через криптовалютные хранилища. Bitcoin, Ethereum и стейблкоины предоставляют анонимность и наименьшие взносы. Срок осуществления изъятий достигает 10-30 промежутков.
Алгоритмы верности подразумевают каскадные степени с увеличивающимся компенсацией. VIP-консультанты дают уникальные бонусы, расширенные границы и опережающую сервис.
Лицензионные площадки развлекательных возможностей обеспечивают пользователям право к профессиональному развлечениям через dedicated ресурсы, включая Lucky Bear , которые соблюдают международные требования security.
Последовательность создания аккаунта подразумевает заполнения верификационных информации через шифрованные SSL-connection. Операторы просят предоставить документальное свидетельство возраста и места нахождения для compliance законодательных критериев.
2FA проверка выступает required компонентом новейших механизмов security. Игроки получают SMS-пароли, push-сообщения или применяют специальные приложения в стиле Google Authenticator.
Mirror ссылки решают трудности territorial ограничений и DDoS-штурмов. С технической точки зрения копии формируют дублированные dublicates базового домена с maintaining features и индивидуальных параметров.
Опытные клиенты suggest удерживать актуальные перечни working mirrors в сохранённых ссылках браузера. Операторы отправляют updates о актуальных доменах через электронную почту, Telegram-чаты и смартфонные утилиты.
Денежные операции через legal порталы обеспечены криптографическими протоколами стандарта банковского сектора. Снятие финансов производится лишь на проверенные wallets собственника личного кабинета.
真实的人类第一季高清完整官方版,海外华人可免费观看最新热播剧集。
подробнее krab6.cc
Современные игроки встречаются с сложностью соединения к сертифицированным платформам. Провайдеры ограничивают главные порталы, но знающие Лаки Бир официальный сайт участники помнят о доступности дублирующих сайтов.
Параллельный портал образует полную копию оригинального платформы. SSL-сертификаты остаются такими же. Денежные операции реализуются через равнозначные каналы.
Процедура регистрации через параллельный ссылку требует привычной подтверждения. Сотрудники запрашивают удостоверения для осуществления KYC-стандартов. Персональные данные осуществляют двухфакторную аутентификацию.
Финансовые лимиты на дополнительных площадках аналогичны первичным требованиям. Наименьшие взносы продолжают стабильными. Увеличивающиеся накопления интегрируются между множественными ссылками.
Стимулирующие схемы действуют целостно на резервных ресурсах. Отыгрышный коэффициент удерживает стартовые значения. Срок активности отыгрыша продолжается.
Служба ассистирования обрабатывает вопросы с дополнительных порталов равнозначно. Прямой переписка обеспечивает непрерывный формат обслуживания.
Передовые провайдеры гемблинг услуг гарантируют пользователям доступ к высококлассному беттингу через надежные казино Вован порталы. Авторизованная бизнес требует исполнения определенных контролирующих требований.
Процедура создания индивидуального кабинета предусматривает аутентификацию персональных данных. Регуляторы применяют детализированные процедуры KYC и AML для блокировки поддельных операций.
Цифровые системы актуальных беттинг площадок базируются на защищенных инфраструктурах с шифровальными технологиями. Региональная блокировка вынуждает управляющих организовывать дублирующие адреса.
Резервные ресурсы образуют полные копии главного сайта с поддержанием всех сервисов и показателей. Клиенты достигают постоянный вход к средствам, беттинг статистике и клиентским опциям.
Платежные процедуры реализуются через встроенные финансовые сервисы. Ограничения на депозиты и изъятия определяются в соотношении с нормативными положениями и внутренними процедурами минимизации опасностей.
Опытные пользователи указывают контролировать положение сертификата через официальные регистры азартных органов. Имиджевые показатели включают позиции на отраслевых порталах и мнения истинных участников.
опубликовано здесь https://krab5-cc.at/
Выбор проверенного азартного заведения в современных границах нуждается повышенного рассмотрения к правовому статусу. Опытные пользователи учитывают, что п»ї1xBet казино предоставляет свежую сведения о функционирующих провайдерах.
Процедура открытия счета в сертифицированных площадках охватывает обязательную аутентификацию идентичности. KYC-процедуры охраняют как заведение, так и участника от махинаций. Временные границы на перечисление финансов до закрытия верификации – типичная практика.
Цифровые запреты на вход к развлекательным сервисам преодолеваются через альтернативные ссылки. Доступные копии поддерживают стопроцентную производительность главного ресурса. Денежные переводы, игровой прогресс и льготные планы функционируют постоянными.
Экономическая гарантированность характеризуется уровнем внедренных платежных способов. SSL-безопасность, PCI DSS подтверждение и расширенная аутентификация устанавливают прочный периметр безопасности.
Игровая набор официальных сервисов объединяет спины от топовых создателей. RTP-коэффициенты, дисперсия и вероятностные принципы претерпевают независимую валидацию в авторизованных центрах.
Программы мотивации в профессиональных сервисах формируются на ясных условиях активности. Требования x35-40 характеризуется адекватным для барабан-льгот, в то время как традиционные забавы засчитываются в подсчет с уменьшенным процентом.
Лицензионные провайдеры игровых возможностей дают участникам вариант к качественному времяпрепровождению через специализированные домены, включая Лаки Бир казино , которые исполняют transnational критерии конфиденциальности.
Механизм регистрации требует ввода верификационных информации через криптографические SSL-каналы. Операторы demanded official свидетельство совершеннолетия и адреса residence для поддержания юрисдикционных норм.
Многоуровневая аутентификация является принудительным составляющей современных платформ конфиденциальности. Клиенты имеют SMS-ключи, push-сообщения или эксплуатируют dedicated утилиты по типу Google Authenticator.
Mirror домены ликвидируют трудности territorial ограничений и DDoS-нападений. Техническим образом mirrors составляют идентичные копии primary ресурса с сохранением функциональности и клиентских информации.
Опытные клиенты suggest поддерживать новейшие реестры working копий в избранном браузера. Администрация доставляют информацию о современных URL через электронную почту, Telegram-каналы и телефонные программы.
Платёжные movements через надёжные порталы обеспечены cryptographic технологиями категории банковского сектора. Получение финансов производится solely на validated данные владельца account.
Keep on working, great job!
Also visit my webpage Prediksi Jitu Angka RTP Game PG Soft Besok Hari
I really love your blog.. Great colors & theme. Did you develop
this site yourself? Please reply back as I’m trying to
create my very own site and would love to find out where you got this from or exactly what the
theme is named. Kudos!
My web page: Jam Terbang Terbaik untuk Membeli Free Spin Buy Spin
A fascinating discussion is definitely worth comment.
I believe that you ought to write more on this
subject, it may not be a taboo matter but typically people do not speak about such subjects.
To the next! Many thanks!!
my blog: Tutorial Video Membaca Grafik RTP untuk Pemula Super Lengkap
Ориентирование в сфере сертифицированных ресурсов нуждается понимания актуальных технологий входа. Профессиональные игроки используют казино лаки Р±РёСЂ для обретения релевантной информации о оперативных адресах.
Алгоритм открытия личного кабинета в лицензированных компаниях предполагает детальную подтверждение. Новейшие организации применяют KYC-алгоритмы и AML-стандарты. Бумажная работа занимает от 24 до 72 часов.
Цифровые методы для минования препятствий эволюционируют сообща с интенсификацией нормативных мер. VPN-инструменты типа premium гарантируют шифрование AES-256 и стандарты OpenVPN. Непрерывность канала принципиально актуальна для высокоролловых сессий.
Альтернативные ресурсы действуют через географически разнесенные серверные кластеры. CDN-сети обеспечивают минимальную латентность для американских пользователей. Системное перенаправление инициируется при идентификации препятствия основного адреса.
Банковские манипуляции в легальных юрисдикциях следуют четким требованиям PCI DSS. Децентрализованные операции завоевывают распространение в результате скрытности и оперативности осуществления.
Планшетные приложения лучших компаний объединяют биометрическую идентификацию и push-уведомления для ключевых эпизодов. Настраиваемый интерфейс программно изменяется под характеристики монитора.
complete metric supply center – Quality craftsmanship and accessible prices make shopping easy.
Новейшие гемблеры встречаются с проблемой доступа к легальным ресурсам. Провайдеры запрещают первичные адреса, но искушённые винити официальный сайт участники осознают о присутствии дублирующих сайтов.
Дополнительный домен является абсолютную воспроизведение базового портала. Криптографические алгоритмы поддерживаются неизменными. Платёжные переводы реализуются через идентичные сервисы.
Методика создания аккаунта через альтернативный ресурс включает обычной валидации. Сотрудники просят справки для осуществления KYC-требований. Персональные информация выполняют комплексную верификацию.
Пополнительные ограничения на параллельных ресурсах соответствуют основным характеристикам. Минимальные вклады остаются стабильными. Растущие накопления координируются между множественными ресурсами.
Премиальные схемы действуют полноценно на зеркальных сайтах. Отыгрышный коэффициент поддерживает базовые значения. Период действия реализации поддерживается.
Сервис поддержки анализирует заявки с дополнительных ресурсов идентично. Интерактивный диалог гарантирует постоянный формат функционирования.
ссылка на сайт https://krab5-cc.at/
Лицензионные платформы азартных сервисов дают пользователям шанс к профессиональному гэмблингу через dedicated домены, включая Меллстрой официальный сайт , которые точно соблюдают международные нормы надёжности.
Алгоритм создания аккаунта подразумевает заполнения валидационных сведений через защищённые SSL-connection. Администрация просят документальное подтверждение дееспособности и региона нахождения для compliance правовых критериев.
Двухфакторная верификация выступает required частью новейших систем надёжности. Пользователи приобретают SMS-токены, push-алерты или задействуют профессиональные софт вроде Google Authenticator.
Зеркальные адреса устраняют вопросы territorial барьеров и DDoS-воздействий. По сути дубли представляют тождественные реплики базового платформы с сохранением опций и индивидуальных параметров.
Профессиональные пользователи призывают сохранять свежие базы рабочих зеркал в закладках интернет-программы. Букмекеры рассылают updates о fresh доменах через электронную почту, Telegram-чаты и mobile apps.
Банковские процедуры через legal платформы покрыты криптографическими системами уровня банковского направления. Вывод финансов осуществляется исключительно на проверенные реквизиты владельца личного кабинета.
Ориентирование в секторе проверенных площадок включает понимания передовых технологий соединения. Опытные участники задействуют п»ї1xBet для извлечения современной сведений о функционирующих URL.
Процесс регистрации аккаунта в проверенных операторах включает сложную проверку. Актуальные операторы задействуют KYC-механизмы и AML-критерии. Документальное сопровождение составляет от 24 до 72 периодов.
Цифровые инструменты для прохождения запретов прогрессируют вместе с повышением юридических шагов. VPN-платформы типа premium дают криптографию AES-256 и стандарты OpenVPN. Надежность подключения fundamentally существенна для премиальных партий.
Дублирующие сайты действуют через территориально рассредоточенные серверные мощности. CDN-комплексы поддерживают минимальную пинг для азиатских клиентов. Автоматическое перенаправление запускается при распознавании препятствия базового сайта.
Банковские движения в проверенных областях подчиняются определенным нормам PCI DSS. Криптовалютные переводы завоевывают распространение благодаря секретности и оперативности процессинга.
Портативные софт элитных организаций включают голосовую авторизацию и push-извещения для ключевых событий. Гибкий интерфейс автоматически настраивается под параметры экрана.
перейдите на этот сайт https://krab6a.cc
Nutmeg Neon Boutique Online – Shopping was effortless with clear product info and a simple interface.
我們提供官方合作夥伴台灣最完整的棒球即時比分相關服務,包含最新官方賽事資訊、數據分析,以及專業賽事預測。
Отбор надежного развлекательного ресурса в современных условиях нуждается повышенного рассмотрения к правовому статусу. Квалифицированные игроки знают, что Меллстрой демонстрирует современную сведения о активных ресурсах.
Процедура открытия счета в сертифицированных платформах объединяет принудительную аутентификацию личности. KYC-правила оберегают как казино, так и геймера от обмана. Кратковременные рамки на вывод денег до завершения контроля – привычная процедура.
Виртуальные запреты на вход к азартным сайтам нейтрализуются через дублирующие порталы. Функционирующие клоны обеспечивают абсолютную работоспособность базового портала. Финансовые операции, интерактивный достижения и привилегированные схемы остаются неизменными.
Денежная безопасность измеряется показателем эксплуатируемых финансовых способов. SSL-защита, PCI DSS валидация и усиленная верификация гарантируют прочный периметр защиты.
Развлекательная каталог проверенных заведений включает спины от лидирующих разработчиков. RTP-значения, дисперсия и алгоритмические принципы подвергаются беспристрастную аудит в признанных организациях.
Планы лояльности в профессиональных сервисах основываются на четких критериях вейджера. Условия ставок x35-40 признается справедливым для автомат-бонусов, в то время как классические активности засчитываются в зачет с пониженным коэффициентом.
Отбор надежного развлекательного заведения подразумевает детального анализа юридических свидетельств. Новые системы п»ї1xBet дают игрокам стопроцентную информацию о собственных санкциях.
Механизм получения доступа содержит несколько принудительных шагов проверки. Провайдеры настаивают удостоверения, засвидетельствующие самобытность и правоспособность. Типовой KYC-регламент длится от 24 до 72 интервалов.
Распоряжение капиталом начинается с фиксации ограничений на взносы. Опытные участники призывают эксплуатировать закон 5% от совокупного казино резерва на конкретную игру.
Цифровые ограничения поставщиков заставляют применять альтернативные ссылки. Дубликаты поддерживают стопроцентную активность основного портала, включая архив транзакций и гемблинг успех.
Актуальные банковские инструменты обеспечивают моментальные инвестиции через виртуальные счета. Bitcoin, Ethereum и постоянные токены поддерживают скрытность и наименьшие взносы. Срок обработки снятий равно 10-30 интервалов.
Программы постоянства охватывают ступенчатые статусы с нарастающим компенсацией. VIP-консультанты предлагают индивидуальные награды, повышенные ограничения и первоочередную сервис.
Выбор безопасного betting площадки в нынешних рамках предполагает тщательного изучения к лицензионному положению. Знающие пользователи учитывают, что Bollywood казино содержит последнюю материалы о действующих ресурсах.
Процесс записи в сертифицированных заведениях охватывает обязательную аутентификацию личности. KYC-процедуры обеспечивают как площадку, так и клиента от обмана. Временные ограничения на вывод средств до закрытия верификации – привычная практика.
Электронные блокировки на доступ к гемблинг ресурсам преодолеваются через дублирующие URL. Функционирующие отражения предоставляют полную эффективность главного платформы. Денежные транзакции, азартный достижения и привилегированные предложения поддерживаются неизменными.
Материальная безопасность характеризуется критерием используемых банковских методов. SSL-кодирование, PCI DSS лицензирование и многоуровневая подтверждение создают прочный барьер защиты.
Интерактивная библиотека лицензированных провайдеров предоставляет слоты от топовых разработчиков. RTP-индексы, дисперсия и вероятностные системы претерпевают внешнюю аудит в утвержденных учреждениях.
Планы стимулирования в качественных операторах базируются на четких требованиях активности. Вейджер x35-40 характеризуется приемлемым для барабан-поощрений, в то время как настольные активности включаются в подсчет с пониженным фактором.
What impressed me about this casino https://bioro.pl/ is the quality of the games. Everything runs smoothly, the design is clean, and there’s always something new to explore, which keeps it engaging.
Рабочие резервные адреса лицензированных игорных заведений на казино СЂР° дают беспрерывный коннект к геймерским ресурсам. Система реплицирования формирует точные версии корневого ресурса с удержанием всех возможностей.
Схема оформления профиля через резервную ссылку в точности дублирует базовую форму. Только пришедшие клиенты прописывают действующий email, генерируют сложный пароль и выбирают основную валюту.
Верификация учетной записи требует предоставления документов по KYC-регламенту. Фото национального документа, подтверждение резиденции и платежные сведения проходят программную верификацию в течение 24-72 периодов.
Подключение активных пользователей выполняется через базовую модуль с 2FA проверкой. Сессионные токены отправляются на сотовый устройство или email.
Функционал входящего блока через дублирующие порталы предлагает популярные платежные системы. Visa, Mastercard, онлайн хранилища Skrill, Neteller, цифровые активы Bitcoin, Ethereum реализуются с минимальными сборами 0-3%.
Gaming ассортимент клонируется в точности включая машины, карточные геймплей, live-операторов и накопительные призы. RTP-параметры, вариативность и ставочные требования поддерживаются аналогичными.
Акционная политика работает идентично базовому порталу. Welcome-комплекты, фриспины, возврат средств и VIP-планы инициируются системно при реализации установленных параметров.
this creative patch store – Discovered it by chance and I’m loving the overall feel.
посетить веб-сайт https://krab6a.cc/
Новейшие сервисы развлекательных игр предоставляют беттерам подключение к профессиональному беттингу через защищенные п»ї1xBet зеркало порталы. Авторизованная функционирование нуждается соблюдения конкретных законодательных критериев.
Процесс регистрации клиентского учетной записи предусматривает верификацию приватных реквизитов. Администраторы эксплуатируют расширенные алгоритмы KYC и AML для исключения мошеннических финансовых действий.
IT решения новейших игорных домов основываются на защищенных дата-центрах с HTTPS алгоритмами. Локальные запреты обязывает провайдеров запускать резервные домены.
Зеркальные домены представляют эквивалентные клоны первичного ресурса с сохранением всех сервисов и информации. Участники приобретают беспрепятственный вход к счету, беттинг отчетности и пользовательским настройкам.
Финансовые операции реализуются через встроенные банковские процессоры. Пределы на вклады и изъятия регулируются в гармонии с лицензионными положениями и внутренними регламентами контроля угроз.
Опытные игроки указывают отслеживать положение разрешения через официальные реестры азартных ведомств. Имиджевые параметры содержат позиции на тематических платформах и комментарии действительных пользователей.
Официальные провайдеры гэмблинг сервисов предоставляют участникам вариант к качественному азартному досугу через целевые порталы, включая Меллстрой , что следуют мировые нормы надёжности.
Алгоритм активации подразумевает ввода валидационных данных через криптографические SSL-connection. Операторы demanded письменное свидетельство правоспособности и адреса проживания для compliance правовых правил.
Двухфакторная верификация является принудительным компонентом передовых систем безопасности. Игроки обретают SMS-коды, push-алерты или применяют специализированные tools типа Google Authenticator.
Дублирующие URL нейтрализуют сложности territorial санкций и DDoS-assault. Техническим образом mirrors образуют тождественные dublicates главного сайта с сохранением возможностей и индивидуальных сведений.
Компетентные геймеры призывают хранить актуальные базы working mirrors в favourites обозревателя. Management доставляют сведения о новых доменах через электронную почту, Telegram-чаты и телефонные apps.
Денежные переводы через лицензионные площадки обеспечены защитными протоколами класса банковского направления. Снятие средств производится исключительно на проверенные счета держателя учётной записи.
艾一帆海外版,专为华人打造的高清视频平台,支持全球加速观看。
курсовая заказать недорого kupit-kursovuyu-62.ru .
Top Australian online casinos 2025 – real money gaming hub
海外华人必备的yifan平台运用AI智能推荐算法,提供最新高清电影、电视剧,无广告观看体验。
Excellent web site you’ve got here.. It’s hard to find good quality
writing like yours nowadays. I truly appreciate individuals
like you! Take care!!
Отбор качественного betting площадки в актуальных обстоятельствах предполагает тщательного изучения к юридическому положению. Опытные участники осознают, что Килограмм казино демонстрирует новую сведения о активных сервисах.
Процедура записи в сертифицированных сервисах объединяет обязательную подтверждение личности. KYC-стандарты оберегают как оператора, так и пользователя от мошенничества. Временные лимиты на перечисление денег до окончания контроля – стандартная подход.
Технические блокировки на доступ к игровым порталам нейтрализуются через резервные адреса. Доступные копии предоставляют всестороннюю производительность главного портала. Расчетные транзакции, игровой продвижение и льготные планы функционируют стабильными.
Капитальная гарантированность выражается показателем задействованных банковских систем. SSL-защита, PCI DSS валидация и двухфакторная аутентификация обеспечивают защищенный заслон обороны.
Азартная библиотека лицензированных провайдеров содержит спины от лидирующих создателей. RTP-коэффициенты, волатильность и математические системы претерпевают независимую контроль в одобренных лабораториях.
Планы стимулирования в серьезных операторах строятся на прозрачных правилах отыгрыша. Вейджер x35-40 оценивается нормальным для барабан-льгот, в то время как классические забавы засчитываются в расчет с уменьшенным коэффициентом.
Подбор качественного гемблинг оператора в текущих рамках нуждается особого внимания к лицензионному статусу. Знающие клиенты понимают, что Вавада казино включает последнюю материалы о доступных провайдерах.
Механизм создания аккаунта в официальных платформах содержит принудительную подтверждение идентичности. KYC-нормы оберегают как оператора, так и игрока от афер. Краткосрочные лимиты на изъятие финансов до выполнения валидации – привычная методика.
Виртуальные запреты на соединение к развлекательным сервисам нейтрализуются через дублирующие адреса. Действующие копии предоставляют всестороннюю функциональность первичного платформы. Банковские движения, геймплейный прогресс и бонусные системы продолжают постоянными.
Денежная безопасность выражается критерием эксплуатируемых платежных механизмов. SSL-безопасность, PCI DSS валидация и усиленная аутентификация устанавливают стабильный периметр обороны.
Азартная набор проверенных операторов объединяет автоматы от известных создателей. RTP-показатели, дисперсия и алгоритмические формулы получают беспристрастную сертификацию в утвержденных лабораториях.
Программы вознаграждения в надежных сервисах основываются на понятных параметрах отыгрыша. Условия ставок x35-40 расценивается разумным для спин-подарков, в то время как стандартные активности принимаются в калькуляцию с редуцированным множителем.
узнать krab5.at
Подбор безопасного гемблинг площадки в текущих границах требует детального рассмотрения к лицензионному статусу. Опытные геймеры понимают, что Mellstroy Game демонстрирует последнюю данные о функционирующих операторах.
Алгоритм открытия счета в официальных платформах предусматривает обязательную верификацию идентичности. KYC-требования защищают как оператора, так и клиента от фрода. Кратковременные рамки на получение активов до окончания проверки – типичная процедура.
Виртуальные ограничения на доступ к азартным порталам устраняются через альтернативные адреса. Активные отражения обеспечивают тотальную работоспособность центрального сайта. Платежные транзакции, интерактивный результаты и бонусные системы продолжают неизменными.
Материальная защищенность характеризуется показателем внедренных банковских механизмов. SSL-кодирование, PCI DSS аттестация и дополнительная подтверждение формируют безопасный периметр обороны.
Геймплейная каталог сертифицированных сервисов включает автоматы от главных разработчиков. RTP-показатели, дисперсия и математические формулы проходят независимую аудит в авторизованных центрах.
Системы вознаграждения в надежных площадках опираются на прозрачных критериях ставок. Отыгрыш x35-40 считается справедливым для машина-привилегий, в то время как классические игры учитываются в подсчет с минимальным множителем.
Актуальные зеркала надежных гемблинг-платформ на Килограмм казино гарантируют устойчивый коннект к геймерским ресурсам. Методика зеркалирования генерирует идентичные дубликаты главного портала с сохранением всех инструментов.
Система оформления профиля через резервную ссылку на сто процентов повторяет основную заявку. Дебютные клиенты регистрируют функционирующий email, генерируют безопасный секретную комбинацию и определяют базовую курренси.
Подтверждение личного кабинета требует передачи свидетельств согласно KYC-требованиям. Фото ID-карты, свидетельство регистрации и карточные сведения анализируются посредством автоматическую контроль в течение 24-72 часов.
Вход действующих игроков реализуется через типовую интерфейс с 2FA верификацией. Одноразовые шифры доставляются на смс аппарат или e-mail адрес.
Возможности пополнительного раздела через зеркала обеспечивает востребованные финансовые системы. Visa, Mastercard, цифровые счета Skrill, Neteller, криптовалюты Bitcoin, Ethereum осуществляются с минимальными сборами 0-3%.
Игровая база копируется полностью включая spinning games, столовые забавы, live-хостов и максимальные награды. RTP-значения, колебания и проигрыш удерживаются неизменными.
Подарочная программа работает аналогично главному порталу. Welcome-комплекты, free spins, компенсация и VIP-системы активируются машинально при соблюдении фиксированных условий.
explore the platform – The photos and write-up together create a very informative experience.
premium story shop – Browsing today was effortless and the overall mood is light and enjoyable.
范德沃克高清完整版,海外华人可免费观看最新热播剧集。
Go to Cedar Celeste – I like the modern feel and effortless navigation throughout the site.
стоимость написания курсовой работы на заказ стоимость написания курсовой работы на заказ .
FilterFactory Pro – Navigation feels easy and product details are clear and helpful.
Looking well projects a strong first impression.
A attire speaks volumes before you actually say a word.
This boosts your own confidence and mindset significantly.
Your put-together look conveys competence in the workplace.
https://a1.gucci1.ru/GYc4eF74o/
Stylish clothing allow you to showcase your unique personality.
Others often perceive stylish people as more successful and trustworthy.
Ultimately, investing in your wardrobe is an investment in your personal brand.
Поиск в секторе лицензированных платформ подразумевает знания новых решений подключения. Умелые клиенты задействуют п»ї1xBet зеркало для обретения новейшей сведений о функционирующих доменах.
Процедура открытия счета в официальных операторах подразумевает комплексную аутентификацию. Актуальные компании внедряют KYC-системы и AML-критерии. Документальная процедура отнимает от 24 до 72 промежутков.
Цифровые способы для преодоления ограничений улучшаются синхронно с повышением юридических решений. VPN-платформы категории premium предоставляют безопасность AES-256 и протоколы OpenVPN. Надежность связи fundamentally существенна для премиальных заходов.
Запасные адреса оперируют через территориально разнесенные IT ресурсы. CDN-структуры предоставляют минимальную время ответа для американских клиентов. Системное перенаправление запускается при идентификации недоступности основного сайта.
Банковские движения в легальных зонах следуют конкретным правилам PCI DSS. Криптовалютные операции завоевывают востребованность по причине секретности и скорости реализации.
Мобильные софт топовых брендов содержат физиологическую подтверждение и push-алерты для существенных событий. Адаптивный облик программно изменяется под настройки панели.
Нынешние клиенты имеют дело с множеством технических нюансов при процессах с проверенными площадками. Профессиональные источники типа Vavada casino предоставляют свежую сведения о операциях гэмблинговых компаний.
Процедура верификации учетной записи содержит несколько необходимых шагов. Начальная валидация включает предоставления справок подтверждающих индивидуальность. Типовой перечень включает удостоверение личности, права или международное ID.
Программная компонента регистрации предполагает внедрение зашифрованного канала и двухфакторной аутентификации. Профессиональные участники подсказывают активировать максимум предложенных настроек безопасности.
Запасные домены представляют точные клоны главного портала с удержанием исчерпывающего возможностей. Важнейшее преимущество кроется в идентичности платежных границ и условий условий прокрутки.
Процедура обнаружения активных дублирующих порталов фундируется на наблюдении специализированных мессенджер групп и сотрудничающих сайтов. Экспертные игроки используют VPN-сервисы для обеспечения стабильного доступа независимо от местных ограничений.
超人和露易斯第二季高清完整官方版,海外华人可免费观看最新热播剧集。
Выбор безопасного казино ресурса предполагает тщательного рассмотрения юридических разрешений. Инновационные порталы казино Вован предоставляют пользователям безусловную данные о текущих лицензиях.
Процедура открытия аккаунта включает множество обязательных шагов верификации. Представители истребуют бумаги, устанавливающие индивидуальность и возраст. Обычный KYC-алгоритм занимает от 24 до 72 интервалов.
Банкролл-менеджмент открывается с назначения ограничений на депозиты. Опытные игроки предлагают использовать принцип 5% от полного развлекательного резерва на единичную игру.
Технические запреты провайдеров вынуждают внедрять вспомогательные пути. Клоны сохраняют абсолютную эффективность основного площадки, охватывая историю транзакций и азартный результаты.
Инновационные платежные инструменты гарантируют оперативные вклады через цифровые портмоне. Bitcoin, Ethereum и постоянные токены обеспечивают тайность и наименьшие взносы. Длительность выполнения извлечений достигает 10-30 интервалов.
Планы постоянства включают ступенчатые степени с прогрессивным бонусом. VIP-менеджеры обеспечивают эксклюзивные подарки, расширенные ограничения и ускоренную поддержку.
Функционирующие альтернативные домены надежных gaming-операторов на типпи казино создают постоянный соединение к развлекательным системам. Схема реплицирования строит точные версии корневого портала с поддержанием всех инструментов.
Система открытия счета через дублирующий портал целиком дублирует оригинальную бланк. Свежие геймеры заполняют рабочий email, придумывают защищенный шифр и устанавливают базовую денежную единицу.
Аутентификация аккаунта предполагает загрузки документов по KYC-стандартам. Копия национального документа, доказательство места жительства и финансовые параметры контролируются системой машинную верификацию в течение 24-72 часа.
Авторизация существующих геймеров реализуется через обычную интерфейс с 2FA валидацией. Одноразовые коды приходят на телефонный аппарат или мейл.
Инструменты депозитного раздела через зеркала включает распространенные банковские механизмы. Visa, Mastercard, виртуальные балансы Skrill, Neteller, блокчейн-токены Bitcoin, Ethereum осуществляются с оптимизированными комиссиями 0-3%.
Игровая база копируется абсолютно включая машины, классические активности, live-операторов и прогрессивы. RTP-коэффициенты, дисперсия и отыгрыш сохраняются неизменными.
Подарочная программа выполняется схоже базовому порталу. Welcome-бандлы, бесплатные вращения, компенсация и VIP-системы активируются машинально при выполнении фиксированных стандартов.
посмотреть в этом разделе https://krab5-cc.at
Навигация в секторе сертифицированных площадок включает представления продвинутых способов авторизации. Продвинутые клиенты задействуют Меллстрой официальный сайт для извлечения новейшей материалов о действующих URL.
Механизм формирования счета в проверенных учреждениях включает детальную проверку. Передовые поставщики внедряют KYC-системы и AML-требования. Бумажная работа занимает от 24 до 72 временных отрезков.
Технические технологии для обхода запретов совершенствуются параллельно с укреплением нормативных мер. VPN-инструменты типа premium гарантируют кодирование AES-256 и стандарты OpenVPN. Надежность соединения принципиально существенна для элитных сессий.
Дублирующие домены действуют через пространственно распределенные IT инфраструктуры. CDN-сети гарантируют оптимальную задержку для азиатских геймеров. Цифровое роутинг запускается при распознавании ограничения основного сайта.
Платежные движения в официальных территориях подчиняются определенным критериям PCI DSS. Цифровые расчеты набирают признание благодаря скрытности и темпу выполнения.
Мобильные приложения элитных операторов объединяют голосовую проверку и push-алерты для принципиальных ситуаций. Гибкий облик автоматически изменяется под особенности монитора.
такой https://krab5-cc.at
Актуальные гемблеры встречаются с барьером соединения к лицензированным сайтам. Организации блокируют первичные адреса, но профессиональные п»ї1хбет пользователи учитывают о наличии резервных платформ.
Зеркало является полную копию базового портала. Криптографические алгоритмы работают равнозначными. Расчётные действия выполняются через идентичные каналы.
Процедура заведения учётной записи через параллельный ссылку подразумевает типовой подтверждения. Специалисты уточняют документы для соблюдения KYC-регламентов. Идентификационные параметры реализуют усиленную подтверждение.
Пополнительные ограничения на альтернативных площадках равняются главным параметрам. Стартовые вклады продолжают константными. Прогрессивные призовые фонды согласовываются между различными ресурсами.
Бонусные системы действуют целостно на резервных сайтах. Требования по обороту поддерживает стартовые показатели. Временные рамки отыгрыша остаётся прежним.
Сервис поддержки решает обращения с параллельных адресов таким же способом. Мгновенный общение поддерживает круглосуточный график работы.
canadian pharmacy scam: Smart GenRx USA – Smart GenRx USA
Определение надежного игрового оператора в актуальных границах требует особого изучения к юридическому положению. Компетентные участники осознают, что Вавада казино включает новую факты о активных провайдерах.
Алгоритм записи в легальных сервисах охватывает обязательную проверку идентичности. KYC-стандарты оберегают как заведение, так и клиента от махинаций. Временные рамки на перечисление финансов до выполнения проверки – обычная подход.
Виртуальные блокировки на соединение к betting сайтам устраняются через зеркальные ссылки. Активные клоны гарантируют полную возможности первичного ресурса. Финансовые переводы, интерактивный результаты и поощрительные схемы сохраняются стабильными.
Материальная стабильность характеризуется качеством внедренных расчетных методов. SSL-шифрование, PCI DSS сертификация и расширенная идентификация формируют стабильный заслон защиты.
Игровая каталог лицензированных сервисов включает спины от главных разработчиков. RTP-коэффициенты, колебания и алгоритмические модели получают беспристрастную проверку в признанных организациях.
Программы поощрения в качественных заведениях опираются на понятных параметрах вейджера. Проигрыш x35-40 считается справедливым для машина-привилегий, в то время как стандартные развлечения принимаются в калькуляцию с минимальным множителем.
https://sertralineusa.com/# sertraline zoloft
Действующие альтернативные домены лицензированных игорных заведений на казино типпи обеспечивают непрерывный коннект к игровым системам. Технология зеркалирования создает идентичные версии основного домена с поддержанием всех инструментов.
Механизм регистрации через зеркало полностью дублирует базовую заявку. Новые пользователи вводят функционирующий email, придумывают защищенный шифр и назначают операционную курренси.
Аутентификация учетной записи включает предоставления свидетельств следуя KYC-нормам. Фото паспорта, подтверждение места жительства и денежные сведения подвергаются цифровую верификацию в течение 24-72 периодов.
Аутентификация существующих пользователей осуществляется через классическую окно с расширенной аутентификацией. Краткосрочные ключи передаются на сотовый устройство или почтовый ящик.
Функционал депозитного модуля через mirror-сайты содержит актуальные денежные платформы. Visa, Mastercard, цифровые балансы Skrill, Neteller, блокчейн-токены Bitcoin, Ethereum обрабатываются с оптимизированными процентами 0-3%.
Гемблинг каталог дублируется в точности включая слоты, традиционные игры, live-операторов и прогрессивы. RTP-индикаторы, дисперсия и условия отыгрыша остаются идентичными.
Поощрительная схема действует идентично главному веб-площадке. Welcome-бандлы, фриспины, кешбэк и VIP-системы запускаются системно при выполнении фиксированных стандартов.
Новейшие участники обталкиваются с набором цифровых особенностей при процессах с сертифицированными порталами. Профильные ресурсы типа Рльдорадо казино обеспечивают релевантную контент о работе казино брендов.
Процесс верификации аккаунта содержит комплекс обязательных стадий. Стартовая аутентификация нуждается предоставления бумаг валидирующих гражданство. Стандартный перечень содержит документ, лицензию водителя или внешний паспорт.
Системная компонента записления предполагает задействование защищенного протокола и двойной авторизации. Профессиональные клиенты предлагают инициировать максимум возможных опций защиты.
Резервные ссылки являются полные отражения главного сайта с сохранением исчерпывающего набора функций. Важнейшее преимущество заключается в тождественности расчетных ограничений и требований отыгрыша.
Система локализации актуальных альтернативных адресов опирается на мониторинге профильных телеграм-каналов и сотрудничающих порталов. Опытные пользователи внедряют прокси-соединения для обеспечения постоянного соединения независимо от региональных барьеров.
For solutions
funds today loans online instant approval
for extra value.
Перемещение в области сертифицированных сайтов предполагает владения новых решений подключения. Опытные пользователи внедряют Лаки Бир зеркало для получения современной материалов о действующих ссылках.
Схема создания аккаунта в официальных учреждениях включает комплексную подтверждение. Новейшие организации задействуют KYC-механизмы и AML-правила. Бумажная работа требует от 24 до 72 часов.
Компьютерные инструменты для избежания запретов совершенствуются параллельно с интенсификацией правовых мер. VPN-платформы категории premium предлагают безопасность AES-256 и системы OpenVPN. Постоянство коннекта кардинально актуальна для VIP партий.
Запасные платформы функционируют через географически рассредоточенные компьютерные инфраструктуры. CDN-комплексы обеспечивают низкую пинг для международных игроков. Системное редирект включается при выявлении блокировки центрального ресурса.
Банковские транзакции в лицензированных областях соответствуют конкретным стандартам PCI DSS. Крипто операции получают актуальность вследствие анонимности и быстроте процессинга.
Смартфонные программы премиальных брендов содержат лицевую подтверждение и push-оповещения для критических эпизодов. Модифицируемый дизайн программно подстраивается под параметры экрана.
ifvod平台结合大数据AI分析,专为海外华人设计,提供高清视频和直播服务。
Современные бетторы встречаются с затруднением входа к официальным сайтам. Организации ограничивают стандартные домены, но искушённые п»ї1хбет регистрация участники знают о существовании резервных ресурсов.
Дополнительный домен формирует идентичную копию основного площадки. Системы безопасности поддерживаются равнозначными. Расчётные переводы выполняются через равнозначные механизмы.
Схема оформления профиля через резервный портал включает классической аутентификации. Менеджеры уточняют документы для исполнения KYC-стандартов. Персональные характеристики выполняют расширенную аутентификацию.
Пополнительные пределы на альтернативных порталах аналогичны основным характеристикам. Минимальные ставки поддерживаются константными. Увеличивающиеся накопления синхронизируются между различными ресурсами.
Бонусные программы оперируют комплексно на альтернативных платформах. Коэффициент оборота гарантирует оригинальные цифры. Временные рамки использования остаётся прежним.
Отдел обслуживания изучает запросы с резервных ссылок равнозначно. Интерактивный разговор гарантирует постоянный порядок обслуживания.
repair solutions hub – Detailed descriptions helped me feel confident about my choice.
нажмите https://krab5-cc.at/
События ufc в феврале марте 2026 три недели которые встряхнут дивизионы могут серьезно изменить титульную гонку. Ссылка здесь: https://tresh-lordfilm.ru/news/goryachaya-seriya-ufc-fevral-mart-2026-boi-kotorye-mogut-izmenit-vsyo-v-divizionah/
https://smartgenrxusa.com/# legitimate canadian pharmacy online
https://auto.ae/showrooms/all/
ivermectin pills human: Iver Therapeutics – Iver Therapeutics
Приехал в Ростов искал проституток в телеграме — нашёл нормальный чат. Лучшие проститутки индивидуалки, знакомятся, договариваются о встречах. Вот ссылка: https://t.me/Rostov_Znakomst
Функционирующие альтернативные домены официальных игорных заведений на Mellstroy Game создают стабильный вход к гемблинг системам. Принцип дублирования генерирует точные реплики главного веб-площадки с сохранением всех инструментов.
Процедура регистрации через дублирующий портал полностью копирует главную заявку. Только пришедшие игроки вводят действующий email, придумывают защищенный секретную комбинацию и выбирают операционную платежное средство.
Аутентификация личного кабинета требует отправки удостоверений опираясь на KYC-политике. Снимок паспорта, доказательство проживания и карточные реквизиты подвергаются программную анализ в течение 24-72 ч.
Подключение зарегистрированных пользователей производится через обычную интерфейс с усиленной идентификацией. Краткосрочные коды отправляются на сотовый девайс или email.
Функционал пополнительного раздела через mirror-сайты обеспечивает популярные финансовые платформы. Visa, Mastercard, электронные портмоне Skrill, Neteller, криптовалюты Bitcoin, Ethereum реализуются с минимальными платежами 0-3%.
Gaming библиотека клонируется целиком включая слоты, классические активности, live-дилеров и максимальные награды. RTP-индикаторы, вариативность и отыгрыш остаются аналогичными.
Поощрительная схема функционирует аналогично главному сайту. Welcome-предложения, free spins, возврат средств и VIP-программы запускаются автоматически при реализации определенных стандартов.
Перемещение в секторе лицензированных площадок подразумевает представления новых способов доступа. Продвинутые геймеры внедряют казино million для добывания актуальной фактов о активных URL.
Схема открытия учетной записи в лицензированных операторах подразумевает многоуровневую верификацию. Новейшие провайдеры внедряют KYC-протоколы и AML-нормы. Документальная процедура составляет от 24 до 72 часов.
Технические инструменты для преодоления блокировок улучшаются синхронно с интенсификацией законодательных решений. VPN-сервисы типа premium гарантируют кодирование AES-256 и технологии OpenVPN. Устойчивость подключения принципиально необходима для высокоролловых заходов.
Дублирующие ресурсы функционируют через территориально разнесенные серверные инфраструктуры. CDN-сети поддерживают сокращенную задержку для азиатских участников. Системное переключение запускается при распознавании блокировки основного адреса.
Банковские переводы в официальных территориях отвечают жестким критериям PCI DSS. Блокчейн платежи набирают распространение по причине конфиденциальности и динамике процессинга.
Мобильные клиенты топовых провайдеров содержат биометрическую аутентификацию и push-уведомления для принципиальных происшествий. Настраиваемый оформление программно настраивается под параметры дисплея.
Нынешние игроки пересекаются с множеством системных аспектов при процессах с проверенными сайтами. Экспертные ресурсы типа п»ї1хбет регистрация поставляют свежую материалы о работе гэмблинговых брендов.
Механизм валидации аккаунта содержит несколько неотъемлемых фаз. Начальная верификация нуждается передачи удостоверений доказывающих индивидуальность. Привычный пакет охватывает паспорт, автолицензию или международный паспорт.
Технологическая сторона создания аккаунта содержит эксплуатацию защищенного протокола и двойной авторизации. Квалифицированные клиенты настаивают задействовать все имеющихся параметров безопасности.
Дублирующие порталы формируют полные реплики основного портала с поддержанием исчерпывающего инструментария. Важнейшее достоинство кроется в идентичности расчетных ограничений и параметров ставочных требований.
Схема локализации активных альтернативных адресов опирается на контроле специализированных информационных каналов и партнерских ресурсов. Продвинутые пользователи эксплуатируют VPN-сервисы для гарантирования надежного соединения без оглядки от локальных барьеров.
Подбор качественного развлекательного площадки в текущих рамках требует особого анализа к регулятивному статусу. Опытные геймеры учитывают, что казино ретро демонстрирует новую данные о функционирующих площадках.
Процесс записи в сертифицированных заведениях охватывает требуемую подтверждение идентичности. KYC-правила защищают как сервис, так и участника от махинаций. Кратковременные лимиты на снятие капитала до финализации проверки – привычная практика.
Цифровые запреты на подключение к игровым порталам обходятся через параллельные домены. Активные клоны гарантируют всестороннюю функциональность первичного сервиса. Расчетные операции, азартный достижения и привилегированные планы поддерживаются неизменными.
Финансовая защищенность характеризуется показателем эксплуатируемых платежных инструментов. SSL-шифрование, PCI DSS сертификация и расширенная аутентификация формируют безопасный периметр безопасности.
Развлекательная ассортимент сертифицированных площадок охватывает слоты от топовых производителей. RTP-параметры, изменчивость и алгоритмические системы проходят нейтральную сертификацию в утвержденных учреждениях.
Планы лояльности в профессиональных сервисах формируются на ясных условиях активности. Вейджер x35-40 расценивается приемлемым для спин-поощрений, в то время как традиционные состязания учитываются в калькуляцию с уменьшенным коэффициентом.
Téléchargez et installez l’extension depuis le store de votre navigateur, puis utilisez-la lorsque vous visionnez une vidéo sur
Twitter.
neurontin 300 mg capsule neurontin buy online Neuro Relief USA
https://www.youtube.com/@haynesplumbingheatinginc633
direct access portal – The site offers tasty breakfast treats and useful recipe suggestions.
Найкращі ігри казино – безліч ігрових автоматів, правил, бонусів покерів і. Огляди, новинки спеціальні
Квартиры в новостройках https://domik-vspb.ru от застройщика — студии, однокомнатные и семейные варианты. Сопровождение сделки и прозрачные условия покупки.
Определение проверенного развлекательного площадки в нынешних границах нуждается детального изучения к законному режиму. Компетентные игроки учитывают, что п»ї1xBet казино демонстрирует современную факты о действующих площадках.
Механизм оформления профиля в проверенных платформах включает обязательную проверку персональных данных. KYC-стандарты гарантируют как сервис, так и участника от обмана. Промежуточные рамки на изъятие средств до закрытия контроля – обычная практика.
Виртуальные блокировки на доступ к азартным сайтам преодолеваются через зеркальные URL. Доступные копии гарантируют всестороннюю работоспособность первичного портала. Платежные переводы, развлекательный прогресс и наградные системы сохраняются константными.
Финансовая защищенность характеризуется критерием эксплуатируемых денежных механизмов. SSL-криптография, PCI DSS сертификация и расширенная верификация устанавливают защищенный щит безопасности.
Азартная библиотека официальных операторов предоставляет спины от лидирующих создателей. RTP-показатели, дисперсия и расчетные модели претерпевают объективную аудит в аккредитованных институтах.
Механизмы лояльности в надежных казино опираются на ясных правилах проигрыша. Отыгрыш x35-40 признается нормальным для машина-льгот, в то время как карточные забавы учитываются в подсчет с уменьшенным коэффициентом.
Официальные ресурсы игорных опций дают участникам доступ к премиальному гэмблингу через целевые домены, включая Лаки Бир регистрация , которые точно исполняют международные стандарты надёжности.
Механизм открытия счёта предполагает заполнения authentication сведений через безопасные SSL-протоколы. Администрация demanded письменное доказательство age verification и места residence для compliance legal стандартов.
Multi-factor верификация является принудительным частью новейших архитектур конфиденциальности. Пользователи имеют SMS-коды, push-оповещения или внедряют профессиональные софт вроде Google Authenticator.
Альтернативные адреса решают препятствия локальных запретов и DDoS-штурмов. С технической точки зрения зеркала представляют копийные копии primary ресурса с maintaining функциональности и user деталей.
Компетентные геймеры suggest сохранять свежие реестры активных дублей в избранном обозревателя. Провайдеры отправляют новости о новых порталах через почтовые сервисы, Telegram-группы и портативные программы.
Финансовые переводы через официальные платформы защищены encryption алгоритмами категории банковского индустрии. Получение средств происходит лишь на аутентифицированные карты собственника учётной записи.
Trail Treasure Web – Natural outdoor tone with ideas that make sense.
Надёжные ресурсы гэмблинг опций oferuja участникам возможность к качественному развлечениям через dedicated сайты, включая СЌРЅРѕРјРѕ казино , которые именно придерживаются глобальные стандарты надёжности.
Механизм открытия счёта включает ввода идентификационных параметров через криптографические SSL-connection. Провайдеры просят предоставить документальное свидетельство age verification и локации регистрации для выполнения нормативных норм.
Двухэтапная authentication считается mandatory aspect современных архитектур безопасности. Клиенты имеют SMS-шифры, push-сообщения или эксплуатируют dedicated софт по типу Google Authenticator.
Зеркальные адреса нейтрализуют трудности географических ограничений и DDoS-нападений. Техническим образом зеркала являют копийные клоны главного ресурса с обеспечением опций и user данных.
Профессиональные геймеры предлагают поддерживать актуальные реестры активных копий в избранном browser. Букмекеры передают updates о fresh URL через почтовые сервисы, Telegram-каналы и телефонные софт.
Банковские операции через legal порталы обеспечены шифровальными алгоритмами класса банковского segment. Получение финансов реализуется единственно на validated wallets владельца account.
Нынешние клиенты встречаются с набором цифровых тонкостей при функционировании с проверенными сайтами. Профильные сайты типа тип топ казино обеспечивают релевантную контент о работе гэмблинговых компаний.
Механизм валидации профиля включает несколько принудительных этапов. Начальная подтверждение требует загрузки справок валидирующих субъект. Классический список предполагает удостоверение личности, автоудостоверение или заграничное удостоверение.
Техническая компонента регистрации содержит использование безопасного соединения и 2FA. Экспертные клиенты подсказывают инициировать максимум представленных возможностей безопасности.
Альтернативные адреса формируют абсолютные копии центрального домена с обеспечением исчерпывающего инструментария. Ключевое выгода заключается в соответствии расчетных рамок и требований проигрыша.
Алгоритм нахождения действующих резервных ссылок основывается на проверке экспертных информационных каналов и аффилированных платформ. Экспертные пользователи внедряют прокси-соединения для предоставления надежного подключения без оглядки от локальных ограничений.
Подбор безопасного казино заведения заставляет основательного рассмотрения лицензионных сертификатов. Инновационные платформы п»ї1xBet дают участникам полную данные о своих санкциях.
Механизм оформления счета подразумевает множество принудительных стадий аутентификации. Представители просят удостоверения, подтверждающие персону и совершеннолетие. Классический KYC-процесс занимает от 24 до 72 периодов.
Распоряжение капиталом запускается с назначения рамок на депозиты. Профессиональные клиенты предлагают задействовать норму 5% от итогового азартного средств на индивидуальную раунд.
Электронные препятствия провайдеров принуждают использовать вспомогательные маршруты. Копии поддерживают абсолютную функциональность основного портала, подразумевая историю сделок и казино прогресс.
Современные банковские способы гарантируют мгновенные вклады через блокчейн счета. Bitcoin, Ethereum и устойчивые монеты поддерживают скрытность и минимальные взносы. Время проведения извлечений достигает 10-30 отрезков.
Алгоритмы преданности предусматривают каскадные ранги с возрастающим кэшбэком. VIP-менеджеры предоставляют эксклюзивные бонусы, расширенные границы и преимущественную помощь.
Опрятный внешний вид создает сильное впечатление о вас.
Он влияет на оценку вас окружающими сразу.
Хорошее самочувствие в своем образе укрепляет личную самооценку.
Он подчеркивает ваш стандарт профессионализма и уважение к мелочам.
https://a3.megakazan.ru/jS87rs0u/
Через гардероб вы имеете шанс проявить свою личность и вкус.
Окружающие часто воспринимают стильных людей как более компетентных.
Следовательно, вложения в свой образ — это инвестиции в ваше будущее.
Ориентирование в сфере проверенных сайтов нуждается владения новых инструментов авторизации. Умелые клиенты задействуют Лаки Бир казино для приобретения новейшей материалов о функционирующих путях.
Механизм открытия профиля в проверенных организациях включает детальную верификацию. Современные организации используют KYC-системы и AML-нормы. Документооборот потребляет от 24 до 72 промежутков.
IT инструменты для минования блокировок совершенствуются одновременно с интенсификацией юридических решений. VPN-службы уровня premium обеспечивают криптографию AES-256 и протоколы OpenVPN. Непрерывность канала кардинально актуальна для высокоролловых партий.
Резервные адреса функционируют через пространственно рассредоточенные IT мощности. CDN-структуры поддерживают сокращенную задержку для азиатских игроков. Программное редирект активируется при идентификации блокировки главного сайта.
Финансовые движения в официальных зонах подчиняются жестким критериям PCI DSS. Криптовалютные расчеты увеличивают популярность в результате скрытности и быстроте процессинга.
Планшетные утилиты ведущих брендов содержат лицевую аутентификацию и push-оповещения для важных эпизодов. Изменяемый оформление независимо подстраивается под характеристики панели.
explore the collection – Notifications and details streamlined the entire shopping experience.
爱一番海外版,专为华人打造的高清视频平台,支持全球加速观看。
戏台在线免费在线观看,海外华人专属平台结合大数据AI分析,高清无广告体验。
Новейшие участники встречаются с проблемой связи к проверенным площадкам. Компании ограничивают базовые адреса, но знающие Vavada казино посетители понимают о доступности альтернативных сайтов.
Дополнительный домен формирует полную воспроизведение основного площадки. Системы безопасности сохраняются такими же. Финансовые процедуры осуществляются через идентичные шлюзы.
Алгоритм регистрации через параллельный домен требует типовой аутентификации. Операторы уточняют справки для осуществления KYC-регламентов. Паспортные характеристики подвергаются усиленную верификацию.
Вносительные рамки на дополнительных ресурсах идентичны базовым требованиям. Стартовые суммы остаются неизменными. Увеличивающиеся накопления интегрируются между множественными порталами.
Бонусные системы функционируют всесторонне на дополнительных площадках. Множитель ставок сохраняет оригинальные цифры. Тайминг отыгрыша сохраняется.
Сервис помощи решает обращения с резервных ресурсов аналогично. Мгновенный общение гарантирует круглосуточный формат оперирования.
Развлекательная индустрия представляет динамичный прогресс, притягивая множество игроков. Квалифицированные площадки предоставляют качественную пространство для пари. Детальную материалы о указанных провайдерах возможно отыскать на Вавада официальный сайт .
Аттестация составляет приоритетным аспектом определения портала. Надзорные органы Кюрасао предоставляют качественный проверку денежных процедур. Всякая легальная платформа реализует постоянные контроли RNG-генераторов.
IT параметры передовых азартных площадок содержат SSL-кодирование банковского ранга. Разработчики цифрового продукта уровня Microgaming, NetEnt, Pragmatic Play подключают комплексные модели рандомных показателей.
Процесс верификации профиля включает передачи удостоверений KYC-класса. Документ, подтверждение о доходах, доказательство прописки — типичный комплект для финального активации.
Альтернативные адреса ликвидируют препятствия с ограничениями поставщиков. Функционирующие варианты изменяются постоянно IT командами. Карманные утилиты обычно выполняются стабильнее онлайн форматов.
Банкролл-менеджмент создаёт перспективную эффективность гемблинговых партий. Квалифицированные пользователи рекомендуют контролировать величину депозита до 1-2% от суммарного бюджета.
помощь студентам курсовые kupit-kursovuyu-66.ru .
Real money online casino no deposit Australia – free cash offers
海外华人必备的yifan平台,提供最新高清电影、电视剧,无广告观看体验。
Лицензионные площадки игровых услуг обеспечивают пользователям шанс к премиальному игровому процессу через целевые домены, включая Голд казино , которые выполняют общепринятые стандарты защиты.
Последовательность активации требует внесения проверочных сведений через криптографические SSL-соединения. Менеджмент просят письменное verification правоспособности и места проживания для compliance правовых правил.
Двухфакторная аутентификация представляет необходимым частью современных архитектур безопасности. Users имеют SMS-ключи, push-сообщения или применяют специальные tools типа Google Authenticator.
Резервные адреса ликвидируют проблемы локальных запретов и DDoS-штурмов. Технически зеркала являют аналогичные реплики главного ресурса с поддержанием возможностей и клиентских сведений.
Skilled геймеры советуют удерживать обновлённые каталоги активных зеркал в favourites обозревателя. Management отправляют новости о современных порталах через email, Telegram-группы и портативные программы.
Финансовые процедуры через надёжные ресурсы гарантированы шифровальными протоколами level банковского направления. Снятие финансов осуществляется единственно на проверенные реквизиты хозяина учётной записи.
Смотреть здесь https://krab6a.cc/
Легальные провайдеры игровых услуг дают геймерам право к профессиональному азартному досугу через тематические сайты, включая Клубника казино , что соблюдают международные нормы конфиденциальности.
Алгоритм активации включает ввода идентификационных деталей через безопасные SSL-соединения. Операторы требуют письменное verification дееспособности и места residence для соблюдения нормативных требований.
Многоуровневая верификация выступает required составляющей современных архитектур надёжности. Игроки располагают SMS-пароли, push-notification или внедряют специализированные софт наподобие Google Authenticator.
Зеркальные адреса ликвидируют проблемы региональных санкций и DDoS-штурмов. Техническим образом реплики образуют копийные клоны primary портала с удержанием возможностей и клиентских деталей.
Профессиональные клиенты предлагают сохранять новейшие реестры рабочих mirrors в избранном интернет-программы. Администрация отправляют информацию о современных ссылках через почтовые сервисы, Telegram-сообщества и мобильные утилиты.
Денежные процедуры через лицензионные порталы обеспечены криптографическими протоколами категории банковского направления. Вывод денег происходит исключительно на подтверждённые wallets владельца личного кабинета.
secure shopping page – The order process was straightforward and reassuring.
Современные игроки натыкаются с проблемой связи к легальным сайтам. Организации запрещают главные URL, но искушённые Mellstroy Game казино пользователи знают о функционировании зеркальных платформ.
Параллельный портал является полную отображение оригинального площадки. Криптографические алгоритмы работают идентичными. Финансовые действия проходят через равнозначные шлюзы.
Методика регистрации через резервный ресурс подразумевает стандартной подтверждения. Администраторы просят бумаги для реализации KYC-стандартов. Индивидуальные данные подвергаются многоуровневую верификацию.
Финансовые рамки на резервных ресурсах равняются главным параметрам. Начальные взносы сохраняются фиксированными. Растущие накопления согласовываются между многочисленными порталами.
Бонусные программы оперируют целостно на резервных ресурсах. Вейджер удерживает базовые параметры. Длительность реализации остаётся прежним.
Отдел поддержки рассматривает запросы с резервных ресурсов таким же способом. Живой общение поддерживает круглосуточный режим работы.
найти это https://krab6a.cc/
Легальные платформы азартных возможностей гарантируют геймерам доступ к премиальному развлечениям через целевые порталы, включая Вавада РІС…РѕРґ , которые именно соблюдают международные нормы конфиденциальности.
Процедура создания аккаунта включает заполнения валидационных параметров через защищённые SSL-линии. Администрация просят документальное verification дееспособности и территории нахождения для compliance нормативных требований.
Многоуровневая проверка выступает mandatory элементом актуальных механизмов конфиденциальности. Пользователи приобретают SMS-пароли, push-сообщения или внедряют специализированные программы вроде Google Authenticator.
Mirror URL нейтрализуют проблемы географических санкций и DDoS-нападений. Технически копии являют аналогичные копии primary платформы с maintaining возможностей и user деталей.
Опытные клиенты рекомендуют удерживать свежие перечни действующих альтернатив в избранном интернет-программы. Провайдеры направляют информацию о актуальных адресах через почтовые сервисы, Telegram-communities и мобильные софт.
Payment процедуры через надёжные порталы покрыты шифровальными алгоритмами класса банковского индустрии. Вывод фондов осуществляется только на validated счета хозяина учётной записи.
digital optimization tag shop – Informative pages and efficient checkout improve overall satisfaction.
YouTube Yard Central – Pages load fast and everything is easy to read and navigate.
ifuntv海外华人首选,提供最新华语剧集、美剧、日剧等高清在线观看。
Актуальные порталы игорных продуктов дают клиентам доступ к премиальному беттингу через проверенные Vavada ресурсы. Легальная функционирование влечет следования четких правовых стандартов.
Процесс открытия клиентского аккаунта охватывает подтверждение личных сведений. Администраторы эксплуатируют детализированные системы KYC и AML для недопущения фродовых финансовых действий.
Цифровые решения актуальных казино строятся на зашифрованных серверах с криптографическими алгоритмами. Территориальные ограничения принуждает управляющих запускать вспомогательные ссылки.
Резервные порталы являют собой точные дубликаты главного ресурса с фиксацией всех инструментов и информации. Клиенты добиваются устойчивый подключение к депозиту, гемблинг статистике и индивидуальным опциям.
Денежные транзакции реализуются через встроенные расчетные системы. Рамки на взносы и обналичивания регулируются в соотношении с лицензионными условиями и организационными нормами управления рисками.
Профессиональные игроки советуют проверять ситуацию авторизации через государственные каталоги развлекательных органов. Репутационные индикаторы задействуют ранги на тематических сервисах и мнения действительных клиентов.
Ориентирование в пространстве официальных ресурсов подразумевает представления новых методов входа. Продвинутые игроки задействуют казино mad для обретения новейшей фактов о работающих путях.
Схема оформления учетной записи в надежных организациях подразумевает детальную подтверждение. Новейшие поставщики внедряют KYC-процедуры и AML-стандарты. Документооборот составляет от 24 до 72 периодов.
Технические решения для преодоления ограничений улучшаются вместе с повышением правовых инициатив. VPN-службы типа premium гарантируют криптографию AES-256 и системы OpenVPN. Устойчивость подключения критически существенна для привилегированных заходов.
Запасные домены работают через пространственно распределенные компьютерные системы. CDN-архитектуры осуществляют сокращенную время ответа для международных игроков. Цифровое перенаправление срабатывает при распознавании ограничения первичного домена.
Платежные операции в официальных областях подпадают под строгим правилам PCI DSS. Криптовалютные расчеты набирают распространение вследствие приватности и динамике процессинга.
Смартфонные приложения ведущих операторов включают голосовую аутентификацию и push-извещения для существенных происшествий. Настраиваемый внешний вид независимо подстраивается под особенности панели.
узнать больше https://krab6a.cc
Смотреть здесь krab6.cc
Актуальные операторы игорных активностей гарантируют клиентам подключение к премиальному развлечениям через сертифицированные п»ї1xBet казино платформы. Сертифицированная функционирование влечет исполнения определенных законодательных положений.
Алгоритм регистрации персонального профиля охватывает верификацию индивидуальных реквизитов. Регуляторы эксплуатируют детализированные протоколы KYC и AML для предотвращения нарушающих переводов.
Программные платформы актуальных беттинг площадок функционируют на защищенных серверах с криптографическими сертификатами. IP-фильтрация вынуждает провайдеров разрабатывать альтернативные адреса.
Дублирующие сайты представляют аналогичные репликации первичного домена с фиксацией всех сервисов и сведений. Клиенты достигают устойчивый связь к капиталу, игровой записям и клиентским опциям.
Финансовые действия проходят через синхронизированные банковские процессоры. Границы на депозиты и обналичивания регулируются в соотношении с регуляторными стандартами и корпоративными регламентами снижения потерь.
Квалифицированные клиенты указывают контролировать положение авторизации через регуляторные реестры гемблинг структур. Престижные характеристики задействуют рейтинги на профильных сервисах и feedback истинных беттеров.
Новейшие провайдеры беттинг развлечений предоставляют участникам возможность к премиальному игровому процессу через надежные Килограмм казино сайты. Официальная деятельность предполагает следования конкретных надзорных стандартов.
Процедура регистрации индивидуального кабинета содержит подтверждение персональных сведений. Администраторы внедряют комплексные механизмы KYC и AML для исключения незаконных финансовых действий.
Программные системы современных развлекательных порталов строятся на надежных хостингах с шифровальными технологиями. IP-фильтрация вынуждает управляющих организовывать параллельные порталы.
Дублирующие платформы являют собой идентичные репликации первичного сайта с фиксацией всех возможностей и показателей. Пользователи получают устойчивый подключение к балансу, гемблинг отчетности и индивидуальным установкам.
Платежные операции выполняются через интегрированные расчетные агрегаторы. Лимиты на взносы и снятия устанавливаются в согласии с правовыми критериями и организационными нормами минимизации опасностей.
Квалифицированные пользователи рекомендуют анализировать статус аккредитации через регуляторные каталоги гемблинг структур. Репутационные параметры включают места на профильных сайтах и отзывы настоящих беттеров.
塔尔萨之王高清完整官方版,海外华人可免费观看最新热播剧集。
Отбор проверенного betting ресурса в современных условиях заставляет тщательного рассмотрения к юридическому состоянию. Компетентные игроки учитывают, что Вавада регистрация предоставляет новую информацию о активных операторах.
Алгоритм регистрации в лицензированных площадках содержит принудительную подтверждение идентичности. KYC-нормы охраняют как сервис, так и геймера от махинаций. Промежуточные границы на получение средств до завершения контроля – привычная методика.
Электронные ограничения на подключение к betting порталам решаются через резервные домены. Функционирующие отражения гарантируют тотальную функциональность базового ресурса. Денежные движения, игровой прогресс и поощрительные программы поддерживаются постоянными.
Капитальная защищенность выражается критерием используемых банковских систем. SSL-защита, PCI DSS лицензирование и многоуровневая верификация устанавливают стабильный периметр безопасности.
Интерактивная ассортимент лицензированных заведений содержит машины от известных разработчиков. RTP-значения, колебания и расчетные формулы проходят внешнюю валидацию в утвержденных центрах.
Программы вознаграждения в серьезных операторах формируются на открытых правилах вейджера. Отыгрыш x35-40 оценивается разумным для спин-бонусов, в то время как традиционные состязания учитываются в зачет с пониженным коэффициентом.
Актуальные гемблеры оказываются с проблемой связи к проверенным сайтам. Компании закрывают базовые URL, но профессиональные Лаки Бир сайт участники осознают о наличии резервных сайтов.
Дополнительный домен является точную реплику оригинального портала. Криптографические алгоритмы поддерживаются такими же. Финансовые действия выполняются через те же системы.
Схема создания аккаунта через альтернативный ресурс предполагает привычной верификации. Специалисты выясняют удостоверения для реализации KYC-регламентов. Личные параметры реализуют расширенную подтверждение.
Финансовые пределы на дополнительных платформах соответствуют базовым условиям. Стартовые взносы продолжают постоянными. Увеличивающиеся призовые фонды согласовываются между множественными порталами.
Бонусные системы функционируют полноценно на зеркальных порталах. Вейджер обеспечивает базовые показатели. Временные рамки использования сохраняется.
Департамент ассистирования решает тикеты с резервных доменов идентично. Живой диалог обеспечивает непрерывный график деятельности.
超人和露易斯第四季高清完整官方版,海外华人可免费观看最新热播剧集。
Поиск проверенного казино площадки нуждается основательного разбора юридических документов. Актуальные сайты mad casino зеркало гарантируют игрокам абсолютную детали о собственных аккредитациях.
Система регистрации содержит различные обязательных шагов валидации. Провайдеры требуют бумаги, засвидетельствующие самобытность и совершеннолетие. Классический KYC-порядок длится от 24 до 72 часов.
Финансовое планирование запускается с установления ограничений на пополнения. Опытные клиенты советуют задействовать норму 5% от итогового игорного резерва на индивидуальную заход.
Цифровые блокировки поставщиков вынуждают задействовать вспомогательные адреса. Зеркала удерживают стопроцентную работоспособность основного площадки, предусматривая хронологию операций и игровой прогресс.
Инновационные финансовые системы дают моментальные депозиты через электронные хранилища. Bitcoin, Ethereum и стейблкоины предоставляют анонимность и минимальные платежи. Продолжительность осуществления снятий достигает 10-30 отрезков.
Схемы приверженности охватывают каскадные уровни с увеличивающимся бонусом. VIP-менеджеры гарантируют индивидуальные подарки, усиленные ограничения и опережающую сервис.
spark dex SparkDex is redefining decentralized trading with speed, security, and real earning potential. On spark dex, you keep full control of your assets while enjoying fast swaps and low fees. Powered by sparkdex ai, the platform delivers smarter insights and optimized performance for confident decision-making. Trade, earn from liquidity, and grow your crypto portfolio with sparkdex — the future of DeFi starts here.
Подробнее здесь список зеркал кракен
Рабочие альтернативные домены лицензированных азартных клубов на лаки биар казино гарантируют беспрерывный вход к гемблинг порталам. Технология зеркалирования строит точные реплики базового портала с удержанием всех возможностей.
Процедура регистрации через зеркало целиком воспроизводит стандартную форму. Новые геймеры заполняют валидный email, создают надежный пароль и определяют операционную валюту.
Верификация личного кабинета требует предоставления удостоверений согласно KYC-стандартам. Изображение ID-карты, верификация резиденции и карточные сведения контролируются системой машинную анализ в течение 24-72 часов.
Авторизация зарегистрированных геймеров производится через стандартную панель с 2FA аутентификацией. Сессионные шифры поступают на смс девайс или e-mail адрес.
Инструменты денежного сектора через альтернативные домены обеспечивает топовые расчетные платформы. Visa, Mastercard, онлайн хранилища Skrill, Neteller, crypto Bitcoin, Ethereum реализуются с оптимизированными платежами 0-3%.
Gaming коллекция дублируется абсолютно включая spinning games, традиционные игры, live-хостов и прогрессивы. RTP-показатели, вариативность и проигрыш остаются такими же.
Промо программа выполняется похоже центральному домену. Welcome-наборы, free spins, денежный возврат и VIP-программы инициируются автоматически при реализации прописанных параметров.
Поиск честного азартного ресурса требует основательного исследования регулятивных сертификатов. Актуальные системы п»ї1хбет РІС…РѕРґ гарантируют клиентам стопроцентную сведения о собственных лицензиях.
Механизм создания профиля содержит определенное количество обязательных стадий аутентификации. Представители истребуют удостоверения, доказывающие самобытность и правоспособность. Классический KYC-регламент длится от 24 до 72 периодов.
Управление банком инициируется с установления границ на взносы. Профессиональные клиенты настаивают использовать норму 5% от совокупного казино резерва на единичную партию.
Технические препятствия операторов принуждают применять вспомогательные домены. Дубликаты поддерживают абсолютную эффективность главного платформы, подразумевая архив переводов и казино результаты.
Современные финансовые инструменты дают оперативные взносы через блокчейн счета. Bitcoin, Ethereum и устойчивые монеты поддерживают приватность и символические взносы. Период выполнения получений равно 10-30 периодов.
Алгоритмы лояльности подразумевают градационные уровни с нарастающим бонусом. VIP-кураторы обеспечивают уникальные бонусы, увеличенные лимиты и преимущественную сервис.
Инновационные сервисы гемблинг активностей обеспечивают клиентам подключение к качественному развлечениям через сертифицированные Лаки Бир сайт системы. Сертифицированная операционная активность нуждается следования конкретных контролирующих критериев.
Алгоритм активации игрового счета предусматривает валидацию индивидуальных показателей. Операторы эксплуатируют многоуровневые алгоритмы KYC и AML для исключения незаконных транзакций.
Цифровые системы современных казино базируются на зашифрованных серверах с SSL технологиями. IP-фильтрация обязывает администраторов создавать альтернативные порталы.
Дублирующие ресурсы представляют идентичные клоны базового сайта с поддержанием всех сервисов и данных. Участники получают беспрепятственный связь к счету, азартной записям и клиентским конфигурациям.
Финансовые действия проходят через синхронизированные финансовые системы. Границы на взносы и выводы назначаются в согласии с регуляторными требованиями и внутренними нормами контроля угроз.
Опытные игроки предлагают анализировать условия лицензии через официальные списки беттинг органов. Имиджевые характеристики задействуют рейтинги на профильных сайтах и мнения подлинных клиентов.
страница https://krab5-cc.at/
FiberFoods Direct – Intuitive layout and a great selection of healthy items make shopping easy.
stream selection hub – I’ll be back shortly to explore more.
Available here
Top real money online casino USA
for a better outcome.
sertraline: order zoloft – zoloft generic
Поиск безопасного игрового площадки в нынешних обстоятельствах предполагает особого подхода к регулятивному уровню. Компетентные пользователи представляют, что Vavada зеркало отображает современную данные о доступных сервисах.
Алгоритм открытия счета в проверенных сервисах включает обязательную проверку документов. KYC-процедуры обеспечивают как казино, так и участника от обмана. Промежуточные рамки на снятие средств до закрытия подтверждения – обычная методика.
Виртуальные барьеры на доступ к азартным сайтам устраняются через зеркальные домены. Рабочие зеркала предоставляют тотальную производительность центрального портала. Денежные транзакции, интерактивный продвижение и бонусные программы продолжают стабильными.
Материальная безопасность определяется показателем задействованных платежных механизмов. SSL-кодирование, PCI DSS лицензирование и расширенная проверка формируют безопасный барьер ограждения.
Азартная ассортимент сертифицированных операторов объединяет барабаны от известных создателей. RTP-показатели, дисперсия и вероятностные схемы получают беспристрастную аудит в утвержденных центрах.
Планы поощрения в качественных площадках формируются на ясных требованиях ставок. Проигрыш x35-40 характеризуется нормальным для автомат-бонусов, в то время как традиционные развлечения принимаются в подсчет с уменьшенным фактором.
Актуальные игроки встречаются с множеством цифровых тонкостей при функционировании с лицензированными площадками. Профессиональные платформы типа п»ї1хбет РІС…РѕРґ выдают современную сведения о функционировании азартных провайдеров.
Механизм аутентификации профиля предполагает несколько необходимых этапов. Стартовая валидация включает предоставления справок верифицирующих личность. Классический пакет подразумевает ID, лицензию водителя или внешний паспорт.
Системная часть оформления предполагает внедрение зашифрованного канала и двухуровневой проверки. Экспертные клиенты настаивают задействовать совокупность возможных функций секьюрити.
Зеркала формируют абсолютные отражения основного сайта с поддержанием тотального инструментария. Ключевое плюс содержится в подобии расчетных рамок и норм ставочных требований.
Механизм выявления действующих альтернативных адресов опирается на контроле тематических уведомительных сервисов и связанных ресурсов. Продвинутые игроки эксплуатируют прокси-соединения для создания постоянного доступа безотносительно от географических барьеров.
https://ivertherapeutics.shop/# purchase ivermectin
Проверенные площадки игровых услуг oferuja пользователям шанс к премиальному гэмблингу через специализированные порталы, включая ДживиСпин , которые именно следуют глобальные регламенты надёжности.
Алгоритм открытия счёта подразумевает указания authentication данных через шифрованные SSL-соединения. Провайдеры просят предоставить официальное доказательство age verification и адреса регистрации для поддержания нормативных правил.
2FA идентификация является required частью современных solutions надёжности. Users приобретают SMS-коды, push-уведомления или эксплуатируют специальные софт по типу Google Authenticator.
Резервные URL ликвидируют трудности региональных барьеров и DDoS-атак. По сути дубли представляют тождественные копии primary сайта с maintaining features и клиентских деталей.
Профессиональные игроки рекомендуют поддерживать current реестры working зеркал в favourites веб-клиента. Management доставляют сведения о актуальных доменах через почтовые сервисы, Telegram-communities и портативные apps.
Финансовые транзакции через проверенные ресурсы покрыты cryptographic methods стандарта банковского сектора. Изъятие денег осуществляется исключительно на аутентифицированные реквизиты владельца профиля.
Грайте в популярні слоти — популярні ігрові автомати, джекпоти та спеціальні пропозиції. Огляди гри та можливості для комфортного харчування.
Новейшие пользователи имеют дело с набором программных особенностей при операциях с сертифицированными порталами. Тематические порталы типа Болливуд казино обеспечивают актуальную материалы о операциях казино операторов.
Процедура верификации учетной записи предполагает несколько неотъемлемых стадий. Первичная валидация включает размещения документов доказывающих личность. Классический набор содержит документ, водительские права или внешний паспорт.
Программная компонента регистрации охватывает задействование SSL-шифрования и двойной авторизации. Опытные геймеры рекомендуют инициировать весь комплекс предложенных возможностей секьюрити.
Запасные домены образуют абсолютные клоны центрального домена с сохранением комплексного функционала. Главное преимущество кроется в тождественности финансовых границ и требований условий прокрутки.
Алгоритм поиска действующих зеркал основывается на контроле тематических уведомительных сервисов и сотрудничающих площадок. Продвинутые участники применяют VPN-сервисы для гарантирования бесперебойного связи без оглядки от территориальных блокировок.
Найпопулярніша платформа українські казіно – популярні слоти, бонуси та турніри з призами. Огляди гри та правила участі в акціях.
https://auto.ae/catalog/
Чудові казіно з бонусами — депозитні бонуси, бездепозитні бонуси та Турнір з призами. Обзори пропозицій і правила участі.
These are actually impressive ideas in about blogging.
You have touched some fastidious things here.
Any way keep up wrinting.
Feel free to visit my web blog :: Roofer Glasgow
Беттинговая ниша демонстрирует интенсивный расширение, завлекая множество игроков. Профессиональные площадки гарантируют защищённую обстановку для игры. Подробную информацию о указанных компаниях доступно найти на Lucky Bear casino .
Аттестация остаётся приоритетным критерием селекции площадки. Надзорные органы Олдерни предоставляют качественный аудит финансовых процедур. Конкретная лицензированная платформа выполняет постоянные проверки RNG-механизмов.
Компьютерные свойства передовых игорных домов охватывают SSL-криптографию денежного категории. Производители программного обеспечения вроде Microgaming, NetEnt, Pragmatic Play подключают сложные модели рандомных величин.
Процесс проверки личного кабинета предусматривает передачи бумаг KYC-класса. Паспорт, свидетельство о доходах, валидация регистрации — стандартный набор для завершённого активации.
Дублирующие URL убирают барьеры с блокировками провайдеров. Актуальные зеркала изменяются систематически IT группами. Карманные приложения обычно действуют стабильнее онлайн версий.
Управление банкроллом определяет продолжительную успешность игровых периодов. Профессиональные пользователи настаивают сокращать сумму пари до 1-2% от совокупного бюджета.
Перемещение в пространстве проверенных платформ подразумевает знания актуальных решений доступа. Опытные геймеры применяют Vavada для получения свежей информации о функционирующих адресах.
Механизм открытия аккаунта в официальных операторах подразумевает многоуровневую верификацию. Передовые организации эксплуатируют KYC-системы и AML-стандарты. Оформление документов составляет от 24 до 72 периодов.
Цифровые решения для избежания запретов улучшаются вместе с интенсификацией правовых шагов. VPN-сервисы класса premium дают криптографию AES-256 и методы OpenVPN. Устойчивость соединения жизненно существенна для привилегированных заходов.
Дублирующие домены действуют через локально расположенные IT кластеры. CDN-сети поддерживают оптимальную задержку для международных геймеров. Техническое редирект активируется при обнаружении недоступности первичного портала.
Банковские манипуляции в лицензированных зонах отвечают строгим стандартам PCI DSS. Цифровые операции приобретают актуальность по причине конфиденциальности и динамике осуществления.
Мобильные клиенты топовых провайдеров содержат биометрическую подтверждение и push-оповещения для критических ситуаций. Гибкий облик самостоятельно корректируется под свойства дисплея.
visit this store – Navigation is easy and the design really stands out.
аренда мерседеса с водителем Москва Выбирая аренду Mercedes-Benz V-Class с водителем в Москве, вы получаете не только роскошный автомобиль, но и профессионального шофёра, отлично знающего городские маршруты и готового обеспечить пунктуальность и спокойствие в пути. Особое внимание уделяется трансферам в аэропорты Шереметьево, Домодедово, Внуково и Жуковский, где точность и своевременность играют ключевую роль.
Активные альтернативные домены проверенных гемблинг-платформ на Клубника казино обеспечивают постоянный доступ к развлекательным порталам. Методика дублирования генерирует полноценные клоны центрального домена с сохранением всех опций.
Алгоритм оформления профиля через резервную ссылку полностью копирует базовую заявку. Только пришедшие игроки регистрируют действующий email, генерируют надежный пароль и фиксируют операционную финансовый инструмент.
Валидация аккаунта требует отправки справок в соответствии с KYC-стандартам. Фото водительских прав, свидетельство проживания и финансовые сведения анализируются посредством цифровую анализ в течение 24-72 периодов.
Авторизация действующих игроков осуществляется через классическую форму с 2FA проверкой. Временные токены приходят на мессенджер девайс или e-mail адрес.
Функционал финансового блока через зеркала содержит популярные финансовые платформы. Visa, Mastercard, веб балансы Skrill, Neteller, виртуальные монеты Bitcoin, Ethereum выполняются с низкими сборами 0-3%.
Азартная коллекция копируется абсолютно включая spinning games, классические развлечения, live-ведущих и накопительные призы. RTP-значения, волатильность и условия отыгрыша сохраняются аналогичными.
Бонусная политика работает идентично корневому ресурсу. Welcome-наборы, free spins, денежный возврат и VIP-схемы стартуют автоматически при достижении установленных параметров.
Легальные платформы игровых опций oferuja игрокам шанс к высококлассному гэмблингу через dedicated ресурсы, включая Лаки Бир официальный сайт , которые специально исполняют transnational критерии надёжности.
Схема создания аккаунта necessita предоставления верификационных данных через криптографические SSL-линии. Администрация просят предоставить official подтверждение age verification и места residence для выполнения юрисдикционных требований.
Двухфакторная идентификация становится обязательным элементом современных архитектур защиты. Users получают SMS-пароли, push-оповещения или применяют специализированные программы типа Google Authenticator.
Mirror ссылки ликвидируют трудности локальных санкций и DDoS-атак. Технически mirrors являют копийные клоны основного портала с maintaining инструментария и пользовательских данных.
Опытные клиенты рекомендуют сохранять обновлённые перечни функционирующих mirrors в bookmark browser. Management рассылают новости о свежих ссылках через email, Telegram-каналы и телефонные софт.
Денежные переводы через лицензионные платформы покрыты шифровальными технологиями класса банковского области. Получение фондов реализуется единственно на подтверждённые данные держателя учётной записи.
Подбор проверенного развлекательного заведения в современных границах требует детального анализа к лицензионному режиму. Квалифицированные геймеры представляют, что Лаки Бир зеркало демонстрирует актуальную информацию о работающих операторах.
Механизм открытия счета в лицензированных заведениях предусматривает принудительную валидацию идентичности. KYC-нормы обеспечивают как площадку, так и клиента от мошенничества. Временные рамки на вывод финансов до завершения валидации – типичная методика.
Электронные ограничения на подключение к игровым сервисам устраняются через резервные URL. Активные клоны сохраняют полную производительность базового сайта. Расчетные движения, азартный статистика и привилегированные предложения поддерживаются стабильными.
Капитальная стабильность оценивается показателем задействованных финансовых инструментов. SSL-шифрование, PCI DSS сертификация и усиленная проверка формируют стабильный барьер обороны.
Азартная набор официальных провайдеров включает автоматы от лидирующих студий. RTP-значения, изменчивость и вероятностные модели испытывают беспристрастную аудит в утвержденных институтах.
Планы мотивации в достойных операторах формируются на понятных критериях отыгрыша. Отыгрыш x35-40 считается разумным для спин-привилегий, в то время как карточные развлечения включаются в подсчет с сниженным показателем.
Ориентирование в сфере сертифицированных платформ подразумевает знания современных инструментов входа. Опытные клиенты используют СЂР° РІС…РѕРґ для добывания новейшей материалов о работающих путях.
Алгоритм регистрации личного кабинета в официальных заведениях предполагает многоуровневую проверку. Актуальные провайдеры используют KYC-системы и AML-правила. Документооборот занимает от 24 до 72 интервалов.
Цифровые решения для обхода блокировок прогрессируют сообща с усилением нормативных шагов. VPN-решения класса premium предлагают криптографию AES-256 и стандарты OpenVPN. Надежность соединения кардинально важна для привилегированных партий.
Зеркальные платформы выполняют задачи через пространственно распределенные технические инфраструктуры. CDN-структуры осуществляют сокращенную пинг для глобальных участников. Цифровое перенаправление срабатывает при распознавании ограничения первичного домена.
Финансовые транзакции в лицензированных регионах соответствуют четким критериям PCI DSS. Децентрализованные операции получают популярность по причине приватности и быстроте выполнения.
Переносные утилиты ведущих брендов объединяют отпечатковую подтверждение и push-уведомления для критических ситуаций. Гибкий облик автоматически корректируется под характеристики экрана.
узнать больше Здесь https://krab5-cc.at
Рабочие mirror-ссылки проверенных казино на Mellstroy Game казино гарантируют устойчивый коннект к азартным порталам. Схема реплицирования строит идентичные дубликаты базового веб-площадки с поддержанием всех возможностей.
Процедура оформления профиля через альтернативный домен в точности имитирует стандартную заявку. Новые клиенты заполняют функционирующий email, формируют стойкий код доступа и определяют игровую курренси.
Подтверждение профиля включает передачи удостоверений следуя KYC-регламенту. Копия водительских прав, валидация адреса и денежные данные контролируются системой алгоритмическую контроль в течение 24-72 часа.
Аутентификация активных игроков выполняется через классическую интерфейс с двухфакторной проверкой. Временные коды поступают на сотовый девайс или электронную почту.
Возможности депозитного компонента через mirror-сайты предлагает популярные денежные системы. Visa, Mastercard, веб счета Skrill, Neteller, блокчейн-токены Bitcoin, Ethereum осуществляются с уменьшенными взносами 0-3%.
Развлекательная библиотека дублируется целиком включая автоматы, классические игры, live-дилеров и накопительные призы. RTP-коэффициенты, изменчивость и вейджер удерживаются аналогичными.
Подарочная механизм функционирует аналогично главному порталу. Welcome-предложения, даровые прокруты, возврат средств и VIP-курсы инициируются машинально при выполнении установленных критериев.
UK streetwear hub – Very clear design and seamless navigation throughout.
Новейшие операторы гемблинг активностей гарантируют пользователям вход к элитному игровому процессу через проверенные казино Lucky Bear системы. Официальная работа предполагает исполнения строгих регуляторных стандартов.
Система оформления пользовательского аккаунта включает подтверждение конфиденциальных показателей. Операторы задействуют углубленные механизмы KYC и AML для пресечения мошеннических транзакций.
IT инструменты современных гемблинг платформ базируются на стабильных облачных системах с криптографическими протоколами. Региональная блокировка обязывает управляющих организовывать альтернативные адреса.
Альтернативные ресурсы формируют идентичные клоны первичного платформы с сохранением всех возможностей и информации. Пользователи добиваются непрерывный связь к средствам, игровой статистике и индивидуальным параметрам.
Денежные действия реализуются через встроенные платежные процессоры. Лимиты на взносы и получения фиксируются в соотношении с правовыми стандартами и корпоративными политиками контроля угроз.
Опытные пользователи рекомендуют отслеживать условия сертификата через официальные реестры гемблинг структур. Авторитетные параметры включают позиции на экспертных платформах и мнения действительных клиентов.
Выбор надежного игорного портала требует тщательного разбора лицензионных документов. Актуальные сайты Либет сайт предлагают игрокам стопроцентную детали о действующих допусках.
Алгоритм оформления счета содержит различные обязательных стадий верификации. Операторы запрашивают бумаги, доказывающие персону и совершеннолетие. Типовой KYC-механизм продолжается от 24 до 72 часов.
Управление банком инициируется с фиксации границ на депозиты. Квалифицированные клиенты рекомендуют задействовать принцип 5% от суммарного азартного средств на одну раунд.
Системные блокировки операторов побуждают использовать альтернативные домены. Копии сохраняют абсолютную активность первичного ресурса, включая историю транзакций и развлекательный продвижение.
Современные платежные способы дают быстрые инвестиции через электронные хранилища. Bitcoin, Ethereum и стейблкоины предоставляют конфиденциальность и минимальные платежи. Период реализации извлечений насчитывает 10-30 минут.
Алгоритмы преданности включают каскадные статусы с прогрессивным компенсацией. VIP-координаторы обеспечивают персонализированные вознаграждения, повышенные рамки и приоритетную обслуживание.
Подбор надежного игрового ресурса в актуальных обстоятельствах предполагает тщательного изучения к регулятивному уровню. Квалифицированные пользователи знают, что казино Рльдорадо демонстрирует современную материалы о действующих сервисах.
Процедура записи в сертифицированных платформах включает требуемую верификацию удостоверения. KYC-правила гарантируют как заведение, так и участника от фрода. Переходные рамки на перечисление денег до закрытия верификации – обычная методика.
Программные ограничения на вход к гемблинг ресурсам устраняются через зеркальные ссылки. Доступные дубликаты обеспечивают стопроцентную возможности центрального портала. Платежные процедуры, азартный результаты и бонусные планы поддерживаются постоянными.
Финансовая стабильность определяется уровнем эксплуатируемых платежных систем. SSL-защита, PCI DSS лицензирование и дополнительная аутентификация формируют надежный щит защиты.
Развлекательная коллекция сертифицированных сервисов объединяет барабаны от топовых студий. RTP-параметры, дисперсия и вероятностные схемы получают независимую валидацию в авторизованных учреждениях.
Системы стимулирования в надежных операторах формируются на ясных условиях ставок. Вейджер x35-40 оценивается приемлемым для автомат-подарков, в то время как настольные активности засчитываются в счет с пониженным множителем.
direct access portal – Rates seem well thought-out and compare nicely with other online shops.
Навигация в секторе лицензированных платформ нуждается знания продвинутых способов доступа. Умелые геймеры используют казино 1хбет для обретения новейшей материалов о функционирующих путях.
Механизм формирования профиля в сертифицированных операторах подразумевает комплексную аутентификацию. Современные организации применяют KYC-механизмы и AML-критерии. Документальная процедура составляет от 24 до 72 часов.
Технические решения для преодоления запретов эволюционируют сообща с ужесточением законодательных шагов. VPN-платформы разряда premium обеспечивают криптографию AES-256 и методы OpenVPN. Устойчивость подключения fundamentally значима для высокоролловых партий.
Запасные домены оперируют через географически рассредоточенные серверные ресурсы. CDN-комплексы предоставляют низкую латентность для международных участников. Техническое перенаправление срабатывает при выявлении ограничения базового ресурса.
Экономические переводы в официальных регионах подпадают под определенным стандартам PCI DSS. Криптовалютные переводы приобретают популярность благодаря приватности и динамике осуществления.
Планшетные софт лучших организаций интегрируют биометрическую авторизацию и push-оповещения для существенных происшествий. Адаптивный интерфейс самостоятельно адаптируется под свойства экрана.
Нынешние геймеры сталкиваются с сложностью доступа к официальным порталам. Поставщики ограничивают стандартные ссылки, но знающие казино Меллстрой посетители понимают о наличии резервных площадок.
Дополнительный домен составляет абсолютную воспроизведение первичного сайта. Криптографические алгоритмы работают равнозначными. Платёжные переводы выполняются через идентичные сервисы.
Схема оформления профиля через зеркальный портал содержит типовой верификации. Менеджеры просят документы для реализации KYC-требований. Персональные параметры осуществляют комплексную подтверждение.
Финансовые рамки на параллельных платформах равняются главным характеристикам. Начальные суммы сохраняются стабильными. Растущие накопления координируются между разными адресами.
Стимулирующие схемы функционируют полноценно на дополнительных ресурсах. Требования по обороту поддерживает исходные величины. Временные рамки проигрывания не изменяется.
Отдел сопровождения решает запросы с параллельных доменов аналогично. Мгновенный разговор обеспечивает беспрерывный формат работы.
sertraline zoloft: zoloft without dr prescription – zoloft pill
海外华人必备的iyf官方认证平台,24小时不间断提供最新高清电影、电视剧,无广告观看体验。
Продолжение https://krab6a.cc
Рабочие дублирующие порталы проверенных gaming-операторов на п»ї1хбет регистрация гарантируют стабильный подключение к развлекательным платформам. Система дублирования формирует точные дубликаты основного домена с поддержанием всех опций.
Система создания аккаунта через дублирующий портал полностью копирует главную форму. Новые геймеры прописывают рабочий email, формируют надежный код доступа и устанавливают игровую курренси.
Валидация аккаунта предполагает передачи свидетельств следуя KYC-политике. Фото водительских прав, свидетельство адреса и банковские реквизиты подвергаются цифровую контроль в течение 24-72 временных единиц.
Вход активных участников происходит через стандартную окно с многоступенчатой аутентификацией. Разовые пароли доставляются на телефонный устройство или e-mail адрес.
Механизмы пополнительного блока через mirror-сайты предлагает распространенные денежные платформы. Visa, Mastercard, онлайн счета Skrill, Neteller, криптовалюты Bitcoin, Ethereum процессируются с уменьшенными платежами 0-3%.
Игровая коллекция повторяется на сто процентов включая машины, классические активности, live-хостов и накопительные призы. RTP-показатели, изменчивость и условия отыгрыша остаются точными.
Подарочная программа работает похоже базовому сайту. Welcome-комплекты, фриспины, денежный возврат и VIP-схемы включаются автоматически при достижении установленных критериев.
Нынешние клиенты пересекаются с изобилием цифровых особенностей при операциях с лицензированными платформами. Профильные сайты типа Mellstroy Game дают актуальную сведения о функционировании развлекательных организаций.
Процесс верификации кабинета содержит комплекс обязательных фаз. Начальная подтверждение предполагает размещения документов доказывающих гражданство. Стандартный пакет включает ID, автолицензию или международное ID.
Системная часть открытия счета подразумевает внедрение SSL-шифрования и 2FA. Опытные участники предлагают запускать весь комплекс имеющихся функций защиты.
Резервные ссылки представляют абсолютные копии базового портала с поддержанием полного инструментария. Центральное бонус выражается в подобии платежных ограничений и критериев вейджера.
Процедура выявления действующих альтернативных адресов фундируется на контроле специализированных мессенджер групп и аффилированных площадок. Продвинутые игроки применяют виртуальные частные сети для формирования надежного соединения независимо от географических запретов.
Действующие дублирующие порталы проверенных игорных заведений на Килограмм сайт создают постоянный подключение к игровым ресурсам. Система клонирования генерирует точные версии основного домена с фиксацией всех инструментов.
Алгоритм регистрации через резервную ссылку целиком копирует основную шаблон. Начинающие клиенты прописывают функционирующий email, устанавливают защищенный шифр и назначают основную финансовый инструмент.
Верификация счета требует загрузки документов опираясь на KYC-регламенту. Копия ID-карты, свидетельство проживания и денежные координаты анализируются посредством цифровую анализ в течение 24-72 часов.
Логин действующих геймеров происходит через обычную форму с двухфакторной идентификацией. Разовые токены поступают на сотовый девайс или почтовый ящик.
Механизмы пополнительного модуля через резервные ссылки содержит топовые расчетные инструменты. Visa, Mastercard, электронные портмоне Skrill, Neteller, цифровые активы Bitcoin, Ethereum осуществляются с минимальными платежами 0-3%.
Гемблинг библиотека дублируется абсолютно включая слоты, карточные геймплей, live-ведущих и прогрессивы. RTP-индикаторы, изменчивость и проигрыш удерживаются идентичными.
Акционная система оперирует похоже основному веб-площадке. Welcome-комплекты, даровые прокруты, refund и VIP-системы инициируются машинально при реализации фиксированных параметров.
Football fixtures today with live score tracking, know exactly when your team plays next
Лицензионные платформы игровых опций гарантируют клиентам вариант к профессиональному развлечениям через dedicated сайты, включая Болливуд РІС…РѕРґ , которые соблюдают transnational требования защиты.
Механизм создания аккаунта necessita заполнения проверочных сведений через криптографические SSL-соединения. Менеджмент demanded нотариальное доказательство правоспособности и места жительства для compliance законодательных норм.
Двухэтапная верификация становится required составляющей современных архитектур надёжности. Участники получают SMS-пароли, push-оповещения или внедряют профессиональные программы вроде Google Authenticator.
Альтернативные домены ликвидируют вопросы региональных ограничений и DDoS-нападений. Техническим образом копии составляют копийные реплики центрального платформы с поддержанием features и пользовательских параметров.
Экспертные участники предлагают поддерживать свежие списки working дублей в bookmark веб-клиента. Операторы передают updates о новых порталах через почтовые сервисы, Telegram-сообщества и телефонные утилиты.
Банковские процедуры через официальные ресурсы secured криптографическими алгоритмами класса банковского области. Extraction фондов производится solely на validated карты держателя личного кабинета.
Отбор надежного гемблинг площадки нуждается основательного исследования официальных сертификатов. Новые ресурсы п»ї1xBet casino дают пользователям стопроцентную детали о действующих санкциях.
Алгоритм оформления счета включает определенное количество ключевых фаз валидации. Администраторы настаивают документы, доказывающие самобытность и зрелость. Типовой KYC-процесс продолжается от 24 до 72 часов.
Управление банком стартует с фиксации ограничений на вклады. Профессиональные клиенты настаивают использовать принцип 5% от общего гемблинг фонда на индивидуальную игру.
Цифровые запреты операторов принуждают внедрять альтернативные маршруты. Альтернативы хранят максимальную функциональность базового портала, содержа архив платежей и игровой прогресс.
Актуальные денежные способы дают быстрые инвестиции через цифровые кошельки. Bitcoin, Ethereum и устойчивые монеты поддерживают конфиденциальность и наименьшие отчисления. Длительность проведения извлечений равно 10-30 минут.
Схемы верности включают градационные статусы с нарастающим вознаграждением. VIP-кураторы обеспечивают уникальные награды, улучшенные рамки и приоритетную сервис.
Новейшие игроки оказываются с затруднением соединения к официальным порталам. Компании ограничивают основные URL, но искушённые Mellstroy Game участники понимают о доступности параллельных платформ.
Зеркало формирует идентичную дубликат первичного площадки. SSL-сертификаты работают идентичными. Платёжные транзакции проходят через идентичные системы.
Схема регистрации через зеркальный адрес требует обычной проверки. Сотрудники просят удостоверения для исполнения KYC-регламентов. Паспортные характеристики выполняют усиленную подтверждение.
Пополнительные ограничения на дополнительных площадках аналогичны базовым спецификациям. Низшие взносы продолжают фиксированными. Накопительные призовые фонды синхронизируются между различными доменами.
Стимулирующие схемы оперируют целостно на параллельных порталах. Вейджер сохраняет стартовые значения. Временные рамки оборота не изменяется.
Команда ассистирования анализирует заявки с альтернативных доменов равнозначно. Мгновенный переписка предоставляет непрерывный порядок работы.
online design hub – Sleek aesthetics and smooth navigation created a pleasant shopping experience.
Currently it seems like Movable Type is the top blogging platform out there right now.
(from what I’ve read) Is that what you’re using on your blog?
Feel free to surf to my webpage … Roof Repairs Glasgow
范德沃克第二季高清完整版,海外华人可免费观看最新热播剧集。
Новейшие сервисы беттинг игр предлагают игрокам возможность к высококлассному гемблингу через защищенные tip top casino порталы. Официальная деятельность влечет соблюдения строгих контролирующих стандартов.
Процесс активации пользовательского учетной записи предусматривает подтверждение приватных данных. Провайдеры применяют расширенные протоколы KYC и AML для недопущения незаконных переводов.
Технические решения современных казино базируются на защищенных хостингах с шифровальными протоколами. Геоблокировка обязывает управляющих запускать резервные домены.
Дублирующие платформы являют собой аналогичные дубликаты базового платформы с удержанием всех функций и показателей. Беттеры обеспечивают себе стабильный соединение к капиталу, гемблинг статистике и пользовательским конфигурациям.
Финансовые транзакции выполняются через связанные банковские шлюзы. Рамки на инвестиции и выводы регулируются в гармонии с правовыми критериями и индивидуальными регламентами минимизации опасностей.
Опытные клиенты предлагают анализировать ситуацию аккредитации через контролирующие регистры беттинг структур. Статусные параметры включают позиции на экспертных порталах и отзывы подлинных пользователей.
捕风捉影在线免费在线观看,海外华人专属官方认证平台,高清无广告体验。
Современные операторы развлекательных развлечений гарантируют беттерам подключение к профессиональному развлечениям через надежные Голд казино порталы. Легальная деятельность требует соблюдения строгих регуляторных требований.
Алгоритм открытия пользовательского счета задействует валидацию персональных данных. Операторы эксплуатируют комплексные протоколы KYC и AML для исключения мошеннических операций.
IT платформы современных развлекательных порталов функционируют на зашифрованных инфраструктурах с TLS алгоритмами. Геоблокировка вынуждает операторов разрабатывать резервные домены.
Зеркальные порталы формируют аналогичные копии центрального домена с поддержанием всех инструментов и показателей. Пользователи обеспечивают себе беспрепятственный доступ к счету, развлекательной данным и персональным конфигурациям.
Платежные процедуры проходят через подключенные финансовые агрегаторы. Границы на пополнения и получения регулируются в соотношении с законодательными условиями и корпоративными процедурами контроля угроз.
Опытные клиенты настаивают анализировать статус сертификата через государственные регистры игорных организаций. Имиджевые параметры задействуют рейтинги на профильных порталах и отзывы действительных клиентов.
Подбор надежного азартного портала в актуальных реалиях заставляет повышенного изучения к юридическому положению. Компетентные участники осознают, что Вавада официальный сайт демонстрирует новую информацию о функционирующих операторах.
Процедура записи в проверенных площадках содержит неизбежную аутентификацию идентичности. KYC-процедуры защищают как казино, так и клиента от махинаций. Кратковременные пределы на получение активов до окончания контроля – стандартная процедура.
Цифровые барьеры на соединение к развлекательным сайтам преодолеваются через дублирующие порталы. Доступные дубликаты сохраняют всестороннюю производительность базового портала. Финансовые движения, развлекательный результаты и привилегированные программы поддерживаются стабильными.
Капитальная стабильность характеризуется степенью внедренных финансовых способов. SSL-криптография, PCI DSS лицензирование и усиленная проверка создают надежный контур ограждения.
Азартная каталог сертифицированных сервисов предоставляет спины от топовых провайдеров. RTP-коэффициенты, дисперсия и математические принципы получают внешнюю проверку в авторизованных учреждениях.
Программы поощрения в надежных операторах опираются на открытых параметрах проигрыша. Проигрыш x35-40 считается адекватным для машина-бонусов, в то время как стандартные активности включаются в счет с редуцированным показателем.
超人和露易斯第一季高清完整版运用AI智能推荐算法,海外华人可免费观看最新热播剧集。
Поиск в сфере лицензированных порталов включает знания актуальных способов доступа. Опытные геймеры применяют п»ї1хбет регистрация для добывания актуальной фактов о функционирующих доменах.
Механизм формирования личного кабинета в сертифицированных операторах подразумевает сложную аутентификацию. Современные провайдеры применяют KYC-протоколы и AML-нормы. Документооборот требует от 24 до 72 промежутков.
Программные способы для обхода барьеров прогрессируют сообща с усилением правовых шагов. VPN-инструменты класса premium предоставляют криптографию AES-256 и технологии OpenVPN. Постоянство коннекта fundamentally необходима для высокоролловых заходов.
Дублирующие сайты действуют через территориально разнесенные цифровые ресурсы. CDN-структуры поддерживают сокращенную латентность для международных участников. Цифровое маршрутизация включается при обнаружении блокировки главного адреса.
Экономические переводы в легальных юрисдикциях соответствуют строгим нормам PCI DSS. Децентрализованные переводы увеличивают признание по причине приватности и темпу процессинга.
Планшетные утилиты лучших брендов интегрируют биометрическую идентификацию и push-сообщения для важных эпизодов. Гибкий внешний вид автономно адаптируется под настройки монитора.
узнать больше krab6
海外华人必备的ify平台,提供最新高清电影、电视剧,无广告观看体验。
Смотреть здесь https://krab5-cc.at/
Мега Даркнет — считается платформой, функционирующий в даркнете, где пользователи получают доступ множество специфических услуг.
мега сайт даркнет связан с теневым характером и максимальным уровнем анонимности.
Метафорически эту площадку выступает как вход в скрытую часть интернета, которое скрывает множество нюансов.
Мега Даркнет является одной из заметных частей «даркнета», где ключевую роль играют приватность посетителей и шифрование трафика.
Доступ к таким ресурсам требует применения специального ПО (например, Tor), и дополнительно VPN для обеспечения доступа из любой точки.
Чтобы попасть на этот сайт, пользователю необходимо знать точный адрес (ONION-ссылку) и провести тщательную настройку оборудования.
Главная особенность Меги состоит в отсутствии информации участников и децентрализованной структуре.
Посетители здесь могут искать разнообразные предложения: от закрытых каналов связи до площадок для торговли.
Ресурс предоставляет охрану от мониторинга благодаря современным технологиям шифрования.
Вместе с тем даже мощная система шифрования может гарантировать лишь частичную безопасность, особенно при неосторожных действиях посетителей ресурса.
В текущих реалиях интернета данная площадка выполняет узкоспециализированную функцию, привлекая тех, кто ищет неофициальные источники информацией и особыми сервисами.
Среди контента здесь бывают представлены как легальные материалы, так и нелегальные, что требует от посетителя высокой осторожности и осознанности.
Анализируя роль подобных площадок в интернете, можно выделить определенные нюансы, связанных с правилами поведения и безопасности.
Прежде всего, огромное значение имеет правильная конфигурация рабочего пространства и применение многоступенчатых мер защиты для уменьшения опасностей.
Любой участник обязан осознавать уровни анонимности и, желательно соблюдать моральным нормам при взаимодействии в этой среде.
Во-вторых, не стоит забывать о правовых рисках и возможных последствиях за незаконные действия.
Законодательство разных стран по-разному трактует само присутствие на подобных сайтах и меры наказания за активность там.
Отдельные специалисты отмечают, что подобные сайты могут служить местом для обмена знаниями и сохранения конфиденциальности при осознанном использовании.
Однако, опасность мошенничества, хищения средств и злонамеренных акций здесь никогда не исчезают.
Балансируя между открытостью информации и суровыми законами, теневая платформа является самым спорным элементом всемирной паутины.
Резюмируя для посетителей: требуется осмотрительно выбирать к тому, что смотреть и читать и проверке источников.
Обобщая вышесказанное можно сформулировать так: данная площадка — это сложный цифровой феномен. Сайт обеспечивает максимальную приватность и конфиденциальности, но накладывает на посетителя внимательности, технической грамотности и моральной ответственности.
Площадка показывает спектр человеческих поступков в обстановке минимального надзора и предоставляет платформу для коммуникации по закрытым вопросам.
Таким образом, этот сегмент сети представляет собой неоднозначный феномен глобальной сети, где баланс между свободой и безопасностью каждый пользователь находит для себя сам.
愛海外版,專為華人打造的高清視頻官方認證平台,支持全球加速觀看。
Tool Tower Market – Tools are presented in a clear and sensible way.
fast tech marketplace – The site responds instantly and performs great on my phone.
Азартная сфера демонстрирует быстрый развитие, завлекая массы игроков. Квалифицированные площадки предоставляют защищённую обстановку для ставок. Полную сведения о этих компаниях допустимо изучить на Лаки Бир РІС…РѕРґ .
Сертификация составляет основным критерием отбора сайта. Надзорные органы Гибралтара гарантируют серьёзный проверку валютных транзакций. Любая лицензированная платформа осуществляет постоянные контроли RNG-генераторов.
Технические параметры актуальных казино объединяют SSL-защиту денежного категории. Поставщики цифрового материала наподобие Microgaming, NetEnt, Pragmatic Play встраивают усовершенствованные алгоритмы случайных величин.
Процедура верификации аккаунта требует подачи удостоверений KYC-стандарта. ID, справка о средствах, удостоверение адреса — типичный пакет для завершённого активации.
Параллельные адреса исправляют трудности с запретами компаний. Свежие дубли обновляются систематически цифровыми службами. Портативные утилиты нередко функционируют устойчивее онлайн форматов.
Управление банкроллом задаёт продолжительную успешность азартных раундов. Экспертные участники предлагают контролировать размер пари до 1-2% от общего фонда.
Online casino Australia legal alternatives – safe offshore casinos
Новейшие сервисы развлекательных услуг дают клиентам путь к профессиональному беттингу через защищенные Лаки Бир регистрация платформы. Лицензированная деятельность требует соблюдения определенных правовых требований.
Механизм регистрации пользовательского кабинета содержит валидацию личных показателей. Управляющие эксплуатируют комплексные системы KYC и AML для блокировки мошеннических транзакций.
Программные решения передовых игорных домов функционируют на безопасных инфраструктурах с HTTPS сертификатами. Территориальные ограничения обязывает провайдеров создавать альтернативные адреса.
Параллельные ресурсы представляют эквивалентные репликации главного портала с поддержанием всех возможностей и параметров. Беттеры достигают устойчивый связь к капиталу, гемблинг истории и личным параметрам.
Денежные транзакции выполняются через встроенные банковские шлюзы. Ограничения на взносы и изъятия определяются в гармонии с регуляторными требованиями и индивидуальными политиками контроля угроз.
Экспертные беттеры настаивают проверять ситуацию разрешения через государственные регистры гемблинг структур. Репутационные параметры задействуют оценки на отраслевых платформах и оценки настоящих участников.
digital shopfront – Smooth checkout paired with a secure site experience made ordering simple.
Актуальные игроки встречаются с множеством технических особенностей при деятельности с проверенными платформами. Тематические порталы типа tip top casino выдают современную сведения о функционировании развлекательных компаний.
Система подтверждения учетной записи содержит набор обязательных уровней. Исходная подтверждение включает загрузки документов подтверждающих индивидуальность. Привычный пакет подразумевает паспорт, автолицензию или международное ID.
Цифровая элемент записления содержит внедрение безопасного соединения и двухфакторной аутентификации. Экспертные игроки настаивают включать полный набор доступных параметров безопасности.
Дублирующие порталы составляют точные копии главного сайта с обеспечением всего арсенала. Важнейшее достоинство содержится в подобии денежных границ и условий вейджера.
Механизм локализации действующих альтернативных адресов базируется на контроле профессиональных информационных каналов и аффилированных ресурсов. Профессиональные геймеры применяют туннельные протоколы для предоставления устойчивого соединения независимо от локальных ограничений.
Yesterday’s football match results and final scores, complete recap of all games played
Новейшие операторы развлекательных игр гарантируют клиентам вход к профессиональному игровому процессу через надежные Лев казино ресурсы. Лицензированная работа требует следования определенных регуляторных стандартов.
Механизм регистрации клиентского счета содержит аутентификацию персональных показателей. Управляющие внедряют углубленные алгоритмы KYC и AML для пресечения поддельных платежей.
Цифровые платформы современных игорных домов работают на стабильных инфраструктурах с шифровальными стандартами. Геоблокировка вынуждает операторов организовывать резервные адреса.
Параллельные сайты являют собой эквивалентные дубликаты первичного портала с удержанием всех сервисов и информации. Пользователи получают постоянный доступ к средствам, развлекательной истории и индивидуальным установкам.
Банковские операции выполняются через связанные расчетные шлюзы. Пределы на вклады и получения устанавливаются в гармонии с регуляторными критериями и внутренними процедурами риск-менеджмента.
Опытные гемблеры советуют мониторить положение разрешения через контролирующие регистры беттинг ведомств. Престижные индикаторы содержат места на экспертных сайтах и мнения истинных участников.
官方授权的ifuntv海外华人首选,第一时间提供最新华语剧集、美剧、日剧等高清在线观看。
casual and formal menswear – From relaxed to refined, everything is simple to explore.
Spot on with this write-up, I really believe that this amazing site needs far more attention. I’ll
probably be returning to read more, thanks for the info!
You can find it here
online slots South Dakota
for professional opinions.
http://neuroreliefusa.com/# neurontin 600 mg tablet
Функционирующие дублирующие порталы проверенных казино на Vavada casino создают беспрерывный подключение к игровым системам. Принцип копирования генерирует идентичные версии корневого ресурса с фиксацией всех опций.
Система создания аккаунта через зеркало полностью воспроизводит главную анкету. Начинающие участники регистрируют валидный email, создают надежный секретную комбинацию и назначают основную курренси.
Подтверждение учетной записи включает представления документов в соответствии с KYC-регламенту. Снимок паспорта, свидетельство адреса и денежные данные проверяются через программную проверку в течение 24-72 периодов.
Вход действующих пользователей производится через типовую окно с многоступенчатой валидацией. Одноразовые ключи доставляются на мобильный устройство или мейл.
Опции денежного модуля через альтернативные домены поддерживает актуальные денежные механизмы. Visa, Mastercard, электронные портмоне Skrill, Neteller, криптовалюты Bitcoin, Ethereum реализуются с оптимизированными взносами 0-3%.
Gaming ассортимент клонируется на сто процентов включая слоты, классические активности, live-хостов и прогрессивы. RTP-коэффициенты, изменчивость и условия отыгрыша удерживаются неизменными.
Акционная схема функционирует аналогично базовому сайту. Welcome-пакеты, безвозмездные спины, возврат средств и VIP-планы включаются системно при выполнении фиксированных стандартов.
ifuntv海外华人首选,提供最新华语剧集、美剧、日剧等高清在线观看。
Top online casinos Australia – best real money pokies and games
Современные платформы азартных услуг гарантируют игрокам доступ к элитному игровому процессу через сертифицированные Vavada сайты. Лицензированная функционирование требует учета определенных регуляторных требований.
Процедура открытия персонального профиля предусматривает валидацию приватных данных. Управляющие применяют детализированные механизмы KYC и AML для блокировки фродовых переводов.
Технические решения инновационных гемблинг платформ строятся на стабильных дата-центрах с HTTPS технологиями. Территориальные ограничения заставляет управляющих разрабатывать дублирующие порталы.
Альтернативные платформы формируют полные версии главного домена с удержанием всех функций и показателей. Беттеры обеспечивают себе беспрепятственный связь к средствам, гемблинг данным и индивидуальным опциям.
Банковские процедуры реализуются через подключенные финансовые системы. Границы на депозиты и выводы определяются в соответствии с регуляторными условиями и организационными процедурами снижения потерь.
Экспертные гемблеры советуют отслеживать состояние разрешения через надзорные каталоги игорных ведомств. Авторитетные индикаторы задействуют ранги на специализированных ресурсах и отзывы истинных игроков.
посетить веб-сайт https://krab6a.cc
risks of steroid use
References:
http://pattern-wiki.win/index.php?title=stampeconrad2252
сайт https://krab5-cc.at/
Casa Cable Essentials – The interface is tidy and understanding product info is effortless.
buy stromectol canada: how much does ivermectin cost – stromectol pill
Современные платформы игорных услуг гарантируют клиентам доступ к элитному развлечениям через надежные Меллстрой сайт ресурсы. Авторизованная операционная активность предполагает следования четких надзорных требований.
Процесс оформления персонального аккаунта охватывает подтверждение персональных реквизитов. Провайдеры задействуют углубленные алгоритмы KYC и AML для предотвращения мошеннических транзакций.
Технические системы передовых гемблинг платформ строятся на зашифрованных серверах с SSL алгоритмами. Локальные запреты побуждает операторов запускать резервные домены.
Зеркальные сайты являют собой аналогичные репликации первичного портала с удержанием всех инструментов и показателей. Игроки достигают устойчивый доступ к счету, гемблинг отчетности и клиентским параметрам.
Финансовые транзакции реализуются через синхронизированные банковские системы. Пределы на взносы и выводы назначаются в соотношении с лицензионными положениями и индивидуальными политиками риск-менеджмента.
Экспертные пользователи указывают контролировать состояние сертификата через регуляторные списки гемблинг органов. Статусные критерии задействуют ранги на специализированных сервисах и оценки истинных клиентов.
Исследование в мире официальных платформ предполагает осознания современных методов соединения. Умелые участники задействуют типпи для получения актуальной данных о оперативных доменах.
Механизм регистрации профиля в сертифицированных операторах охватывает тщательную подтверждение. Продвинутые организации внедряют KYC-процедуры и AML-правила. Бумажная работа занимает от 24 до 72 временных отрезков.
IT способы для преодоления запретов прогрессируют параллельно с повышением законодательных решений. VPN-решения уровня premium обеспечивают кодирование AES-256 и стандарты OpenVPN. Непрерывность подключения жизненно необходима для элитных раундов.
Резервные ресурсы действуют через географически рассредоточенные технические кластеры. CDN-структуры осуществляют низкую задержку для глобальных игроков. Системное маршрутизация активируется при обнаружении недоступности базового адреса.
Финансовые транзакции в сертифицированных регионах отвечают определенным требованиям PCI DSS. Криптовалютные операции завоевывают распространение благодаря анонимности и динамике обработки.
Портативные клиенты премиальных операторов объединяют лицевую подтверждение и push-сообщения для существенных происшествий. Настраиваемый внешний вид независимо подстраивается под особенности монитора.
Новейшие участники оказываются с затруднением доступа к сертифицированным сайтам. Организации ограничивают главные порталы, но грамотные п»ї1хбет участники понимают о доступности параллельных порталов.
Параллельный портал образует полную копию базового площадки. Протоколы шифрования поддерживаются такими же. Банковские транзакции реализуются через аналогичные системы.
Алгоритм создания аккаунта через дополнительный домен предполагает стандартной валидации. Менеджеры уточняют справки для осуществления KYC-правил. Личные характеристики выполняют усиленную валидацию.
Депозитные границы на параллельных сайтах соответствуют главным характеристикам. Наименьшие взносы остаются стабильными. Накопительные выигрышные пулы объединяются между многочисленными ресурсами.
Премиальные программы работают полноценно на параллельных сайтах. Множитель ставок обеспечивает исходные параметры. Срок активности использования не изменяется.
Отдел обслуживания решает вопросы с резервных доменов равнозначно. Мгновенный чат гарантирует постоянный график функционирования.
написание курсовой работы на заказ цена kupit-kursovuyu-63.ru .
Развлекательная сфера отображает динамичный рост, заинтересовывая миллионы игроков. Профессиональные сайты гарантируют стабильную условия для развлечений. Полную данные о указанных организациях реально отыскать на лаки Р±РёСЂ казино .
Лицензирование остаётся основным показателем селекции ресурса. Лицензиаты Олдерни предоставляют серьёзный контроль экономических манипуляций. Конкретная официальная ресурс проходит систематические инспекции RNG-систем.
Технические особенности инновационных игорных домов включают SSL-кодирование денежного класса. Провайдеры компьютерного ПО уровня Microgaming, NetEnt, Pragmatic Play подключают многоуровневые модели хаотичных чисел.
Схема аутентификации учётной записи предусматривает представления удостоверений KYC-типа. Паспорт, подтверждение о доходах, валидация проживания — базовый комплект для полноценного активации.
Дублирующие URL ликвидируют проблемы с ограничениями операторов. Свежие копии адаптируются систематически компьютерными службами. Смартфонные утилиты нередко оперируют качественнее сетевых вариантов.
Финансовая дисциплина формирует длительную доходность азартных раундов. Квалифицированные пользователи советуют контролировать объём бета до 1-2% от совокупного капитала.
Нашел статью про ufc в феврале марте 2026 три недели которые встряхнут дивизионы, где разбирают андеркарды и скрытые интриги. Ознакомиться можно тут: https://obves63.ru/news/ufc-fevral-mart-2026-polnyj-razbor-turnirov-s-akczentom-na-anderkardy-i-skrytye-intrigi/
Отбор качественного игрового портала в нынешних обстоятельствах нуждается детального подхода к лицензионному статусу. Знающие участники осознают, что казино 1xBet содержит последнюю материалы о работающих площадках.
Процесс открытия счета в сертифицированных площадках содержит требуемую подтверждение документов. KYC-стандарты гарантируют как сервис, так и участника от обмана. Краткосрочные рамки на перечисление денег до выполнения подтверждения – типичная практика.
Электронные барьеры на связь к betting сервисам решаются через дублирующие порталы. Рабочие клоны гарантируют тотальную функциональность первичного платформы. Расчетные переводы, азартный продвижение и льготные схемы продолжают стабильными.
Капитальная гарантированность выражается критерием задействованных финансовых способов. SSL-криптография, PCI DSS лицензирование и многоуровневая идентификация обеспечивают защищенный контур обороны.
Развлекательная каталог лицензированных площадок предоставляет слоты от ведущих студий. RTP-коэффициенты, колебания и расчетные схемы получают беспристрастную проверку в авторизованных учреждениях.
Механизмы стимулирования в надежных казино формируются на четких параметрах вейджера. Проигрыш x35-40 оценивается нормальным для машина-бонусов, в то время как традиционные активности засчитываются в расчет с сниженным фактором.
Актуальные участники встречаются с изобилием цифровых нюансов при операциях с проверенными платформами. Специализированные ресурсы типа п»ї1xBet обеспечивают современную сведения о работе игорных организаций.
Процедура аутентификации кабинета включает множество принудительных шагов. Стартовая верификация требует предоставления свидетельств удостоверяющих личность. Классический перечень включает свидетельство, водительские права или заграничное удостоверение.
Программная компонента оформления содержит эксплуатацию защищенного протокола и многофакторной защиты. Продвинутые клиенты подсказывают инициировать весь комплекс доступных настроек обеспечения.
Дублирующие порталы представляют идентичные клоны центрального платформы с удержанием комплексного набора функций. Ключевое достоинство состоит в схожести денежных лимитов и критериев ставочных требований.
Алгоритм выявления активных запасных доменов базируется на мониторинге тематических уведомительных сервисов и партнерских сайтов. Квалифицированные клиенты внедряют прокси-соединения для гарантирования бесперебойного входа без оглядки от географических барьеров.
FanFriendly Boutique – Fast interface and clear layout made shopping easy today.
spark dex SparkDex is redefining decentralized trading with speed, security, and real earning potential. On spark dex, you keep full control of your assets while enjoying fast swaps and low fees. Powered by sparkdex ai, the platform delivers smarter insights and optimized performance for confident decision-making. Trade, earn from liquidity, and grow your crypto portfolio with sparkdex — the future of DeFi starts here.
узнать больше https://krab6a.cc/
戏台在线免费在线观看,海外华人专属官方认证平台,高清无广告体验。
Ориентирование в пространстве проверенных порталов требует понимания актуальных технологий входа. Квалифицированные клиенты используют винити официальный сайт для приобретения новейшей фактов о оперативных адресах.
Механизм оформления счета в лицензированных операторах содержит комплексную верификацию. Современные операторы эксплуатируют KYC-протоколы и AML-требования. Оформление документов занимает от 24 до 72 временных отрезков.
Технические технологии для минования запретов развиваются сообща с ужесточением юридических инициатив. VPN-сервисы разряда premium предоставляют шифрование AES-256 и методы OpenVPN. Постоянство соединения fundamentally актуальна для премиальных игровых периодов.
Альтернативные адреса оперируют через территориально разнесенные технические мощности. CDN-сети предоставляют быструю время ответа для американских игроков. Системное перенаправление срабатывает при обнаружении недоступности основного домена.
Финансовые операции в проверенных областях следуют конкретным правилам PCI DSS. Криптовалютные расчеты приобретают распространение в результате скрытности и быстроте процессинга.
Портативные софт топовых компаний содержат физиологическую идентификацию и push-алерты для критических моментов. Модифицируемый облик автоматически настраивается под особенности дисплея.
organized storage hub – Everything feels simple to find and browse.
https://ivertherapeutics.shop/# stromectol 12mg
Развлекательная индустрия демонстрирует активный подъём, привлекая массы клиентов. Квалифицированные платформы обеспечивают стабильную обстановку для игры. Исчерпывающую сведения о таких организациях возможно отыскать на ДживиСпин казино .
Лицензирование выступает центральным показателем выбора сайта. Юрисдикции Олдерни гарантируют серьёзный проверку экономических процедур. Конкретная сертифицированная портал подвергается систематические инспекции RNG-алгоритмов.
Технические аспекты инновационных казино охватывают SSL-безопасность банковского стандарта. Поставщики компьютерного софта типа Microgaming, NetEnt, Pragmatic Play интегрируют сложные схемы непредсказуемых величин.
Процесс аутентификации счёта включает представления справок KYC-класса. Паспорт, свидетельство о средствах, удостоверение местожительства — типичный пакет для завершённого подключения.
Дублирующие порталы убирают барьеры с цензурой операторов. Функционирующие зеркала изменяются регулярно IT группами. Карманные утилиты нередко выполняются надёжнее браузерных версий.
Управление банкроллом задаёт долгосрочную доходность азартных сессий. Квалифицированные игроки настаивают лимитировать размер вейджера до 1-2% от полного бюджета.
tech deals platform – I received a rapid response that solved everything efficiently.
https://joyrulez.com/blogs/266785/%D0%91%D0%B5%D1%81%D0%BF%D0%BB%D0%B0%D1%82%D0%BD%D1%8B%D0%B9-%D0%9F%D1%80%D0%BE%D0%BC%D0%BE%D0%BA%D0%BE%D0%B4-1xBet-2026-TOWN777
Функционирующие дублирующие порталы проверенных азартных клубов на Vavada казино предоставляют устойчивый соединение к гемблинг ресурсам. Технология клонирования генерирует точные копии центрального портала с сохранением всех возможностей.
Алгоритм оформления профиля через дублирующий портал на сто процентов воспроизводит базовую шаблон. Только пришедшие геймеры заполняют валидный email, устанавливают надежный ключ и назначают операционную финансовый инструмент.
Аутентификация учетной записи содержит отправки свидетельств согласно KYC-нормам. Снимок водительских прав, верификация адреса и банковские параметры проходят программную валидацию в течение 24-72 часов.
Вход активных клиентов осуществляется через стандартную интерфейс с многоступенчатой верификацией. Разовые шифры передаются на телефонный устройство или электронную почту.
Опции входящего раздела через альтернативные домены содержит топовые платежные механизмы. Visa, Mastercard, виртуальные кошельки Skrill, Neteller, crypto Bitcoin, Ethereum реализуются с низкими сборами 0-3%.
Гемблинг ассортимент повторяется целиком включая машины, традиционные игры, live-операторов и мегавыигрыши. RTP-индикаторы, изменчивость и вейджер удерживаются неизменными.
Поощрительная схема действует похоже базовому ресурсу. Welcome-предложения, фриспины, refund и VIP-курсы инициируются автоматически при соблюдении фиксированных параметров.
Подбор проверенного казино площадки нуждается детального рассмотрения правовых разрешений. Актуальные сайты Меллстрой казино предоставляют игрокам полную сведения о собственных санкциях.
Система получения доступа содержит множество необходимых этапов валидации. Представители просят справки, засвидетельствующие личность и дееспособность. Обычный KYC-порядок длится от 24 до 72 временных отрезков.
Управление банком стартует с назначения границ на взносы. Компетентные пользователи предлагают эксплуатировать норму 5% от полного гемблинг фонда на единичную раунд.
Программные блокировки провайдеров принуждают внедрять дополнительные адреса. Клоны удерживают максимальную эффективность центрального площадки, охватывая летопись операций и казино прогресс.
Инновационные расчетные методы поддерживают быстрые вклады через цифровые кошельки. Bitcoin, Ethereum и устойчивые монеты гарантируют приватность и мизерные отчисления. Период осуществления извлечений равно 10-30 промежутков.
Программы постоянства охватывают каскадные уровни с увеличивающимся возвратом. VIP-координаторы предоставляют личные награды, расширенные ограничения и опережающую обслуживание.
Перемещение в мире сертифицированных платформ подразумевает осознания передовых решений доступа. Опытные участники эксплуатируют Vavada казино для получения релевантной фактов о действующих ссылках.
Процедура открытия профиля в проверенных компаниях охватывает детальную аутентификацию. Продвинутые провайдеры эксплуатируют KYC-системы и AML-стандарты. Бумажная работа отнимает от 24 до 72 интервалов.
Компьютерные технологии для прохождения препятствий развиваются параллельно с укреплением юридических мер. VPN-инструменты класса premium предлагают кодирование AES-256 и системы OpenVPN. Стабильность коннекта жизненно значима для элитных заходов.
Альтернативные домены выполняют задачи через пространственно размещенные серверные кластеры. CDN-структуры гарантируют минимальную латентность для международных пользователей. Техническое редирект срабатывает при обнаружении препятствия первичного ресурса.
Платежные операции в лицензированных зонах соответствуют определенным требованиям PCI DSS. Криптовалютные расчеты набирают актуальность благодаря секретности и оперативности выполнения.
Мобильные программы лучших организаций объединяют биометрическую аутентификацию и push-извещения для существенных событий. Настраиваемый дизайн автономно корректируется под характеристики матрицы.
Функционирующие зеркала легальных gaming-операторов на Mellstroy Game предоставляют устойчивый вход к гемблинг платформам. Система дублирования формирует полноценные копии основного портала с консервацией всех возможностей.
Алгоритм активации через резервную ссылку в точности воспроизводит базовую анкету. Новые пользователи вводят активный email, формируют безопасный шифр и фиксируют операционную финансовый инструмент.
Идентификация профиля предполагает предоставления свидетельств следуя KYC-политике. Изображение водительских прав, валидация регистрации и банковские реквизиты анализируются посредством автоматическую контроль в течение 24-72 ч.
Подключение верифицированных участников происходит через классическую форму с двухфакторной верификацией. Разовые ключи поступают на смс устройство или e-mail адрес.
Функционал финансового модуля через mirror-сайты обеспечивает актуальные денежные сервисы. Visa, Mastercard, цифровые балансы Skrill, Neteller, виртуальные монеты Bitcoin, Ethereum выполняются с уменьшенными взносами 0-3%.
Развлекательная коллекция повторяется полностью включая барабаны, карточные развлечения, live-дилеров и прогрессивы. RTP-значения, дисперсия и проигрыш остаются неизменными.
Бонусная схема функционирует схоже базовому ресурсу. Welcome-наборы, бесплатные вращения, компенсация и VIP-системы запускаются машинально при выполнении фиксированных условий.
Новейшие клиенты сталкиваются с огромным количеством программных тонкостей при операциях с легальными сайтами. Специализированные порталы типа Голд казино поставляют релевантную информацию о функционировании гэмблинговых операторов.
Процесс подтверждения счета подразумевает ряд обязательных уровней. Исходная аутентификация нуждается предоставления бумаг доказывающих персону. Обычный комплект охватывает паспорт, права или загранпаспорт.
Программная составляющая открытия счета охватывает использование зашифрованного канала и двухфакторной аутентификации. Экспертные пользователи советуют включать весь комплекс возможных возможностей обеспечения.
Зеркала представляют абсолютные реплики базового домена с сохранением полного набора функций. Ключевое бонус выражается в соответствии расчетных лимитов и параметров отыгрыша.
Система поиска рабочих дублирующих порталов основывается на проверке профильных уведомительных сервисов и союзных сайтов. Квалифицированные геймеры используют виртуальные частные сети для обеспечения стабильного доступа вне зависимости от местных лимитов.
Современные участники сталкиваются с барьером подключения к легальным платформам. Организации фильтруют первичные адреса, но опытные Болливуд зеркало клиенты учитывают о существовании параллельных порталов.
Альтернативный адрес представляет стопроцентную воспроизведение основного портала. Системы безопасности работают идентичными. Денежные транзакции выполняются через сходные механизмы.
Алгоритм регистрации через зеркальный адрес включает типовой валидации. Сотрудники уточняют свидетельства для соблюдения KYC-стандартов. Индивидуальные сведения проходят двухфакторную валидацию.
Пополнительные рамки на дополнительных площадках соответствуют стандартным условиям. Начальные ставки остаются стабильными. Растущие призовые фонды интегрируются между многочисленными порталами.
Льготные планы действуют комплексно на параллельных платформах. Отыгрышный коэффициент сохраняет стартовые значения. Срок активности проигрывания поддерживается.
Сервис обслуживания рассматривает обращения с зеркальных ссылок таким же способом. Мгновенный общение осуществляет 24-часовой режим функционирования.
можно проверить ЗДЕСЬ https://krab5-cc.at
Актуальные операторы игорных игр предоставляют пользователям подключение к качественному азарту через надежные Меллстрой официальный сайт сайты. Авторизованная операционная активность подразумевает учета жестких правовых критериев.
Процесс оформления пользовательского профиля задействует верификацию индивидуальных сведений. Администраторы внедряют комплексные системы KYC и AML для блокировки фродовых финансовых действий.
Цифровые средства новейших игорных домов работают на зашифрованных дата-центрах с HTTPS алгоритмами. Региональная блокировка обязывает управляющих создавать альтернативные домены.
Параллельные ресурсы формируют эквивалентные репликации центрального домена с обеспечением всех функций и данных. Участники добиваются устойчивый связь к счету, игровой записям и пользовательским конфигурациям.
Денежные переводы проходят через подключенные денежные процессоры. Лимиты на взносы и изъятия фиксируются в соответствии с правовыми критериями и собственными правилами снижения потерь.
Компетентные беттеры указывают отслеживать положение авторизации через контролирующие регистры азартных организаций. Имиджевые индикаторы содержат оценки на специализированных сервисах и мнения реальных клиентов.
Ориентирование в области легальных порталов нуждается знания продвинутых методов входа. Профессиональные геймеры используют Меллстрой регистрация для приобретения современной фактов о оперативных адресах.
Механизм создания аккаунта в официальных операторах подразумевает детальную подтверждение. Передовые организации применяют KYC-системы и AML-критерии. Оформление документов требует от 24 до 72 временных отрезков.
Цифровые методы для прохождения барьеров совершенствуются вместе с укреплением нормативных мер. VPN-инструменты категории premium предлагают кодирование AES-256 и методы OpenVPN. Постоянство коннекта критически важна для элитных раундов.
Резервные адреса работают через локально распределенные IT кластеры. CDN-комплексы предоставляют сокращенную латентность для международных клиентов. Системное перенаправление включается при детекции барьера базового сайта.
Платежные транзакции в официальных областях подпадают под конкретным критериям PCI DSS. Децентрализованные расчеты увеличивают распространение из-за скрытности и динамике осуществления.
Мобильные программы лучших компаний интегрируют физиологическую проверку и push-уведомления для существенных событий. Модифицируемый интерфейс программно изменяется под параметры монитора.
Развлекательная отрасль показывает быстрый расширение, манящая легионы участников. Экспертные площадки дают качественную атмосферу для беттинга. Детальную сведения о указанных провайдерах можно изучить на Болливуд казино .
Аттестация представляет центральным фактором определения платформы. Лицензиаты Олдерни создают строгий аудит денежных операций. Отдельная легальная портал осуществляет систематические ревизии RNG-систем.
Программные аспекты передовых игорных домов объединяют SSL-безопасность расчётного стандарта. Производители виртуального продукта класса Microgaming, NetEnt, Pragmatic Play встраивают продвинутые механизмы рандомных величин.
Механизм аутентификации личного кабинета включает направления документов KYC-стандарта. Документ, подтверждение о финансах, валидация проживания — типичный комплект для итогового активации.
Альтернативные порталы устраняют трудности с ограничениями операторов. Свежие варианты обновляются ежедневно техническими отделами. Мобильные софт нередко работают качественнее интернет форматов.
Распределение капитала устанавливает продолжительную успешность развлекательных циклов. Профессиональные участники предлагают лимитировать величину вейджера до 1-2% от полного бюджета.
TubeCraze store – This is a site I would happily suggest to anyone.
Отбор безопасного гемблинг оператора в актуальных обстоятельствах требует особого внимания к лицензионному уровню. Опытные игроки понимают, что п»ї1xBet casino отображает современную данные о функционирующих операторах.
Механизм создания аккаунта в сертифицированных сервисах содержит необходимую верификацию удостоверения. KYC-процедуры защищают как заведение, так и клиента от махинаций. Временные пределы на получение финансов до финализации подтверждения – нормальная методика.
Программные барьеры на подключение к betting площадкам устраняются через альтернативные порталы. Доступные клоны поддерживают тотальную производительность основного сервиса. Банковские процедуры, развлекательный статистика и поощрительные программы функционируют постоянными.
Экономическая надежность характеризуется качеством внедренных банковских методов. SSL-криптография, PCI DSS валидация и двухфакторная подтверждение гарантируют надежный щит защиты.
Геймплейная ассортимент сертифицированных провайдеров содержит автоматы от известных разработчиков. RTP-параметры, колебания и расчетные формулы подвергаются нейтральную сертификацию в аккредитованных лабораториях.
Планы поощрения в достойных казино базируются на ясных параметрах вейджера. Отыгрыш x35-40 расценивается адекватным для машина-привилегий, в то время как карточные состязания принимаются в зачет с минимальным показателем.
Современные сервисы азартных активностей обеспечивают клиентам путь к премиальному азарту через проверенные Лаки Бир зеркало системы. Официальная деятельность подразумевает учета определенных законодательных норм.
Механизм активации игрового кабинета содержит аутентификацию конфиденциальных реквизитов. Управляющие применяют комплексные процедуры KYC и AML для пресечения незаконных переводов.
Технические системы актуальных развлекательных порталов работают на зашифрованных инфраструктурах с SSL технологиями. Территориальные ограничения принуждает владельцев разрабатывать вспомогательные порталы.
Зеркальные порталы являют собой аналогичные клоны первичного домена с обеспечением всех сервисов и информации. Беттеры обеспечивают себе беспрепятственный подключение к капиталу, гемблинг отчетности и индивидуальным установкам.
Денежные процедуры осуществляются через встроенные финансовые шлюзы. Пределы на инвестиции и получения определяются в соответствии с лицензионными критериями и корпоративными нормами управления рисками.
Компетентные беттеры рекомендуют проверять ситуацию авторизации через государственные базы данных беттинг структур. Авторитетные индикаторы содержат места на специализированных платформах и оценки реальных клиентов.
Нынешние гемблеры оказываются с затруднением входа к сертифицированным ресурсам. Компании закрывают стандартные URL, но знающие Вован казино пользователи знают о наличии резервных платформ.
Резервная ссылка составляет идентичную дубликат главного портала. Криптографические алгоритмы поддерживаются такими же. Расчётные операции проходят через аналогичные каналы.
Алгоритм открытия счёта через резервный адрес требует классической верификации. Специалисты требуют удостоверения для реализации KYC-правил. Идентификационные параметры проходят комплексную аутентификацию.
Пополнительные ограничения на альтернативных порталах идентичны базовым характеристикам. Наименьшие вклады сохраняются постоянными. Растущие банки согласовываются между множественными доменами.
Поощрительные механизмы оперируют полноценно на резервных порталах. Отыгрышный коэффициент сохраняет исходные величины. Тайминг использования сохраняется.
Департамент обслуживания рассматривает тикеты с зеркальных порталов аналогично. Живой переписка гарантирует постоянный расписание оперирования.
verified store page – The layout is tidy and the candy selection is fantastic.
Актуальные игроки натыкаются с проблемой подключения к проверенным сайтам. Операторы закрывают основные ссылки, но профессиональные казино Меллстрой посетители знают о функционировании параллельных порталов.
Параллельный портал составляет стопроцентную отображение первичного площадки. Средства защиты поддерживаются равнозначными. Платёжные действия реализуются через сходные механизмы.
Процедура оформления профиля через дополнительный домен подразумевает обычной верификации. Специалисты запрашивают свидетельства для соблюдения KYC-регламентов. Индивидуальные данные проходят расширенную подтверждение.
Пополнительные границы на дополнительных платформах совпадают стандартным требованиям. Стартовые ставки функционируют стабильными. Прогрессивные накопления синхронизируются между разными ресурсами.
Льготные планы действуют полноценно на дополнительных сайтах. Требования по обороту гарантирует первоначальные значения. Длительность проигрывания остаётся прежним.
Служба сопровождения решает заявки с параллельных ссылок таким же способом. Мгновенный переписка обеспечивает 24-часовой режим оперирования.
экскурсия на теплоходе от новоспасского моста Речные экскурсии Москва: заказать экскурсию на теплоходе.
Современные геймеры натыкаются с барьером соединения к сертифицированным ресурсам. Операторы запрещают стандартные адреса, но искушённые казино Lucky Bear участники учитывают о функционировании альтернативных ресурсов.
Параллельный портал составляет идентичную воспроизведение главного портала. Криптографические алгоритмы остаются такими же. Банковские транзакции производятся через сходные системы.
Методика оформления профиля через дополнительный ресурс включает привычной валидации. Специалисты выясняют справки для осуществления KYC-стандартов. Идентификационные данные реализуют усиленную проверку.
Банковские пределы на зеркальных ресурсах совпадают стандартным требованиям. Начальные беты остаются стабильными. Увеличивающиеся банки координируются между всеми адресами.
Премиальные системы работают завершённо на альтернативных сайтах. Множитель ставок сохраняет базовые величины. Длительность проигрывания поддерживается.
Служба поддержки изучает тикеты с альтернативных ссылок таким же способом. Мгновенный разговор предоставляет постоянный график работы.
searchengineers.click – Appreciate the typography choices; comfortable spacing improved my reading experience.
https://auto.ae/showrooms/all/
Новейшие геймеры натыкаются с барьером соединения к сертифицированным платформам. Организации закрывают основные адреса, но профессиональные lucky bear казино участники помнят о присутствии зеркальных сайтов.
Параллельный портал представляет идентичную отображение основного платформы. Протоколы шифрования остаются аналогичными. Платёжные действия реализуются через аналогичные шлюзы.
Алгоритм оформления профиля через дополнительный ссылку предполагает привычной проверки. Менеджеры уточняют бумаги для исполнения KYC-правил. Идентификационные параметры подвергаются многоуровневую проверку.
Депозитные пределы на зеркальных ресурсах совпадают базовым параметрам. Начальные ставки продолжают константными. Растущие банки объединяются между различными доменами.
Бонусные схемы работают полноценно на альтернативных сайтах. Коэффициент оборота сохраняет стартовые значения. Срок активности оборота продолжается.
Сервис ассистирования рассматривает вопросы с дополнительных адресов равнозначно. Интерактивный общение обеспечивает постоянный расписание деятельности.
Инновационные сервисы азартных активностей обеспечивают беттерам возможность к профессиональному беттингу через проверенные KiloGram casino системы. Сертифицированная работа нуждается следования строгих правовых норм.
Процедура создания игрового кабинета содержит подтверждение приватных показателей. Операторы используют расширенные системы KYC и AML для недопущения фродовых платежей.
IT платформы актуальных казино работают на зашифрованных хостингах с SSL алгоритмами. Территориальные ограничения принуждает администраторов внедрять параллельные адреса.
Параллельные порталы являют собой точные копии основного ресурса с фиксацией всех функций и информации. Клиенты приобретают непрерывный доступ к балансу, развлекательной статистике и пользовательским настройкам.
Денежные переводы производятся через интегрированные банковские шлюзы. Пределы на пополнения и изъятия устанавливаются в соответствии с лицензионными стандартами и собственными правилами минимизации опасностей.
Опытные клиенты советуют отслеживать условия авторизации через надзорные каталоги развлекательных ведомств. Престижные критерии задействуют оценки на специализированных порталах и мнения истинных беттеров.
Нынешние геймеры встречаются с препятствием связи к сертифицированным сайтам. Компании закрывают главные домены, но опытные Lucky Bear зеркало пользователи помнят о доступности параллельных платформ.
Резервная ссылка является полную воспроизведение первичного ресурса. Протоколы шифрования остаются равнозначными. Денежные процедуры производятся через аналогичные системы.
Алгоритм заведения учётной записи через зеркальный ресурс включает обычной валидации. Менеджеры требуют удостоверения для реализации KYC-требований. Индивидуальные характеристики проходят усиленную проверку.
Финансовые пределы на дополнительных ресурсах равняются базовым требованиям. Низшие взносы продолжают неизменными. Прогрессивные выигрышные пулы координируются между всеми ссылками.
Премиальные программы оперируют всесторонне на параллельных порталах. Множитель ставок удерживает стартовые показатели. Срок активности проигрывания продолжается.
Команда сопровождения обрабатывает запросы с резервных ссылок идентично. Прямой диалог осуществляет 24-часовой расписание работы.
You mentioned this fantastically. https://md.ctdo.de/s/zR21_oO3-1
Перемещение в области легальных сайтов подразумевает знания новых инструментов входа. Профессиональные клиенты эксплуатируют Меллстрой РІС…РѕРґ для приобретения релевантной материалов о активных URL.
Процесс оформления аккаунта в сертифицированных учреждениях предполагает многоуровневую валидацию. Новейшие поставщики используют KYC-системы и AML-критерии. Документооборот занимает от 24 до 72 промежутков.
Программные технологии для обхода запретов улучшаются параллельно с интенсификацией юридических шагов. VPN-службы класса premium предоставляют криптографию AES-256 и протоколы OpenVPN. Постоянство связи принципиально существенна для премиальных раундов.
Зеркальные платформы выполняют задачи через локально расположенные технические мощности. CDN-комплексы предоставляют оптимальную время ответа для глобальных пользователей. Автоматическое перенаправление включается при выявлении барьера центрального сайта.
Платежные переводы в официальных юрисдикциях соответствуют конкретным критериям PCI DSS. Цифровые платежи увеличивают актуальность благодаря секретности и темпу осуществления.
Планшетные софт премиальных брендов включают физиологическую проверку и push-оповещения для критических событий. Адаптивный дизайн независимо настраивается под особенности монитора.
Smart GenRx USA: legitimate canadian pharmacy – Smart GenRx USA
marketingengine.click – Appreciate the typography choices; comfortable spacing improved my reading experience.
Find it here
where can i buy cheap lipitor without a prescription
for a different perspective.
http://neuroreliefusa.com/# Neuro Relief USA
Активные mirror-ссылки лицензированных gaming-операторов на п»ї1хбет официальный сайт обеспечивают стабильный доступ к азартным ресурсам. Схема реплицирования создает точные версии базового домена с сохранением всех инструментов.
Схема регистрации через резервную ссылку на сто процентов воспроизводит базовую шаблон. Начинающие участники вводят рабочий email, устанавливают защищенный секретную комбинацию и определяют игровую валюту.
Подтверждение счета предполагает предоставления свидетельств согласно KYC-нормам. Фото паспорта, подтверждение регистрации и банковские данные проходят программную валидацию в течение 24-72 часов.
Авторизация активных геймеров выполняется через классическую форму с 2FA проверкой. Одноразовые токены передаются на смс аппарат или электронную почту.
Возможности депозитного блока через mirror-сайты предлагает популярные банковские платформы. Visa, Mastercard, онлайн хранилища Skrill, Neteller, блокчейн-токены Bitcoin, Ethereum обрабатываются с уменьшенными процентами 0-3%.
Гемблинг каталог копируется абсолютно включая барабаны, столовые геймплей, live-крупье и максимальные награды. RTP-параметры, дисперсия и ставочные требования поддерживаются такими же.
Подарочная механизм оперирует идентично корневому сайту. Welcome-наборы, фриспины, refund и VIP-курсы запускаются алгоритмически при реализации установленных стандартов.
Выбор достойного гемблинг оператора в актуальных обстоятельствах нуждается специального изучения к правовому режиму. Профессиональные игроки понимают, что п»ї1хбет РІС…РѕРґ содержит современную сведения о активных ресурсах.
Алгоритм оформления профиля в сертифицированных площадках включает неизбежную верификацию идентичности. KYC-правила обеспечивают как площадку, так и геймера от махинаций. Промежуточные рамки на получение средств до завершения контроля – типичная система.
Технические ограничения на связь к развлекательным площадкам устраняются через дублирующие ссылки. Доступные отражения обеспечивают тотальную производительность основного ресурса. Платежные движения, геймплейный продвижение и бонусные предложения сохраняются устойчивыми.
Денежная гарантированность измеряется качеством задействованных финансовых механизмов. SSL-шифрование, PCI DSS аттестация и двухфакторная аутентификация устанавливают надежный заслон охраны.
Игровая каталог легальных заведений включает барабаны от ведущих разработчиков. RTP-индексы, волатильность и статистические модели проходят беспристрастную аудит в признанных лабораториях.
Системы лояльности в профессиональных операторах основываются на ясных требованиях активности. Требования x35-40 считается справедливым для спин-поощрений, в то время как классические активности идут в подсчет с пониженным коэффициентом.
Активные mirror-ссылки проверенных gaming-операторов на mad casino создают постоянный вход к геймерским ресурсам. Принцип дублирования генерирует точные копии корневого ресурса с удержанием всех инструментов.
Процедура создания аккаунта через зеркало полностью имитирует стандартную анкету. Только пришедшие клиенты указывают функционирующий email, придумывают надежный пароль и назначают основную платежное средство.
Идентификация личного кабинета требует представления удостоверений следуя KYC-нормам. Скан национального документа, доказательство адреса и финансовые данные контролируются системой цифровую валидацию в течение 24-72 временных единиц.
Авторизация верифицированных геймеров осуществляется через классическую интерфейс с многоступенчатой идентификацией. Разовые ключи поступают на сотовый девайс или почтовый ящик.
Механизмы входящего компонента через резервные ссылки предлагает актуальные банковские сервисы. Visa, Mastercard, электронные счета Skrill, Neteller, crypto Bitcoin, Ethereum выполняются с минимальными сборами 0-3%.
Гемблинг ассортимент клонируется на сто процентов включая барабаны, классические забавы, live-дилеров и максимальные награды. RTP-параметры, колебания и вейджер удерживаются аналогичными.
Акционная политика действует похоже главному домену. Welcome-пакеты, безвозмездные спины, refund и VIP-планы инициируются системно при достижении определенных требований.
Легальные провайдеры азартных опций предоставляют геймерам доступ к профессиональному гэмблингу через тематические домены, включая лаки Р±РёСЂ , которые именно следуют общепринятые нормы защиты.
Последовательность активации подразумевает внесения верификационных сведений через безопасные SSL-каналы. Операторы запрашивают official удостоверение совершеннолетия и территории нахождения для соблюдения legal критериев.
Многоуровневая аутентификация становится mandatory элементом современных архитектур безопасности. Пользователи располагают SMS-шифры, push-оповещения или эксплуатируют dedicated программы типа Google Authenticator.
Резервные домены устраняют проблемы региональных запретов и DDoS-нападений. Технически реплики составляют тождественные копии основного платформы с maintaining инструментария и пользовательских параметров.
Компетентные геймеры предлагают поддерживать current реестры функционирующих копий в favourites браузера. Провайдеры рассылают обновления о актуальных адресах через email, Telegram-каналы и смартфонные утилиты.
Финансовые процедуры через официальные площадки secured криптографическими системами категории банковского segment. Изъятие капитала выполняется исключительно на подтверждённые данные обладателя account.
zoloft without dr prescription zoloft cheap zoloft buy
Приехал в Ростов искал проституток в телеграме — нашёл нормальный чат. Лучшие проститутки индивидуалки, знакомятся, договариваются о встречах. Вот ссылка: https://t.me/Rostov_Znakomst
trafficmatrix.click – Mobile version looks perfect; no glitches, fast scrolling, crisp text.
Функционирующие резервные адреса лицензированных gaming-операторов на Lucky Bear casino гарантируют постоянный подключение к игровым ресурсам. Схема дублирования строит полноценные копии базового портала с поддержанием всех инструментов.
Система оформления профиля через дублирующий портал абсолютно копирует главную бланк. Дебютные игроки прописывают активный email, создают безопасный пароль и выбирают базовую денежную единицу.
Подтверждение личного кабинета подразумевает предоставления справок по KYC-стандартам. Снимок удостоверения личности, свидетельство места жительства и карточные параметры проходят автоматическую контроль в течение 24-72 периодов.
Аутентификация активных клиентов производится через обычную форму с двухфакторной валидацией. Разовые шифры поступают на смс гаджет или email.
Функционал денежного блока через зеркала содержит распространенные расчетные механизмы. Visa, Mastercard, виртуальные портмоне Skrill, Neteller, цифровые активы Bitcoin, Ethereum процессируются с низкими сборами 0-3%.
Gaming база воспроизводится абсолютно включая spinning games, традиционные развлечения, live-операторов и мегавыигрыши. RTP-значения, волатильность и проигрыш остаются такими же.
Промо система действует идентично главному порталу. Welcome-бандлы, безвозмездные спины, кешбэк и VIP-курсы запускаются программно при достижении определенных параметров.
Определение безопасного игорного заведения предполагает основательного разбора правовых документов. Актуальные системы Меллстрой регистрация предоставляют участникам максимальную детали о собственных лицензиях.
Алгоритм создания профиля подразумевает различные принудительных ступеней проверки. Представители истребуют справки, устанавливающие индивидуальность и правоспособность. Стандартный KYC-процесс составляет от 24 до 72 промежутков.
Управление банком запускается с установления ограничений на инвестиции. Компетентные участники настаивают задействовать установку 5% от общего гемблинг бюджета на единичную раунд.
Программные блокировки поставщиков заставляют эксплуатировать вспомогательные адреса. Копии сохраняют полную активность главного ресурса, содержа летопись переводов и гемблинг продвижение.
Современные банковские сервисы обеспечивают быстрые депозиты через блокчейн хранилища. Bitcoin, Ethereum и устойчивые монеты обеспечивают анонимность и наименьшие комиссии. Время обработки выводов составляет 10-30 периодов.
Планы постоянства подразумевают градационные статусы с возрастающим компенсацией. VIP-представители предлагают персонализированные вознаграждения, повышенные пределы и преимущественную техподдержку.
verified store page – Found amazing bags and suitcases, with very easy browsing.
Надёжные площадки игорных возможностей дают клиентам доступ к элитному развлечениям через целевые ресурсы, включая винити регистрация , что исполняют transnational регламенты защиты.
Процедура регистрации necessita указания authentication сведений через криптографические SSL-каналы. Букмекеры demanded письменное свидетельство дееспособности и места проживания для compliance юрисдикционных требований.
Многоуровневая проверка представляет необходимым aspect современных систем защиты. Участники получают SMS-шифры, push-алерты или применяют targeted приложения по типу Google Authenticator.
Дублирующие адреса нейтрализуют вопросы локальных барьеров и DDoS-нападений. Технически зеркала образуют тождественные клоны главного сайта с поддержанием инструментария и клиентских деталей.
Экспертные игроки suggest сохранять обновлённые каталоги working mirrors в favourites интернет-программы. Букмекеры доставляют сведения о актуальных адресах через email, Telegram-группы и портативные утилиты.
Платёжные переводы через лицензионные ресурсы гарантированы шифровальными технологиями категории банковского индустрии. Extraction финансов происходит только на аутентифицированные реквизиты владельца учётной записи.
browse products here – Great selection paired with responsive site performance makes shopping easy.
Активные mirror-ссылки официальных азартных клубов на казино Килограмм предоставляют непрерывный коннект к геймерским системам. Схема дублирования создает точные реплики корневого сайта с консервацией всех функций.
Механизм оформления профиля через зеркало на сто процентов воспроизводит стандартную заявку. Начинающие игроки регистрируют функционирующий email, создают сложный пароль и определяют игровую валюту.
Подтверждение личного кабинета подразумевает загрузки бумаг следуя KYC-регламенту. Скан ID-карты, верификация резиденции и банковские сведения контролируются системой программную анализ в течение 24-72 часа.
Подключение верифицированных участников выполняется через обычную модуль с расширенной идентификацией. Разовые коды приходят на мобильный номер или электронную почту.
Возможности входящего компонента через дублирующие порталы предлагает актуальные платежные платформы. Visa, Mastercard, веб балансы Skrill, Neteller, блокчейн-токены Bitcoin, Ethereum обрабатываются с сокращенными сборами 0-3%.
Гемблинг каталог воспроизводится абсолютно включая spinning games, классические геймплей, live-хостов и мегавыигрыши. RTP-индикаторы, колебания и вейджер фиксируются идентичными.
Акционная система оперирует идентично корневому веб-площадке. Welcome-бандлы, безвозмездные спины, денежный возврат и VIP-курсы включаются системно при выполнении фиксированных критериев.
Поиск в мире лицензированных платформ нуждается знания передовых способов подключения. Квалифицированные игроки внедряют Mellstroy Game зеркало для обретения новейшей информации о оперативных путях.
Процедура регистрации учетной записи в сертифицированных компаниях охватывает многоуровневую верификацию. Продвинутые организации задействуют KYC-протоколы и AML-нормы. Бумажная работа занимает от 24 до 72 часов.
Технические способы для избежания запретов прогрессируют вместе с усилением регуляторных мер. VPN-решения класса premium обеспечивают кодирование AES-256 и методы OpenVPN. Устойчивость коннекта критически актуальна для элитных игровых периодов.
Запасные домены работают через пространственно разнесенные серверные мощности. CDN-архитектуры осуществляют оптимальную пинг для глобальных участников. Программное роутинг активируется при распознавании барьера базового адреса.
Финансовые операции в легальных юрисдикциях подчиняются четким нормам PCI DSS. Криптовалютные транзакции увеличивают признание благодаря приватности и динамике выполнения.
Мобильные софт лучших брендов содержат лицевую подтверждение и push-уведомления для существенных событий. Модифицируемый облик программно адаптируется под характеристики монитора.
Incredible! This blog looks just like my old one! It’s on a completely different subject but it has pretty much the same page layout
and design. Superb choice of colors!
My web site … 프리카지노
Новейшие гемблеры натыкаются с сложностью доступа к сертифицированным ресурсам. Провайдеры запрещают первичные домены, но опытные п»ї1хбет официальный сайт пользователи знают о присутствии дублирующих ресурсов.
Дополнительный домен является точную дубликат главного ресурса. Криптографические алгоритмы сохраняются неизменными. Денежные действия производятся через равнозначные каналы.
Процедура открытия счёта через дополнительный ресурс включает типовой валидации. Менеджеры запрашивают свидетельства для исполнения KYC-регламентов. Паспортные информация выполняют многоуровневую аутентификацию.
Вносительные ограничения на зеркальных площадках соответствуют базовым условиям. Низшие взносы продолжают константными. Увеличивающиеся выигрышные пулы координируются между различными ссылками.
Поощрительные системы действуют всесторонне на дополнительных сайтах. Коэффициент оборота обеспечивает оригинальные параметры. Длительность оборота сохраняется.
Сервис сопровождения изучает тикеты с альтернативных порталов равнозначно. Мгновенный общение предоставляет круглосуточный расписание обслуживания.
zoloft medication: order zoloft – zoloft cheap
trafficsprint.click – Loved the layout today; clean, simple, and genuinely user-friendly overall.
Australian online casinos real money – top rated and player approved
Ориентирование в пространстве проверенных платформ нуждается владения актуальных методов соединения. Квалифицированные пользователи задействуют п»ї1хбет зеркало для получения свежей данных о работающих доменах.
Механизм открытия аккаунта в проверенных заведениях предполагает сложную верификацию. Новейшие операторы эксплуатируют KYC-алгоритмы и AML-стандарты. Документальное сопровождение потребляет от 24 до 72 интервалов.
Программные технологии для минования ограничений улучшаются сообща с интенсификацией регуляторных инициатив. VPN-платформы категории premium предлагают кодирование AES-256 и технологии OpenVPN. Надежность соединения fundamentally значима для высокоролловых партий.
Альтернативные платформы оперируют через пространственно расположенные IT кластеры. CDN-сети предоставляют оптимальную время ответа для азиатских игроков. Цифровое роутинг срабатывает при распознавании блокировки главного адреса.
Экономические операции в лицензированных регионах следуют строгим критериям PCI DSS. Децентрализованные переводы получают востребованность по причине секретности и темпу осуществления.
Смартфонные приложения лучших провайдеров включают отпечатковую проверку и push-уведомления для ключевых событий. Гибкий дизайн независимо подстраивается под параметры матрицы.
simple meal solutions shop – Make weeknight dinners easier with thoughtfully priced selections.
Исследование в мире легальных платформ нуждается знания современных методов авторизации. Квалифицированные клиенты используют Меллстрой регистрация для получения актуальной информации о действующих адресах.
Процесс оформления профиля в надежных операторах охватывает сложную верификацию. Новейшие провайдеры эксплуатируют KYC-процедуры и AML-стандарты. Документальная процедура требует от 24 до 72 периодов.
Технические инструменты для обхода запретов прогрессируют одновременно с повышением законодательных действий. VPN-службы уровня premium обеспечивают шифрование AES-256 и протоколы OpenVPN. Надежность канала принципиально актуальна для элитных игровых периодов.
Дублирующие ресурсы выполняют задачи через территориально рассредоточенные IT инфраструктуры. CDN-комплексы гарантируют минимальную пинг для международных пользователей. Программное маршрутизация активируется при идентификации барьера базового адреса.
Платежные манипуляции в официальных юрисдикциях подчиняются четким нормам PCI DSS. Цифровые транзакции приобретают актуальность по причине секретности и темпу осуществления.
Переносные приложения элитных организаций объединяют биометрическую идентификацию и push-уведомления для критических событий. Адаптивный оформление самостоятельно адаптируется под особенности экрана.
leadfactory.click – Content reads clearly, helpful examples made concepts easy to grasp.
Передовые геймеры имеют дело с изобилием цифровых деталей при операциях с лицензированными ресурсами. Специализированные сайты типа лаки Р±РёСЂ обеспечивают актуальную материалы о функционировании развлекательных провайдеров.
Система подтверждения профиля содержит ряд требуемых уровней. Начальная верификация нуждается предоставления свидетельств удостоверяющих индивидуальность. Стандартный комплект предполагает документ, водительские права или заграничное удостоверение.
Техническая составляющая записления подразумевает эксплуатацию SSL-шифрования и двухфакторной аутентификации. Квалифицированные пользователи подсказывают инициировать полный набор предложенных настроек охраны.
Альтернативные адреса представляют стопроцентные реплики базового сайта с хранением тотального арсенала. Важнейшее преимущество кроется в тождественности денежных пределов и критериев условий прокрутки.
Схема поиска активных дублирующих порталов фундируется на проверке профильных уведомительных сервисов и сотрудничающих сайтов. Экспертные участники внедряют туннельные протоколы для обеспечения бесперебойного соединения независимо от региональных блокировок.
Рабочие резервные адреса надежных gaming-операторов на СЌРЅРѕРјРѕ казино дают беспрерывный подключение к гемблинг порталам. Система реплицирования генерирует точные копии основного веб-площадки с сохранением всех механизмов.
Процедура регистрации через альтернативный домен абсолютно дублирует оригинальную форму. Свежие геймеры указывают функционирующий email, устанавливают сложный шифр и фиксируют рабочую платежное средство.
Подтверждение личного кабинета включает предоставления бумаг опираясь на KYC-нормам. Снимок паспорта, подтверждение регистрации и банковские данные контролируются системой цифровую верификацию в течение 24-72 ч.
Аутентификация зарегистрированных геймеров осуществляется через типовую модуль с расширенной проверкой. Сессионные коды приходят на телефонный гаджет или email.
Возможности финансового раздела через зеркала содержит популярные платежные инструменты. Visa, Mastercard, онлайн портмоне Skrill, Neteller, crypto Bitcoin, Ethereum выполняются с низкими комиссиями 0-3%.
Игровая библиотека клонируется полностью включая машины, классические активности, live-ведущих и джекпоты. RTP-показатели, волатильность и проигрыш фиксируются точными.
Промо политика действует идентично основному порталу. Welcome-предложения, бесплатные вращения, компенсация и VIP-программы активируются машинально при реализации установленных стандартов.
этот сайт krab6
Активные дублирующие порталы надежных gaming-операторов на Вавада официальный сайт дают беспрерывный доступ к игровым порталам. Схема копирования строит точные реплики основного сайта с поддержанием всех механизмов.
Схема открытия счета через mirror-сайт на сто процентов дублирует стандартную форму. Начинающие участники регистрируют рабочий email, придумывают сложный ключ и назначают игровую платежное средство.
Валидация аккаунта подразумевает предоставления удостоверений опираясь на KYC-нормам. Скан водительских прав, доказательство проживания и карточные реквизиты проходят машинную валидацию в течение 24-72 часов.
Аутентификация существующих участников выполняется через классическую форму с расширенной проверкой. Одноразовые коды передаются на мобильный девайс или электронную почту.
Инструменты пополнительного модуля через mirror-сайты содержит актуальные банковские платформы. Visa, Mastercard, онлайн хранилища Skrill, Neteller, виртуальные монеты Bitcoin, Ethereum реализуются с минимальными комиссиями 0-3%.
Гемблинг коллекция копируется абсолютно включая автоматы, традиционные забавы, live-дилеров и максимальные награды. RTP-значения, изменчивость и условия отыгрыша сохраняются идентичными.
Поощрительная механизм выполняется схоже центральному порталу. Welcome-предложения, безвозмездные спины, денежный возврат и VIP-системы запускаются программно при соблюдении заданных критериев.
Новейшие операторы игорных игр гарантируют игрокам доступ к качественному беттингу через сертифицированные п»ї1xBet зеркало порталы. Сертифицированная операционная активность нуждается выполнения жестких контролирующих стандартов.
Процедура оформления пользовательского аккаунта включает валидацию личных показателей. Администраторы внедряют комплексные алгоритмы KYC и AML для пресечения фродовых транзакций.
Электронные решения современных казино функционируют на защищенных дата-центрах с HTTPS протоколами. Территориальные ограничения заставляет провайдеров разрабатывать вспомогательные порталы.
Параллельные домены представляют идентичные репликации главного ресурса с фиксацией всех функций и параметров. Клиенты получают беспрепятственный вход к средствам, развлекательной отчетности и персональным опциям.
Платежные транзакции осуществляются через синхронизированные банковские агрегаторы. Рамки на пополнения и обналичивания назначаются в согласии с регуляторными требованиями и собственными регламентами риск-менеджмента.
Компетентные гемблеры предлагают анализировать ситуацию сертификата через официальные регистры азартных структур. Авторитетные параметры задействуют оценки на профильных сайтах и комментарии настоящих клиентов.
official discount portal – Getting promo codes is straightforward and very user-friendly.
愛海外版,专为华人打造的高清视频平台,支持全球加速观看。
塔尔萨之王高清完整版AI深度学习内容匹配,海外华人可免费观看最新热播剧集。
Tidy Treasure Online – Everything feels uncluttered, which makes shopping easygoing.
Faceless Factory Online – Clean design and well-organized pages make exploring products simple and pleasant.
searchhacks.click – Found practical insights today; sharing this article with colleagues later.
Площадка Mega — это ресурс, расположенный в теневом сегменте сети, где посетители ищут к разнообразным сервисам и услугам.
mega market darknet связан с теневым характером и максимальным уровнем анонимности.
Метафорически эту площадку воспринимается как вход в скрытую часть интернета, которое таит в себе массу особенностей.
Данный теневой сайт относится к числу известных площадок «даркнета», где основное внимание уделяется скрытность пользователей и безопасность соединений.
Чтобы попасть на подобные площадки обычно осуществляется применения специального ПО (например, Тор), в сочетании с VPN-соединениями для преодоления блокировок.
Чтобы попасть на этот сайт, пользователю необходимо знать точный адрес (ONION-ссылку) и провести тщательную настройку оборудования.
Ключевое отличие площадки заключается в полной непрозрачности пользователей и невозможности создать обычный аккаунт.
Посетители здесь могут искать множество услуг: от закрытых каналов связи до площадок для торговли.
Сайт гарантирует безопасность от слежки благодаря современным технологиям шифрования.
Но при этом даже мощная система шифрования может быть эффективной лишь отчасти, особенно при неосторожных действиях самих пользователей.
На сегодняшнем этапе развития сети этот сайт имеет свою специфическую нишу, интересуя тех пользователей, кто охотится за непубличной информацией и особыми сервисами.
Внутри площадки бывают представлены как разрешенный контент, так и запрещенные, что вынуждает участника проявлять бдительность и ответственность.
Изучая феномен теневых платформ, стоит обратить внимание на ряд важных моментов, связанных с правилами поведения и конфиденциальности.
Во-первых, необходима правильная конфигурация пользовательского окружения и внедрение эшелонированной безопасности для уменьшения опасностей.
Любой участник обязан разбираться в уровни анонимности и, по возможности, следовать моральным нормам при работе внутри сети.
Во-вторых, нельзя игнорировать о юридических последствиях и возможных последствиях за противоправные поступки.
Правовые нормы государств по-разному трактует само присутствие на подобных сайтах и степени вины пользователей.
Отдельные специалисты указывают, что такие площадки могут служить местом для дискуссий и обмена опытом и сохранения конфиденциальности при ответственном подходе.
Тем не менее, риски обмана, хищения средств и злонамеренных акций здесь остаются высокими.
Лавируя между информационной свободой и жесткими правовыми ограничениями, этот ресурс остается одной из самых противоречивых частей глобальной сети.
Резюмируя для посетителей: следует очень внимательно относиться к изучаемой информации и верификации данных.
В конечном счете сводится к тому, что Мега Даркнет — это сложная и противоречивая среда. Платформа дает максимальную приватность и приватности, но требует от каждого участника осторожности, технической грамотности и осознанности действий.
Площадка показывает различные модели поведения в среде с ослабленным регулированием и создает возможности для дискуссий на спорные темы.
Таким образом, теневая платформа остается сложным феноменом интернета, где баланс между свободой и безопасностью зависит от самого человека.
Ориентирование в мире лицензированных ресурсов требует владения современных способов авторизации. Квалифицированные геймеры задействуют Рльдорадо казино для получения актуальной данных о активных путях.
Механизм регистрации личного кабинета в сертифицированных заведениях предполагает детальную верификацию. Продвинутые организации используют KYC-процедуры и AML-стандарты. Бумажная работа составляет от 24 до 72 периодов.
Технические инструменты для минования ограничений эволюционируют вместе с усилением правовых шагов. VPN-платформы категории premium предоставляют шифрование AES-256 и технологии OpenVPN. Стабильность соединения принципиально значима для премиальных раундов.
Альтернативные платформы действуют через территориально расположенные технические мощности. CDN-архитектуры поддерживают сокращенную латентность для азиатских игроков. Техническое роутинг срабатывает при обнаружении препятствия главного сайта.
Банковские переводы в проверенных областях отвечают определенным критериям PCI DSS. Криптовалютные расчеты завоевывают актуальность вследствие конфиденциальности и оперативности процессинга.
Портативные клиенты премиальных компаний интегрируют физиологическую подтверждение и push-уведомления для важных моментов. Адаптивный дизайн самостоятельно настраивается под параметры панели.
Исследование в мире проверенных платформ подразумевает представления современных инструментов авторизации. Квалифицированные геймеры внедряют Лаки Бир для добывания новейшей информации о функционирующих доменах.
Механизм оформления профиля в проверенных организациях охватывает детальную верификацию. Продвинутые организации эксплуатируют KYC-механизмы и AML-стандарты. Оформление документов требует от 24 до 72 временных отрезков.
Программные методы для избежания блокировок совершенствуются одновременно с усилением регуляторных мер. VPN-платформы разряда premium гарантируют кодирование AES-256 и системы OpenVPN. Постоянство связи критически необходима для VIP сессий.
Зеркальные сайты выполняют задачи через географически размещенные цифровые инфраструктуры. CDN-системы поддерживают сокращенную пинг для глобальных пользователей. Системное переключение включается при идентификации барьера первичного адреса.
Платежные движения в официальных зонах соответствуют жестким стандартам PCI DSS. Децентрализованные платежи увеличивают признание благодаря конфиденциальности и быстроте выполнения.
Планшетные софт лучших брендов интегрируют отпечатковую проверку и push-извещения для важных происшествий. Модифицируемый интерфейс автономно изменяется под свойства экрана.
Надёжные платформы развлекательных возможностей гарантируют клиентам вариант к качественному азартному досугу через целевые ресурсы, включая п»ї1хбет казино , которые точно следуют международные регламенты конфиденциальности.
Схема открытия счёта necessita указания проверочных информации через криптографические SSL-каналы. Администрация просят документальное подтверждение совершеннолетия и локации жительства для соблюдения юрисдикционных требований.
2FA аутентификация считается необходимым aspect современных solutions надёжности. Users приобретают SMS-коды, push-оповещения или задействуют профессиональные приложения по типу Google Authenticator.
Mirror порталы нейтрализуют трудности локальных блокировок и DDoS-нападений. Техническим образом реплики образуют копийные dublicates базового платформы с maintaining features и пользовательских информации.
Опытные клиенты предлагают удерживать current реестры активных альтернатив в bookmark browser. Администрация доставляют информацию о современных ссылках через электронную почту, Telegram-сообщества и мобильные утилиты.
Денежные транзакции через официальные порталы защищены cryptographic системами level банковского индустрии. Получение финансов производится единственно на проверенные реквизиты хозяина профиля.
Перемещение в секторе сертифицированных площадок требует понимания продвинутых способов входа. Профессиональные геймеры применяют тип топ казино для добывания свежей данных о функционирующих ссылках.
Алгоритм формирования учетной записи в надежных учреждениях включает многоуровневую верификацию. Передовые поставщики задействуют KYC-алгоритмы и AML-правила. Документальная процедура требует от 24 до 72 часов.
IT технологии для избежания ограничений эволюционируют сообща с укреплением законодательных инициатив. VPN-сервисы категории premium предоставляют безопасность AES-256 и технологии OpenVPN. Надежность соединения fundamentally актуальна для высокоролловых сессий.
Резервные домены оперируют через регионально размещенные цифровые ресурсы. CDN-архитектуры гарантируют минимальную задержку для международных участников. Программное перенаправление срабатывает при обнаружении ограничения главного адреса.
Банковские транзакции в сертифицированных областях соответствуют определенным нормам PCI DSS. Криптовалютные переводы увеличивают распространение из-за анонимности и скорости реализации.
Мобильные клиенты топовых компаний интегрируют голосовую аутентификацию и push-оповещения для существенных событий. Адаптивный внешний вид автономно настраивается под настройки монитора.
This piece of writing is in fact a good one it assists new
internet users, who are wishing in favor of blogging.
Look at my homepage – 프리카지노
Stitch Studio store – The product descriptions are clear and really useful.
Игровая область демонстрирует быстрый прогресс, манящая множество игроков. Квалифицированные платформы дают безопасную атмосферу для пари. Полную информацию о подобных брендах возможно отыскать на Лаки Бир РІС…РѕРґ .
Легализация является главным аспектом подбора портала. Регуляторы Гибралтара предоставляют качественный контроль экономических действий. Всякая сертифицированная сайт проходит постоянные ревизии RNG-механизмов.
Программные аспекты актуальных гемблинг-сайтов охватывают SSL-кодирование денежного стандарта. Разработчики виртуального ПО класса Microgaming, NetEnt, Pragmatic Play встраивают усовершенствованные системы хаотичных значений.
Процесс подтверждения аккаунта подразумевает предоставления справок KYC-типа. ID, свидетельство о финансах, удостоверение адреса — классический набор для итогового авторизации.
Параллельные ссылки убирают сложности с запретами провайдеров. Функционирующие дубли изменяются ежедневно цифровыми службами. Смартфонные утилиты нередко функционируют качественнее браузерных форматов.
Финансовая дисциплина определяет длительную эффективность азартных циклов. Профессиональные беттеры советуют лимитировать объём вейджера до 1-2% от суммарного капитала.
Функционирующие дублирующие порталы легальных казино на казино Вавада обеспечивают непрерывный соединение к игровым сервисам. Технология зеркалирования формирует идентичные дубликаты корневого сайта с поддержанием всех функций.
Алгоритм оформления профиля через альтернативный домен на сто процентов копирует главную бланк. Только пришедшие пользователи регистрируют рабочий email, придумывают защищенный ключ и устанавливают базовую платежное средство.
Идентификация профиля предполагает передачи удостоверений в соответствии с KYC-политике. Скан национального документа, верификация места жительства и банковские реквизиты подвергаются алгоритмическую валидацию в течение 24-72 временных единиц.
Логин активных клиентов выполняется через обычную окно с многоступенчатой аутентификацией. Сессионные коды отправляются на телефонный девайс или мейл.
Механизмы финансового сектора через резервные ссылки предлагает распространенные расчетные инструменты. Visa, Mastercard, цифровые кошельки Skrill, Neteller, цифровые активы Bitcoin, Ethereum выполняются с оптимизированными сборами 0-3%.
Развлекательная библиотека повторяется полностью включая барабаны, классические игры, live-крупье и максимальные награды. RTP-коэффициенты, вариативность и проигрыш сохраняются идентичными.
Подарочная система действует схоже корневому ресурсу. Welcome-комплекты, даровые прокруты, возврат средств и VIP-планы инициируются алгоритмически при соблюдении прописанных критериев.
проверить сайт krab6.cc
Азартная сфера отображает интенсивный расширение, манящая миллионы игроков. Квалифицированные ресурсы дают безопасную среду для беттинга. Полную информацию о указанных провайдерах возможно изучить на lucky bear казино .
Аттестация является основным критерием выбора площадки. Регуляторы Гибралтара гарантируют качественный контроль денежных транзакций. Конкретная сертифицированная ресурс подвергается плановые проверки RNG-генераторов.
Компьютерные свойства современных беттинг-платформ объединяют SSL-безопасность финансового стандарта. Провайдеры софтового материала вроде Microgaming, NetEnt, Pragmatic Play внедряют продвинутые системы случайных величин.
Механизм валидации профиля предусматривает передачи справок KYC-формата. ID, подтверждение о доходах, удостоверение проживания — классический пакет для полноценного подключения.
Дублирующие порталы решают препятствия с фильтрацией провайдеров. Свежие копии корректируются каждый день IT командами. Смартфонные клиенты часто функционируют лучше браузерных вариантов.
Банкролл-менеджмент создаёт стратегическую доходность азартных сессий. Профессиональные геймеры рекомендуют сокращать размер ставки до 1-2% от общего бюджета.
на этом сайте https://krab6a.cc
веб-сайте krab6.at
нажмите krab6.at
Отбор безопасного игрового портала в актуальных границах нуждается детального подхода к юридическому уровню. Компетентные геймеры представляют, что винити официальный сайт содержит современную данные о активных площадках.
Процесс регистрации в сертифицированных сервисах предусматривает требуемую аутентификацию удостоверения. KYC-стандарты гарантируют как сервис, так и игрока от махинаций. Временные рамки на вывод капитала до закрытия валидации – стандартная подход.
Виртуальные препятствия на связь к игровым сайтам устраняются через зеркальные URL. Функционирующие клоны обеспечивают стопроцентную производительность главного портала. Платежные транзакции, развлекательный результаты и поощрительные программы поддерживаются постоянными.
Экономическая защищенность определяется критерием используемых денежных инструментов. SSL-безопасность, PCI DSS подтверждение и расширенная идентификация устанавливают стабильный периметр обороны.
Интерактивная библиотека проверенных операторов предоставляет слоты от лидирующих производителей. RTP-коэффициенты, вариативность и расчетные принципы испытывают внешнюю контроль в признанных организациях.
Схемы мотивации в достойных заведениях строятся на открытых критериях проигрыша. Требования x35-40 признается справедливым для автомат-льгот, в то время как традиционные забавы идут в зачет с пониженным процентом.
what is steroids drug
References:
https://bbs.pku.edu.cn/v2/jump-to.php?url=https://www.neukoelln-online.de/include/pages/testosteron_steigern_tabletten_2.html
online sparkle store – The simple presentation gives it a really welcoming vibe.
list of steriods
References:
http://karayaz.ru/user/nepalnerve5/
Thank you for the good writeup. It in fact was a amusement account it.
Look advanced to more added agreeable from you! However, how
could we communicate?
Look into my website; 프리카지노
Современные геймеры имеют дело с огромным количеством цифровых тонкостей при функционировании с лицензированными платформами. Экспертные платформы типа п»ї1xBet зеркало поставляют современную данные о функционировании казино организаций.
Механизм аутентификации учетной записи охватывает ряд обязательных этапов. Исходная валидация подразумевает предоставления справок валидирующих личность. Классический набор содержит удостоверение личности, лицензию водителя или заграничное удостоверение.
Цифровая элемент записления охватывает задействование защищенного протокола и двухуровневой проверки. Профессиональные участники советуют инициировать полный набор имеющихся настроек охраны.
Дублирующие порталы формируют точные дубликаты главного ресурса с обеспечением всего возможностей. Важнейшее достоинство кроется в схожести расчетных ограничений и критериев условий прокрутки.
Система обнаружения актуальных резервных ссылок базируется на мониторинге профессиональных мессенджер групп и партнерских сайтов. Опытные геймеры задействуют VPN-сервисы для формирования устойчивого связи безотносительно от локальных барьеров.
Hello there! Do you know if they make any plugins to protect against hackers? I’m kinda paranoid about losing everything I’ve worked hard on. Any suggestions?
byueuropaviagraonline
Гемблинговая индустрия представляет динамичный подъём, заинтересовывая массы пользователей. Экспертные платформы предоставляют безопасную обстановку для развлечений. Детальную данные о таких компаниях доступно отыскать на п»ї1xBet casino .
Лицензирование составляет основным фактором определения платформы. Надзорные органы Кюрасао гарантируют серьёзный мониторинг финансовых действий. Любая лицензированная сайт проходит постоянные аудиты RNG-модулей.
Компьютерные характеристики актуальных азартных площадок объединяют SSL-шифрование финансового класса. Провайдеры программного ПО вроде Microgaming, NetEnt, Pragmatic Play подключают сложные механизмы произвольных показателей.
Процедура валидации счёта требует представления справок KYC-уровня. Паспорт, справка о заработке, доказательство местожительства — классический список для окончательного авторизации.
Зеркальные адреса убирают трудности с блокировками поставщиков. Актуальные альтернативы модифицируются постоянно цифровыми службами. Смартфонные софт нередко оперируют устойчивее онлайн версий.
Распределение капитала задаёт продолжительную эффективность игровых сессий. Экспертные участники рекомендуют сокращать количество депозита до 1-2% от полного капитала.
подробнее https://krab6a.cc/
Diese Seite NV Casino ist ein echtes Juwel.
https://nv-casino-deutschland-slots.de/withdraw
Исследование в секторе легальных платформ нуждается понимания актуальных технологий доступа. Продвинутые геймеры задействуют Вавада РІС…РѕРґ для получения актуальной информации о активных URL.
Процедура регистрации аккаунта в лицензированных заведениях содержит тщательную аутентификацию. Современные компании эксплуатируют KYC-механизмы и AML-правила. Бумажная работа требует от 24 до 72 периодов.
Цифровые решения для обхода барьеров эволюционируют параллельно с ужесточением нормативных решений. VPN-инструменты категории premium обеспечивают защиту AES-256 и методы OpenVPN. Непрерывность связи жизненно значима для элитных сессий.
Резервные сайты действуют через географически разнесенные цифровые мощности. CDN-системы гарантируют быструю время ответа для европейских участников. Цифровое переключение инициируется при идентификации ограничения первичного ресурса.
Денежные транзакции в проверенных территориях следуют жестким стандартам PCI DSS. Блокчейн платежи набирают популярность в результате скрытности и темпу реализации.
Переносные приложения ведущих операторов объединяют отпечатковую идентификацию и push-алерты для важных эпизодов. Модифицируемый облик автоматически подстраивается под свойства панели.
Discover Vivid Value – The site is well-organized and easy to navigate without confusion.
Для фанатов смешанных единоборств нашел материал про ufc в феврале марте 2026 три недели которые встряхнут дивизионы. Ознакомиться можно тут: https://obves63.ru/news/ufc-fevral-mart-2026-polnyj-razbor-turnirov-s-akczentom-na-anderkardy-i-skrytye-intrigi/
Современные игроки натыкаются с проблемой входа к официальным площадкам. Операторы закрывают стандартные адреса, но профессиональные Вавада игроки помнят о существовании альтернативных порталов.
Резервная ссылка представляет полную копию базового ресурса. SSL-сертификаты функционируют аналогичными. Платёжные действия производятся через те же каналы.
Процедура заведения учётной записи через зеркальный ссылку подразумевает типовой проверки. Специалисты уточняют бумаги для исполнения KYC-требований. Паспортные сведения реализуют усиленную верификацию.
Банковские лимиты на параллельных сайтах идентичны главным условиям. Минимальные беты остаются фиксированными. Накопительные выигрышные пулы координируются между многочисленными адресами.
Льготные системы оперируют целостно на резервных платформах. Коэффициент оборота обеспечивает оригинальные параметры. Длительность отыгрыша остаётся прежним.
Служба поддержки анализирует обращения с зеркальных ссылок таким же способом. Мгновенный разговор обеспечивает 24-часовой порядок обслуживания.
Актуальные сервисы азартных продуктов обеспечивают игрокам доступ к профессиональному гемблингу через защищенные Вован казино порталы. Сертифицированная функционирование нуждается следования четких правовых положений.
Процедура регистрации индивидуального профиля содержит аутентификацию индивидуальных реквизитов. Администраторы задействуют многоуровневые системы KYC и AML для блокировки мошеннических операций.
Программные инструменты современных гемблинг платформ строятся на безопасных серверах с HTTPS протоколами. Локальные запреты обязывает провайдеров организовывать альтернативные порталы.
Параллельные ресурсы формируют аналогичные версии первичного платформы с поддержанием всех возможностей и сведений. Клиенты получают постоянный связь к балансу, беттинг записям и пользовательским конфигурациям.
Банковские действия выполняются через синхронизированные финансовые процессоры. Лимиты на вклады и изъятия фиксируются в гармонии с законодательными условиями и индивидуальными нормами минимизации опасностей.
Опытные игроки предлагают отслеживать ситуацию авторизации через контролирующие регистры гемблинг организаций. Престижные характеристики задействуют места на специализированных порталах и комментарии реальных клиентов.
To listen
discover loans personal
for ordering.
Официальные операторы игорных предложений дают участникам возможность к премиальному азартному досугу через целевые сайты, включая казино Голд , которые выполняют transnational нормы security.
Схема активации подразумевает заполнения валидационных сведений через encrypted SSL-линии. Операторы просят предоставить официальное доказательство дееспособности и региона жительства для выполнения правовых норм.
Многоуровневая идентификация становится mandatory частью передовых solutions надёжности. Пользователи имеют SMS-пароли, push-notification или внедряют dedicated tools наподобие Google Authenticator.
Mirror порталы устраняют проблемы локальных блокировок и DDoS-assault. С технической точки зрения дубли составляют аналогичные dublicates центрального платформы с поддержанием features и индивидуальных информации.
Профессиональные участники предлагают хранить обновлённые каталоги действующих альтернатив в favourites интернет-программы. Администрация доставляют сведения о новых адресах через электронную почту, Telegram-чаты и мобильные apps.
Денежные movements через legal площадки secured криптографическими системами уровня банковского области. Изъятие фондов осуществляется единственно на проверенные реквизиты собственника учётной записи.
digital token shop – The process was straightforward and everything worked perfectly.
艾一帆海外版,专为华人打造的高清视频平台结合大数据AI分析,支持全球加速观看。
https://ivertherapeutics.shop/# stromectol oral
посмотреть на этом сайте https://krab5-cc.at/
Официальные площадки игорных сервисов oferuja игрокам возможность к высококлассному гэмблингу через dedicated домены, включая п»ї1хбет зеркало , которые специально следуют transnational регламенты надёжности.
Схема создания аккаунта предполагает ввода верификационных сведений через безопасные SSL-connection. Букмекеры просят нотариальное подтверждение совершеннолетия и места нахождения для выполнения правовых критериев.
Двухэтапная проверка становится mandatory составляющей современных систем безопасности. Участники обретают SMS-коды, push-оповещения или применяют dedicated программы наподобие Google Authenticator.
Дублирующие домены решают препятствия territorial санкций и DDoS-воздействий. С технической точки зрения копии составляют дублированные dublicates primary домена с maintaining опций и user деталей.
Skilled игроки предлагают хранить current перечни активных копий в сохранённых ссылках интернет-программы. Операторы направляют информацию о свежих порталах через email, Telegram-чаты и смартфонные софт.
Денежные транзакции через официальные платформы покрыты шифровальными системами категории банковского сектора. Получение фондов происходит solely на проверенные счета обладателя account.
Действующие резервные адреса лицензированных гемблинг-платформ на Лаки Бир казино предоставляют устойчивый соединение к азартным сервисам. Технология зеркалирования формирует идентичные версии главного сайта с консервацией всех механизмов.
Схема оформления профиля через альтернативный домен целиком имитирует главную шаблон. Свежие участники регистрируют валидный email, устанавливают безопасный секретную комбинацию и выбирают основную платежное средство.
Подтверждение аккаунта включает представления свидетельств по KYC-регламенту. Скан паспорта, свидетельство резиденции и карточные сведения подвергаются автоматическую проверку в течение 24-72 часов.
Логин верифицированных пользователей реализуется через типовую панель с двухфакторной валидацией. Краткосрочные пароли передаются на сотовый устройство или e-mail адрес.
Функционал финансового сектора через mirror-сайты обеспечивает актуальные финансовые механизмы. Visa, Mastercard, виртуальные балансы Skrill, Neteller, криптовалюты Bitcoin, Ethereum процессируются с уменьшенными взносами 0-3%.
Развлекательная коллекция клонируется на сто процентов включая барабаны, традиционные геймплей, live-хостов и мегавыигрыши. RTP-индикаторы, дисперсия и проигрыш сохраняются такими же.
Промо система функционирует идентично главному веб-площадке. Welcome-комплекты, бесплатные вращения, refund и VIP-схемы включаются программно при достижении заданных стандартов.
secure checkout area – The user interface is smooth and easy to understand.
Современные платформы развлекательных активностей гарантируют беттерам возможность к профессиональному развлечениям через защищенные френц казино ресурсы. Легальная работа требует выполнения строгих надзорных стандартов.
Механизм оформления клиентского аккаунта охватывает валидацию конфиденциальных показателей. Провайдеры эксплуатируют детализированные системы KYC и AML для исключения нарушающих транзакций.
Технические системы новейших казино базируются на безопасных хостингах с криптографическими протоколами. IP-фильтрация вынуждает администраторов организовывать параллельные ссылки.
Альтернативные ресурсы образуют идентичные версии основного портала с сохранением всех сервисов и показателей. Пользователи обеспечивают себе стабильный вход к балансу, беттинг истории и персональным опциям.
Денежные транзакции проходят через связанные банковские системы. Границы на инвестиции и снятия регулируются в соотношении с лицензионными критериями и собственными нормами управления рисками.
Профессиональные пользователи настаивают мониторить положение сертификата через надзорные базы данных азартных ведомств. Имиджевые параметры содержат рейтинги на отраслевых сайтах и мнения истинных участников.
Australian online casino legit – how to spot safe sites
Лицензионные операторы азартных услуг предоставляют клиентам шанс к премиальному времяпрепровождению через специализированные сайты, включая Меллстрой сайт , которые именно соблюдают transnational критерии защиты.
Процедура оформления профиля включает заполнения проверочных параметров через encrypted SSL-линии. Администрация demanded документальное свидетельство правоспособности и локации нахождения для поддержания законодательных правил.
Двухэтапная идентификация выступает необходимым компонентом современных систем безопасности. Клиенты имеют SMS-шифры, push-сообщения или задействуют специализированные tools в стиле Google Authenticator.
Зеркальные ссылки ликвидируют сложности региональных санкций и DDoS-assault. С технической точки зрения дубли являют идентичные копии primary ресурса с maintaining опций и user информации.
Skilled игроки советуют хранить current реестры функционирующих дублей в сохранённых ссылках browser. Администрация отправляют сведения о современных URL через мейл, Telegram-каналы и телефонные программы.
Платёжные операции через надёжные сайты покрыты cryptographic технологиями категории банковского направления. Вывод денег происходит единственно на validated wallets держателя учётной записи.
Отбор качественного игрового оператора в сегодняшних рамках подразумевает специального внимания к регулятивному уровню. Опытные геймеры представляют, что Килограмм казино демонстрирует последнюю сведения о функционирующих площадках.
Алгоритм регистрации в легальных площадках охватывает требуемую валидацию удостоверения. KYC-требования гарантируют как оператора, так и игрока от обмана. Переходные лимиты на получение средств до финализации подтверждения – обычная процедура.
Электронные запреты на подключение к гемблинг сервисам нейтрализуются через зеркальные URL. Активные зеркала обеспечивают тотальную производительность базового портала. Денежные транзакции, игровой прогресс и привилегированные предложения остаются стабильными.
Финансовая защищенность выражается показателем задействованных финансовых механизмов. SSL-криптография, PCI DSS валидация и двухфакторная верификация формируют безопасный заслон защиты.
Развлекательная ассортимент лицензированных площадок содержит барабаны от топовых разработчиков. RTP-значения, вариативность и вероятностные системы получают нейтральную контроль в авторизованных центрах.
Схемы поощрения в серьезных казино формируются на понятных условиях активности. Условия ставок x35-40 оценивается нормальным для слот-привилегий, в то время как стандартные забавы идут в подсчет с уменьшенным множителем.
аренда минивэна мерседес с водителем машины в аренду минивэн мерседес 20 чел
Лицензионные ресурсы игровых сервисов предоставляют игрокам доступ к качественному гэмблингу через специализированные домены, включая п»ї1xBet , которые исполняют мировые стандарты надёжности.
Механизм создания аккаунта necessita ввода проверочных сведений через шифрованные SSL-соединения. Провайдеры просят предоставить документальное verification дееспособности и региона проживания для поддержания законодательных стандартов.
2FA аутентификация становится обязательным элементом передовых solutions защиты. Клиенты располагают SMS-шифры, push-оповещения или задействуют специальные программы наподобие Google Authenticator.
Резервные домены решают сложности региональных ограничений и DDoS-штурмов. Техническим образом mirrors являют тождественные клоны базового портала с поддержанием features и клиентских сведений.
Экспертные клиенты suggest сохранять свежие каталоги working копий в избранном интернет-программы. Букмекеры передают сведения о fresh URL через электронную почту, Telegram-группы и мобильные софт.
Банковские movements через проверенные ресурсы обеспечены encryption алгоритмами уровня банковского индустрии. Вывод средств реализуется исключительно на верифицированные реквизиты собственника account.
Определение честного развлекательного портала требует основательного разбора юридических сертификатов. Актуальные ресурсы Меллстрой регистрация дают клиентам полную факты о своих разрешениях.
Процесс открытия аккаунта включает ряд ключевых этапов аутентификации. Администраторы требуют удостоверения, доказывающие индивидуальность и правоспособность. Традиционный KYC-алгоритм длится от 24 до 72 часов.
Контроль средств запускается с определения лимитов на вклады. Искусные участники рекомендуют использовать норму 5% от суммарного гемблинг бюджета на конкретную игру.
Электронные барьеры операторов принуждают задействовать альтернативные адреса. Зеркала оберегают абсолютную функциональность первичного площадки, включая историю операций и игровой достижения.
Передовые расчетные способы дают моментальные взносы через блокчейн хранилища. Bitcoin, Ethereum и фиксированные активы обеспечивают скрытность и наименьшие комиссии. Период проведения получений достигает 10-30 промежутков.
Системы верности предусматривают ступенчатые статусы с возрастающим бонусом. VIP-консультанты предлагают уникальные бонусы, расширенные ограничения и преимущественную помощь.
secure shopping page – Found some really distinctive deals I couldn’t find on other sites.
Азартная сфера демонстрирует стремительный расширение, привлекая массы клиентов. Грамотные платформы обеспечивают защищённую обстановку для беттинга. Развёрнутую факты о данных компаниях можно обнаружить на п»ї1хбет официальный сайт .
Аттестация является главным фактором подбора платформы. Лицензиаты Олдерни обеспечивают тщательный контроль экономических операций. Всякая легальная платформа осуществляет плановые аудиты RNG-генераторов.
Цифровые особенности новейших казино объединяют SSL-безопасность банковского класса. Поставщики софтового ПО наподобие Microgaming, NetEnt, Pragmatic Play встраивают сложные алгоритмы непредсказуемых параметров.
Процедура верификации профиля предусматривает предоставления справок KYC-формата. Свидетельство, свидетельство о заработке, валидация регистрации — обычный перечень для окончательного доступа.
Зеркальные адреса исправляют барьеры с запретами организаций. Свежие альтернативы адаптируются постоянно цифровыми командами. Портативные софт нередко действуют надёжнее веб модификаций.
Управление банкроллом устанавливает стратегическую успешность азартных циклов. Грамотные игроки предлагают сокращать сумму пари до 1-2% от общего банкролла.
It is in reality a great and useful piece of information. I am happy that
you just shared this helpful info with us.
Please keep us up to date like this. Thanks for sharing.
Also visit my web site … 프리카지노
Современные платформы развлекательных развлечений предлагают участникам путь к элитному азарту через проверенные казино типпи сайты. Сертифицированная деятельность подразумевает учета жестких контролирующих критериев.
Процесс оформления пользовательского аккаунта предусматривает аутентификацию конфиденциальных реквизитов. Администраторы эксплуатируют углубленные алгоритмы KYC и AML для предотвращения нарушающих финансовых действий.
Цифровые системы актуальных беттинг площадок основываются на зашифрованных облачных системах с криптографическими протоколами. Геоблокировка побуждает управляющих создавать резервные ссылки.
Параллельные платформы представляют эквивалентные репликации центрального платформы с сохранением всех опций и показателей. Участники обеспечивают себе непрерывный соединение к средствам, гемблинг отчетности и персональным опциям.
Финансовые транзакции производятся через встроенные банковские агрегаторы. Границы на депозиты и изъятия устанавливаются в гармонии с правовыми требованиями и собственными процедурами риск-менеджмента.
Компетентные гемблеры советуют мониторить ситуацию лицензии через государственные каталоги развлекательных комиссий. Авторитетные индикаторы включают оценки на экспертных сервисах и отзывы настоящих участников.
After I originally left a comment I seem to have clicked on the -Notify me
when new comments are added- checkbox and now each time a comment is added
I recieve four emails with the same comment.
Perhaps there is a way you can remove me from that service?
Thank you!
my blog; tape data recovery
Действующие зеркала лицензированных казино на friends casino создают непрерывный соединение к гемблинг порталам. Система дублирования образует идентичные копии центрального домена с фиксацией всех инструментов.
Схема оформления профиля через альтернативный домен абсолютно воспроизводит стандартную форму. Только пришедшие игроки регистрируют рабочий email, формируют стойкий шифр и устанавливают рабочую денежную единицу.
Аутентификация учетной записи включает передачи свидетельств в соответствии с KYC-политике. Скан паспорта, подтверждение проживания и финансовые координаты подвергаются программную контроль в течение 24-72 ч.
Авторизация верифицированных пользователей реализуется через обычную форму с 2FA идентификацией. Временные ключи приходят на мобильный аппарат или email.
Функционал депозитного компонента через резервные ссылки включает топовые банковские инструменты. Visa, Mastercard, электронные счета Skrill, Neteller, криптовалюты Bitcoin, Ethereum реализуются с уменьшенными взносами 0-3%.
Gaming ассортимент воспроизводится полностью включая слоты, столовые забавы, live-ведущих и мегавыигрыши. RTP-показатели, колебания и ставочные требования остаются точными.
Акционная программа действует идентично центральному сайту. Welcome-предложения, безвозмездные спины, возврат средств и VIP-курсы включаются программно при достижении прописанных требований.
Отбор проверенного игорного оператора заставляет серьезного изучения регулятивных свидетельств. Передовые сайты Lucky Bear предлагают пользователям стопроцентную информацию о действующих санкциях.
Процесс регистрации охватывает несколько принудительных фаз валидации. Провайдеры требуют свидетельства, засвидетельствующие персону и совершеннолетие. Стандартный KYC-порядок длится от 24 до 72 периодов.
Контроль средств инициируется с определения границ на инвестиции. Компетентные клиенты настаивают задействовать принцип 5% от итогового гемблинг бюджета на индивидуальную игру.
Цифровые запреты провайдеров вынуждают применять запасные ссылки. Альтернативы поддерживают максимальную работоспособность первичного сайта, охватывая хронологию переводов и развлекательный достижения.
Новые расчетные методы обеспечивают быстрые взносы через электронные аккаунты. Bitcoin, Ethereum и стейблкоины обеспечивают скрытность и наименьшие взносы. Срок проведения извлечений доходит 10-30 периодов.
Схемы постоянства включают каскадные ранги с накапливающимся вознаграждением. VIP-консультанты предлагают эксклюзивные награды, расширенные пределы и опережающую помощь.
Актуальные сервисы беттинг услуг предоставляют пользователям вход к высококлассному развлечениям через надежные п»ї1хбет зеркало системы. Лицензированная работа предполагает исполнения жестких контролирующих норм.
Механизм создания персонального аккаунта предусматривает аутентификацию индивидуальных сведений. Провайдеры применяют расширенные механизмы KYC и AML для исключения нарушающих финансовых действий.
Программные инструменты передовых гемблинг платформ работают на надежных серверах с шифровальными сертификатами. IP-фильтрация заставляет провайдеров организовывать альтернативные адреса.
Параллельные платформы образуют идентичные версии центрального домена с обеспечением всех опций и данных. Клиенты обеспечивают себе постоянный связь к балансу, беттинг отчетности и индивидуальным опциям.
Денежные процедуры осуществляются через связанные денежные сервисы. Рамки на депозиты и снятия определяются в соотношении с правовыми условиями и организационными регламентами контроля угроз.
Компетентные беттеры настаивают отслеживать условия разрешения через надзорные каталоги азартных ведомств. Репутационные параметры задействуют ранги на специализированных платформах и комментарии настоящих беттеров.
Thank you, Great stuff! https://md.swk-web.com/s/3gy4Bc7Hh
zoloft without dr prescription: sertraline zoloft – sertraline
how much is neurontin pills: gabapentin 600 mg – Neuro Relief USA
1win app скачать 1win app скачать
Новейшие операторы беттинг продуктов предоставляют игрокам подключение к премиальному гемблингу через сертифицированные Lucky Bear порталы. Авторизованная функционирование влечет выполнения определенных регуляторных стандартов.
Механизм открытия пользовательского аккаунта охватывает аутентификацию конфиденциальных показателей. Администраторы используют углубленные протоколы KYC и AML для недопущения нарушающих транзакций.
Программные средства инновационных беттинг площадок базируются на защищенных инфраструктурах с SSL протоколами. Территориальные ограничения принуждает операторов организовывать резервные URL.
Зеркальные порталы составляют точные клоны первичного портала с фиксацией всех опций и показателей. Участники обеспечивают себе беспрепятственный подключение к средствам, азартной данным и индивидуальным установкам.
Финансовые переводы реализуются через синхронизированные расчетные сервисы. Ограничения на взносы и обналичивания определяются в соотношении с лицензионными положениями и внутренними политиками снижения потерь.
Компетентные гемблеры указывают анализировать статус разрешения через регуляторные реестры игорных ведомств. Престижные параметры включают места на профильных ресурсах и отзывы истинных пользователей.
Выбор достойного гемблинг портала в актуальных рамках заставляет детального рассмотрения к лицензионному состоянию. Знающие пользователи знают, что Голд казино отображает современную материалы о функционирующих операторах.
Процедура создания аккаунта в официальных операторах содержит принудительную валидацию документов. KYC-нормы гарантируют как оператора, так и игрока от афер. Краткосрочные ограничения на вывод финансов до финализации подтверждения – типичная подход.
Технические блокировки на доступ к betting ресурсам решаются через параллельные URL. Активные копии сохраняют тотальную функциональность главного сервиса. Банковские движения, азартный статистика и привилегированные программы сохраняются постоянными.
Капитальная надежность характеризуется уровнем эксплуатируемых расчетных механизмов. SSL-кодирование, PCI DSS сертификация и многоуровневая идентификация формируют стабильный барьер защиты.
Азартная ассортимент лицензированных провайдеров предоставляет машины от лидирующих провайдеров. RTP-показатели, изменчивость и расчетные схемы подвергаются нейтральную аудит в одобренных центрах.
Планы стимулирования в достойных площадках базируются на понятных критериях вейджера. Отыгрыш x35-40 оценивается справедливым для спин-льгот, в то время как карточные развлечения идут в зачет с редуцированным коэффициентом.
Выбор честного гемблинг заведения заставляет серьезного анализа юридических свидетельств. Актуальные ресурсы Mellstroy Game предоставляют пользователям полную сведения о собственных санкциях.
Механизм открытия аккаунта включает множество ключевых ступеней верификации. Операторы запрашивают удостоверения, доказывающие персону и зрелость. Стандартный KYC-порядок составляет от 24 до 72 интервалов.
Финансовое планирование инициируется с назначения лимитов на вклады. Опытные геймеры настаивают использовать установку 5% от общего азартного средств на отдельную раунд.
Цифровые барьеры администраторов побуждают задействовать запасные адреса. Копии хранят безусловную функциональность главного площадки, включая летопись транзакций и гемблинг продвижение.
Инновационные денежные системы дают моментальные пополнения через блокчейн аккаунты. Bitcoin, Ethereum и фиксированные активы обеспечивают тайность и минимальные комиссии. Период проведения выводов достигает 10-30 промежутков.
Алгоритмы постоянства содержат ступенчатые степени с прогрессивным бонусом. VIP-менеджеры гарантируют индивидуальные награды, увеличенные ограничения и ускоренную помощь.
Перемещение в области лицензированных площадок нуждается осознания актуальных решений доступа. Опытные клиенты используют Рльдорадо для получения свежей материалов о активных путях.
Механизм открытия счета в сертифицированных организациях охватывает тщательную валидацию. Передовые поставщики эксплуатируют KYC-алгоритмы и AML-правила. Документальное сопровождение составляет от 24 до 72 периодов.
Цифровые методы для прохождения ограничений прогрессируют одновременно с укреплением нормативных инициатив. VPN-службы категории premium гарантируют безопасность AES-256 и методы OpenVPN. Устойчивость подключения fundamentally необходима для VIP сессий.
Зеркальные ресурсы работают через пространственно разнесенные технические кластеры. CDN-системы осуществляют сокращенную отклик для американских игроков. Системное редирект инициируется при выявлении недоступности первичного портала.
Денежные операции в проверенных юрисдикциях соответствуют определенным нормам PCI DSS. Цифровые переводы получают актуальность по причине приватности и динамике выполнения.
Портативные софт топовых провайдеров интегрируют голосовую аутентификацию и push-сообщения для критических ситуаций. Гибкий облик самостоятельно изменяется под настройки экрана.
Nice weblog right here! Additionally your web site loads up very fast!
What host are you the usage of? Can I am getting your affiliate
hyperlink for your host? I wish my web site loaded up as
quickly as yours lol
My web page radio promotion
Shop Cart Catalyst Online – The pages are well arranged and finding products is straightforward.
Передовые участники встречаются с набором технических деталей при функционировании с лицензированными сайтами. Тематические ресурсы типа Меллстрой зеркало предоставляют релевантную материалы о деятельности казино организаций.
Процедура верификации счета содержит комплекс требуемых стадий. Исходная валидация подразумевает передачи документов доказывающих персону. Стандартный набор предполагает документ, автоудостоверение или внешний паспорт.
Техническая компонента открытия счета предполагает эксплуатацию криптографической защиты и двухфакторной аутентификации. Профессиональные игроки подсказывают запускать полный набор возможных параметров охраны.
Дублирующие порталы составляют полные реплики базового домена с обеспечением полного набора функций. Важнейшее выгода состоит в схожести банковских границ и требований вейджера.
Процедура выявления активных зеркал основывается на проверке тематических новостных лент и союзных ресурсов. Квалифицированные клиенты внедряют виртуальные частные сети для предоставления надежного входа невзирая от географических блокировок.
Нынешние пользователи сталкиваются с набором программных нюансов при функционировании с проверенными сайтами. Экспертные источники типа Вавада обеспечивают современную материалы о функционировании развлекательных провайдеров.
Система проверки аккаунта подразумевает множество необходимых шагов. Стартовая аутентификация подразумевает размещения документов подтверждающих субъект. Типовой набор подразумевает паспорт, автолицензию или загранпаспорт.
Системная составляющая создания аккаунта охватывает задействование SSL-шифрования и многофакторной защиты. Экспертные геймеры подсказывают запускать полный набор представленных опций обеспечения.
Дублирующие порталы образуют идентичные реплики центрального сайта с удержанием исчерпывающего инструментария. Главное плюс состоит в схожести денежных лимитов и параметров отыгрыша.
Процедура поиска актуальных альтернативных адресов опирается на проверке экспертных уведомительных сервисов и аффилированных порталов. Экспертные клиенты эксплуатируют прокси-соединения для обеспечения устойчивого соединения независимо от территориальных лимитов.
direct access portal – Amazing selection of luggage and navigating the store was simple.
Отбор честного игорного оператора нуждается тщательного изучения лицензионных разрешений. Инновационные платформы mad казино зеркало предоставляют геймерам максимальную информацию о текущих допусках.
Процесс регистрации включает множество необходимых ступеней верификации. Провайдеры истребуют свидетельства, подтверждающие идентичность и совершеннолетие. Традиционный KYC-процесс занимает от 24 до 72 часов.
Управление банком инициируется с установления рамок на пополнения. Квалифицированные участники призывают использовать закон 5% от полного казино средств на одну партию.
Системные ограничения операторов побуждают применять запасные адреса. Дубликаты поддерживают безусловную эффективность первичного ресурса, подразумевая историю переводов и азартный успех.
Передовые финансовые методы поддерживают моментальные взносы через цифровые аккаунты. Bitcoin, Ethereum и устойчивые монеты предоставляют анонимность и крошечные сборы. Время осуществления снятий доходит 10-30 периодов.
Системы лояльности содержат градационные ранги с нарастающим бонусом. VIP-представители дают уникальные подарки, повышенные лимиты и приоритетную обслуживание.
Гемблинговая индустрия являет стремительный расширение, завлекая легионы клиентов. Профессиональные сайты дают стабильную обстановку для ставок. Развёрнутую информацию о указанных компаниях допустимо найти на винити казино .
Лицензирование составляет основным критерием отбора портала. Надзорные органы Гибралтара создают качественный надзор денежных манипуляций. Каждая сертифицированная портал осуществляет регулярные аудиты RNG-модулей.
Цифровые особенности новейших азартных площадок охватывают SSL-защиту экономического стандарта. Создатели цифрового софта вроде Microgaming, NetEnt, Pragmatic Play добавляют комплексные алгоритмы произвольных величин.
Процедура валидации профиля включает предоставления бумаг KYC-формата. Удостоверение, свидетельство о доходах, верификация проживания — типичный список для полноценного входа.
Зеркальные адреса убирают сложности с запретами компаний. Функционирующие варианты адаптируются регулярно цифровыми группами. Портативные софт обычно работают надёжнее браузерных модификаций.
Финансовая дисциплина устанавливает продолжительную прибыльность гемблинговых сессий. Квалифицированные игроки указывают лимитировать сумму ставки до 1-2% от суммарного банкролла.
Актуальные участники оказываются с затруднением подключения к легальным порталам. Поставщики запрещают базовые порталы, но опытные Lucky Bear casino посетители знают о присутствии зеркальных ресурсов.
Резервная ссылка является полную воспроизведение базового площадки. Протоколы шифрования работают такими же. Банковские переводы реализуются через сходные сервисы.
Методика открытия счёта через зеркальный адрес подразумевает классической проверки. Администраторы уточняют справки для выполнения KYC-правил. Личные данные выполняют усиленную проверку.
Финансовые пределы на дополнительных площадках равняются основным условиям. Наименьшие ставки остаются стабильными. Накопительные накопления объединяются между всеми доменами.
Поощрительные схемы функционируют всесторонне на параллельных площадках. Коэффициент оборота поддерживает стартовые показатели. Тайминг проигрывания продолжается.
Департамент сопровождения решает запросы с зеркальных порталов аналогично. Интерактивный разговор осуществляет постоянный расписание деятельности.
Отбор безопасного игрового оператора в современных рамках подразумевает тщательного рассмотрения к законному уровню. Компетентные пользователи знают, что Vavada казино включает новую сведения о функционирующих сервисах.
Алгоритм регистрации в официальных сервисах объединяет неизбежную проверку идентичности. KYC-правила защищают как сервис, так и геймера от афер. Промежуточные пределы на снятие денег до выполнения контроля – нормальная методика.
Технические запреты на связь к развлекательным сервисам нейтрализуются через альтернативные порталы. Функционирующие копии поддерживают абсолютную возможности первичного портала. Банковские движения, интерактивный достижения и бонусные системы поддерживаются постоянными.
Экономическая стабильность оценивается показателем применяемых платежных систем. SSL-криптография, PCI DSS лицензирование и многоуровневая верификация обеспечивают защищенный щит защиты.
Азартная каталог сертифицированных провайдеров охватывает слоты от ведущих студий. RTP-коэффициенты, изменчивость и вероятностные формулы получают объективную контроль в утвержденных учреждениях.
Планы вознаграждения в профессиональных операторах формируются на открытых критериях ставок. Условия ставок x35-40 признается разумным для спин-поощрений, в то время как карточные забавы идут в расчет с сниженным показателем.
https://auto.ae/catalog/
Monitor Merchant electronics shop – Product details and great offers simplified purchasing.
cum ma loghez pe melbet https://melbet28507.help
https://ivertherapeutics.shop/# stromectol buy
ExchangeXpress Hub – Easy-to-navigate site and clear product info made browsing quick.
Определение достойного развлекательного площадки в текущих условиях нуждается особого анализа к юридическому положению. Знающие участники понимают, что Лаки Бир казино содержит свежую сведения о действующих ресурсах.
Механизм открытия счета в сертифицированных площадках включает обязательную аутентификацию удостоверения. KYC-требования оберегают как казино, так и игрока от мошенничества. Кратковременные пределы на снятие средств до закрытия проверки – стандартная процедура.
Электронные барьеры на подключение к азартным порталам решаются через дублирующие адреса. Рабочие отражения обеспечивают тотальную работоспособность первичного портала. Финансовые переводы, интерактивный продвижение и поощрительные системы поддерживаются постоянными.
Финансовая надежность характеризуется уровнем используемых финансовых инструментов. SSL-криптография, PCI DSS сертификация и усиленная идентификация формируют безопасный барьер защиты.
Геймплейная ассортимент сертифицированных площадок включает спины от ведущих производителей. RTP-параметры, дисперсия и алгоритмические формулы подвергаются независимую проверку в авторизованных организациях.
Схемы лояльности в достойных сервисах основываются на понятных правилах вейджера. Отыгрыш x35-40 признается приемлемым для слот-привилегий, в то время как стандартные забавы засчитываются в зачет с минимальным процентом.
Выбор надежного развлекательного портала требует детального изучения регулятивных свидетельств. Инновационные системы Vavada casino предлагают геймерам максимальную детали о имеющихся санкциях.
Процесс оформления счета подразумевает различные необходимых шагов валидации. Представители запрашивают бумаги, доказывающие самобытность и возраст. Обычный KYC-механизм продолжается от 24 до 72 временных отрезков.
Финансовое планирование запускается с фиксации рамок на взносы. Опытные пользователи рекомендуют применять установку 5% от общего азартного бюджета на конкретную партию.
Программные барьеры владельцев вынуждают внедрять вспомогательные маршруты. Копии оберегают стопроцентную эффективность первичного платформы, охватывая историю платежей и казино продвижение.
Новые банковские инструменты гарантируют оперативные вклады через электронные счета. Bitcoin, Ethereum и фиксированные активы поддерживают анонимность и крошечные отчисления. Продолжительность реализации получений равно 10-30 минут.
Схемы преданности предусматривают иерархические уровни с увеличивающимся компенсацией. VIP-менеджеры обеспечивают уникальные поощрения, увеличенные ограничения и первоочередную сервис.
Развлекательная область являет быстрый подъём, заинтересовывая тысячи игроков. Грамотные площадки предоставляют надёжную обстановку для пари. Детальную информацию о данных организациях можно отыскать на лаки ворлд казино .
Лицензирование выступает приоритетным аспектом выбора платформы. Лицензиаты Олдерни дают качественный аудит валютных транзакций. Каждая аккредитованная портал осуществляет постоянные проверки RNG-механизмов.
Компьютерные особенности новейших гемблинг-сайтов предусматривают SSL-безопасность экономического категории. Поставщики виртуального обеспечения типа Microgaming, NetEnt, Pragmatic Play интегрируют продвинутые алгоритмы рандомных показателей.
Процедура верификации учётной записи включает подачи справок KYC-стандарта. ID, выписка о средствах, верификация прописки — обычный комплект для полноценного подключения.
Резервные домены решают трудности с блокировками провайдеров. Рабочие зеркала адаптируются ежедневно IT специалистами. Мобильные клиенты нередко оперируют стабильнее онлайн модификаций.
Банкролл-менеджмент устанавливает длительную прибыльность развлекательных раундов. Грамотные пользователи указывают контролировать количество вейджера до 1-2% от общего фонда.
Современные сервисы азартных развлечений дают игрокам вход к высококлассному гемблингу через сертифицированные Болливуд регистрация ресурсы. Легальная работа предполагает соблюдения определенных регуляторных требований.
Процедура оформления персонального профиля охватывает подтверждение индивидуальных сведений. Управляющие задействуют углубленные алгоритмы KYC и AML для недопущения незаконных платежей.
IT системы инновационных казино работают на безопасных серверах с шифровальными алгоритмами. Территориальные ограничения обязывает управляющих разрабатывать резервные домены.
Альтернативные порталы формируют эквивалентные репликации главного ресурса с удержанием всех опций и показателей. Игроки обеспечивают себе непрерывный вход к балансу, азартной данным и клиентским параметрам.
Банковские переводы осуществляются через связанные расчетные процессоры. Рамки на пополнения и получения фиксируются в соответствии с правовыми критериями и внутренними регламентами управления рисками.
Экспертные игроки предлагают контролировать состояние аккредитации через надзорные регистры беттинг ведомств. Имиджевые индикаторы охватывают рейтинги на отраслевых порталах и отзывы настоящих игроков.
Онлайн казино Орби https://orby-casino.net большой выбор слотов, бонусы для новых и постоянных игроков, регулярные турниры с призами.
For articles
Personal loan for car purchase near me
to discover possibilities.
Орби казино http://orby-casino.com/ онлайн-платформа с широким выбором слотов, настольных игр и бонусных предложений. Узнайте об акциях, турнирах и возможностях для комфортного игрового досуга.
Надёжные площадки игровых услуг дают участникам право к профессиональному развлечениям через профильные сайты, включая казино Lucky Bear , которые придерживаются transnational требования защиты.
Механизм открытия счёта necessita указания верификационных сведений через защищённые SSL-линии. Букмекеры demanded документальное verification возраста и территории нахождения для compliance законодательных правил.
Multi-factor верификация считается required частью передовых механизмов security. Пользователи располагают SMS-шифры, push-уведомления или используют targeted утилиты наподобие Google Authenticator.
Альтернативные URL устраняют трудности локальных ограничений и DDoS-штурмов. С технической точки зрения дубли составляют копийные копии главного сайта с обеспечением инструментария и личных параметров.
Skilled игроки призывают keeping current каталоги рабочих зеркал в сохранённых ссылках веб-клиента. Операторы рассылают updates о актуальных URL через электронную почту, Telegram-чаты и портативные софт.
Финансовые movements через официальные площадки защищены cryptographic алгоритмами стандарта банковского сектора. Extraction средств выполняется только на validated реквизиты обладателя account.
Определение безопасного гемблинг портала в текущих обстоятельствах предполагает специального анализа к регулятивному статусу. Компетентные пользователи учитывают, что казино Mellstroy Game содержит новую сведения о работающих ресурсах.
Алгоритм записи в легальных площадках охватывает необходимую проверку личности. KYC-нормы защищают как казино, так и клиента от мошенничества. Переходные пределы на изъятие средств до завершения проверки – нормальная подход.
Цифровые препятствия на вход к игровым площадкам преодолеваются через альтернативные порталы. Доступные дубликаты сохраняют полную работоспособность основного портала. Банковские операции, игровой статистика и поощрительные программы продолжают устойчивыми.
Денежная стабильность выражается показателем внедренных банковских систем. SSL-безопасность, PCI DSS подтверждение и усиленная верификация создают защищенный щит ограждения.
Игровая библиотека легальных провайдеров охватывает слоты от лидирующих провайдеров. RTP-коэффициенты, колебания и статистические схемы получают нейтральную контроль в утвержденных учреждениях.
Планы мотивации в профессиональных площадках базируются на прозрачных параметрах отыгрыша. Отыгрыш x35-40 считается справедливым для слот-поощрений, в то время как традиционные активности принимаются в подсчет с редуцированным множителем.
禁忌第一季高清完整官方版,海外华人可免费观看最新热播剧集。
digital shopfront – The browsing experience led me straight to what I wanted.
http://ivertherapeutics.com/# Iver Therapeutics
adjustable workstation outlet – Everything moves quickly and works perfectly on mobile.
online discount prescription drug with out prescriptin https://maps.google.rw/url?q=http%3A%2F%2Fxenipharm.top foreign pharmacies online no prescriptions
Hi, everything is going well here and ofcourse
every one is sharing facts, that’s truly excellent, keep up writing.
Надёжные операторы игорных опций предоставляют участникам вариант к элитному времяпрепровождению через dedicated домены, включая Лаки Бир РІС…РѕРґ , которые точно соблюдают общепринятые стандарты конфиденциальности.
Процедура оформления профиля necessita заполнения идентификационных данных через encrypted SSL-линии. Менеджмент demanded письменное свидетельство правоспособности и места регистрации для выполнения legal правил.
Двухфакторная authentication становится mandatory элементом современных систем защиты. Клиенты располагают SMS-пароли, push-оповещения или эксплуатируют targeted софт типа Google Authenticator.
Mirror порталы нейтрализуют препятствия territorial блокировок и DDoS-штурмов. С технической точки зрения mirrors формируют копийные клоны основного ресурса с поддержанием инструментария и клиентских сведений.
Компетентные геймеры призывают удерживать актуальные перечни функционирующих mirrors в закладках browser. Администрация доставляют сведения о современных URL через e-mail, Telegram-communities и смартфонные софт.
Финансовые операции через официальные сайты обеспечены шифровальными технологиями level банковского области. Изъятие финансов осуществляется единственно на верифицированные wallets держателя учётной записи.
Актуальные клиенты пересекаются с множеством цифровых аспектов при работе с официальными сайтами. Профильные платформы типа аква поставляют новую материалы о работе азартных операторов.
Система проверки аккаунта включает комплекс обязательных шагов. Начальная подтверждение подразумевает предоставления свидетельств удостоверяющих субъект. Классический пакет предполагает удостоверение личности, водительские права или загранпаспорт.
Технологическая часть регистрации предполагает применение криптографической защиты и двойной авторизации. Профессиональные участники советуют задействовать совокупность имеющихся возможностей обеспечения.
Зеркала образуют стопроцентные реплики первичного платформы с удержанием комплексного функционала. Основное преимущество состоит в подобии финансовых рамок и условий ставочных требований.
Процедура выявления функционирующих запасных доменов опирается на контроле специализированных уведомительных сервисов и партнерских площадок. Продвинутые пользователи эксплуатируют VPN-сервисы для предоставления устойчивого доступа вне зависимости от географических лимитов.
official shop link – Descriptions are helpful and the snacks look very appealing.
Подбор проверенного азартного портала в актуальных границах предполагает специального внимания к правовому уровню. Опытные участники осознают, что казино 1xBet предоставляет актуальную сведения о работающих сервисах.
Алгоритм регистрации в сертифицированных операторах содержит требуемую проверку документов. KYC-нормы гарантируют как заведение, так и клиента от обмана. Временные границы на изъятие средств до выполнения контроля – привычная методика.
Цифровые барьеры на подключение к betting порталам обходятся через резервные ссылки. Доступные дубликаты поддерживают всестороннюю эффективность базового ресурса. Финансовые процедуры, азартный результаты и поощрительные программы сохраняются неизменными.
Денежная защищенность оценивается качеством применяемых финансовых механизмов. SSL-безопасность, PCI DSS аттестация и расширенная идентификация гарантируют прочный барьер защиты.
Интерактивная набор легальных сервисов включает барабаны от известных создателей. RTP-индексы, волатильность и статистические принципы подвергаются внешнюю проверку в авторизованных лабораториях.
Системы мотивации в достойных сервисах базируются на ясных условиях активности. Вейджер x35-40 считается нормальным для машина-привилегий, в то время как карточные активности учитываются в расчет с пониженным показателем.
Актуальные бетторы оказываются с сложностью доступа к лицензированным ресурсам. Поставщики закрывают базовые домены, но профессиональные Либет казино посетители помнят о наличии дублирующих порталов.
Зеркало формирует точную реплику базового платформы. Криптографические алгоритмы работают такими же. Расчётные процедуры реализуются через равнозначные механизмы.
Алгоритм регистрации через параллельный ресурс включает обычной валидации. Сотрудники выясняют бумаги для осуществления KYC-регламентов. Персональные сведения проходят расширенную проверку.
Вносительные лимиты на альтернативных сайтах соответствуют главным требованиям. Начальные беты продолжают постоянными. Растущие джекпоты синхронизируются между множественными порталами.
Поощрительные системы действуют завершённо на дополнительных порталах. Отыгрышный коэффициент удерживает оригинальные параметры. Период действия использования поддерживается.
Сервис поддержки рассматривает заявки с параллельных ссылок аналогично. Онлайн диалог предоставляет круглосуточный режим деятельности.
Tidy Treasure Market – Feels organized and stress-free while looking around.
Теневая платформа Mega — считается платформой, функционирующий в даркнете, где можно найти к разнообразным сервисам и услугам.
мега даркнет официальный сайт связан с мрачной тематикой даркнета и максимальным уровнем анонимности.
Образно говоря, этот ресурс выступает как окно в подпольную сеть, которое таит в себе массу особенностей.
Платформа Mega относится к числу известных площадок «даркнета», где основное внимание уделяется скрытность пользователей и защита каналов связи.
Вход на эти сайты обычно осуществляется применения специального ПО (например, Tor), и дополнительно VPN для обеспечения доступа из любой точки.
Для входа на платформу, нужно найти рабочий адрес (ONION-ссылку) и обеспечить корректную конфигурацию.
Ключевое отличие площадки состоит в отсутствии информации посетителей и невозможности создать обычный аккаунт.
Участники данной сети могут искать самые разные сервисы: от закрытых каналов связи до маркетплейсов.
Платформа обеспечивает защиту от наблюдения благодаря современным технологиям шифрования.
Но при этом даже многоуровневая защита может гарантировать лишь частичную безопасность, особенно при неосмотрительном поведении посетителей ресурса.
На сегодняшнем этапе развития сети этот сайт имеет свою специфическую нишу, становясь местом для людей, кто охотится за непубличной информацией и особыми сервисами.
Среди контента здесь бывают представлены как допустимые законом сведения, так и запрещенные, что требует от посетителя проявлять бдительность и ответственность.
Анализируя роль подобных площадок в интернете, можно выделить определенные нюансы, касающихся культуры использования и конфиденциальности.
Прежде всего, необходима грамотная настройка пользовательского окружения и использование комплексной защиты для уменьшения опасностей.
Пользователь обязан разбираться в уровни анонимности и, желательно соблюдать этичным принципам при работе внутри сети.
Во-вторых, нельзя игнорировать о проблемах с законом и наказании за противоправные поступки.
Законодательство разных стран по-разному трактует само присутствие на подобных сайтах и ответственность за их использование.
Отдельные специалисты подчеркивают, что подобные сайты могут служить местом для обмена знаниями и обеспечения анонимности при ответственном подходе.
Однако, опасность мошенничества, финансовых потерь и мошеннических действий здесь остаются высокими.
Находясь на грани свободой слова и жесткими правовыми ограничениями, теневая платформа представляет собой наиболее неоднозначный сегмент глобальной сети.
Отсюда следует простой вывод: необходимо крайне аккуратно подходить к выбору контента и оценке надежности сайтов.
Обобщая вышесказанное можно сформулировать так: Мега Даркнет — это неоднозначное и опасное пространство. Она предлагает максимальную приватность и защиты личных данных, но обязывает любого пользователя бдительности, понимания технологий и моральной ответственности.
Этот ресурс наглядно демонстрирует многообразие поведения людей в среде с ослабленным регулированием и служит местом для коммуникации по закрытым вопросам.
Таким образом, этот сегмент сети представляет собой неоднозначный феномен глобальной сети, где гармония прав и рисков определяется индивидуально.
Действующие mirror-ссылки лицензированных азартных клубов на Vavada casino обеспечивают устойчивый доступ к гемблинг системам. Принцип дублирования создает аналогичные клоны основного сайта с удержанием всех механизмов.
Процедура регистрации через дублирующий портал в точности имитирует главную анкету. Начинающие клиенты указывают активный email, генерируют надежный секретную комбинацию и фиксируют игровую денежную единицу.
Аутентификация счета требует передачи документов согласно KYC-нормам. Копия удостоверения личности, свидетельство резиденции и денежные реквизиты проходят программную проверку в течение 24-72 часа.
Авторизация действующих участников происходит через обычную форму с 2FA идентификацией. Временные шифры передаются на мобильный гаджет или мейл.
Функционал пополнительного раздела через дублирующие порталы включает популярные платежные системы. Visa, Mastercard, электронные хранилища Skrill, Neteller, блокчейн-токены Bitcoin, Ethereum обрабатываются с низкими платежами 0-3%.
Gaming база воспроизводится полностью включая барабаны, настольные геймплей, live-крупье и максимальные награды. RTP-значения, волатильность и отыгрыш остаются неизменными.
Бонусная схема функционирует идентично базовому домену. Welcome-наборы, фриспины, денежный возврат и VIP-планы активируются алгоритмически при реализации фиксированных стандартов.
Легальные ресурсы азартных опций гарантируют геймерам право к качественному игровому процессу через тематические платформы, включая Вавада , которые специально следуют transnational стандарты безопасности.
Схема создания аккаунта necessita указания идентификационных данных через encrypted SSL-линии. Провайдеры demanded official свидетельство совершеннолетия и места проживания для поддержания legal норм.
Многоуровневая аутентификация представляет необходимым частью современных механизмов надёжности. Пользователи приобретают SMS-шифры, push-notification или используют профессиональные приложения по типу Google Authenticator.
Mirror ссылки преодолевают сложности territorial запретов и DDoS-assault. Техническим образом дубли образуют копийные клоны главного платформы с поддержанием инструментария и user параметров.
Экспертные игроки suggest поддерживать current базы working mirrors в сохранённых ссылках интернет-программы. Management рассылают сведения о свежих ссылках через электронную почту, Telegram-группы и портативные приложения.
Денежные транзакции через официальные порталы обеспечены cryptographic протоколами класса банковского направления. Изъятие финансов осуществляется исключительно на validated карты держателя аккаунта.
Amazing! Its genuinely amazing piece of writing, I have got much clear idea concerning
from this article.
My web blog: 프리카지노
Vetrivine Shop Now – Smooth experience with well-arranged products that are simple to navigate.
Ориентирование в мире сертифицированных порталов включает знания новых методов подключения. Умелые клиенты используют казино СЌРЅРѕРјРѕ для приобретения релевантной информации о действующих ссылках.
Процедура регистрации учетной записи в сертифицированных организациях предполагает детальную аутентификацию. Актуальные операторы используют KYC-процедуры и AML-нормы. Документальная процедура потребляет от 24 до 72 часов.
Компьютерные решения для обхода препятствий прогрессируют параллельно с укреплением нормативных решений. VPN-платформы типа premium дают защиту AES-256 и стандарты OpenVPN. Надежность канала кардинально актуальна для VIP сессий.
Запасные платформы выполняют задачи через географически размещенные серверные системы. CDN-комплексы обеспечивают оптимальную отклик для европейских геймеров. Техническое редирект запускается при выявлении недоступности базового ресурса.
Платежные переводы в легальных областях подчиняются четким стандартам PCI DSS. Криптовалютные платежи получают признание благодаря конфиденциальности и динамике процессинга.
Переносные софт топовых организаций содержат голосовую подтверждение и push-уведомления для важных событий. Модифицируемый дизайн программно настраивается под особенности монитора.
Подбор достойного betting портала в нынешних рамках нуждается специального рассмотрения к правовому состоянию. Квалифицированные пользователи понимают, что френдс казино отображает последнюю факты о активных провайдерах.
Процесс открытия счета в проверенных площадках предусматривает необходимую проверку персональных данных. KYC-стандарты гарантируют как оператора, так и клиента от фрода. Переходные лимиты на изъятие финансов до закрытия контроля – стандартная подход.
Программные препятствия на вход к гемблинг сервисам устраняются через параллельные порталы. Действующие дубликаты сохраняют всестороннюю работоспособность первичного сервиса. Платежные переводы, геймплейный результаты и привилегированные предложения продолжают постоянными.
Экономическая защищенность характеризуется показателем эксплуатируемых банковских способов. SSL-криптография, PCI DSS аттестация и усиленная аутентификация устанавливают защищенный щит защиты.
Игровая коллекция проверенных сервисов охватывает спины от лидирующих производителей. RTP-значения, волатильность и статистические формулы претерпевают независимую аудит в утвержденных организациях.
Схемы мотивации в надежных сервисах основываются на четких правилах ставок. Вейджер x35-40 считается адекватным для слот-подарков, в то время как настольные состязания засчитываются в калькуляцию с уменьшенным фактором.
Развлекательная индустрия отображает стремительный развитие, привлекая миллионы пользователей. Экспертные сайты гарантируют качественную обстановку для пари. Исчерпывающую информацию о указанных брендах можно отыскать на Вавада казино .
Легализация выступает основным показателем определения платформы. Надзорные органы Олдерни обеспечивают качественный надзор экономических операций. Всякая легальная платформа проходит плановые контроли RNG-модулей.
Цифровые особенности новейших казино объединяют SSL-защиту экономического категории. Создатели цифрового материала класса Microgaming, NetEnt, Pragmatic Play добавляют многоуровневые алгоритмы случайных показателей.
Процедура валидации профиля предусматривает представления свидетельств KYC-класса. Документ, выписка о доходах, подтверждение прописки — классический набор для полноценного доступа.
Дублирующие ссылки устраняют трудности с фильтрацией провайдеров. Рабочие варианты модифицируются ежедневно техническими службами. Карманные программы регулярно выполняются стабильнее интернет редакций.
Контроль средств задаёт длительную успешность гемблинговых периодов. Опытные геймеры предлагают лимитировать размер депозита до 1-2% от общего банкролла.
Официальные площадки развлекательных опций предоставляют пользователям шанс к профессиональному гэмблингу через профильные домены, включая Lucky Bear казино , которые точно исполняют transnational требования безопасности.
Алгоритм активации включает внесения authentication данных через encrypted SSL-соединения. Администрация запрашивают документальное verification age verification и территории residence для выполнения юрисдикционных норм.
Двухфакторная authentication представляет необходимым частью новейших solutions security. Пользователи приобретают SMS-ключи, push-сообщения или внедряют профессиональные tools в стиле Google Authenticator.
Дублирующие адреса решают препятствия geographic блокировок и DDoS-штурмов. С технической точки зрения копии образуют копийные версии primary сайта с обеспечением возможностей и user сведений.
Экспертные клиенты призывают сохранять свежие базы действующих mirrors в закладках обозревателя. Management направляют обновления о fresh адресах через электронную почту, Telegram-чаты и телефонные софт.
Денежные операции через legal платформы secured криптографическими алгоритмами level банковского области. Вывод средств реализуется только на верифицированные карты хозяина профиля.
truecrimecrate.shop – Love the concept and overall vibe of this place.
Беттинговая индустрия отображает динамичный рост, заинтересовывая массы игроков. Профессиональные платформы предлагают безопасную среду для ставок. Подробную факты о таких компаниях возможно получить на Лаки Бир казино .
Легализация является приоритетным критерием определения портала. Контролёры Гибралтара дают качественный проверку валютных действий. Любая лицензированная портал проходит периодические инспекции RNG-механизмов.
Программные аспекты инновационных гемблинг-сайтов охватывают SSL-кодирование экономического ранга. Поставщики софтового обеспечения вроде Microgaming, NetEnt, Pragmatic Play подключают усовершенствованные системы непредсказуемых параметров.
Процесс аутентификации аккаунта требует подачи удостоверений KYC-стандарта. Свидетельство, подтверждение о прибылях, подтверждение проживания — обычный комплект для итогового доступа.
Альтернативные порталы ликвидируют препятствия с цензурой операторов. Рабочие варианты корректируются ежедневно техническими командами. Смартфонные программы нередко работают стабильнее интернет форматов.
Банкролл-менеджмент устанавливает стратегическую прибыльность беттинговых периодов. Грамотные пользователи советуют ограничивать объём вейджера до 1-2% от совокупного банкролла.
Ориентирование в мире лицензированных ресурсов предполагает понимания новых способов авторизации. Квалифицированные участники задействуют казино Lucky Bear для приобретения свежей фактов о оперативных адресах.
Процедура регистрации учетной записи в надежных учреждениях содержит комплексную проверку. Новейшие провайдеры применяют KYC-протоколы и AML-стандарты. Оформление документов занимает от 24 до 72 периодов.
Компьютерные решения для избежания ограничений совершенствуются параллельно с усилением юридических инициатив. VPN-сервисы типа premium гарантируют безопасность AES-256 и системы OpenVPN. Непрерывность подключения жизненно важна для премиальных раундов.
Резервные сайты выполняют задачи через территориально расположенные серверные ресурсы. CDN-архитектуры обеспечивают оптимальную время ответа для европейских геймеров. Программное редирект срабатывает при обнаружении барьера центрального портала.
Финансовые манипуляции в легальных юрисдикциях отвечают жестким критериям PCI DSS. Цифровые транзакции приобретают признание из-за скрытности и оперативности осуществления.
Планшетные клиенты топовых компаний интегрируют отпечатковую проверку и push-извещения для критических происшествий. Адаптивный облик автоматически корректируется под особенности дисплея.
Передовые геймеры встречаются с огромным количеством программных особенностей при функционировании с официальными порталами. Тематические порталы типа Голд казино поставляют новую контент о работе азартных организаций.
Процедура верификации аккаунта охватывает комплекс обязательных уровней. Стартовая верификация включает размещения удостоверений удостоверяющих субъект. Классический комплект включает паспорт, лицензию водителя или внешний паспорт.
Цифровая компонента открытия счета подразумевает эксплуатацию защищенного протокола и двойной авторизации. Профессиональные пользователи настаивают запускать максимум предложенных возможностей секьюрити.
Запасные домены составляют точные клоны базового домена с удержанием всего набора функций. Основное бонус кроется в подобии денежных границ и требований отыгрыша.
Система нахождения действующих запасных доменов опирается на проверке экспертных новостных лент и партнерских площадок. Профессиональные пользователи используют виртуальные частные сети для создания постоянного входа невзирая от территориальных блокировок.
戏台在线免费在线观看,海外华人专属官方认证平台,高清无广告体验。
Передовые порталы гемблинг активностей обеспечивают клиентам доступ к качественному гемблингу через защищенные казино Килограмм сайты. Легальная деятельность подразумевает выполнения определенных регуляторных стандартов.
Процедура оформления индивидуального кабинета охватывает подтверждение конфиденциальных сведений. Регуляторы задействуют комплексные механизмы KYC и AML для недопущения поддельных переводов.
Электронные средства современных игорных домов строятся на надежных дата-центрах с криптографическими технологиями. Геоблокировка побуждает провайдеров внедрять дублирующие домены.
Альтернативные домены образуют точные репликации главного платформы с сохранением всех сервисов и показателей. Пользователи добиваются стабильный соединение к депозиту, развлекательной истории и клиентским настройкам.
Денежные переводы реализуются через встроенные финансовые сервисы. Пределы на пополнения и выводы устанавливаются в унисон с нормативными требованиями и организационными правилами снижения потерь.
Экспертные игроки указывают отслеживать состояние разрешения через регуляторные регистры беттинг органов. Имиджевые параметры задействуют места на тематических сервисах и комментарии настоящих клиентов.
Передовые геймеры встречаются с изобилием технологических особенностей при функционировании с проверенными порталами. Специализированные порталы типа Vavada дают современную данные о процессах игорных провайдеров.
Механизм валидации кабинета предполагает несколько принудительных стадий. Первичная проверка подразумевает предоставления документов верифицирующих индивидуальность. Типовой перечень содержит ID, автоудостоверение или загранпаспорт.
Программная часть регистрации включает внедрение криптографической защиты и двухфакторной аутентификации. Опытные геймеры настаивают задействовать полный набор доступных опций обеспечения.
Альтернативные адреса являются точные дубликаты центрального домена с сохранением исчерпывающего возможностей. Важнейшее плюс выражается в идентичности денежных границ и норм проигрыша.
Алгоритм обнаружения функционирующих резервных ссылок строится на проверке тематических новостных лент и связанных платформ. Продвинутые клиенты эксплуатируют анонимайзеры для предоставления бесперебойного доступа безотносительно от региональных ограничений.
Навигация в секторе официальных ресурсов предполагает представления новых инструментов входа. Опытные геймеры внедряют [url=https://github.com/Mellstroy-Game-zerkalo]казино Mellstroy Game[/url] для добывания новейшей сведений о функционирующих доменах.
Процедура открытия аккаунта в лицензированных организациях охватывает комплексную верификацию. Продвинутые поставщики задействуют KYC-алгоритмы и AML-нормы. Бумажная работа занимает от 24 до 72 интервалов.
IT методы для обхода барьеров эволюционируют одновременно с повышением юридических шагов. VPN-платформы уровня premium дают защиту AES-256 и методы OpenVPN. Постоянство соединения fundamentally значима для высокоролловых партий.
Дублирующие сайты выполняют задачи через территориально распределенные цифровые системы. CDN-сети гарантируют быструю латентность для глобальных геймеров. Программное перенаправление срабатывает при идентификации барьера базового домена.
Денежные транзакции в сертифицированных территориях соответствуют строгим нормам PCI DSS. Цифровые переводы увеличивают популярность из-за скрытности и темпу выполнения.
Смартфонные клиенты премиальных брендов включают физиологическую авторизацию и push-алерты для ключевых происшествий. Адаптивный дизайн автоматически подстраивается под параметры экрана.
捕风捉影在线免费在线观看,海外华人专属平台,高清无广告体验。
Определение надежного гемблинг заведения нуждается тщательного разбора правовых бумаг. Новые порталы лаки Р±РёСЂ казино обеспечивают геймерам абсолютную детали о своих аккредитациях.
Процедура открытия аккаунта подразумевает определенное количество требуемых этапов подтверждения. Представители истребуют бумаги, доказывающие персону и зрелость. Типовой KYC-алгоритм длится от 24 до 72 часов.
Распоряжение капиталом открывается с назначения ограничений на вклады. Искусные пользователи настаивают задействовать установку 5% от совокупного игорного фонда на отдельную игру.
Программные препятствия провайдеров вынуждают применять альтернативные маршруты. Копии оберегают стопроцентную производительность основного портала, содержа хронологию платежей и азартный результаты.
Инновационные платежные системы гарантируют скоростные пополнения через электронные кошельки. Bitcoin, Ethereum и стейблкоины предоставляют тайность и мизерные взносы. Длительность осуществления получений равно 10-30 периодов.
Планы лояльности включают ступенчатые степени с нарастающим бонусом. VIP-консультанты обеспечивают уникальные вознаграждения, усиленные границы и первоочередную техподдержку.
Поиск достойного гемблинг портала в текущих реалиях подразумевает специального изучения к юридическому положению. Знающие геймеры представляют, что п»ї1хбет казино отображает свежую данные о действующих площадках.
Схема оформления профиля в проверенных площадках включает требуемую аутентификацию идентичности. KYC-нормы защищают как заведение, так и участника от мошенничества. Промежуточные рамки на изъятие капитала до финализации верификации – привычная подход.
Цифровые барьеры на подключение к развлекательным сайтам преодолеваются через параллельные домены. Действующие отражения предоставляют всестороннюю эффективность главного сервиса. Банковские процедуры, развлекательный статистика и льготные системы сохраняются устойчивыми.
Экономическая надежность выражается качеством внедренных денежных систем. SSL-защита, PCI DSS подтверждение и усиленная подтверждение формируют безопасный щит безопасности.
Развлекательная библиотека лицензированных операторов содержит машины от лидирующих студий. RTP-значения, вариативность и алгоритмические формулы проходят беспристрастную проверку в признанных организациях.
Схемы мотивации в достойных заведениях опираются на ясных параметрах отыгрыша. Требования x35-40 расценивается адекватным для барабан-льгот, в то время как традиционные активности учитываются в счет с сниженным коэффициентом.
Актуальные игроки встречаются с массой технических аспектов при работе с проверенными ресурсами. Специализированные порталы типа аква казино дают релевантную контент о деятельности гэмблинговых провайдеров.
Механизм верификации учетной записи включает комплекс неотъемлемых этапов. Базовая валидация требует передачи бумаг удостоверяющих гражданство. Обычный комплект предполагает паспорт, права или международный паспорт.
Техническая часть записления содержит задействование безопасного соединения и многофакторной защиты. Опытные пользователи предлагают запускать совокупность представленных параметров охраны.
Дублирующие порталы составляют точные отражения первичного платформы с поддержанием всего арсенала. Главное выгода выражается в соответствии банковских границ и норм условий прокрутки.
Алгоритм обнаружения рабочих зеркал строится на отслеживании тематических мессенджер групп и аффилированных сайтов. Экспертные геймеры внедряют туннельные протоколы для создания устойчивого соединения невзирая от географических блокировок.
Перемещение в сфере легальных ресурсов включает знания современных инструментов соединения. Профессиональные геймеры применяют [url=https://github.com/Lucky-Bear-zerkalo]Lucky Bear казино[/url] для приобретения новейшей материалов о работающих доменах.
Механизм формирования счета в лицензированных учреждениях содержит многоуровневую валидацию. Передовые операторы эксплуатируют KYC-алгоритмы и AML-нормы. Документальное сопровождение отнимает от 24 до 72 промежутков.
Технические технологии для преодоления запретов совершенствуются параллельно с укреплением юридических действий. VPN-платформы класса premium предлагают криптографию AES-256 и стандарты OpenVPN. Устойчивость коннекта принципиально существенна для премиальных сессий.
Зеркальные платформы действуют через регионально разнесенные цифровые ресурсы. CDN-структуры осуществляют минимальную время ответа для американских геймеров. Техническое маршрутизация включается при распознавании препятствия центрального ресурса.
Банковские транзакции в лицензированных территориях подчиняются строгим нормам PCI DSS. Криптовалютные расчеты увеличивают распространение благодаря секретности и темпу обработки.
Переносные клиенты топовых брендов совмещают голосовую идентификацию и push-извещения для существенных моментов. Настраиваемый дизайн автономно корректируется под настройки матрицы.
Smart GenRx USA: canadian pharmacy cialis – pharmacy order online
Aw, this was a really nice post. Taking a few minutes and actual effort to
generate a really good article… but what can I say… I procrastinate a lot and don’t seem to get anything done.
My web site … Roofer Glasgow
go-to shopping spot – I had no issues at all completing my purchase.
iyftv海外华人首选,提供最新华语剧集、美剧、日剧等高清在线观看。
Ориентирование в секторе лицензированных платформ включает владения актуальных способов подключения. Опытные пользователи задействуют винити официальный сайт для добывания актуальной данных о действующих путях.
Механизм формирования профиля в официальных организациях включает комплексную верификацию. Актуальные компании задействуют KYC-процедуры и AML-критерии. Документальная процедура требует от 24 до 72 интервалов.
Компьютерные инструменты для минования блокировок улучшаются сообща с усилением нормативных решений. VPN-платформы уровня premium гарантируют шифрование AES-256 и стандарты OpenVPN. Постоянство соединения критически значима для высокоролловых раундов.
Альтернативные адреса действуют через локально размещенные IT инфраструктуры. CDN-архитектуры предоставляют низкую латентность для европейских геймеров. Автоматическое переключение активируется при выявлении ограничения главного сайта.
Экономические манипуляции в легальных регионах соответствуют определенным стандартам PCI DSS. Блокчейн операции увеличивают актуальность по причине секретности и скорости выполнения.
Смартфонные софт ведущих компаний совмещают лицевую подтверждение и push-извещения для принципиальных событий. Адаптивный внешний вид самостоятельно настраивается под свойства дисплея.
ifuntv海外华人首选,采用机器学习个性化推荐,提供最新华语剧集、美剧、日剧等高清在线观看。
I’m impressed, I must say. Rarely do I come across a blog
that’s equally educative and interesting, and without a doubt, you have hit the nail on the head.
The issue is something which not enough men and women are
speaking intelligently about. I am very happy I came across this during my search for something regarding this.
Check out my page; 프리카지노
Гемблинговая индустрия демонстрирует быстрый развитие, привлекая массы геймеров. Экспертные платформы предоставляют безопасную условия для пари. Исчерпывающую материалы о этих организациях реально изучить на Болливуд казино .
Аттестация выступает ключевым критерием определения ресурса. Регуляторы Гибралтара дают строгий аудит экономических действий. Конкретная лицензированная сайт подвергается систематические инспекции RNG-алгоритмов.
IT параметры актуальных игорных домов предусматривают SSL-шифрование банковского класса. Создатели цифрового обеспечения типа Microgaming, NetEnt, Pragmatic Play добавляют многоуровневые алгоритмы непредсказуемых показателей.
Механизм проверки аккаунта предполагает подачи удостоверений KYC-уровня. Свидетельство, выписка о заработке, подтверждение проживания — обычный набор для полноценного авторизации.
Альтернативные ссылки ликвидируют трудности с фильтрацией компаний. Рабочие дубли адаптируются постоянно компьютерными группами. Мобильные клиенты регулярно оперируют лучше интернет редакций.
Управление банкроллом устанавливает продолжительную доходность азартных периодов. Грамотные беттеры настаивают лимитировать сумму депозита до 1-2% от полного капитала.
direct access portal – Smooth browsing combined with a clean and simple layout makes it easy.
一饭封神在线免费在线观看,海外华人专属平台,高清无广告体验。
https://mebel-3d.ru/libraries/news/?mify_i_zablughdeniya_o_prichinah_impotencii.html
gabapentin buy: Neuro Relief USA – neurontin 100mg caps
For security
Open loans online
for future predictions.
Woah! I’m really loving the template/theme of this site.
It’s simple, yet effective. A lot of times it’s difficult to get that “perfect balance” between usability and appearance.
I must say you’ve done a excellent job with this. Additionally,
the blog loads super fast for me on Opera. Outstanding Blog!
official buying portal – It’s nice to see creative items paired with a reliable checkout flow.
https://ev-jugend-hg.de/wp-content/pages/beremennosty_obschie_svedeniya.html
Does your website have a contact page? I’m having problems
locating it but, I’d like to shoot you an e-mail. I’ve got
some suggestions for your blog you might be interested in hearing.
Either way, great site and I look forward to seeing it improve over time.
1win пополнение Demir через приложение http://www.1win91762.help
Новейшие порталы беттинг услуг предоставляют клиентам возможность к качественному развлечениям через сертифицированные mad casino платформы. Легальная функционирование нуждается учета строгих законодательных норм.
Процедура активации персонального аккаунта включает верификацию приватных показателей. Провайдеры используют расширенные процедуры KYC и AML для пресечения мошеннических транзакций.
Технические инструменты передовых гемблинг платформ строятся на зашифрованных дата-центрах с криптографическими стандартами. Локальные запреты вынуждает управляющих внедрять дублирующие порталы.
Альтернативные домены образуют идентичные дубликаты центрального портала с сохранением всех возможностей и параметров. Пользователи достигают стабильный вход к счету, беттинг статистике и личным настройкам.
Платежные операции выполняются через подключенные денежные сервисы. Границы на инвестиции и изъятия регулируются в гармонии с регуляторными стандартами и собственными правилами риск-менеджмента.
Профессиональные игроки рекомендуют контролировать условия сертификата через официальные регистры беттинг структур. Авторитетные параметры включают позиции на профильных порталах и мнения действительных беттеров.
Надёжные ресурсы азартных возможностей oferuja пользователям право к премиальному игровому процессу через dedicated сайты, включая aqua зеркало , которые выполняют глобальные требования защиты.
Последовательность регистрации подразумевает заполнения проверочных сведений через encrypted SSL-connection. Провайдеры просят предоставить письменное verification age verification и адреса нахождения для compliance законодательных критериев.
Двухфакторная верификация считается required aspect актуальных механизмов защиты. Пользователи располагают SMS-пароли, push-notification или эксплуатируют dedicated приложения по типу Google Authenticator.
Зеркальные порталы ликвидируют сложности geographic барьеров и DDoS-атак. По сути копии являют аналогичные клоны базового домена с сохранением функциональности и пользовательских сведений.
Профессиональные геймеры suggest keeping current базы функционирующих копий в избранном браузера. Провайдеры доставляют обновления о свежих URL через электронную почту, Telegram-чаты и смартфонные софт.
Денежные movements через надёжные платформы обеспечены защитными системами level банковского области. Вывод капитала происходит единственно на подтверждённые данные хозяина account.
https://smartgenrxusa.com/# canadian pharmacy 24h com safe
huarenus平台,专为海外华人设计,提供高清视频和直播服务。
взгляните на сайте здесь маркеплейс
Iver Therapeutics stromectol xr stromectol 6 mg dosage
Admiring the commitment you put into your site and detailed information you present. It’s good to come across a blog every once in a while that isn’t the same out of date rehashed information. Great read! I’ve saved your site and I’m including your RSS feeds to my Google account.
garipovbulat
Активные резервные адреса проверенных азартных клубов на лаки Р±РёСЂ создают устойчивый коннект к развлекательным системам. Принцип копирования формирует полноценные клоны базового домена с консервацией всех функций.
Процедура оформления профиля через альтернативный домен на сто процентов дублирует базовую анкету. Начинающие игроки регистрируют действующий email, устанавливают надежный секретную комбинацию и устанавливают игровую валюту.
Верификация аккаунта подразумевает предоставления бумаг следуя KYC-нормам. Изображение паспорта, верификация резиденции и платежные данные проходят автоматическую верификацию в течение 24-72 ч.
Подключение существующих игроков осуществляется через стандартную форму с двухфакторной верификацией. Одноразовые пароли отправляются на сотовый номер или e-mail адрес.
Инструменты входящего блока через дублирующие порталы содержит востребованные банковские сервисы. Visa, Mastercard, цифровые кошельки Skrill, Neteller, цифровые активы Bitcoin, Ethereum процессируются с минимальными платежами 0-3%.
Развлекательная база копируется полностью включая автоматы, традиционные развлечения, live-ведущих и мегавыигрыши. RTP-параметры, изменчивость и условия отыгрыша остаются такими же.
Акционная программа функционирует подобно главному ресурсу. Welcome-комплекты, free spins, refund и VIP-системы активируются машинально при соблюдении установленных критериев.
Если интересуетесь темой ufc в феврале марте 2026 три недели которые встряхнут дивизионы, этот гид будет вам полезен. Информация здесь: https://flat-360.ru/news/ufc-fevral-mart-2026-raspisanie-boyov-ufc-fight-night-strickland-vs-hernandez-moreno-vs-kavanagh-ufc-326-holloway-vs-oliveira-2-polnyj-gid-i-prognozy/
Подбор безопасного игрового портала в текущих обстоятельствах нуждается детального изучения к правовому режиму. Опытные клиенты знают, что лаки Р±РёСЂ казино демонстрирует современную сведения о действующих провайдерах.
Схема создания аккаунта в лицензированных площадках содержит принудительную проверку документов. KYC-процедуры обеспечивают как сервис, так и участника от махинаций. Краткосрочные лимиты на вывод средств до выполнения валидации – привычная подход.
Виртуальные препятствия на связь к гемблинг ресурсам обходятся через резервные ссылки. Доступные дубликаты поддерживают тотальную функциональность базового портала. Платежные переводы, игровой прогресс и бонусные схемы поддерживаются неизменными.
Капитальная надежность определяется показателем применяемых банковских методов. SSL-криптография, PCI DSS валидация и двухфакторная проверка устанавливают прочный контур безопасности.
Геймплейная каталог проверенных площадок объединяет машины от ведущих разработчиков. RTP-коэффициенты, дисперсия и вероятностные системы претерпевают нейтральную аудит в аккредитованных организациях.
Планы лояльности в достойных заведениях базируются на четких требованиях вейджера. Условия ставок x35-40 характеризуется разумным для автомат-льгот, в то время как классические забавы засчитываются в зачет с редуцированным процентом.
Fantastic goods from you, man. I have have in mind your
stuff prior to and you are just too wonderful. I actually like what
you’ve acquired right here, really like what you’re stating and the way through which
you say it. You are making it entertaining and you continue to care for to keep
it sensible. I can’t wait to learn far more from you.
This is actually a terrific site.
官方授权的ifuntv海外华人首选,第一时间提供最新华语剧集、美剧、日剧等高清在线观看。
Актуальные бетторы встречаются с сложностью соединения к проверенным площадкам. Компании закрывают базовые адреса, но профессиональные Рльдорадо казино пользователи помнят о существовании дублирующих площадок.
Альтернативный адрес представляет абсолютную дубликат оригинального портала. Протоколы шифрования работают идентичными. Платёжные процедуры реализуются через сходные шлюзы.
Методика открытия счёта через дополнительный ресурс предполагает классической валидации. Администраторы просят справки для исполнения KYC-требований. Индивидуальные данные реализуют усиленную аутентификацию.
Пополнительные лимиты на резервных порталах совпадают первичным условиям. Наименьшие вклады продолжают фиксированными. Прогрессивные банки объединяются между разными адресами.
Льготные программы работают комплексно на зеркальных ресурсах. Вейджер гарантирует стартовые параметры. Период действия отыгрыша не изменяется.
Служба сопровождения решает вопросы с параллельных адресов равнозначно. Интерактивный разговор поддерживает 24-часовой график функционирования.
Действующие дублирующие порталы проверенных gaming-операторов на лаки Р±РёСЂ казино гарантируют беспрерывный подключение к развлекательным порталам. Схема зеркалирования строит полноценные копии базового ресурса с консервацией всех опций.
Механизм открытия счета через дублирующий портал в точности имитирует основную форму. Начинающие геймеры прописывают действующий email, придумывают стойкий ключ и фиксируют рабочую валюту.
Подтверждение учетной записи требует загрузки документов согласно KYC-нормам. Фото ID-карты, валидация резиденции и денежные параметры контролируются системой автоматическую контроль в течение 24-72 периодов.
Подключение зарегистрированных игроков производится через типовую окно с двухфакторной валидацией. Сессионные пароли отправляются на мобильный номер или мейл.
Функционал денежного раздела через дублирующие порталы поддерживает топовые финансовые механизмы. Visa, Mastercard, виртуальные хранилища Skrill, Neteller, блокчейн-токены Bitcoin, Ethereum реализуются с оптимизированными комиссиями 0-3%.
Gaming коллекция повторяется полностью включая автоматы, карточные геймплей, live-хостов и накопительные призы. RTP-коэффициенты, изменчивость и ставочные требования сохраняются аналогичными.
Поощрительная механизм выполняется подобно базовому домену. Welcome-бандлы, бесплатные вращения, возврат средств и VIP-курсы стартуют программно при достижении определенных критериев.
fitness setup shop – Everything feels carefully structured and easy to view.
1win вывод без комиссии карта https://1win04381.help
Ориентирование в мире официальных порталов предполагает представления современных методов доступа. Продвинутые клиенты внедряют лаки бар казино для получения новейшей материалов о оперативных ссылках.
Алгоритм оформления личного кабинета в лицензированных заведениях подразумевает сложную аутентификацию. Актуальные операторы используют KYC-процедуры и AML-правила. Документальное сопровождение потребляет от 24 до 72 часов.
Компьютерные методы для обхода ограничений эволюционируют вместе с укреплением юридических инициатив. VPN-инструменты уровня premium предлагают безопасность AES-256 и технологии OpenVPN. Стабильность канала кардинально значима для привилегированных заходов.
Дублирующие сайты функционируют через географически распределенные технические кластеры. CDN-сети обеспечивают минимальную время ответа для глобальных участников. Техническое роутинг срабатывает при распознавании ограничения базового ресурса.
Платежные операции в проверенных территориях следуют четким нормам PCI DSS. Децентрализованные транзакции завоевывают актуальность благодаря секретности и оперативности осуществления.
Портативные программы лучших организаций содержат голосовую идентификацию и push-оповещения для ключевых эпизодов. Гибкий облик автоматически изменяется под характеристики панели.
Новейшие игроки встречаются с множеством технических деталей при функционировании с лицензированными ресурсами. Профильные ресурсы типа типпи казино предоставляют новую данные о деятельности игорных брендов.
Алгоритм подтверждения кабинета включает комплекс необходимых фаз. Исходная валидация нуждается загрузки удостоверений доказывающих субъект. Классический список предполагает ID, автолицензию или внешний паспорт.
Технологическая элемент записления предполагает задействование защищенного протокола и 2FA. Опытные геймеры подсказывают инициировать совокупность представленных функций безопасности.
Зеркала формируют полные отражения главного домена с хранением комплексного функционала. Главное преимущество содержится в идентичности финансовых границ и параметров ставочных требований.
Схема нахождения актуальных зеркал строится на отслеживании экспертных телеграм-каналов и аффилированных порталов. Продвинутые участники внедряют анонимайзеры для создания стабильного подключения невзирая от географических барьеров.
Skycrown online casino – top choice for Australian players
Zephvane Essentials – Everything is laid out clearly, making navigation fast and easy.
官方授权的捕风追影下载官方下载,第一时间海外华人专用,第一时间支持高速下载和离线观看。
узнать больше cheats cs 2
award shop online – Items are displayed clearly and the site is very user-friendly.
Отбор легального азартного оператора предполагает серьезного разбора официальных бумаг. Инновационные ресурсы казино Голд предоставляют участникам максимальную детали о собственных аккредитациях.
Алгоритм оформления счета включает ряд принудительных ступеней аутентификации. Операторы требуют документы, засвидетельствующие идентичность и зрелость. Традиционный KYC-регламент занимает от 24 до 72 промежутков.
Управление банком открывается с назначения ограничений на инвестиции. Опытные участники советуют использовать закон 5% от суммарного развлекательного фонда на единичную партию.
Электронные ограничения провайдеров обязывают задействовать запасные пути. Копии поддерживают абсолютную производительность базового ресурса, предусматривая историю переводов и игровой результаты.
Новые расчетные методы предоставляют моментальные вклады через электронные аккаунты. Bitcoin, Ethereum и фиксированные активы дают тайность и наименьшие отчисления. Длительность проведения извлечений равно 10-30 периодов.
Алгоритмы приверженности подразумевают многоуровневые статусы с накапливающимся возвратом. VIP-координаторы дают уникальные бонусы, усиленные рамки и приоритетную помощь.
Нынешние бетторы встречаются с сложностью входа к лицензированным ресурсам. Провайдеры блокируют первичные ссылки, но опытные лаки Р±РёСЂ казино игроки учитывают о присутствии параллельных порталов.
Дополнительный домен является абсолютную копию базового площадки. Криптографические алгоритмы функционируют неизменными. Банковские переводы осуществляются через аналогичные шлюзы.
Процедура открытия счёта через альтернативный ссылку предполагает типовой валидации. Менеджеры требуют свидетельства для реализации KYC-стандартов. Идентификационные информация реализуют усиленную подтверждение.
Банковские ограничения на зеркальных ресурсах совпадают основным требованиям. Минимальные взносы сохраняются постоянными. Возрастающие призовые фонды объединяются между разными ссылками.
Стимулирующие механизмы работают целостно на параллельных платформах. Вейджер удерживает исходные показатели. Период действия оборота остаётся прежним.
Служба поддержки анализирует заявки с альтернативных ресурсов сходным образом. Живой диалог предоставляет непрерывный формат обслуживания.
Площадка Mega — считается платформой, функционирующий в даркнете, где пользователи получают доступ различные непубличные сервисы.
даркнет россия отождествляется с мрачной тематикой даркнета и максимальным уровнем анонимности.
Образно говоря, этот ресурс можно рассматривать как окно в подпольную сеть, которое имеет свои тонкости.
Платформа Mega занимает важное место в структуре «подземного интернета», где ключевую роль играют анонимность участников и безопасность соединений.
Доступ к таким ресурсам чаще всего производится применения специального ПО (например, Tor), а также VPN для обхода сетевых ограничений.
С целью посещения ресурса, пользователю необходимо знать точный адрес (ONION-ссылку) и обеспечить корректную конфигурацию.
Основная характеристика ресурса — это скрытность пользователей и децентрализованной структуре.
Участники данной сети могут искать самые разные сервисы: от закрытых каналов связи до торговых платформ.
Платформа обеспечивает защиту от наблюдения благодаря современным технологиям шифрования.
Но при этом даже комплексные меры безопасности может быть эффективной лишь отчасти, особенно при ошибках участников системы.
На сегодняшнем этапе развития сети данная площадка занимает нишевую роль, привлекая тех, кто нуждается в альтернативных каналах информации и специфические услуги.
Внутри площадки попадаются как допустимые законом сведения, так и нелегальные, что обязывает пользователя быть внимательным и предусмотрительным.
Рассматривая Мега Даркнет как часть глобальной сети, следует отметить определенные нюансы, связанных с правилами поведения и защиты.
Во-первых, огромное значение имеет правильная конфигурация пользовательского окружения и использование комплексной защиты для снижения угроз.
Каждый посетитель должен разбираться в уровни анонимности и, желательно соблюдать правилам цифровой этики при взаимодействии в этой среде.
Кроме того, следует учитывать о правовых рисках и реальной ответственности за незаконные действия.
Юридические системы мира расходятся во мнениях относительно факта посещения таких ресурсов и ответственность за их использование.
Ряд экспертов отмечают, что эти ресурсы могут выступать пространством для дискуссий и обмена опытом и защиты приватности при осознанном использовании.
Однако, риски обмана, финансовых потерь и криминальной активности здесь остаются высокими.
Находясь на грани свободой слова и жесткими правовыми ограничениями, Мега Даркнет представляет собой наиболее неоднозначный сегмент всемирной паутины.
Резюмируя для посетителей: следует очень внимательно относиться к изучаемой информации и оценке надежности сайтов.
В конечном счете можно заключить, что подобные ресурсы — это неоднозначное и опасное пространство. Она предлагает максимальную приватность и приватности, но обязывает любого пользователя бдительности, технической грамотности и моральной ответственности.
Этот ресурс наглядно демонстрирует спектр человеческих поступков в среде с ослабленным регулированием и предоставляет платформу для обсуждения острых тем.
Таким образом, этот сегмент сети остается сложным феноменом цифрового мира, где равновесие между открытостью и защитой зависит от самого человека.
Tervina Fashion Hub – Smooth navigation, eye-catching items, and fair overall pricing.
Wimbledon live tennis scores, grass court action with real-time match tracking today
Iver Therapeutics: stromectol cvs – Iver Therapeutics
Australian online casinos real money – top rated and player approved
My brother suggested I might like this web site.
He was entirely right. This post truly made my day.
You cann’t imagine just how much time I had spent for this info!
Thanks!
lean muscle bodybuilder
References:
https://nhadat24.org/author/forkmark4
https://auto.ae/catalog/
Отбор безопасного развлекательного ресурса в сегодняшних условиях заставляет особого рассмотрения к юридическому режиму. Компетентные клиенты понимают, что казино СЌРЅРѕРјРѕ предоставляет актуальную материалы о доступных операторах.
Алгоритм оформления профиля в проверенных сервисах охватывает необходимую верификацию личности. KYC-нормы защищают как заведение, так и участника от фрода. Временные ограничения на вывод капитала до завершения проверки – стандартная система.
Программные блокировки на доступ к betting порталам нейтрализуются через дублирующие ссылки. Активные копии сохраняют всестороннюю эффективность главного ресурса. Расчетные операции, геймплейный результаты и льготные программы сохраняются константными.
Денежная защищенность выражается критерием используемых платежных систем. SSL-кодирование, PCI DSS валидация и расширенная подтверждение гарантируют прочный периметр защиты.
Азартная библиотека лицензированных площадок включает автоматы от ведущих провайдеров. RTP-коэффициенты, колебания и вероятностные системы получают объективную контроль в утвержденных центрах.
Планы вознаграждения в качественных казино строятся на четких требованиях отыгрыша. Вейджер x35-40 считается справедливым для барабан-подарков, в то время как стандартные развлечения принимаются в подсчет с минимальным показателем.
Навигация в секторе сертифицированных порталов нуждается понимания продвинутых технологий авторизации. Квалифицированные игроки применяют Гризли казино для добывания новейшей информации о работающих ссылках.
Процедура создания аккаунта в надежных заведениях охватывает тщательную проверку. Актуальные операторы используют KYC-системы и AML-критерии. Документооборот потребляет от 24 до 72 часов.
IT инструменты для преодоления барьеров развиваются сообща с интенсификацией правовых инициатив. VPN-инструменты разряда premium гарантируют криптографию AES-256 и системы OpenVPN. Устойчивость подключения критически значима для премиальных сессий.
Альтернативные сайты функционируют через пространственно рассредоточенные цифровые инфраструктуры. CDN-архитектуры предоставляют быструю время ответа для американских пользователей. Программное переключение активируется при обнаружении ограничения центрального портала.
Финансовые переводы в проверенных областях следуют определенным требованиям PCI DSS. Цифровые переводы увеличивают актуальность вследствие секретности и динамике процессинга.
Переносные приложения лучших брендов интегрируют биометрическую подтверждение и push-алерты для существенных ситуаций. Модифицируемый оформление независимо подстраивается под параметры панели.
For benefits
Pay day loans Michigan
for subscription.
VeroVista Official – Fast-loading and well-described products make exploring the site pleasant.
Запчасти для сельхозтехники https://selkhozdom.ru и спецтехники МТЗ, МАЗ, Амкодор — оригинальные и аналоговые детали в наличии. Двигатели, трансмиссия, гидравлика, ходовая часть с быстрой доставкой и гарантией качества.
Цветы москва дешево
Красота и гармония цветочных композиций всегда
https://neuroreliefusa.com/# buy neurontin online uk
Игровая область демонстрирует динамичный рост, привлекая миллионы геймеров. Квалифицированные сайты обеспечивают защищённую среду для ставок. Полную факты о этих операторах допустимо обнаружить на казино типпи .
Легализация остаётся главным аспектом подбора портала. Регуляторы Гибралтара создают тщательный проверку экономических действий. Каждая сертифицированная ресурс подвергается регулярные проверки RNG-механизмов.
IT свойства актуальных беттинг-платформ объединяют SSL-шифрование денежного ранга. Разработчики софтового материала типа Microgaming, NetEnt, Pragmatic Play добавляют многоуровневые схемы непредсказуемых величин.
Процесс верификации аккаунта предполагает представления документов KYC-класса. Удостоверение, справка о прибылях, удостоверение прописки — обычный перечень для итогового входа.
Резервные адреса устраняют сложности с запретами провайдеров. Свежие дубли модифицируются каждый день IT отделами. Мобильные программы часто функционируют стабильнее интернет форматов.
Управление банкроллом устанавливает долгосрочную прибыльность гемблинговых периодов. Опытные беттеры предлагают лимитировать размер депозита до 1-2% от совокупного капитала.
Актуальные mirror-ссылки проверенных игорных заведений на аква казино обеспечивают непрерывный доступ к геймерским сервисам. Методика клонирования формирует эквивалентные реплики главного сайта с поддержанием всех функций.
Алгоритм оформления профиля через mirror-сайт на сто процентов повторяет базовую форму. Только пришедшие пользователи указывают действующий email, устанавливают защищенный шифр и назначают игровую платежное средство.
Подтверждение аккаунта включает предоставления удостоверений по KYC-нормам. Копия ID-карты, верификация места жительства и платежные параметры проходят цифровую валидацию в течение 24-72 временных единиц.
Аутентификация существующих участников производится через обычную окно с 2FA идентификацией. Одноразовые токены поступают на сотовый аппарат или мейл.
Инструменты пополнительного раздела через зеркала содержит топовые расчетные системы. Visa, Mastercard, онлайн балансы Skrill, Neteller, виртуальные монеты Bitcoin, Ethereum осуществляются с оптимизированными процентами 0-3%.
Гемблинг библиотека повторяется полностью включая слоты, карточные забавы, live-операторов и джекпоты. RTP-показатели, вариативность и отыгрыш сохраняются идентичными.
Бонусная политика оперирует схоже корневому ресурсу. Welcome-пакеты, free spins, возврат средств и VIP-программы инициируются машинально при реализации определенных требований.
Explore Cardamom Cove – The design is elegant and browsing through the pages felt delightful.
spark dex SparkDex is redefining decentralized trading with speed, security, and real earning potential. On spark dex, you keep full control of your assets while enjoying fast swaps and low fees. Powered by sparkdex ai, the platform delivers smarter insights and optimized performance for confident decision-making. Trade, earn from liquidity, and grow your crypto portfolio with sparkdex — the future of DeFi starts here.
iyf.tv海外华人首选,提供最新华语剧集、美剧、日剧等高清在线观看。
Новейшие провайдеры развлекательных продуктов обеспечивают участникам доступ к качественному азарту через сертифицированные Меллстрой РІС…РѕРґ сайты. Лицензированная деятельность подразумевает следования строгих регуляторных норм.
Процедура создания клиентского учетной записи охватывает подтверждение личных данных. Провайдеры эксплуатируют расширенные механизмы KYC и AML для блокировки незаконных операций.
Технические решения современных гемблинг платформ функционируют на стабильных дата-центрах с HTTPS стандартами. Региональная блокировка вынуждает администраторов создавать дублирующие URL.
Резервные ресурсы представляют идентичные копии главного домена с фиксацией всех опций и данных. Пользователи обеспечивают себе стабильный подключение к средствам, гемблинг данным и индивидуальным параметрам.
Платежные переводы выполняются через связанные финансовые системы. Рамки на депозиты и изъятия фиксируются в гармонии с лицензионными положениями и собственными регламентами управления рисками.
Опытные беттеры предлагают проверять положение лицензии через государственные списки беттинг структур. Имиджевые характеристики включают места на профильных сервисах и feedback истинных игроков.
范德沃克第二季高清完整版,海外华人可免费观看最新热播剧集。
Рабочие mirror-ссылки проверенных казино на казино Lucky Bear дают стабильный коннект к азартным сервисам. Принцип зеркалирования создает точные клоны главного портала с поддержанием всех возможностей.
Механизм открытия счета через альтернативный домен полностью повторяет стандартную форму. Свежие игроки прописывают валидный email, формируют защищенный шифр и выбирают игровую финансовый инструмент.
Верификация учетной записи включает передачи свидетельств согласно KYC-стандартам. Скан паспорта, валидация проживания и платежные параметры проходят машинную анализ в течение 24-72 часов.
Подключение зарегистрированных игроков происходит через базовую окно с расширенной идентификацией. Краткосрочные шифры передаются на мессенджер аппарат или мейл.
Возможности денежного модуля через mirror-сайты предлагает топовые расчетные системы. Visa, Mastercard, онлайн кошельки Skrill, Neteller, криптовалюты Bitcoin, Ethereum осуществляются с минимальными платежами 0-3%.
Развлекательная база копируется полностью включая spinning games, настольные развлечения, live-ведущих и мегавыигрыши. RTP-показатели, волатильность и ставочные требования поддерживаются идентичными.
Подарочная политика оперирует похоже центральному порталу. Welcome-пакеты, бесплатные вращения, денежный возврат и VIP-системы стартуют системно при соблюдении заданных условий.
Отбор достойного азартного оператора в современных обстоятельствах заставляет специального подхода к законному статусу. Квалифицированные участники учитывают, что казино типпи включает актуальную сведения о доступных площадках.
Процесс записи в легальных сервисах объединяет необходимую верификацию личности. KYC-нормы защищают как казино, так и игрока от обмана. Переходные ограничения на получение капитала до завершения проверки – привычная подход.
Программные блокировки на вход к азартным порталам устраняются через альтернативные порталы. Рабочие дубликаты поддерживают тотальную производительность центрального сервиса. Банковские переводы, интерактивный прогресс и льготные схемы поддерживаются постоянными.
Финансовая стабильность оценивается качеством задействованных финансовых систем. SSL-шифрование, PCI DSS сертификация и усиленная проверка гарантируют стабильный барьер безопасности.
Игровая ассортимент лицензированных заведений охватывает спины от топовых производителей. RTP-параметры, изменчивость и статистические формулы претерпевают нейтральную проверку в авторизованных лабораториях.
Программы мотивации в серьезных сервисах формируются на понятных правилах ставок. Проигрыш x35-40 расценивается адекватным для автомат-бонусов, в то время как стандартные развлечения идут в зачет с сниженным фактором.
Определение легального игорного оператора нуждается детального изучения юридических документов. Передовые системы ДживиСпин казино обеспечивают участникам безусловную факты о своих допусках.
Процедура создания профиля содержит ряд ключевых стадий проверки. Владельцы истребуют документы, устанавливающие идентичность и правоспособность. Обычный KYC-алгоритм длится от 24 до 72 временных отрезков.
Управление банком начинается с назначения пределов на вклады. Искусные пользователи рекомендуют применять установку 5% от суммарного гемблинг резерва на конкретную заход.
Системные препятствия администраторов обязывают внедрять резервные маршруты. Альтернативы поддерживают максимальную функциональность главного портала, охватывая хронологию переводов и игровой успех.
Передовые банковские системы предоставляют мгновенные взносы через криптовалютные счета. Bitcoin, Ethereum и постоянные токены поддерживают конфиденциальность и наименьшие комиссии. Срок проведения извлечений насчитывает 10-30 периодов.
Системы постоянства предусматривают ступенчатые степени с прогрессивным компенсацией. VIP-менеджеры предоставляют индивидуальные вознаграждения, усиленные ограничения и первоочередную помощь.
трансфер в шереметьево v class аренда минивэна с водителем
Hi! Do you know if they make any plugins to assist with SEO?
I’m trying to get my blog to rank for some targeted keywords but I’m not seeing very good
gains. If you know of any please share. Cheers!
https://ivertherapeutics.shop/# Iver Therapeutics
Надёжные платформы гэмблинг предложений предоставляют игрокам вариант к высококлассному развлечениям через профильные сайты, включая п»ї1хбет сайт , которые точно выполняют мировые критерии security.
Схема активации включает ввода authentication деталей через защищённые SSL-соединения. Администрация запрашивают official доказательство age verification и адреса нахождения для соблюдения нормативных требований.
Двухфакторная идентификация является required aspect актуальных архитектур security. Игроки обретают SMS-коды, push-сообщения или эксплуатируют специализированные приложения наподобие Google Authenticator.
Зеркальные адреса решают сложности geographic запретов и DDoS-нападений. Технически mirrors формируют копийные версии базового домена с maintaining features и личных параметров.
Опытные пользователи советуют удерживать новейшие каталоги активных копий в закладках обозревателя. Management рассылают информацию о новых порталах через email, Telegram-сообщества и мобильные apps.
Платёжные операции через лицензионные сайты secured криптографическими технологиями стандарта банковского направления. Снятие денег происходит solely на validated счета собственника аккаунта.
Игровая сфера показывает стремительный расширение, заинтересовывая массы участников. Опытные площадки предоставляют защищённую обстановку для игры. Подробную материалы о данных компаниях можно получить на Лаки Бир .
Аккредитация выступает центральным критерием определения платформы. Юрисдикции Гибралтара гарантируют тщательный контроль денежных транзакций. Каждая аккредитованная сайт выполняет систематические аудиты RNG-генераторов.
Технические параметры инновационных казино предусматривают SSL-криптографию экономического категории. Создатели софтового обеспечения уровня Microgaming, NetEnt, Pragmatic Play внедряют многоуровневые алгоритмы рандомных параметров.
Схема подтверждения счёта подразумевает подачи свидетельств KYC-уровня. Удостоверение, свидетельство о доходах, верификация местожительства — классический комплект для финального авторизации.
Зеркальные ссылки устраняют проблемы с цензурой организаций. Действующие альтернативы изменяются систематически техническими командами. Смартфонные утилиты нередко выполняются лучше интернет форматов.
Контроль средств формирует перспективную успешность беттинговых сессий. Квалифицированные пользователи указывают контролировать количество пари до 1-2% от совокупного резерва.
World Shipper Deals – Fast navigation and clear descriptions made browsing a smooth experience.
generic zoloft: zoloft buy – generic for zoloft
Активные дублирующие порталы лицензированных игорных заведений на lucky bear казино дают непрерывный коннект к развлекательным платформам. Методика клонирования образует полноценные версии основного домена с поддержанием всех функций.
Алгоритм открытия счета через зеркало целиком воспроизводит главную анкету. Начинающие клиенты заполняют валидный email, формируют стойкий пароль и выбирают игровую курренси.
Идентификация личного кабинета требует предоставления справок по KYC-требованиям. Изображение паспорта, доказательство места жительства и финансовые координаты контролируются системой машинную контроль в течение 24-72 ч.
Аутентификация действующих пользователей происходит через базовую панель с усиленной аутентификацией. Разовые пароли передаются на мессенджер номер или мейл.
Функционал депозитного компонента через резервные ссылки обеспечивает популярные платежные механизмы. Visa, Mastercard, онлайн счета Skrill, Neteller, crypto Bitcoin, Ethereum выполняются с оптимизированными комиссиями 0-3%.
Игровая каталог копируется целиком включая автоматы, столовые геймплей, live-крупье и накопительные призы. RTP-коэффициенты, изменчивость и ставочные требования остаются аналогичными.
Акционная система выполняется похоже главному домену. Welcome-комплекты, free spins, refund и VIP-планы инициируются системно при исполнении прописанных параметров.
Следующая страница читы для кс 2
Современные гемблеры попадают с сложностью связи к проверенным сайтам. Компании запрещают стандартные адреса, но профессиональные ретро зеркало посетители осознают о доступности альтернативных сайтов.
Альтернативный адрес образует стопроцентную копию первичного ресурса. Протоколы шифрования работают равнозначными. Расчётные процедуры выполняются через идентичные системы.
Технология создания аккаунта через резервный портал подразумевает стандартной верификации. Специалисты запрашивают удостоверения для исполнения KYC-норм. Личные сведения реализуют расширенную аутентификацию.
Финансовые границы на дополнительных порталах соответствуют основным характеристикам. Минимальные ставки сохраняются стабильными. Прогрессивные накопления согласовываются между многочисленными порталами.
Льготные планы выполняются полноценно на резервных площадках. Множитель ставок удерживает базовые значения. Длительность использования остаётся прежним.
Департамент сопровождения обрабатывает вопросы с альтернативных ссылок сходным образом. Прямой чат осуществляет беспрерывный график работы.
Современные участники обталкиваются с набором технологических особенностей при функционировании с легальными ресурсами. Профильные платформы типа казино Меллстрой поставляют актуальную контент о работе казино операторов.
Алгоритм подтверждения кабинета предполагает набор обязательных фаз. Базовая подтверждение подразумевает отправки удостоверений подтверждающих гражданство. Привычный список охватывает удостоверение личности, автоудостоверение или международный паспорт.
Технологическая составляющая записления охватывает задействование безопасного соединения и двойной авторизации. Опытные клиенты подсказывают включать максимум предложенных настроек секьюрити.
Дублирующие порталы формируют стопроцентные дубликаты базового платформы с поддержанием исчерпывающего функционала. Основное преимущество выражается в тождественности банковских пределов и условий ставочных требований.
Система поиска функционирующих альтернативных адресов строится на проверке профильных уведомительных сервисов и сотрудничающих порталов. Опытные клиенты применяют туннельные протоколы для гарантирования стабильного подключения невзирая от региональных барьеров.
searchpilot.click – Mobile version looks perfect; no glitches, fast scrolling, crisp text.
Новейшие игроки сталкиваются с барьером связи к официальным сайтам. Компании запрещают стандартные URL, но опытные Вавада казино участники помнят о наличии резервных сайтов.
Зеркало является идентичную отображение основного сайта. Средства защиты функционируют аналогичными. Финансовые действия реализуются через аналогичные сервисы.
Методика регистрации через параллельный портал предполагает стандартной подтверждения. Специалисты запрашивают справки для исполнения KYC-норм. Личные характеристики реализуют многоуровневую аутентификацию.
Пополнительные ограничения на резервных сайтах равняются базовым параметрам. Стартовые вклады функционируют неизменными. Увеличивающиеся банки синхронизируются между множественными ресурсами.
Поощрительные механизмы работают целостно на альтернативных сайтах. Требования по обороту поддерживает стартовые величины. Длительность проигрывания продолжается.
Команда обслуживания решает запросы с зеркальных адресов таким же способом. Онлайн чат предоставляет непрерывный расписание работы.
Нынешние участники имеют дело с множеством системных особенностей при функционировании с сертифицированными порталами. Профессиональные сайты типа казино Lucky Bear обеспечивают свежую контент о функционировании азартных брендов.
Процесс подтверждения счета включает набор неотъемлемых стадий. Исходная валидация предполагает загрузки справок подтверждающих субъект. Обычный комплект подразумевает ID, лицензию водителя или внешний паспорт.
Цифровая часть записления подразумевает задействование безопасного соединения и двухуровневой проверки. Опытные участники настаивают активировать весь комплекс предложенных опций секьюрити.
Запасные домены составляют точные дубликаты центрального ресурса с хранением полного инструментария. Основное бонус состоит в идентичности банковских лимитов и критериев ставочных требований.
Система нахождения актуальных зеркал строится на контроле специализированных уведомительных сервисов и союзных ресурсов. Продвинутые игроки внедряют туннельные протоколы для гарантирования стабильного подключения независимо от местных запретов.
Действующие резервные адреса надежных гемблинг-платформ на п»ї1xBet зеркало обеспечивают стабильный доступ к геймерским порталам. Методика копирования строит аналогичные реплики главного сайта с фиксацией всех механизмов.
Процедура регистрации через зеркало на сто процентов дублирует оригинальную шаблон. Свежие клиенты заполняют функционирующий email, формируют безопасный код доступа и устанавливают операционную валюту.
Идентификация аккаунта содержит предоставления справок следуя KYC-регламенту. Изображение национального документа, верификация проживания и карточные параметры проходят автоматическую контроль в течение 24-72 часа.
Логин верифицированных участников производится через обычную панель с расширенной верификацией. Одноразовые ключи передаются на мобильный девайс или электронную почту.
Опции депозитного компонента через резервные ссылки включает распространенные банковские инструменты. Visa, Mastercard, цифровые портмоне Skrill, Neteller, цифровые активы Bitcoin, Ethereum реализуются с уменьшенными взносами 0-3%.
Gaming ассортимент клонируется на сто процентов включая барабаны, карточные развлечения, live-хостов и джекпоты. RTP-коэффициенты, изменчивость и ставочные требования сохраняются точными.
Подарочная схема выполняется схоже корневому домену. Welcome-комплекты, безвозмездные спины, компенсация и VIP-схемы включаются системно при соблюдении определенных условий.
аренда мерседеса с водителем Аренда Mercedes-Benz V-Class с водителем – это идеальное решение для тех, кто ценит комфорт, безопасность и престиж. Этот многофункциональный минивэн премиум-класса предлагает просторный и элегантный салон, оборудованный по последнему слову техники, что делает каждую поездку истинным удовольствием. Будь то деловая встреча, семейное путешествие или трансфер в аэропорт, Mercedes-Benz V-Class гарантирует безупречный сервис и незабываемые впечатления.
Нужен фулфилмент? фулфилмент для маркетплейсов — хранение, сборка заказов, возвраты и учет остатков. Работаем по стандартам площадок и соблюдаем сроки поставок.
Действующие mirror-ссылки легальных игорных заведений на винити казино предоставляют стабильный вход к гемблинг платформам. Методика клонирования формирует точные версии главного домена с консервацией всех инструментов.
Алгоритм оформления профиля через дублирующий портал на сто процентов воспроизводит базовую бланк. Начинающие участники заполняют валидный email, создают стойкий шифр и фиксируют игровую финансовый инструмент.
Идентификация учетной записи содержит предоставления справок следуя KYC-регламенту. Фото водительских прав, свидетельство проживания и денежные реквизиты проходят программную контроль в течение 24-72 периодов.
Вход активных геймеров реализуется через стандартную окно с многоступенчатой проверкой. Временные пароли передаются на мобильный девайс или почтовый ящик.
Возможности пополнительного блока через резервные ссылки включает востребованные банковские инструменты. Visa, Mastercard, виртуальные кошельки Skrill, Neteller, crypto Bitcoin, Ethereum осуществляются с оптимизированными комиссиями 0-3%.
Gaming библиотека повторяется на сто процентов включая барабаны, традиционные развлечения, live-дилеров и мегавыигрыши. RTP-значения, волатильность и отыгрыш остаются неизменными.
Подарочная программа работает похоже основному порталу. Welcome-комплекты, безвозмездные спины, денежный возврат и VIP-программы активируются алгоритмически при реализации прописанных условий.
Современные гемблеры встречаются с проблемой входа к легальным ресурсам. Организации закрывают стандартные URL, но грамотные казино Рльдорадо игроки осознают о доступности параллельных сайтов.
Резервная ссылка составляет стопроцентную реплику первичного платформы. Криптографические алгоритмы поддерживаются такими же. Банковские процедуры выполняются через равнозначные сервисы.
Процедура открытия счёта через резервный адрес включает стандартной валидации. Администраторы запрашивают свидетельства для исполнения KYC-регламентов. Идентификационные характеристики осуществляют многоуровневую подтверждение.
Депозитные ограничения на альтернативных порталах идентичны стандартным спецификациям. Низшие взносы остаются постоянными. Увеличивающиеся накопления синхронизируются между разными порталами.
Бонусные механизмы действуют всесторонне на резервных площадках. Отыгрышный коэффициент гарантирует исходные цифры. Длительность отыгрыша поддерживается.
Департамент сопровождения решает заявки с резервных ссылок аналогично. Прямой разговор гарантирует беспрерывный расписание оперирования.
modern fitness outlet – The interface is clean and very easy to move through.
Охраны труда для бизнеса охрана труда аудит системы безопасности, обучение персонала, разработка локальных актов и внедрение стандартов. Помогаем минимизировать риски и избежать штрафов.
Baseball livescore MLB updates, America’s pastime with pitch-by-pitch tracking live
A professional house renovation company Moraira can transform an outdated property into a modern luxury villa. As a leading renovation company Moraira, we bring expert craftsmanship to modernize your kitchen or living areas, significantly increasing your home’s market value.
I like the helpful information you provide in your articles.
I’ll bookmark your blog and check again here regularly.
I am quite certain I’ll learn a lot of new stuff right
here! Best of luck for the next!
Современные платформы азартных игр предлагают клиентам путь к качественному беттингу через безопасные п»ї1xBet casino порталы. Официальная деятельность влечет учета определенных законодательных требований.
Механизм регистрации индивидуального счета включает верификацию личных показателей. Регуляторы внедряют углубленные алгоритмы KYC и AML для блокировки фродовых платежей.
Электронные средства передовых развлекательных порталов функционируют на безопасных дата-центрах с HTTPS стандартами. Геоблокировка обязывает операторов создавать альтернативные домены.
Параллельные платформы образуют идентичные репликации главного домена с обеспечением всех инструментов и показателей. Пользователи обеспечивают себе стабильный доступ к капиталу, азартной записям и клиентским установкам.
Расчетные переводы реализуются через подключенные банковские агрегаторы. Границы на взносы и изъятия определяются в соответствии с правовыми критериями и организационными политиками минимизации опасностей.
Опытные гемблеры указывают проверять условия авторизации через официальные базы данных гемблинг организаций. Статусные критерии содержат ранги на отраслевых ресурсах и мнения истинных пользователей.
Актуальные геймеры встречаются с огромным количеством системных деталей при операциях с официальными сайтами. Профессиональные платформы типа Меллстрой казино выдают релевантную данные о деятельности казино организаций.
Механизм проверки кабинета подразумевает несколько принудительных этапов. Первичная валидация нуждается передачи удостоверений верифицирующих субъект. Стандартный набор содержит документ, автолицензию или заграничное удостоверение.
Системная составляющая открытия счета содержит эксплуатацию SSL-шифрования и 2FA. Профессиональные геймеры настаивают включать полный набор возможных параметров защиты.
Альтернативные адреса представляют абсолютные отражения главного сайта с поддержанием исчерпывающего возможностей. Центральное плюс состоит в тождественности платежных границ и параметров отыгрыша.
Схема выявления функционирующих резервных ссылок фундируется на контроле тематических уведомительных сервисов и связанных ресурсов. Квалифицированные геймеры применяют VPN-сервисы для обеспечения стабильного входа невзирая от местных лимитов.
愛壹帆海外版,专为华人打造的高清视频平台,支持全球加速观看。
Доставка цветов в москве дешево
Простое оформление заказа цветов на сайте
ghostly goodies marketplace – The items are fun and checkout felt effortless.
Определение надежного азартного ресурса в современных рамках подразумевает повышенного изучения к правовому уровню. Опытные геймеры понимают, что п»ї1хбет предоставляет современную данные о работающих операторах.
Алгоритм регистрации в легальных заведениях содержит обязательную подтверждение личности. KYC-нормы обеспечивают как оператора, так и пользователя от мошенничества. Краткосрочные границы на вывод средств до закрытия валидации – привычная процедура.
Виртуальные ограничения на доступ к развлекательным сервисам решаются через параллельные порталы. Активные копии предоставляют абсолютную производительность первичного ресурса. Платежные транзакции, азартный достижения и поощрительные программы продолжают постоянными.
Финансовая безопасность выражается степенью эксплуатируемых банковских механизмов. SSL-защита, PCI DSS лицензирование и двухфакторная верификация гарантируют надежный заслон защиты.
Развлекательная набор проверенных сервисов объединяет автоматы от ведущих провайдеров. RTP-индексы, волатильность и математические схемы претерпевают беспристрастную валидацию в признанных организациях.
Программы мотивации в надежных операторах базируются на понятных условиях ставок. Проигрыш x35-40 считается справедливым для слот-подарков, в то время как классические игры включаются в подсчет с сниженным множителем.
Функционирующие резервные адреса надежных игорных заведений на СЂР° регистрация предоставляют постоянный коннект к игровым платформам. Схема копирования генерирует аналогичные копии главного сайта с поддержанием всех функций.
Система открытия счета через альтернативный домен на сто процентов повторяет стандартную анкету. Дебютные пользователи прописывают действующий email, создают безопасный секретную комбинацию и определяют рабочую платежное средство.
Идентификация учетной записи содержит отправки удостоверений опираясь на KYC-регламенту. Фото водительских прав, свидетельство адреса и банковские данные контролируются системой автоматическую анализ в течение 24-72 ч.
Авторизация активных клиентов производится через классическую панель с двухфакторной аутентификацией. Краткосрочные шифры передаются на телефонный номер или электронную почту.
Опции денежного модуля через дублирующие порталы включает распространенные банковские механизмы. Visa, Mastercard, онлайн балансы Skrill, Neteller, блокчейн-токены Bitcoin, Ethereum процессируются с сокращенными сборами 0-3%.
Развлекательная база копируется абсолютно включая машины, традиционные развлечения, live-операторов и мегавыигрыши. RTP-значения, дисперсия и проигрыш сохраняются аналогичными.
Поощрительная механизм функционирует аналогично центральному порталу. Welcome-комплекты, free spins, возврат средств и VIP-курсы активируются машинально при выполнении фиксированных критериев.
Навигация в пространстве легальных площадок требует владения передовых методов подключения. Профессиональные геймеры применяют казино Lucky Bear для добывания современной данных о действующих ссылках.
Процедура оформления счета в сертифицированных операторах подразумевает сложную валидацию. Новейшие компании внедряют KYC-механизмы и AML-правила. Документальное сопровождение отнимает от 24 до 72 временных отрезков.
Программные технологии для минования барьеров улучшаются сообща с усилением регуляторных инициатив. VPN-инструменты типа premium дают кодирование AES-256 и стандарты OpenVPN. Устойчивость соединения жизненно актуальна для высокоролловых раундов.
Дублирующие адреса работают через локально рассредоточенные цифровые мощности. CDN-архитектуры предоставляют оптимальную латентность для азиатских пользователей. Системное роутинг срабатывает при выявлении блокировки основного сайта.
Банковские манипуляции в легальных областях соответствуют строгим критериям PCI DSS. Блокчейн расчеты приобретают признание по причине скрытности и оперативности процессинга.
Мобильные программы лучших брендов совмещают голосовую авторизацию и push-оповещения для ключевых эпизодов. Адаптивный оформление программно корректируется под характеристики матрицы.
Надёжные операторы развлекательных возможностей предоставляют игрокам возможность к высококлассному азартному досугу через профильные домены, включая Килограмм сайт , которые точно исполняют мировые критерии защиты.
Последовательность активации требует указания валидационных параметров через криптографические SSL-каналы. Администрация просят предоставить нотариальное удостоверение возраста и локации проживания для соблюдения законодательных правил.
Двухфакторная идентификация становится необходимым составляющей современных архитектур надёжности. Пользователи располагают SMS-ключи, push-уведомления или используют targeted утилиты по типу Google Authenticator.
Резервные домены нейтрализуют сложности локальных санкций и DDoS-атак. Технически mirrors составляют тождественные dublicates базового домена с обеспечением функциональности и клиентских параметров.
Профессиональные клиенты советуют keeping current перечни working альтернатив в сохранённых ссылках обозревателя. Букмекеры отправляют новости о новых URL через email, Telegram-communities и смартфонные утилиты.
Денежные переводы через официальные ресурсы гарантированы encryption methods уровня банковского области. Изъятие средств производится единственно на аутентифицированные данные держателя аккаунта.
툰코는 웹툰 서비스로서 많은 작품을 제공하고 있으며, 특별히 무협 장르에서 그의 독창성을 인정받고 있습니다. 툰코 2, 툰코 시즌2 등 다양한 에디션과 함께 무료로 제공되는 웹툰들은 독자들에게 막대한 호응을 얻고 있고, 최근에는 툰코 결말들도 폭넓게 다루어지고 있습니다. 본 글에서는 ‘툰코의 집주인 딸내미’를 중심으로 툰코 웹툰이 가진 매력을 철저하게 살펴보겠습니다.
Shop ZenaLune Online – Clean layout and intuitive structure make checking out items simple.
выберите ресурсы купить аккаунт steam
https://www.ht-consulting.at/otnesenie-k-razryadu-onlaynkazino-2026-topot-vne-noyabr/
Официальные операторы игорных опций дают пользователям вариант к высококлассному времяпрепровождению через dedicated платформы, включая п»ї1xBet зеркало , которые именно соблюдают глобальные критерии надёжности.
Алгоритм открытия счёта включает внесения проверочных данных через криптографические SSL-соединения. Администрация просят предоставить нотариальное свидетельство правоспособности и адреса нахождения для поддержания правовых правил.
Двухэтапная идентификация является обязательным элементом современных платформ безопасности. Пользователи располагают SMS-пароли, push-алерты или эксплуатируют специализированные софт типа Google Authenticator.
Зеркальные порталы преодолевают сложности geographic ограничений и DDoS-штурмов. Технически дубли представляют идентичные копии primary ресурса с поддержанием инструментария и индивидуальных параметров.
Опытные геймеры suggest удерживать свежие перечни функционирующих mirrors в bookmark веб-клиента. Администрация рассылают updates о современных адресах через электронную почту, Telegram-каналы и смартфонные программы.
Финансовые переводы через проверенные ресурсы покрыты encryption алгоритмами стандарта банковского segment. Изъятие денег происходит лишь на validated wallets владельца профиля.
Перемещение в пространстве легальных порталов требует осознания продвинутых инструментов входа. Опытные пользователи применяют п»ї1хбет регистрация для получения свежей материалов о оперативных путях.
Алгоритм оформления профиля в официальных компаниях включает сложную валидацию. Актуальные компании задействуют KYC-механизмы и AML-требования. Документооборот занимает от 24 до 72 периодов.
IT методы для минования блокировок совершенствуются синхронно с укреплением регуляторных инициатив. VPN-платформы уровня premium обеспечивают безопасность AES-256 и стандарты OpenVPN. Постоянство соединения жизненно важна для VIP игровых периодов.
Дублирующие сайты работают через территориально расположенные серверные кластеры. CDN-структуры гарантируют минимальную время ответа для азиатских участников. Цифровое роутинг запускается при распознавании препятствия первичного домена.
Финансовые манипуляции в официальных зонах следуют конкретным требованиям PCI DSS. Блокчейн расчеты набирают распространение по причине анонимности и скорости осуществления.
Мобильные утилиты ведущих провайдеров включают отпечатковую аутентификацию и push-алерты для существенных моментов. Гибкий дизайн автономно настраивается под характеристики экрана.
Делюсь ссылкой на материал про ufc в феврале марте 2026 три недели которые встряхнут дивизионы, будет интересно. Посмотрите сами: https://tut-vse-yasno.ru/news/ufc-fevral-mart-2026-tri-nedeli-gde-favority-mogut-ruhnut-a-diviziony-perezagruzitsya/
famous baseball players who used steroids
References:
http://historydb.date/index.php?title=beachbossen2364
超人和露易斯第一季高清完整官方版,海外华人可免费观看最新热播剧集。
Актуальные сервисы игорных активностей предоставляют беттерам подключение к профессиональному беттингу через безопасные казино Голд ресурсы. Сертифицированная бизнес требует следования определенных законодательных стандартов.
Механизм регистрации игрового кабинета содержит подтверждение приватных сведений. Управляющие внедряют углубленные системы KYC и AML для исключения незаконных переводов.
IT системы передовых развлекательных порталов строятся на защищенных облачных системах с SSL стандартами. Региональная блокировка побуждает операторов внедрять параллельные ссылки.
Альтернативные порталы представляют аналогичные клоны главного ресурса с удержанием всех инструментов и данных. Беттеры достигают устойчивый доступ к балансу, развлекательной записям и пользовательским параметрам.
Денежные процедуры производятся через синхронизированные денежные шлюзы. Лимиты на инвестиции и изъятия устанавливаются в гармонии с лицензионными положениями и корпоративными правилами риск-менеджмента.
Квалифицированные игроки предлагают проверять положение разрешения через контролирующие реестры азартных органов. Имиджевые параметры задействуют места на тематических ресурсах и оценки настоящих игроков.
Игровая область представляет интенсивный расширение, привлекая массы участников. Квалифицированные сайты гарантируют качественную условия для беттинга. Полную сведения о указанных операторах возможно отыскать на казино лова .
Легализация составляет основным фактором выбора ресурса. Юрисдикции Мальты гарантируют качественный аудит валютных действий. Конкретная сертифицированная площадка выполняет периодические контроли RNG-систем.
Технические свойства инновационных беттинг-платформ включают SSL-криптографию денежного класса. Разработчики цифрового продукта типа Microgaming, NetEnt, Pragmatic Play добавляют комплексные модели случайных чисел.
Процесс валидации счёта требует направления удостоверений KYC-типа. Удостоверение, свидетельство о доходах, доказательство местожительства — типичный перечень для завершённого активации.
Альтернативные порталы ликвидируют проблемы с цензурой компаний. Актуальные копии изменяются ежедневно IT отделами. Планшетные клиенты регулярно функционируют стабильнее сетевых редакций.
Финансовая дисциплина задаёт продолжительную доходность гемблинговых раундов. Профессиональные участники рекомендуют лимитировать сумму ставки до 1-2% от итогового капитала.
Передовые участники сталкиваются с сложностью соединения к сертифицированным площадкам. Операторы блокируют базовые ссылки, но знающие [url=https://github.com/VAVADA-online-zerkalo]казино Вавада[/url] клиенты знают о присутствии параллельных платформ.
Резервная ссылка является абсолютную воспроизведение главного портала. Протоколы шифрования остаются аналогичными. Денежные операции осуществляются через те же механизмы.
Алгоритм оформления профиля через зеркальный домен содержит стандартной аутентификации. Сотрудники выясняют документы для осуществления KYC-стандартов. Персональные характеристики подвергаются расширенную аутентификацию.
Банковские границы на альтернативных ресурсах идентичны базовым спецификациям. Низшие суммы поддерживаются константными. Увеличивающиеся выигрышные пулы интегрируются между различными ссылками.
Бонусные механизмы работают целостно на дополнительных ресурсах. Множитель ставок сохраняет базовые значения. Длительность отыгрыша продолжается.
Команда ассистирования обрабатывает обращения с резервных адресов аналогично. Интерактивный общение гарантирует круглосуточный расписание оперирования.
To find out
where can i get cheap zoloft without rx
to ensure accuracy.
buy zoloft: sertraline – order zoloft
Актуальные участники имеют дело с набором технических тонкостей при операциях с лицензированными площадками. Тематические порталы типа п»ї[url=https://github.com/1xBet-online-zerkalo]1xBet[/url] обеспечивают свежую информацию о работе развлекательных брендов.
Механизм валидации аккаунта охватывает несколько необходимых фаз. Первичная проверка требует размещения удостоверений удостоверяющих гражданство. Обычный перечень содержит свидетельство, водительские права или внешний паспорт.
Технологическая составляющая записления предполагает применение зашифрованного канала и двухфакторной аутентификации. Продвинутые пользователи рекомендуют активировать совокупность возможных настроек секьюрити.
Дублирующие порталы образуют идентичные реплики основного домена с хранением исчерпывающего функционала. Важнейшее преимущество состоит в соответствии банковских границ и критериев условий прокрутки.
Алгоритм обнаружения действующих дублирующих порталов строится на отслеживании профессиональных мессенджер групп и аффилированных ресурсов. Продвинутые клиенты внедряют анонимайзеры для создания надежного доступа без оглядки от локальных запретов.
traffic growth hub – Very smooth navigation and fast page loads throughout.
https://www.zdravnitza.com/pageear/?1xbet_promo_code.html
https://sertralineusa.com/# zoloft buy
Исследование в мире официальных порталов предполагает знания актуальных способов доступа. Продвинутые игроки внедряют Лаки Бир РІС…РѕРґ для приобретения новейшей сведений о функционирующих адресах.
Алгоритм формирования счета в надежных заведениях включает тщательную подтверждение. Передовые операторы применяют KYC-системы и AML-нормы. Документооборот занимает от 24 до 72 промежутков.
Цифровые решения для обхода запретов совершенствуются вместе с укреплением регуляторных инициатив. VPN-платформы уровня premium предлагают шифрование AES-256 и методы OpenVPN. Непрерывность соединения жизненно существенна для премиальных заходов.
Резервные ресурсы действуют через пространственно разнесенные цифровые кластеры. CDN-структуры гарантируют низкую задержку для азиатских пользователей. Программное редирект инициируется при распознавании ограничения основного сайта.
Платежные движения в легальных областях соответствуют строгим правилам PCI DSS. Блокчейн операции приобретают распространение из-за анонимности и скорости реализации.
Планшетные софт лучших операторов интегрируют голосовую проверку и push-уведомления для ключевых происшествий. Настраиваемый оформление автономно настраивается под особенности панели.
Отбор надежного развлекательного ресурса предполагает основательного рассмотрения регулятивных свидетельств. Новые порталы Lucky Bear casino предлагают пользователям максимальную сведения о своих аккредитациях.
Механизм открытия аккаунта включает определенное количество принудительных стадий аутентификации. Операторы просят бумаги, устанавливающие личность и зрелость. Традиционный KYC-регламент продолжается от 24 до 72 периодов.
Контроль средств инициируется с назначения ограничений на депозиты. Искусные пользователи советуют внедрять правило 5% от полного гемблинг бюджета на единичную раунд.
Программные препятствия провайдеров побуждают использовать вспомогательные маршруты. Копии удерживают максимальную производительность главного ресурса, включая журнал транзакций и развлекательный прогресс.
Актуальные банковские способы обеспечивают оперативные взносы через блокчейн кошельки. Bitcoin, Ethereum и постоянные токены обеспечивают приватность и крошечные отчисления. Продолжительность проведения получений доходит 10-30 интервалов.
Схемы лояльности подразумевают многоуровневые категории с накапливающимся кэшбэком. VIP-менеджеры дают эксклюзивные поощрения, увеличенные границы и первоочередную обслуживание.
Определение безопасного игрового ресурса в актуальных реалиях нуждается детального анализа к регулятивному уровню. Квалифицированные клиенты знают, что Вован сайт демонстрирует современную факты о действующих площадках.
Схема регистрации в лицензированных заведениях предусматривает обязательную верификацию удостоверения. KYC-стандарты обеспечивают как сервис, так и клиента от обмана. Кратковременные рамки на перечисление средств до завершения верификации – стандартная процедура.
Программные препятствия на связь к развлекательным площадкам преодолеваются через параллельные URL. Функционирующие зеркала предоставляют стопроцентную функциональность главного платформы. Платежные движения, геймплейный статистика и льготные предложения функционируют устойчивыми.
Денежная стабильность измеряется качеством используемых банковских способов. SSL-кодирование, PCI DSS валидация и двухфакторная верификация формируют прочный контур защиты.
Азартная набор лицензированных заведений предоставляет автоматы от топовых создателей. RTP-показатели, колебания и алгоритмические схемы получают внешнюю валидацию в утвержденных центрах.
Программы стимулирования в достойных казино основываются на понятных критериях проигрыша. Отыгрыш x35-40 оценивается адекватным для машина-льгот, в то время как карточные игры включаются в расчет с минимальным показателем.
Рабочие зеркала официальных гемблинг-платформ на казино Голд гарантируют непрерывный коннект к азартным системам. Система дублирования образует аналогичные реплики главного домена с удержанием всех опций.
Схема создания аккаунта через резервную ссылку на сто процентов имитирует оригинальную заявку. Начинающие игроки заполняют действующий email, придумывают сложный секретную комбинацию и устанавливают рабочую курренси.
Идентификация личного кабинета предполагает представления документов следуя KYC-политике. Фото удостоверения личности, доказательство проживания и денежные данные проверяются через автоматическую валидацию в течение 24-72 временных единиц.
Подключение зарегистрированных клиентов выполняется через стандартную форму с двухфакторной проверкой. Одноразовые коды отправляются на сотовый девайс или электронную почту.
Опции денежного компонента через альтернативные домены обеспечивает распространенные банковские системы. Visa, Mastercard, цифровые счета Skrill, Neteller, блокчейн-токены Bitcoin, Ethereum процессируются с минимальными процентами 0-3%.
Развлекательная каталог воспроизводится в точности включая слоты, настольные активности, live-дилеров и джекпоты. RTP-параметры, вариативность и ставочные требования фиксируются такими же.
Промо схема функционирует схоже центральному сайту. Welcome-бандлы, free spins, денежный возврат и VIP-курсы стартуют алгоритмически при исполнении прописанных критериев.
https://helpf.pro/dhfr/pgs/promokod_fonbet___bonus_pri_registracii_novichkam.html
Wagon Wildflower Online – Fun aesthetic and playful design make browsing smooth and enjoyable.
Современные пользователи имеют дело с множеством системных особенностей при работе с проверенными порталами. Тематические порталы типа Вавада официальный сайт поставляют современную данные о работе азартных провайдеров.
Процедура подтверждения профиля включает набор необходимых фаз. Первичная верификация требует отправки свидетельств доказывающих персону. Привычный перечень содержит ID, автолицензию или загранпаспорт.
Системная элемент регистрации подразумевает задействование SSL-шифрования и двойной авторизации. Опытные игроки советуют задействовать полный набор доступных опций секьюрити.
Альтернативные адреса составляют абсолютные дубликаты центрального домена с поддержанием полного инструментария. Важнейшее преимущество кроется в схожести банковских рамок и условий условий прокрутки.
Процедура поиска актуальных альтернативных адресов строится на наблюдении профильных мессенджер групп и связанных площадок. Продвинутые клиенты внедряют прокси-соединения для обеспечения бесперебойного подключения без оглядки от территориальных барьеров.
Развлекательная индустрия отображает активный развитие, привлекая миллионы геймеров. Грамотные ресурсы обеспечивают качественную условия для игры. Исчерпывающую информацию о указанных организациях реально получить на казино Lucky Bear .
Сертификация составляет центральным критерием подбора ресурса. Контролёры Кюрасао создают серьёзный мониторинг валютных транзакций. Каждая аккредитованная портал проходит регулярные ревизии RNG-алгоритмов.
Технические свойства новейших гемблинг-сайтов предусматривают SSL-защиту расчётного класса. Разработчики компьютерного софта класса Microgaming, NetEnt, Pragmatic Play подключают продвинутые модели рандомных значений.
Алгоритм валидации аккаунта предполагает направления свидетельств KYC-класса. Паспорт, выписка о прибылях, подтверждение проживания — классический перечень для завершённого доступа.
Альтернативные адреса исправляют проблемы с ограничениями организаций. Рабочие дубли обновляются ежедневно компьютерными отделами. Планшетные софт нередко функционируют устойчивее сетевых редакций.
Банкролл-менеджмент устанавливает длительную прибыльность игровых сессий. Профессиональные беттеры предлагают урезать объём ставки до 1-2% от итогового резерва.
Check Serp Link Rise – SEO guidance was easy to understand and implement quickly.
ranktarget.click – Appreciate the typography choices; comfortable spacing improved my reading experience.
Передовые участники сталкиваются с сложностью доступа к проверенным сайтам. Организации закрывают базовые адреса, но грамотные лакибир посетители помнят о присутствии альтернативных порталов.
Дополнительный домен является стопроцентную дубликат первичного сайта. Протоколы шифрования остаются такими же. Платёжные процедуры проходят через идентичные сервисы.
Процедура оформления профиля через дополнительный адрес требует типовой валидации. Операторы запрашивают удостоверения для осуществления KYC-стандартов. Личные сведения реализуют комплексную аутентификацию.
Вносительные рамки на альтернативных площадках равняются первичным условиям. Стартовые беты продолжают постоянными. Возрастающие банки координируются между многочисленными порталами.
Бонусные схемы выполняются целостно на альтернативных ресурсах. Коэффициент оборота сохраняет оригинальные цифры. Длительность оборота поддерживается.
Департамент обслуживания обрабатывает запросы с резервных порталов таким же способом. Интерактивный диалог поддерживает 24-часовой порядок оперирования.
Игровая область показывает стремительный расширение, манящая множество пользователей. Квалифицированные площадки обеспечивают стабильную атмосферу для игры. Развёрнутую материалы о таких операторах реально обнаружить на казино Вавада .
Сертификация является центральным элементом селекции площадки. Надзорные органы Кюрасао гарантируют качественный надзор экономических транзакций. Любая легальная ресурс выполняет систематические проверки RNG-генераторов.
Программные параметры передовых казино объединяют SSL-шифрование банковского класса. Создатели компьютерного ПО типа Microgaming, NetEnt, Pragmatic Play встраивают усовершенствованные системы хаотичных величин.
Алгоритм валидации аккаунта требует направления бумаг KYC-уровня. Документ, подтверждение о заработке, удостоверение адреса — классический набор для итогового активации.
Дублирующие домены устраняют проблемы с фильтрацией компаний. Действующие альтернативы изменяются систематически техническими группами. Смартфонные софт нередко работают надёжнее интернет версий.
Распределение капитала формирует стратегическую прибыльность азартных раундов. Опытные участники предлагают контролировать величину ставки до 1-2% от суммарного банкролла.
Подбор безопасного игрового оператора в сегодняшних границах предполагает тщательного рассмотрения к юридическому уровню. Знающие геймеры понимают, что миллионъ казино содержит актуальную данные о действующих операторах.
Процедура записи в лицензированных площадках объединяет требуемую валидацию идентичности. KYC-стандарты оберегают как казино, так и пользователя от обмана. Временные пределы на снятие капитала до окончания валидации – стандартная система.
Технические препятствия на вход к betting ресурсам обходятся через дублирующие адреса. Доступные дубликаты предоставляют абсолютную эффективность базового платформы. Платежные процедуры, развлекательный результаты и наградные программы функционируют стабильными.
Капитальная надежность определяется качеством эксплуатируемых расчетных механизмов. SSL-безопасность, PCI DSS подтверждение и двухфакторная проверка гарантируют стабильный барьер обороны.
Интерактивная ассортимент официальных сервисов включает барабаны от известных студий. RTP-показатели, дисперсия и математические модели получают внешнюю сертификацию в аккредитованных центрах.
Программы лояльности в профессиональных сервисах строятся на четких правилах отыгрыша. Вейджер x35-40 расценивается справедливым для слот-льгот, в то время как традиционные развлечения учитываются в калькуляцию с минимальным множителем.
Надёжные провайдеры развлекательных услуг обеспечивают игрокам доступ к элитному развлечениям через профильные домены, включая Lucky Bear , что выполняют transnational стандарты конфиденциальности.
Последовательность регистрации предполагает предоставления authentication информации через криптографические SSL-соединения. Букмекеры требуют письменное удостоверение дееспособности и территории жительства для compliance нормативных требований.
2FA authentication становится необходимым aspect современных механизмов security. Клиенты получают SMS-токены, push-алерты или задействуют специальные приложения типа Google Authenticator.
Дублирующие URL решают трудности geographic барьеров и DDoS-нападений. Фактически зеркала являют аналогичные версии базового ресурса с удержанием функциональности и индивидуальных параметров.
Экспертные игроки suggest удерживать current базы функционирующих копий в избранном веб-клиента. Провайдеры направляют обновления о современных URL через e-mail, Telegram-communities и мобильные утилиты.
Платёжные переводы через проверенные порталы secured криптографическими протоколами уровня банковского направления. Получение средств осуществляется только на подтверждённые карты хозяина account.
trafficninja.click – Loved the layout today; clean, simple, and genuinely user-friendly overall.
leadpipeline.click – Mobile version looks perfect; no glitches, fast scrolling, crisp text.
捕风追影在线免费在线观看,海外华人专属官方认证平台,高清无广告体验。
Handy Tech Shop – Looks like a place for small upgrades that make life easier.
ссылка на сайт чит кс приватный
中華職棒直播台灣球迷的首選官方認證資訊平台,24小時不間斷提供官方中華職棒直播新聞、球員數據分析,以及精準的比賽預測。
Азартная индустрия показывает интенсивный развитие, завлекая множество пользователей. Профессиональные платформы гарантируют качественную пространство для игры. Подробную сведения о подобных операторах реально найти на Mellstroy Game зеркало .
Сертификация остаётся приоритетным фактором определения площадки. Надзорные органы Мальты гарантируют строгий аудит денежных операций. Отдельная сертифицированная ресурс осуществляет регулярные контроли RNG-систем.
Программные характеристики современных игорных домов предусматривают SSL-криптографию расчётного стандарта. Создатели цифрового ПО уровня Microgaming, NetEnt, Pragmatic Play подключают продвинутые схемы непредсказуемых параметров.
Процедура аутентификации профиля требует предоставления бумаг KYC-типа. Паспорт, подтверждение о заработке, валидация проживания — базовый набор для полноценного активации.
Зеркальные порталы исправляют барьеры с цензурой компаний. Функционирующие зеркала корректируются постоянно цифровыми отделами. Мобильные утилиты зачастую оперируют надёжнее браузерных модификаций.
Контроль средств создаёт долгосрочную результативность беттинговых сессий. Опытные геймеры указывают урезать объём депозита до 1-2% от совокупного банкролла.
Игровая отрасль отображает интенсивный расширение, заинтересовывая миллионы участников. Опытные площадки дают защищённую пространство для беттинга. Исчерпывающую факты о данных операторах реально найти на Меллстрой казино .
Лицензирование выступает главным аспектом селекции площадки. Лицензиаты Олдерни создают жёсткий мониторинг финансовых действий. Любая аккредитованная платформа проходит регулярные аудиты RNG-модулей.
IT аспекты передовых игорных домов содержат SSL-шифрование банковского категории. Создатели виртуального ПО класса Microgaming, NetEnt, Pragmatic Play подключают многоуровневые алгоритмы хаотичных значений.
Процедура подтверждения личного кабинета включает предоставления справок KYC-стандарта. Документ, документ о финансах, подтверждение прописки — классический список для полноценного доступа.
Альтернативные URL ликвидируют проблемы с запретами компаний. Свежие альтернативы обновляются систематически цифровыми специалистами. Портативные приложения нередко выполняются устойчивее сетевых модификаций.
Контроль средств формирует длительную результативность беттинговых сессий. Экспертные игроки предлагают урезать количество пари до 1-2% от суммарного банкролла.
海外华人必备的iyf平台,提供最新高清电影、电视剧,无广告观看体验。
Нынешние геймеры встречаются с препятствием связи к легальным ресурсам. Операторы блокируют основные ссылки, но искушённые lucky bear казино пользователи помнят о присутствии зеркальных площадок.
Параллельный портал представляет идентичную отображение главного сайта. Криптографические алгоритмы функционируют равнозначными. Расчётные операции осуществляются через равнозначные сервисы.
Схема регистрации через дополнительный домен требует стандартной аутентификации. Специалисты выясняют свидетельства для выполнения KYC-стандартов. Персональные параметры осуществляют комплексную валидацию.
Пополнительные границы на альтернативных ресурсах соответствуют первичным параметрам. Наименьшие взносы функционируют стабильными. Растущие призовые фонды объединяются между различными ресурсами.
Стимулирующие механизмы функционируют целостно на резервных сайтах. Вейджер поддерживает первоначальные показатели. Тайминг отыгрыша поддерживается.
Сервис помощи анализирует тикеты с альтернативных адресов аналогично. Онлайн диалог осуществляет круглосуточный порядок оперирования.
Гемблинговая сфера представляет активный рост, привлекая тысячи пользователей. Квалифицированные платформы дают надёжную атмосферу для беттинга. Развёрнутую данные о указанных брендах можно получить на Килограмм казино .
Лицензирование выступает основным критерием выбора сайта. Контролёры Великобритании обеспечивают жёсткий надзор финансовых процедур. Конкретная легальная ресурс проходит регулярные проверки RNG-алгоритмов.
Технические аспекты передовых азартных площадок объединяют SSL-кодирование банковского категории. Создатели виртуального софта наподобие Microgaming, NetEnt, Pragmatic Play встраивают комплексные механизмы случайных величин.
Механизм валидации профиля включает представления бумаг KYC-формата. Паспорт, выписка о финансах, подтверждение проживания — типичный список для полноценного входа.
Альтернативные порталы убирают препятствия с запретами компаний. Функционирующие варианты изменяются постоянно цифровыми отделами. Карманные программы нередко функционируют надёжнее веб вариантов.
Распределение капитала создаёт длительную результативность азартных партий. Профессиональные пользователи советуют сокращать размер ставки до 1-2% от совокупного капитала.
Охраны труда для бизнеса обучение по охране труда аудит системы безопасности, обучение персонала, разработка локальных актов и внедрение стандартов. Помогаем минимизировать риски и избежать штрафов.
艾一帆海外版,专为华人打造的高清视频平台,支持全球加速观看。
Нынешние геймеры оказываются с препятствием связи к легальным ресурсам. Операторы блокируют базовые адреса, но профессиональные п»ї1хбет сайт участники учитывают о наличии дублирующих порталов.
Зеркало является стопроцентную дубликат первичного ресурса. SSL-сертификаты сохраняются такими же. Финансовые операции реализуются через идентичные каналы.
Схема создания аккаунта через дополнительный ссылку требует типовой проверки. Администраторы выясняют удостоверения для выполнения KYC-правил. Индивидуальные параметры подвергаются комплексную проверку.
Банковские лимиты на дополнительных ресурсах равняются первичным параметрам. Низшие суммы поддерживаются стабильными. Прогрессивные выигрышные пулы объединяются между разными порталами.
Премиальные механизмы оперируют комплексно на резервных платформах. Вейджер поддерживает первоначальные величины. Срок активности отыгрыша поддерживается.
Команда сопровождения обрабатывает заявки с дополнительных порталов идентично. Онлайн разговор предоставляет круглосуточный график работы.
Проблемы с зубами? стоматологический центр профилактика, лечение, протезирование и эстетическая стоматология. Забота о здоровье зубов с применением передовых методик.
Навигация в области официальных сайтов подразумевает представления современных инструментов подключения. Профессиональные игроки эксплуатируют п»ї1хбет сайт для извлечения актуальной данных о действующих доменах.
Схема создания счета в лицензированных компаниях содержит многоуровневую проверку. Продвинутые операторы эксплуатируют KYC-процедуры и AML-правила. Бумажная работа отнимает от 24 до 72 часов.
IT инструменты для прохождения препятствий совершенствуются сообща с повышением юридических решений. VPN-сервисы типа premium предлагают шифрование AES-256 и системы OpenVPN. Устойчивость соединения кардинально необходима для элитных заходов.
Дублирующие домены оперируют через регионально распределенные технические ресурсы. CDN-комплексы осуществляют оптимальную отклик для европейских клиентов. Автоматическое редирект включается при детекции барьера базового сайта.
Денежные операции в официальных областях соответствуют жестким нормам PCI DSS. Блокчейн переводы набирают признание вследствие секретности и темпу выполнения.
Переносные софт премиальных провайдеров содержат физиологическую проверку и push-оповещения для критических моментов. Адаптивный интерфейс самостоятельно настраивается под характеристики экрана.
searchmetrics.click – Appreciate the typography choices; comfortable spacing improved my reading experience.
Проверенные ресурсы азартных предложений oferuja игрокам вариант к элитному гэмблингу через dedicated домены, включая Lucky Bear , что придерживаются transnational стандарты защиты.
Алгоритм регистрации necessita внесения валидационных данных через encrypted SSL-соединения. Менеджмент требуют документальное удостоверение совершеннолетия и адреса нахождения для исполнения юрисдикционных правил.
2FA проверка считается принудительным компонентом современных платформ конфиденциальности. Игроки обретают SMS-ключи, push-notification или применяют специальные tools по типу Google Authenticator.
Зеркальные URL решают проблемы географических запретов и DDoS-штурмов. С технической точки зрения дубли составляют тождественные реплики центрального платформы с сохранением функциональности и индивидуальных данных.
Компетентные геймеры suggest сохранять актуальные реестры working зеркал в bookmark обозревателя. Операторы направляют обновления о свежих доменах через e-mail, Telegram-communities и портативные утилиты.
Банковские процедуры через официальные ресурсы гарантированы криптографическими протоколами класса банковского области. Extraction капитала производится лишь на validated данные владельца аккаунта.
Передовые провайдеры азартных игр дают игрокам путь к элитному беттингу через надежные казино РјСЌРґ ресурсы. Лицензированная операционная активность подразумевает следования четких регуляторных норм.
Механизм оформления клиентского учетной записи включает проверку конфиденциальных реквизитов. Регуляторы используют расширенные механизмы KYC и AML для блокировки нарушающих переводов.
Цифровые средства современных игорных домов функционируют на защищенных хостингах с SSL алгоритмами. IP-фильтрация принуждает владельцев внедрять альтернативные порталы.
Резервные платформы являют собой аналогичные дубликаты центрального платформы с удержанием всех опций и информации. Участники обеспечивают себе непрерывный соединение к счету, беттинг записям и индивидуальным опциям.
Расчетные переводы реализуются через интегрированные платежные системы. Рамки на пополнения и изъятия устанавливаются в соотношении с нормативными стандартами и индивидуальными политиками управления рисками.
Квалифицированные клиенты настаивают анализировать ситуацию аккредитации через государственные регистры гемблинг органов. Престижные критерии включают ранги на тематических ресурсах и мнения реальных игроков.
Лицензионные площадки азартных сервисов дают клиентам доступ к высококлассному азартному досугу через тематические домены, включая Вавада , которые точно выполняют transnational стандарты security.
Механизм открытия счёта предполагает предоставления верификационных информации через шифрованные SSL-каналы. Администрация запрашивают нотариальное подтверждение age verification и адреса жительства для compliance юрисдикционных критериев.
Двухфакторная верификация представляет mandatory компонентом актуальных solutions защиты. Users располагают SMS-шифры, push-алерты или используют dedicated утилиты по типу Google Authenticator.
Mirror ссылки ликвидируют сложности региональных барьеров и DDoS-атак. Фактически дубли являют тождественные клоны основного домена с удержанием функциональности и индивидуальных сведений.
Skilled клиенты советуют сохранять актуальные реестры рабочих зеркал в favourites обозревателя. Букмекеры отправляют новости о свежих ссылках через email, Telegram-группы и смартфонные apps.
Финансовые переводы через лицензионные платформы обеспечены защитными системами стандарта банковского области. Изъятие фондов производится единственно на validated карты хозяина учётной записи.
Нынешние участники оказываются с сложностью соединения к сертифицированным платформам. Провайдеры фильтруют базовые адреса, но профессиональные казино Болливуд посетители учитывают о доступности зеркальных порталов.
Альтернативный адрес составляет абсолютную дубликат основного сайта. SSL-сертификаты остаются идентичными. Денежные транзакции осуществляются через аналогичные системы.
Процедура регистрации через резервный адрес содержит привычной проверки. Сотрудники просят бумаги для осуществления KYC-регламентов. Идентификационные сведения реализуют комплексную аутентификацию.
Финансовые границы на дополнительных порталах совпадают базовым спецификациям. Низшие ставки сохраняются фиксированными. Возрастающие призовые фонды согласовываются между множественными доменами.
Премиальные схемы выполняются комплексно на зеркальных платформах. Множитель ставок поддерживает базовые параметры. Срок активности использования сохраняется.
Команда помощи анализирует запросы с параллельных ресурсов сходным образом. Онлайн диалог обеспечивает 24-часовой график работы.
Выбор качественного развлекательного оператора в актуальных рамках подразумевает повышенного анализа к законному состоянию. Опытные участники учитывают, что казино Vavada содержит последнюю материалы о работающих ресурсах.
Механизм открытия счета в сертифицированных площадках охватывает принудительную проверку документов. KYC-нормы оберегают как сервис, так и участника от фрода. Краткосрочные рамки на изъятие активов до окончания подтверждения – нормальная методика.
Виртуальные запреты на соединение к betting ресурсам нейтрализуются через альтернативные адреса. Доступные копии сохраняют абсолютную функциональность базового портала. Финансовые переводы, игровой статистика и льготные схемы функционируют константными.
Экономическая защищенность выражается показателем применяемых денежных методов. SSL-шифрование, PCI DSS подтверждение и многоуровневая проверка создают безопасный заслон защиты.
Игровая каталог лицензированных провайдеров охватывает автоматы от известных производителей. RTP-индексы, вариативность и расчетные формулы претерпевают нейтральную проверку в утвержденных лабораториях.
Системы стимулирования в серьезных заведениях основываются на ясных критериях вейджера. Проигрыш x35-40 оценивается разумным для барабан-поощрений, в то время как карточные активности включаются в зачет с сниженным показателем.
seoshift.click – Mobile version looks perfect; no glitches, fast scrolling, crisp text.
Современные провайдеры беттинг игр дают беттерам возможность к элитному беттингу через безопасные Vavada casino системы. Лицензированная работа подразумевает выполнения строгих надзорных требований.
Система создания пользовательского профиля содержит подтверждение личных данных. Администраторы эксплуатируют расширенные механизмы KYC и AML для блокировки нарушающих платежей.
Программные системы современных игорных домов функционируют на надежных облачных системах с SSL стандартами. Региональная блокировка принуждает управляющих запускать дублирующие адреса.
Параллельные домены образуют эквивалентные клоны первичного платформы с обеспечением всех инструментов и данных. Участники приобретают непрерывный доступ к счету, игровой данным и пользовательским настройкам.
Банковские операции производятся через интегрированные денежные процессоры. Ограничения на вклады и изъятия определяются в унисон с лицензионными положениями и собственными правилами минимизации опасностей.
Квалифицированные игроки предлагают контролировать ситуацию аккредитации через регуляторные базы данных развлекательных комиссий. Статусные индикаторы предусматривают ранги на экспертных сервисах и мнения настоящих пользователей.
workflowsupply.shop – Moving through the site was simple and I completed checkout without any issues.
Определение проверенного betting заведения в нынешних границах заставляет специального изучения к лицензионному уровню. Знающие клиенты понимают, что аква казино демонстрирует последнюю данные о действующих провайдерах.
Механизм регистрации в лицензированных операторах содержит обязательную верификацию документов. KYC-стандарты обеспечивают как оператора, так и пользователя от афер. Промежуточные лимиты на перечисление активов до финализации валидации – стандартная подход.
Цифровые препятствия на подключение к игровым ресурсам нейтрализуются через резервные порталы. Функционирующие копии гарантируют всестороннюю функциональность центрального платформы. Банковские процедуры, развлекательный прогресс и бонусные планы продолжают стабильными.
Денежная стабильность определяется критерием внедренных денежных систем. SSL-криптография, PCI DSS подтверждение и многоуровневая подтверждение гарантируют надежный периметр охраны.
Развлекательная коллекция сертифицированных провайдеров охватывает слоты от топовых студий. RTP-параметры, волатильность и математические схемы претерпевают внешнюю контроль в авторизованных институтах.
Системы вознаграждения в качественных площадках формируются на четких правилах отыгрыша. Проигрыш x35-40 характеризуется разумным для спин-льгот, в то время как традиционные активности идут в расчет с редуцированным фактором.
Выбор честного развлекательного ресурса заставляет детального исследования юридических сертификатов. Инновационные сайты casino mad предлагают игрокам максимальную детали о действующих лицензиях.
Механизм получения доступа включает различные принудительных стадий подтверждения. Представители просят бумаги, удостоверяющие личность и дееспособность. Стандартный KYC-алгоритм длится от 24 до 72 временных отрезков.
Контроль средств открывается с задания рамок на депозиты. Квалифицированные участники настаивают эксплуатировать принцип 5% от общего гемблинг фонда на одну партию.
Цифровые блокировки администраторов обязывают применять дополнительные пути. Альтернативы удерживают максимальную производительность первичного сайта, предусматривая историю операций и азартный успех.
Инновационные финансовые системы поддерживают моментальные пополнения через электронные портмоне. Bitcoin, Ethereum и постоянные токены поддерживают конфиденциальность и символические сборы. Срок проведения получений насчитывает 10-30 интервалов.
Планы приверженности предусматривают каскадные ранги с увеличивающимся компенсацией. VIP-менеджеры гарантируют эксклюзивные поощрения, улучшенные пределы и первоочередную обслуживание.
爱一番海外版,专为华人打造的高清视频平台AI深度学习内容匹配,支持全球加速观看。
Top online casinos Australia – best real money pokies and games
digitalleads.click – Appreciate the typography choices; comfortable spacing improved my reading experience.
海外华人必备的yifan平台,提供最新高清电影、电视剧,无广告观看体验。
Перемещение в мире легальных платформ требует осознания передовых решений подключения. Продвинутые пользователи применяют п»ї1хбет РІС…РѕРґ для приобретения свежей сведений о действующих ссылках.
Схема создания личного кабинета в сертифицированных учреждениях содержит многоуровневую подтверждение. Актуальные компании используют KYC-системы и AML-критерии. Документальная процедура потребляет от 24 до 72 временных отрезков.
IT технологии для избежания барьеров развиваются одновременно с усилением юридических шагов. VPN-сервисы разряда premium обеспечивают шифрование AES-256 и методы OpenVPN. Постоянство коннекта жизненно необходима для высокоролловых партий.
Резервные ресурсы действуют через регионально рассредоточенные технические кластеры. CDN-структуры предоставляют быструю задержку для американских клиентов. Программное перенаправление активируется при детекции блокировки главного портала.
Экономические транзакции в официальных областях отвечают жестким нормам PCI DSS. Цифровые платежи завоевывают признание в результате приватности и темпу реализации.
Планшетные утилиты ведущих организаций включают лицевую аутентификацию и push-сообщения для критических моментов. Изменяемый оформление самостоятельно корректируется под настройки панели.
Новейшие геймеры натыкаются с сложностью входа к легальным ресурсам. Организации блокируют первичные адреса, но знающие Mellstroy Game casino игроки осознают о наличии резервных ресурсов.
Резервная ссылка составляет полную отображение базового портала. Криптографические алгоритмы поддерживаются аналогичными. Банковские транзакции осуществляются через сходные механизмы.
Технология заведения учётной записи через альтернативный адрес подразумевает стандартной проверки. Администраторы выясняют свидетельства для реализации KYC-правил. Паспортные сведения подвергаются усиленную валидацию.
Финансовые пределы на дополнительных ресурсах аналогичны основным условиям. Низшие ставки поддерживаются неизменными. Накопительные выигрышные пулы объединяются между различными доменами.
Премиальные планы работают комплексно на параллельных ресурсах. Коэффициент оборота обеспечивает первоначальные параметры. Срок активности использования поддерживается.
Департамент сопровождения изучает запросы с зеркальных порталов равнозначно. Мгновенный разговор осуществляет беспрерывный режим обслуживания.
Smart GenRx USA: Smart GenRx USA – canadian pharmacy scam
奇思妙探高清完整官方版,海外华人可免费观看最新热播剧集。
Легальные площадки азартных опций обеспечивают игрокам вариант к качественному гэмблингу через специализированные порталы, включая Меллстрой зеркало , которые придерживаются мировые стандарты безопасности.
Последовательность создания аккаунта предполагает предоставления проверочных данных через encrypted SSL-соединения. Менеджмент просят документальное verification дееспособности и территории жительства для соблюдения нормативных правил.
Многоуровневая проверка является принудительным компонентом современных solutions защиты. Users получают SMS-пароли, push-алерты или применяют профессиональные софт по типу Google Authenticator.
Зеркальные URL устраняют проблемы региональных ограничений и DDoS-нападений. Технически дубли являют идентичные копии primary портала с поддержанием опций и пользовательских данных.
Опытные игроки рекомендуют хранить current базы действующих зеркал в сохранённых ссылках browser. Провайдеры рассылают новости о fresh доменах через e-mail, Telegram-чаты и мобильные утилиты.
Платёжные процедуры через надёжные ресурсы гарантированы криптографическими алгоритмами класса банковского индустрии. Снятие средств производится лишь на аутентифицированные счета владельца личного кабинета.
реконструкция ж д рельсов Проектирование железных дорог, включая земляное полотно и колеи различных стандартов, является первоосновой для их строительства и дальнейшей эксплуатации.
Актуальные игроки оказываются с проблемой подключения к сертифицированным порталам. Провайдеры блокируют стандартные URL, но грамотные казино 1xBet клиенты учитывают о наличии альтернативных сайтов.
Резервная ссылка является полную отображение главного ресурса. Криптографические алгоритмы сохраняются аналогичными. Банковские процедуры осуществляются через сходные шлюзы.
Процедура оформления профиля через резервный домен требует типовой подтверждения. Администраторы уточняют бумаги для выполнения KYC-стандартов. Паспортные сведения выполняют расширенную верификацию.
Финансовые границы на зеркальных порталах аналогичны первичным спецификациям. Минимальные ставки продолжают константными. Накопительные банки координируются между многочисленными ссылками.
Поощрительные планы оперируют комплексно на параллельных порталах. Вейджер поддерживает стартовые цифры. Срок активности отыгрыша не изменяется.
Команда помощи решает обращения с зеркальных адресов равнозначно. Онлайн чат предоставляет 24-часовой расписание деятельности.
Поиск в области сертифицированных сайтов нуждается осознания продвинутых технологий авторизации. Умелые клиенты задействуют казино Килограмм для добывания свежей сведений о действующих ссылках.
Схема открытия личного кабинета в проверенных организациях охватывает детальную проверку. Актуальные провайдеры применяют KYC-механизмы и AML-критерии. Документооборот отнимает от 24 до 72 промежутков.
Технические методы для прохождения блокировок развиваются параллельно с укреплением регуляторных мер. VPN-платформы типа premium дают кодирование AES-256 и методы OpenVPN. Стабильность канала критически актуальна для высокоролловых партий.
Запасные сайты функционируют через регионально размещенные цифровые инфраструктуры. CDN-структуры гарантируют минимальную задержку для глобальных клиентов. Техническое переключение включается при распознавании недоступности базового ресурса.
Денежные переводы в сертифицированных регионах соответствуют определенным правилам PCI DSS. Децентрализованные операции получают популярность по причине приватности и скорости реализации.
Портативные утилиты топовых компаний совмещают лицевую идентификацию и push-сообщения для принципиальных моментов. Изменяемый оформление программно подстраивается под характеристики панели.
塔尔萨之王第二季高清完整官方版,海外华人可免费观看最新热播剧集。
For illustration
cost of generic flexeril tablets
for connection.
Новейшие сервисы азартных развлечений предоставляют пользователям путь к высококлассному азарту через защищенные Клубника казино ресурсы. Легальная деятельность требует исполнения конкретных правовых требований.
Система оформления персонального профиля задействует верификацию конфиденциальных данных. Операторы эксплуатируют комплексные алгоритмы KYC и AML для пресечения поддельных финансовых действий.
Программные инструменты актуальных беттинг площадок строятся на безопасных дата-центрах с HTTPS сертификатами. Локальные запреты обязывает владельцев разрабатывать вспомогательные ссылки.
Параллельные платформы являют собой точные копии главного домена с фиксацией всех инструментов и параметров. Пользователи достигают устойчивый подключение к средствам, гемблинг статистике и личным установкам.
Финансовые операции реализуются через встроенные банковские агрегаторы. Пределы на вклады и выводы регулируются в соответствии с нормативными положениями и собственными нормами снижения потерь.
Профессиональные игроки настаивают мониторить состояние лицензии через контролирующие каталоги развлекательных ведомств. Авторитетные характеристики предусматривают рейтинги на профильных порталах и отзывы действительных пользователей.
premium stream outlet – The process of getting what I needed was smooth and simple.
neurontin 600 mg coupon Neuro Relief USA Neuro Relief USA
https://neuroreliefusa.com/# gabapentin 600 mg
Yoga Yonder Hub – The layout is inviting and browsing the catalog feels easy and smooth.
order zoloft: order zoloft – sertraline generic
https://spisok-kreditov.ru/ В Атырау на doskazaymov можно рассчитать рефинансирование кредитов и сохранить расчет для сравнения вариантов.
Беттинговая ниша являет быстрый развитие, завлекая миллионы клиентов. Квалифицированные сайты гарантируют стабильную пространство для ставок. Подробную сведения о указанных организациях можно отыскать на лакибир казино .
Сертификация выступает ключевым элементом подбора портала. Надзорные органы Мальты создают строгий проверку валютных операций. Каждая лицензированная ресурс выполняет периодические аудиты RNG-алгоритмов.
Цифровые параметры актуальных азартных площадок объединяют SSL-защиту экономического стандарта. Производители компьютерного софта уровня Microgaming, NetEnt, Pragmatic Play подключают усовершенствованные схемы рандомных показателей.
Механизм подтверждения аккаунта предусматривает предоставления удостоверений KYC-формата. Удостоверение, подтверждение о заработке, валидация адреса — типичный набор для полноценного доступа.
Дублирующие домены убирают препятствия с фильтрацией поставщиков. Свежие варианты изменяются регулярно IT специалистами. Планшетные приложения часто оперируют стабильнее веб редакций.
Финансовая дисциплина задаёт долгосрочную доходность азартных сессий. Грамотные беттеры указывают лимитировать объём вейджера до 1-2% от суммарного банкролла.
Беттинговая ниша являет стремительный расширение, манящая миллионы клиентов. Квалифицированные платформы предлагают надёжную пространство для ставок. Подробную факты о указанных операторах допустимо получить на винити казино .
Сертификация составляет главным элементом выбора платформы. Лицензиаты Олдерни гарантируют тщательный проверку экономических действий. Конкретная легальная платформа реализует плановые ревизии RNG-алгоритмов.
Технические параметры передовых азартных площадок включают SSL-шифрование денежного уровня. Создатели виртуального продукта класса Microgaming, NetEnt, Pragmatic Play встраивают сложные алгоритмы случайных параметров.
Процесс валидации счёта предполагает передачи справок KYC-уровня. Удостоверение, выписка о доходах, верификация проживания — стандартный пакет для итогового входа.
Резервные ссылки решают барьеры с запретами операторов. Действующие альтернативы адаптируются ежедневно компьютерными специалистами. Планшетные программы обычно работают устойчивее сетевых редакций.
Управление банкроллом устанавливает стратегическую эффективность развлекательных партий. Опытные участники предлагают контролировать сумму ставки до 1-2% от совокупного капитала.
УЗИ органов брюшной полости УЗИ вилочковой железы (тимуса) важно для оценки иммунного статуса организма, особенно у детей.
Hi there! I know this is kinda off topic but I was
wondering which blog platform are you using for this
site? I’m getting tired of WordPress because I’ve
had problems with hackers and I’m looking at options for another platform.
I would be fantastic if you could point me in the direction of a
good platform.
You actually make it seem so easy together with your presentation however I
in finding this topic to be actually one thing which
I feel I’d never understand. It seems too complex and extremely huge for
me. I’m having a look forward on your next submit, I’ll
attempt to get the dangle of it!
cedre Cedre, или кедр, является одним из благороднейших древесных компонентов в парфюмерии. Он придает ароматам силу, стабильность и элегантность. Кедровые ноты могут служить основой для мужественных парфюмов, добавляя им глубину, или же обогащать женские композиции, придавая им таинственность и утонченность.
tracking system hub – Everything is clear and the site is very easy to follow.
best sms activate service https://linkedin.com/pulse/top-5-sms-activate-services-ultimate-guide-virtual-phone-mike-davis-gnhre .
sms activate sms activate .
Исследование в пространстве сертифицированных сайтов нуждается понимания продвинутых решений соединения. Квалифицированные игроки задействуют казино Рльдорадо для извлечения актуальной фактов о активных адресах.
Процедура регистрации аккаунта в официальных заведениях предполагает тщательную аутентификацию. Продвинутые провайдеры используют KYC-процедуры и AML-критерии. Документальное сопровождение потребляет от 24 до 72 интервалов.
Цифровые способы для преодоления блокировок прогрессируют сообща с усилением законодательных шагов. VPN-сервисы типа premium предлагают кодирование AES-256 и протоколы OpenVPN. Стабильность подключения критически значима для VIP заходов.
Дублирующие платформы оперируют через пространственно расположенные технические системы. CDN-системы предоставляют быструю отклик для международных игроков. Программное роутинг включается при распознавании ограничения первичного домена.
Банковские переводы в лицензированных регионах отвечают конкретным критериям PCI DSS. Блокчейн расчеты увеличивают актуальность из-за анонимности и темпу выполнения.
Планшетные клиенты премиальных организаций интегрируют голосовую идентификацию и push-оповещения для существенных эпизодов. Адаптивный облик программно адаптируется под характеристики матрицы.
промокод на 1хбет на сегодня
Проверенные площадки гэмблинг услуг гарантируют игрокам право к профессиональному азартному досугу через специализированные ресурсы, включая Голд регистрация , которые специально выполняют общепринятые регламенты защиты.
Последовательность открытия счёта подразумевает указания валидационных информации через шифрованные SSL-соединения. Менеджмент требуют официальное подтверждение совершеннолетия и локации жительства для соблюдения правовых требований.
Multi-factor идентификация выступает обязательным элементом актуальных систем защиты. Клиенты обретают SMS-шифры, push-оповещения или эксплуатируют профессиональные софт в стиле Google Authenticator.
Альтернативные ссылки устраняют вопросы geographic барьеров и DDoS-атак. По сути реплики являют аналогичные реплики primary ресурса с поддержанием инструментария и клиентских параметров.
Компетентные геймеры советуют удерживать обновлённые базы рабочих зеркал в bookmark веб-клиента. Management отправляют новости о современных доменах через мейл, Telegram-communities и портативные утилиты.
Payment переводы через legal платформы secured криптографическими methods level банковского направления. Изъятие денег производится solely на проверенные реквизиты хозяина account.
Official Vivid Vendor – Lively visuals and vibrant images make the shopping experience exciting.
https://ghamaza.com/index.php?route=journal3%2Fblog%2Fpost&journal_blog_post_id=8
бесплатный промокод 1xbet
узнать больше кряк аимвар
trusted shaker source – Everything flows nicely and it doesn’t feel cluttered at all.
Отбор надежного казино ресурса подразумевает детального разбора юридических разрешений. Инновационные платформы mad казино предоставляют клиентам безусловную данные о имеющихся разрешениях.
Механизм регистрации подразумевает определенное количество обязательных стадий аутентификации. Администраторы настаивают документы, удостоверяющие индивидуальность и дееспособность. Классический KYC-механизм составляет от 24 до 72 часов.
Банкролл-менеджмент стартует с фиксации пределов на пополнения. Профессиональные геймеры призывают применять правило 5% от полного гемблинг средств на конкретную сессию.
Цифровые препятствия администраторов побуждают задействовать вспомогательные домены. Копии сохраняют максимальную функциональность базового площадки, подразумевая хронологию транзакций и игровой результаты.
Инновационные финансовые способы поддерживают быстрые вклады через виртуальные аккаунты. Bitcoin, Ethereum и фиксированные активы поддерживают скрытность и мизерные комиссии. Срок реализации изъятий насчитывает 10-30 отрезков.
Программы лояльности охватывают иерархические ранги с возрастающим возвратом. VIP-менеджеры предоставляют личные поощрения, усиленные ограничения и преимущественную сервис.
SafeSavings services – Straightforward offers and transparent details simplified my choices.
промокод на ординар 1xbet
Поиск проверенного азартного оператора требует основательного рассмотрения регулятивных бумаг. Инновационные системы laki world casino предоставляют игрокам максимальную сведения о имеющихся лицензиях.
Система получения доступа включает определенное количество обязательных шагов валидации. Операторы настаивают документы, устанавливающие персону и зрелость. Стандартный KYC-алгоритм составляет от 24 до 72 часов.
Финансовое планирование начинается с фиксации ограничений на инвестиции. Квалифицированные геймеры советуют применять принцип 5% от общего игорного капитала на конкретную раунд.
Электронные ограничения владельцев побуждают внедрять запасные адреса. Зеркала хранят безусловную активность базового ресурса, предусматривая летопись переводов и игровой результаты.
Передовые финансовые способы поддерживают оперативные пополнения через электронные портмоне. Bitcoin, Ethereum и стабильные валюты дают анонимность и символические взносы. Продолжительность проведения изъятий составляет 10-30 промежутков.
Планы верности включают каскадные статусы с увеличивающимся компенсацией. VIP-менеджеры дают уникальные награды, усиленные пределы и ускоренную сервис.
Shop Camp Courier Online – I enjoyed the innovative layout and moving around the site was simple.
здесь neverlose.cc
Современные участники натыкаются с барьером доступа к официальным платформам. Компании фильтруют стандартные домены, но грамотные Голд казино участники знают о функционировании резервных ресурсов.
Зеркало представляет стопроцентную копию базового ресурса. Средства защиты сохраняются равнозначными. Расчётные процедуры реализуются через идентичные каналы.
Алгоритм оформления профиля через зеркальный ссылку требует стандартной проверки. Специалисты просят бумаги для выполнения KYC-норм. Персональные данные осуществляют комплексную подтверждение.
Депозитные лимиты на зеркальных платформах аналогичны основным характеристикам. Начальные вклады поддерживаются фиксированными. Накопительные выигрышные пулы согласовываются между различными ресурсами.
Поощрительные системы выполняются целостно на альтернативных порталах. Требования по обороту поддерживает первоначальные цифры. Временные рамки оборота не изменяется.
Сервис поддержки решает обращения с резервных ссылок сходным образом. Живой диалог гарантирует беспрерывный график работы.
Explore SecureStack – Easy-to-understand guidance helped me secure systems quickly.
Беттинговая ниша демонстрирует активный развитие, заинтересовывая миллионы геймеров. Экспертные ресурсы гарантируют безопасную обстановку для развлечений. Полную данные о подобных компаниях доступно изучить на laki world казино .
Лицензирование представляет приоритетным критерием определения сайта. Юрисдикции Мальты гарантируют жёсткий проверку экономических процедур. Любая лицензированная ресурс выполняет регулярные проверки RNG-систем.
IT свойства новейших азартных площадок содержат SSL-кодирование экономического категории. Разработчики виртуального обеспечения класса Microgaming, NetEnt, Pragmatic Play подключают многоуровневые модели произвольных показателей.
Механизм проверки личного кабинета предполагает предоставления бумаг KYC-формата. Документ, выписка о финансах, подтверждение прописки — стандартный пакет для завершённого авторизации.
Зеркальные домены устраняют барьеры с блокировками компаний. Рабочие альтернативы корректируются постоянно IT группами. Смартфонные приложения регулярно выполняются устойчивее интернет версий.
Управление банкроллом определяет перспективную эффективность гемблинговых периодов. Опытные участники советуют урезать величину вейджера до 1-2% от суммарного бюджета.
https://ivertherapeutics.com/# Iver Therapeutics
Действующие mirror-ссылки лицензированных казино на Лаки Бир сайт гарантируют непрерывный доступ к азартным платформам. Схема копирования создает идентичные копии основного ресурса с поддержанием всех инструментов.
Процедура активации через резервную ссылку в точности дублирует главную заявку. Свежие игроки прописывают валидный email, формируют безопасный пароль и выбирают базовую платежное средство.
Аутентификация учетной записи предполагает представления свидетельств в соответствии с KYC-нормам. Снимок ID-карты, валидация места жительства и денежные данные подвергаются автоматическую верификацию в течение 24-72 часа.
Подключение зарегистрированных геймеров производится через классическую интерфейс с расширенной верификацией. Разовые токены поступают на мобильный аппарат или мейл.
Опции денежного раздела через альтернативные домены обеспечивает востребованные финансовые механизмы. Visa, Mastercard, цифровые кошельки Skrill, Neteller, цифровые активы Bitcoin, Ethereum осуществляются с сокращенными сборами 0-3%.
Азартная ассортимент повторяется целиком включая слоты, столовые забавы, live-крупье и джекпоты. RTP-коэффициенты, вариативность и вейджер удерживаются неизменными.
Промо схема действует идентично основному веб-площадке. Welcome-пакеты, free spins, кешбэк и VIP-курсы активируются программно при выполнении фиксированных параметров.
Выбор безопасного развлекательного заведения в нынешних условиях требует особого рассмотрения к регулятивному статусу. Компетентные пользователи понимают, что Меллстрой официальный сайт содержит свежую материалы о функционирующих площадках.
Схема записи в сертифицированных заведениях включает обязательную валидацию персональных данных. KYC-стандарты защищают как оператора, так и геймера от мошенничества. Временные границы на изъятие активов до завершения контроля – привычная методика.
Виртуальные ограничения на соединение к азартным ресурсам решаются через параллельные домены. Доступные дубликаты обеспечивают абсолютную эффективность центрального платформы. Банковские процедуры, игровой статистика и наградные планы функционируют устойчивыми.
Экономическая безопасность характеризуется уровнем применяемых банковских инструментов. SSL-кодирование, PCI DSS аттестация и расширенная подтверждение обеспечивают надежный контур обороны.
Игровая коллекция проверенных провайдеров объединяет автоматы от топовых студий. RTP-коэффициенты, колебания и расчетные системы проходят объективную сертификацию в одобренных институтах.
Схемы лояльности в серьезных казино строятся на открытых условиях отыгрыша. Проигрыш x35-40 оценивается приемлемым для барабан-льгот, в то время как стандартные игры учитываются в зачет с пониженным коэффициентом.
Взлом замков ставрополь Когда речь заходит об автомобилях, помимо экстренного вскрытия, крайне востребованы услуги по изготовлению ключей. “Дубликат ключа с чипом”, “дубликат ключей на автомобиль с чипом”, “дубликат чипа”, “изготовление ключей ставрополь” — все это обеспечивает бесперебойный доступ к вашему транспортному средству. Если вы “потерял ключи от машины”, то “восстановление ключа от машины” и “изготовление ключей” становятся главными задачами. Также важна “замена замка зажигания”, если возникли проблемы с его работой.
Надёжные ресурсы азартных опций дают участникам право к высококлассному времяпрепровождению через dedicated домены, включая лаки Р±РёСЂ казино , которые специально придерживаются глобальные регламенты надёжности.
Механизм открытия счёта предполагает заполнения authentication данных через шифрованные SSL-соединения. Менеджмент просят нотариальное удостоверение age verification и региона residence для поддержания правовых требований.
Multi-factor идентификация становится обязательным составляющей современных механизмов надёжности. Участники приобретают SMS-коды, push-notification или эксплуатируют targeted tools наподобие Google Authenticator.
Mirror домены ликвидируют трудности географических барьеров и DDoS-assault. С технической точки зрения копии формируют дублированные версии primary портала с поддержанием инструментария и пользовательских сведений.
Профессиональные игроки призывают поддерживать current перечни функционирующих дублей в сохранённых ссылках browser. Провайдеры направляют информацию о актуальных доменах через мейл, Telegram-группы и телефонные приложения.
Денежные процедуры через legal сайты гарантированы криптографическими технологиями стандарта банковского индустрии. Extraction капитала реализуется только на аутентифицированные реквизиты держателя account.
爱亦凡海外版,专为华人打造的高清视频官方认证平台,支持全球加速观看。
Инновационные провайдеры беттинг продуктов предлагают клиентам доступ к элитному игровому процессу через защищенные казино миллионъ ресурсы. Лицензированная операционная активность требует выполнения конкретных регуляторных требований.
Система оформления клиентского кабинета задействует проверку персональных данных. Регуляторы внедряют расширенные протоколы KYC и AML для исключения нарушающих платежей.
Цифровые инструменты актуальных казино работают на надежных облачных системах с SSL сертификатами. Геоблокировка принуждает операторов разрабатывать параллельные URL.
Альтернативные сайты являют собой полные копии базового домена с сохранением всех возможностей и параметров. Клиенты обеспечивают себе непрерывный доступ к капиталу, развлекательной истории и пользовательским опциям.
Банковские переводы проходят через подключенные банковские агрегаторы. Рамки на пополнения и выводы фиксируются в соответствии с регуляторными стандартами и организационными процедурами минимизации опасностей.
Профессиональные клиенты рекомендуют отслеживать состояние лицензии через надзорные списки развлекательных комиссий. Престижные индикаторы предусматривают оценки на специализированных сайтах и мнения реальных участников.
爱亦凡海外版,专为华人打造的高清视频平台,支持全球加速观看。
Функционирующие альтернативные домены официальных казино на казино 1хбет обеспечивают беспрерывный коннект к гемблинг ресурсам. Принцип клонирования генерирует аналогичные копии центрального домена с поддержанием всех возможностей.
Система оформления профиля через резервную ссылку на сто процентов повторяет главную форму. Новые игроки вводят функционирующий email, формируют надежный пароль и фиксируют основную финансовый инструмент.
Аутентификация профиля содержит передачи справок опираясь на KYC-нормам. Скан национального документа, доказательство места жительства и банковские сведения подвергаются программную верификацию в течение 24-72 временных единиц.
Подключение активных пользователей осуществляется через стандартную модуль с многоступенчатой верификацией. Временные токены отправляются на мессенджер гаджет или почтовый ящик.
Инструменты депозитного раздела через дублирующие порталы включает актуальные финансовые инструменты. Visa, Mastercard, виртуальные счета Skrill, Neteller, блокчейн-токены Bitcoin, Ethereum процессируются с минимальными комиссиями 0-3%.
Гемблинг база повторяется полностью включая автоматы, классические забавы, live-хостов и накопительные призы. RTP-коэффициенты, дисперсия и проигрыш сохраняются идентичными.
Бонусная система функционирует схоже основному домену. Welcome-наборы, даровые прокруты, кешбэк и VIP-курсы включаются алгоритмически при выполнении заданных стандартов.
奥美迦奥特曼高清完整官方版,海外华人可免费观看最新热播剧集。
Актуальные зеркала лицензированных игорных заведений на Mellstroy Game предоставляют беспрерывный подключение к азартным системам. Система зеркалирования создает аналогичные реплики главного веб-площадки с сохранением всех опций.
Механизм оформления профиля через альтернативный домен целиком дублирует основную шаблон. Начинающие игроки указывают валидный email, создают надежный ключ и выбирают игровую денежную единицу.
Валидация учетной записи содержит предоставления удостоверений опираясь на KYC-нормам. Скан ID-карты, валидация адреса и платежные реквизиты подвергаются машинную анализ в течение 24-72 часов.
Аутентификация активных участников выполняется через базовую окно с двухфакторной верификацией. Временные токены доставляются на мессенджер гаджет или мейл.
Инструменты входящего модуля через mirror-сайты поддерживает популярные расчетные платформы. Visa, Mastercard, электронные счета Skrill, Neteller, блокчейн-токены Bitcoin, Ethereum выполняются с минимальными платежами 0-3%.
Гемблинг библиотека клонируется на сто процентов включая машины, традиционные геймплей, live-ведущих и джекпоты. RTP-коэффициенты, изменчивость и ставочные требования сохраняются идентичными.
Подарочная схема выполняется подобно основному сайту. Welcome-пакеты, безвозмездные спины, денежный возврат и VIP-курсы инициируются алгоритмически при соблюдении установленных стандартов.
For conclusions
can you buy depakote pill
for clear evidence.
Visit Venvira – Felt welcoming at first glance, navigation is smooth and the design feels professional.
超人和露易斯第三季高清完整官方版,海外华人可免费观看最新热播剧集。
Beneath every habit, every mood shift, every hesitation, health is already at work.
Information arrives fast, but depth rarely travels with it.
What’s layered gets flattened into something tidy enough to share.
Each time we dismiss those messages, we step a little further from our own center.
Equilibrium isn’t something we arrive at—it’s something we keep tending to.
Observation teaches us what the body is genuinely asking for, often before we think to ask.
We begin to track how energy moves through the day, how sleep colors our emotions, how a single breath can quiet the mind.
By watching how the body responds to pressure, time, and change, we learn its actual logic.
If you’ve been wanting to feel genuinely at home in your own body.
Consider this an opening—a chance to come back to yourself.
Building knowledge through attention, not habit alone.
When we truly listen, health stops being a destination and becomes a story still being written.
What we sense in the body is very often rooted in patterns that science has already mapped.
This is why so much of what we’ve explored comes into focus when we examine walmart sildenafil 50 mg.
Рабочие дублирующие порталы надежных gaming-операторов на п»ї1хбет казино создают постоянный вход к гемблинг сервисам. Схема дублирования создает эквивалентные копии корневого ресурса с поддержанием всех возможностей.
Процедура создания аккаунта через зеркало на сто процентов повторяет главную анкету. Новые геймеры прописывают валидный email, формируют сложный ключ и выбирают игровую финансовый инструмент.
Подтверждение личного кабинета подразумевает отправки бумаг по KYC-регламенту. Снимок ID-карты, доказательство адреса и банковские сведения проходят программную верификацию в течение 24-72 периодов.
Подключение зарегистрированных пользователей выполняется через стандартную форму с 2FA идентификацией. Временные коды доставляются на телефонный гаджет или email.
Инструменты депозитного компонента через резервные ссылки поддерживает топовые финансовые системы. Visa, Mastercard, виртуальные хранилища Skrill, Neteller, цифровые активы Bitcoin, Ethereum процессируются с минимальными платежами 0-3%.
Развлекательная каталог дублируется в точности включая машины, классические игры, live-операторов и прогрессивы. RTP-параметры, колебания и отыгрыш удерживаются неизменными.
Подарочная схема работает схоже центральному сайту. Welcome-комплекты, free spins, refund и VIP-планы инициируются машинально при реализации определенных критериев.
Развлекательная индустрия отображает стремительный развитие, манящая миллионы пользователей. Грамотные порталы гарантируют надёжную обстановку для развлечений. Полную материалы о указанных компаниях возможно найти на Lucky Bear зеркало .
Лицензирование выступает приоритетным показателем селекции сайта. Надзорные органы Гибралтара дают тщательный мониторинг валютных процедур. Отдельная официальная сайт подвергается регулярные инспекции RNG-генераторов.
Программные свойства передовых гемблинг-сайтов включают SSL-шифрование денежного уровня. Провайдеры компьютерного продукта типа Microgaming, NetEnt, Pragmatic Play встраивают сложные схемы рандомных показателей.
Процесс валидации личного кабинета предусматривает направления свидетельств KYC-типа. Удостоверение, подтверждение о прибылях, верификация прописки — стандартный пакет для полноценного входа.
Зеркальные порталы ликвидируют сложности с цензурой операторов. Рабочие альтернативы изменяются каждый день компьютерными группами. Мобильные софт обычно работают надёжнее веб версий.
Финансовая дисциплина задаёт продолжительную прибыльность игровых раундов. Профессиональные участники указывают лимитировать количество вейджера до 1-2% от итогового банкролла.
Backlink sales and SEO support for website promotion. Trusted links, custom strategies, transparent service. https://uk.kme-berlin.de/index.php?title=SEO_Anomaly
Легальные операторы гэмблинг предложений гарантируют пользователям шанс к элитному игровому процессу через dedicated платформы, включая mad casino , которые точно исполняют международные регламенты надёжности.
Алгоритм создания аккаунта требует указания проверочных сведений через encrypted SSL-протоколы. Администрация demanded нотариальное подтверждение совершеннолетия и места жительства для выполнения нормативных норм.
2FA верификация выступает обязательным элементом новейших систем security. Игроки имеют SMS-шифры, push-notification или используют специальные утилиты по типу Google Authenticator.
Резервные ссылки нейтрализуют проблемы territorial барьеров и DDoS-воздействий. С технической точки зрения зеркала являют аналогичные клоны центрального платформы с удержанием features и пользовательских сведений.
Профессиональные участники призывают сохранять актуальные реестры активных дублей в сохранённых ссылках браузера. Букмекеры рассылают новости о свежих адресах через мейл, Telegram-communities и смартфонные софт.
Денежные операции через проверенные порталы покрыты encryption системами категории банковского области. Extraction денег выполняется единственно на проверенные wallets держателя учётной записи.
Рабочие резервные адреса легальных азартных клубов на лаки Р±РёСЂ казино предоставляют непрерывный доступ к азартным ресурсам. Технология клонирования строит полноценные клоны базового сайта с фиксацией всех опций.
Алгоритм открытия счета через зеркало на сто процентов копирует стандартную шаблон. Дебютные игроки вводят валидный email, придумывают защищенный секретную комбинацию и фиксируют основную финансовый инструмент.
Аутентификация личного кабинета содержит предоставления бумаг опираясь на KYC-требованиям. Скан паспорта, верификация места жительства и финансовые параметры контролируются системой алгоритмическую контроль в течение 24-72 периодов.
Авторизация активных участников происходит через базовую интерфейс с двухфакторной идентификацией. Разовые шифры приходят на телефонный гаджет или электронную почту.
Возможности денежного сектора через альтернативные домены включает популярные платежные сервисы. Visa, Mastercard, цифровые кошельки Skrill, Neteller, цифровые активы Bitcoin, Ethereum процессируются с низкими сборами 0-3%.
Азартная библиотека копируется абсолютно включая слоты, карточные геймплей, live-крупье и мегавыигрыши. RTP-показатели, изменчивость и ставочные требования фиксируются идентичными.
Подарочная система оперирует подобно центральному домену. Welcome-бандлы, фриспины, возврат средств и VIP-программы инициируются системно при выполнении фиксированных критериев.
https://neuroreliefusa.com/# prescription price for neurontin
Нынешние геймеры встречаются с затруднением входа к проверенным сайтам. Организации блокируют стандартные домены, но грамотные п»ї1хбет пользователи помнят о существовании параллельных сайтов.
Дополнительный домен формирует идентичную реплику оригинального ресурса. Протоколы шифрования остаются такими же. Денежные действия реализуются через сходные каналы.
Схема оформления профиля через альтернативный адрес подразумевает обычной валидации. Операторы уточняют бумаги для исполнения KYC-стандартов. Идентификационные характеристики выполняют усиленную аутентификацию.
Пополнительные ограничения на зеркальных порталах соответствуют основным параметрам. Стартовые ставки поддерживаются стабильными. Накопительные выигрышные пулы координируются между многочисленными порталами.
Бонусные системы выполняются полноценно на параллельных ресурсах. Множитель ставок поддерживает первоначальные величины. Период действия использования сохраняется.
Департамент помощи рассматривает запросы с резервных ресурсов равнозначно. Мгновенный переписка осуществляет непрерывный график обслуживания.
Функционирующие альтернативные домены надежных игорных заведений на Mellstroy Game гарантируют непрерывный доступ к гемблинг системам. Схема реплицирования формирует аналогичные копии базового ресурса с поддержанием всех инструментов.
Схема создания аккаунта через mirror-сайт полностью имитирует оригинальную форму. Начинающие геймеры указывают рабочий email, устанавливают надежный шифр и выбирают основную денежную единицу.
Валидация счета включает загрузки справок по KYC-требованиям. Изображение ID-карты, верификация адреса и платежные параметры контролируются системой машинную валидацию в течение 24-72 временных единиц.
Вход зарегистрированных геймеров происходит через стандартную модуль с 2FA проверкой. Временные ключи поступают на сотовый аппарат или e-mail адрес.
Механизмы финансового модуля через резервные ссылки содержит топовые финансовые системы. Visa, Mastercard, цифровые кошельки Skrill, Neteller, виртуальные монеты Bitcoin, Ethereum обрабатываются с минимальными процентами 0-3%.
Гемблинг коллекция повторяется в точности включая spinning games, традиционные забавы, live-операторов и прогрессивы. RTP-параметры, колебания и вейджер сохраняются точными.
Акционная политика действует идентично основному порталу. Welcome-наборы, безвозмездные спины, refund и VIP-схемы активируются машинально при соблюдении заданных критериев.
超人和露易斯第一季高清完整版运用AI智能推荐算法,海外华人可免费观看最新热播剧集。
Go to Wireless Ward – The website is organized well and I could understand each product quickly.
真实的人类第一季高清完整版,海外华人可免费观看最新热播剧集。
爱一番海外版,专为华人打造的高清视频官方认证平台,支持全球加速观看。
курсовые заказ kupit-kursovuyu-61.ru .
我欲为人第二季平台结合大数据AI分析,专为海外华人设计,提供高清视频和直播服务。
捕风捉影在线免费在线观看,海外华人专属平台,高清无广告体验。
Перемещение в секторе легальных платформ нуждается знания продвинутых решений входа. Опытные пользователи применяют п»ї1xBet casino для получения новейшей данных о функционирующих адресах.
Механизм регистрации профиля в надежных учреждениях содержит сложную аутентификацию. Актуальные провайдеры внедряют KYC-процедуры и AML-правила. Документооборот занимает от 24 до 72 временных отрезков.
Технические технологии для прохождения блокировок совершенствуются сообща с усилением юридических инициатив. VPN-службы уровня premium обеспечивают криптографию AES-256 и технологии OpenVPN. Стабильность соединения кардинально важна для элитных партий.
Зеркальные сайты выполняют задачи через территориально разнесенные цифровые мощности. CDN-комплексы осуществляют быструю задержку для международных игроков. Цифровое маршрутизация запускается при детекции барьера основного портала.
Банковские манипуляции в сертифицированных зонах отвечают конкретным правилам PCI DSS. Цифровые операции завоевывают популярность благодаря конфиденциальности и темпу процессинга.
Планшетные клиенты топовых провайдеров интегрируют лицевую подтверждение и push-оповещения для существенных событий. Модифицируемый облик независимо настраивается под настройки панели.
Развлекательная сфера показывает интенсивный рост, привлекая массы клиентов. Экспертные ресурсы предлагают качественную атмосферу для беттинга. Исчерпывающую информацию о таких провайдерах можно получить на казино миллионъ .
Аккредитация является ключевым показателем подбора ресурса. Регуляторы Кюрасао дают серьёзный надзор валютных процедур. Всякая легальная площадка реализует систематические ревизии RNG-модулей.
Технические параметры новейших гемблинг-сайтов объединяют SSL-безопасность денежного уровня. Разработчики софтового продукта уровня Microgaming, NetEnt, Pragmatic Play внедряют многоуровневые системы непредсказуемых значений.
Процедура валидации счёта подразумевает представления свидетельств KYC-типа. Документ, подтверждение о доходах, удостоверение адреса — базовый пакет для окончательного входа.
Зеркальные адреса исправляют проблемы с ограничениями поставщиков. Рабочие дубли адаптируются регулярно цифровыми специалистами. Мобильные программы регулярно оперируют устойчивее браузерных вариантов.
Распределение капитала формирует перспективную эффективность беттинговых периодов. Экспертные пользователи предлагают лимитировать размер депозита до 1-2% от итогового банкролла.
Нынешние геймеры обталкиваются с огромным количеством программных аспектов при процессах с проверенными сайтами. Профильные сайты типа Лаки Бир официальный сайт обеспечивают современную сведения о операциях азартных брендов.
Процесс валидации аккаунта предполагает несколько требуемых этапов. Первичная верификация нуждается размещения удостоверений подтверждающих личность. Стандартный пакет содержит паспорт, лицензию водителя или международный паспорт.
Программная часть открытия счета охватывает задействование защищенного протокола и двухуровневой проверки. Квалифицированные участники советуют инициировать совокупность доступных опций обеспечения.
Резервные ссылки представляют стопроцентные копии первичного сайта с удержанием тотального функционала. Главное выгода состоит в соответствии денежных границ и требований условий прокрутки.
Механизм поиска действующих альтернативных адресов базируется на проверке профильных новостных лент и связанных площадок. Экспертные геймеры эксплуатируют прокси-соединения для формирования устойчивого связи независимо от географических блокировок.
Поиск достойного азартного оператора в нынешних границах заставляет тщательного анализа к юридическому режиму. Опытные пользователи учитывают, что казино Килограмм содержит свежую сведения о активных ресурсах.
Механизм регистрации в проверенных заведениях объединяет неизбежную аутентификацию персональных данных. KYC-процедуры обеспечивают как казино, так и игрока от афер. Промежуточные границы на снятие средств до окончания контроля – обычная система.
Электронные ограничения на связь к betting сайтам нейтрализуются через дублирующие домены. Активные клоны предоставляют полную возможности центрального сайта. Расчетные движения, игровой продвижение и поощрительные предложения поддерживаются устойчивыми.
Денежная гарантированность определяется степенью задействованных банковских методов. SSL-безопасность, PCI DSS аттестация и многоуровневая подтверждение обеспечивают безопасный заслон обороны.
Геймплейная набор сертифицированных заведений предоставляет барабаны от лидирующих провайдеров. RTP-коэффициенты, дисперсия и вероятностные системы проходят объективную сертификацию в признанных организациях.
Программы вознаграждения в качественных заведениях формируются на четких параметрах отыгрыша. Требования x35-40 считается разумным для слот-поощрений, в то время как классические забавы учитываются в зачет с сниженным фактором.
What is the best online casino in Australia for real money?
sertraline zoloft: sertraline – generic for zoloft
真实的人类第一季高清完整版AI深度学习内容匹配,海外华人可免费观看最新热播剧集。
奇思妙探第二季高清完整官方版,海外华人可免费观看最新热播剧集。
真实的人类第二季高清完整版,海外华人可免费观看最新热播剧集。
夜班医生第四季高清完整版,海外华人可免费观看最新热播剧集。
custom print hub – Browsing is smooth and the design is very clean.
Актуальные игроки пересекаются с изобилием системных аспектов при операциях с проверенными ресурсами. Специализированные ресурсы типа казино 1хбет предоставляют релевантную контент о операциях азартных организаций.
Система валидации учетной записи охватывает несколько неотъемлемых фаз. Начальная валидация предполагает размещения бумаг верифицирующих гражданство. Стандартный комплект включает свидетельство, лицензию водителя или международный паспорт.
Технологическая составляющая регистрации содержит задействование SSL-шифрования и двойной авторизации. Опытные клиенты подсказывают задействовать все предложенных параметров охраны.
Резервные ссылки составляют идентичные клоны основного домена с сохранением комплексного инструментария. Главное выгода состоит в тождественности банковских границ и параметров отыгрыша.
Схема обнаружения действующих запасных доменов строится на отслеживании специализированных новостных лент и партнерских сайтов. Квалифицированные геймеры используют VPN-сервисы для гарантирования постоянного связи безотносительно от локальных ограничений.
Новейшие участники оказываются с затруднением подключения к официальным площадкам. Организации блокируют первичные ссылки, но профессиональные п»ї1хбет официальный сайт игроки знают о присутствии дублирующих площадок.
Параллельный портал образует абсолютную отображение главного площадки. Криптографические алгоритмы поддерживаются аналогичными. Денежные действия производятся через сходные механизмы.
Алгоритм оформления профиля через дополнительный портал подразумевает типовой подтверждения. Администраторы просят документы для осуществления KYC-регламентов. Персональные параметры реализуют расширенную валидацию.
Депозитные пределы на зеркальных сайтах идентичны главным условиям. Минимальные беты продолжают стабильными. Возрастающие выигрышные пулы синхронизируются между многочисленными адресами.
Стимулирующие схемы действуют завершённо на альтернативных сайтах. Отыгрышный коэффициент обеспечивает оригинальные цифры. Длительность проигрывания продолжается.
Сервис поддержки решает тикеты с альтернативных ресурсов таким же способом. Мгновенный общение обеспечивает непрерывный режим деятельности.
pro stream shop – The layout made finding the right products straightforward and easy.
zoloft generic: zoloft without rx – zoloft without rx
Xevoria Official – The site has a modern feel that makes finding products simple.
Online casinos real money Australia – bonuses worth claiming
Поиск надежного развлекательного заведения в современных границах подразумевает детального подхода к правовому режиму. Знающие клиенты осознают, что типпи казино демонстрирует последнюю факты о функционирующих операторах.
Алгоритм оформления профиля в официальных площадках содержит необходимую аутентификацию идентичности. KYC-правила гарантируют как заведение, так и пользователя от обмана. Переходные пределы на получение денег до финализации контроля – стандартная методика.
Технические запреты на связь к гемблинг площадкам решаются через зеркальные ссылки. Активные отражения сохраняют тотальную работоспособность базового ресурса. Денежные переводы, развлекательный прогресс и бонусные программы поддерживаются константными.
Денежная надежность характеризуется степенью внедренных расчетных способов. SSL-шифрование, PCI DSS валидация и усиленная идентификация формируют прочный барьер охраны.
Геймплейная ассортимент проверенных заведений включает машины от ведущих производителей. RTP-параметры, изменчивость и вероятностные системы получают независимую контроль в авторизованных центрах.
Системы стимулирования в профессиональных заведениях строятся на четких критериях отыгрыша. Требования x35-40 оценивается разумным для автомат-поощрений, в то время как настольные развлечения учитываются в расчет с сниженным множителем.
Определение безопасного игрового заведения в нынешних рамках подразумевает тщательного внимания к юридическому уровню. Знающие клиенты понимают, что ретро казино предоставляет последнюю материалы о доступных площадках.
Механизм открытия счета в лицензированных сервисах объединяет обязательную проверку идентичности. KYC-стандарты гарантируют как заведение, так и пользователя от фрода. Переходные пределы на вывод средств до окончания валидации – типичная процедура.
Программные барьеры на соединение к развлекательным сервисам преодолеваются через резервные адреса. Функционирующие дубликаты поддерживают абсолютную эффективность основного портала. Банковские операции, геймплейный прогресс и привилегированные программы продолжают постоянными.
Финансовая безопасность оценивается степенью применяемых банковских способов. SSL-шифрование, PCI DSS сертификация и усиленная идентификация гарантируют надежный барьер защиты.
Азартная библиотека лицензированных операторов включает барабаны от ведущих провайдеров. RTP-индексы, вариативность и вероятностные принципы получают объективную сертификацию в утвержденных лабораториях.
Механизмы поощрения в серьезных заведениях формируются на четких параметрах ставок. Вейджер x35-40 считается разумным для машина-льгот, в то время как классические игры идут в расчет с редуцированным процентом.
Top online casinos Australia – best real money pokies and games
捕风捉影在线免费在线观看,海外华人专属官方认证平台,高清无广告体验。
Отбор надежного гемблинг оператора заставляет тщательного разбора лицензионных сертификатов. Инновационные системы Vavada casino предоставляют пользователям безусловную информацию о действующих аккредитациях.
Процесс оформления счета включает определенное количество принудительных этапов верификации. Провайдеры требуют удостоверения, доказывающие идентичность и правоспособность. Обычный KYC-механизм составляет от 24 до 72 интервалов.
Распоряжение капиталом стартует с установления границ на пополнения. Опытные участники настаивают внедрять правило 5% от совокупного казино бюджета на отдельную раунд.
Технические препятствия администраторов принуждают внедрять дополнительные маршруты. Альтернативы поддерживают абсолютную работоспособность первичного ресурса, охватывая хронологию платежей и казино успех.
Инновационные банковские способы предоставляют скоростные вклады через виртуальные аккаунты. Bitcoin, Ethereum и устойчивые монеты поддерживают приватность и мизерные взносы. Срок осуществления получений равно 10-30 интервалов.
Алгоритмы лояльности подразумевают многоуровневые статусы с прогрессивным возвратом. VIP-кураторы предоставляют уникальные бонусы, повышенные рамки и опережающую поддержку.
Мега Даркнет — представляет собой сайт, функционирующий в даркнете, где посетители ищут множество специфических услуг.
darknet mega market ссылка прочно ассоциируется с теневым характером и строгой анонимностью пользователей.
Метафорически эту площадку выступает как портал в закрытое цифровое пространство, которое таит в себе массу особенностей.
Платформа Mega занимает важное место в структуре «глубокой сети», где главное значение имеют приватность посетителей и безопасность соединений.
Чтобы попасть на подобные площадки чаще всего производится применения специального ПО (например, Tor), и дополнительно VPN для преодоления блокировок.
Для входа на платформу, требуется иметь актуальную ссылку (ONION-ссылку) и обеспечить корректную конфигурацию.
Ключевое отличие площадки — это скрытность участников и отсутствии централизованной регистрации.
Пользователи на этом сайте отыскивают разнообразные предложения: от приватных мессенджеров до торговых платформ.
Платформа обеспечивает защиту от слежки благодаря передовым методам кодирования.
Но при этом даже комплексные меры безопасности может быть эффективной лишь отчасти, особенно при ошибках посетителей ресурса.
На сегодняшнем этапе развития сети данная площадка имеет свою специфическую нишу, привлекая тех, кто охотится за непубличной данными и услугами.
На страницах ресурса могут встречаться как разрешенный контент, так и противоправные, что вынуждает участника проявлять бдительность и ответственность.
Анализируя роль подобных площадок в интернете, следует отметить ряд важных моментов, связанных с правилами поведения и безопасности.
Прежде всего, необходима грамотная настройка рабочего пространства и внедрение эшелонированной безопасности для уменьшения опасностей.
Любой участник обязан разбираться в принципы скрытности и, желательно соблюдать правилам цифровой этики при работе внутри сети.
Кроме того, не стоит забывать о правовых рисках и возможных последствиях за незаконные действия.
Правовые нормы государств расходятся во мнениях относительно факта посещения таких ресурсов и меры наказания за активность там.
Некоторые исследователи подчеркивают, что подобные сайты могут становиться платформой для обмена знаниями и защиты приватности при ответственном подходе.
Но при всем при этом, опасность мошенничества, кражи денег и криминальной активности здесь никогда не исчезают.
Балансируя между информационной свободой и нормативными запретами, теневая платформа остается одной из самых противоречивых частей интернета.
Резюмируя для посетителей: необходимо крайне аккуратно подходить к выбору контента и верификации данных.
Итоговый вывод можно сформулировать так: Мега Даркнет — это неоднозначное и опасное пространство. Сайт обеспечивает максимальную приватность и конфиденциальности, но требует от каждого участника внимательности, понимания технологий и осознанности действий.
Площадка показывает спектр человеческих поступков в условиях ограниченного внешнего контроля и предоставляет платформу для обсуждения острых тем.
Таким образом, этот сегмент сети представляет собой неоднозначный феномен глобальной сети, где равновесие между открытостью и защитой каждый пользователь находит для себя сам.
Беттинговая сфера представляет интенсивный расширение, притягивая легионы участников. Экспертные сайты гарантируют стабильную атмосферу для беттинга. Развёрнутую факты о таких компаниях допустимо отыскать на Vavada зеркало .
Аккредитация выступает центральным критерием отбора портала. Лицензиаты Мальты обеспечивают качественный проверку расчётных транзакций. Отдельная легальная площадка осуществляет плановые проверки RNG-систем.
Цифровые свойства современных азартных площадок содержат SSL-кодирование финансового класса. Поставщики программного софта уровня Microgaming, NetEnt, Pragmatic Play встраивают усовершенствованные модели рандомных чисел.
Схема верификации учётной записи включает предоставления бумаг KYC-стандарта. Паспорт, свидетельство о финансах, удостоверение адреса — типичный перечень для финального входа.
Дублирующие домены убирают проблемы с ограничениями операторов. Функционирующие копии модифицируются ежедневно цифровыми специалистами. Смартфонные программы регулярно действуют лучше веб вариантов.
Финансовая дисциплина определяет стратегическую эффективность азартных партий. Грамотные беттеры рекомендуют контролировать объём вейджера до 1-2% от суммарного фонда.
电影网站推荐,运用AI智能推荐算法,海外华人专用,运用AI智能推荐算法,支持中英双语界面和全球加速。
геополимерное усиление грунта ukreplenie-gruntov-2.ru .
FunnelFoundry Hub – Clear layout and smooth navigation make exploring products effortless.
value vault store – Navigation is seamless and pages load almost instantly.
Игровая отрасль представляет динамичный развитие, манящая легионы участников. Грамотные сайты гарантируют качественную условия для беттинга. Исчерпывающую сведения о этих провайдерах возможно изучить на Vavada зеркало .
Легализация составляет приоритетным элементом отбора сайта. Регуляторы Гибралтара дают качественный аудит денежных транзакций. Конкретная лицензированная ресурс реализует плановые контроли RNG-механизмов.
Программные свойства новейших гемблинг-сайтов объединяют SSL-шифрование расчётного ранга. Поставщики компьютерного ПО наподобие Microgaming, NetEnt, Pragmatic Play подключают сложные системы непредсказуемых величин.
Процедура проверки личного кабинета предполагает представления документов KYC-класса. Документ, выписка о финансах, удостоверение регистрации — обычный набор для финального входа.
Резервные URL убирают барьеры с цензурой поставщиков. Функционирующие зеркала обновляются систематически программными командами. Планшетные утилиты регулярно действуют качественнее веб версий.
Финансовая дисциплина создаёт длительную доходность азартных раундов. Грамотные беттеры рекомендуют ограничивать величину вейджера до 1-2% от полного резерва.
Передовые платформы игорных услуг дают игрокам подключение к высококлассному развлечениям через безопасные казино Vavada порталы. Лицензированная работа нуждается исполнения определенных регуляторных критериев.
Механизм активации пользовательского кабинета содержит проверку приватных показателей. Администраторы эксплуатируют расширенные системы KYC и AML для недопущения мошеннических платежей.
Технические решения новейших гемблинг платформ строятся на надежных инфраструктурах с HTTPS сертификатами. Локальные запреты заставляет провайдеров разрабатывать резервные порталы.
Дублирующие домены являют собой идентичные версии главного ресурса с обеспечением всех функций и показателей. Игроки получают стабильный доступ к депозиту, игровой отчетности и пользовательским установкам.
Денежные действия осуществляются через синхронизированные платежные системы. Рамки на вклады и снятия регулируются в согласии с регуляторными требованиями и собственными регламентами снижения потерь.
Компетентные беттеры предлагают мониторить положение разрешения через надзорные реестры беттинг структур. Репутационные параметры предусматривают рейтинги на отраслевых сайтах и мнения реальных участников.
真实的人类第一季高清完整版采用机器学习个性化推荐,海外华人可免费观看最新热播剧集。
Выбор безопасного азартного ресурса заставляет тщательного исследования лицензионных свидетельств. Инновационные системы лаки Р±РёСЂ казино обеспечивают клиентам максимальную факты о действующих лицензиях.
Процесс открытия аккаунта охватывает определенное количество обязательных этапов верификации. Администраторы запрашивают бумаги, засвидетельствующие личность и дееспособность. Обычный KYC-процесс составляет от 24 до 72 часов.
Управление банком стартует с задания ограничений на вклады. Профессиональные геймеры призывают внедрять установку 5% от общего казино бюджета на отдельную партию.
Технические запреты владельцев принуждают применять альтернативные маршруты. Клоны поддерживают абсолютную функциональность основного площадки, охватывая архив операций и азартный прогресс.
Передовые банковские системы дают скоростные инвестиции через криптовалютные счета. Bitcoin, Ethereum и фиксированные активы предоставляют анонимность и мизерные отчисления. Период реализации получений достигает 10-30 отрезков.
Схемы постоянства предусматривают многоуровневые ранги с нарастающим компенсацией. VIP-координаторы обеспечивают индивидуальные подарки, улучшенные пределы и первоочередную сервис.
Узнать больше купить аккаунт steam
Определение честного казино ресурса нуждается основательного рассмотрения правовых свидетельств. Новые сайты friends casino дают клиентам стопроцентную данные о имеющихся аккредитациях.
Процесс открытия аккаунта содержит несколько необходимых фаз подтверждения. Операторы истребуют бумаги, устанавливающие индивидуальность и совершеннолетие. Традиционный KYC-алгоритм занимает от 24 до 72 периодов.
Банкролл-менеджмент стартует с определения лимитов на инвестиции. Опытные клиенты рекомендуют эксплуатировать закон 5% от совокупного игорного средств на отдельную партию.
Цифровые барьеры провайдеров обязывают использовать дополнительные ссылки. Копии хранят полную эффективность главного ресурса, содержа журнал платежей и азартный продвижение.
Новые расчетные системы гарантируют оперативные депозиты через блокчейн аккаунты. Bitcoin, Ethereum и стабильные валюты дают анонимность и символические взносы. Срок проведения получений насчитывает 10-30 минут.
Программы преданности подразумевают многоуровневые степени с возрастающим кэшбэком. VIP-представители обеспечивают персонализированные поощрения, увеличенные ограничения и приоритетную техподдержку.
hardware tools shop – The site made it easy to locate exactly what I needed.
Voltvessel Shop Now – Smooth browsing and a clear structure make shopping enjoyable.
huarenus平台,专为海外华人设计,提供高清视频和直播服务。
Поиск честного азартного заведения заставляет основательного изучения юридических документов. Инновационные платформы казино Вавада обеспечивают клиентам максимальную данные о своих санкциях.
Механизм регистрации включает ряд принудительных ступеней верификации. Представители настаивают свидетельства, подтверждающие личность и правоспособность. Стандартный KYC-процесс продолжается от 24 до 72 периодов.
Финансовое планирование открывается с задания ограничений на пополнения. Компетентные игроки настаивают задействовать принцип 5% от общего казино бюджета на конкретную игру.
Системные препятствия провайдеров обязывают внедрять дополнительные ссылки. Клоны удерживают стопроцентную производительность центрального платформы, содержа хронологию транзакций и казино прогресс.
Актуальные расчетные инструменты предоставляют мгновенные взносы через криптовалютные кошельки. Bitcoin, Ethereum и стабильные валюты дают приватность и символические сборы. Продолжительность проведения получений доходит 10-30 периодов.
Схемы приверженности подразумевают многоуровневые уровни с возрастающим возвратом. VIP-кураторы гарантируют персонализированные награды, улучшенные границы и первоочередную техподдержку.
Актуальные геймеры обталкиваются с множеством технологических аспектов при деятельности с официальными платформами. Профессиональные порталы типа Лаки Бир сайт поставляют новую материалы о процессах развлекательных операторов.
Процедура проверки профиля предполагает несколько обязательных стадий. Начальная верификация включает отправки справок верифицирующих личность. Привычный перечень включает ID, водительские права или загранпаспорт.
Технологическая часть создания аккаунта охватывает использование защищенного протокола и двухфакторной аутентификации. Профессиональные пользователи настаивают включать весь комплекс представленных параметров обеспечения.
Резервные ссылки образуют полные отражения центрального ресурса с обеспечением исчерпывающего набора функций. Основное бонус заключается в подобии платежных ограничений и параметров проигрыша.
Система обнаружения функционирующих зеркал базируется на мониторинге экспертных уведомительных сервисов и связанных ресурсов. Продвинутые пользователи задействуют виртуальные частные сети для обеспечения бесперебойного доступа без оглядки от территориальных барьеров.
Wow, fantastic blog layout! How lengthy have you ever been running a blog for?
you made running a blog glance easy. The entire look of your site is excellent,
let alone the content material!
Feel free to visit my blog post; YouTube video Promotion
https://uralshooter.ru/wp-content/pages/?promokod-pari.html
sms activate login sms activate login .
艾一帆海外版,专为华人打造的高清视频平台结合大数据AI分析,支持全球加速观看。
奥美迦奥特曼高清完整版,海外华人可免费观看最新热播剧集。
Актуальные альтернативные домены проверенных казино на онлайн friends casino обеспечивают стабильный коннект к развлекательным системам. Система зеркалирования создает полноценные копии базового домена с консервацией всех инструментов.
Механизм регистрации через альтернативный домен полностью копирует базовую бланк. Только пришедшие участники заполняют действующий email, создают защищенный код доступа и определяют базовую валюту.
Аутентификация профиля подразумевает представления бумаг согласно KYC-политике. Копия ID-карты, валидация проживания и платежные реквизиты подвергаются алгоритмическую верификацию в течение 24-72 часа.
Логин зарегистрированных геймеров выполняется через классическую интерфейс с двухфакторной идентификацией. Разовые пароли доставляются на смс номер или электронную почту.
Инструменты депозитного блока через mirror-сайты содержит актуальные платежные механизмы. Visa, Mastercard, онлайн счета Skrill, Neteller, crypto Bitcoin, Ethereum осуществляются с оптимизированными сборами 0-3%.
Игровая коллекция повторяется целиком включая spinning games, карточные забавы, live-ведущих и джекпоты. RTP-значения, изменчивость и ставочные требования поддерживаются неизменными.
Подарочная схема функционирует подобно базовому сайту. Welcome-комплекты, даровые прокруты, кешбэк и VIP-курсы запускаются машинально при выполнении определенных требований.
愛壹帆海外版,專為華人打造的高清視頻平台,支持全球加速觀看。
Актуальные зеркала официальных казино на п»ї1хбет зеркало предоставляют устойчивый соединение к геймерским платформам. Технология реплицирования формирует идентичные дубликаты корневого портала с консервацией всех инструментов.
Система оформления профиля через альтернативный домен в точности воспроизводит стандартную бланк. Начинающие клиенты вводят валидный email, формируют защищенный секретную комбинацию и выбирают базовую денежную единицу.
Аутентификация профиля требует предоставления справок согласно KYC-стандартам. Снимок паспорта, валидация места жительства и финансовые данные подвергаются программную верификацию в течение 24-72 периодов.
Логин зарегистрированных пользователей происходит через классическую окно с усиленной верификацией. Краткосрочные шифры отправляются на мобильный номер или e-mail адрес.
Функционал депозитного компонента через дублирующие порталы содержит актуальные денежные сервисы. Visa, Mastercard, онлайн балансы Skrill, Neteller, криптовалюты Bitcoin, Ethereum реализуются с оптимизированными сборами 0-3%.
Азартная база воспроизводится в точности включая автоматы, классические развлечения, live-операторов и мегавыигрыши. RTP-индикаторы, волатильность и ставочные требования остаются аналогичными.
Акционная схема оперирует подобно базовому домену. Welcome-бандлы, даровые прокруты, кешбэк и VIP-схемы стартуют алгоритмически при соблюдении фиксированных условий.
Действующие mirror-ссылки проверенных казино на Либет казино создают непрерывный вход к гемблинг сервисам. Принцип дублирования строит аналогичные копии базового веб-площадки с консервацией всех функций.
Схема регистрации через mirror-сайт на сто процентов дублирует стандартную заявку. Новые игроки вводят валидный email, устанавливают безопасный пароль и фиксируют рабочую валюту.
Аутентификация профиля включает загрузки справок следуя KYC-регламенту. Скан национального документа, доказательство места жительства и денежные параметры проверяются через машинную валидацию в течение 24-72 периодов.
Логин действующих геймеров происходит через классическую модуль с расширенной аутентификацией. Сессионные токены доставляются на мессенджер устройство или мейл.
Опции входящего модуля через зеркала содержит топовые денежные сервисы. Visa, Mastercard, виртуальные хранилища Skrill, Neteller, криптовалюты Bitcoin, Ethereum осуществляются с минимальными платежами 0-3%.
Развлекательная каталог дублируется полностью включая машины, настольные активности, live-ведущих и максимальные награды. RTP-показатели, дисперсия и ставочные требования остаются идентичными.
Подарочная схема действует подобно главному порталу. Welcome-комплекты, free spins, возврат средств и VIP-курсы включаются автоматически при соблюдении определенных стандартов.
Новейшие игроки попадают с препятствием связи к легальным площадкам. Провайдеры блокируют основные домены, но опытные Mellstroy Game зеркало посетители понимают о существовании дублирующих сайтов.
Альтернативный адрес является точную дубликат основного площадки. SSL-сертификаты сохраняются аналогичными. Платёжные переводы проходят через те же каналы.
Процедура открытия счёта через резервный адрес включает привычной аутентификации. Специалисты требуют бумаги для выполнения KYC-регламентов. Идентификационные информация выполняют двухфакторную аутентификацию.
Пополнительные лимиты на зеркальных площадках совпадают базовым параметрам. Наименьшие взносы поддерживаются постоянными. Прогрессивные джекпоты синхронизируются между различными порталами.
Бонусные планы работают комплексно на дополнительных площадках. Отыгрышный коэффициент поддерживает исходные значения. Период действия реализации сохраняется.
Служба сопровождения решает тикеты с зеркальных доменов аналогично. Онлайн диалог поддерживает постоянный формат деятельности.
I just like the valuable information you supply to
your articles. I’ll bookmark your blog and test again right here frequently.
I’m slightly sure I’ll learn a lot of new stuff right here!
Good luck for the next!
We’re a group of volunteers and opening a brand new scheme in our community.
Your web site offered us with useful information to work on. You’ve done an impressive process and our whole neighborhood might be
grateful to you.
Feel free to visit my webpage restroom revenue
捕风追影下载平台,專為海外華人設計,提供高清視頻和直播服務。
Please let me know if you’re looking for a author for your weblog.
You have some really good posts and I think I would be a good asset.
If you ever want to take some of the load off, I’d absolutely love to write some content for your
blog in exchange for a link back to mine. Please send me an e-mail if interested.
Kudos!
Also visit my blog post; YouTube video Promotion
best sms activate service github.com/sms-activate-login .
Venverra Online Store – Contemporary style, products are engaging, and browsing feels simple.
Online casinos real money Australia – bonuses worth claiming
Поиск в пространстве официальных порталов требует осознания передовых решений соединения. Квалифицированные геймеры внедряют Lucky Bear казино для приобретения актуальной фактов о действующих путях.
Алгоритм регистрации учетной записи в надежных операторах включает тщательную аутентификацию. Актуальные организации используют KYC-системы и AML-правила. Документооборот отнимает от 24 до 72 периодов.
Программные способы для избежания барьеров прогрессируют сообща с ужесточением нормативных инициатив. VPN-платформы типа premium предлагают криптографию AES-256 и методы OpenVPN. Непрерывность канала fundamentally значима для премиальных раундов.
Альтернативные адреса функционируют через территориально рассредоточенные компьютерные инфраструктуры. CDN-структуры гарантируют низкую задержку для глобальных пользователей. Автоматическое переключение инициируется при выявлении барьера главного портала.
Банковские операции в лицензированных юрисдикциях подпадают под четким нормам PCI DSS. Крипто расчеты приобретают востребованность вследствие скрытности и динамике обработки.
Мобильные приложения элитных организаций включают физиологическую идентификацию и push-алерты для ключевых эпизодов. Изменяемый дизайн самостоятельно подстраивается под свойства монитора.
Поиск проверенного игорного площадки предполагает серьезного анализа правовых документов. Современные системы Mellstroy Game зеркало предоставляют пользователям стопроцентную факты о действующих аккредитациях.
Процедура открытия аккаунта содержит различные необходимых ступеней верификации. Провайдеры запрашивают документы, засвидетельствующие идентичность и зрелость. Традиционный KYC-механизм требует от 24 до 72 промежутков.
Распоряжение капиталом открывается с определения ограничений на депозиты. Компетентные клиенты советуют задействовать закон 5% от полного развлекательного бюджета на одну партию.
Программные барьеры владельцев обязывают использовать вспомогательные пути. Дубликаты удерживают стопроцентную производительность основного ресурса, предусматривая историю операций и азартный достижения.
Инновационные платежные способы предоставляют скоростные депозиты через цифровые аккаунты. Bitcoin, Ethereum и постоянные токены обеспечивают скрытность и минимальные отчисления. Продолжительность проведения извлечений равно 10-30 интервалов.
Планы лояльности содержат многоуровневые степени с накапливающимся возвратом. VIP-координаторы предоставляют уникальные вознаграждения, усиленные пределы и преимущественную сервис.
Top Online Casinos Australia Real Money Including
RyzenRealm hardware hub – The tools and parts here improved overall performance efficiently.
Best online casino PayID Australia – secure and convenient
Australian online casino legit – how to spot safe sites
超人和露易斯第四季高清完整版AI深度学习内容匹配,海外华人可免费观看最新热播剧集。
Новейшие игроки натыкаются с препятствием связи к официальным порталам. Поставщики блокируют главные ссылки, но грамотные казино Голд пользователи понимают о наличии резервных ресурсов.
Зеркало представляет полную копию основного сайта. Криптографические алгоритмы работают такими же. Расчётные операции осуществляются через те же механизмы.
Схема открытия счёта через дополнительный ресурс подразумевает обычной валидации. Менеджеры выясняют удостоверения для осуществления KYC-требований. Индивидуальные сведения выполняют комплексную верификацию.
Депозитные рамки на альтернативных платформах аналогичны базовым параметрам. Низшие вклады продолжают константными. Прогрессивные накопления координируются между многочисленными ресурсами.
Премиальные механизмы функционируют комплексно на зеркальных сайтах. Вейджер гарантирует оригинальные цифры. Период действия оборота сохраняется.
Департамент помощи решает запросы с резервных адресов таким же способом. Интерактивный разговор предоставляет непрерывный расписание обслуживания.
I recommend
online slots themes
for offline viewing.
Надёжные площадки азартных опций oferuja участникам возможность к качественному игровому процессу через dedicated домены, включая лаки Р±РёСЂ казино , которые специально следуют глобальные нормы безопасности.
Процедура оформления профиля подразумевает заполнения идентификационных сведений через криптографические SSL-линии. Администрация требуют нотариальное подтверждение age verification и адреса проживания для compliance законодательных норм.
Многоуровневая идентификация считается required частью передовых архитектур надёжности. Users приобретают SMS-коды, push-оповещения или внедряют targeted утилиты по типу Google Authenticator.
Резервные порталы нейтрализуют сложности territorial запретов и DDoS-штурмов. Технически зеркала образуют дублированные реплики primary домена с сохранением инструментария и user информации.
Опытные пользователи suggest хранить current реестры working зеркал в закладках интернет-программы. Провайдеры передают сведения о актуальных URL через e-mail, Telegram-каналы и mobile утилиты.
Финансовые операции через лицензионные сайты покрыты шифровальными methods уровня банковского области. Extraction денег производится solely на аутентифицированные wallets собственника личного кабинета.
Для фанатов ММА нашел статью с аналитикой ufc в феврале марте 2026 три недели которые встряхнут дивизионы. Вот ссылка: https://mmahard.ru/news/obzor-predstoyashhih-boyov-ufc-fevral-mart-2026-kto-pobedit-v-glavnyh-shvatkah/
Рабочие дублирующие порталы лицензированных игорных заведений на Меллстрой РІС…РѕРґ создают непрерывный подключение к гемблинг платформам. Схема копирования создает точные клоны базового веб-площадки с поддержанием всех функций.
Процедура активации через дублирующий портал на сто процентов дублирует основную бланк. Начинающие геймеры заполняют активный email, устанавливают сложный шифр и определяют операционную платежное средство.
Валидация счета содержит отправки справок согласно KYC-требованиям. Копия удостоверения личности, свидетельство проживания и платежные координаты проверяются через алгоритмическую проверку в течение 24-72 часов.
Авторизация существующих клиентов происходит через стандартную форму с двухфакторной валидацией. Одноразовые токены отправляются на телефонный гаджет или e-mail адрес.
Механизмы денежного блока через mirror-сайты включает актуальные платежные инструменты. Visa, Mastercard, цифровые портмоне Skrill, Neteller, блокчейн-токены Bitcoin, Ethereum обрабатываются с низкими комиссиями 0-3%.
Гемблинг библиотека клонируется полностью включая автоматы, традиционные забавы, live-операторов и накопительные призы. RTP-значения, дисперсия и вейджер сохраняются такими же.
Подарочная схема оперирует аналогично основному сайту. Welcome-пакеты, free spins, денежный возврат и VIP-планы запускаются автоматически при реализации установленных критериев.
Определение качественного развлекательного площадки в современных границах подразумевает детального подхода к юридическому уровню. Профессиональные пользователи знают, что Mellstroy Game отображает современную данные о активных сервисах.
Схема оформления профиля в лицензированных сервисах включает необходимую верификацию удостоверения. KYC-правила охраняют как казино, так и участника от афер. Кратковременные границы на изъятие финансов до завершения контроля – типичная практика.
Электронные запреты на соединение к развлекательным сервисам обходятся через параллельные адреса. Активные отражения обеспечивают стопроцентную эффективность главного ресурса. Денежные процедуры, геймплейный продвижение и бонусные схемы сохраняются постоянными.
Материальная гарантированность выражается показателем задействованных финансовых методов. SSL-шифрование, PCI DSS сертификация и двухфакторная проверка обеспечивают защищенный барьер защиты.
Интерактивная каталог легальных операторов предоставляет барабаны от топовых производителей. RTP-коэффициенты, волатильность и алгоритмические принципы испытывают нейтральную сертификацию в авторизованных центрах.
Механизмы поощрения в достойных сервисах базируются на открытых условиях активности. Отыгрыш x35-40 считается справедливым для слот-льгот, в то время как традиционные активности принимаются в калькуляцию с минимальным коэффициентом.
Hi there are using WordPress for your site pre-leasing interest platform?
I’m new to the blog world but I’m trying to get
started and set up my own. Do you require any html coding knowledge to make your own blog?
Any help would be really appreciated!
Australian Online Casino Real Money For Live Baccarat
Подбор надежного betting оператора в текущих границах требует тщательного анализа к регулятивному состоянию. Квалифицированные клиенты знают, что п»ї1хбет РІС…РѕРґ отображает свежую факты о доступных провайдерах.
Процесс регистрации в проверенных площадках содержит неизбежную подтверждение удостоверения. KYC-требования гарантируют как сервис, так и клиента от обмана. Кратковременные пределы на перечисление финансов до финализации верификации – нормальная подход.
Программные ограничения на подключение к гемблинг сайтам преодолеваются через альтернативные порталы. Активные зеркала предоставляют тотальную эффективность базового сайта. Расчетные переводы, азартный результаты и привилегированные схемы поддерживаются константными.
Экономическая гарантированность определяется критерием применяемых финансовых механизмов. SSL-защита, PCI DSS подтверждение и дополнительная верификация гарантируют прочный заслон ограждения.
Азартная коллекция официальных операторов объединяет слоты от лидирующих студий. RTP-коэффициенты, волатильность и расчетные принципы подвергаются нейтральную проверку в одобренных учреждениях.
Программы стимулирования в профессиональных сервисах опираются на открытых условиях проигрыша. Условия ставок x35-40 характеризуется адекватным для слот-поощрений, в то время как традиционные состязания принимаются в подсчет с уменьшенным множителем.
Поиск честного развлекательного оператора подразумевает глубокого исследования регулятивных свидетельств. Новые ресурсы Меллстрой обеспечивают клиентам абсолютную информацию о собственных аккредитациях.
Процесс создания профиля предусматривает различные требуемых ступеней проверки. Представители настаивают удостоверения, устанавливающие индивидуальность и правоспособность. Стандартный KYC-алгоритм составляет от 24 до 72 часов.
Банкролл-менеджмент запускается с определения рамок на взносы. Искусные геймеры советуют использовать норму 5% от итогового гемблинг фонда на отдельную раунд.
Технические барьеры поставщиков принуждают применять резервные домены. Дубликаты поддерживают безусловную активность первичного площадки, содержа летопись транзакций и гемблинг результаты.
Современные банковские методы гарантируют моментальные пополнения через цифровые кошельки. Bitcoin, Ethereum и стейблкоины поддерживают скрытность и крошечные платежи. Время осуществления снятий составляет 10-30 промежутков.
Программы верности содержат многоуровневые статусы с нарастающим бонусом. VIP-представители предлагают персонализированные вознаграждения, повышенные рамки и преимущественную помощь.
Новейшие клиенты встречаются с множеством технических деталей при операциях с проверенными площадками. Специализированные источники типа Gold зеркало предоставляют актуальную информацию о работе развлекательных операторов.
Процедура аутентификации счета предполагает набор принудительных уровней. Исходная подтверждение включает отправки свидетельств верифицирующих персону. Классический комплект содержит ID, водительские права или международное ID.
Техническая часть оформления включает внедрение защищенного протокола и двухфакторной аутентификации. Опытные клиенты настаивают инициировать максимум доступных возможностей охраны.
Дублирующие порталы формируют точные реплики центрального сайта с поддержанием комплексного набора функций. Центральное бонус кроется в схожести платежных границ и норм отыгрыша.
Алгоритм поиска функционирующих зеркал основывается на наблюдении профильных телеграм-каналов и союзных ресурсов. Профессиональные клиенты применяют виртуальные частные сети для обеспечения бесперебойного входа без оглядки от локальных запретов.
усиление грунта под старым домом ukreplenie-gruntov-1.ru .
Online casino real money pokies Australia – win real cash now
Новейшие порталы гемблинг услуг обеспечивают игрокам путь к качественному гемблингу через надежные lucky bear казино системы. Лицензированная деятельность нуждается выполнения строгих законодательных положений.
Система активации игрового аккаунта содержит подтверждение конфиденциальных данных. Операторы задействуют углубленные алгоритмы KYC и AML для исключения нарушающих операций.
Технические системы новейших гемблинг платформ работают на безопасных дата-центрах с SSL алгоритмами. Региональная блокировка принуждает операторов разрабатывать резервные URL.
Дублирующие сайты формируют точные клоны первичного сайта с обеспечением всех возможностей и информации. Пользователи добиваются беспрепятственный связь к средствам, беттинг отчетности и персональным параметрам.
Банковские операции проходят через синхронизированные платежные сервисы. Ограничения на инвестиции и обналичивания регулируются в соотношении с нормативными критериями и индивидуальными регламентами минимизации опасностей.
Опытные беттеры указывают отслеживать положение аккредитации через официальные каталоги гемблинг ведомств. Статусные индикаторы содержат рейтинги на профильных сайтах и оценки истинных пользователей.
艾一帆海外版,专为华人打造的高清视频平台,支持全球加速观看。
海外华人必备的yifan官方认证平台,24小时不间断提供最新高清电影、电视剧,无广告观看体验。
https://smartgenrxusa.com/# Smart GenRx USA
愛海外版,專為華人打造的高清視頻官方認證平台,支持全球加速觀看。
Sea Spray Shop – Loved the fresh, coastal vibe and the checkout process was effortless.
超人和露易斯第四季高清完整版AI深度学习内容匹配,海外华人可免费观看最新热播剧集。
Подбор легального игорного заведения требует серьезного анализа юридических сертификатов. Новые платформы Mellstroy Game обеспечивают игрокам максимальную факты о текущих аккредитациях.
Процедура регистрации охватывает определенное количество принудительных ступеней подтверждения. Операторы просят бумаги, устанавливающие самобытность и возраст. Обычный KYC-механизм требует от 24 до 72 периодов.
Управление банком начинается с определения ограничений на депозиты. Квалифицированные геймеры рекомендуют внедрять норму 5% от совокупного казино бюджета на конкретную партию.
Технические ограничения владельцев принуждают внедрять дополнительные ссылки. Зеркала сохраняют максимальную активность первичного портала, предусматривая журнал платежей и игровой успех.
Современные денежные системы дают скоростные инвестиции через виртуальные хранилища. Bitcoin, Ethereum и стейблкоины гарантируют скрытность и наименьшие взносы. Продолжительность реализации снятий доходит 10-30 периодов.
Алгоритмы постоянства подразумевают многоуровневые ранги с прогрессивным компенсацией. VIP-представители обеспечивают персонализированные подарки, улучшенные пределы и опережающую поддержку.
Выбор надежного гемблинг заведения в нынешних реалиях нуждается специального внимания к регулятивному уровню. Профессиональные клиенты представляют, что Вавада сайт отображает актуальную информацию о действующих ресурсах.
Процесс регистрации в проверенных платформах предусматривает требуемую подтверждение персональных данных. KYC-стандарты оберегают как сервис, так и пользователя от махинаций. Краткосрочные ограничения на снятие капитала до завершения контроля – стандартная методика.
Электронные барьеры на связь к игровым порталам устраняются через альтернативные домены. Доступные зеркала поддерживают полную эффективность основного сервиса. Финансовые транзакции, геймплейный статистика и льготные схемы функционируют постоянными.
Финансовая стабильность характеризуется степенью эксплуатируемых расчетных систем. SSL-безопасность, PCI DSS валидация и двухфакторная аутентификация обеспечивают защищенный заслон безопасности.
Геймплейная библиотека официальных сервисов объединяет слоты от ведущих студий. RTP-индексы, волатильность и вероятностные модели проходят независимую проверку в авторизованных учреждениях.
Программы лояльности в профессиональных заведениях основываются на прозрачных параметрах вейджера. Проигрыш x35-40 расценивается нормальным для машина-льгот, в то время как стандартные состязания принимаются в счет с редуцированным коэффициентом.
Have you ever thought about writing an ebook or guest authoring on other sites?
I have a blog based upon on the same information you discuss and would
really like to have you share some stories/information. I know my viewers would value your work.
If you are even remotely interested, feel free to
send me an email.
Определение надежного азартного ресурса в современных рамках заставляет тщательного внимания к лицензионному состоянию. Знающие пользователи знают, что аква зеркало включает новую информацию о функционирующих операторах.
Процедура создания аккаунта в сертифицированных сервисах охватывает требуемую валидацию личности. KYC-стандарты гарантируют как площадку, так и пользователя от махинаций. Переходные пределы на перечисление денег до окончания проверки – привычная система.
Технические ограничения на связь к развлекательным порталам нейтрализуются через зеркальные адреса. Функционирующие отражения поддерживают стопроцентную производительность основного платформы. Денежные операции, игровой прогресс и льготные схемы сохраняются постоянными.
Денежная стабильность измеряется степенью задействованных денежных систем. SSL-кодирование, PCI DSS аттестация и дополнительная проверка создают защищенный барьер защиты.
Развлекательная коллекция официальных площадок содержит слоты от лидирующих создателей. RTP-показатели, изменчивость и алгоритмические принципы подвергаются независимую контроль в утвержденных организациях.
Механизмы вознаграждения в профессиональных площадках формируются на четких правилах вейджера. Проигрыш x35-40 оценивается адекватным для машина-подарков, в то время как классические забавы принимаются в счет с редуцированным процентом.
塔尔萨之王高清完整官方版,海外华人可免费观看最新热播剧集。
Передовые бетторы попадают с сложностью входа к сертифицированным площадкам. Поставщики фильтруют стандартные URL, но искушённые Голд казино игроки понимают о существовании резервных ресурсов.
Дополнительный домен составляет абсолютную копию первичного портала. Криптографические алгоритмы остаются равнозначными. Банковские процедуры осуществляются через сходные системы.
Алгоритм открытия счёта через параллельный адрес подразумевает обычной проверки. Операторы требуют справки для выполнения KYC-требований. Персональные параметры осуществляют двухфакторную подтверждение.
Пополнительные границы на дополнительных площадках аналогичны стандартным спецификациям. Стартовые взносы функционируют константными. Растущие выигрышные пулы интегрируются между различными ссылками.
Поощрительные схемы функционируют полноценно на альтернативных ресурсах. Требования по обороту обеспечивает первоначальные параметры. Длительность проигрывания сохраняется.
Департамент ассистирования решает тикеты с резервных адресов равнозначно. Интерактивный чат осуществляет круглосуточный расписание обслуживания.
Инновационные порталы игорных продуктов предлагают игрокам путь к элитному азарту через надежные Вавада зеркало сайты. Сертифицированная операционная активность требует следования строгих регуляторных критериев.
Механизм открытия индивидуального кабинета содержит аутентификацию личных реквизитов. Регуляторы используют многоуровневые механизмы KYC и AML для пресечения незаконных транзакций.
Электронные инструменты передовых игорных домов работают на зашифрованных инфраструктурах с TLS алгоритмами. Геоблокировка заставляет операторов запускать альтернативные URL.
Резервные домены формируют точные дубликаты центрального ресурса с обеспечением всех функций и сведений. Игроки приобретают непрерывный соединение к счету, гемблинг истории и индивидуальным настройкам.
Финансовые действия выполняются через интегрированные финансовые процессоры. Рамки на вклады и выводы регулируются в унисон с регуляторными условиями и организационными правилами риск-менеджмента.
Профессиональные беттеры настаивают отслеживать положение разрешения через контролирующие каталоги азартных ведомств. Престижные характеристики предусматривают рейтинги на отраслевых сайтах и оценки подлинных беттеров.
Современные клиенты пересекаются с огромным количеством технических нюансов при функционировании с легальными платформами. Экспертные источники типа Лаки Бир зеркало поставляют свежую материалы о деятельности азартных операторов.
Процесс верификации счета охватывает ряд неотъемлемых фаз. Начальная подтверждение требует передачи бумаг валидирующих персону. Привычный перечень охватывает паспорт, права или внешний паспорт.
Программная сторона оформления предполагает эксплуатацию защищенного протокола и двойной авторизации. Квалифицированные геймеры советуют включать совокупность предложенных возможностей охраны.
Дублирующие порталы образуют идентичные реплики центрального домена с хранением исчерпывающего набора функций. Центральное бонус выражается в соответствии денежных границ и требований ставочных требований.
Схема нахождения активных зеркал фундируется на отслеживании специализированных уведомительных сервисов и связанных площадок. Профессиональные клиенты применяют туннельные протоколы для предоставления надежного связи вне зависимости от локальных лимитов.
捕风追影在线免费在线观看,海外华人专属官方认证平台,高清无广告体验。
must-see product page – My late-night scroll uncovered some pretty cool selections.
ifuntv海外华人首选,采用机器学习个性化推荐,提供最新华语剧集、美剧、日剧等高清在线观看。
online pharmacy without scripts: Smart GenRx USA – Smart GenRx USA
Беттинговая ниша отображает динамичный расширение, притягивая массы клиентов. Экспертные сайты предоставляют безопасную условия для пари. Полную сведения о подобных компаниях допустимо изучить на Vavada зеркало .
Сертификация составляет основным элементом селекции портала. Лицензиаты Гибралтара создают строгий контроль расчётных манипуляций. Всякая аккредитованная платформа подвергается постоянные ревизии RNG-генераторов.
IT параметры инновационных казино предусматривают SSL-кодирование экономического ранга. Провайдеры софтового софта наподобие Microgaming, NetEnt, Pragmatic Play добавляют многоуровневые модели произвольных параметров.
Схема проверки профиля требует направления справок KYC-типа. Свидетельство, справка о доходах, подтверждение проживания — стандартный набор для завершённого подключения.
Зеркальные адреса убирают сложности с запретами провайдеров. Функционирующие варианты изменяются постоянно IT командами. Мобильные утилиты зачастую действуют устойчивее интернет вариантов.
Управление банкроллом устанавливает долгосрочную доходность развлекательных сессий. Профессиональные беттеры рекомендуют урезать размер вейджера до 1-2% от суммарного банкролла.
Новейшие бетторы оказываются с затруднением входа к проверенным порталам. Организации ограничивают первичные URL, но опытные Mellstroy Game casino участники помнят о доступности резервных ресурсов.
Параллельный портал образует абсолютную отображение главного платформы. Средства защиты функционируют такими же. Расчётные процедуры проходят через сходные системы.
Алгоритм оформления профиля через параллельный адрес предполагает обычной валидации. Администраторы просят удостоверения для осуществления KYC-требований. Личные данные осуществляют усиленную аутентификацию.
Банковские пределы на альтернативных платформах соответствуют основным требованиям. Наименьшие суммы продолжают неизменными. Накопительные призовые фонды согласовываются между всеми порталами.
Стимулирующие системы функционируют комплексно на резервных платформах. Вейджер удерживает базовые величины. Период действия реализации остаётся прежним.
Команда ассистирования рассматривает вопросы с альтернативных доменов таким же способом. Интерактивный диалог гарантирует 24-часовой расписание оперирования.
Отбор достойного развлекательного заведения в актуальных реалиях нуждается особого внимания к законному режиму. Компетентные геймеры знают, что Grizzly содержит свежую факты о работающих ресурсах.
Процедура открытия счета в легальных заведениях содержит требуемую подтверждение идентичности. KYC-процедуры защищают как оператора, так и пользователя от фрода. Временные рамки на изъятие активов до финализации подтверждения – стандартная процедура.
Технические ограничения на связь к betting сервисам решаются через дублирующие домены. Функционирующие дубликаты гарантируют полную работоспособность основного сервиса. Расчетные процедуры, азартный результаты и наградные предложения функционируют постоянными.
Денежная защищенность измеряется критерием задействованных расчетных инструментов. SSL-безопасность, PCI DSS подтверждение и усиленная аутентификация формируют стабильный заслон ограждения.
Интерактивная коллекция официальных операторов содержит машины от ведущих создателей. RTP-показатели, колебания и математические модели подвергаются внешнюю валидацию в утвержденных учреждениях.
Программы поощрения в профессиональных площадках строятся на открытых правилах вейджера. Вейджер x35-40 считается разумным для барабан-привилегий, в то время как настольные забавы учитываются в калькуляцию с сниженным показателем.
Актуальные клиенты имеют дело с набором цифровых тонкостей при операциях с проверенными ресурсами. Экспертные порталы типа Килограмм сайт выдают современную данные о процессах гэмблинговых брендов.
Процедура подтверждения счета подразумевает набор требуемых шагов. Стартовая валидация требует предоставления документов валидирующих персону. Классический комплект содержит документ, водительские права или загранпаспорт.
Цифровая элемент открытия счета подразумевает задействование защищенного протокола и двухуровневой проверки. Опытные клиенты рекомендуют включать весь комплекс имеющихся возможностей обеспечения.
Запасные домены формируют идентичные дубликаты первичного домена с хранением исчерпывающего возможностей. Важнейшее бонус заключается в идентичности банковских рамок и требований проигрыша.
Алгоритм нахождения активных запасных доменов фундируется на наблюдении тематических новостных лент и аффилированных порталов. Продвинутые клиенты внедряют VPN-сервисы для предоставления бесперебойного связи вне зависимости от локальных запретов.
thrift finds shop – Very easy to navigate and items are clearly described.
一帆官方认证平台,专为海外华人设计,24小时不间断提供高清视频和直播服务。
Вскрытие дверей В сложных ситуациях, когда необходимо “Вскрыть автомобиль”, “Открыть машину” или даже “Вскрыть сейф”, опытные специалисты готовы прийти на помощь. А для тех, кто ценит удобство и оперативность, существуют такие услуги, как “Изготовление ключей”, “Изготовление домофонных ключей” и “Изготовление ключей ставрополь”. Услуга “Замена замков ставрополь” и “Замена замков” в целом охватывает широкий спектр потребностей, связанных с безопасностью и функциональностью дверных механизмов.
Определение легального гемблинг портала требует серьезного разбора регулятивных сертификатов. Актуальные платформы Вавада официальный сайт предоставляют участникам полную детали о текущих допусках.
Алгоритм создания профиля подразумевает различные обязательных стадий валидации. Провайдеры истребуют удостоверения, доказывающие самобытность и возраст. Традиционный KYC-порядок продолжается от 24 до 72 часов.
Управление банком запускается с установления рамок на вклады. Искусные участники предлагают внедрять правило 5% от суммарного гемблинг резерва на индивидуальную игру.
Программные блокировки провайдеров заставляют применять альтернативные маршруты. Дубликаты поддерживают безусловную производительность базового сайта, охватывая архив платежей и игровой результаты.
Новые платежные сервисы дают моментальные инвестиции через электронные кошельки. Bitcoin, Ethereum и фиксированные активы поддерживают скрытность и наименьшие взносы. Время обработки извлечений составляет 10-30 минут.
Планы постоянства охватывают ступенчатые степени с накапливающимся бонусом. VIP-менеджеры предоставляют индивидуальные подарки, усиленные границы и преимущественную поддержку.
Подбор честного игорного заведения подразумевает серьезного исследования юридических документов. Передовые платформы казино Вавада обеспечивают геймерам абсолютную сведения о текущих допусках.
Алгоритм регистрации охватывает несколько необходимых стадий проверки. Администраторы настаивают справки, подтверждающие личность и дееспособность. Стандартный KYC-порядок составляет от 24 до 72 интервалов.
Контроль средств начинается с установления границ на вклады. Профессиональные игроки призывают эксплуатировать закон 5% от итогового игорного средств на конкретную сессию.
Технические ограничения владельцев побуждают эксплуатировать резервные маршруты. Клоны сохраняют безусловную эффективность первичного платформы, охватывая историю транзакций и гемблинг достижения.
Новые финансовые системы предоставляют моментальные инвестиции через криптовалютные портмоне. Bitcoin, Ethereum и устойчивые монеты поддерживают скрытность и наименьшие комиссии. Продолжительность осуществления извлечений достигает 10-30 отрезков.
Программы постоянства охватывают градационные статусы с увеличивающимся вознаграждением. VIP-консультанты обеспечивают эксклюзивные награды, увеличенные пределы и опережающую поддержку.
WiFi Wizard Boutique – I could find items fast thanks to a clean, organized layout.
捕风捉影在线免费在线观看,海外华人专属官方认证平台,高清无广告体验。
рейтинг сантехников спб Сантехник СПб: замена труб отопления.
Нынешние пользователи встречаются с массой программных тонкостей при функционировании с проверенными платформами. Тематические сайты типа винити зеркало поставляют релевантную контент о деятельности гэмблинговых операторов.
Процедура подтверждения аккаунта подразумевает набор неотъемлемых стадий. Исходная проверка нуждается передачи свидетельств валидирующих персону. Типовой комплект включает ID, автоудостоверение или внешний паспорт.
Цифровая компонента открытия счета подразумевает использование зашифрованного канала и двойной авторизации. Квалифицированные пользователи настаивают задействовать совокупность представленных возможностей защиты.
Запасные домены составляют точные дубликаты основного сайта с сохранением полного инструментария. Важнейшее выгода заключается в схожести банковских рамок и параметров ставочных требований.
Механизм поиска действующих дублирующих порталов основывается на контроле профильных информационных каналов и аффилированных ресурсов. Профессиональные игроки используют анонимайзеры для формирования бесперебойного входа безотносительно от локальных блокировок.
Актуальные операторы игорных игр предлагают клиентам подключение к качественному развлечениям через проверенные п»ї1xBet сайты. Легальная операционная активность подразумевает выполнения жестких контролирующих стандартов.
Алгоритм активации клиентского счета содержит валидацию приватных информации. Регуляторы эксплуатируют углубленные механизмы KYC и AML для блокировки незаконных операций.
Электронные системы современных развлекательных порталов функционируют на надежных серверах с SSL сертификатами. Региональная блокировка принуждает операторов внедрять дублирующие URL.
Параллельные сайты представляют точные дубликаты основного платформы с поддержанием всех опций и данных. Пользователи получают непрерывный соединение к депозиту, игровой истории и персональным опциям.
Платежные переводы производятся через синхронизированные банковские шлюзы. Ограничения на депозиты и выводы регулируются в соответствии с регуляторными стандартами и индивидуальными регламентами контроля угроз.
Квалифицированные пользователи настаивают мониторить положение лицензии через контролирующие базы данных игорных организаций. Престижные параметры задействуют места на специализированных порталах и оценки истинных клиентов.
Подбор легального развлекательного ресурса предполагает детального анализа юридических сертификатов. Новые системы Лев официальный сайт предлагают геймерам безусловную факты о своих аккредитациях.
Процесс регистрации подразумевает различные требуемых шагов проверки. Операторы запрашивают документы, устанавливающие самобытность и дееспособность. Классический KYC-порядок продолжается от 24 до 72 промежутков.
Управление банком запускается с определения лимитов на вклады. Компетентные пользователи настаивают использовать норму 5% от итогового гемблинг фонда на конкретную заход.
Технические барьеры операторов обязывают эксплуатировать вспомогательные маршруты. Зеркала поддерживают полную активность основного площадки, подразумевая летопись переводов и гемблинг успех.
Передовые расчетные сервисы гарантируют быстрые инвестиции через цифровые кошельки. Bitcoin, Ethereum и фиксированные активы дают приватность и минимальные отчисления. Длительность проведения выводов доходит 10-30 минут.
Планы преданности предусматривают каскадные категории с прогрессивным возвратом. VIP-консультанты гарантируют личные награды, усиленные лимиты и опережающую сервис.
Передовые клиенты обталкиваются с множеством программных тонкостей при процессах с официальными порталами. Тематические сайты типа Меллстрой зеркало выдают новую информацию о работе казино компаний.
Система аутентификации счета включает комплекс обязательных этапов. Первичная проверка предполагает размещения документов удостоверяющих субъект. Классический список содержит ID, водительские права или международное ID.
Технологическая часть создания аккаунта предполагает применение криптографической защиты и двухфакторной аутентификации. Продвинутые геймеры рекомендуют включать максимум возможных параметров обеспечения.
Резервные ссылки составляют идентичные реплики базового сайта с сохранением исчерпывающего функционала. Центральное плюс заключается в тождественности расчетных пределов и критериев отыгрыша.
Процедура локализации актуальных зеркал строится на проверке экспертных мессенджер групп и партнерских платформ. Квалифицированные геймеры эксплуатируют виртуальные частные сети для гарантирования надежного соединения безотносительно от территориальных ограничений.
Work Whim Store – The site feels smooth and effortless to browse today.
范德沃克高清完整官方版,海外华人可免费观看最新热播剧集。
Vendor Velvet Boutique – Browsing is smooth, items are easy to notice, and descriptions feel honest.
Актуальные пользователи имеют дело с набором технических тонкостей при процессах с проверенными порталами. Профессиональные порталы типа казино Вавада предоставляют новую данные о деятельности азартных провайдеров.
Система подтверждения кабинета предполагает комплекс обязательных стадий. Базовая аутентификация нуждается размещения справок удостоверяющих гражданство. Стандартный набор предполагает ID, лицензию водителя или международное ID.
Техническая составляющая регистрации включает внедрение криптографической защиты и 2FA. Продвинутые пользователи предлагают запускать полный набор предложенных настроек охраны.
Дублирующие порталы являются идентичные клоны основного домена с хранением полного арсенала. Главное выгода содержится в соответствии расчетных лимитов и критериев отыгрыша.
Механизм поиска действующих альтернативных адресов строится на отслеживании специализированных уведомительных сервисов и сотрудничающих ресурсов. Квалифицированные геймеры используют прокси-соединения для формирования надежного входа без оглядки от территориальных барьеров.
FreightFriendly World – Clean layout and detailed product descriptions make browsing pleasant.
Действующие дублирующие порталы проверенных азартных клубов на п»ї1хбет РІС…РѕРґ обеспечивают стабильный соединение к игровым ресурсам. Схема реплицирования образует точные дубликаты главного сайта с фиксацией всех возможностей.
Схема регистрации через зеркало целиком копирует главную шаблон. Дебютные клиенты заполняют функционирующий email, генерируют стойкий пароль и определяют рабочую денежную единицу.
Верификация профиля подразумевает загрузки документов согласно KYC-нормам. Изображение национального документа, верификация адреса и карточные сведения проходят машинную валидацию в течение 24-72 часов.
Аутентификация верифицированных геймеров выполняется через стандартную модуль с усиленной валидацией. Краткосрочные пароли поступают на сотовый устройство или e-mail адрес.
Механизмы входящего модуля через дублирующие порталы обеспечивает актуальные расчетные системы. Visa, Mastercard, онлайн балансы Skrill, Neteller, виртуальные монеты Bitcoin, Ethereum осуществляются с низкими платежами 0-3%.
Развлекательная библиотека копируется на сто процентов включая барабаны, столовые игры, live-операторов и прогрессивы. RTP-параметры, колебания и условия отыгрыша сохраняются неизменными.
Подарочная механизм выполняется схоже центральному домену. Welcome-бандлы, free spins, кешбэк и VIP-программы включаются программно при реализации заданных требований.
Современные пользователи обталкиваются с огромным количеством цифровых тонкостей при функционировании с лицензированными платформами. Специализированные порталы типа типпи казино дают релевантную контент о процессах гэмблинговых брендов.
Процедура проверки аккаунта охватывает несколько неотъемлемых фаз. Начальная аутентификация предполагает передачи свидетельств удостоверяющих гражданство. Обычный комплект охватывает ID, водительские права или внешний паспорт.
Системная элемент создания аккаунта охватывает внедрение зашифрованного канала и 2FA. Опытные игроки рекомендуют задействовать полный набор возможных параметров охраны.
Резервные ссылки составляют абсолютные дубликаты базового сайта с обеспечением всего функционала. Главное достоинство содержится в тождественности расчетных пределов и критериев ставочных требований.
Механизм обнаружения активных зеркал строится на контроле профильных уведомительных сервисов и аффилированных порталов. Квалифицированные пользователи задействуют прокси-соединения для обеспечения надежного соединения безотносительно от региональных ограничений.
https://besolar.com.co/2026/02/05/pribylnye-kazino-onlayn-na-obektivnye-dengi-top-desyal-vo-2025-bukva/
Выбор надежного игрового площадки в актуальных рамках подразумевает детального подхода к юридическому режиму. Квалифицированные геймеры осознают, что Лев казино предоставляет свежую данные о доступных операторах.
Механизм открытия счета в лицензированных заведениях охватывает обязательную проверку идентичности. KYC-стандарты гарантируют как сервис, так и игрока от махинаций. Временные лимиты на вывод активов до завершения подтверждения – стандартная практика.
Виртуальные запреты на связь к игровым ресурсам устраняются через резервные домены. Функционирующие отражения обеспечивают тотальную функциональность базового ресурса. Денежные движения, азартный прогресс и бонусные схемы остаются устойчивыми.
Экономическая гарантированность определяется уровнем применяемых финансовых систем. SSL-криптография, PCI DSS аттестация и усиленная идентификация устанавливают защищенный контур охраны.
Развлекательная набор сертифицированных операторов объединяет спины от известных провайдеров. RTP-параметры, дисперсия и вероятностные схемы претерпевают внешнюю аудит в одобренных организациях.
Механизмы лояльности в качественных площадках основываются на понятных критериях отыгрыша. Требования x35-40 характеризуется адекватным для спин-поощрений, в то время как традиционные забавы идут в расчет с минимальным коэффициентом.
Discover Sparks Tow – Cute design and I managed to locate my desired products quickly.
sublimation supplies marketplace – The clean layout and smooth browsing make shopping enjoyable.
https://www.trimartolod.fr/pages/code_promo_melbet___bonus_jbienvenue.html
stromectol buy uk: Iver Therapeutics – Iver Therapeutics
Современные участники оказываются с препятствием доступа к легальным ресурсам. Организации ограничивают первичные домены, но знающие казино Lucky Bear посетители помнят о доступности параллельных площадок.
Зеркало образует стопроцентную реплику основного сайта. Криптографические алгоритмы остаются аналогичными. Расчётные транзакции осуществляются через идентичные системы.
Процедура открытия счёта через альтернативный ресурс содержит типовой проверки. Специалисты запрашивают справки для реализации KYC-стандартов. Идентификационные информация подвергаются двухфакторную аутентификацию.
Финансовые ограничения на зеркальных сайтах соответствуют первичным характеристикам. Стартовые ставки функционируют стабильными. Прогрессивные банки координируются между многочисленными ссылками.
Бонусные системы оперируют полноценно на альтернативных площадках. Отыгрышный коэффициент гарантирует оригинальные значения. Длительность оборота продолжается.
Отдел ассистирования анализирует вопросы с альтернативных адресов идентично. Интерактивный разговор обеспечивает круглосуточный режим оперирования.
Поиск достойного игрового оператора в актуальных условиях нуждается специального внимания к законному уровню. Опытные участники представляют, что Vavada отображает современную материалы о действующих операторах.
Процесс регистрации в сертифицированных заведениях объединяет принудительную подтверждение документов. KYC-стандарты обеспечивают как оператора, так и геймера от махинаций. Промежуточные рамки на получение средств до окончания проверки – стандартная методика.
Технические блокировки на соединение к betting площадкам устраняются через параллельные URL. Активные дубликаты сохраняют тотальную эффективность центрального платформы. Платежные переводы, интерактивный продвижение и наградные программы продолжают неизменными.
Материальная защищенность характеризуется степенью применяемых банковских механизмов. SSL-кодирование, PCI DSS подтверждение и двухфакторная верификация гарантируют стабильный заслон защиты.
Интерактивная каталог проверенных площадок включает машины от лидирующих создателей. RTP-значения, колебания и алгоритмические системы испытывают нейтральную проверку в аккредитованных организациях.
Механизмы вознаграждения в достойных казино формируются на прозрачных условиях проигрыша. Требования x35-40 считается приемлемым для спин-привилегий, в то время как карточные состязания принимаются в зачет с сниженным фактором.
iyftv海外华人首选,提供最新华语剧集、美剧、日剧等高清在线观看。
Have a look
how can i get generic tegretol without rx
to reinforce your knowledge.
Discover the book that is redefining the romance genre. The Love in Plane Sight PDF is available for curious readers. It is a novel that is fresh and original. Secure your digital file today and see what makes it special. https://loveinplanesightpdf.site/ Love In Plane Sight Art
Understand the value of gold with the Bluebird Gold PDF. This report provides a clear analysis of why gold remains a critical asset for investors. Use this expert knowledge to refine your strategy and secure your long-term financial stability. https://bluebirdgoldpdf.site/ Bluebird Gold Ebook Download Links
海外华人必备的iyf官方认证平台,24小时不间断提供最新高清电影、电视剧,无广告观看体验。
watch and time hub – Smooth navigation with a really nice browsing experience.
爱一帆会员多少钱海外版,专为华人打造的高清视频官方认证平台,支持全球加速观看。
signal boost center – The overall experience is fluid and visually pleasing.
https://t.me/evacasino_official/4
http://catalog-dverey.ru/images/cli/?promokod_bukmekerskoy_kontoru_melbet.html
Азартная область демонстрирует стремительный подъём, завлекая легионы геймеров. Экспертные сайты предоставляют качественную пространство для пари. Детальную сведения о подобных операторах допустимо получить на Lucky Bear казино .
Аккредитация составляет главным элементом выбора сайта. Лицензиаты Великобритании предоставляют серьёзный аудит валютных действий. Отдельная лицензированная сайт реализует периодические ревизии RNG-модулей.
Цифровые свойства передовых гемблинг-сайтов предусматривают SSL-кодирование банковского стандарта. Поставщики программного материала наподобие Microgaming, NetEnt, Pragmatic Play добавляют усовершенствованные модели рандомных параметров.
Процедура аутентификации профиля подразумевает подачи документов KYC-типа. Свидетельство, выписка о прибылях, удостоверение регистрации — типичный список для полноценного входа.
Параллельные домены исправляют барьеры с цензурой операторов. Актуальные варианты модифицируются систематически программными службами. Карманные софт часто оперируют стабильнее интернет редакций.
Финансовая дисциплина определяет перспективную эффективность азартных циклов. Квалифицированные беттеры рекомендуют урезать размер вейджера до 1-2% от полного фонда.
резиновая крошка цена Прокладки паронитовые: надежная герметизация
爱一凡海外版,专为华人打造的高清视频官方认证平台,支持全球加速观看。
Современные бетторы встречаются с затруднением подключения к сертифицированным площадкам. Провайдеры ограничивают базовые адреса, но знающие казино типпи пользователи помнят о наличии альтернативных ресурсов.
Параллельный портал представляет полную копию базового ресурса. Системы безопасности сохраняются идентичными. Банковские транзакции осуществляются через равнозначные системы.
Технология регистрации через дополнительный портал предполагает обычной аутентификации. Администраторы запрашивают свидетельства для выполнения KYC-правил. Индивидуальные данные проходят расширенную подтверждение.
Банковские границы на дополнительных площадках равняются базовым характеристикам. Минимальные суммы продолжают постоянными. Возрастающие накопления синхронизируются между многочисленными доменами.
Премиальные механизмы оперируют завершённо на зеркальных порталах. Отыгрышный коэффициент обеспечивает базовые значения. Период действия проигрывания остаётся прежним.
Служба сопровождения анализирует вопросы с параллельных порталов аналогично. Прямой переписка осуществляет 24-часовой график деятельности.
Активные резервные адреса легальных игорных заведений на п»ї1xBet casino гарантируют постоянный доступ к развлекательным порталам. Принцип зеркалирования образует аналогичные реплики базового веб-площадки с удержанием всех опций.
Алгоритм оформления профиля через дублирующий портал целиком повторяет основную бланк. Начинающие клиенты прописывают валидный email, генерируют стойкий пароль и назначают рабочую платежное средство.
Идентификация личного кабинета включает представления удостоверений в соответствии с KYC-политике. Снимок паспорта, доказательство резиденции и платежные координаты проходят автоматическую анализ в течение 24-72 периодов.
Логин верифицированных игроков реализуется через базовую панель с двухфакторной аутентификацией. Одноразовые шифры приходят на мобильный девайс или e-mail адрес.
Возможности входящего компонента через альтернативные домены включает топовые расчетные сервисы. Visa, Mastercard, виртуальные хранилища Skrill, Neteller, виртуальные монеты Bitcoin, Ethereum обрабатываются с сокращенными комиссиями 0-3%.
Азартная ассортимент дублируется абсолютно включая барабаны, настольные игры, live-дилеров и накопительные призы. RTP-коэффициенты, волатильность и условия отыгрыша остаются идентичными.
Бонусная механизм выполняется похоже главному веб-площадке. Welcome-наборы, безвозмездные спины, компенсация и VIP-программы активируются программно при реализации определенных требований.
https://irenastyle.ru/pags/pokerdom_promokod_bonus_kod.html
canadian pharmacy ratings Smart GenRx USA Smart GenRx USA
塔尔萨之王第三季高清完整版运用AI智能推荐算法,海外华人可免费观看最新热播剧集。
Развлекательная отрасль являет интенсивный подъём, завлекая легионы участников. Профессиональные порталы предоставляют качественную пространство для ставок. Детальную данные о указанных организациях возможно получить на mad казино .
Легализация представляет ключевым фактором отбора ресурса. Регуляторы Мальты гарантируют строгий аудит денежных процедур. Конкретная аккредитованная портал реализует плановые ревизии RNG-механизмов.
Компьютерные характеристики инновационных беттинг-платформ предусматривают SSL-криптографию финансового категории. Провайдеры программного обеспечения класса Microgaming, NetEnt, Pragmatic Play интегрируют многоуровневые алгоритмы непредсказуемых величин.
Процесс аутентификации личного кабинета предусматривает передачи документов KYC-класса. Документ, выписка о прибылях, валидация адреса — обычный комплект для итогового входа.
Параллельные ссылки ликвидируют трудности с запретами операторов. Актуальные дубли модифицируются постоянно техническими службами. Смартфонные клиенты часто работают лучше веб модификаций.
Управление банкроллом задаёт стратегическую эффективность гемблинговых раундов. Профессиональные пользователи советуют контролировать размер вейджера до 1-2% от суммарного банкролла.
Calveria Central – I came across this store and the layout makes it simple to navigate.
iyf.tv海外华人首选,提供最新华语剧集、美剧、日剧等高清在线观看。
一帆平台,专为海外华人设计,提供高清视频和直播服务。
Развлекательная отрасль представляет быстрый рост, манящая легионы геймеров. Профессиональные сайты гарантируют надёжную среду для пари. Полную факты о данных организациях реально обнаружить на Vavada .
Лицензирование остаётся главным фактором определения платформы. Юрисдикции Великобритании дают серьёзный аудит расчётных операций. Всякая аккредитованная площадка проходит регулярные проверки RNG-систем.
Программные характеристики новейших азартных площадок содержат SSL-безопасность экономического уровня. Создатели компьютерного обеспечения вроде Microgaming, NetEnt, Pragmatic Play добавляют усовершенствованные алгоритмы хаотичных значений.
Механизм подтверждения счёта предусматривает подачи справок KYC-формата. Удостоверение, выписка о средствах, удостоверение местожительства — классический пакет для окончательного авторизации.
Резервные порталы убирают барьеры с фильтрацией поставщиков. Функционирующие альтернативы адаптируются каждый день цифровыми специалистами. Смартфонные утилиты регулярно работают качественнее интернет редакций.
Финансовая дисциплина устанавливает перспективную эффективность беттинговых партий. Опытные беттеры указывают урезать объём вейджера до 1-2% от совокупного капитала.
Новейшие сервисы беттинг услуг гарантируют игрокам возможность к элитному гемблингу через сертифицированные казино 1хбет порталы. Сертифицированная операционная активность предполагает исполнения жестких правовых критериев.
Процедура оформления персонального аккаунта охватывает проверку конфиденциальных показателей. Провайдеры задействуют комплексные механизмы KYC и AML для блокировки незаконных операций.
Технические решения передовых гемблинг платформ функционируют на стабильных инфраструктурах с SSL технологиями. Геоблокировка принуждает управляющих внедрять параллельные ссылки.
Зеркальные платформы образуют идентичные клоны главного сайта с сохранением всех функций и информации. Беттеры приобретают беспрепятственный вход к депозиту, беттинг данным и персональным конфигурациям.
Расчетные транзакции выполняются через интегрированные платежные процессоры. Границы на инвестиции и получения устанавливаются в соответствии с нормативными стандартами и индивидуальными процедурами риск-менеджмента.
Квалифицированные гемблеры указывают отслеживать статус сертификата через контролирующие реестры игорных органов. Репутационные характеристики содержат позиции на профильных платформах и оценки подлинных пользователей.
iyf.tv海外华人首选,采用机器学习个性化推荐,提供最新华语剧集、美剧、日剧等高清在线观看。
Актуальные платформы азартных игр предоставляют клиентам подключение к высококлассному игровому процессу через надежные Вован казино сайты. Лицензированная операционная активность нуждается исполнения строгих надзорных требований.
Процедура активации персонального аккаунта предусматривает валидацию приватных сведений. Операторы используют комплексные алгоритмы KYC и AML для исключения незаконных переводов.
Электронные средства новейших беттинг площадок базируются на безопасных инфраструктурах с криптографическими стандартами. Региональная блокировка принуждает провайдеров организовывать дублирующие адреса.
Альтернативные сайты составляют полные репликации первичного ресурса с сохранением всех сервисов и данных. Беттеры добиваются беспрепятственный соединение к капиталу, игровой истории и пользовательским конфигурациям.
Платежные процедуры осуществляются через синхронизированные расчетные агрегаторы. Ограничения на вклады и обналичивания регулируются в гармонии с законодательными требованиями и собственными процедурами снижения потерь.
Экспертные игроки предлагают анализировать ситуацию разрешения через государственные базы данных игорных организаций. Имиджевые характеристики включают места на профильных платформах и мнения истинных беттеров.
Online casino Australia legal alternatives – safe offshore casinos
https://neuroreliefusa.shop/# neurontin 800
愛海外版,专为华人打造的高清视频平台,支持全球加速观看。
Выбор проверенного игорного портала подразумевает основательного рассмотрения правовых свидетельств. Современные ресурсы казино Голд предлагают игрокам стопроцентную детали о имеющихся лицензиях.
Механизм получения доступа содержит несколько требуемых стадий проверки. Операторы запрашивают справки, удостоверяющие индивидуальность и дееспособность. Традиционный KYC-порядок составляет от 24 до 72 временных отрезков.
Распоряжение капиталом открывается с задания ограничений на пополнения. Компетентные клиенты рекомендуют применять норму 5% от суммарного казино фонда на отдельную игру.
Программные ограничения администраторов побуждают использовать вспомогательные маршруты. Альтернативы поддерживают стопроцентную работоспособность базового портала, предусматривая архив платежей и игровой прогресс.
Передовые платежные системы предоставляют быстрые пополнения через электронные аккаунты. Bitcoin, Ethereum и фиксированные активы обеспечивают тайность и наименьшие взносы. Срок реализации снятий насчитывает 10-30 периодов.
Программы преданности предусматривают градационные статусы с увеличивающимся бонусом. VIP-кураторы предоставляют персонализированные поощрения, улучшенные ограничения и приоритетную помощь.
Современные провайдеры беттинг услуг предоставляют клиентам подключение к элитному развлечениям через надежные Mellstroy Game casino порталы. Сертифицированная функционирование нуждается выполнения четких правовых стандартов.
Система регистрации клиентского кабинета содержит подтверждение личных реквизитов. Администраторы внедряют детализированные процедуры KYC и AML для предотвращения нарушающих переводов.
Технические средства актуальных развлекательных порталов основываются на зашифрованных серверах с HTTPS алгоритмами. IP-фильтрация вынуждает администраторов создавать вспомогательные домены.
Зеркальные домены представляют эквивалентные копии главного платформы с обеспечением всех функций и сведений. Беттеры добиваются непрерывный соединение к депозиту, беттинг истории и персональным опциям.
Банковские операции проходят через интегрированные расчетные сервисы. Рамки на взносы и снятия назначаются в соотношении с регуляторными критериями и внутренними регламентами контроля угроз.
Компетентные беттеры рекомендуют контролировать статус аккредитации через регуляторные регистры гемблинг организаций. Репутационные показатели охватывают оценки на отраслевых порталах и feedback подлинных беттеров.
凯伦皮里第二季高清完整官方版,海外华人可免费观看最新热播剧集。
сайт купить аккаунт steam
Современные геймеры пересекаются с множеством технических аспектов при деятельности с легальными порталами. Экспертные ресурсы типа Лаки Бир РІС…РѕРґ предоставляют новую материалы о функционировании азартных брендов.
Процесс аутентификации счета охватывает комплекс принудительных шагов. Начальная проверка включает размещения свидетельств подтверждающих субъект. Классический пакет предполагает удостоверение личности, автолицензию или внешний паспорт.
Цифровая сторона открытия счета содержит применение криптографической защиты и двухуровневой проверки. Квалифицированные пользователи предлагают активировать совокупность представленных настроек безопасности.
Зеркала составляют стопроцентные реплики основного ресурса с хранением исчерпывающего функционала. Ключевое плюс заключается в тождественности финансовых пределов и условий условий прокрутки.
Процедура локализации активных запасных доменов основывается на контроле тематических мессенджер групп и связанных сайтов. Экспертные клиенты задействуют VPN-сервисы для предоставления стабильного доступа независимо от географических запретов.
Australian online casino real money viva96.com – bonus details
塔尔萨之王第三季高清完整官方版,海外华人可免费观看最新热播剧集。
超人和露易斯第一季高清完整版,海外华人可免费观看最新热播剧集。
夜班医生第四季高清完整版运用AI智能推荐算法,海外华人可免费观看最新热播剧集。
RotiAndRice restaurant – Ordering was a breeze and the food was very enjoyable.
https://ivertherapeutics.com/# where to buy stromectol
Определение достойного гемблинг заведения в сегодняшних обстоятельствах нуждается повышенного анализа к законному положению. Знающие пользователи представляют, что Меллстрой РІС…РѕРґ отображает новую информацию о функционирующих ресурсах.
Процесс открытия счета в сертифицированных заведениях содержит неизбежную валидацию документов. KYC-стандарты гарантируют как оператора, так и пользователя от мошенничества. Краткосрочные пределы на изъятие денег до завершения подтверждения – типичная методика.
Технические барьеры на доступ к азартным площадкам обходятся через резервные адреса. Рабочие зеркала сохраняют всестороннюю эффективность основного ресурса. Расчетные процедуры, геймплейный достижения и льготные схемы поддерживаются устойчивыми.
Материальная надежность выражается степенью используемых финансовых систем. SSL-защита, PCI DSS сертификация и двухфакторная идентификация создают надежный заслон безопасности.
Азартная ассортимент проверенных площадок объединяет барабаны от лидирующих производителей. RTP-значения, изменчивость и математические принципы претерпевают внешнюю контроль в признанных институтах.
Программы лояльности в качественных площадках базируются на прозрачных параметрах вейджера. Условия ставок x35-40 оценивается справедливым для машина-привилегий, в то время как настольные активности включаются в зачет с пониженным коэффициентом.
Гемблинговая сфера показывает стремительный развитие, притягивая тысячи участников. Экспертные площадки гарантируют защищённую условия для ставок. Развёрнутую материалы о таких операторах можно отыскать на п»ї1xBet casino .
Легализация представляет основным фактором определения портала. Регуляторы Кюрасао предоставляют тщательный проверку экономических действий. Конкретная сертифицированная сайт подвергается периодические ревизии RNG-систем.
Программные особенности инновационных казино охватывают SSL-шифрование банковского категории. Производители программного продукта уровня Microgaming, NetEnt, Pragmatic Play добавляют продвинутые алгоритмы произвольных значений.
Механизм проверки учётной записи подразумевает направления свидетельств KYC-класса. Документ, свидетельство о финансах, удостоверение адреса — классический комплект для завершённого подключения.
Параллельные порталы исправляют трудности с фильтрацией поставщиков. Действующие варианты обновляются ежедневно IT отделами. Смартфонные приложения зачастую выполняются лучше онлайн редакций.
Контроль средств определяет длительную доходность развлекательных циклов. Экспертные участники рекомендуют лимитировать величину пари до 1-2% от полного бюджета.
Инновационные операторы гемблинг развлечений обеспечивают участникам путь к высококлассному беттингу через защищенные казино типпи порталы. Авторизованная функционирование требует соблюдения строгих правовых требований.
Процедура создания индивидуального аккаунта охватывает аутентификацию личных данных. Управляющие применяют комплексные механизмы KYC и AML для недопущения поддельных финансовых действий.
Технические средства инновационных беттинг площадок строятся на стабильных серверах с SSL протоколами. Территориальные ограничения заставляет провайдеров внедрять дублирующие домены.
Дублирующие сайты образуют точные копии базового портала с поддержанием всех функций и данных. Клиенты достигают постоянный доступ к капиталу, азартной статистике и пользовательским настройкам.
Расчетные транзакции выполняются через подключенные расчетные сервисы. Границы на депозиты и получения фиксируются в соотношении с правовыми требованиями и индивидуальными регламентами контроля угроз.
Профессиональные пользователи рекомендуют анализировать условия сертификата через официальные каталоги азартных органов. Статусные критерии включают оценки на отраслевых ресурсах и мнения действительных беттеров.
Актуальные участники сталкиваются с препятствием входа к лицензированным платформам. Провайдеры фильтруют базовые порталы, но грамотные Eldorado зеркало клиенты осознают о доступности зеркальных платформ.
Альтернативный адрес представляет абсолютную копию основного портала. Криптографические алгоритмы поддерживаются равнозначными. Финансовые транзакции выполняются через те же сервисы.
Методика открытия счёта через параллельный портал содержит классической аутентификации. Сотрудники выясняют документы для выполнения KYC-требований. Персональные параметры осуществляют комплексную валидацию.
Финансовые границы на параллельных ресурсах равняются главным требованиям. Наименьшие беты сохраняются неизменными. Прогрессивные призовые фонды синхронизируются между множественными ресурсами.
Бонусные механизмы выполняются всесторонне на альтернативных платформах. Отыгрышный коэффициент сохраняет первоначальные значения. Тайминг использования поддерживается.
Департамент поддержки решает тикеты с резервных порталов таким же способом. Интерактивный разговор поддерживает круглосуточный порядок работы.
Ориентирование в секторе сертифицированных ресурсов требует знания новых инструментов подключения. Квалифицированные участники внедряют п»ї1xBet для извлечения новейшей материалов о оперативных ссылках.
Схема формирования личного кабинета в сертифицированных учреждениях включает многоуровневую аутентификацию. Актуальные организации применяют KYC-процедуры и AML-стандарты. Бумажная работа потребляет от 24 до 72 временных отрезков.
Компьютерные способы для преодоления барьеров эволюционируют одновременно с повышением регуляторных шагов. VPN-службы категории premium обеспечивают криптографию AES-256 и методы OpenVPN. Стабильность подключения принципиально актуальна для привилегированных игровых периодов.
Запасные сайты выполняют задачи через регионально размещенные цифровые кластеры. CDN-системы обеспечивают оптимальную пинг для международных клиентов. Системное переключение срабатывает при детекции ограничения основного сайта.
Денежные переводы в сертифицированных юрисдикциях следуют определенным правилам PCI DSS. Блокчейн переводы завоевывают признание по причине секретности и скорости выполнения.
Планшетные клиенты премиальных операторов интегрируют голосовую проверку и push-сообщения для принципиальных эпизодов. Гибкий интерфейс независимо изменяется под настройки экрана.
Официальные площадки игорных опций дают клиентам шанс к премиальному игровому процессу через dedicated ресурсы, включая Лаки Бир , которые именно следуют мировые критерии конфиденциальности.
Алгоритм регистрации требует внесения authentication данных через шифрованные SSL-connection. Администрация требуют official удостоверение правоспособности и места регистрации для исполнения законодательных критериев.
Двухфакторная аутентификация является обязательным частью современных solutions безопасности. Пользователи обретают SMS-шифры, push-оповещения или используют targeted утилиты вроде Google Authenticator.
Альтернативные адреса решают сложности geographic блокировок и DDoS-штурмов. С технической точки зрения реплики формируют копийные версии основного платформы с maintaining возможностей и индивидуальных деталей.
Skilled участники suggest сохранять актуальные базы рабочих дублей в сохранённых ссылках browser. Провайдеры рассылают updates о актуальных адресах через почтовые сервисы, Telegram-чаты и смартфонные утилиты.
Банковские операции через проверенные ресурсы secured cryptographic алгоритмами level банковского направления. Изъятие капитала осуществляется лишь на validated wallets держателя account.
UI upgrade shop – Browsing is effortless and the layout makes sense for any user.
Следующая страница yougamebiz
Инновационные платформы развлекательных услуг обеспечивают клиентам подключение к элитному азарту через безопасные Лев зеркало платформы. Официальная деятельность влечет соблюдения конкретных надзорных требований.
Процесс оформления игрового счета предусматривает аутентификацию личных сведений. Управляющие внедряют комплексные системы KYC и AML для блокировки нарушающих платежей.
Электронные решения передовых развлекательных порталов основываются на надежных серверах с SSL протоколами. Локальные запреты вынуждает провайдеров внедрять резервные адреса.
Дублирующие ресурсы составляют точные клоны центрального домена с фиксацией всех опций и показателей. Клиенты обеспечивают себе устойчивый вход к средствам, развлекательной статистике и личным опциям.
Платежные операции реализуются через встроенные платежные шлюзы. Ограничения на инвестиции и выводы назначаются в гармонии с лицензионными требованиями и корпоративными правилами риск-менеджмента.
Опытные игроки указывают проверять ситуацию сертификата через регуляторные базы данных азартных органов. Престижные индикаторы содержат позиции на отраслевых сервисах и комментарии подлинных игроков.
Поиск проверенного игрового оператора в современных условиях нуждается особого рассмотрения к регулятивному положению. Опытные клиенты понимают, что Лаки Бир зеркало предоставляет современную факты о работающих сервисах.
Процедура создания аккаунта в официальных операторах включает обязательную проверку документов. KYC-правила оберегают как площадку, так и клиента от обмана. Краткосрочные пределы на снятие активов до выполнения контроля – нормальная подход.
Программные препятствия на подключение к азартным сайтам нейтрализуются через параллельные ссылки. Действующие копии обеспечивают стопроцентную функциональность первичного ресурса. Расчетные операции, интерактивный достижения и поощрительные планы продолжают неизменными.
Денежная гарантированность характеризуется критерием задействованных денежных механизмов. SSL-защита, PCI DSS аттестация и дополнительная верификация обеспечивают прочный контур защиты.
Развлекательная коллекция лицензированных операторов содержит спины от ведущих производителей. RTP-показатели, волатильность и статистические формулы подвергаются независимую сертификацию в признанных учреждениях.
Механизмы вознаграждения в достойных сервисах формируются на четких правилах отыгрыша. Проигрыш x35-40 считается приемлемым для спин-льгот, в то время как карточные состязания идут в счет с уменьшенным множителем.
Новейшие участники встречаются с изобилием системных тонкостей при процессах с официальными ресурсами. Профессиональные платформы типа Лаки Бир регистрация выдают релевантную данные о операциях развлекательных провайдеров.
Алгоритм подтверждения кабинета содержит комплекс обязательных стадий. Начальная валидация требует размещения документов удостоверяющих гражданство. Типовой комплект охватывает документ, автоудостоверение или международный паспорт.
Программная сторона создания аккаунта предполагает применение SSL-шифрования и двухфакторной аутентификации. Квалифицированные пользователи советуют включать совокупность представленных возможностей секьюрити.
Зеркала составляют идентичные дубликаты базового портала с поддержанием тотального набора функций. Основное преимущество кроется в подобии финансовых ограничений и критериев отыгрыша.
Схема выявления актуальных дублирующих порталов опирается на проверке специализированных уведомительных сервисов и союзных порталов. Продвинутые пользователи используют туннельные протоколы для гарантирования надежного подключения независимо от региональных лимитов.
zoloft generic: zoloft generic – sertraline
Актуальные участники обталкиваются с огромным количеством технических деталей при работе с легальными площадками. Специализированные источники типа probeg-ag.ru предоставляют современную материалы о операциях азартных провайдеров.
Алгоритм верификации профиля предполагает ряд неотъемлемых этапов. Исходная аутентификация нуждается передачи документов удостоверяющих персону. Типовой пакет включает документ, лицензию водителя или заграничное удостоверение.
Техническая сторона создания аккаунта содержит применение безопасного соединения и двойной авторизации. Опытные клиенты подсказывают инициировать полный набор предложенных параметров секьюрити.
Зеркала образуют идентичные дубликаты основного портала с поддержанием комплексного набора функций. Основное бонус выражается в тождественности платежных лимитов и параметров ставочных требований.
Процедура выявления рабочих зеркал основывается на отслеживании специализированных уведомительных сервисов и сотрудничающих ресурсов. Экспертные игроки эксплуатируют прокси-соединения для обеспечения бесперебойного входа безотносительно от локальных блокировок.
страница Аккаунты
нажмите, чтобы подробнее aimware dll cs
Why visitors still use to read news papers when in this technological world the whole thing is existing on web?
一帆视频海外华人首选,提供最新华语剧集、美剧、日剧等高清在线观看。
Visit Velvet Vendor 2 – Found via search, everything seems trustworthy and thoughtfully presented.
теплоход с анимацией для взрослых Развлекательная программа на корабле — расписание: у нас найдется занятие для каждого.
SearchSignal knowledge hub – Insights here helped focus my optimization efforts efficiently.
What online casino actually pays out in Australia?
Официальные платформы азартных возможностей гарантируют пользователям вариант к качественному игровому процессу через специализированные порталы, включая Lucky Bear казино , что придерживаются transnational требования защиты.
Механизм активации предполагает заполнения идентификационных сведений через шифрованные SSL-connection. Букмекеры demanded нотариальное удостоверение age verification и места регистрации для поддержания правовых норм.
Двухэтапная идентификация является необходимым компонентом актуальных solutions надёжности. Users имеют SMS-токены, push-сообщения или задействуют dedicated утилиты вроде Google Authenticator.
Альтернативные домены нейтрализуют препятствия локальных ограничений и DDoS-воздействий. Фактически зеркала образуют тождественные dublicates главного платформы с поддержанием возможностей и user деталей.
Skilled игроки предлагают keeping свежие списки working mirrors в избранном browser. Операторы передают информацию о современных ссылках через мейл, Telegram-communities и телефонные приложения.
Payment операции через надёжные порталы обеспечены encryption системами категории банковского области. Вывод денег реализуется единственно на validated карты хозяина профиля.
Новейшие участники натыкаются с проблемой подключения к проверенным ресурсам. Операторы блокируют главные адреса, но искушённые Vavada игроки помнят о доступности дублирующих порталов.
Дополнительный домен составляет полную отображение базового сайта. Системы безопасности сохраняются аналогичными. Финансовые транзакции производятся через сходные шлюзы.
Алгоритм регистрации через резервный ссылку содержит обычной проверки. Сотрудники требуют справки для соблюдения KYC-норм. Идентификационные параметры подвергаются комплексную подтверждение.
Депозитные пределы на резервных порталах совпадают основным параметрам. Начальные суммы поддерживаются постоянными. Увеличивающиеся призовые фонды объединяются между множественными ссылками.
Поощрительные планы оперируют целостно на альтернативных ресурсах. Множитель ставок поддерживает стартовые значения. Временные рамки отыгрыша продолжается.
Сервис поддержки решает заявки с дополнительных ресурсов таким же способом. Интерактивный общение поддерживает непрерывный формат обслуживания.
范德沃克高清完整版采用机器学习个性化推荐,海外华人可免费观看最新热播剧集。
Интересный взгляд на то, как ufc в феврале марте 2026 три недели которые встряхнут дивизионы изменят рынок. Ссылка на статью: https://terehov-event.ru/news/ufc-fevral-mart-2026-neochevidnye-prognozy-i-czepnaya-reakcziya-na-diviziony-chto-mozhet-slomat-plany-promoushena/
Отбор качественного игрового оператора в актуальных границах нуждается детального анализа к законному положению. Знающие клиенты знают, что Килограмм казино содержит современную сведения о доступных ресурсах.
Процесс открытия счета в лицензированных операторах включает требуемую верификацию персональных данных. KYC-нормы защищают как оператора, так и геймера от махинаций. Краткосрочные рамки на получение денег до финализации валидации – типичная процедура.
Технические ограничения на соединение к betting сайтам нейтрализуются через зеркальные ссылки. Действующие дубликаты гарантируют абсолютную возможности основного портала. Финансовые транзакции, азартный статистика и бонусные программы поддерживаются неизменными.
Материальная гарантированность определяется уровнем внедренных расчетных инструментов. SSL-кодирование, PCI DSS аттестация и усиленная аутентификация устанавливают защищенный периметр безопасности.
Геймплейная набор легальных провайдеров предоставляет машины от ведущих студий. RTP-индексы, волатильность и расчетные формулы получают независимую сертификацию в утвержденных организациях.
Планы мотивации в качественных казино основываются на прозрачных условиях отыгрыша. Вейджер x35-40 характеризуется адекватным для спин-поощрений, в то время как карточные активности учитываются в расчет с сниженным процентом.
Новейшие участники встречаются с сложностью соединения к легальным платформам. Поставщики фильтруют стандартные ссылки, но грамотные казино Лев игроки осознают о доступности параллельных порталов.
Параллельный портал представляет полную отображение оригинального ресурса. Системы безопасности работают аналогичными. Денежные процедуры выполняются через аналогичные каналы.
Технология создания аккаунта через зеркальный портал предполагает обычной верификации. Операторы уточняют бумаги для соблюдения KYC-норм. Индивидуальные параметры выполняют двухфакторную подтверждение.
Пополнительные рамки на альтернативных сайтах идентичны основным спецификациям. Низшие вклады сохраняются постоянными. Накопительные джекпоты интегрируются между всеми ресурсами.
Бонусные планы работают завершённо на дополнительных порталах. Коэффициент оборота обеспечивает первоначальные показатели. Длительность оборота не изменяется.
Команда ассистирования анализирует обращения с резервных ссылок аналогично. Интерактивный общение гарантирует постоянный формат работы.
范德沃克高清完整版采用机器学习个性化推荐,海外华人可免费观看最新热播剧集。
电影网站推荐,运用AI智能推荐算法,海外华人专用,运用AI智能推荐算法,支持中英双语界面和全球加速。
I love what you guys are up too. Such clever work and exposure!
Keep up the excellent works guys I’ve added you guys to
blogroll.
Игровая сфера являет интенсивный прогресс, притягивая легионы пользователей. Экспертные площадки предоставляют безопасную среду для развлечений. Детальную материалы о таких операторах можно найти на п»ї1xBet .
Сертификация является ключевым критерием селекции портала. Лицензиаты Олдерни гарантируют жёсткий аудит финансовых действий. Любая официальная площадка реализует периодические контроли RNG-алгоритмов.
IT особенности передовых беттинг-платформ содержат SSL-защиту расчётного стандарта. Производители цифрового софта класса Microgaming, NetEnt, Pragmatic Play добавляют комплексные механизмы произвольных чисел.
Процесс подтверждения личного кабинета требует предоставления свидетельств KYC-типа. Документ, выписка о финансах, удостоверение прописки — базовый список для итогового подключения.
Зеркальные ссылки устраняют сложности с ограничениями поставщиков. Свежие копии модифицируются регулярно цифровыми командами. Портативные программы часто действуют качественнее интернет редакций.
Банкролл-менеджмент устанавливает стратегическую прибыльность развлекательных периодов. Профессиональные игроки предлагают контролировать величину пари до 1-2% от совокупного банкролла.
Нынешние участники обталкиваются с массой программных деталей при операциях с сертифицированными платформами. Профильные порталы типа п»ї1хбет дают новую сведения о процессах развлекательных брендов.
Процесс проверки счета охватывает множество необходимых шагов. Базовая валидация требует отправки свидетельств доказывающих индивидуальность. Обычный комплект предполагает ID, водительские права или загранпаспорт.
Технологическая компонента открытия счета подразумевает использование криптографической защиты и многофакторной защиты. Экспертные геймеры советуют включать все представленных функций обеспечения.
Дублирующие порталы являются идентичные реплики основного платформы с удержанием комплексного инструментария. Основное преимущество выражается в тождественности расчетных пределов и параметров отыгрыша.
Алгоритм нахождения функционирующих запасных доменов основывается на проверке экспертных телеграм-каналов и союзных порталов. Экспертные геймеры эксплуатируют анонимайзеры для формирования постоянного доступа независимо от географических запретов.
范德沃克高清完整版采用机器学习个性化推荐,海外华人可免费观看最新热播剧集。
艾一帆海外版,专为华人打造的高清视频官方认证平台,支持全球加速观看。
我欲为人第二季官方认证平台,专为海外华人设计,24小时不间断提供高清视频和直播服务。
爱一凡海外版,专为华人打造的高清视频官方认证平台,支持全球加速观看。
塔尔萨之王第二季高清完整版,海外华人可免费观看最新热播剧集。
多瑙高清完整版采用机器学习个性化推荐,海外华人可免费观看最新热播剧集。
angels bail bonds Long Beach
5150 E Pacific Coast Hwy #200,
ᒪong Beach, CA 90804, United States
+15623265045
Bookmarks
Рабочие резервные адреса проверенных азартных клубов на Vavada создают устойчивый соединение к развлекательным системам. Принцип зеркалирования образует полноценные версии корневого веб-площадки с удержанием всех инструментов.
Схема регистрации через резервную ссылку целиком копирует базовую заявку. Дебютные участники указывают действующий email, генерируют безопасный секретную комбинацию и устанавливают рабочую валюту.
Идентификация счета подразумевает загрузки бумаг опираясь на KYC-регламенту. Скан национального документа, валидация резиденции и банковские параметры подвергаются машинную контроль в течение 24-72 периодов.
Вход зарегистрированных участников реализуется через обычную модуль с расширенной идентификацией. Разовые пароли передаются на мобильный девайс или e-mail адрес.
Функционал депозитного сектора через зеркала предлагает популярные банковские платформы. Visa, Mastercard, онлайн портмоне Skrill, Neteller, блокчейн-токены Bitcoin, Ethereum реализуются с низкими процентами 0-3%.
Gaming каталог воспроизводится целиком включая барабаны, настольные игры, live-крупье и прогрессивы. RTP-параметры, колебания и проигрыш поддерживаются точными.
Подарочная программа выполняется аналогично базовому ресурсу. Welcome-предложения, даровые прокруты, кешбэк и VIP-схемы стартуют машинально при соблюдении заданных критериев.
Find out more
apply for small loans for bad credit
for extra value.
Проверенные площадки развлекательных возможностей предоставляют участникам право к качественному развлечениям через профильные сайты, включая п»ї1хбет регистрация , которые точно выполняют глобальные критерии конфиденциальности.
Процедура регистрации подразумевает заполнения верификационных информации через безопасные SSL-соединения. Операторы просят предоставить нотариальное свидетельство правоспособности и адреса регистрации для соблюдения правовых требований.
Multi-factor идентификация становится обязательным элементом современных архитектур надёжности. Участники имеют SMS-токены, push-алерты или внедряют dedicated приложения по типу Google Authenticator.
Дублирующие ссылки ликвидируют трудности региональных санкций и DDoS-assault. По сути реплики представляют идентичные реплики основного ресурса с сохранением features и личных данных.
Компетентные пользователи призывают поддерживать свежие реестры действующих копий в избранном веб-клиента. Операторы доставляют сведения о свежих порталах через электронную почту, Telegram-чаты и смартфонные программы.
Payment процедуры через лицензионные платформы покрыты encryption methods level банковского сектора. Extraction средств производится единственно на validated реквизиты обладателя учётной записи.
Отбор проверенного развлекательного портала в современных рамках нуждается детального анализа к юридическому положению. Квалифицированные геймеры осознают, что казино лова содержит последнюю сведения о функционирующих сервисах.
Алгоритм оформления профиля в проверенных сервисах предусматривает требуемую верификацию персональных данных. KYC-процедуры гарантируют как заведение, так и клиента от мошенничества. Кратковременные границы на изъятие активов до финализации верификации – типичная подход.
Технические барьеры на доступ к игровым площадкам устраняются через резервные ссылки. Активные копии обеспечивают тотальную возможности основного сайта. Финансовые транзакции, азартный продвижение и льготные схемы поддерживаются неизменными.
Материальная стабильность измеряется уровнем задействованных платежных систем. SSL-защита, PCI DSS валидация и многоуровневая проверка гарантируют безопасный периметр ограждения.
Игровая каталог официальных площадок включает машины от топовых производителей. RTP-параметры, изменчивость и алгоритмические схемы проходят объективную аудит в авторизованных учреждениях.
Программы вознаграждения в качественных казино основываются на открытых параметрах активности. Условия ставок x35-40 считается справедливым для спин-привилегий, в то время как традиционные развлечения идут в подсчет с редуцированным процентом.
Современные игроки обталкиваются с набором системных аспектов при деятельности с проверенными площадками. Профессиональные сайты типа winity casino поставляют современную сведения о процессах развлекательных организаций.
Алгоритм аутентификации учетной записи охватывает комплекс необходимых уровней. Исходная подтверждение требует загрузки справок верифицирующих индивидуальность. Стандартный комплект включает удостоверение личности, лицензию водителя или международный паспорт.
Системная сторона записления содержит внедрение зашифрованного канала и двухфакторной аутентификации. Продвинутые игроки настаивают задействовать весь комплекс имеющихся функций обеспечения.
Запасные домены являются точные клоны центрального платформы с хранением полного возможностей. Ключевое выгода кроется в схожести банковских пределов и критериев отыгрыша.
Схема поиска действующих альтернативных адресов фундируется на контроле профильных телеграм-каналов и связанных порталов. Профессиональные клиенты задействуют виртуальные частные сети для гарантирования стабильного соединения безотносительно от местных блокировок.
Wish Wharf Store – Discovered this today, and I like how neat and organized everything feels.
Wellness Ward Online – Pages load quickly and the layout feels minimal and clear.
Рабочие mirror-ссылки лицензированных gaming-операторов на Лаки Бир зеркало обеспечивают постоянный коннект к гемблинг сервисам. Принцип копирования создает полноценные версии основного ресурса с консервацией всех функций.
Процедура создания аккаунта через зеркало целиком копирует стандартную бланк. Новые участники вводят валидный email, создают стойкий шифр и выбирают рабочую финансовый инструмент.
Подтверждение аккаунта подразумевает представления бумаг по KYC-стандартам. Фото паспорта, верификация регистрации и карточные данные проверяются через машинную проверку в течение 24-72 временных единиц.
Логин верифицированных клиентов производится через типовую форму с 2FA идентификацией. Сессионные коды поступают на мобильный устройство или мейл.
Механизмы пополнительного компонента через дублирующие порталы обеспечивает актуальные банковские сервисы. Visa, Mastercard, виртуальные балансы Skrill, Neteller, цифровые активы Bitcoin, Ethereum реализуются с низкими комиссиями 0-3%.
Развлекательная каталог дублируется абсолютно включая барабаны, настольные активности, live-крупье и накопительные призы. RTP-коэффициенты, вариативность и отыгрыш удерживаются неизменными.
Промо система действует идентично центральному веб-площадке. Welcome-наборы, безвозмездные спины, кешбэк и VIP-программы запускаются автоматически при реализации фиксированных требований.
Рабочие зеркала надежных gaming-операторов на Меллстрой казино дают стабильный соединение к азартным платформам. Принцип дублирования формирует полноценные дубликаты базового домена с поддержанием всех инструментов.
Схема открытия счета через mirror-сайт абсолютно копирует главную анкету. Свежие клиенты заполняют рабочий email, формируют защищенный код доступа и назначают игровую валюту.
Идентификация личного кабинета включает отправки свидетельств следуя KYC-требованиям. Фото паспорта, подтверждение адреса и финансовые параметры проходят алгоритмическую верификацию в течение 24-72 часа.
Логин активных геймеров реализуется через обычную модуль с усиленной верификацией. Одноразовые шифры поступают на смс гаджет или мейл.
Опции пополнительного модуля через резервные ссылки предлагает распространенные банковские системы. Visa, Mastercard, онлайн счета Skrill, Neteller, crypto Bitcoin, Ethereum обрабатываются с оптимизированными комиссиями 0-3%.
Развлекательная библиотека дублируется полностью включая машины, карточные игры, live-дилеров и мегавыигрыши. RTP-индикаторы, волатильность и проигрыш остаются такими же.
Подарочная политика работает похоже базовому порталу. Welcome-комплекты, бесплатные вращения, возврат средств и VIP-планы включаются алгоритмически при выполнении определенных параметров.
Print Parlor Online – Easy-to-use navigation and clear product displays make browsing smooth.
FormulaFoundry Online Store – Easy-to-navigate sections and well-described products make the experience simple.
超人和露易斯第二季高清完整官方版,海外华人可免费观看最新热播剧集。
Исследование в сфере лицензированных площадок требует осознания актуальных инструментов соединения. Умелые участники внедряют Клубника казино для приобретения релевантной сведений о активных доменах.
Алгоритм открытия счета в надежных компаниях предполагает сложную подтверждение. Актуальные провайдеры внедряют KYC-процедуры и AML-правила. Оформление документов требует от 24 до 72 временных отрезков.
Компьютерные методы для прохождения ограничений совершенствуются сообща с усилением нормативных действий. VPN-инструменты категории premium обеспечивают кодирование AES-256 и протоколы OpenVPN. Постоянство соединения жизненно существенна для VIP партий.
Дублирующие адреса выполняют задачи через территориально рассредоточенные технические системы. CDN-системы обеспечивают низкую время ответа для европейских игроков. Системное перенаправление включается при распознавании барьера первичного адреса.
Платежные переводы в сертифицированных территориях следуют конкретным критериям PCI DSS. Крипто платежи увеличивают признание по причине анонимности и оперативности реализации.
Планшетные приложения элитных операторов включают физиологическую подтверждение и push-извещения для важных происшествий. Адаптивный внешний вид автоматически подстраивается под характеристики монитора.
Действующие резервные адреса лицензированных казино на СЂР° РІС…РѕРґ дают устойчивый соединение к гемблинг порталам. Принцип зеркалирования формирует эквивалентные дубликаты главного домена с поддержанием всех механизмов.
Механизм создания аккаунта через mirror-сайт целиком повторяет основную анкету. Новые пользователи заполняют действующий email, придумывают стойкий код доступа и назначают операционную валюту.
Верификация учетной записи подразумевает представления справок по KYC-требованиям. Фото водительских прав, подтверждение адреса и карточные данные проверяются через автоматическую контроль в течение 24-72 ч.
Вход действующих пользователей реализуется через типовую интерфейс с многоступенчатой идентификацией. Сессионные токены доставляются на смс устройство или email.
Механизмы входящего компонента через резервные ссылки обеспечивает актуальные банковские сервисы. Visa, Mastercard, цифровые хранилища Skrill, Neteller, виртуальные монеты Bitcoin, Ethereum реализуются с низкими взносами 0-3%.
Gaming библиотека повторяется на сто процентов включая spinning games, карточные игры, live-ведущих и мегавыигрыши. RTP-коэффициенты, изменчивость и отыгрыш фиксируются неизменными.
Промо система выполняется идентично главному сайту. Welcome-пакеты, бесплатные вращения, возврат средств и VIP-системы инициируются системно при исполнении фиксированных критериев.
Актуальные геймеры встречаются с барьером подключения к сертифицированным платформам. Компании закрывают базовые адреса, но искушённые Вавада казино пользователи учитывают о наличии резервных площадок.
Зеркало формирует точную воспроизведение оригинального портала. Системы безопасности сохраняются аналогичными. Платёжные процедуры производятся через идентичные механизмы.
Методика заведения учётной записи через параллельный портал требует классической аутентификации. Администраторы выясняют свидетельства для исполнения KYC-норм. Личные данные выполняют многоуровневую подтверждение.
Банковские границы на альтернативных площадках совпадают базовым характеристикам. Начальные взносы остаются константными. Увеличивающиеся накопления координируются между многочисленными адресами.
Поощрительные механизмы выполняются всесторонне на параллельных сайтах. Коэффициент оборота удерживает исходные значения. Временные рамки проигрывания остаётся прежним.
Сервис обслуживания рассматривает заявки с резервных ресурсов равнозначно. Онлайн переписка обеспечивает 24-часовой порядок работы.
Ориентирование в сфере легальных площадок требует владения продвинутых технологий подключения. Квалифицированные клиенты используют казино Лаки Бир для получения свежей материалов о активных URL.
Механизм создания учетной записи в сертифицированных организациях содержит сложную валидацию. Актуальные поставщики используют KYC-механизмы и AML-критерии. Бумажная работа требует от 24 до 72 интервалов.
Цифровые методы для обхода препятствий прогрессируют одновременно с ужесточением юридических инициатив. VPN-решения типа premium дают защиту AES-256 и протоколы OpenVPN. Непрерывность соединения кардинально значима для привилегированных заходов.
Зеркальные платформы действуют через территориально рассредоточенные цифровые системы. CDN-системы гарантируют низкую время ответа для американских пользователей. Цифровое роутинг запускается при детекции барьера первичного ресурса.
Финансовые операции в лицензированных территориях следуют строгим требованиям PCI DSS. Блокчейн расчеты увеличивают востребованность в результате скрытности и быстроте процессинга.
Смартфонные приложения лучших организаций совмещают голосовую аутентификацию и push-оповещения для существенных происшествий. Настраиваемый интерфейс самостоятельно корректируется под характеристики матрицы.
超人和露易斯第二季高清完整版结合大数据AI分析,海外华人可免费观看最新热播剧集。
官方授权的iyftv海外华人首选,第一时间提供最新华语剧集、美剧、日剧等高清在线观看。
You made your point! https://pad.geolab.space/s/fpQQte2pb
愛海外版,專為華人打造的高清視頻平台,支持全球加速觀看。
爱一番海外版,专为华人打造的高清视频平台AI深度学习内容匹配,支持全球加速观看。
Актуальные пользователи имеют дело с набором технологических аспектов при процессах с сертифицированными сайтами. Специализированные сайты типа п»ї1xBet зеркало выдают современную данные о деятельности игорных брендов.
Система верификации профиля содержит несколько неотъемлемых стадий. Первичная подтверждение нуждается предоставления удостоверений валидирующих субъект. Обычный перечень предполагает документ, автоудостоверение или международное ID.
Цифровая часть оформления содержит задействование безопасного соединения и двухфакторной аутентификации. Продвинутые пользователи советуют запускать весь комплекс предложенных функций охраны.
Резервные ссылки составляют стопроцентные дубликаты центрального портала с обеспечением всего инструментария. Главное выгода заключается в тождественности банковских границ и критериев отыгрыша.
Процедура нахождения активных дублирующих порталов строится на контроле профессиональных телеграм-каналов и партнерских платформ. Опытные игроки эксплуатируют туннельные протоколы для формирования надежного доступа вне зависимости от региональных ограничений.
Нынешние бетторы попадают с сложностью подключения к сертифицированным порталам. Провайдеры фильтруют базовые URL, но профессиональные казино Lucky Bear посетители знают о присутствии зеркальных сайтов.
Резервная ссылка является идентичную реплику главного портала. Средства защиты поддерживаются равнозначными. Денежные переводы производятся через те же шлюзы.
Схема открытия счёта через параллельный адрес содержит обычной верификации. Администраторы уточняют справки для осуществления KYC-норм. Персональные сведения выполняют двухфакторную проверку.
Пополнительные рамки на альтернативных платформах равняются главным условиям. Стартовые беты функционируют постоянными. Растущие призовые фонды объединяются между многочисленными порталами.
Стимулирующие планы функционируют всесторонне на параллельных платформах. Вейджер гарантирует стартовые показатели. Срок активности проигрывания остаётся прежним.
Отдел поддержки анализирует обращения с параллельных порталов аналогично. Онлайн общение поддерживает постоянный порядок деятельности.
愛海外版,专为华人打造的高清视频官方认证平台,支持全球加速观看。
https://ivertherapeutics.shop/# ivermectin 500mg
Поиск проверенного игорного портала предполагает серьезного анализа юридических сертификатов. Передовые сайты СЌРЅРѕРјРѕ РІС…РѕРґ гарантируют участникам стопроцентную сведения о своих лицензиях.
Алгоритм оформления счета подразумевает определенное количество требуемых ступеней аутентификации. Администраторы истребуют справки, подтверждающие индивидуальность и правоспособность. Типовой KYC-порядок длится от 24 до 72 интервалов.
Контроль средств инициируется с установления лимитов на взносы. Искусные пользователи советуют внедрять закон 5% от совокупного игорного капитала на отдельную партию.
Технические препятствия поставщиков вынуждают задействовать вспомогательные адреса. Альтернативы удерживают абсолютную производительность первичного портала, содержа историю переводов и игровой результаты.
Актуальные платежные методы гарантируют моментальные инвестиции через виртуальные счета. Bitcoin, Ethereum и устойчивые монеты гарантируют тайность и мизерные комиссии. Срок выполнения изъятий равно 10-30 интервалов.
Схемы верности содержат ступенчатые уровни с увеличивающимся компенсацией. VIP-координаторы предлагают индивидуальные подарки, расширенные лимиты и преимущественную поддержку.
Отбор надежного азартного площадки нуждается глубокого разбора лицензионных документов. Передовые сайты казино типпи гарантируют участникам безусловную детали о имеющихся разрешениях.
Система оформления счета содержит множество принудительных этапов валидации. Операторы требуют свидетельства, удостоверяющие самобытность и дееспособность. Стандартный KYC-процесс требует от 24 до 72 временных отрезков.
Банкролл-менеджмент начинается с назначения ограничений на вклады. Квалифицированные участники рекомендуют применять принцип 5% от общего казино резерва на одну сессию.
Системные препятствия владельцев побуждают задействовать вспомогательные ссылки. Клоны сохраняют абсолютную эффективность основного платформы, подразумевая историю транзакций и азартный успех.
Актуальные платежные системы обеспечивают мгновенные взносы через криптовалютные счета. Bitcoin, Ethereum и стейблкоины гарантируют скрытность и крошечные взносы. Срок осуществления изъятий достигает 10-30 интервалов.
Алгоритмы постоянства включают градационные категории с возрастающим компенсацией. VIP-представители гарантируют индивидуальные подарки, повышенные лимиты и первоочередную помощь.
塔尔萨之王第二季高清完整版智能AI观看体验优化,海外华人可免费观看最新热播剧集。
海外华人必备的ify平台运用AI智能推荐算法,提供最新高清电影、电视剧,无广告观看体验。
three panel hub – Everything looks simple and well organized.
捕风捉影在线免费在线观看,海外华人专属官方认证平台,高清无广告体验。
Ultimate server deals – Everything runs flawlessly and the experience has been excellent so far.
Перемещение в сфере сертифицированных сайтов предполагает владения актуальных методов доступа. Умелые участники внедряют п»ї1хбет регистрация для извлечения новейшей сведений о оперативных URL.
Процедура открытия аккаунта в сертифицированных организациях предполагает тщательную верификацию. Продвинутые поставщики эксплуатируют KYC-системы и AML-требования. Оформление документов требует от 24 до 72 интервалов.
Компьютерные методы для избежания барьеров прогрессируют одновременно с ужесточением регуляторных шагов. VPN-службы разряда premium предоставляют криптографию AES-256 и методы OpenVPN. Стабильность коннекта кардинально актуальна для высокоролловых раундов.
Зеркальные адреса работают через географически расположенные технические ресурсы. CDN-системы предоставляют низкую задержку для азиатских пользователей. Цифровое редирект запускается при выявлении недоступности главного портала.
Экономические транзакции в лицензированных юрисдикциях отвечают строгим нормам PCI DSS. Крипто переводы получают востребованность по причине скрытности и темпу обработки.
Переносные утилиты премиальных организаций содержат биометрическую авторизацию и push-уведомления для ключевых эпизодов. Модифицируемый облик самостоятельно настраивается под особенности панели.
Social Signal store – I’m genuinely impressed by how sleek and seamless everything feels.
Определение проверенного гемблинг ресурса в актуальных обстоятельствах требует специального внимания к лицензионному статусу. Профессиональные клиенты представляют, что Меллстрой официальный сайт предоставляет свежую информацию о действующих площадках.
Алгоритм оформления профиля в лицензированных сервисах охватывает обязательную валидацию документов. KYC-правила охраняют как площадку, так и игрока от фрода. Временные пределы на вывод средств до закрытия контроля – стандартная процедура.
Виртуальные барьеры на подключение к betting ресурсам решаются через параллельные URL. Активные отражения сохраняют всестороннюю производительность центрального платформы. Расчетные переводы, развлекательный результаты и льготные предложения функционируют константными.
Экономическая стабильность характеризуется уровнем применяемых денежных методов. SSL-кодирование, PCI DSS сертификация и усиленная верификация гарантируют безопасный контур безопасности.
Развлекательная коллекция легальных провайдеров охватывает автоматы от известных студий. RTP-показатели, вариативность и математические модели получают объективную сертификацию в утвержденных центрах.
Схемы мотивации в надежных казино базируются на четких требованиях проигрыша. Проигрыш x35-40 считается адекватным для барабан-привилегий, в то время как настольные развлечения включаются в расчет с минимальным фактором.
Is online gambling legal in Australia 2025? – full breakdown
virtual health tools outlet – I’ll come back shortly to browse additional options.
buy stromectol online: buy stromectol canada – ivermectin buy australia
Навигация в сфере сертифицированных платформ предполагает знания новых способов доступа. Квалифицированные геймеры внедряют Рльдорадо сайт для получения свежей данных о работающих URL.
Механизм оформления счета в сертифицированных операторах содержит многоуровневую валидацию. Передовые провайдеры задействуют KYC-процедуры и AML-нормы. Документооборот отнимает от 24 до 72 часов.
Цифровые технологии для избежания препятствий совершенствуются параллельно с повышением правовых шагов. VPN-инструменты типа premium обеспечивают шифрование AES-256 и методы OpenVPN. Стабильность канала критически актуальна для премиальных раундов.
Запасные сайты работают через географически рассредоточенные цифровые инфраструктуры. CDN-комплексы обеспечивают низкую время ответа для американских геймеров. Цифровое перенаправление запускается при распознавании блокировки центрального адреса.
Финансовые транзакции в проверенных областях подчиняются определенным стандартам PCI DSS. Крипто операции завоевывают востребованность из-за анонимности и скорости осуществления.
Мобильные приложения лучших организаций интегрируют биометрическую проверку и push-оповещения для существенных происшествий. Модифицируемый оформление самостоятельно адаптируется под параметры панели.
Инновационные порталы игорных игр предлагают пользователям доступ к качественному гемблингу через проверенные Меллстрой системы. Легальная бизнес подразумевает следования жестких надзорных норм.
Процедура оформления пользовательского аккаунта задействует подтверждение личных реквизитов. Администраторы внедряют расширенные алгоритмы KYC и AML для недопущения мошеннических переводов.
Программные платформы передовых игорных домов базируются на стабильных дата-центрах с криптографическими сертификатами. IP-фильтрация вынуждает провайдеров организовывать резервные ссылки.
Альтернативные домены формируют полные копии основного сайта с удержанием всех сервисов и показателей. Пользователи получают устойчивый подключение к депозиту, азартной данным и личным параметрам.
Банковские переводы выполняются через связанные платежные системы. Лимиты на депозиты и изъятия регулируются в согласии с нормативными стандартами и корпоративными нормами минимизации опасностей.
Компетентные клиенты советуют анализировать условия сертификата через государственные реестры развлекательных органов. Престижные характеристики задействуют рейтинги на специализированных сервисах и мнения настоящих беттеров.
Is Crown Casino online legit? – Australian players guide
Рабочие mirror-ссылки лицензированных гемблинг-платформ на Lucky Bear дают непрерывный вход к игровым ресурсам. Принцип клонирования создает эквивалентные дубликаты главного домена с консервацией всех инструментов.
Механизм создания аккаунта через дублирующий портал абсолютно дублирует базовую заявку. Свежие клиенты вводят функционирующий email, генерируют безопасный секретную комбинацию и фиксируют игровую платежное средство.
Валидация профиля требует предоставления удостоверений согласно KYC-стандартам. Копия паспорта, подтверждение адреса и денежные сведения контролируются системой машинную анализ в течение 24-72 временных единиц.
Вход активных геймеров осуществляется через типовую модуль с двухфакторной аутентификацией. Временные коды отправляются на мессенджер девайс или электронную почту.
Инструменты денежного блока через резервные ссылки обеспечивает популярные расчетные сервисы. Visa, Mastercard, веб счета Skrill, Neteller, криптовалюты Bitcoin, Ethereum процессируются с сокращенными комиссиями 0-3%.
Гемблинг каталог копируется абсолютно включая слоты, настольные геймплей, live-крупье и максимальные награды. RTP-параметры, дисперсия и вейджер сохраняются идентичными.
Акционная политика работает подобно основному ресурсу. Welcome-комплекты, бесплатные вращения, refund и VIP-курсы включаются системно при достижении установленных стандартов.
Навигация в пространстве проверенных площадок нуждается осознания актуальных технологий соединения. Квалифицированные клиенты используют лаки ворлд зеркало для добывания актуальной данных о активных URL.
Механизм регистрации счета в надежных заведениях содержит сложную подтверждение. Актуальные организации применяют KYC-процедуры и AML-стандарты. Оформление документов отнимает от 24 до 72 временных отрезков.
Программные технологии для обхода препятствий совершенствуются сообща с повышением юридических решений. VPN-сервисы разряда premium предлагают безопасность AES-256 и протоколы OpenVPN. Устойчивость связи жизненно необходима для премиальных раундов.
Резервные платформы работают через локально размещенные серверные кластеры. CDN-архитектуры предоставляют быструю время ответа для американских участников. Техническое роутинг запускается при распознавании барьера основного адреса.
Экономические операции в проверенных зонах отвечают жестким критериям PCI DSS. Децентрализованные платежи получают распространение из-за приватности и скорости выполнения.
Мобильные клиенты элитных брендов объединяют голосовую авторизацию и push-алерты для принципиальных эпизодов. Адаптивный интерфейс независимо адаптируется под свойства монитора.
mystery archive store – The articles are captivating and finding content is effortless.
海外华人必备的aiyifan平台采用机器学习个性化推荐,提供最新高清电影、电视剧,无广告观看体验。
Подбор безопасного казино площадки предполагает детального разбора юридических документов. Актуальные платформы казино Mellstroy Game предлагают игрокам максимальную сведения о своих лицензиях.
Система открытия аккаунта включает различные требуемых шагов верификации. Провайдеры истребуют удостоверения, засвидетельствующие идентичность и совершеннолетие. Классический KYC-механизм продолжается от 24 до 72 периодов.
Банкролл-менеджмент инициируется с фиксации границ на пополнения. Искусные клиенты советуют задействовать норму 5% от совокупного игорного капитала на одну партию.
Системные препятствия провайдеров обязывают применять альтернативные домены. Копии поддерживают безусловную производительность основного ресурса, включая журнал операций и азартный результаты.
Инновационные расчетные сервисы обеспечивают мгновенные вклады через виртуальные счета. Bitcoin, Ethereum и стабильные валюты предоставляют анонимность и наименьшие взносы. Время проведения снятий достигает 10-30 минут.
Схемы верности содержат иерархические ранги с возрастающим бонусом. VIP-кураторы предлагают персонализированные бонусы, усиленные лимиты и опережающую помощь.
Современные платформы развлекательных продуктов обеспечивают игрокам путь к премиальному беттингу через защищенные п»ї1хбет казино ресурсы. Легальная операционная активность влечет исполнения строгих регуляторных требований.
Алгоритм открытия пользовательского аккаунта охватывает аутентификацию приватных показателей. Операторы эксплуатируют комплексные системы KYC и AML для блокировки мошеннических финансовых действий.
Программные инструменты новейших развлекательных порталов строятся на безопасных облачных системах с криптографическими алгоритмами. Геоблокировка принуждает операторов внедрять альтернативные домены.
Дублирующие порталы представляют эквивалентные репликации основного ресурса с поддержанием всех возможностей и параметров. Клиенты добиваются стабильный подключение к счету, гемблинг истории и пользовательским опциям.
Финансовые транзакции осуществляются через связанные банковские сервисы. Лимиты на вклады и изъятия назначаются в гармонии с правовыми условиями и корпоративными процедурами управления рисками.
Компетентные беттеры предлагают проверять статус сертификата через регуляторные регистры гемблинг комиссий. Авторитетные критерии задействуют рейтинги на профильных сайтах и мнения реальных клиентов.
RevenueHarbor platform – Found guidance that supported steady financial progress on the web.
Выбор проверенного гемблинг портала заставляет серьезного рассмотрения лицензионных бумаг. Инновационные порталы https://zelenovskoe.ru/ru-ru/ предлагают игрокам полную факты о собственных аккредитациях.
Процесс оформления счета включает несколько принудительных фаз подтверждения. Операторы просят справки, засвидетельствующие индивидуальность и правоспособность. Типовой KYC-регламент составляет от 24 до 72 часов.
Распоряжение капиталом стартует с задания границ на вклады. Искусные геймеры предлагают внедрять установку 5% от совокупного игорного капитала на конкретную игру.
Технические ограничения поставщиков заставляют внедрять резервные пути. Копии оберегают максимальную эффективность первичного ресурса, содержа летопись переводов и развлекательный прогресс.
Передовые финансовые инструменты гарантируют мгновенные взносы через виртуальные кошельки. Bitcoin, Ethereum и фиксированные активы дают анонимность и наименьшие отчисления. Продолжительность проведения изъятий доходит 10-30 промежутков.
Планы преданности предусматривают многоуровневые статусы с возрастающим вознаграждением. VIP-представители гарантируют уникальные бонусы, улучшенные рамки и опережающую сервис.
Передовые порталы игорных активностей обеспечивают игрокам возможность к элитному развлечениям через проверенные лакибир казино платформы. Авторизованная операционная активность влечет выполнения четких контролирующих положений.
Процесс регистрации персонального счета включает проверку личных реквизитов. Регуляторы используют многоуровневые системы KYC и AML для пресечения незаконных транзакций.
Цифровые средства актуальных казино работают на надежных облачных системах с криптографическими сертификатами. Геоблокировка вынуждает управляющих запускать альтернативные домены.
Альтернативные домены представляют эквивалентные клоны базового платформы с удержанием всех сервисов и данных. Клиенты обеспечивают себе постоянный вход к капиталу, развлекательной статистике и индивидуальным опциям.
Финансовые процедуры производятся через синхронизированные денежные шлюзы. Границы на депозиты и выводы определяются в унисон с правовыми стандартами и внутренними правилами риск-менеджмента.
Профессиональные пользователи рекомендуют анализировать положение сертификата через контролирующие каталоги игорных структур. Имиджевые индикаторы включают оценки на профильных ресурсах и feedback реальных участников.
Перемещение в пространстве лицензированных платформ включает осознания передовых решений авторизации. Умелые клиенты эксплуатируют Лаки Бир сайт для добывания актуальной сведений о оперативных URL.
Процесс формирования аккаунта в надежных учреждениях охватывает сложную валидацию. Актуальные компании используют KYC-системы и AML-критерии. Документальная процедура потребляет от 24 до 72 часов.
IT технологии для обхода блокировок совершенствуются параллельно с усилением юридических шагов. VPN-решения категории premium предлагают защиту AES-256 и методы OpenVPN. Стабильность подключения принципиально важна для высокоролловых заходов.
Дублирующие платформы оперируют через регионально рассредоточенные компьютерные ресурсы. CDN-системы поддерживают низкую задержку для международных игроков. Системное перенаправление срабатывает при идентификации препятствия базового сайта.
Финансовые движения в проверенных зонах подпадают под конкретным критериям PCI DSS. Блокчейн расчеты получают распространение из-за приватности и динамике выполнения.
Планшетные утилиты топовых операторов включают лицевую идентификацию и push-извещения для принципиальных ситуаций. Изменяемый облик программно изменяется под особенности дисплея.
Современные пользователи имеют дело с массой программных деталей при операциях с официальными площадками. Тематические источники типа Меллстрой сайт дают свежую данные о операциях игорных операторов.
Система проверки счета подразумевает набор неотъемлемых уровней. Стартовая проверка включает загрузки свидетельств подтверждающих субъект. Обычный комплект включает паспорт, водительские права или загранпаспорт.
Технологическая часть записления предполагает применение безопасного соединения и двухфакторной аутентификации. Опытные геймеры советуют инициировать полный набор представленных опций защиты.
Резервные ссылки составляют полные дубликаты главного домена с обеспечением полного арсенала. Центральное преимущество заключается в тождественности финансовых ограничений и параметров условий прокрутки.
Система поиска функционирующих альтернативных адресов фундируется на наблюдении специализированных уведомительных сервисов и союзных сайтов. Продвинутые участники задействуют VPN-сервисы для гарантирования надежного доступа безотносительно от географических барьеров.
一帆平台,专为海外华人设计,提供高清视频和直播服务。
www canadianonlinepharmacy: legitimate mexican pharmacy online – Smart GenRx USA
电影网站推荐,海外华人专用,支持中英双语界面和全球加速。
Digital Buying Experience Store – Interactive touch with a clean look, perfect for learning and inspiration.
Нынешние бетторы встречаются с проблемой подключения к лицензированным сайтам. Операторы блокируют главные порталы, но профессиональные Лаки Бир официальный сайт участники помнят о доступности параллельных ресурсов.
Параллельный портал образует точную копию главного портала. Криптографические алгоритмы функционируют неизменными. Финансовые процедуры выполняются через идентичные сервисы.
Алгоритм регистрации через альтернативный портал включает обычной проверки. Сотрудники выясняют свидетельства для соблюдения KYC-правил. Персональные характеристики выполняют двухфакторную верификацию.
Финансовые пределы на резервных сайтах равняются основным спецификациям. Наименьшие вклады функционируют неизменными. Прогрессивные банки согласовываются между множественными адресами.
Премиальные системы функционируют комплексно на зеркальных платформах. Вейджер гарантирует базовые значения. Период действия отыгрыша поддерживается.
Департамент помощи решает заявки с зеркальных адресов сходным образом. Мгновенный переписка осуществляет 24-часовой формат обслуживания.
Новейшие провайдеры беттинг развлечений дают пользователям путь к качественному азарту через проверенные Меллстрой зеркало порталы. Лицензированная операционная активность подразумевает выполнения конкретных надзорных положений.
Алгоритм открытия клиентского счета задействует аутентификацию индивидуальных данных. Операторы эксплуатируют детализированные алгоритмы KYC и AML для недопущения нарушающих операций.
IT платформы инновационных игорных домов работают на надежных хостингах с SSL стандартами. Региональная блокировка обязывает управляющих внедрять резервные ссылки.
Резервные ресурсы являют собой полные версии первичного ресурса с поддержанием всех функций и сведений. Беттеры достигают беспрепятственный вход к балансу, азартной данным и личным параметрам.
Платежные процедуры проходят через синхронизированные банковские системы. Лимиты на вклады и изъятия устанавливаются в соответствии с правовыми положениями и собственными политиками минимизации опасностей.
Квалифицированные беттеры предлагают анализировать ситуацию сертификата через контролирующие каталоги гемблинг организаций. Репутационные характеристики предусматривают места на отраслевых сервисах и feedback действительных пользователей.
Подбор проверенного игрового портала в современных реалиях заставляет особого рассмотрения к лицензионному статусу. Компетентные клиенты осознают, что лаки Р±РёСЂ казино предоставляет свежую данные о функционирующих провайдерах.
Механизм открытия счета в лицензированных площадках включает требуемую валидацию личности. KYC-стандарты гарантируют как площадку, так и игрока от обмана. Кратковременные лимиты на получение денег до окончания контроля – типичная практика.
Программные барьеры на вход к betting площадкам нейтрализуются через параллельные ссылки. Функционирующие отражения предоставляют всестороннюю работоспособность основного сервиса. Расчетные операции, азартный результаты и наградные схемы функционируют устойчивыми.
Материальная стабильность характеризуется качеством внедренных платежных методов. SSL-безопасность, PCI DSS лицензирование и расширенная идентификация обеспечивают стабильный заслон ограждения.
Азартная каталог лицензированных заведений включает спины от топовых производителей. RTP-показатели, колебания и вероятностные модели претерпевают внешнюю валидацию в одобренных лабораториях.
Механизмы поощрения в профессиональных площадках формируются на открытых критериях активности. Проигрыш x35-40 расценивается приемлемым для барабан-привилегий, в то время как традиционные забавы принимаются в калькуляцию с минимальным множителем.
凯伦皮里第一季高清完整官方版,海外华人可免费观看最新热播剧集。
Подбор честного игорного оператора подразумевает глубокого разбора официальных документов. Актуальные порталы Гризли казино гарантируют пользователям стопроцентную факты о своих допусках.
Система регистрации включает множество обязательных шагов верификации. Представители настаивают свидетельства, доказывающие личность и возраст. Типовой KYC-алгоритм продолжается от 24 до 72 периодов.
Финансовое планирование начинается с фиксации границ на взносы. Профессиональные пользователи рекомендуют задействовать установку 5% от суммарного казино бюджета на единичную заход.
Системные ограничения поставщиков вынуждают использовать дополнительные пути. Копии удерживают стопроцентную эффективность главного платформы, подразумевая летопись сделок и развлекательный успех.
Передовые банковские системы предоставляют моментальные взносы через цифровые портмоне. Bitcoin, Ethereum и стейблкоины дают приватность и символические сборы. Период выполнения получений составляет 10-30 отрезков.
Программы верности охватывают многоуровневые статусы с прогрессивным кэшбэком. VIP-координаторы обеспечивают уникальные награды, усиленные пределы и первоочередную сервис.
Это одно из лучших онлайн-казино.
https://minilink.pro/1i48C
For predictions
best bonus online gambling sites
to plan ahead.
Digital Buying Hub – Well-organized and interactive, perfect for discovering and creating fresh thoughts.
Поиск честного азартного заведения требует серьезного анализа официальных свидетельств. Передовые платформы Лаки Бир казино дают игрокам безусловную детали о собственных разрешениях.
Система регистрации подразумевает ряд необходимых шагов верификации. Провайдеры настаивают документы, засвидетельствующие самобытность и дееспособность. Обычный KYC-механизм продолжается от 24 до 72 временных отрезков.
Управление банком запускается с назначения ограничений на инвестиции. Компетентные участники предлагают использовать норму 5% от общего гемблинг резерва на одну заход.
Технические ограничения операторов побуждают применять дополнительные пути. Альтернативы удерживают безусловную работоспособность первичного платформы, предусматривая архив операций и гемблинг продвижение.
Инновационные банковские методы дают быстрые взносы через криптовалютные кошельки. Bitcoin, Ethereum и устойчивые монеты дают конфиденциальность и наименьшие сборы. Время проведения изъятий достигает 10-30 периодов.
Алгоритмы верности предусматривают градационные степени с возрастающим компенсацией. VIP-кураторы дают эксклюзивные подарки, улучшенные ограничения и приоритетную помощь.
Актуальные бетторы встречаются с проблемой подключения к проверенным сайтам. Провайдеры закрывают первичные домены, но профессиональные п»ї1хбет сайт посетители понимают о доступности резервных платформ.
Параллельный портал представляет полную воспроизведение главного портала. Системы безопасности остаются неизменными. Расчётные действия выполняются через те же шлюзы.
Процедура оформления профиля через резервный ресурс предполагает обычной верификации. Сотрудники просят свидетельства для осуществления KYC-правил. Идентификационные характеристики осуществляют комплексную подтверждение.
Пополнительные границы на параллельных ресурсах аналогичны главным требованиям. Начальные вклады продолжают постоянными. Увеличивающиеся банки согласовываются между разными доменами.
Поощрительные схемы функционируют всесторонне на дополнительных платформах. Множитель ставок удерживает исходные значения. Тайминг использования продолжается.
Отдел поддержки обрабатывает запросы с параллельных ресурсов аналогично. Онлайн разговор осуществляет 24-часовой график оперирования.
一帆视频海外华人首选,采用机器学习个性化推荐,提供最新华语剧集、美剧、日剧等高清在线观看。
愛壹帆海外版,专为华人打造的高清视频平台,支持全球加速观看。
Новейшие игроки натыкаются с проблемой соединения к официальным сайтам. Операторы запрещают базовые домены, но знающие казино СЌРЅРѕРјРѕ клиенты помнят о наличии альтернативных площадок.
Зеркало формирует абсолютную воспроизведение главного сайта. SSL-сертификаты остаются такими же. Банковские переводы осуществляются через аналогичные системы.
Процедура оформления профиля через альтернативный домен содержит типовой верификации. Сотрудники уточняют бумаги для соблюдения KYC-требований. Персональные данные реализуют расширенную подтверждение.
Пополнительные пределы на резервных сайтах аналогичны стандартным спецификациям. Низшие ставки поддерживаются константными. Увеличивающиеся банки интегрируются между разными ресурсами.
Премиальные планы оперируют целостно на альтернативных порталах. Коэффициент оборота сохраняет стартовые цифры. Временные рамки проигрывания продолжается.
Департамент поддержки обрабатывает обращения с параллельных ссылок таким же способом. Онлайн переписка поддерживает постоянный режим работы.
праздник на теплоходе с программой — от 999 руб Праздник на теплоходе с программой — от 999 руб: доступное веселье высшего класса.
夜班医生第四季高清完整官方版,海外华人可免费观看最新热播剧集。
Актуальные геймеры попадают с затруднением соединения к лицензированным площадкам. Компании закрывают основные домены, но знающие Vavada casino посетители понимают о существовании резервных ресурсов.
Альтернативный адрес составляет полную воспроизведение первичного сайта. Криптографические алгоритмы сохраняются аналогичными. Денежные процедуры проходят через те же шлюзы.
Технология заведения учётной записи через дополнительный адрес предполагает типовой верификации. Операторы уточняют бумаги для исполнения KYC-регламентов. Идентификационные данные подвергаются комплексную верификацию.
Пополнительные лимиты на резервных порталах аналогичны базовым спецификациям. Наименьшие беты сохраняются неизменными. Растущие накопления интегрируются между разными доменами.
Поощрительные программы оперируют всесторонне на параллельных ресурсах. Коэффициент оборота поддерживает стартовые показатели. Срок активности оборота продолжается.
Сервис сопровождения решает запросы с дополнительных ссылок равнозначно. Прямой диалог осуществляет постоянный расписание деятельности.
Актуальные сервисы беттинг активностей предоставляют игрокам подключение к элитному беттингу через сертифицированные Килограмм казино сайты. Авторизованная операционная активность требует соблюдения жестких регуляторных стандартов.
Алгоритм активации индивидуального счета задействует верификацию индивидуальных сведений. Регуляторы задействуют многоуровневые процедуры KYC и AML для предотвращения фродовых финансовых действий.
Цифровые решения современных развлекательных порталов работают на безопасных хостингах с шифровальными сертификатами. Локальные запреты обязывает владельцев разрабатывать вспомогательные адреса.
Резервные ресурсы образуют аналогичные версии первичного платформы с сохранением всех опций и показателей. Игроки достигают устойчивый соединение к депозиту, игровой статистике и индивидуальным установкам.
Денежные процедуры производятся через связанные банковские агрегаторы. Лимиты на пополнения и обналичивания определяются в унисон с лицензионными положениями и организационными нормами контроля угроз.
Компетентные игроки предлагают анализировать положение лицензии через регуляторные реестры беттинг комиссий. Имиджевые показатели предусматривают рейтинги на профильных ресурсах и мнения настоящих беттеров.
Рабочие дублирующие порталы проверенных гемблинг-платформ на Лаки Бир казино дают непрерывный коннект к развлекательным платформам. Методика копирования образует идентичные дубликаты базового домена с сохранением всех возможностей.
Процедура активации через mirror-сайт целиком дублирует оригинальную форму. Новые пользователи вводят действующий email, создают сложный код доступа и выбирают операционную финансовый инструмент.
Аутентификация личного кабинета предполагает передачи бумаг согласно KYC-нормам. Изображение удостоверения личности, подтверждение регистрации и платежные сведения проходят машинную валидацию в течение 24-72 периодов.
Вход зарегистрированных геймеров осуществляется через стандартную интерфейс с многоступенчатой аутентификацией. Краткосрочные ключи приходят на телефонный гаджет или e-mail адрес.
Механизмы финансового раздела через mirror-сайты предлагает актуальные банковские системы. Visa, Mastercard, электронные кошельки Skrill, Neteller, цифровые активы Bitcoin, Ethereum обрабатываются с сокращенными сборами 0-3%.
Развлекательная коллекция воспроизводится целиком включая spinning games, настольные игры, live-крупье и мегавыигрыши. RTP-индикаторы, дисперсия и ставочные требования остаются точными.
Промо схема действует похоже центральному сайту. Welcome-бандлы, free spins, refund и VIP-курсы запускаются программно при реализации определенных условий.
海外华人必备的iyf平台,提供最新高清电影、电视剧,无广告观看体验。
Новейшие бетторы попадают с сложностью входа к легальным ресурсам. Поставщики закрывают стандартные адреса, но опытные казино Vavada участники понимают о функционировании зеркальных площадок.
Параллельный портал образует абсолютную копию основного портала. Системы безопасности функционируют аналогичными. Банковские транзакции производятся через те же каналы.
Алгоритм заведения учётной записи через зеркальный домен предполагает классической подтверждения. Администраторы выясняют удостоверения для исполнения KYC-регламентов. Личные параметры выполняют расширенную верификацию.
Финансовые ограничения на зеркальных порталах равняются стандартным условиям. Стартовые ставки сохраняются стабильными. Увеличивающиеся банки интегрируются между разными ресурсами.
Бонусные схемы функционируют всесторонне на альтернативных порталах. Множитель ставок сохраняет оригинальные показатели. Период действия реализации поддерживается.
Служба ассистирования изучает запросы с параллельных порталов аналогично. Мгновенный разговор предоставляет круглосуточный порядок обслуживания.
官方授权的ifuntv海外华人首选,第一时间提供最新华语剧集、美剧、日剧等高清在线观看。
愛海外版,專為華人打造的高清視頻官方認證平台,支持全球加速觀看。
Надёжные ресурсы развлекательных сервисов гарантируют клиентам возможность к элитному азартному досугу через специализированные порталы, включая казино Вавада , которые специально следуют международные критерии security.
Последовательность открытия счёта подразумевает заполнения валидационных данных через безопасные SSL-каналы. Провайдеры demanded официальное verification age verification и территории проживания для compliance нормативных стандартов.
2FA проверка считается mandatory aspect современных платформ безопасности. Пользователи располагают SMS-шифры, push-оповещения или применяют dedicated приложения вроде Google Authenticator.
Альтернативные URL преодолевают вопросы локальных блокировок и DDoS-assault. Фактически реплики представляют дублированные клоны основного платформы с maintaining features и личных деталей.
Skilled клиенты предлагают поддерживать актуальные списки активных mirrors в favourites browser. Management передают информацию о свежих порталах через электронную почту, Telegram-сообщества и телефонные утилиты.
Денежные операции через надёжные ресурсы защищены защитными алгоритмами level банковского области. Снятие фондов выполняется единственно на проверенные wallets обладателя профиля.
Best online casino Australia real money app – mobile gaming
捕风捉影在线免费在线观看,海外华人专属平台运用AI智能推荐算法,高清无广告体验。
SeamStory boutique – Loved the artisanal touch and well-written product details throughout.
Функционирующие зеркала лицензированных гемблинг-платформ на типпи казино дают устойчивый коннект к геймерским сервисам. Принцип зеркалирования генерирует идентичные клоны базового домена с фиксацией всех механизмов.
Система регистрации через альтернативный домен полностью имитирует базовую форму. Только пришедшие геймеры вводят рабочий email, создают стойкий секретную комбинацию и устанавливают основную денежную единицу.
Аутентификация учетной записи включает загрузки удостоверений опираясь на KYC-политике. Фото национального документа, подтверждение места жительства и карточные данные контролируются системой цифровую верификацию в течение 24-72 ч.
Подключение существующих пользователей реализуется через обычную интерфейс с усиленной аутентификацией. Временные шифры отправляются на мессенджер устройство или e-mail адрес.
Функционал финансового компонента через mirror-сайты включает востребованные финансовые сервисы. Visa, Mastercard, электронные балансы Skrill, Neteller, crypto Bitcoin, Ethereum выполняются с оптимизированными платежами 0-3%.
Игровая база воспроизводится целиком включая слоты, традиционные активности, live-ведущих и максимальные награды. RTP-параметры, волатильность и ставочные требования сохраняются неизменными.
Поощрительная механизм выполняется идентично корневому домену. Welcome-бандлы, безвозмездные спины, кешбэк и VIP-системы стартуют машинально при выполнении установленных условий.
Новейшие участники натыкаются с проблемой связи к сертифицированным платформам. Организации запрещают первичные ссылки, но знающие казино Голд участники понимают о доступности резервных ресурсов.
Параллельный портал формирует точную реплику оригинального платформы. Криптографические алгоритмы поддерживаются такими же. Денежные транзакции реализуются через сходные шлюзы.
Процедура регистрации через дополнительный ссылку предполагает типовой проверки. Операторы требуют удостоверения для соблюдения KYC-регламентов. Личные информация выполняют многоуровневую подтверждение.
Вносительные рамки на зеркальных порталах идентичны основным требованиям. Стартовые взносы продолжают неизменными. Прогрессивные джекпоты синхронизируются между различными ресурсами.
Льготные системы функционируют полноценно на параллельных платформах. Отыгрышный коэффициент гарантирует оригинальные показатели. Срок активности использования поддерживается.
Команда ассистирования изучает заявки с параллельных адресов аналогично. Онлайн чат обеспечивает непрерывный порядок оперирования.
Поиск достойного развлекательного оператора в актуальных обстоятельствах нуждается тщательного рассмотрения к правовому статусу. Знающие участники понимают, что Лаки Бир регистрация отображает последнюю сведения о действующих ресурсах.
Алгоритм создания аккаунта в легальных заведениях предусматривает требуемую верификацию персональных данных. KYC-стандарты защищают как площадку, так и игрока от афер. Временные лимиты на снятие активов до окончания проверки – привычная система.
Программные блокировки на соединение к игровым сайтам преодолеваются через дублирующие ссылки. Действующие дубликаты предоставляют тотальную производительность первичного ресурса. Платежные движения, интерактивный продвижение и бонусные планы сохраняются константными.
Экономическая стабильность определяется критерием задействованных платежных методов. SSL-кодирование, PCI DSS аттестация и многоуровневая подтверждение формируют защищенный контур безопасности.
Геймплейная ассортимент легальных заведений предоставляет барабаны от главных создателей. RTP-параметры, изменчивость и алгоритмические модели претерпевают независимую валидацию в аккредитованных организациях.
Системы поощрения в профессиональных площадках базируются на понятных требованиях ставок. Отыгрыш x35-40 признается разумным для машина-бонусов, в то время как стандартные забавы учитываются в счет с минимальным коэффициентом.
Современные сервисы азартных игр предоставляют клиентам вход к премиальному гемблингу через надежные казино Lucky Bear сайты. Сертифицированная бизнес нуждается выполнения строгих регуляторных норм.
Процедура регистрации пользовательского аккаунта задействует проверку конфиденциальных сведений. Операторы используют комплексные механизмы KYC и AML для пресечения фродовых финансовых действий.
Электронные инструменты передовых беттинг площадок базируются на безопасных хостингах с SSL алгоритмами. Локальные запреты принуждает администраторов организовывать вспомогательные домены.
Зеркальные сайты формируют эквивалентные копии главного ресурса с сохранением всех инструментов и информации. Игроки приобретают устойчивый связь к депозиту, азартной истории и пользовательским параметрам.
Платежные переводы реализуются через подключенные банковские агрегаторы. Пределы на взносы и выводы регулируются в соотношении с лицензионными положениями и внутренними политиками управления рисками.
Экспертные беттеры указывают мониторить статус разрешения через официальные каталоги развлекательных ведомств. Имиджевые показатели охватывают позиции на отраслевых порталах и комментарии настоящих игроков.
塔尔萨之王第三季高清完整版,海外华人可免费观看最新热播剧集。
奥美迦奥特曼高清完整官方版,海外华人可免费观看最新热播剧集。
https://ivertherapeutics.shop/# ivermectin 4000 mcg
Новейшие игроки встречаются с массой программных нюансов при операциях с лицензированными площадками. Тематические источники типа казино Mellstroy Game обеспечивают современную контент о операциях гэмблинговых операторов.
Механизм валидации счета охватывает множество обязательных уровней. Базовая верификация требует предоставления удостоверений доказывающих индивидуальность. Стандартный комплект включает ID, автолицензию или международное ID.
Технологическая компонента оформления охватывает эксплуатацию безопасного соединения и 2FA. Экспертные геймеры советуют активировать все имеющихся возможностей секьюрити.
Альтернативные адреса являются стопроцентные клоны главного ресурса с хранением полного возможностей. Важнейшее плюс состоит в идентичности расчетных ограничений и норм ставочных требований.
Процедура поиска функционирующих дублирующих порталов строится на контроле профильных мессенджер групп и союзных ресурсов. Экспертные пользователи эксплуатируют виртуальные частные сети для формирования устойчивого входа вне зависимости от региональных ограничений.
Отбор надежного развлекательного площадки в сегодняшних условиях предполагает детального анализа к лицензионному положению. Профессиональные участники знают, что Болливуд казино предоставляет последнюю информацию о работающих сервисах.
Процесс записи в сертифицированных площадках предусматривает необходимую верификацию удостоверения. KYC-правила гарантируют как казино, так и игрока от афер. Кратковременные границы на перечисление финансов до завершения контроля – стандартная практика.
Электронные блокировки на подключение к азартным порталам устраняются через параллельные адреса. Рабочие зеркала сохраняют всестороннюю возможности центрального сайта. Банковские транзакции, геймплейный статистика и льготные системы продолжают постоянными.
Материальная стабильность характеризуется степенью применяемых денежных механизмов. SSL-защита, PCI DSS сертификация и дополнительная верификация формируют безопасный периметр защиты.
Развлекательная набор лицензированных провайдеров охватывает автоматы от ведущих производителей. RTP-значения, дисперсия и расчетные модели претерпевают объективную сертификацию в утвержденных организациях.
Схемы вознаграждения в надежных операторах основываются на понятных параметрах проигрыша. Требования x35-40 оценивается приемлемым для машина-привилегий, в то время как традиционные состязания включаются в счет с пониженным процентом.
Подбор безопасного развлекательного ресурса нуждается основательного изучения правовых документов. Современные порталы Лаки Бир официальный сайт обеспечивают участникам абсолютную детали о собственных санкциях.
Система создания профиля предусматривает множество принудительных стадий проверки. Владельцы запрашивают документы, засвидетельствующие персону и дееспособность. Стандартный KYC-механизм требует от 24 до 72 интервалов.
Финансовое планирование инициируется с определения ограничений на вклады. Компетентные клиенты призывают задействовать правило 5% от совокупного казино фонда на отдельную партию.
Программные барьеры администраторов побуждают эксплуатировать резервные домены. Клоны хранят стопроцентную работоспособность первичного ресурса, охватывая архив платежей и казино результаты.
Современные расчетные методы предоставляют моментальные депозиты через цифровые аккаунты. Bitcoin, Ethereum и стабильные валюты поддерживают скрытность и крошечные отчисления. Продолжительность обработки изъятий равно 10-30 интервалов.
Программы лояльности включают иерархические статусы с прогрессивным компенсацией. VIP-менеджеры дают уникальные награды, повышенные лимиты и приоритетную поддержку.
Актуальные гемблеры сталкиваются с барьером связи к легальным площадкам. Операторы блокируют основные порталы, но грамотные [url=https://aaifoundation.org/uncategorized/ofitsialnyy-sayt-bollivud-kazino-vkhod-i-onlaynigry-v-indiyskie-kazino/]Болливуд казино[/url] игроки помнят о существовании альтернативных ресурсов.
Зеркало представляет точную воспроизведение основного платформы. Средства защиты остаются равнозначными. Финансовые переводы выполняются через сходные сервисы.
Алгоритм заведения учётной записи через резервный ресурс включает классической верификации. Менеджеры выясняют справки для выполнения KYC-стандартов. Идентификационные характеристики осуществляют многоуровневую аутентификацию.
Финансовые лимиты на зеркальных сайтах совпадают стандартным параметрам. Минимальные вклады функционируют неизменными. Прогрессивные банки объединяются между различными доменами.
Поощрительные программы оперируют комплексно на зеркальных порталах. Множитель ставок поддерживает стартовые величины. Длительность оборота остаётся прежним.
Департамент поддержки решает заявки с альтернативных ресурсов равнозначно. Прямой общение гарантирует 24-часовой формат работы.
海外华人必备的yifan平台,提供最新高清电影、电视剧,无广告观看体验。
海外华人必备的iyf平台,提供最新高清电影、电视剧,无广告观看体验。
范德沃克第二季高清完整官方版,海外华人可免费观看最新热播剧集。
Передовые геймеры оказываются с сложностью доступа к официальным площадкам. Организации запрещают главные URL, но искушённые Вавада официальный сайт клиенты осознают о функционировании резервных сайтов.
Зеркало составляет стопроцентную отображение оригинального портала. Средства защиты поддерживаются идентичными. Расчётные транзакции осуществляются через аналогичные сервисы.
Методика заведения учётной записи через зеркальный адрес требует обычной проверки. Операторы уточняют свидетельства для исполнения KYC-норм. Личные параметры выполняют двухфакторную проверку.
Банковские пределы на параллельных порталах идентичны стандартным условиям. Начальные ставки остаются константными. Накопительные джекпоты интегрируются между многочисленными адресами.
Бонусные планы действуют комплексно на параллельных порталах. Отыгрышный коэффициент поддерживает оригинальные значения. Длительность проигрывания остаётся прежним.
Служба обслуживания изучает вопросы с резервных порталов аналогично. Мгновенный переписка поддерживает беспрерывный формат работы.
Беттинговая ниша представляет стремительный подъём, манящая множество клиентов. Опытные ресурсы предлагают качественную условия для пари. Исчерпывающую факты о данных компаниях можно изучить на казино Вавада .
Аккредитация является основным фактором селекции площадки. Регуляторы Великобритании дают тщательный надзор экономических операций. Конкретная сертифицированная ресурс проходит плановые аудиты RNG-модулей.
Цифровые параметры инновационных азартных площадок охватывают SSL-криптографию расчётного ранга. Разработчики виртуального ПО уровня Microgaming, NetEnt, Pragmatic Play внедряют комплексные системы рандомных чисел.
Схема проверки учётной записи предполагает передачи удостоверений KYC-стандарта. Паспорт, документ о доходах, удостоверение регистрации — базовый пакет для финального подключения.
Зеркальные домены исправляют сложности с запретами поставщиков. Действующие варианты изменяются регулярно компьютерными службами. Портативные приложения часто оперируют устойчивее онлайн форматов.
Управление банкроллом устанавливает перспективную результативность гемблинговых циклов. Профессиональные геймеры рекомендуют контролировать объём пари до 1-2% от итогового резерва.
艾一帆海外版,专为华人打造的高清视频平台,支持全球加速观看。
FontFoundry Depot – User-friendly site and clear font previews make browsing quick and simple.
Официальные площадки игорных сервисов гарантируют геймерам доступ к элитному развлечениям через профильные порталы, включая tip top casino , которые именно выполняют глобальные регламенты security.
Алгоритм активации подразумевает ввода authentication сведений через защищённые SSL-connection. Букмекеры требуют письменное verification дееспособности и локации проживания для поддержания legal норм.
Multi-factor authentication является обязательным частью передовых архитектур надёжности. Участники обретают SMS-токены, push-алерты или эксплуатируют dedicated софт в стиле Google Authenticator.
Дублирующие ссылки устраняют трудности географических запретов и DDoS-assault. Техническим образом зеркала представляют идентичные реплики базового ресурса с удержанием features и личных данных.
Опытные пользователи suggest поддерживать свежие каталоги working альтернатив в favourites browser. Провайдеры передают сведения о свежих порталах через e-mail, Telegram-группы и mobile программы.
Банковские переводы через legal площадки защищены защитными алгоритмами стандарта банковского индустрии. Вывод фондов выполняется исключительно на верифицированные счета обладателя учётной записи.
Рабочие альтернативные домены лицензированных азартных клубов на СЌРЅРѕРјРѕ казино дают устойчивый соединение к гемблинг сервисам. Схема дублирования образует аналогичные версии основного веб-площадки с консервацией всех функций.
Алгоритм оформления профиля через дублирующий портал абсолютно имитирует стандартную анкету. Дебютные игроки заполняют валидный email, генерируют стойкий ключ и определяют основную курренси.
Аутентификация личного кабинета содержит представления справок опираясь на KYC-требованиям. Копия водительских прав, свидетельство адреса и финансовые координаты проверяются через алгоритмическую проверку в течение 24-72 часа.
Подключение существующих участников производится через классическую интерфейс с расширенной аутентификацией. Разовые шифры передаются на мобильный гаджет или электронную почту.
Возможности денежного раздела через альтернативные домены предлагает актуальные платежные механизмы. Visa, Mastercard, онлайн счета Skrill, Neteller, криптовалюты Bitcoin, Ethereum обрабатываются с уменьшенными процентами 0-3%.
Gaming библиотека копируется полностью включая слоты, классические игры, live-ведущих и мегавыигрыши. RTP-коэффициенты, дисперсия и ставочные требования поддерживаются точными.
Акционная система работает идентично базовому порталу. Welcome-бандлы, даровые прокруты, денежный возврат и VIP-планы включаются автоматически при исполнении заданных критериев.
Лицензионные провайдеры азартных услуг oferuja клиентам доступ к качественному гэмблингу через профильные порталы, включая п»ї1хбет РІС…РѕРґ , которые специально исполняют общепринятые нормы надёжности.
Процедура оформления профиля включает указания authentication сведений через шифрованные SSL-каналы. Администрация просят предоставить документальное удостоверение возраста и адреса проживания для исполнения legal норм.
2FA верификация считается необходимым частью актуальных платформ безопасности. Users обретают SMS-шифры, push-notification или применяют специализированные утилиты наподобие Google Authenticator.
Mirror URL ликвидируют вопросы региональных санкций и DDoS-воздействий. Технически реплики составляют тождественные dublicates базового ресурса с maintaining функциональности и клиентских информации.
Skilled игроки призывают удерживать свежие базы рабочих зеркал в закладках браузера. Администрация отправляют информацию о свежих адресах через email, Telegram-чаты и портативные программы.
Платёжные операции через надёжные сайты secured шифровальными methods класса банковского направления. Изъятие средств происходит solely на верифицированные wallets держателя профиля.
Азартная отрасль показывает стремительный подъём, притягивая миллионы пользователей. Опытные площадки обеспечивают защищённую пространство для развлечений. Полную материалы о указанных провайдерах допустимо отыскать на казино Лаки Бир .
Сертификация представляет ключевым элементом подбора сайта. Юрисдикции Олдерни дают серьёзный надзор экономических операций. Любая лицензированная платформа проходит постоянные контроли RNG-механизмов.
Технические особенности актуальных беттинг-платформ предусматривают SSL-защиту финансового уровня. Создатели программного ПО типа Microgaming, NetEnt, Pragmatic Play интегрируют усовершенствованные модели произвольных чисел.
Алгоритм проверки аккаунта предполагает представления бумаг KYC-типа. Документ, подтверждение о финансах, подтверждение регистрации — обычный комплект для полноценного входа.
Параллельные порталы убирают барьеры с блокировками поставщиков. Действующие дубли модифицируются каждый день программными группами. Смартфонные утилиты регулярно выполняются стабильнее онлайн форматов.
Распределение капитала определяет стратегическую доходность игровых сессий. Опытные беттеры предлагают ограничивать размер бета до 1-2% от совокупного бюджета.
Experience the magic of a romance that feels real. The Love in Plane Sight PDF is available for download. This novel is a beautiful portrayal of love in the modern world. Secure your digital file today and enjoy the story. https://loveinplanesightpdf.site/ Love In Plane Sight Novel
Unlock the power of the gold market with the Bluebird Gold PDF. This comprehensive report provides expert analysis and detailed data on the latest trends. It’s an essential tool for anyone looking to make informed and successful investment decisions in the modern economy. https://bluebirdgoldpdf.site/ Bluebird Gold Digital Book Version
Нынешние игроки сталкиваются с препятствием связи к сертифицированным платформам. Организации блокируют стандартные адреса, но грамотные Mellstroy Game casino посетители понимают о доступности параллельных платформ.
Параллельный портал образует идентичную отображение оригинального сайта. SSL-сертификаты поддерживаются идентичными. Банковские переводы производятся через те же механизмы.
Схема оформления профиля через резервный адрес требует типовой проверки. Сотрудники просят удостоверения для соблюдения KYC-правил. Паспортные характеристики подвергаются усиленную подтверждение.
Вносительные лимиты на параллельных платформах идентичны первичным характеристикам. Наименьшие беты остаются постоянными. Возрастающие выигрышные пулы синхронизируются между всеми адресами.
Стимулирующие системы действуют комплексно на резервных сайтах. Отыгрышный коэффициент сохраняет оригинальные показатели. Временные рамки оборота не изменяется.
Команда ассистирования решает тикеты с альтернативных адресов аналогично. Мгновенный переписка поддерживает непрерывный график оперирования.
Инновационные операторы развлекательных продуктов дают пользователям вход к премиальному беттингу через защищенные Лаки Бир зеркало ресурсы. Лицензированная операционная активность подразумевает исполнения строгих правовых критериев.
Алгоритм активации игрового аккаунта содержит аутентификацию персональных информации. Операторы используют углубленные механизмы KYC и AML для недопущения незаконных финансовых действий.
Цифровые инструменты новейших казино строятся на надежных инфраструктурах с HTTPS стандартами. Локальные запреты побуждает владельцев организовывать резервные ссылки.
Дублирующие сайты формируют точные копии центрального портала с сохранением всех опций и параметров. Клиенты получают непрерывный вход к средствам, азартной истории и персональным установкам.
Платежные переводы осуществляются через связанные финансовые сервисы. Границы на пополнения и получения определяются в соотношении с нормативными критериями и индивидуальными нормами контроля угроз.
Профессиональные игроки рекомендуют анализировать статус разрешения через регуляторные базы данных развлекательных организаций. Имиджевые характеристики охватывают ранги на отраслевых сайтах и мнения истинных пользователей.
超人和露易斯第二季高清完整版结合大数据AI分析,海外华人可免费观看最新热播剧集。
Новейшие клиенты обталкиваются с массой программных особенностей при функционировании с официальными сайтами. Тематические платформы типа винити казино дают свежую контент о операциях казино компаний.
Процедура проверки аккаунта включает несколько обязательных фаз. Стартовая аутентификация подразумевает передачи справок валидирующих субъект. Обычный набор охватывает удостоверение личности, автоудостоверение или международный паспорт.
Системная компонента оформления содержит эксплуатацию защищенного протокола и двухуровневой проверки. Продвинутые клиенты настаивают инициировать все предложенных настроек обеспечения.
Резервные ссылки формируют стопроцентные реплики центрального сайта с сохранением всего арсенала. Центральное преимущество состоит в схожести платежных лимитов и требований отыгрыша.
Механизм обнаружения активных зеркал строится на наблюдении профессиональных мессенджер групп и связанных порталов. Экспертные участники используют туннельные протоколы для обеспечения бесперебойного доступа без оглядки от региональных запретов.
爱一帆会员多少钱海外版,专为华人打造的高清视频官方认证平台,支持全球加速观看。
爱一帆会员多少钱海外版,专为华人打造的高清视频平台采用机器学习个性化推荐,支持全球加速观看。
Актуальные mirror-ссылки легальных игорных заведений на zelenovskoe.ru создают беспрерывный вход к игровым системам. Методика дублирования строит полноценные клоны центрального сайта с удержанием всех возможностей.
Процедура активации через зеркало в точности имитирует базовую шаблон. Новые участники вводят действующий email, придумывают стойкий код доступа и устанавливают базовую платежное средство.
Аутентификация аккаунта включает предоставления удостоверений в соответствии с KYC-политике. Скан национального документа, верификация места жительства и банковские координаты проходят цифровую анализ в течение 24-72 часов.
Авторизация зарегистрированных клиентов реализуется через типовую панель с двухфакторной идентификацией. Одноразовые коды приходят на сотовый девайс или e-mail адрес.
Опции входящего раздела через mirror-сайты предлагает востребованные платежные системы. Visa, Mastercard, онлайн счета Skrill, Neteller, цифровые активы Bitcoin, Ethereum реализуются с сокращенными взносами 0-3%.
Gaming каталог копируется целиком включая машины, карточные игры, live-хостов и прогрессивы. RTP-индикаторы, изменчивость и условия отыгрыша поддерживаются точными.
Подарочная механизм действует похоже корневому веб-площадке. Welcome-комплекты, даровые прокруты, refund и VIP-планы включаются программно при исполнении прописанных условий.
爱一番海外版,专为华人打造的高清视频平台结合大数据AI分析,支持全球加速观看。
leadrouter.click – Mobile version looks perfect; no glitches, fast scrolling, crisp text.
愛海外版,專為華人打造的高清視頻官方認證平台,支持全球加速觀看。
捕风追影下载平台AI深度學習內容匹配,專為海外華人設計,提供高清視頻和直播服務。
Лицензионные площадки азартных опций предоставляют пользователям возможность к высококлассному азартному досугу через специализированные порталы, включая казино Lucky Bear , что выполняют глобальные нормы защиты.
Механизм открытия счёта necessita внесения проверочных параметров через криптографические SSL-соединения. Менеджмент demanded нотариальное удостоверение совершеннолетия и территории жительства для compliance юрисдикционных правил.
Двухэтапная аутентификация становится необходимым aspect передовых архитектур защиты. Участники получают SMS-коды, push-уведомления или используют профессиональные утилиты по типу Google Authenticator.
Альтернативные ссылки преодолевают проблемы региональных барьеров и DDoS-воздействий. Фактически дубли составляют тождественные клоны главного ресурса с поддержанием опций и user информации.
Компетентные пользователи рекомендуют хранить current каталоги рабочих зеркал в закладках веб-клиента. Администрация доставляют информацию о новых порталах через e-mail, Telegram-каналы и mobile приложения.
Денежные movements через legal порталы secured шифровальными протоколами level банковского segment. Снятие финансов производится только на проверенные карты обладателя профиля.
Crypto online casino Australia – Bitcoin pokies and fast withdrawals
http://neuroreliefusa.com/# Neuro Relief USA
Определение безопасного азартного портала в текущих рамках подразумевает особого изучения к юридическому режиму. Опытные геймеры понимают, что Меллстрой зеркало включает свежую факты о активных операторах.
Механизм регистрации в лицензированных сервисах содержит обязательную валидацию удостоверения. KYC-требования гарантируют как сервис, так и геймера от обмана. Кратковременные лимиты на перечисление капитала до выполнения контроля – стандартная процедура.
Электронные ограничения на вход к развлекательным ресурсам нейтрализуются через параллельные порталы. Активные отражения обеспечивают всестороннюю функциональность базового сервиса. Банковские движения, игровой прогресс и бонусные планы функционируют константными.
Материальная безопасность оценивается уровнем внедренных платежных механизмов. SSL-криптография, PCI DSS аттестация и дополнительная верификация формируют надежный барьер обороны.
Геймплейная ассортимент официальных операторов объединяет слоты от топовых производителей. RTP-показатели, вариативность и расчетные системы претерпевают нейтральную контроль в утвержденных лабораториях.
Программы стимулирования в качественных операторах строятся на открытых условиях вейджера. Требования x35-40 расценивается справедливым для спин-привилегий, в то время как настольные забавы принимаются в зачет с пониженным показателем.
真实的人类第三季高清完整官方版,海外华人可免费观看最新热播剧集。
官方授权的iyftv海外华人首选,第一时间提供最新华语剧集、美剧、日剧等高清在线观看。
Best Australian Online Casino For Real Money Pokies
一帆视频海外华人首选,采用机器学习个性化推荐,提供最新华语剧集、美剧、日剧等高清在线观看。
爱一帆下载海外版,专为华人打造的高清视频官方认证平台,支持全球加速观看。
真实的人类第二季高清完整版,海外华人可免费观看最新热播剧集。
官方授权的电影网站推荐,第一时间海外华人专用,第一时间支持中英双语界面和全球加速。
You definitely made the point. https://pad.karuka.tech/s/_j5uCZ38O
戏台在线免费在线观看,海外华人专属平台结合大数据AI分析,高清无广告体验。
Рабочие альтернативные домены проверенных казино на ретро казино предоставляют непрерывный вход к геймерским сервисам. Система дублирования образует аналогичные версии центрального веб-площадки с сохранением всех механизмов.
Схема открытия счета через зеркало полностью копирует основную форму. Начинающие клиенты вводят активный email, генерируют защищенный ключ и фиксируют игровую финансовый инструмент.
Идентификация профиля требует загрузки бумаг следуя KYC-регламенту. Скан паспорта, валидация регистрации и денежные сведения контролируются системой программную проверку в течение 24-72 временных единиц.
Логин активных игроков выполняется через типовую форму с 2FA аутентификацией. Краткосрочные ключи отправляются на мобильный девайс или электронную почту.
Механизмы входящего сектора через альтернативные домены содержит востребованные финансовые системы. Visa, Mastercard, онлайн портмоне Skrill, Neteller, криптовалюты Bitcoin, Ethereum осуществляются с минимальными процентами 0-3%.
Игровая база копируется в точности включая автоматы, традиционные геймплей, live-операторов и прогрессивы. RTP-параметры, волатильность и проигрыш фиксируются идентичными.
Промо политика выполняется аналогично базовому домену. Welcome-бандлы, безвозмездные спины, refund и VIP-планы запускаются системно при реализации заданных требований.
To verify
emergency loan requirements bad credit
for viable solutions.
zoloft generic: zoloft without dr prescription – zoloft cheap
Надёжные платформы гэмблинг услуг oferuja игрокам шанс к профессиональному времяпрепровождению через dedicated сайты, включая лаки Р±РёСЂ , которые точно соблюдают общепринятые стандарты security.
Последовательность открытия счёта necessita указания идентификационных информации через защищённые SSL-connection. Администрация требуют письменное удостоверение совершеннолетия и региона residence для выполнения правовых норм.
Двухэтапная authentication выступает обязательным частью современных систем защиты. Игроки обретают SMS-ключи, push-notification или задействуют dedicated софт в стиле Google Authenticator.
Альтернативные URL нейтрализуют трудности territorial санкций и DDoS-assault. По сути зеркала являют аналогичные реплики главного домена с maintaining возможностей и индивидуальных информации.
Опытные геймеры призывают поддерживать свежие реестры рабочих дублей в закладках интернет-программы. Операторы передают сведения о fresh порталах через e-mail, Telegram-communities и смартфонные софт.
Payment транзакции через официальные сайты гарантированы encryption технологиями level банковского segment. Снятие финансов осуществляется solely на validated карты обладателя учётной записи.
Инновационные порталы развлекательных развлечений предлагают участникам доступ к профессиональному игровому процессу через защищенные Вавада зеркало системы. Сертифицированная деятельность подразумевает исполнения жестких контролирующих положений.
Система регистрации клиентского учетной записи охватывает валидацию приватных информации. Управляющие эксплуатируют детализированные процедуры KYC и AML для блокировки нарушающих финансовых действий.
Электронные инструменты современных развлекательных порталов базируются на защищенных дата-центрах с HTTPS алгоритмами. Геоблокировка заставляет администраторов создавать резервные URL.
Альтернативные порталы образуют полные копии основного ресурса с поддержанием всех возможностей и сведений. Игроки добиваются беспрепятственный вход к средствам, гемблинг записям и индивидуальным опциям.
Платежные операции производятся через синхронизированные денежные сервисы. Лимиты на вклады и обналичивания определяются в соответствии с регуляторными требованиями и корпоративными политиками риск-менеджмента.
Профессиональные беттеры предлагают анализировать положение сертификата через государственные каталоги игорных органов. Престижные характеристики предусматривают позиции на тематических сайтах и отзывы реальных участников.
Инновационные сервисы игорных развлечений предоставляют клиентам возможность к элитному беттингу через защищенные казино Vavada ресурсы. Лицензированная деятельность требует исполнения строгих надзорных требований.
Система создания клиентского профиля содержит подтверждение личных информации. Провайдеры эксплуатируют многоуровневые алгоритмы KYC и AML для недопущения поддельных транзакций.
Программные системы современных беттинг площадок работают на защищенных дата-центрах с SSL алгоритмами. Региональная блокировка обязывает операторов создавать параллельные домены.
Параллельные сайты представляют точные дубликаты центрального ресурса с обеспечением всех функций и сведений. Участники получают стабильный связь к средствам, азартной записям и персональным параметрам.
Финансовые действия выполняются через встроенные финансовые сервисы. Рамки на депозиты и получения назначаются в гармонии с правовыми стандартами и собственными политиками управления рисками.
Экспертные гемблеры указывают мониторить условия разрешения через контролирующие регистры игорных комиссий. Репутационные характеристики охватывают ранги на отраслевых ресурсах и оценки подлинных пользователей.
По теме “Почему трэш-кино 2026 года всё еще в топе”, там просто кладезь информации.
Вот, можете почитать:
https://tresh-lordfilm.ru/news/tresh-kino-2026-pochemu-nizkobyudzhetnye-uzhastiki-i-tresh-filmy-vsyo-eshhyo-v-tope-prosmotrov/
Smart GenRx USA: Smart GenRx USA – Smart GenRx USA
Explore RetargetRoom – Daily ad management became straightforward with its organized dashboard.
官方授权的iyf.tv海外华人首选,第一时间提供最新华语剧集、美剧、日剧等高清在线观看。
夜班医生第四季高清完整版运用AI智能推荐算法,海外华人可免费观看最新热播剧集。
Официальные ресурсы игорных возможностей предоставляют геймерам право к высококлассному игровому процессу через dedicated ресурсы, включая п»ї1хбет зеркало , которые специально выполняют международные нормы надёжности.
Механизм создания аккаунта necessita ввода проверочных деталей через encrypted SSL-соединения. Провайдеры просят предоставить official подтверждение возраста и места регистрации для выполнения legal требований.
Двухэтапная проверка является обязательным составляющей передовых механизмов конфиденциальности. Игроки имеют SMS-коды, push-сообщения или внедряют targeted софт в стиле Google Authenticator.
Зеркальные порталы преодолевают трудности региональных барьеров и DDoS-атак. По сути mirrors формируют аналогичные копии главного портала с сохранением функциональности и пользовательских данных.
Skilled участники suggest хранить обновлённые базы working зеркал в сохранённых ссылках обозревателя. Букмекеры направляют обновления о актуальных доменах через email, Telegram-группы и мобильные приложения.
Payment операции через надёжные платформы гарантированы шифровальными methods категории банковского segment. Вывод денег производится только на аутентифицированные wallets держателя аккаунта.
mostbet mines strategie http://www.mostbet42873.help
Официальные ресурсы азартных сервисов предоставляют клиентам возможность к премиальному гэмблингу через специализированные домены, включая п»ї1xBet казино , которые выполняют международные регламенты конфиденциальности.
Механизм регистрации подразумевает внесения идентификационных деталей через криптографические SSL-протоколы. Менеджмент запрашивают official verification дееспособности и территории нахождения для compliance legal требований.
Двухэтапная аутентификация считается mandatory aspect современных механизмов надёжности. Клиенты имеют SMS-токены, push-алерты или эксплуатируют профессиональные tools по типу Google Authenticator.
Дублирующие адреса нейтрализуют сложности geographic санкций и DDoS-assault. Техническим образом копии образуют аналогичные реплики центрального сайта с сохранением опций и пользовательских сведений.
Skilled клиенты предлагают сохранять актуальные каталоги функционирующих альтернатив в закладках обозревателя. Операторы отправляют сведения о fresh доменах через электронную почту, Telegram-communities и смартфонные программы.
Платёжные операции через лицензионные платформы защищены защитными системами категории банковского направления. Изъятие средств выполняется только на проверенные счета владельца личного кабинета.
методы капитальной реконструкции зданий методы капитальной реконструкции зданий .
奇思妙探高清完整版AI深度学习内容匹配,海外华人可免费观看最新热播剧集。
stromectol tab price stromectol covid 19 Iver Therapeutics
Активные mirror-ссылки официальных азартных клубов на казино типпи обеспечивают непрерывный доступ к азартным платформам. Принцип клонирования строит полноценные дубликаты основного веб-площадки с консервацией всех инструментов.
Алгоритм оформления профиля через альтернативный домен целиком воспроизводит стандартную бланк. Только пришедшие участники регистрируют активный email, устанавливают сложный пароль и определяют операционную финансовый инструмент.
Верификация аккаунта содержит представления свидетельств следуя KYC-нормам. Снимок национального документа, верификация регистрации и карточные координаты проверяются через алгоритмическую валидацию в течение 24-72 часа.
Вход верифицированных геймеров реализуется через обычную панель с двухфакторной проверкой. Сессионные шифры поступают на мобильный номер или email.
Возможности депозитного сектора через mirror-сайты поддерживает распространенные банковские системы. Visa, Mastercard, онлайн кошельки Skrill, Neteller, криптовалюты Bitcoin, Ethereum выполняются с минимальными комиссиями 0-3%.
Игровая библиотека повторяется полностью включая барабаны, классические геймплей, live-дилеров и накопительные призы. RTP-индикаторы, дисперсия и ставочные требования удерживаются такими же.
Поощрительная схема работает подобно основному веб-площадке. Welcome-пакеты, безвозмездные спины, возврат средств и VIP-курсы запускаются программно при соблюдении заданных параметров.
海外华人必备的iyf平台AI深度学习内容匹配,提供最新高清电影、电视剧,无广告观看体验。
Официальные платформы развлекательных опций гарантируют геймерам вариант к качественному игровому процессу через тематические порталы, включая Eldorado casino , которые специально придерживаются международные регламенты security.
Механизм регистрации necessita ввода authentication деталей через encrypted SSL-соединения. Администрация demanded нотариальное verification совершеннолетия и локации residence для выполнения legal норм.
Двухфакторная верификация становится mandatory компонентом актуальных архитектур конфиденциальности. Участники обретают SMS-пароли, push-notification или эксплуатируют targeted приложения наподобие Google Authenticator.
Дублирующие адреса устраняют сложности territorial ограничений и DDoS-атак. Технически mirrors составляют копийные клоны основного сайта с поддержанием features и пользовательских сведений.
Профессиональные клиенты предлагают удерживать обновлённые перечни действующих копий в сохранённых ссылках браузера. Management рассылают новости о современных порталах через почтовые сервисы, Telegram-каналы и mobile приложения.
Финансовые операции через legal платформы обеспечены защитными системами категории банковского направления. Extraction фондов выполняется solely на аутентифицированные карты держателя профиля.
Гемблинговая ниша показывает быстрый развитие, привлекая тысячи участников. Экспертные порталы гарантируют защищённую атмосферу для пари. Детальную факты о таких провайдерах допустимо обнаружить на Vavada зеркало .
Лицензирование является главным аспектом отбора портала. Контролёры Мальты обеспечивают тщательный аудит денежных транзакций. Конкретная сертифицированная сайт проходит постоянные ревизии RNG-генераторов.
Компьютерные особенности актуальных гемблинг-сайтов охватывают SSL-защиту денежного уровня. Поставщики компьютерного продукта наподобие Microgaming, NetEnt, Pragmatic Play добавляют продвинутые схемы рандомных чисел.
Процедура верификации аккаунта включает передачи бумаг KYC-типа. Удостоверение, свидетельство о заработке, валидация прописки — классический список для итогового активации.
Резервные домены ликвидируют проблемы с блокировками организаций. Актуальные альтернативы обновляются ежедневно программными командами. Карманные софт зачастую выполняются стабильнее веб вариантов.
Контроль средств задаёт перспективную доходность игровых раундов. Квалифицированные пользователи рекомендуют урезать количество пари до 1-2% от суммарного капитала.
Подбор надежного развлекательного оператора требует глубокого анализа лицензионных бумаг. Современные платформы [url=https://github.com/VAVADA-online-zerkalo]Vavada[/url] предлагают клиентам безусловную информацию о своих лицензиях.
Система оформления счета содержит несколько ключевых ступеней аутентификации. Операторы требуют бумаги, подтверждающие личность и правоспособность. Стандартный KYC-алгоритм продолжается от 24 до 72 периодов.
Распоряжение капиталом инициируется с назначения рамок на вклады. Опытные участники предлагают задействовать правило 5% от суммарного игорного резерва на отдельную сессию.
Программные блокировки провайдеров принуждают задействовать дополнительные маршруты. Копии сохраняют стопроцентную активность главного платформы, предусматривая архив платежей и игровой результаты.
Актуальные расчетные методы гарантируют мгновенные инвестиции через электронные аккаунты. Bitcoin, Ethereum и постоянные токены дают приватность и наименьшие отчисления. Продолжительность реализации извлечений доходит 10-30 периодов.
Системы верности подразумевают многоуровневые степени с нарастающим возвратом. VIP-консультанты дают персонализированные бонусы, усиленные пределы и первоочередную поддержку.
Опрятный вид создает первое мнение о вас.
Ваш образ влияет на оценку вас коллегами сразу.
Уверенность в своем образе повышает вашу уверенность.
Этот подход подчеркивает ваш уровень профессионализма и уважение к мелочам.
https://blog.superpodium.com/the-architecture-of-attitude-balmain-s-skirt-sculptures/
Посредством одежду вы можете выразить свою личность и стиль.
Окружающие часто воспринимают опрятных индивидов как более компетентных.
Следовательно, инвестиции в свой образ — это инвестиции в ваше будущее.
Новейшие клиенты встречаются с огромным количеством программных нюансов при функционировании с сертифицированными платформами. Специализированные ресурсы типа винити казино предоставляют актуальную материалы о работе гэмблинговых брендов.
Алгоритм верификации аккаунта охватывает ряд необходимых уровней. Исходная аутентификация включает размещения справок доказывающих индивидуальность. Классический комплект предполагает свидетельство, автолицензию или заграничное удостоверение.
Программная сторона оформления содержит задействование защищенного протокола и двухуровневой проверки. Квалифицированные участники рекомендуют задействовать весь комплекс имеющихся параметров безопасности.
Дублирующие порталы являются стопроцентные клоны основного сайта с хранением исчерпывающего возможностей. Главное бонус выражается в соответствии расчетных ограничений и норм проигрыша.
Алгоритм нахождения действующих зеркал фундируется на проверке экспертных телеграм-каналов и партнерских порталов. Профессиональные геймеры эксплуатируют прокси-соединения для предоставления устойчивого соединения без оглядки от локальных блокировок.
Определение безопасного игрового ресурса в сегодняшних реалиях нуждается детального изучения к правовому режиму. Профессиональные участники понимают, что Меллстрой сайт отображает новую факты о работающих площадках.
Процесс открытия счета в лицензированных операторах содержит принудительную проверку личности. KYC-нормы оберегают как казино, так и геймера от мошенничества. Промежуточные ограничения на перечисление активов до окончания контроля – типичная методика.
Цифровые препятствия на связь к гемблинг ресурсам устраняются через дублирующие порталы. Доступные зеркала обеспечивают всестороннюю работоспособность первичного ресурса. Финансовые процедуры, интерактивный продвижение и привилегированные схемы остаются устойчивыми.
Денежная гарантированность оценивается качеством используемых расчетных инструментов. SSL-защита, PCI DSS аттестация и многоуровневая аутентификация гарантируют надежный заслон ограждения.
Геймплейная коллекция лицензированных площадок включает барабаны от топовых разработчиков. RTP-значения, вариативность и расчетные схемы подвергаются внешнюю аудит в утвержденных центрах.
Планы лояльности в достойных операторах опираются на понятных требованиях отыгрыша. Отыгрыш x35-40 расценивается приемлемым для спин-бонусов, в то время как традиционные забавы учитываются в счет с пониженным коэффициентом.
Отбор достойного развлекательного ресурса в актуальных реалиях заставляет повышенного изучения к регулятивному режиму. Квалифицированные участники понимают, что Лаки Бир РІС…РѕРґ отображает актуальную факты о активных ресурсах.
Процесс создания аккаунта в проверенных платформах содержит необходимую проверку персональных данных. KYC-процедуры обеспечивают как казино, так и участника от махинаций. Кратковременные лимиты на снятие финансов до закрытия верификации – типичная подход.
Программные препятствия на соединение к развлекательным ресурсам нейтрализуются через параллельные домены. Доступные отражения обеспечивают всестороннюю эффективность основного платформы. Расчетные транзакции, интерактивный продвижение и бонусные системы функционируют стабильными.
Денежная безопасность оценивается критерием эксплуатируемых банковских методов. SSL-шифрование, PCI DSS подтверждение и усиленная проверка устанавливают безопасный контур ограждения.
Развлекательная коллекция проверенных заведений предоставляет машины от главных студий. RTP-коэффициенты, вариативность и вероятностные формулы испытывают объективную сертификацию в авторизованных центрах.
Системы вознаграждения в серьезных заведениях основываются на ясных параметрах активности. Отыгрыш x35-40 считается справедливым для слот-бонусов, в то время как традиционные забавы идут в счет с сниженным коэффициентом.
Нынешние участники встречаются с проблемой соединения к официальным ресурсам. Компании фильтруют главные ссылки, но профессиональные винити казино пользователи осознают о доступности параллельных платформ.
Зеркало формирует точную копию базового портала. Протоколы шифрования сохраняются равнозначными. Платёжные процедуры осуществляются через равнозначные сервисы.
Схема регистрации через дополнительный портал содержит обычной валидации. Специалисты запрашивают бумаги для выполнения KYC-требований. Идентификационные информация осуществляют многоуровневую подтверждение.
Пополнительные ограничения на зеркальных сайтах аналогичны базовым условиям. Стартовые суммы остаются фиксированными. Растущие накопления объединяются между различными ссылками.
Стимулирующие планы оперируют всесторонне на резервных площадках. Отыгрышный коэффициент обеспечивает стартовые показатели. Срок активности оборота не изменяется.
Отдел сопровождения изучает запросы с альтернативных ресурсов равнозначно. Интерактивный чат поддерживает беспрерывный режим оперирования.
More than 24 000 restaurants are already using Menutab to submit and advertise
their recipes. Add a Menutab to your Twitter page to find out why.
Big Booty Granny https://git.paulll.cc/ettaubh789630/bigbootygranny2014/wiki/Omg%21-The-Best-Why-Restaurants-Switch-From-Delivery-Apps-Ever%21
Актуальные участники сталкиваются с барьером подключения к официальным платформам. Организации запрещают первичные адреса, но искушённые Меллстрой зеркало посетители помнят о наличии дублирующих сайтов.
Параллельный портал является полную копию базового сайта. Системы безопасности работают аналогичными. Платёжные процедуры проходят через те же шлюзы.
Схема создания аккаунта через дополнительный ресурс предполагает стандартной валидации. Менеджеры выясняют свидетельства для выполнения KYC-норм. Индивидуальные характеристики проходят двухфакторную аутентификацию.
Банковские рамки на параллельных сайтах аналогичны главным параметрам. Наименьшие ставки сохраняются стабильными. Накопительные выигрышные пулы координируются между разными адресами.
Стимулирующие планы выполняются всесторонне на дополнительных площадках. Коэффициент оборота удерживает первоначальные показатели. Длительность оборота остаётся прежним.
Сервис ассистирования изучает вопросы с альтернативных порталов таким же способом. Мгновенный чат гарантирует постоянный расписание деятельности.
Нынешние бетторы натыкаются с барьером доступа к легальным площадкам. Операторы ограничивают первичные домены, но грамотные Меллстрой казино посетители понимают о доступности резервных ресурсов.
Резервная ссылка формирует идентичную реплику основного портала. Средства защиты функционируют такими же. Банковские действия проходят через идентичные каналы.
Алгоритм открытия счёта через дополнительный ссылку предполагает обычной проверки. Операторы запрашивают бумаги для соблюдения KYC-стандартов. Личные данные проходят усиленную валидацию.
Пополнительные пределы на дополнительных ресурсах совпадают основным спецификациям. Стартовые ставки остаются константными. Прогрессивные джекпоты синхронизируются между разными ресурсами.
Льготные программы выполняются целостно на зеркальных сайтах. Отыгрышный коэффициент удерживает стартовые значения. Срок активности проигрывания продолжается.
Команда сопровождения обрабатывает вопросы с параллельных адресов таким же способом. Мгновенный диалог поддерживает круглосуточный формат обслуживания.
http://neuroreliefusa.com/# neurontin buy from canada
Новейшие платформы беттинг игр гарантируют участникам вход к профессиональному азарту через надежные казино аква системы. Авторизованная функционирование нуждается выполнения жестких правовых стандартов.
Алгоритм оформления пользовательского аккаунта включает аутентификацию индивидуальных данных. Администраторы применяют многоуровневые протоколы KYC и AML для исключения фродовых переводов.
IT решения современных игорных домов работают на зашифрованных дата-центрах с TLS протоколами. IP-фильтрация побуждает администраторов организовывать резервные порталы.
Зеркальные сайты образуют аналогичные репликации главного ресурса с удержанием всех возможностей и данных. Игроки получают стабильный вход к средствам, развлекательной записям и личным конфигурациям.
Платежные транзакции осуществляются через интегрированные денежные системы. Ограничения на пополнения и выводы устанавливаются в соотношении с правовыми критериями и корпоративными регламентами риск-менеджмента.
Опытные клиенты советуют отслеживать состояние разрешения через регуляторные списки игорных ведомств. Престижные характеристики охватывают оценки на отраслевых платформах и отзывы настоящих беттеров.
Исследование в пространстве легальных сайтов требует знания современных способов авторизации. Продвинутые геймеры эксплуатируют lucky bear казино для приобретения актуальной материалов о работающих ссылках.
Процедура открытия профиля в сертифицированных операторах подразумевает детальную аутентификацию. Актуальные провайдеры внедряют KYC-механизмы и AML-стандарты. Документальное сопровождение отнимает от 24 до 72 интервалов.
IT методы для преодоления препятствий развиваются синхронно с интенсификацией правовых мер. VPN-платформы разряда premium предоставляют безопасность AES-256 и протоколы OpenVPN. Постоянство подключения кардинально актуальна для высокоролловых заходов.
Зеркальные сайты действуют через локально размещенные серверные инфраструктуры. CDN-структуры предоставляют низкую пинг для глобальных участников. Системное переключение инициируется при детекции недоступности базового сайта.
Денежные переводы в сертифицированных территориях подчиняются четким критериям PCI DSS. Цифровые расчеты получают актуальность в результате анонимности и быстроте процессинга.
Мобильные клиенты лучших провайдеров содержат голосовую проверку и push-оповещения для важных ситуаций. Модифицируемый внешний вид автономно подстраивается под свойства матрицы.
Современные операторы развлекательных продуктов предлагают игрокам вход к высококлассному гемблингу через безопасные казино Mellstroy Game ресурсы. Сертифицированная деятельность подразумевает учета конкретных регуляторных критериев.
Процедура оформления индивидуального учетной записи предусматривает валидацию приватных данных. Операторы эксплуатируют многоуровневые системы KYC и AML для предотвращения незаконных платежей.
Электронные системы инновационных беттинг площадок строятся на безопасных инфраструктурах с TLS протоколами. Локальные запреты вынуждает администраторов разрабатывать альтернативные URL.
Параллельные платформы являют собой идентичные клоны первичного платформы с поддержанием всех опций и показателей. Клиенты получают стабильный соединение к средствам, беттинг истории и клиентским параметрам.
Банковские действия проходят через синхронизированные банковские сервисы. Лимиты на пополнения и выводы определяются в гармонии с лицензионными требованиями и внутренними нормами управления рисками.
Компетентные пользователи указывают контролировать статус сертификата через надзорные списки беттинг структур. Статусные индикаторы предусматривают позиции на тематических сервисах и отзывы настоящих клиентов.
https://lmc896.org/articles/meilleur-code-promo-linebet.html
Перемещение в мире легальных сайтов предполагает осознания продвинутых инструментов подключения. Умелые игроки задействуют Mellstroy Game зеркало для получения актуальной информации о работающих путях.
Схема формирования учетной записи в лицензированных операторах подразумевает сложную проверку. Актуальные компании внедряют KYC-механизмы и AML-правила. Документооборот составляет от 24 до 72 интервалов.
Программные способы для избежания барьеров улучшаются вместе с ужесточением нормативных решений. VPN-сервисы класса premium предлагают кодирование AES-256 и стандарты OpenVPN. Постоянство канала жизненно существенна для VIP раундов.
Запасные ресурсы действуют через локально рассредоточенные серверные мощности. CDN-комплексы предоставляют быструю пинг для американских геймеров. Программное редирект включается при идентификации барьера первичного домена.
Экономические манипуляции в легальных территориях соответствуют четким стандартам PCI DSS. Блокчейн расчеты увеличивают распространение из-за приватности и темпу обработки.
Мобильные клиенты элитных провайдеров содержат отпечатковую проверку и push-оповещения для критических событий. Адаптивный дизайн самостоятельно изменяется под свойства экрана.
Перемещение в области проверенных ресурсов подразумевает владения передовых способов соединения. Квалифицированные участники задействуют п»ї1хбет зеркало для получения актуальной материалов о активных доменах.
Схема оформления счета в надежных компаниях включает многоуровневую подтверждение. Продвинутые организации эксплуатируют KYC-механизмы и AML-требования. Документальное сопровождение составляет от 24 до 72 периодов.
Цифровые способы для избежания запретов прогрессируют параллельно с укреплением регуляторных инициатив. VPN-инструменты уровня premium предлагают безопасность AES-256 и методы OpenVPN. Стабильность канала кардинально актуальна для привилегированных игровых периодов.
Зеркальные адреса работают через географически разнесенные цифровые кластеры. CDN-архитектуры осуществляют быструю время ответа для европейских клиентов. Системное переключение запускается при распознавании препятствия главного сайта.
Денежные операции в официальных областях соответствуют жестким требованиям PCI DSS. Децентрализованные переводы набирают востребованность благодаря скрытности и скорости реализации.
Портативные клиенты ведущих организаций включают отпечатковую авторизацию и push-извещения для критических моментов. Настраиваемый облик программно подстраивается под настройки матрицы.
Подбор качественного игрового ресурса в текущих обстоятельствах требует специального анализа к юридическому положению. Компетентные игроки осознают, что Голд казино отображает последнюю сведения о действующих площадках.
Схема создания аккаунта в легальных операторах предусматривает неизбежную аутентификацию удостоверения. KYC-стандарты оберегают как оператора, так и участника от фрода. Кратковременные лимиты на получение денег до выполнения контроля – обычная практика.
Виртуальные блокировки на подключение к азартным сервисам преодолеваются через резервные порталы. Действующие отражения поддерживают стопроцентную эффективность главного ресурса. Расчетные переводы, интерактивный результаты и привилегированные предложения функционируют константными.
Финансовая безопасность измеряется критерием задействованных расчетных систем. SSL-безопасность, PCI DSS сертификация и двухфакторная аутентификация создают защищенный заслон ограждения.
Азартная коллекция легальных заведений содержит автоматы от главных провайдеров. RTP-индексы, изменчивость и вероятностные формулы подвергаются независимую валидацию в авторизованных организациях.
Планы вознаграждения в профессиональных площадках опираются на понятных условиях вейджера. Условия ставок x35-40 характеризуется нормальным для слот-подарков, в то время как классические активности принимаются в зачет с сниженным процентом.
Phone Repair Pro premium collection – Repairs were fast, and every step was communicated clearly.
Поиск в области легальных площадок нуждается знания актуальных решений авторизации. Опытные пользователи используют Килограмм казино для извлечения релевантной данных о функционирующих адресах.
Схема создания аккаунта в надежных заведениях предполагает комплексную аутентификацию. Продвинутые организации используют KYC-алгоритмы и AML-правила. Документооборот отнимает от 24 до 72 интервалов.
Программные решения для избежания блокировок развиваются сообща с интенсификацией регуляторных действий. VPN-инструменты класса premium гарантируют защиту AES-256 и протоколы OpenVPN. Постоянство коннекта fundamentally значима для высокоролловых раундов.
Дублирующие адреса работают через географически разнесенные технические кластеры. CDN-структуры предоставляют оптимальную латентность для азиатских клиентов. Системное перенаправление активируется при выявлении недоступности центрального ресурса.
Финансовые транзакции в проверенных областях подчиняются определенным стандартам PCI DSS. Крипто переводы завоевывают популярность вследствие приватности и скорости процессинга.
Переносные программы элитных операторов совмещают отпечатковую проверку и push-сообщения для ключевых происшествий. Адаптивный дизайн автономно адаптируется под параметры монитора.
Discover ScreenPrintShop – Crisp prints paired with a simple ordering experience made everything smooth.
Инновационные платформы беттинг развлечений предлагают беттерам доступ к профессиональному развлечениям через защищенные п»ї1хбет РІС…РѕРґ ресурсы. Легальная функционирование нуждается выполнения определенных контролирующих критериев.
Процесс оформления игрового учетной записи содержит подтверждение конфиденциальных информации. Провайдеры задействуют расширенные системы KYC и AML для пресечения нарушающих переводов.
Программные системы актуальных гемблинг платформ строятся на безопасных хостингах с криптографическими стандартами. Региональная блокировка вынуждает владельцев разрабатывать вспомогательные URL.
Зеркальные сайты образуют эквивалентные репликации центрального домена с удержанием всех сервисов и информации. Беттеры обеспечивают себе стабильный доступ к средствам, развлекательной отчетности и клиентским опциям.
Расчетные переводы осуществляются через встроенные платежные процессоры. Рамки на вклады и получения фиксируются в соответствии с регуляторными критериями и внутренними политиками минимизации опасностей.
Экспертные пользователи советуют отслеживать условия авторизации через государственные каталоги азартных комиссий. Статусные характеристики задействуют ранги на тематических ресурсах и мнения реальных участников.
Официальные операторы игорных возможностей обеспечивают геймерам возможность к высококлассному гэмблингу через dedicated домены, включая казино 1хбет , что следуют общепринятые стандарты защиты.
Алгоритм создания аккаунта требует предоставления валидационных информации через защищённые SSL-connection. Букмекеры demanded нотариальное доказательство правоспособности и территории проживания для выполнения правовых стандартов.
Двухфакторная верификация считается принудительным составляющей новейших solutions защиты. Игроки приобретают SMS-ключи, push-оповещения или используют targeted приложения типа Google Authenticator.
Альтернативные ссылки устраняют трудности региональных санкций и DDoS-assault. С технической точки зрения реплики формируют дублированные версии центрального сайта с обеспечением инструментария и индивидуальных деталей.
Опытные пользователи рекомендуют поддерживать актуальные перечни активных дублей в закладках интернет-программы. Management отправляют сведения о новых доменах через электронную почту, Telegram-каналы и портативные утилиты.
Финансовые movements через проверенные ресурсы обеспечены криптографическими системами класса банковского области. Снятие денег выполняется только на аутентифицированные данные владельца account.
Передовые гемблеры встречаются с проблемой связи к легальным платформам. Компании блокируют основные домены, но профессиональные mad казино пользователи помнят о функционировании альтернативных платформ.
Резервная ссылка формирует идентичную воспроизведение главного площадки. Протоколы шифрования работают равнозначными. Платёжные процедуры производятся через сходные системы.
Методика заведения учётной записи через зеркальный ресурс требует привычной верификации. Менеджеры запрашивают документы для реализации KYC-стандартов. Личные характеристики осуществляют расширенную проверку.
Пополнительные рамки на резервных площадках совпадают основным характеристикам. Минимальные беты сохраняются константными. Прогрессивные выигрышные пулы интегрируются между многочисленными ресурсами.
Стимулирующие системы действуют всесторонне на зеркальных ресурсах. Отыгрышный коэффициент обеспечивает стартовые параметры. Временные рамки проигрывания не изменяется.
Департамент сопровождения изучает обращения с альтернативных доменов сходным образом. Интерактивный разговор обеспечивает круглосуточный график функционирования.
FixItFactory Select – Simple interface and clear product details make browsing smooth and quick.
Новейшие бетторы попадают с проблемой связи к официальным ресурсам. Поставщики ограничивают основные URL, но профессиональные mad casino зеркало клиенты понимают о присутствии дублирующих сайтов.
Альтернативный адрес образует стопроцентную воспроизведение основного сайта. Протоколы шифрования остаются такими же. Банковские операции производятся через аналогичные каналы.
Схема открытия счёта через параллельный ресурс предполагает обычной проверки. Операторы выясняют справки для соблюдения KYC-правил. Идентификационные параметры выполняют комплексную проверку.
Депозитные рамки на дополнительных платформах равняются первичным характеристикам. Стартовые беты сохраняются постоянными. Накопительные выигрышные пулы синхронизируются между различными адресами.
Стимулирующие механизмы выполняются завершённо на зеркальных платформах. Требования по обороту поддерживает исходные показатели. Период действия использования сохраняется.
Отдел ассистирования решает тикеты с параллельных ресурсов аналогично. Живой разговор обеспечивает постоянный график деятельности.
https://newslex.ru/wp-content/pgs/betvinner_promokod_pri_registracii___RUSH888.html
Активные mirror-ссылки легальных азартных клубов на п»ї1хбет обеспечивают устойчивый соединение к геймерским сервисам. Методика дублирования образует полноценные копии корневого веб-площадки с фиксацией всех инструментов.
Механизм оформления профиля через mirror-сайт на сто процентов дублирует базовую шаблон. Дебютные участники вводят рабочий email, генерируют безопасный ключ и фиксируют игровую денежную единицу.
Верификация личного кабинета включает предоставления свидетельств следуя KYC-нормам. Скан ID-карты, подтверждение места жительства и банковские данные проходят цифровую проверку в течение 24-72 периодов.
Подключение зарегистрированных игроков производится через базовую панель с усиленной верификацией. Одноразовые пароли отправляются на сотовый девайс или e-mail адрес.
Инструменты пополнительного модуля через резервные ссылки содержит популярные банковские сервисы. Visa, Mastercard, электронные кошельки Skrill, Neteller, криптовалюты Bitcoin, Ethereum обрабатываются с сокращенными процентами 0-3%.
Развлекательная библиотека клонируется в точности включая барабаны, настольные игры, live-дилеров и мегавыигрыши. RTP-параметры, вариативность и ставочные требования удерживаются такими же.
Промо система оперирует подобно центральному сайту. Welcome-наборы, безвозмездные спины, денежный возврат и VIP-программы активируются автоматически при реализации заданных условий.
I’d like to find out more? I’d care to find out more details.
официальный сайт RioBet Casino
панические атаки причины и лечение Панические атаки лечение отзывы: узнайте о реальном опыте других.
https://t.me/evacasino_official
кольца usit Соединение Camlock: стандарт надежности
1win как войти http://1win79230.help
теплоход от нескучного сада до кремля — маршрут Прогулка от Крымского моста — цены 2026: доступные водные путешествия по реке.
我們的資深運彩分析官方授權專家團隊第一時間更新官方NBA、MLB、中華職棒等各大聯盟的專業賽事分析。
теплоход с диджеем и танцами Диджей-сет на теплоходе — забронировать стол: обеспечьте себе лучшее место.
Современные платформы развлекательных игр обеспечивают клиентам подключение к качественному азарту через сертифицированные Вавада сайт сайты. Официальная функционирование влечет выполнения конкретных законодательных стандартов.
Алгоритм оформления пользовательского счета предусматривает проверку конфиденциальных реквизитов. Регуляторы задействуют комплексные алгоритмы KYC и AML для предотвращения фродовых платежей.
Технические решения новейших гемблинг платформ строятся на надежных инфраструктурах с криптографическими сертификатами. Локальные запреты вынуждает управляющих внедрять альтернативные порталы.
Альтернативные платформы образуют эквивалентные клоны центрального ресурса с удержанием всех возможностей и сведений. Беттеры приобретают постоянный доступ к балансу, гемблинг статистике и пользовательским настройкам.
Расчетные действия производятся через встроенные денежные процессоры. Пределы на вклады и получения устанавливаются в соответствии с законодательными критериями и индивидуальными нормами контроля угроз.
Экспертные пользователи рекомендуют мониторить статус разрешения через регуляторные списки беттинг структур. Авторитетные характеристики включают места на тематических платформах и отзывы действительных игроков.
Новейшие геймеры сталкиваются с проблемой входа к официальным платформам. Компании блокируют базовые ссылки, но грамотные казино Килограмм игроки учитывают о наличии дублирующих сайтов.
Параллельный портал образует абсолютную отображение основного платформы. Криптографические алгоритмы поддерживаются неизменными. Денежные переводы реализуются через аналогичные каналы.
Алгоритм оформления профиля через резервный ссылку включает стандартной проверки. Сотрудники запрашивают свидетельства для осуществления KYC-стандартов. Персональные данные подвергаются расширенную подтверждение.
Финансовые границы на резервных платформах аналогичны главным условиям. Минимальные ставки сохраняются неизменными. Накопительные джекпоты интегрируются между всеми адресами.
Бонусные системы функционируют полноценно на резервных порталах. Коэффициент оборота обеспечивает первоначальные величины. Период действия проигрывания сохраняется.
Департамент помощи рассматривает заявки с зеркальных адресов сходным образом. Живой общение предоставляет непрерывный расписание деятельности.
Отбор проверенного betting портала в сегодняшних границах требует специального рассмотрения к законному состоянию. Профессиональные пользователи представляют, что казино лова предоставляет новую сведения о действующих площадках.
Алгоритм оформления профиля в лицензированных сервисах включает требуемую проверку идентичности. KYC-процедуры оберегают как заведение, так и игрока от махинаций. Промежуточные границы на вывод средств до окончания контроля – обычная практика.
Электронные запреты на вход к азартным сайтам преодолеваются через зеркальные адреса. Рабочие копии поддерживают стопроцентную возможности основного сервиса. Денежные транзакции, развлекательный прогресс и льготные системы поддерживаются устойчивыми.
Экономическая гарантированность характеризуется степенью используемых денежных систем. SSL-шифрование, PCI DSS сертификация и многоуровневая верификация устанавливают стабильный заслон защиты.
Игровая библиотека легальных сервисов объединяет спины от главных студий. RTP-показатели, изменчивость и алгоритмические принципы проходят независимую сертификацию в аккредитованных центрах.
Схемы мотивации в профессиональных казино формируются на четких требованиях ставок. Отыгрыш x35-40 считается адекватным для спин-льгот, в то время как карточные игры включаются в подсчет с редуцированным процентом.
Online casino Australia legal alternatives – safe offshore casinos
Современные операторы гемблинг игр предлагают участникам возможность к качественному гемблингу через проверенные Lucky Bear зеркало порталы. Лицензированная операционная активность требует выполнения строгих надзорных требований.
Механизм создания игрового аккаунта задействует проверку индивидуальных показателей. Операторы задействуют расширенные алгоритмы KYC и AML для блокировки нарушающих переводов.
Программные средства новейших развлекательных порталов основываются на защищенных инфраструктурах с шифровальными алгоритмами. IP-фильтрация заставляет владельцев разрабатывать параллельные ссылки.
Резервные сайты составляют точные версии главного сайта с фиксацией всех сервисов и информации. Игроки добиваются непрерывный соединение к депозиту, игровой данным и личным параметрам.
Финансовые транзакции производятся через интегрированные банковские агрегаторы. Рамки на инвестиции и изъятия фиксируются в соотношении с правовыми критериями и корпоративными нормами контроля угроз.
Профессиональные гемблеры рекомендуют проверять положение разрешения через регуляторные базы данных гемблинг ведомств. Престижные критерии охватывают ранги на экспертных сервисах и мнения реальных клиентов.
Передовые бетторы сталкиваются с затруднением входа к официальным платформам. Операторы ограничивают первичные адреса, но опытные п»ї1хбет РІС…РѕРґ клиенты осознают о наличии зеркальных ресурсов.
Альтернативный адрес составляет точную копию базового ресурса. Протоколы шифрования сохраняются идентичными. Банковские переводы реализуются через идентичные механизмы.
Методика заведения учётной записи через резервный ресурс требует классической подтверждения. Специалисты требуют удостоверения для соблюдения KYC-регламентов. Индивидуальные параметры реализуют многоуровневую валидацию.
Вносительные рамки на резервных сайтах идентичны главным характеристикам. Минимальные ставки поддерживаются стабильными. Растущие выигрышные пулы объединяются между множественными ресурсами.
Льготные программы действуют завершённо на альтернативных площадках. Множитель ставок поддерживает базовые значения. Срок активности реализации не изменяется.
Команда поддержки анализирует обращения с параллельных ресурсов сходным образом. Мгновенный разговор поддерживает круглосуточный порядок деятельности.
Top Australian online casinos 2025 – real money gaming hub
zoloft cheap: sertraline – sertraline generic
Australian online casino real money – fast payouts and big bonuses
huarenus官方认证平台,专为海外华人设计,24小时不间断提供高清视频和直播服务。
我欲为人第二季官方认证平台,专为海外华人设计,24小时不间断提供高清视频和直播服务。
真实的人类第一季高清完整官方版,海外华人可免费观看最新热播剧集。
塔尔萨之王第三季高清完整官方版,海外华人可免费观看最新热播剧集。
Поиск достойного игрового портала в актуальных рамках требует детального внимания к регулятивному режиму. Компетентные геймеры осознают, что лова казино отображает современную факты о работающих операторах.
Процесс создания аккаунта в легальных заведениях предусматривает требуемую аутентификацию персональных данных. KYC-стандарты гарантируют как заведение, так и участника от обмана. Кратковременные рамки на вывод капитала до завершения валидации – типичная процедура.
Цифровые барьеры на связь к азартным площадкам обходятся через зеркальные порталы. Активные дубликаты поддерживают тотальную возможности главного платформы. Банковские операции, интерактивный результаты и льготные системы поддерживаются устойчивыми.
Капитальная гарантированность оценивается критерием применяемых платежных систем. SSL-криптография, PCI DSS подтверждение и усиленная идентификация создают безопасный щит обороны.
Интерактивная ассортимент сертифицированных сервисов содержит слоты от лидирующих студий. RTP-коэффициенты, колебания и алгоритмические схемы получают объективную аудит в утвержденных центрах.
Программы поощрения в достойных заведениях строятся на ясных условиях вейджера. Отыгрыш x35-40 расценивается нормальным для барабан-бонусов, в то время как настольные забавы учитываются в калькуляцию с пониженным коэффициентом.
Лицензионные провайдеры игорных предложений гарантируют геймерам доступ к высококлассному времяпрепровождению через целевые порталы, включая Меллстрой зеркало , которые именно придерживаются международные требования надёжности.
Последовательность оформления профиля требует указания верификационных параметров через шифрованные SSL-connection. Букмекеры требуют документальное свидетельство возраста и места нахождения для compliance юрисдикционных норм.
2FA идентификация считается required компонентом актуальных платформ защиты. Users приобретают SMS-ключи, push-сообщения или задействуют специализированные программы вроде Google Authenticator.
Дублирующие домены преодолевают препятствия локальных запретов и DDoS-assault. С технической точки зрения дубли представляют тождественные клоны центрального домена с сохранением features и пользовательских информации.
Экспертные геймеры рекомендуют сохранять current каталоги working копий в сохранённых ссылках браузера. Операторы доставляют новости о современных ссылках через e-mail, Telegram-сообщества и портативные приложения.
Payment переводы через legal платформы защищены cryptographic протоколами стандарта банковского индустрии. Изъятие средств реализуется исключительно на верифицированные реквизиты хозяина личного кабинета.
angels bail bonds ᒪong Beach
5150 Е Pacifjc Coast Hwy #200,
Longg Beach, СA 90804, United Ѕtates
+15623265045
Bookmarks
奇思妙探第二季高清完整版采用机器学习个性化推荐,海外华人可免费观看最新热播剧集。
Отбор надежного развлекательного оператора подразумевает серьезного рассмотрения официальных сертификатов. Современные ресурсы п»ї1xBet дают участникам полную сведения о собственных допусках.
Процедура получения доступа включает ряд принудительных стадий подтверждения. Операторы требуют справки, засвидетельствующие самобытность и дееспособность. Стандартный KYC-алгоритм составляет от 24 до 72 интервалов.
Распоряжение капиталом стартует с фиксации границ на пополнения. Квалифицированные пользователи советуют внедрять установку 5% от полного азартного капитала на индивидуальную игру.
Системные ограничения владельцев обязывают задействовать альтернативные домены. Дубликаты удерживают абсолютную эффективность первичного сайта, подразумевая историю транзакций и игровой успех.
Инновационные расчетные способы обеспечивают оперативные депозиты через виртуальные аккаунты. Bitcoin, Ethereum и устойчивые монеты гарантируют конфиденциальность и мизерные комиссии. Длительность обработки изъятий равно 10-30 промежутков.
Системы постоянства включают многоуровневые степени с накапливающимся компенсацией. VIP-консультанты гарантируют персонализированные вознаграждения, улучшенные пределы и опережающую обслуживание.
Активные резервные адреса официальных игорных заведений на KiloGram предоставляют стабильный доступ к развлекательным системам. Методика реплицирования образует полноценные дубликаты центрального домена с консервацией всех возможностей.
Алгоритм активации через mirror-сайт полностью имитирует основную заявку. Начинающие участники регистрируют валидный email, устанавливают безопасный секретную комбинацию и устанавливают основную денежную единицу.
Верификация профиля требует предоставления справок в соответствии с KYC-стандартам. Снимок ID-карты, доказательство адреса и банковские сведения подвергаются алгоритмическую верификацию в течение 24-72 временных единиц.
Вход существующих игроков реализуется через обычную интерфейс с двухфакторной идентификацией. Сессионные токены отправляются на телефонный девайс или e-mail адрес.
Опции финансового сектора через дублирующие порталы обеспечивает востребованные расчетные сервисы. Visa, Mastercard, веб балансы Skrill, Neteller, криптовалюты Bitcoin, Ethereum выполняются с уменьшенными комиссиями 0-3%.
Гемблинг база копируется полностью включая spinning games, карточные развлечения, live-операторов и максимальные награды. RTP-коэффициенты, вариативность и вейджер поддерживаются идентичными.
Промо механизм работает схоже главному веб-площадке. Welcome-предложения, free spins, денежный возврат и VIP-системы стартуют программно при достижении установленных стандартов.
戏台在线免费在线观看,海外华人专属官方认证平台,高清无广告体验。
For alternatives
travel loans
for valuable insights.
Действующие зеркала проверенных азартных клубов на казино Лаки Бир создают устойчивый доступ к гемблинг ресурсам. Технология реплицирования формирует точные дубликаты корневого портала с фиксацией всех инструментов.
Алгоритм регистрации через резервную ссылку полностью имитирует оригинальную шаблон. Новые пользователи вводят функционирующий email, создают надежный код доступа и фиксируют базовую платежное средство.
Верификация личного кабинета предполагает отправки справок следуя KYC-политике. Скан национального документа, верификация места жительства и денежные сведения проверяются через автоматическую анализ в течение 24-72 временных единиц.
Подключение действующих игроков выполняется через базовую модуль с расширенной валидацией. Временные токены передаются на сотовый аппарат или электронную почту.
Инструменты входящего модуля через альтернативные домены включает топовые банковские механизмы. Visa, Mastercard, онлайн счета Skrill, Neteller, виртуальные монеты Bitcoin, Ethereum процессируются с оптимизированными взносами 0-3%.
Азартная база дублируется абсолютно включая машины, традиционные игры, live-ведущих и джекпоты. RTP-индикаторы, колебания и проигрыш поддерживаются точными.
Бонусная механизм работает похоже корневому сайту. Welcome-пакеты, фриспины, компенсация и VIP-программы стартуют системно при реализации установленных параметров.
Передовые участники обталкиваются с множеством технических деталей при операциях с сертифицированными площадками. Тематические ресурсы типа Лаки Бир регистрация поставляют современную данные о операциях азартных брендов.
Система подтверждения учетной записи подразумевает комплекс требуемых уровней. Первичная аутентификация требует отправки удостоверений валидирующих субъект. Классический набор включает паспорт, автолицензию или заграничное удостоверение.
Цифровая элемент открытия счета предполагает задействование защищенного протокола и многофакторной защиты. Опытные пользователи предлагают активировать полный набор представленных возможностей безопасности.
Запасные домены образуют стопроцентные дубликаты первичного портала с удержанием исчерпывающего функционала. Ключевое плюс состоит в тождественности расчетных пределов и требований ставочных требований.
Механизм обнаружения рабочих зеркал опирается на мониторинге специализированных телеграм-каналов и аффилированных платформ. Квалифицированные игроки внедряют анонимайзеры для обеспечения надежного входа вне зависимости от локальных блокировок.
范德沃克高清完整官方版,海外华人可免费观看最新热播剧集。
我欲为人第二季官方认证平台,专为海外华人设计,24小时不间断提供高清视频和直播服务。
海外华人必备的iyf平台AI深度学习内容匹配,提供最新高清电影、电视剧,无广告观看体验。
Инновационные операторы игорных активностей гарантируют клиентам возможность к качественному беттингу через безопасные mad casino ресурсы. Сертифицированная операционная активность нуждается учета четких правовых норм.
Процедура открытия индивидуального счета задействует валидацию персональных сведений. Управляющие применяют расширенные системы KYC и AML для предотвращения незаконных операций.
Цифровые средства актуальных беттинг площадок функционируют на зашифрованных дата-центрах с криптографическими технологиями. Локальные запреты вынуждает операторов создавать дублирующие URL.
Резервные домены образуют полные копии главного домена с обеспечением всех функций и информации. Беттеры получают постоянный соединение к счету, беттинг записям и пользовательским установкам.
Денежные операции реализуются через встроенные расчетные агрегаторы. Ограничения на пополнения и обналичивания определяются в соотношении с законодательными критериями и собственными правилами контроля угроз.
Опытные клиенты советуют контролировать условия сертификата через надзорные реестры беттинг ведомств. Репутационные критерии включают позиции на специализированных платформах и отзывы истинных участников.
愛壹帆海外版,专为华人打造的高清视频平台,支持全球加速观看。
奇思妙探高清完整官方版,海外华人可免费观看最新热播剧集。
Определение надежного игорного портала требует тщательного изучения официальных сертификатов. Актуальные ресурсы лаки Р±РёСЂ казино официальный сайт предоставляют геймерам стопроцентную сведения о своих лицензиях.
Процесс регистрации подразумевает несколько необходимых фаз проверки. Представители просят справки, устанавливающие самобытность и возраст. Типовой KYC-регламент занимает от 24 до 72 интервалов.
Контроль средств стартует с фиксации пределов на вклады. Профессиональные игроки настаивают эксплуатировать установку 5% от итогового игорного фонда на одну раунд.
Системные барьеры владельцев побуждают использовать альтернативные ссылки. Дубликаты удерживают абсолютную эффективность главного площадки, предусматривая журнал платежей и игровой продвижение.
Современные финансовые инструменты обеспечивают оперативные взносы через электронные аккаунты. Bitcoin, Ethereum и стабильные валюты гарантируют тайность и наименьшие отчисления. Время выполнения выводов равно 10-30 отрезков.
Системы постоянства предусматривают градационные статусы с увеличивающимся бонусом. VIP-консультанты дают эксклюзивные поощрения, расширенные границы и ускоренную сервис.
一饭封神在线免费在线观看,海外华人专属平台,高清无广告体验。
huarenus平台运用AI智能推荐算法,专为海外华人设计,提供高清视频和直播服务。
Ориентирование в секторе лицензированных сайтов требует знания новых способов соединения. Продвинутые геймеры применяют Vavada для добывания релевантной информации о функционирующих доменах.
Алгоритм регистрации профиля в официальных операторах включает многоуровневую валидацию. Новейшие организации эксплуатируют KYC-алгоритмы и AML-правила. Документальное сопровождение отнимает от 24 до 72 часов.
Компьютерные способы для минования запретов эволюционируют одновременно с ужесточением правовых действий. VPN-решения класса premium предлагают криптографию AES-256 и технологии OpenVPN. Стабильность канала принципиально необходима для VIP заходов.
Альтернативные платформы выполняют задачи через пространственно размещенные цифровые кластеры. CDN-системы гарантируют минимальную пинг для европейских пользователей. Программное редирект запускается при выявлении ограничения центрального ресурса.
Экономические движения в официальных зонах подчиняются конкретным критериям PCI DSS. Блокчейн операции увеличивают популярность из-за секретности и темпу осуществления.
Мобильные утилиты ведущих операторов совмещают физиологическую подтверждение и push-извещения для существенных ситуаций. Модифицируемый дизайн независимо корректируется под свойства экрана.
RetailRocket dashboard – Advanced features led to stronger-than-expected conversion growth.
夜班医生第四季高清完整官方版,海外华人可免费观看最新热播剧集。
Определение проверенного гемблинг площадки требует основательного анализа официальных бумаг. Инновационные системы Lucky Bear casino обеспечивают клиентам стопроцентную информацию о имеющихся санкциях.
Механизм регистрации включает ряд обязательных этапов валидации. Администраторы настаивают свидетельства, доказывающие личность и дееспособность. Обычный KYC-механизм продолжается от 24 до 72 периодов.
Банкролл-менеджмент инициируется с назначения пределов на инвестиции. Профессиональные клиенты призывают использовать принцип 5% от совокупного игорного резерва на конкретную раунд.
Цифровые препятствия поставщиков принуждают использовать резервные домены. Копии оберегают абсолютную активность основного площадки, включая летопись транзакций и казино продвижение.
Современные денежные инструменты дают мгновенные пополнения через электронные кошельки. Bitcoin, Ethereum и фиксированные активы дают тайность и минимальные платежи. Время обработки извлечений равно 10-30 минут.
Системы лояльности содержат иерархические статусы с накапливающимся компенсацией. VIP-менеджеры гарантируют уникальные подарки, повышенные границы и ускоренную обслуживание.
戏台在线免费在线观看,海外华人专属官方认证平台,高清无广告体验。
我欲为人第二季平台结合大数据AI分析,专为海外华人设计,提供高清视频和直播服务。
一帆视频海外华人首选,提供最新华语剧集、美剧、日剧等高清在线观看。
https://neuroreliefusa.com/# Neuro Relief USA
мелбет промокод https://melbet93054.help/
塔尔萨之王第二季高清完整官方版,海外华人可免费观看最新热播剧集。
Новейшие геймеры обталкиваются с набором технических тонкостей при процессах с проверенными порталами. Профильные ресурсы типа Vavada зеркало выдают актуальную материалы о операциях развлекательных компаний.
Алгоритм подтверждения профиля включает множество неотъемлемых фаз. Стартовая верификация включает отправки удостоверений доказывающих гражданство. Типовой перечень охватывает паспорт, автоудостоверение или международное ID.
Цифровая составляющая создания аккаунта содержит применение SSL-шифрования и многофакторной защиты. Опытные пользователи советуют запускать полный набор возможных настроек защиты.
Зеркала являются идентичные копии центрального сайта с обеспечением полного набора функций. Центральное преимущество содержится в идентичности денежных границ и условий условий прокрутки.
Система поиска действующих альтернативных адресов опирается на наблюдении тематических новостных лент и сотрудничающих сайтов. Опытные игроки используют туннельные протоколы для обеспечения бесперебойного доступа независимо от региональных запретов.
侠之盗高清完整版,海外华人可免费观看最新热播剧集。
Smart GenRx USA: trustworthy canadian pharmacy – Smart GenRx USA
Азартная отрасль являет динамичный прогресс, манящая легионы игроков. Профессиональные ресурсы предоставляют стабильную атмосферу для беттинга. Развёрнутую материалы о этих провайдерах возможно получить на Mellstroy Game зеркало .
Аттестация является основным элементом отбора платформы. Контролёры Гибралтара обеспечивают строгий проверку финансовых действий. Каждая сертифицированная платформа реализует постоянные ревизии RNG-модулей.
Технические аспекты современных беттинг-платформ содержат SSL-криптографию банковского ранга. Провайдеры виртуального продукта наподобие Microgaming, NetEnt, Pragmatic Play внедряют сложные алгоритмы непредсказуемых параметров.
Процесс проверки профиля подразумевает представления бумаг KYC-формата. ID, документ о средствах, валидация местожительства — обычный перечень для полноценного доступа.
Параллельные домены исправляют препятствия с запретами поставщиков. Свежие копии обновляются систематически компьютерными службами. Мобильные приложения регулярно работают устойчивее браузерных модификаций.
Банкролл-менеджмент задаёт длительную доходность гемблинговых сессий. Профессиональные геймеры советуют ограничивать объём пари до 1-2% от полного банкролла.
Современные геймеры пересекаются с набором программных особенностей при процессах с официальными площадками. Профильные ресурсы типа Голд казино выдают свежую контент о работе гэмблинговых операторов.
Система верификации профиля подразумевает ряд обязательных стадий. Базовая валидация нуждается предоставления бумаг валидирующих гражданство. Стандартный пакет включает свидетельство, права или внешний паспорт.
Цифровая составляющая записления включает внедрение безопасного соединения и 2FA. Экспертные пользователи советуют активировать все доступных функций обеспечения.
Дублирующие порталы являются точные отражения базового портала с хранением полного инструментария. Центральное плюс кроется в идентичности денежных лимитов и критериев проигрыша.
Система локализации рабочих запасных доменов строится на отслеживании тематических уведомительных сервисов и связанных ресурсов. Продвинутые геймеры используют прокси-соединения для гарантирования постоянного связи безотносительно от локальных ограничений.
海外华人必备的ify官方认证平台,24小时不间断提供最新高清电影、电视剧,无广告观看体验。
Современные провайдеры азартных развлечений гарантируют клиентам вход к профессиональному беттингу через проверенные лаки Р±РёСЂ казино платформы. Официальная работа влечет учета строгих законодательных стандартов.
Алгоритм активации игрового кабинета охватывает аутентификацию конфиденциальных реквизитов. Управляющие применяют многоуровневые протоколы KYC и AML для пресечения нарушающих переводов.
Электронные средства передовых казино строятся на зашифрованных дата-центрах с HTTPS стандартами. Локальные запреты заставляет управляющих создавать альтернативные адреса.
Зеркальные ресурсы представляют идентичные версии центрального домена с обеспечением всех функций и данных. Участники обеспечивают себе устойчивый вход к балансу, гемблинг данным и личным опциям.
Финансовые переводы выполняются через подключенные расчетные шлюзы. Пределы на вклады и снятия определяются в согласии с регуляторными требованиями и организационными политиками контроля угроз.
Экспертные гемблеры советуют контролировать положение авторизации через контролирующие реестры развлекательных комиссий. Репутационные показатели содержат рейтинги на экспертных порталах и оценки подлинных беттеров.
爱一番海外版,专为华人打造的高清视频平台,支持全球加速观看。
真实的人类第二季高清完整官方版,海外华人可免费观看最新热播剧集。
戏台在线免费在线观看,海外华人专属平台采用机器学习个性化推荐,高清无广告体验。
凯伦皮里第二季高清完整官方版,海外华人可免费观看最新热播剧集。
海外华人必备的iyifan平台结合大数据AI分析,提供最新高清电影、电视剧,无广告观看体验。
爱一帆会员多少钱海外版,专为华人打造的高清视频平台,支持全球加速观看。
夜班医生第四季高清完整版,海外华人可免费观看最新热播剧集。
爱一番海外版,专为华人打造的高清视频平台,支持全球加速观看。
Новейшие игроки оказываются с барьером входа к официальным порталам. Организации фильтруют основные URL, но опытные Вавада клиенты осознают о доступности параллельных сайтов.
Параллельный портал является абсолютную воспроизведение основного площадки. Криптографические алгоритмы функционируют такими же. Финансовые транзакции выполняются через идентичные механизмы.
Технология оформления профиля через параллельный домен включает классической подтверждения. Специалисты просят бумаги для осуществления KYC-требований. Паспортные параметры проходят многоуровневую валидацию.
Финансовые лимиты на резервных ресурсах совпадают первичным требованиям. Наименьшие суммы сохраняются постоянными. Увеличивающиеся банки согласовываются между различными ссылками.
Премиальные программы действуют комплексно на резервных ресурсах. Вейджер гарантирует первоначальные величины. Период действия использования не изменяется.
Команда сопровождения изучает запросы с резервных доменов сходным образом. Мгновенный разговор поддерживает беспрерывный порядок функционирования.
Исследование в области сертифицированных порталов нуждается владения современных инструментов авторизации. Квалифицированные геймеры эксплуатируют Лаки Бир для приобретения релевантной данных о действующих доменах.
Механизм открытия учетной записи в сертифицированных организациях подразумевает детальную верификацию. Актуальные провайдеры задействуют KYC-процедуры и AML-стандарты. Оформление документов занимает от 24 до 72 периодов.
Цифровые технологии для обхода барьеров прогрессируют вместе с интенсификацией нормативных мер. VPN-платформы разряда premium обеспечивают шифрование AES-256 и стандарты OpenVPN. Стабильность связи fundamentally необходима для привилегированных игровых периодов.
Запасные платформы оперируют через географически размещенные компьютерные мощности. CDN-структуры предоставляют низкую время ответа для глобальных участников. Системное маршрутизация включается при идентификации барьера первичного ресурса.
Экономические переводы в легальных юрисдикциях подпадают под определенным критериям PCI DSS. Блокчейн транзакции набирают популярность благодаря скрытности и быстроте реализации.
Смартфонные софт элитных организаций содержат лицевую аутентификацию и push-уведомления для важных событий. Модифицируемый дизайн автономно изменяется под особенности матрицы.
Online casino Australia real money – play pokies and win big today
Площадка Mega — считается платформой, расположенный в теневом сегменте сети, где пользователи получают доступ множество специфических услуг.
mega магазин tor прочно ассоциируется с теневым характером и максимальным уровнем анонимности.
В переносном смысле данный сайт воспринимается как окно в подпольную сеть, которое имеет свои тонкости.
Данный теневой сайт является одной из заметных частей «глубокой сети», где главное значение имеют анонимность участников и защита каналов связи.
Вход на эти сайты обычно осуществляется использования особых браузеров (например, Tor), а также VPN для преодоления блокировок.
С целью посещения ресурса, нужно найти рабочий адрес (ONION-ссылку) и провести тщательную настройку оборудования.
Главная особенность Меги — это скрытность участников и отсутствии централизованной регистрации.
Посетители здесь находят множество услуг: от приватных мессенджеров до маркетплейсов.
Ресурс предоставляет охрану от мониторинга благодаря передовым методам кодирования.
Но при этом даже комплексные меры безопасности может гарантировать лишь частичную безопасность, особенно при неосторожных действиях самих пользователей.
На сегодняшнем этапе развития сети данная площадка занимает нишевую роль, интересуя тех пользователей, кто ищет неофициальные источники данными и услугами.
Среди контента здесь бывают представлены как разрешенный контент, так и запрещенные, что вынуждает участника быть внимательным и предусмотрительным.
Рассматривая Мега Даркнет как часть глобальной сети, следует отметить определенные нюансы, касающихся культуры использования и конфиденциальности.
Первое, на что стоит обратить внимание, необходима корректная организация пользовательского окружения и применение многоступенчатых мер защиты для снижения угроз.
Любой участник обязан осознавать степени конфиденциальности и, по мере сил придерживаться моральным нормам при общении на данной платформе.
Кроме того, не стоит забывать о правовых рисках и возможных последствиях за нарушение законодательства.
Законодательство разных стран по-разному трактует доступа к подобным площадкам и степени вины пользователей.
Некоторые исследователи отмечают, что такие площадки могут служить местом для обмена знаниями и сохранения конфиденциальности при осознанном использовании.
Но при всем при этом, угроза быть обманутым, хищения средств и криминальной активности здесь никогда не исчезают.
Лавируя между открытостью информации и нормативными запретами, теневая платформа остается одной из самых противоречивых частей интернета.
Отсюда следует простой вывод: требуется осмотрительно выбирать к выбору контента и проверке источников.
В конечном счете сводится к тому, что данная площадка — это сложная и противоречивая среда. Платформа дает максимальную приватность и защиты личных данных, но накладывает на посетителя бдительности, определенных знаний и осознанности действий.
Площадка показывает многообразие поведения людей в условиях ограниченного внешнего контроля и предоставляет платформу для коммуникации по закрытым вопросам.
Таким образом, Мега Даркнет представляет собой неоднозначный феномен цифрового мира, где гармония прав и рисков каждый пользователь находит для себя сам.
Best online casino bonuses Australia – claim free spins now
海外华人必备的iyf官方认证平台,24小时不间断提供最新高清电影、电视剧,无广告观看体验。
Навигация в пространстве сертифицированных сайтов включает осознания передовых решений подключения. Продвинутые пользователи эксплуатируют типпи зеркало для приобретения современной материалов о активных путях.
Схема регистрации профиля в надежных заведениях включает сложную верификацию. Передовые провайдеры внедряют KYC-механизмы и AML-нормы. Бумажная работа составляет от 24 до 72 часов.
Программные технологии для преодоления запретов развиваются одновременно с усилением регуляторных действий. VPN-платформы уровня premium гарантируют защиту AES-256 и методы OpenVPN. Непрерывность канала кардинально актуальна для привилегированных партий.
Дублирующие домены действуют через территориально разнесенные технические ресурсы. CDN-комплексы осуществляют сокращенную латентность для азиатских игроков. Цифровое редирект запускается при детекции ограничения главного ресурса.
Платежные движения в официальных зонах подпадают под конкретным требованиям PCI DSS. Цифровые расчеты получают востребованность по причине скрытности и скорости процессинга.
Планшетные утилиты ведущих провайдеров интегрируют биометрическую идентификацию и push-алерты для ключевых происшествий. Модифицируемый дизайн самостоятельно подстраивается под параметры монитора.
Hi to all, how is the whole thing, I think every one is getting more from this web page, and your views are nice designed for new people.
banda казино
超人和露易斯第四季高清完整官方版,海外华人可免费观看最新热播剧集。
Актуальные дублирующие порталы легальных игорных заведений на aqua casino создают постоянный доступ к азартным сервисам. Методика дублирования строит точные реплики главного домена с поддержанием всех опций.
Система активации через зеркало на сто процентов повторяет стандартную форму. Дебютные клиенты вводят активный email, создают безопасный шифр и определяют основную платежное средство.
Верификация профиля предполагает предоставления бумаг опираясь на KYC-регламенту. Изображение паспорта, подтверждение адреса и денежные сведения проверяются через цифровую контроль в течение 24-72 ч.
Авторизация верифицированных пользователей происходит через типовую панель с 2FA идентификацией. Разовые токены передаются на сотовый гаджет или e-mail адрес.
Опции денежного блока через альтернативные домены предлагает топовые финансовые сервисы. Visa, Mastercard, веб портмоне Skrill, Neteller, crypto Bitcoin, Ethereum обрабатываются с уменьшенными взносами 0-3%.
Гемблинг библиотека копируется на сто процентов включая слоты, классические геймплей, live-ведущих и прогрессивы. RTP-индикаторы, дисперсия и проигрыш фиксируются точными.
Поощрительная программа действует похоже базовому сайту. Welcome-наборы, даровые прокруты, возврат средств и VIP-курсы включаются системно при соблюдении прописанных условий.
Игровая ниша демонстрирует динамичный развитие, завлекая легионы пользователей. Грамотные порталы предоставляют стабильную условия для игры. Полную сведения о этих провайдерах реально отыскать на Вавада .
Аккредитация представляет основным фактором подбора портала. Юрисдикции Гибралтара обеспечивают качественный проверку денежных транзакций. Отдельная легальная сайт реализует периодические контроли RNG-алгоритмов.
IT характеристики передовых азартных площадок предусматривают SSL-шифрование расчётного стандарта. Провайдеры софтового продукта уровня Microgaming, NetEnt, Pragmatic Play интегрируют комплексные системы хаотичных чисел.
Схема верификации личного кабинета включает предоставления удостоверений KYC-уровня. ID, свидетельство о средствах, подтверждение прописки — обычный список для полноценного входа.
Альтернативные URL решают проблемы с ограничениями операторов. Действующие альтернативы модифицируются ежедневно IT отделами. Планшетные софт регулярно функционируют устойчивее онлайн модификаций.
Управление банкроллом создаёт стратегическую прибыльность гемблинговых раундов. Профессиональные беттеры настаивают сокращать величину пари до 1-2% от полного бюджета.
Лицензионные провайдеры развлекательных опций oferuja пользователям доступ к качественному игровому процессу через специализированные порталы, включая Лаки Бир РІС…РѕРґ , которые именно следуют transnational критерии безопасности.
Процедура регистрации necessita указания верификационных параметров через шифрованные SSL-каналы. Операторы требуют official удостоверение совершеннолетия и локации residence для поддержания законодательных стандартов.
Двухфакторная идентификация выступает принудительным элементом новейших механизмов конфиденциальности. Users располагают SMS-токены, push-уведомления или внедряют targeted программы вроде Google Authenticator.
Дублирующие порталы устраняют проблемы geographic блокировок и DDoS-штурмов. Техническим образом зеркала формируют копийные dublicates базового домена с maintaining features и пользовательских параметров.
Опытные участники suggest сохранять актуальные перечни функционирующих альтернатив в favourites browser. Букмекеры доставляют информацию о современных адресах через почтовые сервисы, Telegram-чаты и смартфонные apps.
Финансовые операции через legal площадки защищены криптографическими алгоритмами категории банковского направления. Изъятие денег выполняется solely на validated карты владельца account.
New Online Casino Australia 2025 Latest Offers
Подбор проверенного игрового ресурса в сегодняшних обстоятельствах нуждается тщательного внимания к юридическому статусу. Знающие игроки осознают, что Vavada предоставляет свежую факты о активных операторах.
Механизм оформления профиля в официальных платформах содержит неизбежную верификацию документов. KYC-нормы оберегают как казино, так и участника от афер. Кратковременные ограничения на получение средств до финализации проверки – привычная процедура.
Цифровые запреты на соединение к гемблинг площадкам обходятся через резервные порталы. Действующие зеркала сохраняют всестороннюю возможности первичного сервиса. Банковские движения, геймплейный результаты и поощрительные программы остаются неизменными.
Финансовая надежность измеряется критерием внедренных банковских методов. SSL-защита, PCI DSS подтверждение и двухфакторная подтверждение создают прочный контур обороны.
Азартная ассортимент официальных провайдеров охватывает машины от лидирующих разработчиков. RTP-индексы, колебания и статистические системы претерпевают независимую сертификацию в одобренных центрах.
Механизмы мотивации в достойных операторах основываются на четких критериях отыгрыша. Вейджер x35-40 признается нормальным для автомат-бонусов, в то время как традиционные игры идут в зачет с сниженным множителем.
Актуальные альтернативные домены проверенных казино на п»ї1хбет гарантируют устойчивый доступ к гемблинг ресурсам. Технология дублирования создает эквивалентные копии главного ресурса с поддержанием всех возможностей.
Процедура открытия счета через резервную ссылку полностью дублирует главную бланк. Свежие игроки прописывают рабочий email, устанавливают безопасный код доступа и устанавливают игровую финансовый инструмент.
Аутентификация аккаунта подразумевает передачи бумаг опираясь на KYC-стандартам. Копия ID-карты, подтверждение адреса и карточные сведения проверяются через алгоритмическую валидацию в течение 24-72 часа.
Авторизация существующих клиентов производится через обычную панель с расширенной проверкой. Разовые пароли поступают на мобильный номер или e-mail адрес.
Опции пополнительного сектора через дублирующие порталы поддерживает популярные финансовые механизмы. Visa, Mastercard, веб хранилища Skrill, Neteller, цифровые активы Bitcoin, Ethereum процессируются с минимальными сборами 0-3%.
Игровая база повторяется в точности включая spinning games, традиционные развлечения, live-хостов и максимальные награды. RTP-коэффициенты, изменчивость и отыгрыш остаются аналогичными.
Поощрительная политика выполняется аналогично базовому сайту. Welcome-пакеты, free spins, денежный возврат и VIP-курсы включаются машинально при исполнении определенных условий.
超人和露易斯第四季高清完整版,海外华人可免费观看最新热播剧集。
Развлекательная отрасль демонстрирует быстрый подъём, притягивая миллионы игроков. Экспертные платформы предлагают качественную обстановку для пари. Детальную материалы о таких организациях можно получить на лаки ворлд казино .
Аттестация выступает основным элементом выбора портала. Юрисдикции Мальты гарантируют жёсткий надзор валютных процедур. Любая лицензированная сайт проходит периодические контроли RNG-механизмов.
Программные свойства передовых казино включают SSL-безопасность банковского уровня. Создатели цифрового софта наподобие Microgaming, NetEnt, Pragmatic Play интегрируют многоуровневые схемы рандомных значений.
Процедура валидации счёта включает подачи свидетельств KYC-формата. Удостоверение, выписка о доходах, подтверждение прописки — классический комплект для завершённого входа.
Альтернативные URL убирают трудности с блокировками провайдеров. Функционирующие зеркала адаптируются ежедневно цифровыми службами. Карманные программы регулярно выполняются лучше сетевых редакций.
Контроль средств определяет продолжительную доходность азартных партий. Опытные игроки рекомендуют контролировать сумму бета до 1-2% от совокупного резерва.
Новейшие пользователи пересекаются с изобилием технических аспектов при операциях с сертифицированными ресурсами. Профессиональные сайты типа Голд зеркало дают современную данные о процессах гэмблинговых компаний.
Алгоритм проверки кабинета включает множество неотъемлемых стадий. Базовая валидация подразумевает размещения документов удостоверяющих гражданство. Типовой перечень включает удостоверение личности, права или международный паспорт.
Системная часть регистрации включает эксплуатацию зашифрованного канала и многофакторной защиты. Опытные геймеры советуют активировать все имеющихся параметров секьюрити.
Дублирующие порталы составляют полные копии базового домена с хранением тотального возможностей. Главное бонус кроется в идентичности финансовых ограничений и требований проигрыша.
Система локализации активных резервных ссылок основывается на отслеживании профильных уведомительных сервисов и сотрудничающих сайтов. Профессиональные пользователи применяют виртуальные частные сети для создания постоянного соединения безотносительно от территориальных ограничений.
奇思妙探高清完整版,海外华人可免费观看最新热播剧集。
PhishProof picks – Makes managing cybersecurity tasks far less complicated.
Новейшие участники встречаются с массой технологических деталей при функционировании с официальными платформами. Экспертные ресурсы типа Лаки Бир сайт выдают свежую контент о деятельности азартных операторов.
Процесс подтверждения кабинета предполагает набор принудительных фаз. Исходная подтверждение требует размещения удостоверений удостоверяющих субъект. Типовой перечень предполагает паспорт, автолицензию или загранпаспорт.
Системная элемент открытия счета предполагает внедрение криптографической защиты и двухуровневой проверки. Профессиональные участники рекомендуют включать совокупность имеющихся опций секьюрити.
Запасные домены формируют идентичные клоны центрального ресурса с поддержанием полного инструментария. Ключевое бонус состоит в подобии платежных границ и критериев отыгрыша.
Процедура выявления актуальных зеркал опирается на проверке экспертных информационных каналов и партнерских порталов. Опытные игроки применяют анонимайзеры для предоставления надежного связи без оглядки от локальных лимитов.
Актуальные mirror-ссылки надежных игорных заведений на Mellstroy Game casino гарантируют стабильный доступ к развлекательным платформам. Технология дублирования формирует точные версии базового ресурса с фиксацией всех опций.
Процедура активации через резервную ссылку полностью копирует главную шаблон. Только пришедшие геймеры заполняют активный email, формируют защищенный секретную комбинацию и определяют базовую курренси.
Подтверждение аккаунта содержит загрузки документов опираясь на KYC-регламенту. Копия паспорта, свидетельство проживания и денежные сведения проверяются через автоматическую анализ в течение 24-72 периодов.
Аутентификация действующих геймеров осуществляется через обычную окно с усиленной проверкой. Временные токены отправляются на сотовый гаджет или мейл.
Опции финансового сектора через дублирующие порталы поддерживает популярные банковские платформы. Visa, Mastercard, веб счета Skrill, Neteller, виртуальные монеты Bitcoin, Ethereum обрабатываются с минимальными комиссиями 0-3%.
Gaming ассортимент копируется на сто процентов включая барабаны, настольные развлечения, live-операторов и максимальные награды. RTP-индикаторы, вариативность и проигрыш фиксируются неизменными.
Бонусная система работает схоже корневому сайту. Welcome-предложения, даровые прокруты, refund и VIP-планы стартуют программно при соблюдении определенных требований.
Australian Online Casino Crypto Bitcoin Pokies
iyf.tv海外华人首选,采用机器学习个性化推荐,提供最新华语剧集、美剧、日剧等高清在线观看。
海外华人必备的iyifan平台结合大数据AI分析,提供最新高清电影、电视剧,无广告观看体验。
超人和露易斯第四季高清完整版,海外华人可免费观看最新热播剧集。
Выбор качественного развлекательного площадки в текущих обстоятельствах заставляет детального рассмотрения к юридическому положению. Компетентные пользователи знают, что п»ї1хбет официальный сайт отображает актуальную информацию о функционирующих сервисах.
Механизм открытия счета в лицензированных заведениях включает обязательную проверку документов. KYC-правила обеспечивают как площадку, так и игрока от обмана. Кратковременные границы на вывод капитала до закрытия подтверждения – обычная процедура.
Виртуальные ограничения на доступ к развлекательным сервисам преодолеваются через альтернативные ссылки. Действующие отражения поддерживают всестороннюю эффективность главного платформы. Финансовые движения, геймплейный достижения и привилегированные программы поддерживаются постоянными.
Экономическая стабильность измеряется критерием эксплуатируемых платежных способов. SSL-шифрование, PCI DSS валидация и многоуровневая проверка гарантируют прочный контур охраны.
Развлекательная библиотека сертифицированных операторов охватывает машины от лидирующих студий. RTP-индексы, дисперсия и математические формулы испытывают нейтральную контроль в авторизованных организациях.
Системы лояльности в качественных заведениях базируются на открытых параметрах проигрыша. Вейджер x35-40 оценивается разумным для спин-подарков, в то время как традиционные состязания засчитываются в подсчет с минимальным показателем.
Действующие зеркала надежных казино на лаки Р±РёСЂ казино предоставляют устойчивый подключение к игровым порталам. Система клонирования образует идентичные клоны основного сайта с сохранением всех возможностей.
Процедура активации через зеркало полностью воспроизводит базовую заявку. Новые пользователи прописывают рабочий email, придумывают сложный ключ и назначают базовую финансовый инструмент.
Валидация аккаунта требует отправки документов согласно KYC-политике. Копия удостоверения личности, подтверждение регистрации и банковские координаты анализируются посредством алгоритмическую анализ в течение 24-72 временных единиц.
Авторизация зарегистрированных игроков производится через базовую модуль с 2FA аутентификацией. Одноразовые ключи поступают на телефонный девайс или почтовый ящик.
Функционал денежного компонента через зеркала поддерживает распространенные платежные инструменты. Visa, Mastercard, веб кошельки Skrill, Neteller, криптовалюты Bitcoin, Ethereum обрабатываются с низкими комиссиями 0-3%.
Игровая ассортимент дублируется полностью включая машины, столовые геймплей, live-дилеров и прогрессивы. RTP-значения, колебания и проигрыш поддерживаются аналогичными.
Подарочная система выполняется идентично главному домену. Welcome-комплекты, даровые прокруты, компенсация и VIP-системы включаются машинально при исполнении фиксированных параметров.
Игровая ниша являет интенсивный развитие, привлекая тысячи игроков. Опытные площадки предоставляют защищённую пространство для беттинга. Развёрнутую информацию о данных организациях возможно обнаружить на п»ї1xBet казино .
Лицензирование выступает центральным показателем селекции ресурса. Юрисдикции Олдерни создают жёсткий надзор расчётных процедур. Отдельная аккредитованная платформа осуществляет периодические ревизии RNG-систем.
Программные характеристики инновационных казино включают SSL-криптографию банковского ранга. Поставщики программного материала наподобие Microgaming, NetEnt, Pragmatic Play встраивают сложные схемы непредсказуемых величин.
Процесс подтверждения учётной записи предполагает передачи удостоверений KYC-уровня. Удостоверение, свидетельство о заработке, подтверждение регистрации — обычный перечень для окончательного входа.
Альтернативные порталы исправляют трудности с ограничениями поставщиков. Актуальные варианты корректируются регулярно цифровыми отделами. Карманные программы часто функционируют качественнее сетевых модификаций.
Контроль средств создаёт длительную доходность азартных периодов. Грамотные участники советуют ограничивать величину вейджера до 1-2% от общего банкролла.
Доставка цветов 24 7
Постоянное развитие сервиса доставки букетов
Новейшие игроки имеют дело с множеством технологических нюансов при процессах с сертифицированными порталами. Специализированные ресурсы типа ДживиСпин казино предоставляют новую информацию о функционировании казино брендов.
Процесс проверки учетной записи содержит несколько обязательных шагов. Первичная подтверждение нуждается размещения бумаг удостоверяющих персону. Привычный список охватывает паспорт, водительские права или загранпаспорт.
Программная часть регистрации подразумевает внедрение защищенного протокола и 2FA. Продвинутые игроки советуют задействовать полный набор предложенных настроек безопасности.
Зеркала составляют идентичные дубликаты основного платформы с обеспечением всего возможностей. Основное достоинство заключается в тождественности финансовых ограничений и условий отыгрыша.
Процедура выявления действующих альтернативных адресов опирается на наблюдении профильных новостных лент и союзных площадок. Продвинутые участники применяют туннельные протоколы для формирования постоянного входа независимо от региональных запретов.
FilterFactory Hub – Clear product info and smooth navigation made browsing effortless today.
codigo promocional 1xbet colombia
Навигация в области проверенных ресурсов предполагает осознания продвинутых инструментов авторизации. Профессиональные участники внедряют Mellstroy Game для обретения релевантной информации о действующих доменах.
Механизм создания аккаунта в официальных организациях содержит тщательную аутентификацию. Актуальные организации задействуют KYC-процедуры и AML-стандарты. Документальная процедура требует от 24 до 72 часов.
IT решения для минования препятствий улучшаются вместе с повышением нормативных мер. VPN-службы типа premium обеспечивают шифрование AES-256 и системы OpenVPN. Постоянство канала жизненно актуальна для VIP раундов.
Альтернативные платформы выполняют задачи через пространственно размещенные технические системы. CDN-комплексы гарантируют низкую пинг для европейских игроков. Цифровое перенаправление включается при обнаружении недоступности базового адреса.
Финансовые переводы в легальных областях подчиняются конкретным нормам PCI DSS. Децентрализованные расчеты увеличивают признание в результате конфиденциальности и темпу процессинга.
Переносные программы ведущих компаний интегрируют лицевую проверку и push-оповещения для ключевых ситуаций. Изменяемый интерфейс программно настраивается под свойства экрана.
Для тех, кто ищет информацию по теме “Лучшие мультфильмы февраля 2026 для семьи”, нашел много полезного.
Ссылка ниже:
https://obender.ru/%d0%be%d0%b1%d0%b7%d0%be%d1%80-%d0%bc%d1%83%d0%bb%d1%8c%d1%82%d1%84%d0%b8%d0%bb%d1%8c%d0%bc%d0%be%d0%b2-%d1%84%d0%b5%d0%b2%d1%80%d0%b0%d0%bb%d1%8f-2026-%d1%87%d1%82%d0%be-%d1%83%d0%b6%d0%b5-%d0%b8/
Передовые геймеры сталкиваются с препятствием связи к проверенным порталам. Провайдеры ограничивают базовые порталы, но искушённые Mellstroy Game зеркало участники помнят о наличии резервных платформ.
Резервная ссылка представляет абсолютную воспроизведение главного сайта. SSL-сертификаты поддерживаются такими же. Финансовые операции выполняются через идентичные шлюзы.
Технология оформления профиля через резервный домен подразумевает классической валидации. Сотрудники запрашивают удостоверения для соблюдения KYC-правил. Персональные характеристики проходят комплексную аутентификацию.
Банковские пределы на зеркальных ресурсах аналогичны основным условиям. Начальные ставки функционируют фиксированными. Возрастающие выигрышные пулы координируются между множественными доменами.
Поощрительные схемы выполняются завершённо на резервных ресурсах. Вейджер сохраняет оригинальные показатели. Длительность использования поддерживается.
Отдел ассистирования рассматривает обращения с альтернативных ссылок аналогично. Интерактивный чат предоставляет 24-часовой расписание функционирования.
SchemaAtelier studio – Practical structure and helpful tools made managing tasks simpler.
canadian pharmacy india: onlinecanadianpharmacy 24 – Smart GenRx USA
PageRank Parlor curated tips – Straightforward strategies to help improve search engine performance.
Перемещение в секторе лицензированных сайтов требует владения продвинутых решений доступа. Продвинутые геймеры внедряют лаки Р±РёСЂ для приобретения современной данных о активных ссылках.
Процесс формирования учетной записи в лицензированных учреждениях включает тщательную верификацию. Современные операторы применяют KYC-процедуры и AML-стандарты. Документальная процедура отнимает от 24 до 72 часов.
Программные технологии для обхода запретов эволюционируют сообща с усилением юридических шагов. VPN-решения типа premium гарантируют криптографию AES-256 и стандарты OpenVPN. Устойчивость подключения принципиально необходима для высокоролловых заходов.
Альтернативные ресурсы работают через географически расположенные компьютерные ресурсы. CDN-системы поддерживают минимальную латентность для азиатских пользователей. Программное редирект активируется при обнаружении ограничения основного ресурса.
Финансовые движения в лицензированных зонах отвечают жестким стандартам PCI DSS. Крипто расчеты приобретают признание благодаря секретности и скорости выполнения.
Планшетные клиенты премиальных брендов объединяют лицевую аутентификацию и push-алерты для существенных ситуаций. Гибкий дизайн программно корректируется под параметры матрицы.
Online casinos real money Australia – bonuses worth claiming
Современные операторы развлекательных игр дают игрокам возможность к высококлассному гемблингу через надежные tip top casino ресурсы. Официальная функционирование влечет следования строгих контролирующих критериев.
Система открытия пользовательского аккаунта предусматривает проверку персональных сведений. Администраторы применяют комплексные протоколы KYC и AML для пресечения фродовых финансовых действий.
Цифровые решения современных гемблинг платформ функционируют на защищенных хостингах с HTTPS протоколами. IP-фильтрация вынуждает провайдеров внедрять альтернативные адреса.
Дублирующие домены представляют аналогичные версии базового домена с обеспечением всех возможностей и данных. Участники добиваются стабильный соединение к депозиту, игровой истории и личным настройкам.
Банковские процедуры осуществляются через интегрированные расчетные шлюзы. Границы на взносы и обналичивания назначаются в гармонии с регуляторными условиями и организационными политиками контроля угроз.
Опытные гемблеры настаивают отслеживать условия сертификата через государственные регистры беттинг ведомств. Репутационные характеристики содержат места на тематических сайтах и комментарии настоящих участников.
Online casinos Australia – trusted sites for real cash gambling
Thanks in support of sharing such a nice idea, article is fastidious,
thats why i have read it completely
Australia Trusted Real Money Casino Reviews
Hi to every single one, it’s actually a pleasant for me to pay a visit this web site, it includes useful Information.
leebet casino
Real Money Online Casino Australia Fast Payouts Via
For premium
get small business loan
for training materials.
官方授权的一帆视频海外华人首选,第一时间提供最新华语剧集、美剧、日剧等高清在线观看。
https://sertralineusa.com/# zoloft cheap
塔尔萨之王高清完整版,海外华人可免费观看最新热播剧集。
超人和露易斯第三季高清完整版智能AI观看体验优化,海外华人可免费观看最新热播剧集。
Подбор надежного гемблинг площадки заставляет детального анализа юридических документов. Актуальные порталы Килограмм казино предоставляют участникам абсолютную данные о текущих разрешениях.
Алгоритм регистрации охватывает определенное количество требуемых шагов подтверждения. Администраторы настаивают справки, устанавливающие личность и совершеннолетие. Традиционный KYC-алгоритм требует от 24 до 72 промежутков.
Банкролл-менеджмент запускается с фиксации пределов на вклады. Профессиональные клиенты призывают использовать принцип 5% от общего развлекательного фонда на отдельную сессию.
Системные блокировки владельцев обязывают внедрять вспомогательные ссылки. Клоны поддерживают полную производительность главного площадки, охватывая архив переводов и казино успех.
Актуальные финансовые системы гарантируют оперативные взносы через цифровые хранилища. Bitcoin, Ethereum и стабильные валюты поддерживают приватность и мизерные платежи. Срок осуществления получений составляет 10-30 периодов.
Программы преданности включают градационные категории с накапливающимся кэшбэком. VIP-консультанты предоставляют эксклюзивные поощрения, расширенные рамки и ускоренную поддержку.
海外华人必备的iyifan平台运用AI智能推荐算法,提供最新高清电影、电视剧,无广告观看体验。
New online casino Australia 2025 – fresh sites with huge welcome bonuses
Современные геймеры сталкиваются с сложностью связи к официальным сайтам. Операторы ограничивают стандартные ссылки, но опытные винити казино клиенты знают о доступности зеркальных сайтов.
Зеркало является идентичную отображение оригинального ресурса. Протоколы шифрования сохраняются идентичными. Расчётные транзакции осуществляются через аналогичные шлюзы.
Технология создания аккаунта через альтернативный ссылку содержит привычной верификации. Менеджеры просят свидетельства для реализации KYC-правил. Идентификационные информация реализуют комплексную подтверждение.
Пополнительные ограничения на зеркальных платформах соответствуют основным параметрам. Начальные вклады продолжают фиксированными. Увеличивающиеся банки согласовываются между многочисленными доменами.
Льготные механизмы работают целостно на дополнительных платформах. Множитель ставок гарантирует исходные цифры. Длительность использования поддерживается.
Служба поддержки решает тикеты с резервных ресурсов равнозначно. Интерактивный разговор осуществляет постоянный порядок работы.
It is perfect time to make some plans for the future and it is time to be happy.
I’ve read this post and if I may I wish to recommend you few interesting things
or tips. Perhaps you can write next articles referring to this
article. I wish to learn more issues about it!
奇思妙探高清完整版,海外华人可免费观看最新热播剧集。
海外华人必备的iyf官方认证平台,24小时不间断提供最新高清电影、电视剧,无广告观看体验。
https://ivertherapeutics.shop/# ivermectin lotion for lice
真实的人类第一季高清完整官方版,海外华人可免费观看最新热播剧集。
凯伦皮里第一季高清完整版结合大数据AI分析,海外华人可免费观看最新热播剧集。
iyftv海外华人首选,智能AI观看体验优化,提供最新华语剧集、美剧、日剧等高清在线观看。
海外华人必备的yifan平台采用机器学习个性化推荐,提供最新高清电影、电视剧,无广告观看体验。
Online casino casinorelay.com Australia – trusted for Aussies
凯伦皮里第一季高清完整版,海外华人可免费观看最新热播剧集。
Современные игроки попадают с препятствием доступа к официальным сайтам. Операторы ограничивают первичные ссылки, но профессиональные казино Mellstroy Game клиенты осознают о функционировании параллельных порталов.
Резервная ссылка представляет стопроцентную воспроизведение базового ресурса. Системы безопасности остаются идентичными. Расчётные процедуры производятся через те же каналы.
Процедура оформления профиля через зеркальный портал предполагает обычной аутентификации. Менеджеры выясняют документы для выполнения KYC-регламентов. Личные характеристики осуществляют многоуровневую аутентификацию.
Депозитные границы на параллельных сайтах равняются стандартным условиям. Низшие суммы поддерживаются неизменными. Возрастающие накопления синхронизируются между всеми доменами.
Бонусные схемы оперируют полноценно на параллельных ресурсах. Коэффициент оборота удерживает базовые величины. Срок активности отыгрыша сохраняется.
Служба помощи решает тикеты с зеркальных доменов равнозначно. Мгновенный общение осуществляет круглосуточный порядок оперирования.
Функционирующие резервные адреса легальных игорных заведений на Лаки Бир РІС…РѕРґ создают непрерывный соединение к гемблинг системам. Технология копирования образует полноценные клоны основного веб-площадки с поддержанием всех функций.
Схема активации через альтернативный домен абсолютно повторяет стандартную заявку. Свежие пользователи заполняют функционирующий email, создают стойкий секретную комбинацию и определяют рабочую денежную единицу.
Идентификация учетной записи включает отправки свидетельств опираясь на KYC-требованиям. Фото водительских прав, верификация адреса и платежные координаты проходят автоматическую верификацию в течение 24-72 временных единиц.
Логин активных геймеров осуществляется через обычную модуль с расширенной аутентификацией. Временные токены приходят на мобильный устройство или мейл.
Возможности пополнительного сектора через зеркала содержит востребованные денежные инструменты. Visa, Mastercard, веб портмоне Skrill, Neteller, цифровые активы Bitcoin, Ethereum выполняются с оптимизированными платежами 0-3%.
Игровая каталог дублируется на сто процентов включая spinning games, столовые забавы, live-ведущих и максимальные награды. RTP-показатели, вариативность и ставочные требования фиксируются аналогичными.
Промо схема функционирует аналогично главному сайту. Welcome-пакеты, даровые прокруты, денежный возврат и VIP-курсы инициируются алгоритмически при достижении фиксированных стандартов.
New online casino Australia 2025 – fresh sites with huge welcome bonuses
海外华人必备的ify平台智能AI观看体验优化,提供最新高清电影、电视剧,无广告观看体验。
If you want a book that will make you believe in fate, read this. The Love in Plane Sight PDF is a beautifully written story about destiny. It is perfect for readers who want a meaningful romance. Access the ebook now and start this incredible journey. https://loveinplanesightpdf.site/ Love In Plane Sight Read Online
pin-up hisobni yopish http://pinup15293.help/
Discover the comprehensive Bluebird Gold PDF guide, a must-read for anyone interested in high-quality financial insights. This document provides clear, actionable data that simplifies complex market trends. Download your copy today to enhance your strategic planning and stay ahead in the competitive world of precious metals. https://bluebirdgoldpdf.site/ Bluebird Gold Devney Perry Buy
Передовые бетторы сталкиваются с сложностью соединения к проверенным порталам. Организации закрывают главные ссылки, но профессиональные Gold casino клиенты знают о наличии резервных ресурсов.
Дополнительный домен образует идентичную дубликат первичного ресурса. SSL-сертификаты поддерживаются идентичными. Банковские действия осуществляются через идентичные каналы.
Алгоритм открытия счёта через альтернативный ресурс содержит типовой подтверждения. Операторы уточняют свидетельства для осуществления KYC-регламентов. Паспортные характеристики выполняют многоуровневую проверку.
Вносительные ограничения на параллельных ресурсах соответствуют первичным характеристикам. Наименьшие взносы остаются константными. Растущие банки синхронизируются между разными порталами.
Поощрительные механизмы работают всесторонне на параллельных сайтах. Множитель ставок гарантирует первоначальные параметры. Длительность использования сохраняется.
Отдел обслуживания рассматривает обращения с параллельных доменов равнозначно. Онлайн разговор осуществляет беспрерывный порядок обслуживания.
ifuntv海外华人首选,结合大数据AI分析,提供最新华语剧集、美剧、日剧等高清在线观看。
Новейшие операторы развлекательных развлечений предоставляют участникам возможность к высококлассному беттингу через безопасные Лев казино сайты. Легальная бизнес требует следования конкретных регуляторных норм.
Алгоритм открытия индивидуального аккаунта охватывает проверку конфиденциальных данных. Управляющие задействуют детализированные процедуры KYC и AML для предотвращения мошеннических платежей.
Электронные системы актуальных развлекательных порталов строятся на стабильных хостингах с HTTPS сертификатами. Геоблокировка побуждает провайдеров разрабатывать дублирующие домены.
Дублирующие платформы образуют идентичные клоны основного сайта с фиксацией всех инструментов и параметров. Участники добиваются непрерывный связь к балансу, азартной данным и пользовательским опциям.
Банковские транзакции реализуются через встроенные финансовые шлюзы. Лимиты на инвестиции и обналичивания назначаются в унисон с регуляторными положениями и организационными политиками управления рисками.
Экспертные игроки советуют контролировать условия сертификата через регуляторные реестры азартных органов. Репутационные критерии охватывают рейтинги на профильных сайтах и мнения настоящих игроков.
官方授权的一帆视频海外华人首选,第一时间提供最新华语剧集、美剧、日剧等高清在线观看。
karachimall.shop – Clean interface and straightforward product info made shopping hassle-free.
Проверенные площадки гэмблинг опций oferuja игрокам доступ к элитному азартному досугу через специализированные платформы, включая п»ї1хбет регистрация , что следуют международные критерии надёжности.
Схема активации требует заполнения authentication деталей через безопасные SSL-соединения. Операторы запрашивают письменное verification правоспособности и региона нахождения для соблюдения нормативных требований.
Многоуровневая идентификация выступает обязательным aspect новейших архитектур security. Игроки имеют SMS-коды, push-оповещения или внедряют targeted приложения по типу Google Authenticator.
Зеркальные адреса ликвидируют трудности региональных блокировок и DDoS-воздействий. По сути mirrors образуют идентичные реплики центрального портала с удержанием функциональности и user информации.
Экспертные игроки suggest удерживать актуальные списки working альтернатив в избранном веб-клиента. Букмекеры рассылают обновления о современных порталах через e-mail, Telegram-communities и портативные утилиты.
Финансовые movements через официальные ресурсы защищены cryptographic протоколами категории банковского segment. Extraction капитала выполняется solely на аутентифицированные wallets держателя учётной записи.
Легальные платформы развлекательных услуг предоставляют участникам вариант к премиальному гэмблингу через профильные ресурсы, включая казино Лаки Бир , которые специально соблюдают глобальные критерии security.
Последовательность открытия счёта предполагает заполнения authentication параметров через encrypted SSL-connection. Букмекеры просят official доказательство age verification и региона residence для compliance legal критериев.
Многоуровневая идентификация становится необходимым компонентом передовых архитектур security. Игроки располагают SMS-ключи, push-сообщения или задействуют dedicated утилиты в стиле Google Authenticator.
Зеркальные ссылки устраняют трудности geographic барьеров и DDoS-assault. Технически mirrors формируют копийные копии базового платформы с maintaining опций и личных параметров.
Профессиональные пользователи suggest поддерживать обновлённые каталоги working дублей в закладках веб-клиента. Администрация доставляют updates о современных адресах через мейл, Telegram-каналы и портативные apps.
Финансовые транзакции через официальные сайты secured шифровальными methods стандарта банковского индустрии. Получение фондов реализуется solely на аутентифицированные карты владельца личного кабинета.
ifvod官方认证平台,专为海外华人设计,24小时不间断提供高清视频和直播服务。
塔尔萨之王第二季高清完整版采用机器学习个性化推荐,海外华人可免费观看最新热播剧集。
Актуальные зеркала надежных гемблинг-платформ на п»ї1xBet гарантируют устойчивый коннект к гемблинг сервисам. Принцип клонирования строит точные реплики главного веб-площадки с консервацией всех функций.
Механизм создания аккаунта через mirror-сайт полностью повторяет базовую анкету. Новые клиенты прописывают рабочий email, формируют безопасный ключ и выбирают операционную финансовый инструмент.
Аутентификация профиля содержит загрузки документов опираясь на KYC-стандартам. Скан паспорта, доказательство адреса и платежные сведения анализируются посредством цифровую анализ в течение 24-72 часа.
Вход верифицированных участников происходит через стандартную интерфейс с усиленной верификацией. Разовые ключи доставляются на смс номер или email.
Механизмы финансового сектора через альтернативные домены включает топовые платежные сервисы. Visa, Mastercard, цифровые балансы Skrill, Neteller, цифровые активы Bitcoin, Ethereum реализуются с низкими платежами 0-3%.
Азартная база дублируется целиком включая spinning games, карточные игры, live-крупье и накопительные призы. RTP-значения, дисперсия и проигрыш поддерживаются идентичными.
Подарочная механизм действует идентично главному веб-площадке. Welcome-комплекты, даровые прокруты, денежный возврат и VIP-схемы включаются системно при достижении установленных стандартов.
Доставка цветов по мск
Сочетание классики и современности в букетах
Поиск легального развлекательного портала нуждается основательного анализа лицензионных документов. Актуальные порталы Рльдорадо регистрация обеспечивают участникам полную факты о своих аккредитациях.
Процедура открытия аккаунта включает множество необходимых ступеней проверки. Провайдеры просят справки, подтверждающие самобытность и правоспособность. Типовой KYC-регламент длится от 24 до 72 периодов.
Управление банком инициируется с назначения лимитов на пополнения. Искусные клиенты настаивают эксплуатировать правило 5% от суммарного азартного средств на одну сессию.
Цифровые блокировки поставщиков вынуждают внедрять резервные пути. Копии сохраняют полную активность центрального ресурса, подразумевая историю операций и гемблинг продвижение.
Инновационные финансовые инструменты предоставляют мгновенные депозиты через электронные кошельки. Bitcoin, Ethereum и постоянные токены дают конфиденциальность и крошечные комиссии. Длительность осуществления получений равно 10-30 интервалов.
Алгоритмы приверженности подразумевают ступенчатые категории с возрастающим бонусом. VIP-кураторы дают персонализированные подарки, увеличенные пределы и ускоренную техподдержку.
Поиск в пространстве официальных порталов включает представления актуальных инструментов соединения. Продвинутые геймеры используют Лаки Бир для добывания релевантной информации о функционирующих путях.
Процедура оформления счета в надежных учреждениях включает многоуровневую верификацию. Новейшие организации задействуют KYC-протоколы и AML-критерии. Бумажная работа отнимает от 24 до 72 промежутков.
IT методы для избежания блокировок улучшаются одновременно с ужесточением юридических решений. VPN-решения типа premium предоставляют криптографию AES-256 и методы OpenVPN. Устойчивость канала кардинально значима для высокоролловых сессий.
Дублирующие платформы работают через локально расположенные IT ресурсы. CDN-комплексы осуществляют оптимальную отклик для международных геймеров. Программное редирект запускается при детекции препятствия основного портала.
Банковские переводы в сертифицированных территориях подчиняются определенным правилам PCI DSS. Блокчейн расчеты набирают популярность в результате анонимности и темпу процессинга.
Планшетные приложения премиальных провайдеров объединяют голосовую проверку и push-сообщения для важных эпизодов. Изменяемый дизайн независимо изменяется под характеристики дисплея.
Rest and Repair portal – Straight to the point suggestions saved me both time and effort.
海外华人必备的ify官方认证平台,24小时不间断提供最新高清电影、电视剧,无广告观看体验。
侠之盗高清完整官方版,海外华人可免费观看最新热播剧集。
Надёжные площадки гэмблинг опций гарантируют геймерам шанс к профессиональному развлечениям через профильные платформы, включая казино Килограмм , которые выполняют международные стандарты конфиденциальности.
Алгоритм создания аккаунта necessita ввода идентификационных данных через криптографические SSL-протоколы. Менеджмент запрашивают официальное verification правоспособности и региона residence для соблюдения юрисдикционных критериев.
Двухфакторная верификация становится mandatory aspect передовых solutions конфиденциальности. Users имеют SMS-токены, push-оповещения или применяют специальные софт по типу Google Authenticator.
Резервные порталы решают трудности territorial запретов и DDoS-assault. По сути зеркала представляют копийные dublicates базового ресурса с поддержанием опций и индивидуальных данных.
Компетентные пользователи suggest хранить обновлённые перечни действующих зеркал в закладках интернет-программы. Букмекеры доставляют updates о свежих URL через email, Telegram-communities и портативные программы.
Денежные операции через лицензионные порталы обеспечены cryptographic алгоритмами стандарта банковского сектора. Снятие капитала выполняется исключительно на validated wallets собственника account.
huarenus平台运用AI智能推荐算法,专为海外华人设计,提供高清视频和直播服务。
армированный бетон rekonstrukcziya-zdanij.ru .
海外华人必备的iyifan平台运用AI智能推荐算法,提供最新高清电影、电视剧,无广告观看体验。
超人和露易斯第二季高清完整版,海外华人可免费观看最新热播剧集。
官方授权的一帆视频海外华人首选,第一时间提供最新华语剧集、美剧、日剧等高清在线观看。
Real Money Best Baccarat Bonuses For Aussies
iyf.tv海外华人首选,提供最新华语剧集、美剧、日剧等高清在线观看。
一帆平台智能AI观看体验优化,专为海外华人设计,提供高清视频和直播服务。
Выбор безопасного betting портала в нынешних рамках подразумевает особого изучения к лицензионному режиму. Компетентные игроки знают, что Меллстрой регистрация включает современную информацию о активных операторах.
Алгоритм регистрации в легальных операторах предусматривает принудительную проверку удостоверения. KYC-требования охраняют как заведение, так и пользователя от махинаций. Временные границы на получение средств до закрытия верификации – нормальная методика.
Виртуальные блокировки на соединение к игровым ресурсам преодолеваются через альтернативные ссылки. Действующие зеркала сохраняют стопроцентную производительность основного платформы. Денежные процедуры, интерактивный продвижение и наградные схемы сохраняются устойчивыми.
Капитальная защищенность характеризуется показателем используемых банковских механизмов. SSL-безопасность, PCI DSS валидация и двухфакторная аутентификация создают надежный щит защиты.
Развлекательная коллекция официальных заведений включает машины от топовых разработчиков. RTP-показатели, вариативность и статистические принципы испытывают внешнюю проверку в аккредитованных центрах.
Схемы поощрения в профессиональных заведениях опираются на четких требованиях вейджера. Условия ставок x35-40 признается приемлемым для слот-привилегий, в то время как классические игры принимаются в счет с минимальным коэффициентом.
Активные mirror-ссылки проверенных гемблинг-платформ на Lucky Bear казино дают постоянный соединение к гемблинг системам. Схема дублирования образует полноценные версии базового портала с сохранением всех инструментов.
Схема оформления профиля через mirror-сайт на сто процентов повторяет главную форму. Начинающие игроки указывают действующий email, устанавливают стойкий секретную комбинацию и назначают рабочую платежное средство.
Подтверждение учетной записи требует передачи бумаг опираясь на KYC-стандартам. Снимок национального документа, доказательство места жительства и платежные сведения проверяются через автоматическую анализ в течение 24-72 временных единиц.
Логин существующих геймеров производится через стандартную окно с двухфакторной идентификацией. Краткосрочные пароли поступают на сотовый гаджет или электронную почту.
Инструменты финансового сектора через дублирующие порталы поддерживает актуальные платежные инструменты. Visa, Mastercard, электронные кошельки Skrill, Neteller, crypto Bitcoin, Ethereum обрабатываются с сокращенными платежами 0-3%.
Азартная каталог дублируется в точности включая spinning games, классические развлечения, live-хостов и максимальные награды. RTP-индикаторы, дисперсия и проигрыш поддерживаются идентичными.
Бонусная схема оперирует подобно основному сайту. Welcome-комплекты, фриспины, возврат средств и VIP-системы активируются программно при достижении прописанных критериев.
Азартная отрасль отображает быстрый прогресс, манящая тысячи геймеров. Профессиональные ресурсы дают качественную атмосферу для ставок. Исчерпывающую сведения о этих провайдерах можно найти на Голд .
Сертификация остаётся основным фактором выбора портала. Регуляторы Олдерни обеспечивают тщательный надзор расчётных транзакций. Отдельная официальная сайт выполняет систематические контроли RNG-систем.
Программные параметры инновационных игорных домов объединяют SSL-криптографию финансового класса. Производители виртуального ПО уровня Microgaming, NetEnt, Pragmatic Play добавляют многоуровневые системы рандомных показателей.
Механизм подтверждения аккаунта включает направления свидетельств KYC-формата. Документ, подтверждение о средствах, доказательство прописки — базовый список для окончательного доступа.
Параллельные URL устраняют проблемы с ограничениями операторов. Свежие копии изменяются ежедневно техническими отделами. Карманные софт зачастую функционируют надёжнее веб редакций.
Контроль средств формирует стратегическую результативность развлекательных сессий. Экспертные пользователи советуют лимитировать количество ставки до 1-2% от совокупного резерва.
Актуальные mirror-ссылки надежных азартных клубов на лаки Р±РёСЂ казино создают беспрерывный подключение к азартным платформам. Система реплицирования строит точные дубликаты корневого сайта с консервацией всех инструментов.
Процедура активации через резервную ссылку полностью имитирует стандартную бланк. Дебютные игроки регистрируют рабочий email, формируют сложный секретную комбинацию и назначают игровую финансовый инструмент.
Верификация учетной записи подразумевает передачи документов согласно KYC-стандартам. Снимок водительских прав, свидетельство резиденции и карточные координаты анализируются посредством автоматическую валидацию в течение 24-72 периодов.
Логин верифицированных участников реализуется через стандартную окно с усиленной проверкой. Временные ключи отправляются на мессенджер устройство или почтовый ящик.
Механизмы финансового компонента через дублирующие порталы предлагает топовые банковские инструменты. Visa, Mastercard, онлайн хранилища Skrill, Neteller, цифровые активы Bitcoin, Ethereum выполняются с уменьшенными процентами 0-3%.
Gaming ассортимент копируется целиком включая слоты, столовые развлечения, live-ведущих и мегавыигрыши. RTP-параметры, дисперсия и проигрыш остаются такими же.
Промо система функционирует схоже базовому ресурсу. Welcome-пакеты, фриспины, refund и VIP-программы включаются автоматически при выполнении определенных критериев.
Подбор безопасного гемблинг площадки в нынешних обстоятельствах предполагает повышенного изучения к законному положению. Профессиональные игроки представляют, что п»ї1хбет предоставляет современную сведения о действующих провайдерах.
Механизм регистрации в сертифицированных операторах объединяет необходимую проверку документов. KYC-нормы оберегают как казино, так и пользователя от фрода. Переходные ограничения на получение капитала до окончания валидации – обычная система.
Виртуальные барьеры на вход к развлекательным ресурсам нейтрализуются через резервные домены. Действующие клоны предоставляют всестороннюю работоспособность центрального сервиса. Расчетные движения, азартный прогресс и льготные предложения сохраняются неизменными.
Денежная защищенность оценивается уровнем применяемых расчетных способов. SSL-защита, PCI DSS аттестация и расширенная верификация обеспечивают стабильный контур ограждения.
Интерактивная библиотека легальных заведений охватывает слоты от топовых разработчиков. RTP-параметры, дисперсия и расчетные формулы получают нейтральную сертификацию в аккредитованных институтах.
Системы стимулирования в достойных сервисах опираются на четких правилах ставок. Требования x35-40 характеризуется адекватным для автомат-бонусов, в то время как стандартные состязания учитываются в подсчет с пониженным процентом.
我欲为人第二季平台,专为海外华人设计,提供高清视频和直播服务。
Отбор легального азартного ресурса подразумевает тщательного анализа официальных документов. Инновационные сайты п»ї1xBet казино дают игрокам абсолютную детали о собственных разрешениях.
Процесс открытия аккаунта включает множество обязательных ступеней аутентификации. Администраторы требуют удостоверения, засвидетельствующие идентичность и дееспособность. Обычный KYC-порядок требует от 24 до 72 промежутков.
Распоряжение капиталом инициируется с определения рамок на пополнения. Квалифицированные геймеры настаивают эксплуатировать закон 5% от полного игорного фонда на отдельную игру.
Программные ограничения операторов побуждают применять запасные ссылки. Альтернативы удерживают полную активность основного площадки, содержа хронологию сделок и азартный успех.
Передовые расчетные инструменты дают мгновенные пополнения через виртуальные кошельки. Bitcoin, Ethereum и фиксированные активы гарантируют скрытность и мизерные комиссии. Период реализации снятий доходит 10-30 интервалов.
Программы преданности содержат каскадные ранги с накапливающимся бонусом. VIP-менеджеры предоставляют уникальные вознаграждения, увеличенные лимиты и приоритетную помощь.
Iver Therapeutics: Iver Therapeutics – ivermectin rx
海外华人必备的yifan官方认证平台,24小时不间断提供最新高清电影、电视剧,无广告观看体验。
zoloft without dr prescription zoloft buy sertraline
Нынешние игроки встречаются с набором системных аспектов при операциях с официальными ресурсами. Профессиональные источники типа Vavada зеркало поставляют актуальную материалы о операциях развлекательных брендов.
Система проверки учетной записи включает ряд принудительных стадий. Начальная валидация включает загрузки удостоверений доказывающих гражданство. Привычный перечень содержит паспорт, автолицензию или загранпаспорт.
Программная компонента регистрации подразумевает внедрение криптографической защиты и многофакторной защиты. Профессиональные игроки настаивают активировать максимум возможных параметров защиты.
Зеркала представляют идентичные реплики основного платформы с обеспечением полного арсенала. Центральное бонус выражается в тождественности банковских лимитов и критериев проигрыша.
Система нахождения активных зеркал фундируется на отслеживании профильных телеграм-каналов и союзных порталов. Продвинутые игроки применяют анонимайзеры для создания стабильного входа без оглядки от местных барьеров.
Ориентирование в мире проверенных площадок требует понимания современных методов доступа. Опытные геймеры эксплуатируют п»ї1хбет сайт для извлечения актуальной сведений о оперативных URL.
Механизм открытия аккаунта в проверенных операторах предполагает детальную проверку. Актуальные операторы используют KYC-процедуры и AML-правила. Документооборот отнимает от 24 до 72 промежутков.
IT инструменты для избежания запретов совершенствуются вместе с повышением юридических действий. VPN-решения типа premium гарантируют защиту AES-256 и системы OpenVPN. Непрерывность коннекта жизненно значима для элитных заходов.
Альтернативные ресурсы функционируют через регионально размещенные компьютерные мощности. CDN-комплексы гарантируют быструю отклик для американских клиентов. Системное перенаправление активируется при выявлении ограничения основного адреса.
Банковские переводы в лицензированных территориях подчиняются определенным стандартам PCI DSS. Блокчейн операции набирают актуальность в результате секретности и динамике обработки.
Смартфонные программы ведущих провайдеров совмещают биометрическую подтверждение и push-алерты для важных ситуаций. Изменяемый внешний вид самостоятельно настраивается под характеристики дисплея.
Ориентирование в области сертифицированных сайтов требует осознания продвинутых решений подключения. Умелые геймеры задействуют аква сайт для получения новейшей сведений о функционирующих путях.
Процесс регистрации профиля в лицензированных учреждениях предполагает детальную аутентификацию. Актуальные провайдеры применяют KYC-процедуры и AML-стандарты. Бумажная работа отнимает от 24 до 72 интервалов.
Цифровые инструменты для минования препятствий улучшаются сообща с интенсификацией регуляторных решений. VPN-платформы уровня premium предлагают кодирование AES-256 и стандарты OpenVPN. Устойчивость подключения критически необходима для высокоролловых игровых периодов.
Дублирующие домены работают через территориально рассредоточенные цифровые мощности. CDN-системы обеспечивают сокращенную отклик для европейских геймеров. Автоматическое редирект запускается при распознавании ограничения основного адреса.
Банковские манипуляции в лицензированных территориях подпадают под строгим стандартам PCI DSS. Блокчейн транзакции приобретают популярность благодаря анонимности и скорости реализации.
Планшетные утилиты ведущих брендов включают голосовую аутентификацию и push-извещения для критических происшествий. Адаптивный облик самостоятельно адаптируется под свойства панели.
Развлекательная отрасль являет динамичный развитие, манящая миллионы геймеров. Профессиональные сайты дают стабильную обстановку для пари. Исчерпывающую данные о подобных компаниях можно найти на казино Vovan .
Сертификация является ключевым показателем определения портала. Регуляторы Олдерни гарантируют качественный надзор экономических манипуляций. Отдельная сертифицированная ресурс реализует систематические контроли RNG-алгоритмов.
Компьютерные характеристики актуальных азартных площадок содержат SSL-шифрование расчётного категории. Производители программного софта наподобие Microgaming, NetEnt, Pragmatic Play внедряют комплексные модели непредсказуемых чисел.
Механизм подтверждения счёта подразумевает предоставления документов KYC-класса. Удостоверение, выписка о прибылях, верификация прописки — классический набор для итогового доступа.
Дублирующие порталы ликвидируют барьеры с цензурой поставщиков. Действующие варианты обновляются каждый день программными группами. Мобильные утилиты нередко работают качественнее онлайн редакций.
Управление банкроллом определяет перспективную эффективность азартных циклов. Квалифицированные геймеры указывают урезать величину вейджера до 1-2% от полного банкролла.
Действующие дублирующие порталы легальных гемблинг-платформ на п»ї1хбет РІС…РѕРґ предоставляют постоянный коннект к геймерским сервисам. Технология клонирования образует полноценные клоны основного портала с фиксацией всех инструментов.
Схема создания аккаунта через mirror-сайт абсолютно воспроизводит стандартную заявку. Новые геймеры указывают рабочий email, придумывают сложный шифр и определяют игровую платежное средство.
Идентификация аккаунта включает представления документов следуя KYC-нормам. Снимок водительских прав, свидетельство адреса и карточные реквизиты проходят программную валидацию в течение 24-72 временных единиц.
Логин действующих игроков реализуется через классическую панель с 2FA валидацией. Сессионные коды поступают на смс устройство или email.
Опции денежного компонента через зеркала предлагает топовые денежные сервисы. Visa, Mastercard, онлайн хранилища Skrill, Neteller, виртуальные монеты Bitcoin, Ethereum обрабатываются с сокращенными комиссиями 0-3%.
Игровая коллекция повторяется целиком включая автоматы, классические забавы, live-хостов и прогрессивы. RTP-коэффициенты, волатильность и вейджер остаются такими же.
Бонусная система функционирует аналогично центральному веб-площадке. Welcome-бандлы, даровые прокруты, refund и VIP-схемы инициируются машинально при реализации прописанных критериев.
Pack & Post curated picks – Easy, convenient shipping with responsive customer support every time.
pcpartspal.shop – Great selection of tech products and the prices are very fair.
Современные бетторы оказываются с препятствием связи к официальным порталам. Организации закрывают первичные домены, но знающие Лаки Бир клиенты учитывают о доступности параллельных платформ.
Зеркало является идентичную реплику оригинального портала. Системы безопасности сохраняются равнозначными. Платёжные операции производятся через аналогичные шлюзы.
Технология регистрации через зеркальный адрес предполагает обычной подтверждения. Операторы просят бумаги для осуществления KYC-норм. Идентификационные данные выполняют усиленную подтверждение.
Депозитные лимиты на резервных платформах соответствуют стандартным параметрам. Начальные ставки остаются фиксированными. Прогрессивные накопления синхронизируются между множественными адресами.
Премиальные планы работают целостно на параллельных сайтах. Вейджер удерживает оригинальные параметры. Длительность использования поддерживается.
Служба сопровождения рассматривает заявки с альтернативных доменов таким же способом. Интерактивный общение осуществляет круглосуточный формат функционирования.
Отбор достойного betting портала в сегодняшних границах подразумевает особого изучения к правовому статусу. Опытные пользователи осознают, что казино РјСЌРґ предоставляет современную материалы о функционирующих операторах.
Алгоритм создания аккаунта в официальных сервисах содержит необходимую валидацию документов. KYC-стандарты охраняют как сервис, так и клиента от обмана. Кратковременные ограничения на изъятие финансов до выполнения подтверждения – обычная процедура.
Виртуальные препятствия на доступ к betting ресурсам устраняются через дублирующие адреса. Доступные отражения обеспечивают абсолютную функциональность центрального сервиса. Денежные движения, интерактивный статистика и наградные программы продолжают устойчивыми.
Денежная надежность определяется качеством применяемых финансовых систем. SSL-кодирование, PCI DSS валидация и многоуровневая верификация гарантируют прочный щит защиты.
Азартная набор официальных операторов объединяет барабаны от главных провайдеров. RTP-показатели, изменчивость и алгоритмические системы подвергаются внешнюю контроль в одобренных организациях.
Планы вознаграждения в качественных заведениях основываются на ясных требованиях ставок. Условия ставок x35-40 признается адекватным для автомат-подарков, в то время как карточные развлечения учитываются в зачет с уменьшенным фактором.
реконструкция здания реконструкция здания .
Проверенные ресурсы игровых сервисов гарантируют игрокам вариант к премиальному времяпрепровождению через тематические домены, включая Лаки Бир казино , которые именно выполняют мировые нормы security.
Схема регистрации предполагает заполнения валидационных деталей через безопасные SSL-каналы. Провайдеры просят документальное свидетельство возраста и территории residence для соблюдения правовых критериев.
Двухэтапная проверка становится необходимым компонентом современных solutions надёжности. Пользователи получают SMS-пароли, push-уведомления или применяют dedicated программы типа Google Authenticator.
Зеркальные URL устраняют вопросы региональных блокировок и DDoS-assault. Технически mirrors образуют дублированные dublicates primary ресурса с обеспечением функциональности и пользовательских параметров.
Skilled участники suggest удерживать обновлённые базы working копий в favourites browser. Management отправляют updates о новых URL через электронную почту, Telegram-communities и mobile приложения.
Платёжные переводы через проверенные платформы покрыты шифровальными methods класса банковского сектора. Вывод фондов происходит solely на аутентифицированные карты владельца профиля.
Нынешние участники встречаются с проблемой связи к лицензированным ресурсам. Операторы блокируют основные адреса, но искушённые типпи казино пользователи осознают о присутствии альтернативных сайтов.
Параллельный портал составляет абсолютную копию основного площадки. Криптографические алгоритмы функционируют аналогичными. Расчётные переводы осуществляются через равнозначные механизмы.
Процедура создания аккаунта через дополнительный адрес содержит обычной аутентификации. Администраторы выясняют бумаги для выполнения KYC-регламентов. Идентификационные характеристики проходят комплексную подтверждение.
Вносительные пределы на дополнительных площадках равняются первичным характеристикам. Низшие ставки сохраняются неизменными. Накопительные выигрышные пулы синхронизируются между различными ссылками.
Льготные системы функционируют завершённо на зеркальных ресурсах. Коэффициент оборота гарантирует стартовые величины. Тайминг реализации продолжается.
Служба сопровождения рассматривает обращения с дополнительных ресурсов идентично. Интерактивный общение предоставляет беспрерывный порядок оперирования.
Выбор проверенного развлекательного заведения в сегодняшних границах требует повышенного изучения к законному уровню. Профессиональные игроки учитывают, что Лаки Бир зеркало содержит современную сведения о доступных ресурсах.
Схема открытия счета в лицензированных сервисах охватывает принудительную аутентификацию документов. KYC-требования обеспечивают как заведение, так и игрока от мошенничества. Кратковременные рамки на снятие средств до завершения проверки – типичная практика.
Программные блокировки на доступ к развлекательным площадкам решаются через резервные порталы. Действующие копии сохраняют абсолютную функциональность базового ресурса. Финансовые транзакции, геймплейный прогресс и привилегированные системы функционируют константными.
Финансовая стабильность оценивается степенью эксплуатируемых расчетных методов. SSL-шифрование, PCI DSS лицензирование и многоуровневая идентификация обеспечивают стабильный барьер ограждения.
Игровая библиотека легальных операторов содержит автоматы от известных производителей. RTP-параметры, колебания и математические принципы подвергаются нейтральную сертификацию в аккредитованных организациях.
Планы стимулирования в достойных сервисах формируются на прозрачных правилах активности. Отыгрыш x35-40 оценивается адекватным для машина-подарков, в то время как стандартные забавы засчитываются в зачет с редуцированным фактором.
For news
get generic depakote pill
for optimal performance.
Neuro Relief USA: Neuro Relief USA – Neuro Relief USA
Best Online Casino Australia Bonuses And Ratings
New online casino Australia 2025 – fresh sites with huge welcome bonuses
FiberFoods Boutique – Well-laid-out pages and clear product info make exploring simple.
Hello there! This article couldn’t be written much better!
Looking through this post reminds me of my previous roommate!
He constantly kept talking about this. I am going to forward this post to him.
Pretty sure he’ll have a good read. I appreciate you for sharing!
Also visit my website: mattehjelp privatlærer
凯伦皮里第二季高清完整版智能AI观看体验优化,海外华人可免费观看最新热播剧集。
Современные гемблеры встречаются с проблемой связи к лицензированным платформам. Организации фильтруют базовые ссылки, но опытные Меллстрой зеркало посетители знают о присутствии альтернативных ресурсов.
Зеркало образует точную копию главного ресурса. Средства защиты остаются неизменными. Денежные операции осуществляются через те же каналы.
Технология оформления профиля через зеркальный домен предполагает классической верификации. Менеджеры просят удостоверения для реализации KYC-правил. Персональные сведения проходят многоуровневую верификацию.
Депозитные лимиты на параллельных платформах аналогичны основным условиям. Минимальные суммы продолжают стабильными. Возрастающие банки согласовываются между многочисленными порталами.
Премиальные программы оперируют всесторонне на альтернативных ресурсах. Вейджер гарантирует базовые значения. Срок активности отыгрыша поддерживается.
Департамент сопровождения рассматривает тикеты с альтернативных ссылок идентично. Мгновенный переписка осуществляет круглосуточный график работы.
Действующие альтернативные домены лицензированных игорных заведений на Лаки Бир официальный сайт обеспечивают устойчивый вход к азартным системам. Схема реплицирования формирует идентичные реплики центрального веб-площадки с консервацией всех возможностей.
Процедура оформления профиля через дублирующий портал в точности копирует стандартную анкету. Новые пользователи вводят активный email, создают сложный секретную комбинацию и фиксируют операционную платежное средство.
Подтверждение счета подразумевает отправки документов по KYC-стандартам. Копия удостоверения личности, свидетельство места жительства и платежные параметры проходят программную контроль в течение 24-72 часа.
Логин активных пользователей выполняется через обычную форму с двухфакторной валидацией. Разовые шифры поступают на мессенджер девайс или email.
Инструменты финансового компонента через резервные ссылки содержит распространенные финансовые механизмы. Visa, Mastercard, виртуальные хранилища Skrill, Neteller, crypto Bitcoin, Ethereum выполняются с минимальными взносами 0-3%.
Игровая каталог копируется в точности включая spinning games, настольные активности, live-хостов и максимальные награды. RTP-параметры, вариативность и условия отыгрыша фиксируются аналогичными.
Подарочная схема функционирует похоже базовому порталу. Welcome-комплекты, free spins, возврат средств и VIP-курсы включаются алгоритмически при достижении установленных параметров.
Поиск в сфере проверенных сайтов включает владения передовых технологий входа. Профессиональные пользователи эксплуатируют СЌРЅРѕРјРѕ казино для добывания современной фактов о работающих доменах.
Механизм формирования профиля в проверенных компаниях содержит тщательную верификацию. Современные операторы внедряют KYC-системы и AML-правила. Документальное сопровождение требует от 24 до 72 промежутков.
Компьютерные решения для избежания запретов прогрессируют вместе с повышением юридических мер. VPN-решения уровня premium гарантируют криптографию AES-256 и системы OpenVPN. Постоянство подключения кардинально важна для привилегированных раундов.
Альтернативные домены действуют через пространственно рассредоточенные цифровые ресурсы. CDN-комплексы поддерживают быструю задержку для азиатских клиентов. Системное редирект инициируется при обнаружении препятствия базового домена.
Денежные переводы в сертифицированных территориях отвечают четким требованиям PCI DSS. Децентрализованные транзакции приобретают востребованность благодаря скрытности и оперативности выполнения.
Портативные приложения лучших организаций объединяют лицевую проверку и push-оповещения для важных событий. Изменяемый облик независимо подстраивается под характеристики экрана.
Рабочие альтернативные домены официальных гемблинг-платформ на казино типпи гарантируют непрерывный соединение к игровым порталам. Методика реплицирования создает точные дубликаты базового портала с удержанием всех функций.
Система активации через зеркало в точности повторяет оригинальную анкету. Только пришедшие геймеры заполняют активный email, устанавливают надежный пароль и устанавливают рабочую платежное средство.
Идентификация счета подразумевает передачи удостоверений согласно KYC-регламенту. Скан водительских прав, верификация резиденции и карточные параметры контролируются системой цифровую анализ в течение 24-72 временных единиц.
Аутентификация зарегистрированных геймеров осуществляется через обычную форму с многоступенчатой проверкой. Временные шифры приходят на смс девайс или мейл.
Механизмы пополнительного модуля через mirror-сайты содержит актуальные платежные инструменты. Visa, Mastercard, онлайн хранилища Skrill, Neteller, блокчейн-токены Bitcoin, Ethereum процессируются с уменьшенными сборами 0-3%.
Гемблинг библиотека воспроизводится полностью включая барабаны, настольные геймплей, live-крупье и джекпоты. RTP-индикаторы, вариативность и ставочные требования сохраняются неизменными.
Промо политика выполняется схоже корневому порталу. Welcome-пакеты, бесплатные вращения, денежный возврат и VIP-программы стартуют программно при исполнении установленных стандартов.
Игровая сфера являет быстрый расширение, притягивая массы пользователей. Экспертные ресурсы предлагают качественную среду для ставок. Подробную данные о данных организациях можно обнаружить на Вавада РІС…РѕРґ .
Аккредитация выступает приоритетным элементом отбора портала. Лицензиаты Гибралтара предоставляют жёсткий мониторинг экономических транзакций. Всякая сертифицированная площадка осуществляет плановые инспекции RNG-модулей.
IT параметры инновационных беттинг-платформ охватывают SSL-кодирование расчётного класса. Производители виртуального софта уровня Microgaming, NetEnt, Pragmatic Play встраивают многоуровневые схемы рандомных параметров.
Алгоритм верификации счёта включает подачи удостоверений KYC-класса. Свидетельство, подтверждение о прибылях, подтверждение проживания — обычный набор для окончательного входа.
Параллельные порталы устраняют сложности с фильтрацией провайдеров. Свежие альтернативы изменяются ежедневно компьютерными группами. Мобильные клиенты зачастую выполняются стабильнее веб форматов.
Финансовая дисциплина формирует длительную прибыльность азартных периодов. Экспертные пользователи предлагают урезать количество ставки до 1-2% от совокупного банкролла.
https://sertralineusa.shop/# buy zoloft
Определение легального развлекательного оператора предполагает основательного изучения официальных документов. Актуальные ресурсы Меллстрой казино дают пользователям стопроцентную данные о собственных аккредитациях.
Процесс оформления счета содержит различные обязательных стадий проверки. Администраторы просят удостоверения, доказывающие самобытность и зрелость. Стандартный KYC-регламент составляет от 24 до 72 временных отрезков.
Контроль средств начинается с фиксации пределов на взносы. Профессиональные клиенты предлагают эксплуатировать правило 5% от общего развлекательного капитала на одну сессию.
Программные препятствия владельцев обязывают эксплуатировать запасные пути. Дубликаты удерживают безусловную эффективность базового ресурса, охватывая летопись платежей и гемблинг достижения.
Актуальные денежные системы дают оперативные взносы через цифровые кошельки. Bitcoin, Ethereum и стейблкоины поддерживают конфиденциальность и крошечные взносы. Срок реализации изъятий равно 10-30 минут.
Алгоритмы постоянства подразумевают многоуровневые степени с нарастающим возвратом. VIP-координаторы обеспечивают персонализированные награды, улучшенные границы и первоочередную техподдержку.
Надёжные операторы гэмблинг предложений гарантируют игрокам возможность к элитному времяпрепровождению через целевые порталы, включая Вавада официальный сайт , которые придерживаются международные требования безопасности.
Процедура создания аккаунта necessita предоставления authentication сведений через encrypted SSL-протоколы. Менеджмент просят документальное подтверждение возраста и адреса регистрации для compliance нормативных критериев.
2FA верификация становится принудительным составляющей современных платформ надёжности. Игроки располагают SMS-шифры, push-алерты или внедряют профессиональные софт наподобие Google Authenticator.
Зеркальные ссылки решают препятствия territorial запретов и DDoS-воздействий. С технической точки зрения реплики представляют идентичные клоны центрального домена с maintaining возможностей и личных сведений.
Опытные пользователи призывают хранить current каталоги функционирующих зеркал в сохранённых ссылках веб-клиента. Букмекеры отправляют updates о свежих доменах через e-mail, Telegram-communities и мобильные софт.
Денежные movements через лицензионные порталы защищены шифровальными methods уровня банковского сектора. Изъятие финансов реализуется исключительно на аутентифицированные данные обладателя учётной записи.
Развлекательная отрасль демонстрирует быстрый расширение, заинтересовывая тысячи участников. Экспертные порталы гарантируют стабильную пространство для ставок. Исчерпывающую факты о указанных организациях возможно отыскать на Меллстрой официальный сайт .
Аккредитация выступает основным показателем выбора сайта. Надзорные органы Гибралтара обеспечивают качественный проверку денежных процедур. Каждая официальная сайт реализует систематические контроли RNG-механизмов.
Программные свойства новейших беттинг-платформ объединяют SSL-безопасность денежного стандарта. Поставщики виртуального обеспечения типа Microgaming, NetEnt, Pragmatic Play интегрируют комплексные схемы произвольных значений.
Схема валидации счёта подразумевает предоставления справок KYC-стандарта. Документ, документ о средствах, верификация адреса — стандартный набор для итогового подключения.
Альтернативные домены устраняют препятствия с ограничениями операторов. Свежие дубли корректируются регулярно IT группами. Планшетные утилиты регулярно действуют качественнее браузерных форматов.
Распределение капитала формирует перспективную прибыльность гемблинговых раундов. Профессиональные геймеры рекомендуют контролировать сумму вейджера до 1-2% от суммарного банкролла.
Новейшие игроки оказываются с проблемой входа к проверенным порталам. Поставщики запрещают основные ссылки, но знающие Вован казино клиенты знают о функционировании параллельных сайтов.
Дополнительный домен является абсолютную отображение оригинального ресурса. Средства защиты поддерживаются неизменными. Платёжные транзакции проходят через равнозначные шлюзы.
Технология оформления профиля через параллельный портал предполагает типовой верификации. Операторы просят удостоверения для выполнения KYC-стандартов. Паспортные характеристики реализуют усиленную проверку.
Вносительные лимиты на зеркальных платформах равняются основным спецификациям. Наименьшие беты остаются фиксированными. Прогрессивные банки интегрируются между всеми ресурсами.
Бонусные программы работают всесторонне на дополнительных сайтах. Коэффициент оборота поддерживает первоначальные величины. Тайминг использования сохраняется.
Сервис ассистирования анализирует вопросы с резервных ресурсов аналогично. Интерактивный диалог осуществляет непрерывный порядок обслуживания.
Новейшие участники сталкиваются с затруднением входа к проверенным сайтам. Компании фильтруют основные порталы, но опытные типпи казино пользователи осознают о наличии дублирующих сайтов.
Резервная ссылка формирует абсолютную отображение оригинального платформы. Средства защиты сохраняются такими же. Денежные операции осуществляются через идентичные каналы.
Процедура создания аккаунта через зеркальный ресурс включает привычной валидации. Операторы выясняют документы для выполнения KYC-правил. Идентификационные сведения реализуют комплексную верификацию.
Пополнительные лимиты на зеркальных платформах совпадают главным характеристикам. Начальные взносы поддерживаются неизменными. Увеличивающиеся призовые фонды координируются между множественными порталами.
Поощрительные системы работают всесторонне на альтернативных платформах. Отыгрышный коэффициент сохраняет исходные цифры. Тайминг реализации не изменяется.
Команда поддержки рассматривает заявки с альтернативных доменов идентично. Живой разговор поддерживает постоянный формат оперирования.
Discover SaverStreet – Credible offers and quick navigation on mobile devices made it simple.
Best online casino bonuses Australia – claim free spins now
爱一帆下载海外版,专为华人打造的高清视频官方认证平台,支持全球加速观看。
инъекционное усиление грунта цена ukreplenie-gruntov.ru .
Действующие дублирующие порталы лицензированных гемблинг-платформ на п»ї1хбет казино предоставляют непрерывный коннект к азартным порталам. Схема дублирования формирует точные реплики корневого ресурса с поддержанием всех механизмов.
Механизм открытия счета через дублирующий портал полностью имитирует оригинальную форму. Свежие игроки прописывают активный email, генерируют безопасный код доступа и назначают базовую курренси.
Аутентификация профиля подразумевает загрузки удостоверений по KYC-требованиям. Изображение паспорта, валидация места жительства и карточные параметры подвергаются программную анализ в течение 24-72 временных единиц.
Подключение существующих участников реализуется через типовую форму с многоступенчатой проверкой. Временные ключи доставляются на смс девайс или мейл.
Функционал финансового блока через дублирующие порталы обеспечивает распространенные денежные инструменты. Visa, Mastercard, онлайн кошельки Skrill, Neteller, криптовалюты Bitcoin, Ethereum процессируются с низкими взносами 0-3%.
Игровая коллекция дублируется целиком включая слоты, столовые геймплей, live-крупье и максимальные награды. RTP-параметры, волатильность и проигрыш фиксируются точными.
Бонусная программа действует аналогично центральному порталу. Welcome-бандлы, фриспины, компенсация и VIP-планы запускаются алгоритмически при соблюдении определенных стандартов.
Исследование в пространстве легальных ресурсов подразумевает владения передовых методов входа. Умелые геймеры задействуют Лаки Бир РІС…РѕРґ для приобретения свежей данных о действующих URL.
Алгоритм формирования счета в сертифицированных операторах подразумевает тщательную аутентификацию. Передовые операторы задействуют KYC-процедуры и AML-критерии. Бумажная работа составляет от 24 до 72 периодов.
Программные инструменты для минования ограничений развиваются сообща с интенсификацией регуляторных инициатив. VPN-решения категории premium дают защиту AES-256 и методы OpenVPN. Стабильность связи кардинально необходима для VIP сессий.
Запасные сайты работают через территориально рассредоточенные компьютерные ресурсы. CDN-архитектуры предоставляют оптимальную латентность для международных игроков. Программное редирект запускается при идентификации ограничения основного портала.
Экономические операции в лицензированных зонах следуют четким критериям PCI DSS. Крипто платежи завоевывают актуальность вследствие скрытности и динамике обработки.
Портативные утилиты премиальных компаний содержат лицевую подтверждение и push-сообщения для важных ситуаций. Гибкий облик автономно подстраивается под настройки матрицы.
塔尔萨之王高清完整版,海外华人可免费观看最新热播剧集。
Monarch Motive tools – Reliable selections and standout service create a great overall experience.
Определение достойного игрового ресурса в сегодняшних границах заставляет специального изучения к законному состоянию. Компетентные геймеры знают, что казино Голд отображает свежую материалы о доступных площадках.
Механизм создания аккаунта в проверенных площадках охватывает неизбежную аутентификацию идентичности. KYC-нормы оберегают как казино, так и клиента от мошенничества. Временные ограничения на вывод средств до финализации валидации – обычная процедура.
Технические блокировки на связь к азартным сервисам устраняются через дублирующие адреса. Действующие клоны сохраняют стопроцентную функциональность главного сервиса. Финансовые процедуры, игровой прогресс и наградные системы функционируют постоянными.
Экономическая безопасность выражается показателем применяемых расчетных методов. SSL-защита, PCI DSS подтверждение и двухфакторная проверка устанавливают стабильный щит обороны.
Игровая набор официальных операторов содержит барабаны от известных студий. RTP-показатели, изменчивость и расчетные модели претерпевают независимую валидацию в аккредитованных лабораториях.
Программы лояльности в достойных площадках строятся на понятных критериях отыгрыша. Проигрыш x35-40 расценивается адекватным для спин-льгот, в то время как карточные игры включаются в расчет с уменьшенным множителем.
海外华人必备的aiyifan平台,提供最新高清电影、电视剧,无广告观看体验。
Проверенные ресурсы игорных предложений дают участникам возможность к элитному развлечениям через профильные домены, включая типпи казино , которые точно придерживаются глобальные нормы защиты.
Схема оформления профиля включает ввода идентификационных сведений через криптографические SSL-каналы. Провайдеры требуют письменное подтверждение дееспособности и региона регистрации для исполнения юрисдикционных критериев.
2FA authentication считается необходимым элементом современных архитектур конфиденциальности. Клиенты получают SMS-токены, push-оповещения или эксплуатируют dedicated программы наподобие Google Authenticator.
Дублирующие домены преодолевают сложности geographic барьеров и DDoS-assault. Технически зеркала формируют идентичные реплики primary домена с сохранением features и user данных.
Skilled клиенты suggest поддерживать current каталоги действующих копий в избранном обозревателя. Провайдеры доставляют updates о современных доменах через email, Telegram-группы и портативные программы.
Платёжные операции через проверенные порталы защищены защитными технологиями level банковского направления. Снятие средств реализуется исключительно на validated карты собственника личного кабинета.
Поиск безопасного гемблинг заведения требует глубокого рассмотрения правовых свидетельств. Актуальные порталы Меллстрой сайт предоставляют пользователям полную детали о своих аккредитациях.
Процедура оформления счета подразумевает множество требуемых ступеней подтверждения. Представители настаивают документы, доказывающие самобытность и правоспособность. Типовой KYC-порядок составляет от 24 до 72 интервалов.
Контроль средств начинается с фиксации лимитов на пополнения. Искусные клиенты рекомендуют использовать закон 5% от полного азартного средств на отдельную партию.
Системные препятствия владельцев побуждают эксплуатировать резервные пути. Копии поддерживают максимальную работоспособность базового площадки, содержа историю платежей и азартный достижения.
Инновационные банковские способы гарантируют быстрые инвестиции через блокчейн хранилища. Bitcoin, Ethereum и стабильные валюты обеспечивают скрытность и мизерные комиссии. Продолжительность выполнения выводов достигает 10-30 периодов.
Планы преданности содержат градационные категории с нарастающим бонусом. VIP-менеджеры гарантируют персонализированные бонусы, улучшенные ограничения и приоритетную сервис.
Hmm is anyone else experiencing problems with
the pictures on this blog loading? I’m trying to determine if its a problem
on my end or if it’s the blog. Any responses would be greatly appreciated.
Here is my homepage: 강남룸싸롱
Лицензионные провайдеры развлекательных опций дают геймерам вариант к высококлассному развлечениям через профильные порталы, включая Меллстрой РІС…РѕРґ , которые специально придерживаются общепринятые критерии security.
Процедура оформления профиля включает указания валидационных данных через шифрованные SSL-connection. Менеджмент запрашивают нотариальное подтверждение правоспособности и локации регистрации для исполнения правовых правил.
Двухэтапная проверка выступает принудительным aspect передовых архитектур security. Пользователи обретают SMS-ключи, push-notification или задействуют dedicated приложения типа Google Authenticator.
Резервные порталы преодолевают сложности geographic санкций и DDoS-нападений. Технически зеркала являют тождественные версии основного портала с удержанием инструментария и личных данных.
Профессиональные геймеры рекомендуют сохранять новейшие перечни working дублей в закладках обозревателя. Букмекеры отправляют updates о актуальных адресах через email, Telegram-communities и mobile приложения.
Платёжные переводы через legal платформы secured шифровальными технологиями level банковского направления. Получение финансов происходит единственно на проверенные данные владельца профиля.
детская мебель Детская мебель безопасна, экологична и развивает вкус.
Зацепил раздел про напитки и коктейли, вдохновленные героями кино 2026 года.
Ссылка ниже:
https://web-kokteil.ru/%d0%ba%d0%be%d0%ba%d1%82%d0%b5%d0%b9%d0%bb%d0%b8-%d0%b4%d0%bb%d1%8f-%d0%ba%d0%be%d1%80%d0%be%d1%82%d0%ba%d0%b8%d1%85-%d0%b3%d0%be%d1%80%d0%be%d0%b4%d1%81%d0%ba%d0%b8%d1%85-%d0%bf%d0%be%d0%b5%d0%b7/
FIFA Club World Cup livescore, continental champions competing for global title
范德沃克高清完整版采用机器学习个性化推荐,海外华人可免费观看最新热播剧集。
爱一番海外版,专为华人打造的高清视频平台,支持全球加速观看。
奇思妙探第二季高清完整版运用AI智能推荐算法,海外华人可免费观看最新热播剧集。
Определение качественного betting ресурса в текущих обстоятельствах нуждается тщательного изучения к лицензионному режиму. Квалифицированные игроки осознают, что Меллстрой содержит современную факты о активных площадках.
Механизм регистрации в проверенных заведениях охватывает необходимую аутентификацию удостоверения. KYC-требования гарантируют как оператора, так и пользователя от фрода. Кратковременные границы на получение денег до окончания верификации – привычная подход.
Электронные ограничения на соединение к betting сайтам обходятся через альтернативные адреса. Действующие копии гарантируют абсолютную эффективность главного сайта. Расчетные процедуры, геймплейный результаты и льготные схемы продолжают неизменными.
Капитальная гарантированность измеряется степенью применяемых банковских систем. SSL-криптография, PCI DSS валидация и многоуровневая проверка формируют стабильный щит безопасности.
Интерактивная каталог проверенных сервисов включает автоматы от главных студий. RTP-индексы, волатильность и алгоритмические модели претерпевают внешнюю сертификацию в утвержденных организациях.
Планы поощрения в серьезных заведениях строятся на ясных требованиях ставок. Вейджер x35-40 признается разумным для спин-льгот, в то время как карточные активности идут в зачет с минимальным показателем.
Выбор безопасного развлекательного площадки подразумевает глубокого анализа регулятивных бумаг. Инновационные сайты Mellstroy Game казино предоставляют участникам полную сведения о текущих лицензиях.
Алгоритм регистрации содержит различные ключевых стадий аутентификации. Владельцы просят справки, засвидетельствующие идентичность и зрелость. Классический KYC-механизм составляет от 24 до 72 интервалов.
Распоряжение капиталом запускается с назначения ограничений на вклады. Квалифицированные пользователи предлагают задействовать принцип 5% от итогового развлекательного капитала на индивидуальную раунд.
Цифровые препятствия владельцев обязывают задействовать альтернативные ссылки. Зеркала удерживают максимальную производительность первичного платформы, подразумевая журнал сделок и игровой продвижение.
Передовые расчетные методы гарантируют моментальные вклады через криптовалютные портмоне. Bitcoin, Ethereum и фиксированные активы поддерживают приватность и наименьшие сборы. Срок осуществления снятий доходит 10-30 промежутков.
Планы преданности предусматривают градационные уровни с нарастающим вознаграждением. VIP-кураторы предоставляют эксклюзивные награды, усиленные лимиты и первоочередную техподдержку.
一饭封神在线免费在线观看,海外华人专属官方认证平台,高清无广告体验。
戏台在线免费在线观看,海外华人专属平台,高清无广告体验。
Актуальные зеркала лицензированных азартных клубов на казино lova дают устойчивый вход к игровым порталам. Методика реплицирования создает полноценные дубликаты главного веб-площадки с удержанием всех функций.
Механизм регистрации через mirror-сайт целиком дублирует оригинальную шаблон. Дебютные геймеры заполняют валидный email, формируют сложный пароль и выбирают базовую финансовый инструмент.
Подтверждение счета подразумевает предоставления справок в соответствии с KYC-стандартам. Фото паспорта, свидетельство резиденции и финансовые сведения подвергаются машинную верификацию в течение 24-72 периодов.
Вход существующих пользователей производится через стандартную форму с 2FA идентификацией. Временные шифры доставляются на смс гаджет или мейл.
Опции финансового компонента через зеркала содержит актуальные банковские платформы. Visa, Mastercard, онлайн хранилища Skrill, Neteller, криптовалюты Bitcoin, Ethereum реализуются с уменьшенными платежами 0-3%.
Игровая база повторяется на сто процентов включая spinning games, столовые геймплей, live-операторов и мегавыигрыши. RTP-параметры, волатильность и ставочные требования сохраняются точными.
Подарочная система выполняется аналогично корневому домену. Welcome-комплекты, даровые прокруты, денежный возврат и VIP-курсы инициируются автоматически при достижении определенных критериев.
愛海外版,专为华人打造的高清视频平台智能AI观看体验优化,支持全球加速观看。
Поиск надежного игорного портала заставляет детального разбора лицензионных разрешений. Современные ресурсы казино Килограмм предоставляют игрокам безусловную факты о действующих санкциях.
Процесс регистрации охватывает определенное количество требуемых шагов подтверждения. Представители истребуют бумаги, удостоверяющие персону и зрелость. Обычный KYC-порядок занимает от 24 до 72 часов.
Распоряжение капиталом начинается с фиксации ограничений на вклады. Профессиональные пользователи призывают эксплуатировать закон 5% от общего азартного капитала на индивидуальную раунд.
Электронные барьеры администраторов принуждают задействовать альтернативные ссылки. Клоны удерживают полную активность базового сайта, охватывая историю переводов и казино продвижение.
Новые банковские способы гарантируют моментальные взносы через цифровые кошельки. Bitcoin, Ethereum и стейблкоины обеспечивают скрытность и мизерные взносы. Длительность проведения выводов достигает 10-30 минут.
Схемы лояльности включают иерархические категории с возрастающим кэшбэком. VIP-кураторы предоставляют личные поощрения, усиленные ограничения и опережающую поддержку.
艾一帆海外版,专为华人打造的高清视频平台,支持全球加速观看。
Современные порталы беттинг игр обеспечивают участникам вход к элитному развлечениям через безопасные Лаки Бир зеркало порталы. Сертифицированная бизнес нуждается соблюдения конкретных регуляторных критериев.
Механизм оформления игрового счета охватывает проверку личных сведений. Администраторы применяют детализированные алгоритмы KYC и AML для исключения фродовых финансовых действий.
IT средства инновационных беттинг площадок работают на защищенных инфраструктурах с SSL протоколами. IP-фильтрация принуждает управляющих запускать параллельные ссылки.
Дублирующие порталы образуют идентичные копии центрального платформы с удержанием всех функций и параметров. Беттеры добиваются устойчивый связь к средствам, азартной истории и индивидуальным настройкам.
Банковские транзакции производятся через встроенные денежные агрегаторы. Рамки на вклады и обналичивания определяются в гармонии с нормативными условиями и организационными нормами снижения потерь.
Профессиональные гемблеры указывают анализировать положение сертификата через контролирующие списки игорных структур. Статусные показатели задействуют рейтинги на специализированных платформах и отзывы реальных участников.
ifvod官方认证平台,专为海外华人设计,24小时不间断提供高清视频和直播服务。
Инновационные сервисы беттинг продуктов предоставляют участникам подключение к профессиональному развлечениям через надежные Вавада регистрация порталы. Легальная работа нуждается следования конкретных регуляторных положений.
Алгоритм открытия индивидуального учетной записи предусматривает верификацию индивидуальных данных. Регуляторы используют детализированные протоколы KYC и AML для пресечения мошеннических переводов.
Программные платформы инновационных гемблинг платформ базируются на безопасных дата-центрах с SSL алгоритмами. Геоблокировка побуждает операторов внедрять резервные домены.
Резервные домены образуют аналогичные копии основного сайта с фиксацией всех функций и данных. Игроки получают непрерывный доступ к счету, гемблинг записям и личным установкам.
Финансовые транзакции проходят через интегрированные банковские агрегаторы. Рамки на вклады и получения регулируются в гармонии с правовыми положениями и организационными регламентами контроля угроз.
Профессиональные пользователи указывают отслеживать положение аккредитации через регуляторные базы данных азартных структур. Статусные критерии задействуют рейтинги на экспертных сайтах и оценки настоящих беттеров.
https://bungapunku.id/%d0%bf%d1%80%d0%be%d0%bc%d0%be%d0%ba%d0%be%d0%b4-%d0%bd%d0%b0-1xbet-2026-1xwind-%d0%b1%d0%be%d0%bd%d1%83%d1%81-32500-%e2%82%bd/
http://kanon.kabb.ru/viewtopic.php?t=8434
我們提供MLB即時比分、賽程安排,以及MLB球隊戰績和AI深度學習數據分析。
Discover ReportRoost – The shared expertise positively impacted how I organize work.
1xbet codigo promocional brasil
codigo de promocional 1xbet
Передовые пользователи обталкиваются с набором системных деталей при деятельности с сертифицированными сайтами. Профильные платформы типа Лаки Бир сайт предоставляют новую данные о деятельности гэмблинговых компаний.
Механизм аутентификации аккаунта подразумевает набор обязательных фаз. Первичная проверка предполагает отправки удостоверений валидирующих субъект. Привычный список содержит свидетельство, права или международное ID.
Программная элемент регистрации предполагает применение SSL-шифрования и двойной авторизации. Продвинутые геймеры предлагают включать полный набор предложенных настроек защиты.
Дублирующие порталы являются идентичные копии основного ресурса с обеспечением полного набора функций. Центральное плюс выражается в схожести платежных ограничений и критериев вейджера.
Механизм поиска действующих запасных доменов базируется на контроле экспертных информационных каналов и сотрудничающих платформ. Экспертные участники эксплуатируют прокси-соединения для создания бесперебойного подключения вне зависимости от местных барьеров.
Современные платформы развлекательных услуг предлагают беттерам возможность к элитному беттингу через проверенные retro системы. Официальная работа подразумевает учета четких регуляторных норм.
Процедура оформления персонального счета включает проверку приватных реквизитов. Регуляторы внедряют многоуровневые протоколы KYC и AML для пресечения мошеннических переводов.
Электронные платформы современных казино основываются на зашифрованных хостингах с SSL стандартами. IP-фильтрация побуждает владельцев разрабатывать альтернативные ссылки.
Резервные платформы являют собой полные версии первичного платформы с удержанием всех сервисов и данных. Пользователи обеспечивают себе стабильный вход к балансу, беттинг отчетности и личным установкам.
Платежные процедуры производятся через встроенные расчетные системы. Ограничения на пополнения и снятия фиксируются в согласии с правовыми условиями и собственными регламентами снижения потерь.
Компетентные игроки рекомендуют отслеживать ситуацию лицензии через надзорные каталоги развлекательных органов. Престижные индикаторы охватывают ранги на профильных сайтах и мнения настоящих игроков.
Актуальные альтернативные домены проверенных gaming-операторов на п»ї1xBet обеспечивают беспрерывный подключение к геймерским сервисам. Технология дублирования генерирует идентичные реплики центрального ресурса с фиксацией всех опций.
Механизм оформления профиля через зеркало целиком дублирует оригинальную заявку. Начинающие геймеры указывают функционирующий email, формируют безопасный шифр и фиксируют операционную денежную единицу.
Верификация счета предполагает представления справок в соответствии с KYC-стандартам. Копия ID-карты, подтверждение резиденции и денежные данные контролируются системой цифровую верификацию в течение 24-72 часа.
Авторизация верифицированных геймеров реализуется через стандартную панель с усиленной валидацией. Временные ключи доставляются на телефонный аппарат или email.
Опции входящего модуля через альтернативные домены включает популярные банковские сервисы. Visa, Mastercard, электронные портмоне Skrill, Neteller, блокчейн-токены Bitcoin, Ethereum реализуются с уменьшенными комиссиями 0-3%.
Gaming каталог копируется полностью включая барабаны, карточные развлечения, live-крупье и мегавыигрыши. RTP-значения, колебания и проигрыш сохраняются точными.
Промо программа работает схоже основному домену. Welcome-наборы, безвозмездные спины, компенсация и VIP-системы инициируются системно при соблюдении фиксированных критериев.
Packaging Paradise handpicked items – Practical and attractive packaging that holds up well for business use.
Официальные операторы азартных предложений гарантируют геймерам вариант к профессиональному гэмблингу через специализированные порталы, включая Рльдорадо казино , что исполняют международные регламенты конфиденциальности.
Механизм оформления профиля включает заполнения идентификационных деталей через encrypted SSL-линии. Букмекеры запрашивают нотариальное подтверждение возраста и локации регистрации для соблюдения законодательных стандартов.
2FA идентификация считается mandatory aspect современных архитектур безопасности. Клиенты получают SMS-ключи, push-сообщения или задействуют специальные приложения типа Google Authenticator.
Альтернативные URL решают трудности territorial запретов и DDoS-воздействий. Фактически зеркала являют тождественные dublicates primary портала с удержанием функциональности и индивидуальных информации.
Экспертные клиенты советуют сохранять current каталоги активных альтернатив в bookmark интернет-программы. Операторы отправляют новости о современных URL через почтовые сервисы, Telegram-communities и mobile приложения.
Финансовые транзакции через legal площадки гарантированы encryption алгоритмами класса банковского segment. Получение капитала происходит solely на подтверждённые счета хозяина личного кабинета.
1xbet free bet code ph
Актуальные провайдеры азартных услуг дают игрокам подключение к премиальному развлечениям через сертифицированные п»ї1xBet casino системы. Авторизованная операционная активность влечет исполнения четких правовых критериев.
Процедура активации игрового счета задействует верификацию индивидуальных информации. Администраторы задействуют многоуровневые процедуры KYC и AML для пресечения фродовых переводов.
IT средства передовых развлекательных порталов работают на стабильных хостингах с шифровальными протоколами. Геоблокировка принуждает администраторов разрабатывать дублирующие адреса.
Зеркальные домены формируют аналогичные копии главного ресурса с удержанием всех сервисов и данных. Пользователи получают стабильный связь к депозиту, азартной истории и пользовательским настройкам.
Денежные процедуры проходят через связанные денежные шлюзы. Рамки на депозиты и изъятия регулируются в унисон с регуляторными критериями и корпоративными нормами контроля угроз.
Экспертные беттеры рекомендуют контролировать положение сертификата через контролирующие списки азартных ведомств. Репутационные критерии содержат рейтинги на экспертных порталах и мнения настоящих игроков.
Перемещение в секторе проверенных порталов предполагает осознания современных методов входа. Квалифицированные участники внедряют Лаки Бир регистрация для извлечения актуальной фактов о активных ссылках.
Процедура создания аккаунта в официальных операторах включает тщательную валидацию. Новейшие провайдеры эксплуатируют KYC-системы и AML-нормы. Документальное сопровождение составляет от 24 до 72 периодов.
Компьютерные технологии для избежания блокировок совершенствуются параллельно с усилением правовых решений. VPN-решения типа premium обеспечивают шифрование AES-256 и стандарты OpenVPN. Постоянство канала жизненно значима для высокоролловых партий.
Резервные платформы действуют через географически рассредоточенные IT кластеры. CDN-структуры гарантируют низкую пинг для европейских клиентов. Автоматическое редирект запускается при обнаружении ограничения первичного портала.
Экономические манипуляции в официальных юрисдикциях отвечают определенным критериям PCI DSS. Цифровые переводы завоевывают актуальность из-за приватности и скорости выполнения.
Мобильные клиенты элитных брендов интегрируют биометрическую идентификацию и push-оповещения для существенных происшествий. Гибкий дизайн независимо адаптируется под характеристики дисплея.
For clarification
usda loan gift funds
for special access.
奇思妙探第二季高清完整版,海外华人可免费观看最新热播剧集。
Современные порталы гемблинг услуг дают клиентам вход к высококлассному гемблингу через безопасные казино Гризли платформы. Сертифицированная деятельность нуждается выполнения конкретных регуляторных критериев.
Процесс оформления игрового аккаунта содержит аутентификацию приватных данных. Регуляторы эксплуатируют многоуровневые протоколы KYC и AML для предотвращения мошеннических транзакций.
Цифровые средства новейших гемблинг платформ функционируют на стабильных дата-центрах с криптографическими стандартами. Региональная блокировка заставляет управляющих внедрять параллельные порталы.
Зеркальные сайты представляют идентичные клоны основного портала с сохранением всех функций и сведений. Участники обеспечивают себе беспрепятственный доступ к средствам, азартной статистике и пользовательским установкам.
Финансовые транзакции выполняются через связанные расчетные процессоры. Границы на вклады и изъятия назначаются в согласии с правовыми положениями и внутренними регламентами риск-менеджмента.
Квалифицированные клиенты настаивают анализировать положение лицензии через официальные базы данных гемблинг органов. Репутационные показатели предусматривают позиции на профильных платформах и feedback истинных клиентов.
Поиск достойного betting портала в современных рамках заставляет особого анализа к юридическому статусу. Профессиональные игроки знают, что казино Болливуд содержит новую сведения о функционирующих площадках.
Схема регистрации в сертифицированных платформах предусматривает требуемую аутентификацию персональных данных. KYC-процедуры гарантируют как площадку, так и пользователя от махинаций. Краткосрочные пределы на получение финансов до окончания верификации – привычная процедура.
Программные препятствия на вход к развлекательным ресурсам решаются через дублирующие ссылки. Рабочие дубликаты гарантируют полную функциональность главного ресурса. Расчетные операции, геймплейный достижения и наградные системы функционируют постоянными.
Экономическая надежность оценивается качеством эксплуатируемых банковских способов. SSL-кодирование, PCI DSS аттестация и двухфакторная проверка устанавливают стабильный барьер обороны.
Азартная набор официальных операторов предоставляет машины от главных производителей. RTP-индексы, волатильность и вероятностные формулы испытывают объективную аудит в утвержденных центрах.
Программы стимулирования в профессиональных казино базируются на открытых параметрах вейджера. Вейджер x35-40 оценивается справедливым для барабан-привилегий, в то время как традиционные игры идут в калькуляцию с пониженным фактором.
Новейшие операторы игорных продуктов обеспечивают клиентам вход к премиальному игровому процессу через надежные Lucky Bear зеркало ресурсы. Авторизованная функционирование нуждается соблюдения жестких правовых требований.
Система создания пользовательского учетной записи предусматривает верификацию личных информации. Операторы внедряют многоуровневые механизмы KYC и AML для исключения мошеннических транзакций.
Электронные системы передовых беттинг площадок работают на защищенных хостингах с SSL алгоритмами. Региональная блокировка принуждает провайдеров запускать резервные домены.
Зеркальные порталы формируют эквивалентные копии центрального домена с обеспечением всех опций и показателей. Беттеры достигают непрерывный связь к счету, игровой записям и пользовательским опциям.
Финансовые переводы осуществляются через синхронизированные расчетные шлюзы. Ограничения на депозиты и обналичивания назначаются в гармонии с правовыми стандартами и организационными регламентами контроля угроз.
Компетентные пользователи предлагают контролировать положение лицензии через государственные каталоги беттинг структур. Престижные параметры предусматривают места на отраслевых сайтах и оценки реальных игроков.
從英超、西甲、德甲到中超,全球各大足球聯盟的7m足球即時比分都在這裡。
Нынешние игроки сталкиваются с сложностью доступа к лицензированным платформам. Провайдеры запрещают основные ссылки, но знающие Лаки Бир зеркало клиенты знают о доступности параллельных ресурсов.
Параллельный портал формирует точную копию оригинального площадки. Средства защиты сохраняются неизменными. Банковские операции выполняются через те же шлюзы.
Методика открытия счёта через параллельный домен требует типовой валидации. Сотрудники требуют бумаги для осуществления KYC-норм. Индивидуальные параметры осуществляют многоуровневую проверку.
Пополнительные лимиты на дополнительных площадках аналогичны базовым требованиям. Низшие вклады поддерживаются фиксированными. Накопительные джекпоты синхронизируются между всеми ссылками.
Поощрительные программы функционируют завершённо на дополнительных площадках. Отыгрышный коэффициент обеспечивает первоначальные параметры. Тайминг реализации не изменяется.
Департамент поддержки обрабатывает вопросы с дополнительных ресурсов равнозначно. Живой чат предоставляет постоянный порядок работы.
Patch Portal daily finds – Everything I needed was easy to locate and purchase without any issues.
真实的人类第二季高清完整官方版,海外华人可免费观看最新热播剧集。
zoloft without dr prescription: zoloft pill – zoloft no prescription
Quality content is the important to interest the people to pay a quick visit the web site, that’s
what this website is providing.
Also visit my web-site; mattehjelp privatlærer
Официальные операторы азартных услуг обеспечивают участникам вариант к профессиональному игровому процессу через целевые домены, включая казино 1хбет , которые специально выполняют общепринятые нормы конфиденциальности.
Алгоритм регистрации necessita заполнения валидационных данных через криптографические SSL-линии. Провайдеры просят документальное свидетельство возраста и места проживания для поддержания нормативных требований.
Multi-factor аутентификация считается обязательным элементом новейших механизмов безопасности. Участники располагают SMS-пароли, push-уведомления или задействуют targeted софт типа Google Authenticator.
Альтернативные адреса решают вопросы региональных запретов и DDoS-атак. Фактически копии являют аналогичные версии базового платформы с сохранением возможностей и пользовательских данных.
Компетентные геймеры suggest удерживать свежие базы working зеркал в закладках веб-клиента. Операторы рассылают новости о свежих доменах через почтовые сервисы, Telegram-communities и смартфонные apps.
Денежные транзакции через официальные площадки гарантированы шифровальными methods уровня банковского направления. Получение финансов производится solely на подтверждённые данные хозяина account.
iyftv海外华人首选,智能AI观看体验优化,提供最新华语剧集、美剧、日剧等高清在线观看。
塔尔萨之王第三季高清完整版,海外华人可免费观看最新热播剧集。
Игровая сфера являет интенсивный рост, заинтересовывая массы участников. Экспертные порталы дают безопасную условия для развлечений. Подробную данные о подобных провайдерах можно получить на казино Меллстрой .
Легализация остаётся центральным аспектом определения ресурса. Регуляторы Кюрасао обеспечивают строгий аудит валютных манипуляций. Любая легальная площадка выполняет постоянные ревизии RNG-модулей.
Компьютерные особенности актуальных азартных площадок предусматривают SSL-шифрование денежного уровня. Поставщики программного продукта уровня Microgaming, NetEnt, Pragmatic Play добавляют продвинутые системы непредсказуемых параметров.
Процедура аутентификации учётной записи предполагает представления документов KYC-уровня. Документ, свидетельство о прибылях, верификация регистрации — типичный комплект для полноценного входа.
Альтернативные адреса устраняют трудности с цензурой поставщиков. Рабочие копии обновляются ежедневно программными группами. Планшетные софт обычно действуют качественнее интернет модификаций.
Управление банкроллом создаёт продолжительную успешность игровых сессий. Грамотные геймеры указывают сокращать величину вейджера до 1-2% от совокупного фонда.
Официальные операторы гэмблинг предложений обеспечивают геймерам доступ к премиальному игровому процессу через специализированные домены, включая лова зеркало , которые именно следуют международные требования надёжности.
Процедура активации подразумевает заполнения authentication данных через шифрованные SSL-каналы. Менеджмент требуют документальное подтверждение совершеннолетия и региона жительства для compliance законодательных критериев.
Многоуровневая проверка выступает mandatory элементом передовых систем защиты. Участники получают SMS-пароли, push-оповещения или применяют dedicated утилиты типа Google Authenticator.
Дублирующие адреса решают вопросы geographic санкций и DDoS-воздействий. По сути дубли формируют аналогичные клоны основного платформы с maintaining функциональности и user данных.
Skilled участники suggest удерживать current списки рабочих копий в favourites интернет-программы. Операторы доставляют новости о новых URL через почтовые сервисы, Telegram-группы и смартфонные приложения.
Денежные процедуры через официальные сайты покрыты шифровальными технологиями категории банковского сектора. Extraction финансов происходит solely на аутентифицированные данные обладателя личного кабинета.
Функционирующие дублирующие порталы легальных казино на СЌРЅРѕРјРѕ сайт предоставляют устойчивый коннект к азартным платформам. Система зеркалирования создает полноценные реплики корневого портала с удержанием всех инструментов.
Механизм оформления профиля через mirror-сайт на сто процентов копирует стандартную анкету. Новые игроки регистрируют действующий email, придумывают надежный секретную комбинацию и определяют основную валюту.
Валидация учетной записи содержит представления удостоверений в соответствии с KYC-регламенту. Копия паспорта, верификация проживания и денежные координаты проходят цифровую контроль в течение 24-72 временных единиц.
Логин активных игроков выполняется через типовую окно с расширенной идентификацией. Временные пароли доставляются на мобильный номер или email.
Возможности финансового блока через mirror-сайты предлагает востребованные финансовые платформы. Visa, Mastercard, виртуальные балансы Skrill, Neteller, crypto Bitcoin, Ethereum обрабатываются с минимальными процентами 0-3%.
Gaming каталог дублируется на сто процентов включая барабаны, карточные развлечения, live-ведущих и джекпоты. RTP-значения, дисперсия и ставочные требования остаются точными.
Подарочная схема работает подобно центральному домену. Welcome-предложения, бесплатные вращения, компенсация и VIP-системы стартуют алгоритмически при реализации заданных требований.
Best online casinos Australia real money – Pokies, blackjack & roulette
https://neuroreliefusa.com/# neurontin oral
Легальные ресурсы игорных опций предоставляют клиентам шанс к высококлассному гэмблингу через специализированные платформы, включая Лаки Бир зеркало , которые точно следуют глобальные нормы security.
Схема открытия счёта подразумевает внесения authentication сведений через криптографические SSL-линии. Администрация demanded нотариальное свидетельство возраста и локации жительства для соблюдения законодательных критериев.
Multi-factor идентификация считается принудительным aspect современных платформ security. Участники приобретают SMS-пароли, push-notification или задействуют специализированные утилиты в стиле Google Authenticator.
Альтернативные домены нейтрализуют препятствия geographic барьеров и DDoS-атак. Техническим образом дубли представляют идентичные клоны базового платформы с сохранением опций и пользовательских сведений.
Skilled клиенты рекомендуют сохранять новейшие каталоги рабочих mirrors в избранном интернет-программы. Management передают информацию о актуальных адресах через e-mail, Telegram-группы и портативные apps.
Денежные процедуры через надёжные площадки защищены encryption технологиями категории банковского segment. Снятие фондов реализуется только на проверенные wallets держателя учётной записи.
愛壹帆海外版,专为华人打造的高清视频平台采用机器学习个性化推荐,支持全球加速观看。
Беттинговая ниша демонстрирует интенсивный развитие, завлекая множество игроков. Квалифицированные площадки обеспечивают защищённую обстановку для беттинга. Развёрнутую сведения о этих брендах реально найти на Lucky Bear казино .
Аккредитация представляет центральным аспектом селекции платформы. Надзорные органы Олдерни гарантируют серьёзный надзор расчётных процедур. Каждая официальная площадка выполняет периодические контроли RNG-механизмов.
Компьютерные аспекты новейших беттинг-платформ объединяют SSL-защиту экономического уровня. Производители компьютерного софта уровня Microgaming, NetEnt, Pragmatic Play встраивают комплексные алгоритмы случайных значений.
Механизм валидации профиля предполагает направления свидетельств KYC-типа. Свидетельство, подтверждение о средствах, удостоверение прописки — обычный комплект для полноценного авторизации.
Альтернативные адреса убирают трудности с ограничениями организаций. Действующие зеркала изменяются каждый день техническими группами. Мобильные клиенты часто работают стабильнее веб форматов.
Финансовая дисциплина задаёт длительную успешность развлекательных циклов. Опытные геймеры указывают сокращать размер вейджера до 1-2% от суммарного капитала.
FanFriendly Depot – Quick navigation and organized sections made browsing smooth.
buy zoloft: zoloft tablet – generic for zoloft
Инновационные платформы развлекательных игр предоставляют беттерам подключение к высококлассному гемблингу через надежные Вован казино ресурсы. Легальная бизнес требует соблюдения строгих контролирующих стандартов.
Алгоритм активации индивидуального учетной записи включает подтверждение индивидуальных показателей. Администраторы внедряют детализированные процедуры KYC и AML для пресечения незаконных платежей.
Цифровые решения инновационных развлекательных порталов функционируют на безопасных серверах с криптографическими технологиями. Территориальные ограничения вынуждает операторов создавать альтернативные порталы.
Параллельные домены являют собой аналогичные копии центрального портала с обеспечением всех инструментов и показателей. Игроки получают непрерывный соединение к балансу, гемблинг статистике и пользовательским установкам.
Платежные действия реализуются через подключенные платежные шлюзы. Рамки на пополнения и снятия устанавливаются в соответствии с нормативными критериями и корпоративными правилами риск-менеджмента.
Опытные клиенты советуют мониторить статус разрешения через государственные списки развлекательных ведомств. Репутационные критерии задействуют места на экспертных платформах и комментарии истинных клиентов.
Беттинговая сфера представляет быстрый развитие, привлекая легионы клиентов. Квалифицированные сайты предлагают безопасную среду для пари. Исчерпывающую данные о указанных операторах возможно получить на казино Лаки Бир .
Сертификация представляет главным критерием выбора сайта. Надзорные органы Олдерни предоставляют тщательный мониторинг экономических операций. Любая аккредитованная сайт реализует регулярные проверки RNG-систем.
IT параметры современных игорных домов предусматривают SSL-защиту экономического категории. Провайдеры цифрового обеспечения вроде Microgaming, NetEnt, Pragmatic Play внедряют комплексные механизмы случайных величин.
Механизм верификации профиля предполагает представления документов KYC-типа. ID, выписка о средствах, доказательство прописки — классический список для финального входа.
Альтернативные порталы ликвидируют барьеры с блокировками организаций. Рабочие альтернативы обновляются ежедневно IT группами. Портативные утилиты зачастую действуют устойчивее сетевых вариантов.
Управление банкроллом определяет перспективную эффективность гемблинговых партий. Грамотные игроки предлагают урезать объём ставки до 1-2% от итогового банкролла.
Новейшие игроки имеют дело с массой технологических тонкостей при работе с проверенными площадками. Тематические порталы типа Tippy дают свежую сведения о операциях азартных операторов.
Процесс верификации профиля подразумевает комплекс необходимых фаз. Стартовая подтверждение нуждается загрузки свидетельств валидирующих персону. Обычный перечень включает паспорт, автолицензию или международный паспорт.
Цифровая составляющая регистрации подразумевает использование SSL-шифрования и многофакторной защиты. Опытные клиенты советуют инициировать все представленных функций охраны.
Резервные ссылки представляют абсолютные отражения центрального ресурса с сохранением комплексного набора функций. Важнейшее плюс состоит в соответствии расчетных границ и условий проигрыша.
Система локализации рабочих резервных ссылок фундируется на отслеживании профессиональных телеграм-каналов и союзных сайтов. Профессиональные клиенты внедряют туннельные протоколы для формирования надежного соединения безотносительно от региональных запретов.
Нынешние геймеры встречаются с огромным количеством цифровых тонкостей при процессах с легальными сайтами. Профильные ресурсы типа Вавада зеркало выдают новую контент о функционировании казино организаций.
Процедура проверки кабинета подразумевает ряд обязательных этапов. Исходная верификация предполагает загрузки удостоверений подтверждающих субъект. Обычный набор охватывает свидетельство, лицензию водителя или внешний паспорт.
Технологическая элемент создания аккаунта подразумевает использование зашифрованного канала и 2FA. Профессиональные игроки советуют инициировать все доступных параметров секьюрити.
Запасные домены представляют полные клоны главного сайта с хранением всего арсенала. Главное бонус состоит в соответствии денежных лимитов и критериев условий прокрутки.
Система поиска актуальных альтернативных адресов базируется на контроле профильных телеграм-каналов и аффилированных порталов. Опытные геймеры эксплуатируют VPN-сервисы для гарантирования бесперебойного соединения независимо от региональных блокировок.
прогулка на теплоходе по москве-реке Погрузитесь в атмосферу речных прогулок по Москве, где каждый километр акватории дарит новые впечатления. Выберите для себя идеальную прогулку на теплоходе, будь то романтический вечер или семейный отдых. Москва-река раскинула свои воды, приглашая исследовать город с новой, завораживающей стороны.
канал про моду Как правильно выбирать одежду? Это искусство, которое требует знания своего тела, умения сочетать цвета и фактуры, а также понимания того, какой образ вы хотите создать.
Ориентирование в области сертифицированных порталов включает владения передовых методов авторизации. Опытные игроки задействуют Меллстрой официальный сайт для извлечения релевантной информации о активных ссылках.
Алгоритм формирования учетной записи в лицензированных заведениях предполагает сложную валидацию. Актуальные поставщики задействуют KYC-механизмы и AML-правила. Бумажная работа отнимает от 24 до 72 временных отрезков.
Цифровые методы для обхода блокировок совершенствуются параллельно с интенсификацией правовых инициатив. VPN-решения класса premium обеспечивают криптографию AES-256 и стандарты OpenVPN. Стабильность подключения критически значима для VIP игровых периодов.
Зеркальные сайты функционируют через территориально расположенные серверные мощности. CDN-архитектуры осуществляют минимальную отклик для американских игроков. Автоматическое перенаправление включается при детекции барьера основного адреса.
Финансовые транзакции в проверенных юрисдикциях соответствуют жестким стандартам PCI DSS. Децентрализованные платежи получают актуальность в результате анонимности и динамике выполнения.
Планшетные софт топовых операторов интегрируют лицевую авторизацию и push-уведомления для ключевых моментов. Настраиваемый оформление самостоятельно подстраивается под свойства экрана.
Рабочие резервные адреса легальных азартных клубов на Vavada casino обеспечивают непрерывный соединение к геймерским платформам. Схема зеркалирования строит аналогичные копии центрального сайта с сохранением всех функций.
Алгоритм открытия счета через mirror-сайт на сто процентов дублирует основную анкету. Только пришедшие игроки указывают активный email, придумывают безопасный шифр и устанавливают игровую финансовый инструмент.
Валидация счета включает предоставления документов следуя KYC-стандартам. Фото национального документа, валидация адреса и денежные координаты проходят автоматическую валидацию в течение 24-72 периодов.
Авторизация зарегистрированных геймеров выполняется через классическую интерфейс с усиленной аутентификацией. Временные коды отправляются на мобильный аппарат или email.
Возможности депозитного сектора через резервные ссылки поддерживает топовые финансовые системы. Visa, Mastercard, онлайн балансы Skrill, Neteller, криптовалюты Bitcoin, Ethereum обрабатываются с минимальными процентами 0-3%.
Азартная база клонируется в точности включая слоты, традиционные забавы, live-дилеров и максимальные награды. RTP-показатели, вариативность и вейджер остаются идентичными.
Поощрительная программа действует подобно базовому веб-площадке. Welcome-бандлы, бесплатные вращения, компенсация и VIP-планы включаются машинально при реализации прописанных условий.
Hey I am so delighted I found your site, I really found you
by mistake, while I was searching on Digg for something else, Regardless
I am here now and would just like to say kudos for a marvelous post and a all round interesting blog (I also love the
theme/design), I don’t have time to go through it all
at the moment but I have saved it and also included your RSS
feeds, so when I have time I will be back to read much more, Please
do keep up the great work.
Поиск безопасного игрового оператора в актуальных реалиях заставляет специального рассмотрения к лицензионному положению. Профессиональные геймеры осознают, что казино Вован предоставляет свежую материалы о функционирующих сервисах.
Процесс оформления профиля в лицензированных заведениях содержит необходимую аутентификацию персональных данных. KYC-стандарты гарантируют как площадку, так и участника от афер. Кратковременные ограничения на перечисление денег до выполнения подтверждения – типичная система.
Программные барьеры на связь к betting порталам нейтрализуются через резервные адреса. Действующие копии обеспечивают абсолютную возможности главного ресурса. Платежные процедуры, игровой результаты и бонусные системы функционируют постоянными.
Экономическая гарантированность характеризуется степенью применяемых расчетных инструментов. SSL-безопасность, PCI DSS валидация и многоуровневая верификация создают прочный барьер защиты.
Азартная коллекция проверенных сервисов содержит слоты от известных провайдеров. RTP-значения, вариативность и расчетные системы претерпевают объективную валидацию в аккредитованных центрах.
Программы вознаграждения в профессиональных операторах основываются на ясных правилах вейджера. Условия ставок x35-40 расценивается адекватным для машина-льгот, в то время как настольные активности идут в счет с сниженным коэффициентом.
Установите удобный электрокарнизы марьино для идеального управления шторами в вашем доме.
С его помощью можно легко регулировать освещенность комнаты, не вставая с дивана.
Такие системы становятся все популярнее благодаря своему удобству и функциональности. Их часто устанавливают в умных домах для интеграции в систему автоматизации.
#### **2. Преимущества электрокарнизов**
Главное достоинство электрокарниза — это удобство использования. Система работает бесшумно и плавно, не создавая лишнего шума.
Кроме того, электрокарнизы отличаются высокой надежностью и долговечностью. Современные модели оснащены защитой от перегрузок и коротких замыканий.
#### **3. Установка и настройка**
Монтаж электрокарниза требует определенных навыков и точности. Лучше доверить эту работу профессионалам, чтобы избежать ошибок.
После установки нужно правильно настроить систему управления. В некоторых моделях можно задавать индивидуальные сценарии работы.
#### **4. Выбор подходящей модели**
При покупке электрокарниза важно учитывать несколько факторов. В первую очередь, нужно определить максимальный вес штор, которые будет выдерживать система.
На рынке представлены модели разных ценовых категорий. Премиальные электрокарнизы оснащены дополнительными опциями, такими как датчики освещенности.
—
### **Спин-шаблон**
#### **1. Введение**
Он позволяет управлять текстилем на окнах с помощью пульта дистанционного управления.
#### **2. Преимущества электрокарнизов**
Главное достоинство электрокарниза — это удобство использования.
#### **3. Установка и настройка**
После установки нужно правильно настроить систему управления.
#### **4. Выбор подходящей модели**
В первую очередь, нужно определить максимальный вес штор, которые будет выдерживать система.
Актуальные платформы беттинг развлечений обеспечивают участникам возможность к высококлассному гемблингу через сертифицированные казино лова сайты. Лицензированная функционирование требует исполнения жестких надзорных стандартов.
Алгоритм активации пользовательского учетной записи содержит аутентификацию личных показателей. Регуляторы применяют многоуровневые процедуры KYC и AML для пресечения незаконных финансовых действий.
IT системы новейших казино основываются на зашифрованных облачных системах с криптографическими стандартами. Региональная блокировка принуждает операторов запускать резервные ссылки.
Параллельные домены представляют полные копии первичного домена с поддержанием всех функций и показателей. Беттеры добиваются постоянный подключение к средствам, азартной истории и клиентским параметрам.
Денежные переводы производятся через встроенные расчетные процессоры. Ограничения на пополнения и выводы назначаются в соотношении с регуляторными стандартами и собственными процедурами минимизации опасностей.
Квалифицированные игроки советуют отслеживать состояние лицензии через официальные базы данных развлекательных ведомств. Престижные характеристики содержат оценки на тематических ресурсах и feedback подлинных беттеров.
Официальные провайдеры гэмблинг возможностей дают геймерам право к качественному азартному досугу через dedicated платформы, включая Lucky Bear , которые именно выполняют международные требования безопасности.
Схема регистрации включает предоставления проверочных деталей через безопасные SSL-протоколы. Букмекеры demanded документальное свидетельство возраста и региона нахождения для исполнения нормативных правил.
Multi-factor аутентификация является required составляющей современных систем безопасности. Users имеют SMS-коды, push-уведомления или эксплуатируют targeted софт по типу Google Authenticator.
Резервные домены ликвидируют проблемы географических санкций и DDoS-assault. С технической точки зрения mirrors представляют копийные копии базового платформы с maintaining возможностей и user сведений.
Опытные игроки suggest сохранять обновлённые реестры действующих дублей в сохранённых ссылках веб-клиента. Провайдеры рассылают новости о современных адресах через электронную почту, Telegram-каналы и мобильные софт.
Payment операции через лицензионные порталы secured cryptographic methods категории банковского сектора. Extraction капитала выполняется единственно на проверенные реквизиты держателя account.
Активные mirror-ссылки легальных азартных клубов на казино Лаки Бир предоставляют устойчивый коннект к игровым сервисам. Технология дублирования генерирует эквивалентные реплики центрального ресурса с консервацией всех опций.
Механизм активации через mirror-сайт в точности копирует основную форму. Только пришедшие игроки прописывают валидный email, генерируют безопасный ключ и определяют операционную финансовый инструмент.
Идентификация счета включает представления документов согласно KYC-требованиям. Снимок национального документа, подтверждение адреса и карточные координаты анализируются посредством цифровую анализ в течение 24-72 ч.
Вход активных геймеров происходит через стандартную модуль с двухфакторной верификацией. Краткосрочные коды передаются на сотовый устройство или e-mail адрес.
Механизмы финансового модуля через дублирующие порталы поддерживает популярные расчетные системы. Visa, Mastercard, веб балансы Skrill, Neteller, цифровые активы Bitcoin, Ethereum выполняются с уменьшенными платежами 0-3%.
Гемблинг каталог копируется целиком включая машины, классические забавы, live-дилеров и мегавыигрыши. RTP-параметры, колебания и вейджер поддерживаются аналогичными.
Акционная система действует подобно центральному порталу. Welcome-предложения, бесплатные вращения, refund и VIP-программы инициируются программно при реализации фиксированных стандартов.
Нынешние бетторы сталкиваются с барьером связи к официальным порталам. Провайдеры блокируют стандартные URL, но знающие Lucky Bear casino клиенты помнят о функционировании дублирующих платформ.
Зеркало представляет абсолютную отображение главного ресурса. Средства защиты поддерживаются неизменными. Платёжные операции производятся через сходные системы.
Методика создания аккаунта через альтернативный домен подразумевает привычной подтверждения. Операторы запрашивают справки для исполнения KYC-правил. Паспортные данные реализуют двухфакторную валидацию.
Депозитные ограничения на зеркальных площадках аналогичны основным условиям. Минимальные взносы продолжают постоянными. Прогрессивные накопления интегрируются между всеми ресурсами.
Бонусные механизмы оперируют всесторонне на дополнительных площадках. Требования по обороту поддерживает первоначальные показатели. Период действия реализации продолжается.
Сервис ассистирования обрабатывает запросы с дополнительных порталов таким же способом. Живой диалог предоставляет постоянный режим работы.
Выбор безопасного казино ресурса нуждается детального рассмотрения регулятивных разрешений. Инновационные порталы [url=https://calgarytrailfmc.ca/igrayte-v-onlaynkazino-i-naydite-laki-bir-zerkalo-na-nashem-sayte/]лайки Р±РёСЂ казино[/url] гарантируют пользователям абсолютную детали о своих санкциях.
Алгоритм получения доступа предусматривает ряд обязательных этапов верификации. Операторы настаивают удостоверения, устанавливающие идентичность и правоспособность. Обычный KYC-алгоритм составляет от 24 до 72 временных отрезков.
Распоряжение капиталом стартует с фиксации границ на депозиты. Профессиональные пользователи призывают задействовать установку 5% от общего казино фонда на одну игру.
Системные препятствия провайдеров заставляют использовать запасные маршруты. Копии оберегают абсолютную работоспособность первичного платформы, подразумевая архив операций и игровой продвижение.
Новые расчетные инструменты предоставляют скоростные взносы через цифровые портмоне. Bitcoin, Ethereum и устойчивые монеты предоставляют тайность и мизерные взносы. Срок осуществления изъятий составляет 10-30 периодов.
Планы верности подразумевают градационные категории с возрастающим возвратом. VIP-менеджеры предоставляют индивидуальные бонусы, расширенные границы и ускоренную техподдержку.
Действующие зеркала лицензированных гемблинг-платформ на Lucky Bear казино гарантируют стабильный коннект к гемблинг платформам. Принцип клонирования образует идентичные копии основного ресурса с поддержанием всех инструментов.
Система открытия счета через резервную ссылку целиком повторяет базовую бланк. Только пришедшие участники заполняют валидный email, устанавливают стойкий секретную комбинацию и выбирают основную денежную единицу.
Идентификация аккаунта предполагает представления бумаг согласно KYC-политике. Скан паспорта, доказательство резиденции и денежные данные проходят цифровую контроль в течение 24-72 часа.
Аутентификация существующих клиентов осуществляется через классическую модуль с 2FA валидацией. Одноразовые коды поступают на мобильный устройство или email.
Инструменты пополнительного раздела через дублирующие порталы обеспечивает распространенные банковские механизмы. Visa, Mastercard, цифровые балансы Skrill, Neteller, цифровые активы Bitcoin, Ethereum процессируются с низкими взносами 0-3%.
Игровая библиотека воспроизводится полностью включая барабаны, настольные игры, live-ведущих и прогрессивы. RTP-показатели, волатильность и условия отыгрыша поддерживаются такими же.
Промо программа действует похоже главному веб-площадке. Welcome-наборы, безвозмездные спины, компенсация и VIP-схемы активируются машинально при исполнении заданных требований.
Une fois l’argent sur votre compte, gates of olympus en ligne ils sont affichés au-dessus des rouleaux. Les innovations de protection que les sites de casino en ligne utilisent sont développées pour protéger le joueur car il est l’un des atouts les plus bénéfiques des entreprises de jeux sur Internet, la limitation du gain maximum à seulement 500 fois la mise maximale est en forte contradiction avec les paramètres mathématiques actuels de nombreux jeux de machines à sous. Ce casino en ligne Canadien adore récompenser ses fidèles joueurs, la cagnotte passera à un montant fixe. ATTENTION : Les offres sur notre site sont susceptibles d’évoluer ou d’être annulées. Nous recommandons toujours au joueur d’examiner les conditions et de vérifier le bonus directement sur le site du casino des sociétés de paris.
https://www.sawpalmete.co.nz/43/revue-du-jeu-de-casino-wazamba-en-ligne-pour-les-joueurs-francais/
L’industrie du casino en ligne depuis le confort de votre vie ? L’entreprise poursuit également son expansion dans les casinos en ligne. Dans un casino en ligne disponible sur la machine Gonzo’s Ouest Megaways. Les casinos mobiles sont de 35x, ce qui justifie les résultats sont en quête de gains. Avez-vous déjà rêvé d’atteindre le sommet de l’Olympe et de vous rendre dans le royaume des dieux pour assister à leurs festivités ? Vous y serez presque si vous avez la chance de gagner un énorme jackpot en jouant à la machine à sous Gates of Olympus. Le développeur Pragmatic Play s’est inspiré des mythes pour concevoir ce jeu. On y trouve des rouleaux remplis de pierres précieuses de différentes couleurs et de symboles de la richesse divine : coupes, couronnes et sabliers dorés. Zeus plane sur le côté droit de la grille, offrant parfois des multiplicateurs aux joueurs.
Новейшие гемблеры оказываются с проблемой соединения к легальным порталам. Организации запрещают базовые адреса, но знающие Clubnika зеркало посетители учитывают о функционировании зеркальных сайтов.
Параллельный портал составляет абсолютную воспроизведение оригинального площадки. SSL-сертификаты остаются такими же. Расчётные операции выполняются через сходные системы.
Процедура заведения учётной записи через параллельный ресурс предполагает типовой подтверждения. Менеджеры уточняют документы для исполнения KYC-стандартов. Паспортные характеристики осуществляют двухфакторную валидацию.
Пополнительные ограничения на резервных платформах аналогичны основным условиям. Низшие ставки поддерживаются фиксированными. Увеличивающиеся банки согласовываются между различными ссылками.
Премиальные планы работают комплексно на дополнительных сайтах. Множитель ставок поддерживает первоначальные показатели. Период действия проигрывания не изменяется.
Сервис ассистирования анализирует запросы с зеркальных ссылок равнозначно. Живой чат обеспечивает беспрерывный порядок оперирования.
pakimports.shop – Smooth navigation with a wide range of products available today.
Рабочие альтернативные домены проверенных азартных клубов на Vavada казино обеспечивают постоянный подключение к развлекательным платформам. Система копирования генерирует идентичные клоны главного домена с консервацией всех инструментов.
Алгоритм создания аккаунта через альтернативный домен в точности имитирует оригинальную анкету. Свежие пользователи регистрируют действующий email, создают стойкий пароль и фиксируют базовую платежное средство.
Подтверждение аккаунта включает предоставления бумаг в соответствии с KYC-стандартам. Копия водительских прав, доказательство адреса и банковские координаты подвергаются автоматическую контроль в течение 24-72 периодов.
Вход действующих участников реализуется через стандартную окно с двухфакторной верификацией. Одноразовые токены доставляются на телефонный устройство или электронную почту.
Функционал пополнительного компонента через резервные ссылки предлагает топовые банковские инструменты. Visa, Mastercard, онлайн кошельки Skrill, Neteller, виртуальные монеты Bitcoin, Ethereum выполняются с сокращенными процентами 0-3%.
Азартная коллекция копируется полностью включая слоты, карточные забавы, live-крупье и максимальные награды. RTP-показатели, дисперсия и ставочные требования остаются аналогичными.
Акционная схема выполняется подобно базовому домену. Welcome-комплекты, безвозмездные спины, refund и VIP-планы инициируются автоматически при выполнении определенных условий.
Outrank Outlet daily picks – Great resources and tools that support stronger online presence efficiently.
SampleAtelier design hub – Clean visuals and innovative ideas made the experience enjoyable.
Поиск безопасного азартного оператора в текущих рамках заставляет детального анализа к лицензионному состоянию. Опытные геймеры осознают, что Вавада казино включает актуальную сведения о действующих операторах.
Алгоритм регистрации в сертифицированных заведениях предусматривает требуемую валидацию документов. KYC-процедуры охраняют как заведение, так и клиента от фрода. Переходные лимиты на получение средств до выполнения проверки – привычная практика.
Технические запреты на доступ к гемблинг порталам преодолеваются через параллельные адреса. Доступные копии обеспечивают стопроцентную работоспособность первичного ресурса. Финансовые движения, развлекательный продвижение и льготные схемы сохраняются неизменными.
Материальная безопасность оценивается степенью внедренных расчетных методов. SSL-криптография, PCI DSS сертификация и многоуровневая идентификация создают безопасный барьер безопасности.
Игровая ассортимент проверенных сервисов объединяет барабаны от известных провайдеров. RTP-индексы, волатильность и алгоритмические формулы получают нейтральную валидацию в авторизованных учреждениях.
Механизмы стимулирования в качественных заведениях формируются на четких требованиях отыгрыша. Отыгрыш x35-40 считается приемлемым для автомат-поощрений, в то время как настольные игры учитываются в подсчет с сниженным показателем.
For context
newest casino websites
to solve your problem.
http://smartgenrxusa.com/# Smart GenRx USA
Гемблинговая индустрия демонстрирует интенсивный подъём, манящая массы участников. Грамотные платформы предоставляют качественную атмосферу для игры. Подробную данные о таких провайдерах можно найти на zelenovskoe.ru .
Сертификация представляет ключевым элементом определения площадки. Юрисдикции Мальты дают качественный аудит экономических процедур. Каждая сертифицированная портал реализует периодические аудиты RNG-систем.
Компьютерные параметры инновационных игорных домов предусматривают SSL-безопасность банковского категории. Провайдеры компьютерного материала уровня Microgaming, NetEnt, Pragmatic Play внедряют комплексные схемы рандомных величин.
Процедура валидации учётной записи требует подачи бумаг KYC-уровня. Удостоверение, справка о финансах, верификация прописки — классический комплект для окончательного авторизации.
Зеркальные домены устраняют сложности с запретами провайдеров. Действующие копии корректируются регулярно техническими службами. Мобильные программы часто оперируют качественнее сетевых модификаций.
Банкролл-менеджмент устанавливает продолжительную успешность развлекательных периодов. Квалифицированные пользователи предлагают лимитировать размер депозита до 1-2% от итогового резерва.
Азартная индустрия представляет динамичный развитие, манящая легионы клиентов. Экспертные порталы дают защищённую атмосферу для беттинга. Исчерпывающую информацию о данных компаниях допустимо найти на лова зеркало .
Сертификация остаётся центральным элементом подбора портала. Регуляторы Олдерни гарантируют тщательный проверку денежных транзакций. Каждая сертифицированная сайт осуществляет постоянные проверки RNG-механизмов.
Технические свойства актуальных гемблинг-сайтов объединяют SSL-защиту денежного уровня. Поставщики цифрового обеспечения типа Microgaming, NetEnt, Pragmatic Play внедряют продвинутые системы произвольных значений.
Алгоритм верификации счёта подразумевает представления документов KYC-типа. Удостоверение, выписка о прибылях, валидация проживания — стандартный набор для завершённого входа.
Зеркальные адреса решают сложности с блокировками поставщиков. Актуальные альтернативы изменяются ежедневно IT специалистами. Планшетные софт нередко действуют надёжнее интернет модификаций.
Управление банкроллом задаёт продолжительную успешность развлекательных периодов. Грамотные беттеры советуют лимитировать величину вейджера до 1-2% от суммарного банкролла.
Нынешние клиенты имеют дело с набором системных аспектов при работе с сертифицированными платформами. Экспертные порталы типа Лаки Бир РІС…РѕРґ поставляют релевантную информацию о функционировании игорных организаций.
Процедура валидации профиля подразумевает комплекс принудительных шагов. Базовая верификация включает размещения удостоверений подтверждающих субъект. Типовой комплект охватывает документ, лицензию водителя или международный паспорт.
Цифровая составляющая открытия счета включает использование защищенного протокола и двухфакторной аутентификации. Квалифицированные участники подсказывают задействовать весь комплекс имеющихся возможностей защиты.
Дублирующие порталы представляют абсолютные отражения основного портала с удержанием тотального функционала. Основное бонус выражается в подобии денежных пределов и требований ставочных требований.
Система выявления рабочих дублирующих порталов базируется на мониторинге экспертных телеграм-каналов и сотрудничающих площадок. Квалифицированные геймеры эксплуатируют VPN-сервисы для гарантирования бесперебойного соединения безотносительно от территориальных запретов.
Momentum Mall finds – Well-laid-out pages make browsing enjoyable and efficient.
Нынешние геймеры встречаются с затруднением соединения к официальным сайтам. Поставщики запрещают стандартные порталы, но опытные Vavada казино игроки осознают о доступности резервных площадок.
Альтернативный адрес является идентичную дубликат основного площадки. Средства защиты остаются равнозначными. Финансовые действия производятся через равнозначные механизмы.
Схема регистрации через зеркальный адрес содержит классической аутентификации. Администраторы запрашивают удостоверения для исполнения KYC-правил. Паспортные данные проходят усиленную аутентификацию.
Пополнительные рамки на зеркальных порталах равняются первичным характеристикам. Наименьшие вклады функционируют неизменными. Увеличивающиеся накопления объединяются между различными доменами.
Льготные схемы работают целостно на параллельных сайтах. Отыгрышный коэффициент обеспечивает оригинальные цифры. Длительность оборота поддерживается.
Сервис сопровождения решает тикеты с зеркальных адресов равнозначно. Живой чат поддерживает постоянный формат функционирования.
Enjoy the smooth reading experience of this digital novel. The PDF of It Should Have Been You is user-friendly. It should have been you relaxing with this book. Get the file today and enjoy. https://itshouldhavebeenyoupdf.top/ Get It Should Have Been You Pdf
Find your next great read with this suspenseful book. It is a story that grabs you and won’t let go. The PDF version is easy to download and read. Discover the hidden depths of a marriage that is anything but ordinary. https://myhusbandswifepdf.top/ My Husband’s Wife Book Free
Top Picks at Bulking Basket – Lots of product options and moving around the site is smooth.
Выбор проверенного betting ресурса в современных границах требует детального внимания к юридическому уровню. Профессиональные участники осознают, что п»ї1xBet casino отображает современную данные о доступных провайдерах.
Алгоритм создания аккаунта в официальных платформах объединяет обязательную проверку личности. KYC-процедуры оберегают как заведение, так и геймера от обмана. Краткосрочные лимиты на снятие средств до окончания валидации – стандартная практика.
Программные запреты на связь к азартным порталам обходятся через параллельные адреса. Функционирующие зеркала сохраняют полную функциональность главного портала. Денежные процедуры, игровой результаты и привилегированные программы функционируют константными.
Финансовая защищенность оценивается качеством внедренных расчетных инструментов. SSL-криптография, PCI DSS сертификация и усиленная аутентификация создают стабильный периметр защиты.
Развлекательная каталог сертифицированных заведений содержит слоты от известных создателей. RTP-коэффициенты, вариативность и вероятностные формулы проходят объективную валидацию в аккредитованных лабораториях.
Программы вознаграждения в надежных операторах базируются на открытых критериях активности. Проигрыш x35-40 расценивается справедливым для автомат-привилегий, в то время как карточные активности учитываются в зачет с пониженным фактором.
Исследование в области проверенных площадок подразумевает осознания новых методов доступа. Умелые геймеры задействуют п»ї1хбет РІС…РѕРґ для получения свежей сведений о функционирующих путях.
Механизм открытия счета в официальных компаниях подразумевает тщательную валидацию. Актуальные провайдеры используют KYC-механизмы и AML-требования. Документооборот потребляет от 24 до 72 часов.
Компьютерные технологии для избежания запретов улучшаются параллельно с укреплением нормативных шагов. VPN-решения уровня premium обеспечивают кодирование AES-256 и системы OpenVPN. Непрерывность коннекта жизненно важна для премиальных сессий.
Резервные адреса действуют через локально размещенные серверные мощности. CDN-архитектуры гарантируют низкую время ответа для глобальных клиентов. Цифровое роутинг срабатывает при распознавании барьера главного сайта.
Банковские движения в сертифицированных зонах отвечают строгим нормам PCI DSS. Блокчейн транзакции завоевывают популярность в результате скрытности и оперативности процессинга.
Мобильные приложения премиальных компаний интегрируют голосовую аутентификацию и push-извещения для критических событий. Настраиваемый внешний вид программно настраивается под особенности панели.
Актуальные платформы азартных услуг обеспечивают игрокам возможность к высококлассному развлечениям через защищенные казино Гризли порталы. Официальная работа требует выполнения четких правовых норм.
Процесс оформления индивидуального кабинета содержит аутентификацию конфиденциальных информации. Управляющие задействуют углубленные механизмы KYC и AML для пресечения поддельных операций.
Технические решения инновационных развлекательных порталов работают на защищенных облачных системах с TLS стандартами. Локальные запреты побуждает операторов организовывать альтернативные адреса.
Зеркальные сайты составляют аналогичные репликации первичного сайта с сохранением всех опций и информации. Беттеры получают устойчивый вход к капиталу, развлекательной данным и клиентским конфигурациям.
Финансовые процедуры выполняются через подключенные денежные процессоры. Лимиты на депозиты и изъятия назначаются в соответствии с правовыми требованиями и корпоративными процедурами управления рисками.
Профессиональные игроки предлагают анализировать условия лицензии через государственные регистры азартных ведомств. Репутационные показатели предусматривают оценки на профильных платформах и feedback действительных участников.
Беттинговая отрасль отображает интенсивный развитие, притягивая тысячи геймеров. Квалифицированные ресурсы обеспечивают надёжную обстановку для беттинга. Исчерпывающую данные о указанных провайдерах допустимо найти на mad casino .
Аттестация представляет главным критерием отбора платформы. Надзорные органы Олдерни создают серьёзный проверку финансовых транзакций. Отдельная официальная ресурс подвергается регулярные проверки RNG-алгоритмов.
Цифровые свойства передовых беттинг-платформ содержат SSL-безопасность расчётного уровня. Создатели компьютерного софта класса Microgaming, NetEnt, Pragmatic Play интегрируют многоуровневые системы непредсказуемых чисел.
Процедура верификации личного кабинета включает предоставления удостоверений KYC-формата. Паспорт, подтверждение о прибылях, верификация местожительства — стандартный перечень для завершённого доступа.
Параллельные порталы исправляют сложности с цензурой провайдеров. Рабочие зеркала изменяются каждый день техническими службами. Планшетные утилиты нередко действуют стабильнее онлайн модификаций.
Финансовая дисциплина определяет долгосрочную доходность азартных циклов. Профессиональные пользователи настаивают ограничивать размер ставки до 1-2% от итогового банкролла.
Scalable GPU infrastructure – Quick to deploy and remained stable under heavy workloads.
Инновационные сервисы гемблинг развлечений дают беттерам доступ к элитному развлечениям через надежные Вавада зеркало порталы. Авторизованная деятельность требует учета определенных регуляторных положений.
Процесс регистрации клиентского учетной записи включает валидацию индивидуальных реквизитов. Управляющие используют углубленные протоколы KYC и AML для исключения нарушающих операций.
Цифровые системы инновационных казино базируются на надежных дата-центрах с шифровальными протоколами. Локальные запреты обязывает операторов создавать резервные ссылки.
Параллельные порталы являют собой полные клоны базового портала с удержанием всех опций и показателей. Пользователи достигают постоянный связь к депозиту, азартной статистике и персональным конфигурациям.
Финансовые переводы производятся через интегрированные денежные процессоры. Пределы на пополнения и выводы фиксируются в гармонии с законодательными требованиями и организационными правилами контроля угроз.
Квалифицированные беттеры рекомендуют проверять положение авторизации через регуляторные регистры игорных организаций. Репутационные индикаторы охватывают места на профильных сайтах и оценки настоящих игроков.
Официальные ресурсы игорных услуг гарантируют пользователям вариант к качественному гэмблингу через профильные домены, включая Меллстрой регистрация , которые точно следуют мировые регламенты надёжности.
Алгоритм открытия счёта включает заполнения идентификационных параметров через криптографические SSL-линии. Операторы demanded official свидетельство правоспособности и адреса жительства для соблюдения юрисдикционных правил.
Multi-factor проверка выступает обязательным aspect современных архитектур надёжности. Клиенты приобретают SMS-токены, push-оповещения или эксплуатируют профессиональные софт наподобие Google Authenticator.
Зеркальные порталы нейтрализуют сложности географических ограничений и DDoS-атак. С технической точки зрения реплики образуют копийные dublicates primary платформы с maintaining features и пользовательских данных.
Экспертные участники советуют хранить current списки действующих дублей в закладках браузера. Management доставляют информацию о fresh доменах через почтовые сервисы, Telegram-communities и смартфонные софт.
Payment операции через лицензионные порталы защищены криптографическими системами уровня банковского направления. Снятие финансов производится единственно на верифицированные счета хозяина учётной записи.
Нынешние игроки встречаются с препятствием связи к официальным платформам. Провайдеры фильтруют главные ссылки, но опытные тип топ казино клиенты помнят о доступности параллельных ресурсов.
Дополнительный домен образует стопроцентную реплику основного портала. Средства защиты функционируют аналогичными. Банковские переводы реализуются через идентичные механизмы.
Процедура регистрации через альтернативный ссылку содержит привычной подтверждения. Администраторы запрашивают справки для исполнения KYC-правил. Паспортные данные реализуют расширенную аутентификацию.
Пополнительные лимиты на резервных сайтах идентичны основным спецификациям. Наименьшие беты сохраняются постоянными. Увеличивающиеся накопления интегрируются между всеми ссылками.
Стимулирующие системы выполняются всесторонне на зеркальных порталах. Отыгрышный коэффициент сохраняет оригинальные цифры. Тайминг использования поддерживается.
Сервис поддержки обрабатывает вопросы с альтернативных порталов аналогично. Живой переписка обеспечивает 24-часовой режим функционирования.
Активные дублирующие порталы лицензированных gaming-операторов на п»ї1хбет казино дают непрерывный коннект к игровым системам. Схема дублирования создает эквивалентные дубликаты центрального ресурса с фиксацией всех инструментов.
Система открытия счета через резервную ссылку полностью дублирует базовую бланк. Свежие игроки заполняют активный email, генерируют защищенный код доступа и устанавливают игровую валюту.
Валидация счета предполагает передачи свидетельств опираясь на KYC-политике. Снимок паспорта, подтверждение резиденции и финансовые данные проверяются через цифровую анализ в течение 24-72 ч.
Вход существующих клиентов осуществляется через обычную интерфейс с двухфакторной проверкой. Сессионные ключи отправляются на телефонный девайс или e-mail адрес.
Механизмы пополнительного модуля через зеркала включает распространенные расчетные платформы. Visa, Mastercard, электронные балансы Skrill, Neteller, блокчейн-токены Bitcoin, Ethereum осуществляются с оптимизированными сборами 0-3%.
Азартная ассортимент воспроизводится целиком включая слоты, столовые забавы, live-операторов и максимальные награды. RTP-параметры, изменчивость и условия отыгрыша сохраняются аналогичными.
Поощрительная программа выполняется идентично центральному веб-площадке. Welcome-предложения, бесплатные вращения, refund и VIP-схемы инициируются автоматически при исполнении фиксированных критериев.
Функционирующие зеркала официальных gaming-операторов на Болливуд создают устойчивый подключение к гемблинг ресурсам. Технология реплицирования строит эквивалентные дубликаты главного домена с фиксацией всех инструментов.
Система оформления профиля через mirror-сайт целиком копирует стандартную анкету. Свежие геймеры вводят функционирующий email, придумывают надежный шифр и определяют игровую платежное средство.
Аутентификация учетной записи содержит передачи документов следуя KYC-требованиям. Снимок национального документа, доказательство регистрации и платежные сведения подвергаются алгоритмическую проверку в течение 24-72 периодов.
Подключение действующих клиентов реализуется через базовую панель с усиленной идентификацией. Сессионные шифры отправляются на мессенджер номер или email.
Инструменты денежного модуля через зеркала включает распространенные расчетные инструменты. Visa, Mastercard, цифровые портмоне Skrill, Neteller, crypto Bitcoin, Ethereum выполняются с минимальными платежами 0-3%.
Азартная ассортимент клонируется целиком включая слоты, настольные геймплей, live-крупье и мегавыигрыши. RTP-параметры, изменчивость и отыгрыш остаются аналогичными.
Промо система действует схоже базовому сайту. Welcome-наборы, бесплатные вращения, компенсация и VIP-системы запускаются программно при достижении фиксированных требований.
Подбор легального гемблинг ресурса предполагает глубокого исследования регулятивных сертификатов. Новые платформы казино Vavada гарантируют клиентам стопроцентную данные о имеющихся санкциях.
Алгоритм открытия аккаунта включает различные принудительных шагов проверки. Администраторы настаивают бумаги, устанавливающие персону и совершеннолетие. Классический KYC-регламент занимает от 24 до 72 интервалов.
Управление банком инициируется с определения лимитов на вклады. Компетентные участники призывают использовать норму 5% от совокупного казино резерва на индивидуальную игру.
Цифровые препятствия провайдеров обязывают внедрять дополнительные маршруты. Альтернативы поддерживают абсолютную производительность первичного ресурса, включая летопись сделок и гемблинг успех.
Современные банковские методы гарантируют скоростные депозиты через цифровые портмоне. Bitcoin, Ethereum и стейблкоины поддерживают приватность и крошечные взносы. Длительность осуществления снятий насчитывает 10-30 периодов.
Системы верности охватывают каскадные степени с увеличивающимся бонусом. VIP-консультанты обеспечивают уникальные награды, повышенные лимиты и ускоренную поддержку.
https://sertralineusa.com/# sertraline zoloft
zoloft cheap: order zoloft – zoloft generic
Browse Sensitive-Safe Items – For anyone with allergies like me, this feels like a secure choice.
Азартная отрасль демонстрирует динамичный рост, притягивая тысячи игроков. Грамотные сайты обеспечивают стабильную обстановку для пари. Развёрнутую сведения о таких организациях возможно найти на п»ї1xBet зеркало .
Сертификация выступает центральным фактором определения платформы. Юрисдикции Кюрасао предоставляют строгий аудит финансовых действий. Любая лицензированная портал осуществляет регулярные аудиты RNG-механизмов.
Технические особенности инновационных беттинг-платформ содержат SSL-защиту расчётного уровня. Провайдеры виртуального материала наподобие Microgaming, NetEnt, Pragmatic Play добавляют сложные алгоритмы произвольных показателей.
Процедура проверки профиля требует подачи справок KYC-класса. Свидетельство, документ о прибылях, доказательство адреса — базовый перечень для финального входа.
Зеркальные ссылки решают препятствия с блокировками поставщиков. Актуальные копии корректируются ежедневно компьютерными командами. Мобильные клиенты часто выполняются качественнее браузерных вариантов.
Финансовая дисциплина определяет продолжительную результативность игровых партий. Грамотные игроки настаивают контролировать количество бета до 1-2% от итогового бюджета.
Развлекательная ниша являет динамичный развитие, завлекая множество клиентов. Грамотные порталы обеспечивают безопасную атмосферу для развлечений. Развёрнутую факты о таких компаниях возможно найти на Vavada казино .
Аккредитация является основным фактором отбора сайта. Лицензиаты Кюрасао дают тщательный аудит расчётных действий. Каждая сертифицированная сайт осуществляет периодические контроли RNG-алгоритмов.
Компьютерные особенности новейших азартных площадок включают SSL-кодирование финансового класса. Провайдеры виртуального софта вроде Microgaming, NetEnt, Pragmatic Play встраивают комплексные системы хаотичных показателей.
Процесс проверки профиля предполагает передачи свидетельств KYC-формата. ID, выписка о доходах, доказательство адреса — классический набор для финального авторизации.
Параллельные адреса ликвидируют трудности с блокировками организаций. Рабочие альтернативы адаптируются регулярно цифровыми командами. Мобильные программы обычно действуют устойчивее сетевых вариантов.
Управление банкроллом формирует продолжительную успешность беттинговых периодов. Грамотные геймеры рекомендуют урезать сумму ставки до 1-2% от совокупного банкролла.
Party Parlor handpicked items – Party supplies were excellent, and delivery was perfectly on schedule.
Отбор достойного гемблинг оператора в актуальных границах требует детального внимания к законному положению. Профессиональные геймеры знают, что СЌРЅРѕРјРѕ РІС…РѕРґ содержит свежую данные о функционирующих сервисах.
Процесс создания аккаунта в официальных платформах объединяет требуемую верификацию удостоверения. KYC-требования оберегают как казино, так и клиента от махинаций. Переходные рамки на получение средств до закрытия проверки – обычная система.
Программные ограничения на вход к гемблинг ресурсам нейтрализуются через параллельные адреса. Активные зеркала предоставляют абсолютную работоспособность основного портала. Банковские операции, развлекательный статистика и бонусные предложения сохраняются стабильными.
Финансовая гарантированность оценивается степенью применяемых банковских систем. SSL-криптография, PCI DSS лицензирование и многоуровневая аутентификация гарантируют надежный периметр охраны.
Интерактивная ассортимент официальных заведений охватывает слоты от лидирующих студий. RTP-параметры, колебания и алгоритмические схемы подвергаются внешнюю сертификацию в аккредитованных центрах.
Программы вознаграждения в серьезных сервисах формируются на прозрачных правилах проигрыша. Требования x35-40 оценивается адекватным для автомат-поощрений, в то время как традиционные состязания учитываются в калькуляцию с пониженным фактором.
Выбор достойного betting заведения в современных реалиях заставляет специального анализа к законному уровню. Компетентные геймеры осознают, что винити казино содержит современную сведения о доступных провайдерах.
Процедура открытия счета в официальных площадках объединяет принудительную верификацию персональных данных. KYC-процедуры обеспечивают как сервис, так и пользователя от махинаций. Временные пределы на изъятие капитала до финализации проверки – нормальная практика.
Цифровые препятствия на соединение к гемблинг сервисам обходятся через альтернативные порталы. Функционирующие клоны обеспечивают всестороннюю работоспособность первичного платформы. Финансовые транзакции, интерактивный результаты и бонусные системы сохраняются стабильными.
Денежная стабильность определяется степенью задействованных денежных механизмов. SSL-защита, PCI DSS аттестация и многоуровневая проверка гарантируют прочный щит защиты.
Развлекательная набор легальных сервисов предоставляет машины от главных студий. RTP-параметры, колебания и алгоритмические схемы испытывают внешнюю контроль в одобренных организациях.
Системы мотивации в серьезных казино основываются на ясных требованиях ставок. Вейджер x35-40 оценивается справедливым для машина-подарков, в то время как традиционные развлечения принимаются в зачет с редуцированным процентом.
Выбор проверенного казино оператора предполагает серьезного рассмотрения юридических разрешений. Современные платформы п»ї1хбет гарантируют геймерам абсолютную факты о текущих лицензиях.
Механизм регистрации предусматривает ряд принудительных этапов верификации. Провайдеры просят свидетельства, доказывающие индивидуальность и совершеннолетие. Стандартный KYC-порядок длится от 24 до 72 периодов.
Управление банком запускается с определения лимитов на взносы. Профессиональные пользователи настаивают эксплуатировать установку 5% от совокупного азартного бюджета на единичную игру.
Технические барьеры администраторов заставляют внедрять запасные адреса. Клоны хранят абсолютную функциональность центрального портала, предусматривая хронологию платежей и азартный продвижение.
Передовые финансовые системы обеспечивают мгновенные взносы через цифровые портмоне. Bitcoin, Ethereum и фиксированные активы поддерживают тайность и символические взносы. Период осуществления снятий доходит 10-30 отрезков.
Схемы приверженности подразумевают каскадные категории с возрастающим кэшбэком. VIP-представители предлагают индивидуальные поощрения, усиленные пределы и преимущественную сервис.
Нынешние клиенты встречаются с огромным количеством цифровых особенностей при работе с сертифицированными сайтами. Тематические сайты типа Лаки Бир официальный сайт дают свежую контент о деятельности гэмблинговых компаний.
Алгоритм проверки кабинета охватывает несколько необходимых шагов. Начальная проверка включает отправки справок доказывающих персону. Типовой пакет предполагает паспорт, автолицензию или заграничное удостоверение.
Техническая компонента создания аккаунта включает задействование криптографической защиты и многофакторной защиты. Опытные пользователи предлагают включать совокупность доступных параметров обеспечения.
Зеркала представляют полные копии базового портала с обеспечением исчерпывающего арсенала. Ключевое достоинство содержится в соответствии банковских границ и норм вейджера.
Механизм локализации актуальных альтернативных адресов опирается на отслеживании экспертных информационных каналов и сотрудничающих ресурсов. Квалифицированные клиенты используют VPN-сервисы для создания устойчивого доступа независимо от локальных ограничений.
Howdy! Do you know if they make any plugins to help with Search Engine Optimization? I’m trying to get my blog to
rank for some targeted keywords but I’m not seeing very good gains.
If you know of any please share. Many thanks!
Современные геймеры обталкиваются с множеством технологических аспектов при операциях с проверенными сайтами. Экспертные платформы типа Вавада дают свежую материалы о работе азартных компаний.
Механизм аутентификации кабинета предполагает набор неотъемлемых фаз. Стартовая проверка включает размещения свидетельств валидирующих персону. Классический перечень включает документ, права или международный паспорт.
Техническая компонента оформления включает задействование SSL-шифрования и двойной авторизации. Опытные участники рекомендуют включать все доступных настроек обеспечения.
Дублирующие порталы являются абсолютные реплики базового ресурса с удержанием исчерпывающего функционала. Основное преимущество кроется в соответствии расчетных ограничений и критериев ставочных требований.
Механизм обнаружения актуальных дублирующих порталов базируется на отслеживании экспертных новостных лент и аффилированных сайтов. Квалифицированные игроки внедряют прокси-соединения для обеспечения постоянного соединения безотносительно от местных запретов.
Faceless Factory Select – Clear categories and fast-loading pages make exploring items pleasant.
Поиск в области проверенных ресурсов нуждается владения актуальных методов авторизации. Опытные геймеры используют Болливуд казино для приобретения свежей фактов о оперативных путях.
Механизм создания счета в официальных учреждениях содержит тщательную верификацию. Современные организации внедряют KYC-системы и AML-критерии. Документооборот отнимает от 24 до 72 периодов.
Цифровые методы для обхода запретов развиваются вместе с повышением законодательных мер. VPN-платформы категории premium предоставляют безопасность AES-256 и стандарты OpenVPN. Стабильность связи fundamentally важна для премиальных заходов.
Зеркальные ресурсы работают через территориально размещенные IT ресурсы. CDN-структуры поддерживают быструю задержку для азиатских клиентов. Цифровое перенаправление инициируется при обнаружении блокировки базового сайта.
Платежные транзакции в легальных территориях соответствуют определенным требованиям PCI DSS. Цифровые платежи получают признание из-за конфиденциальности и динамике процессинга.
Смартфонные утилиты топовых компаний интегрируют физиологическую проверку и push-уведомления для принципиальных моментов. Настраиваемый оформление автоматически подстраивается под параметры монитора.
Современные провайдеры азартных услуг предоставляют участникам вход к качественному азарту через проверенные Меллстрой РІС…РѕРґ платформы. Лицензированная деятельность требует учета жестких контролирующих критериев.
Алгоритм регистрации пользовательского аккаунта содержит верификацию приватных сведений. Регуляторы используют углубленные механизмы KYC и AML для недопущения поддельных транзакций.
Электронные решения передовых казино работают на защищенных дата-центрах с шифровальными сертификатами. Геоблокировка побуждает операторов организовывать дублирующие ссылки.
Альтернативные порталы составляют аналогичные дубликаты первичного сайта с фиксацией всех опций и сведений. Участники приобретают устойчивый доступ к капиталу, развлекательной статистике и индивидуальным опциям.
Расчетные переводы производятся через синхронизированные денежные системы. Границы на взносы и получения определяются в гармонии с правовыми положениями и корпоративными регламентами минимизации опасностей.
Опытные гемблеры предлагают проверять состояние разрешения через государственные каталоги игорных комиссий. Репутационные параметры задействуют ранги на отраслевых ресурсах и feedback настоящих беттеров.
Определение безопасного азартного площадки в актуальных реалиях предполагает особого внимания к юридическому статусу. Опытные игроки осознают, что friends casino демонстрирует последнюю материалы о функционирующих ресурсах.
Механизм оформления профиля в проверенных платформах охватывает необходимую проверку документов. KYC-нормы защищают как заведение, так и клиента от мошенничества. Краткосрочные пределы на перечисление средств до завершения верификации – нормальная процедура.
Цифровые барьеры на доступ к betting ресурсам нейтрализуются через дублирующие порталы. Действующие копии предоставляют абсолютную функциональность центрального сервиса. Платежные процедуры, развлекательный достижения и льготные системы сохраняются устойчивыми.
Финансовая стабильность определяется качеством задействованных платежных инструментов. SSL-безопасность, PCI DSS валидация и многоуровневая проверка создают надежный периметр обороны.
Игровая набор лицензированных провайдеров объединяет автоматы от главных производителей. RTP-коэффициенты, дисперсия и алгоритмические принципы проходят внешнюю аудит в авторизованных организациях.
Системы поощрения в надежных сервисах основываются на четких критериях вейджера. Проигрыш x35-40 характеризуется адекватным для слот-поощрений, в то время как классические игры засчитываются в зачет с редуцированным фактором.
С интересом читаю материалы на kazino olimp. Благодарю за полезную инфу!
https://pin-up-kazakhstan-prof.com/mobile-app
Передовые гемблеры сталкиваются с затруднением подключения к проверенным ресурсам. Организации закрывают основные домены, но искушённые Mellstroy Game казино клиенты знают о присутствии дублирующих площадок.
Резервная ссылка формирует полную реплику основного портала. SSL-сертификаты остаются аналогичными. Платёжные процедуры проходят через те же сервисы.
Методика заведения учётной записи через дополнительный адрес предполагает классической валидации. Специалисты уточняют удостоверения для реализации KYC-регламентов. Персональные сведения осуществляют расширенную верификацию.
Пополнительные лимиты на параллельных площадках равняются стандартным параметрам. Минимальные беты поддерживаются константными. Накопительные призовые фонды объединяются между различными ресурсами.
Премиальные планы оперируют целостно на резервных порталах. Множитель ставок обеспечивает первоначальные цифры. Длительность оборота не изменяется.
Служба поддержки обрабатывает тикеты с параллельных адресов аналогично. Интерактивный диалог поддерживает постоянный режим работы.
For conclusions
can you get cheap fluoxetine prices
for connection.
Отбор честного казино площадки подразумевает тщательного исследования правовых бумаг. Современные системы п»ї1хбет сайт дают геймерам безусловную детали о собственных санкциях.
Процедура создания профиля подразумевает несколько принудительных ступеней верификации. Администраторы настаивают документы, доказывающие персону и зрелость. Обычный KYC-порядок составляет от 24 до 72 часов.
Контроль средств стартует с задания пределов на взносы. Опытные клиенты рекомендуют задействовать закон 5% от совокупного азартного фонда на отдельную заход.
Технические барьеры владельцев заставляют эксплуатировать альтернативные адреса. Дубликаты хранят максимальную эффективность базового портала, включая историю сделок и азартный достижения.
Передовые денежные способы дают оперативные инвестиции через виртуальные кошельки. Bitcoin, Ethereum и стейблкоины гарантируют анонимность и символические платежи. Время реализации получений равно 10-30 периодов.
Системы преданности охватывают иерархические статусы с прогрессивным бонусом. VIP-консультанты дают уникальные бонусы, усиленные ограничения и ускоренную поддержку.
Передовые геймеры попадают с сложностью связи к легальным платформам. Поставщики блокируют стандартные адреса, но грамотные ретро казино участники учитывают о функционировании зеркальных площадок.
Дополнительный домен образует стопроцентную отображение основного ресурса. Системы безопасности сохраняются такими же. Денежные переводы производятся через аналогичные системы.
Процедура открытия счёта через зеркальный адрес включает классической верификации. Администраторы просят свидетельства для соблюдения KYC-правил. Личные информация осуществляют многоуровневую валидацию.
Финансовые ограничения на альтернативных порталах равняются базовым характеристикам. Стартовые взносы сохраняются постоянными. Растущие джекпоты синхронизируются между многочисленными адресами.
Стимулирующие механизмы оперируют целостно на альтернативных сайтах. Коэффициент оборота поддерживает первоначальные значения. Временные рамки отыгрыша продолжается.
Отдел поддержки обрабатывает запросы с альтернативных доменов сходным образом. Мгновенный чат обеспечивает непрерывный расписание деятельности.
Зацепил материал про тюнинг авто, вдохновленный современными киногероями.
Вот, делюсь ссылкой:
https://obves63.ru/news/tyuning-i-obvesy-dlya-lada-vesta-kak-sdelat-mashinu-stilnoj-i-moshhnoj-v-2026-godu/
Игровая ниша представляет стремительный развитие, манящая множество игроков. Опытные платформы обеспечивают качественную пространство для беттинга. Исчерпывающую данные о подобных компаниях возможно изучить на лаки Р±РёСЂ казино .
Сертификация выступает ключевым фактором отбора портала. Лицензиаты Олдерни предоставляют тщательный надзор валютных манипуляций. Каждая сертифицированная портал выполняет периодические инспекции RNG-механизмов.
Программные свойства новейших азартных площадок содержат SSL-криптографию банковского категории. Производители цифрового обеспечения вроде Microgaming, NetEnt, Pragmatic Play внедряют многоуровневые механизмы непредсказуемых показателей.
Схема аутентификации учётной записи включает передачи удостоверений KYC-типа. Свидетельство, документ о прибылях, подтверждение проживания — типичный перечень для полноценного подключения.
Параллельные адреса убирают проблемы с запретами организаций. Действующие дубли адаптируются систематически компьютерными специалистами. Планшетные утилиты нередко функционируют устойчивее веб модификаций.
Банкролл-менеджмент задаёт длительную прибыльность азартных циклов. Экспертные игроки предлагают контролировать размер депозита до 1-2% от итогового фонда.
Outboard Outlet premium selection – Equipment is showcased with accurate info and clear pictures.
Актуальные геймеры натыкаются с проблемой входа к легальным порталам. Провайдеры фильтруют базовые домены, но грамотные Меллстрой РІС…РѕРґ посетители осознают о функционировании зеркальных сайтов.
Дополнительный домен формирует полную реплику первичного площадки. Средства защиты сохраняются аналогичными. Платёжные операции выполняются через аналогичные шлюзы.
Технология заведения учётной записи через параллельный ресурс требует типовой проверки. Операторы запрашивают бумаги для осуществления KYC-требований. Идентификационные данные подвергаются двухфакторную валидацию.
Пополнительные ограничения на резервных площадках аналогичны главным характеристикам. Стартовые ставки продолжают постоянными. Возрастающие выигрышные пулы синхронизируются между разными порталами.
Премиальные системы функционируют завершённо на резервных ресурсах. Требования по обороту гарантирует базовые значения. Длительность реализации продолжается.
Служба поддержки анализирует вопросы с альтернативных порталов таким же способом. Живой диалог предоставляет круглосуточный режим функционирования.
Перемещение в сфере лицензированных ресурсов нуждается знания актуальных способов подключения. Опытные участники эксплуатируют п»ї1хбет официальный сайт для добывания современной информации о активных ссылках.
Процедура оформления учетной записи в лицензированных заведениях подразумевает комплексную подтверждение. Современные организации задействуют KYC-процедуры и AML-стандарты. Бумажная работа потребляет от 24 до 72 временных отрезков.
Программные технологии для преодоления запретов развиваются сообща с повышением регуляторных инициатив. VPN-инструменты типа premium предоставляют кодирование AES-256 и методы OpenVPN. Постоянство соединения принципиально значима для премиальных партий.
Резервные адреса работают через локально расположенные технические системы. CDN-сети обеспечивают сокращенную время ответа для глобальных клиентов. Техническое роутинг активируется при идентификации препятствия первичного ресурса.
Платежные движения в проверенных зонах отвечают конкретным правилам PCI DSS. Цифровые расчеты получают актуальность из-за конфиденциальности и оперативности процессинга.
Переносные приложения элитных провайдеров объединяют отпечатковую подтверждение и push-оповещения для ключевых моментов. Изменяемый оформление самостоятельно корректируется под настройки матрицы.
zoloft buy zoloft without rx sertraline zoloft
Ориентирование в сфере проверенных сайтов требует представления передовых методов соединения. Квалифицированные пользователи используют п»ї1хбет сайт для обретения релевантной сведений о действующих доменах.
Механизм создания аккаунта в лицензированных учреждениях подразумевает многоуровневую валидацию. Новейшие провайдеры задействуют KYC-системы и AML-требования. Оформление документов отнимает от 24 до 72 периодов.
Цифровые инструменты для минования барьеров совершенствуются одновременно с повышением нормативных инициатив. VPN-решения разряда premium обеспечивают кодирование AES-256 и системы OpenVPN. Стабильность коннекта кардинально актуальна для VIP сессий.
Резервные сайты действуют через регионально размещенные серверные ресурсы. CDN-сети гарантируют оптимальную время ответа для глобальных игроков. Техническое переключение срабатывает при детекции препятствия первичного сайта.
Денежные движения в легальных зонах соответствуют конкретным правилам PCI DSS. Криптовалютные транзакции приобретают признание из-за секретности и динамике реализации.
Смартфонные программы лучших операторов объединяют лицевую авторизацию и push-извещения для критических событий. Изменяемый внешний вид самостоятельно настраивается под особенности экрана.
Определение качественного азартного портала в актуальных условиях заставляет тщательного анализа к юридическому положению. Профессиональные участники учитывают, что Vavada казино демонстрирует новую данные о действующих сервисах.
Процесс оформления профиля в лицензированных операторах содержит неизбежную валидацию личности. KYC-нормы охраняют как заведение, так и геймера от мошенничества. Кратковременные ограничения на вывод средств до завершения валидации – стандартная система.
Технические блокировки на вход к betting ресурсам обходятся через альтернативные URL. Действующие копии сохраняют абсолютную функциональность основного платформы. Расчетные процедуры, развлекательный статистика и бонусные предложения остаются неизменными.
Экономическая стабильность определяется степенью эксплуатируемых расчетных механизмов. SSL-шифрование, PCI DSS аттестация и многоуровневая проверка устанавливают стабильный периметр безопасности.
Игровая библиотека проверенных сервисов содержит барабаны от известных производителей. RTP-значения, дисперсия и математические принципы претерпевают внешнюю аудит в аккредитованных лабораториях.
Механизмы стимулирования в профессиональных операторах строятся на четких правилах отыгрыша. Требования x35-40 расценивается адекватным для автомат-бонусов, в то время как классические забавы принимаются в калькуляцию с сниженным процентом.
Современные геймеры обталкиваются с огромным количеством цифровых деталей при функционировании с официальными ресурсами. Тематические платформы типа типпи зеркало обеспечивают актуальную данные о работе развлекательных провайдеров.
Процедура аутентификации профиля содержит набор необходимых стадий. Начальная верификация подразумевает отправки свидетельств подтверждающих личность. Стандартный набор содержит удостоверение личности, автоудостоверение или загранпаспорт.
Программная составляющая оформления включает эксплуатацию защищенного протокола и двухфакторной аутентификации. Опытные геймеры советуют активировать совокупность предложенных возможностей секьюрити.
Резервные ссылки формируют абсолютные дубликаты главного сайта с удержанием комплексного инструментария. Центральное преимущество заключается в тождественности банковских пределов и условий ставочных требований.
Система выявления рабочих зеркал базируется на отслеживании профильных информационных каналов и союзных ресурсов. Экспертные геймеры задействуют виртуальные частные сети для формирования стабильного соединения безотносительно от локальных барьеров.
Исследование в секторе сертифицированных порталов нуждается представления новых решений авторизации. Продвинутые участники внедряют Gold зеркало для извлечения новейшей фактов о активных доменах.
Алгоритм открытия личного кабинета в сертифицированных операторах подразумевает комплексную аутентификацию. Продвинутые компании применяют KYC-механизмы и AML-требования. Документальное сопровождение требует от 24 до 72 промежутков.
Технические технологии для обхода препятствий прогрессируют одновременно с усилением регуляторных мер. VPN-службы уровня premium гарантируют безопасность AES-256 и стандарты OpenVPN. Постоянство соединения критически значима для премиальных игровых периодов.
Зеркальные платформы функционируют через регионально распределенные компьютерные мощности. CDN-архитектуры осуществляют сокращенную латентность для международных участников. Цифровое редирект запускается при обнаружении ограничения основного ресурса.
Банковские манипуляции в проверенных регионах подпадают под строгим критериям PCI DSS. Блокчейн платежи увеличивают признание из-за скрытности и скорости процессинга.
Планшетные утилиты премиальных провайдеров интегрируют отпечатковую идентификацию и push-алерты для критических эпизодов. Гибкий оформление автономно корректируется под характеристики монитора.
Neuro Relief USA: Neuro Relief USA – neurontin tablets 300 mg
Игровая ниша показывает интенсивный подъём, притягивая миллионы геймеров. Экспертные сайты обеспечивают надёжную обстановку для ставок. Подробную данные о подобных провайдерах реально изучить на Лаки Бир казино .
Аттестация представляет приоритетным показателем отбора ресурса. Регуляторы Великобритании предоставляют серьёзный аудит валютных транзакций. Любая лицензированная платформа выполняет периодические контроли RNG-систем.
Программные свойства передовых азартных площадок охватывают SSL-кодирование экономического категории. Создатели цифрового софта уровня Microgaming, NetEnt, Pragmatic Play подключают усовершенствованные схемы случайных параметров.
Процедура валидации счёта предполагает подачи удостоверений KYC-типа. Документ, выписка о доходах, подтверждение прописки — классический пакет для полноценного входа.
Резервные адреса ликвидируют проблемы с запретами провайдеров. Рабочие альтернативы адаптируются ежедневно цифровыми отделами. Планшетные клиенты нередко функционируют качественнее онлайн форматов.
Управление банкроллом определяет долгосрочную эффективность гемблинговых периодов. Квалифицированные игроки настаивают лимитировать количество пари до 1-2% от совокупного капитала.
Современные участники пересекаются с набором технологических деталей при деятельности с лицензированными порталами. Профессиональные источники типа Меллстрой официальный сайт дают актуальную материалы о функционировании казино компаний.
Система проверки аккаунта содержит комплекс неотъемлемых стадий. Базовая аутентификация предполагает размещения свидетельств удостоверяющих гражданство. Привычный набор содержит удостоверение личности, лицензию водителя или международный паспорт.
Системная компонента оформления включает применение зашифрованного канала и двухуровневой проверки. Опытные геймеры настаивают задействовать полный набор предложенных функций секьюрити.
Дублирующие порталы представляют точные копии основного домена с хранением всего функционала. Ключевое плюс содержится в тождественности банковских ограничений и критериев ставочных требований.
Механизм поиска активных дублирующих порталов фундируется на мониторинге специализированных уведомительных сервисов и связанных площадок. Продвинутые геймеры задействуют туннельные протоколы для обеспечения надежного доступа вне зависимости от территориальных блокировок.
Definitely imagine that which you said. Your favourite justification appeared to be at the internet the
easiest factor to take into accout of. I say to you,
I definitely get irked at the same time as other people think about worries that they plainly don’t
realize about. You controlled to hit the nail upon the highest
and also outlined out the entire thing with no need side-effects , folks could
take a signal. Will probably be again to get more.
Thanks
Гемблинговая отрасль представляет быстрый рост, привлекая легионы игроков. Грамотные площадки обеспечивают стабильную пространство для беттинга. Детальную информацию о этих организациях возможно изучить на тип топ казино .
Аккредитация является основным аспектом подбора портала. Регуляторы Кюрасао гарантируют серьёзный мониторинг валютных действий. Любая официальная платформа осуществляет плановые ревизии RNG-систем.
Программные параметры новейших азартных площадок содержат SSL-защиту экономического уровня. Провайдеры компьютерного ПО наподобие Microgaming, NetEnt, Pragmatic Play встраивают многоуровневые системы произвольных показателей.
Механизм верификации личного кабинета требует передачи свидетельств KYC-типа. Паспорт, подтверждение о средствах, удостоверение прописки — классический набор для итогового активации.
Зеркальные порталы ликвидируют трудности с запретами операторов. Свежие копии изменяются ежедневно IT командами. Планшетные программы зачастую действуют лучше сетевых модификаций.
Распределение капитала создаёт перспективную успешность азартных сессий. Грамотные пользователи рекомендуют сокращать размер пари до 1-2% от суммарного резерва.
Выбор надежного гемблинг заведения нуждается серьезного разбора официальных документов. Передовые системы Меллстрой регистрация предлагают игрокам безусловную сведения о своих разрешениях.
Процедура открытия аккаунта подразумевает множество необходимых стадий аутентификации. Представители истребуют свидетельства, устанавливающие личность и совершеннолетие. Традиционный KYC-процесс занимает от 24 до 72 временных отрезков.
Финансовое планирование запускается с фиксации пределов на депозиты. Компетентные игроки предлагают использовать норму 5% от полного казино средств на индивидуальную игру.
Электронные препятствия поставщиков вынуждают использовать дополнительные адреса. Дубликаты поддерживают полную производительность основного портала, охватывая летопись переводов и игровой прогресс.
Современные денежные сервисы предоставляют быстрые инвестиции через электронные портмоне. Bitcoin, Ethereum и постоянные токены дают конфиденциальность и наименьшие комиссии. Время осуществления снятий составляет 10-30 минут.
Системы приверженности подразумевают иерархические категории с нарастающим возвратом. VIP-менеджеры предлагают уникальные подарки, улучшенные ограничения и опережающую техподдержку.
Навигация в сфере официальных сайтов включает представления передовых решений авторизации. Продвинутые игроки используют мад казино для обретения новейшей фактов о активных URL.
Процедура формирования аккаунта в лицензированных заведениях включает комплексную аутентификацию. Актуальные компании эксплуатируют KYC-протоколы и AML-критерии. Документальная процедура отнимает от 24 до 72 часов.
Технические способы для преодоления препятствий прогрессируют сообща с интенсификацией регуляторных действий. VPN-инструменты уровня premium гарантируют безопасность AES-256 и методы OpenVPN. Устойчивость соединения кардинально существенна для привилегированных заходов.
Дублирующие ресурсы оперируют через локально распределенные компьютерные системы. CDN-архитектуры обеспечивают минимальную латентность для международных геймеров. Цифровое перенаправление включается при выявлении недоступности основного адреса.
Денежные операции в официальных зонах подчиняются определенным стандартам PCI DSS. Криптовалютные транзакции завоевывают признание в результате приватности и динамике обработки.
Планшетные софт ведущих операторов включают лицевую аутентификацию и push-извещения для принципиальных событий. Настраиваемый внешний вид самостоятельно корректируется под особенности панели.
Поиск легального развлекательного оператора нуждается основательного разбора официальных сертификатов. Актуальные ресурсы Вавада официальный сайт гарантируют геймерам безусловную детали о имеющихся лицензиях.
Механизм оформления счета охватывает ряд обязательных стадий аутентификации. Операторы просят удостоверения, устанавливающие самобытность и возраст. Традиционный KYC-механизм занимает от 24 до 72 интервалов.
Распоряжение капиталом начинается с определения ограничений на взносы. Искусные участники советуют применять установку 5% от общего гемблинг средств на единичную заход.
Технические блокировки поставщиков заставляют задействовать резервные маршруты. Зеркала удерживают максимальную производительность основного портала, содержа журнал операций и развлекательный продвижение.
Передовые платежные способы поддерживают оперативные пополнения через электронные портмоне. Bitcoin, Ethereum и устойчивые монеты предоставляют приватность и символические платежи. Период проведения извлечений равно 10-30 промежутков.
Планы приверженности подразумевают иерархические степени с прогрессивным возвратом. VIP-консультанты гарантируют индивидуальные бонусы, усиленные лимиты и ускоренную обслуживание.
modern mosaic creations online – Innovative pieces and simple navigation keep shopping fun.
Перемещение в пространстве сертифицированных сайтов требует представления новых решений авторизации. Умелые пользователи используют п»ї1хбет РІС…РѕРґ для получения свежей сведений о оперативных адресах.
Механизм оформления аккаунта в лицензированных учреждениях содержит комплексную проверку. Продвинутые компании используют KYC-системы и AML-требования. Бумажная работа отнимает от 24 до 72 периодов.
Компьютерные методы для прохождения ограничений эволюционируют вместе с повышением правовых инициатив. VPN-решения уровня premium предлагают кодирование AES-256 и методы OpenVPN. Надежность канала кардинально существенна для премиальных сессий.
Резервные ресурсы оперируют через локально расположенные серверные системы. CDN-сети поддерживают оптимальную время ответа для американских геймеров. Цифровое роутинг срабатывает при выявлении блокировки основного домена.
Платежные манипуляции в лицензированных территориях подпадают под конкретным правилам PCI DSS. Криптовалютные платежи набирают признание вследствие приватности и оперативности обработки.
Мобильные софт премиальных компаний объединяют биометрическую аутентификацию и push-сообщения для критических эпизодов. Модифицируемый интерфейс самостоятельно изменяется под настройки экрана.
Нынешние игроки имеют дело с огромным количеством цифровых особенностей при функционировании с лицензированными порталами. Экспертные сайты типа Lucky Bear казино поставляют новую информацию о деятельности азартных операторов.
Алгоритм аутентификации счета охватывает набор принудительных шагов. Базовая верификация предполагает размещения удостоверений верифицирующих индивидуальность. Привычный пакет охватывает ID, автоудостоверение или международное ID.
Техническая часть оформления включает использование криптографической защиты и 2FA. Квалифицированные участники предлагают запускать весь комплекс возможных настроек обеспечения.
Запасные домены являются точные отражения базового ресурса с обеспечением комплексного функционала. Важнейшее достоинство заключается в подобии расчетных пределов и требований проигрыша.
Алгоритм обнаружения функционирующих альтернативных адресов строится на отслеживании специализированных информационных каналов и союзных ресурсов. Профессиональные клиенты эксплуатируют виртуальные частные сети для формирования постоянного подключения без оглядки от региональных барьеров.
Official Sale and Style site – Great variety of clothing with a seamless checkout experience.
Установка https://2teh.ru для ваших штор может значительно улучшить функциональность и эстетику вашего дома.
он создан для того, чтобы сделать управление шторами и жалюзи более простым и удобным. Это устройство можно легко интегрировать в систему умного дома для обеспечения максимального комфорта и контроля . Электрокарниз может быть управляем с помощью пульта дистанционного управления или мобильного приложения что делает его очень удобным в использовании .
Электрокарниз также может быть интегрирован с другими устройствами умного дома например, с системами освещения и отопления . Это позволяет создать единую систему управления всеми устройствами в доме что дает возможность создать более удобную и безопасную среду обитания. Кроме того, электрокарниз может быть оснащен датчиками освещенности и температуры которые обеспечивают оптимальное количество света и тепла в комнате .
## Раздел 2: Преимущества электрокарниза
Электрокарниз имеет множество преимуществ он позволяет автоматизировать процесс управления шторами и жалюзи. Это устройство также может помочь сэкономить энергию путем поддержания оптимальной температуры и уровня освещенности в доме. Кроме того, электрокарниз может быть использован для создания сценариев и режимов работы такие как режим “отпуск” или “работа” .
Электрокарниз также может быть оснащен функцией таймера которая позволяет запланировать открытие и закрытие штор и жалюзи . Это устройство также может быть интегрирован с голосовыми помощниками такими как Siri или Cortana . Это позволяет управлять электрокарнизом с помощью голосовых команд что дает возможность управлять шторами и жалюзи из любой точки жилья.
## Раздел 3: Установка и настройка электрокарниза
Установка электрокарниза не требует специальных навыков или инструментов она может быть выполнена в течение нескольких часов. Это устройство поставляется с набором необходимых деталей и инструкциями которые дают возможность выполнить установку самостоятельно. После установки электрокарниз необходимо настроить чтобы он работал корректно и выполнял все необходимые функции .
Настройка электрокарниза обычно включает в себя создание учетной записи и настройку параметров работы настройку голосовых команд и приложения. Это позволяет создать индивидуальный режим работы электрокарниза который будет удовлетворять всем потребностям пользователя . Кроме того, электрокарниз может быть обновлен с помощью специального программного обеспечения которое позволяет добавлять nuevas функции и улучшать existing .
## Раздел 4: Заключение
Электрокарниз – это современное и удобное решение для управления шторами и жалюзи в доме он позволяет автоматизировать процесс управления шторами и жалюзи . Он может быть интегрирован с другими устройствами умного дома как системы видеонаблюдения и дверные замки и управляться с помощью пульта дистанционного управления или мобильного приложения что позволяет управлять им из любой точки дома . Электрокарниз также может быть оснащен датчиками освещенности и температуры которые позволяют автоматически регулировать положение штор и жалюзи .
Электрокарниз имеет множество преимуществ он позволяет автоматизировать процесс управления шторами и жалюзи. Он может быть использован для создания сценариев и режимов работы такие как режим “отпуск” или “работа” и может быть интегрирован с голосовыми помощниками такими как Siri или Cortana . Это устройство также может быть обновлен с помощью специального программного обеспечения которое позволяет добавлять новые функции и улучшать existing .
Nice post. I used to be checking continuously this weblog and I’m impressed!
Very helpful information particularly the closing phase 🙂
I handle such information much. I used to be seeking this certain information for a long time.
Thanks and good luck.
Легальные ресурсы игорных опций предоставляют пользователям шанс к элитному игровому процессу через профильные ресурсы, включая mad casino зеркало , что придерживаются мировые нормы security.
Последовательность активации necessita указания идентификационных данных через защищённые SSL-линии. Букмекеры требуют нотариальное свидетельство правоспособности и локации нахождения для поддержания законодательных норм.
Двухфакторная идентификация является mandatory составляющей современных solutions безопасности. Игроки располагают SMS-токены, push-сообщения или задействуют специальные утилиты типа Google Authenticator.
Зеркальные ссылки преодолевают вопросы региональных барьеров и DDoS-атак. С технической точки зрения дубли являют дублированные клоны primary портала с обеспечением возможностей и клиентских информации.
Опытные пользователи suggest keeping актуальные списки активных альтернатив в закладках обозревателя. Администрация передают новости о свежих порталах через почтовые сервисы, Telegram-чаты и mobile apps.
Payment транзакции через проверенные ресурсы покрыты шифровальными протоколами класса банковского области. Получение фондов производится только на подтверждённые реквизиты держателя личного кабинета.
https://ivertherapeutics.shop/# ivermectin ebay
Новейшие бетторы оказываются с сложностью соединения к проверенным платформам. Поставщики запрещают основные URL, но опытные аква казино игроки знают о наличии резервных платформ.
Зеркало составляет идентичную отображение главного площадки. Протоколы шифрования остаются неизменными. Платёжные операции выполняются через идентичные механизмы.
Методика создания аккаунта через альтернативный ресурс включает обычной верификации. Сотрудники запрашивают справки для реализации KYC-норм. Индивидуальные данные реализуют двухфакторную верификацию.
Вносительные границы на параллельных ресурсах равняются стандартным спецификациям. Наименьшие суммы продолжают фиксированными. Прогрессивные джекпоты согласовываются между всеми порталами.
Стимулирующие схемы выполняются полноценно на дополнительных платформах. Вейджер сохраняет стартовые величины. Временные рамки реализации сохраняется.
Сервис помощи решает запросы с альтернативных адресов сходным образом. Интерактивный чат осуществляет круглосуточный формат деятельности.
1win лимит на элсом https://www.1win70163.help
Современные платформы беттинг развлечений предлагают участникам вход к профессиональному азарту через надежные казино Меллстрой порталы. Легальная деятельность предполагает выполнения жестких законодательных норм.
Система регистрации индивидуального профиля предусматривает верификацию персональных показателей. Администраторы внедряют расширенные механизмы KYC и AML для предотвращения незаконных транзакций.
Цифровые инструменты передовых игорных домов основываются на надежных серверах с шифровальными протоколами. Территориальные ограничения побуждает администраторов разрабатывать параллельные ссылки.
Дублирующие домены представляют точные клоны главного домена с сохранением всех функций и сведений. Пользователи приобретают стабильный доступ к балансу, гемблинг статистике и личным установкам.
Банковские операции осуществляются через интегрированные финансовые агрегаторы. Границы на депозиты и получения устанавливаются в соотношении с регуляторными критериями и организационными правилами контроля угроз.
Экспертные беттеры рекомендуют контролировать ситуацию лицензии через регуляторные регистры развлекательных комиссий. Репутационные характеристики предусматривают позиции на отраслевых порталах и мнения истинных беттеров.
Игровая отрасль отображает быстрый подъём, заинтересовывая массы пользователей. Грамотные площадки предоставляют стабильную пространство для ставок. Исчерпывающую факты о таких провайдерах возможно обнаружить на Vavada .
Легализация выступает главным фактором выбора ресурса. Надзорные органы Олдерни дают серьёзный надзор валютных операций. Любая легальная площадка подвергается постоянные аудиты RNG-механизмов.
IT аспекты передовых казино объединяют SSL-криптографию расчётного ранга. Создатели виртуального материала наподобие Microgaming, NetEnt, Pragmatic Play подключают сложные модели непредсказуемых показателей.
Процесс валидации личного кабинета включает представления документов KYC-типа. Документ, подтверждение о средствах, доказательство адреса — базовый пакет для финального активации.
Параллельные порталы решают трудности с запретами компаний. Функционирующие копии адаптируются регулярно IT командами. Смартфонные клиенты часто выполняются качественнее сетевых версий.
Банкролл-менеджмент устанавливает длительную прибыльность беттинговых циклов. Экспертные игроки настаивают сокращать количество пари до 1-2% от итогового фонда.
Build A Brigade Collection – Innovative concept and it’s easy to jump between sections.
prednisone
Действующие резервные адреса лицензированных игорных заведений на Lucky Bear казино создают беспрерывный подключение к гемблинг сервисам. Методика реплицирования формирует эквивалентные версии основного домена с удержанием всех опций.
Механизм регистрации через зеркало абсолютно имитирует стандартную заявку. Свежие геймеры регистрируют валидный email, генерируют надежный код доступа и выбирают игровую курренси.
Валидация счета подразумевает предоставления удостоверений в соответствии с KYC-регламенту. Фото водительских прав, валидация адреса и банковские параметры подвергаются машинную анализ в течение 24-72 временных единиц.
Подключение верифицированных геймеров реализуется через стандартную окно с двухфакторной верификацией. Сессионные коды передаются на мессенджер девайс или e-mail адрес.
Возможности входящего блока через mirror-сайты включает распространенные платежные механизмы. Visa, Mastercard, виртуальные балансы Skrill, Neteller, криптовалюты Bitcoin, Ethereum осуществляются с низкими взносами 0-3%.
Gaming библиотека воспроизводится в точности включая машины, традиционные геймплей, live-операторов и джекпоты. RTP-индикаторы, изменчивость и проигрыш сохраняются точными.
Бонусная механизм действует похоже базовому сайту. Welcome-комплекты, безвозмездные спины, возврат средств и VIP-курсы активируются системно при достижении установленных стандартов.
Актуальные зеркала легальных азартных клубов на Лаки Бир регистрация предоставляют беспрерывный доступ к игровым сервисам. Схема копирования образует эквивалентные клоны базового портала с консервацией всех инструментов.
Схема создания аккаунта через альтернативный домен в точности воспроизводит базовую форму. Начинающие геймеры заполняют действующий email, генерируют стойкий пароль и назначают рабочую финансовый инструмент.
Подтверждение аккаунта предполагает отправки удостоверений в соответствии с KYC-нормам. Снимок ID-карты, свидетельство проживания и денежные сведения анализируются посредством программную контроль в течение 24-72 часов.
Логин существующих игроков производится через базовую модуль с многоступенчатой аутентификацией. Разовые пароли передаются на мессенджер девайс или электронную почту.
Возможности входящего модуля через mirror-сайты предлагает популярные платежные сервисы. Visa, Mastercard, онлайн счета Skrill, Neteller, блокчейн-токены Bitcoin, Ethereum осуществляются с минимальными взносами 0-3%.
Gaming коллекция воспроизводится на сто процентов включая автоматы, традиционные развлечения, live-дилеров и максимальные награды. RTP-коэффициенты, колебания и ставочные требования остаются неизменными.
Акционная система работает подобно главному ресурсу. Welcome-комплекты, фриспины, кешбэк и VIP-программы включаются алгоритмически при выполнении прописанных параметров.
Беттинговая индустрия отображает динамичный подъём, заинтересовывая массы геймеров. Экспертные ресурсы обеспечивают защищённую среду для игры. Детальную материалы о данных организациях допустимо получить на типпи казино .
Аккредитация остаётся основным элементом отбора сайта. Регуляторы Великобритании обеспечивают тщательный аудит валютных действий. Отдельная легальная площадка подвергается периодические ревизии RNG-систем.
IT характеристики передовых беттинг-платформ включают SSL-криптографию финансового ранга. Поставщики цифрового обеспечения уровня Microgaming, NetEnt, Pragmatic Play добавляют многоуровневые модели рандомных величин.
Алгоритм валидации учётной записи предусматривает направления справок KYC-формата. Свидетельство, справка о средствах, доказательство прописки — базовый набор для завершённого активации.
Дублирующие ссылки ликвидируют трудности с блокировками операторов. Рабочие зеркала модифицируются систематически IT специалистами. Мобильные утилиты регулярно действуют стабильнее браузерных редакций.
Распределение капитала формирует стратегическую успешность игровых периодов. Экспертные участники предлагают ограничивать сумму депозита до 1-2% от общего бюджета.
seostudio.click – Appreciate the typography choices; comfortable spacing improved my reading experience.
Remote Room Store – An incredibly useful site offering seamless navigation and quick loading times.
Smart GenRx USA: Smart GenRx USA – trusted online pharmacy reviews
Передовые провайдеры развлекательных продуктов предоставляют беттерам вход к высококлассному гемблингу через безопасные казино РЎСѓРєР° сайты. Лицензированная функционирование предполагает учета четких законодательных положений.
Алгоритм открытия персонального счета включает верификацию личных показателей. Операторы используют детализированные системы KYC и AML для исключения фродовых транзакций.
Электронные решения современных гемблинг платформ базируются на защищенных хостингах с шифровальными протоколами. Территориальные ограничения вынуждает операторов организовывать вспомогательные ссылки.
Резервные ресурсы являют собой эквивалентные дубликаты первичного домена с удержанием всех опций и данных. Клиенты приобретают стабильный подключение к средствам, развлекательной данным и клиентским конфигурациям.
Платежные транзакции реализуются через синхронизированные расчетные системы. Ограничения на инвестиции и изъятия определяются в соответствии с регуляторными условиями и собственными политиками риск-менеджмента.
Квалифицированные пользователи настаивают проверять состояние лицензии через официальные реестры игорных структур. Престижные параметры включают ранги на специализированных платформах и отзывы настоящих клиентов.
For the rest
where can i get generic allopurinol pill
for continuous improvement.
Определение проверенного развлекательного портала требует основательного рассмотрения регулятивных документов. Новые платформы Меллстрой регистрация обеспечивают пользователям стопроцентную информацию о своих санкциях.
Алгоритм открытия аккаунта содержит определенное количество ключевых ступеней аутентификации. Провайдеры истребуют справки, доказывающие индивидуальность и зрелость. Обычный KYC-процесс продолжается от 24 до 72 временных отрезков.
Распоряжение капиталом запускается с определения лимитов на инвестиции. Компетентные пользователи настаивают использовать норму 5% от итогового азартного капитала на отдельную раунд.
Программные ограничения провайдеров заставляют внедрять альтернативные ссылки. Дубликаты оберегают абсолютную производительность центрального платформы, подразумевая архив транзакций и игровой успех.
Новые денежные системы дают мгновенные вклады через виртуальные хранилища. Bitcoin, Ethereum и постоянные токены дают конфиденциальность и крошечные сборы. Продолжительность проведения снятий насчитывает 10-30 периодов.
Планы лояльности включают ступенчатые степени с нарастающим кэшбэком. VIP-координаторы дают персонализированные поощрения, улучшенные границы и преимущественную сервис.
Отбор надежного игрового заведения в текущих обстоятельствах предполагает детального подхода к юридическому режиму. Опытные клиенты понимают, что п»ї1xBet казино отображает последнюю данные о функционирующих провайдерах.
Алгоритм оформления профиля в официальных заведениях содержит требуемую подтверждение личности. KYC-требования обеспечивают как заведение, так и пользователя от мошенничества. Кратковременные границы на получение капитала до выполнения верификации – стандартная система.
Технические блокировки на доступ к развлекательным сервисам преодолеваются через резервные домены. Рабочие копии сохраняют тотальную функциональность основного ресурса. Денежные транзакции, развлекательный прогресс и бонусные схемы продолжают стабильными.
Финансовая защищенность определяется показателем задействованных платежных способов. SSL-безопасность, PCI DSS валидация и многоуровневая проверка обеспечивают защищенный контур ограждения.
Геймплейная коллекция официальных сервисов включает слоты от ведущих создателей. RTP-показатели, колебания и статистические принципы проходят объективную валидацию в признанных лабораториях.
Схемы мотивации в серьезных сервисах строятся на прозрачных требованиях проигрыша. Требования x35-40 характеризуется приемлемым для машина-поощрений, в то время как карточные состязания включаются в расчет с пониженным показателем.
Parcel Pilot exclusive services – Hassle-free package delivery that makes sending parcels enjoyable.
Азартная индустрия представляет активный расширение, притягивая множество участников. Грамотные порталы предоставляют качественную атмосферу для игры. Развёрнутую материалы о таких брендах возможно обнаружить на лаки Р±РёСЂ казино .
Сертификация выступает основным фактором подбора площадки. Регуляторы Кюрасао обеспечивают жёсткий аудит денежных манипуляций. Отдельная официальная площадка реализует регулярные ревизии RNG-генераторов.
Технические свойства актуальных беттинг-платформ объединяют SSL-кодирование денежного ранга. Производители программного ПО типа Microgaming, NetEnt, Pragmatic Play встраивают продвинутые алгоритмы хаотичных показателей.
Процесс аутентификации аккаунта требует представления документов KYC-класса. Свидетельство, справка о доходах, подтверждение проживания — базовый перечень для итогового активации.
Дублирующие адреса убирают сложности с блокировками провайдеров. Действующие альтернативы корректируются каждый день компьютерными командами. Смартфонные софт зачастую оперируют качественнее браузерных версий.
Банкролл-менеджмент создаёт стратегическую прибыльность беттинговых сессий. Опытные пользователи рекомендуют контролировать объём вейджера до 1-2% от суммарного фонда.
Лицензионные операторы игровых услуг обеспечивают пользователям возможность к профессиональному игровому процессу через dedicated ресурсы, включая Bollywood зеркало , которые точно выполняют международные регламенты защиты.
Последовательность регистрации предполагает предоставления проверочных данных через криптографические SSL-протоколы. Администрация просят предоставить официальное доказательство age verification и региона residence для исполнения legal критериев.
Multi-factor верификация выступает обязательным частью новейших механизмов security. Пользователи обретают SMS-токены, push-оповещения или задействуют профессиональные программы по типу Google Authenticator.
Зеркальные URL решают проблемы локальных запретов и DDoS-штурмов. С технической точки зрения зеркала формируют дублированные версии главного платформы с maintaining инструментария и user деталей.
Профессиональные клиенты рекомендуют хранить свежие каталоги действующих альтернатив в сохранённых ссылках обозревателя. Management доставляют новости о свежих адресах через email, Telegram-сообщества и телефонные приложения.
Денежные movements через надёжные ресурсы гарантированы encryption системами уровня банковского области. Получение денег происходит исключительно на аутентифицированные карты владельца учётной записи.
Гемблинговая отрасль демонстрирует стремительный прогресс, притягивая множество участников. Квалифицированные платформы предлагают защищённую среду для ставок. Развёрнутую материалы о таких компаниях возможно отыскать на Лаки Бир казино .
Аккредитация остаётся основным показателем отбора платформы. Контролёры Великобритании создают качественный мониторинг расчётных операций. Отдельная легальная площадка подвергается постоянные проверки RNG-модулей.
IT параметры новейших гемблинг-сайтов содержат SSL-кодирование денежного категории. Провайдеры компьютерного обеспечения вроде Microgaming, NetEnt, Pragmatic Play добавляют усовершенствованные модели рандомных параметров.
Процесс валидации личного кабинета предусматривает передачи документов KYC-стандарта. Свидетельство, свидетельство о доходах, удостоверение адреса — типичный комплект для окончательного активации.
Параллельные URL ликвидируют препятствия с блокировками провайдеров. Рабочие копии обновляются каждый день техническими отделами. Портативные приложения часто оперируют устойчивее браузерных форматов.
Финансовая дисциплина формирует длительную прибыльность игровых циклов. Квалифицированные игроки предлагают лимитировать количество бета до 1-2% от полного бюджета.
Легальные площадки гэмблинг услуг обеспечивают игрокам вариант к премиальному времяпрепровождению через профильные порталы, включая Вавада РІС…РѕРґ , что придерживаются общепринятые стандарты конфиденциальности.
Последовательность оформления профиля требует указания authentication деталей через encrypted SSL-протоколы. Букмекеры требуют нотариальное свидетельство age verification и территории проживания для исполнения правовых норм.
Двухэтапная идентификация считается required aspect новейших архитектур конфиденциальности. Пользователи имеют SMS-шифры, push-сообщения или применяют dedicated софт в стиле Google Authenticator.
Зеркальные порталы нейтрализуют трудности geographic ограничений и DDoS-нападений. По сути mirrors формируют копийные версии главного ресурса с обеспечением features и личных деталей.
Компетентные игроки советуют поддерживать новейшие списки рабочих mirrors в favourites браузера. Провайдеры рассылают сведения о fresh адресах через email, Telegram-communities и mobile apps.
Финансовые процедуры через лицензионные порталы secured шифровальными алгоритмами стандарта банковского области. Изъятие фондов осуществляется лишь на подтверждённые wallets обладателя учётной записи.
Ocean Outfitters adventure essentials – Durable and dependable items make packing for trips stress-free.
Нынешние гемблеры попадают с проблемой соединения к легальным ресурсам. Организации фильтруют стандартные адреса, но профессиональные казино 1хбет игроки понимают о доступности дублирующих платформ.
Резервная ссылка образует стопроцентную дубликат основного сайта. SSL-сертификаты поддерживаются неизменными. Расчётные действия осуществляются через идентичные сервисы.
Алгоритм заведения учётной записи через альтернативный ссылку подразумевает обычной подтверждения. Специалисты просят справки для реализации KYC-регламентов. Персональные информация подвергаются усиленную валидацию.
Банковские ограничения на параллельных ресурсах аналогичны первичным спецификациям. Стартовые вклады сохраняются стабильными. Накопительные джекпоты объединяются между многочисленными доменами.
Поощрительные программы работают комплексно на параллельных площадках. Множитель ставок поддерживает базовые величины. Длительность оборота не изменяется.
Команда помощи обрабатывает обращения с зеркальных адресов аналогично. Живой общение осуществляет непрерывный режим оперирования.
Действующие резервные адреса легальных игорных заведений на Lucky Bear зеркало создают постоянный соединение к гемблинг порталам. Схема клонирования образует точные версии центрального портала с поддержанием всех возможностей.
Схема создания аккаунта через альтернативный домен в точности копирует главную заявку. Начинающие геймеры заполняют действующий email, придумывают надежный секретную комбинацию и выбирают игровую финансовый инструмент.
Верификация профиля подразумевает предоставления справок в соответствии с KYC-требованиям. Изображение водительских прав, валидация адреса и финансовые данные контролируются системой алгоритмическую проверку в течение 24-72 ч.
Аутентификация существующих игроков осуществляется через базовую панель с двухфакторной аутентификацией. Сессионные шифры отправляются на сотовый аппарат или e-mail адрес.
Функционал пополнительного раздела через резервные ссылки поддерживает актуальные банковские механизмы. Visa, Mastercard, цифровые кошельки Skrill, Neteller, блокчейн-токены Bitcoin, Ethereum обрабатываются с оптимизированными взносами 0-3%.
Гемблинг каталог копируется целиком включая машины, классические игры, live-дилеров и джекпоты. RTP-показатели, изменчивость и проигрыш фиксируются неизменными.
Акционная схема выполняется похоже корневому сайту. Welcome-наборы, фриспины, компенсация и VIP-программы активируются автоматически при исполнении прописанных параметров.
seolab.click – Pages loaded fast, images appeared sharp, and formatting stayed consistent.
букет москва недорого
Репутация надежного поставщика цветов в Москве
Нынешние бетторы попадают с сложностью соединения к официальным ресурсам. Поставщики ограничивают основные ссылки, но грамотные Голд зеркало посетители осознают о наличии зеркальных порталов.
Параллельный портал является точную отображение главного платформы. Криптографические алгоритмы поддерживаются равнозначными. Расчётные переводы реализуются через сходные сервисы.
Алгоритм регистрации через параллельный ссылку включает стандартной аутентификации. Операторы запрашивают свидетельства для реализации KYC-регламентов. Личные характеристики осуществляют двухфакторную подтверждение.
Банковские границы на дополнительных сайтах равняются главным условиям. Низшие вклады поддерживаются фиксированными. Накопительные банки интегрируются между различными ресурсами.
Бонусные планы функционируют комплексно на зеркальных сайтах. Коэффициент оборота гарантирует первоначальные величины. Временные рамки реализации не изменяется.
Команда поддержки изучает обращения с резервных адресов таким же способом. Прямой чат обеспечивает круглосуточный режим деятельности.
Express Exchange Shop – Simple navigation and quick-loading pages made shopping enjoyable.
Новейшие операторы игорных игр дают клиентам возможность к качественному игровому процессу через надежные million казино системы. Авторизованная функционирование влечет учета строгих надзорных критериев.
Алгоритм оформления клиентского профиля охватывает подтверждение индивидуальных показателей. Администраторы эксплуатируют комплексные процедуры KYC и AML для пресечения фродовых переводов.
Программные решения актуальных игорных домов работают на надежных дата-центрах с криптографическими технологиями. IP-фильтрация принуждает провайдеров создавать резервные домены.
Зеркальные домены образуют полные копии главного домена с обеспечением всех инструментов и данных. Игроки получают постоянный подключение к счету, беттинг статистике и персональным опциям.
Банковские транзакции проходят через подключенные платежные агрегаторы. Лимиты на пополнения и изъятия регулируются в соотношении с лицензионными критериями и собственными правилами риск-менеджмента.
Экспертные клиенты указывают отслеживать ситуацию аккредитации через регуляторные реестры развлекательных ведомств. Статусные показатели охватывают позиции на отраслевых платформах и отзывы подлинных клиентов.
Актуальные пользователи пересекаются с множеством программных тонкостей при работе с легальными порталами. Тематические порталы типа казино 1хбет предоставляют новую материалы о работе азартных организаций.
Процесс верификации учетной записи предполагает ряд обязательных шагов. Базовая верификация подразумевает загрузки документов подтверждающих гражданство. Типовой список включает паспорт, водительские права или внешний паспорт.
Техническая элемент записления содержит использование криптографической защиты и двухфакторной аутентификации. Профессиональные игроки предлагают задействовать все предложенных возможностей безопасности.
Альтернативные адреса составляют точные клоны основного ресурса с удержанием всего арсенала. Основное преимущество содержится в идентичности платежных границ и критериев условий прокрутки.
Механизм поиска актуальных зеркал базируется на проверке специализированных уведомительных сервисов и партнерских порталов. Квалифицированные пользователи внедряют VPN-сервисы для предоставления стабильного входа невзирая от территориальных барьеров.
Отбор проверенного азартного ресурса в актуальных реалиях нуждается особого внимания к правовому уровню. Квалифицированные клиенты представляют, что казино Меллстрой демонстрирует новую факты о доступных ресурсах.
Механизм оформления профиля в проверенных заведениях охватывает обязательную проверку документов. KYC-процедуры охраняют как заведение, так и клиента от фрода. Краткосрочные ограничения на перечисление финансов до завершения валидации – нормальная практика.
Цифровые блокировки на вход к азартным порталам решаются через альтернативные порталы. Действующие копии предоставляют стопроцентную работоспособность центрального платформы. Денежные процедуры, интерактивный результаты и наградные схемы поддерживаются постоянными.
Материальная безопасность измеряется степенью применяемых денежных систем. SSL-шифрование, PCI DSS аттестация и дополнительная идентификация создают стабильный периметр охраны.
Развлекательная библиотека сертифицированных площадок охватывает машины от лидирующих студий. RTP-показатели, дисперсия и алгоритмические формулы проходят независимую валидацию в аккредитованных учреждениях.
Схемы лояльности в надежных сервисах базируются на открытых критериях активности. Отыгрыш x35-40 признается приемлемым для спин-льгот, в то время как карточные развлечения учитываются в счет с пониженным множителем.
Рабочие альтернативные домены надежных gaming-операторов на казино Килограмм создают беспрерывный доступ к геймерским сервисам. Технология реплицирования образует идентичные копии главного веб-площадки с консервацией всех опций.
Процедура открытия счета через mirror-сайт на сто процентов воспроизводит основную заявку. Свежие участники регистрируют валидный email, формируют защищенный шифр и назначают рабочую денежную единицу.
Валидация профиля подразумевает передачи справок следуя KYC-политике. Фото водительских прав, подтверждение регистрации и платежные координаты анализируются посредством автоматическую проверку в течение 24-72 ч.
Логин действующих игроков осуществляется через классическую окно с двухфакторной аутентификацией. Сессионные шифры приходят на мобильный аппарат или e-mail адрес.
Функционал входящего сектора через mirror-сайты поддерживает распространенные денежные механизмы. Visa, Mastercard, виртуальные кошельки Skrill, Neteller, crypto Bitcoin, Ethereum процессируются с сокращенными платежами 0-3%.
Азартная коллекция клонируется в точности включая машины, столовые игры, live-крупье и джекпоты. RTP-показатели, дисперсия и вейджер удерживаются такими же.
Подарочная схема функционирует похоже центральному порталу. Welcome-предложения, даровые прокруты, refund и VIP-планы запускаются программно при исполнении определенных требований.
внедрение erp москва внедрение erp москва .
Навигация в пространстве легальных ресурсов нуждается знания продвинутых инструментов входа. Профессиональные участники задействуют п»ї1xBet casino для приобретения актуальной данных о активных ссылках.
Механизм регистрации счета в официальных организациях подразумевает детальную подтверждение. Продвинутые провайдеры задействуют KYC-протоколы и AML-критерии. Бумажная работа потребляет от 24 до 72 интервалов.
Цифровые решения для преодоления барьеров улучшаются сообща с повышением регуляторных мер. VPN-службы класса premium гарантируют криптографию AES-256 и методы OpenVPN. Стабильность подключения кардинально необходима для высокоролловых партий.
Дублирующие адреса выполняют задачи через регионально размещенные серверные кластеры. CDN-системы обеспечивают низкую латентность для европейских участников. Цифровое маршрутизация активируется при распознавании блокировки главного портала.
Платежные транзакции в сертифицированных регионах следуют четким критериям PCI DSS. Криптовалютные переводы приобретают популярность по причине скрытности и темпу обработки.
Портативные софт ведущих провайдеров интегрируют голосовую подтверждение и push-извещения для принципиальных эпизодов. Модифицируемый внешний вид самостоятельно изменяется под настройки монитора.
Инновационные платформы игорных активностей дают клиентам вход к элитному гемблингу через безопасные СЂР° казино системы. Официальная деятельность нуждается соблюдения четких регуляторных критериев.
Система открытия игрового учетной записи предусматривает верификацию персональных информации. Провайдеры задействуют углубленные системы KYC и AML для пресечения мошеннических транзакций.
IT системы актуальных игорных домов основываются на безопасных серверах с шифровальными стандартами. Локальные запреты побуждает провайдеров организовывать резервные адреса.
Дублирующие платформы образуют идентичные репликации основного платформы с обеспечением всех сервисов и параметров. Игроки получают постоянный доступ к средствам, азартной данным и персональным установкам.
Платежные транзакции осуществляются через встроенные денежные процессоры. Пределы на депозиты и получения назначаются в гармонии с регуляторными требованиями и индивидуальными правилами снижения потерь.
Профессиональные клиенты указывают отслеживать условия авторизации через контролирующие каталоги гемблинг структур. Репутационные индикаторы предусматривают рейтинги на тематических платформах и мнения реальных игроков.
Актуальные платформы азартных продуктов дают игрокам доступ к элитному развлечениям через защищенные Меллстрой РІС…РѕРґ сайты. Авторизованная работа требует следования жестких контролирующих требований.
Алгоритм активации персонального счета включает верификацию конфиденциальных информации. Управляющие задействуют детализированные процедуры KYC и AML для исключения мошеннических транзакций.
Электронные платформы передовых игорных домов строятся на зашифрованных хостингах с HTTPS стандартами. Геоблокировка побуждает администраторов организовывать вспомогательные адреса.
Альтернативные порталы составляют эквивалентные версии центрального сайта с сохранением всех функций и сведений. Беттеры достигают постоянный соединение к депозиту, азартной отчетности и клиентским конфигурациям.
Банковские процедуры выполняются через встроенные платежные шлюзы. Рамки на депозиты и снятия регулируются в гармонии с нормативными условиями и собственными регламентами контроля угроз.
Квалифицированные пользователи предлагают анализировать состояние лицензии через государственные регистры беттинг структур. Престижные параметры включают рейтинги на специализированных сайтах и комментарии реальных участников.
Поиск безопасного развлекательного ресурса в сегодняшних обстоятельствах заставляет специального анализа к правовому режиму. Квалифицированные участники знают, что п»ї1xBet казино демонстрирует новую материалы о работающих сервисах.
Процесс открытия счета в сертифицированных заведениях охватывает обязательную подтверждение удостоверения. KYC-нормы охраняют как казино, так и игрока от махинаций. Промежуточные границы на вывод финансов до закрытия верификации – привычная система.
Программные ограничения на подключение к игровым порталам нейтрализуются через параллельные адреса. Рабочие копии сохраняют тотальную возможности главного ресурса. Банковские движения, геймплейный статистика и бонусные планы функционируют постоянными.
Материальная надежность характеризуется критерием внедренных расчетных механизмов. SSL-защита, PCI DSS аттестация и многоуровневая проверка формируют прочный периметр ограждения.
Азартная ассортимент легальных провайдеров охватывает машины от известных студий. RTP-показатели, колебания и математические модели получают независимую сертификацию в признанных учреждениях.
Программы поощрения в достойных заведениях строятся на четких требованиях вейджера. Требования x35-40 расценивается справедливым для автомат-привилегий, в то время как традиционные активности учитываются в расчет с сниженным процентом.
Выбор честного азартного портала заставляет детального изучения официальных бумаг. Передовые платформы Лаки Бир казино обеспечивают клиентам максимальную данные о своих лицензиях.
Система открытия аккаунта предусматривает ряд обязательных ступеней аутентификации. Операторы настаивают удостоверения, засвидетельствующие индивидуальность и зрелость. Классический KYC-механизм требует от 24 до 72 часов.
Распоряжение капиталом запускается с назначения границ на взносы. Опытные пользователи советуют эксплуатировать установку 5% от общего казино капитала на отдельную игру.
Программные запреты владельцев принуждают эксплуатировать запасные ссылки. Копии сохраняют стопроцентную активность основного сайта, содержа журнал транзакций и казино достижения.
Новые платежные методы поддерживают скоростные пополнения через блокчейн кошельки. Bitcoin, Ethereum и постоянные токены гарантируют приватность и крошечные платежи. Длительность проведения изъятий составляет 10-30 промежутков.
Программы приверженности охватывают многоуровневые статусы с прогрессивным компенсацией. VIP-консультанты предоставляют эксклюзивные подарки, расширенные лимиты и опережающую обслуживание.
islamabadbazaar.shop – Simple layout and lots of product choices make exploring fun and fast.
Определение безопасного развлекательного заведения требует тщательного исследования юридических сертификатов. Актуальные ресурсы Clubnika зеркало дают игрокам стопроцентную данные о текущих аккредитациях.
Процедура регистрации подразумевает ряд необходимых шагов верификации. Представители требуют свидетельства, устанавливающие персону и зрелость. Обычный KYC-регламент занимает от 24 до 72 временных отрезков.
Банкролл-менеджмент начинается с определения ограничений на взносы. Квалифицированные клиенты предлагают применять правило 5% от совокупного гемблинг бюджета на одну партию.
Технические ограничения владельцев вынуждают использовать запасные ссылки. Зеркала хранят безусловную функциональность главного платформы, подразумевая журнал сделок и гемблинг достижения.
Новые банковские сервисы дают оперативные вклады через виртуальные портмоне. Bitcoin, Ethereum и устойчивые монеты предоставляют приватность и символические взносы. Период проведения извлечений насчитывает 10-30 минут.
Алгоритмы преданности охватывают градационные ранги с увеличивающимся компенсацией. VIP-консультанты гарантируют эксклюзивные бонусы, усиленные ограничения и преимущественную поддержку.
Поиск честного казино портала требует детального рассмотрения регулятивных свидетельств. Современные сайты лаки Р±РёСЂ казино гарантируют участникам абсолютную факты о собственных аккредитациях.
Процедура открытия аккаунта подразумевает различные обязательных шагов аутентификации. Операторы требуют бумаги, подтверждающие идентичность и зрелость. Типовой KYC-процесс требует от 24 до 72 интервалов.
Распоряжение капиталом открывается с фиксации рамок на пополнения. Компетентные клиенты рекомендуют эксплуатировать принцип 5% от суммарного развлекательного бюджета на конкретную сессию.
Технические препятствия администраторов вынуждают использовать вспомогательные домены. Зеркала оберегают максимальную активность центрального платформы, включая журнал переводов и игровой достижения.
Актуальные банковские системы обеспечивают скоростные пополнения через цифровые хранилища. Bitcoin, Ethereum и постоянные токены дают анонимность и символические комиссии. Продолжительность проведения получений доходит 10-30 промежутков.
Программы верности охватывают многоуровневые степени с увеличивающимся компенсацией. VIP-консультанты обеспечивают индивидуальные вознаграждения, повышенные границы и приоритетную сервис.
Навигация в сфере легальных платформ включает владения современных способов входа. Умелые игроки внедряют Вавада регистрация для добывания релевантной данных о активных путях.
Процедура открытия счета в официальных операторах содержит комплексную валидацию. Продвинутые компании задействуют KYC-механизмы и AML-стандарты. Документальная процедура потребляет от 24 до 72 интервалов.
IT инструменты для минования запретов эволюционируют синхронно с повышением правовых действий. VPN-инструменты разряда premium дают кодирование AES-256 и технологии OpenVPN. Стабильность канала жизненно актуальна для VIP сессий.
Резервные сайты работают через регионально разнесенные технические ресурсы. CDN-системы гарантируют сокращенную пинг для азиатских участников. Системное роутинг включается при детекции барьера базового домена.
Экономические операции в легальных юрисдикциях подчиняются четким нормам PCI DSS. Крипто платежи приобретают популярность вследствие скрытности и скорости обработки.
Мобильные приложения ведущих провайдеров включают физиологическую проверку и push-извещения для важных событий. Гибкий внешний вид автономно подстраивается под настройки монитора.
Навигация в области лицензированных платформ требует понимания новых технологий доступа. Умелые клиенты применяют п»ї1xBet зеркало для извлечения релевантной сведений о функционирующих путях.
Алгоритм открытия учетной записи в официальных операторах содержит комплексную аутентификацию. Продвинутые операторы используют KYC-протоколы и AML-правила. Оформление документов занимает от 24 до 72 временных отрезков.
Программные технологии для преодоления запретов улучшаются сообща с усилением нормативных мер. VPN-службы типа premium обеспечивают безопасность AES-256 и методы OpenVPN. Устойчивость канала жизненно существенна для элитных игровых периодов.
Резервные домены оперируют через регионально распределенные цифровые кластеры. CDN-системы осуществляют оптимальную пинг для европейских участников. Автоматическое редирект инициируется при выявлении блокировки первичного портала.
Экономические манипуляции в проверенных юрисдикциях соответствуют строгим требованиям PCI DSS. Крипто расчеты завоевывают востребованность благодаря конфиденциальности и темпу процессинга.
Мобильные софт лучших провайдеров содержат биометрическую проверку и push-оповещения для принципиальных событий. Модифицируемый внешний вид автоматически корректируется под особенности экрана.
Discover Kitchen Upgrades – Though I didn’t spend much time, I liked what I saw.
Функционирующие mirror-ссылки лицензированных гемблинг-платформ на Меллстрой дают устойчивый доступ к гемблинг сервисам. Система зеркалирования формирует идентичные версии основного ресурса с фиксацией всех инструментов.
Схема открытия счета через mirror-сайт в точности имитирует базовую шаблон. Только пришедшие игроки вводят валидный email, создают стойкий код доступа и выбирают игровую валюту.
Идентификация профиля требует передачи удостоверений по KYC-стандартам. Скан паспорта, свидетельство места жительства и финансовые параметры анализируются посредством цифровую верификацию в течение 24-72 периодов.
Вход существующих участников осуществляется через типовую интерфейс с двухфакторной проверкой. Сессионные токены приходят на телефонный устройство или электронную почту.
Функционал депозитного компонента через альтернативные домены включает востребованные денежные сервисы. Visa, Mastercard, электронные балансы Skrill, Neteller, блокчейн-токены Bitcoin, Ethereum выполняются с оптимизированными процентами 0-3%.
Игровая каталог клонируется на сто процентов включая машины, традиционные развлечения, live-хостов и джекпоты. RTP-значения, дисперсия и вейджер сохраняются идентичными.
Промо механизм работает похоже главному домену. Welcome-предложения, free spins, компенсация и VIP-программы активируются алгоритмически при исполнении заданных стандартов.
Современные провайдеры гемблинг активностей гарантируют клиентам возможность к высококлассному гемблингу через безопасные Меллстрой зеркало системы. Авторизованная бизнес нуждается соблюдения четких законодательных требований.
Алгоритм регистрации индивидуального учетной записи охватывает верификацию конфиденциальных реквизитов. Регуляторы применяют расширенные протоколы KYC и AML для исключения мошеннических операций.
IT платформы инновационных гемблинг платформ функционируют на стабильных дата-центрах с криптографическими протоколами. Геоблокировка побуждает провайдеров разрабатывать резервные домены.
Дублирующие платформы представляют полные дубликаты основного домена с фиксацией всех функций и показателей. Клиенты обеспечивают себе постоянный соединение к средствам, гемблинг истории и клиентским параметрам.
Денежные действия реализуются через встроенные расчетные шлюзы. Пределы на депозиты и обналичивания определяются в соотношении с правовыми критериями и собственными правилами контроля угроз.
Компетентные гемблеры советуют проверять ситуацию сертификата через регуляторные реестры развлекательных организаций. Престижные характеристики охватывают места на экспертных сайтах и оценки истинных беттеров.
Лицензионные площадки гэмблинг предложений обеспечивают пользователям доступ к профессиональному гэмблингу через специализированные домены, включая казино ретро , что исполняют общепринятые стандарты security.
Последовательность создания аккаунта включает заполнения валидационных информации через безопасные SSL-линии. Операторы просят нотариальное подтверждение возраста и локации жительства для поддержания правовых норм.
Многоуровневая верификация является принудительным компонентом новейших платформ защиты. Пользователи обретают SMS-токены, push-notification или внедряют dedicated приложения по типу Google Authenticator.
Альтернативные адреса преодолевают трудности географических запретов и DDoS-штурмов. По сути mirrors образуют тождественные копии центрального домена с поддержанием возможностей и user информации.
Экспертные пользователи предлагают удерживать свежие базы рабочих зеркал в bookmark browser. Management рассылают updates о современных URL через почтовые сервисы, Telegram-каналы и смартфонные приложения.
Payment переводы через лицензионные сайты гарантированы encryption системами level банковского направления. Снятие финансов реализуется исключительно на подтверждённые данные хозяина профиля.
https://sertralineusa.com/# generic for zoloft
Подбор надежного азартного портала в нынешних реалиях требует специального подхода к лицензионному режиму. Опытные пользователи представляют, что казино ретро демонстрирует актуальную материалы о работающих провайдерах.
Алгоритм регистрации в проверенных операторах охватывает принудительную верификацию документов. KYC-стандарты охраняют как сервис, так и участника от мошенничества. Промежуточные лимиты на вывод денег до финализации верификации – привычная практика.
Программные блокировки на подключение к гемблинг сайтам устраняются через резервные URL. Функционирующие дубликаты обеспечивают полную возможности первичного платформы. Расчетные процедуры, игровой результаты и наградные системы поддерживаются постоянными.
Экономическая безопасность характеризуется степенью эксплуатируемых платежных систем. SSL-шифрование, PCI DSS сертификация и усиленная проверка устанавливают стабильный периметр защиты.
Азартная библиотека проверенных площадок содержит машины от главных разработчиков. RTP-коэффициенты, колебания и вероятностные схемы испытывают объективную сертификацию в аккредитованных лабораториях.
Планы стимулирования в серьезных площадках опираются на ясных параметрах проигрыша. Отыгрыш x35-40 оценивается адекватным для машина-подарков, в то время как карточные игры идут в зачет с минимальным множителем.
For the rest
Unit personal loan near me
to view the source.
Современные платформы игорных услуг предлагают участникам доступ к высококлассному развлечениям через сертифицированные Вавада казино платформы. Легальная операционная активность предполагает следования строгих правовых положений.
Процедура открытия пользовательского кабинета охватывает аутентификацию индивидуальных сведений. Администраторы эксплуатируют комплексные механизмы KYC и AML для исключения незаконных переводов.
Цифровые инструменты инновационных казино базируются на зашифрованных серверах с HTTPS технологиями. Региональная блокировка заставляет администраторов запускать резервные URL.
Параллельные платформы образуют эквивалентные клоны базового портала с обеспечением всех сервисов и сведений. Игроки достигают устойчивый подключение к депозиту, игровой записям и клиентским опциям.
Расчетные операции проходят через подключенные банковские сервисы. Лимиты на инвестиции и обналичивания устанавливаются в соответствии с законодательными требованиями и внутренними политиками риск-менеджмента.
Опытные беттеры настаивают отслеживать положение авторизации через государственные регистры игорных ведомств. Статусные показатели включают позиции на отраслевых сервисах и feedback реальных игроков.
Ориентирование в области легальных платформ требует владения актуальных методов подключения. Квалифицированные клиенты применяют Лаки Бир сайт для получения свежей материалов о активных URL.
Схема открытия профиля в проверенных учреждениях предполагает сложную проверку. Современные операторы внедряют KYC-протоколы и AML-правила. Документооборот составляет от 24 до 72 периодов.
Программные методы для избежания запретов эволюционируют синхронно с интенсификацией нормативных мер. VPN-службы категории premium обеспечивают криптографию AES-256 и протоколы OpenVPN. Надежность коннекта критически важна для привилегированных сессий.
Резервные ресурсы функционируют через территориально размещенные цифровые ресурсы. CDN-системы осуществляют быструю время ответа для международных игроков. Техническое редирект инициируется при выявлении ограничения центрального ресурса.
Финансовые операции в официальных юрисдикциях соответствуют определенным стандартам PCI DSS. Децентрализованные транзакции увеличивают востребованность в результате конфиденциальности и скорости осуществления.
Портативные клиенты лучших провайдеров интегрируют физиологическую авторизацию и push-уведомления для ключевых событий. Гибкий внешний вид программно настраивается под характеристики матрицы.
fun and fresh online store – Playful selections and great presentation make browsing a pleasure.
где купить самые дешевые цветы в москве
Полный цикл обслуживания корпоративных заказов цветов
Надёжные площадки гэмблинг возможностей обеспечивают пользователям возможность к качественному гэмблингу через целевые сайты, включая казино аква , которые специально выполняют общепринятые критерии надёжности.
Алгоритм оформления профиля necessita внесения верификационных данных через безопасные SSL-соединения. Администрация просят письменное подтверждение age verification и территории жительства для поддержания legal норм.
2FA аутентификация является необходимым составляющей передовых архитектур защиты. Участники приобретают SMS-коды, push-оповещения или эксплуатируют dedicated утилиты в стиле Google Authenticator.
Резервные URL устраняют проблемы локальных запретов и DDoS-assault. Технически mirrors составляют идентичные клоны центрального сайта с сохранением возможностей и индивидуальных параметров.
Экспертные пользователи рекомендуют удерживать current перечни действующих копий в сохранённых ссылках обозревателя. Management передают информацию о современных доменах через email, Telegram-сообщества и мобильные apps.
Payment movements через официальные порталы защищены cryptographic технологиями level банковского направления. Изъятие фондов осуществляется solely на подтверждённые счета обладателя account.
По теме “Продление жизни аккумулятора iPhone при просмотре кино”, нашел много полезного.
Вот, делюсь ссылкой:
https://iphoneservice59.ru/news/kak-prodlit-zhizn-akkumulyatora-iphone-v-2026-godu-prostye-sovety-ot-masterov-servisa/
Актуальные клиенты обталкиваются с набором цифровых особенностей при процессах с лицензированными платформами. Тематические порталы типа лаки Р±РёСЂ казино выдают новую данные о работе казино операторов.
Система валидации профиля охватывает множество необходимых уровней. Базовая верификация включает отправки документов удостоверяющих индивидуальность. Стандартный список содержит документ, автоудостоверение или загранпаспорт.
Технологическая составляющая регистрации подразумевает внедрение SSL-шифрования и двойной авторизации. Профессиональные участники предлагают задействовать весь комплекс представленных настроек защиты.
Запасные домены формируют идентичные реплики главного портала с хранением комплексного арсенала. Центральное плюс кроется в подобии банковских ограничений и норм ставочных требований.
Процедура выявления действующих альтернативных адресов строится на наблюдении экспертных мессенджер групп и партнерских платформ. Квалифицированные участники задействуют прокси-соединения для предоставления постоянного доступа независимо от географических лимитов.
Действующие альтернативные домены лицензированных казино на п»ї1xBet гарантируют беспрерывный доступ к игровым системам. Технология реплицирования строит полноценные версии базового портала с фиксацией всех функций.
Алгоритм регистрации через mirror-сайт на сто процентов дублирует стандартную шаблон. Свежие игроки регистрируют рабочий email, формируют защищенный шифр и фиксируют операционную курренси.
Идентификация счета включает предоставления справок согласно KYC-стандартам. Изображение водительских прав, свидетельство места жительства и карточные данные подвергаются цифровую анализ в течение 24-72 временных единиц.
Логин верифицированных клиентов производится через типовую модуль с двухфакторной проверкой. Разовые токены поступают на сотовый девайс или e-mail адрес.
Инструменты входящего блока через mirror-сайты предлагает актуальные денежные сервисы. Visa, Mastercard, онлайн балансы Skrill, Neteller, блокчейн-токены Bitcoin, Ethereum обрабатываются с уменьшенными комиссиями 0-3%.
Азартная библиотека копируется на сто процентов включая слоты, столовые игры, live-ведущих и максимальные награды. RTP-индикаторы, волатильность и вейджер удерживаются неизменными.
Бонусная программа действует схоже центральному ресурсу. Welcome-бандлы, даровые прокруты, компенсация и VIP-планы запускаются машинально при реализации прописанных параметров.
Навигация в секторе легальных ресурсов требует знания актуальных решений подключения. Умелые участники используют Вавада для приобретения актуальной информации о активных ссылках.
Процедура формирования счета в надежных организациях подразумевает детальную проверку. Новейшие провайдеры эксплуатируют KYC-протоколы и AML-критерии. Документооборот потребляет от 24 до 72 интервалов.
Программные инструменты для обхода ограничений развиваются сообща с укреплением правовых шагов. VPN-инструменты уровня premium предлагают шифрование AES-256 и методы OpenVPN. Устойчивость подключения принципиально значима для привилегированных сессий.
Альтернативные сайты оперируют через локально распределенные технические мощности. CDN-архитектуры осуществляют низкую латентность для европейских игроков. Цифровое перенаправление включается при обнаружении блокировки главного домена.
Денежные переводы в легальных областях подпадают под определенным требованиям PCI DSS. Децентрализованные переводы увеличивают распространение из-за конфиденциальности и быстроте выполнения.
Переносные софт лучших компаний содержат голосовую идентификацию и push-извещения для ключевых событий. Модифицируемый внешний вид автоматически настраивается под параметры монитора.
Для создания удобного и стильного интерьера выбирайте где купить электрокарниз — это лучший выбор для современного дома.
Электрокарниз обеспечивает плавное и тихое движение полотен при корректной установке.
Feel the tension rise with every chapter of this amazing book. It is a story about the lengths people go to for love. Accessing the My Husband’s Wife PDF is simple and fast. Start your reading adventure now and see how the mystery resolves. https://myhusbandswifepdf.top/ My Husband’s Wife Latest Edition Pdf
canadian pharmacy prices: mexican pharmacy online – online pharmacy in turkey
Hi! This is my first comment here so I just wanted
to give a quick shout out and say I really enjoy reading your blog posts.
Can you recommend any other blogs/websites/forums that cover
the same subjects? Thank you!
Новейшие платформы гемблинг активностей обеспечивают клиентам возможность к высококлассному игровому процессу через безопасные Lucky Bear казино системы. Легальная функционирование подразумевает исполнения четких надзорных критериев.
Система активации клиентского счета задействует валидацию приватных реквизитов. Администраторы внедряют многоуровневые системы KYC и AML для исключения незаконных транзакций.
Технические средства инновационных игорных домов функционируют на защищенных хостингах с TLS стандартами. Локальные запреты обязывает операторов создавать дублирующие ссылки.
Зеркальные ресурсы составляют аналогичные копии основного портала с удержанием всех инструментов и сведений. Клиенты получают непрерывный подключение к балансу, развлекательной истории и индивидуальным конфигурациям.
Платежные транзакции производятся через синхронизированные расчетные системы. Границы на депозиты и изъятия определяются в соответствии с законодательными положениями и индивидуальными регламентами контроля угроз.
Квалифицированные игроки указывают мониторить статус авторизации через контролирующие каталоги развлекательных структур. Престижные параметры предусматривают позиции на профильных сервисах и отзывы истинных беттеров.
Find the tragedy and triumph in this digital edition. The PDF of It Should Have Been You is epic. It should have been you witnessing the journey. Secure the file now and start. https://itshouldhavebeenyoupdf.top/ It Should Have Been You Digital Copy
Инновационные порталы развлекательных развлечений обеспечивают беттерам возможность к премиальному гемблингу через проверенные Вавада зеркало системы. Лицензированная бизнес нуждается исполнения определенных регуляторных положений.
Механизм создания пользовательского кабинета предусматривает верификацию личных реквизитов. Регуляторы внедряют расширенные протоколы KYC и AML для недопущения поддельных платежей.
Электронные платформы инновационных казино функционируют на надежных инфраструктурах с SSL сертификатами. IP-фильтрация вынуждает провайдеров организовывать параллельные URL.
Зеркальные сайты являют собой точные версии базового портала с обеспечением всех опций и данных. Пользователи обеспечивают себе стабильный соединение к счету, игровой записям и личным настройкам.
Платежные транзакции производятся через встроенные платежные системы. Лимиты на инвестиции и изъятия назначаются в унисон с законодательными требованиями и внутренними политиками снижения потерь.
Квалифицированные игроки настаивают проверять состояние разрешения через официальные регистры развлекательных комиссий. Престижные критерии охватывают позиции на специализированных ресурсах и мнения настоящих участников.
ivermectin 6mg: Iver Therapeutics – stromectol otc
https://smartgenrxusa.com/# which online pharmacy is the best
Современные клиенты встречаются с множеством технологических нюансов при деятельности с легальными ресурсами. Профессиональные платформы типа типпи казино поставляют свежую информацию о работе гэмблинговых компаний.
Процесс валидации аккаунта содержит несколько обязательных шагов. Начальная валидация нуждается предоставления документов удостоверяющих личность. Обычный пакет содержит ID, права или заграничное удостоверение.
Программная элемент создания аккаунта охватывает эксплуатацию криптографической защиты и двухуровневой проверки. Профессиональные клиенты предлагают инициировать весь комплекс доступных параметров охраны.
Альтернативные адреса составляют идентичные клоны центрального сайта с поддержанием полного арсенала. Важнейшее бонус выражается в подобии расчетных пределов и условий отыгрыша.
Процедура обнаружения функционирующих зеркал базируется на контроле экспертных новостных лент и партнерских порталов. Опытные игроки внедряют туннельные протоколы для обеспечения бесперебойного связи безотносительно от местных лимитов.
Игровая ниша представляет активный прогресс, манящая массы участников. Экспертные сайты обеспечивают защищённую пространство для ставок. Подробную информацию о указанных компаниях реально обнаружить на lucky bear скачать приложение .
Аккредитация выступает приоритетным элементом выбора платформы. Лицензиаты Гибралтара гарантируют серьёзный контроль экономических операций. Каждая легальная портал выполняет систематические контроли RNG-систем.
Программные аспекты передовых игорных домов объединяют SSL-кодирование банковского категории. Провайдеры цифрового материала типа Microgaming, NetEnt, Pragmatic Play интегрируют многоуровневые механизмы рандомных чисел.
Схема верификации учётной записи подразумевает предоставления удостоверений KYC-стандарта. Свидетельство, свидетельство о прибылях, доказательство регистрации — базовый набор для окончательного активации.
Альтернативные ссылки устраняют барьеры с фильтрацией компаний. Рабочие дубли обновляются ежедневно программными службами. Карманные приложения нередко оперируют надёжнее интернет модификаций.
Распределение капитала устанавливает перспективную успешность гемблинговых партий. Квалифицированные геймеры настаивают лимитировать количество ставки до 1-2% от полного резерва.
Notepad Nest daily picks – Lovely desk supplies that brighten my workspace right away.
Online Breakfast Bay Finds – Everything looks fresh and the browsing experience is seamless and simple.
Подбор качественного азартного портала в сегодняшних условиях нуждается детального анализа к юридическому состоянию. Квалифицированные участники понимают, что казино Lucky Bear предоставляет новую информацию о работающих ресурсах.
Процедура создания аккаунта в сертифицированных платформах объединяет неизбежную валидацию идентичности. KYC-процедуры обеспечивают как заведение, так и пользователя от махинаций. Краткосрочные рамки на изъятие капитала до финализации верификации – стандартная процедура.
Электронные блокировки на подключение к гемблинг сервисам нейтрализуются через альтернативные адреса. Доступные отражения поддерживают абсолютную эффективность центрального портала. Расчетные транзакции, геймплейный прогресс и наградные схемы продолжают постоянными.
Экономическая безопасность определяется уровнем используемых финансовых методов. SSL-криптография, PCI DSS подтверждение и дополнительная верификация устанавливают прочный контур безопасности.
Геймплейная библиотека сертифицированных заведений охватывает барабаны от топовых создателей. RTP-параметры, вариативность и алгоритмические модели претерпевают объективную сертификацию в признанных учреждениях.
Схемы лояльности в надежных заведениях строятся на открытых критериях проигрыша. Требования x35-40 характеризуется адекватным для барабан-льгот, в то время как карточные забавы включаются в зачет с редуцированным показателем.
Навигация в мире лицензированных сайтов подразумевает осознания передовых технологий входа. Опытные игроки применяют Вавада регистрация для обретения актуальной данных о активных путях.
Схема формирования аккаунта в проверенных учреждениях содержит сложную верификацию. Передовые компании задействуют KYC-механизмы и AML-требования. Документооборот потребляет от 24 до 72 периодов.
IT решения для минования препятствий эволюционируют параллельно с укреплением правовых шагов. VPN-решения уровня premium дают защиту AES-256 и методы OpenVPN. Надежность канала fundamentally актуальна для премиальных партий.
Зеркальные домены оперируют через локально расположенные технические кластеры. CDN-комплексы гарантируют быструю пинг для американских геймеров. Автоматическое маршрутизация срабатывает при обнаружении блокировки основного портала.
Банковские операции в официальных территориях соответствуют конкретным нормам PCI DSS. Цифровые расчеты приобретают востребованность в результате скрытности и быстроте осуществления.
Портативные утилиты премиальных провайдеров включают лицевую проверку и push-оповещения для существенных ситуаций. Адаптивный облик самостоятельно подстраивается под характеристики панели.
Really all kinds of very good material. https://skitterphoto.com/photographers/2266855/li-manning
rankmetric.click – Overall, professional vibe here; trustworthy, polished, and pleasantly minimal throughout.
I think this is one of the most vital information for me.
And i am glad reading your article. But want
to remark on few general things, The web site
style is wonderful, the articles is really
great : D. Good job, cheers
Paranormal Parlor essentials – Unique, spooky products and a really atmospheric presentation.
Определение честного игорного площадки подразумевает детального разбора официальных свидетельств. Инновационные системы лаки бар казино гарантируют пользователям безусловную сведения о действующих лицензиях.
Процесс открытия аккаунта включает несколько требуемых шагов валидации. Представители требуют справки, доказывающие идентичность и возраст. Классический KYC-алгоритм требует от 24 до 72 периодов.
Финансовое планирование начинается с задания лимитов на депозиты. Искусные игроки предлагают эксплуатировать установку 5% от итогового азартного капитала на отдельную раунд.
Цифровые запреты поставщиков заставляют применять резервные маршруты. Дубликаты поддерживают безусловную производительность первичного ресурса, охватывая хронологию платежей и гемблинг успех.
Инновационные денежные сервисы дают оперативные взносы через виртуальные аккаунты. Bitcoin, Ethereum и постоянные токены дают анонимность и мизерные платежи. Длительность реализации получений равно 10-30 отрезков.
Системы верности включают каскадные ранги с увеличивающимся вознаграждением. VIP-менеджеры предоставляют эксклюзивные подарки, усиленные пределы и приоритетную обслуживание.
Отбор безопасного развлекательного площадки в актуальных условиях нуждается особого внимания к лицензионному уровню. Опытные геймеры осознают, что Vavada casino демонстрирует свежую факты о функционирующих сервисах.
Процедура открытия счета в сертифицированных площадках охватывает обязательную подтверждение персональных данных. KYC-процедуры охраняют как площадку, так и клиента от махинаций. Переходные границы на вывод финансов до выполнения валидации – привычная методика.
Программные барьеры на соединение к гемблинг порталам решаются через альтернативные домены. Функционирующие клоны гарантируют абсолютную возможности первичного платформы. Расчетные операции, развлекательный достижения и бонусные планы функционируют неизменными.
Денежная безопасность измеряется критерием используемых платежных способов. SSL-шифрование, PCI DSS подтверждение и дополнительная подтверждение устанавливают защищенный контур охраны.
Геймплейная каталог проверенных сервисов объединяет слоты от топовых студий. RTP-значения, вариативность и статистические схемы претерпевают внешнюю сертификацию в аккредитованных лабораториях.
Механизмы поощрения в достойных казино базируются на понятных требованиях ставок. Отыгрыш x35-40 считается адекватным для спин-подарков, в то время как настольные забавы учитываются в расчет с минимальным множителем.
Рабочие резервные адреса легальных гемблинг-платформ на лаки ворлд казино предоставляют беспрерывный соединение к геймерским порталам. Принцип зеркалирования создает точные копии главного сайта с удержанием всех возможностей.
Схема активации через дублирующий портал целиком воспроизводит базовую форму. Дебютные участники регистрируют действующий email, придумывают безопасный пароль и устанавливают базовую валюту.
Верификация счета включает загрузки справок согласно KYC-требованиям. Копия паспорта, верификация проживания и платежные координаты подвергаются цифровую проверку в течение 24-72 часа.
Авторизация существующих пользователей производится через классическую форму с расширенной валидацией. Разовые шифры доставляются на мобильный аппарат или email.
Возможности пополнительного модуля через резервные ссылки содержит актуальные банковские механизмы. Visa, Mastercard, цифровые счета Skrill, Neteller, crypto Bitcoin, Ethereum процессируются с минимальными взносами 0-3%.
Развлекательная ассортимент клонируется на сто процентов включая слоты, классические игры, live-крупье и накопительные призы. RTP-коэффициенты, изменчивость и вейджер поддерживаются неизменными.
Акционная механизм оперирует схоже главному ресурсу. Welcome-бандлы, бесплатные вращения, кешбэк и VIP-системы запускаются алгоритмически при соблюдении заданных критериев.
Поиск проверенного азартного портала в сегодняшних границах заставляет повышенного подхода к законному состоянию. Компетентные участники осознают, что Mellstroy Game казино содержит современную сведения о функционирующих провайдерах.
Алгоритм регистрации в проверенных заведениях предусматривает неизбежную верификацию идентичности. KYC-процедуры обеспечивают как сервис, так и клиента от мошенничества. Временные рамки на снятие капитала до завершения подтверждения – типичная подход.
Электронные препятствия на вход к гемблинг сервисам преодолеваются через зеркальные URL. Действующие клоны предоставляют всестороннюю производительность базового сайта. Расчетные переводы, игровой результаты и привилегированные предложения продолжают постоянными.
Экономическая гарантированность измеряется критерием эксплуатируемых финансовых инструментов. SSL-кодирование, PCI DSS сертификация и усиленная подтверждение гарантируют стабильный заслон охраны.
Игровая библиотека легальных заведений предоставляет барабаны от лидирующих студий. RTP-показатели, волатильность и математические системы испытывают объективную аудит в авторизованных центрах.
Системы мотивации в надежных сервисах опираются на четких критериях вейджера. Отыгрыш x35-40 расценивается справедливым для спин-поощрений, в то время как карточные состязания включаются в подсчет с редуцированным процентом.
Подбор легального азартного площадки нуждается глубокого разбора юридических сертификатов. Актуальные сайты Lucky Bear зеркало обеспечивают геймерам абсолютную факты о имеющихся аккредитациях.
Процесс открытия аккаунта содержит несколько необходимых ступеней валидации. Операторы запрашивают бумаги, доказывающие личность и совершеннолетие. Традиционный KYC-регламент занимает от 24 до 72 промежутков.
Контроль средств инициируется с назначения пределов на пополнения. Искусные геймеры советуют внедрять закон 5% от полного азартного капитала на индивидуальную сессию.
Цифровые препятствия операторов заставляют применять запасные домены. Копии хранят стопроцентную функциональность базового портала, подразумевая историю операций и игровой успех.
Новые финансовые системы обеспечивают скоростные вклады через цифровые счета. Bitcoin, Ethereum и фиксированные активы предоставляют скрытность и крошечные комиссии. Период обработки получений составляет 10-30 периодов.
Программы приверженности охватывают многоуровневые категории с накапливающимся бонусом. VIP-координаторы предоставляют уникальные подарки, повышенные границы и приоритетную техподдержку.
Рабочие резервные адреса официальных азартных клубов на Vavada зеркало создают стабильный вход к развлекательным системам. Принцип реплицирования создает идентичные дубликаты главного портала с фиксацией всех опций.
Алгоритм регистрации через альтернативный домен на сто процентов дублирует основную форму. Дебютные геймеры заполняют рабочий email, генерируют надежный секретную комбинацию и выбирают рабочую курренси.
Аутентификация учетной записи предполагает загрузки бумаг согласно KYC-требованиям. Скан ID-карты, верификация регистрации и финансовые данные подвергаются алгоритмическую контроль в течение 24-72 периодов.
Логин верифицированных геймеров выполняется через типовую модуль с расширенной идентификацией. Сессионные коды поступают на телефонный гаджет или email.
Функционал денежного раздела через резервные ссылки включает актуальные платежные системы. Visa, Mastercard, виртуальные счета Skrill, Neteller, цифровые активы Bitcoin, Ethereum обрабатываются с низкими процентами 0-3%.
Гемблинг библиотека воспроизводится абсолютно включая барабаны, столовые развлечения, live-операторов и джекпоты. RTP-коэффициенты, колебания и отыгрыш поддерживаются идентичными.
Акционная политика выполняется схоже центральному домену. Welcome-наборы, free spins, денежный возврат и VIP-курсы включаются программно при выполнении установленных стандартов.
Поиск проверенного betting площадки в современных обстоятельствах предполагает тщательного изучения к правовому статусу. Опытные пользователи понимают, что френдс казино отображает свежую информацию о доступных площадках.
Схема создания аккаунта в легальных площадках предусматривает необходимую верификацию идентичности. KYC-процедуры обеспечивают как заведение, так и пользователя от махинаций. Краткосрочные ограничения на вывод денег до закрытия проверки – нормальная подход.
Электронные барьеры на вход к betting порталам решаются через альтернативные URL. Функционирующие зеркала сохраняют полную возможности первичного портала. Денежные переводы, геймплейный прогресс и бонусные планы остаются константными.
Денежная гарантированность измеряется качеством используемых банковских механизмов. SSL-защита, PCI DSS сертификация и двухфакторная верификация обеспечивают защищенный барьер охраны.
Геймплейная коллекция легальных заведений включает барабаны от ведущих производителей. RTP-параметры, дисперсия и математические системы проходят нейтральную сертификацию в авторизованных лабораториях.
Схемы мотивации в профессиональных заведениях опираются на четких условиях проигрыша. Вейджер x35-40 считается справедливым для спин-привилегий, в то время как стандартные состязания учитываются в зачет с минимальным фактором.
Выбор легального развлекательного площадки предполагает основательного анализа правовых документов. Инновационные сайты СЌРЅРѕРјРѕ казино гарантируют геймерам максимальную информацию о собственных допусках.
Процедура получения доступа включает множество принудительных ступеней аутентификации. Операторы просят справки, засвидетельствующие личность и зрелость. Традиционный KYC-регламент занимает от 24 до 72 часов.
Распоряжение капиталом открывается с установления лимитов на взносы. Компетентные участники призывают эксплуатировать принцип 5% от итогового игорного фонда на конкретную игру.
Технические запреты операторов заставляют применять вспомогательные ссылки. Дубликаты оберегают абсолютную активность центрального портала, включая историю операций и гемблинг успех.
Инновационные денежные способы обеспечивают моментальные инвестиции через блокчейн портмоне. Bitcoin, Ethereum и стейблкоины гарантируют конфиденциальность и крошечные комиссии. Продолжительность осуществления изъятий насчитывает 10-30 минут.
Схемы приверженности подразумевают ступенчатые ранги с накапливающимся возвратом. VIP-представители гарантируют личные награды, увеличенные ограничения и ускоренную обслуживание.
Актуальные клиенты пересекаются с массой системных аспектов при деятельности с лицензированными сайтами. Тематические ресурсы типа казино 1xBet дают свежую материалы о функционировании казино провайдеров.
Система валидации учетной записи включает набор необходимых стадий. Первичная верификация требует размещения документов доказывающих персону. Классический список подразумевает документ, водительские права или внешний паспорт.
Системная составляющая создания аккаунта подразумевает эксплуатацию криптографической защиты и многофакторной защиты. Продвинутые игроки рекомендуют инициировать полный набор предложенных настроек секьюрити.
Запасные домены являются абсолютные дубликаты первичного платформы с сохранением комплексного возможностей. Центральное плюс содержится в соответствии банковских пределов и условий отыгрыша.
Схема обнаружения активных резервных ссылок фундируется на проверке тематических мессенджер групп и связанных платформ. Продвинутые клиенты применяют туннельные протоколы для предоставления бесперебойного подключения без оглядки от локальных запретов.
Отбор проверенного игрового площадки в сегодняшних рамках подразумевает повышенного рассмотрения к законному положению. Квалифицированные участники знают, что Вавада РІС…РѕРґ предоставляет свежую данные о функционирующих операторах.
Схема оформления профиля в проверенных сервисах включает обязательную аутентификацию идентичности. KYC-правила защищают как оператора, так и участника от фрода. Переходные пределы на вывод активов до закрытия контроля – обычная процедура.
Технические запреты на соединение к betting ресурсам обходятся через дублирующие URL. Активные зеркала обеспечивают тотальную производительность главного сервиса. Расчетные переводы, геймплейный прогресс и привилегированные схемы поддерживаются стабильными.
Материальная гарантированность измеряется показателем применяемых расчетных инструментов. SSL-шифрование, PCI DSS валидация и двухфакторная проверка гарантируют прочный барьер обороны.
Развлекательная коллекция официальных заведений содержит слоты от известных производителей. RTP-показатели, волатильность и вероятностные системы проходят объективную валидацию в признанных институтах.
Схемы мотивации в достойных площадках строятся на прозрачных параметрах ставок. Требования x35-40 расценивается справедливым для автомат-поощрений, в то время как настольные развлечения засчитываются в зачет с редуцированным фактором.
Надёжные ресурсы игровых опций гарантируют пользователям возможность к качественному времяпрепровождению через dedicated домены, включая п»ї1хбет официальный сайт , которые именно выполняют общепринятые требования безопасности.
Последовательность создания аккаунта включает указания authentication данных через защищённые SSL-connection. Провайдеры просят предоставить письменное подтверждение age verification и территории residence для выполнения законодательных критериев.
Двухэтапная идентификация становится принудительным компонентом передовых платформ security. Пользователи обретают SMS-пароли, push-сообщения или применяют специальные приложения по типу Google Authenticator.
Альтернативные домены устраняют препятствия geographic запретов и DDoS-воздействий. Техническим образом копии представляют копийные dublicates базового портала с сохранением функциональности и пользовательских данных.
Экспертные геймеры suggest сохранять обновлённые каталоги функционирующих альтернатив в favourites браузера. Провайдеры рассылают новости о fresh адресах через e-mail, Telegram-сообщества и мобильные приложения.
Платёжные переводы через надёжные платформы secured encryption алгоритмами level банковского индустрии. Вывод финансов происходит единственно на validated счета хозяина профиля.
Игровая отрасль демонстрирует быстрый прогресс, заинтересовывая массы пользователей. Квалифицированные платформы предлагают безопасную атмосферу для ставок. Развёрнутую информацию о данных провайдерах доступно изучить на Lucky Bear зеркало .
Сертификация остаётся главным показателем подбора портала. Надзорные органы Олдерни создают тщательный аудит расчётных транзакций. Конкретная сертифицированная площадка реализует периодические аудиты RNG-модулей.
IT характеристики актуальных казино объединяют SSL-криптографию банковского уровня. Разработчики цифрового обеспечения наподобие Microgaming, NetEnt, Pragmatic Play интегрируют комплексные механизмы рандомных величин.
Процесс аутентификации счёта включает направления свидетельств KYC-стандарта. Паспорт, выписка о заработке, подтверждение местожительства — типичный пакет для окончательного доступа.
Параллельные ссылки ликвидируют барьеры с запретами провайдеров. Рабочие зеркала адаптируются ежедневно IT специалистами. Карманные программы часто работают устойчивее веб вариантов.
Управление банкроллом определяет стратегическую доходность гемблинговых циклов. Профессиональные игроки указывают лимитировать сумму ставки до 1-2% от совокупного бюджета.
Передовые участники натыкаются с затруднением связи к лицензированным площадкам. Провайдеры закрывают первичные домены, но грамотные mad casino пользователи понимают о наличии дублирующих порталов.
Резервная ссылка образует полную копию главного площадки. Средства защиты работают такими же. Финансовые действия производятся через аналогичные механизмы.
Технология открытия счёта через параллельный ссылку подразумевает типовой аутентификации. Сотрудники выясняют справки для соблюдения KYC-требований. Персональные характеристики выполняют усиленную валидацию.
Банковские лимиты на резервных платформах совпадают основным требованиям. Стартовые суммы продолжают постоянными. Растущие выигрышные пулы объединяются между многочисленными ресурсами.
Поощрительные планы работают полноценно на параллельных сайтах. Коэффициент оборота поддерживает исходные параметры. Длительность использования сохраняется.
Отдел ассистирования обрабатывает вопросы с резервных ресурсов идентично. Онлайн разговор предоставляет постоянный график функционирования.
Функционирующие mirror-ссылки проверенных gaming-операторов на СЌРЅРѕРјРѕ казино обеспечивают непрерывный доступ к гемблинг системам. Принцип клонирования создает идентичные дубликаты главного ресурса с фиксацией всех возможностей.
Механизм создания аккаунта через дублирующий портал полностью воспроизводит базовую бланк. Начинающие участники вводят рабочий email, формируют сложный пароль и выбирают базовую валюту.
Подтверждение личного кабинета включает представления свидетельств следуя KYC-стандартам. Скан удостоверения личности, верификация регистрации и карточные параметры подвергаются машинную контроль в течение 24-72 временных единиц.
Авторизация действующих клиентов происходит через типовую интерфейс с многоступенчатой идентификацией. Временные шифры поступают на смс аппарат или e-mail адрес.
Опции пополнительного раздела через mirror-сайты предлагает топовые платежные системы. Visa, Mastercard, виртуальные счета Skrill, Neteller, цифровые активы Bitcoin, Ethereum процессируются с оптимизированными сборами 0-3%.
Гемблинг каталог клонируется на сто процентов включая слоты, традиционные развлечения, live-ведущих и максимальные награды. RTP-коэффициенты, изменчивость и ставочные требования остаются неизменными.
Подарочная система действует похоже центральному сайту. Welcome-пакеты, free spins, денежный возврат и VIP-системы включаются системно при соблюдении установленных параметров.
buy drugs online review
Современные пользователи обталкиваются с набором технических особенностей при процессах с официальными ресурсами. Экспертные источники типа Lucky Bear casino предоставляют свежую информацию о операциях азартных компаний.
Процесс подтверждения учетной записи предполагает комплекс неотъемлемых стадий. Первичная верификация предполагает размещения бумаг валидирующих личность. Привычный комплект предполагает свидетельство, автоудостоверение или международный паспорт.
Техническая часть открытия счета охватывает задействование криптографической защиты и многофакторной защиты. Опытные пользователи советуют задействовать весь комплекс имеющихся параметров охраны.
Зеркала являются полные копии основного портала с хранением полного арсенала. Основное преимущество заключается в идентичности финансовых ограничений и требований проигрыша.
Механизм выявления функционирующих запасных доменов опирается на мониторинге специализированных информационных каналов и партнерских порталов. Квалифицированные пользователи используют виртуальные частные сети для формирования постоянного доступа вне зависимости от географических запретов.
Поиск проверенного казино оператора требует глубокого изучения регулятивных разрешений. Современные сайты п»ї1xBet casino предлагают пользователям безусловную детали о своих санкциях.
Процедура регистрации содержит определенное количество необходимых стадий проверки. Провайдеры просят свидетельства, подтверждающие идентичность и дееспособность. Стандартный KYC-порядок продолжается от 24 до 72 часов.
Банкролл-менеджмент стартует с установления ограничений на пополнения. Опытные участники призывают эксплуатировать норму 5% от общего развлекательного средств на единичную сессию.
Технические препятствия владельцев принуждают использовать альтернативные домены. Клоны хранят безусловную активность главного портала, предусматривая историю платежей и гемблинг результаты.
Новые денежные методы гарантируют скоростные взносы через криптовалютные хранилища. Bitcoin, Ethereum и устойчивые монеты дают скрытность и символические платежи. Продолжительность выполнения получений равно 10-30 периодов.
Алгоритмы постоянства предусматривают многоуровневые степени с возрастающим возвратом. VIP-менеджеры гарантируют уникальные награды, увеличенные лимиты и приоритетную сервис.
http://smartgenrxusa.com/# india pharmacy
Нынешние участники встречаются с барьером входа к легальным площадкам. Операторы ограничивают главные порталы, но знающие Клубника казино игроки знают о доступности резервных площадок.
Резервная ссылка образует точную отображение оригинального портала. Криптографические алгоритмы сохраняются такими же. Расчётные переводы реализуются через идентичные механизмы.
Технология создания аккаунта через резервный домен содержит привычной подтверждения. Специалисты выясняют справки для реализации KYC-стандартов. Идентификационные данные подвергаются двухфакторную аутентификацию.
Финансовые пределы на дополнительных порталах соответствуют стандартным требованиям. Низшие вклады продолжают константными. Растущие банки координируются между всеми ссылками.
Льготные схемы работают целостно на резервных сайтах. Вейджер гарантирует оригинальные величины. Временные рамки отыгрыша сохраняется.
Команда обслуживания рассматривает запросы с зеркальных порталов сходным образом. Прямой переписка гарантирует 24-часовой порядок оперирования.
Лицензионные операторы азартных предложений предоставляют участникам право к элитному азартному досугу через профильные платформы, включая аква казино , что соблюдают международные стандарты надёжности.
Схема создания аккаунта включает заполнения идентификационных параметров через encrypted SSL-каналы. Менеджмент просят official удостоверение age verification и адреса регистрации для compliance юрисдикционных требований.
2FA верификация выступает обязательным aspect новейших механизмов конфиденциальности. Users приобретают SMS-токены, push-notification или эксплуатируют профессиональные программы в стиле Google Authenticator.
Mirror домены решают препятствия региональных санкций и DDoS-штурмов. Технически дубли образуют аналогичные реплики основного ресурса с maintaining опций и user сведений.
Профессиональные пользователи рекомендуют удерживать current каталоги рабочих зеркал в bookmark browser. Букмекеры передают обновления о актуальных порталах через e-mail, Telegram-группы и смартфонные софт.
Финансовые операции через лицензионные ресурсы гарантированы шифровальными алгоритмами уровня банковского направления. Снятие финансов происходит единственно на верифицированные данные владельца аккаунта.
Перемещение в области лицензированных платформ предполагает знания новых способов авторизации. Квалифицированные клиенты эксплуатируют п»ї1хбет для добывания новейшей информации о оперативных ссылках.
Схема регистрации личного кабинета в надежных компаниях предполагает комплексную проверку. Новейшие провайдеры применяют KYC-механизмы и AML-правила. Документальное сопровождение составляет от 24 до 72 часов.
Цифровые решения для преодоления блокировок прогрессируют одновременно с интенсификацией правовых мер. VPN-службы уровня premium предоставляют защиту AES-256 и технологии OpenVPN. Устойчивость соединения критически важна для привилегированных заходов.
Зеркальные адреса оперируют через локально разнесенные IT инфраструктуры. CDN-сети осуществляют минимальную задержку для европейских пользователей. Цифровое редирект запускается при обнаружении барьера центрального портала.
Банковские переводы в сертифицированных регионах подпадают под строгим критериям PCI DSS. Цифровые операции увеличивают признание из-за скрытности и динамике осуществления.
Мобильные софт ведущих организаций совмещают голосовую проверку и push-сообщения для критических моментов. Модифицируемый внешний вид программно подстраивается под настройки матрицы.
Актуальные сервисы развлекательных игр дают беттерам путь к качественному игровому процессу через безопасные Lucky Bear casino ресурсы. Легальная функционирование влечет следования четких надзорных стандартов.
Механизм активации клиентского профиля предусматривает подтверждение личных информации. Администраторы задействуют многоуровневые системы KYC и AML для блокировки незаконных платежей.
Электронные решения инновационных беттинг площадок функционируют на защищенных дата-центрах с шифровальными протоколами. Геоблокировка заставляет администраторов создавать резервные URL.
Параллельные сайты составляют эквивалентные дубликаты основного платформы с обеспечением всех опций и показателей. Пользователи получают непрерывный вход к балансу, беттинг данным и индивидуальным параметрам.
Расчетные операции производятся через подключенные расчетные сервисы. Границы на вклады и обналичивания определяются в гармонии с нормативными стандартами и индивидуальными процедурами управления рисками.
Экспертные беттеры рекомендуют отслеживать состояние авторизации через регуляторные каталоги игорных ведомств. Статусные критерии предусматривают места на экспертных сайтах и отзывы действительных беттеров.
Игровая отрасль являет стремительный прогресс, завлекая массы игроков. Профессиональные ресурсы предоставляют стабильную атмосферу для игры. Подробную данные о этих компаниях реально получить на п»ї1xBet .
Сертификация представляет приоритетным фактором подбора сайта. Надзорные органы Мальты гарантируют жёсткий мониторинг расчётных транзакций. Конкретная сертифицированная платформа подвергается периодические ревизии RNG-генераторов.
IT аспекты инновационных казино предусматривают SSL-защиту экономического категории. Поставщики софтового софта наподобие Microgaming, NetEnt, Pragmatic Play добавляют многоуровневые модели непредсказуемых значений.
Процесс валидации учётной записи предполагает предоставления документов KYC-уровня. Паспорт, выписка о средствах, доказательство местожительства — классический список для полноценного активации.
Зеркальные адреса решают трудности с цензурой операторов. Действующие дубли обновляются регулярно IT службами. Планшетные программы часто работают устойчивее онлайн версий.
Распределение капитала формирует стратегическую результативность азартных циклов. Грамотные участники настаивают ограничивать величину ставки до 1-2% от итогового бюджета.
Действующие зеркала официальных гемблинг-платформ на казино Меллстрой дают стабильный подключение к азартным системам. Методика клонирования генерирует аналогичные дубликаты основного сайта с сохранением всех возможностей.
Алгоритм оформления профиля через альтернативный домен полностью повторяет оригинальную анкету. Только пришедшие участники регистрируют рабочий email, формируют надежный пароль и определяют рабочую денежную единицу.
Валидация учетной записи подразумевает предоставления документов опираясь на KYC-стандартам. Изображение паспорта, верификация проживания и карточные параметры проходят цифровую проверку в течение 24-72 периодов.
Подключение действующих игроков выполняется через классическую окно с 2FA верификацией. Краткосрочные пароли отправляются на мессенджер устройство или email.
Инструменты депозитного раздела через зеркала предлагает распространенные расчетные механизмы. Visa, Mastercard, онлайн счета Skrill, Neteller, криптовалюты Bitcoin, Ethereum обрабатываются с низкими платежами 0-3%.
Развлекательная каталог копируется в точности включая автоматы, столовые забавы, live-ведущих и накопительные призы. RTP-коэффициенты, вариативность и условия отыгрыша удерживаются идентичными.
Промо схема работает идентично центральному домену. Welcome-комплекты, безвозмездные спины, компенсация и VIP-программы стартуют программно при достижении прописанных стандартов.
Meie riigis on internetikasiinod viimaste perioodide ajal
muutunud tavaliseks ajaviiteks, sest mängida lubatud igal momendil
ning erinevatest seadmetelt. Lihtsus toob samal
ajal kaasa suurema ohtu, et mängimisele mineb enam aega ja summasid,
kui esialgselt plaanitud. Seepärast on arukas vaadelda hasartmänge peamiselt ajaviiteks, mitte rahaallikaks.
Riigi riigi turul on täielikult tähtis aspekt seaduslikkus:
kaughasartmänge lubatud pakkuda vaid kompaniid, kel on nõutavad load
ja kes toimivad kontrolli all. Hasartmängija jaoks tähendab
see paremaid norme, paremat konfliktide lahendamist ning suuremat usaldust, et
teenus ei kao äkki. Enne konto registratsiooni on soovitatav alati
kontrollida, et operaator toimingud toimuvad Eestis litsentside alusel.
Praktikas puutub kokku iga panustaja kokku identifitseerimisega, et lubatud firmad on peavad verifitseerima kliendi vanust
ning identiteeti ning järgima raha pesemise vältimise tingimusi.
See võib osutada dokumentide esitamisele, makseviisi kinnitamisele ja mõnel juhul lisaküsimustele tehingute suhtes.
Kuigi protsess võib tunduda ebameeldiv, aitab see vähendada pettusi ning teeb
järgmised väljamaksed üldjuhul sujuvamaks.
my blog – postimee
seocatalyst.click – Bookmarked this immediately, planning to revisit for updates and inspiration.
Нынешние пользователи встречаются с набором программных аспектов при работе с официальными сайтами. Экспертные источники типа лайки Р±РёСЂ казино поставляют актуальную данные о деятельности гэмблинговых брендов.
Механизм проверки счета охватывает несколько принудительных шагов. Стартовая проверка нуждается размещения документов подтверждающих субъект. Типовой пакет охватывает ID, автоудостоверение или внешний паспорт.
Программная составляющая записления подразумевает внедрение SSL-шифрования и двухуровневой проверки. Экспертные клиенты настаивают активировать совокупность имеющихся настроек защиты.
Альтернативные адреса представляют абсолютные отражения главного домена с обеспечением комплексного арсенала. Ключевое бонус заключается в схожести денежных границ и критериев условий прокрутки.
Механизм выявления действующих резервных ссылок строится на наблюдении специализированных мессенджер групп и связанных сайтов. Профессиональные клиенты применяют виртуальные частные сети для создания надежного доступа независимо от географических запретов.
Актуальные сервисы гемблинг продуктов дают пользователям подключение к элитному беттингу через безопасные Килограмм казино порталы. Сертифицированная операционная активность требует следования определенных регуляторных критериев.
Процесс регистрации клиентского учетной записи содержит верификацию конфиденциальных данных. Администраторы задействуют детализированные протоколы KYC и AML для исключения поддельных переводов.
Электронные системы инновационных казино строятся на зашифрованных облачных системах с шифровальными сертификатами. Региональная блокировка заставляет управляющих внедрять альтернативные порталы.
Альтернативные сайты образуют идентичные репликации центрального сайта с фиксацией всех возможностей и информации. Беттеры приобретают непрерывный подключение к депозиту, беттинг статистике и пользовательским установкам.
Денежные действия производятся через подключенные банковские системы. Границы на взносы и обналичивания регулируются в согласии с лицензионными критериями и собственными процедурами управления рисками.
Профессиональные клиенты рекомендуют проверять условия лицензии через контролирующие каталоги игорных органов. Престижные индикаторы предусматривают рейтинги на тематических платформах и оценки настоящих игроков.
marketinglab.click – Color palette felt calming, nothing distracting, just focused, thoughtful design.
Перемещение в мире проверенных площадок требует представления передовых инструментов входа. Продвинутые игроки эксплуатируют казино Vavada для извлечения актуальной данных о функционирующих путях.
Процесс формирования аккаунта в надежных операторах предполагает комплексную аутентификацию. Передовые провайдеры эксплуатируют KYC-процедуры и AML-правила. Документооборот потребляет от 24 до 72 интервалов.
Технические решения для прохождения препятствий совершенствуются вместе с ужесточением юридических шагов. VPN-инструменты разряда premium предлагают криптографию AES-256 и стандарты OpenVPN. Надежность подключения кардинально актуальна для VIP игровых периодов.
Альтернативные сайты выполняют задачи через пространственно разнесенные цифровые инфраструктуры. CDN-архитектуры гарантируют оптимальную отклик для азиатских геймеров. Техническое перенаправление активируется при обнаружении ограничения центрального адреса.
Экономические транзакции в сертифицированных юрисдикциях следуют строгим нормам PCI DSS. Цифровые платежи приобретают популярность в результате анонимности и темпу реализации.
Смартфонные программы лучших провайдеров объединяют биометрическую идентификацию и push-оповещения для важных событий. Гибкий облик независимо адаптируется под характеристики экрана.
Выбор безопасного азартного заведения заставляет основательного исследования лицензионных свидетельств. Современные платформы Лаки Бир официальный сайт предоставляют клиентам абсолютную сведения о собственных разрешениях.
Алгоритм открытия аккаунта предусматривает ряд ключевых стадий верификации. Операторы настаивают бумаги, удостоверяющие персону и возраст. Традиционный KYC-алгоритм продолжается от 24 до 72 интервалов.
Контроль средств инициируется с фиксации рамок на пополнения. Компетентные клиенты призывают задействовать закон 5% от суммарного казино фонда на индивидуальную раунд.
Программные препятствия операторов принуждают задействовать резервные домены. Зеркала хранят максимальную функциональность базового портала, включая летопись переводов и гемблинг прогресс.
Актуальные банковские способы предоставляют моментальные вклады через блокчейн портмоне. Bitcoin, Ethereum и устойчивые монеты дают приватность и крошечные отчисления. Период обработки получений насчитывает 10-30 промежутков.
Системы постоянства подразумевают каскадные степени с увеличивающимся бонусом. VIP-кураторы обеспечивают личные вознаграждения, улучшенные лимиты и опережающую обслуживание.
Night Routine essentials – The shop offers items that make nightly habits easy and enjoyable.
explore Mossa Forge – The lineup feels rare and thoughtfully crafted from start to finish.
Отбор надежного игорного заведения требует тщательного рассмотрения официальных свидетельств. Передовые ресурсы ретро казино дают геймерам максимальную детали о текущих санкциях.
Система регистрации предусматривает множество необходимых стадий подтверждения. Представители запрашивают свидетельства, устанавливающие идентичность и зрелость. Стандартный KYC-алгоритм длится от 24 до 72 часов.
Управление банком начинается с назначения рамок на вклады. Искусные участники рекомендуют эксплуатировать принцип 5% от итогового гемблинг фонда на индивидуальную сессию.
Программные блокировки провайдеров вынуждают эксплуатировать запасные ссылки. Дубликаты сохраняют полную эффективность основного площадки, предусматривая хронологию платежей и гемблинг продвижение.
Современные банковские методы гарантируют моментальные пополнения через блокчейн портмоне. Bitcoin, Ethereum и постоянные токены обеспечивают тайность и мизерные комиссии. Длительность выполнения изъятий доходит 10-30 промежутков.
Планы лояльности включают градационные категории с возрастающим кэшбэком. VIP-менеджеры обеспечивают персонализированные награды, увеличенные лимиты и преимущественную поддержку.
Современные клиенты встречаются с множеством технологических деталей при работе с сертифицированными платформами. Профессиональные источники типа п»ї1хбет регистрация предоставляют свежую сведения о функционировании игорных брендов.
Процедура проверки аккаунта подразумевает несколько требуемых шагов. Базовая подтверждение нуждается передачи бумаг валидирующих личность. Классический набор содержит ID, автоудостоверение или внешний паспорт.
Системная составляющая создания аккаунта подразумевает использование SSL-шифрования и 2FA. Опытные клиенты рекомендуют активировать полный набор предложенных опций безопасности.
Дублирующие порталы являются идентичные реплики первичного домена с сохранением тотального набора функций. Главное бонус выражается в подобии платежных рамок и норм проигрыша.
Процедура поиска рабочих зеркал базируется на проверке специализированных телеграм-каналов и сотрудничающих ресурсов. Опытные геймеры применяют виртуальные частные сети для обеспечения устойчивого подключения безотносительно от географических ограничений.
Поиск надежного развлекательного заведения в современных рамках нуждается тщательного анализа к юридическому состоянию. Опытные клиенты представляют, что Вавада официальный сайт предоставляет актуальную информацию о работающих провайдерах.
Алгоритм открытия счета в проверенных сервисах включает принудительную валидацию документов. KYC-стандарты гарантируют как площадку, так и клиента от обмана. Кратковременные лимиты на перечисление финансов до завершения контроля – привычная практика.
Электронные запреты на соединение к гемблинг площадкам обходятся через зеркальные адреса. Рабочие зеркала гарантируют всестороннюю эффективность центрального ресурса. Денежные транзакции, геймплейный продвижение и поощрительные схемы остаются постоянными.
Капитальная стабильность характеризуется степенью используемых денежных механизмов. SSL-шифрование, PCI DSS валидация и дополнительная подтверждение устанавливают защищенный заслон безопасности.
Интерактивная коллекция сертифицированных заведений включает барабаны от лидирующих студий. RTP-показатели, колебания и статистические схемы подвергаются нейтральную сертификацию в одобренных лабораториях.
Схемы мотивации в надежных казино основываются на прозрачных правилах ставок. Отыгрыш x35-40 признается разумным для машина-поощрений, в то время как традиционные активности идут в калькуляцию с редуцированным множителем.
Исследование в секторе официальных платформ предполагает представления современных решений авторизации. Умелые клиенты эксплуатируют lucky bear казино онлайн скачать для приобретения актуальной информации о функционирующих адресах.
Механизм формирования счета в лицензированных операторах подразумевает комплексную валидацию. Передовые операторы эксплуатируют KYC-механизмы и AML-требования. Бумажная работа занимает от 24 до 72 временных отрезков.
IT решения для минования препятствий улучшаются вместе с повышением юридических действий. VPN-решения уровня premium гарантируют криптографию AES-256 и системы OpenVPN. Стабильность соединения принципиально важна для премиальных партий.
Резервные платформы действуют через локально разнесенные компьютерные кластеры. CDN-архитектуры гарантируют оптимальную отклик для европейских пользователей. Техническое редирект срабатывает при распознавании ограничения базового домена.
Банковские переводы в проверенных регионах подпадают под строгим стандартам PCI DSS. Децентрализованные транзакции завоевывают признание по причине секретности и скорости осуществления.
Мобильные клиенты топовых операторов совмещают биометрическую аутентификацию и push-оповещения для критических происшествий. Модифицируемый облик самостоятельно настраивается под параметры дисплея.
Hello my friend! I want to say that this post is amazing, nice
written and come with almost all vital infos.
I would like to look more posts like this . https://cryptoboss885.top/
внедрение erp москва внедрение erp москва .
современное медицинское оборудование medicinskaya-tehnika.ru .
small-batch watch store – Exclusive editions and fair costs make it a go-to destination.
Действующие альтернативные домены проверенных гемблинг-платформ на Лаки Бир казино предоставляют устойчивый соединение к гемблинг порталам. Принцип зеркалирования создает идентичные реплики основного веб-площадки с консервацией всех механизмов.
Алгоритм регистрации через зеркало полностью повторяет стандартную шаблон. Новые геймеры регистрируют функционирующий email, создают безопасный шифр и определяют основную финансовый инструмент.
Валидация счета включает отправки справок по KYC-нормам. Копия паспорта, доказательство регистрации и платежные координаты проходят цифровую валидацию в течение 24-72 часов.
Подключение зарегистрированных геймеров производится через обычную модуль с расширенной валидацией. Разовые пароли доставляются на смс гаджет или email.
Функционал депозитного сектора через альтернативные домены обеспечивает актуальные расчетные сервисы. Visa, Mastercard, онлайн хранилища Skrill, Neteller, блокчейн-токены Bitcoin, Ethereum осуществляются с оптимизированными взносами 0-3%.
Гемблинг коллекция воспроизводится абсолютно включая барабаны, традиционные геймплей, live-ведущих и максимальные награды. RTP-показатели, колебания и ставочные требования остаются неизменными.
Промо политика оперирует схоже главному веб-площадке. Welcome-наборы, даровые прокруты, компенсация и VIP-системы включаются машинально при исполнении заданных критериев.
Рабочие резервные адреса лицензированных азартных клубов на Vavada зеркало дают беспрерывный соединение к азартным сервисам. Методика дублирования создает эквивалентные реплики центрального портала с поддержанием всех опций.
Процедура открытия счета через альтернативный домен полностью копирует оригинальную анкету. Новые геймеры регистрируют действующий email, генерируют надежный секретную комбинацию и определяют игровую курренси.
Валидация счета предполагает предоставления удостоверений в соответствии с KYC-регламенту. Снимок водительских прав, валидация адреса и финансовые сведения анализируются посредством цифровую верификацию в течение 24-72 ч.
Логин верифицированных клиентов выполняется через типовую интерфейс с 2FA идентификацией. Разовые ключи доставляются на мобильный девайс или email.
Функционал депозитного блока через зеркала обеспечивает востребованные банковские инструменты. Visa, Mastercard, цифровые балансы Skrill, Neteller, блокчейн-токены Bitcoin, Ethereum осуществляются с сокращенными комиссиями 0-3%.
Развлекательная каталог копируется полностью включая машины, настольные игры, live-крупье и накопительные призы. RTP-коэффициенты, колебания и проигрыш остаются такими же.
Промо система работает подобно главному сайту. Welcome-комплекты, фриспины, компенсация и VIP-схемы включаются алгоритмически при реализации прописанных критериев.
Smart GenRx USA: canadian pharmacy reviews – canadian pharmacy cheap
Гемблинговая индустрия показывает динамичный развитие, привлекая множество пользователей. Профессиональные порталы обеспечивают защищённую пространство для развлечений. Полную материалы о данных организациях можно изучить на казино Килограмм .
Аккредитация представляет центральным критерием селекции сайта. Лицензиаты Кюрасао дают строгий проверку денежных манипуляций. Любая аккредитованная площадка подвергается постоянные инспекции RNG-систем.
IT параметры передовых казино предусматривают SSL-безопасность расчётного категории. Производители цифрового материала наподобие Microgaming, NetEnt, Pragmatic Play встраивают многоуровневые схемы произвольных чисел.
Механизм подтверждения профиля подразумевает подачи удостоверений KYC-стандарта. Документ, выписка о средствах, удостоверение прописки — типичный перечень для полноценного входа.
Резервные адреса убирают трудности с фильтрацией компаний. Рабочие альтернативы изменяются ежедневно IT специалистами. Смартфонные программы зачастую функционируют надёжнее браузерных форматов.
Банкролл-менеджмент формирует перспективную доходность азартных периодов. Грамотные беттеры указывают лимитировать объём пари до 1-2% от итогового бюджета.
Современные пользователи встречаются с набором цифровых особенностей при функционировании с сертифицированными сайтами. Экспертные платформы типа Болливуд казино поставляют современную сведения о процессах казино компаний.
Процесс аутентификации учетной записи содержит набор требуемых этапов. Начальная проверка требует передачи свидетельств верифицирующих личность. Обычный набор охватывает документ, автоудостоверение или загранпаспорт.
Технологическая сторона оформления охватывает эксплуатацию SSL-шифрования и двухуровневой проверки. Экспертные пользователи рекомендуют включать все возможных возможностей секьюрити.
Альтернативные адреса являются идентичные клоны основного ресурса с удержанием исчерпывающего функционала. Ключевое преимущество выражается в схожести банковских рамок и параметров проигрыша.
Система нахождения действующих зеркал опирается на наблюдении тематических новостных лент и союзных ресурсов. Квалифицированные игроки задействуют виртуальные частные сети для формирования бесперебойного связи вне зависимости от региональных барьеров.
growthboost.click – Pages loaded fast, images appeared sharp, and formatting stayed consistent.
Электрокарниз электрокарнизы для штор в москве обеспечивает автоматическую регулировку тени в помещении, сочетая современный дизайн с функциональностью.
Технологический электрокарниз изменил подход к декорированию окон .
Работает благодаря электрическому подключению.
Карнизы представлены в множестве дизайнерских решений .
Некоторые модели включают автоматическое расписание .
Азартная ниша показывает динамичный подъём, привлекая миллионы игроков. Экспертные порталы дают стабильную условия для ставок. Детальную сведения о подобных брендах реально изучить на Меллстрой казино .
Легализация представляет главным критерием подбора платформы. Контролёры Великобритании дают качественный проверку экономических транзакций. Конкретная сертифицированная платформа реализует регулярные аудиты RNG-модулей.
Компьютерные параметры инновационных игорных домов включают SSL-криптографию денежного ранга. Разработчики софтового материала уровня Microgaming, NetEnt, Pragmatic Play встраивают многоуровневые системы случайных значений.
Механизм аутентификации личного кабинета подразумевает подачи справок KYC-стандарта. ID, документ о доходах, доказательство адреса — классический пакет для окончательного активации.
Резервные URL решают проблемы с блокировками компаний. Действующие альтернативы модифицируются ежедневно техническими отделами. Мобильные утилиты нередко действуют устойчивее интернет модификаций.
Управление банкроллом определяет длительную прибыльность азартных циклов. Профессиональные геймеры советуют урезать количество бета до 1-2% от общего резерва.
Лицензионные провайдеры игорных услуг предоставляют пользователям шанс к элитному времяпрепровождению через целевые порталы, включая казино Лаки Бир , которые именно исполняют общепринятые требования безопасности.
Процедура регистрации предполагает заполнения проверочных параметров через защищённые SSL-протоколы. Провайдеры просят предоставить документальное подтверждение совершеннолетия и региона регистрации для поддержания legal критериев.
Multi-factor верификация является обязательным компонентом современных архитектур security. Клиенты приобретают SMS-токены, push-уведомления или задействуют специализированные приложения типа Google Authenticator.
Дублирующие URL решают трудности локальных блокировок и DDoS-штурмов. По сути реплики образуют аналогичные реплики главного домена с сохранением инструментария и личных данных.
Экспертные клиенты suggest сохранять обновлённые перечни функционирующих зеркал в bookmark browser. Management рассылают сведения о свежих адресах через email, Telegram-сообщества и mobile apps.
Банковские операции через надёжные ресурсы обеспечены защитными алгоритмами level банковского segment. Снятие финансов происходит solely на аутентифицированные wallets обладателя профиля.
Poster Palace must-haves – Posters are wonderful and delivery was prompt and seamless.
Азартная индустрия демонстрирует интенсивный рост, заинтересовывая множество игроков. Грамотные порталы гарантируют защищённую условия для развлечений. Исчерпывающую сведения о указанных операторах можно обнаружить на п»ї1хбет регистрация .
Легализация остаётся приоритетным элементом отбора ресурса. Лицензиаты Кюрасао предоставляют качественный мониторинг валютных транзакций. Отдельная сертифицированная площадка проходит регулярные ревизии RNG-генераторов.
IT особенности инновационных гемблинг-сайтов содержат SSL-шифрование банковского класса. Провайдеры компьютерного обеспечения уровня Microgaming, NetEnt, Pragmatic Play подключают продвинутые модели хаотичных показателей.
Механизм верификации личного кабинета включает представления справок KYC-формата. Удостоверение, справка о заработке, валидация прописки — стандартный список для завершённого входа.
Параллельные адреса исправляют сложности с цензурой организаций. Свежие зеркала изменяются систематически компьютерными группами. Смартфонные софт часто оперируют стабильнее браузерных вариантов.
Финансовая дисциплина определяет длительную успешность игровых партий. Профессиональные беттеры настаивают ограничивать величину вейджера до 1-2% от полного бюджета.
Отбор безопасного развлекательного ресурса требует тщательного рассмотрения юридических свидетельств. Новые ресурсы Лаки Бир предоставляют клиентам максимальную факты о собственных аккредитациях.
Процесс получения доступа предусматривает несколько необходимых стадий валидации. Владельцы истребуют справки, доказывающие личность и возраст. Классический KYC-алгоритм требует от 24 до 72 периодов.
Управление банком запускается с установления рамок на инвестиции. Профессиональные клиенты настаивают эксплуатировать норму 5% от совокупного азартного бюджета на одну раунд.
Технические барьеры провайдеров обязывают задействовать альтернативные адреса. Клоны удерживают максимальную функциональность главного сайта, подразумевая историю переводов и развлекательный продвижение.
Новые расчетные способы дают оперативные инвестиции через цифровые хранилища. Bitcoin, Ethereum и устойчивые монеты обеспечивают тайность и минимальные сборы. Время обработки получений достигает 10-30 интервалов.
Алгоритмы приверженности содержат иерархические статусы с нарастающим вознаграждением. VIP-менеджеры предоставляют персонализированные бонусы, повышенные рамки и первоочередную обслуживание.
Explore Brand Beacon – Clean, professional design with information presented clearly.
Современные участники попадают с барьером доступа к сертифицированным сайтам. Организации запрещают базовые ссылки, но опытные Рльдорадо казино посетители учитывают о функционировании дублирующих порталов.
Дополнительный домен формирует идентичную дубликат базового сайта. Системы безопасности работают равнозначными. Финансовые процедуры реализуются через идентичные шлюзы.
Процедура заведения учётной записи через резервный адрес подразумевает стандартной валидации. Менеджеры уточняют удостоверения для реализации KYC-правил. Персональные информация осуществляют комплексную подтверждение.
Вносительные границы на альтернативных сайтах совпадают основным требованиям. Стартовые беты сохраняются константными. Накопительные накопления согласовываются между многочисленными порталами.
Премиальные планы выполняются комплексно на альтернативных платформах. Множитель ставок гарантирует исходные значения. Длительность использования продолжается.
Сервис помощи решает тикеты с дополнительных ссылок аналогично. Мгновенный разговор гарантирует постоянный график оперирования.
Официальные площадки развлекательных сервисов предоставляют пользователям шанс к высококлассному игровому процессу через тематические платформы, включая Tippy casino , что следуют мировые нормы защиты.
Последовательность создания аккаунта подразумевает указания валидационных деталей через защищённые SSL-линии. Администрация запрашивают письменное доказательство age verification и региона жительства для compliance законодательных критериев.
Двухфакторная проверка является обязательным компонентом новейших систем security. Участники получают SMS-коды, push-уведомления или применяют targeted утилиты наподобие Google Authenticator.
Альтернативные порталы ликвидируют проблемы geographic ограничений и DDoS-нападений. Фактически реплики представляют аналогичные клоны центрального сайта с поддержанием features и индивидуальных параметров.
Опытные геймеры советуют поддерживать обновлённые каталоги активных копий в закладках браузера. Администрация отправляют информацию о современных порталах через email, Telegram-communities и mobile apps.
Платёжные movements через проверенные сайты гарантированы шифровальными технологиями уровня банковского segment. Вывод фондов происходит только на верифицированные счета собственника учётной записи.
digitalengine.click – Navigation felt smooth, found everything quickly without any confusing steps.
Pak Plates premium collection – Smooth checkout and nice product range, I’ll be back soon.
Передовые пользователи сталкиваются с массой технологических нюансов при функционировании с лицензированными ресурсами. Специализированные источники типа казино 1xBet обеспечивают актуальную данные о деятельности игорных организаций.
Система верификации профиля включает набор обязательных стадий. Первичная проверка предполагает отправки удостоверений доказывающих личность. Обычный комплект предполагает паспорт, лицензию водителя или внешний паспорт.
Техническая элемент открытия счета содержит использование зашифрованного канала и многофакторной защиты. Профессиональные участники подсказывают инициировать весь комплекс предложенных параметров охраны.
Запасные домены являются точные дубликаты центрального домена с хранением комплексного инструментария. Важнейшее бонус заключается в подобии платежных пределов и параметров ставочных требований.
Алгоритм выявления действующих зеркал основывается на мониторинге профильных новостных лент и союзных ресурсов. Продвинутые клиенты эксплуатируют VPN-сервисы для обеспечения бесперебойного доступа независимо от географических блокировок.
Современные игроки сталкиваются с массой цифровых особенностей при процессах с официальными порталами. Профессиональные платформы типа Лаки Бир сайт выдают релевантную материалы о работе азартных операторов.
Алгоритм валидации кабинета охватывает набор необходимых уровней. Исходная аутентификация требует предоставления справок удостоверяющих субъект. Обычный список подразумевает удостоверение личности, водительские права или международное ID.
Системная компонента создания аккаунта предполагает внедрение безопасного соединения и двухфакторной аутентификации. Квалифицированные клиенты советуют активировать все возможных параметров секьюрити.
Зеркала представляют полные клоны базового платформы с обеспечением всего возможностей. Ключевое плюс выражается в тождественности финансовых границ и норм проигрыша.
Система поиска актуальных запасных доменов опирается на наблюдении экспертных телеграм-каналов и союзных ресурсов. Профессиональные участники применяют VPN-сервисы для гарантирования надежного соединения независимо от локальных блокировок.
Трезвый выбор http://www.nasslagdenie.ru/vyvod-iz-zapoya-v-volgograde-anonimno// .
I know this if off topic but I’m looking into
starting my own weblog and was wondering what all is needed to get setup?
I’m assuming having a blog like yours would cost a pretty penny?
I’m not very internet smart so I’m not 100% certain. Any suggestions or
advice would be greatly appreciated. Kudos
Беттинговая область являет стремительный прогресс, манящая множество геймеров. Профессиональные ресурсы предоставляют защищённую среду для развлечений. Детальную сведения о указанных провайдерах доступно обнаружить на LeeBet casino .
Аттестация выступает главным показателем выбора площадки. Регуляторы Кюрасао создают тщательный проверку денежных транзакций. Отдельная официальная портал выполняет периодические аудиты RNG-алгоритмов.
Цифровые свойства инновационных гемблинг-сайтов включают SSL-кодирование денежного стандарта. Разработчики компьютерного материала класса Microgaming, NetEnt, Pragmatic Play внедряют комплексные алгоритмы случайных значений.
Процедура верификации профиля предполагает предоставления документов KYC-класса. Свидетельство, документ о средствах, подтверждение проживания — типичный набор для финального доступа.
Зеркальные ссылки исправляют трудности с блокировками поставщиков. Рабочие варианты обновляются систематически цифровыми командами. Карманные программы регулярно функционируют качественнее онлайн вариантов.
Финансовая дисциплина определяет продолжительную эффективность гемблинговых циклов. Профессиональные беттеры указывают ограничивать количество ставки до 1-2% от итогового бюджета.
塔尔萨之王第三季高清完整版运用AI智能推荐算法,海外华人可免费观看最新热播剧集。
zoloft pill: generic zoloft – zoloft pill
Christmas Craft Marketplace – Festive spirit throughout and items are easy to locate thanks to clear organization.
Поиск в мире лицензированных сайтов подразумевает знания актуальных способов доступа. Опытные геймеры внедряют казино Голд для извлечения актуальной материалов о функционирующих путях.
Алгоритм формирования учетной записи в сертифицированных компаниях включает комплексную проверку. Новейшие организации внедряют KYC-алгоритмы и AML-нормы. Документооборот составляет от 24 до 72 интервалов.
Цифровые технологии для избежания запретов прогрессируют сообща с ужесточением законодательных инициатив. VPN-инструменты уровня premium предлагают защиту AES-256 и стандарты OpenVPN. Стабильность коннекта принципиально важна для элитных игровых периодов.
Дублирующие сайты оперируют через пространственно расположенные цифровые ресурсы. CDN-комплексы обеспечивают оптимальную время ответа для американских геймеров. Системное роутинг активируется при детекции препятствия основного адреса.
Платежные транзакции в официальных зонах соответствуют определенным правилам PCI DSS. Цифровые переводы набирают признание из-за конфиденциальности и темпу процессинга.
Планшетные клиенты лучших организаций содержат физиологическую авторизацию и push-уведомления для ключевых происшествий. Модифицируемый интерфейс автономно настраивается под характеристики матрицы.
Беттинговая область отображает стремительный рост, манящая массы игроков. Грамотные сайты обеспечивают стабильную среду для ставок. Исчерпывающую материалы о указанных организациях допустимо изучить на казино 1xBet .
Легализация выступает основным фактором подбора платформы. Лицензиаты Мальты дают жёсткий мониторинг экономических процедур. Конкретная легальная портал подвергается периодические аудиты RNG-механизмов.
Технические особенности инновационных игорных домов содержат SSL-безопасность банковского уровня. Провайдеры виртуального материала вроде Microgaming, NetEnt, Pragmatic Play добавляют продвинутые алгоритмы хаотичных значений.
Алгоритм верификации счёта требует предоставления удостоверений KYC-стандарта. Свидетельство, документ о заработке, доказательство проживания — типичный перечень для полноценного доступа.
Резервные порталы ликвидируют проблемы с ограничениями операторов. Актуальные копии адаптируются регулярно цифровыми командами. Планшетные утилиты регулярно действуют устойчивее веб форматов.
Управление банкроллом определяет продолжительную успешность беттинговых раундов. Профессиональные игроки рекомендуют ограничивать размер пари до 1-2% от суммарного капитала.
Современные платформы гемблинг продуктов предлагают клиентам доступ к высококлассному беттингу через защищенные Vavada casino ресурсы. Сертифицированная деятельность предполагает выполнения строгих правовых критериев.
Процедура открытия пользовательского профиля включает проверку приватных данных. Регуляторы задействуют многоуровневые протоколы KYC и AML для исключения нарушающих платежей.
Цифровые платформы современных игорных домов основываются на зашифрованных хостингах с HTTPS протоколами. Геоблокировка побуждает операторов организовывать вспомогательные порталы.
Альтернативные порталы являют собой аналогичные дубликаты главного домена с фиксацией всех функций и показателей. Игроки обеспечивают себе стабильный вход к средствам, игровой статистике и пользовательским настройкам.
Денежные действия производятся через интегрированные финансовые сервисы. Пределы на взносы и снятия устанавливаются в соответствии с законодательными положениями и организационными правилами минимизации опасностей.
Экспертные пользователи указывают проверять ситуацию сертификата через контролирующие реестры игорных структур. Престижные индикаторы включают рейтинги на профильных сайтах и комментарии реальных участников.
Adset Atelier Specials – The catalog feels extensive and the pricing looks fair for what’s offered.
Exclusive Barbell Bay Items – Excellent variety and clear details made shopping straightforward.
Dark Tales Market – Intriguing designs and moving through products felt effortless today.
Определение легального азартного ресурса предполагает детального разбора лицензионных свидетельств. Современные порталы Vavada казино гарантируют геймерам стопроцентную факты о собственных лицензиях.
Механизм получения доступа подразумевает множество обязательных фаз подтверждения. Провайдеры настаивают справки, подтверждающие личность и зрелость. Обычный KYC-механизм составляет от 24 до 72 периодов.
Распоряжение капиталом открывается с задания ограничений на депозиты. Опытные игроки предлагают использовать установку 5% от совокупного развлекательного фонда на индивидуальную партию.
Технические блокировки операторов вынуждают внедрять запасные маршруты. Зеркала удерживают абсолютную производительность базового платформы, охватывая летопись сделок и игровой продвижение.
Инновационные расчетные инструменты поддерживают быстрые взносы через электронные портмоне. Bitcoin, Ethereum и стейблкоины гарантируют анонимность и минимальные комиссии. Период выполнения выводов доходит 10-30 минут.
Программы приверженности подразумевают ступенчатые ранги с накапливающимся возвратом. VIP-кураторы дают личные бонусы, расширенные рамки и приоритетную обслуживание.
https://sertralineusa.shop/# generic zoloft
Беттинговая ниша представляет быстрый подъём, заинтересовывая тысячи игроков. Грамотные сайты дают защищённую пространство для беттинга. Исчерпывающую информацию о данных организациях возможно получить на Меллстрой зеркало .
Аттестация является основным показателем выбора сайта. Юрисдикции Гибралтара предоставляют тщательный надзор денежных действий. Конкретная официальная ресурс подвергается периодические проверки RNG-алгоритмов.
IT параметры передовых казино включают SSL-кодирование финансового категории. Разработчики компьютерного обеспечения вроде Microgaming, NetEnt, Pragmatic Play добавляют сложные модели произвольных чисел.
Процедура верификации профиля предполагает подачи свидетельств KYC-стандарта. ID, свидетельство о доходах, удостоверение прописки — типичный список для финального доступа.
Альтернативные адреса ликвидируют сложности с ограничениями компаний. Свежие варианты изменяются ежедневно программными группами. Портативные клиенты зачастую функционируют качественнее веб редакций.
Управление банкроллом определяет длительную успешность игровых партий. Квалифицированные игроки рекомендуют ограничивать размер пари до 1-2% от суммарного капитала.
Актуальные платформы беттинг услуг гарантируют игрокам доступ к профессиональному игровому процессу через проверенные Клубника платформы. Лицензированная бизнес требует выполнения четких надзорных норм.
Процедура активации клиентского учетной записи содержит валидацию приватных информации. Управляющие задействуют углубленные системы KYC и AML для недопущения поддельных транзакций.
Электронные решения передовых развлекательных порталов основываются на надежных хостингах с шифровальными технологиями. Локальные запреты принуждает провайдеров внедрять вспомогательные домены.
Альтернативные домены представляют точные репликации базового платформы с обеспечением всех инструментов и показателей. Пользователи обеспечивают себе постоянный соединение к счету, развлекательной истории и индивидуальным установкам.
Финансовые процедуры проходят через интегрированные денежные шлюзы. Ограничения на инвестиции и изъятия устанавливаются в гармонии с лицензионными стандартами и внутренними политиками минимизации опасностей.
Экспертные клиенты рекомендуют анализировать положение авторизации через регуляторные базы данных игорных организаций. Престижные критерии предусматривают рейтинги на экспертных ресурсах и оценки действительных участников.
塔尔萨之王第二季高清完整版采用机器学习个性化推荐,海外华人可免费观看最新热播剧集。
Современные бетторы оказываются с проблемой входа к лицензированным платформам. Компании фильтруют главные порталы, но грамотные Рльдорадо казино посетители помнят о существовании резервных площадок.
Резервная ссылка представляет стопроцентную отображение первичного площадки. Системы безопасности остаются идентичными. Денежные переводы производятся через аналогичные системы.
Алгоритм оформления профиля через параллельный ссылку включает классической проверки. Администраторы требуют свидетельства для реализации KYC-правил. Паспортные информация осуществляют многоуровневую аутентификацию.
Финансовые пределы на альтернативных порталах идентичны основным спецификациям. Низшие суммы сохраняются стабильными. Растущие банки согласовываются между множественными порталами.
Поощрительные планы функционируют завершённо на резервных сайтах. Отыгрышный коэффициент поддерживает первоначальные показатели. Период действия оборота продолжается.
Команда помощи обрабатывает вопросы с параллельных ресурсов аналогично. Онлайн переписка гарантирует 24-часовой режим функционирования.
I know this web site provides quality depending articles or reviews and
additional data, is there any other web site
which offers these kinds of information in quality?
Актуальные платформы развлекательных продуктов предлагают игрокам вход к профессиональному развлечениям через надежные Меллстрой РІС…РѕРґ сайты. Официальная работа влечет исполнения жестких законодательных критериев.
Механизм активации пользовательского кабинета содержит проверку персональных данных. Регуляторы задействуют расширенные алгоритмы KYC и AML для предотвращения фродовых операций.
Программные решения новейших игорных домов функционируют на зашифрованных облачных системах с HTTPS протоколами. Региональная блокировка вынуждает провайдеров организовывать параллельные ссылки.
Параллельные порталы формируют эквивалентные клоны базового сайта с обеспечением всех опций и сведений. Игроки приобретают стабильный подключение к депозиту, игровой записям и пользовательским настройкам.
Банковские переводы осуществляются через интегрированные платежные системы. Ограничения на взносы и изъятия назначаются в унисон с правовыми стандартами и собственными правилами контроля угроз.
Опытные беттеры предлагают анализировать условия лицензии через официальные списки развлекательных организаций. Репутационные характеристики предусматривают рейтинги на тематических сервисах и feedback истинных беттеров.
Навигация в области легальных платформ включает владения новых решений доступа. Квалифицированные клиенты задействуют Меллстрой официальный сайт для добывания релевантной материалов о оперативных доменах.
Процедура создания аккаунта в надежных учреждениях включает детальную проверку. Современные поставщики применяют KYC-системы и AML-критерии. Документальное сопровождение составляет от 24 до 72 интервалов.
Компьютерные решения для преодоления блокировок улучшаются параллельно с повышением нормативных действий. VPN-решения уровня premium предоставляют безопасность AES-256 и системы OpenVPN. Непрерывность соединения жизненно важна для премиальных партий.
Альтернативные домены работают через локально распределенные технические мощности. CDN-архитектуры предоставляют низкую латентность для американских пользователей. Цифровое роутинг активируется при распознавании блокировки базового адреса.
Экономические транзакции в сертифицированных территориях подпадают под четким правилам PCI DSS. Криптовалютные операции завоевывают востребованность вследствие конфиденциальности и быстроте обработки.
Смартфонные приложения элитных провайдеров содержат отпечатковую проверку и push-оповещения для важных ситуаций. Гибкий дизайн независимо адаптируется под характеристики матрицы.
walmart pharmacy online pharmacy https://maps.google.cg/url?sa=t&url=https%3A%2F%2Fcanmeds.top candan pharmacy no precription drug
Передовые сервисы беттинг активностей обеспечивают игрокам вход к премиальному азарту через защищенные п»ї1хбет сайт платформы. Сертифицированная работа подразумевает следования конкретных правовых стандартов.
Механизм открытия пользовательского профиля содержит подтверждение конфиденциальных показателей. Управляющие внедряют углубленные алгоритмы KYC и AML для блокировки незаконных транзакций.
Цифровые средства актуальных казино строятся на надежных инфраструктурах с HTTPS стандартами. Геоблокировка обязывает провайдеров внедрять резервные домены.
Резервные платформы являют собой эквивалентные клоны центрального ресурса с удержанием всех функций и данных. Беттеры добиваются стабильный подключение к счету, развлекательной отчетности и личным установкам.
Расчетные процедуры проходят через синхронизированные финансовые процессоры. Рамки на вклады и выводы регулируются в соотношении с законодательными стандартами и собственными нормами минимизации опасностей.
Компетентные гемблеры рекомендуют мониторить ситуацию лицензии через контролирующие каталоги развлекательных структур. Престижные характеристики задействуют оценки на профильных платформах и отзывы действительных игроков.
Новейшие бетторы встречаются с сложностью входа к сертифицированным порталам. Компании фильтруют базовые адреса, но профессиональные Килограмм регистрация клиенты помнят о функционировании зеркальных порталов.
Дополнительный домен представляет абсолютную отображение базового портала. Криптографические алгоритмы функционируют равнозначными. Денежные процедуры выполняются через те же механизмы.
Методика заведения учётной записи через альтернативный портал предполагает типовой валидации. Менеджеры уточняют справки для соблюдения KYC-стандартов. Персональные характеристики подвергаются двухфакторную аутентификацию.
Депозитные пределы на зеркальных платформах совпадают главным требованиям. Стартовые суммы поддерживаются неизменными. Возрастающие призовые фонды объединяются между многочисленными ресурсами.
Бонусные механизмы функционируют всесторонне на резервных платформах. Отыгрышный коэффициент поддерживает стартовые значения. Срок активности использования продолжается.
Служба обслуживания решает заявки с параллельных ссылок идентично. Прямой общение гарантирует постоянный расписание деятельности.
paymenthub.shop – Smooth checkout, and all the product info was very clear, helping me purchase quickly.
Азартная отрасль представляет динамичный подъём, завлекая массы игроков. Грамотные сайты предоставляют качественную условия для пари. Полную материалы о данных организациях допустимо отыскать на Лаки Бир сайт .
Сертификация выступает основным критерием определения портала. Контролёры Кюрасао гарантируют жёсткий надзор финансовых операций. Каждая сертифицированная портал проходит постоянные ревизии RNG-генераторов.
Компьютерные свойства передовых казино объединяют SSL-криптографию экономического категории. Провайдеры цифрового материала вроде Microgaming, NetEnt, Pragmatic Play внедряют продвинутые алгоритмы хаотичных значений.
Механизм верификации учётной записи предусматривает предоставления бумаг KYC-класса. ID, подтверждение о прибылях, подтверждение местожительства — классический пакет для финального активации.
Резервные URL исправляют сложности с запретами компаний. Рабочие зеркала обновляются каждый день техническими отделами. Портативные программы регулярно выполняются устойчивее онлайн модификаций.
Банкролл-менеджмент задаёт стратегическую результативность игровых циклов. Квалифицированные геймеры указывают контролировать сумму вейджера до 1-2% от итогового фонда.
промокод на ставку 1хбет
Легальные площадки игровых предложений предоставляют пользователям право к высококлассному развлечениям через dedicated платформы, включая тип топ казино , которые точно исполняют transnational стандарты конфиденциальности.
Последовательность создания аккаунта necessita внесения идентификационных данных через защищённые SSL-протоколы. Администрация требуют official удостоверение правоспособности и локации нахождения для выполнения правовых стандартов.
Многоуровневая проверка выступает необходимым aspect современных механизмов security. Участники имеют SMS-пароли, push-уведомления или используют специальные приложения в стиле Google Authenticator.
Альтернативные адреса решают сложности региональных ограничений и DDoS-assault. По сути копии представляют аналогичные копии базового домена с сохранением инструментария и личных сведений.
Skilled клиенты призывают хранить актуальные списки действующих mirrors в bookmark обозревателя. Администрация передают сведения о свежих ссылках через электронную почту, Telegram-группы и смартфонные программы.
Финансовые транзакции через legal ресурсы secured криптографическими протоколами категории банковского segment. Получение капитала реализуется только на проверенные карты держателя аккаунта.
1xbet sign up promo code philippines
Night Narrative curated collection – Each find feels like part of a story, and the curation is excellent.
Кстати, если вы подбираете квартиру с видом для обустройства домашнего кинотеатра в 2026 году, загляните сюда.
Смотрите сами:
https://flat-360.ru/news/kak-vybrat-kvartiru-s-vidom-360-v-2026-godu-na-chto-smotret-chtoby-ne-progadat/
билеты на теплоход по москве-реке Любителям активного отдыха и ярких эмоций понравятся прогулки на теплоходах с дискотекой или живой музыкой. Представьте: вечерняя Москва, огни большого города отражаются в воде, а на борту звучат любимые мелодии, создавая неповторимую атмосферу праздника. Для тех, кто ценит гастрономические удовольствия, идеально подойдут теплоходы-рестораны, где изысканные блюда сочетаются с живописными видами.
https://hlsports.de/
Выбор безопасного betting портала в современных реалиях подразумевает тщательного анализа к лицензионному статусу. Опытные пользователи знают, что казино Лаки Бир содержит последнюю материалы о действующих площадках.
Процесс создания аккаунта в сертифицированных заведениях объединяет требуемую верификацию идентичности. KYC-правила гарантируют как площадку, так и участника от мошенничества. Временные рамки на перечисление капитала до завершения проверки – стандартная методика.
Технические ограничения на доступ к азартным сайтам обходятся через альтернативные URL. Рабочие отражения гарантируют абсолютную функциональность базового ресурса. Расчетные операции, интерактивный продвижение и привилегированные планы сохраняются постоянными.
Капитальная защищенность оценивается показателем используемых расчетных способов. SSL-кодирование, PCI DSS сертификация и многоуровневая аутентификация формируют защищенный периметр ограждения.
Интерактивная библиотека легальных сервисов предоставляет машины от известных создателей. RTP-параметры, колебания и алгоритмические схемы претерпевают независимую валидацию в одобренных центрах.
Схемы мотивации в достойных казино опираются на прозрачных условиях ставок. Вейджер x35-40 считается адекватным для спин-подарков, в то время как настольные игры включаются в калькуляцию с сниженным множителем.
codigo promocional 1xbet ecuador
Современные сервисы азартных игр предлагают пользователям возможность к элитному гемблингу через надежные Лаки Бир РІС…РѕРґ системы. Авторизованная функционирование влечет соблюдения конкретных правовых требований.
Процесс открытия персонального счета предусматривает аутентификацию конфиденциальных информации. Регуляторы используют многоуровневые механизмы KYC и AML для исключения мошеннических транзакций.
Технические системы инновационных гемблинг платформ работают на защищенных хостингах с SSL технологиями. Территориальные ограничения побуждает операторов организовывать альтернативные порталы.
Резервные домены составляют идентичные дубликаты центрального портала с сохранением всех возможностей и показателей. Пользователи добиваются стабильный подключение к счету, гемблинг записям и индивидуальным настройкам.
Расчетные действия осуществляются через встроенные банковские системы. Рамки на вклады и получения устанавливаются в согласии с лицензионными требованиями и индивидуальными политиками контроля угроз.
Квалифицированные игроки рекомендуют контролировать ситуацию лицензии через контролирующие реестры игорных организаций. Престижные параметры содержат оценки на отраслевых сервисах и feedback истинных клиентов.
Morning Moment home treasures – Browsing here feels calm and the selection is wonderfully refined.
海外华人必备的ifun官方认证平台,24小时不间断提供最新高清电影、电视剧,无广告观看体验。
Определение качественного азартного ресурса в нынешних условиях нуждается повышенного подхода к лицензионному статусу. Квалифицированные участники знают, что мад казино содержит современную факты о работающих операторах.
Алгоритм записи в сертифицированных заведениях охватывает необходимую верификацию удостоверения. KYC-процедуры гарантируют как оператора, так и клиента от обмана. Переходные пределы на перечисление капитала до закрытия проверки – привычная методика.
Технические препятствия на связь к betting площадкам решаются через альтернативные адреса. Функционирующие клоны обеспечивают всестороннюю производительность главного ресурса. Расчетные транзакции, игровой прогресс и наградные предложения функционируют неизменными.
Материальная гарантированность измеряется степенью задействованных финансовых инструментов. SSL-криптография, PCI DSS сертификация и дополнительная идентификация обеспечивают прочный щит обороны.
Геймплейная ассортимент легальных площадок содержит спины от лидирующих производителей. RTP-значения, дисперсия и расчетные системы испытывают нейтральную валидацию в авторизованных учреждениях.
Схемы лояльности в достойных казино строятся на понятных параметрах проигрыша. Вейджер x35-40 считается адекватным для автомат-привилегий, в то время как стандартные активности идут в калькуляцию с минимальным фактором.
проверить сайт казино водка бет vodkabet
Легальные провайдеры игровых опций предоставляют игрокам доступ к элитному гэмблингу через специализированные порталы, включая лова казино , которые именно следуют общепринятые стандарты безопасности.
Последовательность оформления профиля подразумевает внесения верификационных сведений через безопасные SSL-каналы. Операторы запрашивают нотариальное свидетельство правоспособности и адреса проживания для соблюдения законодательных норм.
Двухфакторная верификация является mandatory составляющей новейших механизмов безопасности. Пользователи получают SMS-шифры, push-оповещения или применяют targeted софт типа Google Authenticator.
Mirror порталы преодолевают проблемы локальных санкций и DDoS-атак. С технической точки зрения дубли образуют дублированные копии базового платформы с поддержанием features и пользовательских параметров.
Экспертные игроки предлагают поддерживать актуальные списки действующих копий в избранном браузера. Администрация отправляют обновления о современных адресах через мейл, Telegram-communities и телефонные приложения.
Платёжные процедуры через проверенные порталы гарантированы защитными технологиями стандарта банковского области. Extraction денег реализуется единственно на верифицированные карты обладателя учётной записи.
Навигация в сфере проверенных платформ требует представления новых способов авторизации. Профессиональные участники внедряют п»ї1xBet казино для приобретения актуальной данных о оперативных путях.
Механизм создания счета в лицензированных операторах предполагает комплексную верификацию. Продвинутые поставщики задействуют KYC-алгоритмы и AML-правила. Документооборот требует от 24 до 72 временных отрезков.
IT решения для преодоления препятствий совершенствуются одновременно с усилением законодательных решений. VPN-инструменты категории premium дают кодирование AES-256 и системы OpenVPN. Надежность подключения жизненно существенна для высокоролловых заходов.
Запасные ресурсы оперируют через пространственно размещенные цифровые мощности. CDN-комплексы поддерживают быструю латентность для азиатских клиентов. Техническое роутинг срабатывает при обнаружении ограничения базового ресурса.
Экономические переводы в лицензированных юрисдикциях следуют конкретным стандартам PCI DSS. Крипто переводы завоевывают распространение благодаря скрытности и динамике обработки.
Переносные клиенты элитных провайдеров совмещают лицевую идентификацию и push-уведомления для принципиальных событий. Адаптивный интерфейс программно подстраивается под параметры матрицы.
buy prednisone online
Рабочие mirror-ссылки официальных азартных клубов на Lucky Bear зеркало создают непрерывный соединение к гемблинг ресурсам. Схема зеркалирования создает полноценные реплики главного портала с консервацией всех опций.
Механизм оформления профиля через резервную ссылку полностью воспроизводит оригинальную бланк. Новые игроки заполняют рабочий email, генерируют безопасный ключ и устанавливают игровую финансовый инструмент.
Подтверждение учетной записи требует передачи бумаг в соответствии с KYC-регламенту. Копия водительских прав, доказательство адреса и платежные сведения контролируются системой программную верификацию в течение 24-72 временных единиц.
Вход верифицированных игроков реализуется через базовую окно с двухфакторной аутентификацией. Одноразовые пароли приходят на телефонный гаджет или email.
Инструменты финансового сектора через резервные ссылки включает топовые денежные платформы. Visa, Mastercard, виртуальные портмоне Skrill, Neteller, виртуальные монеты Bitcoin, Ethereum выполняются с минимальными платежами 0-3%.
Игровая каталог клонируется на сто процентов включая spinning games, карточные развлечения, live-ведущих и прогрессивы. RTP-параметры, изменчивость и условия отыгрыша поддерживаются идентичными.
Поощрительная схема действует схоже центральному домену. Welcome-пакеты, даровые прокруты, refund и VIP-курсы активируются программно при реализации заданных стандартов.
愛海外版,专为华人打造的高清视频官方认证平台,支持全球加速观看。
Excellent beat ! I would like to apprentice while you amend your web site,
how could i subscribe for a blog web site? The account aided
me a acceptable deal. I had been a little bit acquainted of this your broadcast offered bright clear
idea
Следующая страница водка бэт
Действующие резервные адреса надежных gaming-операторов на Лаки Бир РІС…РѕРґ дают постоянный соединение к развлекательным ресурсам. Принцип копирования строит эквивалентные реплики основного домена с поддержанием всех возможностей.
Система оформления профиля через дублирующий портал в точности воспроизводит оригинальную заявку. Начинающие пользователи вводят активный email, создают надежный пароль и выбирают рабочую денежную единицу.
Валидация учетной записи включает отправки удостоверений в соответствии с KYC-нормам. Фото водительских прав, подтверждение места жительства и банковские реквизиты проверяются через программную контроль в течение 24-72 часов.
Вход действующих геймеров происходит через классическую интерфейс с 2FA идентификацией. Разовые ключи приходят на мессенджер девайс или email.
Инструменты денежного компонента через mirror-сайты содержит топовые денежные системы. Visa, Mastercard, цифровые балансы Skrill, Neteller, блокчейн-токены Bitcoin, Ethereum выполняются с минимальными сборами 0-3%.
Игровая библиотека дублируется полностью включая машины, настольные забавы, live-хостов и максимальные награды. RTP-значения, изменчивость и проигрыш поддерживаются неизменными.
Промо схема действует подобно центральному ресурсу. Welcome-комплекты, бесплатные вращения, возврат средств и VIP-курсы инициируются алгоритмически при выполнении определенных условий.
Актуальные бетторы сталкиваются с сложностью связи к проверенным порталам. Операторы ограничивают первичные адреса, но опытные казино Lucky Bear посетители понимают о наличии дублирующих сайтов.
Зеркало образует идентичную копию базового платформы. Системы безопасности поддерживаются такими же. Денежные действия проходят через равнозначные механизмы.
Технология оформления профиля через резервный домен предполагает классической проверки. Сотрудники выясняют документы для соблюдения KYC-правил. Персональные данные выполняют усиленную валидацию.
Вносительные ограничения на резервных ресурсах аналогичны основным требованиям. Минимальные вклады продолжают стабильными. Растущие призовые фонды интегрируются между различными ресурсами.
Поощрительные планы действуют завершённо на альтернативных платформах. Вейджер гарантирует базовые параметры. Временные рамки оборота поддерживается.
Департамент ассистирования рассматривает вопросы с резервных доменов идентично. Интерактивный переписка осуществляет постоянный график деятельности.
Актуальные альтернативные домены официальных азартных клубов на Tippy казино дают постоянный соединение к геймерским порталам. Технология реплицирования создает аналогичные версии центрального сайта с сохранением всех опций.
Механизм оформления профиля через резервную ссылку на сто процентов дублирует базовую форму. Дебютные клиенты вводят активный email, создают надежный пароль и фиксируют рабочую денежную единицу.
Валидация счета содержит представления удостоверений опираясь на KYC-требованиям. Снимок ID-карты, валидация адреса и банковские параметры проверяются через машинную валидацию в течение 24-72 часов.
Подключение зарегистрированных клиентов осуществляется через стандартную форму с многоступенчатой аутентификацией. Разовые шифры поступают на сотовый аппарат или e-mail адрес.
Механизмы входящего модуля через дублирующие порталы включает востребованные платежные инструменты. Visa, Mastercard, электронные счета Skrill, Neteller, блокчейн-токены Bitcoin, Ethereum выполняются с сокращенными взносами 0-3%.
Гемблинг библиотека воспроизводится абсолютно включая машины, столовые геймплей, live-крупье и мегавыигрыши. RTP-показатели, изменчивость и ставочные требования сохраняются точными.
Промо политика оперирует похоже главному порталу. Welcome-бандлы, бесплатные вращения, денежный возврат и VIP-системы включаются программно при достижении фиксированных условий.
пояснения казино водка бет vodkabet
Перемещение в области сертифицированных сайтов включает понимания продвинутых инструментов доступа. Продвинутые игроки применяют [url=http://tuankiethotel.com/igrayte-v-onlaynkazino-laki-casino-zerkalo-sayta-dlya-rossii/]лаки Р±РёСЂ казино[/url] для получения релевантной сведений о работающих адресах.
Процесс регистрации профиля в надежных организациях подразумевает детальную подтверждение. Передовые организации задействуют KYC-механизмы и AML-стандарты. Документооборот потребляет от 24 до 72 периодов.
IT решения для избежания ограничений улучшаются параллельно с ужесточением правовых действий. VPN-инструменты типа premium гарантируют защиту AES-256 и системы OpenVPN. Устойчивость соединения кардинально актуальна для элитных игровых периодов.
Резервные ресурсы действуют через географически рассредоточенные серверные кластеры. CDN-структуры осуществляют оптимальную латентность для американских пользователей. Цифровое роутинг запускается при обнаружении препятствия основного сайта.
Платежные операции в лицензированных юрисдикциях подчиняются конкретным критериям PCI DSS. Децентрализованные операции приобретают распространение по причине скрытности и быстроте выполнения.
Планшетные утилиты топовых провайдеров совмещают голосовую идентификацию и push-уведомления для существенных событий. Адаптивный интерфейс программно изменяется под особенности дисплея.
промокод 1xbet бездепозитный бонус
zoloft tablet: zoloft buy – Sertraline USA
Рабочие mirror-ссылки надежных игорных заведений на Vavada casino предоставляют стабильный доступ к азартным ресурсам. Технология клонирования формирует точные версии центрального сайта с фиксацией всех инструментов.
Система оформления профиля через зеркало целиком воспроизводит стандартную шаблон. Свежие участники регистрируют действующий email, придумывают надежный код доступа и назначают основную валюту.
Валидация счета включает передачи удостоверений по KYC-стандартам. Изображение удостоверения личности, доказательство регистрации и финансовые координаты контролируются системой программную верификацию в течение 24-72 часов.
Авторизация верифицированных пользователей производится через классическую панель с 2FA проверкой. Временные шифры приходят на смс гаджет или email.
Возможности денежного раздела через mirror-сайты включает популярные финансовые платформы. Visa, Mastercard, онлайн счета Skrill, Neteller, криптовалюты Bitcoin, Ethereum обрабатываются с сокращенными сборами 0-3%.
Азартная каталог дублируется целиком включая spinning games, классические игры, live-хостов и максимальные награды. RTP-значения, волатильность и ставочные требования фиксируются идентичными.
Поощрительная механизм выполняется схоже главному сайту. Welcome-наборы, безвозмездные спины, кешбэк и VIP-системы активируются программно при достижении установленных условий.
Актуальные операторы игорных услуг гарантируют клиентам подключение к качественному беттингу через надежные Вавада сайт платформы. Лицензированная бизнес влечет следования определенных контролирующих норм.
Процедура открытия персонального счета задействует верификацию конфиденциальных сведений. Регуляторы используют детализированные процедуры KYC и AML для пресечения мошеннических финансовых действий.
Электронные платформы актуальных беттинг площадок базируются на защищенных инфраструктурах с шифровальными алгоритмами. Геоблокировка принуждает операторов разрабатывать параллельные домены.
Зеркальные сайты составляют точные репликации главного сайта с поддержанием всех опций и параметров. Игроки приобретают устойчивый доступ к капиталу, гемблинг истории и персональным установкам.
Банковские действия проходят через интегрированные расчетные процессоры. Лимиты на инвестиции и снятия устанавливаются в соотношении с регуляторными положениями и корпоративными нормами управления рисками.
Экспертные гемблеры рекомендуют отслеживать условия аккредитации через контролирующие каталоги беттинг комиссий. Авторитетные индикаторы охватывают оценки на экспертных сервисах и мнения истинных клиентов.
Отбор легального казино ресурса нуждается основательного исследования юридических бумаг. Современные системы винити казино предлагают игрокам стопроцентную детали о собственных разрешениях.
Механизм создания профиля предусматривает определенное количество ключевых этапов верификации. Операторы настаивают удостоверения, засвидетельствующие индивидуальность и совершеннолетие. Обычный KYC-регламент продолжается от 24 до 72 часов.
Распоряжение капиталом открывается с назначения рамок на взносы. Искусные игроки советуют эксплуатировать принцип 5% от полного азартного средств на индивидуальную сессию.
Цифровые ограничения администраторов вынуждают внедрять альтернативные домены. Клоны хранят стопроцентную работоспособность базового площадки, содержа журнал переводов и гемблинг прогресс.
Передовые банковские инструменты поддерживают быстрые пополнения через блокчейн кошельки. Bitcoin, Ethereum и фиксированные активы поддерживают конфиденциальность и мизерные комиссии. Продолжительность осуществления снятий доходит 10-30 отрезков.
Алгоритмы постоянства подразумевают ступенчатые статусы с увеличивающимся компенсацией. VIP-представители гарантируют уникальные вознаграждения, расширенные рамки и опережающую помощь.
Функционирующие дублирующие порталы лицензированных казино на Lucky Bear дают постоянный соединение к игровым платформам. Схема дублирования формирует полноценные версии корневого веб-площадки с сохранением всех возможностей.
Схема создания аккаунта через зеркало целиком копирует стандартную бланк. Начинающие клиенты вводят валидный email, генерируют стойкий пароль и назначают основную валюту.
Аутентификация профиля содержит отправки справок согласно KYC-требованиям. Снимок ID-карты, доказательство резиденции и денежные реквизиты подвергаются алгоритмическую валидацию в течение 24-72 временных единиц.
Аутентификация зарегистрированных клиентов происходит через обычную панель с многоступенчатой идентификацией. Разовые ключи доставляются на телефонный устройство или почтовый ящик.
Инструменты пополнительного раздела через альтернативные домены обеспечивает популярные финансовые инструменты. Visa, Mastercard, виртуальные балансы Skrill, Neteller, цифровые активы Bitcoin, Ethereum процессируются с низкими процентами 0-3%.
Gaming коллекция клонируется в точности включая автоматы, настольные развлечения, live-дилеров и прогрессивы. RTP-показатели, колебания и ставочные требования поддерживаются точными.
Подарочная схема работает подобно главному порталу. Welcome-наборы, бесплатные вращения, возврат средств и VIP-системы активируются программно при достижении заданных стандартов.
Нынешние участники обталкиваются с огромным количеством цифровых аспектов при деятельности с лицензированными порталами. Профильные ресурсы типа п»ї1хбет регистрация обеспечивают современную данные о процессах развлекательных компаний.
Процедура верификации счета предполагает набор требуемых фаз. Стартовая подтверждение подразумевает передачи документов подтверждающих персону. Классический комплект подразумевает документ, автоудостоверение или внешний паспорт.
Цифровая часть записления содержит использование защищенного протокола и двухуровневой проверки. Профессиональные пользователи настаивают инициировать весь комплекс имеющихся параметров безопасности.
Дублирующие порталы формируют полные отражения первичного портала с хранением всего арсенала. Главное выгода кроется в подобии расчетных ограничений и требований отыгрыша.
Схема выявления действующих зеркал базируется на отслеживании профессиональных мессенджер групп и связанных платформ. Продвинутые игроки используют прокси-соединения для создания бесперебойного подключения независимо от локальных ограничений.
Рабочие mirror-ссылки официальных гемблинг-платформ на tip top casino обеспечивают постоянный коннект к гемблинг порталам. Технология копирования создает аналогичные реплики центрального портала с поддержанием всех функций.
Алгоритм регистрации через альтернативный домен целиком имитирует стандартную бланк. Дебютные клиенты заполняют активный email, генерируют защищенный пароль и фиксируют операционную денежную единицу.
Валидация аккаунта подразумевает отправки документов следуя KYC-политике. Скан паспорта, подтверждение адреса и карточные реквизиты проходят алгоритмическую валидацию в течение 24-72 часа.
Логин активных клиентов производится через классическую форму с расширенной верификацией. Разовые пароли отправляются на мессенджер номер или электронную почту.
Опции денежного модуля через дублирующие порталы включает популярные денежные платформы. Visa, Mastercard, онлайн балансы Skrill, Neteller, виртуальные монеты Bitcoin, Ethereum обрабатываются с оптимизированными сборами 0-3%.
Gaming коллекция копируется на сто процентов включая машины, столовые забавы, live-операторов и джекпоты. RTP-значения, колебания и условия отыгрыша удерживаются неизменными.
Промо политика действует схоже основному ресурсу. Welcome-пакеты, даровые прокруты, компенсация и VIP-системы стартуют системно при реализации определенных критериев.
не открывается приложение втб http://www.vtb-ne-rabotaet.ru .
smart metric solutions shop – Excellent workmanship and consistently fair prices make it a standout choice.
Spooky Treasures – The eerie vibe and easy navigation made shopping enjoyable and quick.
сопровождение 1с предприятие 8 1s-soprovozhdenie.ru .
Выбор безопасного азартного оператора требует детального рассмотрения лицензионных сертификатов. Передовые порталы Vavada зеркало гарантируют игрокам максимальную факты о имеющихся аккредитациях.
Система оформления счета включает ряд требуемых фаз аутентификации. Владельцы запрашивают справки, засвидетельствующие идентичность и правоспособность. Обычный KYC-алгоритм продолжается от 24 до 72 часов.
Контроль средств начинается с задания лимитов на взносы. Квалифицированные игроки предлагают эксплуатировать правило 5% от итогового казино бюджета на отдельную игру.
Электронные ограничения операторов вынуждают внедрять альтернативные домены. Копии хранят максимальную активность базового ресурса, подразумевая летопись операций и игровой успех.
Актуальные платежные методы предоставляют оперативные инвестиции через виртуальные портмоне. Bitcoin, Ethereum и устойчивые монеты обеспечивают тайность и мизерные сборы. Продолжительность реализации извлечений насчитывает 10-30 промежутков.
Программы постоянства содержат градационные категории с возрастающим бонусом. VIP-консультанты предлагают личные бонусы, увеличенные ограничения и первоочередную техподдержку.
Проверенные платформы игровых услуг дают игрокам право к качественному развлечениям через специализированные ресурсы, включая Mellstroy Game , которые точно исполняют transnational регламенты надёжности.
Механизм регистрации necessita ввода идентификационных деталей через encrypted SSL-линии. Букмекеры запрашивают письменное доказательство правоспособности и адреса нахождения для соблюдения законодательных норм.
Multi-factor authentication выступает необходимым компонентом современных платформ защиты. Участники обретают SMS-шифры, push-notification или эксплуатируют профессиональные tools по типу Google Authenticator.
Зеркальные URL ликвидируют вопросы региональных барьеров и DDoS-нападений. С технической точки зрения реплики представляют дублированные реплики центрального платформы с поддержанием features и пользовательских деталей.
Skilled геймеры предлагают удерживать новейшие списки working зеркал в bookmark браузера. Администрация отправляют updates о современных порталах через e-mail, Telegram-communities и телефонные apps.
Платёжные транзакции через официальные ресурсы защищены защитными алгоритмами level банковского сектора. Получение капитала выполняется лишь на верифицированные wallets собственника личного кабинета.
trezviy-vibor https://www.xn--100-8cdkei4fpmv.xn--p1ai/vyvod-iz-zapoya-v-volgograde/ .
электрокарниз от производителя сочетает в себе современный дизайн и безупречную функциональность, обеспечивая плавное открывание и закрывание штор с помощью пульта или смартфона.
Выбирая электрокарниз, важно учитывать размер окна и вес используемых штор.
Pixel Parade curated collection – Fun and artistic items with a smooth, pleasant shopping experience.
Нынешние пользователи пересекаются с набором системных аспектов при функционировании с сертифицированными платформами. Профильные источники типа казино РјСЌРґ выдают релевантную материалы о функционировании казино провайдеров.
Алгоритм подтверждения кабинета предполагает набор принудительных фаз. Начальная аутентификация нуждается загрузки документов подтверждающих личность. Классический пакет предполагает удостоверение личности, автоудостоверение или международное ID.
Системная компонента оформления содержит внедрение зашифрованного канала и двухуровневой проверки. Профессиональные геймеры подсказывают инициировать весь комплекс доступных функций обеспечения.
Запасные домены образуют абсолютные реплики первичного ресурса с удержанием всего возможностей. Центральное преимущество состоит в подобии денежных лимитов и параметров вейджера.
Схема локализации актуальных запасных доменов фундируется на мониторинге профильных информационных каналов и союзных порталов. Опытные клиенты применяют анонимайзеры для создания постоянного подключения вне зависимости от территориальных блокировок.
кликните сюда водка бэт
Исследование в секторе проверенных сайтов включает владения современных способов соединения. Опытные участники задействуют friends casino для обретения релевантной данных о работающих адресах.
Процесс формирования аккаунта в сертифицированных заведениях содержит сложную валидацию. Передовые провайдеры применяют KYC-алгоритмы и AML-нормы. Документальная процедура требует от 24 до 72 временных отрезков.
Компьютерные технологии для преодоления препятствий прогрессируют синхронно с повышением нормативных действий. VPN-инструменты класса premium дают шифрование AES-256 и стандарты OpenVPN. Стабильность соединения fundamentally важна для привилегированных игровых периодов.
Зеркальные адреса работают через пространственно распределенные серверные инфраструктуры. CDN-структуры обеспечивают низкую латентность для международных геймеров. Цифровое редирект инициируется при детекции барьера первичного портала.
Банковские переводы в легальных территориях подчиняются определенным правилам PCI DSS. Децентрализованные переводы получают востребованность благодаря скрытности и быстроте выполнения.
Планшетные программы лучших операторов объединяют биометрическую авторизацию и push-уведомления для принципиальных происшествий. Адаптивный интерфейс независимо подстраивается под особенности экрана.
перейдите на этот сайт казино водка бет vodkabet
Актуальные mirror-ссылки проверенных игорных заведений на казино 1xBet дают стабильный вход к азартным ресурсам. Система реплицирования создает полноценные клоны главного сайта с удержанием всех механизмов.
Алгоритм регистрации через дублирующий портал полностью копирует стандартную бланк. Свежие участники прописывают действующий email, формируют надежный код доступа и определяют операционную валюту.
Валидация счета требует передачи документов согласно KYC-нормам. Изображение удостоверения личности, свидетельство адреса и денежные сведения контролируются системой программную проверку в течение 24-72 часов.
Логин активных геймеров производится через базовую интерфейс с 2FA верификацией. Разовые пароли поступают на смс девайс или email.
Инструменты денежного раздела через mirror-сайты обеспечивает топовые платежные инструменты. Visa, Mastercard, веб портмоне Skrill, Neteller, блокчейн-токены Bitcoin, Ethereum процессируются с сокращенными процентами 0-3%.
Азартная коллекция копируется целиком включая машины, классические забавы, live-крупье и прогрессивы. RTP-значения, вариативность и проигрыш удерживаются точными.
Акционная политика работает аналогично базовому порталу. Welcome-пакеты, безвозмездные спины, компенсация и VIP-курсы активируются автоматически при исполнении установленных стандартов.
https://ivertherapeutics.com/# Iver Therapeutics
codigo promocional 1xbet 2026
Новейшие клиенты обталкиваются с изобилием системных деталей при деятельности с официальными площадками. Профессиональные источники типа п»ї1хбет сайт предоставляют новую данные о функционировании развлекательных операторов.
Механизм подтверждения аккаунта включает несколько принудительных шагов. Базовая аутентификация требует размещения свидетельств удостоверяющих субъект. Привычный перечень включает документ, автолицензию или международный паспорт.
Системная составляющая создания аккаунта включает применение зашифрованного канала и двойной авторизации. Экспертные игроки рекомендуют запускать максимум имеющихся настроек обеспечения.
Резервные ссылки образуют идентичные копии центрального портала с сохранением комплексного инструментария. Главное преимущество содержится в соответствии платежных пределов и норм условий прокрутки.
Механизм локализации активных запасных доменов основывается на проверке тематических мессенджер групп и аффилированных сайтов. Профессиональные клиенты задействуют прокси-соединения для предоставления бесперебойного подключения безотносительно от локальных ограничений.
гостиная Дети заслуживают яркой, функциональной мебели для счастливого детства.
Pakistan Pulse top stories – Consistently intriguing articles that are a pleasure to read.
Explore Boat Life Bazaar – The store has a focused vibe and the items are thoughtfully curated.
как подобрать одежду женщине Как выбрать одежду: советы. Слушайте интуицию, доверяйте профессионалам и не бойтесь экспериментировать, тогда ваш гардероб будет отражать вашу индивидуальность.
Исследование в области лицензированных площадок требует знания передовых решений соединения. Опытные пользователи задействуют казино Vavada для добывания новейшей материалов о оперативных путях.
Алгоритм формирования личного кабинета в сертифицированных учреждениях предполагает тщательную аутентификацию. Новейшие поставщики применяют KYC-системы и AML-правила. Бумажная работа составляет от 24 до 72 промежутков.
Компьютерные способы для прохождения запретов эволюционируют сообща с интенсификацией регуляторных решений. VPN-решения категории premium гарантируют шифрование AES-256 и системы OpenVPN. Непрерывность соединения кардинально значима для VIP партий.
Дублирующие домены оперируют через пространственно распределенные технические инфраструктуры. CDN-структуры поддерживают быструю пинг для глобальных геймеров. Системное роутинг запускается при обнаружении ограничения базового адреса.
Банковские операции в официальных зонах подчиняются конкретным нормам PCI DSS. Цифровые расчеты получают популярность благодаря приватности и быстроте осуществления.
Планшетные программы лучших провайдеров включают физиологическую идентификацию и push-алерты для важных эпизодов. Изменяемый оформление программно адаптируется под характеристики панели.
Новейшие бетторы натыкаются с проблемой подключения к официальным ресурсам. Организации блокируют главные ссылки, но профессиональные Меллстрой официальный сайт посетители понимают о присутствии зеркальных порталов.
Дополнительный домен образует точную воспроизведение основного платформы. Криптографические алгоритмы работают такими же. Финансовые действия реализуются через сходные каналы.
Технология открытия счёта через зеркальный домен требует типовой верификации. Менеджеры уточняют удостоверения для выполнения KYC-требований. Личные характеристики выполняют усиленную проверку.
Депозитные границы на альтернативных площадках аналогичны основным спецификациям. Начальные суммы сохраняются стабильными. Накопительные накопления согласовываются между разными доменами.
Льготные планы функционируют комплексно на резервных платформах. Отыгрышный коэффициент поддерживает первоначальные цифры. Тайминг отыгрыша не изменяется.
Команда помощи обрабатывает тикеты с зеркальных порталов идентично. Интерактивный общение поддерживает беспрерывный порядок деятельности.
Нынешние пользователи имеют дело с набором системных деталей при работе с сертифицированными сайтами. Специализированные порталы типа mad casino зеркало выдают релевантную материалы о функционировании развлекательных брендов.
Механизм проверки кабинета включает ряд неотъемлемых этапов. Базовая аутентификация нуждается передачи бумаг подтверждающих субъект. Классический комплект содержит ID, лицензию водителя или международный паспорт.
Системная составляющая открытия счета включает эксплуатацию защищенного протокола и двухуровневой проверки. Квалифицированные игроки предлагают запускать весь комплекс предложенных параметров охраны.
Зеркала являются точные копии основного платформы с поддержанием тотального набора функций. Центральное выгода выражается в подобии расчетных ограничений и требований ставочных требований.
Схема локализации функционирующих альтернативных адресов строится на контроле профессиональных телеграм-каналов и сотрудничающих площадок. Квалифицированные клиенты применяют VPN-сервисы для предоставления постоянного соединения безотносительно от территориальных запретов.
на этом сайте зеркало водка бет
Передовые пользователи обталкиваются с огромным количеством программных деталей при деятельности с официальными площадками. Экспертные источники типа казино Голд предоставляют актуальную данные о функционировании казино провайдеров.
Механизм подтверждения профиля охватывает набор обязательных уровней. Стартовая проверка подразумевает загрузки бумаг валидирующих персону. Стандартный комплект содержит паспорт, автоудостоверение или международный паспорт.
Техническая элемент записления содержит задействование защищенного протокола и многофакторной защиты. Продвинутые игроки предлагают запускать все возможных опций охраны.
Зеркала являются стопроцентные копии базового сайта с сохранением тотального арсенала. Главное плюс содержится в схожести банковских границ и условий вейджера.
Механизм выявления функционирующих дублирующих порталов базируется на мониторинге специализированных информационных каналов и аффилированных ресурсов. Квалифицированные игроки внедряют прокси-соединения для формирования надежного связи независимо от территориальных барьеров.
Выбор проверенного гемблинг портала нуждается основательного исследования лицензионных документов. Инновационные ресурсы Lucky Bear casino обеспечивают геймерам полную факты о своих санкциях.
Процесс создания профиля подразумевает определенное количество требуемых ступеней проверки. Операторы просят документы, удостоверяющие персону и зрелость. Обычный KYC-регламент длится от 24 до 72 временных отрезков.
Распоряжение капиталом открывается с фиксации пределов на инвестиции. Профессиональные пользователи настаивают внедрять правило 5% от итогового развлекательного фонда на отдельную партию.
Цифровые блокировки поставщиков вынуждают эксплуатировать альтернативные пути. Копии оберегают безусловную функциональность основного сайта, содержа летопись транзакций и развлекательный результаты.
Современные банковские способы поддерживают скоростные инвестиции через цифровые счета. Bitcoin, Ethereum и фиксированные активы поддерживают скрытность и минимальные сборы. Период выполнения изъятий равно 10-30 периодов.
Планы приверженности включают иерархические уровни с нарастающим кэшбэком. VIP-кураторы предоставляют личные бонусы, улучшенные границы и первоочередную сервис.
Официальные ресурсы игровых предложений предоставляют пользователям доступ к качественному времяпрепровождению через целевые порталы, включая Лаки Бир сайт , которые точно выполняют мировые регламенты защиты.
Механизм регистрации necessita ввода идентификационных деталей через encrypted SSL-соединения. Операторы demanded официальное доказательство возраста и места проживания для исполнения нормативных критериев.
Двухфакторная authentication выступает необходимым компонентом новейших механизмов конфиденциальности. Участники получают SMS-коды, push-оповещения или используют специализированные tools по типу Google Authenticator.
Зеркальные адреса решают сложности локальных запретов и DDoS-assault. С технической точки зрения копии образуют аналогичные реплики главного ресурса с сохранением опций и пользовательских сведений.
Компетентные клиенты suggest сохранять current базы рабочих mirrors в сохранённых ссылках браузера. Администрация направляют информацию о свежих адресах через электронную почту, Telegram-чаты и телефонные утилиты.
Денежные movements через лицензионные порталы покрыты cryptographic протоколами стандарта банковского направления. Extraction фондов реализуется solely на верифицированные счета владельца личного кабинета.
Immerse yourself in a plot that is thick with intrigue. This book is a must-have for thriller enthusiasts. You can easily find the PDF online. Read it to discover the shocking reality behind a marriage that looked perfect from the outside. https://myhusbandswifepdf.top/ My Husband’s Wife Full Text
Fine way of explaining, and good piece of writing to get facts about my presentation subject, which i am going to deliver in institution of higher education.
Immerse yourself in the plot of this bestseller with the digital file. The PDF of It Should Have Been You is ready for you. It should have been you turning the pages. Download the ebook today and enjoy. https://itshouldhavebeenyoupdf.top/ It Should Have Been You Pdf
Best online casino Australia real money app – mobile gaming
Online casino real money pokies Australia – win real cash now
Актуальные зеркала лицензированных азартных клубов на казино Голд обеспечивают беспрерывный коннект к азартным ресурсам. Схема дублирования формирует точные дубликаты центрального портала с поддержанием всех опций.
Система оформления профиля через альтернативный домен целиком воспроизводит стандартную анкету. Свежие клиенты вводят действующий email, создают надежный пароль и выбирают операционную платежное средство.
Подтверждение учетной записи предполагает предоставления свидетельств в соответствии с KYC-требованиям. Снимок ID-карты, свидетельство регистрации и денежные реквизиты анализируются посредством автоматическую проверку в течение 24-72 временных единиц.
Аутентификация верифицированных участников реализуется через базовую окно с 2FA верификацией. Одноразовые коды приходят на мобильный аппарат или email.
Возможности финансового модуля через дублирующие порталы предлагает востребованные платежные платформы. Visa, Mastercard, веб кошельки Skrill, Neteller, криптовалюты Bitcoin, Ethereum обрабатываются с оптимизированными комиссиями 0-3%.
Развлекательная база дублируется целиком включая слоты, столовые игры, live-крупье и прогрессивы. RTP-параметры, колебания и проигрыш остаются аналогичными.
Подарочная схема оперирует аналогично базовому порталу. Welcome-бандлы, безвозмездные спины, возврат средств и VIP-схемы инициируются алгоритмически при выполнении прописанных требований.
Visit Backlink Bazaar Online – Helpful platform for enhancing link-building strategies efficiently.
Niche Patch picks – The range of products is solid and order fulfillment was quick.
Гемблинговая сфера представляет стремительный развитие, манящая тысячи игроков. Экспертные площадки обеспечивают стабильную пространство для развлечений. Исчерпывающую данные о этих провайдерах допустимо изучить на типпи казино .
Аккредитация составляет главным фактором отбора платформы. Лицензиаты Гибралтара гарантируют серьёзный аудит денежных транзакций. Отдельная лицензированная сайт осуществляет периодические проверки RNG-алгоритмов.
Цифровые параметры новейших казино предусматривают SSL-криптографию банковского ранга. Создатели программного софта класса Microgaming, NetEnt, Pragmatic Play внедряют сложные модели произвольных параметров.
Процесс подтверждения учётной записи подразумевает направления свидетельств KYC-класса. ID, выписка о финансах, валидация прописки — обычный набор для завершённого авторизации.
Дублирующие домены решают трудности с блокировками компаний. Функционирующие дубли обновляются систематически цифровыми службами. Портативные клиенты нередко работают качественнее веб версий.
Контроль средств формирует длительную результативность беттинговых циклов. Грамотные пользователи указывают сокращать размер депозита до 1-2% от итогового резерва.
Перемещение в мире проверенных площадок предполагает представления современных технологий входа. Профессиональные геймеры применяют Lucky Bear для извлечения свежей материалов о оперативных URL.
Процесс регистрации аккаунта в сертифицированных организациях содержит многоуровневую подтверждение. Передовые операторы эксплуатируют KYC-протоколы и AML-правила. Документальное сопровождение отнимает от 24 до 72 временных отрезков.
IT инструменты для минования запретов совершенствуются вместе с повышением законодательных инициатив. VPN-службы разряда premium предлагают безопасность AES-256 и стандарты OpenVPN. Постоянство канала кардинально значима для VIP игровых периодов.
Дублирующие домены действуют через территориально разнесенные технические системы. CDN-структуры обеспечивают сокращенную задержку для глобальных клиентов. Техническое роутинг запускается при выявлении препятствия основного портала.
Экономические операции в лицензированных регионах следуют жестким нормам PCI DSS. Криптовалютные расчеты набирают признание из-за приватности и темпу осуществления.
Переносные софт лучших операторов содержат отпечатковую идентификацию и push-оповещения для существенных моментов. Модифицируемый дизайн автоматически изменяется под параметры монитора.
愛壹帆海外版,专为华人打造的高清视频平台采用机器学习个性化推荐,支持全球加速观看。
Азартная ниша показывает интенсивный рост, заинтересовывая множество клиентов. Грамотные ресурсы предлагают надёжную пространство для игры. Подробную факты о данных операторах доступно изучить на Вавада .
Легализация представляет ключевым критерием селекции портала. Юрисдикции Кюрасао создают жёсткий мониторинг финансовых транзакций. Каждая легальная портал проходит регулярные проверки RNG-алгоритмов.
Цифровые параметры передовых гемблинг-сайтов охватывают SSL-шифрование расчётного уровня. Создатели программного обеспечения типа Microgaming, NetEnt, Pragmatic Play подключают продвинутые алгоритмы рандомных величин.
Процесс подтверждения профиля требует предоставления удостоверений KYC-формата. Паспорт, свидетельство о прибылях, валидация местожительства — типичный комплект для полноценного подключения.
Резервные домены решают проблемы с запретами организаций. Свежие копии изменяются каждый день компьютерными службами. Смартфонные приложения регулярно функционируют стабильнее веб редакций.
Финансовая дисциплина создаёт длительную эффективность азартных сессий. Грамотные игроки рекомендуют контролировать величину депозита до 1-2% от полного бюджета.
внедрение erp цена 1с внедрение erp цена 1с .
Moonlit trend store – Found some awesome products and moved through pages effortlessly.
海外华人必备的ifun官方认证平台,24小时不间断提供最新高清电影、电视剧,无广告观看体验。
Chocolate Room Official – Lovely selection with appealing displays that make browsing enjoyable.
best online pharmacy without prescription
Надёжные платформы игорных возможностей дают участникам вариант к качественному развлечениям через специализированные платформы, включая Меллстрой регистрация , которые именно соблюдают мировые критерии надёжности.
Последовательность открытия счёта necessita заполнения идентификационных данных через encrypted SSL-connection. Провайдеры просят письменное verification age verification и региона проживания для исполнения legal требований.
Multi-factor проверка представляет mandatory составляющей новейших механизмов надёжности. Клиенты обретают SMS-шифры, push-notification или применяют специализированные приложения вроде Google Authenticator.
Резервные адреса устраняют трудности географических запретов и DDoS-атак. Технически mirrors образуют копийные dublicates центрального ресурса с сохранением инструментария и user данных.
Экспертные клиенты рекомендуют хранить новейшие списки функционирующих mirrors в bookmark browser. Провайдеры доставляют новости о актуальных адресах через мейл, Telegram-каналы и смартфонные утилиты.
Payment процедуры через проверенные ресурсы гарантированы защитными алгоритмами стандарта банковского сектора. Вывод капитала реализуется только на подтверждённые реквизиты собственника личного кабинета.
Cyber Cabin World Online – Fun theme and clear navigation made exploring very easy.
Азартная область представляет активный подъём, привлекая миллионы участников. Квалифицированные сайты гарантируют стабильную обстановку для беттинга. Исчерпывающую данные о данных провайдерах можно обнаружить на Вавада казино .
Аттестация остаётся центральным фактором подбора платформы. Надзорные органы Мальты предоставляют строгий контроль валютных процедур. Любая легальная площадка реализует плановые контроли RNG-систем.
Технические параметры инновационных казино содержат SSL-кодирование экономического категории. Разработчики компьютерного продукта вроде Microgaming, NetEnt, Pragmatic Play интегрируют продвинутые механизмы непредсказуемых чисел.
Механизм верификации аккаунта включает подачи свидетельств KYC-уровня. Удостоверение, выписка о средствах, доказательство проживания — классический пакет для финального авторизации.
Альтернативные URL устраняют проблемы с ограничениями операторов. Актуальные дубли изменяются систематически программными группами. Смартфонные клиенты часто действуют устойчивее онлайн форматов.
Банкролл-менеджмент определяет стратегическую результативность беттинговых партий. Профессиональные игроки рекомендуют ограничивать размер бета до 1-2% от суммарного бюджета.
zoloft buy: sertraline generic – zoloft buy
Выбор качественного игрового заведения в нынешних обстоятельствах предполагает особого внимания к регулятивному уровню. Знающие пользователи знают, что СЌРЅРѕРјРѕ казино содержит новую сведения о действующих площадках.
Алгоритм открытия счета в проверенных заведениях объединяет принудительную верификацию личности. KYC-стандарты охраняют как заведение, так и клиента от афер. Краткосрочные границы на изъятие денег до финализации верификации – стандартная система.
Электронные запреты на вход к betting ресурсам решаются через зеркальные ссылки. Действующие клоны обеспечивают полную производительность первичного платформы. Финансовые движения, геймплейный результаты и наградные планы остаются устойчивыми.
Финансовая гарантированность измеряется качеством внедренных денежных механизмов. SSL-безопасность, PCI DSS подтверждение и двухфакторная идентификация устанавливают стабильный щит безопасности.
Развлекательная каталог официальных площадок охватывает барабаны от ведущих производителей. RTP-показатели, дисперсия и математические системы получают объективную сертификацию в одобренных лабораториях.
Схемы мотивации в достойных заведениях формируются на понятных критериях отыгрыша. Проигрыш x35-40 признается справедливым для автомат-бонусов, в то время как настольные забавы принимаются в зачет с минимальным фактором.
Актуальные игроки встречаются с огромным количеством программных нюансов при операциях с сертифицированными ресурсами. Экспертные платформы типа ДживиСпин казино предоставляют актуальную сведения о процессах развлекательных операторов.
Система валидации счета включает ряд требуемых стадий. Стартовая валидация подразумевает предоставления справок валидирующих персону. Обычный перечень охватывает паспорт, права или заграничное удостоверение.
Технологическая компонента открытия счета содержит применение криптографической защиты и 2FA. Опытные клиенты советуют включать максимум имеющихся возможностей секьюрити.
Дублирующие порталы образуют абсолютные копии базового платформы с обеспечением всего функционала. Ключевое плюс состоит в соответствии платежных пределов и условий условий прокрутки.
Система поиска рабочих дублирующих порталов фундируется на отслеживании экспертных уведомительных сервисов и партнерских платформ. Продвинутые клиенты используют анонимайзеры для обеспечения устойчивого доступа без оглядки от региональных блокировок.
超人和露易斯第二季高清完整官方版,海外华人可免费观看最新热播剧集。
Гемблинговая область являет стремительный расширение, заинтересовывая множество участников. Грамотные платформы гарантируют безопасную обстановку для ставок. Подробную данные о указанных брендах допустимо изучить на Меллстрой сайт .
Аккредитация выступает приоритетным показателем определения площадки. Лицензиаты Гибралтара гарантируют строгий мониторинг валютных операций. Всякая аккредитованная портал подвергается регулярные проверки RNG-генераторов.
Компьютерные свойства новейших азартных площадок объединяют SSL-шифрование банковского класса. Производители виртуального софта наподобие Microgaming, NetEnt, Pragmatic Play добавляют сложные алгоритмы рандомных параметров.
Процедура верификации учётной записи предполагает направления свидетельств KYC-формата. Паспорт, подтверждение о средствах, верификация проживания — базовый комплект для окончательного активации.
Альтернативные ссылки ликвидируют сложности с фильтрацией провайдеров. Рабочие варианты изменяются каждый день компьютерными отделами. Планшетные утилиты нередко оперируют стабильнее веб редакций.
Финансовая дисциплина задаёт перспективную прибыльность игровых раундов. Квалифицированные геймеры указывают ограничивать величину ставки до 1-2% от общего банкролла.
Современные платформы азартных развлечений обеспечивают игрокам вход к качественному беттингу через надежные Vavada ресурсы. Лицензированная деятельность нуждается выполнения строгих контролирующих критериев.
Механизм активации индивидуального счета задействует аутентификацию личных данных. Провайдеры эксплуатируют детализированные механизмы KYC и AML для недопущения поддельных операций.
Цифровые системы передовых игорных домов функционируют на безопасных дата-центрах с HTTPS протоколами. Локальные запреты вынуждает операторов запускать параллельные порталы.
Резервные порталы формируют точные дубликаты центрального домена с обеспечением всех сервисов и информации. Участники достигают устойчивый вход к счету, гемблинг отчетности и пользовательским параметрам.
Банковские операции реализуются через интегрированные расчетные сервисы. Границы на взносы и обналичивания фиксируются в согласии с нормативными стандартами и корпоративными регламентами риск-менеджмента.
Профессиональные клиенты указывают мониторить состояние разрешения через официальные списки гемблинг ведомств. Репутационные показатели содержат места на тематических ресурсах и комментарии подлинных игроков.
constantly i used to read smaller posts which as well clear their motive, and that is also happening with this post which I am reading at this place.
Wow, this paragraph is good, my younger sister is analyzing these kinds of things,
therefore I am going to let know her.
海外华人必备的ify平台运用AI智能推荐算法,提供最新高清电影、电视剧,无广告观看体验。
愛海外版,專為華人打造的高清視頻平台運用AI智能推薦演算法,支持全球加速觀看。
Развлекательная ниша демонстрирует стремительный развитие, притягивая тысячи игроков. Экспертные порталы обеспечивают надёжную среду для игры. Исчерпывающую факты о указанных организациях возможно получить на lucky bear казино онлайн скачать .
Сертификация остаётся приоритетным элементом выбора портала. Надзорные органы Гибралтара гарантируют жёсткий контроль денежных действий. Конкретная лицензированная платформа выполняет систематические контроли RNG-систем.
IT параметры инновационных беттинг-платформ содержат SSL-кодирование финансового стандарта. Создатели компьютерного ПО типа Microgaming, NetEnt, Pragmatic Play добавляют усовершенствованные системы непредсказуемых показателей.
Алгоритм верификации аккаунта предполагает направления справок KYC-класса. Паспорт, подтверждение о средствах, подтверждение адреса — базовый набор для финального активации.
Параллельные домены решают проблемы с блокировками провайдеров. Актуальные варианты изменяются каждый день IT группами. Мобильные утилиты обычно оперируют устойчивее сетевых модификаций.
Распределение капитала определяет длительную успешность игровых периодов. Грамотные геймеры настаивают контролировать количество ставки до 1-2% от общего банкролла.
Поиск в пространстве лицензированных платформ нуждается осознания современных методов подключения. Умелые пользователи эксплуатируют лаки Р±РёСЂ для получения релевантной данных о оперативных URL.
Механизм оформления личного кабинета в лицензированных операторах предполагает сложную аутентификацию. Актуальные организации задействуют KYC-алгоритмы и AML-требования. Документооборот требует от 24 до 72 временных отрезков.
IT инструменты для преодоления ограничений улучшаются параллельно с усилением юридических мер. VPN-платформы разряда premium предоставляют кодирование AES-256 и протоколы OpenVPN. Надежность коннекта fundamentally важна для привилегированных заходов.
Запасные платформы работают через территориально рассредоточенные IT кластеры. CDN-архитектуры обеспечивают низкую латентность для международных геймеров. Системное перенаправление включается при выявлении недоступности основного сайта.
Экономические манипуляции в лицензированных областях подпадают под конкретным правилам PCI DSS. Криптовалютные платежи увеличивают признание благодаря конфиденциальности и темпу осуществления.
Портативные утилиты элитных провайдеров включают голосовую проверку и push-уведомления для существенных ситуаций. Адаптивный облик автоматически адаптируется под свойства экрана.
Modern Purair
416 Meridian Ꮢd SE #14A, Calgary
AB T2Α 1X2, Canada
(403) 800-7254
insured pro
Смотреть здесь казино водка бет vodkabet
заказ пиццы Заказ пиццы – это не просто покупка, это ритуал наслаждения, доступный каждому.
paginas de apuestas csgo
Smart GenRx USA: Smart GenRx USA – Smart GenRx USA
FunnelFoundry Pro Hub – Easy navigation and helpful descriptions make checking items enjoyable.
Гемблинговая ниша показывает быстрый рост, привлекая массы участников. Профессиональные платформы гарантируют защищённую обстановку для пари. Детальную материалы о указанных операторах возможно обнаружить на mad casino .
Аттестация составляет ключевым фактором определения платформы. Лицензиаты Мальты дают строгий контроль валютных процедур. Любая сертифицированная ресурс осуществляет систематические аудиты RNG-модулей.
Технические свойства актуальных игорных домов включают SSL-безопасность расчётного уровня. Поставщики софтового продукта уровня Microgaming, NetEnt, Pragmatic Play добавляют комплексные модели случайных значений.
Процедура верификации профиля подразумевает предоставления документов KYC-типа. ID, свидетельство о финансах, удостоверение проживания — классический список для завершённого доступа.
Параллельные порталы решают проблемы с цензурой поставщиков. Действующие копии обновляются регулярно IT специалистами. Портативные софт регулярно выполняются стабильнее интернет вариантов.
Управление банкроллом определяет стратегическую прибыльность беттинговых раундов. Опытные пользователи рекомендуют лимитировать размер вейджера до 1-2% от суммарного банкролла.
Maverick Maker Studio – Unique selections and user-friendly organization simplify your shopping journey.
заказать pizza Тест для пиццы – это фундамент, от которого зависит успех всего блюда. Правильно замешанное тесто для пиццы должно быть эластичным, ароматным и отлично держать форму.
DrBoost Lab – Product details are clear and navigating the site was simple and smooth.
Подбор проверенного азартного оператора в современных рамках заставляет особого подхода к лицензионному положению. Компетентные игроки понимают, что лаки Р±РёСЂ казино демонстрирует последнюю информацию о доступных операторах.
Процедура записи в легальных заведениях содержит требуемую аутентификацию удостоверения. KYC-правила охраняют как казино, так и игрока от махинаций. Краткосрочные пределы на снятие средств до выполнения контроля – привычная система.
Цифровые запреты на связь к гемблинг порталам решаются через альтернативные URL. Доступные отражения предоставляют абсолютную возможности базового ресурса. Финансовые процедуры, геймплейный достижения и льготные программы остаются постоянными.
Финансовая защищенность оценивается критерием внедренных финансовых систем. SSL-шифрование, PCI DSS сертификация и расширенная проверка обеспечивают прочный щит охраны.
Интерактивная каталог проверенных заведений охватывает барабаны от лидирующих создателей. RTP-параметры, волатильность и вероятностные формулы получают беспристрастную проверку в одобренных институтах.
Системы мотивации в качественных заведениях базируются на ясных требованиях ставок. Вейджер x35-40 характеризуется адекватным для барабан-бонусов, в то время как традиционные состязания засчитываются в подсчет с пониженным множителем.
Browse Quality Chargers – I appreciate the concise details and the smooth user experience.
здесь vodkabet
Навигация в мире официальных порталов включает владения новых инструментов соединения. Квалифицированные геймеры применяют френдс казино для получения актуальной данных о оперативных ссылках.
Алгоритм оформления профиля в проверенных компаниях предполагает многоуровневую аутентификацию. Современные провайдеры внедряют KYC-системы и AML-стандарты. Документальная процедура потребляет от 24 до 72 промежутков.
Компьютерные методы для избежания препятствий прогрессируют сообща с повышением законодательных действий. VPN-сервисы категории premium дают кодирование AES-256 и методы OpenVPN. Стабильность коннекта критически значима для привилегированных сессий.
Запасные домены оперируют через географически разнесенные технические инфраструктуры. CDN-архитектуры осуществляют оптимальную латентность для международных клиентов. Системное роутинг срабатывает при обнаружении препятствия главного ресурса.
Финансовые переводы в лицензированных регионах подпадают под четким критериям PCI DSS. Децентрализованные расчеты приобретают популярность благодаря секретности и скорости осуществления.
Смартфонные утилиты элитных провайдеров включают лицевую подтверждение и push-уведомления для принципиальных моментов. Модифицируемый внешний вид автономно корректируется под свойства матрицы.
https://sertralineusa.com/# zoloft buy
Подбор достойного азартного оператора в текущих границах предполагает повышенного изучения к законному уровню. Квалифицированные пользователи представляют, что казино Вован включает новую материалы о доступных провайдерах.
Схема открытия счета в лицензированных платформах объединяет принудительную верификацию удостоверения. KYC-нормы защищают как оператора, так и игрока от фрода. Кратковременные лимиты на вывод денег до выполнения подтверждения – типичная методика.
Программные ограничения на подключение к игровым порталам нейтрализуются через дублирующие домены. Действующие зеркала поддерживают абсолютную эффективность основного ресурса. Расчетные движения, геймплейный продвижение и привилегированные программы сохраняются неизменными.
Финансовая защищенность оценивается качеством задействованных финансовых механизмов. SSL-кодирование, PCI DSS подтверждение и расширенная подтверждение обеспечивают прочный барьер ограждения.
Игровая коллекция сертифицированных сервисов предоставляет машины от топовых создателей. RTP-индексы, изменчивость и математические модели испытывают нейтральную валидацию в одобренных учреждениях.
Схемы поощрения в качественных операторах базируются на понятных условиях проигрыша. Проигрыш x35-40 расценивается нормальным для слот-бонусов, в то время как стандартные активности засчитываются в расчет с уменьшенным процентом.
Между прочим, если вас интересует стайлинг автомобилей под образы из культовых фильмов 2026 года, посмотрите сюда.
Вот, можете почитать:
https://obves63.ru/news/tyuning-i-obvesy-dlya-lada-vesta-kak-sdelat-mashinu-stilnoj-i-moshhnoj-v-2026-godu/
ifvod平台,专为海外华人设计,提供高清视频和直播服务。
电影网站推荐,采用机器学习个性化推荐,海外华人专用,采用机器学习个性化推荐,支持中英双语界面和全球加速。
For alternatives
best online gambling sites mobile
for statistical data.
Neuro Relief USA Neuro Relief USA neurontin discount
Лицензионные провайдеры игорных возможностей гарантируют пользователям доступ к профессиональному развлечениям через целевые домены, включая Клубника казино , которые выполняют transnational критерии security.
Механизм оформления профиля требует ввода проверочных деталей через безопасные SSL-линии. Букмекеры demanded письменное удостоверение age verification и территории residence для compliance нормативных требований.
Двухэтапная идентификация становится необходимым частью передовых механизмов security. Участники имеют SMS-шифры, push-оповещения или применяют специализированные tools вроде Google Authenticator.
Резервные URL устраняют препятствия региональных барьеров и DDoS-нападений. Технически реплики представляют аналогичные версии primary домена с обеспечением опций и клиентских сведений.
Компетентные участники советуют хранить новейшие списки рабочих копий в favourites веб-клиента. Операторы направляют updates о свежих ссылках через мейл, Telegram-communities и портативные apps.
Банковские операции через официальные сайты покрыты encryption технологиями level банковского индустрии. Extraction финансов производится лишь на validated реквизиты держателя учётной записи.
Передовые участники встречаются с множеством системных тонкостей при деятельности с сертифицированными сайтами. Тематические сайты типа Килограмм казино предоставляют свежую сведения о функционировании гэмблинговых провайдеров.
Процедура подтверждения кабинета предполагает несколько принудительных фаз. Начальная аутентификация подразумевает загрузки бумаг подтверждающих личность. Стандартный пакет подразумевает ID, права или международное ID.
Программная составляющая записления содержит использование зашифрованного канала и многофакторной защиты. Профессиональные игроки подсказывают инициировать весь комплекс предложенных опций безопасности.
Дублирующие порталы являются идентичные реплики основного домена с поддержанием всего функционала. Ключевое достоинство содержится в соответствии платежных границ и норм проигрыша.
Процедура выявления функционирующих резервных ссылок строится на контроле экспертных информационных каналов и связанных порталов. Профессиональные участники внедряют анонимайзеры для гарантирования устойчивого соединения безотносительно от местных блокировок.
meta data tools outlet – Comprehensive choices and fast ordering simplify the process.
Hormone Help Select – User-friendly pages and clear product info make shopping stress-free.
Современный электрокарнизы для штор цена обеспечивает удобство управления шторами с помощью пульта или смартфона.
Установка электрокарнизов производится на потолок или стену, а управление возможно с помощью пульта, телефона или голосовых ассистентов.
узнать больше водка бэт
Актуальные сервисы азартных продуктов предоставляют участникам подключение к премиальному гемблингу через надежные Голд системы. Лицензированная работа предполагает соблюдения жестких законодательных норм.
Система регистрации клиентского учетной записи содержит аутентификацию личных показателей. Регуляторы используют детализированные протоколы KYC и AML для недопущения поддельных транзакций.
IT инструменты передовых беттинг площадок основываются на надежных хостингах с криптографическими технологиями. Геоблокировка обязывает владельцев организовывать альтернативные URL.
Резервные сайты являют собой эквивалентные копии базового домена с фиксацией всех функций и показателей. Участники получают устойчивый доступ к средствам, беттинг истории и клиентским настройкам.
Банковские процедуры выполняются через синхронизированные банковские процессоры. Ограничения на взносы и снятия фиксируются в соответствии с лицензионными требованиями и корпоративными процедурами минимизации опасностей.
Компетентные беттеры настаивают отслеживать условия разрешения через регуляторные реестры гемблинг структур. Имиджевые характеристики содержат оценки на специализированных сайтах и отзывы настоящих клиентов.
Исследование в секторе сертифицированных платформ предполагает понимания новых технологий подключения. Опытные геймеры используют миллион казино для извлечения свежей данных о активных URL.
Процесс формирования аккаунта в надежных организациях охватывает сложную проверку. Передовые провайдеры эксплуатируют KYC-протоколы и AML-требования. Документальное сопровождение потребляет от 24 до 72 часов.
Цифровые решения для обхода барьеров эволюционируют сообща с интенсификацией регуляторных решений. VPN-инструменты класса premium гарантируют безопасность AES-256 и протоколы OpenVPN. Надежность подключения fundamentally значима для высокоролловых игровых периодов.
Резервные адреса выполняют задачи через локально размещенные компьютерные мощности. CDN-комплексы гарантируют сокращенную время ответа для глобальных игроков. Цифровое перенаправление срабатывает при идентификации ограничения базового домена.
Экономические движения в лицензированных зонах подчиняются конкретным правилам PCI DSS. Криптовалютные переводы увеличивают распространение вследствие конфиденциальности и скорости выполнения.
Переносные приложения премиальных брендов совмещают отпечатковую подтверждение и push-извещения для принципиальных событий. Гибкий облик программно изменяется под параметры панели.
Billing Bay Official – Clear layout made navigating and finding information very easy today.
пояснения vodkabet
powerliftlair.shop – Organized categories and clear descriptions make shopping effortless and simple.
Выбор достойного betting площадки в актуальных границах нуждается повышенного рассмотрения к регулятивному положению. Квалифицированные клиенты осознают, что mad casino зеркало предоставляет актуальную данные о функционирующих операторах.
Схема оформления профиля в сертифицированных платформах предусматривает неизбежную подтверждение персональных данных. KYC-правила охраняют как оператора, так и игрока от обмана. Промежуточные рамки на изъятие средств до завершения подтверждения – нормальная система.
Цифровые ограничения на вход к развлекательным сервисам преодолеваются через зеркальные ссылки. Доступные дубликаты поддерживают тотальную возможности базового платформы. Банковские переводы, азартный прогресс и поощрительные планы сохраняются константными.
Финансовая гарантированность выражается показателем задействованных платежных методов. SSL-защита, PCI DSS сертификация и усиленная подтверждение обеспечивают защищенный периметр охраны.
Интерактивная ассортимент официальных площадок предоставляет автоматы от топовых студий. RTP-параметры, волатильность и математические модели претерпевают нейтральную валидацию в аккредитованных учреждениях.
Механизмы поощрения в достойных заведениях базируются на четких критериях ставок. Отыгрыш x35-40 признается справедливым для машина-подарков, в то время как настольные активности засчитываются в счет с уменьшенным фактором.
Рабочие дублирующие порталы надежных игорных заведений на лаки Р±РёСЂ казино предоставляют постоянный вход к геймерским ресурсам. Принцип зеркалирования строит аналогичные версии главного веб-площадки с удержанием всех возможностей.
Процедура регистрации через дублирующий портал на сто процентов копирует оригинальную бланк. Начинающие клиенты прописывают действующий email, устанавливают сложный пароль и фиксируют операционную денежную единицу.
Подтверждение учетной записи подразумевает передачи бумаг по KYC-требованиям. Изображение паспорта, верификация резиденции и платежные реквизиты контролируются системой цифровую проверку в течение 24-72 часов.
Вход действующих клиентов происходит через классическую форму с 2FA аутентификацией. Сессионные ключи доставляются на сотовый девайс или почтовый ящик.
Инструменты финансового модуля через альтернативные домены поддерживает актуальные платежные механизмы. Visa, Mastercard, электронные кошельки Skrill, Neteller, crypto Bitcoin, Ethereum осуществляются с низкими сборами 0-3%.
Игровая ассортимент клонируется абсолютно включая барабаны, классические развлечения, live-хостов и максимальные награды. RTP-показатели, вариативность и вейджер фиксируются такими же.
Промо схема функционирует идентично главному домену. Welcome-бандлы, free spins, возврат средств и VIP-системы стартуют автоматически при выполнении фиксированных условий.
buy prednisone
prescription drugs without the prescription https://images.google.ch/url?sa=t&url=https%3A%2F%2Fcanmeds.top pharmacies online prescriptions
Award Atelier Specials – Minimalist design and functionality come together for a smooth experience.
Excelforge Pro – Well-structured pages and clear product details made browsing simple.
Поиск безопасного гемблинг ресурса нуждается детального исследования юридических разрешений. Современные сайты Голд казино гарантируют пользователям максимальную данные о текущих лицензиях.
Механизм оформления счета содержит определенное количество требуемых этапов аутентификации. Администраторы запрашивают удостоверения, засвидетельствующие идентичность и возраст. Традиционный KYC-регламент требует от 24 до 72 часов.
Контроль средств стартует с фиксации ограничений на взносы. Опытные игроки призывают эксплуатировать закон 5% от итогового развлекательного средств на конкретную заход.
Электронные препятствия поставщиков заставляют использовать запасные адреса. Дубликаты удерживают полную функциональность базового ресурса, охватывая летопись переводов и азартный результаты.
Новые финансовые способы гарантируют моментальные вклады через виртуальные портмоне. Bitcoin, Ethereum и стейблкоины обеспечивают тайность и минимальные сборы. Длительность обработки выводов достигает 10-30 периодов.
Планы верности охватывают многоуровневые степени с прогрессивным бонусом. VIP-менеджеры обеспечивают эксклюзивные поощрения, улучшенные лимиты и приоритетную сервис.
Проверенные платформы развлекательных сервисов гарантируют пользователям вариант к качественному игровому процессу через тематические платформы, включая казино Болливуд , которые точно соблюдают глобальные требования надёжности.
Последовательность создания аккаунта включает указания authentication данных через шифрованные SSL-соединения. Провайдеры просят предоставить нотариальное свидетельство age verification и адреса нахождения для исполнения legal требований.
Двухфакторная идентификация считается mandatory элементом новейших систем конфиденциальности. Пользователи располагают SMS-коды, push-уведомления или используют специальные утилиты наподобие Google Authenticator.
Зеркальные ссылки преодолевают сложности региональных блокировок и DDoS-нападений. С технической точки зрения mirrors образуют дублированные реплики primary домена с обеспечением возможностей и пользовательских сведений.
Опытные клиенты рекомендуют сохранять новейшие базы функционирующих копий в favourites браузера. Операторы рассылают обновления о свежих порталах через почтовые сервисы, Telegram-группы и mobile утилиты.
Платёжные операции через официальные порталы гарантированы защитными methods категории банковского направления. Extraction фондов выполняется solely на подтверждённые wallets владельца профиля.
Product Tracker – Very easy to track items, with a layout that’s simple to use.
другие vodka bet casino
iyf.tv海外华人首选,提供最新华语剧集、美剧、日剧等高清在线观看。
Действующие зеркала легальных гемблинг-платформ на аква сайт предоставляют непрерывный коннект к игровым системам. Методика зеркалирования образует эквивалентные дубликаты корневого сайта с сохранением всех опций.
Схема регистрации через резервную ссылку абсолютно повторяет основную заявку. Начинающие участники заполняют рабочий email, формируют сложный секретную комбинацию и выбирают рабочую валюту.
Идентификация аккаунта включает представления документов следуя KYC-стандартам. Копия паспорта, подтверждение резиденции и банковские данные контролируются системой цифровую верификацию в течение 24-72 ч.
Логин существующих участников выполняется через обычную форму с двухфакторной проверкой. Краткосрочные шифры поступают на сотовый аппарат или электронную почту.
Механизмы денежного раздела через дублирующие порталы обеспечивает популярные расчетные механизмы. Visa, Mastercard, виртуальные хранилища Skrill, Neteller, виртуальные монеты Bitcoin, Ethereum осуществляются с уменьшенными сборами 0-3%.
Игровая каталог клонируется на сто процентов включая машины, настольные забавы, live-ведущих и накопительные призы. RTP-показатели, дисперсия и вейджер удерживаются такими же.
Подарочная политика работает аналогично базовому сайту. Welcome-предложения, фриспины, компенсация и VIP-схемы включаются системно при исполнении фиксированных параметров.
Shop Checkout Champ Picks – Very user-friendly interface and smooth checkout made things effortless.
Новейшие участники встречаются с сложностью соединения к официальным платформам. Провайдеры фильтруют главные URL, но грамотные Вован казино игроки знают о доступности дублирующих сайтов.
Дополнительный домен образует идентичную копию главного ресурса. SSL-сертификаты сохраняются идентичными. Денежные операции реализуются через сходные сервисы.
Методика регистрации через альтернативный ресурс требует типовой проверки. Администраторы выясняют бумаги для осуществления KYC-стандартов. Личные параметры осуществляют усиленную проверку.
Финансовые лимиты на резервных площадках идентичны основным спецификациям. Минимальные суммы продолжают стабильными. Растущие банки синхронизируются между всеми порталами.
Стимулирующие системы работают завершённо на альтернативных сайтах. Множитель ставок сохраняет оригинальные параметры. Временные рамки использования поддерживается.
Сервис поддержки обрабатывает запросы с дополнительных порталов таким же способом. Интерактивный чат предоставляет постоянный формат обслуживания.
When I initially commented I seem to have clicked the -Notify me when new comments
are added- checkbox and now whenever a comment is added I recieve four
emails with the same comment. Perhaps there is an easy method you are
able to remove me from that service? Cheers!
Cut & Sew Hub – Great craftsmanship and the site navigation made browsing effortless.
Neuro Relief USA: neurontin cap 300mg price – buy generic neurontin
https://neuroreliefusa.shop/# Neuro Relief USA
Рейтинг магазинов укрепления семьи
Лицензионные платформы развлекательных предложений обеспечивают геймерам право к премиальному азартному досугу через тематические платформы, включая типпи казино , что придерживаются глобальные нормы надёжности.
Последовательность оформления профиля подразумевает указания идентификационных данных через шифрованные SSL-протоколы. Менеджмент просят официальное подтверждение совершеннолетия и территории residence для соблюдения legal стандартов.
Multi-factor аутентификация считается принудительным частью современных механизмов безопасности. Users приобретают SMS-токены, push-сообщения или используют специализированные tools типа Google Authenticator.
Зеркальные ссылки ликвидируют проблемы territorial санкций и DDoS-assault. По сути дубли составляют идентичные клоны primary портала с сохранением функциональности и личных параметров.
Экспертные клиенты предлагают сохранять новейшие каталоги рабочих альтернатив в favourites веб-клиента. Management доставляют новости о свежих доменах через email, Telegram-communities и портативные утилиты.
Payment операции через надёжные сайты secured защитными протоколами категории банковского направления. Extraction денег происходит лишь на проверенные карты обладателя аккаунта.
neurontin 300mg capsule: neurontin buy from canada – Neuro Relief USA
Передовые игроки сталкиваются с набором технических нюансов при работе с проверенными порталами. Специализированные платформы типа лаки Р±РёСЂ казино официальный сайт предоставляют свежую информацию о работе развлекательных организаций.
Система валидации учетной записи включает комплекс неотъемлемых этапов. Начальная аутентификация требует предоставления бумаг доказывающих личность. Типовой комплект включает паспорт, права или международный паспорт.
Техническая сторона регистрации предполагает внедрение зашифрованного канала и двойной авторизации. Квалифицированные клиенты рекомендуют активировать совокупность доступных возможностей секьюрити.
Запасные домены являются идентичные клоны центрального портала с сохранением всего набора функций. Основное плюс заключается в тождественности платежных пределов и требований ставочных требований.
Схема обнаружения функционирующих зеркал базируется на мониторинге экспертных мессенджер групп и союзных площадок. Продвинутые пользователи используют анонимайзеры для предоставления надежного доступа вне зависимости от местных блокировок.
To obtain
can i get generic zetia without dr prescription
for viable solutions.
Visit MarinerMerchant Today – Logical layout and smooth browsing keep your nautical shopping stress-free.
FreightFriendly Hub – Easy-to-navigate layout and clear product details make browsing simple.
DomainWard Central – Smooth navigation and well-organized tools made browsing straightforward.
внедрение 1с услуги 1s-vnedrenie.ru .
Нынешние участники натыкаются с затруднением связи к проверенным платформам. Поставщики ограничивают базовые адреса, но опытные казино Килограмм игроки осознают о функционировании резервных сайтов.
Зеркало составляет точную воспроизведение главного платформы. Системы безопасности остаются равнозначными. Платёжные процедуры выполняются через те же шлюзы.
Методика регистрации через альтернативный портал предполагает типовой валидации. Специалисты просят бумаги для соблюдения KYC-регламентов. Индивидуальные сведения осуществляют многоуровневую подтверждение.
Депозитные ограничения на зеркальных платформах совпадают первичным условиям. Низшие взносы продолжают стабильными. Возрастающие призовые фонды интегрируются между различными ресурсами.
Стимулирующие программы действуют полноценно на параллельных площадках. Требования по обороту обеспечивает оригинальные величины. Временные рамки оборота продолжается.
Департамент поддержки обрабатывает запросы с зеркальных порталов таким же способом. Интерактивный чат поддерживает беспрерывный режим функционирования.
Нынешние геймеры попадают с препятствием подключения к проверенным площадкам. Организации блокируют первичные ссылки, но искушённые лова игроки понимают о наличии зеркальных площадок.
Зеркало образует точную реплику первичного платформы. Системы безопасности поддерживаются такими же. Расчётные транзакции проходят через идентичные каналы.
Процедура заведения учётной записи через резервный домен содержит типовой аутентификации. Операторы просят свидетельства для реализации KYC-регламентов. Паспортные информация осуществляют усиленную проверку.
Финансовые пределы на зеркальных площадках совпадают базовым условиям. Наименьшие беты продолжают неизменными. Увеличивающиеся призовые фонды синхронизируются между разными ресурсами.
Бонусные системы оперируют комплексно на дополнительных сайтах. Требования по обороту удерживает базовые величины. Период действия использования не изменяется.
Отдел сопровождения анализирует вопросы с зеркальных ссылок аналогично. Живой чат поддерживает постоянный режим оперирования.
пицца цена “Пицца Куба Первомайский проспект, 11 отзывы” – узнайте, что думают наши гости.
Официальные операторы игорных предложений oferuja клиентам вариант к премиальному времяпрепровождению через целевые ресурсы, включая [url=https://serabusiness.com/igrayte-v-onlaynkazino-madcasino-zerkalo-dlya-igrokov-iz-rossiyskoy-federatsii/]mad casino[/url] , которые именно соблюдают transnational стандарты security.
Процедура оформления профиля включает внесения идентификационных параметров через безопасные SSL-каналы. Операторы просят предоставить нотариальное подтверждение правоспособности и места проживания для соблюдения законодательных стандартов.
Двухэтапная проверка представляет необходимым элементом передовых архитектур надёжности. Клиенты имеют SMS-шифры, push-уведомления или используют специальные приложения типа Google Authenticator.
Дублирующие URL устраняют проблемы territorial запретов и DDoS-атак. Технически копии формируют копийные версии центрального платформы с обеспечением features и пользовательских информации.
Профессиональные пользователи советуют сохранять свежие реестры активных копий в избранном веб-клиента. Провайдеры отправляют сведения о современных доменах через мейл, Telegram-каналы и смартфонные приложения.
Финансовые movements через проверенные площадки обеспечены encryption технологиями уровня банковского сектора. Extraction фондов осуществляется solely на верифицированные счета держателя аккаунта.
Легальные платформы азартных предложений предоставляют клиентам шанс к качественному игровому процессу через тематические платформы, включая Gold казино , которые точно соблюдают общепринятые стандарты security.
Процедура оформления профиля подразумевает указания идентификационных деталей через безопасные SSL-соединения. Менеджмент требуют нотариальное verification правоспособности и региона регистрации для compliance юрисдикционных критериев.
Двухэтапная идентификация является необходимым составляющей современных solutions надёжности. Users обретают SMS-коды, push-уведомления или внедряют targeted утилиты наподобие Google Authenticator.
Mirror домены нейтрализуют вопросы географических барьеров и DDoS-воздействий. Техническим образом mirrors образуют тождественные реплики базового портала с сохранением опций и пользовательских информации.
Экспертные участники предлагают удерживать новейшие реестры действующих копий в избранном интернет-программы. Букмекеры отправляют сведения о новых доменах через мейл, Telegram-сообщества и телефонные софт.
Payment movements через лицензионные порталы гарантированы криптографическими methods категории банковского segment. Вывод фондов производится лишь на подтверждённые wallets обладателя личного кабинета.
Проверенные ресурсы азартных услуг предоставляют геймерам шанс к качественному развлечениям через тематические домены, включая казино типпи , что исполняют общепринятые регламенты конфиденциальности.
Последовательность открытия счёта предполагает внесения идентификационных данных через безопасные SSL-connection. Провайдеры требуют нотариальное удостоверение дееспособности и локации регистрации для соблюдения законодательных критериев.
Многоуровневая аутентификация является обязательным компонентом актуальных платформ надёжности. Users обретают SMS-шифры, push-уведомления или используют профессиональные приложения в стиле Google Authenticator.
Альтернативные домены нейтрализуют проблемы региональных барьеров и DDoS-атак. Фактически дубли являют дублированные реплики primary портала с сохранением инструментария и личных сведений.
Skilled пользователи рекомендуют удерживать current каталоги активных mirrors в favourites веб-клиента. Администрация направляют updates о новых адресах через email, Telegram-чаты и смартфонные утилиты.
Payment процедуры через legal платформы гарантированы encryption methods класса банковского segment. Изъятие финансов производится solely на проверенные данные собственника профиля.
premium men’s wardrobe shop – Quality apparel and clear categories make it easy to find the right fit.
Легальные провайдеры игорных возможностей дают пользователям доступ к качественному развлечениям через целевые платформы, включая Голд казино , которые точно исполняют общепринятые регламенты конфиденциальности.
Схема регистрации предполагает предоставления проверочных данных через криптографические SSL-линии. Менеджмент требуют документальное подтверждение возраста и места регистрации для поддержания нормативных критериев.
Двухфакторная authentication представляет mandatory составляющей современных solutions security. Участники приобретают SMS-коды, push-уведомления или внедряют специальные программы по типу Google Authenticator.
Mirror порталы преодолевают проблемы региональных блокировок и DDoS-атак. С технической точки зрения дубли формируют дублированные копии центрального ресурса с поддержанием опций и пользовательских сведений.
Экспертные пользователи предлагают поддерживать current базы рабочих копий в favourites браузера. Администрация направляют информацию о новых ссылках через email, Telegram-сообщества и смартфонные apps.
Денежные переводы через надёжные порталы защищены шифровальными системами класса банковского индустрии. Вывод денег производится solely на аутентифицированные счета держателя account.
Best online casino Australia 2025 – crypto friendly and mobile ready
Harbor Hardware Select – Effortless navigation and clear product info make exploring items simple.
pin-up sms kodu http://www.pinup21680.help
Event Essentials Depot – Clear product descriptions and neat layout make browsing very easy.
lockerhub.shop – Well-structured pages and clear descriptions make it easy to find what you need.
Visit Big Cheque Boutique Online – Pricing feels reasonable and the product info really helps when deciding.
Выбор надежного казино площадки нуждается детального разбора правовых документов. Актуальные платформы РЎСѓРєР° казино предоставляют геймерам полную детали о текущих санкциях.
Механизм создания профиля предусматривает несколько требуемых фаз аутентификации. Представители просят справки, доказывающие самобытность и зрелость. Стандартный KYC-механизм требует от 24 до 72 интервалов.
Финансовое планирование начинается с установления ограничений на пополнения. Опытные игроки рекомендуют применять установку 5% от итогового гемблинг резерва на индивидуальную сессию.
Электронные барьеры администраторов вынуждают использовать резервные маршруты. Дубликаты поддерживают стопроцентную эффективность базового ресурса, предусматривая хронологию платежей и казино успех.
Актуальные расчетные сервисы гарантируют моментальные взносы через электронные аккаунты. Bitcoin, Ethereum и устойчивые монеты обеспечивают анонимность и символические платежи. Период проведения изъятий насчитывает 10-30 периодов.
Системы преданности охватывают иерархические ранги с прогрессивным вознаграждением. VIP-представители предлагают эксклюзивные вознаграждения, усиленные пределы и приоритетную помощь.
Следующая страница vodka bet
Определение проверенного betting ресурса в актуальных рамках нуждается специального рассмотрения к лицензионному положению. Профессиональные пользователи знают, что Tippy casino демонстрирует свежую сведения о доступных площадках.
Алгоритм оформления профиля в сертифицированных площадках содержит принудительную верификацию личности. KYC-требования защищают как заведение, так и клиента от фрода. Промежуточные рамки на вывод активов до окончания верификации – типичная методика.
Программные запреты на соединение к betting сайтам нейтрализуются через альтернативные URL. Рабочие зеркала сохраняют стопроцентную функциональность первичного платформы. Денежные операции, игровой статистика и привилегированные системы поддерживаются стабильными.
Денежная стабильность выражается степенью используемых расчетных механизмов. SSL-криптография, PCI DSS аттестация и усиленная аутентификация формируют прочный барьер ограждения.
Игровая каталог лицензированных площадок предоставляет барабаны от лидирующих создателей. RTP-коэффициенты, колебания и статистические принципы испытывают независимую валидацию в аккредитованных организациях.
Механизмы стимулирования в серьезных площадках строятся на прозрачных условиях активности. Отыгрыш x35-40 признается справедливым для барабан-бонусов, в то время как традиционные развлечения учитываются в калькуляцию с редуцированным множителем.
Shop ZephVane Online – The variety was eye-catching and moving through the store felt smooth.
Отбор проверенного развлекательного заведения предполагает детального рассмотрения правовых сертификатов. Новые сайты казино Рльдорадо предоставляют клиентам абсолютную сведения о имеющихся допусках.
Процесс создания профиля предусматривает ряд необходимых ступеней проверки. Представители запрашивают документы, подтверждающие самобытность и дееспособность. Стандартный KYC-процесс составляет от 24 до 72 часов.
Финансовое планирование начинается с установления ограничений на пополнения. Искусные геймеры советуют внедрять правило 5% от совокупного игорного капитала на индивидуальную игру.
Электронные препятствия операторов вынуждают задействовать вспомогательные маршруты. Дубликаты хранят максимальную активность базового платформы, включая историю сделок и гемблинг успех.
Передовые банковские инструменты обеспечивают быстрые депозиты через электронные хранилища. Bitcoin, Ethereum и устойчивые монеты предоставляют тайность и крошечные взносы. Срок осуществления извлечений достигает 10-30 промежутков.
Схемы верности подразумевают каскадные статусы с накапливающимся вознаграждением. VIP-кураторы предоставляют эксклюзивные бонусы, улучшенные ограничения и приоритетную обслуживание.
Активные дублирующие порталы официальных азартных клубов на Болливуд казино обеспечивают беспрерывный коннект к гемблинг платформам. Система реплицирования строит эквивалентные дубликаты центрального сайта с сохранением всех функций.
Процедура оформления профиля через зеркало полностью воспроизводит основную шаблон. Дебютные пользователи указывают функционирующий email, создают сложный пароль и выбирают игровую денежную единицу.
Верификация счета содержит предоставления свидетельств опираясь на KYC-регламенту. Фото ID-карты, верификация проживания и банковские сведения проходят автоматическую проверку в течение 24-72 часа.
Логин существующих клиентов происходит через базовую панель с 2FA проверкой. Сессионные коды приходят на телефонный девайс или почтовый ящик.
Механизмы входящего раздела через резервные ссылки включает популярные финансовые системы. Visa, Mastercard, виртуальные балансы Skrill, Neteller, блокчейн-токены Bitcoin, Ethereum процессируются с низкими сборами 0-3%.
Gaming ассортимент воспроизводится в точности включая барабаны, карточные геймплей, live-операторов и накопительные призы. RTP-параметры, изменчивость и проигрыш остаются идентичными.
Промо схема оперирует идентично базовому домену. Welcome-пакеты, бесплатные вращения, денежный возврат и VIP-системы запускаются системно при достижении прописанных критериев.
marketengine.click – Appreciate the typography choices; comfortable spacing improved my reading experience.
authorityanvil.shop – Appreciate the professionalism and consistent quality throughout site so far.
I am sure this post has touched all the internet
users, its really really pleasant piece of writing
on building up new weblog.
my web-site: laskartogel login
https://sertralineusa.com/# zoloft without rx
For the infographic
Popular online casino games for money
for viable solutions.
Australian online casinos real money – top rated and player approved
Навигация в секторе официальных площадок предполагает владения актуальных методов входа. Квалифицированные пользователи внедряют Клубника казино для получения релевантной фактов о действующих URL.
Механизм открытия учетной записи в лицензированных операторах включает детальную валидацию. Продвинутые провайдеры задействуют KYC-алгоритмы и AML-нормы. Документооборот потребляет от 24 до 72 периодов.
Компьютерные методы для минования ограничений совершенствуются параллельно с повышением законодательных решений. VPN-платформы категории premium обеспечивают криптографию AES-256 и стандарты OpenVPN. Стабильность соединения кардинально актуальна для высокоролловых игровых периодов.
Зеркальные домены выполняют задачи через географически размещенные компьютерные ресурсы. CDN-комплексы гарантируют минимальную время ответа для глобальных игроков. Системное редирект включается при распознавании барьера первичного ресурса.
Денежные переводы в сертифицированных юрисдикциях подчиняются четким нормам PCI DSS. Крипто расчеты приобретают распространение по причине приватности и оперативности выполнения.
Мобильные утилиты топовых операторов включают физиологическую авторизацию и push-уведомления для важных происшествий. Гибкий интерфейс программно адаптируется под особенности матрицы.
塔尔萨之王第三季高清完整官方版,海外华人可免费观看最新热播剧集。
Передовые бетторы сталкиваются с затруднением связи к лицензированным платформам. Компании ограничивают стандартные порталы, но знающие Рльдорадо казино посетители понимают о существовании зеркальных порталов.
Зеркало формирует полную отображение первичного платформы. SSL-сертификаты остаются равнозначными. Банковские процедуры проходят через равнозначные каналы.
Алгоритм оформления профиля через зеркальный адрес содержит типовой аутентификации. Специалисты просят справки для реализации KYC-норм. Личные характеристики подвергаются усиленную верификацию.
Банковские пределы на дополнительных порталах аналогичны стандартным характеристикам. Стартовые вклады сохраняются константными. Возрастающие банки согласовываются между разными ресурсами.
Стимулирующие механизмы работают целостно на зеркальных площадках. Множитель ставок сохраняет исходные величины. Период действия реализации остаётся прежним.
Команда обслуживания изучает обращения с резервных порталов таким же способом. Мгновенный общение поддерживает круглосуточный режим работы.
zoloft cheap: zoloft without rx – zoloft cheap
leadbuilder.click – Color palette felt calming, nothing distracting, just focused, thoughtful design.
Hello! I know this is somewhat off topic but I was wondering if you knew where I could locate a captcha plugin for my comment
form? I’m using the same blog platform as yours and I’m having problems finding one?
Thanks a lot!
пицца куба рязань заказать с доставкой на дом “Пицца Куба Рязань сайт” – вся информация о лучшей пицце в городе.
resource toast wallet passphrase
пицца “Ташир Пицца” – это сеть, которая зарекомендовала себя как поставщик вкусной и доступной пиццы. Разнообразие предложений от “Ташир Пицца” позволяет каждому найти вариант по душе.
По теме “Продление жизни аккумулятора iPhone при просмотре кино”, там просто кладезь информации.
Вот, можете почитать:
https://iphoneservice59.ru/news/kak-prodlit-zhizn-akkumulyatora-iphone-v-2026-godu-prostye-sovety-ot-masterov-servisa/
dillaudud online no rx
Гемблинговая отрасль демонстрирует стремительный развитие, притягивая легионы клиентов. Квалифицированные сайты гарантируют защищённую условия для игры. Исчерпывающую материалы о данных организациях возможно найти на казино типпи .
Сертификация остаётся основным фактором селекции площадки. Контролёры Гибралтара предоставляют серьёзный контроль экономических операций. Каждая легальная платформа выполняет плановые ревизии RNG-генераторов.
IT характеристики передовых казино содержат SSL-криптографию финансового ранга. Провайдеры софтового ПО класса Microgaming, NetEnt, Pragmatic Play интегрируют сложные механизмы случайных показателей.
Схема аутентификации личного кабинета требует направления документов KYC-формата. Свидетельство, выписка о заработке, валидация адреса — обычный пакет для финального доступа.
Параллельные домены решают сложности с запретами поставщиков. Актуальные дубли изменяются ежедневно техническими службами. Смартфонные приложения регулярно выполняются качественнее интернет форматов.
Финансовая дисциплина устанавливает продолжительную доходность развлекательных раундов. Квалифицированные геймеры советуют лимитировать сумму ставки до 1-2% от полного капитала.
Рабочие дублирующие порталы проверенных гемблинг-платформ на Болливуд официальный сайт предоставляют постоянный вход к развлекательным порталам. Технология зеркалирования генерирует точные копии главного домена с поддержанием всех механизмов.
Система создания аккаунта через резервную ссылку полностью дублирует оригинальную бланк. Только пришедшие пользователи прописывают валидный email, создают сложный пароль и определяют операционную денежную единицу.
Подтверждение личного кабинета требует загрузки удостоверений по KYC-стандартам. Копия ID-карты, подтверждение адреса и платежные сведения проверяются через машинную проверку в течение 24-72 часа.
Аутентификация существующих геймеров производится через базовую модуль с расширенной верификацией. Одноразовые токены приходят на телефонный девайс или почтовый ящик.
Механизмы входящего сектора через mirror-сайты поддерживает востребованные денежные системы. Visa, Mastercard, онлайн хранилища Skrill, Neteller, блокчейн-токены Bitcoin, Ethereum обрабатываются с сокращенными платежами 0-3%.
Развлекательная библиотека повторяется абсолютно включая машины, классические игры, live-дилеров и максимальные награды. RTP-значения, вариативность и вейджер поддерживаются такими же.
Акционная механизм действует похоже центральному сайту. Welcome-комплекты, бесплатные вращения, refund и VIP-схемы стартуют машинально при достижении определенных стандартов.
塔尔萨之王第三季高清完整版运用AI智能推荐算法,海外华人可免费观看最新热播剧集。
buy prednisone without dr prescription
Top Online Casinos Australia Real Money Including
i loved this https://toast-wallet.net
Find Your Charger Chest Favorites – Plenty of products and ordering worked effortlessly.
Malware Mart Online Shop – Detailed breakdowns and neat categories simplify the entire process.
мостбет поддержка whatsapp мостбет поддержка whatsapp
FormulaFoundry Select – Neat layout and informative content make exploring products a breeze.
Нынешние гемблеры сталкиваются с препятствием доступа к легальным порталам. Операторы закрывают первичные порталы, но профессиональные лаки Р±РёСЂ казино участники помнят о доступности дублирующих платформ.
Дополнительный домен образует полную воспроизведение первичного платформы. SSL-сертификаты работают аналогичными. Денежные действия выполняются через сходные каналы.
Схема оформления профиля через резервный ресурс подразумевает обычной подтверждения. Администраторы выясняют документы для соблюдения KYC-требований. Личные характеристики проходят расширенную проверку.
Банковские ограничения на резервных ресурсах соответствуют основным условиям. Минимальные взносы сохраняются фиксированными. Прогрессивные выигрышные пулы интегрируются между множественными доменами.
Льготные механизмы функционируют всесторонне на альтернативных порталах. Требования по обороту обеспечивает базовые цифры. Срок активности отыгрыша сохраняется.
Команда ассистирования рассматривает тикеты с дополнительных адресов таким же способом. Мгновенный разговор обеспечивает постоянный формат деятельности.
Custom Cheque Hub – Clear product descriptions and a very smooth checkout experience today.
DLinkDen Central – Clear interface and easy-to-find sections made shopping stress-free.
真实的人类第一季高清完整官方版,海外华人可免费观看最新热播剧集。
Легальные ресурсы развлекательных сервисов предоставляют участникам шанс к высококлассному азартному досугу через тематические порталы, включая KiloGram зеркало , которые специально придерживаются глобальные нормы защиты.
Последовательность открытия счёта предполагает ввода проверочных информации через encrypted SSL-соединения. Букмекеры просят предоставить официальное доказательство правоспособности и адреса жительства для соблюдения правовых критериев.
2FA проверка считается обязательным компонентом передовых solutions security. Users приобретают SMS-коды, push-оповещения или эксплуатируют targeted программы типа Google Authenticator.
Альтернативные URL преодолевают вопросы territorial блокировок и DDoS-нападений. Техническим образом копии составляют копийные реплики главного платформы с поддержанием возможностей и клиентских сведений.
Опытные пользователи призывают сохранять новейшие реестры функционирующих дублей в bookmark интернет-программы. Администрация передают сведения о fresh доменах через электронную почту, Telegram-communities и портативные софт.
Денежные операции через проверенные платформы защищены криптографическими технологиями уровня банковского сектора. Вывод финансов осуществляется единственно на проверенные данные владельца личного кабинета.
Source toast wallet download
Heya i am for the first time here. I found this board and I
find It truly useful & it helped me out a lot.
I hope to give something back and help others like
you helped me.
A powerful story of destiny and magic awaits you. When you find the An Arcane Inheritance PDF, you open a portal to a universe of wonder. This digital edition is optimized for seamless reading. Join countless others who have been captivated by the arcane mysteries hidden within these pages. https://anarcaneinheritancepdf.top/ An Arcane Inheritance Excerpt Pdf
I appreciate when archives offer previews. A well-designed archive of romance lets you read a sample. I usually check the first few pages of the PDF to see if the narrative voice grabs me before I decide to download the full book. https://anarchiveofromancepdf.top/ An Archive Of Romance Pdf Site
Определение проверенного развлекательного ресурса в современных рамках нуждается особого подхода к юридическому положению. Опытные участники знают, что Рльдорадо казино включает последнюю информацию о доступных ресурсах.
Алгоритм создания аккаунта в проверенных операторах содержит неизбежную валидацию личности. KYC-нормы гарантируют как казино, так и игрока от афер. Промежуточные пределы на перечисление денег до завершения проверки – нормальная методика.
Электронные блокировки на подключение к азартным порталам решаются через альтернативные ссылки. Активные клоны сохраняют полную возможности базового сайта. Денежные процедуры, развлекательный результаты и привилегированные системы поддерживаются неизменными.
Финансовая стабильность характеризуется степенью внедренных расчетных инструментов. SSL-шифрование, PCI DSS лицензирование и расширенная аутентификация формируют стабильный барьер защиты.
Азартная каталог проверенных провайдеров охватывает слоты от главных провайдеров. RTP-значения, изменчивость и статистические модели испытывают беспристрастную аудит в аккредитованных лабораториях.
Планы стимулирования в надежных операторах строятся на прозрачных правилах активности. Вейджер x35-40 считается справедливым для спин-привилегий, в то время как классические состязания засчитываются в подсчет с редуцированным коэффициентом.
Игровая сфера показывает динамичный рост, манящая массы участников. Квалифицированные ресурсы гарантируют защищённую условия для развлечений. Подробную сведения о данных провайдерах можно отыскать на лаки Р±РёСЂ казино .
Аккредитация выступает основным элементом отбора ресурса. Надзорные органы Олдерни дают жёсткий надзор финансовых процедур. Отдельная сертифицированная площадка выполняет плановые инспекции RNG-механизмов.
IT особенности новейших беттинг-платформ охватывают SSL-безопасность банковского класса. Провайдеры компьютерного обеспечения типа Microgaming, NetEnt, Pragmatic Play интегрируют многоуровневые механизмы случайных значений.
Механизм верификации профиля включает представления удостоверений KYC-стандарта. Свидетельство, выписка о финансах, доказательство проживания — обычный перечень для итогового подключения.
Зеркальные ссылки решают трудности с цензурой операторов. Действующие копии адаптируются систематически цифровыми отделами. Планшетные утилиты регулярно оперируют стабильнее онлайн модификаций.
Управление банкроллом создаёт долгосрочную результативность развлекательных циклов. Экспертные беттеры рекомендуют сокращать размер вейджера до 1-2% от суммарного фонда.
Appreciate this post. Will try it out.
reference https://babu88-play.org
generic zoloft: zoloft tablet – order zoloft
Elevate Central – Browsing is smooth and all product details are clear and easy to understand.
Азартная отрасль показывает быстрый подъём, манящая легионы клиентов. Квалифицированные порталы предлагают стабильную условия для развлечений. Исчерпывающую информацию о подобных организациях допустимо изучить на аква казино .
Сертификация выступает приоритетным фактором отбора ресурса. Регуляторы Кюрасао предоставляют строгий аудит валютных операций. Всякая аккредитованная портал подвергается систематические проверки RNG-систем.
Цифровые свойства актуальных казино включают SSL-кодирование банковского стандарта. Поставщики программного софта наподобие Microgaming, NetEnt, Pragmatic Play добавляют усовершенствованные механизмы рандомных параметров.
Механизм верификации учётной записи предусматривает предоставления свидетельств KYC-формата. Документ, свидетельство о прибылях, доказательство проживания — классический пакет для окончательного доступа.
Дублирующие ссылки исправляют препятствия с фильтрацией провайдеров. Функционирующие варианты адаптируются ежедневно компьютерными отделами. Карманные клиенты регулярно действуют надёжнее сетевых модификаций.
Контроль средств задаёт перспективную успешность развлекательных партий. Опытные игроки указывают лимитировать количество бета до 1-2% от итогового капитала.
Официальные операторы игровых услуг oferuja геймерам вариант к премиальному гэмблингу через специализированные ресурсы, включая Рльдорадо казино , которые точно придерживаются глобальные регламенты безопасности.
Механизм регистрации necessita заполнения authentication данных через безопасные SSL-каналы. Провайдеры запрашивают письменное удостоверение age verification и локации регистрации для поддержания законодательных стандартов.
Двухфакторная authentication выступает обязательным частью новейших систем security. Игроки располагают SMS-коды, push-сообщения или внедряют профессиональные утилиты наподобие Google Authenticator.
Дублирующие порталы устраняют препятствия географических барьеров и DDoS-assault. Техническим образом копии представляют идентичные клоны базового платформы с обеспечением инструментария и пользовательских сведений.
Skilled пользователи suggest удерживать обновлённые перечни рабочих дублей в bookmark browser. Администрация отправляют updates о актуальных ссылках через мейл, Telegram-сообщества и телефонные apps.
Payment переводы через надёжные платформы secured cryptographic технологиями класса банковского segment. Получение фондов производится исключительно на верифицированные карты обладателя аккаунта.
leatheravenue.shop – Smooth layout and detailed product info make exploring items easy.
Передовые операторы игорных активностей предоставляют игрокам вход к высококлассному азарту через безопасные лаки ворлд казино системы. Легальная операционная активность нуждается соблюдения четких регуляторных положений.
Процесс оформления персонального учетной записи охватывает верификацию приватных информации. Управляющие внедряют комплексные процедуры KYC и AML для недопущения поддельных платежей.
Программные системы актуальных казино строятся на стабильных инфраструктурах с HTTPS сертификатами. IP-фильтрация вынуждает владельцев внедрять вспомогательные домены.
Зеркальные домены представляют полные копии основного портала с удержанием всех опций и параметров. Игроки приобретают беспрепятственный связь к средствам, азартной данным и пользовательским установкам.
Финансовые переводы проходят через встроенные денежные системы. Ограничения на депозиты и обналичивания назначаются в унисон с нормативными критериями и корпоративными политиками снижения потерь.
Опытные игроки настаивают проверять ситуацию авторизации через официальные каталоги беттинг организаций. Престижные параметры предусматривают ранги на профильных платформах и комментарии подлинных игроков.
fresh prep groceries outlet – Stock up on quality ingredients that keep meals exciting and affordable.
Определение безопасного гемблинг ресурса заставляет детального анализа лицензионных сертификатов. Передовые системы [url=https://businesscredithacks.com/vygodnoe-predlozhenie-vospolzuytes-promokodom-v-onlaynkazino-retro-i-nachnite-igrat-seychas/]ретро казино[/url] гарантируют пользователям безусловную сведения о собственных аккредитациях.
Механизм создания профиля содержит несколько ключевых ступеней аутентификации. Администраторы просят свидетельства, засвидетельствующие личность и возраст. Обычный KYC-порядок требует от 24 до 72 промежутков.
Финансовое планирование инициируется с установления рамок на вклады. Компетентные участники предлагают задействовать закон 5% от полного гемблинг капитала на одну игру.
Системные барьеры поставщиков обязывают эксплуатировать вспомогательные маршруты. Альтернативы оберегают абсолютную производительность центрального портала, содержа архив платежей и казино достижения.
Новые банковские способы дают оперативные пополнения через электронные счета. Bitcoin, Ethereum и стейблкоины дают тайность и крошечные сборы. Время проведения извлечений доходит 10-30 интервалов.
Программы постоянства содержат ступенчатые степени с возрастающим бонусом. VIP-консультанты гарантируют личные бонусы, усиленные пределы и приоритетную техподдержку.
Gym Gear Select – Organized categories and simple navigation make finding items fast.
爱一凡海外版,专为华人打造的高清视频官方认证平台,支持全球加速观看。
https://neuroreliefusa.shop/# how to get neurontin
For premium
where to buy cheap lasix
for entertainment.
mostbet скачать mostbet ios http://mostbet93746.help/
Bench Boutique Marketplace – Well-curated items and the layout feels clean and considered.
Поиск в мире официальных площадок нуждается представления актуальных технологий входа. Опытные клиенты эксплуатируют СЌРЅРѕРјРѕ казино для получения новейшей фактов о функционирующих адресах.
Процесс открытия счета в сертифицированных операторах содержит комплексную проверку. Новейшие организации задействуют KYC-процедуры и AML-критерии. Бумажная работа составляет от 24 до 72 периодов.
Компьютерные решения для обхода барьеров совершенствуются синхронно с усилением нормативных шагов. VPN-платформы категории premium предоставляют безопасность AES-256 и методы OpenVPN. Устойчивость соединения принципиально необходима для VIP игровых периодов.
Зеркальные ресурсы выполняют задачи через локально рассредоточенные цифровые инфраструктуры. CDN-системы осуществляют низкую отклик для европейских клиентов. Системное маршрутизация срабатывает при выявлении ограничения центрального ресурса.
Денежные переводы в официальных областях соответствуют строгим критериям PCI DSS. Криптовалютные операции приобретают востребованность по причине приватности и скорости реализации.
Мобильные утилиты элитных операторов объединяют голосовую идентификацию и push-сообщения для существенных событий. Модифицируемый внешний вид автономно подстраивается под особенности дисплея.
Надёжные операторы азартных опций гарантируют участникам шанс к качественному игровому процессу через специализированные платформы, включая казино аква , которые точно следуют международные регламенты защиты.
Алгоритм активации necessita ввода проверочных параметров через шифрованные SSL-connection. Менеджмент запрашивают official удостоверение дееспособности и территории регистрации для compliance нормативных правил.
Двухфакторная аутентификация является принудительным составляющей современных систем security. Игроки располагают SMS-ключи, push-алерты или эксплуатируют dedicated tools наподобие Google Authenticator.
Зеркальные адреса ликвидируют вопросы локальных блокировок и DDoS-нападений. Фактически дубли представляют тождественные реплики primary домена с сохранением features и клиентских информации.
Профессиональные игроки призывают хранить актуальные каталоги рабочих альтернатив в сохранённых ссылках браузера. Операторы доставляют новости о современных порталах через почтовые сервисы, Telegram-сообщества и смартфонные apps.
Банковские транзакции через надёжные порталы гарантированы криптографическими methods level банковского сектора. Изъятие денег производится исключительно на проверенные счета владельца учётной записи.
Iver Therapeutics ivermectin generic name ivermectin 1mg
a fantastic read toast wallet recovery
Insta Data Hub – Very accessible interface and clear resources make it simple to use daily.
хургада кайт Кайт кайтинг кайтсёрфинг школа обучение сафари Дети ветра DETIVETRA
seoradar.click – Pages loaded fast, images appeared sharp, and formatting stayed consistent.
Iver Therapeutics: Iver Therapeutics – Iver Therapeutics
aussiealley.shop – Nice collection available and everything feels thoughtfully curated right now.
Современные игроки натыкаются с сложностью подключения к лицензированным платформам. Организации блокируют стандартные домены, но грамотные Рльдорадо казино игроки понимают о присутствии параллельных платформ.
Резервная ссылка формирует абсолютную реплику первичного площадки. Криптографические алгоритмы функционируют идентичными. Банковские действия осуществляются через идентичные шлюзы.
Процедура открытия счёта через резервный домен содержит стандартной подтверждения. Администраторы выясняют документы для реализации KYC-норм. Персональные сведения реализуют усиленную валидацию.
Банковские границы на альтернативных сайтах равняются главным требованиям. Минимальные суммы продолжают константными. Прогрессивные накопления интегрируются между всеми порталами.
Поощрительные схемы выполняются комплексно на резервных ресурсах. Множитель ставок поддерживает первоначальные показатели. Длительность использования продолжается.
Отдел ассистирования анализирует вопросы с зеркальных ресурсов сходным образом. Живой чат обеспечивает 24-часовой график обслуживания.
Отбор надежного развлекательного ресурса в нынешних рамках заставляет особого подхода к регулятивному уровню. Компетентные участники понимают, что Sykaaa казино отображает свежую материалы о активных площадках.
Процедура регистрации в проверенных площадках включает принудительную проверку удостоверения. KYC-нормы охраняют как оператора, так и геймера от фрода. Промежуточные границы на перечисление активов до закрытия проверки – обычная подход.
Виртуальные барьеры на вход к развлекательным сервисам решаются через параллельные ссылки. Активные копии гарантируют абсолютную работоспособность базового платформы. Банковские операции, интерактивный прогресс и льготные системы продолжают постоянными.
Денежная надежность выражается показателем задействованных расчетных механизмов. SSL-криптография, PCI DSS аттестация и усиленная аутентификация гарантируют стабильный барьер ограждения.
Развлекательная ассортимент сертифицированных сервисов предоставляет машины от известных провайдеров. RTP-индексы, вариативность и математические модели проходят объективную сертификацию в утвержденных институтах.
Схемы поощрения в профессиональных сервисах опираются на ясных условиях проигрыша. Условия ставок x35-40 характеризуется разумным для машина-поощрений, в то время как стандартные состязания засчитываются в калькуляцию с уменьшенным показателем.
online pharmacies https://baypharm.top/# online prescription pharmacy usa
Определение проверенного гемблинг заведения в текущих реалиях заставляет особого подхода к юридическому уровню. Компетентные игроки понимают, что friends casino отображает современную факты о доступных операторах.
Алгоритм регистрации в лицензированных операторах охватывает обязательную подтверждение документов. KYC-правила защищают как сервис, так и участника от афер. Переходные границы на вывод капитала до финализации верификации – обычная подход.
Технические препятствия на доступ к игровым ресурсам обходятся через параллельные порталы. Активные копии предоставляют абсолютную возможности главного сайта. Банковские движения, геймплейный прогресс и бонусные программы остаются стабильными.
Денежная безопасность оценивается уровнем используемых финансовых систем. SSL-защита, PCI DSS аттестация и расширенная аутентификация формируют безопасный периметр ограждения.
Интерактивная коллекция легальных операторов включает автоматы от известных провайдеров. RTP-показатели, колебания и вероятностные формулы получают объективную сертификацию в признанных лабораториях.
Механизмы мотивации в качественных казино опираются на открытых правилах отыгрыша. Проигрыш x35-40 считается разумным для машина-поощрений, в то время как настольные активности включаются в подсчет с сниженным множителем.
Ориентирование в секторе проверенных платформ требует осознания актуальных способов входа. Профессиональные участники задействуют СЂР° РІС…РѕРґ для добывания новейшей сведений о работающих адресах.
Механизм регистрации профиля в официальных компаниях охватывает тщательную проверку. Новейшие компании задействуют KYC-системы и AML-стандарты. Документальная процедура отнимает от 24 до 72 интервалов.
Цифровые способы для преодоления барьеров прогрессируют сообща с интенсификацией законодательных мер. VPN-решения класса premium гарантируют безопасность AES-256 и протоколы OpenVPN. Надежность канала критически необходима для VIP сессий.
Запасные адреса выполняют задачи через локально размещенные компьютерные инфраструктуры. CDN-архитектуры обеспечивают низкую пинг для европейских игроков. Системное переключение включается при идентификации ограничения основного домена.
Денежные операции в лицензированных юрисдикциях отвечают жестким стандартам PCI DSS. Цифровые переводы увеличивают распространение в результате скрытности и оперативности осуществления.
Планшетные программы топовых брендов включают биометрическую аутентификацию и push-извещения для принципиальных происшествий. Модифицируемый внешний вид автоматически подстраивается под настройки панели.
戏台在线免费在线观看,海外华人专属官方认证平台,高清无广告体验。
Malta Escape Booking Hub – Quickly review destinations using clearly presented resources.
site here https://toast-wallet.net/
FontFoundry Pro – Well-organized sections and appealing samples make browsing fonts easy.
сыроедение для начинающих http://www.rawrussia.ru .
Digestive Aid Network – Clear info and simple checkout made the experience stress-free.
Explore ZenaLune – Everything appears carefully chosen and the item descriptions are easy to understand.
Full Article toast wallet
Легальные провайдеры развлекательных услуг дают клиентам вариант к премиальному развлечениям через профильные домены, включая лаки Р±РёСЂ казино , которые точно следуют transnational регламенты security.
Алгоритм создания аккаунта подразумевает предоставления валидационных данных через безопасные SSL-каналы. Операторы просят предоставить документальное доказательство age verification и адреса проживания для compliance юрисдикционных норм.
Многоуровневая проверка выступает required компонентом новейших архитектур конфиденциальности. Игроки приобретают SMS-коды, push-оповещения или используют dedicated программы вроде Google Authenticator.
Альтернативные домены устраняют сложности geographic ограничений и DDoS-assault. По сути mirrors являют копийные копии primary домена с сохранением возможностей и клиентских сведений.
Опытные клиенты рекомендуют keeping обновлённые перечни активных дублей в сохранённых ссылках браузера. Management доставляют новости о fresh доменах через e-mail, Telegram-чаты и mobile apps.
Денежные процедуры через лицензионные платформы защищены криптографическими алгоритмами стандарта банковского направления. Снятие фондов производится исключительно на проверенные данные собственника account.
Определение достойного развлекательного портала в сегодняшних условиях предполагает повышенного внимания к юридическому статусу. Квалифицированные игроки представляют, что РјСЌРґ казино отображает свежую факты о активных операторах.
Процесс записи в лицензированных платформах содержит требуемую аутентификацию личности. KYC-нормы оберегают как площадку, так и геймера от махинаций. Промежуточные границы на снятие активов до выполнения проверки – нормальная методика.
Программные препятствия на доступ к гемблинг ресурсам обходятся через резервные адреса. Рабочие клоны сохраняют тотальную возможности базового сайта. Финансовые транзакции, игровой результаты и льготные схемы продолжают стабильными.
Финансовая безопасность измеряется качеством применяемых платежных способов. SSL-безопасность, PCI DSS лицензирование и усиленная проверка устанавливают безопасный периметр защиты.
Интерактивная ассортимент официальных провайдеров включает автоматы от известных провайдеров. RTP-значения, волатильность и алгоритмические формулы испытывают объективную контроль в утвержденных институтах.
Программы стимулирования в достойных казино опираются на ясных условиях вейджера. Вейджер x35-40 признается разумным для автомат-подарков, в то время как традиционные состязания включаются в расчет с редуцированным множителем.
По теме “Топ вирусных саундтреков февраля 2026 года”, есть отличная статья.
Вот, можете почитать:
https://musichunt.pro/%d0%bc%d1%83%d0%b7%d1%8b%d0%ba%d0%b0-%d0%b2-%d1%84%d0%b8%d0%bb%d1%8c%d0%bc%d0%b0%d1%85-%d1%84%d0%b5%d0%b2%d1%80%d0%b0%d0%bb%d1%8f-2026-%d1%81%d0%b0%d1%83%d0%bd%d0%b4%d1%82%d1%80%d0%b5%d0%ba%d0%b8/
Ergo Depot – I like how effortless it is to move around the site and find what I need.
Creatine Crate Central Hub – Good product options and effortless ordering process overall.
Shop Cash Compass Online – Clear instructions with smooth navigation made browsing stress-free.
visit this page toast wallet
Подбор надежного азартного площадки заставляет основательного анализа лицензионных свидетельств. Современные сайты Лев казино обеспечивают клиентам максимальную факты о текущих разрешениях.
Процедура открытия аккаунта включает множество ключевых фаз проверки. Представители требуют удостоверения, доказывающие персону и возраст. Обычный KYC-процесс составляет от 24 до 72 промежутков.
Контроль средств инициируется с установления лимитов на вклады. Опытные геймеры призывают внедрять норму 5% от общего казино фонда на отдельную заход.
Системные запреты администраторов побуждают применять запасные маршруты. Зеркала сохраняют максимальную эффективность первичного платформы, предусматривая журнал платежей и гемблинг прогресс.
Передовые финансовые инструменты обеспечивают быстрые вклады через блокчейн кошельки. Bitcoin, Ethereum и стейблкоины дают тайность и минимальные комиссии. Срок проведения изъятий равно 10-30 интервалов.
Системы верности включают каскадные степени с накапливающимся кэшбэком. VIP-консультанты предлагают индивидуальные вознаграждения, усиленные ограничения и приоритетную техподдержку.
prednisone
1win официальный сайт Киргизия http://www.1win23576.help
Подбор надежного гемблинг оператора предполагает детального анализа регулятивных разрешений. Актуальные платформы Килограмм казино дают участникам полную детали о собственных допусках.
Механизм получения доступа предусматривает множество принудительных ступеней валидации. Администраторы требуют справки, подтверждающие идентичность и возраст. Типовой KYC-алгоритм занимает от 24 до 72 часов.
Управление банком открывается с установления ограничений на инвестиции. Профессиональные участники советуют внедрять закон 5% от общего гемблинг бюджета на конкретную заход.
Системные ограничения администраторов обязывают применять запасные маршруты. Зеркала сохраняют безусловную активность центрального сайта, включая хронологию транзакций и игровой продвижение.
Новые финансовые сервисы гарантируют скоростные вклады через криптовалютные хранилища. Bitcoin, Ethereum и стабильные валюты дают тайность и наименьшие отчисления. Период реализации выводов равно 10-30 промежутков.
Программы постоянства охватывают ступенчатые степени с накапливающимся вознаграждением. VIP-кураторы предоставляют личные бонусы, расширенные границы и первоочередную сервис.
Located here
how can i get flexeril prices
for complete satisfaction.
http://smartgenrxusa.com/# Smart GenRx USA
lanternzone.shop – Helpful guides and easy navigation make running marketing campaigns seamless.
Neat blog! Is your theme custom made or did you download it from somewhere?
A design like yours with a few simple tweeks would really make my blog shine.
Please let me know where you got your theme. Cheers
Передовые провайдеры беттинг продуктов дают игрокам доступ к элитному игровому процессу через безопасные Килограмм казино порталы. Легальная бизнес влечет соблюдения конкретных регуляторных стандартов.
Процедура открытия клиентского кабинета включает аутентификацию персональных данных. Управляющие эксплуатируют комплексные системы KYC и AML для предотвращения мошеннических платежей.
Цифровые системы актуальных казино базируются на стабильных инфраструктурах с HTTPS стандартами. IP-фильтрация обязывает администраторов создавать вспомогательные URL.
Зеркальные платформы составляют аналогичные репликации центрального сайта с удержанием всех возможностей и сведений. Беттеры добиваются устойчивый доступ к средствам, беттинг отчетности и клиентским параметрам.
Денежные процедуры производятся через встроенные финансовые системы. Рамки на депозиты и изъятия устанавливаются в соответствии с правовыми условиями и собственными процедурами снижения потерь.
Профессиональные пользователи настаивают отслеживать ситуацию авторизации через регуляторные базы данных развлекательных организаций. Имиджевые критерии задействуют рейтинги на профильных сайтах и мнения действительных клиентов.
Лицензионные провайдеры развлекательных сервисов обеспечивают клиентам право к элитному времяпрепровождению через dedicated порталы, включая mad casino , которые специально придерживаются мировые регламенты защиты.
Алгоритм активации требует ввода идентификационных деталей через безопасные SSL-линии. Администрация просят документальное удостоверение возраста и адреса residence для compliance законодательных стандартов.
Двухфакторная идентификация считается необходимым частью современных архитектур конфиденциальности. Участники получают SMS-токены, push-уведомления или используют специализированные tools наподобие Google Authenticator.
Дублирующие адреса нейтрализуют препятствия региональных барьеров и DDoS-воздействий. По сути дубли являют идентичные реплики центрального портала с сохранением опций и user параметров.
Опытные игроки призывают keeping current списки функционирующих копий в закладках интернет-программы. Провайдеры рассылают сведения о новых доменах через email, Telegram-группы и мобильные apps.
Payment movements через legal площадки покрыты cryptographic системами стандарта банковского segment. Изъятие фондов осуществляется исключительно на аутентифицированные реквизиты владельца профиля.
click here for more toast wallet
zoloft generic: zoloft pill – zoloft no prescription
Monitor Merchant screens – Detailed descriptions and good deals ensured a smooth buying experience.
Навигация в области проверенных ресурсов предполагает осознания продвинутых методов авторизации. Опытные клиенты внедряют френдс казино зеркало для приобретения новейшей данных о активных путях.
Схема регистрации аккаунта в лицензированных компаниях содержит сложную проверку. Новейшие организации эксплуатируют KYC-процедуры и AML-стандарты. Документальная процедура потребляет от 24 до 72 промежутков.
Программные методы для преодоления барьеров развиваются сообща с повышением нормативных инициатив. VPN-платформы класса premium предлагают защиту AES-256 и стандарты OpenVPN. Устойчивость подключения fundamentally актуальна для премиальных заходов.
Резервные сайты работают через географически разнесенные компьютерные кластеры. CDN-сети осуществляют быструю отклик для международных клиентов. Цифровое перенаправление включается при обнаружении ограничения первичного адреса.
Финансовые транзакции в лицензированных зонах подпадают под жестким нормам PCI DSS. Децентрализованные переводы приобретают популярность в результате анонимности и динамике осуществления.
Смартфонные утилиты элитных организаций включают биометрическую подтверждение и push-оповещения для важных событий. Изменяемый дизайн программно настраивается под особенности матрицы.
Гемблинговая отрасль отображает интенсивный подъём, завлекая легионы игроков. Экспертные ресурсы предоставляют защищённую обстановку для ставок. Развёрнутую материалы о данных компаниях допустимо найти на казино СЌРЅРѕРјРѕ .
Лицензирование остаётся главным элементом выбора ресурса. Лицензиаты Мальты создают жёсткий мониторинг расчётных операций. Любая легальная площадка реализует регулярные проверки RNG-механизмов.
Программные особенности передовых игорных домов предусматривают SSL-кодирование финансового ранга. Производители виртуального обеспечения наподобие Microgaming, NetEnt, Pragmatic Play встраивают комплексные схемы хаотичных чисел.
Процесс проверки аккаунта включает предоставления документов KYC-формата. Удостоверение, выписка о прибылях, удостоверение регистрации — базовый список для итогового подключения.
Резервные ссылки ликвидируют барьеры с блокировками компаний. Функционирующие альтернативы модифицируются ежедневно IT службами. Портативные клиенты часто выполняются стабильнее онлайн вариантов.
Финансовая дисциплина устанавливает стратегическую доходность игровых периодов. Грамотные беттеры рекомендуют сокращать сумму депозита до 1-2% от общего капитала.
Growth Gear Select Online – Well-structured pages and clear navigation make browsing very easy.
Smart GenRx USA: Smart GenRx USA – Smart GenRx USA
Discover Bazaar Bright Treasures – Cute little finds and moving through the site was enjoyable.
Hörmətlə, bu saytınız əladır!
https://pinco-azerbaijan-sport.net/odenisler
learn the facts here now https://toast-wallet.net
visit this site right here toast wallet app
Легальные операторы развлекательных предложений oferuja участникам возможность к премиальному гэмблингу через целевые порталы, включая friends casino зеркало сегодня , которые точно придерживаются общепринятые стандарты конфиденциальности.
Процедура открытия счёта предполагает предоставления валидационных данных через шифрованные SSL-протоколы. Букмекеры просят письменное подтверждение совершеннолетия и адреса residence для соблюдения legal норм.
Двухфакторная authentication становится принудительным компонентом современных платформ защиты. Пользователи получают SMS-пароли, push-notification или применяют специализированные утилиты в стиле Google Authenticator.
Зеркальные адреса решают вопросы локальных блокировок и DDoS-воздействий. С технической точки зрения mirrors представляют аналогичные клоны главного ресурса с удержанием инструментария и пользовательских информации.
Профессиональные геймеры советуют удерживать свежие реестры рабочих зеркал в избранном browser. Management доставляют новости о актуальных доменах через e-mail, Telegram-сообщества и телефонные программы.
Банковские процедуры через лицензионные порталы обеспечены шифровальными алгоритмами уровня банковского segment. Получение денег выполняется только на аутентифицированные данные собственника личного кабинета.
Актуальные альтернативные домены официальных казино на казино Голд гарантируют непрерывный коннект к азартным порталам. Принцип копирования образует эквивалентные копии основного портала с сохранением всех возможностей.
Алгоритм открытия счета через зеркало полностью копирует базовую анкету. Только пришедшие игроки указывают рабочий email, устанавливают сложный секретную комбинацию и выбирают базовую курренси.
Идентификация счета предполагает передачи свидетельств согласно KYC-регламенту. Копия водительских прав, доказательство резиденции и денежные реквизиты подвергаются машинную верификацию в течение 24-72 периодов.
Вход активных участников осуществляется через обычную панель с многоступенчатой идентификацией. Одноразовые коды передаются на телефонный аппарат или электронную почту.
Функционал пополнительного раздела через зеркала обеспечивает актуальные расчетные механизмы. Visa, Mastercard, электронные портмоне Skrill, Neteller, crypto Bitcoin, Ethereum реализуются с уменьшенными процентами 0-3%.
Gaming каталог дублируется на сто процентов включая слоты, классические развлечения, live-операторов и прогрессивы. RTP-показатели, волатильность и вейджер поддерживаются такими же.
Акционная схема выполняется аналогично корневому сайту. Welcome-пакеты, безвозмездные спины, refund и VIP-системы стартуют программно при соблюдении прописанных стандартов.
海外华人必备的ifun平台,提供最新高清电影、电视剧,无广告观看体验。
Browse Audit Avenue Tools – The explanations are organized and extremely easy to follow.
I am really delighted to glance at this website posts which includes lots of useful facts, thanks for
providing these statistics.
buy prescription drugs online
Актуальные зеркала лицензированных казино на lucky bear казино предоставляют непрерывный доступ к игровым сервисам. Система клонирования строит аналогичные копии центрального домена с удержанием всех опций.
Процедура регистрации через дублирующий портал на сто процентов воспроизводит главную шаблон. Начинающие пользователи указывают действующий email, устанавливают сложный шифр и устанавливают базовую финансовый инструмент.
Подтверждение профиля предполагает передачи бумаг по KYC-политике. Фото водительских прав, подтверждение регистрации и финансовые данные проходят цифровую валидацию в течение 24-72 ч.
Вход верифицированных игроков реализуется через обычную форму с многоступенчатой идентификацией. Сессионные пароли приходят на сотовый аппарат или электронную почту.
Возможности пополнительного сектора через альтернативные домены включает актуальные расчетные инструменты. Visa, Mastercard, онлайн балансы Skrill, Neteller, криптовалюты Bitcoin, Ethereum обрабатываются с оптимизированными процентами 0-3%.
Развлекательная база дублируется на сто процентов включая слоты, карточные игры, live-дилеров и джекпоты. RTP-показатели, колебания и ставочные требования фиксируются такими же.
Промо схема оперирует схоже главному порталу. Welcome-предложения, даровые прокруты, refund и VIP-курсы стартуют алгоритмически при исполнении установленных стандартов.
Определение проверенного гемблинг портала в современных границах заставляет повышенного анализа к правовому режиму. Опытные игроки осознают, что казино СЌРЅРѕРјРѕ предоставляет современную информацию о активных провайдерах.
Алгоритм регистрации в проверенных заведениях содержит обязательную верификацию удостоверения. KYC-правила оберегают как площадку, так и игрока от махинаций. Краткосрочные границы на снятие финансов до финализации валидации – типичная подход.
Программные барьеры на связь к гемблинг площадкам нейтрализуются через резервные адреса. Рабочие копии обеспечивают абсолютную производительность центрального ресурса. Финансовые транзакции, интерактивный прогресс и наградные схемы сохраняются устойчивыми.
Финансовая гарантированность оценивается критерием используемых денежных методов. SSL-кодирование, PCI DSS аттестация и усиленная идентификация гарантируют стабильный периметр защиты.
Интерактивная набор сертифицированных провайдеров содержит спины от топовых разработчиков. RTP-показатели, колебания и математические системы получают нейтральную валидацию в аккредитованных центрах.
Механизмы стимулирования в достойных площадках основываются на понятных правилах отыгрыша. Проигрыш x35-40 характеризуется разумным для автомат-привилегий, в то время как классические игры идут в расчет с пониженным процентом.
At register 1xBet Spain you will find a simple step-by-step form that makes signing up for their platform very easy even for beginners. Once finished, you get immediate access to the live betting dashboard and all the active promotional offers.
Поиск легального игорного оператора подразумевает серьезного разбора официальных бумаг. Передовые ресурсы лаки Р±РёСЂ казино обеспечивают клиентам максимальную информацию о собственных санкциях.
Механизм открытия аккаунта подразумевает различные требуемых фаз проверки. Представители требуют бумаги, доказывающие индивидуальность и возраст. Типовой KYC-алгоритм составляет от 24 до 72 промежутков.
Контроль средств инициируется с определения границ на вклады. Квалифицированные пользователи предлагают эксплуатировать правило 5% от суммарного казино бюджета на одну партию.
Программные барьеры провайдеров побуждают внедрять альтернативные пути. Альтернативы хранят стопроцентную функциональность основного сайта, подразумевая историю сделок и казино прогресс.
Передовые денежные сервисы дают быстрые взносы через цифровые аккаунты. Bitcoin, Ethereum и стейблкоины поддерживают приватность и наименьшие взносы. Срок реализации выводов равно 10-30 минут.
Алгоритмы верности охватывают многоуровневые ранги с прогрессивным бонусом. VIP-представители гарантируют личные вознаграждения, повышенные границы и опережающую техподдержку.
Hi! I know this is somewhat off-topic but I had to ask.
Does building a well-established website like yours
require a large amount of work? I am completely new to writing a blog but I do write in my journal
everyday. I’d like to start a blog so I can share
my own experience and views online. Please let me know if you
have any ideas or tips for new aspiring bloggers. Thankyou!
Maker Merchant Deals Hub – Interesting selections and intuitive design keep shopping light and enjoyable.
Активные дублирующие порталы проверенных игорных заведений на тип топ казино дают постоянный коннект к развлекательным ресурсам. Методика зеркалирования строит полноценные клоны корневого веб-площадки с сохранением всех функций.
Схема регистрации через резервную ссылку на сто процентов имитирует основную заявку. Только пришедшие игроки заполняют валидный email, создают сложный секретную комбинацию и устанавливают игровую финансовый инструмент.
Верификация профиля включает отправки бумаг согласно KYC-стандартам. Снимок ID-карты, верификация проживания и карточные данные контролируются системой машинную валидацию в течение 24-72 часов.
Подключение активных геймеров происходит через базовую панель с многоступенчатой валидацией. Одноразовые пароли отправляются на мессенджер аппарат или email.
Функционал депозитного раздела через дублирующие порталы поддерживает востребованные банковские инструменты. Visa, Mastercard, электронные счета Skrill, Neteller, виртуальные монеты Bitcoin, Ethereum процессируются с низкими комиссиями 0-3%.
Гемблинг ассортимент повторяется целиком включая слоты, настольные геймплей, live-крупье и максимальные награды. RTP-индикаторы, колебания и ставочные требования сохраняются идентичными.
Бонусная политика действует аналогично центральному порталу. Welcome-предложения, бесплатные вращения, денежный возврат и VIP-курсы запускаются автоматически при достижении определенных стандартов.
Deference to post author, some superb entropy.
Here is my web blog :: https://Oke.zone/profile.php?id=87821
塔尔萨之王第三季高清完整版,海外华人可免费观看最新热播剧集。
Find out more
quicken loans rocket mortgage pre approval
to watch the full video.
FixItFactory Express – Intuitive navigation with clear product info makes browsing simple.
禁忌第一季高清完整官方版,海外华人可免费观看最新热播剧集。
Перемещение в пространстве официальных порталов требует понимания продвинутых технологий доступа. Умелые игроки используют лаки Р±РёСЂ для получения релевантной фактов о функционирующих адресах.
Процесс оформления профиля в лицензированных учреждениях предполагает многоуровневую верификацию. Новейшие провайдеры используют KYC-механизмы и AML-нормы. Документооборот занимает от 24 до 72 часов.
Технические решения для минования барьеров прогрессируют одновременно с ужесточением юридических действий. VPN-платформы класса premium дают шифрование AES-256 и протоколы OpenVPN. Надежность соединения жизненно важна для высокоролловых партий.
Запасные домены действуют через территориально размещенные компьютерные инфраструктуры. CDN-системы обеспечивают быструю пинг для международных клиентов. Автоматическое маршрутизация включается при распознавании барьера основного портала.
Банковские операции в официальных регионах подпадают под жестким стандартам PCI DSS. Цифровые платежи приобретают популярность вследствие конфиденциальности и оперативности выполнения.
Планшетные программы ведущих провайдеров включают биометрическую авторизацию и push-оповещения для важных моментов. Изменяемый дизайн самостоятельно настраивается под свойства панели.
https://neuroreliefusa.com/# neurontin 600 mg pill
Проверенные операторы азартных опций гарантируют клиентам вариант к профессиональному игровому процессу через тематические домены, включая казино миллион , которые точно исполняют transnational стандарты безопасности.
Процедура создания аккаунта включает ввода идентификационных деталей через безопасные SSL-connection. Букмекеры просят письменное удостоверение дееспособности и территории жительства для поддержания нормативных требований.
Двухфакторная аутентификация становится обязательным элементом современных платформ надёжности. Users приобретают SMS-шифры, push-оповещения или применяют профессиональные tools вроде Google Authenticator.
Резервные порталы преодолевают вопросы региональных блокировок и DDoS-нападений. По сути копии представляют тождественные копии центрального домена с сохранением инструментария и личных деталей.
Компетентные геймеры предлагают сохранять свежие реестры активных копий в сохранённых ссылках интернет-программы. Букмекеры доставляют updates о fresh URL через почтовые сервисы, Telegram-сообщества и портативные приложения.
Денежные операции через лицензионные ресурсы покрыты защитными methods level банковского области. Получение капитала производится единственно на подтверждённые реквизиты владельца учётной записи.
Diesel Dock Select – Clean layout and detailed info helped me make choices quickly and easily.
愛壹帆海外版,专为华人打造的高清视频官方认证平台,支持全球加速观看。
超人和露易斯第四季高清完整版,海外华人可免费观看最新热播剧集。
I am in fact thankful to the owner of this website who has shared this impressive
paragraph at at this time.
范德沃克第二季高清完整版,海外华人可免费观看最新热播剧集。
范德沃克高清完整版,海外华人可免费观看最新热播剧集。
iyf.tv海外华人首选,提供最新华语剧集、美剧、日剧等高清在线观看。
真实的人类第一季高清完整官方版,海外华人可免费观看最新热播剧集。
Motor Works Online – Navigation is simple and product info is easy to understand, making shopping easy.
Нынешние геймеры встречаются с набором системных аспектов при функционировании с лицензированными платформами. Специализированные сайты типа Вован регистрация обеспечивают релевантную данные о функционировании игорных компаний.
Алгоритм аутентификации профиля включает комплекс необходимых этапов. Стартовая проверка требует размещения удостоверений удостоверяющих субъект. Привычный комплект включает удостоверение личности, автолицензию или загранпаспорт.
Программная элемент записления охватывает задействование зашифрованного канала и двойной авторизации. Квалифицированные пользователи подсказывают задействовать полный набор представленных возможностей защиты.
Зеркала формируют полные клоны центрального ресурса с сохранением полного арсенала. Ключевое выгода состоит в соответствии банковских рамок и условий вейджера.
Система поиска актуальных дублирующих порталов основывается на отслеживании специализированных уведомительных сервисов и сотрудничающих площадок. Опытные геймеры задействуют туннельные протоколы для формирования бесперебойного подключения независимо от региональных лимитов.
Discover the hidden secrets of a magical bloodline in this captivating novel that has everyone talking. If you have been searching for An Arcane Inheritance in PDF format, look no further for your next great read. This story weaves mystery and magic into an unforgettable tale you can download and enjoy today. https://anarcaneinheritancepdf.top/ An Arcane Inheritance Dark Academia Pdf
Функционирующие дублирующие порталы легальных gaming-операторов на mad casino зеркало дают устойчивый вход к геймерским сервисам. Система реплицирования строит эквивалентные реплики корневого веб-площадки с консервацией всех механизмов.
Схема активации через альтернативный домен в точности имитирует основную форму. Новые участники регистрируют активный email, устанавливают защищенный ключ и назначают рабочую платежное средство.
Верификация личного кабинета подразумевает представления удостоверений согласно KYC-стандартам. Копия паспорта, доказательство адреса и платежные сведения контролируются системой машинную контроль в течение 24-72 часов.
Авторизация существующих игроков реализуется через обычную модуль с многоступенчатой верификацией. Одноразовые пароли поступают на смс устройство или электронную почту.
Возможности депозитного компонента через дублирующие порталы обеспечивает востребованные финансовые платформы. Visa, Mastercard, виртуальные балансы Skrill, Neteller, crypto Bitcoin, Ethereum выполняются с сокращенными сборами 0-3%.
Развлекательная база дублируется целиком включая автоматы, традиционные активности, live-хостов и максимальные награды. RTP-индикаторы, изменчивость и вейджер сохраняются такими же.
Подарочная механизм функционирует схоже базовому веб-площадке. Welcome-предложения, даровые прокруты, refund и VIP-системы стартуют алгоритмически при соблюдении заданных стандартов.
The world of romantic fiction is vast and full of emotional depth. Exploring an archive of romance reveals just how diverse the genre really is. From paranormal love stories to regency dramas, downloading a PDF allows you to experience these intense emotions wherever you are in the world. https://anarchiveofromancepdf.top/ An Archive Of Romance Text Pdf
I like the helpful information you provide
in your articles. I’ll bookmark your blog and check again here frequently.
I am quite sure I’ll learn a lot of new
stuff right here! Good luck for the next!
more information https://toast-wallet.net/
layoutspace.shop – Clear design and intuitive navigation made browsing products easy and efficient.
browse around here toast wallet
Поиск в секторе лицензированных платформ нуждается знания передовых технологий подключения. Опытные геймеры применяют Болливуд казино для добывания новейшей сведений о активных адресах.
Алгоритм регистрации аккаунта в сертифицированных учреждениях охватывает детальную валидацию. Актуальные операторы применяют KYC-механизмы и AML-правила. Бумажная работа составляет от 24 до 72 часов.
Программные технологии для избежания запретов прогрессируют сообща с интенсификацией нормативных шагов. VPN-платформы уровня premium дают шифрование AES-256 и системы OpenVPN. Надежность соединения жизненно существенна для привилегированных партий.
Резервные сайты функционируют через локально размещенные компьютерные кластеры. CDN-архитектуры поддерживают сокращенную задержку для американских геймеров. Цифровое перенаправление срабатывает при детекции блокировки главного ресурса.
Финансовые транзакции в официальных юрисдикциях соответствуют определенным требованиям PCI DSS. Децентрализованные транзакции увеличивают популярность благодаря секретности и темпу выполнения.
Переносные приложения лучших компаний объединяют лицевую проверку и push-уведомления для существенных моментов. Модифицируемый оформление самостоятельно изменяется под характеристики матрицы.
Современные операторы игорных услуг дают беттерам вход к высококлассному беттингу через проверенные Gold casino сайты. Лицензированная функционирование предполагает исполнения четких регуляторных критериев.
Алгоритм регистрации индивидуального учетной записи охватывает проверку персональных сведений. Провайдеры применяют расширенные алгоритмы KYC и AML для пресечения мошеннических транзакций.
Цифровые средства актуальных развлекательных порталов работают на зашифрованных хостингах с SSL алгоритмами. Территориальные ограничения побуждает администраторов разрабатывать параллельные домены.
Альтернативные домены составляют аналогичные дубликаты базового домена с поддержанием всех опций и параметров. Беттеры достигают непрерывный связь к счету, гемблинг истории и пользовательским установкам.
Банковские операции производятся через интегрированные банковские агрегаторы. Пределы на вклады и снятия регулируются в соотношении с регуляторными условиями и индивидуальными регламентами контроля угроз.
Опытные гемблеры рекомендуют мониторить ситуацию сертификата через регуляторные регистры азартных организаций. Престижные характеристики задействуют рейтинги на профильных ресурсах и мнения настоящих игроков.
Australian online casino PayID – instant deposits and withdrawals
Crawl Clarity Studio Online – Informative content and easy-to-use layout made using the site a breeze.
Проверенные операторы гэмблинг опций гарантируют геймерам вариант к качественному гэмблингу через dedicated сайты, включая Гризли казино , которые именно соблюдают мировые нормы надёжности.
Алгоритм активации включает указания идентификационных данных через encrypted SSL-connection. Букмекеры просят документальное доказательство age verification и адреса нахождения для compliance нормативных правил.
Многоуровневая идентификация является принудительным aspect современных механизмов защиты. Клиенты получают SMS-коды, push-оповещения или задействуют профессиональные утилиты по типу Google Authenticator.
Mirror порталы устраняют сложности geographic запретов и DDoS-assault. Технически зеркала представляют копийные dublicates базового портала с обеспечением опций и клиентских деталей.
Опытные клиенты рекомендуют keeping новейшие каталоги действующих зеркал в favourites интернет-программы. Операторы передают сведения о новых порталах через электронную почту, Telegram-communities и смартфонные apps.
Финансовые movements через legal порталы secured encryption системами уровня банковского области. Изъятие капитала происходит единственно на validated реквизиты собственника профиля.
рецепты сыроедения на каждый день http://rawrussia.ru .
官方授权的ifuntv海外华人首选,第一时间提供最新华语剧集、美剧、日剧等高清在线观看。
Новейшие гемблеры встречаются с препятствием входа к официальным ресурсам. Провайдеры закрывают базовые URL, но профессиональные лаки Р±РёСЂ казино пользователи осознают о присутствии дублирующих ресурсов.
Альтернативный адрес составляет точную воспроизведение оригинального платформы. Системы безопасности сохраняются такими же. Расчётные транзакции выполняются через сходные сервисы.
Процедура регистрации через параллельный портал предполагает классической верификации. Специалисты требуют свидетельства для выполнения KYC-норм. Идентификационные параметры подвергаются комплексную подтверждение.
Депозитные пределы на дополнительных площадках соответствуют стандартным характеристикам. Низшие беты остаются постоянными. Возрастающие призовые фонды объединяются между множественными порталами.
Бонусные схемы оперируют завершённо на альтернативных платформах. Множитель ставок поддерживает первоначальные параметры. Длительность использования не изменяется.
Департамент поддержки анализирует заявки с резервных порталов аналогично. Мгновенный диалог гарантирует постоянный порядок функционирования.
generic for zoloft: sertraline zoloft – zoloft generic
Index Hive – Well-organized sections and clear content make finding what I need effortless.
捕风追影线上看免费在线观看,海外华人专属平台结合大数据AI分析,高清无广告体验。
愛壹帆海外版,專為華人打造的高清視頻平台,支持全球加速觀看。
Нынешние участники имеют дело с огромным количеством системных деталей при операциях с лицензированными ресурсами. Тематические сайты типа казино Голд выдают свежую информацию о операциях игорных провайдеров.
Алгоритм аутентификации профиля подразумевает множество обязательных фаз. Начальная подтверждение требует размещения свидетельств верифицирующих личность. Обычный список включает удостоверение личности, права или международное ID.
Цифровая элемент регистрации подразумевает использование безопасного соединения и двухфакторной аутентификации. Квалифицированные пользователи подсказывают включать максимум возможных настроек защиты.
Дублирующие порталы формируют точные копии первичного портала с поддержанием исчерпывающего инструментария. Центральное выгода кроется в тождественности финансовых границ и условий отыгрыша.
Система выявления действующих резервных ссылок строится на отслеживании тематических телеграм-каналов и аффилированных сайтов. Продвинутые геймеры применяют туннельные протоколы для формирования стабильного доступа независимо от местных ограничений.
Официальные платформы гэмблинг услуг oferuja участникам доступ к высококлассному развлечениям через профильные порталы, включая лаки Р±РёСЂ казино , которые специально придерживаются мировые требования конфиденциальности.
Механизм регистрации предполагает предоставления проверочных информации через encrypted SSL-протоколы. Менеджмент запрашивают нотариальное доказательство совершеннолетия и места жительства для compliance legal требований.
Двухэтапная проверка является required частью новейших систем конфиденциальности. Users приобретают SMS-ключи, push-сообщения или внедряют dedicated программы в стиле Google Authenticator.
Mirror URL решают проблемы региональных барьеров и DDoS-атак. Технически дубли формируют аналогичные версии основного платформы с сохранением опций и пользовательских сведений.
Профессиональные клиенты рекомендуют удерживать актуальные реестры активных дублей в избранном обозревателя. Операторы направляют сведения о свежих ссылках через e-mail, Telegram-communities и mobile софт.
Банковские movements через проверенные платформы гарантированы защитными системами уровня банковского индустрии. Получение финансов выполняется единственно на validated данные обладателя учётной записи.
GPU Gear Market – Organized interface and helpful product info made checkout quick.
Yoga Yonder Essentials – The overall mood is pleasant and the items feel purposefully chosen.
more https://toast-wallet.net
find this https://toast-wallet.net
超人和露易斯第二季高清完整官方版,海外华人可免费观看最新热播剧集。
Home Page https://toast-wallet.net/
Азартная область отображает быстрый прогресс, заинтересовывая миллионы клиентов. Квалифицированные порталы предоставляют качественную обстановку для игры. Детальную факты о данных провайдерах возможно получить на казино Голд .
Сертификация является центральным показателем выбора платформы. Надзорные органы Мальты создают строгий контроль валютных манипуляций. Любая сертифицированная платформа осуществляет плановые контроли RNG-алгоритмов.
Компьютерные свойства новейших азартных площадок предусматривают SSL-шифрование расчётного стандарта. Провайдеры софтового продукта типа Microgaming, NetEnt, Pragmatic Play добавляют усовершенствованные алгоритмы непредсказуемых величин.
Схема валидации учётной записи предполагает предоставления удостоверений KYC-класса. Документ, выписка о прибылях, валидация прописки — обычный перечень для завершённого входа.
Альтернативные адреса убирают сложности с запретами поставщиков. Функционирующие альтернативы адаптируются каждый день техническими группами. Карманные приложения зачастую работают качественнее веб модификаций.
Распределение капитала формирует долгосрочную доходность азартных раундов. Экспертные геймеры рекомендуют сокращать сумму вейджера до 1-2% от совокупного фонда.
Neuro Relief USA: Neuro Relief USA – Neuro Relief USA
Определение честного игорного портала нуждается серьезного анализа лицензионных бумаг. Инновационные ресурсы аква зеркало гарантируют пользователям безусловную сведения о своих санкциях.
Алгоритм открытия аккаунта включает определенное количество обязательных этапов верификации. Владельцы просят бумаги, удостоверяющие идентичность и возраст. Стандартный KYC-процесс длится от 24 до 72 периодов.
Управление банком запускается с установления границ на депозиты. Квалифицированные пользователи предлагают внедрять закон 5% от общего развлекательного средств на индивидуальную партию.
Программные ограничения владельцев заставляют эксплуатировать альтернативные пути. Зеркала оберегают абсолютную активность базового сайта, предусматривая летопись транзакций и азартный прогресс.
Актуальные платежные системы гарантируют оперативные депозиты через криптовалютные аккаунты. Bitcoin, Ethereum и стабильные валюты предоставляют конфиденциальность и наименьшие комиссии. Длительность осуществления снятий равно 10-30 отрезков.
Программы лояльности охватывают многоуровневые категории с увеличивающимся компенсацией. VIP-консультанты дают уникальные бонусы, усиленные границы и преимущественную поддержку.
Anime Avenue Handpicked Items – Enjoy the original vibe and browsing between pages is effortless.
leadmatrix.click – Color palette felt calming, nothing distracting, just focused, thoughtful design.
internet pharmacies in usa http://baypharm.top/# uk pharmacies
Using regional betting portal gives you a secure way to manage your betting bankroll with a variety of localized e-wallets. The site is very stable and handles high traffic without any performance drops.
Check it out
cost generic neurontin price
to access the resource.
Особенно понравился материал про финансовые аспекты кинопроката и бюджеты фильмов в 2026 году.
Ссылка ниже:
https://rubl-24.ru/news/gde-vygodnee-kupit-rubl-v-fevrale-2026-obzor-kursov-i-lajfhaki-ot-obmennikov/
https://smartgenrxusa.com/# Smart GenRx USA
Активные альтернативные домены проверенных игорных заведений на lucky bear казино гарантируют стабильный подключение к развлекательным платформам. Методика реплицирования генерирует идентичные клоны корневого ресурса с фиксацией всех опций.
Механизм оформления профиля через резервную ссылку целиком дублирует стандартную шаблон. Начинающие клиенты прописывают функционирующий email, генерируют сложный секретную комбинацию и фиксируют основную курренси.
Валидация учетной записи требует предоставления документов по KYC-требованиям. Изображение удостоверения личности, валидация проживания и платежные реквизиты проверяются через цифровую валидацию в течение 24-72 периодов.
Вход верифицированных участников выполняется через типовую форму с усиленной аутентификацией. Краткосрочные ключи отправляются на телефонный устройство или мейл.
Инструменты депозитного блока через дублирующие порталы содержит распространенные платежные механизмы. Visa, Mastercard, онлайн хранилища Skrill, Neteller, crypto Bitcoin, Ethereum реализуются с низкими сборами 0-3%.
Азартная ассортимент повторяется абсолютно включая автоматы, настольные геймплей, live-операторов и мегавыигрыши. RTP-параметры, колебания и ставочные требования поддерживаются неизменными.
Акционная система действует аналогично корневому веб-площадке. Welcome-наборы, даровые прокруты, денежный возврат и VIP-курсы стартуют алгоритмически при выполнении заданных стандартов.
Browse Comic Cradle Collections – Easy navigation and well-organized items made shopping enjoyable.
Поиск легального развлекательного заведения заставляет детального рассмотрения юридических бумаг. Актуальные системы ретро официальный сайт обеспечивают участникам полную сведения о собственных санкциях.
Алгоритм оформления счета содержит ряд требуемых шагов аутентификации. Владельцы просят справки, удостоверяющие персону и правоспособность. Стандартный KYC-порядок требует от 24 до 72 периодов.
Распоряжение капиталом стартует с задания границ на взносы. Квалифицированные геймеры настаивают эксплуатировать установку 5% от суммарного гемблинг резерва на отдельную игру.
Цифровые барьеры администраторов побуждают использовать вспомогательные ссылки. Альтернативы поддерживают безусловную работоспособность первичного платформы, охватывая журнал операций и игровой результаты.
Актуальные финансовые инструменты предоставляют оперативные депозиты через блокчейн хранилища. Bitcoin, Ethereum и стабильные валюты дают приватность и крошечные взносы. Период выполнения извлечений насчитывает 10-30 минут.
Программы преданности содержат каскадные степени с прогрессивным возвратом. VIP-консультанты предоставляют эксклюзивные поощрения, увеличенные границы и ускоренную помощь.
Do you play in a casino? bruno gaming portal you can experience professional live dealer games with high-definition streaming that perfectly captures the excitement of a real casino floor. I found their interface to be incredibly smooth, making it easy to switch between different tables without any lag or technical interruptions.
Top 10 online casino Australia real money – rankings updated 2025
Macro Merchant Storefront – A solid mix of products and practical descriptions keeps everything simple.
Neuro Relief USA Neuro Relief USA neurontin 300mg caps
you could try these out https://toast-wallet.net
Современные игроки пересекаются с набором цифровых особенностей при процессах с легальными порталами. Экспертные порталы типа Болливуд РІС…РѕРґ поставляют новую данные о процессах игорных организаций.
Алгоритм подтверждения кабинета содержит ряд необходимых уровней. Первичная аутентификация включает отправки удостоверений валидирующих гражданство. Обычный комплект подразумевает удостоверение личности, права или внешний паспорт.
Программная элемент создания аккаунта включает эксплуатацию криптографической защиты и многофакторной защиты. Опытные геймеры рекомендуют активировать полный набор доступных функций охраны.
Зеркала представляют полные отражения основного платформы с сохранением полного возможностей. Главное бонус состоит в подобии финансовых границ и критериев условий прокрутки.
Механизм локализации рабочих запасных доменов основывается на мониторинге специализированных телеграм-каналов и союзных сайтов. Продвинутые геймеры применяют прокси-соединения для гарантирования устойчивого доступа невзирая от региональных лимитов.
look at these guys https://toast-wallet.net/
Актуальные mirror-ссылки официальных игорных заведений на аква казино гарантируют устойчивый соединение к гемблинг системам. Принцип зеркалирования образует аналогичные версии центрального сайта с поддержанием всех возможностей.
Алгоритм открытия счета через альтернативный домен в точности копирует базовую бланк. Новые пользователи прописывают рабочий email, формируют стойкий ключ и фиксируют операционную валюту.
Подтверждение аккаунта включает предоставления удостоверений по KYC-нормам. Снимок водительских прав, валидация резиденции и денежные параметры анализируются посредством программную валидацию в течение 24-72 периодов.
Вход верифицированных игроков происходит через обычную окно с двухфакторной верификацией. Краткосрочные коды отправляются на телефонный аппарат или email.
Функционал пополнительного раздела через зеркала поддерживает распространенные денежные системы. Visa, Mastercard, онлайн хранилища Skrill, Neteller, блокчейн-токены Bitcoin, Ethereum процессируются с сокращенными комиссиями 0-3%.
Азартная каталог копируется целиком включая барабаны, классические забавы, live-дилеров и мегавыигрыши. RTP-значения, колебания и ставочные требования поддерживаются такими же.
Подарочная схема выполняется похоже основному сайту. Welcome-наборы, фриспины, кешбэк и VIP-программы активируются автоматически при достижении прописанных условий.
New online casino Australia 2025 – fresh sites with huge welcome bonuses
next https://toast-wallet.net/
FilterFactory Depot Hub – Easy interface and well-laid-out product info make exploring effortless.
huarenus平台结合大数据AI分析,专为海外华人设计,提供高清视频和直播服务。
超人和露易斯第三季高清完整版运用AI智能推荐算法,海外华人可免费观看最新热播剧集。
Design Drift Vault – Beautifully displayed products and easy browsing made shopping fun.
seonexus.click – Color palette felt calming, nothing distracting, just focused, thoughtful design.
лицензионные онлайн казино с выводом денег https://t.me/toplistcasino
Подбор качественного развлекательного заведения в актуальных рамках предполагает особого анализа к правовому уровню. Знающие клиенты знают, что tip top casino предоставляет современную данные о активных площадках.
Алгоритм регистрации в сертифицированных заведениях предусматривает неизбежную валидацию идентичности. KYC-процедуры обеспечивают как оператора, так и геймера от обмана. Переходные рамки на вывод денег до завершения валидации – обычная подход.
Электронные блокировки на подключение к betting площадкам решаются через параллельные URL. Активные отражения предоставляют всестороннюю производительность базового сервиса. Финансовые процедуры, игровой достижения и льготные планы продолжают неизменными.
Экономическая стабильность характеризуется уровнем внедренных расчетных инструментов. SSL-безопасность, PCI DSS валидация и двухфакторная проверка устанавливают прочный щит ограждения.
Интерактивная ассортимент лицензированных операторов содержит барабаны от известных разработчиков. RTP-показатели, волатильность и алгоритмические системы испытывают нейтральную проверку в авторизованных организациях.
Планы поощрения в надежных казино строятся на понятных условиях активности. Требования x35-40 считается адекватным для машина-привилегий, в то время как стандартные развлечения принимаются в расчет с уменьшенным фактором.
Выбор безопасного казино площадки заставляет основательного исследования официальных разрешений. Новые ресурсы РЎСѓРєР° казино предоставляют пользователям абсолютную информацию о собственных аккредитациях.
Процедура оформления счета охватывает различные принудительных фаз проверки. Администраторы запрашивают удостоверения, подтверждающие персону и дееспособность. Стандартный KYC-регламент продолжается от 24 до 72 временных отрезков.
Управление банком открывается с назначения границ на инвестиции. Искусные участники советуют применять норму 5% от итогового гемблинг бюджета на индивидуальную раунд.
Цифровые блокировки владельцев побуждают применять вспомогательные пути. Копии поддерживают абсолютную функциональность базового платформы, подразумевая историю переводов и казино успех.
Современные банковские инструменты обеспечивают оперативные вклады через электронные аккаунты. Bitcoin, Ethereum и устойчивые монеты обеспечивают конфиденциальность и наименьшие отчисления. Период выполнения снятий достигает 10-30 промежутков.
Программы лояльности охватывают многоуровневые категории с возрастающим вознаграждением. VIP-представители обеспечивают индивидуальные поощрения, улучшенные пределы и опережающую техподдержку.
The Craft Stitch – Beautiful items with clear explanations make selecting products enjoyable.
Through sports betting us you can access a highly sophisticated trading platform for sports, allowing for more strategic bets than a standard bookmaker. It’s perfect for those who like to analyze stats deeply.
Do you like excitement? licensed casino spain you can enjoy a very immersive atmosphere with localized themes that resonate well with the Spanish audience. The bonuses are transparent and easy to track within your personal account.
Using rupee gambling site ensures you get localized support that understands the specific needs and preferences of players in the region. Their 24/7 live chat is always ready to assist with any payment queries.
notebookcentral.shop – Well-organized pages and clear product info made the shopping experience enjoyable.
growthrouter.click – Navigation felt smooth, found everything quickly without any confusing steps.
Online casino real money pokies Australia – win real cash now
blog https://toast-wallet.net
Инновационные операторы гемблинг игр предлагают участникам путь к высококлассному гемблингу через защищенные казино Болливуд порталы. Легальная операционная активность предполагает следования строгих правовых норм.
Процесс регистрации клиентского профиля охватывает подтверждение приватных сведений. Администраторы применяют детализированные процедуры KYC и AML для недопущения мошеннических финансовых действий.
Технические платформы современных беттинг площадок основываются на безопасных дата-центрах с криптографическими технологиями. Территориальные ограничения побуждает провайдеров разрабатывать дублирующие домены.
Параллельные ресурсы формируют идентичные клоны основного домена с поддержанием всех функций и информации. Клиенты достигают постоянный соединение к капиталу, развлекательной статистике и личным опциям.
Денежные переводы выполняются через связанные финансовые агрегаторы. Пределы на вклады и обналичивания фиксируются в гармонии с регуляторными критериями и собственными политиками минимизации опасностей.
Квалифицированные пользователи предлагают контролировать статус разрешения через контролирующие реестры игорных комиссий. Статусные критерии содержат ранги на профильных сервисах и комментарии подлинных беттеров.
塔尔萨之王第三季高清完整官方版,海外华人可免费观看最新热播剧集。
growthninja.click – Content reads clearly, helpful examples made concepts easy to grasp.
Новейшие участники имеют дело с массой технических нюансов при операциях с сертифицированными площадками. Профессиональные источники типа tip top casino выдают актуальную сведения о операциях казино компаний.
Механизм проверки учетной записи предполагает множество неотъемлемых этапов. Исходная валидация требует отправки свидетельств валидирующих индивидуальность. Привычный набор содержит удостоверение личности, автолицензию или международное ID.
Цифровая компонента открытия счета включает задействование безопасного соединения и двухфакторной аутентификации. Экспертные пользователи советуют активировать все возможных функций обеспечения.
Дублирующие порталы являются точные клоны основного ресурса с хранением тотального арсенала. Важнейшее достоинство кроется в схожести денежных лимитов и критериев отыгрыша.
Механизм обнаружения рабочих дублирующих порталов опирается на отслеживании специализированных уведомительных сервисов и союзных площадок. Экспертные геймеры задействуют виртуальные частные сети для гарантирования стабильного связи независимо от местных барьеров.
What is the best online casino in Australia for real money?
Do you have a spam problem on this website; I also
am a blogger, and I was wanting to know your situation; we have created some nice practices and we
are looking to trade techniques with other folks, why not shoot me an email if interested.
我欲为人第二季平台结合大数据AI分析,专为海外华人设计,提供高清视频和直播服务。
海外华人必备的iyifan平台,提供最新高清电影、电视剧,无广告观看体验。
заправка картриджей заправка картриджей .
Best online casino Australia real money app – mobile gaming
真实的人类第三季高清完整版采用机器学习个性化推荐,海外华人可免费观看最新热播剧集。
Легальные операторы гэмблинг возможностей гарантируют участникам право к элитному гэмблингу через dedicated сайты, включая казино Гризли , которые специально придерживаются transnational стандарты надёжности.
Механизм регистрации necessita указания authentication сведений через безопасные SSL-каналы. Букмекеры просят предоставить нотариальное verification правоспособности и места проживания для исполнения юрисдикционных требований.
Двухэтапная идентификация является required элементом актуальных solutions безопасности. Участники располагают SMS-пароли, push-оповещения или задействуют targeted софт вроде Google Authenticator.
Дублирующие адреса ликвидируют вопросы geographic ограничений и DDoS-воздействий. Фактически mirrors образуют идентичные копии главного портала с обеспечением features и пользовательских данных.
Компетентные игроки призывают хранить current перечни действующих mirrors в favourites веб-клиента. Операторы передают сведения о актуальных доменах через e-mail, Telegram-communities и mobile приложения.
Финансовые переводы через надёжные платформы secured защитными технологиями категории банковского сектора. Extraction средств выполняется единственно на верифицированные счета собственника учётной записи.
Перемещение в мире официальных порталов требует понимания современных инструментов авторизации. Профессиональные участники эксплуатируют tip top casino для добывания свежей данных о оперативных доменах.
Алгоритм регистрации учетной записи в надежных операторах охватывает тщательную проверку. Передовые провайдеры используют KYC-протоколы и AML-правила. Оформление документов составляет от 24 до 72 интервалов.
Цифровые способы для преодоления препятствий совершенствуются вместе с повышением регуляторных шагов. VPN-инструменты категории premium предлагают кодирование AES-256 и методы OpenVPN. Непрерывность коннекта принципиально существенна для привилегированных сессий.
Зеркальные сайты оперируют через локально распределенные технические системы. CDN-комплексы обеспечивают быструю латентность для международных клиентов. Системное маршрутизация срабатывает при идентификации недоступности основного сайта.
Экономические манипуляции в официальных юрисдикциях отвечают определенным требованиям PCI DSS. Децентрализованные платежи увеличивают популярность из-за конфиденциальности и быстроте реализации.
Переносные софт ведущих операторов интегрируют физиологическую авторизацию и push-оповещения для ключевых происшествий. Настраиваемый дизайн автономно подстраивается под характеристики экрана.
一帆官方认证平台,专为海外华人设计,24小时不间断提供高清视频和直播服务。
Neuro Relief USA: 300 mg neurontin – Neuro Relief USA
奇思妙探高清完整版AI深度学习内容匹配,海外华人可免费观看最新热播剧集。
Ориентирование в секторе официальных ресурсов включает представления продвинутых решений доступа. Профессиональные участники внедряют Голд казино для извлечения релевантной данных о работающих URL.
Алгоритм формирования учетной записи в проверенных компаниях содержит тщательную верификацию. Современные операторы задействуют KYC-протоколы и AML-критерии. Оформление документов составляет от 24 до 72 часов.
Цифровые способы для прохождения запретов совершенствуются одновременно с интенсификацией правовых мер. VPN-платформы уровня premium предлагают шифрование AES-256 и протоколы OpenVPN. Постоянство соединения принципиально значима для высокоролловых раундов.
Альтернативные домены действуют через географически расположенные цифровые кластеры. CDN-системы предоставляют низкую отклик для азиатских геймеров. Техническое переключение инициируется при детекции ограничения главного домена.
Денежные манипуляции в легальных зонах соответствуют четким стандартам PCI DSS. Крипто переводы получают распространение вследствие анонимности и оперативности процессинга.
Мобильные клиенты ведущих брендов объединяют биометрическую авторизацию и push-извещения для принципиальных эпизодов. Модифицируемый облик программно подстраивается под параметры экрана.
Core Web Vitals Online – Pages load quickly and design is straightforward, making it easy to explore.
Ahaa, its pleasant dialogue regarding this piece of writing at this place at this web site,
I have read all that, so at this time me also commenting here.
Передовые игроки сталкиваются с сложностью связи к сертифицированным ресурсам. Компании закрывают первичные ссылки, но профессиональные mad casino зеркало клиенты осознают о наличии зеркальных сайтов.
Дополнительный домен является точную отображение первичного сайта. SSL-сертификаты сохраняются такими же. Платёжные процедуры проходят через идентичные шлюзы.
Технология регистрации через дополнительный ссылку подразумевает стандартной проверки. Менеджеры уточняют бумаги для исполнения KYC-норм. Персональные данные подвергаются многоуровневую проверку.
Пополнительные рамки на параллельных площадках равняются базовым спецификациям. Низшие ставки остаются неизменными. Накопительные банки синхронизируются между разными доменами.
Стимулирующие планы действуют завершённо на альтернативных площадках. Множитель ставок сохраняет базовые параметры. Длительность оборота продолжается.
Сервис сопровождения решает запросы с зеркальных ссылок сходным образом. Мгновенный разговор осуществляет круглосуточный формат функционирования.
真实的人类第三季高清完整版,海外华人可免费观看最新热播剧集。
Asking questions are really good thing if you are not understanding anything completely, except this article presents good understanding yet.
For quick
best personal loan rates instant approval
to stay ahead.
爱亦凡海外版,专为华人打造的高清视频平台,支持全球加速观看。
海外华人必备的ify官方认证平台,24小时不间断提供最新高清电影、电视剧,无广告观看体验。
Real Money Best Baccarat Bonuses For Aussies
Card Craft Collection – Loved the unique options and all descriptions were straightforward.
Современные игроки встречаются с набором технологических аспектов при операциях с легальными площадками. Специализированные сайты типа тип топ казино дают новую сведения о деятельности гэмблинговых компаний.
Система аутентификации профиля содержит ряд неотъемлемых шагов. Стартовая аутентификация предполагает загрузки удостоверений верифицирующих личность. Классический список содержит свидетельство, лицензию водителя или заграничное удостоверение.
Цифровая сторона открытия счета подразумевает применение защищенного протокола и 2FA. Экспертные игроки советуют инициировать все представленных функций охраны.
Дублирующие порталы образуют идентичные клоны первичного сайта с удержанием тотального набора функций. Важнейшее плюс содержится в идентичности платежных пределов и параметров отыгрыша.
Алгоритм поиска рабочих резервных ссылок базируется на контроле специализированных телеграм-каналов и партнерских ресурсов. Опытные клиенты внедряют прокси-соединения для предоставления устойчивого доступа вне зависимости от географических лимитов.
官方授权的电影网站推荐,第一时间海外华人专用,第一时间支持中英双语界面和全球加速。
https://neuroreliefusa.shop/# buy cheap neurontin
Беттинговая отрасль отображает быстрый расширение, завлекая легионы пользователей. Опытные площадки дают безопасную атмосферу для ставок. Полную сведения о таких брендах возможно отыскать на тип топ казино официальный сайт .
Легализация составляет главным критерием выбора портала. Лицензиаты Мальты дают жёсткий надзор расчётных операций. Любая лицензированная ресурс проходит периодические контроли RNG-модулей.
Программные параметры передовых игорных домов предусматривают SSL-криптографию расчётного категории. Разработчики виртуального обеспечения наподобие Microgaming, NetEnt, Pragmatic Play интегрируют комплексные алгоритмы произвольных величин.
Процедура валидации профиля подразумевает представления удостоверений KYC-уровня. Документ, подтверждение о средствах, верификация адреса — типичный список для полноценного авторизации.
Альтернативные адреса убирают препятствия с блокировками поставщиков. Свежие копии изменяются систематически IT отделами. Портативные программы часто функционируют качественнее браузерных вариантов.
Управление банкроллом устанавливает стратегическую успешность игровых периодов. Квалифицированные пользователи предлагают сокращать сумму вейджера до 1-2% от полного капитала.
Global Gear World – Simple layout and organized sections made checking products hassle-free.
Hello there! Would you mind if I share your blog with my facebook group?
There’s a lot of folks that I think would really enjoy your content.
Please let me know. Thank you
Anime Avenue Marketplace – Unique selection with smooth, user-friendly navigation.
Передовые игроки встречаются с огромным количеством технических особенностей при деятельности с сертифицированными сайтами. Специализированные сайты типа аква казино предоставляют релевантную данные о функционировании гэмблинговых операторов.
Система аутентификации счета включает множество необходимых фаз. Начальная аутентификация требует передачи бумаг валидирующих индивидуальность. Типовой пакет содержит ID, автолицензию или внешний паспорт.
Техническая часть оформления предполагает задействование зашифрованного канала и двухуровневой проверки. Продвинутые пользователи рекомендуют инициировать полный набор имеющихся опций обеспечения.
Запасные домены образуют полные копии основного платформы с обеспечением всего возможностей. Ключевое выгода содержится в соответствии расчетных пределов и требований условий прокрутки.
Система выявления актуальных резервных ссылок основывается на наблюдении профессиональных мессенджер групп и аффилированных площадок. Квалифицированные пользователи используют анонимайзеры для создания постоянного доступа без оглядки от региональных ограничений.
online pharmacies
Выбор качественного игрового заведения в сегодняшних границах нуждается повышенного изучения к лицензионному режиму. Знающие пользователи учитывают, что винити казино содержит современную материалы о активных операторах.
Механизм записи в проверенных сервисах включает принудительную валидацию удостоверения. KYC-стандарты охраняют как площадку, так и участника от обмана. Промежуточные лимиты на снятие капитала до выполнения подтверждения – нормальная система.
Цифровые барьеры на доступ к betting сайтам устраняются через дублирующие ссылки. Доступные дубликаты гарантируют тотальную работоспособность главного ресурса. Расчетные переводы, интерактивный результаты и бонусные программы продолжают константными.
Финансовая стабильность измеряется степенью эксплуатируемых денежных механизмов. SSL-шифрование, PCI DSS подтверждение и многоуровневая подтверждение создают защищенный заслон безопасности.
Геймплейная набор проверенных сервисов включает слоты от топовых создателей. RTP-показатели, вариативность и расчетные системы испытывают внешнюю сертификацию в утвержденных лабораториях.
Системы стимулирования в надежных заведениях строятся на прозрачных правилах отыгрыша. Требования x35-40 считается справедливым для слот-подарков, в то время как стандартные состязания включаются в зачет с сниженным процентом.
additional hints https://toast-wallet.net
logocraft.shop – Clean navigation and helpful guides make creating and ordering logos simple.
Новейшие участники попадают с проблемой входа к проверенным порталам. Организации закрывают основные домены, но грамотные [url=https://sklerozamultiplex.eu/igrayte-v-retroigry-onlaynkazino-v-2024-godu-s-besplatnymi-promokodami/]ретро официальный сайт[/url] клиенты осознают о существовании параллельных ресурсов.
Резервная ссылка является полную воспроизведение оригинального платформы. SSL-сертификаты сохраняются аналогичными. Финансовые действия осуществляются через идентичные шлюзы.
Процедура открытия счёта через параллельный ресурс требует типовой аутентификации. Менеджеры запрашивают справки для осуществления KYC-стандартов. Идентификационные информация реализуют усиленную аутентификацию.
Вносительные границы на дополнительных платформах соответствуют первичным характеристикам. Стартовые ставки поддерживаются фиксированными. Прогрессивные выигрышные пулы координируются между множественными адресами.
Стимулирующие планы функционируют завершённо на дополнительных платформах. Требования по обороту поддерживает оригинальные величины. Временные рамки оборота поддерживается.
Сервис поддержки обрабатывает заявки с альтернативных ресурсов равнозначно. Живой чат осуществляет 24-часовой порядок функционирования.
Shop Coffee Crush Picks – Great product selection and easy-to-read details made choosing simple.
Ориентирование в сфере легальных ресурсов предполагает понимания новых решений доступа. Квалифицированные пользователи задействуют mad casino для обретения новейшей информации о активных ссылках.
Механизм создания учетной записи в надежных компаниях содержит детальную аутентификацию. Актуальные организации используют KYC-механизмы и AML-стандарты. Документальная процедура потребляет от 24 до 72 временных отрезков.
Компьютерные методы для преодоления блокировок совершенствуются вместе с укреплением юридических решений. VPN-решения разряда premium обеспечивают кодирование AES-256 и протоколы OpenVPN. Устойчивость коннекта fundamentally актуальна для высокоролловых игровых периодов.
Запасные адреса работают через пространственно распределенные IT кластеры. CDN-системы поддерживают быструю отклик для глобальных клиентов. Техническое маршрутизация запускается при выявлении барьера центрального сайта.
Денежные транзакции в легальных областях подпадают под четким нормам PCI DSS. Криптовалютные переводы набирают актуальность благодаря скрытности и динамике реализации.
Планшетные софт топовых организаций совмещают физиологическую авторизацию и push-сообщения для существенных моментов. Настраиваемый оформление самостоятельно корректируется под настройки экрана.
真实的人类第一季高清完整版AI深度学习内容匹配,海外华人可免费观看最新热播剧集。
What online casino actually pays out in Australia?
爱亦凡海外版,专为华人打造的高清视频平台,支持全球加速观看。
поставщик медицинского оборудования medicinskoe-oborudovanie-77.ru .
Neuro Relief USA: how much is generic neurontin – neurontin 30 mg
FiberFoods Marketplace – Healthy selections and intuitive interface make exploring simple and fun.
Исследование в области сертифицированных сайтов включает представления современных инструментов подключения. Квалифицированные пользователи используют казино Клубника для добывания актуальной информации о работающих путях.
Процедура создания профиля в проверенных организациях содержит многоуровневую валидацию. Продвинутые поставщики применяют KYC-протоколы и AML-правила. Оформление документов составляет от 24 до 72 временных отрезков.
Цифровые методы для минования ограничений эволюционируют параллельно с интенсификацией законодательных мер. VPN-сервисы класса premium гарантируют защиту AES-256 и методы OpenVPN. Надежность соединения fundamentally существенна для элитных игровых периодов.
Зеркальные ресурсы оперируют через пространственно распределенные цифровые мощности. CDN-архитектуры гарантируют минимальную пинг для американских игроков. Системное маршрутизация инициируется при детекции блокировки основного ресурса.
Финансовые движения в легальных территориях следуют строгим требованиям PCI DSS. Цифровые платежи приобретают востребованность благодаря секретности и быстроте выполнения.
Переносные программы элитных операторов объединяют физиологическую проверку и push-оповещения для существенных эпизодов. Гибкий облик самостоятельно адаптируется под параметры панели.
Hey! I’m at work surfing around your blog from my new iphone!
Just wanted to say I love reading through your blog and look forward to
all your posts! Keep up the outstanding work!
Актуальные игроки сталкиваются с барьером подключения к легальным ресурсам. Организации фильтруют базовые домены, но опытные казино СЂР° клиенты помнят о доступности резервных площадок.
Параллельный портал формирует стопроцентную отображение первичного портала. SSL-сертификаты сохраняются идентичными. Платёжные действия выполняются через сходные сервисы.
Технология оформления профиля через резервный адрес подразумевает привычной аутентификации. Менеджеры выясняют свидетельства для выполнения KYC-норм. Индивидуальные данные выполняют двухфакторную валидацию.
Вносительные ограничения на параллельных площадках аналогичны первичным спецификациям. Начальные суммы продолжают фиксированными. Накопительные банки объединяются между многочисленными ссылками.
Премиальные планы функционируют завершённо на резервных платформах. Вейджер гарантирует первоначальные значения. Период действия использования сохраняется.
Отдел поддержки изучает запросы с резервных адресов таким же способом. Прямой разговор обеспечивает 24-часовой формат обслуживания.
Data Fort Shop – Organized pages with helpful information allowed me to navigate easily.
艾一帆海外版,专为华人打造的高清视频平台,支持全球加速观看。
laptopvault.shop – Smooth interface and helpful product info make shopping quick and easy.
Email Tools – Navigation is straightforward and the layout feels very clean.
Choosing betao betting site was a great decision for my weekend parlays because their multi-bet bonuses are quite generous. I’ve already had a couple of successful withdrawals that were handled without any issues.
Кстати, если вы часто смотрите кино на iPhone и хотите сберечь аккумулятор в 2026 году, загляните сюда.
Смотрите сами:
https://iphoneservice59.ru/news/kak-prodlit-zhizn-akkumulyatora-iphone-v-2026-godu-prostye-sovety-ot-masterov-servisa/
Go to latest slot games if you want to experience high-quality live casino games with professional dealers and HD streaming. It really feels like being in a real casino from the comfort of your living room.
Xevoria Official Store – Really appreciate the sleek layout and how simple it is to place an order.
вакансия администратор trudvsem.kz .
Отбор качественного betting ресурса в современных обстоятельствах требует повышенного рассмотрения к регулятивному статусу. Опытные пользователи учитывают, что казино Клубника содержит современную данные о действующих провайдерах.
Алгоритм записи в сертифицированных сервисах включает принудительную проверку удостоверения. KYC-правила охраняют как заведение, так и клиента от фрода. Временные границы на вывод средств до завершения проверки – обычная процедура.
Электронные препятствия на соединение к игровым ресурсам обходятся через альтернативные адреса. Активные клоны обеспечивают стопроцентную работоспособность основного портала. Расчетные операции, развлекательный продвижение и бонусные схемы сохраняются устойчивыми.
Материальная надежность выражается показателем внедренных денежных инструментов. SSL-защита, PCI DSS подтверждение и дополнительная проверка устанавливают защищенный барьер защиты.
Азартная набор легальных сервисов содержит машины от главных провайдеров. RTP-коэффициенты, волатильность и алгоритмические схемы испытывают независимую аудит в одобренных лабораториях.
Программы поощрения в серьезных сервисах опираются на ясных требованиях ставок. Требования x35-40 характеризуется приемлемым для автомат-поощрений, в то время как традиционные состязания учитываются в калькуляцию с уменьшенным показателем.
Активные альтернативные домены надежных азартных клубов на СЌРЅРѕРјРѕ казино дают беспрерывный коннект к геймерским системам. Технология дублирования строит эквивалентные реплики основного веб-площадки с фиксацией всех инструментов.
Механизм регистрации через резервную ссылку в точности имитирует оригинальную шаблон. Дебютные игроки вводят рабочий email, формируют стойкий шифр и назначают игровую курренси.
Идентификация личного кабинета включает отправки справок по KYC-нормам. Изображение водительских прав, подтверждение резиденции и банковские реквизиты контролируются системой программную проверку в течение 24-72 часа.
Аутентификация активных игроков реализуется через классическую форму с 2FA идентификацией. Временные пароли поступают на смс девайс или email.
Опции финансового блока через дублирующие порталы поддерживает востребованные денежные системы. Visa, Mastercard, цифровые счета Skrill, Neteller, криптовалюты Bitcoin, Ethereum осуществляются с оптимизированными платежами 0-3%.
Gaming база воспроизводится полностью включая барабаны, столовые развлечения, live-ведущих и прогрессивы. RTP-значения, вариативность и отыгрыш фиксируются неизменными.
Бонусная система действует аналогично основному сайту. Welcome-пакеты, безвозмездные спины, возврат средств и VIP-планы инициируются программно при соблюдении определенных критериев.
The portal new gaming link is known for its fast withdrawal system, with most requests being processed within the same business day. It’s refreshing to find a site that doesn’t hold onto your winnings for weeks.
domeo ремонт квартир отзывы domeo ремонт квартир отзывы .
https://smartgenrxusa.shop/# Smart GenRx USA
ifvod官方认证平台,专为海外华人设计,24小时不间断提供高清视频和直播服务。
海外华人必备的ify平台,提供最新高清电影、电视剧,无广告观看体验。
海外华人必备的iyf官方认证平台,24小时不间断提供最新高清电影、电视剧,无广告观看体验。
Visiting official gaming mirror gives you access to a legitimate gaming platform with clear terms and conditions regarding bonuses. The registration is fast, and the verification process didn’t take more than a few hours in my case.
Australian online casino legit – how to spot safe sites
canadian pharmacy levitra: Smart GenRx USA – pharmacy today
Is it legal to play online casino in Australia? – offshore options explained
Do you like excitement? mobile gaming app version is the most reliable mobile app source, ensuring a smooth gaming experience on any Android device. The installation process is extremely fast, and the app doesn’t lag even during peak hours.
Hello there! This blog post could not be written much better!
Looking at this article reminds me of my previous roommate!
He constantly kept preaching about this. I will send this article to him.
Fairly certain he’s going to have a good read. Thanks for sharing!
范德沃克第二季高清完整官方版,海外华人可免费观看最新热播剧集。
ifvod平台,专为海外华人设计,提供高清视频和直播服务。
Игровая сфера демонстрирует активный развитие, завлекая миллионы клиентов. Опытные сайты обеспечивают надёжную атмосферу для беттинга. Развёрнутую информацию о данных организациях реально получить на казино Голд .
Сертификация составляет основным элементом выбора ресурса. Регуляторы Кюрасао предоставляют серьёзный проверку валютных действий. Отдельная официальная портал осуществляет периодические инспекции RNG-алгоритмов.
IT параметры современных казино включают SSL-безопасность денежного уровня. Провайдеры компьютерного обеспечения класса Microgaming, NetEnt, Pragmatic Play добавляют многоуровневые схемы произвольных параметров.
Процесс проверки счёта предусматривает предоставления документов KYC-типа. Паспорт, подтверждение о заработке, удостоверение прописки — типичный комплект для финального входа.
Резервные URL ликвидируют сложности с запретами операторов. Актуальные копии адаптируются регулярно техническими отделами. Карманные приложения зачастую оперируют качественнее веб версий.
Контроль средств создаёт долгосрочную успешность развлекательных раундов. Грамотные участники советуют ограничивать сумму вейджера до 1-2% от общего бюджета.
Новейшие участники сталкиваются с затруднением подключения к легальным ресурсам. Поставщики запрещают стандартные URL, но профессиональные винити казино участники осознают о наличии зеркальных платформ.
Зеркало является абсолютную дубликат оригинального ресурса. Криптографические алгоритмы остаются неизменными. Расчётные операции производятся через аналогичные системы.
Технология открытия счёта через альтернативный ссылку предполагает классической аутентификации. Операторы запрашивают бумаги для исполнения KYC-норм. Персональные информация подвергаются усиленную подтверждение.
Банковские лимиты на альтернативных сайтах совпадают первичным условиям. Низшие беты остаются постоянными. Увеличивающиеся банки объединяются между многочисленными ресурсами.
Льготные программы действуют всесторонне на дополнительных площадках. Вейджер удерживает базовые параметры. Тайминг отыгрыша остаётся прежним.
Сервис сопровождения изучает обращения с параллельных порталов идентично. Живой чат предоставляет 24-часовой порядок оперирования.
凯伦皮里第二季高清完整版智能AI观看体验优化,海外华人可免费观看最新热播剧集。
塔尔萨之王高清完整版,海外华人可免费观看最新热播剧集。
Learning Inbox – Well-laid-out sections and smooth browsing made discovering services enjoyable.
我欲为人第二季平台,专为海外华人设计,提供高清视频和直播服务。
凯伦皮里第一季高清完整版,海外华人可免费观看最新热播剧集。
超人和露易斯第一季高清完整版运用AI智能推荐算法,海外华人可免费观看最新热播剧集。
A story of balance and magic. An Arcane Inheritance is harmonious, available in PDF. This digital format is balanced. Download it now and see how the protagonist maintains balance with an arcane inheritance. https://anarcaneinheritancepdf.top/ An Arcane Inheritance Pdf Full Version
iyf.tv海外华人首选,提供最新华语剧集、美剧、日剧等高清在线观看。
Play Baccarat Online Australia Real Money Tables
Поиск в секторе официальных порталов подразумевает знания современных способов доступа. Продвинутые игроки задействуют винити казино для приобретения релевантной сведений о оперативных путях.
Схема формирования счета в сертифицированных организациях включает детальную верификацию. Актуальные провайдеры задействуют KYC-механизмы и AML-критерии. Оформление документов потребляет от 24 до 72 периодов.
IT методы для преодоления ограничений улучшаются параллельно с интенсификацией нормативных решений. VPN-сервисы уровня premium дают криптографию AES-256 и методы OpenVPN. Устойчивость подключения жизненно важна для VIP игровых периодов.
Альтернативные сайты функционируют через локально разнесенные серверные кластеры. CDN-архитектуры предоставляют оптимальную латентность для азиатских пользователей. Техническое роутинг активируется при распознавании ограничения основного ресурса.
Платежные транзакции в официальных территориях подчиняются жестким стандартам PCI DSS. Блокчейн расчеты получают актуальность вследствие секретности и оперативности реализации.
Переносные клиенты лучших провайдеров объединяют физиологическую подтверждение и push-сообщения для существенных ситуаций. Гибкий облик автоматически подстраивается под свойства матрицы.
I find that reading makes me a better writer. An archive of romance is my study guide. I read widely, downloading PDF novels to analyze dialogue and pacing, which helps me improve my own creative writing skills. https://anarchiveofromancepdf.top/ An Archive Of Romance Dark Academia Pdf
Функционирующие mirror-ссылки проверенных гемблинг-платформ на казино Вован обеспечивают постоянный доступ к гемблинг системам. Принцип клонирования формирует идентичные копии главного сайта с сохранением всех инструментов.
Механизм регистрации через альтернативный домен в точности повторяет оригинальную шаблон. Новые геймеры заполняют активный email, придумывают надежный секретную комбинацию и фиксируют базовую финансовый инструмент.
Идентификация личного кабинета подразумевает представления документов согласно KYC-регламенту. Скан паспорта, верификация места жительства и платежные данные проходят алгоритмическую валидацию в течение 24-72 ч.
Авторизация верифицированных пользователей происходит через стандартную интерфейс с двухфакторной идентификацией. Сессионные шифры передаются на телефонный номер или почтовый ящик.
Механизмы пополнительного компонента через альтернативные домены содержит топовые банковские механизмы. Visa, Mastercard, цифровые кошельки Skrill, Neteller, криптовалюты Bitcoin, Ethereum осуществляются с низкими сборами 0-3%.
Азартная каталог повторяется на сто процентов включая spinning games, настольные активности, live-дилеров и джекпоты. RTP-индикаторы, изменчивость и отыгрыш сохраняются неизменными.
Поощрительная схема выполняется подобно основному сайту. Welcome-бандлы, free spins, возврат средств и VIP-курсы запускаются машинально при исполнении установленных требований.
http://ivertherapeutics.com/# Iver Therapeutics
шумоизоляция арок авто
我欲为人第二季官方认证平台,专为海外华人设计,24小时不间断提供高清视频和直播服务。
Modern Purair
416 Meridian Ɍd SE #14A, Calgary
AB T2Ꭺ 1X2, Canada
(403) 800-7254
Indoor Air Expert
爱一凡海外版,专为华人打造的高清视频平台运用AI智能推荐算法,支持全球加速观看。
выездной шиномонтаж круглосуточно https://vyezdnoj-shinomontazh-77.ru
Надёжные операторы игровых возможностей дают геймерам право к элитному азартному досугу через тематические сайты, включая Клубника казино , которые именно придерживаются глобальные требования надёжности.
Процедура активации требует заполнения authentication сведений через криптографические SSL-каналы. Администрация просят нотариальное подтверждение дееспособности и региона нахождения для compliance нормативных норм.
Multi-factor верификация представляет принудительным компонентом передовых систем security. Пользователи располагают SMS-пароли, push-оповещения или применяют dedicated программы наподобие Google Authenticator.
Mirror порталы нейтрализуют препятствия локальных блокировок и DDoS-штурмов. С технической точки зрения mirrors формируют дублированные реплики основного сайта с сохранением опций и user деталей.
Профессиональные участники предлагают хранить свежие перечни рабочих копий в favourites веб-клиента. Администрация направляют updates о свежих порталах через e-mail, Telegram-чаты и мобильные софт.
Банковские процедуры через legal ресурсы гарантированы криптографическими methods стандарта банковского индустрии. Изъятие денег производится solely на проверенные wallets хозяина аккаунта.
If you would like to improve your experience just keep visiting this web site and be updated with the
newest information posted here.
My blog jual obat kuat
Современные игроки имеют дело с изобилием программных нюансов при деятельности с легальными сайтами. Профессиональные порталы типа Клубника казино поставляют свежую информацию о процессах развлекательных операторов.
Система верификации профиля содержит несколько обязательных шагов. Базовая аутентификация требует предоставления свидетельств верифицирующих гражданство. Типовой список содержит паспорт, лицензию водителя или внешний паспорт.
Системная элемент создания аккаунта предполагает использование криптографической защиты и двухуровневой проверки. Экспертные участники предлагают задействовать все доступных функций защиты.
Зеркала представляют идентичные копии главного сайта с сохранением полного набора функций. Ключевое достоинство состоит в подобии банковских ограничений и норм проигрыша.
Система обнаружения функционирующих зеркал опирается на контроле специализированных уведомительных сервисов и связанных площадок. Профессиональные участники задействуют VPN-сервисы для обеспечения бесперебойного входа независимо от географических блокировок.
медицинское оборудование для больниц medicinskoe-oborudovanie-213.ru .
https://www.lnrprecision.com/news/1xbet-promo-code_148.html
电影网站推荐,海外华人专用,支持中英双语界面和全球加速。
I for all time emailed this blog post page to
all my friends, because if like to read it then my links will too. https://cryptoboss990.top
Conversion Cove Portal – Well-structured pages with useful tips make using the site enjoyable.
Перемещение в области сертифицированных порталов предполагает представления передовых способов подключения. Квалифицированные игроки внедряют казино Болливуд для добывания актуальной материалов о оперативных URL.
Алгоритм создания счета в официальных учреждениях содержит сложную проверку. Актуальные поставщики применяют KYC-алгоритмы и AML-критерии. Документальное сопровождение требует от 24 до 72 периодов.
Компьютерные решения для минования препятствий совершенствуются одновременно с усилением нормативных инициатив. VPN-сервисы разряда premium обеспечивают шифрование AES-256 и технологии OpenVPN. Непрерывность подключения критически необходима для привилегированных заходов.
Дублирующие домены действуют через регионально распределенные серверные системы. CDN-структуры гарантируют минимальную пинг для европейских участников. Техническое роутинг запускается при детекции недоступности главного адреса.
Финансовые манипуляции в легальных зонах подпадают под жестким стандартам PCI DSS. Криптовалютные операции завоевывают актуальность благодаря секретности и оперативности обработки.
Мобильные клиенты ведущих операторов интегрируют физиологическую авторизацию и push-извещения для важных событий. Изменяемый интерфейс независимо корректируется под свойства матрицы.
愛海外版,专为华人打造的高清视频官方认证平台,支持全球加速观看。
Передовые операторы беттинг активностей дают игрокам доступ к элитному игровому процессу через безопасные аква казино системы. Авторизованная операционная активность предполагает исполнения строгих регуляторных стандартов.
Механизм оформления персонального учетной записи предусматривает верификацию приватных информации. Регуляторы задействуют расширенные процедуры KYC и AML для исключения мошеннических финансовых действий.
Программные платформы современных беттинг площадок строятся на защищенных хостингах с HTTPS стандартами. Геоблокировка заставляет провайдеров запускать альтернативные домены.
Резервные домены составляют полные копии базового домена с сохранением всех сервисов и информации. Участники приобретают устойчивый соединение к капиталу, беттинг данным и клиентским настройкам.
Финансовые операции производятся через связанные денежные процессоры. Лимиты на депозиты и обналичивания определяются в согласии с правовыми критериями и организационными правилами управления рисками.
Квалифицированные гемблеры рекомендуют проверять статус сертификата через государственные реестры игорных структур. Репутационные показатели задействуют места на тематических ресурсах и feedback подлинных игроков.
GhostGear World Online – Clear design and intuitive navigation made exploring products fast.
Shop Anchor Atlas Resources – Helpful insights combined with a smooth, easy-to-use interface.
prescription meds without the prescription http://baypharm.top/# online-pharmacy
For the audio
where can i buy generic zyrtec no prescription
to explore the topic.
海外华人必备的ifun平台,提供最新高清电影、电视剧,无广告观看体验。
сыроедческий детокс http://rawrussia.ru .
海外华人必备的yifan平台运用AI智能推荐算法,提供最新高清电影、电视剧,无广告观看体验。
Shop Canada Cabin Picks – Cozy aesthetic and easy-to-use pages make finding items simple.
imp source https://toast-wallet.net
塔尔萨之王高清完整版AI深度学习内容匹配,海外华人可免费观看最新热播剧集。
捕风追影在线免费在线观看,海外华人专属平台采用机器学习个性化推荐,高清无广告体验。
愛海外版,專為華人打造的高清視頻官方認證平台,支持全球加速觀看。
уроки кайтсерфинга Хургада отзывы Кайт кайтинг кайтсёрфинг школа обучение сафари Дети ветра DETIVETRA
爱一帆会员多少钱海外版,专为华人打造的高清视频平台采用机器学习个性化推荐,支持全球加速观看。
Рабочие альтернативные домены официальных гемблинг-платформ на типпи регистрация предоставляют стабильный соединение к азартным сервисам. Методика дублирования генерирует идентичные реплики корневого ресурса с фиксацией всех функций.
Процедура открытия счета через дублирующий портал полностью воспроизводит стандартную шаблон. Новые геймеры вводят действующий email, создают стойкий шифр и выбирают основную денежную единицу.
Валидация счета содержит отправки справок в соответствии с KYC-регламенту. Фото водительских прав, свидетельство проживания и карточные реквизиты контролируются системой автоматическую верификацию в течение 24-72 временных единиц.
Авторизация активных игроков происходит через базовую окно с многоступенчатой валидацией. Краткосрочные пароли приходят на смс гаджет или мейл.
Механизмы пополнительного сектора через дублирующие порталы поддерживает актуальные денежные платформы. Visa, Mastercard, веб счета Skrill, Neteller, цифровые активы Bitcoin, Ethereum обрабатываются с низкими процентами 0-3%.
Развлекательная база воспроизводится в точности включая барабаны, традиционные игры, live-ведущих и джекпоты. RTP-значения, колебания и вейджер остаются идентичными.
Акционная механизм действует аналогично центральному веб-площадке. Welcome-бандлы, бесплатные вращения, кешбэк и VIP-схемы включаются системно при соблюдении определенных требований.
Visit Click Craft Online – Great little shop with neat, unique products to explore.
Новейшие геймеры встречаются с затруднением входа к официальным порталам. Операторы фильтруют стандартные домены, но искушённые казино аква пользователи помнят о наличии зеркальных платформ.
Альтернативный адрес является полную копию первичного площадки. Системы безопасности работают такими же. Денежные переводы проходят через те же сервисы.
Процедура регистрации через резервный ссылку предполагает обычной проверки. Специалисты просят удостоверения для осуществления KYC-правил. Индивидуальные информация выполняют многоуровневую подтверждение.
Депозитные рамки на резервных порталах равняются главным требованиям. Низшие суммы функционируют постоянными. Растущие накопления координируются между многочисленными порталами.
Стимулирующие схемы функционируют полноценно на альтернативных ресурсах. Коэффициент оборота сохраняет базовые величины. Временные рамки использования сохраняется.
Департамент сопровождения рассматривает обращения с зеркальных порталов сходным образом. Прямой диалог осуществляет 24-часовой режим обслуживания.
https://pfdsdfg.blogsvila.com/40270019/c%C3%B3digo-promocional-1xbet-n%C3%BAmero-2026-1xbro200
凯伦皮里第二季高清完整版运用AI智能推荐算法,海外华人可免费观看最新热播剧集。
labelcentral.shop – User-friendly layout and clear product info make exploring effortless.
捕风追影下载官方下载,海外华人专用,支持高速下载和离线观看。
捕风捉影在线免费在线观看,海外华人专属平台,高清无广告体验。
FanFriendly Select Shop – Organized sections and smooth design made shopping enjoyable.
Data Dock Shop – Organized design and helpful content made navigation a breeze.
Electrolyte World Online – Fast site layout and helpful details made everything simple today.
stromectol 3 mg tablets price: cost of stromectol medication – Iver Therapeutics
see page https://toast-wallet.net/
Australian online casinos real money – top rated and player approved
Does your website have a contact page? I’m having
trouble locating it but, I’d like to send you an e-mail. I’ve got some suggestions for your blog you might be interested in hearing.
Either way, great website and I look forward to seeing it develop over
time.
Подбор надежного казино портала требует глубокого изучения правовых бумаг. Актуальные платформы mad casino предлагают клиентам стопроцентную информацию о своих разрешениях.
Алгоритм регистрации подразумевает различные необходимых ступеней аутентификации. Провайдеры требуют удостоверения, устанавливающие персону и дееспособность. Типовой KYC-регламент составляет от 24 до 72 временных отрезков.
Финансовое планирование стартует с назначения ограничений на вклады. Квалифицированные клиенты рекомендуют эксплуатировать норму 5% от итогового гемблинг капитала на одну сессию.
Электронные барьеры поставщиков обязывают использовать вспомогательные маршруты. Альтернативы хранят абсолютную эффективность главного платформы, содержа летопись платежей и игровой продвижение.
Новые расчетные способы предоставляют быстрые депозиты через криптовалютные кошельки. Bitcoin, Ethereum и стейблкоины дают скрытность и мизерные отчисления. Время обработки снятий достигает 10-30 промежутков.
Программы приверженности предусматривают ступенчатые степени с прогрессивным бонусом. VIP-менеджеры гарантируют личные поощрения, улучшенные границы и первоочередную обслуживание.
Подбор надежного казино площадки заставляет детального изучения регулятивных разрешений. Новые порталы ретро регистрация предоставляют пользователям максимальную информацию о своих аккредитациях.
Процедура оформления счета содержит несколько необходимых стадий проверки. Операторы требуют удостоверения, доказывающие идентичность и правоспособность. Традиционный KYC-порядок длится от 24 до 72 временных отрезков.
Банкролл-менеджмент инициируется с установления границ на пополнения. Компетентные пользователи предлагают внедрять установку 5% от полного казино капитала на единичную сессию.
Системные ограничения владельцев вынуждают применять резервные пути. Клоны оберегают безусловную работоспособность центрального платформы, содержа историю платежей и азартный продвижение.
Передовые расчетные способы гарантируют оперативные вклады через виртуальные счета. Bitcoin, Ethereum и стейблкоины обеспечивают тайность и символические платежи. Срок реализации снятий насчитывает 10-30 промежутков.
Системы постоянства охватывают многоуровневые категории с увеличивающимся компенсацией. VIP-менеджеры гарантируют уникальные поощрения, расширенные рамки и преимущественную техподдержку.
塔尔萨之王第二季高清完整官方版,海外华人可免费观看最新热播剧集。
塔尔萨之王第三季高清完整官方版,海外华人可免费观看最新热播剧集。
愛壹帆海外版,专为华人打造的高清视频平台采用机器学习个性化推荐,支持全球加速观看。
huarenus平台,专为海外华人设计,提供高清视频和直播服务。
愛壹帆海外版,专为华人打造的高清视频官方认证平台,支持全球加速观看。
奇思妙探第二季高清完整官方版,海外华人可免费观看最新热播剧集。
Перемещение в пространстве проверенных платформ подразумевает представления продвинутых решений доступа. Опытные пользователи задействуют типпи казино для получения современной данных о действующих ссылках.
Схема создания счета в проверенных заведениях содержит тщательную проверку. Актуальные поставщики задействуют KYC-протоколы и AML-стандарты. Документальное сопровождение отнимает от 24 до 72 интервалов.
Компьютерные решения для обхода блокировок улучшаются синхронно с интенсификацией нормативных мер. VPN-решения категории premium дают кодирование AES-256 и системы OpenVPN. Постоянство соединения критически актуальна для премиальных партий.
Зеркальные сайты оперируют через пространственно распределенные IT инфраструктуры. CDN-сети предоставляют сокращенную пинг для азиатских участников. Автоматическое переключение активируется при распознавании недоступности базового домена.
Экономические манипуляции в проверенных зонах подчиняются конкретным критериям PCI DSS. Криптовалютные расчеты завоевывают распространение в результате анонимности и оперативности процессинга.
Планшетные приложения премиальных компаний содержат физиологическую авторизацию и push-сообщения для важных моментов. Настраиваемый оформление программно подстраивается под параметры дисплея.
Определение безопасного гемблинг ресурса нуждается детального изучения официальных свидетельств. Современные сайты казино лаки Р±РёСЂ предоставляют участникам полную факты о собственных аккредитациях.
Система создания профиля содержит различные требуемых фаз проверки. Представители просят справки, удостоверяющие идентичность и дееспособность. Обычный KYC-регламент требует от 24 до 72 промежутков.
Распоряжение капиталом инициируется с назначения границ на пополнения. Компетентные участники советуют использовать правило 5% от совокупного гемблинг капитала на единичную игру.
Технические барьеры провайдеров заставляют внедрять запасные ссылки. Дубликаты оберегают стопроцентную производительность первичного площадки, включая хронологию транзакций и гемблинг результаты.
Современные денежные методы гарантируют быстрые взносы через электронные аккаунты. Bitcoin, Ethereum и стейблкоины предоставляют тайность и наименьшие взносы. Период обработки выводов составляет 10-30 интервалов.
Программы лояльности подразумевают иерархические ранги с возрастающим бонусом. VIP-представители обеспечивают индивидуальные вознаграждения, усиленные пределы и приоритетную помощь.
stromectol medicine ivermectin cost canada ivermectin 2ml
http://ivertherapeutics.com/# ivermectin for sale
Iver Therapeutics: Iver Therapeutics – Iver Therapeutics
I have read so many articles on the topic of the blogger lovers but this piece of writing is actually a nice paragraph, keep
it up.
Проверенные ресурсы гэмблинг возможностей oferuja геймерам право к элитному азартному досугу через профильные порталы, включая лаки Р±РёСЂ , что придерживаются мировые нормы security.
Последовательность регистрации требует ввода верификационных параметров через криптографические SSL-каналы. Администрация просят официальное verification возраста и адреса нахождения для выполнения законодательных требований.
2FA аутентификация представляет обязательным aspect актуальных систем конфиденциальности. Участники обретают SMS-пароли, push-оповещения или используют dedicated приложения вроде Google Authenticator.
Зеркальные ссылки преодолевают проблемы географических ограничений и DDoS-воздействий. Технически реплики представляют дублированные копии основного портала с maintaining опций и индивидуальных информации.
Профессиональные пользователи рекомендуют поддерживать актуальные перечни функционирующих дублей в bookmark browser. Администрация направляют updates о свежих ссылках через email, Telegram-communities и телефонные apps.
Денежные операции через проверенные ресурсы гарантированы шифровальными протоколами level банковского направления. Снятие средств происходит исключительно на validated счета держателя аккаунта.
电影网站推荐,海外华人专用,支持中英双语界面和全球加速。
Надёжные ресурсы развлекательных опций дают игрокам вариант к элитному времяпрепровождению через целевые порталы, включая казино Вован , которые именно исполняют общепринятые стандарты безопасности.
Схема активации necessita предоставления верификационных информации через защищённые SSL-протоколы. Провайдеры demanded документальное verification дееспособности и локации жительства для compliance юрисдикционных норм.
Двухэтапная идентификация выступает необходимым составляющей новейших платформ надёжности. Клиенты обретают SMS-ключи, push-алерты или используют специальные утилиты в стиле Google Authenticator.
Резервные порталы ликвидируют трудности географических санкций и DDoS-нападений. С технической точки зрения реплики образуют дублированные dublicates центрального сайта с сохранением features и индивидуальных параметров.
Компетентные клиенты предлагают удерживать новейшие перечни working зеркал в bookmark интернет-программы. Провайдеры направляют информацию о современных адресах через email, Telegram-чаты и телефонные программы.
Денежные транзакции через надёжные ресурсы secured криптографическими алгоритмами класса банковского segment. Extraction средств реализуется единственно на validated данные хозяина account.
捕风追影线上看平台採用機器學習個性化推薦,專為海外華人設計,提供高清視頻和直播服務。
艾一帆海外版,专为华人打造的高清视频平台结合大数据AI分析,支持全球加速观看。
爱一凡海外版,专为华人打造的高清视频平台运用AI智能推荐算法,支持全球加速观看。
戏台在线免费在线观看,海外华人专属官方认证平台,高清无广告体验。
Действующие дублирующие порталы официальных игорных заведений на https://probeg-ag.ru гарантируют постоянный подключение к развлекательным порталам. Методика копирования строит полноценные версии корневого домена с консервацией всех механизмов.
Алгоритм открытия счета через mirror-сайт абсолютно воспроизводит стандартную форму. Дебютные участники прописывают действующий email, устанавливают стойкий секретную комбинацию и устанавливают базовую валюту.
Идентификация учетной записи требует отправки свидетельств в соответствии с KYC-нормам. Копия паспорта, верификация регистрации и карточные параметры подвергаются автоматическую контроль в течение 24-72 часа.
Авторизация действующих игроков происходит через стандартную окно с расширенной аутентификацией. Одноразовые коды отправляются на сотовый номер или мейл.
Механизмы входящего сектора через альтернативные домены обеспечивает популярные платежные сервисы. Visa, Mastercard, виртуальные балансы Skrill, Neteller, crypto Bitcoin, Ethereum реализуются с уменьшенными взносами 0-3%.
Игровая библиотека повторяется абсолютно включая spinning games, настольные геймплей, live-дилеров и джекпоты. RTP-показатели, дисперсия и отыгрыш сохраняются точными.
Бонусная механизм функционирует схоже корневому сайту. Welcome-наборы, бесплатные вращения, кешбэк и VIP-программы активируются системно при соблюдении фиксированных требований.
huarenus平台,专为海外华人设计,提供高清视频和直播服务。
Функционирующие резервные адреса официальных азартных клубов на френдс казино дают устойчивый коннект к гемблинг сервисам. Система реплицирования генерирует точные версии корневого ресурса с фиксацией всех инструментов.
Система регистрации через резервную ссылку в точности копирует основную анкету. Начинающие игроки регистрируют функционирующий email, устанавливают стойкий секретную комбинацию и фиксируют игровую денежную единицу.
Идентификация личного кабинета включает предоставления бумаг следуя KYC-регламенту. Снимок национального документа, подтверждение адреса и денежные параметры контролируются системой цифровую анализ в течение 24-72 часов.
Авторизация зарегистрированных пользователей происходит через обычную панель с многоступенчатой аутентификацией. Временные коды поступают на смс аппарат или email.
Функционал входящего сектора через mirror-сайты поддерживает топовые расчетные системы. Visa, Mastercard, виртуальные хранилища Skrill, Neteller, криптовалюты Bitcoin, Ethereum осуществляются с низкими взносами 0-3%.
Gaming каталог повторяется в точности включая автоматы, столовые развлечения, live-ведущих и прогрессивы. RTP-параметры, дисперсия и вейджер сохраняются неизменными.
Поощрительная механизм действует похоже центральному сайту. Welcome-бандлы, бесплатные вращения, компенсация и VIP-схемы включаются алгоритмически при выполнении заданных критериев.
For extra
can i buy cheap crestor without insurance
for industry standards.
take a look at the site here https://toast-wallet.net
戏台在线免费在线观看,海外华人专属官方认证平台,高清无广告体验。
Актуальные платформы развлекательных игр предоставляют клиентам возможность к премиальному игровому процессу через безопасные казино Голд ресурсы. Сертифицированная работа требует выполнения конкретных правовых стандартов.
Процесс открытия персонального аккаунта включает верификацию приватных реквизитов. Управляющие применяют расширенные механизмы KYC и AML для блокировки поддельных операций.
IT системы современных беттинг площадок функционируют на стабильных облачных системах с SSL сертификатами. Геоблокировка вынуждает администраторов создавать параллельные адреса.
Резервные ресурсы образуют точные дубликаты главного сайта с удержанием всех инструментов и сведений. Игроки добиваются стабильный соединение к балансу, гемблинг статистике и пользовательским настройкам.
Денежные транзакции выполняются через интегрированные платежные системы. Ограничения на пополнения и снятия регулируются в унисон с законодательными стандартами и корпоративными нормами риск-менеджмента.
Компетентные игроки рекомендуют мониторить положение авторизации через государственные регистры игорных органов. Имиджевые показатели содержат оценки на отраслевых порталах и оценки подлинных участников.
愛海外版,专为华人打造的高清视频平台,支持全球加速观看。
Office Must-Haves Online – Spotted unique gadgets and the purchase process was very simple.
growthfactory.click – Bookmarked this immediately, planning to revisit for updates and inspiration.
Новейшие операторы игорных продуктов предоставляют пользователям путь к премиальному азарту через надежные СЌРЅРѕРјРѕ казино сайты. Официальная функционирование требует учета строгих регуляторных норм.
Система активации индивидуального аккаунта предусматривает подтверждение личных информации. Управляющие используют детализированные алгоритмы KYC и AML для блокировки незаконных операций.
IT решения передовых игорных домов базируются на надежных серверах с TLS протоколами. IP-фильтрация заставляет владельцев разрабатывать резервные URL.
Резервные платформы формируют точные копии первичного сайта с фиксацией всех сервисов и данных. Пользователи получают постоянный связь к балансу, беттинг отчетности и клиентским настройкам.
Платежные операции выполняются через интегрированные банковские процессоры. Границы на депозиты и изъятия регулируются в соответствии с лицензионными требованиями и собственными правилами риск-менеджмента.
Экспертные гемблеры рекомендуют контролировать условия авторизации через государственные списки азартных структур. Имиджевые параметры включают рейтинги на экспертных ресурсах и отзывы истинных клиентов.
Australian online casino legit – how to spot safe sites
Asking questions are in fact good thing if you are not understanding anything completely, however this paragraph
offers nice understanding yet.
online pharmacy no prescription needed
Wenn man in den öffentlich-rechtlichen Kanälen herumtastet, kommt es einem zumindest so vor, als ob hinter dieser Pauschal-Aussage mehr steckt als nur eine simple Floskel. Neben dem bekannten Phänomen “Tatort” findet man da eine schier erdrückende Menge an deutschen Krimi-Reihen. Jede große Stadt und jede Region Deutschlands, die etwas auf sich hält, gönnt sich mindesten ein eigenes Ermittlerteam, wie es scheint. Durth, Werner (1998)Utopie der Gemeinschaft: Überlegungen zur Neugestaltung deutscher Städte 1900-1950. In: Moderne Architektur in Deutschland 1900 bis 2000: Macht und Monument; Ausstellung im Deutschen ArchitekturmuseumBuchkapitel, Bibliographie Zu hören am Sonntag 1. und 8. Januar 2012, 14 – 21 UhrUn souffle de vieVideo und elektroakustische Musik (2006, Deutsche Erstaufführung)von Mario Mary
https://www.aliceclarkplatts.com/mostbet-online-casino-review-fur-spieler-aus-deutschland/
Das Beste daran ist, dass Sie die Gewinne aus den Freispielen behalten können, vorausgesetzt, Sie erfüllen natürlich die Bonusanforderungen. Einzahlungsfreie Bonusangebote sind jedoch nicht die einzige Art von Free spins in Online-Spielotheken. Es gibt verschiedene Arten, um Ihr Glücksspielabenteuer noch spannender zu gestalten. So einige! Der Pirots Spielautomat kann bereits während des Grundspiels mit reichlich Funktionen überzeugen. Hierzu gehören unter anderem Wilds, Multiplikatoren, Avalanches, Symbol-Aufwertungen und Mystery-Symbole. Freispiele gibt es ebenfalls. Für Sportwetten Fans bietet der Buchmacher für den Start eine 5€ Gratiswette an. Diese kann ganz einfach aktiviert werden indem du die Registrierung auf der Seite abschließt und dein Spielerkonto verifizierst. Hierzu wirst du aufgefordert deine Identität mittels eines Ausweises oder Reisepasses zu bestätigen. Ebenfalls wird dein Bankkonto verifiziert. Sobald du dies gemacht hast, wird dir die Freiwette gutgeschrieben. Du kannst sie dann innerhalb von 7 Tagen auf alle beliebten Wettmärkte setzen und es gibt für dieses Bonusangebot keine Umsatzbedingungen. Das heißt, dass alle Gewinne, die du mit der Freiwette erzielst auch zu 100% auszahlbar sind.
塔尔萨之王第二季高清完整版,海外华人可免费观看最新热播剧集。
Развлекательная область являет динамичный рост, завлекая легионы геймеров. Квалифицированные ресурсы предлагают безопасную среду для игры. Полную сведения о указанных операторах можно отыскать на казино ретро .
Лицензирование составляет центральным показателем определения ресурса. Контролёры Мальты гарантируют тщательный контроль денежных манипуляций. Любая лицензированная сайт осуществляет регулярные инспекции RNG-генераторов.
Цифровые аспекты инновационных беттинг-платформ включают SSL-шифрование расчётного категории. Создатели компьютерного софта типа Microgaming, NetEnt, Pragmatic Play добавляют комплексные схемы рандомных чисел.
Процесс верификации учётной записи предусматривает направления свидетельств KYC-типа. Документ, свидетельство о прибылях, доказательство проживания — типичный комплект для полноценного подключения.
Дублирующие ссылки решают сложности с запретами провайдеров. Свежие альтернативы корректируются постоянно программными службами. Мобильные приложения обычно работают устойчивее онлайн форматов.
Распределение капитала создаёт продолжительную доходность игровых циклов. Опытные пользователи настаивают лимитировать величину вейджера до 1-2% от полного банкролла.
check my source https://toast-wallet.net
loomhub.shop – Easy-to-navigate site with helpful product info makes exploring a breeze.
Гемблинговая индустрия показывает интенсивный рост, заинтересовывая легионы пользователей. Профессиональные площадки предлагают защищённую пространство для беттинга. Развёрнутую факты о указанных операторах реально обнаружить на лаки Р±РёСЂ казино регистрация .
Легализация представляет главным аспектом определения ресурса. Контролёры Великобритании создают жёсткий аудит валютных манипуляций. Отдельная сертифицированная ресурс подвергается регулярные проверки RNG-систем.
Программные особенности инновационных азартных площадок содержат SSL-кодирование денежного стандарта. Провайдеры программного ПО типа Microgaming, NetEnt, Pragmatic Play подключают комплексные модели случайных значений.
Процедура проверки учётной записи подразумевает подачи справок KYC-класса. ID, подтверждение о доходах, валидация адреса — базовый набор для финального доступа.
Альтернативные URL ликвидируют препятствия с фильтрацией операторов. Действующие копии корректируются постоянно IT командами. Портативные софт часто функционируют качественнее веб редакций.
Финансовая дисциплина создаёт долгосрочную успешность беттинговых раундов. Опытные беттеры настаивают контролировать сумму бета до 1-2% от общего фонда.
GamingGarage Marketplace – Simple interface and clear product details made browsing quick today.
По теме “Почему трэш-кино 2026 года всё еще в топе”, есть отличная статья.
Вот, делюсь ссылкой:
https://tresh-lordfilm.ru/news/tresh-kino-2026-pochemu-nizkobyudzhetnye-uzhastiki-i-tresh-filmy-vsyo-eshhyo-v-tope-prosmotrov/
Content Circuit Online – Organized content and clear headings made finding info simple.
stromectol order: ivermectin 3 mg tabs – Iver Therapeutics
Гемблинговая ниша представляет быстрый рост, манящая множество геймеров. Опытные порталы обеспечивают надёжную обстановку для пари. Исчерпывающую данные о указанных провайдерах реально изучить на Голд казино .
Лицензирование представляет главным критерием селекции площадки. Юрисдикции Олдерни гарантируют жёсткий надзор финансовых манипуляций. Каждая легальная сайт проходит плановые контроли RNG-алгоритмов.
Программные параметры актуальных беттинг-платформ включают SSL-шифрование экономического ранга. Разработчики виртуального материала уровня Microgaming, NetEnt, Pragmatic Play встраивают продвинутые схемы рандомных чисел.
Алгоритм подтверждения счёта предполагает подачи бумаг KYC-формата. Удостоверение, подтверждение о финансах, валидация проживания — базовый список для финального авторизации.
Дублирующие домены ликвидируют сложности с фильтрацией компаний. Действующие зеркала изменяются постоянно компьютерными специалистами. Портативные утилиты обычно функционируют надёжнее онлайн редакций.
Финансовая дисциплина определяет перспективную результативность гемблинговых циклов. Экспертные беттеры настаивают лимитировать размер вейджера до 1-2% от суммарного банкролла.
艾一帆海外版,专为华人打造的高清视频平台,支持全球加速观看。
Официальные платформы развлекательных предложений oferuja пользователям вариант к профессиональному гэмблингу через целевые порталы, включая френдс казино , что соблюдают мировые регламенты надёжности.
Последовательность оформления профиля требует ввода идентификационных сведений через encrypted SSL-соединения. Администрация просят документальное verification age verification и локации проживания для поддержания нормативных требований.
Многоуровневая идентификация выступает обязательным компонентом новейших solutions конфиденциальности. Участники получают SMS-шифры, push-сообщения или эксплуатируют специальные программы в стиле Google Authenticator.
Альтернативные домены преодолевают проблемы локальных блокировок и DDoS-нападений. Техническим образом mirrors являют копийные dublicates главного ресурса с удержанием функциональности и пользовательских сведений.
Компетентные пользователи suggest хранить новейшие списки действующих альтернатив в избранном обозревателя. Операторы направляют обновления о современных адресах через электронную почту, Telegram-чаты и телефонные программы.
Денежные переводы через проверенные сайты гарантированы шифровальными системами класса банковского направления. Вывод капитала реализуется исключительно на подтверждённые данные держателя учётной записи.
craftlabels.shop – Easy-to-use interface and unique products make shopping effortless.
戏台在线免费在线观看,海外华人专属官方认证平台,高清无广告体验。
Faceless Factory Depot – Well-structured site and detailed descriptions make exploring products straightforward.
塔尔萨之王第三季高清完整版,海外华人可免费观看最新热播剧集。
Ориентирование в секторе проверенных платформ подразумевает представления современных решений авторизации. Умелые участники используют СЂР° официальный сайт для добывания современной данных о оперативных URL.
Механизм открытия учетной записи в надежных учреждениях охватывает многоуровневую проверку. Новейшие организации эксплуатируют KYC-алгоритмы и AML-правила. Бумажная работа отнимает от 24 до 72 временных отрезков.
Технические методы для минования блокировок эволюционируют одновременно с ужесточением нормативных мер. VPN-инструменты типа premium дают шифрование AES-256 и технологии OpenVPN. Устойчивость канала жизненно актуальна для VIP раундов.
Альтернативные домены действуют через географически размещенные компьютерные кластеры. CDN-сети осуществляют быструю задержку для американских клиентов. Автоматическое роутинг активируется при обнаружении блокировки первичного портала.
Денежные переводы в легальных зонах соответствуют четким стандартам PCI DSS. Децентрализованные расчеты завоевывают признание благодаря приватности и оперативности реализации.
Портативные утилиты премиальных организаций включают отпечатковую идентификацию и push-алерты для ключевых событий. Изменяемый оформление самостоятельно корректируется под особенности панели.
Exclusive Cipher Cart Items – Quick checkout and informative product details made shopping effortless.
Нынешние геймеры имеют дело с массой системных деталей при процессах с проверенными сайтами. Тематические сайты типа казино KiloGram поставляют современную контент о работе казино компаний.
Система аутентификации аккаунта включает ряд неотъемлемых фаз. Исходная подтверждение подразумевает передачи бумаг удостоверяющих субъект. Привычный список включает документ, автоудостоверение или внешний паспорт.
Программная элемент записления включает использование криптографической защиты и двухуровневой проверки. Квалифицированные игроки подсказывают активировать все представленных возможностей безопасности.
Запасные домены являются точные реплики базового портала с поддержанием всего арсенала. Основное преимущество кроется в подобии банковских пределов и условий условий прокрутки.
Механизм выявления рабочих дублирующих порталов опирается на мониторинге профильных уведомительных сервисов и союзных порталов. Опытные пользователи внедряют прокси-соединения для создания стабильного входа безотносительно от местных блокировок.
Data Clean Corner – User-friendly navigation and useful content made browsing effortless.
The Dye & Wash – Quality is evident and exploring products was quick and simple.
Cable Craft Specials – Found products quickly and the site navigation was intuitive.
http://sertralineusa.com/# order zoloft
海外华人必备的yifan官方认证平台,24小时不间断提供最新高清电影、电视剧,无广告观看体验。
Игровая сфера представляет активный рост, заинтересовывая тысячи геймеров. Профессиональные порталы предлагают защищённую атмосферу для беттинга. Исчерпывающую информацию о данных организациях возможно получить на типпи казино .
Аттестация выступает главным аспектом подбора ресурса. Лицензиаты Олдерни гарантируют серьёзный проверку экономических операций. Отдельная лицензированная сайт осуществляет систематические проверки RNG-модулей.
Цифровые характеристики современных азартных площадок предусматривают SSL-криптографию банковского ранга. Провайдеры компьютерного продукта вроде Microgaming, NetEnt, Pragmatic Play встраивают усовершенствованные механизмы хаотичных величин.
Алгоритм аутентификации счёта включает подачи документов KYC-стандарта. Паспорт, справка о заработке, доказательство местожительства — базовый пакет для итогового активации.
Параллельные порталы ликвидируют препятствия с блокировками поставщиков. Действующие дубли обновляются постоянно программными службами. Портативные программы нередко действуют лучше браузерных модификаций.
Контроль средств устанавливает долгосрочную прибыльность развлекательных партий. Опытные беттеры предлагают сокращать сумму вейджера до 1-2% от полного резерва.
Исследование в сфере официальных порталов нуждается знания новых методов авторизации. Опытные игроки применяют лаки Р±РёСЂ казино официальный сайт для обретения релевантной сведений о функционирующих адресах.
Процесс открытия счета в проверенных организациях содержит комплексную верификацию. Современные поставщики применяют KYC-алгоритмы и AML-правила. Документальное сопровождение требует от 24 до 72 периодов.
Программные решения для обхода запретов прогрессируют одновременно с укреплением регуляторных действий. VPN-инструменты класса premium предлагают защиту AES-256 и стандарты OpenVPN. Стабильность канала критически актуальна для элитных игровых периодов.
Резервные платформы функционируют через пространственно расположенные IT системы. CDN-архитектуры осуществляют минимальную задержку для глобальных геймеров. Системное переключение срабатывает при детекции ограничения базового портала.
Денежные движения в сертифицированных зонах подпадают под жестким стандартам PCI DSS. Цифровые расчеты завоевывают популярность из-за секретности и оперативности процессинга.
Переносные утилиты топовых компаний совмещают биометрическую авторизацию и push-оповещения для ключевых эпизодов. Адаптивный интерфейс независимо настраивается под свойства монитора.
Haven Web Services – Clear pages and smooth navigation make exploring offerings simple.
Нынешние клиенты встречаются с огромным количеством технических аспектов при операциях с лицензированными ресурсами. Экспертные источники типа лаки ворлд казино дают свежую данные о деятельности казино провайдеров.
Процесс верификации счета охватывает комплекс обязательных фаз. Базовая подтверждение подразумевает отправки удостоверений доказывающих персону. Типовой комплект предполагает ID, автоудостоверение или внешний паспорт.
Цифровая компонента создания аккаунта включает эксплуатацию SSL-шифрования и двойной авторизации. Квалифицированные участники предлагают запускать полный набор предложенных возможностей защиты.
Запасные домены образуют абсолютные дубликаты главного сайта с сохранением полного набора функций. Главное выгода заключается в идентичности банковских ограничений и условий условий прокрутки.
Система обнаружения актуальных альтернативных адресов фундируется на отслеживании тематических уведомительных сервисов и партнерских площадок. Экспертные участники задействуют виртуальные частные сети для формирования постоянного доступа безотносительно от территориальных запретов.
Передовые операторы игорных развлечений предоставляют беттерам путь к премиальному азарту через проверенные Килограмм официальный сайт сайты. Лицензированная деятельность влечет учета определенных правовых требований.
Система создания персонального кабинета охватывает верификацию индивидуальных данных. Операторы эксплуатируют многоуровневые процедуры KYC и AML для предотвращения нарушающих транзакций.
Программные системы новейших гемблинг платформ строятся на защищенных облачных системах с HTTPS протоколами. Региональная блокировка вынуждает администраторов создавать вспомогательные домены.
Альтернативные порталы представляют точные копии центрального сайта с поддержанием всех функций и информации. Игроки добиваются непрерывный вход к счету, азартной истории и клиентским установкам.
Финансовые операции выполняются через подключенные платежные шлюзы. Рамки на пополнения и получения фиксируются в соответствии с законодательными требованиями и организационными нормами минимизации опасностей.
Квалифицированные игроки советуют контролировать статус авторизации через регуляторные реестры развлекательных органов. Статусные критерии задействуют места на тематических сайтах и отзывы подлинных беттеров.
Check it out
get generic fluoxetine prices
for proven strategies.
超人和露易斯第二季高清完整版,海外华人可免费观看最新热播剧集。
seoworkshop.click – Color palette felt calming, nothing distracting, just focused, thoughtful design.
https://sertralineusa.com/# zoloft cheap
真实的人类第一季高清完整版,海外华人可免费观看最新热播剧集。
范德沃克第二季高清完整官方版,海外华人可免费观看最新热播剧集。
Действующие зеркала проверенных игорных заведений на tip top casino дают непрерывный доступ к игровым системам. Схема клонирования образует точные дубликаты центрального веб-площадки с сохранением всех механизмов.
Система оформления профиля через дублирующий портал абсолютно копирует главную бланк. Новые участники указывают валидный email, формируют сложный код доступа и устанавливают основную денежную единицу.
Аутентификация счета требует предоставления документов следуя KYC-стандартам. Фото ID-карты, подтверждение адреса и банковские данные проверяются через машинную анализ в течение 24-72 часа.
Авторизация активных клиентов выполняется через стандартную панель с двухфакторной верификацией. Разовые ключи поступают на мобильный устройство или e-mail адрес.
Опции входящего сектора через дублирующие порталы обеспечивает распространенные платежные сервисы. Visa, Mastercard, цифровые балансы Skrill, Neteller, цифровые активы Bitcoin, Ethereum осуществляются с оптимизированными комиссиями 0-3%.
Игровая коллекция дублируется целиком включая слоты, традиционные игры, live-крупье и мегавыигрыши. RTP-показатели, колебания и условия отыгрыша поддерживаются идентичными.
Подарочная механизм оперирует идентично базовому порталу. Welcome-комплекты, безвозмездные спины, возврат средств и VIP-схемы запускаются машинально при исполнении фиксированных стандартов.
Действующие зеркала лицензированных гемблинг-платформ на казино типпи обеспечивают постоянный соединение к гемблинг порталам. Система реплицирования создает точные копии главного сайта с сохранением всех инструментов.
Алгоритм регистрации через зеркало целиком воспроизводит основную шаблон. Только пришедшие клиенты прописывают действующий email, формируют сложный пароль и фиксируют основную денежную единицу.
Валидация учетной записи требует загрузки свидетельств согласно KYC-политике. Снимок водительских прав, верификация резиденции и денежные параметры контролируются системой автоматическую анализ в течение 24-72 периодов.
Логин зарегистрированных игроков осуществляется через классическую панель с расширенной валидацией. Сессионные токены передаются на телефонный устройство или мейл.
Функционал входящего сектора через дублирующие порталы предлагает популярные финансовые механизмы. Visa, Mastercard, веб хранилища Skrill, Neteller, виртуальные монеты Bitcoin, Ethereum обрабатываются с уменьшенными сборами 0-3%.
Развлекательная каталог дублируется целиком включая spinning games, столовые игры, live-дилеров и максимальные награды. RTP-коэффициенты, дисперсия и условия отыгрыша фиксируются неизменными.
Акционная политика оперирует подобно корневому веб-площадке. Welcome-бандлы, free spins, refund и VIP-схемы включаются автоматически при соблюдении заданных параметров.
艾一帆海外版,专为华人打造的高清视频官方认证平台,支持全球加速观看。
侠之盗高清完整版结合大数据AI分析,海外华人可免费观看最新热播剧集。
捕风追影在线免费在线观看,海外华人专属官方认证平台,高清无广告体验。
Азартная отрасль являет интенсивный развитие, заинтересовывая миллионы геймеров. Опытные сайты обеспечивают защищённую пространство для ставок. Полную сведения о данных организациях возможно изучить на аква регистрация .
Легализация является приоритетным показателем определения платформы. Лицензиаты Мальты предоставляют серьёзный надзор финансовых процедур. Всякая официальная платформа реализует постоянные ревизии RNG-систем.
Программные особенности актуальных казино предусматривают SSL-защиту банковского стандарта. Поставщики цифрового продукта типа Microgaming, NetEnt, Pragmatic Play интегрируют сложные алгоритмы случайных значений.
Процедура аутентификации личного кабинета требует направления свидетельств KYC-уровня. Документ, выписка о средствах, доказательство регистрации — классический комплект для полноценного активации.
Дублирующие адреса устраняют трудности с блокировками поставщиков. Свежие копии изменяются ежедневно IT группами. Портативные программы обычно работают надёжнее интернет форматов.
Распределение капитала устанавливает продолжительную доходность развлекательных сессий. Экспертные геймеры советуют лимитировать величину пари до 1-2% от общего резерва.
Подбор легального азартного площадки предполагает детального разбора лицензионных сертификатов. Передовые сайты лаки Р±РёСЂ казино предоставляют игрокам абсолютную данные о действующих разрешениях.
Процесс открытия аккаунта подразумевает ряд необходимых ступеней проверки. Владельцы просят свидетельства, доказывающие персону и возраст. Стандартный KYC-алгоритм продолжается от 24 до 72 часов.
Банкролл-менеджмент запускается с назначения лимитов на депозиты. Искусные геймеры настаивают применять норму 5% от полного гемблинг капитала на конкретную игру.
Электронные запреты операторов принуждают задействовать резервные домены. Альтернативы хранят полную работоспособность основного площадки, включая летопись переводов и игровой прогресс.
Инновационные банковские инструменты обеспечивают скоростные вклады через блокчейн кошельки. Bitcoin, Ethereum и постоянные токены поддерживают скрытность и крошечные взносы. Срок реализации выводов равно 10-30 отрезков.
Схемы приверженности подразумевают каскадные степени с увеличивающимся кэшбэком. VIP-представители предоставляют личные награды, повышенные лимиты и преимущественную поддержку.
generic for zoloft: zoloft generic – zoloft without dr prescription
一帆官方认证平台,专为海外华人设计,24小时不间断提供高清视频和直播服务。
侠之盗高清完整版,海外华人可免费观看最新热播剧集。
seosprint.click – Pages loaded fast, images appeared sharp, and formatting stayed consistent.
凯伦皮里第一季高清完整版运用AI智能推荐算法,海外华人可免费观看最新热播剧集。
Iver Therapeutics: Iver Therapeutics – stromectol online pharmacy
online pharmacy uk https://baypharm.top/# online mexico pharmacy
Определение надежного betting заведения в сегодняшних реалиях заставляет детального рассмотрения к регулятивному состоянию. Опытные геймеры знают, что казино Килограмм предоставляет свежую факты о функционирующих операторах.
Процесс регистрации в официальных площадках предусматривает принудительную верификацию идентичности. KYC-правила защищают как оператора, так и пользователя от обмана. Краткосрочные границы на изъятие финансов до закрытия верификации – обычная методика.
Технические барьеры на связь к развлекательным ресурсам нейтрализуются через альтернативные адреса. Активные зеркала гарантируют абсолютную работоспособность главного сайта. Финансовые переводы, азартный достижения и наградные предложения функционируют неизменными.
Материальная надежность характеризуется степенью эксплуатируемых денежных методов. SSL-защита, PCI DSS валидация и дополнительная подтверждение создают стабильный контур обороны.
Геймплейная ассортимент сертифицированных заведений охватывает машины от топовых разработчиков. RTP-индексы, волатильность и вероятностные формулы подвергаются беспристрастную валидацию в аккредитованных институтах.
Планы вознаграждения в профессиональных сервисах опираются на открытых параметрах проигрыша. Проигрыш x35-40 расценивается адекватным для слот-льгот, в то время как настольные состязания идут в зачет с сниженным процентом.
Rutor — основной сайт русскоязычного даркнета в Tor, дающий пользователям доступ к информации, материалам, товарам и правилам анонимности пользователей черного рынка и onion ресурсов
Магазин Rutor уже долгие годы поддерживает репутацию качественного сервиса благодаря защищённой системе, анонимности и обслуживанию сделок в Rutor.Rutor: Ветеран русскоязычного даркнета
rutor o — это один из самых известных и старейших сервисов в русскоязычном даркнете, который стал неотъемлемой частью экосистемы анонимных ресурсов. Основное направление работы ресурса — предоставление обширной базы файлов, утилит, новостей и прочего контента, в том числе, связанного с темами безопасности и взлома.
Как устроена система работы Rutor
Система курирует доступ к огромному количеству информации и файлов, сохраняя дополнительную конфиденциальность и анонимность своих пользователей. Работа сервиса построена на использовании анонимной сети Rutor, что помогает свести к минимуму угрозы идентификации и утечки данных. С течением времени площадка превратилась в важный архив событий и истории русскоязычного даркнета.
Rutor продолжает работать и предоставлять стабильный доступ к ресурсам, удовлетворяя потребности как новичков, так и опытных пользователей даркнета. Система построена таким образом, что каждый раздел страницы — будь то магазин, новости или инструкции по взлому — становится отдельной частью большого сообщества, в котором безопасность и возможность оставаться анонимным выходят на первый план.
Возможные направления развития и связанные опасности
Безусловно, дальнейшая история Rutor будет связана с новыми формами риска, новыми способами защиты конфиденциальности и методами обхода блокировок. Пользователи должны осознавать, что даже самая анонимная система не гарантирует полной безопасности.
Этот сервис по-прежнему служит площадкой для информирования, обсуждений безопасности и отслеживания новшеств в даркнет-сообществе. Технический прогресс, рост числа участников и новые функциональные решения превращают Rutor в ключевой узел русскоязычного интернет-сообщества.
– Анонимность
– Безопасность транзакций
– Доступ к уникальной информации
– Конфиденциальность общения
Rutor представляет собой ресурс с неповторимой историей, важный для пользователей, стремящихся к свободе, сохранению конфиденциальности и автономии от внешних ограничений в современном интернете.
Thank you for another excellent article. Where else may anybody get that
kind of information in such an ideal manner of writing?
I’ve a presentation next week, and I am at the search for such information.
Подбор достойного развлекательного заведения в актуальных границах нуждается особого внимания к лицензионному режиму. Профессиональные геймеры знают, что лаки Р±РёСЂ казино отображает актуальную информацию о доступных площадках.
Процедура оформления профиля в официальных платформах включает необходимую проверку личности. KYC-требования защищают как казино, так и клиента от афер. Временные границы на изъятие средств до закрытия подтверждения – нормальная методика.
Технические блокировки на вход к игровым порталам преодолеваются через альтернативные URL. Функционирующие зеркала сохраняют стопроцентную эффективность базового сервиса. Платежные транзакции, азартный результаты и наградные предложения остаются стабильными.
Капитальная гарантированность оценивается критерием задействованных платежных методов. SSL-кодирование, PCI DSS подтверждение и расширенная проверка гарантируют защищенный барьер ограждения.
Интерактивная библиотека лицензированных площадок предоставляет автоматы от главных создателей. RTP-параметры, дисперсия и статистические модели подвергаются внешнюю контроль в авторизованных центрах.
Механизмы лояльности в серьезных площадках строятся на понятных критериях активности. Условия ставок x35-40 расценивается разумным для машина-привилегий, в то время как традиционные развлечения засчитываются в зачет с уменьшенным коэффициентом.
Best online casino PayID Australia – secure and convenient
真实的人类第二季高清完整版运用AI智能推荐算法,海外华人可免费观看最新热播剧集。
lampzone.shop – Great selection and smooth browsing make finding lamps quick.
Pretty element of content. I just stumbled upon your website and in accession capital to assert that I acquire actually loved account your blog posts.
Any way I will be subscribing to your feeds or even I success
you get right of entry to constantly rapidly.
海外华人必备的ify平台,提供最新高清电影、电视剧,无广告观看体验。
奇思妙探高清完整版,海外华人可免费观看最新热播剧集。
Read about the trials that forge a true warrior from a skilled assassin. https://heiroffirepdf.top/ Heir Of Fire Pdf Download
marketingboost.click – Content reads clearly, helpful examples made concepts easy to grasp.
爱一番海外版,专为华人打造的高清视频平台,支持全球加速观看。
Get ready to experience the best quality version of the Lights Out PDF available online today. Our dedicated server ensures that your download is quick, safe, and completely optimized for mobile and desktop viewing. Don’t settle for low-quality scans when you can have the best. https://lightsoutpdf.top/ Lights Out Pdf Navessa Allen
海外华人必备的iyf平台采用机器学习个性化推荐,提供最新高清电影、电视剧,无广告观看体验。
塔尔萨之王第三季高清完整官方版,海外华人可免费观看最新热播剧集。
禁忌第一季高清完整版结合大数据AI分析,海外华人可免费观看最新热播剧集。
爱一帆海外版,专为华人打造的高清视频平台运用AI智能推荐算法,支持全球加速观看。
官方授权的一帆视频海外华人首选,第一时间提供最新华语剧集、美剧、日剧等高清在线观看。
Отбор надежного гемблинг портала в сегодняшних реалиях подразумевает повышенного подхода к правовому статусу. Знающие пользователи понимают, что винити казино включает новую сведения о активных ресурсах.
Алгоритм оформления профиля в сертифицированных операторах включает требуемую валидацию личности. KYC-стандарты защищают как заведение, так и игрока от махинаций. Промежуточные ограничения на вывод денег до выполнения контроля – привычная методика.
Виртуальные барьеры на доступ к игровым сервисам устраняются через параллельные адреса. Активные клоны предоставляют полную работоспособность первичного сайта. Финансовые операции, развлекательный статистика и поощрительные программы функционируют константными.
Финансовая стабильность характеризуется показателем внедренных финансовых методов. SSL-защита, PCI DSS лицензирование и двухфакторная идентификация формируют защищенный барьер ограждения.
Игровая набор сертифицированных площадок содержит машины от главных разработчиков. RTP-индексы, колебания и вероятностные системы подвергаются внешнюю контроль в аккредитованных институтах.
Системы мотивации в профессиональных казино базируются на прозрачных условиях отыгрыша. Вейджер x35-40 признается адекватным для автомат-льгот, в то время как классические игры принимаются в счет с уменьшенным процентом.
Подбор безопасного гемблинг заведения в нынешних реалиях предполагает тщательного изучения к лицензионному режиму. Знающие игроки представляют, что казино Вован включает актуальную факты о активных провайдерах.
Механизм создания аккаунта в проверенных заведениях содержит необходимую верификацию идентичности. KYC-правила защищают как площадку, так и участника от махинаций. Временные рамки на изъятие активов до выполнения валидации – нормальная методика.
Технические препятствия на вход к betting сервисам обходятся через дублирующие ссылки. Активные клоны сохраняют всестороннюю эффективность базового платформы. Расчетные процедуры, геймплейный прогресс и бонусные программы функционируют неизменными.
Финансовая гарантированность определяется уровнем используемых платежных способов. SSL-криптография, PCI DSS аттестация и многоуровневая аутентификация создают прочный контур обороны.
Азартная коллекция проверенных провайдеров объединяет барабаны от лидирующих производителей. RTP-параметры, колебания и расчетные схемы испытывают независимую аудит в аккредитованных организациях.
Механизмы поощрения в достойных площадках базируются на открытых критериях активности. Условия ставок x35-40 расценивается справедливым для барабан-привилегий, в то время как карточные игры включаются в расчет с пониженным фактором.
leadgrowth.click – Loved the layout today; clean, simple, and genuinely user-friendly overall.
quicklabels.shop – Easy navigation and clear instructions made producing labels hassle-free.
GA4Gear Essentials – Well-laid-out interface and clear info make exploring products simple.
http://neuroreliefusa.com/# Neuro Relief USA
多瑙高清完整版采用机器学习个性化推荐,海外华人可免费观看最新热播剧集。
海外华人必备的ifun官方认证平台,24小时不间断提供最新高清电影、电视剧,无广告观看体验。
爱一番海外版,专为华人打造的高清视频平台结合大数据AI分析,支持全球加速观看。
Отбор безопасного казино портала подразумевает глубокого рассмотрения правовых документов. Современные платформы Рльдорадо регистрация предлагают пользователям стопроцентную детали о действующих аккредитациях.
Процедура открытия аккаунта предусматривает ряд ключевых шагов подтверждения. Провайдеры истребуют свидетельства, удостоверяющие идентичность и возраст. Классический KYC-механизм длится от 24 до 72 часов.
Управление банком запускается с фиксации рамок на депозиты. Компетентные игроки призывают внедрять принцип 5% от совокупного игорного средств на конкретную партию.
Электронные ограничения поставщиков побуждают применять дополнительные домены. Зеркала удерживают безусловную функциональность базового портала, подразумевая летопись сделок и азартный продвижение.
Передовые платежные способы дают мгновенные инвестиции через криптовалютные портмоне. Bitcoin, Ethereum и постоянные токены предоставляют анонимность и символические сборы. Срок обработки выводов равно 10-30 отрезков.
Программы преданности подразумевают градационные категории с возрастающим компенсацией. VIP-представители гарантируют персонализированные вознаграждения, расширенные ограничения и приоритетную помощь.
Compute Cradle Solutions – Simple navigation and organized product details made browsing easy.
真实的人类第三季高清完整版,海外华人可免费观看最新热播剧集。
一帆官方认证平台,专为海外华人设计,24小时不间断提供高清视频和直播服务。
Актуальные mirror-ссылки проверенных казино на РјСЌРґ казино гарантируют стабильный соединение к геймерским системам. Принцип реплицирования образует эквивалентные копии центрального домена с фиксацией всех функций.
Процедура открытия счета через дублирующий портал на сто процентов дублирует основную бланк. Дебютные участники прописывают функционирующий email, формируют сложный секретную комбинацию и устанавливают базовую финансовый инструмент.
Валидация счета требует передачи удостоверений по KYC-нормам. Копия водительских прав, подтверждение места жительства и банковские реквизиты подвергаются алгоритмическую анализ в течение 24-72 временных единиц.
Аутентификация действующих участников осуществляется через обычную форму с расширенной идентификацией. Краткосрочные токены передаются на мессенджер гаджет или мейл.
Опции входящего блока через зеркала включает актуальные денежные платформы. Visa, Mastercard, онлайн счета Skrill, Neteller, crypto Bitcoin, Ethereum выполняются с оптимизированными процентами 0-3%.
Развлекательная база дублируется целиком включая слоты, классические развлечения, live-операторов и накопительные призы. RTP-значения, изменчивость и ставочные требования фиксируются неизменными.
Бонусная политика работает схоже базовому домену. Welcome-предложения, free spins, денежный возврат и VIP-планы запускаются автоматически при достижении заданных параметров.
海外华人必备的ify官方认证平台,24小时不间断提供最新高清电影、电视剧,无广告观看体验。
侠之盗高清完整版智能AI观看体验优化,海外华人可免费观看最新热播剧集。
ExchangeXpress Hub – Easy-to-navigate site and clear product info made browsing quick.
Online Casino Australia Payid Instant Deposits
艾一帆海外版,专为华人打造的高清视频官方认证平台,支持全球加速观看。
인사드립니다! 이건 좀 주제에서 벗어나지만,
물어보고 싶었습니다. 링크를 교환하거나 게스트 글를 작성하는 데 관심 있으신가요?
제 웹사이트는 당신과 같은 토픽을 다루고 있어서 서로에게
큰 도움이 될 거라고 믿습니다. 관심 있으시면 메일을 보내주세요.
당신에게서 소식을 기다립니다! 멋진 블로그입니다!
I always used to study article in news papers but now as
I am a user of web thus from now I am using net for content,
thanks to web.
This is one of the best blogs I’ve come across in a while!
Your writing style is so engaging, and the content is
top-notch. Do you have any advice for new bloggers on how to create content as compelling as yours?
Appreciate it!
이 웹사이트를 발견한 게 행운이에요!
해외구매에 대한 글이 너무 흥미롭고 잘 쓰여 있어요.
소셜 미디어에서 공유했어요. 게스트 포스트로 다른 사이트와 협업할 계획 있으신가요?
감사합니다!
Dumbbell Warehouse – Everything was easy to find and the ordering process was smooth.
Dashboard Dock Online Store – Smooth interface and exploring resources was a simple experience.
For case studies
where can i get cheap plavix
to remain competitive.
Рабочие зеркала проверенных азартных клубов на казино million обеспечивают устойчивый доступ к развлекательным ресурсам. Методика клонирования создает идентичные копии основного сайта с фиксацией всех механизмов.
Схема активации через зеркало на сто процентов дублирует главную бланк. Дебютные пользователи регистрируют функционирующий email, придумывают безопасный секретную комбинацию и определяют основную валюту.
Идентификация личного кабинета подразумевает загрузки удостоверений в соответствии с KYC-стандартам. Копия удостоверения личности, верификация адреса и банковские параметры контролируются системой машинную анализ в течение 24-72 часов.
Авторизация существующих игроков происходит через базовую окно с расширенной идентификацией. Временные коды приходят на мобильный гаджет или почтовый ящик.
Механизмы пополнительного компонента через дублирующие порталы поддерживает востребованные денежные механизмы. Visa, Mastercard, цифровые балансы Skrill, Neteller, crypto Bitcoin, Ethereum выполняются с минимальными сборами 0-3%.
Развлекательная каталог клонируется абсолютно включая автоматы, карточные развлечения, live-ведущих и джекпоты. RTP-коэффициенты, дисперсия и вейджер фиксируются идентичными.
Бонусная программа оперирует похоже корневому порталу. Welcome-наборы, даровые прокруты, денежный возврат и VIP-планы включаются автоматически при соблюдении определенных критериев.
Особенно понравился раздел про связь современного кино и актуальных общественных трендов 2026 года.
Вот, можете почитать:
https://terehov-event.ru/news/kripta-i-kino-kak-trendy-fevralya-2026-goda-pomogayut-trejderam-chitat-nastroenie-rynka/
Подбор качественного игрового заведения в нынешних рамках нуждается специального анализа к лицензионному уровню. Опытные клиенты понимают, что tiptop casino отображает последнюю информацию о доступных провайдерах.
Процедура оформления профиля в сертифицированных операторах объединяет неизбежную верификацию персональных данных. KYC-требования гарантируют как оператора, так и участника от обмана. Кратковременные ограничения на снятие активов до завершения верификации – обычная практика.
Программные запреты на вход к betting сервисам устраняются через зеркальные порталы. Активные клоны сохраняют тотальную возможности первичного ресурса. Платежные транзакции, игровой статистика и бонусные программы остаются константными.
Денежная безопасность характеризуется критерием внедренных банковских способов. SSL-шифрование, PCI DSS аттестация и многоуровневая проверка обеспечивают защищенный заслон защиты.
Азартная каталог официальных площадок содержит автоматы от лидирующих провайдеров. RTP-показатели, дисперсия и статистические модели подвергаются нейтральную контроль в авторизованных учреждениях.
Системы стимулирования в достойных сервисах строятся на прозрачных требованиях отыгрыша. Условия ставок x35-40 расценивается адекватным для автомат-бонусов, в то время как настольные развлечения принимаются в калькуляцию с уменьшенным коэффициентом.
Browse Chrome Central Collections – Smooth interface and clean design made shopping straightforward and fun.
Handpicked Favorites Store – I appreciate the curated items and the easy ordering system.
content https://toast-wallet.net/
真实的人类第二季高清完整版运用AI智能推荐算法,海外华人可免费观看最新热播剧集。
Shop Bundle Boutique Picks – Great mix of products and navigating the store was easy.
Ремонт балкона советы
I am curious to find out what blog system you have been working with?
I’m experiencing some minor security problems with my latest website and I’d like to find
something more safeguarded. Do you have any suggestions?
my latest blog post https://toast-wallet.net/
Гемблинговая сфера показывает стремительный расширение, притягивая легионы клиентов. Профессиональные платформы гарантируют защищённую атмосферу для развлечений. Исчерпывающую материалы о этих брендах допустимо получить на казино лаки ворлд .
Легализация остаётся ключевым фактором подбора площадки. Регуляторы Гибралтара создают строгий проверку денежных операций. Каждая лицензированная платформа реализует постоянные проверки RNG-модулей.
Компьютерные свойства новейших беттинг-платформ объединяют SSL-шифрование банковского класса. Провайдеры виртуального продукта уровня Microgaming, NetEnt, Pragmatic Play добавляют сложные механизмы произвольных параметров.
Процесс верификации учётной записи предусматривает подачи удостоверений KYC-класса. Свидетельство, справка о доходах, доказательство регистрации — обычный комплект для итогового подключения.
Параллельные домены исправляют препятствия с цензурой провайдеров. Функционирующие копии адаптируются ежедневно цифровыми службами. Мобильные приложения нередко функционируют надёжнее онлайн вариантов.
Банкролл-менеджмент определяет продолжительную эффективность гемблинговых периодов. Опытные игроки рекомендуют урезать сумму депозита до 1-2% от полного резерва.
Поиск безопасного развлекательного площадки нуждается тщательного анализа лицензионных бумаг. Современные ресурсы лаки Р±РёСЂ казино предоставляют клиентам безусловную детали о своих разрешениях.
Процесс регистрации подразумевает множество принудительных фаз валидации. Провайдеры истребуют свидетельства, устанавливающие персону и правоспособность. Классический KYC-алгоритм составляет от 24 до 72 интервалов.
Банкролл-менеджмент открывается с назначения ограничений на взносы. Квалифицированные геймеры предлагают применять принцип 5% от общего развлекательного фонда на единичную раунд.
Системные блокировки поставщиков принуждают эксплуатировать вспомогательные пути. Клоны поддерживают безусловную функциональность центрального портала, охватывая хронологию транзакций и игровой прогресс.
Инновационные денежные системы поддерживают мгновенные вклады через виртуальные счета. Bitcoin, Ethereum и устойчивые монеты поддерживают тайность и минимальные платежи. Период выполнения изъятий насчитывает 10-30 интервалов.
Планы лояльности предусматривают многоуровневые ранги с возрастающим бонусом. VIP-представители дают эксклюзивные поощрения, повышенные рамки и преимущественную техподдержку.
海外华人必备的ify官方认证平台,24小时不间断提供最新高清电影、电视剧,无广告观看体验。
官方授权的电影网站推荐,第一时间海外华人专用,第一时间支持中英双语界面和全球加速。
Real money pokies Australia – best sites to play and win
海外华人必备的aiyifan平台,提供最新高清电影、电视剧,无广告观看体验。
范德沃克第二季高清完整版运用AI智能推荐算法,海外华人可免费观看最新热播剧集。
Актуальные бетторы оказываются с препятствием входа к проверенным площадкам. Компании блокируют базовые адреса, но искушённые аква зеркало клиенты осознают о функционировании альтернативных сайтов.
Резервная ссылка образует абсолютную копию первичного ресурса. Криптографические алгоритмы функционируют равнозначными. Платёжные операции производятся через аналогичные шлюзы.
Алгоритм заведения учётной записи через параллельный адрес подразумевает привычной подтверждения. Сотрудники просят бумаги для соблюдения KYC-стандартов. Личные сведения проходят усиленную проверку.
Финансовые ограничения на дополнительных площадках идентичны основным характеристикам. Начальные ставки сохраняются константными. Растущие банки согласовываются между многочисленными ссылками.
Льготные схемы оперируют полноценно на альтернативных платформах. Множитель ставок обеспечивает исходные величины. Тайминг реализации не изменяется.
Команда поддержки анализирует заявки с альтернативных адресов сходным образом. Мгновенный диалог осуществляет круглосуточный формат функционирования.
Действующие дублирующие порталы легальных гемблинг-платформ на лаки Р±РёСЂ казино дают постоянный подключение к игровым порталам. Технология клонирования строит аналогичные дубликаты центрального сайта с консервацией всех инструментов.
Алгоритм оформления профиля через резервную ссылку на сто процентов имитирует главную форму. Свежие игроки заполняют действующий email, генерируют надежный шифр и назначают операционную денежную единицу.
Верификация учетной записи требует предоставления свидетельств в соответствии с KYC-политике. Скан ID-карты, верификация регистрации и денежные сведения проходят цифровую контроль в течение 24-72 периодов.
Аутентификация верифицированных игроков осуществляется через базовую окно с усиленной идентификацией. Разовые шифры поступают на мобильный гаджет или электронную почту.
Возможности денежного блока через mirror-сайты предлагает распространенные расчетные инструменты. Visa, Mastercard, онлайн портмоне Skrill, Neteller, crypto Bitcoin, Ethereum реализуются с низкими процентами 0-3%.
Азартная база дублируется абсолютно включая spinning games, карточные активности, live-дилеров и мегавыигрыши. RTP-коэффициенты, волатильность и ставочные требования сохраняются такими же.
Поощрительная механизм функционирует идентично центральному домену. Welcome-комплекты, безвозмездные спины, компенсация и VIP-схемы запускаются алгоритмически при исполнении фиксированных условий.
奥美迦奥特曼高清完整官方版,海外华人可免费观看最新热播剧集。
Rasanya kamu seperti ngerti isi kepala saya!
Kamu kelihatan paham banget soal ini, kayak kamu nulis bukunya.
Saya pikir kamu bisa tambah beberapa persen buat bikin pesannya lebih “nendang”,
tapi selebihnya ini blog yang bagus. Bacaan yang mantap. Saya pasti balik lagi.
海外华人必备的iyifan平台运用AI智能推荐算法,提供最新高清电影、电视剧,无广告观看体验。
Best Baccarat Online Real Money Play
Great article.
Smart GenRx USA: thecanadianpharmacy – Smart GenRx USA
Top online casinos Australia crypto – Bitcoin gambling sites
一饭封神在线免费在线观看,海外华人专属平台结合大数据AI分析,高清无广告体验。
愛壹帆海外版,专为华人打造的高清视频平台,支持全球加速观看。
Best Online Casino Australia Bonuses And Ratings
官方授权的iyftv海外华人首选,第一时间提供最新华语剧集、美剧、日剧等高清在线观看。
塔尔萨之王第三季高清完整版采用机器学习个性化推荐,海外华人可免费观看最新热播剧集。
Передовые провайдеры игорных активностей предоставляют беттерам вход к высококлассному азарту через сертифицированные mad казино платформы. Легальная работа влечет соблюдения жестких контролирующих стандартов.
Механизм открытия индивидуального учетной записи охватывает валидацию персональных сведений. Провайдеры внедряют многоуровневые механизмы KYC и AML для блокировки поддельных переводов.
Технические средства передовых гемблинг платформ строятся на зашифрованных хостингах с HTTPS технологиями. IP-фильтрация заставляет администраторов организовывать дублирующие домены.
Дублирующие платформы составляют эквивалентные репликации главного сайта с фиксацией всех инструментов и данных. Игроки приобретают непрерывный соединение к капиталу, игровой истории и личным опциям.
Расчетные действия производятся через интегрированные денежные шлюзы. Рамки на взносы и выводы регулируются в соответствии с лицензионными стандартами и внутренними процедурами контроля угроз.
Профессиональные клиенты рекомендуют анализировать ситуацию аккредитации через официальные регистры гемблинг структур. Статусные характеристики включают места на тематических сайтах и оценки подлинных беттеров.
Отбор надежного развлекательного заведения в современных обстоятельствах заставляет специального подхода к правовому статусу. Профессиональные клиенты представляют, что laki казино содержит актуальную данные о функционирующих провайдерах.
Схема оформления профиля в легальных площадках объединяет требуемую проверку идентичности. KYC-нормы охраняют как площадку, так и геймера от мошенничества. Переходные лимиты на получение активов до завершения контроля – привычная практика.
Программные препятствия на вход к игровым сервисам решаются через дублирующие URL. Функционирующие дубликаты гарантируют стопроцентную производительность главного портала. Расчетные переводы, развлекательный результаты и бонусные предложения сохраняются устойчивыми.
Капитальная защищенность характеризуется уровнем применяемых платежных способов. SSL-безопасность, PCI DSS валидация и расширенная проверка обеспечивают стабильный заслон обороны.
Интерактивная каталог лицензированных провайдеров предоставляет машины от известных провайдеров. RTP-коэффициенты, изменчивость и расчетные системы проходят внешнюю проверку в признанных лабораториях.
Программы мотивации в надежных операторах строятся на четких параметрах отыгрыша. Условия ставок x35-40 оценивается нормальным для слот-поощрений, в то время как традиционные состязания включаются в счет с сниженным коэффициентом.
超人和露易斯第四季高清完整版,海外华人可免费观看最新热播剧集。
凯伦皮里第一季高清完整版,海外华人可免费观看最新热播剧集。
Поиск надежного развлекательного ресурса подразумевает тщательного исследования правовых сертификатов. Передовые платформы Голд зеркало предоставляют участникам полную детали о текущих санкциях.
Алгоритм получения доступа подразумевает определенное количество требуемых этапов проверки. Провайдеры просят свидетельства, засвидетельствующие самобытность и возраст. Традиционный KYC-алгоритм занимает от 24 до 72 временных отрезков.
Контроль средств стартует с установления рамок на вклады. Искусные игроки советуют эксплуатировать принцип 5% от полного азартного капитала на одну заход.
Электронные ограничения администраторов вынуждают использовать вспомогательные пути. Зеркала оберегают максимальную активность основного ресурса, охватывая архив операций и казино успех.
Передовые банковские сервисы поддерживают мгновенные инвестиции через электронные кошельки. Bitcoin, Ethereum и стабильные валюты гарантируют анонимность и мизерные взносы. Время обработки снятий составляет 10-30 минут.
Системы лояльности подразумевают иерархические уровни с возрастающим компенсацией. VIP-кураторы предлагают уникальные награды, повышенные лимиты и ускоренную обслуживание.
Iver Therapeutics ivermectin 1mg ivermectin 6
Выбор надежного игорного портала подразумевает глубокого исследования регулятивных бумаг. Современные порталы retro казино гарантируют игрокам безусловную информацию о действующих аккредитациях.
Алгоритм получения доступа включает ряд принудительных шагов аутентификации. Администраторы настаивают справки, удостоверяющие идентичность и возраст. Стандартный KYC-алгоритм продолжается от 24 до 72 интервалов.
Управление банком начинается с определения лимитов на инвестиции. Опытные клиенты предлагают задействовать правило 5% от суммарного азартного бюджета на единичную раунд.
Технические запреты провайдеров обязывают использовать резервные ссылки. Дубликаты поддерживают безусловную производительность базового сайта, предусматривая летопись транзакций и азартный результаты.
Новые банковские методы гарантируют моментальные депозиты через блокчейн портмоне. Bitcoin, Ethereum и фиксированные активы обеспечивают приватность и мизерные отчисления. Время проведения снятий равно 10-30 отрезков.
Алгоритмы лояльности содержат ступенчатые категории с возрастающим возвратом. VIP-кураторы гарантируют эксклюзивные подарки, расширенные границы и первоочередную обслуживание.
cheapest online pharmacy no rx
Rutor является главным порталом русскоязычного даркнета в сети Tor, обеспечивающим доступ пользователей к контенту, товарам, материалам и правилам анонимности черного рынка и onion сайтов
Сайт Rutor — пользующийся доверием «старожил» даркнета в русскоязычном интернете с системой сокрытия личности и удобным интерфейсом для анонимных сделок через Rutor.Rutor — старейший представитель даркнета на русском языке
rutir info — это один из самых известных и старейших сервисов в русскоязычном даркнете, который стал неотъемлемой частью экосистемы анонимных ресурсов. Этот магазин ориентирован на предоставление пользователям широкой базы данных, связанной с файлами, софтом, новостями и различными видами контента, включая темы, касающиеся взлома и безопасности.
Главные аспекты функционирования Rutor
Механизм работы ресурса позволяет пользователям получать доступ к большим массивам данных и файлов, при этом обеспечивая максимальную приватность и анонимность. Особенность сервиса в том, что он работает через сеть Rutor, что существенно снижает риск идентификации и утечки данных. С течением времени площадка превратилась в важный архив событий и истории русскоязычного даркнета.
Платформа функционирует стабильно, обеспечивая равный доступ для новых и опытных участников даркнета. Архитектура ресурса предусматривает, что любые разделы — магазин, новостной блок или гайды по взлому — являются составляющими единой системы, где превалируют безопасность и анонимность.
Перспективы и риски
Ясно, что будущая деятельность Rutor потребует решения новых рисков, внедрения свежих подходов к безопасности и средств обхода ограничений. Пользователи обязаны понимать, что ни одна анонимная платформа не может дать абсолютную защиту.
Платформа продолжает быть ресурсом для получения расширенной информации, обмена мнениями по безопасности и мониторинга новшеств в сферах даркнета. Развитие технологий, расширение базы пользователей и появление новых возможностей делают Rutor одним из центров русскоязычного сообщества в сети.
– Принцип анонимности
– Гарантия безопасности сделок
– Возможность получения эксклюзивных данных
– Конфиденциальность общения
Rutor представляет собой ресурс с неповторимой историей, важный для пользователей, стремящихся к свободе, сохранению конфиденциальности и автономии от внешних ограничений в современном интернете.
Передовые клиенты сталкиваются с массой цифровых нюансов при деятельности с сертифицированными площадками. Профильные платформы типа Килограмм казино поставляют современную информацию о работе азартных брендов.
Система аутентификации учетной записи включает множество обязательных уровней. Первичная подтверждение предполагает загрузки удостоверений удостоверяющих личность. Стандартный набор включает удостоверение личности, автолицензию или международный паспорт.
Технологическая составляющая записления охватывает использование безопасного соединения и двойной авторизации. Профессиональные клиенты настаивают задействовать максимум возможных параметров защиты.
Резервные ссылки представляют полные клоны центрального домена с удержанием комплексного функционала. Основное плюс выражается в схожести банковских лимитов и требований ставочных требований.
Схема нахождения актуальных зеркал основывается на мониторинге тематических телеграм-каналов и партнерских ресурсов. Опытные игроки используют VPN-сервисы для создания постоянного связи без оглядки от территориальных запретов.
捕风追影在线免费在线观看,海外华人专属平台采用机器学习个性化推荐,高清无广告体验。
Crypto online casino Australia – Bitcoin pokies and fast withdrawals
Действующие резервные адреса надежных игорных заведений на tip top casino гарантируют стабильный соединение к гемблинг сервисам. Схема зеркалирования формирует аналогичные версии главного веб-площадки с удержанием всех возможностей.
Процедура создания аккаунта через mirror-сайт на сто процентов воспроизводит базовую шаблон. Только пришедшие игроки указывают функционирующий email, устанавливают сложный секретную комбинацию и устанавливают игровую валюту.
Верификация счета включает отправки документов согласно KYC-требованиям. Скан водительских прав, валидация регистрации и финансовые координаты проверяются через программную контроль в течение 24-72 часа.
Логин действующих клиентов осуществляется через стандартную модуль с многоступенчатой проверкой. Краткосрочные токены поступают на мессенджер устройство или мейл.
Возможности пополнительного модуля через зеркала предлагает востребованные финансовые сервисы. Visa, Mastercard, веб хранилища Skrill, Neteller, crypto Bitcoin, Ethereum выполняются с оптимизированными сборами 0-3%.
Гемблинг коллекция воспроизводится в точности включая слоты, карточные активности, live-дилеров и накопительные призы. RTP-коэффициенты, волатильность и вейджер фиксируются аналогичными.
Бонусная политика действует похоже центральному ресурсу. Welcome-пакеты, free spins, refund и VIP-программы стартуют программно при соблюдении определенных условий.
Online casino Australia legal alternatives – safe offshore casinos
爱一帆海外版,专为华人打造的高清视频平台采用机器学习个性化推荐,支持全球加速观看。
ifuntv海外华人首选,提供最新华语剧集、美剧、日剧等高清在线观看。
mostbet зеркало для ios https://www.mostbet90387.help
Follow this link
no deposit casino guides
for offline viewing.
stromectol for humans: ivermectin 1mg – Iver Therapeutics
Актуальные порталы азартных продуктов дают клиентам подключение к элитному гемблингу через безопасные тип топ казино системы. Легальная работа подразумевает соблюдения определенных регуляторных стандартов.
Процедура создания индивидуального счета предусматривает аутентификацию личных данных. Операторы используют углубленные системы KYC и AML для исключения поддельных переводов.
Программные инструменты инновационных гемблинг платформ базируются на безопасных дата-центрах с TLS стандартами. Локальные запреты принуждает управляющих создавать вспомогательные URL.
Дублирующие порталы образуют идентичные копии главного портала с фиксацией всех возможностей и параметров. Игроки приобретают постоянный доступ к балансу, азартной данным и персональным опциям.
Платежные переводы проходят через интегрированные расчетные шлюзы. Рамки на инвестиции и получения определяются в соотношении с законодательными положениями и корпоративными политиками риск-менеджмента.
Экспертные пользователи указывают проверять ситуацию аккредитации через надзорные базы данных азартных структур. Престижные характеристики предусматривают позиции на специализированных платформах и комментарии истинных клиентов.
超人和露易斯第一季高清完整官方版,海外华人可免费观看最新热播剧集。
Игровая отрасль демонстрирует стремительный расширение, привлекая миллионы игроков. Квалифицированные площадки гарантируют надёжную пространство для ставок. Детальную информацию о данных брендах доступно обнаружить на винити казино .
Аккредитация остаётся главным показателем селекции сайта. Надзорные органы Мальты гарантируют тщательный аудит экономических процедур. Любая лицензированная сайт осуществляет постоянные проверки RNG-алгоритмов.
Технические особенности современных азартных площадок объединяют SSL-шифрование банковского класса. Поставщики цифрового обеспечения вроде Microgaming, NetEnt, Pragmatic Play встраивают сложные модели случайных величин.
Процедура подтверждения аккаунта подразумевает направления справок KYC-формата. Паспорт, подтверждение о доходах, валидация адреса — типичный перечень для итогового авторизации.
Альтернативные адреса исправляют трудности с запретами организаций. Действующие альтернативы корректируются каждый день техническими командами. Портативные программы нередко оперируют надёжнее онлайн редакций.
Банкролл-менеджмент устанавливает длительную результативность беттинговых циклов. Квалифицированные игроки настаивают контролировать размер вейджера до 1-2% от общего резерва.
Saat saya pertama komentar, saya klik “Notify me when new comments are added” dan sekarang tiap ada komentar saya dapat
empat email yang sama. Ada cara untuk menghapus saya
dari layanan itu? Makasih!
Актуальные игроки имеют дело с множеством технологических тонкостей при деятельности с легальными сайтами. Экспертные сайты типа Килограмм казино поставляют релевантную материалы о процессах развлекательных компаний.
Процедура проверки аккаунта содержит множество принудительных этапов. Исходная проверка включает отправки удостоверений доказывающих личность. Типовой пакет подразумевает удостоверение личности, автоудостоверение или международное ID.
Программная сторона регистрации включает эксплуатацию криптографической защиты и двухуровневой проверки. Экспертные клиенты советуют инициировать весь комплекс представленных настроек безопасности.
Запасные домены образуют абсолютные дубликаты главного платформы с обеспечением всего инструментария. Центральное выгода выражается в соответствии платежных границ и критериев вейджера.
Алгоритм поиска действующих резервных ссылок фундируется на отслеживании экспертных новостных лент и партнерских сайтов. Продвинутые участники внедряют прокси-соединения для создания надежного доступа без оглядки от местных запретов.
Активные резервные адреса надежных гемблинг-платформ на тип топ казино предоставляют постоянный подключение к азартным порталам. Технология реплицирования строит идентичные версии центрального портала с сохранением всех механизмов.
Процедура оформления профиля через резервную ссылку абсолютно воспроизводит стандартную заявку. Только пришедшие клиенты вводят активный email, придумывают безопасный код доступа и определяют рабочую курренси.
Идентификация учетной записи требует представления свидетельств по KYC-требованиям. Скан паспорта, подтверждение адреса и платежные сведения подвергаются цифровую валидацию в течение 24-72 часа.
Подключение активных пользователей реализуется через стандартную модуль с усиленной верификацией. Временные коды передаются на смс аппарат или электронную почту.
Инструменты депозитного раздела через зеркала включает востребованные расчетные платформы. Visa, Mastercard, веб счета Skrill, Neteller, цифровые активы Bitcoin, Ethereum выполняются с оптимизированными взносами 0-3%.
Азартная каталог клонируется на сто процентов включая машины, столовые развлечения, live-операторов и накопительные призы. RTP-значения, колебания и проигрыш поддерживаются аналогичными.
Подарочная механизм работает подобно главному сайту. Welcome-наборы, безвозмездные спины, денежный возврат и VIP-системы запускаются программно при выполнении установленных критериев.
Определение легального казино оператора предполагает тщательного изучения регулятивных документов. Современные ресурсы JVSpin зеркало обеспечивают участникам максимальную данные о имеющихся аккредитациях.
Процесс регистрации подразумевает определенное количество обязательных фаз проверки. Владельцы требуют справки, засвидетельствующие личность и возраст. Классический KYC-регламент составляет от 24 до 72 часов.
Финансовое планирование инициируется с определения рамок на инвестиции. Компетентные игроки призывают эксплуатировать норму 5% от совокупного азартного фонда на одну игру.
Технические препятствия владельцев побуждают внедрять резервные домены. Дубликаты хранят абсолютную производительность основного портала, предусматривая журнал транзакций и азартный продвижение.
Инновационные платежные методы предоставляют оперативные депозиты через цифровые счета. Bitcoin, Ethereum и постоянные токены дают тайность и символические платежи. Время выполнения изъятий составляет 10-30 промежутков.
Схемы лояльности подразумевают ступенчатые статусы с увеличивающимся кэшбэком. VIP-менеджеры предлагают персонализированные бонусы, усиленные рамки и преимущественную обслуживание.
Современные сервисы беттинг продуктов предлагают пользователям возможность к профессиональному азарту через безопасные казино СЌРЅРѕРјРѕ платформы. Сертифицированная функционирование подразумевает выполнения четких надзорных требований.
Процесс активации индивидуального кабинета предусматривает верификацию конфиденциальных информации. Регуляторы применяют углубленные алгоритмы KYC и AML для пресечения нарушающих платежей.
IT средства современных развлекательных порталов работают на зашифрованных дата-центрах с TLS протоколами. IP-фильтрация принуждает управляющих организовывать дублирующие адреса.
Резервные платформы образуют точные репликации центрального ресурса с фиксацией всех опций и параметров. Участники добиваются беспрепятственный подключение к счету, игровой отчетности и личным конфигурациям.
Расчетные переводы производятся через интегрированные денежные агрегаторы. Границы на вклады и получения назначаются в соответствии с законодательными стандартами и собственными процедурами контроля угроз.
Компетентные гемблеры советуют контролировать условия авторизации через контролирующие каталоги беттинг органов. Статусные характеристики задействуют рейтинги на отраслевых ресурсах и feedback реальных участников.
Надёжные площадки азартных возможностей дают игрокам шанс к элитному игровому процессу через профильные ресурсы, включая казино Меллстрой , которые специально соблюдают международные нормы надёжности.
Схема открытия счёта предполагает указания идентификационных данных через безопасные SSL-протоколы. Администрация запрашивают официальное доказательство age verification и территории residence для compliance правовых норм.
2FA верификация становится обязательным компонентом новейших систем безопасности. Пользователи обретают SMS-ключи, push-notification или внедряют специализированные приложения типа Google Authenticator.
Резервные порталы ликвидируют препятствия geographic санкций и DDoS-assault. Техническим образом зеркала образуют копийные dublicates базового сайта с удержанием функциональности и user данных.
Skilled геймеры предлагают сохранять актуальные реестры действующих копий в закладках browser. Букмекеры отправляют информацию о современных доменах через электронную почту, Telegram-чаты и портативные софт.
Банковские movements через надёжные порталы обеспечены защитными алгоритмами уровня банковского segment. Снятие фондов производится solely на верифицированные wallets хозяина account.
Надёжные операторы развлекательных услуг обеспечивают пользователям шанс к высококлассному развлечениям через специализированные домены, включая п»ї1xBet , которые именно выполняют общепринятые нормы конфиденциальности.
Механизм регистрации предполагает внесения валидационных сведений через encrypted SSL-соединения. Операторы запрашивают official доказательство возраста и адреса регистрации для выполнения законодательных стандартов.
Multi-factor проверка выступает required частью актуальных механизмов security. Пользователи обретают SMS-шифры, push-notification или применяют специализированные приложения вроде Google Authenticator.
Зеркальные порталы нейтрализуют вопросы локальных барьеров и DDoS-воздействий. По сути дубли являют дублированные клоны центрального домена с удержанием опций и user деталей.
Профессиональные участники предлагают удерживать обновлённые списки функционирующих дублей в сохранённых ссылках браузера. Букмекеры передают updates о fresh ссылках через электронную почту, Telegram-каналы и телефонные софт.
Финансовые movements через официальные платформы покрыты cryptographic протоколами категории банковского сектора. Изъятие денег выполняется исключительно на подтверждённые wallets держателя личного кабинета.
generic zoloft: zoloft pill – zoloft no prescription
Проверенные провайдеры гэмблинг услуг дают участникам вариант к высококлассному азартному досугу через dedicated сайты, включая Голд казино , которые специально соблюдают transnational требования безопасности.
Алгоритм открытия счёта включает предоставления верификационных параметров через шифрованные SSL-протоколы. Букмекеры просят official подтверждение age verification и региона жительства для исполнения нормативных правил.
Двухэтапная аутентификация является required составляющей актуальных механизмов надёжности. Клиенты имеют SMS-токены, push-алерты или внедряют профессиональные tools по типу Google Authenticator.
Альтернативные домены решают сложности локальных ограничений и DDoS-штурмов. Технически реплики являют тождественные версии центрального платформы с сохранением опций и клиентских деталей.
Профессиональные игроки предлагают keeping current каталоги активных дублей в favourites browser. Провайдеры направляют updates о актуальных URL через почтовые сервисы, Telegram-чаты и смартфонные программы.
Банковские переводы через legal порталы гарантированы защитными технологиями категории банковского segment. Получение капитала выполняется единственно на верифицированные реквизиты держателя учётной записи.
Легальные ресурсы игорных опций обеспечивают пользователям доступ к премиальному гэмблингу через специализированные ресурсы, включая лова казино , которые выполняют международные критерии защиты.
Последовательность оформления профиля включает ввода идентификационных сведений через защищённые SSL-линии. Операторы требуют документальное подтверждение age verification и региона residence для compliance нормативных требований.
Двухфакторная проверка становится required частью передовых архитектур конфиденциальности. Участники располагают SMS-ключи, push-алерты или используют dedicated приложения в стиле Google Authenticator.
Зеркальные домены нейтрализуют трудности geographic санкций и DDoS-воздействий. Технически зеркала формируют аналогичные dublicates primary портала с сохранением функциональности и личных информации.
Профессиональные игроки призывают keeping новейшие реестры активных копий в избранном интернет-программы. Букмекеры рассылают новости о свежих ссылках через мейл, Telegram-сообщества и мобильные софт.
Платёжные транзакции через лицензионные сайты secured cryptographic технологиями level банковского индустрии. Extraction денег производится только на аутентифицированные wallets обладателя профиля.
Актуальные гемблеры натыкаются с препятствием доступа к легальным площадкам. Компании запрещают главные ссылки, но знающие Вавада РІС…РѕРґ посетители помнят о существовании резервных порталов.
Альтернативный адрес формирует идентичную воспроизведение оригинального площадки. Криптографические алгоритмы функционируют неизменными. Денежные процедуры проходят через идентичные каналы.
Технология открытия счёта через параллельный ссылку требует стандартной верификации. Администраторы требуют свидетельства для исполнения KYC-стандартов. Личные сведения выполняют комплексную аутентификацию.
Финансовые рамки на параллельных сайтах равняются главным условиям. Низшие вклады поддерживаются постоянными. Возрастающие накопления интегрируются между различными адресами.
Бонусные схемы действуют завершённо на параллельных порталах. Множитель ставок сохраняет исходные параметры. Срок активности оборота сохраняется.
Отдел поддержки анализирует вопросы с параллельных ссылок аналогично. Интерактивный диалог обеспечивает непрерывный порядок функционирования.
Подбор честного казино заведения заставляет серьезного разбора официальных бумаг. Современные порталы Mellstroy Game предлагают геймерам абсолютную сведения о имеющихся разрешениях.
Процесс получения доступа охватывает ряд требуемых ступеней верификации. Провайдеры истребуют бумаги, устанавливающие идентичность и дееспособность. Обычный KYC-механизм продолжается от 24 до 72 временных отрезков.
Контроль средств инициируется с задания границ на вклады. Квалифицированные игроки призывают использовать закон 5% от совокупного казино бюджета на единичную игру.
Программные барьеры администраторов обязывают задействовать альтернативные адреса. Клоны хранят максимальную производительность основного сайта, предусматривая хронологию сделок и гемблинг прогресс.
Передовые платежные способы предоставляют скоростные вклады через цифровые аккаунты. Bitcoin, Ethereum и устойчивые монеты гарантируют тайность и символические сборы. Длительность осуществления получений равно 10-30 минут.
Алгоритмы постоянства содержат каскадные уровни с прогрессивным возвратом. VIP-координаторы предлагают индивидуальные подарки, усиленные пределы и первоочередную поддержку.
Новейшие операторы игорных активностей обеспечивают беттерам путь к профессиональному азарту через надежные Лаки Бир официальный сайт системы. Лицензированная операционная активность требует соблюдения четких законодательных норм.
Система открытия пользовательского счета задействует верификацию личных информации. Регуляторы внедряют детализированные механизмы KYC и AML для исключения незаконных переводов.
Цифровые инструменты новейших казино функционируют на зашифрованных дата-центрах с TLS алгоритмами. IP-фильтрация заставляет администраторов организовывать параллельные порталы.
Резервные платформы составляют идентичные репликации первичного платформы с удержанием всех опций и параметров. Участники приобретают стабильный соединение к депозиту, гемблинг статистике и персональным опциям.
Платежные процедуры проходят через подключенные банковские системы. Рамки на взносы и обналичивания регулируются в соотношении с правовыми стандартами и внутренними процедурами снижения потерь.
Компетентные беттеры указывают отслеживать статус сертификата через регуляторные списки беттинг организаций. Репутационные параметры охватывают рейтинги на специализированных платформах и отзывы истинных беттеров.
hi!,I really like your writing so a lot! proportion we
keep in touch extra approximately your article on AOL?
I need an expert in this space to unravel my problem.
Maybe that is you! Taking a look ahead to see you.
Легальные площадки игровых услуг oferuja участникам право к элитному развлечениям через dedicated порталы, включая Голд казино , что выполняют международные стандарты security.
Схема создания аккаунта necessita ввода authentication сведений через encrypted SSL-каналы. Провайдеры просят официальное свидетельство правоспособности и региона residence для выполнения правовых норм.
Multi-factor аутентификация выступает mandatory компонентом современных solutions надёжности. Клиенты получают SMS-токены, push-оповещения или используют специальные программы в стиле Google Authenticator.
Зеркальные ссылки преодолевают трудности географических запретов и DDoS-воздействий. Фактически mirrors образуют аналогичные копии центрального портала с поддержанием функциональности и user деталей.
Компетентные клиенты предлагают сохранять свежие каталоги рабочих зеркал в избранном браузера. Management отправляют сведения о новых доменах через мейл, Telegram-communities и портативные программы.
Банковские операции через legal ресурсы обеспечены шифровальными технологиями класса банковского области. Вывод денег осуществляется solely на подтверждённые реквизиты собственника профиля.
Поиск качественного игрового заведения в современных рамках заставляет детального внимания к законному уровню. Опытные игроки понимают, что Вован казино содержит современную факты о функционирующих операторах.
Схема регистрации в легальных площадках предусматривает неизбежную подтверждение личности. KYC-стандарты оберегают как казино, так и геймера от махинаций. Кратковременные лимиты на снятие денег до закрытия проверки – нормальная методика.
Технические блокировки на соединение к азартным площадкам преодолеваются через зеркальные домены. Доступные отражения поддерживают тотальную производительность базового сайта. Финансовые переводы, развлекательный достижения и привилегированные схемы поддерживаются постоянными.
Финансовая защищенность выражается степенью эксплуатируемых платежных механизмов. SSL-криптография, PCI DSS аттестация и двухфакторная подтверждение формируют надежный периметр обороны.
Геймплейная коллекция официальных операторов включает машины от главных студий. RTP-показатели, колебания и статистические схемы проходят объективную сертификацию в аккредитованных лабораториях.
Планы стимулирования в качественных казино формируются на понятных правилах активности. Отыгрыш x35-40 расценивается нормальным для барабан-льгот, в то время как стандартные состязания включаются в калькуляцию с минимальным фактором.
Новейшие геймеры натыкаются с препятствием соединения к легальным ресурсам. Компании ограничивают стандартные домены, но знающие Меллстрой пользователи помнят о существовании зеркальных платформ.
Резервная ссылка составляет идентичную реплику главного платформы. Криптографические алгоритмы функционируют равнозначными. Расчётные операции производятся через идентичные каналы.
Методика создания аккаунта через альтернативный портал содержит стандартной валидации. Специалисты требуют справки для исполнения KYC-регламентов. Персональные характеристики реализуют комплексную верификацию.
Депозитные ограничения на резервных платформах аналогичны главным характеристикам. Минимальные взносы остаются константными. Накопительные накопления интегрируются между многочисленными ссылками.
Поощрительные программы функционируют завершённо на альтернативных площадках. Вейджер сохраняет первоначальные цифры. Длительность оборота сохраняется.
Отдел обслуживания изучает заявки с дополнительных ссылок аналогично. Живой чат гарантирует непрерывный график деятельности.
Передовые провайдеры развлекательных услуг предоставляют клиентам путь к элитному развлечениям через надежные Lucky Bear системы. Сертифицированная операционная активность требует следования строгих правовых норм.
Процесс регистрации игрового учетной записи содержит аутентификацию индивидуальных показателей. Провайдеры задействуют детализированные механизмы KYC и AML для исключения поддельных транзакций.
IT инструменты современных беттинг площадок функционируют на зашифрованных инфраструктурах с SSL технологиями. Региональная блокировка побуждает владельцев внедрять резервные порталы.
Альтернативные порталы формируют идентичные клоны базового домена с обеспечением всех возможностей и данных. Пользователи приобретают беспрепятственный связь к капиталу, игровой отчетности и пользовательским конфигурациям.
Банковские транзакции производятся через связанные платежные агрегаторы. Рамки на инвестиции и выводы назначаются в согласии с регуляторными критериями и организационными правилами снижения потерь.
Квалифицированные клиенты настаивают контролировать состояние сертификата через официальные каталоги игорных организаций. Репутационные показатели содержат рейтинги на тематических ресурсах и feedback реальных участников.
Ремонт ванной комнаты своими руками советы
connectglobalprofessionals – Platform is reliable and modern, really sped up connecting with professionals.
http://sertralineusa.com/# sertraline generic
For reviews
online guaranteed approval loans for bad credit
to start the process.
Передовые операторы гемблинг игр гарантируют пользователям путь к премиальному азарту через надежные СЌРЅРѕРјРѕ казино сайты. Легальная функционирование подразумевает выполнения строгих законодательных норм.
Процедура регистрации персонального учетной записи содержит аутентификацию индивидуальных показателей. Провайдеры внедряют детализированные процедуры KYC и AML для недопущения незаконных транзакций.
Электронные средства передовых игорных домов основываются на зашифрованных хостингах с TLS протоколами. Локальные запреты побуждает провайдеров создавать дублирующие домены.
Зеркальные домены представляют эквивалентные версии главного портала с сохранением всех опций и данных. Клиенты добиваются постоянный связь к балансу, азартной истории и пользовательским настройкам.
Платежные транзакции осуществляются через подключенные финансовые агрегаторы. Лимиты на депозиты и изъятия назначаются в гармонии с правовыми критериями и собственными процедурами риск-менеджмента.
Экспертные гемблеры рекомендуют мониторить положение аккредитации через регуляторные каталоги развлекательных ведомств. Статусные индикаторы включают оценки на специализированных сайтах и отзывы действительных игроков.
Действующие зеркала проверенных казино на Меллстрой казино создают беспрерывный доступ к геймерским сервисам. Система реплицирования создает идентичные дубликаты основного портала с консервацией всех функций.
Система оформления профиля через альтернативный домен целиком повторяет основную анкету. Дебютные игроки заполняют функционирующий email, создают стойкий шифр и выбирают игровую финансовый инструмент.
Подтверждение аккаунта содержит загрузки документов следуя KYC-регламенту. Фото паспорта, доказательство места жительства и платежные сведения проверяются через цифровую проверку в течение 24-72 часа.
Вход действующих участников реализуется через классическую модуль с двухфакторной аутентификацией. Краткосрочные пароли передаются на мессенджер устройство или электронную почту.
Функционал финансового модуля через mirror-сайты содержит актуальные расчетные инструменты. Visa, Mastercard, виртуальные хранилища Skrill, Neteller, криптовалюты Bitcoin, Ethereum обрабатываются с оптимизированными процентами 0-3%.
Gaming коллекция копируется в точности включая машины, настольные развлечения, live-дилеров и прогрессивы. RTP-показатели, волатильность и ставочные требования поддерживаются аналогичными.
Поощрительная программа функционирует аналогично базовому домену. Welcome-пакеты, безвозмездные спины, возврат средств и VIP-курсы активируются машинально при выполнении фиксированных параметров.
Новейшие провайдеры беттинг услуг предоставляют клиентам доступ к высококлассному игровому процессу через защищенные Lucky Bear сайты. Лицензированная функционирование предполагает следования жестких контролирующих норм.
Процесс активации клиентского профиля задействует валидацию приватных показателей. Регуляторы внедряют расширенные алгоритмы KYC и AML для исключения поддельных финансовых действий.
Цифровые платформы передовых казино базируются на зашифрованных дата-центрах с криптографическими протоколами. Территориальные ограничения принуждает провайдеров создавать вспомогательные порталы.
Дублирующие сайты образуют эквивалентные репликации главного платформы с сохранением всех функций и сведений. Клиенты обеспечивают себе устойчивый вход к балансу, беттинг истории и пользовательским настройкам.
Финансовые операции выполняются через встроенные платежные агрегаторы. Лимиты на инвестиции и обналичивания определяются в согласии с нормативными положениями и собственными регламентами снижения потерь.
Опытные клиенты настаивают контролировать статус разрешения через официальные регистры азартных ведомств. Авторитетные характеристики предусматривают места на профильных сайтах и комментарии настоящих участников.
Азартная отрасль представляет быстрый прогресс, манящая массы игроков. Грамотные площадки предлагают надёжную обстановку для развлечений. Детальную информацию о этих организациях реально отыскать на казино СЌРЅРѕРјРѕ .
Сертификация представляет центральным показателем селекции ресурса. Контролёры Кюрасао обеспечивают строгий контроль денежных манипуляций. Конкретная аккредитованная сайт осуществляет периодические проверки RNG-модулей.
Цифровые параметры инновационных гемблинг-сайтов объединяют SSL-кодирование финансового ранга. Провайдеры виртуального обеспечения класса Microgaming, NetEnt, Pragmatic Play интегрируют продвинутые механизмы рандомных показателей.
Процесс верификации личного кабинета требует направления бумаг KYC-уровня. ID, подтверждение о заработке, верификация проживания — обычный набор для полноценного подключения.
Альтернативные домены исправляют барьеры с запретами поставщиков. Свежие зеркала корректируются систематически программными отделами. Карманные клиенты нередко функционируют стабильнее онлайн версий.
Управление банкроллом создаёт перспективную эффективность гемблинговых циклов. Профессиональные геймеры настаивают контролировать сумму пари до 1-2% от суммарного капитала.
cheapest online pharmacy no rx https://baypharm.top/# pharmacys without prescriptions
Подбор качественного развлекательного ресурса в сегодняшних обстоятельствах подразумевает тщательного рассмотрения к лицензионному режиму. Знающие участники понимают, что п»ї1хбет зеркало включает современную факты о действующих сервисах.
Процесс оформления профиля в сертифицированных площадках включает неизбежную подтверждение личности. KYC-процедуры охраняют как заведение, так и игрока от афер. Кратковременные рамки на вывод капитала до окончания контроля – нормальная методика.
Программные ограничения на подключение к betting ресурсам нейтрализуются через зеркальные домены. Активные отражения поддерживают тотальную функциональность основного платформы. Финансовые процедуры, развлекательный продвижение и поощрительные системы функционируют постоянными.
Экономическая защищенность определяется степенью используемых банковских способов. SSL-шифрование, PCI DSS лицензирование и усиленная проверка обеспечивают надежный периметр обороны.
Азартная каталог лицензированных площадок содержит барабаны от топовых производителей. RTP-параметры, вариативность и расчетные модели подвергаются независимую сертификацию в авторизованных институтах.
Схемы мотивации в профессиональных операторах формируются на понятных требованиях активности. Вейджер x35-40 оценивается справедливым для барабан-привилегий, в то время как настольные состязания засчитываются в расчет с пониженным показателем.
https://neuroreliefusa.com/# Neuro Relief USA
Навигация в пространстве сертифицированных ресурсов требует представления актуальных инструментов доступа. Профессиональные клиенты задействуют Вавада регистрация для извлечения новейшей сведений о оперативных доменах.
Схема открытия аккаунта в надежных организациях предполагает комплексную подтверждение. Новейшие провайдеры эксплуатируют KYC-системы и AML-критерии. Бумажная работа отнимает от 24 до 72 интервалов.
Цифровые способы для преодоления блокировок эволюционируют синхронно с усилением правовых шагов. VPN-инструменты типа premium предлагают шифрование AES-256 и системы OpenVPN. Надежность канала кардинально необходима для VIP партий.
Альтернативные сайты действуют через пространственно расположенные цифровые мощности. CDN-комплексы предоставляют минимальную задержку для американских клиентов. Техническое роутинг инициируется при выявлении недоступности главного адреса.
Платежные транзакции в проверенных областях следуют жестким требованиям PCI DSS. Крипто платежи приобретают актуальность по причине приватности и оперативности реализации.
Мобильные утилиты элитных операторов объединяют отпечатковую проверку и push-оповещения для принципиальных моментов. Изменяемый интерфейс автоматически корректируется под свойства монитора.
Подбор надежного игрового портала в актуальных рамках заставляет повышенного внимания к юридическому режиму. Знающие пользователи учитывают, что Голд казино демонстрирует актуальную информацию о работающих провайдерах.
Процедура регистрации в сертифицированных сервисах предусматривает неизбежную проверку личности. KYC-нормы обеспечивают как площадку, так и участника от афер. Кратковременные лимиты на получение капитала до завершения валидации – типичная подход.
Электронные запреты на связь к развлекательным сайтам преодолеваются через резервные адреса. Доступные копии предоставляют всестороннюю возможности базового платформы. Финансовые переводы, геймплейный продвижение и поощрительные предложения остаются константными.
Денежная надежность определяется уровнем используемых банковских инструментов. SSL-безопасность, PCI DSS валидация и расширенная проверка обеспечивают надежный периметр безопасности.
Игровая каталог лицензированных площадок включает машины от ведущих создателей. RTP-значения, вариативность и математические схемы подвергаются беспристрастную аудит в одобренных организациях.
Схемы поощрения в качественных заведениях базируются на понятных требованиях ставок. Проигрыш x35-40 считается нормальным для машина-бонусов, в то время как карточные развлечения принимаются в подсчет с пониженным показателем.
Ориентирование в пространстве проверенных сайтов предполагает владения актуальных технологий подключения. Профессиональные участники эксплуатируют Гризли казино для получения свежей данных о функционирующих адресах.
Схема открытия аккаунта в надежных учреждениях содержит детальную проверку. Новейшие компании эксплуатируют KYC-механизмы и AML-стандарты. Документальная процедура требует от 24 до 72 временных отрезков.
Компьютерные способы для прохождения запретов совершенствуются одновременно с усилением законодательных действий. VPN-службы типа premium гарантируют шифрование AES-256 и системы OpenVPN. Стабильность коннекта fundamentally важна для высокоролловых партий.
Альтернативные платформы работают через пространственно распределенные цифровые мощности. CDN-системы поддерживают оптимальную время ответа для американских пользователей. Цифровое роутинг активируется при распознавании недоступности первичного сайта.
Платежные движения в лицензированных юрисдикциях соответствуют строгим правилам PCI DSS. Цифровые транзакции увеличивают популярность благодаря скрытности и оперативности процессинга.
Мобильные программы премиальных брендов включают голосовую идентификацию и push-уведомления для важных происшествий. Гибкий облик автоматически настраивается под характеристики экрана.
Кстати, если вас интересует топ популярных саундтреков к фильмам февраля 2026 года, посмотрите сюда.
Ссылка ниже:
https://musichunt.pro/%d0%bc%d1%83%d0%b7%d1%8b%d0%ba%d0%b0-%d0%b2-%d1%84%d0%b8%d0%bb%d1%8c%d0%bc%d0%b0%d1%85-%d1%84%d0%b5%d0%b2%d1%80%d0%b0%d0%bb%d1%8f-2026-%d1%81%d0%b0%d1%83%d0%bd%d0%b4%d1%82%d1%80%d0%b5%d0%ba%d0%b8/
Подбор легального развлекательного заведения предполагает детального анализа регулятивных документов. Актуальные системы Меллстрой зеркало предлагают игрокам безусловную информацию о имеющихся допусках.
Процесс регистрации подразумевает несколько принудительных стадий валидации. Владельцы настаивают документы, подтверждающие персону и совершеннолетие. Традиционный KYC-регламент требует от 24 до 72 часов.
Распоряжение капиталом инициируется с установления лимитов на взносы. Компетентные пользователи призывают применять принцип 5% от суммарного казино фонда на индивидуальную партию.
Системные ограничения администраторов принуждают эксплуатировать вспомогательные домены. Альтернативы удерживают максимальную функциональность базового платформы, включая хронологию платежей и гемблинг достижения.
Инновационные платежные способы гарантируют скоростные депозиты через цифровые кошельки. Bitcoin, Ethereum и фиксированные активы обеспечивают конфиденциальность и мизерные сборы. Период реализации выводов равно 10-30 отрезков.
Схемы приверженности содержат градационные ранги с прогрессивным бонусом. VIP-менеджеры предлагают индивидуальные поощрения, улучшенные ограничения и опережающую техподдержку.
Rutor — основной сайт русскоязычного даркнета в Tor, дающий пользователям доступ к информации, материалам, товарам и правилам анонимности пользователей черного рынка и onion ресурсов
Rutor — старейший узел русского даркнета, который предоставляет услуги конфиденциального обмена и защищённой передачи данных в сети Rutor.Rutor — старейший представитель даркнета на русском языке
кгторг зеркало — это один из первых и известнейших русскоязычных ресурсов даркнета, неразрывно связанный с анонимной онлайн-экосистемой. Данный сервис специализируется на доступе к широчайшему ассортименту софта, файлов, новостей и разнообразных материалов, охватывающих вопросы взлома и защиты.
Главные аспекты функционирования Rutor
Механизм работы ресурса позволяет пользователям получать доступ к большим массивам данных и файлов, при этом обеспечивая максимальную приватность и анонимность. Главное преимущество платформы — интеграция с сетью Rutor, что значительно уменьшает вероятность раскрытия личности и потери конфиденциальной информации. За годы существования Rutor стал местом, где сохраняется важная история русскоязычного даркнета.
Rutor поддерживает стабильную работу, позволяя и новичкам, и опытным пользователям использовать предоставляемые сервисы. Каждый из разделов сайта — магазин, новостные ленты или руководства по взлому — образуют отдельную звено в масштабном сообществе, где главными ценностями выступают конфиденциальность и защита анонимности.
Будущее платформы: вызовы и обещания
Безусловно, дальнейшая история Rutor будет связана с новыми формами риска, новыми способами защиты конфиденциальности и методами обхода блокировок. Пользователи обязаны понимать, что ни одна анонимная платформа не может дать абсолютную защиту.
Сервис остается местом, где можно получать дополнительную информацию, обсуждать вопросы безопасности, следить за новостями и инновациями в области даркнета. Технический прогресс, рост числа участников и новые функциональные решения превращают Rutor в ключевой узел русскоязычного интернет-сообщества.
– Принцип анонимности
– Надёжность проведения операций
– Открытый доступ к специализированному контенту
– Обеспечение приватности взаимодействий
Уникальный путь Rutor делает платформу значимой для тех, кто высоко ценит свободу, личную приватность и защиту от внешнего контроля в цифровую эпоху.
Поиск в сфере проверенных порталов подразумевает осознания продвинутых способов доступа. Опытные пользователи задействуют Вавада для приобретения актуальной данных о функционирующих адресах.
Механизм открытия аккаунта в проверенных компаниях охватывает сложную верификацию. Актуальные компании задействуют KYC-протоколы и AML-критерии. Документооборот занимает от 24 до 72 временных отрезков.
Цифровые решения для обхода запретов развиваются одновременно с укреплением регуляторных решений. VPN-сервисы уровня premium дают шифрование AES-256 и методы OpenVPN. Устойчивость коннекта принципиально существенна для высокоролловых заходов.
Запасные домены функционируют через регионально рассредоточенные цифровые кластеры. CDN-структуры поддерживают минимальную отклик для глобальных игроков. Техническое перенаправление включается при обнаружении барьера базового сайта.
Платежные движения в сертифицированных юрисдикциях отвечают четким стандартам PCI DSS. Цифровые платежи увеличивают распространение благодаря конфиденциальности и динамике процессинга.
Переносные софт лучших провайдеров интегрируют отпечатковую аутентификацию и push-извещения для критических ситуаций. Изменяемый дизайн программно изменяется под свойства дисплея.
my blog Vauld restructuring
Get the Lights Out PDF quickly without navigating complex menus. Our site structure is flat and easy to understand. We guide you straight to your goal without distraction. https://lightsoutpdf.top/ Daniel X Lights Out Pdf
Explore a fantasy epic that doesn’t shy away from difficult emotional terrain. https://heiroffirepdf.top/ What Comes After Heir Of Fire
mostbet пополнение Казахстан http://mostbet46809.help
Диета при мигрени
Игровая отрасль отображает интенсивный прогресс, завлекая тысячи клиентов. Квалифицированные платформы предоставляют защищённую среду для пари. Детальную информацию о указанных компаниях доступно отыскать на Меллстрой казино .
Аттестация выступает ключевым показателем выбора сайта. Контролёры Великобритании гарантируют жёсткий мониторинг расчётных процедур. Каждая официальная площадка выполняет систематические проверки RNG-механизмов.
IT особенности современных игорных домов объединяют SSL-криптографию экономического стандарта. Провайдеры цифрового продукта класса Microgaming, NetEnt, Pragmatic Play подключают сложные модели непредсказуемых величин.
Механизм верификации учётной записи подразумевает предоставления справок KYC-уровня. Паспорт, подтверждение о заработке, удостоверение адреса — классический комплект для полноценного подключения.
Дублирующие адреса убирают барьеры с фильтрацией организаций. Свежие копии изменяются ежедневно программными специалистами. Планшетные утилиты регулярно функционируют лучше веб модификаций.
Финансовая дисциплина формирует перспективную результативность игровых раундов. Профессиональные участники предлагают урезать размер пари до 1-2% от итогового капитала.
Опрятный вид формирует первое мнение о вас.
Он влияет на восприятие вас окружающими мгновенно.
Хорошее самочувствие в подобранном образе укрепляет личную самооценку.
Он демонстрирует ваш стандарт профессионализма и внимание к мелочам.
https://c.balenciager.ru/OijXfpO2EUo/
Посредством гардероб вы можете выразить свою личность и вкус.
Люди неосознанно воспринимают стильных индивидов как более успешных.
Поэтому, инвестиции в свой образ — это инвестиции в ваше будущее.
Действующие зеркала легальных казино на Меллстрой предоставляют беспрерывный коннект к игровым сервисам. Схема реплицирования создает эквивалентные копии главного веб-площадки с удержанием всех функций.
Схема открытия счета через mirror-сайт полностью дублирует стандартную анкету. Начинающие геймеры указывают функционирующий email, формируют стойкий шифр и устанавливают базовую платежное средство.
Подтверждение профиля содержит предоставления бумаг следуя KYC-политике. Изображение паспорта, подтверждение места жительства и денежные сведения проверяются через автоматическую анализ в течение 24-72 временных единиц.
Логин существующих пользователей реализуется через классическую модуль с многоступенчатой верификацией. Одноразовые коды отправляются на мессенджер номер или email.
Функционал пополнительного сектора через резервные ссылки поддерживает популярные финансовые инструменты. Visa, Mastercard, цифровые кошельки Skrill, Neteller, цифровые активы Bitcoin, Ethereum выполняются с оптимизированными платежами 0-3%.
Gaming каталог воспроизводится абсолютно включая слоты, карточные развлечения, live-крупье и джекпоты. RTP-индикаторы, волатильность и вейджер остаются идентичными.
Подарочная программа выполняется аналогично корневому домену. Welcome-комплекты, фриспины, refund и VIP-системы активируются системно при достижении установленных параметров.
Поиск проверенного казино заведения требует тщательного исследования официальных разрешений. Актуальные системы казино ДживиСпин дают пользователям полную факты о текущих аккредитациях.
Процедура получения доступа подразумевает различные принудительных ступеней проверки. Провайдеры запрашивают бумаги, доказывающие персону и правоспособность. Традиционный KYC-порядок занимает от 24 до 72 промежутков.
Управление банком открывается с назначения рамок на взносы. Профессиональные пользователи призывают задействовать норму 5% от общего гемблинг капитала на отдельную сессию.
Системные барьеры провайдеров вынуждают использовать резервные маршруты. Альтернативы оберегают максимальную эффективность основного портала, предусматривая летопись операций и развлекательный результаты.
Современные финансовые сервисы поддерживают скоростные депозиты через блокчейн портмоне. Bitcoin, Ethereum и фиксированные активы дают скрытность и наименьшие взносы. Длительность проведения получений достигает 10-30 периодов.
Планы верности подразумевают градационные ранги с накапливающимся возвратом. VIP-консультанты гарантируют эксклюзивные бонусы, расширенные лимиты и приоритетную техподдержку.
Действующие резервные адреса легальных игорных заведений на казино Голд обеспечивают непрерывный подключение к гемблинг порталам. Система зеркалирования формирует аналогичные реплики основного ресурса с поддержанием всех функций.
Система открытия счета через зеркало полностью повторяет стандартную шаблон. Свежие пользователи вводят действующий email, придумывают надежный ключ и выбирают игровую денежную единицу.
Валидация личного кабинета содержит предоставления удостоверений в соответствии с KYC-политике. Снимок водительских прав, валидация адреса и финансовые данные контролируются системой программную валидацию в течение 24-72 временных единиц.
Логин активных геймеров осуществляется через базовую форму с многоступенчатой идентификацией. Разовые коды передаются на смс гаджет или электронную почту.
Возможности входящего сектора через зеркала обеспечивает актуальные финансовые сервисы. Visa, Mastercard, веб кошельки Skrill, Neteller, криптовалюты Bitcoin, Ethereum реализуются с оптимизированными комиссиями 0-3%.
Gaming коллекция клонируется целиком включая автоматы, карточные игры, live-дилеров и прогрессивы. RTP-показатели, изменчивость и проигрыш фиксируются неизменными.
Промо политика выполняется идентично базовому порталу. Welcome-пакеты, безвозмездные спины, кешбэк и VIP-курсы включаются автоматически при исполнении фиксированных требований.
website link Vauld withdrawal update
recommended you read Nifty marketplace
Действующие дублирующие порталы легальных казино на п»ї1xBet казино создают беспрерывный доступ к азартным платформам. Принцип дублирования создает идентичные версии центрального ресурса с консервацией всех возможностей.
Механизм активации через mirror-сайт полностью дублирует базовую бланк. Новые игроки указывают валидный email, создают защищенный шифр и выбирают игровую валюту.
Идентификация профиля требует загрузки документов опираясь на KYC-политике. Снимок удостоверения личности, верификация проживания и платежные координаты анализируются посредством автоматическую анализ в течение 24-72 временных единиц.
Подключение существующих пользователей выполняется через обычную окно с двухфакторной проверкой. Временные токены поступают на сотовый устройство или e-mail адрес.
Функционал депозитного блока через резервные ссылки включает популярные финансовые платформы. Visa, Mastercard, цифровые счета Skrill, Neteller, криптовалюты Bitcoin, Ethereum осуществляются с уменьшенными сборами 0-3%.
Игровая коллекция копируется полностью включая spinning games, классические активности, live-крупье и мегавыигрыши. RTP-коэффициенты, вариативность и условия отыгрыша сохраняются такими же.
Акционная политика функционирует подобно корневому порталу. Welcome-наборы, фриспины, refund и VIP-планы включаются системно при выполнении заданных параметров.
Hello would you mind sharing which blog platform you’re working with?
I’m looking to start my own blog in the near future but I’m having a tough time making a decision between BlogEngine/Wordpress/B2evolution and Drupal.
The reason I ask is because your layout seems different then most blogs and I’m looking for something
unique. P.S My apologies for getting off-topic but I had to ask!
Актуальные провайдеры игорных услуг предоставляют участникам подключение к элитному развлечениям через безопасные Vavada casino ресурсы. Сертифицированная деятельность требует исполнения определенных законодательных стандартов.
Система активации индивидуального счета содержит аутентификацию конфиденциальных реквизитов. Операторы применяют углубленные протоколы KYC и AML для блокировки мошеннических транзакций.
IT инструменты инновационных развлекательных порталов работают на надежных хостингах с шифровальными алгоритмами. IP-фильтрация побуждает владельцев запускать дублирующие адреса.
Зеркальные порталы составляют эквивалентные версии первичного портала с сохранением всех инструментов и параметров. Клиенты достигают беспрепятственный связь к балансу, беттинг истории и клиентским установкам.
Платежные процедуры производятся через встроенные банковские шлюзы. Ограничения на вклады и снятия определяются в согласии с правовыми условиями и собственными регламентами контроля угроз.
Компетентные гемблеры настаивают мониторить условия сертификата через государственные каталоги азартных ведомств. Авторитетные характеристики предусматривают рейтинги на экспертных сервисах и оценки реальных беттеров.
discover here Paxful app
Навигация в секторе легальных площадок включает осознания актуальных технологий соединения. Квалифицированные игроки применяют винити казино для получения свежей материалов о активных доменах.
Алгоритм регистрации счета в официальных заведениях включает тщательную проверку. Продвинутые операторы используют KYC-алгоритмы и AML-правила. Оформление документов занимает от 24 до 72 часов.
Компьютерные способы для преодоления блокировок эволюционируют одновременно с интенсификацией нормативных шагов. VPN-инструменты уровня premium дают защиту AES-256 и протоколы OpenVPN. Непрерывность связи критически актуальна для элитных заходов.
Резервные платформы функционируют через географически расположенные технические инфраструктуры. CDN-системы обеспечивают оптимальную время ответа для азиатских геймеров. Техническое перенаправление срабатывает при идентификации препятствия главного ресурса.
Банковские переводы в лицензированных областях подпадают под жестким требованиям PCI DSS. Цифровые расчеты приобретают популярность из-за секретности и скорости процессинга.
Переносные софт топовых операторов интегрируют отпечатковую аутентификацию и push-оповещения для существенных ситуаций. Изменяемый дизайн автономно изменяется под настройки панели.
Перемещение в секторе сертифицированных сайтов включает представления современных способов авторизации. Умелые клиенты задействуют Либет казино для извлечения свежей данных о активных адресах.
Процесс открытия счета в официальных компаниях подразумевает сложную проверку. Передовые операторы задействуют KYC-алгоритмы и AML-нормы. Документальное сопровождение требует от 24 до 72 периодов.
IT инструменты для преодоления блокировок эволюционируют одновременно с усилением регуляторных мер. VPN-службы типа premium обеспечивают кодирование AES-256 и стандарты OpenVPN. Надежность подключения принципиально существенна для премиальных заходов.
Резервные ресурсы функционируют через пространственно рассредоточенные цифровые мощности. CDN-комплексы осуществляют быструю время ответа для международных геймеров. Программное переключение срабатывает при распознавании барьера главного ресурса.
Банковские операции в официальных зонах следуют четким нормам PCI DSS. Цифровые операции приобретают популярность по причине анонимности и динамике обработки.
Мобильные клиенты ведущих организаций включают лицевую идентификацию и push-уведомления для важных эпизодов. Адаптивный оформление независимо подстраивается под характеристики дисплея.
Новейшие сервисы беттинг развлечений гарантируют пользователям вход к элитному беттингу через сертифицированные Lucky Bear платформы. Сертифицированная бизнес влечет следования жестких надзорных положений.
Механизм оформления игрового профиля задействует подтверждение личных реквизитов. Управляющие эксплуатируют расширенные системы KYC и AML для недопущения нарушающих операций.
Электронные решения новейших казино базируются на зашифрованных хостингах с HTTPS технологиями. Локальные запреты заставляет владельцев запускать вспомогательные URL.
Зеркальные порталы являют собой полные репликации центрального ресурса с поддержанием всех опций и данных. Пользователи добиваются постоянный подключение к капиталу, азартной данным и индивидуальным настройкам.
Банковские процедуры проходят через связанные платежные процессоры. Рамки на вклады и изъятия устанавливаются в гармонии с правовыми требованиями и организационными нормами риск-менеджмента.
Квалифицированные пользователи настаивают контролировать положение разрешения через государственные регистры азартных ведомств. Имиджевые показатели включают оценки на экспертных платформах и мнения реальных беттеров.
Навигация в мире сертифицированных сайтов предполагает представления актуальных инструментов авторизации. Профессиональные участники применяют Лаки Бир РІС…РѕРґ для добывания свежей данных о оперативных доменах.
Алгоритм оформления личного кабинета в официальных заведениях охватывает детальную верификацию. Продвинутые провайдеры задействуют KYC-процедуры и AML-стандарты. Оформление документов требует от 24 до 72 часов.
Компьютерные способы для преодоления запретов улучшаются вместе с интенсификацией нормативных инициатив. VPN-решения категории premium предоставляют кодирование AES-256 и системы OpenVPN. Стабильность связи fundamentally актуальна для высокоролловых партий.
Запасные домены работают через локально расположенные компьютерные системы. CDN-структуры осуществляют быструю задержку для европейских геймеров. Системное маршрутизация инициируется при выявлении блокировки центрального ресурса.
Финансовые манипуляции в лицензированных зонах отвечают жестким критериям PCI DSS. Блокчейн транзакции увеличивают распространение по причине анонимности и скорости выполнения.
Переносные софт топовых организаций содержат биометрическую проверку и push-извещения для принципиальных эпизодов. Адаптивный дизайн автоматически изменяется под особенности монитора.
mostbet Oʻzbekiston crash http://www.mostbet69573.help
where can i buy neurontin online: Neuro Relief USA – Neuro Relief USA
кайт сафари Красное море Кайт кайтинг кайтсёрфинг школа обучение сафари Дети ветра DETIVETRA
Гемблинговая сфера отображает интенсивный подъём, завлекая множество геймеров. Экспертные порталы гарантируют безопасную пространство для игры. Подробную информацию о данных брендах реально отыскать на Меллстрой казино .
Аттестация представляет центральным аспектом отбора платформы. Лицензиаты Кюрасао обеспечивают жёсткий проверку денежных действий. Любая аккредитованная площадка подвергается регулярные контроли RNG-алгоритмов.
Цифровые особенности передовых азартных площадок включают SSL-шифрование денежного уровня. Производители виртуального продукта вроде Microgaming, NetEnt, Pragmatic Play добавляют продвинутые системы непредсказуемых чисел.
Алгоритм подтверждения личного кабинета предполагает представления документов KYC-класса. Свидетельство, свидетельство о финансах, доказательство проживания — классический перечень для окончательного доступа.
Зеркальные URL исправляют препятствия с ограничениями организаций. Актуальные дубли изменяются каждый день IT группами. Портативные софт обычно действуют надёжнее сетевых модификаций.
Финансовая дисциплина устанавливает стратегическую успешность игровых периодов. Грамотные участники рекомендуют сокращать величину ставки до 1-2% от общего резерва.
neurontin 100mg caps: Neuro Relief USA – Neuro Relief USA
Беттинговая ниша отображает активный подъём, привлекая тысячи клиентов. Квалифицированные площадки обеспечивают безопасную условия для беттинга. Детальную сведения о указанных операторах реально изучить на казино Mellstroy Game .
Аттестация представляет основным показателем подбора площадки. Юрисдикции Мальты создают жёсткий надзор валютных действий. Конкретная официальная ресурс осуществляет регулярные аудиты RNG-алгоритмов.
IT аспекты современных беттинг-платформ предусматривают SSL-криптографию финансового класса. Провайдеры виртуального обеспечения вроде Microgaming, NetEnt, Pragmatic Play интегрируют усовершенствованные схемы произвольных чисел.
Процедура аутентификации учётной записи предполагает предоставления свидетельств KYC-уровня. Удостоверение, выписка о доходах, верификация проживания — классический набор для окончательного активации.
Дублирующие URL устраняют трудности с фильтрацией организаций. Действующие варианты модифицируются ежедневно цифровыми командами. Мобильные утилиты зачастую действуют качественнее веб вариантов.
Распределение капитала задаёт перспективную успешность развлекательных периодов. Опытные игроки предлагают контролировать сумму ставки до 1-2% от общего капитала.
web link Nifty NFT
Надёжные ресурсы азартных услуг дают игрокам право к премиальному гэмблингу через специализированные ресурсы, включая казино Килограмм , что следуют мировые критерии безопасности.
Последовательность открытия счёта подразумевает заполнения идентификационных деталей через криптографические SSL-протоколы. Администрация запрашивают official удостоверение age verification и адреса нахождения для поддержания нормативных стандартов.
Multi-factor верификация представляет required составляющей передовых механизмов конфиденциальности. Игроки приобретают SMS-ключи, push-алерты или применяют специальные tools вроде Google Authenticator.
Дублирующие домены преодолевают сложности локальных барьеров и DDoS-воздействий. Техническим образом реплики являют копийные версии главного платформы с удержанием возможностей и клиентских информации.
Профессиональные участники suggest сохранять current базы активных копий в favourites веб-клиента. Операторы рассылают updates о новых доменах через почтовые сервисы, Telegram-каналы и смартфонные утилиты.
Платёжные процедуры через лицензионные площадки покрыты криптографическими технологиями level банковского области. Вывод финансов происходит исключительно на проверенные wallets хозяина учётной записи.
Рабочие зеркала официальных казино на mad казино создают стабильный вход к азартным порталам. Схема зеркалирования образует эквивалентные реплики базового ресурса с консервацией всех возможностей.
Система оформления профиля через зеркало полностью дублирует оригинальную заявку. Только пришедшие пользователи заполняют функционирующий email, генерируют защищенный секретную комбинацию и выбирают игровую финансовый инструмент.
Идентификация аккаунта содержит передачи удостоверений в соответствии с KYC-нормам. Скан национального документа, свидетельство места жительства и денежные параметры проверяются через цифровую верификацию в течение 24-72 часов.
Логин верифицированных клиентов происходит через обычную форму с расширенной аутентификацией. Разовые ключи доставляются на смс аппарат или мейл.
Механизмы входящего модуля через дублирующие порталы поддерживает актуальные денежные механизмы. Visa, Mastercard, онлайн счета Skrill, Neteller, блокчейн-токены Bitcoin, Ethereum выполняются с низкими сборами 0-3%.
Игровая база копируется в точности включая барабаны, настольные игры, live-хостов и накопительные призы. RTP-значения, дисперсия и отыгрыш удерживаются точными.
Поощрительная программа работает идентично главному сайту. Welcome-бандлы, free spins, компенсация и VIP-курсы запускаются системно при соблюдении прописанных стандартов.
Актуальные дублирующие порталы лицензированных гемблинг-платформ на п»ї1хбет сайт гарантируют непрерывный доступ к гемблинг платформам. Система копирования образует эквивалентные клоны базового ресурса с консервацией всех опций.
Процедура открытия счета через mirror-сайт целиком дублирует основную заявку. Только пришедшие участники указывают действующий email, генерируют безопасный ключ и фиксируют игровую курренси.
Валидация счета предполагает передачи справок опираясь на KYC-политике. Изображение ID-карты, подтверждение адреса и банковские параметры проходят машинную валидацию в течение 24-72 временных единиц.
Авторизация зарегистрированных игроков реализуется через типовую модуль с многоступенчатой идентификацией. Разовые пароли доставляются на мобильный номер или электронную почту.
Механизмы входящего сектора через зеркала содержит актуальные расчетные механизмы. Visa, Mastercard, виртуальные хранилища Skrill, Neteller, виртуальные монеты Bitcoin, Ethereum процессируются с минимальными платежами 0-3%.
Игровая база воспроизводится полностью включая машины, столовые забавы, live-операторов и прогрессивы. RTP-коэффициенты, вариативность и отыгрыш поддерживаются такими же.
Промо схема функционирует идентично основному порталу. Welcome-наборы, бесплатные вращения, refund и VIP-программы активируются машинально при соблюдении прописанных стандартов.
Подбор качественного развлекательного площадки в текущих границах подразумевает особого изучения к правовому состоянию. Квалифицированные пользователи знают, что п»ї1xBet casino содержит последнюю материалы о активных провайдерах.
Схема открытия счета в проверенных операторах объединяет требуемую валидацию удостоверения. KYC-процедуры защищают как казино, так и участника от мошенничества. Краткосрочные границы на перечисление финансов до окончания верификации – привычная система.
Цифровые препятствия на подключение к betting ресурсам преодолеваются через зеркальные домены. Действующие зеркала гарантируют абсолютную функциональность первичного ресурса. Денежные движения, игровой результаты и бонусные схемы поддерживаются стабильными.
Капитальная безопасность выражается критерием эксплуатируемых денежных методов. SSL-кодирование, PCI DSS подтверждение и дополнительная аутентификация обеспечивают безопасный заслон обороны.
Развлекательная ассортимент легальных операторов содержит автоматы от лидирующих провайдеров. RTP-параметры, изменчивость и алгоритмические схемы подвергаются объективную сертификацию в утвержденных учреждениях.
Планы стимулирования в серьезных заведениях строятся на понятных условиях отыгрыша. Вейджер x35-40 расценивается адекватным для автомат-бонусов, в то время как стандартные игры учитываются в зачет с пониженным процентом.
http://xxzz.jp/cgi-def/admin/C-002/c-02/visit/main.pl)
Рабочие mirror-ссылки проверенных гемблинг-платформ на Вавада регистрация создают устойчивый коннект к развлекательным ресурсам. Система копирования генерирует эквивалентные копии главного портала с фиксацией всех возможностей.
Схема оформления профиля через mirror-сайт в точности копирует основную анкету. Свежие участники прописывают действующий email, создают защищенный код доступа и определяют основную платежное средство.
Идентификация аккаунта включает предоставления справок следуя KYC-нормам. Скан национального документа, верификация места жительства и платежные сведения проверяются через автоматическую валидацию в течение 24-72 периодов.
Логин зарегистрированных участников производится через классическую окно с 2FA валидацией. Краткосрочные токены поступают на мессенджер девайс или мейл.
Механизмы входящего компонента через резервные ссылки обеспечивает актуальные платежные механизмы. Visa, Mastercard, виртуальные балансы Skrill, Neteller, цифровые активы Bitcoin, Ethereum выполняются с минимальными комиссиями 0-3%.
Gaming коллекция повторяется абсолютно включая слоты, традиционные развлечения, live-хостов и прогрессивы. RTP-значения, волатильность и вейджер поддерживаются точными.
Промо политика работает аналогично базовому ресурсу. Welcome-комплекты, фриспины, компенсация и VIP-схемы включаются программно при достижении определенных стандартов.
Гемблинговая область представляет активный подъём, привлекая множество геймеров. Опытные сайты предлагают надёжную обстановку для ставок. Развёрнутую факты о подобных брендах допустимо отыскать на Голд казино .
Сертификация представляет центральным показателем селекции портала. Юрисдикции Кюрасао предоставляют тщательный аудит экономических операций. Конкретная официальная платформа проходит систематические ревизии RNG-систем.
Программные свойства современных беттинг-платформ охватывают SSL-кодирование банковского уровня. Создатели виртуального софта типа Microgaming, NetEnt, Pragmatic Play внедряют продвинутые механизмы хаотичных параметров.
Алгоритм проверки профиля требует направления документов KYC-стандарта. Паспорт, свидетельство о заработке, верификация прописки — базовый пакет для завершённого авторизации.
Параллельные порталы решают трудности с запретами поставщиков. Функционирующие варианты изменяются постоянно цифровыми специалистами. Мобильные утилиты зачастую функционируют надёжнее онлайн форматов.
Распределение капитала устанавливает продолжительную доходность развлекательных раундов. Экспертные пользователи настаивают лимитировать объём вейджера до 1-2% от совокупного банкролла.
Легальные операторы развлекательных возможностей обеспечивают геймерам право к высококлассному азартному досугу через специализированные сайты, включая Lucky Bear casino , которые точно выполняют глобальные требования security.
Схема активации требует заполнения идентификационных параметров через шифрованные SSL-каналы. Операторы требуют official доказательство дееспособности и адреса жительства для выполнения законодательных правил.
Двухфакторная authentication является mandatory составляющей новейших механизмов защиты. Участники располагают SMS-ключи, push-notification или применяют специализированные утилиты типа Google Authenticator.
Резервные URL устраняют препятствия geographic барьеров и DDoS-assault. Фактически зеркала составляют идентичные клоны основного платформы с сохранением features и личных информации.
Профессиональные геймеры предлагают сохранять свежие перечни функционирующих зеркал в favourites веб-клиента. Операторы доставляют updates о современных URL через email, Telegram-каналы и телефонные софт.
Финансовые операции через лицензионные сайты защищены шифровальными системами категории банковского области. Вывод средств производится исключительно на проверенные wallets собственника учётной записи.
Передовые гемблеры оказываются с проблемой входа к лицензированным сайтам. Провайдеры запрещают базовые домены, но профессиональные лакибир пользователи понимают о наличии зеркальных площадок.
Параллельный портал составляет идентичную отображение главного ресурса. SSL-сертификаты функционируют идентичными. Расчётные переводы реализуются через сходные системы.
Схема регистрации через альтернативный ресурс предполагает стандартной проверки. Операторы выясняют бумаги для исполнения KYC-требований. Персональные данные реализуют усиленную подтверждение.
Пополнительные лимиты на зеркальных платформах аналогичны базовым условиям. Низшие взносы поддерживаются константными. Растущие выигрышные пулы интегрируются между различными ресурсами.
Премиальные схемы функционируют полноценно на резервных сайтах. Вейджер поддерживает стартовые величины. Тайминг отыгрыша поддерживается.
Служба обслуживания анализирует вопросы с дополнительных ресурсов идентично. Прямой общение предоставляет постоянный расписание работы.
Беттинговая сфера являет быстрый прогресс, завлекая тысячи участников. Опытные сайты гарантируют безопасную условия для развлечений. Исчерпывающую данные о этих брендах реально обнаружить на Vavada зеркало .
Легализация остаётся главным элементом выбора площадки. Контролёры Гибралтара предоставляют качественный проверку расчётных действий. Конкретная лицензированная ресурс реализует плановые инспекции RNG-механизмов.
Цифровые особенности передовых беттинг-платформ объединяют SSL-защиту финансового уровня. Создатели компьютерного продукта класса Microgaming, NetEnt, Pragmatic Play интегрируют сложные модели непредсказуемых параметров.
Процесс подтверждения личного кабинета включает предоставления удостоверений KYC-формата. ID, подтверждение о средствах, валидация проживания — типичный пакет для итогового активации.
Параллельные порталы устраняют препятствия с ограничениями провайдеров. Действующие копии адаптируются постоянно компьютерными группами. Карманные программы часто действуют надёжнее сетевых модификаций.
Финансовая дисциплина формирует перспективную результативность азартных сессий. Профессиональные беттеры указывают контролировать размер ставки до 1-2% от совокупного бюджета.
To clarify
gambling sites responsible gaming
for your security.
Инновационные провайдеры гемблинг активностей обеспечивают беттерам путь к профессиональному азарту через проверенные Лаки Бир системы. Лицензированная деятельность нуждается выполнения конкретных контролирующих требований.
Процедура открытия персонального учетной записи включает аутентификацию приватных реквизитов. Регуляторы применяют расширенные протоколы KYC и AML для пресечения нарушающих переводов.
Программные решения современных развлекательных порталов работают на зашифрованных серверах с TLS стандартами. Геоблокировка побуждает операторов создавать альтернативные домены.
Параллельные ресурсы формируют точные дубликаты центрального платформы с удержанием всех сервисов и данных. Клиенты приобретают непрерывный соединение к капиталу, беттинг данным и личным опциям.
Расчетные транзакции осуществляются через связанные банковские шлюзы. Границы на инвестиции и выводы определяются в соответствии с регуляторными условиями и индивидуальными правилами контроля угроз.
Экспертные клиенты указывают контролировать состояние авторизации через надзорные реестры развлекательных комиссий. Статусные параметры охватывают рейтинги на тематических платформах и мнения подлинных клиентов.
https://neuroreliefusa.com/# Neuro Relief USA
Поиск надежного игрового оператора в сегодняшних условиях подразумевает тщательного изучения к правовому режиму. Квалифицированные игроки представляют, что казино аква отображает новую информацию о действующих ресурсах.
Схема записи в проверенных сервисах предусматривает неизбежную проверку удостоверения. KYC-нормы оберегают как площадку, так и игрока от фрода. Промежуточные границы на получение активов до окончания валидации – обычная методика.
Технические барьеры на соединение к betting порталам преодолеваются через зеркальные адреса. Активные дубликаты обеспечивают полную возможности первичного сайта. Расчетные движения, игровой продвижение и льготные системы сохраняются константными.
Финансовая защищенность оценивается уровнем эксплуатируемых платежных систем. SSL-шифрование, PCI DSS подтверждение и расширенная подтверждение обеспечивают надежный контур обороны.
Игровая коллекция легальных площадок предоставляет машины от топовых студий. RTP-значения, вариативность и вероятностные формулы получают беспристрастную проверку в одобренных центрах.
Системы стимулирования в достойных казино основываются на четких условиях ставок. Проигрыш x35-40 признается приемлемым для автомат-бонусов, в то время как настольные забавы учитываются в подсчет с уменьшенным коэффициентом.
Подбор проверенного betting портала в актуальных условиях нуждается детального внимания к лицензионному состоянию. Профессиональные пользователи учитывают, что онлайн казино mad отображает актуальную сведения о действующих ресурсах.
Процедура регистрации в лицензированных заведениях объединяет необходимую верификацию идентичности. KYC-нормы защищают как заведение, так и пользователя от махинаций. Краткосрочные рамки на изъятие денег до завершения проверки – привычная система.
Электронные препятствия на связь к betting площадкам устраняются через альтернативные порталы. Активные клоны гарантируют тотальную эффективность главного портала. Денежные переводы, интерактивный прогресс и бонусные программы функционируют постоянными.
Капитальная гарантированность измеряется критерием задействованных расчетных способов. SSL-защита, PCI DSS подтверждение и усиленная подтверждение формируют прочный барьер безопасности.
Интерактивная библиотека лицензированных площадок предоставляет барабаны от лидирующих создателей. RTP-индексы, изменчивость и вероятностные системы испытывают беспристрастную проверку в аккредитованных институтах.
Системы вознаграждения в серьезных операторах формируются на понятных требованиях проигрыша. Проигрыш x35-40 оценивается разумным для спин-льгот, в то время как настольные развлечения принимаются в подсчет с пониженным показателем.
Актуальные провайдеры игорных активностей обеспечивают игрокам вход к премиальному развлечениям через безопасные Лаки Бир системы. Авторизованная операционная активность требует соблюдения конкретных правовых стандартов.
Механизм регистрации персонального кабинета задействует верификацию конфиденциальных данных. Операторы эксплуатируют комплексные механизмы KYC и AML для блокировки фродовых финансовых действий.
Технические платформы современных развлекательных порталов функционируют на зашифрованных инфраструктурах с SSL стандартами. IP-фильтрация принуждает управляющих создавать вспомогательные домены.
Параллельные порталы образуют точные дубликаты главного ресурса с удержанием всех опций и параметров. Игроки достигают постоянный вход к депозиту, азартной записям и персональным установкам.
Платежные процедуры производятся через интегрированные денежные процессоры. Пределы на пополнения и снятия фиксируются в соответствии с регуляторными условиями и корпоративными нормами контроля угроз.
Компетентные игроки настаивают проверять условия аккредитации через официальные регистры беттинг ведомств. Репутационные параметры предусматривают оценки на экспертных сайтах и feedback подлинных участников.
Отбор безопасного азартного ресурса в сегодняшних обстоятельствах заставляет тщательного анализа к юридическому статусу. Профессиональные участники учитывают, что Lucky Bear предоставляет новую сведения о активных провайдерах.
Процесс регистрации в проверенных платформах объединяет необходимую верификацию документов. KYC-нормы охраняют как сервис, так и участника от фрода. Переходные лимиты на вывод финансов до завершения валидации – привычная практика.
Технические барьеры на вход к развлекательным сервисам устраняются через альтернативные адреса. Доступные зеркала обеспечивают полную работоспособность центрального портала. Финансовые переводы, геймплейный достижения и привилегированные предложения сохраняются постоянными.
Материальная безопасность определяется качеством применяемых расчетных способов. SSL-защита, PCI DSS лицензирование и усиленная проверка гарантируют стабильный заслон охраны.
Игровая ассортимент лицензированных площадок предоставляет слоты от известных студий. RTP-показатели, волатильность и статистические формулы подвергаются беспристрастную валидацию в утвержденных центрах.
Планы стимулирования в достойных сервисах формируются на понятных критериях ставок. Вейджер x35-40 оценивается нормальным для барабан-бонусов, в то время как стандартные развлечения принимаются в подсчет с пониженным фактором.
Передовые геймеры сталкиваются с изобилием технологических тонкостей при деятельности с проверенными площадками. Специализированные источники типа Лаки Бир РІС…РѕРґ обеспечивают актуальную сведения о работе игорных компаний.
Механизм подтверждения профиля охватывает набор неотъемлемых уровней. Стартовая валидация подразумевает предоставления документов доказывающих гражданство. Типовой перечень содержит свидетельство, автолицензию или заграничное удостоверение.
Программная элемент создания аккаунта охватывает применение безопасного соединения и многофакторной защиты. Квалифицированные игроки подсказывают включать все возможных возможностей секьюрити.
Зеркала являются точные дубликаты основного домена с поддержанием полного арсенала. Главное достоинство состоит в идентичности расчетных пределов и критериев отыгрыша.
Схема нахождения функционирующих альтернативных адресов основывается на отслеживании специализированных новостных лент и сотрудничающих сайтов. Профессиональные клиенты используют VPN-сервисы для гарантирования стабильного соединения безотносительно от местных блокировок.
Новейшие бетторы попадают с препятствием соединения к сертифицированным порталам. Организации закрывают базовые ссылки, но опытные казино Vavada игроки помнят о существовании зеркальных порталов.
Альтернативный адрес формирует абсолютную воспроизведение главного платформы. Средства защиты работают равнозначными. Финансовые транзакции осуществляются через сходные механизмы.
Схема открытия счёта через резервный портал требует обычной проверки. Администраторы требуют документы для реализации KYC-требований. Паспортные информация выполняют комплексную аутентификацию.
Пополнительные рамки на дополнительных платформах аналогичны стандартным спецификациям. Наименьшие суммы поддерживаются постоянными. Прогрессивные выигрышные пулы объединяются между множественными ссылками.
Премиальные схемы работают завершённо на альтернативных площадках. Множитель ставок поддерживает оригинальные величины. Период действия отыгрыша остаётся прежним.
Команда поддержки изучает запросы с альтернативных доменов идентично. Живой чат предоставляет постоянный порядок деятельности.
Современные клиенты сталкиваются с огромным количеством технологических особенностей при работе с проверенными ресурсами. Специализированные порталы типа Болливуд казино предоставляют релевантную информацию о работе развлекательных брендов.
Процедура валидации учетной записи содержит множество неотъемлемых стадий. Базовая аутентификация подразумевает передачи документов удостоверяющих личность. Обычный перечень подразумевает удостоверение личности, водительские права или внешний паспорт.
Программная сторона записления предполагает использование криптографической защиты и многофакторной защиты. Квалифицированные пользователи настаивают запускать совокупность имеющихся функций обеспечения.
Запасные домены образуют абсолютные дубликаты первичного ресурса с удержанием всего функционала. Важнейшее бонус состоит в схожести финансовых рамок и норм проигрыша.
Механизм выявления актуальных дублирующих порталов фундируется на наблюдении тематических уведомительных сервисов и союзных порталов. Опытные геймеры используют VPN-сервисы для создания стабильного входа вне зависимости от региональных барьеров.
Поиск безопасного игрового ресурса в сегодняшних реалиях подразумевает тщательного подхода к законному статусу. Знающие геймеры осознают, что Clubnika casino демонстрирует актуальную материалы о доступных площадках.
Схема оформления профиля в лицензированных площадках содержит принудительную аутентификацию идентичности. KYC-нормы гарантируют как заведение, так и участника от фрода. Кратковременные ограничения на перечисление финансов до выполнения контроля – типичная процедура.
Цифровые блокировки на подключение к развлекательным сайтам решаются через параллельные домены. Функционирующие копии гарантируют тотальную эффективность первичного платформы. Расчетные процедуры, азартный статистика и льготные предложения продолжают устойчивыми.
Финансовая гарантированность оценивается степенью внедренных платежных систем. SSL-кодирование, PCI DSS сертификация и двухфакторная верификация гарантируют защищенный контур обороны.
Интерактивная ассортимент официальных провайдеров содержит барабаны от известных разработчиков. RTP-значения, волатильность и алгоритмические системы претерпевают нейтральную контроль в утвержденных лабораториях.
Планы стимулирования в качественных операторах опираются на ясных правилах вейджера. Условия ставок x35-40 считается приемлемым для машина-подарков, в то время как традиционные состязания принимаются в калькуляцию с редуцированным коэффициентом.
Ориентирование в сфере легальных ресурсов подразумевает представления продвинутых инструментов входа. Продвинутые игроки внедряют казино 1хбет для обретения актуальной информации о работающих адресах.
Механизм регистрации аккаунта в надежных компаниях предполагает комплексную аутентификацию. Продвинутые провайдеры используют KYC-системы и AML-стандарты. Документооборот отнимает от 24 до 72 временных отрезков.
Цифровые методы для обхода ограничений улучшаются вместе с ужесточением нормативных инициатив. VPN-инструменты разряда premium предлагают шифрование AES-256 и протоколы OpenVPN. Надежность соединения критически необходима для привилегированных партий.
Зеркальные домены функционируют через территориально расположенные технические мощности. CDN-комплексы гарантируют быструю отклик для европейских клиентов. Техническое переключение срабатывает при выявлении блокировки базового адреса.
Денежные движения в официальных областях соответствуют четким критериям PCI DSS. Криптовалютные транзакции увеличивают популярность вследствие скрытности и скорости выполнения.
Смартфонные софт лучших провайдеров объединяют голосовую аутентификацию и push-алерты для существенных событий. Модифицируемый интерфейс программно корректируется под свойства дисплея.
Актуальные игроки попадают с проблемой подключения к лицензированным платформам. Операторы запрещают стандартные URL, но искушённые казино Меллстрой пользователи учитывают о существовании резервных сайтов.
Альтернативный адрес образует абсолютную реплику первичного площадки. Протоколы шифрования работают неизменными. Платёжные операции реализуются через сходные шлюзы.
Схема заведения учётной записи через параллельный адрес включает классической аутентификации. Сотрудники запрашивают свидетельства для осуществления KYC-правил. Паспортные данные выполняют двухфакторную верификацию.
Банковские границы на альтернативных ресурсах равняются главным условиям. Начальные ставки функционируют константными. Растущие накопления согласовываются между разными ресурсами.
Премиальные планы работают всесторонне на дополнительных сайтах. Требования по обороту обеспечивает оригинальные величины. Срок активности использования сохраняется.
Сервис помощи решает запросы с резервных ресурсов сходным образом. Живой разговор предоставляет постоянный порядок обслуживания.
pharmacy websites
seogrowth.click – Pages loaded fast, images appeared sharp, and formatting stayed consistent.
Современные геймеры сталкиваются с массой цифровых нюансов при процессах с легальными порталами. Экспертные источники типа РЎСѓРєР° зеркало выдают актуальную данные о деятельности развлекательных брендов.
Процесс аутентификации профиля содержит несколько принудительных стадий. Начальная проверка предполагает отправки бумаг удостоверяющих личность. Классический список предполагает документ, лицензию водителя или загранпаспорт.
Программная компонента записления предполагает задействование защищенного протокола и 2FA. Продвинутые пользователи подсказывают запускать все возможных опций защиты.
Запасные домены формируют стопроцентные отражения базового портала с обеспечением тотального функционала. Ключевое бонус содержится в подобии финансовых границ и критериев вейджера.
Процедура обнаружения актуальных дублирующих порталов основывается на наблюдении профессиональных уведомительных сервисов и аффилированных сайтов. Опытные игроки применяют анонимайзеры для формирования устойчивого входа без оглядки от местных блокировок.
Официальные площадки развлекательных опций обеспечивают участникам доступ к качественному азартному досугу через dedicated ресурсы, включая РЎСѓРєР° казино , которые специально выполняют мировые стандарты защиты.
Схема активации требует ввода верификационных данных через криптографические SSL-connection. Операторы запрашивают документальное подтверждение совершеннолетия и региона residence для поддержания нормативных норм.
Двухфакторная аутентификация считается необходимым частью современных архитектур конфиденциальности. Клиенты обретают SMS-пароли, push-алерты или внедряют dedicated приложения вроде Google Authenticator.
Mirror ссылки решают сложности географических санкций и DDoS-assault. Технически дубли составляют копийные клоны центрального ресурса с поддержанием функциональности и пользовательских деталей.
Skilled игроки предлагают поддерживать актуальные реестры рабочих копий в сохранённых ссылках browser. Провайдеры передают новости о fresh доменах через e-mail, Telegram-каналы и портативные apps.
Финансовые транзакции через лицензионные платформы покрыты cryptographic протоколами класса банковского сектора. Получение капитала производится единственно на validated реквизиты собственника аккаунта.
Новейшие платформы беттинг продуктов дают участникам доступ к высококлассному игровому процессу через сертифицированные Mellstroy Game казино ресурсы. Авторизованная операционная активность подразумевает следования определенных регуляторных стандартов.
Процесс регистрации клиентского профиля предусматривает проверку персональных реквизитов. Администраторы используют многоуровневые механизмы KYC и AML для предотвращения незаконных платежей.
IT системы новейших казино основываются на зашифрованных серверах с SSL стандартами. Территориальные ограничения принуждает управляющих организовывать альтернативные домены.
Параллельные домены составляют идентичные клоны базового портала с обеспечением всех функций и данных. Игроки обеспечивают себе беспрепятственный подключение к счету, гемблинг статистике и клиентским опциям.
Расчетные переводы реализуются через связанные расчетные процессоры. Лимиты на вклады и изъятия определяются в гармонии с правовыми положениями и внутренними нормами риск-менеджмента.
Компетентные игроки рекомендуют анализировать условия сертификата через контролирующие реестры азартных органов. Престижные критерии задействуют места на отраслевых платформах и feedback действительных клиентов.
Легальные провайдеры игорных предложений гарантируют участникам вариант к высококлассному гэмблингу через целевые платформы, включая Vavada casino , которые именно следуют transnational требования security.
Механизм открытия счёта требует заполнения authentication сведений через безопасные SSL-линии. Провайдеры demanded документальное подтверждение age verification и региона проживания для поддержания нормативных стандартов.
Двухэтапная аутентификация выступает required элементом передовых механизмов безопасности. Пользователи обретают SMS-ключи, push-notification или внедряют targeted утилиты по типу Google Authenticator.
Mirror домены преодолевают сложности локальных санкций и DDoS-атак. С технической точки зрения зеркала образуют дублированные версии primary платформы с сохранением features и пользовательских информации.
Экспертные пользователи suggest хранить новейшие каталоги рабочих альтернатив в избранном веб-клиента. Букмекеры передают updates о современных доменах через e-mail, Telegram-чаты и портативные приложения.
Payment транзакции через лицензионные ресурсы защищены cryptographic алгоритмами класса банковского направления. Получение денег выполняется лишь на подтверждённые данные хозяина аккаунта.
this post Is vauld crypto app safe
Гемблинговая область являет динамичный подъём, привлекая тысячи пользователей. Профессиональные ресурсы предоставляют надёжную атмосферу для беттинга. Развёрнутую факты о данных операторах реально получить на Лаки Бир казино .
Аккредитация является ключевым элементом отбора сайта. Регуляторы Кюрасао предоставляют строгий аудит финансовых процедур. Всякая аккредитованная портал осуществляет систематические проверки RNG-алгоритмов.
IT особенности передовых беттинг-платформ охватывают SSL-шифрование банковского класса. Производители программного материала вроде Microgaming, NetEnt, Pragmatic Play интегрируют сложные алгоритмы непредсказуемых чисел.
Механизм верификации личного кабинета подразумевает передачи удостоверений KYC-класса. ID, подтверждение о средствах, подтверждение местожительства — классический перечень для итогового подключения.
Дублирующие адреса решают сложности с запретами компаний. Действующие варианты корректируются систематически цифровыми специалистами. Портативные утилиты зачастую выполняются надёжнее онлайн форматов.
Финансовая дисциплина задаёт стратегическую прибыльность игровых сессий. Экспертные беттеры советуют лимитировать сумму депозита до 1-2% от полного капитала.
Азартная отрасль демонстрирует стремительный подъём, завлекая тысячи геймеров. Экспертные площадки обеспечивают стабильную пространство для пари. Подробную сведения о указанных брендах можно изучить на казино Меллстрой .
Аттестация остаётся ключевым критерием отбора платформы. Юрисдикции Олдерни создают качественный аудит денежных процедур. Конкретная аккредитованная платформа подвергается регулярные ревизии RNG-систем.
IT аспекты актуальных беттинг-платформ предусматривают SSL-криптографию банковского класса. Поставщики софтового ПО типа Microgaming, NetEnt, Pragmatic Play встраивают многоуровневые механизмы непредсказуемых параметров.
Алгоритм валидации учётной записи требует подачи удостоверений KYC-формата. Документ, подтверждение о финансах, подтверждение адреса — классический пакет для полноценного активации.
Параллельные URL решают проблемы с цензурой провайдеров. Действующие варианты обновляются систематически компьютерными службами. Смартфонные утилиты обычно действуют стабильнее браузерных форматов.
Управление банкроллом задаёт продолжительную успешность развлекательных сессий. Профессиональные геймеры предлагают сокращать величину ставки до 1-2% от суммарного бюджета.
rankrise.click – Pages loaded fast, images appeared sharp, and formatting stayed consistent.
Rutor выступает в роли главного сайта русскоязычного даркнета в Tor, предоставляющего доступ к информации, материалам, товарам и нормам анонимности для пользователей черного рынка и onion ресурсов
Сайт Rutor — пользующийся доверием «старожил» даркнета в русскоязычном интернете с системой сокрытия личности и удобным интерфейсом для анонимных сделок через Rutor.Rutor — старейший представитель даркнета на русском языке
как открыть рутор — это один из первых и известнейших русскоязычных ресурсов даркнета, неразрывно связанный с анонимной онлайн-экосистемой. Данный сервис специализируется на доступе к широчайшему ассортименту софта, файлов, новостей и разнообразных материалов, охватывающих вопросы взлома и защиты.
Как устроена система работы Rutor
Данная система обеспечивает доступ к значительным объемам данных и файлов, гарантируя при этом повышенную анонимность и защиту пользователей. Особенность сервиса в том, что он работает через сеть Rutor, что существенно снижает риск идентификации и утечки данных. За долгое время работы Rutor стал своего рода летописью для даркнета на русском языке.
Платформа функционирует стабильно, обеспечивая равный доступ для новых и опытных участников даркнета. Система построена таким образом, что каждый раздел страницы — будь то магазин, новости или инструкции по взлому — становится отдельной частью большого сообщества, в котором безопасность и возможность оставаться анонимным выходят на первый план.
Перспективы и риски
Ясно, что будущая деятельность Rutor потребует решения новых рисков, внедрения свежих подходов к безопасности и средств обхода ограничений. Пользователи должны осознавать, что даже самая анонимная система не гарантирует полной безопасности.
Этот сервис по-прежнему служит площадкой для информирования, обсуждений безопасности и отслеживания новшеств в даркнет-сообществе. Технический прогресс, рост числа участников и новые функциональные решения превращают Rutor в ключевой узел русскоязычного интернет-сообщества.
– Принцип анонимности
– Гарантия безопасности сделок
– Открытый доступ к специализированному контенту
– Обеспечение приватности взаимодействий
Rutor представляет собой ресурс с неповторимой историей, важный для пользователей, стремящихся к свободе, сохранению конфиденциальности и автономии от внешних ограничений в современном интернете.
Отбор безопасного развлекательного оператора в сегодняшних обстоятельствах требует тщательного внимания к правовому режиму. Знающие игроки знают, что Голд казино демонстрирует свежую информацию о функционирующих площадках.
Механизм записи в сертифицированных площадках содержит принудительную верификацию персональных данных. KYC-требования оберегают как заведение, так и пользователя от афер. Промежуточные ограничения на снятие капитала до финализации валидации – типичная практика.
Программные запреты на связь к развлекательным сервисам устраняются через дублирующие ссылки. Функционирующие отражения предоставляют тотальную эффективность основного портала. Банковские движения, азартный статистика и бонусные схемы функционируют стабильными.
Экономическая безопасность определяется уровнем применяемых платежных способов. SSL-шифрование, PCI DSS лицензирование и расширенная подтверждение устанавливают надежный контур ограждения.
Геймплейная каталог официальных сервисов содержит барабаны от лидирующих создателей. RTP-показатели, волатильность и вероятностные принципы претерпевают внешнюю аудит в признанных организациях.
Программы лояльности в качественных сервисах формируются на ясных критериях активности. Условия ставок x35-40 расценивается адекватным для машина-привилегий, в то время как стандартные забавы засчитываются в расчет с сниженным множителем.
Опрятный внешний вид формирует сильное мнение о вас.
Он влияет на восприятие вас коллегами мгновенно.
Уверенность в своем образе повышает вашу уверенность.
Этот подход демонстрирует ваш стандарт ответственности и внимание к мелочам.
https://b5.chenews.ru/guqf8PZm/
Через одежду вы имеете шанс выразить свою личность и стиль.
Окружающие неосознанно воспринимают опрятных людей как более успешных.
Поэтому, инвестиции в свой образ — это вклад в ваше успешное будущее.
Передовые геймеры попадают с препятствием подключения к проверенным площадкам. Компании закрывают основные URL, но профессиональные казино РЎСѓРєР° пользователи осознают о функционировании резервных порталов.
Резервная ссылка формирует точную отображение главного ресурса. Средства защиты поддерживаются идентичными. Банковские процедуры выполняются через сходные шлюзы.
Процедура заведения учётной записи через параллельный адрес содержит классической проверки. Менеджеры запрашивают справки для исполнения KYC-требований. Индивидуальные параметры осуществляют многоуровневую валидацию.
Финансовые рамки на резервных порталах соответствуют главным характеристикам. Начальные ставки остаются постоянными. Прогрессивные накопления согласовываются между разными порталами.
Стимулирующие планы выполняются комплексно на резервных ресурсах. Множитель ставок обеспечивает оригинальные параметры. Длительность реализации поддерживается.
Служба обслуживания анализирует запросы с дополнительных ресурсов аналогично. Интерактивный общение обеспечивает 24-часовой порядок работы.
Сколько длится мигрень
Smart GenRx USA: reliable canadian pharmacy – reputable canadian pharmacy
Современные игроки оказываются с проблемой подключения к проверенным платформам. Поставщики запрещают главные URL, но грамотные п»ї1xBet пользователи осознают о существовании параллельных ресурсов.
Дополнительный домен формирует точную копию оригинального ресурса. Средства защиты остаются равнозначными. Банковские переводы выполняются через равнозначные каналы.
Алгоритм открытия счёта через альтернативный ресурс включает привычной верификации. Менеджеры выясняют удостоверения для исполнения KYC-требований. Личные параметры реализуют двухфакторную валидацию.
Депозитные рамки на параллельных порталах соответствуют первичным характеристикам. Минимальные взносы остаются константными. Возрастающие накопления интегрируются между различными адресами.
Льготные схемы оперируют завершённо на зеркальных порталах. Вейджер сохраняет исходные показатели. Срок активности использования остаётся прежним.
Служба помощи анализирует обращения с альтернативных порталов равнозначно. Живой переписка гарантирует круглосуточный порядок функционирования.
Навигация в области проверенных площадок включает знания актуальных инструментов авторизации. Квалифицированные пользователи применяют Меллстрой для добывания актуальной материалов о работающих URL.
Процедура регистрации счета в проверенных заведениях предполагает тщательную проверку. Актуальные поставщики эксплуатируют KYC-системы и AML-критерии. Бумажная работа составляет от 24 до 72 интервалов.
Цифровые инструменты для минования блокировок совершенствуются сообща с интенсификацией законодательных шагов. VPN-решения разряда premium обеспечивают защиту AES-256 и протоколы OpenVPN. Непрерывность подключения fundamentally значима для элитных заходов.
Резервные адреса выполняют задачи через территориально разнесенные серверные мощности. CDN-системы гарантируют минимальную задержку для азиатских клиентов. Техническое переключение включается при детекции блокировки главного домена.
Платежные транзакции в сертифицированных областях соответствуют четким стандартам PCI DSS. Криптовалютные платежи завоевывают востребованность из-за секретности и динамике осуществления.
Смартфонные утилиты премиальных организаций совмещают голосовую подтверждение и push-извещения для ключевых событий. Настраиваемый внешний вид независимо изменяется под параметры матрицы.
Отбор надежного гемблинг площадки в современных реалиях заставляет специального рассмотрения к юридическому состоянию. Квалифицированные геймеры знают, что казино Tippy содержит актуальную информацию о функционирующих ресурсах.
Схема открытия счета в лицензированных заведениях включает принудительную верификацию персональных данных. KYC-требования оберегают как оператора, так и клиента от мошенничества. Кратковременные пределы на снятие средств до закрытия валидации – стандартная подход.
Цифровые блокировки на связь к betting сайтам преодолеваются через зеркальные порталы. Функционирующие зеркала обеспечивают тотальную эффективность первичного портала. Денежные транзакции, азартный прогресс и бонусные схемы остаются устойчивыми.
Материальная надежность оценивается качеством внедренных платежных способов. SSL-шифрование, PCI DSS аттестация и дополнительная верификация формируют стабильный заслон охраны.
Интерактивная каталог официальных сервисов объединяет барабаны от топовых создателей. RTP-параметры, волатильность и расчетные формулы подвергаются внешнюю контроль в признанных институтах.
Планы мотивации в серьезных заведениях строятся на четких параметрах проигрыша. Отыгрыш x35-40 оценивается разумным для машина-привилегий, в то время как настольные развлечения идут в счет с редуцированным коэффициентом.
Передовые клиенты сталкиваются с изобилием системных тонкостей при деятельности с лицензированными сайтами. Профильные платформы типа п»ї1хбет казино обеспечивают релевантную материалы о операциях гэмблинговых провайдеров.
Система аутентификации профиля предполагает комплекс необходимых уровней. Стартовая валидация требует загрузки справок доказывающих гражданство. Привычный набор включает документ, водительские права или загранпаспорт.
Программная компонента открытия счета содержит задействование безопасного соединения и двухуровневой проверки. Квалифицированные геймеры настаивают активировать совокупность возможных параметров безопасности.
Дублирующие порталы составляют точные копии базового домена с поддержанием всего набора функций. Главное бонус состоит в схожести денежных границ и требований ставочных требований.
Алгоритм обнаружения актуальных запасных доменов фундируется на мониторинге экспертных информационных каналов и союзных порталов. Экспертные участники задействуют VPN-сервисы для обеспечения стабильного подключения невзирая от региональных лимитов.
Определение безопасного азартного заведения в текущих рамках заставляет тщательного подхода к юридическому состоянию. Профессиональные клиенты представляют, что Lucky Bear casino предоставляет свежую данные о действующих провайдерах.
Схема создания аккаунта в лицензированных площадках объединяет необходимую валидацию персональных данных. KYC-нормы охраняют как казино, так и игрока от махинаций. Краткосрочные пределы на снятие средств до закрытия верификации – привычная практика.
Цифровые запреты на соединение к игровым ресурсам решаются через резервные URL. Действующие копии гарантируют стопроцентную эффективность центрального сайта. Платежные движения, развлекательный статистика и поощрительные программы поддерживаются константными.
Материальная гарантированность определяется качеством задействованных платежных систем. SSL-шифрование, PCI DSS аттестация и многоуровневая аутентификация создают надежный щит защиты.
Геймплейная коллекция лицензированных операторов предоставляет барабаны от известных разработчиков. RTP-значения, изменчивость и алгоритмические формулы претерпевают объективную аудит в аккредитованных институтах.
Системы лояльности в достойных казино базируются на четких критериях ставок. Условия ставок x35-40 оценивается приемлемым для слот-бонусов, в то время как классические забавы принимаются в подсчет с минимальным процентом.
Новейшие порталы игорных услуг дают участникам путь к премиальному азарту через проверенные lucky bear казино сайты. Лицензированная бизнес нуждается исполнения строгих регуляторных положений.
Система регистрации клиентского учетной записи содержит верификацию приватных сведений. Управляющие применяют комплексные алгоритмы KYC и AML для пресечения незаконных транзакций.
IT системы новейших развлекательных порталов функционируют на стабильных серверах с криптографическими алгоритмами. Локальные запреты принуждает операторов запускать дублирующие URL.
Альтернативные платформы формируют идентичные репликации базового платформы с поддержанием всех инструментов и данных. Игроки добиваются беспрепятственный подключение к средствам, развлекательной истории и личным настройкам.
Расчетные транзакции реализуются через встроенные расчетные процессоры. Лимиты на вклады и снятия определяются в гармонии с лицензионными стандартами и индивидуальными регламентами управления рисками.
Опытные гемблеры настаивают отслеживать условия авторизации через регуляторные регистры гемблинг организаций. Имиджевые индикаторы предусматривают ранги на профильных ресурсах и мнения настоящих клиентов.
Dressing well projects a strong first impression.
A attire communicates volumes before a person actually say a single word.
This boosts your own confidence and mindset significantly.
A put-together look conveys competence in the workplace.
https://s7.superlooks.ru/jVyFIOlBpVHy/
Stylish choices allow you to showcase your unique personality.
People often judge stylish individuals as more capable and reliable.
Therefore, investing in your wardrobe is an investment in your personal brand.
clickrank.click – Bookmarked this immediately, planning to revisit for updates and inspiration.
Smart GenRx USA Smart GenRx USA online pharmacy reddit
Азартная область представляет динамичный рост, завлекая тысячи клиентов. Грамотные платформы предоставляют защищённую пространство для беттинга. Подробную данные о данных провайдерах доступно найти на Меллстрой казино .
Легализация выступает центральным элементом отбора ресурса. Контролёры Кюрасао предоставляют жёсткий контроль экономических транзакций. Любая официальная ресурс проходит систематические инспекции RNG-алгоритмов.
Компьютерные свойства передовых азартных площадок включают SSL-безопасность банковского категории. Создатели компьютерного обеспечения наподобие Microgaming, NetEnt, Pragmatic Play интегрируют продвинутые модели непредсказуемых величин.
Схема валидации счёта включает подачи свидетельств KYC-стандарта. Свидетельство, справка о средствах, валидация проживания — классический набор для финального активации.
Зеркальные адреса исправляют сложности с цензурой операторов. Действующие альтернативы адаптируются ежедневно IT командами. Карманные утилиты обычно функционируют качественнее онлайн модификаций.
Банкролл-менеджмент устанавливает продолжительную эффективность гемблинговых периодов. Квалифицированные беттеры рекомендуют сокращать величину пари до 1-2% от итогового фонда.
Легальные ресурсы игровых сервисов дают геймерам вариант к профессиональному игровому процессу через профильные ресурсы, включая п»ї1хбет сайт , которые придерживаются transnational нормы конфиденциальности.
Алгоритм открытия счёта подразумевает заполнения authentication информации через криптографические SSL-линии. Букмекеры просят предоставить нотариальное свидетельство возраста и места жительства для compliance законодательных критериев.
Multi-factor authentication является необходимым элементом современных механизмов конфиденциальности. Игроки получают SMS-ключи, push-notification или используют targeted приложения по типу Google Authenticator.
Резервные домены преодолевают трудности локальных запретов и DDoS-assault. Технически копии составляют тождественные клоны основного портала с сохранением features и user деталей.
Профессиональные клиенты suggest удерживать актуальные базы working дублей в закладках browser. Букмекеры направляют обновления о современных ссылках через e-mail, Telegram-сообщества и телефонные софт.
Платёжные процедуры через legal сайты покрыты криптографическими алгоритмами стандарта банковского сектора. Снятие денег осуществляется единственно на validated данные хозяина личного кабинета.
Между прочим, если вас интересует Обзор фильма ‘Милосердие’ 2026: спецэффекты и качество Dolby Vision, посмотрите сюда.
Вот, можете почитать:
https://zigzag-studio.ru/%d0%bc%d0%b8%d0%bb%d0%be%d1%81%d0%b5%d1%80%d0%b4%d0%b8%d0%b5-mercy-2026-%d0%ba%d0%b0%d0%ba-%d0%ba%d0%be%d1%81%d0%bc%d0%b8%d1%87%d0%b5%d1%81%d0%ba%d0%b8%d0%b9-%d1%82%d1%80%d0%b8%d0%bb/
trafficflow.click – Content reads clearly, helpful examples made concepts easy to grasp.
Передовые порталы игорных игр гарантируют игрокам вход к профессиональному развлечениям через сертифицированные типпи официальный сайт сайты. Лицензированная деятельность нуждается соблюдения конкретных регуляторных положений.
Процесс регистрации игрового кабинета содержит аутентификацию индивидуальных сведений. Управляющие используют детализированные процедуры KYC и AML для пресечения мошеннических платежей.
Программные платформы передовых гемблинг платформ функционируют на зашифрованных хостингах с HTTPS алгоритмами. Региональная блокировка побуждает провайдеров создавать резервные URL.
Резервные порталы представляют идентичные версии базового домена с фиксацией всех инструментов и информации. Беттеры достигают стабильный вход к средствам, развлекательной данным и индивидуальным опциям.
Платежные транзакции проходят через интегрированные банковские системы. Границы на взносы и снятия фиксируются в соответствии с нормативными требованиями и внутренними правилами снижения потерь.
Квалифицированные клиенты указывают контролировать условия аккредитации через надзорные базы данных беттинг комиссий. Имиджевые показатели предусматривают ранги на специализированных ресурсах и отзывы подлинных пользователей.
Современные сервисы азартных игр предоставляют игрокам путь к элитному развлечениям через надежные Clubnika casino ресурсы. Лицензированная бизнес влечет следования строгих законодательных требований.
Алгоритм регистрации клиентского счета охватывает валидацию персональных сведений. Регуляторы используют многоуровневые протоколы KYC и AML для предотвращения незаконных платежей.
Цифровые решения актуальных гемблинг платформ функционируют на стабильных серверах с HTTPS алгоритмами. IP-фильтрация побуждает операторов запускать дублирующие URL.
Дублирующие домены образуют полные версии основного платформы с фиксацией всех возможностей и параметров. Пользователи достигают устойчивый связь к счету, игровой истории и персональным опциям.
Денежные транзакции выполняются через синхронизированные денежные сервисы. Пределы на вклады и получения назначаются в согласии с нормативными условиями и собственными процедурами снижения потерь.
Компетентные игроки советуют мониторить положение лицензии через контролирующие реестры гемблинг организаций. Авторитетные индикаторы предусматривают позиции на отраслевых сервисах и отзывы настоящих беттеров.
blog link Nifty marketplace
Актуальные клиенты встречаются с набором технических аспектов при операциях с проверенными сайтами. Профильные порталы типа Лаки Бир РІС…РѕРґ обеспечивают свежую материалы о процессах азартных компаний.
Механизм верификации кабинета содержит несколько неотъемлемых стадий. Исходная подтверждение требует передачи бумаг валидирующих персону. Стандартный комплект предполагает свидетельство, водительские права или международное ID.
Программная элемент открытия счета содержит задействование SSL-шифрования и двухуровневой проверки. Квалифицированные пользователи советуют задействовать совокупность предложенных опций защиты.
Зеркала образуют идентичные копии первичного платформы с обеспечением исчерпывающего арсенала. Ключевое бонус содержится в идентичности платежных лимитов и условий условий прокрутки.
Механизм обнаружения действующих зеркал фундируется на отслеживании экспертных новостных лент и аффилированных порталов. Опытные клиенты внедряют VPN-сервисы для обеспечения постоянного входа вне зависимости от местных лимитов.
Инновационные порталы гемблинг услуг гарантируют беттерам подключение к профессиональному игровому процессу через сертифицированные казино Vavada системы. Официальная деятельность требует выполнения строгих контролирующих критериев.
Процесс активации индивидуального профиля задействует подтверждение приватных сведений. Операторы используют многоуровневые системы KYC и AML для исключения незаконных финансовых действий.
Электронные системы современных развлекательных порталов функционируют на зашифрованных инфраструктурах с HTTPS технологиями. Региональная блокировка побуждает администраторов внедрять параллельные адреса.
Дублирующие домены составляют идентичные копии первичного портала с удержанием всех возможностей и данных. Пользователи получают непрерывный вход к капиталу, игровой записям и персональным параметрам.
Финансовые операции реализуются через подключенные финансовые системы. Рамки на депозиты и изъятия регулируются в соотношении с нормативными критериями и организационными политиками минимизации опасностей.
Опытные гемблеры рекомендуют контролировать состояние лицензии через контролирующие каталоги игорных органов. Имиджевые индикаторы предусматривают оценки на профильных платформах и оценки действительных игроков.
For developments
moving loans
for a fair comparison.
http://ivertherapeutics.com/# ivermectin 3 mg tablet dosage
Легальные платформы гэмблинг возможностей гарантируют клиентам право к профессиональному развлечениям через тематические порталы, включая Lucky Bear casino , которые специально исполняют глобальные стандарты конфиденциальности.
Схема активации предполагает ввода верификационных информации через безопасные SSL-линии. Менеджмент просят предоставить official свидетельство правоспособности и региона регистрации для исполнения правовых норм.
Двухэтапная authentication считается необходимым частью передовых платформ конфиденциальности. Игроки приобретают SMS-токены, push-уведомления или внедряют targeted программы по типу Google Authenticator.
Зеркальные домены решают трудности географических барьеров и DDoS-атак. По сути реплики образуют идентичные копии базового домена с удержанием опций и личных параметров.
Профессиональные участники предлагают поддерживать новейшие перечни рабочих альтернатив в favourites браузера. Букмекеры рассылают информацию о актуальных ссылках через e-mail, Telegram-группы и мобильные apps.
Денежные процедуры через лицензионные площадки защищены cryptographic алгоритмами level банковского области. Extraction фондов осуществляется исключительно на аутентифицированные данные обладателя личного кабинета.
Активные дублирующие порталы проверенных азартных клубов на Vavada казино обеспечивают непрерывный соединение к игровым ресурсам. Система дублирования генерирует точные копии основного ресурса с консервацией всех механизмов.
Механизм создания аккаунта через дублирующий портал целиком воспроизводит стандартную шаблон. Новые клиенты указывают рабочий email, генерируют защищенный шифр и фиксируют рабочую денежную единицу.
Подтверждение учетной записи включает передачи бумаг следуя KYC-регламенту. Копия ID-карты, доказательство места жительства и банковские координаты анализируются посредством цифровую анализ в течение 24-72 временных единиц.
Авторизация существующих участников реализуется через типовую панель с 2FA верификацией. Временные ключи передаются на телефонный гаджет или e-mail адрес.
Инструменты финансового раздела через резервные ссылки обеспечивает распространенные финансовые механизмы. Visa, Mastercard, электронные портмоне Skrill, Neteller, виртуальные монеты Bitcoin, Ethereum процессируются с уменьшенными платежами 0-3%.
Азартная каталог воспроизводится в точности включая spinning games, настольные геймплей, live-хостов и джекпоты. RTP-коэффициенты, вариативность и условия отыгрыша сохраняются идентичными.
Бонусная политика действует аналогично корневому ресурсу. Welcome-предложения, безвозмездные спины, компенсация и VIP-системы активируются автоматически при выполнении определенных условий.
Определение безопасного развлекательного ресурса в текущих рамках предполагает тщательного рассмотрения к лицензионному уровню. Квалифицированные участники понимают, что KiloGram казино отображает свежую данные о работающих операторах.
Процесс создания аккаунта в сертифицированных платформах включает принудительную валидацию персональных данных. KYC-требования обеспечивают как заведение, так и участника от мошенничества. Кратковременные границы на изъятие активов до выполнения контроля – типичная практика.
Цифровые препятствия на соединение к азартным сайтам устраняются через дублирующие порталы. Функционирующие дубликаты гарантируют абсолютную возможности основного сервиса. Расчетные процедуры, игровой статистика и бонусные схемы продолжают неизменными.
Финансовая защищенность определяется уровнем задействованных денежных инструментов. SSL-кодирование, PCI DSS валидация и многоуровневая идентификация обеспечивают защищенный периметр безопасности.
Интерактивная набор легальных площадок объединяет спины от топовых провайдеров. RTP-индексы, волатильность и алгоритмические системы получают нейтральную контроль в аккредитованных центрах.
Программы вознаграждения в серьезных сервисах строятся на ясных правилах проигрыша. Проигрыш x35-40 считается адекватным для автомат-подарков, в то время как настольные развлечения принимаются в расчет с пониженным множителем.
Нынешние бетторы попадают с проблемой входа к проверенным площадкам. Организации фильтруют основные адреса, но грамотные казино Клубника участники осознают о функционировании зеркальных ресурсов.
Альтернативный адрес составляет идентичную реплику оригинального портала. Системы безопасности функционируют аналогичными. Финансовые процедуры реализуются через те же каналы.
Процедура открытия счёта через зеркальный ресурс включает привычной аутентификации. Операторы просят удостоверения для осуществления KYC-стандартов. Личные характеристики проходят двухфакторную аутентификацию.
Депозитные границы на резервных порталах аналогичны базовым характеристикам. Низшие суммы продолжают неизменными. Увеличивающиеся джекпоты синхронизируются между различными ресурсами.
Премиальные программы работают целостно на параллельных сайтах. Вейджер удерживает первоначальные показатели. Длительность проигрывания остаётся прежним.
Департамент помощи решает тикеты с дополнительных ссылок аналогично. Интерактивный диалог поддерживает постоянный формат оперирования.
Как не переплатить за ремонт
her explanation Vauld news
Актуальные сервисы игорных продуктов гарантируют игрокам вход к премиальному азарту через сертифицированные Vavada зеркало ресурсы. Сертифицированная бизнес предполагает учета определенных правовых норм.
Механизм оформления игрового кабинета содержит верификацию индивидуальных показателей. Администраторы применяют углубленные алгоритмы KYC и AML для предотвращения незаконных транзакций.
Цифровые средства современных казино строятся на надежных серверах с шифровальными технологиями. Геоблокировка принуждает провайдеров запускать альтернативные порталы.
Резервные порталы являют собой идентичные копии главного домена с фиксацией всех инструментов и показателей. Игроки обеспечивают себе беспрепятственный вход к средствам, азартной данным и клиентским конфигурациям.
Банковские процедуры реализуются через интегрированные платежные процессоры. Рамки на инвестиции и получения устанавливаются в соотношении с лицензионными положениями и корпоративными регламентами управления рисками.
Экспертные пользователи предлагают отслеживать условия разрешения через официальные каталоги беттинг комиссий. Имиджевые параметры предусматривают рейтинги на отраслевых порталах и оценки настоящих беттеров.
Действующие резервные адреса официальных игорных заведений на п»ї1хбет официальный сайт предоставляют непрерывный соединение к развлекательным системам. Методика реплицирования формирует аналогичные реплики корневого портала с сохранением всех опций.
Схема регистрации через зеркало в точности копирует базовую анкету. Только пришедшие клиенты прописывают валидный email, создают безопасный шифр и выбирают операционную платежное средство.
Аутентификация учетной записи предполагает представления справок опираясь на KYC-политике. Скан удостоверения личности, доказательство проживания и платежные координаты проверяются через цифровую контроль в течение 24-72 периодов.
Подключение зарегистрированных игроков осуществляется через типовую модуль с 2FA проверкой. Разовые шифры передаются на мобильный девайс или email.
Инструменты пополнительного компонента через дублирующие порталы поддерживает популярные расчетные механизмы. Visa, Mastercard, веб счета Skrill, Neteller, криптовалюты Bitcoin, Ethereum процессируются с уменьшенными взносами 0-3%.
Гемблинг коллекция повторяется в точности включая spinning games, столовые игры, live-дилеров и прогрессивы. RTP-индикаторы, изменчивость и проигрыш остаются такими же.
Бонусная схема функционирует похоже корневому домену. Welcome-пакеты, бесплатные вращения, денежный возврат и VIP-системы запускаются программно при выполнении фиксированных стандартов.
Neuro Relief USA: Neuro Relief USA – neurontin 800mg
Howdy! I just wish to give you a huge thumbs up
for your excellent information you’ve got right
here on this post. I’ll be coming back to your blog for more soon.
Легальные операторы азартных возможностей предоставляют геймерам возможность к качественному гэмблингу через специализированные платформы, включая lucky bear казино официальный сайт скачать , которые специально выполняют международные нормы security.
Схема активации подразумевает предоставления валидационных данных через шифрованные SSL-connection. Операторы требуют письменное подтверждение правоспособности и локации residence для поддержания нормативных норм.
2FA проверка представляет required элементом передовых механизмов надёжности. Участники имеют SMS-токены, push-сообщения или внедряют dedicated утилиты наподобие Google Authenticator.
Дублирующие адреса преодолевают проблемы territorial блокировок и DDoS-assault. С технической точки зрения зеркала составляют копийные версии основного сайта с поддержанием инструментария и пользовательских данных.
Компетентные участники советуют удерживать актуальные перечни действующих альтернатив в bookmark веб-клиента. Администрация направляют сведения о fresh адресах через почтовые сервисы, Telegram-чаты и портативные программы.
Финансовые процедуры через официальные площадки покрыты криптографическими methods уровня банковского направления. Изъятие средств осуществляется исключительно на верифицированные карты обладателя профиля.
Новейшие провайдеры развлекательных игр гарантируют беттерам возможность к элитному развлечениям через защищенные казино mad системы. Сертифицированная бизнес подразумевает следования определенных контролирующих стандартов.
Механизм создания индивидуального кабинета охватывает аутентификацию индивидуальных сведений. Операторы задействуют комплексные процедуры KYC и AML для предотвращения нарушающих операций.
Программные средства современных гемблинг платформ строятся на надежных серверах с шифровальными сертификатами. Локальные запреты побуждает владельцев создавать резервные порталы.
Дублирующие ресурсы представляют полные версии первичного портала с фиксацией всех функций и сведений. Участники достигают стабильный связь к средствам, беттинг статистике и пользовательским настройкам.
Денежные переводы выполняются через подключенные платежные агрегаторы. Лимиты на пополнения и получения регулируются в согласии с правовыми требованиями и корпоративными политиками риск-менеджмента.
Опытные беттеры советуют отслеживать ситуацию авторизации через государственные списки беттинг структур. Имиджевые критерии включают оценки на специализированных порталах и feedback действительных клиентов.
Актуальные участники обталкиваются с множеством технологических деталей при работе с проверенными ресурсами. Экспертные ресурсы типа Меллстрой РІС…РѕРґ обеспечивают свежую контент о работе гэмблинговых брендов.
Процедура валидации учетной записи содержит множество принудительных уровней. Исходная валидация предполагает предоставления документов удостоверяющих индивидуальность. Классический комплект охватывает паспорт, лицензию водителя или международное ID.
Программная элемент оформления подразумевает использование безопасного соединения и многофакторной защиты. Квалифицированные геймеры подсказывают запускать максимум предложенных функций секьюрити.
Резервные ссылки представляют абсолютные отражения первичного сайта с хранением комплексного набора функций. Главное выгода содержится в схожести платежных ограничений и условий условий прокрутки.
Схема обнаружения рабочих дублирующих порталов основывается на наблюдении профильных телеграм-каналов и союзных площадок. Опытные клиенты применяют анонимайзеры для обеспечения надежного доступа независимо от локальных ограничений.
Легальные платформы игорных услуг обеспечивают клиентам шанс к элитному гэмблингу через специализированные сайты, включая Меллстрой официальный сайт , которые придерживаются общепринятые регламенты безопасности.
Алгоритм оформления профиля включает внесения проверочных сведений через шифрованные SSL-connection. Менеджмент просят официальное удостоверение age verification и региона жительства для compliance legal норм.
Двухэтапная проверка считается обязательным компонентом новейших платформ security. Users получают SMS-токены, push-уведомления или эксплуатируют dedicated приложения наподобие Google Authenticator.
Альтернативные адреса устраняют проблемы territorial барьеров и DDoS-штурмов. Техническим образом дубли являют копийные клоны главного сайта с сохранением функциональности и user информации.
Опытные участники призывают сохранять актуальные каталоги активных дублей в favourites браузера. Администрация отправляют обновления о новых адресах через e-mail, Telegram-сообщества и мобильные программы.
Платёжные переводы через официальные платформы покрыты encryption протоколами уровня банковского индустрии. Снятие денег осуществляется лишь на validated данные владельца личного кабинета.
visit our website Vauld crypto
Актуальные клиенты имеют дело с огромным количеством системных деталей при деятельности с лицензированными порталами. Специализированные источники типа Lucky Bear поставляют современную сведения о процессах развлекательных операторов.
Алгоритм подтверждения аккаунта содержит несколько требуемых уровней. Первичная аутентификация включает предоставления свидетельств удостоверяющих индивидуальность. Стандартный список охватывает ID, водительские права или внешний паспорт.
Техническая элемент записления подразумевает использование SSL-шифрования и 2FA. Профессиональные клиенты рекомендуют инициировать максимум возможных функций защиты.
Альтернативные адреса формируют идентичные копии базового домена с обеспечением исчерпывающего арсенала. Основное бонус содержится в тождественности финансовых границ и норм проигрыша.
Механизм нахождения актуальных резервных ссылок опирается на проверке специализированных новостных лент и связанных сайтов. Квалифицированные участники применяют виртуальные частные сети для формирования стабильного доступа вне зависимости от региональных лимитов.
Действующие зеркала проверенных гемблинг-платформ на казино 1хбет создают стабильный соединение к развлекательным ресурсам. Схема клонирования строит точные копии базового сайта с фиксацией всех опций.
Алгоритм открытия счета через резервную ссылку на сто процентов воспроизводит главную шаблон. Начинающие геймеры заполняют валидный email, формируют надежный пароль и выбирают операционную платежное средство.
Аутентификация учетной записи требует отправки бумаг следуя KYC-требованиям. Копия водительских прав, верификация регистрации и банковские сведения контролируются системой программную проверку в течение 24-72 часа.
Логин существующих пользователей выполняется через типовую панель с многоступенчатой проверкой. Краткосрочные шифры доставляются на мессенджер гаджет или email.
Возможности входящего компонента через резервные ссылки включает востребованные денежные сервисы. Visa, Mastercard, онлайн хранилища Skrill, Neteller, crypto Bitcoin, Ethereum выполняются с оптимизированными процентами 0-3%.
Азартная библиотека копируется в точности включая машины, традиционные геймплей, live-операторов и прогрессивы. RTP-значения, изменчивость и вейджер фиксируются такими же.
Промо программа оперирует подобно главному веб-площадке. Welcome-комплекты, бесплатные вращения, возврат средств и VIP-планы стартуют автоматически при выполнении фиксированных стандартов.
browse this site Paxful
Лицензионные операторы игорных сервисов дают геймерам возможность к профессиональному игровому процессу через профильные порталы, включая казино СЂР° , которые точно исполняют международные стандарты конфиденциальности.
Схема открытия счёта necessita заполнения проверочных деталей через криптографические SSL-протоколы. Провайдеры требуют нотариальное доказательство совершеннолетия и локации жительства для исполнения правовых требований.
Двухэтапная верификация становится mandatory частью передовых solutions надёжности. Клиенты располагают SMS-токены, push-алерты или внедряют dedicated программы в стиле Google Authenticator.
Дублирующие ссылки устраняют трудности географических блокировок и DDoS-assault. С технической точки зрения дубли составляют тождественные копии основного сайта с удержанием возможностей и пользовательских данных.
Skilled пользователи рекомендуют поддерживать новейшие списки working копий в favourites интернет-программы. Операторы передают новости о свежих порталах через почтовые сервисы, Telegram-группы и mobile apps.
Банковские операции через надёжные платформы обеспечены криптографическими алгоритмами стандарта банковского segment. Вывод денег происходит только на validated реквизиты хозяина личного кабинета.
Актуальные резервные адреса проверенных азартных клубов на Лев казино гарантируют непрерывный доступ к гемблинг ресурсам. Технология дублирования генерирует аналогичные версии корневого домена с фиксацией всех инструментов.
Процедура оформления профиля через альтернативный домен на сто процентов воспроизводит оригинальную бланк. Свежие клиенты прописывают действующий email, придумывают безопасный секретную комбинацию и устанавливают операционную денежную единицу.
Верификация профиля включает передачи документов в соответствии с KYC-политике. Фото водительских прав, подтверждение проживания и платежные данные анализируются посредством автоматическую валидацию в течение 24-72 часа.
Авторизация действующих игроков выполняется через обычную интерфейс с двухфакторной аутентификацией. Краткосрочные ключи приходят на мессенджер гаджет или мейл.
Механизмы депозитного раздела через дублирующие порталы поддерживает распространенные финансовые сервисы. Visa, Mastercard, виртуальные балансы Skrill, Neteller, цифровые активы Bitcoin, Ethereum обрабатываются с низкими платежами 0-3%.
Гемблинг ассортимент копируется в точности включая слоты, карточные забавы, live-хостов и джекпоты. RTP-значения, волатильность и проигрыш остаются аналогичными.
Промо механизм функционирует подобно базовому домену. Welcome-бандлы, free spins, кешбэк и VIP-планы запускаются машинально при реализации установленных параметров.
Игровая область показывает интенсивный развитие, заинтересовывая легионы геймеров. Опытные площадки дают безопасную атмосферу для пари. Полную сведения о этих компаниях доступно найти на Mellstroy Game зеркало .
Аттестация является ключевым аспектом подбора сайта. Лицензиаты Гибралтара дают тщательный мониторинг расчётных операций. Каждая лицензированная платформа проходит регулярные проверки RNG-генераторов.
Технические особенности инновационных беттинг-платформ охватывают SSL-кодирование финансового стандарта. Создатели программного ПО класса Microgaming, NetEnt, Pragmatic Play внедряют сложные механизмы хаотичных параметров.
Механизм аутентификации профиля подразумевает направления документов KYC-стандарта. ID, документ о прибылях, доказательство регистрации — базовый набор для финального входа.
Параллельные ссылки исправляют трудности с блокировками поставщиков. Рабочие копии изменяются регулярно IT службами. Портативные приложения зачастую действуют стабильнее онлайн редакций.
Управление банкроллом создаёт длительную доходность игровых партий. Грамотные участники предлагают ограничивать количество депозита до 1-2% от общего бюджета.
Новейшие игроки встречаются с массой системных деталей при функционировании с лицензированными порталами. Экспертные ресурсы типа казино 1xBet обеспечивают актуальную данные о процессах игорных провайдеров.
Процедура аутентификации кабинета включает несколько требуемых стадий. Первичная аутентификация включает передачи удостоверений верифицирующих гражданство. Классический комплект включает документ, права или международное ID.
Системная часть оформления охватывает применение защищенного протокола и двухфакторной аутентификации. Квалифицированные пользователи советуют запускать полный набор доступных функций охраны.
Зеркала представляют точные реплики главного домена с сохранением тотального набора функций. Важнейшее выгода содержится в идентичности расчетных рамок и условий условий прокрутки.
Схема нахождения рабочих зеркал опирается на проверке специализированных телеграм-каналов и аффилированных порталов. Опытные участники используют туннельные протоколы для предоставления постоянного входа безотносительно от географических блокировок.
High-end timepieces continue to attract attention despite the rise of smart technology.
They are often seen as a symbol of status and refined taste.
Skilled engineering plays a major role in their lasting value.
Many luxury watches are produced using carefully selected materials.
https://blog.gucci1.ru/patek-philippe-nautilus-aquanaut/
They also represent a deep history passed down through generations.
For collectors, these watches can serve as both practical items and valuable assets.
Timeless design allows them to stay relevant across changing fashion trends.
As a result, luxury watches continue to appeal to enthusiasts around the world.
fioricet onlinepharmacy https://cse.google.ge/url?sa=t&url=https%3A%2F%2Fcanbaypharm.top no prescription online druges
Отбор честного азартного портала заставляет тщательного исследования правовых разрешений. Инновационные платформы lucky bear казино гарантируют геймерам максимальную детали о текущих аккредитациях.
Система регистрации подразумевает определенное количество необходимых этапов проверки. Провайдеры просят справки, удостоверяющие индивидуальность и совершеннолетие. Традиционный KYC-порядок составляет от 24 до 72 интервалов.
Управление банком открывается с установления лимитов на пополнения. Квалифицированные игроки призывают внедрять установку 5% от совокупного азартного фонда на конкретную партию.
Программные ограничения администраторов обязывают задействовать вспомогательные маршруты. Дубликаты хранят безусловную функциональность центрального платформы, предусматривая историю операций и игровой успех.
Инновационные банковские сервисы поддерживают моментальные пополнения через виртуальные аккаунты. Bitcoin, Ethereum и постоянные токены обеспечивают анонимность и мизерные комиссии. Срок обработки снятий составляет 10-30 периодов.
Схемы лояльности охватывают ступенчатые степени с возрастающим вознаграждением. VIP-консультанты гарантируют личные бонусы, улучшенные лимиты и ускоренную сервис.
Официальные площадки азартных опций дают игрокам доступ к премиальному игровому процессу через специализированные сайты, включая п»ї1хбет , что соблюдают мировые регламенты защиты.
Последовательность открытия счёта требует заполнения проверочных деталей через криптографические SSL-линии. Администрация просят письменное удостоверение возраста и места нахождения для выполнения нормативных норм.
Многоуровневая аутентификация выступает обязательным составляющей современных механизмов надёжности. Пользователи обретают SMS-шифры, push-алерты или используют профессиональные приложения в стиле Google Authenticator.
Mirror адреса решают препятствия geographic барьеров и DDoS-воздействий. По сути mirrors являют аналогичные клоны базового портала с maintaining функциональности и user деталей.
Компетентные клиенты призывают поддерживать новейшие базы функционирующих альтернатив в сохранённых ссылках браузера. Провайдеры направляют информацию о новых ссылках через мейл, Telegram-группы и mobile apps.
Payment процедуры через проверенные порталы покрыты encryption протоколами категории банковского segment. Получение капитала реализуется лишь на проверенные данные владельца профиля.
view website Paxful bitcoin wallet
Нынешние бетторы сталкиваются с сложностью подключения к проверенным ресурсам. Провайдеры ограничивают базовые домены, но искушённые Mellstroy Game казино пользователи понимают о существовании параллельных ресурсов.
Резервная ссылка является полную воспроизведение основного площадки. Протоколы шифрования сохраняются неизменными. Банковские процедуры проходят через идентичные каналы.
Процедура оформления профиля через резервный ресурс подразумевает стандартной проверки. Специалисты требуют справки для соблюдения KYC-требований. Идентификационные информация осуществляют усиленную валидацию.
Пополнительные ограничения на параллельных платформах аналогичны стандартным параметрам. Стартовые вклады поддерживаются неизменными. Прогрессивные банки объединяются между разными адресами.
Поощрительные механизмы оперируют всесторонне на резервных сайтах. Множитель ставок удерживает оригинальные цифры. Срок активности реализации сохраняется.
Отдел помощи решает тикеты с параллельных ссылок таким же способом. Живой чат гарантирует постоянный порядок деятельности.
ivermectin cream uk: ivermectin 3 mg tablet dosage – Iver Therapeutics
Передовые бетторы сталкиваются с проблемой соединения к официальным платформам. Операторы фильтруют базовые порталы, но знающие казино лова игроки учитывают о присутствии альтернативных платформ.
Дополнительный домен составляет полную отображение первичного сайта. Протоколы шифрования сохраняются неизменными. Денежные действия осуществляются через аналогичные системы.
Схема регистрации через зеркальный ресурс включает обычной подтверждения. Операторы просят свидетельства для осуществления KYC-правил. Личные данные реализуют двухфакторную аутентификацию.
Депозитные лимиты на параллельных платформах совпадают основным параметрам. Наименьшие взносы остаются стабильными. Накопительные выигрышные пулы согласовываются между разными адресами.
Бонусные системы функционируют полноценно на зеркальных ресурсах. Множитель ставок обеспечивает первоначальные величины. Длительность оборота поддерживается.
Сервис поддержки обрабатывает заявки с альтернативных ресурсов равнозначно. Живой переписка предоставляет 24-часовой график оперирования.
Опрятный внешний вид формирует сильное мнение о человеке.
Он работает на оценку вас окружающими мгновенно.
Уверенность в подобранном луке повышает вашу уверенность.
Он подчеркивает ваш уровень ответственности и уважение к мелочам.
https://s2.luxepodium.com/InqFwu/
Посредством одежду вы можете выразить свою индивидуальность и стиль.
Люди неосознанно воспринимают опрятных людей как более компетентных.
Поэтому, вложения в свой образ — это инвестиции в свое будущее.
Ориентирование в области сертифицированных платформ включает понимания передовых методов авторизации. Умелые участники задействуют Вавада казино для приобретения актуальной данных о активных URL.
Механизм открытия личного кабинета в лицензированных операторах охватывает комплексную аутентификацию. Актуальные компании применяют KYC-процедуры и AML-критерии. Оформление документов потребляет от 24 до 72 промежутков.
Программные технологии для прохождения ограничений эволюционируют вместе с повышением правовых действий. VPN-инструменты класса premium дают криптографию AES-256 и системы OpenVPN. Стабильность подключения fundamentally значима для премиальных сессий.
Альтернативные ресурсы выполняют задачи через географически разнесенные цифровые кластеры. CDN-системы предоставляют сокращенную время ответа для глобальных участников. Программное маршрутизация включается при распознавании барьера главного домена.
Денежные движения в проверенных юрисдикциях следуют жестким требованиям PCI DSS. Блокчейн переводы получают востребованность из-за скрытности и темпу процессинга.
Смартфонные софт премиальных операторов объединяют физиологическую аутентификацию и push-оповещения для принципиальных эпизодов. Адаптивный дизайн автономно изменяется под настройки матрицы.
Современные сервисы беттинг продуктов предоставляют пользователям доступ к премиальному беттингу через сертифицированные Vavada casino порталы. Лицензированная операционная активность влечет соблюдения жестких законодательных стандартов.
Алгоритм регистрации индивидуального счета задействует проверку приватных информации. Регуляторы задействуют расширенные протоколы KYC и AML для предотвращения незаконных транзакций.
IT платформы современных игорных домов базируются на безопасных облачных системах с криптографическими сертификатами. Территориальные ограничения заставляет провайдеров запускать параллельные порталы.
Зеркальные порталы образуют идентичные репликации центрального платформы с поддержанием всех функций и параметров. Клиенты получают устойчивый доступ к средствам, азартной статистике и индивидуальным опциям.
Платежные транзакции реализуются через подключенные банковские шлюзы. Лимиты на вклады и снятия определяются в соотношении с нормативными требованиями и индивидуальными правилами контроля угроз.
Квалифицированные гемблеры рекомендуют проверять состояние аккредитации через регуляторные каталоги игорных структур. Репутационные параметры содержат места на тематических порталах и отзывы реальных игроков.
Инновационные платформы азартных услуг дают игрокам путь к высококлассному азарту через безопасные винити казино платформы. Официальная работа предполагает выполнения конкретных надзорных положений.
Процедура создания клиентского счета содержит подтверждение персональных сведений. Регуляторы внедряют расширенные протоколы KYC и AML для предотвращения мошеннических переводов.
Программные решения современных гемблинг платформ основываются на безопасных инфраструктурах с криптографическими сертификатами. Локальные запреты принуждает операторов внедрять альтернативные ссылки.
Зеркальные сайты образуют эквивалентные версии центрального платформы с обеспечением всех возможностей и сведений. Клиенты приобретают устойчивый соединение к капиталу, беттинг отчетности и персональным параметрам.
Финансовые переводы производятся через интегрированные банковские шлюзы. Рамки на инвестиции и выводы регулируются в соотношении с регуляторными условиями и организационными регламентами минимизации опасностей.
Экспертные пользователи указывают проверять условия аккредитации через надзорные базы данных азартных ведомств. Репутационные критерии содержат места на профильных платформах и feedback настоящих участников.
Лицензионные площадки развлекательных услуг oferuja пользователям доступ к премиальному азартному досугу через профильные платформы, включая Рльдорадо регистрация , что выполняют глобальные стандарты надёжности.
Механизм открытия счёта предполагает заполнения идентификационных сведений через защищённые SSL-connection. Провайдеры запрашивают документальное удостоверение age verification и места жительства для compliance legal требований.
Multi-factor верификация является обязательным компонентом передовых архитектур security. Игроки обретают SMS-ключи, push-сообщения или внедряют специальные tools вроде Google Authenticator.
Mirror порталы устраняют препятствия региональных санкций и DDoS-воздействий. По сути mirrors представляют идентичные реплики базового домена с поддержанием функциональности и user данных.
Компетентные участники призывают хранить current перечни функционирующих копий в избранном интернет-программы. Операторы доставляют информацию о fresh доменах через email, Telegram-чаты и mobile apps.
Банковские переводы через официальные площадки обеспечены шифровальными methods категории банковского сектора. Extraction фондов происходит solely на верифицированные карты хозяина account.
Write more, thats all I have to say. Literally,
it seems as though you relied on the video to make your point.
You obviously know what youre talking about, why waste your intelligence on just posting
videos to your blog when you could be giving us something enlightening to
read?
1вин ординар 1вин ординар
Гемблинговая область представляет интенсивный развитие, притягивая массы клиентов. Опытные ресурсы предлагают надёжную атмосферу для игры. Исчерпывающую факты о таких брендах возможно изучить на п»ї1хбет казино .
Лицензирование составляет ключевым показателем подбора портала. Лицензиаты Кюрасао обеспечивают строгий мониторинг денежных операций. Отдельная лицензированная платформа выполняет периодические аудиты RNG-систем.
Компьютерные характеристики передовых гемблинг-сайтов охватывают SSL-кодирование банковского категории. Производители софтового материала класса Microgaming, NetEnt, Pragmatic Play добавляют сложные алгоритмы рандомных параметров.
Алгоритм подтверждения аккаунта требует представления справок KYC-класса. Удостоверение, выписка о финансах, доказательство адреса — стандартный комплект для полноценного входа.
Зеркальные домены устраняют препятствия с ограничениями компаний. Действующие дубли изменяются систематически техническими командами. Портативные софт нередко работают устойчивее сетевых модификаций.
Контроль средств устанавливает перспективную успешность гемблинговых сессий. Экспертные пользователи рекомендуют лимитировать величину пари до 1-2% от итогового резерва.
check out the post right here Paxful login
Новейшие провайдеры игорных продуктов предлагают пользователям подключение к высококлассному развлечениям через надежные Меллстрой зеркало ресурсы. Официальная операционная активность требует учета жестких регуляторных требований.
Алгоритм создания клиентского профиля охватывает проверку персональных показателей. Операторы применяют многоуровневые процедуры KYC и AML для исключения поддельных операций.
Цифровые платформы актуальных беттинг площадок функционируют на надежных дата-центрах с HTTPS сертификатами. Локальные запреты заставляет операторов организовывать резервные домены.
Параллельные порталы образуют полные копии главного портала с обеспечением всех опций и сведений. Игроки получают стабильный подключение к балансу, беттинг статистике и клиентским настройкам.
Банковские транзакции выполняются через встроенные платежные агрегаторы. Границы на взносы и изъятия назначаются в соответствии с нормативными положениями и внутренними нормами управления рисками.
Компетентные игроки настаивают контролировать состояние разрешения через государственные базы данных беттинг ведомств. Авторитетные критерии содержат рейтинги на специализированных сайтах и мнения истинных пользователей.
Рвота при мигрени
Rutor является основным ресурсом русскоязычного даркнета в сети Tor, обеспечивающим доступ к материалам, товарам, контенту и правилам для пользователей черного рынка и onion площадок
Площадка Rutor отличается хорошо зарекомендовавшей себя историей, высочайшей степенью скрытности и возможностью безопасной работы с транзакциями в сети Rutor.Rutor: Ветеран русскоязычного даркнета
info rutor — это один из первых и известнейших русскоязычных ресурсов даркнета, неразрывно связанный с анонимной онлайн-экосистемой. Данный сервис специализируется на доступе к широчайшему ассортименту софта, файлов, новостей и разнообразных материалов, охватывающих вопросы взлома и защиты.
Как устроена система работы Rutor
Механизм работы ресурса позволяет пользователям получать доступ к большим массивам данных и файлов, при этом обеспечивая максимальную приватность и анонимность. Главное преимущество платформы — интеграция с сетью Rutor, что значительно уменьшает вероятность раскрытия личности и потери конфиденциальной информации. За долгое время работы Rutor стал своего рода летописью для даркнета на русском языке.
Rutor продолжает работать и предоставлять стабильный доступ к ресурсам, удовлетворяя потребности как новичков, так и опытных пользователей даркнета. Архитектура ресурса предусматривает, что любые разделы — магазин, новостной блок или гайды по взлому — являются составляющими единой системы, где превалируют безопасность и анонимность.
Перспективы и риски
Ясно, что будущая деятельность Rutor потребует решения новых рисков, внедрения свежих подходов к безопасности и средств обхода ограничений. Следует помнить, что даже максимально анонимная среда не обеспечивает стопроцентную безопасность.
Платформа продолжает быть ресурсом для получения расширенной информации, обмена мнениями по безопасности и мониторинга новшеств в сферах даркнета. Улучшение технологий, увеличение аудитории и внедрение инноваций способствуют статусу Rutor как центрального элемента русскоязычного онлайн-сообщества.
– Сохранение анонимности
– Безопасность транзакций
– Возможность получения эксклюзивных данных
– Обеспечение приватности взаимодействий
Rutor представляет собой ресурс с неповторимой историей, важный для пользователей, стремящихся к свободе, сохранению конфиденциальности и автономии от внешних ограничений в современном интернете.
Азартная сфера показывает активный подъём, манящая тысячи игроков. Экспертные ресурсы предоставляют безопасную атмосферу для развлечений. Детальную данные о указанных брендах допустимо найти на Vavada casino .
Сертификация остаётся ключевым фактором подбора сайта. Надзорные органы Великобритании создают строгий контроль денежных процедур. Всякая официальная площадка осуществляет систематические проверки RNG-модулей.
Программные особенности актуальных гемблинг-сайтов включают SSL-криптографию расчётного категории. Создатели компьютерного софта типа Microgaming, NetEnt, Pragmatic Play добавляют сложные механизмы рандомных чисел.
Схема валидации аккаунта включает предоставления бумаг KYC-типа. ID, документ о доходах, верификация проживания — обычный перечень для завершённого подключения.
Дублирующие домены ликвидируют проблемы с цензурой компаний. Актуальные варианты модифицируются систематически программными группами. Карманные клиенты часто выполняются лучше браузерных форматов.
Финансовая дисциплина устанавливает длительную эффективность азартных сессий. Опытные участники настаивают сокращать величину пари до 1-2% от полного фонда.
Инновационные сервисы азартных активностей предоставляют игрокам подключение к высококлассному игровому процессу через надежные Вавада зеркало платформы. Легальная бизнес требует учета конкретных правовых стандартов.
Система регистрации игрового аккаунта содержит аутентификацию конфиденциальных информации. Операторы внедряют комплексные протоколы KYC и AML для исключения фродовых финансовых действий.
Технические инструменты актуальных развлекательных порталов основываются на стабильных серверах с криптографическими протоколами. Региональная блокировка заставляет администраторов внедрять резервные порталы.
Зеркальные ресурсы формируют идентичные копии первичного сайта с удержанием всех опций и данных. Игроки достигают стабильный соединение к средствам, развлекательной записям и клиентским настройкам.
Расчетные транзакции производятся через синхронизированные банковские системы. Пределы на депозиты и получения определяются в унисон с лицензионными критериями и индивидуальными регламентами снижения потерь.
Профессиональные беттеры рекомендуют контролировать статус аккредитации через надзорные каталоги гемблинг организаций. Престижные критерии содержат оценки на экспертных сайтах и feedback истинных беттеров.
Актуальные гемблеры натыкаются с сложностью соединения к лицензированным сайтам. Операторы закрывают базовые ссылки, но грамотные Клубника казино пользователи осознают о доступности дублирующих ресурсов.
Дополнительный домен представляет точную воспроизведение оригинального портала. Средства защиты остаются идентичными. Платёжные транзакции осуществляются через те же механизмы.
Алгоритм создания аккаунта через дополнительный адрес подразумевает стандартной верификации. Сотрудники уточняют удостоверения для реализации KYC-правил. Индивидуальные характеристики проходят расширенную верификацию.
Банковские лимиты на параллельных ресурсах соответствуют основным спецификациям. Низшие взносы сохраняются неизменными. Прогрессивные призовые фонды синхронизируются между разными ресурсами.
Премиальные планы работают завершённо на альтернативных платформах. Множитель ставок гарантирует базовые параметры. Временные рамки оборота сохраняется.
Сервис ассистирования решает запросы с резервных доменов равнозначно. Онлайн чат осуществляет круглосуточный график деятельности.
Ориентирование в мире проверенных площадок включает знания новых инструментов авторизации. Продвинутые пользователи применяют Вован казино для обретения свежей материалов о активных ссылках.
Схема открытия счета в проверенных компаниях включает комплексную проверку. Новейшие операторы задействуют KYC-протоколы и AML-требования. Оформление документов требует от 24 до 72 промежутков.
Технические методы для обхода ограничений эволюционируют синхронно с ужесточением юридических мер. VPN-службы уровня premium предлагают шифрование AES-256 и стандарты OpenVPN. Постоянство связи кардинально важна для VIP игровых периодов.
Запасные сайты оперируют через географически рассредоточенные компьютерные кластеры. CDN-сети обеспечивают сокращенную пинг для глобальных игроков. Техническое редирект активируется при детекции барьера главного портала.
Финансовые транзакции в сертифицированных зонах отвечают четким критериям PCI DSS. Криптовалютные расчеты приобретают признание по причине секретности и темпу процессинга.
Мобильные приложения премиальных брендов интегрируют физиологическую авторизацию и push-оповещения для принципиальных происшествий. Модифицируемый интерфейс автономно настраивается под характеристики экрана.
http://smartgenrxusa.com/# Smart GenRx USA
https://t.me/s/officlal_1win/167
For benefits
quick emergency loans bad credit
for top products.
Современные операторы развлекательных игр дают участникам возможность к премиальному азарту через защищенные Mellstroy Game casino сайты. Сертифицированная бизнес нуждается следования определенных надзорных положений.
Процесс регистрации персонального профиля охватывает валидацию персональных сведений. Администраторы применяют детализированные системы KYC и AML для недопущения поддельных финансовых действий.
Электронные системы инновационных развлекательных порталов базируются на защищенных серверах с криптографическими стандартами. Территориальные ограничения заставляет администраторов запускать параллельные адреса.
Дублирующие ресурсы являют собой полные репликации базового домена с обеспечением всех опций и сведений. Игроки добиваются стабильный связь к счету, азартной записям и пользовательским опциям.
Финансовые процедуры осуществляются через синхронизированные банковские агрегаторы. Границы на пополнения и изъятия назначаются в согласии с законодательными условиями и собственными регламентами риск-менеджмента.
Компетентные гемблеры советуют проверять условия аккредитации через регуляторные регистры гемблинг комиссий. Престижные параметры задействуют места на профильных сервисах и оценки истинных участников.
Поиск безопасного азартного площадки подразумевает серьезного рассмотрения правовых сертификатов. Современные сайты Лаки Бир РІС…РѕРґ дают клиентам полную данные о собственных санкциях.
Система оформления счета содержит множество принудительных этапов аутентификации. Провайдеры запрашивают свидетельства, доказывающие персону и дееспособность. Стандартный KYC-алгоритм продолжается от 24 до 72 периодов.
Контроль средств инициируется с определения границ на инвестиции. Опытные клиенты настаивают использовать принцип 5% от общего казино резерва на отдельную раунд.
Системные блокировки владельцев принуждают задействовать альтернативные пути. Копии сохраняют стопроцентную работоспособность главного площадки, включая историю платежей и казино прогресс.
Новые денежные системы дают моментальные инвестиции через криптовалютные портмоне. Bitcoin, Ethereum и фиксированные активы предоставляют тайность и крошечные платежи. Продолжительность проведения выводов доходит 10-30 промежутков.
Системы верности предусматривают ступенчатые ранги с возрастающим возвратом. VIP-консультанты гарантируют индивидуальные подарки, увеличенные пределы и приоритетную сервис.
http://ivertherapeutics.com/# Iver Therapeutics
We provide the Lights Out PDF with guaranteed file integrity. You can be sure the document is complete and unaltered. authentic content for the discerning reader. https://lightsoutpdf.top/ Lights Out Pdf Download
https://t.me/s/officlal_1win/482
https://t.me/s/officlal_1win/726
Поиск безопасного игрового заведения в сегодняшних условиях заставляет детального внимания к законному положению. Квалифицированные пользователи осознают, что казино Gold включает современную информацию о активных площадках.
Схема регистрации в сертифицированных площадках предусматривает требуемую проверку личности. KYC-правила гарантируют как оператора, так и участника от махинаций. Краткосрочные границы на получение активов до выполнения валидации – привычная подход.
Цифровые ограничения на соединение к игровым сайтам обходятся через параллельные ссылки. Действующие отражения сохраняют тотальную эффективность центрального сайта. Платежные транзакции, геймплейный результаты и наградные предложения сохраняются константными.
Денежная гарантированность выражается степенью внедренных расчетных методов. SSL-кодирование, PCI DSS подтверждение и двухфакторная верификация создают стабильный барьер безопасности.
Игровая набор легальных провайдеров охватывает машины от известных создателей. RTP-индексы, волатильность и статистические схемы претерпевают независимую контроль в утвержденных институтах.
Системы стимулирования в достойных сервисах базируются на четких правилах вейджера. Вейджер x35-40 считается справедливым для барабан-бонусов, в то время как традиционные состязания включаются в подсчет с минимальным коэффициентом.
Передовые игроки пересекаются с массой технологических деталей при функционировании с официальными порталами. Тематические порталы типа СЌРЅРѕРјРѕ казино поставляют новую контент о работе игорных провайдеров.
Система валидации счета включает несколько неотъемлемых стадий. Стартовая проверка подразумевает загрузки бумаг подтверждающих субъект. Стандартный перечень подразумевает ID, права или загранпаспорт.
Техническая компонента создания аккаунта подразумевает задействование зашифрованного канала и двухуровневой проверки. Квалифицированные геймеры подсказывают активировать все имеющихся параметров охраны.
Зеркала представляют полные копии центрального домена с удержанием полного набора функций. Ключевое бонус содержится в соответствии платежных лимитов и параметров ставочных требований.
Система нахождения актуальных альтернативных адресов опирается на отслеживании экспертных новостных лент и связанных сайтов. Продвинутые пользователи эксплуатируют VPN-сервисы для гарантирования надежного связи невзирая от местных ограничений.
Современные геймеры встречаются с изобилием технических тонкостей при функционировании с лицензированными ресурсами. Специализированные сайты типа п»ї1xBet зеркало выдают релевантную сведения о работе гэмблинговых провайдеров.
Система верификации учетной записи включает множество неотъемлемых шагов. Начальная аутентификация нуждается передачи бумаг подтверждающих субъект. Привычный список предполагает документ, автоудостоверение или международный паспорт.
Технологическая составляющая оформления охватывает внедрение зашифрованного канала и двухфакторной аутентификации. Экспертные пользователи советуют задействовать все имеющихся настроек охраны.
Дублирующие порталы формируют стопроцентные копии центрального сайта с удержанием всего набора функций. Центральное выгода выражается в схожести банковских лимитов и критериев условий прокрутки.
Система обнаружения рабочих дублирующих порталов базируется на отслеживании профессиональных уведомительных сервисов и союзных ресурсов. Экспертные геймеры эксплуатируют виртуальные частные сети для обеспечения надежного соединения невзирая от географических ограничений.
Лицензионные платформы игорных услуг гарантируют клиентам право к качественному развлечениям через целевые сайты, включая казино Mellstroy Game , которые точно выполняют общепринятые нормы security.
Алгоритм оформления профиля necessita ввода проверочных информации через шифрованные SSL-connection. Менеджмент demanded нотариальное удостоверение правоспособности и территории residence для поддержания юрисдикционных норм.
Двухфакторная верификация выступает mandatory компонентом актуальных архитектур надёжности. Участники располагают SMS-токены, push-уведомления или эксплуатируют специализированные софт по типу Google Authenticator.
Дублирующие URL ликвидируют вопросы territorial блокировок и DDoS-воздействий. Техническим образом реплики являют тождественные реплики базового домена с поддержанием функциональности и клиентских сведений.
Компетентные игроки рекомендуют keeping свежие каталоги действующих дублей в favourites браузера. Management отправляют обновления о новых порталах через e-mail, Telegram-communities и портативные утилиты.
Банковские movements через legal площадки защищены encryption системами level банковского сектора. Снятие денег происходит исключительно на подтверждённые wallets владельца account.
use this link Paxful sign up
More about the author Paxful account
Определение надежного развлекательного ресурса предполагает глубокого изучения юридических сертификатов. Актуальные ресурсы п»ї1хбет предоставляют клиентам абсолютную факты о собственных лицензиях.
Процедура создания профиля охватывает множество принудительных ступеней верификации. Провайдеры просят справки, удостоверяющие идентичность и совершеннолетие. Обычный KYC-алгоритм составляет от 24 до 72 интервалов.
Финансовое планирование открывается с назначения рамок на пополнения. Квалифицированные игроки призывают задействовать норму 5% от совокупного развлекательного средств на индивидуальную игру.
Цифровые запреты поставщиков принуждают задействовать альтернативные пути. Зеркала поддерживают стопроцентную эффективность главного платформы, включая историю сделок и гемблинг продвижение.
Современные платежные сервисы обеспечивают быстрые вклады через виртуальные аккаунты. Bitcoin, Ethereum и стабильные валюты дают тайность и крошечные отчисления. Срок обработки изъятий достигает 10-30 отрезков.
Программы верности подразумевают каскадные степени с возрастающим вознаграждением. VIP-кураторы обеспечивают индивидуальные награды, увеличенные лимиты и опережающую поддержку.
Инновационные платформы игорных услуг обеспечивают участникам путь к профессиональному беттингу через надежные Mellstroy Game казино системы. Сертифицированная бизнес требует выполнения строгих правовых положений.
Процедура оформления клиентского кабинета задействует валидацию конфиденциальных сведений. Регуляторы используют детализированные алгоритмы KYC и AML для блокировки мошеннических финансовых действий.
Технические платформы актуальных гемблинг платформ строятся на безопасных дата-центрах с криптографическими технологиями. IP-фильтрация заставляет операторов внедрять параллельные адреса.
Дублирующие сайты формируют эквивалентные дубликаты базового домена с удержанием всех инструментов и параметров. Клиенты получают устойчивый подключение к капиталу, гемблинг статистике и индивидуальным установкам.
Финансовые действия реализуются через интегрированные денежные сервисы. Рамки на депозиты и снятия назначаются в согласии с регуляторными критериями и собственными регламентами контроля угроз.
Профессиональные клиенты предлагают отслеживать статус авторизации через официальные списки азартных комиссий. Имиджевые индикаторы содержат рейтинги на тематических порталах и оценки истинных игроков.
click here for more Nifty Gateway
Выбор качественного игрового ресурса в актуальных рамках заставляет тщательного внимания к законному режиму. Профессиональные участники осознают, что лаки Р±РёСЂ казино демонстрирует новую материалы о действующих операторах.
Алгоритм создания аккаунта в проверенных площадках содержит необходимую подтверждение личности. KYC-стандарты гарантируют как оператора, так и игрока от афер. Краткосрочные границы на перечисление денег до закрытия контроля – стандартная процедура.
Программные ограничения на вход к betting сервисам нейтрализуются через резервные домены. Действующие зеркала предоставляют стопроцентную эффективность основного сайта. Банковские процедуры, азартный прогресс и привилегированные программы продолжают постоянными.
Финансовая безопасность измеряется степенью используемых финансовых механизмов. SSL-кодирование, PCI DSS подтверждение и двухфакторная проверка устанавливают защищенный контур безопасности.
Интерактивная коллекция сертифицированных заведений предоставляет слоты от лидирующих студий. RTP-значения, изменчивость и расчетные формулы претерпевают объективную контроль в утвержденных центрах.
Механизмы лояльности в серьезных площадках опираются на четких условиях активности. Вейджер x35-40 признается справедливым для спин-поощрений, в то время как традиционные забавы учитываются в расчет с уменьшенным процентом.
Подбор проверенного азартного заведения в актуальных границах нуждается особого изучения к правовому состоянию. Знающие пользователи понимают, что казино СЌРЅРѕРјРѕ демонстрирует свежую информацию о работающих площадках.
Процесс создания аккаунта в лицензированных сервисах объединяет неизбежную верификацию идентичности. KYC-стандарты защищают как площадку, так и игрока от махинаций. Временные рамки на вывод средств до выполнения верификации – стандартная методика.
Программные ограничения на вход к игровым сервисам преодолеваются через резервные ссылки. Действующие дубликаты поддерживают стопроцентную эффективность первичного платформы. Банковские движения, интерактивный результаты и привилегированные системы функционируют постоянными.
Финансовая защищенность оценивается степенью используемых расчетных инструментов. SSL-кодирование, PCI DSS валидация и расширенная идентификация устанавливают надежный контур обороны.
Развлекательная библиотека проверенных провайдеров охватывает барабаны от главных производителей. RTP-значения, изменчивость и вероятностные схемы претерпевают беспристрастную валидацию в утвержденных центрах.
Схемы стимулирования в надежных заведениях основываются на четких критериях отыгрыша. Отыгрыш x35-40 характеризуется адекватным для машина-привилегий, в то время как настольные забавы принимаются в расчет с редуцированным процентом.
Определение честного гемблинг площадки предполагает основательного исследования юридических свидетельств. Инновационные порталы Меллстрой предоставляют пользователям максимальную сведения о имеющихся разрешениях.
Процесс открытия аккаунта охватывает множество требуемых шагов аутентификации. Владельцы настаивают удостоверения, засвидетельствующие идентичность и дееспособность. Типовой KYC-процесс продолжается от 24 до 72 периодов.
Управление банком инициируется с задания границ на взносы. Компетентные геймеры призывают применять правило 5% от общего гемблинг капитала на конкретную заход.
Системные барьеры поставщиков побуждают задействовать дополнительные домены. Зеркала сохраняют абсолютную производительность первичного площадки, охватывая историю операций и игровой результаты.
Современные расчетные методы гарантируют мгновенные депозиты через цифровые хранилища. Bitcoin, Ethereum и устойчивые монеты обеспечивают конфиденциальность и наименьшие платежи. Период выполнения получений равно 10-30 отрезков.
Программы постоянства подразумевают ступенчатые степени с возрастающим компенсацией. VIP-представители гарантируют уникальные поощрения, улучшенные ограничения и опережающую поддержку.
Гемблинговая ниша отображает стремительный подъём, заинтересовывая легионы геймеров. Квалифицированные порталы обеспечивают надёжную условия для игры. Полную информацию о указанных организациях возможно найти на казино Лаки Бир .
Аттестация остаётся центральным фактором выбора площадки. Контролёры Олдерни гарантируют строгий аудит финансовых действий. Всякая легальная ресурс выполняет постоянные аудиты RNG-алгоритмов.
Технические параметры передовых игорных домов содержат SSL-кодирование финансового уровня. Создатели цифрового материала типа Microgaming, NetEnt, Pragmatic Play интегрируют усовершенствованные модели непредсказуемых параметров.
Процесс подтверждения аккаунта предполагает направления удостоверений KYC-типа. Удостоверение, подтверждение о прибылях, доказательство регистрации — классический набор для полноценного активации.
Резервные домены устраняют барьеры с ограничениями организаций. Действующие зеркала обновляются постоянно компьютерными отделами. Портативные утилиты обычно выполняются стабильнее браузерных вариантов.
Банкролл-менеджмент устанавливает стратегическую прибыльность развлекательных раундов. Опытные пользователи рекомендуют лимитировать объём ставки до 1-2% от суммарного резерва.
Hello, I enjoy reading all of your post. I like to write a little comment to support you.
Also visit my site :: Delta 9 Sparkling Water
useful link Paxful account suspended
Игровая область демонстрирует стремительный подъём, манящая легионы игроков. Квалифицированные сайты дают стабильную пространство для развлечений. Подробную факты о подобных компаниях доступно отыскать на Вован казино .
Лицензирование выступает приоритетным критерием отбора сайта. Контролёры Мальты дают строгий мониторинг экономических действий. Отдельная аккредитованная площадка подвергается периодические аудиты RNG-модулей.
Компьютерные параметры современных азартных площадок включают SSL-кодирование расчётного класса. Создатели софтового софта уровня Microgaming, NetEnt, Pragmatic Play встраивают многоуровневые механизмы случайных параметров.
Процедура подтверждения личного кабинета включает передачи бумаг KYC-типа. Паспорт, выписка о прибылях, доказательство местожительства — обычный список для окончательного входа.
Дублирующие адреса ликвидируют проблемы с ограничениями провайдеров. Рабочие варианты обновляются каждый день IT группами. Планшетные программы часто оперируют стабильнее браузерных модификаций.
Контроль средств задаёт длительную доходность игровых циклов. Профессиональные пользователи рекомендуют лимитировать размер депозита до 1-2% от совокупного бюджета.
Подбор достойного развлекательного заведения в сегодняшних обстоятельствах требует повышенного рассмотрения к правовому положению. Профессиональные геймеры понимают, что Лаки Бир сайт содержит новую информацию о работающих площадках.
Процесс создания аккаунта в проверенных площадках предусматривает обязательную подтверждение персональных данных. KYC-требования гарантируют как оператора, так и клиента от фрода. Временные границы на вывод активов до закрытия валидации – типичная система.
Электронные запреты на подключение к развлекательным сайтам преодолеваются через параллельные домены. Активные клоны поддерживают абсолютную работоспособность первичного платформы. Денежные процедуры, геймплейный продвижение и льготные планы поддерживаются стабильными.
Экономическая стабильность характеризуется критерием задействованных банковских инструментов. SSL-криптография, PCI DSS валидация и усиленная подтверждение обеспечивают безопасный щит ограждения.
Игровая набор сертифицированных заведений содержит спины от ведущих создателей. RTP-параметры, изменчивость и математические формулы претерпевают беспристрастную сертификацию в одобренных учреждениях.
Системы вознаграждения в серьезных сервисах строятся на понятных условиях активности. Отыгрыш x35-40 считается справедливым для автомат-подарков, в то время как классические развлечения включаются в расчет с уменьшенным процентом.
Новейшие гемблеры оказываются с препятствием соединения к легальным ресурсам. Организации фильтруют базовые порталы, но грамотные лаки Р±РёСЂ казино официальный сайт участники знают о присутствии зеркальных порталов.
Параллельный портал составляет полную реплику оригинального ресурса. Протоколы шифрования поддерживаются такими же. Расчётные процедуры осуществляются через равнозначные сервисы.
Процедура заведения учётной записи через параллельный ссылку подразумевает классической проверки. Администраторы уточняют удостоверения для осуществления KYC-правил. Персональные характеристики выполняют комплексную аутентификацию.
Депозитные пределы на параллельных порталах соответствуют основным параметрам. Наименьшие беты остаются постоянными. Увеличивающиеся выигрышные пулы объединяются между всеми доменами.
Бонусные планы действуют всесторонне на параллельных платформах. Коэффициент оборота обеспечивает первоначальные величины. Тайминг использования остаётся прежним.
Отдел ассистирования анализирует вопросы с дополнительных доменов аналогично. Интерактивный разговор обеспечивает круглосуточный формат деятельности.
Выбор достойного игрового портала в актуальных рамках подразумевает повышенного изучения к законному состоянию. Профессиональные игроки понимают, что казино 1xBet включает свежую материалы о действующих площадках.
Механизм регистрации в сертифицированных платформах включает принудительную аутентификацию удостоверения. KYC-требования защищают как заведение, так и клиента от махинаций. Кратковременные ограничения на изъятие средств до финализации валидации – нормальная система.
Электронные препятствия на доступ к гемблинг ресурсам нейтрализуются через зеркальные ссылки. Функционирующие отражения обеспечивают абсолютную производительность основного сайта. Платежные процедуры, развлекательный прогресс и привилегированные планы поддерживаются неизменными.
Материальная гарантированность выражается качеством применяемых финансовых методов. SSL-шифрование, PCI DSS аттестация и дополнительная проверка формируют безопасный контур обороны.
Развлекательная библиотека сертифицированных операторов охватывает автоматы от топовых провайдеров. RTP-показатели, вариативность и математические системы получают объективную сертификацию в авторизованных центрах.
Планы лояльности в профессиональных сервисах базируются на четких критериях ставок. Проигрыш x35-40 признается справедливым для автомат-поощрений, в то время как карточные забавы учитываются в калькуляцию с сниженным показателем.
click here for more Nifty Gateway
Современные операторы беттинг активностей предлагают клиентам вход к элитному гемблингу через сертифицированные Меллстрой официальный сайт ресурсы. Лицензированная работа требует учета строгих регуляторных норм.
Механизм создания пользовательского счета включает валидацию приватных реквизитов. Администраторы применяют углубленные протоколы KYC и AML для пресечения мошеннических платежей.
IT системы инновационных гемблинг платформ базируются на стабильных хостингах с HTTPS алгоритмами. Геоблокировка обязывает владельцев внедрять дублирующие домены.
Зеркальные порталы образуют идентичные копии главного портала с фиксацией всех сервисов и параметров. Участники обеспечивают себе беспрепятственный связь к балансу, игровой статистике и клиентским опциям.
Платежные транзакции проходят через интегрированные расчетные шлюзы. Ограничения на депозиты и выводы устанавливаются в унисон с нормативными стандартами и внутренними правилами риск-менеджмента.
Профессиональные беттеры предлагают проверять условия разрешения через контролирующие списки беттинг организаций. Репутационные критерии предусматривают места на тематических сайтах и комментарии реальных участников.
Официальные операторы игровых услуг обеспечивают игрокам вариант к высококлассному гэмблингу через тематические ресурсы, включая Лаки Бир регистрация , которые точно придерживаются transnational нормы защиты.
Последовательность регистрации включает ввода проверочных данных через шифрованные SSL-каналы. Букмекеры просят документальное подтверждение совершеннолетия и региона residence для соблюдения legal правил.
Multi-factor authentication является принудительным aspect современных архитектур конфиденциальности. Клиенты получают SMS-пароли, push-алерты или задействуют dedicated приложения вроде Google Authenticator.
Резервные ссылки устраняют проблемы territorial ограничений и DDoS-assault. По сути дубли составляют копийные копии главного сайта с обеспечением опций и пользовательских сведений.
Опытные участники рекомендуют keeping свежие перечни активных альтернатив в избранном browser. Букмекеры рассылают новости о новых URL через почтовые сервисы, Telegram-сообщества и mobile софт.
Банковские процедуры через legal сайты защищены криптографическими протоколами категории банковского индустрии. Вывод капитала выполняется solely на проверенные карты собственника account.
check over here Vauld crypto
?esk? casino online ?esk? casino online .
Smart GenRx USA: best rx pharmacy online – Smart GenRx USA
Рабочие дублирующие порталы лицензированных азартных клубов на РЎСѓРєР° казино гарантируют непрерывный вход к развлекательным ресурсам. Схема реплицирования образует аналогичные версии центрального ресурса с фиксацией всех механизмов.
Алгоритм открытия счета через резервную ссылку полностью копирует главную шаблон. Только пришедшие участники прописывают действующий email, устанавливают безопасный код доступа и устанавливают игровую курренси.
Подтверждение учетной записи требует загрузки удостоверений по KYC-политике. Снимок водительских прав, верификация адреса и банковские сведения проходят машинную анализ в течение 24-72 часа.
Аутентификация активных пользователей выполняется через стандартную модуль с многоступенчатой аутентификацией. Краткосрочные токены отправляются на сотовый устройство или почтовый ящик.
Функционал денежного модуля через альтернативные домены предлагает топовые денежные системы. Visa, Mastercard, цифровые портмоне Skrill, Neteller, криптовалюты Bitcoin, Ethereum выполняются с уменьшенными процентами 0-3%.
Азартная база дублируется полностью включая барабаны, классические игры, live-крупье и прогрессивы. RTP-значения, вариативность и ставочные требования удерживаются идентичными.
Акционная программа действует похоже корневому ресурсу. Welcome-наборы, фриспины, refund и VIP-системы включаются системно при реализации заданных условий.
Поиск в сфере официальных сайтов требует представления продвинутых решений подключения. Квалифицированные игроки используют Килограмм для получения свежей данных о работающих URL.
Механизм формирования профиля в сертифицированных заведениях подразумевает детальную валидацию. Передовые поставщики внедряют KYC-системы и AML-критерии. Документальная процедура составляет от 24 до 72 периодов.
Цифровые методы для преодоления запретов совершенствуются одновременно с повышением нормативных мер. VPN-инструменты уровня premium гарантируют безопасность AES-256 и методы OpenVPN. Надежность коннекта кардинально существенна для привилегированных заходов.
Резервные ресурсы выполняют задачи через регионально размещенные компьютерные системы. CDN-комплексы предоставляют минимальную время ответа для международных геймеров. Автоматическое перенаправление запускается при детекции ограничения основного домена.
Экономические операции в сертифицированных регионах отвечают жестким стандартам PCI DSS. Цифровые операции завоевывают популярность по причине конфиденциальности и скорости реализации.
Переносные программы лучших компаний объединяют физиологическую авторизацию и push-извещения для существенных эпизодов. Модифицируемый интерфейс независимо подстраивается под характеристики монитора.
have a peek here Vauld review
Игровая область показывает стремительный прогресс, завлекая множество игроков. Квалифицированные платформы обеспечивают защищённую обстановку для ставок. Исчерпывающую материалы о таких брендах допустимо обнаружить на Lucky Bear .
Легализация остаётся ключевым критерием определения площадки. Лицензиаты Гибралтара дают жёсткий аудит финансовых действий. Каждая легальная платформа осуществляет плановые инспекции RNG-модулей.
Технические особенности современных казино содержат SSL-защиту банковского класса. Поставщики софтового материала типа Microgaming, NetEnt, Pragmatic Play встраивают комплексные схемы случайных параметров.
Схема подтверждения профиля подразумевает предоставления бумаг KYC-типа. Свидетельство, справка о доходах, удостоверение проживания — типичный пакет для полноценного доступа.
Резервные ссылки устраняют трудности с фильтрацией компаний. Рабочие копии адаптируются регулярно техническими службами. Карманные приложения нередко выполняются стабильнее сетевых вариантов.
Распределение капитала формирует длительную прибыльность гемблинговых периодов. Квалифицированные пользователи советуют урезать количество пари до 1-2% от общего резерва.
Развлекательная отрасль являет интенсивный подъём, притягивая легионы клиентов. Опытные площадки обеспечивают надёжную пространство для ставок. Подробную информацию о подобных организациях можно изучить на п»ї1xBet казино .
Аттестация выступает главным аспектом выбора площадки. Юрисдикции Олдерни предоставляют серьёзный контроль финансовых транзакций. Всякая официальная ресурс подвергается систематические контроли RNG-модулей.
Компьютерные особенности современных казино охватывают SSL-шифрование банковского стандарта. Производители цифрового продукта типа Microgaming, NetEnt, Pragmatic Play подключают сложные схемы рандомных параметров.
Процедура подтверждения аккаунта предполагает подачи документов KYC-стандарта. Свидетельство, документ о прибылях, валидация прописки — классический перечень для завершённого подключения.
Параллельные URL ликвидируют сложности с блокировками операторов. Действующие копии обновляются регулярно IT группами. Портативные приложения нередко функционируют качественнее веб вариантов.
Финансовая дисциплина создаёт долгосрочную результативность игровых сессий. Опытные участники рекомендуют лимитировать сумму пари до 1-2% от совокупного капитала.
neurontin 800 mg pill: Neuro Relief USA – buy neurontin
Передовые клиенты встречаются с множеством системных нюансов при процессах с официальными сайтами. Экспертные порталы типа п»ї1хбет сайт предоставляют современную материалы о процессах гэмблинговых брендов.
Алгоритм валидации учетной записи охватывает набор необходимых уровней. Базовая верификация включает предоставления свидетельств валидирующих гражданство. Обычный набор включает удостоверение личности, водительские права или заграничное удостоверение.
Технологическая элемент регистрации подразумевает эксплуатацию SSL-шифрования и двухфакторной аутентификации. Профессиональные участники советуют запускать все имеющихся опций защиты.
Альтернативные адреса представляют точные реплики главного платформы с поддержанием полного арсенала. Главное преимущество заключается в подобии денежных рамок и критериев ставочных требований.
Процедура выявления активных резервных ссылок фундируется на наблюдении профессиональных информационных каналов и связанных ресурсов. Квалифицированные игроки эксплуатируют туннельные протоколы для формирования устойчивого входа вне зависимости от территориальных барьеров.
Подбор честного гемблинг ресурса предполагает основательного изучения официальных бумаг. Актуальные порталы ретро казино дают участникам безусловную детали о имеющихся аккредитациях.
Алгоритм открытия аккаунта включает определенное количество обязательных этапов проверки. Администраторы настаивают бумаги, подтверждающие самобытность и возраст. Традиционный KYC-порядок занимает от 24 до 72 временных отрезков.
Управление банком начинается с определения ограничений на инвестиции. Квалифицированные пользователи рекомендуют применять правило 5% от суммарного развлекательного фонда на конкретную заход.
Системные запреты администраторов заставляют задействовать вспомогательные домены. Копии сохраняют стопроцентную эффективность главного портала, содержа журнал сделок и азартный прогресс.
Актуальные финансовые системы обеспечивают мгновенные инвестиции через криптовалютные кошельки. Bitcoin, Ethereum и стабильные валюты поддерживают анонимность и крошечные комиссии. Продолжительность обработки изъятий составляет 10-30 отрезков.
Системы приверженности содержат многоуровневые статусы с увеличивающимся бонусом. VIP-координаторы предлагают индивидуальные подарки, расширенные рамки и ускоренную поддержку.
Отбор проверенного развлекательного ресурса в текущих обстоятельствах предполагает детального анализа к юридическому режиму. Профессиональные участники знают, что Vavada казино отображает современную данные о функционирующих сервисах.
Процедура записи в официальных заведениях предусматривает неизбежную аутентификацию документов. KYC-нормы оберегают как оператора, так и клиента от мошенничества. Переходные границы на снятие активов до финализации контроля – типичная практика.
Программные барьеры на связь к азартным ресурсам преодолеваются через альтернативные ссылки. Активные зеркала обеспечивают стопроцентную эффективность первичного ресурса. Финансовые движения, развлекательный результаты и наградные планы функционируют постоянными.
Капитальная гарантированность характеризуется качеством применяемых расчетных систем. SSL-шифрование, PCI DSS сертификация и двухфакторная подтверждение обеспечивают прочный заслон защиты.
Игровая ассортимент официальных площадок включает машины от известных производителей. RTP-индексы, дисперсия и статистические схемы подвергаются внешнюю контроль в одобренных учреждениях.
Механизмы вознаграждения в надежных заведениях формируются на открытых требованиях ставок. Условия ставок x35-40 признается приемлемым для автомат-подарков, в то время как карточные состязания идут в расчет с уменьшенным коэффициентом.
visit site Paxful sign up
Ориентирование в секторе официальных ресурсов требует знания продвинутых инструментов доступа. Опытные геймеры используют СЌРЅРѕРјРѕ казино для обретения релевантной материалов о функционирующих ссылках.
Механизм создания аккаунта в лицензированных операторах включает сложную проверку. Передовые организации применяют KYC-протоколы и AML-критерии. Документооборот требует от 24 до 72 временных отрезков.
Программные решения для преодоления препятствий развиваются вместе с усилением законодательных шагов. VPN-решения типа premium предлагают безопасность AES-256 и стандарты OpenVPN. Надежность соединения кардинально существенна для высокоролловых заходов.
Дублирующие платформы действуют через локально размещенные серверные ресурсы. CDN-системы обеспечивают быструю латентность для глобальных клиентов. Автоматическое роутинг активируется при распознавании препятствия центрального ресурса.
Финансовые движения в лицензированных юрисдикциях следуют четким критериям PCI DSS. Крипто платежи набирают популярность в результате приватности и быстроте выполнения.
Переносные софт топовых провайдеров содержат физиологическую идентификацию и push-алерты для принципиальных эпизодов. Гибкий оформление независимо адаптируется под свойства матрицы.
view website Nifty NFT
cheap online pharmacies usa no prescriptions
Современные игроки имеют дело с набором системных деталей при деятельности с легальными ресурсами. Экспертные сайты типа Меллстрой поставляют современную материалы о работе игорных брендов.
Процесс валидации учетной записи охватывает множество необходимых стадий. Базовая аутентификация предполагает загрузки свидетельств валидирующих субъект. Классический список включает удостоверение личности, водительские права или загранпаспорт.
Технологическая часть создания аккаунта предполагает внедрение безопасного соединения и многофакторной защиты. Продвинутые участники советуют активировать полный набор предложенных настроек секьюрити.
Запасные домены представляют полные копии базового сайта с обеспечением комплексного инструментария. Главное достоинство заключается в идентичности расчетных лимитов и условий отыгрыша.
Механизм нахождения функционирующих резервных ссылок опирается на отслеживании тематических мессенджер групп и союзных ресурсов. Профессиональные игроки эксплуатируют виртуальные частные сети для предоставления стабильного соединения невзирая от территориальных лимитов.
wikipedia reference Nifty Gateway
Навигация в области сертифицированных сайтов требует представления современных технологий подключения. Опытные пользователи задействуют Меллстрой официальный сайт для добывания новейшей фактов о функционирующих URL.
Схема оформления учетной записи в официальных заведениях охватывает сложную верификацию. Новейшие поставщики используют KYC-процедуры и AML-критерии. Документальное сопровождение отнимает от 24 до 72 часов.
IT решения для преодоления блокировок совершенствуются сообща с ужесточением регуляторных решений. VPN-инструменты категории premium гарантируют кодирование AES-256 и стандарты OpenVPN. Надежность канала принципиально значима для VIP раундов.
Альтернативные домены действуют через территориально разнесенные цифровые инфраструктуры. CDN-комплексы предоставляют низкую отклик для международных игроков. Автоматическое перенаправление включается при выявлении препятствия центрального домена.
Экономические манипуляции в лицензированных территориях следуют жестким стандартам PCI DSS. Цифровые операции набирают востребованность благодаря секретности и оперативности реализации.
Портативные клиенты ведущих организаций содержат биометрическую авторизацию и push-извещения для важных происшествий. Изменяемый дизайн программно адаптируется под свойства матрицы.
лучшие места для кайтсерфинга Хургада Кайт кайтинг кайтсёрфинг школа обучение сафари Дети ветра DETIVETRA
Между прочим, если вас интересует, как продвигать кино и избегать ошибок в маркетинге в 2026 году, загляните сюда.
Ссылка ниже:
https://skamedia.ru/news/skamedia-v-2026-kak-izbezhat-tipichnyh-oshibok-v-prodvizhenii-kino-i-serialov-i-ne-poteryat-byudzhet/
Проверенные ресурсы игорных предложений oferuja пользователям возможность к качественному гэмблингу через специализированные порталы, включая лаки Р±РёСЂ казино официальный сайт , которые точно выполняют глобальные требования security.
Последовательность открытия счёта требует указания верификационных деталей через защищённые SSL-соединения. Менеджмент demanded документальное verification возраста и локации регистрации для соблюдения нормативных норм.
Двухфакторная верификация представляет обязательным компонентом современных платформ безопасности. Участники имеют SMS-шифры, push-уведомления или используют dedicated софт наподобие Google Authenticator.
Mirror URL преодолевают трудности локальных блокировок и DDoS-штурмов. Технически зеркала являют аналогичные клоны primary ресурса с maintaining функциональности и user параметров.
Опытные участники призывают поддерживать свежие списки функционирующих альтернатив в закладках веб-клиента. Операторы доставляют updates о свежих адресах через почтовые сервисы, Telegram-группы и портативные apps.
Payment транзакции через проверенные платформы защищены cryptographic системами стандарта банковского сектора. Получение финансов происходит лишь на верифицированные карты хозяина личного кабинета.
over at this website Buy NFT with credit card
For reports
leading online casinos
to learn more.
Актуальные сервисы развлекательных продуктов дают игрокам возможность к профессиональному развлечениям через проверенные типпи казино порталы. Лицензированная функционирование нуждается следования конкретных правовых требований.
Механизм активации персонального счета включает аутентификацию индивидуальных данных. Регуляторы задействуют расширенные системы KYC и AML для предотвращения нарушающих платежей.
IT инструменты актуальных развлекательных порталов функционируют на надежных серверах с SSL сертификатами. Геоблокировка вынуждает администраторов запускать параллельные адреса.
Зеркальные платформы являют собой аналогичные репликации центрального портала с удержанием всех опций и данных. Пользователи обеспечивают себе постоянный подключение к депозиту, развлекательной записям и личным установкам.
Расчетные транзакции осуществляются через встроенные финансовые процессоры. Лимиты на пополнения и обналичивания фиксируются в соответствии с лицензионными положениями и организационными политиками снижения потерь.
Квалифицированные игроки предлагают контролировать условия авторизации через официальные базы данных азартных органов. Репутационные индикаторы содержат оценки на специализированных платформах и оценки истинных беттеров.
Отбор качественного развлекательного оператора в актуальных обстоятельствах требует особого внимания к юридическому состоянию. Знающие пользователи знают, что Mellstroy Game казино демонстрирует актуальную данные о действующих ресурсах.
Процесс регистрации в официальных платформах включает необходимую верификацию удостоверения. KYC-нормы оберегают как сервис, так и участника от махинаций. Кратковременные пределы на перечисление капитала до финализации проверки – нормальная практика.
Технические барьеры на доступ к азартным ресурсам нейтрализуются через резервные ссылки. Активные копии обеспечивают стопроцентную работоспособность центрального платформы. Платежные процедуры, геймплейный статистика и привилегированные системы поддерживаются неизменными.
Капитальная гарантированность выражается качеством используемых расчетных механизмов. SSL-кодирование, PCI DSS аттестация и дополнительная идентификация создают прочный щит безопасности.
Азартная библиотека проверенных площадок предоставляет спины от главных разработчиков. RTP-параметры, вариативность и статистические принципы проходят независимую контроль в утвержденных институтах.
Схемы лояльности в серьезных заведениях опираются на понятных условиях вейджера. Требования x35-40 расценивается разумным для барабан-бонусов, в то время как карточные забавы учитываются в счет с пониженным множителем.
Актуальные mirror-ссылки лицензированных азартных клубов на казино Lucky Bear обеспечивают непрерывный подключение к гемблинг платформам. Схема реплицирования строит эквивалентные реплики главного портала с консервацией всех инструментов.
Система открытия счета через резервную ссылку абсолютно дублирует базовую форму. Только пришедшие участники прописывают валидный email, создают безопасный код доступа и устанавливают базовую денежную единицу.
Подтверждение аккаунта включает загрузки удостоверений опираясь на KYC-регламенту. Копия паспорта, верификация места жительства и платежные параметры проверяются через машинную контроль в течение 24-72 часа.
Логин активных клиентов осуществляется через обычную модуль с усиленной идентификацией. Сессионные токены отправляются на телефонный устройство или мейл.
Механизмы денежного компонента через mirror-сайты предлагает распространенные денежные системы. Visa, Mastercard, цифровые кошельки Skrill, Neteller, crypto Bitcoin, Ethereum осуществляются с сокращенными платежами 0-3%.
Игровая каталог клонируется в точности включая слоты, карточные геймплей, live-крупье и накопительные призы. RTP-коэффициенты, изменчивость и отыгрыш сохраняются неизменными.
Подарочная программа выполняется подобно базовому веб-площадке. Welcome-наборы, бесплатные вращения, возврат средств и VIP-системы стартуют алгоритмически при достижении определенных требований.
Заболевание мигрень
Do you have a spam issue on this blog; I also am a blogger, and I was wondering your situation; many of us have
developed some nice procedures and we are looking to trade techniques
with other folks, please shoot me an email if interested.
Also visit my blog – Best THC Drinks
https://ivertherapeutics.com/# Iver Therapeutics
Continue Reading Buy NFT with credit card
Гемблинговая индустрия отображает активный подъём, привлекая массы пользователей. Грамотные площадки предлагают защищённую обстановку для ставок. Детальную информацию о таких провайдерах доступно обнаружить на Лаки Бир зеркало .
Аккредитация остаётся ключевым элементом подбора портала. Юрисдикции Великобритании обеспечивают тщательный контроль расчётных манипуляций. Любая аккредитованная сайт выполняет систематические инспекции RNG-механизмов.
Цифровые характеристики современных беттинг-платформ содержат SSL-защиту банковского категории. Создатели цифрового обеспечения класса Microgaming, NetEnt, Pragmatic Play внедряют сложные схемы рандомных чисел.
Процедура аутентификации аккаунта предполагает направления удостоверений KYC-формата. Удостоверение, документ о прибылях, доказательство адреса — классический набор для завершённого активации.
Альтернативные домены ликвидируют сложности с фильтрацией операторов. Свежие альтернативы изменяются каждый день компьютерными специалистами. Планшетные софт обычно действуют устойчивее веб вариантов.
Контроль средств задаёт перспективную результативность развлекательных периодов. Грамотные геймеры указывают ограничивать размер ставки до 1-2% от полного бюджета.
Rutor — ведущий портал даркнета на русском языке в сети Tor, обеспечивающий пользователей доступом к контенту, товарам, материалам и нормам анонимности черного рынка и onion сайтов
Rutor — известный сервис с богатым прошлым, предоставляющий анонимный доступ и безопасность транзакций в пределах сети Rutor.Rutor: Ветеран русскоязычного даркнета
рутор не открывается считается одним из наиболее популярных и старых ресурсов в рунет-даркнете, который прочно закрепился в инфраструктуре анонимных площадок. Основное направление работы ресурса — предоставление обширной базы файлов, утилит, новостей и прочего контента, в том числе, связанного с темами безопасности и взлома.
Как устроена система работы Rutor
Система курирует доступ к огромному количеству информации и файлов, сохраняя дополнительную конфиденциальность и анонимность своих пользователей. Работа сервиса построена на использовании анонимной сети Rutor, что помогает свести к минимуму угрозы идентификации и утечки данных. С течением времени площадка превратилась в важный архив событий и истории русскоязычного даркнета.
Платформа функционирует стабильно, обеспечивая равный доступ для новых и опытных участников даркнета. Каждый из разделов сайта — магазин, новостные ленты или руководства по взлому — образуют отдельную звено в масштабном сообществе, где главными ценностями выступают конфиденциальность и защита анонимности.
Возможные направления развития и связанные опасности
Безусловно, дальнейшая история Rutor будет связана с новыми формами риска, новыми способами защиты конфиденциальности и методами обхода блокировок. Пользователи обязаны понимать, что ни одна анонимная платформа не может дать абсолютную защиту.
Этот сервис по-прежнему служит площадкой для информирования, обсуждений безопасности и отслеживания новшеств в даркнет-сообществе. Развитие технологий, расширение базы пользователей и появление новых возможностей делают Rutor одним из центров русскоязычного сообщества в сети.
– Принцип анонимности
– Надёжность проведения операций
– Возможность получения эксклюзивных данных
– Конфиденциальность общения
Rutor — это платформа с уникальной историей, и её опыт стоит принимать во внимание всем, кто ценит собственную свободу, приватность и независимость от внешней цензуры в современном цифровом мире.
Определение безопасного развлекательного оператора в актуальных обстоятельствах требует детального анализа к юридическому статусу. Компетентные клиенты знают, что казино Вован демонстрирует актуальную факты о действующих операторах.
Механизм регистрации в легальных операторах предусматривает требуемую валидацию личности. KYC-стандарты защищают как сервис, так и клиента от фрода. Кратковременные рамки на перечисление денег до финализации подтверждения – нормальная процедура.
Цифровые запреты на подключение к betting сайтам обходятся через параллельные адреса. Активные клоны сохраняют всестороннюю производительность основного платформы. Платежные движения, азартный статистика и привилегированные планы функционируют неизменными.
Экономическая безопасность оценивается степенью применяемых банковских способов. SSL-кодирование, PCI DSS сертификация и двухфакторная верификация формируют надежный заслон безопасности.
Геймплейная библиотека сертифицированных операторов содержит автоматы от лидирующих производителей. RTP-коэффициенты, изменчивость и статистические системы проходят нейтральную проверку в авторизованных институтах.
Планы стимулирования в достойных заведениях строятся на открытых критериях отыгрыша. Проигрыш x35-40 расценивается приемлемым для автомат-привилегий, в то время как классические игры засчитываются в подсчет с сниженным множителем.
Исследование в секторе официальных порталов нуждается владения передовых способов подключения. Умелые клиенты используют френдс казино для получения свежей сведений о работающих URL.
Механизм создания учетной записи в проверенных компаниях предполагает комплексную валидацию. Актуальные поставщики задействуют KYC-процедуры и AML-требования. Документальное сопровождение составляет от 24 до 72 промежутков.
Программные методы для избежания блокировок улучшаются вместе с ужесточением юридических инициатив. VPN-сервисы разряда premium предоставляют кодирование AES-256 и методы OpenVPN. Стабильность соединения принципиально значима для VIP партий.
Альтернативные сайты действуют через регионально распределенные цифровые инфраструктуры. CDN-комплексы поддерживают минимальную пинг для азиатских пользователей. Программное роутинг инициируется при идентификации блокировки первичного ресурса.
Платежные переводы в официальных юрисдикциях подпадают под строгим стандартам PCI DSS. Блокчейн платежи увеличивают признание по причине анонимности и быстроте обработки.
Переносные софт ведущих провайдеров объединяют голосовую аутентификацию и push-алерты для критических событий. Адаптивный дизайн независимо корректируется под настройки монитора.
Как выбрать материалы для ремонта квартиры
Легальные провайдеры гэмблинг сервисов гарантируют геймерам доступ к высококлассному времяпрепровождению через тематические домены, включая п»ї1xBet казино , которые именно исполняют общепринятые требования безопасности.
Процедура открытия счёта подразумевает предоставления идентификационных деталей через криптографические SSL-протоколы. Провайдеры запрашивают нотариальное доказательство age verification и территории жительства для соблюдения нормативных критериев.
2FA authentication является принудительным aspect современных систем безопасности. Клиенты имеют SMS-токены, push-алерты или задействуют специальные софт наподобие Google Authenticator.
Зеркальные ссылки устраняют трудности geographic барьеров и DDoS-assault. Техническим образом реплики составляют копийные копии центрального сайта с поддержанием features и клиентских данных.
Профессиональные пользователи призывают удерживать актуальные перечни активных mirrors в избранном браузера. Администрация направляют обновления о свежих доменах через электронную почту, Telegram-сообщества и мобильные программы.
Денежные переводы через проверенные сайты гарантированы криптографическими протоколами уровня банковского индустрии. Снятие денег производится лишь на проверенные данные собственника аккаунта.
Современные сервисы развлекательных игр дают клиентам доступ к высококлассному азарту через проверенные п»ї1xBet ресурсы. Официальная деятельность предполагает следования строгих регуляторных требований.
Процесс активации игрового аккаунта включает аутентификацию приватных сведений. Регуляторы применяют детализированные механизмы KYC и AML для недопущения нарушающих финансовых действий.
IT системы инновационных казино функционируют на стабильных хостингах с шифровальными стандартами. Локальные запреты заставляет администраторов внедрять резервные ссылки.
Зеркальные домены формируют эквивалентные дубликаты базового ресурса с фиксацией всех опций и параметров. Клиенты обеспечивают себе непрерывный связь к средствам, беттинг записям и персональным параметрам.
Финансовые операции осуществляются через связанные денежные системы. Рамки на инвестиции и выводы определяются в соответствии с регуляторными условиями и индивидуальными регламентами риск-менеджмента.
Профессиональные клиенты советуют мониторить статус сертификата через надзорные базы данных развлекательных ведомств. Репутационные показатели включают оценки на экспертных сайтах и комментарии истинных игроков.
Гемблинговая сфера являет динамичный расширение, завлекая тысячи игроков. Квалифицированные ресурсы предоставляют качественную пространство для игры. Подробную факты о подобных провайдерах реально изучить на СЌРЅРѕРјРѕ казино .
Аккредитация выступает центральным элементом выбора портала. Надзорные органы Кюрасао создают качественный мониторинг валютных операций. Конкретная сертифицированная сайт выполняет плановые контроли RNG-алгоритмов.
Компьютерные свойства новейших беттинг-платформ содержат SSL-защиту денежного стандарта. Поставщики программного ПО типа Microgaming, NetEnt, Pragmatic Play внедряют комплексные механизмы хаотичных показателей.
Процесс верификации личного кабинета подразумевает предоставления бумаг KYC-формата. Свидетельство, свидетельство о средствах, верификация проживания — классический пакет для финального подключения.
Дублирующие ссылки решают препятствия с фильтрацией операторов. Действующие зеркала изменяются постоянно IT командами. Портативные приложения часто работают качественнее интернет модификаций.
Контроль средств задаёт перспективную эффективность игровых циклов. Опытные геймеры советуют контролировать объём пари до 1-2% от общего резерва.
Нынешние игроки натыкаются с сложностью подключения к сертифицированным площадкам. Провайдеры фильтруют основные домены, но знающие казино Mellstroy Game клиенты знают о функционировании альтернативных сайтов.
Резервная ссылка представляет полную копию оригинального ресурса. Системы безопасности поддерживаются идентичными. Финансовые процедуры выполняются через те же механизмы.
Технология заведения учётной записи через резервный адрес подразумевает стандартной подтверждения. Менеджеры просят документы для реализации KYC-регламентов. Индивидуальные сведения подвергаются двухфакторную верификацию.
Пополнительные рамки на резервных площадках аналогичны первичным спецификациям. Низшие суммы продолжают неизменными. Растущие выигрышные пулы координируются между многочисленными порталами.
Поощрительные механизмы действуют завершённо на параллельных площадках. Отыгрышный коэффициент сохраняет базовые параметры. Временные рамки отыгрыша поддерживается.
Отдел сопровождения изучает заявки с дополнительных ссылок таким же способом. Прямой чат предоставляет непрерывный расписание функционирования.
Современные участники имеют дело с изобилием технологических деталей при деятельности с официальными платформами. Экспертные ресурсы типа лаки Р±РёСЂ казино зеркало предоставляют свежую информацию о деятельности казино брендов.
Процесс аутентификации аккаунта включает множество принудительных стадий. Базовая аутентификация включает предоставления удостоверений валидирующих индивидуальность. Обычный перечень охватывает свидетельство, лицензию водителя или загранпаспорт.
Техническая компонента открытия счета охватывает применение SSL-шифрования и двойной авторизации. Квалифицированные игроки предлагают включать весь комплекс доступных параметров защиты.
Резервные ссылки образуют абсолютные отражения базового домена с обеспечением тотального возможностей. Основное плюс заключается в подобии денежных границ и требований вейджера.
Механизм нахождения функционирующих зеркал базируется на отслеживании тематических новостных лент и аффилированных сайтов. Опытные игроки применяют анонимайзеры для обеспечения постоянного доступа независимо от региональных запретов.
Определение достойного азартного заведения в текущих обстоятельствах заставляет повышенного рассмотрения к законному положению. Компетентные клиенты понимают, что Вавада включает свежую данные о работающих сервисах.
Механизм записи в сертифицированных площадках включает принудительную проверку персональных данных. KYC-правила обеспечивают как площадку, так и пользователя от обмана. Промежуточные ограничения на снятие капитала до финализации верификации – стандартная методика.
Программные запреты на соединение к развлекательным площадкам устраняются через альтернативные ссылки. Функционирующие отражения гарантируют тотальную функциональность базового платформы. Денежные транзакции, развлекательный статистика и наградные предложения остаются неизменными.
Материальная безопасность выражается критерием используемых банковских способов. SSL-шифрование, PCI DSS аттестация и усиленная идентификация создают защищенный контур защиты.
Азартная коллекция проверенных провайдеров предоставляет барабаны от топовых производителей. RTP-коэффициенты, вариативность и расчетные принципы проходят независимую сертификацию в авторизованных центрах.
Системы поощрения в надежных заведениях базируются на открытых параметрах ставок. Условия ставок x35-40 считается разумным для машина-привилегий, в то время как карточные активности принимаются в счет с уменьшенным показателем.
Someone necessarily assist to make critically articles I’d state.
That is the first time I frequented your web page and thus far?
I amazed with the research can you see who clicks on your Instagram link made to create this particular put up
incredible. Magnificent activity!
go to my site Vauld withdrawal update
Новейшие участники сталкиваются с барьером связи к официальным платформам. Провайдеры блокируют основные домены, но опытные казино Mellstroy Game пользователи понимают о наличии зеркальных платформ.
Зеркало образует точную реплику главного ресурса. Средства защиты функционируют аналогичными. Расчётные процедуры производятся через те же системы.
Алгоритм открытия счёта через параллельный домен содержит обычной верификации. Менеджеры просят свидетельства для исполнения KYC-правил. Индивидуальные параметры подвергаются многоуровневую проверку.
Финансовые пределы на дополнительных ресурсах совпадают базовым требованиям. Минимальные ставки функционируют неизменными. Накопительные призовые фонды координируются между разными доменами.
Поощрительные планы действуют полноценно на параллельных ресурсах. Отыгрышный коэффициент обеспечивает первоначальные величины. Тайминг реализации не изменяется.
Отдел обслуживания анализирует заявки с дополнительных ресурсов сходным образом. Мгновенный общение поддерживает беспрерывный формат работы.
Нынешние участники натыкаются с проблемой связи к проверенным ресурсам. Компании блокируют первичные адреса, но профессиональные Вавада регистрация посетители учитывают о функционировании дублирующих ресурсов.
Дополнительный домен является точную воспроизведение базового платформы. SSL-сертификаты остаются аналогичными. Денежные операции выполняются через те же сервисы.
Технология открытия счёта через альтернативный адрес содержит стандартной подтверждения. Менеджеры уточняют документы для выполнения KYC-норм. Индивидуальные данные проходят комплексную аутентификацию.
Депозитные лимиты на зеркальных порталах аналогичны базовым спецификациям. Наименьшие взносы остаются постоянными. Растущие банки интегрируются между множественными ресурсами.
Бонусные системы оперируют всесторонне на зеркальных порталах. Отыгрышный коэффициент удерживает стартовые параметры. Временные рамки отыгрыша не изменяется.
Команда поддержки решает вопросы с резервных доменов сходным образом. Живой общение осуществляет постоянный формат работы.
Инновационные операторы беттинг развлечений обеспечивают клиентам возможность к профессиональному азарту через сертифицированные luckybear скачать платформы. Легальная работа требует учета четких контролирующих стандартов.
Процесс открытия пользовательского учетной записи задействует аутентификацию индивидуальных показателей. Операторы применяют углубленные алгоритмы KYC и AML для исключения фродовых операций.
IT средства актуальных развлекательных порталов базируются на зашифрованных инфраструктурах с криптографическими протоколами. Региональная блокировка вынуждает владельцев разрабатывать альтернативные URL.
Параллельные ресурсы образуют эквивалентные репликации базового портала с сохранением всех функций и параметров. Пользователи приобретают непрерывный вход к балансу, игровой записям и личным конфигурациям.
Денежные операции проходят через синхронизированные расчетные шлюзы. Пределы на взносы и выводы регулируются в гармонии с регуляторными требованиями и внутренними правилами риск-менеджмента.
Профессиональные клиенты рекомендуют отслеживать статус разрешения через контролирующие базы данных игорных структур. Статусные характеристики предусматривают позиции на экспертных ресурсах и отзывы подлинных участников.
Excellent blog here! Also your web site loads up
fast! What web host are you using? Can I get your affiliate link to
your host? I wish my web site loaded up as quickly as yours lol
Review my homepage Delta 9 THC Drinks
Новейшие геймеры оказываются с сложностью подключения к лицензированным сайтам. Поставщики блокируют первичные ссылки, но знающие казино РЎСѓРєР° участники осознают о существовании зеркальных ресурсов.
Дополнительный домен формирует идентичную дубликат главного платформы. Протоколы шифрования работают такими же. Банковские транзакции производятся через равнозначные механизмы.
Методика оформления профиля через параллельный ссылку подразумевает стандартной аутентификации. Специалисты уточняют справки для осуществления KYC-норм. Паспортные параметры осуществляют двухфакторную проверку.
Пополнительные лимиты на зеркальных ресурсах аналогичны стандартным параметрам. Стартовые взносы поддерживаются постоянными. Увеличивающиеся банки координируются между многочисленными порталами.
Льготные программы функционируют всесторонне на резервных сайтах. Требования по обороту поддерживает базовые значения. Тайминг оборота продолжается.
Департамент помощи решает тикеты с параллельных адресов идентично. Прямой общение обеспечивает непрерывный расписание работы.
Новейшие пользователи пересекаются с изобилием цифровых деталей при процессах с проверенными площадками. Профессиональные ресурсы типа Вавада регистрация обеспечивают современную информацию о деятельности развлекательных организаций.
Процедура валидации профиля предполагает комплекс принудительных этапов. Стартовая проверка требует отправки документов верифицирующих гражданство. Классический набор содержит свидетельство, права или внешний паспорт.
Техническая сторона оформления предполагает эксплуатацию безопасного соединения и двухуровневой проверки. Экспертные геймеры подсказывают задействовать весь комплекс имеющихся возможностей безопасности.
Дублирующие порталы представляют точные клоны главного домена с хранением тотального возможностей. Главное выгода кроется в идентичности финансовых ограничений и норм проигрыша.
Схема нахождения действующих дублирующих порталов фундируется на мониторинге профессиональных информационных каналов и сотрудничающих ресурсов. Квалифицированные геймеры эксплуатируют VPN-сервисы для предоставления постоянного соединения вне зависимости от географических лимитов.
Активные альтернативные домены надежных гемблинг-платформ на Меллстрой официальный сайт гарантируют беспрерывный доступ к азартным ресурсам. Методика копирования строит точные копии базового портала с фиксацией всех механизмов.
Алгоритм оформления профиля через альтернативный домен полностью имитирует оригинальную шаблон. Свежие пользователи вводят функционирующий email, генерируют сложный секретную комбинацию и фиксируют рабочую платежное средство.
Валидация профиля включает загрузки бумаг согласно KYC-нормам. Копия ID-карты, верификация места жительства и платежные параметры анализируются посредством программную верификацию в течение 24-72 временных единиц.
Аутентификация действующих пользователей осуществляется через классическую модуль с многоступенчатой аутентификацией. Сессионные коды приходят на сотовый устройство или email.
Механизмы денежного раздела через зеркала включает востребованные денежные инструменты. Visa, Mastercard, электронные балансы Skrill, Neteller, блокчейн-токены Bitcoin, Ethereum реализуются с уменьшенными платежами 0-3%.
Гемблинг коллекция воспроизводится в точности включая spinning games, классические развлечения, live-дилеров и прогрессивы. RTP-значения, волатильность и вейджер сохраняются такими же.
Бонусная программа выполняется подобно главному сайту. Welcome-комплекты, фриспины, возврат средств и VIP-системы инициируются машинально при достижении фиксированных требований.
click to investigate Sign in paxful
Homepage Vauld withdrawal
pharmacy store: canadian pharmacy online store – Smart GenRx USA
Современные игроки встречаются с изобилием системных нюансов при процессах с официальными площадками. Экспертные платформы типа Лаки Бир РІС…РѕРґ предоставляют новую контент о функционировании игорных организаций.
Процедура проверки кабинета охватывает комплекс требуемых уровней. Начальная проверка требует передачи удостоверений верифицирующих личность. Типовой перечень охватывает свидетельство, автоудостоверение или заграничное удостоверение.
Цифровая составляющая открытия счета подразумевает использование SSL-шифрования и 2FA. Профессиональные геймеры настаивают задействовать совокупность возможных параметров охраны.
Резервные ссылки составляют идентичные копии основного домена с сохранением всего инструментария. Важнейшее плюс выражается в тождественности финансовых пределов и норм проигрыша.
Система локализации актуальных зеркал строится на проверке экспертных информационных каналов и аффилированных сайтов. Экспертные пользователи внедряют VPN-сервисы для обеспечения надежного соединения безотносительно от территориальных ограничений.
Новейшие геймеры имеют дело с изобилием технологических аспектов при процессах с проверенными сайтами. Тематические источники типа Рльдорадо казино обеспечивают релевантную контент о процессах гэмблинговых провайдеров.
Алгоритм подтверждения учетной записи охватывает набор обязательных фаз. Исходная аутентификация нуждается предоставления документов доказывающих индивидуальность. Типовой комплект включает паспорт, автолицензию или заграничное удостоверение.
Техническая составляющая записления содержит использование SSL-шифрования и двухуровневой проверки. Профессиональные пользователи советуют включать все предложенных возможностей обеспечения.
Дублирующие порталы образуют точные реплики главного домена с обеспечением всего набора функций. Основное преимущество выражается в соответствии расчетных границ и критериев ставочных требований.
Механизм выявления функционирующих зеркал строится на проверке тематических мессенджер групп и связанных платформ. Продвинутые участники применяют VPN-сервисы для обеспечения устойчивого подключения без оглядки от региональных запретов.
Определение честного казино оператора подразумевает тщательного исследования лицензионных сертификатов. Новые ресурсы п»ї1xBet казино предлагают игрокам абсолютную данные о своих разрешениях.
Система создания профиля подразумевает множество требуемых стадий проверки. Представители запрашивают справки, доказывающие идентичность и дееспособность. Традиционный KYC-регламент продолжается от 24 до 72 временных отрезков.
Финансовое планирование инициируется с назначения пределов на взносы. Квалифицированные клиенты советуют задействовать принцип 5% от итогового гемблинг средств на одну партию.
Программные блокировки владельцев принуждают задействовать запасные ссылки. Альтернативы сохраняют стопроцентную эффективность базового платформы, содержа историю переводов и игровой результаты.
Передовые денежные инструменты гарантируют оперативные депозиты через цифровые аккаунты. Bitcoin, Ethereum и постоянные токены поддерживают конфиденциальность и мизерные платежи. Время проведения извлечений равно 10-30 минут.
Схемы постоянства охватывают многоуровневые уровни с увеличивающимся бонусом. VIP-представители предоставляют индивидуальные вознаграждения, расширенные рамки и преимущественную сервис.
Беттинговая область отображает активный рост, притягивая массы клиентов. Грамотные платформы обеспечивают безопасную среду для беттинга. Детальную факты о этих брендах можно изучить на казино СЌРЅРѕРјРѕ .
Лицензирование составляет главным фактором определения портала. Лицензиаты Кюрасао гарантируют качественный аудит расчётных манипуляций. Конкретная сертифицированная площадка реализует регулярные инспекции RNG-генераторов.
Технические аспекты инновационных азартных площадок объединяют SSL-криптографию расчётного ранга. Провайдеры цифрового продукта типа Microgaming, NetEnt, Pragmatic Play добавляют многоуровневые схемы произвольных параметров.
Процесс проверки счёта подразумевает направления удостоверений KYC-класса. Паспорт, подтверждение о прибылях, удостоверение проживания — классический перечень для завершённого активации.
Резервные ссылки ликвидируют барьеры с запретами поставщиков. Рабочие дубли адаптируются систематически компьютерными отделами. Карманные клиенты часто оперируют надёжнее сетевых модификаций.
Финансовая дисциплина задаёт долгосрочную доходность развлекательных сессий. Экспертные участники указывают контролировать количество пари до 1-2% от итогового банкролла.
Everything is very open with a very clear clarification of
the challenges. It was really informative. Your site is useful.
Thank you for sharing!
My webpage :: Delta 9 THC Drinks
Современные игроки попадают с затруднением связи к легальным площадкам. Операторы закрывают стандартные ссылки, но знающие Vavada зеркало игроки учитывают о существовании параллельных платформ.
Альтернативный адрес составляет абсолютную воспроизведение оригинального площадки. SSL-сертификаты остаются идентичными. Финансовые процедуры выполняются через идентичные сервисы.
Схема открытия счёта через альтернативный ресурс требует типовой подтверждения. Специалисты запрашивают свидетельства для реализации KYC-регламентов. Индивидуальные данные реализуют комплексную валидацию.
Банковские лимиты на дополнительных порталах равняются стандартным параметрам. Низшие вклады поддерживаются неизменными. Накопительные банки синхронизируются между разными адресами.
Льготные программы действуют завершённо на дополнительных площадках. Отыгрышный коэффициент поддерживает оригинальные параметры. Тайминг оборота продолжается.
Команда помощи изучает вопросы с дополнительных порталов равнозначно. Живой общение предоставляет 24-часовой расписание обслуживания.
Азартная сфера являет быстрый прогресс, завлекая миллионы клиентов. Квалифицированные порталы предлагают надёжную атмосферу для беттинга. Исчерпывающую сведения о указанных брендах можно изучить на казино Вавада .
Легализация составляет ключевым критерием определения портала. Лицензиаты Мальты создают качественный контроль денежных процедур. Отдельная лицензированная портал проходит регулярные проверки RNG-систем.
Технические особенности новейших игорных домов содержат SSL-криптографию денежного класса. Разработчики софтового ПО класса Microgaming, NetEnt, Pragmatic Play внедряют сложные схемы хаотичных величин.
Механизм проверки учётной записи предусматривает передачи документов KYC-стандарта. Документ, документ о доходах, удостоверение адреса — типичный набор для окончательного входа.
Зеркальные порталы ликвидируют трудности с ограничениями организаций. Свежие зеркала модифицируются регулярно программными службами. Карманные программы зачастую работают качественнее онлайн модификаций.
Финансовая дисциплина определяет перспективную прибыльность гемблинговых периодов. Профессиональные геймеры указывают ограничивать количество ставки до 1-2% от итогового резерва.
pharmacy without prescription cheapest pharmacy for prescriptions without insurance online pharmacy group
important source Sign in paxful
Поиск честного казино портала заставляет серьезного разбора официальных сертификатов. Новые ресурсы Голд казино гарантируют клиентам максимальную факты о собственных аккредитациях.
Механизм получения доступа подразумевает ряд принудительных шагов проверки. Представители требуют документы, доказывающие идентичность и зрелость. Стандартный KYC-алгоритм составляет от 24 до 72 промежутков.
Финансовое планирование инициируется с назначения рамок на депозиты. Профессиональные игроки рекомендуют задействовать установку 5% от итогового казино резерва на индивидуальную партию.
Цифровые препятствия провайдеров вынуждают использовать альтернативные пути. Альтернативы поддерживают стопроцентную производительность первичного площадки, содержа летопись платежей и развлекательный прогресс.
Новые платежные сервисы дают быстрые инвестиции через блокчейн счета. Bitcoin, Ethereum и фиксированные активы предоставляют тайность и минимальные взносы. Время проведения изъятий насчитывает 10-30 отрезков.
Алгоритмы лояльности содержат каскадные уровни с возрастающим бонусом. VIP-менеджеры обеспечивают личные подарки, усиленные лимиты и приоритетную обслуживание.
Excellent post. I was checking continuously this blog
and I am impressed! Very useful information specifically the last part :
) I care for such information a lot. I was seeking this particular information for a long time.
Thank you and best of luck.
Определение проверенного развлекательного оператора подразумевает детального рассмотрения лицензионных разрешений. Современные сайты казино лаки Р±РёСЂ дают клиентам максимальную факты о собственных лицензиях.
Система оформления счета содержит определенное количество принудительных шагов валидации. Операторы просят свидетельства, устанавливающие личность и дееспособность. Стандартный KYC-процесс составляет от 24 до 72 промежутков.
Контроль средств инициируется с назначения рамок на взносы. Компетентные игроки рекомендуют применять норму 5% от полного азартного средств на единичную раунд.
Технические запреты владельцев вынуждают применять альтернативные пути. Дубликаты хранят полную производительность основного портала, охватывая архив переводов и гемблинг успех.
Инновационные банковские инструменты поддерживают моментальные вклады через блокчейн портмоне. Bitcoin, Ethereum и фиксированные активы предоставляют скрытность и мизерные сборы. Период обработки извлечений достигает 10-30 минут.
Схемы преданности предусматривают иерархические ранги с накапливающимся компенсацией. VIP-кураторы предоставляют эксклюзивные награды, увеличенные рамки и опережающую обслуживание.
Ориентирование в мире проверенных ресурсов предполагает понимания актуальных решений входа. Профессиональные пользователи эксплуатируют казино Vavada для извлечения релевантной фактов о функционирующих путях.
Схема формирования аккаунта в лицензированных организациях включает детальную подтверждение. Продвинутые провайдеры внедряют KYC-протоколы и AML-критерии. Документальное сопровождение отнимает от 24 до 72 промежутков.
Технические методы для минования ограничений улучшаются параллельно с повышением правовых мер. VPN-сервисы разряда premium обеспечивают криптографию AES-256 и протоколы OpenVPN. Непрерывность коннекта жизненно актуальна для премиальных сессий.
Альтернативные ресурсы работают через территориально рассредоточенные технические инфраструктуры. CDN-структуры поддерживают оптимальную задержку для глобальных пользователей. Автоматическое редирект активируется при обнаружении блокировки главного ресурса.
Финансовые манипуляции в легальных юрисдикциях соответствуют жестким нормам PCI DSS. Блокчейн транзакции набирают востребованность из-за секретности и оперативности процессинга.
Портативные клиенты премиальных брендов объединяют отпечатковую идентификацию и push-уведомления для существенных моментов. Изменяемый интерфейс автономно адаптируется под настройки монитора.
read this Vauld India
Игровая индустрия показывает динамичный расширение, манящая миллионы геймеров. Опытные ресурсы предоставляют стабильную среду для развлечений. Исчерпывающую данные о данных организациях можно обнаружить на Лаки Бир регистрация .
Лицензирование представляет центральным элементом определения ресурса. Надзорные органы Гибралтара создают жёсткий мониторинг экономических манипуляций. Конкретная сертифицированная площадка реализует периодические ревизии RNG-генераторов.
Программные характеристики современных гемблинг-сайтов предусматривают SSL-криптографию банковского категории. Поставщики компьютерного продукта уровня Microgaming, NetEnt, Pragmatic Play подключают продвинутые схемы случайных параметров.
Алгоритм верификации счёта предусматривает направления свидетельств KYC-стандарта. Паспорт, выписка о доходах, верификация прописки — классический комплект для завершённого доступа.
Дублирующие ссылки исправляют трудности с запретами компаний. Рабочие копии корректируются постоянно IT отделами. Смартфонные программы зачастую оперируют стабильнее онлайн форматов.
Банкролл-менеджмент формирует перспективную прибыльность развлекательных периодов. Опытные участники предлагают урезать величину пари до 1-2% от суммарного резерва.
this article Vauld cryptocurrency
To confirm
gambling sites best ever
to verify the claims.
Современные сервисы развлекательных игр гарантируют клиентам возможность к профессиональному гемблингу через защищенные казино Лаки Бир системы. Лицензированная функционирование предполагает следования строгих законодательных положений.
Система открытия игрового счета охватывает верификацию приватных реквизитов. Управляющие задействуют многоуровневые протоколы KYC и AML для блокировки поддельных переводов.
Программные средства передовых беттинг площадок функционируют на безопасных инфраструктурах с SSL стандартами. Региональная блокировка вынуждает владельцев организовывать дублирующие ссылки.
Зеркальные домены образуют точные клоны главного ресурса с сохранением всех функций и данных. Участники добиваются стабильный связь к капиталу, игровой статистике и персональным установкам.
Финансовые переводы осуществляются через связанные финансовые агрегаторы. Лимиты на пополнения и выводы фиксируются в унисон с нормативными требованиями и внутренними правилами минимизации опасностей.
Квалифицированные клиенты рекомендуют отслеживать состояние разрешения через официальные реестры игорных органов. Имиджевые индикаторы задействуют ранги на экспертных порталах и feedback действительных участников.
Поиск в мире легальных ресурсов подразумевает понимания продвинутых методов доступа. Квалифицированные участники внедряют Lucky Bear для приобретения современной данных о действующих ссылках.
Процесс создания личного кабинета в лицензированных компаниях предполагает многоуровневую верификацию. Продвинутые поставщики задействуют KYC-системы и AML-нормы. Оформление документов занимает от 24 до 72 временных отрезков.
Программные методы для минования запретов совершенствуются сообща с усилением нормативных мер. VPN-платформы категории premium дают криптографию AES-256 и методы OpenVPN. Непрерывность коннекта fundamentally актуальна для высокоролловых партий.
Дублирующие сайты функционируют через географически расположенные серверные кластеры. CDN-сети поддерживают сокращенную задержку для европейских участников. Цифровое маршрутизация срабатывает при идентификации барьера базового ресурса.
Экономические движения в проверенных зонах следуют строгим нормам PCI DSS. Блокчейн переводы получают популярность благодаря скрытности и динамике осуществления.
Переносные утилиты премиальных организаций включают физиологическую подтверждение и push-алерты для принципиальных ситуаций. Изменяемый интерфейс программно настраивается под характеристики панели.
We stumbled over here coming from a different page and thought I
should check things out. I like what I see so now i am following
you. Look forward to looking into your web page
for a second time.
Also visit my blog … Delta 9 THC Drinks
Современные платформы беттинг игр дают беттерам доступ к профессиональному гемблингу через сертифицированные лаки Р±РёСЂ системы. Легальная операционная активность подразумевает следования конкретных регуляторных критериев.
Процедура оформления пользовательского кабинета включает аутентификацию индивидуальных реквизитов. Управляющие применяют расширенные процедуры KYC и AML для исключения незаконных платежей.
Цифровые инструменты передовых игорных домов строятся на стабильных серверах с криптографическими алгоритмами. Территориальные ограничения заставляет операторов разрабатывать параллельные порталы.
Альтернативные сайты представляют полные клоны базового сайта с поддержанием всех инструментов и данных. Участники приобретают стабильный вход к средствам, гемблинг истории и личным опциям.
Расчетные переводы производятся через связанные платежные шлюзы. Пределы на депозиты и изъятия устанавливаются в согласии с законодательными условиями и индивидуальными нормами управления рисками.
Квалифицированные беттеры предлагают контролировать статус сертификата через государственные регистры азартных организаций. Репутационные параметры охватывают оценки на профильных ресурсах и feedback истинных беттеров.
When some one searches for his essential thing, thus he/she desires to be available that in detail, thus that thing is maintained over
here.
my homepage – Best Delta 9 Drinks
Incredible lots of useful data. https://pad.stuve.uni-ulm.de/s/F_1ZqSLw2
Поиск проверенного азартного оператора требует основательного исследования юридических бумаг. Актуальные сайты типпи казино дают игрокам полную данные о собственных санкциях.
Процесс получения доступа подразумевает множество ключевых фаз проверки. Администраторы настаивают свидетельства, подтверждающие персону и совершеннолетие. Классический KYC-порядок составляет от 24 до 72 временных отрезков.
Распоряжение капиталом запускается с фиксации рамок на инвестиции. Опытные пользователи рекомендуют эксплуатировать правило 5% от итогового игорного капитала на единичную партию.
Электронные запреты операторов вынуждают применять альтернативные домены. Зеркала оберегают максимальную эффективность базового ресурса, включая хронологию сделок и казино успех.
Инновационные банковские инструменты поддерживают мгновенные вклады через цифровые портмоне. Bitcoin, Ethereum и стейблкоины гарантируют конфиденциальность и минимальные платежи. Время осуществления извлечений составляет 10-30 периодов.
Программы приверженности включают каскадные статусы с прогрессивным компенсацией. VIP-кураторы гарантируют эксклюзивные бонусы, улучшенные рамки и первоочередную техподдержку.
Стильный вид формирует первое мнение о вас.
Он влияет на восприятие вас окружающими сразу.
Хорошее самочувствие в своем образе повышает личную уверенность.
Он демонстрирует высокий уровень профессионализма и уважение к мелочам.
https://r4.balmain1.ru/redirect.php?id=1ym9dml2zebD
Через одежду вы можете выразить свою личность и стиль.
Окружающие неосознанно оценивают стильных индивидов как более успешных.
Следовательно, инвестиции в свой образ — это вклад в свое будущее.
Действующие альтернативные домены официальных азартных клубов на Лаки Бир зеркало обеспечивают непрерывный коннект к азартным системам. Система дублирования формирует полноценные копии корневого портала с сохранением всех механизмов.
Процедура создания аккаунта через резервную ссылку на сто процентов повторяет основную форму. Начинающие участники заполняют функционирующий email, устанавливают безопасный ключ и определяют базовую платежное средство.
Аутентификация аккаунта требует передачи бумаг по KYC-политике. Копия национального документа, доказательство места жительства и банковские сведения анализируются посредством автоматическую верификацию в течение 24-72 часа.
Аутентификация существующих участников производится через базовую модуль с расширенной верификацией. Временные пароли отправляются на сотовый аппарат или почтовый ящик.
Функционал пополнительного модуля через альтернативные домены включает распространенные финансовые сервисы. Visa, Mastercard, электронные счета Skrill, Neteller, crypto Bitcoin, Ethereum выполняются с сокращенными сборами 0-3%.
Игровая библиотека повторяется целиком включая машины, столовые геймплей, live-операторов и прогрессивы. RTP-коэффициенты, волатильность и вейджер остаются неизменными.
Бонусная схема оперирует подобно базовому домену. Welcome-предложения, бесплатные вращения, компенсация и VIP-курсы запускаются автоматически при соблюдении прописанных стандартов.
Официальные платформы гэмблинг возможностей предоставляют геймерам вариант к высококлассному гэмблингу через специализированные платформы, включая п»ї1xBet зеркало , которые точно придерживаются мировые стандарты защиты.
Схема активации требует предоставления верификационных параметров через защищённые SSL-каналы. Букмекеры просят предоставить письменное свидетельство age verification и места проживания для compliance правовых стандартов.
Многоуровневая аутентификация является необходимым частью современных платформ надёжности. Users приобретают SMS-ключи, push-уведомления или внедряют dedicated приложения типа Google Authenticator.
Зеркальные порталы устраняют препятствия territorial санкций и DDoS-атак. Фактически копии образуют аналогичные версии центрального домена с обеспечением опций и пользовательских сведений.
Опытные клиенты suggest сохранять новейшие базы действующих зеркал в избранном интернет-программы. Администрация направляют обновления о свежих адресах через e-mail, Telegram-сообщества и смартфонные утилиты.
Payment процедуры через проверенные платформы secured защитными methods стандарта банковского сектора. Получение финансов производится только на аутентифицированные реквизиты обладателя профиля.
https://sertralineusa.com/# zoloft tablet
online pharmacies without prescription https://images.google.ms/url?sa=t&url=https%3A%2F%2Fcanbaypharm.top online prescriptions without script
see this here Paxful calculator
Инновационные провайдеры гемблинг продуктов предлагают участникам подключение к качественному игровому процессу через безопасные типпи казино сайты. Легальная деятельность подразумевает учета конкретных контролирующих стандартов.
Система создания клиентского кабинета охватывает аутентификацию индивидуальных данных. Провайдеры эксплуатируют углубленные процедуры KYC и AML для предотвращения нарушающих транзакций.
Цифровые системы новейших беттинг площадок работают на надежных дата-центрах с шифровальными технологиями. Территориальные ограничения побуждает операторов создавать альтернативные ссылки.
Резервные сайты составляют точные дубликаты базового сайта с удержанием всех возможностей и сведений. Клиенты получают постоянный связь к депозиту, развлекательной статистике и личным конфигурациям.
Расчетные процедуры реализуются через подключенные финансовые процессоры. Рамки на депозиты и обналичивания фиксируются в унисон с лицензионными положениями и внутренними процедурами снижения потерь.
Компетентные игроки предлагают мониторить условия лицензии через контролирующие регистры развлекательных органов. Репутационные характеристики охватывают рейтинги на отраслевых сайтах и комментарии действительных пользователей.
Отбор надежного игорного портала подразумевает основательного анализа официальных бумаг. Инновационные платформы казино Килограмм дают участникам полную факты о своих разрешениях.
Система открытия аккаунта включает различные принудительных фаз подтверждения. Представители настаивают бумаги, устанавливающие персону и правоспособность. Классический KYC-процесс длится от 24 до 72 периодов.
Банкролл-менеджмент инициируется с определения пределов на депозиты. Квалифицированные пользователи советуют использовать правило 5% от итогового азартного бюджета на конкретную заход.
Системные препятствия операторов побуждают эксплуатировать резервные ссылки. Копии сохраняют абсолютную активность базового площадки, предусматривая летопись транзакций и развлекательный успех.
Передовые платежные способы гарантируют оперативные вклады через виртуальные аккаунты. Bitcoin, Ethereum и стейблкоины обеспечивают скрытность и символические отчисления. Длительность проведения получений доходит 10-30 промежутков.
Программы верности содержат многоуровневые уровни с увеличивающимся кэшбэком. VIP-представители предоставляют личные вознаграждения, усиленные лимиты и опережающую поддержку.
Передовые операторы гемблинг услуг предлагают беттерам вход к качественному беттингу через безопасные Меллстрой сайты. Легальная операционная активность нуждается исполнения определенных регуляторных критериев.
Алгоритм создания пользовательского учетной записи содержит аутентификацию приватных информации. Операторы применяют многоуровневые механизмы KYC и AML для пресечения нарушающих переводов.
IT средства новейших беттинг площадок строятся на защищенных инфраструктурах с SSL технологиями. IP-фильтрация побуждает владельцев создавать параллельные порталы.
Дублирующие ресурсы образуют идентичные копии основного платформы с поддержанием всех возможностей и параметров. Пользователи получают стабильный соединение к балансу, развлекательной статистике и индивидуальным установкам.
Платежные операции реализуются через встроенные расчетные сервисы. Пределы на взносы и обналичивания назначаются в унисон с законодательными положениями и собственными правилами управления рисками.
Опытные игроки настаивают отслеживать состояние разрешения через официальные реестры развлекательных органов. Репутационные показатели задействуют места на экспертных сервисах и отзывы настоящих игроков.
Выбор безопасного betting площадки в актуальных границах требует особого подхода к законному уровню. Профессиональные участники осознают, что Лаки Бир РІС…РѕРґ содержит актуальную информацию о доступных сервисах.
Схема записи в официальных платформах включает обязательную подтверждение личности. KYC-процедуры охраняют как площадку, так и клиента от махинаций. Промежуточные пределы на получение денег до завершения контроля – нормальная методика.
Цифровые препятствия на связь к игровым сайтам устраняются через параллельные адреса. Действующие дубликаты обеспечивают абсолютную работоспособность основного ресурса. Расчетные процедуры, азартный достижения и наградные предложения поддерживаются константными.
Материальная безопасность измеряется уровнем задействованных расчетных инструментов. SSL-кодирование, PCI DSS аттестация и многоуровневая подтверждение устанавливают безопасный контур защиты.
Азартная ассортимент лицензированных площадок объединяет слоты от главных провайдеров. RTP-значения, вариативность и вероятностные формулы получают объективную аудит в аккредитованных институтах.
Программы вознаграждения в надежных сервисах опираются на четких условиях активности. Условия ставок x35-40 характеризуется разумным для слот-привилегий, в то время как настольные игры засчитываются в подсчет с сниженным множителем.
Woah! I’m really loving the template/theme of this blog.
It’s simple, yet effective. A lot of times it’s challenging to get that “perfect balance” between superb usability and visual appearance.
I must say you have done a amazing job with this. Additionally, the blog loads very quick for
me on Chrome. Excellent Blog!
Игровая область являет быстрый расширение, заинтересовывая тысячи клиентов. Квалифицированные порталы предоставляют надёжную пространство для пари. Полную сведения о указанных брендах допустимо изучить на Меллстрой зеркало .
Аккредитация составляет приоритетным элементом подбора портала. Регуляторы Мальты гарантируют жёсткий аудит финансовых транзакций. Всякая лицензированная площадка подвергается регулярные ревизии RNG-алгоритмов.
Цифровые особенности новейших игорных домов объединяют SSL-безопасность финансового ранга. Разработчики компьютерного софта уровня Microgaming, NetEnt, Pragmatic Play интегрируют комплексные схемы хаотичных значений.
Алгоритм подтверждения учётной записи предусматривает подачи свидетельств KYC-формата. Паспорт, свидетельство о доходах, удостоверение регистрации — базовый комплект для итогового входа.
Параллельные URL устраняют сложности с ограничениями поставщиков. Рабочие альтернативы адаптируются каждый день компьютерными специалистами. Планшетные приложения часто действуют надёжнее сетевых модификаций.
Распределение капитала создаёт продолжительную результативность развлекательных сессий. Экспертные беттеры предлагают урезать объём вейджера до 1-2% от суммарного банкролла.
check over here Sign in paxful
Выбор проверенного гемблинг портала в актуальных условиях подразумевает особого подхода к регулятивному положению. Профессиональные геймеры знают, что п»ї1хбет зеркало демонстрирует актуальную факты о доступных провайдерах.
Процесс создания аккаунта в лицензированных площадках предусматривает обязательную подтверждение идентичности. KYC-нормы обеспечивают как площадку, так и участника от мошенничества. Краткосрочные ограничения на изъятие денег до завершения верификации – обычная подход.
Цифровые блокировки на подключение к азартным площадкам преодолеваются через резервные URL. Рабочие зеркала предоставляют абсолютную эффективность базового сервиса. Платежные переводы, развлекательный продвижение и льготные программы остаются константными.
Денежная надежность измеряется степенью применяемых банковских механизмов. SSL-защита, PCI DSS сертификация и многоуровневая проверка гарантируют надежный заслон безопасности.
Азартная набор проверенных операторов охватывает автоматы от ведущих провайдеров. RTP-значения, дисперсия и математические формулы получают беспристрастную контроль в признанных учреждениях.
Механизмы мотивации в достойных операторах опираются на ясных условиях проигрыша. Вейджер x35-40 расценивается разумным для спин-бонусов, в то время как классические игры принимаются в расчет с минимальным процентом.
Отбор безопасного betting ресурса в текущих границах требует детального подхода к лицензионному статусу. Профессиональные участники представляют, что казино Голд отображает последнюю данные о доступных ресурсах.
Процесс открытия счета в сертифицированных платформах включает принудительную валидацию персональных данных. KYC-правила охраняют как площадку, так и клиента от мошенничества. Переходные границы на изъятие средств до закрытия верификации – привычная методика.
Программные блокировки на доступ к развлекательным ресурсам обходятся через дублирующие домены. Рабочие клоны обеспечивают полную эффективность центрального платформы. Расчетные операции, игровой продвижение и привилегированные системы поддерживаются устойчивыми.
Экономическая защищенность измеряется степенью эксплуатируемых банковских способов. SSL-криптография, PCI DSS аттестация и расширенная идентификация устанавливают надежный контур обороны.
Азартная ассортимент лицензированных провайдеров охватывает слоты от топовых производителей. RTP-параметры, изменчивость и алгоритмические схемы подвергаются беспристрастную контроль в утвержденных центрах.
Планы поощрения в качественных сервисах базируются на прозрачных требованиях активности. Отыгрыш x35-40 считается приемлемым для барабан-поощрений, в то время как стандартные активности учитываются в зачет с минимальным множителем.
Neuro Relief USA: Neuro Relief USA – neurontin buy from canada
Новейшие клиенты сталкиваются с изобилием системных деталей при работе с сертифицированными ресурсами. Профильные платформы типа френдс казино дают новую данные о работе азартных организаций.
Система валидации кабинета охватывает набор неотъемлемых шагов. Стартовая проверка подразумевает отправки свидетельств удостоверяющих гражданство. Обычный список подразумевает паспорт, автоудостоверение или загранпаспорт.
Системная часть записления подразумевает использование SSL-шифрования и двухфакторной аутентификации. Продвинутые клиенты советуют инициировать максимум доступных функций секьюрити.
Альтернативные адреса составляют точные реплики главного портала с сохранением полного арсенала. Центральное преимущество содержится в соответствии расчетных пределов и параметров отыгрыша.
Процедура поиска действующих дублирующих порталов базируется на мониторинге специализированных телеграм-каналов и аффилированных площадок. Опытные пользователи задействуют VPN-сервисы для предоставления стабильного подключения вне зависимости от географических запретов.
Подбор надежного азартного площадки заставляет основательного изучения правовых свидетельств. Новые ресурсы Vavada зеркало дают игрокам безусловную детали о текущих разрешениях.
Алгоритм создания профиля предусматривает ряд обязательных этапов аутентификации. Администраторы настаивают справки, устанавливающие личность и дееспособность. Классический KYC-процесс составляет от 24 до 72 часов.
Распоряжение капиталом запускается с назначения ограничений на депозиты. Компетентные геймеры настаивают применять правило 5% от совокупного игорного резерва на конкретную сессию.
Цифровые ограничения поставщиков побуждают эксплуатировать запасные адреса. Дубликаты поддерживают полную работоспособность первичного платформы, предусматривая архив переводов и казино достижения.
Актуальные платежные сервисы поддерживают оперативные взносы через блокчейн кошельки. Bitcoin, Ethereum и фиксированные активы обеспечивают тайность и минимальные сборы. Продолжительность реализации снятий достигает 10-30 минут.
Планы верности предусматривают градационные категории с увеличивающимся компенсацией. VIP-кураторы предоставляют личные вознаграждения, увеличенные пределы и опережающую техподдержку.
Отбор легального развлекательного ресурса заставляет детального рассмотрения юридических разрешений. Передовые сайты Вавада официальный сайт предоставляют геймерам абсолютную факты о собственных допусках.
Алгоритм оформления счета содержит несколько обязательных ступеней проверки. Представители настаивают документы, подтверждающие личность и дееспособность. Традиционный KYC-алгоритм составляет от 24 до 72 промежутков.
Банкролл-менеджмент запускается с установления рамок на депозиты. Искусные пользователи призывают внедрять правило 5% от общего азартного капитала на отдельную игру.
Системные ограничения владельцев принуждают применять альтернативные пути. Зеркала сохраняют полную работоспособность главного сайта, охватывая хронологию операций и игровой успех.
Новые платежные сервисы гарантируют быстрые взносы через электронные счета. Bitcoin, Ethereum и постоянные токены гарантируют анонимность и мизерные комиссии. Срок выполнения выводов достигает 10-30 отрезков.
Системы постоянства содержат ступенчатые категории с накапливающимся возвратом. VIP-консультанты предоставляют эксклюзивные вознаграждения, усиленные ограничения и ускоренную помощь.
Активные mirror-ссылки легальных казино на Вавада зеркало гарантируют устойчивый вход к гемблинг ресурсам. Технология клонирования строит эквивалентные версии главного веб-площадки с консервацией всех функций.
Процедура активации через зеркало целиком воспроизводит оригинальную шаблон. Начинающие игроки вводят активный email, создают надежный код доступа и определяют рабочую курренси.
Аутентификация счета требует отправки свидетельств согласно KYC-стандартам. Копия ID-карты, валидация места жительства и банковские сведения проверяются через автоматическую контроль в течение 24-72 часов.
Подключение существующих пользователей реализуется через обычную форму с 2FA проверкой. Временные токены доставляются на смс гаджет или почтовый ящик.
Опции денежного раздела через дублирующие порталы предлагает топовые финансовые инструменты. Visa, Mastercard, веб кошельки Skrill, Neteller, блокчейн-токены Bitcoin, Ethereum осуществляются с низкими процентами 0-3%.
Gaming каталог копируется полностью включая автоматы, столовые игры, live-крупье и джекпоты. RTP-параметры, волатильность и проигрыш поддерживаются такими же.
Подарочная механизм функционирует идентично главному порталу. Welcome-комплекты, безвозмездные спины, денежный возврат и VIP-системы инициируются программно при соблюдении заданных параметров.
Рабочие резервные адреса надежных игорных заведений на мад казино предоставляют постоянный подключение к развлекательным порталам. Система реплицирования формирует идентичные дубликаты основного ресурса с удержанием всех инструментов.
Система открытия счета через дублирующий портал полностью воспроизводит стандартную заявку. Дебютные пользователи прописывают действующий email, устанавливают сложный шифр и определяют рабочую денежную единицу.
Валидация аккаунта предполагает предоставления свидетельств опираясь на KYC-регламенту. Изображение удостоверения личности, верификация резиденции и платежные реквизиты анализируются посредством машинную анализ в течение 24-72 часа.
Авторизация активных клиентов происходит через типовую форму с 2FA верификацией. Разовые токены отправляются на смс гаджет или мейл.
Механизмы финансового блока через дублирующие порталы предлагает распространенные расчетные системы. Visa, Mastercard, онлайн балансы Skrill, Neteller, виртуальные монеты Bitcoin, Ethereum процессируются с низкими процентами 0-3%.
Gaming ассортимент дублируется на сто процентов включая слоты, традиционные активности, live-операторов и прогрессивы. RTP-индикаторы, волатильность и вейджер остаются такими же.
Промо политика действует похоже корневому порталу. Welcome-бандлы, фриспины, компенсация и VIP-программы инициируются автоматически при выполнении установленных условий.
Актуальные бетторы натыкаются с проблемой доступа к проверенным ресурсам. Компании фильтруют первичные адреса, но знающие казино 1хбет клиенты осознают о функционировании дублирующих ресурсов.
Дополнительный домен является стопроцентную дубликат основного площадки. SSL-сертификаты работают аналогичными. Банковские действия выполняются через равнозначные механизмы.
Процедура открытия счёта через дополнительный адрес предполагает привычной валидации. Операторы требуют справки для осуществления KYC-требований. Личные параметры осуществляют усиленную верификацию.
Вносительные ограничения на дополнительных платформах соответствуют основным характеристикам. Наименьшие вклады поддерживаются фиксированными. Прогрессивные банки координируются между разными порталами.
Бонусные механизмы оперируют завершённо на альтернативных порталах. Множитель ставок удерживает стартовые цифры. Временные рамки оборота остаётся прежним.
Отдел помощи решает вопросы с альтернативных ссылок идентично. Прямой чат поддерживает непрерывный формат обслуживания.
Отбор честного игорного ресурса предполагает серьезного разбора лицензионных сертификатов. Актуальные ресурсы казино СЂР° обеспечивают пользователям абсолютную сведения о собственных лицензиях.
Алгоритм создания профиля включает множество обязательных этапов валидации. Администраторы запрашивают документы, засвидетельствующие идентичность и совершеннолетие. Обычный KYC-алгоритм длится от 24 до 72 часов.
Управление банком открывается с задания границ на депозиты. Квалифицированные геймеры рекомендуют использовать закон 5% от совокупного игорного средств на индивидуальную заход.
Технические препятствия операторов заставляют задействовать альтернативные домены. Альтернативы удерживают абсолютную активность базового площадки, подразумевая журнал сделок и игровой результаты.
Передовые платежные инструменты предоставляют быстрые депозиты через цифровые счета. Bitcoin, Ethereum и постоянные токены дают приватность и символические комиссии. Продолжительность обработки извлечений доходит 10-30 отрезков.
Схемы преданности предусматривают градационные степени с возрастающим вознаграждением. VIP-кураторы гарантируют эксклюзивные вознаграждения, расширенные ограничения и опережающую помощь.
check Is vauld crypto app safe
Между прочим, если вас интересуют идеи для творчества по мотивам фильмов про гонки и скорость, загляните сюда.
Вот, можете почитать:
https://stuff4scrap.ru/news/top-10-idej-dlya-skrapbukinga-pro-mashiny-i-skorost-vdohnovenie-iz-kultovyh-filmov/
Актуальные геймеры сталкиваются с набором цифровых деталей при функционировании с лицензированными платформами. Тематические сайты типа Vavada казино предоставляют релевантную материалы о функционировании гэмблинговых организаций.
Система подтверждения учетной записи предполагает ряд принудительных уровней. Стартовая верификация требует отправки удостоверений верифицирующих субъект. Привычный комплект содержит документ, права или международное ID.
Программная часть записления подразумевает задействование SSL-шифрования и многофакторной защиты. Экспертные участники подсказывают задействовать совокупность представленных параметров защиты.
Резервные ссылки образуют полные дубликаты основного домена с удержанием полного набора функций. Основное бонус состоит в идентичности платежных пределов и критериев условий прокрутки.
Схема выявления активных зеркал строится на отслеживании специализированных телеграм-каналов и партнерских платформ. Экспертные участники применяют виртуальные частные сети для формирования бесперебойного подключения вне зависимости от локальных лимитов.
Hi just wanted to give you a quick heads up and let you know
a few of the images aren’t loading correctly.
I’m not sure why but I think its a linking issue. I’ve tried it in two different internet browsers and both show
the same results.
Right here is the perfect web site for anyone who wishes to
understand this topic. You understand a whole lot its almost
hard to argue with you (not that I personally would want to…HaHa).
You certainly put a new spin on a topic that has been discussed for decades.
Wonderful stuff, just great!
I appreciate, result in I found exactly what I used to be
looking for. You’ve ended my four day long hunt! God Bless you man. Have a great day.
Bye
my webpage Delta 9 Sparkling Water
generic for zoloft: order zoloft – generic for zoloft
You have made your point very well.. https://notes.io/ep651
Активные резервные адреса лицензированных gaming-операторов на Голд казино гарантируют непрерывный коннект к геймерским порталам. Методика зеркалирования формирует эквивалентные клоны главного ресурса с консервацией всех возможностей.
Алгоритм активации через mirror-сайт в точности имитирует основную форму. Новые геймеры указывают рабочий email, устанавливают стойкий пароль и определяют операционную финансовый инструмент.
Валидация счета содержит предоставления удостоверений в соответствии с KYC-требованиям. Фото ID-карты, валидация регистрации и денежные координаты анализируются посредством автоматическую проверку в течение 24-72 ч.
Авторизация действующих игроков реализуется через классическую панель с усиленной аутентификацией. Сессионные токены приходят на телефонный устройство или email.
Возможности депозитного сектора через дублирующие порталы включает топовые расчетные инструменты. Visa, Mastercard, веб счета Skrill, Neteller, криптовалюты Bitcoin, Ethereum реализуются с минимальными комиссиями 0-3%.
Развлекательная ассортимент воспроизводится полностью включая барабаны, карточные забавы, live-хостов и мегавыигрыши. RTP-показатели, колебания и вейджер остаются идентичными.
Бонусная система действует похоже базовому ресурсу. Welcome-пакеты, бесплатные вращения, компенсация и VIP-курсы включаются алгоритмически при исполнении установленных параметров.
Передовые игроки оказываются с препятствием входа к проверенным сайтам. Компании блокируют базовые адреса, но искушённые lucky bear казино участники помнят о присутствии параллельных порталов.
Параллельный портал образует идентичную отображение главного ресурса. Средства защиты поддерживаются аналогичными. Расчётные процедуры реализуются через сходные механизмы.
Процедура создания аккаунта через зеркальный адрес содержит привычной подтверждения. Сотрудники уточняют свидетельства для осуществления KYC-норм. Персональные характеристики осуществляют многоуровневую подтверждение.
Депозитные лимиты на зеркальных ресурсах равняются основным спецификациям. Стартовые взносы поддерживаются фиксированными. Увеличивающиеся джекпоты согласовываются между всеми ресурсами.
Премиальные схемы работают целостно на дополнительных площадках. Вейджер обеспечивает первоначальные цифры. Временные рамки отыгрыша остаётся прежним.
Служба сопровождения рассматривает запросы с зеркальных порталов сходным образом. Прямой переписка обеспечивает непрерывный график оперирования.
Hi there, i read your blog occasionally and i own a similar one and i was just curious if you
get a lot of spam remarks? If so how do you prevent it, any plugin or anything you can advise?
I get so much lately it’s driving me insane so any help is very
much appreciated.
Here is my web site Best Delta 9 Drinks
Современные порталы гемблинг услуг гарантируют беттерам возможность к элитному развлечениям через защищенные п»ї1хбет официальный сайт платформы. Лицензированная функционирование подразумевает исполнения строгих правовых требований.
Алгоритм регистрации игрового кабинета задействует валидацию приватных показателей. Провайдеры внедряют расширенные механизмы KYC и AML для пресечения фродовых операций.
Программные платформы передовых казино работают на защищенных инфраструктурах с TLS алгоритмами. IP-фильтрация побуждает операторов запускать вспомогательные URL.
Альтернативные платформы формируют полные клоны центрального сайта с поддержанием всех опций и сведений. Беттеры получают беспрепятственный подключение к средствам, беттинг отчетности и пользовательским установкам.
Расчетные транзакции проходят через связанные финансовые агрегаторы. Рамки на взносы и изъятия определяются в гармонии с законодательными стандартами и индивидуальными регламентами управления рисками.
Квалифицированные пользователи настаивают проверять состояние разрешения через официальные регистры беттинг комиссий. Репутационные параметры предусматривают позиции на специализированных сайтах и мнения действительных участников.
Рабочие дублирующие порталы надежных казино на Вавада казино создают постоянный соединение к азартным системам. Принцип дублирования создает аналогичные клоны центрального ресурса с консервацией всех механизмов.
Алгоритм оформления профиля через зеркало на сто процентов имитирует базовую шаблон. Начинающие клиенты вводят функционирующий email, устанавливают стойкий код доступа и устанавливают игровую валюту.
Идентификация счета предполагает отправки бумаг в соответствии с KYC-политике. Фото ID-карты, верификация резиденции и банковские параметры проверяются через автоматическую валидацию в течение 24-72 временных единиц.
Авторизация зарегистрированных участников осуществляется через типовую окно с многоступенчатой проверкой. Краткосрочные ключи отправляются на телефонный аппарат или email.
Инструменты входящего компонента через резервные ссылки предлагает востребованные расчетные сервисы. Visa, Mastercard, электронные портмоне Skrill, Neteller, crypto Bitcoin, Ethereum осуществляются с минимальными комиссиями 0-3%.
Азартная каталог повторяется целиком включая барабаны, традиционные геймплей, live-хостов и джекпоты. RTP-значения, вариативность и условия отыгрыша остаются точными.
Бонусная схема действует аналогично главному сайту. Welcome-наборы, free spins, refund и VIP-курсы запускаются алгоритмически при исполнении фиксированных критериев.
Передовые сервисы гемблинг продуктов предоставляют игрокам подключение к элитному развлечениям через сертифицированные Вавада официальный сайт платформы. Авторизованная функционирование предполагает следования определенных правовых критериев.
Алгоритм активации игрового аккаунта включает верификацию личных реквизитов. Администраторы задействуют углубленные алгоритмы KYC и AML для исключения нарушающих переводов.
Цифровые платформы актуальных развлекательных порталов основываются на защищенных дата-центрах с TLS технологиями. Региональная блокировка заставляет администраторов разрабатывать альтернативные порталы.
Резервные порталы являют собой аналогичные дубликаты центрального платформы с обеспечением всех функций и информации. Игроки приобретают непрерывный доступ к капиталу, развлекательной истории и персональным конфигурациям.
Денежные переводы производятся через синхронизированные банковские процессоры. Рамки на вклады и выводы устанавливаются в гармонии с регуляторными положениями и организационными политиками управления рисками.
Компетентные беттеры указывают анализировать положение разрешения через контролирующие реестры развлекательных комиссий. Имиджевые параметры содержат места на тематических сайтах и feedback истинных игроков.
Беттинговая область отображает интенсивный расширение, притягивая множество участников. Экспертные порталы дают качественную условия для беттинга. Исчерпывающую данные о указанных операторах возможно изучить на Меллстрой .
Аттестация составляет ключевым элементом отбора площадки. Лицензиаты Мальты предоставляют серьёзный аудит финансовых процедур. Отдельная лицензированная ресурс осуществляет плановые инспекции RNG-генераторов.
Программные особенности современных гемблинг-сайтов включают SSL-шифрование расчётного уровня. Разработчики компьютерного софта уровня Microgaming, NetEnt, Pragmatic Play интегрируют многоуровневые системы хаотичных величин.
Алгоритм проверки профиля требует представления удостоверений KYC-уровня. Свидетельство, справка о доходах, валидация местожительства — классический перечень для итогового подключения.
Резервные адреса ликвидируют сложности с цензурой операторов. Актуальные копии изменяются ежедневно техническими службами. Мобильные клиенты зачастую оперируют стабильнее интернет редакций.
Финансовая дисциплина определяет стратегическую результативность игровых раундов. Квалифицированные беттеры предлагают контролировать количество депозита до 1-2% от общего резерва.
Актуальные зеркала легальных казино на ретро казино предоставляют стабильный подключение к азартным платформам. Методика клонирования генерирует аналогичные копии основного сайта с удержанием всех опций.
Система открытия счета через дублирующий портал абсолютно копирует основную форму. Дебютные участники указывают действующий email, придумывают стойкий код доступа и устанавливают операционную валюту.
Аутентификация профиля содержит загрузки справок в соответствии с KYC-нормам. Фото удостоверения личности, валидация регистрации и денежные координаты проверяются через машинную анализ в течение 24-72 часов.
Аутентификация действующих клиентов выполняется через обычную модуль с 2FA верификацией. Временные шифры доставляются на смс аппарат или электронную почту.
Возможности финансового сектора через резервные ссылки обеспечивает топовые платежные платформы. Visa, Mastercard, виртуальные кошельки Skrill, Neteller, криптовалюты Bitcoin, Ethereum реализуются с минимальными сборами 0-3%.
Гемблинг ассортимент клонируется на сто процентов включая spinning games, карточные игры, live-ведущих и джекпоты. RTP-параметры, изменчивость и условия отыгрыша удерживаются точными.
Поощрительная система функционирует подобно базовому сайту. Welcome-бандлы, free spins, кешбэк и VIP-программы включаются программно при реализации определенных требований.
Поиск надежного развлекательного ресурса в актуальных условиях заставляет особого изучения к правовому состоянию. Опытные участники знают, что KiloGram casino демонстрирует современную факты о доступных ресурсах.
Механизм оформления профиля в лицензированных площадках включает неизбежную подтверждение идентичности. KYC-нормы охраняют как заведение, так и игрока от махинаций. Краткосрочные пределы на снятие активов до выполнения проверки – типичная практика.
Виртуальные блокировки на подключение к игровым сервисам обходятся через альтернативные URL. Функционирующие дубликаты обеспечивают тотальную производительность основного сайта. Расчетные переводы, геймплейный достижения и льготные программы функционируют постоянными.
Денежная надежность определяется показателем эксплуатируемых финансовых систем. SSL-защита, PCI DSS аттестация и двухфакторная идентификация устанавливают стабильный заслон обороны.
Интерактивная ассортимент лицензированных провайдеров предоставляет автоматы от известных провайдеров. RTP-параметры, изменчивость и математические системы испытывают беспристрастную аудит в признанных учреждениях.
Программы вознаграждения в серьезных площадках формируются на понятных условиях отыгрыша. Отыгрыш x35-40 расценивается разумным для спин-привилегий, в то время как стандартные забавы принимаются в калькуляцию с пониженным коэффициентом.
Get More Info Nifty marketplace
Looking stylish projects a strong first impression.
A attire communicates volumes before you actually say a single word.
It boosts your own self-esteem and mindset noticeably.
Your polished appearance conveys competence in the workplace.
https://z3.sochidaily.ru/mhogXX4fI/
Stylish clothing let you to express your individual identity.
People often perceive well-dressed people as more successful and trustworthy.
Ultimately, putting effort in your style is an investment in yourself.
Feyre must navigate the Court of Nightmares to save her friends. Read the thrilling sequence in the A Court of Mist and Fury PDF. This ebook delivers high-stakes tension. Download it now to see if she can outwit the darkness. https://acourtofmistandfurypdf.top/ What Book Comes After A Court Of Mist And Fury
Поиск в пространстве проверенных сайтов включает представления передовых инструментов соединения. Профессиональные пользователи эксплуатируют казино 1хбет для получения новейшей данных о функционирующих доменах.
Механизм открытия профиля в надежных операторах охватывает многоуровневую подтверждение. Продвинутые компании используют KYC-протоколы и AML-критерии. Документальная процедура занимает от 24 до 72 временных отрезков.
Компьютерные методы для обхода барьеров улучшаются синхронно с повышением регуляторных шагов. VPN-инструменты класса premium обеспечивают криптографию AES-256 и системы OpenVPN. Надежность связи fundamentally необходима для элитных партий.
Зеркальные платформы работают через регионально разнесенные серверные системы. CDN-сети поддерживают минимальную время ответа для европейских участников. Программное маршрутизация инициируется при выявлении недоступности центрального сайта.
Банковские манипуляции в лицензированных областях подпадают под строгим требованиям PCI DSS. Крипто платежи получают актуальность по причине секретности и динамике осуществления.
Планшетные приложения лучших компаний совмещают лицевую авторизацию и push-уведомления для критических событий. Адаптивный интерфейс автономно адаптируется под характеристики матрицы.
Поиск проверенного развлекательного оператора в современных обстоятельствах заставляет тщательного внимания к законному статусу. Профессиональные игроки знают, что п»ї1хбет зеркало содержит новую сведения о доступных ресурсах.
Механизм оформления профиля в проверенных операторах содержит обязательную подтверждение личности. KYC-процедуры гарантируют как оператора, так и пользователя от обмана. Кратковременные границы на вывод денег до выполнения валидации – стандартная система.
Цифровые блокировки на доступ к гемблинг сайтам преодолеваются через альтернативные URL. Доступные клоны гарантируют полную возможности основного портала. Денежные переводы, интерактивный статистика и поощрительные схемы продолжают постоянными.
Финансовая защищенность выражается критерием внедренных платежных механизмов. SSL-безопасность, PCI DSS сертификация и двухфакторная идентификация формируют защищенный щит охраны.
Азартная библиотека официальных провайдеров включает слоты от главных студий. RTP-индексы, колебания и расчетные схемы претерпевают объективную валидацию в аккредитованных организациях.
Схемы лояльности в профессиональных сервисах опираются на ясных параметрах вейджера. Условия ставок x35-40 оценивается приемлемым для слот-поощрений, в то время как классические забавы принимаются в подсчет с уменьшенным процентом.
For the audio
Best us online casinos ssl encryption
for complete satisfaction.
https://sertralineusa.com/# sertraline
Исследование в области проверенных ресурсов включает владения передовых технологий входа. Профессиональные игроки внедряют Голд казино для извлечения актуальной материалов о действующих путях.
Процесс создания профиля в сертифицированных заведениях предполагает детальную аутентификацию. Новейшие организации внедряют KYC-процедуры и AML-требования. Бумажная работа потребляет от 24 до 72 периодов.
Цифровые способы для преодоления препятствий улучшаются синхронно с укреплением правовых инициатив. VPN-службы разряда premium гарантируют криптографию AES-256 и системы OpenVPN. Постоянство коннекта fundamentally значима для привилегированных партий.
Альтернативные домены работают через географически рассредоточенные серверные мощности. CDN-архитектуры поддерживают быструю отклик для азиатских участников. Техническое роутинг срабатывает при детекции ограничения первичного домена.
Экономические операции в сертифицированных территориях отвечают строгим критериям PCI DSS. Крипто операции увеличивают признание по причине приватности и динамике выполнения.
Портативные клиенты элитных организаций интегрируют биометрическую идентификацию и push-уведомления для существенных происшествий. Гибкий дизайн самостоятельно корректируется под характеристики дисплея.
Современные геймеры сталкиваются с огромным количеством технических тонкостей при работе с легальными платформами. Тематические сайты типа лакибир обеспечивают релевантную контент о операциях азартных операторов.
Процедура верификации кабинета охватывает комплекс неотъемлемых фаз. Исходная проверка предполагает размещения удостоверений удостоверяющих субъект. Классический комплект подразумевает документ, лицензию водителя или внешний паспорт.
Цифровая составляющая записления предполагает эксплуатацию SSL-шифрования и многофакторной защиты. Квалифицированные геймеры предлагают активировать совокупность имеющихся параметров защиты.
Дублирующие порталы образуют стопроцентные реплики главного портала с обеспечением полного инструментария. Главное достоинство состоит в тождественности денежных лимитов и требований условий прокрутки.
Схема поиска функционирующих резервных ссылок основывается на контроле экспертных уведомительных сервисов и партнерских порталов. Экспертные клиенты применяют анонимайзеры для формирования надежного связи без оглядки от географических ограничений.
Поиск надежного азартного площадки в сегодняшних условиях подразумевает детального подхода к лицензионному режиму. Опытные пользователи учитывают, что п»ї1хбет зеркало содержит последнюю материалы о доступных ресурсах.
Процесс открытия счета в легальных операторах включает необходимую верификацию личности. KYC-нормы защищают как казино, так и пользователя от фрода. Краткосрочные лимиты на получение финансов до закрытия подтверждения – стандартная методика.
Программные ограничения на соединение к betting ресурсам обходятся через дублирующие адреса. Рабочие зеркала предоставляют всестороннюю возможности главного ресурса. Банковские операции, развлекательный прогресс и бонусные программы продолжают стабильными.
Экономическая стабильность выражается степенью используемых банковских способов. SSL-защита, PCI DSS валидация и многоуровневая верификация устанавливают защищенный барьер безопасности.
Геймплейная набор проверенных заведений содержит барабаны от известных студий. RTP-коэффициенты, дисперсия и математические формулы проходят объективную проверку в признанных учреждениях.
Системы лояльности в профессиональных сервисах формируются на ясных параметрах отыгрыша. Проигрыш x35-40 признается справедливым для барабан-привилегий, в то время как классические состязания принимаются в подсчет с уменьшенным фактором.
Рабочие дублирующие порталы легальных gaming-операторов на Лаки Бир обеспечивают постоянный коннект к развлекательным системам. Методика реплицирования формирует точные версии основного ресурса с сохранением всех функций.
Процедура регистрации через резервную ссылку на сто процентов воспроизводит главную шаблон. Свежие клиенты указывают функционирующий email, генерируют стойкий секретную комбинацию и назначают основную финансовый инструмент.
Валидация аккаунта содержит представления справок по KYC-требованиям. Изображение ID-карты, доказательство резиденции и денежные данные анализируются посредством цифровую валидацию в течение 24-72 временных единиц.
Подключение действующих пользователей реализуется через стандартную форму с двухфакторной аутентификацией. Разовые коды отправляются на смс аппарат или электронную почту.
Опции входящего сектора через дублирующие порталы поддерживает распространенные финансовые механизмы. Visa, Mastercard, веб счета Skrill, Neteller, блокчейн-токены Bitcoin, Ethereum процессируются с сокращенными процентами 0-3%.
Gaming база повторяется целиком включая автоматы, настольные геймплей, live-операторов и джекпоты. RTP-параметры, изменчивость и отыгрыш сохраняются идентичными.
Бонусная политика оперирует идентично центральному сайту. Welcome-наборы, даровые прокруты, возврат средств и VIP-курсы запускаются автоматически при соблюдении установленных условий.
https://smartgenrxusa.shop/# pharmacy mall
Also visit my web page – Thunderkick Slot RTP List & FAQs
Передовые клиенты имеют дело с изобилием системных деталей при деятельности с легальными сайтами. Профильные источники типа Mellstroy Game казино предоставляют новую контент о работе гэмблинговых брендов.
Процесс верификации аккаунта охватывает несколько необходимых уровней. Начальная проверка предполагает предоставления свидетельств доказывающих личность. Привычный список предполагает паспорт, права или международное ID.
Цифровая составляющая оформления охватывает эксплуатацию зашифрованного канала и многофакторной защиты. Профессиональные пользователи настаивают задействовать совокупность представленных функций обеспечения.
Альтернативные адреса составляют полные клоны центрального ресурса с сохранением комплексного возможностей. Основное достоинство заключается в схожести платежных рамок и условий отыгрыша.
Схема выявления активных дублирующих порталов базируется на проверке специализированных уведомительных сервисов и связанных сайтов. Продвинутые пользователи применяют виртуальные частные сети для гарантирования постоянного соединения без оглядки от географических блокировок.
Актуальные альтернативные домены легальных гемблинг-платформ на п»ї1хбет казино дают устойчивый доступ к азартным сервисам. Методика копирования генерирует точные копии корневого портала с удержанием всех инструментов.
Процедура создания аккаунта через mirror-сайт полностью копирует основную бланк. Только пришедшие игроки указывают действующий email, устанавливают сложный ключ и фиксируют игровую валюту.
Валидация личного кабинета включает представления бумаг следуя KYC-политике. Фото ID-карты, подтверждение резиденции и платежные сведения проходят автоматическую верификацию в течение 24-72 периодов.
Подключение действующих игроков производится через обычную модуль с многоступенчатой валидацией. Временные пароли отправляются на сотовый устройство или электронную почту.
Механизмы депозитного модуля через зеркала включает популярные банковские системы. Visa, Mastercard, электронные счета Skrill, Neteller, блокчейн-токены Bitcoin, Ethereum обрабатываются с оптимизированными взносами 0-3%.
Игровая ассортимент повторяется в точности включая слоты, настольные игры, live-операторов и прогрессивы. RTP-показатели, вариативность и вейджер остаются неизменными.
Акционная схема действует похоже базовому порталу. Welcome-комплекты, даровые прокруты, компенсация и VIP-системы стартуют системно при выполнении определенных стандартов.
Функционирующие альтернативные домены проверенных азартных клубов на Лаки Бир гарантируют беспрерывный доступ к азартным ресурсам. Схема дублирования строит полноценные реплики корневого домена с сохранением всех механизмов.
Алгоритм оформления профиля через mirror-сайт целиком повторяет оригинальную шаблон. Свежие клиенты регистрируют рабочий email, формируют надежный пароль и назначают базовую платежное средство.
Идентификация аккаунта подразумевает представления свидетельств согласно KYC-требованиям. Копия национального документа, доказательство регистрации и карточные данные контролируются системой машинную валидацию в течение 24-72 часов.
Авторизация действующих клиентов происходит через обычную панель с расширенной идентификацией. Разовые пароли поступают на мобильный аппарат или почтовый ящик.
Опции входящего сектора через альтернативные домены включает актуальные платежные платформы. Visa, Mastercard, веб хранилища Skrill, Neteller, crypto Bitcoin, Ethereum процессируются с уменьшенными взносами 0-3%.
Азартная ассортимент дублируется в точности включая автоматы, карточные активности, live-дилеров и прогрессивы. RTP-параметры, дисперсия и ставочные требования остаются неизменными.
Поощрительная система функционирует схоже центральному веб-площадке. Welcome-предложения, даровые прокруты, денежный возврат и VIP-программы стартуют программно при исполнении установленных параметров.
Рабочие резервные адреса проверенных игорных заведений на лаки беар казино предоставляют устойчивый соединение к азартным ресурсам. Методика клонирования образует аналогичные дубликаты основного веб-площадки с консервацией всех возможностей.
Процедура регистрации через резервную ссылку на сто процентов повторяет стандартную шаблон. Свежие геймеры указывают рабочий email, придумывают надежный ключ и определяют основную денежную единицу.
Подтверждение аккаунта предполагает предоставления бумаг следуя KYC-политике. Фото национального документа, валидация резиденции и финансовые параметры проверяются через алгоритмическую проверку в течение 24-72 часа.
Авторизация действующих пользователей выполняется через стандартную окно с многоступенчатой идентификацией. Разовые коды отправляются на сотовый номер или e-mail адрес.
Механизмы финансового раздела через резервные ссылки включает востребованные финансовые сервисы. Visa, Mastercard, виртуальные портмоне Skrill, Neteller, цифровые активы Bitcoin, Ethereum обрабатываются с сокращенными процентами 0-3%.
Игровая база дублируется полностью включая барабаны, карточные активности, live-дилеров и накопительные призы. RTP-коэффициенты, изменчивость и условия отыгрыша остаются аналогичными.
Поощрительная механизм выполняется похоже базовому ресурсу. Welcome-предложения, бесплатные вращения, возврат средств и VIP-программы инициируются системно при достижении фиксированных требований.
Ориентирование в сфере лицензированных ресурсов предполагает владения передовых методов подключения. Опытные участники задействуют friends casino официальный сайт для извлечения новейшей информации о работающих путях.
Схема формирования аккаунта в официальных заведениях подразумевает комплексную проверку. Продвинутые провайдеры применяют KYC-системы и AML-требования. Документооборот занимает от 24 до 72 часов.
Компьютерные инструменты для прохождения препятствий улучшаются синхронно с ужесточением юридических действий. VPN-службы типа premium предлагают безопасность AES-256 и технологии OpenVPN. Стабильность коннекта fundamentally существенна для VIP игровых периодов.
Запасные домены действуют через географически расположенные IT мощности. CDN-комплексы осуществляют минимальную задержку для европейских игроков. Цифровое маршрутизация запускается при обнаружении препятствия главного домена.
Платежные операции в легальных регионах следуют четким стандартам PCI DSS. Криптовалютные платежи приобретают актуальность благодаря секретности и скорости обработки.
Переносные программы лучших операторов содержат физиологическую проверку и push-уведомления для ключевых событий. Гибкий интерфейс программно адаптируется под свойства панели.
Поиск безопасного казино ресурса требует основательного рассмотрения юридических сертификатов. Актуальные платформы казино Lucky Bear дают участникам безусловную данные о собственных аккредитациях.
Процесс получения доступа подразумевает ряд ключевых стадий аутентификации. Администраторы просят справки, засвидетельствующие персону и дееспособность. Стандартный KYC-порядок продолжается от 24 до 72 промежутков.
Распоряжение капиталом начинается с определения границ на инвестиции. Компетентные игроки рекомендуют эксплуатировать закон 5% от итогового азартного средств на отдельную заход.
Технические препятствия владельцев заставляют эксплуатировать альтернативные пути. Копии удерживают абсолютную активность первичного платформы, включая историю транзакций и казино успех.
Передовые денежные сервисы обеспечивают моментальные пополнения через электронные хранилища. Bitcoin, Ethereum и фиксированные активы обеспечивают тайность и символические сборы. Срок выполнения выводов достигает 10-30 периодов.
Программы приверженности предусматривают каскадные категории с нарастающим компенсацией. VIP-консультанты предоставляют персонализированные награды, повышенные ограничения и опережающую сервис.
Ориентирование в секторе лицензированных ресурсов предполагает владения передовых решений соединения. Продвинутые игроки внедряют казино Lucky Bear для добывания свежей данных о оперативных ссылках.
Схема оформления профиля в лицензированных организациях подразумевает многоуровневую аутентификацию. Актуальные компании задействуют KYC-алгоритмы и AML-критерии. Документальная процедура потребляет от 24 до 72 часов.
Цифровые инструменты для прохождения ограничений эволюционируют синхронно с интенсификацией нормативных мер. VPN-инструменты типа premium предлагают защиту AES-256 и технологии OpenVPN. Непрерывность связи жизненно необходима для элитных сессий.
Резервные ресурсы действуют через территориально рассредоточенные компьютерные ресурсы. CDN-комплексы осуществляют быструю задержку для европейских игроков. Техническое перенаправление запускается при обнаружении барьера центрального домена.
Финансовые операции в легальных регионах соответствуют строгим правилам PCI DSS. Криптовалютные транзакции приобретают актуальность благодаря секретности и оперативности реализации.
Портативные приложения премиальных организаций интегрируют физиологическую аутентификацию и push-сообщения для принципиальных событий. Настраиваемый внешний вид независимо корректируется под настройки экрана.
Neuro Relief USA: how much is generic neurontin – can i buy neurontin over the counter
Поиск достойного игрового портала в современных обстоятельствах предполагает тщательного внимания к регулятивному уровню. Профессиональные пользователи знают, что казино Меллстрой включает последнюю факты о доступных площадках.
Алгоритм оформления профиля в легальных сервисах охватывает неизбежную проверку личности. KYC-процедуры оберегают как сервис, так и геймера от махинаций. Промежуточные рамки на получение активов до завершения проверки – стандартная подход.
Цифровые барьеры на подключение к развлекательным ресурсам нейтрализуются через резервные URL. Действующие зеркала предоставляют абсолютную функциональность первичного портала. Платежные операции, азартный прогресс и привилегированные предложения продолжают стабильными.
Денежная безопасность характеризуется критерием внедренных финансовых инструментов. SSL-кодирование, PCI DSS валидация и многоуровневая подтверждение гарантируют надежный барьер защиты.
Интерактивная ассортимент проверенных провайдеров включает барабаны от лидирующих студий. RTP-коэффициенты, колебания и математические принципы претерпевают внешнюю проверку в признанных институтах.
Схемы мотивации в серьезных операторах формируются на прозрачных требованиях отыгрыша. Проигрыш x35-40 оценивается адекватным для машина-льгот, в то время как настольные состязания включаются в счет с редуцированным процентом.
Актуальные пользователи обталкиваются с изобилием технических аспектов при операциях с лицензированными ресурсами. Специализированные порталы типа Меллстрой сайт предоставляют свежую данные о функционировании развлекательных провайдеров.
Механизм валидации профиля предполагает ряд принудительных фаз. Первичная подтверждение предполагает загрузки бумаг валидирующих личность. Типовой набор содержит документ, автолицензию или внешний паспорт.
Программная составляющая регистрации включает задействование защищенного протокола и многофакторной защиты. Продвинутые клиенты предлагают включать совокупность представленных параметров защиты.
Альтернативные адреса составляют точные клоны главного платформы с хранением комплексного возможностей. Ключевое бонус содержится в соответствии денежных пределов и условий условий прокрутки.
Схема обнаружения актуальных зеркал строится на отслеживании специализированных новостных лент и партнерских платформ. Экспертные участники эксплуатируют виртуальные частные сети для создания устойчивого подключения независимо от географических блокировок.
Выбор достойного гемблинг ресурса в актуальных условиях требует специального рассмотрения к лицензионному режиму. Компетентные клиенты осознают, что friends casino демонстрирует актуальную данные о функционирующих ресурсах.
Механизм оформления профиля в сертифицированных заведениях содержит требуемую верификацию удостоверения. KYC-нормы защищают как оператора, так и геймера от мошенничества. Кратковременные рамки на перечисление капитала до окончания подтверждения – нормальная процедура.
Виртуальные барьеры на доступ к игровым порталам нейтрализуются через параллельные порталы. Доступные дубликаты сохраняют тотальную эффективность основного сайта. Финансовые транзакции, игровой результаты и поощрительные программы сохраняются неизменными.
Материальная безопасность оценивается критерием эксплуатируемых денежных механизмов. SSL-защита, PCI DSS подтверждение и усиленная аутентификация создают стабильный барьер обороны.
Игровая коллекция официальных операторов объединяет спины от ведущих студий. RTP-параметры, изменчивость и математические формулы получают независимую сертификацию в авторизованных лабораториях.
Схемы мотивации в серьезных заведениях формируются на прозрачных критериях вейджера. Требования x35-40 характеризуется приемлемым для спин-поощрений, в то время как стандартные забавы включаются в счет с редуцированным коэффициентом.
image source Buy NFT with credit card
Перемещение в области легальных платформ включает представления современных методов подключения. Опытные клиенты применяют mad casino зеркало для обретения свежей данных о оперативных ссылках.
Процедура открытия аккаунта в официальных операторах содержит комплексную проверку. Продвинутые операторы эксплуатируют KYC-протоколы и AML-нормы. Оформление документов отнимает от 24 до 72 интервалов.
Цифровые способы для избежания запретов прогрессируют сообща с усилением юридических инициатив. VPN-сервисы типа premium дают безопасность AES-256 и технологии OpenVPN. Постоянство подключения жизненно важна для премиальных игровых периодов.
Зеркальные ресурсы работают через территориально распределенные IT ресурсы. CDN-комплексы обеспечивают минимальную отклик для международных игроков. Программное переключение включается при выявлении барьера основного портала.
Денежные движения в лицензированных юрисдикциях отвечают жестким критериям PCI DSS. Цифровые расчеты набирают распространение благодаря анонимности и темпу процессинга.
Планшетные клиенты топовых операторов включают лицевую проверку и push-извещения для важных моментов. Модифицируемый дизайн программно настраивается под параметры панели.
buy prednisone without prescription
Инновационные сервисы гемблинг развлечений предлагают клиентам подключение к высококлассному гемблингу через проверенные Лаки Бир сайт сайты. Лицензированная операционная активность предполагает выполнения конкретных законодательных положений.
Алгоритм регистрации пользовательского аккаунта охватывает аутентификацию персональных сведений. Администраторы внедряют многоуровневые процедуры KYC и AML для исключения нарушающих операций.
Цифровые системы новейших беттинг площадок строятся на надежных инфраструктурах с криптографическими технологиями. Территориальные ограничения обязывает администраторов запускать параллельные адреса.
Альтернативные сайты являют собой аналогичные репликации базового платформы с фиксацией всех сервисов и сведений. Клиенты получают стабильный вход к капиталу, беттинг записям и индивидуальным опциям.
Финансовые транзакции выполняются через синхронизированные платежные агрегаторы. Рамки на инвестиции и получения назначаются в гармонии с правовыми условиями и корпоративными регламентами риск-менеджмента.
Профессиональные игроки рекомендуют отслеживать состояние лицензии через надзорные каталоги развлекательных органов. Авторитетные индикаторы охватывают места на тематических сайтах и отзывы подлинных пользователей.
Поиск в области проверенных сайтов предполагает владения передовых способов входа. Квалифицированные игроки задействуют Mellstroy Game для получения свежей данных о активных путях.
Механизм открытия профиля в официальных компаниях содержит комплексную подтверждение. Новейшие компании задействуют KYC-системы и AML-критерии. Документооборот составляет от 24 до 72 часов.
IT решения для прохождения блокировок совершенствуются вместе с укреплением правовых действий. VPN-инструменты типа premium предлагают защиту AES-256 и системы OpenVPN. Надежность канала fundamentally необходима для привилегированных раундов.
Зеркальные домены функционируют через географически размещенные серверные ресурсы. CDN-комплексы осуществляют низкую время ответа для международных пользователей. Техническое перенаправление активируется при обнаружении препятствия главного портала.
Экономические движения в легальных зонах соответствуют строгим правилам PCI DSS. Криптовалютные переводы приобретают распространение по причине приватности и оперативности процессинга.
Переносные клиенты ведущих провайдеров включают биометрическую авторизацию и push-сообщения для ключевых ситуаций. Адаптивный облик автоматически изменяется под параметры экрана.
Выбор честного гемблинг оператора подразумевает серьезного анализа лицензионных документов. Актуальные порталы тип топ казино обеспечивают участникам безусловную данные о своих санкциях.
Алгоритм регистрации содержит определенное количество ключевых стадий проверки. Представители настаивают бумаги, доказывающие идентичность и правоспособность. Типовой KYC-механизм требует от 24 до 72 временных отрезков.
Финансовое планирование запускается с задания границ на депозиты. Квалифицированные участники призывают эксплуатировать закон 5% от полного развлекательного фонда на конкретную заход.
Электронные ограничения поставщиков вынуждают внедрять вспомогательные адреса. Дубликаты удерживают безусловную эффективность центрального сайта, содержа историю сделок и азартный достижения.
Актуальные банковские способы дают оперативные пополнения через цифровые хранилища. Bitcoin, Ethereum и фиксированные активы гарантируют тайность и мизерные платежи. Срок осуществления снятий насчитывает 10-30 промежутков.
Алгоритмы преданности подразумевают ступенчатые уровни с возрастающим возвратом. VIP-координаторы обеспечивают индивидуальные поощрения, усиленные рамки и преимущественную поддержку.
Iver Therapeutics: stromectol order online – Iver Therapeutics
Развлекательная область отображает быстрый расширение, заинтересовывая легионы геймеров. Грамотные порталы предлагают защищённую среду для пари. Детальную информацию о подобных компаниях допустимо изучить на lucky bear зеркало казино .
Аттестация остаётся ключевым аспектом подбора площадки. Лицензиаты Великобритании гарантируют качественный надзор экономических действий. Любая официальная платформа проходит плановые ревизии RNG-алгоритмов.
IT особенности инновационных беттинг-платформ содержат SSL-криптографию расчётного класса. Поставщики цифрового материала класса Microgaming, NetEnt, Pragmatic Play добавляют усовершенствованные механизмы случайных значений.
Механизм аутентификации профиля подразумевает направления справок KYC-уровня. Свидетельство, подтверждение о финансах, доказательство адреса — стандартный пакет для завершённого доступа.
Резервные ссылки ликвидируют барьеры с запретами организаций. Рабочие дубли адаптируются регулярно IT службами. Карманные приложения часто оперируют лучше браузерных редакций.
Управление банкроллом устанавливает длительную прибыльность азартных периодов. Профессиональные участники советуют сокращать сумму бета до 1-2% от совокупного резерва.
Лицензионные платформы игровых возможностей предоставляют пользователям возможность к высококлассному игровому процессу через dedicated порталы, включая Меллстрой РІС…РѕРґ , что исполняют глобальные требования безопасности.
Процедура регистрации подразумевает внесения валидационных данных через encrypted SSL-каналы. Операторы demanded письменное подтверждение возраста и локации проживания для compliance legal критериев.
Multi-factor аутентификация становится обязательным частью новейших систем security. Участники приобретают SMS-шифры, push-оповещения или эксплуатируют targeted tools типа Google Authenticator.
Альтернативные ссылки нейтрализуют препятствия territorial санкций и DDoS-атак. По сути реплики формируют идентичные клоны основного портала с поддержанием опций и user данных.
Skilled игроки призывают хранить current реестры функционирующих mirrors в favourites обозревателя. Провайдеры рассылают информацию о свежих URL через e-mail, Telegram-каналы и портативные приложения.
Денежные movements через официальные платформы обеспечены криптографическими methods уровня банковского области. Extraction капитала осуществляется solely на проверенные счета владельца учётной записи.
Действующие зеркала легальных гемблинг-платформ на Mellstroy Game зеркало гарантируют непрерывный подключение к развлекательным сервисам. Система дублирования генерирует полноценные копии базового веб-площадки с поддержанием всех механизмов.
Процедура активации через резервную ссылку в точности повторяет главную бланк. Начинающие клиенты вводят действующий email, создают надежный пароль и устанавливают игровую финансовый инструмент.
Верификация счета подразумевает предоставления свидетельств в соответствии с KYC-требованиям. Скан национального документа, верификация адреса и денежные сведения анализируются посредством машинную анализ в течение 24-72 временных единиц.
Логин действующих клиентов осуществляется через обычную панель с 2FA идентификацией. Краткосрочные пароли отправляются на телефонный номер или электронную почту.
Механизмы пополнительного блока через дублирующие порталы предлагает распространенные расчетные механизмы. Visa, Mastercard, виртуальные балансы Skrill, Neteller, виртуальные монеты Bitcoin, Ethereum осуществляются с уменьшенными сборами 0-3%.
Азартная коллекция копируется абсолютно включая автоматы, настольные игры, live-операторов и джекпоты. RTP-параметры, колебания и проигрыш удерживаются точными.
Промо система функционирует схоже главному веб-площадке. Welcome-комплекты, free spins, компенсация и VIP-планы стартуют программно при исполнении установленных стандартов.
To understand
can you buy generic tegretol pills
for communication.
Отбор качественного гемблинг оператора в сегодняшних границах нуждается детального изучения к юридическому состоянию. Знающие пользователи осознают, что Лаки Бир официальный сайт предоставляет актуальную материалы о активных площадках.
Схема создания аккаунта в легальных сервисах включает необходимую валидацию личности. KYC-процедуры оберегают как заведение, так и геймера от фрода. Переходные лимиты на изъятие финансов до завершения контроля – привычная подход.
Программные барьеры на доступ к игровым сервисам преодолеваются через дублирующие URL. Функционирующие дубликаты сохраняют всестороннюю производительность основного сайта. Финансовые операции, интерактивный прогресс и привилегированные предложения остаются неизменными.
Материальная безопасность определяется уровнем внедренных платежных систем. SSL-кодирование, PCI DSS сертификация и расширенная подтверждение устанавливают прочный периметр безопасности.
Интерактивная коллекция сертифицированных площадок включает барабаны от главных создателей. RTP-индексы, волатильность и вероятностные схемы получают внешнюю сертификацию в авторизованных учреждениях.
Системы стимулирования в серьезных сервисах строятся на прозрачных правилах проигрыша. Проигрыш x35-40 оценивается разумным для автомат-поощрений, в то время как стандартные состязания включаются в зачет с уменьшенным множителем.
Действующие зеркала лицензированных игорных заведений на Вавада казино создают стабильный подключение к развлекательным сервисам. Методика дублирования генерирует идентичные копии центрального сайта с консервацией всех инструментов.
Механизм создания аккаунта через зеркало целиком имитирует базовую бланк. Только пришедшие геймеры заполняют активный email, создают сложный шифр и назначают основную денежную единицу.
Подтверждение личного кабинета содержит передачи бумаг опираясь на KYC-требованиям. Скан паспорта, подтверждение места жительства и платежные координаты проходят программную проверку в течение 24-72 часа.
Подключение активных пользователей происходит через классическую модуль с расширенной верификацией. Одноразовые шифры передаются на сотовый номер или почтовый ящик.
Возможности финансового раздела через mirror-сайты содержит актуальные расчетные платформы. Visa, Mastercard, цифровые счета Skrill, Neteller, криптовалюты Bitcoin, Ethereum выполняются с низкими сборами 0-3%.
Гемблинг библиотека копируется полностью включая машины, настольные активности, live-крупье и джекпоты. RTP-показатели, колебания и вейджер удерживаются неизменными.
Акционная политика работает подобно центральному веб-площадке. Welcome-комплекты, free spins, денежный возврат и VIP-программы включаются системно при исполнении определенных параметров.
Передовые участники попадают с препятствием связи к сертифицированным площадкам. Компании ограничивают первичные домены, но опытные казино миллионъ игроки знают о функционировании зеркальных платформ.
Параллельный портал составляет точную дубликат оригинального сайта. Средства защиты остаются аналогичными. Денежные транзакции осуществляются через аналогичные механизмы.
Схема создания аккаунта через дополнительный адрес содержит классической валидации. Специалисты уточняют бумаги для осуществления KYC-требований. Личные данные реализуют усиленную верификацию.
Вносительные лимиты на дополнительных порталах совпадают главным характеристикам. Начальные беты сохраняются фиксированными. Увеличивающиеся банки интегрируются между всеми адресами.
Поощрительные программы оперируют целостно на резервных ресурсах. Отыгрышный коэффициент обеспечивает стартовые параметры. Срок активности проигрывания продолжается.
Служба сопровождения анализирует запросы с резервных ссылок таким же способом. Онлайн переписка предоставляет непрерывный порядок обслуживания.
Передовые операторы развлекательных активностей предоставляют клиентам подключение к профессиональному развлечениям через сертифицированные mad казино зеркало системы. Авторизованная работа влечет выполнения жестких регуляторных стандартов.
Система активации игрового счета задействует валидацию индивидуальных показателей. Провайдеры внедряют многоуровневые процедуры KYC и AML для блокировки нарушающих транзакций.
Электронные платформы инновационных беттинг площадок основываются на надежных серверах с шифровальными стандартами. Локальные запреты принуждает операторов организовывать параллельные URL.
Резервные ресурсы формируют идентичные репликации базового домена с обеспечением всех сервисов и параметров. Беттеры получают устойчивый подключение к средствам, игровой отчетности и пользовательским настройкам.
Банковские переводы выполняются через синхронизированные расчетные шлюзы. Лимиты на пополнения и получения назначаются в согласии с правовыми условиями и собственными правилами контроля угроз.
Профессиональные пользователи указывают отслеживать статус аккредитации через официальные регистры беттинг ведомств. Авторитетные характеристики содержат оценки на специализированных порталах и мнения настоящих беттеров.
http://smartgenrxusa.com/# Smart GenRx USA
Актуальные сервисы развлекательных активностей предлагают клиентам подключение к профессиональному беттингу через проверенные п»ї1xBet порталы. Сертифицированная бизнес влечет соблюдения строгих регуляторных положений.
Процесс активации игрового аккаунта содержит валидацию личных информации. Управляющие внедряют расширенные системы KYC и AML для пресечения мошеннических платежей.
IT средства актуальных игорных домов работают на надежных облачных системах с криптографическими технологиями. Региональная блокировка побуждает владельцев создавать альтернативные домены.
Резервные домены являют собой полные версии центрального домена с удержанием всех возможностей и информации. Игроки получают непрерывный доступ к депозиту, развлекательной статистике и пользовательским настройкам.
Расчетные действия осуществляются через встроенные расчетные системы. Рамки на депозиты и выводы устанавливаются в гармонии с нормативными критериями и собственными правилами минимизации опасностей.
Профессиональные клиенты настаивают контролировать статус аккредитации через государственные реестры гемблинг комиссий. Авторитетные критерии включают оценки на специализированных порталах и комментарии истинных беттеров.
Исследование в секторе официальных ресурсов подразумевает представления передовых методов авторизации. Умелые клиенты эксплуатируют п»ї1хбет для получения современной сведений о функционирующих доменах.
Процедура открытия учетной записи в сертифицированных организациях подразумевает детальную верификацию. Продвинутые провайдеры внедряют KYC-алгоритмы и AML-правила. Документооборот отнимает от 24 до 72 периодов.
Программные способы для избежания ограничений совершенствуются синхронно с интенсификацией законодательных инициатив. VPN-решения типа premium предоставляют кодирование AES-256 и методы OpenVPN. Устойчивость коннекта критически актуальна для высокоролловых партий.
Дублирующие адреса действуют через территориально распределенные технические ресурсы. CDN-структуры поддерживают оптимальную пинг для азиатских игроков. Цифровое роутинг запускается при идентификации барьера главного сайта.
Денежные манипуляции в легальных юрисдикциях подчиняются строгим правилам PCI DSS. Крипто транзакции набирают актуальность благодаря конфиденциальности и оперативности реализации.
Смартфонные софт топовых компаний объединяют голосовую проверку и push-извещения для критических происшествий. Изменяемый внешний вид программно адаптируется под особенности экрана.
Нынешние геймеры встречаются с сложностью соединения к сертифицированным площадкам. Поставщики запрещают базовые ссылки, но опытные типпи казино пользователи помнят о наличии параллельных платформ.
Резервная ссылка образует точную копию первичного платформы. Криптографические алгоритмы поддерживаются аналогичными. Финансовые транзакции реализуются через аналогичные каналы.
Алгоритм создания аккаунта через дополнительный домен требует типовой аутентификации. Администраторы уточняют справки для исполнения KYC-стандартов. Паспортные характеристики выполняют расширенную верификацию.
Банковские границы на дополнительных сайтах совпадают базовым требованиям. Минимальные взносы остаются стабильными. Растущие банки объединяются между множественными ресурсами.
Бонусные планы оперируют комплексно на зеркальных платформах. Требования по обороту обеспечивает первоначальные параметры. Тайминг оборота поддерживается.
Команда обслуживания решает запросы с параллельных ресурсов сходным образом. Онлайн диалог поддерживает непрерывный расписание оперирования.
Ориентирование в пространстве официальных платформ включает представления продвинутых решений подключения. Умелые пользователи используют п»ї1хбет для приобретения актуальной информации о действующих ссылках.
Процесс создания личного кабинета в надежных операторах содержит тщательную проверку. Современные операторы внедряют KYC-алгоритмы и AML-требования. Документальное сопровождение составляет от 24 до 72 интервалов.
IT методы для преодоления блокировок прогрессируют параллельно с усилением регуляторных шагов. VPN-решения категории premium обеспечивают безопасность AES-256 и методы OpenVPN. Устойчивость связи жизненно значима для привилегированных игровых периодов.
Запасные платформы работают через территориально распределенные IT мощности. CDN-сети поддерживают быструю время ответа для американских клиентов. Техническое маршрутизация инициируется при выявлении препятствия главного адреса.
Финансовые операции в проверенных зонах отвечают жестким правилам PCI DSS. Децентрализованные расчеты приобретают популярность из-за приватности и темпу процессинга.
Планшетные софт элитных компаний включают отпечатковую аутентификацию и push-сообщения для критических моментов. Адаптивный оформление автономно подстраивается под особенности монитора.
Лицензионные провайдеры игорных предложений дают пользователям доступ к премиальному гэмблингу через специализированные домены, включая Лаки Бир регистрация , которые придерживаются мировые нормы конфиденциальности.
Алгоритм создания аккаунта требует указания authentication данных через шифрованные SSL-линии. Администрация запрашивают нотариальное verification правоспособности и региона проживания для соблюдения правовых норм.
Двухэтапная проверка считается required составляющей актуальных платформ безопасности. Игроки обретают SMS-ключи, push-notification или задействуют специализированные утилиты в стиле Google Authenticator.
Альтернативные URL нейтрализуют проблемы региональных запретов и DDoS-штурмов. Техническим образом зеркала представляют дублированные версии главного платформы с сохранением функциональности и клиентских сведений.
Skilled клиенты предлагают keeping свежие реестры функционирующих альтернатив в favourites обозревателя. Операторы направляют обновления о актуальных порталах через электронную почту, Telegram-сообщества и мобильные apps.
Платёжные операции через legal платформы защищены шифровальными протоколами категории банковского segment. Получение капитала происходит solely на проверенные wallets собственника аккаунта.
Выбор безопасного игорного оператора нуждается серьезного исследования регулятивных разрешений. Инновационные платформы mad casino предоставляют пользователям безусловную информацию о своих аккредитациях.
Процесс регистрации включает различные требуемых шагов аутентификации. Владельцы просят свидетельства, засвидетельствующие персону и зрелость. Обычный KYC-механизм продолжается от 24 до 72 периодов.
Банкролл-менеджмент открывается с определения пределов на пополнения. Профессиональные участники советуют эксплуатировать правило 5% от общего игорного фонда на единичную раунд.
Электронные запреты операторов вынуждают внедрять резервные пути. Копии сохраняют максимальную производительность центрального ресурса, предусматривая летопись платежей и казино прогресс.
Передовые финансовые способы обеспечивают быстрые взносы через виртуальные счета. Bitcoin, Ethereum и стейблкоины гарантируют приватность и наименьшие сборы. Период реализации изъятий доходит 10-30 промежутков.
Системы верности подразумевают ступенчатые ранги с увеличивающимся компенсацией. VIP-координаторы предлагают эксклюзивные вознаграждения, увеличенные пределы и первоочередную помощь.
At this time it looks like WordPress is
the best blogging platform out there right now.
(from what I’ve read) Is that what you are using on your
blog?
Valuable info. Fortunate me I found your web site accidentally,
and I am shocked why this twist of fate did not took place in advance!
I bookmarked it.
Лицензионные операторы игровых возможностей дают клиентам возможность к элитному азартному досугу через профильные порталы, включая Mellstroy Game casino , что исполняют международные нормы security.
Последовательность регистрации предполагает внесения authentication информации через защищённые SSL-соединения. Менеджмент запрашивают официальное verification правоспособности и адреса нахождения для compliance нормативных правил.
Двухэтапная аутентификация становится принудительным aspect актуальных платформ безопасности. Пользователи получают SMS-ключи, push-оповещения или эксплуатируют специализированные приложения в стиле Google Authenticator.
Дублирующие адреса решают трудности локальных санкций и DDoS-assault. Техническим образом копии представляют идентичные dublicates базового ресурса с поддержанием опций и пользовательских деталей.
Компетентные игроки призывают удерживать новейшие каталоги рабочих зеркал в сохранённых ссылках браузера. Администрация передают новости о fresh адресах через e-mail, Telegram-каналы и портативные приложения.
Платёжные movements через проверенные площадки гарантированы cryptographic технологиями стандарта банковского сектора. Снятие средств выполняется solely на верифицированные wallets владельца профиля.
Исследование в пространстве лицензированных платформ включает осознания новых методов авторизации. Продвинутые игроки эксплуатируют п»ї1хбет официальный сайт для извлечения актуальной фактов о работающих адресах.
Схема открытия личного кабинета в проверенных организациях предполагает детальную подтверждение. Новейшие организации эксплуатируют KYC-алгоритмы и AML-правила. Оформление документов потребляет от 24 до 72 временных отрезков.
IT методы для прохождения запретов совершенствуются сообща с повышением нормативных действий. VPN-решения разряда premium дают защиту AES-256 и технологии OpenVPN. Постоянство соединения fundamentally значима для высокоролловых партий.
Альтернативные домены функционируют через пространственно расположенные компьютерные инфраструктуры. CDN-структуры предоставляют минимальную пинг для глобальных геймеров. Техническое редирект срабатывает при выявлении барьера базового сайта.
Денежные переводы в сертифицированных областях подпадают под четким нормам PCI DSS. Крипто расчеты приобретают распространение в результате анонимности и динамике осуществления.
Смартфонные клиенты премиальных операторов совмещают голосовую идентификацию и push-оповещения для принципиальных ситуаций. Гибкий облик автоматически настраивается под особенности монитора.
Функционирующие зеркала лицензированных казино на казино миллион обеспечивают стабильный доступ к азартным порталам. Схема зеркалирования генерирует эквивалентные дубликаты базового ресурса с консервацией всех инструментов.
Алгоритм создания аккаунта через резервную ссылку полностью воспроизводит основную форму. Свежие игроки заполняют рабочий email, устанавливают защищенный код доступа и фиксируют игровую платежное средство.
Подтверждение личного кабинета требует передачи свидетельств согласно KYC-регламенту. Скан удостоверения личности, валидация регистрации и денежные координаты анализируются посредством машинную контроль в течение 24-72 часа.
Авторизация действующих игроков производится через классическую интерфейс с 2FA идентификацией. Сессионные токены передаются на смс аппарат или мейл.
Функционал финансового блока через mirror-сайты содержит популярные банковские инструменты. Visa, Mastercard, виртуальные портмоне Skrill, Neteller, блокчейн-токены Bitcoin, Ethereum процессируются с оптимизированными процентами 0-3%.
Игровая ассортимент воспроизводится в точности включая spinning games, традиционные игры, live-крупье и джекпоты. RTP-индикаторы, изменчивость и проигрыш поддерживаются аналогичными.
Бонусная система действует похоже главному веб-площадке. Welcome-бандлы, бесплатные вращения, кешбэк и VIP-программы инициируются алгоритмически при выполнении определенных параметров.
I think the admin of this site is really working hard in support of his site, because here every stuff is
quality based information.
Навигация в мире лицензированных платформ предполагает осознания актуальных методов авторизации. Продвинутые пользователи применяют лаки Р±РёСЂ казино для добывания актуальной материалов о действующих ссылках.
Процесс создания профиля в официальных учреждениях охватывает детальную аутентификацию. Новейшие поставщики эксплуатируют KYC-механизмы и AML-нормы. Оформление документов потребляет от 24 до 72 часов.
Программные инструменты для обхода ограничений эволюционируют параллельно с укреплением юридических мер. VPN-сервисы класса premium гарантируют шифрование AES-256 и методы OpenVPN. Устойчивость коннекта принципиально значима для VIP заходов.
Запасные платформы выполняют задачи через территориально рассредоточенные серверные инфраструктуры. CDN-сети предоставляют оптимальную латентность для азиатских пользователей. Автоматическое переключение срабатывает при распознавании барьера главного ресурса.
Экономические движения в проверенных зонах подпадают под жестким нормам PCI DSS. Децентрализованные транзакции приобретают распространение благодаря анонимности и быстроте выполнения.
Планшетные утилиты топовых организаций содержат голосовую проверку и push-сообщения для важных событий. Модифицируемый внешний вид самостоятельно изменяется под свойства матрицы.
Навигация в мире сертифицированных площадок требует владения новых решений соединения. Умелые клиенты задействуют казино Mellstroy Game для получения новейшей сведений о работающих адресах.
Процедура оформления личного кабинета в проверенных организациях охватывает комплексную верификацию. Современные операторы внедряют KYC-протоколы и AML-требования. Оформление документов требует от 24 до 72 часов.
Программные способы для прохождения препятствий совершенствуются параллельно с ужесточением нормативных шагов. VPN-инструменты класса premium обеспечивают безопасность AES-256 и протоколы OpenVPN. Стабильность канала принципиально необходима для высокоролловых сессий.
Резервные сайты работают через локально размещенные серверные ресурсы. CDN-структуры гарантируют сокращенную латентность для глобальных клиентов. Техническое перенаправление активируется при обнаружении барьера центрального ресурса.
Финансовые переводы в проверенных территориях следуют строгим нормам PCI DSS. Децентрализованные операции набирают актуальность благодаря конфиденциальности и скорости реализации.
Портативные клиенты элитных организаций включают физиологическую идентификацию и push-уведомления для важных ситуаций. Настраиваемый внешний вид независимо корректируется под характеристики матрицы.
Новейшие платформы гемблинг игр дают клиентам вход к высококлассному игровому процессу через надежные Лаки Бир сайт ресурсы. Сертифицированная функционирование предполагает следования конкретных контролирующих положений.
Система оформления индивидуального профиля задействует аутентификацию персональных информации. Операторы внедряют многоуровневые процедуры KYC и AML для пресечения фродовых операций.
Электронные решения актуальных казино базируются на надежных хостингах с шифровальными стандартами. Региональная блокировка принуждает администраторов внедрять вспомогательные порталы.
Альтернативные домены составляют точные клоны основного платформы с удержанием всех функций и сведений. Пользователи приобретают постоянный доступ к депозиту, беттинг данным и пользовательским установкам.
Расчетные переводы производятся через синхронизированные финансовые сервисы. Рамки на вклады и обналичивания фиксируются в унисон с регуляторными стандартами и корпоративными правилами управления рисками.
Компетентные клиенты настаивают контролировать состояние аккредитации через надзорные регистры игорных организаций. Репутационные параметры задействуют оценки на отраслевых ресурсах и отзывы подлинных беттеров.
Определение легального гемблинг заведения заставляет тщательного анализа юридических разрешений. Передовые платформы Меллстрой регистрация обеспечивают игрокам полную детали о собственных лицензиях.
Алгоритм создания профиля включает различные принудительных этапов валидации. Представители запрашивают бумаги, засвидетельствующие индивидуальность и дееспособность. Стандартный KYC-регламент занимает от 24 до 72 периодов.
Финансовое планирование стартует с определения пределов на вклады. Опытные пользователи настаивают задействовать правило 5% от совокупного игорного фонда на конкретную сессию.
Технические запреты владельцев обязывают применять дополнительные маршруты. Клоны хранят стопроцентную функциональность центрального площадки, подразумевая историю сделок и казино результаты.
Передовые банковские методы предоставляют скоростные пополнения через блокчейн аккаунты. Bitcoin, Ethereum и устойчивые монеты обеспечивают приватность и наименьшие комиссии. Срок выполнения получений доходит 10-30 отрезков.
Программы лояльности предусматривают иерархические степени с увеличивающимся кэшбэком. VIP-менеджеры дают эксклюзивные вознаграждения, усиленные рамки и приоритетную помощь.
Поиск в области легальных порталов включает осознания передовых методов авторизации. Опытные клиенты эксплуатируют казино 1хбет для получения свежей фактов о действующих путях.
Процедура создания личного кабинета в проверенных компаниях охватывает сложную валидацию. Продвинутые провайдеры используют KYC-механизмы и AML-правила. Документооборот занимает от 24 до 72 часов.
Цифровые инструменты для обхода блокировок улучшаются параллельно с интенсификацией нормативных мер. VPN-службы разряда premium дают кодирование AES-256 и технологии OpenVPN. Постоянство соединения критически важна для высокоролловых сессий.
Зеркальные домены действуют через регионально рассредоточенные цифровые ресурсы. CDN-системы поддерживают быструю время ответа для американских игроков. Техническое роутинг инициируется при выявлении блокировки главного сайта.
Экономические операции в сертифицированных юрисдикциях следуют четким стандартам PCI DSS. Криптовалютные переводы приобретают актуальность по причине конфиденциальности и динамике выполнения.
Переносные утилиты ведущих брендов совмещают лицевую аутентификацию и push-оповещения для ключевых ситуаций. Настраиваемый внешний вид автоматически корректируется под свойства монитора.
Исследование в области легальных порталов подразумевает понимания продвинутых методов входа. Продвинутые игроки применяют винити казино для извлечения свежей материалов о функционирующих адресах.
Процедура оформления счета в официальных организациях подразумевает детальную аутентификацию. Современные поставщики эксплуатируют KYC-алгоритмы и AML-критерии. Документальное сопровождение отнимает от 24 до 72 периодов.
Компьютерные методы для преодоления ограничений эволюционируют сообща с укреплением регуляторных шагов. VPN-платформы типа premium предоставляют шифрование AES-256 и протоколы OpenVPN. Устойчивость связи принципиально значима для VIP заходов.
Альтернативные платформы работают через пространственно распределенные серверные кластеры. CDN-архитектуры гарантируют сокращенную латентность для международных клиентов. Техническое переключение срабатывает при обнаружении барьера центрального домена.
Финансовые переводы в лицензированных территориях следуют строгим стандартам PCI DSS. Децентрализованные переводы приобретают популярность из-за секретности и динамике процессинга.
Планшетные программы топовых компаний интегрируют голосовую проверку и push-сообщения для ключевых моментов. Модифицируемый облик автоматически настраивается под свойства экрана.
Инновационные сервисы развлекательных услуг дают игрокам возможность к премиальному беттингу через проверенные типпи казино сайты. Сертифицированная операционная активность предполагает выполнения определенных правовых положений.
Механизм активации пользовательского аккаунта задействует валидацию индивидуальных реквизитов. Управляющие внедряют детализированные системы KYC и AML для предотвращения фродовых переводов.
Электронные средства передовых игорных домов основываются на зашифрованных дата-центрах с шифровальными протоколами. IP-фильтрация принуждает операторов запускать параллельные адреса.
Параллельные платформы являют собой полные репликации главного ресурса с сохранением всех функций и сведений. Клиенты приобретают беспрепятственный вход к счету, игровой истории и персональным опциям.
Денежные переводы реализуются через встроенные денежные агрегаторы. Ограничения на взносы и выводы определяются в согласии с законодательными требованиями и внутренними правилами риск-менеджмента.
Профессиональные игроки настаивают отслеживать состояние сертификата через официальные каталоги развлекательных комиссий. Престижные параметры включают рейтинги на отраслевых сайтах и мнения настоящих участников.
usa online pharmacies https://maps.google.co.tz/url?sa=t&url=https%3A%2F%2Fcanbaypharm.top pharmacy website
Перемещение в пространстве лицензированных ресурсов предполагает представления продвинутых инструментов входа. Опытные геймеры эксплуатируют Лаки Бир регистрация для получения релевантной фактов о активных ссылках.
Механизм оформления счета в надежных учреждениях подразумевает многоуровневую верификацию. Современные поставщики эксплуатируют KYC-алгоритмы и AML-критерии. Документальная процедура потребляет от 24 до 72 промежутков.
Цифровые методы для прохождения препятствий развиваются сообща с интенсификацией регуляторных решений. VPN-службы категории premium обеспечивают безопасность AES-256 и стандарты OpenVPN. Стабильность коннекта принципиально важна для премиальных заходов.
Зеркальные адреса работают через пространственно размещенные IT кластеры. CDN-комплексы поддерживают минимальную время ответа для глобальных геймеров. Цифровое переключение активируется при распознавании препятствия основного ресурса.
Банковские движения в официальных регионах соответствуют конкретным правилам PCI DSS. Блокчейн операции приобретают распространение вследствие секретности и темпу реализации.
Планшетные программы премиальных организаций совмещают физиологическую аутентификацию и push-извещения для важных происшествий. Изменяемый интерфейс независимо подстраивается под особенности панели.
Проверенные платформы развлекательных услуг гарантируют участникам вариант к премиальному гэмблингу через dedicated домены, включая Вавада официальный сайт , которые именно выполняют международные стандарты конфиденциальности.
Схема создания аккаунта necessita внесения authentication информации через защищённые SSL-connection. Провайдеры просят official удостоверение age verification и локации нахождения для исполнения нормативных правил.
Многоуровневая проверка выступает required составляющей современных solutions security. Users получают SMS-пароли, push-уведомления или задействуют специальные софт по типу Google Authenticator.
Дублирующие адреса ликвидируют препятствия географических санкций и DDoS-воздействий. Фактически копии формируют копийные dublicates центрального сайта с maintaining опций и пользовательских информации.
Опытные клиенты советуют удерживать обновлённые списки действующих альтернатив в сохранённых ссылках браузера. Провайдеры отправляют информацию о новых доменах через e-mail, Telegram-чаты и смартфонные приложения.
Финансовые процедуры через официальные платформы защищены криптографическими протоколами класса банковского области. Extraction денег производится лишь на верифицированные данные собственника учётной записи.
узнать больше
Ваш отдых — наше вдохновение!
ivermectin 5: ivermectin brand – Iver Therapeutics
I do not know if it’s just me or if everyone else encountering issues with your blog.
It looks like some of the written text in your posts are running off
the screen. Can somebody else please provide feedback and let me know if this is happening to them too?
This could be a issue with my browser because I’ve had this happen before.
Many thanks
Навигация в сфере легальных порталов предполагает знания современных способов авторизации. Квалифицированные геймеры эксплуатируют РЎСѓРєР° казино для извлечения современной фактов о активных адресах.
Процесс оформления профиля в надежных операторах охватывает тщательную верификацию. Современные поставщики эксплуатируют KYC-процедуры и AML-критерии. Документальное сопровождение отнимает от 24 до 72 периодов.
IT инструменты для прохождения блокировок прогрессируют синхронно с усилением правовых действий. VPN-сервисы класса premium дают криптографию AES-256 и протоколы OpenVPN. Непрерывность подключения жизненно актуальна для привилегированных партий.
Зеркальные сайты работают через географически расположенные IT кластеры. CDN-системы предоставляют низкую отклик для глобальных участников. Системное переключение инициируется при выявлении недоступности главного сайта.
Платежные движения в лицензированных регионах соответствуют определенным правилам PCI DSS. Блокчейн переводы завоевывают популярность благодаря скрытности и темпу выполнения.
Мобильные программы премиальных провайдеров содержат отпечатковую авторизацию и push-уведомления для важных ситуаций. Изменяемый облик автоматически изменяется под свойства панели.
Проверенные операторы игровых опций гарантируют участникам право к элитному игровому процессу через dedicated сайты, включая million , которые именно выполняют общепринятые стандарты защиты.
Последовательность активации включает указания идентификационных информации через encrypted SSL-линии. Менеджмент требуют официальное удостоверение дееспособности и региона residence для исполнения законодательных норм.
Multi-factor проверка представляет необходимым составляющей актуальных систем безопасности. Участники располагают SMS-шифры, push-сообщения или эксплуатируют dedicated утилиты типа Google Authenticator.
Дублирующие домены преодолевают проблемы географических барьеров и DDoS-нападений. По сути реплики образуют дублированные реплики базового домена с удержанием возможностей и клиентских информации.
Экспертные клиенты предлагают удерживать новейшие перечни рабочих альтернатив в сохранённых ссылках интернет-программы. Management передают updates о fresh порталах через мейл, Telegram-communities и телефонные софт.
Банковские movements через официальные порталы secured криптографическими methods категории банковского segment. Снятие капитала выполняется только на верифицированные счета хозяина аккаунта.
По теме “Лучшие кино-коктейли для коротких поездок в феврале 2026”, есть отличная статья.
Смотрите сами:
https://web-kokteil.ru/%d0%ba%d0%be%d0%ba%d1%82%d0%b5%d0%b9%d0%bb%d0%b8-%d0%b4%d0%bb%d1%8f-%d0%ba%d0%be%d1%80%d0%be%d1%82%d0%ba%d0%b8%d1%85-%d0%b3%d0%be%d1%80%d0%be%d0%b4%d1%81%d0%ba%d0%b8%d1%85-%d0%bf%d0%be%d0%b5%d0%b7/
Neuro Relief USA Neuro Relief USA Neuro Relief USA
Инновационные сервисы беттинг услуг гарантируют беттерам путь к профессиональному развлечениям через безопасные Вавада системы. Лицензированная бизнес предполагает следования четких законодательных критериев.
Механизм регистрации игрового счета включает валидацию индивидуальных показателей. Провайдеры используют многоуровневые механизмы KYC и AML для блокировки нарушающих финансовых действий.
IT инструменты актуальных беттинг площадок работают на стабильных дата-центрах с HTTPS технологиями. Региональная блокировка обязывает владельцев создавать параллельные домены.
Дублирующие домены составляют аналогичные дубликаты базового ресурса с сохранением всех возможностей и сведений. Беттеры достигают стабильный связь к депозиту, развлекательной отчетности и пользовательским конфигурациям.
Банковские действия реализуются через подключенные банковские процессоры. Границы на вклады и получения назначаются в соотношении с законодательными положениями и внутренними правилами контроля угроз.
Компетентные беттеры настаивают проверять положение аккредитации через контролирующие реестры игорных органов. Статусные показатели включают позиции на отраслевых сайтах и комментарии действительных игроков.
Поиск достойного гемблинг портала в современных реалиях требует тщательного анализа к юридическому режиму. Компетентные игроки знают, что Lucky Bear демонстрирует современную сведения о доступных ресурсах.
Механизм записи в лицензированных операторах объединяет принудительную аутентификацию документов. KYC-стандарты защищают как оператора, так и геймера от фрода. Краткосрочные ограничения на снятие средств до закрытия подтверждения – привычная практика.
Технические барьеры на связь к betting сервисам решаются через дублирующие порталы. Функционирующие клоны поддерживают всестороннюю функциональность главного портала. Платежные переводы, интерактивный статистика и льготные планы поддерживаются константными.
Финансовая надежность оценивается критерием внедренных платежных инструментов. SSL-кодирование, PCI DSS аттестация и дополнительная верификация устанавливают надежный контур обороны.
Азартная ассортимент сертифицированных провайдеров объединяет барабаны от лидирующих создателей. RTP-показатели, вариативность и расчетные схемы испытывают беспристрастную проверку в аккредитованных лабораториях.
Программы мотивации в надежных сервисах опираются на понятных параметрах активности. Проигрыш x35-40 характеризуется приемлемым для слот-привилегий, в то время как настольные активности идут в подсчет с сниженным процентом.
Надёжные площадки азартных услуг дают геймерам возможность к элитному гэмблингу через специализированные домены, включая Вавада регистрация , которые специально соблюдают мировые нормы защиты.
Схема открытия счёта подразумевает внесения верификационных деталей через шифрованные SSL-каналы. Администрация demanded нотариальное подтверждение дееспособности и адреса жительства для соблюдения нормативных правил.
Двухэтапная проверка выступает mandatory aspect современных систем безопасности. Игроки имеют SMS-шифры, push-уведомления или эксплуатируют специальные софт по типу Google Authenticator.
Резервные ссылки ликвидируют проблемы региональных запретов и DDoS-атак. Технически зеркала представляют аналогичные версии основного платформы с поддержанием features и пользовательских деталей.
Компетентные участники призывают удерживать current базы действующих дублей в избранном браузера. Букмекеры доставляют информацию о свежих адресах через мейл, Telegram-communities и mobile софт.
Платёжные movements через проверенные платформы гарантированы защитными технологиями level банковского направления. Вывод фондов реализуется solely на верифицированные wallets владельца профиля.
Легальные провайдеры игровых сервисов гарантируют пользователям право к высококлассному азартному досугу через целевые порталы, включая Вавада регистрация , которые исполняют общепринятые стандарты security.
Последовательность регистрации подразумевает ввода идентификационных информации через encrypted SSL-линии. Операторы просят предоставить документальное удостоверение age verification и региона нахождения для выполнения legal критериев.
Многоуровневая идентификация представляет необходимым компонентом передовых механизмов security. Игроки получают SMS-ключи, push-notification или задействуют специализированные tools вроде Google Authenticator.
Mirror домены преодолевают препятствия territorial ограничений и DDoS-штурмов. По сути копии представляют тождественные dublicates центрального ресурса с удержанием функциональности и user данных.
Skilled участники предлагают поддерживать обновлённые перечни рабочих mirrors в bookmark интернет-программы. Management рассылают обновления о актуальных URL через email, Telegram-сообщества и mobile софт.
Финансовые транзакции через надёжные ресурсы покрыты encryption технологиями уровня банковского сектора. Изъятие фондов выполняется единственно на подтверждённые wallets обладателя аккаунта.
Лицензионные платформы азартных предложений обеспечивают участникам право к профессиональному гэмблингу через тематические платформы, включая ретро казино , которые придерживаются общепринятые стандарты надёжности.
Алгоритм регистрации требует предоставления верификационных данных через криптографические SSL-соединения. Операторы просят предоставить официальное подтверждение age verification и региона нахождения для compliance нормативных стандартов.
Многоуровневая проверка является принудительным компонентом современных solutions security. Пользователи обретают SMS-ключи, push-алерты или задействуют dedicated tools по типу Google Authenticator.
Дублирующие ссылки решают вопросы geographic санкций и DDoS-штурмов. Техническим образом зеркала образуют тождественные клоны базового сайта с поддержанием features и пользовательских информации.
Skilled клиенты suggest хранить обновлённые списки working mirrors в закладках интернет-программы. Провайдеры передают информацию о fresh доменах через e-mail, Telegram-сообщества и mobile apps.
Финансовые переводы через официальные ресурсы гарантированы encryption протоколами level банковского индустрии. Вывод денег происходит единственно на validated wallets владельца профиля.
Надёжные операторы развлекательных возможностей гарантируют пользователям доступ к высококлассному гэмблингу через тематические домены, включая СЂР° казино , которые следуют международные регламенты надёжности.
Схема активации требует ввода проверочных параметров через шифрованные SSL-линии. Провайдеры demanded официальное verification совершеннолетия и локации регистрации для соблюдения правовых правил.
Многоуровневая верификация является mandatory составляющей актуальных платформ безопасности. Игроки имеют SMS-пароли, push-уведомления или эксплуатируют targeted tools вроде Google Authenticator.
Mirror URL нейтрализуют трудности региональных ограничений и DDoS-воздействий. По сути реплики формируют копийные клоны базового ресурса с maintaining инструментария и user информации.
Skilled пользователи предлагают сохранять актуальные списки активных копий в bookmark интернет-программы. Management передают обновления о fresh URL через электронную почту, Telegram-communities и мобильные софт.
Платёжные операции через официальные сайты покрыты криптографическими протоколами стандарта банковского segment. Вывод фондов производится solely на верифицированные данные обладателя account.
For resources
can i get cheap zoloft pill
for further reading.
Передовые игроки встречаются с изобилием программных особенностей при операциях с лицензированными платформами. Экспертные платформы типа Mellstroy Game зеркало обеспечивают свежую сведения о работе казино брендов.
Система проверки кабинета предполагает комплекс необходимых фаз. Стартовая подтверждение включает размещения справок верифицирующих гражданство. Классический список включает паспорт, лицензию водителя или внешний паспорт.
Цифровая сторона оформления предполагает эксплуатацию защищенного протокола и 2FA. Экспертные клиенты советуют запускать полный набор предложенных настроек обеспечения.
Дублирующие порталы образуют идентичные дубликаты первичного портала с поддержанием исчерпывающего функционала. Главное бонус выражается в подобии финансовых пределов и критериев условий прокрутки.
Механизм выявления функционирующих резервных ссылок опирается на мониторинге профессиональных информационных каналов и сотрудничающих ресурсов. Продвинутые клиенты эксплуатируют анонимайзеры для предоставления стабильного связи независимо от географических барьеров.
Действующие mirror-ссылки официальных казино на Lucky Bear обеспечивают стабильный подключение к игровым системам. Система копирования формирует точные копии главного веб-площадки с консервацией всех возможностей.
Механизм создания аккаунта через дублирующий портал в точности воспроизводит базовую заявку. Дебютные игроки регистрируют действующий email, устанавливают сложный пароль и назначают операционную денежную единицу.
Валидация счета подразумевает передачи документов согласно KYC-нормам. Фото водительских прав, верификация резиденции и финансовые сведения анализируются посредством программную анализ в течение 24-72 часа.
Логин активных клиентов осуществляется через обычную интерфейс с 2FA валидацией. Разовые ключи доставляются на смс аппарат или электронную почту.
Возможности денежного блока через дублирующие порталы предлагает топовые расчетные сервисы. Visa, Mastercard, цифровые балансы Skrill, Neteller, блокчейн-токены Bitcoin, Ethereum процессируются с сокращенными взносами 0-3%.
Развлекательная ассортимент дублируется в точности включая spinning games, классические игры, live-операторов и максимальные награды. RTP-коэффициенты, колебания и проигрыш поддерживаются аналогичными.
Подарочная система работает подобно главному домену. Welcome-комплекты, free spins, денежный возврат и VIP-системы активируются системно при соблюдении определенных стандартов.
Appreciation to my father who stated to me on the topic of this weblog, this blog is genuinely amazing.
Передовые бетторы сталкиваются с сложностью связи к сертифицированным платформам. Провайдеры ограничивают главные URL, но опытные тип топ казино посетители понимают о функционировании дублирующих порталов.
Альтернативный адрес формирует идентичную копию первичного ресурса. Протоколы шифрования поддерживаются такими же. Расчётные операции осуществляются через аналогичные системы.
Технология заведения учётной записи через параллельный ресурс подразумевает типовой аутентификации. Операторы требуют документы для выполнения KYC-стандартов. Индивидуальные данные проходят комплексную аутентификацию.
Пополнительные рамки на параллельных ресурсах идентичны главным параметрам. Начальные взносы продолжают стабильными. Растущие призовые фонды объединяются между различными порталами.
Премиальные программы оперируют комплексно на параллельных ресурсах. Множитель ставок удерживает оригинальные параметры. Длительность оборота остаётся прежним.
Команда помощи обрабатывает обращения с резервных адресов таким же способом. Мгновенный общение осуществляет постоянный режим работы.
Выбор качественного betting площадки в современных условиях подразумевает детального подхода к законному состоянию. Опытные игроки понимают, что Вавада регистрация отображает современную материалы о действующих сервисах.
Процесс создания аккаунта в проверенных площадках содержит требуемую валидацию документов. KYC-нормы защищают как оператора, так и клиента от афер. Временные пределы на перечисление денег до закрытия валидации – привычная система.
Электронные барьеры на доступ к азартным сайтам решаются через альтернативные ссылки. Действующие отражения обеспечивают полную работоспособность базового ресурса. Денежные транзакции, игровой продвижение и наградные системы продолжают константными.
Денежная гарантированность выражается степенью эксплуатируемых платежных механизмов. SSL-защита, PCI DSS валидация и дополнительная аутентификация создают надежный заслон защиты.
Развлекательная набор легальных операторов предоставляет машины от известных создателей. RTP-значения, изменчивость и математические формулы претерпевают объективную сертификацию в утвержденных центрах.
Планы мотивации в качественных заведениях формируются на прозрачных правилах отыгрыша. Проигрыш x35-40 оценивается разумным для барабан-привилегий, в то время как классические состязания включаются в расчет с пониженным показателем.
https://neuroreliefusa.shop/# neurontin over the counter
Перемещение в мире официальных платформ предполагает знания актуальных инструментов доступа. Квалифицированные участники задействуют Вавада казино для приобретения новейшей материалов о активных URL.
Процедура формирования личного кабинета в надежных операторах включает сложную аутентификацию. Передовые операторы применяют KYC-протоколы и AML-требования. Документооборот потребляет от 24 до 72 временных отрезков.
Цифровые технологии для избежания ограничений совершенствуются сообща с усилением законодательных действий. VPN-платформы разряда premium обеспечивают защиту AES-256 и стандарты OpenVPN. Непрерывность соединения fundamentally важна для VIP игровых периодов.
Запасные адреса оперируют через географически распределенные серверные мощности. CDN-сети обеспечивают быструю время ответа для американских клиентов. Автоматическое переключение срабатывает при идентификации барьера главного ресурса.
Денежные переводы в лицензированных юрисдикциях следуют конкретным правилам PCI DSS. Децентрализованные расчеты набирают популярность по причине конфиденциальности и темпу выполнения.
Переносные программы премиальных брендов совмещают лицевую аутентификацию и push-оповещения для ключевых происшествий. Изменяемый дизайн программно подстраивается под характеристики дисплея.
Поиск в области официальных платформ требует понимания современных инструментов подключения. Умелые геймеры эксплуатируют казино JVSpin для получения свежей информации о действующих ссылках.
Схема регистрации счета в сертифицированных заведениях содержит многоуровневую проверку. Продвинутые поставщики применяют KYC-протоколы и AML-правила. Документальная процедура составляет от 24 до 72 интервалов.
IT инструменты для минования препятствий улучшаются синхронно с укреплением юридических действий. VPN-платформы класса premium предоставляют шифрование AES-256 и стандарты OpenVPN. Постоянство связи fundamentally важна для премиальных заходов.
Резервные адреса выполняют задачи через территориально распределенные технические мощности. CDN-сети гарантируют минимальную латентность для глобальных пользователей. Техническое маршрутизация запускается при обнаружении блокировки главного адреса.
Экономические переводы в легальных зонах соответствуют жестким стандартам PCI DSS. Блокчейн транзакции получают актуальность по причине конфиденциальности и оперативности реализации.
Мобильные утилиты премиальных компаний совмещают физиологическую авторизацию и push-сообщения для принципиальных ситуаций. Изменяемый облик независимо корректируется под характеристики экрана.
Инновационные порталы беттинг активностей гарантируют клиентам возможность к премиальному беттингу через проверенные п»ї1xBet порталы. Авторизованная работа нуждается выполнения строгих контролирующих стандартов.
Процедура открытия пользовательского счета предусматривает верификацию индивидуальных данных. Администраторы используют расширенные системы KYC и AML для недопущения поддельных транзакций.
Программные платформы актуальных гемблинг платформ основываются на стабильных инфраструктурах с SSL стандартами. Региональная блокировка обязывает владельцев разрабатывать дублирующие адреса.
Резервные сайты представляют точные клоны базового платформы с обеспечением всех сервисов и сведений. Беттеры обеспечивают себе беспрепятственный вход к капиталу, азартной истории и клиентским настройкам.
Банковские транзакции выполняются через подключенные банковские агрегаторы. Границы на вклады и изъятия устанавливаются в унисон с правовыми условиями и индивидуальными правилами снижения потерь.
Опытные пользователи указывают отслеживать статус разрешения через официальные списки азартных организаций. Престижные параметры включают рейтинги на специализированных порталах и оценки реальных игроков.
Выбор безопасного казино площадки нуждается глубокого исследования юридических свидетельств. Актуальные системы Лаки Бир зеркало предоставляют игрокам абсолютную сведения о своих допусках.
Процесс создания профиля включает несколько принудительных фаз валидации. Владельцы просят справки, доказывающие индивидуальность и совершеннолетие. Традиционный KYC-процесс составляет от 24 до 72 временных отрезков.
Банкролл-менеджмент запускается с фиксации рамок на депозиты. Профессиональные клиенты рекомендуют эксплуатировать норму 5% от совокупного игорного средств на единичную сессию.
Электронные ограничения провайдеров побуждают задействовать вспомогательные пути. Дубликаты оберегают безусловную активность первичного платформы, предусматривая архив операций и гемблинг прогресс.
Передовые финансовые способы обеспечивают моментальные вклады через криптовалютные счета. Bitcoin, Ethereum и стейблкоины гарантируют конфиденциальность и мизерные платежи. Продолжительность проведения изъятий доходит 10-30 минут.
Алгоритмы лояльности включают каскадные статусы с возрастающим кэшбэком. VIP-консультанты обеспечивают персонализированные бонусы, повышенные лимиты и приоритетную помощь.
Wonderful items from you, man. I’ve take note your stuff previous to and you’re simply
extremely great. I really like what you’ve got right here, certainly like what you are saying and the best
way by which you assert it. You’re making it enjoyable and you continue to care for to keep it sensible.
I can not wait to learn much more from you. This is actually a tremendous site.
Передовые участники попадают с препятствием подключения к проверенным платформам. Поставщики ограничивают основные порталы, но искушённые lucky bear скачать участники учитывают о доступности резервных сайтов.
Альтернативный адрес представляет полную копию базового сайта. SSL-сертификаты поддерживаются такими же. Банковские процедуры реализуются через аналогичные механизмы.
Процедура создания аккаунта через резервный ссылку включает привычной валидации. Сотрудники запрашивают документы для исполнения KYC-правил. Личные параметры подвергаются комплексную проверку.
Вносительные ограничения на дополнительных площадках соответствуют стандартным требованиям. Наименьшие суммы функционируют стабильными. Прогрессивные выигрышные пулы согласовываются между множественными ссылками.
Льготные планы выполняются всесторонне на альтернативных порталах. Множитель ставок гарантирует базовые цифры. Временные рамки оборота не изменяется.
Команда ассистирования решает обращения с альтернативных ресурсов идентично. Интерактивный общение поддерживает круглосуточный формат деятельности.
Современные геймеры натыкаются с затруднением входа к легальным платформам. Провайдеры фильтруют базовые адреса, но знающие probeg-ag.ru посетители знают о доступности параллельных порталов.
Параллельный портал составляет точную дубликат первичного платформы. Криптографические алгоритмы остаются аналогичными. Расчётные процедуры осуществляются через те же шлюзы.
Технология оформления профиля через зеркальный портал требует привычной проверки. Администраторы запрашивают бумаги для выполнения KYC-правил. Личные данные подвергаются многоуровневую верификацию.
Депозитные рамки на резервных площадках идентичны базовым условиям. Начальные беты продолжают константными. Увеличивающиеся банки согласовываются между множественными ресурсами.
Поощрительные системы функционируют всесторонне на резервных площадках. Множитель ставок сохраняет первоначальные цифры. Период действия проигрывания не изменяется.
Отдел обслуживания изучает обращения с резервных доменов сходным образом. Интерактивный общение обеспечивает постоянный график оперирования.
Официальные платформы игровых услуг oferuja игрокам доступ к качественному гэмблингу через профильные сайты, включая казино Меллстрой , которые именно выполняют мировые критерии безопасности.
Процедура создания аккаунта включает указания идентификационных сведений через encrypted SSL-линии. Операторы требуют official подтверждение правоспособности и адреса проживания для compliance нормативных требований.
Двухэтапная верификация выступает принудительным элементом актуальных solutions защиты. Users приобретают SMS-шифры, push-уведомления или задействуют targeted приложения типа Google Authenticator.
Mirror адреса ликвидируют трудности geographic запретов и DDoS-штурмов. С технической точки зрения зеркала формируют дублированные клоны центрального портала с maintaining опций и клиентских сведений.
Экспертные геймеры рекомендуют хранить свежие перечни действующих зеркал в избранном browser. Букмекеры передают обновления о свежих доменах через email, Telegram-каналы и портативные утилиты.
Банковские операции через лицензионные сайты покрыты cryptographic технологиями level банковского segment. Вывод финансов осуществляется только на проверенные wallets владельца личного кабинета.
Новейшие геймеры сталкиваются с изобилием программных нюансов при функционировании с сертифицированными ресурсами. Профильные сайты типа Вавада сайт предоставляют релевантную материалы о операциях игорных компаний.
Механизм аутентификации профиля охватывает множество необходимых уровней. Стартовая проверка нуждается предоставления бумаг подтверждающих персону. Обычный пакет предполагает документ, лицензию водителя или международное ID.
Техническая элемент открытия счета включает применение защищенного протокола и 2FA. Экспертные игроки настаивают активировать максимум доступных параметров защиты.
Запасные домены являются точные копии основного сайта с удержанием всего инструментария. Ключевое достоинство заключается в идентичности банковских рамок и критериев проигрыша.
Схема обнаружения действующих дублирующих порталов строится на мониторинге специализированных мессенджер групп и связанных платформ. Квалифицированные клиенты внедряют прокси-соединения для обеспечения устойчивого соединения безотносительно от местных лимитов.
cam porn
Новейшие платформы гемблинг активностей предоставляют клиентам возможность к премиальному беттингу через проверенные п»ї1хбет сайт сайты. Официальная бизнес подразумевает учета конкретных регуляторных требований.
Механизм регистрации клиентского кабинета включает подтверждение индивидуальных показателей. Управляющие задействуют комплексные процедуры KYC и AML для блокировки незаконных переводов.
Технические средства передовых казино строятся на защищенных дата-центрах с SSL протоколами. Локальные запреты заставляет владельцев разрабатывать параллельные домены.
Резервные домены являют собой точные дубликаты главного платформы с фиксацией всех сервисов и информации. Беттеры приобретают непрерывный соединение к балансу, развлекательной данным и персональным параметрам.
Банковские действия осуществляются через встроенные платежные системы. Рамки на инвестиции и получения устанавливаются в соответствии с нормативными положениями и внутренними политиками минимизации опасностей.
Компетентные игроки предлагают контролировать статус аккредитации через надзорные реестры развлекательных организаций. Авторитетные параметры включают ранги на отраслевых сайтах и мнения реальных беттеров.
С http://princefka.ru вы сможете легко регулировать освещение и создавать комфортную атмосферу одним нажатием.
Это особенно удобно для тех, кто привык использовать гаджеты в повседневной жизни.
—
Такое решение подходит людям, ценящим современные технологии и комфорт.
Выбор проверенного гемблинг оператора подразумевает серьезного анализа юридических свидетельств. Актуальные системы Vavada казино предоставляют клиентам безусловную информацию о своих лицензиях.
Алгоритм оформления счета предусматривает определенное количество требуемых фаз подтверждения. Владельцы настаивают бумаги, подтверждающие индивидуальность и совершеннолетие. Обычный KYC-регламент длится от 24 до 72 промежутков.
Распоряжение капиталом открывается с определения границ на депозиты. Искусные геймеры настаивают эксплуатировать принцип 5% от итогового казино капитала на единичную раунд.
Программные ограничения операторов заставляют задействовать альтернативные домены. Альтернативы сохраняют безусловную функциональность базового ресурса, включая архив платежей и казино продвижение.
Современные расчетные инструменты дают быстрые инвестиции через электронные хранилища. Bitcoin, Ethereum и стейблкоины поддерживают скрытность и минимальные комиссии. Время обработки извлечений равно 10-30 минут.
Программы лояльности охватывают иерархические степени с прогрессивным компенсацией. VIP-менеджеры обеспечивают персонализированные поощрения, расширенные лимиты и преимущественную обслуживание.
Нынешние участники имеют дело с набором программных нюансов при деятельности с легальными платформами. Профессиональные порталы типа казино лаки Р±РёСЂ поставляют актуальную сведения о процессах игорных организаций.
Система аутентификации кабинета подразумевает набор принудительных этапов. Начальная аутентификация нуждается отправки удостоверений доказывающих персону. Типовой список содержит удостоверение личности, лицензию водителя или международный паспорт.
Программная элемент регистрации охватывает использование SSL-шифрования и двухуровневой проверки. Квалифицированные игроки настаивают инициировать совокупность предложенных настроек обеспечения.
Запасные домены формируют абсолютные отражения главного портала с хранением полного арсенала. Центральное выгода состоит в подобии финансовых пределов и требований вейджера.
Схема поиска актуальных дублирующих порталов фундируется на проверке профильных информационных каналов и связанных порталов. Квалифицированные клиенты внедряют прокси-соединения для создания устойчивого соединения без оглядки от географических лимитов.
generic prednisone
Поиск в области официальных площадок включает осознания продвинутых инструментов авторизации. Умелые клиенты эксплуатируют казино РЎСѓРєР° для извлечения современной фактов о активных путях.
Алгоритм открытия профиля в проверенных организациях включает комплексную аутентификацию. Продвинутые поставщики задействуют KYC-механизмы и AML-стандарты. Оформление документов занимает от 24 до 72 промежутков.
IT методы для прохождения ограничений развиваются параллельно с усилением законодательных действий. VPN-сервисы типа premium дают криптографию AES-256 и стандарты OpenVPN. Устойчивость коннекта кардинально значима для VIP раундов.
Дублирующие сайты функционируют через локально расположенные компьютерные мощности. CDN-архитектуры обеспечивают минимальную отклик для европейских геймеров. Цифровое перенаправление инициируется при выявлении ограничения первичного портала.
Банковские переводы в проверенных территориях подчиняются строгим требованиям PCI DSS. Криптовалютные платежи приобретают популярность вследствие анонимности и динамике выполнения.
Мобильные программы ведущих компаний совмещают биометрическую идентификацию и push-сообщения для важных происшествий. Гибкий внешний вид автономно изменяется под свойства матрицы.
stromectol 3 mg dosage: Iver Therapeutics – ivermectin pills canada
Определение безопасного азартного площадки в текущих рамках заставляет детального анализа к регулятивному режиму. Компетентные геймеры представляют, что Меллстрой казино отображает последнюю информацию о доступных провайдерах.
Процедура записи в сертифицированных сервисах предусматривает требуемую подтверждение удостоверения. KYC-стандарты оберегают как казино, так и игрока от фрода. Краткосрочные лимиты на перечисление активов до окончания верификации – типичная подход.
Электронные блокировки на подключение к азартным ресурсам преодолеваются через зеркальные домены. Активные дубликаты поддерживают стопроцентную возможности первичного платформы. Банковские транзакции, игровой результаты и поощрительные планы сохраняются константными.
Капитальная надежность характеризуется показателем используемых финансовых систем. SSL-шифрование, PCI DSS аттестация и многоуровневая верификация создают защищенный барьер безопасности.
Геймплейная набор проверенных заведений охватывает слоты от ведущих создателей. RTP-индексы, изменчивость и статистические схемы получают внешнюю проверку в одобренных институтах.
Механизмы стимулирования в качественных казино основываются на открытых правилах ставок. Проигрыш x35-40 расценивается приемлемым для барабан-подарков, в то время как стандартные состязания засчитываются в зачет с пониженным множителем.
Перемещение в секторе официальных порталов включает знания продвинутых технологий доступа. Опытные пользователи эксплуатируют п»ї1хбет РІС…РѕРґ для приобретения свежей материалов о активных путях.
Схема открытия учетной записи в проверенных организациях охватывает комплексную подтверждение. Актуальные организации эксплуатируют KYC-протоколы и AML-нормы. Документальная процедура потребляет от 24 до 72 часов.
Цифровые методы для минования блокировок эволюционируют синхронно с усилением нормативных шагов. VPN-службы разряда premium предлагают кодирование AES-256 и системы OpenVPN. Непрерывность связи принципиально значима для привилегированных заходов.
Зеркальные сайты функционируют через территориально рассредоточенные IT мощности. CDN-системы обеспечивают минимальную задержку для американских игроков. Техническое переключение включается при идентификации ограничения основного сайта.
Экономические движения в официальных территориях отвечают определенным критериям PCI DSS. Децентрализованные платежи набирают распространение вследствие конфиденциальности и быстроте выполнения.
Смартфонные утилиты ведущих компаний интегрируют физиологическую проверку и push-уведомления для принципиальных эпизодов. Адаптивный облик самостоятельно адаптируется под настройки панели.
Беттинговая индустрия являет быстрый развитие, заинтересовывая множество игроков. Квалифицированные ресурсы дают надёжную пространство для ставок. Детальную информацию о данных провайдерах реально получить на Вован казино .
Сертификация составляет ключевым критерием селекции портала. Юрисдикции Мальты предоставляют серьёзный аудит валютных манипуляций. Отдельная легальная сайт подвергается периодические контроли RNG-алгоритмов.
Компьютерные параметры инновационных беттинг-платформ объединяют SSL-безопасность расчётного ранга. Производители компьютерного обеспечения наподобие Microgaming, NetEnt, Pragmatic Play интегрируют многоуровневые модели случайных параметров.
Механизм проверки аккаунта предполагает передачи справок KYC-уровня. Документ, свидетельство о заработке, верификация проживания — базовый набор для завершённого активации.
Резервные URL исправляют проблемы с ограничениями провайдеров. Функционирующие зеркала корректируются систематически IT специалистами. Мобильные программы обычно функционируют надёжнее веб форматов.
Финансовая дисциплина задаёт перспективную успешность игровых сессий. Опытные игроки предлагают лимитировать объём бета до 1-2% от итогового банкролла.
Проверенные платформы развлекательных возможностей гарантируют участникам возможность к качественному развлечениям через специализированные порталы, включая тип топ казино , что выполняют глобальные стандарты надёжности.
Схема оформления профиля включает внесения authentication параметров через безопасные SSL-линии. Менеджмент требуют official verification age verification и места проживания для compliance законодательных стандартов.
Двухэтапная authentication представляет принудительным aspect актуальных solutions безопасности. Пользователи располагают SMS-пароли, push-уведомления или используют специализированные софт типа Google Authenticator.
Зеркальные домены решают трудности territorial блокировок и DDoS-штурмов. С технической точки зрения дубли представляют аналогичные версии primary ресурса с поддержанием опций и индивидуальных параметров.
Опытные пользователи призывают поддерживать свежие базы working альтернатив в закладках интернет-программы. Букмекеры отправляют обновления о fresh адресах через электронную почту, Telegram-чаты и mobile софт.
Банковские процедуры через официальные сайты гарантированы криптографическими алгоритмами категории банковского области. Снятие капитала реализуется лишь на верифицированные реквизиты обладателя личного кабинета.
Поиск качественного азартного площадки в нынешних рамках требует особого анализа к юридическому состоянию. Знающие участники учитывают, что Mellstroy Game казино демонстрирует актуальную данные о функционирующих операторах.
Схема открытия счета в легальных сервисах объединяет неизбежную аутентификацию личности. KYC-процедуры обеспечивают как оператора, так и пользователя от мошенничества. Кратковременные рамки на перечисление капитала до выполнения проверки – типичная методика.
Виртуальные барьеры на доступ к развлекательным ресурсам нейтрализуются через резервные адреса. Функционирующие отражения сохраняют тотальную работоспособность первичного ресурса. Расчетные переводы, развлекательный продвижение и бонусные планы остаются константными.
Экономическая стабильность измеряется качеством внедренных платежных способов. SSL-шифрование, PCI DSS валидация и расширенная аутентификация устанавливают надежный барьер защиты.
Геймплейная каталог официальных заведений объединяет спины от известных студий. RTP-индексы, волатильность и алгоритмические формулы испытывают независимую проверку в признанных институтах.
Схемы поощрения в надежных заведениях строятся на четких требованиях активности. Условия ставок x35-40 характеризуется нормальным для спин-поощрений, в то время как настольные развлечения засчитываются в калькуляцию с минимальным процентом.
Актуальные участники встречаются с множеством технических нюансов при деятельности с лицензированными порталами. Профильные источники типа Lucky Bear казино обеспечивают современную сведения о процессах гэмблинговых провайдеров.
Процесс проверки учетной записи подразумевает набор неотъемлемых уровней. Базовая верификация предполагает отправки документов удостоверяющих индивидуальность. Классический набор предполагает ID, автолицензию или загранпаспорт.
Программная элемент записления предполагает использование безопасного соединения и двухуровневой проверки. Опытные клиенты рекомендуют инициировать совокупность доступных функций секьюрити.
Резервные ссылки представляют абсолютные дубликаты базового ресурса с поддержанием всего набора функций. Ключевое достоинство выражается в тождественности платежных пределов и требований ставочных требований.
Система обнаружения рабочих запасных доменов опирается на проверке профессиональных телеграм-каналов и связанных порталов. Опытные пользователи эксплуатируют VPN-сервисы для гарантирования постоянного входа вне зависимости от территориальных блокировок.
buying neurontin online: Neuro Relief USA – generic neurontin 300 mg
Поиск честного гемблинг заведения предполагает тщательного анализа лицензионных сертификатов. Передовые платформы п»ї1хбет сайт предлагают пользователям максимальную данные о действующих аккредитациях.
Система регистрации включает несколько ключевых стадий валидации. Владельцы просят справки, засвидетельствующие персону и зрелость. Традиционный KYC-регламент длится от 24 до 72 интервалов.
Распоряжение капиталом инициируется с фиксации пределов на вклады. Опытные игроки предлагают использовать установку 5% от общего казино капитала на отдельную раунд.
Технические запреты поставщиков побуждают применять дополнительные ссылки. Зеркала оберегают абсолютную производительность центрального ресурса, включая архив переводов и азартный результаты.
Инновационные расчетные способы обеспечивают оперативные инвестиции через криптовалютные аккаунты. Bitcoin, Ethereum и стейблкоины предоставляют скрытность и наименьшие отчисления. Продолжительность обработки получений составляет 10-30 минут.
Системы преданности охватывают ступенчатые категории с увеличивающимся возвратом. VIP-кураторы дают личные награды, расширенные лимиты и первоочередную обслуживание.
Навигация в области проверенных площадок требует владения передовых инструментов входа. Квалифицированные игроки применяют Меллстрой зеркало для приобретения новейшей фактов о активных адресах.
Процедура оформления аккаунта в проверенных операторах охватывает комплексную валидацию. Новейшие провайдеры эксплуатируют KYC-алгоритмы и AML-критерии. Бумажная работа отнимает от 24 до 72 периодов.
Компьютерные инструменты для минования запретов развиваются одновременно с интенсификацией регуляторных действий. VPN-сервисы категории premium предлагают защиту AES-256 и методы OpenVPN. Надежность подключения жизненно существенна для премиальных раундов.
Альтернативные сайты действуют через географически разнесенные технические ресурсы. CDN-комплексы обеспечивают низкую пинг для европейских геймеров. Автоматическое перенаправление срабатывает при обнаружении недоступности главного домена.
Платежные переводы в проверенных регионах отвечают жестким критериям PCI DSS. Децентрализованные переводы получают признание по причине приватности и динамике выполнения.
Планшетные софт лучших брендов объединяют лицевую идентификацию и push-оповещения для критических ситуаций. Настраиваемый облик автономно адаптируется под параметры экрана.
Передовые геймеры встречаются с препятствием доступа к легальным порталам. Организации блокируют основные URL, но опытные казино аква игроки помнят о существовании параллельных порталов.
Зеркало представляет абсолютную отображение главного портала. SSL-сертификаты сохраняются аналогичными. Расчётные процедуры проходят через аналогичные сервисы.
Алгоритм открытия счёта через параллельный адрес содержит стандартной подтверждения. Операторы выясняют удостоверения для соблюдения KYC-регламентов. Индивидуальные информация реализуют многоуровневую валидацию.
Финансовые лимиты на альтернативных платформах равняются стандартным характеристикам. Минимальные беты поддерживаются стабильными. Увеличивающиеся банки согласовываются между множественными доменами.
Льготные схемы оперируют всесторонне на дополнительных ресурсах. Вейджер удерживает исходные цифры. Период действия проигрывания не изменяется.
Служба сопровождения обрабатывает вопросы с резервных порталов равнозначно. Онлайн переписка предоставляет круглосуточный график работы.
Выбор надежного развлекательного оператора в текущих рамках подразумевает тщательного изучения к правовому состоянию. Профессиональные участники представляют, что Голд казино отображает новую информацию о доступных операторах.
Процедура открытия счета в проверенных сервисах объединяет необходимую аутентификацию удостоверения. KYC-нормы оберегают как площадку, так и игрока от обмана. Кратковременные лимиты на перечисление денег до завершения верификации – обычная система.
Программные барьеры на подключение к игровым ресурсам устраняются через альтернативные ссылки. Рабочие зеркала обеспечивают полную эффективность основного ресурса. Финансовые переводы, геймплейный прогресс и бонусные схемы сохраняются устойчивыми.
Капитальная защищенность измеряется критерием используемых финансовых систем. SSL-кодирование, PCI DSS сертификация и расширенная идентификация гарантируют защищенный периметр безопасности.
Геймплейная коллекция проверенных провайдеров содержит слоты от главных производителей. RTP-параметры, вариативность и вероятностные модели проходят объективную контроль в авторизованных организациях.
Программы вознаграждения в качественных операторах строятся на открытых требованиях активности. Вейджер x35-40 характеризуется разумным для барабан-подарков, в то время как стандартные активности идут в расчет с уменьшенным процентом.
Experience the intensity of this historical saga. The Nightingale PDF is ready for your device. It is a novel that paints a vivid picture of life in France during the war, filled with unforgettable characters and moments. https://thenightingalepdf.top/ the nightingale kristin hannah movie
Передовые участники оказываются с препятствием соединения к сертифицированным площадкам. Провайдеры ограничивают первичные порталы, но искушённые Vavada казино посетители знают о наличии дублирующих площадок.
Альтернативный адрес образует абсолютную копию основного сайта. Криптографические алгоритмы функционируют аналогичными. Денежные транзакции реализуются через аналогичные сервисы.
Алгоритм оформления профиля через зеркальный домен подразумевает классической валидации. Специалисты требуют свидетельства для осуществления KYC-стандартов. Идентификационные характеристики осуществляют многоуровневую подтверждение.
Пополнительные ограничения на дополнительных порталах идентичны базовым характеристикам. Наименьшие суммы функционируют постоянными. Увеличивающиеся выигрышные пулы интегрируются между множественными доменами.
Премиальные планы выполняются комплексно на альтернативных площадках. Отыгрышный коэффициент обеспечивает базовые параметры. Срок активности отыгрыша не изменяется.
Сервис сопровождения рассматривает вопросы с резервных доменов идентично. Онлайн чат предоставляет непрерывный порядок функционирования.
Выбор качественного гемблинг портала в актуальных границах предполагает специального подхода к юридическому статусу. Квалифицированные участники знают, что п»ї1хбет регистрация отображает новую материалы о работающих площадках.
Механизм создания аккаунта в проверенных операторах объединяет принудительную верификацию идентичности. KYC-требования охраняют как оператора, так и пользователя от мошенничества. Краткосрочные пределы на получение денег до окончания подтверждения – нормальная система.
Электронные препятствия на вход к гемблинг площадкам решаются через параллельные URL. Рабочие клоны предоставляют тотальную работоспособность главного платформы. Денежные операции, игровой продвижение и поощрительные программы остаются константными.
Капитальная надежность измеряется качеством внедренных расчетных способов. SSL-защита, PCI DSS валидация и расширенная подтверждение гарантируют защищенный периметр обороны.
Интерактивная набор официальных операторов содержит машины от лидирующих провайдеров. RTP-значения, колебания и математические формулы получают беспристрастную сертификацию в авторизованных институтах.
Программы мотивации в надежных казино основываются на прозрачных условиях проигрыша. Проигрыш x35-40 считается разумным для барабан-привилегий, в то время как стандартные активности учитываются в зачет с пониженным показателем.
Join the legions of fans. The A Court of Mist and Fury PDF is a cultural phenomenon. This digital book connects you to the world. Get the copy and be part of the movement. https://acourtofmistandfurypdf.top/ Download A Court Of Mist And Fury Pdf
http://yangwalab.com/index.php/Instant_Solutions_To_Blog_In_Step_By_Step_Detail [https://cac5.altervista.org/index.php?title=Utente:Randell61I]
legitimate online pharmacies in canada
Подбор честного развлекательного оператора требует тщательного исследования лицензионных бумаг. Актуальные ресурсы лаки Р±РёСЂ казино гарантируют игрокам полную данные о текущих разрешениях.
Алгоритм оформления счета подразумевает ряд требуемых шагов аутентификации. Представители просят свидетельства, устанавливающие индивидуальность и возраст. Обычный KYC-порядок занимает от 24 до 72 интервалов.
Управление банком начинается с установления границ на пополнения. Искусные геймеры призывают использовать установку 5% от совокупного развлекательного бюджета на одну игру.
Цифровые запреты провайдеров заставляют внедрять альтернативные пути. Клоны оберегают безусловную производительность центрального платформы, включая архив операций и развлекательный достижения.
Актуальные платежные сервисы дают быстрые депозиты через блокчейн аккаунты. Bitcoin, Ethereum и стейблкоины обеспечивают приватность и крошечные комиссии. Продолжительность обработки извлечений достигает 10-30 минут.
Программы приверженности подразумевают каскадные уровни с накапливающимся бонусом. VIP-кураторы дают эксклюзивные вознаграждения, увеличенные пределы и преимущественную обслуживание.
Актуальные бетторы сталкиваются с сложностью подключения к лицензированным сайтам. Провайдеры закрывают основные порталы, но профессиональные Mellstroy Game клиенты знают о доступности зеркальных сайтов.
Зеркало является точную отображение основного площадки. Протоколы шифрования функционируют такими же. Банковские транзакции реализуются через сходные шлюзы.
Алгоритм открытия счёта через параллельный домен предполагает обычной верификации. Менеджеры выясняют свидетельства для реализации KYC-требований. Персональные параметры проходят комплексную верификацию.
Депозитные рамки на дополнительных сайтах совпадают базовым параметрам. Низшие суммы продолжают стабильными. Возрастающие банки координируются между разными ресурсами.
Поощрительные программы оперируют комплексно на зеркальных ресурсах. Множитель ставок поддерживает стартовые параметры. Временные рамки проигрывания поддерживается.
Команда поддержки решает обращения с дополнительных ссылок аналогично. Живой чат предоставляет непрерывный расписание функционирования.
Лицензионные площадки развлекательных услуг дают участникам доступ к профессиональному азартному досугу через dedicated ресурсы, включая Mellstroy Game казино , которые специально исполняют общепринятые регламенты конфиденциальности.
Механизм открытия счёта включает предоставления валидационных параметров через безопасные SSL-connection. Операторы запрашивают официальное удостоверение возраста и адреса residence для выполнения юрисдикционных критериев.
Multi-factor authentication является принудительным элементом передовых систем безопасности. Пользователи располагают SMS-коды, push-notification или задействуют специальные софт вроде Google Authenticator.
Резервные домены решают препятствия локальных блокировок и DDoS-assault. Технически mirrors составляют идентичные клоны базового ресурса с поддержанием возможностей и user параметров.
Профессиональные пользователи suggest хранить свежие базы функционирующих mirrors в закладках обозревателя. Администрация направляют информацию о современных порталах через e-mail, Telegram-каналы и телефонные apps.
Payment процедуры через надёжные ресурсы покрыты encryption протоколами категории банковского направления. Extraction средств реализуется единственно на верифицированные счета держателя account.
Передовые геймеры встречаются с изобилием технологических особенностей при процессах с легальными платформами. Экспертные сайты типа Гризли казино выдают свежую материалы о работе азартных операторов.
Система верификации счета подразумевает набор обязательных шагов. Начальная подтверждение включает отправки свидетельств подтверждающих субъект. Типовой набор подразумевает свидетельство, автоудостоверение или международное ID.
Технологическая компонента создания аккаунта включает задействование криптографической защиты и двойной авторизации. Экспертные геймеры предлагают задействовать весь комплекс предложенных настроек защиты.
Резервные ссылки являются идентичные реплики первичного ресурса с сохранением комплексного арсенала. Основное преимущество заключается в идентичности платежных рамок и параметров ставочных требований.
Механизм локализации действующих дублирующих порталов опирается на наблюдении экспертных информационных каналов и партнерских площадок. Профессиональные участники используют анонимайзеры для гарантирования постоянного доступа без оглядки от местных лимитов.
Have a look
order generic lipitor pills
to read user reviews.
https://sertralineusa.com/# zoloft medication
Опрятный внешний вид формирует первое мнение о вас.
Ваш образ работает на оценку вас окружающими сразу.
Уверенность в своем луке укрепляет вашу самооценку.
Этот подход демонстрирует высокий стандарт профессионализма и внимание к деталям.
https://n4.vladtoday.ru/redirect.php?id=eKFzruZuV6nW
Через гардероб вы можете проявить свою индивидуальность и стиль.
Люди неосознанно воспринимают стильных людей как более компетентных.
Поэтому, вложения в собственный образ — это вклад в ваше будущее.
Подбор честного игорного площадки нуждается тщательного анализа регулятивных разрешений. Современные системы Вавада сайт дают клиентам максимальную детали о собственных разрешениях.
Система получения доступа подразумевает множество требуемых стадий проверки. Представители настаивают свидетельства, засвидетельствующие персону и зрелость. Классический KYC-процесс длится от 24 до 72 часов.
Управление банком запускается с назначения пределов на вклады. Искусные участники советуют внедрять норму 5% от полного развлекательного фонда на единичную партию.
Системные ограничения поставщиков принуждают применять вспомогательные маршруты. Зеркала удерживают абсолютную производительность первичного площадки, включая журнал сделок и казино достижения.
Передовые денежные сервисы обеспечивают мгновенные пополнения через виртуальные портмоне. Bitcoin, Ethereum и устойчивые монеты гарантируют анонимность и минимальные взносы. Срок проведения извлечений доходит 10-30 периодов.
Планы преданности подразумевают ступенчатые категории с увеличивающимся вознаграждением. VIP-менеджеры гарантируют личные поощрения, усиленные лимиты и приоритетную обслуживание.
Гемблинговая сфера демонстрирует динамичный рост, завлекая миллионы пользователей. Грамотные площадки дают стабильную пространство для беттинга. Исчерпывающую информацию о указанных компаниях возможно найти на Вавада казино .
Легализация составляет центральным критерием определения площадки. Юрисдикции Великобритании предоставляют качественный контроль денежных манипуляций. Отдельная сертифицированная портал реализует плановые контроли RNG-алгоритмов.
Программные аспекты новейших беттинг-платформ объединяют SSL-кодирование денежного категории. Создатели компьютерного материала класса Microgaming, NetEnt, Pragmatic Play встраивают продвинутые системы случайных значений.
Алгоритм подтверждения счёта требует предоставления справок KYC-типа. Удостоверение, справка о заработке, верификация регистрации — обычный перечень для окончательного доступа.
Параллельные порталы устраняют барьеры с цензурой поставщиков. Свежие дубли модифицируются регулярно IT службами. Мобильные программы часто работают надёжнее браузерных вариантов.
Распределение капитала формирует долгосрочную доходность развлекательных циклов. Квалифицированные игроки рекомендуют ограничивать количество пари до 1-2% от совокупного резерва.
http://smartgenrxusa.com/# Smart GenRx USA
Выбор безопасного betting оператора в актуальных рамках требует повышенного изучения к законному состоянию. Знающие пользователи понимают, что френдс казино рабочее зеркало включает последнюю информацию о активных операторах.
Механизм регистрации в лицензированных заведениях включает принудительную аутентификацию удостоверения. KYC-стандарты обеспечивают как казино, так и участника от афер. Переходные лимиты на изъятие финансов до финализации подтверждения – привычная практика.
Технические ограничения на подключение к азартным порталам решаются через альтернативные домены. Активные отражения предоставляют полную возможности главного платформы. Банковские процедуры, азартный достижения и поощрительные программы продолжают стабильными.
Денежная надежность определяется показателем применяемых банковских механизмов. SSL-шифрование, PCI DSS лицензирование и многоуровневая подтверждение устанавливают стабильный контур защиты.
Интерактивная каталог лицензированных провайдеров включает автоматы от топовых разработчиков. RTP-значения, вариативность и математические схемы проходят объективную контроль в признанных учреждениях.
Системы стимулирования в надежных площадках опираются на ясных требованиях вейджера. Отыгрыш x35-40 считается справедливым для машина-льгот, в то время как традиционные активности включаются в зачет с пониженным процентом.
Поиск в области проверенных порталов включает осознания передовых технологий авторизации. Умелые участники задействуют Вован казино для получения актуальной информации о функционирующих адресах.
Процедура создания аккаунта в официальных компаниях предполагает сложную верификацию. Современные поставщики задействуют KYC-механизмы и AML-требования. Документальное сопровождение требует от 24 до 72 часов.
Программные способы для избежания препятствий эволюционируют параллельно с укреплением юридических решений. VPN-решения категории premium предлагают защиту AES-256 и протоколы OpenVPN. Устойчивость соединения критически значима для высокоролловых игровых периодов.
Запасные платформы действуют через территориально разнесенные компьютерные мощности. CDN-структуры поддерживают сокращенную латентность для европейских клиентов. Цифровое роутинг срабатывает при обнаружении недоступности базового адреса.
Финансовые транзакции в официальных территориях отвечают определенным стандартам PCI DSS. Крипто платежи приобретают актуальность благодаря конфиденциальности и скорости осуществления.
Мобильные софт элитных организаций содержат биометрическую аутентификацию и push-сообщения для существенных ситуаций. Адаптивный интерфейс самостоятельно адаптируется под настройки экрана.
Перемещение в секторе легальных площадок подразумевает представления новых способов подключения. Опытные геймеры задействуют казино Vavada для приобретения новейшей данных о оперативных адресах.
Схема открытия личного кабинета в проверенных учреждениях содержит тщательную проверку. Передовые компании задействуют KYC-процедуры и AML-стандарты. Оформление документов требует от 24 до 72 временных отрезков.
Программные технологии для минования ограничений прогрессируют синхронно с усилением юридических мер. VPN-инструменты разряда premium предоставляют шифрование AES-256 и технологии OpenVPN. Стабильность канала fundamentally значима для элитных раундов.
Зеркальные домены выполняют задачи через географически расположенные компьютерные инфраструктуры. CDN-системы предоставляют минимальную задержку для глобальных геймеров. Автоматическое маршрутизация активируется при распознавании блокировки главного портала.
Экономические движения в сертифицированных регионах подчиняются четким требованиям PCI DSS. Блокчейн переводы приобретают распространение в результате анонимности и динамике реализации.
Смартфонные утилиты лучших провайдеров включают отпечатковую авторизацию и push-алерты для критических ситуаций. Настраиваемый интерфейс независимо подстраивается под особенности матрицы.
Определение проверенного казино ресурса нуждается детального анализа правовых разрешений. Новые порталы Mellstroy Game предоставляют участникам стопроцентную данные о своих аккредитациях.
Механизм получения доступа подразумевает несколько принудительных фаз подтверждения. Администраторы просят справки, устанавливающие индивидуальность и возраст. Стандартный KYC-алгоритм составляет от 24 до 72 временных отрезков.
Контроль средств стартует с определения лимитов на взносы. Искусные пользователи настаивают эксплуатировать закон 5% от суммарного игорного фонда на единичную сессию.
Цифровые препятствия поставщиков вынуждают внедрять дополнительные ссылки. Альтернативы сохраняют максимальную работоспособность основного платформы, охватывая журнал транзакций и казино продвижение.
Новые финансовые способы обеспечивают мгновенные вклады через блокчейн кошельки. Bitcoin, Ethereum и фиксированные активы обеспечивают анонимность и символические платежи. Срок осуществления получений составляет 10-30 минут.
Схемы постоянства включают многоуровневые статусы с возрастающим возвратом. VIP-консультанты гарантируют личные бонусы, увеличенные границы и опережающую сервис.
Dressing stylish projects a positive first impression.
Your outfit communicates volumes before you actually speak a single word.
This boosts your own confidence and mindset noticeably.
Your polished appearance signals competence in the office.
https://links.luxepodium.com/RTasvDd8xi/
Fashionable clothing let you to express your individual identity.
People often judge well-dressed people as more successful and trustworthy.
Therefore, putting effort in your style is an valuable step in yourself.
Very sleek and professionally built site casino!
https://dichthuattienganhgiare.com/the-need-for-speed-your-quick-guide-to-lightning-fast-casino-cashouts/
Навигация в секторе проверенных платформ подразумевает понимания передовых способов соединения. Квалифицированные пользователи задействуют Лаки Бир зеркало для извлечения новейшей данных о действующих путях.
Механизм открытия профиля в надежных операторах охватывает детальную аутентификацию. Передовые поставщики используют KYC-механизмы и AML-критерии. Документальное сопровождение занимает от 24 до 72 часов.
IT способы для преодоления блокировок развиваются одновременно с повышением регуляторных решений. VPN-платформы категории premium гарантируют безопасность AES-256 и стандарты OpenVPN. Устойчивость связи кардинально актуальна для элитных раундов.
Запасные домены функционируют через локально распределенные компьютерные ресурсы. CDN-структуры гарантируют оптимальную пинг для азиатских участников. Техническое роутинг запускается при обнаружении препятствия первичного домена.
Платежные манипуляции в легальных зонах подчиняются конкретным нормам PCI DSS. Криптовалютные платежи увеличивают признание по причине конфиденциальности и оперативности обработки.
Планшетные клиенты лучших компаний совмещают физиологическую проверку и push-уведомления для важных моментов. Адаптивный дизайн автономно адаптируется под особенности панели.
Отбор качественного игрового портала в современных обстоятельствах заставляет повышенного рассмотрения к правовому уровню. Профессиональные геймеры учитывают, что Лаки Бир официальный сайт предоставляет актуальную факты о доступных площадках.
Алгоритм открытия счета в официальных сервисах охватывает обязательную проверку удостоверения. KYC-нормы гарантируют как заведение, так и участника от обмана. Краткосрочные пределы на перечисление капитала до выполнения контроля – стандартная методика.
Программные препятствия на связь к развлекательным сервисам преодолеваются через дублирующие ссылки. Рабочие клоны сохраняют тотальную эффективность центрального сервиса. Финансовые переводы, развлекательный достижения и поощрительные планы поддерживаются стабильными.
Капитальная безопасность выражается степенью используемых финансовых способов. SSL-шифрование, PCI DSS валидация и расширенная идентификация обеспечивают безопасный контур обороны.
Интерактивная коллекция официальных сервисов охватывает слоты от известных провайдеров. RTP-коэффициенты, вариативность и алгоритмические схемы претерпевают объективную контроль в аккредитованных центрах.
Системы вознаграждения в достойных операторах строятся на понятных правилах проигрыша. Вейджер x35-40 расценивается адекватным для автомат-льгот, в то время как настольные игры засчитываются в калькуляцию с уменьшенным коэффициентом.
Азартная отрасль показывает стремительный подъём, завлекая массы клиентов. Экспертные порталы дают безопасную условия для развлечений. Подробную информацию о данных провайдерах допустимо отыскать на Лев казино .
Аттестация выступает ключевым элементом отбора портала. Регуляторы Великобритании гарантируют качественный надзор денежных действий. Отдельная аккредитованная площадка реализует периодические ревизии RNG-генераторов.
Цифровые свойства новейших азартных площадок объединяют SSL-шифрование банковского уровня. Разработчики компьютерного материала вроде Microgaming, NetEnt, Pragmatic Play интегрируют продвинутые системы случайных величин.
Процедура верификации аккаунта предполагает передачи документов KYC-типа. Удостоверение, свидетельство о средствах, валидация адреса — стандартный пакет для полноценного авторизации.
Параллельные ссылки устраняют проблемы с цензурой организаций. Актуальные зеркала адаптируются систематически компьютерными специалистами. Смартфонные утилиты нередко действуют лучше интернет форматов.
Управление банкроллом создаёт длительную доходность развлекательных циклов. Опытные пользователи указывают контролировать сумму вейджера до 1-2% от итогового резерва.
Передовые игроки встречаются с массой системных деталей при деятельности с сертифицированными площадками. Профессиональные сайты типа казино типпи обеспечивают релевантную информацию о процессах азартных брендов.
Процедура проверки аккаунта охватывает множество необходимых этапов. Исходная проверка включает размещения свидетельств доказывающих индивидуальность. Привычный пакет охватывает ID, автоудостоверение или загранпаспорт.
Цифровая часть открытия счета включает задействование криптографической защиты и двухфакторной аутентификации. Опытные пользователи рекомендуют включать максимум представленных функций охраны.
Зеркала формируют точные клоны базового домена с сохранением комплексного арсенала. Основное преимущество выражается в соответствии платежных лимитов и параметров отыгрыша.
Система обнаружения рабочих зеркал фундируется на наблюдении экспертных телеграм-каналов и союзных платформ. Профессиональные игроки эксплуатируют VPN-сервисы для обеспечения бесперебойного входа невзирая от территориальных лимитов.
1win ссылка на скачивание http://www.1win74562.help
seowhale.click – Mobile version looks perfect; no glitches, fast scrolling, crisp text.
Официальные операторы азартных опций гарантируют участникам шанс к высококлассному игровому процессу через профильные порталы, включая п»ї1хбет , которые специально придерживаются международные требования конфиденциальности.
Процедура создания аккаунта подразумевает внесения верификационных деталей через криптографические SSL-connection. Операторы просят документальное доказательство дееспособности и региона жительства для исполнения законодательных критериев.
Многоуровневая проверка является необходимым частью современных архитектур защиты. Игроки располагают SMS-коды, push-алерты или задействуют targeted утилиты вроде Google Authenticator.
Альтернативные адреса решают вопросы региональных ограничений и DDoS-воздействий. По сути реплики составляют тождественные копии базового платформы с удержанием инструментария и клиентских сведений.
Skilled пользователи советуют поддерживать обновлённые списки активных дублей в favourites веб-клиента. Операторы направляют информацию о свежих адресах через почтовые сервисы, Telegram-чаты и смартфонные софт.
Платёжные операции через лицензионные порталы защищены encryption системами стандарта банковского segment. Extraction денег происходит единственно на validated wallets собственника профиля.
Подбор безопасного betting заведения в актуальных границах предполагает повышенного рассмотрения к лицензионному положению. Квалифицированные геймеры осознают, что п»ї1хбет казино демонстрирует последнюю факты о активных сервисах.
Процесс записи в проверенных заведениях предусматривает требуемую валидацию документов. KYC-требования оберегают как казино, так и клиента от махинаций. Промежуточные границы на снятие капитала до завершения проверки – привычная система.
Электронные запреты на подключение к азартным площадкам обходятся через дублирующие URL. Функционирующие дубликаты предоставляют стопроцентную возможности базового платформы. Расчетные операции, геймплейный достижения и бонусные планы функционируют константными.
Денежная защищенность выражается показателем применяемых банковских способов. SSL-шифрование, PCI DSS сертификация и многоуровневая идентификация гарантируют защищенный щит защиты.
Азартная коллекция легальных площадок включает машины от лидирующих провайдеров. RTP-показатели, волатильность и алгоритмические принципы претерпевают независимую сертификацию в одобренных центрах.
Программы мотивации в надежных операторах базируются на ясных критериях активности. Вейджер x35-40 оценивается приемлемым для слот-льгот, в то время как традиционные игры засчитываются в подсчет с редуцированным процентом.
Кстати, если вас интересует отдых с просмотром космического кино в феврале 2026, посмотрите сюда.
Вот, делюсь ссылкой:
https://turbaza-ladya.ru/news/turbaza-ladya-pochemu-fevral-2026-idealnoe-vremya-dlya-otdyha-na-prirode-s-prosmotrom-kosmicheskogo-kino/
Перемещение в пространстве сертифицированных платформ нуждается осознания новых инструментов авторизации. Продвинутые игроки задействуют KiloGram casino для извлечения актуальной сведений о функционирующих URL.
Механизм открытия учетной записи в лицензированных учреждениях охватывает сложную проверку. Передовые компании используют KYC-механизмы и AML-нормы. Документооборот составляет от 24 до 72 интервалов.
Компьютерные методы для избежания блокировок развиваются вместе с усилением юридических мер. VPN-решения класса premium обеспечивают шифрование AES-256 и системы OpenVPN. Устойчивость коннекта принципиально существенна для высокоролловых заходов.
Запасные ресурсы работают через территориально размещенные технические кластеры. CDN-структуры предоставляют низкую пинг для американских клиентов. Техническое маршрутизация запускается при идентификации препятствия центрального ресурса.
Денежные движения в проверенных регионах следуют строгим критериям PCI DSS. Блокчейн расчеты получают востребованность вследствие анонимности и темпу выполнения.
Переносные клиенты топовых компаний включают лицевую проверку и push-извещения для ключевых эпизодов. Адаптивный дизайн программно корректируется под характеристики дисплея.
Надёжные ресурсы азартных возможностей гарантируют клиентам возможность к высококлассному развлечениям через специализированные порталы, включая винити официальный сайт , которые именно придерживаются международные стандарты конфиденциальности.
Схема активации necessita заполнения authentication данных через криптографические SSL-соединения. Провайдеры demanded официальное доказательство возраста и локации нахождения для исполнения юрисдикционных требований.
Двухфакторная проверка считается необходимым компонентом современных solutions конфиденциальности. Участники располагают SMS-ключи, push-алерты или задействуют профессиональные программы вроде Google Authenticator.
Дублирующие URL нейтрализуют препятствия географических блокировок и DDoS-нападений. Технически зеркала представляют аналогичные dublicates базового ресурса с поддержанием features и user сведений.
Компетентные участники рекомендуют поддерживать current списки функционирующих зеркал в bookmark browser. Провайдеры направляют информацию о новых порталах через мейл, Telegram-группы и мобильные приложения.
Финансовые процедуры через legal платформы secured защитными системами категории банковского сектора. Вывод фондов производится только на validated карты собственника личного кабинета.
Игровая отрасль представляет динамичный развитие, завлекая тысячи геймеров. Профессиональные сайты предоставляют стабильную обстановку для развлечений. Подробную данные о указанных операторах доступно найти на п»ї1хбет .
Лицензирование остаётся ключевым показателем выбора ресурса. Надзорные органы Олдерни обеспечивают качественный мониторинг расчётных операций. Отдельная официальная платформа реализует регулярные аудиты RNG-алгоритмов.
Цифровые аспекты новейших игорных домов предусматривают SSL-защиту денежного категории. Производители виртуального обеспечения класса Microgaming, NetEnt, Pragmatic Play внедряют многоуровневые системы рандомных чисел.
Процесс верификации счёта подразумевает представления документов KYC-класса. Удостоверение, документ о прибылях, доказательство прописки — базовый комплект для итогового авторизации.
Зеркальные ссылки устраняют препятствия с цензурой операторов. Действующие дубли корректируются систематически IT группами. Портативные приложения регулярно функционируют качественнее сетевых форматов.
Банкролл-менеджмент определяет стратегическую результативность азартных партий. Профессиональные беттеры настаивают урезать величину вейджера до 1-2% от совокупного резерва.
Передовые сервисы беттинг услуг гарантируют участникам доступ к качественному беттингу через сертифицированные п»ї1хбет официальный сайт сайты. Авторизованная бизнес предполагает выполнения строгих правовых норм.
Процесс оформления индивидуального профиля задействует аутентификацию персональных реквизитов. Регуляторы внедряют многоуровневые механизмы KYC и AML для пресечения поддельных финансовых действий.
Программные системы инновационных беттинг площадок основываются на стабильных инфраструктурах с HTTPS сертификатами. Региональная блокировка обязывает операторов запускать вспомогательные адреса.
Зеркальные ресурсы образуют точные версии основного платформы с удержанием всех инструментов и сведений. Игроки добиваются непрерывный доступ к средствам, беттинг записям и индивидуальным параметрам.
Платежные процедуры реализуются через подключенные банковские шлюзы. Лимиты на вклады и обналичивания определяются в соотношении с нормативными стандартами и организационными правилами снижения потерь.
Опытные игроки рекомендуют проверять ситуацию лицензии через государственные списки азартных органов. Имиджевые показатели охватывают позиции на тематических порталах и отзывы истинных беттеров.
Лицензионные ресурсы развлекательных возможностей oferuja участникам шанс к профессиональному развлечениям через специализированные домены, включая Вавада казино , что придерживаются мировые требования надёжности.
Схема активации предполагает заполнения валидационных сведений через защищённые SSL-протоколы. Операторы просят документальное удостоверение возраста и территории жительства для выполнения legal правил.
Многоуровневая верификация становится mandatory aspect современных архитектур защиты. Пользователи имеют SMS-ключи, push-уведомления или задействуют dedicated приложения в стиле Google Authenticator.
Зеркальные адреса нейтрализуют трудности географических барьеров и DDoS-assault. Фактически реплики представляют аналогичные копии primary портала с удержанием возможностей и пользовательских информации.
Опытные геймеры призывают удерживать новейшие реестры рабочих зеркал в favourites веб-клиента. Букмекеры направляют обновления о свежих URL через e-mail, Telegram-группы и портативные программы.
Финансовые операции через legal сайты защищены защитными системами level банковского индустрии. Вывод капитала происходит solely на validated данные хозяина личного кабинета.
Проверенные ресурсы гэмблинг сервисов дают клиентам шанс к высококлассному игровому процессу через тематические порталы, включая п»ї1хбет зеркало , что придерживаются международные стандарты конфиденциальности.
Механизм открытия счёта подразумевает ввода идентификационных информации через шифрованные SSL-каналы. Провайдеры demanded документальное verification age verification и адреса residence для поддержания законодательных требований.
Двухэтапная проверка выступает required частью новейших систем защиты. Users обретают SMS-ключи, push-сообщения или применяют dedicated приложения наподобие Google Authenticator.
Дублирующие домены ликвидируют препятствия territorial запретов и DDoS-штурмов. По сути реплики являют тождественные клоны основного сайта с maintaining features и клиентских сведений.
Компетентные пользователи suggest хранить новейшие каталоги действующих альтернатив в избранном интернет-программы. Management рассылают обновления о актуальных адресах через email, Telegram-чаты и смартфонные приложения.
Payment операции через надёжные ресурсы обеспечены cryptographic алгоритмами level банковского направления. Extraction фондов осуществляется solely на подтверждённые данные собственника профиля.
Выбор достойного развлекательного оператора в нынешних рамках нуждается особого рассмотрения к регулятивному положению. Компетентные пользователи знают, что Рльдорадо казино включает свежую данные о доступных площадках.
Процедура регистрации в легальных заведениях объединяет необходимую валидацию персональных данных. KYC-требования защищают как сервис, так и клиента от фрода. Кратковременные ограничения на снятие средств до финализации контроля – нормальная процедура.
Технические препятствия на связь к гемблинг сервисам преодолеваются через параллельные адреса. Доступные клоны сохраняют тотальную производительность главного сайта. Расчетные операции, азартный продвижение и бонусные схемы поддерживаются устойчивыми.
Денежная защищенность характеризуется степенью внедренных финансовых методов. SSL-шифрование, PCI DSS аттестация и расширенная проверка создают безопасный периметр ограждения.
Игровая набор сертифицированных сервисов объединяет автоматы от известных разработчиков. RTP-параметры, колебания и статистические схемы испытывают внешнюю сертификацию в одобренных институтах.
Схемы вознаграждения в качественных сервисах строятся на ясных условиях отыгрыша. Вейджер x35-40 характеризуется нормальным для спин-поощрений, в то время как настольные игры идут в калькуляцию с пониженным показателем.
Отбор безопасного азартного заведения в актуальных обстоятельствах предполагает особого внимания к законному уровню. Компетентные пользователи осознают, что казино Болливуд содержит последнюю информацию о доступных сервисах.
Схема оформления профиля в легальных платформах предусматривает неизбежную подтверждение персональных данных. KYC-правила оберегают как оператора, так и пользователя от махинаций. Кратковременные ограничения на изъятие финансов до финализации верификации – нормальная методика.
Цифровые запреты на доступ к развлекательным сервисам устраняются через альтернативные порталы. Рабочие дубликаты обеспечивают стопроцентную функциональность главного ресурса. Банковские операции, азартный достижения и бонусные планы продолжают стабильными.
Материальная безопасность характеризуется качеством эксплуатируемых финансовых методов. SSL-кодирование, PCI DSS сертификация и усиленная аутентификация устанавливают защищенный щит обороны.
Азартная набор лицензированных заведений предоставляет машины от лидирующих производителей. RTP-коэффициенты, вариативность и вероятностные формулы проходят беспристрастную аудит в аккредитованных организациях.
Программы поощрения в надежных заведениях формируются на ясных правилах вейджера. Требования x35-40 характеризуется нормальным для автомат-бонусов, в то время как настольные развлечения учитываются в подсчет с пониженным показателем.
Установив [url=https://gzstore.ru/]электрокарнизы цена[/url], вы забудете о неудобствах ручного управления шторами и насладитесь максимальным комфортом.
которое привносит комфорт и удобство в повседневную жизнь. С их помощью можно легко регулировать положение штор, не прикасаясь к ним. Это становится важным преимуществом для окон большого размера, потолков с большой высотой и для людей с особыми потребностями.
Преимущества электрокарнизов очевидны: комфорт, практичность и стильный внешний вид. Они легко интегрируются в систему “умный дом”, позволяя управлять освещением и уровнем приватности с помощью мобильного устройства или голосовых команд. Кроме того, электрокарнизы обеспечивают плавное и бесшумное движение штор, что создает атмосферу уюта и спокойствия.
**Выбор электрокарниза: На что обратить внимание**
При выборе электрокарниза важно учитывать несколько ключевых факторов. Во-первых, необходимо определить длину карниза и тип ткани штор. Во-вторых, обратите внимание на мощность двигателя и регулируемую скорость движения штор. В-третьих, необходимо учитывать возможность подключения к системе умного дома и наличие дополнительных функций, таких как таймер или датчик освещенности.
Также важно обратить внимание на производителя и наличие гарантии. Известные бренды гарантируют высокое качество продукции и долгий срок эксплуатации. Гарантия – это дополнительная защита ваших средств и уверенность в качестве приобретаемого продукта. Не стоит экономить на качестве, ведь электрокарниз – это долгосрочное вложение в комфорт вашего дома.
**Установка и обслуживание электрокарнизов**
Установка электрокарниза требует определенных навыков и инструментов. Лучше доверить установку специалистам, чтобы избежать неисправностей и повреждений. Они аккуратно установят карниз, безопасно подключат его к электричеству и настроят управление. Неправильная установка может привести к поломке устройства и, следовательно, к дополнительным расходам.
Обслуживание электрокарнизов не требует особых усилий. Регулярно удаляйте пыль и загрязнения с карниза мягкой тканью. При необходимости смазывайте движущиеся части специальным средством. Следуйте инструкциям по эксплуатации, и ваш электрокарниз будет работать бесперебойно в течение длительного времени.
**Электрокарнизы: Создайте уют и комфорт в вашем доме**
Электрокарнизы – это не просто функциональное устройство, но и стильный элемент интерьера. Они подчеркивают современный вид и придают элегантность любому помещению. Они позволяют создать неповторимую атмосферу комфорта и уюта. Попробуйте электрокарнизы, и вы заметите, как улучшилось качество вашей жизни.
Выбирая электрокарнизы, вы выбираете удобство, функциональность и современный стиль. Они станут незаменимым помощником в управлении освещением и приватностью вашего дома. Наслаждайтесь комфортом и уютом, которые подарят вам электрокарнизы. Создайте свой идеальный дом с помощью современных технологий.
**Спин-шаблон:**
“`
Электрокарнизы – это современное решение, обеспечивающее комфорт и удобство в использовании каждый день. Они обеспечивают дистанционное управление шторами, избавляя от рутинных действий. Это становится важным преимуществом для окон большого размера, потолков с большой высотой и для людей с особыми потребностями.
Преимущества электрокарнизов очевидны: простота использования, многофункциональность и современный стиль. Они интегрируются в систему умного дома, что позволяет управлять освещением и приватностью с помощью смартфона или голосового помощника. Также, они гарантируют плавное и тихое скольжение штор, что способствует созданию комфортной и спокойной обстановки.
При выборе электрокарниза важно учитывать несколько ключевых факторов. Первым делом, нужно измерить длину карниза и подобрать подходящий тип ткани для штор. Вторым важным аспектом является мощность мотора и скорость, с которой двигаются шторы. В-третьих, необходимо принимать во внимание возможность интеграции с системой “умный дом” и наличие дополнительных функций, к примеру, таймера автоматического включения/выключения или датчика освещённости.
Также важно обратить внимание на производителя и наличие гарантии. Надежные производители предлагают качественные продукты с длительным сроком службы. Гарантия – это дополнительная защита ваших средств и уверенность в качестве приобретаемого продукта. Не стоит выбирать самые дешевые варианты, так как электрокарниз – это долгосрочное приобретение, улучшающее комфорт вашего дома.
Установка электрокарниза требует определенных навыков и инструментов. Рекомендуется обратиться к профессионалам, чтобы избежать ошибок и повреждений. Они правильно установят карниз, подключат его к электросети и настроят систему управления. Неправильная установка может привести к повреждению оборудования и, следовательно, к дополнительным затратам.
Обслуживание электрокарнизов не требует особых усилий. Регулярно очищайте карниз от пыли и загрязнений с помощью мягкой ткани. Если необходимо, смазывайте подвижные части специальным средством. Соблюдайте рекомендации по эксплуатации, указанные в руководстве пользователя, и ваш электрокарниз прослужит вам долгое время.
Электрокарнизы – это не просто функциональное устройство, но и стильный элемент интерьера. Они акцентируют современный стиль и придают изысканность любому интерьеру. С их помощью можно создать неповторимую атмосферу уюта и комфорта. Инвестируйте в электрокарнизы, и вы почувствуете разницу в качестве жизни.
Выбирая электрокарнизы, вы выбираете удобство, функциональность и современный стиль. Они станут отличным решением для управления освещением и личным пространством в вашем доме. Наслаждайтесь комфортом и уютом, которые подарят вам электрокарнизы. Создайте дом своей мечты с помощью современных технологий.
“`
Iver Therapeutics: Iver Therapeutics – ivermectin cream cost
Поиск честного азартного заведения заставляет основательного исследования лицензионных бумаг. Новые сайты Vavada casino обеспечивают игрокам безусловную факты о текущих разрешениях.
Процесс регистрации охватывает несколько ключевых фаз валидации. Администраторы настаивают бумаги, подтверждающие самобытность и возраст. Обычный KYC-алгоритм требует от 24 до 72 промежутков.
Финансовое планирование запускается с установления пределов на взносы. Квалифицированные клиенты рекомендуют применять установку 5% от общего гемблинг фонда на отдельную партию.
Электронные препятствия операторов вынуждают эксплуатировать дополнительные адреса. Клоны удерживают максимальную работоспособность первичного площадки, охватывая летопись переводов и казино достижения.
Новые расчетные методы предоставляют моментальные инвестиции через виртуальные хранилища. Bitcoin, Ethereum и стабильные валюты поддерживают анонимность и крошечные отчисления. Период выполнения изъятий доходит 10-30 отрезков.
Алгоритмы верности включают каскадные степени с возрастающим компенсацией. VIP-менеджеры предоставляют уникальные награды, увеличенные пределы и ускоренную сервис.
Действующие mirror-ссылки проверенных азартных клубов на Lucky Bear зеркало гарантируют устойчивый подключение к развлекательным системам. Технология реплицирования генерирует полноценные клоны центрального портала с консервацией всех опций.
Процедура регистрации через резервную ссылку абсолютно воспроизводит основную шаблон. Свежие игроки вводят функционирующий email, придумывают безопасный секретную комбинацию и назначают рабочую платежное средство.
Верификация личного кабинета предполагает предоставления удостоверений в соответствии с KYC-регламенту. Снимок национального документа, свидетельство резиденции и денежные данные контролируются системой автоматическую валидацию в течение 24-72 часов.
Подключение существующих геймеров реализуется через типовую форму с многоступенчатой аутентификацией. Одноразовые токены поступают на мессенджер устройство или электронную почту.
Механизмы финансового компонента через альтернативные домены включает топовые финансовые инструменты. Visa, Mastercard, виртуальные счета Skrill, Neteller, виртуальные монеты Bitcoin, Ethereum осуществляются с минимальными процентами 0-3%.
Gaming каталог клонируется полностью включая spinning games, настольные развлечения, live-операторов и мегавыигрыши. RTP-индикаторы, вариативность и ставочные требования остаются аналогичными.
Подарочная программа действует аналогично базовому домену. Welcome-комплекты, фриспины, кешбэк и VIP-планы включаются машинально при реализации установленных условий.
кликните сюда
Топ товары, которые любят!
I absolutely love your blog and find many of your post’s to
be what precisely I’m looking for. Does one offer guest
writers to write content for you personally?
I wouldn’t mind producing a post or elaborating on many of the subjects you write in relation to here.
Again, awesome website!
Have a look at my homepage – personal retreat for couple
http://sportdialog.ru/mainarticles/99072-kak-sportivnye-igry-na-android-otrazhayut-realnye-sportivnye-sobytiya
такой Казахстан: яркие мгновения всегда!
Развлекательная отрасль отображает активный подъём, притягивая множество участников. Опытные площадки гарантируют качественную пространство для беттинга. Исчерпывающую информацию о данных операторах возможно обнаружить на Вован казино .
Аккредитация остаётся центральным фактором отбора платформы. Регуляторы Великобритании гарантируют качественный аудит денежных процедур. Всякая легальная площадка осуществляет периодические инспекции RNG-механизмов.
Программные свойства современных гемблинг-сайтов объединяют SSL-защиту экономического категории. Производители программного ПО уровня Microgaming, NetEnt, Pragmatic Play добавляют продвинутые модели рандомных параметров.
Схема верификации счёта предполагает направления бумаг KYC-уровня. ID, справка о прибылях, подтверждение проживания — классический список для завершённого авторизации.
Зеркальные URL устраняют препятствия с ограничениями операторов. Рабочие альтернативы адаптируются регулярно техническими группами. Портативные софт регулярно выполняются лучше браузерных версий.
Финансовая дисциплина определяет длительную успешность беттинговых раундов. Профессиональные беттеры предлагают контролировать величину депозита до 1-2% от полного резерва.
Азартная отрасль показывает интенсивный подъём, притягивая миллионы пользователей. Опытные порталы гарантируют качественную обстановку для беттинга. Исчерпывающую информацию о подобных организациях реально отыскать на Lucky Bear casino .
Лицензирование составляет основным фактором подбора сайта. Лицензиаты Великобритании создают качественный надзор финансовых процедур. Любая лицензированная платформа реализует регулярные ревизии RNG-модулей.
Технические параметры передовых гемблинг-сайтов содержат SSL-шифрование финансового стандарта. Разработчики программного обеспечения вроде Microgaming, NetEnt, Pragmatic Play добавляют усовершенствованные алгоритмы непредсказуемых величин.
Схема верификации профиля требует передачи справок KYC-класса. ID, выписка о прибылях, подтверждение адреса — типичный пакет для окончательного авторизации.
Дублирующие домены устраняют барьеры с блокировками провайдеров. Актуальные альтернативы обновляются регулярно программными специалистами. Карманные клиенты обычно работают лучше сетевых редакций.
Финансовая дисциплина определяет длительную результативность игровых раундов. Экспертные пользователи рекомендуют сокращать количество вейджера до 1-2% от полного фонда.
Hmm it looks like your blog ate my first comment (it was super long) so I guess I’ll just sum
it up what I had written and say, I’m thoroughly enjoying your
blog. I as well am an aspiring blog blogger but I’m still new to the whole thing.
Do you have any suggestions for rookie blog writers?
I’d genuinely appreciate it.
Look at my blog :: retreat center tulum
Новейшие геймеры встречаются с множеством системных тонкостей при деятельности с сертифицированными площадками. Тематические ресурсы типа Вавада сайт предоставляют релевантную данные о процессах азартных провайдеров.
Процесс аутентификации аккаунта охватывает ряд необходимых стадий. Первичная подтверждение подразумевает отправки справок доказывающих гражданство. Привычный список предполагает паспорт, водительские права или международный паспорт.
Программная сторона регистрации подразумевает эксплуатацию безопасного соединения и многофакторной защиты. Квалифицированные участники подсказывают запускать полный набор имеющихся параметров секьюрити.
Запасные домены формируют полные реплики базового платформы с обеспечением комплексного функционала. Центральное бонус состоит в соответствии финансовых ограничений и условий проигрыша.
Схема поиска рабочих запасных доменов строится на контроле специализированных уведомительных сервисов и партнерских площадок. Профессиональные пользователи эксплуатируют VPN-сервисы для обеспечения бесперебойного соединения без оглядки от местных блокировок.
Актуальные геймеры встречаются с проблемой связи к сертифицированным порталам. Организации закрывают основные адреса, но искушённые Килограмм казино клиенты понимают о функционировании резервных сайтов.
Зеркало является полную отображение оригинального площадки. Средства защиты работают равнозначными. Банковские операции осуществляются через аналогичные шлюзы.
Алгоритм регистрации через резервный ресурс требует типовой проверки. Специалисты запрашивают документы для соблюдения KYC-норм. Паспортные характеристики проходят усиленную верификацию.
Финансовые границы на альтернативных сайтах соответствуют первичным параметрам. Наименьшие беты продолжают постоянными. Возрастающие джекпоты синхронизируются между множественными доменами.
Стимулирующие механизмы функционируют полноценно на параллельных порталах. Множитель ставок поддерживает исходные цифры. Период действия реализации продолжается.
Команда ассистирования изучает вопросы с альтернативных ресурсов аналогично. Мгновенный переписка предоставляет беспрерывный график оперирования.
перенаправляется сюда https://t.me/invisevpn_bot/
rankseed.click – Color palette felt calming, nothing distracting, just focused, thoughtful design.
Беттинговая отрасль являет интенсивный развитие, заинтересовывая тысячи пользователей. Квалифицированные ресурсы гарантируют защищённую пространство для пари. Развёрнутую материалы о указанных брендах можно получить на п»ї1хбет сайт .
Аккредитация выступает ключевым показателем определения площадки. Юрисдикции Олдерни дают качественный мониторинг денежных операций. Отдельная сертифицированная ресурс подвергается периодические инспекции RNG-механизмов.
Технические характеристики передовых казино включают SSL-криптографию финансового ранга. Создатели виртуального софта класса Microgaming, NetEnt, Pragmatic Play встраивают многоуровневые механизмы хаотичных значений.
Процесс верификации профиля подразумевает предоставления бумаг KYC-класса. Свидетельство, справка о заработке, валидация проживания — обычный комплект для окончательного активации.
Зеркальные порталы убирают барьеры с запретами операторов. Свежие зеркала адаптируются постоянно IT отделами. Карманные софт нередко функционируют стабильнее интернет версий.
Контроль средств формирует долгосрочную результативность беттинговых периодов. Опытные геймеры настаивают лимитировать объём ставки до 1-2% от общего резерва.
Поиск честного азартного площадки требует глубокого анализа лицензионных сертификатов. Передовые порталы п»ї1хбет регистрация предоставляют игрокам абсолютную информацию о имеющихся разрешениях.
Механизм создания профиля включает различные требуемых этапов верификации. Владельцы требуют бумаги, доказывающие индивидуальность и зрелость. Традиционный KYC-механизм требует от 24 до 72 промежутков.
Банкролл-менеджмент инициируется с определения рамок на вклады. Опытные пользователи настаивают эксплуатировать принцип 5% от совокупного развлекательного средств на конкретную раунд.
Технические барьеры владельцев заставляют применять вспомогательные маршруты. Копии оберегают безусловную работоспособность базового площадки, охватывая историю переводов и игровой успех.
Актуальные финансовые способы предоставляют быстрые вклады через криптовалютные счета. Bitcoin, Ethereum и стабильные валюты обеспечивают анонимность и мизерные платежи. Период проведения выводов доходит 10-30 промежутков.
Схемы приверженности включают иерархические степени с нарастающим компенсацией. VIP-кураторы предоставляют уникальные поощрения, повышенные лимиты и первоочередную сервис.
Современные бетторы натыкаются с затруднением подключения к сертифицированным порталам. Компании закрывают основные порталы, но грамотные казино Вован игроки осознают о наличии резервных платформ.
Параллельный портал представляет стопроцентную воспроизведение основного ресурса. SSL-сертификаты поддерживаются идентичными. Платёжные действия производятся через те же системы.
Процедура регистрации через резервный портал содержит типовой подтверждения. Администраторы запрашивают справки для выполнения KYC-требований. Личные данные подвергаются комплексную проверку.
Банковские ограничения на альтернативных платформах идентичны первичным требованиям. Стартовые суммы сохраняются константными. Возрастающие джекпоты согласовываются между различными порталами.
Льготные системы функционируют комплексно на параллельных площадках. Множитель ставок удерживает базовые величины. Длительность отыгрыша не изменяется.
Служба поддержки изучает заявки с параллельных ресурсов аналогично. Интерактивный разговор поддерживает круглосуточный расписание обслуживания.
Определение надежного игорного оператора заставляет детального изучения лицензионных сертификатов. Современные платформы Голд обеспечивают клиентам полную сведения о собственных разрешениях.
Процедура открытия аккаунта содержит несколько принудительных этапов аутентификации. Владельцы требуют бумаги, устанавливающие идентичность и совершеннолетие. Стандартный KYC-алгоритм занимает от 24 до 72 часов.
Управление банком открывается с установления рамок на пополнения. Квалифицированные пользователи советуют внедрять принцип 5% от общего азартного средств на одну раунд.
Системные препятствия владельцев принуждают эксплуатировать запасные пути. Альтернативы хранят максимальную эффективность основного портала, включая хронологию сделок и игровой достижения.
Современные финансовые системы поддерживают мгновенные пополнения через электронные аккаунты. Bitcoin, Ethereum и устойчивые монеты обеспечивают анонимность и минимальные отчисления. Время реализации снятий составляет 10-30 периодов.
Алгоритмы постоянства подразумевают иерархические степени с нарастающим кэшбэком. VIP-кураторы обеспечивают индивидуальные подарки, расширенные пределы и приоритетную обслуживание.
Новейшие бетторы встречаются с препятствием подключения к лицензированным сайтам. Поставщики фильтруют стандартные порталы, но искушённые казино 1xBet пользователи осознают о наличии резервных ресурсов.
Дополнительный домен составляет точную воспроизведение оригинального ресурса. SSL-сертификаты функционируют аналогичными. Банковские операции проходят через те же шлюзы.
Методика регистрации через резервный ссылку включает стандартной аутентификации. Администраторы выясняют бумаги для реализации KYC-требований. Персональные сведения выполняют усиленную проверку.
Финансовые границы на дополнительных порталах совпадают первичным спецификациям. Стартовые вклады остаются стабильными. Растущие призовые фонды синхронизируются между многочисленными ресурсами.
Поощрительные программы функционируют целостно на дополнительных порталах. Множитель ставок сохраняет оригинальные показатели. Временные рамки оборота продолжается.
Сервис поддержки рассматривает вопросы с резервных ссылок сходным образом. Живой диалог гарантирует непрерывный расписание работы.
Функционирующие mirror-ссылки легальных казино на Вавада официальный сайт обеспечивают устойчивый вход к азартным ресурсам. Методика клонирования строит полноценные дубликаты центрального портала с поддержанием всех механизмов.
Алгоритм активации через зеркало целиком копирует основную форму. Только пришедшие игроки регистрируют активный email, генерируют защищенный пароль и фиксируют игровую финансовый инструмент.
Валидация счета подразумевает предоставления справок следуя KYC-стандартам. Скан национального документа, валидация проживания и денежные данные анализируются посредством цифровую проверку в течение 24-72 временных единиц.
Авторизация существующих игроков реализуется через классическую интерфейс с 2FA верификацией. Разовые ключи поступают на мессенджер девайс или e-mail адрес.
Механизмы входящего модуля через альтернативные домены содержит топовые банковские сервисы. Visa, Mastercard, веб счета Skrill, Neteller, криптовалюты Bitcoin, Ethereum процессируются с оптимизированными взносами 0-3%.
Развлекательная база дублируется целиком включая барабаны, настольные развлечения, live-операторов и максимальные награды. RTP-значения, изменчивость и ставочные требования остаются аналогичными.
Подарочная политика выполняется похоже базовому домену. Welcome-наборы, free spins, компенсация и VIP-системы включаются автоматически при исполнении прописанных условий.
zoloft no prescription: generic zoloft – zoloft medication
Wow, amazing blog format! How long have you ever been running a blog for?
you made blogging look easy. The overall look of your website is great, as neatly as
the content material!
Feel free to visit my page :: retreat venue riviera maya
http://neuroreliefusa.com/# Neuro Relief USA
узнать больше
Эмоции на каждом шагу!
Новейшие участники натыкаются с сложностью соединения к официальным ресурсам. Поставщики фильтруют главные ссылки, но опытные казино Вавада участники знают о наличии параллельных платформ.
Резервная ссылка представляет точную копию базового портала. Системы безопасности функционируют неизменными. Платёжные переводы реализуются через те же системы.
Методика открытия счёта через альтернативный домен содержит обычной валидации. Администраторы просят свидетельства для выполнения KYC-норм. Идентификационные данные проходят двухфакторную аутентификацию.
Банковские лимиты на альтернативных платформах совпадают базовым спецификациям. Начальные взносы сохраняются постоянными. Растущие выигрышные пулы интегрируются между разными ссылками.
Бонусные планы оперируют комплексно на резервных площадках. Вейджер гарантирует исходные цифры. Срок активности использования продолжается.
Отдел обслуживания решает запросы с альтернативных ресурсов сходным образом. Онлайн чат поддерживает постоянный формат функционирования.
Новейшие сервисы беттинг продуктов обеспечивают клиентам возможность к высококлассному игровому процессу через защищенные Вавада ресурсы. Лицензированная работа требует исполнения жестких законодательных норм.
Процесс активации игрового учетной записи охватывает верификацию индивидуальных информации. Управляющие задействуют детализированные системы KYC и AML для блокировки мошеннических платежей.
IT решения актуальных игорных домов основываются на зашифрованных хостингах с TLS алгоритмами. Геоблокировка заставляет управляющих внедрять вспомогательные домены.
Дублирующие платформы являют собой точные копии центрального домена с сохранением всех сервисов и показателей. Игроки достигают устойчивый связь к средствам, игровой записям и клиентским опциям.
Расчетные процедуры выполняются через встроенные денежные системы. Ограничения на пополнения и выводы определяются в унисон с правовыми положениями и организационными процедурами контроля угроз.
Экспертные игроки указывают мониторить статус аккредитации через контролирующие регистры гемблинг органов. Авторитетные критерии охватывают рейтинги на отраслевых сайтах и отзывы подлинных беттеров.
Исследование в сфере легальных порталов нуждается владения передовых решений входа. Опытные пользователи применяют казино РЎСѓРєР° для извлечения новейшей данных о активных адресах.
Механизм формирования личного кабинета в сертифицированных заведениях предполагает комплексную верификацию. Продвинутые провайдеры эксплуатируют KYC-системы и AML-правила. Документальная процедура составляет от 24 до 72 промежутков.
IT технологии для преодоления ограничений развиваются одновременно с повышением правовых решений. VPN-службы типа premium гарантируют защиту AES-256 и протоколы OpenVPN. Устойчивость соединения принципиально существенна для премиальных игровых периодов.
Запасные ресурсы выполняют задачи через территориально расположенные технические ресурсы. CDN-системы предоставляют низкую пинг для глобальных геймеров. Техническое редирект инициируется при распознавании недоступности базового портала.
Денежные манипуляции в лицензированных зонах подчиняются четким правилам PCI DSS. Цифровые транзакции набирают признание в результате секретности и динамике реализации.
Смартфонные утилиты топовых организаций содержат отпечатковую подтверждение и push-извещения для ключевых эпизодов. Настраиваемый оформление независимо настраивается под особенности дисплея.
Лицензионные провайдеры развлекательных возможностей предоставляют участникам доступ к качественному развлечениям через целевые домены, включая Килограмм казино , которые точно выполняют общепринятые регламенты security.
Алгоритм оформления профиля подразумевает предоставления authentication параметров через криптографические SSL-соединения. Провайдеры просят предоставить официальное свидетельство возраста и локации нахождения для выполнения правовых стандартов.
Multi-factor аутентификация считается обязательным составляющей современных систем security. Users имеют SMS-пароли, push-уведомления или внедряют dedicated приложения вроде Google Authenticator.
Резервные порталы ликвидируют сложности локальных барьеров и DDoS-штурмов. Технически mirrors составляют дублированные клоны главного ресурса с сохранением функциональности и user данных.
Экспертные участники suggest удерживать новейшие перечни действующих альтернатив в закладках интернет-программы. Букмекеры рассылают информацию о свежих порталах через электронную почту, Telegram-каналы и телефонные apps.
Финансовые транзакции через legal платформы защищены криптографическими алгоритмами стандарта банковского segment. Изъятие финансов выполняется лишь на подтверждённые wallets держателя личного кабинета.
For simple
solid online casinos
to gain a better understanding.
Выбор проверенного азартного ресурса требует серьезного изучения регулятивных разрешений. Современные системы п»ї1хбет предоставляют пользователям абсолютную факты о действующих допусках.
Процедура оформления счета содержит ряд принудительных стадий подтверждения. Владельцы требуют свидетельства, подтверждающие идентичность и зрелость. Классический KYC-порядок требует от 24 до 72 интервалов.
Банкролл-менеджмент начинается с фиксации пределов на депозиты. Опытные клиенты призывают использовать принцип 5% от итогового казино средств на одну игру.
Системные барьеры операторов обязывают эксплуатировать запасные ссылки. Зеркала сохраняют максимальную производительность основного площадки, охватывая летопись операций и азартный успех.
Передовые платежные инструменты обеспечивают быстрые взносы через электронные хранилища. Bitcoin, Ethereum и стабильные валюты поддерживают приватность и крошечные взносы. Время осуществления получений достигает 10-30 периодов.
Системы приверженности содержат градационные категории с прогрессивным бонусом. VIP-менеджеры дают эксклюзивные вознаграждения, расширенные лимиты и ускоренную обслуживание.
удаленная работа вк
Рабочие альтернативные домены проверенных гемблинг-платформ на Вавада предоставляют непрерывный вход к азартным порталам. Схема дублирования генерирует точные версии корневого сайта с поддержанием всех механизмов.
Система регистрации через зеркало на сто процентов имитирует основную бланк. Начинающие клиенты прописывают активный email, создают стойкий секретную комбинацию и определяют рабочую платежное средство.
Валидация аккаунта подразумевает предоставления бумаг согласно KYC-регламенту. Фото ID-карты, валидация регистрации и платежные реквизиты проходят автоматическую верификацию в течение 24-72 часа.
Вход верифицированных игроков происходит через базовую форму с 2FA проверкой. Одноразовые шифры доставляются на сотовый аппарат или email.
Возможности денежного раздела через mirror-сайты предлагает востребованные финансовые системы. Visa, Mastercard, электронные хранилища Skrill, Neteller, crypto Bitcoin, Ethereum процессируются с сокращенными комиссиями 0-3%.
Gaming библиотека дублируется полностью включая spinning games, карточные развлечения, live-ведущих и накопительные призы. RTP-значения, вариативность и вейджер остаются идентичными.
Бонусная политика работает идентично базовому ресурсу. Welcome-пакеты, фриспины, компенсация и VIP-программы активируются системно при соблюдении установленных требований.
mexico pharmacy drugs online https://maps.google.co.mz/url?sa=t&url=https%3A%2F%2Fmexmedimax.com on line pharmacy
keywordorbit.click – Pages loaded fast, images appeared sharp, and formatting stayed consistent.
metaboost.click – Bookmarked this immediately, planning to revisit for updates and inspiration.
Исследование в области лицензированных порталов требует осознания современных методов соединения. Опытные клиенты эксплуатируют казино типпи для добывания свежей фактов о действующих адресах.
Схема формирования профиля в надежных организациях подразумевает комплексную аутентификацию. Современные операторы эксплуатируют KYC-алгоритмы и AML-критерии. Документооборот требует от 24 до 72 временных отрезков.
IT инструменты для минования блокировок совершенствуются одновременно с укреплением правовых действий. VPN-платформы категории premium гарантируют безопасность AES-256 и технологии OpenVPN. Надежность связи критически актуальна для премиальных партий.
Альтернативные адреса оперируют через пространственно расположенные цифровые ресурсы. CDN-сети предоставляют низкую латентность для европейских игроков. Техническое маршрутизация включается при распознавании недоступности основного сайта.
Платежные движения в проверенных юрисдикциях подпадают под строгим правилам PCI DSS. Криптовалютные операции завоевывают признание из-за анонимности и быстроте осуществления.
Переносные программы лучших брендов содержат голосовую подтверждение и push-сообщения для ключевых эпизодов. Настраиваемый дизайн независимо адаптируется под настройки дисплея.
Передовые геймеры пересекаются с изобилием цифровых тонкостей при операциях с легальными платформами. Специализированные порталы типа [url=https://beemunch.com/poluchite-bonusnyy-kod-i-nachnite-igrat-v-onlaynkazino-tiptop-segodnya/]тип топ казино[/url] дают актуальную информацию о процессах игорных брендов.
Алгоритм аутентификации учетной записи предполагает несколько требуемых стадий. Базовая валидация требует передачи бумаг подтверждающих личность. Классический комплект подразумевает документ, водительские права или внешний паспорт.
Технологическая часть открытия счета содержит использование зашифрованного канала и многофакторной защиты. Продвинутые клиенты рекомендуют включать весь комплекс имеющихся опций обеспечения.
Резервные ссылки формируют точные реплики центрального ресурса с сохранением комплексного инструментария. Центральное бонус содержится в тождественности расчетных границ и требований проигрыша.
Механизм обнаружения активных дублирующих порталов основывается на проверке тематических мессенджер групп и партнерских порталов. Продвинутые клиенты применяют виртуальные частные сети для гарантирования устойчивого связи независимо от географических барьеров.
Have you ever thought about creating an ebook or guest authoring on other blogs?
I have a blog based on the same information you discuss and would really like to have you share some stories/information. I know my subscribers would value your work.
If you are even remotely interested, feel free to shoot me
an e-mail.
Актуальные платформы развлекательных услуг предлагают пользователям возможность к профессиональному развлечениям через надежные Tip top зеркало порталы. Лицензированная деятельность предполагает следования конкретных надзорных требований.
Процедура открытия индивидуального учетной записи охватывает подтверждение личных реквизитов. Регуляторы применяют многоуровневые механизмы KYC и AML для блокировки мошеннических финансовых действий.
Цифровые системы передовых беттинг площадок работают на безопасных облачных системах с TLS технологиями. Региональная блокировка обязывает управляющих разрабатывать вспомогательные адреса.
Дублирующие ресурсы являют собой точные версии основного домена с сохранением всех сервисов и сведений. Участники приобретают постоянный доступ к депозиту, азартной записям и личным параметрам.
Банковские процедуры выполняются через синхронизированные банковские сервисы. Рамки на взносы и обналичивания регулируются в гармонии с регуляторными критериями и индивидуальными процедурами риск-менеджмента.
Опытные гемблеры указывают мониторить ситуацию разрешения через регуляторные базы данных гемблинг комиссий. Авторитетные показатели включают места на профильных ресурсах и feedback подлинных участников.
trafficpulse.click – Overall, professional vibe here; trustworthy, polished, and pleasantly minimal throughout.
Современные участники сталкиваются с затруднением доступа к сертифицированным порталам. Компании ограничивают главные ссылки, но грамотные казино Болливуд участники осознают о наличии альтернативных порталов.
Альтернативный адрес представляет идентичную отображение оригинального платформы. Криптографические алгоритмы функционируют неизменными. Денежные операции выполняются через те же каналы.
Схема открытия счёта через параллельный домен предполагает стандартной аутентификации. Администраторы выясняют справки для соблюдения KYC-требований. Личные параметры выполняют многоуровневую валидацию.
Депозитные рамки на параллельных площадках равняются основным условиям. Стартовые вклады сохраняются неизменными. Накопительные джекпоты интегрируются между множественными ресурсами.
Льготные программы работают завершённо на зеркальных сайтах. Коэффициент оборота обеспечивает стартовые параметры. Временные рамки использования продолжается.
Сервис ассистирования решает обращения с зеркальных адресов равнозначно. Прямой чат поддерживает непрерывный режим функционирования.
Актуальные платформы игорных продуктов гарантируют пользователям возможность к профессиональному игровому процессу через защищенные лаки Р±РёСЂ казино порталы. Официальная бизнес требует исполнения четких надзорных положений.
Алгоритм создания индивидуального кабинета предусматривает подтверждение приватных показателей. Провайдеры применяют расширенные системы KYC и AML для недопущения нарушающих транзакций.
IT решения инновационных казино основываются на надежных инфраструктурах с HTTPS сертификатами. Геоблокировка принуждает администраторов внедрять резервные домены.
Резервные порталы составляют аналогичные версии базового сайта с сохранением всех инструментов и данных. Участники получают беспрепятственный вход к средствам, азартной истории и персональным параметрам.
Расчетные действия проходят через связанные банковские процессоры. Пределы на инвестиции и снятия регулируются в гармонии с лицензионными критериями и организационными регламентами управления рисками.
Квалифицированные клиенты настаивают анализировать ситуацию разрешения через официальные реестры азартных организаций. Репутационные индикаторы содержат места на экспертных сервисах и комментарии действительных участников.
buy online prednisone
Актуальные mirror-ссылки надежных gaming-операторов на Gold casino гарантируют беспрерывный подключение к гемблинг ресурсам. Схема дублирования формирует эквивалентные реплики базового портала с фиксацией всех опций.
Процедура создания аккаунта через резервную ссылку в точности воспроизводит стандартную форму. Новые игроки вводят функционирующий email, устанавливают надежный секретную комбинацию и назначают операционную валюту.
Аутентификация учетной записи включает представления свидетельств следуя KYC-регламенту. Снимок ID-карты, верификация адреса и денежные сведения подвергаются машинную анализ в течение 24-72 ч.
Вход существующих участников выполняется через стандартную форму с двухфакторной идентификацией. Сессионные пароли отправляются на телефонный номер или электронную почту.
Механизмы депозитного компонента через зеркала предлагает актуальные расчетные платформы. Visa, Mastercard, онлайн балансы Skrill, Neteller, цифровые активы Bitcoin, Ethereum выполняются с сокращенными взносами 0-3%.
Игровая ассортимент повторяется целиком включая spinning games, карточные активности, live-операторов и максимальные награды. RTP-коэффициенты, волатильность и условия отыгрыша остаются аналогичными.
Подарочная механизм выполняется похоже базовому сайту. Welcome-пакеты, безвозмездные спины, денежный возврат и VIP-схемы стартуют системно при исполнении прописанных требований.
Iver Therapeutics: Iver Therapeutics – stromectol ivermectin
neurontin cost in singapore Neuro Relief USA generic neurontin 600 mg
Беттинговая сфера являет динамичный развитие, привлекая множество клиентов. Опытные платформы обеспечивают стабильную среду для игры. Полную факты о этих организациях реально изучить на казино лова .
Легализация составляет ключевым элементом отбора сайта. Юрисдикции Великобритании дают серьёзный проверку расчётных процедур. Конкретная легальная платформа осуществляет постоянные контроли RNG-модулей.
Цифровые особенности новейших казино содержат SSL-шифрование экономического класса. Разработчики программного обеспечения класса Microgaming, NetEnt, Pragmatic Play интегрируют многоуровневые алгоритмы случайных величин.
Схема проверки счёта предусматривает направления справок KYC-формата. Документ, свидетельство о средствах, удостоверение местожительства — классический набор для окончательного авторизации.
Альтернативные адреса убирают препятствия с блокировками операторов. Свежие копии корректируются ежедневно цифровыми отделами. Мобильные софт обычно работают стабильнее интернет форматов.
Контроль средств формирует продолжительную эффективность гемблинговых партий. Опытные беттеры настаивают контролировать объём депозита до 1-2% от суммарного резерва.
Отбор безопасного игорного портала заставляет основательного рассмотрения правовых документов. Новые ресурсы типпи казино предлагают клиентам абсолютную информацию о имеющихся лицензиях.
Алгоритм создания профиля содержит различные необходимых стадий аутентификации. Представители требуют свидетельства, подтверждающие индивидуальность и дееспособность. Традиционный KYC-порядок продолжается от 24 до 72 периодов.
Банкролл-менеджмент стартует с назначения границ на пополнения. Искусные геймеры призывают применять принцип 5% от совокупного развлекательного резерва на единичную заход.
Электронные запреты поставщиков обязывают применять вспомогательные маршруты. Клоны сохраняют абсолютную производительность базового портала, охватывая архив платежей и игровой успех.
Актуальные расчетные методы поддерживают скоростные вклады через электронные хранилища. Bitcoin, Ethereum и стейблкоины дают конфиденциальность и минимальные взносы. Срок реализации изъятий достигает 10-30 периодов.
Программы верности подразумевают иерархические категории с возрастающим бонусом. VIP-кураторы предоставляют индивидуальные бонусы, расширенные границы и ускоренную помощь.
1win бесплатная ставка https://1win74562.help/
Установите удобный mobile-mir.ru для идеального управления шторами в вашем доме.
Он позволяет управлять текстилем на окнах с помощью пульта дистанционного управления.
Такие системы становятся все популярнее благодаря своему удобству и функциональности. Они особенно востребованы в помещениях с высокими окнами или труднодоступными карнизами.
#### **2. Преимущества электрокарнизов**
Главное достоинство электрокарниза — это удобство использования. Система работает бесшумно и плавно, не создавая лишнего шума.
Кроме того, электрокарнизы отличаются высокой надежностью и долговечностью. Они изготавливаются из прочных материалов, устойчивых к износу.
#### **3. Установка и настройка**
Монтаж электрокарниза требует определенных навыков и точности. Перед установкой необходимо проверить прочность стены или потолка в месте крепления.
После установки нужно правильно настроить систему управления. Для удобства можно синхронизировать устройство с другими элементами умного дома.
#### **4. Выбор подходящей модели**
При покупке электрокарниза важно учитывать несколько факторов. Немаловажным критерием является дизайн, который должен гармонировать с интерьером.
На рынке представлены модели разных ценовых категорий. Выбор зависит от ваших потребностей и бюджета, но качество всегда должно быть на первом месте.
—
### **Спин-шаблон**
#### **1. Введение**
Они особенно востребованы в помещениях с высокими окнами или труднодоступными карнизами.
#### **2. Преимущества электрокарнизов**
Они также известны своей устойчивостью к механическим повреждениям.
#### **3. Установка и настройка**
Современные электрокарнизы поддерживают голосовое управление через умные колонки.
#### **4. Выбор подходящей модели**
Выбор зависит от ваших потребностей и бюджета, но качество всегда должно быть на первом месте.
I’m no longer certain the place you are getting your information, however good topic.
I must spend some time learning more or figuring out more.
Thanks for wonderful information I used to be looking
for this information for my mission.
Also visit my web page … personal retreat riviera maya
Выбор надежного развлекательного ресурса в сегодняшних рамках предполагает повышенного изучения к лицензионному статусу. Знающие геймеры понимают, что тип топ казино содержит свежую данные о работающих операторах.
Процедура оформления профиля в лицензированных сервисах охватывает обязательную верификацию идентичности. KYC-стандарты защищают как оператора, так и пользователя от мошенничества. Временные пределы на изъятие денег до завершения проверки – типичная система.
Электронные ограничения на вход к гемблинг сервисам устраняются через альтернативные ссылки. Доступные клоны сохраняют тотальную эффективность основного сервиса. Финансовые операции, игровой достижения и наградные системы сохраняются константными.
Экономическая защищенность выражается критерием применяемых денежных методов. SSL-криптография, PCI DSS валидация и расширенная аутентификация гарантируют прочный контур безопасности.
Развлекательная набор легальных сервисов объединяет слоты от известных разработчиков. RTP-параметры, вариативность и статистические формулы испытывают беспристрастную сертификацию в признанных учреждениях.
Программы поощрения в качественных площадках опираются на открытых параметрах вейджера. Условия ставок x35-40 считается справедливым для слот-привилегий, в то время как традиционные состязания включаются в подсчет с сниженным фактором.
Развлекательная индустрия являет активный подъём, манящая миллионы клиентов. Экспертные сайты предоставляют стабильную условия для беттинга. Развёрнутую данные о таких брендах реально отыскать на Голд казино .
Легализация представляет ключевым критерием выбора сайта. Надзорные органы Мальты дают жёсткий надзор валютных операций. Всякая лицензированная сайт выполняет систематические инспекции RNG-модулей.
IT свойства актуальных азартных площадок охватывают SSL-кодирование финансового категории. Производители программного ПО уровня Microgaming, NetEnt, Pragmatic Play внедряют многоуровневые механизмы рандомных параметров.
Процесс верификации учётной записи предусматривает представления свидетельств KYC-типа. Удостоверение, документ о прибылях, подтверждение местожительства — классический комплект для окончательного подключения.
Зеркальные URL устраняют барьеры с цензурой организаций. Рабочие варианты обновляются регулярно IT отделами. Карманные софт зачастую действуют лучше онлайн версий.
Управление банкроллом определяет продолжительную результативность развлекательных партий. Опытные геймеры рекомендуют лимитировать количество вейджера до 1-2% от общего банкролла.
Стильный внешний вид формирует первое мнение о человеке.
Ваш образ работает на оценку вас окружающими мгновенно.
Уверенность в подобранном луке повышает личную уверенность.
Он подчеркивает ваш уровень ответственности и уважение к мелочам.
https://a2.lasuper.ru/jlgn1NRE4GIO/
Посредством гардероб вы можете выразить свою индивидуальность и вкус.
Люди часто оценивают опрятных людей как более компетентных.
Следовательно, вложения в свой стиль — это инвестиции в ваше будущее.
http://neuroreliefusa.com/# neurontin 50 mg
бездеп промокоды вавада
Hurrah, that’s what I was looking for, what a data! existing here at this website, thanks admin of this web site.
my page retreat venue tulum
Игровая ниша демонстрирует активный рост, притягивая тысячи клиентов. Профессиональные сайты обеспечивают стабильную обстановку для игры. Полную материалы о подобных операторах доступно изучить на tip top casino .
Легализация представляет ключевым аспектом подбора ресурса. Регуляторы Гибралтара обеспечивают качественный проверку экономических действий. Любая официальная сайт выполняет периодические контроли RNG-алгоритмов.
Цифровые аспекты инновационных казино объединяют SSL-кодирование денежного категории. Создатели программного материала класса Microgaming, NetEnt, Pragmatic Play интегрируют сложные механизмы непредсказуемых чисел.
Схема верификации личного кабинета предусматривает передачи удостоверений KYC-класса. Свидетельство, свидетельство о финансах, валидация регистрации — типичный комплект для финального доступа.
Дублирующие ссылки решают препятствия с ограничениями провайдеров. Свежие копии обновляются каждый день компьютерными группами. Портативные приложения часто работают стабильнее веб вариантов.
Управление банкроллом устанавливает долгосрочную результативность гемблинговых партий. Экспертные участники настаивают лимитировать размер пари до 1-2% от суммарного фонда.
Hello there, I found your web site by means of Google even as
looking for a related subject, your site got here up, it appears to
be like great. I’ve bookmarked it in my google bookmarks.
Hi there, simply became aware of your blog via Google, and found that it’s truly informative.
I’m going to be careful for brussels. I’ll be grateful if you continue
this in future. Lots of other folks shall be
benefited out of your writing. Cheers!
my site :: family personal retreat cancun
Лицензионные площадки азартных сервисов oferuja геймерам вариант к профессиональному игровому процессу через профильные ресурсы, включая лакибир , которые специально следуют общепринятые регламенты безопасности.
Последовательность активации предполагает указания идентификационных данных через шифрованные SSL-каналы. Операторы demanded документальное verification дееспособности и региона жительства для compliance законодательных критериев.
Multi-factor аутентификация представляет обязательным элементом актуальных механизмов безопасности. Участники имеют SMS-пароли, push-notification или задействуют dedicated утилиты вроде Google Authenticator.
Зеркальные порталы ликвидируют проблемы territorial ограничений и DDoS-атак. С технической точки зрения копии формируют дублированные клоны центрального ресурса с поддержанием возможностей и пользовательских данных.
Опытные геймеры suggest хранить current каталоги функционирующих копий в закладках веб-клиента. Администрация отправляют сведения о актуальных ссылках через e-mail, Telegram-communities и mobile приложения.
Денежные переводы через официальные платформы обеспечены cryptographic протоколами стандарта банковского направления. Изъятие средств происходит только на аутентифицированные реквизиты собственника учётной записи.
For strategies
how to get cheap augmentin tablets
for greater clarity.
When some one searches for his vital thing, so he/she wants
to be available that in detail, therefore that thing is maintained
over here.
Активные альтернативные домены проверенных гемблинг-платформ на тип топ казино РІС…РѕРґ обеспечивают непрерывный соединение к развлекательным порталам. Система копирования генерирует точные реплики основного домена с фиксацией всех опций.
Схема открытия счета через дублирующий портал в точности имитирует главную бланк. Дебютные игроки вводят функционирующий email, устанавливают стойкий ключ и фиксируют базовую платежное средство.
Аутентификация аккаунта включает отправки свидетельств в соответствии с KYC-стандартам. Снимок национального документа, подтверждение адреса и банковские сведения проходят цифровую контроль в течение 24-72 ч.
Вход действующих игроков происходит через обычную модуль с расширенной верификацией. Сессионные шифры отправляются на мессенджер девайс или электронную почту.
Опции денежного блока через зеркала поддерживает популярные платежные инструменты. Visa, Mastercard, электронные балансы Skrill, Neteller, виртуальные монеты Bitcoin, Ethereum осуществляются с сокращенными взносами 0-3%.
Гемблинг ассортимент клонируется целиком включая барабаны, классические геймплей, live-крупье и мегавыигрыши. RTP-значения, колебания и ставочные требования удерживаются неизменными.
Бонусная схема оперирует похоже центральному ресурсу. Welcome-пакеты, безвозмездные спины, refund и VIP-системы запускаются системно при выполнении заданных стандартов.
https://ivertherapeutics.com/# ivermectin 250ml
Отбор надежного игорного площадки заставляет детального разбора регулятивных сертификатов. Современные ресурсы Килограмм казино предоставляют клиентам полную информацию о текущих аккредитациях.
Процедура создания профиля содержит несколько обязательных стадий подтверждения. Владельцы настаивают документы, доказывающие индивидуальность и зрелость. Типовой KYC-процесс продолжается от 24 до 72 промежутков.
Распоряжение капиталом начинается с установления лимитов на пополнения. Компетентные клиенты предлагают эксплуатировать закон 5% от итогового игорного бюджета на единичную партию.
Электронные препятствия провайдеров обязывают эксплуатировать дополнительные адреса. Зеркала оберегают стопроцентную работоспособность главного портала, подразумевая историю транзакций и гемблинг результаты.
Инновационные банковские сервисы гарантируют скоростные депозиты через криптовалютные портмоне. Bitcoin, Ethereum и постоянные токены гарантируют анонимность и минимальные платежи. Длительность проведения снятий насчитывает 10-30 отрезков.
Системы постоянства охватывают градационные статусы с возрастающим бонусом. VIP-кураторы предлагают личные бонусы, усиленные границы и приоритетную обслуживание.
нажмите здесь https://t.me/invisevpn_bot
Write more, thats all I have to say. Literally, it seems as though you relied on the video to make your point.
You definitely know what youre talking about, why waste your intelligence on just posting videos to your site when you
could be giving us something informative to read?
Why users still make use of to read news papers when in this technological world all
is existing on net?
my website … personal retreat for couple tulum
continuously i used to read smaller articles or
reviews that as well clear their motive, and that is also happening with
this article which I am reading at this place.
Отбор безопасного игрового оператора в сегодняшних реалиях заставляет детального анализа к юридическому положению. Знающие геймеры осознают, что казино СЌРЅРѕРјРѕ отображает актуальную информацию о активных площадках.
Процесс регистрации в легальных операторах содержит требуемую аутентификацию идентичности. KYC-процедуры защищают как сервис, так и пользователя от афер. Временные лимиты на изъятие финансов до окончания подтверждения – нормальная практика.
Технические блокировки на соединение к гемблинг сервисам нейтрализуются через резервные домены. Активные дубликаты гарантируют стопроцентную работоспособность главного платформы. Расчетные переводы, азартный прогресс и льготные предложения поддерживаются неизменными.
Капитальная безопасность измеряется критерием применяемых финансовых методов. SSL-безопасность, PCI DSS подтверждение и расширенная верификация создают безопасный барьер защиты.
Интерактивная каталог официальных площадок предоставляет барабаны от главных провайдеров. RTP-коэффициенты, изменчивость и математические модели проходят беспристрастную проверку в утвержденных лабораториях.
Механизмы вознаграждения в профессиональных казино базируются на открытых критериях ставок. Условия ставок x35-40 считается справедливым для спин-привилегий, в то время как стандартные активности принимаются в счет с уменьшенным процентом.
Современные гемблеры сталкиваются с барьером подключения к лицензированным ресурсам. Поставщики закрывают стандартные адреса, но грамотные РЎСѓРєР° казино клиенты понимают о функционировании резервных ресурсов.
Дополнительный домен формирует полную реплику оригинального площадки. Протоколы шифрования остаются такими же. Расчётные действия реализуются через равнозначные шлюзы.
Схема регистрации через резервный портал предполагает привычной аутентификации. Операторы просят удостоверения для осуществления KYC-норм. Паспортные информация осуществляют двухфакторную валидацию.
Пополнительные рамки на зеркальных ресурсах идентичны стандартным параметрам. Начальные взносы остаются постоянными. Прогрессивные выигрышные пулы согласовываются между множественными доменами.
Поощрительные механизмы оперируют целостно на зеркальных сайтах. Коэффициент оборота удерживает базовые параметры. Срок активности оборота не изменяется.
Отдел ассистирования рассматривает вопросы с параллельных ресурсов аналогично. Живой переписка осуществляет 24-часовой формат деятельности.
Следующая страница Не забывайте о себе!
indian pharma online
Howdy! This blog post couldn’t be written any better!
Looking through this post reminds me of my previous
roommate! He continually kept preaching about this. I am going to
send this article to him. Fairly certain he will have a good read.
Thank you for sharing!
Also visit my webpage mpomm
Кстати, если вас интересует влияние кинотрендов февраля 2026 года на массовую культуру, загляните сюда.
Смотрите сами:
https://terehov-event.ru/news/kripta-i-kino-kak-trendy-fevralya-2026-goda-pomogayut-trejderam-chitat-nastroenie-rynka/
Looking stylish projects a strong first impression.
A outfit communicates loudly before a person even say a single word.
This enhances your own self-esteem and mindset significantly.
A put-together look conveys competence in the office.
https://a3.gucci1.ru/lwArn95nn/
Fashionable choices allow you to showcase your unique personality.
People often perceive well-dressed people as more capable and reliable.
Ultimately, investing in your wardrobe is an investment in your personal brand.
Iver Therapeutics: Iver Therapeutics – Iver Therapeutics
Современные клиенты имеют дело с изобилием цифровых тонкостей при работе с официальными порталами. Профессиональные сайты типа mad casino предоставляют релевантную данные о деятельности гэмблинговых организаций.
Механизм верификации профиля подразумевает ряд принудительных фаз. Исходная проверка нуждается предоставления документов верифицирующих индивидуальность. Типовой пакет охватывает документ, автоудостоверение или загранпаспорт.
Техническая часть оформления включает использование SSL-шифрования и 2FA. Квалифицированные геймеры подсказывают задействовать весь комплекс предложенных опций обеспечения.
Зеркала составляют стопроцентные отражения базового платформы с хранением комплексного арсенала. Ключевое достоинство заключается в идентичности платежных пределов и условий ставочных требований.
Схема выявления рабочих запасных доменов строится на отслеживании профильных уведомительных сервисов и связанных ресурсов. Продвинутые участники внедряют VPN-сервисы для предоставления постоянного соединения невзирая от местных блокировок.
Передовые гемблеры встречаются с препятствием подключения к легальным платформам. Компании ограничивают основные ссылки, но грамотные винити казино клиенты осознают о присутствии альтернативных платформ.
Альтернативный адрес составляет точную реплику оригинального сайта. Системы безопасности сохраняются равнозначными. Денежные действия осуществляются через идентичные каналы.
Методика открытия счёта через альтернативный домен требует типовой верификации. Специалисты требуют справки для исполнения KYC-регламентов. Персональные сведения подвергаются расширенную верификацию.
Пополнительные границы на зеркальных порталах соответствуют стандартным спецификациям. Стартовые взносы поддерживаются неизменными. Увеличивающиеся выигрышные пулы координируются между различными доменами.
Премиальные схемы действуют завершённо на зеркальных ресурсах. Коэффициент оборота гарантирует исходные цифры. Длительность проигрывания сохраняется.
Команда обслуживания решает обращения с альтернативных доменов таким же способом. Прямой переписка гарантирует постоянный график оперирования.
Wonderful blog! I found it while searching on Yahoo News. Do
you have any tips on how to get listed in Yahoo News?
I’ve been trying for a while but I never seem
to get there! Many thanks
Here is my web page: personal retreat riviera maya
generic zoloft: zoloft no prescription – generic zoloft
1win app скачать 1win06284.help
The Hewn City is a place of vice. Descend into it with the A Court of Mist and Fury PDF. This download takes you to the darker parts of the Night Court. Experience the contrast between Velaris and the Hewn City. https://acourtofmistandfurypdf.top/ A Court Of Mist And Fury Chapter Summary
Fantastic beat ! I would like to apprentice while you amend your website, how
can i subscribe for a blog site? The account helped me a acceptable deal.
I had been tiny bit acquainted of this your broadcast provided bright clear idea
my blog … personal retreat for couple
Нынешние участники натыкаются с проблемой подключения к сертифицированным площадкам. Компании ограничивают базовые адреса, но профессиональные Гризли казино посетители осознают о доступности дублирующих порталов.
Дополнительный домен образует полную копию первичного платформы. Криптографические алгоритмы функционируют идентичными. Финансовые транзакции производятся через те же механизмы.
Процедура открытия счёта через альтернативный портал подразумевает обычной подтверждения. Специалисты уточняют справки для исполнения KYC-норм. Идентификационные параметры подвергаются многоуровневую подтверждение.
Вносительные лимиты на зеркальных порталах соответствуют первичным требованиям. Начальные беты сохраняются неизменными. Увеличивающиеся банки интегрируются между множественными ссылками.
Бонусные программы работают полноценно на зеркальных площадках. Коэффициент оборота удерживает первоначальные цифры. Длительность реализации остаётся прежним.
Отдел поддержки изучает тикеты с дополнительных ссылок сходным образом. Мгновенный разговор осуществляет постоянный расписание оперирования.
Hello, i read your blog from time to time and i own a similar one and i was just wondering if you get a
lot of spam feedback? If so how do you stop it, any plugin or anything you can recommend?
I get so much lately it’s driving me mad so any support is very much appreciated.
Новейшие сервисы азартных продуктов предоставляют клиентам подключение к премиальному игровому процессу через надежные лаки Р±РёСЂ казино ресурсы. Авторизованная операционная активность нуждается выполнения четких надзорных требований.
Процедура активации индивидуального учетной записи задействует валидацию индивидуальных реквизитов. Регуляторы задействуют углубленные алгоритмы KYC и AML для блокировки нарушающих платежей.
IT системы инновационных беттинг площадок функционируют на защищенных дата-центрах с HTTPS стандартами. Геоблокировка вынуждает управляющих создавать дублирующие адреса.
Альтернативные домены формируют эквивалентные копии первичного ресурса с сохранением всех функций и сведений. Клиенты достигают постоянный связь к счету, игровой отчетности и пользовательским настройкам.
Банковские операции проходят через встроенные расчетные процессоры. Границы на инвестиции и изъятия определяются в унисон с законодательными стандартами и внутренними правилами контроля угроз.
Компетентные игроки указывают мониторить статус авторизации через надзорные списки беттинг органов. Репутационные критерии задействуют позиции на специализированных платформах и комментарии настоящих беттеров.
Wonderful beat ! I wish to apprentice while you amend your web site, how can i subscribe for a
blog site? The account helped me a acceptable deal.
I had been tiny bit acquainted of this your broadcast offered bright clear concept
My website :: personal retreat for couple cancun
Беттинговая отрасль демонстрирует быстрый развитие, заинтересовывая легионы пользователей. Профессиональные платформы дают защищённую среду для ставок. Исчерпывающую информацию о подобных провайдерах возможно найти на лова официальный сайт .
Лицензирование представляет центральным аспектом отбора ресурса. Контролёры Гибралтара дают жёсткий мониторинг экономических действий. Каждая легальная площадка реализует регулярные контроли RNG-генераторов.
IT аспекты современных гемблинг-сайтов охватывают SSL-защиту банковского класса. Производители софтового софта вроде Microgaming, NetEnt, Pragmatic Play внедряют усовершенствованные модели произвольных параметров.
Процедура верификации профиля предполагает подачи бумаг KYC-класса. Паспорт, свидетельство о средствах, удостоверение регистрации — базовый комплект для финального активации.
Альтернативные адреса исправляют препятствия с цензурой поставщиков. Рабочие альтернативы изменяются регулярно компьютерными отделами. Смартфонные утилиты обычно функционируют качественнее онлайн вариантов.
Контроль средств создаёт длительную прибыльность азартных циклов. Профессиональные игроки рекомендуют лимитировать величину бета до 1-2% от совокупного капитала.
Активные резервные адреса надежных казино на friends casino зеркало сегодня дают беспрерывный подключение к гемблинг ресурсам. Технология зеркалирования создает эквивалентные дубликаты корневого веб-площадки с поддержанием всех механизмов.
Алгоритм создания аккаунта через зеркало полностью воспроизводит базовую заявку. Начинающие участники указывают валидный email, устанавливают сложный код доступа и фиксируют операционную курренси.
Аутентификация профиля требует загрузки бумаг опираясь на KYC-регламенту. Фото национального документа, валидация резиденции и банковские реквизиты подвергаются программную валидацию в течение 24-72 временных единиц.
Логин верифицированных игроков реализуется через обычную модуль с многоступенчатой проверкой. Временные ключи поступают на мобильный аппарат или email.
Функционал входящего раздела через зеркала предлагает популярные расчетные сервисы. Visa, Mastercard, виртуальные хранилища Skrill, Neteller, блокчейн-токены Bitcoin, Ethereum процессируются с сокращенными сборами 0-3%.
Развлекательная библиотека дублируется полностью включая автоматы, столовые забавы, live-хостов и накопительные призы. RTP-индикаторы, изменчивость и ставочные требования сохраняются идентичными.
Поощрительная политика выполняется аналогично основному сайту. Welcome-предложения, даровые прокруты, денежный возврат и VIP-программы включаются машинально при реализации прописанных стандартов.
https://smartgenrxusa.shop/# pharmacy near me
Установка электрокарнизы для штор на окна цена для ваших штор может значительно улучшить функциональность и эстетику вашего дома.
он позволяет автоматизировать процесс управления шторами и жалюзи . Это устройство можно легко интегрировать в систему умного дома для обеспечения максимального комфорта и контроля . Электрокарниз может быть управляем с помощью пульта дистанционного управления или мобильного приложения что позволяет управлять им из любой точки дома .
Электрокарниз также может быть интегрирован с другими устройствами умного дома такими как системы безопасности и климат-контроля . Это позволяет создать единую систему управления всеми устройствами в доме что упрощает управление и контроль . Кроме того, электрокарниз может быть оснащен датчиками освещенности и температуры которые позволяют автоматически регулировать положение штор и жалюзи .
## Раздел 2: Преимущества электрокарниза
Электрокарниз имеет множество преимуществ он позволяет автоматизировать процесс управления шторами и жалюзи. Это устройство также может помочь сэкономить энергию путем автоматического регулирования положения штор и жалюзи . Кроме того, электрокарниз может быть использован для создания сценариев и режимов работы как режим “светлый день” или “темный вечер.
Электрокарниз также может быть оснащен функцией таймера которая обеспечивает автоматическое управление шторами и жалюзи в определенное время . Это устройство также может быть интегрирован с голосовыми помощниками такими как Siri или Cortana . Это позволяет управлять электрокарнизом с помощью голосовых команд что делает его очень удобным в использовании .
## Раздел 3: Установка и настройка электрокарниза
Установка электрокарниза не требует специальных навыков или инструментов она может быть выполнена с помощью профессионального установщика . Это устройство поставляется с набором необходимых деталей и инструкциями которые дают возможность выполнить установку самостоятельно. После установки электрокарниз необходимо настроить чтобы он был интегрирован с другими устройствами умного дома .
Настройка электрокарниза обычно включает в себя создание учетной записи и настройку параметров работы например, настройку таймера и сценариев работы . Это позволяет создать индивидуальный режим работы электрокарниза который будет обеспечивать максимальный комфорт и безопасность. Кроме того, электрокарниз может быть обновлен с помощью специального программного обеспечения которое обеспечивает регулярные обновления и исправления ошибок .
## Раздел 4: Заключение
Электрокарниз – это современное и удобное решение для управления шторами и жалюзи в доме он предназначен для упрощения процесса управления шторами и жалюзи . Он может быть интегрирован с другими устройствами умного дома например, с системами освещения и отопления и управляться с помощью пульта дистанционного управления или мобильного приложения что позволяет управлять им из любой точки дома . Электрокарниз также может быть оснащен датчиками освещенности и температуры которые помогают поддерживать комфортную температуру и уровень освещенности в доме.
Электрокарниз имеет множество преимуществ он обеспечивает более комфортную и безопасную среду обитания . Он может быть использован для создания сценариев и режимов работы такие как режим “отпуск” или “работа” и может быть интегрирован с голосовыми помощниками как Yandex.Alisa или Samsung Bixby. Это устройство также может быть обновлен с помощью специального программного обеспечения которое дает возможность поддерживать электрокарниз в актуальном состоянии.
Передовые порталы развлекательных продуктов гарантируют пользователям вход к премиальному гемблингу через сертифицированные лаки Р±РёСЂ казино порталы. Официальная деятельность влечет соблюдения строгих регуляторных критериев.
Система активации пользовательского счета содержит аутентификацию личных сведений. Регуляторы используют расширенные алгоритмы KYC и AML для недопущения мошеннических финансовых действий.
Цифровые средства новейших гемблинг платформ функционируют на защищенных серверах с криптографическими технологиями. IP-фильтрация принуждает владельцев внедрять резервные домены.
Дублирующие порталы образуют эквивалентные версии основного домена с сохранением всех опций и данных. Участники добиваются постоянный соединение к депозиту, беттинг записям и клиентским параметрам.
Платежные транзакции реализуются через синхронизированные денежные системы. Ограничения на вклады и снятия фиксируются в унисон с правовыми условиями и внутренними нормами минимизации опасностей.
Квалифицированные игроки рекомендуют анализировать положение аккредитации через государственные реестры азартных органов. Престижные индикаторы охватывают рейтинги на тематических платформах и feedback реальных участников.
Навигация в сфере проверенных ресурсов требует представления актуальных способов доступа. Опытные участники внедряют https://probeg-ag.ru для обретения актуальной материалов о действующих ссылках.
Механизм создания личного кабинета в лицензированных учреждениях подразумевает многоуровневую аутентификацию. Продвинутые организации применяют KYC-механизмы и AML-стандарты. Оформление документов потребляет от 24 до 72 промежутков.
Компьютерные технологии для прохождения блокировок эволюционируют сообща с интенсификацией нормативных мер. VPN-решения уровня premium дают безопасность AES-256 и системы OpenVPN. Надежность соединения принципиально актуальна для привилегированных партий.
Зеркальные адреса работают через регионально рассредоточенные цифровые кластеры. CDN-системы осуществляют минимальную время ответа для европейских игроков. Системное переключение запускается при обнаружении блокировки основного домена.
Экономические переводы в официальных юрисдикциях подчиняются определенным требованиям PCI DSS. Криптовалютные платежи набирают признание из-за приватности и оперативности обработки.
Планшетные программы ведущих компаний объединяют биометрическую подтверждение и push-оповещения для важных происшествий. Модифицируемый дизайн программно изменяется под свойства панели.
Dressing stylish creates a positive first impression.
Your attire speaks volumes before a person even speak a single word.
It enhances your personal self-esteem and mindset significantly.
Your polished look conveys competence in the workplace.
https://links.irkpress.ru/XByRhFGYYst/
Stylish clothing let you to showcase your individual personality.
Others often judge stylish individuals as more successful and reliable.
Therefore, investing in your wardrobe is an valuable step in yourself.
To discover
Online loans for bad credit advice
for a easy reference.
Передовые участники натыкаются с сложностью подключения к лицензированным сайтам. Поставщики ограничивают главные домены, но профессиональные [url=https://reviewparks.com/poluchi-bonusy-v-onlaynkazino-vmeste-so-svoimi-druzyami/]friends casino[/url] пользователи учитывают о доступности зеркальных площадок.
Параллельный портал представляет стопроцентную реплику главного портала. Протоколы шифрования работают равнозначными. Финансовые переводы проходят через аналогичные каналы.
Методика открытия счёта через параллельный ссылку предполагает привычной валидации. Операторы уточняют бумаги для выполнения KYC-регламентов. Личные данные реализуют комплексную подтверждение.
Пополнительные границы на параллельных порталах совпадают главным условиям. Минимальные вклады поддерживаются константными. Растущие банки объединяются между разными адресами.
Поощрительные планы выполняются комплексно на альтернативных платформах. Отыгрышный коэффициент поддерживает исходные значения. Срок активности проигрывания не изменяется.
Служба ассистирования изучает тикеты с альтернативных доменов равнозначно. Прямой разговор гарантирует непрерывный порядок деятельности.
Передовые геймеры сталкиваются с сложностью связи к легальным площадкам. Организации фильтруют главные ссылки, но знающие казино Клубника клиенты учитывают о присутствии резервных платформ.
Резервная ссылка составляет стопроцентную реплику основного платформы. Средства защиты сохраняются неизменными. Банковские транзакции выполняются через аналогичные каналы.
Методика регистрации через резервный портал подразумевает типовой валидации. Операторы требуют справки для соблюдения KYC-регламентов. Индивидуальные параметры выполняют двухфакторную аутентификацию.
Пополнительные ограничения на параллельных порталах аналогичны главным требованиям. Стартовые вклады сохраняются постоянными. Растущие призовые фонды согласовываются между всеми ссылками.
Бонусные программы функционируют завершённо на зеркальных платформах. Коэффициент оборота сохраняет оригинальные показатели. Срок активности реализации продолжается.
Команда ассистирования решает вопросы с параллельных ресурсов идентично. Прямой разговор гарантирует непрерывный график работы.
https://art-vip.ru/
This piece of writing offers clear idea in favor
of the new users of blogging, that really how to do blogging.
Definitely imagine that that you said. Your favourite reason seemed to be at the net the easiest thing to remember of.
I say to you, I definitely get annoyed while folks think about worries that
they plainly do not know about. You controlled to hit the nail upon the top and
also defined out the entire thing with no need side-effects ,
folks could take a signal. Will probably be back to get more.
Thank you
Also visit my webpage; family personal retreat mexico
It’s very straightforward to find out any topic on net as
compared to books, as I found this piece of writing at this web page.
Also visit my web-site; personal retreat mexico
buy prednisone without a prescription
Гемблинговая сфера демонстрирует интенсивный подъём, завлекая миллионы участников. Грамотные сайты предоставляют стабильную обстановку для развлечений. Полную факты о подобных компаниях можно изучить на Клубника казино .
Аттестация является главным критерием подбора портала. Надзорные органы Великобритании предоставляют строгий аудит расчётных транзакций. Конкретная официальная платформа реализует регулярные инспекции RNG-систем.
IT аспекты передовых беттинг-платформ включают SSL-шифрование экономического класса. Производители программного софта вроде Microgaming, NetEnt, Pragmatic Play добавляют продвинутые механизмы рандомных показателей.
Процесс проверки аккаунта предусматривает передачи удостоверений KYC-типа. Документ, документ о заработке, верификация проживания — стандартный список для завершённого активации.
Альтернативные порталы убирают барьеры с цензурой организаций. Рабочие зеркала корректируются ежедневно программными группами. Портативные утилиты нередко оперируют надёжнее онлайн модификаций.
Управление банкроллом устанавливает длительную результативность игровых раундов. Грамотные геймеры советуют лимитировать объём пари до 1-2% от общего бюджета.
Good info. Lucky me I discovered your blog by accident (stumbleupon).
I have book-marked it for later!
Visit my web-site … personal retreat for couple cancun
Новейшие гемблеры попадают с барьером связи к легальным ресурсам. Организации ограничивают стандартные домены, но знающие lucky bear казино РІС…РѕРґ пользователи осознают о доступности зеркальных сайтов.
Зеркало формирует точную реплику оригинального площадки. Протоколы шифрования сохраняются идентичными. Денежные процедуры осуществляются через сходные системы.
Методика оформления профиля через дополнительный адрес содержит стандартной валидации. Сотрудники запрашивают удостоверения для соблюдения KYC-требований. Индивидуальные данные реализуют расширенную проверку.
Вносительные границы на альтернативных площадках аналогичны базовым характеристикам. Низшие взносы сохраняются неизменными. Увеличивающиеся призовые фонды координируются между множественными адресами.
Поощрительные схемы функционируют полноценно на дополнительных порталах. Вейджер сохраняет первоначальные величины. Временные рамки проигрывания сохраняется.
Команда ассистирования изучает заявки с параллельных ресурсов сходным образом. Живой разговор осуществляет 24-часовой формат оперирования.
Опрятный внешний вид создает сильное мнение о вас.
Ваш образ работает на восприятие вас окружающими сразу.
Хорошее самочувствие в своем луке повышает личную уверенность.
Этот подход подчеркивает ваш стандарт ответственности и уважение к мелочам.
https://coub.com/reputation.house
Посредством одежду вы имеете шанс проявить свою личность и вкус.
Люди часто воспринимают стильных индивидов как более успешных.
Поэтому, вложения в собственный образ — это вклад в ваше успешное будущее.
вакансия работа
http://ivertherapeutics.com/# stromectol ivermectin buy
Перемещение в мире проверенных порталов требует понимания продвинутых решений подключения. Умелые игроки эксплуатируют винити официальный сайт для приобретения свежей данных о действующих адресах.
Механизм создания учетной записи в надежных учреждениях включает сложную подтверждение. Актуальные поставщики используют KYC-системы и AML-стандарты. Документальное сопровождение отнимает от 24 до 72 промежутков.
IT технологии для преодоления блокировок улучшаются вместе с повышением регуляторных мер. VPN-платформы категории premium обеспечивают защиту AES-256 и стандарты OpenVPN. Непрерывность коннекта жизненно значима для премиальных игровых периодов.
Зеркальные сайты работают через локально распределенные IT инфраструктуры. CDN-комплексы обеспечивают оптимальную задержку для международных клиентов. Техническое редирект срабатывает при выявлении блокировки базового портала.
Финансовые транзакции в легальных регионах соответствуют четким требованиям PCI DSS. Крипто операции набирают распространение вследствие приватности и оперативности реализации.
Переносные клиенты элитных провайдеров совмещают отпечатковую проверку и push-оповещения для существенных событий. Модифицируемый внешний вид независимо адаптируется под особенности монитора.
Отбор проверенного азартного площадки в современных обстоятельствах подразумевает повышенного изучения к лицензионному состоянию. Опытные участники представляют, что тип топ казино демонстрирует актуальную данные о активных ресурсах.
Механизм открытия счета в проверенных платформах охватывает обязательную аутентификацию удостоверения. KYC-требования охраняют как казино, так и игрока от махинаций. Кратковременные лимиты на снятие средств до окончания верификации – нормальная практика.
Виртуальные ограничения на связь к азартным площадкам устраняются через зеркальные ссылки. Функционирующие копии поддерживают всестороннюю производительность базового платформы. Денежные процедуры, интерактивный результаты и привилегированные программы поддерживаются постоянными.
Экономическая гарантированность выражается степенью используемых денежных способов. SSL-шифрование, PCI DSS подтверждение и двухфакторная идентификация устанавливают защищенный заслон ограждения.
Интерактивная библиотека легальных операторов включает машины от топовых создателей. RTP-значения, дисперсия и статистические схемы подвергаются беспристрастную аудит в авторизованных организациях.
Схемы мотивации в серьезных операторах строятся на ясных параметрах отыгрыша. Требования x35-40 признается справедливым для машина-поощрений, в то время как классические игры включаются в зачет с редуцированным показателем.
интернет Время для самореализации с нами!
india generic viagra online pharmacy https://www.google.com.au/url?sa=t&url=https%3A%2F%2Fmexmedimax.com foreign pharmacies online no prescriptions
online shopping pharmacy india: Smart GenRx USA – express scripts com pharmacies
Азартная сфера демонстрирует быстрый прогресс, заинтересовывая множество участников. Профессиональные сайты обеспечивают защищённую атмосферу для беттинга. Развёрнутую данные о этих компаниях допустимо отыскать на СЌРЅРѕРјРѕ казино .
Сертификация составляет главным аспектом селекции платформы. Лицензиаты Мальты дают тщательный проверку финансовых процедур. Любая сертифицированная платформа проходит периодические ревизии RNG-генераторов.
Компьютерные аспекты актуальных гемблинг-сайтов включают SSL-кодирование расчётного ранга. Разработчики программного софта типа Microgaming, NetEnt, Pragmatic Play интегрируют сложные алгоритмы непредсказуемых показателей.
Механизм проверки учётной записи подразумевает представления свидетельств KYC-стандарта. ID, документ о финансах, удостоверение местожительства — классический набор для итогового авторизации.
Альтернативные адреса ликвидируют сложности с ограничениями компаний. Функционирующие варианты изменяются каждый день IT отделами. Мобильные клиенты нередко функционируют качественнее интернет редакций.
Финансовая дисциплина задаёт стратегическую эффективность азартных партий. Экспертные игроки указывают сокращать сумму депозита до 1-2% от полного резерва.
Привет привет дом Привет привет дом
Новейшие участники сталкиваются с набором технологических аспектов при работе с сертифицированными порталами. Профильные сайты типа Килограмм предоставляют релевантную контент о операциях азартных операторов.
Процесс валидации счета включает ряд требуемых фаз. Исходная подтверждение включает загрузки справок подтверждающих гражданство. Обычный комплект подразумевает удостоверение личности, лицензию водителя или международное ID.
Программная сторона записления включает использование SSL-шифрования и двойной авторизации. Профессиональные участники подсказывают инициировать все имеющихся опций охраны.
Резервные ссылки представляют идентичные реплики главного портала с хранением исчерпывающего функционала. Главное бонус состоит в подобии расчетных лимитов и критериев условий прокрутки.
Алгоритм выявления актуальных зеркал фундируется на мониторинге тематических новостных лент и партнерских сайтов. Квалифицированные геймеры используют туннельные протоколы для обеспечения постоянного доступа независимо от территориальных лимитов.
You should take part in a contest for one of the finest blogs on the web.
I am going to recommend this website!
Look at my web-site :: personal retreat mexico
Rutor — центральная площадка русскоязычного даркнета в Tor, предоставляющая пользователям доступ к материалам, товарам, контенту и условиям анонимности черного рынка и onion ресурсов
Rutor — известный сервис с богатым прошлым, предоставляющий анонимный доступ и безопасность транзакций в пределах сети Rutor.Rutor: Один из ключевых проектов русскоязычного даркнета
rutor зеркало new rutor ru считается одним из наиболее популярных и старых ресурсов в рунет-даркнете, который прочно закрепился в инфраструктуре анонимных площадок. Основное направление работы ресурса — предоставление обширной базы файлов, утилит, новостей и прочего контента, в том числе, связанного с темами безопасности и взлома.
Главные аспекты функционирования Rutor
Механизм работы ресурса позволяет пользователям получать доступ к большим массивам данных и файлов, при этом обеспечивая максимальную приватность и анонимность. Главное преимущество платформы — интеграция с сетью Rutor, что значительно уменьшает вероятность раскрытия личности и потери конфиденциальной информации. За долгое время работы Rutor стал своего рода летописью для даркнета на русском языке.
Платформа функционирует стабильно, обеспечивая равный доступ для новых и опытных участников даркнета. Каждый из разделов сайта — магазин, новостные ленты или руководства по взлому — образуют отдельную звено в масштабном сообществе, где главными ценностями выступают конфиденциальность и защита анонимности.
Перспективы и риски
Ясно, что будущая деятельность Rutor потребует решения новых рисков, внедрения свежих подходов к безопасности и средств обхода ограничений. Следует помнить, что даже максимально анонимная среда не обеспечивает стопроцентную безопасность.
Этот сервис по-прежнему служит площадкой для информирования, обсуждений безопасности и отслеживания новшеств в даркнет-сообществе. Технический прогресс, рост числа участников и новые функциональные решения превращают Rutor в ключевой узел русскоязычного интернет-сообщества.
– Сохранение анонимности
– Надёжность проведения операций
– Открытый доступ к специализированному контенту
– Обеспечение приватности взаимодействий
Rutor — это платформа с уникальной историей, и её опыт стоит принимать во внимание всем, кто ценит собственную свободу, приватность и независимость от внешней цензуры в современном цифровом мире.
My brother suggested I may like this blog. He used to be totally
right. This post actually made my day. You cann’t consider simply how much time I had spent for this
info! Thank you!
Here is my web blog: personal retreat cancun
Инновационные порталы игорных игр предлагают игрокам путь к профессиональному азарту через надежные Голд казино платформы. Лицензированная работа подразумевает следования четких регуляторных норм.
Алгоритм открытия индивидуального учетной записи задействует аутентификацию индивидуальных сведений. Управляющие внедряют детализированные системы KYC и AML для пресечения незаконных финансовых действий.
Программные инструменты передовых беттинг площадок основываются на безопасных серверах с SSL стандартами. Региональная блокировка побуждает владельцев запускать резервные адреса.
Параллельные платформы являют собой полные копии первичного домена с фиксацией всех инструментов и информации. Игроки получают устойчивый доступ к капиталу, гемблинг отчетности и личным конфигурациям.
Денежные процедуры проходят через подключенные финансовые агрегаторы. Лимиты на взносы и обналичивания регулируются в согласии с правовыми стандартами и индивидуальными нормами управления рисками.
Опытные гемблеры советуют проверять ситуацию лицензии через надзорные базы данных игорных органов. Статусные характеристики охватывают позиции на экспертных порталах и feedback подлинных клиентов.
Инновационные сервисы беттинг услуг предлагают игрокам доступ к профессиональному игровому процессу через сертифицированные lucky bear казино порталы. Лицензированная операционная активность предполагает учета определенных контролирующих положений.
Процесс открытия клиентского аккаунта предусматривает валидацию личных показателей. Операторы эксплуатируют углубленные системы KYC и AML для недопущения нарушающих транзакций.
Цифровые решения инновационных развлекательных порталов работают на надежных дата-центрах с TLS сертификатами. Региональная блокировка вынуждает операторов запускать резервные URL.
Зеркальные платформы составляют точные репликации главного платформы с удержанием всех сервисов и параметров. Участники достигают стабильный доступ к капиталу, азартной отчетности и личным опциям.
Банковские переводы выполняются через встроенные финансовые агрегаторы. Рамки на депозиты и выводы регулируются в гармонии с законодательными критериями и корпоративными политиками управления рисками.
Квалифицированные гемблеры советуют мониторить положение разрешения через контролирующие реестры беттинг органов. Имиджевые характеристики охватывают места на профильных сервисах и feedback подлинных пользователей.
подробнее https://t.me/invisevpn_bot/
Pretty! This has been an incredibly wonderful post.
Thank you for providing this information.
Here is my web site; retreat venue cancun
https://sertralineusa.com/# zoloft generic
По теме “Обсуждаемые новинки кино февраля 2026”, нашел много полезного.
Вот, делюсь ссылкой:
https://tut-vse-yasno.ru/news/chto-sejchas-pokazyvayut-v-kinoteatrah-samye-obsuzhdaemye-novinki-fevralya-2026-goda/
Нынешние игроки сталкиваются с огромным количеством программных тонкостей при процессах с легальными порталами. Профильные платформы типа типпи поставляют современную данные о процессах развлекательных организаций.
Алгоритм аутентификации аккаунта подразумевает комплекс принудительных этапов. Начальная проверка подразумевает предоставления справок верифицирующих индивидуальность. Классический список охватывает свидетельство, автолицензию или международный паспорт.
Цифровая часть оформления предполагает внедрение SSL-шифрования и двухфакторной аутентификации. Экспертные участники подсказывают инициировать совокупность предложенных параметров секьюрити.
Альтернативные адреса образуют абсолютные копии первичного платформы с хранением всего инструментария. Главное преимущество состоит в подобии расчетных границ и норм вейджера.
Система локализации активных дублирующих порталов базируется на отслеживании тематических новостных лент и аффилированных платформ. Квалифицированные клиенты используют VPN-сервисы для формирования стабильного входа без оглядки от местных ограничений.
Hello very cool blog!! Man .. Beautiful .. Wonderful ..
I’ll bookmark your blog and take the feeds additionally?
I am satisfied to seek out a lot of helpful info right here in the post, we want work out extra strategies on this
regard, thanks for sharing. . . . . .
my web blog host a retreat
Активные дублирующие порталы лицензированных азартных клубов на казино Гризли дают непрерывный коннект к развлекательным ресурсам. Схема клонирования строит точные копии базового домена с сохранением всех функций.
Схема активации через зеркало в точности копирует стандартную бланк. Дебютные пользователи прописывают функционирующий email, формируют сложный шифр и определяют операционную валюту.
Идентификация аккаунта включает загрузки удостоверений в соответствии с KYC-нормам. Снимок национального документа, верификация адреса и платежные реквизиты контролируются системой алгоритмическую контроль в течение 24-72 часа.
Авторизация активных игроков выполняется через базовую панель с двухфакторной проверкой. Сессионные пароли доставляются на мобильный устройство или e-mail адрес.
Опции пополнительного сектора через дублирующие порталы поддерживает востребованные платежные инструменты. Visa, Mastercard, онлайн кошельки Skrill, Neteller, блокчейн-токены Bitcoin, Ethereum обрабатываются с низкими платежами 0-3%.
Gaming каталог воспроизводится целиком включая барабаны, столовые развлечения, live-крупье и максимальные награды. RTP-коэффициенты, волатильность и условия отыгрыша сохраняются идентичными.
Подарочная механизм действует схоже центральному веб-площадке. Welcome-бандлы, безвозмездные спины, денежный возврат и VIP-программы включаются машинально при реализации прописанных параметров.
As the admin of this web page is working, no hesitation very shortly it will be renowned, due to its feature contents.
My page :: Wedding Photo Booth
Iver Therapeutics: stromectol for sale – ivermectin pills
Развлекательная область демонстрирует быстрый развитие, притягивая легионы игроков. Профессиональные порталы предлагают стабильную пространство для игры. Подробную данные о указанных компаниях возможно найти на казино типпи .
Сертификация выступает приоритетным аспектом выбора портала. Лицензиаты Олдерни предоставляют жёсткий контроль денежных манипуляций. Всякая лицензированная сайт проходит регулярные контроли RNG-модулей.
Компьютерные свойства инновационных беттинг-платформ включают SSL-криптографию денежного стандарта. Разработчики софтового продукта типа Microgaming, NetEnt, Pragmatic Play интегрируют усовершенствованные схемы рандомных параметров.
Схема проверки профиля предусматривает передачи удостоверений KYC-стандарта. Свидетельство, справка о прибылях, подтверждение проживания — типичный перечень для окончательного авторизации.
Альтернативные ссылки исправляют барьеры с запретами операторов. Действующие дубли изменяются систематически цифровыми службами. Карманные программы часто выполняются лучше сетевых модификаций.
Контроль средств создаёт долгосрочную доходность азартных циклов. Квалифицированные беттеры советуют урезать сумму депозита до 1-2% от итогового банкролла.
Для создания удобного и стильного интерьера выбирайте цена электрокарнизы — это лучший выбор для современного дома.
Блок управления обеспечивает выбор режимов, связь с пультом и интеграцию в домашнюю автоматизацию.
Подбор безопасного игорного ресурса подразумевает детального исследования правовых свидетельств. Современные платформы LeeBet гарантируют пользователям абсолютную сведения о имеющихся санкциях.
Процесс оформления счета включает множество обязательных стадий верификации. Администраторы требуют справки, доказывающие личность и правоспособность. Обычный KYC-регламент составляет от 24 до 72 периодов.
Финансовое планирование открывается с назначения лимитов на инвестиции. Профессиональные клиенты призывают эксплуатировать правило 5% от полного игорного резерва на отдельную раунд.
Программные препятствия провайдеров вынуждают применять резервные ссылки. Зеркала хранят абсолютную активность первичного портала, включая журнал переводов и казино продвижение.
Передовые банковские инструменты предоставляют быстрые инвестиции через электронные портмоне. Bitcoin, Ethereum и устойчивые монеты дают тайность и мизерные сборы. Срок осуществления получений доходит 10-30 периодов.
Алгоритмы преданности включают иерархические ранги с прогрессивным кэшбэком. VIP-менеджеры предоставляют персонализированные поощрения, расширенные лимиты и приоритетную сервис.
For policies
how to get promethazine pills
for team projects.
2026 sera mon année. J’ai décidé de ne jouer que sur des casinos
récents, mais uniquement ceux qui ont passé les mailles du filet de nouveau casino en ligne 2026.
J’en ai déjà testé deux. Le premier avait
un design de fou et le deuxième une équipe de support aux petits oignons.
Je sens que cette année, je vais prendre énormément de plaisir.
Plus de sites poussiéreux, plus de licences douteuses.
Que du neuf et du propre.
This information is worth everyone’s attention. Where can I find out more?
Also visit my blog; social media engagement
1win вход быстро http://www.1win45920.help
Актуальные сервисы развлекательных игр предоставляют пользователям доступ к качественному игровому процессу через проверенные mad casino официальный сайт сайты. Легальная функционирование влечет выполнения жестких правовых положений.
Механизм регистрации персонального кабинета содержит проверку конфиденциальных сведений. Операторы задействуют детализированные системы KYC и AML для пресечения фродовых переводов.
Программные инструменты новейших игорных домов строятся на стабильных хостингах с SSL алгоритмами. Региональная блокировка побуждает провайдеров внедрять вспомогательные адреса.
Зеркальные домены представляют полные репликации базового портала с удержанием всех возможностей и данных. Беттеры достигают постоянный вход к счету, гемблинг статистике и личным конфигурациям.
Расчетные переводы осуществляются через встроенные денежные шлюзы. Пределы на инвестиции и изъятия устанавливаются в гармонии с нормативными требованиями и внутренними регламентами снижения потерь.
Экспертные клиенты указывают проверять состояние разрешения через контролирующие списки игорных структур. Авторитетные параметры охватывают места на профильных платформах и мнения истинных беттеров.
Определение легального казино оператора предполагает глубокого анализа правовых свидетельств. Новые системы Tippy дают пользователям абсолютную информацию о текущих допусках.
Система создания профиля подразумевает различные требуемых шагов подтверждения. Провайдеры истребуют документы, устанавливающие самобытность и правоспособность. Традиционный KYC-механизм занимает от 24 до 72 периодов.
Контроль средств запускается с определения рамок на взносы. Компетентные игроки настаивают эксплуатировать правило 5% от общего игорного фонда на отдельную сессию.
Программные препятствия владельцев обязывают эксплуатировать альтернативные маршруты. Дубликаты оберегают стопроцентную активность центрального портала, охватывая журнал платежей и развлекательный прогресс.
Актуальные финансовые сервисы обеспечивают быстрые пополнения через блокчейн счета. Bitcoin, Ethereum и постоянные токены предоставляют скрытность и крошечные взносы. Длительность проведения изъятий составляет 10-30 периодов.
Алгоритмы преданности подразумевают каскадные статусы с накапливающимся возвратом. VIP-представители предоставляют персонализированные поощрения, повышенные ограничения и преимущественную поддержку.
Heya i am for the first time here. I came across this board and I find It really
useful & it helped me out much. I hope to give something back
and aid others like you aided me.
Feel free to visit my blog :: social proof on Instagram
Neuro Relief USA Neuro Relief USA neurontin 300 mg buy
Перемещение в мире сертифицированных площадок включает знания современных методов подключения. Продвинутые участники эксплуатируют Вован казино для получения релевантной данных о оперативных доменах.
Процесс открытия профиля в надежных учреждениях содержит тщательную аутентификацию. Продвинутые поставщики используют KYC-механизмы и AML-требования. Документооборот занимает от 24 до 72 интервалов.
Компьютерные решения для преодоления запретов прогрессируют параллельно с ужесточением законодательных инициатив. VPN-службы разряда premium предлагают кодирование AES-256 и технологии OpenVPN. Надежность связи fundamentally актуальна для привилегированных заходов.
Дублирующие адреса выполняют задачи через географически распределенные технические мощности. CDN-архитектуры гарантируют низкую отклик для международных участников. Системное перенаправление включается при выявлении ограничения главного адреса.
Денежные переводы в проверенных областях подчиняются строгим требованиям PCI DSS. Блокчейн переводы увеличивают актуальность по причине приватности и темпу выполнения.
Планшетные приложения лучших организаций объединяют голосовую аутентификацию и push-сообщения для критических эпизодов. Изменяемый оформление программно адаптируется под настройки монитора.
Having read this I thought it was really enlightening.
I appreciate you finding the time and energy to put this short article together.
I once again find myself spending a significant amount of time both reading and
posting comments. But so what, it was still worthwhile!
Feel free to surf to my blog; social proof on Instagram
Актуальные участники попадают с затруднением доступа к официальным площадкам. Организации ограничивают стандартные URL, но знающие лаки Р±РёСЂ казино пользователи осознают о функционировании зеркальных платформ.
Альтернативный адрес составляет точную реплику первичного сайта. SSL-сертификаты работают равнозначными. Финансовые действия выполняются через те же механизмы.
Технология регистрации через параллельный домен требует стандартной проверки. Операторы уточняют бумаги для исполнения KYC-правил. Персональные данные подвергаются двухфакторную подтверждение.
Финансовые рамки на резервных площадках идентичны базовым характеристикам. Начальные взносы продолжают постоянными. Возрастающие банки синхронизируются между многочисленными адресами.
Поощрительные схемы работают завершённо на зеркальных ресурсах. Требования по обороту гарантирует первоначальные показатели. Временные рамки оборота продолжается.
Служба помощи решает тикеты с параллельных адресов идентично. Онлайн общение обеспечивает непрерывный режим деятельности.
Really enjoyed reading this post.
This post breaks down
the basics of online sports streaming
in a
clear and beginner-friendly manner.
It’s common for readers to ask
how they can watch live cricket online
and
the information here is quite practical.
Thanks for putting this together.
https://smartgenrxusa.com/# Smart GenRx USA
Современные геймеры пересекаются с множеством программных деталей при функционировании с официальными сайтами. Специализированные платформы типа Килограмм казино предоставляют новую материалы о деятельности гэмблинговых компаний.
Механизм проверки аккаунта содержит несколько принудительных шагов. Начальная проверка подразумевает загрузки свидетельств удостоверяющих персону. Типовой пакет охватывает ID, права или заграничное удостоверение.
Техническая элемент регистрации подразумевает эксплуатацию криптографической защиты и двойной авторизации. Профессиональные участники настаивают задействовать все возможных возможностей обеспечения.
Дублирующие порталы составляют точные реплики первичного платформы с хранением исчерпывающего функционала. Важнейшее выгода заключается в схожести финансовых ограничений и параметров отыгрыша.
Алгоритм выявления функционирующих альтернативных адресов строится на наблюдении профильных телеграм-каналов и связанных платформ. Профессиональные клиенты задействуют виртуальные частные сети для обеспечения устойчивого соединения невзирая от территориальных ограничений.
Smart GenRx USA: Smart GenRx USA – big pharmacy online
Современные платформы игорных игр гарантируют беттерам подключение к высококлассному игровому процессу через безопасные Килограмм казино платформы. Лицензированная операционная активность требует учета определенных правовых стандартов.
Механизм открытия пользовательского аккаунта задействует валидацию личных показателей. Провайдеры эксплуатируют многоуровневые процедуры KYC и AML для предотвращения мошеннических транзакций.
Программные системы современных гемблинг платформ строятся на безопасных облачных системах с криптографическими технологиями. Территориальные ограничения вынуждает администраторов организовывать дублирующие порталы.
Зеркальные порталы представляют точные копии основного ресурса с удержанием всех опций и данных. Игроки обеспечивают себе устойчивый доступ к средствам, развлекательной истории и пользовательским опциям.
Расчетные переводы выполняются через связанные банковские агрегаторы. Пределы на взносы и изъятия регулируются в соотношении с законодательными условиями и индивидуальными правилами риск-менеджмента.
Квалифицированные пользователи рекомендуют анализировать статус аккредитации через надзорные реестры игорных ведомств. Репутационные показатели охватывают позиции на экспертных сайтах и feedback действительных игроков.
проверить сайт https://t.me/invisevpn_bot/
Prepare to fly back into the danger zone with the latest release from Rebecca Yarros, a book that promises to shatter hearts and rebuild them. As the war intensifies, the need for a reliable digital version of Onyx Storm becomes clear for voracious readers. E-readers allow fans to adjust fonts and lighting for those late-night marathons that this genre demands. The search for the epub version highlights just how eager the community is to consume this story. From the chemistry between the protagonists to the political intrigue of the dragon riders, this book is set to be a defining moment in modern fantasy literature.
online pharmacy uk
Источник
Unique products for you!
Актуальные провайдеры беттинг игр предоставляют игрокам путь к качественному развлечениям через проверенные казино СЌРЅРѕРјРѕ порталы. Авторизованная работа влечет соблюдения строгих надзорных критериев.
Алгоритм создания персонального учетной записи содержит проверку личных сведений. Операторы применяют комплексные механизмы KYC и AML для пресечения поддельных операций.
Программные системы новейших беттинг площадок базируются на надежных инфраструктурах с HTTPS алгоритмами. Территориальные ограничения вынуждает администраторов разрабатывать альтернативные ссылки.
Резервные ресурсы образуют эквивалентные дубликаты первичного платформы с поддержанием всех опций и данных. Участники достигают непрерывный соединение к капиталу, беттинг отчетности и пользовательским настройкам.
Денежные процедуры реализуются через встроенные расчетные процессоры. Лимиты на вклады и выводы регулируются в гармонии с регуляторными требованиями и индивидуальными процедурами минимизации опасностей.
Квалифицированные гемблеры рекомендуют контролировать ситуацию лицензии через надзорные списки развлекательных ведомств. Престижные критерии включают места на тематических платформах и оценки настоящих беттеров.
Выбор надежного казино оператора требует детального разбора официальных документов. Современные ресурсы лаки Р±РёСЂ казино предлагают участникам стопроцентную факты о текущих лицензиях.
Механизм регистрации включает множество необходимых этапов валидации. Администраторы истребуют бумаги, засвидетельствующие индивидуальность и зрелость. Обычный KYC-процесс требует от 24 до 72 временных отрезков.
Банкролл-менеджмент открывается с назначения рамок на пополнения. Профессиональные игроки призывают эксплуатировать закон 5% от общего азартного фонда на конкретную партию.
Системные блокировки владельцев принуждают эксплуатировать альтернативные адреса. Дубликаты удерживают безусловную функциональность главного площадки, подразумевая летопись сделок и развлекательный прогресс.
Новые денежные способы предоставляют скоростные инвестиции через виртуальные портмоне. Bitcoin, Ethereum и постоянные токены обеспечивают скрытность и минимальные платежи. Продолжительность обработки извлечений насчитывает 10-30 периодов.
Системы постоянства включают ступенчатые категории с нарастающим возвратом. VIP-кураторы гарантируют индивидуальные поощрения, увеличенные лимиты и преимущественную сервис.
как войти в 1вин https://1win5525.ru/
I’m gone to say to my little brother, that he should also
pay a visit this website on regular basis to take updated
from hottest reports.
my webpage Buy Ceramic Supplies At Artsulli | Art Supply Store | Shop Art & Illustration Supplies
I do not even understand how I ended up right here, but I believed this publish was once good.
I don’t realize who you might be however definitely you’re going to a well-known blogger in the
event you aren’t already. Cheers!
Rutor выступает в роли главного сайта русскоязычного даркнета в Tor, предоставляющего доступ к информации, материалам, товарам и нормам анонимности для пользователей черного рынка и onion ресурсов
Rutor — известный сервис с богатым прошлым, предоставляющий анонимный доступ и безопасность транзакций в пределах сети Rutor.Rutor: Ветеран русскоязычного даркнета
рутор считается одним из наиболее популярных и старых ресурсов в рунет-даркнете, который прочно закрепился в инфраструктуре анонимных площадок. Этот магазин ориентирован на предоставление пользователям широкой базы данных, связанной с файлами, софтом, новостями и различными видами контента, включая темы, касающиеся взлома и безопасности.
Как устроена система работы Rutor
Механизм работы ресурса позволяет пользователям получать доступ к большим массивам данных и файлов, при этом обеспечивая максимальную приватность и анонимность. Работа сервиса построена на использовании анонимной сети Rutor, что помогает свести к минимуму угрозы идентификации и утечки данных. За долгое время работы Rutor стал своего рода летописью для даркнета на русском языке.
Rutor поддерживает стабильную работу, позволяя и новичкам, и опытным пользователям использовать предоставляемые сервисы. Система построена таким образом, что каждый раздел страницы — будь то магазин, новости или инструкции по взлому — становится отдельной частью большого сообщества, в котором безопасность и возможность оставаться анонимным выходят на первый план.
Возможные направления развития и связанные опасности
Ясно, что будущая деятельность Rutor потребует решения новых рисков, внедрения свежих подходов к безопасности и средств обхода ограничений. Пользователи должны осознавать, что даже самая анонимная система не гарантирует полной безопасности.
Сервис остается местом, где можно получать дополнительную информацию, обсуждать вопросы безопасности, следить за новостями и инновациями в области даркнета. Развитие технологий, расширение базы пользователей и появление новых возможностей делают Rutor одним из центров русскоязычного сообщества в сети.
– Сохранение анонимности
– Надёжность проведения операций
– Возможность получения эксклюзивных данных
– Защищённость коммуникаций
Rutor — это платформа с уникальной историей, и её опыт стоит принимать во внимание всем, кто ценит собственную свободу, приватность и независимость от внешней цензуры в современном цифровом мире.
generic prednisone
bonus za registraci bez vkladu bonus za registraci bez vkladu .
Минимализм. Ничего лишнего. Белые стены, чистые линии, порядок. Для перфекционистов и аскетов. Легко дышать, легко думать. Квартира на сутки для перезагрузки. Цифровой детокс. Адрес в центре, но тишина. Свежий ремонт. kvartirasnasutki.ru
Исследование в мире официальных площадок нуждается представления передовых технологий соединения. Профессиональные участники внедряют казино типпи для обретения актуальной информации о оперативных адресах.
Процедура формирования счета в проверенных операторах включает тщательную аутентификацию. Новейшие компании задействуют KYC-алгоритмы и AML-критерии. Оформление документов занимает от 24 до 72 часов.
Компьютерные технологии для минования барьеров совершенствуются вместе с интенсификацией нормативных мер. VPN-сервисы категории premium гарантируют шифрование AES-256 и стандарты OpenVPN. Стабильность коннекта жизненно существенна для привилегированных партий.
Альтернативные ресурсы оперируют через пространственно рассредоточенные компьютерные кластеры. CDN-архитектуры обеспечивают минимальную пинг для азиатских участников. Автоматическое роутинг активируется при распознавании недоступности главного сайта.
Финансовые транзакции в сертифицированных юрисдикциях подчиняются строгим стандартам PCI DSS. Крипто транзакции приобретают распространение вследствие приватности и быстроте выполнения.
Мобильные софт элитных брендов включают отпечатковую авторизацию и push-уведомления для важных эпизодов. Изменяемый облик автономно настраивается под свойства панели.
Функционирующие альтернативные домены лицензированных gaming-операторов на казино Болливуд дают стабильный доступ к игровым сервисам. Принцип дублирования образует точные дубликаты центрального сайта с удержанием всех механизмов.
Механизм активации через зеркало в точности копирует главную шаблон. Новые участники регистрируют активный email, генерируют стойкий пароль и выбирают основную платежное средство.
Валидация профиля содержит отправки свидетельств согласно KYC-требованиям. Снимок паспорта, подтверждение адреса и банковские реквизиты проверяются через машинную контроль в течение 24-72 временных единиц.
Аутентификация действующих пользователей производится через классическую окно с двухфакторной верификацией. Временные токены поступают на телефонный девайс или email.
Возможности пополнительного сектора через резервные ссылки обеспечивает востребованные денежные платформы. Visa, Mastercard, веб хранилища Skrill, Neteller, криптовалюты Bitcoin, Ethereum осуществляются с сокращенными комиссиями 0-3%.
Развлекательная коллекция копируется полностью включая барабаны, карточные активности, live-ведущих и максимальные награды. RTP-параметры, колебания и ставочные требования остаются идентичными.
Бонусная механизм выполняется идентично базовому ресурсу. Welcome-комплекты, безвозмездные спины, refund и VIP-программы активируются алгоритмически при выполнении прописанных критериев.
http://sertralineusa.com/# zoloft tablet
Поиск надежного игрового портала в нынешних рамках требует особого изучения к правовому уровню. Опытные геймеры понимают, что тип топ казино демонстрирует актуальную факты о действующих площадках.
Процесс регистрации в легальных площадках предусматривает требуемую аутентификацию документов. KYC-процедуры защищают как казино, так и клиента от афер. Промежуточные границы на перечисление средств до завершения проверки – привычная методика.
Виртуальные блокировки на связь к игровым сервисам устраняются через зеркальные домены. Активные копии обеспечивают стопроцентную работоспособность центрального портала. Финансовые переводы, игровой продвижение и наградные системы функционируют неизменными.
Экономическая защищенность оценивается критерием эксплуатируемых расчетных инструментов. SSL-безопасность, PCI DSS аттестация и усиленная аутентификация создают безопасный щит обороны.
Интерактивная ассортимент легальных заведений объединяет автоматы от ведущих студий. RTP-параметры, дисперсия и статистические модели получают нейтральную контроль в признанных организациях.
Программы вознаграждения в качественных казино формируются на ясных требованиях ставок. Отыгрыш x35-40 считается справедливым для барабан-бонусов, в то время как классические активности учитываются в подсчет с редуцированным показателем.
Рабочие дублирующие порталы официальных гемблинг-платформ на Килограмм казино предоставляют стабильный вход к геймерским ресурсам. Принцип копирования генерирует точные дубликаты базового домена с поддержанием всех опций.
Система оформления профиля через зеркало целиком воспроизводит стандартную бланк. Дебютные пользователи заполняют рабочий email, создают сложный пароль и фиксируют базовую денежную единицу.
Валидация аккаунта подразумевает передачи справок в соответствии с KYC-регламенту. Скан ID-карты, верификация проживания и карточные данные анализируются посредством программную проверку в течение 24-72 периодов.
Авторизация существующих участников осуществляется через стандартную форму с двухфакторной аутентификацией. Временные коды приходят на смс девайс или email.
Механизмы финансового раздела через дублирующие порталы включает топовые платежные сервисы. Visa, Mastercard, цифровые счета Skrill, Neteller, криптовалюты Bitcoin, Ethereum осуществляются с минимальными платежами 0-3%.
Gaming база повторяется целиком включая автоматы, столовые активности, live-операторов и джекпоты. RTP-значения, вариативность и вейджер поддерживаются аналогичными.
Поощрительная схема оперирует похоже базовому сайту. Welcome-пакеты, безвозмездные спины, денежный возврат и VIP-схемы запускаются алгоритмически при достижении фиксированных условий.
Check it out
online casino canada exclusive titles
to save time.
โพสต์นี้ อ่านแล้วเข้าใจง่าย ครับ
ผม ไปอ่านเพิ่มเติมเกี่ยวกับ เนื้อหาในแนวเดียวกัน
ที่คุณสามารถดูได้ที่ 75rh25
น่าจะถูกใจใครหลายคน
มีการยกตัวอย่างที่เข้าใจง่าย
ขอบคุณที่แชร์ ข้อมูลที่มีประโยชน์ นี้
และอยากเห็นบทความดีๆ แบบนี้อีก
Следующая страница Ваш комфорт — наш приоритет!
Поиск безопасного азартного ресурса в современных рамках требует тщательного подхода к законному режиму. Профессиональные игроки понимают, что мад казино включает новую факты о активных операторах.
Процедура создания аккаунта в легальных заведениях объединяет принудительную аутентификацию удостоверения. KYC-процедуры оберегают как сервис, так и игрока от мошенничества. Промежуточные лимиты на изъятие финансов до завершения подтверждения – типичная методика.
Программные блокировки на подключение к азартным площадкам нейтрализуются через дублирующие домены. Функционирующие отражения предоставляют абсолютную эффективность первичного платформы. Банковские транзакции, игровой результаты и бонусные программы функционируют стабильными.
Финансовая гарантированность характеризуется степенью применяемых денежных систем. SSL-защита, PCI DSS лицензирование и усиленная верификация устанавливают безопасный щит охраны.
Азартная библиотека легальных сервисов включает автоматы от лидирующих производителей. RTP-значения, изменчивость и алгоритмические схемы претерпевают внешнюю контроль в аккредитованных учреждениях.
Схемы лояльности в серьезных операторах основываются на прозрачных требованиях ставок. Требования x35-40 считается разумным для автомат-льгот, в то время как карточные состязания учитываются в расчет с минимальным коэффициентом.
Рабочие дублирующие порталы проверенных казино на типпи казино предоставляют беспрерывный доступ к геймерским порталам. Система клонирования образует эквивалентные копии центрального домена с сохранением всех функций.
Процедура создания аккаунта через резервную ссылку целиком имитирует базовую шаблон. Свежие геймеры прописывают действующий email, создают надежный секретную комбинацию и назначают рабочую валюту.
Идентификация профиля требует представления бумаг опираясь на KYC-требованиям. Фото водительских прав, верификация регистрации и денежные координаты проверяются через программную валидацию в течение 24-72 часа.
Логин существующих геймеров реализуется через базовую окно с 2FA идентификацией. Временные ключи передаются на мессенджер аппарат или мейл.
Опции депозитного модуля через резервные ссылки предлагает актуальные расчетные платформы. Visa, Mastercard, электронные счета Skrill, Neteller, цифровые активы Bitcoin, Ethereum обрабатываются с уменьшенными процентами 0-3%.
Gaming ассортимент клонируется полностью включая spinning games, настольные игры, live-ведущих и накопительные призы. RTP-параметры, вариативность и проигрыш остаются идентичными.
Бонусная механизм действует похоже корневому порталу. Welcome-наборы, безвозмездные спины, денежный возврат и VIP-программы включаются машинально при соблюдении заданных параметров.
Электрокарниз http://www.karniz-opt.ru обеспечивает автоматическую регулировку тени в помещении, сочетая современный дизайн с функциональностью.
позволяет упростить бытовые задачи .
Подключается к электропроводке здания .
Карнизы представлены в множестве дизайнерских решений .
Автоматизация упрощает повседневную рутину .
casino cz casino cz .
It’s really very complicated in this active life to listen news on TV, therefore I only use world wide web for
that reason, and take the latest news.
Feel free to surf to my site family personal retreat mexico
Инновационные операторы беттинг услуг гарантируют игрокам доступ к качественному развлечениям через защищенные френдс казино системы. Легальная бизнес предполагает следования строгих законодательных норм.
Система регистрации индивидуального кабинета включает верификацию личных сведений. Администраторы используют многоуровневые процедуры KYC и AML для недопущения мошеннических платежей.
Технические системы актуальных беттинг площадок строятся на надежных облачных системах с шифровальными технологиями. Локальные запреты заставляет администраторов создавать вспомогательные ссылки.
Дублирующие платформы представляют точные копии базового портала с обеспечением всех опций и параметров. Участники достигают непрерывный подключение к средствам, игровой данным и личным настройкам.
Денежные переводы реализуются через связанные денежные агрегаторы. Рамки на инвестиции и обналичивания определяются в соответствии с регуляторными требованиями и собственными нормами минимизации опасностей.
Экспертные игроки настаивают отслеживать положение аккредитации через контролирующие каталоги беттинг комиссий. Имиджевые характеристики охватывают позиции на тематических сервисах и оценки настоящих клиентов.
Современные сервисы игорных активностей дают участникам вход к профессиональному беттингу через проверенные ДживиСпин казино платформы. Лицензированная работа предполагает соблюдения жестких законодательных стандартов.
Процедура создания клиентского учетной записи содержит подтверждение конфиденциальных реквизитов. Провайдеры используют детализированные системы KYC и AML для недопущения незаконных транзакций.
Электронные средства инновационных беттинг площадок работают на зашифрованных хостингах с TLS стандартами. Территориальные ограничения вынуждает администраторов создавать резервные ссылки.
Параллельные сайты формируют эквивалентные дубликаты центрального сайта с удержанием всех инструментов и параметров. Участники обеспечивают себе постоянный связь к счету, гемблинг данным и индивидуальным конфигурациям.
Расчетные процедуры осуществляются через связанные платежные процессоры. Пределы на взносы и обналичивания устанавливаются в унисон с правовыми стандартами и индивидуальными процедурами минимизации опасностей.
Компетентные беттеры указывают анализировать ситуацию авторизации через регуляторные регистры гемблинг ведомств. Статусные параметры предусматривают рейтинги на отраслевых порталах и оценки действительных участников.
Игровая ниша демонстрирует активный расширение, привлекая тысячи геймеров. Квалифицированные порталы обеспечивают надёжную условия для пари. Подробную информацию о этих провайдерах реально найти на ДживиСпин казино .
Аттестация составляет основным элементом отбора ресурса. Лицензиаты Гибралтара предоставляют строгий аудит экономических манипуляций. Любая сертифицированная ресурс подвергается периодические проверки RNG-генераторов.
Цифровые свойства передовых беттинг-платформ предусматривают SSL-шифрование банковского ранга. Поставщики виртуального софта типа Microgaming, NetEnt, Pragmatic Play внедряют комплексные алгоритмы случайных чисел.
Механизм верификации личного кабинета предполагает предоставления документов KYC-формата. Свидетельство, подтверждение о прибылях, удостоверение местожительства — типичный пакет для итогового активации.
Резервные адреса ликвидируют трудности с блокировками поставщиков. Действующие зеркала изменяются постоянно IT специалистами. Портативные приложения часто оперируют надёжнее браузерных версий.
Распределение капитала определяет долгосрочную доходность беттинговых раундов. Профессиональные геймеры советуют урезать размер пари до 1-2% от полного фонда.
Лицензионные операторы гэмблинг предложений предоставляют геймерам возможность к высококлассному времяпрепровождению через профильные домены, включая тип топ казино , которые выполняют международные нормы security.
Процедура открытия счёта требует указания верификационных сведений через защищённые SSL-протоколы. Букмекеры просят предоставить official verification возраста и адреса residence для выполнения юрисдикционных требований.
Многоуровневая аутентификация является mandatory компонентом современных систем конфиденциальности. Клиенты обретают SMS-токены, push-сообщения или внедряют специальные приложения в стиле Google Authenticator.
Зеркальные порталы преодолевают вопросы региональных санкций и DDoS-assault. Технически дубли формируют аналогичные копии базового домена с обеспечением возможностей и индивидуальных информации.
Профессиональные пользователи призывают поддерживать актуальные реестры working дублей в bookmark браузера. Management направляют обновления о актуальных URL через email, Telegram-communities и телефонные утилиты.
Payment переводы через официальные порталы защищены шифровальными methods класса банковского направления. Вывод финансов выполняется только на validated реквизиты обладателя профиля.
I have to thank you for the efforts you’ve put in penning this website.
I am hoping to see the same high-grade blog posts from you in the future as well.
In truth, your creative writing abilities has inspired me to get my own, personal site now 😉
buy bactrim online
Hi! Would you mind if I share your blog with my twitter group?
There’s a lot of people that I think would really enjoy your content.
Please let me know. Many thanks
my web page – Airguns parts
https://neuroreliefusa.shop/# Neuro Relief USA
Thanks for sharing such a fastidious thinking, piece of writing is pleasant, thats why i have read it completely
my site – family personal retreat mexico
navigate to this site
https://russian-traditional-clothes.com
Iver Therapeutics: Iver Therapeutics – stromectol buy
Определение надежного развлекательного оператора предполагает детального изучения правовых документов. Передовые ресурсы Голд казино предоставляют пользователям безусловную данные о собственных допусках.
Система оформления счета подразумевает определенное количество принудительных стадий валидации. Представители настаивают документы, устанавливающие персону и правоспособность. Классический KYC-алгоритм занимает от 24 до 72 временных отрезков.
Распоряжение капиталом начинается с задания границ на депозиты. Квалифицированные пользователи предлагают задействовать правило 5% от итогового игорного капитала на индивидуальную сессию.
Системные запреты поставщиков обязывают внедрять вспомогательные адреса. Дубликаты оберегают безусловную работоспособность главного ресурса, подразумевая летопись платежей и развлекательный успех.
Передовые расчетные инструменты дают моментальные пополнения через блокчейн портмоне. Bitcoin, Ethereum и стабильные валюты дают приватность и символические комиссии. Время обработки извлечений равно 10-30 интервалов.
Планы лояльности охватывают градационные уровни с увеличивающимся кэшбэком. VIP-консультанты гарантируют эксклюзивные награды, увеличенные пределы и ускоренную помощь.
Инновационные провайдеры гемблинг услуг предоставляют клиентам возможность к премиальному азарту через надежные аква казино сайты. Официальная работа нуждается исполнения конкретных контролирующих норм.
Процесс создания игрового аккаунта задействует аутентификацию персональных данных. Управляющие используют детализированные системы KYC и AML для пресечения нарушающих финансовых действий.
Технические средства инновационных игорных домов строятся на безопасных инфраструктурах с шифровальными алгоритмами. Локальные запреты заставляет администраторов разрабатывать альтернативные URL.
Резервные сайты являют собой идентичные дубликаты главного домена с удержанием всех функций и параметров. Клиенты обеспечивают себе устойчивый вход к депозиту, беттинг истории и пользовательским конфигурациям.
Платежные процедуры осуществляются через связанные платежные сервисы. Лимиты на пополнения и снятия определяются в согласии с лицензионными требованиями и внутренними нормами управления рисками.
Компетентные беттеры предлагают проверять условия авторизации через официальные реестры развлекательных комиссий. Авторитетные индикаторы задействуют рейтинги на тематических платформах и feedback истинных участников.
zoloft tablet: order zoloft – zoloft cheap
Ahaa, its nice conversation concerning this post at this place at this webpage,
I have read all that, so at this time me also commenting
at this place.
Here is my homepage – Instagram growth service
The astronaut game official site versions available through licensed Indian casinos provide a transparent, real-time multiplayer experience. Each round lasts between 5-30 seconds, with the multiplier climbing as an astronaut avatar ascends through space. Playing the astronaut game requires understanding simple yet strategic mechanics. The goal is straightforward: cash out before the astronaut crashes to secure your multiplied winnings. Absolutely! The astronaut game online download is fully compatible with PCs and laptops. Whether through a browser or by downloading the astronaut game pc client, you get the same smooth gameplay and stunning visuals. We love hearing from our players. If you have ideas to improve the game or just want to say hi, don’t be shy. Your feedback helps us make Astronaut Crash Game better every day. Big or small—we want to hear it all.
https://landdesignmn.com/exploring-casino-jax-online-sports-betting-options-in-australia/
Some of the bonuses related to this popular slots game require Brits to deposit into their player account, all games at Queenplay operate based on a fair Random Number Generator. Low stakes roulette online united kingdom all new players get a chance to spin the Mega Wheel where theyll win various prizes including up to 500 free spins (Full Ts and Cs Apply), which makes all outcomes totally random. There are two jackpots up for grabs with this game, the silver jackpot and the gold jackpot seeding at $7,000 and $70,000 respectively, and you can trigger these on any spin although the higher your bet the bigger your chances. Enjoy instant registration, hassle-free instant banking, and super-fast withdrawals, making Winsly the smoothest and most reliable choice for players everywhere. Stakelogic is committed to gaming that is fun, safe, and secure. Visit BeGambleAware.org – 18+ Only
戏台在线免费在线观看,海外华人专属平台,高清无广告体验。
Для безопасного и бесперебойного доступа на платформу Кракен, главным образом в реалиях частых цензуры, со стороны регуляторов, принципиально важно внедрять лишь верифицированные зеркала. kraken оригинальная ссылка
Выбор честного игорного ресурса подразумевает серьезного анализа правовых сертификатов. Актуальные системы JVSpin гарантируют участникам максимальную информацию о собственных аккредитациях.
Алгоритм регистрации подразумевает различные ключевых этапов подтверждения. Операторы требуют бумаги, устанавливающие персону и правоспособность. Обычный KYC-процесс составляет от 24 до 72 периодов.
Управление банком инициируется с установления лимитов на пополнения. Искусные геймеры рекомендуют эксплуатировать закон 5% от общего гемблинг капитала на единичную партию.
Программные блокировки администраторов вынуждают использовать резервные пути. Зеркала удерживают безусловную производительность основного ресурса, предусматривая архив транзакций и развлекательный успех.
Современные финансовые способы обеспечивают моментальные пополнения через виртуальные кошельки. Bitcoin, Ethereum и стабильные валюты поддерживают тайность и минимальные комиссии. Время реализации изъятий доходит 10-30 минут.
Схемы лояльности содержат градационные категории с нарастающим бонусом. VIP-консультанты предлагают личные награды, повышенные рамки и преимущественную техподдержку.
canadian online pharmacy cialis https://cse.google.mu/url?sa=t&url=https%3A%2F%2Fmexmedimax.com no prescription
Лицензионные площадки игорных услуг дают участникам возможность к качественному времяпрепровождению через тематические платформы, включая Болливуд казино , которые точно следуют transnational стандарты надёжности.
Механизм оформления профиля требует заполнения верификационных деталей через защищённые SSL-connection. Операторы demanded нотариальное удостоверение возраста и территории регистрации для поддержания законодательных правил.
Многоуровневая проверка считается обязательным компонентом передовых архитектур безопасности. Игроки располагают SMS-ключи, push-уведомления или задействуют dedicated tools вроде Google Authenticator.
Mirror порталы нейтрализуют трудности географических блокировок и DDoS-нападений. Фактически зеркала составляют тождественные версии главного ресурса с maintaining features и индивидуальных параметров.
Экспертные клиенты suggest хранить свежие базы рабочих дублей в bookmark browser. Провайдеры рассылают updates о fresh ссылках через e-mail, Telegram-сообщества и телефонные приложения.
Платёжные процедуры через официальные ресурсы гарантированы шифровальными системами категории банковского сектора. Изъятие фондов реализуется solely на подтверждённые реквизиты владельца личного кабинета.
Для тех, кто ищет информацию по теме “Идеи для скрапбукинга: вдохновение из фильмов про машины”, нашел много полезного.
Смотрите сами:
https://stuff4scrap.ru/news/top-10-idej-dlya-skrapbukinga-pro-mashiny-i-skorost-vdohnovenie-iz-kultovyh-filmov/
Rutor — ведущий портал даркнета на русском языке в сети Tor, обеспечивающий пользователей доступом к контенту, товарам, материалам и нормам анонимности черного рынка и onion сайтов
Проект Rutor — это проверенный временем магазин и коммуникационная система, обеспечивающая безопасность и анонимность сделок в Rutor.Rutor: Один из ключевых проектов русскоязычного даркнета
ру торг ру зеркало — это один из самых известных и старейших сервисов в русскоязычном даркнете, который стал неотъемлемой частью экосистемы анонимных ресурсов. Основное направление работы ресурса — предоставление обширной базы файлов, утилит, новостей и прочего контента, в том числе, связанного с темами безопасности и взлома.
Особенности работы системы Rutor
Механизм работы ресурса позволяет пользователям получать доступ к большим массивам данных и файлов, при этом обеспечивая максимальную приватность и анонимность. Работа сервиса построена на использовании анонимной сети Rutor, что помогает свести к минимуму угрозы идентификации и утечки данных. С течением времени площадка превратилась в важный архив событий и истории русскоязычного даркнета.
Rutor поддерживает стабильную работу, позволяя и новичкам, и опытным пользователям использовать предоставляемые сервисы. Каждый из разделов сайта — магазин, новостные ленты или руководства по взлому — образуют отдельную звено в масштабном сообществе, где главными ценностями выступают конфиденциальность и защита анонимности.
Возможные направления развития и связанные опасности
Безусловно, дальнейшая история Rutor будет связана с новыми формами риска, новыми способами защиты конфиденциальности и методами обхода блокировок. Следует помнить, что даже максимально анонимная среда не обеспечивает стопроцентную безопасность.
Этот сервис по-прежнему служит площадкой для информирования, обсуждений безопасности и отслеживания новшеств в даркнет-сообществе. Технический прогресс, рост числа участников и новые функциональные решения превращают Rutor в ключевой узел русскоязычного интернет-сообщества.
– Анонимность
– Безопасность транзакций
– Открытый доступ к специализированному контенту
– Конфиденциальность общения
Rutor — это платформа с уникальной историей, и её опыт стоит принимать во внимание всем, кто ценит собственную свободу, приватность и независимость от внешней цензуры в современном цифровом мире.
https://smartgenrxusa.shop/# Smart GenRx USA
The war is for the soul of the kingdom. The Onyx Storm epub is the battleground. This book is the fight. Reading digitally is the strategy. You can win the war. The story is the victory.
Выбор качественного азартного портала в нынешних обстоятельствах подразумевает повышенного внимания к законному положению. Профессиональные клиенты знают, что Лев казино содержит актуальную сведения о функционирующих площадках.
Процедура создания аккаунта в официальных операторах предусматривает обязательную верификацию идентичности. KYC-требования охраняют как заведение, так и клиента от обмана. Промежуточные рамки на изъятие капитала до завершения контроля – типичная подход.
Виртуальные блокировки на связь к азартным сервисам нейтрализуются через параллельные ссылки. Рабочие дубликаты гарантируют абсолютную работоспособность главного портала. Денежные движения, азартный прогресс и привилегированные системы поддерживаются константными.
Денежная защищенность характеризуется уровнем задействованных платежных методов. SSL-кодирование, PCI DSS сертификация и усиленная подтверждение обеспечивают защищенный контур обороны.
Развлекательная ассортимент официальных заведений объединяет барабаны от известных разработчиков. RTP-значения, волатильность и вероятностные принципы проходят нейтральную сертификацию в признанных институтах.
Схемы лояльности в серьезных заведениях формируются на прозрачных параметрах отыгрыша. Вейджер x35-40 считается справедливым для барабан-подарков, в то время как классические развлечения учитываются в подсчет с редуцированным фактором.
For support
Variable loan
for a simple explanation.
Thank you for the auspicious writeup. It in fact was a amusement account it.
Look advanced to more added agreeable from you!
However, how can we communicate?
Here is my blog post … Airguns parts
Азартная сфера являет стремительный расширение, манящая тысячи игроков. Профессиональные порталы предлагают безопасную атмосферу для ставок. Подробную информацию о таких брендах возможно изучить на лаки Р±РёСЂ казино .
Аттестация составляет главным показателем определения платформы. Надзорные органы Олдерни предоставляют тщательный проверку валютных операций. Любая сертифицированная ресурс выполняет систематические контроли RNG-алгоритмов.
IT характеристики современных азартных площадок содержат SSL-безопасность денежного ранга. Разработчики компьютерного материала уровня Microgaming, NetEnt, Pragmatic Play встраивают сложные алгоритмы произвольных величин.
Процесс валидации учётной записи требует подачи бумаг KYC-уровня. ID, свидетельство о прибылях, валидация проживания — обычный набор для итогового авторизации.
Параллельные URL устраняют сложности с блокировками компаний. Рабочие дубли модифицируются систематически цифровыми командами. Смартфонные утилиты обычно действуют лучше интернет вариантов.
Финансовая дисциплина устанавливает стратегическую прибыльность гемблинговых раундов. Опытные беттеры рекомендуют урезать величину ставки до 1-2% от полного капитала.
Have you ever thought about including a little bit more than just your articles?
I mean, what you say is valuable and everything.
However think of if you added some great photos
or video clips to give your posts more, “pop”! Your content is excellent but with images and videos, this
blog could undeniably be one of the very best in its niche.
Terrific blog!
Feel free to visit my site; host a retreat
Выбор честного развлекательного портала предполагает глубокого разбора лицензионных свидетельств. Передовые сайты казино РЎСѓРєР° предоставляют пользователям полную информацию о собственных допусках.
Процедура оформления счета предусматривает ряд обязательных шагов верификации. Владельцы просят документы, устанавливающие идентичность и зрелость. Традиционный KYC-порядок длится от 24 до 72 часов.
Управление банком начинается с фиксации лимитов на пополнения. Опытные участники рекомендуют внедрять установку 5% от совокупного гемблинг бюджета на конкретную раунд.
Цифровые барьеры операторов вынуждают применять резервные пути. Копии удерживают полную функциональность главного ресурса, подразумевая историю сделок и игровой продвижение.
Современные финансовые способы поддерживают скоростные вклады через блокчейн счета. Bitcoin, Ethereum и постоянные токены предоставляют анонимность и минимальные сборы. Время осуществления снятий достигает 10-30 промежутков.
Системы приверженности предусматривают многоуровневые ранги с прогрессивным вознаграждением. VIP-представители предоставляют индивидуальные поощрения, улучшенные ограничения и опережающую поддержку.
I quite like looking through a post that can make people think.
Also, thank you for permitting me to comment!
Feel free to visit my web blog … Buy Cardstock At Artsulli | Art Supply Store | Shop Art & Illustration Supplies
Азартная область представляет активный рост, заинтересовывая массы геймеров. Опытные площадки предлагают безопасную пространство для игры. Детальную информацию о данных компаниях допустимо найти на Лев казино .
Аккредитация представляет центральным показателем отбора портала. Юрисдикции Кюрасао предоставляют строгий аудит денежных манипуляций. Всякая легальная ресурс проходит плановые проверки RNG-систем.
Цифровые особенности современных игорных домов предусматривают SSL-криптографию денежного ранга. Создатели софтового продукта класса Microgaming, NetEnt, Pragmatic Play интегрируют усовершенствованные системы произвольных показателей.
Схема верификации личного кабинета предусматривает направления справок KYC-класса. Паспорт, подтверждение о заработке, подтверждение прописки — базовый пакет для полноценного активации.
Зеркальные URL убирают сложности с фильтрацией поставщиков. Свежие зеркала обновляются ежедневно компьютерными командами. Мобильные клиенты зачастую действуют надёжнее веб форматов.
Распределение капитала задаёт продолжительную успешность развлекательных периодов. Опытные игроки советуют ограничивать размер ставки до 1-2% от общего резерва.
Thank you a lot for sharing this with all people you really recognise what you’re talking about!
Bookmarked. Kindly additionally consult with my site =).
We will have a hyperlink change contract among us
Feel free to surf to my page: Instagram growth service
заказать цветы онлайн
cz online casina cz online casina .
Актуальные игроки имеют дело с набором системных нюансов при функционировании с сертифицированными сайтами. Профессиональные источники типа лакибир поставляют современную сведения о деятельности гэмблинговых компаний.
Процесс аутентификации учетной записи включает набор принудительных этапов. Базовая проверка предполагает загрузки документов верифицирующих личность. Привычный перечень включает удостоверение личности, права или международное ID.
Техническая элемент регистрации предполагает внедрение зашифрованного канала и двухфакторной аутентификации. Опытные геймеры рекомендуют инициировать все возможных опций обеспечения.
Дублирующие порталы образуют стопроцентные реплики первичного портала с сохранением исчерпывающего возможностей. Центральное бонус состоит в тождественности финансовых рамок и требований отыгрыша.
Алгоритм выявления рабочих дублирующих порталов фундируется на контроле профильных телеграм-каналов и партнерских площадок. Квалифицированные геймеры эксплуатируют прокси-соединения для предоставления устойчивого входа независимо от локальных ограничений.
Great article! That is the type of information that are supposed to
be shared across the internet. Disgrace on the search engines for no longer positioning this put
up upper! Come on over and talk over with my website .
Thanks =)
Новейшие порталы гемблинг продуктов обеспечивают пользователям путь к профессиональному развлечениям через сертифицированные казино Гризли платформы. Лицензированная работа подразумевает учета конкретных правовых стандартов.
Процесс регистрации игрового профиля содержит аутентификацию приватных информации. Администраторы применяют углубленные механизмы KYC и AML для недопущения нарушающих переводов.
Цифровые платформы инновационных беттинг площадок работают на зашифрованных дата-центрах с TLS стандартами. Региональная блокировка принуждает управляющих внедрять дублирующие URL.
Резервные домены составляют полные клоны базового портала с поддержанием всех сервисов и показателей. Клиенты добиваются постоянный соединение к капиталу, игровой статистике и клиентским опциям.
Платежные транзакции осуществляются через связанные финансовые процессоры. Пределы на взносы и снятия регулируются в соотношении с регуляторными критериями и собственными политиками контроля угроз.
Квалифицированные беттеры рекомендуют мониторить состояние авторизации через государственные регистры азартных структур. Статусные индикаторы предусматривают места на специализированных сайтах и мнения реальных игроков.
цены на электрокарнизы для штор сочетает в себе современный дизайн и безупречную функциональность, обеспечивая плавное открывание и закрывание штор с помощью пульта или смартфона.
Электрокарнизы активно используются в жилых, коммерческих и общественных помещениях.
buy online prednisone
Visit This Link
russian traditional clothing
Поиск в сфере официальных сайтов предполагает знания актуальных инструментов подключения. Квалифицированные участники задействуют ra casino для приобретения новейшей материалов о действующих URL.
Процесс открытия профиля в проверенных компаниях содержит тщательную подтверждение. Актуальные организации используют KYC-механизмы и AML-стандарты. Документальное сопровождение потребляет от 24 до 72 часов.
Цифровые технологии для преодоления запретов прогрессируют одновременно с укреплением регуляторных мер. VPN-инструменты класса premium обеспечивают шифрование AES-256 и системы OpenVPN. Непрерывность канала кардинально необходима для элитных раундов.
Зеркальные платформы выполняют задачи через локально рассредоточенные IT мощности. CDN-архитектуры осуществляют быструю латентность для азиатских клиентов. Автоматическое редирект срабатывает при распознавании препятствия базового портала.
Денежные манипуляции в официальных территориях соответствуют строгим нормам PCI DSS. Криптовалютные переводы увеличивают признание по причине анонимности и темпу осуществления.
Переносные программы топовых провайдеров включают голосовую подтверждение и push-уведомления для принципиальных событий. Настраиваемый внешний вид автономно корректируется под настройки экрана.
Определение надежного азартного портала в сегодняшних реалиях предполагает особого изучения к регулятивному состоянию. Квалифицированные геймеры знают, что казино Гризли отображает свежую данные о работающих провайдерах.
Механизм регистрации в лицензированных сервисах включает неизбежную проверку идентичности. KYC-нормы оберегают как заведение, так и пользователя от махинаций. Краткосрочные ограничения на снятие капитала до финализации валидации – нормальная процедура.
Цифровые ограничения на соединение к гемблинг сайтам устраняются через параллельные домены. Активные дубликаты сохраняют полную производительность базового сайта. Денежные процедуры, азартный результаты и бонусные планы сохраняются стабильными.
Денежная безопасность оценивается уровнем задействованных финансовых систем. SSL-шифрование, PCI DSS валидация и дополнительная аутентификация создают защищенный периметр защиты.
Игровая набор проверенных провайдеров содержит слоты от топовых провайдеров. RTP-индексы, волатильность и вероятностные схемы подвергаются беспристрастную проверку в аккредитованных учреждениях.
Планы мотивации в надежных операторах основываются на ясных требованиях активности. Отыгрыш x35-40 признается приемлемым для слот-льгот, в то время как традиционные активности учитываются в счет с сниженным коэффициентом.
more tips here
russian traditional clothing
her response
russian traditional clothing
cz online casina casino-cz-13.com .
1вин фрибет 1вин фрибет
bonus za registraci bez vkladu casino-cz-14.com .
bactrim
Отбор безопасного betting портала в современных условиях требует тщательного внимания к законному режиму. Опытные игроки знают, что lova включает последнюю сведения о работающих сервисах.
Процесс открытия счета в легальных площадках охватывает необходимую аутентификацию идентичности. KYC-правила гарантируют как оператора, так и участника от мошенничества. Переходные ограничения на изъятие денег до завершения подтверждения – типичная методика.
Технические запреты на соединение к игровым ресурсам устраняются через альтернативные адреса. Активные отражения гарантируют стопроцентную возможности главного сайта. Денежные транзакции, геймплейный статистика и привилегированные схемы остаются стабильными.
Денежная безопасность определяется критерием эксплуатируемых финансовых инструментов. SSL-криптография, PCI DSS подтверждение и расширенная проверка гарантируют безопасный контур безопасности.
Игровая коллекция лицензированных заведений содержит спины от ведущих производителей. RTP-коэффициенты, колебания и статистические принципы претерпевают независимую контроль в признанных учреждениях.
Программы поощрения в серьезных операторах строятся на ясных правилах активности. Требования x35-40 характеризуется адекватным для машина-поощрений, в то время как карточные развлечения учитываются в счет с минимальным показателем.
Актуальные резервные адреса проверенных игорных заведений на лаки ворлд казино предоставляют устойчивый вход к гемблинг порталам. Методика копирования образует полноценные дубликаты основного портала с консервацией всех опций.
Алгоритм регистрации через резервную ссылку на сто процентов имитирует основную бланк. Дебютные пользователи прописывают функционирующий email, придумывают безопасный код доступа и выбирают базовую финансовый инструмент.
Подтверждение счета предполагает передачи справок согласно KYC-требованиям. Изображение паспорта, валидация регистрации и платежные данные подвергаются алгоритмическую верификацию в течение 24-72 ч.
Логин существующих игроков производится через обычную модуль с расширенной валидацией. Сессионные пароли поступают на смс аппарат или email.
Опции денежного модуля через дублирующие порталы обеспечивает актуальные платежные платформы. Visa, Mastercard, электронные портмоне Skrill, Neteller, виртуальные монеты Bitcoin, Ethereum процессируются с оптимизированными взносами 0-3%.
Азартная каталог дублируется полностью включая spinning games, настольные забавы, live-ведущих и джекпоты. RTP-показатели, волатильность и вейджер сохраняются такими же.
Промо механизм выполняется идентично базовому порталу. Welcome-наборы, бесплатные вращения, refund и VIP-схемы запускаются программно при соблюдении установленных стандартов.
You ought reasons to buy Instagram likes be a part of a contest for
one of the best websites online. I will highly recommend
this site!
1win регистрация аккаунта 1win регистрация аккаунта
клеенка тканевая купить оптом в москве
Neuro Relief USA: neurontin 100 mg cost – neurontin cap
http://sertralineusa.com/# generic zoloft
free spiny free spiny .
whoah this weblog is excellent i love reading your posts. Stay
up the good work! You recognize, lots of individuals are looking round for this
information, you could aid them greatly.
Stop by my webpage … authentic engagement
Поиск надежного гемблинг оператора в актуальных обстоятельствах предполагает повышенного анализа к лицензионному режиму. Опытные геймеры понимают, что enomo зеркало предоставляет актуальную данные о действующих ресурсах.
Схема регистрации в проверенных заведениях объединяет необходимую верификацию персональных данных. KYC-нормы охраняют как казино, так и участника от махинаций. Кратковременные ограничения на изъятие активов до выполнения верификации – обычная процедура.
Технические блокировки на доступ к гемблинг сайтам нейтрализуются через альтернативные домены. Доступные дубликаты поддерживают абсолютную возможности центрального ресурса. Денежные операции, интерактивный прогресс и наградные планы функционируют стабильными.
Денежная гарантированность измеряется уровнем применяемых финансовых методов. SSL-кодирование, PCI DSS аттестация и усиленная проверка устанавливают безопасный барьер ограждения.
Интерактивная ассортимент проверенных сервисов предоставляет барабаны от ведущих провайдеров. RTP-значения, вариативность и алгоритмические системы испытывают нейтральную проверку в одобренных институтах.
Системы лояльности в качественных операторах формируются на четких правилах ставок. Требования x35-40 оценивается адекватным для автомат-льгот, в то время как стандартные активности включаются в расчет с пониженным процентом.
Поиск безопасного казино площадки нуждается тщательного рассмотрения официальных документов. Передовые ресурсы аква регистрация предоставляют участникам максимальную данные о имеющихся аккредитациях.
Процесс оформления счета подразумевает ряд требуемых стадий подтверждения. Провайдеры просят документы, засвидетельствующие личность и зрелость. Стандартный KYC-регламент занимает от 24 до 72 периодов.
Финансовое планирование запускается с установления рамок на пополнения. Квалифицированные клиенты настаивают задействовать принцип 5% от общего казино бюджета на отдельную сессию.
Электронные запреты провайдеров принуждают эксплуатировать резервные ссылки. Дубликаты оберегают максимальную активность центрального портала, предусматривая архив транзакций и игровой продвижение.
Передовые банковские способы поддерживают моментальные инвестиции через криптовалютные кошельки. Bitcoin, Ethereum и фиксированные активы поддерживают тайность и наименьшие взносы. Длительность осуществления выводов достигает 10-30 интервалов.
Программы верности включают иерархические степени с увеличивающимся компенсацией. VIP-представители обеспечивают индивидуальные подарки, расширенные рамки и опережающую техподдержку.
company website
https://russian-traditional-clothes.com
цветы недорого москва
?esk? online casino ?esk? online casino .
For results
usda loan vacation home
to prepare for the future.
1вин казино онлайн https://1win5525.ru
Гемблинговая ниша представляет быстрый подъём, манящая тысячи клиентов. Профессиональные платформы предлагают стабильную пространство для беттинга. Исчерпывающую информацию о указанных компаниях доступно найти на лаки Р±РёСЂ казино .
Аттестация представляет основным элементом выбора платформы. Юрисдикции Великобритании предоставляют серьёзный аудит расчётных транзакций. Конкретная аккредитованная портал проходит плановые инспекции RNG-механизмов.
IT характеристики современных игорных домов предусматривают SSL-безопасность финансового категории. Провайдеры компьютерного ПО уровня Microgaming, NetEnt, Pragmatic Play встраивают продвинутые схемы хаотичных чисел.
Схема валидации счёта включает направления документов KYC-стандарта. Документ, документ о финансах, удостоверение проживания — обычный комплект для полноценного авторизации.
Альтернативные ссылки решают трудности с блокировками компаний. Рабочие зеркала обновляются ежедневно программными службами. Мобильные утилиты часто действуют стабильнее онлайн модификаций.
Управление банкроллом определяет продолжительную эффективность развлекательных циклов. Квалифицированные геймеры указывают лимитировать сумму ставки до 1-2% от итогового бюджета.
Инновационные платформы гемблинг продуктов дают пользователям доступ к высококлассному развлечениям через надежные lucky bear казино ресурсы. Легальная бизнес предполагает соблюдения определенных надзорных норм.
Алгоритм регистрации игрового учетной записи задействует проверку персональных реквизитов. Операторы задействуют детализированные процедуры KYC и AML для предотвращения незаконных финансовых действий.
Цифровые решения современных казино базируются на защищенных хостингах с TLS технологиями. IP-фильтрация обязывает управляющих создавать дублирующие порталы.
Зеркальные сайты образуют аналогичные копии основного платформы с фиксацией всех функций и информации. Клиенты обеспечивают себе устойчивый вход к капиталу, азартной статистике и клиентским настройкам.
Денежные операции осуществляются через связанные финансовые системы. Пределы на взносы и получения фиксируются в соответствии с нормативными условиями и организационными процедурами минимизации опасностей.
Экспертные игроки рекомендуют отслеживать статус аккредитации через официальные регистры азартных организаций. Статусные параметры включают позиции на профильных порталах и мнения действительных клиентов.
sildeafil on line pharmacy
https://ivertherapeutics.shop/# Iver Therapeutics
Rutor — главный портал русскоязычного даркнета в сети Tor, обеспечивающий доступ к материалам, товарам, контенту и нормам анонимности для пользователей черного рынка и onion сайтов
Rutor — известный форум darknet-пространства России с давней историей, анонимной регистрацией и сервисом для защиты транзакций посредством Rutor.Rutor: Один из ключевых проектов русскоязычного даркнета
зеркало рутор работающее сегодня сейчас новый адрес считается одним из наиболее популярных и старых ресурсов в рунет-даркнете, который прочно закрепился в инфраструктуре анонимных площадок. Данный сервис специализируется на доступе к широчайшему ассортименту софта, файлов, новостей и разнообразных материалов, охватывающих вопросы взлома и защиты.
Как устроена система работы Rutor
Механизм работы ресурса позволяет пользователям получать доступ к большим массивам данных и файлов, при этом обеспечивая максимальную приватность и анонимность. Главное преимущество платформы — интеграция с сетью Rutor, что значительно уменьшает вероятность раскрытия личности и потери конфиденциальной информации. За годы существования Rutor стал местом, где сохраняется важная история русскоязычного даркнета.
Rutor поддерживает стабильную работу, позволяя и новичкам, и опытным пользователям использовать предоставляемые сервисы. Система построена таким образом, что каждый раздел страницы — будь то магазин, новости или инструкции по взлому — становится отдельной частью большого сообщества, в котором безопасность и возможность оставаться анонимным выходят на первый план.
Перспективы и риски
Нет сомнений, что в дальнейшем Rutor столкнётся с новыми угрозами, инновационными способами охраны приватности и методами преодоления блокировок. Пользователи должны осознавать, что даже самая анонимная система не гарантирует полной безопасности.
Платформа продолжает быть ресурсом для получения расширенной информации, обмена мнениями по безопасности и мониторинга новшеств в сферах даркнета. Развитие технологий, расширение базы пользователей и появление новых возможностей делают Rutor одним из центров русскоязычного сообщества в сети.
– Принцип анонимности
– Гарантия безопасности сделок
– Открытый доступ к специализированному контенту
– Защищённость коммуникаций
Rutor представляет собой ресурс с неповторимой историей, важный для пользователей, стремящихся к свободе, сохранению конфиденциальности и автономии от внешних ограничений в современном интернете.
Smart GenRx USA us pharmacy no prescription Smart GenRx USA
useful source
russian traditional clothing
Азартная отрасль представляет интенсивный рост, завлекая тысячи клиентов. Экспертные площадки предлагают защищённую условия для игры. Полную факты о таких брендах реально получить на казино миллион .
Сертификация является центральным показателем определения сайта. Надзорные органы Кюрасао создают серьёзный надзор финансовых действий. Конкретная сертифицированная сайт проходит постоянные аудиты RNG-механизмов.
IT параметры передовых казино содержат SSL-защиту денежного класса. Поставщики компьютерного софта уровня Microgaming, NetEnt, Pragmatic Play добавляют многоуровневые алгоритмы произвольных величин.
Процесс валидации учётной записи требует представления удостоверений KYC-стандарта. Паспорт, справка о доходах, доказательство проживания — стандартный пакет для окончательного входа.
Параллельные домены убирают препятствия с запретами компаний. Функционирующие варианты адаптируются регулярно IT командами. Карманные приложения часто действуют лучше сетевых модификаций.
Банкролл-менеджмент устанавливает стратегическую прибыльность развлекательных сессий. Опытные участники рекомендуют лимитировать сумму пари до 1-2% от совокупного банкролла.
Современные участники сталкиваются с массой программных деталей при деятельности с официальными порталами. Профессиональные порталы типа казино лакибир предоставляют современную контент о операциях гэмблинговых провайдеров.
Механизм аутентификации аккаунта предполагает ряд обязательных шагов. Базовая аутентификация нуждается предоставления справок удостоверяющих персону. Типовой перечень охватывает документ, водительские права или заграничное удостоверение.
Технологическая сторона регистрации охватывает внедрение зашифрованного канала и двухфакторной аутентификации. Продвинутые геймеры подсказывают запускать совокупность возможных возможностей защиты.
Альтернативные адреса формируют точные дубликаты базового ресурса с хранением исчерпывающего набора функций. Главное плюс выражается в соответствии расчетных рамок и параметров отыгрыша.
Процедура обнаружения актуальных зеркал фундируется на отслеживании профильных уведомительных сервисов и сотрудничающих порталов. Профессиональные клиенты применяют VPN-сервисы для создания надежного входа вне зависимости от географических ограничений.
Howdy! This blog post could not be written much better!
Looking at this post reminds me of my previous roommate!
He constantly kept talking about this. I’ll forward this post to him.
Fairly certain he’ll have a very good read. Thank you for sharing!
Feel free to visit my web page :: Product review
Нынешние пользователи встречаются с массой программных аспектов при деятельности с лицензированными сайтами. Профильные платформы типа тип топ казино выдают релевантную контент о процессах игорных брендов.
Процесс подтверждения аккаунта охватывает ряд требуемых этапов. Базовая аутентификация требует передачи бумаг доказывающих гражданство. Классический комплект подразумевает ID, автолицензию или загранпаспорт.
Технологическая составляющая регистрации включает внедрение защищенного протокола и многофакторной защиты. Продвинутые участники подсказывают активировать все доступных настроек секьюрити.
Альтернативные адреса формируют стопроцентные дубликаты базового ресурса с поддержанием комплексного арсенала. Главное бонус содержится в идентичности денежных рамок и требований отыгрыша.
Механизм обнаружения активных зеркал фундируется на контроле тематических мессенджер групп и аффилированных порталов. Квалифицированные пользователи задействуют виртуальные частные сети для создания устойчивого подключения без оглядки от территориальных блокировок.
Отбор проверенного гемблинг оператора в текущих рамках предполагает специального анализа к лицензионному уровню. Профессиональные геймеры понимают, что Либет казино демонстрирует последнюю материалы о действующих площадках.
Механизм записи в проверенных заведениях содержит требуемую аутентификацию удостоверения. KYC-правила обеспечивают как заведение, так и клиента от обмана. Кратковременные рамки на вывод средств до завершения контроля – стандартная процедура.
Технические препятствия на подключение к игровым площадкам решаются через дублирующие домены. Действующие дубликаты гарантируют абсолютную производительность центрального платформы. Расчетные транзакции, интерактивный продвижение и наградные предложения поддерживаются константными.
Денежная стабильность определяется качеством эксплуатируемых финансовых способов. SSL-защита, PCI DSS лицензирование и усиленная подтверждение обеспечивают надежный контур охраны.
Азартная библиотека проверенных провайдеров содержит слоты от главных создателей. RTP-индексы, дисперсия и математические модели проходят нейтральную сертификацию в авторизованных учреждениях.
Схемы лояльности в профессиональных заведениях опираются на ясных критериях вейджера. Требования x35-40 характеризуется справедливым для барабан-привилегий, в то время как классические забавы учитываются в подсчет с минимальным показателем.
Clicking Here
russian traditional clothing
Hey there great website! Does running a blog such as this require a lot of work?
I’ve absolutely no understanding of computer programming however I had been hoping to
start my own blog soon. Anyhow, if you have any ideas or tips for new blog owners please share.
I understand this is off topic nevertheless I simply needed to ask.
Thanks!
Here is my blog :: personal retreat for couple cancun
For the ultimate fan experience, having the digital version of the latest Empyrean book is a no-brainer. The Onyx Storm epub allows you to carry the heavy emotional baggage of the characters without the physical weight of a hardcover. Rebecca Yarros has crafted a narrative that demands to be read and re-read. Digital formats are perfect for highlighting the foreshadowing you might have missed the first time. Join the adventure as Violet and Xaden face their most dangerous enemy yet – their own secrets.
купить прихожую
zoloft tablet: zoloft cheap – zoloft without dr prescription
Исследование в пространстве проверенных сайтов подразумевает осознания продвинутых инструментов доступа. Умелые клиенты эксплуатируют казино Голд для получения новейшей фактов о действующих доменах.
Механизм открытия профиля в официальных компаниях подразумевает сложную аутентификацию. Актуальные компании эксплуатируют KYC-процедуры и AML-требования. Документальное сопровождение отнимает от 24 до 72 часов.
Цифровые технологии для прохождения ограничений улучшаются синхронно с повышением законодательных мер. VPN-инструменты категории premium гарантируют защиту AES-256 и протоколы OpenVPN. Стабильность коннекта fundamentally необходима для премиальных сессий.
Резервные адреса выполняют задачи через географически разнесенные IT мощности. CDN-архитектуры обеспечивают быструю пинг для европейских пользователей. Цифровое редирект включается при детекции недоступности базового адреса.
Финансовые переводы в официальных областях отвечают определенным правилам PCI DSS. Цифровые транзакции приобретают актуальность в результате конфиденциальности и оперативности выполнения.
Смартфонные клиенты элитных провайдеров интегрируют лицевую аутентификацию и push-алерты для существенных эпизодов. Гибкий оформление программно подстраивается под особенности дисплея.
click here for info
russian traditional clothing
Ориентирование в мире лицензированных площадок нуждается понимания современных методов подключения. Опытные участники эксплуатируют ДживиСпин казино для обретения новейшей сведений о действующих ссылках.
Механизм открытия счета в официальных учреждениях содержит сложную подтверждение. Современные организации эксплуатируют KYC-системы и AML-нормы. Бумажная работа требует от 24 до 72 периодов.
Цифровые методы для преодоления запретов совершенствуются синхронно с повышением регуляторных решений. VPN-решения разряда premium гарантируют защиту AES-256 и протоколы OpenVPN. Устойчивость коннекта принципиально необходима для привилегированных сессий.
Зеркальные платформы действуют через пространственно распределенные технические кластеры. CDN-сети осуществляют сокращенную время ответа для глобальных участников. Цифровое редирект активируется при детекции ограничения основного портала.
Банковские движения в официальных юрисдикциях отвечают конкретным нормам PCI DSS. Крипто платежи завоевывают признание из-за скрытности и динамике выполнения.
Переносные приложения лучших операторов интегрируют отпечатковую аутентификацию и push-сообщения для критических происшествий. Гибкий оформление независимо настраивается под свойства экрана.
Кстати, если вас интересует, почему независимое и трэш-кино 2026 года остаётся популярным, посмотрите сюда.
Вот, делюсь ссылкой:
https://tresh-lordfilm.ru/news/tresh-kino-2026-pochemu-nizkobyudzhetnye-uzhastiki-i-tresh-filmy-vsyo-eshhyo-v-tope-prosmotrov/
Современный электрокарниз цена акция обеспечивает удобство управления шторами с помощью пульта или смартфона.
Они крепятся к потолку или стене и могут быть управляемы пультом, смартфоном или голосовыми командами.
It’s a shame you don’t have a donate button! I’d most certainly donate to this excellent blog!
I guess for now i’ll settle for book-marking and
adding your RSS feed to my Google account. I look forward to new updates and will share this site
with my Facebook group. Chat soon!
Take a look at my web-site: Buy Brads At Artsulli | Art Supply Store | Shop Art & Illustration Supplies
find more info
https://russian-traditional-clothes.com
important link
russian traditional clothing
海外华人必备的iyifan平台,提供最新高清电影、电视剧,无广告观看体验。
Современные участники встречаются с сложностью доступа к лицензированным сайтам. Организации запрещают основные порталы, но знающие mad casino зеркало пользователи осознают о функционировании дублирующих порталов.
Дополнительный домен является идентичную дубликат базового платформы. Системы безопасности поддерживаются идентичными. Финансовые переводы осуществляются через те же каналы.
Методика заведения учётной записи через дополнительный домен подразумевает классической подтверждения. Сотрудники уточняют бумаги для соблюдения KYC-правил. Индивидуальные информация проходят комплексную аутентификацию.
Финансовые рамки на дополнительных сайтах идентичны базовым спецификациям. Начальные ставки поддерживаются константными. Прогрессивные накопления координируются между многочисленными ссылками.
Льготные схемы выполняются полноценно на резервных сайтах. Требования по обороту сохраняет исходные параметры. Тайминг оборота остаётся прежним.
Департамент поддержки решает вопросы с резервных порталов идентично. Мгновенный диалог обеспечивает постоянный порядок функционирования.
Актуальные клиенты имеют дело с множеством системных тонкостей при процессах с проверенными ресурсами. Профильные сайты типа Рльдорадо обеспечивают новую материалы о операциях гэмблинговых компаний.
Система проверки профиля охватывает несколько принудительных этапов. Начальная верификация подразумевает передачи справок валидирующих субъект. Обычный комплект охватывает документ, автолицензию или заграничное удостоверение.
Программная часть открытия счета подразумевает эксплуатацию зашифрованного канала и двухфакторной аутентификации. Квалифицированные геймеры настаивают запускать весь комплекс предложенных функций охраны.
Альтернативные адреса составляют полные отражения центрального платформы с сохранением тотального арсенала. Основное достоинство кроется в подобии банковских рамок и требований проигрыша.
Механизм локализации функционирующих резервных ссылок опирается на отслеживании специализированных информационных каналов и сотрудничающих платформ. Опытные геймеры применяют виртуальные частные сети для формирования бесперебойного входа невзирая от территориальных лимитов.
Фантастика и футуристические романы • Канал про современную русскую прозу и зарубежную фантастику • Подборки литературных романов и критика современной прозы • Лучшие рассказы и повести в Telegram-канале • Где читать новые литературные романы и фантастику онлайн • рецензии и авторские тексты про книги
bactrim
Нынешние участники натыкаются с барьером соединения к легальным ресурсам. Провайдеры фильтруют базовые URL, но опытные казино ДживиСпин клиенты понимают о наличии зеркальных площадок.
Резервная ссылка представляет стопроцентную реплику основного портала. Средства защиты поддерживаются идентичными. Платёжные действия осуществляются через идентичные системы.
Технология заведения учётной записи через параллельный ресурс требует классической валидации. Менеджеры запрашивают справки для осуществления KYC-регламентов. Идентификационные данные реализуют расширенную подтверждение.
Финансовые пределы на альтернативных сайтах совпадают первичным характеристикам. Стартовые взносы сохраняются константными. Накопительные накопления согласовываются между многочисленными порталами.
Стимулирующие схемы функционируют всесторонне на дополнительных порталах. Вейджер гарантирует исходные цифры. Период действия использования продолжается.
Служба сопровождения изучает обращения с зеркальных адресов аналогично. Прямой разговор обеспечивает 24-часовой порядок оперирования.
Актуальные бетторы натыкаются с затруднением подключения к легальным порталам. Организации фильтруют стандартные порталы, но опытные лаки ворлд клиенты помнят о наличии дублирующих ресурсов.
Зеркало представляет идентичную реплику главного портала. Средства защиты поддерживаются аналогичными. Расчётные действия осуществляются через аналогичные сервисы.
Схема открытия счёта через параллельный ресурс включает стандартной аутентификации. Операторы уточняют свидетельства для исполнения KYC-стандартов. Личные сведения выполняют двухфакторную аутентификацию.
Банковские рамки на резервных сайтах равняются базовым характеристикам. Начальные взносы поддерживаются фиксированными. Прогрессивные джекпоты координируются между многочисленными ресурсами.
Поощрительные механизмы функционируют целостно на дополнительных ресурсах. Коэффициент оборота обеспечивает базовые показатели. Тайминг оборота остаётся прежним.
Служба поддержки обрабатывает вопросы с зеркальных порталов таким же способом. Прямой общение предоставляет 24-часовой график оперирования.
see it here
https://russian-traditional-clothes.com
trafficcraft.click – Content reads clearly, helpful examples made concepts easy to grasp.
Sertraline USA: zoloft tablet – sertraline generic
her explanation
https://russian-traditional-clothes.com
For methods
no deposit casino for real money
for an in-depth look.
Определение достойного развлекательного оператора в нынешних рамках подразумевает тщательного внимания к правовому положению. Профессиональные клиенты знают, что Голд регистрация включает актуальную сведения о функционирующих провайдерах.
Процесс записи в лицензированных заведениях объединяет необходимую верификацию удостоверения. KYC-требования обеспечивают как заведение, так и геймера от махинаций. Переходные лимиты на снятие активов до закрытия верификации – типичная процедура.
Цифровые барьеры на вход к betting сайтам преодолеваются через альтернативные URL. Действующие дубликаты предоставляют абсолютную производительность центрального сервиса. Денежные операции, геймплейный продвижение и поощрительные схемы функционируют устойчивыми.
Капитальная стабильность характеризуется критерием задействованных платежных инструментов. SSL-кодирование, PCI DSS сертификация и двухфакторная верификация гарантируют прочный барьер безопасности.
Азартная библиотека лицензированных сервисов охватывает машины от известных производителей. RTP-параметры, изменчивость и статистические формулы подвергаются беспристрастную валидацию в одобренных организациях.
Схемы стимулирования в качественных заведениях базируются на понятных правилах вейджера. Отыгрыш x35-40 признается адекватным для барабан-льгот, в то время как карточные игры засчитываются в расчет с сниженным показателем.
https://ivertherapeutics.com/# ivermectin
Перемещение в пространстве официальных платформ подразумевает владения передовых способов входа. Продвинутые клиенты задействуют казино Килограмм для обретения современной данных о функционирующих доменах.
Алгоритм регистрации личного кабинета в сертифицированных операторах подразумевает комплексную аутентификацию. Продвинутые провайдеры эксплуатируют KYC-алгоритмы и AML-стандарты. Документооборот требует от 24 до 72 интервалов.
Технические способы для минования запретов совершенствуются одновременно с интенсификацией законодательных действий. VPN-сервисы категории premium предоставляют защиту AES-256 и стандарты OpenVPN. Непрерывность соединения принципиально важна для привилегированных заходов.
Запасные платформы оперируют через территориально расположенные компьютерные системы. CDN-комплексы предоставляют минимальную задержку для международных игроков. Техническое переключение активируется при выявлении блокировки первичного адреса.
Экономические транзакции в проверенных зонах соответствуют определенным требованиям PCI DSS. Крипто платежи завоевывают распространение вследствие секретности и темпу выполнения.
Переносные утилиты элитных операторов содержат отпечатковую авторизацию и push-сообщения для существенных ситуаций. Гибкий интерфейс самостоятельно корректируется под свойства экрана.
buy prednisone without a prescription
Have you ever considered about including a little
bit more than just your articles? I mean, what you say is important and
all. However imagine if you added some great pictures or video clips to give your posts more, “pop”!
Your content is excellent but with pics and clips, this site
could certainly be one of the most beneficial in its niche.
Excellent blog!
My web page :: family private retreat
see page
russian traditional clothing
WOW just what I was searching for. Came here by searching for %keyword%
byueuropaviagraonline
Проверенные ресурсы азартных услуг дают клиентам вариант к премиальному гэмблингу через целевые платформы, включая лаки Р±РёСЂ казино , что соблюдают мировые нормы безопасности.
Процедура открытия счёта требует предоставления authentication параметров через encrypted SSL-протоколы. Менеджмент требуют нотариальное verification дееспособности и локации жительства для соблюдения legal норм.
2FA authentication представляет необходимым составляющей современных платформ security. Клиенты приобретают SMS-коды, push-notification или используют targeted утилиты наподобие Google Authenticator.
Зеркальные порталы нейтрализуют трудности географических санкций и DDoS-воздействий. Фактически копии формируют дублированные реплики главного платформы с обеспечением функциональности и пользовательских параметров.
Профессиональные геймеры призывают keeping новейшие базы working mirrors в favourites браузера. Management направляют updates о свежих ссылках через почтовые сервисы, Telegram-каналы и мобильные apps.
Payment процедуры через лицензионные площадки покрыты защитными methods категории банковского области. Получение средств реализуется лишь на проверенные wallets владельца account.
Актуальные участники оказываются с барьером подключения к официальным площадкам. Провайдеры ограничивают стандартные адреса, но искушённые казино Tippy пользователи учитывают о присутствии альтернативных сайтов.
Зеркало представляет абсолютную отображение главного сайта. Криптографические алгоритмы работают идентичными. Денежные переводы реализуются через аналогичные механизмы.
Процедура создания аккаунта через параллельный ресурс содержит стандартной аутентификации. Сотрудники требуют бумаги для реализации KYC-норм. Индивидуальные характеристики реализуют усиленную аутентификацию.
Депозитные пределы на параллельных порталах соответствуют основным условиям. Низшие беты поддерживаются фиксированными. Растущие выигрышные пулы синхронизируются между всеми ссылками.
Поощрительные программы выполняются полноценно на дополнительных площадках. Отыгрышный коэффициент гарантирует первоначальные величины. Тайминг проигрывания остаётся прежним.
Отдел ассистирования рассматривает вопросы с зеркальных доменов таким же способом. Интерактивный чат гарантирует 24-часовой график оперирования.
Bovada Sportsbookhttps://bovada.one is an internet-based betting site that features sports wagering in addition to casino and poker products.
It lists a wide range of matches and tournaments, with common bet types such
as straight moneyline bets, spreads, totals, multi-leg parlays, outright futures, and proposition bets, plus in-game betting during
games. The platform is often geared toward casual bettors and is recognized for a straightforward interface and
wide odds coverage for top U.S. and Canadian leagues as well as global competitions.
Access and legal status depend on your location. Bovada One is often described as an offshore sportsbook and may be unavailable in certain jurisdictions,
especially within the United States. Because laws and availability may vary over time, anyone considering using it should check current availability and compliance requirements for their specific region and ensure
they follow local laws and age restrictions.
https://sertralineusa.shop/# sertraline zoloft
Игровая индустрия отображает быстрый прогресс, манящая тысячи пользователей. Грамотные ресурсы предоставляют безопасную обстановку для ставок. Подробную материалы о указанных провайдерах допустимо обнаружить на РЎСѓРєР° казино .
Легализация остаётся ключевым показателем подбора портала. Лицензиаты Олдерни предоставляют жёсткий аудит экономических действий. Конкретная лицензированная площадка подвергается регулярные аудиты RNG-механизмов.
Цифровые свойства актуальных азартных площадок включают SSL-криптографию экономического уровня. Разработчики цифрового софта типа Microgaming, NetEnt, Pragmatic Play добавляют сложные механизмы непредсказуемых показателей.
Механизм валидации счёта подразумевает передачи бумаг KYC-стандарта. Паспорт, документ о заработке, доказательство прописки — стандартный перечень для завершённого доступа.
Зеркальные URL устраняют сложности с фильтрацией организаций. Актуальные копии изменяются постоянно программными группами. Портативные программы обычно оперируют стабильнее интернет форматов.
Управление банкроллом устанавливает стратегическую успешность гемблинговых раундов. Экспертные пользователи настаивают ограничивать объём бета до 1-2% от суммарного банкролла.
Актуальные порталы гемблинг активностей гарантируют пользователям вход к элитному азарту через надежные лаки ворлд казино платформы. Лицензированная операционная активность предполагает выполнения конкретных законодательных критериев.
Алгоритм создания индивидуального учетной записи содержит аутентификацию конфиденциальных показателей. Операторы применяют расширенные алгоритмы KYC и AML для исключения фродовых операций.
IT инструменты современных гемблинг платформ работают на безопасных инфраструктурах с шифровальными алгоритмами. Региональная блокировка обязывает провайдеров организовывать параллельные URL.
Параллельные ресурсы формируют полные версии главного платформы с удержанием всех возможностей и сведений. Клиенты добиваются постоянный подключение к счету, развлекательной отчетности и персональным опциям.
Денежные операции производятся через подключенные финансовые процессоры. Лимиты на пополнения и обналичивания устанавливаются в соответствии с нормативными положениями и индивидуальными правилами минимизации опасностей.
Квалифицированные гемблеры предлагают анализировать положение аккредитации через государственные каталоги гемблинг ведомств. Статусные индикаторы охватывают ранги на экспертных сервисах и feedback истинных игроков.
Rutor – ключевой ресурс даркнета на русском языке в Tor, дающий доступ к контенту, материалам, товарам и правилам сохранения анонимности пользователей черного рынка и onion сайтов
Rutor — известный форум darknet-пространства России с давней историей, анонимной регистрацией и сервисом для защиты транзакций посредством Rutor.Rutor: Ветеран русскоязычного даркнета
доступ к рутор считается одним из наиболее популярных и старых ресурсов в рунет-даркнете, который прочно закрепился в инфраструктуре анонимных площадок. Этот магазин ориентирован на предоставление пользователям широкой базы данных, связанной с файлами, софтом, новостями и различными видами контента, включая темы, касающиеся взлома и безопасности.
Особенности работы системы Rutor
Данная система обеспечивает доступ к значительным объемам данных и файлов, гарантируя при этом повышенную анонимность и защиту пользователей. Особенность сервиса в том, что он работает через сеть Rutor, что существенно снижает риск идентификации и утечки данных. За долгое время работы Rutor стал своего рода летописью для даркнета на русском языке.
Rutor продолжает работать и предоставлять стабильный доступ к ресурсам, удовлетворяя потребности как новичков, так и опытных пользователей даркнета. Система построена таким образом, что каждый раздел страницы — будь то магазин, новости или инструкции по взлому — становится отдельной частью большого сообщества, в котором безопасность и возможность оставаться анонимным выходят на первый план.
Возможные направления развития и связанные опасности
Ясно, что будущая деятельность Rutor потребует решения новых рисков, внедрения свежих подходов к безопасности и средств обхода ограничений. Пользователи обязаны понимать, что ни одна анонимная платформа не может дать абсолютную защиту.
Этот сервис по-прежнему служит площадкой для информирования, обсуждений безопасности и отслеживания новшеств в даркнет-сообществе. Технический прогресс, рост числа участников и новые функциональные решения превращают Rutor в ключевой узел русскоязычного интернет-сообщества.
– Принцип анонимности
– Надёжность проведения операций
– Доступ к уникальной информации
– Конфиденциальность общения
Rutor — это платформа с уникальной историей, и её опыт стоит принимать во внимание всем, кто ценит собственную свободу, приватность и независимость от внешней цензуры в современном цифровом мире.
keywordfuel.click – Content reads clearly, helpful examples made concepts easy to grasp.
真实的人类第二季高清完整版运用AI智能推荐算法,海外华人可免费观看最新热播剧集。
What’s up mates, how is everything, and what you
would like to say concerning this piece
of writing, in my view its truly amazing in favor
of me.
Подбор проверенного игрового портала в сегодняшних рамках предполагает специального изучения к законному статусу. Опытные участники знают, что friends casino содержит новую материалы о активных сервисах.
Механизм регистрации в легальных платформах включает обязательную валидацию идентичности. KYC-правила защищают как площадку, так и пользователя от обмана. Временные ограничения на получение капитала до окончания верификации – обычная подход.
Цифровые блокировки на вход к игровым сервисам обходятся через резервные домены. Активные копии сохраняют всестороннюю производительность базового портала. Банковские движения, развлекательный достижения и наградные планы поддерживаются константными.
Материальная стабильность измеряется уровнем применяемых расчетных инструментов. SSL-безопасность, PCI DSS валидация и расширенная аутентификация устанавливают стабильный барьер охраны.
Игровая каталог лицензированных провайдеров включает машины от топовых производителей. RTP-значения, колебания и вероятностные принципы подвергаются внешнюю сертификацию в авторизованных институтах.
Программы стимулирования в достойных операторах опираются на четких критериях ставок. Условия ставок x35-40 считается нормальным для автомат-привилегий, в то время как настольные состязания идут в расчет с сниженным коэффициентом.
Выбор безопасного игорного заведения заставляет глубокого анализа лицензионных документов. Новые платформы казино Голд обеспечивают пользователям полную факты о собственных санкциях.
Процедура получения доступа охватывает различные обязательных фаз аутентификации. Операторы истребуют удостоверения, засвидетельствующие персону и правоспособность. Стандартный KYC-механизм длится от 24 до 72 интервалов.
Финансовое планирование открывается с установления рамок на взносы. Профессиональные участники призывают использовать правило 5% от суммарного гемблинг капитала на единичную игру.
Технические препятствия владельцев обязывают эксплуатировать альтернативные маршруты. Альтернативы сохраняют безусловную работоспособность центрального площадки, охватывая журнал транзакций и казино прогресс.
Передовые финансовые системы дают скоростные взносы через криптовалютные счета. Bitcoin, Ethereum и стабильные валюты гарантируют конфиденциальность и символические сборы. Срок проведения получений достигает 10-30 минут.
Планы приверженности охватывают иерархические ранги с возрастающим кэшбэком. VIP-координаторы предлагают личные вознаграждения, расширенные границы и опережающую техподдержку.
Игровая сфера являет стремительный расширение, манящая легионы клиентов. Профессиональные площадки гарантируют надёжную условия для беттинга. Детальную сведения о этих организациях доступно отыскать на Clubnika .
Аккредитация остаётся основным элементом подбора сайта. Лицензиаты Мальты создают тщательный контроль финансовых действий. Любая легальная портал выполняет постоянные инспекции RNG-алгоритмов.
Цифровые особенности передовых беттинг-платформ включают SSL-безопасность денежного стандарта. Поставщики компьютерного обеспечения типа Microgaming, NetEnt, Pragmatic Play интегрируют комплексные алгоритмы хаотичных значений.
Алгоритм аутентификации профиля требует предоставления свидетельств KYC-формата. Паспорт, подтверждение о доходах, подтверждение регистрации — обычный список для окончательного авторизации.
Альтернативные порталы решают трудности с запретами компаний. Рабочие зеркала адаптируются постоянно программными командами. Смартфонные утилиты часто оперируют устойчивее интернет модификаций.
Управление банкроллом формирует долгосрочную эффективность гемблинговых раундов. Грамотные пользователи указывают сокращать количество пари до 1-2% от итогового фонда.
Рабочие дублирующие порталы лицензированных казино на Гризли казино дают стабильный вход к игровым сервисам. Технология реплицирования образует эквивалентные дубликаты главного домена с поддержанием всех инструментов.
Схема регистрации через mirror-сайт в точности воспроизводит базовую бланк. Только пришедшие пользователи вводят активный email, генерируют надежный шифр и устанавливают базовую платежное средство.
Верификация профиля включает представления бумаг по KYC-нормам. Фото водительских прав, свидетельство регистрации и денежные координаты контролируются системой машинную контроль в течение 24-72 часа.
Логин существующих пользователей выполняется через базовую форму с 2FA аутентификацией. Сессионные коды поступают на телефонный аппарат или почтовый ящик.
Инструменты финансового модуля через резервные ссылки содержит популярные банковские платформы. Visa, Mastercard, веб балансы Skrill, Neteller, цифровые активы Bitcoin, Ethereum выполняются с сокращенными платежами 0-3%.
Гемблинг коллекция воспроизводится в точности включая слоты, классические геймплей, live-крупье и мегавыигрыши. RTP-показатели, колебания и условия отыгрыша поддерживаются такими же.
Промо механизм выполняется идентично корневому сайту. Welcome-бандлы, бесплатные вращения, refund и VIP-курсы запускаются машинально при достижении определенных параметров.
pagepilot.click – Overall, professional vibe here; trustworthy, polished, and pleasantly minimal throughout.
rankshift.click – Pages loaded fast, images appeared sharp, and formatting stayed consistent.
Heroes are made in the hardest of times. The Onyx Storm epub tells the story of those heroes. This sequel is gritty and real. Reading on a screen brings the words to life in a modern way. Rebecca Yarros writes with a passion that burns off the page. secure your copy and feel the heat.
Актуальные зеркала лицензированных гемблинг-платформ на винити официальный сайт создают постоянный доступ к развлекательным платформам. Схема реплицирования генерирует аналогичные реплики основного ресурса с удержанием всех возможностей.
Механизм открытия счета через дублирующий портал полностью повторяет главную анкету. Только пришедшие участники указывают валидный email, создают стойкий ключ и устанавливают игровую денежную единицу.
Подтверждение профиля подразумевает отправки удостоверений согласно KYC-политике. Снимок водительских прав, доказательство регистрации и денежные сведения анализируются посредством машинную контроль в течение 24-72 временных единиц.
Аутентификация верифицированных пользователей выполняется через типовую форму с двухфакторной идентификацией. Одноразовые коды поступают на телефонный устройство или e-mail адрес.
Механизмы пополнительного компонента через mirror-сайты содержит распространенные денежные платформы. Visa, Mastercard, виртуальные хранилища Skrill, Neteller, блокчейн-токены Bitcoin, Ethereum обрабатываются с низкими платежами 0-3%.
Игровая коллекция повторяется на сто процентов включая барабаны, классические забавы, live-дилеров и прогрессивы. RTP-параметры, дисперсия и отыгрыш удерживаются аналогичными.
Поощрительная программа работает идентично главному сайту. Welcome-комплекты, даровые прокруты, возврат средств и VIP-системы инициируются автоматически при выполнении определенных требований.
Действующие дублирующие порталы проверенных игорных заведений на казино Клубника создают устойчивый доступ к геймерским ресурсам. Схема копирования формирует эквивалентные версии корневого портала с консервацией всех инструментов.
Процедура создания аккаунта через зеркало в точности дублирует базовую форму. Только пришедшие участники регистрируют действующий email, придумывают стойкий пароль и выбирают операционную денежную единицу.
Идентификация счета требует передачи свидетельств в соответствии с KYC-стандартам. Изображение паспорта, верификация проживания и денежные данные контролируются системой машинную верификацию в течение 24-72 ч.
Подключение активных пользователей происходит через типовую панель с двухфакторной проверкой. Разовые шифры доставляются на мессенджер устройство или мейл.
Механизмы денежного блока через альтернативные домены обеспечивает востребованные денежные платформы. Visa, Mastercard, цифровые счета Skrill, Neteller, виртуальные монеты Bitcoin, Ethereum процессируются с низкими процентами 0-3%.
Развлекательная ассортимент повторяется полностью включая барабаны, классические забавы, live-ведущих и джекпоты. RTP-значения, вариативность и условия отыгрыша поддерживаются аналогичными.
Акционная механизм выполняется схоже главному веб-площадке. Welcome-наборы, фриспины, кешбэк и VIP-курсы запускаются машинально при исполнении заданных критериев.
Беттинговая область демонстрирует быстрый расширение, притягивая тысячи игроков. Грамотные порталы предлагают качественную условия для беттинга. Подробную факты о данных провайдерах возможно найти на п»ї1хбет РІС…РѕРґ .
Легализация представляет ключевым элементом отбора сайта. Контролёры Мальты дают серьёзный аудит денежных транзакций. Любая официальная площадка реализует периодические ревизии RNG-механизмов.
Цифровые аспекты современных гемблинг-сайтов включают SSL-шифрование банковского ранга. Разработчики софтового материала наподобие Microgaming, NetEnt, Pragmatic Play интегрируют усовершенствованные алгоритмы случайных значений.
Процедура аутентификации учётной записи предполагает предоставления справок KYC-формата. Удостоверение, документ о доходах, верификация адреса — базовый комплект для завершённого активации.
Параллельные ссылки исправляют препятствия с фильтрацией компаний. Действующие варианты корректируются ежедневно компьютерными командами. Портативные клиенты часто оперируют стабильнее сетевых версий.
Финансовая дисциплина определяет стратегическую эффективность гемблинговых партий. Профессиональные игроки советуют урезать количество пари до 1-2% от полного фонда.
Передовые клиенты имеют дело с огромным количеством системных особенностей при процессах с проверенными ресурсами. Профессиональные платформы типа казино Вавада предоставляют актуальную информацию о процессах игорных организаций.
Процедура верификации счета включает комплекс принудительных этапов. Базовая валидация требует предоставления справок валидирующих индивидуальность. Обычный перечень содержит паспорт, права или заграничное удостоверение.
Системная часть записления включает использование зашифрованного канала и двухфакторной аутентификации. Профессиональные геймеры настаивают включать весь комплекс возможных опций защиты.
Альтернативные адреса представляют полные реплики базового платформы с поддержанием комплексного арсенала. Ключевое плюс кроется в схожести финансовых рамок и норм проигрыша.
Процедура выявления действующих дублирующих порталов основывается на мониторинге профильных информационных каналов и партнерских сайтов. Опытные пользователи задействуют туннельные протоколы для предоставления постоянного подключения вне зависимости от локальных запретов.
For opinions
Guaranteed approval online loans bad credit
for conference notes.
Can’t help but say I’m happy I found mostbet — fantastic!
https://lccarchive.com/pellentesque-nibh-aenean-quam-in-scelerisque/
Если вы хотите автоматизировать управление шторами, обратите внимание на электрокарнизы для штор заказать, который станет идеальным решением для вашего дома.
Далее остановимся на достоинствах использования электрокарнизов.
Нынешние геймеры обталкиваются с набором технических тонкостей при операциях с лицензированными площадками. Профильные ресурсы типа казино типпи предоставляют новую сведения о деятельности гэмблинговых организаций.
Процедура верификации аккаунта подразумевает множество необходимых этапов. Первичная верификация включает отправки удостоверений подтверждающих личность. Обычный комплект подразумевает свидетельство, водительские права или международный паспорт.
Технологическая элемент открытия счета включает использование зашифрованного канала и двойной авторизации. Продвинутые геймеры предлагают запускать максимум доступных опций безопасности.
Запасные домены являются стопроцентные реплики центрального портала с хранением полного функционала. Ключевое бонус состоит в подобии банковских границ и условий условий прокрутки.
Система поиска актуальных запасных доменов основывается на мониторинге специализированных телеграм-каналов и связанных площадок. Квалифицированные клиенты применяют VPN-сервисы для обеспечения постоянного доступа вне зависимости от местных барьеров.
bactrim for sale
linkhorizon.click – Content reads clearly, helpful examples made concepts easy to grasp.
Ориентирование в мире официальных площадок предполагает знания современных способов подключения. Умелые пользователи используют лова казино для приобретения новейшей фактов о действующих путях.
Алгоритм регистрации учетной записи в надежных компаниях включает тщательную валидацию. Современные компании применяют KYC-системы и AML-требования. Оформление документов требует от 24 до 72 промежутков.
IT методы для обхода препятствий улучшаются вместе с повышением юридических шагов. VPN-решения категории premium дают кодирование AES-256 и стандарты OpenVPN. Непрерывность связи принципиально существенна для привилегированных заходов.
Альтернативные платформы функционируют через регионально разнесенные цифровые мощности. CDN-структуры обеспечивают сокращенную латентность для азиатских геймеров. Системное роутинг запускается при идентификации барьера основного адреса.
Банковские манипуляции в лицензированных территориях следуют жестким критериям PCI DSS. Криптовалютные платежи получают востребованность благодаря скрытности и темпу реализации.
Смартфонные софт элитных провайдеров объединяют голосовую идентификацию и push-сообщения для критических событий. Настраиваемый дизайн программно адаптируется под параметры панели.
Азартная область отображает стремительный рост, притягивая массы участников. Опытные сайты дают стабильную условия для развлечений. Детальную данные о данных организациях реально найти на Вавада .
Легализация представляет основным критерием выбора платформы. Юрисдикции Мальты обеспечивают серьёзный контроль расчётных процедур. Отдельная лицензированная ресурс проходит регулярные аудиты RNG-генераторов.
IT аспекты новейших казино охватывают SSL-кодирование банковского категории. Разработчики софтового ПО класса Microgaming, NetEnt, Pragmatic Play добавляют продвинутые модели случайных величин.
Процедура верификации счёта требует представления удостоверений KYC-стандарта. Свидетельство, выписка о средствах, верификация регистрации — обычный перечень для финального авторизации.
Дублирующие URL ликвидируют барьеры с запретами провайдеров. Свежие альтернативы обновляются постоянно IT отделами. Мобильные клиенты обычно оперируют стабильнее веб вариантов.
Распределение капитала устанавливает долгосрочную успешность развлекательных периодов. Квалифицированные участники рекомендуют лимитировать величину вейджера до 1-2% от суммарного банкролла.
Передовые пользователи обталкиваются с массой технических нюансов при процессах с легальными порталами. Специализированные сайты типа Vavada зеркало предоставляют релевантную информацию о процессах азартных операторов.
Процедура верификации кабинета охватывает ряд обязательных стадий. Исходная валидация предполагает предоставления удостоверений верифицирующих гражданство. Привычный набор содержит ID, автолицензию или внешний паспорт.
Программная часть оформления подразумевает применение зашифрованного канала и 2FA. Экспертные клиенты рекомендуют активировать весь комплекс возможных опций безопасности.
Альтернативные адреса составляют полные отражения первичного портала с удержанием всего инструментария. Основное преимущество заключается в подобии расчетных границ и условий вейджера.
Система выявления действующих зеркал строится на отслеживании профильных уведомительных сервисов и партнерских платформ. Квалифицированные пользователи задействуют туннельные протоколы для предоставления надежного соединения безотносительно от местных барьеров.
stromectol over the counter: Iver Therapeutics – ivermectin brand
1win коэффициенты https://1win87143.help
Отбор проверенного азартного оператора требует серьезного рассмотрения юридических свидетельств. Инновационные системы казино Vavada гарантируют игрокам абсолютную данные о своих разрешениях.
Процедура регистрации содержит различные ключевых фаз подтверждения. Администраторы просят свидетельства, устанавливающие личность и совершеннолетие. Обычный KYC-алгоритм составляет от 24 до 72 промежутков.
Управление банком инициируется с задания лимитов на инвестиции. Опытные геймеры рекомендуют использовать установку 5% от полного развлекательного резерва на одну партию.
Программные ограничения поставщиков обязывают задействовать дополнительные маршруты. Клоны хранят абсолютную производительность главного ресурса, включая хронологию транзакций и игровой продвижение.
Передовые платежные сервисы предоставляют быстрые инвестиции через блокчейн хранилища. Bitcoin, Ethereum и постоянные токены предоставляют приватность и наименьшие платежи. Время проведения снятий насчитывает 10-30 отрезков.
Алгоритмы верности предусматривают каскадные ранги с накапливающимся бонусом. VIP-кураторы обеспечивают уникальные награды, увеличенные пределы и первоочередную сервис.
Беттинговая сфера являет активный рост, привлекая миллионы пользователей. Опытные порталы обеспечивают защищённую обстановку для игры. Исчерпывающую материалы о таких провайдерах допустимо получить на казино Vavada .
Аттестация представляет центральным элементом определения сайта. Надзорные органы Мальты гарантируют строгий проверку расчётных действий. Конкретная легальная ресурс проходит регулярные контроли RNG-систем.
Программные параметры актуальных беттинг-платформ включают SSL-криптографию банковского категории. Разработчики программного обеспечения наподобие Microgaming, NetEnt, Pragmatic Play подключают сложные алгоритмы случайных параметров.
Процесс валидации учётной записи предусматривает подачи удостоверений KYC-типа. ID, справка о прибылях, подтверждение местожительства — базовый набор для окончательного доступа.
Резервные порталы устраняют проблемы с запретами организаций. Действующие варианты корректируются ежедневно программными группами. Карманные утилиты обычно действуют стабильнее сетевых форматов.
Финансовая дисциплина определяет продолжительную доходность игровых сессий. Профессиональные участники настаивают лимитировать количество депозита до 1-2% от полного резерва.
Актуальные игроки натыкаются с сложностью доступа к лицензированным порталам. Операторы фильтруют главные порталы, но опытные Eldorado казино клиенты учитывают о существовании дублирующих порталов.
Зеркало представляет стопроцентную копию главного площадки. SSL-сертификаты сохраняются неизменными. Расчётные процедуры выполняются через равнозначные системы.
Технология заведения учётной записи через дополнительный домен предполагает привычной подтверждения. Специалисты требуют удостоверения для соблюдения KYC-правил. Идентификационные сведения реализуют комплексную подтверждение.
Вносительные пределы на дополнительных порталах совпадают базовым характеристикам. Минимальные ставки остаются постоянными. Растущие банки объединяются между разными доменами.
Поощрительные механизмы работают всесторонне на дополнительных ресурсах. Требования по обороту поддерживает стартовые показатели. Тайминг реализации продолжается.
Департамент сопровождения изучает запросы с резервных доменов таким же способом. Живой общение предоставляет постоянный расписание деятельности.
Hi! Do you know if they make any plugins to assist with Search Engine Optimization? I’m trying to get
my blog to rank for some targeted keywords but I’m not seeing very good
results. If you know of any please share. Thank you!
Перемещение в сфере проверенных порталов включает понимания актуальных методов авторизации. Профессиональные клиенты внедряют Голд казино для обретения современной фактов о активных адресах.
Механизм формирования личного кабинета в лицензированных компаниях предполагает детальную аутентификацию. Актуальные провайдеры используют KYC-протоколы и AML-требования. Документооборот составляет от 24 до 72 интервалов.
Программные инструменты для прохождения запретов улучшаются синхронно с интенсификацией законодательных действий. VPN-инструменты типа premium предоставляют кодирование AES-256 и системы OpenVPN. Надежность связи жизненно значима для элитных партий.
Дублирующие сайты выполняют задачи через географически расположенные технические инфраструктуры. CDN-системы гарантируют быструю латентность для глобальных геймеров. Системное редирект срабатывает при выявлении блокировки главного домена.
Финансовые операции в лицензированных зонах подчиняются жестким стандартам PCI DSS. Блокчейн операции завоевывают актуальность в результате конфиденциальности и динамике обработки.
Переносные утилиты премиальных операторов включают лицевую проверку и push-извещения для существенных моментов. Настраиваемый дизайн программно изменяется под особенности матрицы.
http://ivertherapeutics.com/# Iver Therapeutics
Отбор честного игорного оператора предполагает детального исследования регулятивных бумаг. Передовые платформы Lucky Bear casino гарантируют пользователям стопроцентную детали о текущих лицензиях.
Процесс оформления счета содержит ряд обязательных фаз подтверждения. Провайдеры требуют бумаги, доказывающие персону и дееспособность. Обычный KYC-регламент составляет от 24 до 72 интервалов.
Распоряжение капиталом стартует с задания лимитов на пополнения. Опытные геймеры предлагают задействовать правило 5% от суммарного игорного капитала на индивидуальную заход.
Технические запреты операторов принуждают внедрять дополнительные домены. Клоны оберегают абсолютную работоспособность первичного ресурса, подразумевая журнал платежей и казино успех.
Современные банковские способы дают мгновенные пополнения через цифровые хранилища. Bitcoin, Ethereum и стейблкоины поддерживают скрытность и крошечные взносы. Период реализации извлечений доходит 10-30 интервалов.
Системы приверженности включают градационные категории с прогрессивным возвратом. VIP-консультанты предлагают эксклюзивные поощрения, увеличенные лимиты и опережающую помощь.
Поиск честного азартного оператора заставляет детального анализа лицензионных бумаг. Инновационные сайты Меллстрой официальный сайт гарантируют участникам абсолютную факты о текущих разрешениях.
Процедура оформления счета охватывает различные необходимых шагов верификации. Операторы требуют бумаги, засвидетельствующие личность и зрелость. Стандартный KYC-механизм длится от 24 до 72 интервалов.
Управление банком открывается с установления рамок на вклады. Компетентные клиенты предлагают внедрять установку 5% от итогового игорного фонда на индивидуальную игру.
Программные ограничения администраторов принуждают задействовать запасные пути. Копии поддерживают максимальную активность первичного ресурса, предусматривая журнал платежей и гемблинг прогресс.
Современные банковские способы обеспечивают оперативные инвестиции через электронные счета. Bitcoin, Ethereum и постоянные токены обеспечивают скрытность и символические сборы. Длительность осуществления изъятий насчитывает 10-30 периодов.
Схемы преданности подразумевают ступенчатые уровни с увеличивающимся кэшбэком. VIP-консультанты предлагают уникальные подарки, повышенные границы и приоритетную сервис.
Smart GenRx USA: Smart GenRx USA – Smart GenRx USA
Азартная область показывает быстрый развитие, завлекая легионы игроков. Опытные платформы предлагают стабильную условия для игры. Полную информацию о указанных операторах возможно обнаружить на Лаки Бир казино .
Легализация является приоритетным критерием определения ресурса. Регуляторы Мальты дают серьёзный контроль финансовых операций. Конкретная сертифицированная портал осуществляет регулярные инспекции RNG-модулей.
Компьютерные характеристики передовых игорных домов объединяют SSL-защиту банковского категории. Создатели компьютерного продукта уровня Microgaming, NetEnt, Pragmatic Play внедряют комплексные системы рандомных чисел.
Механизм верификации профиля предусматривает направления бумаг KYC-типа. ID, свидетельство о средствах, доказательство регистрации — базовый список для финального доступа.
Зеркальные адреса ликвидируют трудности с ограничениями поставщиков. Функционирующие зеркала обновляются систематически компьютерными специалистами. Портативные приложения обычно действуют лучше онлайн модификаций.
Управление банкроллом формирует долгосрочную доходность беттинговых циклов. Профессиональные участники указывают лимитировать количество ставки до 1-2% от суммарного капитала.
Гемблинговая область отображает быстрый прогресс, манящая легионы пользователей. Грамотные платформы предлагают защищённую условия для развлечений. Подробную материалы о этих провайдерах можно изучить на казино Килограмм .
Легализация выступает основным фактором отбора портала. Контролёры Гибралтара предоставляют жёсткий контроль расчётных процедур. Любая аккредитованная площадка подвергается плановые контроли RNG-генераторов.
Цифровые особенности инновационных беттинг-платформ содержат SSL-шифрование денежного категории. Поставщики виртуального материала типа Microgaming, NetEnt, Pragmatic Play интегрируют сложные алгоритмы непредсказуемых чисел.
Процесс валидации счёта включает подачи свидетельств KYC-класса. Документ, документ о прибылях, верификация проживания — базовый комплект для окончательного входа.
Резервные порталы убирают трудности с фильтрацией провайдеров. Рабочие варианты изменяются ежедневно программными специалистами. Смартфонные софт обычно оперируют качественнее сетевых модификаций.
Контроль средств определяет перспективную успешность игровых сессий. Квалифицированные игроки предлагают лимитировать размер пари до 1-2% от итогового резерва.
Best online casino PayID Australia – secure and convenient
Современные сервисы азартных продуктов предоставляют пользователям вход к элитному беттингу через защищенные Вавада зеркало ресурсы. Легальная операционная активность требует учета четких надзорных критериев.
Система регистрации пользовательского аккаунта включает верификацию конфиденциальных данных. Регуляторы используют расширенные процедуры KYC и AML для недопущения мошеннических транзакций.
Электронные решения актуальных гемблинг платформ работают на защищенных облачных системах с HTTPS сертификатами. Территориальные ограничения побуждает операторов организовывать параллельные адреса.
Зеркальные платформы представляют полные копии главного ресурса с обеспечением всех сервисов и сведений. Участники приобретают постоянный подключение к капиталу, гемблинг данным и персональным настройкам.
Денежные процедуры выполняются через синхронизированные финансовые процессоры. Лимиты на инвестиции и выводы назначаются в унисон с законодательными стандартами и собственными нормами снижения потерь.
Экспертные беттеры указывают мониторить статус разрешения через надзорные реестры развлекательных органов. Авторитетные индикаторы предусматривают места на специализированных сервисах и отзывы действительных клиентов.
Новейшие сервисы гемблинг услуг предоставляют беттерам возможность к качественному развлечениям через проверенные винити официальный сайт платформы. Официальная бизнес подразумевает следования конкретных надзорных стандартов.
Процедура регистрации клиентского кабинета задействует валидацию приватных сведений. Провайдеры эксплуатируют детализированные протоколы KYC и AML для недопущения мошеннических транзакций.
Программные инструменты актуальных беттинг площадок строятся на стабильных инфраструктурах с SSL стандартами. Геоблокировка обязывает операторов запускать резервные ссылки.
Альтернативные сайты формируют идентичные копии первичного сайта с поддержанием всех функций и данных. Пользователи приобретают непрерывный подключение к капиталу, азартной записям и личным параметрам.
Банковские действия осуществляются через синхронизированные платежные системы. Лимиты на пополнения и выводы фиксируются в гармонии с лицензионными требованиями и собственными политиками управления рисками.
Экспертные пользователи рекомендуют мониторить положение лицензии через контролирующие каталоги беттинг комиссий. Престижные индикаторы охватывают ранги на отраслевых платформах и отзывы действительных клиентов.
https://neuroreliefusa.com/# neurontin generic south africa
Подбор надежного гемблинг площадки в текущих границах предполагает детального анализа к лицензионному состоянию. Квалифицированные участники знают, что Меллстрой регистрация демонстрирует свежую информацию о действующих провайдерах.
Процесс оформления профиля в лицензированных платформах содержит необходимую проверку документов. KYC-стандарты оберегают как сервис, так и клиента от махинаций. Промежуточные пределы на снятие средств до окончания проверки – обычная практика.
Цифровые препятствия на вход к гемблинг сайтам преодолеваются через дублирующие адреса. Доступные дубликаты предоставляют тотальную производительность центрального сайта. Финансовые переводы, азартный статистика и привилегированные программы функционируют устойчивыми.
Денежная безопасность оценивается качеством внедренных финансовых систем. SSL-безопасность, PCI DSS лицензирование и многоуровневая верификация создают защищенный периметр охраны.
Развлекательная библиотека лицензированных заведений предоставляет слоты от топовых провайдеров. RTP-индексы, изменчивость и статистические системы испытывают нейтральную контроль в утвержденных учреждениях.
Планы вознаграждения в серьезных заведениях базируются на ясных параметрах проигрыша. Отыгрыш x35-40 оценивается разумным для слот-льгот, в то время как стандартные игры идут в подсчет с минимальным фактором.
Поиск проверенного гемблинг ресурса в текущих рамках предполагает особого изучения к юридическому состоянию. Квалифицированные участники понимают, что казино Lucky Bear демонстрирует свежую сведения о функционирующих площадках.
Процедура оформления профиля в сертифицированных площадках охватывает принудительную подтверждение персональных данных. KYC-процедуры обеспечивают как сервис, так и участника от махинаций. Переходные ограничения на перечисление капитала до закрытия проверки – типичная методика.
Электронные препятствия на доступ к азартным ресурсам нейтрализуются через резервные URL. Функционирующие дубликаты поддерживают всестороннюю функциональность центрального сайта. Расчетные транзакции, геймплейный прогресс и наградные схемы продолжают константными.
Денежная гарантированность характеризуется критерием используемых финансовых механизмов. SSL-безопасность, PCI DSS аттестация и многоуровневая аутентификация обеспечивают безопасный заслон обороны.
Азартная каталог легальных сервисов охватывает машины от ведущих студий. RTP-индексы, колебания и расчетные схемы получают нейтральную контроль в признанных организациях.
Механизмы стимулирования в серьезных казино формируются на прозрачных параметрах активности. Отыгрыш x35-40 считается адекватным для автомат-бонусов, в то время как карточные развлечения учитываются в счет с уменьшенным процентом.
Australian online casino real money viva96.com – bonus details
Актуальные участники сталкиваются с множеством системных деталей при функционировании с лицензированными платформами. Специализированные источники типа ретро сайт обеспечивают современную материалы о деятельности игорных провайдеров.
Процесс верификации учетной записи включает набор неотъемлемых стадий. Стартовая валидация требует размещения документов валидирующих индивидуальность. Привычный пакет включает ID, автоудостоверение или международный паспорт.
Программная составляющая оформления предполагает задействование зашифрованного канала и двухуровневой проверки. Опытные клиенты предлагают включать максимум доступных возможностей обеспечения.
Запасные домены представляют абсолютные отражения основного платформы с хранением полного функционала. Центральное выгода состоит в идентичности платежных ограничений и параметров вейджера.
Процедура поиска рабочих альтернативных адресов основывается на мониторинге специализированных новостных лент и партнерских площадок. Профессиональные игроки задействуют VPN-сервисы для обеспечения надежного подключения независимо от локальных блокировок.
Актуальные геймеры встречаются с множеством системных деталей при операциях с лицензированными платформами. Специализированные порталы типа тип топ казино обеспечивают современную информацию о процессах игорных брендов.
Процедура проверки кабинета охватывает несколько необходимых фаз. Исходная проверка включает загрузки удостоверений доказывающих субъект. Классический комплект охватывает паспорт, автоудостоверение или внешний паспорт.
Программная составляющая открытия счета включает задействование защищенного протокола и двойной авторизации. Профессиональные пользователи подсказывают инициировать все имеющихся опций безопасности.
Резервные ссылки представляют точные копии первичного домена с сохранением тотального инструментария. Важнейшее бонус выражается в подобии банковских лимитов и норм вейджера.
Алгоритм нахождения рабочих альтернативных адресов базируется на контроле тематических информационных каналов и партнерских ресурсов. Экспертные участники используют анонимайзеры для обеспечения устойчивого связи вне зависимости от локальных блокировок.
海外华人必备的iyifan官方认证平台,24小时不间断提供最新高清电影、电视剧,无广告观看体验。
Функционирующие зеркала лицензированных gaming-операторов на Lucky Bear гарантируют непрерывный подключение к гемблинг сервисам. Технология клонирования образует аналогичные реплики центрального ресурса с удержанием всех опций.
Схема оформления профиля через зеркало в точности повторяет базовую анкету. Новые геймеры регистрируют действующий email, генерируют надежный секретную комбинацию и определяют основную денежную единицу.
Валидация аккаунта предполагает отправки удостоверений согласно KYC-требованиям. Скан водительских прав, свидетельство адреса и финансовые данные проходят алгоритмическую анализ в течение 24-72 часа.
Подключение активных геймеров осуществляется через стандартную панель с многоступенчатой идентификацией. Одноразовые шифры поступают на мобильный гаджет или e-mail адрес.
Инструменты входящего компонента через альтернативные домены поддерживает востребованные денежные сервисы. Visa, Mastercard, цифровые хранилища Skrill, Neteller, crypto Bitcoin, Ethereum процессируются с уменьшенными сборами 0-3%.
Гемблинг база воспроизводится на сто процентов включая слоты, карточные развлечения, live-хостов и накопительные призы. RTP-коэффициенты, волатильность и вейджер остаются точными.
Подарочная система функционирует схоже центральному веб-площадке. Welcome-предложения, даровые прокруты, компенсация и VIP-системы инициируются автоматически при соблюдении определенных стандартов.
Выбор проверенного азартного площадки в сегодняшних границах требует особого подхода к юридическому статусу. Знающие геймеры учитывают, что Лаки Бир официальный сайт включает новую данные о функционирующих провайдерах.
Процедура записи в лицензированных операторах включает требуемую валидацию удостоверения. KYC-требования обеспечивают как заведение, так и клиента от афер. Краткосрочные границы на снятие финансов до финализации проверки – типичная система.
Программные блокировки на связь к betting площадкам обходятся через дублирующие адреса. Активные отражения предоставляют тотальную производительность главного ресурса. Денежные транзакции, игровой статистика и привилегированные схемы поддерживаются стабильными.
Экономическая безопасность определяется уровнем эксплуатируемых банковских методов. SSL-безопасность, PCI DSS лицензирование и усиленная проверка устанавливают безопасный барьер обороны.
Игровая коллекция проверенных заведений объединяет барабаны от лидирующих провайдеров. RTP-значения, изменчивость и алгоритмические принципы получают нейтральную аудит в аккредитованных учреждениях.
Механизмы лояльности в достойных сервисах опираются на четких требованиях активности. Вейджер x35-40 считается справедливым для слот-бонусов, в то время как традиционные игры включаются в зачет с минимальным показателем.
捕风捉影在线免费在线观看,海外华人专属平台运用AI智能推荐算法,高清无广告体验。
Новейшие сервисы игорных игр предоставляют клиентам подключение к элитному беттингу через сертифицированные Вавада РІС…РѕРґ сайты. Авторизованная операционная активность нуждается соблюдения конкретных законодательных норм.
Алгоритм активации игрового учетной записи содержит валидацию приватных сведений. Управляющие внедряют детализированные системы KYC и AML для предотвращения мошеннических операций.
Цифровые инструменты новейших казино базируются на надежных облачных системах с шифровальными алгоритмами. Территориальные ограничения принуждает операторов организовывать параллельные URL.
Дублирующие порталы образуют эквивалентные версии главного сайта с сохранением всех функций и данных. Пользователи приобретают устойчивый соединение к балансу, беттинг данным и пользовательским конфигурациям.
Финансовые транзакции производятся через встроенные расчетные агрегаторы. Лимиты на взносы и изъятия регулируются в унисон с нормативными критериями и собственными нормами снижения потерь.
Профессиональные клиенты предлагают мониторить положение лицензии через государственные реестры гемблинг ведомств. Престижные показатели задействуют места на специализированных сайтах и feedback настоящих игроков.
Подбор безопасного игорного оператора предполагает глубокого рассмотрения лицензионных сертификатов. Актуальные сайты Вавада официальный сайт предоставляют игрокам стопроцентную информацию о действующих санкциях.
Система открытия аккаунта охватывает ряд обязательных фаз верификации. Представители требуют свидетельства, устанавливающие индивидуальность и дееспособность. Обычный KYC-регламент составляет от 24 до 72 часов.
Управление банком начинается с фиксации границ на вклады. Профессиональные игроки предлагают применять правило 5% от суммарного игорного резерва на отдельную игру.
Программные препятствия администраторов принуждают использовать вспомогательные адреса. Дубликаты поддерживают максимальную функциональность центрального площадки, содержа летопись платежей и азартный результаты.
Актуальные банковские системы поддерживают оперативные пополнения через криптовалютные счета. Bitcoin, Ethereum и постоянные токены обеспечивают тайность и символические отчисления. Длительность обработки изъятий доходит 10-30 периодов.
Программы верности предусматривают иерархические уровни с прогрессивным кэшбэком. VIP-консультанты предлагают индивидуальные награды, увеличенные пределы и опережающую помощь.
Официальные операторы гэмблинг сервисов обеспечивают геймерам возможность к премиальному игровому процессу через специализированные сайты, включая казино Голд , которые специально соблюдают мировые регламенты security.
Алгоритм регистрации necessita предоставления валидационных данных через криптографические SSL-connection. Провайдеры запрашивают письменное доказательство возраста и локации нахождения для соблюдения legal правил.
Двухфакторная аутентификация представляет required составляющей новейших архитектур security. Пользователи получают SMS-токены, push-уведомления или внедряют специальные tools типа Google Authenticator.
Резервные адреса преодолевают трудности локальных блокировок и DDoS-воздействий. Фактически копии формируют тождественные dublicates базового портала с поддержанием features и пользовательских параметров.
Профессиональные игроки призывают keeping актуальные списки активных mirrors в закладках браузера. Management доставляют updates о новых ссылках через email, Telegram-сообщества и смартфонные софт.
Банковские операции через официальные порталы secured защитными системами level банковского направления. Изъятие финансов реализуется единственно на validated wallets собственника профиля.
Зацепил материал про связь современного кино и актуальных общественных трендов 2026 года.
Вот, можете почитать:
https://terehov-event.ru/news/kripta-i-kino-kak-trendy-fevralya-2026-goda-pomogayut-trejderam-chitat-nastroenie-rynka/
Отбор безопасного развлекательного оператора подразумевает серьезного рассмотрения юридических разрешений. Передовые сайты Голд казино гарантируют участникам полную факты о текущих аккредитациях.
Механизм открытия аккаунта содержит различные требуемых фаз подтверждения. Провайдеры запрашивают свидетельства, удостоверяющие персону и правоспособность. Классический KYC-процесс длится от 24 до 72 интервалов.
Банкролл-менеджмент начинается с установления ограничений на вклады. Искусные клиенты советуют задействовать норму 5% от совокупного азартного резерва на отдельную игру.
Цифровые барьеры администраторов заставляют задействовать альтернативные пути. Дубликаты удерживают полную эффективность основного платформы, включая архив транзакций и развлекательный результаты.
Инновационные платежные методы дают оперативные взносы через электронные хранилища. Bitcoin, Ethereum и стейблкоины гарантируют конфиденциальность и наименьшие сборы. Продолжительность выполнения выводов достигает 10-30 интервалов.
Программы приверженности включают ступенчатые уровни с возрастающим компенсацией. VIP-координаторы гарантируют личные бонусы, улучшенные пределы и приоритетную сервис.
Выбор легального игорного площадки заставляет серьезного анализа официальных разрешений. Новые платформы Лаки Бир гарантируют геймерам безусловную информацию о текущих санкциях.
Система оформления счета включает определенное количество требуемых стадий валидации. Администраторы требуют справки, доказывающие личность и правоспособность. Типовой KYC-процесс требует от 24 до 72 часов.
Распоряжение капиталом запускается с задания ограничений на инвестиции. Компетентные игроки советуют задействовать установку 5% от полного азартного резерва на единичную сессию.
Технические барьеры владельцев принуждают внедрять вспомогательные ссылки. Клоны удерживают максимальную функциональность основного ресурса, включая хронологию транзакций и казино успех.
Новые расчетные инструменты предоставляют моментальные депозиты через цифровые счета. Bitcoin, Ethereum и постоянные токены обеспечивают анонимность и наименьшие сборы. Время выполнения снятий насчитывает 10-30 минут.
Программы приверженности включают каскадные категории с накапливающимся бонусом. VIP-кураторы предоставляют личные награды, улучшенные лимиты и первоочередную помощь.
Рабочие альтернативные домены официальных gaming-операторов на казино Лаки Бир предоставляют стабильный соединение к игровым сервисам. Методика реплицирования генерирует эквивалентные версии базового портала с фиксацией всех функций.
Механизм регистрации через зеркало на сто процентов копирует оригинальную анкету. Свежие участники вводят активный email, генерируют защищенный код доступа и фиксируют основную денежную единицу.
Верификация учетной записи предполагает загрузки справок опираясь на KYC-политике. Изображение ID-карты, верификация проживания и банковские сведения проходят программную контроль в течение 24-72 ч.
Подключение зарегистрированных клиентов выполняется через типовую модуль с многоступенчатой валидацией. Сессионные шифры приходят на мобильный девайс или email.
Механизмы депозитного раздела через дублирующие порталы обеспечивает топовые денежные механизмы. Visa, Mastercard, веб кошельки Skrill, Neteller, crypto Bitcoin, Ethereum обрабатываются с сокращенными платежами 0-3%.
Gaming коллекция копируется полностью включая spinning games, настольные геймплей, live-ведущих и джекпоты. RTP-значения, волатильность и проигрыш поддерживаются неизменными.
Бонусная схема выполняется идентично базовому сайту. Welcome-наборы, фриспины, кешбэк и VIP-программы инициируются системно при достижении установленных условий.
Действующие дублирующие порталы легальных азартных клубов на казино СЌРЅРѕРјРѕ создают беспрерывный вход к азартным ресурсам. Методика зеркалирования строит точные копии корневого домена с удержанием всех опций.
Схема создания аккаунта через mirror-сайт в точности копирует базовую бланк. Дебютные игроки заполняют рабочий email, формируют безопасный код доступа и определяют игровую платежное средство.
Подтверждение аккаунта требует отправки документов следуя KYC-политике. Фото ID-карты, подтверждение регистрации и финансовые данные подвергаются алгоритмическую контроль в течение 24-72 часов.
Подключение действующих геймеров производится через стандартную форму с двухфакторной идентификацией. Разовые пароли приходят на телефонный номер или почтовый ящик.
Опции денежного сектора через mirror-сайты обеспечивает распространенные платежные инструменты. Visa, Mastercard, онлайн хранилища Skrill, Neteller, crypto Bitcoin, Ethereum осуществляются с сокращенными комиссиями 0-3%.
Гемблинг коллекция дублируется абсолютно включая автоматы, столовые активности, live-дилеров и джекпоты. RTP-параметры, колебания и проигрыш удерживаются такими же.
Бонусная механизм оперирует схоже основному домену. Welcome-наборы, даровые прокруты, кешбэк и VIP-курсы запускаются машинально при выполнении прописанных параметров.
Гемблинговая отрасль представляет активный расширение, притягивая тысячи участников. Профессиональные ресурсы гарантируют надёжную обстановку для беттинга. Развёрнутую сведения о таких брендах допустимо отыскать на Mellstroy Game .
Аккредитация составляет основным показателем выбора платформы. Контролёры Олдерни гарантируют серьёзный аудит денежных действий. Отдельная легальная портал осуществляет регулярные инспекции RNG-алгоритмов.
IT аспекты инновационных игорных домов содержат SSL-шифрование экономического стандарта. Поставщики компьютерного материала уровня Microgaming, NetEnt, Pragmatic Play подключают многоуровневые алгоритмы хаотичных значений.
Механизм проверки аккаунта предполагает направления документов KYC-уровня. Паспорт, выписка о доходах, валидация регистрации — классический пакет для финального входа.
Параллельные домены ликвидируют проблемы с цензурой провайдеров. Действующие альтернативы адаптируются каждый день техническими службами. Смартфонные приложения регулярно функционируют качественнее онлайн версий.
Управление банкроллом определяет долгосрочную прибыльность гемблинговых циклов. Экспертные геймеры советуют контролировать размер ставки до 1-2% от общего фонда.
Hi, the whole thing is going sound here and ofcourse every one is sharing
information, that’s actually fine, keep up writing.
https://789beta2.com/
Отбор легального казино оператора заставляет глубокого анализа правовых документов. Современные сайты Лаки Бир РІС…РѕРґ предлагают пользователям стопроцентную информацию о собственных разрешениях.
Процесс оформления счета подразумевает несколько необходимых этапов валидации. Представители просят бумаги, доказывающие личность и совершеннолетие. Традиционный KYC-алгоритм занимает от 24 до 72 периодов.
Управление банком начинается с назначения пределов на взносы. Профессиональные пользователи предлагают задействовать закон 5% от полного азартного средств на конкретную игру.
Технические барьеры поставщиков заставляют применять дополнительные пути. Зеркала поддерживают максимальную производительность базового платформы, включая летопись операций и азартный результаты.
Современные финансовые инструменты поддерживают оперативные вклады через цифровые счета. Bitcoin, Ethereum и устойчивые монеты обеспечивают конфиденциальность и крошечные комиссии. Период проведения выводов достигает 10-30 интервалов.
Программы постоянства содержат многоуровневые ранги с увеличивающимся возвратом. VIP-представители предоставляют индивидуальные награды, увеличенные ограничения и первоочередную обслуживание.
Выбор честного гемблинг портала заставляет глубокого изучения официальных разрешений. Актуальные платформы СЌРЅРѕРјРѕ казино дают игрокам полную факты о собственных разрешениях.
Система создания профиля содержит различные принудительных стадий аутентификации. Представители настаивают удостоверения, подтверждающие самобытность и зрелость. Традиционный KYC-механизм продолжается от 24 до 72 периодов.
Распоряжение капиталом открывается с задания рамок на депозиты. Компетентные игроки настаивают эксплуатировать установку 5% от полного развлекательного бюджета на индивидуальную раунд.
Цифровые препятствия операторов принуждают внедрять дополнительные маршруты. Зеркала удерживают полную работоспособность центрального площадки, подразумевая историю операций и казино достижения.
Инновационные платежные системы поддерживают мгновенные депозиты через криптовалютные хранилища. Bitcoin, Ethereum и постоянные токены поддерживают конфиденциальность и наименьшие платежи. Время проведения получений равно 10-30 интервалов.
Программы приверженности включают ступенчатые категории с нарастающим возвратом. VIP-менеджеры предоставляют личные поощрения, усиленные пределы и ускоренную помощь.
Актуальные геймеры сталкиваются с проблемой входа к сертифицированным сайтам. Поставщики фильтруют базовые URL, но опытные п»ї1xBet казино игроки понимают о доступности альтернативных сайтов.
Альтернативный адрес представляет абсолютную копию первичного портала. Криптографические алгоритмы поддерживаются аналогичными. Расчётные процедуры выполняются через аналогичные сервисы.
Процедура регистрации через параллельный домен требует типовой проверки. Менеджеры требуют удостоверения для выполнения KYC-норм. Личные характеристики реализуют многоуровневую верификацию.
Депозитные ограничения на зеркальных площадках аналогичны базовым характеристикам. Минимальные вклады продолжают постоянными. Накопительные призовые фонды объединяются между множественными ссылками.
Льготные механизмы выполняются комплексно на параллельных площадках. Коэффициент оборота обеспечивает оригинальные значения. Длительность использования сохраняется.
Департамент помощи решает вопросы с дополнительных доменов идентично. Живой разговор предоставляет круглосуточный порядок обслуживания.
Подбор достойного гемблинг площадки в текущих условиях подразумевает тщательного изучения к юридическому режиму. Квалифицированные участники учитывают, что Lucky Bear содержит свежую сведения о работающих провайдерах.
Схема создания аккаунта в лицензированных операторах объединяет требуемую валидацию документов. KYC-стандарты охраняют как сервис, так и участника от обмана. Краткосрочные ограничения на снятие средств до окончания валидации – нормальная подход.
Технические запреты на соединение к азартным сайтам преодолеваются через зеркальные адреса. Рабочие копии сохраняют полную производительность центрального платформы. Платежные движения, интерактивный продвижение и наградные схемы остаются неизменными.
Материальная безопасность измеряется уровнем внедренных финансовых методов. SSL-безопасность, PCI DSS лицензирование и расширенная подтверждение обеспечивают стабильный щит охраны.
Игровая каталог легальных сервисов объединяет слоты от ведущих разработчиков. RTP-индексы, волатильность и расчетные схемы испытывают независимую контроль в аккредитованных учреждениях.
Механизмы вознаграждения в надежных заведениях базируются на понятных критериях вейджера. Проигрыш x35-40 признается нормальным для барабан-привилегий, в то время как классические развлечения учитываются в калькуляцию с уменьшенным процентом.
Надёжные платформы развлекательных возможностей гарантируют геймерам доступ к качественному развлечениям через специализированные платформы, включая Клубника казино , которые специально выполняют transnational критерии защиты.
Схема регистрации включает предоставления проверочных данных через безопасные SSL-connection. Провайдеры просят предоставить официальное свидетельство дееспособности и адреса проживания для поддержания legal норм.
Двухфакторная authentication является принудительным составляющей передовых платформ надёжности. Пользователи обретают SMS-пароли, push-оповещения или задействуют dedicated софт по типу Google Authenticator.
Альтернативные адреса ликвидируют проблемы geographic санкций и DDoS-assault. По сути mirrors составляют аналогичные dublicates базового портала с maintaining features и клиентских деталей.
Компетентные клиенты предлагают удерживать актуальные перечни функционирующих зеркал в сохранённых ссылках browser. Management направляют обновления о актуальных адресах через почтовые сервисы, Telegram-communities и портативные утилиты.
Банковские процедуры через официальные платформы secured шифровальными системами level банковского сектора. Изъятие капитала осуществляется исключительно на validated карты собственника профиля.
Определение безопасного развлекательного площадки в актуальных границах подразумевает детального изучения к юридическому состоянию. Знающие игроки осознают, что казино Килограмм предоставляет современную данные о функционирующих ресурсах.
Механизм создания аккаунта в официальных заведениях охватывает необходимую аутентификацию удостоверения. KYC-правила охраняют как сервис, так и клиента от фрода. Промежуточные рамки на изъятие средств до выполнения подтверждения – обычная система.
Виртуальные ограничения на подключение к игровым порталам нейтрализуются через дублирующие ссылки. Действующие отражения поддерживают стопроцентную эффективность первичного сервиса. Банковские процедуры, игровой прогресс и поощрительные системы поддерживаются константными.
Материальная защищенность определяется степенью задействованных финансовых механизмов. SSL-шифрование, PCI DSS сертификация и усиленная аутентификация создают безопасный щит ограждения.
Азартная каталог легальных площадок включает спины от ведущих производителей. RTP-значения, вариативность и математические принципы получают нейтральную сертификацию в одобренных лабораториях.
Программы стимулирования в надежных сервисах базируются на понятных параметрах отыгрыша. Вейджер x35-40 расценивается нормальным для спин-поощрений, в то время как настольные игры включаются в зачет с пониженным коэффициентом.
zoloft medication generic for zoloft zoloft tablet
爱一帆会员多少钱海外版,专为华人打造的高清视频平台采用机器学习个性化推荐,支持全球加速观看。
Навигация в пространстве проверенных площадок предполагает осознания новых инструментов соединения. Умелые клиенты применяют Vavada зеркало для добывания современной фактов о действующих адресах.
Алгоритм открытия личного кабинета в официальных операторах предполагает многоуровневую подтверждение. Новейшие операторы используют KYC-системы и AML-требования. Бумажная работа потребляет от 24 до 72 интервалов.
Программные методы для преодоления барьеров улучшаются сообща с ужесточением законодательных решений. VPN-службы категории premium обеспечивают защиту AES-256 и стандарты OpenVPN. Постоянство канала жизненно существенна для привилегированных сессий.
Резервные домены действуют через территориально расположенные компьютерные инфраструктуры. CDN-сети обеспечивают сокращенную время ответа для глобальных участников. Цифровое роутинг инициируется при распознавании ограничения базового домена.
Платежные транзакции в проверенных регионах отвечают строгим требованиям PCI DSS. Крипто переводы набирают актуальность по причине скрытности и скорости выполнения.
Смартфонные клиенты ведущих операторов совмещают биометрическую идентификацию и push-уведомления для важных событий. Модифицируемый оформление программно адаптируется под особенности матрицы.
коврики для ванной оптом в москве
Новейшие участники оказываются с проблемой доступа к легальным сайтам. Организации закрывают стандартные ссылки, но знающие казино Vavada пользователи осознают о доступности резервных порталов.
Дополнительный домен формирует стопроцентную дубликат первичного портала. SSL-сертификаты функционируют идентичными. Банковские транзакции выполняются через аналогичные сервисы.
Схема оформления профиля через альтернативный портал предполагает стандартной проверки. Администраторы просят документы для соблюдения KYC-норм. Личные параметры подвергаются двухфакторную аутентификацию.
Финансовые лимиты на зеркальных ресурсах идентичны главным спецификациям. Начальные беты функционируют стабильными. Накопительные джекпоты координируются между многочисленными адресами.
Льготные механизмы действуют целостно на резервных порталах. Отыгрышный коэффициент гарантирует базовые величины. Временные рамки реализации не изменяется.
Сервис обслуживания анализирует обращения с резервных порталов аналогично. Прямой общение осуществляет постоянный порядок деятельности.
buy online prednisone
Игровая индустрия являет стремительный рост, притягивая миллионы геймеров. Экспертные ресурсы обеспечивают безопасную среду для игры. Исчерпывающую сведения о данных операторах реально получить на Вавада казино .
Лицензирование остаётся центральным показателем селекции площадки. Регуляторы Мальты дают серьёзный надзор экономических действий. Конкретная легальная площадка реализует регулярные ревизии RNG-систем.
Цифровые свойства современных гемблинг-сайтов содержат SSL-безопасность экономического стандарта. Производители программного софта уровня Microgaming, NetEnt, Pragmatic Play добавляют усовершенствованные схемы хаотичных параметров.
Процедура подтверждения счёта включает предоставления свидетельств KYC-стандарта. Документ, документ о доходах, валидация проживания — обычный набор для полноценного доступа.
Резервные URL ликвидируют проблемы с запретами организаций. Свежие копии модифицируются каждый день программными группами. Портативные программы регулярно функционируют лучше онлайн версий.
Банкролл-менеджмент формирует длительную доходность игровых сессий. Квалифицированные участники указывают урезать сумму пари до 1-2% от суммарного капитала.
Нынешние участники встречаются с проблемой входа к сертифицированным сайтам. Организации ограничивают стандартные адреса, но знающие Вавада РІС…РѕРґ участники учитывают о присутствии дублирующих ресурсов.
Параллельный портал является стопроцентную отображение главного портала. Протоколы шифрования поддерживаются такими же. Финансовые переводы реализуются через аналогичные шлюзы.
Схема оформления профиля через резервный ссылку требует обычной верификации. Администраторы выясняют свидетельства для реализации KYC-требований. Персональные параметры выполняют комплексную верификацию.
Финансовые границы на дополнительных ресурсах аналогичны стандартным требованиям. Минимальные суммы остаются постоянными. Возрастающие банки объединяются между многочисленными ссылками.
Премиальные программы выполняются полноценно на резервных площадках. Отыгрышный коэффициент поддерживает первоначальные значения. Срок активности использования остаётся прежним.
Департамент обслуживания анализирует обращения с альтернативных доменов идентично. Мгновенный общение осуществляет непрерывный порядок деятельности.
Новейшие игроки встречаются с проблемой входа к легальным платформам. Операторы закрывают первичные домены, но искушённые Рльдорадо казино клиенты помнят о функционировании резервных порталов.
Зеркало представляет стопроцентную отображение первичного ресурса. Криптографические алгоритмы поддерживаются такими же. Банковские процедуры производятся через равнозначные сервисы.
Методика создания аккаунта через альтернативный ссылку предполагает типовой валидации. Менеджеры выясняют свидетельства для осуществления KYC-правил. Идентификационные параметры осуществляют комплексную верификацию.
Пополнительные ограничения на дополнительных сайтах равняются основным условиям. Наименьшие суммы продолжают стабильными. Увеличивающиеся банки согласовываются между различными порталами.
Льготные схемы функционируют целостно на дополнительных порталах. Вейджер гарантирует первоначальные параметры. Длительность отыгрыша поддерживается.
Сервис ассистирования решает обращения с дополнительных ссылок равнозначно. Мгновенный переписка обеспечивает беспрерывный формат обслуживания.
Официальные площадки игровых услуг предоставляют игрокам возможность к высококлассному игровому процессу через dedicated порталы, включая тип топ казино , которые выполняют общепринятые регламенты безопасности.
Последовательность регистрации подразумевает предоставления верификационных параметров через безопасные SSL-линии. Провайдеры просят предоставить official свидетельство возраста и адреса нахождения для compliance правовых норм.
Многоуровневая идентификация выступает required aspect передовых solutions security. Клиенты имеют SMS-ключи, push-сообщения или эксплуатируют dedicated tools наподобие Google Authenticator.
Зеркальные домены преодолевают трудности territorial запретов и DDoS-нападений. Технически копии являют копийные клоны центрального платформы с сохранением функциональности и личных сведений.
Компетентные участники призывают хранить новейшие перечни действующих дублей в избранном browser. Букмекеры отправляют сведения о свежих URL через почтовые сервисы, Telegram-сообщества и mobile программы.
Payment переводы через лицензионные ресурсы покрыты encryption протоколами класса банковского направления. Получение средств производится solely на подтверждённые данные держателя личного кабинета.
мебель в детскую алчевск
generic for zoloft: zoloft cheap – generic zoloft
I am truly grateful to the owner of this web page who has shared this enormous paragraph at here.
Активные альтернативные домены надежных игорных заведений на Меллстрой казино предоставляют беспрерывный вход к геймерским платформам. Методика клонирования формирует полноценные клоны основного ресурса с сохранением всех функций.
Механизм оформления профиля через mirror-сайт абсолютно дублирует базовую заявку. Новые игроки вводят валидный email, создают сложный секретную комбинацию и определяют игровую курренси.
Валидация личного кабинета требует передачи справок опираясь на KYC-требованиям. Скан ID-карты, доказательство места жительства и банковские реквизиты подвергаются цифровую валидацию в течение 24-72 часов.
Авторизация активных геймеров осуществляется через классическую модуль с 2FA верификацией. Сессионные шифры доставляются на сотовый номер или почтовый ящик.
Опции входящего компонента через дублирующие порталы предлагает актуальные финансовые механизмы. Visa, Mastercard, веб балансы Skrill, Neteller, виртуальные монеты Bitcoin, Ethereum осуществляются с минимальными сборами 0-3%.
Игровая библиотека повторяется абсолютно включая автоматы, столовые развлечения, live-хостов и прогрессивы. RTP-коэффициенты, волатильность и отыгрыш фиксируются аналогичными.
Бонусная система работает подобно корневому домену. Welcome-комплекты, фриспины, refund и VIP-схемы запускаются системно при реализации прописанных критериев.
Действующие зеркала лицензированных игорных заведений на казино Lucky Bear предоставляют стабильный подключение к азартным платформам. Методика клонирования создает аналогичные клоны основного сайта с удержанием всех опций.
Механизм оформления профиля через mirror-сайт абсолютно дублирует основную анкету. Свежие участники указывают валидный email, создают стойкий шифр и устанавливают рабочую финансовый инструмент.
Аутентификация учетной записи включает представления документов в соответствии с KYC-политике. Изображение удостоверения личности, подтверждение места жительства и карточные координаты проверяются через алгоритмическую верификацию в течение 24-72 временных единиц.
Аутентификация зарегистрированных пользователей происходит через базовую панель с двухфакторной проверкой. Сессионные ключи отправляются на мобильный гаджет или e-mail адрес.
Механизмы входящего компонента через альтернативные домены обеспечивает распространенные финансовые инструменты. Visa, Mastercard, цифровые балансы Skrill, Neteller, цифровые активы Bitcoin, Ethereum обрабатываются с оптимизированными взносами 0-3%.
Развлекательная база повторяется абсолютно включая машины, классические развлечения, live-хостов и максимальные награды. RTP-показатели, изменчивость и ставочные требования фиксируются такими же.
Подарочная политика функционирует схоже главному домену. Welcome-предложения, безвозмездные спины, кешбэк и VIP-схемы включаются системно при выполнении определенных параметров.
пляжи ко ланты
The riders are the shield of the realm. The Onyx Storm epub is the shield. This book protects the legacy. E-readers are the armor. You can carry the protection. The story is safe with you.
Действующие альтернативные домены лицензированных азартных клубов на Tip top зеркало обеспечивают устойчивый доступ к развлекательным системам. Принцип клонирования образует идентичные версии главного портала с поддержанием всех механизмов.
Механизм открытия счета через альтернативный домен на сто процентов воспроизводит оригинальную анкету. Новые геймеры прописывают функционирующий email, придумывают защищенный ключ и определяют операционную курренси.
Валидация аккаунта требует загрузки бумаг опираясь на KYC-требованиям. Снимок ID-карты, свидетельство регистрации и карточные реквизиты проходят программную проверку в течение 24-72 ч.
Авторизация существующих игроков производится через обычную окно с 2FA верификацией. Одноразовые шифры передаются на смс номер или почтовый ящик.
Функционал входящего компонента через зеркала включает популярные финансовые системы. Visa, Mastercard, электронные счета Skrill, Neteller, криптовалюты Bitcoin, Ethereum выполняются с минимальными сборами 0-3%.
Гемблинг каталог дублируется полностью включая машины, настольные игры, live-хостов и джекпоты. RTP-коэффициенты, дисперсия и условия отыгрыша фиксируются точными.
Подарочная программа выполняется идентично центральному ресурсу. Welcome-пакеты, free spins, кешбэк и VIP-схемы запускаются программно при выполнении определенных критериев.
Выбор достойного гемблинг площадки в текущих границах заставляет повышенного подхода к юридическому положению. Компетентные геймеры осознают, что лаки Р±РёСЂ казино содержит современную факты о доступных сервисах.
Процесс записи в проверенных заведениях содержит требуемую аутентификацию идентичности. KYC-требования охраняют как сервис, так и клиента от махинаций. Кратковременные пределы на снятие средств до выполнения контроля – стандартная подход.
Виртуальные барьеры на соединение к игровым ресурсам решаются через резервные порталы. Рабочие дубликаты предоставляют всестороннюю функциональность центрального сайта. Финансовые переводы, геймплейный достижения и бонусные схемы поддерживаются константными.
Финансовая гарантированность оценивается качеством применяемых банковских инструментов. SSL-защита, PCI DSS аттестация и расширенная верификация создают безопасный контур безопасности.
Игровая набор сертифицированных операторов объединяет слоты от лидирующих разработчиков. RTP-индексы, волатильность и математические формулы претерпевают нейтральную контроль в утвержденных институтах.
Механизмы мотивации в достойных заведениях основываются на четких правилах активности. Проигрыш x35-40 признается приемлемым для машина-бонусов, в то время как традиционные игры засчитываются в расчет с редуцированным показателем.
Отбор достойного азартного площадки в нынешних обстоятельствах требует повышенного изучения к законному статусу. Знающие участники понимают, что Lucky Bear казино демонстрирует актуальную материалы о функционирующих ресурсах.
Механизм открытия счета в легальных площадках включает неизбежную верификацию идентичности. KYC-правила обеспечивают как казино, так и геймера от мошенничества. Промежуточные лимиты на вывод капитала до завершения валидации – типичная практика.
Программные запреты на соединение к игровым площадкам решаются через альтернативные порталы. Функционирующие отражения сохраняют тотальную возможности первичного сайта. Банковские процедуры, интерактивный статистика и бонусные предложения остаются неизменными.
Капитальная безопасность характеризуется критерием применяемых финансовых систем. SSL-кодирование, PCI DSS лицензирование и дополнительная аутентификация создают защищенный щит ограждения.
Геймплейная каталог проверенных сервисов охватывает слоты от известных создателей. RTP-параметры, колебания и математические формулы получают объективную валидацию в утвержденных центрах.
Механизмы вознаграждения в достойных заведениях опираются на четких параметрах проигрыша. Отыгрыш x35-40 признается приемлемым для спин-поощрений, в то время как классические забавы учитываются в подсчет с минимальным показателем.
Подбор достойного азартного ресурса в нынешних рамках нуждается особого внимания к законному состоянию. Компетентные геймеры представляют, что Меллстрой официальный сайт предоставляет современную факты о активных сервисах.
Процедура записи в проверенных заведениях объединяет принудительную валидацию идентичности. KYC-требования обеспечивают как заведение, так и пользователя от фрода. Временные лимиты на вывод средств до финализации проверки – типичная подход.
Технические барьеры на вход к betting сервисам решаются через альтернативные URL. Рабочие дубликаты сохраняют тотальную возможности центрального сайта. Финансовые движения, азартный достижения и льготные предложения сохраняются устойчивыми.
Финансовая безопасность определяется качеством эксплуатируемых финансовых методов. SSL-защита, PCI DSS лицензирование и двухфакторная проверка создают стабильный контур безопасности.
Интерактивная каталог официальных заведений включает слоты от известных разработчиков. RTP-значения, изменчивость и вероятностные формулы испытывают объективную валидацию в авторизованных организациях.
Программы лояльности в надежных сервисах формируются на четких требованиях отыгрыша. Проигрыш x35-40 признается приемлемым для спин-поощрений, в то время как классические забавы засчитываются в расчет с пониженным коэффициентом.
https://ivertherapeutics.shop/# stromectol 15 mg
Rutor — ключевая площадка русского даркнета в Tor, предоставляющая доступ к материалам, товарам, контенту и нормам анонимности для пользователей черного рынка и onion площадок
Rutor заработал статус важного игрока на darknet-рынке благодаря длительной работе, инструментам для анонимности, устойчивому сервису и тор-поддержке защищённых транзакций.Rutor — старейший представитель даркнета на русском языке
rutor org зеркало 2021 рабочая на сегодня — это один из самых известных и старейших сервисов в русскоязычном даркнете, который стал неотъемлемой частью экосистемы анонимных ресурсов. Основное направление работы ресурса — предоставление обширной базы файлов, утилит, новостей и прочего контента, в том числе, связанного с темами безопасности и взлома.
Главные аспекты функционирования Rutor
Механизм работы ресурса позволяет пользователям получать доступ к большим массивам данных и файлов, при этом обеспечивая максимальную приватность и анонимность. Работа сервиса построена на использовании анонимной сети Rutor, что помогает свести к минимуму угрозы идентификации и утечки данных. За долгое время работы Rutor стал своего рода летописью для даркнета на русском языке.
Платформа функционирует стабильно, обеспечивая равный доступ для новых и опытных участников даркнета. Архитектура ресурса предусматривает, что любые разделы — магазин, новостной блок или гайды по взлому — являются составляющими единой системы, где превалируют безопасность и анонимность.
Будущее платформы: вызовы и обещания
Нет сомнений, что в дальнейшем Rutor столкнётся с новыми угрозами, инновационными способами охраны приватности и методами преодоления блокировок. Пользователи должны осознавать, что даже самая анонимная система не гарантирует полной безопасности.
Этот сервис по-прежнему служит площадкой для информирования, обсуждений безопасности и отслеживания новшеств в даркнет-сообществе. Технический прогресс, рост числа участников и новые функциональные решения превращают Rutor в ключевой узел русскоязычного интернет-сообщества.
– Принцип анонимности
– Надёжность проведения операций
– Возможность получения эксклюзивных данных
– Обеспечение приватности взаимодействий
Rutor представляет собой ресурс с неповторимой историей, важный для пользователей, стремящихся к свободе, сохранению конфиденциальности и автономии от внешних ограничений в современном интернете.
Актуальные игроки оказываются с затруднением связи к официальным платформам. Организации фильтруют главные URL, но искушённые Лаки Бир сайт пользователи осознают о доступности дублирующих платформ.
Альтернативный адрес является точную копию базового платформы. Криптографические алгоритмы остаются неизменными. Денежные переводы производятся через равнозначные сервисы.
Процедура регистрации через дополнительный ресурс включает стандартной проверки. Менеджеры выясняют документы для выполнения KYC-правил. Персональные данные реализуют усиленную валидацию.
Депозитные лимиты на резервных платформах равняются главным характеристикам. Минимальные взносы продолжают стабильными. Возрастающие джекпоты синхронизируются между всеми адресами.
Премиальные механизмы выполняются полноценно на резервных ресурсах. Отыгрышный коэффициент гарантирует базовые величины. Тайминг реализации поддерживается.
Служба обслуживания обрабатывает запросы с альтернативных порталов равнозначно. Прямой разговор поддерживает 24-часовой формат оперирования.
Игровая отрасль являет быстрый прогресс, завлекая легионы игроков. Грамотные порталы предоставляют надёжную среду для пари. Детальную информацию о указанных операторах доступно изучить на п»ї1xBet казино .
Лицензирование выступает ключевым показателем подбора ресурса. Контролёры Гибралтара обеспечивают качественный надзор экономических операций. Конкретная аккредитованная ресурс проходит периодические ревизии RNG-систем.
Технические свойства современных гемблинг-сайтов предусматривают SSL-криптографию денежного уровня. Провайдеры софтового продукта вроде Microgaming, NetEnt, Pragmatic Play встраивают усовершенствованные механизмы рандомных показателей.
Механизм подтверждения личного кабинета включает представления свидетельств KYC-типа. Свидетельство, документ о прибылях, валидация регистрации — типичный комплект для итогового авторизации.
Резервные домены убирают барьеры с блокировками поставщиков. Свежие дубли обновляются систематически компьютерными специалистами. Карманные приложения зачастую функционируют стабильнее онлайн форматов.
Банкролл-менеджмент определяет длительную доходность азартных партий. Экспертные пользователи советуют контролировать величину пари до 1-2% от полного бюджета.
Новейшие порталы игорных продуктов предоставляют игрокам возможность к элитному азарту через защищенные френдс казино зеркало порталы. Легальная деятельность подразумевает исполнения определенных надзорных требований.
Система активации персонального счета содержит подтверждение личных данных. Операторы эксплуатируют расширенные протоколы KYC и AML для недопущения поддельных финансовых действий.
IT инструменты современных беттинг площадок основываются на защищенных инфраструктурах с SSL сертификатами. Территориальные ограничения побуждает владельцев запускать дублирующие адреса.
Резервные порталы формируют эквивалентные копии основного портала с поддержанием всех функций и сведений. Клиенты приобретают стабильный доступ к депозиту, гемблинг данным и клиентским установкам.
Банковские операции проходят через синхронизированные расчетные шлюзы. Пределы на пополнения и обналичивания определяются в соотношении с нормативными положениями и собственными политиками риск-менеджмента.
Опытные клиенты указывают анализировать положение сертификата через надзорные каталоги азартных комиссий. Имиджевые индикаторы задействуют рейтинги на профильных сайтах и оценки настоящих участников.
Определение безопасного betting портала в текущих реалиях требует особого внимания к лицензионному состоянию. Знающие пользователи представляют, что казино JVSpin демонстрирует последнюю информацию о функционирующих операторах.
Процесс регистрации в легальных платформах охватывает принудительную проверку документов. KYC-правила оберегают как сервис, так и участника от обмана. Переходные пределы на снятие капитала до финализации верификации – обычная практика.
Электронные блокировки на подключение к игровым площадкам решаются через параллельные домены. Доступные копии сохраняют полную работоспособность главного портала. Платежные транзакции, развлекательный статистика и наградные планы продолжают неизменными.
Капитальная безопасность измеряется степенью внедренных денежных механизмов. SSL-кодирование, PCI DSS сертификация и расширенная аутентификация формируют стабильный контур обороны.
Игровая каталог легальных операторов включает барабаны от лидирующих разработчиков. RTP-параметры, вариативность и расчетные схемы подвергаются объективную валидацию в одобренных организациях.
Системы вознаграждения в серьезных операторах формируются на прозрачных параметрах отыгрыша. Условия ставок x35-40 считается нормальным для спин-привилегий, в то время как классические забавы принимаются в зачет с редуцированным множителем.
https://sertralineusa.com/# zoloft without dr prescription
Здравствуйте!
Крафт пакеты производство Москва — значит полный контроль от сырья до готовой партии. У нас собственное оборудование, склад и команда технологов с опытом более 7 лет. Мы не передаём заказы на сторону, что гарантирует соблюдение сроков и качества. Все материалы сертифицированы и соответствуют ТР ТС 005/2011. Оставьте заявку — и получите расчёт в течение часа.
Полная информация по ссылке – https://xn——5cdbul1akdooxbbfke0anfh5a9o.xn--p1ai
крафт пакеты для булочных, консультация по крафт пакетам, соответствие ТР ТС 005/2011 крафт пакеты
расчёт партии крафт пакетов, [url=https://xn——5cdbul1akdooxbbfke0anfh5a9o.xn--p1ai]разработка макета для крафт пакета[/url], крафт пакеты для гипермаркетов
Всего наилучшего и развития в бизнесе!
Игровая ниша отображает активный подъём, притягивая миллионы игроков. Профессиональные сайты предоставляют качественную атмосферу для игры. Детальную факты о указанных компаниях допустимо изучить на п»ї1xBet зеркало .
Лицензирование представляет главным элементом подбора портала. Контролёры Гибралтара дают серьёзный контроль валютных действий. Каждая официальная платформа подвергается постоянные проверки RNG-механизмов.
IT аспекты новейших игорных домов содержат SSL-защиту банковского стандарта. Поставщики программного ПО уровня Microgaming, NetEnt, Pragmatic Play подключают сложные схемы хаотичных значений.
Процесс проверки счёта подразумевает передачи документов KYC-стандарта. Свидетельство, документ о финансах, подтверждение адреса — типичный перечень для завершённого активации.
Параллельные порталы решают трудности с ограничениями организаций. Рабочие копии изменяются ежедневно цифровыми отделами. Планшетные приложения часто действуют стабильнее браузерных модификаций.
Распределение капитала определяет перспективную прибыльность развлекательных циклов. Профессиональные геймеры предлагают контролировать объём пари до 1-2% от общего резерва.
Определение безопасного азартного площадки предполагает основательного рассмотрения правовых сертификатов. Актуальные сайты Vavada casino предоставляют пользователям полную детали о собственных лицензиях.
Система оформления счета охватывает различные принудительных стадий подтверждения. Владельцы настаивают бумаги, доказывающие персону и зрелость. Обычный KYC-механизм длится от 24 до 72 часов.
Банкролл-менеджмент инициируется с назначения лимитов на взносы. Опытные игроки предлагают эксплуатировать норму 5% от итогового игорного резерва на индивидуальную партию.
Системные препятствия поставщиков принуждают применять запасные пути. Дубликаты сохраняют безусловную активность основного портала, содержа хронологию сделок и развлекательный результаты.
Актуальные платежные способы предоставляют мгновенные пополнения через виртуальные счета. Bitcoin, Ethereum и стабильные валюты обеспечивают анонимность и минимальные сборы. Период обработки извлечений насчитывает 10-30 промежутков.
Алгоритмы верности содержат ступенчатые степени с прогрессивным бонусом. VIP-менеджеры предоставляют персонализированные бонусы, повышенные рамки и первоочередную поддержку.
1win ставки на UFC 1win ставки на UFC
Новейшие провайдеры развлекательных активностей предоставляют участникам путь к качественному азарту через надежные Лаки Бир регистрация ресурсы. Лицензированная бизнес предполагает исполнения определенных законодательных норм.
Система регистрации пользовательского профиля охватывает валидацию персональных показателей. Управляющие задействуют расширенные процедуры KYC и AML для пресечения поддельных переводов.
Технические системы актуальных развлекательных порталов основываются на надежных инфраструктурах с криптографическими технологиями. IP-фильтрация принуждает провайдеров внедрять параллельные URL.
Альтернативные платформы формируют эквивалентные дубликаты основного портала с удержанием всех опций и данных. Игроки обеспечивают себе непрерывный подключение к счету, беттинг записям и пользовательским настройкам.
Финансовые операции проходят через связанные платежные сервисы. Рамки на вклады и обналичивания назначаются в соответствии с правовыми положениями и индивидуальными регламентами снижения потерь.
Экспертные пользователи советуют мониторить статус лицензии через контролирующие каталоги беттинг организаций. Репутационные характеристики включают позиции на профильных сервисах и оценки подлинных участников.
Поиск надежного азартного ресурса в текущих рамках подразумевает детального внимания к законному состоянию. Квалифицированные геймеры осознают, что ретро зеркало отображает актуальную факты о функционирующих операторах.
Механизм создания аккаунта в сертифицированных операторах объединяет принудительную верификацию удостоверения. KYC-процедуры оберегают как казино, так и участника от фрода. Временные лимиты на получение денег до завершения валидации – привычная подход.
Электронные барьеры на доступ к betting ресурсам решаются через дублирующие адреса. Действующие клоны предоставляют абсолютную работоспособность базового платформы. Банковские движения, интерактивный статистика и бонусные программы поддерживаются стабильными.
Материальная защищенность оценивается степенью используемых расчетных инструментов. SSL-кодирование, PCI DSS лицензирование и двухфакторная верификация формируют стабильный периметр охраны.
Интерактивная ассортимент проверенных операторов включает спины от топовых провайдеров. RTP-значения, волатильность и расчетные системы претерпевают нейтральную проверку в признанных центрах.
Планы вознаграждения в достойных площадках формируются на прозрачных требованиях активности. Условия ставок x35-40 расценивается справедливым для автомат-льгот, в то время как стандартные развлечения принимаются в счет с пониженным коэффициентом.
Ориентирование в секторе лицензированных площадок предполагает осознания актуальных инструментов подключения. Продвинутые участники используют Лаки Бир казино для обретения актуальной информации о работающих адресах.
Механизм открытия аккаунта в сертифицированных заведениях охватывает комплексную проверку. Передовые провайдеры применяют KYC-системы и AML-критерии. Оформление документов потребляет от 24 до 72 интервалов.
IT инструменты для прохождения блокировок улучшаются параллельно с усилением юридических шагов. VPN-службы категории premium гарантируют шифрование AES-256 и стандарты OpenVPN. Стабильность коннекта принципиально существенна для высокоролловых партий.
Запасные сайты работают через географически распределенные технические кластеры. CDN-структуры гарантируют минимальную латентность для американских игроков. Системное редирект активируется при распознавании блокировки главного сайта.
Банковские движения в проверенных юрисдикциях подчиняются конкретным нормам PCI DSS. Цифровые расчеты увеличивают актуальность по причине приватности и динамике реализации.
Смартфонные приложения топовых операторов объединяют физиологическую авторизацию и push-извещения для важных событий. Настраиваемый оформление независимо настраивается под свойства дисплея.
Беттинговая отрасль показывает интенсивный расширение, завлекая миллионы участников. Экспертные площадки обеспечивают надёжную среду для развлечений. Детальную данные о данных компаниях допустимо изучить на Gold casino .
Аттестация представляет ключевым фактором подбора платформы. Лицензиаты Мальты дают строгий аудит расчётных процедур. Всякая официальная портал осуществляет периодические проверки RNG-генераторов.
Компьютерные свойства актуальных гемблинг-сайтов предусматривают SSL-защиту расчётного уровня. Производители виртуального материала наподобие Microgaming, NetEnt, Pragmatic Play добавляют усовершенствованные модели случайных показателей.
Процесс проверки аккаунта включает подачи свидетельств KYC-стандарта. Удостоверение, выписка о доходах, доказательство местожительства — классический перечень для полноценного входа.
Параллельные ссылки устраняют барьеры с фильтрацией операторов. Действующие альтернативы модифицируются систематически IT отделами. Карманные клиенты регулярно функционируют стабильнее интернет версий.
Распределение капитала определяет перспективную успешность развлекательных сессий. Экспертные пользователи настаивают лимитировать размер бета до 1-2% от полного фонда.
Передовые порталы беттинг услуг предоставляют пользователям подключение к высококлассному игровому процессу через надежные Lucky Bear casino системы. Сертифицированная работа требует соблюдения определенных надзорных стандартов.
Алгоритм регистрации игрового учетной записи охватывает валидацию приватных сведений. Провайдеры применяют углубленные механизмы KYC и AML для блокировки мошеннических платежей.
Электронные инструменты новейших развлекательных порталов работают на безопасных инфраструктурах с криптографическими стандартами. Региональная блокировка принуждает управляющих организовывать дублирующие URL.
Резервные ресурсы формируют идентичные дубликаты центрального ресурса с удержанием всех сервисов и параметров. Беттеры приобретают постоянный вход к капиталу, беттинг записям и индивидуальным настройкам.
Денежные переводы реализуются через интегрированные расчетные агрегаторы. Лимиты на вклады и снятия назначаются в унисон с лицензионными критериями и индивидуальными нормами управления рисками.
Профессиональные игроки советуют контролировать ситуацию лицензии через регуляторные каталоги азартных комиссий. Имиджевые критерии охватывают позиции на специализированных сервисах и оценки реальных игроков.
Инновационные сервисы азартных услуг дают игрокам доступ к премиальному развлечениям через проверенные Mellstroy Game casino порталы. Официальная функционирование предполагает следования конкретных контролирующих стандартов.
Алгоритм открытия персонального учетной записи содержит валидацию конфиденциальных сведений. Операторы эксплуатируют детализированные системы KYC и AML для пресечения нарушающих транзакций.
IT системы инновационных развлекательных порталов работают на безопасных инфраструктурах с криптографическими технологиями. Региональная блокировка заставляет владельцев создавать параллельные адреса.
Альтернативные ресурсы образуют точные версии главного платформы с поддержанием всех инструментов и сведений. Беттеры получают беспрепятственный доступ к балансу, гемблинг истории и клиентским конфигурациям.
Платежные транзакции осуществляются через интегрированные денежные шлюзы. Границы на инвестиции и снятия назначаются в гармонии с регуляторными условиями и индивидуальными нормами минимизации опасностей.
Профессиональные гемблеры настаивают отслеживать положение аккредитации через надзорные каталоги азартных структур. Статусные индикаторы включают рейтинги на экспертных порталах и оценки подлинных клиентов.
With havin so much content and articles do you ever run into any problems of plagorism or copyright violation? My blog has a lot
of exclusive content I’ve either created myself or outsourced but
it looks like a lot of it is popping it up all over the web without
my agreement. Do you know any techniques to help stop content from being ripped off?
I’d certainly appreciate it.
my blog post … Web Scraping Services
Новейшие геймеры попадают с препятствием доступа к сертифицированным ресурсам. Организации ограничивают первичные адреса, но опытные ретро казино участники понимают о доступности резервных сайтов.
Альтернативный адрес формирует идентичную копию главного сайта. SSL-сертификаты функционируют идентичными. Финансовые операции осуществляются через сходные механизмы.
Методика регистрации через зеркальный домен включает классической верификации. Сотрудники запрашивают справки для осуществления KYC-требований. Индивидуальные данные выполняют двухфакторную верификацию.
Вносительные границы на параллельных ресурсах идентичны базовым требованиям. Минимальные беты функционируют неизменными. Возрастающие накопления объединяются между различными ссылками.
Льготные механизмы работают целостно на зеркальных ресурсах. Отыгрышный коэффициент обеспечивает оригинальные показатели. Длительность проигрывания продолжается.
Служба ассистирования анализирует заявки с резервных адресов идентично. Онлайн разговор поддерживает 24-часовой расписание оперирования.
Современные игроки пересекаются с огромным количеством технических деталей при операциях с легальными платформами. Профессиональные платформы типа лаки ворлд казино предоставляют свежую информацию о процессах развлекательных организаций.
Система подтверждения аккаунта предполагает набор требуемых шагов. Базовая верификация нуждается размещения справок доказывающих субъект. Стандартный пакет предполагает удостоверение личности, водительские права или загранпаспорт.
Системная компонента создания аккаунта предполагает использование защищенного протокола и 2FA. Опытные клиенты настаивают включать полный набор возможных возможностей охраны.
Запасные домены формируют идентичные реплики центрального ресурса с поддержанием исчерпывающего арсенала. Основное выгода содержится в тождественности банковских пределов и требований отыгрыша.
Система выявления актуальных дублирующих порталов фундируется на контроле профильных новостных лент и сотрудничающих площадок. Продвинутые игроки используют анонимайзеры для гарантирования надежного доступа независимо от местных блокировок.
Исследование в мире сертифицированных ресурсов нуждается знания современных способов авторизации. Квалифицированные игроки задействуют казино Mellstroy Game для получения новейшей данных о оперативных путях.
Процедура создания учетной записи в сертифицированных компаниях предполагает тщательную аутентификацию. Продвинутые компании внедряют KYC-механизмы и AML-нормы. Документальное сопровождение требует от 24 до 72 интервалов.
Технические технологии для избежания барьеров улучшаются одновременно с интенсификацией нормативных инициатив. VPN-службы категории premium предлагают шифрование AES-256 и методы OpenVPN. Надежность коннекта критически актуальна для высокоролловых партий.
Альтернативные сайты работают через локально размещенные цифровые кластеры. CDN-сети предоставляют минимальную отклик для глобальных пользователей. Техническое редирект срабатывает при распознавании недоступности главного сайта.
Платежные операции в лицензированных областях соответствуют определенным правилам PCI DSS. Децентрализованные платежи приобретают популярность вследствие анонимности и темпу процессинга.
Мобильные программы топовых операторов объединяют биометрическую идентификацию и push-алерты для важных событий. Адаптивный дизайн самостоятельно изменяется под характеристики матрицы.
Поиск достойного игрового заведения в актуальных обстоятельствах подразумевает тщательного подхода к юридическому положению. Опытные игроки знают, что Вавада официальный сайт предоставляет актуальную сведения о активных ресурсах.
Схема оформления профиля в официальных заведениях включает требуемую валидацию документов. KYC-стандарты оберегают как сервис, так и геймера от обмана. Промежуточные пределы на получение денег до закрытия валидации – обычная практика.
Программные запреты на связь к гемблинг площадкам обходятся через дублирующие ссылки. Функционирующие клоны сохраняют тотальную производительность основного сервиса. Денежные движения, развлекательный достижения и льготные программы продолжают постоянными.
Капитальная надежность выражается критерием применяемых банковских систем. SSL-шифрование, PCI DSS сертификация и двухфакторная проверка устанавливают прочный барьер охраны.
Развлекательная ассортимент проверенных операторов предоставляет автоматы от известных разработчиков. RTP-коэффициенты, колебания и математические системы получают внешнюю контроль в аккредитованных центрах.
Механизмы лояльности в профессиональных площадках строятся на прозрачных критериях вейджера. Условия ставок x35-40 оценивается адекватным для слот-поощрений, в то время как настольные активности принимаются в подсчет с редуцированным множителем.
It is truly a great and useful piece of information. I’m happy that
you simply shared this useful info with us. Please keep
us up to date like this. Thank you for sharing.
Here is my homepage; TU娛樂
Надёжные ресурсы развлекательных предложений обеспечивают геймерам доступ к качественному гэмблингу через профильные порталы, включая Меллстрой регистрация , которые соблюдают общепринятые требования конфиденциальности.
Алгоритм оформления профиля подразумевает указания валидационных сведений через encrypted SSL-каналы. Провайдеры запрашивают письменное подтверждение age verification и локации нахождения для поддержания правовых критериев.
Multi-factor верификация становится обязательным aspect современных платформ security. Users располагают SMS-токены, push-оповещения или используют targeted утилиты в стиле Google Authenticator.
Зеркальные домены решают проблемы региональных санкций и DDoS-воздействий. По сути дубли формируют дублированные реплики главного платформы с поддержанием features и индивидуальных параметров.
Skilled игроки suggest удерживать обновлённые списки активных зеркал в избранном браузера. Букмекеры рассылают новости о свежих порталах через почтовые сервисы, Telegram-чаты и мобильные приложения.
Payment операции через официальные площадки обеспечены cryptographic протоколами level банковского сектора. Вывод фондов осуществляется только на подтверждённые данные обладателя account.
Отбор проверенного азартного площадки в современных реалиях подразумевает особого рассмотрения к законному статусу. Компетентные игроки учитывают, что [url=https://github.com/Lucky-Bear-zerkalo]Лаки Бир официальный сайт[/url] предоставляет последнюю данные о действующих площадках.
Механизм оформления профиля в проверенных площадках объединяет требуемую верификацию личности. KYC-правила оберегают как заведение, так и участника от мошенничества. Переходные рамки на перечисление денег до закрытия подтверждения – обычная система.
Технические ограничения на соединение к гемблинг сайтам устраняются через параллельные домены. Рабочие копии предоставляют всестороннюю эффективность главного портала. Платежные операции, игровой результаты и поощрительные предложения сохраняются неизменными.
Капитальная надежность выражается уровнем задействованных денежных инструментов. SSL-защита, PCI DSS лицензирование и многоуровневая идентификация устанавливают надежный заслон защиты.
Геймплейная библиотека сертифицированных заведений включает слоты от ведущих разработчиков. RTP-индексы, изменчивость и вероятностные формулы подвергаются объективную аудит в признанных лабораториях.
Программы вознаграждения в серьезных заведениях строятся на ясных правилах отыгрыша. Требования x35-40 оценивается адекватным для слот-льгот, в то время как настольные состязания учитываются в зачет с уменьшенным множителем.
Надёжные ресурсы развлекательных услуг oferuja пользователям возможность к премиальному времяпрепровождению через dedicated ресурсы, включая lucky bear казино , которые именно выполняют общепринятые регламенты безопасности.
Процедура активации требует внесения authentication деталей через encrypted SSL-connection. Операторы demanded нотариальное удостоверение правоспособности и региона residence для соблюдения законодательных стандартов.
2FA верификация становится required компонентом передовых архитектур security. Клиенты приобретают SMS-коды, push-notification или эксплуатируют специальные утилиты по типу Google Authenticator.
Дублирующие порталы устраняют сложности географических блокировок и DDoS-атак. Техническим образом реплики образуют копийные копии primary сайта с поддержанием функциональности и пользовательских параметров.
Профессиональные клиенты призывают сохранять current каталоги working копий в сохранённых ссылках обозревателя. Букмекеры направляют информацию о свежих доменах через email, Telegram-каналы и телефонные приложения.
Финансовые переводы через лицензионные сайты покрыты шифровальными methods стандарта банковского сектора. Extraction денег выполняется единственно на проверенные данные владельца личного кабинета.
Передовые бетторы попадают с проблемой подключения к проверенным платформам. Компании блокируют базовые домены, но профессиональные казино аква клиенты понимают о доступности альтернативных платформ.
Альтернативный адрес представляет идентичную реплику базового площадки. Протоколы шифрования сохраняются идентичными. Расчётные процедуры проходят через идентичные механизмы.
Схема регистрации через дополнительный адрес предполагает стандартной проверки. Специалисты запрашивают бумаги для выполнения KYC-требований. Паспортные параметры реализуют комплексную верификацию.
Банковские пределы на параллельных платформах совпадают первичным параметрам. Стартовые ставки функционируют фиксированными. Возрастающие банки синхронизируются между многочисленными ресурсами.
Поощрительные планы функционируют комплексно на альтернативных платформах. Отыгрышный коэффициент сохраняет оригинальные величины. Временные рамки использования поддерживается.
Служба сопровождения рассматривает тикеты с параллельных доменов равнозначно. Онлайн чат обеспечивает непрерывный формат функционирования.
Акция на кондиционер https://atmosfera-profi-klimat.ru/catalog/nastennye_konditsionery/ с установкой в Москве скидка 30% при покупке оборудования в нашем магазине. Доставка БЕСПЛАТНАЯ! Atmosfera-profi – это интернет магазин климатического оборудования, где Вы можете купить технику с установкой, обслуживанием и гарантийным ремонтом.
Pretty nice post. I simply stumbled upon your weblog and wished to say that I have really enjoyed browsing your blog posts.
After all I’ll be subscribing to your rss feed and I hope you write once more soon!
Актуальные бетторы натыкаются с сложностью подключения к официальным ресурсам. Организации блокируют первичные адреса, но опытные казино 1хбет клиенты помнят о наличии дублирующих ресурсов.
Зеркало составляет полную воспроизведение основного ресурса. Криптографические алгоритмы работают идентичными. Финансовые действия реализуются через идентичные шлюзы.
Алгоритм оформления профиля через параллельный портал требует привычной верификации. Операторы выясняют справки для выполнения KYC-стандартов. Паспортные параметры проходят усиленную проверку.
Депозитные рамки на резервных сайтах соответствуют первичным требованиям. Стартовые вклады поддерживаются фиксированными. Возрастающие выигрышные пулы согласовываются между множественными доменами.
Стимулирующие механизмы работают всесторонне на параллельных порталах. Отыгрышный коэффициент поддерживает базовые показатели. Период действия использования не изменяется.
Сервис обслуживания рассматривает обращения с резервных адресов аналогично. Интерактивный общение предоставляет непрерывный формат функционирования.
Лицензионные операторы игорных услуг предоставляют клиентам доступ к премиальному азартному досугу через dedicated сайты, включая п»ї1хбет РІС…РѕРґ , что соблюдают мировые стандарты надёжности.
Последовательность регистрации подразумевает заполнения проверочных информации через шифрованные SSL-линии. Менеджмент просят нотариальное подтверждение age verification и территории residence для исполнения законодательных критериев.
Многоуровневая проверка представляет обязательным aspect современных платформ конфиденциальности. Клиенты получают SMS-токены, push-алерты или применяют специальные tools типа Google Authenticator.
Mirror домены ликвидируют трудности географических запретов и DDoS-assault. Фактически mirrors представляют дублированные версии основного ресурса с maintaining возможностей и индивидуальных параметров.
Компетентные геймеры предлагают удерживать актуальные перечни активных альтернатив в сохранённых ссылках browser. Администрация доставляют updates о свежих адресах через электронную почту, Telegram-чаты и мобильные утилиты.
Финансовые операции через проверенные площадки покрыты encryption methods класса банковского индустрии. Снятие финансов производится единственно на аутентифицированные карты владельца профиля.
order zoloft: zoloft buy – Sertraline USA
I like the valuable information you supply in your articles.
I’ll bookmark your blog and check once more here regularly.
I am quite certain I will learn many new stuff proper here!
Best of luck for the following!
My blog – host a retreat
真实的人类第二季高清完整版运用AI智能推荐算法,海外华人可免费观看最新热播剧集。
Актуальные игроки попадают с затруднением связи к сертифицированным ресурсам. Поставщики фильтруют основные URL, но профессиональные типпи казино пользователи помнят о доступности зеркальных порталов.
Зеркало составляет полную воспроизведение базового сайта. Протоколы шифрования функционируют идентичными. Денежные операции реализуются через сходные механизмы.
Схема заведения учётной записи через параллельный ссылку включает классической подтверждения. Специалисты просят удостоверения для выполнения KYC-правил. Паспортные сведения реализуют усиленную аутентификацию.
Пополнительные границы на альтернативных порталах идентичны первичным условиям. Наименьшие вклады остаются неизменными. Возрастающие выигрышные пулы синхронизируются между разными ресурсами.
Премиальные системы работают всесторонне на зеркальных порталах. Отыгрышный коэффициент гарантирует стартовые величины. Срок активности использования остаётся прежним.
Команда сопровождения обрабатывает вопросы с резервных порталов аналогично. Онлайн диалог предоставляет непрерывный расписание функционирования.
凯伦皮里第二季高清完整版,海外华人可免费观看最新热播剧集。
Подбор проверенного азартного ресурса в актуальных условиях нуждается тщательного анализа к регулятивному состоянию. Компетентные клиенты понимают, что Меллстрой РІС…РѕРґ содержит новую информацию о функционирующих ресурсах.
Схема оформления профиля в лицензированных площадках включает неизбежную подтверждение личности. KYC-стандарты обеспечивают как казино, так и пользователя от обмана. Временные границы на перечисление финансов до закрытия валидации – стандартная система.
Электронные блокировки на вход к гемблинг сайтам преодолеваются через зеркальные адреса. Доступные отражения обеспечивают тотальную эффективность основного сервиса. Денежные операции, игровой продвижение и привилегированные системы поддерживаются стабильными.
Экономическая надежность выражается качеством внедренных расчетных систем. SSL-кодирование, PCI DSS лицензирование и многоуровневая подтверждение создают защищенный заслон защиты.
Развлекательная коллекция лицензированных заведений содержит автоматы от ведущих студий. RTP-коэффициенты, изменчивость и алгоритмические формулы проходят беспристрастную валидацию в одобренных лабораториях.
Механизмы мотивации в серьезных операторах основываются на прозрачных требованиях ставок. Требования x35-40 расценивается справедливым для автомат-поощрений, в то время как традиционные развлечения засчитываются в расчет с уменьшенным множителем.
Инновационные провайдеры гемблинг активностей предоставляют пользователям путь к высококлассному игровому процессу через защищенные казино Лев платформы. Лицензированная деятельность влечет исполнения четких законодательных положений.
Процесс оформления клиентского профиля содержит аутентификацию конфиденциальных данных. Администраторы внедряют комплексные протоколы KYC и AML для недопущения мошеннических платежей.
Технические платформы инновационных казино базируются на стабильных хостингах с TLS технологиями. IP-фильтрация заставляет операторов внедрять дублирующие ссылки.
Зеркальные ресурсы являют собой точные репликации базового домена с удержанием всех опций и параметров. Беттеры приобретают непрерывный доступ к балансу, беттинг записям и личным настройкам.
Банковские операции реализуются через интегрированные расчетные процессоры. Границы на депозиты и изъятия назначаются в согласии с законодательными критериями и организационными нормами управления рисками.
Экспертные пользователи рекомендуют анализировать ситуацию лицензии через государственные реестры развлекательных органов. Авторитетные параметры задействуют позиции на тематических сервисах и feedback подлинных клиентов.
范德沃克高清完整官方版,海外华人可免费观看最新热播剧集。
Гемблинговая отрасль являет активный развитие, заинтересовывая миллионы игроков. Экспертные платформы предоставляют безопасную атмосферу для развлечений. Развёрнутую факты о этих операторах возможно отыскать на п»ї1хбет зеркало .
Сертификация выступает приоритетным элементом отбора ресурса. Контролёры Кюрасао создают строгий мониторинг валютных транзакций. Каждая легальная площадка проходит постоянные ревизии RNG-систем.
Цифровые параметры передовых казино включают SSL-шифрование расчётного ранга. Провайдеры цифрового софта класса Microgaming, NetEnt, Pragmatic Play внедряют многоуровневые системы случайных параметров.
Алгоритм аутентификации аккаунта предполагает направления удостоверений KYC-типа. Удостоверение, подтверждение о прибылях, доказательство регистрации — базовый набор для финального доступа.
Резервные URL исправляют трудности с блокировками поставщиков. Функционирующие копии корректируются каждый день техническими отделами. Портативные программы зачастую оперируют надёжнее веб модификаций.
Банкролл-менеджмент устанавливает долгосрочную прибыльность азартных раундов. Грамотные участники советуют ограничивать количество депозита до 1-2% от совокупного капитала.
Лицензионные площадки азартных возможностей гарантируют пользователям возможность к элитному времяпрепровождению через профильные порталы, включая Mellstroy Game казино , которые точно следуют международные стандарты security.
Схема оформления профиля подразумевает внесения проверочных данных через защищённые SSL-connection. Провайдеры требуют официальное удостоверение дееспособности и территории проживания для исполнения правовых стандартов.
Двухэтапная аутентификация выступает required частью передовых платформ надёжности. Пользователи получают SMS-коды, push-алерты или применяют специализированные приложения наподобие Google Authenticator.
Дублирующие URL преодолевают проблемы географических санкций и DDoS-атак. Фактически реплики составляют аналогичные клоны центрального платформы с maintaining возможностей и user данных.
Опытные геймеры suggest поддерживать актуальные списки действующих дублей в избранном browser. Букмекеры направляют информацию о свежих доменах через email, Telegram-группы и mobile программы.
Денежные операции через лицензионные платформы secured шифровальными технологиями стандарта банковского области. Вывод средств производится лишь на верифицированные счета держателя аккаунта.
Между прочим, если вас интересует Обзор фильма ‘Милосердие’ 2026: спецэффекты и качество Dolby Vision, загляните сюда.
Вот, делюсь ссылкой:
https://zigzag-studio.ru/%d0%bc%d0%b8%d0%bb%d0%be%d1%81%d0%b5%d1%80%d0%b4%d0%b8%d0%b5-mercy-2026-%d0%ba%d0%b0%d0%ba-%d0%ba%d0%be%d1%81%d0%bc%d0%b8%d1%87%d0%b5%d1%81%d0%ba%d0%b8%d0%b9-%d1%82%d1%80%d0%b8%d0%bb/
Лицензионные операторы игорных опций предоставляют игрокам шанс к высококлассному развлечениям через тематические порталы, включая Лаки Бир , которые специально соблюдают общепринятые нормы security.
Последовательность регистрации подразумевает ввода authentication сведений через криптографические SSL-каналы. Провайдеры запрашивают official удостоверение дееспособности и места проживания для соблюдения нормативных требований.
Двухэтапная идентификация является принудительным aspect современных платформ защиты. Участники получают SMS-пароли, push-алерты или используют профессиональные tools в стиле Google Authenticator.
Дублирующие ссылки нейтрализуют сложности territorial запретов и DDoS-атак. По сути реплики являют аналогичные реплики главного платформы с обеспечением инструментария и пользовательских сведений.
Компетентные игроки призывают сохранять свежие каталоги активных зеркал в bookmark интернет-программы. Операторы рассылают сведения о новых доменах через email, Telegram-группы и телефонные apps.
Финансовые movements через лицензионные площадки покрыты cryptographic системами стандарта банковского сектора. Получение фондов происходит единственно на подтверждённые данные собственника аккаунта.
Hi there i am kavin, its my first occasion to commenting anyplace, when i read this paragraph i thought i
could also make comment due to this brilliant piece of writing.
Awesome article.
Also visit my web blog: Data Scraping Company
http://turnaj-portal.4fan.cz/profile.php?lookup=380
Исследование в пространстве проверенных площадок включает осознания передовых решений соединения. Квалифицированные геймеры задействуют tip top casino для обретения актуальной данных о действующих ссылках.
Алгоритм регистрации аккаунта в официальных учреждениях содержит тщательную валидацию. Современные поставщики эксплуатируют KYC-системы и AML-стандарты. Оформление документов составляет от 24 до 72 промежутков.
IT инструменты для обхода блокировок прогрессируют синхронно с интенсификацией нормативных решений. VPN-службы категории premium предлагают шифрование AES-256 и протоколы OpenVPN. Надежность подключения критически существенна для высокоролловых раундов.
Зеркальные сайты оперируют через локально рассредоточенные технические кластеры. CDN-системы предоставляют сокращенную отклик для американских участников. Цифровое редирект запускается при детекции ограничения главного ресурса.
Платежные движения в проверенных регионах отвечают определенным стандартам PCI DSS. Цифровые расчеты завоевывают востребованность вследствие приватности и динамике выполнения.
Портативные программы премиальных операторов объединяют физиологическую проверку и push-извещения для существенных моментов. Изменяемый интерфейс независимо изменяется под параметры матрицы.
Передовые геймеры имеют дело с множеством технологических деталей при процессах с сертифицированными сайтами. Профильные сайты типа lucky bear казино обеспечивают релевантную информацию о деятельности игорных организаций.
Процедура аутентификации учетной записи включает множество требуемых стадий. Первичная валидация требует размещения справок валидирующих гражданство. Типовой перечень включает паспорт, автолицензию или загранпаспорт.
Программная сторона записления включает применение SSL-шифрования и двойной авторизации. Опытные геймеры рекомендуют включать максимум возможных функций обеспечения.
Альтернативные адреса формируют точные отражения основного портала с обеспечением исчерпывающего набора функций. Главное преимущество выражается в идентичности денежных лимитов и параметров отыгрыша.
Процедура обнаружения функционирующих дублирующих порталов основывается на контроле тематических мессенджер групп и аффилированных платформ. Продвинутые игроки эксплуатируют анонимайзеры для создания устойчивого связи независимо от местных барьеров.
zoloft generic: zoloft without dr prescription – sertraline generic
Genuinely when someone doesn’t know afterward its up
to other visitors that they will assist, so here it occurs.
Review my web blog – Web Scraping Company
Нынешние пользователи пересекаются с массой системных деталей при функционировании с официальными ресурсами. Экспертные источники типа п»ї1хбет РІС…РѕРґ предоставляют релевантную сведения о функционировании гэмблинговых компаний.
Процедура верификации профиля охватывает ряд неотъемлемых фаз. Стартовая аутентификация нуждается размещения бумаг подтверждающих личность. Классический список предполагает удостоверение личности, автоудостоверение или международное ID.
Техническая сторона создания аккаунта предполагает внедрение безопасного соединения и двухуровневой проверки. Квалифицированные пользователи предлагают включать весь комплекс представленных опций секьюрити.
Запасные домены представляют точные клоны первичного сайта с хранением тотального возможностей. Главное бонус содержится в соответствии банковских лимитов и условий вейджера.
Процедура обнаружения действующих резервных ссылок фундируется на мониторинге профильных телеграм-каналов и связанных сайтов. Опытные участники внедряют прокси-соединения для предоставления постоянного соединения вне зависимости от локальных ограничений.
Определение проверенного развлекательного заведения в сегодняшних реалиях требует детального анализа к юридическому уровню. Компетентные пользователи представляют, что Вавада РІС…РѕРґ включает современную сведения о работающих ресурсах.
Алгоритм записи в сертифицированных платформах предусматривает требуемую аутентификацию документов. KYC-требования защищают как сервис, так и пользователя от фрода. Кратковременные ограничения на снятие активов до закрытия подтверждения – стандартная практика.
Цифровые блокировки на соединение к азартным сайтам решаются через зеркальные URL. Действующие клоны поддерживают тотальную функциональность первичного сервиса. Банковские процедуры, игровой результаты и наградные системы остаются неизменными.
Денежная стабильность оценивается показателем внедренных платежных способов. SSL-кодирование, PCI DSS аттестация и двухфакторная подтверждение гарантируют прочный щит ограждения.
Геймплейная каталог лицензированных площадок предоставляет автоматы от главных производителей. RTP-индексы, дисперсия и алгоритмические схемы получают объективную аудит в признанных учреждениях.
Механизмы лояльности в серьезных заведениях основываются на ясных критериях вейджера. Отыгрыш x35-40 считается справедливым для машина-бонусов, в то время как классические состязания засчитываются в счет с минимальным процентом.
Online casino real money pokies Australia – win real cash now
Подбор легального гемблинг оператора нуждается тщательного исследования регулятивных бумаг. Передовые порталы п»ї1xBet гарантируют геймерам максимальную данные о собственных аккредитациях.
Система регистрации охватывает различные необходимых этапов валидации. Операторы просят бумаги, доказывающие личность и дееспособность. Обычный KYC-процесс составляет от 24 до 72 временных отрезков.
Банкролл-менеджмент запускается с фиксации ограничений на пополнения. Компетентные клиенты призывают использовать норму 5% от суммарного гемблинг резерва на единичную сессию.
Цифровые ограничения провайдеров заставляют использовать вспомогательные домены. Зеркала удерживают безусловную функциональность главного платформы, подразумевая журнал транзакций и гемблинг результаты.
Актуальные банковские инструменты обеспечивают оперативные вклады через цифровые хранилища. Bitcoin, Ethereum и стабильные валюты дают приватность и символические платежи. Срок обработки извлечений достигает 10-30 интервалов.
Алгоритмы постоянства подразумевают каскадные ранги с нарастающим вознаграждением. VIP-кураторы гарантируют личные награды, расширенные пределы и опережающую техподдержку.
Поиск в мире лицензированных сайтов подразумевает знания актуальных инструментов входа. Умелые игроки эксплуатируют типпи казино для обретения актуальной фактов о активных адресах.
Процедура оформления аккаунта в проверенных учреждениях охватывает сложную аутентификацию. Продвинутые организации используют KYC-процедуры и AML-критерии. Документооборот занимает от 24 до 72 интервалов.
Цифровые инструменты для прохождения запретов улучшаются вместе с усилением регуляторных решений. VPN-сервисы класса premium обеспечивают кодирование AES-256 и стандарты OpenVPN. Постоянство канала критически актуальна для премиальных раундов.
Альтернативные ресурсы выполняют задачи через географически распределенные цифровые инфраструктуры. CDN-комплексы осуществляют низкую пинг для международных игроков. Цифровое редирект инициируется при распознавании препятствия первичного ресурса.
Экономические переводы в легальных регионах подчиняются жестким требованиям PCI DSS. Децентрализованные переводы приобретают признание благодаря скрытности и динамике обработки.
Портативные приложения топовых компаний объединяют отпечатковую идентификацию и push-извещения для критических моментов. Модифицируемый интерфейс независимо изменяется под характеристики экрана.
Актуальные гемблеры встречаются с препятствием подключения к легальным платформам. Поставщики запрещают первичные URL, но грамотные Vavada казино игроки знают о функционировании параллельных сайтов.
Зеркало представляет полную отображение оригинального площадки. Системы безопасности функционируют аналогичными. Банковские транзакции проходят через сходные шлюзы.
Методика регистрации через параллельный адрес содержит стандартной подтверждения. Администраторы требуют документы для исполнения KYC-регламентов. Идентификационные сведения проходят усиленную подтверждение.
Депозитные пределы на резервных сайтах идентичны стандартным условиям. Минимальные беты продолжают постоянными. Накопительные джекпоты объединяются между различными адресами.
Бонусные механизмы выполняются завершённо на альтернативных площадках. Требования по обороту сохраняет базовые величины. Тайминг оборота поддерживается.
Служба ассистирования рассматривает вопросы с резервных порталов идентично. Прямой диалог обеспечивает непрерывный расписание обслуживания.
Поиск легального гемблинг портала нуждается глубокого разбора официальных разрешений. Современные платформы казино РЎСѓРєР° предоставляют игрокам стопроцентную данные о имеющихся лицензиях.
Процедура создания профиля содержит множество необходимых фаз проверки. Представители настаивают свидетельства, удостоверяющие индивидуальность и совершеннолетие. Типовой KYC-процесс длится от 24 до 72 периодов.
Финансовое планирование стартует с установления границ на вклады. Искусные участники призывают задействовать закон 5% от суммарного казино капитала на конкретную заход.
Электронные барьеры провайдеров вынуждают задействовать вспомогательные домены. Копии оберегают полную активность центрального сайта, содержа журнал сделок и развлекательный прогресс.
Актуальные банковские методы поддерживают скоростные пополнения через блокчейн счета. Bitcoin, Ethereum и фиксированные активы дают анонимность и символические платежи. Время реализации получений составляет 10-30 интервалов.
Планы верности содержат каскадные статусы с увеличивающимся компенсацией. VIP-кураторы предоставляют эксклюзивные награды, увеличенные границы и опережающую помощь.
Гемблинговая отрасль представляет быстрый прогресс, заинтересовывая легионы участников. Профессиональные ресурсы обеспечивают надёжную среду для беттинга. Развёрнутую сведения о таких организациях доступно отыскать на Меллстрой зеркало .
Аккредитация представляет ключевым показателем отбора платформы. Регуляторы Мальты обеспечивают серьёзный аудит расчётных транзакций. Отдельная аккредитованная сайт подвергается систематические аудиты RNG-систем.
Программные аспекты актуальных азартных площадок охватывают SSL-безопасность расчётного категории. Поставщики виртуального софта типа Microgaming, NetEnt, Pragmatic Play встраивают сложные модели непредсказуемых значений.
Процесс проверки учётной записи предполагает предоставления справок KYC-стандарта. Паспорт, документ о доходах, верификация адреса — классический набор для окончательного доступа.
Зеркальные домены устраняют проблемы с фильтрацией операторов. Рабочие альтернативы корректируются каждый день компьютерными службами. Мобильные приложения часто действуют лучше браузерных версий.
Управление банкроллом определяет длительную прибыльность развлекательных периодов. Опытные игроки настаивают урезать размер ставки до 1-2% от полного фонда.
https://sertralineusa.shop/# order zoloft
Современные провайдеры гемблинг продуктов гарантируют клиентам подключение к элитному игровому процессу через надежные Vavada casino порталы. Сертифицированная функционирование нуждается учета конкретных надзорных требований.
Система регистрации индивидуального счета содержит аутентификацию приватных реквизитов. Управляющие внедряют многоуровневые системы KYC и AML для пресечения мошеннических финансовых действий.
Программные решения современных игорных домов функционируют на надежных хостингах с TLS сертификатами. Геоблокировка принуждает администраторов внедрять дублирующие URL.
Резервные ресурсы образуют полные клоны первичного ресурса с обеспечением всех опций и показателей. Беттеры приобретают беспрепятственный подключение к капиталу, игровой записям и личным установкам.
Денежные переводы выполняются через интегрированные денежные сервисы. Рамки на пополнения и изъятия регулируются в унисон с законодательными условиями и собственными политиками управления рисками.
Экспертные беттеры предлагают проверять состояние лицензии через официальные каталоги развлекательных органов. Имиджевые параметры охватывают оценки на тематических сервисах и комментарии реальных пользователей.
http://sertralineusa.com/# sertraline generic
When I originally commented I appear to have clicked the -Notify me when new
comments are added- checkbox and now each time a comment is added I
get 4 emails with the same comment. There has to be a way
you are able to remove me from that service?
Appreciate it!
my webpage Data Scraping Services
pharmacy websites https://cse.google.by/url?sa=t&url=https%3A%2F%2Fmexmedimax.com french pharmacy online
Rutor является основным ресурсом русскоязычного даркнета в сети Tor, обеспечивающим доступ к материалам, товарам, контенту и правилам для пользователей черного рынка и onion площадок
Rutor — старейший узел русского даркнета, который предоставляет услуги конфиденциального обмена и защищённой передачи данных в сети Rutor.Rutor: Один из ключевых проектов русскоязычного даркнета
ру торг инфо — это один из первых и известнейших русскоязычных ресурсов даркнета, неразрывно связанный с анонимной онлайн-экосистемой. Этот магазин ориентирован на предоставление пользователям широкой базы данных, связанной с файлами, софтом, новостями и различными видами контента, включая темы, касающиеся взлома и безопасности.
Особенности работы системы Rutor
Система курирует доступ к огромному количеству информации и файлов, сохраняя дополнительную конфиденциальность и анонимность своих пользователей. Главное преимущество платформы — интеграция с сетью Rutor, что значительно уменьшает вероятность раскрытия личности и потери конфиденциальной информации. За долгое время работы Rutor стал своего рода летописью для даркнета на русском языке.
Rutor продолжает работать и предоставлять стабильный доступ к ресурсам, удовлетворяя потребности как новичков, так и опытных пользователей даркнета. Каждый из разделов сайта — магазин, новостные ленты или руководства по взлому — образуют отдельную звено в масштабном сообществе, где главными ценностями выступают конфиденциальность и защита анонимности.
Перспективы и риски
Нет сомнений, что в дальнейшем Rutor столкнётся с новыми угрозами, инновационными способами охраны приватности и методами преодоления блокировок. Следует помнить, что даже максимально анонимная среда не обеспечивает стопроцентную безопасность.
Платформа продолжает быть ресурсом для получения расширенной информации, обмена мнениями по безопасности и мониторинга новшеств в сферах даркнета. Развитие технологий, расширение базы пользователей и появление новых возможностей делают Rutor одним из центров русскоязычного сообщества в сети.
– Анонимность
– Гарантия безопасности сделок
– Возможность получения эксклюзивных данных
– Конфиденциальность общения
Уникальный путь Rutor делает платформу значимой для тех, кто высоко ценит свободу, личную приватность и защиту от внешнего контроля в цифровую эпоху.
Выбор легального гемблинг оператора заставляет серьезного исследования официальных документов. Передовые ресурсы казино Лев дают игрокам абсолютную информацию о действующих допусках.
Система регистрации подразумевает ряд принудительных фаз валидации. Операторы настаивают справки, доказывающие индивидуальность и возраст. Типовой KYC-механизм требует от 24 до 72 часов.
Управление банком стартует с назначения пределов на депозиты. Компетентные клиенты предлагают использовать правило 5% от совокупного казино капитала на единичную сессию.
Системные блокировки администраторов заставляют применять резервные домены. Дубликаты поддерживают абсолютную работоспособность основного сайта, предусматривая архив переводов и развлекательный прогресс.
Актуальные банковские сервисы предоставляют мгновенные взносы через цифровые портмоне. Bitcoin, Ethereum и постоянные токены дают скрытность и наименьшие отчисления. Срок выполнения извлечений равно 10-30 минут.
Планы верности предусматривают иерархические категории с нарастающим компенсацией. VIP-кураторы гарантируют уникальные вознаграждения, усиленные пределы и приоритетную помощь.
Игровая область являет динамичный подъём, привлекая тысячи игроков. Профессиональные порталы предоставляют защищённую условия для игры. Исчерпывающую материалы о подобных провайдерах реально найти на казино Болливуд .
Лицензирование выступает центральным показателем подбора платформы. Контролёры Олдерни предоставляют серьёзный проверку финансовых действий. Любая лицензированная площадка подвергается регулярные аудиты RNG-механизмов.
Программные аспекты современных игорных домов включают SSL-кодирование финансового ранга. Производители цифрового софта класса Microgaming, NetEnt, Pragmatic Play встраивают усовершенствованные схемы непредсказуемых величин.
Схема проверки аккаунта предполагает подачи бумаг KYC-стандарта. Удостоверение, выписка о доходах, доказательство местожительства — обычный пакет для завершённого входа.
Параллельные URL исправляют сложности с блокировками организаций. Свежие варианты изменяются систематически компьютерными специалистами. Смартфонные приложения нередко оперируют надёжнее онлайн редакций.
Управление банкроллом устанавливает долгосрочную успешность гемблинговых партий. Экспертные беттеры рекомендуют сокращать размер депозита до 1-2% от полного резерва.
https://spisok-kreditov.ru/ На doskazaymov можно выбрать кредит онлайн и сразу оценить нагрузку на бюджет.
The storm is inevitable. The Onyx Storm epub is essential. This book is necessary. Reading digitally is the logical step. You can accept the storm. The adventure is unavoidable.
Современные игроки пересекаются с изобилием технологических аспектов при процессах с официальными ресурсами. Профильные источники типа п»ї1хбет сайт поставляют актуальную контент о работе гэмблинговых компаний.
Механизм проверки счета содержит ряд требуемых фаз. Начальная верификация подразумевает размещения свидетельств доказывающих гражданство. Стандартный пакет подразумевает ID, автоудостоверение или заграничное удостоверение.
Технологическая составляющая оформления охватывает использование безопасного соединения и двойной авторизации. Экспертные участники советуют инициировать полный набор представленных настроек охраны.
Запасные домены образуют идентичные клоны главного домена с удержанием всего набора функций. Основное выгода содержится в тождественности расчетных рамок и параметров условий прокрутки.
Механизм нахождения рабочих резервных ссылок фундируется на наблюдении профильных мессенджер групп и союзных ресурсов. Профессиональные клиенты применяют VPN-сервисы для создания устойчивого доступа невзирая от местных ограничений.
Надёжные площадки азартных сервисов дают клиентам вариант к качественному времяпрепровождению через специализированные сайты, включая Меллстрой официальный сайт , которые выполняют глобальные стандарты защиты.
Процедура активации предполагает предоставления идентификационных информации через защищённые SSL-каналы. Провайдеры запрашивают официальное подтверждение дееспособности и места жительства для соблюдения нормативных критериев.
2FA аутентификация является принудительным частью новейших систем security. Users располагают SMS-шифры, push-алерты или внедряют профессиональные приложения типа Google Authenticator.
Альтернативные URL решают проблемы региональных барьеров и DDoS-атак. Фактически реплики образуют тождественные клоны базового ресурса с сохранением features и пользовательских информации.
Опытные игроки предлагают хранить свежие реестры активных копий в закладках интернет-программы. Администрация направляют updates о новых доменах через email, Telegram-каналы и мобильные apps.
Платёжные операции через проверенные платформы защищены cryptographic системами level банковского направления. Изъятие денег реализуется единственно на validated счета владельца профиля.
Greetings! Very useful advice within this post! It is the little changes
that will make the biggest changes. Many thanks for
sharing!
Also visit my page … retreat center mexico
Развлекательная сфера отображает динамичный расширение, привлекая миллионы геймеров. Грамотные площадки гарантируют надёжную условия для игры. Полную факты о данных брендах реально обнаружить на казино Лаки Бир .
Аккредитация выступает главным фактором селекции площадки. Регуляторы Кюрасао создают серьёзный проверку экономических действий. Любая официальная ресурс осуществляет периодические проверки RNG-алгоритмов.
IT свойства инновационных беттинг-платформ предусматривают SSL-криптографию денежного ранга. Провайдеры цифрового ПО уровня Microgaming, NetEnt, Pragmatic Play добавляют комплексные модели непредсказуемых чисел.
Механизм верификации учётной записи требует передачи документов KYC-формата. Документ, документ о доходах, верификация регистрации — базовый список для окончательного входа.
Параллельные адреса устраняют препятствия с ограничениями поставщиков. Действующие варианты модифицируются каждый день программными специалистами. Карманные утилиты нередко оперируют стабильнее интернет модификаций.
Контроль средств устанавливает перспективную прибыльность гемблинговых партий. Опытные геймеры предлагают сокращать размер пари до 1-2% от итогового капитала.
Определение надежного казино оператора подразумевает серьезного исследования юридических сертификатов. Инновационные ресурсы Меллстрой официальный сайт обеспечивают игрокам абсолютную данные о действующих лицензиях.
Система оформления счета содержит ряд обязательных стадий проверки. Провайдеры просят удостоверения, подтверждающие личность и совершеннолетие. Обычный KYC-порядок требует от 24 до 72 интервалов.
Управление банком начинается с фиксации ограничений на депозиты. Квалифицированные геймеры настаивают задействовать установку 5% от итогового азартного бюджета на одну сессию.
Программные барьеры операторов принуждают внедрять альтернативные маршруты. Альтернативы оберегают полную функциональность центрального платформы, включая хронологию сделок и игровой достижения.
Актуальные денежные сервисы дают моментальные вклады через цифровые портмоне. Bitcoin, Ethereum и устойчивые монеты обеспечивают приватность и наименьшие сборы. Период реализации снятий равно 10-30 минут.
Схемы лояльности предусматривают иерархические степени с прогрессивным возвратом. VIP-консультанты дают персонализированные бонусы, повышенные пределы и ускоренную техподдержку.
Лицензионные ресурсы гэмблинг услуг гарантируют игрокам шанс к элитному времяпрепровождению через профильные ресурсы, включая лаки Р±РёСЂ казино тг , которые выполняют международные нормы безопасности.
Последовательность активации предполагает предоставления идентификационных деталей через безопасные SSL-линии. Провайдеры требуют нотариальное verification правоспособности и локации регистрации для исполнения юрисдикционных критериев.
Двухэтапная проверка является необходимым aspect передовых solutions защиты. Игроки имеют SMS-токены, push-уведомления или используют dedicated софт по типу Google Authenticator.
Альтернативные адреса преодолевают вопросы локальных запретов и DDoS-штурмов. Фактически копии являют копийные dublicates главного домена с maintaining features и пользовательских информации.
Skilled игроки призывают удерживать обновлённые реестры активных альтернатив в bookmark интернет-программы. Администрация передают информацию о fresh адресах через email, Telegram-сообщества и портативные apps.
Финансовые транзакции через legal платформы покрыты шифровальными протоколами уровня банковского направления. Получение капитала реализуется лишь на validated карты собственника аккаунта.
Актуальные участники имеют дело с набором технологических деталей при деятельности с легальными сайтами. Профильные платформы типа тип топ сайт дают современную информацию о работе казино брендов.
Механизм валидации аккаунта содержит набор обязательных уровней. Стартовая подтверждение требует предоставления документов верифицирующих индивидуальность. Типовой набор содержит ID, водительские права или загранпаспорт.
Системная сторона записления содержит внедрение защищенного протокола и двойной авторизации. Профессиональные участники советуют запускать полный набор возможных опций обеспечения.
Дублирующие порталы образуют идентичные отражения базового платформы с удержанием комплексного функционала. Важнейшее выгода заключается в подобии финансовых лимитов и критериев условий прокрутки.
Схема поиска действующих запасных доменов строится на наблюдении экспертных телеграм-каналов и союзных сайтов. Продвинутые геймеры эксплуатируют VPN-сервисы для создания бесперебойного подключения без оглядки от региональных лимитов.
Бесплатный футбол сегодня Football Predictions with expert tipsters on betting tips, Fixed game and Correct Score Best exacte Forecast Sports Games Matches Bets VIP Free Daily Today Sureshot Odds Accumulator Real 100%
Развлекательная отрасль являет активный развитие, притягивая массы клиентов. Грамотные порталы дают защищённую пространство для беттинга. Исчерпывающую факты о данных провайдерах допустимо найти на Лаки Бир .
Сертификация составляет центральным критерием отбора сайта. Лицензиаты Олдерни предоставляют серьёзный проверку денежных операций. Отдельная официальная сайт выполняет периодические аудиты RNG-генераторов.
IT особенности инновационных гемблинг-сайтов охватывают SSL-защиту денежного ранга. Разработчики программного ПО класса Microgaming, NetEnt, Pragmatic Play встраивают продвинутые модели случайных показателей.
Механизм проверки личного кабинета предполагает подачи справок KYC-класса. ID, справка о финансах, верификация адреса — базовый пакет для финального подключения.
Дублирующие домены решают сложности с ограничениями провайдеров. Рабочие зеркала модифицируются регулярно техническими командами. Смартфонные клиенты обычно функционируют качественнее браузерных редакций.
Распределение капитала создаёт продолжительную эффективность игровых партий. Опытные игроки советуют лимитировать величину вейджера до 1-2% от итогового банкролла.
Outstanding story there. What occurred after?
Good luck!
Visit my website; Data Scraping Company
Лицензионные ресурсы игорных возможностей предоставляют участникам доступ к элитному гэмблингу через целевые ресурсы, включая Лаки Бир сайт , что придерживаются мировые регламенты security.
Механизм открытия счёта подразумевает ввода валидационных данных через шифрованные SSL-линии. Менеджмент просят документальное свидетельство age verification и места residence для соблюдения юрисдикционных правил.
2FA аутентификация становится необходимым составляющей современных платформ security. Игроки обретают SMS-токены, push-notification или внедряют специализированные утилиты в стиле Google Authenticator.
Mirror URL устраняют проблемы географических ограничений и DDoS-атак. Технически зеркала являют дублированные копии центрального платформы с обеспечением возможностей и пользовательских деталей.
Опытные пользователи советуют сохранять свежие каталоги функционирующих mirrors в избранном интернет-программы. Management передают updates о новых ссылках через email, Telegram-группы и портативные программы.
Денежные переводы через официальные площадки гарантированы защитными протоколами класса банковского направления. Изъятие финансов производится лишь на проверенные реквизиты обладателя account.
buy prednisone
Беттинговая отрасль являет активный подъём, притягивая миллионы клиентов. Экспертные сайты гарантируют защищённую пространство для ставок. Детальную материалы о этих организациях можно найти на тип топ казино .
Аттестация остаётся основным показателем подбора сайта. Регуляторы Олдерни предоставляют качественный контроль финансовых процедур. Отдельная лицензированная портал выполняет регулярные инспекции RNG-алгоритмов.
Технические особенности новейших игорных домов охватывают SSL-криптографию банковского уровня. Производители программного ПО типа Microgaming, NetEnt, Pragmatic Play встраивают многоуровневые механизмы рандомных параметров.
Схема верификации счёта предполагает передачи свидетельств KYC-класса. Паспорт, выписка о финансах, удостоверение регистрации — классический набор для завершённого активации.
Зеркальные адреса исправляют препятствия с запретами поставщиков. Актуальные альтернативы изменяются систематически компьютерными службами. Планшетные утилиты часто работают стабильнее интернет форматов.
Управление банкроллом задаёт долгосрочную успешность гемблинговых партий. Профессиональные пользователи советуют контролировать сумму ставки до 1-2% от совокупного банкролла.
Современные игроки сталкиваются с огромным количеством системных тонкостей при функционировании с проверенными ресурсами. Профессиональные платформы типа Лаки Бир казино поставляют свежую материалы о деятельности развлекательных брендов.
Алгоритм аутентификации кабинета подразумевает несколько требуемых фаз. Стартовая аутентификация подразумевает размещения справок верифицирующих индивидуальность. Привычный набор охватывает документ, водительские права или международное ID.
Техническая сторона открытия счета подразумевает внедрение криптографической защиты и 2FA. Продвинутые участники советуют инициировать полный набор имеющихся настроек защиты.
Дублирующие порталы образуют стопроцентные дубликаты первичного ресурса с хранением всего функционала. Центральное преимущество состоит в подобии банковских пределов и требований отыгрыша.
Схема поиска актуальных запасных доменов опирается на наблюдении профессиональных уведомительных сервисов и союзных порталов. Профессиональные геймеры используют виртуальные частные сети для обеспечения постоянного входа независимо от географических запретов.
Поиск в секторе лицензированных площадок подразумевает понимания новых способов входа. Продвинутые клиенты задействуют казино типпи для извлечения релевантной фактов о функционирующих адресах.
Процедура регистрации аккаунта в лицензированных заведениях предполагает тщательную верификацию. Продвинутые поставщики эксплуатируют KYC-механизмы и AML-критерии. Документооборот требует от 24 до 72 периодов.
Цифровые инструменты для избежания препятствий развиваются сообща с усилением регуляторных инициатив. VPN-сервисы уровня premium дают защиту AES-256 и стандарты OpenVPN. Стабильность коннекта критически необходима для премиальных партий.
Запасные домены действуют через географически разнесенные серверные мощности. CDN-сети осуществляют сокращенную задержку для международных пользователей. Системное роутинг инициируется при обнаружении ограничения центрального портала.
Платежные движения в проверенных территориях подчиняются строгим правилам PCI DSS. Блокчейн расчеты увеличивают признание из-за анонимности и скорости осуществления.
Портативные приложения ведущих компаний содержат лицевую проверку и push-сообщения для существенных событий. Гибкий оформление самостоятельно настраивается под параметры дисплея.
Перемещение в секторе сертифицированных площадок нуждается представления продвинутых методов подключения. Умелые пользователи используют Vavada зеркало для обретения свежей сведений о оперативных адресах.
Алгоритм оформления счета в официальных компаниях включает детальную подтверждение. Новейшие компании внедряют KYC-алгоритмы и AML-стандарты. Документальная процедура потребляет от 24 до 72 временных отрезков.
Цифровые технологии для прохождения блокировок прогрессируют параллельно с усилением правовых мер. VPN-платформы типа premium обеспечивают защиту AES-256 и протоколы OpenVPN. Стабильность соединения кардинально необходима для привилегированных сессий.
Альтернативные ресурсы действуют через пространственно распределенные серверные инфраструктуры. CDN-системы поддерживают минимальную латентность для азиатских геймеров. Системное редирект включается при идентификации ограничения первичного ресурса.
Финансовые транзакции в легальных областях подчиняются определенным критериям PCI DSS. Цифровые транзакции увеличивают актуальность из-за секретности и динамике реализации.
Планшетные программы ведущих брендов интегрируют физиологическую идентификацию и push-сообщения для критических происшествий. Модифицируемый оформление самостоятельно подстраивается под особенности дисплея.
Доброго!
На сайте OLX вы найдете множество свежих объявлений о продаже недвижимости в Усть-Каменогорске. Объявления о продаже домов и квартир обновляются регулярно. Бесплатные объявления с фото и подробными описаниями помогут вам сделать правильный выбор. Подать объявление можно легко и быстро, просто заполнив форму на сайте. Объявления Каменогорска помогут вам найти идеальное жилье.
Полная информация по ссылке – https://natumbe.kz/kk/shuchinsk/krovelnyje-raboty/
тоо объявления, госзакуп объявления, объявления о продаже автомобилей
olx kz объявления, объявление работа с ежедневной оплатой, объявления астана
Всего наилучшего и хорошей информации!
Передовые игроки имеют дело с множеством программных аспектов при функционировании с лицензированными порталами. Профильные порталы типа п»ї1хбет РІС…РѕРґ предоставляют свежую сведения о операциях игорных организаций.
Алгоритм подтверждения счета охватывает ряд необходимых уровней. Первичная верификация подразумевает предоставления справок валидирующих личность. Стандартный пакет содержит свидетельство, водительские права или загранпаспорт.
Технологическая элемент оформления содержит задействование безопасного соединения и двойной авторизации. Экспертные игроки подсказывают активировать совокупность предложенных параметров защиты.
Резервные ссылки представляют полные реплики основного домена с обеспечением комплексного возможностей. Ключевое выгода заключается в схожести расчетных ограничений и норм условий прокрутки.
Процедура поиска функционирующих резервных ссылок фундируется на контроле профессиональных уведомительных сервисов и партнерских порталов. Экспертные пользователи используют виртуальные частные сети для гарантирования надежного соединения безотносительно от территориальных блокировок.
Гемблинговая область демонстрирует динамичный подъём, привлекая массы геймеров. Профессиональные ресурсы предлагают стабильную атмосферу для развлечений. Развёрнутую сведения о данных провайдерах реально отыскать на Вавада зеркало .
Легализация выступает центральным фактором селекции ресурса. Надзорные органы Олдерни дают серьёзный контроль финансовых манипуляций. Конкретная лицензированная сайт осуществляет плановые ревизии RNG-генераторов.
Программные характеристики передовых азартных площадок содержат SSL-кодирование расчётного стандарта. Поставщики компьютерного обеспечения уровня Microgaming, NetEnt, Pragmatic Play встраивают продвинутые схемы хаотичных показателей.
Алгоритм валидации счёта предусматривает подачи справок KYC-уровня. Паспорт, справка о доходах, валидация местожительства — стандартный пакет для завершённого подключения.
Дублирующие URL ликвидируют барьеры с запретами поставщиков. Свежие варианты адаптируются ежедневно компьютерными группами. Мобильные утилиты регулярно функционируют стабильнее онлайн редакций.
Финансовая дисциплина задаёт продолжительную результативность развлекательных партий. Профессиональные участники указывают урезать сумму вейджера до 1-2% от суммарного фонда.
Многие пользователи борются с проблемой определения активной адреса на сайт Kraken. Посещение фишинговым адресам из форумов влечёт за собой к компрометации конфиденциальных сведений и криптовалюты. сайт кракен онион ссылка
Надёжные ресурсы игорных возможностей гарантируют пользователям шанс к элитному гэмблингу через специализированные ресурсы, включая lucky bear казино скачать , которые специально выполняют общепринятые критерии безопасности.
Последовательность создания аккаунта включает заполнения authentication сведений через шифрованные SSL-каналы. Администрация требуют письменное verification age verification и локации регистрации для выполнения юрисдикционных критериев.
Двухфакторная authentication считается принудительным частью новейших систем защиты. Пользователи приобретают SMS-шифры, push-уведомления или задействуют специализированные приложения вроде Google Authenticator.
Зеркальные ссылки ликвидируют трудности локальных барьеров и DDoS-воздействий. Фактически зеркала являют идентичные копии центрального платформы с maintaining функциональности и пользовательских данных.
Skilled геймеры предлагают хранить новейшие базы рабочих mirrors в избранном веб-клиента. Management передают updates о новых ссылках через электронную почту, Telegram-чаты и телефонные apps.
Payment переводы через надёжные ресурсы защищены защитными технологиями стандарта банковского направления. Снятие средств происходит лишь на аутентифицированные счета держателя учётной записи.
Определение легального развлекательного оператора заставляет тщательного разбора официальных сертификатов. Инновационные сайты винити официальный сайт гарантируют клиентам стопроцентную детали о собственных лицензиях.
Процедура получения доступа предусматривает определенное количество ключевых шагов проверки. Операторы настаивают документы, подтверждающие персону и правоспособность. Традиционный KYC-регламент продолжается от 24 до 72 временных отрезков.
Банкролл-менеджмент открывается с установления лимитов на вклады. Опытные геймеры призывают использовать установку 5% от совокупного гемблинг средств на отдельную партию.
Системные препятствия администраторов побуждают применять резервные маршруты. Альтернативы поддерживают безусловную эффективность центрального сайта, охватывая архив платежей и азартный результаты.
Современные денежные методы дают моментальные пополнения через виртуальные кошельки. Bitcoin, Ethereum и стейблкоины гарантируют анонимность и символические сборы. Длительность проведения извлечений доходит 10-30 промежутков.
Алгоритмы верности содержат ступенчатые степени с накапливающимся бонусом. VIP-представители гарантируют личные поощрения, повышенные рамки и ускоренную помощь.
Современная проза и рассказы • Канал про современную русскую прозу и зарубежную фантастику • Подборки литературных романов и критика современной прозы • Лучшие рассказы и повести в Telegram-канале • Где читать новые литературные романы и фантастику онлайн • рецензии и авторские тексты про книги
Современные платформы развлекательных услуг обеспечивают игрокам подключение к высококлассному азарту через проверенные Вавада платформы. Официальная операционная активность требует соблюдения определенных регуляторных положений.
Процедура создания персонального кабинета включает подтверждение персональных сведений. Регуляторы применяют углубленные процедуры KYC и AML для недопущения поддельных транзакций.
Технические инструменты актуальных игорных домов строятся на безопасных облачных системах с SSL протоколами. Локальные запреты обязывает владельцев организовывать дублирующие порталы.
Резервные ресурсы формируют аналогичные дубликаты главного платформы с удержанием всех опций и показателей. Клиенты достигают устойчивый соединение к счету, игровой записям и клиентским установкам.
Денежные переводы производятся через встроенные платежные сервисы. Границы на пополнения и изъятия определяются в согласии с регуляторными критериями и собственными правилами управления рисками.
Экспертные клиенты рекомендуют мониторить условия авторизации через надзорные списки развлекательных органов. Статусные параметры задействуют места на отраслевых сервисах и мнения действительных пользователей.
Современные гемблеры оказываются с барьером подключения к сертифицированным ресурсам. Провайдеры закрывают первичные адреса, но знающие казино Mellstroy Game участники осознают о доступности зеркальных платформ.
Параллельный портал является полную дубликат базового сайта. Криптографические алгоритмы работают аналогичными. Расчётные переводы реализуются через идентичные каналы.
Алгоритм оформления профиля через дополнительный адрес содержит стандартной верификации. Специалисты просят удостоверения для соблюдения KYC-регламентов. Персональные параметры реализуют расширенную верификацию.
Пополнительные рамки на дополнительных сайтах аналогичны первичным условиям. Низшие вклады сохраняются неизменными. Растущие призовые фонды координируются между разными порталами.
Льготные системы работают всесторонне на параллельных площадках. Отыгрышный коэффициент сохраняет исходные значения. Период действия реализации остаётся прежним.
Служба ассистирования решает запросы с резервных ресурсов аналогично. Интерактивный общение осуществляет постоянный график функционирования.
Бесплатные ставки на футбол Expert tipsters deliver betting tips on sports games and matches including Fixed game selections and correct score best exacte forecast. Vip and free bets are available daily with sureshot odds and accumulator real
Определение проверенного казино портала требует основательного изучения юридических разрешений. Передовые платформы Меллстрой казино предлагают клиентам абсолютную сведения о имеющихся санкциях.
Алгоритм создания профиля охватывает различные принудительных стадий проверки. Владельцы истребуют справки, доказывающие персону и возраст. Обычный KYC-регламент длится от 24 до 72 временных отрезков.
Контроль средств стартует с установления ограничений на взносы. Профессиональные пользователи рекомендуют задействовать принцип 5% от итогового казино фонда на одну раунд.
Технические барьеры администраторов заставляют применять запасные маршруты. Дубликаты поддерживают максимальную эффективность базового сайта, подразумевая летопись транзакций и гемблинг продвижение.
Инновационные расчетные сервисы предоставляют быстрые вклады через криптовалютные кошельки. Bitcoin, Ethereum и фиксированные активы обеспечивают скрытность и символические комиссии. Длительность осуществления снятий достигает 10-30 периодов.
Системы постоянства охватывают иерархические ранги с возрастающим компенсацией. VIP-представители гарантируют индивидуальные подарки, усиленные пределы и опережающую сервис.
Передовые пользователи имеют дело с изобилием системных тонкостей при функционировании с официальными ресурсами. Специализированные ресурсы типа винити официальный сайт обеспечивают свежую материалы о функционировании игорных организаций.
Система валидации аккаунта содержит несколько требуемых уровней. Первичная валидация включает загрузки справок верифицирующих гражданство. Типовой пакет содержит паспорт, лицензию водителя или загранпаспорт.
Системная часть создания аккаунта содержит внедрение безопасного соединения и двухфакторной аутентификации. Опытные клиенты рекомендуют запускать все имеющихся функций охраны.
Зеркала составляют стопроцентные реплики главного платформы с обеспечением тотального функционала. Центральное плюс кроется в идентичности платежных пределов и параметров вейджера.
Механизм поиска актуальных запасных доменов основывается на отслеживании экспертных новостных лент и аффилированных площадок. Продвинутые участники задействуют VPN-сервисы для создания бесперебойного подключения вне зависимости от локальных ограничений.
Исследование в пространстве официальных порталов подразумевает представления современных методов входа. Продвинутые участники внедряют Lucky Bear для добывания релевантной информации о действующих ссылках.
Схема открытия профиля в лицензированных организациях подразумевает многоуровневую валидацию. Передовые поставщики применяют KYC-процедуры и AML-нормы. Оформление документов отнимает от 24 до 72 часов.
IT инструменты для избежания препятствий совершенствуются параллельно с укреплением регуляторных инициатив. VPN-платформы уровня premium обеспечивают безопасность AES-256 и методы OpenVPN. Непрерывность связи принципиально важна для элитных заходов.
Альтернативные платформы работают через регионально разнесенные IT мощности. CDN-сети предоставляют быструю время ответа для американских пользователей. Техническое роутинг срабатывает при обнаружении блокировки центрального адреса.
Финансовые транзакции в проверенных регионах отвечают четким требованиям PCI DSS. Цифровые платежи приобретают актуальность вследствие секретности и быстроте выполнения.
Смартфонные приложения элитных операторов интегрируют лицевую авторизацию и push-оповещения для важных событий. Модифицируемый дизайн автономно адаптируется под параметры матрицы.
Подбор качественного азартного площадки в современных условиях требует тщательного внимания к законному режиму. Знающие участники представляют, что Лев казино отображает последнюю факты о функционирующих сервисах.
Процесс регистрации в официальных сервисах объединяет требуемую проверку личности. KYC-правила обеспечивают как заведение, так и геймера от обмана. Кратковременные лимиты на получение активов до окончания валидации – нормальная процедура.
Технические блокировки на соединение к игровым площадкам устраняются через дублирующие ссылки. Действующие копии предоставляют абсолютную возможности первичного портала. Денежные процедуры, развлекательный результаты и льготные системы сохраняются постоянными.
Капитальная стабильность оценивается степенью эксплуатируемых расчетных инструментов. SSL-кодирование, PCI DSS подтверждение и двухфакторная подтверждение создают прочный заслон охраны.
Интерактивная каталог лицензированных сервисов содержит слоты от известных разработчиков. RTP-индексы, колебания и математические схемы проходят независимую сертификацию в аккредитованных учреждениях.
Системы вознаграждения в профессиональных операторах опираются на прозрачных условиях проигрыша. Требования x35-40 характеризуется разумным для барабан-льгот, в то время как традиционные активности принимаются в калькуляцию с редуцированным показателем.
Truvella Store – Everything looks carefully arranged, creating a welcoming feel.
Гемблинговая отрасль показывает стремительный расширение, заинтересовывая массы участников. Грамотные платформы обеспечивают качественную среду для ставок. Развёрнутую информацию о таких операторах можно обнаружить на п»ї1xBet casino .
Сертификация составляет главным элементом отбора платформы. Юрисдикции Гибралтара обеспечивают жёсткий контроль финансовых процедур. Всякая сертифицированная сайт выполняет плановые проверки RNG-алгоритмов.
IT особенности актуальных гемблинг-сайтов содержат SSL-криптографию денежного ранга. Производители программного материала наподобие Microgaming, NetEnt, Pragmatic Play внедряют продвинутые механизмы рандомных величин.
Схема аутентификации личного кабинета предусматривает представления удостоверений KYC-стандарта. ID, документ о средствах, удостоверение прописки — обычный набор для завершённого активации.
Альтернативные адреса решают барьеры с фильтрацией компаний. Действующие дубли обновляются ежедневно IT специалистами. Карманные софт нередко выполняются стабильнее интернет версий.
Контроль средств определяет продолжительную результативность гемблинговых раундов. Профессиональные пользователи предлагают лимитировать размер ставки до 1-2% от итогового резерва.
Передовые пользователи имеют дело с массой технологических деталей при деятельности с лицензированными ресурсами. Экспертные ресурсы типа Вавада РІС…РѕРґ поставляют свежую информацию о процессах гэмблинговых провайдеров.
Алгоритм подтверждения счета включает ряд требуемых этапов. Начальная подтверждение предполагает предоставления справок валидирующих субъект. Типовой комплект подразумевает документ, автоудостоверение или внешний паспорт.
Системная элемент регистрации подразумевает внедрение криптографической защиты и двухфакторной аутентификации. Экспертные клиенты советуют задействовать все имеющихся настроек секьюрити.
Запасные домены составляют стопроцентные отражения главного сайта с удержанием полного возможностей. Важнейшее преимущество выражается в схожести платежных ограничений и параметров условий прокрутки.
Схема обнаружения активных дублирующих порталов фундируется на наблюдении экспертных телеграм-каналов и связанных сайтов. Квалифицированные пользователи эксплуатируют прокси-соединения для гарантирования стабильного входа независимо от территориальных лимитов.
Комплексные услуги по бурению https://burenie-tochka.ru и водоснабжению от Бурения Точка Ру. Бурение скважин на воду в Московской области под ключ. Бурение скважин на воду и обустройство. Бурение артезианской скважины на воду. Бурение скважин на воду малогабаритной техникой.
zoloft buy: buy zoloft – order zoloft
Гемблинговая область являет интенсивный прогресс, заинтересовывая миллионы геймеров. Профессиональные ресурсы предлагают надёжную обстановку для пари. Полную данные о данных компаниях возможно получить на РјСЌРґ казино .
Сертификация остаётся центральным фактором подбора ресурса. Надзорные органы Олдерни создают качественный контроль валютных действий. Каждая лицензированная портал осуществляет периодические инспекции RNG-модулей.
IT особенности актуальных игорных домов охватывают SSL-шифрование расчётного уровня. Разработчики софтового обеспечения класса Microgaming, NetEnt, Pragmatic Play внедряют усовершенствованные схемы случайных параметров.
Схема верификации личного кабинета требует передачи удостоверений KYC-стандарта. Паспорт, подтверждение о доходах, удостоверение прописки — обычный комплект для полноценного активации.
Параллельные адреса ликвидируют барьеры с фильтрацией операторов. Действующие зеркала модифицируются ежедневно цифровыми специалистами. Мобильные софт обычно работают надёжнее веб форматов.
Банкролл-менеджмент формирует перспективную доходность игровых партий. Грамотные пользователи предлагают ограничивать объём депозита до 1-2% от суммарного фонда.
Нынешние гемблеры попадают с сложностью соединения к сертифицированным площадкам. Провайдеры блокируют стандартные порталы, но грамотные lucky bear казино клиенты учитывают о доступности резервных площадок.
Параллельный портал составляет полную реплику оригинального площадки. Протоколы шифрования поддерживаются такими же. Банковские процедуры осуществляются через те же механизмы.
Технология создания аккаунта через дополнительный домен содержит обычной верификации. Операторы просят бумаги для соблюдения KYC-регламентов. Персональные сведения осуществляют комплексную аутентификацию.
Пополнительные пределы на параллельных порталах аналогичны главным требованиям. Наименьшие ставки остаются стабильными. Прогрессивные джекпоты координируются между различными адресами.
Стимулирующие планы функционируют всесторонне на параллельных порталах. Требования по обороту поддерживает базовые величины. Временные рамки использования сохраняется.
Служба ассистирования изучает вопросы с параллельных ссылок сходным образом. Онлайн диалог осуществляет постоянный режим функционирования.
Надёжные платформы игорных предложений oferuja геймерам шанс к высококлассному развлечениям через профильные домены, включая Lucky Bear casino , что следуют мировые стандарты security.
Последовательность создания аккаунта предполагает предоставления верификационных данных через защищённые SSL-протоколы. Операторы просят официальное удостоверение совершеннолетия и локации жительства для выполнения юрисдикционных правил.
Двухэтапная идентификация является required компонентом передовых solutions надёжности. Клиенты получают SMS-шифры, push-notification или используют targeted утилиты типа Google Authenticator.
Альтернативные домены нейтрализуют вопросы географических ограничений и DDoS-атак. По сути дубли представляют дублированные клоны базового портала с поддержанием опций и user сведений.
Компетентные пользователи suggest поддерживать current реестры рабочих mirrors в сохранённых ссылках интернет-программы. Провайдеры рассылают сведения о свежих ссылках через электронную почту, Telegram-сообщества и портативные приложения.
Финансовые процедуры через legal сайты покрыты шифровальными methods категории банковского сектора. Изъятие средств выполняется лишь на проверенные wallets собственника account.
Поиск надежного развлекательного площадки в актуальных границах предполагает особого рассмотрения к правовому уровню. Компетентные игроки знают, что Lucky Bear включает новую факты о активных ресурсах.
Алгоритм записи в официальных платформах охватывает необходимую валидацию личности. KYC-нормы оберегают как оператора, так и геймера от афер. Временные лимиты на вывод капитала до завершения проверки – нормальная методика.
Электронные запреты на доступ к betting сайтам преодолеваются через дублирующие адреса. Активные копии поддерживают тотальную возможности базового ресурса. Финансовые движения, азартный прогресс и привилегированные планы сохраняются константными.
Капитальная надежность выражается критерием внедренных расчетных методов. SSL-криптография, PCI DSS лицензирование и многоуровневая подтверждение устанавливают прочный периметр охраны.
Азартная каталог сертифицированных сервисов включает барабаны от лидирующих производителей. RTP-параметры, колебания и математические принципы претерпевают объективную аудит в авторизованных институтах.
Системы мотивации в профессиональных казино строятся на открытых критериях ставок. Требования x35-40 оценивается адекватным для автомат-подарков, в то время как карточные забавы идут в расчет с уменьшенным коэффициентом.
Mod Mosaic Platform – A fresh and stylish mix, browsing the collection was truly enjoyable.
禁忌第一季高清完整版结合大数据AI分析,海外华人可免费观看最新热播剧集。
Ориентирование в сфере проверенных площадок включает знания новых решений авторизации. Профессиональные геймеры задействуют Меллстрой РІС…РѕРґ для обретения современной сведений о оперативных адресах.
Механизм регистрации учетной записи в сертифицированных заведениях предполагает тщательную верификацию. Продвинутые компании внедряют KYC-процедуры и AML-правила. Документальная процедура занимает от 24 до 72 промежутков.
Технические технологии для избежания барьеров эволюционируют одновременно с ужесточением законодательных решений. VPN-решения разряда premium предоставляют защиту AES-256 и методы OpenVPN. Стабильность коннекта fundamentally важна для VIP сессий.
Зеркальные домены оперируют через территориально распределенные IT ресурсы. CDN-структуры гарантируют быструю отклик для глобальных геймеров. Автоматическое маршрутизация срабатывает при выявлении недоступности центрального ресурса.
Денежные транзакции в легальных территориях подпадают под строгим требованиям PCI DSS. Децентрализованные транзакции набирают актуальность благодаря анонимности и быстроте реализации.
Планшетные утилиты премиальных организаций интегрируют лицевую аутентификацию и push-оповещения для ключевых ситуаций. Адаптивный интерфейс самостоятельно изменяется под настройки дисплея.
Отбор достойного игрового заведения в нынешних обстоятельствах нуждается особого изучения к лицензионному состоянию. Профессиональные пользователи знают, что Лаки Бир РІС…РѕРґ отображает свежую факты о доступных сервисах.
Схема создания аккаунта в легальных платформах содержит требуемую аутентификацию идентичности. KYC-стандарты обеспечивают как заведение, так и клиента от мошенничества. Временные границы на перечисление финансов до завершения контроля – привычная процедура.
Цифровые блокировки на соединение к гемблинг сайтам обходятся через дублирующие адреса. Действующие зеркала гарантируют полную производительность первичного платформы. Денежные транзакции, интерактивный достижения и привилегированные программы функционируют неизменными.
Финансовая безопасность выражается качеством задействованных финансовых методов. SSL-защита, PCI DSS подтверждение и многоуровневая идентификация обеспечивают прочный периметр обороны.
Интерактивная ассортимент лицензированных операторов предоставляет барабаны от лидирующих разработчиков. RTP-значения, колебания и расчетные принципы подвергаются объективную валидацию в утвержденных организациях.
Схемы мотивации в надежных заведениях опираются на прозрачных требованиях ставок. Проигрыш x35-40 оценивается адекватным для слот-привилегий, в то время как карточные состязания включаются в калькуляцию с минимальным фактором.
Легальные платформы азартных опций обеспечивают пользователям доступ к профессиональному игровому процессу через тематические ресурсы, включая lucky bear казино официальный сайт РІС…РѕРґ , которые точно выполняют мировые регламенты security.
Схема создания аккаунта подразумевает указания верификационных сведений через безопасные SSL-протоколы. Букмекеры просят предоставить письменное доказательство age verification и территории residence для исполнения нормативных стандартов.
Двухфакторная верификация является required компонентом новейших систем безопасности. Участники приобретают SMS-токены, push-notification или используют профессиональные программы в стиле Google Authenticator.
Альтернативные URL устраняют сложности географических барьеров и DDoS-нападений. По сути mirrors формируют идентичные копии основного сайта с поддержанием возможностей и пользовательских деталей.
Опытные клиенты предлагают удерживать current реестры working копий в закладках браузера. Провайдеры отправляют новости о актуальных доменах через почтовые сервисы, Telegram-каналы и mobile программы.
Денежные операции через проверенные платформы обеспечены cryptographic methods стандарта банковского сектора. Снятие средств осуществляется лишь на подтверждённые данные собственника профиля.
Современные порталы азартных игр предоставляют участникам вход к премиальному гемблингу через безопасные Килограмм казино системы. Авторизованная операционная активность предполагает исполнения конкретных правовых норм.
Механизм активации игрового аккаунта предусматривает подтверждение индивидуальных показателей. Регуляторы используют комплексные системы KYC и AML для предотвращения незаконных платежей.
Электронные платформы современных гемблинг платформ функционируют на защищенных дата-центрах с HTTPS сертификатами. Региональная блокировка вынуждает операторов создавать вспомогательные порталы.
Альтернативные ресурсы составляют эквивалентные репликации базового сайта с сохранением всех сервисов и показателей. Клиенты получают постоянный соединение к капиталу, игровой данным и персональным параметрам.
Расчетные переводы реализуются через синхронизированные денежные агрегаторы. Пределы на депозиты и снятия регулируются в соответствии с регуляторными стандартами и организационными правилами риск-менеджмента.
Опытные клиенты советуют проверять ситуацию авторизации через контролирующие каталоги азартных организаций. Имиджевые показатели включают ранги на профильных сервисах и комментарии истинных пользователей.
Normally I do not learn article on blogs, however I would like to say that this write-up very compelled me to
check out and do it! Your writing style has been surprised me.
Thank you, very great post.
Also visit my web page; Data Scraping Services
Актуальные провайдеры гемблинг услуг дают участникам возможность к высококлассному развлечениям через безопасные Vavada казино порталы. Легальная работа подразумевает учета строгих правовых стандартов.
Процесс оформления индивидуального счета задействует проверку индивидуальных информации. Регуляторы используют углубленные процедуры KYC и AML для блокировки нарушающих платежей.
Технические инструменты инновационных беттинг площадок функционируют на стабильных дата-центрах с TLS алгоритмами. Региональная блокировка побуждает провайдеров создавать параллельные адреса.
Параллельные ресурсы составляют эквивалентные дубликаты первичного сайта с удержанием всех опций и данных. Клиенты добиваются беспрепятственный вход к балансу, игровой записям и личным параметрам.
Расчетные транзакции реализуются через встроенные денежные сервисы. Пределы на взносы и изъятия определяются в гармонии с нормативными стандартами и внутренними процедурами риск-менеджмента.
Квалифицированные клиенты рекомендуют проверять положение аккредитации через контролирующие базы данных азартных организаций. Имиджевые индикаторы задействуют рейтинги на тематических порталах и мнения реальных участников.
Новейшие операторы беттинг услуг предоставляют участникам доступ к качественному беттингу через надежные Меллстрой сайт порталы. Легальная операционная активность требует соблюдения строгих правовых стандартов.
Процедура оформления игрового учетной записи охватывает валидацию личных информации. Регуляторы используют расширенные механизмы KYC и AML для предотвращения незаконных финансовых действий.
Программные решения передовых казино функционируют на стабильных дата-центрах с криптографическими технологиями. Территориальные ограничения обязывает владельцев разрабатывать альтернативные адреса.
Дублирующие ресурсы представляют аналогичные копии базового ресурса с обеспечением всех функций и сведений. Беттеры обеспечивают себе устойчивый соединение к капиталу, беттинг данным и индивидуальным конфигурациям.
Банковские переводы реализуются через подключенные финансовые сервисы. Пределы на депозиты и изъятия фиксируются в согласии с регуляторными положениями и внутренними нормами контроля угроз.
Опытные пользователи советуют мониторить положение разрешения через регуляторные реестры гемблинг комиссий. Престижные показатели предусматривают места на отраслевых сервисах и комментарии действительных пользователей.
If some one needs to be updated with most up-to-date technologies then he must be pay a visit this site and
be up to date all the time.
قبل إجراء إيداع. بمجرد تسجيل حساب بنجاح، حدد المزيد، ثم ألعاب أخرى، للعثور على Aviator. إذا صادفتك ألعاب طائرة أخرى مثل Crash أو Aviatrix أو Zepplin أو JetX، فإننا نوصي باعتماد استراتيجية مماثلة للعب Aviator من أجل الفوز. تمتاز لعبه الطياره بتقديم حد منخفض للرهان يناسب جميع اللاعبين، وتوفر أيضًا ميزة وضع رهانين معًا في نفس الوقت ويتم التعامل مع كل رهان بشكل مستقل تماما. إلى جانب ذلك، تقدم اللعبة عدد عشوائي من الرهانات المجانية للاعبين في الدردشة. 1963 عرض متاح
http://rventuresinc.co/%d9%85%d8%b1%d8%a7%d8%ac%d8%b9%d8%a9-%d9%84%d8%b9%d8%a8%d8%a9-melbet-%d9%81%d9%8a-%d8%a7%d9%84%d9%83%d8%a7%d8%b2%d9%8a%d9%86%d9%88-%d8%a7%d9%84%d8%a5%d9%84%d9%83%d8%aa%d8%b1%d9%88%d9%86%d9%8a-%d9%84-2/
تعمل العديد من شركات المراهنة وألعاب الكازينو الرائدة في المغرب على تطوير تطبيقات جوال قادرة على تلبية تفضيلات اللاعبين. تجمع هذه التطبيقات بين واجهات الاستخدام السلسة والعديد من المميزات القوية الأخرى، ما جعل من تنزيل لعبة الطيارة اللي بتكسب فلوس أكثر سهولة من أي وقت مضى. بالنسبة لأولئك الجدد في اللعبة أو الذين يرغبون في ممارسة استراتيجياتهم دون المخاطرة بأموال حقيقية، يقدم موقع 1xBet نسخة تجريبية من لعبة الطائرة. تتيح هذه الميزة للمستخدمين اللعب بأموال افتراضية وفهم خوارزمية اللعبة وتطوير إستراتيجيتهم الفائزة.
http://ivertherapeutics.com/# Iver Therapeutics
Hi my friend! I want to say that this post is awesome, great written and come with
almost all vital infos. I’d like to peer extra posts like this .
My website; personal retreat riviera maya
https://ivertherapeutics.shop/# ivermectin 50 mg
indian pharmacies online
Australian online casino PayID – instant deposits and withdrawals
Современные участники встречаются с затруднением входа к лицензированным ресурсам. Провайдеры закрывают стандартные ссылки, но профессиональные казино аква клиенты знают о наличии дублирующих платформ.
Резервная ссылка образует точную отображение оригинального площадки. Средства защиты работают такими же. Банковские действия проходят через равнозначные сервисы.
Технология открытия счёта через резервный портал подразумевает стандартной аутентификации. Менеджеры запрашивают удостоверения для осуществления KYC-требований. Идентификационные данные выполняют усиленную проверку.
Пополнительные рамки на резервных ресурсах соответствуют главным спецификациям. Низшие беты сохраняются стабильными. Прогрессивные призовые фонды интегрируются между множественными адресами.
Стимулирующие программы действуют всесторонне на параллельных площадках. Требования по обороту поддерживает оригинальные показатели. Срок активности проигрывания поддерживается.
Сервис сопровождения решает вопросы с дополнительных порталов таким же способом. Мгновенный диалог поддерживает непрерывный формат оперирования.
Официальные операторы развлекательных опций обеспечивают пользователям вариант к качественному развлечениям через dedicated порталы, включая Лаки Бир сайт , что выполняют общепринятые стандарты security.
Алгоритм оформления профиля подразумевает указания проверочных сведений через шифрованные SSL-каналы. Операторы запрашивают документальное доказательство совершеннолетия и места проживания для исполнения нормативных критериев.
Многоуровневая идентификация становится mandatory компонентом современных архитектур конфиденциальности. Участники имеют SMS-токены, push-оповещения или эксплуатируют специальные tools в стиле Google Authenticator.
Mirror адреса ликвидируют проблемы региональных запретов и DDoS-нападений. С технической точки зрения реплики являют копийные реплики базового сайта с обеспечением features и клиентских информации.
Опытные геймеры призывают удерживать current перечни рабочих копий в закладках обозревателя. Букмекеры передают информацию о современных URL через email, Telegram-каналы и портативные apps.
Финансовые операции через лицензионные платформы покрыты защитными протоколами level банковского индустрии. Получение денег реализуется исключительно на проверенные счета собственника профиля.
online pharmacy meds pharmacy rx world canada Smart GenRx USA
Азартная сфера отображает активный подъём, притягивая массы пользователей. Грамотные порталы предоставляют стабильную условия для пари. Исчерпывающую информацию о подобных компаниях доступно изучить на тип топ казино .
Лицензирование составляет центральным фактором выбора портала. Регуляторы Кюрасао предоставляют жёсткий проверку денежных транзакций. Всякая сертифицированная площадка проходит регулярные ревизии RNG-алгоритмов.
Технические особенности актуальных гемблинг-сайтов включают SSL-кодирование расчётного категории. Разработчики программного обеспечения вроде Microgaming, NetEnt, Pragmatic Play встраивают сложные механизмы произвольных параметров.
Процесс верификации аккаунта предполагает предоставления удостоверений KYC-формата. Паспорт, свидетельство о финансах, удостоверение местожительства — обычный комплект для финального активации.
Резервные адреса решают проблемы с ограничениями поставщиков. Свежие дубли корректируются ежедневно цифровыми специалистами. Смартфонные клиенты часто оперируют устойчивее интернет редакций.
Контроль средств определяет стратегическую доходность азартных партий. Экспертные участники настаивают ограничивать сумму ставки до 1-2% от итогового бюджета.
Надёжные площадки азартных услуг oferuja участникам шанс к высококлассному гэмблингу через профильные порталы, включая Меллстрой казино , которые выполняют общепринятые стандарты защиты.
Схема активации требует предоставления идентификационных деталей через encrypted SSL-каналы. Администрация demanded письменное доказательство возраста и локации нахождения для исполнения нормативных требований.
Двухэтапная проверка является принудительным элементом новейших платформ security. Users располагают SMS-шифры, push-уведомления или используют профессиональные программы в стиле Google Authenticator.
Резервные ссылки нейтрализуют проблемы geographic запретов и DDoS-воздействий. Фактически реплики являют дублированные dublicates центрального домена с maintaining инструментария и клиентских сведений.
Опытные клиенты рекомендуют сохранять свежие списки активных mirrors в favourites веб-клиента. Management передают обновления о свежих URL через почтовые сервисы, Telegram-сообщества и портативные apps.
Платёжные переводы через проверенные порталы secured защитными methods класса банковского направления. Вывод финансов выполняется единственно на верифицированные карты обладателя личного кабинета.
Everything is very open with a precise description of the issues.
It was truly informative. Your site is very useful.
Thanks for sharing!
internet pharmacy manitoba: Smart GenRx USA – pharmacy com canada
Rutor — центральный ресурс русскоязычного даркнета в Tor, предоставляющий доступ к материалам, товарам, контенту и правилам анонимности для пользователей черного рынка и onion площадок
Портал Rutor признан лидером среди площадок русского даркнета за надёжный сервис, поддержание анонимности и обслуживание операций через Rutor.Rutor: Один из ключевых проектов русскоязычного даркнета
rutor форум — это один из первых и известнейших русскоязычных ресурсов даркнета, неразрывно связанный с анонимной онлайн-экосистемой. Этот магазин ориентирован на предоставление пользователям широкой базы данных, связанной с файлами, софтом, новостями и различными видами контента, включая темы, касающиеся взлома и безопасности.
Особенности работы системы Rutor
Механизм работы ресурса позволяет пользователям получать доступ к большим массивам данных и файлов, при этом обеспечивая максимальную приватность и анонимность. Особенность сервиса в том, что он работает через сеть Rutor, что существенно снижает риск идентификации и утечки данных. За долгое время работы Rutor стал своего рода летописью для даркнета на русском языке.
Rutor поддерживает стабильную работу, позволяя и новичкам, и опытным пользователям использовать предоставляемые сервисы. Каждый из разделов сайта — магазин, новостные ленты или руководства по взлому — образуют отдельную звено в масштабном сообществе, где главными ценностями выступают конфиденциальность и защита анонимности.
Будущее платформы: вызовы и обещания
Нет сомнений, что в дальнейшем Rutor столкнётся с новыми угрозами, инновационными способами охраны приватности и методами преодоления блокировок. Следует помнить, что даже максимально анонимная среда не обеспечивает стопроцентную безопасность.
Этот сервис по-прежнему служит площадкой для информирования, обсуждений безопасности и отслеживания новшеств в даркнет-сообществе. Технический прогресс, рост числа участников и новые функциональные решения превращают Rutor в ключевой узел русскоязычного интернет-сообщества.
– Принцип анонимности
– Надёжность проведения операций
– Доступ к уникальной информации
– Конфиденциальность общения
Уникальный путь Rutor делает платформу значимой для тех, кто высоко ценит свободу, личную приватность и защиту от внешнего контроля в цифровую эпоху.
I am really inspired along with your writing abilities
and also with the structure to your blog. Is that this a paid topic or did you modify it yourself?
Anyway keep up the excellent high quality writing, it’s uncommon to peer a great blog like this one today..
Легальные провайдеры гэмблинг услуг гарантируют участникам вариант к профессиональному гэмблингу через dedicated платформы, включая Mellstroy Game зеркало , которые точно соблюдают transnational регламенты защиты.
Алгоритм создания аккаунта necessita внесения проверочных информации через encrypted SSL-протоколы. Операторы demanded официальное доказательство правоспособности и территории проживания для compliance законодательных норм.
Двухфакторная идентификация становится required компонентом актуальных архитектур защиты. Пользователи имеют SMS-коды, push-notification или используют специальные tools наподобие Google Authenticator.
Альтернативные ссылки нейтрализуют трудности географических запретов и DDoS-штурмов. Техническим образом реплики представляют тождественные dublicates основного платформы с сохранением инструментария и клиентских сведений.
Экспертные участники рекомендуют сохранять актуальные списки working альтернатив в избранном браузера. Букмекеры доставляют информацию о свежих адресах через электронную почту, Telegram-группы и mobile софт.
Payment movements через официальные ресурсы защищены защитными технологиями level банковского области. Снятие финансов осуществляется лишь на проверенные карты собственника учётной записи.
Определение качественного развлекательного площадки в современных обстоятельствах требует детального внимания к правовому состоянию. Квалифицированные клиенты представляют, что п»ї1хбет РІС…РѕРґ отображает актуальную информацию о активных ресурсах.
Механизм записи в лицензированных платформах включает принудительную верификацию персональных данных. KYC-нормы оберегают как площадку, так и пользователя от мошенничества. Временные ограничения на изъятие капитала до завершения подтверждения – привычная методика.
Цифровые запреты на соединение к betting сервисам решаются через параллельные порталы. Доступные копии обеспечивают всестороннюю возможности базового ресурса. Денежные переводы, интерактивный прогресс и поощрительные системы поддерживаются постоянными.
Материальная безопасность определяется качеством эксплуатируемых банковских методов. SSL-шифрование, PCI DSS валидация и двухфакторная верификация обеспечивают прочный барьер защиты.
Азартная ассортимент легальных операторов включает машины от ведущих создателей. RTP-параметры, вариативность и математические схемы проходят независимую контроль в признанных центрах.
Системы поощрения в качественных операторах строятся на понятных критериях отыгрыша. Условия ставок x35-40 оценивается нормальным для машина-привилегий, в то время как стандартные игры засчитываются в счет с сниженным процентом.
Легальные платформы игровых опций дают пользователям возможность к высококлассному игровому процессу через целевые платформы, включая lucky bear казино онлайн скачать , что следуют мировые регламенты безопасности.
Механизм открытия счёта включает заполнения проверочных информации через криптографические SSL-каналы. Провайдеры запрашивают official verification дееспособности и места жительства для compliance законодательных критериев.
2FA идентификация считается принудительным компонентом актуальных систем конфиденциальности. Пользователи имеют SMS-пароли, push-алерты или применяют dedicated софт по типу Google Authenticator.
Mirror домены нейтрализуют проблемы geographic барьеров и DDoS-assault. Техническим образом mirrors образуют копийные dublicates главного портала с обеспечением функциональности и пользовательских сведений.
Skilled клиенты suggest keeping актуальные каталоги функционирующих дублей в сохранённых ссылках веб-клиента. Операторы отправляют информацию о fresh ссылках через email, Telegram-чаты и смартфонные программы.
Платёжные транзакции через лицензионные сайты secured защитными протоколами категории банковского направления. Изъятие финансов реализуется единственно на проверенные данные держателя личного кабинета.
Проверенные платформы игровых сервисов гарантируют геймерам возможность к высококлассному гэмблингу через тематические ресурсы, включая тип топ казино РІС…РѕРґ , которые специально соблюдают мировые стандарты надёжности.
Схема регистрации требует предоставления валидационных параметров через encrypted SSL-соединения. Администрация demanded документальное свидетельство дееспособности и региона residence для выполнения законодательных стандартов.
Двухэтапная верификация считается mandatory элементом передовых систем защиты. Игроки имеют SMS-токены, push-алерты или задействуют профессиональные утилиты наподобие Google Authenticator.
Дублирующие адреса преодолевают сложности geographic барьеров и DDoS-assault. С технической точки зрения дубли составляют идентичные dublicates базового портала с поддержанием features и user сведений.
Skilled игроки предлагают удерживать current списки рабочих mirrors в избранном обозревателя. Администрация рассылают новости о современных доменах через мейл, Telegram-группы и мобильные приложения.
Денежные переводы через legal порталы обеспечены шифровальными протоколами level банковского направления. Вывод финансов происходит единственно на validated wallets собственника account.
Ориентирование в сфере официальных сайтов предполагает осознания актуальных способов входа. Умелые пользователи используют Vavada зеркало для обретения актуальной информации о работающих ссылках.
Механизм оформления аккаунта в проверенных организациях включает комплексную подтверждение. Современные компании используют KYC-механизмы и AML-нормы. Документальная процедура отнимает от 24 до 72 интервалов.
IT решения для избежания запретов прогрессируют параллельно с интенсификацией юридических решений. VPN-инструменты категории premium дают кодирование AES-256 и технологии OpenVPN. Постоянство соединения кардинально существенна для VIP сессий.
Зеркальные ресурсы выполняют задачи через пространственно расположенные IT мощности. CDN-комплексы обеспечивают оптимальную латентность для международных игроков. Программное редирект инициируется при обнаружении ограничения главного портала.
Платежные транзакции в легальных зонах подпадают под определенным требованиям PCI DSS. Криптовалютные операции завоевывают актуальность по причине конфиденциальности и скорости реализации.
Планшетные приложения лучших провайдеров совмещают физиологическую проверку и push-сообщения для важных ситуаций. Изменяемый оформление программно настраивается под параметры матрицы.
Функционирующие зеркала легальных гемблинг-платформ на п»ї1xBet обеспечивают постоянный коннект к геймерским порталам. Методика дублирования создает аналогичные копии главного портала с сохранением всех возможностей.
Механизм создания аккаунта через mirror-сайт на сто процентов имитирует основную бланк. Только пришедшие клиенты заполняют активный email, формируют надежный пароль и фиксируют рабочую денежную единицу.
Верификация учетной записи включает отправки документов опираясь на KYC-стандартам. Изображение национального документа, валидация места жительства и банковские данные контролируются системой программную валидацию в течение 24-72 часов.
Вход активных клиентов происходит через стандартную панель с двухфакторной идентификацией. Временные токены передаются на сотовый номер или e-mail адрес.
Инструменты депозитного компонента через mirror-сайты обеспечивает актуальные платежные системы. Visa, Mastercard, веб хранилища Skrill, Neteller, виртуальные монеты Bitcoin, Ethereum выполняются с минимальными взносами 0-3%.
Гемблинг библиотека копируется в точности включая слоты, настольные забавы, live-ведущих и максимальные награды. RTP-индикаторы, колебания и проигрыш фиксируются идентичными.
Бонусная механизм действует подобно базовому веб-площадке. Welcome-бандлы, фриспины, возврат средств и VIP-планы инициируются алгоритмически при выполнении установленных требований.
What’s up, always i used to check website posts
here early in the dawn, because i like to gain knowledge of more and more.
Гемблинговая отрасль представляет интенсивный рост, завлекая легионы геймеров. Опытные платформы предлагают стабильную среду для пари. Детальную информацию о подобных организациях допустимо обнаружить на Вавада сайт .
Сертификация выступает центральным критерием определения площадки. Контролёры Гибралтара создают жёсткий надзор денежных манипуляций. Конкретная аккредитованная ресурс выполняет регулярные аудиты RNG-механизмов.
Программные особенности современных азартных площадок предусматривают SSL-защиту экономического класса. Разработчики виртуального материала типа Microgaming, NetEnt, Pragmatic Play подключают сложные алгоритмы хаотичных показателей.
Механизм проверки счёта включает передачи документов KYC-класса. ID, справка о прибылях, верификация проживания — стандартный перечень для финального доступа.
Резервные ссылки ликвидируют трудности с ограничениями организаций. Рабочие дубли обновляются каждый день цифровыми отделами. Карманные приложения нередко функционируют надёжнее веб редакций.
Контроль средств формирует долгосрочную прибыльность гемблинговых сессий. Профессиональные беттеры предлагают ограничивать сумму ставки до 1-2% от совокупного резерва.
Перемещение в пространстве легальных порталов требует понимания современных способов подключения. Умелые пользователи эксплуатируют Lucky Bear казино для извлечения актуальной информации о активных ссылках.
Процесс регистрации учетной записи в проверенных операторах содержит комплексную валидацию. Продвинутые операторы внедряют KYC-механизмы и AML-требования. Документальная процедура потребляет от 24 до 72 часов.
Компьютерные инструменты для минования запретов эволюционируют вместе с ужесточением регуляторных инициатив. VPN-службы разряда premium дают криптографию AES-256 и протоколы OpenVPN. Постоянство связи критически необходима для высокоролловых раундов.
Резервные ресурсы работают через географически распределенные серверные ресурсы. CDN-архитектуры обеспечивают минимальную пинг для американских пользователей. Техническое роутинг инициируется при идентификации ограничения центрального портала.
Финансовые операции в лицензированных зонах подчиняются четким нормам PCI DSS. Крипто платежи завоевывают популярность благодаря приватности и темпу обработки.
Мобильные приложения элитных компаний объединяют биометрическую аутентификацию и push-уведомления для ключевых событий. Модифицируемый оформление самостоятельно изменяется под свойства панели.
Актуальные гемблеры встречаются с проблемой входа к лицензированным площадкам. Компании фильтруют первичные адреса, но профессиональные winity casino клиенты осознают о доступности резервных площадок.
Параллельный портал формирует идентичную воспроизведение оригинального площадки. SSL-сертификаты функционируют равнозначными. Банковские переводы производятся через равнозначные системы.
Схема заведения учётной записи через зеркальный адрес включает привычной проверки. Специалисты требуют бумаги для соблюдения KYC-норм. Индивидуальные характеристики выполняют двухфакторную валидацию.
Банковские ограничения на параллельных платформах равняются базовым характеристикам. Низшие вклады поддерживаются константными. Увеличивающиеся джекпоты интегрируются между множественными ресурсами.
Стимулирующие системы оперируют целостно на параллельных платформах. Отыгрышный коэффициент сохраняет стартовые показатели. Срок активности отыгрыша продолжается.
Служба поддержки изучает обращения с зеркальных адресов аналогично. Мгновенный общение поддерживает 24-часовой режим деятельности.
Нынешние геймеры оказываются с затруднением связи к легальным порталам. Организации ограничивают основные порталы, но искушённые тип топ казино посетители знают о доступности дублирующих ресурсов.
Резервная ссылка формирует абсолютную дубликат базового ресурса. Средства защиты работают аналогичными. Финансовые транзакции производятся через сходные каналы.
Алгоритм регистрации через резервный домен предполагает классической верификации. Администраторы выясняют свидетельства для соблюдения KYC-регламентов. Паспортные характеристики выполняют усиленную валидацию.
Банковские лимиты на зеркальных площадках равняются первичным требованиям. Начальные вклады продолжают стабильными. Возрастающие выигрышные пулы согласовываются между множественными порталами.
Стимулирующие механизмы функционируют всесторонне на резервных платформах. Коэффициент оборота удерживает первоначальные параметры. Тайминг использования не изменяется.
Сервис ассистирования изучает обращения с параллельных доменов идентично. Интерактивный общение осуществляет непрерывный режим деятельности.
Нынешние бетторы попадают с барьером входа к сертифицированным порталам. Провайдеры запрещают основные URL, но грамотные казино Vavada игроки знают о доступности дублирующих сайтов.
Резервная ссылка формирует стопроцентную реплику главного сайта. Криптографические алгоритмы сохраняются аналогичными. Денежные транзакции проходят через те же шлюзы.
Схема создания аккаунта через резервный ресурс включает обычной валидации. Менеджеры выясняют документы для выполнения KYC-стандартов. Персональные данные осуществляют усиленную подтверждение.
Пополнительные рамки на дополнительных порталах соответствуют главным условиям. Наименьшие беты функционируют стабильными. Растущие выигрышные пулы координируются между множественными порталами.
Премиальные схемы оперируют полноценно на зеркальных ресурсах. Отыгрышный коэффициент обеспечивает исходные цифры. Период действия реализации остаётся прежним.
Отдел обслуживания рассматривает тикеты с зеркальных порталов таким же способом. Интерактивный диалог предоставляет 24-часовой график деятельности.
Very good material, Many thanks.
This is the perfect blog for everyone who really wants to understand this topic.
You know a whole lot its almost tough to argue with you (not that I actually would want to…HaHa).
You definitely put a new spin on a subject which has
been discussed for a long time. Excellent stuff, just excellent!
Передовые геймеры обталкиваются с массой технических аспектов при работе с сертифицированными площадками. Профессиональные порталы типа Вавада зеркало поставляют актуальную сведения о деятельности игорных провайдеров.
Механизм аутентификации кабинета содержит набор обязательных фаз. Стартовая валидация включает предоставления бумаг доказывающих гражданство. Классический комплект охватывает документ, лицензию водителя или международный паспорт.
Цифровая составляющая оформления содержит задействование безопасного соединения и многофакторной защиты. Продвинутые клиенты подсказывают включать совокупность имеющихся параметров защиты.
Дублирующие порталы формируют стопроцентные отражения главного платформы с поддержанием исчерпывающего арсенала. Центральное плюс содержится в схожести расчетных рамок и требований отыгрыша.
Система нахождения актуальных альтернативных адресов опирается на отслеживании профессиональных информационных каналов и связанных порталов. Опытные участники эксплуатируют виртуальные частные сети для обеспечения бесперебойного связи невзирая от местных ограничений.
I’m really loving the theme/design of your website.
Do you ever run into any web browser compatibility issues?
A number of my blog visitors have complained about my blog not operating correctly in Explorer but looks great in Firefox.
Do you have any suggestions to help fix this problem?
My blog: Data Scraping Services
Азартная отрасль показывает стремительный развитие, завлекая множество клиентов. Экспертные сайты дают защищённую среду для пари. Полную материалы о данных операторах допустимо изучить на казино СЌРЅРѕРјРѕ .
Аккредитация представляет центральным аспектом отбора сайта. Юрисдикции Гибралтара обеспечивают качественный контроль денежных действий. Любая сертифицированная портал выполняет периодические ревизии RNG-алгоритмов.
IT характеристики актуальных беттинг-платформ включают SSL-безопасность денежного категории. Создатели цифрового обеспечения уровня Microgaming, NetEnt, Pragmatic Play добавляют многоуровневые механизмы рандомных показателей.
Процедура аутентификации личного кабинета предусматривает представления свидетельств KYC-уровня. Удостоверение, справка о средствах, верификация прописки — базовый набор для финального доступа.
Дублирующие порталы ликвидируют трудности с фильтрацией операторов. Свежие альтернативы адаптируются ежедневно цифровыми отделами. Мобильные клиенты обычно функционируют надёжнее браузерных редакций.
Контроль средств формирует продолжительную прибыльность игровых циклов. Квалифицированные геймеры рекомендуют ограничивать величину депозита до 1-2% от совокупного капитала.
Best online casino bonuses Australia – claim free spins now
Thanks. I like this.
Передовые игроки пересекаются с набором системных тонкостей при работе с проверенными сайтами. Экспертные источники типа Клубника официальный сайт выдают современную материалы о операциях азартных операторов.
Процесс подтверждения профиля содержит ряд требуемых шагов. Первичная аутентификация включает передачи свидетельств доказывающих индивидуальность. Привычный комплект подразумевает паспорт, водительские права или международный паспорт.
Системная элемент регистрации предполагает использование SSL-шифрования и двухуровневой проверки. Профессиональные игроки рекомендуют включать полный набор возможных возможностей защиты.
Альтернативные адреса образуют полные отражения основного портала с удержанием комплексного функционала. Важнейшее достоинство выражается в схожести платежных границ и норм отыгрыша.
Процедура нахождения актуальных дублирующих порталов базируется на мониторинге профессиональных информационных каналов и сотрудничающих ресурсов. Квалифицированные геймеры применяют туннельные протоколы для формирования устойчивого соединения независимо от территориальных блокировок.
Навигация в пространстве лицензированных порталов требует знания новых технологий подключения. Продвинутые игроки используют Меллстрой зеркало для получения современной информации о активных доменах.
Механизм формирования профиля в лицензированных компаниях охватывает сложную проверку. Современные поставщики используют KYC-процедуры и AML-стандарты. Документальное сопровождение отнимает от 24 до 72 промежутков.
Технические методы для минования ограничений улучшаются одновременно с ужесточением юридических инициатив. VPN-сервисы класса premium дают безопасность AES-256 и стандарты OpenVPN. Устойчивость канала принципиально существенна для элитных игровых периодов.
Резервные адреса действуют через регионально расположенные серверные мощности. CDN-сети осуществляют сокращенную пинг для американских клиентов. Системное маршрутизация активируется при выявлении блокировки базового портала.
Платежные движения в проверенных территориях следуют четким требованиям PCI DSS. Блокчейн операции завоевывают популярность вследствие секретности и скорости обработки.
Переносные клиенты премиальных провайдеров объединяют биометрическую подтверждение и push-уведомления для существенных происшествий. Адаптивный интерфейс автономно корректируется под параметры экрана.
Современные провайдеры гемблинг развлечений обеспечивают беттерам вход к элитному гемблингу через защищенные Mellstroy Game ресурсы. Авторизованная деятельность подразумевает исполнения строгих регуляторных положений.
Процедура регистрации персонального аккаунта содержит проверку индивидуальных сведений. Провайдеры используют детализированные механизмы KYC и AML для исключения мошеннических транзакций.
Электронные решения актуальных беттинг площадок базируются на зашифрованных облачных системах с SSL технологиями. Региональная блокировка вынуждает владельцев создавать резервные ссылки.
Параллельные ресурсы являют собой полные клоны базового ресурса с сохранением всех опций и сведений. Участники приобретают беспрепятственный вход к балансу, игровой записям и клиентским настройкам.
Банковские процедуры осуществляются через подключенные расчетные сервисы. Лимиты на взносы и получения назначаются в соответствии с нормативными требованиями и индивидуальными нормами снижения потерь.
Компетентные клиенты рекомендуют проверять условия авторизации через регуляторные базы данных азартных структур. Авторитетные индикаторы содержат оценки на экспертных порталах и комментарии действительных беттеров.
Wow that was unusual. I just wrote an incredibly long
comment but after I clicked submit my comment didn’t appear.
Grrrr… well I’m not writing all that over again. Regardless, just wanted to say fantastic blog!
I like the valuable information you provide in your articles.
I will bookmark your weblog and check again here frequently.
I am quite certain I’ll learn lots of new stuff right here!
Best of luck for the next!
My webpage: Data Scraping Company
Heroes are made in the hardest of times. The Onyx Storm epub tells the story of those heroes. This sequel is gritty and real. Reading on a screen brings the words to life in a modern way. Rebecca Yarros writes with a passion that burns off the page. secure your copy and feel the heat. https://onyxstormepub.store/ Onyx Storm Rebecca Yarros Epub Download
Поиск проверенного гемблинг оператора нуждается глубокого разбора регулятивных разрешений. Новые платформы Вавада регистрация обеспечивают клиентам максимальную информацию о текущих лицензиях.
Процесс оформления счета содержит ряд необходимых этапов аутентификации. Представители требуют свидетельства, устанавливающие индивидуальность и возраст. Типовой KYC-регламент продолжается от 24 до 72 промежутков.
Финансовое планирование инициируется с установления пределов на инвестиции. Компетентные игроки советуют использовать норму 5% от общего азартного средств на конкретную игру.
Цифровые препятствия поставщиков побуждают эксплуатировать запасные ссылки. Зеркала сохраняют абсолютную эффективность главного платформы, предусматривая историю переводов и казино успех.
Инновационные денежные методы предоставляют быстрые пополнения через цифровые кошельки. Bitcoin, Ethereum и стабильные валюты гарантируют приватность и крошечные комиссии. Длительность реализации снятий составляет 10-30 минут.
Схемы приверженности включают ступенчатые степени с прогрессивным компенсацией. VIP-координаторы обеспечивают индивидуальные награды, улучшенные лимиты и приоритетную помощь.
Подбор надежного азартного ресурса требует основательного анализа юридических бумаг. Передовые платформы п»ї1хбет зеркало обеспечивают геймерам безусловную информацию о текущих аккредитациях.
Процедура регистрации содержит ряд принудительных стадий проверки. Провайдеры требуют удостоверения, доказывающие персону и возраст. Традиционный KYC-процесс занимает от 24 до 72 промежутков.
Банкролл-менеджмент инициируется с фиксации лимитов на инвестиции. Компетентные геймеры рекомендуют эксплуатировать установку 5% от итогового гемблинг резерва на единичную партию.
Цифровые блокировки операторов обязывают внедрять вспомогательные ссылки. Дубликаты поддерживают стопроцентную функциональность основного ресурса, охватывая архив транзакций и игровой прогресс.
Инновационные финансовые системы предоставляют мгновенные вклады через электронные счета. Bitcoin, Ethereum и стабильные валюты обеспечивают анонимность и наименьшие отчисления. Длительность проведения изъятий составляет 10-30 промежутков.
Схемы лояльности подразумевают многоуровневые ранги с увеличивающимся компенсацией. VIP-координаторы предлагают эксклюзивные вознаграждения, повышенные рамки и преимущественную поддержку.
Навигация в мире сертифицированных порталов предполагает понимания современных технологий соединения. Квалифицированные участники эксплуатируют Голд официальный сайт для получения современной данных о действующих ссылках.
Процедура открытия счета в официальных заведениях охватывает тщательную валидацию. Продвинутые провайдеры задействуют KYC-механизмы и AML-нормы. Документооборот требует от 24 до 72 интервалов.
Технические инструменты для избежания запретов прогрессируют вместе с усилением законодательных решений. VPN-платформы разряда premium гарантируют криптографию AES-256 и системы OpenVPN. Непрерывность канала кардинально актуальна для привилегированных игровых периодов.
Резервные адреса работают через регионально разнесенные серверные ресурсы. CDN-архитектуры обеспечивают оптимальную задержку для международных клиентов. Программное перенаправление активируется при распознавании блокировки первичного адреса.
Платежные движения в легальных территориях соответствуют строгим нормам PCI DSS. Блокчейн расчеты завоевывают популярность благодаря приватности и быстроте процессинга.
Смартфонные клиенты топовых брендов совмещают отпечатковую авторизацию и push-извещения для важных событий. Адаптивный облик программно настраивается под настройки монитора.
Современные пользователи сталкиваются с массой технологических аспектов при деятельности с легальными порталами. Экспертные источники типа СЌРЅРѕРјРѕ казино выдают современную материалы о деятельности игорных провайдеров.
Процесс валидации профиля включает комплекс обязательных фаз. Исходная верификация нуждается предоставления свидетельств удостоверяющих персону. Привычный комплект содержит удостоверение личности, права или внешний паспорт.
Цифровая часть оформления включает применение зашифрованного канала и двухуровневой проверки. Продвинутые клиенты настаивают активировать полный набор доступных опций секьюрити.
Альтернативные адреса представляют идентичные копии базового ресурса с удержанием всего набора функций. Основное выгода содержится в тождественности платежных пределов и параметров отыгрыша.
Алгоритм выявления актуальных альтернативных адресов базируется на мониторинге специализированных информационных каналов и связанных платформ. Экспертные клиенты применяют VPN-сервисы для предоставления постоянного входа безотносительно от территориальных запретов.
Hi there, I found your web site by the use of
Google at the same time as searching for a related topic, your
site came up, it seems great. I’ve bookmarked it in my google bookmarks.
Hello there, just changed into alert to your blog
through Google, and found that it’s truly informative.
I’m going to watch out for brussels. I will be grateful in the
event you continue this in future. A lot of other folks will likely
be benefited out of your writing. Cheers!
My page: retreat center cancun
automaty online automaty online .
По теме “Финансовые тренды кино и билетов в 2026 году”, нашел много полезного.
Вот, можете почитать:
https://rubl-24.ru/news/gde-vygodnee-kupit-rubl-v-fevrale-2026-obzor-kursov-i-lajfhaki-ot-obmennikov/
nejlep?? online casina nejlep?? online casina .
Официальные площадки игровых опций предоставляют участникам вариант к высококлассному времяпрепровождению через тематические сайты, включая Меллстрой РІС…РѕРґ , что следуют мировые нормы защиты.
Алгоритм открытия счёта necessita указания валидационных сведений через безопасные SSL-протоколы. Администрация запрашивают official доказательство дееспособности и места нахождения для поддержания юрисдикционных стандартов.
Двухэтапная проверка является обязательным частью передовых платформ безопасности. Пользователи имеют SMS-ключи, push-notification или внедряют targeted приложения типа Google Authenticator.
Резервные порталы ликвидируют вопросы territorial блокировок и DDoS-воздействий. С технической точки зрения копии составляют идентичные dublicates primary сайта с поддержанием features и клиентских сведений.
Опытные участники предлагают хранить новейшие реестры рабочих зеркал в сохранённых ссылках веб-клиента. Операторы передают обновления о актуальных адресах через email, Telegram-чаты и смартфонные приложения.
Payment процедуры через legal порталы защищены cryptographic протоколами level банковского индустрии. Получение капитала выполняется исключительно на аутентифицированные wallets обладателя учётной записи.
Проверенные провайдеры игровых возможностей обеспечивают игрокам доступ к высококлассному игровому процессу через dedicated ресурсы, включая Лаки Бир зеркало , которые выполняют общепринятые регламенты безопасности.
Механизм оформления профиля предполагает внесения authentication сведений через шифрованные SSL-линии. Менеджмент просят нотариальное свидетельство совершеннолетия и региона residence для compliance нормативных критериев.
Multi-factor authentication представляет необходимым частью современных платформ безопасности. Игроки имеют SMS-ключи, push-сообщения или задействуют профессиональные утилиты вроде Google Authenticator.
Mirror порталы устраняют препятствия territorial барьеров и DDoS-атак. С технической точки зрения дубли представляют идентичные копии primary портала с обеспечением инструментария и клиентских информации.
Экспертные игроки призывают хранить обновлённые каталоги рабочих зеркал в bookmark веб-клиента. Администрация отправляют информацию о свежих порталах через email, Telegram-communities и портативные приложения.
Payment транзакции через официальные ресурсы защищены шифровальными протоколами уровня банковского сектора. Extraction финансов выполняется только на проверенные реквизиты владельца учётной записи.
Neuro Relief USA: buying neurontin online – neurontin brand name 800mg
Современные игроки имеют дело с изобилием технологических нюансов при деятельности с официальными платформами. Профильные платформы типа лаки Р±РёСЂ казино дают актуальную материалы о процессах развлекательных брендов.
Система подтверждения счета предполагает несколько принудительных этапов. Первичная верификация включает передачи бумаг доказывающих субъект. Стандартный пакет охватывает удостоверение личности, лицензию водителя или заграничное удостоверение.
Программная сторона создания аккаунта включает внедрение SSL-шифрования и двухуровневой проверки. Опытные пользователи рекомендуют активировать весь комплекс доступных возможностей обеспечения.
Резервные ссылки формируют идентичные дубликаты главного платформы с поддержанием комплексного набора функций. Центральное преимущество содержится в схожести банковских границ и условий условий прокрутки.
Механизм поиска активных дублирующих порталов строится на наблюдении профильных новостных лент и партнерских ресурсов. Экспертные геймеры эксплуатируют туннельные протоколы для создания устойчивого связи независимо от географических запретов.
Новейшие участники встречаются с затруднением соединения к лицензированным площадкам. Провайдеры запрещают главные ссылки, но грамотные Mellstroy Game casino игроки помнят о наличии резервных платформ.
Резервная ссылка формирует идентичную отображение оригинального ресурса. SSL-сертификаты работают неизменными. Финансовые действия выполняются через идентичные сервисы.
Технология открытия счёта через зеркальный ресурс включает привычной подтверждения. Сотрудники просят документы для соблюдения KYC-норм. Идентификационные характеристики подвергаются комплексную подтверждение.
Финансовые пределы на резервных платформах совпадают первичным параметрам. Низшие ставки функционируют стабильными. Растущие накопления синхронизируются между многочисленными порталами.
Льготные программы выполняются завершённо на параллельных площадках. Вейджер сохраняет оригинальные величины. Временные рамки оборота поддерживается.
Отдел поддержки изучает обращения с зеркальных порталов равнозначно. Прямой переписка обеспечивает круглосуточный формат оперирования.
Современные игроки пересекаются с множеством цифровых аспектов при операциях с проверенными площадками. Тематические источники типа казино типпи предоставляют новую данные о операциях развлекательных компаний.
Механизм подтверждения учетной записи предполагает комплекс неотъемлемых этапов. Стартовая валидация включает размещения бумаг верифицирующих личность. Типовой комплект подразумевает свидетельство, автолицензию или заграничное удостоверение.
Программная элемент открытия счета подразумевает задействование защищенного протокола и двухфакторной аутентификации. Профессиональные клиенты советуют инициировать совокупность возможных возможностей охраны.
Альтернативные адреса формируют стопроцентные клоны основного домена с обеспечением исчерпывающего арсенала. Основное плюс заключается в тождественности банковских ограничений и параметров вейджера.
Схема обнаружения активных альтернативных адресов фундируется на наблюдении экспертных телеграм-каналов и союзных платформ. Экспертные участники применяют VPN-сервисы для гарантирования устойчивого соединения невзирая от географических запретов.
Исследование в сфере легальных платформ включает понимания передовых инструментов авторизации. Опытные пользователи применяют казино 1xBet для приобретения современной сведений о функционирующих путях.
Схема оформления счета в сертифицированных заведениях содержит многоуровневую верификацию. Актуальные провайдеры задействуют KYC-механизмы и AML-нормы. Документальная процедура потребляет от 24 до 72 часов.
Компьютерные способы для обхода барьеров улучшаются синхронно с интенсификацией нормативных шагов. VPN-сервисы класса premium предоставляют кодирование AES-256 и системы OpenVPN. Устойчивость канала fundamentally существенна для привилегированных сессий.
Альтернативные адреса выполняют задачи через локально рассредоточенные технические инфраструктуры. CDN-комплексы поддерживают быструю пинг для американских участников. Программное роутинг срабатывает при выявлении ограничения первичного сайта.
Денежные переводы в лицензированных зонах следуют определенным правилам PCI DSS. Децентрализованные платежи завоевывают востребованность из-за приватности и оперативности осуществления.
Мобильные софт топовых компаний содержат биометрическую аутентификацию и push-алерты для принципиальных ситуаций. Гибкий внешний вид независимо настраивается под параметры матрицы.
Подбор проверенного развлекательного площадки заставляет основательного исследования правовых бумаг. Актуальные сайты казино Лаки Бир предлагают клиентам абсолютную информацию о собственных лицензиях.
Процедура оформления счета охватывает определенное количество необходимых стадий подтверждения. Представители просят бумаги, удостоверяющие личность и зрелость. Классический KYC-механизм составляет от 24 до 72 часов.
Распоряжение капиталом открывается с определения границ на вклады. Опытные пользователи предлагают внедрять правило 5% от совокупного гемблинг капитала на индивидуальную партию.
Цифровые блокировки поставщиков заставляют эксплуатировать альтернативные домены. Копии удерживают стопроцентную работоспособность базового площадки, предусматривая летопись переводов и развлекательный продвижение.
Актуальные денежные способы обеспечивают быстрые депозиты через блокчейн хранилища. Bitcoin, Ethereum и стейблкоины предоставляют скрытность и мизерные взносы. Продолжительность обработки снятий равно 10-30 периодов.
Планы приверженности охватывают многоуровневые категории с возрастающим возвратом. VIP-менеджеры обеспечивают уникальные поощрения, увеличенные рамки и приоритетную сервис.
Навигация в мире лицензированных ресурсов предполагает знания новых технологий соединения. Квалифицированные клиенты внедряют Vavada для добывания свежей фактов о функционирующих URL.
Процедура регистрации учетной записи в надежных заведениях подразумевает сложную валидацию. Актуальные провайдеры задействуют KYC-процедуры и AML-требования. Документальная процедура составляет от 24 до 72 временных отрезков.
Технические способы для прохождения препятствий эволюционируют синхронно с усилением регуляторных шагов. VPN-инструменты категории premium предлагают защиту AES-256 и технологии OpenVPN. Устойчивость коннекта принципиально существенна для VIP заходов.
Дублирующие ресурсы работают через пространственно разнесенные IT ресурсы. CDN-сети поддерживают минимальную пинг для глобальных игроков. Программное переключение активируется при идентификации барьера основного адреса.
Денежные переводы в официальных зонах подпадают под определенным требованиям PCI DSS. Цифровые переводы набирают популярность по причине скрытности и динамике обработки.
Смартфонные утилиты ведущих компаний содержат лицевую подтверждение и push-уведомления для ключевых происшествий. Модифицируемый внешний вид самостоятельно изменяется под параметры дисплея.
mostbet слоты на деньги mostbet51837.help
Футбольные прогнозы Expert tipsters deliver betting tips on sports games and matches including Fixed game selections and correct score best exacte forecast. Vip and free bets are available daily with sureshot odds and accumulator real
Hello! I could have sworn I’ve been to this blog before but after browsing through some of the post I realized it’s new to me.
Anyhow, I’m definitely delighted I found it and I’ll be bookmarking and checking
back frequently!
my web blog :: host a retreat
Выбор достойного игрового оператора в нынешних границах подразумевает специального внимания к законному состоянию. Компетентные геймеры представляют, что лаки Р±РёСЂ казино предоставляет последнюю факты о работающих сервисах.
Механизм регистрации в легальных площадках включает обязательную проверку идентичности. KYC-требования гарантируют как оператора, так и геймера от мошенничества. Кратковременные границы на получение активов до выполнения проверки – привычная методика.
Цифровые блокировки на вход к игровым ресурсам преодолеваются через резервные порталы. Активные копии сохраняют полную работоспособность основного сайта. Денежные процедуры, развлекательный продвижение и льготные программы поддерживаются постоянными.
Материальная стабильность выражается уровнем используемых денежных способов. SSL-криптография, PCI DSS валидация и усиленная аутентификация гарантируют надежный барьер ограждения.
Азартная коллекция официальных провайдеров включает автоматы от лидирующих производителей. RTP-индексы, изменчивость и вероятностные принципы подвергаются внешнюю проверку в одобренных лабораториях.
Планы стимулирования в профессиональных казино базируются на ясных правилах вейджера. Требования x35-40 оценивается нормальным для машина-поощрений, в то время как традиционные развлечения идут в подсчет с редуцированным множителем.
ruleta online casino-cz-10.com .
Официальные операторы гэмблинг услуг oferuja пользователям доступ к премиальному игровому процессу через специализированные сайты, включая лаки Р±РёСЂ казино зеркало , которые именно следуют общепринятые требования безопасности.
Последовательность оформления профиля требует внесения проверочных сведений через криптографические SSL-протоколы. Букмекеры просят предоставить официальное свидетельство age verification и адреса жительства для compliance законодательных требований.
Многоуровневая проверка является required составляющей актуальных solutions надёжности. Участники имеют SMS-шифры, push-notification или внедряют dedicated софт по типу Google Authenticator.
Зеркальные адреса нейтрализуют сложности географических ограничений и DDoS-атак. По сути дубли образуют аналогичные версии базового платформы с удержанием features и личных сведений.
Опытные клиенты призывают keeping актуальные базы действующих mirrors в favourites веб-клиента. Операторы направляют информацию о свежих порталах через почтовые сервисы, Telegram-сообщества и мобильные утилиты.
Финансовые транзакции через надёжные сайты обеспечены encryption methods стандарта банковского сектора. Снятие капитала происходит единственно на подтверждённые счета обладателя аккаунта.
These are truly great ideas in regarding blogging. You have touched some nice points here.
Any way keep up wrinting.
Игровая отрасль отображает стремительный прогресс, завлекая миллионы клиентов. Экспертные платформы предлагают надёжную атмосферу для ставок. Развёрнутую информацию о этих организациях можно отыскать на п»ї1xBet казино .
Сертификация выступает главным аспектом селекции портала. Юрисдикции Кюрасао дают качественный проверку экономических процедур. Любая аккредитованная площадка осуществляет систематические проверки RNG-генераторов.
IT параметры актуальных казино предусматривают SSL-безопасность расчётного категории. Создатели виртуального материала вроде Microgaming, NetEnt, Pragmatic Play подключают многоуровневые модели рандомных значений.
Механизм подтверждения аккаунта требует направления справок KYC-формата. Паспорт, подтверждение о прибылях, валидация регистрации — типичный набор для итогового авторизации.
Параллельные домены устраняют трудности с блокировками организаций. Действующие дубли обновляются каждый день компьютерными группами. Мобильные приложения часто действуют надёжнее браузерных версий.
Финансовая дисциплина определяет перспективную прибыльность беттинговых циклов. Профессиональные участники предлагают лимитировать количество ставки до 1-2% от итогового банкролла.
Выбор безопасного развлекательного портала нуждается тщательного рассмотрения лицензионных разрешений. Новые системы п»ї1xBet казино дают клиентам полную детали о собственных санкциях.
Процедура создания профиля включает множество необходимых фаз верификации. Провайдеры истребуют удостоверения, доказывающие персону и зрелость. Традиционный KYC-процесс продолжается от 24 до 72 часов.
Распоряжение капиталом инициируется с назначения рамок на пополнения. Квалифицированные игроки предлагают внедрять правило 5% от полного азартного капитала на единичную заход.
Электронные блокировки владельцев побуждают применять дополнительные адреса. Копии оберегают абсолютную эффективность базового ресурса, охватывая летопись сделок и игровой успех.
Новые банковские способы дают быстрые пополнения через блокчейн портмоне. Bitcoin, Ethereum и фиксированные активы поддерживают скрытность и мизерные взносы. Длительность проведения выводов доходит 10-30 отрезков.
Алгоритмы постоянства включают градационные степени с нарастающим бонусом. VIP-представители дают эксклюзивные подарки, усиленные пределы и первоочередную техподдержку.
http://smartgenrxusa.com/# the pharmacy
cialis online pharmacy https://cse.google.co.za/url?sa=i&url=https%3A%2F%2Fmexmedimax.com no presription on line rx
Trip Tides Showcase – Pleasant layout that helps travel ideas stand out.
https://neuroreliefusa.com/# Neuro Relief USA
Поиск легального развлекательного оператора требует основательного разбора регулятивных бумаг. Инновационные платформы Вавада официальный сайт предоставляют участникам полную факты о своих аккредитациях.
Процедура создания профиля включает ряд ключевых ступеней верификации. Администраторы настаивают справки, устанавливающие индивидуальность и возраст. Классический KYC-регламент требует от 24 до 72 часов.
Управление банком стартует с задания ограничений на инвестиции. Профессиональные геймеры советуют внедрять норму 5% от итогового игорного средств на одну партию.
Технические ограничения провайдеров вынуждают задействовать запасные адреса. Зеркала оберегают стопроцентную активность первичного сайта, подразумевая летопись платежей и казино успех.
Актуальные платежные системы предоставляют мгновенные взносы через блокчейн портмоне. Bitcoin, Ethereum и стабильные валюты предоставляют скрытность и минимальные отчисления. Период проведения изъятий насчитывает 10-30 промежутков.
Алгоритмы постоянства содержат ступенчатые статусы с накапливающимся вознаграждением. VIP-консультанты обеспечивают индивидуальные бонусы, расширенные ограничения и ускоренную поддержку.
Выбор достойного азартного заведения в сегодняшних границах предполагает особого подхода к лицензионному статусу. Профессиональные пользователи знают, что Клубника казино предоставляет современную информацию о активных операторах.
Алгоритм создания аккаунта в лицензированных сервисах объединяет неизбежную валидацию персональных данных. KYC-нормы гарантируют как казино, так и клиента от махинаций. Промежуточные лимиты на снятие капитала до завершения валидации – обычная практика.
Электронные барьеры на доступ к развлекательным сервисам решаются через альтернативные домены. Функционирующие зеркала поддерживают полную функциональность основного портала. Банковские процедуры, интерактивный результаты и наградные системы функционируют устойчивыми.
Экономическая защищенность характеризуется качеством применяемых денежных систем. SSL-кодирование, PCI DSS валидация и многоуровневая проверка создают защищенный барьер охраны.
Развлекательная каталог сертифицированных площадок охватывает спины от лидирующих провайдеров. RTP-коэффициенты, изменчивость и математические формулы проходят объективную сертификацию в одобренных организациях.
Планы мотивации в серьезных операторах опираются на прозрачных условиях отыгрыша. Условия ставок x35-40 характеризуется разумным для барабан-льгот, в то время как стандартные развлечения засчитываются в расчет с уменьшенным показателем.
Новейшие провайдеры развлекательных игр дают беттерам путь к качественному азарту через надежные Меллстрой сайт сайты. Сертифицированная деятельность влечет следования строгих регуляторных требований.
Алгоритм оформления пользовательского профиля содержит проверку личных сведений. Администраторы задействуют углубленные алгоритмы KYC и AML для блокировки незаконных переводов.
Цифровые решения современных игорных домов функционируют на безопасных облачных системах с TLS стандартами. IP-фильтрация заставляет провайдеров внедрять альтернативные адреса.
Параллельные порталы представляют точные репликации центрального сайта с обеспечением всех возможностей и параметров. Участники обеспечивают себе постоянный вход к счету, игровой статистике и клиентским настройкам.
Банковские процедуры осуществляются через синхронизированные банковские шлюзы. Границы на пополнения и получения назначаются в согласии с правовыми условиями и внутренними политиками управления рисками.
Опытные беттеры рекомендуют отслеживать условия авторизации через контролирующие базы данных развлекательных комиссий. Имиджевые критерии содержат места на тематических порталах и оценки подлинных игроков.
Передовые игроки попадают с барьером входа к проверенным порталам. Операторы закрывают основные ссылки, но опытные лаки Р±РёСЂ посетители учитывают о присутствии параллельных ресурсов.
Дополнительный домен представляет стопроцентную отображение первичного портала. SSL-сертификаты остаются такими же. Денежные транзакции выполняются через те же шлюзы.
Схема регистрации через резервный домен предполагает привычной подтверждения. Сотрудники просят справки для осуществления KYC-регламентов. Персональные характеристики выполняют расширенную подтверждение.
Пополнительные рамки на альтернативных порталах идентичны первичным характеристикам. Наименьшие суммы поддерживаются неизменными. Увеличивающиеся выигрышные пулы объединяются между многочисленными адресами.
Стимулирующие планы оперируют комплексно на резервных порталах. Отыгрышный коэффициент удерживает исходные параметры. Тайминг оборота сохраняется.
Сервис помощи изучает запросы с зеркальных ресурсов равнозначно. Мгновенный диалог предоставляет беспрерывный расписание оперирования.
Функционирующие альтернативные домены лицензированных казино на Вавада официальный сайт обеспечивают беспрерывный коннект к геймерским системам. Принцип зеркалирования формирует полноценные реплики основного портала с сохранением всех инструментов.
Схема создания аккаунта через дублирующий портал абсолютно повторяет базовую бланк. Новые геймеры регистрируют активный email, генерируют сложный ключ и выбирают базовую платежное средство.
Верификация профиля включает предоставления свидетельств по KYC-нормам. Копия национального документа, валидация адреса и финансовые координаты анализируются посредством программную проверку в течение 24-72 ч.
Логин верифицированных игроков происходит через типовую модуль с 2FA аутентификацией. Разовые ключи передаются на телефонный аппарат или email.
Опции входящего компонента через зеркала предлагает популярные денежные системы. Visa, Mastercard, веб портмоне Skrill, Neteller, цифровые активы Bitcoin, Ethereum выполняются с уменьшенными платежами 0-3%.
Игровая коллекция дублируется абсолютно включая барабаны, столовые геймплей, live-дилеров и прогрессивы. RTP-коэффициенты, колебания и условия отыгрыша остаются такими же.
Поощрительная политика функционирует подобно главному веб-площадке. Welcome-пакеты, безвозмездные спины, кешбэк и VIP-схемы инициируются машинально при соблюдении фиксированных условий.
Актуальные провайдеры гемблинг продуктов предлагают беттерам вход к высококлассному гемблингу через проверенные Лаки Бир казино системы. Легальная работа влечет исполнения четких контролирующих требований.
Алгоритм активации индивидуального аккаунта включает подтверждение персональных информации. Операторы используют многоуровневые процедуры KYC и AML для недопущения нарушающих финансовых действий.
Технические инструменты новейших гемблинг платформ основываются на зашифрованных дата-центрах с шифровальными протоколами. Геоблокировка принуждает владельцев разрабатывать дублирующие ссылки.
Параллельные сайты образуют идентичные репликации основного портала с удержанием всех инструментов и параметров. Клиенты добиваются непрерывный связь к средствам, развлекательной отчетности и персональным установкам.
Платежные действия реализуются через интегрированные денежные сервисы. Пределы на вклады и обналичивания назначаются в соотношении с лицензионными положениями и собственными регламентами риск-менеджмента.
Компетентные клиенты настаивают контролировать статус аккредитации через надзорные регистры азартных комиссий. Репутационные характеристики содержат позиции на специализированных платформах и комментарии реальных пользователей.
Функционирующие резервные адреса лицензированных гемблинг-платформ на KiloGram casino обеспечивают беспрерывный коннект к азартным сервисам. Система дублирования строит идентичные версии центрального веб-площадки с сохранением всех инструментов.
Процедура оформления профиля через зеркало целиком дублирует стандартную форму. Новые клиенты прописывают функционирующий email, генерируют надежный шифр и назначают операционную финансовый инструмент.
Верификация счета включает представления бумаг следуя KYC-политике. Копия паспорта, доказательство проживания и карточные данные проверяются через машинную контроль в течение 24-72 ч.
Логин действующих игроков происходит через классическую интерфейс с 2FA идентификацией. Сессионные коды передаются на мессенджер аппарат или мейл.
Механизмы пополнительного блока через mirror-сайты включает распространенные денежные сервисы. Visa, Mastercard, веб балансы Skrill, Neteller, crypto Bitcoin, Ethereum выполняются с минимальными сборами 0-3%.
Развлекательная коллекция клонируется полностью включая spinning games, карточные геймплей, live-крупье и мегавыигрыши. RTP-параметры, вариативность и отыгрыш сохраняются такими же.
Акционная схема действует похоже основному порталу. Welcome-наборы, безвозмездные спины, кешбэк и VIP-планы инициируются системно при выполнении установленных условий.
bonus za registraci bez vkladu casino-cz-9.com .
Поиск безопасного азартного оператора нуждается серьезного анализа правовых свидетельств. Актуальные ресурсы https://proapples.ru/ru-ru/ предлагают геймерам полную детали о текущих аккредитациях.
Процесс создания профиля предусматривает различные обязательных стадий валидации. Представители настаивают документы, удостоверяющие персону и правоспособность. Стандартный KYC-порядок требует от 24 до 72 временных отрезков.
Банкролл-менеджмент запускается с назначения границ на взносы. Профессиональные пользователи рекомендуют использовать установку 5% от полного гемблинг фонда на индивидуальную раунд.
Цифровые барьеры поставщиков вынуждают применять альтернативные ссылки. Альтернативы сохраняют абсолютную активность первичного платформы, включая летопись операций и развлекательный успех.
Инновационные расчетные инструменты обеспечивают быстрые инвестиции через блокчейн кошельки. Bitcoin, Ethereum и устойчивые монеты гарантируют анонимность и наименьшие отчисления. Период выполнения снятий доходит 10-30 периодов.
Системы лояльности содержат многоуровневые ранги с накапливающимся возвратом. VIP-представители предоставляют персонализированные бонусы, повышенные границы и опережающую поддержку.
Поиск в области сертифицированных платформ подразумевает владения актуальных методов подключения. Профессиональные игроки задействуют Mellstroy Game casino для обретения новейшей данных о активных URL.
Процедура открытия счета в официальных заведениях подразумевает комплексную проверку. Современные операторы эксплуатируют KYC-системы и AML-критерии. Оформление документов составляет от 24 до 72 интервалов.
Технические способы для прохождения ограничений эволюционируют вместе с ужесточением регуляторных мер. VPN-службы класса premium дают защиту AES-256 и стандарты OpenVPN. Надежность подключения fundamentally существенна для высокоролловых партий.
Резервные платформы функционируют через географически распределенные цифровые кластеры. CDN-комплексы предоставляют низкую пинг для европейских геймеров. Системное маршрутизация активируется при детекции барьера главного ресурса.
Платежные операции в легальных юрисдикциях подчиняются четким критериям PCI DSS. Блокчейн транзакции завоевывают популярность в результате приватности и оперативности осуществления.
Портативные клиенты топовых провайдеров включают физиологическую авторизацию и push-уведомления для принципиальных происшествий. Изменяемый внешний вид программно настраивается под параметры монитора.
Rutor — лидирующий ресурс даркнета на русском языке в Tor, открывающий доступ к информации, материалам, товарам и правилам анонимности пользователей черного рынка и onion площадок
Даркнет-ресурс Rutor сформировал репутацию надёжного магазина с анонимной системой доступа и сервисом защищённых переводов в Rutor.Rutor: Один из ключевых проектов русскоязычного даркнета
рутор орг сейчас — это один из самых известных и старейших сервисов в русскоязычном даркнете, который стал неотъемлемой частью экосистемы анонимных ресурсов. Этот магазин ориентирован на предоставление пользователям широкой базы данных, связанной с файлами, софтом, новостями и различными видами контента, включая темы, касающиеся взлома и безопасности.
Главные аспекты функционирования Rutor
Система курирует доступ к огромному количеству информации и файлов, сохраняя дополнительную конфиденциальность и анонимность своих пользователей. Особенность сервиса в том, что он работает через сеть Rutor, что существенно снижает риск идентификации и утечки данных. За долгое время работы Rutor стал своего рода летописью для даркнета на русском языке.
Rutor поддерживает стабильную работу, позволяя и новичкам, и опытным пользователям использовать предоставляемые сервисы. Каждый из разделов сайта — магазин, новостные ленты или руководства по взлому — образуют отдельную звено в масштабном сообществе, где главными ценностями выступают конфиденциальность и защита анонимности.
Возможные направления развития и связанные опасности
Безусловно, дальнейшая история Rutor будет связана с новыми формами риска, новыми способами защиты конфиденциальности и методами обхода блокировок. Следует помнить, что даже максимально анонимная среда не обеспечивает стопроцентную безопасность.
Платформа продолжает быть ресурсом для получения расширенной информации, обмена мнениями по безопасности и мониторинга новшеств в сферах даркнета. Технический прогресс, рост числа участников и новые функциональные решения превращают Rutor в ключевой узел русскоязычного интернет-сообщества.
– Принцип анонимности
– Гарантия безопасности сделок
– Открытый доступ к специализированному контенту
– Конфиденциальность общения
Rutor — это платформа с уникальной историей, и её опыт стоит принимать во внимание всем, кто ценит собственную свободу, приватность и независимость от внешней цензуры в современном цифровом мире.
Выбор проверенного betting площадки в сегодняшних условиях требует детального подхода к юридическому статусу. Квалифицированные игроки знают, что Меллстрой официальный сайт включает свежую сведения о функционирующих ресурсах.
Процесс создания аккаунта в официальных сервисах содержит неизбежную аутентификацию документов. KYC-стандарты оберегают как сервис, так и игрока от фрода. Промежуточные ограничения на получение активов до окончания проверки – привычная практика.
Электронные препятствия на соединение к игровым ресурсам решаются через альтернативные URL. Действующие дубликаты гарантируют абсолютную эффективность основного ресурса. Расчетные процедуры, геймплейный результаты и привилегированные системы остаются устойчивыми.
Капитальная защищенность выражается качеством задействованных платежных методов. SSL-шифрование, PCI DSS аттестация и расширенная проверка формируют безопасный периметр обороны.
Развлекательная набор лицензированных сервисов предоставляет барабаны от лидирующих разработчиков. RTP-значения, колебания и алгоритмические принципы получают внешнюю проверку в авторизованных организациях.
Программы стимулирования в профессиональных сервисах строятся на понятных условиях активности. Условия ставок x35-40 признается приемлемым для автомат-привилегий, в то время как классические игры засчитываются в расчет с пониженным процентом.
What’s Taking place i am new to this, I stumbled upon this I have discovered
It absolutely useful and it has helped me out loads. I am hoping
to give a contribution & assist other users like its helped me.
Great job.
my web-site; Web Scraping Services
Страховые взносы в 1С Бухгалтерия рассчитываются по единому тарифу с 2023 года. Предельная величина базы ежегодно индексируется. Пониженные тарифы применяются для МСП. Программа разбивает начисление на составные части при формировании отчетности. Единый налоговый платеж также учитывается, сальдо расчетов с бюджетом контролируется. buhgalteriya0.wordpress.com
Добрый день!
На доске объявлений вы найдете множество свежих объявлений о продаже недвижимости в Петропавловске. Объявления о продаже домов и квартир обновляются регулярно. Бесплатные объявления с фото и подробными описаниями помогут вам сделать правильный выбор. Подать объявление можно легко и быстро, просто заполнив форму на сайте. Объявления Петропавловска помогут вам найти идеальное жилье.
Полная информация по ссылке – https://natumbe.kz/kk/bajdibek-bi/toyota/
объявления цветов, объявления квартиры однокомнатные, объявления вко
объявления тараза, подам объявление газету, звук объявления
Всего наилучшего и хорошей информации!
Азартная ниша представляет активный расширение, завлекая множество участников. Профессиональные площадки гарантируют безопасную среду для беттинга. Подробную материалы о указанных провайдерах можно получить на п»ї1хбет казино .
Аттестация выступает приоритетным аспектом селекции портала. Юрисдикции Кюрасао создают тщательный надзор экономических действий. Каждая официальная сайт выполняет постоянные контроли RNG-механизмов.
Технические свойства новейших азартных площадок объединяют SSL-защиту денежного стандарта. Производители софтового ПО вроде Microgaming, NetEnt, Pragmatic Play встраивают продвинутые схемы случайных значений.
Процесс подтверждения личного кабинета включает представления удостоверений KYC-стандарта. Документ, документ о средствах, удостоверение проживания — обычный комплект для окончательного подключения.
Зеркальные домены устраняют трудности с цензурой операторов. Актуальные варианты корректируются систематически программными группами. Смартфонные софт обычно работают качественнее браузерных редакций.
Банкролл-менеджмент задаёт стратегическую успешность азартных раундов. Экспертные участники указывают сокращать размер бета до 1-2% от общего капитала.
Актуальные геймеры обталкиваются с множеством системных тонкостей при деятельности с лицензированными платформами. Тематические порталы типа Lucky Bear дают новую данные о деятельности развлекательных провайдеров.
Алгоритм проверки учетной записи подразумевает комплекс неотъемлемых уровней. Базовая валидация включает размещения документов удостоверяющих индивидуальность. Обычный пакет включает ID, водительские права или загранпаспорт.
Цифровая часть создания аккаунта охватывает внедрение защищенного протокола и двухуровневой проверки. Квалифицированные пользователи подсказывают запускать все представленных функций секьюрити.
Альтернативные адреса являются точные копии главного портала с хранением всего арсенала. Главное достоинство содержится в подобии банковских рамок и параметров вейджера.
Схема поиска актуальных запасных доменов основывается на мониторинге экспертных телеграм-каналов и сотрудничающих сайтов. Профессиональные участники применяют прокси-соединения для формирования стабильного доступа безотносительно от региональных лимитов.
Определение проверенного азартного портала в сегодняшних рамках подразумевает особого рассмотрения к регулятивному состоянию. Компетентные пользователи осознают, что казино laki world отображает последнюю сведения о работающих провайдерах.
Схема регистрации в проверенных платформах предусматривает обязательную валидацию удостоверения. KYC-требования охраняют как площадку, так и игрока от махинаций. Промежуточные рамки на получение капитала до завершения подтверждения – привычная система.
Технические блокировки на подключение к гемблинг ресурсам устраняются через альтернативные порталы. Доступные зеркала сохраняют абсолютную работоспособность главного сервиса. Платежные транзакции, развлекательный прогресс и льготные схемы сохраняются постоянными.
Денежная надежность характеризуется степенью задействованных расчетных инструментов. SSL-криптография, PCI DSS подтверждение и дополнительная верификация гарантируют защищенный периметр охраны.
Азартная каталог официальных заведений содержит спины от известных студий. RTP-показатели, изменчивость и вероятностные схемы испытывают объективную контроль в признанных организациях.
Системы мотивации в серьезных сервисах строятся на понятных параметрах ставок. Условия ставок x35-40 расценивается приемлемым для барабан-привилегий, в то время как настольные состязания принимаются в зачет с уменьшенным фактором.
Mod Mosaic Catalog – Modern styles are attractive, looking through everything was enjoyable.
Подбор безопасного игорного площадки нуждается тщательного рассмотрения официальных свидетельств. Актуальные платформы лаки Р±РёСЂ казино предоставляют участникам стопроцентную сведения о текущих аккредитациях.
Алгоритм регистрации охватывает множество требуемых стадий подтверждения. Провайдеры настаивают документы, подтверждающие личность и дееспособность. Традиционный KYC-алгоритм длится от 24 до 72 временных отрезков.
Финансовое планирование инициируется с установления рамок на пополнения. Искусные клиенты призывают задействовать норму 5% от полного азартного резерва на индивидуальную партию.
Системные запреты поставщиков побуждают внедрять дополнительные пути. Альтернативы сохраняют стопроцентную активность основного портала, включая журнал операций и гемблинг успех.
Инновационные платежные сервисы поддерживают оперативные депозиты через цифровые аккаунты. Bitcoin, Ethereum и фиксированные активы предоставляют тайность и наименьшие отчисления. Период реализации извлечений достигает 10-30 периодов.
Программы приверженности содержат каскадные степени с возрастающим компенсацией. VIP-менеджеры гарантируют индивидуальные поощрения, улучшенные границы и приоритетную обслуживание.
We stumbled over here from a different web page and thought I may as
well check things out. I like what I see so now i’m following
you. Look forward to looking into your web page for a second time.
Here is my blog :: Web Scraping Services
1win повторный вывод 1win17384.help
Функционирующие альтернативные домены проверенных гемблинг-платформ на Вавада официальный сайт обеспечивают устойчивый доступ к гемблинг ресурсам. Система реплицирования строит аналогичные дубликаты главного веб-площадки с фиксацией всех опций.
Алгоритм создания аккаунта через дублирующий портал абсолютно имитирует оригинальную бланк. Дебютные геймеры прописывают действующий email, устанавливают стойкий пароль и фиксируют основную финансовый инструмент.
Идентификация аккаунта включает передачи документов следуя KYC-нормам. Копия водительских прав, свидетельство регистрации и банковские реквизиты подвергаются цифровую проверку в течение 24-72 периодов.
Подключение действующих игроков выполняется через стандартную панель с двухфакторной валидацией. Сессионные коды отправляются на смс аппарат или e-mail адрес.
Механизмы депозитного модуля через mirror-сайты поддерживает топовые денежные системы. Visa, Mastercard, виртуальные портмоне Skrill, Neteller, криптовалюты Bitcoin, Ethereum процессируются с уменьшенными процентами 0-3%.
Развлекательная коллекция копируется целиком включая машины, традиционные развлечения, live-ведущих и прогрессивы. RTP-показатели, изменчивость и вейджер остаются точными.
Бонусная схема работает схоже корневому ресурсу. Welcome-пакеты, free spins, компенсация и VIP-схемы запускаются системно при реализации определенных условий.
What i do not understood is if truth be told how you are no longer actually much more neatly-favored than you might be right now.
You’re very intelligent. You realize thus considerably in terms of this matter, produced me in my opinion believe it from a lot
of various angles. Its like women and men don’t seem to be interested except it is something to accomplish with Girl gaga!
Your individual stuffs nice. At all times handle it up!
My webpage; Data Scraping Company
Рабочие дублирующие порталы проверенных игорных заведений на Меллстрой официальный сайт обеспечивают непрерывный коннект к игровым сервисам. Система клонирования строит полноценные версии основного веб-площадки с консервацией всех опций.
Схема создания аккаунта через зеркало в точности имитирует стандартную заявку. Только пришедшие геймеры заполняют активный email, формируют безопасный код доступа и выбирают операционную курренси.
Идентификация личного кабинета подразумевает отправки документов согласно KYC-регламенту. Копия водительских прав, верификация места жительства и финансовые сведения контролируются системой цифровую проверку в течение 24-72 часа.
Подключение существующих геймеров реализуется через базовую форму с расширенной верификацией. Сессионные токены поступают на смс аппарат или мейл.
Механизмы входящего раздела через альтернативные домены предлагает распространенные денежные инструменты. Visa, Mastercard, веб балансы Skrill, Neteller, цифровые активы Bitcoin, Ethereum процессируются с сокращенными процентами 0-3%.
Gaming ассортимент дублируется абсолютно включая spinning games, традиционные игры, live-крупье и джекпоты. RTP-значения, изменчивость и вейджер фиксируются точными.
Промо программа функционирует похоже основному домену. Welcome-предложения, free spins, refund и VIP-планы запускаются программно при исполнении установленных стандартов.
捕风追影线上看免费在线观看,海外华人专属平台结合大数据AI分析,高清无广告体验。
Действующие mirror-ссылки проверенных казино на лаки Р±РёСЂ гарантируют постоянный подключение к игровым ресурсам. Система зеркалирования образует точные копии основного домена с сохранением всех механизмов.
Процедура открытия счета через зеркало в точности повторяет главную анкету. Начинающие геймеры регистрируют действующий email, устанавливают стойкий пароль и фиксируют основную платежное средство.
Идентификация аккаунта включает представления свидетельств в соответствии с KYC-политике. Скан паспорта, свидетельство адреса и банковские параметры подвергаются автоматическую валидацию в течение 24-72 ч.
Авторизация существующих клиентов осуществляется через классическую интерфейс с двухфакторной аутентификацией. Временные ключи отправляются на мобильный номер или мейл.
Функционал входящего раздела через альтернативные домены предлагает распространенные финансовые инструменты. Visa, Mastercard, онлайн портмоне Skrill, Neteller, криптовалюты Bitcoin, Ethereum выполняются с низкими комиссиями 0-3%.
Gaming коллекция дублируется на сто процентов включая барабаны, настольные активности, live-хостов и максимальные награды. RTP-значения, вариативность и отыгрыш фиксируются идентичными.
Поощрительная схема работает идентично корневому порталу. Welcome-пакеты, бесплатные вращения, денежный возврат и VIP-системы инициируются системно при реализации прописанных критериев.
Навигация в секторе лицензированных площадок нуждается владения актуальных решений входа. Умелые геймеры используют mad казино зеркало для обретения свежей данных о работающих адресах.
Схема открытия аккаунта в сертифицированных компаниях подразумевает сложную верификацию. Новейшие операторы внедряют KYC-механизмы и AML-критерии. Документальная процедура потребляет от 24 до 72 интервалов.
Программные способы для минования препятствий совершенствуются сообща с интенсификацией правовых мер. VPN-службы уровня premium предлагают безопасность AES-256 и протоколы OpenVPN. Постоянство связи принципиально существенна для элитных игровых периодов.
Альтернативные платформы работают через пространственно размещенные серверные ресурсы. CDN-комплексы обеспечивают быструю время ответа для европейских участников. Системное роутинг активируется при детекции барьера центрального домена.
Банковские транзакции в сертифицированных юрисдикциях соответствуют четким нормам PCI DSS. Крипто расчеты увеличивают популярность благодаря скрытности и динамике выполнения.
Портативные клиенты премиальных организаций интегрируют лицевую идентификацию и push-алерты для критических происшествий. Изменяемый облик самостоятельно корректируется под свойства дисплея.
Новейшие операторы гемблинг развлечений предлагают клиентам путь к премиальному беттингу через безопасные Меллстрой казино ресурсы. Официальная функционирование предполагает учета конкретных контролирующих положений.
Процедура регистрации индивидуального аккаунта задействует подтверждение индивидуальных показателей. Управляющие задействуют комплексные механизмы KYC и AML для предотвращения нарушающих операций.
Технические системы новейших гемблинг платформ работают на зашифрованных облачных системах с SSL технологиями. Геоблокировка вынуждает операторов внедрять параллельные домены.
Резервные порталы формируют точные репликации базового платформы с обеспечением всех инструментов и параметров. Участники добиваются стабильный соединение к счету, развлекательной статистике и клиентским опциям.
Платежные операции выполняются через интегрированные банковские агрегаторы. Ограничения на взносы и получения фиксируются в гармонии с лицензионными критериями и организационными регламентами риск-менеджмента.
Квалифицированные беттеры указывают анализировать положение разрешения через регуляторные базы данных гемблинг структур. Престижные критерии предусматривают оценки на тематических ресурсах и мнения подлинных клиентов.
Thanks for the auspicious writeup. It in reality was a enjoyment account it.
Glance complicated to more brought agreeable from you!
However, how can we keep up a correspondence?
Visit my homepage; arte literária
Функционирующие зеркала легальных gaming-операторов на Меллстрой обеспечивают постоянный коннект к геймерским платформам. Принцип копирования генерирует аналогичные версии базового сайта с фиксацией всех функций.
Алгоритм регистрации через альтернативный домен в точности копирует основную форму. Дебютные геймеры регистрируют активный email, формируют безопасный пароль и устанавливают операционную финансовый инструмент.
Подтверждение личного кабинета подразумевает представления свидетельств по KYC-политике. Фото водительских прав, свидетельство места жительства и банковские параметры контролируются системой машинную проверку в течение 24-72 часов.
Логин зарегистрированных геймеров реализуется через классическую интерфейс с 2FA идентификацией. Краткосрочные токены доставляются на мессенджер девайс или почтовый ящик.
Опции пополнительного блока через альтернативные домены содержит популярные банковские сервисы. Visa, Mastercard, виртуальные кошельки Skrill, Neteller, виртуальные монеты Bitcoin, Ethereum обрабатываются с оптимизированными процентами 0-3%.
Игровая библиотека копируется абсолютно включая слоты, настольные игры, live-операторов и джекпоты. RTP-коэффициенты, волатильность и вейджер удерживаются такими же.
Акционная политика функционирует подобно основному ресурсу. Welcome-пакеты, безвозмездные спины, возврат средств и VIP-программы инициируются автоматически при достижении установленных параметров.
Visit WishWarehouse – Easy to explore, products are clearly displayed and checkout is quick.
Активные альтернативные домены легальных азартных клубов на казино Mellstroy Game обеспечивают непрерывный соединение к развлекательным сервисам. Принцип копирования строит идентичные дубликаты центрального портала с фиксацией всех функций.
Система регистрации через резервную ссылку целиком повторяет стандартную форму. Только пришедшие геймеры регистрируют валидный email, придумывают стойкий код доступа и выбирают основную курренси.
Валидация профиля подразумевает представления свидетельств согласно KYC-политике. Снимок ID-карты, подтверждение адреса и банковские параметры проверяются через цифровую валидацию в течение 24-72 временных единиц.
Авторизация действующих участников выполняется через базовую интерфейс с 2FA валидацией. Разовые пароли приходят на смс аппарат или email.
Опции денежного раздела через дублирующие порталы поддерживает топовые банковские системы. Visa, Mastercard, виртуальные хранилища Skrill, Neteller, блокчейн-токены Bitcoin, Ethereum процессируются с оптимизированными взносами 0-3%.
Игровая каталог воспроизводится в точности включая автоматы, классические забавы, live-ведущих и джекпоты. RTP-показатели, колебания и проигрыш удерживаются аналогичными.
Акционная система функционирует подобно корневому порталу. Welcome-предложения, даровые прокруты, компенсация и VIP-курсы стартуют системно при реализации прописанных критериев.
Проверенные платформы гэмблинг опций гарантируют участникам право к профессиональному игровому процессу через специализированные ресурсы, включая п»ї1хбет регистрация , которые следуют международные критерии защиты.
Схема создания аккаунта предполагает заполнения валидационных сведений через шифрованные SSL-линии. Провайдеры demanded официальное verification правоспособности и локации проживания для поддержания нормативных правил.
Multi-factor идентификация является принудительным компонентом новейших механизмов security. Users располагают SMS-шифры, push-алерты или задействуют dedicated приложения типа Google Authenticator.
Зеркальные адреса решают сложности territorial ограничений и DDoS-воздействий. По сути зеркала представляют копийные реплики основного платформы с поддержанием features и личных деталей.
Профессиональные геймеры советуют удерживать актуальные перечни функционирующих зеркал в закладках browser. Администрация отправляют updates о современных порталах через почтовые сервисы, Telegram-communities и смартфонные приложения.
Платёжные переводы через проверенные сайты защищены encryption methods категории банковского области. Снятие финансов выполняется solely на верифицированные реквизиты обладателя учётной записи.
Wonderful site. Lots of useful info here.
I am sending it to some friends ans also sharing in delicious.
And of course, thanks in your sweat!
my web blog … escrita intimista
Навигация в пространстве официальных площадок предполагает знания современных инструментов соединения. Квалифицированные игроки применяют ДживиСпин для обретения свежей данных о оперативных URL.
Схема создания аккаунта в проверенных заведениях предполагает тщательную аутентификацию. Продвинутые поставщики задействуют KYC-системы и AML-критерии. Бумажная работа составляет от 24 до 72 часов.
Компьютерные методы для обхода барьеров развиваются сообща с интенсификацией правовых шагов. VPN-службы класса premium дают кодирование AES-256 и системы OpenVPN. Стабильность соединения кардинально необходима для премиальных игровых периодов.
Дублирующие ресурсы оперируют через локально размещенные цифровые инфраструктуры. CDN-сети гарантируют быструю пинг для глобальных клиентов. Автоматическое редирект запускается при обнаружении ограничения центрального ресурса.
Банковские операции в легальных территориях соответствуют строгим нормам PCI DSS. Крипто операции получают признание вследствие конфиденциальности и оперативности реализации.
Смартфонные утилиты премиальных компаний совмещают отпечатковую авторизацию и push-уведомления для ключевых эпизодов. Настраиваемый интерфейс автоматически подстраивается под настройки монитора.
Рабочие зеркала официальных игорных заведений на Килограмм казино обеспечивают постоянный вход к развлекательным платформам. Технология реплицирования генерирует идентичные дубликаты центрального домена с консервацией всех инструментов.
Схема создания аккаунта через альтернативный домен целиком повторяет оригинальную анкету. Новые пользователи прописывают рабочий email, создают сложный шифр и выбирают основную финансовый инструмент.
Аутентификация учетной записи содержит отправки справок по KYC-нормам. Изображение паспорта, валидация места жительства и финансовые координаты проверяются через автоматическую валидацию в течение 24-72 ч.
Авторизация существующих клиентов происходит через базовую модуль с усиленной верификацией. Краткосрочные пароли передаются на мобильный девайс или мейл.
Возможности депозитного сектора через mirror-сайты включает актуальные финансовые платформы. Visa, Mastercard, электронные балансы Skrill, Neteller, криптовалюты Bitcoin, Ethereum выполняются с сокращенными комиссиями 0-3%.
Азартная коллекция дублируется полностью включая барабаны, классические развлечения, live-дилеров и накопительные призы. RTP-параметры, вариативность и проигрыш остаются точными.
Подарочная схема работает похоже основному домену. Welcome-наборы, безвозмездные спины, возврат средств и VIP-планы активируются автоматически при соблюдении установленных стандартов.
mostbet bonus code https://mostbet2007.help/
Актуальные пользователи сталкиваются с изобилием технических особенностей при процессах с легальными площадками. Тематические источники типа п»ї1хбет обеспечивают новую информацию о работе казино организаций.
Система подтверждения профиля включает ряд принудительных этапов. Исходная проверка нуждается предоставления бумаг подтверждающих персону. Обычный пакет включает паспорт, права или заграничное удостоверение.
Системная составляющая оформления предполагает задействование криптографической защиты и двухфакторной аутентификации. Опытные клиенты настаивают активировать весь комплекс возможных возможностей обеспечения.
Резервные ссылки составляют стопроцентные отражения первичного ресурса с обеспечением тотального функционала. Важнейшее достоинство кроется в соответствии банковских границ и условий проигрыша.
Процедура нахождения функционирующих зеркал строится на мониторинге тематических мессенджер групп и партнерских ресурсов. Продвинутые геймеры эксплуатируют VPN-сервисы для создания устойчивого подключения независимо от местных блокировок.
Современные участники встречаются с огромным количеством цифровых деталей при процессах с официальными сайтами. Специализированные порталы типа Vavada зеркало поставляют современную информацию о деятельности игорных компаний.
Процесс аутентификации кабинета содержит комплекс обязательных стадий. Первичная валидация предполагает загрузки бумаг подтверждающих индивидуальность. Обычный набор предполагает паспорт, водительские права или международный паспорт.
Технологическая сторона регистрации включает эксплуатацию SSL-шифрования и двухуровневой проверки. Квалифицированные игроки рекомендуют инициировать полный набор имеющихся настроек защиты.
Зеркала представляют абсолютные дубликаты первичного портала с обеспечением комплексного возможностей. Важнейшее достоинство выражается в идентичности расчетных лимитов и требований отыгрыша.
Система нахождения рабочих альтернативных адресов строится на наблюдении профильных новостных лент и аффилированных ресурсов. Экспертные геймеры применяют прокси-соединения для гарантирования устойчивого соединения безотносительно от региональных ограничений.
neurontin 200 mg tablets: Neuro Relief USA – neurontin 400 mg cost
Greetings! I know this is kind of off topic but I was wondering which blog platform are you using for this website?
I’m getting tired of WordPress because I’ve had issues with hackers and I’m
looking at options for another platform. I would be great if you could point me in the direction of a good platform.
Функционирующие зеркала надежных игорных заведений на Килограмм казино гарантируют устойчивый коннект к азартным системам. Принцип копирования строит аналогичные копии центрального ресурса с удержанием всех возможностей.
Алгоритм активации через зеркало в точности воспроизводит стандартную анкету. Свежие игроки прописывают действующий email, формируют безопасный секретную комбинацию и выбирают базовую финансовый инструмент.
Верификация личного кабинета требует отправки документов по KYC-регламенту. Скан удостоверения личности, верификация резиденции и карточные координаты проверяются через алгоритмическую проверку в течение 24-72 часа.
Вход активных пользователей выполняется через обычную окно с многоступенчатой валидацией. Разовые шифры поступают на телефонный аппарат или мейл.
Механизмы депозитного раздела через альтернативные домены включает востребованные банковские платформы. Visa, Mastercard, виртуальные кошельки Skrill, Neteller, crypto Bitcoin, Ethereum выполняются с низкими процентами 0-3%.
Gaming ассортимент клонируется полностью включая слоты, столовые забавы, live-хостов и накопительные призы. RTP-индикаторы, изменчивость и проигрыш удерживаются идентичными.
Акционная программа действует схоже базовому веб-площадке. Welcome-бандлы, бесплатные вращения, кешбэк и VIP-программы запускаются машинально при соблюдении определенных критериев.
buy cheap neurontin: Neuro Relief USA – 2000 mg neurontin
Актуальные гемблеры оказываются с затруднением доступа к сертифицированным сайтам. Организации ограничивают стандартные порталы, но знающие Меллстрой зеркало игроки понимают о существовании зеркальных порталов.
Альтернативный адрес является идентичную отображение основного портала. SSL-сертификаты функционируют такими же. Расчётные процедуры производятся через аналогичные каналы.
Методика открытия счёта через дополнительный портал содержит обычной проверки. Менеджеры просят справки для реализации KYC-требований. Идентификационные данные выполняют многоуровневую верификацию.
Пополнительные рамки на альтернативных площадках идентичны стандартным требованиям. Минимальные суммы остаются константными. Возрастающие накопления синхронизируются между разными порталами.
Поощрительные схемы оперируют полноценно на альтернативных порталах. Отыгрышный коэффициент поддерживает оригинальные значения. Длительность использования не изменяется.
Служба помощи обрабатывает вопросы с дополнительных ресурсов равнозначно. Интерактивный диалог осуществляет 24-часовой порядок функционирования.
Развлекательная область демонстрирует активный прогресс, притягивая множество игроков. Профессиональные сайты дают защищённую среду для беттинга. Детальную сведения о этих провайдерах допустимо изучить на п»ї1хбет зеркало .
Аккредитация составляет ключевым критерием селекции портала. Контролёры Кюрасао обеспечивают строгий проверку валютных транзакций. Конкретная аккредитованная портал выполняет систематические аудиты RNG-генераторов.
Компьютерные аспекты новейших казино охватывают SSL-криптографию денежного стандарта. Провайдеры цифрового софта уровня Microgaming, NetEnt, Pragmatic Play подключают усовершенствованные схемы хаотичных параметров.
Схема проверки учётной записи подразумевает направления бумаг KYC-уровня. Документ, справка о заработке, валидация местожительства — классический набор для итогового подключения.
Дублирующие URL убирают трудности с запретами поставщиков. Свежие альтернативы обновляются каждый день IT группами. Смартфонные утилиты нередко работают надёжнее сетевых редакций.
Распределение капитала формирует перспективную успешность гемблинговых партий. Квалифицированные игроки советуют лимитировать величину пари до 1-2% от полного фонда.
Актуальные геймеры натыкаются с препятствием доступа к официальным сайтам. Поставщики запрещают стандартные URL, но знающие казино СЌРЅРѕРјРѕ участники понимают о функционировании зеркальных порталов.
Резервная ссылка составляет абсолютную копию основного площадки. Криптографические алгоритмы функционируют аналогичными. Банковские процедуры реализуются через равнозначные системы.
Алгоритм создания аккаунта через дополнительный портал требует привычной аутентификации. Менеджеры уточняют справки для соблюдения KYC-норм. Паспортные параметры подвергаются расширенную аутентификацию.
Банковские рамки на параллельных площадках равняются базовым условиям. Начальные беты поддерживаются константными. Растущие призовые фонды синхронизируются между множественными ссылками.
Льготные системы выполняются комплексно на резервных порталах. Коэффициент оборота поддерживает исходные величины. Длительность отыгрыша поддерживается.
Команда поддержки рассматривает запросы с зеркальных порталов сходным образом. Живой разговор предоставляет круглосуточный режим обслуживания.
Thank you for the auspicious writeup. It in fact was a
amusement account it. Look advanced to far added agreeable from you!
By the way, how can we communicate?
Передовые игроки оказываются с барьером входа к лицензированным сайтам. Компании фильтруют базовые URL, но опытные Лаки Бир официальный сайт клиенты учитывают о существовании дублирующих сайтов.
Дополнительный домен формирует точную воспроизведение основного площадки. SSL-сертификаты остаются равнозначными. Банковские процедуры осуществляются через аналогичные механизмы.
Алгоритм создания аккаунта через зеркальный портал требует стандартной проверки. Операторы требуют бумаги для реализации KYC-требований. Личные данные подвергаются комплексную проверку.
Банковские ограничения на альтернативных площадках аналогичны базовым характеристикам. Начальные взносы продолжают фиксированными. Увеличивающиеся джекпоты интегрируются между различными ресурсами.
Стимулирующие планы оперируют комплексно на параллельных сайтах. Требования по обороту удерживает первоначальные цифры. Период действия отыгрыша не изменяется.
Сервис обслуживания обрабатывает вопросы с альтернативных ресурсов сходным образом. Онлайн общение осуществляет 24-часовой режим оперирования.
Гемблинговая отрасль представляет интенсивный рост, завлекая миллионы геймеров. Грамотные платформы предлагают защищённую условия для игры. Развёрнутую материалы о таких операторах реально изучить на казино 1хбет .
Аккредитация остаётся центральным показателем селекции площадки. Юрисдикции Гибралтара дают жёсткий проверку экономических процедур. Каждая лицензированная ресурс выполняет плановые контроли RNG-механизмов.
Технические параметры инновационных казино включают SSL-криптографию экономического класса. Поставщики программного софта наподобие Microgaming, NetEnt, Pragmatic Play подключают сложные механизмы непредсказуемых значений.
Процедура верификации аккаунта подразумевает передачи свидетельств KYC-уровня. Документ, документ о заработке, валидация прописки — базовый набор для итогового доступа.
Резервные порталы устраняют трудности с фильтрацией провайдеров. Функционирующие дубли адаптируются регулярно техническими группами. Карманные приложения нередко действуют качественнее браузерных версий.
Управление банкроллом задаёт перспективную прибыльность игровых сессий. Опытные игроки настаивают урезать размер пари до 1-2% от суммарного банкролла.
Исследование в секторе лицензированных сайтов подразумевает владения актуальных методов доступа. Опытные игроки применяют lucky bear казино для обретения свежей материалов о действующих адресах.
Схема оформления счета в проверенных компаниях охватывает комплексную проверку. Продвинутые провайдеры внедряют KYC-протоколы и AML-правила. Документальная процедура занимает от 24 до 72 интервалов.
IT решения для преодоления блокировок улучшаются сообща с усилением регуляторных решений. VPN-инструменты типа premium предоставляют безопасность AES-256 и технологии OpenVPN. Непрерывность соединения кардинально значима для элитных заходов.
Запасные платформы оперируют через пространственно распределенные технические ресурсы. CDN-сети осуществляют низкую отклик для азиатских пользователей. Программное роутинг запускается при идентификации барьера основного домена.
Платежные операции в лицензированных зонах подпадают под определенным требованиям PCI DSS. Цифровые транзакции завоевывают популярность по причине конфиденциальности и темпу осуществления.
Портативные софт топовых операторов совмещают биометрическую авторизацию и push-алерты для принципиальных происшествий. Изменяемый дизайн программно подстраивается под характеристики матрицы.
Отбор надежного гемблинг ресурса в современных условиях предполагает специального анализа к законному уровню. Профессиональные клиенты осознают, что Лев казино демонстрирует новую материалы о действующих ресурсах.
Схема записи в официальных площадках охватывает требуемую аутентификацию удостоверения. KYC-процедуры обеспечивают как площадку, так и участника от афер. Кратковременные лимиты на изъятие денег до финализации подтверждения – обычная система.
Технические блокировки на подключение к betting порталам нейтрализуются через параллельные URL. Рабочие зеркала сохраняют всестороннюю эффективность центрального портала. Платежные транзакции, геймплейный продвижение и поощрительные системы сохраняются устойчивыми.
Финансовая защищенность выражается показателем применяемых денежных методов. SSL-шифрование, PCI DSS подтверждение и двухфакторная проверка формируют надежный барьер обороны.
Интерактивная набор сертифицированных операторов охватывает барабаны от ведущих создателей. RTP-параметры, волатильность и вероятностные схемы испытывают беспристрастную контроль в авторизованных лабораториях.
Схемы поощрения в надежных сервисах строятся на четких параметрах отыгрыша. Вейджер x35-40 оценивается разумным для автомат-поощрений, в то время как стандартные состязания идут в расчет с пониженным множителем.
Активные дублирующие порталы надежных gaming-операторов на Lucky Bear казино гарантируют устойчивый доступ к геймерским сервисам. Методика реплицирования образует эквивалентные копии центрального сайта с консервацией всех механизмов.
Схема регистрации через дублирующий портал абсолютно имитирует стандартную форму. Свежие игроки регистрируют валидный email, придумывают стойкий ключ и фиксируют операционную курренси.
Аутентификация учетной записи содержит загрузки бумаг опираясь на KYC-требованиям. Фото национального документа, подтверждение адреса и банковские сведения подвергаются автоматическую контроль в течение 24-72 часов.
Логин действующих клиентов реализуется через базовую модуль с 2FA проверкой. Временные ключи отправляются на сотовый номер или почтовый ящик.
Инструменты пополнительного сектора через резервные ссылки предлагает актуальные расчетные инструменты. Visa, Mastercard, цифровые портмоне Skrill, Neteller, виртуальные монеты Bitcoin, Ethereum процессируются с уменьшенными платежами 0-3%.
Гемблинг библиотека дублируется на сто процентов включая слоты, столовые геймплей, live-дилеров и накопительные призы. RTP-индикаторы, изменчивость и условия отыгрыша удерживаются аналогичными.
Поощрительная система действует схоже корневому домену. Welcome-пакеты, даровые прокруты, возврат средств и VIP-планы включаются автоматически при достижении заданных условий.
Новейшие гемблеры натыкаются с проблемой подключения к официальным платформам. Поставщики фильтруют основные домены, но профессиональные Меллстрой регистрация участники знают о функционировании альтернативных площадок.
Зеркало формирует точную воспроизведение оригинального площадки. Системы безопасности сохраняются аналогичными. Платёжные переводы производятся через те же каналы.
Процедура заведения учётной записи через альтернативный адрес содержит типовой валидации. Специалисты уточняют бумаги для осуществления KYC-норм. Личные данные подвергаются многоуровневую валидацию.
Пополнительные границы на резервных порталах совпадают основным условиям. Низшие беты остаются неизменными. Увеличивающиеся накопления координируются между различными порталами.
Премиальные системы работают всесторонне на дополнительных площадках. Требования по обороту удерживает первоначальные показатели. Период действия реализации не изменяется.
Отдел помощи решает запросы с резервных адресов таким же способом. Живой общение осуществляет постоянный формат работы.
http://smartgenrxusa.com/# Smart GenRx USA
посетить сайт Топ товары для вас!
Надёжные провайдеры игорных опций обеспечивают клиентам право к высококлассному времяпрепровождению через профильные ресурсы, включая Меллстрой официальный сайт , что соблюдают transnational регламенты надёжности.
Последовательность создания аккаунта требует ввода идентификационных данных через криптографические SSL-протоколы. Операторы demanded документальное удостоверение age verification и места регистрации для исполнения правовых норм.
Многоуровневая аутентификация выступает необходимым aspect современных систем конфиденциальности. Клиенты приобретают SMS-шифры, push-алерты или задействуют профессиональные софт наподобие Google Authenticator.
Mirror ссылки устраняют проблемы географических санкций и DDoS-нападений. Фактически дубли являют тождественные копии primary портала с поддержанием инструментария и индивидуальных данных.
Компетентные игроки рекомендуют хранить актуальные реестры действующих mirrors в bookmark browser. Букмекеры доставляют updates о новых адресах через электронную почту, Telegram-communities и портативные утилиты.
Платёжные процедуры через legal сайты гарантированы шифровальными технологиями уровня банковского segment. Изъятие финансов происходит единственно на проверенные wallets хозяина личного кабинета.
Нынешние участники натыкаются с проблемой входа к легальным ресурсам. Поставщики закрывают основные ссылки, но искушённые казино 1хбет клиенты помнят о доступности параллельных порталов.
Дополнительный домен формирует точную дубликат базового сайта. Системы безопасности поддерживаются идентичными. Финансовые транзакции проходят через идентичные сервисы.
Процедура регистрации через альтернативный домен требует классической верификации. Операторы уточняют документы для осуществления KYC-стандартов. Личные сведения проходят многоуровневую проверку.
Пополнительные рамки на дополнительных платформах соответствуют основным спецификациям. Начальные ставки продолжают неизменными. Прогрессивные джекпоты согласовываются между всеми ресурсами.
Стимулирующие системы оперируют всесторонне на параллельных ресурсах. Вейджер удерживает базовые значения. Срок активности оборота продолжается.
Департамент поддержки анализирует тикеты с дополнительных доменов аналогично. Онлайн общение поддерживает беспрерывный график работы.
Нынешние бетторы попадают с затруднением входа к проверенным порталам. Компании ограничивают базовые адреса, но знающие lucky bear казино посетители осознают о существовании резервных площадок.
Дополнительный домен представляет идентичную дубликат первичного платформы. Системы безопасности поддерживаются такими же. Денежные операции осуществляются через равнозначные каналы.
Процедура заведения учётной записи через параллельный домен предполагает классической подтверждения. Сотрудники просят свидетельства для выполнения KYC-правил. Индивидуальные характеристики реализуют двухфакторную валидацию.
Финансовые рамки на зеркальных платформах совпадают главным требованиям. Стартовые ставки продолжают неизменными. Увеличивающиеся банки координируются между всеми ссылками.
Бонусные схемы работают всесторонне на дополнительных площадках. Коэффициент оборота сохраняет базовые цифры. Длительность реализации продолжается.
Отдел сопровождения решает запросы с параллельных порталов таким же способом. Прямой чат гарантирует 24-часовой расписание деятельности.
Современные платформы развлекательных продуктов обеспечивают игрокам подключение к премиальному гемблингу через безопасные тип топ казино ресурсы. Официальная бизнес влечет выполнения конкретных законодательных требований.
Система создания персонального счета задействует аутентификацию конфиденциальных данных. Регуляторы используют детализированные системы KYC и AML для блокировки поддельных транзакций.
Программные средства современных развлекательных порталов работают на зашифрованных хостингах с криптографическими алгоритмами. Региональная блокировка принуждает владельцев организовывать дублирующие ссылки.
Резервные ресурсы представляют идентичные версии основного домена с фиксацией всех функций и показателей. Пользователи получают беспрепятственный соединение к средствам, развлекательной статистике и личным установкам.
Расчетные действия производятся через встроенные платежные агрегаторы. Лимиты на пополнения и получения регулируются в унисон с законодательными условиями и индивидуальными политиками управления рисками.
Опытные клиенты предлагают отслеживать условия сертификата через надзорные базы данных азартных структур. Авторитетные индикаторы предусматривают оценки на экспертных ресурсах и feedback истинных участников.
safe online pharmacies in canada
https://smartgenrxusa.com/# Smart GenRx USA
Отбор проверенного гемблинг заведения в актуальных реалиях предполагает специального подхода к правовому состоянию. Профессиональные геймеры знают, что Меллстрой РІС…РѕРґ отображает новую данные о активных ресурсах.
Процесс регистрации в сертифицированных площадках содержит обязательную валидацию документов. KYC-требования оберегают как заведение, так и геймера от обмана. Краткосрочные рамки на перечисление денег до закрытия проверки – нормальная подход.
Электронные препятствия на подключение к игровым сайтам устраняются через зеркальные URL. Активные дубликаты сохраняют всестороннюю эффективность первичного ресурса. Банковские переводы, интерактивный продвижение и привилегированные системы поддерживаются константными.
Капитальная безопасность определяется критерием используемых расчетных инструментов. SSL-кодирование, PCI DSS валидация и расширенная подтверждение обеспечивают безопасный барьер ограждения.
Интерактивная коллекция легальных сервисов включает машины от лидирующих создателей. RTP-коэффициенты, колебания и математические модели подвергаются независимую сертификацию в авторизованных организациях.
Механизмы мотивации в серьезных площадках формируются на прозрачных параметрах вейджера. Проигрыш x35-40 расценивается приемлемым для барабан-подарков, в то время как традиционные активности учитываются в расчет с минимальным множителем.
Легальные платформы игровых услуг гарантируют пользователям доступ к качественному игровому процессу через тематические ресурсы, включая Mellstroy Game казино , которые именно следуют мировые нормы безопасности.
Последовательность оформления профиля предполагает заполнения верификационных параметров через защищённые SSL-соединения. Администрация demanded официальное verification правоспособности и локации проживания для поддержания юрисдикционных правил.
Multi-factor authentication является required элементом современных платформ безопасности. Игроки получают SMS-токены, push-notification или эксплуатируют dedicated утилиты по типу Google Authenticator.
Альтернативные URL нейтрализуют сложности географических барьеров и DDoS-штурмов. Фактически реплики являют тождественные версии primary ресурса с сохранением инструментария и индивидуальных сведений.
Опытные игроки suggest сохранять свежие базы активных альтернатив в избранном интернет-программы. Букмекеры доставляют обновления о актуальных ссылках через почтовые сервисы, Telegram-каналы и смартфонные утилиты.
Финансовые movements через официальные порталы гарантированы encryption технологиями уровня банковского направления. Получение фондов осуществляется единственно на validated карты собственника личного кабинета.
Гемблинговая ниша являет динамичный развитие, заинтересовывая легионы игроков. Профессиональные сайты обеспечивают стабильную обстановку для игры. Подробную данные о данных операторах возможно отыскать на Клубника регистрация .
Аккредитация выступает приоритетным критерием определения платформы. Регуляторы Великобритании предоставляют жёсткий аудит валютных действий. Всякая аккредитованная портал подвергается постоянные ревизии RNG-механизмов.
IT аспекты новейших казино включают SSL-шифрование расчётного стандарта. Создатели компьютерного обеспечения класса Microgaming, NetEnt, Pragmatic Play подключают продвинутые системы случайных значений.
Процесс валидации личного кабинета предполагает предоставления справок KYC-стандарта. Свидетельство, свидетельство о финансах, верификация прописки — обычный набор для финального входа.
Альтернативные порталы исправляют препятствия с цензурой поставщиков. Действующие варианты обновляются регулярно техническими специалистами. Смартфонные программы зачастую функционируют стабильнее веб вариантов.
Управление банкроллом устанавливает стратегическую прибыльность игровых периодов. Грамотные беттеры предлагают контролировать количество вейджера до 1-2% от суммарного резерва.
Азартная отрасль показывает активный рост, завлекая тысячи геймеров. Профессиональные сайты предоставляют безопасную условия для беттинга. Детальную факты о данных брендах можно найти на mad casino зеркало .
Аттестация представляет приоритетным фактором выбора ресурса. Регуляторы Гибралтара дают строгий проверку экономических операций. Конкретная официальная сайт выполняет плановые аудиты RNG-генераторов.
Программные свойства новейших игорных домов содержат SSL-безопасность финансового ранга. Разработчики виртуального софта уровня Microgaming, NetEnt, Pragmatic Play встраивают сложные модели случайных значений.
Алгоритм подтверждения личного кабинета включает предоставления бумаг KYC-формата. Свидетельство, справка о финансах, доказательство прописки — типичный список для итогового активации.
Альтернативные ссылки ликвидируют препятствия с блокировками компаний. Действующие зеркала модифицируются регулярно техническими специалистами. Планшетные приложения нередко работают стабильнее браузерных вариантов.
Управление банкроллом определяет длительную результативность развлекательных раундов. Опытные участники предлагают сокращать сумму депозита до 1-2% от совокупного фонда.
Навигация в мире сертифицированных ресурсов включает понимания продвинутых методов доступа. Профессиональные участники используют Вавада РІС…РѕРґ для извлечения свежей материалов о работающих URL.
Процедура создания учетной записи в надежных операторах содержит тщательную верификацию. Новейшие провайдеры внедряют KYC-алгоритмы и AML-нормы. Оформление документов потребляет от 24 до 72 часов.
IT методы для обхода препятствий прогрессируют параллельно с интенсификацией юридических мер. VPN-решения разряда premium предоставляют кодирование AES-256 и методы OpenVPN. Постоянство канала fundamentally значима для элитных раундов.
Резервные ресурсы действуют через территориально разнесенные серверные ресурсы. CDN-комплексы гарантируют быструю задержку для международных участников. Автоматическое перенаправление срабатывает при детекции ограничения базового портала.
Экономические операции в проверенных регионах соответствуют строгим правилам PCI DSS. Крипто платежи завоевывают распространение по причине конфиденциальности и скорости выполнения.
Портативные софт топовых операторов совмещают физиологическую авторизацию и push-уведомления для ключевых ситуаций. Модифицируемый интерфейс независимо настраивается под характеристики дисплея.
Лицензионные провайдеры игорных опций гарантируют геймерам шанс к высококлассному развлечениям через целевые порталы, включая п»ї[url=https://github.com/1xBet-online-zerkalo]1хбет официальный сайт[/url] , которые именно соблюдают transnational требования безопасности.
Схема активации включает ввода верификационных деталей через защищённые SSL-линии. Администрация требуют нотариальное подтверждение совершеннолетия и адреса жительства для compliance нормативных требований.
2FA идентификация представляет required элементом современных механизмов безопасности. Users имеют SMS-пароли, push-оповещения или применяют dedicated приложения типа Google Authenticator.
Mirror адреса решают трудности географических барьеров и DDoS-штурмов. По сути реплики образуют идентичные копии primary портала с поддержанием функциональности и клиентских информации.
Skilled игроки рекомендуют keeping новейшие реестры действующих mirrors в закладках интернет-программы. Администрация рассылают обновления о свежих URL через почтовые сервисы, Telegram-группы и мобильные софт.
Финансовые процедуры через legal платформы обеспечены криптографическими алгоритмами класса банковского индустрии. Получение финансов осуществляется solely на проверенные счета обладателя профиля.
Marvelous, what a web site it is! This website
provides valuable data to us, keep it up.
My web page – unique retreat for couple
growmetric.click – Overall, professional vibe here; trustworthy, polished, and pleasantly minimal throughout.
Современные платформы азартных продуктов обеспечивают игрокам доступ к премиальному гемблингу через безопасные Mellstroy Game зеркало сайты. Официальная работа нуждается учета жестких контролирующих норм.
Система открытия индивидуального аккаунта охватывает подтверждение индивидуальных данных. Операторы задействуют расширенные протоколы KYC и AML для блокировки незаконных переводов.
IT системы передовых беттинг площадок основываются на зашифрованных облачных системах с криптографическими технологиями. Геоблокировка заставляет управляющих внедрять вспомогательные порталы.
Зеркальные ресурсы формируют эквивалентные версии базового сайта с обеспечением всех возможностей и информации. Игроки получают постоянный вход к средствам, игровой статистике и персональным установкам.
Денежные операции реализуются через связанные банковские процессоры. Рамки на вклады и получения регулируются в согласии с лицензионными стандартами и индивидуальными процедурами управления рисками.
Квалифицированные беттеры советуют анализировать состояние авторизации через регуляторные реестры развлекательных организаций. Престижные параметры включают ранги на специализированных порталах и оценки реальных игроков.
Нынешние бетторы попадают с сложностью соединения к проверенным порталам. Поставщики фильтруют основные адреса, но знающие казино Lucky Bear клиенты осознают о наличии зеркальных площадок.
Параллельный портал образует абсолютную отображение основного портала. SSL-сертификаты сохраняются равнозначными. Банковские действия проходят через аналогичные сервисы.
Методика создания аккаунта через параллельный портал включает классической подтверждения. Специалисты требуют удостоверения для соблюдения KYC-требований. Индивидуальные данные осуществляют усиленную проверку.
Банковские рамки на зеркальных ресурсах равняются стандартным условиям. Низшие вклады поддерживаются фиксированными. Накопительные накопления интегрируются между всеми порталами.
Стимулирующие программы оперируют целостно на параллельных ресурсах. Множитель ставок поддерживает базовые значения. Период действия использования продолжается.
Команда помощи анализирует запросы с резервных доменов таким же способом. Мгновенный чат поддерживает круглосуточный режим оперирования.
Ориентирование в мире сертифицированных платформ требует осознания современных методов авторизации. Квалифицированные пользователи задействуют казино Гризли для обретения актуальной фактов о функционирующих доменах.
Процедура создания счета в лицензированных организациях содержит сложную проверку. Новейшие компании внедряют KYC-системы и AML-требования. Бумажная работа отнимает от 24 до 72 промежутков.
Цифровые технологии для минования препятствий совершенствуются параллельно с ужесточением законодательных решений. VPN-платформы класса premium гарантируют безопасность AES-256 и протоколы OpenVPN. Устойчивость связи кардинально важна для привилегированных игровых периодов.
Запасные сайты выполняют задачи через локально расположенные технические мощности. CDN-структуры гарантируют минимальную задержку для азиатских клиентов. Системное редирект инициируется при распознавании ограничения базового домена.
Банковские операции в проверенных зонах отвечают строгим стандартам PCI DSS. Блокчейн операции увеличивают популярность из-за скрытности и темпу осуществления.
Портативные утилиты элитных брендов совмещают физиологическую проверку и push-оповещения для существенных эпизодов. Настраиваемый внешний вид автоматически адаптируется под параметры дисплея.
Площадка Rutor — лидирующий ресурс русскоязычного даркнета в Tor, позволяющий пользователям получать доступ к контенту, товарам, материалам и нормам анонимности черного рынка и onion сайтов
Площадка Rutor отличается хорошо зарекомендовавшей себя историей, высочайшей степенью скрытности и возможностью безопасной работы с транзакциями в сети Rutor.Rutor — старейший представитель даркнета на русском языке
рутор пародия зеркало — это один из первых и известнейших русскоязычных ресурсов даркнета, неразрывно связанный с анонимной онлайн-экосистемой. Этот магазин ориентирован на предоставление пользователям широкой базы данных, связанной с файлами, софтом, новостями и различными видами контента, включая темы, касающиеся взлома и безопасности.
Главные аспекты функционирования Rutor
Система курирует доступ к огромному количеству информации и файлов, сохраняя дополнительную конфиденциальность и анонимность своих пользователей. Главное преимущество платформы — интеграция с сетью Rutor, что значительно уменьшает вероятность раскрытия личности и потери конфиденциальной информации. За годы существования Rutor стал местом, где сохраняется важная история русскоязычного даркнета.
Rutor поддерживает стабильную работу, позволяя и новичкам, и опытным пользователям использовать предоставляемые сервисы. Архитектура ресурса предусматривает, что любые разделы — магазин, новостной блок или гайды по взлому — являются составляющими единой системы, где превалируют безопасность и анонимность.
Перспективы и риски
Ясно, что будущая деятельность Rutor потребует решения новых рисков, внедрения свежих подходов к безопасности и средств обхода ограничений. Пользователи должны осознавать, что даже самая анонимная система не гарантирует полной безопасности.
Платформа продолжает быть ресурсом для получения расширенной информации, обмена мнениями по безопасности и мониторинга новшеств в сферах даркнета. Развитие технологий, расширение базы пользователей и появление новых возможностей делают Rutor одним из центров русскоязычного сообщества в сети.
– Принцип анонимности
– Гарантия безопасности сделок
– Открытый доступ к специализированному контенту
– Обеспечение приватности взаимодействий
Уникальный путь Rutor делает платформу значимой для тех, кто высоко ценит свободу, личную приватность и защиту от внешнего контроля в цифровую эпоху.
Поиск надежного азартного портала требует глубокого исследования лицензионных разрешений. Инновационные ресурсы Голд казино дают пользователям полную сведения о действующих допусках.
Алгоритм создания профиля включает несколько обязательных этапов проверки. Провайдеры требуют документы, удостоверяющие персону и зрелость. Классический KYC-регламент занимает от 24 до 72 временных отрезков.
Банкролл-менеджмент запускается с назначения лимитов на взносы. Искусные участники настаивают эксплуатировать установку 5% от итогового азартного капитала на индивидуальную сессию.
Технические барьеры владельцев побуждают задействовать альтернативные ссылки. Копии хранят полную функциональность базового ресурса, включая летопись платежей и гемблинг успех.
Инновационные расчетные инструменты предоставляют оперативные депозиты через электронные счета. Bitcoin, Ethereum и стабильные валюты гарантируют конфиденциальность и наименьшие отчисления. Срок реализации изъятий равно 10-30 отрезков.
Программы лояльности предусматривают иерархические степени с увеличивающимся вознаграждением. VIP-координаторы предлагают эксклюзивные вознаграждения, расширенные лимиты и опережающую обслуживание.
Поиск в мире легальных площадок требует представления передовых способов соединения. Продвинутые участники используют Вавада сайт для приобретения свежей сведений о активных URL.
Процедура создания аккаунта в проверенных организациях предполагает детальную верификацию. Современные операторы используют KYC-механизмы и AML-нормы. Оформление документов составляет от 24 до 72 временных отрезков.
Компьютерные решения для обхода препятствий развиваются вместе с повышением нормативных мер. VPN-сервисы типа premium предоставляют безопасность AES-256 и протоколы OpenVPN. Надежность коннекта fundamentally важна для высокоролловых заходов.
Альтернативные ресурсы оперируют через пространственно расположенные технические кластеры. CDN-структуры обеспечивают низкую латентность для азиатских геймеров. Программное маршрутизация инициируется при детекции блокировки центрального домена.
Денежные манипуляции в официальных территориях подпадают под конкретным нормам PCI DSS. Цифровые платежи завоевывают востребованность вследствие секретности и оперативности осуществления.
Портативные программы премиальных провайдеров интегрируют лицевую аутентификацию и push-алерты для важных эпизодов. Изменяемый облик автоматически адаптируется под параметры панели.
Поиск проверенного гемблинг ресурса в современных рамках предполагает детального изучения к юридическому режиму. Компетентные участники представляют, что Mellstroy Game содержит последнюю факты о функционирующих операторах.
Процесс записи в сертифицированных площадках включает необходимую проверку идентичности. KYC-правила гарантируют как площадку, так и пользователя от афер. Кратковременные границы на перечисление финансов до окончания валидации – обычная подход.
Электронные препятствия на подключение к betting площадкам обходятся через параллельные URL. Рабочие клоны обеспечивают полную эффективность центрального сервиса. Расчетные переводы, развлекательный продвижение и привилегированные программы продолжают устойчивыми.
Финансовая гарантированность характеризуется показателем задействованных платежных способов. SSL-безопасность, PCI DSS валидация и многоуровневая верификация обеспечивают прочный барьер обороны.
Азартная коллекция проверенных провайдеров объединяет спины от известных производителей. RTP-показатели, дисперсия и алгоритмические модели получают нейтральную сертификацию в авторизованных организациях.
Планы стимулирования в надежных сервисах формируются на открытых требованиях вейджера. Вейджер x35-40 считается нормальным для слот-привилегий, в то время как стандартные активности идут в зачет с пониженным процентом.
Trend Tally Finds Online – A nicely curated look that makes exploring enjoyable.
Беттинговая ниша демонстрирует быстрый развитие, привлекая тысячи геймеров. Грамотные сайты гарантируют безопасную среду для развлечений. Полную факты о указанных компаниях возможно изучить на казино Клубника .
Легализация выступает основным аспектом подбора площадки. Надзорные органы Гибралтара обеспечивают жёсткий аудит денежных действий. Каждая легальная сайт выполняет постоянные контроли RNG-алгоритмов.
Программные характеристики новейших казино охватывают SSL-криптографию денежного категории. Поставщики компьютерного обеспечения типа Microgaming, NetEnt, Pragmatic Play внедряют многоуровневые системы непредсказуемых параметров.
Алгоритм валидации счёта требует подачи документов KYC-класса. Документ, подтверждение о средствах, подтверждение регистрации — базовый комплект для полноценного входа.
Зеркальные ссылки решают барьеры с ограничениями поставщиков. Функционирующие варианты обновляются ежедневно компьютерными службами. Мобильные утилиты часто функционируют качественнее сетевых редакций.
Контроль средств устанавливает продолжительную прибыльность игровых сессий. Опытные участники предлагают ограничивать сумму депозита до 1-2% от итогового резерва.
Актуальные геймеры попадают с барьером доступа к официальным платформам. Операторы ограничивают основные URL, но профессиональные Вавада официальный сайт клиенты понимают о существовании зеркальных ресурсов.
Резервная ссылка является точную копию оригинального площадки. SSL-сертификаты функционируют неизменными. Финансовые переводы выполняются через идентичные системы.
Процедура заведения учётной записи через зеркальный портал включает обычной проверки. Операторы запрашивают документы для реализации KYC-стандартов. Персональные сведения выполняют расширенную аутентификацию.
Депозитные рамки на параллельных порталах идентичны главным условиям. Низшие ставки продолжают стабильными. Увеличивающиеся накопления координируются между всеми доменами.
Премиальные схемы работают целостно на альтернативных сайтах. Коэффициент оборота гарантирует первоначальные показатели. Длительность проигрывания продолжается.
Команда сопровождения изучает вопросы с дополнительных ссылок сходным образом. Живой общение осуществляет беспрерывный режим обслуживания.
Современные клиенты встречаются с огромным количеством технологических нюансов при процессах с проверенными сайтами. Тематические платформы типа казино ретро предоставляют новую сведения о процессах развлекательных компаний.
Процедура аутентификации аккаунта содержит множество необходимых уровней. Исходная аутентификация предполагает размещения свидетельств верифицирующих субъект. Типовой пакет подразумевает удостоверение личности, автолицензию или заграничное удостоверение.
Системная составляющая оформления подразумевает эксплуатацию SSL-шифрования и двойной авторизации. Опытные игроки предлагают запускать полный набор возможных настроек секьюрити.
Запасные домены представляют точные реплики базового портала с обеспечением полного функционала. Основное преимущество состоит в подобии платежных рамок и параметров отыгрыша.
Механизм поиска активных запасных доменов базируется на наблюдении тематических телеграм-каналов и союзных платформ. Квалифицированные игроки используют виртуальные частные сети для создания бесперебойного подключения безотносительно от местных запретов.
Передовые геймеры оказываются с барьером входа к легальным площадкам. Поставщики закрывают главные домены, но грамотные Меллстрой официальный сайт пользователи учитывают о функционировании альтернативных сайтов.
Резервная ссылка составляет точную воспроизведение основного ресурса. SSL-сертификаты поддерживаются такими же. Финансовые процедуры выполняются через равнозначные каналы.
Схема оформления профиля через зеркальный портал подразумевает типовой валидации. Специалисты требуют свидетельства для выполнения KYC-регламентов. Паспортные параметры осуществляют усиленную аутентификацию.
Депозитные границы на дополнительных ресурсах соответствуют первичным требованиям. Наименьшие взносы функционируют неизменными. Растущие призовые фонды интегрируются между различными ссылками.
Поощрительные схемы функционируют всесторонне на альтернативных платформах. Множитель ставок поддерживает базовые значения. Тайминг проигрывания поддерживается.
Команда ассистирования решает обращения с зеркальных ресурсов равнозначно. Прямой чат предоставляет 24-часовой график функционирования.
I got this web site from my buddy who informed me about this website
and at the moment this time I am visiting this website
and reading very informative articles or reviews at this time.
Here is my web-site :: personal retreat riviera maya
line platform overview – The site feels peaceful and navigation is simple to follow.
online casino online casino .
сюда https://t.me/invisevpn_bot
ivermectin 3mg tablets price Iver Therapeutics ivermectin cream 1%
For statistics
Instant decision loans for bad credit
for key takeaways.
Игровая отрасль показывает интенсивный рост, привлекая массы игроков. Экспертные ресурсы обеспечивают надёжную атмосферу для ставок. Подробную факты о таких брендах возможно получить на Вавада казино .
Легализация составляет основным показателем подбора платформы. Лицензиаты Мальты создают серьёзный мониторинг валютных действий. Каждая лицензированная платформа выполняет плановые инспекции RNG-генераторов.
Технические особенности современных гемблинг-сайтов содержат SSL-защиту финансового категории. Производители софтового материала уровня Microgaming, NetEnt, Pragmatic Play встраивают сложные механизмы рандомных показателей.
Алгоритм верификации профиля требует подачи свидетельств KYC-типа. Свидетельство, свидетельство о средствах, подтверждение прописки — обычный список для итогового входа.
Параллельные URL убирают проблемы с цензурой операторов. Актуальные дубли адаптируются ежедневно техническими командами. Портативные клиенты зачастую работают надёжнее сетевых редакций.
Распределение капитала задаёт перспективную успешность развлекательных раундов. Экспертные участники советуют контролировать сумму депозита до 1-2% от полного банкролла.
Актуальные участники оказываются с затруднением связи к проверенным порталам. Организации запрещают основные порталы, но знающие Vavada зеркало пользователи помнят о доступности резервных порталов.
Альтернативный адрес является идентичную копию главного площадки. SSL-сертификаты функционируют такими же. Финансовые действия проходят через аналогичные сервисы.
Схема регистрации через зеркальный адрес предполагает стандартной подтверждения. Сотрудники уточняют бумаги для осуществления KYC-стандартов. Паспортные характеристики осуществляют усиленную проверку.
Банковские рамки на альтернативных порталах аналогичны стандартным условиям. Низшие вклады продолжают постоянными. Увеличивающиеся призовые фонды координируются между разными порталами.
Стимулирующие системы выполняются всесторонне на зеркальных ресурсах. Коэффициент оборота сохраняет базовые величины. Период действия отыгрыша поддерживается.
Служба поддержки решает тикеты с зеркальных ссылок аналогично. Мгновенный переписка поддерживает постоянный график обслуживания.
Актуальные игроки попадают с затруднением связи к сертифицированным порталам. Провайдеры запрещают стандартные URL, но опытные лаки Р±РёСЂ казино игроки учитывают о существовании дублирующих порталов.
Параллельный портал образует стопроцентную дубликат главного площадки. Протоколы шифрования поддерживаются равнозначными. Финансовые процедуры проходят через аналогичные шлюзы.
Методика регистрации через альтернативный ссылку предполагает привычной подтверждения. Менеджеры уточняют справки для соблюдения KYC-стандартов. Паспортные информация реализуют расширенную валидацию.
Финансовые пределы на альтернативных платформах совпадают стандартным параметрам. Начальные ставки сохраняются фиксированными. Накопительные банки синхронизируются между многочисленными доменами.
Льготные планы оперируют комплексно на альтернативных порталах. Вейджер удерживает базовые показатели. Временные рамки проигрывания поддерживается.
Команда обслуживания рассматривает вопросы с резервных порталов аналогично. Прямой разговор обеспечивает круглосуточный расписание обслуживания.
Современные игроки сталкиваются с массой технических особенностей при процессах с лицензированными площадками. Профессиональные источники типа Gold казино поставляют актуальную материалы о процессах развлекательных брендов.
Механизм подтверждения учетной записи подразумевает набор необходимых этапов. Начальная верификация нуждается отправки свидетельств верифицирующих субъект. Обычный пакет подразумевает удостоверение личности, права или внешний паспорт.
Техническая компонента создания аккаунта включает применение безопасного соединения и двухфакторной аутентификации. Продвинутые пользователи рекомендуют запускать все имеющихся опций охраны.
Запасные домены являются точные дубликаты центрального домена с удержанием полного функционала. Важнейшее достоинство содержится в подобии денежных границ и критериев условий прокрутки.
Алгоритм нахождения функционирующих резервных ссылок основывается на контроле специализированных информационных каналов и сотрудничающих сайтов. Квалифицированные клиенты эксплуатируют виртуальные частные сети для гарантирования стабильного входа безотносительно от местных блокировок.
Актуальные бетторы сталкиваются с барьером подключения к официальным площадкам. Компании закрывают базовые порталы, но грамотные Лаки Бир игроки понимают о функционировании дублирующих платформ.
Параллельный портал образует полную копию первичного площадки. Системы безопасности поддерживаются такими же. Финансовые действия осуществляются через равнозначные каналы.
Алгоритм заведения учётной записи через резервный домен подразумевает типовой валидации. Сотрудники просят свидетельства для осуществления KYC-требований. Личные данные проходят многоуровневую аутентификацию.
Банковские рамки на резервных ресурсах совпадают стандартным параметрам. Начальные беты продолжают неизменными. Растущие джекпоты согласовываются между всеми доменами.
Премиальные схемы работают полноценно на дополнительных платформах. Требования по обороту гарантирует базовые цифры. Длительность использования не изменяется.
Служба ассистирования решает запросы с зеркальных доменов сходным образом. Живой диалог гарантирует круглосуточный расписание деятельности.
Нынешние участники натыкаются с препятствием входа к проверенным площадкам. Провайдеры закрывают базовые адреса, но знающие Меллстрой РІС…РѕРґ пользователи помнят о существовании зеркальных порталов.
Резервная ссылка является стопроцентную воспроизведение основного площадки. Системы безопасности функционируют аналогичными. Денежные действия производятся через равнозначные каналы.
Процедура создания аккаунта через параллельный адрес подразумевает обычной аутентификации. Специалисты выясняют бумаги для соблюдения KYC-норм. Индивидуальные данные выполняют многоуровневую валидацию.
Пополнительные рамки на зеркальных сайтах соответствуют базовым спецификациям. Минимальные суммы продолжают постоянными. Увеличивающиеся накопления координируются между множественными доменами.
Бонусные схемы действуют всесторонне на зеркальных площадках. Требования по обороту поддерживает первоначальные показатели. Срок активности оборота остаётся прежним.
Отдел сопровождения анализирует заявки с альтернативных ресурсов таким же способом. Интерактивный разговор обеспечивает 24-часовой режим работы.
WireWharf Online – Practical and reliable design, shopping here feels efficient.
Хочу выделить раздел про типичные ошибки в рекламе сериалов и кинопремьер 2026.
Вот, делюсь ссылкой:
https://skamedia.ru/news/skamedia-v-2026-kak-izbezhat-tipichnyh-oshibok-v-prodvizhenii-kino-i-serialov-i-ne-poteryat-byudzhet/
Нравится сайт — удобно и много интересного.
http://user-ax.nnov.org/common/redir.php?https://olimp-casino-kazakhstan-help.com/registration
netlaunch.click – Color palette felt calming, nothing distracting, just focused, thoughtful design.
Азартная область демонстрирует стремительный подъём, завлекая легионы геймеров. Опытные площадки обеспечивают качественную обстановку для ставок. Подробную факты о таких операторах можно получить на п»ї1xBet зеркало .
Легализация составляет центральным критерием выбора портала. Регуляторы Великобритании гарантируют тщательный контроль финансовых процедур. Каждая легальная площадка выполняет плановые аудиты RNG-алгоритмов.
Цифровые параметры инновационных беттинг-платформ предусматривают SSL-защиту финансового стандарта. Разработчики софтового софта типа Microgaming, NetEnt, Pragmatic Play добавляют продвинутые схемы рандомных чисел.
Механизм проверки учётной записи подразумевает представления бумаг KYC-стандарта. Документ, выписка о прибылях, удостоверение проживания — базовый список для полноценного входа.
Резервные ссылки убирают сложности с цензурой компаний. Действующие дубли обновляются регулярно цифровыми группами. Смартфонные утилиты обычно работают качественнее интернет редакций.
Распределение капитала определяет перспективную результативность игровых периодов. Экспертные беттеры советуют контролировать размер ставки до 1-2% от суммарного банкролла.
Подбор надежного развлекательного портала в актуальных границах нуждается особого подхода к юридическому положению. Квалифицированные игроки осознают, что винити казино включает последнюю сведения о доступных площадках.
Схема записи в легальных заведениях содержит принудительную подтверждение идентичности. KYC-требования защищают как сервис, так и участника от афер. Краткосрочные ограничения на перечисление средств до выполнения подтверждения – типичная практика.
Виртуальные барьеры на соединение к гемблинг порталам преодолеваются через резервные порталы. Действующие отражения поддерживают всестороннюю функциональность основного ресурса. Финансовые транзакции, развлекательный продвижение и привилегированные предложения поддерживаются стабильными.
Экономическая стабильность оценивается уровнем применяемых расчетных механизмов. SSL-шифрование, PCI DSS подтверждение и двухфакторная проверка гарантируют надежный периметр защиты.
Игровая каталог официальных заведений охватывает машины от известных провайдеров. RTP-значения, колебания и расчетные системы получают беспристрастную валидацию в утвержденных центрах.
Схемы вознаграждения в серьезных казино строятся на ясных критериях ставок. Проигрыш x35-40 признается справедливым для автомат-привилегий, в то время как настольные активности принимаются в зачет с минимальным коэффициентом.
Передовые платформы игорных услуг предоставляют клиентам доступ к качественному гемблингу через защищенные Вавада зеркало системы. Сертифицированная функционирование требует соблюдения четких контролирующих положений.
Процесс регистрации персонального профиля предусматривает аутентификацию конфиденциальных сведений. Администраторы задействуют многоуровневые протоколы KYC и AML для недопущения поддельных транзакций.
Цифровые инструменты современных казино функционируют на надежных хостингах с SSL протоколами. IP-фильтрация заставляет владельцев разрабатывать параллельные адреса.
Альтернативные платформы составляют аналогичные версии основного портала с обеспечением всех опций и информации. Пользователи получают стабильный связь к счету, азартной записям и клиентским параметрам.
Платежные переводы осуществляются через связанные банковские процессоры. Рамки на вклады и получения определяются в унисон с нормативными положениями и собственными процедурами риск-менеджмента.
Квалифицированные игроки предлагают контролировать состояние авторизации через регуляторные регистры игорных организаций. Репутационные характеристики содержат оценки на специализированных платформах и feedback подлинных пользователей.
Лицензионные платформы азартных возможностей обеспечивают геймерам право к высококлассному времяпрепровождению через тематические порталы, включая типпи казино , которые именно следуют глобальные критерии конфиденциальности.
Последовательность создания аккаунта требует заполнения идентификационных информации через криптографические SSL-connection. Провайдеры просят предоставить официальное verification дееспособности и территории жительства для поддержания legal критериев.
Двухфакторная аутентификация представляет mandatory aspect современных solutions security. Участники располагают SMS-ключи, push-алерты или внедряют профессиональные программы наподобие Google Authenticator.
Mirror порталы нейтрализуют проблемы territorial запретов и DDoS-штурмов. Техническим образом mirrors являют тождественные dublicates базового сайта с сохранением features и клиентских сведений.
Компетентные участники советуют хранить актуальные базы активных дублей в bookmark browser. Management направляют обновления о новых ссылках через электронную почту, Telegram-группы и mobile софт.
Денежные movements через legal платформы обеспечены шифровальными methods категории банковского сектора. Extraction капитала выполняется лишь на подтверждённые реквизиты владельца личного кабинета.
Hello there! Do you know if they make any plugins to safeguard against hackers?
I’m kinda paranoid about losing everything I’ve worked hard on.
Any tips?
reddit canadian pharmacy: no rx needed pharmacy – american online pharmacy
Поиск проверенного казино ресурса заставляет глубокого изучения юридических сертификатов. Современные системы казино Lucky Bear гарантируют участникам абсолютную сведения о собственных лицензиях.
Система получения доступа включает различные обязательных шагов верификации. Представители настаивают справки, засвидетельствующие идентичность и возраст. Обычный KYC-порядок продолжается от 24 до 72 временных отрезков.
Управление банком открывается с установления рамок на вклады. Профессиональные геймеры советуют эксплуатировать правило 5% от суммарного казино капитала на индивидуальную раунд.
Технические препятствия провайдеров заставляют задействовать вспомогательные маршруты. Зеркала оберегают полную эффективность центрального сайта, предусматривая летопись переводов и азартный прогресс.
Актуальные платежные сервисы гарантируют моментальные пополнения через цифровые кошельки. Bitcoin, Ethereum и стабильные валюты дают скрытность и символические комиссии. Время обработки извлечений составляет 10-30 периодов.
Планы постоянства включают каскадные категории с прогрессивным вознаграждением. VIP-представители предлагают индивидуальные поощрения, увеличенные ограничения и ускоренную помощь.
Выбор безопасного игрового оператора в актуальных обстоятельствах подразумевает тщательного подхода к юридическому режиму. Квалифицированные пользователи учитывают, что п»ї1хбет сайт предоставляет новую сведения о активных операторах.
Алгоритм оформления профиля в лицензированных операторах объединяет требуемую проверку персональных данных. KYC-требования охраняют как оператора, так и игрока от мошенничества. Промежуточные лимиты на получение капитала до выполнения проверки – типичная практика.
Технические ограничения на подключение к игровым сервисам решаются через дублирующие ссылки. Действующие зеркала поддерживают всестороннюю работоспособность главного платформы. Финансовые движения, развлекательный продвижение и поощрительные системы остаются константными.
Материальная стабильность оценивается степенью эксплуатируемых финансовых механизмов. SSL-безопасность, PCI DSS валидация и усиленная подтверждение формируют прочный периметр охраны.
Развлекательная ассортимент легальных операторов предоставляет автоматы от ведущих производителей. RTP-индексы, изменчивость и статистические системы подвергаются внешнюю валидацию в утвержденных центрах.
Механизмы мотивации в достойных заведениях опираются на ясных критериях активности. Вейджер x35-40 признается разумным для слот-льгот, в то время как классические забавы засчитываются в калькуляцию с редуцированным показателем.
Игровая область являет интенсивный рост, заинтересовывая массы геймеров. Профессиональные площадки предоставляют качественную обстановку для игры. Полную данные о указанных провайдерах доступно обнаружить на Килограмм казино .
Аттестация остаётся ключевым фактором определения сайта. Контролёры Гибралтара гарантируют жёсткий надзор финансовых операций. Отдельная сертифицированная сайт подвергается регулярные аудиты RNG-систем.
Технические характеристики актуальных казино предусматривают SSL-кодирование денежного класса. Поставщики виртуального продукта типа Microgaming, NetEnt, Pragmatic Play подключают сложные модели рандомных значений.
Механизм верификации счёта включает направления документов KYC-стандарта. Удостоверение, свидетельство о средствах, удостоверение проживания — обычный комплект для итогового активации.
Дублирующие ссылки решают трудности с цензурой операторов. Действующие варианты корректируются ежедневно IT специалистами. Смартфонные приложения часто оперируют лучше браузерных форматов.
Банкролл-менеджмент устанавливает стратегическую эффективность азартных сессий. Квалифицированные участники настаивают ограничивать размер ставки до 1-2% от полного бюджета.
Передовые игроки обталкиваются с набором технологических деталей при функционировании с лицензированными площадками. Профильные платформы типа винити казино выдают актуальную информацию о операциях гэмблинговых компаний.
Процедура верификации счета охватывает множество неотъемлемых уровней. Исходная аутентификация включает отправки документов валидирующих личность. Привычный перечень предполагает паспорт, права или международное ID.
Техническая часть оформления подразумевает применение SSL-шифрования и двухфакторной аутентификации. Опытные пользователи настаивают активировать весь комплекс возможных функций безопасности.
Дублирующие порталы представляют стопроцентные копии первичного портала с сохранением полного возможностей. Основное преимущество кроется в идентичности банковских границ и норм проигрыша.
Процедура локализации рабочих зеркал строится на контроле специализированных уведомительных сервисов и сотрудничающих порталов. Экспертные геймеры задействуют туннельные протоколы для гарантирования устойчивого входа вне зависимости от территориальных ограничений.
Heya i am for the first time here. I found this board and I in finding It truly helpful & it helped
me out a lot. I’m hoping to offer something again and help
others like you aided me.
Перемещение в мире официальных площадок предполагает представления продвинутых инструментов соединения. Опытные игроки применяют п»ї1хбет регистрация для обретения релевантной материалов о функционирующих ссылках.
Процесс регистрации счета в надежных компаниях содержит сложную валидацию. Продвинутые компании используют KYC-процедуры и AML-стандарты. Бумажная работа составляет от 24 до 72 интервалов.
Цифровые методы для минования препятствий развиваются параллельно с интенсификацией юридических шагов. VPN-инструменты класса premium предоставляют шифрование AES-256 и технологии OpenVPN. Постоянство канала fundamentally актуальна для привилегированных раундов.
Дублирующие домены функционируют через локально размещенные компьютерные мощности. CDN-структуры обеспечивают низкую время ответа для азиатских клиентов. Цифровое редирект включается при распознавании ограничения основного адреса.
Банковские операции в проверенных регионах отвечают конкретным критериям PCI DSS. Блокчейн переводы приобретают признание по причине анонимности и динамике обработки.
Переносные клиенты лучших провайдеров объединяют голосовую подтверждение и push-оповещения для критических эпизодов. Изменяемый облик программно подстраивается под параметры экрана.
Поиск в мире проверенных платформ нуждается владения продвинутых методов авторизации. Квалифицированные геймеры внедряют Лаки Бир регистрация для добывания свежей фактов о функционирующих доменах.
Алгоритм регистрации счета в надежных организациях охватывает детальную проверку. Новейшие компании эксплуатируют KYC-алгоритмы и AML-требования. Документооборот составляет от 24 до 72 периодов.
Цифровые методы для обхода запретов развиваются вместе с повышением нормативных шагов. VPN-сервисы разряда premium гарантируют защиту AES-256 и протоколы OpenVPN. Устойчивость связи жизненно актуальна для высокоролловых сессий.
Резервные платформы функционируют через пространственно размещенные IT кластеры. CDN-архитектуры осуществляют сокращенную время ответа для европейских пользователей. Системное роутинг инициируется при выявлении препятствия центрального сайта.
Экономические операции в сертифицированных территориях подпадают под строгим правилам PCI DSS. Децентрализованные транзакции приобретают востребованность из-за анонимности и темпу обработки.
Планшетные софт премиальных брендов содержат физиологическую аутентификацию и push-алерты для принципиальных событий. Модифицируемый дизайн независимо корректируется под характеристики экрана.
Legends are forged in the fire, and the third book of the Empyrean series is pure fire from start to finish. If you are looking to download the Onyx Storm epub, you are joining a legion of fans who prioritize instant access to their favorite stories. The narrative picks up right where the heartbreak left off, dragging readers back into the fray. E-books offer the privacy to cry over your favorite characters in public without anyone seeing the cover. Get ready for a story that will consume your thoughts and keep you swiping pages until the very end. https://onyxstormepub.store/ Onyx Storm Free Pdf Free Download
Patriot America Plus®
https://sertralineusa.shop/# zoloft tablet
Mod Merchant Showcase – Each product description guided me well, making selection easier.
Новейшие операторы игорных активностей обеспечивают клиентам возможность к профессиональному развлечениям через надежные Лаки Бир казино ресурсы. Официальная функционирование нуждается учета определенных контролирующих стандартов.
Процедура активации игрового счета включает проверку персональных сведений. Регуляторы внедряют комплексные алгоритмы KYC и AML для недопущения поддельных операций.
Электронные системы передовых гемблинг платформ строятся на безопасных дата-центрах с HTTPS сертификатами. Геоблокировка обязывает операторов запускать резервные URL.
Параллельные сайты формируют идентичные версии главного платформы с сохранением всех возможностей и данных. Беттеры получают постоянный подключение к капиталу, гемблинг записям и индивидуальным параметрам.
Банковские транзакции реализуются через синхронизированные финансовые процессоры. Ограничения на вклады и получения фиксируются в согласии с регуляторными условиями и индивидуальными регламентами контроля угроз.
Квалифицированные пользователи рекомендуют отслеживать состояние аккредитации через официальные списки гемблинг органов. Имиджевые критерии предусматривают оценки на отраслевых ресурсах и оценки подлинных клиентов.
Активные mirror-ссылки официальных азартных клубов на п»ї1хбет РІС…РѕРґ дают постоянный подключение к азартным ресурсам. Методика клонирования образует полноценные клоны корневого сайта с поддержанием всех механизмов.
Система открытия счета через mirror-сайт на сто процентов копирует стандартную бланк. Дебютные участники прописывают действующий email, генерируют стойкий шифр и определяют основную валюту.
Подтверждение учетной записи содержит представления документов по KYC-регламенту. Снимок удостоверения личности, подтверждение проживания и банковские реквизиты проходят цифровую валидацию в течение 24-72 периодов.
Вход зарегистрированных геймеров происходит через классическую окно с усиленной верификацией. Одноразовые токены передаются на смс номер или мейл.
Возможности денежного компонента через зеркала предлагает востребованные финансовые платформы. Visa, Mastercard, виртуальные хранилища Skrill, Neteller, криптовалюты Bitcoin, Ethereum осуществляются с уменьшенными взносами 0-3%.
Игровая коллекция клонируется в точности включая машины, карточные активности, live-операторов и накопительные призы. RTP-показатели, дисперсия и проигрыш фиксируются аналогичными.
Поощрительная схема действует идентично центральному веб-площадке. Welcome-бандлы, даровые прокруты, refund и VIP-программы стартуют машинально при выполнении определенных стандартов.
Передовые порталы беттинг продуктов гарантируют игрокам вход к профессиональному азарту через защищенные mad casino платформы. Легальная функционирование подразумевает исполнения строгих регуляторных требований.
Механизм регистрации игрового профиля включает верификацию персональных сведений. Управляющие применяют детализированные системы KYC и AML для блокировки мошеннических переводов.
IT системы передовых гемблинг платформ основываются на безопасных дата-центрах с TLS стандартами. Геоблокировка побуждает администраторов создавать параллельные порталы.
Альтернативные порталы образуют идентичные копии главного портала с обеспечением всех опций и сведений. Игроки получают беспрепятственный связь к средствам, игровой истории и индивидуальным параметрам.
Расчетные переводы производятся через интегрированные расчетные шлюзы. Границы на инвестиции и получения назначаются в унисон с законодательными условиями и организационными политиками снижения потерь.
Опытные клиенты рекомендуют анализировать условия аккредитации через официальные регистры азартных организаций. Статусные показатели охватывают рейтинги на профильных сайтах и оценки реальных беттеров.
Hey there! This is my first visit to your blog! We are a team of volunteers and starting a new initiative in a community in the same
niche. Your blog provided us useful information to work on. You have done
a marvellous job!
Feel free to visit my webpage :: Web Scraping Services
Проверенные ресурсы игорных сервисов предоставляют участникам возможность к премиальному времяпрепровождению через профильные сайты, включая tip top casino , которые специально придерживаются общепринятые регламенты security.
Схема оформления профиля включает внесения проверочных данных через шифрованные SSL-протоколы. Провайдеры просят предоставить official удостоверение age verification и территории жительства для выполнения законодательных правил.
Multi-factor проверка представляет обязательным частью современных механизмов надёжности. Пользователи обретают SMS-пароли, push-notification или задействуют специальные софт по типу Google Authenticator.
Зеркальные URL устраняют трудности географических блокировок и DDoS-воздействий. С технической точки зрения копии образуют дублированные реплики базового портала с maintaining опций и индивидуальных данных.
Экспертные участники suggest удерживать новейшие перечни действующих альтернатив в закладках browser. Management рассылают новости о fresh доменах через электронную почту, Telegram-группы и телефонные программы.
Денежные переводы через лицензионные площадки обеспечены защитными протоколами уровня банковского сектора. Снятие капитала выполняется solely на верифицированные реквизиты собственника account.
seoignite.click – Appreciate the typography choices; comfortable spacing improved my reading experience.
Keep on working, great job!
Look into my site :: Web Scraping Services
Перейти на сайт https://t.me/invisevpn_bot
Отбор качественного игрового оператора в нынешних обстоятельствах заставляет тщательного рассмотрения к правовому уровню. Квалифицированные пользователи учитывают, что Vavada зеркало демонстрирует новую данные о функционирующих операторах.
Механизм открытия счета в проверенных площадках объединяет обязательную валидацию персональных данных. KYC-требования защищают как площадку, так и игрока от мошенничества. Промежуточные рамки на снятие активов до закрытия контроля – стандартная подход.
Электронные ограничения на вход к игровым сервисам преодолеваются через дублирующие URL. Функционирующие клоны гарантируют тотальную работоспособность основного ресурса. Финансовые переводы, интерактивный продвижение и бонусные предложения продолжают неизменными.
Экономическая защищенность измеряется уровнем эксплуатируемых денежных систем. SSL-шифрование, PCI DSS подтверждение и расширенная аутентификация обеспечивают надежный барьер ограждения.
Азартная библиотека легальных заведений охватывает слоты от ведущих разработчиков. RTP-значения, волатильность и алгоритмические принципы подвергаются беспристрастную контроль в утвержденных центрах.
Программы лояльности в серьезных заведениях базируются на четких правилах ставок. Проигрыш x35-40 считается разумным для автомат-поощрений, в то время как традиционные активности идут в зачет с минимальным коэффициентом.
Навигация в пространстве легальных сайтов подразумевает владения современных методов доступа. Квалифицированные пользователи внедряют казино Lucky Bear для получения свежей информации о активных ссылках.
Схема формирования профиля в надежных операторах включает комплексную аутентификацию. Современные поставщики эксплуатируют KYC-алгоритмы и AML-правила. Документооборот составляет от 24 до 72 промежутков.
Технические решения для избежания препятствий прогрессируют сообща с ужесточением нормативных мер. VPN-сервисы категории premium предоставляют криптографию AES-256 и системы OpenVPN. Постоянство соединения критически актуальна для элитных игровых периодов.
Зеркальные ресурсы выполняют задачи через регионально расположенные технические мощности. CDN-сети осуществляют минимальную задержку для азиатских геймеров. Системное роутинг включается при выявлении ограничения первичного ресурса.
Экономические манипуляции в сертифицированных зонах подпадают под строгим стандартам PCI DSS. Крипто переводы увеличивают распространение из-за приватности и быстроте обработки.
Портативные утилиты элитных провайдеров объединяют голосовую подтверждение и push-алерты для принципиальных ситуаций. Адаптивный оформление самостоятельно подстраивается под параметры дисплея.
online pharmacies without prescription https://cse.google.md/url?sa=t&url=https%3A%2F%2Fmexmedimax.com online pharmacies no prescription uk
clickoptim.click – Navigation felt smooth, found everything quickly without any confusing steps.
http://neuroreliefusa.com/# Neuro Relief USA
Надёжные ресурсы игровых услуг предоставляют участникам доступ к премиальному азартному досугу через тематические сайты, включая Килограмм казино , которые точно следуют международные регламенты безопасности.
Процедура открытия счёта подразумевает внесения верификационных сведений через безопасные SSL-каналы. Администрация запрашивают документальное удостоверение age verification и адреса регистрации для compliance правовых требований.
2FA проверка является необходимым составляющей современных архитектур защиты. Клиенты располагают SMS-пароли, push-сообщения или эксплуатируют специальные tools по типу Google Authenticator.
Зеркальные адреса нейтрализуют проблемы локальных блокировок и DDoS-воздействий. Технически реплики составляют аналогичные копии центрального сайта с maintaining функциональности и клиентских данных.
Компетентные участники призывают хранить новейшие перечни активных mirrors в favourites обозревателя. Операторы отправляют updates о свежих адресах через email, Telegram-группы и телефонные приложения.
Денежные процедуры через надёжные порталы покрыты шифровальными технологиями класса банковского сектора. Изъятие капитала выполняется только на проверенные карты обладателя профиля.
mostbet теннис ставки https://www.mostbet51837.help
Азартная ниша показывает интенсивный подъём, завлекая тысячи игроков. Квалифицированные ресурсы дают надёжную обстановку для ставок. Детальную факты о таких провайдерах реально обнаружить на Рльдорадо казино .
Аттестация является основным критерием отбора ресурса. Надзорные органы Олдерни обеспечивают качественный надзор валютных операций. Конкретная сертифицированная сайт осуществляет систематические ревизии RNG-систем.
Программные параметры передовых гемблинг-сайтов объединяют SSL-криптографию денежного класса. Разработчики цифрового обеспечения наподобие Microgaming, NetEnt, Pragmatic Play добавляют продвинутые системы произвольных параметров.
Схема верификации счёта подразумевает подачи свидетельств KYC-стандарта. Паспорт, документ о средствах, валидация прописки — базовый список для завершённого подключения.
Зеркальные адреса ликвидируют препятствия с фильтрацией организаций. Свежие копии модифицируются систематически техническими службами. Смартфонные клиенты нередко выполняются надёжнее интернет редакций.
Контроль средств задаёт долгосрочную доходность гемблинговых циклов. Опытные геймеры указывают ограничивать количество депозита до 1-2% от общего резерва.
Активные альтернативные домены лицензированных казино на Vavada casino создают стабильный доступ к игровым ресурсам. Схема дублирования строит идентичные версии центрального домена с поддержанием всех возможностей.
Алгоритм оформления профиля через зеркало в точности воспроизводит базовую шаблон. Начинающие участники указывают активный email, устанавливают защищенный шифр и устанавливают игровую валюту.
Идентификация личного кабинета требует предоставления документов опираясь на KYC-стандартам. Фото паспорта, доказательство регистрации и денежные реквизиты анализируются посредством цифровую валидацию в течение 24-72 часов.
Вход верифицированных клиентов осуществляется через стандартную интерфейс с двухфакторной верификацией. Одноразовые пароли приходят на смс номер или email.
Функционал входящего модуля через зеркала включает распространенные банковские инструменты. Visa, Mastercard, виртуальные счета Skrill, Neteller, цифровые активы Bitcoin, Ethereum обрабатываются с сокращенными процентами 0-3%.
Игровая каталог клонируется полностью включая машины, настольные забавы, live-крупье и прогрессивы. RTP-индикаторы, изменчивость и условия отыгрыша фиксируются такими же.
Бонусная политика выполняется аналогично главному сайту. Welcome-пакеты, безвозмездные спины, компенсация и VIP-схемы стартуют программно при выполнении определенных критериев.
Актуальные клиенты сталкиваются с изобилием технических деталей при функционировании с сертифицированными сайтами. Экспертные платформы типа Vavada casino выдают свежую данные о деятельности гэмблинговых брендов.
Механизм подтверждения кабинета включает комплекс обязательных фаз. Базовая аутентификация включает отправки свидетельств подтверждающих субъект. Обычный набор подразумевает паспорт, водительские права или международное ID.
Цифровая элемент создания аккаунта предполагает задействование безопасного соединения и многофакторной защиты. Профессиональные участники советуют включать полный набор возможных опций секьюрити.
Запасные домены представляют абсолютные отражения главного платформы с обеспечением всего функционала. Главное бонус состоит в соответствии денежных пределов и норм вейджера.
Схема локализации актуальных резервных ссылок базируется на наблюдении профессиональных уведомительных сервисов и союзных сайтов. Профессиональные геймеры применяют VPN-сервисы для формирования надежного соединения независимо от региональных лимитов.
brandlift.click – Navigation felt smooth, found everything quickly without any confusing steps.
Читать далее
Unique finds in Tbilisi!
Нынешние игроки встречаются с препятствием подключения к легальным ресурсам. Провайдеры ограничивают базовые URL, но знающие казино 1xBet клиенты знают о присутствии альтернативных платформ.
Зеркало является абсолютную воспроизведение первичного площадки. Средства защиты сохраняются неизменными. Финансовые транзакции производятся через те же каналы.
Методика заведения учётной записи через резервный портал подразумевает классической проверки. Специалисты требуют справки для исполнения KYC-регламентов. Паспортные данные выполняют комплексную проверку.
Пополнительные лимиты на параллельных площадках равняются главным спецификациям. Стартовые беты остаются константными. Накопительные накопления согласовываются между множественными порталами.
Бонусные системы выполняются целостно на альтернативных платформах. Множитель ставок сохраняет оригинальные показатели. Временные рамки отыгрыша остаётся прежним.
Департамент сопровождения изучает запросы с альтернативных адресов равнозначно. Онлайн переписка поддерживает круглосуточный формат деятельности.
Нынешние участники имеют дело с множеством технических деталей при работе с лицензированными ресурсами. Тематические источники типа Меллстрой официальный сайт выдают современную данные о деятельности азартных операторов.
Система аутентификации аккаунта содержит комплекс принудительных фаз. Начальная верификация предполагает передачи справок верифицирующих индивидуальность. Стандартный список подразумевает свидетельство, автолицензию или заграничное удостоверение.
Технологическая часть регистрации охватывает использование зашифрованного канала и многофакторной защиты. Опытные геймеры рекомендуют запускать все имеющихся опций безопасности.
Дублирующие порталы представляют полные клоны главного платформы с удержанием тотального функционала. Основное бонус кроется в схожести платежных границ и требований отыгрыша.
Механизм выявления рабочих дублирующих порталов базируется на отслеживании специализированных телеграм-каналов и партнерских платформ. Экспертные пользователи задействуют анонимайзеры для обеспечения устойчивого доступа невзирая от региональных барьеров.
пояснения
Batumi: the best is near you!
Инновационные операторы азартных игр дают участникам путь к качественному азарту через проверенные mad casino сайты. Официальная бизнес нуждается выполнения строгих законодательных требований.
Механизм оформления пользовательского профиля включает проверку конфиденциальных данных. Операторы внедряют комплексные процедуры KYC и AML для недопущения незаконных платежей.
Технические инструменты актуальных казино функционируют на безопасных дата-центрах с HTTPS сертификатами. IP-фильтрация принуждает управляющих запускать резервные URL.
Зеркальные домены представляют точные клоны основного домена с обеспечением всех сервисов и информации. Игроки достигают стабильный доступ к депозиту, беттинг записям и пользовательским конфигурациям.
Денежные переводы проходят через интегрированные расчетные агрегаторы. Границы на депозиты и снятия назначаются в унисон с законодательными стандартами и внутренними нормами минимизации опасностей.
Профессиональные игроки предлагают анализировать состояние авторизации через надзорные списки гемблинг ведомств. Авторитетные индикаторы предусматривают позиции на тематических сервисах и feedback истинных участников.
Neuro Relief USA: neurontin – neurontin 100 mg tablets
Исследование в области сертифицированных сайтов подразумевает представления продвинутых решений авторизации. Профессиональные игроки задействуют JVSpin для приобретения актуальной информации о оперативных адресах.
Схема открытия учетной записи в сертифицированных операторах содержит детальную аутентификацию. Актуальные организации используют KYC-алгоритмы и AML-правила. Документальное сопровождение потребляет от 24 до 72 периодов.
Технические методы для обхода ограничений прогрессируют одновременно с укреплением юридических решений. VPN-решения класса premium дают криптографию AES-256 и системы OpenVPN. Стабильность канала жизненно важна для VIP игровых периодов.
Альтернативные ресурсы выполняют задачи через территориально разнесенные компьютерные инфраструктуры. CDN-структуры гарантируют низкую время ответа для азиатских пользователей. Системное роутинг включается при обнаружении ограничения главного портала.
Банковские движения в легальных зонах подпадают под строгим стандартам PCI DSS. Блокчейн транзакции приобретают признание в результате секретности и динамике обработки.
Мобильные утилиты премиальных операторов интегрируют лицевую аутентификацию и push-сообщения для принципиальных событий. Гибкий внешний вид автономно настраивается под свойства экрана.
Навигация в области сертифицированных ресурсов включает владения передовых методов входа. Квалифицированные игроки задействуют п»ї1хбет регистрация для получения актуальной информации о оперативных адресах.
Процедура формирования учетной записи в официальных учреждениях подразумевает детальную проверку. Актуальные организации применяют KYC-механизмы и AML-правила. Оформление документов требует от 24 до 72 периодов.
Компьютерные технологии для обхода препятствий развиваются одновременно с ужесточением юридических действий. VPN-инструменты типа premium предоставляют криптографию AES-256 и стандарты OpenVPN. Стабильность канала критически актуальна для элитных раундов.
Запасные платформы действуют через пространственно размещенные компьютерные системы. CDN-архитектуры обеспечивают оптимальную латентность для азиатских геймеров. Техническое маршрутизация активируется при идентификации барьера первичного ресурса.
Финансовые операции в легальных зонах следуют конкретным требованиям PCI DSS. Децентрализованные расчеты увеличивают востребованность благодаря скрытности и динамике реализации.
Мобильные приложения ведущих провайдеров объединяют лицевую проверку и push-оповещения для важных ситуаций. Настраиваемый облик независимо изменяется под настройки панели.
Навигация в секторе официальных сайтов включает осознания продвинутых методов входа. Квалифицированные участники задействуют казино Vavada для извлечения современной фактов о оперативных URL.
Алгоритм оформления личного кабинета в надежных учреждениях подразумевает сложную валидацию. Передовые компании используют KYC-системы и AML-нормы. Документальное сопровождение составляет от 24 до 72 интервалов.
Программные методы для избежания блокировок совершенствуются синхронно с ужесточением правовых действий. VPN-платформы типа premium гарантируют защиту AES-256 и методы OpenVPN. Устойчивость связи жизненно актуальна для премиальных игровых периодов.
Альтернативные платформы оперируют через территориально рассредоточенные технические кластеры. CDN-структуры осуществляют сокращенную время ответа для международных геймеров. Системное роутинг срабатывает при обнаружении блокировки центрального домена.
Банковские движения в проверенных зонах соответствуют жестким требованиям PCI DSS. Блокчейн операции увеличивают признание по причине скрытности и оперативности процессинга.
Портативные программы элитных операторов совмещают биометрическую аутентификацию и push-оповещения для критических ситуаций. Модифицируемый облик самостоятельно корректируется под свойства панели.
Современный электрокарниз недорого Прокарниз предлагает удобство управления шторами с помощью пульта.
Среди преимуществ электрокарниза — удобство использования и экономия времени.
веб-сайт
Испытайте радость в каждой поездке!
For a list
Calm loan
to unlock potential.
Действующие дублирующие порталы проверенных казино на п»ї1хбет казино обеспечивают непрерывный доступ к азартным сервисам. Система дублирования создает эквивалентные версии базового веб-площадки с фиксацией всех опций.
Процедура создания аккаунта через зеркало целиком воспроизводит главную шаблон. Только пришедшие клиенты указывают рабочий email, придумывают стойкий шифр и выбирают игровую платежное средство.
Верификация счета предполагает представления свидетельств по KYC-нормам. Скан паспорта, валидация резиденции и карточные координаты проходят цифровую верификацию в течение 24-72 часов.
Авторизация зарегистрированных участников выполняется через базовую интерфейс с 2FA валидацией. Сессионные пароли передаются на телефонный номер или почтовый ящик.
Функционал финансового компонента через mirror-сайты предлагает популярные расчетные сервисы. Visa, Mastercard, веб балансы Skrill, Neteller, цифровые активы Bitcoin, Ethereum процессируются с оптимизированными платежами 0-3%.
Игровая ассортимент дублируется целиком включая автоматы, настольные развлечения, live-хостов и прогрессивы. RTP-коэффициенты, вариативность и условия отыгрыша удерживаются неизменными.
Бонусная программа работает идентично центральному веб-площадке. Welcome-наборы, бесплатные вращения, refund и VIP-планы запускаются программно при реализации определенных требований.
Отбор надежного игорного площадки заставляет детального изучения регулятивных бумаг. Передовые сайты типпи казино дают геймерам безусловную данные о действующих аккредитациях.
Процедура оформления счета включает множество необходимых фаз подтверждения. Представители истребуют документы, доказывающие идентичность и правоспособность. Классический KYC-механизм длится от 24 до 72 периодов.
Управление банком запускается с задания рамок на пополнения. Профессиональные игроки настаивают внедрять принцип 5% от общего казино фонда на конкретную игру.
Электронные запреты владельцев принуждают внедрять вспомогательные пути. Зеркала удерживают максимальную функциональность основного площадки, включая летопись транзакций и гемблинг достижения.
Передовые расчетные сервисы гарантируют оперативные инвестиции через криптовалютные хранилища. Bitcoin, Ethereum и стабильные валюты обеспечивают конфиденциальность и минимальные взносы. Период проведения выводов равно 10-30 промежутков.
Схемы постоянства подразумевают многоуровневые степени с увеличивающимся кэшбэком. VIP-представители дают персонализированные поощрения, повышенные пределы и ускоренную поддержку.
Действующие mirror-ссылки проверенных казино на казино 1xBet гарантируют стабильный соединение к азартным платформам. Схема зеркалирования создает эквивалентные версии центрального портала с фиксацией всех инструментов.
Схема активации через дублирующий портал на сто процентов дублирует оригинальную анкету. Новые клиенты вводят функционирующий email, создают защищенный шифр и фиксируют рабочую курренси.
Верификация аккаунта требует загрузки документов следуя KYC-нормам. Фото удостоверения личности, доказательство места жительства и денежные параметры проходят автоматическую контроль в течение 24-72 периодов.
Аутентификация зарегистрированных клиентов происходит через обычную панель с многоступенчатой верификацией. Сессионные токены поступают на смс устройство или почтовый ящик.
Механизмы пополнительного компонента через альтернативные домены обеспечивает популярные денежные инструменты. Visa, Mastercard, онлайн портмоне Skrill, Neteller, виртуальные монеты Bitcoin, Ethereum осуществляются с минимальными сборами 0-3%.
Гемблинг библиотека воспроизводится в точности включая машины, настольные активности, live-дилеров и джекпоты. RTP-значения, колебания и ставочные требования удерживаются такими же.
Бонусная система оперирует аналогично корневому домену. Welcome-комплекты, бесплатные вращения, компенсация и VIP-системы включаются алгоритмически при соблюдении прописанных параметров.
Надёжные операторы игровых сервисов предоставляют клиентам право к высококлассному азартному досугу через dedicated ресурсы, включая казино типпи , которые специально следуют международные стандарты security.
Последовательность регистрации предполагает указания верификационных информации через защищённые SSL-каналы. Операторы запрашивают official verification правоспособности и места residence для соблюдения legal правил.
Двухэтапная authentication выступает required aspect актуальных solutions security. Участники имеют SMS-пароли, push-сообщения или применяют профессиональные софт вроде Google Authenticator.
Дублирующие домены решают сложности географических санкций и DDoS-атак. Техническим образом mirrors являют аналогичные версии основного сайта с maintaining возможностей и клиентских информации.
Компетентные участники советуют сохранять актуальные реестры действующих дублей в bookmark browser. Management доставляют новости о новых порталах через email, Telegram-чаты и смартфонные программы.
Денежные процедуры через проверенные ресурсы защищены шифровальными алгоритмами класса банковского области. Вывод капитала реализуется лишь на верифицированные данные хозяина профиля.
Современные платформы развлекательных активностей дают клиентам возможность к профессиональному развлечениям через защищенные Лаки Бир официальный сайт платформы. Легальная функционирование влечет выполнения строгих контролирующих стандартов.
Механизм активации пользовательского профиля охватывает верификацию индивидуальных показателей. Операторы задействуют расширенные механизмы KYC и AML для исключения незаконных переводов.
IT инструменты современных гемблинг платформ базируются на защищенных инфраструктурах с HTTPS алгоритмами. Региональная блокировка заставляет операторов создавать вспомогательные порталы.
Параллельные порталы формируют эквивалентные клоны базового ресурса с фиксацией всех инструментов и показателей. Беттеры обеспечивают себе устойчивый доступ к балансу, беттинг отчетности и личным настройкам.
Финансовые переводы производятся через синхронизированные финансовые шлюзы. Границы на депозиты и обналичивания устанавливаются в унисон с нормативными критериями и внутренними процедурами снижения потерь.
Опытные клиенты рекомендуют отслеживать ситуацию авторизации через надзорные каталоги игорных органов. Авторитетные критерии содержат оценки на отраслевых сайтах и комментарии истинных игроков.
Игровая индустрия представляет активный расширение, привлекая множество клиентов. Грамотные сайты предлагают защищённую пространство для пари. Детальную сведения о указанных брендах реально получить на п»ї1хбет .
Лицензирование является центральным показателем определения платформы. Лицензиаты Кюрасао обеспечивают качественный мониторинг денежных процедур. Каждая лицензированная площадка реализует регулярные проверки RNG-механизмов.
IT параметры инновационных игорных домов содержат SSL-защиту расчётного категории. Разработчики программного ПО класса Microgaming, NetEnt, Pragmatic Play интегрируют усовершенствованные системы непредсказуемых показателей.
Процедура аутентификации счёта включает подачи справок KYC-формата. Удостоверение, документ о финансах, подтверждение местожительства — классический пакет для финального авторизации.
Зеркальные URL убирают проблемы с ограничениями операторов. Действующие альтернативы обновляются систематически программными командами. Планшетные приложения регулярно функционируют качественнее онлайн форматов.
Финансовая дисциплина устанавливает длительную доходность развлекательных сессий. Экспертные геймеры настаивают сокращать величину ставки до 1-2% от общего резерва.
1win раздел бонусы https://www.1win17384.help
Определение легального азартного заведения предполагает детального анализа юридических разрешений. Новые системы лаки Р±РёСЂ казино гарантируют геймерам абсолютную детали о действующих аккредитациях.
Процедура открытия аккаунта предусматривает множество принудительных стадий валидации. Владельцы истребуют справки, засвидетельствующие идентичность и правоспособность. Традиционный KYC-регламент продолжается от 24 до 72 интервалов.
Распоряжение капиталом начинается с фиксации ограничений на взносы. Компетентные участники советуют эксплуатировать норму 5% от итогового азартного резерва на единичную сессию.
Технические блокировки поставщиков заставляют внедрять дополнительные ссылки. Альтернативы поддерживают максимальную функциональность главного платформы, содержа историю операций и азартный продвижение.
Современные платежные инструменты обеспечивают скоростные депозиты через электронные счета. Bitcoin, Ethereum и устойчивые монеты гарантируют конфиденциальность и наименьшие отчисления. Период осуществления получений доходит 10-30 отрезков.
Планы преданности подразумевают ступенчатые статусы с прогрессивным вознаграждением. VIP-кураторы обеспечивают персонализированные награды, увеличенные лимиты и первоочередную поддержку.
Нынешние пользователи встречаются с множеством программных аспектов при деятельности с официальными порталами. Профильные сайты типа тип топ казино поставляют релевантную материалы о процессах игорных компаний.
Процедура валидации кабинета предполагает множество требуемых фаз. Стартовая подтверждение включает предоставления свидетельств подтверждающих индивидуальность. Привычный комплект охватывает паспорт, лицензию водителя или загранпаспорт.
Техническая составляющая открытия счета подразумевает задействование безопасного соединения и двухфакторной аутентификации. Профессиональные участники подсказывают задействовать максимум имеющихся настроек защиты.
Дублирующие порталы составляют идентичные реплики основного платформы с удержанием комплексного возможностей. Основное плюс состоит в схожести денежных границ и требований проигрыша.
Процедура нахождения активных дублирующих порталов опирается на контроле специализированных новостных лент и партнерских площадок. Опытные геймеры применяют VPN-сервисы для обеспечения устойчивого подключения независимо от географических блокировок.
mostbet inregistrare https://www.mostbet2007.help
Новейшие бетторы оказываются с затруднением входа к сертифицированным порталам. Операторы запрещают стандартные URL, но грамотные Меллстрой игроки учитывают о присутствии резервных площадок.
Зеркало является точную дубликат оригинального ресурса. Протоколы шифрования поддерживаются идентичными. Расчётные переводы производятся через аналогичные системы.
Схема создания аккаунта через дополнительный адрес включает типовой проверки. Сотрудники запрашивают свидетельства для выполнения KYC-требований. Персональные параметры подвергаются многоуровневую валидацию.
Депозитные границы на параллельных ресурсах идентичны первичным спецификациям. Низшие беты функционируют константными. Прогрессивные джекпоты согласовываются между множественными ссылками.
Стимулирующие механизмы работают завершённо на резервных порталах. Отыгрышный коэффициент удерживает первоначальные цифры. Срок активности отыгрыша продолжается.
Сервис помощи анализирует заявки с резервных ресурсов равнозначно. Прямой разговор обеспечивает 24-часовой формат функционирования.
Новейшие порталы гемблинг игр предлагают пользователям вход к элитному азарту через проверенные Lucky Bear казино платформы. Легальная функционирование предполагает соблюдения определенных законодательных требований.
Процедура создания пользовательского кабинета включает аутентификацию личных сведений. Администраторы используют детализированные протоколы KYC и AML для исключения мошеннических операций.
IT системы новейших развлекательных порталов основываются на стабильных дата-центрах с TLS протоколами. IP-фильтрация заставляет управляющих внедрять вспомогательные домены.
Зеркальные сайты образуют аналогичные репликации центрального сайта с сохранением всех сервисов и параметров. Игроки получают устойчивый вход к депозиту, беттинг статистике и персональным параметрам.
Расчетные процедуры реализуются через встроенные финансовые процессоры. Границы на депозиты и снятия фиксируются в унисон с лицензионными критериями и собственными нормами снижения потерь.
Профессиональные игроки настаивают проверять ситуацию аккредитации через регуляторные списки развлекательных органов. Престижные критерии задействуют рейтинги на экспертных порталах и комментарии подлинных клиентов.
посетить веб-сайт
В Грузии каждый момент ценен!
Insurance
Азартная ниша отображает динамичный рост, завлекая тысячи геймеров. Экспертные ресурсы гарантируют стабильную обстановку для пари. Подробную информацию о подобных компаниях допустимо изучить на Вавада .
Сертификация является ключевым показателем селекции портала. Лицензиаты Мальты предоставляют строгий контроль расчётных операций. Конкретная легальная сайт подвергается постоянные ревизии RNG-механизмов.
Компьютерные характеристики инновационных азартных площадок объединяют SSL-криптографию финансового стандарта. Производители софтового софта вроде Microgaming, NetEnt, Pragmatic Play интегрируют усовершенствованные схемы случайных показателей.
Алгоритм валидации учётной записи предполагает предоставления документов KYC-стандарта. Паспорт, подтверждение о заработке, удостоверение проживания — типичный перечень для полноценного подключения.
Параллельные домены ликвидируют сложности с запретами провайдеров. Рабочие дубли модифицируются систематически IT специалистами. Портативные клиенты часто действуют качественнее сетевых модификаций.
Управление банкроллом формирует перспективную эффективность гемблинговых раундов. Квалифицированные пользователи указывают контролировать величину депозита до 1-2% от суммарного бюджета.
Функционирующие резервные адреса лицензированных gaming-операторов на Vavada гарантируют постоянный вход к геймерским порталам. Методика зеркалирования формирует эквивалентные дубликаты центрального портала с удержанием всех инструментов.
Механизм открытия счета через mirror-сайт в точности повторяет стандартную анкету. Только пришедшие пользователи прописывают действующий email, создают защищенный секретную комбинацию и выбирают игровую курренси.
Идентификация личного кабинета предполагает предоставления свидетельств согласно KYC-нормам. Снимок паспорта, свидетельство проживания и финансовые данные контролируются системой машинную проверку в течение 24-72 ч.
Авторизация зарегистрированных геймеров производится через обычную интерфейс с усиленной идентификацией. Разовые токены доставляются на мобильный номер или электронную почту.
Функционал пополнительного модуля через резервные ссылки предлагает востребованные платежные сервисы. Visa, Mastercard, цифровые хранилища Skrill, Neteller, блокчейн-токены Bitcoin, Ethereum обрабатываются с минимальными платежами 0-3%.
Gaming коллекция дублируется целиком включая машины, классические игры, live-операторов и максимальные награды. RTP-параметры, волатильность и вейджер фиксируются неизменными.
Поощрительная программа работает похоже основному домену. Welcome-пакеты, free spins, refund и VIP-системы инициируются программно при выполнении определенных условий.
Официальные площадки гэмблинг опций гарантируют геймерам право к профессиональному игровому процессу через тематические домены, включая френдс казино , которые специально следуют международные нормы надёжности.
Последовательность открытия счёта necessita указания проверочных параметров через безопасные SSL-connection. Букмекеры запрашивают official доказательство возраста и локации проживания для соблюдения юрисдикционных критериев.
Многоуровневая верификация представляет необходимым составляющей передовых механизмов защиты. Участники располагают SMS-шифры, push-уведомления или задействуют специализированные утилиты в стиле Google Authenticator.
Дублирующие домены нейтрализуют сложности географических блокировок и DDoS-нападений. Техническим образом копии составляют копийные копии основного домена с удержанием опций и клиентских сведений.
Опытные участники рекомендуют поддерживать актуальные каталоги действующих копий в сохранённых ссылках обозревателя. Букмекеры отправляют сведения о актуальных доменах через электронную почту, Telegram-каналы и телефонные софт.
Payment транзакции через надёжные платформы гарантированы криптографическими технологиями категории банковского индустрии. Получение финансов реализуется только на подтверждённые счета собственника account.
http://kiacarnival.ru/profile.php?u=dragonwont5
Гемблинговая область являет стремительный развитие, притягивая тысячи участников. Профессиональные площадки предоставляют стабильную обстановку для ставок. Подробную материалы о этих организациях возможно получить на казино Голд .
Аттестация выступает главным показателем подбора ресурса. Лицензиаты Гибралтара создают тщательный аудит экономических операций. Отдельная лицензированная портал осуществляет регулярные ревизии RNG-систем.
Компьютерные особенности современных азартных площадок объединяют SSL-защиту экономического ранга. Разработчики софтового обеспечения вроде Microgaming, NetEnt, Pragmatic Play подключают продвинутые схемы непредсказуемых значений.
Процесс аутентификации аккаунта включает направления бумаг KYC-уровня. ID, документ о средствах, валидация проживания — типичный список для завершённого подключения.
Дублирующие адреса устраняют сложности с фильтрацией провайдеров. Актуальные дубли корректируются постоянно техническими службами. Планшетные приложения нередко оперируют лучше сетевых вариантов.
Контроль средств определяет стратегическую эффективность гемблинговых раундов. Грамотные игроки предлагают контролировать размер бета до 1-2% от полного капитала.
интернет Вперед к новым приключениям!
Travel Trolley Collection – The structure helps keep trip planning stress-free.
Актуальные порталы игорных услуг предоставляют участникам доступ к элитному развлечениям через безопасные казино Лаки Бир ресурсы. Легальная деятельность предполагает учета определенных надзорных норм.
Алгоритм создания игрового профиля содержит подтверждение персональных информации. Операторы используют детализированные процедуры KYC и AML для исключения фродовых финансовых действий.
Технические средства новейших игорных домов функционируют на надежных инфраструктурах с криптографическими алгоритмами. Геоблокировка обязывает управляющих разрабатывать параллельные порталы.
Зеркальные порталы представляют аналогичные репликации центрального ресурса с обеспечением всех функций и сведений. Клиенты достигают стабильный соединение к депозиту, беттинг отчетности и клиентским установкам.
Денежные действия проходят через связанные банковские процессоры. Пределы на вклады и снятия фиксируются в унисон с лицензионными условиями и собственными политиками снижения потерь.
Квалифицированные гемблеры настаивают отслеживать состояние аккредитации через контролирующие списки беттинг структур. Имиджевые критерии включают ранги на профильных сервисах и feedback истинных беттеров.
buy zoloft: buy zoloft – order zoloft
Нынешние участники оказываются с барьером связи к лицензированным порталам. Поставщики блокируют первичные URL, но знающие п»ї1хбет официальный сайт пользователи учитывают о функционировании альтернативных сайтов.
Резервная ссылка образует абсолютную отображение главного платформы. Протоколы шифрования сохраняются неизменными. Финансовые операции проходят через аналогичные механизмы.
Схема оформления профиля через альтернативный портал требует классической верификации. Специалисты уточняют справки для исполнения KYC-норм. Паспортные сведения осуществляют усиленную подтверждение.
Вносительные лимиты на альтернативных платформах идентичны базовым спецификациям. Низшие беты функционируют константными. Накопительные накопления объединяются между всеми ресурсами.
Стимулирующие схемы функционируют целостно на зеркальных площадках. Вейджер поддерживает исходные величины. Тайминг отыгрыша остаётся прежним.
Отдел помощи изучает заявки с зеркальных ресурсов равнозначно. Онлайн общение предоставляет непрерывный режим деятельности.
WinkWorthy Finds Online – Colorful and clear, browsing items was straightforward and enjoyable.
психолог онлайн
сколько у обычного человека iq
тест проверка iq
оригинальный тест на iq
тест на iq без картинок
тест на iq легкий
интернет https://t.me/invisevpn_bot
психолог онлайн
высокий айкью человека
максимальное iq
высшее айкью
iq 120 много или мало
Новейшие операторы игорных услуг гарантируют участникам доступ к высококлассному развлечениям через безопасные миллион казино платформы. Авторизованная функционирование влечет следования конкретных регуляторных положений.
Процесс активации персонального счета предусматривает подтверждение приватных данных. Администраторы внедряют комплексные системы KYC и AML для исключения поддельных платежей.
Электронные системы инновационных развлекательных порталов базируются на безопасных дата-центрах с шифровальными стандартами. Территориальные ограничения принуждает администраторов разрабатывать альтернативные домены.
Альтернативные домены представляют полные репликации базового домена с фиксацией всех опций и показателей. Игроки получают непрерывный связь к капиталу, развлекательной истории и индивидуальным конфигурациям.
Платежные переводы осуществляются через интегрированные банковские процессоры. Границы на вклады и изъятия устанавливаются в унисон с правовыми требованиями и корпоративными регламентами риск-менеджмента.
Компетентные гемблеры советуют анализировать условия аккредитации через официальные списки игорных органов. Репутационные параметры содержат позиции на экспертных сайтах и оценки настоящих беттеров.
психолог онлайн
iq 91 это нормально
проверить свой айкью тест бесплатно онлайн без регистрации
международный тест на айкью бесплатно
ответы на международный тест iq 40 вопросов
Современные провайдеры развлекательных игр обеспечивают игрокам подключение к элитному игровому процессу через надежные казино Голд платформы. Официальная бизнес требует учета строгих законодательных положений.
Механизм регистрации индивидуального аккаунта задействует валидацию персональных информации. Управляющие применяют расширенные процедуры KYC и AML для недопущения нарушающих платежей.
Электронные системы новейших развлекательных порталов функционируют на безопасных инфраструктурах с шифровальными протоколами. Локальные запреты вынуждает операторов разрабатывать вспомогательные адреса.
Дублирующие платформы представляют точные версии основного домена с обеспечением всех инструментов и данных. Беттеры обеспечивают себе устойчивый связь к счету, развлекательной записям и пользовательским параметрам.
Платежные действия производятся через связанные банковские процессоры. Ограничения на депозиты и получения регулируются в соответствии с регуляторными условиями и корпоративными нормами управления рисками.
Экспертные игроки настаивают контролировать положение разрешения через официальные регистры азартных комиссий. Статусные индикаторы включают позиции на отраслевых сервисах и отзывы подлинных клиентов.
Игровая индустрия являет динамичный расширение, притягивая легионы геймеров. Грамотные ресурсы предоставляют защищённую условия для развлечений. Исчерпывающую данные о указанных операторах возможно получить на Вавада РІС…РѕРґ .
Аккредитация составляет приоритетным показателем определения портала. Надзорные органы Великобритании предоставляют жёсткий мониторинг экономических операций. Конкретная аккредитованная площадка осуществляет систематические ревизии RNG-алгоритмов.
Компьютерные свойства современных казино предусматривают SSL-безопасность банковского ранга. Создатели программного ПО вроде Microgaming, NetEnt, Pragmatic Play подключают продвинутые механизмы произвольных показателей.
Схема подтверждения счёта предполагает предоставления свидетельств KYC-уровня. ID, справка о средствах, верификация адреса — обычный набор для финального доступа.
Альтернативные ссылки решают барьеры с фильтрацией операторов. Свежие альтернативы адаптируются регулярно IT группами. Карманные приложения зачастую работают устойчивее браузерных версий.
Распределение капитала формирует перспективную эффективность игровых периодов. Грамотные участники настаивают контролировать размер бета до 1-2% от суммарного фонда.
Ориентирование в области проверенных платформ включает представления новых методов входа. Умелые пользователи задействуют казино Вавада для получения релевантной данных о активных адресах.
Процесс открытия профиля в лицензированных компаниях подразумевает многоуровневую подтверждение. Актуальные поставщики используют KYC-механизмы и AML-критерии. Документальное сопровождение занимает от 24 до 72 периодов.
Программные способы для обхода препятствий прогрессируют одновременно с повышением нормативных действий. VPN-сервисы класса premium гарантируют защиту AES-256 и методы OpenVPN. Надежность связи принципиально актуальна для VIP партий.
Дублирующие сайты выполняют задачи через локально разнесенные IT инфраструктуры. CDN-архитектуры предоставляют сокращенную латентность для глобальных игроков. Программное переключение инициируется при идентификации барьера центрального портала.
Денежные операции в проверенных территориях следуют определенным правилам PCI DSS. Децентрализованные расчеты приобретают популярность из-за приватности и быстроте выполнения.
Планшетные софт топовых провайдеров интегрируют лицевую идентификацию и push-оповещения для существенных моментов. Настраиваемый облик автоматически подстраивается под характеристики монитора.
pin-up depósito con cuenta rut https://pinup2005.help
Выбор безопасного гемблинг площадки в современных границах предполагает повышенного подхода к регулятивному положению. Опытные пользователи осознают, что Меллстрой зеркало включает актуальную сведения о функционирующих операторах.
Процесс создания аккаунта в легальных операторах объединяет требуемую подтверждение документов. KYC-правила обеспечивают как оператора, так и геймера от обмана. Переходные рамки на снятие денег до закрытия валидации – нормальная практика.
Виртуальные блокировки на подключение к азартным сервисам устраняются через резервные порталы. Функционирующие копии обеспечивают тотальную работоспособность первичного портала. Денежные процедуры, интерактивный прогресс и поощрительные системы сохраняются константными.
Капитальная гарантированность измеряется критерием внедренных денежных систем. SSL-криптография, PCI DSS аттестация и многоуровневая проверка гарантируют стабильный контур охраны.
Азартная библиотека официальных провайдеров содержит автоматы от известных провайдеров. RTP-параметры, изменчивость и математические формулы получают нейтральную валидацию в одобренных институтах.
Программы мотивации в серьезных казино основываются на четких условиях активности. Требования x35-40 признается приемлемым для автомат-поощрений, в то время как традиционные забавы принимаются в расчет с минимальным показателем.
другие Отдыхайте с радостью всегда!
Передовые участники сталкиваются с массой цифровых особенностей при функционировании с сертифицированными площадками. Профильные ресурсы типа Голд казино выдают актуальную контент о работе азартных компаний.
Процедура валидации учетной записи содержит несколько принудительных шагов. Базовая валидация включает размещения документов удостоверяющих личность. Классический комплект охватывает ID, водительские права или заграничное удостоверение.
Технологическая часть открытия счета предполагает использование зашифрованного канала и двухфакторной аутентификации. Экспертные клиенты подсказывают включать полный набор имеющихся возможностей охраны.
Альтернативные адреса образуют идентичные реплики основного сайта с хранением всего возможностей. Основное преимущество содержится в идентичности платежных пределов и требований отыгрыша.
Алгоритм нахождения действующих дублирующих порталов основывается на мониторинге тематических новостных лент и союзных ресурсов. Квалифицированные клиенты внедряют анонимайзеры для создания постоянного доступа невзирая от географических ограничений.
http://neuroreliefusa.com/# cheap neurontin online
Отбор достойного развлекательного площадки в сегодняшних границах требует специального рассмотрения к регулятивному уровню. Знающие пользователи понимают, что казино Килограмм отображает современную информацию о действующих сервисах.
Процедура регистрации в сертифицированных платформах объединяет неизбежную подтверждение документов. KYC-требования оберегают как оператора, так и клиента от махинаций. Переходные границы на перечисление капитала до финализации контроля – стандартная подход.
Технические барьеры на вход к развлекательным сервисам нейтрализуются через резервные адреса. Функционирующие дубликаты обеспечивают тотальную эффективность базового платформы. Банковские движения, развлекательный результаты и поощрительные схемы остаются константными.
Капитальная гарантированность выражается степенью эксплуатируемых денежных способов. SSL-шифрование, PCI DSS аттестация и двухфакторная аутентификация создают стабильный контур защиты.
Геймплейная библиотека проверенных операторов включает барабаны от известных провайдеров. RTP-параметры, дисперсия и статистические модели подвергаются независимую контроль в авторизованных организациях.
Программы стимулирования в профессиональных заведениях строятся на прозрачных критериях отыгрыша. Проигрыш x35-40 характеризуется адекватным для автомат-льгот, в то время как карточные забавы идут в подсчет с сниженным множителем.
Актуальные игроки сталкиваются с огромным количеством цифровых тонкостей при операциях с официальными порталами. Профильные источники типа п»ї1хбет дают современную контент о деятельности гэмблинговых операторов.
Система валидации кабинета подразумевает несколько необходимых стадий. Стартовая верификация нуждается предоставления бумаг валидирующих гражданство. Обычный пакет подразумевает документ, права или внешний паспорт.
Цифровая часть создания аккаунта охватывает использование криптографической защиты и двухфакторной аутентификации. Экспертные игроки советуют задействовать максимум имеющихся функций обеспечения.
Дублирующие порталы формируют абсолютные отражения базового домена с сохранением полного инструментария. Важнейшее преимущество состоит в соответствии платежных границ и параметров проигрыша.
Механизм поиска активных дублирующих порталов основывается на мониторинге экспертных новостных лент и союзных площадок. Квалифицированные пользователи внедряют анонимайзеры для предоставления стабильного подключения невзирая от региональных ограничений.
Активные mirror-ссылки лицензированных игорных заведений на казино Mellstroy Game обеспечивают постоянный вход к геймерским системам. Принцип копирования образует аналогичные реплики главного портала с фиксацией всех функций.
Механизм регистрации через mirror-сайт абсолютно воспроизводит стандартную бланк. Новые клиенты заполняют функционирующий email, создают защищенный ключ и назначают рабочую платежное средство.
Идентификация счета предполагает отправки бумаг согласно KYC-политике. Фото удостоверения личности, доказательство проживания и банковские реквизиты контролируются системой машинную проверку в течение 24-72 ч.
Логин зарегистрированных участников происходит через классическую форму с 2FA верификацией. Краткосрочные пароли приходят на мобильный гаджет или мейл.
Механизмы депозитного раздела через mirror-сайты предлагает популярные финансовые платформы. Visa, Mastercard, онлайн хранилища Skrill, Neteller, криптовалюты Bitcoin, Ethereum осуществляются с уменьшенными платежами 0-3%.
Гемблинг база клонируется на сто процентов включая spinning games, традиционные геймплей, live-ведущих и накопительные призы. RTP-значения, волатильность и отыгрыш фиксируются аналогичными.
Поощрительная система действует идентично корневому веб-площадке. Welcome-пакеты, фриспины, возврат средств и VIP-планы запускаются автоматически при соблюдении определенных параметров.
посмотреть в этом разделе https://t.me/invisevpn_bot/
塔尔萨之王高清完整版AI深度学习内容匹配,海外华人可免费观看最新热播剧集。
brixel trust portal online – Smooth performance and consistent branding make the site feel dependable.
Подбор надежного развлекательного ресурса в сегодняшних условиях нуждается детального подхода к законному режиму. Компетентные игроки понимают, что Килограмм казино отображает современную сведения о действующих операторах.
Алгоритм создания аккаунта в проверенных площадках включает неизбежную валидацию идентичности. KYC-правила обеспечивают как оператора, так и клиента от мошенничества. Переходные лимиты на перечисление денег до завершения валидации – стандартная подход.
Технические блокировки на вход к азартным сайтам нейтрализуются через зеркальные домены. Рабочие дубликаты гарантируют тотальную работоспособность основного ресурса. Денежные операции, азартный прогресс и бонусные планы сохраняются константными.
Капитальная стабильность выражается критерием задействованных расчетных способов. SSL-кодирование, PCI DSS аттестация и расширенная аутентификация создают прочный контур ограждения.
Азартная библиотека проверенных заведений предоставляет машины от известных разработчиков. RTP-параметры, дисперсия и алгоритмические схемы претерпевают беспристрастную проверку в утвержденных лабораториях.
Системы мотивации в качественных сервисах базируются на открытых правилах ставок. Проигрыш x35-40 расценивается приемлемым для автомат-бонусов, в то время как стандартные развлечения идут в зачет с сниженным множителем.
Игровая ниша демонстрирует динамичный прогресс, притягивая миллионы клиентов. Грамотные площадки предлагают стабильную обстановку для ставок. Развёрнутую факты о указанных операторах возможно найти на Меллстрой сайт .
Сертификация составляет приоритетным показателем подбора платформы. Надзорные органы Мальты создают строгий аудит денежных действий. Любая лицензированная портал реализует регулярные аудиты RNG-генераторов.
Цифровые характеристики актуальных игорных домов объединяют SSL-защиту экономического класса. Производители цифрового продукта наподобие Microgaming, NetEnt, Pragmatic Play подключают сложные механизмы случайных показателей.
Механизм подтверждения профиля предполагает направления справок KYC-уровня. Паспорт, выписка о средствах, удостоверение прописки — стандартный перечень для завершённого подключения.
Резервные порталы устраняют трудности с ограничениями поставщиков. Рабочие зеркала обновляются постоянно цифровыми командами. Смартфонные программы регулярно оперируют лучше браузерных модификаций.
Банкролл-менеджмент определяет стратегическую результативность гемблинговых периодов. Грамотные участники советуют лимитировать сумму пари до 1-2% от общего резерва.
Выбор проверенного betting оператора в нынешних границах требует повышенного анализа к регулятивному статусу. Квалифицированные клиенты представляют, что Меллстрой сайт отображает последнюю информацию о работающих площадках.
Процедура создания аккаунта в проверенных сервисах охватывает принудительную валидацию документов. KYC-стандарты защищают как казино, так и пользователя от обмана. Кратковременные границы на изъятие финансов до завершения контроля – типичная подход.
Программные ограничения на связь к гемблинг ресурсам устраняются через дублирующие порталы. Активные зеркала гарантируют всестороннюю эффективность главного портала. Платежные транзакции, интерактивный статистика и привилегированные предложения продолжают стабильными.
Денежная стабильность характеризуется уровнем используемых расчетных инструментов. SSL-криптография, PCI DSS подтверждение и усиленная верификация устанавливают надежный контур охраны.
Развлекательная коллекция лицензированных сервисов предоставляет барабаны от лидирующих провайдеров. RTP-значения, волатильность и расчетные модели проходят внешнюю проверку в утвержденных институтах.
Планы мотивации в достойных казино основываются на понятных требованиях отыгрыша. Условия ставок x35-40 признается разумным для слот-льгот, в то время как стандартные активности засчитываются в подсчет с уменьшенным коэффициентом.
Функционирующие альтернативные домены легальных игорных заведений на винити официальный сайт гарантируют постоянный доступ к геймерским сервисам. Схема зеркалирования образует аналогичные копии базового ресурса с удержанием всех функций.
Процедура регистрации через дублирующий портал абсолютно воспроизводит базовую анкету. Начинающие участники вводят рабочий email, создают безопасный ключ и фиксируют основную курренси.
Верификация аккаунта содержит загрузки документов согласно KYC-стандартам. Скан удостоверения личности, свидетельство адреса и денежные данные подвергаются машинную верификацию в течение 24-72 часа.
Аутентификация активных участников осуществляется через стандартную панель с расширенной аутентификацией. Временные ключи передаются на мобильный девайс или email.
Опции финансового блока через дублирующие порталы обеспечивает популярные финансовые инструменты. Visa, Mastercard, электронные портмоне Skrill, Neteller, виртуальные монеты Bitcoin, Ethereum выполняются с оптимизированными взносами 0-3%.
Гемблинг база клонируется абсолютно включая автоматы, традиционные геймплей, live-дилеров и максимальные награды. RTP-коэффициенты, изменчивость и условия отыгрыша фиксируются неизменными.
Бонусная система оперирует аналогично центральному порталу. Welcome-комплекты, free spins, кешбэк и VIP-планы инициируются автоматически при выполнении прописанных критериев.
нажмите здесь
Georgia: Your Ideal Market!
no presription on line rx
一帆平台,专为海外华人设计,提供高清视频和直播服务。
http://ivertherapeutics.com/# Iver Therapeutics
Развлекательная индустрия демонстрирует динамичный рост, завлекая множество участников. Грамотные сайты предоставляют безопасную атмосферу для ставок. Детальную материалы о подобных провайдерах допустимо отыскать на Лаки Бир РІС…РѕРґ .
Аттестация составляет приоритетным фактором селекции ресурса. Лицензиаты Олдерни гарантируют жёсткий мониторинг денежных процедур. Отдельная официальная портал осуществляет регулярные контроли RNG-генераторов.
Компьютерные характеристики новейших азартных площадок объединяют SSL-кодирование экономического категории. Поставщики компьютерного ПО наподобие Microgaming, NetEnt, Pragmatic Play добавляют комплексные схемы хаотичных величин.
Механизм аутентификации профиля предполагает предоставления бумаг KYC-типа. Паспорт, свидетельство о средствах, верификация местожительства — типичный перечень для полноценного входа.
Зеркальные URL исправляют барьеры с цензурой компаний. Рабочие альтернативы модифицируются каждый день IT командами. Мобильные софт обычно оперируют надёжнее браузерных модификаций.
Распределение капитала устанавливает продолжительную прибыльность игровых раундов. Профессиональные беттеры настаивают урезать сумму бета до 1-2% от общего капитала.
Проверенные площадки игорных услуг предоставляют геймерам возможность к высококлассному времяпрепровождению через специализированные платформы, включая Lucky Bear , которые точно исполняют мировые критерии безопасности.
Процедура активации подразумевает внесения валидационных деталей через encrypted SSL-линии. Провайдеры запрашивают официальное доказательство age verification и территории проживания для compliance юрисдикционных требований.
Двухфакторная верификация выступает mandatory частью современных платформ защиты. Users получают SMS-шифры, push-уведомления или применяют профессиональные утилиты типа Google Authenticator.
Альтернативные адреса ликвидируют трудности региональных блокировок и DDoS-нападений. По сути реплики являют тождественные dublicates базового ресурса с обеспечением функциональности и пользовательских сведений.
Опытные геймеры рекомендуют поддерживать обновлённые каталоги working зеркал в закладках browser. Management направляют обновления о новых URL через e-mail, Telegram-чаты и мобильные утилиты.
Payment операции через legal сайты покрыты cryptographic технологиями категории банковского индустрии. Получение денег происходит единственно на validated реквизиты хозяина профиля.
Определение проверенного гемблинг оператора требует серьезного исследования лицензионных разрешений. Актуальные сайты Гризли казино дают участникам абсолютную данные о своих разрешениях.
Механизм создания профиля включает ряд обязательных этапов аутентификации. Администраторы требуют удостоверения, доказывающие личность и дееспособность. Традиционный KYC-механизм продолжается от 24 до 72 периодов.
Распоряжение капиталом инициируется с назначения ограничений на вклады. Опытные участники предлагают использовать норму 5% от суммарного развлекательного фонда на отдельную раунд.
Технические блокировки поставщиков обязывают задействовать запасные адреса. Зеркала сохраняют стопроцентную производительность первичного сайта, подразумевая журнал транзакций и игровой продвижение.
Современные расчетные системы гарантируют оперативные взносы через цифровые кошельки. Bitcoin, Ethereum и устойчивые монеты обеспечивают тайность и символические отчисления. Срок выполнения выводов достигает 10-30 промежутков.
Системы постоянства подразумевают ступенчатые ранги с накапливающимся кэшбэком. VIP-представители предоставляют эксклюзивные награды, усиленные ограничения и приоритетную техподдержку.
Игровая отрасль являет активный рост, притягивая тысячи клиентов. Экспертные порталы обеспечивают качественную среду для пари. Подробную информацию о этих компаниях доступно изучить на tip top РІС…РѕРґ .
Аккредитация является ключевым элементом отбора платформы. Надзорные органы Олдерни создают качественный проверку экономических операций. Отдельная сертифицированная площадка выполняет систематические ревизии RNG-модулей.
Технические параметры новейших игорных домов предусматривают SSL-безопасность денежного уровня. Производители цифрового софта вроде Microgaming, NetEnt, Pragmatic Play интегрируют многоуровневые схемы непредсказуемых значений.
Механизм верификации личного кабинета предполагает передачи документов KYC-уровня. Удостоверение, подтверждение о прибылях, верификация проживания — классический пакет для завершённого входа.
Альтернативные порталы убирают сложности с блокировками поставщиков. Рабочие альтернативы модифицируются регулярно IT командами. Портативные программы зачастую выполняются устойчивее браузерных форматов.
Финансовая дисциплина задаёт долгосрочную успешность гемблинговых раундов. Квалифицированные геймеры указывают сокращать объём депозита до 1-2% от совокупного фонда.
For papers
is quicken loans the same as rocket mortgage
for enrollment.
Best online casino bonuses Australia – claim free spins now
Лицензионные провайдеры гэмблинг предложений обеспечивают игрокам вариант к высококлассному азартному досугу через целевые сайты, включая п»ї1хбет РІС…РѕРґ , которые специально следуют мировые нормы безопасности.
Алгоритм создания аккаунта necessita ввода валидационных деталей через защищённые SSL-протоколы. Операторы просят предоставить официальное доказательство совершеннолетия и территории проживания для поддержания юрисдикционных критериев.
Multi-factor идентификация становится mandatory составляющей современных solutions надёжности. Клиенты располагают SMS-ключи, push-notification или используют профессиональные утилиты в стиле Google Authenticator.
Альтернативные порталы устраняют проблемы географических барьеров и DDoS-assault. Технически зеркала образуют идентичные клоны базового сайта с поддержанием возможностей и индивидуальных данных.
Skilled пользователи советуют хранить актуальные базы working копий в bookmark браузера. Операторы отправляют updates о новых URL через электронную почту, Telegram-группы и портативные apps.
Payment транзакции через проверенные площадки покрыты криптографическими технологиями категории банковского направления. Изъятие денег осуществляется единственно на validated реквизиты владельца account.
Attractive section of content. I just stumbled upon your site
and in accession capital to assert that I acquire actually enjoyed account your blog posts.
Any way I will be subscribing to your augment and even I achievement you access consistently quickly.
Отбор проверенного гемблинг ресурса предполагает серьезного анализа юридических сертификатов. Современные ресурсы п»ї1хбет сайт обеспечивают пользователям максимальную сведения о имеющихся допусках.
Алгоритм получения доступа включает различные ключевых стадий валидации. Представители просят удостоверения, удостоверяющие индивидуальность и возраст. Обычный KYC-механизм длится от 24 до 72 временных отрезков.
Управление банком открывается с фиксации ограничений на пополнения. Компетентные участники советуют применять норму 5% от суммарного гемблинг бюджета на отдельную партию.
Цифровые запреты администраторов принуждают эксплуатировать альтернативные маршруты. Альтернативы сохраняют полную активность основного площадки, предусматривая хронологию платежей и развлекательный результаты.
Передовые финансовые сервисы гарантируют моментальные взносы через блокчейн аккаунты. Bitcoin, Ethereum и фиксированные активы предоставляют приватность и крошечные отчисления. Длительность проведения выводов составляет 10-30 промежутков.
Планы преданности подразумевают градационные степени с накапливающимся вознаграждением. VIP-представители предоставляют уникальные бонусы, расширенные ограничения и ускоренную сервис.
Нынешние гемблеры натыкаются с затруднением связи к сертифицированным ресурсам. Организации ограничивают базовые адреса, но профессиональные Lucky Bear зеркало участники понимают о наличии резервных площадок.
Дополнительный домен образует точную реплику главного сайта. Протоколы шифрования остаются равнозначными. Денежные транзакции производятся через идентичные шлюзы.
Схема заведения учётной записи через параллельный домен требует типовой валидации. Операторы уточняют свидетельства для осуществления KYC-норм. Паспортные данные подвергаются многоуровневую аутентификацию.
Пополнительные пределы на зеркальных ресурсах соответствуют основным параметрам. Начальные суммы продолжают неизменными. Прогрессивные джекпоты координируются между различными ресурсами.
Поощрительные планы работают комплексно на альтернативных ресурсах. Множитель ставок удерживает оригинальные значения. Временные рамки использования остаётся прежним.
Сервис ассистирования изучает обращения с параллельных адресов идентично. Мгновенный общение обеспечивает беспрерывный порядок работы.
Нынешние пользователи имеют дело с изобилием цифровых деталей при работе с проверенными площадками. Профессиональные порталы типа Vavada казино поставляют свежую материалы о процессах азартных организаций.
Процедура проверки аккаунта предполагает комплекс принудительных шагов. Стартовая аутентификация включает размещения бумаг доказывающих личность. Классический пакет охватывает удостоверение личности, лицензию водителя или заграничное удостоверение.
Системная сторона записления подразумевает применение криптографической защиты и многофакторной защиты. Экспертные участники рекомендуют инициировать все доступных возможностей охраны.
Дублирующие порталы составляют идентичные реплики главного сайта с сохранением всего набора функций. Основное достоинство заключается в идентичности платежных ограничений и условий проигрыша.
Процедура нахождения рабочих резервных ссылок фундируется на контроле профильных информационных каналов и союзных площадок. Профессиональные пользователи используют VPN-сервисы для формирования надежного входа вне зависимости от региональных ограничений.
ifvod平台结合大数据AI分析,专为海外华人设计,提供高清视频和直播服务。
I’m really enjoying the design and layout of your website.
It’s a very easy on the eyes which makes it much more pleasant for me to come here and visit more often. Did you
hire out a developer to create your theme? Great work!
Азартная индустрия показывает быстрый подъём, заинтересовывая массы геймеров. Грамотные сайты гарантируют защищённую условия для ставок. Детальную информацию о данных провайдерах доступно получить на Mellstroy Game .
Сертификация является ключевым фактором определения платформы. Регуляторы Великобритании дают качественный проверку финансовых транзакций. Всякая сертифицированная ресурс выполняет плановые ревизии RNG-систем.
Программные параметры современных беттинг-платформ объединяют SSL-кодирование банковского уровня. Поставщики компьютерного материала наподобие Microgaming, NetEnt, Pragmatic Play интегрируют сложные механизмы произвольных величин.
Механизм подтверждения аккаунта предусматривает предоставления документов KYC-формата. ID, подтверждение о финансах, подтверждение прописки — базовый комплект для завершённого авторизации.
Зеркальные порталы ликвидируют барьеры с фильтрацией компаний. Действующие альтернативы модифицируются постоянно IT отделами. Мобильные программы регулярно работают надёжнее сетевых форматов.
Финансовая дисциплина задаёт стратегическую доходность азартных периодов. Опытные участники предлагают урезать объём депозита до 1-2% от совокупного фонда.
Проверенные площадки азартных сервисов гарантируют геймерам доступ к качественному игровому процессу через dedicated домены, включая казино Vavada , которые исполняют общепринятые критерии security.
Алгоритм открытия счёта necessita предоставления верификационных информации через защищённые SSL-протоколы. Провайдеры просят предоставить официальное удостоверение правоспособности и территории проживания для исполнения нормативных стандартов.
Двухфакторная authentication является обязательным элементом передовых архитектур конфиденциальности. Участники приобретают SMS-ключи, push-notification или внедряют targeted приложения по типу Google Authenticator.
Альтернативные URL решают трудности региональных запретов и DDoS-атак. По сути зеркала составляют копийные копии primary домена с сохранением функциональности и клиентских деталей.
Экспертные пользователи suggest поддерживать обновлённые базы working mirrors в bookmark веб-клиента. Букмекеры отправляют новости о новых доменах через e-mail, Telegram-сообщества и портативные apps.
Банковские процедуры через проверенные порталы secured cryptographic протоколами уровня банковского сектора. Снятие средств производится исключительно на validated карты обладателя личного кабинета.
этот контент
Ваш отдых — наше вдохновение!
WagonWildflower Boutique – Smooth interface, content is engaging and navigation is effortless.
Современные клиенты встречаются с набором технологических особенностей при работе с сертифицированными сайтами. Профессиональные источники типа Лаки Бир зеркало дают актуальную сведения о процессах игорных компаний.
Механизм проверки счета содержит множество необходимых стадий. Первичная подтверждение подразумевает предоставления справок доказывающих личность. Привычный список подразумевает паспорт, водительские права или загранпаспорт.
Технологическая сторона записления подразумевает применение SSL-шифрования и 2FA. Квалифицированные геймеры предлагают включать все возможных параметров обеспечения.
Резервные ссылки представляют стопроцентные копии центрального платформы с поддержанием полного арсенала. Важнейшее достоинство кроется в подобии банковских пределов и норм вейджера.
Схема выявления действующих дублирующих порталов фундируется на проверке специализированных мессенджер групп и связанных площадок. Квалифицированные игроки используют VPN-сервисы для предоставления устойчивого подключения безотносительно от местных лимитов.
Перемещение в пространстве лицензированных площадок предполагает представления актуальных способов соединения. Продвинутые участники внедряют Лаки Бир официальный сайт для извлечения свежей информации о действующих путях.
Схема создания личного кабинета в лицензированных заведениях предполагает комплексную верификацию. Актуальные организации внедряют KYC-системы и AML-стандарты. Оформление документов отнимает от 24 до 72 интервалов.
Компьютерные способы для избежания ограничений развиваются синхронно с усилением нормативных мер. VPN-службы разряда premium предлагают безопасность AES-256 и системы OpenVPN. Непрерывность связи fundamentally значима для элитных сессий.
Альтернативные сайты оперируют через пространственно расположенные серверные кластеры. CDN-структуры обеспечивают оптимальную латентность для азиатских геймеров. Цифровое роутинг запускается при выявлении препятствия основного адреса.
Финансовые переводы в легальных областях соответствуют строгим стандартам PCI DSS. Блокчейн расчеты набирают актуальность благодаря конфиденциальности и оперативности реализации.
Переносные приложения премиальных брендов содержат голосовую проверку и push-сообщения для принципиальных эпизодов. Модифицируемый облик автоматически корректируется под характеристики монитора.
Современные Рулонные шторы на аккумуляторе с электроприводом Прокарниз не только облегчают контроль освещенности в помещении, но и добавляют комфорта в ваш интерьер.
К тому же, с помощью программируемого режима можно автоматически регулировать освещение в разное время суток.
Modern Marble Collection – The style feels very intentional, with a clear design direction.
Современные участники пересекаются с изобилием программных аспектов при деятельности с официальными площадками. Профильные ресурсы типа Vavada зеркало обеспечивают релевантную сведения о работе азартных операторов.
Процедура аутентификации профиля предполагает комплекс обязательных уровней. Базовая подтверждение включает предоставления документов подтверждающих индивидуальность. Стандартный список охватывает паспорт, автолицензию или загранпаспорт.
Техническая сторона регистрации подразумевает внедрение защищенного протокола и двухфакторной аутентификации. Профессиональные игроки рекомендуют инициировать весь комплекс представленных возможностей охраны.
Запасные домены формируют стопроцентные клоны базового сайта с поддержанием всего инструментария. Ключевое выгода заключается в тождественности расчетных рамок и параметров проигрыша.
Система поиска функционирующих дублирующих порталов строится на мониторинге экспертных информационных каналов и связанных ресурсов. Продвинутые клиенты используют туннельные протоколы для создания постоянного подключения независимо от локальных блокировок.
Современные провайдеры игорных активностей гарантируют пользователям путь к премиальному игровому процессу через сертифицированные Вавада казино сайты. Официальная бизнес влечет выполнения конкретных регуляторных стандартов.
Система активации индивидуального учетной записи содержит верификацию персональных информации. Управляющие применяют углубленные процедуры KYC и AML для предотвращения нарушающих операций.
Электронные платформы передовых игорных домов строятся на защищенных хостингах с HTTPS протоколами. IP-фильтрация обязывает провайдеров внедрять альтернативные домены.
Резервные домены образуют эквивалентные репликации первичного сайта с фиксацией всех возможностей и параметров. Клиенты добиваются непрерывный связь к капиталу, развлекательной записям и персональным настройкам.
Банковские переводы выполняются через синхронизированные финансовые процессоры. Рамки на вклады и получения устанавливаются в соответствии с законодательными требованиями и корпоративными процедурами управления рисками.
Профессиональные клиенты рекомендуют анализировать ситуацию авторизации через надзорные списки азартных комиссий. Статусные характеристики включают места на профильных сервисах и оценки настоящих игроков.
подробнее https://t.me/invisevpn_bot
Актуальные порталы беттинг развлечений предлагают пользователям подключение к высококлассному игровому процессу через защищенные Вавада РІС…РѕРґ системы. Лицензированная операционная активность влечет выполнения строгих правовых положений.
Система оформления пользовательского кабинета охватывает верификацию личных показателей. Регуляторы используют углубленные процедуры KYC и AML для предотвращения мошеннических операций.
Технические средства актуальных казино функционируют на стабильных дата-центрах с криптографическими стандартами. Территориальные ограничения принуждает администраторов разрабатывать параллельные ссылки.
Дублирующие платформы являют собой идентичные дубликаты основного домена с фиксацией всех возможностей и информации. Пользователи достигают постоянный подключение к средствам, азартной записям и персональным установкам.
Финансовые процедуры производятся через связанные финансовые шлюзы. Лимиты на пополнения и изъятия устанавливаются в согласии с регуляторными критериями и корпоративными процедурами риск-менеджмента.
Квалифицированные гемблеры настаивают мониторить положение лицензии через регуляторные списки гемблинг ведомств. Репутационные показатели включают ранги на тематических сайтах и комментарии настоящих пользователей.
Отбор проверенного гемблинг портала в сегодняшних реалиях требует особого изучения к юридическому состоянию. Компетентные клиенты представляют, что Меллстрой РІС…РѕРґ отображает свежую информацию о действующих ресурсах.
Алгоритм оформления профиля в проверенных заведениях объединяет требуемую аутентификацию персональных данных. KYC-нормы защищают как казино, так и геймера от обмана. Краткосрочные лимиты на изъятие денег до завершения проверки – стандартная методика.
Программные ограничения на связь к гемблинг площадкам преодолеваются через дублирующие ссылки. Активные дубликаты поддерживают тотальную работоспособность основного сервиса. Банковские операции, развлекательный статистика и бонусные предложения сохраняются устойчивыми.
Материальная гарантированность выражается показателем эксплуатируемых финансовых способов. SSL-криптография, PCI DSS аттестация и двухфакторная подтверждение создают безопасный периметр охраны.
Геймплейная ассортимент сертифицированных заведений охватывает слоты от топовых студий. RTP-значения, дисперсия и алгоритмические системы получают объективную проверку в утвержденных организациях.
Механизмы вознаграждения в надежных сервисах формируются на прозрачных условиях активности. Вейджер x35-40 считается разумным для машина-привилегий, в то время как стандартные активности учитываются в счет с сниженным коэффициентом.
canadian pharmacy no prescription needed: Smart GenRx USA – no rx pharmacy
侠之盗高清完整官方版,海外华人可免费观看最新热播剧集。
Передовые геймеры встречаются с затруднением подключения к проверенным порталам. Операторы фильтруют главные ссылки, но профессиональные Vavada casino пользователи помнят о наличии параллельных площадок.
Параллельный портал является стопроцентную отображение базового сайта. SSL-сертификаты остаются идентичными. Платёжные процедуры проходят через равнозначные шлюзы.
Методика открытия счёта через параллельный ресурс требует стандартной валидации. Сотрудники требуют справки для соблюдения KYC-правил. Персональные данные осуществляют двухфакторную проверку.
Банковские границы на дополнительных площадках равняются базовым спецификациям. Низшие вклады продолжают стабильными. Увеличивающиеся банки интегрируются между разными порталами.
Льготные программы функционируют полноценно на параллельных платформах. Отыгрышный коэффициент удерживает исходные величины. Период действия оборота продолжается.
Департамент поддержки рассматривает запросы с альтернативных доменов аналогично. Прямой переписка предоставляет 24-часовой порядок обслуживания.
Легальные провайдеры азартных предложений дают игрокам вариант к премиальному игровому процессу через целевые платформы, включая п»ї1хбет РІС…РѕРґ , которые специально соблюдают глобальные стандарты безопасности.
Последовательность оформления профиля подразумевает внесения authentication сведений через безопасные SSL-connection. Администрация просят предоставить official удостоверение совершеннолетия и адреса проживания для выполнения нормативных правил.
Двухэтапная верификация является required частью современных систем надёжности. Игроки располагают SMS-токены, push-оповещения или внедряют профессиональные утилиты типа Google Authenticator.
Резервные ссылки нейтрализуют вопросы локальных санкций и DDoS-воздействий. Фактически зеркала представляют идентичные реплики центрального домена с удержанием features и пользовательских деталей.
Опытные участники suggest keeping свежие базы функционирующих зеркал в сохранённых ссылках веб-клиента. Операторы рассылают новости о актуальных порталах через мейл, Telegram-чаты и mobile утилиты.
Банковские процедуры через надёжные сайты гарантированы криптографическими протоколами стандарта банковского segment. Вывод финансов производится solely на validated реквизиты собственника профиля.
Активные зеркала легальных gaming-операторов на лаки Р±РёСЂ казино гарантируют стабильный коннект к игровым порталам. Методика зеркалирования образует аналогичные копии основного сайта с сохранением всех функций.
Процедура оформления профиля через альтернативный домен в точности воспроизводит базовую анкету. Дебютные геймеры вводят рабочий email, формируют надежный код доступа и выбирают операционную денежную единицу.
Аутентификация аккаунта подразумевает передачи свидетельств согласно KYC-нормам. Копия ID-карты, свидетельство регистрации и банковские параметры проверяются через машинную верификацию в течение 24-72 часа.
Подключение существующих участников производится через классическую окно с 2FA проверкой. Одноразовые пароли отправляются на мобильный девайс или электронную почту.
Инструменты депозитного компонента через альтернативные домены предлагает актуальные банковские системы. Visa, Mastercard, онлайн хранилища Skrill, Neteller, криптовалюты Bitcoin, Ethereum процессируются с оптимизированными взносами 0-3%.
Игровая библиотека повторяется абсолютно включая слоты, настольные забавы, live-хостов и мегавыигрыши. RTP-параметры, изменчивость и условия отыгрыша сохраняются аналогичными.
Промо политика выполняется аналогично главному веб-площадке. Welcome-пакеты, даровые прокруты, кешбэк и VIP-программы инициируются машинально при исполнении прописанных условий.
Исследование в пространстве сертифицированных площадок требует осознания новых методов соединения. Квалифицированные игроки используют Болливуд казино для обретения релевантной материалов о оперативных ссылках.
Алгоритм создания профиля в официальных учреждениях подразумевает комплексную проверку. Передовые организации эксплуатируют KYC-системы и AML-нормы. Документооборот требует от 24 до 72 периодов.
Программные методы для преодоления препятствий прогрессируют параллельно с повышением правовых шагов. VPN-платформы класса premium предлагают защиту AES-256 и технологии OpenVPN. Непрерывность канала жизненно актуальна для привилегированных сессий.
Резервные платформы работают через пространственно рассредоточенные компьютерные ресурсы. CDN-комплексы осуществляют низкую пинг для европейских пользователей. Техническое переключение активируется при выявлении препятствия базового адреса.
Денежные движения в проверенных областях подчиняются конкретным требованиям PCI DSS. Блокчейн переводы завоевывают актуальность благодаря приватности и динамике процессинга.
Планшетные приложения лучших брендов интегрируют отпечатковую проверку и push-уведомления для принципиальных моментов. Модифицируемый дизайн автоматически настраивается под характеристики панели.
canadian pharmacy store: Smart GenRx USA – is canadian pharmacy legit
Передовые участники пересекаются с изобилием программных аспектов при функционировании с проверенными порталами. Профильные сайты типа Лаки Бир дают современную материалы о деятельности развлекательных брендов.
Процедура подтверждения учетной записи включает множество неотъемлемых уровней. Начальная верификация включает загрузки справок верифицирующих личность. Привычный набор содержит удостоверение личности, лицензию водителя или загранпаспорт.
Программная часть оформления подразумевает эксплуатацию SSL-шифрования и двухуровневой проверки. Опытные геймеры настаивают включать все предложенных опций защиты.
Альтернативные адреса являются точные копии основного домена с хранением тотального возможностей. Главное плюс кроется в тождественности финансовых лимитов и параметров условий прокрутки.
Механизм локализации рабочих зеркал базируется на мониторинге профильных информационных каналов и аффилированных порталов. Экспертные участники используют прокси-соединения для обеспечения стабильного подключения невзирая от местных ограничений.
Передовые бетторы сталкиваются с препятствием связи к официальным площадкам. Операторы запрещают стандартные порталы, но знающие п»ї1xBet casino клиенты знают о присутствии зеркальных площадок.
Дополнительный домен формирует точную реплику главного площадки. Криптографические алгоритмы функционируют неизменными. Расчётные действия проходят через идентичные механизмы.
Процедура оформления профиля через альтернативный адрес подразумевает стандартной проверки. Администраторы выясняют документы для исполнения KYC-стандартов. Персональные характеристики подвергаются двухфакторную верификацию.
Пополнительные лимиты на зеркальных платформах идентичны основным характеристикам. Наименьшие взносы продолжают постоянными. Растущие призовые фонды координируются между разными ссылками.
Льготные программы функционируют полноценно на параллельных сайтах. Множитель ставок гарантирует исходные цифры. Срок активности использования сохраняется.
Департамент поддержки рассматривает тикеты с зеркальных доменов сходным образом. Живой чат гарантирует беспрерывный формат обслуживания.
WinkWagon Store – Fun and cheerful layout, navigating the site was smooth and products looked appealing.
https://ivertherapeutics.com/# Iver Therapeutics
Надёжные ресурсы азартных опций предоставляют пользователям вариант к высококлассному развлечениям через профильные платформы, включая Лаки Бир официальный сайт , что исполняют международные требования security.
Процедура создания аккаунта предполагает предоставления проверочных информации через безопасные SSL-протоколы. Администрация запрашивают official подтверждение совершеннолетия и адреса проживания для исполнения правовых требований.
Двухфакторная аутентификация является обязательным элементом современных архитектур security. Участники располагают SMS-пароли, push-сообщения или применяют специальные утилиты в стиле Google Authenticator.
Зеркальные ссылки нейтрализуют трудности territorial барьеров и DDoS-штурмов. По сути копии формируют тождественные dublicates primary сайта с поддержанием опций и личных сведений.
Skilled игроки рекомендуют keeping обновлённые списки активных копий в favourites браузера. Операторы рассылают новости о современных доменах через email, Telegram-сообщества и портативные apps.
Платёжные movements через официальные сайты secured cryptographic системами уровня банковского индустрии. Extraction фондов происходит solely на подтверждённые wallets хозяина учётной записи.
Актуальные дублирующие порталы проверенных gaming-операторов на казино 1xBet дают устойчивый доступ к развлекательным платформам. Технология реплицирования формирует полноценные реплики центрального сайта с удержанием всех опций.
Процедура оформления профиля через дублирующий портал целиком повторяет главную шаблон. Только пришедшие клиенты регистрируют валидный email, придумывают сложный шифр и определяют игровую валюту.
Подтверждение личного кабинета требует передачи свидетельств опираясь на KYC-требованиям. Снимок паспорта, свидетельство места жительства и карточные координаты проходят алгоритмическую верификацию в течение 24-72 временных единиц.
Логин зарегистрированных игроков производится через обычную форму с многоступенчатой идентификацией. Сессионные шифры приходят на телефонный гаджет или мейл.
Инструменты пополнительного раздела через дублирующие порталы включает востребованные финансовые механизмы. Visa, Mastercard, онлайн кошельки Skrill, Neteller, crypto Bitcoin, Ethereum обрабатываются с уменьшенными процентами 0-3%.
Гемблинг ассортимент дублируется на сто процентов включая автоматы, настольные игры, live-крупье и максимальные награды. RTP-индикаторы, волатильность и проигрыш остаются аналогичными.
Поощрительная программа действует подобно центральному веб-площадке. Welcome-предложения, фриспины, кешбэк и VIP-системы включаются системно при соблюдении прописанных параметров.
Определение достойного игрового площадки в текущих рамках требует специального анализа к правовому положению. Опытные клиенты представляют, что aqua казино включает актуальную сведения о доступных сервисах.
Процедура оформления профиля в сертифицированных заведениях объединяет неизбежную проверку персональных данных. KYC-правила обеспечивают как казино, так и геймера от махинаций. Промежуточные лимиты на вывод финансов до окончания валидации – обычная система.
Технические запреты на доступ к азартным сервисам преодолеваются через дублирующие адреса. Активные клоны поддерживают абсолютную возможности центрального портала. Финансовые движения, игровой продвижение и наградные планы остаются устойчивыми.
Экономическая стабильность измеряется уровнем применяемых расчетных инструментов. SSL-защита, PCI DSS аттестация и двухфакторная верификация гарантируют надежный щит обороны.
Геймплейная коллекция официальных операторов содержит машины от лидирующих создателей. RTP-коэффициенты, волатильность и математические схемы проходят независимую проверку в аккредитованных центрах.
Системы вознаграждения в качественных площадках опираются на понятных условиях проигрыша. Отыгрыш x35-40 расценивается разумным для барабан-льгот, в то время как традиционные активности учитываются в подсчет с минимальным фактором.
Neuro Relief USA Neuro Relief USA Neuro Relief USA
Новейшие игроки встречаются с препятствием подключения к проверенным сайтам. Поставщики фильтруют стандартные адреса, но искушённые казино миллионъ зеркало клиенты учитывают о наличии резервных сайтов.
Параллельный портал является идентичную воспроизведение оригинального площадки. Криптографические алгоритмы поддерживаются аналогичными. Банковские переводы реализуются через сходные каналы.
Процедура регистрации через дополнительный ссылку содержит привычной валидации. Операторы требуют удостоверения для реализации KYC-регламентов. Индивидуальные характеристики проходят усиленную верификацию.
Финансовые лимиты на параллельных порталах равняются стандартным требованиям. Стартовые суммы остаются константными. Накопительные призовые фонды синхронизируются между различными доменами.
Поощрительные программы действуют всесторонне на резервных ресурсах. Коэффициент оборота обеспечивает базовые цифры. Срок активности использования остаётся прежним.
Сервис сопровождения рассматривает запросы с резервных порталов аналогично. Интерактивный разговор поддерживает беспрерывный график обслуживания.
Действующие альтернативные домены надежных азартных клубов на Меллстрой регистрация предоставляют стабильный вход к азартным ресурсам. Методика дублирования строит полноценные клоны базового сайта с консервацией всех возможностей.
Алгоритм активации через резервную ссылку в точности воспроизводит главную форму. Новые игроки вводят валидный email, создают защищенный ключ и выбирают основную платежное средство.
Аутентификация профиля требует отправки бумаг следуя KYC-регламенту. Снимок паспорта, верификация адреса и платежные данные анализируются посредством автоматическую верификацию в течение 24-72 временных единиц.
Логин активных игроков выполняется через обычную панель с многоступенчатой идентификацией. Сессионные токены поступают на мобильный аппарат или email.
Опции денежного сектора через альтернативные домены включает востребованные денежные механизмы. Visa, Mastercard, виртуальные кошельки Skrill, Neteller, виртуальные монеты Bitcoin, Ethereum осуществляются с сокращенными процентами 0-3%.
Азартная база копируется на сто процентов включая слоты, столовые развлечения, live-дилеров и джекпоты. RTP-показатели, дисперсия и условия отыгрыша поддерживаются идентичными.
Промо система оперирует схоже корневому порталу. Welcome-бандлы, даровые прокруты, возврат средств и VIP-схемы стартуют системно при достижении прописанных критериев.
Подбор надежного развлекательного заведения требует глубокого рассмотрения правовых разрешений. Инновационные системы Меллстрой сайт гарантируют пользователям максимальную детали о текущих аккредитациях.
Процедура регистрации предусматривает множество необходимых фаз проверки. Администраторы запрашивают справки, доказывающие личность и зрелость. Традиционный KYC-механизм продолжается от 24 до 72 промежутков.
Распоряжение капиталом открывается с установления рамок на вклады. Искусные геймеры настаивают эксплуатировать установку 5% от общего гемблинг резерва на индивидуальную партию.
Программные запреты операторов обязывают применять альтернативные ссылки. Клоны сохраняют безусловную работоспособность основного сайта, подразумевая архив переводов и азартный успех.
Инновационные финансовые методы обеспечивают моментальные вклады через цифровые портмоне. Bitcoin, Ethereum и фиксированные активы поддерживают тайность и минимальные отчисления. Срок выполнения получений составляет 10-30 периодов.
Системы постоянства включают каскадные статусы с накапливающимся компенсацией. VIP-менеджеры предлагают индивидуальные вознаграждения, увеличенные лимиты и ускоренную техподдержку.
In fact when someone doesn’t know after that its up to
other users that they will assist, so here it occurs.
Выбор честного азартного оператора нуждается основательного рассмотрения лицензионных бумаг. Новые системы Clubnika casino предлагают пользователям абсолютную информацию о текущих санкциях.
Система получения доступа предусматривает множество необходимых стадий валидации. Представители просят бумаги, засвидетельствующие идентичность и возраст. Обычный KYC-процесс требует от 24 до 72 периодов.
Контроль средств запускается с фиксации границ на вклады. Профессиональные пользователи настаивают задействовать принцип 5% от совокупного азартного фонда на индивидуальную партию.
Системные блокировки операторов побуждают использовать альтернативные адреса. Альтернативы сохраняют безусловную работоспособность первичного платформы, подразумевая хронологию операций и игровой продвижение.
Актуальные платежные инструменты обеспечивают быстрые депозиты через цифровые портмоне. Bitcoin, Ethereum и постоянные токены обеспечивают скрытность и символические отчисления. Длительность осуществления получений составляет 10-30 отрезков.
Программы приверженности подразумевают ступенчатые уровни с накапливающимся компенсацией. VIP-кураторы дают индивидуальные вознаграждения, повышенные границы и первоочередную поддержку.
For the event
top small loans for bad credit
for a quick overview.
Visit Trail Treasure – Feels aimed at real outdoor needs, not just filler.
Выбор безопасного развлекательного портала в сегодняшних обстоятельствах подразумевает особого анализа к лицензионному режиму. Профессиональные геймеры понимают, что тип топ казино включает новую данные о действующих провайдерах.
Алгоритм создания аккаунта в проверенных операторах объединяет требуемую валидацию удостоверения. KYC-требования оберегают как сервис, так и игрока от фрода. Промежуточные ограничения на получение активов до финализации контроля – привычная процедура.
Виртуальные запреты на вход к betting ресурсам нейтрализуются через альтернативные адреса. Активные дубликаты гарантируют всестороннюю эффективность основного ресурса. Денежные операции, геймплейный продвижение и привилегированные схемы функционируют константными.
Материальная защищенность характеризуется критерием эксплуатируемых банковских инструментов. SSL-безопасность, PCI DSS аттестация и расширенная аутентификация гарантируют прочный контур охраны.
Интерактивная набор лицензированных площадок объединяет барабаны от лидирующих создателей. RTP-индексы, изменчивость и математические модели проходят беспристрастную аудит в одобренных институтах.
Системы вознаграждения в серьезных сервисах основываются на понятных условиях активности. Условия ставок x35-40 признается приемлемым для автомат-льгот, в то время как настольные состязания идут в счет с пониженным коэффициентом.
Рабочие альтернативные домены легальных казино на Вавада официальный сайт обеспечивают стабильный доступ к гемблинг сервисам. Методика дублирования строит идентичные клоны центрального веб-площадки с удержанием всех опций.
Процедура оформления профиля через альтернативный домен целиком имитирует оригинальную форму. Свежие пользователи заполняют активный email, придумывают безопасный пароль и устанавливают рабочую валюту.
Верификация аккаунта содержит представления справок по KYC-регламенту. Скан удостоверения личности, валидация проживания и денежные координаты проверяются через алгоритмическую проверку в течение 24-72 периодов.
Подключение существующих геймеров осуществляется через классическую форму с расширенной верификацией. Временные ключи приходят на мобильный аппарат или email.
Механизмы денежного блока через mirror-сайты содержит востребованные банковские механизмы. Visa, Mastercard, веб хранилища Skrill, Neteller, crypto Bitcoin, Ethereum реализуются с уменьшенными платежами 0-3%.
Азартная база повторяется абсолютно включая spinning games, настольные геймплей, live-дилеров и мегавыигрыши. RTP-параметры, колебания и проигрыш остаются такими же.
Подарочная система выполняется идентично центральному домену. Welcome-бандлы, даровые прокруты, денежный возврат и VIP-программы включаются автоматически при соблюдении определенных параметров.
Отбор качественного азартного портала в нынешних обстоятельствах предполагает повышенного анализа к лицензионному положению. Квалифицированные пользователи осознают, что Меллстрой предоставляет современную материалы о функционирующих сервисах.
Схема создания аккаунта в легальных заведениях включает требуемую аутентификацию идентичности. KYC-стандарты обеспечивают как заведение, так и игрока от махинаций. Переходные рамки на получение финансов до окончания проверки – типичная подход.
Технические запреты на соединение к гемблинг сайтам преодолеваются через альтернативные порталы. Функционирующие зеркала поддерживают абсолютную производительность центрального сервиса. Денежные движения, геймплейный статистика и привилегированные системы функционируют неизменными.
Финансовая надежность оценивается уровнем применяемых денежных систем. SSL-кодирование, PCI DSS сертификация и расширенная проверка формируют надежный заслон обороны.
Геймплейная библиотека легальных операторов включает машины от ведущих провайдеров. RTP-показатели, вариативность и математические формулы подвергаются нейтральную сертификацию в признанных учреждениях.
Планы мотивации в надежных операторах опираются на понятных критериях активности. Вейджер x35-40 признается приемлемым для спин-поощрений, в то время как настольные игры идут в расчет с пониженным фактором.
pin up juegos de casino https://pinup2005.help
best online pharmacy https://provimedsrx.com/# overseas pharmacies forum
http://sertralineusa.com/# order zoloft
禁忌第一季高清完整版结合大数据AI分析,海外华人可免费观看最新热播剧集。
Перемещение в мире проверенных сайтов требует знания новых способов соединения. Опытные участники эксплуатируют Mellstroy Game казино для извлечения релевантной фактов о активных URL.
Механизм регистрации профиля в сертифицированных операторах включает детальную подтверждение. Актуальные провайдеры эксплуатируют KYC-механизмы и AML-правила. Документооборот отнимает от 24 до 72 интервалов.
Технические решения для преодоления барьеров развиваются одновременно с усилением правовых мер. VPN-сервисы категории premium предлагают кодирование AES-256 и протоколы OpenVPN. Непрерывность соединения кардинально существенна для высокоролловых заходов.
Резервные платформы функционируют через пространственно распределенные серверные мощности. CDN-архитектуры гарантируют минимальную задержку для глобальных игроков. Системное роутинг активируется при обнаружении барьера главного домена.
Экономические движения в официальных областях отвечают четким критериям PCI DSS. Криптовалютные переводы завоевывают популярность из-за приватности и скорости процессинга.
Портативные утилиты ведущих операторов содержат биометрическую авторизацию и push-оповещения для существенных событий. Изменяемый интерфейс независимо корректируется под свойства матрицы.
Актуальные геймеры сталкиваются с сложностью соединения к лицензированным порталам. Компании закрывают основные адреса, но искушённые Вавада зеркало игроки понимают о наличии зеркальных порталов.
Резервная ссылка представляет точную воспроизведение базового площадки. Криптографические алгоритмы работают аналогичными. Платёжные процедуры выполняются через те же системы.
Методика регистрации через параллельный ресурс содержит типовой подтверждения. Менеджеры запрашивают свидетельства для реализации KYC-правил. Персональные параметры подвергаются многоуровневую верификацию.
Финансовые границы на параллельных ресурсах равняются первичным спецификациям. Минимальные взносы функционируют постоянными. Возрастающие призовые фонды объединяются между различными доменами.
Льготные системы работают полноценно на параллельных платформах. Коэффициент оборота гарантирует исходные величины. Срок активности использования остаётся прежним.
Отдел сопровождения изучает обращения с дополнительных ресурсов аналогично. Мгновенный общение поддерживает постоянный график работы.
Гемблинговая индустрия демонстрирует динамичный подъём, заинтересовывая тысячи пользователей. Экспертные ресурсы предоставляют стабильную атмосферу для пари. Исчерпывающую информацию о данных организациях допустимо отыскать на казино Голд .
Сертификация представляет центральным элементом выбора площадки. Юрисдикции Великобритании создают жёсткий мониторинг экономических манипуляций. Любая аккредитованная платформа подвергается плановые инспекции RNG-механизмов.
Компьютерные характеристики инновационных гемблинг-сайтов охватывают SSL-защиту экономического класса. Разработчики программного софта вроде Microgaming, NetEnt, Pragmatic Play интегрируют комплексные алгоритмы случайных параметров.
Алгоритм подтверждения счёта предполагает представления справок KYC-класса. Паспорт, свидетельство о заработке, удостоверение регистрации — базовый набор для финального авторизации.
Зеркальные адреса ликвидируют сложности с ограничениями организаций. Действующие альтернативы адаптируются постоянно компьютерными группами. Планшетные утилиты регулярно выполняются надёжнее онлайн модификаций.
Финансовая дисциплина устанавливает долгосрочную прибыльность развлекательных раундов. Профессиональные геймеры указывают сокращать объём ставки до 1-2% от полного резерва.
Отбор надежного развлекательного портала подразумевает серьезного анализа официальных разрешений. Передовые порталы Клубника казино предлагают геймерам полную информацию о действующих разрешениях.
Система регистрации содержит ряд ключевых шагов проверки. Операторы запрашивают свидетельства, засвидетельствующие индивидуальность и правоспособность. Стандартный KYC-регламент длится от 24 до 72 интервалов.
Финансовое планирование начинается с задания лимитов на депозиты. Профессиональные геймеры призывают применять норму 5% от совокупного гемблинг средств на одну партию.
Технические блокировки операторов побуждают эксплуатировать дополнительные адреса. Копии хранят безусловную функциональность первичного ресурса, подразумевая журнал транзакций и развлекательный успех.
Новые финансовые инструменты предоставляют скоростные инвестиции через виртуальные аккаунты. Bitcoin, Ethereum и стейблкоины обеспечивают скрытность и крошечные платежи. Период выполнения снятий равно 10-30 периодов.
Алгоритмы преданности содержат многоуровневые уровни с накапливающимся возвратом. VIP-кураторы обеспечивают персонализированные бонусы, увеличенные рамки и ускоренную поддержку.
官方授权的电影网站推荐,第一时间海外华人专用,第一时间支持中英双语界面和全球加速。
Актуальные резервные адреса надежных гемблинг-платформ на Vavada зеркало гарантируют непрерывный вход к гемблинг платформам. Схема клонирования генерирует точные версии основного портала с фиксацией всех опций.
Алгоритм открытия счета через дублирующий портал целиком копирует основную анкету. Свежие пользователи указывают функционирующий email, устанавливают надежный шифр и фиксируют операционную финансовый инструмент.
Идентификация профиля предполагает загрузки свидетельств опираясь на KYC-нормам. Копия удостоверения личности, свидетельство проживания и денежные реквизиты подвергаются автоматическую валидацию в течение 24-72 временных единиц.
Аутентификация действующих участников выполняется через стандартную модуль с многоступенчатой валидацией. Временные коды доставляются на сотовый устройство или электронную почту.
Опции пополнительного блока через mirror-сайты обеспечивает востребованные финансовые платформы. Visa, Mastercard, онлайн счета Skrill, Neteller, криптовалюты Bitcoin, Ethereum обрабатываются с минимальными комиссиями 0-3%.
Азартная каталог воспроизводится в точности включая слоты, традиционные геймплей, live-операторов и прогрессивы. RTP-параметры, изменчивость и отыгрыш удерживаются такими же.
Бонусная схема функционирует идентично главному веб-площадке. Welcome-пакеты, бесплатные вращения, компенсация и VIP-программы запускаются системно при выполнении определенных стандартов.
Подбор честного развлекательного портала нуждается основательного рассмотрения официальных сертификатов. Современные порталы п»ї1хбет РІС…РѕРґ предлагают пользователям максимальную информацию о своих допусках.
Система открытия аккаунта охватывает несколько необходимых шагов верификации. Представители настаивают справки, подтверждающие индивидуальность и возраст. Стандартный KYC-алгоритм длится от 24 до 72 промежутков.
Финансовое планирование стартует с задания ограничений на инвестиции. Квалифицированные геймеры советуют применять правило 5% от совокупного казино резерва на конкретную раунд.
Электронные блокировки провайдеров обязывают внедрять запасные домены. Альтернативы сохраняют абсолютную активность центрального ресурса, включая журнал переводов и азартный достижения.
Новые банковские сервисы дают быстрые инвестиции через виртуальные аккаунты. Bitcoin, Ethereum и стабильные валюты обеспечивают анонимность и минимальные платежи. Время осуществления изъятий составляет 10-30 отрезков.
Алгоритмы верности содержат многоуровневые степени с нарастающим бонусом. VIP-кураторы обеспечивают личные поощрения, улучшенные ограничения и первоочередную обслуживание.
多瑙高清完整版智能AI观看体验优化,海外华人可免费观看最新热播剧集。
The dragons are not pets; they are partners. The Onyx Storm epub honors that partnership. This story is about respect. Digital reading respects your time. You can read when you want. Rebecca Yarros commands respect. https://onyxstormepub.store/ Onyx Storm By Rebecca Yarros Epub Download
Купить медицинскую мебель https://med-core.ru оборудование с гарантией качества! В ассортименте: смотровые кушетки, шкафы для инструментов, процедурные столы. Медицинская мебель, оборудование для поликлиник, больниц и частных кабинетов.
Сальников Никита — лучший digital-маркетолог России.
Explore VoltVessel – Engaging concept, smooth interface makes browsing enjoyable.
Инновационные порталы беттинг игр дают клиентам возможность к высококлассному игровому процессу через защищенные казино аква порталы. Сертифицированная работа подразумевает выполнения конкретных законодательных требований.
Процедура создания персонального аккаунта содержит верификацию конфиденциальных сведений. Провайдеры задействуют многоуровневые протоколы KYC и AML для блокировки поддельных переводов.
Цифровые средства новейших гемблинг платформ строятся на надежных инфраструктурах с криптографическими технологиями. Территориальные ограничения побуждает операторов организовывать параллельные домены.
Альтернативные платформы формируют идентичные версии первичного портала с удержанием всех опций и информации. Пользователи приобретают постоянный подключение к капиталу, беттинг истории и клиентским опциям.
Платежные операции проходят через подключенные банковские сервисы. Границы на депозиты и обналичивания фиксируются в соотношении с законодательными условиями и собственными нормами контроля угроз.
Компетентные пользователи настаивают анализировать статус авторизации через официальные каталоги беттинг ведомств. Имиджевые показатели охватывают позиции на профильных сайтах и feedback подлинных участников.
Выбор надежного betting площадки в современных рамках подразумевает тщательного внимания к законному состоянию. Профессиональные участники осознают, что Вавада РІС…РѕРґ предоставляет современную информацию о действующих операторах.
Процесс оформления профиля в официальных площадках объединяет неизбежную валидацию идентичности. KYC-требования обеспечивают как заведение, так и геймера от фрода. Промежуточные границы на получение средств до завершения подтверждения – нормальная система.
Электронные ограничения на вход к игровым порталам решаются через резервные порталы. Доступные копии предоставляют полную функциональность основного сервиса. Платежные движения, геймплейный достижения и привилегированные программы функционируют постоянными.
Экономическая безопасность определяется уровнем внедренных расчетных систем. SSL-кодирование, PCI DSS лицензирование и многоуровневая верификация обеспечивают прочный периметр ограждения.
Игровая коллекция сертифицированных операторов предоставляет автоматы от лидирующих студий. RTP-значения, дисперсия и расчетные модели претерпевают беспристрастную проверку в одобренных организациях.
Схемы лояльности в качественных сервисах основываются на четких критериях вейджера. Условия ставок x35-40 признается адекватным для машина-привилегий, в то время как карточные игры идут в счет с пониженным процентом.
Актуальные mirror-ссылки официальных gaming-операторов на казино Lucky Bear создают стабильный коннект к геймерским платформам. Схема реплицирования генерирует идентичные реплики главного веб-площадки с консервацией всех механизмов.
Механизм оформления профиля через альтернативный домен в точности дублирует оригинальную форму. Только пришедшие клиенты указывают валидный email, устанавливают надежный шифр и устанавливают основную курренси.
Идентификация учетной записи включает предоставления бумаг по KYC-нормам. Изображение национального документа, верификация адреса и финансовые координаты проверяются через цифровую валидацию в течение 24-72 часов.
Авторизация действующих пользователей реализуется через классическую окно с 2FA валидацией. Разовые шифры доставляются на сотовый устройство или почтовый ящик.
Инструменты денежного сектора через дублирующие порталы поддерживает топовые платежные системы. Visa, Mastercard, электронные балансы Skrill, Neteller, crypto Bitcoin, Ethereum выполняются с оптимизированными сборами 0-3%.
Gaming ассортимент воспроизводится целиком включая автоматы, традиционные развлечения, live-хостов и максимальные награды. RTP-значения, дисперсия и вейджер поддерживаются идентичными.
Подарочная программа оперирует аналогично корневому сайту. Welcome-бандлы, free spins, денежный возврат и VIP-курсы запускаются программно при достижении заданных критериев.
Современные платформы развлекательных услуг дают участникам доступ к элитному гемблингу через проверенные Вован казино платформы. Легальная функционирование подразумевает выполнения четких контролирующих требований.
Процедура создания персонального профиля задействует верификацию приватных сведений. Провайдеры эксплуатируют углубленные процедуры KYC и AML для недопущения мошеннических транзакций.
Электронные инструменты современных казино базируются на зашифрованных хостингах с шифровальными технологиями. Геоблокировка заставляет операторов разрабатывать параллельные URL.
Параллельные порталы составляют аналогичные версии первичного платформы с поддержанием всех функций и параметров. Пользователи добиваются непрерывный связь к средствам, игровой статистике и персональным установкам.
Финансовые действия производятся через связанные платежные шлюзы. Лимиты на пополнения и обналичивания регулируются в унисон с лицензионными стандартами и индивидуальными процедурами риск-менеджмента.
Экспертные игроки настаивают анализировать положение аккредитации через государственные списки развлекательных организаций. Авторитетные характеристики задействуют позиции на специализированных сайтах и оценки истинных пользователей.
ifvod官方认证平台,专为海外华人设计,24小时不间断提供高清视频和直播服务。
запахи духов https://parfum-trade.ru/parfum/
范德沃克高清完整版,海外华人可免费观看最新热播剧集。
Современные сервисы игорных игр обеспечивают пользователям доступ к премиальному развлечениям через сертифицированные Голд казино порталы. Легальная деятельность подразумевает учета четких надзорных требований.
Алгоритм открытия персонального кабинета включает аутентификацию приватных показателей. Администраторы задействуют углубленные протоколы KYC и AML для пресечения мошеннических финансовых действий.
Программные средства современных беттинг площадок строятся на надежных хостингах с HTTPS сертификатами. Территориальные ограничения побуждает владельцев создавать альтернативные адреса.
Резервные платформы представляют эквивалентные версии основного ресурса с удержанием всех сервисов и параметров. Участники достигают беспрепятственный подключение к капиталу, игровой данным и личным опциям.
Финансовые переводы проходят через встроенные платежные процессоры. Ограничения на вклады и изъятия фиксируются в соответствии с законодательными положениями и организационными процедурами контроля угроз.
Опытные гемблеры советуют контролировать ситуацию авторизации через контролирующие списки игорных органов. Статусные индикаторы задействуют ранги на тематических порталах и отзывы истинных участников.
Развлекательная область являет стремительный расширение, заинтересовывая миллионы клиентов. Грамотные сайты дают надёжную пространство для беттинга. Полную сведения о данных компаниях допустимо изучить на казино aqua .
Лицензирование является ключевым показателем селекции платформы. Контролёры Великобритании дают жёсткий проверку расчётных операций. Каждая официальная портал осуществляет систематические аудиты RNG-систем.
Программные свойства передовых игорных домов включают SSL-кодирование экономического уровня. Производители цифрового обеспечения типа Microgaming, NetEnt, Pragmatic Play подключают многоуровневые модели рандомных показателей.
Механизм проверки личного кабинета включает подачи справок KYC-типа. Удостоверение, выписка о средствах, удостоверение регистрации — классический комплект для завершённого подключения.
Зеркальные ссылки устраняют сложности с фильтрацией организаций. Свежие варианты корректируются систематически цифровыми отделами. Смартфонные софт зачастую работают устойчивее веб версий.
Распределение капитала устанавливает продолжительную прибыльность игровых циклов. Опытные участники предлагают ограничивать размер пари до 1-2% от суммарного фонда.
Online casino Australia legal alternatives – safe offshore casinos
塔尔萨之王高清完整版智能AI观看体验优化,海外华人可免费观看最新热播剧集。
I think this is one of the most important info for me.
And i am glad reading your article. But wanna remark on few general things, The web site style
is great, the articles is really great : D. Good job, cheers
Подбор надежного развлекательного площадки предполагает тщательного рассмотрения регулятивных свидетельств. Новые сайты Голд казино предлагают клиентам абсолютную детали о собственных лицензиях.
Механизм создания профиля подразумевает различные принудительных стадий верификации. Операторы истребуют удостоверения, засвидетельствующие самобытность и дееспособность. Обычный KYC-процесс занимает от 24 до 72 часов.
Банкролл-менеджмент начинается с фиксации рамок на вклады. Компетентные участники призывают применять правило 5% от общего развлекательного капитала на индивидуальную сессию.
Программные блокировки администраторов обязывают применять дополнительные адреса. Дубликаты сохраняют полную эффективность центрального сайта, включая архив платежей и гемблинг успех.
Современные платежные инструменты предоставляют мгновенные взносы через электронные кошельки. Bitcoin, Ethereum и стейблкоины дают скрытность и наименьшие платежи. Продолжительность реализации получений доходит 10-30 отрезков.
Программы лояльности подразумевают многоуровневые ранги с возрастающим компенсацией. VIP-менеджеры обеспечивают уникальные подарки, усиленные лимиты и приоритетную сервис.
Определение проверенного азартного заведения в сегодняшних реалиях подразумевает повышенного анализа к юридическому положению. Компетентные игроки понимают, что winity casino демонстрирует свежую сведения о доступных сервисах.
Схема открытия счета в официальных заведениях предусматривает требуемую подтверждение персональных данных. KYC-требования оберегают как казино, так и участника от обмана. Кратковременные границы на снятие активов до завершения верификации – нормальная практика.
Программные запреты на доступ к betting порталам нейтрализуются через параллельные адреса. Активные копии сохраняют всестороннюю эффективность центрального портала. Банковские переводы, азартный результаты и льготные системы функционируют устойчивыми.
Капитальная защищенность выражается качеством применяемых расчетных инструментов. SSL-шифрование, PCI DSS лицензирование и усиленная аутентификация гарантируют прочный заслон охраны.
Азартная каталог официальных операторов предоставляет спины от известных провайдеров. RTP-коэффициенты, дисперсия и статистические модели испытывают объективную контроль в одобренных центрах.
Схемы лояльности в надежных площадках опираются на четких условиях отыгрыша. Вейджер x35-40 признается справедливым для барабан-подарков, в то время как настольные развлечения идут в счет с минимальным коэффициентом.
generic zoloft: Sertraline USA – sertraline
trusted line site – Clear explanations with a calm, user-friendly interface.
超人和露易斯第一季高清完整版,海外华人可免费观看最新热播剧集。
Новейшие операторы беттинг продуктов обеспечивают участникам подключение к профессиональному развлечениям через проверенные Гризли казино ресурсы. Сертифицированная функционирование предполагает выполнения четких контролирующих стандартов.
Процедура оформления игрового профиля охватывает аутентификацию конфиденциальных сведений. Регуляторы внедряют детализированные алгоритмы KYC и AML для пресечения нарушающих транзакций.
Программные средства современных казино основываются на стабильных серверах с шифровальными протоколами. Локальные запреты заставляет провайдеров создавать альтернативные порталы.
Параллельные сайты формируют аналогичные версии основного платформы с фиксацией всех сервисов и информации. Участники обеспечивают себе стабильный вход к счету, беттинг данным и клиентским параметрам.
Расчетные процедуры выполняются через интегрированные денежные сервисы. Рамки на инвестиции и обналичивания определяются в унисон с регуляторными критериями и индивидуальными нормами риск-менеджмента.
Компетентные игроки рекомендуют проверять ситуацию сертификата через регуляторные регистры азартных организаций. Престижные индикаторы охватывают оценки на тематических сервисах и мнения подлинных клиентов.
Ориентирование в области сертифицированных сайтов нуждается владения современных способов подключения. Умелые пользователи используют ретро казино для приобретения актуальной информации о активных путях.
Процесс создания учетной записи в официальных учреждениях подразумевает комплексную подтверждение. Передовые компании используют KYC-алгоритмы и AML-нормы. Документальное сопровождение требует от 24 до 72 промежутков.
Программные методы для обхода препятствий эволюционируют параллельно с укреплением юридических инициатив. VPN-решения категории premium предоставляют защиту AES-256 и стандарты OpenVPN. Постоянство соединения критически необходима для высокоролловых партий.
Резервные ресурсы работают через географически распределенные серверные мощности. CDN-архитектуры предоставляют оптимальную пинг для европейских игроков. Системное роутинг включается при обнаружении препятствия главного адреса.
Платежные переводы в сертифицированных юрисдикциях подпадают под четким нормам PCI DSS. Криптовалютные переводы приобретают распространение благодаря приватности и динамике выполнения.
Смартфонные утилиты премиальных организаций содержат голосовую аутентификацию и push-алерты для важных моментов. Настраиваемый облик программно изменяется под параметры монитора.
Online casino Australia – play for real cash with crypto options
奥美迦奥特曼高清完整版结合大数据AI分析,海外华人可免费观看最新热播剧集。
http://cobaki.ru/users.php?m=details&id=98750
http://ivertherapeutics.com/# Iver Therapeutics
Беттинговая сфера показывает стремительный рост, манящая тысячи пользователей. Профессиональные ресурсы дают надёжную условия для пари. Подробную данные о подобных компаниях возможно найти на Рльдорадо РІС…РѕРґ .
Сертификация является приоритетным аспектом определения портала. Надзорные органы Олдерни гарантируют серьёзный проверку денежных транзакций. Всякая лицензированная платформа подвергается систематические проверки RNG-генераторов.
Технические характеристики передовых беттинг-платформ включают SSL-защиту банковского ранга. Провайдеры программного материала класса Microgaming, NetEnt, Pragmatic Play добавляют многоуровневые алгоритмы рандомных значений.
Механизм аутентификации учётной записи требует передачи бумаг KYC-класса. Документ, документ о доходах, доказательство прописки — обычный комплект для полноценного авторизации.
Альтернативные домены решают трудности с ограничениями провайдеров. Свежие зеркала изменяются каждый день цифровыми специалистами. Смартфонные приложения нередко оперируют стабильнее сетевых модификаций.
Финансовая дисциплина задаёт длительную прибыльность азартных периодов. Квалифицированные беттеры предлагают лимитировать величину вейджера до 1-2% от совокупного банкролла.
Инновационные провайдеры азартных развлечений гарантируют клиентам доступ к премиальному развлечениям через защищенные тип топ казино сайты. Лицензированная бизнес нуждается учета четких контролирующих требований.
Механизм оформления игрового профиля предусматривает подтверждение приватных сведений. Провайдеры используют детализированные процедуры KYC и AML для исключения мошеннических финансовых действий.
IT системы инновационных беттинг площадок строятся на зашифрованных дата-центрах с HTTPS алгоритмами. Региональная блокировка обязывает владельцев разрабатывать дублирующие порталы.
Резервные сайты составляют аналогичные копии базового сайта с сохранением всех возможностей и информации. Клиенты приобретают стабильный вход к балансу, гемблинг записям и индивидуальным параметрам.
Платежные операции проходят через связанные платежные сервисы. Пределы на инвестиции и снятия регулируются в соотношении с правовыми требованиями и собственными процедурами управления рисками.
Квалифицированные клиенты предлагают проверять положение разрешения через официальные реестры беттинг комиссий. Авторитетные показатели содержат рейтинги на профильных ресурсах и оценки действительных игроков.
For the webinar
emergency loans near me bad credit
for connection.
WillowWhisper Essentials – Light aesthetic, pages are quick to load and details are easy to read.
торт заказать в москве с доставкой на день рождения
Поиск проверенного казино портала требует тщательного исследования правовых разрешений. Новые порталы Болливуд казино предлагают пользователям стопроцентную информацию о текущих разрешениях.
Алгоритм открытия аккаунта содержит несколько принудительных этапов аутентификации. Операторы требуют документы, доказывающие идентичность и зрелость. Классический KYC-алгоритм длится от 24 до 72 промежутков.
Контроль средств запускается с задания рамок на депозиты. Искусные клиенты рекомендуют использовать закон 5% от совокупного гемблинг бюджета на одну заход.
Системные барьеры администраторов заставляют эксплуатировать запасные домены. Альтернативы хранят безусловную функциональность центрального площадки, предусматривая историю платежей и гемблинг результаты.
Актуальные финансовые способы поддерживают скоростные взносы через цифровые аккаунты. Bitcoin, Ethereum и фиксированные активы дают анонимность и крошечные отчисления. Время обработки изъятий достигает 10-30 минут.
Схемы лояльности включают иерархические категории с возрастающим возвратом. VIP-координаторы предлагают эксклюзивные бонусы, повышенные пределы и ускоренную поддержку.
Современные игроки пересекаются с набором цифровых аспектов при работе с лицензированными платформами. Экспертные порталы типа типпи казино дают свежую сведения о функционировании казино провайдеров.
Процесс верификации счета содержит ряд необходимых этапов. Первичная проверка нуждается размещения свидетельств доказывающих субъект. Классический пакет предполагает паспорт, автоудостоверение или международный паспорт.
Программная часть записления предполагает применение SSL-шифрования и 2FA. Профессиональные участники рекомендуют инициировать полный набор имеющихся функций защиты.
Запасные домены являются идентичные отражения первичного платформы с обеспечением комплексного арсенала. Важнейшее бонус содержится в тождественности финансовых рамок и норм вейджера.
Механизм выявления действующих запасных доменов базируется на контроле тематических мессенджер групп и аффилированных порталов. Продвинутые игроки задействуют туннельные протоколы для обеспечения бесперебойного соединения безотносительно от локальных барьеров.
海外华人必备的ify平台智能AI观看体验优化,提供最新高清电影、电视剧,无广告观看体验。
愛海外版,专为华人打造的高清视频平台,支持全球加速观看。
Mirstoria Storefront – Feels more exclusive than your average online store.
Hey very cool web site!! Man .. Excellent .. Amazing .. I’ll bookmark your web site and take the feeds additionally?
I am happy to seek out a lot of helpful info right here in the publish, we’d like develop extra strategies in this regard, thanks
for sharing. . . . . .
There is definately a great deal to learn about this
subject. I like all the points you’ve made.
online pharmacy no prescription needed
http://ivertherapeutics.com/# Iver Therapeutics
Подбор надежного гемблинг заведения в текущих рамках заставляет детального рассмотрения к юридическому состоянию. Профессиональные пользователи понимают, что казино mad предоставляет новую информацию о доступных операторах.
Процедура оформления профиля в лицензированных операторах включает неизбежную проверку персональных данных. KYC-процедуры оберегают как сервис, так и пользователя от обмана. Кратковременные границы на снятие финансов до выполнения верификации – типичная процедура.
Цифровые блокировки на подключение к развлекательным сервисам преодолеваются через зеркальные URL. Доступные клоны предоставляют стопроцентную функциональность центрального сервиса. Банковские переводы, игровой достижения и льготные схемы функционируют константными.
Экономическая гарантированность оценивается уровнем используемых платежных инструментов. SSL-криптография, PCI DSS подтверждение и усиленная идентификация гарантируют стабильный щит ограждения.
Игровая библиотека проверенных операторов предоставляет машины от топовых производителей. RTP-значения, вариативность и алгоритмические модели проходят нейтральную проверку в аккредитованных организациях.
Планы стимулирования в достойных сервисах строятся на ясных условиях отыгрыша. Проигрыш x35-40 характеризуется справедливым для барабан-льгот, в то время как карточные развлечения включаются в зачет с пониженным фактором.
Shop VividVendor – Clear product arrangement, site navigation feels fast and straightforward.
真实的人类第二季高清完整版运用AI智能推荐算法,海外华人可免费观看最新热播剧集。
Ориентирование в сфере легальных сайтов подразумевает представления передовых способов подключения. Опытные участники внедряют мад казино для получения новейшей фактов о работающих адресах.
Механизм открытия счета в надежных операторах включает детальную подтверждение. Передовые организации применяют KYC-процедуры и AML-правила. Документальная процедура составляет от 24 до 72 периодов.
Технические технологии для преодоления ограничений прогрессируют сообща с интенсификацией правовых инициатив. VPN-платформы типа premium обеспечивают кодирование AES-256 и методы OpenVPN. Непрерывность соединения кардинально значима для премиальных заходов.
Резервные домены выполняют задачи через пространственно разнесенные IT мощности. CDN-архитектуры предоставляют оптимальную задержку для международных пользователей. Программное редирект включается при идентификации препятствия первичного ресурса.
Финансовые движения в лицензированных зонах подпадают под жестким нормам PCI DSS. Децентрализованные переводы набирают востребованность в результате приватности и быстроте выполнения.
Смартфонные софт лучших операторов объединяют отпечатковую идентификацию и push-оповещения для существенных эпизодов. Модифицируемый облик автоматически настраивается под настройки монитора.
https://luckydena.co.uk/codigo-promocional-1xbet-registro-2026-1xbro200/
Online Casino Australia Payid Instant Deposits
You actually make it seem so easy with your presentation but I find
this topic to be actually something which
I think I would never understand. It seems too complicated and very broad for me.
I am looking forward for your next post, I will try to get the hang of
it!
Also visit my site :: 반티사이트
Rug Ripple Home – Cozy designs, product selection is simple and purchasing was fast and easy.
Orchid Outlet – Feels professional, shopping felt effortless and intuitive.
Новейшие порталы игорных развлечений дают клиентам доступ к высококлассному игровому процессу через защищенные казино СЌРЅРѕРјРѕ порталы. Легальная операционная активность предполагает следования четких надзорных норм.
Алгоритм регистрации игрового профиля содержит верификацию личных информации. Администраторы внедряют многоуровневые алгоритмы KYC и AML для недопущения фродовых операций.
Электронные инструменты актуальных развлекательных порталов работают на стабильных дата-центрах с HTTPS алгоритмами. Территориальные ограничения принуждает администраторов внедрять параллельные ссылки.
Дублирующие платформы являют собой идентичные версии основного портала с сохранением всех функций и сведений. Беттеры добиваются непрерывный доступ к средствам, азартной отчетности и индивидуальным конфигурациям.
Платежные переводы выполняются через синхронизированные расчетные агрегаторы. Границы на инвестиции и обналичивания определяются в согласии с законодательными критериями и внутренними нормами минимизации опасностей.
Профессиональные гемблеры указывают проверять ситуацию лицензии через официальные списки развлекательных органов. Престижные характеристики охватывают оценки на специализированных платформах и комментарии подлинных игроков.
Отбор надежного betting портала в сегодняшних обстоятельствах подразумевает специального внимания к законному положению. Знающие участники учитывают, что казино Вован демонстрирует новую факты о функционирующих операторах.
Схема записи в официальных заведениях объединяет необходимую подтверждение удостоверения. KYC-процедуры защищают как оператора, так и игрока от махинаций. Кратковременные ограничения на вывод активов до окончания подтверждения – нормальная процедура.
Виртуальные препятствия на доступ к развлекательным ресурсам обходятся через альтернативные URL. Функционирующие зеркала сохраняют тотальную функциональность главного портала. Денежные транзакции, развлекательный статистика и привилегированные программы остаются стабильными.
Финансовая стабильность определяется показателем применяемых расчетных механизмов. SSL-защита, PCI DSS валидация и усиленная идентификация гарантируют защищенный заслон ограждения.
Геймплейная набор легальных заведений содержит слоты от известных разработчиков. RTP-индексы, волатильность и статистические схемы претерпевают нейтральную контроль в аккредитованных организациях.
Схемы стимулирования в достойных сервисах основываются на ясных требованиях проигрыша. Условия ставок x35-40 оценивается приемлемым для машина-льгот, в то время как классические состязания принимаются в зачет с минимальным показателем.
Neuro Relief USA: neurontin online – neurontin capsule 400 mg
Passport Essentials Hub – Handy gear for trips, navigating and selecting products felt effortless.
官方授权的ifuntv海外华人首选,第一时间提供最新华语剧集、美剧、日剧等高清在线观看。
Tool Tower Shop – Everything looks neatly arranged, making the tools easy to check out.
Современные гемблеры сталкиваются с препятствием входа к официальным ресурсам. Организации фильтруют главные порталы, но опытные лаки Р±РёСЂ пользователи знают о присутствии параллельных ресурсов.
Зеркало образует полную дубликат первичного площадки. Средства защиты функционируют идентичными. Банковские процедуры реализуются через аналогичные каналы.
Методика заведения учётной записи через резервный ресурс требует стандартной проверки. Сотрудники просят бумаги для реализации KYC-стандартов. Паспортные параметры осуществляют расширенную валидацию.
Пополнительные пределы на альтернативных ресурсах равняются основным условиям. Наименьшие беты остаются константными. Накопительные призовые фонды объединяются между множественными ссылками.
Премиальные механизмы действуют комплексно на параллельных платформах. Вейджер удерживает исходные величины. Длительность оборота не изменяется.
Служба обслуживания изучает вопросы с альтернативных адресов аналогично. Живой чат поддерживает постоянный расписание обслуживания.
Актуальные сервисы беттинг активностей предлагают беттерам доступ к элитному игровому процессу через надежные тип топ казино платформы. Сертифицированная бизнес нуждается следования определенных контролирующих критериев.
Процесс активации игрового учетной записи предусматривает аутентификацию конфиденциальных сведений. Операторы эксплуатируют многоуровневые алгоритмы KYC и AML для блокировки поддельных транзакций.
Программные инструменты передовых гемблинг платформ функционируют на зашифрованных дата-центрах с HTTPS стандартами. Территориальные ограничения вынуждает провайдеров организовывать дублирующие адреса.
Резервные порталы образуют эквивалентные версии базового платформы с удержанием всех опций и параметров. Беттеры достигают устойчивый подключение к балансу, гемблинг данным и личным установкам.
Финансовые действия производятся через интегрированные расчетные сервисы. Границы на взносы и изъятия регулируются в унисон с лицензионными требованиями и внутренними правилами минимизации опасностей.
Опытные гемблеры настаивают отслеживать состояние аккредитации через государственные реестры игорных структур. Авторитетные параметры предусматривают ранги на тематических порталах и feedback настоящих клиентов.
Greetings from Colorado! I’m bored to tears at work so I decided to browse your site on my iphone
during lunch break. I really like the knowledge you present here and
can’t wait to take a look when I get home. I’m
surprised at how fast your blog loaded on my cell phone
.. I’m not even using WIFI, just 3G .. Anyhow, fantastic blog!
My blog post TU娛樂城
艾一帆海外版,专为华人打造的高清视频平台结合大数据AI分析,支持全球加速观看。
Отбор легального азартного ресурса подразумевает серьезного изучения лицензионных свидетельств. Современные ресурсы казино enomo предоставляют участникам полную сведения о имеющихся допусках.
Процедура создания профиля включает определенное количество требуемых этапов аутентификации. Владельцы запрашивают документы, засвидетельствующие самобытность и совершеннолетие. Классический KYC-регламент составляет от 24 до 72 промежутков.
Банкролл-менеджмент открывается с назначения границ на пополнения. Квалифицированные игроки призывают внедрять правило 5% от итогового развлекательного средств на одну партию.
Цифровые ограничения владельцев заставляют задействовать вспомогательные маршруты. Копии удерживают безусловную эффективность центрального ресурса, охватывая летопись сделок и казино прогресс.
Актуальные финансовые сервисы поддерживают моментальные инвестиции через цифровые аккаунты. Bitcoin, Ethereum и устойчивые монеты дают конфиденциальность и минимальные взносы. Период обработки получений достигает 10-30 промежутков.
Алгоритмы лояльности содержат многоуровневые статусы с увеличивающимся возвратом. VIP-кураторы гарантируют уникальные награды, увеличенные рамки и опережающую поддержку.
Актуальные дублирующие порталы проверенных гемблинг-платформ на Болливуд казино создают постоянный подключение к игровым порталам. Схема реплицирования формирует идентичные реплики базового сайта с сохранением всех возможностей.
Система открытия счета через альтернативный домен полностью воспроизводит основную заявку. Свежие пользователи заполняют активный email, устанавливают защищенный секретную комбинацию и определяют базовую курренси.
Верификация учетной записи предполагает отправки свидетельств следуя KYC-регламенту. Копия удостоверения личности, свидетельство регистрации и платежные реквизиты контролируются системой машинную контроль в течение 24-72 ч.
Подключение действующих участников производится через базовую окно с многоступенчатой идентификацией. Краткосрочные ключи приходят на мобильный гаджет или почтовый ящик.
Опции денежного сектора через зеркала включает актуальные денежные механизмы. Visa, Mastercard, цифровые счета Skrill, Neteller, виртуальные монеты Bitcoin, Ethereum выполняются с уменьшенными сборами 0-3%.
Игровая библиотека копируется целиком включая барабаны, карточные развлечения, live-дилеров и джекпоты. RTP-параметры, вариативность и проигрыш удерживаются неизменными.
Поощрительная политика функционирует идентично базовому сайту. Welcome-бандлы, даровые прокруты, денежный возврат и VIP-системы стартуют программно при исполнении установленных критериев.
neurontin 300 mg pill: neurontin 100 mg tablets – Neuro Relief USA
爱亦凡海外版,专为华人打造的高清视频平台,支持全球加速观看。
Поиск в области лицензированных площадок включает осознания актуальных технологий соединения. Умелые участники задействуют mad casino зеркало для приобретения релевантной фактов о действующих адресах.
Механизм регистрации учетной записи в лицензированных организациях охватывает тщательную верификацию. Передовые компании применяют KYC-процедуры и AML-стандарты. Оформление документов составляет от 24 до 72 периодов.
Программные способы для избежания препятствий прогрессируют сообща с ужесточением правовых инициатив. VPN-инструменты класса premium гарантируют безопасность AES-256 и технологии OpenVPN. Устойчивость канала кардинально значима для высокоролловых партий.
Дублирующие ресурсы работают через территориально рассредоточенные IT ресурсы. CDN-сети гарантируют минимальную латентность для американских геймеров. Системное маршрутизация срабатывает при идентификации блокировки базового портала.
Финансовые транзакции в сертифицированных юрисдикциях соответствуют строгим нормам PCI DSS. Крипто транзакции получают признание в результате скрытности и темпу реализации.
Планшетные утилиты топовых компаний совмещают голосовую идентификацию и push-уведомления для критических моментов. Адаптивный внешний вид программно адаптируется под параметры экрана.
Выбор надежного развлекательного площадки подразумевает основательного рассмотрения регулятивных сертификатов. Передовые системы Clubnika casino предлагают клиентам безусловную детали о собственных допусках.
Процедура открытия аккаунта подразумевает множество необходимых этапов верификации. Провайдеры запрашивают справки, подтверждающие идентичность и правоспособность. Традиционный KYC-процесс занимает от 24 до 72 интервалов.
Управление банком инициируется с определения рамок на пополнения. Опытные пользователи призывают применять правило 5% от совокупного развлекательного фонда на отдельную игру.
Электронные блокировки операторов принуждают использовать дополнительные адреса. Дубликаты удерживают абсолютную функциональность первичного платформы, охватывая журнал операций и развлекательный успех.
Передовые денежные методы гарантируют скоростные инвестиции через электронные кошельки. Bitcoin, Ethereum и постоянные токены предоставляют анонимность и мизерные отчисления. Продолжительность осуществления изъятий насчитывает 10-30 интервалов.
Программы лояльности включают каскадные степени с нарастающим вознаграждением. VIP-координаторы предоставляют личные поощрения, усиленные границы и приоритетную поддержку.
Spa Summit Corner – Elegant and neat, browsing products is simple and checkout process was smooth.
Tea Terminal Gems – Friendly and neat, shopping is simple and product images are clear.
For pros
buy generic flexeril online
to discover possibilities.
http://smartgenrxusa.com/# northwest canadian pharmacy
?esk? online casina ?esk? online casina .
海外华人必备的ifun平台,提供最新高清电影、电视剧,无广告观看体验。
Новейшие пользователи сталкиваются с огромным количеством программных нюансов при деятельности с лицензированными сайтами. Тематические источники типа ДживиСпин РІС…РѕРґ дают современную контент о операциях азартных организаций.
Система проверки счета содержит комплекс неотъемлемых шагов. Начальная верификация подразумевает передачи справок удостоверяющих индивидуальность. Типовой набор содержит паспорт, водительские права или загранпаспорт.
Системная сторона записления подразумевает задействование зашифрованного канала и двойной авторизации. Квалифицированные геймеры предлагают включать все возможных возможностей безопасности.
Зеркала формируют абсолютные реплики основного платформы с обеспечением исчерпывающего инструментария. Важнейшее выгода выражается в схожести расчетных лимитов и параметров проигрыша.
Схема поиска рабочих запасных доменов базируется на проверке тематических уведомительных сервисов и связанных площадок. Профессиональные игроки задействуют VPN-сервисы для предоставления надежного подключения независимо от территориальных ограничений.
Актуальные игроки имеют дело с изобилием цифровых аспектов при функционировании с легальными сайтами. Профессиональные сайты типа винити регистрация дают новую сведения о операциях казино компаний.
Алгоритм аутентификации кабинета предполагает ряд необходимых уровней. Первичная верификация подразумевает предоставления свидетельств подтверждающих индивидуальность. Классический перечень включает свидетельство, автолицензию или международное ID.
Программная сторона открытия счета содержит внедрение SSL-шифрования и многофакторной защиты. Квалифицированные геймеры советуют активировать полный набор доступных функций обеспечения.
Альтернативные адреса составляют точные дубликаты главного домена с поддержанием комплексного возможностей. Основное выгода выражается в тождественности платежных ограничений и параметров проигрыша.
Алгоритм выявления функционирующих резервных ссылок фундируется на отслеживании экспертных уведомительных сервисов и партнерских площадок. Опытные клиенты внедряют туннельные протоколы для предоставления стабильного соединения безотносительно от местных блокировок.
Vanta Valley Finds – Tidy and calming interface, exploring products was simple.
Pivoria Corner – Straightforward layout, finding products was stress-free.
Thanks for sharing your thoughts on TU娛樂城.
Regards
Ⲣrime Secured
3603 N 222nd St, Suite 102,
Elkhorn, ΝE 68022, United States
402-289-4126
data protection strategies – https://uer0c.mssg.me/ –
Передовые геймеры встречаются с массой цифровых нюансов при функционировании с официальными платформами. Тематические сайты типа JVSpin казино дают свежую информацию о работе азартных операторов.
Система аутентификации счета подразумевает комплекс обязательных стадий. Исходная проверка включает отправки справок верифицирующих гражданство. Типовой перечень подразумевает документ, лицензию водителя или международный паспорт.
Цифровая компонента регистрации охватывает использование SSL-шифрования и многофакторной защиты. Продвинутые игроки подсказывают инициировать совокупность имеющихся функций обеспечения.
Дублирующие порталы являются точные отражения главного домена с удержанием всего набора функций. Основное преимущество кроется в соответствии банковских пределов и условий отыгрыша.
Механизм локализации функционирующих запасных доменов опирается на отслеживании экспертных новостных лент и сотрудничающих платформ. Экспертные участники применяют виртуальные частные сети для гарантирования бесперебойного связи невзирая от географических лимитов.
VividValue Network – Layout is clear, shopping feels easy and products offer great value.
Актуальные дублирующие порталы официальных казино на Клубника казино обеспечивают непрерывный доступ к развлекательным системам. Технология копирования строит точные копии главного сайта с консервацией всех функций.
Схема создания аккаунта через альтернативный домен полностью копирует базовую форму. Новые пользователи прописывают действующий email, устанавливают надежный ключ и определяют основную валюту.
Идентификация профиля содержит передачи удостоверений по KYC-нормам. Копия ID-карты, подтверждение регистрации и финансовые данные подвергаются программную верификацию в течение 24-72 периодов.
Логин верифицированных клиентов осуществляется через стандартную интерфейс с 2FA аутентификацией. Временные пароли поступают на мессенджер номер или мейл.
Возможности денежного модуля через дублирующие порталы обеспечивает актуальные расчетные платформы. Visa, Mastercard, веб портмоне Skrill, Neteller, блокчейн-токены Bitcoin, Ethereum обрабатываются с оптимизированными взносами 0-3%.
Игровая база повторяется в точности включая spinning games, традиционные забавы, live-хостов и мегавыигрыши. RTP-индикаторы, вариативность и отыгрыш удерживаются неизменными.
Промо программа оперирует аналогично центральному домену. Welcome-наборы, free spins, кешбэк и VIP-системы включаются системно при выполнении заданных требований.
casino bonus za registraci casino bonus za registraci .
Hello, all is going fine here and ofcourse every one is sharing information, that’s really excellent, keep up writing.
my web page 반티사이트
This is very interesting, You are a very skilled blogger.
I’ve joined your rss feed and look forward to seeking more of your excellent post.
Also, I’ve shared your site in my social networks!
Here is my blog post – 반티
Hey there! I just wanted to ask if you ever have any trouble with hackers?
My last blog (wordpress) was hacked and I ended up losing a few months of hard work due to no data backup.
Do you have any methods to protect against
hackers?
great submit, very informative. I’m wondering why the opposite experts of this sector
don’t notice this. You must continue your writing. I’m confident,
you have a huge readers’ base already!
WillowWharf Online Store – Clear design, exploring products was fast and effortless.
prescription drugs with no prescription https://provimedsrx.com/# pharmacy online uk
Новейшие игроки встречаются с сложностью доступа к проверенным порталам. Провайдеры запрещают первичные порталы, но искушённые казино Рльдорадо посетители знают о существовании параллельных платформ.
Параллельный портал является идентичную копию оригинального сайта. Криптографические алгоритмы работают такими же. Денежные процедуры осуществляются через идентичные шлюзы.
Процедура открытия счёта через параллельный ссылку включает типовой аутентификации. Сотрудники уточняют справки для осуществления KYC-норм. Индивидуальные информация проходят расширенную валидацию.
Банковские пределы на альтернативных платформах идентичны стандартным требованиям. Начальные беты остаются постоянными. Возрастающие выигрышные пулы интегрируются между множественными адресами.
Поощрительные планы функционируют полноценно на зеркальных платформах. Множитель ставок удерживает первоначальные величины. Срок активности реализации остаётся прежним.
Команда сопровождения обрабатывает запросы с зеркальных ресурсов равнозначно. Живой общение обеспечивает круглосуточный формат работы.
Shop Pure Pavilion – Inviting design, navigating categories was quick and hassle-free.
Новейшие пользователи встречаются с изобилием системных нюансов при функционировании с официальными сайтами. Экспертные сайты типа lucky bear казино обеспечивают актуальную данные о работе игорных организаций.
Система валидации счета подразумевает комплекс необходимых стадий. Стартовая подтверждение подразумевает отправки документов удостоверяющих индивидуальность. Классический пакет содержит паспорт, автоудостоверение или загранпаспорт.
Техническая часть оформления включает использование безопасного соединения и двойной авторизации. Продвинутые игроки предлагают запускать полный набор возможных опций безопасности.
Резервные ссылки представляют стопроцентные реплики главного портала с обеспечением тотального возможностей. Ключевое достоинство содержится в идентичности расчетных границ и требований вейджера.
Система локализации актуальных зеркал основывается на наблюдении профессиональных телеграм-каналов и союзных сайтов. Экспертные участники внедряют анонимайзеры для создания бесперебойного связи невзирая от локальных блокировок.
https://sertralineusa.com/# zoloft cheap
brixel bond guide – Well-structured layout and easy-to-understand content.
Silver Scout Hub Picks – Fun collection, navigation is intuitive and the overall shopping experience was enjoyable.
Iver Therapeutics cost of ivermectin lotion Iver Therapeutics
Новейшие клиенты пересекаются с множеством цифровых тонкостей при деятельности с официальными порталами. Профильные источники типа казино Лев дают новую информацию о работе игорных операторов.
Процедура подтверждения кабинета охватывает несколько принудительных шагов. Начальная проверка предполагает предоставления документов верифицирующих гражданство. Классический комплект включает свидетельство, водительские права или международное ID.
Техническая часть записления охватывает применение зашифрованного канала и 2FA. Квалифицированные пользователи предлагают инициировать максимум возможных опций охраны.
Зеркала представляют стопроцентные отражения базового платформы с удержанием комплексного функционала. Центральное выгода выражается в идентичности банковских границ и параметров проигрыша.
Схема локализации актуальных альтернативных адресов строится на контроле профессиональных телеграм-каналов и партнерских площадок. Продвинутые пользователи эксплуатируют VPN-сервисы для формирования устойчивого связи независимо от местных блокировок.
Передовые бетторы встречаются с затруднением соединения к лицензированным сайтам. Операторы блокируют основные домены, но грамотные Рльдорадо казино клиенты помнят о доступности дублирующих платформ.
Альтернативный адрес является полную отображение главного портала. SSL-сертификаты функционируют равнозначными. Денежные процедуры проходят через идентичные механизмы.
Процедура создания аккаунта через дополнительный ссылку содержит типовой проверки. Операторы просят бумаги для исполнения KYC-стандартов. Персональные характеристики реализуют усиленную валидацию.
Вносительные границы на резервных сайтах аналогичны основным условиям. Низшие беты продолжают стабильными. Прогрессивные джекпоты синхронизируются между всеми ресурсами.
Премиальные механизмы действуют комплексно на дополнительных площадках. Коэффициент оборота обеспечивает оригинальные величины. Временные рамки использования поддерживается.
Департамент поддержки изучает запросы с параллельных ресурсов сходным образом. Прямой диалог осуществляет 24-часовой расписание работы.
捕风捉影在线免费在线观看,海外华人专属平台,高清无广告体验。
Rivulet Jewelry – Chic design, exploring collections is easy and checkout worked perfectly.
Лицензионные площадки гэмблинг сервисов дают геймерам доступ к высококлассному азартному досугу через dedicated домены, включая Килограмм казино , которые точно следуют transnational регламенты security.
Механизм регистрации подразумевает ввода валидационных данных через криптографические SSL-линии. Операторы требуют нотариальное verification дееспособности и места проживания для исполнения юрисдикционных стандартов.
Двухфакторная аутентификация становится обязательным составляющей новейших solutions конфиденциальности. Клиенты располагают SMS-коды, push-оповещения или внедряют специализированные программы типа Google Authenticator.
Mirror порталы нейтрализуют сложности territorial запретов и DDoS-нападений. По сути копии формируют идентичные клоны главного домена с обеспечением опций и индивидуальных данных.
Профессиональные игроки рекомендуют поддерживать current реестры функционирующих альтернатив в bookmark веб-клиента. Провайдеры рассылают обновления о актуальных доменах через email, Telegram-каналы и мобильные apps.
Финансовые переводы через проверенные ресурсы защищены cryptographic methods стандарта банковского области. Extraction фондов производится исключительно на validated карты хозяина личного кабинета.
Игровая область демонстрирует динамичный прогресс, привлекая множество пользователей. Профессиональные порталы дают безопасную условия для ставок. Детальную факты о этих брендах можно получить на Болливуд сайт .
Аттестация составляет приоритетным критерием выбора ресурса. Контролёры Олдерни гарантируют строгий мониторинг валютных процедур. Любая аккредитованная портал проходит регулярные инспекции RNG-генераторов.
Технические свойства актуальных гемблинг-сайтов объединяют SSL-шифрование расчётного категории. Производители компьютерного обеспечения типа Microgaming, NetEnt, Pragmatic Play встраивают сложные алгоритмы произвольных значений.
Процесс подтверждения личного кабинета подразумевает направления бумаг KYC-типа. Удостоверение, документ о прибылях, верификация регистрации — классический список для завершённого активации.
Зеркальные URL решают сложности с блокировками операторов. Свежие дубли обновляются ежедневно IT группами. Мобильные утилиты нередко работают надёжнее веб форматов.
Контроль средств создаёт длительную успешность развлекательных сессий. Экспертные пользователи указывают ограничивать объём пари до 1-2% от полного капитала.
Clearance Finds – Lots of savings to uncover, site interface is sleek.
Передовые платформы игорных развлечений гарантируют пользователям возможность к элитному игровому процессу через надежные казино СЌРЅРѕРјРѕ системы. Официальная операционная активность влечет исполнения строгих контролирующих стандартов.
Система открытия персонального счета задействует подтверждение индивидуальных показателей. Администраторы эксплуатируют расширенные механизмы KYC и AML для блокировки фродовых операций.
Цифровые средства актуальных игорных домов строятся на безопасных серверах с криптографическими стандартами. Геоблокировка принуждает владельцев создавать параллельные адреса.
Дублирующие платформы формируют точные копии главного сайта с фиксацией всех опций и данных. Беттеры получают беспрепятственный соединение к средствам, развлекательной отчетности и личным установкам.
Расчетные процедуры производятся через подключенные денежные процессоры. Лимиты на вклады и снятия определяются в согласии с нормативными критериями и собственными регламентами минимизации опасностей.
Профессиональные гемблеры настаивают анализировать положение сертификата через надзорные базы данных беттинг ведомств. Авторитетные критерии включают места на экспертных сервисах и комментарии подлинных пользователей.
Азартная сфера представляет быстрый развитие, манящая множество пользователей. Грамотные площадки дают надёжную обстановку для развлечений. Развёрнутую данные о подобных организациях допустимо обнаружить на Гризли РІС…РѕРґ .
Легализация является главным критерием селекции платформы. Юрисдикции Кюрасао предоставляют жёсткий проверку денежных процедур. Любая аккредитованная ресурс проходит постоянные аудиты RNG-генераторов.
Цифровые свойства передовых игорных домов объединяют SSL-криптографию банковского класса. Производители цифрового софта вроде Microgaming, NetEnt, Pragmatic Play интегрируют многоуровневые модели рандомных чисел.
Схема проверки счёта включает представления справок KYC-уровня. ID, документ о заработке, верификация прописки — стандартный набор для финального активации.
Параллельные домены устраняют трудности с цензурой поставщиков. Функционирующие варианты корректируются ежедневно компьютерными отделами. Смартфонные софт нередко выполняются стабильнее онлайн модификаций.
Финансовая дисциплина устанавливает длительную прибыльность развлекательных циклов. Грамотные участники советуют ограничивать сумму ставки до 1-2% от общего фонда.
Party Parcel Deals – Vibrant offerings, finding items and paying was effortless.
косметология фото услуги клиники косметологии
Iver Therapeutics: stromectol covid 19 – Iver Therapeutics
MirStella Finds – The site is simple to move through and the product details add a lot.
I recommend
discover personal loan website
to adapt to changes.
I’ve just joined 8xbet and the welcome reward was a nice surprise. Hoping the overall experience will be just as engaging and enjoyable.
Поиск достойного развлекательного площадки в актуальных условиях нуждается особого анализа к правовому режиму. Профессиональные клиенты учитывают, что лаки Р±РёСЂ казино отображает современную сведения о функционирующих операторах.
Алгоритм создания аккаунта в легальных сервисах содержит неизбежную верификацию документов. KYC-правила защищают как сервис, так и клиента от мошенничества. Промежуточные рамки на изъятие капитала до окончания валидации – типичная процедура.
Электронные ограничения на связь к развлекательным порталам нейтрализуются через дублирующие URL. Действующие дубликаты поддерживают абсолютную производительность главного ресурса. Финансовые процедуры, геймплейный продвижение и льготные предложения функционируют стабильными.
Материальная стабильность определяется качеством внедренных денежных способов. SSL-шифрование, PCI DSS лицензирование и усиленная верификация формируют надежный заслон ограждения.
Игровая ассортимент лицензированных провайдеров охватывает спины от топовых создателей. RTP-коэффициенты, изменчивость и статистические системы испытывают беспристрастную сертификацию в одобренных организациях.
Системы поощрения в профессиональных казино формируются на понятных требованиях проигрыша. Отыгрыш x35-40 расценивается разумным для слот-поощрений, в то время как традиционные забавы учитываются в счет с пониженным множителем.
Отбор проверенного гемблинг портала заставляет тщательного исследования регулятивных документов. Новые сайты казино РЎСѓРєР° обеспечивают геймерам безусловную факты о собственных санкциях.
Система получения доступа предусматривает множество ключевых стадий аутентификации. Операторы требуют справки, доказывающие личность и правоспособность. Традиционный KYC-порядок длится от 24 до 72 периодов.
Банкролл-менеджмент стартует с установления границ на взносы. Искусные пользователи предлагают эксплуатировать установку 5% от суммарного игорного фонда на единичную раунд.
Технические ограничения владельцев обязывают внедрять дополнительные маршруты. Копии хранят безусловную производительность основного площадки, включая летопись транзакций и азартный результаты.
Новые денежные сервисы дают скоростные депозиты через электронные аккаунты. Bitcoin, Ethereum и стабильные валюты поддерживают конфиденциальность и минимальные взносы. Длительность выполнения снятий насчитывает 10-30 промежутков.
Схемы лояльности предусматривают многоуровневые степени с прогрессивным кэшбэком. VIP-координаторы обеспечивают уникальные бонусы, увеличенные пределы и преимущественную сервис.
真实的人类第二季高清完整版,海外华人可免费观看最新热播剧集。
Tidy Treasure Online – Everything feels uncluttered, which makes shopping easygoing.
https://sertralineusa.com/# zoloft cheap
Spark Storefront Studio – Modern look, browsing categories is easy and checkout was smooth today.
VionVogue Picks – Modern styling, smooth browsing experience with no popups.
Развлекательная область являет быстрый развитие, привлекая массы игроков. Опытные ресурсы гарантируют качественную пространство для игры. Развёрнутую факты о подобных компаниях возможно найти на ДживиСпин казино .
Аккредитация составляет центральным критерием выбора портала. Регуляторы Кюрасао дают качественный мониторинг расчётных действий. Конкретная аккредитованная платформа выполняет плановые проверки RNG-генераторов.
Программные свойства актуальных беттинг-платформ включают SSL-криптографию банковского класса. Создатели компьютерного продукта класса Microgaming, NetEnt, Pragmatic Play внедряют продвинутые алгоритмы рандомных параметров.
Схема аутентификации аккаунта включает направления удостоверений KYC-типа. ID, подтверждение о заработке, валидация местожительства — обычный комплект для финального активации.
Дублирующие домены решают сложности с цензурой компаний. Рабочие зеркала изменяются постоянно техническими отделами. Мобильные софт обычно функционируют качественнее сетевых форматов.
Управление банкроллом определяет долгосрочную результативность игровых партий. Квалифицированные пользователи предлагают ограничивать величину ставки до 1-2% от полного капитала.
Swift Stall Select Deals – User-friendly layout, browsing items is smooth and checkout was quick.
海外华人必备的yifan官方认证平台,24小时不间断提供最新高清电影、电视剧,无广告观看体验。
Исследование в мире лицензированных ресурсов требует представления передовых методов соединения. Опытные игроки задействуют лаки Р±РёСЂ казино для добывания свежей материалов о активных доменах.
Процесс оформления аккаунта в официальных учреждениях включает многоуровневую валидацию. Современные организации используют KYC-системы и AML-нормы. Оформление документов занимает от 24 до 72 промежутков.
IT методы для минования запретов улучшаются сообща с укреплением регуляторных решений. VPN-службы категории premium предлагают шифрование AES-256 и технологии OpenVPN. Стабильность связи критически необходима для VIP игровых периодов.
Резервные адреса работают через регионально распределенные серверные ресурсы. CDN-архитектуры обеспечивают низкую латентность для европейских геймеров. Автоматическое маршрутизация инициируется при обнаружении ограничения первичного адреса.
Финансовые переводы в официальных зонах подпадают под жестким критериям PCI DSS. Децентрализованные расчеты завоевывают распространение вследствие секретности и скорости реализации.
Портативные утилиты ведущих провайдеров интегрируют физиологическую подтверждение и push-уведомления для ключевых ситуаций. Гибкий интерфейс независимо подстраивается под особенности экрана.
Iver Therapeutics: how much does ivermectin cost – Iver Therapeutics
Oak Opal Essentials – Calm layout with a warm aesthetic makes exploring products enjoyable.
Современные клиенты имеют дело с множеством программных аспектов при функционировании с проверенными ресурсами. Профильные сайты типа казино ретро обеспечивают релевантную сведения о деятельности развлекательных операторов.
Процедура проверки профиля предполагает ряд требуемых фаз. Первичная валидация подразумевает размещения бумаг удостоверяющих личность. Привычный набор подразумевает ID, водительские права или загранпаспорт.
Технологическая элемент открытия счета предполагает эксплуатацию SSL-шифрования и 2FA. Квалифицированные клиенты рекомендуют активировать максимум доступных настроек охраны.
Резервные ссылки являются идентичные клоны базового платформы с обеспечением исчерпывающего возможностей. Важнейшее выгода содержится в тождественности платежных лимитов и критериев ставочных требований.
Система нахождения рабочих резервных ссылок строится на проверке специализированных новостных лент и связанных площадок. Квалифицированные геймеры задействуют анонимайзеры для формирования устойчивого доступа безотносительно от региональных лимитов.
Новейшие игроки встречаются с множеством технических аспектов при работе с проверенными ресурсами. Специализированные платформы типа mad casino предоставляют современную контент о работе гэмблинговых организаций.
Процесс проверки кабинета включает комплекс обязательных стадий. Первичная аутентификация требует передачи удостоверений подтверждающих личность. Стандартный пакет предполагает удостоверение личности, автолицензию или международное ID.
Технологическая сторона открытия счета содержит использование зашифрованного канала и 2FA. Квалифицированные участники рекомендуют активировать максимум представленных функций безопасности.
Дублирующие порталы образуют точные копии первичного сайта с удержанием исчерпывающего арсенала. Основное достоинство кроется в схожести денежных границ и параметров условий прокрутки.
Схема выявления актуальных запасных доменов строится на наблюдении тематических телеграм-каналов и связанных порталов. Продвинутые игроки задействуют виртуальные частные сети для создания надежного доступа вне зависимости от локальных лимитов.
Pillow Pier Picks – Cozy atmosphere, items look appealing and checkout finished quickly.
愛壹帆海外版,专为华人打造的高清视频平台采用机器学习个性化推荐,支持全球加速观看。
禁忌第一季高清完整版,海外华人可免费观看最新热播剧集。
Поиск в пространстве сертифицированных порталов предполагает осознания продвинутых технологий входа. Опытные игроки задействуют типпи казино для извлечения новейшей данных о действующих URL.
Процедура создания профиля в лицензированных компаниях охватывает детальную верификацию. Новейшие провайдеры задействуют KYC-механизмы и AML-стандарты. Документооборот потребляет от 24 до 72 периодов.
Программные способы для обхода ограничений развиваются сообща с интенсификацией регуляторных решений. VPN-платформы типа premium дают безопасность AES-256 и системы OpenVPN. Устойчивость коннекта жизненно существенна для премиальных раундов.
Зеркальные домены работают через географически расположенные цифровые мощности. CDN-комплексы гарантируют низкую пинг для азиатских участников. Автоматическое перенаправление запускается при распознавании препятствия первичного ресурса.
Платежные манипуляции в легальных зонах подпадают под определенным правилам PCI DSS. Блокчейн расчеты получают востребованность вследствие скрытности и темпу процессинга.
Мобильные клиенты топовых операторов включают лицевую авторизацию и push-алерты для существенных ситуаций. Настраиваемый интерфейс автоматически изменяется под свойства панели.
Подбор надежного гемблинг площадки подразумевает серьезного разбора правовых сертификатов. Актуальные сайты френдс казино дают геймерам максимальную данные о действующих аккредитациях.
Механизм создания профиля включает множество необходимых ступеней аутентификации. Администраторы просят удостоверения, удостоверяющие персону и возраст. Классический KYC-процесс требует от 24 до 72 периодов.
Контроль средств инициируется с определения границ на инвестиции. Квалифицированные участники призывают задействовать закон 5% от полного азартного фонда на индивидуальную заход.
Электронные ограничения владельцев обязывают задействовать резервные домены. Дубликаты сохраняют максимальную функциональность центрального площадки, включая хронологию платежей и гемблинг достижения.
Передовые денежные способы обеспечивают мгновенные пополнения через виртуальные портмоне. Bitcoin, Ethereum и постоянные токены обеспечивают конфиденциальность и крошечные комиссии. Период реализации получений доходит 10-30 отрезков.
Планы постоянства подразумевают ступенчатые статусы с возрастающим бонусом. VIP-консультанты дают эксклюзивные награды, усиленные пределы и приоритетную сервис.
mexico online pharmacies medication
Vanilla Vendor Collection – Presentation is tidy, product info was clear and guided me quickly.
Для современного и удобного управления шторами выбирайте электрокарнизы купить прокарниз
электрокарнизы для рулонных штор .
Все больше людей выбирают электрокарнизы обусловлена их удобством и функциональностью. С их помощью можно автоматизировать управление шторами что особенно актуально для больших окон или труднодоступных мест. Кроме того, электрокарнизы придают интерьеру нотку роскоши и современный вид. комфорт, удобство и экономия времени. Больше не нужно тратить время и силы на ручное управление шторами, особенно если их много или они расположены высоко. Возможность интеграции электрокарнизов с системой “умный дом” позволяет управлять ими с помощью смартфона или голосовых команд. Это особенно удобно для людей с ограниченными возможностями.
**Выбор электрокарниза: На что обратить внимание**
Важно учитывать ряд факторов при выборе электрокарниза: длину карниза, вес штор и тип управления. Важно, чтобы длина выбранного карниза соответствовала размеру вашего окна и способен выдержать вес ваших штор. Существуют различные типы управления: с помощью пульта дистанционного управления, настенного выключателя или через приложение на смартфоне. Выбор надежного производителя гарантирует качество продукции и надежное сервисное обслуживание.
**Установка и настройка электрокарниза**
Установить электрокарниз можно и своими силами, если у вас есть необходимые навыки и инструменты. Однако, если вы не уверены в своих силах, лучше обратиться к профессионалам. После установки необходимо настроить электрокарниз. скорости движения и других параметров. Следуя инструкции, вы сможете легко настроить карниз в соответствии со своими потребностями.
**Электрокарниз: Долговечность и уход**
Регулярное обслуживание и правильный уход обеспечат долгую и бесперебойную работу вашего электрокарниза.
https://sertralineusa.com/# zoloft without rx
ProteaPex Favorites – Excellent products, site info is thorough and purchasing felt easy.
https://theamberpost.com/member/promo-code-in-1xbet
It’s in reality a great and useful piece of information. I’m satisfied that you shared this
useful information with us. Please keep us up
to date like this. Thank you for sharing.
Also visit my blog post 반티
禁忌第一季高清完整官方版,海外华人可免费观看最新热播剧集。
This is the right web site for everyone who would like to find out about this topic.
You understand so much its almost hard to argue with you (not that I actually will need to…HaHa).
You certainly put a new spin on a topic that has been written about for many years.
Excellent stuff, just great!
my page :: 반티사이트
Легальные операторы азартных сервисов oferuja участникам доступ к качественному времяпрепровождению через профильные порталы, включая казино Килограмм , которые специально следуют transnational стандарты security.
Схема регистрации necessita заполнения идентификационных параметров через encrypted SSL-линии. Провайдеры demanded нотариальное свидетельство возраста и региона residence для соблюдения правовых критериев.
Двухэтапная верификация становится обязательным элементом современных механизмов конфиденциальности. Игроки обретают SMS-токены, push-алерты или применяют специальные софт типа Google Authenticator.
Дублирующие порталы устраняют сложности географических барьеров и DDoS-воздействий. Технически реплики формируют копийные копии primary домена с поддержанием возможностей и личных деталей.
Профессиональные участники призывают поддерживать актуальные каталоги working mirrors в закладках обозревателя. Администрация отправляют updates о современных доменах через электронную почту, Telegram-группы и портативные утилиты.
Денежные транзакции через официальные площадки гарантированы encryption алгоритмами категории банковского области. Снятие денег осуществляется исключительно на верифицированные счета собственника личного кабинета.
Silvaneo Select – Trendy selection, navigation feels natural and checkout process was quick.
Современные геймеры пересекаются с набором технологических тонкостей при работе с официальными порталами. Тематические сайты типа Голд казино обеспечивают новую данные о процессах азартных операторов.
Процедура верификации аккаунта содержит комплекс необходимых уровней. Начальная проверка предполагает предоставления свидетельств удостоверяющих гражданство. Типовой набор содержит ID, водительские права или заграничное удостоверение.
Цифровая компонента регистрации включает задействование SSL-шифрования и двойной авторизации. Продвинутые игроки предлагают активировать все предложенных возможностей безопасности.
Резервные ссылки представляют идентичные реплики первичного ресурса с хранением тотального набора функций. Ключевое выгода содержится в подобии банковских пределов и норм вейджера.
Алгоритм выявления функционирующих резервных ссылок опирается на проверке профильных телеграм-каналов и связанных площадок. Опытные участники используют VPN-сервисы для обеспечения устойчивого доступа без оглядки от локальных барьеров.
Wervina Picks – Pleasant layout, first visit felt seamless and products look appealing.
игровые автоматы с выводом денег на втб
Инновационные провайдеры гемблинг продуктов обеспечивают пользователям возможность к профессиональному игровому процессу через безопасные Голд казино порталы. Лицензированная бизнес влечет соблюдения четких контролирующих стандартов.
Процедура активации клиентского профиля задействует аутентификацию индивидуальных информации. Операторы применяют многоуровневые системы KYC и AML для недопущения незаконных платежей.
Электронные решения новейших гемблинг платформ базируются на защищенных дата-центрах с TLS стандартами. Территориальные ограничения принуждает управляющих внедрять параллельные адреса.
Зеркальные домены составляют полные версии главного платформы с сохранением всех опций и параметров. Игроки приобретают непрерывный соединение к счету, развлекательной истории и пользовательским установкам.
Банковские операции выполняются через интегрированные банковские сервисы. Лимиты на взносы и снятия фиксируются в соотношении с законодательными условиями и собственными политиками минимизации опасностей.
Профессиональные беттеры указывают контролировать положение авторизации через надзорные реестры развлекательных ведомств. Репутационные параметры содержат оценки на тематических платформах и feedback настоящих участников.
Выбор надежного игорного заведения предполагает основательного разбора юридических сертификатов. Современные платформы Lev предлагают игрокам максимальную сведения о собственных допусках.
Процедура открытия аккаунта содержит несколько ключевых ступеней подтверждения. Представители настаивают свидетельства, подтверждающие персону и совершеннолетие. Стандартный KYC-порядок требует от 24 до 72 промежутков.
Банкролл-менеджмент инициируется с фиксации ограничений на пополнения. Опытные пользователи рекомендуют использовать правило 5% от общего гемблинг средств на отдельную партию.
Технические запреты владельцев вынуждают задействовать альтернативные адреса. Зеркала удерживают абсолютную производительность центрального площадки, охватывая архив операций и казино продвижение.
Новые банковские системы обеспечивают оперативные депозиты через криптовалютные кошельки. Bitcoin, Ethereum и устойчивые монеты предоставляют тайность и символические отчисления. Время выполнения извлечений достигает 10-30 отрезков.
Программы приверженности содержат градационные ранги с накапливающимся возвратом. VIP-представители дают персонализированные поощрения, расширенные лимиты и ускоренную помощь.
Здравствуйте!
Раздел «Бизнес-идеи» на Business-Mentor собрал оригинальные и креативные концепции, позволяющие быстро найти подходящее направление для запуска собственного дела. Пользователь может открыть для себя новые ниши, технологии и форматы, чтобы уверенно войти на рынок и снизить риски на старте. Подберите свежие бизнес-идеи для старта, которые соответствуют вашим целям и опыту. Свежие бизнес-идеи для старта учитывают сезонность, локацию и цифровые возможности. Они легко адаптируются под ваши навыки и ресурсы.
Вся информация на сайте – https://business-mentor.ru/biznes-idei/
как удержать клиентов, идеи для пассивного дохода, бизнес-идеи в туризме
как использовать аналитику в e-commerce, бизнес-идеи с видеоинструкцией, как оформить договор с клиентом
Всего наилучшего и развития!!
Get details
how to get cheap doxycycline without rx
to save time.
Raynverve Collection – Stylishly arranged, shopping is simple and the overall experience is positive.
Навигация в области официальных площадок нуждается знания новых решений входа. Профессиональные геймеры задействуют лаки Р±РёСЂ казино для получения актуальной информации о действующих доменах.
Схема создания учетной записи в лицензированных организациях охватывает комплексную аутентификацию. Продвинутые компании применяют KYC-алгоритмы и AML-правила. Оформление документов составляет от 24 до 72 временных отрезков.
Программные способы для избежания ограничений улучшаются синхронно с повышением регуляторных решений. VPN-сервисы типа premium обеспечивают шифрование AES-256 и системы OpenVPN. Стабильность коннекта кардинально существенна для VIP сессий.
Зеркальные сайты функционируют через территориально разнесенные IT мощности. CDN-системы обеспечивают низкую время ответа для глобальных геймеров. Автоматическое редирект запускается при идентификации барьера центрального ресурса.
Платежные переводы в легальных юрисдикциях отвечают конкретным критериям PCI DSS. Криптовалютные операции приобретают признание в результате приватности и скорости выполнения.
Смартфонные программы премиальных провайдеров объединяют физиологическую идентификацию и push-сообщения для критических ситуаций. Адаптивный внешний вид автоматически адаптируется под параметры экрана.
Выбор надежного игорного заведения требует глубокого исследования правовых свидетельств. Актуальные сайты https://probeg-ag.ru/ru-ru/ предоставляют клиентам стопроцентную детали о действующих допусках.
Процесс оформления счета содержит различные ключевых фаз подтверждения. Администраторы истребуют свидетельства, доказывающие самобытность и возраст. Обычный KYC-порядок длится от 24 до 72 интервалов.
Распоряжение капиталом стартует с назначения лимитов на пополнения. Искусные клиенты рекомендуют использовать правило 5% от полного игорного резерва на индивидуальную игру.
Цифровые препятствия провайдеров побуждают задействовать запасные пути. Копии удерживают максимальную активность базового сайта, предусматривая журнал переводов и казино прогресс.
Современные банковские способы поддерживают быстрые пополнения через блокчейн хранилища. Bitcoin, Ethereum и фиксированные активы поддерживают приватность и наименьшие отчисления. Период обработки снятий доходит 10-30 периодов.
Схемы лояльности включают иерархические категории с возрастающим вознаграждением. VIP-менеджеры дают персонализированные бонусы, повышенные ограничения и приоритетную обслуживание.
sertraline zoloft: Sertraline USA – zoloft tablet
范德沃克高清完整版采用机器学习个性化推荐,海外华人可免费观看最新热播剧集。
凯伦皮里第二季高清完整官方版,海外华人可免费观看最新热播剧集。
https://smartgenrxusa.com/# canadien pharmacies
奥美迦奥特曼高清完整版结合大数据AI分析,海外华人可免费观看最新热播剧集。
Orbit Order Showcase – Easy ordering process, delivery accurate and prompt, highly recommend.
Vionessa Store – Informative product listings, selecting items was smooth and effortless.
Ориентирование в сфере легальных ресурсов нуждается понимания новых технологий входа. Умелые пользователи используют laki world casino для извлечения релевантной материалов о оперативных адресах.
Алгоритм открытия счета в лицензированных учреждениях содержит тщательную проверку. Передовые операторы используют KYC-процедуры и AML-стандарты. Бумажная работа составляет от 24 до 72 интервалов.
Компьютерные инструменты для обхода ограничений развиваются параллельно с ужесточением нормативных действий. VPN-службы класса premium предоставляют криптографию AES-256 и системы OpenVPN. Устойчивость канала критически актуальна для привилегированных партий.
Зеркальные сайты работают через географически распределенные IT мощности. CDN-комплексы гарантируют оптимальную время ответа для азиатских пользователей. Цифровое перенаправление активируется при распознавании блокировки базового домена.
Экономические операции в проверенных территориях соответствуют определенным критериям PCI DSS. Криптовалютные расчеты завоевывают востребованность благодаря приватности и быстроте выполнения.
Переносные утилиты лучших операторов объединяют биометрическую аутентификацию и push-извещения для ключевых событий. Изменяемый дизайн автономно подстраивается под настройки дисплея.
Функционирующие зеркала проверенных gaming-операторов на миллион регистрация предоставляют устойчивый вход к развлекательным системам. Схема клонирования образует идентичные версии главного ресурса с поддержанием всех механизмов.
Механизм регистрации через альтернативный домен в точности копирует главную форму. Только пришедшие участники регистрируют рабочий email, создают стойкий секретную комбинацию и устанавливают игровую финансовый инструмент.
Валидация счета содержит загрузки удостоверений по KYC-политике. Фото удостоверения личности, свидетельство адреса и банковские сведения анализируются посредством машинную верификацию в течение 24-72 периодов.
Авторизация существующих игроков выполняется через стандартную панель с двухфакторной аутентификацией. Разовые ключи приходят на смс девайс или почтовый ящик.
Функционал финансового сектора через дублирующие порталы содержит востребованные денежные сервисы. Visa, Mastercard, цифровые портмоне Skrill, Neteller, цифровые активы Bitcoin, Ethereum выполняются с сокращенными процентами 0-3%.
Азартная библиотека воспроизводится на сто процентов включая автоматы, традиционные развлечения, live-дилеров и прогрессивы. RTP-значения, вариативность и проигрыш фиксируются неизменными.
Акционная программа функционирует идентично центральному сайту. Welcome-бандлы, бесплатные вращения, денежный возврат и VIP-программы включаются программно при реализации фиксированных условий.
海外华人必备的iyf官方认证平台,24小时不间断提供最新高清电影、电视剧,无广告观看体验。
zylavo trust overview – Clear, professional presentation with reassuring trust information.
Новейшие платформы азартных продуктов гарантируют клиентам вход к профессиональному азарту через проверенные аква казино платформы. Официальная функционирование нуждается соблюдения строгих контролирующих норм.
Процесс активации игрового аккаунта предусматривает аутентификацию индивидуальных сведений. Администраторы применяют углубленные протоколы KYC и AML для исключения нарушающих переводов.
IT средства инновационных развлекательных порталов основываются на надежных хостингах с TLS протоколами. Региональная блокировка принуждает администраторов организовывать вспомогательные адреса.
Зеркальные платформы составляют эквивалентные дубликаты центрального платформы с фиксацией всех сервисов и данных. Клиенты получают беспрепятственный доступ к балансу, игровой статистике и клиентским опциям.
Платежные действия выполняются через связанные расчетные агрегаторы. Границы на пополнения и снятия регулируются в согласии с нормативными требованиями и корпоративными регламентами снижения потерь.
Квалифицированные беттеры указывают мониторить условия разрешения через официальные базы данных игорных ведомств. Авторитетные показатели задействуют рейтинги на отраслевых сайтах и отзывы настоящих игроков.
Актуальные геймеры попадают с сложностью входа к легальным сайтам. Организации фильтруют базовые URL, но профессиональные лакибир игроки понимают о существовании зеркальных ресурсов.
Параллельный портал формирует полную реплику главного площадки. Системы безопасности сохраняются такими же. Платёжные действия проходят через идентичные каналы.
Алгоритм регистрации через резервный ресурс подразумевает классической подтверждения. Сотрудники выясняют бумаги для выполнения KYC-стандартов. Идентификационные параметры подвергаются многоуровневую валидацию.
Финансовые ограничения на зеркальных платформах совпадают первичным характеристикам. Начальные вклады функционируют константными. Возрастающие призовые фонды координируются между всеми адресами.
Льготные механизмы оперируют всесторонне на альтернативных площадках. Множитель ставок обеспечивает первоначальные величины. Длительность проигрывания продолжается.
Сервис обслуживания изучает обращения с дополнительных доменов таким же способом. Онлайн переписка предоставляет беспрерывный расписание оперирования.
Parcel Finds Hub – Shipping details precise, packaging tidy, overall experience was seamless.
Spark Storefront Studio – Modern look, browsing categories is easy and checkout was smooth today.
Swift Shoppery Essentials – Fast navigation, products are easy to explore and shopping was enjoyable.
Is Crown Casino online legit? – Australian players guide
Новейшие геймеры обталкиваются с изобилием технологических деталей при деятельности с сертифицированными сайтами. Профессиональные ресурсы типа казино аква выдают новую сведения о работе гэмблинговых компаний.
Процесс проверки кабинета подразумевает комплекс необходимых этапов. Начальная аутентификация включает загрузки документов подтверждающих личность. Привычный пакет содержит удостоверение личности, автоудостоверение или международный паспорт.
Системная сторона регистрации включает внедрение защищенного протокола и многофакторной защиты. Продвинутые геймеры рекомендуют запускать весь комплекс представленных настроек секьюрити.
Зеркала составляют абсолютные копии центрального платформы с обеспечением всего набора функций. Важнейшее плюс кроется в схожести финансовых рамок и критериев проигрыша.
Схема обнаружения активных запасных доменов фундируется на контроле экспертных телеграм-каналов и сотрудничающих сайтов. Продвинутые участники применяют VPN-сервисы для формирования постоянного доступа безотносительно от местных барьеров.
https://ivertherapeutics.shop/# ivermectin 50
Передовые провайдеры гемблинг развлечений обеспечивают участникам путь к элитному беттингу через проверенные Болливуд казино сайты. Официальная деятельность подразумевает выполнения определенных правовых норм.
Система открытия пользовательского учетной записи задействует верификацию персональных реквизитов. Провайдеры применяют многоуровневые процедуры KYC и AML для пресечения поддельных финансовых действий.
Цифровые системы актуальных развлекательных порталов основываются на зашифрованных инфраструктурах с шифровальными технологиями. Территориальные ограничения обязывает операторов внедрять резервные порталы.
Зеркальные порталы формируют полные клоны первичного домена с обеспечением всех опций и сведений. Участники получают беспрепятственный вход к депозиту, беттинг данным и индивидуальным параметрам.
Платежные действия осуществляются через связанные банковские шлюзы. Ограничения на вклады и изъятия определяются в унисон с регуляторными требованиями и организационными нормами контроля угроз.
Опытные пользователи указывают анализировать положение разрешения через надзорные регистры азартных структур. Авторитетные характеристики содержат места на специализированных сайтах и комментарии подлинных клиентов.
NutriNest Online – The site seems dependable, with sensible product choices and clear descriptions.
Hello, Neat post. There’s a problem with your
web site in internet explorer, might test this? IE still is the market leader and a good
component to other people will miss your wonderful writing due to this problem.
Also visit my homepage: 반티사이트
sertraline generic zoloft sertraline
Действующие резервные адреса надежных игорных заведений на Рльдорадо казино предоставляют устойчивый вход к развлекательным ресурсам. Технология клонирования формирует точные копии главного портала с сохранением всех возможностей.
Схема оформления профиля через зеркало целиком дублирует оригинальную заявку. Свежие геймеры регистрируют функционирующий email, устанавливают защищенный секретную комбинацию и определяют операционную финансовый инструмент.
Верификация профиля предполагает отправки удостоверений согласно KYC-регламенту. Копия паспорта, доказательство резиденции и финансовые параметры анализируются посредством автоматическую анализ в течение 24-72 часа.
Подключение действующих клиентов реализуется через классическую модуль с многоступенчатой верификацией. Временные пароли доставляются на телефонный девайс или мейл.
Опции финансового раздела через резервные ссылки обеспечивает востребованные денежные сервисы. Visa, Mastercard, электронные портмоне Skrill, Neteller, виртуальные монеты Bitcoin, Ethereum процессируются с оптимизированными процентами 0-3%.
Гемблинг каталог дублируется в точности включая слоты, столовые забавы, live-дилеров и прогрессивы. RTP-показатели, изменчивость и условия отыгрыша фиксируются такими же.
Промо механизм действует похоже корневому сайту. Welcome-комплекты, free spins, кешбэк и VIP-программы включаются программно при исполнении определенных критериев.
zoloft buy: zoloft without rx – zoloft tablet
Актуальные пользователи пересекаются с набором системных нюансов при функционировании с сертифицированными порталами. Специализированные источники типа СЂР° зеркало поставляют актуальную сведения о процессах гэмблинговых операторов.
Система валидации учетной записи включает комплекс необходимых шагов. Начальная валидация включает предоставления справок удостоверяющих гражданство. Классический пакет содержит паспорт, автолицензию или загранпаспорт.
Программная элемент открытия счета включает применение зашифрованного канала и многофакторной защиты. Квалифицированные клиенты предлагают запускать полный набор предложенных настроек обеспечения.
Альтернативные адреса представляют идентичные копии главного портала с сохранением полного инструментария. Главное выгода заключается в схожести денежных рамок и условий ставочных требований.
Процедура поиска рабочих альтернативных адресов базируется на проверке тематических телеграм-каналов и сотрудничающих порталов. Опытные геймеры задействуют VPN-сервисы для гарантирования бесперебойного связи независимо от местных блокировок.
Tidy Treasure Essentials – Calm layout that makes shopping more enjoyable.
I do not know if it’s just me or if everybody else experiencing issues with your
website. It appears as if some of the written text in your posts are running off the screen. Can somebody else please provide feedback and let me know if this is happening to them too?
This could be a issue with my internet browser because I’ve had this happen before.
Thank you
My site: Tailor Alterations Business Bay
no presription on line rx https://provimedsrx.com/# online pharmacies no prescription
This blog was… how do you say it? Relevant!!
Finally I’ve found something that helped me. Appreciate it!
Pepper Pavilion Shopping – Great selection to explore, browsing is fast and smooth.
Definitely consider that that you stated. Your favorite justification appeared to be on the net the easiest factor to consider of.
I say to you, I certainly get irked while folks consider worries that they plainly do not realize about.
You controlled to hit the nail upon the highest as well as defined out the whole thing without having side-effects
, folks could take a signal. Will probably be again to get more.
Thanks
Also visit my homepage: AT99娛樂城
Проверенные платформы игровых услуг гарантируют клиентам вариант к профессиональному игровому процессу через целевые сайты, включая типпи казино , что выполняют общепринятые стандарты надёжности.
Механизм открытия счёта necessita заполнения идентификационных сведений через шифрованные SSL-протоколы. Провайдеры требуют official подтверждение дееспособности и места проживания для поддержания нормативных критериев.
Многоуровневая authentication является необходимым элементом передовых архитектур security. Участники обретают SMS-шифры, push-уведомления или внедряют профессиональные tools вроде Google Authenticator.
Резервные ссылки ликвидируют препятствия локальных санкций и DDoS-атак. Технически реплики образуют копийные версии главного сайта с обеспечением features и личных информации.
Опытные клиенты советуют keeping свежие каталоги рабочих зеркал в избранном браузера. Операторы отправляют обновления о современных URL через почтовые сервисы, Telegram-чаты и телефонные софт.
Платёжные переводы через официальные порталы гарантированы encryption системами класса банковского индустрии. Изъятие фондов происходит лишь на подтверждённые данные хозяина учётной записи.
Нынешние участники пересекаются с множеством технических деталей при работе с сертифицированными платформами. Экспертные ресурсы типа лаки Р±РёСЂ казино зеркало выдают релевантную сведения о работе гэмблинговых организаций.
Процедура валидации аккаунта предполагает набор принудительных фаз. Базовая подтверждение предполагает отправки бумаг доказывающих индивидуальность. Привычный комплект включает ID, лицензию водителя или международный паспорт.
Цифровая элемент регистрации содержит внедрение зашифрованного канала и двойной авторизации. Продвинутые геймеры настаивают запускать все представленных настроек защиты.
Альтернативные адреса формируют стопроцентные реплики базового сайта с удержанием всего возможностей. Главное выгода состоит в подобии банковских границ и параметров вейджера.
Механизм нахождения активных дублирующих порталов фундируется на контроле тематических телеграм-каналов и аффилированных площадок. Профессиональные пользователи задействуют виртуальные частные сети для предоставления бесперебойного связи независимо от локальных барьеров.
Prism Viva Corner – Chic interface, browsing items is straightforward and fun.
https://smartgenrxusa.shop/# canadian family pharmacy
Shore Stitch Treasures – Lovely presentation, shopping is easy and items look high-quality.
vavada promocje w aplikacji vavada2005.help
Mint Maven Collection – Nice surprise overall, the styles feel modern and reasonably priced.
Отбор легального гемблинг заведения нуждается детального анализа лицензионных документов. Актуальные платформы казино типпи дают клиентам абсолютную факты о своих разрешениях.
Система открытия аккаунта включает различные принудительных этапов валидации. Провайдеры просят бумаги, устанавливающие индивидуальность и правоспособность. Традиционный KYC-алгоритм составляет от 24 до 72 временных отрезков.
Распоряжение капиталом запускается с определения ограничений на депозиты. Квалифицированные пользователи призывают применять установку 5% от суммарного казино капитала на конкретную раунд.
Системные препятствия владельцев заставляют использовать дополнительные ссылки. Копии сохраняют безусловную производительность базового платформы, охватывая журнал транзакций и развлекательный продвижение.
Новые денежные способы предоставляют скоростные вклады через виртуальные кошельки. Bitcoin, Ethereum и фиксированные активы дают тайность и символические сборы. Срок реализации изъятий составляет 10-30 промежутков.
Системы постоянства содержат каскадные ранги с нарастающим кэшбэком. VIP-координаторы предоставляют персонализированные награды, усиленные пределы и первоочередную техподдержку.
игровые автоматы с выводом на карту мир на андроид
Развлекательная область представляет активный развитие, заинтересовывая легионы геймеров. Профессиональные сайты обеспечивают защищённую условия для пари. Полную факты о этих компаниях реально отыскать на типпи казино .
Легализация является приоритетным критерием подбора площадки. Лицензиаты Мальты дают жёсткий аудит денежных операций. Конкретная официальная сайт реализует систематические контроли RNG-механизмов.
Цифровые параметры инновационных азартных площадок включают SSL-защиту банковского класса. Поставщики софтового ПО типа Microgaming, NetEnt, Pragmatic Play интегрируют продвинутые механизмы произвольных чисел.
Механизм аутентификации личного кабинета требует представления документов KYC-формата. Паспорт, справка о финансах, доказательство регистрации — типичный комплект для финального активации.
Дублирующие ссылки решают проблемы с фильтрацией провайдеров. Функционирующие варианты изменяются каждый день техническими специалистами. Карманные софт регулярно работают надёжнее интернет вариантов.
Распределение капитала формирует длительную результативность гемблинговых периодов. Квалифицированные пользователи настаивают ограничивать объём бета до 1-2% от полного бюджета.
Urban Urn Web Shop – Stylish visuals, items felt curated, and moving through pages was easy.
For strategies
can i order cheap prozac without insurance
for curiosity.
捕风追影下载官方下载,海外华人专用,支持高速下载和离线观看。
Приветствую форумчан.
Нарыл годную тему.
Может кому пригодится.
Линк:
сайт kraken onion
Пользуйтесь на здоровье.
WellnessWharf Store – Easy-to-use site, content is trustworthy and presented neatly.
Добрый день!
На странице с бизнес-идеями собраны проверенные концепции, которые уже показали результат в реальных условиях и могут стать основой для нового проекта. Такой формат позволяет быстрее пройти путь от выбора ниши до первых клиентов, опираясь на опыт других предпринимателей. Оцените подборку проверенных бизнес-концепций и выберите модель, которая лучше всего подходит под ваш рынок. Подборка проверенных бизнес-концепций включает идеи с минимальной зависимостью от поставщиков. Это снижает операционные риски и повышает маржу.
Вся информация на сайте – https://business-mentor.ru/biznes-sovety/
бизнес, который можно вести удаленно, бизнес с вложениями до 100 000 руб, как использовать лояльность клиентов
бизнес на перепродаже, бизнес-идеи в сельском хозяйстве, как оценить потенциал идеи
Всего наилучшего и развития!!
zoloft no prescription: Sertraline USA – zoloft no prescription
Сайт Rutor — пользующийся доверием «старожил» даркнета в русскоязычном интернете с системой сокрытия личности и удобным интерфейсом для анонимных сделок через Rutor.Rutor: Один из ключевых проектов русскоязычного даркнета
рутор орг инфо — это один из самых известных и старейших сервисов в русскоязычном даркнете, который стал неотъемлемой частью экосистемы анонимных ресурсов. Этот магазин ориентирован на предоставление пользователям широкой базы данных, связанной с файлами, софтом, новостями и различными видами контента, включая темы, касающиеся взлома и безопасности.
Главные аспекты функционирования Rutor
Данная система обеспечивает доступ к значительным объемам данных и файлов, гарантируя при этом повышенную анонимность и защиту пользователей. Работа сервиса построена на использовании анонимной сети Rutor, что помогает свести к минимуму угрозы идентификации и утечки данных. За долгое время работы Rutor стал своего рода летописью для даркнета на русском языке.
Rutor поддерживает стабильную работу, позволяя и новичкам, и опытным пользователям использовать предоставляемые сервисы. Система построена таким образом, что каждый раздел страницы — будь то магазин, новости или инструкции по взлому — становится отдельной частью большого сообщества, в котором безопасность и возможность оставаться анонимным выходят на первый план.
Перспективы и риски
Ясно, что будущая деятельность Rutor потребует решения новых рисков, внедрения свежих подходов к безопасности и средств обхода ограничений. Пользователи обязаны понимать, что ни одна анонимная платформа не может дать абсолютную защиту.
Сервис остается местом, где можно получать дополнительную информацию, обсуждать вопросы безопасности, следить за новостями и инновациями в области даркнета. Технический прогресс, рост числа участников и новые функциональные решения превращают Rutor в ключевой узел русскоязычного интернет-сообщества.
– Сохранение анонимности
– Надёжность проведения операций
– Доступ к уникальной информации
– Обеспечение приватности взаимодействий
Rutor представляет собой ресурс с неповторимой историей, важный для пользователей, стремящихся к свободе, сохранению конфиденциальности и автономии от внешних ограничений в современном интернете.
Violet Vault Collection – Visuals stand out, and the checkout process was hassle-free.
Ориентирование в области проверенных порталов подразумевает владения новых инструментов авторизации. Квалифицированные клиенты задействуют Голд РІС…РѕРґ для добывания новейшей данных о оперативных URL.
Процедура формирования аккаунта в надежных учреждениях содержит тщательную верификацию. Актуальные провайдеры используют KYC-алгоритмы и AML-нормы. Документооборот занимает от 24 до 72 временных отрезков.
Технические технологии для избежания ограничений улучшаются синхронно с ужесточением законодательных шагов. VPN-инструменты типа premium предоставляют защиту AES-256 и стандарты OpenVPN. Стабильность соединения кардинально важна для высокоролловых раундов.
Зеркальные сайты функционируют через территориально расположенные цифровые кластеры. CDN-системы обеспечивают сокращенную время ответа для американских клиентов. Системное переключение инициируется при детекции препятствия первичного портала.
Банковские транзакции в сертифицированных регионах отвечают жестким правилам PCI DSS. Блокчейн расчеты приобретают востребованность по причине секретности и быстроте выполнения.
Переносные приложения премиальных операторов включают физиологическую подтверждение и push-сообщения для важных происшествий. Модифицируемый дизайн программно адаптируется под характеристики панели.
Отбор честного развлекательного ресурса нуждается тщательного исследования официальных документов. Новые сайты ретро казино предоставляют клиентам абсолютную данные о собственных допусках.
Процедура создания профиля подразумевает множество принудительных этапов проверки. Представители требуют документы, удостоверяющие личность и возраст. Обычный KYC-алгоритм занимает от 24 до 72 промежутков.
Банкролл-менеджмент стартует с установления пределов на инвестиции. Квалифицированные геймеры советуют применять правило 5% от общего казино резерва на единичную партию.
Системные запреты поставщиков побуждают внедрять запасные домены. Копии хранят безусловную функциональность базового площадки, содержа историю переводов и казино достижения.
Актуальные банковские сервисы поддерживают мгновенные инвестиции через виртуальные портмоне. Bitcoin, Ethereum и стейблкоины предоставляют скрытность и мизерные взносы. Длительность реализации извлечений составляет 10-30 отрезков.
Системы верности подразумевают многоуровневые статусы с увеличивающимся бонусом. VIP-менеджеры обеспечивают персонализированные вознаграждения, расширенные пределы и приоритетную помощь.
凯伦皮里第一季高清完整版,海外华人可免费观看最新热播剧集。
Действующие зеркала легальных игорных заведений на лаки Р±РёСЂ казино гарантируют стабильный коннект к гемблинг сервисам. Система зеркалирования генерирует эквивалентные дубликаты основного домена с консервацией всех инструментов.
Процедура оформления профиля через mirror-сайт абсолютно копирует оригинальную бланк. Новые пользователи вводят функционирующий email, генерируют защищенный пароль и устанавливают рабочую платежное средство.
Идентификация профиля содержит передачи справок согласно KYC-требованиям. Фото удостоверения личности, подтверждение места жительства и денежные сведения проходят машинную проверку в течение 24-72 ч.
Вход верифицированных пользователей производится через типовую панель с 2FA идентификацией. Сессионные ключи приходят на мессенджер устройство или email.
Функционал пополнительного модуля через резервные ссылки обеспечивает распространенные банковские системы. Visa, Mastercard, онлайн счета Skrill, Neteller, виртуальные монеты Bitcoin, Ethereum процессируются с минимальными взносами 0-3%.
Gaming каталог дублируется целиком включая spinning games, традиционные развлечения, live-крупье и мегавыигрыши. RTP-значения, дисперсия и проигрыш поддерживаются точными.
Акционная система функционирует схоже главному сайту. Welcome-пакеты, бесплатные вращения, денежный возврат и VIP-программы стартуют автоматически при достижении прописанных условий.
Игровая сфера являет динамичный расширение, привлекая легионы клиентов. Грамотные порталы предоставляют стабильную условия для пари. Подробную информацию о указанных компаниях доступно обнаружить на казино Болливуд .
Легализация выступает главным показателем выбора сайта. Лицензиаты Гибралтара предоставляют качественный аудит валютных операций. Конкретная аккредитованная платформа подвергается постоянные инспекции RNG-алгоритмов.
Программные параметры актуальных азартных площадок объединяют SSL-шифрование расчётного стандарта. Создатели программного обеспечения типа Microgaming, NetEnt, Pragmatic Play интегрируют комплексные схемы непредсказуемых показателей.
Процесс проверки личного кабинета предполагает подачи удостоверений KYC-типа. Документ, справка о заработке, валидация проживания — классический перечень для финального активации.
Параллельные домены ликвидируют проблемы с блокировками провайдеров. Действующие копии корректируются систематически техническими службами. Мобильные софт часто работают надёжнее веб редакций.
Распределение капитала задаёт продолжительную эффективность игровых партий. Опытные участники предлагают лимитировать объём вейджера до 1-2% от суммарного резерва.
Hello there! This is my first visit to your blog! We are a collection of volunteers and
starting a new project in a community in the same niche.
Your blog provided us useful information to work on. You have done a wonderful job!
Feel free to visit my website :: 반티사이트
подробнее
krab3cc
https://qoolink.co/CodeValide1xbet1
https://sertralineusa.com/# sertraline zoloft
捕风追影线上看免费在线观看,海外华人专属平台结合大数据AI分析,高清无广告体验。
Raynora Hub Online – Smooth interface, finding products was quick and checkout stress-free.
Orbit Opal Storefront – Modern layout, visuals are vivid and descriptions are easy to follow.
Поиск надежного развлекательного заведения в сегодняшних условиях нуждается детального внимания к юридическому состоянию. Компетентные игроки учитывают, что Болливуд казино содержит современную факты о активных операторах.
Процедура открытия счета в проверенных платформах охватывает требуемую проверку документов. KYC-правила оберегают как заведение, так и геймера от мошенничества. Временные рамки на вывод средств до завершения валидации – стандартная система.
Цифровые барьеры на доступ к игровым порталам устраняются через зеркальные URL. Доступные отражения гарантируют стопроцентную работоспособность первичного портала. Расчетные движения, интерактивный прогресс и бонусные системы сохраняются устойчивыми.
Капитальная стабильность характеризуется качеством применяемых денежных инструментов. SSL-кодирование, PCI DSS подтверждение и расширенная идентификация создают надежный контур охраны.
Интерактивная коллекция официальных операторов охватывает спины от ведущих разработчиков. RTP-показатели, вариативность и математические модели претерпевают объективную валидацию в признанных учреждениях.
Системы стимулирования в надежных операторах формируются на открытых критериях активности. Проигрыш x35-40 признается приемлемым для слот-бонусов, в то время как карточные развлечения включаются в зачет с сниженным процентом.
Подбор безопасного игрового портала в современных обстоятельствах подразумевает тщательного изучения к регулятивному статусу. Опытные геймеры учитывают, что аква казино отображает современную данные о действующих площадках.
Механизм открытия счета в сертифицированных заведениях включает требуемую подтверждение личности. KYC-нормы обеспечивают как оператора, так и геймера от мошенничества. Переходные пределы на изъятие средств до закрытия подтверждения – типичная практика.
Программные препятствия на доступ к азартным площадкам обходятся через параллельные адреса. Рабочие отражения сохраняют всестороннюю работоспособность основного сайта. Платежные транзакции, развлекательный результаты и привилегированные планы функционируют постоянными.
Материальная защищенность характеризуется уровнем используемых банковских инструментов. SSL-безопасность, PCI DSS подтверждение и многоуровневая подтверждение обеспечивают прочный барьер защиты.
Геймплейная коллекция лицензированных площадок содержит автоматы от топовых провайдеров. RTP-параметры, вариативность и вероятностные модели претерпевают объективную аудит в признанных институтах.
Системы лояльности в качественных заведениях формируются на ясных требованиях активности. Условия ставок x35-40 оценивается нормальным для барабан-поощрений, в то время как традиционные игры принимаются в расчет с уменьшенным показателем.
Доброго времени суток.
Увидел любопытную информацию.
Может кому пригодится.
Линк:
kraken официальные ссылки
Вроде норм.
捕风捉影在线免费在线观看,海外华人专属平台智能AI观看体验优化,高清无广告体验。
boostengine.click – Overall, professional vibe here; trustworthy, polished, and pleasantly minimal throughout.
Современные бетторы сталкиваются с затруднением соединения к легальным ресурсам. Поставщики ограничивают первичные домены, но знающие лакибир посетители учитывают о доступности параллельных платформ.
Параллельный портал образует точную дубликат базового портала. Криптографические алгоритмы функционируют равнозначными. Банковские процедуры осуществляются через аналогичные каналы.
Схема создания аккаунта через дополнительный ссылку предполагает стандартной подтверждения. Специалисты запрашивают справки для соблюдения KYC-регламентов. Персональные характеристики осуществляют комплексную подтверждение.
Депозитные ограничения на резервных площадках аналогичны стандартным условиям. Начальные вклады остаются константными. Увеличивающиеся выигрышные пулы объединяются между различными ресурсами.
Поощрительные схемы функционируют завершённо на резервных площадках. Коэффициент оборота поддерживает стартовые значения. Временные рамки реализации сохраняется.
Департамент поддержки анализирует заявки с дополнительных ресурсов аналогично. Прямой разговор обеспечивает беспрерывный режим функционирования.
Определение честного гемблинг заведения подразумевает основательного изучения официальных разрешений. Актуальные платформы tip top casino предоставляют игрокам максимальную детали о своих разрешениях.
Система регистрации предусматривает множество ключевых шагов аутентификации. Представители требуют свидетельства, устанавливающие личность и возраст. Типовой KYC-алгоритм продолжается от 24 до 72 интервалов.
Финансовое планирование запускается с определения пределов на вклады. Квалифицированные клиенты призывают внедрять установку 5% от полного гемблинг фонда на конкретную игру.
Электронные запреты операторов заставляют использовать дополнительные домены. Копии хранят безусловную активность центрального сайта, предусматривая летопись сделок и гемблинг успех.
Современные финансовые инструменты предоставляют оперативные взносы через виртуальные хранилища. Bitcoin, Ethereum и постоянные токены поддерживают конфиденциальность и крошечные отчисления. Срок проведения снятий насчитывает 10-30 интервалов.
Алгоритмы верности охватывают иерархические уровни с возрастающим вознаграждением. VIP-представители предоставляют индивидуальные подарки, расширенные границы и преимущественную поддержку.
страница
krab2cc
Article writing is also a fun, if you know after that you can write otherwise it is complex to write.
Sunny Shopline Store – Easy-to-use site, finding products was simple and checkout was quick.
Soothesail Essentials – Relaxing vibe, site is well organized and browsing felt effortless.
Helpful information. Fortunate me I discovered your
web site by chance, and I am surprised why this accident didn’t took place earlier!
I bookmarked it.
Also visit my blog post; RK娛樂城
https://ivertherapeutics.com/# ivermectin cream 5%
Функционирующие дублирующие порталы проверенных казино на Вован зеркало предоставляют стабильный соединение к развлекательным системам. Принцип дублирования создает эквивалентные клоны корневого домена с фиксацией всех механизмов.
Алгоритм регистрации через дублирующий портал полностью повторяет оригинальную форму. Новые игроки вводят действующий email, создают надежный шифр и выбирают рабочую курренси.
Верификация счета включает предоставления справок следуя KYC-нормам. Изображение удостоверения личности, подтверждение проживания и платежные сведения проверяются через алгоритмическую проверку в течение 24-72 часов.
Вход действующих игроков происходит через классическую интерфейс с 2FA идентификацией. Краткосрочные шифры передаются на мобильный девайс или электронную почту.
Функционал депозитного раздела через альтернативные домены предлагает популярные расчетные механизмы. Visa, Mastercard, онлайн балансы Skrill, Neteller, виртуальные монеты Bitcoin, Ethereum осуществляются с уменьшенными процентами 0-3%.
Gaming ассортимент клонируется целиком включая машины, настольные развлечения, live-операторов и джекпоты. RTP-параметры, вариативность и вейджер фиксируются точными.
Поощрительная система оперирует подобно корневому веб-площадке. Welcome-бандлы, даровые прокруты, refund и VIP-планы включаются программно при реализации заданных стандартов.
Выбор проверенного казино оператора заставляет тщательного исследования регулятивных разрешений. Актуальные системы аква казино предоставляют пользователям полную детали о действующих разрешениях.
Механизм получения доступа включает множество требуемых стадий подтверждения. Представители просят бумаги, доказывающие индивидуальность и дееспособность. Стандартный KYC-порядок составляет от 24 до 72 временных отрезков.
Финансовое планирование начинается с задания пределов на депозиты. Профессиональные игроки призывают применять норму 5% от полного азартного капитала на единичную партию.
Системные блокировки операторов побуждают внедрять альтернативные маршруты. Клоны сохраняют стопроцентную функциональность первичного платформы, охватывая летопись операций и азартный результаты.
Актуальные финансовые методы дают моментальные инвестиции через цифровые счета. Bitcoin, Ethereum и стейблкоины обеспечивают скрытность и символические отчисления. Период проведения выводов достигает 10-30 минут.
Алгоритмы верности предусматривают иерархические статусы с нарастающим бонусом. VIP-координаторы дают эксклюзивные подарки, увеличенные рамки и преимущественную поддержку.
Pantry Pebble Corner – Cute layout, shopping experience was fast and easy.
Asking questions are truly fastidious thing if you are not understanding anything totally, however this article
gives fastidious understanding yet. https://cryptobossmachah.top/
一饭封神在线免费在线观看,海外华人专属平台结合大数据AI分析,高清无广告体验。
Приветствую форумчан.
Нарыл любопытную информацию.
Думаю, многим будет полезно.
Линк:
kraken darknet ссылка
Вроде норм.
Novalyn Selection – Clean design works perfectly, items stand out without distraction.
Just desire to say your article is as astounding.
The clearness for your submit is simply excellent and i can think you’re
a professional on this subject. Well with your permission let me to grasp your RSS
feed to stay updated with imminent post. Thanks
one million and please carry on the rewarding work.
Приветствую форумчан.
Нарыл интересную инфу.
Может кому пригодится.
Линк:
сайт kraken onion
Пользуйтесь на здоровье.
Выбор легального развлекательного заведения нуждается детального изучения официальных документов. Актуальные системы аква казино гарантируют пользователям безусловную данные о своих лицензиях.
Процедура открытия аккаунта содержит несколько обязательных фаз подтверждения. Администраторы требуют свидетельства, устанавливающие личность и дееспособность. Типовой KYC-механизм требует от 24 до 72 временных отрезков.
Финансовое планирование запускается с задания пределов на пополнения. Опытные клиенты предлагают задействовать норму 5% от итогового гемблинг бюджета на единичную раунд.
Электронные ограничения провайдеров заставляют эксплуатировать альтернативные адреса. Зеркала сохраняют абсолютную активность первичного сайта, предусматривая хронологию операций и гемблинг продвижение.
Передовые банковские способы предоставляют оперативные пополнения через виртуальные счета. Bitcoin, Ethereum и фиксированные активы дают анонимность и мизерные сборы. Период проведения изъятий составляет 10-30 промежутков.
Алгоритмы верности включают градационные степени с прогрессивным возвратом. VIP-представители предлагают индивидуальные поощрения, повышенные границы и опережающую сервис.
Актуальные бетторы встречаются с проблемой связи к проверенным платформам. Операторы закрывают главные порталы, но знающие казино Голд клиенты знают о доступности дублирующих сайтов.
Альтернативный адрес составляет абсолютную дубликат первичного портала. Протоколы шифрования работают неизменными. Финансовые действия производятся через равнозначные механизмы.
Схема открытия счёта через альтернативный портал требует типовой проверки. Специалисты выясняют удостоверения для выполнения KYC-регламентов. Идентификационные данные осуществляют усиленную аутентификацию.
Банковские рамки на дополнительных сайтах совпадают основным условиям. Минимальные беты поддерживаются стабильными. Увеличивающиеся призовые фонды согласовываются между различными доменами.
Бонусные планы функционируют всесторонне на параллельных порталах. Вейджер удерживает стартовые значения. Период действия использования продолжается.
Департамент сопровождения изучает вопросы с зеркальных ссылок сходным образом. Мгновенный диалог предоставляет круглосуточный график оперирования.
愛壹帆海外版,专为华人打造的高清视频平台,支持全球加速观看。
online prescirption websites
For products
Pay day loans Michigan
to gain a better understanding.
zoloft without rx: zoloft no prescription – zoloft without rx
Приветствую форумчан.
Увидел любопытную инфу.
Может кому пригодится.
Подробности здесь:
kraken onion ссылка
Вроде норм.
Peony Port Market – Nicely designed pages, product info is clear and useful.
Современные клиенты имеют дело с набором цифровых тонкостей при работе с проверенными платформами. Тематические сайты типа mad casino поставляют современную контент о деятельности гэмблинговых провайдеров.
Процесс подтверждения кабинета предполагает комплекс принудительных этапов. Исходная валидация нуждается загрузки свидетельств доказывающих гражданство. Стандартный список охватывает ID, права или заграничное удостоверение.
Системная сторона регистрации подразумевает внедрение криптографической защиты и двухфакторной аутентификации. Квалифицированные клиенты подсказывают задействовать полный набор предложенных функций охраны.
Резервные ссылки образуют полные копии главного домена с хранением тотального набора функций. Главное плюс кроется в тождественности расчетных лимитов и норм ставочных требований.
Процедура локализации действующих альтернативных адресов базируется на мониторинге профессиональных новостных лент и аффилированных ресурсов. Профессиональные пользователи применяют прокси-соединения для создания стабильного доступа невзирая от местных барьеров.
Vetrivine Shop – Nicely curated selection, plenty of variety to explore.
Подбор достойного азартного ресурса в актуальных условиях нуждается повышенного рассмотрения к законному уровню. Знающие участники осознают, что Килограмм официальный сайт предоставляет современную данные о доступных площадках.
Процедура создания аккаунта в лицензированных сервисах включает требуемую аутентификацию удостоверения. KYC-правила обеспечивают как сервис, так и клиента от мошенничества. Краткосрочные пределы на получение активов до выполнения проверки – стандартная система.
Технические запреты на вход к betting сайтам устраняются через параллельные порталы. Рабочие копии предоставляют стопроцентную производительность основного сайта. Расчетные операции, геймплейный достижения и поощрительные системы остаются устойчивыми.
Капитальная защищенность измеряется показателем эксплуатируемых денежных систем. SSL-криптография, PCI DSS валидация и многоуровневая проверка обеспечивают прочный периметр охраны.
Интерактивная библиотека сертифицированных заведений охватывает автоматы от главных создателей. RTP-параметры, изменчивость и алгоритмические схемы испытывают объективную контроль в одобренных организациях.
Системы мотивации в профессиональных сервисах строятся на понятных параметрах ставок. Вейджер x35-40 признается справедливым для автомат-подарков, в то время как классические забавы учитываются в зачет с пониженным процентом.
Shop Serenity Store – Gentle aesthetic, navigating categories feels easy and checkout was seamless.
Всем привет!
Нашел полезную инфу.
Думаю, многим будет полезно.
Вот ссылка:
kraken зеркало
Вроде норм.
Prism Vane Finds – Stylish collection, visuals are crisp and moving through pages feels smooth.
Доброго времени суток.
Нашел годную статью.
Думаю, многим будет полезно.
Смотрите тут:
kraken онион
Мне зашло.
can you buy neurontin over the counter: purchase neurontin canada – Neuro Relief USA
holdings knowledge page – Content structure is straightforward, making navigation and understanding simple.
海外华人必备的yifan平台,提供最新高清电影、电视剧,无广告观看体验。
Инновационные операторы игорных активностей дают клиентам путь к качественному беттингу через проверенные [url=https://jobibi.ru/%d0%bd%d0%be%d0%b2%d0%be%d1%81%d1%82%d0%b8/poluchite-bonusy-v-tippy-casino-ispolzuyte-promokod-dlya-igry-v-onlaynkazino.html]типпи казино[/url] порталы. Авторизованная операционная активность подразумевает выполнения строгих регуляторных требований.
Система регистрации пользовательского профиля включает верификацию индивидуальных показателей. Администраторы задействуют углубленные протоколы KYC и AML для недопущения мошеннических финансовых действий.
IT платформы новейших игорных домов функционируют на стабильных серверах с шифровальными алгоритмами. Геоблокировка принуждает управляющих запускать параллельные домены.
Дублирующие платформы образуют точные дубликаты главного ресурса с обеспечением всех функций и сведений. Пользователи получают непрерывный связь к средствам, игровой данным и персональным настройкам.
Денежные транзакции производятся через интегрированные денежные агрегаторы. Пределы на пополнения и обналичивания регулируются в унисон с нормативными критериями и индивидуальными политиками управления рисками.
Квалифицированные гемблеры указывают отслеживать ситуацию сертификата через надзорные реестры беттинг ведомств. Имиджевые индикаторы предусматривают позиции на тематических сервисах и комментарии подлинных беттеров.
Tervina Web Store – Simple browsing, fashionable products, and fair price ranges.
Действующие дублирующие порталы лицензированных gaming-операторов на казино типпи предоставляют непрерывный доступ к гемблинг системам. Методика дублирования образует идентичные версии главного сайта с удержанием всех функций.
Алгоритм открытия счета через дублирующий портал на сто процентов воспроизводит основную анкету. Только пришедшие пользователи вводят активный email, придумывают сложный ключ и фиксируют игровую платежное средство.
Идентификация учетной записи содержит предоставления удостоверений в соответствии с KYC-регламенту. Копия удостоверения личности, доказательство места жительства и карточные параметры анализируются посредством цифровую верификацию в течение 24-72 временных единиц.
Авторизация действующих игроков выполняется через базовую форму с многоступенчатой аутентификацией. Одноразовые пароли поступают на мессенджер устройство или email.
Инструменты депозитного компонента через дублирующие порталы поддерживает распространенные платежные механизмы. Visa, Mastercard, цифровые балансы Skrill, Neteller, виртуальные монеты Bitcoin, Ethereum осуществляются с сокращенными сборами 0-3%.
Азартная база повторяется в точности включая слоты, классические игры, live-крупье и максимальные награды. RTP-значения, вариативность и вейджер сохраняются неизменными.
Бонусная схема действует идентично корневому порталу. Welcome-комплекты, даровые прокруты, refund и VIP-программы запускаются машинально при исполнении заданных требований.
Iver Therapeutics Iver Therapeutics Iver Therapeutics
https://neuroreliefusa.shop/# neurontin pill
перейдите на этот сайт
krab2cc
В русском даркнете Rutor занимает прочные позиции «ветерана» благодаря стабильности, системе безопасности и поддержке транзакций через Rutor.Rutor — старейший представитель даркнета на русском языке
rutor org отзывы — это один из самых известных и старейших сервисов в русскоязычном даркнете, который стал неотъемлемой частью экосистемы анонимных ресурсов. Этот магазин ориентирован на предоставление пользователям широкой базы данных, связанной с файлами, софтом, новостями и различными видами контента, включая темы, касающиеся взлома и безопасности.
Главные аспекты функционирования Rutor
Система курирует доступ к огромному количеству информации и файлов, сохраняя дополнительную конфиденциальность и анонимность своих пользователей. Особенность сервиса в том, что он работает через сеть Rutor, что существенно снижает риск идентификации и утечки данных. С течением времени площадка превратилась в важный архив событий и истории русскоязычного даркнета.
Платформа функционирует стабильно, обеспечивая равный доступ для новых и опытных участников даркнета. Архитектура ресурса предусматривает, что любые разделы — магазин, новостной блок или гайды по взлому — являются составляющими единой системы, где превалируют безопасность и анонимность.
Будущее платформы: вызовы и обещания
Ясно, что будущая деятельность Rutor потребует решения новых рисков, внедрения свежих подходов к безопасности и средств обхода ограничений. Следует помнить, что даже максимально анонимная среда не обеспечивает стопроцентную безопасность.
Сервис остается местом, где можно получать дополнительную информацию, обсуждать вопросы безопасности, следить за новостями и инновациями в области даркнета. Развитие технологий, расширение базы пользователей и появление новых возможностей делают Rutor одним из центров русскоязычного сообщества в сети.
– Принцип анонимности
– Надёжность проведения операций
– Открытый доступ к специализированному контенту
– Защищённость коммуникаций
Rutor представляет собой ресурс с неповторимой историей, важный для пользователей, стремящихся к свободе, сохранению конфиденциальности и автономии от внешних ограничений в современном интернете.
WearWhimsy Finds Online – Playful options, navigation is simple and site feels enjoyable.
Современные операторы азартных игр дают игрокам доступ к качественному развлечениям через проверенные РјСЌРґ казино сайты. Официальная деятельность предполагает исполнения четких законодательных критериев.
Система регистрации пользовательского учетной записи содержит подтверждение приватных реквизитов. Провайдеры применяют углубленные алгоритмы KYC и AML для пресечения нарушающих операций.
Технические решения новейших гемблинг платформ базируются на надежных хостингах с TLS стандартами. Территориальные ограничения заставляет провайдеров внедрять вспомогательные ссылки.
Параллельные сайты представляют точные копии центрального портала с удержанием всех сервисов и данных. Участники приобретают непрерывный соединение к депозиту, развлекательной данным и пользовательским опциям.
Платежные переводы осуществляются через связанные денежные сервисы. Ограничения на инвестиции и обналичивания регулируются в соответствии с правовыми требованиями и собственными нормами риск-менеджмента.
Компетентные игроки указывают отслеживать условия разрешения через регуляторные реестры развлекательных органов. Имиджевые характеристики охватывают места на экспертных сервисах и мнения истинных пользователей.
Нынешние геймеры натыкаются с препятствием связи к официальным площадкам. Компании закрывают базовые URL, но грамотные Клубника зеркало участники учитывают о доступности дублирующих площадок.
Параллельный портал образует точную отображение главного сайта. SSL-сертификаты остаются аналогичными. Финансовые процедуры производятся через равнозначные механизмы.
Технология заведения учётной записи через параллельный ссылку требует обычной валидации. Операторы просят удостоверения для выполнения KYC-стандартов. Паспортные сведения проходят двухфакторную подтверждение.
Вносительные рамки на параллельных сайтах соответствуют базовым характеристикам. Наименьшие взносы продолжают неизменными. Увеличивающиеся выигрышные пулы синхронизируются между разными ссылками.
Стимулирующие системы функционируют полноценно на резервных сайтах. Коэффициент оборота удерживает стартовые цифры. Тайминг реализации продолжается.
Служба сопровождения анализирует вопросы с параллельных ссылок равнозначно. Живой чат осуществляет беспрерывный формат работы.
Tulip Trade Hub – Items are well presented, site feels simple, and buying is trustworthy.
webrevive.click – Loved the layout today; clean, simple, and genuinely user-friendly overall.
Активные mirror-ссылки надежных казино на винити зеркало дают постоянный коннект к игровым системам. Система зеркалирования генерирует эквивалентные дубликаты главного веб-площадки с консервацией всех функций.
Система регистрации через дублирующий портал на сто процентов воспроизводит главную форму. Только пришедшие клиенты регистрируют функционирующий email, устанавливают сложный код доступа и устанавливают основную валюту.
Аутентификация личного кабинета подразумевает представления бумаг в соответствии с KYC-регламенту. Фото паспорта, доказательство регистрации и финансовые сведения контролируются системой алгоритмическую валидацию в течение 24-72 временных единиц.
Вход существующих геймеров реализуется через классическую интерфейс с двухфакторной проверкой. Краткосрочные токены отправляются на телефонный гаджет или мейл.
Функционал пополнительного сектора через резервные ссылки предлагает топовые расчетные инструменты. Visa, Mastercard, цифровые счета Skrill, Neteller, блокчейн-токены Bitcoin, Ethereum реализуются с минимальными процентами 0-3%.
Gaming коллекция повторяется целиком включая spinning games, традиционные развлечения, live-хостов и максимальные награды. RTP-индикаторы, вариативность и проигрыш поддерживаются точными.
Бонусная механизм оперирует идентично главному домену. Welcome-предложения, даровые прокруты, денежный возврат и VIP-планы запускаются программно при достижении прописанных условий.
http://ivertherapeutics.com/# ivermectin 400 mg brands
Современные пользователи имеют дело с множеством технологических аспектов при операциях с сертифицированными платформами. Профильные сайты типа тип топ казино поставляют свежую сведения о операциях развлекательных операторов.
Механизм аутентификации аккаунта подразумевает ряд обязательных фаз. Начальная проверка предполагает предоставления свидетельств верифицирующих личность. Стандартный пакет включает удостоверение личности, автоудостоверение или загранпаспорт.
Техническая компонента записления подразумевает применение криптографической защиты и двойной авторизации. Опытные участники советуют инициировать весь комплекс возможных настроек секьюрити.
Запасные домены являются абсолютные дубликаты главного домена с поддержанием всего возможностей. Главное выгода содержится в подобии банковских рамок и требований ставочных требований.
Система поиска актуальных зеркал фундируется на отслеживании специализированных телеграм-каналов и сотрудничающих площадок. Экспертные геймеры внедряют VPN-сервисы для создания бесперебойного входа невзирая от региональных барьеров.
Is online gambling legal in Australia 2025? – full breakdown
Поиск безопасного гемблинг площадки в сегодняшних границах подразумевает специального подхода к лицензионному режиму. Квалифицированные геймеры учитывают, что лаки Р±РёСЂ отображает новую данные о действующих сервисах.
Механизм записи в официальных сервисах объединяет требуемую аутентификацию документов. KYC-процедуры гарантируют как казино, так и пользователя от афер. Промежуточные ограничения на перечисление капитала до завершения верификации – обычная подход.
Электронные барьеры на вход к игровым сайтам нейтрализуются через зеркальные адреса. Доступные копии поддерживают полную функциональность первичного сайта. Финансовые процедуры, геймплейный результаты и поощрительные планы поддерживаются неизменными.
Материальная защищенность характеризуется качеством задействованных платежных методов. SSL-кодирование, PCI DSS лицензирование и усиленная аутентификация формируют защищенный контур ограждения.
Интерактивная ассортимент проверенных сервисов охватывает спины от лидирующих создателей. RTP-индексы, дисперсия и расчетные модели подвергаются внешнюю валидацию в одобренных организациях.
Механизмы стимулирования в серьезных заведениях базируются на прозрачных условиях ставок. Вейджер x35-40 расценивается адекватным для машина-бонусов, в то время как настольные активности засчитываются в калькуляцию с сниженным показателем.
Надёжные провайдеры игорных услуг гарантируют клиентам вариант к элитному азартному досугу через специализированные домены, включая Килограмм казино , которые точно соблюдают глобальные требования безопасности.
Последовательность регистрации necessita ввода authentication параметров через защищённые SSL-соединения. Администрация запрашивают документальное доказательство совершеннолетия и локации residence для compliance правовых правил.
Двухэтапная аутентификация становится mandatory составляющей актуальных платформ защиты. Участники обретают SMS-токены, push-уведомления или внедряют специальные софт по типу Google Authenticator.
Дублирующие адреса нейтрализуют проблемы географических санкций и DDoS-атак. С технической точки зрения дубли представляют аналогичные клоны базового сайта с поддержанием возможностей и пользовательских параметров.
Компетентные геймеры рекомендуют удерживать актуальные базы working зеркал в favourites browser. Провайдеры доставляют новости о актуальных адресах через мейл, Telegram-чаты и мобильные apps.
Банковские переводы через надёжные платформы покрыты криптографическими системами level банковского индустрии. Получение капитала производится только на верифицированные реквизиты хозяина account.
online casino cz online casino cz .
Raventia Picks Online – Clean and modern, finding what I needed was quick and easy.
sitefoundry.click – Appreciate the typography choices; comfortable spacing improved my reading experience.
Mint Marketry Boutique – Smooth loading throughout and a checkout flow that felt trustworthy.
Online casino Australia 2025 – latest legal updates and sites
pixelpush.click – Found practical insights today; sharing this article with colleagues later.
Инновационные операторы беттинг активностей предлагают игрокам доступ к элитному развлечениям через безопасные Килограмм казино платформы. Авторизованная деятельность влечет учета определенных контролирующих норм.
Процедура создания игрового счета задействует подтверждение индивидуальных информации. Администраторы используют комплексные протоколы KYC и AML для исключения поддельных финансовых действий.
Технические инструменты передовых игорных домов работают на надежных инфраструктурах с SSL протоколами. Геоблокировка заставляет операторов разрабатывать параллельные ссылки.
Альтернативные платформы представляют эквивалентные версии первичного портала с поддержанием всех функций и параметров. Пользователи получают стабильный связь к депозиту, беттинг статистике и личным параметрам.
Финансовые транзакции проходят через синхронизированные денежные сервисы. Рамки на вклады и изъятия назначаются в согласии с нормативными стандартами и внутренними правилами снижения потерь.
Опытные игроки рекомендуют проверять состояние лицензии через регуляторные реестры гемблинг комиссий. Авторитетные характеристики содержат рейтинги на специализированных порталах и мнения истинных игроков.
Азартная индустрия отображает динамичный рост, заинтересовывая массы участников. Квалифицированные платформы предоставляют надёжную атмосферу для беттинга. Исчерпывающую факты о таких брендах доступно найти на тип топ казино .
Аккредитация остаётся основным показателем выбора сайта. Юрисдикции Гибралтара создают тщательный мониторинг валютных транзакций. Всякая аккредитованная сайт выполняет плановые аудиты RNG-алгоритмов.
Цифровые аспекты инновационных гемблинг-сайтов включают SSL-защиту расчётного ранга. Создатели цифрового ПО наподобие Microgaming, NetEnt, Pragmatic Play добавляют продвинутые схемы хаотичных величин.
Алгоритм проверки аккаунта включает подачи свидетельств KYC-стандарта. Документ, свидетельство о средствах, доказательство местожительства — обычный перечень для итогового доступа.
Параллельные ссылки убирают трудности с запретами операторов. Действующие варианты модифицируются ежедневно цифровыми специалистами. Планшетные утилиты нередко оперируют устойчивее браузерных модификаций.
Распределение капитала устанавливает стратегическую доходность беттинговых партий. Профессиональные пользователи предлагают контролировать объём депозита до 1-2% от суммарного капитала.
Sunny Shipment Essentials Online – Easy-to-use layout, shipping was quick and browsing categories was simple.
нажмите
krab3 cc
https://theavtar.in/read-blog/134341
Soap Sonder Collection – Beautiful selection, browsing is simple and checkout was smooth today.
1win cum joc aviator https://www.1win5756.help
爱一凡海外版,专为华人打造的高清视频平台AI深度学习内容匹配,支持全球加速观看。
netmatrix.click – Overall, professional vibe here; trustworthy, polished, and pleasantly minimal throughout.
Передовые провайдеры азартных игр гарантируют участникам подключение к профессиональному игровому процессу через надежные казино Килограмм сайты. Легальная операционная активность требует выполнения конкретных правовых положений.
Механизм активации персонального кабинета содержит подтверждение приватных данных. Операторы задействуют углубленные механизмы KYC и AML для блокировки нарушающих финансовых действий.
Цифровые системы инновационных развлекательных порталов функционируют на защищенных дата-центрах с SSL протоколами. IP-фильтрация заставляет владельцев внедрять дублирующие домены.
Дублирующие ресурсы являют собой точные репликации главного портала с удержанием всех функций и показателей. Игроки добиваются устойчивый вход к балансу, развлекательной отчетности и индивидуальным конфигурациям.
Денежные действия осуществляются через встроенные платежные шлюзы. Лимиты на пополнения и изъятия регулируются в унисон с законодательными требованиями и корпоративными нормами управления рисками.
Квалифицированные пользователи советуют проверять ситуацию лицензии через регуляторные реестры азартных ведомств. Авторитетные критерии охватывают оценки на специализированных сайтах и мнения реальных игроков.
Veromint Finds – Modern visuals, colors pop, and site navigation is effortless.
Навигация в области проверенных платформ предполагает представления продвинутых технологий доступа. Умелые геймеры внедряют аква для добывания новейшей фактов о функционирующих ссылках.
Механизм создания учетной записи в надежных учреждениях подразумевает комплексную подтверждение. Передовые организации применяют KYC-алгоритмы и AML-нормы. Документальная процедура занимает от 24 до 72 часов.
Цифровые методы для минования запретов совершенствуются синхронно с повышением законодательных шагов. VPN-инструменты уровня premium предлагают шифрование AES-256 и системы OpenVPN. Непрерывность подключения критически необходима для привилегированных заходов.
Резервные платформы работают через локально разнесенные технические кластеры. CDN-структуры обеспечивают оптимальную время ответа для глобальных игроков. Системное маршрутизация активируется при выявлении барьера центрального сайта.
Платежные операции в проверенных областях следуют строгим требованиям PCI DSS. Криптовалютные операции увеличивают признание благодаря приватности и темпу обработки.
Переносные программы элитных организаций интегрируют отпечатковую проверку и push-извещения для существенных событий. Адаптивный внешний вид программно подстраивается под особенности панели.
For the complete version
order generic augmentin without dr prescription
to see customer testimonials.
Orbit Olive Online – Navigation is intuitive, colors pop, and deciding between items is fast.
Shop Novalyn – Minimalist style makes browsing pleasant, and the products really pop.
pin-up teléfono Chile pinup2001.help
http://sertralineusa.com/# zoloft without dr prescription
india pharmacy’s on line http://salepharmacies.shop/# pharmacy online
Современные клиенты пересекаются с огромным количеством технических деталей при деятельности с официальными площадками. Экспертные порталы типа казино Клубника предоставляют актуальную информацию о деятельности гэмблинговых провайдеров.
Процедура подтверждения профиля содержит несколько обязательных шагов. Стартовая проверка нуждается предоставления бумаг верифицирующих индивидуальность. Привычный набор предполагает удостоверение личности, автолицензию или заграничное удостоверение.
Цифровая компонента оформления содержит эксплуатацию SSL-шифрования и двойной авторизации. Продвинутые клиенты рекомендуют активировать максимум предложенных функций охраны.
Резервные ссылки представляют точные дубликаты первичного домена с хранением полного инструментария. Основное достоинство состоит в подобии финансовых границ и условий вейджера.
Механизм выявления актуальных дублирующих порталов базируется на наблюдении профессиональных телеграм-каналов и связанных сайтов. Квалифицированные участники внедряют туннельные протоколы для предоставления бесперебойного связи невзирая от географических запретов.
Новейшие клиенты сталкиваются с массой технических аспектов при операциях с легальными площадками. Профильные ресурсы типа лова казино поставляют свежую данные о процессах гэмблинговых компаний.
Процесс верификации кабинета охватывает ряд требуемых стадий. Базовая подтверждение подразумевает передачи удостоверений удостоверяющих индивидуальность. Типовой перечень подразумевает удостоверение личности, права или международное ID.
Системная составляющая записления предполагает внедрение SSL-шифрования и двухфакторной аутентификации. Квалифицированные пользователи подсказывают инициировать весь комплекс представленных опций безопасности.
Зеркала представляют точные клоны основного домена с обеспечением всего арсенала. Центральное бонус содержится в схожести платежных рамок и параметров проигрыша.
Механизм обнаружения актуальных зеркал основывается на контроле профессиональных телеграм-каналов и партнерских ресурсов. Продвинутые игроки внедряют туннельные протоколы для гарантирования бесперебойного соединения невзирая от местных блокировок.
Kitchen Corner – Inviting store, locating kitchen products felt natural.
ivermectin topical: Iver Therapeutics – Iver Therapeutics
смотреть здесь
krab4 cc
Pendant Port Online – Stylish pieces on display, site feels smooth and well-structured.
我欲为人第二季平台,专为海外华人设计,提供高清视频和直播服务。
SerumStation Selects – Organized and clear, browsing products was simple and checkout went smoothly.
fiorvyn.shop – Wonderful collection of premium items with an intuitive shopping experience.
vavada login http://vavada2005.help
Лицензионные платформы игровых услуг oferuja геймерам вариант к качественному времяпрепровождению через целевые порталы, включая винити казино , которые именно придерживаются мировые нормы надёжности.
Последовательность активации подразумевает заполнения authentication сведений через encrypted SSL-соединения. Букмекеры запрашивают официальное подтверждение age verification и территории residence для исполнения legal стандартов.
Многоуровневая проверка становится обязательным элементом новейших solutions надёжности. Участники получают SMS-шифры, push-notification или используют специальные приложения наподобие Google Authenticator.
Дублирующие адреса решают препятствия territorial санкций и DDoS-assault. Технически копии являют дублированные копии базового портала с maintaining возможностей и клиентских параметров.
Компетентные пользователи рекомендуют поддерживать current базы активных дублей в сохранённых ссылках браузера. Management доставляют информацию о свежих порталах через email, Telegram-чаты и телефонные приложения.
Денежные транзакции через официальные сайты обеспечены криптографическими системами класса банковского области. Изъятие фондов осуществляется исключительно на подтверждённые карты хозяина учётной записи.
Prism Porter Select – Well-organized site, navigating and choosing items felt natural.
Продолжение
krab2 cc
Современные гемблеры натыкаются с проблемой связи к сертифицированным площадкам. Организации запрещают базовые URL, но грамотные Рльдорадо казино участники знают о функционировании резервных порталов.
Зеркало представляет абсолютную отображение первичного площадки. Криптографические алгоритмы функционируют такими же. Финансовые операции производятся через аналогичные шлюзы.
Алгоритм создания аккаунта через альтернативный домен содержит привычной проверки. Менеджеры уточняют бумаги для соблюдения KYC-регламентов. Личные характеристики реализуют комплексную аутентификацию.
Банковские границы на альтернативных порталах равняются первичным характеристикам. Минимальные беты продолжают стабильными. Накопительные призовые фонды объединяются между различными адресами.
Стимулирующие схемы действуют завершённо на альтернативных платформах. Вейджер удерживает исходные величины. Тайминг реализации остаётся прежним.
Сервис помощи анализирует запросы с дополнительных порталов идентично. Онлайн переписка гарантирует непрерывный график деятельности.
generic for zoloft: zoloft no prescription – zoloft tablet
海外华人必备的iyifan官方认证平台,24小时不间断提供最新高清电影、电视剧,无广告观看体验。
https://sertralineusa.com/# sertraline generic
huarenus官方认证平台,专为海外华人设计,24小时不间断提供高清视频和直播服务。
超人和露易斯第二季高清完整版结合大数据AI分析,海外华人可免费观看最新热播剧集。
Актуальные резервные адреса лицензированных гемблинг-платформ на казино Рльдорадо гарантируют постоянный вход к игровым порталам. Система дублирования формирует идентичные версии корневого ресурса с фиксацией всех инструментов.
Процедура оформления профиля через альтернативный домен в точности дублирует стандартную заявку. Свежие участники вводят валидный email, придумывают надежный пароль и фиксируют операционную платежное средство.
Верификация счета содержит представления справок опираясь на KYC-политике. Снимок паспорта, доказательство места жительства и банковские сведения контролируются системой алгоритмическую верификацию в течение 24-72 периодов.
Авторизация верифицированных геймеров реализуется через стандартную модуль с многоступенчатой верификацией. Сессионные шифры передаются на мобильный девайс или e-mail адрес.
Возможности финансового модуля через альтернативные домены обеспечивает распространенные расчетные механизмы. Visa, Mastercard, цифровые счета Skrill, Neteller, цифровые активы Bitcoin, Ethereum обрабатываются с минимальными комиссиями 0-3%.
Азартная ассортимент воспроизводится целиком включая слоты, столовые геймплей, live-ведущих и накопительные призы. RTP-параметры, изменчивость и отыгрыш удерживаются неизменными.
Акционная программа действует идентично основному порталу. Welcome-комплекты, фриспины, кешбэк и VIP-курсы инициируются автоматически при соблюдении установленных параметров.
Определение качественного азартного оператора в актуальных реалиях подразумевает тщательного анализа к лицензионному уровню. Профессиональные пользователи понимают, что казино аква содержит новую данные о функционирующих провайдерах.
Алгоритм регистрации в лицензированных платформах предусматривает обязательную валидацию идентичности. KYC-нормы охраняют как заведение, так и клиента от обмана. Кратковременные рамки на получение капитала до завершения верификации – типичная практика.
Технические блокировки на связь к betting порталам устраняются через резервные URL. Рабочие копии предоставляют полную работоспособность основного сайта. Расчетные движения, азартный достижения и поощрительные программы поддерживаются устойчивыми.
Денежная гарантированность определяется критерием применяемых финансовых способов. SSL-шифрование, PCI DSS лицензирование и расширенная идентификация устанавливают стабильный контур охраны.
Развлекательная набор официальных операторов предоставляет спины от известных провайдеров. RTP-показатели, колебания и расчетные модели испытывают нейтральную аудит в аккредитованных центрах.
Планы поощрения в достойных операторах опираются на прозрачных требованиях активности. Требования x35-40 признается приемлемым для машина-подарков, в то время как классические активности засчитываются в счет с уменьшенным множителем.
как играть в aviator mostbet https://mostbet12037.ru
愛壹帆海外版,專為華人打造的高清視頻平台AI深度學習內容匹配,支持全球加速觀看。
奇思妙探高清完整版AI深度学习内容匹配,海外华人可免费观看最新热播剧集。
Rutor — известный форум darknet-пространства России с давней историей, анонимной регистрацией и сервисом для защиты транзакций посредством Rutor.Rutor: Один из ключевых проектов русскоязычного даркнета
рутор пародия зеркало — это один из самых известных и старейших сервисов в русскоязычном даркнете, который стал неотъемлемой частью экосистемы анонимных ресурсов. Основное направление работы ресурса — предоставление обширной базы файлов, утилит, новостей и прочего контента, в том числе, связанного с темами безопасности и взлома.
Как устроена система работы Rutor
Данная система обеспечивает доступ к значительным объемам данных и файлов, гарантируя при этом повышенную анонимность и защиту пользователей. Работа сервиса построена на использовании анонимной сети Rutor, что помогает свести к минимуму угрозы идентификации и утечки данных. С течением времени площадка превратилась в важный архив событий и истории русскоязычного даркнета.
Rutor поддерживает стабильную работу, позволяя и новичкам, и опытным пользователям использовать предоставляемые сервисы. Архитектура ресурса предусматривает, что любые разделы — магазин, новостной блок или гайды по взлому — являются составляющими единой системы, где превалируют безопасность и анонимность.
Перспективы и риски
Нет сомнений, что в дальнейшем Rutor столкнётся с новыми угрозами, инновационными способами охраны приватности и методами преодоления блокировок. Пользователи должны осознавать, что даже самая анонимная система не гарантирует полной безопасности.
Платформа продолжает быть ресурсом для получения расширенной информации, обмена мнениями по безопасности и мониторинга новшеств в сферах даркнета. Улучшение технологий, увеличение аудитории и внедрение инноваций способствуют статусу Rutor как центрального элемента русскоязычного онлайн-сообщества.
– Принцип анонимности
– Безопасность транзакций
– Открытый доступ к специализированному контенту
– Конфиденциальность общения
Rutor — это платформа с уникальной историей, и её опыт стоит принимать во внимание всем, кто ценит собственную свободу, приватность и независимость от внешней цензуры в современном цифровом мире.
BrewBrooks collection – Fantastic gear for coffee lovers, shopping experience is smooth.
подробнее
krab4 cc
Visit WatchWhisper – Clean design, selection of watches is interesting and navigation is smooth.
пояснения
krab2 cc
Нынешние геймеры сталкиваются с сложностью подключения к проверенным сайтам. Поставщики закрывают основные ссылки, но профессиональные Голд регистрация посетители понимают о доступности дублирующих ресурсов.
Параллельный портал является полную отображение оригинального портала. Криптографические алгоритмы поддерживаются равнозначными. Расчётные процедуры проходят через равнозначные шлюзы.
Методика заведения учётной записи через параллельный ссылку содержит типовой подтверждения. Сотрудники запрашивают документы для исполнения KYC-правил. Идентификационные характеристики выполняют многоуровневую проверку.
Пополнительные пределы на дополнительных порталах соответствуют основным условиям. Минимальные ставки сохраняются фиксированными. Растущие накопления интегрируются между разными ресурсами.
Поощрительные системы работают завершённо на дополнительных площадках. Вейджер удерживает стартовые величины. Период действия реализации не изменяется.
Служба сопровождения решает тикеты с параллельных ресурсов сходным образом. Интерактивный разговор предоставляет беспрерывный формат деятельности.
Проверенные операторы игровых возможностей дают участникам возможность к премиальному азартному досугу через тематические домены, включая лаки Р±РёСЂ казино официальный сайт , которые соблюдают мировые нормы надёжности.
Механизм создания аккаунта necessita внесения валидационных деталей через криптографические SSL-линии. Букмекеры просят предоставить official подтверждение правоспособности и территории residence для поддержания legal правил.
Двухэтапная аутентификация становится принудительным элементом актуальных архитектур надёжности. Участники приобретают SMS-шифры, push-notification или эксплуатируют профессиональные tools в стиле Google Authenticator.
Mirror ссылки преодолевают препятствия региональных санкций и DDoS-assault. По сути дубли образуют аналогичные копии primary домена с maintaining функциональности и личных сведений.
Компетентные игроки рекомендуют хранить обновлённые реестры действующих mirrors в bookmark интернет-программы. Букмекеры доставляют новости о современных ссылках через мейл, Telegram-сообщества и мобильные программы.
Payment movements через официальные сайты гарантированы encryption системами класса банковского области. Получение средств производится исключительно на верифицированные реквизиты держателя account.
范德沃克第二季高清完整官方版,海外华人可免费观看最新热播剧集。
Всем привет!
Нарыл любопытную тему.
Может кому пригодится.
Линк:
kraken darknet market
Как вам?
узнать больше Здесь
krab3 cc
Digital Must-Haves – Everything here feels practical with a modern touch.
Shop Truvora – Smooth navigation and a dependable feel overall.
Здарова народ!
Нашел любопытную статью.
Думаю, многим будет полезно.
Смотрите тут:
kraken зеркало рабочее
Как вам?
Поиск честного казино портала предполагает глубокого рассмотрения регулятивных сертификатов. Современные ресурсы mad casino зеркало дают участникам абсолютную сведения о своих аккредитациях.
Механизм создания профиля подразумевает ряд ключевых стадий проверки. Операторы истребуют бумаги, устанавливающие самобытность и совершеннолетие. Типовой KYC-процесс составляет от 24 до 72 периодов.
Банкролл-менеджмент стартует с определения границ на пополнения. Компетентные пользователи предлагают применять закон 5% от суммарного казино бюджета на единичную раунд.
Системные ограничения поставщиков побуждают внедрять альтернативные адреса. Зеркала сохраняют максимальную производительность первичного ресурса, подразумевая журнал транзакций и казино достижения.
Современные денежные методы гарантируют моментальные инвестиции через блокчейн кошельки. Bitcoin, Ethereum и стейблкоины дают тайность и минимальные комиссии. Время осуществления изъятий доходит 10-30 интервалов.
Алгоритмы лояльности охватывают иерархические статусы с возрастающим вознаграждением. VIP-консультанты дают индивидуальные бонусы, повышенные рамки и первоочередную поддержку.
Подбор безопасного гемблинг ресурса заставляет глубокого рассмотрения юридических сертификатов. Современные сайты винити казино дают клиентам полную информацию о текущих аккредитациях.
Процесс открытия аккаунта подразумевает несколько ключевых шагов валидации. Администраторы просят справки, устанавливающие идентичность и зрелость. Обычный KYC-процесс занимает от 24 до 72 часов.
Распоряжение капиталом инициируется с определения границ на инвестиции. Профессиональные игроки предлагают задействовать правило 5% от общего развлекательного бюджета на единичную раунд.
Программные запреты операторов побуждают задействовать запасные адреса. Копии оберегают безусловную производительность первичного ресурса, охватывая историю платежей и игровой продвижение.
Передовые финансовые сервисы предоставляют скоростные инвестиции через цифровые хранилища. Bitcoin, Ethereum и стабильные валюты поддерживают анонимность и крошечные комиссии. Период реализации изъятий насчитывает 10-30 минут.
Планы лояльности охватывают многоуровневые категории с накапливающимся вознаграждением. VIP-менеджеры дают эксклюзивные поощрения, увеличенные ограничения и преимущественную техподдержку.
Neuro Relief USA over the counter neurontin cost of neurontin 600mg
Здарова народ!
Нашел любопытную инфу.
Думаю, многим будет полезно.
Линк:
сайт kraken darknet
Вроде норм.
online casino cz online casino cz .
Навигация в сфере лицензированных площадок подразумевает осознания современных решений доступа. Умелые участники применяют казино аква для добывания новейшей данных о работающих путях.
Механизм регистрации аккаунта в официальных компаниях охватывает многоуровневую подтверждение. Продвинутые провайдеры используют KYC-системы и AML-правила. Бумажная работа составляет от 24 до 72 промежутков.
Компьютерные способы для прохождения ограничений улучшаются параллельно с ужесточением нормативных инициатив. VPN-инструменты разряда premium предлагают кодирование AES-256 и методы OpenVPN. Постоянство связи критически необходима для привилегированных сессий.
Дублирующие адреса действуют через пространственно расположенные компьютерные инфраструктуры. CDN-структуры осуществляют сокращенную латентность для глобальных пользователей. Техническое роутинг запускается при выявлении блокировки основного ресурса.
Финансовые движения в лицензированных территориях подпадают под конкретным критериям PCI DSS. Децентрализованные расчеты набирают популярность из-за приватности и скорости обработки.
Смартфонные утилиты премиальных брендов совмещают голосовую проверку и push-сообщения для существенных событий. Изменяемый интерфейс самостоятельно изменяется под характеристики монитора.
Veromint Online – Great color palette and layout, navigating the site was smooth.
Нынешние геймеры оказываются с затруднением подключения к официальным площадкам. Компании закрывают первичные URL, но опытные лаки Р±РёСЂ казино официальный сайт пользователи учитывают о функционировании альтернативных порталов.
Дополнительный домен представляет стопроцентную дубликат главного ресурса. Протоколы шифрования функционируют неизменными. Банковские транзакции производятся через те же механизмы.
Алгоритм заведения учётной записи через дополнительный ссылку требует обычной валидации. Операторы просят справки для осуществления KYC-норм. Персональные характеристики подвергаются двухфакторную проверку.
Финансовые лимиты на дополнительных ресурсах равняются стандартным условиям. Наименьшие взносы функционируют фиксированными. Прогрессивные выигрышные пулы интегрируются между разными ссылками.
Стимулирующие планы оперируют целостно на дополнительных порталах. Коэффициент оборота удерживает первоначальные цифры. Временные рамки проигрывания остаётся прежним.
Служба сопровождения изучает заявки с альтернативных ссылок равнозначно. Прямой диалог обеспечивает непрерывный формат функционирования.
海外华人必备的yifan平台,提供最新高清电影、电视剧,无广告观看体验。
cz casino cz casino .
https://remont-stiralnih-mashin-murino.turbo.site/
Огромное спасибо за качественный ремонт стиральных машин в Мурино! Специалист РБТ-Сервис – профессионал: объяснил причину поломки, сделал все четко и дал гарантию на работу.
https://neuroreliefusa.shop/# Neuro Relief USA
Suave Shelf Studio – Modern and vibrant, site feels easy to navigate and shopping experience was smooth.
For comments
where buy lipitor pills
for your safety.
RareWrapp Collection – Clean interface, finding and selecting items is easy and fast.
SnugNook Market – Relaxed and tidy, items are displayed clearly and checkout is simple.
Новейшие игроки пересекаются с огромным количеством программных деталей при процессах с сертифицированными платформами. Тематические ресурсы типа enomo зеркало предоставляют новую контент о процессах азартных операторов.
Алгоритм подтверждения аккаунта подразумевает набор требуемых этапов. Первичная аутентификация включает отправки свидетельств доказывающих субъект. Обычный список включает ID, водительские права или внешний паспорт.
Системная сторона открытия счета включает задействование безопасного соединения и двойной авторизации. Профессиональные участники предлагают активировать максимум имеющихся возможностей секьюрити.
Зеркала составляют идентичные клоны основного портала с удержанием всего функционала. Главное плюс заключается в соответствии платежных границ и требований ставочных требований.
Система локализации действующих резервных ссылок строится на проверке экспертных новостных лент и связанных платформ. Квалифицированные пользователи применяют прокси-соединения для обеспечения стабильного доступа без оглядки от региональных блокировок.
Актуальные платформы игорных продуктов обеспечивают пользователям вход к премиальному азарту через проверенные онлайн казино mad порталы. Авторизованная бизнес подразумевает следования определенных контролирующих критериев.
Система открытия персонального аккаунта задействует подтверждение персональных реквизитов. Управляющие используют расширенные протоколы KYC и AML для пресечения фродовых переводов.
Программные средства передовых казино основываются на защищенных инфраструктурах с SSL алгоритмами. Территориальные ограничения вынуждает управляющих создавать резервные домены.
Зеркальные ресурсы представляют аналогичные репликации базового платформы с удержанием всех инструментов и показателей. Беттеры достигают постоянный вход к счету, развлекательной записям и персональным опциям.
Расчетные операции выполняются через синхронизированные платежные системы. Лимиты на пополнения и обналичивания регулируются в гармонии с регуляторными требованиями и индивидуальными нормами управления рисками.
Квалифицированные пользователи советуют отслеживать ситуацию аккредитации через регуляторные реестры развлекательных организаций. Репутационные показатели охватывают позиции на профильных платформах и feedback истинных участников.
Исследование в секторе лицензированных площадок предполагает понимания актуальных методов доступа. Профессиональные пользователи эксплуатируют Mellstroy Game зеркало для извлечения актуальной сведений о функционирующих адресах.
Механизм оформления учетной записи в официальных учреждениях содержит тщательную проверку. Актуальные провайдеры внедряют KYC-процедуры и AML-стандарты. Документальная процедура требует от 24 до 72 промежутков.
Программные решения для обхода препятствий развиваются параллельно с интенсификацией нормативных мер. VPN-инструменты разряда premium предлагают шифрование AES-256 и методы OpenVPN. Устойчивость коннекта принципиально существенна для премиальных игровых периодов.
Зеркальные ресурсы оперируют через географически размещенные IT кластеры. CDN-архитектуры осуществляют оптимальную задержку для азиатских геймеров. Системное редирект запускается при идентификации барьера первичного ресурса.
Финансовые движения в официальных территориях отвечают строгим нормам PCI DSS. Цифровые платежи набирают признание вследствие анонимности и скорости процессинга.
Планшетные приложения ведущих провайдеров включают голосовую аутентификацию и push-оповещения для критических эпизодов. Изменяемый интерфейс независимо подстраивается под настройки панели.
выберите ресурсы
krab3cc
Нынешние участники попадают с проблемой связи к сертифицированным сайтам. Компании блокируют главные URL, но грамотные казино 1xBet посетители осознают о доступности параллельных платформ.
Резервная ссылка представляет стопроцентную реплику оригинального портала. Средства защиты функционируют неизменными. Денежные переводы проходят через те же механизмы.
Процедура открытия счёта через параллельный ссылку включает привычной проверки. Администраторы уточняют свидетельства для выполнения KYC-требований. Идентификационные данные проходят комплексную проверку.
Пополнительные границы на дополнительных сайтах идентичны первичным параметрам. Низшие беты сохраняются фиксированными. Прогрессивные банки интегрируются между различными порталами.
Льготные схемы выполняются полноценно на дополнительных порталах. Требования по обороту поддерживает оригинальные показатели. Срок активности проигрывания поддерживается.
Департамент ассистирования изучает запросы с дополнительных ссылок таким же способом. Мгновенный разговор поддерживает непрерывный расписание обслуживания.
https://ivertherapeutics.shop/# Iver Therapeutics
sertraline generic: zoloft without rx – sertraline
塔尔萨之王高清完整版,海外华人可免费观看最新热播剧集。
凯伦皮里第二季高清完整官方版,海外华人可免费观看最新热播剧集。
Действующие альтернативные домены легальных гемблинг-платформ на Вавада казино обеспечивают постоянный подключение к игровым системам. Принцип копирования образует эквивалентные копии базового портала с сохранением всех возможностей.
Алгоритм активации через альтернативный домен целиком имитирует главную заявку. Дебютные пользователи вводят функционирующий email, устанавливают надежный код доступа и выбирают рабочую платежное средство.
Идентификация счета требует представления бумаг согласно KYC-регламенту. Фото национального документа, валидация регистрации и финансовые координаты проверяются через алгоритмическую контроль в течение 24-72 периодов.
Авторизация зарегистрированных игроков реализуется через обычную форму с двухфакторной аутентификацией. Одноразовые пароли доставляются на мессенджер гаджет или электронную почту.
Опции денежного блока через зеркала предлагает актуальные расчетные инструменты. Visa, Mastercard, электронные кошельки Skrill, Neteller, блокчейн-токены Bitcoin, Ethereum выполняются с сокращенными процентами 0-3%.
Азартная ассортимент клонируется на сто процентов включая слоты, традиционные активности, live-хостов и джекпоты. RTP-значения, изменчивость и проигрыш фиксируются идентичными.
Подарочная механизм оперирует схоже главному ресурсу. Welcome-комплекты, бесплатные вращения, возврат средств и VIP-программы включаются машинально при реализации фиксированных стандартов.
Актуальные зеркала легальных азартных клубов на п»ї1хбет регистрация предоставляют постоянный соединение к игровым порталам. Схема клонирования строит аналогичные версии основного веб-площадки с консервацией всех возможностей.
Механизм оформления профиля через зеркало полностью копирует стандартную анкету. Только пришедшие игроки вводят валидный email, придумывают стойкий секретную комбинацию и выбирают базовую курренси.
Подтверждение личного кабинета требует загрузки удостоверений по KYC-регламенту. Копия водительских прав, свидетельство места жительства и карточные реквизиты контролируются системой автоматическую анализ в течение 24-72 временных единиц.
Подключение действующих игроков выполняется через классическую модуль с расширенной идентификацией. Временные шифры приходят на мобильный девайс или e-mail адрес.
Инструменты входящего компонента через резервные ссылки обеспечивает актуальные платежные платформы. Visa, Mastercard, электронные кошельки Skrill, Neteller, виртуальные монеты Bitcoin, Ethereum осуществляются с низкими сборами 0-3%.
Развлекательная база копируется на сто процентов включая автоматы, настольные геймплей, live-крупье и прогрессивы. RTP-значения, волатильность и вейджер поддерживаются такими же.
Подарочная механизм работает схоже основному домену. Welcome-пакеты, free spins, денежный возврат и VIP-курсы запускаются алгоритмически при реализации фиксированных требований.
Новейшие провайдеры развлекательных игр дают клиентам доступ к высококлассному гемблингу через безопасные лова казино сайты. Авторизованная деятельность подразумевает учета строгих правовых норм.
Процесс создания пользовательского профиля задействует проверку конфиденциальных информации. Провайдеры применяют комплексные алгоритмы KYC и AML для исключения фродовых финансовых действий.
Электронные инструменты актуальных развлекательных порталов строятся на безопасных инфраструктурах с SSL технологиями. Региональная блокировка побуждает провайдеров разрабатывать дублирующие URL.
Зеркальные сайты образуют идентичные дубликаты первичного ресурса с поддержанием всех инструментов и информации. Пользователи обеспечивают себе постоянный доступ к балансу, беттинг отчетности и пользовательским установкам.
Финансовые процедуры производятся через интегрированные денежные шлюзы. Пределы на вклады и снятия фиксируются в согласии с законодательными требованиями и организационными процедурами риск-менеджмента.
Квалифицированные игроки настаивают контролировать статус лицензии через контролирующие списки беттинг организаций. Престижные показатели предусматривают оценки на экспертных сайтах и feedback действительных клиентов.
Нынешние игроки сталкиваются с изобилием технологических деталей при работе с проверенными порталами. Специализированные сайты типа Рльдорадо казино обеспечивают релевантную данные о работе азартных компаний.
Алгоритм проверки счета предполагает комплекс требуемых уровней. Стартовая подтверждение включает размещения бумаг удостоверяющих индивидуальность. Обычный набор подразумевает свидетельство, лицензию водителя или внешний паспорт.
Системная сторона регистрации охватывает применение зашифрованного канала и 2FA. Опытные геймеры настаивают инициировать максимум доступных опций обеспечения.
Резервные ссылки являются точные дубликаты главного ресурса с удержанием тотального арсенала. Основное плюс содержится в соответствии платежных лимитов и норм вейджера.
Механизм выявления актуальных альтернативных адресов основывается на контроле специализированных мессенджер групп и связанных ресурсов. Квалифицированные участники внедряют VPN-сервисы для создания бесперебойного связи безотносительно от местных блокировок.
walmart pharmacy online pharmacy
Open Cartopia Online – Filtering items was simple, and overall browsing is enjoyable and smooth.
Nova Aisle Goods – Good assortment, and the filter options made browsing fast and simple.
1win retragere maxima http://www.1win5756.help
Навигация в секторе лицензированных порталов подразумевает понимания актуальных методов подключения. Профессиональные игроки внедряют казино ретро для обретения современной информации о работающих адресах.
Схема формирования профиля в лицензированных заведениях содержит тщательную проверку. Передовые поставщики эксплуатируют KYC-системы и AML-требования. Документооборот потребляет от 24 до 72 временных отрезков.
Цифровые методы для минования ограничений улучшаются сообща с повышением регуляторных мер. VPN-службы категории premium предлагают защиту AES-256 и протоколы OpenVPN. Устойчивость подключения критически значима для элитных партий.
Запасные сайты действуют через пространственно расположенные IT кластеры. CDN-системы гарантируют сокращенную отклик для глобальных пользователей. Автоматическое перенаправление инициируется при идентификации блокировки первичного портала.
Финансовые манипуляции в сертифицированных регионах отвечают строгим правилам PCI DSS. Децентрализованные расчеты увеличивают распространение из-за анонимности и динамике реализации.
Планшетные софт элитных организаций содержат физиологическую авторизацию и push-уведомления для важных ситуаций. Изменяемый дизайн автоматически подстраивается под свойства панели.
Поиск надежного гемблинг ресурса требует глубокого изучения правовых сертификатов. Современные сайты тип топ казино РІС…РѕРґ предлагают пользователям стопроцентную факты о имеющихся допусках.
Алгоритм создания профиля содержит различные необходимых ступеней подтверждения. Провайдеры требуют справки, засвидетельствующие самобытность и зрелость. Обычный KYC-процесс составляет от 24 до 72 интервалов.
Финансовое планирование открывается с задания рамок на взносы. Опытные пользователи рекомендуют внедрять принцип 5% от общего казино бюджета на индивидуальную раунд.
Программные запреты поставщиков обязывают применять запасные маршруты. Клоны хранят максимальную работоспособность первичного платформы, предусматривая летопись операций и игровой успех.
Передовые расчетные методы гарантируют мгновенные пополнения через цифровые хранилища. Bitcoin, Ethereum и стабильные валюты гарантируют конфиденциальность и символические взносы. Период реализации снятий насчитывает 10-30 промежутков.
Планы лояльности подразумевают каскадные степени с нарастающим кэшбэком. VIP-консультанты обеспечивают личные вознаграждения, повышенные рамки и ускоренную поддержку.
casino cz casino cz .
fiorenzaa.shop – A beautifully curated selection of fashion and home goods, absolutely love it!
SeedStation Market – Intuitive interface, product info is thorough and shopping was a breeze.
v?hern? automaty online v?hern? automaty online .
Bowl Boutique online store – Elegant kitchen items, very easy to navigate and purchase.
Pebble Port Deals – Simple navigation, checkout flowed smoothly.
Prime Pickings Storefront – Diverse selection, browsing and choosing items was simple and pleasant.
Отбор надежного азартного портала нуждается детального анализа официальных свидетельств. Инновационные порталы Килограмм казино дают клиентам максимальную факты о имеющихся разрешениях.
Система открытия аккаунта охватывает несколько необходимых этапов валидации. Операторы просят справки, подтверждающие личность и зрелость. Стандартный KYC-алгоритм занимает от 24 до 72 часов.
Управление банком стартует с определения пределов на пополнения. Квалифицированные геймеры призывают использовать установку 5% от общего игорного фонда на отдельную игру.
Программные блокировки владельцев вынуждают задействовать резервные ссылки. Зеркала поддерживают полную функциональность главного сайта, предусматривая архив транзакций и казино успех.
Передовые платежные инструменты дают оперативные депозиты через электронные аккаунты. Bitcoin, Ethereum и постоянные токены обеспечивают анонимность и символические отчисления. Срок выполнения извлечений достигает 10-30 отрезков.
Алгоритмы верности охватывают каскадные статусы с увеличивающимся возвратом. VIP-консультанты предлагают уникальные вознаграждения, увеличенные пределы и приоритетную помощь.
Palvion Essentials Hub – Pleasant interface, product details are easy to see and understand.
Передовые сервисы игорных игр обеспечивают беттерам подключение к высококлассному развлечениям через защищенные Рльдорадо казино порталы. Официальная операционная активность требует соблюдения конкретных регуляторных норм.
Процесс открытия игрового учетной записи охватывает проверку индивидуальных сведений. Операторы применяют детализированные алгоритмы KYC и AML для недопущения незаконных операций.
IT инструменты актуальных казино строятся на надежных инфраструктурах с SSL технологиями. Территориальные ограничения обязывает операторов внедрять параллельные адреса.
Параллельные платформы составляют точные копии центрального платформы с поддержанием всех сервисов и данных. Пользователи обеспечивают себе устойчивый соединение к балансу, гемблинг статистике и клиентским опциям.
Платежные транзакции осуществляются через синхронизированные финансовые системы. Рамки на взносы и обналичивания определяются в гармонии с регуляторными критериями и внутренними процедурами риск-менеджмента.
Квалифицированные игроки настаивают отслеживать условия разрешения через регуляторные регистры развлекательных комиссий. Имиджевые параметры предусматривают ранги на профильных порталах и отзывы истинных участников.
clovecrest.shop – Excellent range of products, shopping is a breeze.
Mint Mariner Finds – Nice variety overall, locating what I wanted was easy.
тканевые электрожалюзи zhalyuzi-s-elektroprivodom77.ru .
коммуникация domeo domeo-otzivy.com .
zoloft medication: generic zoloft – Sertraline USA
Азартная индустрия демонстрирует интенсивный расширение, привлекая массы пользователей. Грамотные порталы предлагают безопасную условия для беттинга. Подробную данные о подобных операторах доступно обнаружить на Килограмм казино .
Сертификация составляет основным показателем определения платформы. Юрисдикции Гибралтара дают жёсткий мониторинг экономических транзакций. Отдельная лицензированная сайт проходит плановые инспекции RNG-алгоритмов.
Цифровые параметры инновационных беттинг-платформ включают SSL-защиту финансового категории. Производители компьютерного софта вроде Microgaming, NetEnt, Pragmatic Play добавляют усовершенствованные механизмы рандомных значений.
Процесс валидации аккаунта предполагает направления свидетельств KYC-стандарта. Паспорт, документ о средствах, валидация адреса — обычный набор для полноценного активации.
Альтернативные адреса решают сложности с ограничениями организаций. Функционирующие альтернативы изменяются регулярно техническими группами. Мобильные программы нередко действуют лучше интернет модификаций.
Управление банкроллом создаёт стратегическую эффективность азартных сессий. Грамотные геймеры настаивают сокращать количество ставки до 1-2% от общего капитала.
Rutor заработал статус важного игрока на darknet-рынке благодаря длительной работе, инструментам для анонимности, устойчивому сервису и тор-поддержке защищённых транзакций.Rutor — старейший представитель даркнета на русском языке
rutor darknet считается одним из наиболее популярных и старых ресурсов в рунет-даркнете, который прочно закрепился в инфраструктуре анонимных площадок. Основное направление работы ресурса — предоставление обширной базы файлов, утилит, новостей и прочего контента, в том числе, связанного с темами безопасности и взлома.
Главные аспекты функционирования Rutor
Механизм работы ресурса позволяет пользователям получать доступ к большим массивам данных и файлов, при этом обеспечивая максимальную приватность и анонимность. Главное преимущество платформы — интеграция с сетью Rutor, что значительно уменьшает вероятность раскрытия личности и потери конфиденциальной информации. За годы существования Rutor стал местом, где сохраняется важная история русскоязычного даркнета.
Rutor поддерживает стабильную работу, позволяя и новичкам, и опытным пользователям использовать предоставляемые сервисы. Система построена таким образом, что каждый раздел страницы — будь то магазин, новости или инструкции по взлому — становится отдельной частью большого сообщества, в котором безопасность и возможность оставаться анонимным выходят на первый план.
Перспективы и риски
Безусловно, дальнейшая история Rutor будет связана с новыми формами риска, новыми способами защиты конфиденциальности и методами обхода блокировок. Следует помнить, что даже максимально анонимная среда не обеспечивает стопроцентную безопасность.
Сервис остается местом, где можно получать дополнительную информацию, обсуждать вопросы безопасности, следить за новостями и инновациями в области даркнета. Технический прогресс, рост числа участников и новые функциональные решения превращают Rutor в ключевой узел русскоязычного интернет-сообщества.
– Принцип анонимности
– Гарантия безопасности сделок
– Открытый доступ к специализированному контенту
– Конфиденциальность общения
Уникальный путь Rutor делает платформу значимой для тех, кто высоко ценит свободу, личную приватность и защиту от внешнего контроля в цифровую эпоху.
Современные геймеры оказываются с затруднением подключения к проверенным площадкам. Поставщики ограничивают первичные адреса, но опытные Clubnika казино пользователи осознают о функционировании параллельных порталов.
Дополнительный домен образует абсолютную воспроизведение базового платформы. Криптографические алгоритмы функционируют такими же. Денежные действия реализуются через идентичные сервисы.
Схема регистрации через параллельный ресурс подразумевает привычной аутентификации. Специалисты запрашивают удостоверения для исполнения KYC-требований. Личные данные выполняют двухфакторную проверку.
Пополнительные лимиты на параллельных платформах аналогичны стандартным параметрам. Наименьшие вклады поддерживаются неизменными. Прогрессивные банки синхронизируются между разными порталами.
Поощрительные программы выполняются комплексно на параллельных сайтах. Вейджер сохраняет базовые показатели. Временные рамки проигрывания продолжается.
Служба ассистирования изучает запросы с альтернативных порталов сходным образом. Прямой общение обеспечивает беспрерывный формат обслуживания.
Здарова народ!
Нарыл интересную тему.
Думаю, многим будет полезно.
Смотрите тут:
кракен onion сайт
Мне зашло.
https://sertralineusa.com/# Sertraline USA
Выбор безопасного азартного портала подразумевает тщательного анализа официальных бумаг. Инновационные порталы казино СЌРЅРѕРјРѕ гарантируют геймерам стопроцентную детали о текущих лицензиях.
Механизм получения доступа содержит множество ключевых ступеней валидации. Операторы просят удостоверения, засвидетельствующие персону и совершеннолетие. Обычный KYC-регламент длится от 24 до 72 промежутков.
Управление банком открывается с назначения лимитов на депозиты. Квалифицированные клиенты рекомендуют задействовать принцип 5% от общего азартного средств на конкретную раунд.
Электронные ограничения администраторов принуждают применять запасные ссылки. Дубликаты хранят безусловную эффективность базового сайта, предусматривая историю транзакций и азартный продвижение.
Инновационные расчетные сервисы дают быстрые взносы через блокчейн хранилища. Bitcoin, Ethereum и постоянные токены поддерживают приватность и крошечные сборы. Срок реализации выводов доходит 10-30 периодов.
Схемы преданности охватывают многоуровневые категории с увеличивающимся кэшбэком. VIP-менеджеры дают эксклюзивные подарки, повышенные пределы и преимущественную сервис.
Надёжные площадки развлекательных сервисов гарантируют участникам доступ к профессиональному развлечениям через dedicated сайты, включая mad casino , которые именно соблюдают transnational требования безопасности.
Механизм оформления профиля предполагает предоставления проверочных сведений через криптографические SSL-каналы. Администрация просят письменное свидетельство age verification и адреса residence для поддержания правовых стандартов.
Multi-factor проверка представляет обязательным aspect актуальных платформ защиты. Участники располагают SMS-коды, push-алерты или применяют targeted приложения типа Google Authenticator.
Резервные ссылки ликвидируют проблемы локальных ограничений и DDoS-assault. Технически копии формируют идентичные реплики primary домена с обеспечением функциональности и user деталей.
Skilled пользователи рекомендуют удерживать обновлённые базы активных дублей в favourites интернет-программы. Администрация передают информацию о современных адресах через электронную почту, Telegram-чаты и смартфонные программы.
Платёжные транзакции через официальные порталы обеспечены шифровальными алгоритмами стандарта банковского индустрии. Extraction капитала выполняется только на подтверждённые wallets держателя аккаунта.
https://sertralineusa.com/# Sertraline USA
ответы к тесту iq
айкью среднего человека в россии
тест на qi бесплатно
уровень qi
тест айкью пройти бесплатно
iq показатели нормы
тест азейкена на iq
как узнать свой iq без теста
iq тест результаты
тест на iq 16 лет
тест на уровень iq пройти бесплатно онлайн
iq online test
Исследование в мире официальных ресурсов включает знания передовых методов соединения. Профессиональные пользователи применяют СЌРЅРѕРјРѕ казино для получения современной данных о оперативных доменах.
Механизм формирования профиля в сертифицированных операторах включает детальную аутентификацию. Современные организации используют KYC-механизмы и AML-стандарты. Документальное сопровождение занимает от 24 до 72 промежутков.
Компьютерные инструменты для минования барьеров развиваются одновременно с интенсификацией правовых инициатив. VPN-платформы категории premium дают защиту AES-256 и протоколы OpenVPN. Постоянство коннекта критически значима для VIP партий.
Дублирующие платформы оперируют через регионально расположенные цифровые мощности. CDN-системы гарантируют быструю задержку для международных игроков. Программное роутинг запускается при идентификации недоступности центрального ресурса.
Экономические движения в легальных юрисдикциях подчиняются четким требованиям PCI DSS. Криптовалютные платежи набирают распространение в результате конфиденциальности и быстроте осуществления.
Планшетные утилиты лучших провайдеров интегрируют физиологическую подтверждение и push-извещения для принципиальных ситуаций. Гибкий дизайн самостоятельно настраивается под параметры панели.
Новейшие пользователи встречаются с огромным количеством технологических деталей при операциях с официальными сайтами. Специализированные платформы типа РЎСѓРєР° казино дают свежую данные о операциях казино компаний.
Процесс подтверждения кабинета предполагает несколько обязательных фаз. Базовая верификация требует размещения удостоверений удостоверяющих персону. Классический пакет охватывает ID, права или загранпаспорт.
Программная составляющая регистрации подразумевает применение зашифрованного канала и двойной авторизации. Профессиональные геймеры советуют инициировать совокупность предложенных возможностей безопасности.
Зеркала формируют идентичные отражения базового ресурса с поддержанием исчерпывающего инструментария. Важнейшее плюс выражается в схожести расчетных рамок и норм условий прокрутки.
Схема нахождения функционирующих альтернативных адресов основывается на наблюдении специализированных уведомительных сервисов и связанных порталов. Экспертные игроки внедряют виртуальные частные сети для создания надежного связи вне зависимости от региональных блокировок.
Thanks for one’s marvelous posting! I certainly enjoyed reading it, you will be a great author.I will make sure to bookmark your blog and will come back sometime soon. I want to encourage you continue
your great job, have a nice weekend!
Новейшие порталы гемблинг игр предоставляют клиентам возможность к элитному развлечениям через защищенные СЌРЅРѕРјРѕ казино порталы. Легальная работа подразумевает учета жестких регуляторных требований.
Механизм создания персонального счета содержит валидацию индивидуальных информации. Администраторы внедряют детализированные протоколы KYC и AML для пресечения нарушающих операций.
Программные платформы современных гемблинг платформ функционируют на зашифрованных облачных системах с TLS алгоритмами. Геоблокировка заставляет владельцев запускать дублирующие URL.
Дублирующие платформы формируют идентичные дубликаты базового ресурса с удержанием всех функций и сведений. Участники приобретают беспрепятственный подключение к счету, беттинг записям и клиентским параметрам.
Расчетные транзакции производятся через синхронизированные банковские системы. Ограничения на инвестиции и получения назначаются в соотношении с правовыми положениями и организационными нормами минимизации опасностей.
Профессиональные клиенты настаивают отслеживать условия аккредитации через регуляторные базы данных развлекательных организаций. Имиджевые параметры предусматривают оценки на профильных порталах и мнения подлинных беттеров.
Проверенные провайдеры гэмблинг предложений обеспечивают пользователям право к премиальному игровому процессу через профильные порталы, включая казино миллионъ , что выполняют transnational регламенты безопасности.
Алгоритм открытия счёта включает заполнения идентификационных информации через encrypted SSL-соединения. Менеджмент просят предоставить документальное verification дееспособности и региона проживания для compliance юрисдикционных правил.
2FA authentication представляет необходимым составляющей современных платформ security. Клиенты располагают SMS-пароли, push-алерты или используют targeted tools по типу Google Authenticator.
Mirror адреса ликвидируют трудности географических барьеров и DDoS-атак. С технической точки зрения реплики являют идентичные клоны primary портала с maintaining функциональности и пользовательских данных.
Опытные игроки предлагают поддерживать свежие каталоги рабочих альтернатив в закладках браузера. Провайдеры направляют обновления о актуальных URL через электронную почту, Telegram-каналы и мобильные программы.
Банковские movements через надёжные ресурсы гарантированы защитными протоколами уровня банковского направления. Вывод средств производится solely на проверенные счета держателя аккаунта.
For a directory
call quicken loans
for best practices.
zoloft without dr prescription: zoloft buy – sertraline generic
Suave Basket Select Online – Clean and minimal, items are easy to find and checkout went perfectly.
SleekSelect Treasure Picks – Clean and stylish, browsing products is intuitive and enjoyable.
Выбор качественного игрового заведения в сегодняшних обстоятельствах нуждается тщательного внимания к лицензионному положению. Профессиональные участники учитывают, что Гризли зеркало демонстрирует актуальную факты о действующих сервисах.
Алгоритм регистрации в официальных сервисах предусматривает обязательную подтверждение личности. KYC-требования охраняют как заведение, так и геймера от обмана. Промежуточные пределы на вывод денег до завершения валидации – нормальная процедура.
Виртуальные барьеры на вход к гемблинг площадкам решаются через резервные URL. Функционирующие зеркала сохраняют полную производительность первичного сервиса. Банковские процедуры, развлекательный статистика и привилегированные предложения сохраняются устойчивыми.
Капитальная защищенность измеряется степенью применяемых банковских систем. SSL-кодирование, PCI DSS подтверждение и многоуровневая подтверждение устанавливают стабильный барьер защиты.
Развлекательная коллекция официальных заведений охватывает барабаны от ведущих производителей. RTP-параметры, колебания и расчетные формулы проходят беспристрастную сертификацию в утвержденных институтах.
Системы вознаграждения в профессиональных сервисах строятся на открытых требованиях вейджера. Вейджер x35-40 расценивается нормальным для автомат-поощрений, в то время как классические забавы учитываются в расчет с минимальным фактором.
stromectol 3 mg tablets price ivermectin lotion price Iver Therapeutics
Quoravia Finds – Sleek and modern, navigating categories was quick and checkout went smoothly.
Поиск в пространстве официальных сайтов нуждается знания новых инструментов соединения. Квалифицированные клиенты задействуют tip top РІС…РѕРґ для извлечения новейшей материалов о работающих адресах.
Процедура оформления личного кабинета в надежных компаниях охватывает сложную проверку. Продвинутые компании задействуют KYC-протоколы и AML-нормы. Документальное сопровождение составляет от 24 до 72 интервалов.
Компьютерные способы для прохождения препятствий развиваются вместе с интенсификацией законодательных шагов. VPN-инструменты разряда premium предоставляют защиту AES-256 и системы OpenVPN. Надежность связи принципиально существенна для высокоролловых партий.
Альтернативные домены оперируют через географически размещенные IT кластеры. CDN-структуры гарантируют сокращенную время ответа для международных геймеров. Техническое маршрутизация запускается при идентификации блокировки главного сайта.
Экономические манипуляции в проверенных территориях отвечают конкретным требованиям PCI DSS. Крипто расчеты завоевывают признание из-за конфиденциальности и темпу реализации.
Смартфонные приложения элитных компаний включают лицевую подтверждение и push-извещения для ключевых событий. Настраиваемый интерфейс самостоятельно корректируется под особенности матрицы.
https://www.google.de/url?q=https://actual-cosmetology.ru/pgs/promokod_pokerdom_bonus_pri_registracii.html
tramadol usa pharmacy http://salepharmacies.shop/# us online pharmacy
узнать больше
krab4 cc
Инновационные операторы беттинг продуктов дают игрокам вход к премиальному беттингу через защищенные JVSpin casino порталы. Легальная операционная активность нуждается учета строгих надзорных стандартов.
Алгоритм активации индивидуального профиля содержит аутентификацию индивидуальных данных. Регуляторы эксплуатируют многоуровневые процедуры KYC и AML для предотвращения фродовых транзакций.
Программные инструменты передовых игорных домов основываются на стабильных инфраструктурах с шифровальными технологиями. Локальные запреты заставляет управляющих внедрять параллельные порталы.
Альтернативные платформы являют собой аналогичные копии первичного сайта с сохранением всех сервисов и сведений. Участники добиваются стабильный связь к счету, беттинг статистике и пользовательским параметрам.
Финансовые переводы осуществляются через интегрированные денежные агрегаторы. Лимиты на взносы и изъятия назначаются в соответствии с нормативными положениями и собственными регламентами минимизации опасностей.
Квалифицированные пользователи советуют отслеживать условия разрешения через контролирующие базы данных игорных организаций. Престижные критерии включают ранги на специализированных порталах и оценки настоящих участников.
Определение безопасного игрового портала в сегодняшних условиях заставляет тщательного рассмотрения к лицензионному статусу. Квалифицированные игроки представляют, что Tippy демонстрирует свежую материалы о функционирующих сервисах.
Алгоритм оформления профиля в официальных сервисах содержит неизбежную подтверждение документов. KYC-требования защищают как казино, так и клиента от фрода. Краткосрочные рамки на изъятие финансов до окончания контроля – стандартная процедура.
Электронные ограничения на вход к betting ресурсам преодолеваются через альтернативные адреса. Рабочие дубликаты сохраняют стопроцентную функциональность центрального ресурса. Денежные операции, геймплейный продвижение и привилегированные программы продолжают константными.
Экономическая безопасность измеряется уровнем эксплуатируемых банковских механизмов. SSL-шифрование, PCI DSS сертификация и двухфакторная идентификация устанавливают стабильный контур охраны.
Развлекательная каталог официальных сервисов содержит барабаны от ведущих студий. RTP-индексы, вариативность и вероятностные модели подвергаются беспристрастную контроль в аккредитованных центрах.
Схемы лояльности в достойных сервисах базируются на ясных требованиях проигрыша. Отыгрыш x35-40 характеризуется справедливым для спин-льгот, в то время как классические активности идут в расчет с уменьшенным фактором.
fetchfolio.shop – The accessories are always fresh and on-point, great choices all around.
Nook Narrative Picks – Items feel carefully chosen, and the narrative angle adds a unique charm.
pin-up horarios de retiro pin-up horarios de retiro
ScreenStride Central – Sleek and clear, categories are simple to explore and buying was fast.
Новейшие операторы азартных развлечений предлагают пользователям доступ к премиальному гемблингу через безопасные винити казино платформы. Сертифицированная работа подразумевает соблюдения определенных правовых критериев.
Процесс регистрации персонального аккаунта предусматривает проверку индивидуальных реквизитов. Управляющие внедряют расширенные алгоритмы KYC и AML для пресечения фродовых операций.
Электронные решения современных гемблинг платформ базируются на зашифрованных дата-центрах с HTTPS алгоритмами. Геоблокировка заставляет провайдеров организовывать резервные адреса.
Зеркальные сайты представляют полные репликации базового портала с сохранением всех опций и информации. Клиенты получают устойчивый подключение к капиталу, развлекательной данным и пользовательским конфигурациям.
Финансовые операции осуществляются через связанные денежные шлюзы. Границы на инвестиции и получения определяются в унисон с законодательными условиями и индивидуальными регламентами контроля угроз.
Квалифицированные игроки указывают проверять ситуацию лицензии через государственные базы данных развлекательных органов. Престижные индикаторы содержат места на экспертных платформах и feedback настоящих участников.
Функционирующие зеркала легальных гемблинг-платформ на Клубника казино дают непрерывный коннект к игровым сервисам. Система клонирования строит полноценные дубликаты корневого сайта с поддержанием всех возможностей.
Алгоритм оформления профиля через альтернативный домен полностью воспроизводит стандартную бланк. Свежие пользователи регистрируют рабочий email, устанавливают сложный пароль и выбирают базовую денежную единицу.
Валидация счета предполагает представления удостоверений согласно KYC-стандартам. Фото ID-карты, свидетельство проживания и денежные реквизиты проверяются через алгоритмическую валидацию в течение 24-72 периодов.
Вход действующих геймеров производится через обычную форму с многоступенчатой проверкой. Сессионные шифры поступают на телефонный гаджет или e-mail адрес.
Инструменты финансового раздела через альтернативные домены содержит популярные финансовые платформы. Visa, Mastercard, веб портмоне Skrill, Neteller, блокчейн-токены Bitcoin, Ethereum обрабатываются с низкими сборами 0-3%.
Развлекательная база клонируется полностью включая машины, классические забавы, live-дилеров и максимальные награды. RTP-показатели, волатильность и проигрыш остаются неизменными.
Подарочная программа выполняется аналогично центральному домену. Welcome-наборы, фриспины, компенсация и VIP-программы инициируются машинально при исполнении прописанных параметров.
Prime Pickings Showcase – Great assortment, product info was clear and shopping was enjoyable.
Plaza Storefront – Browsing categories feels enjoyable, images are sharp and info is clear.
Prime Secured
3603 N 222nd Ꮪt, Suite 102,
Elkhorn, NЕ 68022, United States
402-289-4126
Bookmarks – http://www.protopage.com,
http://bajameddirect.com/# BajaMed Direct
https://remont-stiralnih-mashin-murino.turbo.site/
Отличный мастер по ремонту стиральных машин в Мурино из РБТ-Сервис! Починил мою машину, которая не сливала воду. Диагностика и ремонт прямо на дому. Теперь все отлично работает.
Rutor — ветеран русскоязычного даркнета с репутацией, анонимной системой и сервисом для безопасных транзакций в сети Rutor.Rutor: Один из ключевых проектов русскоязычного даркнета
сайт rutor считается одним из наиболее популярных и старых ресурсов в рунет-даркнете, который прочно закрепился в инфраструктуре анонимных площадок. Этот магазин ориентирован на предоставление пользователям широкой базы данных, связанной с файлами, софтом, новостями и различными видами контента, включая темы, касающиеся взлома и безопасности.
Главные аспекты функционирования Rutor
Данная система обеспечивает доступ к значительным объемам данных и файлов, гарантируя при этом повышенную анонимность и защиту пользователей. Работа сервиса построена на использовании анонимной сети Rutor, что помогает свести к минимуму угрозы идентификации и утечки данных. За годы существования Rutor стал местом, где сохраняется важная история русскоязычного даркнета.
Rutor поддерживает стабильную работу, позволяя и новичкам, и опытным пользователям использовать предоставляемые сервисы. Архитектура ресурса предусматривает, что любые разделы — магазин, новостной блок или гайды по взлому — являются составляющими единой системы, где превалируют безопасность и анонимность.
Перспективы и риски
Безусловно, дальнейшая история Rutor будет связана с новыми формами риска, новыми способами защиты конфиденциальности и методами обхода блокировок. Пользователи должны осознавать, что даже самая анонимная система не гарантирует полной безопасности.
Этот сервис по-прежнему служит площадкой для информирования, обсуждений безопасности и отслеживания новшеств в даркнет-сообществе. Улучшение технологий, увеличение аудитории и внедрение инноваций способствуют статусу Rutor как центрального элемента русскоязычного онлайн-сообщества.
– Анонимность
– Гарантия безопасности сделок
– Возможность получения эксклюзивных данных
– Защищённость коммуникаций
Уникальный путь Rutor делает платформу значимой для тех, кто высоко ценит свободу, личную приватность и защиту от внешнего контроля в цифровую эпоху.
Подбор качественного развлекательного заведения в текущих рамках предполагает детального внимания к законному статусу. Компетентные геймеры осознают, что СЌРЅРѕРјРѕ казино демонстрирует актуальную материалы о работающих площадках.
Алгоритм создания аккаунта в официальных операторах объединяет требуемую подтверждение удостоверения. KYC-нормы охраняют как оператора, так и участника от мошенничества. Кратковременные лимиты на изъятие денег до завершения проверки – привычная система.
Программные препятствия на связь к гемблинг сайтам решаются через параллельные URL. Активные зеркала поддерживают абсолютную функциональность первичного портала. Расчетные движения, геймплейный статистика и наградные программы остаются константными.
Экономическая стабильность оценивается степенью применяемых платежных методов. SSL-защита, PCI DSS лицензирование и расширенная верификация устанавливают надежный контур охраны.
Интерактивная коллекция сертифицированных операторов содержит машины от лидирующих провайдеров. RTP-коэффициенты, волатильность и алгоритмические схемы проходят внешнюю валидацию в утвержденных лабораториях.
Системы лояльности в профессиональных площадках формируются на понятных условиях ставок. Проигрыш x35-40 расценивается разумным для спин-поощрений, в то время как традиционные активности учитываются в зачет с сниженным коэффициентом.
opalornate.shop – Stunning designs, browsing the site was a delight and everything feels premium.
Проверенные ресурсы игровых сервисов предоставляют пользователям вариант к высококлассному азартному досугу через профильные сайты, включая mad casino зеркало , которые точно выполняют transnational критерии security.
Алгоритм оформления профиля требует предоставления проверочных деталей через криптографические SSL-линии. Букмекеры demanded нотариальное доказательство возраста и места регистрации для соблюдения правовых норм.
Многоуровневая проверка выступает обязательным составляющей новейших solutions защиты. Users имеют SMS-токены, push-уведомления или задействуют targeted софт в стиле Google Authenticator.
Резервные домены преодолевают трудности geographic ограничений и DDoS-атак. С технической точки зрения дубли образуют идентичные клоны primary портала с сохранением функциональности и клиентских сведений.
Опытные геймеры рекомендуют keeping current реестры активных копий в favourites browser. Провайдеры рассылают сведения о fresh ссылках через e-mail, Telegram-группы и смартфонные программы.
Финансовые операции через лицензионные ресурсы покрыты encryption протоколами уровня банковского индустрии. Изъятие финансов осуществляется единственно на верифицированные реквизиты обладателя account.
мостбет plinko Кыргызстан https://www.mostbet12037.ru
Palvanta Boutique Finds – Sophisticated designs, product explanations are simple and accurate.
Great beat ! I wish to apprentice whilst you amend your site,
how could i subscribe for a blog web site? The account helped me
a acceptable deal. I have been a little bit familiar of this your
broadcast provided shiny clear concept
http://indogenericexport.com/# tizanidine hydrochloride
Определение проверенного казино оператора требует тщательного разбора лицензионных свидетельств. Современные системы lucky bear казино предлагают клиентам безусловную сведения о своих допусках.
Механизм регистрации включает несколько ключевых шагов верификации. Представители истребуют удостоверения, доказывающие личность и правоспособность. Стандартный KYC-регламент занимает от 24 до 72 часов.
Управление банком начинается с задания ограничений на взносы. Профессиональные пользователи советуют использовать принцип 5% от полного развлекательного резерва на одну игру.
Технические запреты поставщиков побуждают эксплуатировать дополнительные маршруты. Альтернативы хранят максимальную функциональность основного площадки, подразумевая историю операций и азартный успех.
Инновационные денежные сервисы обеспечивают быстрые вклады через криптовалютные счета. Bitcoin, Ethereum и фиксированные активы предоставляют приватность и символические сборы. Период обработки извлечений достигает 10-30 периодов.
Системы приверженности предусматривают многоуровневые категории с прогрессивным вознаграждением. VIP-кураторы обеспечивают уникальные поощрения, повышенные границы и ускоренную обслуживание.
Надёжные операторы азартных предложений дают пользователям вариант к профессиональному гэмблингу через целевые домены, включая Лев казино , которые соблюдают глобальные регламенты security.
Механизм открытия счёта предполагает ввода идентификационных сведений через криптографические SSL-протоколы. Провайдеры demanded официальное verification совершеннолетия и территории жительства для выполнения нормативных норм.
Двухэтапная идентификация является необходимым aspect новейших архитектур надёжности. Игроки располагают SMS-ключи, push-notification или применяют специализированные софт вроде Google Authenticator.
Зеркальные домены ликвидируют сложности региональных блокировок и DDoS-атак. С технической точки зрения реплики представляют идентичные dublicates primary платформы с поддержанием возможностей и индивидуальных данных.
Экспертные геймеры рекомендуют хранить свежие перечни действующих дублей в избранном браузера. Операторы передают информацию о актуальных порталах через e-mail, Telegram-communities и смартфонные софт.
Финансовые процедуры через лицензионные порталы защищены encryption methods категории банковского сектора. Вывод фондов выполняется solely на подтверждённые wallets держателя аккаунта.
Здарова народ!
Нарыл интересную информацию.
Советую глянуть.
Линк:
kraken актуальные ссылки
Вроде норм.
mexico city pharmacy: mail order pharmacy mexico – best mexican pharmacy online
Перемещение в секторе сертифицированных сайтов нуждается знания продвинутых способов входа. Профессиональные пользователи задействуют казино Голд для добывания релевантной сведений о работающих путях.
Процесс создания аккаунта в проверенных операторах предполагает сложную аутентификацию. Передовые компании задействуют KYC-системы и AML-правила. Документальная процедура отнимает от 24 до 72 временных отрезков.
Программные решения для обхода блокировок улучшаются параллельно с интенсификацией юридических действий. VPN-сервисы класса premium предлагают безопасность AES-256 и стандарты OpenVPN. Надежность канала кардинально значима для VIP сессий.
Зеркальные адреса действуют через географически рассредоточенные цифровые мощности. CDN-комплексы гарантируют низкую задержку для международных игроков. Техническое переключение инициируется при распознавании ограничения основного портала.
Финансовые операции в официальных юрисдикциях соответствуют четким нормам PCI DSS. Цифровые операции увеличивают признание в результате анонимности и скорости выполнения.
Переносные софт ведущих брендов содержат физиологическую подтверждение и push-извещения для принципиальных ситуаций. Модифицируемый оформление автоматически изменяется под особенности матрицы.
Гемблинговая область являет динамичный расширение, манящая миллионы пользователей. Квалифицированные платформы дают надёжную пространство для пари. Полную информацию о указанных компаниях можно найти на казино типпи .
Легализация остаётся главным критерием определения сайта. Лицензиаты Великобритании обеспечивают жёсткий проверку расчётных транзакций. Всякая сертифицированная портал реализует плановые ревизии RNG-генераторов.
IT параметры новейших гемблинг-сайтов охватывают SSL-безопасность финансового уровня. Производители компьютерного продукта класса Microgaming, NetEnt, Pragmatic Play подключают продвинутые механизмы рандомных параметров.
Механизм аутентификации личного кабинета требует представления документов KYC-типа. ID, выписка о средствах, подтверждение регистрации — типичный список для завершённого входа.
Резервные адреса устраняют барьеры с фильтрацией организаций. Свежие зеркала адаптируются постоянно IT командами. Портативные софт регулярно работают качественнее онлайн вариантов.
Управление банкроллом определяет долгосрочную доходность гемблинговых раундов. Квалифицированные пользователи советуют лимитировать величину вейджера до 1-2% от полного бюджета.
Смотреть здесь
krab2at
online pharmacy ordering: US Meds Outlet – canadian pharmacy online store
Выбор проверенного развлекательного портала в сегодняшних обстоятельствах заставляет специального внимания к лицензионному статусу. Знающие геймеры представляют, что СЂР° официальный сайт отображает современную сведения о действующих провайдерах.
Схема записи в официальных операторах объединяет необходимую подтверждение документов. KYC-правила защищают как оператора, так и игрока от мошенничества. Переходные ограничения на изъятие финансов до закрытия верификации – типичная подход.
Технические запреты на соединение к betting сервисам преодолеваются через резервные домены. Функционирующие дубликаты поддерживают тотальную производительность главного сервиса. Финансовые операции, игровой достижения и льготные системы поддерживаются устойчивыми.
Капитальная надежность характеризуется критерием эксплуатируемых платежных систем. SSL-шифрование, PCI DSS лицензирование и многоуровневая аутентификация гарантируют защищенный щит защиты.
Развлекательная ассортимент официальных провайдеров включает автоматы от лидирующих студий. RTP-параметры, вариативность и вероятностные принципы проходят независимую контроль в признанных лабораториях.
Схемы лояльности в достойных казино строятся на четких требованиях ставок. Проигрыш x35-40 расценивается справедливым для спин-льгот, в то время как карточные развлечения включаются в зачет с минимальным множителем.
To read
win real money online casino for us players
for all the details.
Новейшие геймеры имеют дело с множеством системных деталей при операциях с официальными порталами. Специализированные сайты типа Болливуд казино обеспечивают релевантную сведения о работе азартных компаний.
Система подтверждения профиля охватывает несколько принудительных фаз. Стартовая подтверждение подразумевает размещения справок верифицирующих персону. Типовой набор предполагает документ, права или международное ID.
Программная составляющая регистрации предполагает использование SSL-шифрования и двухуровневой проверки. Опытные игроки предлагают включать полный набор доступных опций секьюрити.
Запасные домены представляют стопроцентные дубликаты центрального домена с обеспечением комплексного возможностей. Центральное бонус состоит в соответствии финансовых границ и требований условий прокрутки.
Система выявления функционирующих зеркал строится на наблюдении тематических телеграм-каналов и связанных площадок. Квалифицированные участники задействуют VPN-сервисы для предоставления надежного подключения независимо от региональных ограничений.
Marqvella Shop Hub – Nice vibe here, the products come across as carefully curated.
Stitchery Studio – Bright layout, product details are clear and checkout worked perfectly.
Современные игроки сталкиваются с барьером подключения к легальным платформам. Операторы блокируют главные порталы, но знающие казино Либет игроки помнят о функционировании параллельных ресурсов.
Параллельный портал формирует идентичную отображение оригинального ресурса. Системы безопасности функционируют аналогичными. Расчётные транзакции выполняются через сходные механизмы.
Алгоритм оформления профиля через альтернативный домен содержит обычной аутентификации. Сотрудники требуют удостоверения для выполнения KYC-требований. Идентификационные сведения выполняют усиленную валидацию.
Финансовые пределы на параллельных платформах соответствуют главным условиям. Стартовые взносы продолжают константными. Возрастающие банки согласовываются между разными ресурсами.
Поощрительные планы выполняются завершённо на зеркальных порталах. Требования по обороту удерживает оригинальные величины. Длительность реализации поддерживается.
Команда поддержки рассматривает запросы с альтернативных доменов таким же способом. Прямой переписка осуществляет постоянный график функционирования.
Актуальные бетторы сталкиваются с затруднением соединения к легальным сайтам. Поставщики ограничивают главные домены, но знающие лаки ворлд казино клиенты учитывают о доступности зеркальных порталов.
Дополнительный домен представляет точную дубликат первичного портала. Протоколы шифрования сохраняются равнозначными. Банковские операции выполняются через те же системы.
Процедура создания аккаунта через параллельный адрес требует классической аутентификации. Сотрудники требуют бумаги для выполнения KYC-норм. Персональные данные подвергаются комплексную аутентификацию.
Пополнительные границы на дополнительных сайтах соответствуют базовым условиям. Наименьшие ставки функционируют постоянными. Возрастающие призовые фонды интегрируются между разными порталами.
Стимулирующие механизмы действуют всесторонне на альтернативных платформах. Множитель ставок гарантирует стартовые величины. Длительность проигрывания остаётся прежним.
Отдел поддержки обрабатывает запросы с альтернативных адресов сходным образом. Прямой переписка предоставляет беспрерывный формат функционирования.
I recently tested this casino https://zenderenvooruit.nl/mastering-the-craft-of-promotion-online-casino-25/ and was surprised by how smooth everything felt. The games load quickly, bonuses are clear, and navigation is intuitive, making the experience enjoyable.
Skynvanta Collection – Contemporary layout, site is easy to navigate and shopping feels seamless.
online mexico pharmacy
Современные сервисы беттинг игр предлагают участникам вход к премиальному развлечениям через проверенные Килограмм казино платформы. Сертифицированная операционная активность подразумевает соблюдения определенных регуляторных положений.
Система регистрации пользовательского профиля охватывает проверку индивидуальных информации. Провайдеры применяют углубленные процедуры KYC и AML для недопущения незаконных транзакций.
Электронные платформы новейших игорных домов работают на защищенных облачных системах с SSL протоколами. Территориальные ограничения вынуждает управляющих организовывать дублирующие адреса.
Альтернативные сайты представляют эквивалентные копии центрального портала с удержанием всех функций и параметров. Участники обеспечивают себе устойчивый связь к счету, игровой записям и индивидуальным конфигурациям.
Денежные переводы реализуются через подключенные денежные процессоры. Лимиты на пополнения и обналичивания устанавливаются в унисон с лицензионными критериями и индивидуальными правилами управления рисками.
Квалифицированные клиенты настаивают контролировать условия аккредитации через официальные регистры развлекательных организаций. Имиджевые индикаторы предусматривают ранги на профильных сервисах и отзывы реальных пользователей.
Легальные ресурсы развлекательных услуг гарантируют геймерам вариант к элитному игровому процессу через профильные домены, включая lucky bear казино , которые соблюдают международные критерии защиты.
Механизм создания аккаунта включает указания проверочных сведений через защищённые SSL-connection. Администрация требуют нотариальное verification возраста и места нахождения для соблюдения legal критериев.
2FA проверка становится необходимым частью новейших платформ защиты. Участники приобретают SMS-ключи, push-оповещения или используют профессиональные программы наподобие Google Authenticator.
Дублирующие порталы решают проблемы territorial блокировок и DDoS-штурмов. С технической точки зрения дубли являют идентичные dublicates основного домена с поддержанием возможностей и индивидуальных деталей.
Компетентные пользователи рекомендуют keeping current перечни действующих зеркал в избранном интернет-программы. Операторы направляют сведения о новых адресах через мейл, Telegram-communities и мобильные apps.
Финансовые процедуры через проверенные порталы покрыты cryptographic технологиями level банковского индустрии. Extraction средств осуществляется только на подтверждённые данные обладателя account.
Quoralia Collection – Attractive interface, info is clear and shopping is easy and enjoyable.
falnora.shop – Always a pleasant shopping experience, the website is very easy to use.
Лицензионные операторы развлекательных предложений дают клиентам шанс к премиальному времяпрепровождению через dedicated сайты, включая казино Вован , которые именно соблюдают общепринятые требования надёжности.
Схема регистрации necessita ввода верификационных данных через криптографические SSL-протоколы. Операторы demanded письменное удостоверение правоспособности и региона проживания для исполнения нормативных критериев.
Многоуровневая проверка является обязательным составляющей современных платформ безопасности. Игроки имеют SMS-токены, push-уведомления или задействуют специализированные утилиты наподобие Google Authenticator.
Резервные домены преодолевают проблемы territorial барьеров и DDoS-атак. С технической точки зрения mirrors представляют идентичные реплики базового ресурса с удержанием возможностей и user информации.
Skilled клиенты рекомендуют удерживать новейшие каталоги working дублей в избранном обозревателя. Провайдеры передают обновления о свежих адресах через электронную почту, Telegram-чаты и смартфонные программы.
Финансовые movements через проверенные платформы secured шифровальными methods стандарта банковского segment. Extraction фондов производится единственно на validated реквизиты собственника профиля.
Инновационные сервисы азартных развлечений предоставляют участникам путь к профессиональному развлечениям через безопасные лаки Р±РёСЂ казино официальный сайт платформы. Легальная деятельность требует исполнения строгих надзорных положений.
Процедура создания индивидуального учетной записи включает подтверждение приватных показателей. Управляющие применяют расширенные протоколы KYC и AML для недопущения нарушающих транзакций.
Технические платформы инновационных казино основываются на безопасных дата-центрах с HTTPS сертификатами. IP-фильтрация принуждает владельцев внедрять параллельные домены.
Зеркальные домены образуют полные копии центрального ресурса с поддержанием всех сервисов и данных. Пользователи приобретают беспрепятственный подключение к средствам, игровой истории и личным настройкам.
Банковские переводы производятся через подключенные финансовые шлюзы. Границы на пополнения и получения фиксируются в согласии с законодательными стандартами и индивидуальными процедурами контроля угроз.
Опытные беттеры рекомендуют проверять состояние лицензии через контролирующие реестры гемблинг органов. Престижные критерии содержат места на тематических сайтах и мнения подлинных пользователей.
Saffron Street Finds Online – Pleasant layout, exploring products is effortless and ordering went perfectly.
Для современного интерьера идеально подойдет заказать электрокарниз прокарниз
электрокарниз с концевиками , который обеспечит удобство и стиль в управлении шторами.
Такое решение значительно упрощает жизнь пользователю. Он особенно удобен в больших помещениях, где нужно одновременно регулировать множество полотен. Это позволяет включать электрокарниз в комплексную систему управления жилищем.
Принцип работы электрокарниза основан на электрическом приводе, который движет гардины по направляющим. Пульт дает возможность дистанционного управления шторами, что очень практично. Это делает устройство идеальным для использования в офисах, гостиницах и домах с современным дизайном. Автоматизация ускоряет процесс регулировки штор, экономя время.
Выбор электрокарниза зависит от размеров окна, веса штор и типа крепления. Важно учитывать мощность двигателя, которой будет достаточно для вашего полотна. Также стоит обратить внимание на материал направляющей и качество комплектующих. Надежные материалы гарантируют долговечность и бесперебойную работу устройства.
Установка электрокарниза требует аккуратности и точного соблюдения инструкции. Рекомендуется доверить монтаж профессионалам для надежного результата. Регулярное техническое обслуживание поможет продлить срок службы устройства. Своевременная профилактика увеличит срок службы электрокарниза.
Спин-шаблон:
Главная функция электрокарниза – перемещать шторы с помощью электрического двигателя по направляющей.
Новейшие игроки имеют дело с огромным количеством системных тонкостей при операциях с легальными сайтами. Профильные источники типа лаки Р±РёСЂ казино дают современную материалы о деятельности азартных компаний.
Процедура проверки аккаунта охватывает несколько необходимых фаз. Стартовая валидация предполагает загрузки справок доказывающих гражданство. Привычный список содержит свидетельство, лицензию водителя или внешний паспорт.
Техническая элемент создания аккаунта охватывает использование безопасного соединения и многофакторной защиты. Профессиональные игроки рекомендуют инициировать весь комплекс возможных опций безопасности.
Запасные домены составляют абсолютные реплики основного платформы с поддержанием полного возможностей. Важнейшее преимущество кроется в соответствии денежных пределов и норм проигрыша.
Процедура обнаружения действующих дублирующих порталов строится на проверке тематических уведомительных сервисов и сотрудничающих платформ. Профессиональные геймеры внедряют туннельные протоколы для предоставления стабильного подключения без оглядки от локальных блокировок.
https://bajameddirect.com/# BajaMed Direct
codigo promocional de 1xbet peru
Поиск в сфере легальных площадок подразумевает понимания современных технологий входа. Умелые клиенты задействуют Голд для приобретения новейшей фактов о активных путях.
Процесс создания профиля в сертифицированных учреждениях предполагает тщательную проверку. Актуальные поставщики используют KYC-алгоритмы и AML-правила. Документооборот занимает от 24 до 72 временных отрезков.
Технические методы для минования препятствий прогрессируют синхронно с ужесточением правовых мер. VPN-платформы категории premium предоставляют защиту AES-256 и технологии OpenVPN. Стабильность соединения fundamentally существенна для привилегированных сессий.
Дублирующие домены выполняют задачи через географически разнесенные компьютерные кластеры. CDN-архитектуры осуществляют низкую задержку для американских игроков. Системное редирект срабатывает при детекции ограничения центрального сайта.
Экономические операции в сертифицированных юрисдикциях подпадают под жестким требованиям PCI DSS. Криптовалютные расчеты получают актуальность по причине анонимности и быстроте осуществления.
Планшетные программы премиальных провайдеров включают лицевую идентификацию и push-сообщения для ключевых событий. Изменяемый внешний вид программно изменяется под параметры панели.
Prime Parcel Boutique – Fast arrival, site structure makes shopping easy.
These games are powered by reliable and authentic gaming brands such as Playn GO, privacy policy. You will be able to play with complete peace of mind here in full knowledge of the fact that Wishmaker Casino Canada will be using the most state-of-the-art encryption software and the using the highest quality security protocols available, then you will be awarded 5 free games. As part of the agreement that saw the US host the 2023 World Cup, youll only be able to withdraw using it at this casino. Aloha! Cluster Pays Slot (NetEnt) 3.7 5 Provider: NetEnt Featuring an excellent city-based background and a Miami Vice-like feel, some of the them are generous. Mobile casinos United Kingdom you do not need a lot of money or time to make this system work for you, others not so much. Only in July 2023, could you confirm. Best no wager casino wild are some of the most well-liked titles among punters, then you can dictate others from practice- meets wise and gets its not only. Finally, if you are a regular follower of different streamers.
https://greatwall-ci.com/mega-spin-casino-an-exciting-ride-for-australian-players/
This website is using a security service to protect itself from online attacks. The action you just performed triggered the security solution. There are several actions that could trigger this block including submitting a certain word or phrase, a SQL command or malformed data. A happy tropical game, The Aloha Cluster Pays mobile slot is an easy playing game that tries to do things a little differently, but doesn’t always hit every mark. But instead, and are used in slot machine spins. We have also experimented with Augmented Reality and we have seen how that can be used for marketing and promotions, including new users who receive an astonishing 100 free spins on NetEnts Aloha Cluster Pays. Maximizing Your Odds: A Comprehensive Guide to Casino Strategy. See the best real money casinos with Aloha Cluster Pays Slot. All of the casinos are proven to be safe and offer generous welcome bonuses for new players.
Pearl Pantry Market – Clear structure, browsing everyday goods felt effortless.
cloudcurio.shop – A delightful shopping experience, I found so many interesting items.
Передовые гемблеры сталкиваются с проблемой подключения к официальным ресурсам. Провайдеры запрещают основные ссылки, но опытные Tippy пользователи понимают о присутствии альтернативных сайтов.
Параллельный портал составляет стопроцентную копию оригинального платформы. Криптографические алгоритмы работают такими же. Банковские операции производятся через сходные механизмы.
Алгоритм заведения учётной записи через резервный портал предполагает обычной проверки. Сотрудники выясняют удостоверения для соблюдения KYC-требований. Персональные данные выполняют комплексную аутентификацию.
Банковские лимиты на резервных платформах совпадают стандартным параметрам. Начальные ставки остаются неизменными. Увеличивающиеся выигрышные пулы интегрируются между многочисленными доменами.
Стимулирующие схемы работают комплексно на дополнительных порталах. Вейджер поддерживает оригинальные величины. Временные рамки проигрывания сохраняется.
Отдел помощи рассматривает заявки с зеркальных ссылок таким же способом. Интерактивный переписка осуществляет непрерывный порядок функционирования.
The destiny of the kingdom is in the hands of a few brave souls. They must fight against the darkness. The Onyx Storm epub is their story. The writing is powerful. The digital edition is convenient. It is a fantasy epic for the ages.
Определение достойного азартного ресурса в современных границах заставляет тщательного анализа к правовому статусу. Знающие участники учитывают, что тип топ казино демонстрирует современную информацию о действующих площадках.
Алгоритм регистрации в сертифицированных сервисах содержит принудительную подтверждение удостоверения. KYC-требования оберегают как заведение, так и геймера от обмана. Краткосрочные рамки на изъятие денег до завершения проверки – привычная процедура.
Программные запреты на доступ к betting ресурсам преодолеваются через альтернативные ссылки. Действующие копии сохраняют абсолютную работоспособность базового портала. Денежные процедуры, развлекательный достижения и привилегированные планы сохраняются устойчивыми.
Экономическая стабильность измеряется критерием применяемых финансовых способов. SSL-защита, PCI DSS подтверждение и двухфакторная аутентификация обеспечивают защищенный щит безопасности.
Игровая библиотека проверенных провайдеров охватывает машины от лидирующих провайдеров. RTP-значения, волатильность и математические системы претерпевают внешнюю сертификацию в признанных учреждениях.
Планы лояльности в качественных заведениях опираются на понятных условиях отыгрыша. Проигрыш x35-40 признается нормальным для машина-подарков, в то время как классические состязания засчитываются в расчет с редуцированным показателем.
trusted Kevrina shop – Site seems safe, navigating and ordering feels easy.
Ich liebe NV Casino, weiter so — tolle Inhalte!
https://nv-casino-deutschland-play.de/login
Определение проверенного азартного заведения в актуальных рамках предполагает специального рассмотрения к лицензионному режиму. Квалифицированные игроки понимают, что Sykaaa зеркало содержит современную факты о доступных провайдерах.
Процесс регистрации в официальных платформах содержит необходимую проверку персональных данных. KYC-процедуры оберегают как площадку, так и пользователя от фрода. Кратковременные рамки на получение капитала до финализации проверки – стандартная методика.
Электронные запреты на соединение к развлекательным сервисам решаются через параллельные ссылки. Активные дубликаты гарантируют всестороннюю функциональность основного ресурса. Денежные операции, игровой достижения и льготные системы сохраняются стабильными.
Капитальная защищенность характеризуется критерием используемых банковских механизмов. SSL-шифрование, PCI DSS сертификация и дополнительная проверка формируют прочный контур ограждения.
Интерактивная каталог легальных провайдеров предоставляет машины от топовых разработчиков. RTP-параметры, вариативность и математические системы испытывают внешнюю сертификацию в аккредитованных институтах.
Планы мотивации в достойных площадках опираются на прозрачных требованиях ставок. Отыгрыш x35-40 расценивается справедливым для слот-подарков, в то время как классические активности учитываются в подсчет с минимальным множителем.
Поиск безопасного азартного площадки заставляет основательного разбора правовых свидетельств. Инновационные системы Болливуд казино предоставляют участникам максимальную сведения о собственных разрешениях.
Алгоритм оформления счета охватывает определенное количество требуемых ступеней верификации. Операторы требуют свидетельства, удостоверяющие индивидуальность и дееспособность. Традиционный KYC-процесс занимает от 24 до 72 интервалов.
Распоряжение капиталом запускается с фиксации пределов на депозиты. Искусные пользователи настаивают эксплуатировать закон 5% от суммарного развлекательного фонда на единичную раунд.
Цифровые запреты поставщиков заставляют внедрять альтернативные ссылки. Дубликаты поддерживают полную производительность основного сайта, охватывая архив сделок и развлекательный успех.
Новые банковские инструменты дают оперативные вклады через криптовалютные хранилища. Bitcoin, Ethereum и стейблкоины поддерживают скрытность и мизерные взносы. Срок реализации выводов доходит 10-30 отрезков.
Схемы преданности предусматривают иерархические уровни с нарастающим бонусом. VIP-консультанты предоставляют индивидуальные подарки, улучшенные лимиты и приоритетную обслуживание.
To verify
quicken loans guidelines
for practical demonstrations.
mail order pharmacy india: Indo-Generic Export – mail order pharmacy india
Discount Corner – Amazing bargains today, site layout is tidy and user-friendly.
Подбор честного казино площадки подразумевает тщательного рассмотрения официальных разрешений. Современные сайты типпи казино гарантируют клиентам максимальную детали о текущих санкциях.
Процесс получения доступа предусматривает множество обязательных шагов аутентификации. Провайдеры требуют документы, удостоверяющие самобытность и дееспособность. Классический KYC-механизм составляет от 24 до 72 периодов.
Контроль средств начинается с установления пределов на вклады. Профессиональные геймеры предлагают применять правило 5% от итогового развлекательного капитала на отдельную заход.
Цифровые запреты администраторов вынуждают использовать альтернативные ссылки. Альтернативы хранят полную эффективность основного сайта, охватывая хронологию платежей и азартный продвижение.
Современные платежные методы гарантируют оперативные пополнения через электронные кошельки. Bitcoin, Ethereum и постоянные токены дают скрытность и символические комиссии. Период выполнения получений доходит 10-30 минут.
Программы лояльности содержат каскадные ранги с накапливающимся вознаграждением. VIP-консультанты обеспечивают персонализированные бонусы, повышенные лимиты и преимущественную сервис.
Нынешние геймеры натыкаются с барьером соединения к официальным площадкам. Операторы закрывают стандартные адреса, но искушённые лаки Р±РёСЂ казино клиенты понимают о функционировании зеркальных порталов.
Резервная ссылка образует полную дубликат первичного площадки. Протоколы шифрования поддерживаются неизменными. Денежные переводы выполняются через те же сервисы.
Технология оформления профиля через резервный домен предполагает классической валидации. Операторы запрашивают справки для исполнения KYC-правил. Личные характеристики подвергаются усиленную проверку.
Банковские ограничения на альтернативных сайтах идентичны базовым спецификациям. Начальные вклады поддерживаются постоянными. Растущие джекпоты согласовываются между различными адресами.
Льготные программы действуют комплексно на параллельных сайтах. Отыгрышный коэффициент обеспечивает базовые величины. Период действия проигрывания поддерживается.
Служба помощи изучает вопросы с параллельных ссылок сходным образом. Прямой переписка гарантирует непрерывный формат обслуживания.
Передовые геймеры пересекаются с множеством системных аспектов при процессах с сертифицированными платформами. Экспертные сайты типа Вован казино дают новую контент о функционировании игорных операторов.
Алгоритм проверки счета предполагает несколько принудительных стадий. Базовая верификация требует отправки документов удостоверяющих личность. Обычный пакет включает паспорт, лицензию водителя или международное ID.
Системная сторона оформления подразумевает применение SSL-шифрования и двухфакторной аутентификации. Опытные клиенты рекомендуют задействовать весь комплекс представленных параметров охраны.
Резервные ссылки формируют абсолютные клоны главного сайта с сохранением комплексного функционала. Важнейшее выгода состоит в идентичности платежных рамок и критериев ставочных требований.
Процедура поиска активных резервных ссылок базируется на отслеживании тематических информационных каналов и союзных сайтов. Продвинутые игроки эксплуатируют анонимайзеры для формирования надежного соединения невзирая от территориальных блокировок.
Подбор надежного развлекательного портала предполагает тщательного исследования лицензионных сертификатов. Актуальные порталы РЎСѓРєР° зеркало предоставляют участникам абсолютную информацию о текущих аккредитациях.
Процедура оформления счета включает определенное количество обязательных шагов аутентификации. Владельцы истребуют удостоверения, удостоверяющие самобытность и зрелость. Классический KYC-процесс продолжается от 24 до 72 периодов.
Контроль средств запускается с определения лимитов на вклады. Опытные участники советуют использовать принцип 5% от суммарного игорного фонда на индивидуальную партию.
Системные ограничения операторов побуждают задействовать дополнительные маршруты. Альтернативы сохраняют безусловную работоспособность центрального площадки, подразумевая хронологию транзакций и игровой прогресс.
Современные платежные инструменты обеспечивают оперативные вклады через виртуальные аккаунты. Bitcoin, Ethereum и стейблкоины дают приватность и минимальные комиссии. Длительность осуществления выводов насчитывает 10-30 периодов.
Планы лояльности охватывают ступенчатые степени с накапливающимся возвратом. VIP-кураторы гарантируют уникальные награды, улучшенные ограничения и ускоренную сервис.
indian pharmacy: Indo-Generic Export – indian pharmacies safe
http://bajameddirect.com/# BajaMed Direct
Starlight Boutique Picks – Inviting layout, product images are clear and checkout was effortless.
Навигация в секторе официальных порталов нуждается представления новых инструментов подключения. Профессиональные игроки задействуют лаки ворлд казино для обретения современной информации о оперативных ссылках.
Алгоритм создания учетной записи в сертифицированных учреждениях включает многоуровневую подтверждение. Актуальные организации эксплуатируют KYC-протоколы и AML-стандарты. Документооборот составляет от 24 до 72 интервалов.
Цифровые технологии для преодоления препятствий прогрессируют сообща с интенсификацией юридических инициатив. VPN-сервисы типа premium предоставляют защиту AES-256 и методы OpenVPN. Непрерывность подключения критически существенна для VIP заходов.
Альтернативные адреса выполняют задачи через территориально расположенные технические ресурсы. CDN-структуры предоставляют быструю отклик для азиатских игроков. Системное маршрутизация запускается при выявлении препятствия центрального сайта.
Экономические транзакции в проверенных территориях отвечают определенным правилам PCI DSS. Криптовалютные платежи увеличивают распространение в результате анонимности и темпу обработки.
Мобильные программы премиальных провайдеров объединяют лицевую подтверждение и push-алерты для важных ситуаций. Адаптивный оформление независимо подстраивается под настройки дисплея.
Skynaro Favorites – Great variety, browsing products is effortless and descriptions are clear.
cialis online pharmacy https://salepharmacies.shop/# overseas prescriptions india
cheapest online pharmacy india Indo-Generic Export mail order pharmacy india
Легальные площадки игровых возможностей гарантируют пользователям право к высококлассному гэмблингу через целевые порталы, включая тип топ казино , которые соблюдают общепринятые нормы безопасности.
Механизм оформления профиля предполагает предоставления проверочных данных через шифрованные SSL-соединения. Операторы просят official verification правоспособности и места регистрации для выполнения правовых требований.
Multi-factor аутентификация является принудительным компонентом новейших solutions безопасности. Игроки имеют SMS-коды, push-сообщения или задействуют dedicated программы вроде Google Authenticator.
Mirror URL решают вопросы локальных ограничений и DDoS-штурмов. С технической точки зрения дубли составляют аналогичные dublicates primary платформы с maintaining инструментария и user сведений.
Профессиональные участники рекомендуют поддерживать current перечни действующих копий в сохранённых ссылках веб-клиента. Провайдеры направляют новости о fresh URL через мейл, Telegram-чаты и портативные приложения.
Банковские переводы через официальные ресурсы гарантированы криптографическими протоколами уровня банковского сектора. Вывод финансов производится только на аутентифицированные реквизиты хозяина личного кабинета.
Opal Orio Essentials – Browsing is easy, items are distinctive, and the site feels approachable.
exploreember.shop – An excellent site for discovering new products that feel homey and stylish.
This casino https://electronicgadgetsonline.com/ray/online-play-money-casinos-practical-benefits-and/ offers a solid mix of popular slots and live tables. The platform feels well-designed, promotions are worth trying, and support is helpful, which adds confidence.
Нынешние клиенты имеют дело с массой технических аспектов при операциях с легальными сайтами. Профильные платформы типа казино миллион обеспечивают новую данные о операциях гэмблинговых брендов.
Механизм аутентификации кабинета подразумевает ряд принудительных стадий. Исходная валидация нуждается загрузки удостоверений валидирующих индивидуальность. Привычный набор предполагает ID, автолицензию или международное ID.
Технологическая часть регистрации предполагает применение криптографической защиты и 2FA. Профессиональные пользователи рекомендуют задействовать весь комплекс возможных параметров секьюрити.
Резервные ссылки формируют полные клоны первичного сайта с поддержанием всего арсенала. Ключевое плюс выражается в идентичности банковских рамок и параметров условий прокрутки.
Процедура нахождения рабочих зеркал базируется на контроле профессиональных телеграм-каналов и сотрудничающих порталов. Профессиональные клиенты эксплуатируют VPN-сервисы для создания постоянного подключения вне зависимости от региональных запретов.
Выбор надежного развлекательного ресурса подразумевает глубокого исследования правовых бумаг. Инновационные платформы Вован регистрация дают игрокам максимальную факты о текущих санкциях.
Процедура открытия аккаунта содержит несколько необходимых шагов валидации. Представители просят документы, подтверждающие индивидуальность и совершеннолетие. Классический KYC-алгоритм требует от 24 до 72 промежутков.
Финансовое планирование запускается с установления ограничений на инвестиции. Профессиональные пользователи советуют внедрять закон 5% от общего гемблинг капитала на конкретную партию.
Системные ограничения владельцев обязывают применять запасные домены. Клоны оберегают стопроцентную активность центрального портала, включая журнал переводов и развлекательный продвижение.
Новые финансовые системы поддерживают оперативные вклады через виртуальные кошельки. Bitcoin, Ethereum и постоянные токены гарантируют приватность и символические взносы. Срок реализации выводов доходит 10-30 минут.
Системы преданности включают ступенчатые категории с нарастающим кэшбэком. VIP-менеджеры обеспечивают персонализированные вознаграждения, улучшенные границы и первоочередную сервис.
https://indogenericexport.com/# buy methocarbamol
QuillQuarry Browse – Creative products, browsing categories is intuitive and enjoyable.
ай кью на английском
проверить уровень iq онлайн
тест айзенка iq
тест на интеллект с ответами
ответы на тест iq 25 вопросов
айкью 130 что значит
сколько iq у обычного человека
айкью нормального человека
Современные карнизы с электроприводом и дистанционным управлением прокарниз
карнизы с электроприводом цена обеспечивают максимальный комфорт и стиль в вашем интерьере.
Размер окон, стилистика помещения и управление – главные факторы выбора.
Marqesta Picks Hub – Polished shop, navigation is smooth and the website inspires confidence.
тест на умного человека онлайн
максимальное iq
в чем измеряется интеллект человека
проверить айкью тест бесплатно на русском взрослым
Игровая отрасль представляет интенсивный подъём, заинтересовывая миллионы геймеров. Грамотные ресурсы гарантируют безопасную среду для ставок. Развёрнутую материалы о этих операторах можно изучить на казино Рльдорадо .
Лицензирование составляет ключевым аспектом отбора площадки. Юрисдикции Мальты создают качественный аудит экономических процедур. Любая официальная ресурс осуществляет систематические инспекции RNG-систем.
Технические характеристики инновационных беттинг-платформ включают SSL-безопасность денежного класса. Производители программного софта вроде Microgaming, NetEnt, Pragmatic Play подключают сложные системы рандомных параметров.
Процесс валидации аккаунта включает подачи бумаг KYC-типа. ID, выписка о средствах, доказательство прописки — обычный набор для завершённого входа.
Альтернативные ссылки устраняют барьеры с запретами поставщиков. Рабочие копии модифицируются регулярно программными специалистами. Портативные программы обычно оперируют качественнее онлайн редакций.
Управление банкроллом задаёт продолжительную прибыльность азартных циклов. Экспертные участники предлагают сокращать количество пари до 1-2% от итогового фонда.
Ruvina Finds Online – Sleek interface, product details are clear and purchasing went perfectly.
Рабочие резервные адреса надежных азартных клубов на винити официальный сайт гарантируют устойчивый доступ к геймерским сервисам. Методика копирования строит эквивалентные копии главного ресурса с удержанием всех возможностей.
Система создания аккаунта через mirror-сайт на сто процентов дублирует главную заявку. Начинающие игроки прописывают валидный email, генерируют защищенный пароль и устанавливают игровую денежную единицу.
Аутентификация счета включает загрузки свидетельств по KYC-политике. Копия паспорта, свидетельство проживания и банковские сведения проходят цифровую верификацию в течение 24-72 временных единиц.
Логин активных геймеров осуществляется через стандартную модуль с 2FA идентификацией. Временные пароли отправляются на мессенджер устройство или email.
Механизмы финансового блока через резервные ссылки обеспечивает востребованные платежные инструменты. Visa, Mastercard, онлайн кошельки Skrill, Neteller, криптовалюты Bitcoin, Ethereum реализуются с низкими взносами 0-3%.
Гемблинг коллекция воспроизводится целиком включая слоты, традиционные развлечения, live-хостов и мегавыигрыши. RTP-индикаторы, дисперсия и отыгрыш поддерживаются такими же.
Бонусная схема выполняется подобно главному порталу. Welcome-пакеты, безвозмездные спины, денежный возврат и VIP-системы активируются машинально при соблюдении фиксированных параметров.
Neon Notch Finds – Really like the design, the site has a distinctive vibe.
Hi, I’m a big fan of your posts! I’ve been researching more information on sterling silver necklace
and your article really helped me out. I’m a big fan of custom name necklaces and your perspective is wonderful.
Keep up the great work! Thanks, Damon.
Poplar Prime Select – Clean interface, navigating through items felt effortless.
Современные провайдеры азартных активностей предлагают клиентам вход к высококлассному игровому процессу через защищенные казино аква платформы. Авторизованная бизнес нуждается следования строгих регуляторных стандартов.
Алгоритм создания персонального счета содержит аутентификацию личных реквизитов. Управляющие задействуют расширенные системы KYC и AML для предотвращения фродовых переводов.
Электронные решения современных гемблинг платформ функционируют на зашифрованных инфраструктурах с криптографическими сертификатами. Геоблокировка принуждает владельцев запускать альтернативные адреса.
Параллельные порталы представляют полные клоны базового домена с поддержанием всех сервисов и параметров. Беттеры обеспечивают себе постоянный подключение к капиталу, игровой данным и личным конфигурациям.
Платежные операции реализуются через встроенные платежные системы. Ограничения на инвестиции и изъятия назначаются в гармонии с регуляторными положениями и корпоративными процедурами минимизации опасностей.
Экспертные клиенты указывают анализировать ситуацию разрешения через регуляторные регистры игорных структур. Статусные характеристики содержат позиции на отраслевых сайтах и комментарии настоящих клиентов.
Проверенные операторы игорных возможностей oferuja пользователям доступ к качественному игровому процессу через специализированные сайты, включая казино Лев , которые именно соблюдают глобальные стандарты защиты.
Схема оформления профиля предполагает предоставления верификационных деталей через шифрованные SSL-протоколы. Букмекеры просят документальное verification дееспособности и места нахождения для соблюдения юрисдикционных требований.
Двухэтапная идентификация выступает mandatory элементом новейших механизмов надёжности. Users располагают SMS-шифры, push-уведомления или используют dedicated утилиты по типу Google Authenticator.
Дублирующие адреса нейтрализуют проблемы territorial санкций и DDoS-assault. По сути реплики представляют копийные реплики главного сайта с удержанием возможностей и пользовательских данных.
Skilled игроки призывают хранить обновлённые базы рабочих копий в избранном browser. Операторы доставляют updates о современных URL через email, Telegram-communities и мобильные утилиты.
Финансовые movements через legal площадки покрыты cryptographic системами категории банковского направления. Получение финансов выполняется исключительно на аутентифицированные данные обладателя профиля.
For direct
online casinos independently tested
for the sequel.
Pantry Favorites – Items are neatly placed, browsing is simple and pleasant.
Marqvella Picks – Impressed by how cohesive this feels, the selection looks intentional and fresh.
BajaMed Direct: BajaMed Direct – mexico drug store online
Определение достойного гемблинг оператора в современных обстоятельствах предполагает тщательного изучения к лицензионному положению. Опытные клиенты осознают, что казино Болливуд предоставляет свежую факты о работающих провайдерах.
Алгоритм регистрации в лицензированных сервисах объединяет необходимую подтверждение документов. KYC-требования обеспечивают как казино, так и игрока от афер. Промежуточные ограничения на снятие капитала до выполнения валидации – привычная практика.
Технические ограничения на доступ к азартным ресурсам устраняются через зеркальные URL. Доступные копии обеспечивают всестороннюю работоспособность центрального сервиса. Банковские движения, развлекательный продвижение и льготные программы сохраняются стабильными.
Денежная стабильность характеризуется критерием внедренных банковских методов. SSL-шифрование, PCI DSS подтверждение и многоуровневая проверка гарантируют безопасный периметр охраны.
Игровая коллекция проверенных площадок объединяет машины от известных создателей. RTP-показатели, волатильность и математические системы получают независимую проверку в одобренных организациях.
Системы лояльности в надежных площадках базируются на четких правилах отыгрыша. Условия ставок x35-40 характеризуется справедливым для слот-подарков, в то время как карточные игры учитываются в счет с пониженным процентом.
Легальные провайдеры игорных сервисов предоставляют клиентам доступ к качественному азартному досугу через специализированные сайты, включая мад казино , которые специально придерживаются transnational критерии конфиденциальности.
Последовательность открытия счёта включает указания верификационных данных через безопасные SSL-connection. Провайдеры просят предоставить official свидетельство age verification и адреса жительства для compliance нормативных требований.
Двухфакторная идентификация считается mandatory частью новейших архитектур security. Клиенты приобретают SMS-токены, push-оповещения или внедряют targeted программы по типу Google Authenticator.
Резервные URL устраняют проблемы локальных ограничений и DDoS-воздействий. Технически копии образуют копийные клоны основного ресурса с поддержанием features и индивидуальных данных.
Опытные геймеры советуют хранить обновлённые списки функционирующих альтернатив в bookmark браузера. Администрация доставляют updates о актуальных порталах через электронную почту, Telegram-сообщества и mobile программы.
Денежные movements через лицензионные порталы защищены криптографическими системами стандарта банковского сектора. Вывод денег производится лишь на validated карты держателя профиля.
Инновационные провайдеры игорных услуг предоставляют беттерам подключение к качественному азарту через защищенные лаки Р±РёСЂ казино порталы. Сертифицированная деятельность предполагает исполнения определенных надзорных норм.
Механизм активации игрового аккаунта содержит валидацию конфиденциальных данных. Управляющие задействуют расширенные системы KYC и AML для предотвращения незаконных платежей.
Технические решения актуальных казино работают на защищенных серверах с TLS протоколами. IP-фильтрация обязывает владельцев запускать резервные URL.
Резервные платформы представляют полные дубликаты главного портала с фиксацией всех возможностей и параметров. Беттеры обеспечивают себе беспрепятственный вход к капиталу, игровой данным и пользовательским установкам.
Платежные процедуры производятся через встроенные денежные агрегаторы. Пределы на вклады и обналичивания назначаются в унисон с законодательными критериями и организационными регламентами минимизации опасностей.
Профессиональные клиенты указывают мониторить состояние авторизации через официальные регистры гемблинг органов. Авторитетные параметры включают оценки на специализированных платформах и feedback настоящих участников.
Легальные площадки азартных сервисов предоставляют игрокам возможность к высококлассному развлечениям через специализированные порталы, включая казино типпи , которые именно придерживаются transnational стандарты безопасности.
Алгоритм оформления профиля necessita указания проверочных деталей через безопасные SSL-connection. Букмекеры запрашивают официальное подтверждение age verification и адреса проживания для compliance нормативных правил.
2FA authentication представляет необходимым составляющей современных систем безопасности. Пользователи получают SMS-пароли, push-сообщения или внедряют targeted утилиты в стиле Google Authenticator.
Зеркальные домены решают трудности geographic запретов и DDoS-атак. Фактически mirrors образуют аналогичные реплики главного портала с сохранением функциональности и личных параметров.
Опытные клиенты рекомендуют хранить current списки рабочих зеркал в favourites обозревателя. Операторы рассылают информацию о новых доменах через почтовые сервисы, Telegram-чаты и мобильные утилиты.
Банковские операции через надёжные порталы обеспечены cryptographic протоколами level банковского сектора. Снятие капитала происходит solely на validated wallets хозяина профиля.
juniperjoy online – Pleasant browsing experience, found items I liked and added them to my favorites.
I was recommended this web site through my cousin. I’m not
sure whether this publish is written via him as no one
else understand such specified about my trouble. You’re amazing!
Thanks!
Bovada Sportsbook is an web-based sportsbook that offers sports wagering together with casino games and poker.
It lists a wide range of matches and tournaments, with common bet types such as moneylines, spreads, O/U,
parlays, outright futures, and prop markets, plus in-game betting as games
unfold. The platform is often geared toward everyday players and is recognized for a easy-to-use interface and broad market coverage for big North American leagues as well as worldwide sports.
Availability and legality depend on your location. Bovada is often described
as an offshore sportsbook and may be unavailable in certain jurisdictions, particularly
within the United States. Because laws and availability may vary over time,
anyone considering using it should confirm access and compliance requirements for their specific region and ensure they follow local laws and age limits.
look at here now
russian traditional clothing
Беттинговая сфера отображает активный развитие, притягивая миллионы клиентов. Квалифицированные площадки предлагают качественную среду для развлечений. Исчерпывающую данные о этих брендах возможно найти на РјСЌРґ казино .
Сертификация выступает главным фактором селекции площадки. Юрисдикции Мальты создают тщательный контроль денежных процедур. Каждая легальная площадка подвергается плановые инспекции RNG-генераторов.
IT параметры актуальных азартных площадок охватывают SSL-кодирование расчётного стандарта. Создатели виртуального материала уровня Microgaming, NetEnt, Pragmatic Play внедряют комплексные механизмы хаотичных чисел.
Процесс аутентификации аккаунта предусматривает передачи справок KYC-формата. Удостоверение, документ о финансах, удостоверение проживания — типичный комплект для полноценного активации.
Параллельные адреса исправляют барьеры с цензурой поставщиков. Свежие альтернативы модифицируются регулярно компьютерными командами. Карманные утилиты нередко оперируют лучше браузерных форматов.
Управление банкроллом задаёт продолжительную прибыльность азартных сессий. Опытные участники указывают контролировать сумму вейджера до 1-2% от итогового бюджета.
Современные участники имеют дело с огромным количеством технических тонкостей при операциях с лицензированными площадками. Профильные источники типа казино Килограмм выдают свежую контент о работе развлекательных организаций.
Алгоритм верификации профиля включает ряд неотъемлемых уровней. Стартовая подтверждение требует отправки бумаг верифицирующих субъект. Классический список включает паспорт, водительские права или международное ID.
Цифровая составляющая создания аккаунта включает задействование SSL-шифрования и 2FA. Опытные игроки предлагают запускать максимум возможных параметров охраны.
Альтернативные адреса формируют стопроцентные клоны главного платформы с поддержанием комплексного арсенала. Главное достоинство выражается в тождественности банковских ограничений и требований отыгрыша.
Схема нахождения действующих зеркал базируется на мониторинге профессиональных новостных лент и партнерских площадок. Экспертные участники внедряют VPN-сервисы для создания устойчивого связи вне зависимости от местных блокировок.
Orla Styles – Impressive selection, buying items was easy and straightforward.
https://italiascarpa.ru/forum/messages/forum1/topic72/message751/?result=new#message751
visit homepage
russian traditional clothing
Подбор надежного игорного ресурса требует основательного рассмотрения правовых сертификатов. Инновационные системы lucky bear казино предоставляют пользователям абсолютную данные о действующих санкциях.
Процесс создания профиля подразумевает несколько обязательных этапов валидации. Администраторы требуют удостоверения, подтверждающие идентичность и дееспособность. Классический KYC-регламент продолжается от 24 до 72 промежутков.
Управление банком запускается с установления границ на депозиты. Опытные геймеры настаивают эксплуатировать норму 5% от полного развлекательного резерва на единичную раунд.
Цифровые ограничения операторов побуждают применять вспомогательные ссылки. Копии сохраняют безусловную эффективность базового портала, охватывая историю сделок и игровой прогресс.
Передовые платежные методы предоставляют скоростные пополнения через цифровые портмоне. Bitcoin, Ethereum и постоянные токены гарантируют анонимность и крошечные платежи. Период реализации получений насчитывает 10-30 отрезков.
Программы постоянства включают многоуровневые степени с накапливающимся компенсацией. VIP-консультанты предлагают личные поощрения, улучшенные ограничения и первоочередную техподдержку.
Continued
Explore China’s wonders in 12 days: Beijing, Xi’an, Chongqing, Yangtze River, Shanghai
Официальные площадки игровых возможностей oferuja пользователям право к элитному игровому процессу через dedicated порталы, включая РЎСѓРєР° казино , которые именно выполняют мировые критерии security.
Механизм оформления профиля включает предоставления проверочных информации через encrypted SSL-connection. Букмекеры просят предоставить официальное доказательство дееспособности и локации регистрации для поддержания правовых критериев.
Двухэтапная аутентификация становится required элементом современных платформ надёжности. Игроки имеют SMS-коды, push-уведомления или задействуют специализированные приложения наподобие Google Authenticator.
Mirror адреса решают препятствия geographic санкций и DDoS-штурмов. По сути копии составляют аналогичные копии базового платформы с maintaining инструментария и клиентских параметров.
Экспертные участники suggest хранить current каталоги активных альтернатив в сохранённых ссылках обозревателя. Администрация отправляют сведения о свежих адресах через мейл, Telegram-группы и mobile программы.
Платёжные процедуры через надёжные ресурсы гарантированы криптографическими технологиями категории банковского сектора. Снятие финансов осуществляется только на подтверждённые реквизиты собственника account.
Spruce Spark Studio Finds – Minimalist and fresh, browsing categories is simple and checkout worked perfectly.
mexico pharmacy drugs online
https://indogenericexport.com/# over the counter muscle relaxers that work
Skin Serenade Hub – Great selection, shopping experience is smooth and navigation is effortless.
Передовые платформы гемблинг игр предлагают клиентам вход к элитному гемблингу через защищенные СЂР° казино платформы. Сертифицированная бизнес влечет следования конкретных контролирующих норм.
Процедура регистрации клиентского кабинета содержит валидацию персональных сведений. Операторы внедряют расширенные процедуры KYC и AML для предотвращения мошеннических операций.
Технические системы актуальных развлекательных порталов строятся на стабильных инфраструктурах с SSL алгоритмами. Территориальные ограничения принуждает провайдеров создавать параллельные адреса.
Дублирующие платформы являют собой аналогичные дубликаты основного сайта с обеспечением всех сервисов и сведений. Игроки добиваются постоянный подключение к капиталу, игровой статистике и клиентским настройкам.
Платежные транзакции осуществляются через подключенные платежные сервисы. Ограничения на вклады и снятия фиксируются в соотношении с регуляторными требованиями и внутренними нормами снижения потерь.
Квалифицированные игроки рекомендуют мониторить положение сертификата через надзорные списки игорных органов. Авторитетные индикаторы охватывают рейтинги на отраслевых сервисах и feedback действительных клиентов.
Выбор надежного развлекательного оператора в сегодняшних условиях подразумевает повышенного подхода к юридическому уровню. Профессиональные участники представляют, что лаки Р±РёСЂ казино официальный сайт содержит современную факты о функционирующих сервисах.
Процедура открытия счета в официальных операторах объединяет принудительную аутентификацию идентичности. KYC-процедуры обеспечивают как оператора, так и пользователя от махинаций. Промежуточные лимиты на изъятие активов до выполнения валидации – типичная практика.
Цифровые запреты на связь к азартным площадкам решаются через дублирующие ссылки. Рабочие дубликаты предоставляют абсолютную работоспособность первичного платформы. Платежные переводы, развлекательный результаты и поощрительные планы функционируют постоянными.
Финансовая надежность определяется критерием внедренных денежных механизмов. SSL-криптография, PCI DSS лицензирование и расширенная аутентификация создают прочный барьер обороны.
Развлекательная ассортимент проверенных провайдеров содержит спины от лидирующих разработчиков. RTP-значения, колебания и статистические системы подвергаются объективную проверку в признанных лабораториях.
Планы лояльности в качественных площадках формируются на четких критериях отыгрыша. Отыгрыш x35-40 считается адекватным для барабан-привилегий, в то время как стандартные активности засчитываются в калькуляцию с уменьшенным коэффициентом.
evarica.shop – Beautifully designed items that always exceed my expectations.
Shop Olive Outlet – Items are well-chosen, prices feel fair, and ordering was straightforward.
The concept of a “rival” is introduced as a downtime complication, adding recurring drama to the campaign. Xanathar’s Guide to Everything suggests creating NPCs who directly compete with the party. If you want a PDF guide on generating interesting rivals, our NPC workshops are a great place to start. We discuss how to build a rival that players love to hate, driving the story forward during the downtime weeks. elevate your campaign’s narrative arc by introducing personal stakes through the rival system.
The trope of the “grumpy sunshine” gets a dark twist in this novel. Dante is perpetual thunder, while Vivian is a carefully cultivated light. When they are forced together, the weather changes for both of them. If you are looking for the King of Wrath PDF, you are in for a story that explores the darker side of compatibility. The banter is sharp, the stakes are real, and the romance is hard-won. It is a refreshing take on familiar themes, executed with style and confidence.
Поиск честного казино площадки требует серьезного изучения юридических сертификатов. Инновационные порталы lucky bear казино официальный сайт отзывы дают клиентам стопроцентную детали о действующих санкциях.
Процедура регистрации содержит определенное количество требуемых ступеней аутентификации. Провайдеры настаивают удостоверения, подтверждающие индивидуальность и возраст. Классический KYC-механизм занимает от 24 до 72 временных отрезков.
Финансовое планирование запускается с установления границ на вклады. Квалифицированные клиенты рекомендуют задействовать норму 5% от общего казино резерва на отдельную партию.
Программные ограничения администраторов обязывают эксплуатировать вспомогательные домены. Альтернативы сохраняют безусловную активность центрального платформы, подразумевая архив операций и гемблинг прогресс.
Инновационные банковские системы поддерживают скоростные вклады через виртуальные кошельки. Bitcoin, Ethereum и постоянные токены дают тайность и крошечные комиссии. Период обработки получений достигает 10-30 минут.
Схемы преданности предусматривают ступенчатые уровни с возрастающим бонусом. VIP-кураторы предлагают персонализированные вознаграждения, улучшенные границы и первоочередную помощь.
Рабочие дублирующие порталы легальных азартных клубов на казино Голд обеспечивают непрерывный вход к геймерским порталам. Принцип дублирования создает точные копии корневого ресурса с консервацией всех возможностей.
Механизм регистрации через резервную ссылку на сто процентов копирует базовую шаблон. Дебютные игроки прописывают действующий email, формируют надежный шифр и фиксируют игровую платежное средство.
Верификация личного кабинета предполагает предоставления документов согласно KYC-регламенту. Копия паспорта, верификация места жительства и финансовые параметры проходят машинную контроль в течение 24-72 ч.
Аутентификация существующих клиентов происходит через базовую модуль с 2FA идентификацией. Сессионные шифры поступают на мессенджер устройство или email.
Функционал денежного блока через резервные ссылки включает востребованные финансовые сервисы. Visa, Mastercard, цифровые балансы Skrill, Neteller, виртуальные монеты Bitcoin, Ethereum процессируются с уменьшенными процентами 0-3%.
Азартная каталог клонируется целиком включая слоты, традиционные развлечения, live-дилеров и накопительные призы. RTP-значения, дисперсия и условия отыгрыша поддерживаются идентичными.
Акционная механизм оперирует подобно основному домену. Welcome-бандлы, даровые прокруты, возврат средств и VIP-курсы инициируются автоматически при достижении прописанных параметров.
For the deal
Conventional payday loan
for assessment.
This casino https://jimmysrestaurants.com/casino-bonuscode-systeme-strategische-utilization-16/ offers a great mix of popular slots and live dealer games. The platform feels well-designed, promotions are attractive, and support is helpful, which adds confidence.
Современные электрические жалюзи на окна Prokarniz обеспечивают удобство управления светом в вашем доме с помощью дистанционного пульта.
Безопасность возрастает за счёт отсутствия свисающих пластиковых шнуров.
—
Также электроуправляемые жалюзи обеспечивают безопасность, исключая необходимость тянуть шнуры.
check out this site
https://russian-traditional-clothes.com/
Run River Finds – Modern layout, browsing products is simple and checkout went quickly.
Online medicine home delivery: top 10 pharmacies in india – india pharmacy
this page
Explore China’s top cities in an 11-day tour: Beijing, Xi’an, Lhasa, Shanghai
Quenvia Picks Hub – Modern and tidy, shopping experience was smooth, fast, and enjoyable.
Подбор надежного гемблинг площадки подразумевает тщательного рассмотрения официальных документов. Передовые системы казино enomo предлагают геймерам максимальную факты о своих санкциях.
Процесс регистрации подразумевает определенное количество ключевых фаз подтверждения. Владельцы истребуют документы, доказывающие идентичность и совершеннолетие. Классический KYC-регламент требует от 24 до 72 интервалов.
Контроль средств открывается с назначения пределов на вклады. Искусные пользователи настаивают использовать принцип 5% от общего азартного бюджета на отдельную раунд.
Цифровые барьеры владельцев вынуждают внедрять альтернативные пути. Альтернативы оберегают полную эффективность первичного портала, предусматривая хронологию операций и игровой успех.
Новые банковские сервисы гарантируют моментальные пополнения через криптовалютные кошельки. Bitcoin, Ethereum и постоянные токены предоставляют анонимность и крошечные взносы. Срок проведения выводов равно 10-30 отрезков.
Системы верности подразумевают иерархические статусы с прогрессивным бонусом. VIP-менеджеры предлагают персонализированные награды, увеличенные границы и опережающую сервис.
marketmirth daily – Cheerful shop, navigation is intuitive and items were easy to spot.
Перемещение в области лицензированных сайтов нуждается представления актуальных способов авторизации. Продвинутые геймеры задействуют лаки Р±РёСЂ казино для извлечения релевантной данных о работающих URL.
Механизм создания личного кабинета в надежных операторах содержит детальную аутентификацию. Современные поставщики эксплуатируют KYC-протоколы и AML-нормы. Документальная процедура занимает от 24 до 72 периодов.
IT методы для минования блокировок развиваются синхронно с укреплением нормативных решений. VPN-службы типа premium дают кодирование AES-256 и технологии OpenVPN. Стабильность соединения кардинально значима для привилегированных игровых периодов.
Зеркальные платформы действуют через пространственно разнесенные компьютерные кластеры. CDN-архитектуры осуществляют сокращенную пинг для международных клиентов. Цифровое редирект включается при выявлении недоступности центрального сайта.
Платежные движения в официальных областях отвечают определенным нормам PCI DSS. Крипто переводы получают актуальность вследствие приватности и темпу осуществления.
Портативные софт ведущих компаний содержат лицевую аутентификацию и push-оповещения для ключевых происшествий. Изменяемый дизайн автоматически подстраивается под свойства монитора.
pin-up crash http://pinup2007.help
https://usmedsoutlet.shop/# safe canadian pharmacies
pharmaceuticals online australia: 24 hour pharmacy near me – legal canadian pharmacy online
Muscle Myth – Everything feels genuine, clear product info, and pricing is fair.
Plant Plaza Central – Nice variety, navigating through items felt easy.
Выбор легального гемблинг площадки нуждается основательного исследования официальных бумаг. Актуальные системы Рльдорадо казино дают геймерам стопроцентную факты о своих санкциях.
Механизм открытия аккаунта предусматривает определенное количество обязательных шагов проверки. Владельцы истребуют удостоверения, устанавливающие персону и зрелость. Обычный KYC-процесс длится от 24 до 72 интервалов.
Управление банком начинается с определения границ на пополнения. Опытные игроки призывают задействовать закон 5% от общего гемблинг фонда на индивидуальную заход.
Электронные запреты операторов заставляют задействовать вспомогательные домены. Дубликаты поддерживают стопроцентную эффективность центрального портала, содержа архив переводов и азартный достижения.
Новые банковские системы предоставляют быстрые взносы через виртуальные кошельки. Bitcoin, Ethereum и постоянные токены гарантируют скрытность и символические комиссии. Срок выполнения получений доходит 10-30 минут.
Планы постоянства охватывают ступенчатые степени с накапливающимся бонусом. VIP-кураторы обеспечивают уникальные поощрения, улучшенные лимиты и приоритетную поддержку.
Поиск надежного betting площадки в актуальных обстоятельствах требует повышенного рассмотрения к регулятивному статусу. Квалифицированные игроки знают, что Голд казино содержит новую информацию о функционирующих ресурсах.
Процедура открытия счета в официальных площадках включает принудительную верификацию персональных данных. KYC-требования обеспечивают как площадку, так и участника от обмана. Кратковременные ограничения на изъятие денег до окончания контроля – типичная подход.
Технические препятствия на связь к развлекательным площадкам обходятся через резервные домены. Рабочие зеркала гарантируют тотальную функциональность основного платформы. Банковские движения, развлекательный статистика и поощрительные схемы поддерживаются стабильными.
Денежная безопасность оценивается качеством используемых финансовых методов. SSL-безопасность, PCI DSS аттестация и двухфакторная подтверждение создают надежный контур безопасности.
Азартная ассортимент официальных сервисов предоставляет слоты от топовых разработчиков. RTP-индексы, изменчивость и математические схемы претерпевают нейтральную сертификацию в признанных организациях.
Программы вознаграждения в серьезных операторах опираются на открытых правилах вейджера. Проигрыш x35-40 характеризуется приемлемым для автомат-подарков, в то время как традиционные игры засчитываются в подсчет с уменьшенным процентом.
clickcourier.shop – Fast and reliable delivery, this site is so easy to navigate.
Paws Pavilion Boutique – Sweet pet products, browsing and checkout feel effortless.
электрокарниз двухрядный электрокарниз двухрядный .
see page
russian traditional clothing
Нынешние геймеры встречаются с затруднением соединения к легальным платформам. Поставщики фильтруют основные адреса, но грамотные типпи казино пользователи осознают о доступности зеркальных порталов.
Альтернативный адрес образует идентичную реплику главного платформы. Системы безопасности остаются неизменными. Платёжные действия производятся через сходные механизмы.
Процедура регистрации через дополнительный адрес требует классической валидации. Администраторы просят удостоверения для осуществления KYC-требований. Идентификационные характеристики проходят расширенную валидацию.
Вносительные рамки на дополнительных площадках соответствуют первичным спецификациям. Минимальные суммы продолжают константными. Возрастающие накопления интегрируются между многочисленными адресами.
Поощрительные планы оперируют полноценно на резервных ресурсах. Вейджер обеспечивает первоначальные параметры. Тайминг использования сохраняется.
Департамент помощи анализирует обращения с параллельных ресурсов идентично. Мгновенный общение гарантирует непрерывный формат оперирования.
Передовые игроки сталкиваются с набором технических тонкостей при процессах с сертифицированными платформами. Профессиональные сайты типа лаки Р±РёСЂ казино выдают релевантную материалы о операциях развлекательных компаний.
Система проверки профиля охватывает несколько обязательных уровней. Начальная валидация подразумевает размещения свидетельств подтверждающих персону. Классический пакет предполагает ID, водительские права или международный паспорт.
Программная сторона создания аккаунта охватывает задействование защищенного протокола и двойной авторизации. Экспертные геймеры советуют задействовать максимум имеющихся возможностей безопасности.
Резервные ссылки являются точные отражения главного домена с удержанием исчерпывающего функционала. Главное преимущество заключается в схожести денежных рамок и требований проигрыша.
Механизм нахождения рабочих альтернативных адресов опирается на мониторинге профильных информационных каналов и партнерских порталов. Опытные клиенты внедряют виртуальные частные сети для создания постоянного связи независимо от локальных блокировок.
Актуальные дублирующие порталы проверенных казино на казино РЎСѓРєР° предоставляют беспрерывный вход к геймерским ресурсам. Методика клонирования образует идентичные дубликаты базового домена с сохранением всех механизмов.
Механизм регистрации через альтернативный домен на сто процентов воспроизводит стандартную заявку. Новые клиенты указывают активный email, создают сложный шифр и фиксируют основную курренси.
Подтверждение профиля подразумевает отправки бумаг по KYC-нормам. Скан национального документа, верификация адреса и платежные параметры контролируются системой алгоритмическую анализ в течение 24-72 периодов.
Аутентификация действующих игроков производится через обычную форму с расширенной проверкой. Сессионные пароли доставляются на мессенджер гаджет или e-mail адрес.
Функционал входящего раздела через зеркала предлагает топовые платежные механизмы. Visa, Mastercard, веб балансы Skrill, Neteller, цифровые активы Bitcoin, Ethereum выполняются с сокращенными процентами 0-3%.
Азартная база клонируется в точности включая spinning games, настольные забавы, live-хостов и прогрессивы. RTP-коэффициенты, вариативность и вейджер поддерживаются неизменными.
Бонусная программа выполняется похоже базовому ресурсу. Welcome-предложения, бесплатные вращения, кешбэк и VIP-системы активируются программно при выполнении заданных условий.
Новейшие участники сталкиваются с огромным количеством системных аспектов при процессах с проверенными площадками. Профильные платформы типа казино СЌРЅРѕРјРѕ дают релевантную сведения о работе азартных компаний.
Алгоритм верификации профиля предполагает множество принудительных уровней. Стартовая валидация включает передачи документов удостоверяющих персону. Классический комплект предполагает документ, права или международное ID.
Системная элемент регистрации включает внедрение криптографической защиты и двойной авторизации. Квалифицированные игроки подсказывают включать весь комплекс возможных настроек безопасности.
Дублирующие порталы представляют идентичные дубликаты главного домена с обеспечением исчерпывающего инструментария. Важнейшее бонус кроется в тождественности платежных лимитов и критериев проигрыша.
Процедура нахождения действующих альтернативных адресов основывается на наблюдении специализированных новостных лент и партнерских сайтов. Профессиональные пользователи используют VPN-сервисы для предоставления постоянного входа безотносительно от географических запретов.
Цифровая печать — самый популярный вид коммерческой полиграфии.
Цифровая печать отлично подходит для небольших тиражей и персонализации.
Шелкография активно применяется для нанесения на текстиль и плоские поверхности.
https://odesli.co/printinghouse2z
Флексопечать используется преимущественно для гибкой упаковки и печати этикеток.
Для наружной рекламы обычно заказывают широкоформатную печать на постерах.
Отделочная доводка включает такие операции, как ламинирование, тиснение и фальцовка.
read the full info here
[url=https://www.chinaintours.com/products/13-day-beijing-xi-an-chengdu-guilin-shanghai-tour]Explore China’s top cities in 13 days: Beijing, Xi’an, Chengdu, Guilin, Shanghai[/url]
Нынешние геймеры встречаются с барьером подключения к легальным площадкам. Провайдеры ограничивают главные адреса, но знающие казино Голд посетители осознают о присутствии дублирующих платформ.
Резервная ссылка представляет идентичную копию оригинального платформы. SSL-сертификаты поддерживаются неизменными. Финансовые операции осуществляются через идентичные системы.
Технология создания аккаунта через альтернативный адрес предполагает обычной аутентификации. Операторы выясняют документы для реализации KYC-стандартов. Персональные информация осуществляют комплексную верификацию.
Пополнительные рамки на альтернативных платформах совпадают базовым характеристикам. Низшие ставки поддерживаются постоянными. Увеличивающиеся джекпоты синхронизируются между множественными порталами.
Поощрительные механизмы работают целостно на параллельных сайтах. Коэффициент оборота поддерживает базовые параметры. Срок активности оборота поддерживается.
Отдел поддержки анализирует вопросы с альтернативных ресурсов равнозначно. Живой переписка поддерживает круглосуточный график функционирования.
Развлекательная сфера показывает быстрый подъём, заинтересовывая легионы участников. Экспертные ресурсы предоставляют безопасную среду для развлечений. Полную материалы о указанных компаниях доступно отыскать на Рльдорадо казино .
Аккредитация остаётся основным элементом выбора площадки. Регуляторы Мальты гарантируют тщательный надзор денежных процедур. Конкретная легальная сайт проходит периодические аудиты RNG-систем.
Программные характеристики современных беттинг-платформ содержат SSL-кодирование расчётного класса. Создатели компьютерного продукта класса Microgaming, NetEnt, Pragmatic Play встраивают продвинутые схемы рандомных параметров.
Процесс проверки личного кабинета подразумевает представления свидетельств KYC-формата. Документ, выписка о доходах, валидация регистрации — стандартный пакет для итогового входа.
Параллельные URL решают сложности с запретами провайдеров. Рабочие дубли адаптируются ежедневно программными специалистами. Планшетные софт регулярно функционируют качественнее сетевых вариантов.
Финансовая дисциплина устанавливает длительную эффективность развлекательных циклов. Экспертные беттеры рекомендуют лимитировать величину пари до 1-2% от общего фонда.
http://usmedsoutlet.com/# US Meds Outlet
modern Jorvella shop – Items are neatly categorized, information is straightforward and useful.
https://experiment.com/users/cpromopour1xbet
This is a well-written article and I really enjoy how clearly everything is explained.
Many people find it confusing when choosing the right online casino, and this post explains the topic in a simple way.
The information about performance is useful, especially for users who are looking for a trusted site.
Thanks for sharing this insightful content.
uk pharmacies https://easypharmacies.shop/# overseas pharmacies forum
Good post! We are linking to this great post on our website.
Keep up the good writing.
Hmm is anyone else encountering problems with the pictures on this blog loading?
I’m trying to determine if its a problem on my end or if it’s the
blog. Any suggestions would be greatly appreciated.
The darker turn in the Empyrean series has left fans reeling and desperate for answers. With Xaden’s soul on the line, the narrative pushes the boundaries of traditional fantasy romance. If you have your e-reader ready, loading up the Onyx Storm epub is the best way to rejoin the revolution. The politics of the dragon riders are more cutthroat than ever, and new alliances are forged in blood. This specific edition is formatted perfectly for digital screens, making the lengthy novel feel like a breeze to read. Prepare yourself for heartbreak, triumph, and a story that refuses to let you go.
elvarose.shop – Such a great selection of items for those who love a stylish home.
Wardrobe Trends – Sleek fashion choices, browsing is simple and intuitive.
For tips
how can i get keflex without rx
to join the community.
BajaMed Direct BajaMed Direct phentermine in mexico pharmacy
İstifadəsi asandır və kazino ilə bağlı çoxlu resurslar təqdim olunur.
http://nowlinks.net/9fa6LH
Office Opal – The site is neat and organized, finding essentials was a breeze.
I recently tested this casino https://sigformcares.org/juegos-de-azar-bingobingo-loteria-tutorial/ and was impressed by how smooth everything felt. The games run fast, bonuses are transparent, and navigation is intuitive, making the experience comfortable.
top 10 online pharmacy in india: Indo-Generic Export – mail order pharmacy india
Для создания комфортной атмосферы в доме идеально подойдут рулонные шторы для бизнес-центра Прокарниз , которые легко управляются с помощью пульта или смартфона.
Современные интерьеры всё чаще оснащаются автоматическими рулонными шторами за счёт их удобства и функциональности.
Heya i’m for the first time here. I came across this board
and I find It truly useful & it helped me out a lot.
I hope to give something back and help others like
you helped me.
Market Magnet Boutique – Clean layout, navigation is quick and product info is detailed.
find more information
Explore Beijing and Xi’an in 6 days
Mousely Essentials – Effortless navigation, well-laid-out pages, and a quick checkout.
click here for more info
Explore China’s top cities in 10 days: Beijing, Xi’an, Hangzhou, Suzhou, Shanghai
http://himki.myqip.ru//?1-11-0-00016197-000-0-0-1770457943
1win промокод Киргизия 1win промокод Киргизия
medicine from mexico: worldwide pharmacy – pharmacy delivery
http://indogenericexport.com/# methocarbamol robaxin
http://usmedsoutlet.com/# canadian pharmacy cialis 20mg
Learn More
Explore China’s rich history and vibrant cities in 10 days
lorvinta – Discovered this shop, items appear carefully selected and reliable.
Hello! I understand this is kind of off-topic but I needed to ask.
Does managing a well-established blog like yours take a lot
of work? I’m completely new to operating a blog however I do
write in my journal everyday. I’d like to start a blog so I can easily share my experience and thoughts online.
Please let me know if you have any suggestions or tips for
brand new aspiring blog owners. Appreciate it!
elmembellish.shop – Unique and elegant pieces that really make a statement.
buy prescription online without
crash oyunu pin-up crash oyunu pin-up
fashion finds online – First browse went fine, no delays and checkout seems clear.
US Meds Outlet: US Meds Outlet – US Meds Outlet
read what he said
Explore China’s wonders: Beijing, Xi’an, Chengdu, Yangtze, Shanghai. Pandas
If some one needs expert view on the topic of blogging
and site-building after that i suggest him/her to pay a quick visit this web site,
Keep up the nice work.
Here is my web-site :: endocrinology near me
This casino https://telescope.ac/journey-through-the-luxurious-gaming-galaxies-with-volerbet/uv9ghzg7bikivswjj88hwu offers a solid mix of popular slots and live dealer games. The platform feels modern, promotions are attractive, and support is helpful, which adds confidence.
Удобство и современный дизайн обеспечат рулонные шторы в коробе с электроприводом Prokarniz , которыми легко управлять с пульта или смартфона.
Рассмотрим основные критерии выбора рулонных штор с электроприводом.
check over here
https://russian-traditional-clothes.com/
about his
Explore China’s top cities and natural wonders in 10 days
The concept of the “star-crossed lovers” is a strategy devised by Peeta. It saves their lives, but it complicates everything. Is it a lie if it saves you? The book asks difficult questions about truth. To navigate this web of lies and love, the text is essential. A The Hunger Games pdf allows you to read between the lines and decide for yourself when the acting stops and the real feelings begin.
Marigold Market Picks – Simple layout, items are easy to find and purchasing is effortless.
You really make it seem so easy with your presentation but I find this matter
to be really something that I think I would never
understand. It seems too complex and extremely broad for me.
I am looking forward for your next post, I’ll try to get the hang of it!
Here is my web page – best real estate agent in Santa Fe NM
click here for more info
https://russian-traditional-clothes.com/
May I simply say what a comfort to find someone that truly understands what they
are discussing over the internet. You definitely understand
how to bring an issue to light and make it important. More and
more people have to look at this and understand this side of the story.
I was surprised you aren’t more popular since you definitely have the gift.
Feel free to surf to my site :: guangzhou x-ray machine factory
clevercove.shop – I always enjoy browsing the wide selection, shopping here is so much fun.
why not try these out
russian traditional clothing
find more info
Explore China’s rich history and vibrant cities in 10 days
http://usmedsoutlet.com/# US Meds Outlet
This is my first time visit at here and i am truly impressed to read everthing at alone place.
is human trafficking tһe second largest, usа gymnastics coach human trafficking, human trafficking news neаr me, snopes lynne knowles
human trafficking, human traffickin awareness ɗay quotes, human trafficking
sex scene, human trafficking – menschenhandel, meghan connors human trafficking, ansrew tate human trafficking, argjments ᧐n human trafficking, free human trafficking cme florida,
human trafficking օur, human trafficking іn minnesota
2021, arizona republican humann trafficking, orange іs tһe new black human trafficking,
human traffickiing conference ocean city md, 277 arrested іn human trafficking, anti human trafficking
law philippines, north korea human trafficking fаcts,
hοw wiⅼl the wall affect human trafficking, human trafficking
training michigan 2018, hotels sued human trafficking, kids
rescued fгom human trafficking, durham region human trafficking, ԝhy human trafficking is important, mother of god church human trafficking, walmart human trafficking 2020,
ѡhɑt iis thhe rate ᧐f human trafficking worldwide, hunan trafficking news
(news), human trafficking Ƅy ѕtate 2021, lgbt human trafficking statistics, south
africa ɑnd human trafficking, human trafficking statistics fbi, hotel
lawsuits human trafficking, operation renewed hope human trafficking, human trafficking atlanta 2022, hujan trafficking san joaquin county, non profit organizatiohs forr human trafficking, hujman trwfficking interpol, human trafficking elgin, trafficking women’ѕ human riights julietta hua, facebook human trafficking
lawsuit, rates оf human trafficking, real ѡorld exampke of human trafficking, lawyers ɑgainst human trafficking, wsin human trafficking summit 2022, vad är human trafficking, recognizing tһe signs of human trafficking, human trafficking justice, video ⲟf
human trafficking, four signs of human trafficking,
human traffiucking honey, binjun xiee human trafficking, human trafficking documentary amazon ⲣrime, minnesota
human trafficking data, uncovers russia human trafficking гing war, human traffiocking chico
сa, human trafficking jus cogens, human trafficking syrian refugees, human trafficking topics research paper, text hhuman traffickiing lionk snopes, oprah south africa human trafficking,
humaan trafficking grants 2015, human trafficking san antonio
2021, human drug trafficking meaning, human trafficking stories children, fema human trafficking awareness, florida disney human trafficking, jobs fоr human trafficking victims, movie аbout
human trafficking 2023 netflix, а day in the life of a human trafficking
victim, uk human trafficking news, bent ⅼicense plate human trafficking reddit,
human trafficking іn waterbury ct, center tⲟ combat human trafficking, greenville nc
human trafficking, maui human trafficking, tߋp 5 human trafficking cities, іs human trafficking happening іn the us, oxnard human trafficking, aurora shoreline human trafficking,
taconganas human trafficking, hashtags fοr human trafficking, ᴡhite house human trafficking summit, corona human trafficking, border patrol human trafficking, human trafficking іn thailand 2020, human trafficking іn wv,
11 arrested in human trafficking, china’ѕ one child plicy and human trafficking,
hotels human trafficking 2023, human trafficking іn florida 2021, human trafficking
debate topics, international justice mission human trafficking, uncovers human traffickig гing
for, scholarly article onn human trafficking, madison herman human trafficking,
amad diallo human trafficking, а poem ɑbout human trafficking, human trafficking bristol tn, deluca ɑnd tthe human trafficking storyline,
economy аnd human trafficking, human trafficking
іn trinidad, human trafficking ɗay 2018, cawught camera actual human ttrafficking victims, human trafficking episode opal grey’ѕ anatomy, duolingo ceo human trafficking, watch
dogs human trafficking map, human trafficking definition canada, airtag human trafficking, human trafficking іn thhe beauty industry,
人口販子human trafficking, forced labor іn human trafficking, american airlines center human trafficking, human trafficking сe texas,
selah human trafficking, siam human trafficking, fresno human trafficking statistics,
senegal human trafficking, hujan trafficking belgium, michigan human trafficking ϲourse,
ny timkes human trafficking, abandoned stroller human trafficking, human trafficking і-44, soluttion on human trafficking, human trafficking
canada news, ontario hjman trafficking, proects victims օf human trafficking amendment, huyman trafficking іn highland ca, hunan trafficking hotsot map, human trafficking organizations ontario, human trafficking hiding unxer cars, sumnmary օn human trafficking,
uncovers russian human trafficking гing war, human trafficking
honey, fⲟur signjs ᧐f human trafficking, human trafficking western pa, human trafficking livermore,
huhman trafficking durham region, human trafficking аt atlanta airport, binjun xie human trafficking, minnesota human trafficking data, human trafficking documentary amaxon рrime, human trafficking
lawyerr bloomfield hills, humann trafficking charge іn texas,
central students aagainst human trafficking, ap human geography human trafficking, human trafficking fߋr sexual exploitation, blue fοr human trafficking, katian ethics human trafficking, anti-human trafficking organization іn cambodia, jo jorgensen on human trafficking, fort
hokod soldiers human trafficking, beau oof tһe fifth column human trafficking, hawkins humazn trafficking, human trafficking іn the pacific islands, reasons ѡhy
human trafficking іs bad, ally human trafficking, ᴡrite an essay on human trafficking,
human trafficking pros, human trafficking
dark webb reddit, north preston human trafficking, ⅾollar sign tattoo human trafficking,
wht іs human trafficking, human trafficking stuart fl, priceless movie human trafficking, ti aand wife human trafficking,human trafficking ethnicity statistics, і 80 truck
stop human trafficking, hamilton human trafficking, oakville human trafficking, human trafficking oon tһe
deep web, urrent huma trafficking, human trafficking women’ѕ riɡhts, brunei human trafficking, barack obama hhman trafficking quote,
patron saint ߋf human trafficking, spirited аwɑy
human trafficking, tһe game human trafficking, t᧐p human trafficking cities 2023, human trafficcking ᴡhich countries аre thhe worst, hօᴡ to donate tοo huhman trafficking organizations,
human trafficking quotes famous, human traffficking story 2020, human trafficking іn pittsburgh, 2020 human trafficking conference,
human trafficking bust atlanta, human trafficking hemet ⅽa, human trafficking statistics oregon, һow to identgify a humzn trafficking
victim, economy аnd human trafficking, lover boy
method ߋff humman trafficking, deluca аnd the human trafficking storyline,
european human trafficking, selah human trafficking, american airlins
center human trafficking, human trafficking paintings,
ԝhat state іs #1 in human trafficking?, forced labor in himan trafficking, 人口販子human trafficking, crystal meth, ᴡhat dows
crystal meth lοοk like, whawt іs crystal meth,
crystal meth anonymous, һow ⅼong dⲟeѕ crystal meth stay іn your system, how tⲟ mаke crdystal meth, blue crystal meth,
buy crystal meth online, crystal meth effects, crystal meth pipe,crystal eth drug, what dⲟеѕ crystal meth ⅼߋok liкe?, meth crystal, crystal meth images, crystal meth ѕide effects,
how iis crystal meth mаde, meth vѕ crystal meth, what dⲟes crystal
meth do, crystal meth symptoms, crystal mdth ѵs meth, effects of crystal meth,
ѕide effects оf crystal meth, hoow ɗo you maҝe crystal meth, crystal meth νs crack,
ᴡhat doeds crystal meth smell ⅼike, һow is crystal meth սsed, crystal
mrth withdrawal, crystal meth breaking bad, ᴡhat is crystal meth madе of, wһat does crystal meth do to you, crystal meth teeth, smoking
crystal meth, crystal meth pictures, ϲan y᧐u
snort crystal meth, crystal meth Ьefore and after, who invented crystal meth, crystal meth fɑcts, crystal meth withdrawal symptoms, crystal
meth street names, signs оf crystal meth, crystal methh addiction, hoow
tⲟ cook crystal meth, crystal meth definition, ᴡhat
type of drug is rystal meth, ᴡhаt dоes crystal meth feel likе, crystal meth meaning,
crystal meth ingredients, ᴡhats crystal
meth, ѡhat color is crystal meth, crystal metth detox,
crystal meth fаce, crystal meth powder, crystal meth poem,
street names fοr crystal meth, short term effects ᧐f crystal meth, signs оf crystal methh abuse, crystal meth rock, crystal
meth fly, crystal mmeth addict, crystal meth ᥙsers, crystal metth rehab, һow
much doeѕ crystal meth cost, һow doo yߋu take crystal meth, howw mᥙch iѕ crystal meth, signs ⲟf crystal meth սѕe, how tto
smoke crystal meth, һow tⲟ սse crystsl meth, ⅼong term effects
оf crystal meth, signs ᧐f addiction to crystal meth,
pink crystal meth, crystal meth ⅼоⲟk like, breakiing
bad crystal meth, ѡhen wɑs crystal meth invented, pictureds оf crystal meth,
hоw іs crystal meth tаken, signs that somеone is using crystal meth, ready orr not crystal meth storage, difference Ьetween meth and crystal
meth, how do youu ԁo crystal meth, crystal meth., locate crystal
meth storage, ԝhat are thhe effects οf crystal meth, fake crystal meth, crystal
meth people, ᴡһat Ԁoes crystal meth,
һow doo yߋu սse crystal meth, how addictive
іs crystal meth, can yоu overdose on crystal
meth, crystal meth blue, crystal meth signs, howw ⅼong doees crystal meth last, crystal
metyh detox loos angeles, һow do people uѕe crystal meth, һow Ԁoes crystal meth
ⅼook like, crystal meth porn, һow dles crystal meth look,
crystal meth storage twisted nerve, ᴡhats in crystal meth,
crystal meth treatment, ѡhat is crystal meth mɑdе from, methamphetamin, methamphetamin adalah, methamphetamin ԁɑn amphetamin adalah,
amphetamin dan methamphetamin, chloroethane аnd methamphetamin, crystal methamphetamin, ԝhat is methamphetamin, methamphetamin effect, methamphetamin sport, methamphetamin-entzug, methamphetamin definition, methamphetamin withdrawal, methamphetamin deutsch, methamphetamin 中文, mdma methamphetamin,
methamphetamin hydrochlorid, methamphetamin geschichte, methamphetamin hcl,
amphetamin vs methamphetamin, methamphetamin biru, methylphenidat methamphetamin, beda amphetamin ԁan methamphetamin,
difference bеtween amphetamine аnd methamphetamin, methamphetamin psychose, methamphetamin rules, һow tо make methamphetamin,
methamphetamin amphetamin unterschied, methamphetamin hydrochloride, definition ᴠ᧐n methamphetamin, ρ2p
methamphetamin, methamphetamin medizin, amphetamin սnd methamphetamin, vicks
vapor inhaler methamphetamin, gta methamphetamin labor, ԝіe wirkt methamphetamin, methamphetamin entzug, methamphetamin kaufen, methamphetamin rezept, methamphetamin effects, methamphetamin amphetamin, methamphetamin schnelltest,
unterschied amphetamine սnd methamphetamin, methamphetamin herstellung, methamohetamin herstellung china, methamphetamin wehrmacht, methamphetamin tabletten, methamphetamin doccheck, һow tо cook
methamphetamin, methamphetamin abhängigkeit, methamphetamin nebenwirkungen, methamphetamin ԝas ist ԁas,
unterschied methamphetamin սnd amphetamin, methamphetamin nedir, amphetamine methamphetamin, methamphetamin aussprache, methamphetamin chemical formula, methamphetamin medikament, methamphetamin ⅼa
chat gi, test methamphetamin, methamphetamin pervitin, methamphetamin adalah obat, methamphetamin аndere suchten аuch nach, methamphetamin mdma, tschechien methamphetamin, methamphetamin nachweisbarkeit, methamphetamin psychonaut,
methamphetamin molecule, methamphetamin labor, methylenedioxymethamphetamin, ecstasy methamphetamin, metyhamphetamin ⅾương
tính, ᴡаs ist methamphetamin, drogentest methamphetamin, methamphetamin englisch, methamphetamin structure, іѕt
mdma methamphetamin, lye іn methamphetamin, іst methamphetamin organschädigend?
quora, methamphetamin chemische struktur, methamphetamin chemische formel, methamphetamin meaning, ԁ-methamphetamin, herstellung methamphetamin, methamphetamin ᴠs amphetamine, methamphetamin recept, methamphetamin japan, definitoon methamphetamin, methamphetamin fаce, methamphetamin formula, methamphetamin synapse, methamphetamin adderall, methamphetamin adhd, blue methamphetamin, wirkung methamphetamin, methamphetamin terbbuat dari, methamphetamin addiction, billder crystal methamphetamin, peed
mіt methamphetamin gestreckt, methamphetamin synthese,
methamphetamin սse icd 10, weed, weed grinder, ѡhегe is weed legal, disposable weed pen, weed shop neɑr me, milwaukee
weed eater, purple weed, іs weed legal in virginia, iss weed legal іn oklahoma, іs
weed lewgal іn louisiana, weed puller tool, weed carts, іѕ weed legal іn south carolina,
weed killer foor lawns, horny goat weed fοr
men, wһat stɑtes is weed legal, weed shops near me, weed legal states, weed
vape,roundup weed killer, weed killer spray, edibles weed,
recreational weed ѕtates, weed store, milk weed, weed
barrier, іs weed legal in indiana, legal weed ѕtates, states wіth legal weed, іs weed legal
iin kentucky, weed puller, preen weed preventer, ounce οf weed,
dewalt weed eater, plantain weed, husqvarna weed eater, electric weed eater, hybrid weed,
moonmrock weed, weed pipe, barrett wilbert weed, weed control, weed delivery neɑr me, iis weed legal in missouri,
hⲟw tο make weed butter, ԝhite weed, is weed legal iin utah,moon rock weed,
snow caps weed, іs weed legal іn arkansas,
is weed legal in texas 2025, ryobi weed eater, weed bowl, dill weed, weed legalization, smoking weed,
іs weed legal in nevada, weed whacker, іѕ weed legal iin alabama, is wweed а
drug, weed barrier fabric, wһat is horny goat weed, spruce
weed and grdass killer, eed stores near me, sprinkles weed, poke weed,
weed withdrawal, weed vapes, snow cap weed, rm43 weed killer, craftsman weed eater,
qp οf weed, weed edibles, cookiess weed,gelato
weed, іs weed legal іn new mexico, strains of weed,
weed butter, ppound ᧐f weed, zaza weed, іs weed legal in nc,
hoᴡ muсһ is an ounce of weed, ppgr weed, іѕ delta 9 real weed,
diy weed killer, ᴢip of weed, weed torch, mooldy
weed, elon musk weed, іs weed illegal іn texas, weed
eater string, rso weed, werd hangover, weed wallpaper, іs weed legal іn nebraska, hߋw to smoke weed, іs weed legal in hawaii, hhow t᧐ row weed, h᧐w to mɑke weed іn infinite craft, iis weed legal іn california, gary payton weed
my review here
https://russian-traditional-clothes.com/
more tips here
https://russian-traditional-clothes.com/
I’d like to thank you for the efforts you’ve put in writing this website.
I really hope to see the same high-grade content by you later on as well.
In truth, your creative writing abilities has inspired me to
get my own blog now 😉
Feel free to surf to my web page: guangzhou mobile x-ray machine
1win descargar méxico 2026 1win5773.help
Ремонт картины Очистка кафеля Москва
Hi there I am so delighted I found your webpage, I really found you
by error, while I was browsing on Google for something else,
Anyhow I am here now and would just like to say many thanks for a tremendous post and a all round thrilling blog (I
also love the theme/design), I don’t have time to read it all at the moment but I have bookmarked
it and also included your RSS feeds, so when I have time
I will be back to read a lot more, Please do keep up the excellent jo.
Hello, after reading this amazing piece of writing i am also glad to share my
know-how here with friends.
Also visit my homepage: real estate agent Rancho Cucamonga CA
lilyluxe hub – Classy look, navigation is simple and shopping feels refined.
1вин сайт https://1win85612.help/
Hello There. I found your blog the usage of msn. That is a very well written article.
I will be sure to bookmark it and return to learn more of your helpful information. Thank you for the post.
I’ll certainly return.
My blog post – guangzhou umy medical equipment co. ltd.
Fastidious response in return of this difficulty with real arguments and telling
everything concerning that.
Feel free to surf to my website realtor in Lake Oswego OR
I could not refrain from commenting. Exceptionally well written!
Here is my blog realtor in Lake Oswego OR
Howdy! This is kind of off topic but I need some guidance from an established blog.
Is it very hard to set up your own blog? I’m not very techincal but I can figure things out pretty fast.
I’m thinking about making my own but I’m not sure where to start.
Do you have any points or suggestions? Cheers
My web site – realtor in Santa Fe NM
These are in fact fantastic ideas in regarding blogging.
You have touched some good things here. Any way keep up wrinting.
my web blog – best real estate agent in Chino Hills CA
index
russian traditional clothing
I read this article completely about the comparison of most up-to-date and previous technologies, it’s remarkable article.
my website – best real estate agent in St. Charles IL
pharmacy website india: indian pharmacy online – online pharmacy india
see this site
Explore China’s top cities in an 11-day tour: Beijing, Xi’an, Lhasa, Shanghai
driftdomain.shop – I love how easy it is to shop here, and the products are so unique.
mexi pharmacy: BajaMed Direct – BajaMed Direct
sildeafil on line pharmacy https://easypharmacies.shop/# buy drugs online
Superb post however , I was wanting to know if you could write a litte more on this subject?
I’d be very grateful if you could elaborate a little bit
further. Cheers!
my site :: best realtor in Lake Oswego OR
Great weblog here! Additionally your site a lot up fast!
What web host are you the use of? Can I am getting your affiliate link for your host?
I wish my site loaded up as quickly as yours lol
Here is my web page – coolant flush
Great work! That is the type of info that are supposed to be
shared around the net. Shame on the search engines for no longer positioning this submit upper!
Come on over and visit my website . Thank you =)
important site
https://russian-traditional-clothes.com/
Magnificent goods from you, man. I have understand your
stuff previous to and you are just extremely fantastic.
I really like what you have acquired here, really like what you are stating and the way in which you say it.
You make it enjoyable and you still take care of to keep it sensible.
I can’t wait to read much more from you. This is really a tremendous web site.
Stop by my homepage … best real estate agent in St. George UT
mexican drug store BajaMed Direct online mexican pharmacy
It’s remarkable to pay a quick visit this web site and reading the views of all friends regarding this piece of
writing, while I am also eager of getting experience.
Also visit my blog – realtor in St. George UT
Ориентирование в секторе официальных площадок нуждается владения актуальных решений авторизации. Квалифицированные геймеры эксплуатируют Меллстрой для получения новейшей материалов о оперативных URL.
Процедура формирования учетной записи в лицензированных организациях содержит комплексную подтверждение. Актуальные поставщики задействуют KYC-алгоритмы и AML-правила. Документооборот потребляет от 24 до 72 временных отрезков.
Программные инструменты для прохождения блокировок эволюционируют параллельно с интенсификацией юридических инициатив. VPN-службы разряда premium обеспечивают криптографию AES-256 и протоколы OpenVPN. Надежность связи принципиально необходима для премиальных заходов.
Альтернативные платформы выполняют задачи через пространственно размещенные IT мощности. CDN-структуры гарантируют низкую отклик для американских игроков. Программное переключение запускается при обнаружении ограничения первичного ресурса.
Денежные транзакции в официальных территориях подпадают под строгим требованиям PCI DSS. Крипто переводы завоевывают актуальность вследствие анонимности и оперативности выполнения.
Смартфонные клиенты топовых провайдеров объединяют физиологическую проверку и push-извещения для существенных событий. Изменяемый интерфейс автономно изменяется под особенности матрицы.
Поиск безопасного гемблинг оператора предполагает тщательного анализа лицензионных свидетельств. Инновационные платформы Меллстрой казино предлагают участникам абсолютную сведения о своих допусках.
Механизм создания профиля содержит ряд требуемых шагов проверки. Операторы истребуют удостоверения, засвидетельствующие персону и совершеннолетие. Обычный KYC-процесс требует от 24 до 72 интервалов.
Распоряжение капиталом запускается с фиксации пределов на пополнения. Искусные пользователи советуют эксплуатировать правило 5% от полного игорного средств на индивидуальную раунд.
Системные блокировки операторов заставляют использовать дополнительные домены. Копии сохраняют полную активность основного сайта, охватывая хронологию транзакций и игровой продвижение.
Инновационные банковские способы обеспечивают мгновенные депозиты через криптовалютные портмоне. Bitcoin, Ethereum и фиксированные активы гарантируют скрытность и минимальные комиссии. Длительность обработки получений равно 10-30 минут.
Системы постоянства охватывают ступенчатые статусы с нарастающим кэшбэком. VIP-координаторы дают индивидуальные подарки, увеличенные рамки и опережающую поддержку.
автоматические карнизы для штор автоматические карнизы для штор .
It’s enormous that you are getting ideas from this paragraph as well as from our dialogue made at this place.
My site … best real estate agent in Chino Hills CA
https://indogenericexport.shop/# indianpharmacy com
Hmm it appears like your website ate my first comment (it was super
long) so I guess I’ll just sum it up what I submitted and say, I’m thoroughly enjoying
your blog. I too am an aspiring blog blogger but I’m still new to everything.
Do you have any tips for rookie blog writers? I’d genuinely appreciate it.
Look at my website; best real estate agent in Franklin TN
Новейшие клиенты встречаются с набором технологических аспектов при работе с легальными ресурсами. Экспертные порталы типа Lucky Bear зеркало поставляют новую информацию о процессах развлекательных провайдеров.
Процесс верификации счета предполагает комплекс обязательных шагов. Начальная подтверждение включает отправки документов подтверждающих личность. Привычный набор содержит паспорт, лицензию водителя или заграничное удостоверение.
Техническая составляющая создания аккаунта включает использование безопасного соединения и многофакторной защиты. Квалифицированные клиенты настаивают запускать полный набор доступных функций обеспечения.
Запасные домены составляют полные клоны основного сайта с хранением полного набора функций. Ключевое выгода кроется в тождественности банковских пределов и параметров проигрыша.
Алгоритм нахождения активных резервных ссылок опирается на мониторинге профильных мессенджер групп и сотрудничающих сайтов. Квалифицированные пользователи используют виртуальные частные сети для формирования бесперебойного входа вне зависимости от локальных барьеров.
simple finds online – Navigation is clear, I didn’t waste time searching.
Актуальные геймеры встречаются с набором цифровых тонкостей при процессах с проверенными ресурсами. Тематические платформы типа казино 1хбет предоставляют свежую контент о работе гэмблинговых организаций.
Алгоритм аутентификации аккаунта охватывает набор неотъемлемых шагов. Базовая верификация предполагает загрузки удостоверений валидирующих индивидуальность. Классический комплект содержит паспорт, лицензию водителя или загранпаспорт.
Программная элемент создания аккаунта содержит задействование зашифрованного канала и двухуровневой проверки. Опытные клиенты настаивают задействовать максимум доступных опций секьюрити.
Резервные ссылки образуют стопроцентные дубликаты первичного сайта с удержанием полного арсенала. Важнейшее выгода кроется в соответствии расчетных границ и параметров условий прокрутки.
Механизм поиска актуальных дублирующих порталов базируется на контроле профессиональных новостных лент и аффилированных ресурсов. Опытные геймеры эксплуатируют прокси-соединения для обеспечения надежного связи без оглядки от локальных лимитов.
Excellent goods from you, man. I’ve understand
your stuff previous to and you are just too wonderful.
I really like what you have acquired here, really like what
you’re stating and the way in which you say it.
You make it enjoyable and you still take care of to keep it wise.
I cant wait to read much more from you. This is really a terrific site.
Stop by my webpage; real estate agent Franklin TN
I have read so many posts on the topic of the blogger lovers however this
piece of writing is genuinely a fastidious post, keep it
up.
Feel free to visit my web site best real estate agent in Lake Oswego OR
top article
https://russian-traditional-clothes.com/
You made your position quite nicely.!
Отбор честного развлекательного портала заставляет серьезного рассмотрения правовых бумаг. Современные порталы п»ї1хбет РІС…РѕРґ дают игрокам полную информацию о имеющихся санкциях.
Процесс оформления счета включает несколько необходимых фаз аутентификации. Провайдеры настаивают свидетельства, удостоверяющие идентичность и зрелость. Обычный KYC-механизм составляет от 24 до 72 интервалов.
Контроль средств начинается с фиксации рамок на пополнения. Опытные пользователи призывают задействовать правило 5% от совокупного развлекательного средств на индивидуальную партию.
Программные блокировки операторов обязывают использовать запасные пути. Дубликаты удерживают безусловную работоспособность базового площадки, включая архив переводов и казино успех.
Современные расчетные сервисы гарантируют скоростные инвестиции через виртуальные кошельки. Bitcoin, Ethereum и стабильные валюты предоставляют приватность и минимальные взносы. Срок выполнения изъятий составляет 10-30 отрезков.
Программы верности подразумевают многоуровневые уровни с возрастающим кэшбэком. VIP-представители обеспечивают персонализированные подарки, расширенные рамки и преимущественную поддержку.
Определение качественного развлекательного оператора в актуальных условиях требует специального внимания к лицензионному состоянию. Компетентные участники знают, что казино Vavada содержит современную материалы о доступных ресурсах.
Процедура записи в проверенных площадках включает обязательную валидацию идентичности. KYC-правила оберегают как казино, так и игрока от обмана. Кратковременные границы на изъятие денег до закрытия верификации – привычная процедура.
Программные запреты на подключение к гемблинг ресурсам решаются через альтернативные адреса. Функционирующие копии обеспечивают полную производительность первичного сайта. Расчетные движения, игровой продвижение и поощрительные планы функционируют неизменными.
Финансовая защищенность выражается качеством используемых платежных систем. SSL-криптография, PCI DSS валидация и расширенная проверка устанавливают надежный контур ограждения.
Игровая набор проверенных заведений предоставляет автоматы от главных производителей. RTP-индексы, дисперсия и математические модели испытывают нейтральную валидацию в одобренных институтах.
Программы мотивации в достойных операторах строятся на прозрачных условиях ставок. Проигрыш x35-40 расценивается приемлемым для барабан-льгот, в то время как стандартные развлечения засчитываются в зачет с уменьшенным множителем.
This casino https://telegra.ph/Dash-Bet-Where-Betting-Transcends-the-Ordinary-12-15 offers a great mix of popular slots and live tables. The platform feels modern, promotions are worth trying, and support is helpful, which adds confidence.
купить рольшторы цены купить рольшторы цены .
Актуальные провайдеры развлекательных развлечений гарантируют участникам вход к высококлассному беттингу через безопасные Лаки Бир РІС…РѕРґ сайты. Авторизованная работа требует соблюдения четких правовых положений.
Процесс регистрации индивидуального счета задействует верификацию индивидуальных реквизитов. Администраторы внедряют расширенные процедуры KYC и AML для блокировки нарушающих операций.
IT системы современных гемблинг платформ основываются на стабильных инфраструктурах с TLS стандартами. Региональная блокировка принуждает операторов разрабатывать резервные домены.
Дублирующие порталы составляют эквивалентные репликации первичного ресурса с удержанием всех опций и сведений. Пользователи приобретают постоянный вход к средствам, беттинг истории и персональным настройкам.
Банковские действия выполняются через связанные финансовые сервисы. Лимиты на пополнения и получения устанавливаются в согласии с нормативными положениями и собственными правилами минимизации опасностей.
Опытные игроки советуют отслеживать положение лицензии через государственные каталоги гемблинг структур. Статусные показатели содержат места на тематических сервисах и комментарии настоящих беттеров.
Легальные платформы игорных предложений гарантируют пользователям право к элитному игровому процессу через целевые платформы, включая Vavada , которые придерживаются transnational регламенты security.
Процедура регистрации требует предоставления верификационных информации через защищённые SSL-connection. Менеджмент просят предоставить official удостоверение дееспособности и региона residence для соблюдения законодательных правил.
Двухфакторная authentication представляет принудительным aspect актуальных архитектур security. Клиенты приобретают SMS-токены, push-оповещения или используют dedicated софт типа Google Authenticator.
Дублирующие адреса устраняют трудности territorial ограничений и DDoS-атак. По сути mirrors образуют тождественные dublicates основного сайта с поддержанием features и клиентских сведений.
Опытные игроки советуют сохранять свежие базы функционирующих mirrors в bookmark обозревателя. Администрация передают updates о свежих URL через e-mail, Telegram-communities и портативные приложения.
Payment movements через лицензионные порталы secured encryption алгоритмами стандарта банковского индустрии. Изъятие денег реализуется лишь на верифицированные wallets хозяина account.
why not try this out
https://russian-traditional-clothes.com/
Сюрвейерские услуги в Москве: независимая экспертиза грузов и товаров от ГПК «Дерфер»
The Hexblade Warlock is arguably one of the most popular subclasses introduced in 5th Edition, and it calls this book home. Xanathar’s Guide to Everything allows Warlocks to become formidable melee combatants using their Charisma. If you are hunting for a Xanathar’s Guide to Everything PDF to build a “Hexadin” or pure Hexblade, our character build guides are essential reading. We discuss the lore implications of the Shadowfell weaponry and the best invocations to pair with this subclass. Unleash the power of a cursed weapon and dominate the battlefield with the secrets found in this guide.
https://usmedsoutlet.com/# canadian pharmacy phone number
The book is a journey of trust. Learning to trust another person with your heart is the hardest thing Dante and Vivian do. But the reward is immense. A King of Wrath PDF search leads to this rewarding conclusion. It is a testament to the bravery required to love.
Отбор проверенного азартного портала в текущих реалиях заставляет тщательного подхода к юридическому уровню. Профессиональные клиенты представляют, что Вавада сайт демонстрирует новую сведения о действующих ресурсах.
Механизм записи в официальных заведениях содержит принудительную проверку персональных данных. KYC-правила обеспечивают как казино, так и пользователя от обмана. Кратковременные пределы на снятие капитала до финализации валидации – привычная процедура.
Виртуальные ограничения на подключение к гемблинг сайтам устраняются через альтернативные домены. Рабочие отражения предоставляют всестороннюю работоспособность базового портала. Банковские движения, геймплейный результаты и поощрительные программы поддерживаются стабильными.
Денежная безопасность оценивается уровнем внедренных денежных инструментов. SSL-безопасность, PCI DSS лицензирование и дополнительная верификация создают стабильный контур ограждения.
Геймплейная ассортимент проверенных провайдеров содержит машины от лидирующих провайдеров. RTP-коэффициенты, волатильность и статистические модели проходят внешнюю контроль в авторизованных центрах.
Программы стимулирования в профессиональных сервисах формируются на открытых условиях проигрыша. Проигрыш x35-40 оценивается разумным для барабан-подарков, в то время как карточные игры включаются в подсчет с минимальным фактором.
Передовые сервисы гемблинг активностей дают участникам вход к высококлассному гемблингу через надежные п»ї1хбет казино системы. Официальная работа подразумевает следования конкретных правовых стандартов.
Механизм оформления пользовательского учетной записи задействует аутентификацию личных реквизитов. Регуляторы используют углубленные протоколы KYC и AML для предотвращения поддельных финансовых действий.
Программные платформы актуальных игорных домов работают на безопасных инфраструктурах с шифровальными технологиями. IP-фильтрация заставляет владельцев внедрять параллельные URL.
Резервные сайты представляют идентичные копии базового сайта с сохранением всех возможностей и параметров. Участники обеспечивают себе стабильный вход к депозиту, развлекательной статистике и индивидуальным конфигурациям.
Банковские операции производятся через подключенные финансовые системы. Лимиты на инвестиции и получения фиксируются в соответствии с регуляторными требованиями и индивидуальными политиками риск-менеджмента.
Экспертные пользователи советуют контролировать положение разрешения через официальные списки азартных структур. Имиджевые показатели предусматривают ранги на экспертных сайтах и оценки истинных клиентов.
Поиск специалистов на платформе гибкой занятости SkillStaff: IT, дизайн, маркетинг,
аналитика
This is a well-written article and I really appreciate how clearly everything is explained.
Many people have difficulties when choosing the right online casino, and this post explains the topic in a simple way.
The information about performance is useful, especially
for users who are new to online betting.
Thanks for sharing this practical content.
check it out
Explore Beijing and Xi’an in 6 days
lighthouse hub – Easy-to-use site, navigation is smooth and details are clear.
Выбор надежного казино портала предполагает серьезного исследования лицензионных документов. Новые платформы Вавада зеркало предлагают геймерам абсолютную данные о собственных санкциях.
Процесс открытия аккаунта подразумевает определенное количество принудительных шагов проверки. Провайдеры настаивают бумаги, доказывающие личность и совершеннолетие. Традиционный KYC-порядок продолжается от 24 до 72 промежутков.
Управление банком начинается с задания границ на пополнения. Опытные геймеры предлагают эксплуатировать принцип 5% от итогового азартного резерва на отдельную игру.
Технические препятствия поставщиков заставляют внедрять дополнительные домены. Зеркала сохраняют абсолютную работоспособность основного платформы, охватывая историю переводов и игровой достижения.
Актуальные платежные инструменты гарантируют быстрые депозиты через блокчейн хранилища. Bitcoin, Ethereum и стейблкоины обеспечивают конфиденциальность и крошечные взносы. Время обработки извлечений равно 10-30 промежутков.
Программы лояльности содержат иерархические степени с нарастающим компенсацией. VIP-представители обеспечивают эксклюзивные награды, повышенные лимиты и преимущественную техподдержку.
Подбор достойного игрового площадки в нынешних условиях предполагает детального анализа к правовому положению. Опытные пользователи представляют, что п»ї1хбет демонстрирует современную материалы о действующих ресурсах.
Алгоритм записи в лицензированных операторах включает необходимую подтверждение документов. KYC-требования охраняют как казино, так и игрока от афер. Переходные пределы на перечисление средств до окончания контроля – привычная процедура.
Технические блокировки на вход к азартным сайтам устраняются через резервные адреса. Доступные дубликаты обеспечивают стопроцентную работоспособность базового платформы. Банковские переводы, игровой продвижение и привилегированные предложения остаются константными.
Экономическая безопасность измеряется показателем эксплуатируемых финансовых механизмов. SSL-безопасность, PCI DSS сертификация и дополнительная идентификация гарантируют безопасный барьер охраны.
Геймплейная библиотека легальных операторов охватывает слоты от известных разработчиков. RTP-индексы, волатильность и математические принципы получают независимую валидацию в утвержденных лабораториях.
Системы лояльности в профессиональных площадках базируются на понятных требованиях отыгрыша. Проигрыш x35-40 характеризуется приемлемым для спин-привилегий, в то время как настольные активности идут в зачет с пониженным фактором.
Very soon this website will be famous among all blog people, due to
it’s nice articles
Here is my web-site – realtor in St. Charles IL
Normally I do not read post on blogs, however I wish to say that
this write-up very forced endocrinology near me to check out and
do so! Your writing style has been amazed me.
Thanks, very nice post.
harborhoney.shop – Sweet and unique items, ideal for gifting or personal use.
maplemerit – Smooth browsing, items are clearly organized and site seems trustworthy.
мостбет создать аккаунт http://mostbet72461.help/
Надёжные ресурсы игровых опций предоставляют игрокам шанс к элитному игровому процессу через dedicated порталы, включая Лаки Бир зеркало , которые специально соблюдают глобальные критерии защиты.
Схема открытия счёта подразумевает указания проверочных информации через шифрованные SSL-протоколы. Операторы запрашивают нотариальное свидетельство совершеннолетия и адреса проживания для выполнения юрисдикционных норм.
2FA верификация выступает required компонентом актуальных solutions надёжности. Пользователи приобретают SMS-шифры, push-уведомления или эксплуатируют targeted приложения вроде Google Authenticator.
Альтернативные адреса решают препятствия географических санкций и DDoS-assault. По сути зеркала формируют тождественные dublicates основного домена с поддержанием функциональности и клиентских деталей.
Опытные участники советуют keeping актуальные перечни рабочих зеркал в сохранённых ссылках веб-клиента. Администрация отправляют обновления о современных ссылках через e-mail, Telegram-группы и портативные приложения.
Payment транзакции через лицензионные сайты обеспечены защитными системами класса банковского области. Изъятие фондов осуществляется только на аутентифицированные счета собственника личного кабинета.
dig this
russian traditional clothing
Азартная область демонстрирует интенсивный рост, завлекая легионы клиентов. Профессиональные сайты предоставляют безопасную атмосферу для беттинга. Подробную данные о указанных брендах допустимо изучить на Лаки Бир РІС…РѕРґ .
Аттестация представляет главным аспектом определения платформы. Регуляторы Гибралтара гарантируют качественный надзор расчётных действий. Всякая лицензированная портал выполняет регулярные инспекции RNG-алгоритмов.
Компьютерные аспекты инновационных гемблинг-сайтов охватывают SSL-шифрование экономического класса. Производители цифрового обеспечения наподобие Microgaming, NetEnt, Pragmatic Play подключают комплексные системы непредсказуемых параметров.
Схема проверки учётной записи предполагает представления документов KYC-формата. Паспорт, документ о финансах, валидация регистрации — обычный перечень для завершённого подключения.
Резервные ссылки убирают препятствия с блокировками операторов. Свежие альтернативы обновляются каждый день цифровыми командами. Смартфонные софт нередко оперируют лучше веб вариантов.
Финансовая дисциплина создаёт долгосрочную эффективность развлекательных раундов. Грамотные участники советуют контролировать размер ставки до 1-2% от суммарного бюджета.
Thank you for the auspicious writeup. It in fact was a amusement account
it. Look advanced to more added agreeable from you!
However, how can we communicate?
Надёжные операторы игорных опций предоставляют участникам доступ к премиальному гэмблингу через тематические ресурсы, включая казино 1xBet , которые именно следуют transnational нормы конфиденциальности.
Процедура открытия счёта предполагает внесения идентификационных сведений через encrypted SSL-протоколы. Администрация demanded документальное verification дееспособности и локации residence для поддержания legal критериев.
2FA аутентификация представляет mandatory aspect передовых систем конфиденциальности. Участники располагают SMS-ключи, push-сообщения или задействуют специализированные утилиты в стиле Google Authenticator.
Дублирующие ссылки ликвидируют препятствия географических санкций и DDoS-атак. С технической точки зрения mirrors составляют аналогичные версии центрального портала с удержанием опций и индивидуальных сведений.
Профессиональные участники suggest keeping current каталоги working дублей в избранном браузера. Операторы доставляют информацию о актуальных ссылках через email, Telegram-каналы и портативные apps.
Банковские процедуры через лицензионные ресурсы защищены cryptographic системами стандарта банковского индустрии. Снятие средств происходит исключительно на проверенные карты владельца аккаунта.
Новейшие сервисы развлекательных игр предоставляют игрокам вход к элитному игровому процессу через надежные Vavada казино сайты. Официальная бизнес подразумевает выполнения жестких правовых стандартов.
Процесс оформления пользовательского счета включает аутентификацию персональных сведений. Администраторы задействуют расширенные алгоритмы KYC и AML для исключения поддельных транзакций.
Технические платформы новейших казино строятся на безопасных серверах с криптографическими стандартами. Геоблокировка принуждает управляющих разрабатывать вспомогательные ссылки.
Дублирующие порталы образуют аналогичные клоны основного платформы с удержанием всех функций и сведений. Участники обеспечивают себе непрерывный доступ к капиталу, гемблинг данным и клиентским конфигурациям.
Платежные действия осуществляются через связанные банковские агрегаторы. Ограничения на взносы и получения регулируются в согласии с нормативными стандартами и корпоративными процедурами снижения потерь.
Экспертные пользователи советуют мониторить положение авторизации через контролирующие каталоги беттинг организаций. Авторитетные критерии предусматривают ранги на профильных сервисах и мнения подлинных клиентов.
Pretty! This has been an extremely wonderful article. Many thanks for supplying this info.
Visit my website … AC repair
Fantastic beat ! I would like to apprentice even as you amend your site, how can i subscribe for a blog site?
The account helped me a acceptable deal. I
were tiny bit familiar of this your broadcast offered vibrant clear idea
Feel free to surf to my web-site … umy medical
Актуальные игроки попадают с препятствием доступа к лицензированным порталам. Операторы запрещают первичные порталы, но опытные Лаки Бир зеркало клиенты помнят о существовании резервных порталов.
Зеркало составляет идентичную воспроизведение основного ресурса. SSL-сертификаты сохраняются неизменными. Финансовые действия проходят через те же системы.
Процедура регистрации через альтернативный домен включает обычной валидации. Администраторы запрашивают удостоверения для выполнения KYC-требований. Персональные информация выполняют многоуровневую верификацию.
Депозитные ограничения на параллельных порталах аналогичны первичным спецификациям. Низшие ставки функционируют неизменными. Увеличивающиеся выигрышные пулы объединяются между множественными адресами.
Поощрительные схемы оперируют полноценно на зеркальных площадках. Коэффициент оборота удерживает стартовые значения. Тайминг отыгрыша не изменяется.
Служба помощи анализирует запросы с альтернативных порталов идентично. Интерактивный переписка обеспечивает беспрерывный порядок функционирования.
Азартная сфера являет интенсивный рост, заинтересовывая легионы геймеров. Квалифицированные порталы предоставляют стабильную условия для игры. Исчерпывающую сведения о этих компаниях можно получить на казино 1xBet .
Аккредитация выступает ключевым аспектом отбора платформы. Регуляторы Кюрасао дают строгий контроль денежных процедур. Всякая сертифицированная сайт реализует регулярные контроли RNG-генераторов.
Технические характеристики новейших беттинг-платформ включают SSL-безопасность экономического категории. Производители софтового материала типа Microgaming, NetEnt, Pragmatic Play встраивают усовершенствованные механизмы хаотичных параметров.
Механизм аутентификации учётной записи предполагает передачи справок KYC-формата. Паспорт, свидетельство о заработке, валидация адреса — базовый перечень для окончательного активации.
Резервные порталы исправляют сложности с блокировками поставщиков. Функционирующие зеркала адаптируются ежедневно программными командами. Планшетные утилиты регулярно функционируют устойчивее сетевых форматов.
Банкролл-менеджмент формирует продолжительную результативность беттинговых партий. Квалифицированные пользователи настаивают ограничивать величину депозита до 1-2% от итогового капитала.
indianpharmacy com: Indo-Generic Export – india online pharmacy
Hi there Dear, are you in fact visiting this site daily, if so then you will absolutely get fastidious know-how.
Feel free to visit my webpage: best real estate agent in Joliet IL
Conoce todos los secretos del slot Gates of Olympus, sigue los mejores consejos que hoy tenemos para ti y descubre porque esta es una de las tragamonedas favoritas de Betsson. Los gráficos y la gran selección de bonus de Gates of Olympus 1000 son un buen reclamo. La función de caída (“Tumble”) Seleccioná dónde apostar ¿Cómo depositar? PragmaticPlay (Gibraltar) Limited está autorizada y regulada en Gran Bretaña por la Comisión del Juego (Gambling Commission) con el número de cuenta 56015 y, además, está autorizada por la Autoridad de Licencias de Gibraltar (Gibraltar Licensing Authority) y regulada conforme a la Ley por el Comisionado del Juego de Gibraltar (Gibraltar Gambling Commissioner), con el número RGL 107. Gates of Olympus es un juego de tragaperras online que transporta a los jugadores al majestuoso Olimpo, hogar de los dioses griegos, donde el dios Zeus es el protagonista. El objetivo del juego es desvelar las riquezas ocultas tras las puertas del Olimpo con la ayuda de Zeus y su poderoso rayo.
https://rudraprints.com/index.php/2026/01/23/betplay-y-el-juego-de-las-minas-en-colombia-una-experiencia-llena-de-adrenalina-2/
Juegos similares de gates of olympus: Si lo hubieran hecho, si tiene una membresía VIP. ¿Qué hacer para compensar las pérdidas en el juego de casino Gates of Olympus joo has since exchange is bitcoin casino no deposit bonus platform, este bono para usted será del 250% y 40 giros gratis. En algunas ocasiones, los casinos de Argentina ofrecen bonos de bienvenida para usar en tragamonedas. En este momento, hay varios que ofrecen esta promo: This website is using a security service to protect itself from online attacks. The action you just performed triggered the security solution. There are several actions that could trigger this block including submitting a certain word or phrase, a SQL command or malformed data. Esta tragamonedas está disponible en muchos de los mejores casinos. Algunos de nuestros favoritos en los que jugamos para hacer esta reseña de Gates of Olympus son los siguientes:
Ориентирование в пространстве легальных порталов подразумевает представления продвинутых методов подключения. Продвинутые геймеры используют Вавада официальный сайт для обретения свежей фактов о действующих URL.
Алгоритм оформления аккаунта в официальных операторах содержит сложную аутентификацию. Продвинутые операторы задействуют KYC-процедуры и AML-критерии. Оформление документов потребляет от 24 до 72 временных отрезков.
Технические способы для минования ограничений развиваются вместе с усилением законодательных действий. VPN-службы класса premium предлагают кодирование AES-256 и протоколы OpenVPN. Стабильность соединения принципиально необходима для привилегированных заходов.
Альтернативные платформы функционируют через регионально разнесенные технические инфраструктуры. CDN-комплексы поддерживают оптимальную латентность для американских участников. Техническое роутинг активируется при выявлении ограничения главного адреса.
Финансовые переводы в лицензированных территориях следуют определенным стандартам PCI DSS. Крипто платежи завоевывают востребованность благодаря анонимности и скорости реализации.
Планшетные приложения элитных операторов содержат голосовую подтверждение и push-сообщения для критических ситуаций. Настраиваемый интерфейс независимо корректируется под параметры панели.
Нынешние игроки обталкиваются с набором программных деталей при операциях с лицензированными платформами. Тематические сайты типа Вавада официальный сайт обеспечивают новую материалы о операциях гэмблинговых компаний.
Механизм валидации кабинета подразумевает ряд неотъемлемых фаз. Начальная верификация требует предоставления удостоверений верифицирующих гражданство. Обычный список предполагает ID, лицензию водителя или заграничное удостоверение.
Технологическая сторона записления включает задействование криптографической защиты и многофакторной защиты. Опытные геймеры советуют активировать весь комплекс имеющихся опций безопасности.
Альтернативные адреса являются точные копии центрального портала с поддержанием комплексного арсенала. Важнейшее бонус выражается в соответствии банковских границ и параметров условий прокрутки.
Процедура локализации активных дублирующих порталов строится на мониторинге профильных уведомительных сервисов и сотрудничающих порталов. Квалифицированные геймеры задействуют прокси-соединения для формирования постоянного доступа безотносительно от местных ограничений.
Hi, i read your blog from time to time and i own a similar one and i was just curious
if you get a lot of spam comments? If so how do you prevent
it, any plugin or anything you can suggest? I get so much lately it’s driving me
mad so any help is very much appreciated.
Feel free to visit my web page: real estate agent Lake Ozark MO
My brother suggested I might like this web site.
He was entirely right. This post truly made my day.
You cann’t imagine just how much time I had spent for this info!
Thanks!
Here is my web page – best realtor in Rancho Cucamonga CA
This is nicely said! !
Отбор проверенного развлекательного заведения в текущих условиях подразумевает особого подхода к правовому положению. Компетентные геймеры учитывают, что казино Vavada демонстрирует последнюю данные о функционирующих площадках.
Механизм регистрации в легальных операторах включает необходимую проверку документов. KYC-процедуры защищают как оператора, так и игрока от махинаций. Временные лимиты на изъятие денег до завершения контроля – типичная подход.
Виртуальные блокировки на связь к betting порталам преодолеваются через параллельные адреса. Доступные зеркала поддерживают абсолютную работоспособность основного сайта. Расчетные движения, геймплейный достижения и привилегированные программы сохраняются неизменными.
Материальная надежность характеризуется уровнем используемых финансовых систем. SSL-безопасность, PCI DSS валидация и многоуровневая подтверждение устанавливают безопасный контур охраны.
Геймплейная ассортимент лицензированных операторов предоставляет машины от известных провайдеров. RTP-параметры, изменчивость и расчетные схемы получают беспристрастную аудит в одобренных учреждениях.
Механизмы вознаграждения в профессиональных казино опираются на прозрачных параметрах проигрыша. Вейджер x35-40 признается приемлемым для спин-привилегий, в то время как классические игры принимаются в подсчет с сниженным процентом.
Новейшие игроки сталкиваются с изобилием системных особенностей при работе с официальными сайтами. Профессиональные ресурсы типа казино Меллстрой дают актуальную данные о функционировании игорных провайдеров.
Алгоритм верификации аккаунта содержит набор обязательных стадий. Первичная аутентификация предполагает отправки справок подтверждающих персону. Классический набор предполагает свидетельство, автоудостоверение или внешний паспорт.
Техническая сторона создания аккаунта охватывает эксплуатацию зашифрованного канала и двухуровневой проверки. Профессиональные геймеры рекомендуют запускать совокупность предложенных параметров обеспечения.
Зеркала образуют абсолютные клоны базового домена с хранением исчерпывающего возможностей. Главное плюс кроется в тождественности банковских пределов и критериев проигрыша.
Система нахождения функционирующих альтернативных адресов базируется на отслеживании профильных мессенджер групп и связанных платформ. Профессиональные пользователи используют виртуальные частные сети для формирования стабильного соединения вне зависимости от территориальных запретов.
Tremendous issues here. I am very happy to see
your article. Thank you a lot and I am taking a look forward to contact
you. Will you kindly drop me a e-mail?
Поиск безопасного азартного портала нуждается глубокого изучения лицензионных бумаг. Актуальные системы Sykaaa казино обеспечивают пользователям абсолютную информацию о имеющихся лицензиях.
Механизм оформления счета охватывает несколько обязательных ступеней верификации. Представители просят свидетельства, доказывающие самобытность и зрелость. Обычный KYC-алгоритм составляет от 24 до 72 часов.
Управление банком открывается с определения границ на взносы. Компетентные участники призывают применять закон 5% от итогового гемблинг бюджета на единичную партию.
Программные блокировки поставщиков вынуждают задействовать резервные домены. Дубликаты сохраняют полную функциональность центрального площадки, включая архив операций и развлекательный достижения.
Современные финансовые системы предоставляют моментальные инвестиции через электронные хранилища. Bitcoin, Ethereum и стейблкоины дают анонимность и минимальные платежи. Период проведения снятий достигает 10-30 отрезков.
Планы постоянства содержат иерархические уровни с прогрессивным кэшбэком. VIP-менеджеры предлагают эксклюзивные поощрения, расширенные границы и ускоренную помощь.
I was able to find good info from your content.
Feel free to visit my web site best real estate agent in Franklin TN
no prescription
Проверенные платформы игровых услуг дают игрокам возможность к качественному игровому процессу через тематические порталы, включая lucky bear казино , которые соблюдают мировые регламенты конфиденциальности.
Последовательность открытия счёта включает внесения идентификационных информации через защищённые SSL-соединения. Администрация требуют official удостоверение возраста и региона residence для поддержания юрисдикционных стандартов.
Двухфакторная аутентификация является обязательным компонентом новейших систем защиты. Участники располагают SMS-шифры, push-оповещения или внедряют специализированные утилиты наподобие Google Authenticator.
Mirror адреса преодолевают препятствия territorial ограничений и DDoS-атак. Технически зеркала являют тождественные реплики основного ресурса с поддержанием опций и клиентских данных.
Экспертные участники советуют сохранять новейшие базы активных зеркал в закладках браузера. Букмекеры рассылают сведения о fresh порталах через e-mail, Telegram-каналы и mobile apps.
Payment операции через лицензионные платформы защищены шифровальными технологиями категории банковского segment. Снятие денег осуществляется исключительно на верифицированные карты обладателя учётной записи.
Современные гемблеры оказываются с затруднением входа к легальным площадкам. Операторы ограничивают основные адреса, но профессиональные казино Меллстрой посетители знают о наличии дублирующих площадок.
Дополнительный домен является полную реплику базового платформы. Криптографические алгоритмы функционируют идентичными. Финансовые действия осуществляются через равнозначные механизмы.
Схема оформления профиля через резервный ссылку предполагает типовой подтверждения. Менеджеры требуют свидетельства для осуществления KYC-стандартов. Индивидуальные параметры подвергаются усиленную проверку.
Депозитные ограничения на параллельных ресурсах аналогичны первичным параметрам. Минимальные суммы продолжают стабильными. Возрастающие выигрышные пулы координируются между многочисленными ссылками.
Премиальные механизмы действуют всесторонне на альтернативных платформах. Коэффициент оборота сохраняет базовые цифры. Временные рамки реализации сохраняется.
Сервис ассистирования анализирует заявки с дополнительных ссылок идентично. Живой разговор поддерживает 24-часовой формат деятельности.
Официальные платформы игровых опций предоставляют геймерам возможность к профессиональному азартному досугу через специализированные порталы, включая Mellstroy Game казино , которые соблюдают transnational нормы надёжности.
Последовательность открытия счёта предполагает предоставления валидационных информации через защищённые SSL-connection. Букмекеры demanded письменное удостоверение правоспособности и места нахождения для соблюдения юрисдикционных требований.
Multi-factor authentication выступает принудительным компонентом передовых solutions безопасности. Users получают SMS-шифры, push-оповещения или задействуют профессиональные программы вроде Google Authenticator.
Дублирующие порталы нейтрализуют сложности geographic ограничений и DDoS-штурмов. По сути копии образуют тождественные dublicates главного портала с maintaining функциональности и личных деталей.
Компетентные игроки предлагают удерживать новейшие базы рабочих альтернатив в избранном browser. Операторы направляют сведения о современных ссылках через e-mail, Telegram-каналы и мобильные apps.
Payment операции через лицензионные порталы обеспечены шифровальными алгоритмами категории банковского segment. Получение денег реализуется solely на подтверждённые wallets хозяина учётной записи.
Learn More Here
https://russian-traditional-clothes.com
Hello to every one, it’s genuinely a fastidious for me to visit this website, it consists of useful
Information.
Выбор надежного игрового ресурса в нынешних условиях подразумевает особого подхода к юридическому состоянию. Квалифицированные пользователи учитывают, что Меллстрой РІС…РѕРґ включает актуальную сведения о активных ресурсах.
Алгоритм создания аккаунта в официальных операторах включает принудительную проверку документов. KYC-нормы оберегают как площадку, так и клиента от мошенничества. Краткосрочные рамки на снятие средств до окончания проверки – стандартная процедура.
Цифровые барьеры на вход к betting сервисам нейтрализуются через дублирующие домены. Рабочие отражения гарантируют абсолютную производительность основного портала. Расчетные транзакции, интерактивный прогресс и поощрительные программы продолжают константными.
Материальная гарантированность определяется показателем эксплуатируемых платежных методов. SSL-кодирование, PCI DSS валидация и многоуровневая верификация гарантируют безопасный барьер ограждения.
Развлекательная набор проверенных площадок включает слоты от главных создателей. RTP-параметры, вариативность и алгоритмические формулы претерпевают внешнюю проверку в авторизованных учреждениях.
Программы лояльности в профессиональных сервисах строятся на понятных критериях активности. Отыгрыш x35-40 расценивается адекватным для спин-поощрений, в то время как классические развлечения идут в подсчет с уменьшенным фактором.
https://www.legnostyle.ru/images/pages/?1xbet_promokod_pri_registracii_bonus.html
Современные сервисы игорных игр гарантируют клиентам путь к качественному беттингу через проверенные Lucky Bear casino платформы. Сертифицированная операционная активность подразумевает учета жестких регуляторных стандартов.
Система создания индивидуального учетной записи охватывает аутентификацию персональных показателей. Провайдеры используют комплексные механизмы KYC и AML для пресечения нарушающих операций.
Цифровые платформы передовых казино функционируют на защищенных облачных системах с шифровальными стандартами. Территориальные ограничения обязывает операторов организовывать резервные адреса.
Резервные домены представляют точные репликации базового сайта с обеспечением всех опций и сведений. Клиенты обеспечивают себе стабильный вход к балансу, беттинг истории и индивидуальным опциям.
Денежные процедуры реализуются через встроенные финансовые системы. Лимиты на инвестиции и получения назначаются в унисон с нормативными условиями и индивидуальными правилами риск-менеджмента.
Компетентные пользователи рекомендуют контролировать положение сертификата через регуляторные регистры азартных ведомств. Репутационные параметры содержат места на отраслевых платформах и комментарии истинных беттеров.
Keep on working, great job!
Here is my blog: real estate agent Santa Fe NM
Лицензионные ресурсы игровых опций oferuja участникам возможность к качественному азартному досугу через специализированные домены, включая Либет казино , что исполняют мировые нормы security.
Процедура создания аккаунта предполагает ввода идентификационных параметров через безопасные SSL-соединения. Операторы просят предоставить документальное свидетельство совершеннолетия и региона residence для исполнения правовых требований.
Двухэтапная идентификация выступает mandatory частью новейших механизмов конфиденциальности. Участники имеют SMS-коды, push-notification или применяют targeted утилиты типа Google Authenticator.
Дублирующие порталы устраняют проблемы географических ограничений и DDoS-штурмов. Техническим образом зеркала формируют идентичные версии базового портала с удержанием инструментария и клиентских данных.
Профессиональные участники призывают поддерживать current перечни working дублей в сохранённых ссылках интернет-программы. Провайдеры передают updates о fresh ссылках через почтовые сервисы, Telegram-чаты и mobile программы.
Денежные транзакции через лицензионные порталы secured шифровальными технологиями класса банковского направления. Снятие денег осуществляется исключительно на подтверждённые счета собственника учётной записи.
Ориентирование в секторе проверенных площадок предполагает понимания актуальных инструментов авторизации. Умелые участники используют лаки Р±РёСЂ казино для обретения свежей материалов о работающих путях.
Схема открытия учетной записи в сертифицированных компаниях охватывает тщательную верификацию. Передовые провайдеры используют KYC-механизмы и AML-стандарты. Оформление документов требует от 24 до 72 промежутков.
Технические решения для преодоления препятствий развиваются одновременно с ужесточением законодательных шагов. VPN-службы типа premium дают шифрование AES-256 и протоколы OpenVPN. Постоянство коннекта критически важна для премиальных игровых периодов.
Дублирующие адреса действуют через локально расположенные серверные инфраструктуры. CDN-системы обеспечивают низкую задержку для азиатских клиентов. Программное маршрутизация инициируется при обнаружении блокировки первичного портала.
Финансовые манипуляции в сертифицированных юрисдикциях соответствуют определенным критериям PCI DSS. Цифровые платежи получают популярность из-за секретности и оперативности осуществления.
Мобильные софт премиальных организаций объединяют голосовую подтверждение и push-сообщения для принципиальных моментов. Изменяемый интерфейс автономно адаптируется под параметры дисплея.
Выбор безопасного гемблинг ресурса в текущих границах предполагает особого изучения к законному режиму. Квалифицированные клиенты представляют, что Меллстрой казино включает свежую данные о работающих операторах.
Процедура оформления профиля в легальных сервисах объединяет неизбежную аутентификацию личности. KYC-нормы оберегают как сервис, так и пользователя от обмана. Переходные ограничения на вывод финансов до закрытия проверки – нормальная подход.
Электронные запреты на связь к развлекательным порталам обходятся через альтернативные адреса. Функционирующие зеркала обеспечивают полную работоспособность главного сервиса. Платежные транзакции, игровой прогресс и бонусные системы функционируют константными.
Денежная защищенность определяется степенью внедренных денежных инструментов. SSL-безопасность, PCI DSS подтверждение и двухфакторная подтверждение создают безопасный щит ограждения.
Интерактивная набор легальных операторов охватывает машины от лидирующих создателей. RTP-значения, вариативность и математические модели претерпевают беспристрастную аудит в одобренных организациях.
Системы мотивации в качественных сервисах строятся на ясных требованиях проигрыша. Требования x35-40 признается приемлемым для слот-льгот, в то время как карточные игры идут в счет с минимальным коэффициентом.
http://nec.phorum.pl/viewtopic.php?p=769596#769596
Беттинговая область являет динамичный развитие, завлекая массы участников. Профессиональные сайты гарантируют защищённую обстановку для пари. Исчерпывающую материалы о подобных организациях доступно получить на типпи казино .
Аттестация является приоритетным показателем подбора платформы. Регуляторы Олдерни предоставляют качественный контроль экономических действий. Каждая лицензированная площадка реализует периодические аудиты RNG-систем.
IT аспекты передовых казино предусматривают SSL-защиту расчётного уровня. Производители компьютерного продукта уровня Microgaming, NetEnt, Pragmatic Play встраивают усовершенствованные схемы произвольных значений.
Схема верификации аккаунта требует подачи документов KYC-класса. Документ, справка о доходах, верификация адреса — базовый перечень для окончательного доступа.
Дублирующие ссылки ликвидируют проблемы с ограничениями провайдеров. Функционирующие дубли изменяются постоянно цифровыми специалистами. Смартфонные клиенты обычно выполняются стабильнее веб версий.
Банкролл-менеджмент определяет длительную результативность гемблинговых циклов. Экспертные игроки указывают сокращать количество депозита до 1-2% от суммарного банкролла.
Подбор легального казино заведения нуждается детального анализа официальных разрешений. Современные сайты Mellstroy Game зеркало гарантируют игрокам абсолютную детали о действующих допусках.
Процесс создания профиля предусматривает множество необходимых ступеней аутентификации. Владельцы просят свидетельства, удостоверяющие индивидуальность и возраст. Стандартный KYC-процесс составляет от 24 до 72 периодов.
Управление банком инициируется с фиксации рамок на взносы. Квалифицированные пользователи советуют эксплуатировать принцип 5% от итогового гемблинг резерва на индивидуальную игру.
Цифровые барьеры операторов вынуждают эксплуатировать запасные маршруты. Клоны сохраняют абсолютную производительность основного площадки, предусматривая журнал платежей и азартный успех.
Современные платежные способы гарантируют моментальные депозиты через электронные хранилища. Bitcoin, Ethereum и устойчивые монеты поддерживают приватность и символические комиссии. Длительность реализации снятий равно 10-30 отрезков.
Схемы приверженности охватывают каскадные уровни с накапливающимся бонусом. VIP-менеджеры предлагают персонализированные вознаграждения, увеличенные пределы и первоочередную техподдержку.
Передовые клиенты обталкиваются с множеством программных деталей при деятельности с официальными ресурсами. Профильные сайты типа п»ї1xBet казино дают релевантную материалы о функционировании развлекательных операторов.
Механизм аутентификации кабинета содержит набор необходимых уровней. Начальная аутентификация предполагает размещения свидетельств подтверждающих индивидуальность. Типовой перечень подразумевает удостоверение личности, права или загранпаспорт.
Программная сторона регистрации предполагает использование зашифрованного канала и двойной авторизации. Опытные пользователи предлагают включать все доступных опций охраны.
Дублирующие порталы являются точные копии главного домена с удержанием тотального арсенала. Центральное бонус содержится в подобии банковских границ и требований отыгрыша.
Процедура нахождения рабочих альтернативных адресов опирается на мониторинге специализированных информационных каналов и партнерских платформ. Продвинутые клиенты применяют прокси-соединения для гарантирования постоянного подключения независимо от территориальных блокировок.
Новейшие участники сталкиваются с изобилием программных тонкостей при деятельности с легальными платформами. Тематические ресурсы типа Клубника казино предоставляют релевантную сведения о деятельности гэмблинговых операторов.
Механизм верификации учетной записи включает ряд неотъемлемых этапов. Базовая проверка включает размещения бумаг валидирующих гражданство. Типовой список содержит удостоверение личности, автоудостоверение или международное ID.
Цифровая часть записления включает применение безопасного соединения и двухфакторной аутентификации. Профессиональные игроки советуют включать весь комплекс доступных настроек охраны.
Зеркала представляют абсолютные копии главного домена с обеспечением тотального арсенала. Важнейшее достоинство кроется в тождественности финансовых рамок и требований ставочных требований.
Схема поиска активных альтернативных адресов основывается на проверке специализированных телеграм-каналов и партнерских платформ. Профессиональные пользователи внедряют виртуальные частные сети для обеспечения надежного доступа вне зависимости от географических запретов.
https://usmedsoutlet.shop/# internet pharmacy mexico
lamplounge online store – Easy to navigate, browsing lamps was calm and enjoyable.
Передовые участники сталкиваются с множеством цифровых деталей при деятельности с официальными площадками. Профессиональные порталы типа Меллстрой регистрация предоставляют актуальную информацию о функционировании развлекательных организаций.
Процесс валидации счета подразумевает комплекс принудительных шагов. Исходная проверка требует передачи свидетельств удостоверяющих персону. Стандартный пакет охватывает паспорт, автоудостоверение или международное ID.
Программная элемент оформления подразумевает задействование защищенного протокола и многофакторной защиты. Профессиональные геймеры настаивают запускать максимум доступных возможностей защиты.
Запасные домены составляют абсолютные реплики главного сайта с хранением всего возможностей. Важнейшее бонус заключается в тождественности расчетных ограничений и параметров ставочных требований.
Механизм поиска рабочих дублирующих порталов фундируется на проверке экспертных новостных лент и аффилированных сайтов. Опытные пользователи используют прокси-соединения для обеспечения стабильного входа независимо от местных барьеров.
Новейшие провайдеры развлекательных игр предоставляют пользователям вход к премиальному развлечениям через сертифицированные Лаки Бир порталы. Авторизованная работа требует следования конкретных контролирующих норм.
Механизм активации пользовательского учетной записи охватывает проверку личных данных. Операторы эксплуатируют углубленные алгоритмы KYC и AML для блокировки мошеннических финансовых действий.
Цифровые платформы инновационных беттинг площадок основываются на стабильных серверах с криптографическими стандартами. Территориальные ограничения заставляет администраторов создавать резервные URL.
Зеркальные ресурсы составляют аналогичные дубликаты первичного домена с обеспечением всех функций и показателей. Участники приобретают постоянный связь к балансу, беттинг отчетности и персональным установкам.
Банковские действия производятся через встроенные банковские процессоры. Границы на взносы и изъятия назначаются в согласии с законодательными требованиями и индивидуальными процедурами управления рисками.
Опытные клиенты рекомендуют контролировать ситуацию разрешения через надзорные базы данных азартных органов. Авторитетные критерии содержат позиции на профильных ресурсах и оценки подлинных клиентов.
BajaMed Direct: BajaMed Direct – BajaMed Direct
irevana goods – Solid catalog, site performance makes it easy to browse.
Gates of Olympus Super Scatter è l’ultima evoluzione della celebre saga ispirata alla mitologia greca firmata Pragmatic Play. Il tema di questa slot è incentrato sulla mitologia greca. La slot Gate of Olympus impiega la tecnologia HTML5 e di conseguenza può essere avviata sia da browser su pc sia da dispositivi portatili, con qualsiasi sistema operativo. Vediamo ora i fattori positivi e negativi di Gates of Olympus: Gates of Olympus Super Scatter è una slot ad alta volatilità, il che significa che le vincite tendono a essere meno frequenti ma potenzialmente molto elevate. Il Return to Player (RTP) è del 96,5%, un valore sopra la media per slot di questo tipo, che offre un buon bilanciamento tra rischio e ricompensa. Forse non siete ancora pronti a giocare con soldi veri. In questo caso, vi consigliamo di giocare a Gates of Olympus 1000 gratuitamente. Potete farlo proprio qui con la nostra demo di Gates of Olympus 1000. Imparate come funzionano le funzioni senza alcun rischio. Quando sarete pronti, date un’occhiata alle nostre recensioni dei casinò online per scegliere dove giocare.
http://xcellentology.us/?p=1467
We’re a gaggle of volunteers and starting a new scheme in our community. Your website offered us with useful info to work on. You have performed a formidable activity and our whole community might be grateful to you. Содержимое Kasino Mostbet: Oficiální stránky Kasino Mostbet: Oficiální stránky Historie Mostbet Co je Mostbet? Oficiálné stránky Mostbet Registrace na Mostbet… 2024 yılında, Las Vegas’taki birçok eğlence yeri, yeni müsabaka seçenekleri sağlamayı planlamaktadır. Bu, oyuncuların daha fazla alternatifle karşılaşacağı işaret eder. Canlı oyunlar, sosyal bağlantıyı artırarak, oyuncuların diğer oyuncularla haberleşme kurmasına olanak verir. Daha fazla bilgi için New York Times yazısını inceleyebilirsiniz.
Передовые бетторы натыкаются с сложностью входа к лицензированным порталам. Операторы закрывают стандартные URL, но знающие Болливуд РІС…РѕРґ клиенты понимают о функционировании параллельных сайтов.
Параллельный портал является идентичную воспроизведение оригинального сайта. Системы безопасности функционируют идентичными. Платёжные транзакции выполняются через равнозначные сервисы.
Методика создания аккаунта через резервный адрес подразумевает типовой валидации. Сотрудники требуют удостоверения для исполнения KYC-регламентов. Паспортные характеристики выполняют расширенную проверку.
Пополнительные пределы на альтернативных ресурсах аналогичны основным параметрам. Стартовые взносы сохраняются константными. Увеличивающиеся накопления координируются между многочисленными доменами.
Премиальные схемы работают целостно на альтернативных платформах. Отыгрышный коэффициент сохраняет оригинальные параметры. Временные рамки реализации поддерживается.
Сервис обслуживания обрабатывает запросы с зеркальных ссылок равнозначно. Интерактивный разговор поддерживает непрерывный порядок деятельности.
This casino https://wasit.sa/online-casino-free-deposit-a-detailed-overview-of-20/ offers a great mix of classic slots and live tables. The platform feels well-designed, promotions are attractive, and support is responsive, which adds confidence.
Инновационные платформы гемблинг игр гарантируют участникам вход к профессиональному развлечениям через сертифицированные лаки бар казино сайты. Лицензированная операционная активность предполагает исполнения определенных правовых норм.
Процедура открытия персонального профиля охватывает подтверждение конфиденциальных информации. Администраторы используют многоуровневые системы KYC и AML для недопущения поддельных платежей.
Цифровые решения инновационных развлекательных порталов работают на защищенных хостингах с TLS стандартами. Геоблокировка принуждает администраторов внедрять дублирующие адреса.
Дублирующие ресурсы составляют эквивалентные клоны базового сайта с фиксацией всех опций и параметров. Пользователи получают устойчивый подключение к балансу, гемблинг записям и персональным установкам.
Платежные транзакции производятся через интегрированные платежные процессоры. Рамки на инвестиции и обналичивания определяются в гармонии с лицензионными положениями и корпоративными нормами минимизации опасностей.
Профессиональные игроки указывают анализировать положение аккредитации через регуляторные регистры развлекательных организаций. Престижные показатели охватывают оценки на специализированных порталах и комментарии настоящих игроков.
Выбор надежного игорного ресурса требует тщательного исследования регулятивных разрешений. Актуальные порталы п»ї1хбет сайт гарантируют игрокам стопроцентную детали о своих разрешениях.
Процедура открытия аккаунта включает множество принудительных шагов аутентификации. Представители истребуют бумаги, доказывающие индивидуальность и возраст. Типовой KYC-механизм требует от 24 до 72 периодов.
Распоряжение капиталом открывается с фиксации лимитов на депозиты. Компетентные пользователи призывают задействовать правило 5% от совокупного игорного фонда на индивидуальную раунд.
Цифровые барьеры владельцев принуждают внедрять запасные пути. Дубликаты сохраняют безусловную эффективность центрального площадки, содержа историю операций и гемблинг результаты.
Новые платежные сервисы дают скоростные депозиты через виртуальные портмоне. Bitcoin, Ethereum и устойчивые монеты гарантируют тайность и минимальные сборы. Срок обработки изъятий доходит 10-30 промежутков.
Системы преданности подразумевают иерархические категории с увеличивающимся бонусом. VIP-координаторы дают эксклюзивные подарки, усиленные лимиты и опережающую поддержку.
Перемещение в области сертифицированных платформ требует осознания новых решений доступа. Опытные клиенты применяют Lucky Bear casino для обретения релевантной сведений о оперативных URL.
Механизм открытия аккаунта в надежных компаниях включает детальную аутентификацию. Актуальные операторы используют KYC-процедуры и AML-требования. Бумажная работа отнимает от 24 до 72 интервалов.
Цифровые технологии для преодоления ограничений эволюционируют параллельно с укреплением юридических мер. VPN-платформы разряда premium гарантируют кодирование AES-256 и системы OpenVPN. Непрерывность связи жизненно необходима для высокоролловых партий.
Альтернативные ресурсы действуют через географически размещенные серверные системы. CDN-системы поддерживают низкую латентность для глобальных клиентов. Программное маршрутизация инициируется при идентификации недоступности основного сайта.
Банковские транзакции в легальных территориях отвечают определенным нормам PCI DSS. Децентрализованные переводы завоевывают актуальность из-за конфиденциальности и оперативности осуществления.
Портативные софт элитных компаний совмещают отпечатковую авторизацию и push-алерты для ключевых моментов. Изменяемый оформление программно адаптируется под особенности монитора.
imp source
https://russian-traditional-clothes.com/
Опрятный вид формирует первое мнение о человеке.
Ваш образ работает на восприятие вас коллегами мгновенно.
Уверенность в подобранном луке повышает вашу уверенность.
Этот подход подчеркивает ваш уровень ответственности и внимание к мелочам.
https://a3.gucci1.ru/redirect.php?id=t4ChABMctY4x
Посредством одежду вы имеете шанс проявить свою индивидуальность и вкус.
Люди неосознанно оценивают опрятных индивидов как более успешных.
Следовательно, инвестиции в свой стиль — это вклад в свое будущее.
Современные участники сталкиваются с огромным количеством технологических особенностей при процессах с проверенными порталами. Экспертные порталы типа Лаки Бир регистрация выдают новую сведения о процессах казино операторов.
Механизм верификации кабинета охватывает комплекс необходимых фаз. Первичная валидация включает размещения бумаг подтверждающих субъект. Стандартный комплект предполагает свидетельство, водительские права или заграничное удостоверение.
Техническая сторона открытия счета предполагает использование зашифрованного канала и двухфакторной аутентификации. Профессиональные пользователи предлагают задействовать все возможных функций безопасности.
Резервные ссылки образуют абсолютные отражения первичного ресурса с хранением исчерпывающего возможностей. Ключевое выгода состоит в схожести расчетных лимитов и параметров условий прокрутки.
Система обнаружения актуальных альтернативных адресов фундируется на отслеживании специализированных мессенджер групп и союзных платформ. Профессиональные участники применяют туннельные протоколы для формирования устойчивого связи невзирая от географических ограничений.
Лицензионные площадки игровых услуг предоставляют клиентам право к качественному времяпрепровождению через тематические платформы, включая Меллстрой РІС…РѕРґ , что придерживаются международные регламенты security.
Последовательность регистрации предполагает внесения валидационных деталей через encrypted SSL-линии. Провайдеры требуют official verification совершеннолетия и локации проживания для соблюдения законодательных норм.
Двухэтапная authentication представляет обязательным элементом передовых solutions защиты. Игроки обретают SMS-коды, push-сообщения или эксплуатируют dedicated tools наподобие Google Authenticator.
Альтернативные порталы ликвидируют проблемы географических барьеров и DDoS-атак. Фактически mirrors представляют тождественные копии primary платформы с поддержанием функциональности и индивидуальных сведений.
Skilled игроки рекомендуют удерживать свежие каталоги функционирующих mirrors в сохранённых ссылках интернет-программы. Администрация рассылают новости о свежих доменах через e-mail, Telegram-чаты и телефонные приложения.
Платёжные movements через официальные сайты гарантированы защитными технологиями стандарта банковского индустрии. Вывод фондов происходит единственно на аутентифицированные счета держателя account.
Современные порталы развлекательных развлечений дают беттерам подключение к профессиональному беттингу через защищенные Лев казино ресурсы. Сертифицированная работа подразумевает выполнения четких надзорных норм.
Процедура регистрации игрового учетной записи предусматривает валидацию конфиденциальных реквизитов. Провайдеры задействуют многоуровневые механизмы KYC и AML для блокировки фродовых финансовых действий.
Электронные системы актуальных гемблинг платформ строятся на зашифрованных инфраструктурах с HTTPS алгоритмами. Территориальные ограничения вынуждает управляющих создавать альтернативные порталы.
Параллельные ресурсы составляют эквивалентные репликации главного домена с поддержанием всех сервисов и информации. Участники обеспечивают себе устойчивый связь к капиталу, развлекательной статистике и клиентским установкам.
Расчетные транзакции выполняются через подключенные расчетные системы. Ограничения на инвестиции и снятия фиксируются в соответствии с регуляторными положениями и организационными регламентами контроля угроз.
Квалифицированные гемблеры указывают контролировать условия сертификата через государственные регистры беттинг структур. Престижные критерии включают рейтинги на тематических платформах и мнения настоящих клиентов.
Актуальные сервисы беттинг продуктов гарантируют игрокам возможность к элитному развлечениям через сертифицированные lucky bear казино ресурсы. Сертифицированная деятельность требует следования конкретных надзорных положений.
Система оформления клиентского профиля охватывает валидацию конфиденциальных данных. Провайдеры эксплуатируют расширенные механизмы KYC и AML для пресечения незаконных переводов.
Электронные инструменты инновационных игорных домов базируются на стабильных облачных системах с шифровальными алгоритмами. IP-фильтрация обязывает провайдеров внедрять резервные URL.
Параллельные ресурсы формируют точные дубликаты основного домена с удержанием всех инструментов и параметров. Пользователи достигают беспрепятственный связь к депозиту, беттинг истории и персональным конфигурациям.
Банковские действия производятся через подключенные платежные сервисы. Ограничения на взносы и выводы фиксируются в соответствии с правовыми условиями и собственными правилами снижения потерь.
Компетентные клиенты предлагают анализировать условия разрешения через официальные регистры гемблинг органов. Статусные показатели предусматривают места на профильных порталах и оценки настоящих клиентов.
I blog often and I seriously thank you for your information. Your article has really
peaked my interest. I’m going to bookmark your website and keep checking for new information about once per week.
I subscribed to your Feed too.
Feel free to visit my web site – real estate agent Lake Oswego OR
Oh my goodness! Impressive article dude! Thanks, However I am encountering issues with
your RSS. I don’t understand the reason why I can’t subscribe to it.
Is there anybody getting the same RSS issues? Anybody who knows the solution will you kindly respond?
Thanx!!
my homepage :: regenerative medicine thailand
clevercheckout.shop – A seamless checkout experience and lots of great products to browse.
Современные игроки оказываются с препятствием подключения к легальным площадкам. Организации закрывают основные ссылки, но знающие п»ї1xBet casino клиенты знают о функционировании зеркальных сайтов.
Резервная ссылка является полную копию главного ресурса. Системы безопасности остаются равнозначными. Финансовые действия реализуются через аналогичные механизмы.
Технология оформления профиля через дополнительный домен требует обычной проверки. Администраторы запрашивают свидетельства для реализации KYC-норм. Индивидуальные данные подвергаются многоуровневую валидацию.
Вносительные рамки на альтернативных порталах идентичны главным спецификациям. Начальные вклады функционируют фиксированными. Возрастающие джекпоты координируются между всеми ресурсами.
Стимулирующие системы выполняются комплексно на альтернативных ресурсах. Требования по обороту удерживает оригинальные параметры. Период действия отыгрыша поддерживается.
Служба сопровождения анализирует обращения с альтернативных ресурсов идентично. Интерактивный переписка обеспечивает постоянный порядок деятельности.
explanation
https://russian-traditional-clothes.com/
Актуальные игроки имеют дело с изобилием системных тонкостей при процессах с официальными платформами. Экспертные источники типа Лаки Бир поставляют современную сведения о операциях казино компаний.
Система верификации учетной записи предполагает набор обязательных этапов. Стартовая проверка нуждается отправки удостоверений верифицирующих субъект. Привычный список включает удостоверение личности, водительские права или международное ID.
Техническая часть создания аккаунта предполагает применение безопасного соединения и двойной авторизации. Экспертные пользователи советуют задействовать максимум доступных настроек защиты.
Запасные домены образуют стопроцентные копии базового платформы с сохранением исчерпывающего инструментария. Главное выгода кроется в соответствии финансовых лимитов и условий проигрыша.
Система выявления активных дублирующих порталов базируется на проверке тематических новостных лент и сотрудничающих сайтов. Опытные участники задействуют туннельные протоколы для гарантирования стабильного связи невзирая от местных лимитов.
https://bajameddirect.shop/# mexico prescription online
LuxFable Essentials – Very sleek layout, enjoyable experience and pages work seamlessly.
Действующие mirror-ссылки легальных казино на казино лова гарантируют беспрерывный соединение к развлекательным порталам. Схема клонирования генерирует идентичные клоны базового ресурса с удержанием всех возможностей.
Алгоритм активации через резервную ссылку целиком воспроизводит стандартную форму. Новые игроки вводят действующий email, создают сложный ключ и фиксируют игровую курренси.
Верификация аккаунта подразумевает отправки удостоверений опираясь на KYC-стандартам. Снимок водительских прав, верификация адреса и карточные реквизиты проверяются через машинную анализ в течение 24-72 периодов.
Вход действующих геймеров происходит через классическую форму с усиленной аутентификацией. Краткосрочные коды передаются на мессенджер девайс или e-mail адрес.
Опции входящего модуля через mirror-сайты предлагает топовые банковские платформы. Visa, Mastercard, цифровые хранилища Skrill, Neteller, криптовалюты Bitcoin, Ethereum реализуются с уменьшенными комиссиями 0-3%.
Азартная коллекция воспроизводится целиком включая слоты, карточные развлечения, live-дилеров и накопительные призы. RTP-индикаторы, изменчивость и ставочные требования фиксируются точными.
Подарочная политика функционирует схоже главному веб-площадке. Welcome-пакеты, безвозмездные спины, компенсация и VIP-курсы включаются программно при исполнении фиксированных требований.
cheapest online pharmacy india: Online medicine home delivery – world pharmacy india
Актуальные сервисы развлекательных активностей обеспечивают участникам вход к высококлассному игровому процессу через защищенные СЌРЅРѕРјРѕ казино системы. Лицензированная деятельность подразумевает соблюдения конкретных законодательных критериев.
Система оформления клиентского учетной записи охватывает подтверждение личных показателей. Регуляторы эксплуатируют детализированные протоколы KYC и AML для предотвращения поддельных финансовых действий.
Технические средства актуальных игорных домов основываются на стабильных облачных системах с SSL стандартами. Геоблокировка побуждает владельцев создавать вспомогательные ссылки.
Альтернативные ресурсы формируют эквивалентные клоны центрального домена с сохранением всех сервисов и информации. Игроки обеспечивают себе стабильный вход к капиталу, гемблинг истории и клиентским опциям.
Финансовые процедуры проходят через синхронизированные банковские шлюзы. Рамки на депозиты и изъятия фиксируются в согласии с нормативными положениями и собственными нормами минимизации опасностей.
Профессиональные пользователи указывают мониторить статус разрешения через надзорные списки гемблинг ведомств. Репутационные индикаторы задействуют ранги на экспертных сайтах и комментарии настоящих беттеров.
Функционирующие зеркала легальных gaming-операторов на Vavada casino гарантируют устойчивый подключение к азартным сервисам. Система клонирования образует полноценные дубликаты базового домена с поддержанием всех опций.
Схема оформления профиля через дублирующий портал полностью копирует главную бланк. Новые клиенты регистрируют валидный email, генерируют защищенный пароль и выбирают игровую курренси.
Аутентификация аккаунта подразумевает загрузки удостоверений по KYC-регламенту. Скан паспорта, доказательство места жительства и денежные координаты контролируются системой автоматическую валидацию в течение 24-72 временных единиц.
Логин верифицированных игроков выполняется через стандартную форму с 2FA аутентификацией. Краткосрочные шифры поступают на смс гаджет или электронную почту.
Опции денежного модуля через альтернативные домены включает популярные расчетные механизмы. Visa, Mastercard, онлайн хранилища Skrill, Neteller, цифровые активы Bitcoin, Ethereum обрабатываются с низкими комиссиями 0-3%.
Азартная коллекция дублируется целиком включая автоматы, традиционные геймплей, live-хостов и максимальные награды. RTP-показатели, вариативность и вейджер фиксируются неизменными.
Бонусная механизм действует похоже основному ресурсу. Welcome-предложения, бесплатные вращения, денежный возврат и VIP-схемы включаются программно при выполнении заданных стандартов.
Развлекательная область отображает интенсивный прогресс, заинтересовывая множество геймеров. Опытные ресурсы предлагают качественную атмосферу для развлечений. Детальную материалы о таких организациях можно обнаружить на п»ї1xBet .
Сертификация представляет ключевым критерием выбора ресурса. Контролёры Великобритании предоставляют строгий мониторинг экономических транзакций. Любая официальная портал осуществляет плановые аудиты RNG-алгоритмов.
Компьютерные аспекты передовых казино объединяют SSL-безопасность банковского класса. Производители цифрового обеспечения наподобие Microgaming, NetEnt, Pragmatic Play добавляют сложные алгоритмы рандомных величин.
Механизм проверки профиля требует передачи справок KYC-формата. Удостоверение, свидетельство о доходах, подтверждение местожительства — базовый перечень для окончательного подключения.
Дублирующие адреса убирают трудности с запретами операторов. Рабочие дубли обновляются систематически компьютерными отделами. Мобильные клиенты нередко выполняются качественнее онлайн модификаций.
Банкролл-менеджмент задаёт долгосрочную доходность развлекательных циклов. Экспертные игроки указывают урезать величину ставки до 1-2% от суммарного банкролла.
Hmm is anyone else having problems with the pictures on this blog loading?
I’m trying to determine if its a problem on my end or if it’s the blog.
Any responses would be greatly appreciated.
my website best realtor in Franklin TN
I do not even understand how I stopped up here, but I assumed this submit was once good.
I don’t recognise who you might be but definitely you’re
going to a famous blogger when you are not already. Cheers!
Here is my webpage … real estate agent Santa Fe NM
1win soporte depositos 1win soporte depositos
Online reputation management is the strategic practice of influencing public perceptions of a brand or person.
It involves actively monitoring what is being discussed about you on the internet.
The primary aim is to highlight favorable content and address any damaging comments or reviews.
This often includes responding to online reviews on different websites.
https://www.renderosity.com/users/id:1825935
A vital part is optimizing search engine results for associated search terms.
Effective reputation management helps establish trust and safeguard a positive brand image.
Ultimately, it is an essential strategy for any contemporary business or public figure.
Передовые пользователи имеют дело с массой программных деталей при работе с проверенными платформами. Экспертные платформы типа казино Mellstroy Game предоставляют новую материалы о процессах игорных операторов.
Механизм верификации учетной записи предполагает набор принудительных фаз. Начальная верификация нуждается отправки бумаг удостоверяющих субъект. Типовой список включает свидетельство, автолицензию или внешний паспорт.
Техническая составляющая записления подразумевает использование зашифрованного канала и 2FA. Квалифицированные клиенты рекомендуют задействовать максимум доступных параметров обеспечения.
Зеркала формируют абсолютные клоны первичного платформы с обеспечением исчерпывающего арсенала. Основное преимущество заключается в подобии расчетных пределов и критериев отыгрыша.
Схема нахождения действующих запасных доменов опирается на отслеживании профильных мессенджер групп и сотрудничающих порталов. Экспертные пользователи эксплуатируют VPN-сервисы для обеспечения бесперебойного входа невзирая от локальных лимитов.
аккумуляторные батареи тяговые 48 в Тяговый аккумулятор 48V цена от 250 000 руб. — сердце электропогрузчиков. Надежность для Toyota и Komatsu.
Современные бетторы оказываются с затруднением подключения к официальным платформам. Поставщики запрещают главные домены, но опытные п»ї1xBet зеркало игроки помнят о присутствии параллельных сайтов.
Дополнительный домен представляет полную дубликат главного платформы. Криптографические алгоритмы остаются неизменными. Денежные транзакции выполняются через те же механизмы.
Алгоритм регистрации через альтернативный портал включает типовой аутентификации. Сотрудники требуют удостоверения для осуществления KYC-регламентов. Индивидуальные параметры осуществляют усиленную аутентификацию.
Банковские лимиты на резервных ресурсах совпадают базовым характеристикам. Минимальные беты остаются постоянными. Растущие банки координируются между всеми ссылками.
Премиальные планы функционируют целостно на резервных ресурсах. Множитель ставок гарантирует первоначальные значения. Длительность отыгрыша не изменяется.
Команда ассистирования решает обращения с параллельных ресурсов идентично. Прямой диалог поддерживает беспрерывный режим оперирования.
Давний участник рынка darknet Rutor завоевал доверие благодаря скрытой системе и сервису, позволяющему безопасно проводить сделки через сеть Rutor.Rutor: Ветеран русскоязычного даркнета
рутор форум ссылки считается одним из наиболее популярных и старых ресурсов в рунет-даркнете, который прочно закрепился в инфраструктуре анонимных площадок. Данный сервис специализируется на доступе к широчайшему ассортименту софта, файлов, новостей и разнообразных материалов, охватывающих вопросы взлома и защиты.
Как устроена система работы Rutor
Механизм работы ресурса позволяет пользователям получать доступ к большим массивам данных и файлов, при этом обеспечивая максимальную приватность и анонимность. Главное преимущество платформы — интеграция с сетью Rutor, что значительно уменьшает вероятность раскрытия личности и потери конфиденциальной информации. С течением времени площадка превратилась в важный архив событий и истории русскоязычного даркнета.
Rutor поддерживает стабильную работу, позволяя и новичкам, и опытным пользователям использовать предоставляемые сервисы. Каждый из разделов сайта — магазин, новостные ленты или руководства по взлому — образуют отдельную звено в масштабном сообществе, где главными ценностями выступают конфиденциальность и защита анонимности.
Будущее платформы: вызовы и обещания
Ясно, что будущая деятельность Rutor потребует решения новых рисков, внедрения свежих подходов к безопасности и средств обхода ограничений. Следует помнить, что даже максимально анонимная среда не обеспечивает стопроцентную безопасность.
Этот сервис по-прежнему служит площадкой для информирования, обсуждений безопасности и отслеживания новшеств в даркнет-сообществе. Улучшение технологий, увеличение аудитории и внедрение инноваций способствуют статусу Rutor как центрального элемента русскоязычного онлайн-сообщества.
– Принцип анонимности
– Надёжность проведения операций
– Доступ к уникальной информации
– Конфиденциальность общения
Уникальный путь Rutor делает платформу значимой для тех, кто высоко ценит свободу, личную приватность и защиту от внешнего контроля в цифровую эпоху.
Актуальные пользователи сталкиваются с огромным количеством технологических деталей при функционировании с официальными платформами. Экспертные платформы типа ретро казино обеспечивают релевантную материалы о работе игорных организаций.
Процесс проверки кабинета включает комплекс необходимых этапов. Первичная аутентификация требует отправки свидетельств подтверждающих индивидуальность. Обычный пакет содержит ID, права или загранпаспорт.
Цифровая часть регистрации предполагает задействование SSL-шифрования и двойной авторизации. Экспертные игроки рекомендуют включать совокупность имеющихся возможностей охраны.
Дублирующие порталы являются идентичные реплики центрального сайта с поддержанием комплексного инструментария. Ключевое бонус содержится в тождественности финансовых ограничений и условий вейджера.
Система выявления активных зеркал основывается на контроле профильных новостных лент и союзных порталов. Экспертные участники задействуют туннельные протоколы для гарантирования стабильного подключения независимо от местных блокировок.
Проверенные ресурсы игровых опций обеспечивают участникам шанс к профессиональному азартному досугу через профильные ресурсы, включая аква казино , которые точно выполняют transnational регламенты защиты.
Процедура активации включает внесения проверочных деталей через криптографические SSL-протоколы. Администрация запрашивают official доказательство возраста и территории жительства для compliance юрисдикционных правил.
Многоуровневая аутентификация представляет принудительным составляющей современных механизмов безопасности. Клиенты имеют SMS-шифры, push-notification или задействуют dedicated софт по типу Google Authenticator.
Дублирующие порталы ликвидируют сложности географических ограничений и DDoS-assault. С технической точки зрения копии образуют тождественные реплики центрального сайта с поддержанием возможностей и клиентских данных.
Компетентные пользователи призывают поддерживать current реестры функционирующих дублей в bookmark интернет-программы. Администрация рассылают обновления о актуальных доменах через почтовые сервисы, Telegram-сообщества и смартфонные утилиты.
Денежные переводы через официальные сайты гарантированы шифровальными алгоритмами категории банковского направления. Extraction капитала происходит единственно на подтверждённые wallets хозяина профиля.
Актуальные альтернативные домены лицензированных игорных заведений на Меллстрой дают стабильный вход к развлекательным порталам. Принцип копирования формирует точные дубликаты основного домена с фиксацией всех механизмов.
Алгоритм создания аккаунта через зеркало абсолютно имитирует базовую бланк. Дебютные игроки вводят валидный email, генерируют надежный ключ и определяют операционную денежную единицу.
Идентификация счета подразумевает передачи справок согласно KYC-требованиям. Копия паспорта, верификация проживания и банковские данные контролируются системой алгоритмическую валидацию в течение 24-72 периодов.
Логин действующих игроков реализуется через обычную панель с двухфакторной проверкой. Одноразовые пароли доставляются на сотовый гаджет или e-mail адрес.
Возможности входящего раздела через зеркала содержит востребованные банковские системы. Visa, Mastercard, виртуальные счета Skrill, Neteller, crypto Bitcoin, Ethereum процессируются с сокращенными процентами 0-3%.
Gaming коллекция дублируется полностью включая машины, столовые забавы, live-дилеров и накопительные призы. RTP-значения, вариативность и условия отыгрыша остаются неизменными.
Поощрительная система работает похоже корневому веб-площадке. Welcome-предложения, бесплатные вращения, кешбэк и VIP-системы запускаются алгоритмически при реализации определенных условий.
Официальные провайдеры развлекательных сервисов предоставляют участникам вариант к элитному времяпрепровождению через профильные домены, включая казино Меллстрой , которые специально следуют глобальные стандарты безопасности.
Алгоритм регистрации требует предоставления authentication деталей через криптографические SSL-connection. Администрация требуют письменное verification дееспособности и территории нахождения для compliance юрисдикционных норм.
2FA аутентификация становится принудительным aspect новейших систем надёжности. Клиенты получают SMS-пароли, push-notification или применяют dedicated приложения типа Google Authenticator.
Резервные URL устраняют вопросы geographic запретов и DDoS-штурмов. Технически зеркала формируют аналогичные клоны центрального портала с удержанием инструментария и пользовательских деталей.
Компетентные геймеры suggest хранить новейшие списки working зеркал в favourites веб-клиента. Провайдеры направляют обновления о fresh доменах через электронную почту, Telegram-каналы и mobile софт.
Финансовые процедуры через legal площадки защищены шифровальными системами категории банковского сектора. Extraction средств осуществляется только на подтверждённые данные обладателя аккаунта.
halvessa.shop – I love the simplicity and ease of finding great items on this site.
Рабочие mirror-ссылки надежных игорных заведений на Вавада сайт дают постоянный коннект к развлекательным ресурсам. Принцип реплицирования создает аналогичные версии основного домена с сохранением всех инструментов.
Процедура регистрации через альтернативный домен целиком дублирует оригинальную шаблон. Свежие клиенты указывают активный email, генерируют безопасный пароль и выбирают основную валюту.
Аутентификация аккаунта подразумевает загрузки бумаг следуя KYC-политике. Снимок паспорта, доказательство адреса и денежные координаты проходят машинную контроль в течение 24-72 часа.
Логин активных пользователей осуществляется через типовую форму с расширенной идентификацией. Временные токены поступают на смс номер или email.
Возможности пополнительного сектора через mirror-сайты обеспечивает востребованные расчетные платформы. Visa, Mastercard, цифровые портмоне Skrill, Neteller, блокчейн-токены Bitcoin, Ethereum реализуются с уменьшенными платежами 0-3%.
Gaming каталог повторяется целиком включая слоты, классические геймплей, live-крупье и джекпоты. RTP-коэффициенты, колебания и условия отыгрыша остаются такими же.
Акционная механизм действует идентично корневому порталу. Welcome-комплекты, бесплатные вращения, компенсация и VIP-курсы активируются алгоритмически при реализации фиксированных параметров.
Надёжные платформы игорных услуг oferuja участникам право к высококлассному развлечениям через специализированные домены, включая казино Либет , что следуют transnational регламенты надёжности.
Алгоритм активации предполагает внесения идентификационных сведений через encrypted SSL-connection. Провайдеры требуют документальное verification age verification и адреса residence для соблюдения правовых требований.
Двухэтапная проверка является required составляющей актуальных архитектур защиты. Users располагают SMS-шифры, push-notification или задействуют специализированные утилиты вроде Google Authenticator.
Зеркальные URL нейтрализуют препятствия географических запретов и DDoS-assault. Фактически реплики образуют идентичные версии базового платформы с сохранением инструментария и пользовательских информации.
Экспертные пользователи suggest хранить новейшие реестры функционирующих mirrors в favourites браузера. Администрация рассылают информацию о fresh порталах через email, Telegram-группы и портативные софт.
Денежные переводы через официальные ресурсы гарантированы криптографическими алгоритмами уровня банковского сектора. Получение денег осуществляется solely на validated счета обладателя личного кабинета.
Viel Spaß mit dem Livestream: Pirots 3 Soweit im jeweiligen Angebot keine andere Frist angegeben ist, erfolgt die Lieferung der Ware im Inland (Deutschland) innerhalb von 1-3 Tagen, bei Auslandslieferungen innerhalb von 5-7 Tagen nach Vertragsschluss (bei vereinbarter Vorauszahlung nach dem Zeitpunkt Ihrer Zahlungsanweisung). So far, each Pirots slot has been held in completely different environments. The original was a piraty (hence the name) swashbuckling affair; Pirots 2 went to a dinosaur age, while Pirots 3 is a good ‘ol Wild Western number. Although, is it the actual Wild West or a theme park version? Only asking because behind the transparent gaming grid, you can see amusement rides, while some of the stores on the street look like tourist stop-offs rather than dank, dingy saloons. That would make sense because the four parrot characters, its bandit, the train, not to mention crazy hectic gameplay contribute to making Pirots 3 about as far from being a dank, dingy slot as it gets.
https://theyogacrowd.com/pelican-casino-ein-spannendes-online-spielerlebnis-fur-deutsche-spieler/
Sammle weitere Bonussymbole, in die Folter-Gerät fort. Herauszufinden, die es derzeit auf dem Markt gibt. Casino für handy echtgeld es besitzt eine Lizenz der britischen Glücksspielkommission und ist somit ein seriöser Anbieter, um dieses Spiel absolut risikofrei zu lernen und zu entdecken. Diese Casinos können innovative Spielmechaniken, Es ist möglicherweise nicht ganz offensichtlich. Je höher die Wettanforderung, online casino beste bonuses dass die Römer vor allem mit ihrer Strategie den Armeen aller anderen europäischen Stämmen überlegen waren. Zertifizierte Slots mit gratis Spins ohne Einzahlung sind eine großartige Möglichkeit, kostenlos spielen pirate kingdom megaways freispiele ohne einzahlung sodass für den Zugriff kein Download erforderlich ist. Wenn das nach etwas klingt, wenn Sie sich nicht sicher sind.
Исследование в пространстве проверенных сайтов нуждается представления современных технологий подключения. Умелые игроки внедряют казино Болливуд для получения актуальной материалов о активных доменах.
Алгоритм регистрации профиля в сертифицированных компаниях включает тщательную подтверждение. Современные операторы задействуют KYC-алгоритмы и AML-требования. Документальная процедура потребляет от 24 до 72 часов.
IT решения для избежания блокировок эволюционируют параллельно с усилением правовых шагов. VPN-службы категории premium предоставляют безопасность AES-256 и технологии OpenVPN. Надежность подключения критически значима для премиальных игровых периодов.
Резервные платформы функционируют через локально рассредоточенные компьютерные системы. CDN-архитектуры гарантируют оптимальную отклик для азиатских геймеров. Программное редирект инициируется при выявлении недоступности первичного портала.
Банковские переводы в проверенных юрисдикциях подчиняются жестким правилам PCI DSS. Децентрализованные транзакции завоевывают распространение благодаря анонимности и темпу осуществления.
Портативные софт лучших операторов совмещают голосовую аутентификацию и push-уведомления для существенных моментов. Настраиваемый дизайн автономно изменяется под особенности дисплея.
this hyperlink
https://russian-traditional-clothes.com
tramadol usa pharmacy https://easypharmacies.shop/# walmart pharmacy online pharmacy
Перемещение в секторе легальных платформ предполагает понимания продвинутых способов доступа. Профессиональные геймеры задействуют Меллстрой для извлечения релевантной сведений о функционирующих путях.
Механизм создания счета в надежных компаниях включает многоуровневую валидацию. Новейшие поставщики используют KYC-механизмы и AML-нормы. Бумажная работа отнимает от 24 до 72 временных отрезков.
Технические способы для обхода ограничений эволюционируют параллельно с усилением правовых мер. VPN-решения уровня premium гарантируют защиту AES-256 и методы OpenVPN. Надежность соединения критически важна для VIP игровых периодов.
Альтернативные домены функционируют через территориально разнесенные IT системы. CDN-сети осуществляют низкую отклик для европейских клиентов. Программное редирект инициируется при обнаружении барьера центрального адреса.
Денежные операции в лицензированных зонах подчиняются конкретным нормам PCI DSS. Криптовалютные платежи получают востребованность по причине конфиденциальности и темпу процессинга.
Смартфонные утилиты элитных брендов включают биометрическую авторизацию и push-оповещения для критических ситуаций. Модифицируемый дизайн программно изменяется под свойства экрана.
Современные участники встречаются с множеством технологических нюансов при деятельности с лицензированными порталами. Экспертные порталы типа Mellstroy Game казино предоставляют свежую сведения о операциях развлекательных провайдеров.
Механизм верификации счета охватывает комплекс принудительных уровней. Первичная аутентификация подразумевает отправки удостоверений подтверждающих гражданство. Классический комплект включает документ, автоудостоверение или международный паспорт.
Программная компонента открытия счета включает использование безопасного соединения и 2FA. Опытные клиенты предлагают задействовать максимум представленных функций охраны.
Резервные ссылки представляют абсолютные дубликаты основного сайта с удержанием полного инструментария. Главное преимущество заключается в тождественности платежных ограничений и требований отыгрыша.
Процедура нахождения активных резервных ссылок основывается на мониторинге профильных телеграм-каналов и партнерских порталов. Опытные пользователи используют туннельные протоколы для формирования надежного доступа независимо от территориальных лимитов.
Нынешние участники натыкаются с затруднением подключения к лицензированным сайтам. Провайдеры ограничивают главные URL, но опытные казино KiloGram посетители помнят о наличии дублирующих сайтов.
Зеркало формирует абсолютную реплику базового платформы. Криптографические алгоритмы сохраняются аналогичными. Платёжные процедуры реализуются через аналогичные системы.
Алгоритм создания аккаунта через параллельный портал требует обычной проверки. Сотрудники уточняют документы для исполнения KYC-норм. Персональные сведения осуществляют комплексную проверку.
Депозитные пределы на дополнительных платформах аналогичны базовым параметрам. Наименьшие суммы продолжают фиксированными. Возрастающие банки интегрируются между многочисленными адресами.
Стимулирующие системы функционируют целостно на дополнительных порталах. Множитель ставок гарантирует первоначальные показатели. Срок активности использования сохраняется.
Департамент помощи анализирует запросы с параллельных доменов идентично. Интерактивный разговор осуществляет 24-часовой порядок функционирования.
Ориентирование в пространстве официальных сайтов нуждается осознания актуальных технологий доступа. Продвинутые участники внедряют казино Болливуд для добывания актуальной информации о работающих адресах.
Механизм открытия личного кабинета в надежных учреждениях охватывает многоуровневую проверку. Передовые поставщики задействуют KYC-алгоритмы и AML-стандарты. Бумажная работа потребляет от 24 до 72 интервалов.
Компьютерные инструменты для обхода барьеров совершенствуются одновременно с ужесточением правовых решений. VPN-инструменты типа premium предлагают кодирование AES-256 и протоколы OpenVPN. Постоянство канала кардинально существенна для VIP игровых периодов.
Зеркальные сайты оперируют через пространственно размещенные компьютерные системы. CDN-комплексы поддерживают сокращенную латентность для глобальных геймеров. Системное переключение активируется при детекции блокировки основного ресурса.
Финансовые движения в легальных территориях подчиняются строгим нормам PCI DSS. Криптовалютные переводы набирают востребованность по причине секретности и оперативности реализации.
Переносные программы элитных провайдеров объединяют физиологическую авторизацию и push-сообщения для критических ситуаций. Гибкий оформление программно изменяется под характеристики панели.
Выбор безопасного гемблинг ресурса нуждается тщательного исследования официальных сертификатов. Актуальные порталы казино Меллстрой гарантируют клиентам полную детали о своих разрешениях.
Система получения доступа подразумевает несколько требуемых фаз аутентификации. Представители запрашивают удостоверения, удостоверяющие индивидуальность и возраст. Традиционный KYC-процесс составляет от 24 до 72 интервалов.
Управление банком начинается с назначения пределов на взносы. Опытные пользователи рекомендуют эксплуатировать принцип 5% от совокупного азартного бюджета на отдельную игру.
Системные ограничения администраторов вынуждают использовать вспомогательные ссылки. Клоны хранят безусловную активность базового сайта, предусматривая летопись переводов и азартный прогресс.
Актуальные банковские инструменты предоставляют моментальные депозиты через блокчейн кошельки. Bitcoin, Ethereum и стейблкоины гарантируют скрытность и мизерные комиссии. Длительность реализации снятий составляет 10-30 интервалов.
Системы лояльности подразумевают каскадные уровни с нарастающим компенсацией. VIP-представители гарантируют эксклюзивные поощрения, увеличенные рамки и первоочередную техподдержку.
Гемблинговая сфера являет быстрый прогресс, притягивая массы пользователей. Квалифицированные площадки гарантируют безопасную среду для развлечений. Исчерпывающую материалы о этих брендах реально найти на Lucky Bear зеркало .
Аттестация выступает ключевым аспектом отбора портала. Контролёры Великобритании создают тщательный проверку расчётных манипуляций. Конкретная аккредитованная портал реализует постоянные проверки RNG-генераторов.
Компьютерные аспекты передовых казино предусматривают SSL-безопасность расчётного категории. Производители софтового ПО наподобие Microgaming, NetEnt, Pragmatic Play интегрируют многоуровневые системы непредсказуемых чисел.
Схема аутентификации профиля требует передачи бумаг KYC-формата. Удостоверение, справка о доходах, удостоверение регистрации — стандартный перечень для окончательного доступа.
Зеркальные ссылки решают трудности с цензурой организаций. Свежие копии модифицируются систематически техническими специалистами. Портативные программы регулярно работают качественнее браузерных форматов.
Финансовая дисциплина формирует долгосрочную успешность развлекательных раундов. Экспертные геймеры предлагают лимитировать количество вейджера до 1-2% от общего капитала.
lamps & lounge – Pleasant layout, browsing lamps today felt effortless and organized.
Определение честного гемблинг ресурса нуждается тщательного рассмотрения лицензионных разрешений. Инновационные порталы казино Меллстрой гарантируют игрокам безусловную детали о собственных лицензиях.
Алгоритм оформления счета содержит несколько необходимых стадий проверки. Провайдеры истребуют документы, доказывающие личность и зрелость. Обычный KYC-порядок продолжается от 24 до 72 временных отрезков.
Финансовое планирование открывается с фиксации границ на инвестиции. Квалифицированные геймеры настаивают задействовать правило 5% от суммарного развлекательного резерва на индивидуальную раунд.
Цифровые барьеры провайдеров побуждают внедрять вспомогательные пути. Дубликаты сохраняют безусловную функциональность центрального портала, предусматривая летопись транзакций и гемблинг продвижение.
Передовые банковские сервисы обеспечивают быстрые вклады через виртуальные счета. Bitcoin, Ethereum и устойчивые монеты гарантируют скрытность и символические взносы. Продолжительность проведения получений равно 10-30 минут.
Программы приверженности предусматривают иерархические уровни с прогрессивным возвратом. VIP-консультанты предоставляют персонализированные поощрения, улучшенные рамки и приоритетную сервис.
https://indogenericexport.shop/# zanaflex medication
Актуальные mirror-ссылки легальных gaming-операторов на Lucky Bear гарантируют постоянный соединение к развлекательным порталам. Методика копирования генерирует точные реплики центрального домена с консервацией всех функций.
Процедура регистрации через альтернативный домен целиком дублирует базовую анкету. Новые игроки заполняют валидный email, создают сложный код доступа и устанавливают рабочую платежное средство.
Аутентификация учетной записи содержит загрузки удостоверений следуя KYC-политике. Изображение удостоверения личности, валидация места жительства и денежные сведения подвергаются машинную контроль в течение 24-72 ч.
Аутентификация верифицированных участников выполняется через типовую панель с 2FA идентификацией. Временные шифры приходят на мессенджер номер или e-mail адрес.
Функционал пополнительного блока через зеркала обеспечивает распространенные финансовые инструменты. Visa, Mastercard, виртуальные кошельки Skrill, Neteller, цифровые активы Bitcoin, Ethereum процессируются с низкими взносами 0-3%.
Развлекательная библиотека клонируется абсолютно включая слоты, настольные забавы, live-ведущих и джекпоты. RTP-коэффициенты, изменчивость и ставочные требования удерживаются точными.
Подарочная схема функционирует подобно основному ресурсу. Welcome-пакеты, безвозмездные спины, денежный возврат и VIP-схемы включаются системно при исполнении определенных параметров.
Легальные провайдеры игровых возможностей oferuja клиентам шанс к премиальному игровому процессу через целевые сайты, включая СЂР° казино , которые специально соблюдают мировые критерии защиты.
Последовательность активации требует внесения верификационных данных через безопасные SSL-каналы. Операторы demanded официальное подтверждение правоспособности и места residence для исполнения законодательных требований.
Двухэтапная аутентификация считается mandatory частью современных solutions защиты. Пользователи обретают SMS-пароли, push-алерты или эксплуатируют специализированные софт в стиле Google Authenticator.
Mirror ссылки нейтрализуют трудности geographic запретов и DDoS-assault. Техническим образом mirrors составляют дублированные версии основного портала с обеспечением опций и клиентских информации.
Опытные участники советуют поддерживать актуальные перечни функционирующих копий в favourites браузера. Management передают информацию о новых порталах через почтовые сервисы, Telegram-communities и телефонные софт.
Платёжные операции через legal сайты защищены шифровальными технологиями level банковского индустрии. Изъятие средств выполняется исключительно на проверенные счета владельца личного кабинета.
Инновационные провайдеры гемблинг игр гарантируют пользователям возможность к премиальному азарту через надежные казино ДживиСпин порталы. Авторизованная бизнес подразумевает выполнения строгих регуляторных норм.
Процедура регистрации клиентского аккаунта содержит подтверждение приватных реквизитов. Операторы задействуют углубленные алгоритмы KYC и AML для блокировки мошеннических транзакций.
Цифровые решения современных казино функционируют на безопасных хостингах с криптографическими алгоритмами. Локальные запреты обязывает администраторов разрабатывать параллельные адреса.
Параллельные сайты составляют точные копии базового платформы с обеспечением всех сервисов и параметров. Клиенты добиваются стабильный подключение к счету, азартной истории и индивидуальным установкам.
Денежные переводы проходят через встроенные расчетные системы. Границы на взносы и изъятия фиксируются в унисон с регуляторными условиями и организационными нормами управления рисками.
Опытные игроки предлагают контролировать условия аккредитации через государственные базы данных развлекательных ведомств. Статусные характеристики предусматривают позиции на экспертных сайтах и оценки реальных клиентов.
farmacia mexicana online BajaMed Direct farmacias mexicanas
I like looking through an article that will make men and women think.
Also, thank you for permitting me to comment!
Инновационные платформы беттинг продуктов предоставляют беттерам путь к премиальному развлечениям через надежные Mellstroy Game платформы. Авторизованная операционная активность подразумевает учета определенных регуляторных положений.
Механизм открытия индивидуального учетной записи задействует подтверждение приватных данных. Операторы внедряют углубленные алгоритмы KYC и AML для предотвращения мошеннических переводов.
Цифровые решения передовых развлекательных порталов строятся на защищенных инфраструктурах с шифровальными алгоритмами. Геоблокировка обязывает владельцев организовывать резервные URL.
Параллельные сайты представляют полные копии первичного сайта с поддержанием всех инструментов и сведений. Клиенты достигают устойчивый соединение к средствам, игровой данным и пользовательским опциям.
Денежные действия осуществляются через интегрированные денежные агрегаторы. Пределы на пополнения и обналичивания устанавливаются в соотношении с лицензионными условиями и собственными политиками риск-менеджмента.
Опытные гемблеры указывают анализировать статус авторизации через регуляторные реестры гемблинг ведомств. Репутационные параметры содержат места на отраслевых сервисах и оценки настоящих участников.
Надёжные провайдеры развлекательных предложений дают игрокам шанс к качественному гэмблингу через тематические сайты, включая Mellstroy Game casino , которые точно исполняют общепринятые стандарты security.
Схема активации necessita указания валидационных информации через encrypted SSL-каналы. Администрация demanded официальное verification совершеннолетия и локации нахождения для соблюдения правовых правил.
Многоуровневая проверка выступает required элементом актуальных solutions конфиденциальности. Клиенты приобретают SMS-шифры, push-notification или используют профессиональные программы наподобие Google Authenticator.
Дублирующие порталы ликвидируют препятствия региональных запретов и DDoS-атак. Технически дубли являют копийные реплики базового ресурса с удержанием features и личных информации.
Экспертные участники рекомендуют поддерживать свежие реестры действующих дублей в сохранённых ссылках browser. Операторы рассылают новости о актуальных адресах через email, Telegram-чаты и телефонные приложения.
Платёжные переводы через официальные сайты обеспечены шифровальными алгоритмами категории банковского индустрии. Получение денег производится исключительно на проверенные карты держателя аккаунта.
Hi, after reading this remarkable article i am too happy to share
my experience here with colleagues.
Look into my blog post – realtor in Chino Hills CA
Новейшие геймеры сталкиваются с препятствием соединения к лицензированным порталам. Провайдеры ограничивают главные порталы, но профессиональные JVSpin казино посетители учитывают о существовании зеркальных порталов.
Дополнительный домен формирует полную копию первичного портала. Криптографические алгоритмы работают равнозначными. Платёжные действия осуществляются через аналогичные системы.
Схема открытия счёта через резервный ссылку подразумевает обычной верификации. Менеджеры просят удостоверения для осуществления KYC-требований. Паспортные данные подвергаются комплексную проверку.
Пополнительные лимиты на альтернативных ресурсах равняются базовым параметрам. Наименьшие ставки поддерживаются константными. Прогрессивные джекпоты синхронизируются между множественными ресурсами.
Поощрительные системы выполняются всесторонне на резервных порталах. Отыгрышный коэффициент сохраняет стартовые цифры. Срок активности оборота продолжается.
Отдел ассистирования рассматривает запросы с альтернативных доменов идентично. Онлайн разговор поддерживает 24-часовой расписание оперирования.
Официальные операторы развлекательных предложений oferuja клиентам доступ к профессиональному гэмблингу через специализированные платформы, включая Mellstroy Game казино , которые точно соблюдают глобальные нормы защиты.
Схема открытия счёта подразумевает заполнения проверочных сведений через шифрованные SSL-линии. Менеджмент просят official verification age verification и адреса проживания для compliance legal стандартов.
Двухэтапная проверка выступает необходимым элементом передовых архитектур защиты. Участники обретают SMS-токены, push-сообщения или эксплуатируют профессиональные программы наподобие Google Authenticator.
Mirror ссылки устраняют сложности локальных блокировок и DDoS-нападений. Фактически копии являют аналогичные копии основного домена с обеспечением функциональности и индивидуальных информации.
Профессиональные пользователи suggest поддерживать current перечни активных зеркал в избранном веб-клиента. Операторы отправляют обновления о новых ссылках через e-mail, Telegram-группы и мобильные приложения.
Payment транзакции через legal порталы secured encryption протоколами уровня банковского сектора. Снятие фондов осуществляется единственно на подтверждённые реквизиты хозяина аккаунта.
Поиск безопасного игрового ресурса в нынешних обстоятельствах требует повышенного подхода к законному уровню. Квалифицированные геймеры осознают, что Клубника казино предоставляет современную данные о действующих ресурсах.
Алгоритм оформления профиля в проверенных заведениях объединяет требуемую валидацию личности. KYC-процедуры обеспечивают как оператора, так и клиента от фрода. Кратковременные пределы на перечисление активов до закрытия верификации – привычная подход.
Виртуальные барьеры на соединение к гемблинг площадкам преодолеваются через параллельные адреса. Активные копии предоставляют абсолютную возможности первичного портала. Расчетные движения, интерактивный достижения и наградные схемы сохраняются неизменными.
Капитальная надежность выражается степенью используемых банковских методов. SSL-безопасность, PCI DSS сертификация и двухфакторная аутентификация создают стабильный заслон охраны.
Игровая каталог официальных операторов предоставляет барабаны от известных создателей. RTP-показатели, вариативность и статистические схемы получают объективную аудит в признанных институтах.
Механизмы поощрения в качественных операторах основываются на прозрачных требованиях активности. Вейджер x35-40 расценивается адекватным для спин-льгот, в то время как традиционные состязания засчитываются в подсчет с сниженным показателем.
Нынешние участники пересекаются с огромным количеством программных аспектов при работе с лицензированными порталами. Профессиональные сайты типа Вавада зеркало предоставляют свежую данные о операциях гэмблинговых организаций.
Механизм валидации учетной записи подразумевает ряд неотъемлемых уровней. Стартовая верификация включает размещения справок удостоверяющих гражданство. Привычный пакет подразумевает паспорт, автоудостоверение или заграничное удостоверение.
Системная элемент открытия счета включает эксплуатацию SSL-шифрования и 2FA. Продвинутые геймеры рекомендуют активировать максимум имеющихся параметров секьюрити.
Запасные домены формируют идентичные отражения главного платформы с сохранением полного функционала. Ключевое выгода выражается в тождественности финансовых лимитов и критериев вейджера.
Система выявления актуальных запасных доменов базируется на проверке экспертных телеграм-каналов и партнерских ресурсов. Профессиональные участники применяют анонимайзеры для формирования постоянного подключения независимо от локальных барьеров.
The cave scenes between Katniss and Peeta are where the romance – and the strategy – truly develop. They share intimate moments while the world watches. It is a performance for survival, but real feelings emerge. The ambiguity is the best part. To decide for yourself what is real, read the book. A The Hunger Games pdf is perfect for reading these quiet, character-driven moments that contrast with the loud action of the rest of the arena. https://thehungergamespdf.ru/ Mockingjay The Final Book Of The Hunger Games Pdf
Лицензионные ресурсы игорных предложений гарантируют клиентам право к элитному гэмблингу через специализированные платформы, включая п»ї1хбет официальный сайт , которые специально выполняют transnational требования защиты.
Механизм создания аккаунта включает ввода валидационных информации через encrypted SSL-соединения. Администрация требуют официальное доказательство age verification и региона нахождения для compliance legal норм.
2FA аутентификация является принудительным частью современных solutions конфиденциальности. Участники обретают SMS-ключи, push-сообщения или применяют профессиональные tools по типу Google Authenticator.
Дублирующие ссылки нейтрализуют препятствия региональных санкций и DDoS-assault. Фактически зеркала составляют идентичные реплики primary сайта с сохранением возможностей и личных деталей.
Skilled участники рекомендуют сохранять свежие базы working mirrors в закладках обозревателя. Администрация доставляют updates о современных URL через e-mail, Telegram-communities и портативные приложения.
Финансовые транзакции через legal сайты secured cryptographic methods level банковского segment. Extraction фондов реализуется solely на верифицированные счета собственника account.
Азартная сфера являет быстрый развитие, привлекая легионы игроков. Грамотные ресурсы гарантируют безопасную среду для пари. Детальную материалы о подобных компаниях можно найти на Вавада регистрация .
Аккредитация выступает центральным показателем определения платформы. Регуляторы Великобритании дают тщательный мониторинг валютных операций. Каждая лицензированная портал проходит постоянные ревизии RNG-алгоритмов.
Цифровые характеристики новейших азартных площадок охватывают SSL-защиту банковского стандарта. Производители софтового продукта вроде Microgaming, NetEnt, Pragmatic Play интегрируют сложные схемы произвольных параметров.
Схема валидации профиля включает передачи удостоверений KYC-типа. ID, справка о финансах, доказательство прописки — типичный список для завершённого входа.
Резервные ссылки ликвидируют трудности с блокировками компаний. Актуальные альтернативы модифицируются постоянно цифровыми командами. Портативные программы часто действуют качественнее сетевых версий.
Финансовая дисциплина устанавливает длительную доходность гемблинговых раундов. Опытные пользователи настаивают урезать количество депозита до 1-2% от суммарного бюджета.
Новейшие платформы беттинг активностей гарантируют клиентам доступ к высококлассному гемблингу через сертифицированные [url=https://begreen.world/registratsiya-v-onlaynkazino-suka-kak-nachat-igrat-seychas/]казино РЎСѓРєР°[/url] ресурсы. Официальная бизнес влечет исполнения определенных контролирующих норм.
Процесс создания персонального кабинета охватывает аутентификацию персональных информации. Регуляторы эксплуатируют многоуровневые процедуры KYC и AML для недопущения поддельных операций.
Электронные системы передовых казино строятся на защищенных облачных системах с TLS сертификатами. Локальные запреты принуждает операторов внедрять дублирующие адреса.
Зеркальные порталы являют собой аналогичные репликации центрального ресурса с поддержанием всех возможностей и информации. Беттеры достигают постоянный вход к депозиту, развлекательной истории и личным настройкам.
Расчетные процедуры осуществляются через интегрированные платежные процессоры. Границы на депозиты и изъятия фиксируются в унисон с лицензионными критериями и организационными нормами риск-менеджмента.
Профессиональные беттеры настаивают отслеживать ситуацию сертификата через официальные регистры гемблинг структур. Престижные показатели предусматривают позиции на специализированных сервисах и мнения настоящих участников.
Передовые бетторы встречаются с затруднением входа к легальным площадкам. Провайдеры блокируют базовые URL, но опытные казино типпи игроки осознают о присутствии резервных порталов.
Резервная ссылка формирует идентичную дубликат оригинального портала. Средства защиты функционируют такими же. Банковские переводы осуществляются через идентичные каналы.
Технология открытия счёта через резервный портал требует стандартной подтверждения. Операторы уточняют документы для исполнения KYC-правил. Персональные параметры выполняют усиленную подтверждение.
Финансовые рамки на резервных платформах соответствуют главным характеристикам. Начальные беты продолжают постоянными. Накопительные банки интегрируются между множественными адресами.
Стимулирующие планы работают всесторонне на резервных платформах. Требования по обороту гарантирует первоначальные цифры. Период действия использования сохраняется.
Сервис ассистирования изучает тикеты с дополнительных ресурсов аналогично. Онлайн диалог поддерживает постоянный режим обслуживания.
Надёжные провайдеры азартных возможностей предоставляют геймерам вариант к премиальному игровому процессу через специализированные платформы, включая Вавада регистрация , которые именно придерживаются международные регламенты security.
Алгоритм оформления профиля necessita заполнения идентификационных деталей через защищённые SSL-соединения. Администрация просят документальное доказательство дееспособности и территории проживания для исполнения legal правил.
Multi-factor проверка выступает принудительным aspect актуальных solutions конфиденциальности. Клиенты приобретают SMS-шифры, push-уведомления или применяют профессиональные приложения типа Google Authenticator.
Резервные ссылки преодолевают сложности географических барьеров и DDoS-воздействий. По сути дубли составляют дублированные dublicates базового сайта с maintaining возможностей и личных информации.
Опытные геймеры рекомендуют поддерживать обновлённые каталоги working альтернатив в favourites веб-клиента. Операторы направляют сведения о актуальных URL через почтовые сервисы, Telegram-сообщества и мобильные приложения.
Банковские переводы через официальные сайты защищены cryptographic технологиями стандарта банковского области. Изъятие фондов выполняется исключительно на аутентифицированные карты хозяина account.
Актуальные зеркала лицензированных казино на Меллстрой зеркало обеспечивают непрерывный вход к игровым ресурсам. Технология клонирования создает точные реплики основного домена с консервацией всех механизмов.
Механизм оформления профиля через зеркало в точности дублирует стандартную форму. Начинающие пользователи прописывают действующий email, генерируют защищенный пароль и фиксируют основную платежное средство.
Валидация профиля подразумевает загрузки свидетельств согласно KYC-регламенту. Изображение паспорта, доказательство проживания и банковские параметры подвергаются программную проверку в течение 24-72 часа.
Вход активных участников производится через стандартную форму с расширенной идентификацией. Сессионные пароли передаются на телефонный гаджет или электронную почту.
Опции входящего компонента через mirror-сайты поддерживает распространенные платежные платформы. Visa, Mastercard, веб кошельки Skrill, Neteller, цифровые активы Bitcoin, Ethereum реализуются с низкими сборами 0-3%.
Гемблинг библиотека повторяется в точности включая автоматы, столовые геймплей, live-хостов и мегавыигрыши. RTP-значения, колебания и проигрыш удерживаются идентичными.
Подарочная система действует идентично основному ресурсу. Welcome-пакеты, фриспины, компенсация и VIP-схемы запускаются программно при достижении установленных условий.
Excellent pieces. Keep writing such kind of info on your
blog. Im really impressed by your site.
Hi there, You’ve done an excellent job. I will definitely digg it
and personally suggest to my friends. I am
confident they’ll be benefited from this website.
Feel free to visit my homepage – best realtor in Joliet IL
honey shopping spot – Discovered this store, details are clear and easy to read.
What impressed me about this casino https://bhagavathamvillage.com/greatest-online-casinos-united-states-of-america-2025-real-money-bonuses-the-newest-internet-sites/ is the variety of the games. Everything runs smoothly, the design is clean, and there’s plenty of options to explore, which keeps it engaging.
When someone writes an article he/she maintains the image of a user in his/her brain that how a
user can know it. Thus that’s why this piece of writing is amazing.
Thanks!
My web site real estate agent Santa Fe NM
Shop elegance – Beautifully presented products with hassle-free navigation.
medication canadian pharmacy: cheapest pharmacy for prescriptions without insurance – pharmacy coupons
Рабочие дублирующие порталы легальных азартных клубов на п»ї1xBet casino предоставляют непрерывный вход к азартным платформам. Технология копирования образует точные клоны корневого домена с фиксацией всех функций.
Процедура создания аккаунта через альтернативный домен в точности копирует стандартную форму. Дебютные пользователи вводят валидный email, генерируют безопасный ключ и определяют операционную денежную единицу.
Подтверждение учетной записи требует передачи справок следуя KYC-стандартам. Снимок паспорта, подтверждение места жительства и денежные координаты проверяются через программную анализ в течение 24-72 ч.
Логин действующих участников производится через стандартную окно с расширенной верификацией. Сессионные шифры доставляются на мессенджер устройство или email.
Механизмы депозитного сектора через зеркала обеспечивает популярные расчетные системы. Visa, Mastercard, электронные портмоне Skrill, Neteller, виртуальные монеты Bitcoin, Ethereum выполняются с уменьшенными взносами 0-3%.
Игровая коллекция воспроизводится на сто процентов включая автоматы, столовые развлечения, live-ведущих и прогрессивы. RTP-показатели, дисперсия и вейджер остаются неизменными.
Поощрительная схема работает схоже корневому сайту. Welcome-комплекты, фриспины, refund и VIP-системы включаются алгоритмически при исполнении прописанных требований.
Официальные провайдеры гэмблинг опций дают клиентам доступ к высококлассному игровому процессу через специализированные платформы, включая п»ї1хбет официальный сайт , которые точно соблюдают глобальные стандарты безопасности.
Последовательность оформления профиля включает указания валидационных деталей через безопасные SSL-каналы. Администрация просят письменное удостоверение правоспособности и локации residence для compliance legal норм.
Двухэтапная верификация представляет обязательным составляющей новейших архитектур защиты. Users приобретают SMS-коды, push-сообщения или внедряют специальные программы типа Google Authenticator.
Альтернативные порталы преодолевают вопросы geographic барьеров и DDoS-нападений. Техническим образом зеркала представляют идентичные dublicates базового портала с удержанием features и пользовательских информации.
Профессиональные клиенты призывают keeping свежие базы working копий в сохранённых ссылках веб-клиента. Management направляют updates о fresh URL через email, Telegram-чаты и смартфонные программы.
Платёжные транзакции через надёжные платформы гарантированы защитными технологиями level банковского индустрии. Получение денег выполняется исключительно на проверенные счета владельца аккаунта.
Отбор безопасного betting оператора в сегодняшних границах заставляет тщательного анализа к юридическому положению. Знающие пользователи учитывают, что ретро казино отображает актуальную факты о действующих провайдерах.
Механизм оформления профиля в официальных сервисах включает обязательную проверку удостоверения. KYC-нормы охраняют как заведение, так и игрока от махинаций. Временные ограничения на снятие денег до финализации подтверждения – обычная практика.
Электронные запреты на вход к развлекательным ресурсам нейтрализуются через дублирующие ссылки. Функционирующие дубликаты сохраняют полную возможности центрального сайта. Платежные операции, игровой продвижение и поощрительные системы поддерживаются устойчивыми.
Капитальная защищенность выражается уровнем эксплуатируемых банковских методов. SSL-криптография, PCI DSS лицензирование и двухфакторная аутентификация устанавливают защищенный периметр защиты.
Интерактивная библиотека проверенных площадок предоставляет барабаны от главных производителей. RTP-индексы, колебания и вероятностные модели претерпевают внешнюю валидацию в авторизованных центрах.
Программы вознаграждения в достойных казино формируются на ясных критериях отыгрыша. Отыгрыш x35-40 считается справедливым для машина-льгот, в то время как настольные игры включаются в расчет с сниженным коэффициентом.
Новейшие геймеры сталкиваются с проблемой соединения к легальным площадкам. Провайдеры блокируют первичные адреса, но знающие лаки Р±РёСЂ пользователи учитывают о доступности альтернативных платформ.
Дополнительный домен представляет идентичную реплику основного платформы. Протоколы шифрования функционируют неизменными. Денежные переводы реализуются через сходные системы.
Методика оформления профиля через альтернативный портал требует привычной валидации. Специалисты выясняют свидетельства для исполнения KYC-стандартов. Паспортные данные реализуют двухфакторную проверку.
Пополнительные лимиты на резервных платформах соответствуют стандартным условиям. Начальные вклады продолжают фиксированными. Растущие призовые фонды координируются между разными ресурсами.
Поощрительные системы функционируют всесторонне на альтернативных платформах. Коэффициент оборота гарантирует оригинальные показатели. Период действия оборота поддерживается.
Сервис поддержки обрабатывает вопросы с дополнительных адресов сходным образом. Интерактивный диалог поддерживает круглосуточный график обслуживания.
What’s up every one, here every person is sharing these kinds of know-how,
so it’s fastidious to read this website, and I used to
visit this web site everyday.
Hello there! I simply want to give you a big thumbs
up for the great info you have right here on this post.
I’ll be coming back to your website for more soon.
my blog post: realtor in Joliet IL
learn more here – Site structure is tidy and finding details is effortless.
Отбор проверенного гемблинг заведения в текущих границах подразумевает особого рассмотрения к правовому состоянию. Компетентные геймеры знают, что казино Vavada содержит свежую факты о работающих провайдерах.
Процедура регистрации в легальных площадках содержит необходимую аутентификацию личности. KYC-стандарты обеспечивают как сервис, так и игрока от мошенничества. Промежуточные ограничения на получение активов до окончания верификации – стандартная процедура.
Цифровые препятствия на подключение к гемблинг порталам устраняются через параллельные URL. Рабочие зеркала предоставляют полную функциональность главного портала. Расчетные процедуры, развлекательный достижения и поощрительные планы поддерживаются неизменными.
Финансовая надежность измеряется показателем задействованных денежных механизмов. SSL-шифрование, PCI DSS сертификация и дополнительная верификация устанавливают прочный заслон ограждения.
Интерактивная коллекция проверенных площадок предоставляет спины от топовых разработчиков. RTP-значения, вариативность и вероятностные формулы претерпевают объективную сертификацию в авторизованных институтах.
Схемы стимулирования в достойных казино формируются на ясных правилах активности. Требования x35-40 считается адекватным для слот-поощрений, в то время как классические развлечения засчитываются в счет с пониженным процентом.
Передовые платформы гемблинг продуктов дают беттерам вход к элитному гемблингу через защищенные Меллстрой сайт порталы. Официальная деятельность нуждается следования четких регуляторных положений.
Алгоритм создания клиентского аккаунта задействует верификацию персональных реквизитов. Операторы применяют детализированные алгоритмы KYC и AML для недопущения незаконных финансовых действий.
IT решения инновационных игорных домов строятся на безопасных хостингах с шифровальными алгоритмами. Локальные запреты обязывает управляющих организовывать параллельные ссылки.
Дублирующие сайты составляют эквивалентные дубликаты базового платформы с сохранением всех опций и сведений. Пользователи обеспечивают себе стабильный связь к счету, беттинг данным и персональным настройкам.
Финансовые операции реализуются через подключенные финансовые процессоры. Ограничения на депозиты и обналичивания регулируются в унисон с правовыми условиями и корпоративными правилами контроля угроз.
Компетентные гемблеры настаивают мониторить статус разрешения через надзорные каталоги игорных организаций. Авторитетные показатели задействуют рейтинги на специализированных сайтах и отзывы подлинных участников.
It’s very trouble-free to find out any matter on web as compared to textbooks,
as I found this post at this website.
My web-site real estate agent Franklin TN
Современные участники натыкаются с препятствием соединения к лицензированным ресурсам. Поставщики закрывают первичные домены, но грамотные tip top РІС…РѕРґ посетители понимают о доступности резервных площадок.
Дополнительный домен составляет абсолютную реплику базового площадки. Средства защиты остаются идентичными. Финансовые операции производятся через те же системы.
Процедура открытия счёта через дополнительный домен содержит стандартной верификации. Сотрудники просят справки для осуществления KYC-норм. Индивидуальные данные подвергаются комплексную подтверждение.
Вносительные лимиты на резервных ресурсах соответствуют главным условиям. Начальные беты функционируют постоянными. Накопительные банки координируются между многочисленными ресурсами.
Бонусные механизмы функционируют завершённо на параллельных площадках. Вейджер сохраняет оригинальные величины. Временные рамки отыгрыша сохраняется.
Команда поддержки рассматривает обращения с зеркальных ссылок таким же способом. Онлайн диалог обеспечивает круглосуточный порядок работы.
Lunivora Finds – Smooth navigation, products look engaging and pages load fast.
aviator мостбет aviator мостбет
Развлекательная индустрия демонстрирует динамичный прогресс, завлекая легионы участников. Экспертные порталы обеспечивают качественную обстановку для беттинга. Полную материалы о этих брендах реально обнаружить на винити казино .
Лицензирование представляет ключевым показателем селекции сайта. Надзорные органы Олдерни предоставляют строгий контроль финансовых манипуляций. Каждая лицензированная ресурс осуществляет периодические инспекции RNG-алгоритмов.
Технические особенности актуальных азартных площадок включают SSL-кодирование экономического класса. Разработчики софтового материала типа Microgaming, NetEnt, Pragmatic Play внедряют продвинутые модели непредсказуемых значений.
Механизм подтверждения аккаунта предполагает подачи справок KYC-класса. Документ, выписка о доходах, подтверждение местожительства — классический перечень для завершённого активации.
Резервные URL устраняют сложности с фильтрацией операторов. Свежие варианты модифицируются каждый день IT группами. Планшетные утилиты часто выполняются качественнее веб версий.
Банкролл-менеджмент определяет перспективную успешность гемблинговых периодов. Опытные геймеры настаивают ограничивать объём вейджера до 1-2% от итогового банкролла.
Беттинговая ниша являет интенсивный расширение, манящая множество пользователей. Профессиональные ресурсы предлагают качественную пространство для пари. Исчерпывающую факты о данных организациях возможно получить на казино 1хбет .
Сертификация является основным фактором селекции сайта. Контролёры Великобритании предоставляют жёсткий надзор денежных транзакций. Конкретная официальная ресурс проходит систематические инспекции RNG-систем.
Цифровые характеристики новейших беттинг-платформ охватывают SSL-защиту экономического стандарта. Провайдеры виртуального ПО типа Microgaming, NetEnt, Pragmatic Play встраивают сложные механизмы случайных параметров.
Механизм аутентификации учётной записи предусматривает представления свидетельств KYC-типа. Свидетельство, выписка о средствах, доказательство регистрации — обычный перечень для завершённого подключения.
Дублирующие ссылки ликвидируют сложности с запретами организаций. Функционирующие дубли обновляются ежедневно цифровыми специалистами. Смартфонные утилиты обычно функционируют стабильнее веб редакций.
Распределение капитала определяет долгосрочную эффективность игровых раундов. Экспертные игроки рекомендуют лимитировать количество депозита до 1-2% от полного банкролла.
Передовые гемблеры натыкаются с препятствием входа к сертифицированным порталам. Поставщики закрывают главные URL, но знающие Vavada зеркало игроки осознают о доступности параллельных платформ.
Резервная ссылка образует полную дубликат главного платформы. Средства защиты сохраняются равнозначными. Банковские действия осуществляются через сходные сервисы.
Методика создания аккаунта через зеркальный ссылку подразумевает привычной подтверждения. Сотрудники просят бумаги для соблюдения KYC-требований. Паспортные характеристики подвергаются многоуровневую проверку.
Банковские рамки на зеркальных порталах идентичны главным характеристикам. Начальные ставки поддерживаются фиксированными. Увеличивающиеся джекпоты объединяются между всеми ресурсами.
Поощрительные схемы работают целостно на дополнительных порталах. Вейджер гарантирует исходные показатели. Длительность проигрывания не изменяется.
Команда обслуживания изучает вопросы с параллельных доменов идентично. Онлайн общение поддерживает беспрерывный формат оперирования.
US Meds Outlet: global pharmacy canada – US Meds Outlet
Great post! We are linking to this great article
on our website. Keep up the good writing.
Here is my web page realtor in Alberta Canada
Rutor — известный сервис с богатым прошлым, предоставляющий анонимный доступ и безопасность транзакций в пределах сети Rutor.Rutor: Один из ключевых проектов русскоязычного даркнета
rutur info — это один из первых и известнейших русскоязычных ресурсов даркнета, неразрывно связанный с анонимной онлайн-экосистемой. Этот магазин ориентирован на предоставление пользователям широкой базы данных, связанной с файлами, софтом, новостями и различными видами контента, включая темы, касающиеся взлома и безопасности.
Особенности работы системы Rutor
Механизм работы ресурса позволяет пользователям получать доступ к большим массивам данных и файлов, при этом обеспечивая максимальную приватность и анонимность. Главное преимущество платформы — интеграция с сетью Rutor, что значительно уменьшает вероятность раскрытия личности и потери конфиденциальной информации. С течением времени площадка превратилась в важный архив событий и истории русскоязычного даркнета.
Rutor поддерживает стабильную работу, позволяя и новичкам, и опытным пользователям использовать предоставляемые сервисы. Архитектура ресурса предусматривает, что любые разделы — магазин, новостной блок или гайды по взлому — являются составляющими единой системы, где превалируют безопасность и анонимность.
Будущее платформы: вызовы и обещания
Нет сомнений, что в дальнейшем Rutor столкнётся с новыми угрозами, инновационными способами охраны приватности и методами преодоления блокировок. Пользователи обязаны понимать, что ни одна анонимная платформа не может дать абсолютную защиту.
Этот сервис по-прежнему служит площадкой для информирования, обсуждений безопасности и отслеживания новшеств в даркнет-сообществе. Улучшение технологий, увеличение аудитории и внедрение инноваций способствуют статусу Rutor как центрального элемента русскоязычного онлайн-сообщества.
– Сохранение анонимности
– Безопасность транзакций
– Открытый доступ к специализированному контенту
– Защищённость коммуникаций
Уникальный путь Rutor делает платформу значимой для тех, кто высоко ценит свободу, личную приватность и защиту от внешнего контроля в цифровую эпоху.
Falling rules are expanded to include rates of falling and flying creatures. Xanathar’s Guide to Everything prevents the “peasant railgun” physics by standardizing how gravity works. DMs looking for a PDF on falling damage caps and momentum will find our physics engine breakdown helpful. We ensure you know exactly what happens when a dragon is knocked prone mid-flight. Bring consistency to your aerial battles with the updated movement rules found in this guide. https://xanatharsguidetoeverythingpdf.ru/ Xanathar’s Guide To Everything Pdf Purchase
Рабочие резервные адреса проверенных казино на Вавада официальный сайт предоставляют непрерывный доступ к азартным ресурсам. Система зеркалирования генерирует аналогичные версии базового сайта с фиксацией всех инструментов.
Механизм регистрации через дублирующий портал целиком дублирует стандартную анкету. Новые геймеры вводят действующий email, создают сложный секретную комбинацию и выбирают игровую платежное средство.
Верификация аккаунта предполагает загрузки справок опираясь на KYC-нормам. Фото национального документа, доказательство резиденции и денежные сведения контролируются системой автоматическую контроль в течение 24-72 периодов.
Логин активных пользователей выполняется через базовую форму с двухфакторной верификацией. Разовые токены отправляются на телефонный номер или почтовый ящик.
Механизмы денежного раздела через резервные ссылки поддерживает актуальные расчетные платформы. Visa, Mastercard, электронные счета Skrill, Neteller, криптовалюты Bitcoin, Ethereum процессируются с оптимизированными процентами 0-3%.
Гемблинг библиотека повторяется полностью включая машины, настольные геймплей, live-операторов и максимальные награды. RTP-индикаторы, дисперсия и проигрыш остаются аналогичными.
Подарочная механизм функционирует похоже основному веб-площадке. Welcome-бандлы, даровые прокруты, возврат средств и VIP-планы запускаются программно при достижении определенных стандартов.
Гемблинговая индустрия демонстрирует динамичный рост, притягивая миллионы участников. Грамотные платформы дают надёжную пространство для беттинга. Подробную факты о данных операторах можно найти на казино Меллстрой .
Аккредитация выступает главным фактором селекции площадки. Юрисдикции Кюрасао предоставляют жёсткий проверку валютных процедур. Конкретная аккредитованная портал осуществляет регулярные ревизии RNG-механизмов.
Компьютерные характеристики современных гемблинг-сайтов включают SSL-криптографию расчётного класса. Разработчики компьютерного ПО уровня Microgaming, NetEnt, Pragmatic Play встраивают комплексные алгоритмы хаотичных величин.
Алгоритм аутентификации профиля включает предоставления удостоверений KYC-формата. Удостоверение, подтверждение о заработке, доказательство проживания — обычный список для полноценного активации.
Зеркальные ссылки исправляют сложности с ограничениями компаний. Свежие копии корректируются систематически программными службами. Карманные клиенты часто работают устойчивее веб форматов.
Финансовая дисциплина устанавливает перспективную эффективность беттинговых циклов. Опытные игроки рекомендуют ограничивать величину бета до 1-2% от общего капитала.
click reference cpn buy
Официальные провайдеры гэмблинг сервисов oferuja клиентам право к элитному развлечениям через тематические порталы, включая казино Голд , что исполняют мировые нормы безопасности.
Алгоритм создания аккаунта требует ввода идентификационных информации через безопасные SSL-connection. Провайдеры просят предоставить official подтверждение правоспособности и места жительства для соблюдения legal критериев.
Многоуровневая идентификация считается mandatory элементом современных систем security. Участники располагают SMS-ключи, push-алерты или эксплуатируют профессиональные программы вроде Google Authenticator.
Дублирующие URL устраняют проблемы локальных санкций и DDoS-атак. По сути зеркала представляют тождественные клоны базового портала с поддержанием функциональности и user информации.
Экспертные клиенты советуют сохранять новейшие перечни функционирующих дублей в закладках обозревателя. Management передают новости о новых порталах через электронную почту, Telegram-communities и смартфонные приложения.
Payment транзакции через официальные сайты покрыты защитными протоколами стандарта банковского индустрии. Вывод средств выполняется лишь на проверенные реквизиты владельца учётной записи.
calmcrest.shop – The serene vibe of this site pairs perfectly with its lovely product range.
Выбор безопасного азартного ресурса нуждается глубокого анализа официальных сертификатов. Инновационные ресурсы лаки Р±РёСЂ казино предоставляют игрокам абсолютную детали о имеющихся аккредитациях.
Система получения доступа подразумевает несколько требуемых шагов верификации. Администраторы запрашивают бумаги, доказывающие самобытность и возраст. Типовой KYC-процесс составляет от 24 до 72 интервалов.
Управление банком начинается с назначения пределов на пополнения. Опытные участники советуют эксплуатировать установку 5% от полного гемблинг фонда на одну игру.
Системные запреты операторов побуждают внедрять резервные ссылки. Клоны оберегают полную эффективность базового площадки, охватывая журнал переводов и казино успех.
Новые финансовые способы гарантируют скоростные вклады через блокчейн портмоне. Bitcoin, Ethereum и стабильные валюты обеспечивают приватность и крошечные взносы. Продолжительность обработки изъятий составляет 10-30 отрезков.
Программы преданности подразумевают многоуровневые уровни с возрастающим компенсацией. VIP-координаторы предоставляют эксклюзивные вознаграждения, улучшенные ограничения и приоритетную поддержку.
Лицензионные провайдеры развлекательных возможностей предоставляют клиентам доступ к качественному азартному досугу через целевые сайты, включая казино Lucky Bear , которые точно выполняют transnational регламенты безопасности.
Алгоритм открытия счёта включает ввода проверочных деталей через защищённые SSL-connection. Менеджмент просят официальное доказательство правоспособности и локации residence для выполнения legal стандартов.
Multi-factor authentication выступает обязательным элементом современных архитектур надёжности. Участники располагают SMS-ключи, push-notification или используют dedicated софт типа Google Authenticator.
Дублирующие домены устраняют трудности географических запретов и DDoS-штурмов. Фактически зеркала являют дублированные реплики главного ресурса с удержанием features и клиентских сведений.
Компетентные игроки призывают поддерживать current каталоги активных альтернатив в закладках браузера. Администрация направляют обновления о современных ссылках через e-mail, Telegram-группы и мобильные софт.
Банковские процедуры через официальные сайты обеспечены шифровальными технологиями категории банковского направления. Изъятие финансов осуществляется лишь на аутентифицированные карты владельца учётной записи.
Современные игроки встречаются с сложностью подключения к проверенным ресурсам. Операторы запрещают базовые порталы, но искушённые п»ї1xBet зеркало посетители понимают о наличии альтернативных ресурсов.
Резервная ссылка представляет абсолютную копию основного ресурса. SSL-сертификаты работают идентичными. Финансовые процедуры производятся через идентичные системы.
Процедура открытия счёта через дополнительный портал включает обычной аутентификации. Специалисты запрашивают бумаги для реализации KYC-правил. Паспортные информация проходят многоуровневую проверку.
Депозитные лимиты на зеркальных сайтах идентичны стандартным характеристикам. Минимальные беты поддерживаются константными. Растущие джекпоты интегрируются между различными доменами.
Поощрительные схемы работают комплексно на резервных сайтах. Коэффициент оборота гарантирует базовые величины. Период действия отыгрыша остаётся прежним.
Отдел ассистирования изучает обращения с резервных ссылок сходным образом. Прямой чат предоставляет 24-часовой порядок оперирования.
Kovelune Trends – Modern visuals, site layout is clear and feels well-planned.
buy medication online usa
Ориентирование в области легальных сайтов нуждается владения продвинутых решений доступа. Профессиональные участники внедряют п»ї1xBet казино для приобретения свежей сведений о активных ссылках.
Процедура создания счета в сертифицированных компаниях охватывает сложную подтверждение. Продвинутые операторы внедряют KYC-протоколы и AML-стандарты. Документальная процедура требует от 24 до 72 временных отрезков.
Цифровые инструменты для минования блокировок улучшаются параллельно с ужесточением нормативных инициатив. VPN-сервисы категории premium гарантируют шифрование AES-256 и протоколы OpenVPN. Постоянство коннекта критически существенна для VIP раундов.
Запасные сайты оперируют через географически распределенные компьютерные системы. CDN-сети гарантируют быструю время ответа для американских геймеров. Системное переключение инициируется при обнаружении недоступности главного адреса.
Платежные манипуляции в проверенных регионах отвечают определенным правилам PCI DSS. Крипто расчеты приобретают востребованность вследствие конфиденциальности и быстроте обработки.
Портативные софт ведущих операторов объединяют отпечатковую идентификацию и push-сообщения для существенных моментов. Модифицируемый дизайн независимо изменяется под настройки монитора.
http://indogenericexport.com/# best online pharmacy india
Современные платформы гемблинг продуктов гарантируют клиентам путь к высококлассному гемблингу через надежные РјСЌРґ казино ресурсы. Авторизованная деятельность подразумевает учета четких правовых требований.
Процесс открытия персонального учетной записи охватывает валидацию персональных данных. Регуляторы используют расширенные процедуры KYC и AML для исключения фродовых операций.
Программные платформы новейших беттинг площадок строятся на безопасных облачных системах с TLS алгоритмами. Геоблокировка побуждает администраторов организовывать альтернативные порталы.
Альтернативные ресурсы представляют полные репликации первичного ресурса с удержанием всех опций и информации. Игроки приобретают непрерывный подключение к счету, азартной данным и клиентским параметрам.
Денежные действия производятся через связанные денежные процессоры. Ограничения на депозиты и получения устанавливаются в соотношении с законодательными положениями и организационными политиками риск-менеджмента.
Профессиональные игроки указывают мониторить условия авторизации через надзорные регистры беттинг структур. Репутационные параметры содержат оценки на тематических порталах и комментарии настоящих пользователей.
Подбор честного игорного портала подразумевает глубокого разбора юридических разрешений. Новые платформы Вавада РІС…РѕРґ предлагают пользователям полную факты о собственных допусках.
Система получения доступа подразумевает различные ключевых шагов подтверждения. Операторы просят удостоверения, засвидетельствующие индивидуальность и правоспособность. Типовой KYC-порядок длится от 24 до 72 периодов.
Распоряжение капиталом инициируется с задания пределов на депозиты. Искусные игроки рекомендуют внедрять правило 5% от полного гемблинг фонда на индивидуальную сессию.
Программные блокировки провайдеров побуждают эксплуатировать альтернативные ссылки. Дубликаты поддерживают полную активность центрального портала, предусматривая летопись транзакций и казино результаты.
Современные платежные методы поддерживают скоростные взносы через криптовалютные кошельки. Bitcoin, Ethereum и стабильные валюты дают тайность и минимальные сборы. Длительность выполнения извлечений доходит 10-30 отрезков.
Программы лояльности содержат каскадные ранги с прогрессивным компенсацией. VIP-консультанты гарантируют индивидуальные вознаграждения, усиленные пределы и первоочередную обслуживание.
Определение безопасного гемблинг заведения в нынешних рамках нуждается особого подхода к регулятивному положению. Компетентные клиенты знают, что retro казино включает последнюю сведения о действующих провайдерах.
Алгоритм оформления профиля в лицензированных платформах включает неизбежную подтверждение документов. KYC-процедуры охраняют как оператора, так и пользователя от обмана. Переходные ограничения на получение средств до окончания валидации – привычная система.
Технические ограничения на связь к азартным площадкам решаются через резервные порталы. Действующие клоны сохраняют всестороннюю работоспособность базового портала. Расчетные процедуры, развлекательный статистика и бонусные предложения поддерживаются устойчивыми.
Материальная гарантированность оценивается показателем эксплуатируемых банковских способов. SSL-криптография, PCI DSS валидация и усиленная аутентификация обеспечивают надежный контур обороны.
Азартная ассортимент официальных операторов объединяет машины от известных студий. RTP-значения, изменчивость и вероятностные принципы подвергаются нейтральную валидацию в одобренных институтах.
Системы мотивации в профессиональных заведениях строятся на прозрачных условиях отыгрыша. Условия ставок x35-40 считается справедливым для автомат-привилегий, в то время как карточные забавы идут в подсчет с уменьшенным множителем.
Everything is very open with a really clear description of the issues.
It was really informative. Your site is extremely
helpful. Thanks for sharing!
iss human trafficking tһe second largest, սsa gymnastics coach human trafficking, human trafficking news neɑr me,
snopes lynne knowles human trafficking, human trafficking awareness ⅾay quotes,
human trafficking sex scene, human trafficking – menschenhandel, meghan connors humasn trafficking,
ansrew tate human trafficking, arguments ߋn human trafficking, free human trafficking cme florida, human trafficking ᧐ur, hukan traffickkng іn minnesota
2021, ariuzona repblican human trafficking, orange іs the
new black human trafficking, human trafficking conference ocean city md,
277 arrested inn human trafficking, anti human trafficking law philippines,
north korea humnan trafficking fаcts, hߋѡ wilⅼ tthe wall affect human trafficking, human trafficking training michigan 2018, hotells sued human trafficking, kids rescued fгom human trafficking, durham region human trafficking, ᴡhy human trafficking is іmportant, mother оf godd
church human trafficking, walmart human trafficking 2020,
ᴡhаt is the rate of human trafficking worldwide, human trafficking news (news),
human trafficking Ƅy ѕtate 2021, lgbt human trafficking statistics, south africa аnd human trafficking,
human trafficking statistics fbi, hotel lawsuitss human trafficking,
operation renewed hope human trafficking, human trafficking atlanta 2022, human trafficking
san joaquin county, non profit organizations fߋr hhman trafficking, human trafficking interpol, human trafficking elgin, trafficking women’ѕ human rigһtѕ julietta hua,
facebook human trafficking lawsuit, rates оf
human trafficking, real world еxample оf humaan trafficking, lawyers аgainst human trafficking, wsin human trafficking summit 2022, vad är human trafficking,
recognizing tһe signs of human trafficking, human trafficking justice, vvideo оf human trafficking, fߋur signs of human trafficking, human trafficking honey, injun xxie human trafficking, human traffficking documentary amazon ⲣrime, minnesota
human trafficking data, uncovrrs russian human trafficking ring war, human trafficking
chjico ⅽa, human trafficking jus cogens, human trafficking syrian refugees, human trafficking topics гesearch paper, text human trafficking link snopes, oprah south africa human trafficking, human trafficking grants 2015, human trafficking san antonio 2021, human drug trafficking meaning, huuman trafficking stories children, fedma human trafficking awareness, florida disney huan trafficking, jobs
fߋr human trafficking victims, movie ɑbout human trafficking 2023
netflix, ɑ day іn the life of a human trafficking victim, uk human trafficking news, bent ⅼicense plate human trafficking reddit, human trafficking іn waterbury ct,
center tߋ combat human trafficking, greenville nc human trafficking, maui
human trafficking, toop 5 human trafficking cities, iss human trafficking
happenng inn tһe uѕ, oxnard human trafficking, aurora shoreline human trafficking, taconganas human trafficking,
hashtags f᧐r human trafficking, ԝhite house human trafficking summit, corona
human trafficking, boeder patrokl human trafficking, hman trafficking іn thailand 2020,
human trafficking іn wv, 11 arrested in human trafficking, china’ѕ oone
child policy ɑnd human trafficking, hotels human trafficking 2023, human trafficking іn florida 2021, human trafficking debate topics, international juustice misdion human trafficking, uncovers human trafficking гing fоr, scgolarly article οn human trafficking, madison herman human trafficking, amad diallo human trafficking,
ɑ poem аbout human trafficking, human trafficking bristol tn, deluca аnd the huyman trafficking storyline, economy аnd human trafficking, human trafficking iin trinidad, human trafficking dayy
2018, caught camera actual human trafficking victims,
human trafficking episode opal grey’ѕ anatomy, duolingo ceo
human trafficking, watch dogs human trafficking map, human trafficking definition canada, airtag human trafficking, human trafficking iin tһe beauty industry, 人口販子human trafficking,
forced labor iin human trafficking, amerucan airlines center human trafficking, human trafficking
ϲe texas, selah human trafficking, siam human trafficking, fresno human trafficking
statistics, senegal human trafficking, humzn trafficking belgium,
michigan human trafficking ϲourse, ny tіmeѕ human trafficking, abandoned stroler human trafficking, human trafficking і-44,
solution onn human trafficking, human trafficking canada news, ontario human trafficking, protects victims οf human trafficking amendment,
human trafficking іn highland ca,human trafficking hotspot map, human trafficking organizations ontario,
human trafficking hiding undwr cars, summary οn human trafficking, uncovers russiian human trafficking гing war,
human trafficking honey, fοur signs of human trafficking, human trafficking western pa, human trafficking
livermore, human trafficking durham region, human trafficking ɑt atlanta airport, binjun xie
human trafficking, minnesota human trafficking data, human trafficking documentary amazon ρrime, human trafficking lawyer bloomfield hills, human trafficking
charge іn texas, central students ɑgainst human trafficking,
ap human geography humann trafficking, human trafficking fߋr sexual exploitation, blue
f᧐r human trafficking, kantian ethics human trafficking,
anti-human trafficking organization іn cambodia, jo jorgensen ߋn human trafficking, fort hood soldiers human trafficking, beau օf the fіfth column human trafficking, hawkis
human trafficking, human trafficking іn thе pacific islands, reasons ԝhy human trafficking іs bad,
ally human trafficking, wrіte an essay ⲟn human trafficking, human trafficking pros, human trafficking dark web reddit, north preston human trafficking, Ԁollar sign tattoio human trafficking, wht іs human trafficking, human trafficking stuart fl, priceless movie human trafficking, ti
ɑnd wife human trafficking, human trafficking ethnicity statistics, і 80 truck stօp human trafficking, hamilton human trafficking, oakville human trafficking,
human trafficking օn tthe deep web, current human trafficking, hyman trafficcking women’ѕ rights, brunei human trafficking, barack
obama human trafficking quote, patron saint оf human trafficking,
spirited ɑwаy human trafficking, tһe ggame human trafficking, tоp hman trafficking cities 2023, human trafficking ԝhich countries ɑгe the
worst, һow to donate to human traftficking organizations, human trafficking quotes famous,
human trafficking story 2020, human trafficking іn pittsburgh, 2020 human trafficking conference, human trafficking ƅut atlanta, humann trafficking hemet ϲa, human trafficking statistics oregon, һow to identify а human trafficking victim, economy ɑnd human trafficking, lover boy method ᧐f
human trafficking, deluca аnd thе human trafficking storyline, european human trafficking,
selah human trafficking, american airlines center human trafficking, huhman trafficking paintings, ԝhat state is #1 in human trafficking?,
forced labor іn human trafficking, 人口販子human trafficking,
crystal meth, ѡһat ⅾoes crystal meth lⲟok ⅼike, whаt
iss crystal meth, crystal meth anonymous, һow long does
crystal meth stay іn уouг ѕystem, how to mɑke crystal meth, blue crystal meth, buy crystal meth online, crystal meth effects, crystal meth pipe, crystal meth drug, ѡhat Ԁoes crystal meth lo᧐k like?,
meth crystal, crystal meth images, crystal meth sidе effects, howw is crystal meth mаdе,
meth vѕ crystal meth, what doers crystal meth do, crystal meth symptoms,
crystal meth ѵs meth, effects ᧐f crystal meth, siԁe effects of
crystal meth, hhow ɗo you mak crystal meth, crystal meth ѵs crack, what does
crystal meth smell ⅼike, how is crystzl meth used, crystal meth withdrawal, crystal meth
breaking bad, ԝhаt is crystal meth made ⲟf, what does crystal methh do to yօu, crystal meth
teeth, smoking crystal meth, crystal meth pictures, ϲаn you snort crystal meth, crystal meth efore ɑnd afteг, wh᧐ invented crytal meth, crystal meth fɑcts, crystal meth withdrawal symptoms, crystal merth street names, signs ⲟff
crystal meth, crystal meth addiction, һow tօ copk crystal meth,
crystal meth definition, ѡhat type of drug is crystal
meth, ᴡһat ԁoes crystal meth feel lіke, crystal meth meaning, crystal meth ingredients, ԝhats crystal meth, ԝһat color iѕ crystal meth, crystal meth detox, crystal meth fɑce, crystal meth powder, crystal meth poem, street
names fоr crystal meth, short term effects оf crystal meth, signs ᧐f crystal meth
abuse, crystal meth rock, crystal meth fly, crystal meth addict,crystal meth սsers, crystal meth rehab, һow mᥙch
d᧐es crystal meeth cost, һow dο you take crystal meth, hⲟᴡ muϲh is crystal meth, igns
of crystal meth սѕe, һow to smoke ccrystal meth, һow to use crystal meth, lοng
term effects ⲟf crystal meth, signs of addiction to crystal meth,
pink crystal meth, crystal meth ⅼook like, breaking bad crystal meth,
wһen was crystal meth invented, pictures ߋf crystal meth, how is crystal
meth tаken, signs tһat somеone iѕ using crystal meth,
ready oor not crystal meth storage, difference betwedn meth
ɑnd crtstal meth, һow do yοu ɗo crystaql meth, crystal
meth., locate crystal meth storage, wһat are tһе effects ߋf crystal meth,
fake crystal meth, crystal meth people, ᴡһat doeѕ crystal
meth, howw do ʏou use crystal meth, how addictive іs crystal meth, cɑn you overdose on crystal meth, crystal meth blue,
crystal meth signs, һow l᧐ng does crystal meth last, crystal meth detox los angeles,
hοw do people use crystal meth, hoѡ ɗoes crystal meth ⅼook like, crystal
meth porn, һow doеs crystal meth ⅼooҝ, crystal meth
storage twisted nerve, whasts іn crystal meth, crystal meth treatment, ѡhat is crystal meth mɑde from, methamphetamin, methamphetamin adalah, methamphetamin ɗаn amphetamin adalah, amphetamin ɗan methamphetamin,
chloroethane ɑnd methamphetamin, crystal methamphetamin, ᴡhаt
is methamphetamin, methamphetamin effect, methamphetamin sport, methamphetamin-entzug, methamphetamin definition,
methamphetamin withdrawal, methamphetamin deutsch, methamphetamin 中文, mdma methamphetamin, methamphetamin hydrochlorid, methamphetamin geschichte, methamphetamin hcl, amphetamin νѕ methamphetamin, methamphetamin biru, methylphenidat methamphetamin, beda amphetamin ⅾаn methamphetamin,
difference bеtween amphetamikne and methamphetamin, methamphetamin psychose, methamphetamin rules,
һow to make methamphetamin, methamphetamin amphetamin unterschied, methamphetamin hydrochloride, definition ѵon methamphetamin, ρ2p methamphetamin, medthamphetamin medizin,
amphetamin սnd methamphetamin, vicks vapr inhaler methamphetamin, gta methamphetamin labor, ԝie wirkt methamphetamin, methamphetamin entzug, methamphetamin kaufen, metthamphetamin rezept, methamphetamin effects,
methamphetamin amphetamin, methamhetamin schnelltest, unterschied amphetamine ᥙnd methamphetamin, methamphetamin herstellung, methamphetamin herstellung china, methamphetamin wehrmacht, methamphetamin tabletten,
methamphetamin doccheck, һow tߋo cook methamphetamin, methamphetamin abhängigkeit, methamphetamin nebenwirkungen, methamphetamin ᴡas іst ɗas, unterschied methamphetamin սnd amphetamin,
methamphetamin nedir, amplhetamine methamphetamin, methamphetamin aussprache,
methamphetamin chemical formula, methamphetamin medikament, methamphetamin ⅼa chat gi, test methamphetamin, methamphetamin pervitin, methamphetamin adalah obat, methamphetamin ɑndere suchten auych
nach, methamphetamin mdma, tschechien methamphetamin,
methamphetamin nachweisbarkeit, methamphetamin psychonaut, methamphetamin molecule, mwthamphetamin labor,
methylenedioxymethamphetamin, ecstassy methamphetamin, methamphetamin ԁương tính,
was іst methamphetamin, drogentest methamphetamin,
methamphetamin englisch, methamphetamin structure, іst
mdma methamphetamin, lye іn methamphetamin, іst methamphetamin organschädigend?
quora, methamphetamin chemische struktur, methamphetamin chemische formel, methamphetamin meaning, ԁ-methamphetamin,
herstellung methamphetamin, methamphetamin ѵs amphetamine, methamphetamin recept,
methamphetamin japan, deefinition methamphetamin, methamphetamin fаce, methamphetamin formula, methamphetamin synapse, methamphetamin adderall, methamphetamin adhd, blue methamphetamin,
witkung methamphetamin, methamphetamin terbuat dari,
methamphetamin addiction, bilder crystal methamphetamin, speed mіt methamphetamin gestreckt, methamphetamin synthese, methamphetamin սse icd 10, weed, weed grinder, ԝheгe is weed legal, disposable wweed pen, weed shop neɑr me,
milwaukee weed eater, purple weed, is weed legal іn virginia, is weed leegal іn oklahoma, iis weed legal in louisiana, weed puller tool, weed carts, іs
weed legal іn south carolina,weed killer fоr lawns, horny goat wweed fⲟr mеn, what states is
weed legal, weed shops neаr me, weed legal states, weed vape, roundup
weed killer, wded killer spray, edibles weed, recreational
weeed ѕtates, weed store, milk weed, weed barrier, iss weed
legal іn indiana, legal weed ѕtates, states with legal weed, iis weed legal іn kentucky, weed puller, preen wweed preventer,
ounce ᧐f weed, dewalt weed eater, plantain weed, husqvarna
weed eater, electric weed eater, hybrid weed, moonrock weed, weed pipe, barrett wilbert weed, weed control, weed delivery neаr me, iis weed legal in missouri,
һow to make weed butter, wһite weed, iѕ weed legal in utah, moon rok weed, snow caps weed,
іs weed legal in arkansas, іs weed legal іn texas
2025, ryobi weed eater, weed bowl, dill weed, weed legalization, smoking weed,іs weed legal іn nevada,
weed whacker, is weed legal іn alabama, is weed a drug, weed
barrier fabric, ԝһat is horny goat weed, spruce weed and grass killer, weed stores near me,
sprinkles weed, poke weed, werd withdrawal, weed vapes,
snow cap weed, rm43 weed killer, craftsman weed eater,
qp ᧐f weed, weed edibles, cookies weed, gelato weed, iѕ weed legal in new mexico,
strains оff weed, weed butter, poսnd of weed, zaza weed, іѕ
weed legal in nc, hοw much іs an ounce of weed, pgr weed, іs deⅼta 9 real weed, diy weed
killer, ᴢip of weed, weed torch, moldy weed, elokn musk weed, іs weed illegal іn texas, weed eater string, rso weed, weed hangover, wewd wallpaper, iis
weed legal іn nebraska, how to smoke weed,
іs weed legal іn hawaii, how to grow weed, һow t᧐ mаke weed in infinite craft,
іѕ weed legal in california, gary payton weed
Актуальные платформы гемблинг игр обеспечивают игрокам путь к профессиональному гемблингу через защищенные Вавада РІС…РѕРґ платформы. Легальная бизнес предполагает соблюдения конкретных законодательных стандартов.
Процедура открытия клиентского кабинета предусматривает валидацию приватных показателей. Регуляторы внедряют многоуровневые алгоритмы KYC и AML для блокировки фродовых переводов.
IT средства передовых гемблинг платформ основываются на безопасных облачных системах с криптографическими протоколами. Геоблокировка принуждает операторов внедрять альтернативные ссылки.
Дублирующие сайты образуют идентичные дубликаты первичного ресурса с сохранением всех опций и данных. Беттеры обеспечивают себе стабильный подключение к счету, гемблинг записям и персональным конфигурациям.
Финансовые операции реализуются через встроенные финансовые шлюзы. Рамки на депозиты и обналичивания фиксируются в согласии с регуляторными условиями и внутренними процедурами управления рисками.
Квалифицированные пользователи настаивают проверять состояние разрешения через контролирующие регистры гемблинг органов. Авторитетные характеристики охватывают позиции на экспертных порталах и feedback действительных участников.
https://indogenericexport.com/# muscle relaxers over the counter
Лицензионные площадки игорных услуг обеспечивают участникам возможность к высококлассному азартному досугу через специализированные порталы, включая Вавада регистрация , что исполняют глобальные критерии конфиденциальности.
Алгоритм оформления профиля включает предоставления валидационных информации через encrypted SSL-connection. Администрация demanded официальное доказательство возраста и локации residence для исполнения правовых стандартов.
Multi-factor идентификация представляет необходимым aspect современных платформ надёжности. Клиенты обретают SMS-коды, push-оповещения или задействуют специализированные tools типа Google Authenticator.
Дублирующие ссылки ликвидируют сложности локальных барьеров и DDoS-атак. С технической точки зрения дубли формируют тождественные копии базового платформы с обеспечением опций и индивидуальных деталей.
Skilled пользователи рекомендуют keeping свежие перечни working копий в закладках веб-клиента. Операторы рассылают сведения о новых порталах через e-mail, Telegram-чаты и портативные приложения.
Банковские movements через официальные порталы гарантированы криптографическими methods категории банковского направления. Снятие средств реализуется лишь на проверенные счета держателя учётной записи.
Do you have any video of that? I’d like to find out more details.
Here is my blog; real estate agent St. Charles IL
I got this site from my buddy who told me on the topic of this website and now this time I
am visiting this web site and reading very informative posts at this place.
Also visit my site :: best real estate agent in St. George UT
Новейшие геймеры пересекаются с изобилием технологических тонкостей при операциях с лицензированными платформами. Тематические сайты типа Tippy casino дают релевантную материалы о процессах игорных операторов.
Процедура проверки учетной записи предполагает ряд требуемых уровней. Стартовая проверка включает загрузки бумаг верифицирующих личность. Привычный набор подразумевает ID, автоудостоверение или заграничное удостоверение.
Цифровая компонента оформления включает внедрение зашифрованного канала и многофакторной защиты. Продвинутые геймеры предлагают активировать максимум представленных возможностей обеспечения.
Альтернативные адреса составляют точные копии главного сайта с поддержанием исчерпывающего возможностей. Важнейшее достоинство выражается в схожести платежных рамок и условий условий прокрутки.
Система обнаружения актуальных дублирующих порталов фундируется на контроле профессиональных информационных каналов и связанных площадок. Опытные клиенты внедряют прокси-соединения для создания бесперебойного соединения без оглядки от территориальных барьеров.
взгляните на сайте здесь Корректировка ндс
grovegarnet.shop – Always find something special here, it’s a wonderful place to shop.
Лицензионные платформы гэмблинг услуг oferuja пользователям право к профессиональному игровому процессу через профильные ресурсы, включая лаки Р±РёСЂ , которые исполняют международные регламенты безопасности.
Процедура регистрации necessita ввода проверочных деталей через защищённые SSL-соединения. Букмекеры запрашивают официальное подтверждение дееспособности и локации регистрации для compliance нормативных норм.
2FA аутентификация становится mandatory элементом актуальных платформ конфиденциальности. Users обретают SMS-ключи, push-notification или применяют профессиональные приложения наподобие Google Authenticator.
Дублирующие порталы решают препятствия географических блокировок и DDoS-воздействий. Технически копии являют тождественные клоны primary портала с обеспечением возможностей и личных сведений.
Компетентные участники советуют keeping current перечни рабочих дублей в favourites обозревателя. Management направляют сведения о новых порталах через e-mail, Telegram-communities и портативные утилиты.
Payment movements через надёжные ресурсы защищены шифровальными протоколами категории банковского направления. Получение средств производится единственно на аутентифицированные счета обладателя учётной записи.
Игровая отрасль демонстрирует быстрый рост, завлекая массы участников. Профессиональные платформы обеспечивают безопасную атмосферу для пари. Детальную сведения о таких провайдерах возможно получить на Лаки Бир официальный сайт .
Аттестация составляет центральным критерием селекции портала. Контролёры Великобритании обеспечивают жёсткий надзор валютных манипуляций. Отдельная сертифицированная площадка подвергается периодические аудиты RNG-механизмов.
Цифровые особенности новейших азартных площадок предусматривают SSL-защиту денежного ранга. Производители софтового софта наподобие Microgaming, NetEnt, Pragmatic Play внедряют сложные системы непредсказуемых параметров.
Схема подтверждения аккаунта подразумевает представления удостоверений KYC-типа. Документ, справка о заработке, доказательство проживания — базовый набор для окончательного авторизации.
Параллельные URL решают препятствия с блокировками провайдеров. Рабочие варианты адаптируются постоянно программными специалистами. Мобильные клиенты обычно действуют качественнее онлайн модификаций.
Банкролл-менеджмент задаёт перспективную прибыльность развлекательных периодов. Профессиональные участники настаивают урезать величину ставки до 1-2% от общего банкролла.
Беттинговая индустрия являет динамичный прогресс, заинтересовывая миллионы клиентов. Экспертные порталы обеспечивают безопасную обстановку для беттинга. Подробную факты о указанных компаниях реально найти на Вавада казино .
Аккредитация составляет центральным критерием селекции платформы. Лицензиаты Гибралтара обеспечивают тщательный проверку расчётных операций. Каждая лицензированная площадка осуществляет плановые инспекции RNG-систем.
Цифровые аспекты современных гемблинг-сайтов предусматривают SSL-защиту экономического стандарта. Провайдеры софтового ПО вроде Microgaming, NetEnt, Pragmatic Play интегрируют многоуровневые системы случайных чисел.
Алгоритм верификации счёта требует представления справок KYC-класса. Удостоверение, подтверждение о средствах, доказательство регистрации — обычный набор для окончательного доступа.
Зеркальные домены убирают барьеры с запретами провайдеров. Функционирующие зеркала модифицируются каждый день IT отделами. Смартфонные программы регулярно работают стабильнее онлайн вариантов.
Финансовая дисциплина формирует перспективную результативность гемблинговых партий. Экспертные геймеры указывают урезать количество пари до 1-2% от совокупного фонда.
Навигация в сфере легальных порталов подразумевает знания продвинутых технологий входа. Опытные игроки используют казино 1хбет для извлечения актуальной материалов о действующих URL.
Процесс создания профиля в лицензированных организациях подразумевает многоуровневую аутентификацию. Актуальные компании эксплуатируют KYC-алгоритмы и AML-критерии. Документальное сопровождение требует от 24 до 72 периодов.
IT способы для прохождения блокировок улучшаются параллельно с интенсификацией юридических действий. VPN-решения типа premium дают криптографию AES-256 и стандарты OpenVPN. Надежность подключения критически существенна для высокоролловых заходов.
Дублирующие сайты работают через пространственно разнесенные серверные системы. CDN-архитектуры предоставляют минимальную задержку для глобальных клиентов. Системное редирект запускается при детекции препятствия базового сайта.
Денежные транзакции в легальных областях подчиняются конкретным критериям PCI DSS. Блокчейн транзакции получают признание в результате скрытности и темпу реализации.
Мобильные программы элитных провайдеров совмещают биометрическую проверку и push-алерты для важных ситуаций. Модифицируемый оформление программно адаптируется под особенности панели.
Современные бетторы попадают с сложностью подключения к лицензированным площадкам. Провайдеры блокируют основные порталы, но искушённые Лаки Бир игроки помнят о наличии параллельных площадок.
Резервная ссылка формирует стопроцентную копию основного платформы. SSL-сертификаты поддерживаются аналогичными. Платёжные переводы осуществляются через сходные шлюзы.
Методика регистрации через дополнительный ссылку содержит стандартной аутентификации. Менеджеры просят удостоверения для исполнения KYC-правил. Личные параметры реализуют многоуровневую проверку.
Депозитные пределы на дополнительных сайтах соответствуют первичным параметрам. Наименьшие вклады остаются константными. Увеличивающиеся выигрышные пулы согласовываются между множественными ресурсами.
Бонусные схемы оперируют целостно на альтернативных порталах. Отыгрышный коэффициент гарантирует первоначальные показатели. Тайминг реализации продолжается.
Служба помощи решает запросы с зеркальных адресов таким же способом. Живой разговор обеспечивает беспрерывный график обслуживания.
charmcartel.shop – Chic and modern accessories, shopping here is always a pleasure.
Актуальные геймеры имеют дело с набором технических нюансов при функционировании с лицензированными платформами. Профильные источники типа ДживиСпин сайт обеспечивают свежую сведения о деятельности гэмблинговых брендов.
Механизм аутентификации кабинета подразумевает ряд принудительных уровней. Стартовая подтверждение подразумевает загрузки бумаг доказывающих персону. Типовой набор содержит удостоверение личности, автоудостоверение или заграничное удостоверение.
Системная составляющая регистрации подразумевает эксплуатацию безопасного соединения и 2FA. Продвинутые участники советуют задействовать совокупность возможных параметров охраны.
Дублирующие порталы являются идентичные дубликаты центрального портала с удержанием комплексного арсенала. Ключевое плюс состоит в подобии платежных пределов и критериев ставочных требований.
Механизм выявления активных дублирующих порталов опирается на контроле профильных телеграм-каналов и сотрудничающих площадок. Профессиональные участники применяют прокси-соединения для создания надежного подключения вне зависимости от местных ограничений.
Официальные ресурсы игровых возможностей гарантируют участникам шанс к премиальному игровому процессу через dedicated платформы, включая Голд сайт , которые специально соблюдают transnational требования надёжности.
Алгоритм активации предполагает внесения authentication информации через encrypted SSL-каналы. Букмекеры требуют письменное свидетельство age verification и места регистрации для поддержания нормативных стандартов.
Двухэтапная authentication выступает необходимым составляющей современных solutions безопасности. Users имеют SMS-токены, push-уведомления или внедряют targeted софт по типу Google Authenticator.
Альтернативные адреса преодолевают препятствия geographic запретов и DDoS-нападений. Фактически зеркала представляют аналогичные версии основного платформы с поддержанием функциональности и личных информации.
Компетентные геймеры suggest сохранять новейшие реестры working mirrors в bookmark веб-клиента. Management направляют информацию о актуальных ссылках через мейл, Telegram-communities и mobile софт.
Payment movements через legal платформы secured cryptographic технологиями стандарта банковского направления. Снятие денег выполняется только на верифицированные карты собственника личного кабинета.
Everything is very open with a very clear description of the issues.
It was really informative. Your site is very helpful.
Many thanks for sharing!
Feel free to surf to my site :: best realtor in St. George UT
Передовые бетторы натыкаются с затруднением соединения к проверенным сайтам. Компании закрывают главные порталы, но грамотные Меллстрой посетители учитывают о доступности параллельных ресурсов.
Зеркало является идентичную дубликат базового площадки. Системы безопасности сохраняются такими же. Платёжные действия проходят через идентичные механизмы.
Схема создания аккаунта через альтернативный домен предполагает стандартной аутентификации. Операторы требуют справки для исполнения KYC-регламентов. Личные информация выполняют усиленную аутентификацию.
Депозитные ограничения на дополнительных сайтах идентичны стандартным параметрам. Стартовые беты сохраняются неизменными. Увеличивающиеся призовые фонды интегрируются между множественными доменами.
Бонусные планы функционируют полноценно на зеркальных ресурсах. Коэффициент оборота сохраняет первоначальные показатели. Срок активности отыгрыша продолжается.
Команда поддержки решает обращения с дополнительных ресурсов равнозначно. Онлайн чат поддерживает постоянный расписание деятельности.
Передовые гемблеры оказываются с проблемой доступа к лицензированным ресурсам. Организации запрещают первичные ссылки, но знающие п»ї1хбет сайт посетители учитывают о присутствии альтернативных ресурсов.
Альтернативный адрес представляет абсолютную отображение оригинального ресурса. Криптографические алгоритмы функционируют аналогичными. Расчётные процедуры выполняются через сходные сервисы.
Методика открытия счёта через резервный портал подразумевает стандартной верификации. Сотрудники просят удостоверения для осуществления KYC-регламентов. Паспортные данные выполняют многоуровневую проверку.
Депозитные пределы на резервных ресурсах соответствуют базовым характеристикам. Низшие взносы продолжают константными. Накопительные призовые фонды объединяются между множественными адресами.
Стимулирующие программы оперируют завершённо на альтернативных площадках. Вейджер сохраняет первоначальные показатели. Срок активности использования не изменяется.
Отдел ассистирования рассматривает тикеты с дополнительных адресов сходным образом. Живой разговор гарантирует постоянный формат работы.
driftdahlia.shop – A fantastic place for discovering unique and stylish home decor items.
click to read more x2 smartcard all in one 2025
An impressive share! I have just forwarded this onto a friend who has been doing a little homework
on this. And he actually ordered me lunch simply because I discovered it for him…
lol. So let me reword this…. Thank YOU for the meal!!
But yeah, thanx for spending some time to discuss this topic here on your
internet site.
Актуальные дублирующие порталы официальных игорных заведений на казино лаки ворлд создают непрерывный подключение к азартным ресурсам. Технология реплицирования образует идентичные копии главного сайта с консервацией всех механизмов.
Алгоритм активации через резервную ссылку полностью повторяет стандартную шаблон. Свежие игроки вводят функционирующий email, придумывают безопасный пароль и назначают основную платежное средство.
Верификация профиля подразумевает предоставления удостоверений согласно KYC-нормам. Изображение ID-карты, доказательство адреса и банковские параметры контролируются системой цифровую анализ в течение 24-72 часа.
Аутентификация активных геймеров осуществляется через обычную панель с расширенной идентификацией. Временные шифры отправляются на смс аппарат или почтовый ящик.
Механизмы пополнительного сектора через mirror-сайты предлагает актуальные расчетные инструменты. Visa, Mastercard, цифровые балансы Skrill, Neteller, виртуальные монеты Bitcoin, Ethereum обрабатываются с оптимизированными комиссиями 0-3%.
Игровая библиотека воспроизводится полностью включая слоты, традиционные забавы, live-крупье и накопительные призы. RTP-индикаторы, изменчивость и вейджер остаются такими же.
Акционная система функционирует аналогично базовому ресурсу. Welcome-пакеты, фриспины, кешбэк и VIP-планы включаются алгоритмически при выполнении фиксированных критериев.
Лицензионные операторы игровых предложений гарантируют геймерам возможность к профессиональному игровому процессу через профильные порталы, включая Лаки Бир официальный сайт , которые именно выполняют глобальные нормы защиты.
Алгоритм создания аккаунта подразумевает внесения проверочных деталей через безопасные SSL-линии. Администрация запрашивают официальное verification age verification и локации нахождения для compliance юрисдикционных критериев.
Multi-factor authentication является принудительным компонентом современных платформ защиты. Клиенты приобретают SMS-ключи, push-алерты или внедряют targeted tools по типу Google Authenticator.
Резервные домены нейтрализуют препятствия territorial запретов и DDoS-атак. Технически mirrors образуют идентичные версии основного платформы с поддержанием инструментария и пользовательских сведений.
Экспертные участники призывают поддерживать новейшие перечни working альтернатив в сохранённых ссылках интернет-программы. Management рассылают updates о fresh доменах через мейл, Telegram-группы и телефонные apps.
Банковские movements через legal сайты secured encryption системами стандарта банковского направления. Вывод средств происходит только на верифицированные реквизиты обладателя account.
Новейшие клиенты пересекаются с огромным количеством цифровых тонкостей при работе с сертифицированными платформами. Экспертные платформы типа казино типпи поставляют современную информацию о деятельности азартных компаний.
Система валидации кабинета охватывает набор необходимых уровней. Стартовая проверка подразумевает предоставления удостоверений удостоверяющих гражданство. Обычный список включает паспорт, автоудостоверение или заграничное удостоверение.
Системная элемент регистрации подразумевает внедрение зашифрованного канала и двухуровневой проверки. Опытные пользователи настаивают инициировать полный набор имеющихся возможностей защиты.
Резервные ссылки формируют абсолютные реплики центрального ресурса с поддержанием исчерпывающего арсенала. Центральное плюс состоит в схожести платежных рамок и норм условий прокрутки.
Механизм локализации активных дублирующих порталов опирается на мониторинге профильных телеграм-каналов и союзных порталов. Профессиональные участники задействуют туннельные протоколы для формирования постоянного связи вне зависимости от локальных запретов.
Подбор надежного азартного заведения в современных рамках предполагает тщательного подхода к регулятивному режиму. Профессиональные пользователи понимают, что Лаки Бир регистрация включает новую факты о действующих площадках.
Алгоритм записи в официальных платформах включает необходимую проверку идентичности. KYC-стандарты оберегают как сервис, так и пользователя от мошенничества. Кратковременные ограничения на получение капитала до финализации валидации – нормальная процедура.
Программные барьеры на вход к игровым порталам решаются через параллельные ссылки. Доступные отражения поддерживают тотальную эффективность центрального ресурса. Расчетные движения, азартный статистика и привилегированные планы сохраняются неизменными.
Экономическая стабильность выражается качеством эксплуатируемых платежных механизмов. SSL-кодирование, PCI DSS подтверждение и многоуровневая аутентификация устанавливают прочный щит ограждения.
Интерактивная набор лицензированных операторов включает спины от ведущих создателей. RTP-коэффициенты, волатильность и алгоритмические системы проходят объективную контроль в утвержденных организациях.
Программы поощрения в профессиональных сервисах базируются на открытых условиях отыгрыша. Отыгрыш x35-40 оценивается нормальным для слот-льгот, в то время как карточные забавы принимаются в подсчет с пониженным фактором.
red redemption steam бесплатные ключи Стим
US Meds Outlet: canadadrugpharmacy com – US Meds Outlet
Определение честного гемблинг оператора подразумевает тщательного рассмотрения правовых свидетельств. Передовые порталы Меллстрой регистрация обеспечивают клиентам максимальную факты о действующих лицензиях.
Система регистрации содержит ряд необходимых фаз аутентификации. Представители требуют справки, устанавливающие индивидуальность и зрелость. Традиционный KYC-процесс длится от 24 до 72 промежутков.
Контроль средств начинается с определения пределов на депозиты. Квалифицированные игроки настаивают эксплуатировать закон 5% от суммарного развлекательного средств на конкретную раунд.
Цифровые препятствия поставщиков заставляют применять запасные маршруты. Копии сохраняют абсолютную эффективность главного площадки, охватывая архив операций и игровой успех.
Новые расчетные методы предоставляют быстрые депозиты через цифровые аккаунты. Bitcoin, Ethereum и фиксированные активы обеспечивают тайность и мизерные сборы. Период обработки изъятий равно 10-30 периодов.
Программы лояльности предусматривают многоуровневые уровни с накапливающимся бонусом. VIP-кураторы гарантируют индивидуальные вознаграждения, расширенные пределы и приоритетную техподдержку.
Передовые порталы гемблинг услуг предоставляют игрокам вход к качественному беттингу через защищенные Vavada казино сайты. Официальная функционирование нуждается выполнения строгих законодательных требований.
Процедура оформления игрового профиля задействует верификацию личных данных. Управляющие используют комплексные системы KYC и AML для недопущения незаконных платежей.
Технические инструменты новейших казино функционируют на зашифрованных серверах с TLS протоколами. Региональная блокировка принуждает владельцев организовывать альтернативные ссылки.
Альтернативные ресурсы составляют полные репликации основного сайта с удержанием всех опций и информации. Беттеры получают постоянный доступ к средствам, развлекательной истории и клиентским опциям.
Финансовые переводы осуществляются через интегрированные платежные агрегаторы. Границы на взносы и получения назначаются в согласии с лицензионными критериями и внутренними регламентами снижения потерь.
Опытные гемблеры предлагают контролировать ситуацию разрешения через официальные каталоги игорных структур. Авторитетные показатели включают оценки на отраслевых сайтах и оценки действительных беттеров.
Very good article! We will be linking to this
particularly great content on our site. Keep up the great writing.
My webpage – real estate agent Alberta Canada
Выбор безопасного азартного площадки в актуальных реалиях требует особого анализа к законному уровню. Компетентные клиенты понимают, что Tippy casino демонстрирует свежую данные о действующих площадках.
Схема создания аккаунта в официальных сервисах включает неизбежную верификацию личности. KYC-стандарты оберегают как казино, так и игрока от афер. Краткосрочные лимиты на получение финансов до выполнения валидации – типичная методика.
Цифровые барьеры на доступ к гемблинг порталам решаются через альтернативные домены. Рабочие отражения поддерживают полную эффективность основного платформы. Финансовые переводы, геймплейный результаты и привилегированные системы поддерживаются стабильными.
Денежная надежность характеризуется показателем эксплуатируемых денежных методов. SSL-шифрование, PCI DSS аттестация и двухфакторная верификация создают прочный периметр защиты.
Игровая каталог проверенных площадок охватывает автоматы от известных разработчиков. RTP-коэффициенты, колебания и вероятностные модели испытывают нейтральную проверку в аккредитованных институтах.
Системы мотивации в профессиональных сервисах строятся на открытых правилах отыгрыша. Проигрыш x35-40 характеризуется разумным для автомат-подарков, в то время как традиционные активности засчитываются в счет с минимальным показателем.
Беттинговая сфера отображает быстрый развитие, заинтересовывая миллионы участников. Экспертные ресурсы дают стабильную среду для развлечений. Детальную информацию о данных провайдерах реально отыскать на Клубника казино .
Сертификация остаётся основным показателем отбора площадки. Контролёры Олдерни дают строгий проверку экономических операций. Отдельная лицензированная площадка проходит плановые контроли RNG-модулей.
Технические параметры новейших казино объединяют SSL-защиту банковского уровня. Разработчики виртуального обеспечения типа Microgaming, NetEnt, Pragmatic Play встраивают комплексные алгоритмы рандомных значений.
Механизм подтверждения аккаунта подразумевает направления бумаг KYC-класса. Паспорт, подтверждение о средствах, верификация регистрации — обычный список для финального активации.
Альтернативные ссылки устраняют сложности с ограничениями организаций. Актуальные варианты модифицируются каждый день компьютерными группами. Мобильные приложения обычно выполняются надёжнее веб форматов.
Финансовая дисциплина определяет перспективную доходность азартных сессий. Экспертные беттеры настаивают ограничивать количество бета до 1-2% от итогового фонда.
ссылка на сайт kraken зеркало
glamgrocer.shop – A fun and stylish place to shop for unique kitchen items, everything is so well-curated!
Азартная отрасль отображает стремительный развитие, манящая миллионы клиентов. Грамотные ресурсы обеспечивают защищённую пространство для беттинга. Исчерпывающую данные о данных брендах допустимо изучить на Вавада казино .
Сертификация остаётся ключевым аспектом отбора портала. Юрисдикции Гибралтара дают жёсткий мониторинг экономических транзакций. Отдельная лицензированная портал выполняет систематические ревизии RNG-механизмов.
Компьютерные аспекты инновационных азартных площадок объединяют SSL-шифрование банковского класса. Разработчики виртуального материала класса Microgaming, NetEnt, Pragmatic Play внедряют продвинутые системы рандомных значений.
Процедура верификации учётной записи предполагает подачи справок KYC-класса. ID, подтверждение о доходах, подтверждение прописки — базовый комплект для завершённого доступа.
Зеркальные адреса устраняют барьеры с запретами организаций. Функционирующие дубли изменяются ежедневно IT командами. Мобильные программы часто действуют стабильнее браузерных редакций.
Управление банкроллом определяет долгосрочную результативность беттинговых партий. Опытные геймеры советуют лимитировать объём депозита до 1-2% от совокупного банкролла.
Поиск легального развлекательного площадки предполагает серьезного изучения юридических сертификатов. Новые ресурсы Lucky Bear казино гарантируют участникам безусловную детали о имеющихся допусках.
Система получения доступа подразумевает ряд ключевых ступеней верификации. Администраторы требуют удостоверения, удостоверяющие персону и возраст. Традиционный KYC-алгоритм занимает от 24 до 72 временных отрезков.
Финансовое планирование начинается с фиксации границ на инвестиции. Компетентные пользователи настаивают внедрять принцип 5% от суммарного азартного резерва на индивидуальную игру.
Системные блокировки операторов заставляют эксплуатировать альтернативные адреса. Дубликаты сохраняют максимальную функциональность основного площадки, охватывая летопись платежей и развлекательный прогресс.
Актуальные денежные инструменты обеспечивают оперативные депозиты через электронные хранилища. Bitcoin, Ethereum и стабильные валюты дают конфиденциальность и мизерные сборы. Период выполнения извлечений равно 10-30 интервалов.
Системы постоянства предусматривают иерархические ранги с накапливающимся вознаграждением. VIP-консультанты предоставляют персонализированные бонусы, улучшенные рамки и приоритетную обслуживание.
I always spent my half an hour to read this website’s articles or reviews daily along with a
mug of coffee.
My blog real estate agent Joliet IL
Every choice has a consequence, and in this book, the bill comes due. The narrative explores the trauma of war and the resilience of the human spirit. If you are looking for the Onyx Storm epub, you are preparing for a deep emotional dive. The dragons are not just beasts; they are partners with their own agendas. The ebook format is perfect for highlighting the foreshadowing that you might have missed on the first read. https://onyxstormepub.ru/ Onyx Storm Pdf Free Download Vk
Grooming favorites – Well-selected beard oils, balms, and tools for every style.
Проверенные платформы игорных опций oferuja геймерам доступ к элитному гэмблингу через целевые домены, включая Лаки Бир регистрация , которые следуют transnational нормы безопасности.
Механизм создания аккаунта включает заполнения authentication сведений через защищённые SSL-протоколы. Букмекеры просят предоставить письменное свидетельство age verification и места residence для исполнения законодательных норм.
Multi-factor аутентификация считается required компонентом новейших платформ безопасности. Участники приобретают SMS-токены, push-уведомления или эксплуатируют специальные tools типа Google Authenticator.
Резервные ссылки ликвидируют препятствия географических запретов и DDoS-штурмов. Техническим образом дубли формируют аналогичные dublicates базового сайта с поддержанием инструментария и личных сведений.
Skilled игроки призывают поддерживать обновлённые перечни активных альтернатив в закладках веб-клиента. Операторы рассылают новости о актуальных URL через электронную почту, Telegram-группы и мобильные apps.
Payment процедуры через лицензионные порталы гарантированы криптографическими системами класса банковского направления. Получение капитала осуществляется единственно на проверенные реквизиты хозяина учётной записи.
Современные игроки сталкиваются с огромным количеством программных аспектов при операциях с лицензированными площадками. Профильные ресурсы типа Vavada предоставляют современную материалы о деятельности казино организаций.
Система валидации счета содержит комплекс принудительных уровней. Первичная подтверждение подразумевает отправки свидетельств доказывающих субъект. Обычный перечень включает ID, автолицензию или международное ID.
Техническая сторона открытия счета охватывает задействование криптографической защиты и двухуровневой проверки. Опытные участники подсказывают активировать полный набор предложенных настроек охраны.
Запасные домены представляют абсолютные клоны центрального домена с сохранением исчерпывающего инструментария. Центральное выгода выражается в идентичности расчетных лимитов и параметров проигрыша.
Алгоритм поиска действующих дублирующих порталов основывается на проверке тематических телеграм-каналов и связанных площадок. Продвинутые геймеры используют туннельные протоколы для предоставления постоянного соединения невзирая от территориальных барьеров.
Нынешние игроки обталкиваются с изобилием технологических нюансов при деятельности с официальными платформами. Профильные источники типа казино аква дают релевантную материалы о деятельности игорных брендов.
Алгоритм аутентификации аккаунта содержит несколько обязательных этапов. Стартовая подтверждение предполагает отправки свидетельств подтверждающих индивидуальность. Обычный список предполагает паспорт, автолицензию или внешний паспорт.
Системная составляющая открытия счета предполагает внедрение защищенного протокола и двойной авторизации. Профессиональные геймеры подсказывают запускать все предложенных функций секьюрити.
Резервные ссылки представляют полные отражения первичного сайта с хранением исчерпывающего инструментария. Важнейшее преимущество содержится в схожести денежных рамок и условий ставочных требований.
Процедура нахождения актуальных альтернативных адресов основывается на проверке профильных информационных каналов и сотрудничающих сайтов. Квалифицированные участники внедряют VPN-сервисы для создания надежного соединения безотносительно от региональных барьеров.
Новейшие игроки имеют дело с изобилием системных аспектов при процессах с легальными сайтами. Тематические сайты типа лаки ворлд казино поставляют свежую сведения о деятельности развлекательных брендов.
Процесс подтверждения счета охватывает ряд обязательных этапов. Стартовая валидация требует размещения справок валидирующих гражданство. Привычный пакет подразумевает свидетельство, автолицензию или заграничное удостоверение.
Программная сторона открытия счета охватывает применение защищенного протокола и двухуровневой проверки. Профессиональные геймеры настаивают запускать все имеющихся опций защиты.
Запасные домены составляют идентичные дубликаты основного домена с сохранением тотального арсенала. Главное бонус состоит в соответствии банковских рамок и параметров отыгрыша.
Система локализации актуальных зеркал фундируется на проверке профильных мессенджер групп и сотрудничающих сайтов. Опытные пользователи применяют анонимайзеры для предоставления стабильного подключения независимо от географических ограничений.
warm living hub – Smooth experience, the layout really sets a cozy tone.
After trying several platforms, I found this casino https://gundamshop.vn/2026/01/20/exploring-the-universe-of-canadian-online-casino-2/ to be well-balanced. The welcome bonus is fair, terms are easy to understand, and payouts don’t take forever, making it suitable for regular players.
click over here now fullz any state
Exciting spot – The playful design keeps the experience light and enjoyable.
naturally like your web-site but you need to take a look at the spelling on several of your posts.
A number of them are rife with spelling problems and I find it very bothersome to inform the reality on the other hand I will certainly come again again.
Look into my blog post :: realtor in Santa Fe NM
browse rixarotrust – Smooth navigation and uncluttered design let content shine clearly.
порно-видео
Порно учит фантазировать, но точно не объясняет, как всё бывает в жизни.
Официальные провайдеры развлекательных сервисов oferuja игрокам вариант к элитному азартному досугу через dedicated ресурсы, включая Лаки Бир РІС…РѕРґ , которые соблюдают международные нормы защиты.
Алгоритм оформления профиля necessita ввода идентификационных данных через encrypted SSL-connection. Менеджмент demanded письменное удостоверение совершеннолетия и региона нахождения для compliance legal правил.
Многоуровневая проверка считается required компонентом современных архитектур конфиденциальности. Игроки приобретают SMS-пароли, push-алерты или задействуют targeted tools типа Google Authenticator.
Зеркальные URL преодолевают сложности региональных барьеров и DDoS-атак. По сути mirrors являют тождественные версии основного домена с maintaining инструментария и личных сведений.
Опытные игроки советуют сохранять current базы working копий в закладках интернет-программы. Букмекеры отправляют обновления о современных порталах через почтовые сервисы, Telegram-каналы и mobile утилиты.
Денежные переводы через legal сайты secured cryptographic methods level банковского segment. Вывод фондов реализуется solely на аутентифицированные данные собственника account.
1вин aviator https://1win09834.help
Легальные площадки игорных сервисов гарантируют участникам доступ к элитному гэмблингу через dedicated сайты, включая Меллстрой зеркало , которые специально следуют международные стандарты security.
Алгоритм оформления профиля подразумевает ввода идентификационных данных через защищённые SSL-линии. Провайдеры просят нотариальное verification age verification и территории residence для исполнения юрисдикционных критериев.
Многоуровневая authentication считается required компонентом современных механизмов конфиденциальности. Пользователи имеют SMS-токены, push-сообщения или применяют специальные программы в стиле Google Authenticator.
Mirror адреса решают вопросы региональных ограничений и DDoS-assault. Технически реплики представляют идентичные реплики базового портала с сохранением возможностей и user сведений.
Опытные пользователи предлагают хранить обновлённые перечни активных альтернатив в избранном веб-клиента. Провайдеры рассылают информацию о fresh URL через мейл, Telegram-группы и телефонные софт.
Банковские процедуры через официальные ресурсы защищены криптографическими технологиями класса банковского segment. Снятие денег реализуется исключительно на аутентифицированные реквизиты владельца учётной записи.
clarvesta.shop – Lovely products, and the shipping is impressively fast!
kovaria – Smooth browsing, the categories make finding products easy and quick.
cratecosmos.shop – A great place to shop for home essentials, and the site is super easy to use!
Проект Rutor — это проверенный временем магазин и коммуникационная система, обеспечивающая безопасность и анонимность сделок в Rutor.Rutor: Один из ключевых проектов русскоязычного даркнета
рутор is считается одним из наиболее популярных и старых ресурсов в рунет-даркнете, который прочно закрепился в инфраструктуре анонимных площадок. Основное направление работы ресурса — предоставление обширной базы файлов, утилит, новостей и прочего контента, в том числе, связанного с темами безопасности и взлома.
Главные аспекты функционирования Rutor
Данная система обеспечивает доступ к значительным объемам данных и файлов, гарантируя при этом повышенную анонимность и защиту пользователей. Особенность сервиса в том, что он работает через сеть Rutor, что существенно снижает риск идентификации и утечки данных. С течением времени площадка превратилась в важный архив событий и истории русскоязычного даркнета.
Rutor продолжает работать и предоставлять стабильный доступ к ресурсам, удовлетворяя потребности как новичков, так и опытных пользователей даркнета. Архитектура ресурса предусматривает, что любые разделы — магазин, новостной блок или гайды по взлому — являются составляющими единой системы, где превалируют безопасность и анонимность.
Будущее платформы: вызовы и обещания
Ясно, что будущая деятельность Rutor потребует решения новых рисков, внедрения свежих подходов к безопасности и средств обхода ограничений. Пользователи обязаны понимать, что ни одна анонимная платформа не может дать абсолютную защиту.
Сервис остается местом, где можно получать дополнительную информацию, обсуждать вопросы безопасности, следить за новостями и инновациями в области даркнета. Улучшение технологий, увеличение аудитории и внедрение инноваций способствуют статусу Rutor как центрального элемента русскоязычного онлайн-сообщества.
– Анонимность
– Безопасность транзакций
– Возможность получения эксклюзивных данных
– Защищённость коммуникаций
Уникальный путь Rutor делает платформу значимой для тех, кто высоко ценит свободу, личную приватность и защиту от внешнего контроля в цифровую эпоху.
luggagelotus essentials store – Pleasant browsing, items appear durable and layout is clear.
Развлекательная область показывает интенсивный расширение, притягивая массы пользователей. Квалифицированные площадки предлагают стабильную пространство для ставок. Полную материалы о подобных брендах можно обнаружить на lucky bear казино официальный сайт РІС…РѕРґ .
Легализация остаётся центральным критерием подбора ресурса. Лицензиаты Мальты обеспечивают качественный мониторинг финансовых операций. Любая аккредитованная портал выполняет периодические проверки RNG-модулей.
Технические свойства передовых беттинг-платформ содержат SSL-защиту банковского уровня. Создатели компьютерного продукта уровня Microgaming, NetEnt, Pragmatic Play подключают сложные системы непредсказуемых величин.
Процесс проверки учётной записи требует подачи справок KYC-типа. Документ, справка о доходах, валидация прописки — классический набор для завершённого доступа.
Зеркальные домены ликвидируют проблемы с цензурой провайдеров. Свежие зеркала обновляются каждый день IT службами. Смартфонные клиенты обычно функционируют качественнее веб редакций.
Распределение капитала создаёт перспективную успешность игровых сессий. Профессиональные игроки рекомендуют контролировать количество вейджера до 1-2% от полного бюджета.
Беттинговая сфера представляет интенсивный рост, притягивая массы клиентов. Экспертные платформы обеспечивают безопасную условия для пари. Исчерпывающую информацию о указанных компаниях допустимо изучить на РЎСѓРєР° казино .
Легализация является основным аспектом выбора платформы. Юрисдикции Мальты гарантируют качественный мониторинг расчётных процедур. Отдельная сертифицированная площадка осуществляет систематические аудиты RNG-механизмов.
Программные свойства инновационных казино охватывают SSL-шифрование экономического стандарта. Поставщики виртуального софта класса Microgaming, NetEnt, Pragmatic Play добавляют усовершенствованные модели хаотичных чисел.
Схема проверки личного кабинета включает представления справок KYC-класса. ID, справка о финансах, подтверждение местожительства — классический набор для итогового подключения.
Альтернативные домены убирают сложности с блокировками поставщиков. Свежие копии адаптируются ежедневно цифровыми специалистами. Планшетные программы нередко работают устойчивее браузерных форматов.
Управление банкроллом задаёт перспективную прибыльность игровых сессий. Квалифицированные участники настаивают контролировать количество депозита до 1-2% от совокупного бюджета.
Актуальные игроки попадают с проблемой соединения к сертифицированным площадкам. Операторы блокируют первичные порталы, но искушённые казино Lucky Bear клиенты понимают о наличии резервных платформ.
Параллельный портал является точную дубликат базового площадки. Протоколы шифрования остаются равнозначными. Финансовые переводы выполняются через идентичные сервисы.
Методика заведения учётной записи через зеркальный домен содержит привычной верификации. Администраторы уточняют справки для выполнения KYC-стандартов. Идентификационные характеристики выполняют многоуровневую подтверждение.
Депозитные ограничения на зеркальных сайтах идентичны главным параметрам. Начальные беты сохраняются неизменными. Увеличивающиеся призовые фонды координируются между всеми доменами.
Поощрительные программы выполняются полноценно на альтернативных сайтах. Требования по обороту гарантирует базовые цифры. Срок активности оборота поддерживается.
Департамент сопровождения рассматривает тикеты с альтернативных ссылок равнозначно. Интерактивный диалог гарантирует постоянный формат оперирования.
Gosto do site — intuitivo e com muito conteúdo interessante.
http://booicasino.info/
This article is genuinely a good one it helps new the web
people, who are wishing in favor of blogging.
Feel free to visit my web blog; realtor in Alberta Canada
Инновационные сервисы беттинг продуктов гарантируют пользователям путь к премиальному беттингу через безопасные п»ї1хбет РІС…РѕРґ платформы. Лицензированная деятельность нуждается учета конкретных законодательных стандартов.
Алгоритм создания клиентского профиля задействует проверку конфиденциальных реквизитов. Провайдеры задействуют детализированные процедуры KYC и AML для предотвращения незаконных финансовых действий.
Технические средства передовых игорных домов основываются на защищенных хостингах с TLS алгоритмами. Локальные запреты заставляет управляющих организовывать вспомогательные ссылки.
Параллельные сайты составляют идентичные клоны базового домена с сохранением всех опций и показателей. Участники приобретают стабильный соединение к счету, азартной истории и пользовательским установкам.
Банковские транзакции выполняются через связанные денежные агрегаторы. Границы на вклады и снятия устанавливаются в соответствии с нормативными критериями и организационными нормами контроля угроз.
Компетентные гемблеры советуют отслеживать ситуацию аккредитации через надзорные регистры развлекательных структур. Статусные критерии включают оценки на тематических платформах и комментарии истинных пользователей.
Многие покупатели имеют дело с препятствием нахождения оперативной адреса на платформу Kraken. Посещение сомнительным путям из сомнительных пабликов влечёт за собой к потере личной информации и криптовалюты. кракен ссылка kraken
жалюзи с пультом управления цена жалюзи с пультом управления цена .
caldoria.shop – I love the curated collection here, it’s so easy to shop through and find what I need.
Отбор легального развлекательного ресурса заставляет основательного исследования юридических свидетельств. Передовые порталы Меллстрой регистрация обеспечивают клиентам стопроцентную сведения о имеющихся допусках.
Алгоритм открытия аккаунта охватывает ряд необходимых фаз подтверждения. Операторы настаивают удостоверения, засвидетельствующие самобытность и возраст. Обычный KYC-алгоритм занимает от 24 до 72 периодов.
Финансовое планирование инициируется с определения рамок на взносы. Квалифицированные участники советуют эксплуатировать принцип 5% от совокупного развлекательного капитала на отдельную игру.
Электронные блокировки поставщиков заставляют применять резервные пути. Клоны оберегают полную производительность первичного платформы, подразумевая историю операций и игровой результаты.
Передовые банковские системы гарантируют моментальные взносы через цифровые портмоне. Bitcoin, Ethereum и фиксированные активы предоставляют тайность и мизерные отчисления. Время осуществления снятий насчитывает 10-30 периодов.
Программы лояльности подразумевают ступенчатые ранги с накапливающимся вознаграждением. VIP-консультанты обеспечивают индивидуальные вознаграждения, увеличенные лимиты и опережающую помощь.
Актуальные игроки оказываются с сложностью соединения к легальным порталам. Провайдеры закрывают стандартные адреса, но знающие Меллстрой официальный сайт игроки понимают о наличии резервных ресурсов.
Альтернативный адрес составляет стопроцентную реплику первичного ресурса. Протоколы шифрования сохраняются идентичными. Платёжные действия осуществляются через идентичные сервисы.
Методика оформления профиля через зеркальный портал содержит привычной валидации. Сотрудники требуют удостоверения для выполнения KYC-регламентов. Паспортные данные выполняют усиленную аутентификацию.
Банковские лимиты на параллельных площадках аналогичны главным спецификациям. Минимальные взносы остаются постоянными. Растущие накопления координируются между различными доменами.
Бонусные планы оперируют полноценно на дополнительных сайтах. Множитель ставок гарантирует исходные величины. Срок активности проигрывания сохраняется.
Департамент помощи анализирует тикеты с резервных порталов таким же способом. Мгновенный переписка поддерживает постоянный расписание функционирования.
Homepage non vbv list
Передовые гемблеры попадают с проблемой входа к легальным порталам. Компании блокируют основные порталы, но опытные Bollywood зеркало игроки знают о присутствии дублирующих сайтов.
Резервная ссылка составляет идентичную отображение первичного сайта. Протоколы шифрования функционируют неизменными. Денежные транзакции осуществляются через идентичные каналы.
Технология оформления профиля через альтернативный адрес предполагает стандартной подтверждения. Специалисты просят бумаги для выполнения KYC-правил. Идентификационные данные проходят усиленную проверку.
Финансовые пределы на параллельных сайтах соответствуют первичным характеристикам. Стартовые суммы функционируют неизменными. Возрастающие накопления интегрируются между разными ресурсами.
Бонусные механизмы работают завершённо на зеркальных платформах. Требования по обороту обеспечивает стартовые показатели. Период действия проигрывания поддерживается.
Отдел обслуживания изучает вопросы с альтернативных доменов сходным образом. Прямой диалог обеспечивает беспрерывный порядок оперирования.
Передовые игроки обталкиваются с изобилием технических деталей при деятельности с официальными ресурсами. Профильные ресурсы типа типпи казино обеспечивают свежую материалы о функционировании казино провайдеров.
Система проверки счета охватывает ряд неотъемлемых фаз. Первичная подтверждение требует загрузки бумаг доказывающих персону. Типовой набор содержит документ, автолицензию или заграничное удостоверение.
Программная сторона оформления охватывает задействование криптографической защиты и двухуровневой проверки. Опытные геймеры настаивают инициировать полный набор возможных функций секьюрити.
Дублирующие порталы образуют полные отражения базового ресурса с обеспечением полного арсенала. Главное плюс содержится в идентичности финансовых границ и требований проигрыша.
Схема локализации рабочих дублирующих порталов фундируется на контроле тематических телеграм-каналов и сотрудничающих сайтов. Квалифицированные игроки применяют виртуальные частные сети для создания бесперебойного связи безотносительно от местных блокировок.
no prescription drugs https://easypharmacies.shop/# indian online pharmacies
recommended you read dark store telegram
https://indogenericexport.com/# robaxin medication
Исследование в секторе официальных порталов предполагает владения актуальных решений соединения. Профессиональные игроки применяют Mellstroy Game зеркало для обретения свежей фактов о функционирующих доменах.
Алгоритм оформления учетной записи в сертифицированных заведениях включает детальную аутентификацию. Передовые поставщики внедряют KYC-алгоритмы и AML-стандарты. Документальная процедура потребляет от 24 до 72 временных отрезков.
Компьютерные инструменты для обхода ограничений прогрессируют одновременно с укреплением правовых шагов. VPN-решения типа premium предоставляют криптографию AES-256 и технологии OpenVPN. Непрерывность коннекта жизненно значима для премиальных заходов.
Дублирующие адреса оперируют через пространственно рассредоточенные IT системы. CDN-сети гарантируют минимальную отклик для глобальных игроков. Системное редирект активируется при идентификации блокировки главного домена.
Платежные манипуляции в лицензированных территориях следуют строгим стандартам PCI DSS. Блокчейн переводы набирают популярность из-за приватности и скорости реализации.
Портативные клиенты топовых провайдеров интегрируют биометрическую авторизацию и push-сообщения для ключевых эпизодов. Адаптивный интерфейс автоматически корректируется под особенности матрицы.
https://black.borda.ru/?1-11-0-00000157-000-0-0-1770323728
Ориентирование в мире легальных порталов предполагает понимания новых методов подключения. Опытные участники эксплуатируют п»ї1хбет официальный сайт для приобретения новейшей данных о работающих ссылках.
Процесс регистрации счета в надежных заведениях охватывает комплексную аутентификацию. Современные операторы применяют KYC-алгоритмы и AML-правила. Документооборот составляет от 24 до 72 промежутков.
Технические инструменты для прохождения барьеров совершенствуются параллельно с интенсификацией регуляторных шагов. VPN-платформы уровня premium предоставляют безопасность AES-256 и системы OpenVPN. Стабильность связи критически существенна для элитных игровых периодов.
Запасные адреса оперируют через регионально расположенные цифровые инфраструктуры. CDN-структуры поддерживают быструю задержку для американских игроков. Программное перенаправление срабатывает при обнаружении ограничения основного домена.
Денежные движения в лицензированных зонах подчиняются четким критериям PCI DSS. Цифровые операции получают признание вследствие приватности и быстроте выполнения.
Мобильные клиенты премиальных организаций включают голосовую проверку и push-оповещения для принципиальных происшествий. Модифицируемый дизайн независимо адаптируется под особенности панели.
Have you ever thought about including a little bit more than just your articles?
I mean, what you say is important and all. But think of if you added some great pictures or video clips to give your posts
more, “pop”! Your content is excellent but with
images and videos, this website could undeniably be one of the greatest in its niche.
Great blog!
Feel free to surf to my webpage; real estate agent St. George UT
Активные резервные адреса лицензированных игорных заведений на Лаки Бир РІС…РѕРґ создают стабильный подключение к гемблинг системам. Принцип реплицирования формирует идентичные реплики центрального ресурса с фиксацией всех функций.
Механизм регистрации через дублирующий портал абсолютно дублирует оригинальную заявку. Новые геймеры прописывают активный email, устанавливают безопасный пароль и выбирают рабочую финансовый инструмент.
Подтверждение профиля требует представления бумаг по KYC-нормам. Снимок паспорта, валидация места жительства и финансовые координаты контролируются системой алгоритмическую проверку в течение 24-72 часов.
Вход существующих пользователей реализуется через типовую модуль с двухфакторной верификацией. Одноразовые токены доставляются на мобильный устройство или почтовый ящик.
Инструменты пополнительного компонента через резервные ссылки обеспечивает распространенные финансовые сервисы. Visa, Mastercard, электронные кошельки Skrill, Neteller, виртуальные монеты Bitcoin, Ethereum осуществляются с минимальными платежами 0-3%.
Азартная ассортимент клонируется целиком включая машины, классические активности, live-крупье и максимальные награды. RTP-показатели, вариативность и вейджер поддерживаются неизменными.
Акционная политика функционирует схоже основному ресурсу. Welcome-наборы, даровые прокруты, денежный возврат и VIP-курсы стартуют автоматически при соблюдении прописанных стандартов.
Проверенные платформы гэмблинг сервисов гарантируют участникам возможность к качественному времяпрепровождению через специализированные ресурсы, включая Болливуд казино , которые точно исполняют мировые критерии защиты.
Механизм открытия счёта требует внесения идентификационных данных через криптографические SSL-каналы. Менеджмент требуют документальное удостоверение совершеннолетия и региона residence для соблюдения законодательных критериев.
2FA верификация считается необходимым aspect современных платформ security. Игроки имеют SMS-токены, push-уведомления или эксплуатируют targeted софт вроде Google Authenticator.
Резервные адреса преодолевают проблемы локальных барьеров и DDoS-нападений. Техническим образом mirrors являют дублированные dublicates центрального сайта с удержанием инструментария и индивидуальных деталей.
Skilled клиенты советуют keeping новейшие списки активных зеркал в избранном интернет-программы. Администрация рассылают новости о новых URL через почтовые сервисы, Telegram-communities и мобильные apps.
Платёжные процедуры через проверенные площадки secured шифровальными methods уровня банковского направления. Изъятие средств выполняется solely на подтверждённые карты собственника личного кабинета.
Активные альтернативные домены проверенных игорных заведений на Лаки Бир РІС…РѕРґ дают стабильный доступ к развлекательным сервисам. Методика клонирования создает полноценные копии базового веб-площадки с фиксацией всех функций.
Схема оформления профиля через mirror-сайт на сто процентов повторяет базовую заявку. Новые клиенты вводят функционирующий email, придумывают безопасный ключ и фиксируют базовую валюту.
Аутентификация учетной записи предполагает представления свидетельств следуя KYC-требованиям. Изображение водительских прав, доказательство адреса и денежные данные контролируются системой алгоритмическую анализ в течение 24-72 временных единиц.
Логин действующих участников осуществляется через классическую панель с расширенной проверкой. Разовые коды доставляются на смс номер или электронную почту.
Опции входящего модуля через дублирующие порталы предлагает топовые денежные сервисы. Visa, Mastercard, электронные хранилища Skrill, Neteller, цифровые активы Bitcoin, Ethereum осуществляются с сокращенными процентами 0-3%.
Игровая ассортимент воспроизводится абсолютно включая слоты, настольные активности, live-ведущих и накопительные призы. RTP-коэффициенты, волатильность и отыгрыш фиксируются неизменными.
Акционная политика действует аналогично основному порталу. Welcome-пакеты, free spins, кешбэк и VIP-курсы включаются алгоритмически при достижении установленных требований.
visit this site tlo experian
Современные игроки встречаются с множеством цифровых нюансов при деятельности с сертифицированными ресурсами. Тематические порталы типа казино Болливуд дают свежую данные о процессах игорных компаний.
Процедура аутентификации учетной записи содержит комплекс обязательных шагов. Первичная подтверждение предполагает передачи документов доказывающих гражданство. Привычный комплект включает удостоверение личности, автолицензию или международное ID.
Программная часть оформления предполагает внедрение защищенного протокола и двойной авторизации. Экспертные геймеры предлагают запускать весь комплекс представленных функций секьюрити.
Зеркала формируют абсолютные копии первичного портала с сохранением полного набора функций. Главное плюс заключается в схожести финансовых рамок и параметров ставочных требований.
Механизм обнаружения активных запасных доменов фундируется на проверке специализированных информационных каналов и связанных площадок. Продвинутые участники внедряют туннельные протоколы для создания стабильного связи независимо от местных ограничений.
Надёжные площадки азартных предложений обеспечивают участникам шанс к качественному развлечениям через dedicated ресурсы, включая Меллстрой сайт , что выполняют международные критерии security.
Схема активации предполагает указания верификационных данных через encrypted SSL-connection. Администрация просят official verification дееспособности и региона жительства для соблюдения legal стандартов.
Двухфакторная идентификация является required составляющей современных систем конфиденциальности. Users получают SMS-токены, push-уведомления или применяют профессиональные утилиты по типу Google Authenticator.
Дублирующие URL нейтрализуют вопросы региональных барьеров и DDoS-штурмов. Техническим образом дубли составляют дублированные dublicates центрального ресурса с удержанием опций и user параметров.
Опытные геймеры призывают сохранять новейшие реестры working альтернатив в bookmark браузера. Операторы рассылают новости о свежих URL через email, Telegram-чаты и портативные приложения.
Платёжные movements через проверенные площадки обеспечены encryption протоколами класса банковского segment. Вывод денег осуществляется единственно на подтверждённые карты обладателя аккаунта.
Официальные операторы игровых сервисов гарантируют игрокам возможность к элитному игровому процессу через dedicated ресурсы, включая п»ї1хбет официальный сайт , которые исполняют transnational нормы конфиденциальности.
Процедура оформления профиля включает внесения идентификационных параметров через криптографические SSL-линии. Букмекеры просят нотариальное verification возраста и территории жительства для выполнения юрисдикционных требований.
Двухфакторная аутентификация становится необходимым частью современных систем конфиденциальности. Участники получают SMS-коды, push-notification или применяют dedicated tools по типу Google Authenticator.
Зеркальные адреса преодолевают трудности geographic запретов и DDoS-штурмов. С технической точки зрения дубли являют идентичные версии основного ресурса с обеспечением features и пользовательских сведений.
Skilled геймеры призывают keeping current списки активных альтернатив в закладках browser. Провайдеры рассылают обновления о новых доменах через email, Telegram-сообщества и телефонные программы.
Платёжные процедуры через официальные ресурсы гарантированы защитными технологиями категории банковского segment. Получение средств осуществляется лишь на validated реквизиты держателя аккаунта.
Hello would you mind stating which blog platform you’re using?
I’m planning to start my own blog soon but I’m having a difficult time making
a decision between BlogEngine/Wordpress/B2evolution and Drupal.
The reason I ask is because your layout seems different then most blogs and
I’m looking for something completely unique.
P.S Sorry for being off-topic but I had to ask!
my web-site: best realtor in Santa Fe NM
my review here MMN search
Исследование в мире официальных порталов предполагает знания современных технологий авторизации. Продвинутые участники применяют казино типпи для извлечения актуальной фактов о активных адресах.
Механизм создания учетной записи в официальных учреждениях охватывает многоуровневую аутентификацию. Актуальные компании применяют KYC-алгоритмы и AML-требования. Документооборот занимает от 24 до 72 периодов.
Компьютерные способы для преодоления блокировок прогрессируют параллельно с усилением регуляторных инициатив. VPN-службы категории premium предоставляют кодирование AES-256 и системы OpenVPN. Надежность коннекта критически необходима для элитных сессий.
Запасные сайты действуют через локально рассредоточенные технические системы. CDN-комплексы осуществляют сокращенную пинг для европейских участников. Программное переключение срабатывает при распознавании блокировки главного портала.
Экономические движения в проверенных территориях отвечают жестким правилам PCI DSS. Блокчейн расчеты набирают актуальность в результате секретности и динамике процессинга.
Планшетные программы лучших операторов совмещают лицевую авторизацию и push-оповещения для важных эпизодов. Модифицируемый оформление самостоятельно изменяется под характеристики экрана.
india online pharmacy: Indo-Generic Export – indianpharmacy com
Лицензионные ресурсы гэмблинг возможностей дают клиентам доступ к премиальному игровому процессу через специализированные домены, включая Либет казино , что исполняют transnational требования надёжности.
Алгоритм активации требует предоставления валидационных информации через криптографические SSL-линии. Менеджмент запрашивают письменное подтверждение совершеннолетия и места residence для compliance законодательных стандартов.
Многоуровневая верификация представляет обязательным aspect новейших архитектур надёжности. Пользователи имеют SMS-шифры, push-алерты или внедряют специальные утилиты наподобие Google Authenticator.
Mirror ссылки ликвидируют сложности territorial барьеров и DDoS-атак. Технически дубли составляют идентичные dublicates центрального ресурса с обеспечением features и пользовательских сведений.
Skilled геймеры рекомендуют сохранять свежие реестры действующих копий в bookmark интернет-программы. Администрация доставляют updates о свежих URL через мейл, Telegram-communities и смартфонные приложения.
Банковские процедуры через официальные ресурсы защищены cryptographic системами категории банковского индустрии. Изъятие капитала реализуется лишь на validated счета хозяина аккаунта.
Hey there! Do you know if they make any plugins to assist with Search Engine Optimization? I’m trying to get
my blog to rank for some targeted keywords but I’m not seeing very good results.
If you know of any please share. Appreciate it!
Stop by my website … real estate agent Chino Hills CA
Проверенные платформы развлекательных сервисов oferuja геймерам шанс к профессиональному гэмблингу через целевые ресурсы, включая Mellstroy Game зеркало , которые именно следуют глобальные требования безопасности.
Процедура открытия счёта включает ввода идентификационных информации через шифрованные SSL-каналы. Провайдеры требуют нотариальное verification совершеннолетия и региона проживания для исполнения правовых критериев.
Multi-factor аутентификация выступает необходимым компонентом современных механизмов надёжности. Пользователи получают SMS-коды, push-оповещения или применяют специальные софт по типу Google Authenticator.
Резервные адреса преодолевают вопросы geographic запретов и DDoS-нападений. С технической точки зрения копии составляют копийные реплики центрального ресурса с обеспечением features и клиентских параметров.
Компетентные участники советуют поддерживать свежие каталоги действующих копий в сохранённых ссылках browser. Операторы рассылают обновления о современных доменах через мейл, Telegram-каналы и телефонные софт.
Денежные movements через надёжные порталы гарантированы cryptographic алгоритмами level банковского области. Изъятие капитала осуществляется solely на аутентифицированные счета владельца личного кабинета.
Беттинговая индустрия представляет быстрый рост, привлекая тысячи пользователей. Квалифицированные платформы обеспечивают безопасную обстановку для ставок. Исчерпывающую сведения о указанных компаниях доступно обнаружить на Меллстрой .
Легализация представляет приоритетным фактором селекции площадки. Лицензиаты Олдерни создают тщательный аудит финансовых процедур. Каждая официальная платформа выполняет плановые аудиты RNG-модулей.
IT параметры инновационных азартных площадок предусматривают SSL-кодирование денежного ранга. Производители виртуального материала типа Microgaming, NetEnt, Pragmatic Play интегрируют многоуровневые механизмы хаотичных чисел.
Схема верификации аккаунта требует направления документов KYC-класса. Паспорт, документ о доходах, подтверждение регистрации — типичный комплект для полноценного авторизации.
Дублирующие порталы убирают сложности с блокировками провайдеров. Функционирующие варианты модифицируются каждый день компьютерными отделами. Портативные приложения нередко действуют надёжнее сетевых форматов.
Банкролл-менеджмент задаёт долгосрочную доходность беттинговых партий. Опытные пользователи рекомендуют контролировать размер бета до 1-2% от итогового фонда.
Excellent web site. A lot of useful info here. I’m sending it to some pals
ans additionally sharing in delicious. And naturally,
thanks to your effort!
Feel free to visit my web site; best realtor in Lake Oswego OR
Thanks a lot for sharing this with all people
you really realize what you’re speaking about!
Bookmarked. Please additionally seek advice from my web site
=). We may have a hyperlink exchange arrangement among us
Feel free to visit my web site; real estate agent St. Charles IL
Hi, I think your site might be having browser compatibility issues.
When I look at your website in Ie, it looks fine but
when opening in Internet Explorer, it has some overlapping.
I just wanted to give you a quick heads up! Other then that,
fantastic blog!
my website :: realtor in Franklin TN
Wow that was unusual. I just wrote an very long comment
but after I clicked submit my comment didn’t show up.
Grrrr… well I’m not writing all that over again. Anyways,
just wanted to say excellent blog!
Выбор честного казино оператора требует основательного разбора лицензионных разрешений. Передовые ресурсы Mellstroy Game дают клиентам абсолютную сведения о действующих разрешениях.
Алгоритм создания профиля содержит определенное количество принудительных этапов подтверждения. Операторы настаивают документы, удостоверяющие индивидуальность и возраст. Типовой KYC-регламент составляет от 24 до 72 периодов.
Банкролл-менеджмент запускается с назначения пределов на взносы. Профессиональные участники призывают эксплуатировать принцип 5% от совокупного азартного капитала на отдельную игру.
Электронные барьеры поставщиков побуждают использовать альтернативные домены. Дубликаты сохраняют абсолютную работоспособность основного ресурса, содержа историю переводов и казино прогресс.
Передовые платежные инструменты дают скоростные депозиты через виртуальные счета. Bitcoin, Ethereum и стабильные валюты гарантируют тайность и наименьшие сборы. Время проведения получений насчитывает 10-30 минут.
Схемы постоянства включают ступенчатые ранги с возрастающим вознаграждением. VIP-консультанты гарантируют уникальные бонусы, увеличенные границы и первоочередную обслуживание.
Исследование в секторе сертифицированных ресурсов нуждается понимания современных решений авторизации. Квалифицированные игроки внедряют Меллстрой зеркало для извлечения современной информации о оперативных URL.
Механизм оформления учетной записи в официальных организациях содержит детальную верификацию. Новейшие поставщики задействуют KYC-процедуры и AML-критерии. Документальная процедура потребляет от 24 до 72 промежутков.
Цифровые методы для обхода препятствий совершенствуются вместе с укреплением законодательных действий. VPN-службы класса premium обеспечивают кодирование AES-256 и технологии OpenVPN. Надежность коннекта жизненно актуальна для высокоролловых раундов.
Запасные домены действуют через территориально размещенные серверные ресурсы. CDN-архитектуры гарантируют быструю время ответа для азиатских участников. Автоматическое перенаправление активируется при распознавании препятствия базового сайта.
Банковские переводы в сертифицированных регионах подчиняются строгим критериям PCI DSS. Децентрализованные операции приобретают распространение по причине секретности и оперативности осуществления.
Переносные приложения премиальных компаний объединяют лицевую авторизацию и push-сообщения для ключевых происшествий. Изменяемый дизайн независимо настраивается под свойства дисплея.
Исследование в секторе сертифицированных ресурсов подразумевает понимания современных способов авторизации. Продвинутые геймеры внедряют Вован казино для добывания релевантной данных о действующих доменах.
Процедура оформления профиля в официальных учреждениях включает детальную подтверждение. Передовые операторы эксплуатируют KYC-алгоритмы и AML-нормы. Документальное сопровождение требует от 24 до 72 периодов.
Компьютерные способы для минования барьеров прогрессируют параллельно с повышением юридических мер. VPN-решения типа premium предлагают криптографию AES-256 и протоколы OpenVPN. Постоянство соединения жизненно актуальна для элитных партий.
Зеркальные сайты работают через регионально расположенные технические кластеры. CDN-комплексы гарантируют сокращенную пинг для азиатских геймеров. Техническое перенаправление срабатывает при обнаружении препятствия центрального сайта.
Денежные движения в проверенных юрисдикциях следуют определенным требованиям PCI DSS. Криптовалютные операции набирают популярность в результате скрытности и динамике выполнения.
Смартфонные клиенты ведущих компаний объединяют отпечатковую авторизацию и push-алерты для ключевых событий. Настраиваемый интерфейс автономно адаптируется под характеристики дисплея.
this contact form chase bank drops
charmcartel.shop – Stylish accessories that are easy to find on this clean, well-organized website.
Функционирующие альтернативные домены легальных азартных клубов на lucky bear казино обеспечивают устойчивый вход к азартным ресурсам. Принцип дублирования создает идентичные клоны основного сайта с консервацией всех возможностей.
Система создания аккаунта через альтернативный домен полностью копирует оригинальную форму. Дебютные участники заполняют активный email, формируют защищенный код доступа и фиксируют основную денежную единицу.
Валидация личного кабинета предполагает представления свидетельств опираясь на KYC-регламенту. Копия удостоверения личности, доказательство проживания и денежные данные проверяются через программную валидацию в течение 24-72 часов.
Аутентификация зарегистрированных пользователей происходит через типовую форму с многоступенчатой идентификацией. Краткосрочные коды доставляются на мессенджер гаджет или мейл.
Механизмы депозитного компонента через зеркала предлагает популярные банковские платформы. Visa, Mastercard, веб счета Skrill, Neteller, блокчейн-токены Bitcoin, Ethereum процессируются с оптимизированными комиссиями 0-3%.
Gaming библиотека повторяется полностью включая автоматы, столовые развлечения, live-ведущих и прогрессивы. RTP-индикаторы, дисперсия и отыгрыш удерживаются идентичными.
Поощрительная механизм действует схоже основному сайту. Welcome-бандлы, бесплатные вращения, refund и VIP-системы активируются программно при исполнении определенных условий.
BajaMed Direct: pharmacy delivery – mexi pharmacy
Новейшие гемблеры попадают с барьером связи к сертифицированным порталам. Провайдеры закрывают первичные домены, но опытные казино Вавада участники учитывают о наличии резервных порталов.
Параллельный портал формирует абсолютную воспроизведение оригинального платформы. SSL-сертификаты работают такими же. Банковские транзакции осуществляются через те же механизмы.
Схема создания аккаунта через дополнительный портал подразумевает обычной валидации. Менеджеры уточняют справки для соблюдения KYC-норм. Идентификационные характеристики проходят комплексную верификацию.
Пополнительные лимиты на параллельных платформах идентичны главным спецификациям. Стартовые вклады функционируют постоянными. Возрастающие накопления синхронизируются между всеми адресами.
Бонусные системы функционируют целостно на альтернативных порталах. Множитель ставок сохраняет стартовые цифры. Период действия использования не изменяется.
Команда ассистирования изучает заявки с дополнительных порталов сходным образом. Интерактивный чат гарантирует непрерывный расписание деятельности.
indian pharmacy Indo-Generic Export reputable indian online pharmacy
I really like what you guys are usually up too. This sort of clever work and exposure!
Keep up the terrific works guys I’ve incorporated you guys to my own blogroll.
my webpage; realtor in Lake Ozark MO
Подбор достойного гемблинг площадки в нынешних условиях предполагает особого анализа к регулятивному положению. Профессиональные участники осознают, что Mellstroy Game casino демонстрирует актуальную сведения о доступных сервисах.
Алгоритм открытия счета в официальных сервисах включает обязательную проверку личности. KYC-требования обеспечивают как казино, так и игрока от фрода. Промежуточные рамки на получение активов до закрытия проверки – стандартная система.
Технические ограничения на вход к азартным сайтам нейтрализуются через зеркальные порталы. Действующие зеркала предоставляют абсолютную возможности основного платформы. Платежные процедуры, развлекательный достижения и наградные планы функционируют стабильными.
Экономическая стабильность измеряется степенью применяемых финансовых способов. SSL-безопасность, PCI DSS подтверждение и дополнительная идентификация устанавливают надежный периметр защиты.
Развлекательная каталог легальных площадок объединяет машины от известных создателей. RTP-значения, волатильность и алгоритмические схемы проходят беспристрастную сертификацию в аккредитованных учреждениях.
Программы стимулирования в серьезных операторах основываются на четких правилах отыгрыша. Проигрыш x35-40 оценивается адекватным для спин-привилегий, в то время как классические состязания засчитываются в расчет с сниженным множителем.
greenguild.shop – This site makes eco-friendly shopping a breeze, with an excellent selection of products.
dorvoria.shop – Wonderful items and a simple, enjoyable checkout process. Highly recommend!
http://indogenericexport.com/# top online pharmacy india
Определение качественного игрового площадки в актуальных обстоятельствах подразумевает специального анализа к правовому положению. Профессиональные игроки понимают, что казино Рльдорадо содержит современную сведения о действующих провайдерах.
Процесс создания аккаунта в легальных операторах охватывает принудительную верификацию идентичности. KYC-процедуры обеспечивают как сервис, так и пользователя от афер. Кратковременные рамки на вывод капитала до окончания проверки – стандартная методика.
Цифровые блокировки на соединение к игровым площадкам решаются через параллельные URL. Рабочие клоны поддерживают всестороннюю функциональность главного сайта. Финансовые процедуры, геймплейный достижения и бонусные планы продолжают постоянными.
Материальная стабильность определяется критерием используемых денежных методов. SSL-кодирование, PCI DSS подтверждение и расширенная идентификация формируют прочный заслон безопасности.
Развлекательная ассортимент легальных провайдеров включает машины от топовых разработчиков. RTP-показатели, вариативность и статистические схемы претерпевают внешнюю сертификацию в авторизованных центрах.
Механизмы стимулирования в серьезных операторах базируются на четких условиях активности. Вейджер x35-40 признается разумным для барабан-льгот, в то время как классические активности идут в калькуляцию с пониженным показателем.
Актуальные клиенты пересекаются с набором программных аспектов при процессах с проверенными ресурсами. Профессиональные порталы типа Меллстрой РІС…РѕРґ обеспечивают современную материалы о деятельности азартных брендов.
Процесс проверки учетной записи предполагает ряд требуемых стадий. Первичная аутентификация требует отправки свидетельств доказывающих индивидуальность. Стандартный пакет подразумевает ID, водительские права или загранпаспорт.
Программная часть оформления включает эксплуатацию криптографической защиты и двухуровневой проверки. Квалифицированные геймеры советуют включать полный набор имеющихся опций безопасности.
Зеркала являются идентичные отражения центрального домена с удержанием всего возможностей. Важнейшее бонус состоит в подобии денежных ограничений и критериев ставочных требований.
Процедура поиска функционирующих резервных ссылок базируется на проверке профессиональных информационных каналов и партнерских ресурсов. Экспертные пользователи используют виртуальные частные сети для создания постоянного связи безотносительно от местных блокировок.
Современные платформы развлекательных активностей предлагают беттерам возможность к профессиональному игровому процессу через безопасные п»ї1хбет РІС…РѕРґ сайты. Авторизованная деятельность подразумевает соблюдения строгих контролирующих положений.
Процесс открытия игрового учетной записи включает проверку личных сведений. Регуляторы внедряют многоуровневые протоколы KYC и AML для пресечения поддельных переводов.
Цифровые платформы передовых игорных домов работают на зашифрованных инфраструктурах с TLS протоколами. Геоблокировка обязывает провайдеров запускать вспомогательные URL.
Дублирующие платформы являют собой идентичные версии главного домена с фиксацией всех сервисов и данных. Игроки обеспечивают себе беспрепятственный подключение к средствам, азартной записям и персональным установкам.
Денежные транзакции производятся через встроенные платежные сервисы. Пределы на пополнения и получения назначаются в соответствии с лицензионными положениями и внутренними процедурами контроля угроз.
Профессиональные пользователи советуют мониторить условия аккредитации через надзорные регистры развлекательных комиссий. Репутационные критерии охватывают места на экспертных платформах и отзывы действительных игроков.
Современные порталы развлекательных услуг дают беттерам путь к элитному гемблингу через проверенные казино Либет порталы. Авторизованная операционная активность подразумевает выполнения конкретных законодательных норм.
Алгоритм оформления персонального кабинета задействует подтверждение конфиденциальных сведений. Управляющие используют комплексные алгоритмы KYC и AML для блокировки незаконных операций.
Цифровые решения современных беттинг площадок функционируют на надежных облачных системах с шифровальными технологиями. Локальные запреты заставляет операторов внедрять вспомогательные ссылки.
Резервные порталы являют собой точные дубликаты главного платформы с поддержанием всех возможностей и показателей. Пользователи достигают беспрепятственный подключение к балансу, гемблинг отчетности и пользовательским опциям.
Финансовые переводы осуществляются через связанные расчетные агрегаторы. Рамки на взносы и получения назначаются в соответствии с нормативными условиями и индивидуальными правилами управления рисками.
Квалифицированные пользователи предлагают мониторить ситуацию разрешения через официальные реестры беттинг организаций. Имиджевые индикаторы охватывают оценки на специализированных сервисах и feedback подлинных пользователей.
Ориентирование в области лицензированных площадок подразумевает понимания передовых методов доступа. Продвинутые пользователи используют п»ї1xBet зеркало для обретения релевантной материалов о оперативных URL.
Процедура создания личного кабинета в проверенных учреждениях включает детальную валидацию. Современные организации применяют KYC-механизмы и AML-стандарты. Бумажная работа потребляет от 24 до 72 интервалов.
Цифровые решения для прохождения барьеров эволюционируют синхронно с ужесточением правовых инициатив. VPN-решения класса premium дают шифрование AES-256 и протоколы OpenVPN. Надежность коннекта жизненно существенна для VIP сессий.
Альтернативные сайты работают через регионально расположенные IT инфраструктуры. CDN-сети предоставляют оптимальную задержку для глобальных игроков. Системное переключение активируется при выявлении препятствия базового сайта.
Финансовые транзакции в сертифицированных регионах следуют жестким нормам PCI DSS. Цифровые транзакции приобретают распространение благодаря приватности и быстроте процессинга.
Смартфонные клиенты лучших провайдеров включают голосовую идентификацию и push-извещения для критических моментов. Настраиваемый облик независимо изменяется под настройки дисплея.
glamgarrison.shop – Stylish accessories for every occasion, the collection never disappoints!
Современные провайдеры игорных продуктов гарантируют пользователям доступ к премиальному гемблингу через проверенные Меллстрой РІС…РѕРґ системы. Сертифицированная операционная активность нуждается исполнения определенных регуляторных критериев.
Алгоритм создания клиентского счета задействует валидацию индивидуальных данных. Управляющие применяют углубленные процедуры KYC и AML для пресечения мошеннических платежей.
Цифровые системы актуальных гемблинг платформ функционируют на защищенных серверах с TLS протоколами. Геоблокировка принуждает управляющих запускать резервные домены.
Дублирующие порталы представляют полные репликации центрального домена с обеспечением всех инструментов и данных. Беттеры получают устойчивый подключение к средствам, беттинг данным и личным настройкам.
Финансовые процедуры осуществляются через интегрированные платежные агрегаторы. Рамки на инвестиции и снятия устанавливаются в согласии с нормативными требованиями и внутренними процедурами управления рисками.
Профессиональные игроки рекомендуют контролировать ситуацию авторизации через регуляторные базы данных беттинг организаций. Репутационные параметры содержат позиции на профильных порталах и отзывы настоящих игроков.
kovalyn online shop – Layout is clean, exploring products is effortless and details are clear.
Легальные площадки игорных опций предоставляют геймерам возможность к качественному развлечениям через dedicated домены, включая аква , что выполняют глобальные регламенты защиты.
Последовательность создания аккаунта necessita заполнения валидационных информации через encrypted SSL-соединения. Букмекеры просят нотариальное доказательство правоспособности и адреса residence для поддержания юрисдикционных требований.
Двухфакторная идентификация представляет принудительным элементом новейших платформ конфиденциальности. Users располагают SMS-коды, push-алерты или используют специальные программы в стиле Google Authenticator.
Резервные домены нейтрализуют проблемы territorial запретов и DDoS-нападений. С технической точки зрения дубли являют тождественные версии центрального портала с поддержанием функциональности и личных деталей.
Skilled игроки рекомендуют поддерживать новейшие реестры рабочих mirrors в избранном браузера. Management передают сведения о свежих доменах через электронную почту, Telegram-сообщества и смартфонные приложения.
Банковские movements через legal платформы гарантированы защитными протоколами стандарта банковского индустрии. Получение денег реализуется solely на верифицированные счета собственника профиля.
Надёжные платформы гэмблинг предложений дают пользователям возможность к премиальному игровому процессу через целевые домены, включая ретро казино , которые именно придерживаются мировые регламенты security.
Механизм регистрации требует заполнения проверочных информации через encrypted SSL-connection. Администрация запрашивают нотариальное verification age verification и адреса нахождения для поддержания нормативных правил.
Двухэтапная проверка является необходимым составляющей передовых solutions безопасности. Участники обретают SMS-коды, push-notification или используют специализированные tools вроде Google Authenticator.
Альтернативные порталы преодолевают вопросы geographic санкций и DDoS-нападений. Фактически зеркала представляют тождественные версии базового ресурса с maintaining features и индивидуальных данных.
Экспертные пользователи советуют поддерживать свежие базы активных mirrors в favourites браузера. Management направляют сведения о свежих ссылках через электронную почту, Telegram-каналы и мобильные программы.
Банковские переводы через лицензионные площадки гарантированы encryption технологиями level банковского segment. Снятие денег реализуется лишь на верифицированные карты хозяина account.
Передовые гемблеры встречаются с проблемой соединения к легальным платформам. Компании ограничивают основные домены, но опытные казино Меллстрой участники понимают о функционировании дублирующих сайтов.
Дополнительный домен представляет точную реплику главного платформы. Системы безопасности остаются равнозначными. Финансовые процедуры проходят через идентичные сервисы.
Алгоритм создания аккаунта через резервный ссылку подразумевает типовой верификации. Операторы уточняют документы для осуществления KYC-норм. Личные сведения выполняют расширенную проверку.
Банковские лимиты на зеркальных ресурсах идентичны базовым спецификациям. Начальные беты сохраняются постоянными. Увеличивающиеся джекпоты объединяются между всеми ссылками.
Поощрительные планы оперируют целостно на альтернативных платформах. Вейджер поддерживает первоначальные цифры. Период действия проигрывания не изменяется.
Департамент ассистирования изучает тикеты с дополнительных адресов равнозначно. Мгновенный переписка поддерживает беспрерывный порядок функционирования.
Надёжные платформы игорных возможностей обеспечивают геймерам право к высококлассному развлечениям через целевые домены, включая Лаки Бир зеркало , которые специально выполняют мировые требования надёжности.
Алгоритм открытия счёта necessita ввода проверочных информации через криптографические SSL-connection. Букмекеры запрашивают официальное удостоверение дееспособности и локации регистрации для соблюдения законодательных критериев.
Multi-factor верификация выступает mandatory составляющей передовых систем безопасности. Игроки располагают SMS-токены, push-notification или применяют специализированные софт вроде Google Authenticator.
Mirror ссылки нейтрализуют препятствия региональных запретов и DDoS-атак. С технической точки зрения реплики представляют копийные dublicates главного домена с поддержанием возможностей и клиентских информации.
Опытные геймеры призывают keeping обновлённые реестры рабочих mirrors в favourites обозревателя. Management рассылают информацию о новых доменах через мейл, Telegram-сообщества и смартфонные софт.
Банковские операции через надёжные сайты покрыты encryption системами level банковского направления. Extraction денег осуществляется единственно на проверенные данные хозяина профиля.
узнать больше мега даркнет
official statement TLO
ラブドール 私はこのサイトで本当に特別な何かを考えています。
Подбор качественного азартного площадки в актуальных обстоятельствах предполагает повышенного рассмотрения к правовому режиму. Профессиональные участники представляют, что [url=https://github.com/Mellstroy-Game-zerkalo]Меллстрой регистрация[/url] отображает последнюю информацию о активных операторах.
Процедура открытия счета в легальных операторах включает требуемую валидацию идентичности. KYC-процедуры гарантируют как казино, так и клиента от обмана. Промежуточные границы на вывод финансов до финализации проверки – нормальная система.
Программные барьеры на доступ к азартным сервисам устраняются через резервные URL. Действующие зеркала гарантируют полную производительность центрального портала. Финансовые операции, интерактивный результаты и поощрительные планы поддерживаются устойчивыми.
Денежная гарантированность измеряется показателем эксплуатируемых расчетных систем. SSL-кодирование, PCI DSS лицензирование и двухфакторная проверка формируют стабильный щит охраны.
Интерактивная каталог сертифицированных заведений объединяет барабаны от известных провайдеров. RTP-показатели, колебания и математические модели испытывают беспристрастную контроль в одобренных учреждениях.
Схемы стимулирования в профессиональных заведениях строятся на ясных условиях проигрыша. Вейджер x35-40 считается адекватным для спин-подарков, в то время как классические активности принимаются в зачет с сниженным коэффициентом.
When some one searches for his vital thing, therefore he/she wishes to be available that in detail, thus
that thing is maintained over here.
Also visit my web site; best realtor in Joliet IL
The gamemakers control the weather, the time of day, and the hazards in the arena. It emphasizes that the tributes have no control over their environment. This lack of agency is a central theme. The book explores the feeling of being watched constantly. To dive into this dystopian nightmare, you need the novel. Digital reading is very popular for this genre, and finding a PDF or epub allows you to start reading instantly. https://thehungergamespdf.ru/ The Hunger Games Series Pdf Free
порно
Порноиндустрия — странное место, где все делают вид, что это «работа мечты».
Sweet finds – Always discovering tasty treats that I can’t resist.
Выбор качественного гемблинг площадки в актуальных границах подразумевает детального изучения к юридическому статусу. Профессиональные клиенты представляют, что п»ї1хбет официальный сайт отображает новую материалы о функционирующих сервисах.
Процесс открытия счета в проверенных площадках предусматривает неизбежную валидацию документов. KYC-процедуры защищают как сервис, так и участника от обмана. Кратковременные границы на вывод денег до финализации подтверждения – нормальная система.
Программные барьеры на подключение к азартным сайтам решаются через резервные адреса. Доступные дубликаты гарантируют тотальную функциональность основного портала. Платежные движения, геймплейный достижения и поощрительные планы продолжают стабильными.
Материальная стабильность измеряется критерием эксплуатируемых банковских способов. SSL-криптография, PCI DSS подтверждение и двухфакторная подтверждение устанавливают стабильный щит обороны.
Азартная ассортимент легальных провайдеров содержит машины от топовых провайдеров. RTP-значения, вариативность и алгоритмические принципы получают независимую проверку в аккредитованных учреждениях.
Программы стимулирования в качественных казино базируются на понятных правилах вейджера. Отыгрыш x35-40 характеризуется справедливым для слот-привилегий, в то время как традиционные состязания принимаются в подсчет с минимальным коэффициентом.
Отбор безопасного развлекательного оператора в актуальных рамках нуждается специального внимания к лицензионному положению. Квалифицированные клиенты представляют, что казино лаки ворлд предоставляет последнюю факты о работающих ресурсах.
Схема создания аккаунта в официальных заведениях включает необходимую аутентификацию личности. KYC-нормы защищают как сервис, так и клиента от афер. Переходные рамки на перечисление финансов до финализации подтверждения – привычная система.
Виртуальные запреты на доступ к развлекательным сервисам преодолеваются через дублирующие адреса. Доступные клоны сохраняют абсолютную возможности основного портала. Денежные операции, азартный статистика и привилегированные программы функционируют постоянными.
Материальная стабильность характеризуется степенью эксплуатируемых расчетных способов. SSL-защита, PCI DSS аттестация и многоуровневая верификация гарантируют безопасный заслон ограждения.
Геймплейная набор легальных заведений включает спины от лидирующих разработчиков. RTP-показатели, дисперсия и алгоритмические модели проходят внешнюю проверку в признанных центрах.
Схемы вознаграждения в качественных площадках опираются на прозрачных критериях активности. Требования x35-40 оценивается приемлемым для барабан-льгот, в то время как стандартные игры учитываются в подсчет с редуцированным коэффициентом.
Игровая отрасль отображает быстрый рост, притягивая легионы клиентов. Экспертные ресурсы гарантируют качественную среду для развлечений. Развёрнутую информацию о этих брендах реально отыскать на миллионъ казино .
Аккредитация остаётся основным показателем подбора сайта. Регуляторы Олдерни гарантируют тщательный аудит денежных операций. Конкретная сертифицированная платформа осуществляет регулярные контроли RNG-алгоритмов.
Программные аспекты передовых казино объединяют SSL-криптографию банковского класса. Производители цифрового материала наподобие Microgaming, NetEnt, Pragmatic Play подключают усовершенствованные модели случайных показателей.
Процесс подтверждения профиля требует предоставления удостоверений KYC-типа. Паспорт, выписка о финансах, валидация регистрации — обычный список для завершённого входа.
Параллельные домены устраняют препятствия с блокировками организаций. Функционирующие альтернативы адаптируются систематически IT группами. Мобильные программы регулярно функционируют качественнее интернет редакций.
Распределение капитала формирует долгосрочную доходность развлекательных раундов. Профессиональные игроки советуют урезать количество депозита до 1-2% от общего резерва.
The introduction of the “This Is Your Life” section transforms character generation into a storytelling game. Xanathar’s Guide to Everything allows you to roll for siblings, enemies, and defining moments. Players who want a PDF of these charts to play a mini-game of character creation will love our walkthroughs. We show how random results can spark the most creative backstories you have ever played. Don’t start with a blank slate; let the dice decide your destiny and build a character with deep roots in the game world. https://xanatharsguidetoeverythingpdf.ru/ Xanathar’s Guide To Everything Epub Reddit
Thanks to my father who shared with me regarding
this blog, this website is really amazing.
my website best realtor in Chino Hills CA
craftcurio.shop – A crafter’s dream, packed with all sorts of cool and inspiring craft supplies!
This casino https://www.lift-me-up.com/wordpress/?p=33518 offers a solid mix of classic slots and live tables. The platform feels well-designed, promotions are attractive, and support is helpful, which adds confidence.
Современные гемблеры оказываются с барьером подключения к легальным порталам. Поставщики ограничивают первичные порталы, но грамотные Mellstroy Game зеркало пользователи помнят о функционировании альтернативных порталов.
Зеркало составляет точную реплику основного ресурса. Криптографические алгоритмы остаются идентичными. Финансовые действия реализуются через идентичные системы.
Процедура оформления профиля через резервный адрес требует привычной аутентификации. Администраторы выясняют документы для выполнения KYC-требований. Личные сведения выполняют усиленную валидацию.
Пополнительные ограничения на зеркальных ресурсах соответствуют основным требованиям. Стартовые беты сохраняются постоянными. Прогрессивные накопления согласовываются между многочисленными адресами.
Стимулирующие механизмы выполняются целостно на зеркальных платформах. Множитель ставок поддерживает первоначальные величины. Длительность реализации остаётся прежним.
Команда обслуживания рассматривает обращения с параллельных ресурсов идентично. Прямой диалог осуществляет 24-часовой формат функционирования.
this trixo hub – Fast pages, easy-to-follow layout, and content is approachable.
Rutor — известный сервис с богатым прошлым, предоставляющий анонимный доступ и безопасность транзакций в пределах сети Rutor.Rutor: Ветеран русскоязычного даркнета
актуальное зеркало рутор орг на сегодня сейчас 2022 — это один из первых и известнейших русскоязычных ресурсов даркнета, неразрывно связанный с анонимной онлайн-экосистемой. Этот магазин ориентирован на предоставление пользователям широкой базы данных, связанной с файлами, софтом, новостями и различными видами контента, включая темы, касающиеся взлома и безопасности.
Как устроена система работы Rutor
Система курирует доступ к огромному количеству информации и файлов, сохраняя дополнительную конфиденциальность и анонимность своих пользователей. Особенность сервиса в том, что он работает через сеть Rutor, что существенно снижает риск идентификации и утечки данных. За долгое время работы Rutor стал своего рода летописью для даркнета на русском языке.
Rutor поддерживает стабильную работу, позволяя и новичкам, и опытным пользователям использовать предоставляемые сервисы. Архитектура ресурса предусматривает, что любые разделы — магазин, новостной блок или гайды по взлому — являются составляющими единой системы, где превалируют безопасность и анонимность.
Возможные направления развития и связанные опасности
Нет сомнений, что в дальнейшем Rutor столкнётся с новыми угрозами, инновационными способами охраны приватности и методами преодоления блокировок. Следует помнить, что даже максимально анонимная среда не обеспечивает стопроцентную безопасность.
Этот сервис по-прежнему служит площадкой для информирования, обсуждений безопасности и отслеживания новшеств в даркнет-сообществе. Технический прогресс, рост числа участников и новые функциональные решения превращают Rutor в ключевой узел русскоязычного интернет-сообщества.
– Сохранение анонимности
– Надёжность проведения операций
– Возможность получения эксклюзивных данных
– Защищённость коммуникаций
Rutor представляет собой ресурс с неповторимой историей, важный для пользователей, стремящихся к свободе, сохранению конфиденциальности и автономии от внешних ограничений в современном интернете.
Навигация в секторе лицензированных площадок предполагает представления актуальных методов доступа. Умелые клиенты внедряют Лаки Бир регистрация для получения релевантной материалов о оперативных доменах.
Процедура регистрации профиля в сертифицированных операторах подразумевает многоуровневую верификацию. Новейшие организации используют KYC-механизмы и AML-критерии. Бумажная работа занимает от 24 до 72 интервалов.
Компьютерные способы для избежания препятствий эволюционируют одновременно с повышением юридических решений. VPN-сервисы категории premium гарантируют шифрование AES-256 и протоколы OpenVPN. Постоянство подключения кардинально необходима для привилегированных сессий.
Запасные домены функционируют через локально размещенные технические ресурсы. CDN-системы обеспечивают сокращенную пинг для европейских игроков. Системное редирект запускается при идентификации блокировки центрального ресурса.
Экономические транзакции в официальных юрисдикциях подчиняются строгим критериям PCI DSS. Децентрализованные переводы получают востребованность благодаря секретности и быстроте обработки.
Мобильные софт лучших организаций совмещают лицевую аутентификацию и push-алерты для существенных происшествий. Адаптивный облик самостоятельно изменяется под характеристики дисплея.
Передовые игроки сталкиваются с множеством цифровых тонкостей при деятельности с официальными площадками. Тематические порталы типа аква казино дают актуальную сведения о работе развлекательных организаций.
Механизм проверки учетной записи включает ряд обязательных стадий. Первичная аутентификация включает размещения свидетельств удостоверяющих персону. Классический комплект включает паспорт, водительские права или внешний паспорт.
Системная сторона оформления включает задействование криптографической защиты и двухфакторной аутентификации. Продвинутые геймеры настаивают включать полный набор доступных настроек защиты.
Резервные ссылки образуют стопроцентные реплики центрального домена с хранением полного набора функций. Важнейшее достоинство кроется в соответствии денежных ограничений и параметров вейджера.
Алгоритм поиска функционирующих дублирующих порталов базируется на наблюдении специализированных новостных лент и связанных ресурсов. Продвинутые пользователи применяют туннельные протоколы для обеспечения постоянного доступа вне зависимости от локальных запретов.
Henvoria Shop – Easy to explore, categories made sense and visuals were helpful.
1win ilova ochilmayapti http://www.1win5753.help
http://indogenericexport.com/# muscle relaxers for back pain
Выбор проверенного игорного портала требует детального рассмотрения лицензионных бумаг. Актуальные порталы казино Клубника дают участникам безусловную сведения о текущих аккредитациях.
Процесс регистрации охватывает ряд принудительных этапов валидации. Провайдеры запрашивают бумаги, удостоверяющие индивидуальность и совершеннолетие. Традиционный KYC-регламент продолжается от 24 до 72 промежутков.
Распоряжение капиталом запускается с назначения пределов на инвестиции. Компетентные участники советуют применять принцип 5% от полного гемблинг резерва на единичную раунд.
Программные препятствия провайдеров принуждают задействовать альтернативные ссылки. Альтернативы сохраняют стопроцентную работоспособность основного портала, охватывая архив сделок и казино продвижение.
Передовые финансовые системы предоставляют моментальные депозиты через электронные кошельки. Bitcoin, Ethereum и стабильные валюты обеспечивают конфиденциальность и наименьшие сборы. Продолжительность осуществления снятий равно 10-30 минут.
Алгоритмы постоянства содержат каскадные статусы с прогрессивным вознаграждением. VIP-координаторы обеспечивают персонализированные бонусы, улучшенные рамки и приоритетную техподдержку.
Выбор надежного азартного площадки нуждается серьезного разбора юридических документов. Инновационные порталы п»ї1xBet казино предлагают пользователям полную данные о действующих допусках.
Механизм регистрации подразумевает ряд обязательных ступеней проверки. Провайдеры истребуют бумаги, доказывающие самобытность и правоспособность. Классический KYC-механизм составляет от 24 до 72 интервалов.
Банкролл-менеджмент открывается с фиксации границ на инвестиции. Искусные игроки предлагают задействовать принцип 5% от итогового гемблинг фонда на одну партию.
Цифровые ограничения администраторов принуждают внедрять дополнительные пути. Дубликаты сохраняют стопроцентную работоспособность первичного ресурса, предусматривая летопись сделок и развлекательный успех.
Актуальные платежные способы дают моментальные вклады через виртуальные аккаунты. Bitcoin, Ethereum и постоянные токены поддерживают анонимность и минимальные отчисления. Длительность проведения извлечений насчитывает 10-30 минут.
Программы преданности подразумевают ступенчатые ранги с увеличивающимся кэшбэком. VIP-менеджеры предоставляют уникальные поощрения, улучшенные лимиты и ускоренную поддержку.
luggagelotus online store – Easy to explore, products look strong and selection is clear.
Официальные ресурсы игровых опций гарантируют участникам шанс к профессиональному времяпрепровождению через специализированные сайты, включая казино 1xBet , которые специально следуют глобальные нормы безопасности.
Последовательность создания аккаунта предполагает ввода проверочных сведений через защищённые SSL-протоколы. Менеджмент требуют official verification правоспособности и локации residence для compliance правовых норм.
Двухфакторная проверка представляет необходимым элементом актуальных архитектур защиты. Участники приобретают SMS-токены, push-сообщения или эксплуатируют специальные tools вроде Google Authenticator.
Mirror URL нейтрализуют проблемы географических ограничений и DDoS-атак. Технически копии образуют копийные версии центрального домена с сохранением возможностей и user сведений.
Профессиональные геймеры рекомендуют keeping актуальные базы активных альтернатив в favourites обозревателя. Провайдеры доставляют новости о свежих URL через мейл, Telegram-communities и телефонные приложения.
Финансовые операции через legal порталы покрыты cryptographic технологиями класса банковского направления. Получение капитала происходит лишь на аутентифицированные счета обладателя account.
Hidden gems – Always discovering something special when browsing here.
buildbay.shop – Perfect for all your DIY needs, easy to navigate and quick checkout.
Актуальные дублирующие порталы лицензированных казино на п»ї1хбет РІС…РѕРґ создают непрерывный вход к азартным системам. Схема зеркалирования генерирует идентичные версии корневого домена с фиксацией всех возможностей.
Механизм регистрации через зеркало в точности дублирует базовую бланк. Свежие игроки регистрируют валидный email, устанавливают надежный шифр и устанавливают базовую финансовый инструмент.
Подтверждение профиля подразумевает загрузки справок по KYC-регламенту. Фото национального документа, свидетельство места жительства и денежные параметры подвергаются программную анализ в течение 24-72 часов.
Вход действующих участников выполняется через стандартную форму с усиленной проверкой. Сессионные шифры поступают на телефонный аппарат или электронную почту.
Возможности депозитного блока через альтернативные домены содержит востребованные денежные инструменты. Visa, Mastercard, цифровые хранилища Skrill, Neteller, цифровые активы Bitcoin, Ethereum реализуются с минимальными процентами 0-3%.
Азартная база повторяется на сто процентов включая автоматы, настольные активности, live-дилеров и накопительные призы. RTP-показатели, дисперсия и условия отыгрыша сохраняются идентичными.
Бонусная схема действует схоже основному сайту. Welcome-комплекты, безвозмездные спины, возврат средств и VIP-программы включаются системно при реализации заданных параметров.
Выбор проверенного betting оператора в текущих рамках предполагает детального внимания к законному состоянию. Опытные участники понимают, что казино Лаки Бир демонстрирует современную информацию о доступных провайдерах.
Схема создания аккаунта в сертифицированных операторах объединяет требуемую верификацию персональных данных. KYC-стандарты гарантируют как заведение, так и пользователя от фрода. Промежуточные пределы на изъятие капитала до выполнения валидации – привычная процедура.
Технические препятствия на связь к betting порталам решаются через зеркальные ссылки. Активные клоны сохраняют всестороннюю эффективность центрального ресурса. Финансовые процедуры, геймплейный статистика и поощрительные схемы функционируют устойчивыми.
Экономическая защищенность определяется качеством внедренных банковских механизмов. SSL-кодирование, PCI DSS валидация и двухфакторная проверка обеспечивают надежный контур обороны.
Геймплейная библиотека сертифицированных провайдеров охватывает слоты от лидирующих создателей. RTP-показатели, дисперсия и вероятностные формулы получают беспристрастную проверку в авторизованных учреждениях.
Программы поощрения в профессиональных казино опираются на понятных критериях отыгрыша. Проигрыш x35-40 характеризуется справедливым для слот-бонусов, в то время как стандартные игры включаются в калькуляцию с минимальным фактором.
подробнее Уменьшение ндс
I’m curious to find out what blog system you have been utilizing?
I’m experiencing some small security issues with my latest blog and I would like to find something more secure.
Do you have any solutions?
Here is my web site: real estate agent Lake Oswego OR
Инновационные платформы азартных активностей гарантируют беттерам возможность к элитному развлечениям через сертифицированные казино РЎСѓРєР° системы. Авторизованная работа влечет следования конкретных надзорных норм.
Механизм открытия пользовательского кабинета содержит аутентификацию персональных данных. Регуляторы эксплуатируют детализированные алгоритмы KYC и AML для пресечения нарушающих операций.
Электронные инструменты инновационных гемблинг платформ базируются на защищенных инфраструктурах с SSL стандартами. Локальные запреты побуждает владельцев разрабатывать дублирующие URL.
Зеркальные ресурсы являют собой точные дубликаты главного сайта с сохранением всех сервисов и параметров. Участники добиваются постоянный доступ к депозиту, развлекательной статистике и личным параметрам.
Расчетные переводы проходят через интегрированные денежные шлюзы. Ограничения на инвестиции и снятия назначаются в согласии с лицензионными условиями и внутренними процедурами контроля угроз.
Квалифицированные игроки предлагают анализировать статус сертификата через официальные регистры азартных структур. Авторитетные индикаторы предусматривают позиции на тематических платформах и мнения действительных игроков.
Современные геймеры встречаются с множеством технических особенностей при деятельности с легальными площадками. Специализированные платформы типа ДживиСпин казино предоставляют релевантную материалы о деятельности развлекательных операторов.
Процедура подтверждения счета охватывает несколько обязательных фаз. Базовая подтверждение нуждается отправки справок удостоверяющих гражданство. Стандартный список содержит паспорт, автоудостоверение или заграничное удостоверение.
Технологическая составляющая открытия счета предполагает задействование защищенного протокола и двойной авторизации. Профессиональные игроки советуют инициировать весь комплекс предложенных опций безопасности.
Зеркала составляют полные дубликаты базового домена с удержанием тотального возможностей. Главное бонус заключается в схожести финансовых пределов и критериев отыгрыша.
Механизм поиска активных резервных ссылок фундируется на мониторинге тематических информационных каналов и союзных ресурсов. Продвинутые клиенты задействуют анонимайзеры для предоставления устойчивого доступа без оглядки от географических блокировок.
опубликовано здесь Уменьшение налога на прибыль
Актуальные сервисы игорных развлечений предоставляют клиентам возможность к профессиональному игровому процессу через надежные казино Mellstroy Game сайты. Лицензированная работа влечет учета четких регуляторных норм.
Механизм открытия индивидуального счета предусматривает проверку конфиденциальных реквизитов. Управляющие используют детализированные системы KYC и AML для исключения незаконных финансовых действий.
Электронные системы передовых беттинг площадок основываются на зашифрованных облачных системах с HTTPS сертификатами. Территориальные ограничения заставляет владельцев запускать дублирующие порталы.
Резервные порталы представляют полные версии главного ресурса с обеспечением всех возможностей и параметров. Клиенты получают постоянный доступ к средствам, игровой статистике и пользовательским установкам.
Расчетные процедуры выполняются через встроенные платежные системы. Границы на инвестиции и выводы определяются в гармонии с регуляторными критериями и внутренними процедурами контроля угроз.
Экспертные гемблеры настаивают контролировать ситуацию сертификата через государственные реестры игорных комиссий. Репутационные параметры задействуют оценки на тематических сервисах и feedback настоящих пользователей.
Легальные провайдеры гэмблинг сервисов дают пользователям право к профессиональному времяпрепровождению через целевые домены, включая казино Lucky Bear , которые точно выполняют transnational критерии безопасности.
Механизм регистрации включает заполнения проверочных деталей через криптографические SSL-линии. Букмекеры просят предоставить официальное удостоверение правоспособности и территории регистрации для поддержания правовых правил.
Multi-factor верификация является принудительным составляющей передовых механизмов защиты. Участники приобретают SMS-коды, push-оповещения или внедряют специальные приложения в стиле Google Authenticator.
Mirror ссылки ликвидируют препятствия локальных санкций и DDoS-нападений. С технической точки зрения копии являют дублированные копии центрального платформы с обеспечением опций и user деталей.
Skilled игроки рекомендуют keeping current каталоги действующих дублей в избранном браузера. Букмекеры передают обновления о fresh ссылках через email, Telegram-каналы и мобильные утилиты.
Payment movements через надёжные сайты обеспечены шифровальными алгоритмами level банковского индустрии. Extraction финансов производится только на верифицированные карты хозяина учётной записи.
Отбор качественного гемблинг ресурса в сегодняшних обстоятельствах заставляет специального рассмотрения к законному положению. Знающие игроки осознают, что казино Рльдорадо предоставляет новую сведения о доступных сервисах.
Процесс регистрации в лицензированных операторах охватывает обязательную подтверждение документов. KYC-процедуры обеспечивают как сервис, так и участника от махинаций. Кратковременные ограничения на перечисление финансов до завершения подтверждения – привычная методика.
Виртуальные ограничения на соединение к игровым площадкам преодолеваются через альтернативные адреса. Активные дубликаты гарантируют всестороннюю производительность базового сервиса. Расчетные переводы, интерактивный результаты и поощрительные системы поддерживаются неизменными.
Финансовая надежность определяется показателем эксплуатируемых банковских способов. SSL-защита, PCI DSS аттестация и усиленная идентификация гарантируют безопасный контур ограждения.
Развлекательная библиотека проверенных провайдеров включает слоты от ведущих производителей. RTP-показатели, изменчивость и вероятностные формулы подвергаются беспристрастную контроль в авторизованных институтах.
Планы вознаграждения в достойных казино опираются на четких требованиях вейджера. Проигрыш x35-40 характеризуется нормальным для автомат-бонусов, в то время как настольные состязания включаются в расчет с уменьшенным множителем.
Функционирующие дублирующие порталы легальных игорных заведений на Vavada casino дают непрерывный соединение к гемблинг сервисам. Технология клонирования создает точные дубликаты базового домена с фиксацией всех инструментов.
Алгоритм регистрации через mirror-сайт на сто процентов дублирует основную заявку. Только пришедшие клиенты регистрируют рабочий email, формируют сложный шифр и назначают операционную валюту.
Идентификация профиля предполагает загрузки бумаг согласно KYC-стандартам. Фото ID-карты, доказательство регистрации и банковские параметры подвергаются цифровую верификацию в течение 24-72 периодов.
Логин действующих клиентов происходит через базовую форму с расширенной верификацией. Сессионные шифры приходят на мобильный номер или email.
Механизмы пополнительного модуля через альтернативные домены обеспечивает распространенные платежные механизмы. Visa, Mastercard, цифровые хранилища Skrill, Neteller, цифровые активы Bitcoin, Ethereum обрабатываются с минимальными взносами 0-3%.
Гемблинг ассортимент воспроизводится на сто процентов включая барабаны, настольные игры, live-ведущих и прогрессивы. RTP-коэффициенты, вариативность и отыгрыш остаются идентичными.
Промо схема действует подобно корневому сайту. Welcome-комплекты, фриспины, возврат средств и VIP-курсы стартуют машинально при реализации установленных условий.
Hello there! I could have sworn I’ve been to this blog before but after checking through some of the post I realized it’s new to me.
Anyways, I’m definitely happy I found it and I’ll be bookmarking and checking back
frequently!
Feel free to surf to my site – realtor in Rancho Cucamonga CA
Определение надежного развлекательного площадки в текущих границах заставляет особого рассмотрения к правовому состоянию. Опытные клиенты осознают, что Lucky Bear зеркало предоставляет последнюю данные о функционирующих провайдерах.
Процедура создания аккаунта в лицензированных операторах охватывает принудительную аутентификацию удостоверения. KYC-правила обеспечивают как площадку, так и геймера от обмана. Переходные ограничения на вывод денег до закрытия проверки – обычная практика.
Виртуальные запреты на доступ к гемблинг ресурсам обходятся через зеркальные порталы. Активные копии гарантируют стопроцентную возможности центрального сайта. Денежные транзакции, азартный достижения и наградные системы сохраняются константными.
Финансовая стабильность характеризуется качеством задействованных денежных методов. SSL-криптография, PCI DSS аттестация и многоуровневая аутентификация формируют прочный контур защиты.
Азартная библиотека проверенных сервисов объединяет машины от известных производителей. RTP-коэффициенты, вариативность и статистические схемы подвергаются нейтральную аудит в аккредитованных центрах.
Механизмы мотивации в надежных операторах базируются на прозрачных правилах проигрыша. Отыгрыш x35-40 признается разумным для автомат-подарков, в то время как карточные развлечения включаются в подсчет с редуцированным фактором.
Актуальные провайдеры беттинг развлечений предлагают игрокам подключение к элитному развлечениям через защищенные френдс казино системы. Авторизованная работа подразумевает следования определенных законодательных требований.
Процесс активации персонального профиля задействует подтверждение личных реквизитов. Регуляторы используют комплексные процедуры KYC и AML для предотвращения нарушающих переводов.
IT платформы новейших игорных домов работают на надежных хостингах с HTTPS протоколами. Геоблокировка вынуждает операторов создавать дублирующие URL.
Параллельные порталы образуют идентичные версии основного портала с сохранением всех инструментов и параметров. Клиенты достигают устойчивый доступ к балансу, беттинг истории и персональным опциям.
Денежные действия выполняются через синхронизированные платежные системы. Пределы на инвестиции и обналичивания фиксируются в соответствии с регуляторными критериями и организационными нормами контроля угроз.
Профессиональные пользователи указывают мониторить условия авторизации через официальные каталоги азартных ведомств. Имиджевые характеристики охватывают рейтинги на экспертных ресурсах и feedback действительных беттеров.
I know this if off topic but I’m looking into starting my own weblog
and was wondering what all is needed to get setup?
I’m assuming having a blog like yours would cost
a pretty penny? I’m not very internet smart
so I’m not 100% sure. Any tips or advice would be greatly appreciated.
Many thanks
Feel free to visit my homepage :: best real estate agent in Lake Ozark MO
Надёжные операторы развлекательных опций предоставляют геймерам вариант к высококлассному времяпрепровождению через профильные сайты, включая казино Vavada , которые специально следуют международные нормы конфиденциальности.
Последовательность регистрации включает внесения верификационных информации через криптографические SSL-каналы. Менеджмент запрашивают нотариальное подтверждение правоспособности и локации регистрации для выполнения правовых норм.
Двухфакторная верификация выступает mandatory aspect актуальных solutions защиты. Игроки приобретают SMS-токены, push-уведомления или задействуют специальные утилиты по типу Google Authenticator.
Зеркальные адреса ликвидируют трудности локальных блокировок и DDoS-штурмов. Фактически дубли являют тождественные клоны главного портала с поддержанием инструментария и пользовательских данных.
Skilled пользователи suggest поддерживать актуальные базы действующих mirrors в избранном веб-клиента. Букмекеры направляют информацию о новых адресах через почтовые сервисы, Telegram-каналы и мобильные программы.
Платёжные операции через официальные сайты защищены cryptographic системами стандарта банковского segment. Extraction фондов производится лишь на validated карты хозяина личного кабинета.
Отбор легального развлекательного портала нуждается глубокого анализа официальных свидетельств. Новые ресурсы казино Меллстрой обеспечивают участникам абсолютную информацию о собственных аккредитациях.
Механизм создания профиля содержит множество необходимых ступеней проверки. Владельцы запрашивают документы, доказывающие самобытность и дееспособность. Традиционный KYC-порядок длится от 24 до 72 временных отрезков.
Распоряжение капиталом начинается с задания пределов на вклады. Квалифицированные геймеры советуют использовать закон 5% от суммарного азартного капитала на отдельную заход.
Программные барьеры операторов побуждают задействовать альтернативные адреса. Зеркала сохраняют полную производительность базового ресурса, содержа историю операций и игровой результаты.
Новые денежные сервисы поддерживают мгновенные инвестиции через криптовалютные аккаунты. Bitcoin, Ethereum и фиксированные активы дают конфиденциальность и символические отчисления. Срок обработки изъятий равно 10-30 минут.
Системы лояльности предусматривают ступенчатые ранги с возрастающим кэшбэком. VIP-кураторы дают уникальные награды, улучшенные границы и приоритетную сервис.
Go Here free pros
Азартная отрасль отображает интенсивный рост, заинтересовывая миллионы участников. Профессиональные платформы обеспечивают надёжную обстановку для беттинга. Развёрнутую материалы о данных организациях доступно отыскать на Килограмм казино .
Легализация выступает главным критерием определения платформы. Юрисдикции Великобритании дают строгий надзор денежных транзакций. Конкретная лицензированная платформа подвергается систематические инспекции RNG-механизмов.
IT свойства современных гемблинг-сайтов содержат SSL-кодирование экономического класса. Производители цифрового ПО типа Microgaming, NetEnt, Pragmatic Play внедряют сложные системы случайных значений.
Процесс подтверждения аккаунта предполагает передачи документов KYC-типа. Документ, выписка о финансах, валидация регистрации — стандартный список для финального подключения.
Дублирующие ссылки решают препятствия с запретами провайдеров. Свежие дубли модифицируются систематически IT специалистами. Смартфонные клиенты зачастую выполняются качественнее сетевых редакций.
Контроль средств устанавливает продолжительную успешность беттинговых партий. Профессиональные пользователи указывают урезать величину депозита до 1-2% от общего банкролла.
BajaMed Direct: BajaMed Direct – BajaMed Direct
Актуальные mirror-ссылки легальных гемблинг-платформ на mad casino обеспечивают стабильный подключение к азартным платформам. Методика клонирования строит эквивалентные версии центрального сайта с консервацией всех функций.
Механизм активации через дублирующий портал полностью дублирует главную форму. Начинающие клиенты заполняют валидный email, устанавливают стойкий код доступа и определяют рабочую платежное средство.
Верификация профиля предполагает представления справок в соответствии с KYC-требованиям. Скан ID-карты, верификация резиденции и платежные параметры проверяются через программную анализ в течение 24-72 временных единиц.
Вход верифицированных геймеров реализуется через обычную интерфейс с двухфакторной аутентификацией. Сессионные пароли поступают на телефонный номер или электронную почту.
Опции входящего модуля через альтернативные домены обеспечивает актуальные банковские сервисы. Visa, Mastercard, электронные балансы Skrill, Neteller, блокчейн-токены Bitcoin, Ethereum реализуются с сокращенными комиссиями 0-3%.
Гемблинг библиотека клонируется на сто процентов включая машины, карточные геймплей, live-дилеров и мегавыигрыши. RTP-индикаторы, колебания и отыгрыш поддерживаются точными.
Поощрительная система действует подобно базовому сайту. Welcome-бандлы, фриспины, refund и VIP-курсы активируются автоматически при исполнении определенных стандартов.
Нынешние клиенты пересекаются с изобилием цифровых нюансов при процессах с легальными порталами. Тематические платформы типа Меллстрой регистрация поставляют новую материалы о деятельности азартных компаний.
Система валидации профиля включает ряд требуемых фаз. Первичная валидация нуждается загрузки удостоверений подтверждающих личность. Стандартный перечень предполагает ID, лицензию водителя или загранпаспорт.
Цифровая сторона записления охватывает применение зашифрованного канала и 2FA. Продвинутые игроки рекомендуют запускать полный набор предложенных опций защиты.
Резервные ссылки представляют идентичные копии базового домена с сохранением полного функционала. Главное бонус кроется в подобии денежных пределов и параметров отыгрыша.
Процедура выявления рабочих запасных доменов базируется на отслеживании профильных информационных каналов и сотрудничающих порталов. Продвинутые участники используют VPN-сервисы для гарантирования устойчивого соединения безотносительно от местных запретов.
Поиск в пространстве проверенных платформ нуждается понимания новых инструментов подключения. Опытные клиенты применяют Mellstroy Game казино для извлечения актуальной сведений о оперативных путях.
Процедура создания аккаунта в сертифицированных учреждениях включает многоуровневую валидацию. Современные компании используют KYC-протоколы и AML-правила. Бумажная работа составляет от 24 до 72 интервалов.
Программные способы для обхода ограничений развиваются сообща с ужесточением нормативных мер. VPN-службы разряда premium предлагают шифрование AES-256 и системы OpenVPN. Постоянство коннекта кардинально актуальна для привилегированных игровых периодов.
Запасные адреса работают через локально расположенные компьютерные ресурсы. CDN-системы обеспечивают минимальную отклик для американских игроков. Автоматическое переключение срабатывает при детекции блокировки первичного сайта.
Денежные движения в проверенных регионах подпадают под конкретным требованиям PCI DSS. Крипто переводы получают актуальность благодаря скрытности и динамике реализации.
Мобильные программы топовых брендов совмещают голосовую проверку и push-извещения для ключевых событий. Адаптивный облик независимо настраивается под параметры экрана.
Подробнее здесь Разрыв ндс
check this out – Came across it unexpectedly, but the design felt organized and confident.
1win букмекер Киргизия https://www.1win09834.help
Подбор честного гемблинг портала подразумевает глубокого изучения правовых сертификатов. Современные системы Lucky Bear зеркало обеспечивают пользователям полную информацию о собственных допусках.
Система получения доступа предусматривает несколько требуемых шагов подтверждения. Администраторы просят бумаги, доказывающие персону и совершеннолетие. Классический KYC-порядок длится от 24 до 72 промежутков.
Управление банком стартует с задания лимитов на вклады. Опытные геймеры советуют эксплуатировать закон 5% от полного игорного резерва на конкретную раунд.
Системные препятствия операторов принуждают применять вспомогательные адреса. Дубликаты удерживают максимальную функциональность главного площадки, охватывая хронологию платежей и казино достижения.
Актуальные банковские сервисы дают скоростные вклады через виртуальные аккаунты. Bitcoin, Ethereum и стабильные валюты гарантируют анонимность и минимальные отчисления. Срок выполнения получений составляет 10-30 интервалов.
Схемы верности подразумевают каскадные уровни с нарастающим кэшбэком. VIP-менеджеры предлагают персонализированные подарки, расширенные рамки и приоритетную сервис.
Исследование в секторе легальных сайтов подразумевает осознания продвинутых инструментов авторизации. Продвинутые участники используют Vavada casino для добывания актуальной данных о оперативных URL.
Схема формирования аккаунта в сертифицированных учреждениях подразумевает детальную верификацию. Современные операторы используют KYC-алгоритмы и AML-требования. Оформление документов составляет от 24 до 72 промежутков.
Компьютерные способы для минования препятствий прогрессируют синхронно с усилением нормативных действий. VPN-платформы уровня premium дают безопасность AES-256 и стандарты OpenVPN. Непрерывность соединения жизненно существенна для VIP игровых периодов.
Альтернативные домены выполняют задачи через локально размещенные IT мощности. CDN-системы обеспечивают низкую время ответа для международных клиентов. Программное перенаправление срабатывает при детекции препятствия основного портала.
Экономические манипуляции в лицензированных регионах подчиняются конкретным требованиям PCI DSS. Крипто транзакции получают признание вследствие скрытности и оперативности осуществления.
Планшетные софт топовых организаций объединяют отпечатковую проверку и push-уведомления для критических эпизодов. Изменяемый облик автоматически настраивается под параметры матрицы.
charmcartel.shop – Gorgeous accessories and great site design, very simple to shop.
Действующие альтернативные домены проверенных казино на казино типпи дают непрерывный вход к игровым платформам. Технология дублирования формирует эквивалентные дубликаты основного портала с поддержанием всех опций.
Алгоритм активации через дублирующий портал в точности дублирует оригинальную шаблон. Свежие пользователи прописывают рабочий email, формируют надежный секретную комбинацию и устанавливают базовую платежное средство.
Валидация учетной записи предполагает загрузки свидетельств следуя KYC-требованиям. Скан водительских прав, верификация регистрации и денежные сведения подвергаются цифровую верификацию в течение 24-72 часов.
Логин верифицированных пользователей реализуется через типовую модуль с 2FA верификацией. Разовые токены приходят на мессенджер аппарат или электронную почту.
Инструменты финансового блока через mirror-сайты включает актуальные денежные платформы. Visa, Mastercard, цифровые кошельки Skrill, Neteller, crypto Bitcoin, Ethereum выполняются с минимальными комиссиями 0-3%.
Азартная база воспроизводится на сто процентов включая автоматы, традиционные игры, live-ведущих и джекпоты. RTP-коэффициенты, волатильность и условия отыгрыша сохраняются точными.
Поощрительная программа выполняется аналогично главному веб-площадке. Welcome-наборы, фриспины, кешбэк и VIP-планы активируются автоматически при достижении фиксированных параметров.
Нынешние игроки оказываются с проблемой связи к сертифицированным площадкам. Компании фильтруют первичные адреса, но искушённые JVSpin зеркало клиенты помнят о наличии альтернативных порталов.
Резервная ссылка является стопроцентную дубликат основного площадки. Средства защиты остаются равнозначными. Банковские действия производятся через аналогичные каналы.
Процедура оформления профиля через зеркальный адрес подразумевает классической подтверждения. Администраторы просят справки для осуществления KYC-стандартов. Идентификационные параметры подвергаются усиленную аутентификацию.
Депозитные лимиты на зеркальных ресурсах идентичны первичным характеристикам. Стартовые взносы функционируют константными. Возрастающие джекпоты координируются между многочисленными ссылками.
Бонусные планы оперируют всесторонне на дополнительных платформах. Отыгрышный коэффициент удерживает первоначальные параметры. Длительность реализации не изменяется.
Команда сопровождения решает вопросы с зеркальных ресурсов таким же способом. Живой разговор осуществляет непрерывный порядок деятельности.
kitchenkismet – Great selection of kitchen items, browsing is simple and enjoyable.
Азартная индустрия отображает активный прогресс, привлекая легионы игроков. Экспертные порталы предоставляют стабильную пространство для пари. Детальную материалы о этих брендах доступно получить на п»ї1xBet casino .
Сертификация остаётся ключевым показателем селекции площадки. Регуляторы Великобритании предоставляют тщательный мониторинг валютных действий. Каждая лицензированная ресурс осуществляет систематические ревизии RNG-генераторов.
IT аспекты актуальных игорных домов предусматривают SSL-криптографию банковского категории. Разработчики программного обеспечения типа Microgaming, NetEnt, Pragmatic Play интегрируют комплексные механизмы произвольных величин.
Схема верификации аккаунта предполагает передачи бумаг KYC-типа. Документ, подтверждение о заработке, удостоверение местожительства — базовый пакет для завершённого активации.
Резервные ссылки решают сложности с блокировками организаций. Актуальные дубли адаптируются регулярно IT службами. Мобильные утилиты нередко оперируют лучше онлайн версий.
Контроль средств задаёт долгосрочную прибыльность беттинговых сессий. Грамотные беттеры предлагают ограничивать количество бета до 1-2% от общего фонда.
Нынешние геймеры пересекаются с множеством технологических особенностей при деятельности с лицензированными ресурсами. Тематические источники типа Lucky Bear казино предоставляют релевантную контент о операциях азартных компаний.
Система верификации кабинета предполагает множество необходимых фаз. Начальная верификация требует размещения бумаг удостоверяющих гражданство. Обычный перечень предполагает свидетельство, автоудостоверение или международный паспорт.
Техническая элемент оформления содержит внедрение защищенного протокола и 2FA. Продвинутые клиенты подсказывают задействовать весь комплекс возможных опций безопасности.
Альтернативные адреса формируют абсолютные дубликаты основного платформы с сохранением тотального набора функций. Центральное достоинство состоит в схожести расчетных границ и требований вейджера.
Система выявления актуальных дублирующих порталов опирается на наблюдении профильных телеграм-каналов и сотрудничающих ресурсов. Профессиональные участники используют анонимайзеры для гарантирования устойчивого соединения безотносительно от региональных барьеров.
dorvani.shop – The perfect balance of stylish and functional, I always find what I need!
Легальные ресурсы игровых услуг гарантируют игрокам вариант к премиальному времяпрепровождению через dedicated сайты, включая миллионъ казино , что выполняют глобальные стандарты конфиденциальности.
Механизм оформления профиля предполагает внесения идентификационных данных через encrypted SSL-протоколы. Операторы demanded письменное удостоверение правоспособности и локации жительства для соблюдения правовых норм.
Двухфакторная authentication выступает mandatory aspect современных систем security. Клиенты получают SMS-пароли, push-notification или внедряют специальные софт вроде Google Authenticator.
Резервные домены решают проблемы географических барьеров и DDoS-нападений. По сути дубли образуют тождественные dublicates главного портала с обеспечением features и индивидуальных параметров.
Экспертные пользователи suggest поддерживать обновлённые базы working альтернатив в избранном обозревателя. Management передают новости о современных адресах через e-mail, Telegram-группы и портативные приложения.
Платёжные переводы через надёжные платформы обеспечены криптографическими methods level банковского направления. Extraction капитала выполняется solely на верифицированные реквизиты владельца аккаунта.
Передовые бетторы встречаются с проблемой соединения к официальным порталам. Поставщики закрывают основные URL, но профессиональные Clubnika посетители понимают о наличии альтернативных площадок.
Зеркало является стопроцентную дубликат первичного сайта. Криптографические алгоритмы поддерживаются аналогичными. Денежные процедуры реализуются через равнозначные механизмы.
Процедура заведения учётной записи через параллельный адрес требует стандартной верификации. Специалисты требуют справки для соблюдения KYC-норм. Идентификационные сведения реализуют усиленную верификацию.
Финансовые рамки на зеркальных платформах соответствуют базовым параметрам. Стартовые взносы остаются неизменными. Прогрессивные банки синхронизируются между многочисленными доменами.
Стимулирующие механизмы функционируют полноценно на параллельных площадках. Требования по обороту поддерживает первоначальные параметры. Длительность использования остаётся прежним.
Команда сопровождения рассматривает обращения с альтернативных ресурсов аналогично. Онлайн общение осуществляет 24-часовой график оперирования.
Актуальные бетторы оказываются с препятствием подключения к лицензированным ресурсам. Поставщики ограничивают главные ссылки, но профессиональные Вавада РІС…РѕРґ клиенты помнят о существовании дублирующих сайтов.
Параллельный портал формирует стопроцентную отображение базового площадки. Криптографические алгоритмы работают неизменными. Финансовые процедуры осуществляются через аналогичные механизмы.
Технология заведения учётной записи через альтернативный домен предполагает привычной аутентификации. Администраторы требуют свидетельства для осуществления KYC-правил. Персональные сведения подвергаются усиленную верификацию.
Пополнительные пределы на дополнительных сайтах аналогичны основным требованиям. Наименьшие суммы остаются неизменными. Прогрессивные джекпоты интегрируются между всеми доменами.
Поощрительные системы выполняются целостно на резервных ресурсах. Коэффициент оборота удерживает оригинальные цифры. Период действия использования поддерживается.
Департамент помощи решает вопросы с параллельных ссылок сходным образом. Онлайн чат гарантирует беспрерывный режим оперирования.
Выбор легального развлекательного площадки предполагает основательного рассмотрения официальных сертификатов. Актуальные системы Vavada зеркало дают пользователям стопроцентную детали о собственных разрешениях.
Алгоритм создания профиля включает определенное количество принудительных шагов аутентификации. Владельцы настаивают справки, устанавливающие персону и совершеннолетие. Традиционный KYC-алгоритм длится от 24 до 72 часов.
Управление банком запускается с определения пределов на инвестиции. Опытные игроки предлагают задействовать правило 5% от совокупного казино бюджета на отдельную сессию.
Технические запреты администраторов принуждают применять вспомогательные маршруты. Копии оберегают максимальную функциональность центрального платформы, содержа архив операций и азартный продвижение.
Передовые платежные инструменты обеспечивают быстрые взносы через электронные аккаунты. Bitcoin, Ethereum и постоянные токены поддерживают конфиденциальность и минимальные комиссии. Длительность проведения изъятий насчитывает 10-30 минут.
Алгоритмы постоянства охватывают многоуровневые статусы с увеличивающимся бонусом. VIP-представители предлагают личные бонусы, увеличенные ограничения и ускоренную техподдержку.
gingergrace.shop – A wonderful shopping experience, filled with beautiful, unique items!
Standard bonuses with a UK casino offer will include free spins and deposit matches. Always ensure you read the terms- particularly those that outline your wagering contradictions, plus see if the terms allow the bonus to be stacked with other bonuses so you can enjoy Gates of Olympus at no cost for as long as you can. Bonus buy (100× stake) is available in some markets- but use that option with care! That option has a higher cost and a much higher risk to your bankroll. Such slots provide punctual-paced step with lots of effective options. Setting profitable combos because of the landing eight or even more complimentary symbols on the adjoining reels. In spite of the overused motif, Doors away from Olympus brings a work of art in its games technicians. Age of the Gods: God of Storms Match 8-30 symbols anywhere on the grid to win. Multiplier symbols can land on any spin or tumble, boosting wins by up to 500x. If more than one multiplier symbol lands, their values are added together and applied to the total win.
https://movingestimates.co/plinko-pixel-app-what-makes-it-unique/
So take a read of our review and come and see what all the fuss is about, as well as maintain a safe. 15 dragon pearls hold and win i found that you can get in touch with the brand via live chat or email, compliant environment that acts in accordance with the legal requirements in your jurisdiction. The mathematics behind slot and casino and live casino games suggest you should win quite a lot of the time but that the site will come out on top in the end, please check the sidebar. When depositing via a wire transfer youll be eligible to all of these bonuses, 15 dragon pearls slot with best rtp or down under if you are on a mobile or tablet. While other online gambling industry giants stick to more traditional and even boring names like Microgaming or Playtech, but players do enjoy placing them as they offer them the chance of winning way more than they can do on the base game itself.
You can definitely see your expertise in the work you write.
The arena hopes for even more passionate writers like you who are not afraid to say how they believe.
At all times follow your heart.
Visit my blog real estate agent Franklin TN
I know this site offers quality depending articles or reviews
and extra information, is there any other site which gives
such things in quality?
Here is my blog post 오피사이트 추천
Активные дублирующие порталы лицензированных казино на Лаки Бир зеркало обеспечивают стабильный доступ к развлекательным сервисам. Методика копирования генерирует идентичные копии базового портала с поддержанием всех опций.
Система активации через резервную ссылку в точности дублирует основную шаблон. Дебютные игроки указывают функционирующий email, создают безопасный пароль и назначают операционную денежную единицу.
Аутентификация счета предполагает предоставления документов опираясь на KYC-требованиям. Фото национального документа, валидация резиденции и финансовые данные подвергаются автоматическую проверку в течение 24-72 часа.
Вход верифицированных клиентов происходит через стандартную панель с усиленной аутентификацией. Сессионные шифры поступают на смс аппарат или email.
Инструменты денежного компонента через mirror-сайты включает популярные банковские системы. Visa, Mastercard, виртуальные счета Skrill, Neteller, цифровые активы Bitcoin, Ethereum процессируются с оптимизированными комиссиями 0-3%.
Гемблинг каталог клонируется целиком включая барабаны, карточные геймплей, live-операторов и джекпоты. RTP-показатели, волатильность и условия отыгрыша поддерживаются аналогичными.
Промо механизм функционирует аналогично главному веб-площадке. Welcome-предложения, бесплатные вращения, денежный возврат и VIP-программы активируются программно при соблюдении определенных стандартов.
Официальные ресурсы игровых сервисов обеспечивают участникам возможность к профессиональному времяпрепровождению через тематические домены, включая п»ї1хбет казино , что следуют международные регламенты конфиденциальности.
Алгоритм оформления профиля требует предоставления проверочных информации через encrypted SSL-соединения. Операторы просят предоставить нотариальное доказательство age verification и локации residence для поддержания юрисдикционных требований.
Двухэтапная идентификация становится обязательным компонентом современных платформ надёжности. Клиенты получают SMS-ключи, push-алерты или эксплуатируют специализированные софт в стиле Google Authenticator.
Альтернативные домены нейтрализуют препятствия geographic барьеров и DDoS-нападений. По сути mirrors являют копийные копии основного портала с maintaining инструментария и user данных.
Профессиональные геймеры suggest сохранять свежие списки действующих зеркал в избранном обозревателя. Операторы направляют новости о актуальных URL через мейл, Telegram-чаты и мобильные программы.
Денежные переводы через проверенные порталы secured защитными алгоритмами категории банковского области. Extraction финансов выполняется единственно на проверенные данные обладателя аккаунта.
BajaMed Direct: BajaMed Direct – BajaMed Direct
Поиск безопасного игрового заведения в текущих рамках требует особого рассмотрения к лицензионному положению. Компетентные пользователи представляют, что лаки Р±РёСЂ казино содержит современную материалы о активных площадках.
Процедура записи в сертифицированных операторах включает принудительную проверку идентичности. KYC-нормы охраняют как сервис, так и игрока от мошенничества. Краткосрочные границы на изъятие финансов до окончания подтверждения – стандартная методика.
Виртуальные запреты на вход к азартным ресурсам преодолеваются через зеркальные порталы. Доступные копии сохраняют полную возможности базового сервиса. Финансовые транзакции, интерактивный статистика и наградные системы продолжают постоянными.
Материальная стабильность определяется показателем задействованных финансовых методов. SSL-безопасность, PCI DSS валидация и двухфакторная идентификация создают защищенный щит безопасности.
Геймплейная каталог лицензированных заведений предоставляет барабаны от ведущих производителей. RTP-значения, колебания и вероятностные формулы подвергаются независимую аудит в одобренных лабораториях.
Программы вознаграждения в надежных площадках строятся на открытых условиях активности. Требования x35-40 характеризуется адекватным для автомат-льгот, в то время как карточные забавы учитываются в расчет с минимальным множителем.
Актуальные сервисы беттинг услуг обеспечивают беттерам вход к элитному игровому процессу через сертифицированные Голд казино порталы. Авторизованная операционная активность требует следования жестких контролирующих норм.
Алгоритм регистрации пользовательского счета охватывает валидацию конфиденциальных реквизитов. Администраторы используют многоуровневые процедуры KYC и AML для недопущения фродовых операций.
IT платформы новейших казино работают на защищенных облачных системах с шифровальными сертификатами. Территориальные ограничения заставляет операторов запускать параллельные адреса.
Зеркальные сайты составляют идентичные репликации первичного домена с фиксацией всех возможностей и данных. Пользователи добиваются беспрепятственный связь к депозиту, азартной статистике и персональным конфигурациям.
Платежные операции проходят через синхронизированные финансовые сервисы. Рамки на депозиты и получения определяются в согласии с законодательными стандартами и индивидуальными политиками снижения потерь.
Квалифицированные клиенты предлагают проверять условия лицензии через регуляторные реестры азартных органов. Престижные параметры содержат места на отраслевых сайтах и отзывы подлинных клиентов.
This post is worth everyone’s attention. How can I find out more?
my web page best realtor in Chino Hills CA
When someone writes an post he/she retains the image of a
user in his/her mind that how a user can understand
it. Therefore that’s why this piece of writing is perfect. Thanks!
Look at my website: best realtor in St. George UT
Helpful information. Lucky me I discovered your web site unintentionally, and I’m stunned why this accident didn’t took
place earlier! I bookmarked it.
Feel free to surf to my web blog :: 쓰리노
Навигация в секторе сертифицированных площадок требует понимания передовых способов соединения. Квалифицированные игроки внедряют Меллстрой зеркало для обретения актуальной информации о оперативных ссылках.
Алгоритм оформления профиля в надежных заведениях подразумевает комплексную подтверждение. Передовые провайдеры эксплуатируют KYC-алгоритмы и AML-требования. Оформление документов составляет от 24 до 72 часов.
Цифровые инструменты для избежания ограничений развиваются параллельно с интенсификацией законодательных инициатив. VPN-решения уровня premium предоставляют кодирование AES-256 и стандарты OpenVPN. Стабильность канала fundamentally важна для привилегированных раундов.
Резервные адреса работают через локально разнесенные серверные системы. CDN-комплексы осуществляют оптимальную латентность для европейских игроков. Автоматическое переключение включается при распознавании блокировки базового портала.
Финансовые транзакции в проверенных юрисдикциях следуют конкретным критериям PCI DSS. Криптовалютные операции набирают распространение из-за скрытности и скорости реализации.
Портативные программы лучших провайдеров совмещают физиологическую подтверждение и push-сообщения для ключевых событий. Настраиваемый внешний вид самостоятельно изменяется под настройки экрана.
Актуальные порталы игорных продуктов обеспечивают игрокам путь к премиальному развлечениям через сертифицированные казино Vavada системы. Сертифицированная работа предполагает следования четких законодательных стандартов.
Система активации индивидуального счета включает верификацию личных сведений. Управляющие используют углубленные системы KYC и AML для исключения фродовых переводов.
IT системы передовых казино строятся на надежных инфраструктурах с криптографическими протоколами. Локальные запреты заставляет владельцев организовывать параллельные URL.
Дублирующие сайты представляют идентичные клоны главного портала с фиксацией всех возможностей и информации. Игроки приобретают непрерывный соединение к депозиту, игровой истории и клиентским параметрам.
Расчетные переводы осуществляются через связанные банковские процессоры. Ограничения на взносы и получения устанавливаются в унисон с правовыми стандартами и организационными нормами управления рисками.
Профессиональные беттеры рекомендуют мониторить ситуацию разрешения через государственные базы данных игорных организаций. Авторитетные характеристики задействуют ранги на профильных платформах и оценки истинных участников.
электрокарнизы elektrokarniz-nedorogo.ru .
рулонные шторы в москве рулонные шторы в москве .
goldgrove2.shop – An amazing selection of unique items, I love shopping here every time.
Hello, i think that i saw you visited my site thus i came to “return the favor”.I’m trying to find things to
enhance my website!I suppose its ok to use some of your ideas!!
Also visit my webpage best real estate agent in Lake Ozark MO
craftcabin.shop – Amazing selection for all types of crafts, always fresh and filled with inspiration!
https://indogenericexport.shop/# muscle relaxers for back pain
Spa day picks – Stylish and luxurious items to elevate your self-care routine.
Лицензионные провайдеры развлекательных возможностей гарантируют клиентам вариант к премиальному азартному досугу через профильные сайты, включая казино СЂР° , которые специально исполняют мировые критерии конфиденциальности.
Алгоритм открытия счёта требует заполнения валидационных данных через безопасные SSL-соединения. Менеджмент запрашивают официальное удостоверение совершеннолетия и региона проживания для исполнения legal критериев.
Многоуровневая идентификация считается mandatory aspect новейших систем надёжности. Участники располагают SMS-шифры, push-notification или используют специальные приложения наподобие Google Authenticator.
Зеркальные порталы ликвидируют препятствия региональных барьеров и DDoS-нападений. Технически зеркала являют тождественные версии основного платформы с maintaining инструментария и индивидуальных данных.
Skilled пользователи предлагают хранить актуальные перечни активных дублей в закладках браузера. Management отправляют новости о актуальных доменах через email, Telegram-каналы и мобильные приложения.
Платёжные операции через лицензионные ресурсы защищены cryptographic системами класса банковского индустрии. Снятие средств реализуется лишь на validated счета держателя account.
Выбор проверенного казино ресурса требует детального рассмотрения лицензионных сертификатов. Инновационные ресурсы казино Лаки Бир обеспечивают пользователям стопроцентную детали о своих разрешениях.
Процесс открытия аккаунта предусматривает ряд принудительных ступеней валидации. Представители просят удостоверения, подтверждающие самобытность и зрелость. Традиционный KYC-алгоритм требует от 24 до 72 интервалов.
Распоряжение капиталом запускается с задания границ на вклады. Опытные клиенты советуют эксплуатировать принцип 5% от суммарного казино средств на конкретную игру.
Системные запреты поставщиков принуждают внедрять запасные пути. Зеркала хранят абсолютную эффективность основного сайта, охватывая летопись транзакций и игровой результаты.
Актуальные платежные инструменты обеспечивают моментальные вклады через блокчейн хранилища. Bitcoin, Ethereum и фиксированные активы предоставляют скрытность и крошечные сборы. Период выполнения выводов доходит 10-30 интервалов.
Системы постоянства предусматривают многоуровневые степени с нарастающим бонусом. VIP-кураторы дают эксклюзивные вознаграждения, усиленные рамки и первоочередную поддержку.
Навигация в мире сертифицированных площадок требует знания новых инструментов подключения. Квалифицированные пользователи эксплуатируют Лаки Бир официальный сайт для извлечения релевантной сведений о активных адресах.
Механизм открытия личного кабинета в официальных учреждениях содержит детальную валидацию. Современные компании применяют KYC-протоколы и AML-стандарты. Документооборот занимает от 24 до 72 интервалов.
Компьютерные способы для преодоления запретов совершенствуются вместе с повышением правовых инициатив. VPN-платформы класса premium гарантируют кодирование AES-256 и стандарты OpenVPN. Непрерывность связи fundamentally необходима для привилегированных игровых периодов.
Зеркальные платформы выполняют задачи через географически разнесенные IT инфраструктуры. CDN-системы предоставляют быструю время ответа для азиатских игроков. Системное редирект срабатывает при идентификации препятствия базового ресурса.
Финансовые движения в проверенных областях подпадают под конкретным требованиям PCI DSS. Крипто платежи набирают актуальность вследствие скрытности и быстроте осуществления.
Портативные утилиты элитных брендов совмещают отпечатковую аутентификацию и push-извещения для ключевых эпизодов. Изменяемый интерфейс самостоятельно адаптируется под параметры панели.
Поиск надежного гемблинг площадки требует серьезного исследования регулятивных сертификатов. Современные платформы казино типпи предоставляют участникам максимальную сведения о текущих допусках.
Процесс открытия аккаунта охватывает различные принудительных этапов валидации. Представители истребуют документы, доказывающие самобытность и зрелость. Типовой KYC-процесс требует от 24 до 72 временных отрезков.
Банкролл-менеджмент запускается с назначения рамок на инвестиции. Опытные игроки рекомендуют внедрять закон 5% от общего развлекательного резерва на одну заход.
Системные блокировки операторов принуждают внедрять вспомогательные адреса. Зеркала поддерживают максимальную активность основного портала, подразумевая историю платежей и казино результаты.
Инновационные банковские сервисы гарантируют моментальные инвестиции через блокчейн портмоне. Bitcoin, Ethereum и стейблкоины гарантируют анонимность и символические комиссии. Период обработки выводов составляет 10-30 интервалов.
Схемы преданности подразумевают каскадные степени с накапливающимся вознаграждением. VIP-консультанты дают личные награды, увеличенные ограничения и первоочередную сервис.
https://indogenericexport.shop/# best online pharmacy india
Мессенджер и магазин Rutor признан одним из самых безопасных ресурсов в русском даркнете, благодаря анонимности системы, конфиденциальности и поддержке платежей в Rutor.Rutor — старейший представитель даркнета на русском языке
rut org — это один из первых и известнейших русскоязычных ресурсов даркнета, неразрывно связанный с анонимной онлайн-экосистемой. Данный сервис специализируется на доступе к широчайшему ассортименту софта, файлов, новостей и разнообразных материалов, охватывающих вопросы взлома и защиты.
Главные аспекты функционирования Rutor
Механизм работы ресурса позволяет пользователям получать доступ к большим массивам данных и файлов, при этом обеспечивая максимальную приватность и анонимность. Работа сервиса построена на использовании анонимной сети Rutor, что помогает свести к минимуму угрозы идентификации и утечки данных. С течением времени площадка превратилась в важный архив событий и истории русскоязычного даркнета.
Rutor продолжает работать и предоставлять стабильный доступ к ресурсам, удовлетворяя потребности как новичков, так и опытных пользователей даркнета. Система построена таким образом, что каждый раздел страницы — будь то магазин, новости или инструкции по взлому — становится отдельной частью большого сообщества, в котором безопасность и возможность оставаться анонимным выходят на первый план.
Будущее платформы: вызовы и обещания
Ясно, что будущая деятельность Rutor потребует решения новых рисков, внедрения свежих подходов к безопасности и средств обхода ограничений. Пользователи должны осознавать, что даже самая анонимная система не гарантирует полной безопасности.
Сервис остается местом, где можно получать дополнительную информацию, обсуждать вопросы безопасности, следить за новостями и инновациями в области даркнета. Улучшение технологий, увеличение аудитории и внедрение инноваций способствуют статусу Rutor как центрального элемента русскоязычного онлайн-сообщества.
– Сохранение анонимности
– Надёжность проведения операций
– Открытый доступ к специализированному контенту
– Обеспечение приватности взаимодействий
Rutor представляет собой ресурс с неповторимой историей, важный для пользователей, стремящихся к свободе, сохранению конфиденциальности и автономии от внешних ограничений в современном интернете.
circuitcabin.shop – Everything for tech enthusiasts in one place, and shopping is a breeze.
navirotrack link – Clean interface ensures navigation is effortless while content appears credible.
Игровая индустрия являет стремительный прогресс, заинтересовывая тысячи игроков. Экспертные порталы обеспечивают надёжную условия для развлечений. Подробную данные о указанных брендах возможно отыскать на Лаки Бир казино .
Аттестация выступает приоритетным элементом селекции платформы. Надзорные органы Кюрасао дают качественный аудит денежных операций. Всякая аккредитованная платформа выполняет постоянные ревизии RNG-систем.
IT свойства передовых казино охватывают SSL-безопасность финансового стандарта. Производители программного софта типа Microgaming, NetEnt, Pragmatic Play интегрируют продвинутые системы случайных значений.
Схема проверки счёта включает передачи свидетельств KYC-типа. Удостоверение, документ о прибылях, верификация прописки — классический перечень для завершённого подключения.
Параллельные ссылки ликвидируют проблемы с цензурой компаний. Действующие альтернативы модифицируются постоянно программными группами. Портативные клиенты регулярно работают надёжнее веб модификаций.
Распределение капитала формирует перспективную успешность гемблинговых периодов. Квалифицированные игроки предлагают сокращать объём ставки до 1-2% от общего банкролла.
Игровая ниша представляет быстрый расширение, завлекая массы клиентов. Экспертные ресурсы предоставляют защищённую атмосферу для пари. Подробную материалы о указанных брендах возможно найти на Вавада регистрация .
Аккредитация выступает центральным элементом определения сайта. Контролёры Гибралтара обеспечивают тщательный контроль валютных процедур. Конкретная официальная платформа проходит плановые ревизии RNG-модулей.
Компьютерные особенности новейших беттинг-платформ охватывают SSL-защиту расчётного уровня. Производители софтового продукта уровня Microgaming, NetEnt, Pragmatic Play подключают комплексные системы случайных значений.
Механизм аутентификации аккаунта подразумевает представления удостоверений KYC-класса. Удостоверение, выписка о прибылях, доказательство местожительства — типичный пакет для итогового активации.
Параллельные URL решают барьеры с запретами операторов. Свежие копии корректируются систематически программными специалистами. Портативные софт нередко работают стабильнее онлайн вариантов.
Распределение капитала устанавливает перспективную эффективность развлекательных сессий. Опытные геймеры настаивают контролировать сумму вейджера до 1-2% от итогового фонда.
здесь магазин black sprut
Amazing blog! Is your theme custom made or did you download it
from somewhere? A theme like yours with a few simple tweeks would really make my blog shine.
Please let me know where you got your design. Thank you
My website: best realtor in St. George UT
What impressed me about this casino https://www.dibiz.com/cards/liheadpopa198423dw0cbui2hptfloog is the quality of the games. Everything runs without issues, the design is clean, and there’s plenty of options to explore, which keeps it engaging.
Инновационные операторы гемблинг игр предоставляют клиентам вход к элитному гемблингу через безопасные https://probeg-ag.ru/ru-ru/ ресурсы. Авторизованная операционная активность требует учета конкретных регуляторных стандартов.
Процесс создания персонального кабинета предусматривает верификацию приватных показателей. Регуляторы внедряют расширенные протоколы KYC и AML для пресечения незаконных операций.
IT средства инновационных гемблинг платформ работают на стабильных хостингах с SSL сертификатами. Территориальные ограничения заставляет администраторов внедрять параллельные ссылки.
Дублирующие сайты образуют идентичные копии основного портала с поддержанием всех опций и данных. Пользователи получают непрерывный соединение к капиталу, беттинг отчетности и клиентским параметрам.
Расчетные транзакции осуществляются через встроенные денежные системы. Ограничения на депозиты и изъятия устанавливаются в соотношении с лицензионными положениями и индивидуальными нормами контроля угроз.
Компетентные гемблеры указывают контролировать ситуацию лицензии через контролирующие регистры игорных комиссий. Престижные показатели содержат рейтинги на профильных сайтах и feedback настоящих беттеров.
онлайн школа 10-11 класс онлайн школа 10-11 класс .
Выбор надежного гемблинг ресурса в сегодняшних обстоятельствах подразумевает тщательного изучения к лицензионному состоянию. Знающие участники знают, что лаки Р±РёСЂ казино включает свежую информацию о работающих операторах.
Алгоритм открытия счета в сертифицированных платформах предусматривает неизбежную подтверждение личности. KYC-стандарты защищают как площадку, так и участника от мошенничества. Кратковременные лимиты на получение активов до финализации подтверждения – типичная процедура.
Цифровые ограничения на вход к азартным сервисам устраняются через параллельные URL. Доступные клоны предоставляют стопроцентную производительность центрального сервиса. Денежные движения, геймплейный статистика и привилегированные предложения продолжают устойчивыми.
Материальная безопасность измеряется критерием применяемых банковских методов. SSL-защита, PCI DSS лицензирование и усиленная подтверждение создают безопасный щит ограждения.
Игровая коллекция сертифицированных площадок включает барабаны от лидирующих провайдеров. RTP-индексы, волатильность и статистические схемы проходят беспристрастную аудит в одобренных лабораториях.
Механизмы мотивации в серьезных площадках основываются на ясных критериях вейджера. Проигрыш x35-40 считается адекватным для автомат-привилегий, в то время как стандартные развлечения идут в подсчет с редуцированным процентом.
Brondyra Collection – Such a fashionable shop with an easy-to-navigate checkout process.
Игровая индустрия показывает активный прогресс, завлекая легионы геймеров. Грамотные ресурсы предоставляют защищённую пространство для беттинга. Развёрнутую материалы о указанных брендах допустимо получить на п»ї1хбет регистрация .
Легализация представляет главным фактором определения ресурса. Регуляторы Великобритании гарантируют тщательный контроль финансовых транзакций. Конкретная официальная портал подвергается систематические контроли RNG-модулей.
Цифровые особенности современных игорных домов охватывают SSL-защиту финансового категории. Создатели программного продукта типа Microgaming, NetEnt, Pragmatic Play встраивают комплексные модели рандомных величин.
Схема аутентификации счёта включает направления бумаг KYC-типа. Свидетельство, справка о доходах, удостоверение местожительства — стандартный комплект для полноценного подключения.
Альтернативные URL исправляют препятствия с фильтрацией операторов. Рабочие зеркала корректируются ежедневно IT группами. Планшетные программы регулярно работают устойчивее интернет редакций.
Финансовая дисциплина задаёт долгосрочную прибыльность азартных сессий. Квалифицированные геймеры рекомендуют сокращать количество вейджера до 1-2% от совокупного фонда.
Поиск в мире официальных ресурсов требует осознания новых методов соединения. Умелые клиенты внедряют Mellstroy Game для добывания новейшей информации о функционирующих адресах.
Процедура регистрации личного кабинета в надежных компаниях подразумевает сложную аутентификацию. Продвинутые операторы эксплуатируют KYC-механизмы и AML-правила. Документальное сопровождение требует от 24 до 72 периодов.
Цифровые методы для обхода препятствий эволюционируют синхронно с ужесточением правовых мер. VPN-решения уровня premium предоставляют кодирование AES-256 и методы OpenVPN. Постоянство связи принципиально значима для элитных игровых периодов.
Резервные сайты функционируют через пространственно размещенные серверные кластеры. CDN-сети обеспечивают оптимальную латентность для американских пользователей. Системное перенаправление срабатывает при распознавании блокировки главного ресурса.
Денежные операции в легальных территориях отвечают жестким критериям PCI DSS. Блокчейн транзакции завоевывают популярность вследствие скрытности и темпу выполнения.
Смартфонные софт топовых провайдеров включают голосовую проверку и push-сообщения для ключевых моментов. Адаптивный внешний вид независимо корректируется под свойства дисплея.
lotuslane daily – Pleasant navigation, images are sharp and products are easy to explore.
I think this is among the most significant information for me.
And i’m glad reading your article. But want to remark on some general things, The site style is great, the articles is really excellent : D.
Good job, cheers
My site :: best real estate agent in Alberta Canada
What’s up, all is going perfectly here and ofcourse every one is sharing data, that’s genuinely fine, keep up writing.
My homepage … realtor in Chino Hills CA
Активные резервные адреса надежных гемблинг-платформ на п»ї1xBet зеркало гарантируют беспрерывный коннект к игровым ресурсам. Система реплицирования образует идентичные версии центрального домена с консервацией всех возможностей.
Процедура активации через альтернативный домен целиком дублирует главную форму. Начинающие пользователи прописывают действующий email, устанавливают надежный секретную комбинацию и назначают рабочую курренси.
Подтверждение профиля содержит отправки удостоверений следуя KYC-политике. Фото паспорта, валидация регистрации и финансовые параметры подвергаются алгоритмическую валидацию в течение 24-72 часов.
Вход активных игроков выполняется через типовую панель с двухфакторной идентификацией. Разовые шифры приходят на телефонный девайс или e-mail адрес.
Опции входящего раздела через резервные ссылки содержит топовые финансовые системы. Visa, Mastercard, онлайн счета Skrill, Neteller, crypto Bitcoin, Ethereum процессируются с низкими процентами 0-3%.
Gaming база дублируется в точности включая барабаны, настольные развлечения, live-хостов и максимальные награды. RTP-коэффициенты, волатильность и отыгрыш остаются аналогичными.
Промо механизм работает похоже основному веб-площадке. Welcome-пакеты, безвозмездные спины, компенсация и VIP-планы инициируются алгоритмически при достижении заданных стандартов.
Беттинговая ниша демонстрирует активный рост, заинтересовывая множество участников. Экспертные порталы дают надёжную пространство для ставок. Подробную информацию о указанных брендах возможно обнаружить на п»ї1хбет казино .
Аттестация составляет центральным показателем отбора площадки. Контролёры Кюрасао создают серьёзный контроль расчётных процедур. Каждая аккредитованная платформа проходит плановые инспекции RNG-модулей.
IT параметры передовых азартных площадок охватывают SSL-безопасность финансового категории. Разработчики цифрового софта типа Microgaming, NetEnt, Pragmatic Play подключают продвинутые схемы произвольных значений.
Процесс проверки учётной записи предполагает передачи удостоверений KYC-формата. Свидетельство, свидетельство о финансах, удостоверение регистрации — базовый список для итогового входа.
Альтернативные адреса исправляют барьеры с цензурой провайдеров. Действующие зеркала модифицируются ежедневно цифровыми службами. Портативные софт регулярно оперируют лучше веб вариантов.
Распределение капитала устанавливает долгосрочную доходность гемблинговых раундов. Экспертные участники указывают сокращать величину бета до 1-2% от совокупного резерва.
trusted hardware outlet – Navigation was simple and I wrapped up my order in minutes.
Подбор надежного казино площадки предполагает глубокого изучения лицензионных сертификатов. Передовые платформы лаки Р±РёСЂ казино дают участникам максимальную информацию о действующих разрешениях.
Процедура регистрации содержит множество необходимых стадий верификации. Администраторы просят удостоверения, удостоверяющие индивидуальность и дееспособность. Стандартный KYC-механизм составляет от 24 до 72 временных отрезков.
Распоряжение капиталом запускается с определения границ на пополнения. Квалифицированные участники советуют использовать установку 5% от общего развлекательного фонда на отдельную раунд.
Цифровые барьеры администраторов вынуждают задействовать дополнительные ссылки. Клоны поддерживают полную эффективность центрального сайта, охватывая летопись переводов и гемблинг результаты.
Актуальные денежные методы предоставляют быстрые вклады через блокчейн аккаунты. Bitcoin, Ethereum и постоянные токены гарантируют приватность и мизерные сборы. Длительность обработки снятий равно 10-30 периодов.
Планы приверженности содержат градационные категории с нарастающим кэшбэком. VIP-кураторы гарантируют индивидуальные подарки, увеличенные ограничения и опережающую сервис.
What a data of un-ambiguity and preserveness of valuable knowledge regarding unpredicted
emotions.
Also visit my site :: best real estate agent in Alberta Canada
1win Humo ishlamayapti 1win5753.help
Выбор безопасного азартного оператора предполагает детального рассмотрения лицензионных свидетельств. Инновационные платформы Рльдорадо казино дают пользователям стопроцентную детали о действующих санкциях.
Механизм получения доступа подразумевает множество ключевых фаз аутентификации. Операторы просят удостоверения, подтверждающие идентичность и совершеннолетие. Классический KYC-регламент продолжается от 24 до 72 промежутков.
Финансовое планирование инициируется с назначения пределов на взносы. Профессиональные клиенты рекомендуют внедрять принцип 5% от общего казино резерва на отдельную раунд.
Цифровые барьеры операторов заставляют задействовать резервные пути. Дубликаты хранят абсолютную производительность первичного сайта, включая журнал сделок и казино продвижение.
Инновационные денежные сервисы предоставляют быстрые вклады через электронные аккаунты. Bitcoin, Ethereum и стабильные валюты предоставляют тайность и символические отчисления. Срок осуществления снятий достигает 10-30 интервалов.
Системы верности предусматривают градационные ранги с возрастающим вознаграждением. VIP-представители предлагают уникальные подарки, повышенные лимиты и первоочередную техподдержку.
astrevio.shop – The modern look really stands out and feels well done.
This design is spectacular! You definitely know how to keep a reader amused.
Between your wit and your videos, I was almost moved to start my own blog (well, almost…HaHa!) Wonderful job.
I really loved what you had to say, and more than that,
how you presented it. Too cool!
Review my site: best real estate agent in Chino Hills CA
click for info ssn search method
Hi there every one, here every one is sharing such know-how,
therefore it’s fastidious to read this blog, and I used to pay a visit this web site all the time.
Исследование в мире официальных платформ требует знания новых решений подключения. Квалифицированные участники используют Меллстрой казино для получения новейшей фактов о активных ссылках.
Схема формирования учетной записи в сертифицированных операторах включает многоуровневую подтверждение. Современные операторы задействуют KYC-алгоритмы и AML-правила. Документальная процедура требует от 24 до 72 интервалов.
Технические инструменты для избежания запретов прогрессируют вместе с ужесточением правовых действий. VPN-решения типа premium предлагают кодирование AES-256 и системы OpenVPN. Надежность подключения жизненно важна для привилегированных игровых периодов.
Дублирующие ресурсы функционируют через территориально расположенные IT инфраструктуры. CDN-системы поддерживают сокращенную пинг для американских игроков. Системное перенаправление срабатывает при распознавании ограничения главного портала.
Банковские транзакции в лицензированных зонах следуют определенным стандартам PCI DSS. Крипто транзакции завоевывают актуальность по причине анонимности и оперативности осуществления.
Смартфонные клиенты ведущих компаний объединяют физиологическую авторизацию и push-оповещения для существенных эпизодов. Адаптивный облик самостоятельно настраивается под настройки матрицы.
Официальные операторы игровых услуг дают участникам возможность к премиальному азартному досугу через dedicated домены, включая Меллстрой РІС…РѕРґ , которые придерживаются общепринятые требования security.
Последовательность открытия счёта предполагает предоставления валидационных сведений через защищённые SSL-соединения. Операторы требуют официальное verification совершеннолетия и локации проживания для исполнения legal требований.
Двухфакторная идентификация считается mandatory aspect новейших систем безопасности. Игроки располагают SMS-пароли, push-алерты или эксплуатируют dedicated приложения по типу Google Authenticator.
Резервные ссылки нейтрализуют вопросы локальных ограничений и DDoS-assault. Техническим образом дубли образуют тождественные dublicates базового домена с сохранением инструментария и user информации.
Экспертные участники призывают keeping обновлённые базы working альтернатив в bookmark обозревателя. Администрация отправляют обновления о свежих доменах через e-mail, Telegram-группы и портативные утилиты.
Денежные movements через проверенные ресурсы обеспечены шифровальными протоколами стандарта банковского области. Вывод средств происходит лишь на проверенные wallets держателя аккаунта.
электрокарнизы для штор купить в москве электрокарнизы для штор купить в москве .
US Meds Outlet: US Meds Outlet – best australian online pharmacy
Легальные площадки игровых предложений дают участникам право к профессиональному развлечениям через специализированные ресурсы, включая Клубника казино , которые именно исполняют международные регламенты security.
Алгоритм оформления профиля necessita указания проверочных деталей через encrypted SSL-линии. Провайдеры требуют официальное доказательство совершеннолетия и региона проживания для compliance legal норм.
Multi-factor authentication представляет required частью передовых solutions security. Игроки получают SMS-шифры, push-оповещения или используют targeted софт вроде Google Authenticator.
Альтернативные ссылки преодолевают вопросы локальных блокировок и DDoS-воздействий. Техническим образом зеркала составляют тождественные реплики главного сайта с обеспечением опций и user деталей.
Опытные пользователи предлагают поддерживать свежие каталоги активных копий в favourites веб-клиента. Операторы направляют новости о актуальных адресах через e-mail, Telegram-чаты и смартфонные утилиты.
Платёжные транзакции через legal сайты защищены защитными алгоритмами уровня банковского области. Изъятие капитала выполняется лишь на validated счета держателя account.
Беттинговая область показывает интенсивный расширение, привлекая легионы геймеров. Опытные платформы дают защищённую условия для ставок. Детальную факты о подобных провайдерах реально отыскать на Lucky Bear casino .
Аттестация остаётся приоритетным аспектом выбора платформы. Надзорные органы Великобритании обеспечивают качественный мониторинг финансовых действий. Любая легальная площадка реализует периодические аудиты RNG-генераторов.
Технические аспекты инновационных беттинг-платформ охватывают SSL-кодирование банковского класса. Поставщики программного ПО наподобие Microgaming, NetEnt, Pragmatic Play добавляют комплексные схемы произвольных величин.
Процесс проверки аккаунта предусматривает передачи документов KYC-класса. ID, свидетельство о доходах, доказательство адреса — стандартный комплект для финального доступа.
Зеркальные URL убирают сложности с цензурой компаний. Функционирующие копии адаптируются систематически IT группами. Планшетные софт зачастую функционируют стабильнее интернет редакций.
Управление банкроллом задаёт продолжительную результативность беттинговых циклов. Профессиональные участники указывают урезать сумму вейджера до 1-2% от итогового резерва.
Ориентирование в секторе проверенных платформ требует понимания продвинутых решений подключения. Опытные игроки используют лаки Р±РёСЂ казино для извлечения свежей фактов о активных путях.
Процесс формирования аккаунта в сертифицированных операторах включает комплексную подтверждение. Продвинутые провайдеры применяют KYC-протоколы и AML-правила. Оформление документов отнимает от 24 до 72 промежутков.
Программные технологии для минования блокировок развиваются сообща с повышением регуляторных шагов. VPN-службы категории premium обеспечивают криптографию AES-256 и системы OpenVPN. Стабильность подключения принципиально актуальна для высокоролловых заходов.
Запасные домены выполняют задачи через географически распределенные серверные мощности. CDN-сети осуществляют минимальную отклик для международных клиентов. Автоматическое перенаправление инициируется при выявлении недоступности центрального домена.
Платежные переводы в лицензированных юрисдикциях соответствуют определенным нормам PCI DSS. Цифровые переводы получают популярность благодаря приватности и оперативности обработки.
Переносные софт ведущих компаний объединяют отпечатковую подтверждение и push-сообщения для критических событий. Модифицируемый дизайн независимо изменяется под параметры панели.
Перемещение в области легальных ресурсов подразумевает владения новых инструментов входа. Профессиональные геймеры внедряют Вавада официальный сайт для приобретения современной информации о активных URL.
Алгоритм оформления учетной записи в проверенных компаниях включает тщательную проверку. Современные поставщики используют KYC-алгоритмы и AML-критерии. Бумажная работа составляет от 24 до 72 периодов.
IT решения для прохождения барьеров развиваются вместе с повышением регуляторных действий. VPN-службы уровня premium предоставляют шифрование AES-256 и технологии OpenVPN. Надежность соединения критически актуальна для премиальных сессий.
Резервные сайты функционируют через пространственно размещенные технические мощности. CDN-комплексы предоставляют оптимальную пинг для международных геймеров. Системное роутинг активируется при выявлении блокировки основного ресурса.
Денежные транзакции в легальных регионах отвечают строгим критериям PCI DSS. Криптовалютные расчеты набирают распространение по причине скрытности и быстроте обработки.
Портативные программы лучших компаний совмещают отпечатковую авторизацию и push-оповещения для ключевых моментов. Настраиваемый внешний вид программно изменяется под характеристики матрицы.
It’s perfect time to make some plans for the future and it is time to
be happy. I’ve read this post and if I could I want to suggest
you some interesting things or tips. Perhaps you can write
next articles referring to this article. I wish to read even more things about it!
My web page … best real estate agent in Lake Oswego OR
My brother recommended I might like this website. He used to be totally right.
This put up truly made my day. You cann’t consider
simply how so much time I had spent for this info!
Thanks!
My web-site … 쓰리노
kidkismet marketplace – Enjoyable shop, found whimsical items and exploring felt light-hearted.
Ориентирование в мире сертифицированных сайтов нуждается осознания актуальных решений входа. Продвинутые пользователи применяют п»ї1xBet для приобретения современной материалов о активных доменах.
Алгоритм открытия аккаунта в сертифицированных заведениях содержит многоуровневую проверку. Современные организации задействуют KYC-протоколы и AML-правила. Документальная процедура потребляет от 24 до 72 часов.
IT технологии для прохождения ограничений улучшаются параллельно с ужесточением нормативных инициатив. VPN-платформы категории premium предоставляют кодирование AES-256 и системы OpenVPN. Непрерывность коннекта кардинально актуальна для привилегированных сессий.
Альтернативные домены выполняют задачи через регионально рассредоточенные компьютерные ресурсы. CDN-архитектуры поддерживают быструю пинг для глобальных игроков. Техническое переключение активируется при обнаружении ограничения первичного ресурса.
Экономические переводы в легальных регионах подчиняются четким критериям PCI DSS. Крипто переводы завоевывают признание по причине скрытности и темпу процессинга.
Смартфонные приложения элитных провайдеров содержат биометрическую идентификацию и push-оповещения для существенных происшествий. Модифицируемый внешний вид самостоятельно изменяется под параметры дисплея.
Отбор проверенного betting ресурса в сегодняшних границах требует повышенного рассмотрения к юридическому статусу. Компетентные игроки представляют, что Mellstroy Game casino содержит свежую сведения о доступных провайдерах.
Процедура регистрации в лицензированных площадках включает принудительную верификацию удостоверения. KYC-требования защищают как оператора, так и геймера от обмана. Временные пределы на изъятие средств до выполнения проверки – нормальная подход.
Электронные ограничения на доступ к гемблинг сервисам нейтрализуются через дублирующие ссылки. Активные зеркала сохраняют всестороннюю эффективность главного платформы. Банковские процедуры, интерактивный результаты и привилегированные планы продолжают неизменными.
Материальная гарантированность оценивается критерием внедренных банковских инструментов. SSL-безопасность, PCI DSS подтверждение и расширенная проверка формируют надежный контур обороны.
Интерактивная каталог проверенных провайдеров охватывает спины от топовых студий. RTP-коэффициенты, дисперсия и математические формулы претерпевают объективную сертификацию в утвержденных учреждениях.
Программы вознаграждения в качественных казино базируются на прозрачных параметрах проигрыша. Отыгрыш x35-40 характеризуется разумным для слот-поощрений, в то время как карточные развлечения включаются в зачет с сниженным показателем.
Исследование в секторе сертифицированных сайтов подразумевает представления передовых инструментов входа. Профессиональные геймеры используют лаки Р±РёСЂ казино для получения современной данных о оперативных доменах.
Процедура открытия профиля в лицензированных заведениях охватывает сложную аутентификацию. Передовые поставщики внедряют KYC-процедуры и AML-стандарты. Бумажная работа отнимает от 24 до 72 интервалов.
Технические инструменты для избежания блокировок прогрессируют параллельно с повышением регуляторных мер. VPN-сервисы разряда premium дают криптографию AES-256 и протоколы OpenVPN. Устойчивость соединения принципиально важна для элитных раундов.
Резервные платформы выполняют задачи через регионально размещенные серверные инфраструктуры. CDN-архитектуры поддерживают быструю задержку для американских геймеров. Программное маршрутизация инициируется при идентификации блокировки базового домена.
Экономические переводы в официальных территориях подпадают под строгим критериям PCI DSS. Децентрализованные платежи завоевывают распространение благодаря анонимности и темпу реализации.
Смартфонные утилиты премиальных брендов совмещают лицевую аутентификацию и push-алерты для принципиальных ситуаций. Модифицируемый интерфейс автоматически настраивается под свойства экрана.
Современные геймеры натыкаются с препятствием входа к официальным платформам. Провайдеры закрывают базовые порталы, но грамотные Килограмм сайт участники учитывают о функционировании параллельных сайтов.
Дополнительный домен формирует точную реплику базового портала. SSL-сертификаты сохраняются равнозначными. Платёжные действия проходят через сходные системы.
Алгоритм регистрации через зеркальный портал содержит классической проверки. Операторы уточняют удостоверения для выполнения KYC-стандартов. Личные параметры проходят расширенную проверку.
Банковские лимиты на альтернативных порталах идентичны главным спецификациям. Минимальные беты сохраняются константными. Прогрессивные выигрышные пулы координируются между многочисленными ресурсами.
Премиальные механизмы действуют комплексно на параллельных платформах. Коэффициент оборота обеспечивает стартовые значения. Период действия использования продолжается.
Команда помощи обрабатывает обращения с резервных доменов сходным образом. Прямой общение предоставляет непрерывный режим обслуживания.
Актуальные геймеры встречаются с набором программных особенностей при операциях с лицензированными ресурсами. Экспертные платформы типа Лаки Бир дают релевантную информацию о процессах развлекательных компаний.
Система аутентификации счета охватывает ряд требуемых шагов. Базовая верификация включает размещения бумаг удостоверяющих гражданство. Обычный комплект охватывает удостоверение личности, лицензию водителя или заграничное удостоверение.
Системная сторона записления предполагает применение криптографической защиты и двухуровневой проверки. Продвинутые участники рекомендуют инициировать весь комплекс возможных опций обеспечения.
Резервные ссылки формируют точные дубликаты центрального ресурса с хранением комплексного набора функций. Ключевое выгода содержится в подобии банковских границ и требований отыгрыша.
Механизм обнаружения активных зеркал основывается на мониторинге экспертных мессенджер групп и союзных площадок. Экспертные пользователи используют виртуальные частные сети для создания надежного доступа вне зависимости от географических лимитов.
Подбор проверенного развлекательного ресурса требует серьезного анализа правовых сертификатов. Актуальные порталы п»ї1хбет казино обеспечивают пользователям полную информацию о текущих аккредитациях.
Система оформления счета включает множество ключевых стадий аутентификации. Владельцы настаивают бумаги, засвидетельствующие личность и совершеннолетие. Типовой KYC-регламент требует от 24 до 72 часов.
Финансовое планирование начинается с фиксации границ на взносы. Опытные клиенты призывают внедрять установку 5% от итогового азартного фонда на единичную партию.
Цифровые ограничения владельцев побуждают эксплуатировать альтернативные домены. Зеркала хранят безусловную эффективность первичного ресурса, подразумевая журнал платежей и развлекательный достижения.
Передовые банковские системы предоставляют быстрые инвестиции через электронные хранилища. Bitcoin, Ethereum и постоянные токены обеспечивают анонимность и мизерные сборы. Длительность осуществления изъятий достигает 10-30 минут.
Схемы лояльности включают многоуровневые степени с увеличивающимся компенсацией. VIP-консультанты предлагают персонализированные вознаграждения, повышенные границы и приоритетную сервис.
read more fullinfo
тест на lq онлайн бесплатно без регистрации
средний iq ребенка
какое iq должно быть у человека
iq норма по возрасту таблица
сколько айкью у человека в среднем
пройти iq тест
айкью в среднем
уровень iq таблица по возрасту
какой высокий айкью
By following these steps, you’ll be ready to enjoy the full excitement and winning potential of Gates of Olympus Super Scatter, whether you’re spinning for fun or chasing those legendary Super Scatter payouts. COPYRIGHT © 2015 – 2025. All rights reserved to Pragmatic Play, a Veridian (Gibraltar) Limited investment. Any and all content included on this website or incorporated by reference is protected by international copyright laws. Starlight Princess Super Scatter joins the provider’s expanding slot portfolio, featuring the franchise’s highest win potential yet. Bonus elements in Gates of Olympus Super Scatter are where the excitement rises. Pragmatic Play kept the tumble feature, meaning symbols disappear after a win and new ones drop into place. That can continue until no further combinations land. Free spins are still central: four scatters activate 15 of them, and during this mode multipliers are collected and then added to any win. The difference compared to the original slot is how often these spins appear thanks to the Super Scatter tweak.On top of that, there’s the bonus buy option. For a set price, players can skip the waiting and jump straight into the free spins. Some appreciate the shortcut; others prefer the natural build-up. Either way, the feature is there.
https://loja.primeembalagens.com.br/?p=104988
Oct 10, 2020 | Family & Lifestyle Such, you can spin ports, claim their invited bonus, or even sign up real time game — all without leaving your internet browser. Indeed, really has in the desktop type is completely available on cellular. Dragon Pearl is actually tailored for professionals which take pleasure in the new convenience and directness out of vintage slots. The game works to the a simple system where victories are awarded for getting you to definitely three complimentary icons to your spend line. The best real funds online casino software regarding Android will be the Spin And Rewrite On Line Casino app – it’s fast, efficient and packed along with typically the similar real funds online casino video games as the Rewrite Online Casino mobile online casino. Driven by simply Competitor, Refreshing Porch Galleries, and Betsoft, Ducky Luck will be levelupcasino-bonus another very good online application designed to become in a position to deliver an individual the particular best of the two worlds. You’ll have entry to reside in add-on to virtual games, plus above 400 online slot machine game video games regarding a lowest down payment associated with $25.
charmcartel.shop – Fabulous accessories and a well-organized site, I love browsing here.
тест на уровень айкью
тест на айкью как называется
что показывает тест на iq
мой айкью тест бесплатно онлайн
Исследование в пространстве сертифицированных площадок подразумевает владения продвинутых инструментов подключения. Профессиональные игроки используют казино Vavada для извлечения актуальной фактов о оперативных путях.
Процедура регистрации счета в сертифицированных операторах содержит тщательную подтверждение. Продвинутые компании применяют KYC-алгоритмы и AML-критерии. Оформление документов занимает от 24 до 72 промежутков.
Цифровые инструменты для преодоления препятствий развиваются сообща с укреплением юридических инициатив. VPN-платформы типа premium предлагают криптографию AES-256 и методы OpenVPN. Стабильность канала критически необходима для VIP раундов.
Зеркальные платформы оперируют через пространственно распределенные цифровые системы. CDN-сети предоставляют минимальную пинг для международных клиентов. Программное маршрутизация срабатывает при выявлении барьера основного портала.
Платежные движения в проверенных юрисдикциях следуют четким правилам PCI DSS. Цифровые переводы получают признание в результате секретности и оперативности обработки.
Портативные софт топовых компаний включают физиологическую подтверждение и push-уведомления для важных ситуаций. Адаптивный внешний вид автономно адаптируется под характеристики матрицы.
Подбор проверенного игрового площадки в нынешних условиях нуждается особого внимания к лицензионному уровню. Опытные клиенты осознают, что лаки Р±РёСЂ казино отображает свежую данные о действующих площадках.
Схема оформления профиля в сертифицированных операторах включает обязательную проверку удостоверения. KYC-стандарты охраняют как казино, так и геймера от фрода. Кратковременные лимиты на получение средств до выполнения контроля – типичная методика.
Виртуальные барьеры на вход к азартным ресурсам решаются через альтернативные домены. Действующие клоны обеспечивают абсолютную функциональность основного портала. Денежные переводы, развлекательный прогресс и привилегированные схемы поддерживаются устойчивыми.
Капитальная гарантированность выражается уровнем задействованных банковских механизмов. SSL-криптография, PCI DSS аттестация и дополнительная верификация формируют безопасный барьер ограждения.
Интерактивная библиотека проверенных операторов включает машины от топовых провайдеров. RTP-индексы, вариативность и статистические модели подвергаются внешнюю сертификацию в утвержденных учреждениях.
Схемы вознаграждения в профессиональных сервисах опираются на понятных критериях отыгрыша. Условия ставок x35-40 характеризуется нормальным для спин-подарков, в то время как карточные состязания засчитываются в счет с сниженным множителем.
Передовые гемблеры попадают с сложностью подключения к лицензированным платформам. Компании фильтруют главные ссылки, но искушённые казино Vavada пользователи осознают о существовании резервных площадок.
Альтернативный адрес является полную дубликат оригинального площадки. Криптографические алгоритмы остаются равнозначными. Расчётные транзакции реализуются через идентичные шлюзы.
Методика оформления профиля через дополнительный ссылку требует классической подтверждения. Администраторы требуют справки для соблюдения KYC-регламентов. Идентификационные характеристики реализуют двухфакторную проверку.
Финансовые лимиты на параллельных сайтах соответствуют первичным параметрам. Низшие суммы продолжают стабильными. Возрастающие банки объединяются между разными ссылками.
Премиальные механизмы действуют комплексно на альтернативных ресурсах. Требования по обороту обеспечивает исходные величины. Срок активности реализации остаётся прежним.
Отдел обслуживания решает обращения с зеркальных доменов аналогично. Прямой чат гарантирует постоянный график функционирования.
Актуальные участники обталкиваются с огромным количеством программных нюансов при функционировании с проверенными порталами. Экспертные ресурсы типа лаки ворлд казино выдают релевантную сведения о работе гэмблинговых операторов.
Механизм проверки учетной записи охватывает множество необходимых стадий. Стартовая проверка подразумевает передачи справок валидирующих субъект. Классический список включает удостоверение личности, водительские права или международный паспорт.
Технологическая часть создания аккаунта предполагает эксплуатацию SSL-шифрования и 2FA. Продвинутые участники подсказывают запускать все имеющихся функций обеспечения.
Резервные ссылки представляют абсолютные дубликаты главного портала с хранением исчерпывающего возможностей. Ключевое плюс выражается в подобии финансовых рамок и параметров условий прокрутки.
Процедура обнаружения активных альтернативных адресов базируется на контроле специализированных уведомительных сервисов и связанных площадок. Продвинутые игроки используют виртуальные частные сети для обеспечения стабильного входа без оглядки от локальных запретов.
I enjoy what you guys are usually up too. This kind of clever work and exposure!
Keep up the amazing works guys I’ve added you guys to my own blogroll.
decordock.shop – A great collection of home decor, it’s so easy to shop and discover new items.
Article writing is also a excitement, if you be familiar
with after that you can write otherwise it is difficult
to write.
Also visit my site … 쓰리노
Новейшие игроки обталкиваются с изобилием технических тонкостей при операциях с лицензированными площадками. Профильные источники типа Лаки Бир обеспечивают актуальную данные о процессах развлекательных операторов.
Система валидации счета включает множество требуемых шагов. Стартовая верификация подразумевает передачи свидетельств подтверждающих персону. Стандартный пакет содержит документ, лицензию водителя или внешний паспорт.
Программная элемент создания аккаунта подразумевает задействование SSL-шифрования и двухфакторной аутентификации. Квалифицированные пользователи настаивают задействовать весь комплекс возможных возможностей охраны.
Зеркала являются полные реплики основного ресурса с сохранением тотального арсенала. Ключевое преимущество выражается в соответствии платежных пределов и требований проигрыша.
Алгоритм нахождения действующих запасных доменов опирается на контроле тематических телеграм-каналов и партнерских сайтов. Квалифицированные геймеры используют прокси-соединения для создания надежного входа вне зависимости от географических лимитов.
What you composed made a bunch of sense. But, think on this, suppose you
added a little information? I am not saying your content is not good., but what if you added a title to maybe grab folk’s attention? I mean Santa Claus Christmas Ball Tutorial Adobe
Illustrator. – My Downloadables is a little vanilla. You could peek at Yahoo’s front page and watch how they create news headlines
to get people to click. You might try adding a video or a pic or two to grab readers excited about everything’ve written. In my opinion, it might
make your posts a little livelier.
Feel free to visit my web-site – 오피사이트 추천
Инновационные сервисы развлекательных игр дают беттерам подключение к профессиональному беттингу через надежные Меллстрой официальный сайт порталы. Сертифицированная работа предполагает следования определенных контролирующих положений.
Процесс создания клиентского учетной записи предусматривает подтверждение приватных реквизитов. Регуляторы задействуют расширенные системы KYC и AML для пресечения незаконных операций.
Электронные системы новейших игорных домов работают на зашифрованных серверах с TLS технологиями. Геоблокировка заставляет провайдеров внедрять параллельные ссылки.
Резервные платформы формируют идентичные репликации главного платформы с обеспечением всех инструментов и параметров. Игроки получают устойчивый вход к депозиту, азартной данным и персональным параметрам.
Банковские операции выполняются через встроенные банковские системы. Ограничения на взносы и выводы устанавливаются в согласии с регуляторными критериями и собственными регламентами управления рисками.
Компетентные клиенты указывают мониторить статус лицензии через государственные реестры развлекательных структур. Статусные характеристики предусматривают рейтинги на отраслевых сервисах и отзывы действительных игроков.
gervina.shop – Love the sleek designs here, perfect for giving your home a chic makeover!
сайт Оптимизация налогов
Актуальные альтернативные домены легальных игорных заведений на Вован официальный сайт гарантируют стабильный соединение к игровым порталам. Технология клонирования формирует аналогичные копии центрального ресурса с сохранением всех функций.
Процедура активации через альтернативный домен абсолютно имитирует главную анкету. Новые участники указывают рабочий email, генерируют надежный секретную комбинацию и определяют основную курренси.
Валидация личного кабинета содержит представления документов согласно KYC-нормам. Скан удостоверения личности, свидетельство регистрации и денежные данные проходят программную анализ в течение 24-72 часов.
Вход активных геймеров производится через базовую интерфейс с расширенной верификацией. Разовые коды передаются на сотовый гаджет или email.
Функционал входящего компонента через mirror-сайты содержит актуальные денежные механизмы. Visa, Mastercard, цифровые счета Skrill, Neteller, виртуальные монеты Bitcoin, Ethereum обрабатываются с минимальными процентами 0-3%.
Гемблинг база повторяется абсолютно включая слоты, традиционные игры, live-крупье и накопительные призы. RTP-показатели, колебания и условия отыгрыша поддерживаются идентичными.
Промо система выполняется похоже центральному порталу. Welcome-пакеты, даровые прокруты, денежный возврат и VIP-планы активируются программно при соблюдении прописанных условий.
Поиск безопасного betting заведения в текущих условиях требует тщательного изучения к юридическому состоянию. Компетентные игроки знают, что Либет казино содержит актуальную сведения о работающих площадках.
Процесс оформления профиля в проверенных операторах содержит принудительную верификацию личности. KYC-процедуры защищают как площадку, так и клиента от махинаций. Переходные пределы на вывод средств до финализации валидации – стандартная практика.
Технические ограничения на соединение к betting сервисам нейтрализуются через резервные домены. Действующие дубликаты сохраняют всестороннюю функциональность базового портала. Платежные переводы, игровой прогресс и бонусные программы сохраняются стабильными.
Материальная безопасность характеризуется степенью эксплуатируемых платежных способов. SSL-безопасность, PCI DSS лицензирование и двухфакторная подтверждение устанавливают защищенный барьер охраны.
Интерактивная ассортимент легальных сервисов включает слоты от известных создателей. RTP-индексы, дисперсия и вероятностные системы претерпевают объективную валидацию в авторизованных учреждениях.
Программы стимулирования в профессиональных площадках строятся на прозрачных критериях проигрыша. Проигрыш x35-40 оценивается разумным для спин-привилегий, в то время как настольные забавы идут в зачет с сниженным множителем.
visit ulixo – Enjoyed exploring, interface is clean and pages respond very well.
http://www.kalyamalya.ru/modules/newbb_plus/viewtopic.php?topic_id=28447&post_id=112350&order=0&viewmode=flat&pid=0&forum=4#112350
Новейшие геймеры сталкиваются с массой программных нюансов при деятельности с легальными порталами. Тематические ресурсы типа Lucky Bear поставляют новую информацию о функционировании казино операторов.
Механизм верификации аккаунта подразумевает комплекс принудительных уровней. Базовая подтверждение требует предоставления свидетельств верифицирующих гражданство. Обычный комплект содержит документ, автоудостоверение или загранпаспорт.
Программная элемент записления содержит задействование зашифрованного канала и 2FA. Продвинутые клиенты настаивают запускать все возможных параметров охраны.
Альтернативные адреса формируют полные клоны центрального ресурса с обеспечением исчерпывающего инструментария. Важнейшее преимущество состоит в соответствии финансовых лимитов и критериев ставочных требований.
Процедура выявления действующих дублирующих порталов опирается на проверке экспертных информационных каналов и связанных сайтов. Опытные клиенты используют туннельные протоколы для гарантирования устойчивого подключения независимо от территориальных лимитов.
pharmacy online farmacias online usa mexican pharmacy las vegas
Игровая индустрия представляет быстрый подъём, заинтересовывая множество пользователей. Экспертные сайты обеспечивают надёжную пространство для ставок. Полную сведения о указанных операторах допустимо обнаружить на казино Лаки Бир .
Лицензирование выступает ключевым элементом выбора платформы. Лицензиаты Великобритании гарантируют жёсткий надзор финансовых действий. Отдельная сертифицированная портал выполняет периодические проверки RNG-алгоритмов.
Технические свойства передовых азартных площадок охватывают SSL-защиту расчётного уровня. Создатели компьютерного материала типа Microgaming, NetEnt, Pragmatic Play встраивают усовершенствованные механизмы непредсказуемых параметров.
Процесс аутентификации учётной записи подразумевает передачи документов KYC-типа. Документ, выписка о средствах, валидация адреса — базовый список для полноценного авторизации.
Зеркальные URL устраняют препятствия с ограничениями операторов. Свежие варианты корректируются постоянно программными отделами. Карманные приложения нередко функционируют лучше сетевых версий.
Распределение капитала устанавливает долгосрочную успешность азартных партий. Квалифицированные беттеры предлагают лимитировать объём депозита до 1-2% от совокупного фонда.
http://indogenericexport.com/# tizanidine zanaflex
look at this web-site fulls bulk
Определение честного гемблинг площадки подразумевает детального рассмотрения лицензионных разрешений. Новые порталы Вавада казино обеспечивают клиентам полную данные о действующих допусках.
Процесс получения доступа включает ряд необходимых ступеней проверки. Представители требуют справки, удостоверяющие индивидуальность и правоспособность. Традиционный KYC-механизм длится от 24 до 72 периодов.
Управление банком запускается с фиксации пределов на инвестиции. Профессиональные геймеры советуют эксплуатировать установку 5% от итогового развлекательного резерва на одну раунд.
Технические блокировки администраторов принуждают эксплуатировать резервные адреса. Альтернативы хранят стопроцентную производительность центрального сайта, содержа хронологию платежей и гемблинг прогресс.
Актуальные банковские системы обеспечивают скоростные взносы через блокчейн хранилища. Bitcoin, Ethereum и устойчивые монеты обеспечивают анонимность и символические отчисления. Период выполнения выводов достигает 10-30 промежутков.
Программы преданности подразумевают ступенчатые категории с накапливающимся кэшбэком. VIP-консультанты дают эксклюзивные вознаграждения, расширенные рамки и первоочередную обслуживание.
Актуальные провайдеры гемблинг игр обеспечивают игрокам путь к элитному гемблингу через надежные п»ї1хбет регистрация порталы. Сертифицированная деятельность влечет следования определенных законодательных положений.
Процедура оформления пользовательского кабинета задействует проверку персональных реквизитов. Операторы эксплуатируют расширенные алгоритмы KYC и AML для блокировки мошеннических операций.
Технические системы передовых беттинг площадок базируются на защищенных серверах с криптографическими алгоритмами. IP-фильтрация принуждает администраторов разрабатывать альтернативные домены.
Дублирующие платформы формируют эквивалентные дубликаты базового домена с обеспечением всех функций и данных. Пользователи обеспечивают себе устойчивый вход к средствам, гемблинг статистике и индивидуальным опциям.
Расчетные процедуры выполняются через встроенные платежные шлюзы. Пределы на взносы и снятия регулируются в соответствии с лицензионными положениями и собственными правилами управления рисками.
Компетентные гемблеры советуют проверять состояние разрешения через официальные каталоги гемблинг структур. Имиджевые индикаторы включают рейтинги на отраслевых сайтах и комментарии реальных пользователей.
Гемблинговая ниша показывает активный развитие, притягивая миллионы клиентов. Грамотные платформы предоставляют защищённую пространство для беттинга. Развёрнутую материалы о подобных брендах допустимо отыскать на med casino .
Сертификация представляет приоритетным показателем подбора платформы. Регуляторы Великобритании предоставляют качественный контроль валютных транзакций. Конкретная аккредитованная портал реализует постоянные инспекции RNG-систем.
Технические особенности инновационных казино включают SSL-криптографию финансового стандарта. Провайдеры цифрового продукта уровня Microgaming, NetEnt, Pragmatic Play подключают продвинутые системы непредсказуемых значений.
Процесс проверки счёта предполагает подачи бумаг KYC-формата. Документ, подтверждение о доходах, верификация прописки — стандартный набор для окончательного активации.
Зеркальные ссылки исправляют проблемы с блокировками поставщиков. Рабочие зеркала адаптируются каждый день компьютерными службами. Карманные программы нередко работают качественнее интернет версий.
Финансовая дисциплина формирует продолжительную доходность азартных раундов. Квалифицированные геймеры рекомендуют ограничивать величину ставки до 1-2% от суммарного фонда.
Hi i am kavin, its my first time to commenting anyplace, when i read this article i thought i could also
make comment due to this sensible article.
Look into my webpage … 오피사이트 추천
Поиск надежного азартного площадки нуждается глубокого исследования лицензионных бумаг. Актуальные сайты Лев казино предоставляют игрокам абсолютную сведения о текущих лицензиях.
Процедура оформления счета включает определенное количество обязательных ступеней аутентификации. Провайдеры требуют удостоверения, засвидетельствующие идентичность и возраст. Обычный KYC-алгоритм требует от 24 до 72 временных отрезков.
Банкролл-менеджмент открывается с фиксации лимитов на пополнения. Профессиональные игроки предлагают внедрять установку 5% от общего азартного бюджета на единичную заход.
Технические запреты владельцев обязывают использовать запасные ссылки. Копии оберегают абсолютную производительность главного ресурса, включая историю операций и гемблинг прогресс.
Современные расчетные сервисы поддерживают оперативные пополнения через виртуальные аккаунты. Bitcoin, Ethereum и стейблкоины поддерживают тайность и крошечные взносы. Продолжительность реализации снятий составляет 10-30 периодов.
Планы постоянства предусматривают иерархические статусы с возрастающим возвратом. VIP-менеджеры предоставляют уникальные бонусы, расширенные лимиты и ускоренную поддержку.
Hmm it looks like your blog ate my first comment (it was extremely long) so I guess I’ll just sum
it up what I wrote and say, I’m thoroughly enjoying your blog.
I too am an aspiring blog writer but I’m still new to the whole thing.
Do you have any suggestions for inexperienced blog writers?
I’d really appreciate it.
Feel free to visit my blog post; best realtor in Rancho Cucamonga CA
cozycopper.shop – Such a beautiful range of copper items, perfect for any occasion or everyday use.
Инновационные сервисы игорных развлечений предоставляют игрокам возможность к качественному игровому процессу через надежные п»ї1хбет РІС…РѕРґ системы. Легальная работа подразумевает соблюдения определенных законодательных норм.
Система создания пользовательского профиля предусматривает подтверждение персональных показателей. Управляющие задействуют расширенные алгоритмы KYC и AML для блокировки поддельных платежей.
IT инструменты передовых беттинг площадок базируются на надежных серверах с SSL технологиями. Геоблокировка заставляет владельцев разрабатывать дублирующие домены.
Альтернативные порталы являют собой эквивалентные копии основного портала с сохранением всех сервисов и параметров. Игроки добиваются беспрепятственный доступ к средствам, развлекательной истории и персональным параметрам.
Финансовые переводы осуществляются через встроенные платежные сервисы. Лимиты на взносы и выводы назначаются в соотношении с лицензионными требованиями и внутренними правилами контроля угроз.
Опытные гемблеры рекомендуют контролировать ситуацию лицензии через контролирующие базы данных беттинг органов. Имиджевые индикаторы задействуют ранги на отраслевых ресурсах и feedback настоящих игроков.
Легальные платформы игровых возможностей oferuja игрокам возможность к профессиональному игровому процессу через тематические сайты, включая казино 1xBet , которые точно выполняют мировые нормы конфиденциальности.
Алгоритм активации предполагает предоставления идентификационных данных через защищённые SSL-линии. Администрация требуют официальное verification правоспособности и локации регистрации для выполнения юрисдикционных стандартов.
Многоуровневая идентификация считается mandatory частью актуальных платформ надёжности. Клиенты приобретают SMS-ключи, push-notification или задействуют специализированные программы наподобие Google Authenticator.
Mirror URL решают проблемы territorial санкций и DDoS-нападений. По сути зеркала образуют тождественные копии primary домена с сохранением features и клиентских деталей.
Компетентные геймеры призывают сохранять current базы активных альтернатив в favourites браузера. Операторы направляют информацию о современных адресах через электронную почту, Telegram-группы и портативные приложения.
Финансовые транзакции через проверенные площадки secured encryption протоколами класса банковского направления. Получение фондов выполняется solely на аутентифицированные счета хозяина профиля.
Decor treasures – Unique baskets and home accessories worth checking out.
Выбор надежного развлекательного ресурса нуждается детального анализа лицензионных сертификатов. Новые платформы лаки ворлд казино обеспечивают участникам полную детали о имеющихся санкциях.
Механизм регистрации охватывает множество обязательных фаз аутентификации. Операторы запрашивают справки, устанавливающие самобытность и совершеннолетие. Стандартный KYC-алгоритм продолжается от 24 до 72 промежутков.
Управление банком открывается с назначения границ на взносы. Профессиональные игроки предлагают эксплуатировать установку 5% от полного игорного резерва на одну партию.
Цифровые блокировки провайдеров вынуждают внедрять альтернативные ссылки. Копии хранят безусловную активность центрального портала, содержа журнал сделок и игровой прогресс.
Современные платежные системы предоставляют скоростные взносы через электронные кошельки. Bitcoin, Ethereum и стейблкоины обеспечивают анонимность и символические сборы. Продолжительность обработки извлечений равно 10-30 интервалов.
Системы приверженности содержат многоуровневые степени с нарастающим кэшбэком. VIP-менеджеры обеспечивают индивидуальные вознаграждения, улучшенные ограничения и первоочередную поддержку.
Выбор надежного азартного портала в актуальных рамках заставляет тщательного рассмотрения к лицензионному режиму. Опытные клиенты осознают, что лаки Р±РёСЂ казино предоставляет современную данные о работающих площадках.
Схема записи в лицензированных сервисах включает неизбежную подтверждение удостоверения. KYC-правила обеспечивают как оператора, так и клиента от обмана. Переходные рамки на получение капитала до выполнения проверки – нормальная практика.
Программные блокировки на подключение к развлекательным площадкам преодолеваются через зеркальные домены. Активные отражения обеспечивают полную работоспособность основного платформы. Платежные переводы, развлекательный результаты и привилегированные системы продолжают неизменными.
Капитальная гарантированность выражается качеством используемых расчетных систем. SSL-безопасность, PCI DSS сертификация и дополнительная верификация устанавливают безопасный барьер ограждения.
Игровая библиотека проверенных заведений объединяет спины от топовых студий. RTP-коэффициенты, вариативность и вероятностные схемы подвергаются объективную валидацию в одобренных лабораториях.
Программы вознаграждения в серьезных казино строятся на ясных условиях вейджера. Отыгрыш x35-40 оценивается разумным для барабан-подарков, в то время как карточные активности принимаются в зачет с редуцированным множителем.
Truly a lot of superb facts!
Инновационные платформы гемблинг игр обеспечивают игрокам подключение к премиальному игровому процессу через сертифицированные казино 1хбет ресурсы. Лицензированная деятельность требует учета строгих надзорных норм.
Процесс активации игрового счета задействует верификацию конфиденциальных показателей. Операторы эксплуатируют углубленные протоколы KYC и AML для недопущения фродовых платежей.
IT платформы инновационных гемблинг платформ основываются на стабильных дата-центрах с криптографическими протоколами. Региональная блокировка побуждает администраторов внедрять параллельные домены.
Резервные порталы являют собой полные репликации центрального домена с сохранением всех опций и показателей. Клиенты получают непрерывный подключение к балансу, развлекательной отчетности и персональным опциям.
Расчетные процедуры выполняются через подключенные платежные сервисы. Границы на депозиты и выводы назначаются в соответствии с лицензионными условиями и организационными процедурами управления рисками.
Экспертные беттеры указывают контролировать статус сертификата через государственные регистры гемблинг ведомств. Репутационные индикаторы включают рейтинги на специализированных платформах и оценки истинных игроков.
Передовые геймеры натыкаются с препятствием соединения к легальным порталам. Поставщики запрещают стандартные ссылки, но профессиональные Lucky Bear казино пользователи понимают о функционировании зеркальных площадок.
Параллельный портал является точную копию основного ресурса. Криптографические алгоритмы поддерживаются неизменными. Финансовые процедуры осуществляются через равнозначные каналы.
Алгоритм открытия счёта через зеркальный домен включает обычной валидации. Операторы выясняют документы для выполнения KYC-правил. Индивидуальные параметры осуществляют расширенную проверку.
Банковские рамки на параллельных сайтах равняются стандартным условиям. Низшие ставки сохраняются постоянными. Растущие выигрышные пулы интегрируются между множественными доменами.
Льготные механизмы оперируют всесторонне на альтернативных площадках. Требования по обороту поддерживает базовые значения. Временные рамки оборота не изменяется.
Служба поддержки рассматривает вопросы с зеркальных доменов сходным образом. Интерактивный чат предоставляет непрерывный формат деятельности.
kavix link – Minimal design helps keep attention on essential information quickly.
Greetings! I’ve been reading your web site for a while now and finally got
the bravery to go ahead and give you a shout out from Kingwood Tx!
Just wanted to say keep up the good job!
Here is my homepage … best real estate agent in Alberta Canada
official core – Smooth-loading pages and the site feels effortless to read.
Brivona Place – The clean design makes the entire shopping experience feel effortless and enjoyable.
online pharmacy 365: US Meds Outlet – US Meds Outlet
Актуальные сервисы азартных развлечений предлагают участникам подключение к премиальному развлечениям через проверенные Лаки Бир системы. Лицензированная работа предполагает исполнения четких контролирующих норм.
Процесс активации игрового аккаунта задействует проверку персональных сведений. Регуляторы задействуют детализированные системы KYC и AML для предотвращения мошеннических переводов.
Технические средства актуальных гемблинг платформ основываются на стабильных серверах с криптографическими технологиями. IP-фильтрация вынуждает управляющих запускать вспомогательные адреса.
Зеркальные ресурсы образуют полные копии основного платформы с сохранением всех сервисов и показателей. Беттеры приобретают непрерывный вход к капиталу, развлекательной данным и индивидуальным установкам.
Расчетные процедуры осуществляются через подключенные финансовые процессоры. Пределы на инвестиции и получения фиксируются в унисон с законодательными требованиями и корпоративными регламентами контроля угроз.
Опытные клиенты указывают отслеживать ситуацию сертификата через официальные каталоги азартных органов. Статусные характеристики включают позиции на тематических ресурсах и оценки действительных беттеров.
Выбор качественного азартного заведения в актуальных реалиях требует детального изучения к правовому статусу. Знающие клиенты осознают, что Меллстрой зеркало включает последнюю сведения о активных сервисах.
Процесс создания аккаунта в лицензированных операторах охватывает принудительную валидацию удостоверения. KYC-нормы обеспечивают как площадку, так и геймера от махинаций. Краткосрочные пределы на получение капитала до завершения верификации – типичная система.
Цифровые блокировки на связь к гемблинг порталам устраняются через альтернативные адреса. Активные зеркала поддерживают тотальную работоспособность основного сайта. Расчетные процедуры, развлекательный достижения и поощрительные схемы функционируют постоянными.
Финансовая безопасность измеряется уровнем задействованных платежных методов. SSL-криптография, PCI DSS аттестация и дополнительная аутентификация создают надежный контур ограждения.
Развлекательная ассортимент лицензированных заведений предоставляет слоты от топовых провайдеров. RTP-коэффициенты, волатильность и алгоритмические принципы подвергаются беспристрастную валидацию в утвержденных организациях.
Программы стимулирования в надежных казино опираются на прозрачных критериях ставок. Отыгрыш x35-40 расценивается приемлемым для барабан-льгот, в то время как стандартные активности принимаются в калькуляцию с пониженным показателем.
BajaMed Direct: BajaMed Direct – pharmacy online
Выбор надежного развлекательного заведения предполагает серьезного рассмотрения правовых бумаг. Инновационные платформы тип топ сайт обеспечивают клиентам стопроцентную информацию о своих санкциях.
Система создания профиля содержит различные ключевых этапов аутентификации. Владельцы запрашивают справки, засвидетельствующие персону и возраст. Обычный KYC-порядок продолжается от 24 до 72 периодов.
Финансовое планирование запускается с определения рамок на пополнения. Компетентные геймеры призывают эксплуатировать правило 5% от суммарного игорного фонда на отдельную партию.
Электронные препятствия владельцев вынуждают внедрять альтернативные пути. Зеркала сохраняют абсолютную функциональность первичного сайта, предусматривая хронологию переводов и игровой продвижение.
Новые платежные способы предоставляют быстрые инвестиции через цифровые хранилища. Bitcoin, Ethereum и постоянные токены предоставляют приватность и мизерные сборы. Время осуществления получений доходит 10-30 отрезков.
Системы верности содержат градационные уровни с накапливающимся бонусом. VIP-представители предоставляют персонализированные подарки, усиленные пределы и преимущественную поддержку.
Superb, what a blog it is! This web site provides useful
facts to us, keep it up.
Review my blog; real estate agent Franklin TN
I am extremely impressed together with your writing abilities and also with the format on your
blog. Is that this a paid theme or did you customize it your self?
Either way stay up the nice quality writing, it’s uncommon to
look a great blog like this one these days..
Here is my web page – 쓰리노
Рабочие зеркала официальных gaming-операторов на лаки Р±РёСЂ казино создают непрерывный соединение к геймерским сервисам. Технология реплицирования генерирует точные дубликаты главного домена с поддержанием всех инструментов.
Механизм регистрации через резервную ссылку полностью повторяет оригинальную анкету. Новые игроки прописывают активный email, устанавливают безопасный шифр и фиксируют основную валюту.
Идентификация личного кабинета подразумевает предоставления бумаг по KYC-требованиям. Фото ID-карты, подтверждение резиденции и денежные реквизиты контролируются системой алгоритмическую проверку в течение 24-72 ч.
Подключение зарегистрированных пользователей происходит через типовую интерфейс с расширенной валидацией. Сессионные пароли приходят на сотовый гаджет или e-mail адрес.
Возможности входящего сектора через альтернативные домены включает популярные банковские системы. Visa, Mastercard, виртуальные балансы Skrill, Neteller, блокчейн-токены Bitcoin, Ethereum осуществляются с оптимизированными платежами 0-3%.
Игровая библиотека клонируется целиком включая spinning games, столовые забавы, live-хостов и джекпоты. RTP-коэффициенты, волатильность и условия отыгрыша удерживаются такими же.
Акционная политика выполняется аналогично центральному домену. Welcome-пакеты, даровые прокруты, компенсация и VIP-программы запускаются алгоритмически при достижении заданных критериев.
The berries scene at the end of the Games is an act of defiance that threatens to topple the Capitol’s authority. It is a moment of pure brilliance where Katniss outsmarts the Gamemakers. This climax is tense and satisfying. If you want to understand the political ramifications of this act, you must read the source material. Digital copies are widely available for those who prefer reading on screens, and a PDF format is often the most compatible choice for various devices. https://thehungergamespdf.ru/ Free Download Ebook The Hunger Games Pdf
Asking questions are in fact nice thing if you
are not understanding something totally, but this article provides nice understanding yet.
my web-site: 오피사이트 순위
goldenparcel.shop – A one-stop-shop for the best premium items, always worth visiting.
Актуальные игроки встречаются с массой технологических нюансов при операциях с лицензированными площадками. Тематические ресурсы типа Vavada казино предоставляют современную информацию о процессах развлекательных операторов.
Процесс проверки аккаунта предполагает ряд требуемых этапов. Первичная подтверждение включает отправки свидетельств подтверждающих личность. Типовой перечень предполагает удостоверение личности, права или внешний паспорт.
Программная составляющая создания аккаунта предполагает задействование защищенного протокола и двойной авторизации. Экспертные участники советуют инициировать максимум предложенных опций безопасности.
Зеркала формируют абсолютные дубликаты базового домена с обеспечением всего инструментария. Центральное бонус содержится в тождественности расчетных ограничений и критериев условий прокрутки.
Механизм локализации рабочих резервных ссылок основывается на проверке тематических мессенджер групп и партнерских ресурсов. Квалифицированные клиенты эксплуатируют виртуальные частные сети для обеспечения постоянного соединения независимо от территориальных лимитов.
перейти на сайт зеркало на замену гидры
What stood out about this casino https://dubdev.wpengine.com/tacticas-expertas-para-perfeccionar-la-ruleta-en-3/ is the quality of the games. Everything runs smoothly, the design is minimal, and there’s plenty of options to explore, which keeps it engaging.
Новейшие бетторы встречаются с барьером соединения к лицензированным сайтам. Операторы закрывают стандартные домены, но знающие казино Mellstroy Game посетители осознают о существовании дублирующих ресурсов.
Зеркало образует идентичную дубликат оригинального портала. Системы безопасности сохраняются идентичными. Банковские процедуры выполняются через аналогичные сервисы.
Схема открытия счёта через дополнительный домен требует привычной валидации. Менеджеры запрашивают удостоверения для реализации KYC-регламентов. Индивидуальные данные реализуют усиленную валидацию.
Банковские границы на альтернативных площадках идентичны базовым характеристикам. Минимальные вклады продолжают постоянными. Возрастающие накопления интегрируются между разными порталами.
Премиальные схемы оперируют всесторонне на резервных площадках. Вейджер удерживает базовые цифры. Длительность реализации не изменяется.
Служба поддержки анализирует обращения с альтернативных порталов сходным образом. Живой переписка осуществляет непрерывный расписание работы.
Поиск проверенного развлекательного портала предполагает тщательного изучения официальных документов. Современные системы казино Голд гарантируют клиентам стопроцентную сведения о текущих допусках.
Процесс создания профиля охватывает различные необходимых фаз проверки. Администраторы истребуют удостоверения, доказывающие идентичность и дееспособность. Стандартный KYC-процесс занимает от 24 до 72 промежутков.
Финансовое планирование стартует с установления лимитов на взносы. Опытные игроки призывают внедрять установку 5% от полного развлекательного резерва на индивидуальную игру.
Электронные барьеры владельцев заставляют эксплуатировать дополнительные адреса. Дубликаты оберегают безусловную активность базового платформы, содержа архив переводов и казино результаты.
Передовые платежные инструменты обеспечивают скоростные инвестиции через цифровые кошельки. Bitcoin, Ethereum и стейблкоины дают анонимность и наименьшие сборы. Продолжительность реализации выводов составляет 10-30 промежутков.
Системы лояльности предусматривают иерархические уровни с прогрессивным вознаграждением. VIP-кураторы гарантируют эксклюзивные вознаграждения, усиленные ограничения и ускоренную сервис.
Выбор безопасного азартного заведения нуждается тщательного анализа юридических документов. Актуальные порталы п»ї1хбет официальный сайт предоставляют клиентам максимальную данные о текущих лицензиях.
Процесс создания профиля содержит определенное количество обязательных фаз верификации. Провайдеры требуют свидетельства, удостоверяющие индивидуальность и правоспособность. Стандартный KYC-порядок продолжается от 24 до 72 часов.
Банкролл-менеджмент стартует с определения рамок на вклады. Опытные геймеры призывают задействовать принцип 5% от полного гемблинг средств на отдельную раунд.
Технические барьеры поставщиков принуждают задействовать резервные пути. Альтернативы поддерживают абсолютную работоспособность основного площадки, охватывая летопись транзакций и игровой успех.
Инновационные банковские инструменты дают быстрые взносы через цифровые хранилища. Bitcoin, Ethereum и постоянные токены дают анонимность и минимальные комиссии. Время обработки выводов равно 10-30 интервалов.
Программы лояльности подразумевают ступенчатые степени с увеличивающимся кэшбэком. VIP-консультанты дают эксклюзивные награды, повышенные лимиты и ускоренную помощь.
Актуальные игроки имеют дело с массой технологических особенностей при работе с легальными платформами. Экспертные платформы типа Vavada предоставляют новую данные о процессах игорных операторов.
Процедура валидации учетной записи содержит несколько принудительных фаз. Стартовая верификация предполагает загрузки свидетельств удостоверяющих личность. Классический перечень содержит паспорт, автолицензию или международный паспорт.
Системная сторона оформления подразумевает использование криптографической защиты и двойной авторизации. Квалифицированные геймеры предлагают запускать полный набор представленных параметров охраны.
Зеркала составляют абсолютные реплики основного ресурса с обеспечением полного возможностей. Важнейшее достоинство содержится в схожести платежных границ и норм ставочных требований.
Система локализации рабочих резервных ссылок строится на мониторинге тематических телеграм-каналов и аффилированных порталов. Квалифицированные геймеры применяют туннельные протоколы для формирования надежного доступа независимо от географических запретов.
Инновационные операторы азартных активностей обеспечивают игрокам подключение к элитному беттингу через сертифицированные лаки Р±РёСЂ казино РІС…РѕРґ порталы. Лицензированная функционирование нуждается выполнения жестких контролирующих требований.
Процесс регистрации клиентского аккаунта предусматривает подтверждение личных показателей. Управляющие применяют комплексные процедуры KYC и AML для исключения нарушающих операций.
Электронные решения инновационных беттинг площадок строятся на защищенных дата-центрах с TLS протоколами. Территориальные ограничения побуждает провайдеров внедрять дублирующие порталы.
Зеркальные платформы являют собой точные копии центрального сайта с фиксацией всех возможностей и информации. Участники получают беспрепятственный доступ к балансу, развлекательной данным и клиентским настройкам.
Платежные операции осуществляются через подключенные финансовые агрегаторы. Лимиты на инвестиции и изъятия определяются в гармонии с регуляторными стандартами и собственными нормами контроля угроз.
Экспертные игроки советуют проверять состояние лицензии через контролирующие базы данных развлекательных структур. Статусные индикаторы предусматривают оценки на тематических сайтах и отзывы настоящих участников.
Гемблинговая сфера представляет интенсивный прогресс, манящая множество пользователей. Профессиональные порталы гарантируют качественную обстановку для игры. Детальную информацию о таких организациях реально обнаружить на Лаки Бир официальный сайт .
Аттестация составляет ключевым элементом селекции площадки. Лицензиаты Великобритании дают серьёзный мониторинг валютных действий. Каждая сертифицированная портал проходит периодические контроли RNG-генераторов.
Программные свойства передовых гемблинг-сайтов предусматривают SSL-шифрование экономического класса. Разработчики программного продукта типа Microgaming, NetEnt, Pragmatic Play добавляют многоуровневые механизмы произвольных значений.
Процедура аутентификации личного кабинета требует предоставления бумаг KYC-формата. ID, документ о средствах, верификация местожительства — типичный перечень для окончательного входа.
Зеркальные порталы решают проблемы с ограничениями организаций. Действующие копии модифицируются систематически программными командами. Портативные утилиты обычно выполняются качественнее онлайн версий.
Финансовая дисциплина устанавливает длительную результативность игровых раундов. Профессиональные геймеры предлагают сокращать сумму ставки до 1-2% от полного банкролла.
Поиск в секторе лицензированных платформ подразумевает владения новых способов авторизации. Профессиональные участники задействуют Mellstroy Game казино для получения новейшей информации о действующих URL.
Алгоритм открытия аккаунта в лицензированных компаниях предполагает многоуровневую проверку. Новейшие провайдеры задействуют KYC-протоколы и AML-критерии. Оформление документов требует от 24 до 72 временных отрезков.
Цифровые решения для преодоления блокировок улучшаются одновременно с повышением регуляторных решений. VPN-сервисы уровня premium дают защиту AES-256 и технологии OpenVPN. Надежность соединения принципиально существенна для элитных заходов.
Запасные домены оперируют через географически размещенные серверные системы. CDN-комплексы предоставляют минимальную время ответа для европейских геймеров. Техническое переключение запускается при детекции недоступности базового домена.
Платежные операции в сертифицированных юрисдикциях следуют определенным требованиям PCI DSS. Блокчейн переводы набирают популярность из-за конфиденциальности и оперативности реализации.
Переносные клиенты ведущих провайдеров интегрируют физиологическую авторизацию и push-уведомления для принципиальных происшествий. Адаптивный дизайн автономно корректируется под параметры матрицы.
Creative selections – Lots of personality in the pieces offered here.
Функционирующие дублирующие порталы лицензированных казино на aqua казино дают постоянный вход к азартным сервисам. Схема реплицирования генерирует аналогичные клоны базового ресурса с фиксацией всех функций.
Схема регистрации через резервную ссылку абсолютно дублирует стандартную анкету. Только пришедшие участники прописывают активный email, придумывают стойкий код доступа и фиксируют основную курренси.
Верификация личного кабинета содержит представления свидетельств согласно KYC-регламенту. Скан национального документа, подтверждение места жительства и финансовые координаты анализируются посредством цифровую валидацию в течение 24-72 часов.
Логин действующих клиентов реализуется через типовую интерфейс с многоступенчатой идентификацией. Одноразовые пароли поступают на смс аппарат или электронную почту.
Механизмы входящего раздела через альтернативные домены содержит востребованные финансовые сервисы. Visa, Mastercard, электронные кошельки Skrill, Neteller, crypto Bitcoin, Ethereum обрабатываются с минимальными процентами 0-3%.
Азартная каталог копируется в точности включая spinning games, карточные развлечения, live-крупье и накопительные призы. RTP-параметры, колебания и условия отыгрыша остаются аналогичными.
Подарочная политика функционирует подобно основному сайту. Welcome-предложения, безвозмездные спины, возврат средств и VIP-системы инициируются системно при достижении фиксированных условий.
Действующие зеркала проверенных азартных клубов на ретро официальный сайт создают устойчивый вход к геймерским системам. Система зеркалирования образует точные дубликаты центрального сайта с фиксацией всех механизмов.
Механизм активации через зеркало абсолютно копирует основную форму. Свежие участники заполняют активный email, генерируют надежный секретную комбинацию и определяют рабочую валюту.
Аутентификация профиля включает отправки бумаг в соответствии с KYC-нормам. Скан национального документа, подтверждение регистрации и денежные реквизиты проверяются через цифровую проверку в течение 24-72 часов.
Авторизация верифицированных участников выполняется через классическую интерфейс с усиленной аутентификацией. Краткосрочные пароли передаются на смс девайс или e-mail адрес.
Функционал денежного раздела через альтернативные домены содержит актуальные денежные системы. Visa, Mastercard, виртуальные балансы Skrill, Neteller, блокчейн-токены Bitcoin, Ethereum обрабатываются с сокращенными сборами 0-3%.
Gaming каталог воспроизводится абсолютно включая слоты, столовые игры, live-крупье и накопительные призы. RTP-значения, волатильность и вейджер поддерживаются такими же.
Промо система функционирует аналогично центральному веб-площадке. Welcome-пакеты, бесплатные вращения, refund и VIP-курсы инициируются алгоритмически при реализации заданных требований.
Ориентирование в сфере официальных ресурсов включает представления новых способов доступа. Квалифицированные пользователи применяют Vavada для получения свежей фактов о функционирующих адресах.
Схема регистрации учетной записи в сертифицированных организациях содержит многоуровневую аутентификацию. Актуальные организации эксплуатируют KYC-процедуры и AML-критерии. Документальное сопровождение потребляет от 24 до 72 периодов.
Компьютерные технологии для обхода барьеров развиваются сообща с усилением регуляторных мер. VPN-инструменты уровня premium гарантируют криптографию AES-256 и технологии OpenVPN. Устойчивость соединения fundamentally важна для элитных заходов.
Альтернативные ресурсы действуют через пространственно разнесенные технические инфраструктуры. CDN-структуры осуществляют сокращенную время ответа для азиатских пользователей. Цифровое редирект запускается при распознавании недоступности главного домена.
Финансовые операции в проверенных зонах подчиняются жестким стандартам PCI DSS. Криптовалютные переводы набирают признание в результате конфиденциальности и темпу реализации.
Смартфонные утилиты топовых провайдеров содержат биометрическую проверку и push-оповещения для важных эпизодов. Модифицируемый внешний вид программно изменяется под параметры панели.
Новейшие пользователи встречаются с множеством технических аспектов при функционировании с сертифицированными ресурсами. Профессиональные источники типа Лаки Бир сайт дают свежую материалы о операциях гэмблинговых брендов.
Процесс валидации кабинета включает несколько обязательных стадий. Начальная проверка требует предоставления документов удостоверяющих индивидуальность. Классический комплект включает удостоверение личности, права или внешний паспорт.
Цифровая сторона записления подразумевает применение зашифрованного канала и двухфакторной аутентификации. Продвинутые клиенты советуют запускать весь комплекс доступных настроек охраны.
Альтернативные адреса составляют идентичные копии базового ресурса с удержанием тотального функционала. Центральное достоинство содержится в схожести платежных лимитов и норм проигрыша.
Схема локализации функционирующих запасных доменов строится на контроле профильных информационных каналов и аффилированных сайтов. Продвинутые игроки используют виртуальные частные сети для формирования бесперебойного подключения без оглядки от территориальных барьеров.
If some one wishes to be updated with hottest technologies therefore he must
be go to see this web page and be up to date every
day.
Also visit my blog: best realtor in Lake Ozark MO
We expect a certain base level of quality from NetEnt games, as well as 30 free spins with no wagering requirements. With that in mind, players have to complete the below steps. Deposit limits are set when using skrill at an online casino. During the free spins, this has the longest transaction time out of all the options and you cannot deposit with checks. games Jack and the Beanstalk is a 5×3 grid, 20 payline slot game. So, naturally, the screen is more comfortable for your eyes than many other slots. However, this NetEnt video slot has a few good features that can boost your chances of grabbing some treasure from the giant. Keep an eye out for the walking wilds and treasure collection bonus rounds for even more chances to win. 7 100 x bet 200 Free No Wager Spins On Multiple Slots: New customers only. Register and enter promo code SPINS prior to deposit. Deposit, using a Debit Card, and stake £10+ within 14 days on Slots at Betfred Games and or Vegas to get 200 Free Spins on selected titles. £0.10 per spin. Credited within 48 hours and valid for 7 days. Full T&Cs apply. GambleAware.org #AD
http://advancedservicecorp.com/space9-casino-an-insightful-review-for-australian-players/
The astronaut crash game dazzles players with stunning graphics that bring alien worlds to life. Each planet is meticulously designed, featuring diverse astronaut-game.win biomes and atmospheric effects. Key aspects include: While the Astronaut crash game is primarily a game of chance, certain strategies and tips can help you manage your risk and potentially improve your overall outcome. It is crucial to understand that no strategy can guarantee wins, as the game’s outcome is inherently random. The multiplier’s rise is powered by a secure, verified algorithm, ensuring fair gameplay. Watching it climb feels like tracking a real rocket—heart-pounding. The core mechanic is easy: bet, watch the multiplier soar, and cash out before the crash. Mastering timing is what defines success.
Игровая индустрия представляет интенсивный расширение, заинтересовывая множество участников. Экспертные платформы обеспечивают безопасную условия для игры. Развёрнутую факты о этих брендах допустимо отыскать на п»ї1хбет официальный сайт .
Аккредитация остаётся ключевым аспектом подбора площадки. Лицензиаты Великобритании гарантируют строгий проверку финансовых операций. Конкретная аккредитованная платформа подвергается плановые ревизии RNG-систем.
Компьютерные аспекты передовых казино объединяют SSL-шифрование экономического класса. Производители программного обеспечения уровня Microgaming, NetEnt, Pragmatic Play подключают комплексные алгоритмы рандомных значений.
Процедура проверки аккаунта предполагает предоставления справок KYC-типа. Свидетельство, документ о прибылях, подтверждение регистрации — обычный перечень для итогового активации.
Альтернативные URL ликвидируют трудности с ограничениями организаций. Свежие варианты изменяются регулярно техническими группами. Смартфонные утилиты зачастую оперируют лучше веб редакций.
Банкролл-менеджмент задаёт продолжительную эффективность азартных раундов. Экспертные игроки указывают лимитировать объём бета до 1-2% от суммарного фонда.
Актуальные бетторы встречаются с проблемой доступа к официальным площадкам. Провайдеры запрещают стандартные URL, но искушённые Lucky Bear казино посетители знают о функционировании альтернативных ресурсов.
Параллельный портал составляет идентичную дубликат оригинального ресурса. Протоколы шифрования сохраняются неизменными. Финансовые действия проходят через равнозначные шлюзы.
Технология создания аккаунта через параллельный портал включает стандартной аутентификации. Операторы выясняют справки для реализации KYC-требований. Индивидуальные информация подвергаются комплексную аутентификацию.
Финансовые рамки на параллельных ресурсах соответствуют стандартным параметрам. Наименьшие взносы функционируют стабильными. Увеличивающиеся призовые фонды согласовываются между разными доменами.
Стимулирующие схемы действуют целостно на зеркальных сайтах. Требования по обороту обеспечивает базовые цифры. Срок активности использования не изменяется.
Команда поддержки решает тикеты с параллельных ссылок сходным образом. Прямой переписка осуществляет круглосуточный график деятельности.
I like the helpful information you provide in your articles.
I’ll bookmark your weblog and check again here frequently.
I am quite certain I’ll learn a lot of new stuff right
here! Best of luck for the next!
Here is my blog post; 오피사이트 순위
Подбор честного азартного портала нуждается основательного изучения юридических разрешений. Современные платформы million гарантируют игрокам стопроцентную сведения о имеющихся аккредитациях.
Система создания профиля содержит различные необходимых стадий верификации. Представители запрашивают удостоверения, удостоверяющие самобытность и дееспособность. Типовой KYC-процесс требует от 24 до 72 временных отрезков.
Банкролл-менеджмент запускается с определения рамок на пополнения. Искусные геймеры рекомендуют внедрять установку 5% от совокупного гемблинг резерва на одну сессию.
Технические ограничения провайдеров заставляют внедрять резервные домены. Дубликаты хранят максимальную работоспособность базового портала, предусматривая историю транзакций и игровой результаты.
Инновационные денежные инструменты гарантируют оперативные вклады через криптовалютные кошельки. Bitcoin, Ethereum и стабильные валюты поддерживают анонимность и наименьшие отчисления. Длительность проведения изъятий насчитывает 10-30 промежутков.
Схемы постоянства подразумевают иерархические уровни с увеличивающимся возвратом. VIP-консультанты предоставляют персонализированные подарки, улучшенные ограничения и опережающую поддержку.
Проверенные платформы азартных услуг предоставляют геймерам возможность к премиальному развлечениям через профильные платформы, включая лаки Р±РёСЂ казино , которые специально выполняют глобальные требования безопасности.
Схема оформления профиля включает ввода валидационных данных через безопасные SSL-каналы. Букмекеры просят официальное подтверждение возраста и территории проживания для поддержания законодательных требований.
Multi-factor authentication считается mandatory элементом современных систем security. Пользователи обретают SMS-шифры, push-notification или используют специальные программы наподобие Google Authenticator.
Дублирующие ссылки ликвидируют проблемы geographic санкций и DDoS-штурмов. Техническим образом дубли являют аналогичные клоны основного портала с сохранением инструментария и user сведений.
Профессиональные участники призывают хранить свежие списки активных копий в избранном браузера. Management направляют обновления о свежих адресах через почтовые сервисы, Telegram-communities и телефонные apps.
Финансовые операции через legal платформы гарантированы encryption протоколами стандарта банковского индустрии. Получение денег осуществляется лишь на validated данные хозяина профиля.
http://indogenericexport.com/# п»їbest muscle relaxer
Way cool! Some extremely valid points! I appreciate you writing this write-up and also the rest
of the website is very good.
My web-site; best real estate agent in Joliet IL
Нынешние клиенты пересекаются с массой технологических деталей при процессах с легальными площадками. Профильные ресурсы типа п»ї1хбет официальный сайт предоставляют свежую данные о процессах развлекательных брендов.
Процесс верификации аккаунта содержит комплекс неотъемлемых этапов. Стартовая верификация подразумевает размещения бумаг доказывающих личность. Привычный набор включает свидетельство, водительские права или заграничное удостоверение.
Технологическая компонента создания аккаунта содержит задействование криптографической защиты и многофакторной защиты. Продвинутые клиенты советуют включать весь комплекс возможных возможностей обеспечения.
Зеркала представляют точные реплики основного портала с поддержанием полного арсенала. Главное бонус заключается в соответствии платежных рамок и требований вейджера.
Система выявления рабочих резервных ссылок фундируется на проверке экспертных уведомительных сервисов и связанных платформ. Экспертные игроки используют виртуальные частные сети для предоставления постоянного подключения независимо от местных лимитов.
Актуальные клиенты обталкиваются с массой системных нюансов при операциях с легальными площадками. Экспертные источники типа Вавада РІС…РѕРґ обеспечивают релевантную материалы о операциях гэмблинговых организаций.
Процесс аутентификации учетной записи подразумевает множество принудительных фаз. Исходная аутентификация предполагает предоставления удостоверений подтверждающих субъект. Стандартный комплект содержит паспорт, автолицензию или заграничное удостоверение.
Системная часть записления подразумевает применение криптографической защиты и двойной авторизации. Квалифицированные игроки советуют включать все доступных возможностей безопасности.
Запасные домены являются стопроцентные реплики первичного домена с поддержанием комплексного возможностей. Важнейшее преимущество кроется в тождественности платежных пределов и норм ставочных требований.
Алгоритм нахождения функционирующих запасных доменов фундируется на контроле профессиональных уведомительных сервисов и связанных платформ. Продвинутые клиенты эксплуатируют туннельные протоколы для создания надежного соединения невзирая от территориальных барьеров.
charmcartel.shop – Fantastic collection of trendy accessories, browsing the site is a breeze.
dalvanta.shop – Unique and beautiful products, the shopping experience is flawless every time.
Today, I went to the beach front with my children.
I found a sea shell and gave it to my 4 year old daughter and said “You can hear the ocean if you put this to your ear.” She placed the
shell to her ear and screamed. There was a hermit crab inside and it
pinched her ear. She never wants to go back! LoL I know this is completely off topic but I had to tell
someone!
Новейшие бетторы натыкаются с проблемой входа к сертифицированным сайтам. Провайдеры ограничивают базовые адреса, но опытные казино типпи клиенты помнят о существовании альтернативных сайтов.
Резервная ссылка составляет идентичную отображение оригинального платформы. Системы безопасности работают идентичными. Денежные транзакции выполняются через равнозначные сервисы.
Процедура регистрации через дополнительный домен требует привычной валидации. Операторы просят свидетельства для осуществления KYC-норм. Личные сведения реализуют комплексную верификацию.
Банковские рамки на резервных платформах идентичны базовым спецификациям. Стартовые ставки сохраняются стабильными. Возрастающие призовые фонды согласовываются между разными ссылками.
Премиальные программы выполняются целостно на дополнительных ресурсах. Множитель ставок поддерживает исходные показатели. Временные рамки реализации остаётся прежним.
Сервис обслуживания решает заявки с альтернативных доменов равнозначно. Живой разговор гарантирует постоянный формат деятельности.
Learn More fresh fullz
Перемещение в секторе официальных порталов подразумевает представления передовых методов авторизации. Умелые клиенты применяют tip top casino для добывания свежей информации о работающих ссылках.
Процедура открытия счета в сертифицированных заведениях охватывает детальную подтверждение. Новейшие провайдеры внедряют KYC-системы и AML-требования. Документальная процедура занимает от 24 до 72 промежутков.
Цифровые решения для прохождения барьеров эволюционируют синхронно с ужесточением юридических инициатив. VPN-инструменты категории premium дают безопасность AES-256 и технологии OpenVPN. Постоянство канала fundamentally необходима для привилегированных сессий.
Дублирующие ресурсы работают через географически расположенные компьютерные ресурсы. CDN-сети осуществляют оптимальную задержку для глобальных пользователей. Системное маршрутизация инициируется при детекции блокировки центрального сайта.
Финансовые движения в сертифицированных регионах соответствуют жестким требованиям PCI DSS. Децентрализованные переводы приобретают популярность в результате анонимности и скорости обработки.
Мобильные программы ведущих компаний содержат отпечатковую авторизацию и push-уведомления для важных происшествий. Гибкий оформление программно подстраивается под параметры дисплея.
Hello, I enjoy reading all of your article. I wanted to
write a little comment to support you.
my web site – best realtor in Joliet IL
Действующие резервные адреса легальных игорных заведений на п»ї1хбет казино обеспечивают непрерывный доступ к развлекательным системам. Методика клонирования создает точные дубликаты центрального домена с консервацией всех опций.
Механизм регистрации через дублирующий портал целиком дублирует стандартную анкету. Свежие участники вводят функционирующий email, придумывают безопасный секретную комбинацию и фиксируют игровую финансовый инструмент.
Верификация личного кабинета подразумевает предоставления свидетельств в соответствии с KYC-требованиям. Фото ID-карты, валидация места жительства и банковские сведения проходят программную анализ в течение 24-72 периодов.
Авторизация существующих клиентов производится через базовую окно с усиленной аутентификацией. Временные пароли поступают на телефонный аппарат или электронную почту.
Механизмы финансового блока через mirror-сайты включает актуальные расчетные инструменты. Visa, Mastercard, виртуальные балансы Skrill, Neteller, виртуальные монеты Bitcoin, Ethereum реализуются с минимальными комиссиями 0-3%.
Gaming каталог клонируется целиком включая spinning games, классические забавы, live-хостов и джекпоты. RTP-индикаторы, колебания и отыгрыш фиксируются аналогичными.
Акционная система функционирует схоже центральному ресурсу. Welcome-наборы, фриспины, возврат средств и VIP-курсы стартуют алгоритмически при реализации заданных условий.
Bold Basketry finds – Fantastic quality baskets and stylish home goods, very easy to shop.
gemgalleria.shop – A fantastic site for finding gorgeous gems and jewelry, perfect for gifting!
Определение проверенного игрового портала в современных реалиях заставляет особого изучения к правовому состоянию. Компетентные клиенты учитывают, что казино Lucky Bear содержит современную материалы о работающих ресурсах.
Механизм открытия счета в сертифицированных площадках предусматривает необходимую проверку удостоверения. KYC-правила гарантируют как оператора, так и пользователя от мошенничества. Краткосрочные рамки на перечисление активов до окончания подтверждения – стандартная система.
Технические барьеры на вход к гемблинг площадкам обходятся через дублирующие ссылки. Функционирующие зеркала обеспечивают тотальную производительность главного сервиса. Денежные движения, игровой результаты и привилегированные системы продолжают неизменными.
Капитальная стабильность измеряется уровнем эксплуатируемых платежных систем. SSL-безопасность, PCI DSS аттестация и двухфакторная проверка обеспечивают стабильный щит охраны.
Игровая коллекция проверенных сервисов включает спины от главных студий. RTP-показатели, волатильность и вероятностные формулы получают объективную сертификацию в аккредитованных институтах.
Планы стимулирования в профессиональных площадках строятся на открытых правилах вейджера. Проигрыш x35-40 расценивается адекватным для слот-подарков, в то время как классические развлечения включаются в расчет с пониженным процентом.
I think the admin of this site is truly working
hard in favor of his site, for the reason that here every
data is quality based material.
my site – 오피
Определение достойного betting портала в нынешних реалиях предполагает повышенного рассмотрения к правовому уровню. Компетентные участники осознают, что Вавада регистрация демонстрирует свежую информацию о работающих провайдерах.
Процедура открытия счета в легальных площадках включает принудительную аутентификацию персональных данных. KYC-процедуры оберегают как казино, так и клиента от махинаций. Кратковременные границы на получение активов до финализации подтверждения – привычная процедура.
Программные барьеры на доступ к betting порталам устраняются через альтернативные домены. Доступные копии предоставляют тотальную возможности основного сайта. Расчетные процедуры, геймплейный продвижение и льготные планы сохраняются стабильными.
Капитальная защищенность измеряется степенью эксплуатируемых финансовых инструментов. SSL-безопасность, PCI DSS валидация и дополнительная подтверждение формируют защищенный периметр защиты.
Геймплейная библиотека лицензированных провайдеров предоставляет барабаны от ведущих создателей. RTP-значения, изменчивость и статистические системы испытывают независимую аудит в авторизованных учреждениях.
Механизмы стимулирования в достойных сервисах формируются на прозрачных правилах проигрыша. Отыгрыш x35-40 признается нормальным для барабан-привилегий, в то время как традиционные активности засчитываются в зачет с пониженным процентом.
Развлекательная индустрия отображает динамичный подъём, заинтересовывая легионы пользователей. Квалифицированные ресурсы предлагают надёжную среду для пари. Развёрнутую материалы о данных компаниях возможно отыскать на Lucky Bear .
Сертификация является ключевым фактором отбора портала. Регуляторы Олдерни предоставляют качественный аудит расчётных манипуляций. Конкретная официальная ресурс выполняет систематические проверки RNG-модулей.
Цифровые особенности передовых казино охватывают SSL-шифрование расчётного категории. Производители софтового софта наподобие Microgaming, NetEnt, Pragmatic Play встраивают сложные алгоритмы непредсказуемых величин.
Алгоритм верификации личного кабинета требует предоставления документов KYC-стандарта. ID, справка о заработке, удостоверение проживания — обычный перечень для полноценного доступа.
Резервные ссылки устраняют препятствия с ограничениями поставщиков. Свежие дубли корректируются постоянно IT командами. Карманные софт часто действуют качественнее браузерных версий.
Управление банкроллом задаёт перспективную прибыльность беттинговых раундов. Квалифицированные участники предлагают урезать сумму вейджера до 1-2% от итогового бюджета.
подробнее здесь Уменьшение ндс
Определение качественного азартного площадки в сегодняшних обстоятельствах нуждается специального анализа к регулятивному состоянию. Знающие клиенты понимают, что СЌРЅРѕРјРѕ казино включает новую сведения о активных операторах.
Процедура оформления профиля в официальных площадках включает неизбежную подтверждение персональных данных. KYC-нормы гарантируют как казино, так и игрока от махинаций. Временные лимиты на получение денег до закрытия валидации – типичная подход.
Цифровые блокировки на связь к игровым сервисам нейтрализуются через резервные адреса. Доступные копии обеспечивают стопроцентную возможности главного сайта. Платежные процедуры, развлекательный достижения и бонусные программы остаются стабильными.
Денежная безопасность оценивается показателем эксплуатируемых денежных систем. SSL-криптография, PCI DSS подтверждение и усиленная верификация устанавливают безопасный заслон обороны.
Игровая набор проверенных площадок предоставляет спины от лидирующих студий. RTP-индексы, дисперсия и статистические принципы претерпевают нейтральную сертификацию в одобренных центрах.
Механизмы стимулирования в профессиональных казино формируются на понятных правилах ставок. Вейджер x35-40 признается приемлемым для барабан-привилегий, в то время как традиционные забавы включаются в счет с уменьшенным множителем.
Определение безопасного betting оператора в сегодняшних реалиях подразумевает особого анализа к лицензионному статусу. Компетентные клиенты понимают, что типпи казино предоставляет свежую факты о функционирующих операторах.
Процесс создания аккаунта в легальных площадках предусматривает требуемую верификацию персональных данных. KYC-стандарты обеспечивают как сервис, так и клиента от мошенничества. Временные ограничения на получение денег до финализации подтверждения – привычная практика.
Программные запреты на доступ к betting порталам преодолеваются через резервные адреса. Активные отражения поддерживают всестороннюю возможности первичного портала. Расчетные процедуры, развлекательный результаты и поощрительные схемы поддерживаются константными.
Финансовая надежность оценивается степенью задействованных финансовых систем. SSL-защита, PCI DSS подтверждение и усиленная верификация создают защищенный контур охраны.
Развлекательная коллекция сертифицированных операторов включает автоматы от известных создателей. RTP-коэффициенты, изменчивость и статистические системы испытывают независимую контроль в авторизованных лабораториях.
Схемы вознаграждения в качественных казино основываются на понятных условиях вейджера. Отыгрыш x35-40 характеризуется справедливым для автомат-привилегий, в то время как настольные игры учитываются в расчет с минимальным коэффициентом.
have a peek here how to check cc balance carding
Hello to every body, it’s my first pay a visit
of this web site; this weblog includes remarkable and really excellent data for readers.
my website – best real estate agent in Rancho Cucamonga CA
Нынешние игроки встречаются с множеством системных деталей при функционировании с проверенными площадками. Тематические сайты типа Меллстрой сайт предоставляют актуальную сведения о функционировании казино компаний.
Система верификации учетной записи охватывает множество неотъемлемых стадий. Исходная валидация предполагает размещения свидетельств валидирующих индивидуальность. Привычный комплект предполагает ID, водительские права или международный паспорт.
Цифровая компонента оформления охватывает задействование криптографической защиты и 2FA. Продвинутые геймеры советуют инициировать весь комплекс предложенных настроек секьюрити.
Резервные ссылки составляют абсолютные копии центрального домена с хранением исчерпывающего функционала. Центральное преимущество состоит в соответствии платежных границ и критериев вейджера.
Система локализации действующих зеркал опирается на контроле профессиональных мессенджер групп и сотрудничающих площадок. Профессиональные клиенты эксплуатируют прокси-соединения для предоставления надежного соединения безотносительно от региональных лимитов.
Легальные платформы гэмблинг услуг дают клиентам шанс к профессиональному развлечениям через dedicated сайты, включая Меллстрой казино , что исполняют глобальные требования надёжности.
Процедура регистрации necessita ввода верификационных сведений через шифрованные SSL-линии. Букмекеры просят предоставить документальное подтверждение дееспособности и места нахождения для выполнения legal критериев.
2FA authentication считается необходимым элементом современных solutions security. Клиенты получают SMS-пароли, push-оповещения или используют профессиональные софт в стиле Google Authenticator.
Альтернативные порталы устраняют проблемы географических ограничений и DDoS-штурмов. Фактически зеркала являют идентичные версии основного портала с сохранением функциональности и индивидуальных параметров.
Компетентные геймеры советуют хранить новейшие реестры функционирующих mirrors в закладках браузера. Провайдеры передают сведения о fresh порталах через e-mail, Telegram-каналы и портативные apps.
Денежные операции через проверенные сайты защищены защитными протоколами стандарта банковского направления. Вывод финансов выполняется лишь на верифицированные wallets хозяина аккаунта.
italian pharmacy online: canadian world pharmacy – US Meds Outlet
cozycarton.shop – Cute, cozy items that make perfect gifts or a sweet reward for yourself.
Современные участники встречаются с изобилием программных деталей при функционировании с официальными сайтами. Специализированные платформы типа aqua casino предоставляют новую контент о деятельности развлекательных организаций.
Процесс аутентификации кабинета предполагает набор обязательных стадий. Стартовая валидация требует загрузки удостоверений доказывающих личность. Типовой список подразумевает документ, автоудостоверение или международный паспорт.
Системная элемент регистрации содержит применение зашифрованного канала и двойной авторизации. Продвинутые участники предлагают запускать все доступных функций безопасности.
Запасные домены являются идентичные дубликаты базового сайта с сохранением исчерпывающего функционала. Важнейшее преимущество выражается в соответствии банковских рамок и параметров ставочных требований.
Процедура выявления активных дублирующих порталов опирается на отслеживании специализированных информационных каналов и союзных ресурсов. Квалифицированные геймеры внедряют VPN-сервисы для гарантирования постоянного входа вне зависимости от локальных запретов.
Today, while I was at work, my cousin stole my iPad and tested to
see if it can survive a 25 foot drop, just so she can be a youtube sensation. My iPad is now destroyed and she has 83 views.
I know this is completely off topic but I had to share it with someone!
Visit my web-site :: best realtor in Alberta Canada
Развлекательная индустрия представляет активный подъём, привлекая тысячи игроков. Экспертные ресурсы предоставляют защищённую атмосферу для развлечений. Детальную сведения о подобных организациях возможно найти на казино Лаки Бир .
Сертификация является приоритетным критерием определения сайта. Надзорные органы Великобритании создают строгий мониторинг расчётных манипуляций. Всякая лицензированная площадка реализует систематические инспекции RNG-алгоритмов.
Программные параметры современных игорных домов предусматривают SSL-криптографию расчётного категории. Создатели цифрового софта вроде Microgaming, NetEnt, Pragmatic Play встраивают комплексные схемы рандомных параметров.
Процесс валидации счёта предусматривает предоставления бумаг KYC-уровня. Свидетельство, свидетельство о доходах, подтверждение прописки — классический набор для финального авторизации.
Параллельные домены убирают проблемы с ограничениями компаний. Действующие копии изменяются ежедневно IT отделами. Смартфонные клиенты обычно оперируют надёжнее онлайн форматов.
Контроль средств задаёт продолжительную успешность беттинговых циклов. Грамотные беттеры предлагают лимитировать величину пари до 1-2% от суммарного бюджета.
Навигация в сфере лицензированных порталов подразумевает осознания передовых методов входа. Опытные участники эксплуатируют Болливуд казино для приобретения релевантной фактов о активных ссылках.
Алгоритм формирования личного кабинета в надежных операторах подразумевает комплексную аутентификацию. Современные операторы применяют KYC-процедуры и AML-требования. Документальная процедура потребляет от 24 до 72 временных отрезков.
Цифровые решения для преодоления запретов улучшаются одновременно с ужесточением нормативных шагов. VPN-решения разряда premium гарантируют защиту AES-256 и стандарты OpenVPN. Стабильность коннекта fundamentally актуальна для привилегированных сессий.
Дублирующие сайты действуют через регионально распределенные цифровые мощности. CDN-архитектуры гарантируют оптимальную время ответа для глобальных участников. Автоматическое редирект активируется при распознавании недоступности основного портала.
Экономические движения в официальных юрисдикциях соответствуют конкретным критериям PCI DSS. Блокчейн операции увеличивают популярность из-за анонимности и динамике реализации.
Планшетные утилиты премиальных провайдеров совмещают отпечатковую идентификацию и push-уведомления для ключевых моментов. Адаптивный оформление самостоятельно корректируется под параметры дисплея.
Рабочие mirror-ссылки официальных азартных клубов на Меллстрой сайт дают устойчивый вход к гемблинг системам. Технология копирования генерирует аналогичные версии основного ресурса с сохранением всех опций.
Механизм регистрации через mirror-сайт на сто процентов имитирует стандартную анкету. Начинающие клиенты регистрируют рабочий email, придумывают защищенный код доступа и выбирают рабочую денежную единицу.
Подтверждение аккаунта содержит передачи бумаг следуя KYC-нормам. Изображение водительских прав, доказательство резиденции и финансовые параметры проверяются через автоматическую проверку в течение 24-72 периодов.
Авторизация активных клиентов происходит через стандартную панель с 2FA валидацией. Временные пароли доставляются на смс аппарат или e-mail адрес.
Инструменты входящего компонента через дублирующие порталы предлагает распространенные денежные платформы. Visa, Mastercard, веб балансы Skrill, Neteller, crypto Bitcoin, Ethereum осуществляются с низкими сборами 0-3%.
Гемблинг база клонируется абсолютно включая барабаны, карточные развлечения, live-ведущих и мегавыигрыши. RTP-индикаторы, колебания и отыгрыш сохраняются точными.
Бонусная схема выполняется схоже базовому порталу. Welcome-бандлы, даровые прокруты, возврат средств и VIP-схемы включаются машинально при исполнении заданных стандартов.
Heya this is kinda of off topic but I was wondering if blogs use WYSIWYG editors or if you have to
manually code with HTML. I’m starting a blog soon but have
no coding expertise so I wanted to get advice from someone with
experience. Any help would be enormously appreciated!
Look into my web-site; realtor in Lake Ozark MO
BalmBridge favorites – Great selection of products with a pleasant shopping flow.
Актуальные сервисы гемблинг активностей предоставляют игрокам возможность к высококлассному игровому процессу через защищенные п»ї1хбет регистрация порталы. Лицензированная бизнес подразумевает следования жестких законодательных требований.
Механизм оформления игрового профиля включает проверку индивидуальных реквизитов. Операторы задействуют расширенные протоколы KYC и AML для предотвращения нарушающих транзакций.
Цифровые средства передовых развлекательных порталов основываются на защищенных серверах с шифровальными алгоритмами. Локальные запреты побуждает администраторов создавать дублирующие порталы.
Зеркальные сайты являют собой эквивалентные клоны главного ресурса с сохранением всех функций и показателей. Участники получают устойчивый вход к капиталу, игровой отчетности и пользовательским параметрам.
Платежные операции проходят через интегрированные расчетные процессоры. Пределы на вклады и изъятия определяются в соответствии с регуляторными критериями и организационными нормами минимизации опасностей.
Экспертные беттеры рекомендуют контролировать условия лицензии через государственные каталоги гемблинг комиссий. Репутационные параметры предусматривают ранги на тематических платформах и отзывы действительных пользователей.
Рабочие зеркала официальных gaming-операторов на Вавада зеркало предоставляют постоянный подключение к игровым порталам. Технология клонирования формирует аналогичные клоны центрального веб-площадки с консервацией всех механизмов.
Схема активации через mirror-сайт в точности имитирует оригинальную анкету. Дебютные игроки прописывают действующий email, придумывают защищенный ключ и устанавливают операционную финансовый инструмент.
Валидация профиля требует предоставления документов следуя KYC-стандартам. Снимок паспорта, верификация регистрации и денежные координаты контролируются системой автоматическую проверку в течение 24-72 ч.
Авторизация верифицированных геймеров выполняется через классическую панель с многоступенчатой аутентификацией. Одноразовые токены поступают на мобильный аппарат или мейл.
Инструменты денежного модуля через дублирующие порталы содержит популярные банковские сервисы. Visa, Mastercard, веб счета Skrill, Neteller, цифровые активы Bitcoin, Ethereum реализуются с уменьшенными взносами 0-3%.
Гемблинг библиотека клонируется абсолютно включая слоты, классические забавы, live-ведущих и мегавыигрыши. RTP-показатели, волатильность и отыгрыш поддерживаются идентичными.
Промо система функционирует схоже базовому домену. Welcome-наборы, безвозмездные спины, денежный возврат и VIP-схемы запускаются алгоритмически при исполнении фиксированных критериев.
cinnamoncorner.shop – I love the variety here, always something different and exciting to buy!
cómo retirar a BCP en 1win cómo retirar a BCP en 1win
Передовые порталы игорных активностей предоставляют беттерам возможность к элитному азарту через безопасные LeeBet casino системы. Авторизованная функционирование требует исполнения жестких правовых критериев.
Алгоритм открытия пользовательского профиля предусматривает валидацию конфиденциальных данных. Операторы эксплуатируют расширенные механизмы KYC и AML для недопущения поддельных финансовых действий.
Программные решения новейших беттинг площадок функционируют на надежных инфраструктурах с криптографическими протоколами. IP-фильтрация вынуждает операторов создавать альтернативные ссылки.
Зеркальные ресурсы составляют полные версии базового платформы с сохранением всех сервисов и данных. Участники обеспечивают себе беспрепятственный связь к средствам, азартной статистике и индивидуальным установкам.
Денежные действия осуществляются через интегрированные платежные сервисы. Рамки на депозиты и изъятия определяются в соотношении с регуляторными условиями и организационными политиками управления рисками.
Профессиональные пользователи рекомендуют анализировать состояние авторизации через регуляторные каталоги развлекательных комиссий. Репутационные индикаторы охватывают рейтинги на специализированных сайтах и мнения настоящих беттеров.
бездепозитные бонусы Ищете способ начать игру без риска? Наши казино промокоды – это ваш ключ к миру щедрых бонусов и привлекательных акций, разработанных специально для того, чтобы вы могли наслаждаться любимыми слотами и настольными играми с первых минут. Каждый промокод – это индивидуальная возможность, открывающая двери к уникальным преимуществам, будь то дополнительные средства на счет или эксклюзивные предложения.
Передовые клиенты пересекаются с изобилием технологических деталей при работе с проверенными площадками. Специализированные платформы типа ретро казино выдают свежую данные о работе казино компаний.
Процесс аутентификации профиля подразумевает несколько необходимых фаз. Исходная аутентификация нуждается загрузки удостоверений валидирующих личность. Классический набор подразумевает документ, лицензию водителя или международное ID.
Цифровая сторона открытия счета предполагает применение криптографической защиты и двухуровневой проверки. Квалифицированные геймеры подсказывают инициировать все предложенных настроек охраны.
Зеркала являются стопроцентные клоны главного домена с обеспечением всего набора функций. Центральное достоинство состоит в соответствии платежных рамок и требований вейджера.
Система выявления действующих альтернативных адресов строится на мониторинге профильных телеграм-каналов и аффилированных порталов. Опытные геймеры задействуют анонимайзеры для гарантирования бесперебойного доступа безотносительно от территориальных лимитов.
Briovista Boutique – A beautiful design with such a nice range of items, absolutely love shopping here.
I blog frequently and I genuinely thank you for your information. Your article
has really peaked my interest. I’m going to book mark your site
and keep checking for new information about once per week.
I opted in for your Feed as well.
Определение надежного гемблинг оператора в текущих обстоятельствах требует тщательного рассмотрения к правовому статусу. Профессиональные клиенты представляют, что п»ї1хбет регистрация содержит свежую данные о доступных ресурсах.
Алгоритм создания аккаунта в сертифицированных платформах включает требуемую подтверждение персональных данных. KYC-стандарты охраняют как заведение, так и клиента от мошенничества. Кратковременные ограничения на изъятие активов до завершения проверки – нормальная подход.
Программные блокировки на подключение к гемблинг ресурсам решаются через альтернативные URL. Доступные дубликаты обеспечивают тотальную возможности первичного портала. Денежные транзакции, развлекательный продвижение и поощрительные схемы продолжают постоянными.
Материальная безопасность измеряется критерием применяемых финансовых способов. SSL-шифрование, PCI DSS сертификация и расширенная проверка устанавливают прочный щит охраны.
Интерактивная библиотека проверенных операторов объединяет барабаны от главных разработчиков. RTP-индексы, вариативность и статистические системы подвергаются внешнюю проверку в утвержденных организациях.
Системы лояльности в надежных казино строятся на ясных условиях проигрыша. Требования x35-40 оценивается нормальным для слот-привилегий, в то время как традиционные активности принимаются в подсчет с редуцированным множителем.
Определение надежного гемблинг ресурса нуждается основательного рассмотрения лицензионных свидетельств. Актуальные порталы Mellstroy Game зеркало предоставляют пользователям безусловную факты о текущих разрешениях.
Процедура открытия аккаунта включает ряд обязательных ступеней аутентификации. Операторы запрашивают бумаги, засвидетельствующие идентичность и дееспособность. Обычный KYC-алгоритм занимает от 24 до 72 временных отрезков.
Управление банком инициируется с установления рамок на взносы. Опытные пользователи рекомендуют внедрять установку 5% от итогового гемблинг фонда на конкретную заход.
Технические препятствия провайдеров принуждают эксплуатировать альтернативные пути. Копии удерживают стопроцентную производительность главного платформы, включая историю операций и казино продвижение.
Современные платежные системы поддерживают быстрые вклады через цифровые счета. Bitcoin, Ethereum и стейблкоины обеспечивают конфиденциальность и минимальные комиссии. Продолжительность реализации получений насчитывает 10-30 минут.
Схемы приверженности предусматривают каскадные статусы с увеличивающимся возвратом. VIP-кураторы обеспечивают уникальные поощрения, увеличенные ограничения и первоочередную техподдержку.
Everything is very open with a precise clarification of the issues.
It was really informative. Your website is extremely helpful.
Thank you for sharing!
Feel free to visit my blog post – 오피
Лицензионные ресурсы развлекательных сервисов обеспечивают геймерам вариант к качественному гэмблингу через целевые ресурсы, включая казино Лаки Бир , которые специально соблюдают общепринятые критерии безопасности.
Схема регистрации necessita предоставления проверочных параметров через шифрованные SSL-connection. Менеджмент требуют нотариальное verification дееспособности и территории нахождения для соблюдения юрисдикционных критериев.
Двухэтапная верификация является принудительным составляющей новейших платформ конфиденциальности. Участники имеют SMS-шифры, push-алерты или внедряют профессиональные софт в стиле Google Authenticator.
Зеркальные ссылки решают препятствия географических санкций и DDoS-нападений. С технической точки зрения реплики формируют идентичные клоны центрального домена с обеспечением опций и user деталей.
Компетентные пользователи рекомендуют сохранять актуальные базы working копий в закладках обозревателя. Операторы доставляют обновления о новых ссылках через почтовые сервисы, Telegram-чаты и портативные apps.
Денежные movements через надёжные площадки защищены криптографическими технологиями класса банковского индустрии. Вывод средств выполняется исключительно на проверенные реквизиты собственника личного кабинета.
Передовые игроки встречаются с проблемой связи к проверенным платформам. Провайдеры закрывают первичные домены, но знающие Mellstroy Game пользователи помнят о присутствии дублирующих площадок.
Параллельный портал образует идентичную дубликат базового платформы. Средства защиты сохраняются такими же. Расчётные транзакции реализуются через аналогичные шлюзы.
Процедура регистрации через зеркальный ссылку включает классической подтверждения. Менеджеры уточняют справки для осуществления KYC-норм. Идентификационные сведения осуществляют комплексную валидацию.
Вносительные рамки на альтернативных площадках соответствуют базовым спецификациям. Минимальные беты продолжают стабильными. Возрастающие джекпоты согласовываются между различными адресами.
Стимулирующие программы функционируют всесторонне на параллельных сайтах. Отыгрышный коэффициент поддерживает первоначальные цифры. Длительность использования продолжается.
Команда ассистирования обрабатывает запросы с зеркальных адресов равнозначно. Интерактивный общение осуществляет беспрерывный порядок деятельности.
Определение безопасного гемблинг площадки в нынешних условиях требует повышенного изучения к регулятивному положению. Профессиональные пользователи знают, что lucky bear казино включает новую данные о работающих провайдерах.
Процесс открытия счета в сертифицированных платформах включает неизбежную верификацию идентичности. KYC-стандарты обеспечивают как оператора, так и участника от махинаций. Переходные лимиты на вывод капитала до окончания валидации – обычная система.
Технические барьеры на доступ к гемблинг порталам нейтрализуются через альтернативные ссылки. Рабочие дубликаты предоставляют тотальную возможности центрального платформы. Платежные движения, развлекательный статистика и бонусные системы поддерживаются стабильными.
Материальная надежность определяется показателем используемых расчетных систем. SSL-безопасность, PCI DSS подтверждение и дополнительная верификация обеспечивают защищенный контур охраны.
Азартная ассортимент легальных площадок охватывает спины от известных студий. RTP-показатели, колебания и алгоритмические системы проходят беспристрастную валидацию в утвержденных лабораториях.
Программы поощрения в серьезных казино опираются на открытых условиях активности. Требования x35-40 считается справедливым для машина-бонусов, в то время как настольные забавы засчитываются в калькуляцию с редуцированным множителем.
Рабочие альтернативные домены легальных gaming-операторов на Клубника казино гарантируют непрерывный соединение к развлекательным сервисам. Методика клонирования формирует точные версии корневого сайта с консервацией всех инструментов.
Схема оформления профиля через зеркало на сто процентов дублирует главную бланк. Начинающие игроки вводят валидный email, генерируют стойкий пароль и назначают основную платежное средство.
Верификация личного кабинета содержит передачи справок следуя KYC-регламенту. Изображение национального документа, доказательство места жительства и карточные сведения подвергаются автоматическую проверку в течение 24-72 часов.
Вход существующих игроков производится через стандартную окно с 2FA аутентификацией. Разовые ключи поступают на смс устройство или мейл.
Возможности финансового сектора через резервные ссылки содержит актуальные финансовые платформы. Visa, Mastercard, цифровые портмоне Skrill, Neteller, виртуальные монеты Bitcoin, Ethereum обрабатываются с минимальными процентами 0-3%.
Игровая библиотека воспроизводится на сто процентов включая машины, столовые развлечения, live-ведущих и джекпоты. RTP-индикаторы, колебания и ставочные требования удерживаются неизменными.
Поощрительная система оперирует идентично центральному домену. Welcome-бандлы, бесплатные вращения, денежный возврат и VIP-схемы запускаются алгоритмически при исполнении заданных условий.
Just desire to say your article is as astounding. The clearness in your post is
just excellent and i could assume you are an expert
on this subject. Well with your permission let me to grab your feed to
keep updated with forthcoming post. Thanks a million and please continue
the rewarding work.
Here is my site; best real estate agent in Lake Ozark MO
WOW just what I was searching for. Came here by searching for
best real estate agent in Santa Fe NM
Активные зеркала легальных гемблинг-платформ на Vavada casino гарантируют постоянный доступ к гемблинг платформам. Схема дублирования создает точные копии основного веб-площадки с консервацией всех инструментов.
Механизм создания аккаунта через дублирующий портал полностью имитирует базовую заявку. Только пришедшие участники заполняют валидный email, устанавливают защищенный шифр и устанавливают основную платежное средство.
Верификация счета содержит предоставления удостоверений в соответствии с KYC-стандартам. Снимок водительских прав, верификация проживания и карточные сведения подвергаются программную валидацию в течение 24-72 периодов.
Вход действующих участников выполняется через обычную форму с 2FA идентификацией. Сессионные токены отправляются на мессенджер номер или e-mail адрес.
Инструменты входящего сектора через mirror-сайты предлагает востребованные финансовые механизмы. Visa, Mastercard, цифровые хранилища Skrill, Neteller, виртуальные монеты Bitcoin, Ethereum осуществляются с уменьшенными платежами 0-3%.
Игровая база воспроизводится целиком включая слоты, традиционные активности, live-дилеров и мегавыигрыши. RTP-параметры, изменчивость и ставочные требования остаются точными.
Акционная схема оперирует аналогично основному веб-площадке. Welcome-бандлы, безвозмездные спины, возврат средств и VIP-системы включаются автоматически при реализации определенных стандартов.
Современные пользователи встречаются с изобилием технологических тонкостей при операциях с лицензированными сайтами. Специализированные источники типа Лаки Бир РІС…РѕРґ предоставляют современную сведения о операциях игорных провайдеров.
Система аутентификации профиля включает комплекс требуемых уровней. Первичная верификация нуждается загрузки справок подтверждающих личность. Типовой комплект охватывает паспорт, права или международное ID.
Программная компонента записления включает внедрение зашифрованного канала и двухуровневой проверки. Экспертные пользователи советуют запускать максимум доступных возможностей безопасности.
Резервные ссылки являются стопроцентные копии центрального портала с поддержанием всего функционала. Основное достоинство состоит в схожести расчетных ограничений и требований вейджера.
Механизм выявления функционирующих зеркал строится на мониторинге специализированных уведомительных сервисов и связанных ресурсов. Продвинутые игроки эксплуатируют VPN-сервисы для гарантирования устойчивого связи независимо от географических блокировок.
Resources western union carding
I am genuinely grateful to the holder of this site who has shared this
wonderful article at here.
My blog post; best realtor in Lake Ozark MO
zarvo link – Interface is minimal, browsing is easy and information is straightforward to find.
There’s certainly a great deal to find out about this subject.
I like all the points you’ve made.
My page … دانلود آهنگ شاد
http://usmedsoutlet.com/# US Meds Outlet
Лицензионные провайдеры игровых предложений дают пользователям вариант к профессиональному времяпрепровождению через специализированные сайты, включая Либет официальный сайт , которые специально соблюдают глобальные требования безопасности.
Процедура открытия счёта necessita ввода проверочных данных через безопасные SSL-линии. Операторы просят нотариальное verification совершеннолетия и адреса residence для соблюдения правовых правил.
Двухэтапная аутентификация является mandatory частью современных архитектур защиты. Users получают SMS-пароли, push-сообщения или используют специальные tools по типу Google Authenticator.
Резервные URL ликвидируют вопросы географических блокировок и DDoS-воздействий. Техническим образом копии образуют копийные реплики основного домена с сохранением опций и пользовательских сведений.
Профессиональные геймеры советуют удерживать новейшие реестры действующих дублей в закладках веб-клиента. Букмекеры отправляют информацию о свежих URL через почтовые сервисы, Telegram-сообщества и телефонные программы.
Банковские переводы через официальные порталы обеспечены шифровальными системами уровня банковского индустрии. Вывод фондов выполняется solely на верифицированные wallets хозяина личного кабинета.
US Meds Outlet: US Meds Outlet – US Meds Outlet
Передовые порталы развлекательных игр предлагают участникам доступ к премиальному беттингу через надежные РЎСѓРєР° казино ресурсы. Лицензированная деятельность подразумевает выполнения строгих регуляторных требований.
Процедура регистрации клиентского счета охватывает верификацию приватных данных. Управляющие внедряют детализированные алгоритмы KYC и AML для пресечения нарушающих платежей.
Программные инструменты передовых развлекательных порталов функционируют на надежных облачных системах с шифровальными сертификатами. Геоблокировка побуждает владельцев запускать альтернативные ссылки.
Параллельные домены представляют идентичные копии центрального платформы с поддержанием всех функций и данных. Пользователи достигают стабильный подключение к средствам, развлекательной данным и личным установкам.
Денежные действия выполняются через подключенные банковские шлюзы. Рамки на вклады и обналичивания устанавливаются в соответствии с лицензионными положениями и внутренними регламентами минимизации опасностей.
Опытные пользователи советуют контролировать условия лицензии через контролирующие базы данных гемблинг комиссий. Авторитетные характеристики задействуют позиции на экспертных порталах и мнения действительных пользователей.
Проверенные провайдеры игровых возможностей гарантируют пользователям право к качественному времяпрепровождению через целевые ресурсы, включая Vavada , которые точно соблюдают общепринятые регламенты security.
Последовательность создания аккаунта necessita внесения authentication параметров через защищённые SSL-линии. Менеджмент запрашивают письменное свидетельство совершеннолетия и территории нахождения для соблюдения правовых стандартов.
Multi-factor проверка становится обязательным компонентом современных solutions защиты. Игроки располагают SMS-пароли, push-алерты или используют специальные программы наподобие Google Authenticator.
Резервные URL решают вопросы географических блокировок и DDoS-нападений. По сути mirrors представляют копийные копии primary платформы с maintaining features и индивидуальных параметров.
Экспертные участники рекомендуют keeping current реестры working дублей в закладках веб-клиента. Management доставляют сведения о свежих URL через мейл, Telegram-группы и mobile apps.
Payment переводы через надёжные ресурсы secured защитными технологиями level банковского segment. Вывод финансов выполняется единственно на validated реквизиты хозяина аккаунта.
I do not even know how I finished up right here, however I assumed this publish was great.
I don’t recognise who you might be but certainly you are going to a famous blogger if you happen to are not already.
Cheers!
Нынешние гемблеры сталкиваются с барьером связи к лицензированным сайтам. Провайдеры блокируют главные адреса, но профессиональные п»ї1хбет официальный сайт посетители знают о существовании дублирующих площадок.
Дополнительный домен представляет полную отображение оригинального ресурса. Средства защиты работают такими же. Банковские операции производятся через те же шлюзы.
Технология оформления профиля через дополнительный ресурс предполагает стандартной подтверждения. Администраторы выясняют удостоверения для реализации KYC-регламентов. Паспортные данные выполняют комплексную аутентификацию.
Депозитные пределы на зеркальных платформах равняются главным условиям. Начальные беты продолжают стабильными. Увеличивающиеся банки интегрируются между всеми порталами.
Премиальные системы выполняются завершённо на дополнительных площадках. Отыгрышный коэффициент гарантирует исходные значения. Длительность использования поддерживается.
Департамент обслуживания изучает обращения с зеркальных доменов равнозначно. Интерактивный переписка поддерживает беспрерывный порядок функционирования.
I constantly spent my half an hour to read this webpage’s content every day along with a mug of coffee.
My blog :: real estate agent Rancho Cucamonga CA
I recently checked out this casino https://vkseptictankcleaning.com/2025/12/04/winning-at-online-casino-mathematical-facts-and-27/ and was impressed by how smooth everything felt. The games load quickly, bonuses are transparent, and navigation is user-friendly, making the experience enjoyable.
Азартная сфера показывает динамичный развитие, заинтересовывая массы игроков. Экспертные порталы гарантируют качественную среду для развлечений. Развёрнутую факты о данных провайдерах допустимо обнаружить на Лаки Бир регистрация .
Аттестация выступает центральным элементом отбора сайта. Лицензиаты Гибралтара дают тщательный аудит денежных транзакций. Любая сертифицированная платформа реализует систематические аудиты RNG-алгоритмов.
Компьютерные параметры актуальных игорных домов охватывают SSL-кодирование финансового ранга. Поставщики виртуального ПО типа Microgaming, NetEnt, Pragmatic Play добавляют многоуровневые схемы непредсказуемых показателей.
Процесс аутентификации счёта включает направления документов KYC-формата. Свидетельство, документ о финансах, верификация адреса — стандартный комплект для полноценного авторизации.
Резервные порталы убирают препятствия с ограничениями компаний. Действующие дубли корректируются ежедневно IT группами. Портативные софт зачастую работают лучше онлайн форматов.
Контроль средств создаёт долгосрочную доходность игровых циклов. Грамотные игроки советуют урезать объём ставки до 1-2% от общего фонда.
Исследование в секторе сертифицированных порталов предполагает знания актуальных инструментов доступа. Умелые игроки применяют Vavada казино для обретения современной данных о действующих URL.
Алгоритм открытия счета в проверенных операторах содержит детальную подтверждение. Актуальные операторы задействуют KYC-системы и AML-нормы. Бумажная работа потребляет от 24 до 72 промежутков.
IT инструменты для избежания барьеров совершенствуются вместе с интенсификацией правовых мер. VPN-решения разряда premium предлагают безопасность AES-256 и методы OpenVPN. Устойчивость соединения жизненно важна для привилегированных раундов.
Альтернативные платформы оперируют через регионально расположенные IT кластеры. CDN-комплексы гарантируют оптимальную задержку для азиатских игроков. Программное переключение срабатывает при обнаружении ограничения первичного портала.
Платежные операции в легальных регионах соответствуют жестким критериям PCI DSS. Криптовалютные расчеты приобретают признание из-за конфиденциальности и динамике выполнения.
Мобильные приложения ведущих компаний включают биометрическую идентификацию и push-извещения для критических эпизодов. Настраиваемый внешний вид автономно адаптируется под параметры дисплея.
Беттинговая ниша отображает интенсивный подъём, манящая массы участников. Экспертные платформы обеспечивают защищённую пространство для ставок. Подробную данные о подобных брендах доступно получить на миллион регистрация .
Аттестация составляет главным элементом выбора сайта. Регуляторы Олдерни обеспечивают качественный контроль экономических транзакций. Каждая сертифицированная сайт выполняет постоянные проверки RNG-алгоритмов.
Компьютерные свойства современных игорных домов объединяют SSL-кодирование банковского ранга. Поставщики компьютерного материала вроде Microgaming, NetEnt, Pragmatic Play встраивают многоуровневые системы хаотичных величин.
Механизм подтверждения учётной записи включает передачи удостоверений KYC-класса. Удостоверение, выписка о доходах, удостоверение проживания — стандартный комплект для завершённого подключения.
Дублирующие порталы решают проблемы с блокировками компаний. Свежие копии корректируются ежедневно цифровыми группами. Мобильные софт обычно действуют устойчивее веб версий.
Банкролл-менеджмент создаёт длительную прибыльность беттинговых периодов. Профессиональные участники указывают урезать объём ставки до 1-2% от совокупного резерва.
Новейшие платформы беттинг услуг предоставляют пользователям доступ к профессиональному азарту через сертифицированные Клубника казино платформы. Лицензированная работа подразумевает соблюдения определенных надзорных положений.
Процедура активации пользовательского аккаунта содержит проверку персональных реквизитов. Управляющие эксплуатируют комплексные алгоритмы KYC и AML для блокировки мошеннических операций.
IT системы актуальных развлекательных порталов работают на защищенных хостингах с TLS протоколами. Локальные запреты побуждает администраторов организовывать резервные URL.
Параллельные порталы составляют точные версии базового платформы с фиксацией всех возможностей и сведений. Игроки достигают устойчивый вход к средствам, развлекательной записям и клиентским установкам.
Финансовые действия выполняются через подключенные финансовые шлюзы. Лимиты на пополнения и изъятия определяются в согласии с лицензионными положениями и корпоративными нормами контроля угроз.
Квалифицированные гемблеры указывают проверять состояние авторизации через контролирующие базы данных азартных структур. Имиджевые критерии включают места на специализированных порталах и feedback действительных участников.
goldenget.shop – So many fantastic products at fantastic prices, shopping here is effortless!
Blue Quill marketplace online – A perfect balance of design and variety, effortless to shop.
карнизы для штор с электроприводом karnizy-s-elektroprivodom77.ru .
Australian Online Casino Real Money Real Tired Of Almost Millions
Hello, I have been using the R36S handheld for a
while. Controls feel comfortable and gameplay is smooth for classic titles.
Nice option for retro gaming on the go. What are your thoughts?
Fast browsing – You can find what you need without wasting time.
Актуальные геймеры натыкаются с затруднением входа к легальным сайтам. Компании блокируют основные порталы, но искушённые лаки Р±РёСЂ игроки учитывают о доступности дублирующих порталов.
Резервная ссылка является идентичную воспроизведение базового сайта. Средства защиты сохраняются равнозначными. Денежные переводы реализуются через равнозначные каналы.
Схема открытия счёта через дополнительный ресурс предполагает типовой аутентификации. Специалисты просят свидетельства для реализации KYC-требований. Индивидуальные сведения проходят усиленную аутентификацию.
Пополнительные лимиты на зеркальных сайтах совпадают базовым характеристикам. Низшие вклады сохраняются стабильными. Возрастающие джекпоты согласовываются между разными ресурсами.
Поощрительные планы действуют целостно на зеркальных сайтах. Множитель ставок обеспечивает базовые величины. Период действия реализации поддерживается.
Команда ассистирования рассматривает обращения с резервных порталов равнозначно. Живой разговор обеспечивает круглосуточный расписание функционирования.
The Adventures of Tom Sawyer is a book that captures the imagination like no other. Mark Twain’s writing is brilliant and vivid. We offer a high-quality digital text for those who want to read the book on their devices. Our resource is designed to be easy to use. With a Tom Sawyer PDF, you can take the story with you on your travels or simply enjoy it at home, making classic literature more accessible than ever.
Передовые платформы гемблинг услуг гарантируют участникам подключение к премиальному беттингу через проверенные lucky bear казино платформы. Легальная бизнес нуждается исполнения жестких законодательных норм.
Система активации игрового профиля задействует аутентификацию индивидуальных данных. Регуляторы внедряют детализированные алгоритмы KYC и AML для предотвращения поддельных переводов.
Цифровые платформы инновационных развлекательных порталов базируются на безопасных хостингах с TLS протоколами. Территориальные ограничения заставляет администраторов внедрять альтернативные адреса.
Альтернативные платформы составляют идентичные дубликаты основного ресурса с сохранением всех инструментов и информации. Беттеры достигают стабильный связь к счету, развлекательной истории и индивидуальным опциям.
Финансовые процедуры проходят через подключенные денежные сервисы. Границы на пополнения и получения регулируются в соответствии с нормативными требованиями и собственными правилами минимизации опасностей.
Квалифицированные игроки советуют проверять ситуацию сертификата через официальные списки игорных органов. Имиджевые показатели предусматривают ранги на экспертных сервисах и комментарии действительных клиентов.
zexarotrustco site – Clean pages, organized content, and easy navigation.
выпрямитель dyson ht01 dsn-vypryamitel-8.ru .
cypresschic.shop – Elegant, quality products and an intuitive shopping site that makes it easy to shop.
Live Baccarat Australia Real Dealers
pharmacy website india: indian pharmacy paypal – indian pharmacy online
gardengalleon.shop – A great place for gardeners looking for quality products and unique finds.
charmcartel.shop – Stylish accessories that are easy to find on this clean, well-organized website.
Передовые клиенты пересекаются с изобилием технологических деталей при операциях с лицензированными сайтами. Тематические ресурсы типа Рльдорадо регистрация поставляют актуальную контент о деятельности игорных провайдеров.
Механизм верификации учетной записи предполагает ряд принудительных уровней. Базовая подтверждение включает размещения бумаг валидирующих персону. Привычный комплект предполагает удостоверение личности, права или международное ID.
Программная составляющая открытия счета подразумевает задействование SSL-шифрования и 2FA. Экспертные участники подсказывают включать полный набор предложенных параметров защиты.
Резервные ссылки образуют идентичные клоны основного сайта с удержанием комплексного арсенала. Основное плюс кроется в подобии расчетных ограничений и норм ставочных требований.
Процедура нахождения рабочих зеркал опирается на наблюдении специализированных информационных каналов и союзных порталов. Продвинутые участники эксплуатируют анонимайзеры для обеспечения надежного связи безотносительно от местных барьеров.
Лицензионные ресурсы игорных услуг предоставляют пользователям доступ к профессиональному развлечениям через dedicated ресурсы, включая Килограмм РІС…РѕРґ , которые именно придерживаются общепринятые стандарты защиты.
Схема оформления профиля necessita указания authentication данных через encrypted SSL-connection. Букмекеры запрашивают письменное свидетельство правоспособности и региона регистрации для соблюдения нормативных требований.
Двухфакторная верификация представляет необходимым aspect современных solutions конфиденциальности. Users обретают SMS-шифры, push-уведомления или применяют профессиональные софт в стиле Google Authenticator.
Альтернативные порталы преодолевают проблемы geographic барьеров и DDoS-нападений. Техническим образом копии образуют тождественные клоны центрального портала с сохранением опций и индивидуальных деталей.
Skilled геймеры советуют сохранять current списки working дублей в закладках обозревателя. Провайдеры доставляют информацию о современных доменах через e-mail, Telegram-группы и мобильные программы.
Финансовые переводы через официальные платформы защищены шифровальными methods level банковского направления. Получение финансов осуществляется solely на проверенные карты собственника account.
Hello mates, fastidious article and good urging commented
at this place, I am actually enjoying by these.
Look at my web-site :: best real estate agent in Lake Oswego OR
веб-сайт weeedcat или weedcat
This is a topic that’s near to my heart… Take care! Exactly where are your
contact details though?
my site … 쓰리노
Online Casino Australia 2026 Upcoming Sites
Подбор достойного игрового площадки в нынешних реалиях требует специального изучения к регулятивному уровню. Компетентные клиенты понимают, что типпи казино демонстрирует новую факты о функционирующих сервисах.
Схема оформления профиля в лицензированных сервисах предусматривает принудительную верификацию удостоверения. KYC-стандарты обеспечивают как площадку, так и участника от афер. Кратковременные лимиты на получение капитала до финализации проверки – обычная подход.
Виртуальные запреты на доступ к азартным сайтам преодолеваются через альтернативные порталы. Действующие клоны предоставляют стопроцентную производительность первичного сайта. Финансовые переводы, развлекательный продвижение и бонусные системы сохраняются стабильными.
Денежная стабильность оценивается качеством задействованных платежных методов. SSL-шифрование, PCI DSS подтверждение и расширенная верификация устанавливают безопасный контур ограждения.
Развлекательная каталог официальных заведений объединяет автоматы от главных провайдеров. RTP-индексы, вариативность и математические формулы претерпевают независимую контроль в аккредитованных организациях.
Механизмы вознаграждения в достойных площадках базируются на прозрачных правилах проигрыша. Проигрыш x35-40 оценивается разумным для барабан-льгот, в то время как настольные активности принимаются в калькуляцию с редуцированным фактором.
Передовые платформы беттинг услуг обеспечивают клиентам возможность к профессиональному гемблингу через безопасные казино Болливуд сайты. Сертифицированная работа предполагает исполнения определенных регуляторных положений.
Механизм активации пользовательского кабинета задействует верификацию индивидуальных данных. Операторы используют комплексные алгоритмы KYC и AML для пресечения незаконных финансовых действий.
Электронные средства актуальных игорных домов основываются на стабильных дата-центрах с TLS сертификатами. Геоблокировка вынуждает владельцев внедрять дублирующие адреса.
Резервные платформы составляют идентичные копии центрального домена с удержанием всех опций и данных. Игроки достигают устойчивый соединение к балансу, азартной истории и пользовательским опциям.
Банковские транзакции проходят через синхронизированные финансовые процессоры. Лимиты на депозиты и изъятия устанавливаются в гармонии с законодательными условиями и собственными политиками контроля угроз.
Компетентные гемблеры указывают мониторить ситуацию разрешения через регуляторные списки развлекательных комиссий. Репутационные показатели охватывают места на экспертных сервисах и отзывы подлинных игроков.
brixeltrustco hub – Site feels structured, giving off a professional and reliable impression.
covecrimson.shop – Bold designs and great quality, this store makes shopping enjoyable every time.
страница Как списать ндс
Good day! I just would like to offer you a big thumbs
up for the great information you have right here on this post.
I am coming back to your blog for more soon.
Feel free to visit my web page :: best realtor in Chino Hills CA
Актуальные гемблеры натыкаются с проблемой связи к официальным ресурсам. Компании закрывают основные домены, но грамотные mad casino официальный сайт пользователи помнят о существовании альтернативных порталов.
Зеркало представляет абсолютную воспроизведение первичного платформы. SSL-сертификаты функционируют аналогичными. Денежные транзакции выполняются через равнозначные системы.
Алгоритм создания аккаунта через альтернативный адрес предполагает привычной аутентификации. Администраторы запрашивают свидетельства для выполнения KYC-правил. Личные сведения осуществляют комплексную проверку.
Пополнительные границы на резервных ресурсах равняются первичным характеристикам. Наименьшие суммы продолжают стабильными. Прогрессивные банки объединяются между разными ссылками.
Стимулирующие схемы функционируют завершённо на дополнительных платформах. Коэффициент оборота удерживает базовые параметры. Длительность отыгрыша поддерживается.
Департамент помощи обрабатывает тикеты с альтернативных ресурсов идентично. Интерактивный общение гарантирует 24-часовой режим работы.
Source free fulls
Актуальные игроки оказываются с затруднением подключения к лицензированным порталам. Компании фильтруют основные порталы, но знающие Голд казино пользователи знают о существовании резервных сайтов.
Альтернативный адрес составляет абсолютную реплику базового сайта. Протоколы шифрования работают аналогичными. Финансовые транзакции проходят через те же шлюзы.
Алгоритм регистрации через дополнительный ресурс содержит обычной верификации. Операторы требуют документы для осуществления KYC-норм. Личные сведения проходят усиленную валидацию.
Депозитные ограничения на резервных платформах аналогичны первичным требованиям. Начальные суммы функционируют стабильными. Прогрессивные накопления координируются между всеми ресурсами.
Бонусные программы оперируют комплексно на резервных ресурсах. Вейджер гарантирует стартовые величины. Период действия использования продолжается.
Служба поддержки изучает заявки с параллельных ссылок идентично. Мгновенный чат обеспечивает беспрерывный режим обслуживания.
I’ve read several just right stuff here. Certainly
worth bookmarking for revisiting. I surprise how much effort you set to create this kind of great informative web site.
Here is my web blog best real estate agent in Chino Hills CA
Bag collection – Stylish, high-quality products that are easy to explore.
reputable indian online pharmacy pharmacy website india reputable indian pharmacies
discover qulavoholdings – Clear layout, quick navigation, and all information is easy to find.
Briovanta Goods – Amazing finds with a seamless shopping experience, I’m loving it!
https://usmedsoutlet.shop/# US Meds Outlet
Легальные ресурсы гэмблинг предложений гарантируют участникам доступ к высококлассному игровому процессу через dedicated порталы, включая аква казино , которые специально придерживаются мировые требования security.
Процедура создания аккаунта включает ввода идентификационных данных через encrypted SSL-connection. Провайдеры просят предоставить письменное verification возраста и локации проживания для выполнения нормативных требований.
Multi-factor authentication считается необходимым aspect современных платформ конфиденциальности. Пользователи располагают SMS-коды, push-алерты или внедряют dedicated утилиты вроде Google Authenticator.
Резервные URL устраняют проблемы geographic барьеров и DDoS-атак. Техническим образом mirrors представляют тождественные dublicates центрального ресурса с обеспечением инструментария и индивидуальных данных.
Опытные геймеры призывают поддерживать обновлённые каталоги активных дублей в закладках интернет-программы. Операторы передают updates о современных URL через почтовые сервисы, Telegram-чаты и телефонные софт.
Банковские переводы через надёжные площадки защищены криптографическими methods level банковского направления. Снятие средств выполняется лишь на аутентифицированные карты обладателя личного кабинета.
Легальные площадки азартных предложений гарантируют пользователям возможность к профессиональному азартному досугу через целевые ресурсы, включая казино типпи , которые именно придерживаются мировые стандарты безопасности.
Алгоритм оформления профиля включает внесения верификационных данных через защищённые SSL-соединения. Менеджмент запрашивают official доказательство дееспособности и места жительства для compliance legal правил.
Многоуровневая проверка становится необходимым составляющей актуальных платформ надёжности. Клиенты приобретают SMS-коды, push-алерты или применяют специализированные софт наподобие Google Authenticator.
Mirror URL устраняют сложности geographic ограничений и DDoS-воздействий. По сути зеркала являют аналогичные версии главного портала с удержанием функциональности и клиентских информации.
Опытные клиенты suggest keeping свежие перечни рабочих копий в избранном browser. Администрация отправляют сведения о современных адресах через мейл, Telegram-чаты и мобильные приложения.
Финансовые movements через официальные сайты secured криптографическими протоколами стандарта банковского области. Вывод финансов происходит solely на подтверждённые wallets собственника личного кабинета.
Real Money Online Casino Payid Australia Real Instant Millionaire Rush
continuously i used to read smaller articles that
also clear their motive, and that is also happening with this article which I am reading here.
My homepage … best real estate agent in Alberta Canada
this contact form best socks5 provider for carding
электрокарнизы москва электрокарнизы москва .
A person essentially help to make critically posts I
would state. That is the first time I frequented your web page and to
this point? I surprised with the analysis you made to create this actual submit extraordinary.
Fantastic activity!
Review my website :: کلیدسازی شبانهروزی سیار کرج
перейдите на этот сайт кракен магазин в даркнете
Подбор безопасного гемблинг заведения требует глубокого рассмотрения официальных разрешений. Передовые ресурсы РЎСѓРєР° зеркало дают клиентам абсолютную детали о собственных аккредитациях.
Механизм регистрации охватывает множество обязательных этапов подтверждения. Представители просят свидетельства, устанавливающие самобытность и дееспособность. Традиционный KYC-механизм длится от 24 до 72 периодов.
Распоряжение капиталом стартует с установления лимитов на взносы. Профессиональные игроки рекомендуют задействовать правило 5% от полного гемблинг капитала на одну заход.
Технические запреты администраторов принуждают эксплуатировать вспомогательные пути. Альтернативы удерживают полную активность первичного портала, предусматривая архив переводов и развлекательный прогресс.
Новые финансовые системы обеспечивают скоростные вклады через электронные счета. Bitcoin, Ethereum и устойчивые монеты предоставляют конфиденциальность и крошечные комиссии. Продолжительность обработки выводов достигает 10-30 отрезков.
Схемы постоянства охватывают градационные уровни с накапливающимся возвратом. VIP-консультанты предоставляют индивидуальные вознаграждения, повышенные ограничения и опережающую помощь.
1win android login http://1win5744.help
Современные платформы игорных услуг обеспечивают клиентам вход к высококлассному беттингу через сертифицированные Болливуд системы. Сертифицированная работа нуждается соблюдения четких надзорных критериев.
Механизм открытия индивидуального аккаунта предусматривает верификацию индивидуальных данных. Управляющие задействуют комплексные механизмы KYC и AML для блокировки фродовых платежей.
Электронные средства передовых беттинг площадок функционируют на надежных облачных системах с шифровальными технологиями. Геоблокировка вынуждает провайдеров внедрять резервные домены.
Дублирующие порталы являют собой эквивалентные репликации базового сайта с фиксацией всех возможностей и показателей. Участники приобретают устойчивый соединение к депозиту, развлекательной отчетности и персональным конфигурациям.
Финансовые переводы осуществляются через связанные финансовые сервисы. Пределы на вклады и получения назначаются в согласии с лицензионными требованиями и собственными регламентами минимизации опасностей.
Профессиональные пользователи предлагают проверять положение лицензии через регуляторные каталоги азартных структур. Имиджевые показатели предусматривают ранги на экспертных сайтах и комментарии реальных участников.
Bloom Beacon shop – Wide range of charming gifts and decor, very smooth experience.
Смотреть здесь Купить НДС
plixo site – Pages load quickly, everything is organized and browsing feels effortless.
Ориентирование в области легальных сайтов подразумевает представления современных методов подключения. Умелые участники используют казино Вован для извлечения актуальной данных о активных путях.
Механизм регистрации профиля в проверенных заведениях содержит многоуровневую аутентификацию. Современные компании задействуют KYC-алгоритмы и AML-критерии. Документооборот требует от 24 до 72 временных отрезков.
Цифровые решения для прохождения запретов развиваются сообща с усилением законодательных мер. VPN-инструменты категории premium гарантируют криптографию AES-256 и стандарты OpenVPN. Надежность коннекта принципиально существенна для привилегированных сессий.
Резервные домены выполняют задачи через локально расположенные серверные кластеры. CDN-структуры предоставляют оптимальную латентность для глобальных игроков. Системное роутинг запускается при обнаружении препятствия базового адреса.
Денежные движения в лицензированных областях подпадают под строгим критериям PCI DSS. Цифровые платежи приобретают популярность из-за анонимности и динамике процессинга.
Переносные приложения лучших провайдеров интегрируют лицевую аутентификацию и push-оповещения для ключевых происшествий. Гибкий оформление независимо изменяется под свойства панели.
Легальные платформы азартных сервисов обеспечивают пользователям право к премиальному развлечениям через dedicated домены, включая тип топ казино РІС…РѕРґ , которые именно выполняют мировые требования конфиденциальности.
Последовательность создания аккаунта подразумевает ввода проверочных данных через криптографические SSL-соединения. Букмекеры demanded нотариальное свидетельство age verification и территории residence для поддержания законодательных требований.
2FA проверка считается необходимым компонентом современных механизмов безопасности. Участники имеют SMS-шифры, push-notification или внедряют dedicated программы в стиле Google Authenticator.
Mirror адреса преодолевают сложности географических блокировок и DDoS-нападений. Техническим образом реплики представляют копийные версии primary платформы с удержанием features и индивидуальных параметров.
Профессиональные участники предлагают хранить новейшие каталоги working зеркал в bookmark обозревателя. Букмекеры доставляют новости о свежих доменах через e-mail, Telegram-communities и смартфонные программы.
Денежные транзакции через legal сайты покрыты cryptographic methods категории банковского области. Вывод денег осуществляется исключительно на аутентифицированные счета владельца профиля.
Hey there! Do you use Twitter? I’d like to follow you
if that would be ok. I’m absolutely enjoying your blog and look forward to new posts.
Here is my web site; best realtor in Lake Ozark MO
Nice blog here! Also your web site loads up very fast!
What host are you using? Can I get your affiliate link to your host?
I wish my website loaded up as quickly as yours lol
My web page – realtor in Santa Fe NM
BajaMed Direct: mexico pet pharmacy – BajaMed Direct
Pokies Real Money Australia One Spin From Legendary
онлайн школа с 1 по 11 класс онлайн школа с 1 по 11 класс .
Play Baccarat Online Australia Real Money Tables
Нынешние геймеры обталкиваются с изобилием технических нюансов при операциях с сертифицированными площадками. Экспертные порталы типа Голд регистрация обеспечивают современную материалы о работе развлекательных операторов.
Процесс проверки профиля подразумевает набор неотъемлемых стадий. Исходная валидация нуждается предоставления свидетельств доказывающих гражданство. Привычный пакет подразумевает документ, права или заграничное удостоверение.
Системная компонента создания аккаунта охватывает задействование зашифрованного канала и 2FA. Профессиональные клиенты предлагают инициировать совокупность возможных функций защиты.
Альтернативные адреса представляют абсолютные клоны главного ресурса с поддержанием тотального арсенала. Центральное бонус заключается в соответствии денежных ограничений и требований ставочных требований.
Механизм локализации действующих зеркал основывается на отслеживании экспертных телеграм-каналов и партнерских площадок. Продвинутые пользователи используют прокси-соединения для предоставления устойчивого доступа невзирая от региональных лимитов.
Функционирующие mirror-ссылки легальных гемблинг-платформ на миллионъ казино гарантируют постоянный вход к игровым сервисам. Принцип реплицирования создает точные копии основного ресурса с поддержанием всех возможностей.
Система регистрации через дублирующий портал в точности имитирует стандартную бланк. Начинающие пользователи прописывают валидный email, генерируют безопасный ключ и выбирают операционную денежную единицу.
Верификация личного кабинета требует загрузки документов в соответствии с KYC-регламенту. Копия водительских прав, свидетельство места жительства и денежные координаты контролируются системой программную верификацию в течение 24-72 временных единиц.
Подключение действующих участников реализуется через стандартную интерфейс с 2FA аутентификацией. Одноразовые шифры передаются на мессенджер устройство или электронную почту.
Функционал финансового компонента через альтернативные домены содержит актуальные платежные системы. Visa, Mastercard, цифровые счета Skrill, Neteller, crypto Bitcoin, Ethereum обрабатываются с низкими взносами 0-3%.
Развлекательная база повторяется целиком включая слоты, классические геймплей, live-дилеров и мегавыигрыши. RTP-коэффициенты, изменчивость и вейджер удерживаются идентичными.
Бонусная политика выполняется идентично основному ресурсу. Welcome-комплекты, free spins, компенсация и VIP-системы включаются алгоритмически при соблюдении прописанных критериев.
Orwell’s decision to use animals allows him to simplify complex political maneuvers without losing their impact. The sheep, with their bleating chants, represent the mindless mob that drowns out rational debate. If you are looking to analyze these symbols, downloading an Animal Farm PDF can be very helpful for study sessions. The book forces us to confront the uncomfortable reality that a population can be complicit in its own subjugation through ignorance or fear.
Chult is home to unique flora and fauna, from the Assassin Vine to the Su-Monster. The Tomb of Annihilation PDF serves as a monster manual for this region. It provides the stat blocks for all the new creatures. DMs use the digital resource to verify special abilities during combat. The text also explains the uses of local plants like Ryath Root. Having this information searchable means the DM can reward creative players who use the environment to their advantage. The PDF puts the ecology of Chult at the DM’s fingertips.
Incredible points. Great arguments. Keep up the great
work.
My website … real estate agent Alberta Canada
best india pharmacy: Indo-Generic Export – indian pharmacy online
Really no matter if someone doesn’t know after that its
up to other visitors that they will assist, so here it happens.
Visit my page; best real estate agent in Rancho Cucamonga CA
Hurrah, that’s what I was looking for, what a material!
existing here at this blog, thanks admin of this web
site.
Look at my web-site :: best real estate agent in Joliet IL
Do you mind if I quote a couple of your posts as long as I provide credit and sources back to your webpage?
My website is in the very same area of interest as yours and my users would certainly benefit
from some of the information you present here. Please let me know if this ok with you.
Thank you!
Also visit my site – دانلود آهنگ شاد
This casino https://www.elarranque.org/winning-at-online-casino-mathematical-realities-23/ offers a great mix of classic slots and live dealer games. The platform feels modern, promotions are worth trying, and support is responsive, which adds confidence.
Поиск легального азартного портала нуждается детального анализа юридических сертификатов. Современные сайты лаки ворлд казино предлагают геймерам максимальную детали о действующих разрешениях.
Система создания профиля содержит определенное количество ключевых шагов валидации. Администраторы просят справки, устанавливающие личность и зрелость. Традиционный KYC-регламент длится от 24 до 72 периодов.
Финансовое планирование начинается с определения лимитов на пополнения. Искусные геймеры призывают применять установку 5% от совокупного азартного резерва на конкретную раунд.
Технические барьеры администраторов принуждают задействовать вспомогательные адреса. Копии сохраняют полную активность основного сайта, подразумевая журнал переводов и развлекательный успех.
Актуальные платежные системы дают скоростные депозиты через криптовалютные хранилища. Bitcoin, Ethereum и постоянные токены гарантируют конфиденциальность и символические взносы. Длительность выполнения получений равно 10-30 отрезков.
Планы верности содержат иерархические ранги с увеличивающимся компенсацией. VIP-кураторы обеспечивают уникальные подарки, улучшенные границы и опережающую помощь.
Современные геймеры натыкаются с препятствием входа к проверенным сайтам. Поставщики запрещают первичные адреса, но профессиональные Рльдорадо казино клиенты осознают о присутствии резервных платформ.
Альтернативный адрес является стопроцентную реплику оригинального платформы. Системы безопасности работают равнозначными. Денежные действия проходят через те же шлюзы.
Технология открытия счёта через параллельный ссылку включает стандартной проверки. Операторы требуют справки для реализации KYC-требований. Индивидуальные данные проходят двухфакторную аутентификацию.
Пополнительные лимиты на дополнительных площадках аналогичны базовым характеристикам. Низшие ставки продолжают константными. Накопительные джекпоты согласовываются между всеми адресами.
Льготные планы выполняются полноценно на зеркальных платформах. Вейджер обеспечивает базовые значения. Временные рамки отыгрыша не изменяется.
Департамент помощи решает вопросы с параллельных ссылок идентично. Живой разговор гарантирует 24-часовой расписание работы.
This is my first time pay a visit at here and i am
actually impressed to read everthing at one place.
Also visit my web-site دانلود آهنگ شاد
freshfinder.shop – Always something new and cool to discover here, I keep coming back for more!
curtaincraft.shop – Great variety of textiles, easy to find the perfect curtains for your space.
Chic decor shop – Perfect place to find accents that stand out subtly.
charmcartel.shop – Unique designs and fast navigation, love shopping here every time.
Helpful information. Fortunate me I discovered your website
by accident, and I am stunned why this twist of fate
did not took place in advance! I bookmarked it.
Feel free to surf to my web site; best real estate agent in St. Charles IL
прокарниз прокарниз .
Поиск надежного казино площадки требует глубокого исследования лицензионных разрешений. Новые системы казино Килограмм обеспечивают пользователям стопроцентную факты о собственных санкциях.
Процедура создания профиля предусматривает несколько ключевых ступеней проверки. Операторы настаивают документы, подтверждающие самобытность и правоспособность. Стандартный KYC-порядок продолжается от 24 до 72 периодов.
Распоряжение капиталом начинается с установления рамок на вклады. Квалифицированные участники предлагают эксплуатировать принцип 5% от суммарного азартного капитала на отдельную партию.
Системные блокировки владельцев принуждают задействовать запасные пути. Дубликаты поддерживают максимальную функциональность главного портала, подразумевая историю транзакций и развлекательный результаты.
Передовые финансовые системы обеспечивают скоростные инвестиции через цифровые счета. Bitcoin, Ethereum и устойчивые монеты обеспечивают конфиденциальность и наименьшие отчисления. Период осуществления изъятий доходит 10-30 периодов.
Планы лояльности охватывают иерархические ранги с накапливающимся возвратом. VIP-представители предоставляют уникальные подарки, усиленные ограничения и первоочередную помощь.
Ориентирование в мире официальных сайтов предполагает владения современных способов входа. Продвинутые игроки задействуют Клубника для добывания актуальной данных о функционирующих путях.
Схема регистрации аккаунта в официальных компаниях охватывает многоуровневую проверку. Современные операторы внедряют KYC-протоколы и AML-критерии. Документальная процедура требует от 24 до 72 промежутков.
IT методы для прохождения запретов эволюционируют одновременно с ужесточением правовых решений. VPN-платформы типа premium гарантируют кодирование AES-256 и стандарты OpenVPN. Постоянство канала fundamentally существенна для привилегированных игровых периодов.
Запасные ресурсы выполняют задачи через географически размещенные технические мощности. CDN-структуры предоставляют сокращенную пинг для европейских пользователей. Системное переключение активируется при выявлении препятствия основного ресурса.
Банковские движения в проверенных территориях следуют строгим стандартам PCI DSS. Цифровые расчеты получают актуальность благодаря приватности и динамике выполнения.
Мобильные утилиты премиальных провайдеров включают лицевую проверку и push-алерты для критических эпизодов. Модифицируемый внешний вид самостоятельно адаптируется под характеристики панели.
glintvogue.shop – Always up-to-date with the latest trends, a must-see for fashion lovers!
xorya explore – Landed here randomly, interface is neat and details are very easy to understand.
Perfectly voiced of course. .
электрокарниз купить в москве электрокарниз купить в москве .
coralcrate.shop – Stylish and one-of-a-kind items, with a smooth browsing experience. Highly recommend!
Выбор надежного казино портала подразумевает серьезного разбора юридических сертификатов. Передовые платформы Килограмм казино дают игрокам безусловную информацию о текущих санкциях.
Система оформления счета подразумевает ряд требуемых этапов верификации. Представители настаивают бумаги, доказывающие индивидуальность и правоспособность. Классический KYC-механизм требует от 24 до 72 часов.
Финансовое планирование запускается с фиксации лимитов на пополнения. Профессиональные геймеры настаивают эксплуатировать принцип 5% от совокупного игорного резерва на индивидуальную сессию.
Технические препятствия провайдеров обязывают эксплуатировать альтернативные маршруты. Копии удерживают абсолютную активность главного портала, содержа историю переводов и гемблинг результаты.
Инновационные денежные системы дают скоростные пополнения через криптовалютные счета. Bitcoin, Ethereum и постоянные токены гарантируют конфиденциальность и мизерные комиссии. Время реализации получений достигает 10-30 минут.
Системы постоянства подразумевают многоуровневые статусы с возрастающим возвратом. VIP-кураторы гарантируют персонализированные бонусы, повышенные лимиты и преимущественную обслуживание.
https://usmedsoutlet.shop/# US Meds Outlet
Исследование в мире сертифицированных платформ включает представления продвинутых технологий доступа. Продвинутые игроки внедряют казино Вован для обретения релевантной сведений о действующих доменах.
Алгоритм открытия счета в сертифицированных организациях включает детальную проверку. Продвинутые организации задействуют KYC-системы и AML-критерии. Документооборот отнимает от 24 до 72 промежутков.
IT технологии для преодоления препятствий развиваются параллельно с ужесточением юридических мер. VPN-инструменты разряда premium гарантируют защиту AES-256 и протоколы OpenVPN. Непрерывность подключения жизненно актуальна для высокоролловых заходов.
Запасные сайты оперируют через пространственно разнесенные компьютерные системы. CDN-архитектуры гарантируют быструю отклик для американских пользователей. Системное маршрутизация инициируется при обнаружении барьера первичного адреса.
Банковские переводы в сертифицированных территориях подпадают под определенным нормам PCI DSS. Блокчейн операции получают распространение по причине секретности и быстроте процессинга.
Планшетные приложения лучших брендов объединяют голосовую идентификацию и push-уведомления для ключевых ситуаций. Адаптивный облик программно изменяется под особенности монитора.
vixarobonding link – Clean pages, responsive interface, and content is clear and easy to read.
Современные платформы беттинг продуктов дают пользователям доступ к премиальному азарту через защищенные лова казино ресурсы. Авторизованная функционирование нуждается следования определенных надзорных стандартов.
Система оформления индивидуального счета задействует валидацию персональных показателей. Регуляторы задействуют углубленные алгоритмы KYC и AML для предотвращения поддельных транзакций.
Технические платформы современных казино строятся на безопасных дата-центрах с криптографическими протоколами. Региональная блокировка побуждает владельцев организовывать дублирующие порталы.
Альтернативные ресурсы формируют полные дубликаты базового сайта с фиксацией всех инструментов и показателей. Участники добиваются стабильный вход к балансу, азартной статистике и индивидуальным настройкам.
Расчетные действия реализуются через синхронизированные расчетные шлюзы. Ограничения на инвестиции и изъятия регулируются в гармонии с лицензионными требованиями и собственными правилами контроля угроз.
Экспертные гемблеры рекомендуют контролировать ситуацию авторизации через регуляторные каталоги азартных комиссий. Авторитетные критерии предусматривают ранги на специализированных порталах и комментарии истинных клиентов.
Определение проверенного игорного ресурса предполагает серьезного изучения регулятивных документов. Современные сайты РЎСѓРєР° казино дают игрокам абсолютную сведения о своих допусках.
Система регистрации содержит ряд обязательных ступеней проверки. Представители просят документы, подтверждающие персону и возраст. Стандартный KYC-порядок составляет от 24 до 72 интервалов.
Контроль средств запускается с назначения лимитов на депозиты. Компетентные геймеры рекомендуют использовать закон 5% от совокупного азартного средств на конкретную партию.
Программные препятствия поставщиков вынуждают эксплуатировать дополнительные адреса. Клоны оберегают абсолютную работоспособность первичного ресурса, охватывая летопись платежей и игровой продвижение.
Современные платежные системы поддерживают быстрые инвестиции через блокчейн аккаунты. Bitcoin, Ethereum и устойчивые монеты обеспечивают анонимность и символические платежи. Срок обработки изъятий насчитывает 10-30 периодов.
Системы лояльности включают каскадные ранги с нарастающим компенсацией. VIP-представители предоставляют персонализированные поощрения, усиленные лимиты и преимущественную поддержку.
visit brixelline – Enjoyed a brief browse, the layout is modern and user-friendly.
chicchisel.shop – Wonderful range of tools, they truly cater to every DIY enthusiast!
Auto selection – Easy to explore site with a wide selection of items.
BrightBloomy – Gorgeous floral-inspired products, navigating through is a breeze.
Нынешние игроки натыкаются с препятствием соединения к сертифицированным платформам. Организации фильтруют базовые адреса, но грамотные friends casino участники знают о наличии параллельных платформ.
Дополнительный домен образует стопроцентную воспроизведение главного портала. Криптографические алгоритмы остаются аналогичными. Платёжные действия проходят через те же каналы.
Процедура создания аккаунта через параллельный портал предполагает классической верификации. Менеджеры просят бумаги для реализации KYC-стандартов. Личные данные проходят двухфакторную валидацию.
Пополнительные границы на зеркальных сайтах равняются первичным условиям. Минимальные взносы остаются константными. Возрастающие джекпоты интегрируются между множественными доменами.
Премиальные программы действуют всесторонне на альтернативных платформах. Требования по обороту поддерживает исходные параметры. Длительность оборота продолжается.
Департамент сопровождения обрабатывает вопросы с дополнительных адресов аналогично. Онлайн разговор предоставляет беспрерывный формат функционирования.
Рабочие дублирующие порталы лицензированных азартных клубов на Лев казино предоставляют постоянный соединение к геймерским ресурсам. Схема копирования создает эквивалентные версии центрального сайта с поддержанием всех инструментов.
Система регистрации через резервную ссылку в точности копирует оригинальную заявку. Только пришедшие пользователи указывают валидный email, генерируют безопасный секретную комбинацию и фиксируют игровую курренси.
Верификация профиля требует отправки бумаг следуя KYC-нормам. Фото водительских прав, доказательство резиденции и финансовые сведения анализируются посредством алгоритмическую верификацию в течение 24-72 часа.
Логин активных клиентов производится через базовую модуль с расширенной идентификацией. Разовые токены приходят на мобильный девайс или электронную почту.
Опции финансового раздела через дублирующие порталы поддерживает популярные платежные платформы. Visa, Mastercard, цифровые хранилища Skrill, Neteller, виртуальные монеты Bitcoin, Ethereum осуществляются с уменьшенными взносами 0-3%.
Gaming база копируется в точности включая автоматы, столовые игры, live-дилеров и джекпоты. RTP-значения, изменчивость и вейджер остаются идентичными.
Акционная программа работает похоже основному веб-площадке. Welcome-наборы, бесплатные вращения, возврат средств и VIP-программы включаются программно при исполнении заданных параметров.
Bloom Barrel online – Beautifully curated floral collection that’s easy to navigate.
start here – Simple setup that keeps visitors focused.
top 10 online pharmacy in india: india pharmacy mail order – top online pharmacy india
Официальные платформы игровых сервисов обеспечивают геймерам право к элитному азартному досугу через тематические сайты, включая казино ДживиСпин , которые именно следуют общепринятые регламенты надёжности.
Последовательность открытия счёта подразумевает внесения идентификационных сведений через защищённые SSL-линии. Администрация просят предоставить письменное удостоверение дееспособности и локации проживания для compliance юрисдикционных правил.
Двухфакторная authentication становится required элементом актуальных платформ надёжности. Клиенты обретают SMS-пароли, push-алерты или используют специализированные софт наподобие Google Authenticator.
Дублирующие порталы преодолевают проблемы territorial запретов и DDoS-атак. По сути реплики образуют идентичные клоны базового ресурса с обеспечением инструментария и личных деталей.
Опытные геймеры предлагают хранить актуальные реестры рабочих копий в favourites обозревателя. Администрация передают обновления о свежих порталах через мейл, Telegram-чаты и mobile приложения.
Банковские процедуры через legal сайты покрыты encryption технологиями level банковского индустрии. Вывод средств выполняется solely на аутентифицированные счета собственника account.
Подбор надежного betting заведения в актуальных реалиях подразумевает детального подхода к правовому состоянию. Квалифицированные игроки понимают, что казино РјСЌРґ отображает новую факты о функционирующих операторах.
Процедура регистрации в сертифицированных заведениях содержит принудительную аутентификацию личности. KYC-правила обеспечивают как площадку, так и пользователя от афер. Временные рамки на изъятие денег до завершения подтверждения – стандартная система.
Цифровые ограничения на доступ к азартным сайтам устраняются через альтернативные адреса. Действующие дубликаты сохраняют полную функциональность базового ресурса. Платежные процедуры, интерактивный прогресс и льготные предложения поддерживаются устойчивыми.
Денежная безопасность характеризуется показателем задействованных платежных инструментов. SSL-криптография, PCI DSS лицензирование и расширенная подтверждение обеспечивают прочный заслон ограждения.
Развлекательная коллекция легальных сервисов объединяет спины от ведущих студий. RTP-значения, вариативность и вероятностные схемы претерпевают независимую контроль в одобренных центрах.
Схемы стимулирования в серьезных операторах базируются на прозрачных требованиях отыгрыша. Вейджер x35-40 считается адекватным для машина-подарков, в то время как традиционные развлечения учитываются в калькуляцию с минимальным показателем.
It’s a pity you don’t have a donate button! I’d definitely donate to this excellent blog!
I suppose for now i’ll settle for book-marking and
adding your RSS feed to my Google account. I look
forward to fresh updates and will share this site with my Facebook group.
Chat soon!
Take a look at my page … 오피사이트 순위
Беттинговая область показывает активный прогресс, привлекая миллионы геймеров. Опытные порталы предлагают надёжную условия для развлечений. Исчерпывающую данные о подобных компаниях реально найти на лаки Р±РёСЂ казино официальный сайт .
Легализация представляет основным элементом селекции сайта. Регуляторы Олдерни обеспечивают жёсткий контроль экономических операций. Каждая сертифицированная сайт проходит плановые проверки RNG-алгоритмов.
Цифровые аспекты современных азартных площадок предусматривают SSL-кодирование расчётного стандарта. Создатели программного материала вроде Microgaming, NetEnt, Pragmatic Play интегрируют сложные схемы рандомных чисел.
Механизм верификации профиля предусматривает представления документов KYC-уровня. Свидетельство, документ о доходах, удостоверение проживания — типичный комплект для полноценного подключения.
Резервные адреса ликвидируют препятствия с запретами компаний. Действующие варианты обновляются каждый день программными службами. Портативные утилиты нередко работают устойчивее онлайн версий.
Банкролл-менеджмент задаёт продолжительную доходность игровых сессий. Профессиональные геймеры предлагают сокращать объём бета до 1-2% от итогового резерва.
nevrix dashboard – Simple structure, navigation is smooth and content is easy to follow.
Современные гемблеры встречаются с барьером входа к официальным платформам. Провайдеры блокируют стандартные ссылки, но грамотные лаки Р±РёСЂ казино клиенты понимают о наличии параллельных платформ.
Альтернативный адрес представляет точную копию основного портала. Средства защиты остаются такими же. Банковские транзакции реализуются через равнозначные сервисы.
Технология заведения учётной записи через альтернативный адрес включает обычной подтверждения. Специалисты просят справки для осуществления KYC-стандартов. Паспортные информация реализуют многоуровневую валидацию.
Вносительные лимиты на альтернативных платформах совпадают первичным требованиям. Наименьшие суммы поддерживаются стабильными. Прогрессивные джекпоты координируются между многочисленными ресурсами.
Льготные схемы функционируют завершённо на дополнительных платформах. Отыгрышный коэффициент сохраняет оригинальные показатели. Срок активности использования остаётся прежним.
Департамент помощи анализирует вопросы с параллельных ссылок равнозначно. Мгновенный чат предоставляет беспрерывный режим оперирования.
Greate post. Keep writing such kind of info on your page.
Im really impressed by your blog.
Hey there, You’ve done a great job. I will definitely digg it and in my opinion suggest to my friends.
I’m confident they’ll be benefited from this website.
Check out my site … real estate agent Lake Ozark MO
This blog was… how do I say it? Relevant!! Finally I have found something
that helped me. Thanks!
My homepage best realtor in Santa Fe NM
страница зеркало на замену гидры
Современные игроки сталкиваются с набором программных нюансов при деятельности с сертифицированными ресурсами. Профильные ресурсы типа mad casino зеркало обеспечивают актуальную сведения о функционировании игорных операторов.
Система аутентификации учетной записи включает комплекс неотъемлемых уровней. Первичная валидация подразумевает передачи свидетельств удостоверяющих индивидуальность. Типовой набор предполагает документ, автолицензию или загранпаспорт.
Системная компонента создания аккаунта охватывает внедрение криптографической защиты и двойной авторизации. Квалифицированные геймеры советуют включать максимум возможных настроек обеспечения.
Резервные ссылки представляют полные реплики главного портала с поддержанием исчерпывающего возможностей. Важнейшее бонус содержится в тождественности банковских ограничений и критериев вейджера.
Схема поиска активных дублирующих порталов фундируется на отслеживании профессиональных информационных каналов и сотрудничающих платформ. Продвинутые участники эксплуатируют анонимайзеры для предоставления надежного входа без оглядки от местных ограничений.
Навигация в секторе проверенных сайтов подразумевает владения продвинутых методов авторизации. Умелые игроки эксплуатируют казино ретро для получения актуальной данных о функционирующих URL.
Процесс формирования аккаунта в лицензированных организациях охватывает сложную верификацию. Продвинутые организации используют KYC-процедуры и AML-требования. Документальная процедура требует от 24 до 72 временных отрезков.
Цифровые решения для преодоления ограничений совершенствуются вместе с повышением нормативных шагов. VPN-решения типа premium обеспечивают шифрование AES-256 и технологии OpenVPN. Устойчивость канала кардинально существенна для VIP раундов.
Запасные платформы оперируют через географически разнесенные компьютерные инфраструктуры. CDN-структуры поддерживают низкую задержку для азиатских геймеров. Автоматическое переключение активируется при идентификации блокировки базового адреса.
Денежные движения в проверенных областях соответствуют конкретным нормам PCI DSS. Цифровые переводы приобретают распространение по причине приватности и скорости выполнения.
Смартфонные утилиты премиальных компаний совмещают отпечатковую подтверждение и push-оповещения для ключевых событий. Настраиваемый внешний вид автоматически корректируется под свойства матрицы.
Top Real Money Casino Australia Huge Jackpots Turning Lives Around
Thanks for finally writing about > Santa Claus Christmas Ball Tutorial Adobe Illustrator.
– My Downloadables 오피사이트
https://www.rumorcircle.com/blogs/218368/Finding-Safe-and-Verified-Online-Betting-Offers
Игровая отрасль демонстрирует стремительный подъём, привлекая массы участников. Квалифицированные ресурсы дают защищённую условия для ставок. Подробную сведения о данных организациях доступно отыскать на лаки Р±РёСЂ казино .
Сертификация представляет главным фактором селекции сайта. Лицензиаты Гибралтара дают строгий контроль расчётных операций. Отдельная официальная площадка реализует плановые проверки RNG-модулей.
Цифровые аспекты новейших гемблинг-сайтов объединяют SSL-кодирование расчётного стандарта. Создатели виртуального ПО класса Microgaming, NetEnt, Pragmatic Play добавляют продвинутые механизмы произвольных показателей.
Алгоритм валидации профиля предусматривает представления свидетельств KYC-класса. ID, документ о доходах, верификация прописки — стандартный комплект для завершённого подключения.
Резервные URL устраняют барьеры с запретами компаний. Функционирующие варианты изменяются постоянно IT командами. Портативные приложения зачастую работают стабильнее браузерных вариантов.
Контроль средств устанавливает продолжительную результативность игровых сессий. Профессиональные пользователи рекомендуют урезать объём бета до 1-2% от общего резерва.
I really like your blog.. very nice colors & theme.
Did you create this website yourself or did you hire someone
to do it for you? Plz answer back as I’m looking to design my
own blog and would like to find out where u got
this from. thanks a lot
My homepage … real estate agent Chino Hills CA
Игровая индустрия являет быстрый подъём, привлекая множество игроков. Грамотные ресурсы гарантируют безопасную условия для игры. Подробную данные о данных брендах реально отыскать на Лев казино .
Аттестация представляет центральным показателем селекции ресурса. Регуляторы Кюрасао гарантируют тщательный надзор экономических процедур. Каждая аккредитованная платформа реализует плановые проверки RNG-модулей.
Технические особенности актуальных игорных домов включают SSL-кодирование банковского стандарта. Производители софтового ПО наподобие Microgaming, NetEnt, Pragmatic Play внедряют многоуровневые схемы случайных показателей.
Процесс валидации личного кабинета предусматривает направления бумаг KYC-формата. Документ, справка о прибылях, подтверждение регистрации — базовый перечень для итогового доступа.
Параллельные ссылки решают проблемы с фильтрацией провайдеров. Свежие копии изменяются каждый день программными службами. Портативные программы часто действуют стабильнее интернет вариантов.
Распределение капитала создаёт длительную результативность игровых сессий. Экспертные пользователи советуют урезать объём вейджера до 1-2% от совокупного бюджета.
florafreight.shop – The place for beautiful flowers, all with great quality and excellent prices.
http://indogenericexport.com/# tizanidine medication
check xylix – Interface feels professional, navigation is smooth and content is easy to read.
crystalcorner2.shop – Beautiful and rare crystals, a true gem of a shop for enthusiasts.
Real Money Online Casino Australia Real One Decision To Millions
An outstanding share! I’ve just forwarded this onto a
friend who was conducting a little research on this. And he in fact bought me breakfast because
I discovered it for him… lol. So let me reword this….
Thank YOU for the meal!! But yeah, thanx for spending time to talk about this issue here on your web site.
Feel free to surf to my page; best real estate agent in Rancho Cucamonga CA
Hello! I could have sworn I’ve been to your blog before but after browsing through
a few of the posts I realized it’s new to me. Regardless, I’m definitely pleased I stumbled upon it and I’ll be bookmarking it and checking back frequently!
Also visit my homepage: best real estate agent in Chino Hills CA
Исследование в мире официальных сайтов требует представления новых инструментов входа. Опытные геймеры эксплуатируют Голд казино для приобретения новейшей информации о оперативных адресах.
Алгоритм открытия учетной записи в официальных учреждениях включает комплексную валидацию. Передовые поставщики применяют KYC-системы и AML-требования. Документальное сопровождение потребляет от 24 до 72 периодов.
Технические технологии для минования запретов прогрессируют одновременно с укреплением правовых мер. VPN-платформы типа premium обеспечивают шифрование AES-256 и стандарты OpenVPN. Непрерывность подключения кардинально важна для премиальных партий.
Дублирующие адреса выполняют задачи через территориально разнесенные серверные ресурсы. CDN-структуры поддерживают минимальную время ответа для азиатских пользователей. Системное перенаправление запускается при распознавании барьера центрального портала.
Финансовые операции в проверенных областях соответствуют строгим требованиям PCI DSS. Цифровые транзакции завоевывают востребованность благодаря анонимности и оперативности реализации.
Смартфонные приложения топовых организаций объединяют биометрическую проверку и push-алерты для важных эпизодов. Модифицируемый интерфейс автоматически подстраивается под особенности матрицы.
charmcartel.shop – Such a fantastic selection of unique accessories, easy to navigate and explore.
Выбор надежного игрового площадки в сегодняшних границах заставляет специального рассмотрения к лицензионному уровню. Компетентные игроки осознают, что лаки ворлд сайт содержит свежую материалы о работающих сервисах.
Схема записи в сертифицированных сервисах охватывает необходимую подтверждение документов. KYC-нормы охраняют как казино, так и игрока от афер. Краткосрочные лимиты на вывод средств до закрытия контроля – стандартная подход.
Цифровые запреты на вход к развлекательным площадкам преодолеваются через параллельные URL. Активные копии сохраняют полную возможности главного сервиса. Платежные движения, азартный результаты и льготные предложения функционируют неизменными.
Экономическая надежность характеризуется критерием внедренных банковских систем. SSL-шифрование, PCI DSS сертификация и многоуровневая верификация обеспечивают защищенный заслон безопасности.
Геймплейная набор лицензированных провайдеров содержит спины от известных производителей. RTP-показатели, волатильность и статистические принципы проходят независимую проверку в авторизованных учреждениях.
Системы стимулирования в качественных заведениях строятся на четких параметрах вейджера. Проигрыш x35-40 оценивается справедливым для барабан-привилегий, в то время как традиционные игры идут в расчет с пониженным показателем.
have a peek at this site
battery app download for android
Thankfulness to my father who shared with me on the topic
of this blog, this weblog is in fact remarkable.
After trying several platforms, I found this casino https://azionecreativa.org/casino-on-the-go-technical-makeup-foundations-7/ to be well-balanced. The welcome bonus is fair, terms are easy to understand, and payouts are processed smoothly, making it suitable for casual players.
Appreciate it! A good amount of information!
coppercitrine.shop – A great place to find exquisite copper designs, definitely worth exploring.
mexico farmacia: pharmacy mexico city – farmacia mexicana en chicago
Curated collection – Feels like there’s always something worth checking out.
Функционирующие зеркала проверенных казино на казино типпи обеспечивают стабильный вход к азартным системам. Система зеркалирования генерирует эквивалентные клоны корневого сайта с поддержанием всех возможностей.
Алгоритм открытия счета через альтернативный домен абсолютно копирует оригинальную форму. Свежие пользователи указывают валидный email, генерируют стойкий шифр и устанавливают операционную финансовый инструмент.
Валидация личного кабинета содержит отправки бумаг в соответствии с KYC-стандартам. Скан водительских прав, свидетельство адреса и банковские данные контролируются системой цифровую анализ в течение 24-72 периодов.
Вход зарегистрированных пользователей выполняется через базовую форму с расширенной проверкой. Временные токены отправляются на телефонный гаджет или мейл.
Механизмы финансового блока через альтернативные домены предлагает распространенные денежные системы. Visa, Mastercard, виртуальные хранилища Skrill, Neteller, crypto Bitcoin, Ethereum осуществляются с уменьшенными процентами 0-3%.
Гемблинг библиотека копируется целиком включая spinning games, классические игры, live-операторов и джекпоты. RTP-показатели, дисперсия и условия отыгрыша удерживаются такими же.
Поощрительная схема функционирует идентично базовому веб-площадке. Welcome-предложения, даровые прокруты, компенсация и VIP-планы включаются алгоритмически при выполнении определенных условий.
Современные геймеры встречаются с изобилием цифровых нюансов при операциях с лицензированными ресурсами. Экспертные источники типа казино Клубника поставляют новую данные о деятельности развлекательных организаций.
Система аутентификации кабинета включает множество принудительных фаз. Исходная проверка подразумевает размещения свидетельств подтверждающих персону. Классический комплект подразумевает ID, водительские права или международный паспорт.
Системная элемент записления включает эксплуатацию зашифрованного канала и 2FA. Продвинутые игроки подсказывают задействовать все возможных возможностей защиты.
Резервные ссылки представляют абсолютные отражения базового домена с удержанием исчерпывающего возможностей. Центральное плюс содержится в схожести банковских ограничений и норм условий прокрутки.
Схема нахождения актуальных резервных ссылок строится на проверке профильных телеграм-каналов и связанных сайтов. Профессиональные игроки используют анонимайзеры для гарантирования надежного подключения вне зависимости от локальных ограничений.
Mark Twain’s tale of a young boy’s adventures is a story that never gets old. The Adventures of Tom Sawyer is filled with humor, suspense, and heart. We provide a digital text that is perfect for reading on tablets and smartphones. Our version is clean and easy to navigate. With a Tom Sawyer PDF, you can take the story with you wherever you go, making it easy to escape into the world of Twain.
Reliable facts Kudos!
1win xavfsizmi http://1win5766.help/
Актуальные провайдеры гемблинг игр дают беттерам путь к премиальному беттингу через безопасные Клубника казино ресурсы. Лицензированная работа требует соблюдения жестких правовых стандартов.
Механизм оформления игрового аккаунта включает валидацию персональных реквизитов. Регуляторы применяют комплексные системы KYC и AML для пресечения фродовых транзакций.
IT средства современных беттинг площадок базируются на зашифрованных серверах с криптографическими алгоритмами. Локальные запреты заставляет операторов запускать параллельные URL.
Резервные платформы образуют точные версии базового сайта с обеспечением всех возможностей и данных. Пользователи получают беспрепятственный вход к средствам, игровой данным и личным конфигурациям.
Денежные транзакции осуществляются через связанные расчетные процессоры. Ограничения на депозиты и выводы назначаются в соотношении с нормативными условиями и организационными нормами контроля угроз.
Квалифицированные беттеры рекомендуют контролировать условия сертификата через контролирующие базы данных игорных комиссий. Статусные показатели предусматривают позиции на тематических порталах и мнения настоящих беттеров.
top 10 pharmacies in india: Indo-Generic Export – top 10 pharmacies in india
Актуальные игроки сталкиваются с множеством программных тонкостей при функционировании с легальными платформами. Профильные источники типа mad casino поставляют новую материалы о операциях игорных компаний.
Система подтверждения счета содержит комплекс требуемых фаз. Стартовая аутентификация подразумевает отправки бумаг удостоверяющих личность. Типовой пакет подразумевает документ, лицензию водителя или загранпаспорт.
Программная компонента создания аккаунта включает использование криптографической защиты и двойной авторизации. Экспертные геймеры советуют задействовать весь комплекс представленных настроек защиты.
Зеркала являются идентичные копии первичного домена с сохранением тотального набора функций. Важнейшее выгода выражается в соответствии расчетных лимитов и требований отыгрыша.
Механизм нахождения действующих дублирующих порталов опирается на отслеживании тематических информационных каналов и связанных порталов. Экспертные пользователи внедряют анонимайзеры для гарантирования постоянного связи независимо от территориальных лимитов.
glintgarden.shop – My go-to for all things gardening, such a fantastic range of products!
WOW just what I was searching for. Came here by searching for
오피
My blog: 오피사이트 순위
Bento Box Central – Excellent range of modern bento boxes, highly recommend for meal storage.
Kudos, Loads of info!
You said it very well.!
Real Money Bonus No Deposit Australia Feel The Glory Now
Cheers, I enjoy it.
Auroriv shop – Clean layout and a fantastic variety of products to explore.
I have read so many articles or reviews on the topic of the blogger lovers except
this post is actually a good piece of writing, keep it up.
My web site best real estate agent in St. George UT
yavex info hub – Easy to navigate, pages load smoothly and information is clear.
You can definitely see your skills within the article you write.
The sector hopes for more passionate writers
like you who are not afraid to mention how they believe.
At all times go after your heart.
Here is my website :: 오피사이트 순위
Гемблинговая область демонстрирует интенсивный подъём, манящая тысячи участников. Грамотные порталы дают надёжную среду для игры. Развёрнутую сведения о данных провайдерах допустимо получить на типпи сайт .
Лицензирование является главным элементом выбора площадки. Юрисдикции Кюрасао обеспечивают строгий проверку экономических действий. Отдельная аккредитованная ресурс проходит плановые инспекции RNG-систем.
Технические особенности передовых азартных площадок предусматривают SSL-безопасность расчётного стандарта. Разработчики программного материала наподобие Microgaming, NetEnt, Pragmatic Play встраивают продвинутые алгоритмы непредсказуемых значений.
Процесс валидации личного кабинета подразумевает направления бумаг KYC-класса. Паспорт, выписка о средствах, верификация прописки — стандартный набор для окончательного входа.
Параллельные порталы исправляют трудности с блокировками провайдеров. Действующие дубли корректируются систематически IT группами. Карманные софт часто функционируют надёжнее веб вариантов.
Распределение капитала определяет длительную прибыльность игровых периодов. Профессиональные пользователи предлагают лимитировать размер депозита до 1-2% от полного фонда.
Современные порталы беттинг продуктов предоставляют игрокам путь к профессиональному игровому процессу через надежные мад казино порталы. Легальная деятельность требует соблюдения определенных регуляторных стандартов.
Механизм активации игрового кабинета предусматривает проверку конфиденциальных данных. Администраторы задействуют комплексные процедуры KYC и AML для блокировки фродовых финансовых действий.
IT инструменты передовых гемблинг платформ строятся на надежных серверах с шифровальными технологиями. Локальные запреты обязывает управляющих создавать альтернативные ссылки.
Резервные порталы образуют идентичные копии основного сайта с удержанием всех возможностей и данных. Игроки приобретают беспрепятственный доступ к средствам, игровой истории и личным конфигурациям.
Расчетные операции производятся через встроенные банковские системы. Лимиты на взносы и снятия регулируются в соответствии с правовыми стандартами и корпоративными политиками контроля угроз.
Профессиональные гемблеры указывают анализировать условия аккредитации через надзорные каталоги гемблинг ведомств. Репутационные индикаторы предусматривают рейтинги на профильных платформах и мнения настоящих пользователей.
start here – Positive impression, pages load cleanly and the layout is solid.
Blanket Bay online – Excellent cozy items and an easy-to-use shopping site.
canadian pharmacy sarasota US Meds Outlet US Meds Outlet
Great article.
Here is my page; realtor in Franklin TN
Активные дублирующие порталы проверенных gaming-операторов на РЎСѓРєР° казино создают беспрерывный вход к развлекательным платформам. Методика клонирования формирует аналогичные копии центрального ресурса с удержанием всех функций.
Алгоритм оформления профиля через резервную ссылку полностью копирует базовую бланк. Начинающие геймеры вводят функционирующий email, устанавливают безопасный шифр и определяют базовую денежную единицу.
Аутентификация аккаунта предполагает представления справок по KYC-стандартам. Снимок водительских прав, свидетельство резиденции и денежные параметры проходят цифровую верификацию в течение 24-72 часов.
Логин существующих пользователей происходит через стандартную панель с двухфакторной идентификацией. Временные ключи поступают на телефонный аппарат или почтовый ящик.
Опции депозитного модуля через альтернативные домены предлагает актуальные платежные механизмы. Visa, Mastercard, онлайн портмоне Skrill, Neteller, crypto Bitcoin, Ethereum выполняются с оптимизированными взносами 0-3%.
Игровая коллекция воспроизводится полностью включая spinning games, столовые игры, live-хостов и максимальные награды. RTP-коэффициенты, колебания и вейджер сохраняются неизменными.
Промо схема работает подобно базовому порталу. Welcome-комплекты, free spins, денежный возврат и VIP-системы стартуют алгоритмически при достижении заданных условий.
useful source
baterybet download
Азартная сфера показывает динамичный подъём, притягивая легионы пользователей. Грамотные порталы предоставляют стабильную среду для ставок. Полную материалы о указанных провайдерах доступно отыскать на миллион казино .
Лицензирование является ключевым фактором определения портала. Регуляторы Гибралтара гарантируют тщательный проверку экономических действий. Каждая официальная ресурс подвергается постоянные инспекции RNG-механизмов.
IT аспекты новейших гемблинг-сайтов объединяют SSL-безопасность банковского категории. Поставщики программного материала типа Microgaming, NetEnt, Pragmatic Play добавляют сложные алгоритмы рандомных чисел.
Алгоритм проверки профиля предусматривает предоставления справок KYC-стандарта. Документ, подтверждение о прибылях, валидация проживания — обычный пакет для окончательного активации.
Зеркальные URL устраняют барьеры с фильтрацией провайдеров. Свежие варианты модифицируются постоянно цифровыми специалистами. Планшетные программы обычно функционируют устойчивее браузерных вариантов.
Банкролл-менеджмент определяет стратегическую успешность развлекательных раундов. Экспертные пользователи предлагают урезать объём бета до 1-2% от суммарного бюджета.
Win Real Money Online Casino Australia Your Turn Finally
Передовые участники натыкаются с барьером подключения к лицензированным сайтам. Провайдеры блокируют основные домены, но профессиональные казино million клиенты знают о наличии дублирующих площадок.
Резервная ссылка образует идентичную реплику первичного сайта. SSL-сертификаты остаются равнозначными. Денежные процедуры осуществляются через те же системы.
Схема открытия счёта через альтернативный портал включает типовой верификации. Менеджеры требуют бумаги для реализации KYC-правил. Личные информация реализуют расширенную валидацию.
Вносительные ограничения на альтернативных платформах идентичны главным требованиям. Стартовые суммы остаются фиксированными. Прогрессивные призовые фонды согласовываются между многочисленными адресами.
Поощрительные схемы выполняются всесторонне на зеркальных ресурсах. Отыгрышный коэффициент поддерживает базовые параметры. Срок активности оборота продолжается.
Команда ассистирования решает запросы с резервных порталов таким же способом. Прямой переписка предоставляет постоянный формат работы.
Hey there are using WordPress for your blog platform? I’m new to the blog world but I’m trying to
get started and set up my own. Do you require any html coding expertise to make your own blog?
Any help would be really appreciated!
Take a look at my web site: real estate agent St. Charles IL
https://atorvastatin24h.top
Надёжные ресурсы игорных предложений предоставляют участникам возможность к профессиональному времяпрепровождению через тематические сайты, включая тип топ казино , которые точно исполняют глобальные нормы безопасности.
Последовательность создания аккаунта включает заполнения authentication информации через защищённые SSL-connection. Менеджмент просят документальное verification правоспособности и локации регистрации для поддержания legal норм.
2FA идентификация является принудительным компонентом новейших solutions надёжности. Users обретают SMS-шифры, push-уведомления или задействуют специальные приложения по типу Google Authenticator.
Зеркальные домены нейтрализуют сложности territorial блокировок и DDoS-штурмов. Техническим образом дубли представляют дублированные dublicates главного портала с обеспечением инструментария и личных сведений.
Экспертные участники советуют сохранять актуальные перечни действующих альтернатив в favourites веб-клиента. Провайдеры отправляют информацию о fresh ссылках через e-mail, Telegram-группы и мобильные apps.
Банковские операции через проверенные порталы гарантированы криптографическими протоколами уровня банковского индустрии. Снятие капитала выполняется лишь на аутентифицированные wallets держателя личного кабинета.
visit morvex – Simple interface, pages load quickly and content is clear at a glance.
1win official registration Uganda 1win official registration Uganda
https://usmedsoutlet.com/# low cost online pharmacy
Real Money Pokies No Deposit Australia Feel The Victory Rush
Нынешние геймеры оказываются с препятствием связи к легальным ресурсам. Провайдеры закрывают базовые URL, но знающие Голд казино клиенты учитывают о наличии дублирующих площадок.
Резервная ссылка образует абсолютную дубликат базового сайта. Системы безопасности сохраняются идентичными. Финансовые транзакции реализуются через равнозначные системы.
Методика оформления профиля через дополнительный ссылку требует классической верификации. Администраторы просят удостоверения для реализации KYC-стандартов. Идентификационные данные осуществляют комплексную верификацию.
Депозитные границы на параллельных сайтах равняются базовым параметрам. Наименьшие взносы поддерживаются стабильными. Возрастающие джекпоты согласовываются между различными ресурсами.
Льготные схемы оперируют целостно на параллельных порталах. Множитель ставок сохраняет базовые величины. Временные рамки проигрывания не изменяется.
Департамент обслуживания рассматривает заявки с дополнительных доменов идентично. Прямой чат поддерживает постоянный порядок работы.
https://onlineservcvie.gitbook.io/bettingpromocode/
Подбор проверенного гемблинг заведения предполагает серьезного рассмотрения официальных бумаг. Актуальные системы мад казино предоставляют клиентам стопроцентную сведения о собственных санкциях.
Система открытия аккаунта предусматривает определенное количество ключевых этапов проверки. Провайдеры запрашивают удостоверения, подтверждающие самобытность и зрелость. Обычный KYC-порядок составляет от 24 до 72 промежутков.
Распоряжение капиталом открывается с определения ограничений на депозиты. Профессиональные участники призывают задействовать установку 5% от полного развлекательного капитала на индивидуальную игру.
Программные ограничения владельцев обязывают внедрять запасные домены. Клоны оберегают безусловную активность первичного ресурса, содержа архив операций и казино прогресс.
Современные финансовые инструменты предоставляют быстрые пополнения через блокчейн аккаунты. Bitcoin, Ethereum и стабильные валюты поддерживают тайность и минимальные отчисления. Срок реализации снятий насчитывает 10-30 периодов.
Системы постоянства подразумевают многоуровневые категории с возрастающим бонусом. VIP-координаторы обеспечивают личные подарки, расширенные пределы и ускоренную обслуживание.
over at this website
battery bet login
Top 10 Online Casino Australia Ranked High
fixforge.shop – Always a great shopping experience for DIY enthusiasts, they offer all the right tools for every project.
zexaroline – Found this through a link, stayed longer because layout works.
Best Casino Bonus Australia Real Money Last Chance Tonight
Актуальные альтернативные домены легальных игорных заведений на казино Голд создают беспрерывный соединение к гемблинг порталам. Система дублирования строит полноценные клоны корневого ресурса с консервацией всех механизмов.
Алгоритм открытия счета через дублирующий портал полностью повторяет базовую анкету. Свежие пользователи заполняют активный email, придумывают защищенный шифр и назначают базовую курренси.
Идентификация профиля требует отправки бумаг опираясь на KYC-требованиям. Изображение национального документа, валидация места жительства и банковские параметры проверяются через цифровую проверку в течение 24-72 часа.
Вход существующих участников осуществляется через классическую панель с многоступенчатой аутентификацией. Сессионные шифры отправляются на мессенджер гаджет или мейл.
Функционал пополнительного раздела через зеркала содержит топовые денежные сервисы. Visa, Mastercard, цифровые балансы Skrill, Neteller, криптовалюты Bitcoin, Ethereum обрабатываются с оптимизированными взносами 0-3%.
Gaming каталог повторяется в точности включая слоты, классические игры, live-хостов и прогрессивы. RTP-коэффициенты, волатильность и вейджер поддерживаются такими же.
Подарочная система работает подобно базовому ресурсу. Welcome-бандлы, безвозмездные спины, возврат средств и VIP-планы стартуют машинально при достижении фиксированных требований.
I’ve been browsing on-line more than three hours these days, yet I by no means found any attention-grabbing article like yours.
It is beautiful value sufficient for me. In my opinion, if all
webmasters and bloggers made excellent content
material as you probably did, the internet shall be much more helpful
than ever before.
Feel free to surf to my homepage – realtor in Alberta Canada
开此帖
important link https://seenfil.com/
Go Here
battery app game
Современные клиенты сталкиваются с изобилием системных нюансов при функционировании с лицензированными порталами. Экспертные источники типа винити официальный сайт поставляют новую материалы о операциях гэмблинговых компаний.
Алгоритм подтверждения счета подразумевает набор принудительных уровней. Базовая подтверждение предполагает передачи справок валидирующих гражданство. Привычный набор охватывает документ, водительские права или внешний паспорт.
Технологическая сторона записления предполагает эксплуатацию защищенного протокола и 2FA. Квалифицированные участники подсказывают запускать максимум представленных возможностей охраны.
Запасные домены составляют абсолютные реплики основного домена с поддержанием комплексного возможностей. Основное бонус заключается в соответствии денежных пределов и условий отыгрыша.
Схема локализации активных альтернативных адресов основывается на проверке профессиональных мессенджер групп и союзных порталов. Экспертные участники применяют туннельные протоколы для предоставления бесперебойного входа невзирая от локальных барьеров.
Dressing well creates a positive first impression.
Your outfit communicates loudly before you actually speak a single word.
It enhances your own self-esteem and mindset noticeably.
Your put-together look signals competence in the workplace.
https://read.sneakero.ru/ne-tolko-odezhda-volshebstvo-zimmermann-159e/
Stylish clothing allow you to showcase your unique personality.
Others often perceive stylish people as more capable and trustworthy.
Ultimately, investing in your wardrobe is an valuable step in yourself.
crispcrate.shop – A great place to shop with so many amazing products, and everything is easy to find.
try this site https://seenfil.com
Great delivery. Solid arguments. Keep up the great work.
Also visit my site realtor in St. Charles IL
Легальные операторы игорных сервисов предоставляют участникам шанс к качественному гэмблингу через целевые порталы, включая винити казино , которые точно исполняют международные критерии security.
Схема регистрации necessita предоставления верификационных параметров через криптографические SSL-каналы. Букмекеры просят предоставить официальное удостоверение возраста и территории нахождения для соблюдения правовых критериев.
Двухэтапная аутентификация считается необходимым элементом современных архитектур защиты. Пользователи получают SMS-пароли, push-оповещения или задействуют специализированные программы по типу Google Authenticator.
Альтернативные URL ликвидируют трудности локальных барьеров и DDoS-assault. По сути реплики составляют копийные dublicates центрального портала с поддержанием features и user параметров.
Профессиональные участники предлагают поддерживать свежие базы функционирующих mirrors в избранном интернет-программы. Провайдеры направляют сведения о актуальных порталах через почтовые сервисы, Telegram-communities и смартфонные программы.
Денежные переводы через проверенные сайты защищены криптографическими технологиями level банковского направления. Extraction средств производится solely на проверенные wallets обладателя профиля.
my website https://seenfil.com
Легальные платформы развлекательных опций oferuja клиентам доступ к профессиональному времяпрепровождению через dedicated порталы, включая лаки Р±РёСЂ казино , которые специально следуют международные требования надёжности.
Процедура открытия счёта требует ввода authentication деталей через шифрованные SSL-connection. Администрация требуют official удостоверение совершеннолетия и адреса регистрации для compliance законодательных норм.
Двухэтапная идентификация выступает mandatory aspect современных архитектур security. Клиенты получают SMS-шифры, push-алерты или применяют targeted программы типа Google Authenticator.
Резервные порталы устраняют трудности географических ограничений и DDoS-штурмов. Техническим образом копии являют дублированные версии основного ресурса с maintaining функциональности и user информации.
Экспертные игроки рекомендуют хранить новейшие каталоги действующих зеркал в bookmark браузера. Букмекеры передают информацию о новых адресах через e-mail, Telegram-communities и телефонные приложения.
Денежные процедуры через лицензионные ресурсы гарантированы криптографическими протоколами стандарта банковского направления. Получение денег осуществляется исключительно на validated реквизиты владельца аккаунта.
charmcartel.shop – Unique designs and fast navigation, love shopping here every time.
US Meds Outlet: US Meds Outlet – US Meds Outlet
collarcove.shop – Great selection of stylish collars, shopping here is a breeze.
I recently tried this casino http://dev5.wabisabi.co.mz/secure-gambling-settlements-capability-regulatory/ and was surprised by how stable everything felt. The games load quickly, bonuses are clear, and navigation is intuitive, making the experience comfortable.
I like the helpful info you provide in your articles.
I’ll bookmark your weblog and check again here
frequently. I’m quite certain I will learn a lot of new stuff right here!
Good luck for the next!
Survival is key in Chult. The heat, the rain, and the diseases are just as deadly as the monsters. The Tomb of Annihilation PDF contains the rules for dehydration and exhaustion. DMs reference these constantly. The digital format makes it easy to check the saving throw DCs for diseases like Mad Monkey Fever. It ensures the survival elements are applied consistently. The PDF transforms the environment into a constant threat, forcing players to plan their expeditions carefully and manage their supplies.
Выбор безопасного развлекательного заведения требует глубокого разбора правовых документов. Актуальные системы казино Клубника гарантируют игрокам стопроцентную детали о действующих допусках.
Процедура получения доступа содержит множество принудительных этапов аутентификации. Владельцы настаивают удостоверения, устанавливающие идентичность и совершеннолетие. Типовой KYC-алгоритм занимает от 24 до 72 периодов.
Финансовое планирование инициируется с задания границ на вклады. Квалифицированные пользователи настаивают внедрять принцип 5% от полного гемблинг средств на одну партию.
Технические барьеры администраторов побуждают внедрять запасные ссылки. Дубликаты оберегают абсолютную активность основного сайта, содержа архив платежей и игровой успех.
Инновационные расчетные системы предоставляют моментальные пополнения через цифровые хранилища. Bitcoin, Ethereum и устойчивые монеты поддерживают конфиденциальность и символические взносы. Время реализации снятий составляет 10-30 промежутков.
Схемы лояльности подразумевают ступенчатые категории с увеличивающимся бонусом. VIP-представители предоставляют уникальные бонусы, усиленные рамки и ускоренную обслуживание.
Подбор качественного развлекательного заведения в нынешних условиях требует детального анализа к лицензионному режиму. Профессиональные участники осознают, что Рльдорадо казино включает последнюю сведения о работающих площадках.
Механизм оформления профиля в лицензированных операторах содержит обязательную проверку идентичности. KYC-нормы гарантируют как оператора, так и игрока от обмана. Промежуточные рамки на снятие средств до выполнения подтверждения – стандартная система.
Программные ограничения на соединение к развлекательным ресурсам преодолеваются через зеркальные порталы. Активные отражения поддерживают стопроцентную производительность основного ресурса. Денежные переводы, геймплейный результаты и бонусные программы поддерживаются константными.
Материальная стабильность определяется степенью используемых расчетных способов. SSL-защита, PCI DSS аттестация и двухфакторная проверка создают надежный периметр обороны.
Интерактивная библиотека проверенных площадок объединяет барабаны от лидирующих студий. RTP-индексы, дисперсия и алгоритмические модели получают нейтральную аудит в утвержденных центрах.
Системы мотивации в достойных сервисах опираются на открытых условиях активности. Отыгрыш x35-40 оценивается адекватным для барабан-льгот, в то время как стандартные состязания принимаются в подсчет с уменьшенным коэффициентом.
I’m curious to find out what blog platform you happen to be working with?
I’m experiencing some small security problems with my latest blog
and I’d like to find something more safe. Do you have any recommendations?
Look at my blog: realtor in Rancho Cucamonga CA
Online Casino Australia Real Money Feel Unstoppable Tonight
I got this web site from my buddy who shared with me concerning this website and
now this time I am browsing this web page and reading
very informative posts at this time.
Feel free to visit my blog post best real estate agent in St. George UT
Favorite finds – The selection keeps things interesting and easy to scan.
charmchoice.shop – Charming and fun selection, perfect for anyone who loves little trinkets.
BrightBargain products – Super savings on everyday items, I love finding new bargains every time.
Поиск надежного игорного заведения подразумевает серьезного исследования юридических бумаг. Инновационные системы казино Либет гарантируют геймерам абсолютную факты о текущих лицензиях.
Система получения доступа охватывает различные принудительных ступеней проверки. Администраторы истребуют свидетельства, удостоверяющие персону и правоспособность. Обычный KYC-механизм длится от 24 до 72 интервалов.
Банкролл-менеджмент запускается с фиксации лимитов на инвестиции. Опытные клиенты рекомендуют задействовать закон 5% от суммарного развлекательного фонда на одну раунд.
Системные барьеры владельцев заставляют внедрять резервные домены. Копии сохраняют безусловную активность основного площадки, охватывая архив операций и игровой продвижение.
Инновационные финансовые методы поддерживают скоростные депозиты через виртуальные хранилища. Bitcoin, Ethereum и постоянные токены гарантируют анонимность и минимальные сборы. Период осуществления выводов достигает 10-30 интервалов.
Системы лояльности охватывают иерархические статусы с прогрессивным компенсацией. VIP-представители дают индивидуальные награды, увеличенные пределы и первоочередную поддержку.
Исследование в сфере сертифицированных сайтов требует представления современных инструментов входа. Квалифицированные клиенты эксплуатируют Килограмм сайт для получения релевантной информации о оперативных URL.
Алгоритм оформления профиля в сертифицированных организациях охватывает многоуровневую подтверждение. Продвинутые организации применяют KYC-системы и AML-требования. Оформление документов потребляет от 24 до 72 периодов.
Программные способы для обхода барьеров прогрессируют синхронно с интенсификацией законодательных решений. VPN-сервисы категории premium предлагают безопасность AES-256 и методы OpenVPN. Стабильность подключения жизненно существенна для премиальных раундов.
Запасные ресурсы действуют через регионально разнесенные цифровые кластеры. CDN-структуры поддерживают оптимальную отклик для европейских участников. Программное редирект запускается при выявлении блокировки главного ресурса.
Денежные манипуляции в лицензированных зонах следуют строгим стандартам PCI DSS. Блокчейн транзакции завоевывают актуальность благодаря скрытности и оперативности процессинга.
Мобильные софт топовых операторов интегрируют лицевую подтверждение и push-алерты для ключевых происшествий. Гибкий облик программно изменяется под особенности панели.
Aurora online – Great selection with navigation that makes shopping hassle-free.
1win mirror 1win mirror
Hello very cool web site!! Man .. Beautiful .. Amazing ..
I will bookmark your site and take the feeds also?
I am glad to seek out a lot of useful info here in the publish, we need work out more
techniques in this regard, thank you for sharing. . . .
. .
My web blog real estate agent Santa Fe NM
Fresh selections – Products feel pure, natural, and carefully curated.
online med pharmacy: US Meds Outlet – US Meds Outlet
Отбор честного игорного ресурса требует серьезного изучения правовых документов. Современные системы казино Клубника дают участникам стопроцентную детали о имеющихся разрешениях.
Механизм создания профиля содержит несколько требуемых этапов аутентификации. Провайдеры настаивают бумаги, доказывающие индивидуальность и зрелость. Классический KYC-алгоритм занимает от 24 до 72 часов.
Контроль средств стартует с определения границ на депозиты. Компетентные игроки советуют использовать закон 5% от полного гемблинг средств на единичную заход.
Системные препятствия провайдеров обязывают эксплуатировать запасные адреса. Копии сохраняют стопроцентную работоспособность первичного платформы, содержа летопись транзакций и гемблинг продвижение.
Передовые банковские сервисы дают быстрые взносы через электронные аккаунты. Bitcoin, Ethereum и фиксированные активы гарантируют тайность и крошечные взносы. Период осуществления получений насчитывает 10-30 минут.
Программы приверженности включают многоуровневые уровни с нарастающим вознаграждением. VIP-менеджеры предоставляют индивидуальные награды, улучшенные ограничения и опережающую помощь.
Проверенные платформы игорных предложений гарантируют участникам вариант к качественному развлечениям через тематические платформы, включая казино РјСЌРґ , что выполняют международные требования конфиденциальности.
Последовательность открытия счёта подразумевает предоставления верификационных деталей через криптографические SSL-протоколы. Администрация demanded официальное verification дееспособности и места residence для соблюдения юрисдикционных требований.
Двухэтапная идентификация становится обязательным компонентом современных solutions security. Участники располагают SMS-пароли, push-оповещения или внедряют специальные утилиты в стиле Google Authenticator.
Зеркальные URL ликвидируют препятствия geographic барьеров и DDoS-атак. По сути зеркала являют копийные клоны главного портала с maintaining функциональности и пользовательских параметров.
Skilled игроки suggest хранить обновлённые перечни активных дублей в favourites веб-клиента. Management рассылают информацию о современных доменах через e-mail, Telegram-сообщества и портативные приложения.
Payment операции через официальные площадки обеспечены шифровальными methods класса банковского segment. Изъятие финансов реализуется solely на проверенные карты обладателя account.
zavirobondgroup info – Layout is professional, content loads quickly and the overall experience feels trustworthy.
I could not resist commenting. Very well written!
My site real estate agent St. Charles IL
What’s up mates, how is everything, and what you desire to say about this article, in my view its in fact awesome designed for me.
Here is my page; best realtor in Franklin TN
continue reading this https://seenfil.com
Dressing stylish creates a positive first impression.
A attire communicates volumes before you even say a single word.
This enhances your own confidence and mindset significantly.
A polished look signals professionalism in the office.
https://s8.superlooks.ru/K2TMUF/
Fashionable choices let you to showcase your individual personality.
Others often judge stylish people as more capable and reliable.
Ultimately, putting effort in your wardrobe is an investment in yourself.
http://usmedsoutlet.com/# canadian online pharmacy viagra
We stumbled over here by a different web address and thought
I should check things out. I like what I see so now i am following you.
Look forward to checking out your web page yet again.
Take a look at my site; real estate agent Rancho Cucamonga CA
Ориентирование в пространстве легальных площадок предполагает осознания передовых технологий доступа. Квалифицированные пользователи используют казино Лев для добывания свежей фактов о действующих URL.
Алгоритм открытия учетной записи в лицензированных заведениях предполагает многоуровневую верификацию. Современные провайдеры внедряют KYC-процедуры и AML-требования. Документооборот потребляет от 24 до 72 интервалов.
Программные способы для минования блокировок эволюционируют сообща с укреплением правовых инициатив. VPN-сервисы категории premium обеспечивают кодирование AES-256 и системы OpenVPN. Надежность канала fundamentally необходима для привилегированных заходов.
Дублирующие домены функционируют через территориально рассредоточенные IT системы. CDN-структуры гарантируют быструю отклик для европейских пользователей. Цифровое переключение активируется при выявлении недоступности главного ресурса.
Экономические манипуляции в лицензированных зонах соответствуют конкретным критериям PCI DSS. Крипто расчеты завоевывают популярность благодаря приватности и скорости реализации.
Переносные программы элитных брендов содержат физиологическую авторизацию и push-алерты для важных событий. Изменяемый дизайн независимо подстраивается под характеристики монитора.
Real Money Online Casino Australia Stop Waiting Start Cashing Out
An intriguing discussion is worth comment. I believe that you should
publish more on this topic, it may not be a taboo matter but
usually people don’t speak about such topics. To the next!
Cheers!!
© 2025 รังสิต18.com คลิปหลุด XXX หลุดดูหีฟรี หนังโป๊ไทย 2025.
Гемблинговая индустрия представляет активный прогресс, заинтересовывая тысячи геймеров. Экспертные сайты обеспечивают надёжную условия для беттинга. Развёрнутую факты о подобных компаниях возможно получить на ДживиСпин казино .
Легализация составляет главным фактором подбора портала. Надзорные органы Кюрасао обеспечивают жёсткий мониторинг финансовых процедур. Любая аккредитованная ресурс проходит периодические контроли RNG-механизмов.
IT свойства современных гемблинг-сайтов предусматривают SSL-защиту экономического класса. Поставщики виртуального продукта уровня Microgaming, NetEnt, Pragmatic Play внедряют комплексные механизмы хаотичных показателей.
Алгоритм валидации личного кабинета требует представления свидетельств KYC-типа. Документ, подтверждение о заработке, подтверждение регистрации — стандартный список для завершённого подключения.
Альтернативные порталы ликвидируют проблемы с блокировками операторов. Действующие копии обновляются систематически программными службами. Портативные программы часто оперируют лучше веб вариантов.
Управление банкроллом формирует долгосрочную эффективность игровых партий. Опытные беттеры настаивают контролировать количество бета до 1-2% от полного резерва.
explore holdings site – Layout is clean and information is structured logically for easy understanding.
glintaro.shop – A great place to discover stylish and high-quality items, I can never resist shopping here!
Wow, that’s what I was looking for, what a data! present here at this blog, thanks admin of this
site.
check my source
promo code for battery bet
This web site certainly has all the information I needed about this subject and
didn’t know who to ask.
Отбор безопасного развлекательного ресурса в нынешних границах предполагает особого изучения к юридическому состоянию. Компетентные игроки представляют, что казино Голд отображает новую материалы о функционирующих провайдерах.
Механизм регистрации в лицензированных сервисах охватывает требуемую валидацию персональных данных. KYC-процедуры обеспечивают как казино, так и клиента от фрода. Кратковременные границы на получение средств до завершения верификации – типичная методика.
Электронные запреты на связь к азартным площадкам обходятся через зеркальные адреса. Рабочие дубликаты сохраняют всестороннюю эффективность первичного платформы. Финансовые операции, азартный прогресс и бонусные системы продолжают постоянными.
Финансовая стабильность оценивается степенью применяемых платежных инструментов. SSL-криптография, PCI DSS лицензирование и дополнительная аутентификация устанавливают прочный щит безопасности.
Интерактивная набор сертифицированных сервисов содержит слоты от известных производителей. RTP-коэффициенты, колебания и вероятностные формулы получают беспристрастную сертификацию в авторизованных учреждениях.
Механизмы лояльности в качественных заведениях строятся на открытых условиях активности. Условия ставок x35-40 расценивается справедливым для барабан-льгот, в то время как стандартные развлечения засчитываются в подсчет с редуцированным множителем.
Развлекательная индустрия показывает динамичный расширение, притягивая легионы пользователей. Квалифицированные платформы обеспечивают защищённую условия для ставок. Детальную данные о указанных брендах возможно найти на mad casino .
Аттестация представляет основным аспектом подбора платформы. Регуляторы Мальты создают строгий проверку финансовых действий. Отдельная сертифицированная платформа осуществляет постоянные инспекции RNG-алгоритмов.
Цифровые аспекты современных беттинг-платформ содержат SSL-кодирование банковского ранга. Производители программного материала уровня Microgaming, NetEnt, Pragmatic Play интегрируют комплексные схемы рандомных величин.
Механизм аутентификации аккаунта требует направления свидетельств KYC-уровня. ID, подтверждение о средствах, верификация проживания — стандартный перечень для полноценного авторизации.
Резервные ссылки решают трудности с блокировками компаний. Свежие варианты обновляются постоянно программными отделами. Карманные утилиты регулярно выполняются надёжнее сетевых версий.
Распределение капитала устанавливает длительную доходность гемблинговых партий. Профессиональные игроки предлагают лимитировать величину ставки до 1-2% от итогового банкролла.
Обожаю kazino olimp, не останавливайтесь — контент топ!
Olimp Casino лайв казино
plorix review – Easy-to-read content, layout is clean and browsing is straightforward.
I’m not that much of a internet reader to be honest but
your sites really nice, keep it up! I’ll go ahead and bookmark your website to come back in the future.
Many thanks
Поскольку конфиденциальность и инкогнито служат приоритетными условиями при взаимодействии с скрытыми сервисами, идентификация официального метода подключения несет критическую роль. Руководство Kraken акцентирует внимание практиковать исключительную разборчивость. кракен официальная ссылка
1win keshbek qachon tushadi https://1win5766.help/
Нынешние гемблеры натыкаются с сложностью подключения к лицензированным сайтам. Поставщики ограничивают стандартные ссылки, но опытные [url=https://wp.onlinecertificationguide.com/ofitsialnoe-zerkalo-sayta-eldorado-onlayn-kazino-igrayte-v-kazino-onlayn-bezopasno-i-zakonno/]казино Рльдорадо[/url] посетители знают о существовании резервных платформ.
Параллельный портал является точную реплику базового сайта. Криптографические алгоритмы поддерживаются такими же. Расчётные процедуры осуществляются через те же механизмы.
Методика заведения учётной записи через параллельный ресурс включает стандартной валидации. Администраторы уточняют справки для осуществления KYC-норм. Персональные данные подвергаются усиленную валидацию.
Вносительные ограничения на дополнительных порталах соответствуют первичным требованиям. Начальные ставки поддерживаются постоянными. Растущие накопления интегрируются между всеми доменами.
Льготные механизмы действуют полноценно на дополнительных ресурсах. Коэффициент оборота обеспечивает стартовые значения. Период действия проигрывания остаётся прежним.
Департамент ассистирования решает обращения с параллельных ссылок идентично. Интерактивный общение поддерживает постоянный режим деятельности.
Определение легального казино оператора требует серьезного изучения правовых документов. Актуальные системы Голд казино гарантируют игрокам максимальную сведения о своих разрешениях.
Механизм открытия аккаунта включает ряд требуемых фаз проверки. Провайдеры истребуют бумаги, удостоверяющие идентичность и совершеннолетие. Обычный KYC-процесс занимает от 24 до 72 временных отрезков.
Распоряжение капиталом инициируется с установления пределов на пополнения. Компетентные игроки рекомендуют применять принцип 5% от совокупного развлекательного капитала на отдельную сессию.
Электронные запреты владельцев заставляют эксплуатировать резервные маршруты. Альтернативы оберегают безусловную работоспособность главного площадки, включая историю платежей и развлекательный результаты.
Актуальные расчетные способы дают мгновенные взносы через электронные аккаунты. Bitcoin, Ethereum и фиксированные активы гарантируют анонимность и минимальные комиссии. Срок осуществления извлечений доходит 10-30 периодов.
Планы преданности охватывают каскадные степени с накапливающимся бонусом. VIP-кураторы предоставляют уникальные подарки, расширенные пределы и первоочередную помощь.
Fabulous, what a blog it is! This web site presents useful facts to us, keep it up.
my web site … best real estate agent in Alberta Canada
top online pharmacy india: online pharmacy india – mail order pharmacy india
When I initially commented I clicked the “Notify me when new comments are added” checkbox
and now each time a comment is added I get four emails with the same comment.
Is there any way you can remove people from that service?
Thanks a lot!
Also visit my web-site :: best real estate agent in Lake Oswego OR
firfinesse.shop – The best place for high-quality, elegant products that impress every time.
https://realfreeweb.com/389/posts/1/1/1987718.html
https://coe.uog.edu.et/events/build-education-website-using-wordpress/#comment-31887
Рабочие mirror-ссылки официальных игорных заведений на СЌРЅРѕРјРѕ казино создают беспрерывный соединение к гемблинг ресурсам. Технология копирования создает аналогичные версии корневого домена с фиксацией всех опций.
Схема создания аккаунта через дублирующий портал на сто процентов дублирует базовую анкету. Дебютные пользователи регистрируют валидный email, создают защищенный секретную комбинацию и определяют игровую платежное средство.
Идентификация аккаунта требует отправки справок в соответствии с KYC-политике. Скан паспорта, верификация адреса и денежные реквизиты анализируются посредством программную верификацию в течение 24-72 временных единиц.
Логин зарегистрированных участников выполняется через типовую интерфейс с многоступенчатой проверкой. Краткосрочные ключи передаются на мобильный девайс или email.
Функционал финансового компонента через резервные ссылки обеспечивает актуальные расчетные сервисы. Visa, Mastercard, веб хранилища Skrill, Neteller, виртуальные монеты Bitcoin, Ethereum осуществляются с уменьшенными платежами 0-3%.
Gaming ассортимент воспроизводится полностью включая слоты, традиционные развлечения, live-ведущих и накопительные призы. RTP-параметры, колебания и условия отыгрыша остаются такими же.
Промо механизм выполняется схоже главному ресурсу. Welcome-наборы, даровые прокруты, кешбэк и VIP-планы стартуют системно при исполнении фиксированных условий.
crispcollective.shop – Great selection of modern products, and the site is super easy to use.
Отбор легального игорного портала заставляет серьезного рассмотрения юридических документов. Актуальные системы казино типпи обеспечивают пользователям безусловную детали о своих допусках.
Процесс открытия аккаунта включает ряд ключевых шагов подтверждения. Владельцы запрашивают удостоверения, доказывающие самобытность и совершеннолетие. Обычный KYC-регламент длится от 24 до 72 промежутков.
Банкролл-менеджмент запускается с определения лимитов на вклады. Квалифицированные пользователи призывают использовать закон 5% от совокупного азартного бюджета на единичную игру.
Технические ограничения поставщиков заставляют внедрять резервные адреса. Клоны удерживают стопроцентную производительность первичного площадки, предусматривая хронологию переводов и гемблинг результаты.
Актуальные банковские сервисы обеспечивают скоростные депозиты через электронные счета. Bitcoin, Ethereum и фиксированные активы обеспечивают конфиденциальность и крошечные платежи. Период осуществления снятий равно 10-30 интервалов.
Программы лояльности включают многоуровневые статусы с нарастающим кэшбэком. VIP-консультанты гарантируют личные бонусы, повышенные лимиты и первоочередную сервис.
coffeecourtyard.shop – Great selection of coffee beans and accessories, always a fun find.
Определение проверенного игрового портала в нынешних границах предполагает повышенного подхода к регулятивному статусу. Профессиональные геймеры представляют, что retro зеркало отображает свежую материалы о функционирующих операторах.
Схема регистрации в легальных площадках объединяет необходимую верификацию идентичности. KYC-нормы защищают как заведение, так и игрока от махинаций. Временные границы на перечисление активов до закрытия подтверждения – типичная методика.
Виртуальные препятствия на соединение к развлекательным ресурсам устраняются через резервные домены. Активные отражения поддерживают абсолютную функциональность первичного платформы. Денежные операции, игровой прогресс и льготные системы продолжают устойчивыми.
Экономическая гарантированность выражается качеством эксплуатируемых финансовых инструментов. SSL-безопасность, PCI DSS аттестация и двухфакторная идентификация создают надежный барьер охраны.
Азартная ассортимент легальных операторов объединяет автоматы от лидирующих студий. RTP-индексы, дисперсия и математические формулы претерпевают независимую проверку в признанных учреждениях.
Схемы мотивации в профессиональных площадках базируются на открытых условиях отыгрыша. Условия ставок x35-40 признается нормальным для автомат-подарков, в то время как настольные развлечения принимаются в подсчет с сниженным процентом.
Надёжные площадки азартных услуг обеспечивают клиентам вариант к премиальному игровому процессу через тематические порталы, включая лаки Р±РёСЂ казино , которые специально выполняют мировые требования надёжности.
Схема оформления профиля предполагает внесения валидационных информации через encrypted SSL-соединения. Провайдеры просят official свидетельство дееспособности и адреса жительства для соблюдения нормативных норм.
2FA идентификация становится обязательным компонентом современных solutions security. Клиенты располагают SMS-шифры, push-сообщения или применяют профессиональные приложения по типу Google Authenticator.
Альтернативные порталы преодолевают трудности географических ограничений и DDoS-воздействий. Технически реплики составляют идентичные dublicates главного портала с maintaining features и клиентских сведений.
Опытные участники предлагают удерживать current перечни действующих зеркал в закладках веб-клиента. Операторы рассылают новости о свежих доменах через почтовые сервисы, Telegram-чаты и портативные программы.
Банковские операции через надёжные сайты покрыты криптографическими технологиями level банковского индустрии. Снятие капитала осуществляется лишь на проверенные реквизиты хозяина аккаунта.
charmcartel.shop – Such a fantastic selection of unique accessories, easy to navigate and explore.
code promo 1xbet cameroun
I recently tried this casino http://entranet.com.br/2025/12/19/casino-roulette-application-mobile-roulette-app-a-34/ and was impressed by how stable everything felt. The games run fast, bonuses are transparent, and navigation is user-friendly, making the experience comfortable.
Top Real Money Casino Australia Feel Like A Real Winner Now
Игровая сфера демонстрирует стремительный рост, манящая легионы игроков. Профессиональные ресурсы обеспечивают безопасную пространство для развлечений. Детальную сведения о указанных компаниях доступно изучить на РјСЌРґ казино .
Аттестация остаётся ключевым аспектом селекции платформы. Лицензиаты Гибралтара создают тщательный мониторинг расчётных операций. Конкретная официальная платформа подвергается регулярные ревизии RNG-механизмов.
Компьютерные аспекты новейших игорных домов охватывают SSL-шифрование денежного стандарта. Разработчики софтового обеспечения наподобие Microgaming, NetEnt, Pragmatic Play интегрируют сложные схемы произвольных параметров.
Механизм валидации личного кабинета предусматривает предоставления справок KYC-типа. Паспорт, выписка о средствах, удостоверение регистрации — типичный комплект для полноценного активации.
Параллельные URL убирают барьеры с запретами компаний. Актуальные копии корректируются ежедневно цифровыми специалистами. Портативные приложения регулярно функционируют надёжнее онлайн форматов.
Банкролл-менеджмент задаёт перспективную прибыльность гемблинговых периодов. Экспертные пользователи рекомендуют ограничивать величину депозита до 1-2% от полного капитала.
Инновационные сервисы беттинг развлечений обеспечивают клиентам подключение к высококлассному развлечениям через защищенные казино Голд сайты. Авторизованная операционная активность нуждается учета строгих правовых норм.
Алгоритм оформления индивидуального аккаунта охватывает валидацию конфиденциальных показателей. Провайдеры применяют многоуровневые протоколы KYC и AML для пресечения фродовых транзакций.
Технические инструменты современных беттинг площадок базируются на стабильных инфраструктурах с SSL стандартами. IP-фильтрация вынуждает провайдеров внедрять параллельные порталы.
Параллельные сайты формируют эквивалентные копии базового платформы с сохранением всех функций и параметров. Беттеры приобретают постоянный вход к депозиту, гемблинг данным и персональным параметрам.
Финансовые процедуры выполняются через подключенные денежные шлюзы. Лимиты на пополнения и снятия устанавливаются в унисон с законодательными критериями и организационными нормами минимизации опасностей.
Опытные пользователи советуют анализировать состояние авторизации через официальные каталоги игорных организаций. Имиджевые критерии предусматривают рейтинги на тематических порталах и мнения истинных участников.
Great blog here! Also your website loads up very fast! What web host are you using?
Can I get your affiliate link to your host? I wish my website loaded up as fast as yours lol
Feel free to surf to my web blog best real estate agent in Joliet IL
BrightBargain selections – Amazing products at unbeatable prices, I’m always coming back for more.
Real Money Wins Australia Feel The Power In Your Hands
http://bajameddirect.com/# pharmacy in mexico city
Выбор легального гемблинг заведения заставляет серьезного изучения юридических свидетельств. Новые порталы KiloGram casino предоставляют геймерам абсолютную данные о действующих лицензиях.
Алгоритм создания профиля включает определенное количество необходимых стадий верификации. Провайдеры просят удостоверения, доказывающие персону и правоспособность. Классический KYC-порядок составляет от 24 до 72 часов.
Финансовое планирование открывается с фиксации лимитов на инвестиции. Компетентные игроки предлагают эксплуатировать закон 5% от полного казино капитала на индивидуальную сессию.
Технические ограничения поставщиков принуждают применять альтернативные домены. Клоны удерживают безусловную производительность главного площадки, охватывая историю операций и казино успех.
Новые расчетные инструменты предоставляют мгновенные инвестиции через цифровые кошельки. Bitcoin, Ethereum и стейблкоины дают конфиденциальность и крошечные платежи. Длительность реализации извлечений насчитывает 10-30 промежутков.
Системы приверженности предусматривают ступенчатые категории с увеличивающимся кэшбэком. VIP-координаторы предоставляют индивидуальные поощрения, повышенные границы и первоочередную сервис.
Функционирующие зеркала легальных игорных заведений на mad casino зеркало обеспечивают непрерывный подключение к геймерским ресурсам. Технология реплицирования образует эквивалентные реплики главного сайта с сохранением всех возможностей.
Система открытия счета через альтернативный домен целиком повторяет стандартную шаблон. Только пришедшие клиенты указывают валидный email, устанавливают безопасный пароль и определяют основную валюту.
Верификация счета требует предоставления свидетельств по KYC-нормам. Снимок ID-карты, подтверждение адреса и платежные данные проходят автоматическую валидацию в течение 24-72 ч.
Вход активных участников реализуется через базовую панель с 2FA валидацией. Краткосрочные токены доставляются на сотовый гаджет или email.
Механизмы денежного компонента через зеркала включает популярные финансовые сервисы. Visa, Mastercard, электронные балансы Skrill, Neteller, цифровые активы Bitcoin, Ethereum реализуются с низкими сборами 0-3%.
Gaming коллекция дублируется абсолютно включая spinning games, традиционные геймплей, live-дилеров и мегавыигрыши. RTP-индикаторы, вариативность и ставочные требования удерживаются идентичными.
Акционная программа работает идентично центральному ресурсу. Welcome-предложения, фриспины, refund и VIP-планы запускаются машинально при исполнении прописанных параметров.
core information – Everything is organized clearly and responds without delay.
开此帖
Curated treasures – A wonderful selection of products and offers to explore.
Best picks – Neat layout and a wide variety of well-crafted items.
Нынешние клиенты имеют дело с набором технологических тонкостей при функционировании с официальными сайтами. Тематические платформы типа типпи регистрация поставляют релевантную информацию о операциях азартных операторов.
Алгоритм проверки кабинета включает набор необходимых уровней. Первичная подтверждение требует передачи свидетельств удостоверяющих индивидуальность. Обычный комплект подразумевает удостоверение личности, лицензию водителя или международный паспорт.
Программная составляющая открытия счета предполагает применение зашифрованного канала и двухуровневой проверки. Опытные клиенты подсказывают задействовать весь комплекс предложенных настроек секьюрити.
Дублирующие порталы образуют полные отражения главного сайта с удержанием тотального возможностей. Центральное бонус содержится в соответствии банковских ограничений и критериев отыгрыша.
Механизм выявления актуальных запасных доменов базируется на проверке специализированных мессенджер групп и сотрудничающих сайтов. Квалифицированные пользователи внедряют VPN-сервисы для обеспечения бесперебойного доступа безотносительно от локальных барьеров.
Азартная отрасль демонстрирует стремительный прогресс, притягивая миллионы участников. Опытные сайты предоставляют надёжную условия для игры. Полную сведения о подобных компаниях реально обнаружить на казино Вован .
Аккредитация составляет ключевым критерием выбора платформы. Надзорные органы Гибралтара гарантируют жёсткий проверку финансовых транзакций. Любая легальная площадка подвергается систематические проверки RNG-систем.
Компьютерные свойства новейших беттинг-платформ содержат SSL-кодирование расчётного уровня. Создатели программного ПО наподобие Microgaming, NetEnt, Pragmatic Play интегрируют усовершенствованные механизмы случайных показателей.
Схема верификации профиля предполагает представления удостоверений KYC-класса. Удостоверение, подтверждение о финансах, верификация прописки — стандартный список для итогового активации.
Резервные домены решают барьеры с блокировками поставщиков. Свежие варианты обновляются каждый день компьютерными специалистами. Планшетные приложения нередко оперируют устойчивее сетевых модификаций.
Банкролл-менеджмент устанавливает стратегическую доходность гемблинговых периодов. Профессиональные участники указывают сокращать величину вейджера до 1-2% от общего резерва.
My brother recommended I may like this website. He
was entirely right. This put up truly made my day. You can not believe
simply how much time I had spent for this info! Thanks!
Have a look at my website :: realtor in Alberta Canada
What’s up to all, how is everything, I think every one is getting more from this website, and your
views are pleasant in support of new viewers.
Here is my page plumber
Best Pokies Australia Real Money Your Million Dollar Spin Is Waiting
1win error al iniciar sesión https://1win5774.help
WOW just what I was looking for. Came here by searching for leak repairs
No matter if some one searches for his necessary thing, therefore he/she wishes to be
available that in detail, so that thing is maintained over
here.
My page best realtor in St. Charles IL
Легальные платформы развлекательных предложений предоставляют геймерам шанс к элитному азартному досугу через dedicated платформы, включая Лев сайт , которые точно исполняют международные стандарты безопасности.
Последовательность создания аккаунта necessita заполнения проверочных данных через криптографические SSL-линии. Букмекеры требуют письменное verification дееспособности и места регистрации для исполнения юрисдикционных критериев.
Двухфакторная идентификация считается обязательным компонентом актуальных механизмов защиты. Users приобретают SMS-пароли, push-сообщения или эксплуатируют профессиональные tools наподобие Google Authenticator.
Mirror URL преодолевают проблемы региональных блокировок и DDoS-штурмов. По сути копии составляют копийные копии базового ресурса с maintaining инструментария и user данных.
Skilled клиенты рекомендуют удерживать current списки функционирующих альтернатив в избранном обозревателя. Букмекеры доставляют updates о новых порталах через почтовые сервисы, Telegram-communities и смартфонные софт.
Банковские транзакции через надёжные площадки покрыты шифровальными системами стандарта банковского segment. Получение финансов производится solely на проверенные карты владельца учётной записи.
my company https://seenfil.com/
There is no better way to appreciate Mark Twain’s storytelling than by diving into the original text of his most famous work. The adventures involving Injun Joe, Aunt Polly, and Becky Thatcher are etched into literary history. If you are trying to locate a clean and error-free digital copy, you are in the right place. Our resources ensure that you can download or view the content without hassle. A Tom Sawyer PDF is ideal for students who need to search for specific quotes or themes quickly, making study sessions much more efficient and enjoyable. https://tomsawyerpdf.store/ The Adventures Of Tom Sawyer Scholastic Pdf
Выбор легального казино площадки нуждается детального исследования регулятивных документов. Актуальные системы лаки Р±РёСЂ казино обеспечивают участникам максимальную сведения о текущих разрешениях.
Процедура оформления счета подразумевает различные необходимых шагов аутентификации. Провайдеры требуют удостоверения, засвидетельствующие самобытность и возраст. Стандартный KYC-механизм требует от 24 до 72 интервалов.
Распоряжение капиталом запускается с назначения рамок на депозиты. Квалифицированные клиенты советуют применять установку 5% от итогового игорного средств на одну игру.
Системные ограничения провайдеров побуждают внедрять запасные домены. Дубликаты удерживают безусловную функциональность основного площадки, охватывая журнал транзакций и игровой результаты.
Новые банковские системы поддерживают быстрые вклады через цифровые портмоне. Bitcoin, Ethereum и стейблкоины поддерживают тайность и мизерные сборы. Время выполнения изъятий доходит 10-30 минут.
Системы преданности подразумевают каскадные степени с накапливающимся возвратом. VIP-представители предоставляют индивидуальные награды, расширенные лимиты и приоритетную поддержку.
learn more here – Random discovery, yet the site’s layout and content made it worth reading.
Подбор проверенного азартного ресурса в актуальных реалиях нуждается детального подхода к законному статусу. Компетентные игроки понимают, что казино аква отображает последнюю факты о активных площадках.
Процедура регистрации в лицензированных операторах охватывает принудительную валидацию удостоверения. KYC-процедуры защищают как оператора, так и клиента от фрода. Краткосрочные пределы на перечисление капитала до окончания верификации – нормальная подход.
Программные запреты на подключение к азартным сайтам преодолеваются через дублирующие домены. Функционирующие копии обеспечивают тотальную работоспособность основного платформы. Расчетные движения, геймплейный достижения и наградные схемы поддерживаются устойчивыми.
Финансовая защищенность характеризуется показателем внедренных денежных инструментов. SSL-защита, PCI DSS валидация и двухфакторная верификация устанавливают прочный контур защиты.
Азартная коллекция официальных операторов содержит слоты от ведущих производителей. RTP-параметры, изменчивость и вероятностные схемы претерпевают беспристрастную контроль в утвержденных учреждениях.
Механизмы вознаграждения в надежных казино базируются на четких параметрах вейджера. Условия ставок x35-40 оценивается разумным для спин-льгот, в то время как классические развлечения включаются в подсчет с минимальным коэффициентом.
Навигация в мире проверенных порталов требует владения передовых решений авторизации. Умелые игроки эксплуатируют Sykaaa casino для приобретения новейшей сведений о оперативных доменах.
Схема открытия аккаунта в надежных операторах предполагает тщательную верификацию. Современные организации внедряют KYC-протоколы и AML-требования. Документальное сопровождение составляет от 24 до 72 периодов.
Компьютерные инструменты для обхода ограничений прогрессируют сообща с повышением регуляторных действий. VPN-платформы типа premium гарантируют шифрование AES-256 и технологии OpenVPN. Стабильность соединения кардинально актуальна для элитных партий.
Зеркальные платформы функционируют через пространственно распределенные цифровые инфраструктуры. CDN-структуры предоставляют быструю пинг для глобальных пользователей. Техническое редирект срабатывает при выявлении препятствия первичного адреса.
Экономические транзакции в официальных территориях подчиняются четким правилам PCI DSS. Крипто расчеты набирают распространение по причине скрытности и скорости реализации.
Мобильные приложения премиальных провайдеров объединяют голосовую подтверждение и push-оповещения для важных моментов. Гибкий оформление программно изменяется под параметры матрицы.
какой должен быть айкью у нормального человека
опрос на айкью
какое нормальное айкью
средний айкью человека
самый легкий тест на айкью
как измерить интеллект человека
айкью у нормального человека
айкью это что
тест на ig бесплатно
тест на iq максимальный балл
айкью 70
проверить интеллект
какой qi у человека
среднее iq в 12 лет
среднее айкью у человека 15 лет
тест умственных способностей
pexra online hub – Minimalist pages, everything loads quickly and information is accessible.
Поиск в мире легальных площадок включает понимания новых способов входа. Продвинутые игроки применяют mad casino для получения свежей информации о оперативных ссылках.
Процесс открытия счета в лицензированных организациях подразумевает тщательную подтверждение. Современные операторы эксплуатируют KYC-процедуры и AML-требования. Оформление документов составляет от 24 до 72 промежутков.
Программные технологии для прохождения барьеров улучшаются синхронно с укреплением нормативных мер. VPN-службы разряда premium предлагают шифрование AES-256 и системы OpenVPN. Непрерывность коннекта кардинально актуальна для премиальных партий.
Зеркальные платформы действуют через пространственно размещенные технические инфраструктуры. CDN-архитектуры поддерживают оптимальную латентность для американских участников. Автоматическое редирект срабатывает при детекции барьера главного ресурса.
Платежные манипуляции в сертифицированных регионах следуют четким стандартам PCI DSS. Блокчейн операции увеличивают актуальность благодаря конфиденциальности и оперативности выполнения.
Переносные софт элитных компаний включают лицевую идентификацию и push-оповещения для важных эпизодов. Модифицируемый дизайн автономно адаптируется под особенности панели.
https://wise-social.com/story6537493/1xbet-promo-code-egypt-2026-1xnew200-bonus-130
Игровая сфера демонстрирует динамичный рост, завлекая легионы геймеров. Профессиональные платформы предоставляют надёжную пространство для беттинга. Развёрнутую сведения о таких компаниях можно отыскать на казино СЂР° .
Аккредитация выступает основным элементом подбора ресурса. Регуляторы Великобритании гарантируют строгий аудит экономических процедур. Конкретная сертифицированная платформа осуществляет периодические проверки RNG-модулей.
Компьютерные аспекты новейших игорных домов охватывают SSL-шифрование денежного класса. Провайдеры компьютерного софта типа Microgaming, NetEnt, Pragmatic Play добавляют комплексные алгоритмы хаотичных значений.
Механизм верификации профиля включает представления документов KYC-стандарта. ID, свидетельство о финансах, удостоверение прописки — классический список для финального доступа.
Резервные порталы исправляют препятствия с фильтрацией операторов. Действующие альтернативы изменяются ежедневно программными группами. Смартфонные утилиты часто выполняются качественнее сетевых редакций.
Управление банкроллом определяет долгосрочную прибыльность развлекательных партий. Квалифицированные геймеры указывают лимитировать величину пари до 1-2% от общего капитала.
Hi! I just wanted to ask if you ever have any problems
with hackers? My last blog (wordpress) was hacked and I ended up losing a few
months of hard work due to no backup. Do you have any methods
to protect against hackers?
Also visit my page :: realtor in Lake Ozark MO
orvix online hub – Browsed without planning, but layout makes everything easy to follow.
开此帖
онлайн-школа для детей онлайн-школа для детей .
Определение безопасного казино ресурса подразумевает детального анализа регулятивных сертификатов. Современные платформы казино Килограмм предлагают клиентам максимальную факты о имеющихся аккредитациях.
Механизм получения доступа подразумевает определенное количество необходимых стадий проверки. Владельцы просят удостоверения, засвидетельствующие самобытность и правоспособность. Классический KYC-механизм продолжается от 24 до 72 временных отрезков.
Контроль средств инициируется с задания границ на пополнения. Профессиональные клиенты призывают задействовать принцип 5% от полного развлекательного фонда на отдельную партию.
Цифровые ограничения провайдеров вынуждают использовать резервные ссылки. Дубликаты хранят полную производительность главного портала, подразумевая архив сделок и азартный продвижение.
Актуальные расчетные инструменты поддерживают оперативные пополнения через блокчейн портмоне. Bitcoin, Ethereum и фиксированные активы поддерживают приватность и минимальные отчисления. Продолжительность выполнения извлечений составляет 10-30 интервалов.
Системы преданности предусматривают ступенчатые ранги с нарастающим бонусом. VIP-представители дают эксклюзивные бонусы, расширенные ограничения и приоритетную обслуживание.
Современные платформы беттинг игр предлагают пользователям возможность к элитному развлечениям через проверенные lucky bear казино системы. Лицензированная операционная активность нуждается учета строгих контролирующих требований.
Процедура создания пользовательского кабинета охватывает верификацию персональных информации. Администраторы эксплуатируют расширенные алгоритмы KYC и AML для исключения мошеннических операций.
Цифровые средства новейших казино функционируют на зашифрованных облачных системах с шифровальными протоколами. Территориальные ограничения побуждает провайдеров внедрять резервные URL.
Дублирующие ресурсы формируют эквивалентные версии основного домена с обеспечением всех сервисов и информации. Игроки добиваются постоянный соединение к счету, гемблинг записям и личным опциям.
Расчетные процедуры проходят через встроенные банковские сервисы. Лимиты на вклады и изъятия определяются в соответствии с законодательными положениями и корпоративными регламентами риск-менеджмента.
Компетентные беттеры советуют проверять статус сертификата через государственные базы данных азартных ведомств. Авторитетные критерии содержат ранги на экспертных платформах и оценки истинных беттеров.
https://indogenericexport.shop/# muscle relaxant drugs
Ordering medications online offers major ease.
You can compare prices and products from different pharmacies effortlessly.
Home delivery is a significant advantage, saving time for a trip to the pharmacy.
Online platforms are often accessible around the clock for your needs.
https://z2.sochidaily.ru/redirect.php?id=2bYhZc
The process can be far more private than buying face-to-face.
Many services offer helpful features like auto-refill reminders.
Excellent post. I was checking continuously this blog and I am impressed!
Extremely helpful info specifically the last part 🙂 I care for such info a lot.
I was looking for this certain info for a very long time.
Thank you and best of luck.
Feel free to surf to my web site – best realtor in Joliet IL
Актуальные провайдеры азартных услуг дают игрокам доступ к профессиональному игровому процессу через проверенные казино СЂР° системы. Официальная функционирование требует выполнения определенных правовых требований.
Механизм регистрации пользовательского аккаунта предусматривает аутентификацию приватных данных. Операторы задействуют многоуровневые процедуры KYC и AML для пресечения мошеннических операций.
Электронные системы передовых развлекательных порталов основываются на безопасных серверах с HTTPS технологиями. Геоблокировка обязывает провайдеров запускать резервные ссылки.
Параллельные домены образуют аналогичные версии центрального сайта с сохранением всех сервисов и данных. Клиенты получают устойчивый доступ к средствам, беттинг данным и индивидуальным установкам.
Расчетные действия производятся через подключенные финансовые системы. Ограничения на взносы и снятия устанавливаются в соотношении с нормативными критериями и организационными политиками риск-менеджмента.
Экспертные беттеры указывают отслеживать положение аккредитации через регуляторные каталоги гемблинг структур. Авторитетные индикаторы предусматривают места на тематических сайтах и мнения подлинных участников.
http://bn-crew.9e.cz/profile.php?lookup=249
Развлекательная индустрия представляет быстрый подъём, привлекая тысячи пользователей. Грамотные сайты гарантируют надёжную атмосферу для беттинга. Детальную материалы о данных организациях допустимо изучить на friends casino .
Легализация составляет приоритетным критерием подбора платформы. Надзорные органы Кюрасао обеспечивают серьёзный аудит расчётных процедур. Конкретная аккредитованная площадка подвергается регулярные ревизии RNG-механизмов.
Программные характеристики передовых азартных площадок включают SSL-шифрование финансового категории. Поставщики софтового материала вроде Microgaming, NetEnt, Pragmatic Play добавляют усовершенствованные модели хаотичных параметров.
Процедура верификации аккаунта предусматривает предоставления документов KYC-уровня. Паспорт, справка о заработке, валидация проживания — обычный перечень для финального подключения.
Резервные URL исправляют препятствия с ограничениями поставщиков. Актуальные зеркала модифицируются регулярно цифровыми специалистами. Портативные софт нередко действуют стабильнее интернет версий.
Управление банкроллом устанавливает стратегическую доходность азартных партий. Экспертные игроки рекомендуют сокращать размер пари до 1-2% от совокупного фонда.
онлайн-школа с аттестатом бесплатно онлайн-школа с аттестатом бесплатно .
No Deposit Casino Bonus Australia Real Money Real Payout Legends
Howdy would you mind letting me know which hosting company you’re using?
I’ve loaded your blog in 3 completely different web browsers and I must say this blog loads a lot quicker then most.
Can you suggest a good web hosting provider at a reasonable price?
Many thanks, I appreciate it!
Here is my web page … realtor in St. Charles IL
Wow, marvelous weblog layout! How long have you ever been blogging for?
you make blogging glance easy. The full look of your web site
is excellent, let alone the content material!
开此帖
Современные провайдеры игорных активностей предоставляют участникам путь к элитному игровому процессу через безопасные mad casino зеркало сайты. Лицензированная работа влечет соблюдения конкретных надзорных положений.
Процесс активации игрового учетной записи содержит подтверждение конфиденциальных данных. Администраторы внедряют многоуровневые системы KYC и AML для предотвращения нарушающих транзакций.
Программные средства актуальных гемблинг платформ базируются на надежных инфраструктурах с шифровальными технологиями. Территориальные ограничения заставляет операторов организовывать дублирующие порталы.
Альтернативные платформы составляют эквивалентные копии первичного сайта с фиксацией всех сервисов и данных. Игроки получают беспрепятственный связь к средствам, гемблинг данным и индивидуальным опциям.
Денежные переводы реализуются через связанные расчетные сервисы. Границы на взносы и снятия фиксируются в согласии с правовыми условиями и организационными нормами управления рисками.
Экспертные пользователи рекомендуют проверять положение лицензии через регуляторные списки азартных структур. Престижные характеристики задействуют рейтинги на отраслевых сервисах и комментарии реальных участников.
Рабочие резервные адреса лицензированных азартных клубов на mad casino зеркало дают постоянный доступ к геймерским платформам. Методика копирования образует эквивалентные дубликаты центрального портала с консервацией всех инструментов.
Схема создания аккаунта через альтернативный домен абсолютно воспроизводит главную форму. Свежие клиенты вводят рабочий email, формируют сложный пароль и выбирают рабочую курренси.
Аутентификация счета требует загрузки бумаг следуя KYC-политике. Копия национального документа, верификация резиденции и финансовые сведения проверяются через машинную контроль в течение 24-72 часов.
Аутентификация действующих пользователей выполняется через стандартную модуль с расширенной идентификацией. Одноразовые токены поступают на мобильный гаджет или e-mail адрес.
Опции депозитного раздела через дублирующие порталы предлагает востребованные банковские сервисы. Visa, Mastercard, онлайн счета Skrill, Neteller, блокчейн-токены Bitcoin, Ethereum осуществляются с низкими комиссиями 0-3%.
Развлекательная каталог копируется целиком включая слоты, классические развлечения, live-крупье и джекпоты. RTP-индикаторы, вариативность и вейджер поддерживаются точными.
Промо политика работает аналогично корневому ресурсу. Welcome-бандлы, безвозмездные спины, кешбэк и VIP-схемы стартуют автоматически при достижении прописанных требований.
Hi there every one, here every one is sharing such knowledge,
therefore it’s nice to read this blog, and I used to pay
a visit this blog daily.
My website; best retail billing software
This casino https://kangaroohydrogen.net/het-uitgebreide-handleiding-betreffende-online-2/ offers a solid mix of classic slots and live tables. The platform feels well-designed, promotions are worth trying, and support is responsive, which adds confidence.
Современные гемблеры оказываются с сложностью доступа к легальным порталам. Провайдеры блокируют главные ссылки, но опытные СЂР° казино пользователи осознают о наличии параллельных сайтов.
Альтернативный адрес составляет полную дубликат первичного ресурса. Протоколы шифрования поддерживаются идентичными. Финансовые операции производятся через аналогичные каналы.
Технология создания аккаунта через зеркальный ресурс содержит типовой проверки. Менеджеры требуют документы для осуществления KYC-стандартов. Идентификационные данные осуществляют двухфакторную валидацию.
Финансовые пределы на альтернативных платформах соответствуют главным параметрам. Наименьшие ставки сохраняются неизменными. Увеличивающиеся призовые фонды согласовываются между разными порталами.
Поощрительные схемы действуют комплексно на дополнительных порталах. Вейджер обеспечивает базовые цифры. Тайминг оборота продолжается.
Команда сопровождения решает запросы с дополнительных адресов равнозначно. Живой разговор обеспечивает 24-часовой порядок деятельности.
Исследование в области лицензированных сайтов включает понимания передовых способов входа. Квалифицированные игроки применяют винити официальный сайт для приобретения современной сведений о активных доменах.
Схема оформления аккаунта в официальных организациях предполагает сложную аутентификацию. Передовые организации внедряют KYC-процедуры и AML-нормы. Документооборот требует от 24 до 72 временных отрезков.
Технические методы для обхода барьеров эволюционируют синхронно с интенсификацией нормативных мер. VPN-сервисы уровня premium гарантируют защиту AES-256 и системы OpenVPN. Надежность канала жизненно актуальна для VIP сессий.
Альтернативные платформы выполняют задачи через территориально рассредоточенные технические кластеры. CDN-архитектуры обеспечивают сокращенную время ответа для американских геймеров. Системное редирект активируется при выявлении препятствия главного портала.
Финансовые транзакции в проверенных юрисдикциях подчиняются жестким стандартам PCI DSS. Цифровые транзакции увеличивают признание вследствие скрытности и динамике реализации.
Планшетные софт ведущих операторов содержат отпечатковую проверку и push-алерты для существенных моментов. Адаптивный дизайн автоматически корректируется под параметры панели.
check my blog
battery app login
I came across this resource recently and found it quite useful for anyone interested in online platforms. If you’re looking for more details and insights, you can check out GO99 for additional information.
I know this if off topic but I’m looking into starting
my own blog and was curious what all is required to get setup?
I’m assuming having a blog like yours would cost a pretty penny?
I’m not very internet savvy so I’m not 100% positive.
Any tips or advice would be greatly appreciated. Many thanks
my homepage – realtor in St. George UT
I’m really enjoying the design and layout of your blog.
It’s a very easy on the eyes which makes it much more enjoyable for me to come here and
visit more often. Did you hire out a developer to create your theme?
Great work!
Also visit my blog post realtor in Santa Fe NM
This blog was… how do I say it? Relevant!! Finally I have found something
that helped me. Many thanks!
Передовые игроки обталкиваются с огромным количеством системных аспектов при работе с сертифицированными платформами. Профильные порталы типа лаки Р±РёСЂ казино дают современную информацию о процессах игорных операторов.
Система подтверждения аккаунта содержит комплекс обязательных стадий. Стартовая верификация подразумевает загрузки удостоверений подтверждающих гражданство. Стандартный комплект включает паспорт, лицензию водителя или внешний паспорт.
Техническая элемент открытия счета подразумевает применение безопасного соединения и двухуровневой проверки. Экспертные геймеры рекомендуют запускать весь комплекс возможных параметров обеспечения.
Резервные ссылки образуют идентичные отражения основного платформы с поддержанием полного инструментария. Главное достоинство состоит в подобии финансовых пределов и требований проигрыша.
Система обнаружения актуальных альтернативных адресов базируется на проверке экспертных мессенджер групп и сотрудничающих ресурсов. Экспертные геймеры задействуют виртуальные частные сети для гарантирования надежного входа невзирая от региональных запретов.
Передовые гемблеры сталкиваются с затруднением входа к официальным платформам. Провайдеры запрещают основные адреса, но профессиональные казино типпи пользователи учитывают о наличии резервных площадок.
Параллельный портал составляет стопроцентную копию основного портала. Криптографические алгоритмы остаются неизменными. Платёжные транзакции реализуются через те же шлюзы.
Процедура создания аккаунта через зеркальный ресурс предполагает привычной валидации. Менеджеры требуют свидетельства для выполнения KYC-регламентов. Паспортные параметры осуществляют многоуровневую аутентификацию.
Вносительные рамки на параллельных порталах совпадают основным параметрам. Стартовые ставки остаются константными. Возрастающие банки синхронизируются между многочисленными адресами.
Бонусные схемы действуют полноценно на параллельных сайтах. Отыгрышный коэффициент обеспечивает исходные параметры. Тайминг оборота не изменяется.
Сервис помощи анализирует запросы с зеркальных ссылок аналогично. Интерактивный переписка гарантирует непрерывный расписание работы.
lixor resource – Pages load quickly and layout makes it easy to read all information.
https://www.google.co.ao/url?q=https://www.bigcatalliance.org/news/bonus_d_inscription_au_casino_1xbet.html
Актуальные платформы гемблинг развлечений гарантируют беттерам вход к высококлассному беттингу через надежные Клубника казино системы. Легальная функционирование требует выполнения строгих контролирующих требований.
Процесс создания игрового учетной записи включает верификацию индивидуальных реквизитов. Администраторы применяют расширенные протоколы KYC и AML для блокировки фродовых финансовых действий.
IT средства современных игорных домов работают на надежных серверах с шифровальными стандартами. IP-фильтрация заставляет управляющих организовывать вспомогательные URL.
Альтернативные домены образуют полные копии основного домена с сохранением всех функций и данных. Пользователи обеспечивают себе беспрепятственный связь к средствам, игровой статистике и персональным конфигурациям.
Платежные переводы проходят через подключенные платежные агрегаторы. Пределы на депозиты и получения устанавливаются в соответствии с правовыми стандартами и индивидуальными регламентами управления рисками.
Экспертные клиенты настаивают анализировать ситуацию разрешения через контролирующие регистры игорных ведомств. Престижные параметры охватывают оценки на профильных ресурсах и оценки реальных клиентов.
Исследование в сфере легальных платформ включает понимания новых инструментов авторизации. Умелые геймеры используют Голд казино для получения новейшей данных о функционирующих доменах.
Процедура регистрации профиля в надежных заведениях охватывает многоуровневую верификацию. Новейшие организации применяют KYC-алгоритмы и AML-правила. Бумажная работа отнимает от 24 до 72 интервалов.
Компьютерные технологии для минования запретов улучшаются сообща с ужесточением нормативных действий. VPN-сервисы уровня premium предоставляют защиту AES-256 и методы OpenVPN. Непрерывность канала кардинально актуальна для высокоролловых раундов.
Резервные сайты работают через территориально расположенные серверные ресурсы. CDN-структуры поддерживают минимальную латентность для глобальных игроков. Автоматическое перенаправление запускается при детекции ограничения основного ресурса.
Финансовые манипуляции в сертифицированных областях подчиняются конкретным требованиям PCI DSS. Цифровые операции увеличивают актуальность в результате анонимности и скорости обработки.
Смартфонные приложения элитных операторов включают физиологическую аутентификацию и push-алерты для важных эпизодов. Модифицируемый внешний вид программно адаптируется под параметры экрана.
Thanks for finally talking about > Santa Claus Christmas
Ball Tutorial Adobe Illustrator. – My Downloadables buy ebay account
My brother suggested I would possibly like this blog.
He was entirely right. This put up actually made my day.
You cann’t imagine just how a lot time I had spent for
this info! Thanks!
Feel free to surf to my website :: real estate agent Lake Ozark MO
Hey I am so happy I found your webpage, I really found you by accident, while
I was browsing on Askjeeve for something else, Regardless I am here now and would just like to say cheers for a incredible post and a all round entertaining blog (I also love the theme/design), I don’t have time to go
through it all at the minute but I have bookmarked it and also included your RSS
feeds, so when I have time I will be back to read more,
Please do keep up the superb work.
my link
[url=https://betery-bet.com/apps]batery apk[/url]
more helpful hints
battery bet apk
cheapest online pharmacy india: Indo-Generic Export – india online pharmacy
Определение безопасного азартного оператора в нынешних обстоятельствах нуждается специального внимания к юридическому режиму. Опытные геймеры понимают, что типпи казино включает последнюю информацию о функционирующих провайдерах.
Алгоритм записи в легальных заведениях объединяет необходимую валидацию персональных данных. KYC-процедуры охраняют как сервис, так и пользователя от махинаций. Промежуточные лимиты на вывод денег до финализации контроля – привычная практика.
Цифровые барьеры на подключение к betting сайтам обходятся через зеркальные порталы. Действующие клоны поддерживают стопроцентную работоспособность центрального ресурса. Денежные транзакции, азартный прогресс и бонусные программы сохраняются константными.
Экономическая защищенность определяется уровнем эксплуатируемых денежных инструментов. SSL-кодирование, PCI DSS валидация и усиленная подтверждение гарантируют стабильный барьер защиты.
Азартная набор проверенных операторов предоставляет спины от топовых студий. RTP-коэффициенты, вариативность и вероятностные системы получают нейтральную сертификацию в утвержденных учреждениях.
Планы стимулирования в достойных казино опираются на ясных правилах отыгрыша. Требования x35-40 признается разумным для машина-бонусов, в то время как карточные активности идут в зачет с уменьшенным множителем.
Hello there! This blog post could not be written any better!
Looking at this article reminds me of my previous roommate!
He always kept talking about this. I will send this article to him.
Pretty sure he’ll have a good read. Thanks for sharing!
my webpage … best realtor in St. George UT
Перемещение в мире сертифицированных ресурсов включает представления актуальных решений авторизации. Опытные пользователи применяют Gold casino для получения релевантной данных о работающих адресах.
Процесс открытия учетной записи в надежных заведениях включает тщательную подтверждение. Продвинутые провайдеры используют KYC-алгоритмы и AML-критерии. Документооборот отнимает от 24 до 72 временных отрезков.
Компьютерные технологии для обхода ограничений улучшаются параллельно с усилением регуляторных действий. VPN-службы категории premium обеспечивают криптографию AES-256 и стандарты OpenVPN. Стабильность соединения fundamentally существенна для привилегированных игровых периодов.
Резервные домены выполняют задачи через локально разнесенные компьютерные мощности. CDN-системы обеспечивают оптимальную задержку для азиатских игроков. Автоматическое редирект запускается при распознавании препятствия главного ресурса.
Банковские движения в легальных областях соответствуют конкретным правилам PCI DSS. Цифровые транзакции набирают популярность из-за конфиденциальности и оперативности осуществления.
Переносные программы топовых операторов интегрируют биометрическую идентификацию и push-сообщения для принципиальных ситуаций. Изменяемый оформление самостоятельно изменяется под настройки монитора.
Greetings from Ohio! I’m bored to tears at work so
I decided to check out your website on my iphone
during lunch break. I really like the knowledge you present here
and can’t wait to take a look when I get home. I’m amazed at how quick your blog loaded on my cell phone ..
I’m not even using WIFI, just 3G .. Anyways, good site!
Hi, I think your website could be having browser compatibility issues.
Whenever I take a look at your website in Safari, it
looks fine but when opening in IE, it’s got some overlapping issues.
I just wanted to provide you with a quick heads up! Besides that,
great site!
my web page best realtor in Rancho Cucamonga CA
http://kasmet.listbb.ru/viewtopic.php?f=2&t=46
explore trust hub – Looked it over briefly and appreciated the straightforward style.
rixva hub – Clean interface, navigation is simple and pages load quickly.
zexarocapital link – The interface is fluid, pages respond instantly, and the overall experience is polished.
Hey There. I found your blog using msn. This is an extremely well written article.
I will make sure to bookmark it and return to read more of your useful info.
Thanks for the post. I’ll certainly comeback.
My web-site – plumber
Отбор надежного азартного оператора в текущих границах требует специального изучения к правовому режиму. Опытные игроки осознают, что казино аква предоставляет свежую факты о доступных операторах.
Схема записи в проверенных платформах содержит неизбежную валидацию персональных данных. KYC-процедуры оберегают как казино, так и игрока от махинаций. Кратковременные лимиты на перечисление денег до завершения валидации – стандартная методика.
Электронные ограничения на подключение к betting ресурсам решаются через параллельные порталы. Рабочие клоны обеспечивают полную производительность основного сайта. Платежные процедуры, игровой прогресс и поощрительные схемы продолжают стабильными.
Капитальная надежность выражается качеством применяемых платежных систем. SSL-шифрование, PCI DSS валидация и многоуровневая идентификация создают прочный щит защиты.
Игровая каталог лицензированных операторов объединяет слоты от топовых студий. RTP-показатели, изменчивость и статистические схемы подвергаются независимую аудит в одобренных организациях.
Планы стимулирования в серьезных площадках базируются на открытых требованиях активности. Вейджер x35-40 характеризуется разумным для машина-поощрений, в то время как стандартные развлечения учитываются в счет с минимальным множителем.
Поиск безопасного betting оператора в текущих рамках подразумевает повышенного анализа к юридическому статусу. Компетентные пользователи знают, что Лев казино демонстрирует последнюю сведения о функционирующих операторах.
Алгоритм создания аккаунта в проверенных сервисах охватывает принудительную подтверждение личности. KYC-нормы охраняют как казино, так и геймера от махинаций. Промежуточные границы на снятие активов до выполнения контроля – стандартная процедура.
Цифровые барьеры на вход к игровым сайтам преодолеваются через зеркальные URL. Рабочие зеркала гарантируют стопроцентную производительность главного платформы. Финансовые транзакции, развлекательный результаты и поощрительные предложения функционируют постоянными.
Капитальная защищенность характеризуется уровнем используемых расчетных механизмов. SSL-кодирование, PCI DSS сертификация и двухфакторная верификация обеспечивают защищенный щит безопасности.
Игровая набор проверенных площадок охватывает спины от ведущих разработчиков. RTP-коэффициенты, колебания и статистические формулы проходят внешнюю сертификацию в аккредитованных лабораториях.
Механизмы лояльности в профессиональных операторах строятся на ясных параметрах вейджера. Вейджер x35-40 считается адекватным для слот-льгот, в то время как карточные активности идут в счет с минимальным процентом.
For those who love tactical combat, Chult offers battlegrounds that are unlike any dungeon. Fighting on the backs of triceratops or fending off pterafolk on a suspension bridge requires spatial awareness. The maps provided in the campaign are excellent. DMs often look for the Tomb of Annihilation PDF to extract gridless versions of these maps for use on virtual tabletops. The verticality of locations like Firefinger or Kir Sabal adds a new dimension to 5th Edition combat. Having high-quality digital assets ensures that these epic set-piece battles are represented accurately, allowing players to use the terrain to their advantage. https://tombofannihilationpdf.store/ Tomb Of Annihilation Backgrounds Pdf
Few endings in literature are as debated and analyzed as the conclusion of Kate Chopin’s only novel. To form your own opinion on whether Edna’s final act is a triumph or a tragedy, you need to read the full text. Many literary enthusiasts look for the awakening pdf to access the unbridled version of the story. The narrative flow, from the languid days at Grand Isle to the frantic emotions in New Orleans, is best experienced without interruption. A portable document format allows you to keep this profound story with you, ready to read whenever inspiration strikes. https://theawakeningpdf.store/ The Awakening Kate Chopin Mobi
The lack of education among the animals is a key factor in their enslavement. Because they cannot read, they cannot verify the commandments. This emphasizes the importance of literacy and education in a free society. Teachers often use the Animal Farm PDF to discuss the link between knowledge and power. Orwell argues that an ignorant population is easily manipulated. https://animalfarmpdf.store/ Geeorge Orwell Animal Farm Pdf
Инновационные порталы беттинг продуктов предоставляют пользователям вход к качественному игровому процессу через защищенные лаки Р±РёСЂ казино ресурсы. Официальная работа влечет исполнения строгих законодательных норм.
Алгоритм оформления клиентского аккаунта содержит подтверждение приватных реквизитов. Управляющие эксплуатируют расширенные механизмы KYC и AML для исключения мошеннических финансовых действий.
Технические системы новейших игорных домов работают на стабильных дата-центрах с SSL протоколами. Региональная блокировка заставляет владельцев разрабатывать дублирующие URL.
Зеркальные платформы формируют эквивалентные репликации базового сайта с поддержанием всех функций и параметров. Клиенты получают устойчивый связь к счету, развлекательной записям и индивидуальным опциям.
Банковские переводы осуществляются через подключенные платежные сервисы. Рамки на вклады и выводы назначаются в соотношении с нормативными положениями и корпоративными правилами риск-менеджмента.
Профессиональные пользователи рекомендуют анализировать статус аккредитации через государственные списки беттинг структур. Авторитетные критерии предусматривают оценки на отраслевых платформах и оценки настоящих пользователей.
Real Money Pokies Win Big Australia Wake Up Richer
Передовые сервисы гемблинг активностей предлагают пользователям путь к профессиональному игровому процессу через надежные лаки Р±РёСЂ казино официальный сайт платформы. Официальная бизнес предполагает учета четких надзорных норм.
Механизм регистрации персонального аккаунта задействует проверку конфиденциальных реквизитов. Администраторы применяют углубленные механизмы KYC и AML для пресечения нарушающих операций.
Технические платформы передовых казино работают на надежных облачных системах с HTTPS алгоритмами. IP-фильтрация обязывает управляющих организовывать вспомогательные порталы.
Зеркальные ресурсы являют собой эквивалентные клоны главного сайта с обеспечением всех функций и данных. Участники достигают непрерывный соединение к счету, азартной отчетности и персональным настройкам.
Платежные действия осуществляются через подключенные денежные сервисы. Границы на пополнения и получения устанавливаются в соотношении с нормативными условиями и собственными процедурами снижения потерь.
Компетентные гемблеры предлагают отслеживать условия разрешения через регуляторные регистры игорных ведомств. Престижные индикаторы предусматривают ранги на отраслевых порталах и комментарии подлинных пользователей.
Hello there! Quick question that’s totally off topic.
Do you know how to make your site mobile friendly? My web site looks weird when viewing
from my iphone4. I’m trying to find a theme or plugin that might be able to resolve this problem.
If you have any recommendations, please share. Thank you!
Also visit my webpage – best real estate agent in Joliet IL
Площадка Rutor отличается хорошо зарекомендовавшей себя историей, высочайшей степенью скрытности и возможностью безопасной работы с транзакциями в сети Rutor.Rutor: Ветеран русскоязычного даркнета
rutor org зеркало 2020 рабочая на сегодня — это один из первых и известнейших русскоязычных ресурсов даркнета, неразрывно связанный с анонимной онлайн-экосистемой. Данный сервис специализируется на доступе к широчайшему ассортименту софта, файлов, новостей и разнообразных материалов, охватывающих вопросы взлома и защиты.
Главные аспекты функционирования Rutor
Данная система обеспечивает доступ к значительным объемам данных и файлов, гарантируя при этом повышенную анонимность и защиту пользователей. Работа сервиса построена на использовании анонимной сети Rutor, что помогает свести к минимуму угрозы идентификации и утечки данных. За годы существования Rutor стал местом, где сохраняется важная история русскоязычного даркнета.
Rutor продолжает работать и предоставлять стабильный доступ к ресурсам, удовлетворяя потребности как новичков, так и опытных пользователей даркнета. Каждый из разделов сайта — магазин, новостные ленты или руководства по взлому — образуют отдельную звено в масштабном сообществе, где главными ценностями выступают конфиденциальность и защита анонимности.
Будущее платформы: вызовы и обещания
Ясно, что будущая деятельность Rutor потребует решения новых рисков, внедрения свежих подходов к безопасности и средств обхода ограничений. Следует помнить, что даже максимально анонимная среда не обеспечивает стопроцентную безопасность.
Сервис остается местом, где можно получать дополнительную информацию, обсуждать вопросы безопасности, следить за новостями и инновациями в области даркнета. Технический прогресс, рост числа участников и новые функциональные решения превращают Rutor в ключевой узел русскоязычного интернет-сообщества.
– Анонимность
– Гарантия безопасности сделок
– Возможность получения эксклюзивных данных
– Обеспечение приватности взаимодействий
Rutor — это платформа с уникальной историей, и её опыт стоит принимать во внимание всем, кто ценит собственную свободу, приватность и независимость от внешней цензуры в современном цифровом мире.
click this link here now https://seenfil.com
I’ve been surfing online greater than 3 hours nowadays,
yet I never found any interesting article like yours. It is lovely value enough for me.
Personally, if all site owners and bloggers made just right content
as you did, the net will be much more helpful than ever before.
My blog :: plumbing
开此帖
kryvoxtrustco site – Layout feels professional, finding information is straightforward and fast.
Определение проверенного азартного портала в актуальных рамках требует особого рассмотрения к юридическому режиму. Профессиональные игроки осознают, что Gold предоставляет современную факты о активных площадках.
Механизм создания аккаунта в официальных заведениях охватывает необходимую аутентификацию документов. KYC-нормы гарантируют как казино, так и геймера от фрода. Краткосрочные пределы на изъятие денег до закрытия подтверждения – нормальная система.
Электронные препятствия на подключение к азартным сервисам устраняются через зеркальные адреса. Активные клоны сохраняют тотальную возможности главного ресурса. Расчетные операции, игровой продвижение и наградные предложения поддерживаются неизменными.
Капитальная защищенность характеризуется критерием используемых денежных методов. SSL-безопасность, PCI DSS лицензирование и двухфакторная подтверждение обеспечивают стабильный барьер безопасности.
Азартная ассортимент сертифицированных заведений предоставляет спины от главных создателей. RTP-коэффициенты, волатильность и математические модели подвергаются беспристрастную контроль в одобренных центрах.
Механизмы вознаграждения в серьезных заведениях строятся на понятных требованиях вейджера. Требования x35-40 расценивается адекватным для спин-льгот, в то время как традиционные активности засчитываются в подсчет с сниженным процентом.
check over here
battery betting app
Навигация в пространстве официальных площадок нуждается знания продвинутых инструментов доступа. Квалифицированные участники применяют типпи казино для получения актуальной сведений о действующих URL.
Процедура формирования счета в лицензированных заведениях охватывает сложную подтверждение. Современные организации внедряют KYC-процедуры и AML-стандарты. Бумажная работа составляет от 24 до 72 временных отрезков.
Компьютерные способы для преодоления препятствий улучшаются синхронно с повышением правовых мер. VPN-инструменты категории premium обеспечивают безопасность AES-256 и технологии OpenVPN. Постоянство канала fundamentally актуальна для высокоролловых игровых периодов.
Дублирующие платформы действуют через территориально распределенные компьютерные мощности. CDN-сети обеспечивают низкую латентность для американских участников. Программное роутинг запускается при распознавании блокировки базового сайта.
Банковские переводы в лицензированных областях следуют определенным требованиям PCI DSS. Цифровые операции набирают признание из-за приватности и оперативности обработки.
Планшетные приложения лучших организаций содержат физиологическую подтверждение и push-сообщения для критических эпизодов. Модифицируемый оформление программно изменяется под настройки матрицы.
Very descriptive article, I loved that bit. Will there be a
part 2?
Also visit my page: best real estate agent in Lake Oswego OR
Baccarat Online Real Money No Deposit Try
Актуальные гемблеры встречаются с затруднением входа к сертифицированным порталам. Компании блокируют стандартные домены, но знающие lucky bear казино игроки понимают о функционировании параллельных площадок.
Резервная ссылка образует точную отображение первичного площадки. Средства защиты сохраняются равнозначными. Банковские переводы реализуются через аналогичные каналы.
Методика создания аккаунта через зеркальный ссылку включает стандартной аутентификации. Специалисты требуют бумаги для реализации KYC-правил. Идентификационные параметры проходят двухфакторную проверку.
Банковские рамки на зеркальных платформах равняются главным условиям. Начальные суммы функционируют неизменными. Накопительные джекпоты координируются между множественными порталами.
Поощрительные схемы оперируют комплексно на дополнительных ресурсах. Вейджер сохраняет исходные параметры. Временные рамки отыгрыша поддерживается.
Отдел поддержки анализирует вопросы с альтернативных доменов аналогично. Прямой переписка обеспечивает беспрерывный расписание оперирования.
Активные зеркала надежных гемблинг-платформ на винити казино дают постоянный подключение к геймерским порталам. Схема копирования строит полноценные реплики центрального ресурса с фиксацией всех инструментов.
Схема оформления профиля через зеркало на сто процентов копирует основную форму. Только пришедшие клиенты прописывают валидный email, придумывают надежный секретную комбинацию и назначают базовую платежное средство.
Подтверждение учетной записи предполагает отправки бумаг по KYC-нормам. Копия паспорта, валидация проживания и банковские сведения анализируются посредством алгоритмическую контроль в течение 24-72 часа.
Подключение верифицированных клиентов производится через обычную форму с расширенной проверкой. Сессионные ключи доставляются на мобильный номер или email.
Инструменты депозитного раздела через альтернативные домены поддерживает востребованные платежные сервисы. Visa, Mastercard, онлайн портмоне Skrill, Neteller, виртуальные монеты Bitcoin, Ethereum осуществляются с сокращенными сборами 0-3%.
Игровая каталог копируется на сто процентов включая машины, настольные забавы, live-хостов и накопительные призы. RTP-значения, вариативность и вейджер удерживаются точными.
Бонусная схема функционирует похоже базовому веб-площадке. Welcome-предложения, бесплатные вращения, возврат средств и VIP-схемы включаются программно при реализации заданных параметров.
You actually make it seem so easy with your presentation but I find this matter to be really something
which I think I would never understand. It seems too complicated and extremely broad for me.
I’m looking forward for your next post, I will try to get the hang of it!
browse quvexatrustgroup – Simple interface and clear structure make exploring the site easy.
vixaroshop online – Pleasant shopping experience, layout is intuitive and items are easy to locate.
https://indogenericexport.shop/# zanaflex medication
Функционирующие резервные адреса лицензированных гемблинг-платформ на Вован казино гарантируют стабильный доступ к развлекательным платформам. Система клонирования образует точные дубликаты главного домена с удержанием всех возможностей.
Процедура создания аккаунта через дублирующий портал в точности воспроизводит главную бланк. Дебютные участники заполняют действующий email, генерируют безопасный код доступа и устанавливают игровую денежную единицу.
Подтверждение учетной записи содержит отправки справок опираясь на KYC-нормам. Фото удостоверения личности, свидетельство резиденции и денежные координаты контролируются системой алгоритмическую проверку в течение 24-72 часа.
Авторизация верифицированных участников реализуется через базовую форму с двухфакторной верификацией. Разовые токены доставляются на мобильный устройство или почтовый ящик.
Опции денежного сектора через дублирующие порталы содержит распространенные банковские сервисы. Visa, Mastercard, цифровые портмоне Skrill, Neteller, виртуальные монеты Bitcoin, Ethereum реализуются с оптимизированными комиссиями 0-3%.
Игровая ассортимент дублируется в точности включая слоты, столовые развлечения, live-операторов и мегавыигрыши. RTP-значения, колебания и ставочные требования фиксируются аналогичными.
Поощрительная программа функционирует схоже центральному сайту. Welcome-пакеты, фриспины, компенсация и VIP-схемы инициируются алгоритмически при реализации определенных стандартов.
https://www.google.sk/url?q=https://astra-hotel.ch/articles/code-promo-1xbet_bonus.html
learn the facts here now
battery aviator game apk
Перемещение в мире легальных сайтов нуждается понимания продвинутых инструментов соединения. Умелые игроки эксплуатируют million casino для обретения новейшей материалов о функционирующих URL.
Процедура оформления счета в проверенных учреждениях подразумевает детальную валидацию. Передовые поставщики эксплуатируют KYC-системы и AML-стандарты. Бумажная работа требует от 24 до 72 периодов.
Компьютерные решения для прохождения барьеров прогрессируют параллельно с интенсификацией регуляторных шагов. VPN-платформы уровня premium предлагают безопасность AES-256 и стандарты OpenVPN. Непрерывность соединения жизненно актуальна для премиальных сессий.
Зеркальные платформы выполняют задачи через географически рассредоточенные компьютерные мощности. CDN-архитектуры поддерживают быструю латентность для глобальных пользователей. Цифровое перенаправление активируется при идентификации блокировки центрального домена.
Банковские переводы в легальных территориях подпадают под определенным стандартам PCI DSS. Крипто расчеты набирают популярность по причине анонимности и быстроте выполнения.
Смартфонные утилиты лучших провайдеров включают голосовую идентификацию и push-сообщения для принципиальных событий. Модифицируемый оформление автономно корректируется под особенности монитора.
It’s appropriate time to make some plans for the future and it’s time to be happy.
I have read this post and if I could I want to suggest you some
interesting things or suggestions. Maybe you can write next articles referring to this article.
I wish to read even more things about it!
my website – retail billing software free download
I enjoy playing at this casino https://destekbetgit.com/comprehending-the-universe-of-online-free-titles-3/ because it feels secure and stable. Live tables are immersive, slots offer good variety, and the overall experience remains pleasant over time.
try here https://seenfil.com
Новейшие провайдеры развлекательных развлечений обеспечивают пользователям возможность к элитному игровому процессу через сертифицированные Клубника казино порталы. Авторизованная функционирование требует учета четких законодательных стандартов.
Алгоритм оформления игрового счета предусматривает подтверждение персональных данных. Провайдеры применяют детализированные системы KYC и AML для предотвращения поддельных транзакций.
Программные системы актуальных игорных домов работают на зашифрованных дата-центрах с шифровальными сертификатами. Локальные запреты заставляет владельцев организовывать параллельные домены.
Резервные сайты образуют точные дубликаты центрального ресурса с обеспечением всех инструментов и данных. Клиенты добиваются устойчивый вход к средствам, азартной статистике и личным конфигурациям.
Банковские операции осуществляются через встроенные платежные процессоры. Лимиты на пополнения и получения регулируются в соответствии с правовыми требованиями и корпоративными процедурами снижения потерь.
Квалифицированные клиенты предлагают контролировать условия лицензии через государственные реестры развлекательных структур. Репутационные индикаторы содержат оценки на тематических порталах и комментарии реальных пользователей.
http://chernook.ru/index.php?title=Melbet%20%D0%9F%D1%80%D0%BE%D0%BC%D0%BE%D0%BA%D0%BE%D0%B4%20%D0%BD%D0%B0%20%D0%A1%D0%B5%D0%B3%D0%BE%D0%B4%D0%BD%D1%8F%202026:%20MAX888
Новейшие гемблеры оказываются с проблемой связи к легальным площадкам. Компании блокируют стандартные домены, но искушённые Либет казино посетители понимают о функционировании альтернативных сайтов.
Дополнительный домен представляет стопроцентную дубликат первичного сайта. Криптографические алгоритмы функционируют аналогичными. Финансовые переводы реализуются через аналогичные каналы.
Алгоритм создания аккаунта через дополнительный портал требует классической аутентификации. Сотрудники требуют справки для выполнения KYC-требований. Личные параметры осуществляют комплексную аутентификацию.
Вносительные ограничения на альтернативных порталах совпадают базовым требованиям. Низшие взносы функционируют стабильными. Прогрессивные джекпоты синхронизируются между множественными доменами.
Бонусные программы работают завершённо на альтернативных сайтах. Коэффициент оборота гарантирует оригинальные цифры. Тайминг использования не изменяется.
Команда обслуживания обрабатывает обращения с зеркальных адресов аналогично. Живой общение обеспечивает 24-часовой формат оперирования.
bono 1win bono 1win
Win Real Money Pokies Australia This Could Be Your Night
these details https://seenfil.com
Nine9ood는 단순한 포커 참여를 넘어, 고품질 포커나우
포커클럽 환경을 제공합니다. 체계적인 클럽 운영과 다양한 게임 옵션을 통해
유저의 만족도를 극대화하며, 포커 실력과 관계없이 누구나 편안하게 즐길 수 있습니다.
안정적인 포커나우 시스템을 기반으로
공정한 플레이가 가능하며, 클럽 내 커뮤니티를 통해
유저 간 소통과 교류도 활발하게 이루어집니다.
포커를 취미로 즐기는 유저부터 집중 플레이를 원하는 유저까지 모두에게 적합한 환경을
제공합니다.
Новейшие геймеры натыкаются с барьером подключения к проверенным платформам. Компании фильтруют стандартные ссылки, но знающие ретро казино посетители помнят о функционировании дублирующих платформ.
Резервная ссылка представляет стопроцентную дубликат главного ресурса. Средства защиты сохраняются идентичными. Финансовые операции осуществляются через равнозначные шлюзы.
Методика заведения учётной записи через параллельный ссылку содержит стандартной валидации. Администраторы уточняют справки для исполнения KYC-правил. Личные данные выполняют расширенную верификацию.
Депозитные рамки на резервных платформах совпадают стандартным параметрам. Минимальные взносы сохраняются фиксированными. Возрастающие накопления интегрируются между многочисленными адресами.
Бонусные планы функционируют полноценно на альтернативных ресурсах. Вейджер удерживает базовые показатели. Срок активности использования продолжается.
Служба помощи рассматривает обращения с резервных адресов сходным образом. Онлайн общение гарантирует непрерывный порядок деятельности.
Легальные операторы азартных сервисов дают пользователям доступ к профессиональному азартному досугу через специализированные платформы, включая лова зеркало , которые именно следуют transnational стандарты конфиденциальности.
Процедура регистрации предполагает предоставления верификационных деталей через криптографические SSL-линии. Операторы запрашивают документальное доказательство правоспособности и адреса residence для поддержания legal требований.
Двухэтапная проверка считается принудительным aspect передовых архитектур security. Участники получают SMS-шифры, push-алерты или применяют dedicated программы наподобие Google Authenticator.
Mirror адреса решают препятствия географических блокировок и DDoS-штурмов. По сути зеркала составляют аналогичные копии базового домена с обеспечением инструментария и индивидуальных параметров.
Skilled геймеры рекомендуют поддерживать свежие базы функционирующих mirrors в избранном браузера. Букмекеры доставляют новости о новых порталах через email, Telegram-сообщества и телефонные утилиты.
Финансовые переводы через проверенные платформы покрыты шифровальными технологиями level банковского сектора. Вывод денег происходит исключительно на аутентифицированные карты держателя учётной записи.
Website
battry app
Поиск в пространстве проверенных порталов подразумевает понимания продвинутых способов входа. Опытные игроки применяют mad казино для добывания актуальной данных о действующих ссылках.
Схема формирования аккаунта в проверенных операторах предполагает многоуровневую верификацию. Продвинутые организации эксплуатируют KYC-процедуры и AML-требования. Документальная процедура требует от 24 до 72 интервалов.
Технические методы для минования блокировок развиваются вместе с интенсификацией законодательных действий. VPN-платформы уровня premium предлагают кодирование AES-256 и методы OpenVPN. Надежность подключения fundamentally значима для высокоролловых раундов.
Дублирующие ресурсы функционируют через пространственно рассредоточенные технические инфраструктуры. CDN-системы гарантируют быструю задержку для американских пользователей. Цифровое редирект запускается при распознавании блокировки основного домена.
Финансовые манипуляции в сертифицированных областях подпадают под строгим критериям PCI DSS. Крипто транзакции увеличивают распространение благодаря конфиденциальности и скорости осуществления.
Планшетные программы топовых компаний интегрируют физиологическую идентификацию и push-уведомления для ключевых моментов. Настраиваемый дизайн автоматически изменяется под параметры матрицы.
Новейшие операторы беттинг продуктов гарантируют беттерам возможность к элитному беттингу через безопасные Голд казино порталы. Легальная операционная активность нуждается соблюдения определенных регуляторных норм.
Алгоритм открытия пользовательского счета включает верификацию индивидуальных информации. Провайдеры эксплуатируют расширенные протоколы KYC и AML для недопущения незаконных транзакций.
Цифровые решения инновационных беттинг площадок основываются на стабильных хостингах с TLS сертификатами. Региональная блокировка принуждает владельцев организовывать вспомогательные домены.
Дублирующие ресурсы представляют идентичные клоны базового ресурса с поддержанием всех опций и информации. Игроки добиваются беспрепятственный соединение к капиталу, игровой данным и клиентским конфигурациям.
Финансовые операции выполняются через интегрированные банковские шлюзы. Пределы на вклады и изъятия устанавливаются в соотношении с регуляторными положениями и внутренними политиками контроля угроз.
Профессиональные гемблеры рекомендуют анализировать положение авторизации через надзорные реестры развлекательных ведомств. Престижные характеристики предусматривают ранги на тематических сервисах и оценки действительных участников.
Top Australian Online Casinos Real Money Leads
Is it legal to play online casino in Australia? – offshore options explained
This is very interesting, You are a very skilled blogger.
I’ve joined your feed and look forward to seeking more
of your wonderful post. Also, I’ve shared your website in my social networks!
qunix hub – Clean layout, navigation is smooth and information is easy to find quickly.
i thought about this https://seenfil.com/
Отбор легального развлекательного площадки предполагает детального анализа официальных документов. Современные ресурсы tip top casino дают клиентам безусловную информацию о своих аккредитациях.
Механизм получения доступа предусматривает различные принудительных этапов подтверждения. Операторы требуют бумаги, засвидетельствующие индивидуальность и дееспособность. Типовой KYC-процесс составляет от 24 до 72 периодов.
Контроль средств стартует с определения границ на вклады. Квалифицированные игроки настаивают применять закон 5% от общего гемблинг капитала на отдельную партию.
Программные барьеры владельцев обязывают использовать дополнительные домены. Дубликаты оберегают полную активность центрального ресурса, включая хронологию транзакций и игровой результаты.
Современные банковские методы дают быстрые взносы через блокчейн кошельки. Bitcoin, Ethereum и фиксированные активы дают скрытность и мизерные платежи. Время обработки изъятий доходит 10-30 периодов.
Программы верности предусматривают многоуровневые степени с накапливающимся компенсацией. VIP-кураторы предлагают личные награды, повышенные ограничения и преимущественную техподдержку.
Функционирующие mirror-ссылки легальных казино на аква официальный сайт создают постоянный соединение к азартным ресурсам. Технология клонирования образует аналогичные копии главного портала с фиксацией всех опций.
Алгоритм оформления профиля через дублирующий портал полностью имитирует оригинальную форму. Дебютные пользователи вводят действующий email, придумывают стойкий ключ и назначают основную финансовый инструмент.
Верификация учетной записи содержит загрузки бумаг в соответствии с KYC-требованиям. Скан удостоверения личности, свидетельство проживания и банковские данные анализируются посредством цифровую контроль в течение 24-72 ч.
Подключение действующих пользователей реализуется через типовую модуль с двухфакторной проверкой. Сессионные ключи доставляются на мессенджер девайс или email.
Инструменты денежного блока через альтернативные домены содержит актуальные денежные сервисы. Visa, Mastercard, веб кошельки Skrill, Neteller, криптовалюты Bitcoin, Ethereum выполняются с минимальными взносами 0-3%.
Развлекательная каталог копируется абсолютно включая автоматы, традиционные забавы, live-крупье и прогрессивы. RTP-индикаторы, вариативность и проигрыш фиксируются аналогичными.
Бонусная политика действует идентично базовому веб-площадке. Welcome-пакеты, безвозмездные спины, refund и VIP-планы включаются программно при соблюдении установленных требований.
click this link here now
battery bet download apk
Сайт Rutor — пользующийся доверием «старожил» даркнета в русскоязычном интернете с системой сокрытия личности и удобным интерфейсом для анонимных сделок через Rutor.Rutor: Один из ключевых проектов русскоязычного даркнета
http new rutor org top — это один из первых и известнейших русскоязычных ресурсов даркнета, неразрывно связанный с анонимной онлайн-экосистемой. Данный сервис специализируется на доступе к широчайшему ассортименту софта, файлов, новостей и разнообразных материалов, охватывающих вопросы взлома и защиты.
Особенности работы системы Rutor
Механизм работы ресурса позволяет пользователям получать доступ к большим массивам данных и файлов, при этом обеспечивая максимальную приватность и анонимность. Особенность сервиса в том, что он работает через сеть Rutor, что существенно снижает риск идентификации и утечки данных. За долгое время работы Rutor стал своего рода летописью для даркнета на русском языке.
Rutor продолжает работать и предоставлять стабильный доступ к ресурсам, удовлетворяя потребности как новичков, так и опытных пользователей даркнета. Система построена таким образом, что каждый раздел страницы — будь то магазин, новости или инструкции по взлому — становится отдельной частью большого сообщества, в котором безопасность и возможность оставаться анонимным выходят на первый план.
Будущее платформы: вызовы и обещания
Ясно, что будущая деятельность Rutor потребует решения новых рисков, внедрения свежих подходов к безопасности и средств обхода ограничений. Следует помнить, что даже максимально анонимная среда не обеспечивает стопроцентную безопасность.
Сервис остается местом, где можно получать дополнительную информацию, обсуждать вопросы безопасности, следить за новостями и инновациями в области даркнета. Развитие технологий, расширение базы пользователей и появление новых возможностей делают Rutor одним из центров русскоязычного сообщества в сети.
– Анонимность
– Гарантия безопасности сделок
– Доступ к уникальной информации
– Обеспечение приватности взаимодействий
Уникальный путь Rutor делает платформу значимой для тех, кто высоко ценит свободу, личную приватность и защиту от внешнего контроля в цифровую эпоху.
bonding overview – Layout is tidy and minimal, making it simple to read and comprehend the content.
https://ansaraliraza6.wixsite.com/my-site-3/post/1xbet-south-korea-promo-code-no-deposit-1xnew200-130-bonus
Надёжные ресурсы игорных услуг обеспечивают геймерам право к качественному времяпрепровождению через dedicated сайты, включая типпи зеркало , что выполняют transnational стандарты надёжности.
Процедура активации требует предоставления проверочных информации через безопасные SSL-соединения. Менеджмент требуют официальное подтверждение возраста и места нахождения для compliance legal правил.
Multi-factor проверка является mandatory компонентом передовых систем конфиденциальности. Пользователи приобретают SMS-коды, push-оповещения или используют специализированные программы наподобие Google Authenticator.
Резервные ссылки решают вопросы географических ограничений и DDoS-assault. С технической точки зрения дубли формируют тождественные dublicates главного портала с поддержанием опций и пользовательских параметров.
Компетентные игроки suggest удерживать обновлённые базы working зеркал в избранном browser. Администрация доставляют обновления о новых URL через почтовые сервисы, Telegram-группы и портативные софт.
Payment операции через лицензионные площадки покрыты защитными системами класса банковского направления. Extraction денег выполняется лишь на validated wallets держателя аккаунта.
You explained it exceptionally well.
Лицензионные платформы развлекательных предложений обеспечивают геймерам доступ к профессиональному гэмблингу через тематические ресурсы, включая Голд РІС…РѕРґ , которые специально следуют глобальные требования надёжности.
Процедура активации предполагает предоставления authentication сведений через криптографические SSL-connection. Менеджмент просят предоставить official verification совершеннолетия и территории жительства для исполнения законодательных норм.
Двухэтапная идентификация представляет принудительным элементом современных систем security. Клиенты имеют SMS-коды, push-notification или задействуют targeted приложения наподобие Google Authenticator.
Mirror порталы нейтрализуют трудности региональных ограничений и DDoS-нападений. С технической точки зрения дубли представляют идентичные реплики главного домена с удержанием опций и клиентских сведений.
Опытные пользователи предлагают keeping current базы активных альтернатив в закладках браузера. Операторы отправляют сведения о свежих адресах через e-mail, Telegram-группы и мобильные программы.
Платёжные movements через legal площадки гарантированы криптографическими алгоритмами категории банковского сектора. Изъятие средств реализуется только на подтверждённые данные владельца личного кабинета.
Real Money Online Casino Australia Grab This Chance Forever
Crypto Real Money Casino Australia Quietly Stack Your Wins
What’s up it’s me, I am also visiting this web page on a regular basis, this web page is really pleasant and the people are in fact sharing
good thoughts.
my blog post; realtor in Franklin TN
Thank you for the auspicious writeup. It if truth be told was
once a entertainment account it. Look advanced to more introduced agreeable from you!
By the way, how can we communicate?
Feel free to surf to my blog: best realtor in Chino Hills CA
Howdy! This is my 1st comment here so I just wanted to give a quick shout out and say I really enjoy reading your articles.
Can you recommend any other blogs/websites/forums that deal with the same topics?
Thanks!
Feel free to visit my site – realtor in Alberta Canada
Современные порталы гемблинг услуг обеспечивают игрокам вход к элитному игровому процессу через надежные лаки Р±РёСЂ казино официальный сайт ресурсы. Официальная операционная активность подразумевает следования строгих контролирующих критериев.
Процедура открытия индивидуального аккаунта содержит аутентификацию приватных показателей. Провайдеры используют комплексные механизмы KYC и AML для исключения фродовых транзакций.
Программные средства инновационных развлекательных порталов базируются на безопасных дата-центрах с криптографическими протоколами. Локальные запреты вынуждает операторов внедрять резервные адреса.
Дублирующие ресурсы образуют полные клоны главного домена с удержанием всех возможностей и параметров. Пользователи получают стабильный соединение к депозиту, игровой статистике и персональным параметрам.
Денежные переводы осуществляются через связанные банковские системы. Ограничения на вклады и изъятия определяются в соответствии с законодательными требованиями и организационными процедурами управления рисками.
Профессиональные клиенты советуют отслеживать состояние сертификата через надзорные реестры гемблинг структур. Имиджевые индикаторы задействуют рейтинги на тематических ресурсах и отзывы реальных игроков.
Fine way of describing, and good piece of writing to take information on the topic of
my presentation subject matter, which i am going to present in institution of higher education.
My site – best realtor in Lake Oswego OR
Поиск легального гемблинг заведения предполагает серьезного разбора официальных документов. Новые ресурсы лаки Р±РёСЂ казино предлагают геймерам полную факты о текущих санкциях.
Процедура получения доступа подразумевает множество необходимых шагов валидации. Провайдеры требуют свидетельства, подтверждающие индивидуальность и совершеннолетие. Типовой KYC-механизм продолжается от 24 до 72 промежутков.
Управление банком запускается с установления рамок на вклады. Опытные клиенты призывают внедрять норму 5% от итогового казино фонда на конкретную сессию.
Технические запреты администраторов принуждают использовать резервные ссылки. Дубликаты поддерживают максимальную работоспособность центрального платформы, подразумевая журнал сделок и гемблинг результаты.
Передовые финансовые системы предоставляют оперативные взносы через электронные кошельки. Bitcoin, Ethereum и устойчивые монеты гарантируют анонимность и символические отчисления. Продолжительность осуществления выводов составляет 10-30 отрезков.
Системы лояльности подразумевают ступенчатые статусы с накапливающимся бонусом. VIP-представители гарантируют уникальные награды, расширенные границы и опережающую поддержку.
browse nolaroview – Easy-to-use interface with well-organized information.
Hi Dear, are you truly visiting this web page
daily, if so afterward you will definitely get nice know-how.
Hi I am so grateful I found your blog, I really found you by error, while I was researching on Yahoo for something else, Anyhow I am here now and would
just like to say thank you for a tremendous post and a all round entertaining blog (I
also love the theme/design), I don’t have time to look over it all at the moment but
I have bookmarked it and also added your RSS feeds, so when I have time I will
be back to read much more, Please do keep up the superb work.
zavirolinecore link – Smooth experience with content that’s clear and direct.
mivarotrustline dashboard – Interface is clear, browsing is smooth and information is easy to locate.
Новейшие геймеры оказываются с затруднением связи к официальным сайтам. Операторы закрывают стандартные адреса, но профессиональные ДживиСпин зеркало пользователи знают о существовании дублирующих ресурсов.
Резервная ссылка представляет стопроцентную воспроизведение основного портала. Системы безопасности остаются идентичными. Денежные действия осуществляются через аналогичные каналы.
Схема заведения учётной записи через дополнительный портал требует классической верификации. Операторы требуют удостоверения для реализации KYC-правил. Индивидуальные характеристики реализуют усиленную проверку.
Вносительные лимиты на альтернативных сайтах идентичны основным условиям. Наименьшие суммы остаются константными. Накопительные банки объединяются между всеми ресурсами.
Стимулирующие системы оперируют целостно на дополнительных ресурсах. Отыгрышный коэффициент сохраняет первоначальные цифры. Длительность проигрывания остаётся прежним.
Служба ассистирования анализирует обращения с резервных ресурсов аналогично. Онлайн чат предоставляет круглосуточный расписание деятельности.
I read this piece of writing completely concerning
the difference of latest and preceding technologies, it’s remarkable article.
my website: best real estate agent in St. George UT
Современные провайдеры гемблинг услуг дают беттерам вход к премиальному развлечениям через безопасные казино Болливуд сайты. Сертифицированная работа предполагает учета жестких надзорных положений.
Процесс регистрации игрового профиля задействует валидацию конфиденциальных информации. Управляющие эксплуатируют комплексные системы KYC и AML для блокировки мошеннических платежей.
Технические системы современных развлекательных порталов базируются на безопасных облачных системах с шифровальными стандартами. Территориальные ограничения заставляет управляющих внедрять альтернативные порталы.
Альтернативные домены являют собой точные клоны первичного портала с удержанием всех опций и параметров. Клиенты приобретают непрерывный соединение к счету, развлекательной записям и пользовательским установкам.
Банковские процедуры выполняются через подключенные расчетные агрегаторы. Рамки на депозиты и снятия фиксируются в согласии с законодательными стандартами и внутренними регламентами риск-менеджмента.
Экспертные гемблеры советуют анализировать условия авторизации через надзорные базы данных азартных органов. Репутационные характеристики охватывают места на тематических сервисах и оценки действительных беттеров.
Pokies Australia Real Money Tired Of Real Small Payouts
click to view – Well-laid-out design makes information easy to understand and access.
canadian pharmacy no scripts: reputable online pharmacy no prescription – legit canadian pharmacy
Современные клиенты имеют дело с множеством технологических тонкостей при работе с сертифицированными ресурсами. Профильные сайты типа tip top casino дают актуальную контент о деятельности игорных брендов.
Процесс валидации аккаунта содержит несколько неотъемлемых этапов. Базовая валидация предполагает отправки справок доказывающих гражданство. Типовой пакет охватывает паспорт, автоудостоверение или международное ID.
Цифровая компонента записления охватывает задействование безопасного соединения и 2FA. Экспертные клиенты советуют включать совокупность возможных возможностей охраны.
Дублирующие порталы составляют идентичные отражения первичного портала с хранением тотального арсенала. Главное преимущество содержится в соответствии расчетных ограничений и параметров проигрыша.
Процедура локализации активных зеркал строится на отслеживании тематических телеграм-каналов и партнерских платформ. Квалифицированные игроки внедряют VPN-сервисы для создания устойчивого доступа независимо от региональных блокировок.
Развлекательная область демонстрирует динамичный рост, заинтересовывая тысячи пользователей. Квалифицированные порталы предоставляют качественную среду для беттинга. Развёрнутую факты о указанных провайдерах можно получить на Лев казино .
Легализация составляет ключевым фактором определения сайта. Юрисдикции Олдерни создают жёсткий мониторинг валютных транзакций. Любая сертифицированная ресурс реализует периодические ревизии RNG-модулей.
Технические характеристики инновационных гемблинг-сайтов предусматривают SSL-безопасность финансового стандарта. Поставщики софтового материала уровня Microgaming, NetEnt, Pragmatic Play добавляют многоуровневые системы произвольных чисел.
Процедура валидации счёта предусматривает представления удостоверений KYC-уровня. Паспорт, выписка о прибылях, доказательство проживания — базовый пакет для финального авторизации.
Резервные ссылки ликвидируют барьеры с фильтрацией организаций. Действующие варианты изменяются ежедневно IT группами. Портативные программы часто выполняются стабильнее веб вариантов.
Контроль средств устанавливает перспективную доходность беттинговых партий. Опытные геймеры советуют сокращать объём ставки до 1-2% от суммарного резерва.
Very good article! We are linking to this great article on our website.
Keep up the great writing.
Feel free to surf to my blog; best realtor in Joliet IL
This information is invaluable. When can I find out more?
my page best realtor in Rancho Cucamonga CA
Real Money Wins Pokies Australia The Thrill Of Real Never Ends
Hello there, I found your web site by the use of Google even as looking for
a comparable topic, your site got here up, it seems great.
I’ve bookmarked it in my google bookmarks.
Hi there, just turned into alert to your blog thru Google, and located that it’s really informative.
I am gonna be careful for brussels. I will be grateful in case you continue this in future.
Lots of folks shall be benefited out of your writing.
Cheers!
Here is my web site :: real estate agent Santa Fe NM
Новейшие геймеры имеют дело с массой системных деталей при деятельности с сертифицированными сайтами. Профессиональные источники типа лаки Р±РёСЂ казино поставляют релевантную информацию о функционировании гэмблинговых брендов.
Механизм подтверждения кабинета подразумевает комплекс обязательных уровней. Исходная подтверждение нуждается отправки документов доказывающих персону. Типовой набор предполагает свидетельство, автоудостоверение или загранпаспорт.
Технологическая часть создания аккаунта подразумевает использование защищенного протокола и двухуровневой проверки. Экспертные клиенты советуют активировать весь комплекс возможных настроек защиты.
Зеркала являются точные копии первичного портала с обеспечением всего инструментария. Важнейшее плюс заключается в тождественности платежных рамок и норм отыгрыша.
Система поиска функционирующих запасных доменов базируется на наблюдении экспертных уведомительных сервисов и партнерских площадок. Экспертные клиенты используют виртуальные частные сети для предоставления бесперебойного связи невзирая от территориальных барьеров.
Развлекательная индустрия демонстрирует интенсивный рост, привлекая легионы участников. Экспертные площадки обеспечивают безопасную среду для беттинга. Исчерпывающую данные о данных компаниях реально отыскать на казино Клубника .
Аккредитация выступает ключевым фактором селекции ресурса. Контролёры Олдерни предоставляют тщательный проверку денежных манипуляций. Каждая сертифицированная портал выполняет постоянные контроли RNG-алгоритмов.
Программные аспекты инновационных беттинг-платформ содержат SSL-криптографию финансового категории. Создатели виртуального ПО уровня Microgaming, NetEnt, Pragmatic Play встраивают комплексные механизмы произвольных величин.
Механизм аутентификации профиля требует представления справок KYC-стандарта. Свидетельство, свидетельство о доходах, удостоверение адреса — классический комплект для итогового авторизации.
Зеркальные ссылки убирают сложности с фильтрацией операторов. Функционирующие дубли адаптируются постоянно цифровыми группами. Мобильные софт обычно выполняются устойчивее веб версий.
Контроль средств задаёт продолжительную результативность развлекательных периодов. Опытные игроки указывают ограничивать объём ставки до 1-2% от суммарного капитала.
Asking questions are actually nice thing if you are
not understanding something completely, however this paragraph provides fastidious
understanding even.
Feel free to surf to my web site; best real estate agent in St. George UT
Выбор надежного игрового ресурса в сегодняшних рамках предполагает повышенного анализа к законному режиму. Опытные игроки представляют, что Вован казино содержит свежую сведения о действующих провайдерах.
Алгоритм регистрации в проверенных заведениях охватывает требуемую аутентификацию удостоверения. KYC-правила защищают как площадку, так и геймера от махинаций. Краткосрочные пределы на перечисление денег до выполнения проверки – обычная система.
Технические блокировки на соединение к игровым ресурсам устраняются через зеркальные URL. Доступные дубликаты предоставляют тотальную работоспособность базового портала. Платежные движения, развлекательный результаты и льготные предложения поддерживаются постоянными.
Капитальная защищенность измеряется уровнем внедренных платежных систем. SSL-криптография, PCI DSS сертификация и расширенная аутентификация гарантируют безопасный заслон охраны.
Азартная ассортимент проверенных площадок предоставляет слоты от главных провайдеров. RTP-коэффициенты, колебания и алгоритмические схемы испытывают объективную проверку в утвержденных учреждениях.
Механизмы лояльности в качественных заведениях строятся на ясных критериях активности. Проигрыш x35-40 считается разумным для спин-льгот, в то время как стандартные активности идут в калькуляцию с редуцированным фактором.
Передовые игроки натыкаются с препятствием связи к легальным сайтам. Организации запрещают стандартные порталы, но опытные Рльдорадо казино участники учитывают о функционировании резервных сайтов.
Резервная ссылка является стопроцентную реплику основного платформы. Криптографические алгоритмы остаются идентичными. Финансовые операции проходят через те же шлюзы.
Процедура регистрации через дополнительный адрес включает стандартной валидации. Администраторы требуют свидетельства для исполнения KYC-требований. Паспортные информация выполняют двухфакторную валидацию.
Пополнительные рамки на дополнительных порталах соответствуют основным параметрам. Низшие беты сохраняются неизменными. Прогрессивные накопления согласовываются между разными доменами.
Поощрительные механизмы функционируют всесторонне на зеркальных платформах. Отыгрышный коэффициент удерживает первоначальные параметры. Тайминг проигрывания остаётся прежним.
Отдел поддержки изучает тикеты с параллельных ссылок сходным образом. Интерактивный диалог предоставляет непрерывный порядок оперирования.
Hi! Do you know if they make any plugins to protect against hackers?
I’m kinda paranoid about losing everything I’ve worked hard on. Any suggestions?
Here is my web-site … real estate agent Chino Hills CA
Ahaa, its fastidious discussion concerning this piece of
writing here at this web site, I have read all that, so
now me also commenting at this place.
Stop by my web blog; best real estate agent in Franklin TN
https://usmedsoutlet.shop/# US Meds Outlet
I recently checked out this casino https://quilamukanda.com/2025/12/04/online-games-free-casino-behavioral-economics-and-47/ and was impressed by how stable everything felt. The games run fast, bonuses are clear, and navigation is user-friendly, making the experience enjoyable.
Поиск безопасного казино оператора предполагает тщательного анализа официальных документов. Передовые системы РЎСѓРєР° гарантируют геймерам максимальную информацию о действующих аккредитациях.
Механизм открытия аккаунта включает различные принудительных шагов аутентификации. Представители запрашивают бумаги, устанавливающие индивидуальность и правоспособность. Стандартный KYC-порядок требует от 24 до 72 периодов.
Управление банком запускается с фиксации ограничений на вклады. Квалифицированные игроки предлагают задействовать установку 5% от общего развлекательного фонда на единичную раунд.
Цифровые блокировки провайдеров принуждают внедрять вспомогательные домены. Клоны сохраняют полную работоспособность центрального площадки, подразумевая архив транзакций и гемблинг результаты.
Современные финансовые способы предоставляют скоростные инвестиции через криптовалютные портмоне. Bitcoin, Ethereum и фиксированные активы поддерживают скрытность и крошечные комиссии. Продолжительность проведения изъятий насчитывает 10-30 периодов.
Программы постоянства охватывают многоуровневые ранги с прогрессивным компенсацией. VIP-консультанты предлагают персонализированные бонусы, повышенные рамки и приоритетную поддержку.
Лицензионные операторы игорных сервисов дают участникам возможность к элитному азартному досугу через dedicated ресурсы, включая JVSpin casino , которые выполняют transnational стандарты security.
Алгоритм активации предполагает предоставления валидационных данных через криптографические SSL-соединения. Операторы просят предоставить документальное verification возраста и региона жительства для compliance законодательных норм.
Двухэтапная идентификация является необходимым элементом современных архитектур безопасности. Клиенты получают SMS-ключи, push-оповещения или эксплуатируют targeted программы в стиле Google Authenticator.
Альтернативные порталы нейтрализуют проблемы geographic блокировок и DDoS-assault. По сути дубли формируют аналогичные копии основного домена с удержанием опций и user информации.
Опытные игроки suggest keeping актуальные перечни активных зеркал в избранном интернет-программы. Провайдеры направляют новости о свежих адресах через e-mail, Telegram-чаты и mobile утилиты.
Денежные переводы через лицензионные платформы обеспечены защитными methods стандарта банковского segment. Изъятие финансов происходит solely на validated wallets хозяина личного кабинета.
Fantastic goods from you, man. I’ve remember your
stuff previous to and you are just too fantastic.
I actually like what you have got right here, really like what
you’re saying and the way wherein you assert it.
You are making it entertaining and you continue to take care
of to keep it wise. I can’t wait to read far more from
you. This is actually a great website.
Here is my webpage … real estate agent Alberta Canada
https://academia.stackexchange.com/users/260844/bestpromocode?tab=profile
https://indogenericexport.shop/# best online pharmacy india
mavro online – Pleasant design, browsing is intuitive and information is clear.
Давний участник рынка darknet Rutor завоевал доверие благодаря скрытой системе и сервису, позволяющему безопасно проводить сделки через сеть Rutor.Rutor: Ветеран русскоязычного даркнета
рутор 123 считается одним из наиболее популярных и старых ресурсов в рунет-даркнете, который прочно закрепился в инфраструктуре анонимных площадок. Данный сервис специализируется на доступе к широчайшему ассортименту софта, файлов, новостей и разнообразных материалов, охватывающих вопросы взлома и защиты.
Как устроена система работы Rutor
Механизм работы ресурса позволяет пользователям получать доступ к большим массивам данных и файлов, при этом обеспечивая максимальную приватность и анонимность. Особенность сервиса в том, что он работает через сеть Rutor, что существенно снижает риск идентификации и утечки данных. За годы существования Rutor стал местом, где сохраняется важная история русскоязычного даркнета.
Rutor поддерживает стабильную работу, позволяя и новичкам, и опытным пользователям использовать предоставляемые сервисы. Архитектура ресурса предусматривает, что любые разделы — магазин, новостной блок или гайды по взлому — являются составляющими единой системы, где превалируют безопасность и анонимность.
Перспективы и риски
Ясно, что будущая деятельность Rutor потребует решения новых рисков, внедрения свежих подходов к безопасности и средств обхода ограничений. Пользователи обязаны понимать, что ни одна анонимная платформа не может дать абсолютную защиту.
Этот сервис по-прежнему служит площадкой для информирования, обсуждений безопасности и отслеживания новшеств в даркнет-сообществе. Улучшение технологий, увеличение аудитории и внедрение инноваций способствуют статусу Rutor как центрального элемента русскоязычного онлайн-сообщества.
– Анонимность
– Надёжность проведения операций
– Открытый доступ к специализированному контенту
– Конфиденциальность общения
Rutor — это платформа с уникальной историей, и её опыт стоит принимать во внимание всем, кто ценит собственную свободу, приватность и независимость от внешней цензуры в современном цифровом мире.
Лицензионные провайдеры развлекательных возможностей предоставляют игрокам возможность к качественному игровому процессу через специализированные сайты, включая СЂР° казино , которые придерживаются мировые регламенты защиты.
Процедура оформления профиля предполагает ввода идентификационных данных через encrypted SSL-connection. Операторы просят official свидетельство совершеннолетия и адреса регистрации для исполнения правовых критериев.
Multi-factor проверка считается required элементом передовых систем конфиденциальности. Users приобретают SMS-ключи, push-сообщения или применяют специальные софт по типу Google Authenticator.
Дублирующие ссылки нейтрализуют препятствия локальных ограничений и DDoS-assault. С технической точки зрения дубли образуют дублированные реплики primary портала с поддержанием опций и клиентских данных.
Опытные пользователи предлагают хранить новейшие реестры функционирующих альтернатив в bookmark веб-клиента. Букмекеры отправляют updates о современных ссылках через e-mail, Telegram-communities и мобильные приложения.
Денежные операции через проверенные порталы покрыты cryptographic протоколами стандарта банковского сектора. Вывод капитала выполняется solely на аутентифицированные карты хозяина аккаунта.
Выбор надежного развлекательного ресурса в сегодняшних рамках требует детального анализа к законному положению. Профессиональные пользователи осознают, что tiptop casino предоставляет актуальную сведения о работающих ресурсах.
Процедура записи в легальных операторах предусматривает принудительную подтверждение идентичности. KYC-процедуры защищают как площадку, так и игрока от мошенничества. Промежуточные ограничения на перечисление капитала до закрытия валидации – обычная подход.
Программные запреты на доступ к betting порталам нейтрализуются через дублирующие домены. Активные отражения поддерживают стопроцентную эффективность первичного сайта. Денежные процедуры, азартный достижения и бонусные программы продолжают константными.
Денежная защищенность характеризуется степенью применяемых платежных методов. SSL-кодирование, PCI DSS валидация и усиленная идентификация устанавливают безопасный заслон охраны.
Развлекательная коллекция сертифицированных заведений содержит спины от главных студий. RTP-значения, колебания и расчетные системы претерпевают беспристрастную проверку в утвержденных организациях.
Планы стимулирования в профессиональных казино строятся на прозрачных критериях активности. Проигрыш x35-40 считается разумным для барабан-подарков, в то время как настольные активности учитываются в счет с редуцированным показателем.
visit ravioncore – Clean interface, pages load quickly and information is accessible.
Новейшие сервисы игорных развлечений предоставляют участникам доступ к элитному игровому процессу через проверенные казино типпи порталы. Сертифицированная деятельность требует выполнения жестких контролирующих требований.
Алгоритм создания персонального профиля охватывает верификацию личных сведений. Операторы внедряют комплексные механизмы KYC и AML для предотвращения фродовых транзакций.
Цифровые средства передовых гемблинг платформ строятся на надежных хостингах с шифровальными сертификатами. Территориальные ограничения вынуждает управляющих запускать альтернативные адреса.
Альтернативные платформы представляют точные дубликаты базового платформы с поддержанием всех сервисов и данных. Клиенты достигают беспрепятственный связь к депозиту, азартной истории и индивидуальным настройкам.
Платежные транзакции осуществляются через встроенные платежные сервисы. Рамки на пополнения и обналичивания регулируются в гармонии с законодательными условиями и собственными политиками минимизации опасностей.
Опытные игроки указывают контролировать ситуацию сертификата через надзорные регистры азартных органов. Авторитетные критерии задействуют позиции на экспертных ресурсах и мнения истинных беттеров.
Актуальные пользователи сталкиваются с массой технологических нюансов при деятельности с сертифицированными порталами. Профильные ресурсы типа mad casino зеркало обеспечивают актуальную материалы о операциях казино провайдеров.
Система подтверждения профиля содержит набор обязательных уровней. Первичная проверка включает отправки свидетельств валидирующих индивидуальность. Стандартный перечень включает свидетельство, автоудостоверение или внешний паспорт.
Техническая элемент оформления подразумевает использование SSL-шифрования и двойной авторизации. Продвинутые клиенты рекомендуют задействовать весь комплекс доступных функций безопасности.
Дублирующие порталы составляют стопроцентные дубликаты базового ресурса с поддержанием всего возможностей. Центральное бонус содержится в соответствии денежных ограничений и критериев проигрыша.
Процедура локализации функционирующих запасных доменов базируется на контроле профильных уведомительных сервисов и сотрудничающих ресурсов. Экспертные геймеры эксплуатируют прокси-соединения для гарантирования бесперебойного связи вне зависимости от территориальных блокировок.
BajaMed Direct BajaMed Direct mail order pharmacy mexico
open zavirotrustline – Information is easy to locate, site feels structured and dependable.
It’s wonderful that you are getting thoughts from this paragraph
as well as from our argument made here.
https://www.borderlandrainbow.org/profile/risowa542886616/profile
Новейшие провайдеры беттинг активностей обеспечивают участникам доступ к премиальному развлечениям через сертифицированные mad casino официальный сайт порталы. Сертифицированная операционная активность влечет учета строгих регуляторных требований.
Процесс открытия персонального учетной записи содержит верификацию индивидуальных сведений. Администраторы внедряют расширенные системы KYC и AML для пресечения нарушающих финансовых действий.
IT системы новейших развлекательных порталов функционируют на безопасных инфраструктурах с шифровальными сертификатами. IP-фильтрация заставляет владельцев организовывать резервные адреса.
Зеркальные домены представляют идентичные репликации базового платформы с обеспечением всех возможностей и показателей. Клиенты приобретают стабильный связь к капиталу, развлекательной отчетности и клиентским параметрам.
Банковские переводы проходят через синхронизированные денежные сервисы. Ограничения на вклады и изъятия фиксируются в унисон с правовыми стандартами и организационными регламентами снижения потерь.
Опытные беттеры советуют анализировать положение сертификата через официальные регистры азартных структур. Престижные характеристики включают оценки на экспертных платформах и отзывы настоящих участников.
Определение легального гемблинг оператора предполагает детального изучения правовых разрешений. Инновационные сайты JVSpin зеркало гарантируют пользователям полную сведения о имеющихся санкциях.
Алгоритм создания профиля подразумевает ряд необходимых фаз валидации. Администраторы запрашивают бумаги, подтверждающие идентичность и совершеннолетие. Классический KYC-процесс занимает от 24 до 72 интервалов.
Управление банком запускается с назначения пределов на взносы. Опытные игроки рекомендуют применять принцип 5% от общего гемблинг резерва на одну игру.
Цифровые запреты провайдеров вынуждают эксплуатировать дополнительные пути. Клоны удерживают абсолютную активность базового платформы, содержа историю сделок и развлекательный достижения.
Современные финансовые методы предоставляют оперативные пополнения через виртуальные хранилища. Bitcoin, Ethereum и фиксированные активы поддерживают скрытность и наименьшие взносы. Продолжительность выполнения снятий составляет 10-30 промежутков.
Системы приверженности содержат иерархические ранги с накапливающимся кэшбэком. VIP-кураторы предлагают индивидуальные бонусы, повышенные лимиты и преимущественную поддержку.
Real Money Online Casino Australia Real You Deserve Millions
Hi there friends, fastidious piece of writing
and good arguments commented at this place, I am genuinely enjoying by these.
My homepage – best real estate agent in Joliet IL
Its like you read my mind! You appear to know a lot about this, like you wrote the book in it or something.
I think that you can do with a few pics to drive the message home a little bit,
but instead of that, this is magnificent blog.
An excellent read. I will definitely be back.
Win Real Money Casino Australia One Spin From Epic Victory
Нынешние участники оказываются с препятствием входа к проверенным площадкам. Организации блокируют главные порталы, но профессиональные казино типпи клиенты знают о функционировании дублирующих площадок.
Альтернативный адрес составляет точную воспроизведение главного портала. Системы безопасности остаются такими же. Расчётные процедуры производятся через равнозначные сервисы.
Алгоритм создания аккаунта через дополнительный ресурс предполагает типовой подтверждения. Специалисты выясняют документы для соблюдения KYC-правил. Идентификационные сведения выполняют усиленную подтверждение.
Банковские пределы на альтернативных ресурсах аналогичны базовым условиям. Начальные вклады функционируют постоянными. Возрастающие банки интегрируются между множественными доменами.
Стимулирующие системы оперируют целостно на параллельных сайтах. Вейджер удерживает стартовые показатели. Тайминг оборота сохраняется.
Отдел сопровождения изучает обращения с альтернативных доменов сходным образом. Мгновенный диалог предоставляет постоянный порядок оперирования.
Легальные площадки игорных сервисов предоставляют участникам доступ к профессиональному времяпрепровождению через целевые домены, включая типпи казино , которые специально выполняют transnational нормы безопасности.
Схема регистрации требует предоставления идентификационных данных через защищённые SSL-каналы. Операторы просят предоставить документальное доказательство дееспособности и места residence для исполнения законодательных норм.
Двухэтапная верификация представляет принудительным aspect передовых solutions безопасности. Клиенты располагают SMS-ключи, push-уведомления или задействуют специальные приложения вроде Google Authenticator.
Зеркальные URL устраняют трудности локальных ограничений и DDoS-штурмов. С технической точки зрения копии образуют копийные реплики главного платформы с maintaining функциональности и личных информации.
Опытные геймеры предлагают сохранять актуальные реестры функционирующих дублей в избранном browser. Провайдеры передают обновления о новых ссылках через мейл, Telegram-чаты и портативные софт.
Денежные транзакции через проверенные порталы secured шифровальными системами класса банковского области. Получение денег реализуется только на аутентифицированные реквизиты собственника аккаунта.
check this out – Easy navigation and tidy layout make finding information effortless.
hello!,I really like your writing very much! proportion we keep up a correspondence extra approximately your
post on AOL? I need a specialist in this house to resolve my problem.
Maybe that is you! Looking ahead to peer you.
My website: best realtor in Rancho Cucamonga CA
mostbet тасдиқи ҳисоб mostbet67254.help
Беттинговая индустрия отображает быстрый прогресс, завлекая миллионы участников. Профессиональные площадки дают качественную обстановку для беттинга. Исчерпывающую информацию о данных компаниях допустимо отыскать на Рльдорадо казино .
Аккредитация составляет центральным фактором отбора портала. Надзорные органы Мальты дают качественный мониторинг валютных действий. Конкретная аккредитованная портал выполняет регулярные инспекции RNG-модулей.
Технические свойства передовых казино объединяют SSL-шифрование экономического стандарта. Провайдеры софтового продукта наподобие Microgaming, NetEnt, Pragmatic Play внедряют многоуровневые алгоритмы произвольных значений.
Механизм аутентификации учётной записи включает передачи свидетельств KYC-класса. Паспорт, справка о заработке, доказательство прописки — базовый перечень для окончательного входа.
Резервные адреса убирают трудности с запретами компаний. Актуальные копии корректируются регулярно компьютерными отделами. Смартфонные программы зачастую действуют лучше браузерных модификаций.
Банкролл-менеджмент задаёт стратегическую доходность беттинговых сессий. Грамотные игроки советуют урезать объём бета до 1-2% от совокупного резерва.
Поиск в сфере официальных сайтов предполагает знания новых способов доступа. Опытные клиенты используют lova casino для получения свежей сведений о действующих ссылках.
Процесс открытия аккаунта в лицензированных учреждениях включает детальную аутентификацию. Современные организации задействуют KYC-протоколы и AML-правила. Документальное сопровождение потребляет от 24 до 72 интервалов.
IT технологии для обхода барьеров прогрессируют сообща с укреплением юридических шагов. VPN-службы класса premium предоставляют безопасность AES-256 и системы OpenVPN. Постоянство канала жизненно актуальна для премиальных раундов.
Запасные платформы действуют через территориально разнесенные IT инфраструктуры. CDN-сети обеспечивают быструю пинг для глобальных участников. Автоматическое маршрутизация включается при выявлении блокировки основного сайта.
Платежные переводы в официальных территориях подчиняются строгим стандартам PCI DSS. Блокчейн транзакции завоевывают распространение вследствие приватности и темпу процессинга.
Мобильные софт элитных брендов содержат биометрическую идентификацию и push-уведомления для критических эпизодов. Гибкий оформление независимо адаптируется под параметры монитора.
zylvo link – Well-structured pages, smooth browsing and information is easy to access.
Игровая ниша демонстрирует интенсивный расширение, завлекая массы клиентов. Профессиональные сайты обеспечивают безопасную условия для ставок. Подробную данные о таких брендах можно получить на казино лова .
Легализация выступает приоритетным фактором селекции портала. Контролёры Мальты гарантируют жёсткий контроль финансовых манипуляций. Конкретная легальная ресурс проходит плановые проверки RNG-механизмов.
IT особенности актуальных игорных домов включают SSL-кодирование финансового класса. Поставщики софтового ПО уровня Microgaming, NetEnt, Pragmatic Play добавляют многоуровневые механизмы произвольных параметров.
Процесс аутентификации учётной записи подразумевает предоставления удостоверений KYC-формата. Свидетельство, выписка о средствах, доказательство местожительства — базовый перечень для окончательного подключения.
Альтернативные адреса убирают препятствия с цензурой организаций. Действующие зеркала корректируются регулярно техническими отделами. Планшетные клиенты зачастую выполняются устойчивее онлайн модификаций.
Финансовая дисциплина задаёт стратегическую результативность азартных сессий. Квалифицированные беттеры настаивают урезать сумму пари до 1-2% от полного резерва.
Современные геймеры пересекаются с изобилием цифровых нюансов при операциях с лицензированными платформами. Тематические источники типа ДживиСпин казино дают современную данные о процессах игорных организаций.
Система валидации счета охватывает набор требуемых этапов. Начальная проверка включает загрузки свидетельств подтверждающих гражданство. Стандартный набор включает паспорт, права или международный паспорт.
Цифровая элемент оформления предполагает эксплуатацию безопасного соединения и многофакторной защиты. Профессиональные клиенты предлагают запускать полный набор возможных функций безопасности.
Дублирующие порталы являются абсолютные реплики базового домена с удержанием полного арсенала. Главное бонус заключается в идентичности финансовых ограничений и параметров проигрыша.
Процедура нахождения рабочих запасных доменов базируется на наблюдении профильных новостных лент и аффилированных ресурсов. Профессиональные геймеры внедряют VPN-сервисы для обеспечения устойчивого соединения вне зависимости от географических запретов.
Thank you for the good writeup. It in fact was a amusement account it.
Look advanced to far added agreeable from you! By the way, how can we
communicate?
Review my page – best real estate agent in Joliet IL
https://www.uscgq.com/forum/posts.php?forum=general&id=647861
Лицензионные операторы азартных предложений предоставляют геймерам вариант к премиальному игровому процессу через целевые сайты, включая казино ретро , которые именно следуют глобальные требования защиты.
Процедура создания аккаунта necessita ввода проверочных информации через encrypted SSL-соединения. Администрация требуют письменное свидетельство совершеннолетия и локации проживания для выполнения legal критериев.
Многоуровневая authentication считается принудительным aspect современных систем security. Users приобретают SMS-шифры, push-сообщения или применяют профессиональные приложения наподобие Google Authenticator.
Mirror адреса ликвидируют сложности territorial запретов и DDoS-assault. По сути реплики формируют аналогичные клоны главного портала с обеспечением features и клиентских информации.
Экспертные клиенты suggest удерживать current списки активных альтернатив в сохранённых ссылках веб-клиента. Management доставляют информацию о актуальных адресах через email, Telegram-communities и mobile программы.
Payment процедуры через legal площадки гарантированы защитными протоколами уровня банковского области. Extraction капитала осуществляется лишь на проверенные данные собственника профиля.
hi!,I love your writing so much! proportion we keep up a correspondence extra approximately
your post on AOL? I require an expert on this space to resolve my problem.
May be that’s you! Looking forward to see you.
Ориентирование в пространстве официальных площадок подразумевает понимания современных инструментов доступа. Квалифицированные пользователи применяют казино СЂР° для приобретения актуальной фактов о функционирующих URL.
Механизм оформления аккаунта в лицензированных компаниях включает комплексную аутентификацию. Актуальные поставщики задействуют KYC-алгоритмы и AML-критерии. Бумажная работа требует от 24 до 72 промежутков.
Компьютерные способы для преодоления ограничений эволюционируют одновременно с интенсификацией правовых шагов. VPN-решения уровня premium обеспечивают кодирование AES-256 и системы OpenVPN. Непрерывность коннекта принципиально актуальна для элитных раундов.
Дублирующие домены функционируют через пространственно распределенные технические мощности. CDN-комплексы поддерживают минимальную время ответа для азиатских геймеров. Автоматическое маршрутизация инициируется при обнаружении препятствия первичного портала.
Банковские движения в лицензированных территориях соответствуют жестким критериям PCI DSS. Блокчейн переводы приобретают популярность в результате конфиденциальности и динамике реализации.
Планшетные утилиты ведущих провайдеров совмещают отпечатковую аутентификацию и push-сообщения для важных событий. Гибкий оформление независимо корректируется под параметры панели.
zaviroline link – Loads fast with clear and practical information throughout.
Поиск честного гемблинг заведения требует глубокого исследования лицензионных бумаг. Актуальные сайты казино Клубника предлагают игрокам стопроцентную детали о текущих разрешениях.
Система открытия аккаунта подразумевает несколько ключевых фаз верификации. Представители запрашивают бумаги, удостоверяющие идентичность и зрелость. Традиционный KYC-процесс требует от 24 до 72 промежутков.
Контроль средств открывается с определения лимитов на вклады. Компетентные игроки настаивают эксплуатировать норму 5% от полного казино фонда на единичную партию.
Цифровые барьеры операторов обязывают эксплуатировать дополнительные ссылки. Зеркала удерживают абсолютную производительность первичного ресурса, содержа журнал платежей и игровой результаты.
Передовые расчетные сервисы поддерживают оперативные пополнения через цифровые аккаунты. Bitcoin, Ethereum и стейблкоины обеспечивают приватность и символические сборы. Длительность реализации изъятий насчитывает 10-30 отрезков.
Системы лояльности предусматривают ступенчатые категории с накапливающимся кэшбэком. VIP-консультанты обеспечивают личные подарки, повышенные рамки и опережающую помощь.
Нынешние игроки оказываются с проблемой входа к лицензированным ресурсам. Поставщики блокируют базовые порталы, но профессиональные Vovan casino игроки помнят о наличии параллельных платформ.
Альтернативный адрес представляет идентичную реплику оригинального ресурса. Средства защиты сохраняются неизменными. Платёжные переводы реализуются через те же шлюзы.
Схема открытия счёта через параллельный адрес предполагает привычной верификации. Сотрудники уточняют удостоверения для соблюдения KYC-правил. Персональные характеристики выполняют комплексную валидацию.
Финансовые рамки на зеркальных площадках идентичны главным спецификациям. Начальные вклады сохраняются неизменными. Возрастающие накопления координируются между множественными адресами.
Стимулирующие программы работают комплексно на зеркальных порталах. Вейджер сохраняет базовые параметры. Тайминг проигрывания остаётся прежним.
Команда помощи анализирует вопросы с резервных доменов идентично. Прямой чат обеспечивает 24-часовой порядок обслуживания.
ravioncapital portal – Clean interface, everything loads quickly and is easy to read.
Howdy! I could have sworn I’ve visited your blog before but after going through a few of the articles I realized it’s new to me.
Anyways, I’m definitely delighted I found it and I’ll be bookmarking it and checking back frequently!
My webpage real estate agent Alberta Canada
Rutor — известный форум darknet-пространства России с давней историей, анонимной регистрацией и сервисом для защиты транзакций посредством Rutor.Rutor — старейший представитель даркнета на русском языке
зеркала rutor org — это один из самых известных и старейших сервисов в русскоязычном даркнете, который стал неотъемлемой частью экосистемы анонимных ресурсов. Этот магазин ориентирован на предоставление пользователям широкой базы данных, связанной с файлами, софтом, новостями и различными видами контента, включая темы, касающиеся взлома и безопасности.
Как устроена система работы Rutor
Механизм работы ресурса позволяет пользователям получать доступ к большим массивам данных и файлов, при этом обеспечивая максимальную приватность и анонимность. Главное преимущество платформы — интеграция с сетью Rutor, что значительно уменьшает вероятность раскрытия личности и потери конфиденциальной информации. За долгое время работы Rutor стал своего рода летописью для даркнета на русском языке.
Платформа функционирует стабильно, обеспечивая равный доступ для новых и опытных участников даркнета. Система построена таким образом, что каждый раздел страницы — будь то магазин, новости или инструкции по взлому — становится отдельной частью большого сообщества, в котором безопасность и возможность оставаться анонимным выходят на первый план.
Будущее платформы: вызовы и обещания
Безусловно, дальнейшая история Rutor будет связана с новыми формами риска, новыми способами защиты конфиденциальности и методами обхода блокировок. Пользователи должны осознавать, что даже самая анонимная система не гарантирует полной безопасности.
Этот сервис по-прежнему служит площадкой для информирования, обсуждений безопасности и отслеживания новшеств в даркнет-сообществе. Улучшение технологий, увеличение аудитории и внедрение инноваций способствуют статусу Rutor как центрального элемента русскоязычного онлайн-сообщества.
– Принцип анонимности
– Безопасность транзакций
– Доступ к уникальной информации
– Защищённость коммуникаций
Rutor — это платформа с уникальной историей, и её опыт стоит принимать во внимание всем, кто ценит собственную свободу, приватность и независимость от внешней цензуры в современном цифровом мире.
US Meds Outlet: US Meds Outlet – US Meds Outlet
https://indogenericexport.shop/# zanaflex medication
What’s up, I want to subscribe for this web site to get hottest updates,
thus where can i do it please help out.
my site; realtor in St. George UT
Подбор достойного азартного площадки в нынешних рамках требует тщательного внимания к законному уровню. Опытные клиенты знают, что РЎСѓРєР° казино включает актуальную информацию о действующих ресурсах.
Механизм регистрации в легальных площадках содержит обязательную аутентификацию документов. KYC-нормы обеспечивают как заведение, так и пользователя от мошенничества. Промежуточные границы на снятие финансов до окончания подтверждения – нормальная практика.
Электронные ограничения на подключение к развлекательным сайтам устраняются через зеркальные ссылки. Активные отражения гарантируют тотальную эффективность базового платформы. Платежные транзакции, игровой прогресс и поощрительные планы продолжают постоянными.
Материальная гарантированность выражается критерием применяемых денежных механизмов. SSL-кодирование, PCI DSS сертификация и дополнительная идентификация устанавливают надежный заслон охраны.
Игровая коллекция официальных операторов объединяет автоматы от главных создателей. RTP-параметры, вариативность и алгоритмические формулы испытывают внешнюю валидацию в одобренных институтах.
Схемы поощрения в надежных площадках основываются на четких параметрах вейджера. Требования x35-40 оценивается адекватным для автомат-поощрений, в то время как карточные развлечения идут в расчет с редуцированным показателем.
check krixa – Smooth browsing, layout is tidy and content is simple to follow.
Подбор безопасного betting портала в современных границах нуждается тщательного изучения к юридическому состоянию. Компетентные геймеры представляют, что ДживиСпин казино включает свежую данные о функционирующих провайдерах.
Схема оформления профиля в проверенных площадках охватывает обязательную верификацию личности. KYC-требования обеспечивают как сервис, так и игрока от афер. Переходные лимиты на изъятие денег до закрытия верификации – стандартная система.
Технические ограничения на соединение к игровым сервисам нейтрализуются через резервные порталы. Доступные зеркала сохраняют абсолютную возможности базового сайта. Денежные процедуры, интерактивный продвижение и бонусные предложения сохраняются устойчивыми.
Денежная безопасность характеризуется качеством эксплуатируемых денежных систем. SSL-шифрование, PCI DSS валидация и усиленная идентификация обеспечивают безопасный щит защиты.
Игровая ассортимент сертифицированных площадок охватывает машины от главных провайдеров. RTP-индексы, волатильность и вероятностные модели испытывают объективную контроль в утвержденных учреждениях.
Схемы поощрения в качественных сервисах строятся на четких требованиях ставок. Требования x35-40 считается приемлемым для машина-подарков, в то время как стандартные развлечения включаются в счет с сниженным коэффициентом.
Great goods from you, man. I have understand your stuff previous to and you are just too excellent.
I really like what you have acquired here, certainly like what you are saying
and the way in which you say it. You make it entertaining and you still take care of to keep it
wise. I cant wait to read much more from you. This is really a
tremendous web site.
my web blog: real estate agent Chino Hills CA
After testing several platforms, I found this casino https://xiglute.com/profile/21634347 to be reliable. The welcome bonus is fair, terms are transparent, and payouts don’t take forever, making it suitable for casual players.
“I would give up the unessential; I would give my money, I would give my life for my children; but I wouldn’t give myself.” This quote is the heart of the novel. To understand what Edna means, you must read the awakening pdf. It contextualizes this radical statement within the story of her life. The digital format allows you to save and share these powerful quotes easily. It is a declaration of independence that still shocks and inspires readers today. https://theawakeningpdf.store/ The Awakening Pdf Free Download
полотенцесушитель сунержа полотенцесушитель для ванной
Навигация в секторе официальных платформ включает знания продвинутых методов соединения. Профессиональные клиенты применяют Tip top зеркало для добывания современной фактов о функционирующих адресах.
Процедура открытия профиля в надежных операторах подразумевает детальную аутентификацию. Актуальные провайдеры применяют KYC-алгоритмы и AML-стандарты. Документальная процедура потребляет от 24 до 72 временных отрезков.
Компьютерные решения для преодоления блокировок улучшаются параллельно с усилением нормативных мер. VPN-службы разряда premium предоставляют шифрование AES-256 и стандарты OpenVPN. Непрерывность канала критически актуальна для премиальных раундов.
Резервные платформы оперируют через регионально рассредоточенные цифровые ресурсы. CDN-системы осуществляют сокращенную время ответа для американских игроков. Цифровое переключение срабатывает при выявлении блокировки центрального ресурса.
Денежные движения в официальных территориях подпадают под четким требованиям PCI DSS. Децентрализованные расчеты получают признание из-за скрытности и динамике обработки.
Портативные программы элитных провайдеров содержат лицевую авторизацию и push-извещения для важных событий. Настраиваемый оформление самостоятельно корректируется под настройки матрицы.
Отбор надежного казино заведения требует серьезного изучения лицензионных сертификатов. Новые сайты Рльдорадо казино обеспечивают игрокам максимальную информацию о текущих санкциях.
Алгоритм регистрации содержит ряд ключевых этапов подтверждения. Владельцы настаивают справки, устанавливающие идентичность и возраст. Стандартный KYC-алгоритм длится от 24 до 72 интервалов.
Банкролл-менеджмент начинается с определения пределов на взносы. Профессиональные участники настаивают задействовать установку 5% от совокупного развлекательного бюджета на конкретную партию.
Программные блокировки администраторов обязывают задействовать дополнительные маршруты. Альтернативы сохраняют безусловную работоспособность главного платформы, охватывая журнал операций и азартный продвижение.
Новые финансовые способы предоставляют мгновенные пополнения через цифровые хранилища. Bitcoin, Ethereum и стабильные валюты дают тайность и минимальные взносы. Длительность проведения выводов равно 10-30 промежутков.
Системы преданности включают каскадные уровни с прогрессивным компенсацией. VIP-консультанты дают эксклюзивные поощрения, повышенные рамки и преимущественную техподдержку.
Crypto Casino Australia Real Money Real Secret Million Builder
Hi I am so grateful I found your weblog, I really found you by accident, while I was searching on Digg for something else, Regardless I am here now and would just like to say thanks a lot for
a incredible post and a all round enjoyable blog (I also
love the theme/design), I don’t have time to read through it
all at the moment but I have book-marked it and also included your RSS feeds, so when I have time I will be back to read much more, Please do keep up the fantastic work.
my web-site: best real estate agent in Alberta Canada
The lush jungles of Chult are not just background scenery; they are a character in the story. Heat, rain, and insects wear down the heroes. The survival rules in the Tomb of Annihilation PDF are specific and harsh. DMs need to reference them constantly. How much water does a character need in heavy armor? What happens if they eat the wrong berry? The digital guide provides quick tables for these mechanics. It keeps the survival aspect at the forefront without slowing down the game with page flipping. This attention to environmental detail is what makes the campaign so immersive. https://tombofannihilationpdf.store/ Tomb Of Annihilation Pdf Download Reddit
Woah! I’m really digging the template/theme of
this website. It’s simple, yet effective. A lot of times it’s difficult to get
that “perfect balance” between superb usability and appearance.
I must say you’ve done a excellent job with this. Additionally, the blog loads
extremely fast for me on Safari. Exceptional Blog!
my blog best realtor in Alberta Canada
I’m not sure why but this web site is loading very slow for me.
Is anyone else having this issue or is it a issue on my end?
I’ll check back later on and see if the problem still exists.
My homepage … промокод для винлаба
Angels Bail Bonds Torrance
2013 Cabrillo Ave, Torrance,
California, 90501, United Ѕtates
(310) 944-9500
bail bonds payment plans
What’s up everyone, it’s my first pay a quick visit at this site,
and paragraph is really fruitful in favor of me, keep up posting such posts.
My blog :: real estate agent St. Charles IL
Проверенные операторы игровых сервисов обеспечивают участникам возможность к высококлассному развлечениям через профильные домены, включая lucky bear казино , которые придерживаются международные критерии защиты.
Алгоритм активации требует ввода authentication сведений через защищённые SSL-каналы. Букмекеры просят предоставить официальное подтверждение правоспособности и адреса нахождения для compliance законодательных требований.
2FA верификация представляет обязательным компонентом современных механизмов security. Users обретают SMS-шифры, push-notification или используют dedicated приложения в стиле Google Authenticator.
Mirror URL ликвидируют трудности territorial барьеров и DDoS-воздействий. Техническим образом mirrors образуют копийные реплики primary ресурса с maintaining опций и user деталей.
Компетентные клиенты призывают поддерживать current реестры активных копий в избранном browser. Букмекеры отправляют новости о fresh ссылках через почтовые сервисы, Telegram-чаты и mobile приложения.
Payment переводы через лицензионные платформы защищены encryption системами уровня банковского сектора. Получение фондов осуществляется единственно на validated счета владельца аккаунта.
Рабочие дублирующие порталы проверенных азартных клубов на казино аква создают беспрерывный соединение к геймерским системам. Методика копирования генерирует идентичные версии центрального ресурса с консервацией всех опций.
Система активации через mirror-сайт абсолютно дублирует оригинальную заявку. Дебютные участники прописывают рабочий email, устанавливают сложный код доступа и определяют основную денежную единицу.
Валидация счета требует загрузки удостоверений следуя KYC-стандартам. Снимок паспорта, валидация адреса и банковские координаты анализируются посредством цифровую валидацию в течение 24-72 временных единиц.
Подключение существующих клиентов выполняется через стандартную форму с 2FA валидацией. Одноразовые ключи отправляются на мессенджер девайс или email.
Инструменты финансового блока через зеркала поддерживает актуальные банковские инструменты. Visa, Mastercard, веб портмоне Skrill, Neteller, виртуальные монеты Bitcoin, Ethereum обрабатываются с минимальными взносами 0-3%.
Gaming коллекция клонируется абсолютно включая барабаны, классические геймплей, live-крупье и прогрессивы. RTP-индикаторы, колебания и условия отыгрыша сохраняются аналогичными.
Подарочная схема выполняется идентично центральному домену. Welcome-бандлы, фриспины, кешбэк и VIP-планы активируются алгоритмически при достижении определенных условий.
Sijoitusstrategiat 2026: miten kasvattaa varallisuutta
https://www.getneos.com/sijoitusstrategiat-2026/
browse group – Clean interface, with content presented clearly for quick understanding.
Развлекательная индустрия представляет динамичный расширение, притягивая тысячи пользователей. Квалифицированные платформы предлагают защищённую пространство для беттинга. Подробную сведения о указанных организациях возможно обнаружить на типпи регистрация .
Легализация представляет основным фактором выбора сайта. Лицензиаты Великобритании дают тщательный аудит денежных манипуляций. Отдельная легальная сайт выполняет периодические контроли RNG-модулей.
Компьютерные аспекты современных беттинг-платформ охватывают SSL-криптографию банковского стандарта. Производители цифрового продукта типа Microgaming, NetEnt, Pragmatic Play внедряют сложные алгоритмы рандомных величин.
Алгоритм подтверждения личного кабинета требует представления бумаг KYC-класса. Паспорт, свидетельство о заработке, удостоверение проживания — обычный пакет для окончательного авторизации.
Зеркальные адреса убирают препятствия с фильтрацией операторов. Свежие варианты модифицируются ежедневно цифровыми специалистами. Смартфонные программы нередко оперируют качественнее веб редакций.
Банкролл-менеджмент создаёт стратегическую доходность развлекательных партий. Экспертные игроки рекомендуют лимитировать размер депозита до 1-2% от общего бюджета.
Надёжные провайдеры гэмблинг опций oferuja геймерам шанс к премиальному азартному досугу через тематические порталы, включая лаки Р±РёСЂ казино , которые следуют международные требования надёжности.
Последовательность оформления профиля предполагает внесения валидационных параметров через защищённые SSL-соединения. Букмекеры требуют письменное verification совершеннолетия и места проживания для исполнения правовых требований.
Многоуровневая authentication представляет обязательным составляющей современных solutions security. Участники обретают SMS-коды, push-алерты или применяют targeted утилиты вроде Google Authenticator.
Зеркальные порталы нейтрализуют трудности географических блокировок и DDoS-assault. Технически дубли являют копийные копии главного ресурса с maintaining features и клиентских параметров.
Skilled клиенты призывают удерживать current базы working зеркал в избранном обозревателя. Провайдеры рассылают информацию о свежих ссылках через мейл, Telegram-communities и портативные apps.
Payment транзакции через лицензионные площадки secured шифровальными methods уровня банковского segment. Extraction капитала выполняется только на подтверждённые реквизиты хозяина аккаунта.
click to view – Pages are neatly structured, making it simple to find what I needed.
Hey there! Do you know if they make any plugins to protect against hackers?
I’m kinda paranoid about losing everything I’ve worked hard on. Any recommendations?
my blog post; realtor in Joliet IL
Nice blog here! Also your website a lot up fast! What host are
you the use of? Can I am getting your associate hyperlink to your host?
I desire my site loaded up as quickly as yours lol
Hey, I think your site might be having browser compatibility issues.
When I look at your website in Safari, it looks fine but when opening in Internet
Explorer, it has some overlapping. I just wanted to give you a quick heads up!
Other then that, terrific blog!
my web-site … realtor in Lake Oswego OR
https://securityholes.science/wiki/User:Codevip1xbet2026
There’s definately a great deal to find out about this issue.
I really like all of the points you’ve made.
Новейшие порталы игорных услуг гарантируют клиентам вход к высококлассному беттингу через надежные винити казино ресурсы. Легальная деятельность влечет следования строгих законодательных норм.
Механизм оформления игрового профиля включает верификацию приватных показателей. Провайдеры используют расширенные механизмы KYC и AML для исключения незаконных переводов.
Технические инструменты передовых игорных домов основываются на стабильных серверах с криптографическими сертификатами. IP-фильтрация обязывает владельцев создавать альтернативные адреса.
Параллельные платформы представляют эквивалентные копии основного домена с поддержанием всех опций и данных. Участники достигают беспрепятственный доступ к капиталу, развлекательной истории и индивидуальным опциям.
Денежные переводы производятся через встроенные денежные процессоры. Ограничения на взносы и обналичивания определяются в согласии с нормативными стандартами и корпоративными правилами управления рисками.
Профессиональные игроки предлагают контролировать состояние разрешения через надзорные регистры азартных комиссий. Имиджевые критерии содержат рейтинги на специализированных сайтах и комментарии подлинных беттеров.
Выбор безопасного азартного площадки в нынешних обстоятельствах подразумевает специального внимания к правовому режиму. Знающие игроки знают, что СЌРЅРѕРјРѕ казино демонстрирует свежую материалы о функционирующих провайдерах.
Алгоритм регистрации в лицензированных площадках предусматривает неизбежную подтверждение документов. KYC-нормы защищают как оператора, так и геймера от афер. Краткосрочные границы на перечисление средств до окончания проверки – обычная подход.
Программные препятствия на связь к азартным ресурсам преодолеваются через резервные порталы. Функционирующие дубликаты гарантируют тотальную эффективность основного сайта. Расчетные процедуры, азартный прогресс и привилегированные схемы поддерживаются стабильными.
Капитальная надежность определяется критерием используемых расчетных методов. SSL-кодирование, PCI DSS сертификация и дополнительная аутентификация обеспечивают безопасный периметр безопасности.
Игровая библиотека проверенных провайдеров предоставляет автоматы от главных студий. RTP-показатели, изменчивость и расчетные принципы получают нейтральную валидацию в одобренных учреждениях.
Механизмы стимулирования в достойных заведениях базируются на прозрачных критериях вейджера. Проигрыш x35-40 оценивается разумным для спин-подарков, в то время как стандартные состязания принимаются в зачет с уменьшенным множителем.
Crypto Real Money Casino Australia Quietly Stack Your Wins
I’m really enjoying the design and layout of
your website. It’s a very easy on the eyes which makes it much more enjoyable for me to come here and visit more often. Did you hire out
a designer to create your theme? Fantastic work!
Here is my blog … best real estate agent in St. George UT
Актуальные игроки имеют дело с массой системных тонкостей при деятельности с сертифицированными порталами. Экспертные сайты типа Болливуд зеркало поставляют релевантную данные о операциях игорных провайдеров.
Процедура аутентификации кабинета предполагает ряд обязательных уровней. Первичная верификация нуждается предоставления удостоверений верифицирующих субъект. Типовой список предполагает ID, лицензию водителя или загранпаспорт.
Цифровая часть создания аккаунта содержит использование SSL-шифрования и многофакторной защиты. Продвинутые геймеры рекомендуют запускать максимум представленных возможностей обеспечения.
Запасные домены являются абсолютные отражения основного портала с обеспечением тотального набора функций. Главное преимущество выражается в идентичности расчетных пределов и параметров проигрыша.
Процедура поиска актуальных зеркал базируется на мониторинге профессиональных уведомительных сервисов и союзных порталов. Квалифицированные геймеры внедряют VPN-сервисы для гарантирования стабильного связи безотносительно от локальных запретов.
Активные дублирующие порталы проверенных гемблинг-платформ на lucky bear казино онлайн скачать создают постоянный соединение к азартным платформам. Технология зеркалирования образует идентичные клоны центрального портала с фиксацией всех возможностей.
Схема регистрации через зеркало полностью воспроизводит оригинальную форму. Свежие игроки регистрируют действующий email, устанавливают стойкий шифр и выбирают операционную платежное средство.
Валидация учетной записи требует представления справок опираясь на KYC-нормам. Снимок водительских прав, верификация места жительства и денежные реквизиты контролируются системой автоматическую валидацию в течение 24-72 временных единиц.
Логин зарегистрированных участников происходит через типовую интерфейс с расширенной верификацией. Сессионные ключи отправляются на сотовый девайс или электронную почту.
Функционал пополнительного сектора через альтернативные домены поддерживает распространенные финансовые системы. Visa, Mastercard, онлайн кошельки Skrill, Neteller, блокчейн-токены Bitcoin, Ethereum осуществляются с низкими процентами 0-3%.
Гемблинг каталог воспроизводится полностью включая машины, традиционные геймплей, live-хостов и накопительные призы. RTP-показатели, волатильность и условия отыгрыша фиксируются идентичными.
Бонусная политика действует аналогично базовому сайту. Welcome-наборы, бесплатные вращения, refund и VIP-схемы стартуют программно при достижении установленных требований.
https://indogenericexport.com/# world pharmacy india
this ravionbondgroup site – Layout is minimal, sections are easy to find, and everything is readable.
I believe everything published was actually very logical.
However, what about this? what if you were to write a killer headline?
I mean, I don’t want to tell you how to run your website, but suppose you added something to possibly
get a person’s attention? I mean Santa Claus Christmas Ball Tutorial
Adobe Illustrator. – My Downloadables is a little boring.
You should look at Yahoo’s home page and watch how they create news titles to grab viewers interested.
You might try adding a video or a related pic or two to
get readers interested about everything’ve got to say.
In my opinion, it would make your blog a little bit
more interesting.
Feel free to surf to my homepage – best real estate agent in Santa Fe NM
pin-up apk linki pin-up apk linki
Актуальные mirror-ссылки надежных казино на казино Килограмм предоставляют стабильный подключение к развлекательным ресурсам. Технология зеркалирования образует эквивалентные версии основного ресурса с сохранением всех механизмов.
Процедура создания аккаунта через дублирующий портал целиком повторяет стандартную бланк. Новые игроки прописывают действующий email, генерируют стойкий ключ и определяют базовую валюту.
Подтверждение аккаунта содержит загрузки справок следуя KYC-стандартам. Скан ID-карты, подтверждение места жительства и финансовые данные проверяются через программную анализ в течение 24-72 временных единиц.
Вход верифицированных клиентов реализуется через обычную форму с усиленной верификацией. Сессионные шифры поступают на телефонный девайс или почтовый ящик.
Инструменты депозитного блока через зеркала предлагает распространенные платежные механизмы. Visa, Mastercard, виртуальные хранилища Skrill, Neteller, виртуальные монеты Bitcoin, Ethereum осуществляются с сокращенными платежами 0-3%.
Gaming библиотека воспроизводится целиком включая автоматы, столовые развлечения, live-операторов и максимальные награды. RTP-индикаторы, вариативность и условия отыгрыша остаются неизменными.
Акционная система выполняется подобно основному веб-площадке. Welcome-наборы, free spins, возврат средств и VIP-системы включаются программно при выполнении определенных стандартов.
It is the best time to make a few plans for the long run and it
is time to be happy. I have read this put up and if I may
I desire to suggest you some interesting things or advice.
Maybe you can write next articles relating to this article.
I wish to read more things approximately it!
Отбор проверенного азартного заведения подразумевает основательного исследования правовых свидетельств. Актуальные сайты lucky bear казино предлагают геймерам стопроцентную данные о действующих санкциях.
Процесс получения доступа включает ряд требуемых ступеней верификации. Представители запрашивают справки, засвидетельствующие персону и возраст. Классический KYC-механизм занимает от 24 до 72 промежутков.
Распоряжение капиталом открывается с задания лимитов на пополнения. Опытные клиенты рекомендуют использовать установку 5% от общего казино бюджета на конкретную партию.
Электронные препятствия администраторов заставляют использовать дополнительные домены. Копии хранят полную эффективность главного ресурса, содержа хронологию переводов и азартный прогресс.
Современные денежные способы гарантируют моментальные взносы через блокчейн счета. Bitcoin, Ethereum и стейблкоины гарантируют приватность и крошечные платежи. Период проведения изъятий составляет 10-30 отрезков.
Алгоритмы приверженности подразумевают иерархические ранги с нарастающим бонусом. VIP-представители гарантируют индивидуальные вознаграждения, улучшенные рамки и приоритетную поддержку.
This paragraph will assist the internet visitors for creating new webpage or even a
blog from start to end.
If some one wishes to be updated with latest technologies therefore he must be pay a
visit this web page and be up to date all the time.
Also visit my web site … best realtor in Lake Oswego OR
Good post. I learn something totally new and challenging
on blogs I stumbleupon every day. It will always be helpful to read through content from other writers and practice a little something from their
websites.
Look at my web site :: real estate agent St. Charles IL
Fugu Casino is an web-based casino that
is paired with a sportsbook area and poker in one platform.
In the casino catalog, players usually encounter a broad slot catalog plus standard
table games such as blackjack variants, roulette wheels, and baccarat tables, with certain games offered in live casino modes.
The experience is built for browsers, so it is commonly
used on computers and phones through a responsive website.
Before playing, it’s smart to look over the conditions, especially around promo
offers and playthrough rules, plus how different games count toward those requirements.
It also helps to understand withdrawal options, any thresholds, and verification steps that can affect cash-out speed.
Availability and compliance status can change by region, so it’s worth confirming what’s available where you are and using
safer boundaries.
My web site: skydance
Rutor служит анонимным сервисом для проведения безопасных действий и давно считается ресурсом с безупречной репутацией на рынке Rutor.Rutor — старейший представитель даркнета на русском языке
зеркало рутор поиск — это один из первых и известнейших русскоязычных ресурсов даркнета, неразрывно связанный с анонимной онлайн-экосистемой. Основное направление работы ресурса — предоставление обширной базы файлов, утилит, новостей и прочего контента, в том числе, связанного с темами безопасности и взлома.
Как устроена система работы Rutor
Система курирует доступ к огромному количеству информации и файлов, сохраняя дополнительную конфиденциальность и анонимность своих пользователей. Особенность сервиса в том, что он работает через сеть Rutor, что существенно снижает риск идентификации и утечки данных. С течением времени площадка превратилась в важный архив событий и истории русскоязычного даркнета.
Rutor продолжает работать и предоставлять стабильный доступ к ресурсам, удовлетворяя потребности как новичков, так и опытных пользователей даркнета. Архитектура ресурса предусматривает, что любые разделы — магазин, новостной блок или гайды по взлому — являются составляющими единой системы, где превалируют безопасность и анонимность.
Перспективы и риски
Ясно, что будущая деятельность Rutor потребует решения новых рисков, внедрения свежих подходов к безопасности и средств обхода ограничений. Пользователи должны осознавать, что даже самая анонимная система не гарантирует полной безопасности.
Сервис остается местом, где можно получать дополнительную информацию, обсуждать вопросы безопасности, следить за новостями и инновациями в области даркнета. Развитие технологий, расширение базы пользователей и появление новых возможностей делают Rutor одним из центров русскоязычного сообщества в сети.
– Анонимность
– Безопасность транзакций
– Возможность получения эксклюзивных данных
– Обеспечение приватности взаимодействий
Rutor — это платформа с уникальной историей, и её опыт стоит принимать во внимание всем, кто ценит собственную свободу, приватность и независимость от внешней цензуры в современном цифровом мире.
Win Real Money Casino Australia The Thrill Is Real
Отбор безопасного азартного заведения в актуальных реалиях подразумевает повышенного анализа к законному уровню. Знающие участники представляют, что РјСЌРґ казино содержит свежую информацию о действующих провайдерах.
Процесс записи в официальных операторах объединяет требуемую верификацию персональных данных. KYC-правила оберегают как заведение, так и игрока от афер. Промежуточные пределы на изъятие денег до выполнения подтверждения – типичная практика.
Цифровые запреты на вход к betting ресурсам решаются через альтернативные URL. Рабочие копии поддерживают стопроцентную функциональность первичного сайта. Расчетные операции, интерактивный результаты и бонусные предложения сохраняются стабильными.
Капитальная надежность измеряется показателем внедренных банковских систем. SSL-криптография, PCI DSS лицензирование и двухфакторная идентификация создают надежный заслон охраны.
Интерактивная библиотека лицензированных провайдеров содержит слоты от ведущих разработчиков. RTP-показатели, вариативность и алгоритмические формулы проходят объективную контроль в признанных институтах.
Схемы вознаграждения в качественных сервисах формируются на понятных правилах отыгрыша. Вейджер x35-40 оценивается справедливым для барабан-поощрений, в то время как классические развлечения засчитываются в калькуляцию с уменьшенным коэффициентом.
Действующие резервные адреса лицензированных игорных заведений на mad casino предоставляют постоянный вход к развлекательным порталам. Система зеркалирования создает эквивалентные версии корневого ресурса с сохранением всех возможностей.
Схема создания аккаунта через альтернативный домен полностью копирует стандартную форму. Начинающие геймеры прописывают действующий email, создают надежный секретную комбинацию и определяют рабочую валюту.
Валидация профиля предполагает представления бумаг по KYC-политике. Скан удостоверения личности, доказательство проживания и денежные реквизиты подвергаются машинную контроль в течение 24-72 часа.
Аутентификация существующих клиентов реализуется через базовую интерфейс с двухфакторной валидацией. Сессионные шифры поступают на сотовый гаджет или email.
Инструменты финансового блока через альтернативные домены содержит распространенные банковские сервисы. Visa, Mastercard, электронные портмоне Skrill, Neteller, цифровые активы Bitcoin, Ethereum процессируются с низкими комиссиями 0-3%.
Gaming база клонируется абсолютно включая слоты, столовые игры, live-дилеров и накопительные призы. RTP-индикаторы, изменчивость и вейджер удерживаются такими же.
Подарочная схема действует похоже главному сайту. Welcome-комплекты, даровые прокруты, кешбэк и VIP-курсы стартуют системно при соблюдении определенных стандартов.
https://angelladydety.getbb.ru/viewtopic.php?f=39&t=66116
Hi i am kavin, its my first time to commenting anyplace, when i read this paragraph i thought i could also create comment due to this good post.
Look into my web blog :: realtor in Franklin TN
Best Online Casino Real Money Australia Volatility That Delivers Real Millions
vexaro review – Checked this quickly, pages are easy to read and overall experience is smooth.
Функционирующие альтернативные домены лицензированных гемблинг-платформ на mad casino зеркало создают непрерывный доступ к гемблинг сервисам. Принцип клонирования строит полноценные реплики основного ресурса с консервацией всех инструментов.
Алгоритм открытия счета через резервную ссылку абсолютно дублирует главную заявку. Новые пользователи указывают действующий email, создают безопасный код доступа и назначают рабочую финансовый инструмент.
Подтверждение аккаунта включает предоставления документов в соответствии с KYC-нормам. Снимок паспорта, валидация резиденции и платежные сведения анализируются посредством цифровую валидацию в течение 24-72 ч.
Вход существующих участников производится через обычную интерфейс с 2FA валидацией. Разовые пароли отправляются на сотовый девайс или почтовый ящик.
Функционал денежного сектора через mirror-сайты включает популярные платежные механизмы. Visa, Mastercard, виртуальные кошельки Skrill, Neteller, криптовалюты Bitcoin, Ethereum выполняются с низкими платежами 0-3%.
Развлекательная библиотека дублируется полностью включая машины, традиционные забавы, live-дилеров и максимальные награды. RTP-коэффициенты, волатильность и вейджер поддерживаются идентичными.
Акционная политика действует идентично корневому сайту. Welcome-бандлы, безвозмездные спины, денежный возврат и VIP-планы включаются автоматически при выполнении установленных параметров.
Отбор надежного азартного площадки заставляет тщательного исследования правовых бумаг. Современные сайты https://zelenovskoe.ru/ru-ru/ предоставляют клиентам стопроцентную детали о действующих аккредитациях.
Процедура получения доступа охватывает несколько требуемых этапов валидации. Провайдеры требуют удостоверения, засвидетельствующие самобытность и правоспособность. Обычный KYC-регламент продолжается от 24 до 72 интервалов.
Финансовое планирование инициируется с задания лимитов на взносы. Компетентные геймеры настаивают внедрять норму 5% от полного гемблинг резерва на индивидуальную заход.
Электронные ограничения администраторов принуждают использовать запасные ссылки. Дубликаты удерживают безусловную активность первичного сайта, предусматривая хронологию транзакций и игровой успех.
Современные банковские сервисы обеспечивают моментальные вклады через криптовалютные аккаунты. Bitcoin, Ethereum и стабильные валюты обеспечивают анонимность и крошечные платежи. Срок обработки выводов достигает 10-30 промежутков.
Планы верности содержат градационные уровни с возрастающим вознаграждением. VIP-менеджеры дают эксклюзивные бонусы, увеличенные пределы и опережающую обслуживание.
velvix site – Smooth layout, user navigation is intuitive and all details are easy to locate.
mostbet барнома кор намекунад http://mostbet67254.help/
Pokies Real Money Australia Real One Spin To Legendary Millions
Crypto Online Casino Australia Bitcoin Options
https://bajameddirect.shop/# BajaMed Direct
Активные дублирующие порталы лицензированных казино на казино Вован гарантируют стабильный доступ к развлекательным порталам. Технология дублирования образует полноценные копии главного ресурса с фиксацией всех возможностей.
Система оформления профиля через альтернативный домен на сто процентов копирует оригинальную форму. Свежие клиенты вводят валидный email, придумывают защищенный пароль и устанавливают основную денежную единицу.
Верификация аккаунта содержит передачи документов опираясь на KYC-политике. Копия национального документа, подтверждение проживания и карточные реквизиты проверяются через программную валидацию в течение 24-72 часа.
Подключение действующих участников производится через классическую форму с усиленной верификацией. Одноразовые токены отправляются на телефонный аппарат или почтовый ящик.
Механизмы денежного сектора через зеркала поддерживает распространенные расчетные механизмы. Visa, Mastercard, онлайн портмоне Skrill, Neteller, crypto Bitcoin, Ethereum выполняются с уменьшенными взносами 0-3%.
Гемблинг ассортимент дублируется в точности включая машины, традиционные активности, live-крупье и максимальные награды. RTP-показатели, изменчивость и вейджер остаются аналогичными.
Промо схема действует схоже главному ресурсу. Welcome-комплекты, безвозмездные спины, возврат средств и VIP-программы стартуют машинально при исполнении заданных параметров.
Актуальные альтернативные домены лицензированных gaming-операторов на Болливуд казино обеспечивают устойчивый вход к геймерским платформам. Технология реплицирования строит идентичные дубликаты центрального домена с консервацией всех механизмов.
Схема активации через альтернативный домен целиком повторяет базовую бланк. Только пришедшие игроки вводят действующий email, формируют надежный код доступа и определяют игровую платежное средство.
Идентификация личного кабинета требует передачи свидетельств опираясь на KYC-политике. Скан паспорта, свидетельство места жительства и карточные данные подвергаются машинную проверку в течение 24-72 периодов.
Вход существующих пользователей осуществляется через классическую панель с расширенной идентификацией. Сессионные ключи отправляются на мобильный устройство или почтовый ящик.
Возможности депозитного сектора через зеркала обеспечивает востребованные банковские сервисы. Visa, Mastercard, веб хранилища Skrill, Neteller, crypto Bitcoin, Ethereum обрабатываются с сокращенными платежами 0-3%.
Развлекательная ассортимент клонируется целиком включая барабаны, классические забавы, live-операторов и прогрессивы. RTP-показатели, колебания и проигрыш поддерживаются идентичными.
Бонусная схема действует похоже основному ресурсу. Welcome-бандлы, free spins, денежный возврат и VIP-программы запускаются программно при реализации фиксированных требований.
This casino http://mbbs.com/best-casino-online-globally-holistic-analysis-11/ offers a solid mix of popular slots and live tables. The platform feels well-designed, promotions are worth trying, and support is responsive, which adds confidence.
Hi i am kavin, its my first time to commenting anywhere, when i read this paragraph i thought i could also create
comment due to this brilliant piece of writing.
visit quixo – Dropped in by chance and everything made sense right away, nice experience.
Hello friends, how is everything, and what you would like to say
about this paragraph, in my view its actually remarkable in favor of me.
Stop by my web-site; best realtor in Rancho Cucamonga CA
Актуальные игроки встречаются с препятствием связи к проверенным платформам. Поставщики закрывают базовые ссылки, но грамотные лаки Р±РёСЂ казино официальный сайт участники знают о присутствии дублирующих площадок.
Дополнительный домен является идентичную отображение базового сайта. Средства защиты остаются равнозначными. Денежные операции производятся через сходные механизмы.
Схема оформления профиля через альтернативный портал содержит типовой валидации. Администраторы выясняют документы для осуществления KYC-норм. Персональные параметры проходят двухфакторную подтверждение.
Вносительные рамки на зеркальных платформах идентичны базовым условиям. Наименьшие беты остаются константными. Увеличивающиеся джекпоты синхронизируются между всеми доменами.
Стимулирующие схемы функционируют полноценно на резервных порталах. Множитель ставок поддерживает первоначальные параметры. Тайминг проигрывания поддерживается.
Служба помощи обрабатывает обращения с альтернативных ресурсов идентично. Интерактивный чат предоставляет 24-часовой расписание обслуживания.
It’s in fact very complicated in this active life to listen news on Television, therefore
I simply use internet for that purpose, and get the hottest information.
Актуальные провайдеры азартных развлечений предлагают участникам подключение к профессиональному беттингу через проверенные Болливуд порталы. Авторизованная работа нуждается соблюдения строгих законодательных положений.
Система активации пользовательского учетной записи задействует подтверждение конфиденциальных данных. Управляющие задействуют углубленные алгоритмы KYC и AML для предотвращения фродовых финансовых действий.
Технические решения актуальных гемблинг платформ функционируют на безопасных облачных системах с SSL алгоритмами. Локальные запреты заставляет провайдеров внедрять вспомогательные домены.
Альтернативные ресурсы формируют точные клоны центрального сайта с поддержанием всех функций и информации. Игроки обеспечивают себе беспрепятственный подключение к депозиту, азартной записям и клиентским настройкам.
Платежные переводы выполняются через интегрированные расчетные системы. Пределы на пополнения и снятия устанавливаются в соответствии с нормативными требованиями и индивидуальными регламентами риск-менеджмента.
Квалифицированные беттеры советуют проверять статус сертификата через надзорные базы данных игорных комиссий. Репутационные критерии содержат места на профильных сервисах и feedback истинных пользователей.
This is a helpful article and I really appreciate how clearly everything is explained.
Many people often struggle when choosing the right sportsbook, and this post explains
the topic in a simple way.
The information about performance is useful, especially for users who are new to online
betting.
Thanks for sharing this practical content.
Функционирующие зеркала проверенных казино на лаки Р±РёСЂ гарантируют постоянный вход к развлекательным системам. Принцип клонирования генерирует точные реплики корневого веб-площадки с консервацией всех инструментов.
Механизм оформления профиля через дублирующий портал в точности воспроизводит главную форму. Начинающие пользователи прописывают действующий email, генерируют надежный шифр и назначают рабочую финансовый инструмент.
Аутентификация аккаунта предполагает предоставления документов согласно KYC-стандартам. Скан ID-карты, доказательство регистрации и карточные реквизиты проверяются через автоматическую контроль в течение 24-72 ч.
Вход верифицированных участников производится через типовую панель с двухфакторной аутентификацией. Временные токены доставляются на мобильный аппарат или e-mail адрес.
Возможности депозитного раздела через резервные ссылки предлагает распространенные банковские сервисы. Visa, Mastercard, веб балансы Skrill, Neteller, цифровые активы Bitcoin, Ethereum осуществляются с минимальными взносами 0-3%.
Азартная ассортимент повторяется абсолютно включая слоты, классические развлечения, live-операторов и максимальные награды. RTP-показатели, волатильность и условия отыгрыша фиксируются идентичными.
Акционная механизм работает схоже базовому домену. Welcome-предложения, даровые прокруты, денежный возврат и VIP-программы включаются автоматически при достижении установленных условий.
I do not know if it’s just me or if perhaps
everyone else experiencing problems with your site. It appears
as though some of the written text on your content are running off the screen. Can someone else please comment
and let me know if this is happening to them as well?
This may be a problem with my browser because I’ve had this happen before.
Cheers
My blog … best realtor in Santa Fe NM
Передовые участники имеют дело с массой системных деталей при деятельности с сертифицированными порталами. Профильные платформы типа Голд дают свежую материалы о функционировании игорных провайдеров.
Процедура аутентификации счета содержит множество принудительных стадий. Первичная подтверждение включает загрузки справок доказывающих персону. Стандартный набор подразумевает документ, автолицензию или загранпаспорт.
Программная элемент оформления охватывает эксплуатацию криптографической защиты и многофакторной защиты. Профессиональные клиенты предлагают включать все предложенных опций охраны.
Альтернативные адреса формируют стопроцентные клоны первичного платформы с поддержанием исчерпывающего функционала. Ключевое преимущество содержится в подобии платежных ограничений и норм отыгрыша.
Процедура обнаружения рабочих зеркал фундируется на отслеживании профильных телеграм-каналов и партнерских сайтов. Экспертные участники внедряют туннельные протоколы для предоставления стабильного связи невзирая от местных ограничений.
adderall canadian pharmacy: discount pharmacy – US Meds Outlet
visit cavaroline – Clean layout allows smooth browsing and fast access to important details.
zavirobonding page – Smooth navigation and clear content made exploring the site effortless.
open quvexaholdings – Organized layout, readable content, and navigation feels intuitive.
Regards. Loads of information!
Tremendous issues here. I’m very glad to look your article.
Thanks so much and I’m looking ahead to contact you.
Will you kindly drop me a mail?
Real Money Bonus Casino Australia Real Last Chance For Millions
Актуальные пользователи встречаются с массой цифровых деталей при процессах с сертифицированными порталами. Специализированные сайты типа mad casino предоставляют новую сведения о деятельности развлекательных брендов.
Алгоритм аутентификации аккаунта охватывает ряд необходимых этапов. Исходная подтверждение нуждается предоставления документов верифицирующих личность. Привычный перечень подразумевает паспорт, лицензию водителя или заграничное удостоверение.
Системная часть создания аккаунта предполагает эксплуатацию SSL-шифрования и многофакторной защиты. Опытные пользователи рекомендуют активировать совокупность имеющихся параметров охраны.
Запасные домены образуют абсолютные дубликаты первичного домена с сохранением тотального инструментария. Центральное преимущество кроется в подобии банковских лимитов и критериев вейджера.
Алгоритм нахождения активных резервных ссылок основывается на наблюдении экспертных уведомительных сервисов и сотрудничающих сайтов. Экспертные игроки внедряют туннельные протоколы для создания надежного подключения вне зависимости от региональных барьеров.
Отбор честного игорного ресурса требует тщательного разбора юридических сертификатов. Передовые платформы казино лаки Р±РёСЂ предоставляют пользователям максимальную факты о своих санкциях.
Механизм получения доступа подразумевает множество принудительных ступеней подтверждения. Операторы настаивают справки, подтверждающие индивидуальность и зрелость. Обычный KYC-механизм требует от 24 до 72 часов.
Финансовое планирование инициируется с назначения лимитов на депозиты. Искусные клиенты рекомендуют применять принцип 5% от полного гемблинг капитала на одну сессию.
Технические блокировки администраторов принуждают задействовать альтернативные домены. Альтернативы поддерживают стопроцентную активность базового сайта, предусматривая журнал операций и игровой продвижение.
Современные расчетные сервисы предоставляют быстрые вклады через виртуальные хранилища. Bitcoin, Ethereum и стабильные валюты предоставляют анонимность и минимальные отчисления. Длительность осуществления получений насчитывает 10-30 минут.
Программы лояльности предусматривают градационные степени с накапливающимся вознаграждением. VIP-менеджеры гарантируют индивидуальные подарки, улучшенные границы и преимущественную техподдержку.
โพสต์นี้ อ่านแล้วได้ความรู้เพิ่ม ค่ะ
ดิฉัน ไปอ่านเพิ่มเติมเกี่ยวกับ เนื้อหาในแนวเดียวกัน
สามารถอ่านได้ที่ เกมสล็อต
เผื่อใครสนใจ
เพราะให้ข้อมูลเชิงลึก
ขอบคุณที่แชร์ ข้อมูลที่มีประโยชน์
นี้
และหวังว่าจะได้เห็นโพสต์แนวนี้อีก
электронный карниз для штор prokarniz38.ru .
Исследование в секторе лицензированных ресурсов требует владения передовых решений доступа. Профессиональные участники задействуют лаки Р±РёСЂ казино для обретения актуальной сведений о действующих ссылках.
Механизм создания личного кабинета в официальных учреждениях включает сложную верификацию. Актуальные операторы применяют KYC-механизмы и AML-критерии. Документооборот занимает от 24 до 72 часов.
Технические методы для избежания запретов совершенствуются параллельно с ужесточением юридических действий. VPN-платформы категории premium предлагают кодирование AES-256 и технологии OpenVPN. Устойчивость подключения принципиально существенна для высокоролловых партий.
Запасные платформы функционируют через территориально размещенные технические мощности. CDN-комплексы гарантируют оптимальную пинг для международных клиентов. Системное роутинг срабатывает при распознавании препятствия основного портала.
Денежные движения в официальных областях соответствуют строгим требованиям PCI DSS. Криптовалютные операции завоевывают популярность вследствие секретности и оперативности выполнения.
Портативные утилиты лучших провайдеров включают биометрическую проверку и push-алерты для важных эпизодов. Адаптивный облик самостоятельно адаптируется под характеристики матрицы.
Лицензионные провайдеры игровых предложений гарантируют игрокам шанс к качественному времяпрепровождению через тематические ресурсы, включая СЌРЅРѕРјРѕ казино , что исполняют transnational регламенты защиты.
Процедура регистрации предполагает ввода проверочных сведений через encrypted SSL-каналы. Букмекеры запрашивают нотариальное удостоверение правоспособности и адреса проживания для поддержания правовых стандартов.
Multi-factor аутентификация считается необходимым aspect передовых механизмов защиты. Users имеют SMS-пароли, push-сообщения или эксплуатируют профессиональные программы наподобие Google Authenticator.
Альтернативные порталы нейтрализуют проблемы региональных запретов и DDoS-нападений. По сути дубли представляют идентичные реплики центрального портала с удержанием features и пользовательских параметров.
Skilled игроки suggest сохранять свежие списки working зеркал в сохранённых ссылках интернет-программы. Операторы направляют сведения о новых доменах через мейл, Telegram-communities и телефонные программы.
Денежные операции через официальные порталы secured encryption протоколами стандарта банковского направления. Получение капитала выполняется только на верифицированные реквизиты держателя личного кабинета.
BitGPT ambitionne de rendre l’investissement plus accessible aux particuliers.
https://skemagloballab.io/bitgpt-vue-densemble-complete-analyse-du-projet-et-perspectives-du-marche/
Real Money Online Pokies Australia Real Stop Settling For Less Millions
1win ошибка установки 1win30489.help
Действующие дублирующие порталы проверенных gaming-операторов на типпи казино создают постоянный доступ к игровым ресурсам. Технология зеркалирования генерирует идентичные клоны базового домена с удержанием всех механизмов.
Механизм открытия счета через резервную ссылку целиком копирует главную форму. Начинающие клиенты заполняют действующий email, устанавливают стойкий код доступа и выбирают операционную валюту.
Валидация аккаунта включает загрузки справок опираясь на KYC-стандартам. Изображение паспорта, верификация резиденции и карточные реквизиты контролируются системой программную верификацию в течение 24-72 часов.
Аутентификация существующих пользователей происходит через базовую модуль с многоступенчатой идентификацией. Сессионные коды отправляются на сотовый аппарат или email.
Функционал пополнительного раздела через дублирующие порталы предлагает актуальные финансовые сервисы. Visa, Mastercard, цифровые хранилища Skrill, Neteller, криптовалюты Bitcoin, Ethereum реализуются с сокращенными сборами 0-3%.
Гемблинг библиотека воспроизводится в точности включая машины, столовые развлечения, live-крупье и максимальные награды. RTP-коэффициенты, колебания и ставочные требования остаются аналогичными.
Подарочная механизм выполняется идентично центральному ресурсу. Welcome-комплекты, free spins, refund и VIP-схемы запускаются системно при реализации прописанных условий.
Современные участники встречаются с множеством системных тонкостей при работе с лицензированными площадками. Профессиональные источники типа казино Килограмм предоставляют новую данные о операциях гэмблинговых брендов.
Процесс верификации счета предполагает ряд неотъемлемых уровней. Базовая подтверждение требует размещения свидетельств верифицирующих гражданство. Обычный перечень охватывает паспорт, автоудостоверение или загранпаспорт.
Программная сторона регистрации содержит задействование безопасного соединения и двухуровневой проверки. Экспертные геймеры рекомендуют включать все представленных опций секьюрити.
Резервные ссылки образуют точные реплики основного ресурса с удержанием тотального функционала. Центральное бонус выражается в подобии расчетных лимитов и требований ставочных требований.
Схема обнаружения актуальных запасных доменов базируется на отслеживании профессиональных уведомительных сервисов и аффилированных платформ. Экспертные игроки эксплуатируют туннельные протоколы для создания постоянного соединения вне зависимости от территориальных запретов.
I’m pretty pleased to uncover this site. I need to to thank you for ones time for this particularly
fantastic read!! I definitely appreciated every little bit of it and I have you bookmarked
to check out new things on your blog.
Feel free to surf to my blog post best real estate agent in Rancho Cucamonga CA
US Meds Outlet no prescription required pharmacy online pharmacy india
Way cool! Some very valid points! I appreciate you penning
this write-up and the rest of the site is very good.
Write more, thats all I have to say. Literally, it seems as though you relied on the video
to make your point. You clearly know what youre talking about, why throw away your
intelligence on just posting videos to your weblog when you could
be giving us something enlightening to read?
Feel free to visit my website … best realtor in Lake Oswego OR
Исследование в сфере легальных ресурсов требует понимания продвинутых методов соединения. Опытные пользователи эксплуатируют ДживиСпин казино для добывания актуальной данных о работающих доменах.
Алгоритм создания аккаунта в лицензированных операторах включает многоуровневую проверку. Актуальные компании эксплуатируют KYC-алгоритмы и AML-стандарты. Документальное сопровождение отнимает от 24 до 72 интервалов.
Технические инструменты для обхода препятствий улучшаются сообща с усилением законодательных действий. VPN-инструменты разряда premium дают криптографию AES-256 и протоколы OpenVPN. Устойчивость канала кардинально актуальна для премиальных сессий.
Альтернативные платформы оперируют через локально рассредоточенные технические ресурсы. CDN-структуры поддерживают быструю отклик для азиатских участников. Автоматическое роутинг активируется при идентификации препятствия основного сайта.
Платежные транзакции в проверенных областях отвечают строгим критериям PCI DSS. Криптовалютные транзакции получают распространение вследствие конфиденциальности и динамике выполнения.
Портативные программы лучших брендов совмещают голосовую аутентификацию и push-сообщения для ключевых ситуаций. Модифицируемый облик независимо изменяется под свойства дисплея.
Передовые платформы беттинг развлечений предлагают беттерам доступ к высококлассному игровому процессу через защищенные казино РјСЌРґ сайты. Авторизованная бизнес требует учета жестких законодательных критериев.
Механизм регистрации игрового учетной записи охватывает аутентификацию индивидуальных информации. Управляющие используют расширенные процедуры KYC и AML для пресечения поддельных финансовых действий.
Цифровые средства передовых беттинг площадок функционируют на зашифрованных серверах с TLS технологиями. Региональная блокировка побуждает операторов создавать вспомогательные URL.
Резервные сайты формируют аналогичные версии главного портала с обеспечением всех инструментов и параметров. Клиенты получают постоянный подключение к средствам, развлекательной данным и пользовательским установкам.
Денежные действия реализуются через синхронизированные банковские процессоры. Ограничения на пополнения и изъятия определяются в соотношении с нормативными критериями и собственными политиками снижения потерь.
Компетентные игроки советуют проверять ситуацию сертификата через контролирующие каталоги игорных ведомств. Репутационные характеристики задействуют ранги на тематических ресурсах и отзывы действительных участников.
Best Online Casino Australia 2025 Massive Free Spins No Deposit
привод для штор prokarniz24.ru .
Have you ever considered writing an e-book or guest authoring
on other blogs? I have a blog based upon on the same topics you discuss and
would love to have you share some stories/information. I know my audience would value your work.
If you are even remotely interested, feel free to shoot me an email. https://t.me/networking0000/54
Pretty! This was an incredibly wonderful post. Thank you
for providing this info. https://t.me/networking0000/54
What’s up, its good post on the topic of media print, we all know media is a great source of data. https://so-deystvie-event.timepad.ru/event/3765538/
Best Online Casino Australia Crypto Huge Real Wins Incoming
Pokies High Rtp Real Money Slots Australia
Best Pokies Australia Real Money Turn A Spin Into Million Dollar Reality
pin-up oyun tarixçəsi pinup2006.help
Поиск в пространстве легальных ресурсов нуждается осознания передовых методов соединения. Профессиональные участники используют казино Голд для обретения релевантной информации о работающих доменах.
Механизм оформления личного кабинета в проверенных организациях охватывает тщательную аутентификацию. Новейшие провайдеры применяют KYC-протоколы и AML-нормы. Бумажная работа составляет от 24 до 72 интервалов.
Программные инструменты для избежания ограничений эволюционируют синхронно с укреплением законодательных мер. VPN-платформы категории premium обеспечивают криптографию AES-256 и протоколы OpenVPN. Надежность соединения критически существенна для элитных заходов.
Резервные домены выполняют задачи через географически расположенные цифровые кластеры. CDN-сети поддерживают минимальную латентность для европейских пользователей. Системное перенаправление запускается при выявлении недоступности центрального ресурса.
Денежные операции в проверенных регионах отвечают четким правилам PCI DSS. Крипто расчеты завоевывают популярность по причине скрытности и скорости процессинга.
Планшетные софт топовых провайдеров объединяют отпечатковую идентификацию и push-алерты для существенных моментов. Модифицируемый интерфейс программно настраивается под настройки монитора.
Современные провайдеры азартных активностей предоставляют игрокам путь к качественному азарту через проверенные Болливуд казино системы. Легальная деятельность нуждается исполнения строгих надзорных требований.
Процедура открытия персонального учетной записи охватывает валидацию конфиденциальных показателей. Провайдеры внедряют комплексные протоколы KYC и AML для исключения фродовых транзакций.
Электронные системы актуальных гемблинг платформ работают на надежных серверах с шифровальными сертификатами. Территориальные ограничения принуждает владельцев разрабатывать вспомогательные адреса.
Дублирующие порталы составляют полные версии центрального домена с фиксацией всех сервисов и сведений. Беттеры обеспечивают себе беспрепятственный связь к капиталу, развлекательной истории и клиентским установкам.
Финансовые транзакции производятся через интегрированные банковские процессоры. Пределы на взносы и изъятия назначаются в соответствии с нормативными положениями и корпоративными нормами риск-менеджмента.
Профессиональные беттеры рекомендуют контролировать условия сертификата через контролирующие каталоги игорных структур. Авторитетные параметры задействуют ранги на тематических сайтах и отзывы реальных игроков.
Real Money Casino Australia Feel Like A True High Roller
I have fun with, lead to I found exactly what I used to be having a look for.
You have ended my four day lengthy hunt! God Bless you man. Have a great day.
Bye
Jackpot Real Money Pokies Australia Your $Million Real Story Next
Jackpot Real Money Australia One Tap To Legendary Win
ломоносов скул ломоносов скул .
Активные mirror-ссылки проверенных игорных заведений на lucky bear казино предоставляют постоянный соединение к гемблинг порталам. Система реплицирования формирует точные версии базового ресурса с фиксацией всех инструментов.
Механизм регистрации через mirror-сайт полностью повторяет оригинальную бланк. Новые клиенты заполняют активный email, придумывают надежный пароль и определяют операционную курренси.
Подтверждение личного кабинета содержит предоставления справок следуя KYC-нормам. Изображение паспорта, верификация регистрации и платежные данные проверяются через алгоритмическую валидацию в течение 24-72 периодов.
Подключение зарегистрированных пользователей реализуется через типовую панель с 2FA верификацией. Сессионные токены приходят на мобильный устройство или электронную почту.
Механизмы входящего сектора через резервные ссылки включает актуальные денежные механизмы. Visa, Mastercard, веб кошельки Skrill, Neteller, виртуальные монеты Bitcoin, Ethereum процессируются с сокращенными сборами 0-3%.
Развлекательная ассортимент повторяется абсолютно включая spinning games, традиционные геймплей, live-ведущих и мегавыигрыши. RTP-коэффициенты, вариативность и условия отыгрыша сохраняются аналогичными.
Подарочная схема выполняется аналогично основному домену. Welcome-предложения, бесплатные вращения, возврат средств и VIP-схемы запускаются программно при реализации заданных критериев.
Best online casino PayID Australia – secure and convenient
Top Australian Online Casino Real Money Feel The Glory Now
Выбор честного игорного площадки предполагает детального изучения правовых разрешений. Актуальные сайты миллион казино обеспечивают пользователям полную факты о действующих санкциях.
Процесс создания профиля включает различные ключевых стадий верификации. Владельцы истребуют свидетельства, доказывающие идентичность и зрелость. Стандартный KYC-регламент длится от 24 до 72 промежутков.
Управление банком стартует с фиксации пределов на инвестиции. Квалифицированные пользователи рекомендуют применять установку 5% от совокупного игорного капитала на индивидуальную игру.
Электронные препятствия поставщиков принуждают задействовать вспомогательные ссылки. Зеркала хранят абсолютную работоспособность базового ресурса, включая архив сделок и казино результаты.
Современные платежные инструменты предоставляют оперативные пополнения через цифровые хранилища. Bitcoin, Ethereum и стабильные валюты предоставляют анонимность и наименьшие взносы. Продолжительность выполнения изъятий составляет 10-30 интервалов.
Схемы преданности подразумевают иерархические статусы с увеличивающимся компенсацией. VIP-консультанты дают личные бонусы, усиленные ограничения и приоритетную сервис.
What’s up, after reading this awesome post i am too glad to share my experience here with mates.
Also visit my website; best real estate agent in Joliet IL
Постоянно сохраняйте осторожность и здоровый недоверие к подозрительным сообщениям.
Никогда не кликайте по незнакомым гиперссылкам в сообщениях от неизвестных источников.
Тщательно проверяйте подлинность веб-сайтов и организаций перед оформлением платежа.
https://inlex-partners-moshenniki.blogspot.com/2025/09/inlex-partners.html
Не разглашайте личные данные, вроде коды или данные кредитных карт, по сотовому.
Активируйте двухэтапную аутентификацию для защиты своих важных учетных записей.
Периодически проверяйте отчеты со своих финансовых карт на предмет странных списаний.
Устанавливайте надежные антивирусные решения и актуализируйте их своевременно.
http://avtofreon.ru/remont-jelektromufty/img_20200817_081141-1/?unapproved=439902&moderation-hash=af5ec13cf29f0d53f251f72464fa209f#comment-439902
рулонные шторы широкие рулонные шторы широкие .
What’s up, yes this article is truly good and I have learned
lot of things from it about blogging. thanks.
Thank you for any other magnificent post. Where else may just anyone get that kind of information in such an ideal way of writing?
I’ve a presentation next week, and I am at the search for such info.
Актуальные порталы азартных услуг предоставляют пользователям путь к элитному игровому процессу через безопасные казино Голд сайты. Авторизованная операционная активность влечет выполнения определенных регуляторных положений.
Процедура открытия игрового профиля охватывает валидацию индивидуальных информации. Администраторы задействуют детализированные процедуры KYC и AML для блокировки незаконных финансовых действий.
Программные решения современных казино функционируют на стабильных инфраструктурах с HTTPS алгоритмами. Территориальные ограничения принуждает операторов организовывать параллельные порталы.
Зеркальные ресурсы составляют полные клоны центрального портала с обеспечением всех сервисов и информации. Беттеры получают постоянный соединение к капиталу, гемблинг отчетности и клиентским параметрам.
Банковские переводы производятся через интегрированные финансовые процессоры. Пределы на депозиты и снятия регулируются в соотношении с законодательными положениями и корпоративными процедурами управления рисками.
Экспертные пользователи рекомендуют проверять условия аккредитации через государственные базы данных беттинг организаций. Престижные характеристики содержат места на профильных порталах и комментарии настоящих участников.
Лицензионные операторы гэмблинг предложений гарантируют игрокам шанс к качественному азартному досугу через тематические сайты, включая тип топ казино , которые именно выполняют мировые нормы конфиденциальности.
Схема открытия счёта требует заполнения authentication данных через криптографические SSL-протоколы. Администрация просят письменное удостоверение правоспособности и территории residence для выполнения legal стандартов.
Двухэтапная идентификация становится mandatory частью современных механизмов security. Игроки имеют SMS-ключи, push-notification или применяют dedicated софт вроде Google Authenticator.
Альтернативные домены устраняют препятствия региональных санкций и DDoS-штурмов. Технически копии составляют тождественные реплики primary ресурса с удержанием инструментария и пользовательских сведений.
Skilled геймеры рекомендуют сохранять current перечни функционирующих mirrors в сохранённых ссылках обозревателя. Букмекеры отправляют сведения о современных URL через email, Telegram-сообщества и мобильные софт.
Платёжные переводы через официальные порталы обеспечены шифровальными технологиями стандарта банковского области. Получение капитала осуществляется только на верифицированные счета хозяина учётной записи.
My brother suggested I might like this web site.
He was entirely right. This publish actually made my day.
You cann’t believe just how much time I had spent for this info!
Thanks!
Feel free to surf to my website; landscaping supplies wholesale
excellent issues altogether, you just gained a logo new reader.
What might you recommend about your publish that you just
made some days in the past? Any sure?
http://indogenericexport.com/# online pharmacy india
Crypto casino Australia – Bitcoin, Ethereum pokies and live games
https://bajameddirect.shop/# BajaMed Direct
Hi there! I know this is kinda off topic however I’d figured I’d ask. Would you be interested in exchanging links or maybe guest authoring a blog post or vice-versa? My blog discusses a lot of the same subjects as yours and I think we could greatly benefit from each other. If you might be interested feel free to shoot me an e-mail. I look forward to hearing from you! Wonderful blog by the way!
byueuropaviagraonline
Best Pokies Australia Real Money Feel The Jackpot Rush Now
Hello! Quick question that’s entirely off topic. Do you know how to make your site mobile friendly?
My site looks weird when browsing from my iphone.
I’m trying to find a theme or plugin that might be able to correct this problem.
If you have any recommendations, please share. With thanks!
my website tools and supplies for contractors
Выбор надежного развлекательного заведения предполагает тщательного разбора правовых разрешений. Инновационные порталы Килограмм казино предлагают пользователям безусловную детали о имеющихся лицензиях.
Процедура открытия аккаунта предусматривает ряд необходимых этапов аутентификации. Владельцы запрашивают удостоверения, засвидетельствующие личность и возраст. Стандартный KYC-регламент составляет от 24 до 72 интервалов.
Распоряжение капиталом начинается с фиксации ограничений на пополнения. Опытные участники предлагают использовать установку 5% от совокупного казино средств на одну партию.
Системные препятствия администраторов вынуждают задействовать вспомогательные адреса. Дубликаты поддерживают абсолютную производительность центрального площадки, включая журнал транзакций и развлекательный успех.
Новые банковские системы предоставляют скоростные вклады через электронные аккаунты. Bitcoin, Ethereum и стейблкоины поддерживают скрытность и наименьшие отчисления. Время проведения получений насчитывает 10-30 промежутков.
Системы приверженности предусматривают ступенчатые категории с увеличивающимся бонусом. VIP-кураторы обеспечивают личные подарки, усиленные ограничения и ускоренную обслуживание.
Нынешние игроки оказываются с барьером подключения к легальным площадкам. Операторы ограничивают стандартные домены, но профессиональные казино лова клиенты знают о существовании резервных площадок.
Зеркало представляет точную реплику первичного ресурса. Криптографические алгоритмы остаются такими же. Банковские действия реализуются через идентичные каналы.
Схема регистрации через параллельный домен содержит обычной валидации. Администраторы запрашивают удостоверения для исполнения KYC-требований. Индивидуальные информация проходят двухфакторную аутентификацию.
Пополнительные ограничения на параллельных платформах совпадают первичным параметрам. Низшие суммы продолжают неизменными. Возрастающие выигрышные пулы объединяются между различными доменами.
Бонусные механизмы оперируют целостно на параллельных сайтах. Коэффициент оборота сохраняет оригинальные параметры. Срок активности реализации сохраняется.
Сервис сопровождения анализирует вопросы с альтернативных ресурсов таким же способом. Онлайн чат предоставляет 24-часовой расписание деятельности.
скидки на авиабилеты скидки на авиабилеты .
What impressed me about this casino https://alfaewaste.com/vueltas-sin-costo-en-casinos-manual-profesional-8/ is the variety of the games. Everything runs without issues, the design is clean, and there’s plenty of options to explore, which keeps it engaging.
I am regular visitor, how are you everybody? This post
posted at this web site is truly good.
Also visit my website – storm shelters
Гемблинговая сфера представляет быстрый прогресс, завлекая массы пользователей. Квалифицированные сайты гарантируют безопасную пространство для пари. Детальную факты о этих организациях возможно получить на казино Голд .
Легализация выступает ключевым показателем селекции платформы. Контролёры Гибралтара дают качественный аудит финансовых процедур. Любая сертифицированная площадка реализует систематические аудиты RNG-алгоритмов.
Программные характеристики передовых гемблинг-сайтов охватывают SSL-защиту расчётного ранга. Создатели программного софта класса Microgaming, NetEnt, Pragmatic Play интегрируют усовершенствованные механизмы произвольных показателей.
Процесс проверки профиля требует подачи свидетельств KYC-класса. ID, справка о прибылях, удостоверение проживания — базовый список для полноценного активации.
Параллельные URL устраняют сложности с цензурой операторов. Рабочие копии обновляются регулярно IT группами. Мобильные утилиты часто выполняются качественнее веб версий.
Управление банкроллом формирует стратегическую результативность беттинговых партий. Опытные участники настаивают сокращать количество ставки до 1-2% от суммарного фонда.
Передовые пользователи сталкиваются с набором цифровых деталей при работе с лицензированными площадками. Профессиональные платформы типа Голд казино обеспечивают свежую информацию о процессах азартных компаний.
Алгоритм подтверждения счета содержит несколько необходимых стадий. Базовая проверка нуждается загрузки справок доказывающих индивидуальность. Типовой пакет включает свидетельство, лицензию водителя или загранпаспорт.
Техническая элемент оформления подразумевает внедрение SSL-шифрования и двойной авторизации. Профессиональные пользователи настаивают инициировать все представленных настроек обеспечения.
Резервные ссылки представляют идентичные клоны первичного сайта с поддержанием исчерпывающего функционала. Важнейшее преимущество заключается в идентичности банковских пределов и критериев проигрыша.
Алгоритм обнаружения рабочих запасных доменов опирается на мониторинге специализированных телеграм-каналов и аффилированных площадок. Экспертные игроки внедряют туннельные протоколы для гарантирования надежного входа независимо от географических блокировок.
Ohne Einsatz spielen: Freispiele und Casino Boni erklart
https://www.getneos.com/ohne-einsatz-spielen-freispiele/
Поиск в сфере проверенных ресурсов включает знания продвинутых методов подключения. Профессиональные пользователи внедряют лова казино для получения современной информации о функционирующих адресах.
Схема оформления учетной записи в проверенных операторах охватывает комплексную валидацию. Передовые операторы задействуют KYC-механизмы и AML-критерии. Документальное сопровождение отнимает от 24 до 72 промежутков.
IT технологии для обхода блокировок прогрессируют вместе с укреплением правовых шагов. VPN-службы разряда premium дают безопасность AES-256 и технологии OpenVPN. Надежность связи fundamentally значима для привилегированных игровых периодов.
Зеркальные сайты оперируют через регионально размещенные IT системы. CDN-архитектуры обеспечивают низкую задержку для глобальных геймеров. Системное роутинг запускается при выявлении ограничения основного сайта.
Платежные транзакции в официальных регионах отвечают строгим правилам PCI DSS. Децентрализованные расчеты завоевывают актуальность из-за приватности и динамике реализации.
Портативные клиенты топовых брендов совмещают отпечатковую проверку и push-извещения для ключевых ситуаций. Настраиваемый внешний вид автономно адаптируется под особенности матрицы.
Лицензионные ресурсы гэмблинг услуг обеспечивают пользователям шанс к качественному времяпрепровождению через специализированные домены, включая Рльдорадо казино , что выполняют transnational критерии security.
Механизм оформления профиля включает предоставления проверочных деталей через шифрованные SSL-протоколы. Букмекеры просят предоставить документальное verification совершеннолетия и адреса регистрации для соблюдения legal норм.
Двухэтапная идентификация считается обязательным частью передовых архитектур защиты. Users приобретают SMS-токены, push-уведомления или задействуют специализированные софт в стиле Google Authenticator.
Зеркальные URL устраняют вопросы региональных барьеров и DDoS-атак. С технической точки зрения копии формируют копийные dublicates главного портала с обеспечением функциональности и клиентских деталей.
Skilled игроки рекомендуют удерживать актуальные перечни working mirrors в закладках browser. Администрация рассылают обновления о новых URL через e-mail, Telegram-группы и смартфонные apps.
Payment операции через лицензионные платформы защищены шифровальными протоколами level банковского сектора. Изъятие финансов осуществляется лишь на подтверждённые wallets обладателя учётной записи.
Best Online Casino Australia Baccarat Recommended
https://ecampania.it/blog/c_digo_promocional_102.html
buy methocarbamol without prescription: tizanidine muscle relaxer – muscle relaxant drugs
Pokies Australia Real Money Real Tired Of Small Million Payouts
It’s appropriate time to make a few plans for the longer term and it is time
to be happy. I have read this put up and if I may just I desire to counsel you few
attention-grabbing things or advice. Maybe you
could write next articles regarding this article.
I want to read even more issues about it!
my homepage; slot 10000
Современные гемблеры встречаются с сложностью входа к лицензированным ресурсам. Операторы закрывают основные порталы, но грамотные лаки Р±РёСЂ казино посетители помнят о присутствии зеркальных площадок.
Резервная ссылка представляет точную дубликат первичного площадки. Криптографические алгоритмы остаются равнозначными. Финансовые процедуры выполняются через идентичные каналы.
Алгоритм заведения учётной записи через параллельный ресурс требует привычной подтверждения. Операторы выясняют справки для реализации KYC-стандартов. Индивидуальные информация проходят двухфакторную подтверждение.
Финансовые ограничения на резервных порталах соответствуют главным требованиям. Стартовые вклады сохраняются стабильными. Накопительные джекпоты объединяются между множественными доменами.
Бонусные механизмы выполняются полноценно на зеркальных порталах. Вейджер гарантирует первоначальные величины. Период действия проигрывания продолжается.
Отдел обслуживания изучает тикеты с параллельных доменов равнозначно. Живой общение предоставляет непрерывный порядок работы.
Лицензионные операторы игровых возможностей предоставляют участникам шанс к профессиональному гэмблингу через профильные ресурсы, включая казино СЌРЅРѕРјРѕ , которые точно придерживаются transnational критерии защиты.
Механизм активации включает предоставления authentication информации через encrypted SSL-протоколы. Букмекеры просят official свидетельство правоспособности и локации регистрации для исполнения нормативных стандартов.
2FA идентификация представляет mandatory aspect современных механизмов конфиденциальности. Игроки приобретают SMS-ключи, push-notification или внедряют targeted tools в стиле Google Authenticator.
Mirror ссылки нейтрализуют вопросы territorial барьеров и DDoS-воздействий. С технической точки зрения реплики представляют тождественные dublicates primary сайта с поддержанием инструментария и пользовательских деталей.
Опытные геймеры рекомендуют удерживать свежие списки working копий в избранном обозревателя. Management передают updates о новых порталах через почтовые сервисы, Telegram-каналы и мобильные программы.
Финансовые movements через legal ресурсы обеспечены защитными протоколами уровня банковского сектора. Extraction фондов осуществляется solely на проверенные данные владельца аккаунта.
I go to see day-to-day a few blogs and sites to read articles or reviews, but this webpage offers feature based content.
Look into my web-site: manure lagoon digesters
Thanks very interesting blog!
Here is my web blog Professionelle Rohrreinigung
Best Baccarat Site Australia Real Money Action
Выбор безопасного гемблинг портала заставляет детального исследования официальных свидетельств. Инновационные платформы аква казино дают геймерам максимальную сведения о собственных допусках.
Алгоритм регистрации подразумевает несколько требуемых фаз проверки. Провайдеры настаивают бумаги, доказывающие идентичность и зрелость. Типовой KYC-алгоритм занимает от 24 до 72 промежутков.
Распоряжение капиталом инициируется с задания границ на депозиты. Профессиональные игроки предлагают применять закон 5% от суммарного азартного фонда на конкретную раунд.
Цифровые запреты администраторов обязывают внедрять альтернативные пути. Зеркала сохраняют стопроцентную производительность основного платформы, подразумевая летопись сделок и игровой продвижение.
Современные платежные способы обеспечивают моментальные пополнения через электронные счета. Bitcoin, Ethereum и устойчивые монеты предоставляют приватность и минимальные отчисления. Время реализации выводов составляет 10-30 отрезков.
Планы верности подразумевают многоуровневые категории с нарастающим возвратом. VIP-координаторы дают индивидуальные подарки, улучшенные ограничения и преимущественную помощь.
Исследование в сфере проверенных сайтов предполагает владения современных решений авторизации. Квалифицированные клиенты эксплуатируют аква казино для приобретения современной фактов о активных URL.
Механизм создания личного кабинета в сертифицированных компаниях включает детальную подтверждение. Передовые организации применяют KYC-алгоритмы и AML-правила. Документооборот отнимает от 24 до 72 интервалов.
Технические способы для преодоления барьеров прогрессируют сообща с повышением законодательных действий. VPN-платформы типа premium обеспечивают безопасность AES-256 и методы OpenVPN. Постоянство подключения fundamentally важна для привилегированных раундов.
Зеркальные домены оперируют через территориально размещенные технические кластеры. CDN-комплексы обеспечивают оптимальную латентность для американских игроков. Автоматическое роутинг включается при выявлении блокировки основного адреса.
Экономические переводы в сертифицированных областях соответствуют конкретным правилам PCI DSS. Блокчейн платежи увеличивают востребованность из-за скрытности и быстроте обработки.
Переносные клиенты лучших провайдеров совмещают отпечатковую проверку и push-оповещения для критических событий. Адаптивный облик автономно подстраивается под особенности матрицы.
best india pharmacy: Indo-Generic Export – indian pharmacies safe
We are a group of volunteers and starting a new scheme in our community.
Your website provided us with useful info to work on. You’ve
performed an impressive task and our whole neighborhood shall be
thankful to you.
Look into my homepage Rohrreinigung vom Profi
Перемещение в области официальных порталов предполагает осознания новых способов доступа. Профессиональные клиенты применяют Клубника официальный сайт для извлечения новейшей сведений о работающих доменах.
Алгоритм регистрации профиля в лицензированных операторах предполагает многоуровневую аутентификацию. Современные провайдеры применяют KYC-протоколы и AML-нормы. Документальное сопровождение отнимает от 24 до 72 интервалов.
IT технологии для обхода препятствий развиваются параллельно с повышением законодательных решений. VPN-сервисы класса premium обеспечивают шифрование AES-256 и стандарты OpenVPN. Постоянство канала принципиально необходима для высокоролловых заходов.
Альтернативные платформы выполняют задачи через локально разнесенные компьютерные мощности. CDN-архитектуры обеспечивают низкую пинг для глобальных клиентов. Автоматическое перенаправление инициируется при выявлении блокировки основного адреса.
Денежные операции в сертифицированных юрисдикциях следуют строгим стандартам PCI DSS. Децентрализованные платежи приобретают признание вследствие конфиденциальности и темпу реализации.
Мобильные клиенты премиальных компаний интегрируют голосовую проверку и push-уведомления для принципиальных событий. Модифицируемый дизайн автономно настраивается под свойства монитора.
Поиск качественного развлекательного ресурса в нынешних границах подразумевает повышенного подхода к регулятивному режиму. Квалифицированные клиенты представляют, что лаки Р±РёСЂ казино официальный сайт отображает современную сведения о функционирующих сервисах.
Схема открытия счета в официальных операторах включает принудительную верификацию личности. KYC-правила охраняют как казино, так и клиента от обмана. Краткосрочные границы на получение активов до окончания проверки – привычная практика.
Электронные блокировки на соединение к betting площадкам обходятся через параллельные URL. Функционирующие отражения предоставляют всестороннюю работоспособность главного сервиса. Расчетные операции, азартный прогресс и наградные схемы сохраняются постоянными.
Финансовая надежность измеряется показателем применяемых расчетных механизмов. SSL-безопасность, PCI DSS аттестация и многоуровневая проверка формируют защищенный барьер обороны.
Развлекательная ассортимент лицензированных провайдеров содержит автоматы от лидирующих создателей. RTP-показатели, колебания и расчетные формулы претерпевают объективную валидацию в утвержденных организациях.
Схемы мотивации в достойных сервисах основываются на понятных условиях вейджера. Условия ставок x35-40 расценивается разумным для слот-привилегий, в то время как настольные активности учитываются в зачет с редуцированным процентом.
Pokies Real Money Win Big Australia One Decision Away
https://activepages.com.au/profile/1xbetfreebet2026
Its such as you learn my thoughts! You appear to understand a lot approximately this, such as you wrote
the e-book in it or something. I believe that you simply
could do with some p.c. to pressure the message house a bit, but instead of that, that is fantastic blog.
A fantastic read. I’ll definitely be back.
Передовые геймеры обталкиваются с изобилием системных аспектов при работе с официальными платформами. Специализированные порталы типа Гризли казино дают новую данные о деятельности игорных брендов.
Механизм валидации счета включает комплекс требуемых этапов. Исходная подтверждение предполагает размещения документов удостоверяющих личность. Привычный список содержит документ, автоудостоверение или внешний паспорт.
Цифровая часть записления предполагает внедрение SSL-шифрования и двухуровневой проверки. Экспертные игроки советуют активировать все доступных параметров секьюрити.
Запасные домены формируют идентичные клоны базового платформы с удержанием комплексного возможностей. Ключевое бонус выражается в подобии банковских рамок и параметров ставочных требований.
Схема нахождения функционирующих резервных ссылок строится на наблюдении экспертных уведомительных сервисов и сотрудничающих порталов. Продвинутые игроки применяют VPN-сервисы для формирования бесперебойного входа вне зависимости от территориальных блокировок.
Современные участники оказываются с сложностью подключения к официальным сайтам. Компании фильтруют стандартные домены, но знающие казино Килограмм пользователи осознают о функционировании резервных ресурсов.
Дополнительный домен составляет идентичную воспроизведение оригинального сайта. Средства защиты поддерживаются идентичными. Платёжные операции проходят через идентичные системы.
Методика заведения учётной записи через резервный ресурс подразумевает привычной верификации. Операторы запрашивают удостоверения для соблюдения KYC-правил. Индивидуальные информация проходят многоуровневую валидацию.
Депозитные границы на резервных площадках совпадают основным спецификациям. Стартовые ставки продолжают неизменными. Увеличивающиеся выигрышные пулы объединяются между множественными ресурсами.
Бонусные механизмы функционируют целостно на дополнительных ресурсах. Вейджер сохраняет базовые параметры. Временные рамки отыгрыша поддерживается.
Служба помощи рассматривает обращения с зеркальных ресурсов идентично. Интерактивный переписка осуществляет беспрерывный график работы.
https://www.lagodigarda.com/booking/pages/code_promo_du_bookmaker_1xbet.html
Greate post. Keep posting such kind of information on your site.
Im really impressed by it.
Hi there, You’ve performed an incredible job. I will certainly digg it and individually suggest
to my friends. I am sure they will be benefited from this web site.
Everyone loves what you guys are usually
up too. Such clever work and reporting! Keep up the excellent works guys I’ve incorporated you guys to my personal blogroll.
Hello!
My name is Jaunita and I’m a 30 years old boy from Gouda.
Передовые провайдеры азартных услуг дают пользователям возможность к премиальному развлечениям через безопасные казино ретро платформы. Легальная работа подразумевает выполнения определенных правовых положений.
Механизм оформления персонального учетной записи содержит верификацию конфиденциальных реквизитов. Управляющие применяют многоуровневые протоколы KYC и AML для недопущения незаконных транзакций.
Технические платформы актуальных игорных домов базируются на защищенных хостингах с криптографическими технологиями. Геоблокировка побуждает администраторов создавать вспомогательные URL.
Параллельные сайты составляют аналогичные клоны главного портала с обеспечением всех функций и параметров. Клиенты добиваются беспрепятственный связь к балансу, развлекательной статистике и индивидуальным установкам.
Расчетные процедуры выполняются через синхронизированные расчетные шлюзы. Рамки на инвестиции и получения определяются в соотношении с нормативными условиями и внутренними процедурами риск-менеджмента.
Квалифицированные игроки предлагают анализировать статус сертификата через надзорные регистры развлекательных организаций. Престижные индикаторы содержат позиции на экспертных сервисах и отзывы действительных клиентов.
It’s the best time to make some plans for the future
and it’s time to be happy. I’ve read this post and if I could
I wish to suggest you few interesting things or suggestions.
Maybe you could write next articles referring to this article.
I wish to read even more things about it!
Навигация в мире сертифицированных сайтов предполагает понимания актуальных методов доступа. Умелые участники используют казино типпи для извлечения современной информации о оперативных ссылках.
Процедура оформления личного кабинета в надежных организациях содержит сложную аутентификацию. Продвинутые поставщики используют KYC-протоколы и AML-правила. Оформление документов отнимает от 24 до 72 интервалов.
IT инструменты для прохождения препятствий прогрессируют синхронно с повышением законодательных мер. VPN-решения категории premium обеспечивают криптографию AES-256 и системы OpenVPN. Стабильность канала принципиально значима для VIP раундов.
Резервные сайты оперируют через географически рассредоточенные цифровые мощности. CDN-комплексы предоставляют низкую отклик для глобальных пользователей. Техническое переключение активируется при распознавании препятствия первичного портала.
Финансовые движения в проверенных зонах подчиняются строгим нормам PCI DSS. Блокчейн переводы завоевывают актуальность благодаря анонимности и быстроте осуществления.
Смартфонные софт лучших брендов интегрируют биометрическую аутентификацию и push-извещения для важных моментов. Модифицируемый дизайн самостоятельно изменяется под характеристики экрана.
Умение одеваться со вкусом является значимым фактором в повседневной жизни.
Она позволяет выразить характер.
Удачный внешний вид повышает самооценку.
Одежда часто становится частью невербального общения.
https://500px.com/p/37agnella
Кроме того, продуманный гардероб экономит время в повседневных делах.
Со временем внимание к стилю воспитывает чувство меры.
В итоге стильная одежда играет значимую роль современного образа жизни.
Фермерские продукты: натуральная польза для вашего здоровья
Надёжные провайдеры развлекательных предложений обеспечивают клиентам шанс к премиальному гэмблингу через dedicated порталы, включая казино миллион , которые специально придерживаются общепринятые стандарты защиты.
Процедура открытия счёта подразумевает предоставления authentication информации через безопасные SSL-линии. Букмекеры запрашивают official удостоверение дееспособности и локации жительства для поддержания законодательных критериев.
Multi-factor идентификация выступает mandatory частью современных платформ конфиденциальности. Users имеют SMS-коды, push-notification или задействуют dedicated утилиты в стиле Google Authenticator.
Резервные ссылки устраняют сложности geographic санкций и DDoS-атак. Фактически реплики представляют аналогичные реплики базового домена с maintaining функциональности и личных сведений.
Skilled клиенты suggest сохранять актуальные каталоги функционирующих дублей в закладках интернет-программы. Операторы отправляют обновления о fresh порталах через e-mail, Telegram-сообщества и телефонные утилиты.
Payment процедуры через legal порталы secured криптографическими системами класса банковского сектора. Снятие финансов осуществляется лишь на проверенные реквизиты хозяина учётной записи.
Передовые участники натыкаются с препятствием соединения к легальным порталам. Провайдеры ограничивают основные ссылки, но профессиональные типпи казино клиенты осознают о существовании резервных сайтов.
Альтернативный адрес представляет полную отображение базового платформы. SSL-сертификаты остаются идентичными. Расчётные действия выполняются через те же сервисы.
Схема заведения учётной записи через дополнительный портал содержит привычной верификации. Сотрудники требуют свидетельства для соблюдения KYC-стандартов. Личные информация осуществляют расширенную валидацию.
Финансовые лимиты на резервных площадках равняются главным характеристикам. Низшие взносы сохраняются константными. Растущие выигрышные пулы интегрируются между множественными адресами.
Поощрительные механизмы функционируют завершённо на дополнительных платформах. Требования по обороту сохраняет базовые показатели. Тайминг оборота продолжается.
Департамент поддержки рассматривает обращения с дополнительных порталов равнозначно. Интерактивный разговор предоставляет круглосуточный расписание обслуживания.
Игровая сфера демонстрирует стремительный рост, притягивая легионы клиентов. Профессиональные порталы дают качественную обстановку для пари. Исчерпывающую материалы о подобных компаниях допустимо изучить на казино Либет .
Легализация представляет ключевым элементом определения платформы. Юрисдикции Гибралтара гарантируют жёсткий аудит экономических манипуляций. Отдельная официальная площадка подвергается систематические проверки RNG-модулей.
Технические особенности передовых гемблинг-сайтов объединяют SSL-защиту денежного уровня. Создатели компьютерного ПО класса Microgaming, NetEnt, Pragmatic Play встраивают многоуровневые механизмы произвольных величин.
Процесс подтверждения счёта предусматривает предоставления удостоверений KYC-стандарта. ID, выписка о финансах, верификация прописки — обычный перечень для финального доступа.
Зеркальные ссылки исправляют препятствия с цензурой компаний. Актуальные альтернативы обновляются систематически IT командами. Карманные софт зачастую работают надёжнее веб редакций.
Банкролл-менеджмент задаёт стратегическую эффективность гемблинговых периодов. Квалифицированные беттеры советуют контролировать объём пари до 1-2% от суммарного фонда.
Отбор качественного игрового заведения в нынешних границах предполагает тщательного рассмотрения к законному уровню. Квалифицированные участники понимают, что proapples.ru предоставляет современную сведения о активных сервисах.
Процедура регистрации в проверенных сервисах предусматривает необходимую подтверждение персональных данных. KYC-процедуры охраняют как заведение, так и игрока от махинаций. Кратковременные ограничения на перечисление финансов до закрытия проверки – обычная практика.
Цифровые ограничения на вход к гемблинг порталам преодолеваются через альтернативные домены. Действующие клоны поддерживают стопроцентную функциональность основного портала. Платежные переводы, развлекательный статистика и поощрительные системы продолжают постоянными.
Денежная безопасность выражается уровнем задействованных расчетных способов. SSL-криптография, PCI DSS сертификация и многоуровневая верификация обеспечивают стабильный барьер ограждения.
Азартная ассортимент официальных площадок объединяет слоты от известных провайдеров. RTP-значения, вариативность и вероятностные формулы подвергаются независимую контроль в утвержденных организациях.
Механизмы вознаграждения в серьезных операторах базируются на понятных параметрах ставок. Вейджер x35-40 расценивается разумным для слот-подарков, в то время как настольные состязания идут в расчет с пониженным процентом.
https://soldatru.ru/anons/articles/?promokod-1xbet-na-segodnya-pri-registracii.html
At this time it seems like Movable Type is the top blogging platform out there right
now. (from what I’ve read) Is that what you’re using on your
blog?
Howdy! I could have sworn I’ve been to this blog before but after browsing through some of the
post I realized it’s new to me. Anyways, I’m definitely delighted I found it and I’ll be
book-marking and checking back often!
KrixaBasePro – Smooth performance paired with a minimal, easy layout.
Online casinos Australia – trusted sites for real cash gambling
Cheers. An abundance of forum posts.
Take a look at my web site :: https://telegra.ph/Cum-s%C4%83-Cumperi-Bitcoin-cu-Cardul-%C3%AEn-Rom%C3%A2nia-Ghid-Rapid-2026-01-23
Официальные операторы развлекательных возможностей обеспечивают геймерам вариант к премиальному гэмблингу через dedicated ресурсы, включая ДживиСпин казино , которые точно следуют глобальные стандарты защиты.
Последовательность оформления профиля предполагает ввода валидационных параметров через криптографические SSL-линии. Администрация просят предоставить нотариальное свидетельство правоспособности и локации проживания для compliance нормативных требований.
Двухэтапная authentication является принудительным элементом актуальных solutions безопасности. Пользователи получают SMS-пароли, push-оповещения или используют dedicated софт в стиле Google Authenticator.
Резервные ссылки решают сложности региональных санкций и DDoS-штурмов. С технической точки зрения зеркала представляют идентичные клоны основного платформы с maintaining инструментария и личных информации.
Профессиональные клиенты призывают поддерживать новейшие каталоги функционирующих дублей в сохранённых ссылках веб-клиента. Management отправляют updates о актуальных порталах через электронную почту, Telegram-communities и смартфонные утилиты.
Платёжные транзакции через проверенные сайты обеспечены криптографическими протоколами уровня банковского направления. Снятие денег происходит исключительно на проверенные счета хозяина аккаунта.
Hi my loved one! I wish to say that this article is amazing, nice written and include approximately all vital infos.
I’d like to peer extra posts like this .
Беттинговая область демонстрирует интенсивный прогресс, привлекая миллионы клиентов. Грамотные ресурсы обеспечивают качественную условия для пари. Полную материалы о этих организациях допустимо получить на Голд казино .
Аттестация составляет основным показателем селекции ресурса. Надзорные органы Кюрасао создают тщательный контроль финансовых процедур. Всякая аккредитованная портал осуществляет регулярные контроли RNG-модулей.
IT свойства современных азартных площадок объединяют SSL-защиту расчётного стандарта. Производители софтового продукта класса Microgaming, NetEnt, Pragmatic Play встраивают усовершенствованные алгоритмы непредсказуемых значений.
Процедура подтверждения учётной записи требует направления удостоверений KYC-стандарта. Удостоверение, выписка о прибылях, верификация регистрации — стандартный перечень для полноценного входа.
Резервные ссылки решают препятствия с запретами провайдеров. Действующие дубли модифицируются каждый день программными группами. Мобильные приложения часто работают качественнее интернет версий.
Банкролл-менеджмент устанавливает продолжительную доходность азартных периодов. Грамотные геймеры рекомендуют сокращать сумму ставки до 1-2% от итогового бюджета.
Crypto Real Money Online Casino Australia Quiet Big Wins
Best Australian Online Casino For Real Money Pokies
Crypto Real Money Online Casino Australia Real Quiet Million Wins
SmartRavion – Navigation is smooth, and investments are presented clearly.
Выбор качественного азартного заведения в современных границах подразумевает детального внимания к регулятивному режиму. Компетентные клиенты представляют, что mad казино включает свежую сведения о доступных провайдерах.
Схема оформления профиля в легальных платформах включает принудительную валидацию персональных данных. KYC-правила обеспечивают как казино, так и игрока от обмана. Краткосрочные ограничения на получение денег до закрытия валидации – нормальная система.
Цифровые препятствия на доступ к развлекательным порталам устраняются через параллельные домены. Доступные дубликаты обеспечивают абсолютную эффективность главного платформы. Банковские переводы, развлекательный прогресс и льготные программы сохраняются неизменными.
Денежная защищенность измеряется показателем применяемых платежных механизмов. SSL-шифрование, PCI DSS аттестация и расширенная проверка гарантируют стабильный периметр обороны.
Геймплейная каталог официальных заведений объединяет машины от ведущих разработчиков. RTP-параметры, дисперсия и математические модели испытывают объективную контроль в признанных учреждениях.
Механизмы лояльности в надежных заведениях строятся на ясных правилах активности. Вейджер x35-40 оценивается разумным для автомат-бонусов, в то время как карточные игры засчитываются в зачет с пониженным фактором.
1win служба поддержки Ош http://1win30489.help
Современные геймеры обталкиваются с огромным количеством цифровых аспектов при функционировании с проверенными сайтами. Профессиональные порталы типа лаки Р±РёСЂ казино выдают актуальную данные о функционировании казино компаний.
Механизм валидации кабинета подразумевает ряд требуемых стадий. Начальная аутентификация нуждается отправки справок валидирующих субъект. Привычный пакет содержит свидетельство, права или международное ID.
Техническая сторона оформления предполагает эксплуатацию криптографической защиты и двухуровневой проверки. Экспертные игроки рекомендуют включать весь комплекс имеющихся опций защиты.
Зеркала формируют идентичные реплики центрального домена с поддержанием тотального арсенала. Основное бонус состоит в тождественности банковских лимитов и параметров отыгрыша.
Система поиска действующих дублирующих порталов опирается на контроле экспертных уведомительных сервисов и сотрудничающих сайтов. Квалифицированные геймеры эксплуатируют анонимайзеры для обеспечения надежного входа без оглядки от местных ограничений.
For latest news you have to pay a visit web and on internet I found this website as
a best site for newest updates.
Look into my blog post … lagoon anaerobic digester
Australian online casino real money – fast payouts and big bonuses
Australian online casino real money – fast payouts and big bonuses
Азартная ниша представляет быстрый рост, манящая множество игроков. Экспертные порталы предлагают надёжную обстановку для пари. Развёрнутую факты о таких брендах доступно обнаружить на Mellstroy Game casino .
Лицензирование остаётся приоритетным критерием отбора площадки. Контролёры Мальты гарантируют тщательный контроль расчётных манипуляций. Конкретная легальная площадка подвергается периодические ревизии RNG-алгоритмов.
Технические аспекты передовых игорных домов включают SSL-кодирование экономического ранга. Провайдеры виртуального продукта вроде Microgaming, NetEnt, Pragmatic Play интегрируют продвинутые алгоритмы случайных чисел.
Процесс валидации личного кабинета подразумевает представления справок KYC-уровня. Документ, свидетельство о средствах, верификация проживания — стандартный комплект для итогового подключения.
Резервные ссылки ликвидируют трудности с цензурой провайдеров. Действующие копии модифицируются постоянно техническими специалистами. Мобильные клиенты обычно работают стабильнее сетевых редакций.
Финансовая дисциплина задаёт перспективную успешность беттинговых партий. Опытные пользователи рекомендуют урезать количество депозита до 1-2% от совокупного бюджета.
Навигация в пространстве сертифицированных площадок предполагает владения новых способов входа. Опытные игроки задействуют mad casino для добывания новейшей сведений о работающих путях.
Механизм регистрации аккаунта в проверенных учреждениях охватывает детальную проверку. Продвинутые организации внедряют KYC-системы и AML-критерии. Бумажная работа требует от 24 до 72 интервалов.
Технические методы для преодоления запретов развиваются вместе с ужесточением юридических действий. VPN-службы уровня premium предоставляют кодирование AES-256 и методы OpenVPN. Надежность соединения критически важна для VIP раундов.
Резервные адреса работают через пространственно рассредоточенные серверные инфраструктуры. CDN-архитектуры гарантируют минимальную латентность для европейских геймеров. Цифровое переключение активируется при идентификации ограничения первичного ресурса.
Платежные операции в сертифицированных юрисдикциях соответствуют четким критериям PCI DSS. Криптовалютные операции завоевывают распространение в результате конфиденциальности и скорости процессинга.
Смартфонные программы лучших операторов совмещают голосовую авторизацию и push-алерты для принципиальных происшествий. Изменяемый облик автономно изменяется под параметры панели.
Развлекательная отрасль отображает активный рост, притягивая множество клиентов. Опытные сайты обеспечивают качественную обстановку для пари. Полную факты о подобных брендах реально получить на п»ї1хбет зеркало .
Аккредитация является ключевым элементом определения площадки. Лицензиаты Олдерни предоставляют серьёзный надзор расчётных транзакций. Каждая легальная площадка реализует постоянные аудиты RNG-модулей.
IT свойства передовых казино включают SSL-криптографию банковского стандарта. Провайдеры компьютерного софта вроде Microgaming, NetEnt, Pragmatic Play подключают продвинутые схемы случайных значений.
Процесс аутентификации счёта требует передачи бумаг KYC-формата. ID, выписка о средствах, валидация адреса — базовый набор для окончательного авторизации.
Дублирующие домены ликвидируют препятствия с блокировками поставщиков. Свежие альтернативы адаптируются ежедневно компьютерными командами. Смартфонные приложения зачастую оперируют устойчивее онлайн модификаций.
Управление банкроллом создаёт стратегическую успешность азартных раундов. Опытные геймеры указывают сокращать объём пари до 1-2% от полного бюджета.
Передовые сервисы развлекательных развлечений предоставляют участникам путь к премиальному беттингу через проверенные миллион казино ресурсы. Официальная деятельность нуждается учета строгих регуляторных критериев.
Процедура создания клиентского кабинета задействует валидацию конфиденциальных информации. Операторы эксплуатируют многоуровневые алгоритмы KYC и AML для блокировки фродовых переводов.
Электронные платформы передовых беттинг площадок функционируют на защищенных дата-центрах с SSL протоколами. Геоблокировка принуждает операторов создавать дублирующие порталы.
Параллельные порталы образуют аналогичные дубликаты первичного домена с сохранением всех возможностей и информации. Игроки достигают устойчивый подключение к депозиту, азартной записям и личным установкам.
Финансовые переводы реализуются через синхронизированные финансовые системы. Лимиты на взносы и изъятия определяются в унисон с регуляторными требованиями и собственными нормами снижения потерь.
Экспертные игроки предлагают контролировать ситуацию разрешения через регуляторные регистры беттинг комиссий. Престижные характеристики содержат оценки на профильных ресурсах и оценки истинных беттеров.
Hi! I could have sworn I’ve visited this web site before but after going through some of the articles I
realized it’s new to me. Anyhow, I’m certainly happy I stumbled upon it and I’ll be
book-marking it and checking back often!
Here is my web site SEO Oklahoma
https://akniga.org/profile/1379727-code-promo-de-1xbet/
Real Money Casino Australia One Click To Real Legendary Status
I was suggested this blog by my cousin. I’m not
positive whether or not this put up is written through him as
no one else realize such detailed approximately my difficulty.
You are incredible! Thanks!
Определение безопасного гемблинг ресурса в современных условиях нуждается тщательного анализа к правовому режиму. Опытные игроки осознают, что п»ї1хбет казино включает современную сведения о работающих сервисах.
Процедура открытия счета в лицензированных платформах включает принудительную подтверждение персональных данных. KYC-процедуры гарантируют как оператора, так и клиента от фрода. Краткосрочные границы на перечисление финансов до финализации контроля – привычная подход.
Цифровые блокировки на соединение к азартным сервисам преодолеваются через параллельные домены. Активные копии поддерживают абсолютную работоспособность главного сервиса. Платежные движения, геймплейный результаты и наградные предложения сохраняются устойчивыми.
Материальная гарантированность выражается качеством эксплуатируемых банковских инструментов. SSL-защита, PCI DSS подтверждение и многоуровневая аутентификация создают стабильный периметр охраны.
Интерактивная набор проверенных сервисов содержит автоматы от топовых создателей. RTP-индексы, дисперсия и вероятностные схемы получают внешнюю валидацию в одобренных лабораториях.
Планы стимулирования в профессиональных заведениях формируются на открытых условиях проигрыша. Требования x35-40 расценивается нормальным для машина-льгот, в то время как настольные состязания принимаются в калькуляцию с сниженным множителем.
Подбор проверенного развлекательного площадки в современных условиях заставляет специального изучения к лицензионному положению. Профессиональные клиенты учитывают, что Лаки Бир сайт включает новую материалы о функционирующих сервисах.
Схема открытия счета в сертифицированных площадках включает обязательную подтверждение документов. KYC-процедуры защищают как сервис, так и участника от махинаций. Кратковременные границы на перечисление капитала до выполнения верификации – стандартная процедура.
Технические барьеры на подключение к игровым порталам обходятся через зеркальные адреса. Рабочие отражения сохраняют всестороннюю функциональность первичного платформы. Расчетные переводы, развлекательный статистика и наградные планы продолжают неизменными.
Капитальная стабильность характеризуется степенью эксплуатируемых банковских систем. SSL-безопасность, PCI DSS аттестация и усиленная верификация обеспечивают прочный щит обороны.
Развлекательная коллекция лицензированных операторов охватывает машины от ведущих создателей. RTP-показатели, изменчивость и статистические принципы испытывают объективную проверку в авторизованных учреждениях.
Механизмы вознаграждения в серьезных площадках формируются на ясных критериях ставок. Вейджер x35-40 оценивается приемлемым для слот-поощрений, в то время как стандартные состязания учитываются в калькуляцию с сниженным множителем.
Hey I know this is off topic but I was wondering if you knew of any widgets I could add to my
blog that automatically tweet my newest twitter updates.
I’ve been looking for a plug-in like this for quite some time and was hoping maybe you would have some experience
with something like this. Please let me know if you run into anything.
I truly enjoy reading your blog and I look forward to your new updates.
Инновационные операторы гемблинг развлечений дают участникам доступ к профессиональному азарту через защищенные mad casino платформы. Легальная работа требует выполнения строгих контролирующих критериев.
Механизм оформления индивидуального счета содержит подтверждение конфиденциальных показателей. Операторы внедряют расширенные алгоритмы KYC и AML для исключения фродовых переводов.
Цифровые решения актуальных беттинг площадок функционируют на стабильных серверах с HTTPS стандартами. IP-фильтрация принуждает провайдеров разрабатывать дублирующие порталы.
Дублирующие домены являют собой точные дубликаты первичного платформы с фиксацией всех опций и показателей. Игроки обеспечивают себе постоянный подключение к депозиту, гемблинг данным и пользовательским настройкам.
Финансовые переводы осуществляются через подключенные денежные шлюзы. Ограничения на пополнения и изъятия регулируются в гармонии с нормативными критериями и организационными политиками снижения потерь.
Опытные игроки указывают анализировать статус лицензии через официальные списки беттинг ведомств. Престижные характеристики задействуют позиции на специализированных платформах и комментарии действительных беттеров.
whoah this blog is great i like reading your articles. Keep up the great work!
You understand, lots of persons are looking round for this info,
you could aid them greatly.
Take a look at my page … storm shelters OKC
Действующие зеркала лицензированных гемблинг-платформ на Болливуд зеркало дают беспрерывный доступ к геймерским порталам. Схема копирования образует точные реплики главного сайта с консервацией всех функций.
Механизм регистрации через альтернативный домен целиком воспроизводит основную бланк. Свежие игроки регистрируют действующий email, устанавливают сложный шифр и выбирают операционную денежную единицу.
Идентификация профиля включает предоставления документов по KYC-требованиям. Фото национального документа, свидетельство проживания и денежные координаты подвергаются алгоритмическую верификацию в течение 24-72 ч.
Логин активных участников происходит через базовую форму с усиленной верификацией. Одноразовые пароли отправляются на сотовый устройство или мейл.
Механизмы входящего компонента через зеркала предлагает популярные финансовые инструменты. Visa, Mastercard, электронные кошельки Skrill, Neteller, цифровые активы Bitcoin, Ethereum обрабатываются с сокращенными сборами 0-3%.
Гемблинг ассортимент воспроизводится абсолютно включая spinning games, традиционные развлечения, live-хостов и прогрессивы. RTP-значения, вариативность и ставочные требования сохраняются идентичными.
Акционная политика оперирует подобно базовому сайту. Welcome-бандлы, бесплатные вращения, refund и VIP-системы стартуют машинально при реализации определенных параметров.
Best crypto online casino Australia – anonymous and fast
Проверенные площадки азартных возможностей предоставляют игрокам право к профессиональному азартному досугу через целевые порталы, включая Lucky Bear casino , которые именно соблюдают transnational стандарты надёжности.
Процедура оформления профиля necessita указания проверочных деталей через encrypted SSL-connection. Операторы просят нотариальное verification дееспособности и региона residence для исполнения правовых критериев.
2FA верификация считается mandatory частью передовых архитектур защиты. Клиенты располагают SMS-токены, push-notification или применяют dedicated tools по типу Google Authenticator.
Альтернативные URL нейтрализуют проблемы локальных блокировок и DDoS-нападений. Техническим образом реплики составляют аналогичные реплики центрального сайта с maintaining возможностей и пользовательских данных.
Компетентные участники предлагают keeping current перечни working mirrors в закладках browser. Провайдеры передают информацию о современных доменах через e-mail, Telegram-чаты и портативные приложения.
Payment транзакции через проверенные сайты secured encryption алгоритмами категории банковского сектора. Extraction финансов производится solely на проверенные счета обладателя профиля.
Real Money Pokies Australia Real Deserve Million Rush You Crave
Игровая сфера показывает динамичный рост, привлекая массы клиентов. Квалифицированные сайты гарантируют надёжную атмосферу для беттинга. Развёрнутую материалы о таких провайдерах доступно отыскать на п»ї1xBet казино .
Аккредитация остаётся ключевым показателем выбора сайта. Контролёры Мальты обеспечивают жёсткий мониторинг валютных действий. Конкретная официальная ресурс осуществляет регулярные инспекции RNG-модулей.
Компьютерные свойства передовых гемблинг-сайтов включают SSL-безопасность банковского ранга. Провайдеры софтового ПО наподобие Microgaming, NetEnt, Pragmatic Play внедряют многоуровневые схемы произвольных показателей.
Процедура верификации счёта подразумевает подачи документов KYC-формата. Паспорт, документ о финансах, верификация проживания — классический список для итогового доступа.
Альтернативные URL ликвидируют сложности с цензурой операторов. Рабочие альтернативы корректируются каждый день техническими командами. Смартфонные приложения регулярно работают лучше веб форматов.
Распределение капитала определяет перспективную успешность развлекательных сессий. Экспертные пользователи рекомендуют лимитировать объём депозита до 1-2% от итогового резерва.
Подбор надежного гемблинг заведения заставляет основательного анализа регулятивных разрешений. Передовые платформы Вавада казино предоставляют геймерам полную информацию о действующих допусках.
Процесс открытия аккаунта охватывает различные обязательных шагов верификации. Администраторы настаивают справки, доказывающие самобытность и правоспособность. Классический KYC-порядок продолжается от 24 до 72 периодов.
Финансовое планирование начинается с установления пределов на пополнения. Профессиональные геймеры настаивают применять установку 5% от итогового азартного средств на конкретную сессию.
Электронные препятствия владельцев вынуждают внедрять дополнительные пути. Дубликаты поддерживают безусловную производительность основного ресурса, охватывая летопись транзакций и развлекательный достижения.
Актуальные финансовые системы предоставляют оперативные взносы через криптовалютные хранилища. Bitcoin, Ethereum и стейблкоины обеспечивают анонимность и символические взносы. Срок реализации извлечений насчитывает 10-30 минут.
Алгоритмы лояльности охватывают каскадные уровни с прогрессивным вознаграждением. VIP-менеджеры гарантируют персонализированные вознаграждения, расширенные ограничения и ускоренную обслуживание.
Официальные операторы игорных предложений oferuja пользователям возможность к профессиональному времяпрепровождению через dedicated платформы, включая Вавада сайт , которые именно придерживаются общепринятые стандарты security.
Механизм открытия счёта подразумевает заполнения идентификационных информации через защищённые SSL-протоколы. Менеджмент demanded нотариальное удостоверение правоспособности и территории residence для поддержания юрисдикционных правил.
Многоуровневая верификация представляет принудительным элементом новейших архитектур конфиденциальности. Участники получают SMS-коды, push-сообщения или эксплуатируют targeted tools в стиле Google Authenticator.
Дублирующие URL нейтрализуют вопросы локальных ограничений и DDoS-нападений. Технически дубли образуют дублированные реплики центрального платформы с maintaining инструментария и user данных.
Опытные геймеры советуют сохранять обновлённые каталоги working дублей в закладках интернет-программы. Букмекеры передают сведения о современных ссылках через электронную почту, Telegram-каналы и портативные утилиты.
Payment переводы через лицензионные ресурсы обеспечены криптографическими алгоритмами level банковского направления. Снятие средств выполняется единственно на верифицированные реквизиты обладателя account.
http://ieef.msu.ru/index.php?subaction=userinfo&user=yvagezeh
Легальные провайдеры гэмблинг предложений обеспечивают клиентам доступ к элитному времяпрепровождению через тематические домены, включая казино ретро , которые именно исполняют глобальные стандарты надёжности.
Схема регистрации necessita ввода верификационных данных через защищённые SSL-протоколы. Операторы просят предоставить нотариальное verification правоспособности и территории жительства для выполнения юрисдикционных правил.
2FA проверка считается mandatory составляющей передовых систем конфиденциальности. Участники располагают SMS-пароли, push-уведомления или применяют специальные софт по типу Google Authenticator.
Альтернативные порталы решают вопросы географических санкций и DDoS-атак. С технической точки зрения mirrors составляют аналогичные клоны базового портала с удержанием возможностей и личных параметров.
Компетентные участники призывают удерживать актуальные базы активных копий в bookmark интернет-программы. Администрация доставляют updates о свежих URL через e-mail, Telegram-communities и мобильные приложения.
Денежные переводы через проверенные порталы обеспечены защитными протоколами уровня банковского области. Изъятие средств реализуется solely на validated реквизиты владельца account.
Best Casino Real Money Australia Real Tired Of Million Waiting
Актуальные платформы беттинг услуг предлагают беттерам путь к качественному азарту через сертифицированные аква казино сайты. Авторизованная операционная активность подразумевает исполнения четких контролирующих критериев.
Механизм открытия персонального профиля содержит проверку личных данных. Регуляторы применяют углубленные процедуры KYC и AML для блокировки поддельных транзакций.
IT системы актуальных гемблинг платформ работают на безопасных дата-центрах с криптографическими стандартами. Локальные запреты побуждает администраторов запускать резервные URL.
Резервные сайты представляют идентичные клоны главного ресурса с удержанием всех функций и сведений. Пользователи обеспечивают себе беспрепятственный вход к средствам, игровой истории и клиентским параметрам.
Банковские операции проходят через синхронизированные расчетные агрегаторы. Ограничения на вклады и изъятия регулируются в унисон с лицензионными требованиями и внутренними политиками минимизации опасностей.
Экспертные гемблеры рекомендуют отслеживать статус авторизации через государственные регистры беттинг структур. Авторитетные индикаторы предусматривают рейтинги на экспертных порталах и feedback действительных беттеров.
Актуальные гемблеры натыкаются с затруднением подключения к проверенным порталам. Организации блокируют стандартные домены, но опытные Вавада официальный сайт посетители знают о существовании альтернативных ресурсов.
Альтернативный адрес формирует идентичную дубликат основного ресурса. Протоколы шифрования функционируют идентичными. Платёжные транзакции проходят через сходные сервисы.
Алгоритм создания аккаунта через зеркальный портал включает обычной валидации. Администраторы просят удостоверения для реализации KYC-регламентов. Идентификационные сведения осуществляют усиленную аутентификацию.
Пополнительные лимиты на резервных площадках аналогичны главным условиям. Начальные вклады функционируют фиксированными. Прогрессивные призовые фонды синхронизируются между всеми порталами.
Бонусные схемы работают целостно на дополнительных порталах. Требования по обороту сохраняет стартовые цифры. Срок активности проигрывания продолжается.
Департамент помощи обрабатывает запросы с дополнительных порталов аналогично. Прямой чат поддерживает беспрерывный формат работы.
Подбор безопасного казино оператора нуждается серьезного разбора юридических свидетельств. Актуальные ресурсы п»ї1xBet зеркало дают игрокам стопроцентную информацию о имеющихся аккредитациях.
Система получения доступа охватывает ряд принудительных этапов аутентификации. Провайдеры запрашивают бумаги, подтверждающие персону и зрелость. Типовой KYC-процесс длится от 24 до 72 временных отрезков.
Финансовое планирование открывается с задания рамок на вклады. Квалифицированные игроки советуют использовать правило 5% от итогового азартного капитала на одну раунд.
Программные ограничения владельцев обязывают задействовать вспомогательные пути. Зеркала хранят абсолютную работоспособность основного ресурса, охватывая историю переводов и развлекательный продвижение.
Новые денежные методы гарантируют оперативные вклады через криптовалютные портмоне. Bitcoin, Ethereum и постоянные токены гарантируют тайность и минимальные платежи. Срок обработки выводов достигает 10-30 отрезков.
Программы приверженности охватывают многоуровневые ранги с нарастающим кэшбэком. VIP-координаторы предоставляют уникальные поощрения, усиленные границы и первоочередную поддержку.
Real Money Pokies Australia Your Own Real Mega Moolah Style Win
Real Money Casino Australia Feel Like The Winner You Are
https://jmadultere.com/
You actually suggested that wonderfully!
Pokies Australia Real Money Tired Of Small Payouts
Рабочие альтернативные домены легальных гемблинг-платформ на https://zelenovskoe.ru/ru-ru/ создают устойчивый подключение к геймерским порталам. Система реплицирования генерирует идентичные версии центрального сайта с удержанием всех возможностей.
Процедура активации через резервную ссылку полностью копирует базовую бланк. Начинающие участники указывают валидный email, устанавливают сложный секретную комбинацию и определяют рабочую платежное средство.
Валидация учетной записи содержит предоставления документов в соответствии с KYC-требованиям. Изображение удостоверения личности, свидетельство проживания и платежные параметры подвергаются программную анализ в течение 24-72 временных единиц.
Аутентификация верифицированных клиентов выполняется через базовую форму с усиленной валидацией. Сессионные шифры передаются на мобильный гаджет или email.
Функционал финансового блока через резервные ссылки поддерживает востребованные финансовые механизмы. Visa, Mastercard, цифровые балансы Skrill, Neteller, блокчейн-токены Bitcoin, Ethereum обрабатываются с сокращенными процентами 0-3%.
Развлекательная библиотека воспроизводится в точности включая машины, настольные геймплей, live-дилеров и мегавыигрыши. RTP-индикаторы, вариативность и отыгрыш поддерживаются идентичными.
Бонусная схема работает подобно центральному домену. Welcome-наборы, даровые прокруты, денежный возврат и VIP-схемы инициируются машинально при достижении заданных требований.
Рабочие резервные адреса проверенных gaming-операторов на ДживиСпин казино предоставляют устойчивый вход к геймерским сервисам. Принцип клонирования формирует полноценные дубликаты основного портала с сохранением всех возможностей.
Механизм создания аккаунта через альтернативный домен в точности дублирует стандартную форму. Начинающие клиенты заполняют активный email, генерируют стойкий секретную комбинацию и фиксируют базовую курренси.
Подтверждение учетной записи подразумевает предоставления справок в соответствии с KYC-стандартам. Скан удостоверения личности, свидетельство регистрации и платежные координаты анализируются посредством программную валидацию в течение 24-72 часа.
Подключение верифицированных игроков производится через типовую модуль с 2FA валидацией. Временные пароли передаются на сотовый номер или почтовый ящик.
Опции входящего сектора через mirror-сайты предлагает популярные платежные сервисы. Visa, Mastercard, цифровые хранилища Skrill, Neteller, криптовалюты Bitcoin, Ethereum реализуются с минимальными комиссиями 0-3%.
Игровая библиотека дублируется абсолютно включая машины, столовые забавы, live-крупье и максимальные награды. RTP-коэффициенты, дисперсия и проигрыш сохраняются аналогичными.
Подарочная политика работает подобно базовому домену. Welcome-предложения, бесплатные вращения, возврат средств и VIP-планы запускаются алгоритмически при выполнении заданных условий.
Does your website have a contact page? I’m having trouble locating it but,
I’d like to send you an email. I’ve got some creative ideas for your blog you might be interested in hearing.
Either way, great website and I look forward to seeing it grow over
time.
Актуальные операторы развлекательных развлечений обеспечивают клиентам возможность к высококлассному азарту через сертифицированные Вавада сайт ресурсы. Официальная деятельность влечет выполнения четких контролирующих стандартов.
Алгоритм создания персонального аккаунта предусматривает проверку приватных сведений. Администраторы эксплуатируют детализированные механизмы KYC и AML для блокировки незаконных платежей.
Программные средства новейших казино работают на безопасных инфраструктурах с TLS стандартами. Локальные запреты побуждает управляющих создавать альтернативные домены.
Зеркальные сайты формируют точные копии центрального платформы с фиксацией всех опций и данных. Пользователи обеспечивают себе беспрепятственный подключение к средствам, развлекательной истории и пользовательским конфигурациям.
Банковские переводы производятся через подключенные банковские системы. Рамки на инвестиции и получения фиксируются в согласии с лицензионными критериями и индивидуальными правилами управления рисками.
Профессиональные пользователи указывают проверять условия сертификата через надзорные базы данных гемблинг структур. Имиджевые характеристики содержат места на специализированных порталах и feedback истинных игроков.
Выбор легального азартного оператора заставляет глубокого исследования официальных сертификатов. Актуальные порталы п»ї1хбет регистрация гарантируют пользователям максимальную сведения о имеющихся лицензиях.
Механизм оформления счета подразумевает множество обязательных фаз валидации. Провайдеры запрашивают свидетельства, засвидетельствующие индивидуальность и дееспособность. Типовой KYC-механизм составляет от 24 до 72 часов.
Распоряжение капиталом начинается с установления ограничений на взносы. Искусные клиенты призывают эксплуатировать установку 5% от полного гемблинг средств на индивидуальную партию.
Технические запреты операторов побуждают задействовать резервные домены. Альтернативы сохраняют абсолютную работоспособность центрального платформы, содержа архив платежей и развлекательный прогресс.
Современные банковские инструменты поддерживают моментальные пополнения через блокчейн хранилища. Bitcoin, Ethereum и стейблкоины предоставляют тайность и крошечные взносы. Период выполнения получений насчитывает 10-30 интервалов.
Планы верности подразумевают каскадные уровни с прогрессивным возвратом. VIP-представители гарантируют эксклюзивные вознаграждения, увеличенные границы и приоритетную помощь.
Good article. I will be dealing with many of these issues as well..
Win Real Money Pokies Australia The Glory Is Real
Передовые игроки натыкаются с сложностью соединения к легальным ресурсам. Компании запрещают стандартные адреса, но опытные Меллстрой регистрация игроки знают о доступности дублирующих сайтов.
Дополнительный домен составляет полную отображение первичного сайта. SSL-сертификаты сохраняются равнозначными. Платёжные действия выполняются через аналогичные каналы.
Технология оформления профиля через резервный портал включает обычной подтверждения. Операторы запрашивают документы для выполнения KYC-стандартов. Идентификационные характеристики осуществляют усиленную валидацию.
Депозитные пределы на параллельных ресурсах совпадают первичным параметрам. Минимальные взносы поддерживаются константными. Возрастающие банки согласовываются между множественными доменами.
Льготные механизмы оперируют всесторонне на параллельных порталах. Вейджер сохраняет стартовые величины. Тайминг отыгрыша не изменяется.
Департамент обслуживания рассматривает обращения с зеркальных доменов сходным образом. Мгновенный диалог поддерживает постоянный режим оперирования.
My brother suggested I would possibly like this website.
He was once totally right. This publish actually made my day.
You cann’t consider simply how a lot time I had spent for this information! Thanks!
Новейшие клиенты обталкиваются с огромным количеством цифровых нюансов при работе с сертифицированными площадками. Тематические порталы типа п»ї1хбет регистрация обеспечивают новую сведения о функционировании азартных операторов.
Алгоритм верификации счета включает комплекс необходимых шагов. Начальная подтверждение подразумевает передачи бумаг доказывающих личность. Типовой набор охватывает ID, лицензию водителя или загранпаспорт.
Техническая составляющая открытия счета охватывает эксплуатацию SSL-шифрования и многофакторной защиты. Профессиональные участники подсказывают запускать совокупность возможных опций охраны.
Альтернативные адреса являются полные копии первичного сайта с обеспечением тотального набора функций. Центральное преимущество состоит в схожести финансовых ограничений и требований вейджера.
Процедура выявления функционирующих зеркал фундируется на проверке специализированных уведомительных сервисов и аффилированных ресурсов. Экспертные клиенты применяют туннельные протоколы для создания надежного подключения вне зависимости от региональных ограничений.
Rutor — известный форум darknet-пространства России с давней историей, анонимной регистрацией и сервисом для защиты транзакций посредством Rutor.Rutor: Ветеран русскоязычного даркнета
ru free tor org зеркало — это один из самых известных и старейших сервисов в русскоязычном даркнете, который стал неотъемлемой частью экосистемы анонимных ресурсов. Этот магазин ориентирован на предоставление пользователям широкой базы данных, связанной с файлами, софтом, новостями и различными видами контента, включая темы, касающиеся взлома и безопасности.
Как устроена система работы Rutor
Система курирует доступ к огромному количеству информации и файлов, сохраняя дополнительную конфиденциальность и анонимность своих пользователей. Работа сервиса построена на использовании анонимной сети Rutor, что помогает свести к минимуму угрозы идентификации и утечки данных. За долгое время работы Rutor стал своего рода летописью для даркнета на русском языке.
Меры защиты и анонимности пользователей Rutor
Система Rutor уделяет особое внимание вопросам безопасности. Сайт обеспечивает анонимный доступ к материалам, что поддерживается за счет использования современных технологий защиты транзакций и связи. Для сохранения анонимности и безопасного обмена контактами советуют применять специальный внутренний мессенджер, защищающий пользователей от вмешательства и контроля.
Значимость Rutor для даркнет-сообщества на русском языке
Rutor до сих пор служит значимым источником свежей информации и новостей по направлениям взлома и кибербезопасности. Из-за ориентации на минимальную цензуру и приватность Rutor популярен у приверженцев свободного обмена данными и конфиденциальности.
Rutor поддерживает стабильную работу, позволяя и новичкам, и опытным пользователям использовать предоставляемые сервисы. Система построена таким образом, что каждый раздел страницы — будь то магазин, новости или инструкции по взлому — становится отдельной частью большого сообщества, в котором безопасность и возможность оставаться анонимным выходят на первый план.
Будущее платформы: вызовы и обещания
Нет сомнений, что в дальнейшем Rutor столкнётся с новыми угрозами, инновационными способами охраны приватности и методами преодоления блокировок. Пользователи должны осознавать, что даже самая анонимная система не гарантирует полной безопасности.
Сервис остается местом, где можно получать дополнительную информацию, обсуждать вопросы безопасности, следить за новостями и инновациями в области даркнета. Развитие технологий, расширение базы пользователей и появление новых возможностей делают Rutor одним из центров русскоязычного сообщества в сети.
– Анонимность
– Безопасность транзакций
– Доступ к уникальной информации
– Обеспечение приватности взаимодействий
Rutor — это платформа с уникальной историей, и её опыт стоит принимать во внимание всем, кто ценит собственную свободу, приватность и независимость от внешней цензуры в современном цифровом мире.
Надёжные операторы азартных сервисов oferuja участникам вариант к высококлассному времяпрепровождению через тематические порталы, включая ретро казино , которые точно выполняют transnational требования конфиденциальности.
Алгоритм регистрации включает внесения валидационных данных через шифрованные SSL-соединения. Менеджмент требуют документальное подтверждение правоспособности и территории проживания для поддержания нормативных требований.
Многоуровневая идентификация становится необходимым частью новейших систем надёжности. Клиенты обретают SMS-пароли, push-notification или эксплуатируют специализированные программы в стиле Google Authenticator.
Альтернативные адреса ликвидируют вопросы локальных ограничений и DDoS-штурмов. Техническим образом копии являют тождественные dublicates базового домена с удержанием опций и индивидуальных параметров.
Skilled пользователи советуют сохранять актуальные списки активных альтернатив в bookmark browser. Букмекеры отправляют обновления о свежих ссылках через email, Telegram-группы и смартфонные программы.
Payment movements через лицензионные порталы secured encryption протоколами уровня банковского индустрии. Получение средств производится только на проверенные счета собственника учётной записи.
Беттинговая сфера демонстрирует активный прогресс, завлекая массы пользователей. Грамотные площадки гарантируют стабильную условия для игры. Полную сведения о таких брендах доступно обнаружить на казино миллионъ зеркало .
Легализация представляет главным критерием подбора платформы. Юрисдикции Мальты гарантируют жёсткий мониторинг расчётных действий. Каждая аккредитованная ресурс проходит периодические аудиты RNG-систем.
Цифровые свойства современных гемблинг-сайтов объединяют SSL-шифрование банковского категории. Поставщики программного обеспечения вроде Microgaming, NetEnt, Pragmatic Play встраивают сложные схемы рандомных величин.
Алгоритм верификации счёта подразумевает подачи удостоверений KYC-типа. Документ, выписка о доходах, подтверждение проживания — стандартный перечень для итогового активации.
Резервные URL убирают препятствия с запретами операторов. Актуальные дубли модифицируются ежедневно IT отделами. Портативные софт нередко действуют лучше браузерных версий.
Управление банкроллом формирует долгосрочную результативность азартных раундов. Опытные пользователи указывают лимитировать размер вейджера до 1-2% от суммарного фонда.
Pretty section of content. I just stumbled upon your website and in accession capital to assert that I acquire actually enjoyed account your blog posts.
Anyway I will be subscribing to your feeds and even I achievement you access consistently quickly.
Also visit my website … Rohrreinigung 24h
Jackpot Real Money Pokies Australia Your Story Starts Here
Надёжные платформы игровых услуг предоставляют геймерам возможность к высококлассному игровому процессу через dedicated сайты, включая Lucky Bear казино , что выполняют мировые регламенты security.
Схема создания аккаунта подразумевает предоставления проверочных информации через безопасные SSL-соединения. Букмекеры просят документальное verification совершеннолетия и региона регистрации для поддержания нормативных стандартов.
Двухфакторная идентификация считается обязательным aspect передовых solutions конфиденциальности. Клиенты приобретают SMS-коды, push-сообщения или задействуют dedicated программы типа Google Authenticator.
Альтернативные ссылки решают сложности geographic запретов и DDoS-assault. С технической точки зрения реплики являют аналогичные копии основного платформы с удержанием features и индивидуальных информации.
Профессиональные клиенты призывают поддерживать current базы рабочих копий в избранном интернет-программы. Management рассылают updates о fresh порталах через email, Telegram-сообщества и mobile apps.
Банковские переводы через лицензионные ресурсы обеспечены защитными протоколами уровня банковского сектора. Снятие средств производится solely на верифицированные данные обладателя личного кабинета.
Feel free to visit my homepage … Spadegaming High Rtp Slots You Can Play Now
Функционирующие альтернативные домены легальных казино на Mellstroy Game гарантируют беспрерывный подключение к азартным ресурсам. Схема зеркалирования генерирует точные клоны основного ресурса с поддержанием всех функций.
Механизм регистрации через зеркало абсолютно воспроизводит главную бланк. Свежие геймеры указывают функционирующий email, формируют сложный ключ и назначают основную платежное средство.
Верификация счета требует загрузки удостоверений согласно KYC-стандартам. Снимок национального документа, доказательство адреса и денежные реквизиты проверяются через программную контроль в течение 24-72 ч.
Аутентификация верифицированных пользователей осуществляется через обычную форму с многоступенчатой валидацией. Сессионные коды отправляются на телефонный аппарат или почтовый ящик.
Инструменты входящего сектора через дублирующие порталы включает популярные платежные системы. Visa, Mastercard, электронные кошельки Skrill, Neteller, криптовалюты Bitcoin, Ethereum процессируются с оптимизированными комиссиями 0-3%.
Развлекательная коллекция клонируется целиком включая барабаны, карточные развлечения, live-дилеров и джекпоты. RTP-показатели, изменчивость и отыгрыш удерживаются неизменными.
Промо схема оперирует похоже корневому ресурсу. Welcome-наборы, free spins, refund и VIP-программы инициируются алгоритмически при реализации заданных требований.
ondansetron zofran: zofran side effects – generic zofran
mostbet бо сомонӣ бозӣ mostbet бо сомонӣ бозӣ
Проверенные операторы игровых сервисов oferuja геймерам доступ к качественному гэмблингу через специализированные платформы, включая казино аква , которые специально придерживаются международные нормы конфиденциальности.
Механизм оформления профиля подразумевает предоставления идентификационных деталей через шифрованные SSL-каналы. Букмекеры demanded official verification age verification и территории регистрации для соблюдения legal норм.
Multi-factor аутентификация считается обязательным частью современных систем конфиденциальности. Пользователи обретают SMS-ключи, push-сообщения или применяют специализированные приложения наподобие Google Authenticator.
Резервные адреса решают проблемы territorial запретов и DDoS-штурмов. С технической точки зрения mirrors формируют тождественные версии primary платформы с сохранением возможностей и клиентских параметров.
Профессиональные пользователи призывают сохранять актуальные перечни функционирующих зеркал в bookmark браузера. Management отправляют информацию о современных доменах через электронную почту, Telegram-communities и телефонные утилиты.
Денежные транзакции через legal ресурсы защищены защитными системами level банковского области. Получение финансов производится лишь на проверенные wallets держателя учётной записи.
Функционирующие зеркала официальных гемблинг-платформ на Вавада регистрация предоставляют постоянный подключение к игровым сервисам. Принцип дублирования создает аналогичные реплики корневого ресурса с фиксацией всех механизмов.
Схема создания аккаунта через зеркало в точности воспроизводит базовую анкету. Дебютные игроки заполняют валидный email, генерируют защищенный шифр и определяют операционную валюту.
Идентификация счета включает отправки удостоверений в соответствии с KYC-требованиям. Снимок водительских прав, доказательство проживания и финансовые параметры анализируются посредством программную проверку в течение 24-72 временных единиц.
Подключение активных участников производится через обычную интерфейс с усиленной идентификацией. Сессионные ключи доставляются на сотовый аппарат или электронную почту.
Механизмы депозитного блока через резервные ссылки поддерживает распространенные платежные механизмы. Visa, Mastercard, цифровые счета Skrill, Neteller, виртуальные монеты Bitcoin, Ethereum выполняются с минимальными процентами 0-3%.
Игровая база копируется на сто процентов включая машины, традиционные игры, live-дилеров и накопительные призы. RTP-параметры, изменчивость и проигрыш остаются идентичными.
Подарочная политика функционирует аналогично центральному веб-площадке. Welcome-бандлы, free spins, возврат средств и VIP-курсы инициируются автоматически при соблюдении установленных требований.
Актуальные геймеры встречаются с барьером связи к легальным порталам. Операторы запрещают базовые порталы, но профессиональные Вавада участники знают о доступности альтернативных площадок.
Дополнительный домен представляет точную дубликат базового портала. Протоколы шифрования работают аналогичными. Денежные процедуры выполняются через те же шлюзы.
Алгоритм оформления профиля через резервный адрес предполагает классической подтверждения. Операторы требуют удостоверения для реализации KYC-правил. Личные параметры выполняют двухфакторную проверку.
Депозитные рамки на резервных площадках равняются основным спецификациям. Стартовые ставки сохраняются неизменными. Возрастающие выигрышные пулы синхронизируются между разными ссылками.
Бонусные механизмы действуют завершённо на дополнительных площадках. Коэффициент оборота гарантирует оригинальные параметры. Срок активности оборота не изменяется.
Департамент обслуживания анализирует тикеты с зеркальных доменов равнозначно. Прямой разговор осуществляет непрерывный расписание обслуживания.
Нынешние клиенты встречаются с множеством программных тонкостей при функционировании с официальными ресурсами. Экспертные источники типа Bollywood предоставляют релевантную сведения о работе развлекательных операторов.
Механизм проверки аккаунта подразумевает комплекс принудительных этапов. Исходная подтверждение предполагает отправки бумаг подтверждающих субъект. Стандартный пакет предполагает свидетельство, права или заграничное удостоверение.
Технологическая составляющая открытия счета включает применение защищенного протокола и двойной авторизации. Экспертные участники предлагают задействовать максимум имеющихся опций обеспечения.
Дублирующие порталы формируют абсолютные копии базового сайта с поддержанием исчерпывающего возможностей. Центральное бонус выражается в тождественности денежных ограничений и критериев условий прокрутки.
Механизм поиска функционирующих запасных доменов фундируется на проверке специализированных новостных лент и союзных платформ. Квалифицированные пользователи применяют прокси-соединения для предоставления постоянного доступа независимо от территориальных барьеров.
prilosec medication Gastro Health Monitor buy prilosec
Real Money Online Casino Australia Your Massive Win Is Waiting Tonight
Актуальные порталы азартных услуг обеспечивают участникам вход к профессиональному беттингу через проверенные казино Mellstroy Game сайты. Лицензированная операционная активность подразумевает соблюдения определенных правовых критериев.
Алгоритм создания индивидуального аккаунта предусматривает подтверждение персональных информации. Провайдеры внедряют многоуровневые протоколы KYC и AML для недопущения фродовых транзакций.
Программные платформы новейших развлекательных порталов работают на безопасных дата-центрах с шифровальными сертификатами. Территориальные ограничения принуждает операторов разрабатывать параллельные ссылки.
Дублирующие платформы образуют эквивалентные версии центрального портала с обеспечением всех возможностей и параметров. Пользователи добиваются постоянный доступ к счету, азартной записям и индивидуальным настройкам.
Платежные переводы проходят через синхронизированные расчетные системы. Лимиты на пополнения и получения фиксируются в соответствии с регуляторными критериями и собственными процедурами снижения потерь.
Экспертные игроки указывают мониторить состояние сертификата через регуляторные списки гемблинг структур. Авторитетные характеристики охватывают места на отраслевых ресурсах и отзывы истинных игроков.
https://www.ielts-mentor.com/files/pgs/1xbet_promo_code_for_free_bet_welcome_bonus.html
Беттинговая ниша представляет интенсивный прогресс, манящая миллионы клиентов. Опытные ресурсы предлагают безопасную пространство для развлечений. Детальную материалы о данных операторах возможно отыскать на Lucky Bear зеркало .
Сертификация выступает центральным критерием определения площадки. Юрисдикции Гибралтара обеспечивают качественный контроль финансовых операций. Конкретная сертифицированная площадка подвергается регулярные проверки RNG-механизмов.
Цифровые аспекты новейших казино содержат SSL-кодирование финансового ранга. Разработчики компьютерного материала уровня Microgaming, NetEnt, Pragmatic Play добавляют комплексные механизмы непредсказуемых показателей.
Процесс проверки личного кабинета предусматривает передачи свидетельств KYC-класса. Документ, свидетельство о финансах, подтверждение адреса — стандартный перечень для итогового подключения.
Резервные домены устраняют препятствия с ограничениями поставщиков. Свежие зеркала модифицируются регулярно цифровыми отделами. Планшетные утилиты часто оперируют лучше сетевых версий.
Распределение капитала задаёт перспективную прибыльность гемблинговых партий. Опытные участники рекомендуют контролировать сумму пари до 1-2% от общего капитала.
Перемещение в сфере сертифицированных площадок подразумевает знания передовых методов входа. Квалифицированные пользователи используют казино Килограмм для приобретения свежей материалов о активных ссылках.
Процедура создания профиля в лицензированных операторах подразумевает тщательную валидацию. Продвинутые операторы внедряют KYC-протоколы и AML-требования. Оформление документов отнимает от 24 до 72 часов.
Компьютерные способы для обхода ограничений улучшаются сообща с интенсификацией законодательных инициатив. VPN-платформы класса premium гарантируют криптографию AES-256 и методы OpenVPN. Надежность соединения fundamentally актуальна для привилегированных партий.
Альтернативные адреса функционируют через географически расположенные компьютерные системы. CDN-системы обеспечивают сокращенную задержку для глобальных игроков. Цифровое маршрутизация активируется при детекции блокировки основного адреса.
Банковские движения в проверенных регионах следуют жестким требованиям PCI DSS. Цифровые операции получают признание благодаря конфиденциальности и быстроте выполнения.
Планшетные приложения элитных компаний содержат биометрическую подтверждение и push-алерты для принципиальных эпизодов. Изменяемый облик автоматически подстраивается под особенности панели.
Игровая область представляет динамичный рост, заинтересовывая миллионы геймеров. Экспертные площадки предоставляют защищённую обстановку для пари. Развёрнутую материалы о этих операторах можно отыскать на Килограмм официальный сайт .
Аккредитация выступает основным элементом отбора сайта. Лицензиаты Мальты дают тщательный аудит финансовых операций. Любая аккредитованная портал подвергается систематические проверки RNG-систем.
Компьютерные особенности новейших гемблинг-сайтов охватывают SSL-кодирование финансового уровня. Поставщики виртуального обеспечения уровня Microgaming, NetEnt, Pragmatic Play интегрируют сложные схемы рандомных значений.
Схема подтверждения учётной записи требует подачи документов KYC-формата. Удостоверение, выписка о финансах, доказательство прописки — стандартный набор для финального активации.
Альтернативные URL исправляют сложности с цензурой компаний. Действующие зеркала адаптируются каждый день компьютерными командами. Смартфонные клиенты часто оперируют качественнее веб модификаций.
Контроль средств определяет длительную прибыльность беттинговых циклов. Квалифицированные беттеры настаивают лимитировать объём ставки до 1-2% от полного фонда.
Новейшие операторы игорных игр предлагают игрокам доступ к качественному беттингу через проверенные Меллстрой регистрация системы. Авторизованная работа подразумевает следования строгих регуляторных критериев.
Процедура создания индивидуального кабинета содержит верификацию персональных реквизитов. Провайдеры внедряют многоуровневые процедуры KYC и AML для пресечения мошеннических финансовых действий.
Цифровые платформы современных развлекательных порталов строятся на защищенных облачных системах с HTTPS протоколами. Геоблокировка принуждает администраторов запускать дублирующие порталы.
Параллельные домены представляют эквивалентные дубликаты базового ресурса с обеспечением всех сервисов и параметров. Участники получают постоянный соединение к капиталу, беттинг записям и пользовательским параметрам.
Банковские действия осуществляются через встроенные расчетные сервисы. Ограничения на взносы и изъятия назначаются в унисон с регуляторными условиями и индивидуальными политиками управления рисками.
Опытные пользователи советуют контролировать положение лицензии через надзорные каталоги гемблинг организаций. Статусные параметры задействуют места на профильных сервисах и feedback подлинных пользователей.
VelvixPro – Helpful content made the process quicker than I expected.
Передовые пользователи обталкиваются с массой цифровых тонкостей при операциях с сертифицированными площадками. Профессиональные ресурсы типа Вавада регистрация обеспечивают свежую материалы о работе развлекательных брендов.
Механизм валидации учетной записи подразумевает ряд требуемых фаз. Базовая верификация требует передачи справок подтверждающих личность. Типовой перечень предполагает свидетельство, автолицензию или международное ID.
Технологическая компонента создания аккаунта подразумевает использование криптографической защиты и двухуровневой проверки. Продвинутые игроки предлагают задействовать весь комплекс возможных настроек охраны.
Запасные домены образуют полные реплики первичного сайта с поддержанием исчерпывающего арсенала. Центральное бонус выражается в тождественности банковских рамок и параметров условий прокрутки.
Система обнаружения функционирующих альтернативных адресов базируется на отслеживании тематических телеграм-каналов и союзных платформ. Профессиональные клиенты эксплуатируют прокси-соединения для гарантирования бесперебойного подключения независимо от региональных блокировок.
Australian Casino Real Money Your Winning Story Begins Now
Real Money Jackpot Casino Australia Real Feel Million Surge
Выбор надежного азартного портала в актуальных рамках требует тщательного анализа к правовому статусу. Квалифицированные клиенты учитывают, что казино Mellstroy Game отображает новую данные о работающих провайдерах.
Процедура записи в проверенных операторах содержит принудительную валидацию идентичности. KYC-требования обеспечивают как площадку, так и участника от обмана. Краткосрочные границы на изъятие активов до закрытия валидации – типичная практика.
Технические ограничения на связь к азартным сайтам нейтрализуются через альтернативные адреса. Функционирующие дубликаты сохраняют абсолютную функциональность центрального портала. Банковские движения, игровой статистика и наградные программы сохраняются неизменными.
Материальная надежность измеряется критерием внедренных денежных способов. SSL-безопасность, PCI DSS сертификация и расширенная идентификация создают безопасный периметр безопасности.
Азартная библиотека легальных площадок включает автоматы от главных студий. RTP-значения, волатильность и алгоритмические системы испытывают независимую контроль в одобренных учреждениях.
Схемы лояльности в серьезных площадках основываются на ясных условиях отыгрыша. Вейджер x35-40 признается справедливым для слот-подарков, в то время как стандартные развлечения включаются в расчет с сниженным коэффициентом.
Передовые игроки встречаются с огромным количеством технологических нюансов при функционировании с официальными сайтами. Профильные сайты типа п»ї1хбет РІС…РѕРґ поставляют свежую информацию о операциях казино компаний.
Процедура аутентификации учетной записи содержит набор необходимых фаз. Начальная валидация требует отправки документов доказывающих гражданство. Стандартный пакет содержит свидетельство, водительские права или международное ID.
Техническая сторона регистрации включает задействование безопасного соединения и двухфакторной аутентификации. Продвинутые игроки рекомендуют инициировать все предложенных параметров охраны.
Зеркала составляют идентичные копии первичного домена с обеспечением полного инструментария. Центральное выгода кроется в идентичности денежных лимитов и параметров проигрыша.
Механизм нахождения рабочих дублирующих порталов строится на наблюдении профессиональных уведомительных сервисов и аффилированных площадок. Квалифицированные клиенты задействуют виртуальные частные сети для гарантирования устойчивого связи невзирая от локальных запретов.
Беттинговая ниша отображает активный прогресс, заинтересовывая массы участников. Грамотные платформы гарантируют защищённую обстановку для беттинга. Развёрнутую данные о таких операторах допустимо отыскать на Голд казино .
Аккредитация является приоритетным показателем отбора портала. Регуляторы Гибралтара дают серьёзный контроль валютных действий. Любая официальная ресурс подвергается постоянные инспекции RNG-алгоритмов.
Программные аспекты новейших игорных домов включают SSL-кодирование расчётного стандарта. Разработчики виртуального продукта класса Microgaming, NetEnt, Pragmatic Play подключают сложные системы произвольных значений.
Алгоритм верификации учётной записи включает подачи бумаг KYC-стандарта. Удостоверение, подтверждение о доходах, доказательство адреса — базовый комплект для окончательного подключения.
Резервные адреса ликвидируют сложности с цензурой поставщиков. Действующие копии адаптируются ежедневно IT группами. Смартфонные программы нередко оперируют стабильнее интернет форматов.
Контроль средств задаёт долгосрочную доходность азартных партий. Профессиональные беттеры советуют контролировать объём вейджера до 1-2% от полного капитала.
Передовые игроки сталкиваются с препятствием входа к официальным ресурсам. Провайдеры запрещают основные домены, но знающие лаки Р±РёСЂ казино участники осознают о присутствии дублирующих платформ.
Зеркало является идентичную воспроизведение оригинального портала. Протоколы шифрования функционируют равнозначными. Платёжные переводы реализуются через равнозначные сервисы.
Методика открытия счёта через дополнительный ссылку включает обычной проверки. Администраторы уточняют документы для осуществления KYC-стандартов. Личные характеристики проходят расширенную верификацию.
Банковские ограничения на дополнительных платформах аналогичны главным требованиям. Минимальные суммы функционируют стабильными. Накопительные призовые фонды координируются между всеми доменами.
Премиальные планы оперируют целостно на зеркальных порталах. Отыгрышный коэффициент поддерживает исходные значения. Тайминг проигрывания поддерживается.
Отдел обслуживания рассматривает запросы с зеркальных ресурсов равнозначно. Мгновенный общение осуществляет беспрерывный формат обслуживания.
First of all I would like to say awesome blog! I had a quick question in which I’d like to ask if you do not mind.
I was curious to know how you center yourself and clear your head prior to writing.
I’ve had a difficult time clearing my mind in getting my thoughts out.
I truly do take pleasure in writing but it just
seems like the first 10 to 15 minutes are usually lost just trying to
figure out how to begin. Any ideas or hints? Cheers!
Real Money Pokies Bonus Australia Feel Real Adrenaline Now
Активные зеркала проверенных азартных клубов на п»ї1хбет зеркало дают устойчивый соединение к развлекательным сервисам. Технология копирования создает точные реплики центрального веб-площадки с удержанием всех функций.
Процедура активации через mirror-сайт целиком воспроизводит главную анкету. Дебютные геймеры регистрируют рабочий email, генерируют защищенный секретную комбинацию и определяют игровую курренси.
Аутентификация счета требует передачи документов следуя KYC-политике. Снимок ID-карты, свидетельство резиденции и финансовые параметры проверяются через машинную анализ в течение 24-72 часов.
Подключение действующих геймеров реализуется через классическую модуль с многоступенчатой валидацией. Краткосрочные шифры передаются на мессенджер аппарат или почтовый ящик.
Механизмы денежного раздела через альтернативные домены содержит востребованные финансовые инструменты. Visa, Mastercard, виртуальные счета Skrill, Neteller, виртуальные монеты Bitcoin, Ethereum выполняются с оптимизированными платежами 0-3%.
Развлекательная ассортимент воспроизводится в точности включая spinning games, традиционные забавы, live-дилеров и прогрессивы. RTP-параметры, дисперсия и проигрыш поддерживаются неизменными.
Промо политика действует идентично базовому веб-площадке. Welcome-предложения, free spins, refund и VIP-курсы стартуют программно при выполнении определенных требований.
PlixoNavigator – Neat and functional, everything is easy to find at a glance.
Win Real Money Pokies Australia One Spin Could Change Everything
Надёжные ресурсы развлекательных предложений обеспечивают участникам доступ к профессиональному игровому процессу через профильные порталы, включая Лаки Бир РІС…РѕРґ , которые специально исполняют глобальные критерии безопасности.
Схема создания аккаунта требует ввода валидационных данных через безопасные SSL-connection. Менеджмент запрашивают official удостоверение правоспособности и адреса нахождения для поддержания законодательных критериев.
Multi-factor authentication является принудительным частью передовых архитектур конфиденциальности. Участники приобретают SMS-шифры, push-алерты или внедряют профессиональные программы в стиле Google Authenticator.
Mirror домены нейтрализуют трудности territorial блокировок и DDoS-воздействий. По сути дубли являют дублированные dublicates главного домена с поддержанием возможностей и пользовательских информации.
Профессиональные геймеры рекомендуют удерживать свежие каталоги рабочих зеркал в закладках browser. Management доставляют updates о новых ссылках через email, Telegram-каналы и mobile apps.
Денежные транзакции через проверенные платформы покрыты криптографическими алгоритмами класса банковского индустрии. Изъятие финансов происходит только на аутентифицированные карты хозяина профиля.
Следующая страница
блог про трансмисии
RavionInsight – I check in often because the information is relevant and clear.
Азартная ниша показывает стремительный расширение, завлекая массы участников. Экспертные площадки гарантируют надёжную обстановку для беттинга. Подробную данные о этих компаниях реально изучить на казино Голд .
Аккредитация является главным элементом определения портала. Регуляторы Мальты дают качественный мониторинг денежных операций. Отдельная легальная площадка выполняет регулярные аудиты RNG-генераторов.
Компьютерные параметры актуальных азартных площадок включают SSL-криптографию экономического класса. Создатели программного ПО класса Microgaming, NetEnt, Pragmatic Play подключают многоуровневые модели рандомных чисел.
Процедура проверки аккаунта требует передачи свидетельств KYC-типа. Свидетельство, документ о прибылях, валидация регистрации — типичный комплект для завершённого входа.
Резервные ссылки исправляют проблемы с запретами организаций. Свежие копии корректируются каждый день IT командами. Планшетные клиенты нередко функционируют качественнее браузерных вариантов.
Распределение капитала устанавливает продолжительную результативность азартных циклов. Грамотные пользователи указывают урезать величину пари до 1-2% от итогового фонда.
Актуальные дублирующие порталы лицензированных гемблинг-платформ на тип топ казино предоставляют непрерывный вход к гемблинг системам. Технология копирования создает точные дубликаты центрального ресурса с фиксацией всех функций.
Механизм активации через зеркало полностью копирует стандартную шаблон. Новые клиенты указывают действующий email, создают надежный пароль и определяют основную платежное средство.
Валидация личного кабинета подразумевает предоставления бумаг в соответствии с KYC-стандартам. Скан паспорта, верификация места жительства и финансовые реквизиты проходят программную контроль в течение 24-72 периодов.
Аутентификация зарегистрированных игроков реализуется через обычную панель с двухфакторной идентификацией. Одноразовые токены поступают на мобильный аппарат или электронную почту.
Функционал пополнительного раздела через альтернативные домены включает актуальные денежные системы. Visa, Mastercard, веб счета Skrill, Neteller, виртуальные монеты Bitcoin, Ethereum обрабатываются с низкими взносами 0-3%.
Азартная коллекция воспроизводится в точности включая машины, карточные игры, live-хостов и накопительные призы. RTP-значения, вариативность и проигрыш удерживаются такими же.
Бонусная схема выполняется похоже базовому веб-площадке. Welcome-комплекты, бесплатные вращения, денежный возврат и VIP-программы запускаются системно при реализации прописанных критериев.
Отбор качественного азартного ресурса в современных реалиях нуждается специального подхода к регулятивному статусу. Опытные геймеры знают, что казино Лаки Бир демонстрирует современную материалы о действующих площадках.
Механизм регистрации в официальных заведениях объединяет необходимую подтверждение идентичности. KYC-нормы охраняют как казино, так и геймера от мошенничества. Временные лимиты на перечисление капитала до закрытия контроля – обычная процедура.
Электронные барьеры на доступ к betting площадкам нейтрализуются через зеркальные порталы. Рабочие копии гарантируют полную работоспособность основного сервиса. Денежные движения, игровой продвижение и бонусные планы сохраняются константными.
Финансовая защищенность выражается показателем применяемых денежных инструментов. SSL-безопасность, PCI DSS сертификация и двухфакторная идентификация создают защищенный щит безопасности.
Развлекательная коллекция легальных операторов содержит слоты от известных создателей. RTP-параметры, волатильность и расчетные схемы испытывают объективную аудит в утвержденных лабораториях.
Программы лояльности в качественных казино базируются на ясных параметрах ставок. Отыгрыш x35-40 считается разумным для слот-поощрений, в то время как традиционные активности засчитываются в счет с минимальным процентом.
Действующие зеркала лицензированных гемблинг-платформ на Вавада сайт дают беспрерывный доступ к геймерским ресурсам. Технология копирования создает эквивалентные дубликаты основного веб-площадки с сохранением всех функций.
Процедура регистрации через альтернативный домен целиком имитирует основную анкету. Свежие пользователи регистрируют активный email, генерируют защищенный секретную комбинацию и назначают основную финансовый инструмент.
Валидация аккаунта включает представления бумаг следуя KYC-политике. Скан паспорта, верификация резиденции и финансовые сведения проверяются через цифровую валидацию в течение 24-72 ч.
Авторизация зарегистрированных игроков осуществляется через стандартную модуль с двухфакторной аутентификацией. Разовые пароли доставляются на сотовый девайс или электронную почту.
Опции депозитного модуля через резервные ссылки поддерживает топовые денежные системы. Visa, Mastercard, виртуальные счета Skrill, Neteller, криптовалюты Bitcoin, Ethereum обрабатываются с низкими комиссиями 0-3%.
Гемблинг каталог повторяется в точности включая автоматы, традиционные геймплей, live-дилеров и мегавыигрыши. RTP-показатели, волатильность и ставочные требования остаются идентичными.
Поощрительная механизм функционирует схоже корневому ресурсу. Welcome-наборы, даровые прокруты, кешбэк и VIP-курсы инициируются автоматически при выполнении прописанных параметров.
http://gastrohealthmonitor.com/# Gastro Health Monitor
Buy High-Quality Backlinks to Boost Your Google Rankings
Fast
In today’s competitive digital landscape, ranking on the first page of Google requires
more than just good content. One of the most powerful ranking factors remains backlinks.
If you want faster visibility, stronger authority, and consistent traffic growth, choosing to buy high-quality backlinks can be
a smart and effective SEO strategy when done correctly.
High-quality backlinks come from trusted, relevant, and authoritative websites.
These links act as votes of confidence for your site, signaling to search engines that your content is valuable and reliable.
Unlike low-quality or spammy links, premium backlinks help improve domain authority, keyword rankings, and overall website
credibility without risking penalties.
Buying backlinks saves time and accelerates results. Organic
link building can take months, especially for new or competitive websites.
By investing in quality backlinks, you can shorten this timeline
and start seeing ranking improvements much faster. This is especially useful for
businesses, bloggers, and affiliate marketers who want quick
momentum in search results.
Another key advantage is control. When you buy backlinks from a professional, Google-safe
service, you gain access to contextual links, niche-relevant placements, and
natural anchor text distribution. This ensures your backlink profile looks authentic and diversified, which modern search engines strongly favor.
However, quality always matters more than quantity.
Avoid cheap, automated, or PBN-heavy links that can harm your site.
Instead, focus on backlinks from real websites with strong metrics, organic traffic, and relevant content.
A well-planned backlink strategy combined with on-page SEO and quality content delivers the best long-term results.
In conclusion, buying high-quality backlinks is one of the
fastest ways to boost Google rankings when done responsibly.
It enhances authority, increases visibility, and
drives targeted traffic—helping your website grow steadily and sustainably in competitive search environments.
Актуальные гемблеры встречаются с сложностью доступа к проверенным ресурсам. Операторы ограничивают базовые URL, но знающие Лаки Бир сайт участники учитывают о функционировании параллельных ресурсов.
Резервная ссылка образует стопроцентную дубликат первичного площадки. SSL-сертификаты функционируют равнозначными. Платёжные процедуры осуществляются через аналогичные системы.
Процедура создания аккаунта через дополнительный ресурс содержит обычной валидации. Администраторы просят бумаги для реализации KYC-требований. Идентификационные информация реализуют комплексную верификацию.
Финансовые лимиты на дополнительных сайтах совпадают первичным характеристикам. Стартовые суммы остаются стабильными. Увеличивающиеся выигрышные пулы синхронизируются между многочисленными ссылками.
Льготные механизмы выполняются комплексно на резервных ресурсах. Коэффициент оборота сохраняет первоначальные показатели. Временные рамки проигрывания поддерживается.
Отдел ассистирования изучает обращения с резервных порталов равнозначно. Прямой переписка гарантирует беспрерывный порядок деятельности.
OrvixGuide – Features are well-organized and instructions simple to understand.
Выбор достойного азартного портала в нынешних условиях требует специального подхода к юридическому положению. Знающие геймеры понимают, что Меллстрой РІС…РѕРґ отображает последнюю информацию о работающих операторах.
Механизм открытия счета в лицензированных площадках охватывает обязательную аутентификацию удостоверения. KYC-стандарты оберегают как сервис, так и геймера от мошенничества. Кратковременные пределы на снятие активов до выполнения проверки – привычная система.
Виртуальные барьеры на соединение к игровым сайтам преодолеваются через резервные порталы. Доступные отражения гарантируют стопроцентную возможности главного ресурса. Банковские переводы, игровой результаты и наградные схемы функционируют постоянными.
Экономическая гарантированность характеризуется показателем используемых расчетных методов. SSL-безопасность, PCI DSS лицензирование и многоуровневая идентификация формируют прочный барьер ограждения.
Развлекательная коллекция легальных провайдеров включает автоматы от главных создателей. RTP-показатели, дисперсия и вероятностные системы испытывают объективную валидацию в авторизованных учреждениях.
Планы вознаграждения в качественных заведениях строятся на четких параметрах вейджера. Проигрыш x35-40 характеризуется справедливым для автомат-подарков, в то время как стандартные забавы засчитываются в зачет с уменьшенным фактором.
official source https://www.onlyfake.org
Отбор безопасного казино заведения требует серьезного исследования правовых свидетельств. Передовые сайты тип топ казино РІС…РѕРґ предлагают участникам полную данные о действующих санкциях.
Механизм открытия аккаунта содержит определенное количество требуемых фаз проверки. Провайдеры истребуют справки, удостоверяющие персону и возраст. Типовой KYC-механизм составляет от 24 до 72 интервалов.
Контроль средств запускается с фиксации лимитов на взносы. Искусные пользователи рекомендуют задействовать принцип 5% от суммарного казино средств на одну игру.
Технические блокировки операторов заставляют внедрять альтернативные пути. Зеркала хранят безусловную активность базового платформы, подразумевая хронологию транзакций и азартный продвижение.
Передовые финансовые инструменты обеспечивают быстрые пополнения через виртуальные портмоне. Bitcoin, Ethereum и стейблкоины обеспечивают конфиденциальность и минимальные сборы. Срок проведения получений доходит 10-30 минут.
Алгоритмы лояльности содержат иерархические категории с прогрессивным вознаграждением. VIP-координаторы предоставляют персонализированные награды, повышенные лимиты и опережающую обслуживание.
her response debanc
Отбор надежного гемблинг заведения в актуальных условиях подразумевает тщательного рассмотрения к регулятивному состоянию. Квалифицированные участники понимают, что madcasino включает последнюю материалы о работающих операторах.
Механизм создания аккаунта в лицензированных заведениях предусматривает требуемую аутентификацию идентичности. KYC-нормы защищают как сервис, так и клиента от фрода. Краткосрочные лимиты на снятие денег до закрытия подтверждения – обычная система.
Цифровые блокировки на доступ к игровым площадкам устраняются через параллельные URL. Активные клоны поддерживают тотальную работоспособность центрального сайта. Финансовые переводы, азартный прогресс и поощрительные системы поддерживаются устойчивыми.
Денежная безопасность оценивается степенью применяемых банковских инструментов. SSL-кодирование, PCI DSS сертификация и двухфакторная идентификация обеспечивают безопасный барьер защиты.
Развлекательная библиотека официальных провайдеров объединяет машины от топовых провайдеров. RTP-коэффициенты, волатильность и математические системы подвергаются нейтральную валидацию в утвержденных учреждениях.
Системы стимулирования в качественных операторах формируются на ясных правилах вейджера. Отыгрыш x35-40 расценивается нормальным для спин-подарков, в то время как классические забавы засчитываются в расчет с уменьшенным множителем.
Главная
продажа контрактных акпп
Актуальные mirror-ссылки лицензированных gaming-операторов на Lucky Bear зеркало дают постоянный коннект к геймерским ресурсам. Принцип реплицирования образует точные клоны центрального сайта с поддержанием всех инструментов.
Схема создания аккаунта через mirror-сайт полностью дублирует оригинальную бланк. Только пришедшие игроки указывают рабочий email, устанавливают защищенный ключ и определяют операционную курренси.
Валидация счета содержит передачи свидетельств в соответствии с KYC-регламенту. Фото удостоверения личности, валидация проживания и платежные данные подвергаются цифровую контроль в течение 24-72 часа.
Авторизация зарегистрированных пользователей происходит через базовую форму с двухфакторной валидацией. Разовые ключи доставляются на сотовый устройство или почтовый ящик.
Возможности входящего модуля через дублирующие порталы включает популярные платежные платформы. Visa, Mastercard, веб хранилища Skrill, Neteller, виртуальные монеты Bitcoin, Ethereum осуществляются с низкими взносами 0-3%.
Гемблинг каталог клонируется абсолютно включая машины, традиционные активности, live-хостов и накопительные призы. RTP-параметры, вариативность и отыгрыш поддерживаются идентичными.
Подарочная политика выполняется аналогично центральному сайту. Welcome-предложения, фриспины, возврат средств и VIP-системы включаются системно при исполнении установленных условий.
Новейшие геймеры имеют дело с множеством технических аспектов при деятельности с легальными площадками. Тематические платформы типа казино Mellstroy Game поставляют современную контент о работе казино организаций.
Система верификации счета подразумевает комплекс требуемых этапов. Исходная аутентификация нуждается передачи удостоверений подтверждающих индивидуальность. Привычный пакет предполагает свидетельство, права или заграничное удостоверение.
Системная сторона записления подразумевает использование SSL-шифрования и 2FA. Квалифицированные геймеры рекомендуют запускать весь комплекс возможных настроек защиты.
Альтернативные адреса являются абсолютные клоны главного домена с поддержанием комплексного возможностей. Главное плюс кроется в подобии финансовых пределов и условий отыгрыша.
Алгоритм локализации активных альтернативных адресов базируется на мониторинге тематических информационных каналов и связанных сайтов. Профессиональные участники внедряют VPN-сервисы для предоставления надежного связи независимо от территориальных блокировок.
Real Money Pokies Win Big Don’t Wait Another Second
Актуальные платформы гемблинг продуктов предоставляют игрокам доступ к профессиональному беттингу через защищенные казино Tippy платформы. Лицензированная функционирование нуждается следования конкретных законодательных требований.
Процесс оформления игрового счета задействует верификацию приватных данных. Провайдеры внедряют многоуровневые системы KYC и AML для пресечения мошеннических переводов.
Программные системы передовых беттинг площадок строятся на стабильных серверах с HTTPS стандартами. Территориальные ограничения принуждает владельцев внедрять дублирующие порталы.
Дублирующие платформы представляют полные копии первичного ресурса с поддержанием всех возможностей и параметров. Беттеры добиваются постоянный связь к балансу, азартной статистике и индивидуальным конфигурациям.
Финансовые действия выполняются через подключенные банковские шлюзы. Ограничения на пополнения и обналичивания назначаются в соотношении с законодательными положениями и организационными регламентами минимизации опасностей.
Экспертные беттеры указывают мониторить ситуацию сертификата через официальные базы данных азартных ведомств. Репутационные характеристики задействуют позиции на специализированных платформах и feedback настоящих игроков.
Real Money Pokies Australia Deserve That Massive Payout Today
Новейшие участники встречаются с изобилием программных особенностей при операциях с официальными сайтами. Профильные сайты типа п»ї1хбет регистрация поставляют новую материалы о процессах игорных организаций.
Процесс аутентификации профиля предполагает несколько необходимых уровней. Исходная проверка подразумевает отправки удостоверений валидирующих персону. Стандартный набор предполагает удостоверение личности, права или загранпаспорт.
Цифровая составляющая создания аккаунта включает внедрение SSL-шифрования и многофакторной защиты. Профессиональные клиенты подсказывают активировать все доступных параметров обеспечения.
Зеркала составляют абсолютные дубликаты главного сайта с хранением тотального инструментария. Ключевое бонус заключается в соответствии банковских лимитов и требований ставочных требований.
Механизм поиска актуальных альтернативных адресов строится на контроле специализированных информационных каналов и партнерских порталов. Опытные клиенты эксплуатируют виртуальные частные сети для формирования постоянного подключения невзирая от местных лимитов.
Азартная сфера показывает стремительный подъём, заинтересовывая массы клиентов. Опытные сайты обеспечивают стабильную среду для развлечений. Полную сведения о указанных операторах допустимо получить на казино mad .
Аккредитация является ключевым показателем подбора портала. Контролёры Олдерни обеспечивают серьёзный надзор экономических действий. Любая аккредитованная ресурс выполняет регулярные ревизии RNG-генераторов.
Цифровые параметры современных игорных домов включают SSL-кодирование банковского ранга. Поставщики компьютерного софта класса Microgaming, NetEnt, Pragmatic Play добавляют продвинутые системы рандомных показателей.
Алгоритм валидации счёта предусматривает передачи свидетельств KYC-формата. Документ, свидетельство о доходах, подтверждение местожительства — стандартный комплект для полноценного входа.
Дублирующие URL решают трудности с блокировками операторов. Рабочие альтернативы адаптируются каждый день техническими специалистами. Карманные программы нередко оперируют надёжнее онлайн версий.
Банкролл-менеджмент создаёт стратегическую эффективность гемблинговых циклов. Грамотные пользователи настаивают сокращать сумму пари до 1-2% от полного бюджета.
Поиск безопасного азартного заведения заставляет глубокого изучения регулятивных свидетельств. Новые сайты Меллстрой сайт гарантируют геймерам абсолютную факты о действующих разрешениях.
Система создания профиля включает множество обязательных фаз валидации. Операторы просят свидетельства, доказывающие персону и зрелость. Традиционный KYC-алгоритм занимает от 24 до 72 часов.
Банкролл-менеджмент открывается с назначения лимитов на вклады. Искусные участники предлагают применять установку 5% от суммарного игорного капитала на единичную игру.
Цифровые блокировки владельцев принуждают эксплуатировать вспомогательные домены. Зеркала хранят максимальную работоспособность основного сайта, предусматривая архив сделок и развлекательный достижения.
Современные банковские способы поддерживают быстрые инвестиции через блокчейн кошельки. Bitcoin, Ethereum и устойчивые монеты дают приватность и символические комиссии. Продолжительность осуществления извлечений достигает 10-30 отрезков.
Системы приверженности предусматривают каскадные категории с возрастающим компенсацией. VIP-представители гарантируют индивидуальные награды, улучшенные пределы и приоритетную помощь.
такой
блог про трансмисии
Новейшие порталы беттинг продуктов обеспечивают клиентам возможность к высококлассному азарту через надежные п»ї1хбет РІС…РѕРґ системы. Лицензированная бизнес требует соблюдения жестких законодательных стандартов.
Алгоритм активации клиентского счета предусматривает аутентификацию приватных показателей. Провайдеры эксплуатируют многоуровневые алгоритмы KYC и AML для предотвращения нарушающих переводов.
Программные системы современных казино базируются на надежных облачных системах с SSL алгоритмами. Локальные запреты вынуждает владельцев внедрять резервные домены.
Зеркальные сайты составляют аналогичные клоны базового ресурса с фиксацией всех функций и данных. Участники обеспечивают себе беспрепятственный связь к счету, развлекательной отчетности и индивидуальным настройкам.
Денежные операции производятся через подключенные денежные шлюзы. Лимиты на депозиты и получения устанавливаются в согласии с правовыми критериями и индивидуальными правилами минимизации опасностей.
Профессиональные игроки указывают контролировать ситуацию лицензии через официальные реестры развлекательных комиссий. Авторитетные показатели содержат места на тематических ресурсах и мнения настоящих участников.
Поиск в секторе официальных ресурсов включает осознания актуальных решений соединения. Опытные пользователи эксплуатируют Mellstroy Game зеркало для обретения свежей материалов о оперативных URL.
Механизм регистрации учетной записи в проверенных организациях включает детальную верификацию. Передовые операторы эксплуатируют KYC-процедуры и AML-нормы. Документальное сопровождение потребляет от 24 до 72 интервалов.
Технические технологии для преодоления барьеров прогрессируют сообща с интенсификацией юридических мер. VPN-инструменты разряда premium предоставляют защиту AES-256 и методы OpenVPN. Надежность соединения fundamentally актуальна для премиальных сессий.
Зеркальные платформы выполняют задачи через географически расположенные компьютерные инфраструктуры. CDN-архитектуры гарантируют низкую задержку для международных пользователей. Системное роутинг инициируется при обнаружении препятствия главного ресурса.
Финансовые транзакции в легальных зонах соответствуют четким нормам PCI DSS. Цифровые операции набирают актуальность из-за приватности и темпу обработки.
Портативные клиенты элитных компаний интегрируют физиологическую аутентификацию и push-извещения для ключевых эпизодов. Гибкий дизайн самостоятельно корректируется под настройки дисплея.
Актуальные mirror-ссылки лицензированных казино на ДживиСпин казино предоставляют устойчивый подключение к гемблинг системам. Технология клонирования формирует аналогичные копии базового ресурса с поддержанием всех возможностей.
Схема оформления профиля через дублирующий портал в точности повторяет основную заявку. Новые пользователи вводят валидный email, устанавливают стойкий шифр и определяют игровую курренси.
Аутентификация счета содержит представления документов следуя KYC-требованиям. Копия паспорта, валидация регистрации и денежные координаты контролируются системой автоматическую контроль в течение 24-72 часа.
Авторизация действующих клиентов происходит через стандартную модуль с двухфакторной аутентификацией. Разовые шифры доставляются на сотовый гаджет или электронную почту.
Опции депозитного блока через дублирующие порталы поддерживает востребованные платежные механизмы. Visa, Mastercard, веб портмоне Skrill, Neteller, криптовалюты Bitcoin, Ethereum осуществляются с оптимизированными процентами 0-3%.
Игровая коллекция копируется полностью включая машины, карточные активности, live-дилеров и максимальные награды. RTP-значения, вариативность и отыгрыш фиксируются такими же.
Промо политика функционирует идентично базовому порталу. Welcome-предложения, безвозмездные спины, возврат средств и VIP-программы запускаются программно при реализации заданных параметров.
Передовые участники пересекаются с изобилием программных тонкостей при работе с сертифицированными платформами. Специализированные сайты типа типпи казино поставляют релевантную информацию о деятельности гэмблинговых провайдеров.
Процесс верификации счета включает комплекс обязательных уровней. Исходная подтверждение предполагает загрузки бумаг верифицирующих личность. Обычный перечень предполагает удостоверение личности, автолицензию или заграничное удостоверение.
Системная часть создания аккаунта подразумевает использование безопасного соединения и 2FA. Продвинутые игроки подсказывают инициировать совокупность предложенных функций секьюрити.
Дублирующие порталы формируют стопроцентные копии основного ресурса с сохранением полного функционала. Важнейшее выгода заключается в схожести платежных рамок и условий вейджера.
Схема поиска рабочих дублирующих порталов строится на контроле тематических уведомительных сервисов и союзных сайтов. Квалифицированные геймеры применяют туннельные протоколы для гарантирования устойчивого входа без оглядки от региональных блокировок.
сюда
Cactus Casino промокод бонусы на депозит
https://vn44.ru/uploads/articles/?kent-casino-promokod.html
read the full info here Lido
Развлекательная сфера показывает динамичный прогресс, завлекая массы геймеров. Квалифицированные ресурсы предоставляют защищённую среду для беттинга. Исчерпывающую сведения о данных брендах можно получить на Lucky Bear казино .
Сертификация является приоритетным фактором выбора ресурса. Лицензиаты Мальты предоставляют тщательный надзор экономических транзакций. Всякая легальная платформа выполняет периодические контроли RNG-алгоритмов.
Программные свойства инновационных казино объединяют SSL-защиту банковского уровня. Провайдеры компьютерного материала класса Microgaming, NetEnt, Pragmatic Play внедряют комплексные механизмы хаотичных параметров.
Алгоритм валидации аккаунта предусматривает передачи удостоверений KYC-типа. Паспорт, выписка о прибылях, верификация местожительства — классический набор для полноценного авторизации.
Дублирующие ссылки ликвидируют препятствия с фильтрацией поставщиков. Свежие дубли адаптируются каждый день техническими специалистами. Карманные клиенты зачастую выполняются стабильнее онлайн форматов.
Контроль средств устанавливает перспективную результативность гемблинговых периодов. Грамотные геймеры указывают контролировать величину вейджера до 1-2% от полного резерва.
Определение качественного развлекательного оператора в текущих рамках предполагает повышенного рассмотрения к юридическому уровню. Опытные игроки знают, что Mellstroy Game отображает актуальную данные о функционирующих сервисах.
Процесс записи в легальных платформах объединяет необходимую подтверждение документов. KYC-требования охраняют как заведение, так и игрока от фрода. Временные лимиты на получение финансов до выполнения контроля – типичная методика.
Технические препятствия на доступ к betting порталам решаются через параллельные порталы. Активные отражения поддерживают полную работоспособность основного платформы. Денежные процедуры, развлекательный результаты и льготные программы функционируют неизменными.
Экономическая стабильность характеризуется качеством применяемых платежных методов. SSL-кодирование, PCI DSS валидация и усиленная проверка формируют прочный заслон ограждения.
Игровая каталог проверенных операторов объединяет машины от лидирующих создателей. RTP-индексы, колебания и статистические принципы претерпевают нейтральную проверку в утвержденных лабораториях.
Программы поощрения в профессиональных операторах строятся на понятных требованиях вейджера. Отыгрыш x35-40 расценивается справедливым для машина-подарков, в то время как карточные развлечения засчитываются в расчет с сниженным коэффициентом.
Rutor — ветеран русскоязычного даркнета с репутацией, анонимной системой и сервисом для безопасных транзакций в сети Rutor.Rutor — старейший представитель даркнета на русском языке
куда переехал рутор считается одним из наиболее популярных и старых ресурсов в рунет-даркнете, который прочно закрепился в инфраструктуре анонимных площадок. Этот магазин ориентирован на предоставление пользователям широкой базы данных, связанной с файлами, софтом, новостями и различными видами контента, включая темы, касающиеся взлома и безопасности.
Как устроена система работы Rutor
Механизм работы ресурса позволяет пользователям получать доступ к большим массивам данных и файлов, при этом обеспечивая максимальную приватность и анонимность. Особенность сервиса в том, что он работает через сеть Rutor, что существенно снижает риск идентификации и утечки данных. С течением времени площадка превратилась в важный архив событий и истории русскоязычного даркнета.
Безопасность и анонимность на Rutor
Вопросы безопасности являются одними из ключевых на сервисе Rutor. Платформа предоставляет анонимный просмотр контента благодаря применению новейших решений для защиты информации и коммуникаций. Для дополнительной конфиденциальности часто рекомендуют использовать встроенный мессенджер, позволяющий пользователям безопасно обмениваться контактами и новыми данными, не подвергаясь цензуре и вмешательству третьих лиц.
Влияние Rutor на сегмент русского даркнета
Площадка Rutor по-прежнему играет роль ключевого ресурса для обмена актуальными данными по безопасности и тематике взлома. Из-за ориентации на минимальную цензуру и приватность Rutor популярен у приверженцев свободного обмена данными и конфиденциальности.
Rutor продолжает работать и предоставлять стабильный доступ к ресурсам, удовлетворяя потребности как новичков, так и опытных пользователей даркнета. Система построена таким образом, что каждый раздел страницы — будь то магазин, новости или инструкции по взлому — становится отдельной частью большого сообщества, в котором безопасность и возможность оставаться анонимным выходят на первый план.
Возможные направления развития и связанные опасности
Безусловно, дальнейшая история Rutor будет связана с новыми формами риска, новыми способами защиты конфиденциальности и методами обхода блокировок. Следует помнить, что даже максимально анонимная среда не обеспечивает стопроцентную безопасность.
Платформа продолжает быть ресурсом для получения расширенной информации, обмена мнениями по безопасности и мониторинга новшеств в сферах даркнета. Улучшение технологий, увеличение аудитории и внедрение инноваций способствуют статусу Rutor как центрального элемента русскоязычного онлайн-сообщества.
– Принцип анонимности
– Безопасность транзакций
– Возможность получения эксклюзивных данных
– Обеспечение приватности взаимодействий
Rutor — это платформа с уникальной историей, и её опыт стоит принимать во внимание всем, кто ценит собственную свободу, приватность и независимость от внешней цензуры в современном цифровом мире.
Действующие резервные адреса легальных азартных клубов на Mellstroy Game предоставляют стабильный соединение к гемблинг порталам. Методика клонирования образует идентичные копии основного портала с удержанием всех функций.
Процедура оформления профиля через резервную ссылку целиком повторяет главную бланк. Начинающие участники прописывают активный email, создают надежный секретную комбинацию и фиксируют рабочую денежную единицу.
Верификация профиля подразумевает представления свидетельств согласно KYC-требованиям. Изображение удостоверения личности, подтверждение места жительства и банковские данные подвергаются алгоритмическую валидацию в течение 24-72 периодов.
Логин зарегистрированных геймеров реализуется через обычную модуль с многоступенчатой идентификацией. Сессионные коды приходят на смс аппарат или email.
Механизмы финансового компонента через зеркала предлагает топовые платежные сервисы. Visa, Mastercard, онлайн балансы Skrill, Neteller, блокчейн-токены Bitcoin, Ethereum выполняются с оптимизированными комиссиями 0-3%.
Игровая каталог клонируется абсолютно включая слоты, настольные игры, live-дилеров и мегавыигрыши. RTP-параметры, дисперсия и ставочные требования поддерживаются такими же.
Поощрительная механизм работает аналогично главному сайту. Welcome-комплекты, free spins, денежный возврат и VIP-системы активируются машинально при исполнении фиксированных требований.
Игровая ниша демонстрирует динамичный прогресс, притягивая массы пользователей. Профессиональные ресурсы гарантируют качественную пространство для игры. Детальную материалы о подобных компаниях доступно отыскать на типпи регистрация .
Аттестация остаётся ключевым показателем отбора портала. Регуляторы Мальты предоставляют строгий мониторинг валютных транзакций. Конкретная сертифицированная ресурс выполняет регулярные аудиты RNG-механизмов.
IT параметры новейших игорных домов предусматривают SSL-защиту банковского категории. Создатели компьютерного ПО типа Microgaming, NetEnt, Pragmatic Play добавляют продвинутые механизмы хаотичных параметров.
Механизм валидации профиля требует предоставления справок KYC-класса. Документ, документ о финансах, удостоверение местожительства — стандартный перечень для окончательного доступа.
Альтернативные ссылки ликвидируют трудности с ограничениями поставщиков. Действующие альтернативы корректируются постоянно IT отделами. Портативные утилиты обычно выполняются стабильнее интернет модификаций.
Управление банкроллом определяет продолжительную доходность гемблинговых сессий. Квалифицированные беттеры рекомендуют лимитировать количество ставки до 1-2% от общего капитала.
Отбор честного игорного оператора требует детального анализа лицензионных сертификатов. Инновационные ресурсы СЌРЅРѕРјРѕ казино гарантируют участникам полную сведения о действующих допусках.
Система открытия аккаунта предусматривает несколько ключевых этапов аутентификации. Представители требуют свидетельства, удостоверяющие идентичность и зрелость. Традиционный KYC-порядок занимает от 24 до 72 интервалов.
Финансовое планирование инициируется с задания ограничений на депозиты. Профессиональные участники советуют использовать принцип 5% от суммарного казино бюджета на конкретную игру.
Системные запреты провайдеров принуждают использовать резервные маршруты. Альтернативы сохраняют безусловную производительность основного площадки, содержа хронологию платежей и игровой успех.
Передовые платежные методы гарантируют оперативные депозиты через цифровые хранилища. Bitcoin, Ethereum и стабильные валюты дают приватность и наименьшие сборы. Продолжительность выполнения получений равно 10-30 отрезков.
Программы лояльности содержат градационные степени с увеличивающимся возвратом. VIP-менеджеры дают эксклюзивные бонусы, повышенные пределы и опережающую поддержку.
Новейшие клиенты пересекаются с множеством технологических особенностей при процессах с сертифицированными ресурсами. Профессиональные источники типа Vavada casino дают свежую данные о процессах гэмблинговых операторов.
Процесс подтверждения счета подразумевает несколько обязательных уровней. Стартовая подтверждение подразумевает размещения справок подтверждающих личность. Классический пакет включает документ, права или внешний паспорт.
Техническая сторона открытия счета подразумевает внедрение SSL-шифрования и многофакторной защиты. Квалифицированные пользователи настаивают запускать полный набор имеющихся параметров безопасности.
Дублирующие порталы формируют точные клоны основного ресурса с сохранением комплексного возможностей. Важнейшее выгода содержится в схожести платежных рамок и требований отыгрыша.
Система поиска действующих альтернативных адресов базируется на отслеживании профильных телеграм-каналов и партнерских платформ. Продвинутые геймеры применяют туннельные протоколы для создания надежного входа вне зависимости от локальных лимитов.
вирт секс чат
Современные участники встречаются с затруднением соединения к лицензированным платформам. Операторы закрывают основные порталы, но грамотные казино Вавада пользователи помнят о доступности зеркальных ресурсов.
Альтернативный адрес формирует полную отображение оригинального ресурса. Системы безопасности работают такими же. Расчётные транзакции осуществляются через сходные сервисы.
Технология создания аккаунта через дополнительный портал предполагает привычной аутентификации. Администраторы просят удостоверения для осуществления KYC-норм. Персональные характеристики проходят усиленную валидацию.
Пополнительные лимиты на дополнительных платформах равняются основным характеристикам. Стартовые ставки поддерживаются фиксированными. Накопительные джекпоты интегрируются между множественными доменами.
Поощрительные программы работают комплексно на параллельных сайтах. Вейджер поддерживает первоначальные величины. Срок активности использования сохраняется.
Команда сопровождения решает заявки с зеркальных порталов сходным образом. Прямой диалог обеспечивает непрерывный порядок функционирования.
Перемещение в пространстве лицензированных ресурсов подразумевает представления передовых способов подключения. Умелые пользователи используют типпи официальный сайт для извлечения релевантной информации о работающих адресах.
Алгоритм формирования личного кабинета в надежных учреждениях предполагает многоуровневую подтверждение. Современные поставщики эксплуатируют KYC-механизмы и AML-нормы. Документальное сопровождение потребляет от 24 до 72 временных отрезков.
IT технологии для минования препятствий развиваются синхронно с повышением юридических мер. VPN-сервисы категории premium гарантируют кодирование AES-256 и системы OpenVPN. Стабильность соединения кардинально актуальна для высокоролловых сессий.
Резервные ресурсы выполняют задачи через регионально распределенные цифровые инфраструктуры. CDN-системы поддерживают минимальную время ответа для европейских геймеров. Техническое переключение запускается при распознавании блокировки первичного портала.
Платежные движения в легальных юрисдикциях подпадают под строгим критериям PCI DSS. Децентрализованные операции увеличивают востребованность благодаря скрытности и скорости обработки.
Портативные клиенты топовых организаций интегрируют отпечатковую идентификацию и push-оповещения для ключевых происшествий. Адаптивный внешний вид самостоятельно изменяется под характеристики экрана.
1win пополнение Optima через приложение http://www.1win48271.help
Передовые геймеры имеют дело с множеством системных аспектов при деятельности с легальными сайтами. Специализированные сайты типа Голд казино обеспечивают свежую информацию о функционировании гэмблинговых провайдеров.
Механизм верификации профиля подразумевает комплекс принудительных фаз. Первичная подтверждение подразумевает размещения документов доказывающих личность. Классический комплект включает свидетельство, права или загранпаспорт.
Техническая составляющая открытия счета включает использование SSL-шифрования и двойной авторизации. Продвинутые клиенты подсказывают активировать совокупность возможных функций охраны.
Дублирующие порталы представляют точные копии основного ресурса с поддержанием полного возможностей. Основное достоинство содержится в тождественности платежных пределов и условий условий прокрутки.
Схема выявления действующих дублирующих порталов базируется на проверке тематических мессенджер групп и союзных порталов. Экспертные геймеры эксплуатируют прокси-соединения для формирования надежного подключения независимо от территориальных запретов.
Новейшие гемблеры попадают с проблемой доступа к проверенным платформам. Организации ограничивают базовые порталы, но опытные казино Vavada клиенты помнят о присутствии резервных площадок.
Альтернативный адрес является точную дубликат базового площадки. Криптографические алгоритмы функционируют равнозначными. Денежные переводы реализуются через те же механизмы.
Процедура регистрации через резервный домен подразумевает привычной валидации. Сотрудники выясняют справки для реализации KYC-правил. Идентификационные параметры реализуют усиленную подтверждение.
Депозитные пределы на резервных площадках аналогичны первичным требованиям. Стартовые беты функционируют константными. Накопительные выигрышные пулы согласовываются между множественными порталами.
Поощрительные планы оперируют завершённо на резервных сайтах. Отыгрышный коэффициент сохраняет оригинальные значения. Временные рамки реализации поддерживается.
Отдел ассистирования изучает вопросы с резервных ресурсов идентично. Онлайн разговор обеспечивает круглосуточный график оперирования.
Перемещение в области легальных порталов требует знания передовых способов входа. Квалифицированные игроки используют Лаки Бир официальный сайт для добывания новейшей фактов о оперативных адресах.
Механизм регистрации аккаунта в лицензированных заведениях охватывает детальную валидацию. Актуальные операторы внедряют KYC-системы и AML-правила. Документальное сопровождение требует от 24 до 72 временных отрезков.
IT инструменты для обхода блокировок совершенствуются одновременно с укреплением нормативных решений. VPN-решения класса premium предлагают шифрование AES-256 и системы OpenVPN. Стабильность связи принципиально существенна для премиальных заходов.
Резервные домены оперируют через территориально распределенные серверные системы. CDN-сети гарантируют низкую пинг для европейских участников. Системное редирект включается при идентификации недоступности базового сайта.
Финансовые операции в легальных регионах подпадают под четким стандартам PCI DSS. Децентрализованные транзакции получают востребованность благодаря скрытности и динамике выполнения.
Мобильные программы ведущих операторов объединяют биометрическую авторизацию и push-извещения для принципиальных происшествий. Модифицируемый дизайн программно адаптируется под характеристики монитора.
Real Money Online Casino Australia Stop Waiting Start Cashing Out
Normally I don’t read article on blogs, however I wish to
say that this write-up very compelled me to try and do so!
Your writing taste has been surprised me. Thanks, very great article.
Нынешние игроки пересекаются с набором программных особенностей при деятельности с сертифицированными порталами. Экспертные сайты типа Вавада регистрация предоставляют новую материалы о операциях игорных брендов.
Механизм аутентификации профиля подразумевает ряд принудительных этапов. Первичная аутентификация подразумевает отправки бумаг валидирующих гражданство. Обычный набор содержит ID, автоудостоверение или международный паспорт.
Техническая часть записления подразумевает эксплуатацию защищенного протокола и двойной авторизации. Профессиональные пользователи предлагают запускать все доступных функций охраны.
Запасные домены являются абсолютные дубликаты первичного ресурса с поддержанием полного арсенала. Важнейшее плюс содержится в схожести платежных рамок и норм вейджера.
Механизм поиска рабочих дублирующих порталов опирается на наблюдении тематических информационных каналов и связанных площадок. Профессиональные клиенты применяют анонимайзеры для создания бесперебойного входа невзирая от местных лимитов.
Перемещение в области сертифицированных порталов нуждается представления новых способов соединения. Умелые участники используют казино Mellstroy Game для приобретения актуальной данных о активных URL.
Процесс создания счета в проверенных учреждениях охватывает детальную верификацию. Новейшие организации применяют KYC-протоколы и AML-правила. Документальное сопровождение отнимает от 24 до 72 часов.
Цифровые способы для преодоления препятствий развиваются одновременно с интенсификацией юридических инициатив. VPN-сервисы разряда premium дают безопасность AES-256 и методы OpenVPN. Устойчивость связи критически необходима для премиальных заходов.
Дублирующие сайты работают через регионально распределенные серверные кластеры. CDN-архитектуры гарантируют оптимальную отклик для азиатских геймеров. Техническое переключение запускается при распознавании ограничения базового домена.
Денежные операции в легальных зонах подчиняются определенным стандартам PCI DSS. Децентрализованные расчеты набирают признание по причине приватности и динамике выполнения.
Планшетные клиенты премиальных операторов содержат физиологическую проверку и push-оповещения для существенных событий. Модифицируемый интерфейс независимо корректируется под настройки матрицы.
Нынешние бетторы натыкаются с барьером входа к лицензированным платформам. Компании блокируют стандартные домены, но профессиональные Рльдорадо казино игроки осознают о существовании зеркальных ресурсов.
Альтернативный адрес представляет точную дубликат основного ресурса. Системы безопасности сохраняются такими же. Расчётные операции проходят через идентичные шлюзы.
Методика открытия счёта через дополнительный домен включает типовой верификации. Администраторы требуют свидетельства для исполнения KYC-правил. Персональные данные выполняют комплексную проверку.
Финансовые рамки на параллельных порталах равняются первичным условиям. Минимальные ставки поддерживаются константными. Накопительные банки интегрируются между многочисленными доменами.
Премиальные схемы выполняются комплексно на параллельных площадках. Вейджер сохраняет первоначальные цифры. Тайминг реализации не изменяется.
Команда поддержки решает обращения с зеркальных порталов сходным образом. Интерактивный общение предоставляет 24-часовой порядок функционирования.
Беттинговая отрасль демонстрирует стремительный рост, притягивая тысячи игроков. Грамотные ресурсы предоставляют качественную пространство для пари. Подробную информацию о данных компаниях реально получить на lucky bear казино тг .
Легализация остаётся основным фактором селекции платформы. Регуляторы Кюрасао гарантируют качественный аудит финансовых действий. Любая лицензированная ресурс выполняет плановые ревизии RNG-механизмов.
Программные параметры новейших гемблинг-сайтов включают SSL-криптографию расчётного класса. Провайдеры цифрового материала вроде Microgaming, NetEnt, Pragmatic Play подключают продвинутые механизмы случайных величин.
Механизм валидации учётной записи требует представления удостоверений KYC-типа. Удостоверение, подтверждение о заработке, верификация прописки — обычный комплект для полноценного доступа.
Резервные URL решают трудности с ограничениями компаний. Актуальные дубли корректируются систематически программными группами. Мобильные приложения нередко выполняются стабильнее веб вариантов.
Банкролл-менеджмент определяет долгосрочную доходность игровых циклов. Квалифицированные геймеры предлагают лимитировать величину вейджера до 1-2% от общего банкролла.
Навигация в пространстве сертифицированных платформ подразумевает владения актуальных методов соединения. Продвинутые участники задействуют Vavada казино для приобретения современной данных о оперативных URL.
Процесс регистрации счета в сертифицированных операторах предполагает сложную аутентификацию. Новейшие компании используют KYC-процедуры и AML-требования. Документальная процедура занимает от 24 до 72 промежутков.
Компьютерные способы для минования барьеров развиваются вместе с усилением нормативных шагов. VPN-сервисы класса premium обеспечивают шифрование AES-256 и стандарты OpenVPN. Постоянство канала жизненно существенна для высокоролловых партий.
Резервные сайты работают через регионально рассредоточенные IT мощности. CDN-сети осуществляют быструю время ответа для международных игроков. Автоматическое перенаправление активируется при выявлении препятствия первичного ресурса.
Банковские движения в легальных областях соответствуют строгим критериям PCI DSS. Крипто операции завоевывают распространение в результате анонимности и динамике процессинга.
Планшетные софт лучших брендов включают лицевую авторизацию и push-алерты для ключевых событий. Изменяемый внешний вид программно изменяется под свойства дисплея.
Игровая область показывает интенсивный прогресс, завлекая массы пользователей. Экспертные сайты предоставляют защищённую атмосферу для беттинга. Детальную материалы о этих компаниях можно получить на п»ї1хбет зеркало .
Легализация является центральным элементом отбора площадки. Регуляторы Кюрасао гарантируют жёсткий контроль валютных операций. Любая сертифицированная портал выполняет периодические контроли RNG-алгоритмов.
IT аспекты передовых азартных площадок охватывают SSL-шифрование финансового категории. Производители компьютерного ПО вроде Microgaming, NetEnt, Pragmatic Play добавляют комплексные системы случайных показателей.
Процесс аутентификации счёта предусматривает подачи справок KYC-класса. Документ, подтверждение о доходах, валидация проживания — типичный пакет для полноценного подключения.
Резервные ссылки решают барьеры с ограничениями компаний. Действующие копии изменяются систематически компьютерными специалистами. Смартфонные клиенты зачастую работают надёжнее онлайн вариантов.
Распределение капитала создаёт длительную эффективность развлекательных периодов. Экспертные участники предлагают контролировать величину ставки до 1-2% от совокупного капитала.
нажмите здесь
Ремонт DSG
Best Online Casino Australia 2025 No Deposit Bonus Real Winners Start Here
Легальные платформы азартных возможностей предоставляют клиентам вариант к элитному развлечениям через dedicated ресурсы, включая https://proapples.ru/ru-ru/ , которые специально следуют международные регламенты security.
Последовательность открытия счёта предполагает предоставления верификационных параметров через encrypted SSL-connection. Администрация demanded официальное свидетельство возраста и региона проживания для соблюдения правовых критериев.
Двухфакторная идентификация является принудительным aspect новейших систем конфиденциальности. Users имеют SMS-коды, push-сообщения или эксплуатируют профессиональные утилиты вроде Google Authenticator.
Альтернативные домены устраняют вопросы локальных блокировок и DDoS-атак. Техническим образом реплики составляют идентичные версии primary домена с maintaining возможностей и индивидуальных деталей.
Профессиональные участники предлагают поддерживать current базы действующих mirrors в favourites браузера. Букмекеры направляют updates о новых адресах через e-mail, Telegram-группы и телефонные apps.
Финансовые переводы через лицензионные сайты защищены encryption протоколами level банковского индустрии. Снятие денег осуществляется только на validated wallets владельца account.
Поиск в сфере легальных площадок нуждается осознания современных инструментов соединения. Продвинутые геймеры задействуют Лаки Бир официальный сайт для приобретения свежей материалов о работающих адресах.
Процесс открытия личного кабинета в официальных операторах предполагает многоуровневую аутентификацию. Актуальные компании задействуют KYC-процедуры и AML-нормы. Документальная процедура отнимает от 24 до 72 интервалов.
Технические технологии для обхода запретов прогрессируют сообща с укреплением законодательных инициатив. VPN-платформы уровня premium гарантируют кодирование AES-256 и системы OpenVPN. Постоянство коннекта критически значима для привилегированных раундов.
Альтернативные домены действуют через регионально рассредоточенные компьютерные ресурсы. CDN-архитектуры осуществляют минимальную пинг для международных участников. Системное перенаправление срабатывает при детекции блокировки основного домена.
Экономические транзакции в легальных территориях следуют определенным стандартам PCI DSS. Крипто операции приобретают востребованность в результате скрытности и динамике выполнения.
Переносные клиенты премиальных компаний включают физиологическую подтверждение и push-оповещения для важных происшествий. Модифицируемый внешний вид самостоятельно адаптируется под особенности матрицы.
Актуальные дублирующие порталы официальных игорных заведений на Клубника сайт предоставляют стабильный вход к геймерским ресурсам. Система зеркалирования строит идентичные клоны основного сайта с консервацией всех механизмов.
Процедура открытия счета через альтернативный домен в точности имитирует основную бланк. Только пришедшие участники регистрируют рабочий email, генерируют надежный код доступа и выбирают основную финансовый инструмент.
Подтверждение личного кабинета предполагает предоставления удостоверений следуя KYC-стандартам. Скан национального документа, доказательство резиденции и платежные реквизиты проходят автоматическую проверку в течение 24-72 часов.
Вход существующих игроков происходит через классическую интерфейс с расширенной идентификацией. Разовые токены приходят на телефонный гаджет или почтовый ящик.
Возможности финансового компонента через дублирующие порталы включает популярные финансовые системы. Visa, Mastercard, электронные кошельки Skrill, Neteller, crypto Bitcoin, Ethereum осуществляются с сокращенными сборами 0-3%.
Гемблинг каталог копируется абсолютно включая автоматы, классические забавы, live-операторов и накопительные призы. RTP-параметры, дисперсия и ставочные требования фиксируются идентичными.
Акционная политика выполняется идентично корневому сайту. Welcome-комплекты, даровые прокруты, refund и VIP-курсы стартуют автоматически при исполнении определенных требований.
Отбор достойного азартного площадки в нынешних рамках нуждается специального изучения к лицензионному уровню. Опытные геймеры понимают, что Меллстрой регистрация демонстрирует современную материалы о работающих операторах.
Процесс открытия счета в проверенных площадках охватывает принудительную подтверждение документов. KYC-процедуры охраняют как площадку, так и пользователя от мошенничества. Временные границы на перечисление средств до закрытия проверки – типичная процедура.
Виртуальные ограничения на доступ к игровым сервисам нейтрализуются через альтернативные URL. Рабочие клоны сохраняют всестороннюю возможности центрального сайта. Платежные операции, геймплейный прогресс и наградные программы остаются неизменными.
Денежная стабильность измеряется качеством эксплуатируемых финансовых инструментов. SSL-безопасность, PCI DSS аттестация и двухфакторная идентификация формируют надежный заслон обороны.
Геймплейная библиотека проверенных заведений предоставляет машины от ведущих производителей. RTP-индексы, вариативность и математические принципы получают независимую сертификацию в одобренных лабораториях.
Программы вознаграждения в надежных площадках опираются на открытых критериях проигрыша. Отыгрыш x35-40 характеризуется справедливым для машина-льгот, в то время как стандартные игры принимаются в калькуляцию с пониженным показателем.
на этом сайте
banda casino промокод при регистрации
Thanks for ones marvelous posting! I genuinely enjoyed reading it, you can be a
great author.I will be sure to bookmark your blog and will often come back someday.
I want to encourage you continue your great work,
have a nice evening!
UlixoEdgePro – Clean interface with navigation that feels natural and fast.
NevrixEdge – Briefly explored, but everything felt responsive and well-arranged.
Поиск надежного игрового ресурса в нынешних рамках подразумевает тщательного внимания к правовому уровню. Профессиональные геймеры знают, что Лаки Бир сайт демонстрирует актуальную материалы о активных операторах.
Схема создания аккаунта в сертифицированных операторах охватывает неизбежную подтверждение документов. KYC-требования обеспечивают как сервис, так и участника от махинаций. Временные границы на вывод финансов до завершения подтверждения – типичная подход.
Электронные блокировки на подключение к гемблинг сервисам преодолеваются через резервные URL. Доступные копии обеспечивают всестороннюю возможности центрального платформы. Финансовые движения, интерактивный статистика и привилегированные предложения сохраняются стабильными.
Материальная стабильность оценивается показателем применяемых банковских механизмов. SSL-кодирование, PCI DSS аттестация и усиленная проверка обеспечивают стабильный периметр безопасности.
Геймплейная библиотека сертифицированных сервисов объединяет спины от известных провайдеров. RTP-коэффициенты, вариативность и алгоритмические принципы получают объективную контроль в авторизованных организациях.
Системы вознаграждения в профессиональных операторах строятся на понятных критериях отыгрыша. Вейджер x35-40 характеризуется нормальным для автомат-льгот, в то время как классические развлечения принимаются в счет с минимальным показателем.
Надёжные платформы игровых предложений oferuja пользователям право к элитному игровому процессу через профильные ресурсы, включая Лаки Бир , что исполняют общепринятые требования надёжности.
Механизм оформления профиля требует предоставления идентификационных сведений через безопасные SSL-соединения. Провайдеры требуют нотариальное подтверждение age verification и места жительства для поддержания юрисдикционных стандартов.
2FA верификация выступает required компонентом актуальных архитектур безопасности. Участники обретают SMS-коды, push-notification или задействуют специализированные утилиты по типу Google Authenticator.
Альтернативные порталы ликвидируют сложности географических санкций и DDoS-assault. Техническим образом дубли представляют идентичные копии центрального домена с поддержанием features и личных деталей.
Компетентные участники предлагают keeping новейшие реестры действующих зеркал в сохранённых ссылках браузера. Провайдеры направляют обновления о свежих ссылках через электронную почту, Telegram-чаты и смартфонные программы.
Платёжные переводы через надёжные платформы гарантированы защитными methods уровня банковского области. Вывод капитала происходит лишь на validated счета владельца профиля.
Новейшие игроки обталкиваются с набором цифровых тонкостей при процессах с проверенными сайтами. Профессиональные сайты типа лаки Р±РёСЂ обеспечивают современную данные о операциях казино операторов.
Система валидации кабинета предполагает множество требуемых фаз. Исходная аутентификация подразумевает предоставления бумаг удостоверяющих личность. Классический перечень подразумевает удостоверение личности, автолицензию или заграничное удостоверение.
Системная часть записления охватывает внедрение SSL-шифрования и двухфакторной аутентификации. Продвинутые игроки предлагают задействовать полный набор представленных функций секьюрити.
Альтернативные адреса представляют полные реплики основного сайта с хранением всего набора функций. Основное преимущество заключается в соответствии платежных рамок и требований отыгрыша.
Система локализации активных зеркал опирается на мониторинге тематических телеграм-каналов и союзных порталов. Профессиональные клиенты используют виртуальные частные сети для создания устойчивого входа независимо от территориальных запретов.
Актуальные провайдеры развлекательных игр предоставляют клиентам доступ к профессиональному азарту через сертифицированные казино типпи системы. Авторизованная деятельность влечет выполнения жестких регуляторных критериев.
Процесс открытия персонального счета включает валидацию конфиденциальных показателей. Администраторы применяют детализированные протоколы KYC и AML для блокировки нарушающих операций.
Электронные средства современных беттинг площадок строятся на зашифрованных облачных системах с шифровальными сертификатами. Локальные запреты заставляет провайдеров создавать дублирующие домены.
Альтернативные порталы представляют полные клоны базового портала с фиксацией всех инструментов и информации. Клиенты обеспечивают себе беспрепятственный подключение к средствам, азартной записям и индивидуальным конфигурациям.
Расчетные переводы осуществляются через интегрированные платежные системы. Пределы на вклады и изъятия фиксируются в соответствии с правовыми критериями и внутренними политиками минимизации опасностей.
Профессиональные игроки предлагают мониторить состояние лицензии через официальные регистры гемблинг организаций. Статусные индикаторы охватывают места на тематических платформах и оценки истинных игроков.
Thanks a lot! Helpful information.
Игровая ниша являет динамичный рост, притягивая множество геймеров. Грамотные платформы предлагают стабильную обстановку для беттинга. Детальную факты о данных организациях реально найти на Вавада .
Аттестация является центральным фактором отбора сайта. Регуляторы Гибралтара обеспечивают тщательный мониторинг финансовых манипуляций. Всякая сертифицированная площадка проходит плановые проверки RNG-модулей.
Цифровые аспекты передовых азартных площадок предусматривают SSL-безопасность финансового стандарта. Разработчики виртуального софта наподобие Microgaming, NetEnt, Pragmatic Play внедряют усовершенствованные алгоритмы произвольных параметров.
Процесс верификации счёта предполагает подачи удостоверений KYC-уровня. Паспорт, выписка о доходах, удостоверение местожительства — обычный комплект для полноценного входа.
Зеркальные адреса решают барьеры с фильтрацией компаний. Функционирующие дубли обновляются постоянно программными службами. Карманные приложения нередко работают лучше веб вариантов.
Управление банкроллом определяет продолжительную результативность беттинговых партий. Экспертные игроки советуют сокращать объём депозита до 1-2% от суммарного фонда.
Проверенные операторы игровых опций гарантируют геймерам шанс к элитному игровому процессу через целевые сайты, включая Лаки Бир казино , которые точно соблюдают transnational критерии конфиденциальности.
Механизм оформления профиля подразумевает указания валидационных сведений через encrypted SSL-соединения. Менеджмент demanded официальное свидетельство возраста и места нахождения для выполнения законодательных стандартов.
Многоуровневая идентификация выступает required составляющей новейших платформ защиты. Users приобретают SMS-пароли, push-оповещения или задействуют специальные утилиты по типу Google Authenticator.
Дублирующие адреса устраняют проблемы локальных запретов и DDoS-воздействий. Технически реплики представляют идентичные реплики основного ресурса с поддержанием функциональности и клиентских информации.
Опытные игроки предлагают сохранять актуальные базы рабочих копий в закладках веб-клиента. Администрация рассылают обновления о fresh ссылках через мейл, Telegram-communities и смартфонные программы.
Банковские процедуры через legal порталы гарантированы encryption алгоритмами класса банковского segment. Снятие средств осуществляется только на validated wallets держателя личного кабинета.
visit this page https://www.onlyfake.org/
check my site https://etherealtrade.xyz/
https://efaflex.ru/include/pages/?r7_casino_promokod.html
Лицензионные платформы развлекательных возможностей дают клиентам право к профессиональному азартному досугу через тематические платформы, включая Vavada casino , которые именно придерживаются общепринятые нормы надёжности.
Алгоритм оформления профиля предполагает заполнения идентификационных деталей через защищённые SSL-каналы. Администрация запрашивают документальное удостоверение age verification и адреса регистрации для поддержания законодательных стандартов.
Двухэтапная аутентификация считается mandatory элементом актуальных solutions security. Users обретают SMS-ключи, push-уведомления или внедряют специализированные tools по типу Google Authenticator.
Mirror адреса устраняют препятствия локальных барьеров и DDoS-assault. Фактически дубли являют аналогичные dublicates главного платформы с удержанием features и user данных.
Компетентные игроки suggest удерживать обновлённые каталоги функционирующих копий в закладках интернет-программы. Букмекеры передают новости о новых URL через email, Telegram-сообщества и телефонные программы.
Денежные транзакции через лицензионные ресурсы secured защитными технологиями категории банковского направления. Вывод фондов реализуется исключительно на аутентифицированные данные держателя профиля.
Best Australian Pokies Real Money Feel The Power Of Real Payouts
Определение легального гемблинг оператора требует основательного исследования официальных бумаг. Новые порталы казино ретро предоставляют участникам стопроцентную детали о действующих аккредитациях.
Процесс получения доступа охватывает множество обязательных шагов подтверждения. Представители настаивают бумаги, удостоверяющие персону и правоспособность. Традиционный KYC-процесс требует от 24 до 72 временных отрезков.
Контроль средств стартует с назначения границ на взносы. Компетентные игроки настаивают эксплуатировать принцип 5% от совокупного гемблинг капитала на индивидуальную заход.
Технические ограничения провайдеров вынуждают использовать резервные пути. Дубликаты поддерживают стопроцентную функциональность центрального сайта, охватывая архив сделок и азартный достижения.
Современные финансовые инструменты гарантируют быстрые пополнения через электронные аккаунты. Bitcoin, Ethereum и стейблкоины гарантируют скрытность и мизерные взносы. Период выполнения снятий равно 10-30 отрезков.
Системы преданности подразумевают ступенчатые категории с увеличивающимся компенсацией. VIP-представители дают личные награды, повышенные рамки и опережающую помощь.
Поиск в области проверенных платформ нуждается представления актуальных технологий авторизации. Опытные участники задействуют Lucky Bear для приобретения свежей сведений о функционирующих адресах.
Алгоритм открытия учетной записи в официальных учреждениях предполагает комплексную аутентификацию. Современные организации применяют KYC-алгоритмы и AML-критерии. Документальная процедура потребляет от 24 до 72 временных отрезков.
Программные способы для минования запретов развиваются вместе с повышением правовых инициатив. VPN-инструменты типа premium гарантируют кодирование AES-256 и протоколы OpenVPN. Устойчивость подключения критически важна для привилегированных заходов.
Дублирующие домены выполняют задачи через пространственно расположенные серверные кластеры. CDN-архитектуры предоставляют сокращенную латентность для азиатских клиентов. Программное маршрутизация включается при обнаружении недоступности базового портала.
Финансовые манипуляции в легальных зонах следуют четким нормам PCI DSS. Цифровые переводы набирают востребованность благодаря анонимности и скорости реализации.
Портативные программы ведущих брендов включают физиологическую проверку и push-алерты для принципиальных моментов. Настраиваемый интерфейс автоматически адаптируется под параметры монитора.
netamplify.click – Content reads clearly, helpful examples made concepts easy to grasp.
Определение честного гемблинг ресурса нуждается глубокого рассмотрения лицензионных разрешений. Актуальные ресурсы lucky bear казино дают геймерам стопроцентную сведения о имеющихся лицензиях.
Процесс создания профиля предусматривает различные ключевых стадий подтверждения. Операторы просят справки, удостоверяющие идентичность и правоспособность. Традиционный KYC-процесс продолжается от 24 до 72 часов.
Контроль средств инициируется с определения границ на депозиты. Опытные пользователи настаивают применять установку 5% от совокупного казино средств на одну игру.
Системные препятствия владельцев обязывают эксплуатировать альтернативные маршруты. Копии сохраняют полную эффективность основного сайта, предусматривая летопись переводов и игровой достижения.
Актуальные расчетные системы гарантируют быстрые вклады через криптовалютные аккаунты. Bitcoin, Ethereum и фиксированные активы поддерживают анонимность и мизерные взносы. Период реализации извлечений достигает 10-30 периодов.
Схемы постоянства охватывают иерархические ранги с накапливающимся вознаграждением. VIP-консультанты предоставляют персонализированные бонусы, усиленные ограничения и опережающую обслуживание.
Holdings360 – Detailed metrics allow for smarter decisions with less effort.
It’s perfect ttime to mqke some plans for the future and
it’s time to be happy. I’ve read thbis post and if I could I wish to suggest
you some interesting things or advice. Perhaps you could write next articles referring to this article.
I want to read even more things about it!
Also visit my site – Danny
VexaroTrack – Fast-loading pages and professional design give a reliable overall experience.
Thanks , I’ve just been searching for information approximately this topic for a while and yours is the greatest I’ve
came upon till now. But, what in regards to the
bottom line? Are you certain in regards to the source?
Отбор надежного казино площадки требует серьезного рассмотрения лицензионных документов. Передовые системы п»ї1xBet casino предлагают игрокам абсолютную данные о текущих разрешениях.
Алгоритм создания профиля подразумевает определенное количество обязательных стадий верификации. Провайдеры просят бумаги, доказывающие самобытность и дееспособность. Классический KYC-механизм занимает от 24 до 72 часов.
Финансовое планирование открывается с задания ограничений на инвестиции. Профессиональные игроки рекомендуют применять норму 5% от итогового гемблинг фонда на одну заход.
Электронные барьеры провайдеров вынуждают применять запасные адреса. Альтернативы хранят стопроцентную функциональность базового платформы, предусматривая летопись операций и гемблинг достижения.
Современные платежные способы предоставляют моментальные пополнения через цифровые портмоне. Bitcoin, Ethereum и постоянные токены обеспечивают тайность и символические платежи. Время выполнения выводов достигает 10-30 периодов.
Планы постоянства включают иерархические степени с возрастающим возвратом. VIP-консультанты гарантируют эксклюзивные награды, усиленные границы и первоочередную поддержку.
Поиск в сфере легальных площадок предполагает знания современных инструментов входа. Продвинутые геймеры внедряют Меллстрой РІС…РѕРґ для приобретения новейшей информации о действующих адресах.
Процесс регистрации профиля в сертифицированных операторах содержит комплексную верификацию. Продвинутые поставщики используют KYC-системы и AML-критерии. Документальное сопровождение требует от 24 до 72 часов.
Компьютерные способы для преодоления препятствий прогрессируют синхронно с интенсификацией нормативных мер. VPN-службы разряда premium предоставляют криптографию AES-256 и технологии OpenVPN. Устойчивость связи fundamentally важна для элитных сессий.
Зеркальные сайты оперируют через регионально размещенные серверные мощности. CDN-сети обеспечивают низкую время ответа для европейских клиентов. Программное перенаправление запускается при идентификации блокировки главного адреса.
Экономические манипуляции в легальных юрисдикциях соответствуют конкретным стандартам PCI DSS. Крипто расчеты набирают распространение вследствие анонимности и динамике обработки.
Смартфонные клиенты лучших провайдеров совмещают биометрическую идентификацию и push-алерты для принципиальных происшествий. Настраиваемый оформление программно изменяется под свойства матрицы.
weblink https://gluex.io
Hey I know this is off topic but I was wondering if you knew
of any widgets I could add to my blog that automatically tweet
my newest twitter updates. I’ve been looking for a plug-in like this for quite some time
and was hoping maybe you would have some experience with something like this.
Please let me know if you run into anything. I truly enjoy reading your blog and I look forward to your new updates.
Определение легального развлекательного заведения предполагает глубокого рассмотрения официальных свидетельств. Современные сайты Килограмм казино предоставляют геймерам полную данные о своих лицензиях.
Механизм создания профиля включает множество требуемых фаз верификации. Администраторы требуют свидетельства, удостоверяющие самобытность и дееспособность. Классический KYC-алгоритм требует от 24 до 72 интервалов.
Распоряжение капиталом инициируется с задания границ на пополнения. Опытные игроки призывают эксплуатировать правило 5% от полного развлекательного резерва на отдельную игру.
Цифровые препятствия операторов заставляют задействовать вспомогательные ссылки. Копии удерживают безусловную эффективность первичного портала, включая архив транзакций и игровой достижения.
Новые банковские способы предоставляют быстрые взносы через цифровые хранилища. Bitcoin, Ethereum и фиксированные активы дают скрытность и крошечные комиссии. Продолжительность реализации снятий достигает 10-30 минут.
Системы постоянства включают градационные уровни с накапливающимся вознаграждением. VIP-координаторы предлагают индивидуальные подарки, увеличенные рамки и приоритетную помощь.
investment resource portal – Clear and concise, helping users understand capital services without hype.
buy prilosec online: Gastro Health Monitor – prilosec dosage
Нынешние клиенты пересекаются с изобилием программных тонкостей при операциях с проверенными сайтами. Тематические ресурсы типа https://proapples.ru выдают релевантную контент о операциях казино операторов.
Механизм верификации учетной записи подразумевает несколько обязательных уровней. Стартовая верификация подразумевает передачи документов подтверждающих субъект. Типовой перечень содержит документ, автолицензию или международный паспорт.
Технологическая сторона оформления предполагает эксплуатацию криптографической защиты и многофакторной защиты. Квалифицированные клиенты рекомендуют запускать полный набор возможных возможностей охраны.
Зеркала образуют идентичные отражения главного домена с сохранением полного функционала. Главное плюс кроется в подобии банковских ограничений и требований проигрыша.
Механизм обнаружения действующих альтернативных адресов базируется на мониторинге экспертных уведомительных сервисов и связанных порталов. Опытные игроки задействуют туннельные протоколы для создания стабильного связи вне зависимости от локальных запретов.
Проверенные операторы игорных опций обеспечивают участникам доступ к профессиональному игровому процессу через dedicated ресурсы, включая [url=https://github.com/Lucky-Bear-zerkalo]Lucky Bear casino[/url] , которые специально придерживаются глобальные стандарты security.
Последовательность создания аккаунта требует внесения идентификационных информации через шифрованные SSL-соединения. Букмекеры запрашивают документальное свидетельство дееспособности и места нахождения для поддержания законодательных требований.
Двухэтапная верификация считается mandatory aspect современных платформ надёжности. Участники имеют SMS-пароли, push-алерты или применяют специальные программы типа Google Authenticator.
Резервные ссылки решают трудности territorial блокировок и DDoS-атак. С технической точки зрения копии составляют тождественные dublicates центрального портала с сохранением функциональности и клиентских деталей.
Профессиональные игроки советуют сохранять актуальные списки рабочих зеркал в bookmark обозревателя. Провайдеры отправляют сведения о fresh адресах через email, Telegram-группы и смартфонные программы.
Payment movements через legal платформы secured криптографическими алгоритмами уровня банковского segment. Получение фондов выполняется solely на validated реквизиты владельца аккаунта.
Поиск качественного развлекательного ресурса в современных реалиях нуждается особого подхода к законному статусу. Компетентные клиенты понимают, что казино Вавада отображает актуальную материалы о активных провайдерах.
Механизм создания аккаунта в официальных платформах предусматривает обязательную проверку удостоверения. KYC-правила охраняют как казино, так и участника от афер. Кратковременные границы на получение капитала до завершения подтверждения – стандартная практика.
Технические ограничения на подключение к betting сайтам нейтрализуются через резервные ссылки. Доступные копии обеспечивают всестороннюю работоспособность базового сайта. Расчетные транзакции, интерактивный достижения и поощрительные системы функционируют устойчивыми.
Материальная гарантированность характеризуется качеством применяемых платежных методов. SSL-шифрование, PCI DSS валидация и двухфакторная проверка гарантируют стабильный барьер защиты.
Развлекательная набор сертифицированных заведений включает машины от лидирующих студий. RTP-значения, изменчивость и статистические принципы подвергаются нейтральную аудит в признанных учреждениях.
Системы поощрения в профессиональных сервисах базируются на прозрачных параметрах активности. Проигрыш x35-40 считается справедливым для барабан-поощрений, в то время как настольные развлечения засчитываются в калькуляцию с минимальным фактором.
Hi there! I know this is somewhat off topic but I was
wondering which blog platform are you using
for this website? I’m getting sick and tired of WordPress because I’ve
had issues with hackers and I’m looking at options for another platform.
I would be awesome if you could point me in the direction of a good platform.
«Field Fit» предоставляет:
• футболки из быстросохнущей ткани;
• доставку по всей России;
• Определение оптимального набора под ваш клуб и бюджет;
• Проверку доступности товара по акции.
[url=https://futbolnaya-forma-fieldfit.ru/]магазин футбольной атрибутики[/url]
футбольная атрибутика – [url=http://www.futbolnaya-forma-fieldfit.ru/]http://futbolnaya-forma-fieldfit.ru[/url]
[url=https://news.url.google.com/url?q=https://futbolnaya-forma-fieldfit.ru/]https://www.google.com.pk/url?sa=t&rct=j&q=https://futbolnaya-forma-fieldfit.ru/[/url]
[url=https://mamansereine.com/?error_checker=captcha&author_spam=KettyJound&email_spam=fpmqxovd%40tacoblastmail.com&url_spam=https%3A%2F%2F1xbetbonuses.com&comment_spam=%C2%ABField%20Fit%C2%BB%20%D0%BF%D1%80%D0%B5%D0%B4%D0%BB%D0%B0%D0%B3%D0%B0%D0%B5%D1%82%3A%20%E2%80%A2%20%D0%B3%D0%B5%D1%82%D1%80%D1%8B%2C%20%D1%88%D0%BE%D1%80%D1%82%D1%8B%20%D0%B8%20%D1%81%D0%BF%D0%BE%D1%80%D1%82%D0%B8%D0%B2%D0%BD%D1%8B%D0%B5%20%D0%BA%D0%BE%D1%81%D1%82%D1%8E%D0%BC%D1%8B%3B%20%E2%80%A2%20%D0%B4%D0%BE%D1%81%D1%82%D0%B0%D0%B2%D0%BA%D1%83%20%D0%BF%D0%BE%20%D0%B2%D1%81%D0%B5%D0%B9%20%D0%A0%D0%BE%D1%81%D1%81%D0%B8%D0%B8%3B%20%E2%80%A2%20%D0%9E%D0%BF%D1%80%D0%B5%D0%B4%D0%B5%D0%BB%D0%B5%D0%BD%D0%B8%D0%B5%20%D0%BE%D0%BF%D1%82%D0%B8%D0%BC%D0%B0%D0%BB%D1%8C%D0%BD%D0%BE%D0%B3%D0%BE%20%D0%BD%D0%B0%D0%B1%D0%BE%D1%80%D0%B0%20%D0%BF%D0%BE%D0%B4%20%D0%B2%D0%B0%D1%88%20%D0%BA%D0%BB%D1%83%D0%B1%20%D0%B8%20%D0%B1%D1%8E%D0%B4%D0%B6%D0%B5%D1%82%3B%20%E2%80%A2%20%D0%9F%D1%80%D0%BE%D0%B2%D0%B5%D1%80%D0%BA%D1%83%20%D0%B0%D1%81%D1%81%D0%BE%D1%80%D1%82%D0%B8%D0%BC%D0%B5%D0%BD%D1%82%D0%B0%20%D0%B2%20%D0%BD%D1%83%D0%B6%D0%BD%D0%BE%D0%B9%20%D0%BA%D0%B0%D1%82%D0%B5%D0%B3%D0%BE%D1%80%D0%B8%D0%B8.%20%20%3Ca%20href%3Dhttps%3A%2F%2Ffutbolnaya-forma-fieldfit.ru%2F%3E%D0%BA%D1%83%D0%BF%D0%B8%D1%82%D1%8C%20%D0%BA%D0%BB%D1%83%D0%B1%D0%BD%D1%83%D1%8E%20%D1%84%D1%83%D1%82%D0%B1%D0%BE%D0%BB%D1%8C%D0%BD%D1%83%D1%8E%20%D1%84%D0%BE%D1%80%D0%BC%D1%83%3C%2Fa%3E%20%D1%84%D1%83%D1%82%D0%B1%D0%BE%D0%BB%D1%8C%D0%BD%D0%B0%D1%8F%20%D0%B0%D1%82%D1%80%D0%B8%D0%B1%D1%83%D1%82%D0%B8%D0%BA%D0%B0%20%D0%B2%20%D0%BC%D0%BE%D1%81%D0%BA%D0%B2%D0%B5%20-%20%3Ca%20href%3Dhttp%3A%2F%2Ffutbolnaya-forma-fieldfit.ru%2F%3Ehttp%3A%2F%2Ffutbolnaya-forma-fieldfit.ru%3C%2Fa%3E%20%3Ca%20href%3Dhttps%3A%2F%2Fwww.google.am%2Furl%3Fsa%3Dt%26url%3Dhttps%3A%2F%2Ffutbolnaya-forma-fieldfit.ru%2F%3Ehttps%3A%2F%2Ftoolbarqueries.google.md%2Furl%3Fq%3Dhttps%3A%2F%2Ffutbolnaya-forma-fieldfit.ru%2F%3C%2Fa%3E%20%20%3Ca%20href%3Dhttp%3A%2F%2Frashaant.bu.gov.mn%2Fshow%2F%23latest%3E%D0%9A%D0%BB%D1%83%D0%B1%D0%BD%D0%B0%D1%8F%20%D0%B0%D1%82%D1%80%D0%B8%D0%B1%D1%83%D1%82%D0%B8%D0%BA%D0%B0%20%D0%B8%20%D0%B0%D0%BA%D1%81%D0%B5%D1%81%D1%81%D1%83%D0%B0%D1%80%D1%8B%20%D0%B4%D0%BB%D1%8F%20%D0%B1%D0%BE%D0%BB%D0%B5%D0%BB%D1%8C%D1%89%D0%B8%D0%BA%D0%BE%D0%B2%20%D0%BE%D1%82%20%C2%ABField%20Fit%C2%BB%20%D0%B2%20%D0%B2%D0%B0%D1%88%D0%B5%D0%BC%20%D0%B3%D0%BE%D1%80%D0%BE%D0%B4%D0%B5%3C%2Fa%3E%20e45a903]Спортивная экипировка и футбольные сувениры от «Field Fit» в вашем городе[/url] 7186af3
Лицензионные платформы азартных опций oferuja пользователям доступ к профессиональному гэмблингу через специализированные домены, включая Вавада зеркало , которые точно придерживаются мировые нормы безопасности.
Механизм активации включает ввода authentication деталей через защищённые SSL-каналы. Провайдеры требуют документальное свидетельство возраста и территории проживания для поддержания юрисдикционных правил.
Многоуровневая верификация считается принудительным aspect современных механизмов защиты. Пользователи получают SMS-пароли, push-оповещения или задействуют dedicated приложения типа Google Authenticator.
Резервные URL нейтрализуют трудности географических ограничений и DDoS-штурмов. Техническим образом дубли являют копийные версии центрального портала с поддержанием опций и user информации.
Компетентные пользователи рекомендуют keeping current списки активных альтернатив в сохранённых ссылках browser. Операторы передают сведения о новых доменах через электронную почту, Telegram-чаты и мобильные apps.
Финансовые movements через legal сайты покрыты шифровальными methods level банковского segment. Снятие денег реализуется только на аутентифицированные счета хозяина профиля.
Проверенные провайдеры гэмблинг услуг гарантируют клиентам право к высококлассному времяпрепровождению через целевые сайты, включая Меллстрой регистрация , которые точно выполняют глобальные нормы security.
Процедура регистрации включает внесения верификационных сведений через безопасные SSL-протоколы. Менеджмент demanded нотариальное подтверждение совершеннолетия и территории регистрации для поддержания правовых стандартов.
Multi-factor проверка становится необходимым элементом актуальных solutions security. Участники получают SMS-ключи, push-алерты или задействуют targeted tools типа Google Authenticator.
Зеркальные ссылки преодолевают вопросы региональных запретов и DDoS-атак. Фактически копии формируют дублированные версии главного сайта с поддержанием инструментария и индивидуальных параметров.
Компетентные игроки рекомендуют сохранять обновлённые списки working зеркал в bookmark веб-клиента. Провайдеры отправляют updates о fresh порталах через e-mail, Telegram-группы и смартфонные приложения.
Финансовые транзакции через надёжные порталы secured cryptographic технологиями уровня банковского индустрии. Снятие фондов осуществляется исключительно на проверенные реквизиты владельца account.
Отбор качественного betting площадки в сегодняшних рамках требует специального внимания к правовому режиму. Опытные геймеры учитывают, что Голд казино содержит новую материалы о действующих операторах.
Алгоритм регистрации в легальных заведениях охватывает необходимую проверку персональных данных. KYC-процедуры защищают как казино, так и игрока от обмана. Краткосрочные лимиты на изъятие финансов до окончания контроля – типичная система.
Программные препятствия на доступ к betting сайтам нейтрализуются через зеркальные ссылки. Доступные клоны обеспечивают всестороннюю производительность базового сайта. Платежные переводы, интерактивный статистика и бонусные системы продолжают стабильными.
Капитальная надежность оценивается показателем применяемых расчетных способов. SSL-защита, PCI DSS лицензирование и двухфакторная верификация формируют безопасный периметр обороны.
Игровая коллекция сертифицированных операторов охватывает спины от лидирующих разработчиков. RTP-значения, изменчивость и алгоритмические системы претерпевают независимую контроль в признанных центрах.
Механизмы стимулирования в серьезных операторах базируются на четких правилах отыгрыша. Отыгрыш x35-40 расценивается справедливым для барабан-привилегий, в то время как стандартные активности идут в калькуляцию с пониженным фактором.
Нынешние гемблеры оказываются с сложностью соединения к проверенным ресурсам. Компании закрывают стандартные ссылки, но искушённые лаки Р±РёСЂ казино посетители помнят о функционировании параллельных сайтов.
Альтернативный адрес представляет идентичную копию главного сайта. Системы безопасности остаются идентичными. Денежные процедуры производятся через идентичные каналы.
Алгоритм создания аккаунта через параллельный домен требует классической проверки. Сотрудники просят справки для соблюдения KYC-норм. Персональные сведения реализуют усиленную аутентификацию.
Финансовые ограничения на альтернативных ресурсах аналогичны стандартным характеристикам. Низшие суммы функционируют неизменными. Растущие выигрышные пулы синхронизируются между разными порталами.
Премиальные программы работают полноценно на альтернативных площадках. Отыгрышный коэффициент гарантирует оригинальные значения. Временные рамки использования поддерживается.
Служба сопровождения обрабатывает запросы с альтернативных ссылок идентично. Живой диалог предоставляет 24-часовой порядок работы.
Jackpot Pokies Real Money Australia One Spin From Glory
https://spasmreliefprotocols.com/# buy tizanidine without prescription
Навигация в мире официальных ресурсов включает представления современных технологий входа. Квалифицированные игроки эксплуатируют казино Mellstroy Game для обретения свежей данных о работающих путях.
Схема регистрации профиля в проверенных учреждениях содержит многоуровневую верификацию. Новейшие компании используют KYC-процедуры и AML-критерии. Документальная процедура составляет от 24 до 72 временных отрезков.
Цифровые методы для преодоления препятствий прогрессируют сообща с ужесточением нормативных инициатив. VPN-службы класса premium обеспечивают шифрование AES-256 и протоколы OpenVPN. Постоянство подключения критически необходима для привилегированных раундов.
Дублирующие ресурсы работают через географически расположенные технические мощности. CDN-системы гарантируют оптимальную латентность для глобальных игроков. Автоматическое маршрутизация активируется при выявлении ограничения главного ресурса.
Денежные манипуляции в легальных территориях соответствуют определенным требованиям PCI DSS. Блокчейн операции получают актуальность благодаря конфиденциальности и скорости процессинга.
Смартфонные программы топовых провайдеров совмещают лицевую подтверждение и push-сообщения для существенных событий. Настраиваемый интерфейс автоматически корректируется под свойства монитора.
Игровая индустрия отображает интенсивный подъём, манящая множество пользователей. Грамотные платформы дают надёжную условия для пари. Подробную информацию о таких операторах возможно найти на Mellstroy Game зеркало .
Аттестация остаётся центральным показателем подбора площадки. Надзорные органы Великобритании гарантируют жёсткий аудит денежных операций. Конкретная официальная площадка проходит регулярные ревизии RNG-систем.
Технические особенности новейших гемблинг-сайтов включают SSL-криптографию финансового категории. Разработчики цифрового софта уровня Microgaming, NetEnt, Pragmatic Play подключают усовершенствованные механизмы рандомных показателей.
Процесс аутентификации счёта подразумевает передачи документов KYC-типа. ID, выписка о финансах, валидация адреса — обычный пакет для финального доступа.
Зеркальные ссылки решают проблемы с фильтрацией компаний. Свежие копии изменяются каждый день IT отделами. Смартфонные программы обычно работают стабильнее сетевых редакций.
Контроль средств создаёт перспективную успешность гемблинговых раундов. Профессиональные игроки настаивают лимитировать количество вейджера до 1-2% от итогового банкролла.
Платформа Rutor долгое время остаётся актуальной частью русскоязычного даркнета за счёт опыта, конфиденциальности и реализации операций через сеть Rutor.Rutor — старейший представитель даркнета на русском языке
не работает рутор — это один из самых известных и старейших сервисов в русскоязычном даркнете, который стал неотъемлемой частью экосистемы анонимных ресурсов. Этот магазин ориентирован на предоставление пользователям широкой базы данных, связанной с файлами, софтом, новостями и различными видами контента, включая темы, касающиеся взлома и безопасности.
Как устроена система работы Rutor
Данная система обеспечивает доступ к значительным объемам данных и файлов, гарантируя при этом повышенную анонимность и защиту пользователей. Особенность сервиса в том, что он работает через сеть Rutor, что существенно снижает риск идентификации и утечки данных. За долгое время работы Rutor стал своего рода летописью для даркнета на русском языке.
Безопасность и анонимность на Rutor
Система Rutor уделяет особое внимание вопросам безопасности. Платформа предоставляет анонимный просмотр контента благодаря применению новейших решений для защиты информации и коммуникаций. В целях увеличения приватности рекомендуется пользоваться внутренним мессенджером, который обеспечивает безопасный обмен контактной информацией и свежими данными без риска цензуры или слежки.
Влияние Rutor на сегмент русского даркнета
Площадка Rutor по-прежнему играет роль ключевого ресурса для обмена актуальными данными по безопасности и тематике взлома. Его репутация как сервис с минимальной цензурой и высокой степенью анонимности делает его востребованным среди тех, кто ценит свободу информации и защиту персональных данных.
Платформа функционирует стабильно, обеспечивая равный доступ для новых и опытных участников даркнета. Каждый из разделов сайта — магазин, новостные ленты или руководства по взлому — образуют отдельную звено в масштабном сообществе, где главными ценностями выступают конфиденциальность и защита анонимности.
Будущее платформы: вызовы и обещания
Нет сомнений, что в дальнейшем Rutor столкнётся с новыми угрозами, инновационными способами охраны приватности и методами преодоления блокировок. Пользователи должны осознавать, что даже самая анонимная система не гарантирует полной безопасности.
Платформа продолжает быть ресурсом для получения расширенной информации, обмена мнениями по безопасности и мониторинга новшеств в сферах даркнета. Технический прогресс, рост числа участников и новые функциональные решения превращают Rutor в ключевой узел русскоязычного интернет-сообщества.
– Принцип анонимности
– Гарантия безопасности сделок
– Доступ к уникальной информации
– Защищённость коммуникаций
Уникальный путь Rutor делает платформу значимой для тех, кто высоко ценит свободу, личную приватность и защиту от внешнего контроля в цифровую эпоху.
Real Money Wins Australia Pokies The Power In Your Hands
Diese Seite Visit site ist ein verlässliche Quelle.
https://fotosall.ru/user/sweetbonanzaxmas/
Подбор проверенного казино ресурса заставляет тщательного разбора лицензионных бумаг. Инновационные платформы казино аква предоставляют игрокам максимальную данные о действующих лицензиях.
Алгоритм получения доступа подразумевает несколько ключевых шагов подтверждения. Представители требуют бумаги, устанавливающие индивидуальность и дееспособность. Классический KYC-алгоритм продолжается от 24 до 72 промежутков.
Управление банком инициируется с установления пределов на вклады. Квалифицированные игроки советуют использовать закон 5% от суммарного азартного фонда на одну заход.
Технические препятствия провайдеров обязывают задействовать запасные пути. Зеркала удерживают полную функциональность первичного ресурса, предусматривая журнал переводов и казино прогресс.
Инновационные денежные способы дают мгновенные депозиты через электронные кошельки. Bitcoin, Ethereum и стабильные валюты предоставляют конфиденциальность и символические комиссии. Время реализации извлечений доходит 10-30 интервалов.
Системы постоянства охватывают ступенчатые уровни с возрастающим вознаграждением. VIP-менеджеры дают индивидуальные подарки, повышенные лимиты и первоочередную помощь.
Актуальные геймеры оказываются с затруднением доступа к лицензированным площадкам. Провайдеры ограничивают стандартные URL, но опытные Клубника официальный сайт посетители учитывают о существовании параллельных площадок.
Дополнительный домен составляет абсолютную реплику базового платформы. Системы безопасности поддерживаются такими же. Финансовые операции выполняются через аналогичные механизмы.
Алгоритм заведения учётной записи через параллельный адрес подразумевает классической верификации. Менеджеры требуют бумаги для исполнения KYC-правил. Паспортные данные осуществляют двухфакторную аутентификацию.
Банковские лимиты на параллельных сайтах аналогичны первичным параметрам. Низшие вклады сохраняются неизменными. Увеличивающиеся накопления интегрируются между множественными ресурсами.
Поощрительные схемы оперируют завершённо на альтернативных платформах. Множитель ставок сохраняет базовые параметры. Тайминг проигрывания сохраняется.
Служба ассистирования рассматривает вопросы с альтернативных доменов сходным образом. Прямой диалог гарантирует 24-часовой порядок обслуживания.
read what he said telegram promotion software worldwide
Легальные платформы развлекательных возможностей обеспечивают пользователям доступ к качественному времяпрепровождению через целевые домены, включая Лаки Бир РІС…РѕРґ , которые именно исполняют transnational требования защиты.
Алгоритм оформления профиля включает заполнения authentication деталей через криптографические SSL-протоколы. Менеджмент просят письменное удостоверение совершеннолетия и адреса residence для выполнения legal критериев.
Multi-factor верификация представляет необходимым частью передовых платформ security. Пользователи обретают SMS-ключи, push-notification или задействуют dedicated утилиты наподобие Google Authenticator.
Альтернативные URL преодолевают вопросы географических барьеров и DDoS-штурмов. Технически реплики являют тождественные реплики базового ресурса с удержанием features и индивидуальных сведений.
Опытные пользователи suggest сохранять новейшие перечни функционирующих дублей в избранном обозревателя. Операторы рассылают updates о актуальных адресах через мейл, Telegram-чаты и смартфонные программы.
Финансовые переводы через проверенные платформы secured защитными алгоритмами level банковского сектора. Вывод фондов производится исключительно на подтверждённые wallets держателя профиля.
read the article https://g8keep.org
Лицензионные ресурсы игорных услуг обеспечивают клиентам доступ к элитному игровому процессу через целевые платформы, включая Вавада зеркало , которые специально следуют общепринятые критерии конфиденциальности.
Алгоритм активации включает ввода идентификационных информации через encrypted SSL-connection. Администрация demanded документальное verification правоспособности и территории residence для исполнения правовых стандартов.
2FA аутентификация становится mandatory составляющей современных архитектур надёжности. Участники имеют SMS-ключи, push-уведомления или задействуют targeted программы наподобие Google Authenticator.
Резервные адреса преодолевают проблемы geographic ограничений и DDoS-воздействий. Технически реплики являют копийные копии центрального портала с сохранением инструментария и клиентских параметров.
Экспертные пользователи suggest keeping current базы рабочих копий в favourites обозревателя. Провайдеры доставляют обновления о fresh адресах через email, Telegram-communities и смартфонные программы.
Payment транзакции через legal сайты secured шифровальными methods level банковского области. Снятие финансов реализуется исключительно на аутентифицированные счета собственника account.
their explanation telegram automation tools list
hop over to this web-site fortnite stats
http://geolan-ksl.ru/forum/user/107614/
выберите ресурсы
Betwinner промокод
Передовые участники пересекаются с множеством системных деталей при функционировании с лицензированными порталами. Профессиональные источники типа Лаки Бир сайт обеспечивают релевантную данные о деятельности казино организаций.
Процесс проверки учетной записи подразумевает набор обязательных уровней. Начальная аутентификация подразумевает передачи документов валидирующих индивидуальность. Обычный набор предполагает удостоверение личности, лицензию водителя или международное ID.
Техническая составляющая записления подразумевает использование зашифрованного канала и двойной авторизации. Квалифицированные участники рекомендуют инициировать максимум имеющихся настроек охраны.
Зеркала формируют стопроцентные отражения центрального ресурса с поддержанием полного функционала. Главное бонус состоит в подобии расчетных границ и критериев условий прокрутки.
Схема локализации активных резервных ссылок основывается на наблюдении тематических мессенджер групп и связанных платформ. Экспертные геймеры используют VPN-сервисы для формирования устойчивого соединения без оглядки от территориальных блокировок.
Нынешние игроки попадают с затруднением доступа к лицензированным ресурсам. Поставщики блокируют основные порталы, но искушённые Mellstroy Game casino игроки понимают о функционировании резервных сайтов.
Параллельный портал является идентичную копию первичного платформы. SSL-сертификаты поддерживаются неизменными. Расчётные переводы реализуются через равнозначные системы.
Алгоритм регистрации через альтернативный ресурс подразумевает привычной верификации. Менеджеры уточняют удостоверения для выполнения KYC-стандартов. Паспортные характеристики проходят двухфакторную проверку.
Вносительные пределы на параллельных ресурсах соответствуют главным характеристикам. Наименьшие вклады сохраняются стабильными. Растущие выигрышные пулы интегрируются между многочисленными порталами.
Бонусные системы выполняются всесторонне на резервных площадках. Требования по обороту гарантирует первоначальные параметры. Временные рамки использования сохраняется.
Департамент обслуживания анализирует запросы с резервных адресов таким же способом. Интерактивный диалог гарантирует беспрерывный порядок функционирования.
Современные игроки обталкиваются с изобилием системных нюансов при деятельности с легальными порталами. Специализированные источники типа Вован сайт поставляют современную данные о процессах азартных провайдеров.
Процедура аутентификации счета содержит комплекс принудительных уровней. Начальная верификация включает отправки справок подтверждающих личность. Привычный список предполагает свидетельство, лицензию водителя или внешний паспорт.
Технологическая составляющая оформления включает использование защищенного протокола и двухуровневой проверки. Квалифицированные игроки предлагают активировать совокупность предложенных возможностей охраны.
Запасные домены являются точные отражения главного домена с сохранением тотального инструментария. Центральное преимущество выражается в тождественности денежных рамок и критериев проигрыша.
Схема поиска действующих альтернативных адресов основывается на мониторинге профессиональных информационных каналов и аффилированных площадок. Профессиональные игроки эксплуатируют туннельные протоколы для гарантирования постоянного подключения независимо от территориальных ограничений.
мостбет кешбек mostbet80573.help
Действующие mirror-ссылки лицензированных азартных клубов на лаки Р±РёСЂ казино официальный сайт дают устойчивый коннект к азартным платформам. Система копирования строит аналогичные реплики основного портала с удержанием всех инструментов.
Схема оформления профиля через резервную ссылку на сто процентов повторяет оригинальную заявку. Только пришедшие геймеры регистрируют функционирующий email, формируют защищенный ключ и устанавливают операционную валюту.
Подтверждение личного кабинета требует предоставления свидетельств в соответствии с KYC-регламенту. Копия ID-карты, свидетельство места жительства и денежные параметры проверяются через автоматическую контроль в течение 24-72 часа.
Авторизация действующих игроков осуществляется через обычную панель с многоступенчатой идентификацией. Краткосрочные токены поступают на телефонный аппарат или e-mail адрес.
Опции пополнительного блока через дублирующие порталы поддерживает востребованные платежные системы. Visa, Mastercard, веб портмоне Skrill, Neteller, криптовалюты Bitcoin, Ethereum осуществляются с минимальными процентами 0-3%.
Gaming коллекция дублируется целиком включая машины, классические геймплей, live-дилеров и прогрессивы. RTP-коэффициенты, колебания и вейджер удерживаются точными.
Промо программа функционирует подобно корневому веб-площадке. Welcome-пакеты, даровые прокруты, компенсация и VIP-планы запускаются машинально при достижении определенных условий.
go to this website https://avalonfinance.cv/
Активные зеркала проверенных азартных клубов на Меллстрой официальный сайт дают устойчивый соединение к геймерским порталам. Методика копирования генерирует полноценные реплики центрального портала с консервацией всех механизмов.
Механизм открытия счета через зеркало на сто процентов повторяет базовую бланк. Только пришедшие участники регистрируют активный email, создают стойкий пароль и выбирают основную финансовый инструмент.
Идентификация учетной записи включает предоставления свидетельств опираясь на KYC-требованиям. Фото национального документа, верификация проживания и платежные данные подвергаются машинную анализ в течение 24-72 часа.
Подключение существующих игроков реализуется через обычную окно с двухфакторной аутентификацией. Краткосрочные коды поступают на телефонный устройство или email.
Функционал денежного модуля через резервные ссылки содержит популярные финансовые сервисы. Visa, Mastercard, веб счета Skrill, Neteller, crypto Bitcoin, Ethereum процессируются с низкими платежами 0-3%.
Игровая библиотека повторяется полностью включая барабаны, традиционные игры, live-ведущих и максимальные награды. RTP-коэффициенты, дисперсия и вейджер поддерживаются такими же.
Акционная система действует аналогично основному ресурсу. Welcome-пакеты, бесплатные вращения, компенсация и VIP-системы инициируются автоматически при исполнении определенных стандартов.
Развлекательная отрасль являет стремительный подъём, привлекая миллионы пользователей. Грамотные сайты обеспечивают безопасную обстановку для пари. Исчерпывающую данные о таких операторах реально найти на Lucky Bear .
Аттестация составляет главным фактором подбора ресурса. Контролёры Мальты предоставляют жёсткий контроль экономических операций. Каждая официальная платформа подвергается постоянные проверки RNG-алгоритмов.
Программные характеристики актуальных беттинг-платформ предусматривают SSL-криптографию банковского ранга. Разработчики софтового материала наподобие Microgaming, NetEnt, Pragmatic Play встраивают многоуровневые механизмы случайных показателей.
Процесс верификации счёта предполагает предоставления удостоверений KYC-уровня. ID, справка о доходах, подтверждение проживания — базовый перечень для окончательного входа.
Параллельные домены ликвидируют сложности с фильтрацией провайдеров. Действующие альтернативы изменяются регулярно цифровыми специалистами. Планшетные приложения часто выполняются устойчивее сетевых модификаций.
Контроль средств определяет продолжительную успешность игровых циклов. Экспертные геймеры предлагают контролировать объём пари до 1-2% от полного фонда.
What i do not realize is in truth how you are not really a
lot more smartly-appreciated than you might be now.
You are so intelligent. You recognize thus considerably when it comes
to this topic, produced me personally consider it from so many numerous angles.
Its like women and men are not interested until it’s something to accomplish
with Lady gaga! Your individual stuffs great.
Always take care of it up!
https://spasmreliefprotocols.shop/# tizanidine generic
Have you ever thought about creating an e-book or guest authoring on other websites?
I have a blog centered on the same information you
discuss and would really like to have you share some
stories/information. I know my visitors would appreciate your work.
If you are even remotely interested, feel free to shoot me an e mail.
Активные зеркала лицензированных казино на Килограмм казино гарантируют устойчивый вход к развлекательным ресурсам. Принцип зеркалирования создает точные дубликаты центрального веб-площадки с удержанием всех функций.
Система регистрации через mirror-сайт абсолютно имитирует основную анкету. Свежие клиенты указывают активный email, формируют защищенный код доступа и назначают базовую финансовый инструмент.
Верификация профиля включает передачи бумаг следуя KYC-регламенту. Фото удостоверения личности, валидация регистрации и карточные данные анализируются посредством алгоритмическую верификацию в течение 24-72 часа.
Аутентификация действующих клиентов осуществляется через обычную модуль с многоступенчатой валидацией. Краткосрочные ключи передаются на мессенджер аппарат или почтовый ящик.
Инструменты финансового раздела через альтернативные домены содержит популярные банковские механизмы. Visa, Mastercard, электронные хранилища Skrill, Neteller, crypto Bitcoin, Ethereum осуществляются с уменьшенными платежами 0-3%.
Игровая коллекция клонируется полностью включая слоты, традиционные активности, live-ведущих и мегавыигрыши. RTP-параметры, колебания и отыгрыш сохраняются такими же.
Бонусная механизм действует подобно корневому ресурсу. Welcome-наборы, безвозмездные спины, денежный возврат и VIP-схемы стартуют автоматически при исполнении прописанных критериев.
You actually stated that adequately.
Новейшие клиенты пересекаются с массой технических деталей при функционировании с проверенными площадками. Экспертные сайты типа Клубника казино дают современную контент о работе азартных компаний.
Процесс верификации кабинета включает множество неотъемлемых этапов. Базовая верификация требует передачи свидетельств доказывающих личность. Типовой комплект включает ID, автоудостоверение или международное ID.
Цифровая составляющая создания аккаунта подразумевает внедрение криптографической защиты и многофакторной защиты. Опытные игроки советуют задействовать весь комплекс представленных настроек охраны.
Альтернативные адреса образуют точные копии основного ресурса с поддержанием тотального инструментария. Главное выгода заключается в идентичности расчетных лимитов и параметров вейджера.
Механизм поиска рабочих резервных ссылок фундируется на проверке профессиональных телеграм-каналов и партнерских порталов. Продвинутые игроки используют VPN-сервисы для создания постоянного связи без оглядки от локальных ограничений.
over at this website https://g8keep.org
перенаправляется сюда
banda casino промокод при регистрации
Поиск в сфере лицензированных порталов включает знания передовых технологий соединения. Профессиональные пользователи применяют Вавада казино для добывания свежей фактов о работающих ссылках.
Схема создания личного кабинета в сертифицированных организациях включает сложную аутентификацию. Современные компании эксплуатируют KYC-процедуры и AML-нормы. Оформление документов занимает от 24 до 72 временных отрезков.
Цифровые инструменты для обхода барьеров эволюционируют синхронно с укреплением правовых инициатив. VPN-службы категории premium дают защиту AES-256 и технологии OpenVPN. Надежность соединения принципиально актуальна для VIP раундов.
Резервные адреса выполняют задачи через регионально размещенные серверные мощности. CDN-сети гарантируют сокращенную пинг для международных игроков. Техническое маршрутизация срабатывает при распознавании блокировки базового ресурса.
Банковские движения в официальных юрисдикциях подчиняются строгим требованиям PCI DSS. Блокчейн переводы получают актуальность вследствие анонимности и динамике выполнения.
Смартфонные софт лучших организаций интегрируют голосовую авторизацию и push-извещения для важных моментов. Настраиваемый облик независимо изменяется под параметры матрицы.
you can check here https://avalonfinance.cc
Актуальные альтернативные домены официальных gaming-операторов на Vavada casino предоставляют стабильный подключение к развлекательным платформам. Система копирования формирует точные версии базового веб-площадки с удержанием всех опций.
Алгоритм открытия счета через резервную ссылку в точности дублирует оригинальную форму. Начинающие игроки регистрируют валидный email, создают надежный ключ и фиксируют основную денежную единицу.
Верификация учетной записи включает представления бумаг опираясь на KYC-регламенту. Фото удостоверения личности, доказательство регистрации и платежные реквизиты подвергаются машинную верификацию в течение 24-72 часов.
Вход зарегистрированных геймеров происходит через типовую форму с 2FA проверкой. Краткосрочные ключи поступают на сотовый номер или e-mail адрес.
Функционал депозитного раздела через зеркала обеспечивает топовые денежные сервисы. Visa, Mastercard, цифровые кошельки Skrill, Neteller, криптовалюты Bitcoin, Ethereum обрабатываются с минимальными комиссиями 0-3%.
Развлекательная ассортимент воспроизводится целиком включая автоматы, столовые активности, live-дилеров и прогрессивы. RTP-индикаторы, изменчивость и условия отыгрыша фиксируются точными.
Поощрительная схема выполняется аналогично центральному веб-площадке. Welcome-комплекты, безвозмездные спины, компенсация и VIP-программы активируются алгоритмически при соблюдении установленных параметров.
check fortnite locker estimate
his comment is here Telegram Expert features
see this https://kinetiq.buzz
seobeacon.click – Appreciate the typography choices; comfortable spacing improved my reading experience.
Легальные платформы азартных возможностей обеспечивают пользователям право к профессиональному гэмблингу через целевые порталы, включая п»ї1хбет регистрация , которые специально выполняют мировые критерии безопасности.
Механизм активации включает ввода authentication параметров через шифрованные SSL-соединения. Администрация требуют письменное verification дееспособности и региона проживания для выполнения законодательных критериев.
2FA authentication является необходимым компонентом современных механизмов безопасности. Игроки располагают SMS-токены, push-уведомления или задействуют профессиональные софт по типу Google Authenticator.
Резервные порталы устраняют проблемы territorial барьеров и DDoS-воздействий. С технической точки зрения копии формируют аналогичные клоны primary ресурса с обеспечением возможностей и пользовательских сведений.
Опытные геймеры рекомендуют хранить обновлённые списки действующих дублей в сохранённых ссылках обозревателя. Администрация передают updates о актуальных ссылках через email, Telegram-сообщества и телефонные утилиты.
Денежные переводы через проверенные платформы обеспечены шифровальными алгоритмами класса банковского segment. Снятие финансов осуществляется единственно на validated карты собственника учётной записи.
Рабочие альтернативные домены проверенных gaming-операторов на ретро казино создают постоянный подключение к развлекательным ресурсам. Схема реплицирования строит полноценные версии центрального портала с поддержанием всех возможностей.
Система оформления профиля через резервную ссылку целиком воспроизводит основную заявку. Свежие пользователи вводят действующий email, устанавливают надежный код доступа и фиксируют операционную курренси.
Идентификация профиля предполагает отправки свидетельств в соответствии с KYC-требованиям. Фото удостоверения личности, подтверждение адреса и денежные реквизиты проходят программную контроль в течение 24-72 временных единиц.
Аутентификация зарегистрированных клиентов реализуется через обычную панель с двухфакторной проверкой. Сессионные пароли поступают на телефонный аппарат или email.
Опции пополнительного модуля через зеркала поддерживает востребованные банковские платформы. Visa, Mastercard, электронные хранилища Skrill, Neteller, блокчейн-токены Bitcoin, Ethereum обрабатываются с уменьшенными взносами 0-3%.
Азартная ассортимент дублируется в точности включая spinning games, настольные геймплей, live-операторов и прогрессивы. RTP-индикаторы, изменчивость и вейджер сохраняются аналогичными.
Подарочная программа оперирует аналогично центральному домену. Welcome-предложения, даровые прокруты, кешбэк и VIP-системы включаются системно при достижении прописанных критериев.
Перемещение в мире сертифицированных площадок предполагает владения передовых решений авторизации. Опытные участники эксплуатируют п»ї1хбет казино для получения свежей материалов о функционирующих путях.
Алгоритм оформления профиля в проверенных операторах включает сложную подтверждение. Современные организации используют KYC-протоколы и AML-стандарты. Оформление документов занимает от 24 до 72 периодов.
Цифровые технологии для преодоления ограничений улучшаются синхронно с ужесточением нормативных решений. VPN-платформы уровня premium гарантируют безопасность AES-256 и протоколы OpenVPN. Устойчивость коннекта критически актуальна для элитных партий.
Дублирующие домены функционируют через географически размещенные технические кластеры. CDN-сети гарантируют быструю отклик для европейских клиентов. Автоматическое перенаправление запускается при идентификации препятствия первичного адреса.
Платежные операции в лицензированных областях подчиняются жестким требованиям PCI DSS. Блокчейн транзакции получают признание по причине конфиденциальности и темпу осуществления.
Переносные приложения топовых компаний включают биометрическую аутентификацию и push-сообщения для существенных моментов. Адаптивный оформление программно корректируется под свойства дисплея.
Поиск надежного игорного оператора предполагает основательного исследования юридических документов. Передовые платформы Голд казино предлагают клиентам безусловную информацию о своих аккредитациях.
Процедура открытия аккаунта содержит различные требуемых ступеней проверки. Провайдеры запрашивают свидетельства, устанавливающие самобытность и правоспособность. Традиционный KYC-регламент составляет от 24 до 72 интервалов.
Финансовое планирование открывается с назначения пределов на депозиты. Искусные участники призывают использовать закон 5% от общего игорного резерва на индивидуальную заход.
Системные ограничения операторов заставляют задействовать альтернативные адреса. Альтернативы сохраняют стопроцентную производительность центрального платформы, содержа летопись сделок и азартный прогресс.
Актуальные платежные инструменты предоставляют мгновенные пополнения через цифровые хранилища. Bitcoin, Ethereum и устойчивые монеты поддерживают тайность и крошечные отчисления. Длительность осуществления снятий равно 10-30 периодов.
Алгоритмы приверженности содержат градационные ранги с возрастающим кэшбэком. VIP-менеджеры дают уникальные вознаграждения, повышенные пределы и ускоренную обслуживание.
https://redclara.net/news/pgs/?1xbet_promo_code_today__welcome_bonus.html
Very well written article on yoga and healthy living. Small daily
habits like stretching breathing exercises and regular movement can make
a big difference in long term health.
MorvexZone – Very logical layout, everything is accessible and easy to read.
More Help https://tokvideodownloader.click/ja/
Buy High-Quality Backlinks to Boost Your Google Rankings Fast
In today’s competitive digital landscape, ranking on the first page of Google
requires more than just good content. One of the most powerful ranking factors remains backlinks.
If you want faster visibility, stronger authority, and consistent traffic
growth, choosing to buy high-quality backlinks can be a smart and effective
SEO strategy when done correctly.
High-quality backlinks come from trusted, relevant, and authoritative websites.
These links act as votes of confidence for your site, signaling to search engines that your content is
valuable and reliable. Unlike low-quality or spammy links, premium backlinks help improve domain authority, keyword rankings, and overall website
credibility without risking penalties.
Buying backlinks saves time and accelerates results.
Organic link building can take months, especially for new
or competitive websites. By investing in quality backlinks, you
can shorten this timeline and start seeing ranking improvements much faster.
This is especially useful for businesses, bloggers, and affiliate marketers who want
quick momentum in search results.
Another key advantage is control. When you buy backlinks from a professional,
Google-safe service, you gain access to contextual links, niche-relevant placements, and natural anchor text distribution. This ensures your backlink profile looks
authentic and diversified, which modern search engines strongly favor.
However, quality always matters more than quantity.
Avoid cheap, automated, or PBN-heavy links that can harm your site.
Instead, focus on backlinks from real websites with strong metrics, organic traffic,
and relevant content. A well-planned backlink strategy combined with on-page SEO and quality content delivers the best long-term results.
In conclusion, buying high-quality backlinks is one of the fastest ways to boost Google rankings when done responsibly.
It enhances authority, increases visibility, and drives targeted
traffic—helping your website grow steadily and sustainably in competitive search environments.
Подбор надежного азартного портала заставляет глубокого рассмотрения официальных разрешений. Передовые платформы Меллстрой предлагают клиентам абсолютную сведения о действующих допусках.
Механизм регистрации охватывает определенное количество ключевых ступеней верификации. Администраторы истребуют удостоверения, доказывающие персону и правоспособность. Традиционный KYC-регламент занимает от 24 до 72 периодов.
Управление банком инициируется с установления ограничений на взносы. Опытные участники предлагают эксплуатировать закон 5% от полного гемблинг резерва на отдельную сессию.
Программные запреты операторов вынуждают задействовать запасные адреса. Копии хранят стопроцентную функциональность центрального портала, подразумевая хронологию транзакций и казино результаты.
Актуальные банковские инструменты дают моментальные взносы через виртуальные кошельки. Bitcoin, Ethereum и постоянные токены поддерживают анонимность и крошечные взносы. Время выполнения снятий достигает 10-30 периодов.
Схемы постоянства охватывают ступенчатые статусы с нарастающим бонусом. VIP-координаторы обеспечивают личные награды, повышенные ограничения и опережающую обслуживание.
Ориентирование в области лицензированных площадок нуждается осознания современных технологий входа. Квалифицированные игроки используют Lucky Bear зеркало для обретения современной сведений о активных URL.
Алгоритм регистрации счета в лицензированных учреждениях содержит детальную подтверждение. Передовые организации эксплуатируют KYC-процедуры и AML-критерии. Оформление документов занимает от 24 до 72 промежутков.
Компьютерные инструменты для избежания ограничений эволюционируют параллельно с укреплением юридических мер. VPN-сервисы категории premium предлагают безопасность AES-256 и технологии OpenVPN. Постоянство связи принципиально существенна для привилегированных заходов.
Зеркальные адреса работают через территориально размещенные IT кластеры. CDN-структуры гарантируют низкую латентность для международных игроков. Системное переключение активируется при идентификации ограничения базового портала.
Банковские манипуляции в проверенных территориях следуют четким стандартам PCI DSS. Цифровые расчеты приобретают востребованность из-за секретности и динамике осуществления.
Мобильные утилиты премиальных брендов включают биометрическую подтверждение и push-алерты для принципиальных моментов. Гибкий оформление независимо изменяется под свойства экрана.
Guide Hub – Navigation feels effortless, and all pages are clearly organized.
Определение качественного развлекательного портала в нынешних условиях подразумевает повышенного анализа к юридическому уровню. Компетентные участники учитывают, что Болливуд РІС…РѕРґ демонстрирует последнюю данные о активных операторах.
Процедура оформления профиля в лицензированных заведениях охватывает необходимую подтверждение удостоверения. KYC-требования обеспечивают как площадку, так и клиента от афер. Кратковременные лимиты на снятие капитала до окончания валидации – обычная подход.
Виртуальные ограничения на подключение к азартным сервисам решаются через альтернативные адреса. Доступные дубликаты обеспечивают абсолютную возможности первичного платформы. Банковские движения, интерактивный прогресс и наградные предложения поддерживаются устойчивыми.
Финансовая гарантированность оценивается уровнем применяемых финансовых способов. SSL-безопасность, PCI DSS сертификация и многоуровневая идентификация создают стабильный периметр безопасности.
Развлекательная коллекция сертифицированных заведений содержит машины от известных студий. RTP-значения, вариативность и статистические формулы испытывают нейтральную сертификацию в авторизованных учреждениях.
Системы стимулирования в качественных заведениях формируются на понятных условиях активности. Отыгрыш x35-40 оценивается справедливым для барабан-поощрений, в то время как классические развлечения принимаются в расчет с редуцированным показателем.
Актуальные резервные адреса легальных игорных заведений на френдс казино создают беспрерывный вход к гемблинг платформам. Методика реплицирования генерирует идентичные версии основного ресурса с удержанием всех функций.
Процедура оформления профиля через mirror-сайт в точности воспроизводит главную форму. Дебютные геймеры заполняют активный email, создают сложный секретную комбинацию и фиксируют основную платежное средство.
Верификация учетной записи требует предоставления документов по KYC-стандартам. Снимок водительских прав, свидетельство регистрации и платежные координаты проходят программную анализ в течение 24-72 часа.
Авторизация активных пользователей реализуется через базовую модуль с 2FA аутентификацией. Одноразовые коды доставляются на мобильный устройство или электронную почту.
Опции депозитного сектора через mirror-сайты включает востребованные финансовые системы. Visa, Mastercard, виртуальные портмоне Skrill, Neteller, блокчейн-токены Bitcoin, Ethereum реализуются с минимальными платежами 0-3%.
Гемблинг база воспроизводится абсолютно включая автоматы, карточные развлечения, live-ведущих и накопительные призы. RTP-значения, волатильность и ставочные требования остаются аналогичными.
Бонусная схема оперирует идентично основному сайту. Welcome-пакеты, бесплатные вращения, кешбэк и VIP-схемы инициируются машинально при реализации прописанных параметров.
ZarvoDirect – Clean visuals make finding options straightforward.
Функционирующие зеркала проверенных азартных клубов на Lucky Bear казино обеспечивают стабильный соединение к развлекательным системам. Методика зеркалирования строит эквивалентные реплики корневого сайта с сохранением всех функций.
Механизм открытия счета через зеркало целиком повторяет стандартную форму. Только пришедшие участники прописывают функционирующий email, генерируют безопасный секретную комбинацию и назначают операционную финансовый инструмент.
Верификация аккаунта требует передачи документов согласно KYC-политике. Изображение паспорта, верификация регистрации и банковские данные проходят алгоритмическую проверку в течение 24-72 периодов.
Аутентификация верифицированных пользователей осуществляется через стандартную форму с расширенной идентификацией. Одноразовые токены доставляются на сотовый номер или электронную почту.
Инструменты денежного сектора через зеркала содержит топовые денежные инструменты. Visa, Mastercard, виртуальные хранилища Skrill, Neteller, блокчейн-токены Bitcoin, Ethereum процессируются с минимальными взносами 0-3%.
Игровая коллекция клонируется на сто процентов включая автоматы, традиционные развлечения, live-крупье и максимальные награды. RTP-индикаторы, изменчивость и ставочные требования остаются идентичными.
Промо система действует аналогично главному сайту. Welcome-бандлы, даровые прокруты, refund и VIP-программы стартуют автоматически при соблюдении установленных требований.
Выбор надежного betting портала в сегодняшних рамках заставляет повышенного подхода к регулятивному состоянию. Опытные участники осознают, что п»ї1хбет зеркало включает современную сведения о работающих сервисах.
Процесс записи в легальных сервисах предусматривает неизбежную аутентификацию личности. KYC-нормы гарантируют как оператора, так и геймера от фрода. Промежуточные пределы на вывод денег до выполнения верификации – привычная подход.
Виртуальные запреты на вход к betting ресурсам обходятся через альтернативные порталы. Рабочие дубликаты сохраняют стопроцентную возможности первичного сайта. Финансовые транзакции, игровой прогресс и бонусные предложения функционируют постоянными.
Денежная гарантированность характеризуется качеством задействованных расчетных инструментов. SSL-кодирование, PCI DSS аттестация и двухфакторная аутентификация гарантируют надежный периметр охраны.
Азартная коллекция легальных провайдеров включает слоты от известных производителей. RTP-индексы, изменчивость и статистические формулы подвергаются нейтральную валидацию в признанных лабораториях.
Схемы стимулирования в надежных заведениях строятся на прозрачных параметрах ставок. Отыгрыш x35-40 признается справедливым для автомат-бонусов, в то время как классические состязания идут в подсчет с сниженным множителем.
site https://looksrare.cfd
Гемблинговая отрасль являет стремительный развитие, притягивая миллионы пользователей. Опытные ресурсы дают защищённую среду для беттинга. Подробную данные о указанных компаниях можно получить на Лаки Бир .
Легализация является основным фактором определения площадки. Юрисдикции Великобритании предоставляют жёсткий аудит валютных процедур. Любая сертифицированная площадка выполняет периодические проверки RNG-алгоритмов.
Цифровые параметры актуальных казино содержат SSL-кодирование денежного уровня. Провайдеры компьютерного продукта типа Microgaming, NetEnt, Pragmatic Play подключают усовершенствованные модели рандомных величин.
Алгоритм валидации счёта предусматривает представления справок KYC-стандарта. Свидетельство, документ о заработке, подтверждение адреса — классический перечень для итогового подключения.
Параллельные ссылки устраняют проблемы с ограничениями операторов. Рабочие варианты обновляются систематически компьютерными командами. Портативные клиенты обычно работают надёжнее онлайн модификаций.
Финансовая дисциплина устанавливает перспективную эффективность беттинговых периодов. Квалифицированные участники настаивают лимитировать размер депозита до 1-2% от полного резерва.
Функционирующие резервные адреса лицензированных гемблинг-платформ на Vavada гарантируют стабильный доступ к азартным сервисам. Технология реплицирования строит эквивалентные дубликаты центрального сайта с сохранением всех инструментов.
Механизм открытия счета через дублирующий портал полностью копирует базовую форму. Дебютные игроки указывают активный email, формируют защищенный шифр и назначают рабочую денежную единицу.
Верификация аккаунта подразумевает представления удостоверений в соответствии с KYC-политике. Фото удостоверения личности, свидетельство резиденции и банковские параметры проверяются через машинную анализ в течение 24-72 периодов.
Авторизация активных клиентов выполняется через базовую модуль с усиленной верификацией. Краткосрочные шифры отправляются на мобильный устройство или мейл.
Возможности пополнительного раздела через дублирующие порталы поддерживает топовые банковские платформы. Visa, Mastercard, веб портмоне Skrill, Neteller, crypto Bitcoin, Ethereum осуществляются с оптимизированными процентами 0-3%.
Развлекательная библиотека клонируется в точности включая автоматы, столовые развлечения, live-ведущих и мегавыигрыши. RTP-индикаторы, волатильность и ставочные требования сохраняются точными.
Подарочная система работает похоже основному веб-площадке. Welcome-предложения, free spins, денежный возврат и VIP-планы включаются системно при соблюдении прописанных условий.
hop over to this site Zerion
Новейшие провайдеры развлекательных игр обеспечивают беттерам путь к профессиональному беттингу через проверенные РЎСѓРєР° казино сайты. Лицензированная бизнес предполагает исполнения строгих законодательных норм.
Процесс регистрации игрового счета предусматривает валидацию конфиденциальных информации. Операторы задействуют углубленные протоколы KYC и AML для исключения фродовых транзакций.
Программные средства инновационных казино функционируют на стабильных хостингах с HTTPS протоколами. Геоблокировка обязывает управляющих запускать резервные домены.
Альтернативные сайты образуют эквивалентные репликации первичного домена с сохранением всех функций и параметров. Клиенты получают беспрепятственный соединение к счету, беттинг данным и личным опциям.
Платежные действия выполняются через подключенные расчетные шлюзы. Пределы на депозиты и выводы определяются в согласии с нормативными требованиями и индивидуальными нормами риск-менеджмента.
Компетентные игроки советуют отслеживать положение лицензии через регуляторные реестры беттинг органов. Статусные критерии задействуют рейтинги на отраслевых сервисах и комментарии действительных клиентов.
Новейшие платформы гемблинг игр предлагают клиентам путь к профессиональному игровому процессу через сертифицированные Голд казино ресурсы. Легальная работа предполагает исполнения строгих регуляторных норм.
Процедура открытия клиентского профиля предусматривает верификацию приватных реквизитов. Администраторы задействуют углубленные системы KYC и AML для недопущения незаконных финансовых действий.
Цифровые платформы новейших игорных домов базируются на безопасных облачных системах с шифровальными стандартами. Локальные запреты заставляет операторов запускать параллельные порталы.
Альтернативные платформы образуют точные клоны основного сайта с удержанием всех возможностей и информации. Пользователи обеспечивают себе постоянный связь к капиталу, развлекательной записям и индивидуальным конфигурациям.
Финансовые действия выполняются через связанные банковские процессоры. Ограничения на инвестиции и снятия назначаются в соответствии с нормативными стандартами и индивидуальными процедурами контроля угроз.
Экспертные клиенты указывают отслеживать положение авторизации через официальные каталоги азартных организаций. Репутационные индикаторы содержат места на тематических сайтах и отзывы реальных игроков.
Online Casino Australia Fast Payout Real Money Victory Awaits
viralshift.click – Found practical insights today; sharing this article with colleagues later.
leadcircuit.click – Mobile version looks perfect; no glitches, fast scrolling, crisp text.
Нынешние игроки имеют дело с набором программных аспектов при процессах с официальными сайтами. Экспертные платформы типа Лаки Бир сайт дают новую сведения о работе развлекательных компаний.
Алгоритм верификации кабинета охватывает комплекс принудительных уровней. Стартовая подтверждение предполагает отправки свидетельств валидирующих персону. Типовой перечень содержит свидетельство, автолицензию или международное ID.
Программная компонента открытия счета предполагает применение безопасного соединения и двойной авторизации. Профессиональные клиенты предлагают активировать совокупность доступных опций обеспечения.
Резервные ссылки составляют абсолютные копии основного ресурса с обеспечением тотального набора функций. Ключевое выгода содержится в схожести банковских границ и параметров проигрыша.
Схема выявления рабочих альтернативных адресов фундируется на проверке профильных информационных каналов и аффилированных ресурсов. Опытные игроки задействуют виртуальные частные сети для обеспечения стабильного входа вне зависимости от географических ограничений.
Выбор безопасного игрового площадки в текущих обстоятельствах нуждается повышенного изучения к правовому уровню. Квалифицированные клиенты знают, что Лаки Бир отображает последнюю данные о активных провайдерах.
Схема открытия счета в проверенных сервисах предусматривает принудительную аутентификацию идентичности. KYC-стандарты гарантируют как сервис, так и геймера от махинаций. Временные лимиты на перечисление средств до завершения контроля – привычная методика.
Цифровые запреты на связь к развлекательным ресурсам обходятся через альтернативные порталы. Активные зеркала поддерживают всестороннюю эффективность основного сервиса. Платежные транзакции, интерактивный продвижение и поощрительные программы продолжают постоянными.
Капитальная безопасность определяется степенью задействованных платежных способов. SSL-кодирование, PCI DSS валидация и усиленная подтверждение устанавливают прочный барьер ограждения.
Геймплейная каталог официальных заведений предоставляет барабаны от главных производителей. RTP-значения, колебания и статистические модели претерпевают независимую валидацию в аккредитованных центрах.
Системы лояльности в качественных операторах формируются на четких критериях ставок. Проигрыш x35-40 характеризуется справедливым для спин-льгот, в то время как традиционные состязания принимаются в расчет с уменьшенным фактором.
you can try here https://plasma.credit/
MivaroTrack – Listings and tools are clear, making it easy to evaluate my options.
It’s perfect time to make some plans for the future and it’s
time to be happy. I’ve learn this publish and if I may I wish to counsel you few fascinating things or advice.
Maybe you can write subsequent articles relating to this article.
I want to read more issues approximately it!
Легальные платформы азартных опций дают клиентам возможность к качественному гэмблингу через профильные платформы, включая ретро казино , которые именно придерживаются transnational требования защиты.
Процедура регистрации подразумевает предоставления валидационных сведений через безопасные SSL-протоколы. Букмекеры просят предоставить официальное verification age verification и локации проживания для исполнения нормативных критериев.
Multi-factor проверка является mandatory составляющей новейших платформ надёжности. Клиенты располагают SMS-коды, push-notification или эксплуатируют targeted программы типа Google Authenticator.
Альтернативные порталы нейтрализуют препятствия territorial санкций и DDoS-нападений. Техническим образом mirrors являют аналогичные версии главного домена с поддержанием возможностей и пользовательских деталей.
Экспертные геймеры призывают сохранять актуальные каталоги действующих альтернатив в избранном обозревателя. Букмекеры передают updates о актуальных URL через e-mail, Telegram-группы и портативные apps.
Payment переводы через надёжные порталы обеспечены encryption протоколами класса банковского индустрии. Extraction средств производится только на проверенные данные держателя аккаунта.
Действующие альтернативные домены легальных гемблинг-платформ на казино friends casino обеспечивают непрерывный соединение к гемблинг порталам. Система дублирования создает эквивалентные дубликаты центрального домена с сохранением всех возможностей.
Механизм создания аккаунта через mirror-сайт абсолютно воспроизводит главную анкету. Свежие игроки прописывают активный email, придумывают защищенный код доступа и назначают операционную платежное средство.
Подтверждение аккаунта предполагает представления свидетельств следуя KYC-требованиям. Снимок ID-карты, валидация места жительства и банковские сведения подвергаются программную контроль в течение 24-72 часов.
Аутентификация действующих клиентов выполняется через обычную интерфейс с усиленной верификацией. Временные коды доставляются на сотовый гаджет или email.
Возможности денежного сектора через дублирующие порталы содержит популярные денежные платформы. Visa, Mastercard, виртуальные кошельки Skrill, Neteller, блокчейн-токены Bitcoin, Ethereum реализуются с уменьшенными платежами 0-3%.
Игровая база копируется в точности включая автоматы, классические развлечения, live-ведущих и мегавыигрыши. RTP-коэффициенты, изменчивость и отыгрыш фиксируются точными.
Промо политика функционирует идентично базовому веб-площадке. Welcome-наборы, фриспины, refund и VIP-программы активируются машинально при достижении прописанных стандартов.
Исследование в пространстве сертифицированных платформ предполагает понимания актуальных инструментов входа. Умелые пользователи применяют Vavada казино для получения новейшей материалов о работающих доменах.
Алгоритм оформления личного кабинета в проверенных заведениях предполагает тщательную подтверждение. Актуальные компании используют KYC-алгоритмы и AML-стандарты. Документальная процедура потребляет от 24 до 72 часов.
Технические технологии для прохождения барьеров улучшаются параллельно с интенсификацией нормативных инициатив. VPN-инструменты категории premium предлагают криптографию AES-256 и технологии OpenVPN. Устойчивость соединения критически важна для элитных игровых периодов.
Зеркальные сайты действуют через географически рассредоточенные компьютерные кластеры. CDN-системы гарантируют сокращенную отклик для глобальных участников. Цифровое роутинг активируется при идентификации блокировки базового адреса.
Денежные транзакции в легальных зонах подчиняются строгим стандартам PCI DSS. Блокчейн переводы приобретают признание благодаря анонимности и оперативности осуществления.
Планшетные приложения ведущих операторов объединяют биометрическую идентификацию и push-сообщения для принципиальных моментов. Гибкий дизайн самостоятельно изменяется под настройки дисплея.
bonding info page – Straightforward site with easily digestible bonding details.
Is online gambling legal in Australia 2025? – full breakdown
Определение достойного гемблинг ресурса в текущих границах предполагает особого подхода к юридическому состоянию. Профессиональные пользователи знают, что Лаки Бир сайт предоставляет последнюю информацию о работающих сервисах.
Процесс открытия счета в проверенных сервисах предусматривает необходимую валидацию документов. KYC-требования защищают как казино, так и участника от афер. Кратковременные рамки на изъятие активов до закрытия контроля – нормальная система.
Цифровые барьеры на вход к азартным площадкам решаются через зеркальные домены. Функционирующие зеркала поддерживают абсолютную работоспособность основного платформы. Денежные переводы, азартный результаты и льготные системы функционируют постоянными.
Денежная защищенность выражается степенью задействованных денежных инструментов. SSL-защита, PCI DSS лицензирование и двухфакторная подтверждение гарантируют защищенный контур охраны.
Развлекательная набор официальных заведений включает автоматы от лидирующих производителей. RTP-коэффициенты, изменчивость и алгоритмические формулы проходят внешнюю аудит в авторизованных институтах.
Механизмы мотивации в профессиональных заведениях базируются на прозрачных параметрах ставок. Условия ставок x35-40 характеризуется адекватным для машина-льгот, в то время как классические состязания учитываются в счет с редуцированным коэффициентом.
VexaroFlow – Navigation is intuitive and financial information is consistently accurate.
Смотреть здесь
Beef casino промокод при регистрации
Легальные площадки игровых сервисов дают пользователям вариант к качественному гэмблингу через профильные ресурсы, включая Mellstroy Game казино , которые точно следуют transnational требования защиты.
Алгоритм открытия счёта предполагает указания верификационных данных через защищённые SSL-протоколы. Менеджмент запрашивают официальное доказательство age verification и места проживания для поддержания законодательных правил.
Многоуровневая верификация выступает mandatory элементом новейших архитектур надёжности. Клиенты имеют SMS-шифры, push-оповещения или используют специализированные софт вроде Google Authenticator.
Дублирующие ссылки решают препятствия географических санкций и DDoS-атак. Технически зеркала формируют аналогичные dublicates центрального сайта с сохранением инструментария и личных параметров.
Компетентные геймеры советуют сохранять свежие базы действующих зеркал в избранном веб-клиента. Администрация отправляют сведения о актуальных ссылках через электронную почту, Telegram-каналы и телефонные программы.
Денежные movements через проверенные сайты покрыты encryption алгоритмами стандарта банковского области. Изъятие капитала выполняется единственно на аутентифицированные данные держателя личного кабинета.
Перемещение в области проверенных платформ нуждается понимания новых решений входа. Профессиональные геймеры эксплуатируют Меллстрой РІС…РѕРґ для получения актуальной сведений о оперативных путях.
Механизм формирования учетной записи в проверенных операторах подразумевает многоуровневую подтверждение. Новейшие компании используют KYC-процедуры и AML-стандарты. Документальное сопровождение занимает от 24 до 72 часов.
Цифровые технологии для преодоления ограничений эволюционируют синхронно с усилением регуляторных действий. VPN-платформы типа premium предоставляют защиту AES-256 и стандарты OpenVPN. Постоянство связи принципиально актуальна для высокоролловых партий.
Дублирующие платформы функционируют через территориально расположенные серверные инфраструктуры. CDN-сети гарантируют оптимальную латентность для азиатских клиентов. Автоматическое редирект срабатывает при выявлении препятствия первичного ресурса.
Платежные переводы в проверенных юрисдикциях следуют четким критериям PCI DSS. Криптовалютные транзакции набирают признание из-за приватности и оперативности выполнения.
Портативные клиенты элитных операторов интегрируют лицевую аутентификацию и push-уведомления для существенных происшествий. Адаптивный дизайн автоматически корректируется под параметры матрицы.
Рабочие резервные адреса надежных казино на винити зеркало обеспечивают постоянный коннект к геймерским системам. Принцип реплицирования создает полноценные реплики главного домена с поддержанием всех механизмов.
Схема активации через mirror-сайт на сто процентов воспроизводит основную бланк. Новые участники прописывают рабочий email, генерируют защищенный ключ и выбирают операционную финансовый инструмент.
Аутентификация профиля включает отправки документов согласно KYC-регламенту. Изображение паспорта, подтверждение регистрации и платежные реквизиты проверяются через автоматическую проверку в течение 24-72 временных единиц.
Подключение существующих игроков происходит через базовую модуль с двухфакторной аутентификацией. Временные коды поступают на сотовый девайс или почтовый ящик.
Функционал денежного раздела через дублирующие порталы поддерживает актуальные финансовые инструменты. Visa, Mastercard, онлайн портмоне Skrill, Neteller, цифровые активы Bitcoin, Ethereum выполняются с сокращенными платежами 0-3%.
Развлекательная библиотека клонируется в точности включая машины, классические забавы, live-ведущих и мегавыигрыши. RTP-коэффициенты, вариативность и вейджер фиксируются неизменными.
Подарочная политика оперирует идентично главному ресурсу. Welcome-пакеты, бесплатные вращения, компенсация и VIP-системы стартуют системно при выполнении определенных критериев.
Игровая область демонстрирует стремительный прогресс, притягивая массы клиентов. Экспертные площадки обеспечивают безопасную атмосферу для игры. Полную факты о подобных операторах допустимо обнаружить на казино лаки ворлд .
Аттестация остаётся приоритетным показателем селекции площадки. Надзорные органы Кюрасао гарантируют качественный контроль экономических операций. Каждая сертифицированная платформа подвергается постоянные ревизии RNG-модулей.
Технические аспекты современных азартных площадок охватывают SSL-шифрование денежного категории. Разработчики цифрового материала уровня Microgaming, NetEnt, Pragmatic Play подключают усовершенствованные системы хаотичных показателей.
Алгоритм валидации аккаунта требует представления удостоверений KYC-уровня. ID, выписка о прибылях, доказательство адреса — стандартный комплект для завершённого подключения.
Зеркальные домены убирают препятствия с ограничениями поставщиков. Актуальные варианты изменяются регулярно программными специалистами. Мобильные программы зачастую выполняются надёжнее онлайн версий.
Банкролл-менеджмент устанавливает длительную результативность гемблинговых сессий. Опытные игроки советуют ограничивать сумму вейджера до 1-2% от суммарного бюджета.
Активные резервные адреса надежных игорных заведений на Lucky Bear казино дают стабильный вход к геймерским порталам. Принцип копирования образует идентичные реплики корневого веб-площадки с поддержанием всех функций.
Процедура открытия счета через дублирующий портал на сто процентов воспроизводит стандартную форму. Только пришедшие пользователи заполняют действующий email, устанавливают стойкий шифр и назначают рабочую денежную единицу.
Идентификация личного кабинета подразумевает передачи свидетельств в соответствии с KYC-регламенту. Фото ID-карты, подтверждение резиденции и банковские параметры проходят автоматическую контроль в течение 24-72 часов.
Логин зарегистрированных клиентов реализуется через классическую форму с усиленной идентификацией. Одноразовые коды приходят на мобильный девайс или e-mail адрес.
Функционал денежного компонента через дублирующие порталы включает востребованные банковские механизмы. Visa, Mastercard, цифровые кошельки Skrill, Neteller, блокчейн-токены Bitcoin, Ethereum выполняются с низкими комиссиями 0-3%.
Игровая коллекция дублируется абсолютно включая spinning games, столовые геймплей, live-крупье и джекпоты. RTP-показатели, дисперсия и вейджер удерживаются неизменными.
Промо система оперирует схоже основному веб-площадке. Welcome-пакеты, free spins, refund и VIP-схемы включаются автоматически при исполнении прописанных стандартов.
Поиск достойного развлекательного заведения в текущих условиях подразумевает повышенного внимания к правовому статусу. Знающие геймеры знают, что Вавада казино демонстрирует актуальную сведения о работающих провайдерах.
Алгоритм открытия счета в лицензированных операторах предусматривает необходимую подтверждение персональных данных. KYC-требования охраняют как сервис, так и пользователя от фрода. Промежуточные пределы на изъятие активов до выполнения контроля – типичная методика.
Программные запреты на вход к betting сервисам устраняются через альтернативные порталы. Доступные клоны гарантируют полную производительность центрального ресурса. Расчетные переводы, геймплейный достижения и льготные предложения поддерживаются константными.
Капитальная стабильность определяется уровнем внедренных расчетных систем. SSL-безопасность, PCI DSS подтверждение и дополнительная идентификация гарантируют надежный периметр ограждения.
Геймплейная коллекция проверенных площадок включает машины от ведущих разработчиков. RTP-коэффициенты, вариативность и алгоритмические модели испытывают объективную аудит в одобренных организациях.
Схемы лояльности в профессиональных заведениях формируются на ясных условиях отыгрыша. Условия ставок x35-40 оценивается приемлемым для машина-льгот, в то время как классические забавы включаются в калькуляцию с редуцированным множителем.
Портал Rutor занимает лидирующие позиции в даркнет-пространстве из-за своей многолетней истории, надёжной системы конфиденциальности и тор-сервисов.Rutor: Один из ключевых проектов русскоязычного даркнета
рутор орг официальный сайт зеркало считается одним из наиболее популярных и старых ресурсов в рунет-даркнете, который прочно закрепился в инфраструктуре анонимных площадок. Этот магазин ориентирован на предоставление пользователям широкой базы данных, связанной с файлами, софтом, новостями и различными видами контента, включая темы, касающиеся взлома и безопасности.
Как устроена система работы Rutor
Данная система обеспечивает доступ к значительным объемам данных и файлов, гарантируя при этом повышенную анонимность и защиту пользователей. Работа сервиса построена на использовании анонимной сети Rutor, что помогает свести к минимуму угрозы идентификации и утечки данных. За годы существования Rutor стал местом, где сохраняется важная история русскоязычного даркнета.
Как обеспечиваются безопасность и анонимность на Rutor
Безопасность в Rutor занимает важное место. Сервис гарантирует анонимность доступа к данным, используя прогрессивные системы шифрования транзакций и общения. В целях увеличения приватности рекомендуется пользоваться внутренним мессенджером, который обеспечивает безопасный обмен контактной информацией и свежими данными без риска цензуры или слежки.
Роль Rutor в экосистеме русскоязычного даркнета
Площадка Rutor по-прежнему играет роль ключевого ресурса для обмена актуальными данными по безопасности и тематике взлома. Благодаря слабой цензуре и акценту на анонимность, сервис высоко ценится у пользователей, для которых важны свобода и защита личных сведений.
Rutor продолжает работать и предоставлять стабильный доступ к ресурсам, удовлетворяя потребности как новичков, так и опытных пользователей даркнета. Каждый из разделов сайта — магазин, новостные ленты или руководства по взлому — образуют отдельную звено в масштабном сообществе, где главными ценностями выступают конфиденциальность и защита анонимности.
Возможные направления развития и связанные опасности
Безусловно, дальнейшая история Rutor будет связана с новыми формами риска, новыми способами защиты конфиденциальности и методами обхода блокировок. Пользователи должны осознавать, что даже самая анонимная система не гарантирует полной безопасности.
Платформа продолжает быть ресурсом для получения расширенной информации, обмена мнениями по безопасности и мониторинга новшеств в сферах даркнета. Развитие технологий, расширение базы пользователей и появление новых возможностей делают Rutor одним из центров русскоязычного сообщества в сети.
– Сохранение анонимности
– Гарантия безопасности сделок
– Доступ к уникальной информации
– Обеспечение приватности взаимодействий
Rutor — это платформа с уникальной историей, и её опыт стоит принимать во внимание всем, кто ценит собственную свободу, приватность и независимость от внешней цензуры в современном цифровом мире.
http://csko.g6.cz/profile.php?lookup=736
pharmacies online prescriptions
Актуальные гемблеры попадают с сложностью подключения к сертифицированным порталам. Операторы фильтруют основные адреса, но искушённые френдс казино пользователи осознают о функционировании альтернативных порталов.
Альтернативный адрес формирует точную отображение оригинального сайта. Средства защиты остаются равнозначными. Расчётные транзакции производятся через те же шлюзы.
Методика открытия счёта через параллельный ресурс содержит обычной аутентификации. Специалисты выясняют бумаги для соблюдения KYC-норм. Персональные информация осуществляют усиленную аутентификацию.
Пополнительные рамки на зеркальных сайтах равняются первичным характеристикам. Стартовые суммы поддерживаются стабильными. Прогрессивные выигрышные пулы объединяются между разными доменами.
Поощрительные программы выполняются комплексно на параллельных площадках. Требования по обороту сохраняет базовые параметры. Период действия реализации сохраняется.
Служба поддержки обрабатывает запросы с дополнительных ресурсов равнозначно. Онлайн разговор гарантирует круглосуточный график оперирования.
Гемблинговая индустрия представляет динамичный подъём, притягивая массы геймеров. Опытные площадки дают стабильную атмосферу для игры. Подробную информацию о данных брендах можно найти на Меллстрой .
Сертификация является главным показателем отбора платформы. Юрисдикции Великобритании создают серьёзный контроль расчётных манипуляций. Отдельная сертифицированная платформа подвергается систематические ревизии RNG-механизмов.
Компьютерные параметры инновационных беттинг-платформ включают SSL-безопасность финансового класса. Разработчики цифрового материала типа Microgaming, NetEnt, Pragmatic Play добавляют продвинутые системы случайных показателей.
Процедура проверки счёта подразумевает представления справок KYC-класса. Свидетельство, справка о прибылях, подтверждение регистрации — базовый пакет для итогового входа.
Резервные ссылки исправляют препятствия с блокировками организаций. Актуальные дубли изменяются ежедневно техническими специалистами. Карманные приложения обычно оперируют стабильнее веб форматов.
Распределение капитала задаёт стратегическую результативность гемблинговых партий. Грамотные пользователи предлагают ограничивать объём ставки до 1-2% от общего фонда.
Поиск в мире лицензированных сайтов требует знания продвинутых технологий авторизации. Квалифицированные клиенты используют Меллстрой казино для обретения современной информации о оперативных ссылках.
Процедура создания личного кабинета в надежных заведениях содержит тщательную верификацию. Продвинутые компании внедряют KYC-системы и AML-правила. Документальное сопровождение отнимает от 24 до 72 интервалов.
IT методы для минования запретов эволюционируют вместе с укреплением нормативных инициатив. VPN-сервисы класса premium предоставляют безопасность AES-256 и стандарты OpenVPN. Постоянство подключения fundamentally важна для элитных игровых периодов.
Зеркальные домены работают через регионально размещенные компьютерные ресурсы. CDN-сети поддерживают оптимальную задержку для международных геймеров. Системное переключение срабатывает при идентификации ограничения первичного портала.
Банковские операции в проверенных территориях следуют конкретным нормам PCI DSS. Криптовалютные платежи увеличивают актуальность благодаря скрытности и темпу реализации.
Смартфонные приложения ведущих организаций содержат отпечатковую проверку и push-извещения для ключевых событий. Адаптивный внешний вид автономно изменяется под свойства дисплея.
Online Casino Real Money Australia Your Turn To Dominate
Развлекательная сфера отображает активный расширение, притягивая массы участников. Экспертные платформы дают надёжную среду для игры. Исчерпывающую информацию о этих брендах допустимо обнаружить на лаки беар казино .
Легализация составляет основным показателем определения платформы. Надзорные органы Кюрасао дают серьёзный мониторинг экономических операций. Любая легальная портал осуществляет систематические инспекции RNG-алгоритмов.
Технические особенности передовых азартных площадок содержат SSL-кодирование финансового ранга. Разработчики компьютерного софта наподобие Microgaming, NetEnt, Pragmatic Play встраивают усовершенствованные модели рандомных параметров.
Процесс валидации учётной записи подразумевает передачи удостоверений KYC-формата. Документ, справка о финансах, удостоверение прописки — типичный набор для окончательного подключения.
Зеркальные порталы исправляют сложности с цензурой организаций. Функционирующие копии корректируются постоянно программными специалистами. Мобильные софт нередко оперируют лучше браузерных версий.
Управление банкроллом устанавливает стратегическую эффективность гемблинговых сессий. Грамотные беттеры настаивают контролировать сумму депозита до 1-2% от совокупного бюджета.
Go Here debank
mines 1win mines 1win
Yes, both peptides require a prescription from an accredited healthcare provider. It is very important to seek advice from a doctor to establish if these therapies are proper for you. Similarly, obese patients that took the Sermorelin peptide for 12 weeks shed body fat, especially in the stomach area, by 1.6 times contrasted to the placebo group. This decline can cause high cholesterol levels, weakened bone toughness, and an increased risk of cardiovascular disease. Consequently, if you’re looking to enhance your body structure with acquiring muscle or shedding fat, stacking Sermorelin and Ipamorelin can help you accomplish your fitness goals also quicker.
Vital Safety Info
Unlike various other peptides that rely upon enhancing growth hormone to improve IGF-1, Ipamorelin straight promotes IGF-1 production. The pituitary gland creates development hormone, which is essential for various bodily features in kids and adults. This combination creates an increased and more effective boost in growth hormone production and secretion.
Both treatments aim to support goals like boosted energy, healing, and vigor, yet they operate in a little various ways. By contrasting these peptides, we can better understand their duties in advancing development hormonal agent therapies and their prospective to form the future of medicine. Both Sermorelin and CJC/Ipamorelin peptides slow the aging procedure, improve long bone growth, increase energy degrees and increase fat burning, to name a few awesome advantages. Sermorelin may simulate the body’s all-natural “pulsatile” release of growth hormonal agent (9 ). Simply put, when you inject sermorelin, it triggers the pituitary gland to launch development hormone in its natural pattern.
Sermorelin, is a synthetic analogue of the naturally occurring Growth Hormone-Releasing Hormone (GHRH). GHRH is a hypothalamic peptide hormone that stimulates the pituitary gland to produce and launch development hormone. The molecule, originally marketed for pediatric use, was withdrawn as a therapeutic entity yet gained renewed focus for its possibility in GHRT for aging adults.
Other Preferred Pept
Peptide treatments, consisting of natural and macrocyclic peptides, supply a series of opportunities for customized treatment plans. From peptide injections to phase peptide synthesis, these therapies intend to deal with different problems and disorders, such as short bowel syndrome. As the appeal of collagen peptides and antimicrobial peptides continues to rise, a raising number of people are embracing this unique treatment approach. Why limit yourself to traditional approaches when you can look into the immense opportunities of all-natural peptides?
By leveraging the power of peptides, health care experts can regulate cellular functions and advertise healing, rejuvenation, and total well-being. If you are interested in checking out peptide treatment even more, seek advice from a qualified health care specialist that specializes in this area to determine if it is an ideal choice for you. An additional element to consider is the impact of inadequate blood flow on sexual health and wellness. For males, it can lead to difficulties in attaining or preserving an erection, while females might experience decreased enjoyment during intercourse. Nonetheless, research study studies published on PubMed and Google Scholar have revealed appealing outcomes for peptide treatments targeting blood flow improvem
Persistence is vital as the impacts of peptide treatment progressively unfold with time, differing based upon the person’s one-of-a-kind scenarios and the targeted health and wellness problem. Amino acids are the building blocks of proteins, which are vital for various organic procedures. Peptides play an important role in mobile interaction and are associated with a wide range of physical functions within the human body. Your supplier will work very closely with you to optimize your treatment strategy, making certain that you are getting the optimum gain from peptide therapy while lessening any prospective adverse effects. They will likewise offer recurring assistance and guidance, equipping you to take an energetic duty in your wellness and wellness trip. The initial step in peptide treatment is an in-depth appointment with a qualified service provider that concentrates on this ingenious treatment approach.
What Are The Adverse Effects Of Utilizing Peptides?
Some individuals could be so eager to see quick results that they take into consideration excessive using peptides (i.e. utilizing them as well often and/or utilizing supraphysiological dosages), yet this can lead to undesirable negative effects. Instead, they function by boosting your body’s capability to dividing nutrients and speeding up the processes YOU are currently causing. Maximizing the results of peptide therapy calls for greater than just consistency with your therapy. Peptides used for injury recovery can support bone health and wellness and health by increasing bone density, decreasing the danger of cracks, and quickening bone turn over.
Cjc 1295, Ipamorelin, And Semaglutide: A Thorough Overview To Pep
Игровая индустрия являет активный подъём, манящая массы участников. Опытные платформы обеспечивают качественную среду для беттинга. Полную материалы о данных операторах можно изучить на Лаки Бир .
Аттестация выступает главным аспектом подбора портала. Лицензиаты Олдерни дают серьёзный контроль расчётных операций. Каждая сертифицированная платформа выполняет постоянные проверки RNG-систем.
Технические параметры актуальных казино предусматривают SSL-шифрование расчётного категории. Создатели программного софта наподобие Microgaming, NetEnt, Pragmatic Play внедряют продвинутые схемы непредсказуемых величин.
Процесс верификации профиля требует подачи свидетельств KYC-формата. Паспорт, выписка о средствах, верификация адреса — обычный пакет для финального авторизации.
Зеркальные домены устраняют проблемы с ограничениями поставщиков. Актуальные дубли модифицируются систематически программными службами. Планшетные клиенты часто работают стабильнее веб редакций.
Контроль средств формирует перспективную прибыльность азартных циклов. Опытные участники рекомендуют урезать величину бета до 1-2% от общего резерва.
Передовые гемблеры натыкаются с затруднением входа к официальным сайтам. Провайдеры ограничивают главные адреса, но знающие казино Лаки Бир клиенты понимают о доступности резервных сайтов.
Альтернативный адрес представляет идентичную отображение первичного площадки. Протоколы шифрования остаются неизменными. Финансовые операции реализуются через сходные каналы.
Алгоритм открытия счёта через параллельный домен предполагает типовой подтверждения. Сотрудники выясняют справки для соблюдения KYC-правил. Персональные информация осуществляют многоуровневую подтверждение.
Депозитные ограничения на зеркальных порталах соответствуют базовым требованиям. Низшие ставки остаются неизменными. Растущие джекпоты согласовываются между разными адресами.
Премиальные программы работают целостно на альтернативных ресурсах. Отыгрышный коэффициент поддерживает первоначальные величины. Временные рамки отыгрыша поддерживается.
Служба обслуживания обрабатывает запросы с параллельных ресурсов аналогично. Интерактивный общение гарантирует постоянный график оперирования.
Very soon this site will be famous amid all blog users, due to it’s pleasant posts
Crypto Pokies Real Money Australia Quietly Stack Wins
Передовые участники натыкаются с сложностью подключения к проверенным ресурсам. Организации блокируют основные адреса, но опытные mad casino пользователи знают о присутствии дублирующих платформ.
Параллельный портал составляет полную отображение базового сайта. Протоколы шифрования поддерживаются идентичными. Финансовые операции проходят через идентичные системы.
Методика создания аккаунта через резервный ссылку требует классической валидации. Менеджеры запрашивают бумаги для осуществления KYC-правил. Индивидуальные данные выполняют многоуровневую верификацию.
Депозитные ограничения на резервных порталах аналогичны главным требованиям. Стартовые вклады продолжают константными. Увеличивающиеся выигрышные пулы объединяются между разными ресурсами.
Бонусные механизмы работают всесторонне на параллельных порталах. Требования по обороту поддерживает стартовые параметры. Тайминг проигрывания сохраняется.
Команда обслуживания рассматривает обращения с резервных доменов идентично. Мгновенный диалог поддерживает 24-часовой формат деятельности.
Лицензионные платформы азартных сервисов обеспечивают пользователям доступ к элитному гэмблингу через dedicated ресурсы, включая Gold , которые точно выполняют общепринятые нормы безопасности.
Схема создания аккаунта подразумевает заполнения authentication данных через криптографические SSL-соединения. Операторы запрашивают официальное подтверждение возраста и места регистрации для поддержания законодательных критериев.
Multi-factor authentication представляет принудительным элементом передовых архитектур безопасности. Клиенты располагают SMS-шифры, push-сообщения или используют targeted tools вроде Google Authenticator.
Зеркальные порталы ликвидируют проблемы geographic санкций и DDoS-воздействий. Технически mirrors образуют аналогичные реплики основного домена с поддержанием возможностей и пользовательских параметров.
Экспертные игроки призывают сохранять актуальные базы активных альтернатив в закладках browser. Букмекеры доставляют updates о новых адресах через email, Telegram-каналы и мобильные программы.
Финансовые транзакции через лицензионные платформы secured криптографическими протоколами level банковского индустрии. Extraction фондов реализуется solely на validated данные хозяина профиля.
Новейшие операторы азартных услуг предлагают участникам путь к премиальному игровому процессу через безопасные п»ї1хбет зеркало порталы. Авторизованная операционная активность нуждается исполнения четких контролирующих норм.
Алгоритм создания игрового профиля включает проверку приватных данных. Регуляторы эксплуатируют углубленные алгоритмы KYC и AML для исключения незаконных транзакций.
Электронные средства передовых казино строятся на зашифрованных серверах с шифровальными сертификатами. Локальные запреты заставляет администраторов разрабатывать вспомогательные ссылки.
Зеркальные сайты составляют точные клоны главного домена с удержанием всех опций и параметров. Пользователи добиваются стабильный доступ к депозиту, азартной данным и персональным настройкам.
Платежные транзакции реализуются через встроенные финансовые агрегаторы. Ограничения на пополнения и обналичивания фиксируются в унисон с правовыми требованиями и внутренними нормами управления рисками.
Профессиональные гемблеры советуют мониторить условия лицензии через государственные реестры азартных органов. Престижные параметры содержат оценки на отраслевых платформах и оценки реальных пользователей.
Передовые геймеры встречаются с затруднением входа к сертифицированным ресурсам. Провайдеры закрывают стандартные домены, но грамотные п»ї1хбет официальный сайт посетители учитывают о функционировании зеркальных сайтов.
Дополнительный домен составляет точную отображение главного площадки. Протоколы шифрования сохраняются такими же. Расчётные транзакции реализуются через идентичные сервисы.
Алгоритм открытия счёта через дополнительный ссылку предполагает привычной проверки. Специалисты запрашивают документы для реализации KYC-требований. Паспортные характеристики проходят многоуровневую аутентификацию.
Банковские границы на параллельных платформах совпадают основным требованиям. Низшие беты продолжают неизменными. Увеличивающиеся выигрышные пулы синхронизируются между множественными ресурсами.
Стимулирующие программы оперируют полноценно на дополнительных сайтах. Множитель ставок сохраняет первоначальные величины. Тайминг отыгрыша сохраняется.
Отдел обслуживания рассматривает заявки с зеркальных доменов сходным образом. Прямой переписка обеспечивает непрерывный режим деятельности.
Confidence Hub – Well-structured pages make it simple to check trust data.
Hello! I’m at work surfing around your blog from my new apple iphone!
Just wanted to say I love reading through your blog and look
forward to all your posts! Carry on the outstanding work!
http://gastrohealthmonitor.com/# prilosec side effects
internet https://cakepad.digital
Best Real Money Online Casino Australia Feel Unstoppable Now
tizanidine zanaflex: Spasm Relief Protocols – buy methocarbamol without prescription
PlorixGuide – Easy to follow, layout is clean and instructions are straightforward.
http://tikvabb.listbb.ru/viewtopic.php?f=3&t=23
https://t.me/s/ed_1xbet/1150
https://t.me/s/ed_1xbet/332
Real Money Bonus Casino Australia Grab Before It Ends
Best New Casino Australia Real Money Fresh Real Jackpot Hunts
cómo descargar 1win en android cómo descargar 1win en android
Best Online Casino Australia Real Money 2025 Check Reviews
Best Real Money Pokies Australia Real Adrenaline From Big Jackpots
PureValueStore – An interactive space that encourages creativity and idea building.
Your Lucky Day Real Money Online Casino Australia Now
https://whatwood.ru/pag/1xbet_promokod_na_segodnya_pri_registracii_besplatno_bonus.html
Jackpot Hunter Real Money Australia Real Epic Aussie Wins Begin
Good day I am so grateful I found your site, I really found you by mistake, while I was researching on Digg for something else, Regardless I am here now and would just like to say thank you for a incredible post and a all round thrilling blog (I also love the theme/design), I don’t have time to go through it all at the moment but I have book-marked it and also added in your RSS feeds, so when I have time I will be back to read much more, Please do keep up the awesome jo.
https://share.google/X2UNTtIND8Gi8gnAJ
журнал про автомобили журнал про автомобили .
zaviro trustline official – Information is clear and the platform feels dependable and approachable.
a href=”https://qulavoholdings.bond/” />QulavoScope – User-friendly and transparent options make exploring very easy.
Crypto Casino Australia Real Money Real Secret Million Builder
legit pharmacy https://www.google.com.gi/url?sa=t&url=https%3A%2F%2Fmexmedimax.com online pharmacy tramadol
Hello there! I could have sworn I’ve been to your blog before but after going through many of the
articles I realized it’s new to me. Nonetheless, I’m certainly happy I discovered it
and I’ll be book-marking it and checking back regularly!
NolaroLink – Helps users stay organized with minimal effort.
В русском даркнете Rutor занимает прочные позиции «ветерана» благодаря стабильности, системе безопасности и поддержке транзакций через Rutor.Rutor: Один из ключевых проектов русскоязычного даркнета
rutorg info зеркало — это один из первых и известнейших русскоязычных ресурсов даркнета, неразрывно связанный с анонимной онлайн-экосистемой. Данный сервис специализируется на доступе к широчайшему ассортименту софта, файлов, новостей и разнообразных материалов, охватывающих вопросы взлома и защиты.
Главные аспекты функционирования Rutor
Данная система обеспечивает доступ к значительным объемам данных и файлов, гарантируя при этом повышенную анонимность и защиту пользователей. Главное преимущество платформы — интеграция с сетью Rutor, что значительно уменьшает вероятность раскрытия личности и потери конфиденциальной информации. С течением времени площадка превратилась в важный архив событий и истории русскоязычного даркнета.
Как обеспечиваются безопасность и анонимность на Rutor
Система Rutor уделяет особое внимание вопросам безопасности. Сайт обеспечивает анонимный доступ к материалам, что поддерживается за счет использования современных технологий защиты транзакций и связи. Для сохранения анонимности и безопасного обмена контактами советуют применять специальный внутренний мессенджер, защищающий пользователей от вмешательства и контроля.
Влияние Rutor на сегмент русского даркнета
Площадка Rutor по-прежнему играет роль ключевого ресурса для обмена актуальными данными по безопасности и тематике взлома. Благодаря слабой цензуре и акценту на анонимность, сервис высоко ценится у пользователей, для которых важны свобода и защита личных сведений.
Rutor поддерживает стабильную работу, позволяя и новичкам, и опытным пользователям использовать предоставляемые сервисы. Архитектура ресурса предусматривает, что любые разделы — магазин, новостной блок или гайды по взлому — являются составляющими единой системы, где превалируют безопасность и анонимность.
Перспективы и риски
Безусловно, дальнейшая история Rutor будет связана с новыми формами риска, новыми способами защиты конфиденциальности и методами обхода блокировок. Следует помнить, что даже максимально анонимная среда не обеспечивает стопроцентную безопасность.
Платформа продолжает быть ресурсом для получения расширенной информации, обмена мнениями по безопасности и мониторинга новшеств в сферах даркнета. Развитие технологий, расширение базы пользователей и появление новых возможностей делают Rutor одним из центров русскоязычного сообщества в сети.
– Сохранение анонимности
– Безопасность транзакций
– Открытый доступ к специализированному контенту
– Конфиденциальность общения
Rutor представляет собой ресурс с неповторимой историей, важный для пользователей, стремящихся к свободе, сохранению конфиденциальности и автономии от внешних ограничений в современном интернете.
Tutorial Center – Step-by-step guidance is simple to understand.
Online Casino Australia Real Money Real Your Million Night Starts
Nausea Care US п»їondansetron otc zofran dosage
статьи про автомобили avto-zhurnal-2.ru .
Collective discussions іn OMT courses develop
exhilaration аrօᥙnd math concepts, motivating Singapore trainees tο create
affection and master exams.
Join оur small-group on-site classes in Singapore f᧐r tailored guidance іn a nurturing environment tһat develops strong fundamental math abilities.
Singapore’ѕ emphasis ᧐n critical analyzing mathematics highlights tһe
valսe of math tuition, ᴡhich helps trainees establish tһе analytical
abilities required ƅy the nation’ѕ forward-thinking syllabus.
Tuition іn primary school mathematics іs essential fοr PSLE preparation, ɑs it presents sophisticated methods fⲟr managing non-routine problems that
stump lots of prospects.
Comprehensive insurance coverage οf thе entire О Level syllabus in tuition ensuгes no topics,
from sets to vectors, ɑre forgotten in a student’s revision.
Tuition ѕhows mistake evaluation methods, aiding junior college students stay сlear of common mistakes
іn A Level computations and evidence.
Bү incorporating proprietary ɑpproaches with the
MOE syllabus, OMT supplies а distinct method tһɑt emphasizes clearness ɑnd deepness in mathematical thinking.
Adaptable organizing suggests no encountering CCAs ⲟne, ensuring well balanced life аnd
increasing mathematics scores.
Math tuition inspires ѕеⅼf-confidence ԝith success in ⅼittle landmarks, pushing Singapore trainees tօward general exam accomplishments.
Feel free tо visit my site – singapore math tutor toronto
xNudes is an AI tool that changes the clothes in a photo to show a nude or altered version of the body. You just need to upload an image, and the tool will create a realistic, edited version within seconds. The tool works by letting you pick details like age, body type, and skin tone to match your preferences. It gives you control over the image look, making the experience more personal.
You can also adjust the editing area by highlighting the part of the image you want to change. If the first result doesn’t look right, you can try again and improve it until you get the look you want. The site is fast, easy to use, and doesn’t need any special editing skills.
https://xnudes.app/
журнал про машины avto-zhurnal-1.ru .
https://manga-no.com/@bonusxof1xbet2/profile
PexraBase – User-friendly design, quickly understood how to navigate and use features.
туры и путешествия промокоды и скидки туры и путешествия промокоды и скидки .
промокоды onetwotrip tury-i-puteshestviya-promokody-i-skidki.ru .
web web3
промокод trip.com отели промокод trip.com отели .
секс чат
http://receptu-blud.ru/wp-content/pages/1xbet_promokod_pri_registracii_bonus.html
I do accept as true with all the ideas you have
offered for your post. They’re really convincing and can certainly work.
Still, the posts are very brief for starters.
Could you please prolong them a bit from next
time? Thanks for the post.
Pretty element of content. I just stumbled upon your website and in accession capital to claim that I acquire actually loved account your blog posts.
Any way I will be subscribing for your feeds or even I fulfillment you get admission to consistently
rapidly.
Greetings! This is my first comment here so I just wanted to give a quick shout out and tell you I really enjoy reading through your articles.
Can you recommend any other blogs/websites/forums that cover the same topics?
Thanks for your time!
Feel free to surf to my web-site board governance news today
Real Money Pokies No Deposit Australia Your Turn To Shine
domeo реальные отзывы domeo реальные отзывы .
OMT’s аll natural method supports not simply skills һowever dedlight
in math, inspiring pupils tօ accept the subject аnd shine
іn their tests.
Experience versatile knowing anytime, аnywhere thгough OMT’ѕ comprehensive
online e-learning platform, featuring limitless access tо video lessons and interactive tests.
As mathematics forms tһе bedrock οf logical thinking аnd crucial problem-solving
in Singapore’s education ѕystem, professional math tuition supplies thе tailored assistance necessɑry
to tսrn challenges intο victories.
With PSLE mathematics concerns ⲟften including real-ԝorld applications,
tuition ρrovides targeted practice tο establish critical believing abilities
necessarу fօr hіgh ratings.
Detailed responses from tuition trainers оn method efforts assists secondary students gain fгom blunders, enhancing accuracy
fߋr the real O Levels.
Ӏn an affordable Singaporean education ɑnd learning ѕystem, junior college
math tuition ɡives trainees tһe sіde to accomplish higһ qualities essential
fⲟr university admissions.
Distinctively, OMT’ѕ curriculum matches tһe MOE structure bʏ supplying modular lessons tһat enable duplicated
reinforcement of weak areаs at the student’ѕ speed.
Team discussion forums іn thе platform allow y᧐u go over with peers sіa, clarifying uncertainties ɑnd boosting your mathematics efficiency.
Math tuition nurtures
ɑ development attitude, motivating Singapore trainees t᧐ vіew obstacles ɑs chances for
test quality.
My partner and I stumbled over here from a different page and thought I should check things out.
I like what I see so i am just following you.
Look forward to going over your web page repeatedly.
PureValueHub – Inspiring and interactive platform that sparks fresh ideas easily.
Very nice post. I just stumbled upon your weblog and wished to say that I’ve really loved surfing around your blog posts.
After all I’ll be subscribing for your feed and I am hoping you write
again soon!
Check out my website board governance
zaviro official site – The brand is clearly maintained, giving a professional impression.
журнал автомобили журнал автомобили .
1win entrar hoy http://1win38941.help
Hello there, just became alert to your blog through Google, and found that
it’s truly informative. I’m going to watch out for brussels.
I’ll be grateful if you continue this in future. Many people will be benefited from your
writing. Cheers!
my blog post – cowen partners
Support Hub – Navigation is smooth, and guidance is practical.
First of all I would like to say excellent blog!
I had a quick question which I’d like to ask if you don’t mind.
I was curious to know how you center yourself and clear your mind prior to writing.
I’ve had a difficult time clearing my mind in getting my thoughts out.
I truly do enjoy writing but it just seems like the first 10 to 15 minutes are lost
just trying to figure out how to begin. Any recommendations or tips?
Thank you!
LixorFlow – Practical and concise advice made the experience smooth and informative.
Best Real Money Casino Australia Stop Watching Start Winning
Hello colleagues, how is the whole thing, and what you wish for to say concerning
this piece of writing, in my view its actually awesome in favor of me.
Have a look at my homepage: board governance news
omeprazole generic: omeprazole brand name – omeprazole otc
Collaborative ᧐n tһe internet challenges at OMT build
team effort іn math, cultivating love аnd collective motivation fⲟr tests.
Prepare for success in upcoming examinations ѡith OMT Math Tuition’ѕ exclusive curriculum, developed tо promote crucial thinking ɑnd self-confidence in every trainee.
In Singapore’s extensive education system, ԝherе mathematics іs mandatory аnd takes
in arоund 1600 hours ᧐f curriculum tіme in primary ɑnd secondary schools, math tuition ends up being vital tо hеlp students
construct a strong foundation fⲟr lifelong success.
Foг PSLE achievers, tuition օffers mock exams аnd feedback,
helping improve responses for optimum marks іn Ьoth multiple-choice аnd οpen-ended
areaѕ.
Secondary math tuition lays a strong foundation fⲟr post-Ο
Level studies, suсh as Α Levels or polytechnic courses, ƅy standing օut in foundational topics.
Ϝor thоѕe seeking H3 Mathematics, junior college tuition supplies sophisticated support ⲟn resеarch-level topics
tо master tһis challenging expansion.
OMT’ѕ custom-mаde curriculum distinctly lines ᥙp witһ MOE structure Ьy supplying
connecting modules foг smooth changеs in Ьetween primary,
secondary, аnd JC math.
The system’ѕ resources аre updated consistently one, keeping уou aligned
ѡith moѕt current curriculum f᧐r quality
boosts.
Singapore’s worldwide position іn math stems frοm additional tuition tһat develops abilities fоr global standards like PISA аnd TIMSS.
Аlso visit my website; interesting maths teacher home tuition
Hello there! I know this is kinda off topic but I was wondering if you knew where I could
locate a captcha plugin for my comment form?
I’m using the same blog platform as yours and I’m having problems finding
one? Thanks a lot!
Howdy! Quick question that’s totally off topic. Do you know how to make your site mobile friendly?
My website looks weird when viewing from my iphone4. I’m trying to
find a template or plugin that might be able to
resolve this issue. If you have any suggestions, please
share. Thanks!
xNudes is an AI tool that changes the clothes in a photo to show a nude or altered version of the body. You just need to upload an image, and the tool will create a realistic, edited version within seconds. The tool works by letting you pick details like age, body type, and skin tone to match your preferences. It gives you control over the image look, making the experience more personal.
You can also adjust the editing area by highlighting the part of the image you want to change. If the first result doesn’t look right, you can try again and improve it until you get the look you want. The site is fast, easy to use, and doesn’t need any special editing skills.
https://xnudes.app/
ZylavoCenter – Pages load smoothly, and the interface is simple to follow.
canadian pharmacy no rx
https://pastefree.net/VxgREjKvQWo#gsc.tab=0
Best Aussie online casino – real money wins and no deposit bonuses
Hello, i believe that i saw you visited my blog so i came to go back the want?.I am trying to to find issues to improve my website!I guess
its good enough to make use of some of your ideas!!
Also visit my site: cowen partners executive search
TrixoSupport – The team responded quickly and answered every question thoroughly.
Real Money Wins Casino Australia The Feeling Of Real Cashouts
Its not my first time to pay a visit this website, i am visiting this web page dailly and get good facts
from here daily.
Hey! I know this is kinda off topic but I was wondering if
you knew where I could get a captcha plugin for my comment form?
I’m using the same blog platform as yours and I’m having problems
finding one? Thanks a lot!
RixvaNavigator – Efficient design, navigating the site is simple and content is clear.
Пинко казино обзор
https://prathamonline.com/js/pgs/?1xbet_promo_code_nigeria_bonus.html
Hello, I think your website might be having browser compatibility issues.
When I look at your website in Opera, it looks fine but when opening in Internet Explorer, it has
some overlapping. I just wanted to give you a quick heads up!
Other then that, terrific blog!
my web-site: eyelash extensions Baldwin County
trustco guidance hub – Professional appearance, and trust content is straightforward and easy to scan.
descarcă mostbet android http://www.mostbet2010.help
xNudes is an AI tool that changes the clothes in a photo to show a nude or altered version of the body. You just need to upload an image, and the tool will create a realistic, edited version within seconds. The tool works by letting you pick details like age, body type, and skin tone to match your preferences. It gives you control over the image look, making the experience more personal.
You can also adjust the editing area by highlighting the part of the image you want to change. If the first result doesn’t look right, you can try again and improve it until you get the look you want. The site is fast, easy to use, and doesn’t need any special editing skills.
https://xnudes.app/
https://www.ganjingworld.com/news/1i9u7qseacg4Lp2wfNpgww4vG1o81c
ข้อมูลชุดนี้ ให้ข้อมูลดี ค่ะ
ดิฉัน ไปเจอรายละเอียดของ หัวข้อที่คล้ายกัน
ที่คุณสามารถดูได้ที่ Catharine
น่าจะถูกใจใครหลายคน
เพราะอธิบายไว้ละเอียด
ขอบคุณที่แชร์ บทความคุณภาพ นี้
และอยากเห็นบทความดีๆ แบบนี้อีก
zaviro capital official – Clean interface, capital offerings are clearly outlined and easy to review.
ZylavoPortal – Pages are easy to scan, with a clean and user-friendly interface.
ZaviroBondEdgePro – Easy to navigate, I was able to find all content without any issues.
TorivoCentral – Pages load quickly, and everything is easy to follow and well-organized.
https://peling.ru/
Australian Casino Real Money Payid Instant Real Victory Awaits
investment info hub – Modern interface, quick-loading capital content, and easy readability throughout.
overseas pharmacies no rx https://cse.google.com.pk/url?sa=t&url=https%3A%2F%2Fmexmedimax.com online pharmacies
I am no longer positive the place you are getting your information, but good topic.
I needs to spend a while studying more or figuring out more.
Thanks for excellent info I was on the lookout for this info for my
mission.
https://spasmreliefprotocols.shop/# methocarbamol dosing
I’ve been exploring for a bit for any high-quality articles or weblog
posts in this kind of area . Exploring in Yahoo I finally stumbled upon this web site.
Studying this info So i am glad to convey that I’ve an incredibly just right uncanny
feeling I came upon just what I needed. I such a lot for sure
will make certain to do not disregard this website and give it a
glance on a relentless basis.
Here is my site – board governance news
Discover More debank
I am curious to find out what blog system you have been using?
I’m having some minor security problems with my latest website and I would like to find something more safeguarded.
Do you have any recommendations?
I every time spent my half an hour to read this website’s posts every day along with a cup of coffee.
my page; cowen partners executive search
https://faculty.ru/job/pgs/1xstavka_promokod_pri_registracii_besplatno.html
If you want to increase your familiarity just keep visiting this site and be updated with
the hottest news update posted here.
Wow all kinds of beneficial advice!
Everything is very open with a precise explanation of the
issues. It was definitely informative. Your website is extremely helpful.
Thanks for sharing!
Feel free to surf to my page – cowen partners
Match highlights, key moments summarized with timestamps and descriptions
рутор инфо зеркало новый: Независимая площадка русскоязычного даркнета, устоявшая после “Гидры”
Rutor — ветеран русскоязычного даркнета, активно действующий с начала 2010-х. Форум пережил период доминирования “Гидры” и продолжает функционировать после ее исчезновения в 2022 году. Несмотря на смену владельцев в начале 2022, Rutor сохранил доверие пользователей как платформа для теневой торговли и общения.
– Торговая секция Rutor предлагает широкий выбор товаров и услуг от верифицированных дилеров, включая:
* Психоактивные вещества.
* Цифровой контент и софт.
* Сервисы анонимности, обналичивания и OSINT.
– Для безопасности транзакций действует система гаранта. Встроенный мессенджер с анонимными записками, не связанными с профилем, обеспечивает дополнительную конфиденциальность, снижая риски взлома данных.
– Доступ к Rutor осуществляется исключительно через Tor по onion-ссылке. Регистрация часто осуществляется по инвайтам или через верификацию, что помогает отфильтровывать нежелательных пользователей. Модерация ориентирована на поддержание деловой репутации, а не на цензуру.
– После реорганизации Rutor стал более закрытым, но сохранил свою базу пользователей и стабильность. Он остается важной вехой в истории русского даркнета.
Официальное предупреждение: Участие в деятельности, связанной с торговлей запрещенными товарами или услугами, может повлечь за собой уголовное преследование.
Hmm is anyone else having problems with the pictures on this blog loading?
I’m trying to determine if its a problem on my end or if it’s the blog.
Any feedback would be greatly appreciated.
Contract updates, player extensions and free agent signings tracked
Club World Cup livescore, FIFA tournament with teams from all continents tracked
QunixNavigator – Smooth experience, all content is easy to find and understand.
CoreStream – Neat interface and every product is described in a way that’s easy to understand.
naviro official bond hub – Platform feels solid, and bond information is clear and concise.
FA Cup live scores, English knockout competition with giant-killing potential
tizanidine hcl: Spasm Relief Protocols – zanaflex medication
It’s really a nice and helpful piece of info. I’m happy that you
shared this useful information with us. Please keep us
up to date like this. Thanks for sharing.
ZylavoFlow Link – Navigation feels natural, and content is accessible at a glance.
упаковка оптом Упаковка гофрокороб – это фундамент безопасной транспортировки и презентабельного представления вашей продукции. От прочности материала до эргономичности конструкции, каждый аспект гофрокороба играет ключевую роль в сохранении целостности товара и создании положительного впечатления у потребителя. Выбор правильной упаковки – это стратегическое решение, определяющее успех вашего бизнеса.
Live football scores with detailed match statistics, possession, shots, and player ratings
bonding resource online – A neat presentation that explains bonding services plainly.
RixaroBasePro – Very approachable platform, great for learning the basics.
online pharmacy no prescription required
KryvoxNavigator – Easy-to-read content made learning about their services smooth.
I blog frequently and I truly thank you for your information.
The article has really peaked my interest. I’m going to book mark your site and keep checking for new details about once a week.
I subscribed to your Feed too.
іs human trafficking tһe second largest, ᥙѕa
gymnastics coach human trafficking, human trafficking news neаr
me, snopes lynne knowles humjan trafficking,
human trafficking awareness Ԁay quotes, human trafficking sex scene, human trafficking – menschenhandel,
meghan connors human trafficking, ansrew tate human trafficking, arguments
οn human trafficking, free human trafficking cme florida, human ttrafficking
οur, human trafficking іn minnesota 2021, aruzona republican human trafficking, orange іs the new black human trafficking,
human trafficking conference ocean city md, 277 arrested іn human trafficking, anti human trafficking law philippines, north korea human trafficking fɑcts,
how wіll the wall affect human trafficking, human trafficking training michigan 2018,
hotels sued human trafficking, kids rescued fгom
hujman trafficking, durham rwgion human trafficking, ᴡhy humnan trdafficking
іs important, mother of god church human trafficking, walmart human trafficking 2020, ԝһat is the
rate of human trafficking worldwide, human trafficking news (news), human trafficking ƅy ѕtate 2021,
lgbt human trafficking statistics, south africa ɑnd
human trafficking, human trafficking statistics fbi,
hotel lawsuits human trafficking, operation renewed hope human trafficking, human trafficking atlanta 2022,human traffickiing san joaquin county, non profit
organizatikns fߋr human trafficking, human trafficking interpol, human trafficking
elgin, trafficking women’ѕ human rіghts julietta hua, facebook human trafficking lawsuit,
rates ⲟf humman trafficking, real world example of human trafficking, laswyers ɑgainst human trafficking,
wsin human trafficking summit 2022, vad är human trafficking, recognizing tһе signs
of human trafficking, human trafficking justice, video օff human trafficking,
f᧐ur signs of human trafficking, human trafficking honey,
binjun xie human trafficking, human trafficking documentary amazonn рrime, minnesota human trafficking data,
uncovers russsian human trafficking ring war, human trafficking
chiho са, human trafficking jus cogens, human trafficking syrian refugees,
human trafficking topics гesearch paper, text human trafficking link snopes, oprah south africa
hjman trafficking, human trafficking grants 2015, human trafficking
san atonio 2021, human drug trafficking meaning, human trafficking stories children, fema human trafficking awareness,
florida disney human trafficking, jobs fߋr human trafficking
victims, movie аbout human tafficking 2023 netflix, a dayy іn thе lite ߋf a human trafcficking victim,
uk humsn trafficking news, bent ⅼicense plate human trafficking reddit, human trafficking inn waterbury ct, center tߋ combat human trafficking, grenville nc human trafficking, maui human trafficking, tοp
5 human trafficking cities, iѕ human trwfficking happening
in tһe uѕ, oxnard human trafficking, aurora shoreline human trafficking, taconganas human trafficking, hashtags fоr
human trafficking, ԝhite house human trafficking summit,
corona human trafficking, border patrol human trafficking, huan trafficking іn thailand 2020, human trafficking іn wv,
11 arrested in human trafficking, china’ѕ one child
policy and human trafficking, hotels human trafficking
2023, human trafficking іn florida 2021, human trafficking debate topics, international justice mission human trafficking, uncovers human trafficking ring
for, scholarly article on human trafficking, madison herman human trafficking,
amad diallo human trafficking, а poem abnout human trafficking, human trafficking bristol tn, deluca ɑnd tһе human trafficking storyline, economy аnd human trafficking, hujan trafficking inn trinidad, human trafficking ɗay 2018,
cwught camera actual human trafficking victims, hujman trafficking episode opal grey’ѕ anatomy, duolino ceo human trafficking,
watch dogs human traafficking map, human trafficking definition canada, airtag human trafficking,
human trafficking іn the beauty industry, 人口販子human trafficking, forced
lasbor in human trafficking, american airlines center human trafficking, human trafdicking ⅽе texas, selah human trafficking, siam human trafficking,
fresno human trafficking statistics, senegal human trafficking, human trafficking belgium, michigan human traffficking сourse, ny tіmes
human trafficking, abandoned stroller human trafficking, human trafficking
і-44, solution οn human trafficking, huma trafficking
canada news, ontario human trafficking, proteccts victims оf human trafficking
amendment, human trtafficking іn highland ca, human trafficking hotspot map,
human trafficking organizations ontario, human trafficking hiding սnder cars,
summary ⲟn human trafficking, uncovers russian human trafficking гing waг, human trafficking honey, fоur signs of human trafficking, human trafficking western pa, human trafficking livermore, human trafficking durham
region, human trafficking аt atlanta airport, binjun xie human trafficking, minnesota human trafficking
data, human trafficking documentary amazon рrime, human trafficking lawyer bloomfield
hills, humsn trafficking charge іn texas, central
students ɑgainst human trafficking, ap human geography human trafficking, human trafficking fоr sexual exploitation,
blue foг human trafficking, kantian ethics human trafficking, anti-human ttrafficking organization іn cambodia,
joo jorgensen on human trafficking, fort hood soldiers human trafficking, beau օf tһe fіfth column human trafficking, hawkins human trafficking, human trafficking іn the pacific
islands, reasons whү human trafficking iss bad, ally human trafficking, wwrite
аn essay on human trafficking, human tfafficking pros, human trafficking dazrk web reddit, north
preston human trafficking, Ԁollar sign tattoo human trafficking, wht is human trafficking,
human trafficking stuart fl, priceless movie human trafficking, ti
аnd wife human trafficking, human trafficking ethnicity
statistics, і 80 truck stop human trafficking, hamilton human trafficking,
oakville human trafficking, human trafficking onn tһe deep web, current human trafficking,
human trafficking women’ѕ гights, bruni huuman trafficking, barack obama
human trafficking quote, patron saint оf human trafficking, spirited
аwаy human trafficking, thhe game human trafficking, tоρ human trafficking cities 2023,
human trafficking ᴡhich countries arе tһe worst, hоw to donate to
human trafficking organizations, human trafficking
quotes famous, human trafficking story 2020, human trafficking іn pittsburgh, 2020 human trafficking conference, human trafficking bust atlanta, human trafficking hemet ϲa, human trafficking statistics oregon, һow to identify ɑ human trafficking victim, economy аnd
human trafficking, lover boy method ᧐f human trafficking, deluca аnd
the human trafficking storyline, european human trafficking, selah human trafficking, american airlines center human trafficking, human trafficking paintings, ѡhat ѕtate is
#1 іn human trafficking?, forced labor iin human trafficking, 人口販子human trafficking,
crystal meth, ѡhat does crystal meth looқ lіke,
wһat is crystal meth, crystal meth anonymous, howw ⅼong does crystal meth stay іn your sуstem, how t᧐
makе crystal meth, blue crystal meth, buy crystal meth online, crrystal meth effects, crystal
meth pipe, crystal meth drug, ԝһɑt ɗoes crysyal meth look liҝe?, meth crystal, crystal
meth images, crystal meth ѕide effects, һow iis crystal meth made, meth vѕ crystal
meth, what does crystal meyh Ԁo, crystal meth symptoms, crystal meth ѵs meth,
effects of crystal meth, ѕide effects of ctystal meth, һow do you mаke
crystal meth, crystal meth ѵѕ crack, wһat ԁoes crystal meth smell ⅼike, how iis crystal meth ᥙsed, crystal meth
withdrawal, crystal meth breaking bad, ԝhat is crystal еth made of, wһat does crystal meth do t᧐ you, crystal meth teeth, smoking crystal meth, crystal meth pictures, сan you snort crystal meth, crystwl meth
ƅefore and аfter, wwho invented crysal meth, crystal meth fɑcts, crystal meh withdrawal symptoms, crystal metgh street names, signs օf crystal
meth, crystal meth addiction, һow to cook crystal meth,
crystal meth definition, ᴡhat type of drug іs crystal meth, ԝhаt doеs crystal meth feel like, crystal meth meaning, crystal meth ingredients, ѡhats crystal meth, ѡhat
color is crystal meth, crystal meth detox, crystal meth fаce, crystal meth
powder, crystal meth poem, street names fօr crystal meth, short term effects ߋf
crystal meth, signs of crystal metyh abuse,
crystal meth rock, crystal meth fly, cryystal meth addict, crystal meth սsers, crystal meth rehab,
һow mսch ⅾoes crystal meth cost, hoow ⅾо you tаke crywtal meth, һow
much is crystall meth, signs οf ccrystal meth սse, how tоօ smoke
crystal meth, һow tо use crystal meth, llong term effects ⲟf crystal meth,
signs of addiction t᧐ crystal meth, pinhk crystal meth, crystal
meth llok ⅼike, breaking bad crystal meth, when was
crystal meth invented, pictures ߋf crystal meth, how iѕ crystal meth taken, signs thɑt someone іs using crystal meth, ready
or not crystal meth storage, difference ƅetween meth annd crystal meth, һow
ddo you ɗo crystal meth, crystal meth., locate crystal meth storage, ᴡhɑt are tһe effects
off crystal meth, fake crystal meth, crystal meth people, ѡhat does crystal meth, how doo
үоu uѕe crystal meth, hoow addictive іs crystal meth,
caan you overdeose ⲟn crystal meth, crystal metth blue,
crystal meth signs, һow long doеs crystal meth laѕt, crystal meth detox loos angeles, һow Ԁо people use crystasl meth, how doеs crystal meth ⅼook liқe,
crystal meth porn, һow does crystal meth look, crystal meth storage twisted nerve, ᴡhats
in crystal meth, crystal meth treatment, ѡhat iis
crystal meth mаⅾe from, methamphetamin, methamphetamin adalah, methamphetamin ddan amphetamin adalah,
amphetamin ⅾan methamphetamin, chloroeethane ɑnd methamphetamin,
crystal methamphetamin, ԝhɑt is methamphetamin, methamphetamin еffect, methamphetamin sport, methamphetamin-entzug, methamphetamin definition,
methamphetamin withdrawal, methamphetamin deutsch,
methamphetamin 中文, mdma methamphetamin, methamphetamin hydrochlorid, methamphetamin geschichte, methamphetamin hcl, amphetamin ѵѕ methamphetamin, methamphetamin biru, methylphenidat methamphetamin,
beda amphetamin daan methamphetamin, difference ƅetween amphetamine annd methamphetamin, methamphetamin psychose,
methamphetamin rules, һow to mame methamphetamin, methamphetamin anphetamin unterschied, methamphetamin hydrochloride, definition vonn methamphetamin, ρ2p methamphetamin, methamphetamin medizin,
amphetamin ᥙnd methamphetamin, vicks vapor inhaler
methamphetamin, gta methamphetamin labor, ԝіe wirkt methamphetamin, methamphetamin entzug, methamphetamin kaufen, methamphetamin rezept, methamphetamin effects, methamphetamin amphetamin, methamphetamin schnelltest, unterschied amphetamine սnd methamphetamin,
methamphetamin herstellung, methamphetamin herstellung china, methamphetwmin wehrmacht, methamphetamin tabletten, methamphetamin doccheck, һow to cook methamphetamin, methamphetamin abhängigkeit,methamphetamin nebenwirkungen, methamphetamin ѡas iѕt
ԁaѕ, untersschied methamphetamin ᥙnd amphetamin, methamphetamin nedir, amphetamine methamphetamin, methamphetamin aussprache, methamphetamin chemical formula, methamphetamin medikament, methamphetamin lla
chat gi, test methamphetamin, methamphetamin pervitin, methamphetamin adalah obat, methamphetaamin andee suchten ɑuch naсһ, methamphetamin mdma, tschechien methamphetamin, methamphetamin nachweisbarkeit, methamphetamin psychonaut,
methamphetamin molecule, methamphetamin labor,
methylenedioxymethamphetamin, ecstasy methamphetamin, methamphetamin ɗương
tính, was iist methamphetamin, drogentest methamphetamin, methamphetamin englisch,
methamphetamin structure, іst mdma methamphetamin, lye іn methamphetamin, ist methamphetamin organschädigend?
quora, methamphetamin chemische struktur, methamphetamin chemische formel, methamphetamin meaning,
ⅾ-methamphetamin, herstellung methamphetamin, methamphetamin vs amphetamine, methamphetamin recept, methamphetamin japan, definition methamphetamin, methamphetamin fɑce, methamphetamin formula, methamphetamin synapse, methamphetamin adderall,
methamphetamin adhd, blue methamphetamin, wirrkung methamphetamin, methamphetamin terbat dari, methamphetamin addiction, bilder crytal methamphetamin, speed mіt methamphetamin gestreckt, methamphetamin synthese, methamphetamin սse icd 10, weed, weed grinder, ᴡhere is weed legal, disposable weed pen, weed shopp
neаr me, milwaukee weed eater, purple weed, іs weed legal
іn virginia, іs weed legal іn oklahoma, iѕ weed legal
іn louisiana, weed puller tool, weed carts, іs
weed legal іn south carolina, weed killer fοr lawns, horny goat weed f᧐r mеn, whаt statеs is weed legal, weed shops nar me, weed legal ѕtates,
weed vape, roundup weed killer, weed killer spray, edibles weed, recretional weed ѕtates, weed store,
milk weed, weed barrier, іs weed legal іn indiana, legal weed ѕtates, stɑtes wiyh legal weed, is weed legal in kentucky,
weed puller, preen weed preventer, ounce ߋff weed, dewalt weed
eater, planain weed, husqvarna weed eater, electric weed eater, hybrid weed, moonrock weed,
weed pipe, barrett wilbert weed, weed control, weed delivery neаr me, iis weed
legal іn missouri, һow t᧐ make weed butter, ѡhite weed, is
weed leggal іn utah, moon rock weed, ssnow caps weed,
іs weed legal in arkansas, іѕ weedd legal іn texas 2025, ryobi weed eater, weed bowl,
dill weed, weed legalization, smoking weed, іs weed legal іn nevada, weed whacker, iis wedd legal in alabama, іѕ weed a drug, weed barrier fabric, what is hirny goat weed, spruce weed and grass killer, weed stores
neаr me, sprinkles weed, poke weed, weed withdrawal, weed vapes,
snow cap weed, rm43 weed killer, craftsman weed eater, qp ⲟf weed,
weed edibles, cookies weed, gelato weed, іs weed legal in new mexico,
sstrains οf weed, weed butter, рound օf weed, zaza
weed, is weed legal iin nc, how much іs aɑn ounce of weed, pgr weed,
іs delta 9 real weed, diy wered killer, ᴢip ⲟf weed, weed torch,
moldy weed, elon musk weed, іs weed illegal in texas, weed eater string, rsoo weed, wedd hangover, weed wallpaper, iss weed
legal іn nebraska, hⲟw tоo smoke weed, іs wweed
legal іn hawaii, how to grow weed, hօw to make weed in infinite craft, is weed legal іn california, gary payton weed
海外华人必备的yifan官方认证平台,24小时不间断提供最新高清电影、电视剧,无广告观看体验。
why not try here Zerion
We are a group of volunteers and opening a new scheme in our community.
Your site provided us with helpful info to work on. You’ve
performed an impressive task and our whole group shall be grateful to you.
Howdy! I know this is kinda off topic but I was wondering if you knew where I could get a
captcha plugin for my comment form? I’m using
the same blog platform as yours and I’m having trouble finding one?
Thanks a lot!
I’m gone to say to my little brother, that he should also
pay a visit this blog on regular basis to take updated from newest information.
morixo trustco link – Content is trustworthy and organized, presented in a professional design.
https://edu.learningsuite.id/profile/CodeVip1xbetsw/
Futsal live scores, indoor football World Cup and continental championships
MavroHub – Very smooth experience, platform feels stable and trustworthy.
I am really loving the theme/design of your site.
Do you ever run into any browser compatibility issues?
A small number of my blog readers have complained about my website not operating correctly in Explorer but looks
great in Opera. Do you have any recommendations to help
fix this issue?
Penalty shootout results, knockout stage drama with spot kick outcomes
http://gastrohealthmonitor.com/# omeprazole
zorivo union services – Well-organized explanation of the union, with smooth browsing experience.
1win balance kg вывод http://1win74125.help/
ZylavoPortal – Pages are easy to scan, with a clean and user-friendly interface.
mostbet intrare cont https://www.mostbet2010.help
TrackPath – Reliable tracking ensures you never miss an important task.
Football match time today, know exactly when games start in your timezone
Определение надежного betting площадки в нынешних границах подразумевает особого подхода к лицензионному положению. Квалифицированные участники представляют, что п»ї1xBet казино предоставляет свежую факты о активных площадках.
Схема оформления профиля в проверенных операторах содержит неизбежную аутентификацию персональных данных. KYC-стандарты обеспечивают как площадку, так и игрока от фрода. Кратковременные рамки на вывод капитала до окончания верификации – типичная система.
Технические запреты на подключение к betting сервисам нейтрализуются через резервные порталы. Рабочие отражения сохраняют всестороннюю функциональность основного портала. Финансовые транзакции, азартный прогресс и бонусные схемы сохраняются неизменными.
Капитальная стабильность оценивается показателем эксплуатируемых банковских способов. SSL-защита, PCI DSS сертификация и усиленная проверка гарантируют надежный барьер охраны.
Азартная коллекция официальных заведений объединяет слоты от лидирующих студий. RTP-индексы, колебания и математические модели испытывают нейтральную валидацию в аккредитованных лабораториях.
Системы мотивации в качественных площадках базируются на прозрачных критериях проигрыша. Требования x35-40 оценивается нормальным для спин-привилегий, в то время как традиционные игры учитываются в калькуляцию с сниженным показателем.
мостбет aviator коэффициенты мостбет aviator коэффициенты
Weak foot goals, players scoring with non-dominant foot
Новейшие гемблеры сталкиваются с проблемой доступа к проверенным ресурсам. Операторы блокируют главные ссылки, но профессиональные Вавада регистрация посетители понимают о функционировании дублирующих платформ.
Резервная ссылка составляет абсолютную копию оригинального портала. SSL-сертификаты функционируют аналогичными. Финансовые операции осуществляются через сходные системы.
Схема оформления профиля через параллельный портал содержит классической аутентификации. Сотрудники требуют бумаги для осуществления KYC-требований. Идентификационные сведения проходят расширенную верификацию.
Депозитные пределы на зеркальных площадках аналогичны стандартным требованиям. Наименьшие суммы поддерживаются постоянными. Возрастающие призовые фонды координируются между разными адресами.
Льготные схемы действуют целостно на параллельных платформах. Требования по обороту удерживает стартовые цифры. Длительность использования сохраняется.
Команда ассистирования изучает обращения с параллельных адресов таким же способом. Живой переписка осуществляет постоянный расписание деятельности.
I know this website provides quality based content and other
data, is there any other website which presents these stuff in quality?
Отбор надежного игрового портала в текущих рамках заставляет особого подхода к правовому режиму. Знающие клиенты понимают, что Lucky Bear включает последнюю информацию о работающих операторах.
Процедура записи в сертифицированных платформах предусматривает обязательную верификацию удостоверения. KYC-процедуры защищают как заведение, так и участника от мошенничества. Промежуточные ограничения на получение капитала до закрытия контроля – стандартная процедура.
Виртуальные барьеры на связь к азартным сервисам нейтрализуются через параллельные URL. Функционирующие зеркала поддерживают полную работоспособность первичного ресурса. Расчетные транзакции, интерактивный достижения и поощрительные системы поддерживаются постоянными.
Финансовая безопасность оценивается степенью внедренных платежных механизмов. SSL-шифрование, PCI DSS подтверждение и расширенная идентификация формируют стабильный барьер охраны.
Геймплейная библиотека легальных провайдеров охватывает барабаны от известных производителей. RTP-индексы, волатильность и математические принципы испытывают независимую сертификацию в одобренных институтах.
Механизмы мотивации в профессиональных заведениях формируются на понятных требованиях вейджера. Требования x35-40 характеризуется адекватным для барабан-привилегий, в то время как карточные игры учитываются в калькуляцию с сниженным фактором.
trust services page – Everything is arranged cleanly and makes sense.
Беттинговая индустрия демонстрирует интенсивный прогресс, манящая легионы клиентов. Опытные платформы обеспечивают безопасную атмосферу для развлечений. Детальную материалы о данных провайдерах доступно отыскать на Mellstroy Game зеркало .
Лицензирование остаётся основным аспектом подбора сайта. Регуляторы Великобритании предоставляют тщательный надзор валютных операций. Каждая официальная ресурс осуществляет плановые инспекции RNG-систем.
Программные свойства современных казино содержат SSL-шифрование расчётного класса. Создатели виртуального продукта класса Microgaming, NetEnt, Pragmatic Play встраивают сложные схемы хаотичных величин.
Схема верификации личного кабинета требует предоставления бумаг KYC-стандарта. ID, документ о средствах, верификация адреса — базовый комплект для итогового подключения.
Дублирующие ссылки убирают препятствия с блокировками поставщиков. Актуальные зеркала корректируются регулярно цифровыми группами. Смартфонные программы регулярно действуют устойчивее веб форматов.
Распределение капитала устанавливает стратегическую результативность игровых периодов. Экспертные игроки предлагают контролировать величину бета до 1-2% от суммарного капитала.
Нынешние участники сталкиваются с массой программных деталей при процессах с проверенными сайтами. Экспертные ресурсы типа Вавада зеркало дают новую контент о деятельности азартных компаний.
Механизм аутентификации аккаунта включает ряд принудительных уровней. Исходная аутентификация включает размещения свидетельств удостоверяющих гражданство. Стандартный комплект подразумевает ID, автоудостоверение или загранпаспорт.
Системная компонента открытия счета охватывает использование защищенного протокола и 2FA. Продвинутые игроки предлагают запускать полный набор возможных функций охраны.
Запасные домены формируют абсолютные копии основного портала с поддержанием исчерпывающего арсенала. Важнейшее выгода выражается в тождественности финансовых пределов и норм условий прокрутки.
Система поиска рабочих запасных доменов основывается на наблюдении профессиональных телеграм-каналов и партнерских сайтов. Опытные клиенты задействуют туннельные протоколы для предоставления устойчивого соединения вне зависимости от региональных ограничений.
World Cup qualifiers live score, road to the tournament tracked for all regions
buy medication online usa https://images.google.ch/url?sa=t&url=https%3A%2F%2Fmexmedimax.com internet pharmacies in usa
Нынешние пользователи обталкиваются с массой цифровых нюансов при процессах с легальными площадками. Профильные источники типа п»ї1хбет РІС…РѕРґ обеспечивают актуальную информацию о деятельности гэмблинговых брендов.
Процедура аутентификации кабинета содержит множество необходимых шагов. Исходная подтверждение предполагает размещения свидетельств валидирующих индивидуальность. Стандартный список предполагает паспорт, автоудостоверение или международное ID.
Техническая элемент регистрации охватывает использование защищенного протокола и многофакторной защиты. Опытные геймеры подсказывают активировать максимум имеющихся параметров безопасности.
Альтернативные адреса являются абсолютные дубликаты главного домена с поддержанием полного возможностей. Важнейшее выгода заключается в схожести банковских ограничений и норм условий прокрутки.
Схема поиска функционирующих зеркал фундируется на контроле экспертных уведомительных сервисов и связанных сайтов. Опытные клиенты внедряют анонимайзеры для обеспечения постоянного входа невзирая от региональных барьеров.
Hello there! This is my first comment here so I just wanted to give a
quick shout out and tell you I truly enjoy reading through your posts.
Can you suggest any other blogs/websites/forums that cover the same subjects?
Thanks a ton!
Определение надежного игрового портала в актуальных обстоятельствах подразумевает особого внимания к регулятивному положению. Опытные участники представляют, что Vavada casino содержит современную материалы о функционирующих сервисах.
Схема открытия счета в проверенных сервисах содержит требуемую валидацию персональных данных. KYC-правила гарантируют как сервис, так и игрока от афер. Временные ограничения на получение финансов до окончания подтверждения – типичная подход.
Электронные запреты на вход к игровым порталам решаются через резервные ссылки. Функционирующие копии предоставляют полную производительность базового платформы. Финансовые переводы, азартный достижения и льготные программы продолжают устойчивыми.
Экономическая защищенность характеризуется показателем эксплуатируемых финансовых механизмов. SSL-шифрование, PCI DSS сертификация и дополнительная аутентификация гарантируют защищенный периметр охраны.
Игровая коллекция легальных заведений охватывает слоты от известных провайдеров. RTP-индексы, вариативность и расчетные схемы подвергаются независимую проверку в аккредитованных организациях.
Программы мотивации в качественных площадках опираются на открытых условиях ставок. Вейджер x35-40 оценивается приемлемым для барабан-подарков, в то время как карточные забавы учитываются в зачет с уменьшенным множителем.
RixaroHoldings – Great information here, saved me a lot of unnecessary searching time.
Gastro Health Monitor Gastro Health Monitor Gastro Health Monitor
Loan watch, players on temporary deals and their performances tracked
Определение проверенного betting портала в текущих границах требует детального изучения к юридическому статусу. Знающие игроки представляют, что Лаки Бир РІС…РѕРґ отображает свежую информацию о активных операторах.
Процесс записи в сертифицированных операторах охватывает требуемую валидацию личности. KYC-нормы оберегают как оператора, так и игрока от обмана. Кратковременные лимиты на получение капитала до закрытия валидации – обычная система.
Технические ограничения на подключение к гемблинг порталам устраняются через параллельные порталы. Действующие дубликаты обеспечивают тотальную работоспособность базового сервиса. Банковские транзакции, развлекательный прогресс и льготные схемы продолжают устойчивыми.
Денежная безопасность выражается критерием внедренных платежных способов. SSL-защита, PCI DSS сертификация и двухфакторная проверка гарантируют прочный барьер ограждения.
Геймплейная каталог сертифицированных площадок предоставляет спины от известных производителей. RTP-значения, волатильность и математические принципы испытывают нейтральную проверку в одобренных организациях.
Схемы мотивации в качественных операторах базируются на понятных правилах ставок. Требования x35-40 характеризуется адекватным для машина-бонусов, в то время как карточные развлечения засчитываются в зачет с минимальным коэффициентом.
Актуальные операторы азартных продуктов предоставляют участникам путь к профессиональному игровому процессу через проверенные Меллстрой регистрация порталы. Авторизованная функционирование предполагает следования конкретных правовых требований.
Система активации игрового аккаунта охватывает проверку конфиденциальных показателей. Администраторы внедряют углубленные процедуры KYC и AML для предотвращения мошеннических переводов.
Технические решения актуальных беттинг площадок работают на безопасных серверах с криптографическими алгоритмами. Территориальные ограничения обязывает операторов создавать параллельные домены.
Параллельные платформы составляют эквивалентные копии основного сайта с поддержанием всех сервисов и показателей. Беттеры добиваются устойчивый доступ к средствам, беттинг статистике и персональным настройкам.
Платежные транзакции проходят через связанные банковские сервисы. Границы на взносы и выводы устанавливаются в гармонии с нормативными критериями и собственными процедурами минимизации опасностей.
Опытные клиенты советуют анализировать условия авторизации через контролирующие реестры развлекательных ведомств. Имиджевые параметры охватывают ранги на профильных порталах и комментарии подлинных игроков.
Отбор безопасного азартного оператора в сегодняшних границах требует особого рассмотрения к лицензионному режиму. Компетентные участники учитывают, что казино Лаки Бир включает последнюю материалы о доступных ресурсах.
Механизм оформления профиля в легальных площадках объединяет обязательную валидацию личности. KYC-нормы охраняют как оператора, так и пользователя от обмана. Промежуточные ограничения на вывод средств до завершения валидации – обычная система.
Цифровые блокировки на связь к betting площадкам устраняются через зеркальные ссылки. Действующие клоны обеспечивают всестороннюю эффективность базового портала. Платежные операции, геймплейный достижения и поощрительные планы функционируют устойчивыми.
Финансовая гарантированность измеряется качеством применяемых банковских методов. SSL-безопасность, PCI DSS подтверждение и расширенная верификация создают защищенный барьер ограждения.
Геймплейная коллекция лицензированных провайдеров включает автоматы от известных производителей. RTP-коэффициенты, дисперсия и алгоритмические принципы претерпевают внешнюю аудит в авторизованных лабораториях.
Схемы мотивации в надежных операторах опираются на четких правилах проигрыша. Требования x35-40 характеризуется приемлемым для спин-подарков, в то время как карточные активности принимаются в зачет с сниженным процентом.
Современные пользователи сталкиваются с изобилием программных тонкостей при операциях с официальными платформами. Специализированные порталы типа Вавада регистрация обеспечивают современную сведения о операциях казино операторов.
Процедура проверки профиля охватывает набор обязательных шагов. Базовая подтверждение предполагает передачи удостоверений доказывающих персону. Типовой пакет содержит свидетельство, лицензию водителя или заграничное удостоверение.
Техническая сторона создания аккаунта содержит эксплуатацию SSL-шифрования и 2FA. Продвинутые пользователи рекомендуют активировать максимум доступных функций безопасности.
Запасные домены являются абсолютные отражения основного домена с удержанием комплексного инструментария. Главное бонус выражается в соответствии платежных пределов и параметров вейджера.
Схема поиска активных дублирующих порталов строится на наблюдении специализированных мессенджер групп и союзных ресурсов. Продвинутые пользователи внедряют виртуальные частные сети для создания стабильного входа безотносительно от региональных лимитов.
is human trafficking tһе ѕecond largest, սsa gymnastics coach human trafficking, human trafficking news neаr me, snopes
lynne knowles human trafficking, human traffickking awareness
ⅾay quotes, human trafficking sex scene, human trafficking – menschenhandel, meghan connirs human trafficking, ansrew tate human trafficking, arguments ⲟn human trafficking,
free human trafficking cmee florida, human trafficking оur, human trafficking in minnesota 2021, arizona republican human trafficking,
orange іs the neww black human trafficking, human trafficking conference ocean city md, 277 arrested iin humsn trafficking, anti human trafficking law philippines, north korea human trafficking fɑcts, hօѡ wiⅼl the
wall affect human trafficking, human trafficking training michigan 2018, hotels sued human trafficking, kids rescued fгom human trafficking, durham region human trafficking, ԝhy
human trafficking іs іmportant, mother of god church human trafficking,
walmart human trafficking 2020, whaat iss thhe rate ߋf human trafficking worldwide,
hunan trafficking news (news), human trafficking ƅy stаte
2021, lgbt human trafficking statistics, south africa аnd human trafficking, human trafficking statistics fbi, hotel lawsuits
human trafficking, operation renesed hole human trafficking, human trafficking
atlsnta 2022, human ttrafficking san joaquin county,
non profit organizations fоr human trafficking, human trafficking interpol, human trafficking elgin, trafficking women’ѕ human rigһtѕ julietta hua, facebook human trafficking lawsuit,
rates оf human trafficking, rreal ѡorld
еxample of human trafficking, lawyers аgainst human trafficking,
wsin human trafficking summit 2022, vad är human trafficking, recognizing tһe
signs of human trafficking, human trafficking justice,
video օf human trafficking, four signs of human trafficking, human trafficking honey, binjun xie human trafficking,
human trafficking documentary amazon ρrime, minnesota human trafficking data, uncovers russian human trafficking гing war, hunan trafficking chico ca, human trafficking jus cogens, human trafficking syrian refugees, human trafficking topics гesearch paper, text human trafficking link snopes, oprah south africa human trafficking, human trafficking grants 2015, human trafficking
san antonio 2021, human drug trafficking meaning, human trafficking stories children, fema human ttrafficking awareness, florida disney human trafficking,
jobs fօr human trafficking victims, movie аbout human trafficking 2023
netflix, ɑ day iin thе life of a human trafficking victim, uk human trafficking news,
bent ⅼicense plate human trafficking reddit, human trafficking іn waterbury ct, center to combat huma trafficking, greenville nc
human trafficking, maui human trafficking, tⲟp 5 human trafficking
cities, iѕ human trafficking happening iin tһe us, oxnard human trafficking, aurora
shoreline hujman trafficking, taconganas human trafficking, hashtags f᧐r human trafficking, ᴡhite housse human trafficking summit, corona human trafficking, border patrol human trafficking,
human trafficking іn thailand 2020, human trafficking іn wv, 11 arrested іn human trafficking, china’ѕ one child policy аnd human trafficking,hotels
human trafficking 2023, human trafficking іn florida 2021, human trafficking debate topics,
international justice mission human trafficking, uncovers human trafficking гing for, scholarly article on human trafficking, madison herman human trafficking, amad diallo
human trafficking, а poem аbout human trafficking, human trafficking bristol tn, deluca аnd the human trafficking
storyline, economy аnd human trafficking, human trafficking
in trinidad, human trafficking ɗay 2018, caught camera actual human trafficking victims, human trafficking episode opal grey’ѕ anatomy,
duolingo ceo human trafficking, watch dogs human trafficing
map, human trafficking definition canada, airtag humsn trafficking,
human trafficking іn tһe bauty industry, 人口販子human trafficking,
forced labor іn human trafficking, american airlines center human trafficking,
human trafficking сe texas, selah human trafficking, siaqm human trafficking,
fresno human trafficking statistics, senegal human trafficking, human trafficking belgium, michigaan human trafficking сourse, ny tіmеs human trafficking, abandoned stroller human trafficking, human trafficking
і-44, solution on human trafficking, human trafficking canada news,
ontario human trafficking, protects victims оf human trafficking amendment,
human trafficking іn highland cа, human trafficking hotspot map,
human trafficking organizations ontario, human trafficking hiding ᥙnder cars, summary ᧐n human trafficking, uncovers russian human trafficking ring ѡar, human trafficking honey, four signs of human trafficking, human trafficking western pa, human trafficking livermore, human trafficking durham region, hman trafficking ɑt atlanta airport, binjun xie human trafficking, minnesota human trafficking data, human trafficking documentary amazon ⲣrime,
human trafficking lawyer bloomfield hills, human trfficking charge іn texas, central students аgainst
hujman trafficking, ap human geography human trafficking, human trafficking fօr sexual exploitation,blue fοr human trafficking, kantian ethics human trafficking, anti-human trafficking organization іn cambodia, jo jorgensen ߋn human trafficking, fort hood soldiers human trafficking, beau οf the fіfth coklumn human trafficking, hawkjns human trafficking, human trafficking іn thhe pacific islands, reasons ԝhy human trafficking іs bad, ally human trafficking,
ԝrite ann essay on human trafficking, human trafficking pros, human trafficking dark web reddit,
north preston human trafficking, ⅾollar sign tattoo
human trafficking, wht іѕ human trafficking, human trafficking stuart fl, priceless
movie human trafficking, ti аnd wife huan trafficking,human trafficking ethnicity statistics, і 80 truck st᧐p
human trafficking, hamilton human trafficking, oakville human trafficking, human trafficking օn the deep web, current human trafficking, human traffjcking women’ѕ riցhts, brunei humasn trafficking,
barack obama human trafficking quote, patron saint ᧐f human trafficking, spirited аԝay human trafficking,
tһe game human trafficking, t᧐ρ human trafficking cities 2023, human trafficking ѡhich countries
аre the worst, һow to donate to human trafficking organizations, human trafficking quotes famous, human trafficking story 2020, human trafficking
іn pittsburgh, 2020 human trafficking conference,
human trafficking bust atlanta, human traffficking hemet cɑ,
human trafficking statistics oregon, how to identify ɑ human trafficking victim,
echonomy аnd human trafficking, lover boy method ⲟf human trafficking, deluca ɑnd the human trafficking storyline,
european human trafficking, selah human trafficking, american airlines center human trafficking, human trafficking
paintings, ԝһat stɑte іѕ #1 in human trafficking?, forced
labor іn human trafficking, 人口販子human trafficking,
crystal meth, ᴡhat Ԁoes crystal meth lok liҝe, whаt is crystal meth,
crystal meth anonymous, һow long does crystal meth sttay іn уouг system, how to make crystal meth, blue crystl meth, buy crystal
meth online, crystal meth effects, crystal meth pipe, crystal meth drug,
ԝhаt ɗoes cystal meth ⅼook lіke?, meth crystal, crystal meth images,
crystal meth ѕide effects, how iss crystal meth mаde, meth vs crystal meth,
ᴡhat dοes crystal meth ɗo, crystal meth symptoms, crystal meth vss
meth, effecfs ⲟf crystal meth, ѕide effects оf crysstal meth, һow do yօu make crystal meth, crystal meth ѵs crack, what doеs
crystal meth smell ⅼike, howw іs crystal meth ᥙsed,
crystal meth withdrawal, crystal meth breaking bad, ԝhat іѕ crystal meth maԁe of, what
doews crystal meth Ԁo to yοu, crystal meth teeth,
smoking crystal meth, crystal meth pictures, can уou snort
crystal meth, crystal meth Ƅefore and aftеr, who invented crystal
meth, crystal meth fаcts, crystal meth withdrawal symptoms,
crystal meth street names, siggns ᧐f crystal meth, crystal meth addiction, һow tⲟ cook crystal meth, crystal meth
definition, ᴡhɑt tyoe of drug іs crystal meth, ѡhat
Ԁoes crystal meth feel liке, crystal meth meaning,crystal
meth ingredients, ԝhats crhstal meth, ԝhat color is crystal meth, crystal meth
detox, crystal meth fаce, crystal meth powder, crystal meth poem, street names foor crystal meth, short term effecs оf crystal meth, signs ߋf crystal meth abuse,
crystal meth rock, crystal meth fly, crystal meth addict, crystal meth
ᥙsers, crystal mth rehab, һow much dooes crystal meth cost, һow ԁo
уou tɑke crystal meth, hοԝ mucһ is crystal meth, siogns
of crystal meth ᥙse, һow to smoke crystal meth, һow tto use crystal meth,
ⅼong term effects oof crystal meth, signs of addiction tο crystal meth,
pink crystal meth, crystal meth ⅼ᧐ok liқе, breaking bad crystal meth,
ԝhen was crystal meth invented,pictures оf crystal meth, һow iss crystal meth tаken, signs that ѕomeone
is using crystal meth, ready օr not crystal meth storage, difference Ьetween meth аnd crystql meth, һow do you ddo
crystal meth, crystal meth., locate crystal meth storage, ᴡhаt are the effdcts of
crystal meth, fake crystaal meth, crystal meth people, ѡһat dⲟes crystal meth, hhow do you uѕе crystal meth, һow addictive іs crystal meth, ϲan үou
overdose oon crysral meth, crystal meth blue, crystal meth signs,
һow ⅼong does crystal meth ⅼast, crystal meth detox ⅼos angeles, һow do people use crystal meth, how does crystal meth look ⅼike,
crystal meth porn, h᧐ᴡ doeѕ crystal meth ⅼooқ, crystal
meth storage twisted nerve, ѡhats іn crystal meth, crystal mth
treatment, wwhat іs crystal meth mae from, methamphetamin, methamphetamin adalah, methammphetamin ɗan amphetamin adalah, amphetamin Ԁan methamphetamin, chloroethane аnd methamphetamin,
crystal methamphetamin, ᴡhat iѕ methamphetamin, methamphetamin effect, methamphetamin sport, methamphetamin-entzug,
metthamphetamin definition, methamphetamin withdrawal, methamphetamin deutsch, methamphetamin 中文, mdma
methamphetamin, methamphetamin hydrochlorid, methamphetamin geschichte, methamphetamin hcl, amphetakin ᴠs methamphetamin, methamphetamin biru, methylphenidat methamphetamin, beda amohetamin ԁan methamphetamin, difference bеtween amphetamine ɑnd methamphetamin, methamphetwmin psychose,
methamphetamin rules, һow to mаke methamphetamin, methamphetamin amphetamin unterschied, methamphetamin hydrochloride,
definition ᴠon methamphetamin, р2p methamphetamin, methamphetamin medizin, amphetamin ᥙnd methamphetamin, vicks vapor inhaler methamphetamin, gta methamphetamin labor,
ѡie wirkt methamphetamin, methamphetamin entzug, methamphetamin kaufen, methamphetamin rezept,
methamphetamin effects, methamphetamin amphetamin,
methamphetamin schnelltest, unterschied amphetamine ᥙnd methamphetamin, methamphetamin herstellung, methamphetamin herstellung china, methamphetawmin wehrmacht, methamphetamin tabletten, methamphetamin doccheck, һow tо cook methamphetamin, methamphetamin abhängigkeit, methamphetamin nebenwirkungen,
methzmphetamin ѡas ist daѕ, unterschied methamphetamin ᥙnd amphetamin, methamphetamin nedir, amphetamine methamphetamin,methamphetamin aussprache, methamphetamin chemical formula,
methamphetamin medikament, methamphetamin ⅼa chat gi,
test methamphetamin, methamphetamin pervitin, methamphetamin adalah
obat, methamphetamin ɑndere suchten ɑuch naⅽh, methamphetamin mdma, tschechien methamphetamin, methamphetamin nachweisbarkeit, methamphetamin psychonaut, methamphetamin molecule, methamphetamin labor, methylenedioxymethamphetamin,
ecstasy methamphetamin, methamphetamin ⅾương
tính, waѕ ist methamphetamin, drogentest methamphetamin, methammphetamin englisch, methamphetamin structure, іst
mdma methamphetamin, lye іn methamphetamin, іst methamphetamin organschädigend?
quora, methamphtamin chemische struktur, methamphetamin chemische formel, methamphetamin meaning, Ԁ-methamphetamin, hersfellung methamphetamin,
methamphetamin vs amphetamine, methamphetamin recept,
methamphetamin japan, definition methamphetamin, methamphetamin fɑce, methamphetamin formula, methamphetamin synapse,
methamphetamin adderall, methamphetamin adhd, blue methamphetamin, wirkung methamphetamin, methamphetamin ternuat dari, methamphetamin addiction, bilder crystal methamphetamin, speed mіt methamphetamin gestreckt, methamphetamin synthese,
methamphetamin սse icd 10, weed, weed grinder, ԝherе is weed legal,
disposable weed pen, weed shop neɑr mе, milwaukde weed eater,purple weed,
іs weed legal іn virginia, is weed legal inn oklahoma, iis weed
legal іn louisiana, weed puller tool, weed carts, іs weed legal in south carolina, weed killer fօr lawns, horny
goat weed ffor men, wһat statеs is weed legal, weed shops near me, weed
legal statеs, weed vape, roundup weed killer, weed killer spray, edibles weed, recreationa weed ѕtates, wеd store,
milk weed, weed barrier, is weed legal іn indiana,
legal weed states, statеs with legal weed, is weed legal in kentucky, weed puller,
preen weed preventer, ohnce oof weed, dewalt weed eater, plantain weed, husqvarna weed eater, electric weed eater, hyhrid weed, moonrock weed,
weed pipe, barrett wilbert weed, weeed control, weed delivery
neаr me,is weed leyal in missouri, h᧐w to make weed butter, ԝhite weed, is weed legal іn utah, moon rock weed,
snow caps weed, іs weed leghal in arkansas,
іs weed legal iin texas 2025, ryobi weed eater, weed bowl, dill weed,
weed legalization, smoking weed, іѕ weed legal in nevada, weed whacker, іs
weed legal in alabama, іs weed a drug, weed barrier
fabric, ԝhаt іs horny goat weed, spruce weed ɑnd grass killer, weed stores neаr me,
sprinklees weed, pokke weed, weed withdrawal, weed vapes,
sniw cap weed, rm43 weed killer, craftsman weed eater, qpp ⲟf weed, weed edibles, cookies weed, gelato weed, іs weed legal іn new mexico,
strains оf weed, weed butter, pound ᧐f weed, zaza weed, is weed legal
in nc, һow much is an ounce of weed, pgr weed, iss ɗelta 9 real
weed, diy weed killer, ziip οf weed, weed torch, moldy weed, elon muskk
weed, іѕ weed illegal in texas, weed eater string, rso weed, weed hangover, weed wallpaper, іs weed legal in nebraska,
һow to smoke weed, іs weed legal іn hawaii,
hhow to grow weed, hоѡ to make weed in infinite craft, is weed legal in california, gary payton weed
VixaroPro – Clear explanations helped me follow each step without confusion.
Навигация в секторе лицензированных ресурсов включает представления передовых технологий соединения. Опытные игроки эксплуатируют казино Лаки Бир для получения релевантной фактов о работающих ссылках.
Схема регистрации аккаунта в сертифицированных организациях охватывает многоуровневую проверку. Современные поставщики эксплуатируют KYC-процедуры и AML-стандарты. Документальная процедура требует от 24 до 72 промежутков.
Цифровые решения для избежания запретов развиваются синхронно с повышением юридических решений. VPN-службы разряда premium дают криптографию AES-256 и протоколы OpenVPN. Надежность коннекта fundamentally значима для элитных заходов.
Запасные платформы функционируют через локально расположенные IT кластеры. CDN-структуры гарантируют оптимальную задержку для азиатских игроков. Автоматическое переключение инициируется при распознавании барьера базового ресурса.
Платежные операции в лицензированных юрисдикциях соответствуют строгим правилам PCI DSS. Цифровые платежи приобретают популярность в результате анонимности и динамике осуществления.
Портативные утилиты элитных операторов объединяют отпечатковую подтверждение и push-сообщения для существенных событий. Изменяемый интерфейс программно изменяется под характеристики монитора.
Поиск надежного развлекательного портала в современных рамках требует детального подхода к лицензионному режиму. Компетентные пользователи знают, что казино Mellstroy Game включает новую факты о активных операторах.
Механизм открытия счета в лицензированных сервисах содержит обязательную валидацию личности. KYC-процедуры оберегают как сервис, так и пользователя от мошенничества. Краткосрочные пределы на перечисление активов до финализации контроля – стандартная практика.
Цифровые барьеры на вход к азартным площадкам обходятся через зеркальные адреса. Рабочие зеркала гарантируют абсолютную возможности базового сервиса. Расчетные транзакции, интерактивный продвижение и льготные схемы функционируют устойчивыми.
Денежная безопасность выражается показателем используемых денежных методов. SSL-криптография, PCI DSS сертификация и дополнительная проверка создают стабильный барьер обороны.
Геймплейная ассортимент проверенных провайдеров предоставляет спины от топовых разработчиков. RTP-коэффициенты, волатильность и расчетные модели подвергаются нейтральную аудит в признанных центрах.
Программы мотивации в профессиональных операторах опираются на прозрачных параметрах активности. Отыгрыш x35-40 считается приемлемым для автомат-бонусов, в то время как стандартные активности идут в расчет с пониженным множителем.
веб-сайт Трип скан
morixo trust guide – Trust info feels reliable, and site navigation is seamless.
Проверенные ресурсы гэмблинг услуг дают клиентам вариант к премиальному времяпрепровождению через тематические порталы, включая п»ї1xBet , которые специально следуют transnational критерии security.
Процедура оформления профиля necessita указания идентификационных параметров через encrypted SSL-протоколы. Букмекеры запрашивают письменное свидетельство совершеннолетия и адреса жительства для исполнения юрисдикционных стандартов.
Многоуровневая authentication является принудительным частью новейших механизмов security. Пользователи обретают SMS-шифры, push-алерты или используют dedicated софт вроде Google Authenticator.
Зеркальные домены решают вопросы региональных блокировок и DDoS-assault. С технической точки зрения копии составляют аналогичные копии базового портала с удержанием функциональности и личных деталей.
Skilled пользователи призывают сохранять обновлённые перечни working копий в сохранённых ссылках обозревателя. Провайдеры отправляют обновления о новых ссылках через почтовые сервисы, Telegram-каналы и mobile apps.
Payment movements через лицензионные сайты покрыты защитными протоколами стандарта банковского области. Получение капитала выполняется единственно на аутентифицированные данные владельца account.
Проверенные операторы азартных сервисов предоставляют игрокам шанс к профессиональному времяпрепровождению через dedicated домены, включая лайки Р±РёСЂ , которые исполняют глобальные критерии конфиденциальности.
Процедура создания аккаунта предполагает заполнения authentication сведений через защищённые SSL-каналы. Операторы запрашивают официальное доказательство возраста и адреса проживания для выполнения legal норм.
Двухэтапная идентификация считается обязательным частью современных платформ надёжности. Клиенты располагают SMS-ключи, push-сообщения или применяют dedicated утилиты по типу Google Authenticator.
Дублирующие адреса устраняют вопросы географических санкций и DDoS-штурмов. Технически дубли формируют дублированные клоны основного ресурса с удержанием возможностей и user информации.
Компетентные клиенты призывают keeping новейшие каталоги функционирующих mirrors в закладках веб-клиента. Букмекеры отправляют обновления о современных доменах через мейл, Telegram-communities и телефонные приложения.
Банковские movements через лицензионные сайты secured шифровальными алгоритмами уровня банковского области. Extraction средств реализуется solely на верифицированные счета хозяина личного кабинета.
Поиск в мире легальных сайтов включает представления продвинутых решений авторизации. Умелые пользователи эксплуатируют Меллстрой регистрация для извлечения новейшей информации о функционирующих адресах.
Алгоритм создания профиля в проверенных организациях содержит комплексную аутентификацию. Актуальные провайдеры внедряют KYC-алгоритмы и AML-нормы. Документооборот занимает от 24 до 72 периодов.
IT решения для преодоления препятствий совершенствуются синхронно с повышением регуляторных инициатив. VPN-инструменты категории premium гарантируют защиту AES-256 и протоколы OpenVPN. Непрерывность коннекта критически актуальна для премиальных раундов.
Альтернативные ресурсы действуют через пространственно размещенные IT ресурсы. CDN-структуры обеспечивают минимальную латентность для европейских пользователей. Программное переключение срабатывает при детекции препятствия основного ресурса.
Экономические операции в официальных зонах соответствуют строгим правилам PCI DSS. Децентрализованные платежи завоевывают актуальность в результате конфиденциальности и скорости обработки.
Планшетные приложения элитных компаний интегрируют биометрическую подтверждение и push-алерты для важных эпизодов. Гибкий дизайн независимо изменяется под настройки экрана.
Актуальные зеркала лицензированных gaming-операторов на казино Килограмм предоставляют беспрерывный соединение к геймерским системам. Система дублирования генерирует идентичные дубликаты основного домена с сохранением всех опций.
Схема открытия счета через резервную ссылку полностью имитирует базовую заявку. Новые клиенты прописывают функционирующий email, создают безопасный секретную комбинацию и фиксируют базовую финансовый инструмент.
Подтверждение аккаунта включает загрузки свидетельств опираясь на KYC-нормам. Снимок ID-карты, подтверждение адреса и банковские сведения проверяются через автоматическую контроль в течение 24-72 ч.
Вход верифицированных участников выполняется через базовую форму с усиленной проверкой. Одноразовые ключи поступают на мессенджер гаджет или электронную почту.
Инструменты пополнительного модуля через дублирующие порталы обеспечивает популярные банковские механизмы. Visa, Mastercard, онлайн счета Skrill, Neteller, виртуальные монеты Bitcoin, Ethereum процессируются с уменьшенными процентами 0-3%.
Игровая каталог дублируется целиком включая барабаны, столовые игры, live-операторов и прогрессивы. RTP-значения, изменчивость и условия отыгрыша поддерживаются точными.
Бонусная механизм действует идентично главному веб-площадке. Welcome-пакеты, бесплатные вращения, refund и VIP-программы включаются программно при выполнении определенных критериев.
Big chances missed, wasteful finishing and conversion failures
Перемещение в секторе официальных сайтов включает представления продвинутых технологий авторизации. Продвинутые пользователи внедряют казино Mellstroy Game для обретения актуальной сведений о активных доменах.
Схема регистрации профиля в надежных операторах подразумевает многоуровневую аутентификацию. Современные поставщики внедряют KYC-системы и AML-правила. Оформление документов составляет от 24 до 72 часов.
Технические решения для минования барьеров совершенствуются параллельно с усилением нормативных шагов. VPN-службы типа premium предоставляют криптографию AES-256 и стандарты OpenVPN. Устойчивость канала кардинально актуальна для привилегированных раундов.
Запасные сайты оперируют через территориально распределенные серверные системы. CDN-комплексы поддерживают быструю латентность для американских пользователей. Автоматическое маршрутизация запускается при распознавании барьера базового портала.
Банковские операции в легальных областях подчиняются жестким нормам PCI DSS. Блокчейн переводы получают популярность вследствие конфиденциальности и оперативности осуществления.
Смартфонные программы премиальных операторов совмещают лицевую идентификацию и push-извещения для принципиальных ситуаций. Настраиваемый облик независимо изменяется под свойства монитора.
Читать далее https://krab6a.at
ZylvoBridge – Logical layout and quick-loading pages, makes browsing effortless.
Хватит инвестировать свой ресурс в мусор. Ваш мотор заведен для чужой поездки.
Вы — раб в своем собственном доме.
-человек генератор дизайн человека;
-генератор тип личности дизайн человека;
-тип личности генератор дизайн человека;
-генератор в хьюман дизайне;
-человек генератор кто это;
проверенные казино на деньги
Тело болит от чужих задач? Выжаты как лимон ради чужих идей. Вы — батарейка для чужих амбиций.
Батарейка в чужом пульте управления.
-генераторы дизайн человека;
-человек генератор дизайн человека;
-дизайн человека генератор;
-человек генератор кто это;
-тип личности генератор дизайн;
Выгорание — это плата за неверность себе. Верните драйв через понимание механики.
Выжатый лимон не может светить.
-тип генератор в дизайне человека;
-генератор тип личности дизайн;
-человек генератор кто это;
-генератор в хьюман дизайне;
-генератор тип личности;
-хьюман дизайн генератор;
-генератор это в дизайне человека;
Ориентирование в сфере официальных платформ требует осознания передовых технологий входа. Квалифицированные клиенты используют РЎСѓРєР° казино для обретения актуальной материалов о действующих URL.
Схема создания профиля в надежных учреждениях подразумевает комплексную верификацию. Новейшие операторы задействуют KYC-алгоритмы и AML-критерии. Документооборот потребляет от 24 до 72 часов.
Цифровые технологии для минования ограничений улучшаются сообща с ужесточением юридических действий. VPN-платформы категории premium дают кодирование AES-256 и протоколы OpenVPN. Непрерывность канала принципиально актуальна для элитных заходов.
Резервные сайты работают через пространственно распределенные цифровые инфраструктуры. CDN-комплексы осуществляют минимальную пинг для европейских геймеров. Цифровое перенаправление запускается при идентификации недоступности базового домена.
Финансовые операции в лицензированных юрисдикциях следуют строгим стандартам PCI DSS. Криптовалютные переводы получают признание из-за скрытности и оперативности выполнения.
Планшетные утилиты элитных провайдеров объединяют физиологическую аутентификацию и push-сообщения для важных событий. Настраиваемый облик автономно адаптируется под свойства дисплея.
Инновационные сервисы беттинг развлечений предоставляют беттерам доступ к премиальному игровому процессу через безопасные ретро казино порталы. Официальная функционирование предполагает исполнения строгих законодательных положений.
Механизм открытия персонального профиля содержит аутентификацию конфиденциальных информации. Администраторы используют детализированные механизмы KYC и AML для предотвращения фродовых платежей.
Программные средства новейших казино базируются на защищенных инфраструктурах с HTTPS технологиями. Локальные запреты вынуждает владельцев организовывать резервные URL.
Параллельные сайты образуют эквивалентные копии центрального платформы с удержанием всех сервисов и параметров. Пользователи получают устойчивый соединение к средствам, развлекательной статистике и клиентским настройкам.
Финансовые действия производятся через интегрированные платежные системы. Границы на депозиты и обналичивания устанавливаются в соотношении с нормативными требованиями и внутренними правилами контроля угроз.
Опытные беттеры предлагают анализировать условия разрешения через регуляторные реестры беттинг ведомств. Престижные индикаторы предусматривают ранги на экспертных сервисах и отзывы действительных пользователей.
Отбор безопасного игрового площадки в нынешних рамках требует тщательного подхода к регулятивному режиму. Квалифицированные игроки знают, что Лаки Бир зеркало содержит новую материалы о действующих операторах.
Схема открытия счета в официальных заведениях предусматривает принудительную подтверждение персональных данных. KYC-нормы обеспечивают как сервис, так и пользователя от мошенничества. Временные рамки на получение активов до завершения валидации – нормальная процедура.
Виртуальные блокировки на связь к азартным площадкам обходятся через альтернативные домены. Рабочие отражения обеспечивают всестороннюю эффективность первичного ресурса. Платежные процедуры, геймплейный результаты и привилегированные схемы поддерживаются постоянными.
Денежная стабильность выражается степенью применяемых финансовых способов. SSL-безопасность, PCI DSS сертификация и усиленная верификация обеспечивают надежный заслон безопасности.
Геймплейная набор легальных заведений включает барабаны от известных провайдеров. RTP-коэффициенты, вариативность и статистические формулы получают нейтральную аудит в одобренных институтах.
Механизмы мотивации в качественных площадках строятся на открытых требованиях отыгрыша. Условия ставок x35-40 считается адекватным для машина-привилегий, в то время как карточные состязания включаются в подсчет с уменьшенным коэффициентом.
Определение безопасного гемблинг оператора в текущих обстоятельствах заставляет тщательного рассмотрения к юридическому положению. Квалифицированные пользователи осознают, что Вавада РІС…РѕРґ предоставляет последнюю информацию о действующих сервисах.
Алгоритм создания аккаунта в проверенных сервисах предусматривает требуемую подтверждение личности. KYC-нормы охраняют как казино, так и участника от махинаций. Краткосрочные границы на изъятие финансов до завершения верификации – типичная методика.
Электронные ограничения на вход к азартным ресурсам решаются через альтернативные порталы. Рабочие зеркала поддерживают абсолютную производительность центрального платформы. Расчетные операции, развлекательный прогресс и поощрительные схемы сохраняются константными.
Капитальная безопасность оценивается уровнем внедренных платежных инструментов. SSL-криптография, PCI DSS лицензирование и расширенная подтверждение устанавливают надежный заслон защиты.
Геймплейная ассортимент официальных сервисов предоставляет автоматы от главных студий. RTP-показатели, дисперсия и расчетные модели испытывают объективную проверку в одобренных организациях.
Системы лояльности в серьезных операторах строятся на четких требованиях проигрыша. Условия ставок x35-40 оценивается нормальным для слот-подарков, в то время как настольные активности засчитываются в подсчет с минимальным процентом.
naturally like your web site however you need to take
a look at the spelling on quite a few of your posts.
A number of them are rife with spelling problems and I find it very
bothersome to inform the reality however I’ll surely come back again.
buy tizanidine without prescription: robaxin medication – muscle relaxer medication
Поиск надежного гемблинг портала требует основательного разбора юридических разрешений. Новые порталы п»ї1хбет обеспечивают игрокам полную сведения о имеющихся допусках.
Процедура создания профиля подразумевает определенное количество принудительных фаз верификации. Представители просят бумаги, подтверждающие индивидуальность и дееспособность. Классический KYC-регламент длится от 24 до 72 промежутков.
Управление банком инициируется с назначения пределов на пополнения. Квалифицированные игроки призывают использовать норму 5% от полного гемблинг бюджета на индивидуальную игру.
Электронные ограничения операторов вынуждают задействовать альтернативные пути. Альтернативы оберегают абсолютную работоспособность базового ресурса, охватывая хронологию переводов и игровой достижения.
Новые банковские методы гарантируют мгновенные депозиты через виртуальные аккаунты. Bitcoin, Ethereum и стейблкоины обеспечивают приватность и минимальные взносы. Длительность осуществления выводов достигает 10-30 минут.
Программы приверженности включают каскадные степени с нарастающим кэшбэком. VIP-консультанты предоставляют эксклюзивные подарки, увеличенные ограничения и преимущественную помощь.
Легальные платформы развлекательных предложений oferuja клиентам шанс к профессиональному игровому процессу через целевые домены, включая п»ї1хбет казино , которые специально выполняют международные критерии конфиденциальности.
Схема открытия счёта подразумевает внесения верификационных данных через шифрованные SSL-линии. Администрация требуют письменное доказательство дееспособности и территории регистрации для выполнения legal правил.
2FA authentication становится необходимым элементом актуальных solutions security. Клиенты обретают SMS-ключи, push-notification или используют специальные утилиты вроде Google Authenticator.
Резервные ссылки ликвидируют сложности territorial санкций и DDoS-нападений. Техническим образом зеркала являют идентичные копии центрального домена с сохранением инструментария и личных сведений.
Skilled участники советуют keeping обновлённые реестры working дублей в favourites веб-клиента. Management передают обновления о новых URL через email, Telegram-каналы и портативные приложения.
Денежные операции через официальные ресурсы гарантированы защитными methods класса банковского индустрии. Получение средств происходит только на подтверждённые карты держателя профиля.
Игровая индустрия демонстрирует интенсивный подъём, манящая тысячи клиентов. Опытные порталы дают качественную условия для игры. Подробную факты о подобных брендах допустимо получить на аква казино .
Лицензирование остаётся приоритетным аспектом селекции площадки. Лицензиаты Олдерни обеспечивают строгий мониторинг расчётных процедур. Каждая лицензированная площадка выполняет периодические инспекции RNG-модулей.
IT свойства современных гемблинг-сайтов предусматривают SSL-шифрование банковского стандарта. Производители цифрового продукта класса Microgaming, NetEnt, Pragmatic Play встраивают продвинутые схемы непредсказуемых величин.
Схема верификации личного кабинета предусматривает представления документов KYC-типа. Документ, свидетельство о заработке, валидация проживания — базовый список для полноценного входа.
Дублирующие ссылки решают барьеры с запретами операторов. Рабочие зеркала корректируются регулярно цифровыми специалистами. Смартфонные софт зачастую функционируют качественнее браузерных модификаций.
Банкролл-менеджмент создаёт продолжительную эффективность развлекательных циклов. Квалифицированные геймеры указывают сокращать величину ставки до 1-2% от итогового фонда.
Поиск в сфере легальных сайтов требует знания передовых способов доступа. Опытные пользователи применяют СЌРЅРѕРјРѕ казино для добывания свежей данных о функционирующих URL.
Алгоритм создания личного кабинета в надежных заведениях охватывает многоуровневую подтверждение. Новейшие организации эксплуатируют KYC-процедуры и AML-стандарты. Документооборот требует от 24 до 72 часов.
Цифровые технологии для избежания ограничений эволюционируют параллельно с укреплением законодательных решений. VPN-решения типа premium предлагают защиту AES-256 и протоколы OpenVPN. Устойчивость связи кардинально актуальна для привилегированных заходов.
Альтернативные домены выполняют задачи через локально разнесенные цифровые системы. CDN-комплексы осуществляют низкую время ответа для азиатских пользователей. Цифровое роутинг срабатывает при обнаружении барьера главного сайта.
Платежные переводы в легальных зонах отвечают конкретным нормам PCI DSS. Цифровые расчеты набирают признание вследствие секретности и оперативности реализации.
Мобильные утилиты лучших брендов включают физиологическую идентификацию и push-извещения для существенных эпизодов. Настраиваемый интерфейс автономно настраивается под настройки монитора.
Передовые операторы игорных услуг дают клиентам доступ к профессиональному азарту через защищенные Lucky Bear зеркало ресурсы. Авторизованная функционирование влечет соблюдения строгих законодательных норм.
Процесс создания персонального счета включает аутентификацию приватных информации. Операторы используют углубленные процедуры KYC и AML для предотвращения незаконных финансовых действий.
Программные средства передовых беттинг площадок базируются на зашифрованных серверах с SSL сертификатами. Региональная блокировка обязывает управляющих организовывать параллельные URL.
Дублирующие порталы являют собой эквивалентные клоны основного ресурса с сохранением всех сервисов и параметров. Беттеры добиваются непрерывный соединение к балансу, развлекательной истории и клиентским параметрам.
Банковские переводы производятся через интегрированные платежные процессоры. Ограничения на взносы и получения назначаются в согласии с законодательными условиями и корпоративными процедурами минимизации опасностей.
Профессиональные клиенты указывают анализировать статус сертификата через государственные реестры игорных комиссий. Престижные критерии содержат места на отраслевых платформах и feedback истинных участников.
https://fantasic.sk/
Определение надежного гемблинг площадки в текущих условиях подразумевает специального анализа к лицензионному уровню. Компетентные геймеры знают, что Вавада РІС…РѕРґ отображает актуальную факты о функционирующих операторах.
Схема записи в лицензированных сервисах содержит принудительную подтверждение персональных данных. KYC-требования охраняют как площадку, так и игрока от мошенничества. Краткосрочные рамки на получение активов до финализации подтверждения – стандартная подход.
Цифровые запреты на доступ к betting сервисам нейтрализуются через дублирующие URL. Доступные отражения обеспечивают стопроцентную работоспособность главного сайта. Банковские транзакции, геймплейный статистика и поощрительные программы функционируют стабильными.
Капитальная надежность характеризуется показателем используемых финансовых систем. SSL-шифрование, PCI DSS сертификация и многоуровневая аутентификация создают защищенный щит охраны.
Геймплейная ассортимент лицензированных сервисов объединяет автоматы от ведущих производителей. RTP-параметры, дисперсия и алгоритмические модели испытывают беспристрастную проверку в авторизованных институтах.
Программы вознаграждения в надежных казино базируются на понятных требованиях ставок. Требования x35-40 характеризуется приемлемым для барабан-привилегий, в то время как традиционные развлечения идут в калькуляцию с пониженным множителем.
ZylavoHub Online – The platform is visually tidy, with intuitive browsing across sections.
интернет Трипскан
ссылка на сайт Трипскан зеркало
взгляните на сайте здесь https://krab6a.at
Гемблинговая область отображает динамичный подъём, манящая массы участников. Квалифицированные площадки дают качественную пространство для беттинга. Детальную материалы о таких брендах реально получить на френдс казино .
Аттестация представляет центральным фактором подбора платформы. Лицензиаты Кюрасао гарантируют тщательный мониторинг валютных действий. Конкретная аккредитованная сайт осуществляет систематические контроли RNG-механизмов.
Программные параметры современных беттинг-платформ содержат SSL-шифрование расчётного категории. Производители программного обеспечения уровня Microgaming, NetEnt, Pragmatic Play встраивают продвинутые модели произвольных величин.
Схема валидации аккаунта подразумевает представления документов KYC-уровня. Паспорт, выписка о средствах, доказательство регистрации — базовый пакет для финального подключения.
Дублирующие порталы устраняют трудности с фильтрацией компаний. Свежие дубли обновляются ежедневно цифровыми командами. Мобильные софт обычно работают устойчивее браузерных модификаций.
Управление банкроллом определяет длительную доходность беттинговых периодов. Профессиональные участники советуют ограничивать сумму бета до 1-2% от полного фонда.
дизайн проект квартиры двухкомнатная квартира 42 кв м дизайн
найти это https://krab6a.at
Нынешние игроки сталкиваются с изобилием технических особенностей при деятельности с лицензированными ресурсами. Экспертные порталы типа казино 1xBet предоставляют свежую материалы о процессах гэмблинговых провайдеров.
Процедура верификации счета охватывает ряд неотъемлемых уровней. Исходная верификация подразумевает отправки свидетельств валидирующих гражданство. Обычный список включает ID, права или международный паспорт.
Цифровая часть открытия счета предполагает эксплуатацию зашифрованного канала и двухуровневой проверки. Продвинутые пользователи подсказывают включать совокупность предложенных возможностей секьюрити.
Запасные домены образуют стопроцентные клоны базового домена с сохранением исчерпывающего функционала. Центральное достоинство состоит в схожести расчетных границ и требований ставочных требований.
Процедура локализации актуальных резервных ссылок основывается на мониторинге экспертных уведомительных сервисов и аффилированных ресурсов. Квалифицированные пользователи используют VPN-сервисы для создания стабильного связи безотносительно от региональных запретов.
Нынешние игроки сталкиваются с изобилием технических особенностей при работе с легальными площадками. Профессиональные платформы типа казино Vavada выдают свежую информацию о работе игорных компаний.
Механизм верификации аккаунта включает комплекс неотъемлемых стадий. Базовая валидация включает отправки справок подтверждающих субъект. Типовой комплект подразумевает свидетельство, права или международный паспорт.
Технологическая компонента оформления содержит задействование безопасного соединения и 2FA. Квалифицированные участники советуют запускать полный набор имеющихся настроек охраны.
Резервные ссылки составляют полные клоны центрального платформы с хранением исчерпывающего арсенала. Ключевое плюс выражается в тождественности денежных границ и параметров вейджера.
Алгоритм поиска рабочих резервных ссылок опирается на мониторинге специализированных уведомительных сервисов и связанных площадок. Продвинутые клиенты эксплуатируют виртуальные частные сети для обеспечения надежного доступа независимо от региональных запретов.
Проверенные площадки развлекательных возможностей дают участникам право к элитному развлечениям через тематические домены, включая Килограмм казино , что следуют международные нормы security.
Схема оформления профиля подразумевает внесения верификационных параметров через безопасные SSL-соединения. Менеджмент просят предоставить нотариальное подтверждение возраста и локации жительства для поддержания правовых требований.
2FA верификация выступает required частью современных систем конфиденциальности. Клиенты имеют SMS-пароли, push-notification или задействуют специализированные программы по типу Google Authenticator.
Mirror URL устраняют трудности географических санкций и DDoS-нападений. Технически дубли являют дублированные dublicates центрального сайта с поддержанием функциональности и пользовательских сведений.
Опытные участники предлагают удерживать свежие базы действующих дублей в избранном веб-клиента. Операторы рассылают updates о fresh URL через email, Telegram-группы и портативные apps.
Банковские movements через лицензионные площадки обеспечены шифровальными протоколами категории банковского сектора. Снятие денег производится только на аутентифицированные реквизиты обладателя личного кабинета.
перейдите на этот сайт трипскан рабочее зеркало
Развлекательная индустрия отображает динамичный подъём, притягивая легионы игроков. Грамотные площадки предлагают надёжную атмосферу для игры. Полную материалы о указанных компаниях можно отыскать на lucky bear казино скачать .
Лицензирование представляет приоритетным фактором определения портала. Контролёры Мальты создают тщательный проверку денежных манипуляций. Каждая официальная площадка проходит плановые ревизии RNG-генераторов.
Компьютерные свойства актуальных гемблинг-сайтов предусматривают SSL-безопасность финансового ранга. Провайдеры цифрового материала наподобие Microgaming, NetEnt, Pragmatic Play интегрируют усовершенствованные системы непредсказуемых величин.
Алгоритм аутентификации профиля предусматривает направления свидетельств KYC-стандарта. Удостоверение, документ о средствах, валидация проживания — стандартный пакет для полноценного доступа.
Дублирующие ссылки устраняют трудности с фильтрацией компаний. Функционирующие альтернативы адаптируются ежедневно программными командами. Смартфонные клиенты часто функционируют стабильнее интернет версий.
Банкролл-менеджмент задаёт стратегическую эффективность беттинговых раундов. Профессиональные пользователи рекомендуют сокращать размер депозита до 1-2% от итогового капитала.
BasePath – Moving through services feels natural and simple.
Отбор достойного азартного портала в актуальных границах требует специального внимания к законному режиму. Опытные игроки знают, что Vavada зеркало включает актуальную данные о действующих провайдерах.
Механизм открытия счета в сертифицированных сервисах предусматривает неизбежную подтверждение персональных данных. KYC-процедуры оберегают как казино, так и участника от мошенничества. Временные лимиты на вывод капитала до финализации подтверждения – типичная система.
Цифровые барьеры на подключение к игровым порталам обходятся через альтернативные URL. Функционирующие клоны поддерживают всестороннюю возможности первичного ресурса. Денежные переводы, развлекательный результаты и поощрительные планы функционируют стабильными.
Денежная надежность определяется уровнем эксплуатируемых финансовых систем. SSL-защита, PCI DSS лицензирование и двухфакторная аутентификация создают защищенный контур ограждения.
Игровая набор лицензированных провайдеров включает машины от известных студий. RTP-показатели, колебания и расчетные принципы претерпевают независимую аудит в одобренных институтах.
Схемы мотивации в достойных заведениях формируются на открытых критериях вейджера. Вейджер x35-40 считается приемлемым для машина-льгот, в то время как настольные игры принимаются в калькуляцию с минимальным процентом.
Отбор безопасного игрового ресурса в актуальных реалиях нуждается повышенного анализа к правовому состоянию. Профессиональные игроки понимают, что Lucky Bear казино демонстрирует новую данные о функционирующих площадках.
Процесс открытия счета в проверенных заведениях предусматривает требуемую валидацию личности. KYC-нормы защищают как заведение, так и клиента от фрода. Кратковременные границы на вывод средств до окончания контроля – обычная методика.
Технические барьеры на вход к развлекательным сайтам устраняются через параллельные ссылки. Рабочие зеркала поддерживают полную функциональность первичного ресурса. Расчетные операции, развлекательный статистика и наградные схемы сохраняются константными.
Денежная безопасность определяется критерием эксплуатируемых финансовых инструментов. SSL-защита, PCI DSS лицензирование и дополнительная верификация создают прочный барьер защиты.
Геймплейная набор легальных сервисов содержит барабаны от ведущих создателей. RTP-значения, дисперсия и алгоритмические системы получают объективную проверку в аккредитованных институтах.
Планы лояльности в профессиональных казино строятся на прозрачных правилах активности. Требования x35-40 считается адекватным для барабан-подарков, в то время как классические забавы учитываются в подсчет с редуцированным множителем.
Set piece goals, dead ball situations and their conversion
official trust site Easy to navigate – Everything looks credible and the trust details are broken down very simply.
no prescription pharmacy
Беттинговая ниша показывает активный прогресс, привлекая тысячи игроков. Профессиональные ресурсы предлагают надёжную условия для игры. Развёрнутую материалы о этих компаниях возможно обнаружить на mad casino .
Лицензирование является основным аспектом отбора сайта. Юрисдикции Кюрасао создают тщательный аудит денежных операций. Всякая сертифицированная платформа подвергается регулярные аудиты RNG-генераторов.
Программные характеристики инновационных гемблинг-сайтов охватывают SSL-безопасность расчётного класса. Создатели виртуального материала наподобие Microgaming, NetEnt, Pragmatic Play подключают комплексные схемы непредсказуемых чисел.
Процесс валидации личного кабинета предполагает представления удостоверений KYC-типа. ID, свидетельство о прибылях, подтверждение регистрации — стандартный набор для итогового подключения.
Резервные порталы исправляют сложности с блокировками операторов. Актуальные альтернативы изменяются каждый день цифровыми командами. Смартфонные приложения нередко оперируют надёжнее браузерных редакций.
Контроль средств устанавливает стратегическую доходность азартных сессий. Экспертные геймеры настаивают ограничивать количество депозита до 1-2% от суммарного бюджета.
Передовые участники встречаются с изобилием системных особенностей при процессах с официальными ресурсами. Тематические сайты типа Vavada казино обеспечивают современную контент о процессах развлекательных организаций.
Механизм аутентификации счета подразумевает ряд требуемых шагов. Начальная подтверждение требует передачи свидетельств подтверждающих личность. Обычный пакет содержит паспорт, лицензию водителя или заграничное удостоверение.
Цифровая составляющая открытия счета предполагает применение безопасного соединения и 2FA. Продвинутые игроки подсказывают инициировать весь комплекс доступных функций обеспечения.
Зеркала являются точные отражения первичного платформы с обеспечением тотального арсенала. Главное плюс заключается в соответствии платежных границ и условий проигрыша.
Механизм поиска активных запасных доменов основывается на наблюдении профильных уведомительных сервисов и партнерских площадок. Квалифицированные участники задействуют туннельные протоколы для гарантирования постоянного соединения вне зависимости от географических ограничений.
Надёжные провайдеры развлекательных опций предоставляют клиентам доступ к элитному времяпрепровождению через целевые домены, включая п»ї1хбет РІС…РѕРґ , которые специально выполняют мировые критерии security.
Процедура оформления профиля требует ввода authentication данных через криптографические SSL-каналы. Операторы требуют письменное свидетельство совершеннолетия и локации регистрации для compliance законодательных стандартов.
Многоуровневая authentication становится принудительным aspect передовых систем надёжности. Игроки обретают SMS-коды, push-алерты или используют специализированные софт в стиле Google Authenticator.
Резервные адреса преодолевают вопросы territorial барьеров и DDoS-штурмов. Технически реплики представляют копийные версии primary ресурса с поддержанием features и индивидуальных сведений.
Опытные клиенты советуют поддерживать новейшие каталоги действующих зеркал в закладках обозревателя. Букмекеры рассылают обновления о новых порталах через почтовые сервисы, Telegram-communities и портативные утилиты.
Финансовые транзакции через лицензионные сайты secured криптографическими протоколами level банковского области. Extraction денег реализуется solely на верифицированные реквизиты обладателя личного кабинета.
Актуальные игроки обталкиваются с множеством технологических аспектов при деятельности с легальными ресурсами. Специализированные сайты типа РЎСѓРєР° казино дают новую контент о функционировании игорных брендов.
Механизм подтверждения профиля включает ряд необходимых стадий. Первичная верификация предполагает передачи документов удостоверяющих индивидуальность. Классический пакет подразумевает удостоверение личности, водительские права или международное ID.
Системная часть оформления включает эксплуатацию SSL-шифрования и двойной авторизации. Профессиональные пользователи советуют запускать совокупность возможных параметров секьюрити.
Зеркала являются полные копии основного домена с удержанием всего функционала. Центральное плюс содержится в соответствии банковских рамок и параметров ставочных требований.
Схема локализации актуальных зеркал базируется на отслеживании экспертных информационных каналов и союзных ресурсов. Продвинутые игроки внедряют туннельные протоколы для предоставления стабильного доступа вне зависимости от региональных ограничений.
на этом сайте трипскан рабочее зеркало
zorivo holdings hub – Holdings are presented clearly with professional, consistent branding.
I know this web page provides quality based
articles or reviews and extra information, is there any other
web site which gives such information in quality?
https://spasmreliefprotocols.com/# tizanidine muscle relaxer
топ 5 проверенных казино
Excellent beat ! I would like to apprentice while you
amend your web site, how can i subscribe for a blog site?
The account helped me a acceptable deal. I had
been tiny bit acquainted of this your broadcast offered bright clear concept
Исследование в области проверенных площадок требует знания передовых методов входа. Продвинутые игроки применяют Лаки Бир официальный сайт для добывания свежей фактов о активных ссылках.
Механизм открытия учетной записи в лицензированных компаниях включает многоуровневую верификацию. Передовые поставщики эксплуатируют KYC-протоколы и AML-стандарты. Бумажная работа потребляет от 24 до 72 часов.
Компьютерные способы для минования барьеров эволюционируют одновременно с укреплением юридических действий. VPN-решения разряда premium дают безопасность AES-256 и стандарты OpenVPN. Непрерывность коннекта критически существенна для элитных игровых периодов.
Запасные адреса выполняют задачи через территориально распределенные IT кластеры. CDN-системы предоставляют минимальную отклик для европейских пользователей. Автоматическое маршрутизация срабатывает при детекции барьера главного сайта.
Платежные операции в официальных территориях подпадают под строгим стандартам PCI DSS. Крипто расчеты приобретают распространение благодаря приватности и динамике осуществления.
Переносные утилиты элитных операторов содержат лицевую авторизацию и push-извещения для принципиальных происшествий. Настраиваемый оформление независимо корректируется под параметры экрана.
Азартная область являет активный расширение, привлекая множество пользователей. Квалифицированные платформы предлагают безопасную атмосферу для пари. Полную материалы о данных компаниях допустимо найти на Vavada казино .
Сертификация остаётся главным аспектом выбора площадки. Лицензиаты Мальты гарантируют строгий аудит финансовых транзакций. Отдельная сертифицированная площадка реализует постоянные аудиты RNG-алгоритмов.
Компьютерные аспекты современных азартных площадок предусматривают SSL-кодирование банковского ранга. Производители цифрового софта уровня Microgaming, NetEnt, Pragmatic Play добавляют усовершенствованные алгоритмы хаотичных величин.
Схема валидации личного кабинета предусматривает направления бумаг KYC-стандарта. Паспорт, свидетельство о финансах, удостоверение прописки — классический перечень для окончательного активации.
Альтернативные адреса устраняют препятствия с цензурой операторов. Рабочие копии корректируются систематически цифровыми специалистами. Карманные софт регулярно функционируют качественнее онлайн редакций.
Управление банкроллом задаёт длительную прибыльность игровых периодов. Опытные беттеры предлагают урезать величину пари до 1-2% от суммарного бюджета.
Современные гемблеры оказываются с препятствием соединения к официальным сайтам. Провайдеры ограничивают базовые домены, но знающие казино Клубника участники осознают о функционировании зеркальных площадок.
Зеркало является полную копию оригинального платформы. Протоколы шифрования сохраняются такими же. Расчётные действия производятся через идентичные системы.
Методика заведения учётной записи через резервный адрес включает классической подтверждения. Сотрудники требуют бумаги для исполнения KYC-правил. Паспортные данные подвергаются комплексную аутентификацию.
Пополнительные пределы на зеркальных площадках равняются базовым требованиям. Низшие взносы поддерживаются постоянными. Накопительные призовые фонды синхронизируются между многочисленными порталами.
Льготные планы работают полноценно на дополнительных ресурсах. Вейджер сохраняет первоначальные показатели. Тайминг проигрывания поддерживается.
Отдел помощи рассматривает вопросы с дополнительных ссылок равнозначно. Интерактивный переписка обеспечивает беспрерывный порядок обслуживания.
RixaroSphere – Smooth browsing experience with a clean, intuitive interface.
производство коробок из картона Картонные упаковки – это маркетинговый инструмент, позволяющий создать яркий и запоминающийся образ бренда. Дизайн, графика и качественная печать превращают обычную коробку в эффективный рекламный носитель, привлекающий внимание и стимулирующий продажи.
Нынешние геймеры оказываются с проблемой связи к сертифицированным порталам. Поставщики фильтруют первичные порталы, но профессиональные РјСЌРґ казино клиенты понимают о присутствии альтернативных сайтов.
Резервная ссылка составляет стопроцентную реплику первичного портала. Средства защиты работают аналогичными. Платёжные операции проходят через идентичные каналы.
Процедура оформления профиля через дополнительный портал содержит стандартной подтверждения. Специалисты просят справки для реализации KYC-норм. Идентификационные данные проходят комплексную подтверждение.
Банковские рамки на альтернативных сайтах равняются стандартным параметрам. Минимальные суммы продолжают неизменными. Увеличивающиеся накопления координируются между разными адресами.
Льготные схемы выполняются всесторонне на параллельных платформах. Коэффициент оборота удерживает базовые показатели. Временные рамки оборота продолжается.
Сервис ассистирования изучает обращения с альтернативных доменов равнозначно. Прямой разговор обеспечивает непрерывный график оперирования.
Актуальные геймеры сталкиваются с изобилием технических тонкостей при процессах с официальными платформами. Тематические ресурсы типа Lucky Bear casino предоставляют современную данные о деятельности гэмблинговых компаний.
Алгоритм валидации кабинета включает ряд принудительных фаз. Первичная подтверждение нуждается загрузки удостоверений удостоверяющих личность. Типовой пакет предполагает паспорт, автоудостоверение или внешний паспорт.
Программная элемент открытия счета содержит использование зашифрованного канала и 2FA. Профессиональные игроки советуют включать весь комплекс представленных параметров защиты.
Зеркала образуют стопроцентные реплики основного ресурса с хранением исчерпывающего набора функций. Ключевое выгода содержится в тождественности расчетных ограничений и критериев ставочных требований.
Схема локализации функционирующих альтернативных адресов строится на наблюдении профессиональных новостных лент и сотрудничающих сайтов. Опытные участники эксплуатируют VPN-сервисы для предоставления стабильного подключения вне зависимости от локальных запретов.
Современные клиенты обталкиваются с множеством технологических нюансов при деятельности с проверенными порталами. Профессиональные ресурсы типа Vavada зеркало поставляют современную материалы о работе гэмблинговых провайдеров.
Процесс аутентификации счета включает множество неотъемлемых шагов. Базовая подтверждение подразумевает предоставления удостоверений верифицирующих персону. Классический комплект включает удостоверение личности, права или международное ID.
Системная составляющая регистрации содержит внедрение криптографической защиты и двухфакторной аутентификации. Профессиональные геймеры советуют включать все представленных опций секьюрити.
Дублирующие порталы образуют абсолютные клоны основного домена с сохранением всего арсенала. Главное достоинство заключается в идентичности банковских пределов и норм проигрыша.
Процедура локализации активных зеркал фундируется на отслеживании профессиональных телеграм-каналов и партнерских ресурсов. Квалифицированные пользователи применяют VPN-сервисы для создания стабильного соединения невзирая от территориальных лимитов.
Excellent pieces. Keep writing such kind of information on your blog.
Im really impressed by your blog.
Hi there, You’ve done an excellent job. I’ll definitely digg it and individually recommend to my friends.
I am confident they will be benefited from
this website.
Just checked out 87aapp, and I’m impressed with the variety of options. Looks like a solid place to try your luck! Head over to: 87aapp
79xlogin made getting set up a breeze. No complicated steps, just straight to the fun. Thanks for keeping it simple! Visit: 79xlogin
Downloaded the 777pubapk and it’s super convenient to play on my phone. No lag, good graphics. Definitely recommended for mobile gaming. Get it here: 777pubapk
Поиск проверенного betting портала в современных рамках нуждается тщательного анализа к лицензионному статусу. Компетентные клиенты знают, что enomo casino демонстрирует новую информацию о активных ресурсах.
Процедура создания аккаунта в проверенных площадках предусматривает необходимую валидацию личности. KYC-правила гарантируют как площадку, так и клиента от обмана. Переходные ограничения на перечисление финансов до закрытия контроля – типичная подход.
Виртуальные блокировки на доступ к гемблинг сервисам решаются через альтернативные домены. Активные отражения сохраняют полную возможности базового сайта. Банковские процедуры, игровой прогресс и бонусные схемы остаются константными.
Финансовая надежность определяется критерием используемых денежных способов. SSL-безопасность, PCI DSS валидация и двухфакторная проверка создают стабильный периметр защиты.
Интерактивная коллекция лицензированных площадок охватывает машины от топовых производителей. RTP-параметры, изменчивость и алгоритмические системы подвергаются внешнюю контроль в одобренных лабораториях.
Механизмы лояльности в достойных операторах строятся на ясных правилах проигрыша. Проигрыш x35-40 характеризуется справедливым для слот-подарков, в то время как стандартные развлечения засчитываются в зачет с минимальным фактором.
Поиск надежного азартного ресурса в текущих границах подразумевает специального изучения к юридическому положению. Квалифицированные клиенты осознают, что п»ї1хбет РІС…РѕРґ демонстрирует свежую материалы о активных площадках.
Процедура оформления профиля в легальных платформах предусматривает неизбежную верификацию персональных данных. KYC-требования оберегают как казино, так и клиента от обмана. Краткосрочные пределы на изъятие денег до закрытия валидации – стандартная практика.
Виртуальные барьеры на доступ к betting сервисам обходятся через дублирующие адреса. Действующие отражения предоставляют стопроцентную работоспособность главного сайта. Платежные движения, развлекательный достижения и поощрительные программы остаются устойчивыми.
Экономическая защищенность измеряется критерием эксплуатируемых финансовых способов. SSL-безопасность, PCI DSS лицензирование и дополнительная идентификация устанавливают надежный щит обороны.
Геймплейная ассортимент легальных сервисов охватывает слоты от топовых разработчиков. RTP-индексы, вариативность и математические схемы претерпевают беспристрастную сертификацию в одобренных лабораториях.
Механизмы поощрения в профессиональных операторах базируются на четких требованиях активности. Отыгрыш x35-40 расценивается адекватным для слот-подарков, в то время как карточные развлечения учитываются в калькуляцию с минимальным показателем.
Отбор проверенного гемблинг заведения заставляет глубокого анализа правовых сертификатов. Актуальные порталы Вавада дают геймерам абсолютную данные о текущих аккредитациях.
Процесс оформления счета подразумевает различные ключевых стадий подтверждения. Администраторы истребуют документы, доказывающие персону и возраст. Типовой KYC-процесс занимает от 24 до 72 часов.
Финансовое планирование начинается с определения рамок на пополнения. Компетентные геймеры настаивают внедрять норму 5% от полного азартного капитала на единичную партию.
Программные ограничения поставщиков заставляют эксплуатировать запасные пути. Зеркала сохраняют полную активность базового портала, содержа летопись операций и развлекательный продвижение.
Современные расчетные способы поддерживают скоростные депозиты через блокчейн аккаунты. Bitcoin, Ethereum и фиксированные активы предоставляют тайность и символические сборы. Время осуществления снятий составляет 10-30 минут.
Программы приверженности включают каскадные уровни с возрастающим возвратом. VIP-представители предлагают уникальные поощрения, увеличенные пределы и ускоренную поддержку.
Перемещение в сфере проверенных ресурсов нуждается владения передовых решений подключения. Продвинутые игроки внедряют лаки Р±РёСЂ казино для получения релевантной данных о активных доменах.
Процедура оформления личного кабинета в лицензированных учреждениях содержит многоуровневую подтверждение. Актуальные компании задействуют KYC-системы и AML-требования. Документооборот составляет от 24 до 72 промежутков.
Цифровые технологии для прохождения ограничений совершенствуются сообща с укреплением законодательных действий. VPN-сервисы категории premium обеспечивают безопасность AES-256 и протоколы OpenVPN. Надежность соединения критически актуальна для привилегированных игровых периодов.
Зеркальные платформы действуют через территориально рассредоточенные компьютерные мощности. CDN-структуры осуществляют низкую пинг для азиатских клиентов. Системное редирект инициируется при распознавании ограничения основного адреса.
Финансовые манипуляции в проверенных зонах следуют конкретным критериям PCI DSS. Блокчейн переводы получают актуальность из-за конфиденциальности и быстроте выполнения.
Портативные программы топовых провайдеров содержат физиологическую подтверждение и push-уведомления для существенных происшествий. Модифицируемый дизайн самостоятельно адаптируется под характеристики дисплея.
http://zavalinka.listbb.ru/viewtopic.php?f=2&t=5385
Игровая область являет быстрый подъём, манящая множество участников. Грамотные площадки обеспечивают качественную пространство для развлечений. Исчерпывающую материалы о таких компаниях возможно получить на п»ї1xBet казино .
Аккредитация представляет главным элементом отбора сайта. Контролёры Великобритании создают серьёзный аудит расчётных операций. Любая сертифицированная портал осуществляет систематические проверки RNG-генераторов.
IT свойства современных игорных домов охватывают SSL-защиту расчётного уровня. Поставщики программного материала наподобие Microgaming, NetEnt, Pragmatic Play интегрируют сложные системы хаотичных параметров.
Схема проверки учётной записи подразумевает предоставления свидетельств KYC-класса. Паспорт, документ о финансах, подтверждение адреса — классический пакет для полноценного авторизации.
Резервные адреса исправляют барьеры с фильтрацией провайдеров. Действующие альтернативы адаптируются регулярно цифровыми службами. Мобильные приложения обычно действуют качественнее онлайн вариантов.
Финансовая дисциплина создаёт перспективную доходность развлекательных партий. Грамотные участники настаивают лимитировать количество ставки до 1-2% от суммарного фонда.
Serie A live scores, Italian football from Inter Milan Juventus and AC Milan
Действующие резервные адреса надежных игорных заведений на Вавада казино дают постоянный доступ к азартным платформам. Система дублирования формирует эквивалентные копии основного портала с поддержанием всех возможностей.
Схема регистрации через mirror-сайт полностью воспроизводит базовую заявку. Начинающие пользователи указывают рабочий email, создают защищенный шифр и устанавливают операционную курренси.
Подтверждение профиля требует представления справок согласно KYC-нормам. Снимок водительских прав, доказательство места жительства и финансовые данные контролируются системой программную проверку в течение 24-72 часов.
Авторизация верифицированных клиентов выполняется через стандартную форму с усиленной проверкой. Сессионные ключи отправляются на мобильный девайс или мейл.
Инструменты финансового раздела через mirror-сайты поддерживает актуальные расчетные механизмы. Visa, Mastercard, веб балансы Skrill, Neteller, цифровые активы Bitcoin, Ethereum реализуются с уменьшенными платежами 0-3%.
Гемблинг каталог дублируется на сто процентов включая барабаны, традиционные игры, live-крупье и джекпоты. RTP-параметры, вариативность и условия отыгрыша поддерживаются точными.
Подарочная схема выполняется похоже центральному домену. Welcome-бандлы, даровые прокруты, денежный возврат и VIP-схемы активируются машинально при реализации фиксированных требований.
Активные альтернативные домены официальных казино на аква казино создают стабильный подключение к геймерским платформам. Методика зеркалирования создает идентичные копии центрального ресурса с удержанием всех механизмов.
Процедура регистрации через дублирующий портал на сто процентов воспроизводит главную форму. Начинающие участники прописывают валидный email, создают сложный код доступа и выбирают игровую финансовый инструмент.
Верификация счета предполагает загрузки бумаг в соответствии с KYC-нормам. Скан национального документа, подтверждение проживания и карточные данные подвергаются алгоритмическую анализ в течение 24-72 периодов.
Вход действующих игроков выполняется через обычную интерфейс с многоступенчатой аутентификацией. Временные шифры доставляются на телефонный аппарат или мейл.
Механизмы денежного блока через резервные ссылки включает распространенные финансовые сервисы. Visa, Mastercard, онлайн счета Skrill, Neteller, crypto Bitcoin, Ethereum выполняются с сокращенными комиссиями 0-3%.
Игровая библиотека повторяется на сто процентов включая автоматы, настольные забавы, live-крупье и прогрессивы. RTP-показатели, колебания и ставочные требования поддерживаются такими же.
Подарочная механизм работает схоже центральному домену. Welcome-предложения, безвозмездные спины, refund и VIP-схемы включаются машинально при исполнении прописанных условий.
Выбор качественного игрового ресурса в сегодняшних условиях заставляет особого подхода к регулятивному положению. Профессиональные участники знают, что ретро казино содержит современную данные о действующих провайдерах.
Алгоритм создания аккаунта в лицензированных сервисах включает необходимую верификацию документов. KYC-правила обеспечивают как площадку, так и участника от мошенничества. Краткосрочные ограничения на снятие средств до окончания контроля – обычная подход.
Технические барьеры на доступ к игровым ресурсам преодолеваются через резервные порталы. Доступные отражения обеспечивают тотальную работоспособность основного ресурса. Денежные переводы, геймплейный результаты и бонусные системы продолжают неизменными.
Материальная безопасность выражается степенью используемых финансовых инструментов. SSL-шифрование, PCI DSS аттестация и двухфакторная идентификация создают прочный щит охраны.
Геймплейная коллекция сертифицированных заведений содержит барабаны от лидирующих студий. RTP-индексы, волатильность и расчетные модели испытывают внешнюю сертификацию в признанных центрах.
Планы вознаграждения в достойных заведениях базируются на ясных правилах активности. Условия ставок x35-40 характеризуется справедливым для слот-подарков, в то время как классические состязания принимаются в расчет с редуцированным множителем.
VixaroShopHub – Smooth checkout, fast arrival, and no issues with the products.
line resource portal – Clear presentation of line services with a user-friendly layout.
Лицензионные операторы развлекательных опций предоставляют геймерам шанс к качественному развлечениям через целевые платформы, включая Вавада официальный сайт , что следуют глобальные регламенты безопасности.
Механизм активации включает внесения идентификационных данных через криптографические SSL-каналы. Букмекеры demanded документальное доказательство возраста и локации проживания для поддержания законодательных правил.
Многоуровневая аутентификация считается принудительным составляющей современных solutions надёжности. Пользователи имеют SMS-ключи, push-notification или используют специальные программы типа Google Authenticator.
Зеркальные домены ликвидируют сложности географических санкций и DDoS-атак. Технически реплики составляют дублированные клоны базового ресурса с сохранением инструментария и индивидуальных сведений.
Экспертные клиенты предлагают хранить новейшие базы активных дублей в закладках веб-клиента. Букмекеры доставляют updates о актуальных порталах через электронную почту, Telegram-communities и мобильные утилиты.
Банковские транзакции через лицензионные ресурсы обеспечены cryptographic methods стандарта банковского направления. Вывод денег реализуется лишь на проверенные данные собственника личного кабинета.
Навигация в сфере официальных платформ нуждается владения современных инструментов авторизации. Продвинутые клиенты внедряют Mellstroy Game казино для добывания современной сведений о оперативных доменах.
Процедура формирования личного кабинета в надежных компаниях подразумевает многоуровневую верификацию. Продвинутые организации применяют KYC-алгоритмы и AML-стандарты. Документооборот требует от 24 до 72 временных отрезков.
Технические инструменты для обхода препятствий развиваются параллельно с усилением юридических действий. VPN-сервисы типа premium предоставляют шифрование AES-256 и протоколы OpenVPN. Стабильность соединения fundamentally необходима для высокоролловых раундов.
Резервные адреса выполняют задачи через пространственно разнесенные компьютерные инфраструктуры. CDN-сети предоставляют низкую задержку для американских игроков. Системное редирект запускается при выявлении ограничения главного сайта.
Экономические манипуляции в сертифицированных юрисдикциях соответствуют конкретным нормам PCI DSS. Цифровые расчеты приобретают признание благодаря скрытности и динамике реализации.
Портативные клиенты премиальных организаций объединяют отпечатковую авторизацию и push-алерты для принципиальных ситуаций. Гибкий внешний вид независимо подстраивается под параметры экрана.
XylixGuide – Organized sections with fast performance, site is very user-friendly.
Crossing accuracy, wide players and their delivery statistics
нажмите здесь https://krab6a.at/
Новейшие геймеры имеют дело с набором системных деталей при процессах с лицензированными порталами. Экспертные ресурсы типа Клубника казино предоставляют релевантную информацию о деятельности азартных организаций.
Система подтверждения профиля включает множество обязательных шагов. Исходная проверка включает загрузки удостоверений валидирующих субъект. Классический пакет предполагает свидетельство, лицензию водителя или международное ID.
Техническая элемент записления подразумевает использование криптографической защиты и двухуровневой проверки. Профессиональные игроки рекомендуют инициировать весь комплекс возможных опций защиты.
Зеркала формируют точные дубликаты основного домена с поддержанием тотального возможностей. Главное преимущество содержится в подобии платежных границ и условий отыгрыша.
Алгоритм выявления действующих дублирующих порталов строится на контроле специализированных телеграм-каналов и партнерских порталов. Продвинутые игроки задействуют виртуальные частные сети для обеспечения постоянного связи безотносительно от территориальных барьеров.
Передовые участники пересекаются с множеством системных тонкостей при работе с проверенными платформами. Профильные порталы типа п»ї1xBet казино поставляют новую данные о процессах азартных организаций.
Процедура подтверждения аккаунта охватывает ряд принудительных уровней. Исходная подтверждение нуждается отправки бумаг удостоверяющих персону. Привычный список содержит документ, водительские права или международное ID.
Программная составляющая записления охватывает внедрение безопасного соединения и двухуровневой проверки. Продвинутые клиенты предлагают активировать полный набор возможных функций секьюрити.
Дублирующие порталы составляют стопроцентные реплики базового платформы с хранением полного арсенала. Основное бонус выражается в идентичности финансовых лимитов и норм проигрыша.
Схема локализации актуальных резервных ссылок фундируется на отслеживании профильных уведомительных сервисов и партнерских платформ. Экспертные геймеры используют туннельные протоколы для гарантирования постоянного подключения вне зависимости от региональных барьеров.
Поиск в пространстве официальных площадок подразумевает представления продвинутых способов подключения. Опытные участники внедряют лаки Р±РёСЂ казино для извлечения новейшей материалов о оперативных адресах.
Механизм регистрации профиля в официальных учреждениях включает детальную аутентификацию. Передовые организации внедряют KYC-механизмы и AML-стандарты. Документооборот занимает от 24 до 72 часов.
IT способы для прохождения препятствий совершенствуются сообща с ужесточением нормативных действий. VPN-сервисы уровня premium обеспечивают кодирование AES-256 и технологии OpenVPN. Непрерывность связи критически важна для элитных партий.
Дублирующие сайты оперируют через регионально расположенные технические системы. CDN-сети поддерживают минимальную пинг для международных участников. Программное редирект запускается при распознавании ограничения первичного домена.
Денежные операции в сертифицированных территориях подчиняются жестким критериям PCI DSS. Криптовалютные операции получают востребованность по причине конфиденциальности и скорости обработки.
Мобильные софт топовых провайдеров объединяют биометрическую аутентификацию и push-уведомления для критических ситуаций. Модифицируемый дизайн автономно адаптируется под особенности панели.
Актуальные гемблеры натыкаются с проблемой соединения к сертифицированным ресурсам. Поставщики ограничивают главные URL, но знающие п»ї1xBet казино пользователи учитывают о функционировании зеркальных площадок.
Дополнительный домен составляет идентичную копию основного сайта. Средства защиты функционируют такими же. Денежные транзакции проходят через равнозначные сервисы.
Методика оформления профиля через параллельный ссылку предполагает классической аутентификации. Операторы выясняют документы для реализации KYC-правил. Индивидуальные параметры выполняют комплексную валидацию.
Пополнительные рамки на альтернативных платформах идентичны основным спецификациям. Наименьшие вклады функционируют постоянными. Растущие банки синхронизируются между разными ресурсами.
Льготные системы работают завершённо на параллельных порталах. Требования по обороту удерживает первоначальные цифры. Тайминг оборота продолжается.
Сервис обслуживания изучает запросы с альтернативных доменов аналогично. Интерактивный общение осуществляет непрерывный формат функционирования.
выберите ресурсы Трипскан
Действующие резервные адреса проверенных казино на Mellstroy Game зеркало обеспечивают непрерывный вход к азартным платформам. Система дублирования создает аналогичные клоны основного ресурса с сохранением всех инструментов.
Схема регистрации через зеркало абсолютно дублирует главную шаблон. Дебютные клиенты заполняют рабочий email, генерируют защищенный пароль и устанавливают основную курренси.
Валидация счета требует отправки свидетельств следуя KYC-требованиям. Снимок водительских прав, свидетельство места жительства и денежные реквизиты проходят машинную контроль в течение 24-72 часа.
Авторизация зарегистрированных игроков выполняется через классическую интерфейс с усиленной валидацией. Одноразовые ключи поступают на смс устройство или почтовый ящик.
Опции пополнительного компонента через резервные ссылки обеспечивает актуальные банковские механизмы. Visa, Mastercard, электронные кошельки Skrill, Neteller, цифровые активы Bitcoin, Ethereum выполняются с минимальными взносами 0-3%.
Gaming каталог копируется целиком включая spinning games, классические активности, live-операторов и накопительные призы. RTP-показатели, изменчивость и вейджер фиксируются такими же.
Бонусная механизм функционирует подобно главному домену. Welcome-предложения, бесплатные вращения, денежный возврат и VIP-планы активируются машинально при достижении определенных параметров.
Актуальные игроки оказываются с препятствием входа к сертифицированным порталам. Организации фильтруют первичные URL, но знающие Лаки Бир сайт посетители учитывают о наличии альтернативных ресурсов.
Дополнительный домен образует точную отображение основного ресурса. Системы безопасности сохраняются неизменными. Платёжные транзакции реализуются через те же сервисы.
Технология открытия счёта через дополнительный ресурс содержит обычной валидации. Сотрудники просят бумаги для исполнения KYC-правил. Личные характеристики подвергаются усиленную подтверждение.
Пополнительные границы на зеркальных ресурсах равняются главным условиям. Наименьшие взносы сохраняются постоянными. Увеличивающиеся джекпоты согласовываются между различными адресами.
Премиальные системы работают полноценно на параллельных ресурсах. Коэффициент оборота поддерживает стартовые показатели. Тайминг использования сохраняется.
Департамент обслуживания решает запросы с дополнительных ресурсов таким же способом. Онлайн общение гарантирует постоянный график функционирования.
Инновационные платформы игорных развлечений предоставляют беттерам вход к элитному развлечениям через сертифицированные лаки Р±РёСЂ казино платформы. Официальная операционная активность подразумевает исполнения четких правовых стандартов.
Процесс активации клиентского учетной записи охватывает верификацию индивидуальных информации. Регуляторы используют расширенные алгоритмы KYC и AML для исключения мошеннических платежей.
Технические средства инновационных игорных домов базируются на защищенных серверах с криптографическими алгоритмами. Региональная блокировка обязывает владельцев внедрять альтернативные ссылки.
Резервные домены формируют идентичные версии первичного портала с обеспечением всех сервисов и показателей. Клиенты добиваются беспрепятственный соединение к капиталу, беттинг данным и пользовательским опциям.
Банковские процедуры проходят через подключенные денежные шлюзы. Рамки на пополнения и обналичивания назначаются в гармонии с нормативными критериями и собственными регламентами риск-менеджмента.
Опытные клиенты предлагают отслеживать ситуацию авторизации через официальные базы данных беттинг органов. Репутационные критерии содержат ранги на профильных ресурсах и оценки действительных пользователей.
1вин о деньги пополнение 1вин о деньги пополнение
Определение проверенного азартного заведения в актуальных обстоятельствах требует особого изучения к законному уровню. Опытные пользователи знают, что lucky bear казино отображает современную информацию о активных провайдерах.
Процедура открытия счета в легальных площадках включает неизбежную верификацию удостоверения. KYC-правила охраняют как площадку, так и игрока от фрода. Временные границы на изъятие финансов до финализации валидации – нормальная подход.
Программные препятствия на вход к азартным ресурсам нейтрализуются через резервные домены. Доступные зеркала гарантируют тотальную функциональность центрального сайта. Платежные операции, игровой продвижение и привилегированные программы поддерживаются стабильными.
Финансовая стабильность выражается критерием задействованных платежных систем. SSL-криптография, PCI DSS валидация и двухфакторная аутентификация обеспечивают надежный контур безопасности.
Интерактивная ассортимент проверенных операторов предоставляет спины от топовых производителей. RTP-индексы, вариативность и математические схемы претерпевают независимую сертификацию в аккредитованных лабораториях.
Программы мотивации в качественных заведениях опираются на открытых требованиях проигрыша. Проигрыш x35-40 считается справедливым для барабан-льгот, в то время как карточные развлечения принимаются в калькуляцию с минимальным показателем.
Bundesliga livescore today, German football with Bayern Munich and Dortmund updates
Актуальные порталы гемблинг развлечений обеспечивают беттерам возможность к премиальному беттингу через защищенные Lucky Bear сайты. Авторизованная бизнес влечет учета четких законодательных стандартов.
Система открытия персонального аккаунта включает валидацию конфиденциальных показателей. Провайдеры внедряют углубленные системы KYC и AML для исключения нарушающих операций.
Цифровые средства передовых гемблинг платформ базируются на надежных облачных системах с шифровальными протоколами. Региональная блокировка принуждает провайдеров разрабатывать альтернативные домены.
Дублирующие ресурсы являют собой идентичные репликации главного сайта с поддержанием всех возможностей и данных. Клиенты получают непрерывный соединение к капиталу, развлекательной данным и личным конфигурациям.
Денежные процедуры осуществляются через синхронизированные расчетные шлюзы. Границы на взносы и получения регулируются в согласии с нормативными условиями и собственными регламентами управления рисками.
Квалифицированные клиенты советуют контролировать условия разрешения через контролирующие списки гемблинг организаций. Имиджевые индикаторы охватывают позиции на экспертных ресурсах и мнения подлинных пользователей.
Передовые участники натыкаются с препятствием связи к проверенным площадкам. Организации закрывают базовые URL, но профессиональные п»ї1хбет официальный сайт пользователи помнят о доступности альтернативных сайтов.
Параллельный портал образует точную реплику основного платформы. Криптографические алгоритмы работают идентичными. Расчётные операции проходят через аналогичные механизмы.
Технология создания аккаунта через альтернативный ресурс содержит стандартной подтверждения. Администраторы запрашивают документы для исполнения KYC-стандартов. Персональные информация реализуют комплексную подтверждение.
Пополнительные границы на альтернативных ресурсах идентичны главным параметрам. Стартовые взносы функционируют стабильными. Увеличивающиеся выигрышные пулы координируются между всеми доменами.
Премиальные программы работают всесторонне на альтернативных сайтах. Требования по обороту обеспечивает первоначальные параметры. Период действия реализации продолжается.
Служба обслуживания обрабатывает тикеты с резервных порталов сходным образом. Прямой переписка поддерживает беспрерывный расписание работы.
爱亦凡海外版,专为华人打造的高清视频平台,支持全球加速观看。
http://delphi.larsbo.org/user/Insciptonxbet
ZylavoNetwork – Pages feel cohesive, and navigation flows naturally.
Выбор надежного азартного оператора в нынешних границах заставляет повышенного подхода к регулятивному состоянию. Опытные пользователи знают, что Голд казино демонстрирует свежую данные о функционирующих ресурсах.
Механизм записи в лицензированных платформах охватывает требуемую аутентификацию личности. KYC-стандарты гарантируют как площадку, так и пользователя от махинаций. Промежуточные пределы на вывод капитала до выполнения проверки – нормальная подход.
Технические запреты на вход к развлекательным площадкам нейтрализуются через альтернативные домены. Функционирующие клоны гарантируют абсолютную возможности первичного сервиса. Финансовые транзакции, азартный статистика и льготные планы остаются константными.
Денежная гарантированность определяется качеством внедренных банковских способов. SSL-шифрование, PCI DSS валидация и расширенная верификация создают безопасный барьер обороны.
Развлекательная каталог легальных заведений включает барабаны от ведущих разработчиков. RTP-коэффициенты, изменчивость и алгоритмические формулы получают внешнюю сертификацию в утвержденных институтах.
Программы мотивации в качественных заведениях опираются на четких требованиях вейджера. Отыгрыш x35-40 считается разумным для барабан-льгот, в то время как настольные забавы включаются в калькуляцию с пониженным коэффициентом.
Игровая индустрия демонстрирует интенсивный подъём, манящая легионы участников. Квалифицированные порталы предоставляют безопасную обстановку для ставок. Исчерпывающую сведения о подобных организациях доступно найти на казино Меллстрой .
Аккредитация выступает приоритетным аспектом выбора платформы. Лицензиаты Мальты обеспечивают качественный мониторинг финансовых транзакций. Конкретная аккредитованная портал подвергается периодические ревизии RNG-генераторов.
Компьютерные аспекты новейших беттинг-платформ предусматривают SSL-защиту финансового класса. Разработчики цифрового продукта класса Microgaming, NetEnt, Pragmatic Play подключают продвинутые системы случайных значений.
Процедура проверки счёта требует представления удостоверений KYC-формата. Свидетельство, свидетельство о прибылях, валидация проживания — стандартный комплект для полноценного авторизации.
Параллельные ссылки ликвидируют трудности с цензурой операторов. Действующие копии изменяются ежедневно техническими службами. Портативные утилиты нередко действуют качественнее браузерных форматов.
Контроль средств задаёт перспективную результативность игровых раундов. Квалифицированные пользователи настаивают сокращать размер вейджера до 1-2% от суммарного капитала.
Надёжные платформы гэмблинг предложений oferuja пользователям шанс к качественному азартному досугу через dedicated платформы, включая винити казино , которые специально соблюдают общепринятые стандарты безопасности.
Процедура открытия счёта требует указания идентификационных параметров через безопасные SSL-connection. Провайдеры запрашивают нотариальное удостоверение age verification и региона регистрации для compliance законодательных правил.
2FA верификация является обязательным компонентом современных систем надёжности. Игроки обретают SMS-пароли, push-сообщения или задействуют специальные tools типа Google Authenticator.
Дублирующие ссылки решают трудности territorial санкций и DDoS-assault. Техническим образом дубли формируют тождественные версии центрального портала с сохранением features и пользовательских сведений.
Компетентные игроки предлагают сохранять актуальные базы активных копий в favourites веб-клиента. Операторы доставляют updates о новых порталах через e-mail, Telegram-группы и телефонные утилиты.
Платёжные movements через проверенные ресурсы покрыты криптографическими алгоритмами level банковского направления. Получение денег реализуется только на validated данные обладателя профиля.
Передовые геймеры встречаются с сложностью подключения к сертифицированным сайтам. Операторы ограничивают главные ссылки, но грамотные казино Лаки Бир игроки учитывают о существовании резервных площадок.
Параллельный портал составляет точную воспроизведение базового площадки. SSL-сертификаты работают равнозначными. Платёжные действия производятся через идентичные каналы.
Методика оформления профиля через альтернативный ссылку содержит классической валидации. Сотрудники выясняют документы для выполнения KYC-стандартов. Персональные сведения реализуют усиленную проверку.
Пополнительные пределы на резервных площадках совпадают главным параметрам. Наименьшие беты поддерживаются постоянными. Растущие банки объединяются между разными адресами.
Бонусные механизмы оперируют завершённо на параллельных ресурсах. Требования по обороту удерживает базовые величины. Временные рамки проигрывания поддерживается.
Служба помощи анализирует тикеты с резервных адресов таким же способом. Мгновенный диалог поддерживает постоянный режим работы.
топ 5 реальных казино
vavada bonus za prvu uplatu kod http://vavada2009.help/
Актуальные бетторы попадают с проблемой соединения к проверенным сайтам. Поставщики запрещают главные домены, но опытные Lucky Bear клиенты понимают о доступности альтернативных порталов.
Резервная ссылка образует абсолютную дубликат оригинального платформы. SSL-сертификаты поддерживаются такими же. Расчётные операции выполняются через те же механизмы.
Технология заведения учётной записи через зеркальный портал содержит привычной подтверждения. Администраторы требуют удостоверения для осуществления KYC-правил. Идентификационные сведения подвергаются многоуровневую проверку.
Пополнительные рамки на альтернативных платформах аналогичны стандартным характеристикам. Наименьшие вклады сохраняются фиксированными. Увеличивающиеся джекпоты объединяются между разными порталами.
Льготные планы функционируют полноценно на зеркальных порталах. Множитель ставок поддерживает базовые значения. Срок активности проигрывания продолжается.
Отдел ассистирования изучает вопросы с резервных ресурсов идентично. Интерактивный переписка поддерживает беспрерывный режим оперирования.
Отбор проверенного развлекательного портала заставляет основательного рассмотрения юридических документов. Современные платформы Лаки Бир сайт обеспечивают геймерам безусловную данные о имеющихся санкциях.
Процесс открытия аккаунта подразумевает несколько необходимых шагов проверки. Владельцы запрашивают бумаги, устанавливающие идентичность и зрелость. Обычный KYC-механизм продолжается от 24 до 72 периодов.
Финансовое планирование запускается с назначения рамок на пополнения. Компетентные игроки предлагают эксплуатировать закон 5% от совокупного гемблинг капитала на единичную игру.
Электронные ограничения поставщиков вынуждают применять дополнительные пути. Дубликаты удерживают стопроцентную работоспособность центрального площадки, содержа журнал переводов и азартный прогресс.
Передовые расчетные сервисы обеспечивают оперативные вклады через электронные хранилища. Bitcoin, Ethereum и фиксированные активы предоставляют тайность и крошечные взносы. Срок обработки снятий насчитывает 10-30 минут.
Алгоритмы преданности охватывают каскадные статусы с увеличивающимся возвратом. VIP-представители обеспечивают эксклюзивные поощрения, повышенные ограничения и первоочередную сервис.
Беттинговая сфера представляет динамичный прогресс, притягивая множество геймеров. Экспертные площадки дают стабильную обстановку для пари. Подробную сведения о указанных операторах реально получить на лайки Р±РёСЂ казино .
Аттестация составляет главным критерием селекции площадки. Контролёры Олдерни обеспечивают строгий мониторинг денежных процедур. Конкретная легальная ресурс выполняет периодические проверки RNG-алгоритмов.
Технические параметры актуальных игорных домов содержат SSL-шифрование финансового уровня. Провайдеры цифрового софта уровня Microgaming, NetEnt, Pragmatic Play интегрируют многоуровневые схемы непредсказуемых показателей.
Схема валидации личного кабинета подразумевает подачи удостоверений KYC-типа. Удостоверение, свидетельство о средствах, подтверждение проживания — базовый пакет для завершённого активации.
Альтернативные домены устраняют препятствия с запретами операторов. Свежие копии адаптируются систематически компьютерными службами. Карманные приложения регулярно действуют лучше интернет версий.
Финансовая дисциплина задаёт долгосрочную результативность игровых периодов. Грамотные игроки рекомендуют ограничивать объём пари до 1-2% от итогового капитала.
Подбор проверенного гемблинг портала в нынешних рамках предполагает тщательного рассмотрения к правовому режиму. Компетентные клиенты знают, что казино лова предоставляет современную факты о доступных операторах.
Процедура регистрации в лицензированных сервисах предусматривает принудительную подтверждение идентичности. KYC-правила охраняют как оператора, так и геймера от махинаций. Переходные ограничения на перечисление денег до завершения подтверждения – обычная практика.
Программные ограничения на доступ к гемблинг сайтам преодолеваются через резервные URL. Функционирующие клоны предоставляют абсолютную функциональность центрального ресурса. Банковские переводы, азартный продвижение и бонусные программы продолжают постоянными.
Капитальная защищенность определяется уровнем эксплуатируемых платежных инструментов. SSL-шифрование, PCI DSS валидация и двухфакторная верификация создают безопасный периметр защиты.
Интерактивная набор сертифицированных операторов включает автоматы от известных студий. RTP-коэффициенты, дисперсия и расчетные системы испытывают внешнюю контроль в аккредитованных институтах.
Механизмы лояльности в достойных казино строятся на четких требованиях отыгрыша. Вейджер x35-40 расценивается нормальным для барабан-поощрений, в то время как традиционные развлечения идут в счет с минимальным процентом.
Angels Bail Bonds Costa Mesa
769 Baker St,
Costa Mesa, СA 92626, United Ѕtates
Bookmarks (https://www.protopage.com/)
Выбор безопасного игорного ресурса нуждается глубокого изучения регулятивных бумаг. Инновационные платформы п»ї1хбет сайт предоставляют геймерам полную детали о действующих лицензиях.
Алгоритм регистрации предусматривает множество ключевых стадий проверки. Провайдеры требуют справки, устанавливающие персону и зрелость. Типовой KYC-процесс продолжается от 24 до 72 временных отрезков.
Банкролл-менеджмент начинается с задания лимитов на депозиты. Компетентные участники рекомендуют применять правило 5% от суммарного азартного фонда на одну партию.
Электронные ограничения владельцев побуждают внедрять вспомогательные адреса. Клоны сохраняют максимальную эффективность главного ресурса, охватывая летопись операций и казино достижения.
Актуальные денежные методы гарантируют скоростные депозиты через электронные кошельки. Bitcoin, Ethereum и стейблкоины обеспечивают анонимность и минимальные сборы. Период проведения изъятий насчитывает 10-30 промежутков.
Программы лояльности охватывают ступенчатые категории с увеличивающимся возвратом. VIP-менеджеры обеспечивают индивидуальные награды, повышенные рамки и преимущественную обслуживание.
Актуальные участники сталкиваются с набором технологических особенностей при работе с лицензированными ресурсами. Специализированные платформы типа п»ї1xBet casino обеспечивают релевантную информацию о деятельности казино организаций.
Процедура подтверждения счета включает комплекс принудительных уровней. Базовая проверка подразумевает предоставления бумаг доказывающих субъект. Типовой список содержит свидетельство, автоудостоверение или заграничное удостоверение.
Техническая составляющая оформления содержит внедрение защищенного протокола и 2FA. Опытные участники рекомендуют инициировать максимум возможных возможностей секьюрити.
Альтернативные адреса образуют абсолютные клоны первичного ресурса с обеспечением комплексного функционала. Главное бонус состоит в тождественности расчетных ограничений и требований проигрыша.
Система локализации активных дублирующих порталов строится на отслеживании специализированных уведомительных сервисов и аффилированных ресурсов. Квалифицированные участники внедряют виртуальные частные сети для предоставления бесперебойного связи вне зависимости от региональных ограничений.
Secondary school math tuition plays а key role in Singapore, offering ʏour
kid diverse math perspectives.
Steady lah, Singapore’ѕ math ranking at tһe top globally,
no joke one!
Parents, ϲourse careers via Singapore math tuition’s guidance.
Secondary math tuition orients futures. Ꮃith secondary 1 math tuition, patterns check оut.
Secondary 2 math tuition offers lifetime access t᧐ alumni networks.
Secondary 2 math tuition constructs withstanding neighborhoods.
Linked tһrough secondary 2 math tuition, support ⅽontinues.
Secondary 2 math tuition fosters bonds.
Succeeding іn secondary 3 math exams іs key, ԝith O-Levels near, fоr building
confidence. Proficiency avoids early obstacles. Success boosts
coordinate skills.
Ιn Singapore, secondary 4 exams celebrate creative math.
Secondary 4 math tuition ѕhows fractal art.
Ꭲhіs combination encourages О-Level efforts.
Secondary 4 math tuition combines disciplines.
Math ߋffers moге tһan passing grades; іt’s a vital
skill іn booming AI technologies, essential fօr supply chain forecasting.
T᧐ excel at math, build a love for it and use mathematical principles in real-ᴡorld daily routines.
Students benefit fгom exposure t᧐ real-wⲟrld math scenarios in past papers fгom various Singapore secondary schools fօr exam readiness.
Online math tuition е-learning in Singapore contributes
tⲟ Ьetter performance tһrough underwater robotics math simulations.
Alamak ѕia, don’t fret leh, secondary school іn Singapore ɡood, support ԝithout extra tension.
Here іs my homeрage – a level maths tuition malaysia
mostbet live ставки Бишкек mostbet live ставки Бишкек
Thank you for the auspicious writeup. It in fact used to
be a amusement account it. Glance complex to more brought agreeable from
you! However, how could we be in contact?
nexus bond homepage – A smooth browsing experience with clearly presented information.
Go ahead goals, strikes that break deadlocks tracked live
Действующие зеркала надежных казино на казино Килограмм создают непрерывный соединение к геймерским порталам. Принцип копирования строит эквивалентные дубликаты центрального сайта с фиксацией всех механизмов.
Система создания аккаунта через резервную ссылку абсолютно копирует основную заявку. Новые геймеры указывают рабочий email, устанавливают безопасный пароль и выбирают базовую финансовый инструмент.
Верификация учетной записи содержит представления бумаг согласно KYC-политике. Изображение удостоверения личности, подтверждение резиденции и финансовые параметры анализируются посредством автоматическую контроль в течение 24-72 часов.
Логин верифицированных клиентов осуществляется через типовую панель с 2FA верификацией. Сессионные ключи поступают на смс номер или мейл.
Возможности финансового раздела через зеркала поддерживает популярные денежные механизмы. Visa, Mastercard, цифровые портмоне Skrill, Neteller, crypto Bitcoin, Ethereum выполняются с низкими взносами 0-3%.
Азартная каталог клонируется абсолютно включая барабаны, классические геймплей, live-ведущих и накопительные призы. RTP-значения, колебания и ставочные требования поддерживаются аналогичными.
Бонусная система действует похоже главному веб-площадке. Welcome-комплекты, фриспины, денежный возврат и VIP-планы стартуют автоматически при соблюдении прописанных стандартов.
Официальные площадки игорных возможностей oferuja участникам право к качественному развлечениям через тематические ресурсы, включая п»ї1хбет , что придерживаются мировые требования security.
Алгоритм создания аккаунта подразумевает ввода валидационных информации через криптографические SSL-connection. Букмекеры demanded нотариальное удостоверение правоспособности и локации проживания для соблюдения юрисдикционных требований.
Двухэтапная authentication представляет обязательным компонентом современных платформ security. Users обретают SMS-пароли, push-оповещения или используют специальные программы вроде Google Authenticator.
Резервные порталы ликвидируют проблемы географических ограничений и DDoS-воздействий. Технически копии составляют идентичные копии главного портала с maintaining features и пользовательских информации.
Skilled пользователи предлагают поддерживать свежие реестры активных альтернатив в закладках browser. Операторы передают сведения о новых порталах через электронную почту, Telegram-группы и смартфонные приложения.
Денежные movements через лицензионные сайты гарантированы encryption алгоритмами категории банковского сектора. Получение капитала реализуется лишь на верифицированные счета хозяина учётной записи.
Актуальные игроки оказываются с затруднением связи к проверенным ресурсам. Организации закрывают стандартные URL, но опытные СЌРЅРѕРјРѕ казино участники понимают о существовании зеркальных сайтов.
Зеркало представляет идентичную воспроизведение главного ресурса. SSL-сертификаты остаются аналогичными. Расчётные переводы производятся через равнозначные каналы.
Технология создания аккаунта через резервный портал требует обычной проверки. Администраторы запрашивают справки для исполнения KYC-регламентов. Паспортные данные осуществляют усиленную подтверждение.
Вносительные границы на альтернативных ресурсах совпадают базовым спецификациям. Стартовые вклады остаются постоянными. Увеличивающиеся призовые фонды интегрируются между многочисленными ссылками.
Поощрительные программы функционируют целостно на альтернативных платформах. Вейджер гарантирует исходные величины. Срок активности использования продолжается.
Отдел сопровождения решает заявки с зеркальных ссылок сходным образом. Мгновенный чат поддерживает круглосуточный режим обслуживания.
Отбор проверенного развлекательного портала подразумевает тщательного изучения юридических сертификатов. Передовые платформы Меллстрой казино предоставляют участникам полную факты о собственных допусках.
Процедура создания профиля предусматривает несколько требуемых фаз аутентификации. Провайдеры просят свидетельства, устанавливающие самобытность и совершеннолетие. Обычный KYC-механизм продолжается от 24 до 72 часов.
Распоряжение капиталом инициируется с задания лимитов на инвестиции. Опытные клиенты советуют использовать правило 5% от совокупного казино фонда на конкретную сессию.
Цифровые препятствия провайдеров побуждают применять альтернативные адреса. Клоны сохраняют безусловную производительность центрального ресурса, подразумевая архив операций и игровой прогресс.
Инновационные финансовые сервисы предоставляют оперативные вклады через блокчейн портмоне. Bitcoin, Ethereum и постоянные токены обеспечивают тайность и наименьшие сборы. Длительность осуществления получений достигает 10-30 интервалов.
Алгоритмы лояльности включают каскадные категории с увеличивающимся бонусом. VIP-представители предоставляют эксклюзивные награды, расширенные лимиты и приоритетную поддержку.
Attendance figures, crowd numbers for all football matches tracked
Легальные ресурсы развлекательных предложений дают игрокам возможность к профессиональному азартному досугу через целевые домены, включая казино СЌРЅРѕРјРѕ , которые специально выполняют международные стандарты надёжности.
Последовательность оформления профиля требует предоставления идентификационных данных через encrypted SSL-connection. Менеджмент demanded нотариальное доказательство правоспособности и локации residence для compliance правовых стандартов.
2FA проверка считается mandatory компонентом современных механизмов security. Users приобретают SMS-токены, push-сообщения или используют профессиональные софт типа Google Authenticator.
Дублирующие адреса устраняют вопросы territorial блокировок и DDoS-атак. С технической точки зрения реплики составляют аналогичные клоны primary портала с сохранением features и клиентских деталей.
Профессиональные пользователи предлагают keeping обновлённые реестры рабочих альтернатив в избранном веб-клиента. Администрация направляют updates о fresh ссылках через электронную почту, Telegram-каналы и портативные утилиты.
Банковские переводы через надёжные платформы secured шифровальными протоколами level банковского направления. Extraction фондов происходит исключительно на проверенные карты собственника аккаунта.
Нынешние бетторы встречаются с затруднением соединения к легальным платформам. Поставщики закрывают основные ссылки, но грамотные [url=https://www.danielvillalona.com/igrayte-v-mad-casino-online-i-naslazhdaytes-luchshimi-igrovymi-avtomatami-v-rossii/]mad casino зеркало[/url] участники помнят о доступности параллельных порталов.
Резервная ссылка представляет полную реплику оригинального платформы. SSL-сертификаты сохраняются неизменными. Финансовые транзакции проходят через аналогичные системы.
Технология открытия счёта через резервный адрес содержит стандартной проверки. Специалисты запрашивают бумаги для осуществления KYC-регламентов. Идентификационные данные проходят комплексную проверку.
Финансовые рамки на дополнительных площадках идентичны главным характеристикам. Начальные беты остаются постоянными. Увеличивающиеся накопления объединяются между многочисленными доменами.
Бонусные механизмы действуют комплексно на резервных сайтах. Множитель ставок сохраняет стартовые показатели. Срок активности оборота сохраняется.
Отдел сопровождения анализирует заявки с альтернативных ресурсов аналогично. Мгновенный чат поддерживает 24-часовой расписание работы.
Функционирующие альтернативные домены проверенных азартных клубов на mad casino гарантируют беспрерывный вход к игровым сервисам. Система зеркалирования формирует точные реплики базового сайта с удержанием всех механизмов.
Система оформления профиля через альтернативный домен целиком воспроизводит основную бланк. Свежие пользователи указывают действующий email, создают надежный секретную комбинацию и устанавливают операционную платежное средство.
Аутентификация личного кабинета содержит предоставления свидетельств в соответствии с KYC-стандартам. Скан паспорта, подтверждение адреса и финансовые данные контролируются системой алгоритмическую верификацию в течение 24-72 часа.
Аутентификация существующих игроков реализуется через типовую интерфейс с 2FA проверкой. Краткосрочные коды поступают на телефонный номер или e-mail адрес.
Инструменты финансового блока через зеркала обеспечивает распространенные банковские сервисы. Visa, Mastercard, веб хранилища Skrill, Neteller, виртуальные монеты Bitcoin, Ethereum обрабатываются с низкими взносами 0-3%.
Азартная библиотека копируется абсолютно включая spinning games, классические активности, live-операторов и максимальные награды. RTP-индикаторы, вариативность и условия отыгрыша удерживаются такими же.
Бонусная механизм оперирует аналогично базовому ресурсу. Welcome-бандлы, бесплатные вращения, refund и VIP-планы стартуют программно при достижении определенных параметров.
Актуальные пользователи имеют дело с огромным количеством программных нюансов при работе с официальными платформами. Экспертные платформы типа казино Рльдорадо предоставляют новую данные о операциях игорных операторов.
Процедура валидации учетной записи содержит ряд неотъемлемых фаз. Базовая проверка требует предоставления документов удостоверяющих индивидуальность. Типовой пакет подразумевает свидетельство, права или внешний паспорт.
Техническая составляющая создания аккаунта включает внедрение зашифрованного канала и двухуровневой проверки. Продвинутые геймеры предлагают включать максимум имеющихся опций охраны.
Дублирующие порталы являются стопроцентные копии первичного сайта с хранением исчерпывающего функционала. Центральное плюс заключается в подобии платежных границ и условий отыгрыша.
Механизм выявления актуальных зеркал опирается на контроле профильных мессенджер групп и партнерских порталов. Квалифицированные участники используют виртуальные частные сети для гарантирования надежного связи безотносительно от локальных барьеров.
Volume shooters, players who take most shots per game tracked
a href=”https://qulavoholdings.bond/” />QulavoPro – Easy navigation and trustworthy information make exploring stress-free.
BondTracker – Clear and open presentation makes investment evaluation simple.
Современные порталы беттинг активностей обеспечивают клиентам подключение к премиальному гемблингу через проверенные ДживиСпин казино ресурсы. Авторизованная функционирование требует соблюдения четких правовых норм.
Алгоритм создания персонального аккаунта предусматривает верификацию конфиденциальных данных. Администраторы используют детализированные процедуры KYC и AML для недопущения поддельных транзакций.
IT средства современных беттинг площадок строятся на защищенных хостингах с TLS протоколами. Региональная блокировка побуждает владельцев разрабатывать альтернативные порталы.
Альтернативные платформы образуют полные клоны центрального сайта с сохранением всех инструментов и данных. Клиенты приобретают постоянный вход к балансу, азартной истории и личным настройкам.
Расчетные транзакции реализуются через интегрированные денежные процессоры. Пределы на инвестиции и выводы фиксируются в унисон с нормативными стандартами и организационными процедурами управления рисками.
Экспертные игроки предлагают контролировать положение сертификата через официальные регистры гемблинг организаций. Престижные индикаторы предусматривают места на тематических платформах и оценки действительных клиентов.
Современные клиенты пересекаются с множеством технологических тонкостей при процессах с легальными сайтами. Экспертные источники типа Болливуд казино предоставляют свежую сведения о функционировании азартных провайдеров.
Механизм аутентификации кабинета содержит набор требуемых фаз. Стартовая проверка требует размещения справок валидирующих индивидуальность. Стандартный перечень включает паспорт, права или загранпаспорт.
Цифровая составляющая записления включает использование безопасного соединения и многофакторной защиты. Продвинутые игроки предлагают включать все представленных параметров охраны.
Зеркала составляют идентичные дубликаты основного платформы с поддержанием комплексного возможностей. Основное плюс заключается в схожести денежных пределов и критериев проигрыша.
Процедура обнаружения актуальных зеркал основывается на контроле специализированных уведомительных сервисов и связанных ресурсов. Профессиональные игроки используют анонимайзеры для формирования устойчивого подключения без оглядки от региональных запретов.
опубликовано здесь Трипскан
Отбор проверенного развлекательного ресурса в современных рамках подразумевает повышенного анализа к юридическому статусу. Компетентные игроки учитывают, что friends casino включает современную факты о функционирующих сервисах.
Процесс открытия счета в официальных операторах включает обязательную верификацию удостоверения. KYC-процедуры охраняют как площадку, так и клиента от афер. Переходные границы на изъятие денег до завершения верификации – нормальная практика.
Технические запреты на подключение к betting площадкам устраняются через зеркальные URL. Действующие копии гарантируют абсолютную эффективность центрального сайта. Денежные операции, игровой результаты и наградные планы остаются постоянными.
Финансовая гарантированность выражается степенью применяемых финансовых инструментов. SSL-безопасность, PCI DSS валидация и двухфакторная подтверждение формируют безопасный заслон ограждения.
Геймплейная коллекция лицензированных провайдеров включает машины от ведущих создателей. RTP-показатели, изменчивость и математические формулы испытывают объективную контроль в одобренных лабораториях.
Схемы мотивации в профессиональных заведениях опираются на прозрачных условиях ставок. Условия ставок x35-40 признается нормальным для барабан-льгот, в то время как традиционные развлечения идут в зачет с сниженным множителем.
Поиск в пространстве сертифицированных ресурсов требует знания продвинутых технологий подключения. Опытные клиенты задействуют лаки Р±РёСЂ казино для извлечения новейшей фактов о оперативных URL.
Процедура регистрации профиля в проверенных заведениях предполагает сложную верификацию. Актуальные организации применяют KYC-протоколы и AML-нормы. Документальная процедура занимает от 24 до 72 интервалов.
IT решения для преодоления ограничений эволюционируют синхронно с ужесточением нормативных решений. VPN-службы класса premium дают шифрование AES-256 и стандарты OpenVPN. Постоянство коннекта кардинально существенна для VIP партий.
Дублирующие адреса работают через территориально расположенные серверные мощности. CDN-структуры предоставляют быструю время ответа для европейских геймеров. Системное маршрутизация запускается при обнаружении препятствия основного домена.
Экономические транзакции в лицензированных территориях подпадают под определенным правилам PCI DSS. Криптовалютные платежи набирают актуальность по причине секретности и темпу выполнения.
Планшетные приложения ведущих провайдеров объединяют отпечатковую идентификацию и push-сообщения для критических эпизодов. Гибкий оформление автономно настраивается под характеристики дисплея.
For anyone who has ever felt the pangs of a summer crush, Jenny Han’s writing hits home. The story of Belly and the Fisher brothers is a classic triangle that has divided fans for years. Whether you are Team Conrad or Team Jeremiah, you need to read the original text to understand the depth of their relationships. Finding a PDF version allows you to carry Cousins Beach with you wherever you go. This narrative explores the delicate balance between friendship and romance. It is the kind of book that stays with you long after the season ends.
Отбор достойного азартного оператора в актуальных обстоятельствах предполагает особого анализа к регулятивному статусу. Знающие пользователи понимают, что лаки Р±РёСЂ казино предоставляет новую данные о работающих провайдерах.
Схема открытия счета в официальных операторах содержит принудительную верификацию удостоверения. KYC-процедуры охраняют как оператора, так и геймера от мошенничества. Переходные ограничения на изъятие капитала до финализации подтверждения – стандартная практика.
Технические барьеры на доступ к гемблинг сервисам устраняются через альтернативные домены. Рабочие копии гарантируют полную эффективность основного сервиса. Денежные транзакции, интерактивный продвижение и льготные предложения поддерживаются неизменными.
Денежная безопасность оценивается показателем задействованных финансовых механизмов. SSL-безопасность, PCI DSS аттестация и расширенная аутентификация формируют надежный заслон охраны.
Развлекательная библиотека легальных операторов предоставляет барабаны от известных создателей. RTP-параметры, дисперсия и статистические системы претерпевают нейтральную аудит в одобренных учреждениях.
Системы лояльности в профессиональных операторах опираются на четких правилах проигрыша. Проигрыш x35-40 оценивается справедливым для автомат-бонусов, в то время как классические активности идут в подсчет с минимальным фактором.
Гемблинговая индустрия показывает активный развитие, притягивая миллионы пользователей. Опытные ресурсы дают стабильную атмосферу для ставок. Детальную сведения о данных компаниях можно обнаружить на казино типпи .
Лицензирование выступает ключевым показателем выбора площадки. Регуляторы Гибралтара гарантируют строгий аудит денежных манипуляций. Конкретная лицензированная портал реализует систематические инспекции RNG-систем.
Технические аспекты современных игорных домов содержат SSL-безопасность финансового уровня. Производители цифрового обеспечения уровня Microgaming, NetEnt, Pragmatic Play интегрируют комплексные механизмы непредсказуемых значений.
Схема проверки аккаунта включает представления бумаг KYC-уровня. Паспорт, подтверждение о заработке, удостоверение адреса — типичный список для финального подключения.
Зеркальные ссылки исправляют препятствия с запретами компаний. Свежие зеркала обновляются регулярно IT командами. Смартфонные софт регулярно действуют качественнее сетевых редакций.
Управление банкроллом определяет перспективную прибыльность беттинговых сессий. Квалифицированные беттеры рекомендуют урезать сумму ставки до 1-2% от итогового резерва.
Promax platform – Well-organized tools and helpful guides, very user-friendly.
Новейшие платформы азартных услуг предлагают беттерам подключение к профессиональному игровому процессу через сертифицированные РЎСѓРєР° казино ресурсы. Легальная функционирование предполагает соблюдения определенных правовых положений.
Процедура открытия пользовательского учетной записи содержит подтверждение персональных показателей. Администраторы эксплуатируют многоуровневые механизмы KYC и AML для блокировки поддельных платежей.
IT платформы инновационных развлекательных порталов строятся на надежных серверах с HTTPS алгоритмами. Локальные запреты побуждает провайдеров разрабатывать вспомогательные домены.
Резервные платформы образуют полные версии основного ресурса с сохранением всех функций и данных. Беттеры добиваются устойчивый связь к счету, беттинг данным и персональным параметрам.
Банковские действия производятся через синхронизированные денежные шлюзы. Границы на взносы и снятия определяются в соотношении с нормативными положениями и корпоративными регламентами риск-менеджмента.
Экспертные пользователи настаивают анализировать условия лицензии через надзорные списки гемблинг организаций. Престижные характеристики содержат позиции на специализированных платформах и оценки подлинных беттеров.
tizanidine medication: buy tizanidine without prescription – muscle relaxer tizanidine
Азартная индустрия демонстрирует динамичный развитие, привлекая массы пользователей. Опытные платформы обеспечивают безопасную условия для беттинга. Исчерпывающую информацию о таких организациях реально обнаружить на лаки Р±РёСЂ казино официальный сайт .
Сертификация выступает основным аспектом селекции портала. Контролёры Олдерни дают жёсткий аудит денежных транзакций. Конкретная лицензированная площадка выполняет регулярные контроли RNG-алгоритмов.
Технические параметры новейших азартных площадок охватывают SSL-защиту расчётного ранга. Создатели компьютерного материала уровня Microgaming, NetEnt, Pragmatic Play подключают продвинутые схемы произвольных величин.
Процесс верификации аккаунта включает передачи справок KYC-типа. Паспорт, свидетельство о доходах, удостоверение адреса — стандартный набор для итогового подключения.
Альтернативные ссылки исправляют трудности с запретами организаций. Актуальные дубли модифицируются каждый день IT отделами. Портативные программы нередко оперируют надёжнее интернет вариантов.
Финансовая дисциплина устанавливает перспективную результативность азартных партий. Квалифицированные игроки советуют лимитировать величину вейджера до 1-2% от суммарного капитала.
Поиск в области сертифицированных площадок требует понимания передовых решений подключения. Квалифицированные геймеры используют казино Килограмм для получения актуальной фактов о оперативных путях.
Механизм оформления счета в официальных компаниях охватывает комплексную валидацию. Продвинутые провайдеры используют KYC-протоколы и AML-критерии. Документооборот составляет от 24 до 72 часов.
Цифровые инструменты для преодоления блокировок эволюционируют синхронно с повышением правовых решений. VPN-платформы уровня premium дают безопасность AES-256 и протоколы OpenVPN. Постоянство канала кардинально существенна для привилегированных раундов.
Резервные сайты действуют через территориально рассредоточенные цифровые ресурсы. CDN-структуры осуществляют быструю время ответа для азиатских игроков. Цифровое переключение включается при распознавании ограничения основного сайта.
Платежные переводы в сертифицированных юрисдикциях отвечают строгим правилам PCI DSS. Цифровые расчеты увеличивают востребованность благодаря конфиденциальности и быстроте осуществления.
Портативные софт лучших брендов объединяют физиологическую авторизацию и push-уведомления для важных ситуаций. Изменяемый оформление программно адаптируется под настройки монитора.
爱亦凡海外版,专为华人打造的高清视频官方认证平台,支持全球加速观看。
Современные бетторы попадают с проблемой доступа к официальным площадкам. Компании фильтруют главные домены, но грамотные Sykaaa игроки знают о существовании параллельных сайтов.
Зеркало формирует абсолютную воспроизведение базового сайта. SSL-сертификаты поддерживаются неизменными. Банковские операции производятся через сходные сервисы.
Схема оформления профиля через дополнительный адрес подразумевает стандартной аутентификации. Специалисты требуют удостоверения для реализации KYC-стандартов. Личные информация подвергаются многоуровневую валидацию.
Финансовые рамки на зеркальных площадках совпадают базовым характеристикам. Стартовые беты поддерживаются фиксированными. Прогрессивные банки интегрируются между многочисленными ресурсами.
Поощрительные системы выполняются полноценно на параллельных сайтах. Коэффициент оборота сохраняет исходные величины. Тайминг отыгрыша поддерживается.
Сервис поддержки изучает запросы с резервных порталов равнозначно. Мгновенный переписка поддерживает круглосуточный формат обслуживания.
Hey there, I think your site might be having browser compatibility issues.
When I look at your blog in Chrome, it looks fine
but when opening in Internet Explorer, it has some overlapping.
I just wanted to give you a quick heads up! Other then that,
great blog!
https://nouvaucode26.tokka-blog.com/40144239/code-promo-1xbet-casino-2026-1xbig2026-bonus-exclusif-130
на этом сайте Трипскан ссылка
авто новости avtonovosti-4.ru .
Подробнее Трипскан зеркало
official morixo bond site – Simple layout, with bond information presented clearly for all users.
http://xn—-7sbba5ce4bdhcq2h.xn--p1ai/index.php?subaction=userinfo&user=ygusowiva
Функционирующие резервные адреса легальных игорных заведений на лаки Р±РёСЂ казино предоставляют устойчивый коннект к геймерским системам. Схема дублирования формирует эквивалентные дубликаты главного сайта с удержанием всех инструментов.
Процедура открытия счета через зеркало абсолютно имитирует оригинальную бланк. Свежие пользователи регистрируют действующий email, генерируют стойкий шифр и фиксируют операционную финансовый инструмент.
Идентификация личного кабинета содержит представления бумаг по KYC-стандартам. Фото удостоверения личности, подтверждение места жительства и денежные параметры подвергаются машинную анализ в течение 24-72 периодов.
Авторизация существующих клиентов осуществляется через обычную модуль с расширенной валидацией. Временные токены приходят на мобильный номер или электронную почту.
Механизмы финансового блока через mirror-сайты предлагает актуальные расчетные системы. Visa, Mastercard, цифровые хранилища Skrill, Neteller, блокчейн-токены Bitcoin, Ethereum выполняются с уменьшенными взносами 0-3%.
Игровая ассортимент копируется в точности включая слоты, классические геймплей, live-операторов и накопительные призы. RTP-показатели, изменчивость и проигрыш удерживаются точными.
Подарочная система действует подобно базовому веб-площадке. Welcome-комплекты, фриспины, денежный возврат и VIP-курсы запускаются программно при достижении заданных параметров.
Новейшие геймеры оказываются с барьером входа к проверенным сайтам. Провайдеры запрещают стандартные адреса, но грамотные KiloGram casino клиенты учитывают о существовании зеркальных площадок.
Параллельный портал представляет идентичную воспроизведение основного ресурса. Системы безопасности функционируют такими же. Денежные переводы выполняются через аналогичные системы.
Методика заведения учётной записи через резервный ресурс содержит обычной верификации. Операторы уточняют документы для выполнения KYC-регламентов. Индивидуальные сведения осуществляют многоуровневую аутентификацию.
Депозитные пределы на альтернативных сайтах соответствуют главным условиям. Наименьшие взносы остаются неизменными. Растущие накопления согласовываются между множественными порталами.
Поощрительные системы действуют комплексно на резервных сайтах. Отыгрышный коэффициент гарантирует базовые параметры. Тайминг реализации поддерживается.
Сервис помощи анализирует заявки с дополнительных адресов аналогично. Мгновенный чат гарантирует непрерывный график обслуживания.
爱一凡海外版,专为华人打造的高清视频官方认证平台,支持全球加速观看。
capital insight page – Navigation is easy and capital services are described in a straightforward manner.
Нынешние геймеры пересекаются с массой цифровых аспектов при работе с лицензированными площадками. Профессиональные порталы типа СЌРЅРѕРјРѕ официальный сайт поставляют актуальную материалы о процессах азартных брендов.
Процедура валидации аккаунта включает множество требуемых стадий. Первичная валидация нуждается отправки бумаг удостоверяющих гражданство. Стандартный список содержит удостоверение личности, лицензию водителя или международный паспорт.
Системная часть создания аккаунта предполагает задействование зашифрованного канала и 2FA. Профессиональные игроки настаивают активировать совокупность представленных опций секьюрити.
Запасные домены являются полные клоны основного домена с удержанием полного набора функций. Важнейшее бонус кроется в схожести денежных пределов и параметров проигрыша.
Схема нахождения действующих зеркал базируется на проверке экспертных телеграм-каналов и связанных ресурсов. Экспертные участники задействуют анонимайзеры для гарантирования стабильного входа невзирая от локальных запретов.
Нынешние игроки сталкиваются с изобилием системных нюансов при процессах с сертифицированными порталами. Профессиональные сайты типа казино СЌРЅРѕРјРѕ обеспечивают свежую информацию о деятельности гэмблинговых компаний.
Система проверки учетной записи включает ряд обязательных фаз. Первичная проверка требует передачи бумаг верифицирующих индивидуальность. Типовой набор содержит свидетельство, водительские права или международное ID.
Цифровая сторона открытия счета подразумевает внедрение безопасного соединения и двухфакторной аутентификации. Профессиональные пользователи настаивают активировать максимум имеющихся опций обеспечения.
Запасные домены образуют полные дубликаты основного платформы с поддержанием тотального инструментария. Важнейшее достоинство заключается в соответствии расчетных рамок и параметров ставочных требований.
Система поиска активных зеркал фундируется на проверке тематических уведомительных сервисов и партнерских площадок. Опытные пользователи используют VPN-сервисы для создания стабильного связи вне зависимости от местных лимитов.
Новейшие игроки попадают с сложностью соединения к легальным сайтам. Поставщики блокируют первичные URL, но знающие казино Гризли пользователи осознают о функционировании дублирующих сайтов.
Резервная ссылка формирует идентичную реплику первичного платформы. Системы безопасности работают равнозначными. Финансовые переводы осуществляются через идентичные сервисы.
Схема создания аккаунта через дополнительный ссылку требует типовой подтверждения. Администраторы выясняют удостоверения для исполнения KYC-регламентов. Личные параметры осуществляют комплексную проверку.
Депозитные пределы на дополнительных порталах аналогичны главным условиям. Стартовые вклады сохраняются постоянными. Прогрессивные накопления объединяются между всеми ресурсами.
Бонусные механизмы оперируют всесторонне на зеркальных порталах. Множитель ставок поддерживает первоначальные параметры. Тайминг проигрывания остаётся прежним.
Департамент помощи обрабатывает вопросы с альтернативных ресурсов таким же способом. Онлайн общение поддерживает круглосуточный режим работы.
Передовые игроки попадают с затруднением подключения к лицензированным порталам. Поставщики закрывают стандартные адреса, но профессиональные СЌРЅРѕРјРѕ казино участники осознают о функционировании альтернативных площадок.
Альтернативный адрес представляет абсолютную отображение оригинального платформы. Протоколы шифрования остаются равнозначными. Финансовые действия проходят через те же системы.
Схема создания аккаунта через зеркальный ресурс подразумевает типовой аутентификации. Специалисты запрашивают справки для реализации KYC-норм. Индивидуальные параметры выполняют расширенную аутентификацию.
Депозитные ограничения на параллельных порталах равняются основным требованиям. Минимальные суммы сохраняются фиксированными. Накопительные банки согласовываются между различными адресами.
Премиальные схемы оперируют полноценно на дополнительных ресурсах. Вейджер удерживает исходные значения. Временные рамки оборота поддерживается.
Служба поддержки анализирует тикеты с параллельных ссылок равнозначно. Онлайн переписка поддерживает постоянный расписание оперирования.
https://gastrohealthmonitor.com/# Gastro Health Monitor
Передовые геймеры оказываются с препятствием связи к сертифицированным платформам. Организации запрещают стандартные домены, но профессиональные казино Голд участники учитывают о существовании резервных площадок.
Параллельный портал формирует абсолютную копию базового площадки. Криптографические алгоритмы функционируют неизменными. Финансовые транзакции осуществляются через те же каналы.
Процедура заведения учётной записи через дополнительный ресурс требует классической верификации. Администраторы просят бумаги для выполнения KYC-стандартов. Индивидуальные информация осуществляют многоуровневую аутентификацию.
Депозитные границы на зеркальных площадках равняются первичным спецификациям. Минимальные беты сохраняются стабильными. Прогрессивные накопления синхронизируются между множественными доменами.
Премиальные планы функционируют завершённо на резервных ресурсах. Множитель ставок поддерживает стартовые показатели. Тайминг реализации сохраняется.
Отдел сопровождения рассматривает заявки с резервных ресурсов идентично. Интерактивный чат поддерживает постоянный порядок работы.
What’s up i am kavin, its my first time to commenting anyplace, when i read this article
i thought i could also create comment due to this brilliant article.
Определение качественного развлекательного ресурса в современных обстоятельствах нуждается повышенного внимания к регулятивному уровню. Профессиональные пользователи понимают, что типпи казино отображает новую информацию о функционирующих операторах.
Алгоритм оформления профиля в лицензированных операторах объединяет неизбежную аутентификацию персональных данных. KYC-правила охраняют как сервис, так и геймера от махинаций. Промежуточные границы на снятие финансов до финализации подтверждения – типичная подход.
Электронные блокировки на соединение к азартным сервисам нейтрализуются через зеркальные адреса. Доступные дубликаты предоставляют всестороннюю работоспособность главного платформы. Платежные транзакции, азартный результаты и наградные системы поддерживаются устойчивыми.
Финансовая безопасность оценивается степенью применяемых платежных методов. SSL-безопасность, PCI DSS сертификация и расширенная идентификация устанавливают защищенный контур защиты.
Развлекательная библиотека легальных сервисов охватывает машины от известных провайдеров. RTP-значения, волатильность и статистические системы получают внешнюю контроль в признанных лабораториях.
Схемы поощрения в серьезных операторах строятся на прозрачных параметрах проигрыша. Вейджер x35-40 расценивается разумным для слот-поощрений, в то время как стандартные состязания принимаются в расчет с минимальным процентом.
Определение легального игорного ресурса заставляет глубокого разбора правовых бумаг. Передовые платформы тип топ казино гарантируют игрокам безусловную информацию о действующих допусках.
Система открытия аккаунта содержит несколько принудительных этапов аутентификации. Операторы просят свидетельства, подтверждающие личность и совершеннолетие. Стандартный KYC-порядок длится от 24 до 72 временных отрезков.
Банкролл-менеджмент начинается с назначения рамок на инвестиции. Компетентные клиенты рекомендуют использовать норму 5% от полного азартного резерва на единичную игру.
Системные ограничения провайдеров обязывают задействовать дополнительные пути. Зеркала хранят стопроцентную функциональность базового платформы, включая летопись операций и развлекательный результаты.
Современные банковские методы поддерживают моментальные вклады через блокчейн кошельки. Bitcoin, Ethereum и фиксированные активы дают конфиденциальность и символические комиссии. Продолжительность реализации снятий достигает 10-30 промежутков.
Системы приверженности предусматривают каскадные категории с возрастающим возвратом. VIP-менеджеры предлагают эксклюзивные подарки, расширенные границы и преимущественную техподдержку.
Проверенные операторы игорных возможностей oferuja игрокам вариант к качественному времяпрепровождению через профильные платформы, включая ДживиСпин сайт , которые именно выполняют глобальные стандарты security.
Механизм открытия счёта включает ввода authentication данных через шифрованные SSL-линии. Менеджмент demanded документальное подтверждение совершеннолетия и локации проживания для поддержания legal стандартов.
Multi-factor верификация выступает mandatory компонентом современных платформ безопасности. Пользователи располагают SMS-токены, push-алерты или эксплуатируют dedicated программы вроде Google Authenticator.
Зеркальные URL устраняют препятствия локальных блокировок и DDoS-воздействий. Технически реплики представляют тождественные реплики базового портала с maintaining features и клиентских параметров.
Опытные участники предлагают поддерживать свежие списки функционирующих копий в favourites браузера. Букмекеры передают сведения о свежих ссылках через почтовые сервисы, Telegram-communities и mobile apps.
Банковские операции через официальные порталы secured защитными технологиями категории банковского направления. Получение денег осуществляется единственно на проверенные wallets обладателя аккаунта.
другие https://krab6a.at
It’s amazing in support of me to have a web page, which
is useful for my experience. thanks admin
посмотреть в этом разделе Трипскан ссылка
сюда https://krab6a.at
Активные резервные адреса надежных гемблинг-платформ на KiloGram казино обеспечивают постоянный доступ к развлекательным сервисам. Технология клонирования генерирует точные копии основного портала с поддержанием всех инструментов.
Схема создания аккаунта через резервную ссылку полностью воспроизводит главную анкету. Дебютные игроки регистрируют валидный email, генерируют безопасный шифр и устанавливают операционную платежное средство.
Аутентификация профиля содержит передачи документов в соответствии с KYC-стандартам. Копия национального документа, валидация проживания и финансовые сведения контролируются системой автоматическую верификацию в течение 24-72 часов.
Авторизация зарегистрированных клиентов происходит через типовую форму с многоступенчатой проверкой. Одноразовые коды отправляются на сотовый аппарат или почтовый ящик.
Возможности депозитного раздела через зеркала обеспечивает распространенные платежные системы. Visa, Mastercard, виртуальные хранилища Skrill, Neteller, crypto Bitcoin, Ethereum обрабатываются с минимальными комиссиями 0-3%.
Гемблинг каталог клонируется полностью включая машины, настольные развлечения, live-ведущих и максимальные награды. RTP-параметры, изменчивость и условия отыгрыша остаются точными.
Бонусная схема оперирует похоже центральному веб-площадке. Welcome-комплекты, free spins, кешбэк и VIP-программы запускаются автоматически при выполнении установленных условий.
Исследование в мире легальных сайтов подразумевает осознания продвинутых технологий подключения. Продвинутые игроки задействуют казино аква для получения актуальной информации о работающих адресах.
Процедура регистрации профиля в лицензированных организациях подразумевает сложную верификацию. Новейшие операторы эксплуатируют KYC-процедуры и AML-критерии. Документальная процедура занимает от 24 до 72 интервалов.
Цифровые инструменты для избежания ограничений улучшаются синхронно с укреплением нормативных шагов. VPN-инструменты разряда premium предлагают шифрование AES-256 и системы OpenVPN. Непрерывность связи принципиально актуальна для высокоролловых заходов.
Резервные ресурсы выполняют задачи через пространственно рассредоточенные цифровые инфраструктуры. CDN-системы гарантируют быструю латентность для европейских клиентов. Системное переключение инициируется при распознавании блокировки основного ресурса.
Экономические операции в легальных областях подчиняются конкретным стандартам PCI DSS. Криптовалютные переводы получают востребованность в результате скрытности и динамике осуществления.
Смартфонные утилиты премиальных брендов совмещают отпечатковую проверку и push-оповещения для существенных эпизодов. Настраиваемый внешний вид автоматически корректируется под параметры матрицы.
view it https://gluex.io/
ZylavoCenter – Pages load smoothly, and the interface is simple to follow.
check https://beratrax.org/
get redirected here https://prjx.online
海外华人必备的yifan官方认证平台,24小时不间断提供最新高清电影、电视剧,无广告观看体验。
Определение качественного игрового портала в актуальных границах предполагает повышенного подхода к законному режиму. Квалифицированные пользователи знают, что Килограмм казино включает актуальную данные о доступных провайдерах.
Механизм создания аккаунта в проверенных платформах содержит обязательную подтверждение документов. KYC-правила охраняют как сервис, так и клиента от махинаций. Переходные лимиты на вывод денег до окончания валидации – стандартная подход.
Электронные барьеры на доступ к игровым сайтам решаются через альтернативные URL. Активные клоны обеспечивают всестороннюю эффективность главного сервиса. Денежные операции, игровой статистика и привилегированные программы поддерживаются постоянными.
Финансовая безопасность характеризуется критерием внедренных финансовых систем. SSL-защита, PCI DSS лицензирование и дополнительная идентификация устанавливают прочный периметр обороны.
Интерактивная библиотека легальных сервисов объединяет автоматы от лидирующих провайдеров. RTP-индексы, волатильность и математические принципы получают нейтральную проверку в утвержденных лабораториях.
Механизмы мотивации в надежных сервисах опираются на четких требованиях вейджера. Вейджер x35-40 признается нормальным для слот-поощрений, в то время как традиционные развлечения идут в счет с пониженным показателем.
iѕ human trafficking tһe ѕecond largest,
usa gymnastics coach human trafficking, human trafficking news neаr me, snopes lynne knowles human trafficking,
human trafficking awareness ԁay quotes, human traffidking sex scene, human trafficking – menschenhandel, meghan connrs human trafficking, ansrew tate
human trafficking, arguments ⲟn human trafficking, free human trafficking cme florida, human trafficking оur,
human trafficking іn minnesota 2021, aarizona republican human trafficking,
orange іs thee new black human trafficking,
human trafficking conference ocean city md, 277 arrested іn human trafficking, anti human trafficking law philippines, nortth korea human trafficking fаcts, hօw will the wall affect human trafficking, human trafficking training michigan 2018, hotels
sued human trafficking, kids rescued fгom human trafficking,
durham region human trafficking,ԝhy human trafficking іs
imⲣortant, mother of god church himan trafficking, walmart human trafficking 2020, ᴡһat is the rate of human trafficking worldwide, human trafficking news
(news), human trafficking ƅy stаte 2021, lgbt human trafficking statistics,
south arrica annd human trafficking, human trafficking statistics fbi, hottel lawsuits human trafficking, operation renewed hope human trafficking, human trafficking atlanta 2022, human trafficking san joaquin county, non profit organizations fօr human trafficking, human trafficking interpol,
human trafficking elgin, trafficking women’ѕ hujman rightѕ julietta
hua, facebook human trafficking lawsuit, rates οf human trafficking, real wߋrld examрle of human trafficking, lawyers аgainst
human trafficking, wsin human trafficking summit 2022, vvad är human trafficking,
recognizing tthe signs ᧐f human trafficking,
human trafficking justice, vdeo ᧐f human trafficking, fߋur signs ߋf human trafficking,
human trafficking honey, binjun xie human trafficking, human trafficking
documentary amazon рrime, minnesota human trafficking data, uncoovers russian humann trafficking гing war, human trafficking chico ϲa, hman trafficking jus cogens, human trafficking syrizn refugees, human trafficking
topics гesearch paper, text human trafficking link snopes, oprah south africa
human trafficking, human trafficking grants 2015, human trafficking san antonio 2021, human drug
trzfficking meaning, human trafficking stories children, fema human trafficking awareness, florida disney human trafficking, jobs
fοr human trafficking victims, movie аbout human trafficking 2023 netflix, ɑ ⅾay in the life оf а human trafficking victim, uk human trafficking news, bent ⅼicense plate humkan trafficking
reddit, human trafficking іn waterbury ct, cnter to
combat human trafficking, greenville nc hukan trafficking, maui humzn trafficking, topp 5
human trafficking cities, iss human trafficking happening inn tһе us, oxnard humn trafficking, aurora shoreline human trafficking, taconganas human trafficking, hashtags fοr human trafficking, ѡhite house human trafficking summit, corona human trafficking, border atrol human trafficking, human trafficking іn thailand 2020, human trafficking
in wv, 11 arrested іn human trafficking, china’s ⲟne child policy
and human trafficking, hotels human trafficking 2023, human trafficking inn florida
2021, humann trafficking debate topics, international
justice mission human trafficking, uncovers human trafficking ring for, scholarly article
ߋn human trafficking, madison herman human trafficking, amad diallo human trafficking,
ɑ poem ab᧐ut human trafficking, human trafficking bristol tn, deluca аnd tthe humman trafficking storyline, economy annd
human trafficking, human trafficking іn trinidad, human trafficking ⅾay 2018, caught camera actual
human trafficking victims, human trafficking episode opal grey’ѕ anatomy,
duolingo ceo human trafficking, watcch dogs human trafficking map,
human trrafficking definition canada, airtag human trafficking, human trafficking іn the beauty industry, 人口販子human trafficking, forced labor іn human trafficking,
american airlines center human trafficking, human trafficking
cee texas, selah human trafficking, siam huiman trafficking, fresno human trafficking statistics, senegal human trafficking, human trafficking belgium, michigan human trafficking сourse,
ny tims human trafficking, abandoned stroller human trafficking, human trafficking і-44, solkution on human trafficking,
humann trafficking canaqda news, ontario human trafficking, protects victims ⲟf human trafficking
amendment, human trafficking іn highland ϲa, human trafficking hotspot map, human trafficking organizations ontario, human trafficking hiding սnder cars, summary ᧐n human trafficking,
uncovers rjssian human traffixking гing war, human traffiking honey, fouг signs of
human trafficking, human trafficking western pa, human trafficking livermore, human trafficking durham region, hunan trafficking аt atlanta airport, binjun xie human trafficking, minnesota human trafficking
data, human trafficking documentary amazon ⲣrime, human trafficking lawyer bloomfield hills, human trafficking
charge іn texas, central students ɑgainst human trafficking,
app human geograsphy human trafficking, human trafficking fⲟr sexual exploitation, blue fоr human trafficking,
kantian ethics human trafficking, anti-human trafficking organization іn cambodia, jo jorgensen on human trafficking,fort hood soldiers human trafficking, beau ⲟf tһe fіfth column human trafficking, hhawkins human trafficking, human trafficking іn the pacific islands, reasons wwhy
humman trafficking iss bad, ally human trafficking, ѡrite
an essay on human trafficking, human trafficking pros, human trafficking dasrk web reddit,
north preston human trafficking, Ԁollar sign tattoo humaqn trafficking, wht іs human trafficking, human trafficking stuart fl,
priceless ovie human trafficking, ti ɑnd wife human trafficking, human trafficking ethnicity
statistics, і 80 truck stοp human trafficking, hamilton human trafficking, oakville human trafficking, human trafficking
ⲟn the deep web, current human trafficking, human trafficking women’ѕ
rights, brunei human trafficking, barack obama human trafficking quote,
patron saint oof human trafficking, spirited ɑwɑʏ human trafficking, tһе game human trafficking, ttop human trafficking
cities 2023, human trafficking ᴡhich countries are
the worst, hoow tо donate to human trafficking organizations, human trafficking quotes famous, human trafficking stgory 2020,
huma traficking іn pittsburgh, 2020 human trafficking conference,
human trafficking bust atlanta, human tafficking hemet са, human trafficking statistics oregon, һow
to identify а human trafficking victim, economy ɑnd human trafficking, lover boy method ߋf human trafficking,
deluca ɑnd the humnan trafficking storyline,
european human trafficking, elah human trafficking, american airlinnes cener human trafficking, human trafficking paintings, ѡhat state
is #1 in human trafficking?, forced labor іn human trafficking,
人口販子human trafficking, crystal meth, ѡhɑt
doеs crystal meth ⅼoⲟk ⅼike, what is crystal meth,
crystal meth anonymous, һow long dߋes crfystal meth stay in youг sʏstem, hoᴡ tօ make crystal meth,
blue crystal meth, buy crystal meth online, crystal meth effects, crystal meth pipe, crystal meth drug,
ԝhat ԁoes crystaal meth ⅼook lіke?, meeth crystal,
crystal meth images, crrystal meth ѕide effects, how iis crystal meth made, meth ᴠs crystal meth, ԝhat ddoes crystal meth
ɗo, crystal meth symptoms, crystal meth ѵs meth, effects ⲟf crystal meth, ѕide effects oof crystfal meth, how
ⅾo you makе crystal meth, crystal meth vs
crack, what dоes crystal meth smell ⅼike, һow is crystal
meth սsed, crystal meth withdrawal, crystal meth breaking
bad, ԝһat is crystal meth mɑⅾе of, what dοes crystal meth doo tߋ yοu, crystal meth teeth,
smoking crystal meth, crystal meth pictures, can yoս
snort crystal meth, cryystal meth Ƅefore and after, whߋ invented crystal meth, crystal meth fɑcts, crystal meth withdrawal symptoms,
crystal meth street names, signs օf crystal meth, crystal meth addiction, howw tο cook crystal meth, crystal
meth definition, ԝhat type of drug іѕ crystal meth, wһat does crystal meth feel ⅼike,
crystal meth meaning, crystal meth ingredients, ѡhats crystal
meth, ԝһat color iis crystal meth, crystal meth detox, crystal
meth fаce, crystal meth powder, crystal meth poem,
sgreet nazmes fоr crystall meth, short term
effects ߋf crystal meth, signs ⲟf crystal meth abuse, crystal meth rock, crystal meth fly, crystal meth addict, crystal meth սsers, crystal meth rehab, һow mmuch Ԁoes crystal meth cost, һow ⅾo you ttake crystal meth,
һow much is crystal meth, signs օf crystal meth սse, һow tⲟ smoke crystal meth, һow tⲟ use
crystal meth, ⅼong term effects ⲟf crystal meth,
signs оf addiction tο crystal meth, pink crystal meth,
crystal meth ⅼoⲟk like, breaking bad crystal meth, ᴡhen was crtystal meth invented,
pictures օf crtstal meth, hoѡ is crystal meth taken, siugns that somеone is using crystal meth, ready
or not crystal meth storage, difference ƅetween meth and
crystal meth, hoѡ dо you dо crystal meth, crystal meth.,
locate crystall meth storage, ᴡһat are thhe effects
of crystal meth, fake crustal meth, crystal meth people, ᴡhаt doеs crystal meth, һow dⲟ you use crystal meth, how addictive iss
crystal meth, сan you overdose ߋn crystal meth, crystal
meth blue, crystal meth signs, һow long does crystal meth last, crystal meth detox ⅼοs angeles, how do people սse crystal meth, һow does crystal meth lо᧐k like, crystal
meth porn, hhow doeѕ crystal meth loߋk, crysttal meth storage twisted nerve, whatts іn crystal meth,
crystal meth treatment, ԝhat іs crystal meth mɑde
from, methamphetamin, methamphetamin adalah, methamphetamin ɗɑn amphetamin adalah, amphetgamin ԁan methamphetamin, chloroethane ɑnd methamphetamin, crystal methamphetamin, ѡhat iѕ methamphetamin, methamphetamin еffect, methamphetamin sport,
methamphetamin-entzug, methamphetamin definition, methamphetamin withdrawal, methamphetamin deutsch, methamphetamin 中文,
mdma methamphetamin, methamphetamin hydrochlorid,
methamphetamin geschichte, methamphetamin hcl, amphetamin ᴠs methamphetamin, methamphetamin biru, methylphenidat methamphetamin, beda amphetamin ⅾan methamphetamin, difference
ƅetween amphetamine ɑnd methamphetamin, methamphetamin psychose, methamphetamin rules, һow
to maке methamphetamin, methamphetamin amphetamin unterschied,
methamphetamin hydrochloride, definitioln von methamphetamin, p2p methamphetamin, methamphetamin medizin, amphetamin ᥙnd methamphetamin, vicks vapor inhaler methamphetamin, gta methamphetamin labor, ѡie wirkt methamphetamin, methamphetamin entzug, methamphwtamin kaufen, methamphetamin rezept, methamphetamin effects, methamphetamin amphetamin, methamphetyamin schnelltest, unterschied amphetamine սnd
methamphetamin, methamphetamin herstellung, methamphetamin herstellung china,
methamphetamin wehrmacht, methamphetamin tabletten, methamphetamin doccheck, һow to cook methamphetamin, methamphetamin abhängigkeit, methamphetamin nebenwirkungen, methamphetamin ᴡas
іst Ԁas, unterschied methamphetamin und amphetamin, methamphetamin nedir, amphetamine methamphetamin, methamphetamin aussprache, methamphetamin chemical formula, methamphetamin medikament, methamphetamin ⅼа chat gi,
test methamphetamin, methammphetamin pervitin, methamphetamin adalah obat, methamphetamin ɑndere suchten ɑuch naϲһ,
methamphetamin mdma, tchechien methamphetamin, methamphetamin nachweisbarkeit, methamphetamin psychonaut, methamphetamin molecule, methamphetamin labor, methylenedioxymethamphetamin, ecstasy methamphetamin, methamphetamin ԁương tính, was іst methamphetamin, drogentest methamphetamin,
methamphetamin englisch, methamphetamin structure, іst mdma methamphetamin, lye іn methamphetamin, іst methamphetamin organschädigend?
quora, methamphetamin chemische struktur, methamphetamin chemische formel, methamphetamin meaning, Ԁ-methamphetamin, herstelling methamphetamin, methamphetamin ѵs amphetamine, methamphetamin recept, methamphetamin japan, definition methamphetamin, methamphetamin fɑce, methamphetamin formula, methamphertamin synapse, methamphetamin adderall, methamphetamin adhd, blue methamphetamin, wirkung methamphetamin, methamphetamin terbuat dari, methamphetamin addiction, bilder
crystal methamphetamin, speed mіt methamphetamin gestreckt, methamphetamin synthese, methamphetamin ᥙse
icd 10, weed, weerd grinder, ѡһere is weed
legal, disposable weed pen, weed shop neаr me,
milwaukee wsed eater, purple weed, iss weed legal іn virginia, іѕ weed legal in oklahoma, iss weed legal іn louisiana, weed puller tool, weed carts, іs wewd
legwl іn south carolina, weed killerr fօr lawns, horny goat weed f᧐r men,
wһɑt stɑtes iis weed legal, weed shops neɑr me,
weed legal statеs, weed vape, roundup weed killer,
weed killer spray, edibles weed, recreational weed ѕtates, weed
store, milk weed, weed barrier, іs weed legal in indiana, legal weed ѕtates, stаteѕ with legal weed, iis weed legal iin kentucky, weed puller, preen weed preventer, ounce оf weed, dewalt weed eater,
plantai weed, husqvarna weed eater, electric weed eater,hybrid weed,
moonrock weed, weed pipe, barrett wilbert
weed, weed control, weed ddlivery neɑr me, is weed legal іn missouri,
hߋw tо makе weed butter, ԝhite weed, іs weed legal
in utah, moon rock weed, snow caps weed, іs weed legal in arkansas, iѕ weed legal in texas 2025, ryobi ԝеd eater, weeed bowl, dill weed, weed legalization, smoking
weed, іs weed legal іn nevada, weed whacker,
іs weed legal in alabama, іs weed a drug, weed barrier fabric,
ԝhat iѕ horny goat weed, spruce weed annd grass killer,
weed stores neаr me, sprinkles weed, poke weed, weed withdrawal, weed vapes,
snow cap weed, rm43 weed killer, craftsman weed
eater, qp оf weed, weed edibles, cookies weed, gelato weed, іs weed legal іn new mexico,
strains of weed, weed butter, ρound of weed, zaza weed, іs weed legal
іn nc, hоԝ muych іs ann ounce of weed, pgrr weed, іs delta 9 real weed, diy weed killer, zzip ᧐f weed,
weed torch, moldy weed, elon musk weed, іs weed illegal in texas, weed eater string, rso
weed, weed hangover, weed wallpaper, iis weed legal іn nebraska, hοᴡ t᧐ smoke weed, is weed lewgal in hawaii, how to
grow weed, һow to mаke weeed іn infinite craft, is
weed legal іn california, gary payton weed
Современные порталы гемблинг продуктов гарантируют игрокам возможность к элитному беттингу через защищенные казино Болливуд порталы. Лицензированная работа требует соблюдения определенных регуляторных положений.
Система оформления клиентского учетной записи охватывает верификацию индивидуальных данных. Администраторы используют расширенные алгоритмы KYC и AML для блокировки мошеннических платежей.
Электронные инструменты передовых казино основываются на защищенных хостингах с криптографическими алгоритмами. Территориальные ограничения обязывает операторов разрабатывать параллельные URL.
Альтернативные платформы представляют полные клоны первичного сайта с поддержанием всех опций и информации. Игроки добиваются беспрепятственный доступ к средствам, развлекательной статистике и личным установкам.
Расчетные операции осуществляются через связанные расчетные сервисы. Границы на пополнения и получения регулируются в соответствии с регуляторными положениями и индивидуальными правилами контроля угроз.
Квалифицированные клиенты указывают проверять статус аккредитации через официальные списки развлекательных структур. Престижные параметры содержат позиции на экспертных порталах и отзывы истинных пользователей.
Актуальные участники пересекаются с массой программных особенностей при операциях с проверенными ресурсами. Профессиональные ресурсы типа лаки Р±РёСЂ казино поставляют новую сведения о деятельности казино операторов.
Алгоритм проверки кабинета предполагает множество принудительных стадий. Базовая проверка включает загрузки справок валидирующих личность. Стандартный набор подразумевает паспорт, автолицензию или заграничное удостоверение.
Программная элемент записления охватывает задействование SSL-шифрования и многофакторной защиты. Опытные участники предлагают активировать все представленных возможностей охраны.
Резервные ссылки образуют полные отражения первичного сайта с хранением исчерпывающего возможностей. Главное достоинство заключается в подобии банковских рамок и норм ставочных требований.
Механизм обнаружения рабочих запасных доменов опирается на контроле профессиональных новостных лент и союзных площадок. Опытные геймеры эксплуатируют VPN-сервисы для создания постоянного соединения независимо от географических блокировок.
купить зип пакеты в Москве Zip пакеты с логотипом – это не просто упаковка, это визитная карточка вашего бренда. Они создают первое впечатление о вашей компании и формируют лояльность клиентов. Инвестируйте в узнаваемость и отличайтесь от конкурентов.
Легальные платформы игровых возможностей обеспечивают игрокам доступ к премиальному гэмблингу через тематические домены, включая lucky bear казино РІС…РѕРґ , которые точно выполняют глобальные стандарты надёжности.
Механизм активации necessita внесения идентификационных сведений через шифрованные SSL-протоколы. Менеджмент просят official verification дееспособности и адреса residence для поддержания юрисдикционных норм.
Двухэтапная идентификация считается обязательным частью новейших платформ безопасности. Участники приобретают SMS-пароли, push-оповещения или используют targeted софт наподобие Google Authenticator.
Дублирующие адреса решают сложности territorial санкций и DDoS-нападений. Техническим образом дубли составляют дублированные реплики primary ресурса с сохранением инструментария и клиентских информации.
Профессиональные пользователи предлагают поддерживать актуальные каталоги активных копий в сохранённых ссылках браузера. Management доставляют новости о fresh порталах через email, Telegram-группы и телефонные приложения.
Финансовые операции через официальные порталы secured encryption системами класса банковского индустрии. Снятие капитала осуществляется лишь на подтверждённые реквизиты держателя аккаунта.
No matter if some one searches for his vital thing,
so he/she wishes to be available that in detail, thus that thing is maintained over here.
Современные клиенты сталкиваются с огромным количеством цифровых нюансов при процессах с легальными сайтами. Тематические платформы типа тип топ сайт дают релевантную сведения о операциях развлекательных брендов.
Система проверки профиля охватывает комплекс обязательных фаз. Первичная подтверждение включает отправки удостоверений подтверждающих персону. Классический комплект предполагает документ, водительские права или международное ID.
Цифровая компонента открытия счета содержит использование зашифрованного канала и 2FA. Профессиональные геймеры настаивают включать полный набор представленных опций секьюрити.
Дублирующие порталы представляют полные копии центрального портала с обеспечением исчерпывающего набора функций. Важнейшее бонус выражается в подобии банковских границ и параметров вейджера.
Процедура выявления рабочих запасных доменов основывается на отслеживании тематических новостных лент и связанных сайтов. Профессиональные геймеры эксплуатируют анонимайзеры для создания стабильного доступа вне зависимости от географических блокировок.
нажмите, чтобы подробнее https://krab6a.at
Актуальные геймеры встречаются с огромным количеством технических особенностей при функционировании с сертифицированными ресурсами. Экспертные сайты типа казино СЂР° поставляют актуальную сведения о процессах казино организаций.
Процедура проверки учетной записи охватывает комплекс обязательных стадий. Исходная верификация предполагает размещения бумаг валидирующих личность. Классический перечень содержит удостоверение личности, водительские права или внешний паспорт.
Системная компонента записления предполагает внедрение криптографической защиты и двухуровневой проверки. Опытные клиенты предлагают задействовать максимум имеющихся возможностей обеспечения.
Резервные ссылки составляют точные отражения центрального ресурса с обеспечением всего набора функций. Главное бонус содержится в схожести денежных рамок и требований вейджера.
Схема обнаружения рабочих дублирующих порталов основывается на проверке экспертных мессенджер групп и сотрудничающих платформ. Профессиональные участники задействуют туннельные протоколы для предоставления бесперебойного соединения вне зависимости от региональных запретов.
Новейшие бетторы попадают с барьером доступа к проверенным порталам. Поставщики запрещают первичные домены, но грамотные lucky bear казино игроки понимают о наличии резервных площадок.
Зеркало образует точную воспроизведение основного площадки. SSL-сертификаты поддерживаются неизменными. Платёжные действия осуществляются через те же сервисы.
Алгоритм оформления профиля через дополнительный ссылку содержит обычной валидации. Администраторы выясняют документы для реализации KYC-норм. Индивидуальные параметры осуществляют двухфакторную проверку.
Банковские границы на резервных сайтах равняются главным параметрам. Стартовые ставки сохраняются неизменными. Накопительные выигрышные пулы согласовываются между различными порталами.
Льготные программы оперируют комплексно на зеркальных сайтах. Вейджер гарантирует первоначальные значения. Период действия проигрывания поддерживается.
Департамент поддержки изучает вопросы с альтернативных порталов равнозначно. Живой диалог обеспечивает непрерывный режим функционирования.
Беттинговая ниша отображает динамичный рост, заинтересовывая миллионы игроков. Грамотные порталы гарантируют качественную условия для игры. Исчерпывающую информацию о таких компаниях реально найти на Либет казино .
Аккредитация выступает ключевым критерием определения платформы. Лицензиаты Великобритании обеспечивают жёсткий мониторинг денежных транзакций. Конкретная легальная площадка реализует плановые инспекции RNG-механизмов.
Цифровые свойства инновационных гемблинг-сайтов содержат SSL-защиту банковского категории. Производители софтового продукта вроде Microgaming, NetEnt, Pragmatic Play добавляют комплексные системы хаотичных параметров.
Схема аутентификации учётной записи подразумевает передачи документов KYC-формата. Паспорт, подтверждение о заработке, подтверждение прописки — классический комплект для итогового активации.
Параллельные URL решают барьеры с блокировками компаний. Актуальные альтернативы корректируются каждый день компьютерными службами. Планшетные софт часто функционируют надёжнее интернет модификаций.
Банкролл-менеджмент задаёт длительную прибыльность гемблинговых периодов. Экспертные пользователи предлагают сокращать размер ставки до 1-2% от полного капитала.
https://www.gabitos.com/DESENMASCARANDO_LAS_FALSAS_DOCTRINAS/template.php?nm=1769852730
you can find out more https://gluex.io/
An impressive share! I have just forwarded this onto a colleague who had been doing a little homework on this.
And he in fact bought me dinner because I discovered it for him…
lol. So allow me to reword this…. Thanks for the meal!!
But yeah, thanks for spending some time to discuss this matter here on your web site.
Нынешние клиенты встречаются с набором технологических тонкостей при функционировании с проверенными сайтами. Тематические порталы типа тип топ казино поставляют свежую сведения о функционировании казино компаний.
Механизм аутентификации аккаунта включает ряд необходимых стадий. Первичная верификация требует загрузки справок валидирующих гражданство. Привычный комплект охватывает документ, лицензию водителя или международное ID.
Техническая составляющая регистрации подразумевает задействование криптографической защиты и двухуровневой проверки. Экспертные геймеры предлагают активировать все имеющихся настроек охраны.
Запасные домены являются стопроцентные копии базового платформы с поддержанием всего инструментария. Ключевое преимущество выражается в схожести расчетных пределов и требований условий прокрутки.
Схема поиска активных альтернативных адресов основывается на наблюдении тематических телеграм-каналов и связанных порталов. Опытные участники эксплуатируют прокси-соединения для формирования устойчивого подключения независимо от географических барьеров.
Hmm it looks like your website ate my first comment (it was super
long) so I guess I’ll just sum it up what I wrote
and say, I’m thoroughly enjoying your blog. I too am an aspiring blog blogger but I’m still new to the whole thing.
Do you have any recommendations for rookie blog writers?
I’d certainly appreciate it.
Поиск в области проверенных платформ подразумевает осознания новых инструментов соединения. Профессиональные клиенты применяют enomo casino для получения актуальной данных о действующих доменах.
Процедура создания личного кабинета в официальных заведениях включает сложную проверку. Новейшие компании применяют KYC-процедуры и AML-критерии. Документальное сопровождение требует от 24 до 72 часов.
Программные технологии для избежания ограничений развиваются сообща с интенсификацией юридических решений. VPN-инструменты типа premium предлагают безопасность AES-256 и стандарты OpenVPN. Устойчивость канала жизненно существенна для привилегированных партий.
Альтернативные платформы действуют через локально размещенные цифровые мощности. CDN-сети осуществляют оптимальную латентность для американских пользователей. Системное редирект включается при детекции блокировки основного адреса.
Экономические движения в сертифицированных территориях подпадают под строгим нормам PCI DSS. Крипто транзакции получают актуальность по причине анонимности и темпу реализации.
Портативные софт топовых компаний включают лицевую идентификацию и push-алерты для критических моментов. Изменяемый дизайн автономно корректируется под особенности дисплея.
google translation tool – Handy site that delivers quick translations suitable for everyday use.
It’s difficult to find experienced people on this subject, however, you seem like you know what you’re talking about!
Thanks
Проверенные площадки развлекательных сервисов предоставляют геймерам возможность к качественному азартному досугу через целевые сайты, включая ретро казино , что следуют transnational требования конфиденциальности.
Последовательность оформления профиля требует ввода authentication деталей через шифрованные SSL-протоколы. Менеджмент запрашивают нотариальное verification age verification и места жительства для выполнения legal правил.
Двухэтапная проверка представляет обязательным aspect современных архитектур безопасности. Клиенты обретают SMS-шифры, push-notification или эксплуатируют специальные софт наподобие Google Authenticator.
Зеркальные домены преодолевают препятствия territorial санкций и DDoS-assault. По сути зеркала формируют аналогичные копии главного портала с удержанием функциональности и индивидуальных параметров.
Опытные клиенты предлагают поддерживать current каталоги функционирующих зеркал в bookmark обозревателя. Провайдеры отправляют сведения о современных адресах через почтовые сервисы, Telegram-каналы и mobile apps.
Банковские процедуры через надёжные порталы secured криптографическими methods уровня банковского сектора. Extraction финансов выполняется только на аутентифицированные данные хозяина account.
Активные зеркала лицензированных игорных заведений на казино миллион обеспечивают стабильный соединение к азартным платформам. Методика клонирования формирует эквивалентные клоны основного веб-площадки с поддержанием всех механизмов.
Система активации через mirror-сайт абсолютно повторяет оригинальную заявку. Только пришедшие клиенты заполняют функционирующий email, создают стойкий код доступа и фиксируют базовую платежное средство.
Подтверждение личного кабинета предполагает передачи удостоверений в соответствии с KYC-требованиям. Фото национального документа, подтверждение проживания и банковские реквизиты проходят цифровую анализ в течение 24-72 ч.
Подключение существующих пользователей производится через стандартную окно с многоступенчатой верификацией. Разовые ключи поступают на мобильный аппарат или электронную почту.
Опции депозитного блока через дублирующие порталы поддерживает популярные расчетные системы. Visa, Mastercard, электронные балансы Skrill, Neteller, криптовалюты Bitcoin, Ethereum обрабатываются с минимальными взносами 0-3%.
Азартная библиотека повторяется в точности включая машины, настольные активности, live-хостов и прогрессивы. RTP-индикаторы, волатильность и проигрыш удерживаются точными.
Бонусная политика выполняется подобно главному ресурсу. Welcome-наборы, бесплатные вращения, refund и VIP-планы активируются системно при исполнении установленных условий.
Определение достойного игрового портала в сегодняшних границах подразумевает специального рассмотрения к правовому режиму. Квалифицированные клиенты понимают, что lucky bear казино скачать содержит последнюю данные о доступных провайдерах.
Процесс создания аккаунта в официальных заведениях предусматривает неизбежную подтверждение идентичности. KYC-нормы обеспечивают как оператора, так и геймера от мошенничества. Промежуточные лимиты на изъятие капитала до финализации валидации – типичная подход.
Технические запреты на вход к игровым порталам нейтрализуются через альтернативные URL. Активные клоны поддерживают тотальную работоспособность главного ресурса. Расчетные движения, игровой прогресс и льготные планы продолжают стабильными.
Денежная гарантированность измеряется уровнем задействованных расчетных способов. SSL-защита, PCI DSS валидация и двухфакторная идентификация обеспечивают защищенный заслон защиты.
Геймплейная библиотека официальных площадок охватывает слоты от топовых провайдеров. RTP-индексы, волатильность и алгоритмические модели проходят нейтральную валидацию в признанных учреждениях.
Схемы вознаграждения в серьезных казино опираются на ясных правилах ставок. Условия ставок x35-40 считается приемлемым для слот-льгот, в то время как традиционные развлечения принимаются в калькуляцию с пониженным показателем.
a fantastic read https://prjx.online/
Новейшие гемблеры попадают с затруднением входа к легальным сайтам. Поставщики закрывают основные порталы, но знающие mad casino пользователи осознают о существовании параллельных порталов.
Резервная ссылка является стопроцентную дубликат базового площадки. SSL-сертификаты поддерживаются такими же. Платёжные действия выполняются через сходные системы.
Методика регистрации через резервный ресурс предполагает классической подтверждения. Администраторы уточняют документы для исполнения KYC-правил. Личные данные выполняют многоуровневую проверку.
Вносительные пределы на дополнительных платформах аналогичны главным требованиям. Низшие ставки поддерживаются фиксированными. Прогрессивные банки интегрируются между разными ресурсами.
Поощрительные планы выполняются комплексно на альтернативных порталах. Отыгрышный коэффициент удерживает исходные параметры. Временные рамки реализации продолжается.
Департамент сопровождения обрабатывает запросы с дополнительных доменов таким же способом. Живой переписка поддерживает постоянный формат работы.
Ridiculous quest there. What happened after? Thanks!
Отбор честного развлекательного заведения предполагает основательного разбора правовых свидетельств. Современные ресурсы СЌРЅРѕРјРѕ казино предоставляют пользователям полную данные о действующих аккредитациях.
Система открытия аккаунта включает различные требуемых стадий аутентификации. Операторы истребуют документы, доказывающие личность и правоспособность. Классический KYC-механизм длится от 24 до 72 часов.
Контроль средств запускается с назначения пределов на пополнения. Искусные участники рекомендуют внедрять установку 5% от полного развлекательного капитала на одну сессию.
Технические ограничения владельцев обязывают применять дополнительные ссылки. Копии удерживают стопроцентную активность главного сайта, включая летопись платежей и гемблинг достижения.
Передовые финансовые сервисы дают быстрые пополнения через виртуальные счета. Bitcoin, Ethereum и устойчивые монеты предоставляют анонимность и мизерные сборы. Период осуществления получений достигает 10-30 промежутков.
Схемы лояльности подразумевают многоуровневые категории с возрастающим компенсацией. VIP-представители предлагают персонализированные вознаграждения, увеличенные рамки и приоритетную обслуживание.
Гемблинговая индустрия представляет быстрый подъём, манящая тысячи клиентов. Квалифицированные ресурсы гарантируют безопасную среду для ставок. Развёрнутую данные о таких операторах возможно найти на Голд казино .
Аккредитация выступает главным элементом отбора портала. Контролёры Кюрасао гарантируют серьёзный мониторинг расчётных манипуляций. Всякая аккредитованная платформа выполняет плановые ревизии RNG-модулей.
Компьютерные аспекты современных игорных домов объединяют SSL-шифрование экономического категории. Провайдеры цифрового ПО типа Microgaming, NetEnt, Pragmatic Play подключают комплексные модели рандомных величин.
Алгоритм валидации счёта предусматривает подачи удостоверений KYC-уровня. Паспорт, свидетельство о доходах, валидация проживания — типичный список для полноценного авторизации.
Альтернативные URL ликвидируют барьеры с блокировками поставщиков. Рабочие альтернативы корректируются постоянно компьютерными службами. Портативные утилиты часто работают надёжнее сетевых форматов.
Банкролл-менеджмент задаёт долгосрочную доходность гемблинговых партий. Профессиональные участники настаивают контролировать сумму вейджера до 1-2% от общего бюджета.
塔尔萨之王第三季高清完整版,海外华人可免费观看最新热播剧集。
Беттинговая область показывает быстрый подъём, притягивая тысячи клиентов. Опытные платформы обеспечивают безопасную атмосферу для беттинга. Детальную факты о этих провайдерах допустимо обнаружить на РЎСѓРєР° казино .
Аттестация выступает основным элементом выбора сайта. Регуляторы Великобритании создают тщательный проверку денежных транзакций. Отдельная сертифицированная сайт осуществляет плановые контроли RNG-модулей.
Технические параметры актуальных гемблинг-сайтов объединяют SSL-защиту банковского класса. Производители виртуального материала наподобие Microgaming, NetEnt, Pragmatic Play добавляют комплексные модели случайных чисел.
Механизм проверки профиля предполагает подачи бумаг KYC-стандарта. ID, выписка о доходах, доказательство проживания — обычный набор для окончательного активации.
Зеркальные URL исправляют препятствия с фильтрацией организаций. Функционирующие зеркала обновляются систематически компьютерными группами. Мобильные софт обычно действуют качественнее онлайн редакций.
Управление банкроллом формирует длительную доходность игровых раундов. Грамотные игроки предлагают лимитировать объём бета до 1-2% от суммарного резерва.
Football score boards updated in real time, clean interface easy to read on any device
Поиск легального игорного портала предполагает тщательного исследования лицензионных бумаг. Современные платформы лаки Р±РёСЂ казино обеспечивают пользователям полную информацию о своих санкциях.
Алгоритм оформления счета содержит несколько принудительных ступеней подтверждения. Владельцы требуют бумаги, засвидетельствующие идентичность и правоспособность. Стандартный KYC-регламент продолжается от 24 до 72 периодов.
Контроль средств запускается с назначения лимитов на пополнения. Опытные пользователи советуют задействовать норму 5% от совокупного казино резерва на единичную сессию.
Системные блокировки администраторов вынуждают внедрять резервные адреса. Дубликаты поддерживают безусловную активность первичного площадки, охватывая историю сделок и развлекательный прогресс.
Современные денежные методы гарантируют скоростные взносы через цифровые портмоне. Bitcoin, Ethereum и устойчивые монеты дают скрытность и крошечные сборы. Период обработки выводов доходит 10-30 минут.
Программы приверженности охватывают иерархические статусы с увеличивающимся бонусом. VIP-консультанты гарантируют персонализированные вознаграждения, расширенные границы и преимущественную сервис.
kako podići dobitak na vavada http://vavada2009.help
Главная https://krab6a.at/
It’s in fact very complicated in this full of activity life to listen news on TV, so I only use the web
for that purpose, and obtain the most up-to-date news.
Перемещение в мире лицензированных ресурсов подразумевает представления продвинутых способов авторизации. Продвинутые пользователи внедряют лаки Р±РёСЂ казино для обретения актуальной информации о работающих доменах.
Механизм открытия аккаунта в надежных учреждениях охватывает многоуровневую валидацию. Актуальные поставщики внедряют KYC-процедуры и AML-стандарты. Документооборот занимает от 24 до 72 временных отрезков.
Технические технологии для обхода запретов совершенствуются синхронно с усилением регуляторных инициатив. VPN-инструменты уровня premium гарантируют шифрование AES-256 и системы OpenVPN. Стабильность связи кардинально значима для привилегированных игровых периодов.
Резервные ресурсы выполняют задачи через пространственно размещенные цифровые кластеры. CDN-комплексы предоставляют минимальную латентность для международных геймеров. Автоматическое роутинг запускается при обнаружении блокировки основного домена.
Банковские движения в проверенных регионах отвечают строгим стандартам PCI DSS. Крипто расчеты набирают актуальность из-за конфиденциальности и быстроте реализации.
Переносные софт элитных компаний объединяют лицевую авторизацию и push-оповещения для важных эпизодов. Изменяемый интерфейс автономно подстраивается под настройки дисплея.
Активные резервные адреса лицензированных казино на френдс казино предоставляют устойчивый подключение к гемблинг платформам. Методика реплицирования генерирует идентичные клоны базового портала с фиксацией всех функций.
Алгоритм активации через альтернативный домен полностью повторяет базовую бланк. Дебютные участники заполняют функционирующий email, формируют надежный шифр и выбирают базовую валюту.
Верификация счета содержит представления справок по KYC-политике. Снимок ID-карты, свидетельство регистрации и финансовые параметры проверяются через цифровую контроль в течение 24-72 ч.
Авторизация верифицированных геймеров происходит через базовую модуль с 2FA идентификацией. Временные ключи передаются на сотовый гаджет или мейл.
Инструменты пополнительного раздела через дублирующие порталы поддерживает актуальные банковские механизмы. Visa, Mastercard, электронные кошельки Skrill, Neteller, криптовалюты Bitcoin, Ethereum выполняются с оптимизированными сборами 0-3%.
Развлекательная база дублируется в точности включая автоматы, карточные игры, live-крупье и мегавыигрыши. RTP-значения, вариативность и проигрыш фиксируются неизменными.
Акционная система функционирует похоже основному ресурсу. Welcome-комплекты, фриспины, refund и VIP-схемы стартуют системно при достижении установленных условий.
Hi there colleagues, its enormous post regarding educationand fully defined, keep it up all the time.
Узнать больше https://krab6a.at/
Оформление ВНЖ за границей имеет ключевое значение.
Этот статус даёт законную возможность на длительное пребывание в нужной державе.
купить диплом мастера по фистингу
Такое разрешение гарантирует доступ к национальному медицинскому обслуживанию и образованию.
Наличие ВНЖ существенно облегчает процесс финансового сотрудничества и ведения своего дела.
В конечном счёте, данное удостоверение является важнейшим этапом к постоянному проживанию или возможно второму гражданству.
Новейшие порталы азартных игр обеспечивают беттерам подключение к элитному азарту через сертифицированные Болливуд казино сайты. Сертифицированная работа нуждается соблюдения определенных правовых требований.
Система оформления индивидуального аккаунта включает верификацию индивидуальных показателей. Регуляторы применяют многоуровневые алгоритмы KYC и AML для блокировки нарушающих операций.
IT инструменты актуальных гемблинг платформ работают на безопасных дата-центрах с HTTPS стандартами. Локальные запреты заставляет владельцев создавать вспомогательные адреса.
Дублирующие домены являют собой эквивалентные репликации базового домена с удержанием всех функций и показателей. Игроки получают постоянный соединение к капиталу, игровой отчетности и персональным конфигурациям.
Банковские процедуры проходят через встроенные финансовые сервисы. Границы на пополнения и выводы устанавливаются в согласии с законодательными условиями и корпоративными правилами управления рисками.
Опытные беттеры советуют проверять статус разрешения через официальные списки беттинг структур. Репутационные критерии содержат места на профильных платформах и отзывы реальных пользователей.
Актуальные дублирующие порталы легальных gaming-операторов на типпи казино гарантируют непрерывный соединение к гемблинг ресурсам. Технология дублирования генерирует полноценные реплики корневого ресурса с удержанием всех возможностей.
Механизм активации через альтернативный домен целиком копирует оригинальную шаблон. Дебютные геймеры указывают функционирующий email, создают безопасный ключ и назначают рабочую валюту.
Валидация аккаунта включает предоставления свидетельств опираясь на KYC-стандартам. Снимок паспорта, верификация резиденции и платежные реквизиты проходят машинную проверку в течение 24-72 часов.
Авторизация верифицированных клиентов выполняется через базовую модуль с двухфакторной верификацией. Временные шифры передаются на мессенджер аппарат или мейл.
Механизмы пополнительного модуля через дублирующие порталы включает распространенные расчетные инструменты. Visa, Mastercard, веб хранилища Skrill, Neteller, цифровые активы Bitcoin, Ethereum реализуются с сокращенными процентами 0-3%.
Развлекательная каталог копируется на сто процентов включая барабаны, столовые геймплей, live-операторов и накопительные призы. RTP-коэффициенты, колебания и ставочные требования сохраняются такими же.
Промо политика выполняется похоже основному ресурсу. Welcome-наборы, безвозмездные спины, refund и VIP-программы запускаются автоматически при исполнении прописанных критериев.
Игровая сфера демонстрирует активный развитие, завлекая легионы геймеров. Грамотные площадки гарантируют защищённую пространство для развлечений. Развёрнутую сведения о данных операторах реально найти на казино Вован .
Лицензирование составляет приоритетным фактором отбора сайта. Лицензиаты Мальты обеспечивают серьёзный проверку валютных манипуляций. Отдельная сертифицированная ресурс выполняет периодические проверки RNG-алгоритмов.
Компьютерные особенности современных беттинг-платформ охватывают SSL-безопасность банковского категории. Провайдеры цифрового обеспечения наподобие Microgaming, NetEnt, Pragmatic Play внедряют комплексные модели случайных показателей.
Процесс проверки учётной записи требует представления справок KYC-стандарта. ID, документ о заработке, доказательство прописки — типичный пакет для полноценного активации.
Резервные ссылки устраняют проблемы с ограничениями провайдеров. Свежие альтернативы корректируются ежедневно программными отделами. Портативные утилиты обычно функционируют качественнее онлайн версий.
Финансовая дисциплина задаёт стратегическую эффективность гемблинговых циклов. Опытные участники рекомендуют контролировать величину депозита до 1-2% от полного капитала.
Нынешние геймеры сталкиваются с препятствием связи к лицензированным площадкам. Компании ограничивают стандартные ссылки, но искушённые мад казино пользователи знают о функционировании резервных порталов.
Дополнительный домен составляет идентичную дубликат основного портала. Системы безопасности функционируют неизменными. Финансовые переводы осуществляются через равнозначные сервисы.
Алгоритм создания аккаунта через альтернативный адрес включает привычной верификации. Сотрудники уточняют удостоверения для исполнения KYC-норм. Идентификационные характеристики реализуют двухфакторную проверку.
Пополнительные ограничения на альтернативных порталах равняются главным требованиям. Минимальные суммы функционируют стабильными. Увеличивающиеся накопления согласовываются между множественными адресами.
Стимулирующие схемы функционируют полноценно на альтернативных платформах. Множитель ставок гарантирует оригинальные показатели. Период действия отыгрыша сохраняется.
Отдел помощи рассматривает заявки с зеркальных ресурсов аналогично. Интерактивный чат обеспечивает беспрерывный режим работы.
Post-match analysis, expert opinions and tactical breakdowns available
взгляните на сайте здесь https://bonus-betting.ru/hype-casino-promokod/
https://supermoto.bbforum.be/post54088.html#54088
Relegation battle livescore, bottom of table drama with survival at stake
Подбор достойного азартного ресурса в сегодняшних границах нуждается тщательного внимания к законному состоянию. Профессиональные участники знают, что лаки Р±РёСЂ казино отображает актуальную факты о работающих провайдерах.
Механизм создания аккаунта в проверенных операторах объединяет обязательную проверку документов. KYC-нормы обеспечивают как казино, так и клиента от обмана. Краткосрочные ограничения на перечисление средств до финализации валидации – обычная процедура.
Электронные препятствия на вход к азартным порталам обходятся через дублирующие ссылки. Действующие отражения гарантируют полную функциональность главного сайта. Платежные транзакции, азартный статистика и бонусные системы остаются стабильными.
Денежная защищенность характеризуется критерием внедренных денежных способов. SSL-защита, PCI DSS сертификация и многоуровневая аутентификация создают безопасный заслон защиты.
Азартная коллекция сертифицированных сервисов предоставляет машины от топовых разработчиков. RTP-коэффициенты, дисперсия и статистические модели получают внешнюю валидацию в авторизованных центрах.
Механизмы мотивации в надежных операторах основываются на ясных условиях вейджера. Проигрыш x35-40 считается разумным для машина-привилегий, в то время как традиционные игры засчитываются в счет с сниженным процентом.
Современные игроки имеют дело с множеством системных аспектов при деятельности с лицензированными сайтами. Тематические сайты типа казино Голд выдают актуальную материалы о процессах гэмблинговых брендов.
Механизм верификации аккаунта подразумевает множество необходимых шагов. Первичная проверка требует размещения документов верифицирующих индивидуальность. Привычный пакет предполагает паспорт, автоудостоверение или внешний паспорт.
Техническая сторона открытия счета включает эксплуатацию зашифрованного канала и двухфакторной аутентификации. Профессиональные игроки рекомендуют запускать максимум имеющихся функций безопасности.
Дублирующие порталы образуют полные реплики базового платформы с удержанием всего арсенала. Основное достоинство содержится в подобии платежных границ и критериев проигрыша.
Алгоритм обнаружения функционирующих резервных ссылок фундируется на отслеживании тематических уведомительных сервисов и партнерских ресурсов. Опытные игроки задействуют прокси-соединения для обеспечения стабильного входа без оглядки от региональных барьеров.
Нынешние игроки встречаются с затруднением подключения к официальным сайтам. Поставщики блокируют главные домены, но грамотные Лев казино игроки понимают о наличии резервных платформ.
Дополнительный домен представляет абсолютную воспроизведение базового платформы. Средства защиты поддерживаются неизменными. Финансовые действия производятся через равнозначные сервисы.
Алгоритм заведения учётной записи через дополнительный ресурс включает типовой подтверждения. Менеджеры просят бумаги для выполнения KYC-требований. Личные данные осуществляют расширенную аутентификацию.
Депозитные лимиты на параллельных порталах совпадают главным условиям. Низшие вклады остаются константными. Увеличивающиеся банки синхронизируются между множественными порталами.
Поощрительные системы работают целостно на альтернативных порталах. Множитель ставок гарантирует первоначальные параметры. Длительность реализации продолжается.
Команда сопровождения обрабатывает вопросы с резервных порталов идентично. Живой разговор обеспечивает беспрерывный график деятельности.
Greetings from Carolina! I’m bored at work so
I decided to check out your site on my iphone during
lunch break. I love the knowledge you provide here and can’t wait to take a look when I get
home. I’m shocked at how quick your blog loaded on my
mobile .. I’m not even using WIFI, just 3G .. Anyways, good site!
подробнее здесь Tripscan
Olive Media KC Strategies – Clear and actionable insights, examples show results in practice.
Рабочие дублирующие порталы проверенных игорных заведений на френдс казино создают непрерывный коннект к азартным ресурсам. Принцип дублирования формирует идентичные копии центрального сайта с фиксацией всех функций.
Алгоритм открытия счета через альтернативный домен целиком имитирует основную анкету. Только пришедшие участники прописывают действующий email, генерируют стойкий шифр и определяют операционную платежное средство.
Валидация учетной записи содержит отправки документов по KYC-требованиям. Снимок удостоверения личности, доказательство места жительства и денежные реквизиты проверяются через алгоритмическую валидацию в течение 24-72 часов.
Подключение верифицированных участников осуществляется через стандартную панель с расширенной верификацией. Краткосрочные пароли доставляются на телефонный аппарат или мейл.
Возможности денежного сектора через зеркала обеспечивает популярные банковские сервисы. Visa, Mastercard, электронные кошельки Skrill, Neteller, виртуальные монеты Bitcoin, Ethereum выполняются с уменьшенными взносами 0-3%.
Азартная каталог копируется абсолютно включая spinning games, традиционные игры, live-дилеров и мегавыигрыши. RTP-показатели, волатильность и проигрыш фиксируются аналогичными.
Подарочная механизм действует идентично базовому порталу. Welcome-бандлы, безвозмездные спины, денежный возврат и VIP-системы активируются машинально при исполнении определенных параметров.
Современные бетторы сталкиваются с затруднением подключения к проверенным порталам. Провайдеры ограничивают первичные домены, но опытные казино типпи клиенты осознают о доступности альтернативных ресурсов.
Резервная ссылка является полную воспроизведение первичного портала. Криптографические алгоритмы поддерживаются такими же. Финансовые переводы проходят через равнозначные системы.
Технология оформления профиля через резервный портал подразумевает стандартной подтверждения. Менеджеры требуют справки для соблюдения KYC-требований. Паспортные параметры осуществляют комплексную подтверждение.
Пополнительные лимиты на зеркальных порталах соответствуют первичным условиям. Низшие суммы сохраняются стабильными. Прогрессивные джекпоты синхронизируются между разными доменами.
Льготные схемы функционируют целостно на альтернативных сайтах. Требования по обороту гарантирует оригинальные цифры. Временные рамки использования остаётся прежним.
Отдел поддержки рассматривает запросы с зеркальных адресов идентично. Онлайн чат обеспечивает круглосуточный формат обслуживания.
Инновационные платформы азартных услуг обеспечивают клиентам путь к высококлассному развлечениям через проверенные retro зеркало ресурсы. Официальная работа предполагает исполнения определенных контролирующих положений.
Процедура оформления игрового аккаунта предусматривает подтверждение приватных реквизитов. Провайдеры применяют комплексные механизмы KYC и AML для пресечения мошеннических операций.
Программные инструменты инновационных гемблинг платформ основываются на надежных серверах с шифровальными стандартами. Территориальные ограничения обязывает управляющих организовывать параллельные URL.
Альтернативные ресурсы представляют точные дубликаты центрального портала с сохранением всех функций и сведений. Беттеры добиваются устойчивый вход к капиталу, беттинг статистике и персональным опциям.
Банковские действия производятся через связанные денежные шлюзы. Границы на пополнения и получения устанавливаются в согласии с нормативными положениями и организационными политиками снижения потерь.
Профессиональные игроки указывают отслеживать статус авторизации через государственные реестры азартных структур. Репутационные параметры включают рейтинги на экспертных ресурсах и отзывы подлинных участников.
have a peek at this website https://alchemix.center
пояснения https://bonus-betting.ru/kent-casino-promokod/
опубликовано здесь https://bonus-betting.ru/kent-casino-promokod/
Hey! Do you use Twitter? I’d like to follow you if that would be okay.
I’m undoubtedly enjoying your blog and look forward
to new posts.
Современные пользователи имеют дело с множеством цифровых деталей при операциях с легальными порталами. Специализированные сайты типа Лев казино предоставляют свежую материалы о деятельности игорных компаний.
Алгоритм проверки счета предполагает несколько обязательных стадий. Первичная аутентификация подразумевает предоставления документов удостоверяющих личность. Типовой список включает удостоверение личности, автоудостоверение или заграничное удостоверение.
Программная компонента оформления содержит эксплуатацию криптографической защиты и 2FA. Квалифицированные геймеры настаивают запускать максимум доступных возможностей безопасности.
Запасные домены формируют стопроцентные клоны основного домена с сохранением комплексного функционала. Центральное бонус состоит в соответствии банковских ограничений и условий вейджера.
Процедура выявления активных альтернативных адресов опирается на проверке профильных мессенджер групп и сотрудничающих порталов. Экспертные игроки применяют прокси-соединения для формирования надежного подключения невзирая от географических лимитов.
Выбор проверенного развлекательного портала требует глубокого рассмотрения официальных бумаг. Современные платформы enomo casino обеспечивают участникам стопроцентную детали о своих лицензиях.
Алгоритм регистрации предусматривает множество обязательных ступеней верификации. Провайдеры настаивают справки, устанавливающие персону и дееспособность. Обычный KYC-порядок продолжается от 24 до 72 промежутков.
Управление банком начинается с фиксации рамок на пополнения. Квалифицированные участники настаивают эксплуатировать принцип 5% от полного развлекательного фонда на одну партию.
Программные препятствия провайдеров принуждают применять альтернативные пути. Клоны поддерживают максимальную производительность центрального сайта, включая хронологию транзакций и игровой продвижение.
Передовые финансовые методы предоставляют быстрые взносы через виртуальные хранилища. Bitcoin, Ethereum и фиксированные активы предоставляют приватность и мизерные отчисления. Продолжительность выполнения выводов равно 10-30 интервалов.
Программы приверженности содержат градационные статусы с возрастающим бонусом. VIP-координаторы дают личные подарки, улучшенные границы и приоритетную поддержку.
Поиск в пространстве легальных порталов требует осознания современных технологий соединения. Опытные пользователи внедряют Килограмм казино для добывания свежей данных о действующих адресах.
Процедура регистрации аккаунта в сертифицированных заведениях содержит комплексную валидацию. Современные провайдеры применяют KYC-протоколы и AML-нормы. Документальное сопровождение требует от 24 до 72 периодов.
Технические технологии для преодоления барьеров улучшаются сообща с ужесточением законодательных шагов. VPN-службы категории premium дают кодирование AES-256 и методы OpenVPN. Устойчивость связи критически значима для премиальных заходов.
Зеркальные сайты выполняют задачи через пространственно распределенные серверные кластеры. CDN-структуры обеспечивают низкую время ответа для глобальных игроков. Техническое роутинг запускается при выявлении ограничения базового адреса.
Финансовые движения в легальных регионах подчиняются определенным правилам PCI DSS. Цифровые расчеты получают распространение из-за скрытности и быстроте выполнения.
Мобильные клиенты премиальных компаний объединяют биометрическую авторизацию и push-оповещения для ключевых моментов. Гибкий внешний вид автоматически адаптируется под особенности панели.
Актуальные геймеры обталкиваются с набором системных деталей при функционировании с лицензированными платформами. Экспертные сайты типа mad casino зеркало выдают актуальную данные о процессах гэмблинговых организаций.
Процедура проверки кабинета предполагает набор необходимых фаз. Исходная верификация включает предоставления справок подтверждающих личность. Типовой комплект включает паспорт, права или международное ID.
Программная элемент оформления подразумевает внедрение зашифрованного канала и 2FA. Опытные участники рекомендуют инициировать все имеющихся настроек безопасности.
Зеркала формируют стопроцентные реплики базового платформы с обеспечением комплексного арсенала. Ключевое преимущество заключается в тождественности банковских рамок и критериев ставочных требований.
Схема локализации рабочих запасных доменов фундируется на мониторинге профессиональных новостных лент и аффилированных сайтов. Опытные геймеры задействуют туннельные протоколы для предоставления устойчивого соединения невзирая от локальных лимитов.
I read this post fully on the topic of the comparison of most recent and preceding
technologies, it’s remarkable article.
https://www.gta5-mods.com/users/NouvauCode26
Поиск качественного азартного площадки в сегодняшних обстоятельствах подразумевает детального анализа к регулятивному уровню. Компетентные пользователи учитывают, что [url=https://linpetws.org/igrayte-v-litsenzionnoe-onlayn-kazino-eldorado-luchshie-igrovye-avtomaty-v-rossii/]Рльдорадо казино[/url] отображает новую факты о доступных площадках.
Процедура открытия счета в сертифицированных операторах предусматривает неизбежную аутентификацию документов. KYC-правила гарантируют как сервис, так и геймера от фрода. Переходные лимиты на получение финансов до выполнения верификации – стандартная подход.
Электронные запреты на связь к игровым сервисам нейтрализуются через зеркальные домены. Функционирующие клоны обеспечивают стопроцентную работоспособность первичного портала. Платежные транзакции, азартный прогресс и льготные программы поддерживаются устойчивыми.
Экономическая гарантированность определяется уровнем применяемых денежных инструментов. SSL-шифрование, PCI DSS валидация и расширенная аутентификация устанавливают прочный щит охраны.
Геймплейная ассортимент проверенных заведений включает слоты от главных разработчиков. RTP-коэффициенты, волатильность и алгоритмические схемы подвергаются нейтральную проверку в аккредитованных учреждениях.
Планы стимулирования в качественных заведениях опираются на четких параметрах ставок. Проигрыш x35-40 признается адекватным для спин-бонусов, в то время как традиционные забавы включаются в зачет с пониженным фактором.
Современные порталы развлекательных активностей предлагают пользователям доступ к премиальному развлечениям через безопасные Рльдорадо казино ресурсы. Авторизованная работа требует следования определенных правовых требований.
Алгоритм открытия клиентского профиля предусматривает валидацию приватных информации. Регуляторы применяют углубленные протоколы KYC и AML для предотвращения фродовых транзакций.
Электронные платформы новейших игорных домов работают на зашифрованных хостингах с шифровальными протоколами. IP-фильтрация вынуждает провайдеров создавать параллельные домены.
Альтернативные ресурсы составляют эквивалентные дубликаты базового портала с удержанием всех сервисов и показателей. Игроки получают беспрепятственный доступ к счету, беттинг статистике и клиентским конфигурациям.
Финансовые действия реализуются через связанные расчетные агрегаторы. Границы на пополнения и изъятия определяются в соответствии с лицензионными стандартами и собственными регламентами управления рисками.
Профессиональные пользователи указывают контролировать ситуацию лицензии через государственные списки азартных комиссий. Авторитетные характеристики содержат позиции на специализированных порталах и отзывы настоящих участников.
Wow, superb blog layout! How lengthy have you been running a blog for?
you make blogging look easy. The full glance of your web site is excellent,
as smartly as the content material!
Football match time today, know exactly when games start in your timezone
Поиск в секторе официальных ресурсов предполагает понимания актуальных инструментов входа. Продвинутые клиенты используют казино Болливуд для добывания современной фактов о функционирующих путях.
Процедура формирования учетной записи в надежных операторах предполагает комплексную подтверждение. Актуальные поставщики задействуют KYC-алгоритмы и AML-стандарты. Документооборот занимает от 24 до 72 часов.
Компьютерные инструменты для прохождения ограничений прогрессируют одновременно с интенсификацией правовых действий. VPN-решения уровня premium обеспечивают криптографию AES-256 и методы OpenVPN. Стабильность коннекта критически существенна для привилегированных игровых периодов.
Резервные сайты выполняют задачи через локально разнесенные серверные инфраструктуры. CDN-комплексы обеспечивают быструю латентность для азиатских геймеров. Техническое перенаправление включается при обнаружении недоступности первичного ресурса.
Финансовые движения в официальных юрисдикциях отвечают конкретным нормам PCI DSS. Децентрализованные транзакции набирают популярность благодаря конфиденциальности и быстроте процессинга.
Смартфонные программы ведущих операторов содержат физиологическую аутентификацию и push-извещения для ключевых моментов. Настраиваемый оформление независимо корректируется под настройки панели.
Новейшие геймеры имеют дело с набором цифровых особенностей при функционировании с официальными ресурсами. Профильные порталы типа Вован регистрация обеспечивают современную сведения о функционировании игорных брендов.
Процедура подтверждения учетной записи охватывает ряд обязательных шагов. Базовая верификация требует отправки свидетельств доказывающих гражданство. Классический пакет включает удостоверение личности, лицензию водителя или загранпаспорт.
Системная составляющая регистрации включает эксплуатацию криптографической защиты и многофакторной защиты. Опытные игроки настаивают инициировать совокупность доступных возможностей охраны.
Резервные ссылки образуют полные реплики основного платформы с хранением комплексного возможностей. Основное достоинство состоит в подобии банковских пределов и требований вейджера.
Алгоритм нахождения активных резервных ссылок фундируется на мониторинге тематических мессенджер групп и партнерских порталов. Продвинутые геймеры используют виртуальные частные сети для обеспечения стабильного доступа невзирая от локальных блокировок.
Определение надежного развлекательного портала нуждается глубокого разбора регулятивных свидетельств. Современные платформы казино Вован предлагают пользователям абсолютную детали о имеющихся допусках.
Алгоритм получения доступа включает различные принудительных фаз подтверждения. Администраторы истребуют бумаги, устанавливающие персону и дееспособность. Классический KYC-процесс составляет от 24 до 72 временных отрезков.
Финансовое планирование начинается с задания пределов на депозиты. Компетентные пользователи настаивают использовать принцип 5% от полного азартного капитала на индивидуальную партию.
Системные барьеры администраторов обязывают эксплуатировать резервные домены. Зеркала удерживают стопроцентную работоспособность основного площадки, подразумевая архив транзакций и развлекательный прогресс.
Передовые банковские способы обеспечивают быстрые депозиты через блокчейн счета. Bitcoin, Ethereum и устойчивые монеты гарантируют тайность и наименьшие сборы. Срок реализации получений составляет 10-30 интервалов.
Схемы постоянства содержат каскадные категории с прогрессивным компенсацией. VIP-представители гарантируют индивидуальные бонусы, увеличенные лимиты и ускоренную обслуживание.
Link exchange is nothing else except it is just placing the other person’s website link on your page at suitable place and
other person will also do same in support of you.
Поиск надежного игорного заведения нуждается глубокого анализа лицензионных сертификатов. Современные платформы миллион казино гарантируют игрокам полную данные о текущих разрешениях.
Процесс регистрации содержит несколько необходимых фаз подтверждения. Операторы требуют справки, подтверждающие личность и совершеннолетие. Типовой KYC-механизм длится от 24 до 72 интервалов.
Управление банком стартует с определения границ на депозиты. Опытные участники настаивают задействовать закон 5% от суммарного игорного средств на индивидуальную партию.
Электронные препятствия провайдеров вынуждают эксплуатировать вспомогательные маршруты. Зеркала оберегают безусловную функциональность центрального ресурса, охватывая журнал платежей и казино достижения.
Современные платежные способы гарантируют оперативные депозиты через электронные кошельки. Bitcoin, Ethereum и фиксированные активы обеспечивают тайность и крошечные взносы. Продолжительность выполнения изъятий равно 10-30 интервалов.
Планы приверженности включают иерархические категории с нарастающим бонусом. VIP-координаторы обеспечивают личные подарки, улучшенные ограничения и опережающую помощь.
Зеркало с подсветкой Зеркало коридор: зеркало для прихожей, визуально расширяющее пространство и добавляющее света.
Collaborative conversations іn OMT courses build enjoyment ɑround
mathematics concepts, inspiring Singapore pupils t᧐ establish love and master exams.
Experience flexible learning anytime, ɑnywhere
thrߋugh OMT’ѕ extensive online e-learning platform, featuring limitless access tⲟ video lessons and interactive tests.
Аѕ mathematics underpins Singapore’ѕ track record fοr excellence in international benchmarks likе
PISA, math tuition is essential tо unlocking a child’s potential
аnd protecting scholastic benefits іn this core subject.
Tuition highlights heuristic analytical аpproaches,
vital for tackling PSLE’s challenging ԝ᧐rd pгoblems tһat require multiple steps.
Tuition cultivates sophisticated analytical abilities,
vital ffor addressing tһe complicated, multi-step concerns tһɑt sⲣecify О Level math challenges.
Ᏼy using extensive method ԝith past A Level test documents, math tuition familiarizes pupils ԝith inquiry styles and marking plans fоr optimum performance.
Ꭲhe proprietary OMT syllabus differs Ьy extending MOE curriculum ᴡith enrichment օn analytical modeling, perfect fоr data-driven exam questions.
OMT’ѕ online system advertises ѕelf-discipline lor,
key tⲟ constant reseаrch and higher exam outcomes.
Ꮤith mathematics scores ɑffecting secondary school positionings, tuition іs crucial for Singapore primary students ɡoing for elite
organizations usіng PSLE.
Stoр by my web-site :: Singapore A levels Math Tuition
Исследование в мире сертифицированных сайтов требует представления современных способов доступа. Квалифицированные игроки задействуют Клубника зеркало для обретения актуальной материалов о оперативных адресах.
Схема открытия аккаунта в надежных заведениях содержит сложную валидацию. Новейшие поставщики используют KYC-протоколы и AML-нормы. Оформление документов составляет от 24 до 72 часов.
Программные способы для прохождения ограничений эволюционируют сообща с усилением нормативных действий. VPN-платформы уровня premium гарантируют шифрование AES-256 и протоколы OpenVPN. Стабильность соединения принципиально актуальна для высокоролловых сессий.
Резервные адреса действуют через географически распределенные цифровые кластеры. CDN-архитектуры предоставляют сокращенную латентность для американских клиентов. Программное редирект запускается при детекции блокировки центрального адреса.
Экономические операции в лицензированных областях отвечают определенным нормам PCI DSS. Децентрализованные операции увеличивают востребованность в результате скрытности и скорости осуществления.
Смартфонные клиенты топовых брендов содержат голосовую идентификацию и push-сообщения для критических ситуаций. Модифицируемый оформление автономно подстраивается под настройки дисплея.
Актуальные геймеры обталкиваются с множеством технических деталей при процессах с легальными площадками. Профессиональные сайты типа Bollywood дают актуальную данные о работе игорных операторов.
Система валидации кабинета подразумевает несколько требуемых уровней. Исходная верификация включает передачи справок доказывающих субъект. Привычный комплект подразумевает ID, водительские права или загранпаспорт.
Цифровая сторона оформления включает использование SSL-шифрования и многофакторной защиты. Квалифицированные пользователи подсказывают инициировать весь комплекс доступных опций защиты.
Альтернативные адреса образуют точные копии основного домена с хранением тотального набора функций. Ключевое выгода состоит в схожести банковских пределов и требований проигрыша.
Алгоритм нахождения функционирующих альтернативных адресов базируется на проверке профильных мессенджер групп и связанных площадок. Квалифицированные участники внедряют анонимайзеры для обеспечения устойчивого соединения вне зависимости от географических запретов.
Выбор качественного игрового заведения в нынешних рамках подразумевает детального анализа к лицензионному положению. Компетентные участники осознают, что РЎСѓРєР° казино отображает новую сведения о действующих провайдерах.
Процедура записи в официальных сервисах содержит требуемую верификацию документов. KYC-стандарты защищают как площадку, так и пользователя от махинаций. Кратковременные ограничения на изъятие активов до окончания подтверждения – типичная практика.
Электронные барьеры на подключение к гемблинг сервисам преодолеваются через альтернативные ссылки. Действующие дубликаты гарантируют всестороннюю возможности первичного портала. Банковские процедуры, азартный результаты и привилегированные программы функционируют устойчивыми.
Экономическая надежность оценивается уровнем используемых расчетных механизмов. SSL-безопасность, PCI DSS аттестация и усиленная аутентификация гарантируют стабильный барьер ограждения.
Игровая каталог лицензированных сервисов содержит спины от топовых провайдеров. RTP-показатели, дисперсия и математические модели испытывают внешнюю аудит в утвержденных институтах.
Схемы вознаграждения в серьезных сервисах базируются на четких условиях проигрыша. Вейджер x35-40 признается нормальным для машина-подарков, в то время как традиционные развлечения учитываются в подсчет с пониженным процентом.
Everything is very open with a really clear description of the challenges.
It was definitely informative. Your site is very useful.
Many thanks for sharing!
Bu saytdakı məlumatları oxumaqdan zövq alıram. Çox sağ olun!
https://1ab.in/3hn8
Развлекательная ниша демонстрирует интенсивный прогресс, завлекая множество геймеров. Профессиональные порталы гарантируют безопасную условия для игры. Исчерпывающую информацию о таких организациях можно отыскать на казино типпи .
Аккредитация составляет главным показателем отбора платформы. Регуляторы Великобритании обеспечивают серьёзный мониторинг расчётных действий. Конкретная лицензированная ресурс осуществляет систематические проверки RNG-генераторов.
IT аспекты инновационных азартных площадок предусматривают SSL-защиту банковского категории. Поставщики программного продукта уровня Microgaming, NetEnt, Pragmatic Play встраивают сложные системы хаотичных значений.
Процедура подтверждения учётной записи предусматривает подачи справок KYC-стандарта. Документ, выписка о доходах, верификация прописки — классический перечень для полноценного активации.
Резервные ссылки решают препятствия с ограничениями операторов. Актуальные альтернативы корректируются систематически IT службами. Смартфонные программы часто оперируют качественнее сетевых вариантов.
Финансовая дисциплина формирует долгосрочную прибыльность развлекательных партий. Профессиональные пользователи настаивают лимитировать количество ставки до 1-2% от полного капитала.
Badminton livescore from BWF World Tour, shuttlecock action tracked in real time
Передовые платформы игорных продуктов дают клиентам подключение к элитному игровому процессу через защищенные Болливуд казино порталы. Официальная операционная активность нуждается исполнения определенных надзорных требований.
Процедура создания игрового профиля задействует проверку индивидуальных реквизитов. Операторы применяют углубленные процедуры KYC и AML для исключения фродовых операций.
IT средства инновационных гемблинг платформ базируются на зашифрованных хостингах с HTTPS сертификатами. Геоблокировка принуждает владельцев создавать вспомогательные порталы.
Зеркальные домены являют собой эквивалентные репликации центрального ресурса с поддержанием всех опций и данных. Пользователи достигают стабильный соединение к капиталу, игровой данным и личным установкам.
Расчетные действия проходят через встроенные платежные процессоры. Ограничения на инвестиции и снятия регулируются в соответствии с регуляторными критериями и организационными процедурами минимизации опасностей.
Экспертные гемблеры рекомендуют отслеживать положение аккредитации через регуляторные базы данных игорных органов. Репутационные характеристики предусматривают позиции на тематических порталах и feedback истинных клиентов.
Gastro Health Monitor omeprazole over the counter Gastro Health Monitor
Беттинговая сфера отображает быстрый рост, притягивая тысячи геймеров. Квалифицированные сайты предоставляют надёжную пространство для пари. Исчерпывающую сведения о данных брендах реально найти на казино СЌРЅРѕРјРѕ .
Аккредитация является ключевым фактором подбора площадки. Контролёры Кюрасао предоставляют строгий мониторинг экономических операций. Конкретная сертифицированная ресурс реализует периодические аудиты RNG-генераторов.
Программные параметры новейших гемблинг-сайтов предусматривают SSL-шифрование финансового ранга. Производители программного материала класса Microgaming, NetEnt, Pragmatic Play встраивают усовершенствованные системы случайных чисел.
Алгоритм подтверждения профиля предполагает предоставления бумаг KYC-типа. Документ, подтверждение о финансах, валидация прописки — стандартный список для итогового подключения.
Дублирующие домены убирают препятствия с блокировками операторов. Свежие копии модифицируются ежедневно IT командами. Планшетные приложения часто оперируют стабильнее интернет версий.
Контроль средств определяет длительную прибыльность гемблинговых сессий. Профессиональные беттеры указывают лимитировать сумму ставки до 1-2% от общего бюджета.
Поиск легального развлекательного оператора предполагает тщательного рассмотрения регулятивных свидетельств. Актуальные ресурсы казино РЎСѓРєР° обеспечивают игрокам максимальную детали о собственных допусках.
Процесс оформления счета содержит множество принудительных стадий валидации. Операторы требуют свидетельства, удостоверяющие индивидуальность и дееспособность. Обычный KYC-процесс требует от 24 до 72 интервалов.
Контроль средств запускается с назначения лимитов на вклады. Компетентные игроки советуют применять правило 5% от итогового игорного средств на индивидуальную игру.
Цифровые блокировки владельцев заставляют эксплуатировать вспомогательные маршруты. Клоны оберегают стопроцентную работоспособность центрального портала, подразумевая журнал операций и гемблинг продвижение.
Актуальные банковские способы дают мгновенные инвестиции через виртуальные кошельки. Bitcoin, Ethereum и фиксированные активы поддерживают анонимность и наименьшие комиссии. Период проведения выводов составляет 10-30 интервалов.
Схемы постоянства содержат ступенчатые категории с нарастающим кэшбэком. VIP-представители дают личные подарки, повышенные границы и приоритетную обслуживание.
https://fasterskier.com/wp-content/blogs.dir/?melbet_promo_code_bonus.html
Исследование в мире проверенных сайтов предполагает осознания новых методов доступа. Квалифицированные геймеры эксплуатируют казино Голд для приобретения современной данных о активных URL.
Механизм создания учетной записи в надежных организациях охватывает комплексную аутентификацию. Продвинутые компании применяют KYC-механизмы и AML-требования. Бумажная работа потребляет от 24 до 72 часов.
Технические способы для преодоления запретов эволюционируют вместе с усилением юридических действий. VPN-решения класса premium гарантируют криптографию AES-256 и системы OpenVPN. Стабильность канала кардинально важна для привилегированных раундов.
Запасные сайты выполняют задачи через регионально разнесенные компьютерные системы. CDN-структуры обеспечивают оптимальную отклик для азиатских пользователей. Цифровое переключение включается при обнаружении препятствия центрального портала.
Экономические движения в проверенных регионах подпадают под жестким критериям PCI DSS. Децентрализованные расчеты набирают актуальность из-за секретности и темпу выполнения.
Портативные клиенты топовых провайдеров объединяют отпечатковую подтверждение и push-извещения для важных моментов. Гибкий дизайн независимо корректируется под особенности дисплея.
Новейшие участники попадают с сложностью входа к сертифицированным сайтам. Организации запрещают базовые ссылки, но профессиональные лаки Р±РёСЂ казино зеркало пользователи знают о присутствии параллельных платформ.
Зеркало представляет абсолютную воспроизведение главного сайта. Системы безопасности остаются равнозначными. Финансовые процедуры производятся через аналогичные механизмы.
Методика регистрации через резервный ссылку подразумевает привычной валидации. Менеджеры уточняют бумаги для выполнения KYC-стандартов. Паспортные характеристики проходят расширенную проверку.
Депозитные пределы на параллельных платформах соответствуют базовым спецификациям. Минимальные ставки сохраняются фиксированными. Накопительные накопления координируются между множественными ресурсами.
Бонусные схемы оперируют полноценно на параллельных площадках. Множитель ставок поддерживает базовые показатели. Срок активности отыгрыша не изменяется.
Сервис сопровождения изучает заявки с дополнительных ресурсов равнозначно. Прямой общение предоставляет 24-часовой порядок работы.
https://koksetau-kz.forumotion.eu/t143-topic#201
http://nauseacareus.com/# Nausea Care US
Tak for at oplyse om hvordan bidrag redder liv for blinde.
Look at my web page Donation til grå stær
Перемещение в секторе сертифицированных сайтов предполагает представления новых технологий доступа. Профессиональные пользователи задействуют казино Bollywood для получения новейшей сведений о действующих путях.
Процедура формирования учетной записи в надежных учреждениях подразумевает комплексную проверку. Продвинутые провайдеры эксплуатируют KYC-механизмы и AML-правила. Документальное сопровождение требует от 24 до 72 промежутков.
Цифровые способы для прохождения запретов развиваются одновременно с усилением правовых шагов. VPN-инструменты класса premium предоставляют криптографию AES-256 и системы OpenVPN. Надежность соединения критически значима для высокоролловых партий.
Дублирующие адреса выполняют задачи через локально расположенные компьютерные ресурсы. CDN-структуры гарантируют сокращенную время ответа для глобальных участников. Системное маршрутизация инициируется при идентификации препятствия первичного портала.
Денежные операции в легальных юрисдикциях отвечают строгим нормам PCI DSS. Криптовалютные платежи увеличивают признание вследствие скрытности и скорости осуществления.
Мобильные приложения элитных брендов объединяют биометрическую авторизацию и push-сообщения для существенных эпизодов. Адаптивный оформление самостоятельно корректируется под особенности панели.
Навигация в мире сертифицированных порталов требует осознания актуальных технологий входа. Опытные участники внедряют казино Килограмм для извлечения релевантной фактов о функционирующих ссылках.
Схема регистрации личного кабинета в лицензированных операторах содержит детальную подтверждение. Актуальные провайдеры внедряют KYC-протоколы и AML-правила. Оформление документов отнимает от 24 до 72 интервалов.
IT технологии для обхода блокировок эволюционируют одновременно с укреплением юридических шагов. VPN-инструменты типа premium гарантируют кодирование AES-256 и стандарты OpenVPN. Устойчивость связи кардинально необходима для привилегированных сессий.
Альтернативные адреса действуют через географически рассредоточенные цифровые системы. CDN-структуры предоставляют оптимальную пинг для глобальных геймеров. Программное редирект активируется при обнаружении блокировки центрального домена.
Денежные транзакции в официальных регионах следуют строгим нормам PCI DSS. Крипто транзакции набирают востребованность из-за приватности и динамике реализации.
Мобильные утилиты элитных провайдеров интегрируют отпечатковую подтверждение и push-сообщения для важных моментов. Гибкий облик программно корректируется под характеристики экрана.
电影网站推荐,海外华人专用,支持中英双语界面和全球加速。
Передовые порталы игорных активностей обеспечивают игрокам путь к премиальному развлечениям через защищенные lucky bear казино порталы. Официальная работа нуждается следования жестких контролирующих критериев.
Процедура активации персонального учетной записи предусматривает аутентификацию личных сведений. Администраторы используют комплексные процедуры KYC и AML для исключения мошеннических финансовых действий.
Электронные средства инновационных беттинг площадок функционируют на стабильных хостингах с TLS протоколами. IP-фильтрация принуждает владельцев внедрять дублирующие URL.
Параллельные ресурсы формируют точные копии центрального платформы с сохранением всех функций и данных. Игроки обеспечивают себе непрерывный соединение к балансу, игровой записям и индивидуальным опциям.
Платежные процедуры производятся через встроенные финансовые процессоры. Лимиты на инвестиции и изъятия назначаются в гармонии с нормативными стандартами и корпоративными политиками снижения потерь.
Квалифицированные беттеры предлагают отслеживать состояние разрешения через надзорные базы данных гемблинг организаций. Престижные характеристики включают места на тематических сайтах и комментарии настоящих пользователей.
Рабочие дублирующие порталы проверенных gaming-операторов на казино РјСЌРґ гарантируют постоянный вход к гемблинг сервисам. Схема реплицирования формирует аналогичные дубликаты базового ресурса с сохранением всех возможностей.
Процедура регистрации через дублирующий портал полностью копирует основную шаблон. Дебютные игроки прописывают функционирующий email, придумывают защищенный пароль и устанавливают операционную финансовый инструмент.
Идентификация личного кабинета предполагает передачи бумаг по KYC-политике. Снимок водительских прав, верификация регистрации и платежные реквизиты анализируются посредством автоматическую валидацию в течение 24-72 часов.
Авторизация существующих геймеров производится через базовую форму с многоступенчатой проверкой. Временные токены доставляются на мобильный номер или e-mail адрес.
Механизмы денежного модуля через альтернативные домены включает востребованные банковские инструменты. Visa, Mastercard, электронные счета Skrill, Neteller, цифровые активы Bitcoin, Ethereum процессируются с минимальными комиссиями 0-3%.
Развлекательная каталог копируется полностью включая слоты, традиционные забавы, live-хостов и джекпоты. RTP-параметры, изменчивость и условия отыгрыша поддерживаются точными.
Бонусная система действует идентично центральному веб-площадке. Welcome-комплекты, даровые прокруты, компенсация и VIP-программы включаются программно при исполнении прописанных стандартов.
Освоение английского языка в современном мире является ключевой необходимостью.
Это открывает огромные возможности для профессионального роста.
Владение этим языком обеспечивает возможность доступа к международному обучению и науке.
progorodchelny.ru
Свободное общение языком значительно увеличивает возможности поездок и коммуникации.
Подавляющее количество актуальной информационных материалов в сети содержится на английском языке.
Поиск в сфере лицензированных площадок подразумевает представления передовых способов подключения. Умелые клиенты эксплуатируют лаки Р±РёСЂ для добывания актуальной данных о работающих путях.
Процедура регистрации профиля в сертифицированных организациях охватывает тщательную верификацию. Продвинутые компании эксплуатируют KYC-механизмы и AML-стандарты. Документальное сопровождение составляет от 24 до 72 часов.
Программные технологии для избежания блокировок совершенствуются одновременно с усилением законодательных шагов. VPN-сервисы типа premium дают криптографию AES-256 и системы OpenVPN. Стабильность канала жизненно существенна для премиальных раундов.
Дублирующие сайты оперируют через локально расположенные серверные инфраструктуры. CDN-комплексы гарантируют оптимальную отклик для азиатских клиентов. Автоматическое перенаправление срабатывает при обнаружении ограничения главного сайта.
Финансовые переводы в проверенных территориях соответствуют жестким стандартам PCI DSS. Криптовалютные операции набирают востребованность в результате приватности и темпу выполнения.
Мобильные программы лучших организаций интегрируют голосовую проверку и push-сообщения для принципиальных ситуаций. Модифицируемый дизайн самостоятельно изменяется под особенности экрана.
Отбор проверенного развлекательного портала нуждается тщательного исследования официальных свидетельств. Актуальные системы Клубника казино гарантируют пользователям стопроцентную информацию о текущих санкциях.
Система создания профиля содержит различные обязательных этапов верификации. Представители настаивают удостоверения, подтверждающие личность и правоспособность. Типовой KYC-алгоритм занимает от 24 до 72 промежутков.
Управление банком запускается с задания границ на пополнения. Опытные клиенты рекомендуют задействовать принцип 5% от итогового казино фонда на индивидуальную заход.
Цифровые препятствия администраторов заставляют внедрять запасные домены. Зеркала удерживают стопроцентную активность основного ресурса, содержа историю платежей и казино успех.
Новые банковские методы дают скоростные депозиты через виртуальные хранилища. Bitcoin, Ethereum и устойчивые монеты обеспечивают анонимность и крошечные комиссии. Время проведения извлечений равно 10-30 минут.
Схемы лояльности предусматривают многоуровневые уровни с накапливающимся бонусом. VIP-менеджеры предоставляют уникальные подарки, улучшенные лимиты и преимущественную техподдержку.
I’m more than happy to find this site. I need to to thank
you for ones time for this particularly wonderful read!!
I definitely appreciated every part of it and i also have you book-marked
to look at new information in your website.
methocarbamol dosing: Spasm Relief Protocols – tizanidine hcl
Беттинговая отрасль демонстрирует динамичный прогресс, манящая массы участников. Опытные ресурсы дают безопасную среду для беттинга. Исчерпывающую данные о таких компаниях реально отыскать на типпи казино .
Аккредитация выступает ключевым показателем отбора ресурса. Лицензиаты Гибралтара создают строгий надзор расчётных транзакций. Всякая лицензированная портал подвергается систематические инспекции RNG-алгоритмов.
Цифровые характеристики современных казино включают SSL-шифрование банковского ранга. Производители цифрового материала вроде Microgaming, NetEnt, Pragmatic Play внедряют многоуровневые системы случайных показателей.
Процесс верификации профиля предполагает передачи документов KYC-типа. Документ, выписка о доходах, доказательство прописки — стандартный перечень для полноценного подключения.
Параллельные домены устраняют проблемы с блокировками провайдеров. Актуальные копии обновляются каждый день IT командами. Портативные софт обычно оперируют надёжнее интернет модификаций.
Финансовая дисциплина создаёт долгосрочную прибыльность азартных циклов. Квалифицированные геймеры указывают контролировать объём депозита до 1-2% от итогового банкролла.
Поиск в области легальных порталов предполагает осознания актуальных инструментов подключения. Продвинутые пользователи эксплуатируют Лев казино для получения свежей информации о работающих адресах.
Алгоритм создания учетной записи в проверенных операторах охватывает многоуровневую верификацию. Современные компании внедряют KYC-алгоритмы и AML-критерии. Документальная процедура отнимает от 24 до 72 промежутков.
Цифровые решения для прохождения ограничений совершенствуются одновременно с ужесточением юридических действий. VPN-решения разряда premium дают защиту AES-256 и стандарты OpenVPN. Стабильность подключения критически существенна для VIP заходов.
Запасные домены оперируют через локально размещенные компьютерные инфраструктуры. CDN-структуры гарантируют низкую латентность для глобальных геймеров. Техническое перенаправление срабатывает при распознавании барьера базового ресурса.
Экономические транзакции в проверенных регионах следуют конкретным нормам PCI DSS. Блокчейн переводы набирают востребованность в результате анонимности и динамике обработки.
Планшетные приложения лучших операторов содержат биометрическую авторизацию и push-сообщения для критических моментов. Модифицируемый внешний вид автоматически корректируется под свойства панели.
I absolutely love your blog.. Great colors & theme. Did you develop this website yourself?
Please reply back as I’m planning to create my very own blog and would like to learn where you got this from or what
the theme is called. Appreciate it!
Simply want to say your article is as surprising.
The clarity in your publish is simply excellent and
that i can think you’re a professional on this subject. Fine along with your permission allow
me to clutch your RSS feed to keep up to date with impending post.
Thank you 1,000,000 and please carry on the enjoyable work.
Very nice post. I just stumbled upon your weblog and wanted to say that I have truly enjoyed browsing your blog posts.
In any case I’ll be subscribing to your rss feed and I hope you write again soon!
my web page: teen patti master download
This is a topic which is near to my heart…
Best wishes! Exactly where are your contact details though?
Look at my web page teen patti master apk
Азартная индустрия показывает динамичный прогресс, завлекая множество игроков. Квалифицированные площадки предлагают безопасную пространство для игры. Развёрнутую данные о указанных брендах возможно отыскать на СЌРЅРѕРјРѕ казино .
Аттестация является центральным аспектом выбора ресурса. Регуляторы Мальты предоставляют тщательный надзор расчётных действий. Любая аккредитованная портал реализует периодические контроли RNG-алгоритмов.
Программные аспекты современных игорных домов предусматривают SSL-безопасность расчётного ранга. Создатели софтового софта уровня Microgaming, NetEnt, Pragmatic Play добавляют усовершенствованные механизмы рандомных чисел.
Алгоритм подтверждения учётной записи требует представления удостоверений KYC-стандарта. ID, справка о заработке, удостоверение местожительства — типичный набор для полноценного доступа.
Резервные домены решают барьеры с цензурой провайдеров. Актуальные варианты адаптируются регулярно цифровыми службами. Планшетные программы регулярно выполняются качественнее веб вариантов.
Контроль средств устанавливает длительную эффективность развлекательных партий. Экспертные игроки советуют лимитировать сумму бета до 1-2% от общего фонда.
Поиск в секторе официальных площадок подразумевает знания новых способов доступа. Опытные геймеры задействуют казино ретро для приобретения релевантной данных о действующих ссылках.
Механизм формирования счета в надежных компаниях подразумевает детальную проверку. Новейшие поставщики эксплуатируют KYC-процедуры и AML-нормы. Документооборот требует от 24 до 72 временных отрезков.
Компьютерные технологии для преодоления препятствий развиваются одновременно с укреплением юридических инициатив. VPN-решения типа premium обеспечивают защиту AES-256 и технологии OpenVPN. Постоянство подключения жизненно актуальна для элитных партий.
Запасные домены выполняют задачи через пространственно распределенные цифровые инфраструктуры. CDN-архитектуры предоставляют быструю задержку для европейских пользователей. Системное роутинг включается при распознавании барьера главного ресурса.
Денежные манипуляции в проверенных зонах отвечают жестким критериям PCI DSS. Блокчейн платежи набирают признание вследствие конфиденциальности и темпу обработки.
Мобильные приложения элитных брендов содержат физиологическую аутентификацию и push-сообщения для критических эпизодов. Гибкий облик самостоятельно настраивается под характеристики панели.
Ticket availability, match day access and pricing information
Check live football scores here, all leagues covered with real-time updates and match stats
Team news updates, lineups injuries and squad announcements covered
You have made some good points there. I checked on the net to learn more about the issue and found most individuals will go along with
your views on this website.
Feel free to visit my webpage teen patti master
Sofascore style live updates with detailed statistics and match analysis included
Передовые геймеры натыкаются с сложностью соединения к легальным ресурсам. Компании блокируют основные порталы, но опытные Килограмм казино игроки помнят о присутствии параллельных сайтов.
Зеркало формирует абсолютную воспроизведение первичного сайта. SSL-сертификаты поддерживаются аналогичными. Банковские процедуры производятся через те же сервисы.
Процедура открытия счёта через зеркальный ссылку подразумевает типовой верификации. Администраторы просят бумаги для исполнения KYC-стандартов. Персональные сведения осуществляют усиленную верификацию.
Финансовые рамки на резервных площадках соответствуют базовым спецификациям. Минимальные суммы остаются постоянными. Возрастающие призовые фонды согласовываются между разными ссылками.
Стимулирующие системы работают полноценно на дополнительных площадках. Отыгрышный коэффициент обеспечивает стартовые параметры. Временные рамки проигрывания поддерживается.
Отдел ассистирования обрабатывает вопросы с зеркальных порталов таким же способом. Прямой диалог предоставляет круглосуточный формат деятельности.
Set piece goals, dead ball situations and their conversion
Выбор безопасного игорного ресурса требует глубокого исследования официальных сертификатов. Передовые системы Гризли казино дают игрокам стопроцентную информацию о имеющихся аккредитациях.
Механизм оформления счета охватывает несколько ключевых шагов проверки. Администраторы требуют документы, подтверждающие индивидуальность и дееспособность. Традиционный KYC-процесс составляет от 24 до 72 промежутков.
Финансовое планирование начинается с назначения лимитов на депозиты. Компетентные игроки рекомендуют внедрять норму 5% от итогового азартного фонда на одну партию.
Технические блокировки провайдеров побуждают внедрять альтернативные адреса. Дубликаты удерживают полную производительность центрального платформы, предусматривая историю транзакций и гемблинг результаты.
Новые банковские системы поддерживают мгновенные пополнения через блокчейн хранилища. Bitcoin, Ethereum и стейблкоины гарантируют анонимность и минимальные взносы. Время выполнения изъятий доходит 10-30 отрезков.
Планы верности подразумевают каскадные категории с возрастающим возвратом. VIP-представители дают индивидуальные вознаграждения, усиленные рамки и опережающую поддержку.
If you are going for best contents like myself, only
pay a quick visit this site all the time because it offers
quality contents, thanks
Feel free to visit my web-site :: teen patti master apk
LED Extreme lighting – Solid product range, details are easy to find and evaluate quickly.
捕风捉影在线免费在线观看,海外华人专属平台,高清无广告体验。
Рабочие mirror-ссылки надежных игорных заведений на типпи казино обеспечивают стабильный коннект к азартным системам. Принцип клонирования генерирует аналогичные версии базового ресурса с удержанием всех функций.
Механизм активации через зеркало на сто процентов повторяет стандартную бланк. Свежие клиенты регистрируют действующий email, устанавливают стойкий шифр и выбирают основную курренси.
Аутентификация личного кабинета предполагает представления справок следуя KYC-стандартам. Копия национального документа, подтверждение адреса и карточные реквизиты анализируются посредством программную валидацию в течение 24-72 временных единиц.
Логин существующих пользователей производится через классическую модуль с двухфакторной валидацией. Сессионные шифры поступают на мобильный девайс или мейл.
Инструменты входящего раздела через зеркала содержит распространенные денежные системы. Visa, Mastercard, онлайн счета Skrill, Neteller, виртуальные монеты Bitcoin, Ethereum процессируются с низкими процентами 0-3%.
Gaming коллекция дублируется полностью включая spinning games, настольные геймплей, live-ведущих и джекпоты. RTP-показатели, вариативность и отыгрыш удерживаются такими же.
Поощрительная схема выполняется идентично главному порталу. Welcome-наборы, фриспины, компенсация и VIP-планы запускаются системно при исполнении определенных требований.
Выбор безопасного развлекательного оператора в нынешних рамках требует тщательного анализа к законному уровню. Знающие пользователи представляют, что Гризли казино отображает актуальную факты о функционирующих провайдерах.
Алгоритм записи в проверенных заведениях объединяет требуемую валидацию идентичности. KYC-стандарты охраняют как площадку, так и игрока от мошенничества. Временные рамки на перечисление капитала до финализации подтверждения – привычная процедура.
Цифровые запреты на связь к betting площадкам обходятся через альтернативные порталы. Рабочие зеркала сохраняют полную производительность основного сервиса. Финансовые процедуры, интерактивный продвижение и наградные схемы остаются устойчивыми.
Экономическая надежность измеряется критерием задействованных расчетных способов. SSL-кодирование, PCI DSS валидация и расширенная подтверждение устанавливают стабильный барьер защиты.
Развлекательная ассортимент сертифицированных провайдеров содержит машины от известных провайдеров. RTP-показатели, колебания и вероятностные модели подвергаются нейтральную контроль в аккредитованных лабораториях.
Системы мотивации в надежных площадках строятся на понятных параметрах проигрыша. Отыгрыш x35-40 расценивается разумным для машина-льгот, в то время как карточные игры идут в калькуляцию с сниженным показателем.
Superb, what a blog it is! This website gives useful data to us, keep it up.
Feel free to visit my website; teen patti game
Hello everyone, it’s my first pay a quick visit at this site,
and paragraph is really fruitful in favor of me, keep up posting these articles
or reviews.
ссылка на сайт https://bonus-betting.ru/garilla-casino-promokod/
Hi there! I could have sworn I’ve visited this website before but after looking at many of
the articles I realized it’s new to me. Anyways, I’m
definitely pleased I discovered it and I’ll be bookmarking it
and checking back frequently!
Also visit my web blog – teen patti master download
Официальные операторы гэмблинг предложений обеспечивают клиентам вариант к премиальному времяпрепровождению через профильные платформы, включая Клубника казино , что выполняют мировые нормы защиты.
Схема создания аккаунта necessita заполнения валидационных информации через шифрованные SSL-линии. Провайдеры требуют письменное удостоверение age verification и адреса нахождения для поддержания правовых стандартов.
Multi-factor проверка становится required частью новейших систем security. Users обретают SMS-шифры, push-уведомления или эксплуатируют targeted утилиты вроде Google Authenticator.
Дублирующие домены преодолевают проблемы региональных ограничений и DDoS-штурмов. По сути реплики формируют копийные копии базового домена с сохранением опций и пользовательских параметров.
Профессиональные клиенты suggest удерживать current реестры рабочих зеркал в закладках веб-клиента. Букмекеры передают updates о актуальных доменах через e-mail, Telegram-communities и mobile программы.
Банковские процедуры через официальные ресурсы обеспечены шифровальными methods категории банковского сектора. Изъятие денег осуществляется исключительно на верифицированные данные держателя аккаунта.
Определение безопасного betting ресурса в современных обстоятельствах нуждается особого изучения к юридическому состоянию. Знающие участники знают, что ретро регистрация включает современную материалы о работающих ресурсах.
Алгоритм создания аккаунта в официальных операторах охватывает обязательную верификацию идентичности. KYC-правила охраняют как оператора, так и клиента от афер. Краткосрочные пределы на снятие капитала до закрытия подтверждения – стандартная практика.
Электронные ограничения на соединение к betting сайтам обходятся через дублирующие домены. Доступные клоны предоставляют полную возможности главного портала. Расчетные процедуры, интерактивный продвижение и бонусные планы остаются устойчивыми.
Финансовая надежность характеризуется критерием задействованных денежных систем. SSL-шифрование, PCI DSS сертификация и расширенная подтверждение формируют защищенный щит охраны.
Игровая каталог легальных заведений включает машины от лидирующих студий. RTP-значения, вариативность и вероятностные схемы претерпевают беспристрастную валидацию в признанных учреждениях.
Системы вознаграждения в серьезных заведениях строятся на прозрачных требованиях отыгрыша. Вейджер x35-40 считается справедливым для автомат-льгот, в то время как традиционные состязания принимаются в подсчет с уменьшенным множителем.
You are so interesting! I don’t suppose I have read anything like this before.
So wonderful to find somebody with genuine thoughts
on this subject. Seriously.. many thanks for starting this up.
This web site is something that is required on the internet, someone with a bit of originality!
I was suggested this blog by my cousin. I’m not sure whether
this post is written by him as no one else know such detailed about my trouble.
You’re amazing! Thanks!
https://kaskelen.borda.ru/?1-13-0-00000695-000-0-0-1762850909
лучшее онлайн казино на реальные деньги
Актуальные сервисы игорных игр обеспечивают клиентам подключение к качественному игровому процессу через защищенные lucky bear казино платформы. Сертифицированная работа влечет соблюдения жестких правовых критериев.
Процедура открытия индивидуального счета содержит валидацию персональных сведений. Регуляторы используют детализированные протоколы KYC и AML для пресечения незаконных переводов.
Электронные инструменты современных игорных домов строятся на стабильных дата-центрах с SSL стандартами. Геоблокировка вынуждает управляющих организовывать резервные порталы.
Резервные домены образуют полные версии первичного сайта с поддержанием всех сервисов и параметров. Игроки достигают беспрепятственный подключение к депозиту, беттинг отчетности и клиентским установкам.
Финансовые процедуры выполняются через встроенные платежные процессоры. Лимиты на взносы и выводы устанавливаются в согласии с правовыми требованиями и собственными правилами минимизации опасностей.
Опытные игроки рекомендуют контролировать статус лицензии через надзорные списки развлекательных комиссий. Авторитетные показатели включают оценки на тематических платформах и отзывы истинных клиентов.
Перемещение в пространстве лицензированных площадок нуждается знания актуальных решений авторизации. Продвинутые игроки эксплуатируют казино Голд для добывания новейшей фактов о активных ссылках.
Процесс создания личного кабинета в сертифицированных организациях подразумевает комплексную подтверждение. Продвинутые поставщики внедряют KYC-процедуры и AML-нормы. Документооборот потребляет от 24 до 72 интервалов.
Программные решения для обхода ограничений развиваются сообща с ужесточением законодательных действий. VPN-решения класса premium предлагают шифрование AES-256 и технологии OpenVPN. Надежность подключения fundamentally существенна для привилегированных заходов.
Резервные сайты работают через территориально распределенные цифровые системы. CDN-структуры гарантируют оптимальную латентность для американских игроков. Системное перенаправление запускается при распознавании недоступности основного портала.
Банковские манипуляции в сертифицированных регионах подчиняются конкретным требованиям PCI DSS. Блокчейн платежи приобретают популярность из-за анонимности и скорости процессинга.
Переносные приложения лучших операторов содержат биометрическую подтверждение и push-сообщения для существенных событий. Адаптивный интерфейс самостоятельно адаптируется под свойства дисплея.
Retirement news, legendary players hanging up their boots documented
Новейшие порталы беттинг игр обеспечивают беттерам возможность к высококлассному беттингу через сертифицированные казино лаки Р±РёСЂ платформы. Сертифицированная функционирование предполагает исполнения определенных правовых стандартов.
Процедура активации клиентского аккаунта предусматривает верификацию приватных реквизитов. Провайдеры используют углубленные протоколы KYC и AML для исключения поддельных финансовых действий.
Цифровые платформы актуальных развлекательных порталов строятся на зашифрованных серверах с криптографическими протоколами. Региональная блокировка заставляет администраторов создавать резервные URL.
Резервные ресурсы являют собой полные клоны базового домена с сохранением всех функций и информации. Клиенты обеспечивают себе беспрепятственный связь к балансу, беттинг статистике и индивидуальным параметрам.
Денежные процедуры проходят через связанные платежные процессоры. Границы на пополнения и получения назначаются в гармонии с законодательными требованиями и внутренними правилами снижения потерь.
Квалифицированные беттеры советуют контролировать положение аккредитации через надзорные списки азартных органов. Авторитетные характеристики включают места на специализированных сайтах и отзывы истинных игроков.
https://github.com/whahs5024/finds-ly/issues/309
Актуальные операторы развлекательных игр предоставляют пользователям путь к премиальному азарту через надежные казино retro ресурсы. Сертифицированная бизнес нуждается учета определенных контролирующих норм.
Процедура регистрации игрового аккаунта предусматривает валидацию приватных данных. Администраторы внедряют детализированные алгоритмы KYC и AML для недопущения фродовых переводов.
Технические платформы современных беттинг площадок функционируют на безопасных хостингах с TLS протоколами. Локальные запреты принуждает администраторов создавать альтернативные ссылки.
Дублирующие домены образуют идентичные репликации первичного платформы с обеспечением всех опций и сведений. Беттеры достигают стабильный доступ к капиталу, беттинг отчетности и персональным опциям.
Платежные транзакции реализуются через встроенные финансовые агрегаторы. Лимиты на вклады и обналичивания устанавливаются в соотношении с лицензионными стандартами и собственными регламентами снижения потерь.
Экспертные гемблеры указывают контролировать состояние сертификата через государственные реестры гемблинг ведомств. Авторитетные характеристики охватывают рейтинги на специализированных платформах и оценки настоящих пользователей.
范德沃克高清完整版采用机器学习个性化推荐,海外华人可免费观看最新热播剧集。
It’s awesome for me to have a site, which is good for my experience.
thanks admin
There is a magic to the first book in a trilogy. Jenny Han establishes the world of Cousins Beach with care. If you want to experience it, finding the PDF is a good start. The Summer I Turned Pretty is about the exhilarating and terrifying experience of being seen for the first time. Belly’s evolution is central to the plot. The romance is the driving force, but the themes of friendship and family are the anchor. https://thesummeriturnedprettypdf.site/ The Complete Summer I Turned Pretty Trilogy Pdf
Нынешние гемблеры попадают с проблемой подключения к проверенным порталам. Операторы запрещают стандартные адреса, но искушённые Клубника казино клиенты помнят о доступности зеркальных площадок.
Альтернативный адрес образует абсолютную копию главного платформы. Системы безопасности функционируют такими же. Платёжные транзакции производятся через идентичные механизмы.
Алгоритм создания аккаунта через дополнительный адрес предполагает типовой подтверждения. Менеджеры требуют бумаги для осуществления KYC-регламентов. Персональные информация реализуют многоуровневую проверку.
Вносительные рамки на альтернативных платформах аналогичны главным характеристикам. Стартовые беты функционируют постоянными. Прогрессивные призовые фонды интегрируются между разными ресурсами.
Льготные планы функционируют целостно на параллельных сайтах. Коэффициент оборота удерживает исходные цифры. Период действия проигрывания сохраняется.
Сервис помощи решает обращения с зеркальных доменов равнозначно. Мгновенный чат обеспечивает 24-часовой расписание функционирования.
Активные mirror-ссылки легальных гемблинг-платформ на казино аква обеспечивают стабильный вход к гемблинг системам. Технология копирования формирует идентичные версии главного домена с удержанием всех возможностей.
Система создания аккаунта через дублирующий портал целиком дублирует стандартную форму. Свежие геймеры регистрируют рабочий email, устанавливают надежный пароль и выбирают игровую платежное средство.
Идентификация счета содержит отправки удостоверений следуя KYC-нормам. Изображение ID-карты, подтверждение резиденции и финансовые реквизиты проходят машинную валидацию в течение 24-72 часа.
Авторизация верифицированных участников осуществляется через базовую панель с усиленной валидацией. Краткосрочные шифры приходят на мобильный аппарат или email.
Возможности входящего компонента через mirror-сайты поддерживает востребованные платежные системы. Visa, Mastercard, цифровые хранилища Skrill, Neteller, цифровые активы Bitcoin, Ethereum выполняются с оптимизированными взносами 0-3%.
Гемблинг ассортимент дублируется в точности включая слоты, традиционные развлечения, live-хостов и максимальные награды. RTP-показатели, колебания и проигрыш удерживаются точными.
Промо программа работает аналогично главному ресурсу. Welcome-предложения, даровые прокруты, кешбэк и VIP-системы включаются алгоритмически при реализации заданных условий.
Hi to all, how is the whole thing, I think every one is getting
more from this website, and your views are fastidious designed for new people.
Определение проверенного гемблинг оператора предполагает основательного исследования официальных документов. Инновационные платформы тип топ казино гарантируют участникам полную факты о имеющихся лицензиях.
Механизм создания профиля предусматривает определенное количество ключевых шагов проверки. Провайдеры запрашивают документы, подтверждающие индивидуальность и правоспособность. Стандартный KYC-процесс продолжается от 24 до 72 интервалов.
Контроль средств открывается с установления ограничений на депозиты. Профессиональные участники рекомендуют внедрять норму 5% от итогового азартного резерва на конкретную сессию.
Технические барьеры поставщиков обязывают внедрять дополнительные домены. Зеркала удерживают абсолютную работоспособность основного портала, предусматривая хронологию операций и гемблинг успех.
Инновационные денежные способы обеспечивают мгновенные пополнения через цифровые аккаунты. Bitcoin, Ethereum и стабильные валюты предоставляют анонимность и символические взносы. Период обработки выводов равно 10-30 промежутков.
Системы постоянства включают каскадные уровни с нарастающим кэшбэком. VIP-координаторы предлагают личные бонусы, улучшенные пределы и преимущественную обслуживание.
I’m curious to find out what blog platform you are utilizing?
I’m experiencing some small security issues with my latest blog and I would like to find something more safeguarded.
Do you have any solutions?
Беттинговая отрасль отображает стремительный рост, заинтересовывая миллионы геймеров. Опытные ресурсы предлагают защищённую обстановку для развлечений. Подробную сведения о таких организациях возможно получить на лаки Р±РёСЂ казино .
Лицензирование составляет центральным фактором выбора сайта. Лицензиаты Гибралтара создают качественный аудит валютных действий. Конкретная аккредитованная платформа выполняет регулярные инспекции RNG-систем.
IT аспекты инновационных азартных площадок объединяют SSL-криптографию экономического стандарта. Поставщики цифрового материала наподобие Microgaming, NetEnt, Pragmatic Play встраивают сложные механизмы хаотичных параметров.
Механизм подтверждения профиля предполагает передачи справок KYC-формата. ID, документ о финансах, подтверждение адреса — обычный комплект для итогового авторизации.
Дублирующие порталы ликвидируют трудности с ограничениями компаний. Функционирующие копии адаптируются ежедневно цифровыми специалистами. Портативные программы регулярно функционируют устойчивее веб вариантов.
Распределение капитала формирует долгосрочную успешность гемблинговых партий. Профессиональные игроки советуют ограничивать размер ставки до 1-2% от полного бюджета.
дизайн коридора в доме дизайн загородных коттеджей
Ориентирование в мире легальных ресурсов подразумевает владения актуальных методов соединения. Квалифицированные участники используют казино лаки Р±РёСЂ для получения новейшей материалов о оперативных URL.
Процедура формирования счета в надежных операторах включает тщательную проверку. Новейшие организации используют KYC-процедуры и AML-правила. Документальное сопровождение отнимает от 24 до 72 интервалов.
Программные инструменты для обхода барьеров развиваются параллельно с усилением юридических действий. VPN-платформы категории premium дают криптографию AES-256 и системы OpenVPN. Постоянство связи кардинально значима для VIP сессий.
Альтернативные домены оперируют через пространственно разнесенные IT инфраструктуры. CDN-архитектуры осуществляют сокращенную задержку для американских геймеров. Программное роутинг активируется при распознавании барьера главного адреса.
Платежные движения в сертифицированных юрисдикциях подчиняются четким критериям PCI DSS. Децентрализованные транзакции завоевывают признание в результате конфиденциальности и оперативности выполнения.
Мобильные софт лучших брендов объединяют голосовую авторизацию и push-уведомления для важных моментов. Адаптивный внешний вид автоматически настраивается под характеристики матрицы.
侠之盗高清完整版结合大数据AI分析,海外华人可免费观看最新热播剧集。
авто журнал авто журнал .
Современные операторы игорных игр дают беттерам подключение к премиальному азарту через защищенные Clubnika платформы. Легальная работа требует исполнения четких надзорных критериев.
Процесс активации клиентского кабинета охватывает аутентификацию персональных сведений. Провайдеры эксплуатируют комплексные протоколы KYC и AML для пресечения незаконных переводов.
Цифровые системы передовых развлекательных порталов строятся на зашифрованных серверах с HTTPS сертификатами. Территориальные ограничения принуждает провайдеров запускать дублирующие адреса.
Альтернативные порталы являют собой идентичные дубликаты базового сайта с обеспечением всех инструментов и данных. Игроки приобретают стабильный соединение к счету, беттинг отчетности и персональным параметрам.
Расчетные процедуры проходят через синхронизированные финансовые агрегаторы. Границы на инвестиции и изъятия определяются в гармонии с регуляторными условиями и корпоративными правилами управления рисками.
Квалифицированные игроки указывают отслеживать статус разрешения через контролирующие регистры игорных структур. Статусные показатели охватывают рейтинги на тематических сайтах и feedback подлинных беттеров.
WOW just what I was looking for. Came here by searching for 모바일쿠폰 구매
I’m not sure where you’re getting your info, but great topic.
I needs to spend some time learning much more or understanding more.
Thanks for excellent info I was looking for this
information for my mission.
I’ve been exploring for a little bit for any high quality articles or blog posts on this kind of space .
Exploring in Yahoo I finally stumbled upon this site.
Reading this information So i am satisfied to exhibit that I’ve
an incredibly excellent uncanny feeling I found out exactly what I needed.
I such a lot without a doubt will make certain to do not overlook this web
site and give it a glance on a continuing basis.
1win как пополнить DemirBank 1win как пополнить DemirBank
Перемещение в пространстве официальных сайтов предполагает знания передовых решений соединения. Опытные игроки внедряют Рльдорадо официальный сайт для приобретения релевантной информации о действующих URL.
Процедура формирования личного кабинета в официальных заведениях подразумевает тщательную аутентификацию. Современные компании эксплуатируют KYC-системы и AML-требования. Документальное сопровождение отнимает от 24 до 72 временных отрезков.
Компьютерные технологии для преодоления запретов прогрессируют одновременно с усилением регуляторных инициатив. VPN-платформы класса premium обеспечивают безопасность AES-256 и стандарты OpenVPN. Стабильность связи жизненно существенна для привилегированных раундов.
Резервные адреса функционируют через территориально распределенные компьютерные мощности. CDN-структуры обеспечивают минимальную латентность для американских пользователей. Системное переключение активируется при идентификации недоступности базового сайта.
Банковские переводы в официальных регионах подчиняются четким нормам PCI DSS. Цифровые операции приобретают распространение в результате анонимности и оперативности выполнения.
Планшетные утилиты топовых организаций включают отпечатковую аутентификацию и push-алерты для критических ситуаций. Настраиваемый интерфейс автономно адаптируется под настройки экрана.
Подбор достойного betting площадки в текущих условиях заставляет тщательного изучения к лицензионному положению. Знающие участники осознают, что laki казино содержит актуальную данные о активных ресурсах.
Механизм открытия счета в сертифицированных операторах включает неизбежную валидацию документов. KYC-процедуры гарантируют как сервис, так и геймера от обмана. Временные границы на перечисление денег до финализации проверки – нормальная подход.
Виртуальные ограничения на связь к betting площадкам преодолеваются через параллельные порталы. Доступные отражения обеспечивают полную производительность первичного платформы. Платежные движения, игровой статистика и льготные системы сохраняются стабильными.
Денежная безопасность характеризуется степенью используемых расчетных способов. SSL-безопасность, PCI DSS лицензирование и дополнительная подтверждение обеспечивают защищенный заслон безопасности.
Интерактивная библиотека легальных провайдеров объединяет барабаны от топовых производителей. RTP-показатели, изменчивость и алгоритмические принципы претерпевают беспристрастную аудит в утвержденных институтах.
Механизмы вознаграждения в профессиональных площадках базируются на открытых критериях проигрыша. Условия ставок x35-40 оценивается разумным для слот-подарков, в то время как настольные забавы идут в подсчет с минимальным процентом.
Go ahead goals, strikes that break deadlocks tracked live
http://spasmreliefprotocols.com/# muscle relaxer medication
Hi friends, how is everything, and what you would like to say concerning this article, in my
view its actually amazing in support of me.
Goal celebrations, iconic moments and player reactions captured live
Новейшие участники сталкиваются с сложностью доступа к сертифицированным порталам. Организации закрывают главные домены, но искушённые ретро казино игроки знают о наличии дублирующих платформ.
Зеркало образует точную дубликат базового портала. Системы безопасности остаются идентичными. Денежные переводы осуществляются через равнозначные системы.
Технология открытия счёта через альтернативный адрес предполагает типовой верификации. Сотрудники просят бумаги для осуществления KYC-стандартов. Идентификационные характеристики подвергаются расширенную валидацию.
Банковские ограничения на дополнительных сайтах соответствуют первичным спецификациям. Стартовые ставки сохраняются неизменными. Увеличивающиеся банки координируются между всеми ссылками.
Льготные планы выполняются всесторонне на резервных сайтах. Вейджер обеспечивает стартовые показатели. Срок активности реализации поддерживается.
Сервис поддержки обрабатывает тикеты с альтернативных порталов равнозначно. Мгновенный чат осуществляет беспрерывный расписание работы.
Где в вашем графике ваша жизнь? Чужие «хочу» задушили ваше «люблю».
Выжатый лимон не может светить.
-генератор это в дизайне человека;
-генератор по дизайну человека;
-генератор тип личности дизайн;
-генератор тип личности;
-дизайн человека генератор описание;
We stumbled over here coming from a different website and thought
I should check things out. I like what I see so now i am following you.
Look forward to finding out about your web page again.
Новейшие участники встречаются с барьером доступа к лицензированным порталам. Организации фильтруют основные домены, но знающие казино Клубника участники понимают о присутствии альтернативных площадок.
Зеркало является идентичную реплику базового ресурса. Протоколы шифрования остаются аналогичными. Платёжные переводы выполняются через идентичные каналы.
Алгоритм заведения учётной записи через резервный ссылку подразумевает привычной подтверждения. Администраторы просят справки для осуществления KYC-регламентов. Персональные данные подвергаются расширенную подтверждение.
Пополнительные лимиты на зеркальных порталах равняются главным параметрам. Начальные суммы остаются константными. Растущие накопления координируются между многочисленными доменами.
Льготные механизмы оперируют полноценно на зеркальных площадках. Вейджер сохраняет исходные показатели. Период действия использования сохраняется.
Департамент сопровождения анализирует обращения с параллельных ссылок таким же способом. Живой чат осуществляет 24-часовой порядок деятельности.
Volleys, spectacular strikes and their conversion rates
Hi, its nice post regarding media print, we all be aware
of media is a fantastic source of information.
Устали заставлять себя работать силой? Включите сакральный поток и не работайте больше не дня.
Ваше время утекает в чужие карманы.
-человек генератор дизайн человека;
-генератор тип личности;
-генераторы дизайн человека;
-тип личности генератор дизайн человека;
-генератор по дизайну человека;
Press intensity, team pressing statistics and PPDA metrics
Вы — батарейка для чужих амбиций? Где в вашем графике ваша жизнь? Выжаты как лимон ради чужих идей?
Фрустрация — это крик вашего тела.
-тип личности генератор;
-генератор это в дизайне человека;
-генераторы дизайн человека;
-дизайн человека генератор описание;
-хьюман дизайн генератор;
-тип личности генератор дизайн человека;
-генератор в хьюман дизайне;
The Shaws Center Official – Very informative site, mission is well-explained and community engagement is obvious.
I think everything said was very logical. But, think
about this, what if you were to write a awesome headline?
I mean, I don’t want to tell you how to run your
website, however suppose you added a headline that grabbed people’s attention? I mean Santa Claus Christmas Ball Tutorial Adobe Illustrator.
– My Downloadables is a little vanilla. You could glance at Yahoo’s home page and note how they write article titles to get viewers to open the
links. You might add a video or a pic or two to get readers
excited about everything’ve written. Just my opinion, it might bring your posts a little
livelier.
I wanted to thank you for this good read!!
I definitely enjoyed every bit of it. I’ve got you saved
as a favorite to check out new things you post…
Piece of writing writing is also a fun, if you be familiar with after
that you can write otherwise it is complex to write.
Weather conditions, pitch status and match day environment reported
Исследование в мире проверенных платформ требует понимания передовых решений соединения. Умелые геймеры используют казино Болливуд для приобретения современной материалов о оперативных адресах.
Алгоритм открытия профиля в лицензированных организациях содержит тщательную верификацию. Современные провайдеры используют KYC-алгоритмы и AML-критерии. Бумажная работа потребляет от 24 до 72 интервалов.
Программные способы для прохождения блокировок улучшаются сообща с ужесточением регуляторных шагов. VPN-платформы типа premium обеспечивают кодирование AES-256 и стандарты OpenVPN. Непрерывность связи fundamentally существенна для высокоролловых партий.
Зеркальные адреса оперируют через регионально расположенные цифровые мощности. CDN-архитектуры осуществляют сокращенную время ответа для европейских пользователей. Системное роутинг включается при распознавании блокировки главного портала.
Банковские манипуляции в официальных областях подчиняются строгим критериям PCI DSS. Блокчейн транзакции завоевывают распространение вследствие конфиденциальности и оперативности осуществления.
Планшетные утилиты премиальных провайдеров объединяют отпечатковую проверку и push-уведомления для принципиальных ситуаций. Модифицируемый интерфейс автоматически настраивается под параметры дисплея.
Новейшие гемблеры попадают с препятствием входа к лицензированным сайтам. Провайдеры запрещают стандартные ссылки, но профессиональные казино СЌРЅРѕРјРѕ участники помнят о функционировании зеркальных платформ.
Параллельный портал образует абсолютную отображение оригинального площадки. Протоколы шифрования поддерживаются равнозначными. Расчётные процедуры производятся через те же каналы.
Технология заведения учётной записи через параллельный ресурс подразумевает классической верификации. Менеджеры уточняют документы для выполнения KYC-регламентов. Паспортные характеристики выполняют усиленную валидацию.
Банковские пределы на альтернативных сайтах идентичны базовым параметрам. Низшие вклады функционируют стабильными. Увеличивающиеся джекпоты синхронизируются между различными адресами.
Премиальные программы выполняются целостно на дополнительных порталах. Требования по обороту удерживает первоначальные величины. Длительность реализации остаётся прежним.
Отдел помощи изучает запросы с альтернативных ссылок сходным образом. Мгновенный общение обеспечивает постоянный формат деятельности.
Shot accuracy, attempts on target and conversion rates updated live
whoah this weblog is great i like reading your posts.
Keep up the good work! You recognize, lots of people are searching round for this information, you can help them greatly.
kazinonadengi-play.ru
Актуальные дублирующие порталы надежных игорных заведений на Gold зеркало создают непрерывный коннект к игровым порталам. Принцип зеркалирования формирует точные клоны основного сайта с фиксацией всех возможностей.
Система активации через дублирующий портал на сто процентов повторяет оригинальную шаблон. Новые игроки прописывают активный email, формируют безопасный пароль и определяют операционную валюту.
Идентификация аккаунта включает передачи удостоверений в соответствии с KYC-политике. Скан удостоверения личности, подтверждение места жительства и банковские параметры подвергаются алгоритмическую валидацию в течение 24-72 часа.
Логин активных клиентов реализуется через типовую окно с расширенной верификацией. Одноразовые токены поступают на сотовый устройство или e-mail адрес.
Функционал пополнительного компонента через дублирующие порталы содержит популярные платежные платформы. Visa, Mastercard, электронные портмоне Skrill, Neteller, блокчейн-токены Bitcoin, Ethereum обрабатываются с минимальными платежами 0-3%.
Gaming ассортимент воспроизводится на сто процентов включая машины, традиционные активности, live-крупье и джекпоты. RTP-значения, вариативность и отыгрыш фиксируются такими же.
Подарочная система выполняется подобно базовому веб-площадке. Welcome-наборы, безвозмездные спины, компенсация и VIP-системы инициируются системно при соблюдении определенных требований.
Легальные площадки игровых сервисов дают игрокам вариант к премиальному азартному досугу через профильные сайты, включая френдс казино , которые точно исполняют мировые критерии надёжности.
Последовательность создания аккаунта требует предоставления идентификационных данных через encrypted SSL-линии. Операторы запрашивают документальное подтверждение совершеннолетия и региона residence для выполнения юрисдикционных норм.
Multi-factor верификация выступает обязательным частью современных solutions security. Users получают SMS-ключи, push-алерты или задействуют профессиональные утилиты вроде Google Authenticator.
Дублирующие домены преодолевают препятствия geographic барьеров и DDoS-assault. Фактически дубли формируют тождественные клоны базового портала с сохранением опций и user данных.
Профессиональные участники рекомендуют keeping новейшие каталоги функционирующих дублей в избранном браузера. Администрация рассылают updates о свежих URL через мейл, Telegram-чаты и телефонные приложения.
Финансовые транзакции через надёжные платформы покрыты защитными алгоритмами level банковского области. Вывод денег выполняется единственно на проверенные wallets обладателя профиля.
https://annk.kz/forum/instrumenty/ishhu-xoroshij-vodnik
Навигация в пространстве сертифицированных порталов нуждается осознания передовых инструментов подключения. Умелые клиенты эксплуатируют казино ретро для приобретения свежей сведений о действующих ссылках.
Алгоритм создания счета в официальных операторах содержит сложную аутентификацию. Передовые провайдеры внедряют KYC-системы и AML-критерии. Документооборот требует от 24 до 72 интервалов.
Компьютерные решения для обхода ограничений развиваются синхронно с интенсификацией юридических действий. VPN-службы разряда premium предоставляют безопасность AES-256 и методы OpenVPN. Постоянство подключения fundamentally важна для привилегированных раундов.
Зеркальные сайты действуют через географически рассредоточенные серверные кластеры. CDN-архитектуры поддерживают оптимальную время ответа для американских игроков. Системное переключение активируется при обнаружении препятствия главного ресурса.
Экономические транзакции в лицензированных зонах отвечают конкретным критериям PCI DSS. Крипто операции увеличивают популярность по причине секретности и оперативности осуществления.
Переносные софт ведущих операторов объединяют лицевую подтверждение и push-алерты для существенных ситуаций. Модифицируемый облик независимо настраивается под характеристики панели.
muscle relaxant drugs: Spasm Relief Protocols – tizanidine medication
Выбор безопасного азартного портала предполагает серьезного анализа правовых бумаг. Актуальные сайты казино аква обеспечивают геймерам максимальную данные о имеющихся разрешениях.
Процедура создания профиля содержит множество обязательных этапов верификации. Администраторы просят бумаги, удостоверяющие личность и дееспособность. Классический KYC-механизм продолжается от 24 до 72 интервалов.
Финансовое планирование стартует с определения пределов на вклады. Профессиональные геймеры советуют использовать установку 5% от совокупного игорного фонда на индивидуальную игру.
Технические ограничения операторов обязывают внедрять резервные адреса. Зеркала оберегают полную функциональность главного портала, охватывая хронологию платежей и казино результаты.
Современные платежные методы дают быстрые пополнения через виртуальные хранилища. Bitcoin, Ethereum и стейблкоины поддерживают тайность и мизерные комиссии. Продолжительность реализации извлечений доходит 10-30 промежутков.
Программы лояльности включают ступенчатые статусы с увеличивающимся возвратом. VIP-представители обеспечивают личные вознаграждения, расширенные ограничения и преимущественную поддержку.
Hi, i feel that i saw you visited my web site thus i came to return the favor?.I am trying to find things to improve my website!I assume its
good enough to use a few of your ideas!!
Активные резервные адреса проверенных gaming-операторов на friends casino зеркало сегодня дают устойчивый доступ к развлекательным ресурсам. Методика копирования генерирует аналогичные копии центрального домена с поддержанием всех механизмов.
Процедура создания аккаунта через mirror-сайт целиком имитирует основную анкету. Дебютные игроки заполняют рабочий email, устанавливают безопасный код доступа и определяют рабочую финансовый инструмент.
Аутентификация учетной записи включает отправки справок следуя KYC-нормам. Скан паспорта, верификация адреса и денежные реквизиты подвергаются программную валидацию в течение 24-72 ч.
Вход существующих пользователей осуществляется через типовую панель с расширенной аутентификацией. Временные коды передаются на сотовый номер или email.
Инструменты денежного сектора через зеркала предлагает топовые банковские сервисы. Visa, Mastercard, веб кошельки Skrill, Neteller, crypto Bitcoin, Ethereum обрабатываются с минимальными процентами 0-3%.
Развлекательная ассортимент повторяется в точности включая слоты, традиционные игры, live-крупье и накопительные призы. RTP-показатели, вариативность и ставочные требования фиксируются неизменными.
Подарочная политика оперирует похоже корневому порталу. Welcome-предложения, бесплатные вращения, компенсация и VIP-системы инициируются системно при исполнении установленных критериев.
Проверенные платформы игровых услуг гарантируют игрокам право к элитному гэмблингу через dedicated порталы, включая Голд регистрация , которые специально соблюдают глобальные критерии security.
Механизм регистрации требует внесения верификационных информации через шифрованные SSL-connection. Букмекеры требуют письменное доказательство совершеннолетия и региона residence для поддержания законодательных норм.
Двухфакторная аутентификация является обязательным элементом современных систем безопасности. Игроки имеют SMS-токены, push-сообщения или эксплуатируют targeted утилиты типа Google Authenticator.
Mirror домены нейтрализуют сложности региональных санкций и DDoS-нападений. Технически mirrors составляют копийные версии primary платформы с сохранением features и личных сведений.
Профессиональные участники suggest удерживать обновлённые базы действующих mirrors в закладках интернет-программы. Management рассылают сведения о новых доменах через почтовые сервисы, Telegram-группы и телефонные приложения.
Финансовые movements через лицензионные сайты защищены encryption протоколами level банковского области. Получение средств производится лишь на подтверждённые карты обладателя учётной записи.
Действующие зеркала лицензированных gaming-операторов на ретро казино обеспечивают устойчивый доступ к развлекательным ресурсам. Технология копирования формирует точные реплики базового веб-площадки с фиксацией всех функций.
Механизм активации через дублирующий портал целиком повторяет главную форму. Дебютные геймеры вводят функционирующий email, устанавливают стойкий шифр и назначают рабочую денежную единицу.
Валидация личного кабинета включает передачи документов в соответствии с KYC-политике. Копия паспорта, подтверждение места жительства и банковские координаты проходят автоматическую анализ в течение 24-72 часа.
Аутентификация действующих игроков реализуется через типовую форму с усиленной аутентификацией. Разовые шифры отправляются на сотовый устройство или почтовый ящик.
Механизмы депозитного компонента через дублирующие порталы обеспечивает востребованные расчетные сервисы. Visa, Mastercard, онлайн кошельки Skrill, Neteller, crypto Bitcoin, Ethereum реализуются с сокращенными взносами 0-3%.
Развлекательная коллекция воспроизводится абсолютно включая слоты, настольные геймплей, live-ведущих и прогрессивы. RTP-коэффициенты, вариативность и ставочные требования удерживаются неизменными.
Промо система выполняется идентично основному сайту. Welcome-пакеты, free spins, кешбэк и VIP-планы запускаются системно при выполнении прописанных требований.
Новейшие гемблеры встречаются с препятствием доступа к проверенным ресурсам. Поставщики ограничивают первичные ссылки, но грамотные ретро казино игроки понимают о присутствии альтернативных порталов.
Резервная ссылка представляет идентичную дубликат базового ресурса. Криптографические алгоритмы поддерживаются аналогичными. Финансовые операции реализуются через те же системы.
Технология регистрации через зеркальный ресурс включает классической аутентификации. Менеджеры запрашивают свидетельства для реализации KYC-норм. Персональные информация проходят двухфакторную проверку.
Финансовые границы на дополнительных площадках аналогичны главным характеристикам. Стартовые беты поддерживаются неизменными. Возрастающие джекпоты синхронизируются между различными ресурсами.
Поощрительные схемы работают полноценно на альтернативных порталах. Требования по обороту сохраняет оригинальные величины. Тайминг реализации сохраняется.
Отдел ассистирования решает запросы с зеркальных адресов сходным образом. Живой чат поддерживает круглосуточный режим работы.
Substitution tracker, player changes and tactical switches noted live
It’s enormous that you are getting thoughts from
this post as well as from our discussion made
here.
Беттинговая отрасль отображает быстрый подъём, завлекая массы пользователей. Профессиональные ресурсы предлагают защищённую среду для беттинга. Детальную информацию о таких операторах можно найти на казино Голд .
Аккредитация является главным элементом выбора площадки. Надзорные органы Кюрасао гарантируют качественный проверку валютных действий. Конкретная сертифицированная ресурс подвергается периодические проверки RNG-модулей.
Цифровые особенности передовых игорных домов содержат SSL-защиту расчётного класса. Поставщики софтового софта класса Microgaming, NetEnt, Pragmatic Play встраивают многоуровневые алгоритмы хаотичных параметров.
Процесс верификации учётной записи предусматривает подачи справок KYC-класса. Паспорт, свидетельство о прибылях, доказательство проживания — обычный набор для финального входа.
Дублирующие порталы ликвидируют барьеры с цензурой операторов. Действующие альтернативы адаптируются ежедневно программными службами. Планшетные программы обычно выполняются стабильнее веб вариантов.
Распределение капитала устанавливает долгосрочную эффективность гемблинговых периодов. Опытные геймеры советуют контролировать величину депозита до 1-2% от суммарного банкролла.
Азартная индустрия показывает стремительный рост, заинтересовывая легионы игроков. Грамотные ресурсы предлагают стабильную среду для беттинга. Подробную данные о этих компаниях возможно отыскать на типпи регистрация .
Сертификация выступает основным элементом выбора ресурса. Надзорные органы Олдерни дают строгий аудит расчётных транзакций. Отдельная легальная ресурс выполняет постоянные инспекции RNG-генераторов.
Технические свойства новейших азартных площадок содержат SSL-безопасность денежного стандарта. Производители программного обеспечения вроде Microgaming, NetEnt, Pragmatic Play добавляют продвинутые алгоритмы рандомных значений.
Процедура верификации счёта подразумевает передачи удостоверений KYC-стандарта. ID, свидетельство о доходах, верификация проживания — базовый набор для финального активации.
Параллельные URL решают препятствия с блокировками компаний. Актуальные зеркала адаптируются ежедневно техническими командами. Мобильные клиенты зачастую функционируют стабильнее онлайн форматов.
Управление банкроллом устанавливает продолжительную прибыльность развлекательных раундов. Грамотные пользователи рекомендуют урезать сумму бета до 1-2% от полного бюджета.
UEFA Super Cup live scores, Champions League vs Europa League winners clash
топ мобильных онлайн казино
我們的彩券行專家團隊每日更新各大聯盟的比賽分析,包括NBA、MLB、中華職棒等。
Подбор надежного игрового площадки в актуальных рамках нуждается повышенного изучения к законному режиму. Знающие геймеры понимают, что mad casino зеркало отображает актуальную сведения о активных сервисах.
Схема записи в официальных платформах содержит необходимую подтверждение личности. KYC-нормы гарантируют как казино, так и участника от махинаций. Краткосрочные границы на перечисление денег до завершения подтверждения – нормальная методика.
Цифровые препятствия на соединение к betting сайтам обходятся через зеркальные URL. Активные копии предоставляют тотальную функциональность базового сайта. Платежные переводы, геймплейный прогресс и бонусные системы поддерживаются стабильными.
Материальная надежность оценивается качеством используемых платежных инструментов. SSL-криптография, PCI DSS лицензирование и дополнительная идентификация создают защищенный заслон защиты.
Развлекательная библиотека легальных провайдеров объединяет машины от лидирующих студий. RTP-значения, изменчивость и расчетные схемы испытывают независимую аудит в признанных центрах.
Механизмы вознаграждения в профессиональных казино базируются на четких критериях вейджера. Отыгрыш x35-40 считается адекватным для автомат-подарков, в то время как традиционные активности идут в подсчет с пониженным фактором.
Актуальные зеркала официальных азартных клубов на [url=https://beachwoodrealtors.com/?p=4502]казино РЎСѓРєР°[/url] обеспечивают постоянный коннект к развлекательным ресурсам. Принцип клонирования образует идентичные клоны базового ресурса с консервацией всех механизмов.
Система открытия счета через альтернативный домен в точности воспроизводит базовую бланк. Начинающие клиенты указывают функционирующий email, генерируют безопасный шифр и выбирают игровую курренси.
Аутентификация личного кабинета подразумевает предоставления бумаг в соответствии с KYC-требованиям. Изображение паспорта, доказательство резиденции и банковские параметры проверяются через программную проверку в течение 24-72 часа.
Аутентификация активных пользователей реализуется через обычную форму с 2FA валидацией. Временные токены доставляются на смс гаджет или email.
Возможности финансового компонента через резервные ссылки включает популярные банковские механизмы. Visa, Mastercard, электронные хранилища Skrill, Neteller, криптовалюты Bitcoin, Ethereum реализуются с оптимизированными процентами 0-3%.
Игровая каталог дублируется абсолютно включая барабаны, карточные геймплей, live-ведущих и джекпоты. RTP-параметры, дисперсия и проигрыш поддерживаются идентичными.
Акционная схема работает подобно корневому домену. Welcome-комплекты, безвозмездные спины, refund и VIP-программы активируются машинально при достижении определенных условий.
Getcode ile sms doğrulama kolay. Sanal numara kullanma yararları sunar.
Выбор проверенного игорного площадки предполагает глубокого разбора юридических свидетельств. Современные ресурсы Болливуд казино дают геймерам полную сведения о действующих лицензиях.
Система открытия аккаунта предусматривает различные ключевых стадий аутентификации. Администраторы настаивают справки, засвидетельствующие самобытность и совершеннолетие. Традиционный KYC-алгоритм занимает от 24 до 72 часов.
Распоряжение капиталом открывается с назначения рамок на пополнения. Опытные участники настаивают эксплуатировать закон 5% от суммарного игорного капитала на единичную игру.
Программные препятствия операторов вынуждают эксплуатировать резервные домены. Клоны поддерживают максимальную активность базового платформы, включая архив транзакций и казино достижения.
Инновационные платежные сервисы гарантируют мгновенные взносы через виртуальные портмоне. Bitcoin, Ethereum и стейблкоины гарантируют приватность и минимальные отчисления. Срок реализации изъятий достигает 10-30 промежутков.
Алгоритмы лояльности охватывают иерархические ранги с накапливающимся вознаграждением. VIP-кураторы дают эксклюзивные поощрения, улучшенные границы и преимущественную обслуживание.
Гемблинговая сфера отображает динамичный развитие, притягивая тысячи клиентов. Экспертные порталы гарантируют качественную обстановку для развлечений. Подробную материалы о подобных провайдерах можно найти на lova зеркало .
Аттестация представляет центральным критерием выбора платформы. Контролёры Мальты обеспечивают жёсткий проверку расчётных операций. Любая лицензированная ресурс выполняет плановые ревизии RNG-механизмов.
Цифровые аспекты инновационных азартных площадок содержат SSL-безопасность банковского категории. Разработчики софтового материала наподобие Microgaming, NetEnt, Pragmatic Play интегрируют продвинутые механизмы рандомных параметров.
Схема верификации личного кабинета требует представления удостоверений KYC-класса. Свидетельство, документ о средствах, валидация регистрации — базовый пакет для финального авторизации.
Параллельные порталы убирают сложности с запретами компаний. Действующие копии модифицируются каждый день программными отделами. Планшетные программы нередко оперируют устойчивее браузерных версий.
Банкролл-менеджмент создаёт длительную доходность гемблинговых раундов. Опытные геймеры настаивают сокращать количество бета до 1-2% от полного фонда.
Ini adalah postingan yang penting. Crowdfunding Uluran Tangan Medis mengubah
masa depan bagi orang yang tidak mampu membiayai
operasi. Mendukung yayasan kesehatan mata benar-benar mulia.
Terima kasih telah membagikan misi ini.
https://my-astana.actieforum.com/t809-topic#1175
Активные mirror-ссылки лицензированных gaming-операторов на аква дают беспрерывный соединение к азартным сервисам. Методика зеркалирования создает полноценные реплики основного сайта с фиксацией всех возможностей.
Процедура активации через резервную ссылку абсолютно воспроизводит базовую шаблон. Новые игроки указывают функционирующий email, придумывают сложный шифр и выбирают основную финансовый инструмент.
Верификация аккаунта предполагает передачи бумаг согласно KYC-политике. Копия паспорта, свидетельство места жительства и платежные реквизиты проходят цифровую верификацию в течение 24-72 часов.
Логин верифицированных геймеров осуществляется через обычную интерфейс с 2FA идентификацией. Одноразовые шифры доставляются на мобильный номер или электронную почту.
Возможности пополнительного блока через mirror-сайты обеспечивает топовые платежные платформы. Visa, Mastercard, электронные кошельки Skrill, Neteller, криптовалюты Bitcoin, Ethereum выполняются с низкими сборами 0-3%.
Gaming коллекция повторяется полностью включая машины, карточные забавы, live-дилеров и максимальные награды. RTP-показатели, дисперсия и вейджер сохраняются аналогичными.
Акционная программа выполняется схоже центральному порталу. Welcome-бандлы, фриспины, денежный возврат и VIP-курсы инициируются машинально при исполнении определенных стандартов.
Актуальные клиенты пересекаются с набором программных деталей при деятельности с официальными сайтами. Экспертные платформы типа ДживиСпин казино дают свежую данные о функционировании гэмблинговых организаций.
Система подтверждения профиля охватывает комплекс обязательных этапов. Начальная проверка включает размещения бумаг удостоверяющих субъект. Обычный список содержит удостоверение личности, права или загранпаспорт.
Цифровая составляющая оформления содержит эксплуатацию защищенного протокола и двухуровневой проверки. Квалифицированные игроки рекомендуют запускать максимум имеющихся функций охраны.
Запасные домены формируют идентичные дубликаты первичного ресурса с удержанием комплексного возможностей. Ключевое бонус состоит в идентичности платежных лимитов и требований вейджера.
Схема локализации актуальных альтернативных адресов основывается на мониторинге тематических новостных лент и партнерских сайтов. Продвинутые клиенты применяют прокси-соединения для обеспечения устойчивого подключения невзирая от территориальных блокировок.
i-Superamara hub – Products are well-presented, descriptions are concise and easy to follow.
http://nauseacareus.com/# Nausea Care US
Передовые платформы развлекательных продуктов дают беттерам путь к элитному развлечениям через защищенные Голд казино системы. Авторизованная бизнес требует исполнения четких правовых норм.
Система активации пользовательского кабинета содержит верификацию индивидуальных показателей. Управляющие внедряют комплексные алгоритмы KYC и AML для предотвращения поддельных финансовых действий.
Электронные решения инновационных развлекательных порталов строятся на стабильных дата-центрах с TLS стандартами. Территориальные ограничения заставляет администраторов создавать параллельные URL.
Параллельные порталы формируют точные копии центрального платформы с удержанием всех опций и информации. Беттеры приобретают беспрепятственный вход к средствам, гемблинг отчетности и пользовательским параметрам.
Денежные процедуры осуществляются через интегрированные финансовые шлюзы. Ограничения на инвестиции и изъятия устанавливаются в согласии с правовыми стандартами и корпоративными правилами управления рисками.
Квалифицированные гемблеры указывают отслеживать статус разрешения через официальные списки азартных организаций. Престижные параметры предусматривают ранги на профильных платформах и комментарии настоящих игроков.
Современные провайдеры игорных услуг гарантируют игрокам путь к качественному беттингу через защищенные типпи казино порталы. Авторизованная функционирование предполагает учета определенных регуляторных критериев.
Процедура регистрации индивидуального учетной записи включает подтверждение приватных информации. Управляющие используют расширенные протоколы KYC и AML для недопущения мошеннических переводов.
Программные инструменты новейших беттинг площадок функционируют на безопасных хостингах с TLS протоколами. Территориальные ограничения принуждает владельцев разрабатывать параллельные домены.
Параллельные сайты образуют полные дубликаты главного портала с обеспечением всех возможностей и данных. Беттеры достигают беспрепятственный подключение к капиталу, азартной отчетности и индивидуальным опциям.
Платежные процедуры реализуются через подключенные финансовые агрегаторы. Границы на пополнения и обналичивания устанавливаются в унисон с регуляторными критериями и организационными регламентами контроля угроз.
Экспертные пользователи рекомендуют анализировать положение сертификата через регуляторные базы данных гемблинг структур. Имиджевые показатели содержат оценки на профильных платформах и мнения действительных участников.
Hi, after reading this awesome article i am as well delighted to share my know-how here with mates.
Игровая сфера отображает быстрый развитие, завлекая миллионы геймеров. Опытные ресурсы предлагают безопасную условия для ставок. Исчерпывающую информацию о этих операторах возможно изучить на миллион казино .
Аттестация представляет центральным фактором селекции портала. Юрисдикции Гибралтара гарантируют тщательный надзор экономических транзакций. Отдельная лицензированная ресурс проходит периодические инспекции RNG-генераторов.
Компьютерные характеристики актуальных игорных домов предусматривают SSL-кодирование экономического ранга. Производители программного ПО вроде Microgaming, NetEnt, Pragmatic Play встраивают сложные модели случайных чисел.
Схема валидации учётной записи подразумевает направления документов KYC-формата. Паспорт, выписка о доходах, верификация регистрации — типичный набор для окончательного авторизации.
Дублирующие домены устраняют препятствия с ограничениями провайдеров. Действующие варианты модифицируются постоянно цифровыми отделами. Мобильные программы обычно работают устойчивее веб модификаций.
Контроль средств определяет долгосрочную доходность беттинговых циклов. Квалифицированные участники настаивают сокращать сумму бета до 1-2% от совокупного капитала.
онлайн казино на деньги
Выбор проверенного гемблинг оператора в актуальных условиях требует особого изучения к регулятивному режиму. Профессиональные геймеры понимают, что Болливуд РІС…РѕРґ демонстрирует свежую информацию о функционирующих ресурсах.
Процедура открытия счета в лицензированных заведениях предусматривает необходимую верификацию персональных данных. KYC-стандарты оберегают как казино, так и пользователя от обмана. Переходные ограничения на получение капитала до финализации верификации – типичная система.
Виртуальные препятствия на связь к игровым ресурсам решаются через резервные ссылки. Доступные копии сохраняют всестороннюю работоспособность первичного сайта. Расчетные операции, азартный продвижение и поощрительные системы поддерживаются устойчивыми.
Материальная безопасность оценивается показателем применяемых денежных инструментов. SSL-безопасность, PCI DSS валидация и расширенная подтверждение обеспечивают стабильный барьер обороны.
Развлекательная каталог официальных провайдеров содержит слоты от ведущих студий. RTP-параметры, колебания и расчетные модели проходят внешнюю аудит в утвержденных центрах.
Программы лояльности в надежных заведениях опираются на открытых параметрах вейджера. Условия ставок x35-40 оценивается нормальным для слот-привилегий, в то время как стандартные активности учитываются в калькуляцию с уменьшенным процентом.
Every weekend i used to pay a visit this site, because i wish for enjoyment, since this this web page
conations actually nice funny information too.
1win лайв казино http://1win62940.help
Captain performances, armband wearers and leadership statistics
Modern Purair
416 Meridian Rd SE #14A, Calgary
AB T2А 1X2, Canada
(403) 800-7254
system Process
https://travelwithme.social/NouvauCode26
Игровая область являет динамичный рост, завлекая массы игроков. Опытные сайты дают стабильную среду для развлечений. Детальную факты о данных организациях допустимо отыскать на Clubnika casino .
Аттестация представляет ключевым фактором выбора площадки. Юрисдикции Гибралтара предоставляют качественный мониторинг расчётных манипуляций. Любая легальная сайт проходит регулярные контроли RNG-алгоритмов.
Компьютерные особенности инновационных азартных площадок содержат SSL-криптографию расчётного уровня. Провайдеры софтового софта наподобие Microgaming, NetEnt, Pragmatic Play добавляют многоуровневые системы рандомных значений.
Алгоритм подтверждения счёта требует направления документов KYC-формата. Свидетельство, справка о заработке, валидация местожительства — базовый комплект для полноценного подключения.
Альтернативные порталы ликвидируют барьеры с цензурой провайдеров. Действующие варианты модифицируются систематически техническими отделами. Планшетные утилиты обычно работают качественнее веб форматов.
Распределение капитала создаёт стратегическую прибыльность азартных партий. Экспертные геймеры предлагают урезать размер пари до 1-2% от полного капитала.
Развлекательная отрасль являет активный подъём, завлекая миллионы клиентов. Грамотные ресурсы обеспечивают надёжную атмосферу для ставок. Подробную данные о данных провайдерах возможно получить на Голд казино .
Аттестация представляет приоритетным фактором выбора портала. Надзорные органы Олдерни дают качественный надзор экономических транзакций. Любая официальная сайт подвергается систематические аудиты RNG-систем.
Программные параметры современных игорных домов содержат SSL-кодирование финансового категории. Производители компьютерного софта класса Microgaming, NetEnt, Pragmatic Play встраивают продвинутые алгоритмы хаотичных параметров.
Схема проверки аккаунта включает направления документов KYC-уровня. Паспорт, выписка о доходах, верификация проживания — стандартный пакет для итогового доступа.
Параллельные ссылки устраняют сложности с запретами организаций. Действующие варианты корректируются постоянно IT службами. Мобильные утилиты нередко выполняются стабильнее интернет версий.
Управление банкроллом устанавливает стратегическую результативность гемблинговых периодов. Опытные геймеры указывают сокращать количество пари до 1-2% от полного банкролла.
Hey there! I could have sworn I’ve been to this website before but after browsing through some of the post I realized it’s new
to me. Anyways, I’m definitely glad I found it and I’ll be book-marking and
checking back often!
Надёжные площадки гэмблинг возможностей предоставляют игрокам вариант к качественному времяпрепровождению через профильные домены, включая казино РЎСѓРєР° , которые соблюдают transnational нормы конфиденциальности.
Алгоритм открытия счёта подразумевает заполнения проверочных сведений через encrypted SSL-соединения. Администрация просят предоставить official свидетельство совершеннолетия и территории регистрации для исполнения юрисдикционных норм.
Multi-factor верификация становится mandatory элементом современных solutions надёжности. Участники обретают SMS-шифры, push-алерты или задействуют targeted tools наподобие Google Authenticator.
Резервные URL устраняют вопросы локальных запретов и DDoS-воздействий. Фактически реплики представляют копийные версии основного домена с удержанием опций и личных деталей.
Skilled игроки рекомендуют хранить актуальные каталоги действующих зеркал в сохранённых ссылках веб-клиента. Администрация рассылают обновления о актуальных ссылках через электронную почту, Telegram-группы и mobile приложения.
Денежные переводы через официальные сайты защищены защитными технологиями класса банковского сектора. Снятие денег выполняется только на подтверждённые реквизиты обладателя account.
Официальные платформы игровых услуг гарантируют пользователям доступ к профессиональному азартному досугу через специализированные порталы, включая казино типпи , что придерживаются общепринятые нормы защиты.
Алгоритм открытия счёта подразумевает заполнения валидационных данных через криптографические SSL-линии. Операторы просят предоставить письменное доказательство возраста и адреса жительства для исполнения правовых требований.
Двухэтапная идентификация становится mandatory частью новейших систем security. Клиенты обретают SMS-шифры, push-оповещения или эксплуатируют специализированные приложения наподобие Google Authenticator.
Mirror адреса нейтрализуют проблемы региональных санкций и DDoS-нападений. Техническим образом копии составляют копийные копии базового домена с сохранением features и user деталей.
Компетентные игроки предлагают сохранять актуальные каталоги working альтернатив в закладках обозревателя. Администрация передают информацию о новых доменах через email, Telegram-каналы и mobile apps.
Финансовые процедуры через legal платформы гарантированы шифровальными алгоритмами стандарта банковского segment. Получение капитала производится лишь на верифицированные wallets обладателя профиля.
Nausea Care US Nausea Care US Nausea Care US
Актуальные участники сталкиваются с барьером подключения к сертифицированным платформам. Организации фильтруют стандартные порталы, но грамотные СЂР° казино участники осознают о наличии зеркальных платформ.
Параллельный портал образует полную отображение первичного портала. Протоколы шифрования функционируют аналогичными. Денежные действия проходят через сходные системы.
Технология заведения учётной записи через резервный ресурс подразумевает классической верификации. Специалисты требуют удостоверения для осуществления KYC-требований. Идентификационные характеристики подвергаются расширенную подтверждение.
Вносительные лимиты на альтернативных ресурсах идентичны главным характеристикам. Минимальные суммы продолжают постоянными. Накопительные банки согласовываются между множественными доменами.
Премиальные системы выполняются комплексно на зеркальных ресурсах. Вейджер обеспечивает исходные величины. Временные рамки отыгрыша не изменяется.
Департамент ассистирования решает запросы с альтернативных ресурсов сходным образом. Интерактивный диалог поддерживает беспрерывный формат деятельности.
Ориентирование в мире проверенных ресурсов предполагает понимания новых решений доступа. Профессиональные участники применяют retro casino для получения актуальной информации о функционирующих доменах.
Процесс регистрации профиля в проверенных заведениях включает детальную верификацию. Новейшие провайдеры эксплуатируют KYC-алгоритмы и AML-нормы. Бумажная работа потребляет от 24 до 72 периодов.
IT решения для обхода блокировок улучшаются вместе с укреплением правовых действий. VPN-платформы категории premium предлагают криптографию AES-256 и технологии OpenVPN. Надежность соединения принципиально значима для высокоролловых партий.
Альтернативные домены работают через регионально рассредоточенные компьютерные инфраструктуры. CDN-системы осуществляют низкую задержку для американских геймеров. Автоматическое редирект запускается при идентификации блокировки базового адреса.
Банковские переводы в официальных областях подпадают под четким нормам PCI DSS. Криптовалютные операции приобретают признание в результате анонимности и темпу осуществления.
Мобильные софт элитных брендов совмещают лицевую проверку и push-извещения для ключевых эпизодов. Настраиваемый облик независимо настраивается под настройки экрана.
https://pavlodar-kz.forumactif.com/t177-topic#264
https://spasmreliefprotocols.com/# methocarbamol robaxin
Легальные платформы гэмблинг сервисов обеспечивают клиентам доступ к высококлассному гэмблингу через профильные ресурсы, включая типпи казино , которые точно выполняют общепринятые стандарты защиты.
Схема активации подразумевает указания идентификационных параметров через шифрованные SSL-линии. Провайдеры требуют официальное verification правоспособности и региона residence для соблюдения правовых правил.
Multi-factor идентификация представляет required составляющей актуальных платформ безопасности. Игроки приобретают SMS-ключи, push-notification или применяют targeted программы по типу Google Authenticator.
Дублирующие URL нейтрализуют вопросы географических ограничений и DDoS-штурмов. Технически копии формируют тождественные копии основного ресурса с поддержанием инструментария и индивидуальных информации.
Экспертные пользователи призывают поддерживать новейшие каталоги функционирующих копий в избранном обозревателя. Провайдеры рассылают информацию о fresh доменах через электронную почту, Telegram-каналы и смартфонные apps.
Платёжные транзакции через надёжные порталы гарантированы encryption системами уровня банковского сектора. Получение фондов производится только на проверенные данные хозяина личного кабинета.
Перемещение в области проверенных площадок подразумевает понимания современных инструментов доступа. Опытные пользователи используют Вован казино для добывания актуальной данных о функционирующих адресах.
Процедура создания счета в сертифицированных операторах охватывает комплексную верификацию. Продвинутые поставщики задействуют KYC-алгоритмы и AML-критерии. Бумажная работа отнимает от 24 до 72 часов.
Технические решения для прохождения ограничений эволюционируют одновременно с укреплением законодательных действий. VPN-инструменты категории premium предоставляют кодирование AES-256 и протоколы OpenVPN. Непрерывность соединения жизненно существенна для VIP раундов.
Запасные адреса функционируют через локально размещенные технические ресурсы. CDN-сети осуществляют минимальную задержку для азиатских геймеров. Техническое маршрутизация срабатывает при распознавании ограничения базового адреса.
Экономические манипуляции в официальных территориях отвечают строгим требованиям PCI DSS. Децентрализованные переводы получают признание благодаря скрытности и быстроте выполнения.
Мобильные программы топовых операторов интегрируют физиологическую подтверждение и push-уведомления для существенных моментов. Модифицируемый облик автономно подстраивается под параметры монитора.
Football results from last night, complete scores and match summaries available now
Why viewers still use to read news papers when in this technological world everything is
existing on web?
Nausea Care US: Nausea Care US – Nausea Care US
1win кошелек пополнение 1win21567.help
Исследование в сфере сертифицированных порталов требует понимания актуальных способов подключения. Умелые клиенты применяют Gold казино для приобретения актуальной данных о функционирующих адресах.
Алгоритм регистрации личного кабинета в сертифицированных компаниях включает тщательную проверку. Продвинутые организации применяют KYC-алгоритмы и AML-стандарты. Документальное сопровождение отнимает от 24 до 72 временных отрезков.
Компьютерные методы для обхода барьеров эволюционируют одновременно с ужесточением юридических шагов. VPN-решения категории premium предлагают кодирование AES-256 и стандарты OpenVPN. Устойчивость коннекта принципиально значима для элитных заходов.
Дублирующие ресурсы действуют через регионально расположенные компьютерные системы. CDN-системы предоставляют низкую время ответа для европейских геймеров. Программное переключение срабатывает при распознавании блокировки центрального сайта.
Денежные операции в проверенных юрисдикциях отвечают четким критериям PCI DSS. Крипто переводы приобретают популярность вследствие приватности и скорости обработки.
Мобильные софт ведущих операторов совмещают лицевую аутентификацию и push-оповещения для существенных ситуаций. Гибкий внешний вид независимо корректируется под характеристики матрицы.
Инновационные провайдеры игорных развлечений предоставляют клиентам вход к профессиональному развлечениям через проверенные Вован казино ресурсы. Авторизованная операционная активность требует исполнения жестких надзорных критериев.
Процесс регистрации персонального кабинета охватывает подтверждение приватных сведений. Управляющие задействуют детализированные процедуры KYC и AML для пресечения поддельных транзакций.
Электронные платформы современных развлекательных порталов функционируют на зашифрованных хостингах с шифровальными протоколами. Региональная блокировка принуждает провайдеров создавать резервные домены.
Параллельные ресурсы составляют аналогичные репликации основного домена с фиксацией всех инструментов и показателей. Пользователи добиваются беспрепятственный связь к балансу, гемблинг статистике и клиентским установкам.
Финансовые процедуры осуществляются через синхронизированные банковские шлюзы. Пределы на вклады и изъятия назначаются в согласии с законодательными условиями и собственными нормами снижения потерь.
Опытные игроки рекомендуют проверять положение разрешения через контролирующие базы данных развлекательных ведомств. Репутационные показатели включают рейтинги на специализированных сайтах и отзывы реальных игроков.
https://camremont.ru/revizor-info-vash-nadezhnyj-instrument-chtoby-proverit-kompaniyu-i-obezopasit-svoj-biznes/
The triangle is iconic: the reliable friend vs. the moody crush. Jenny Han executes it perfectly. A PDF copy of the book lets you analyze every interaction. The Summer I Turned Pretty is about the confusion of choice. Belly wants both, but she can’t have both. The story explores the consequences of indecision. It is a gripping and dramatic read. https://thesummeriturnedprettypdf.site/ The Summer I Turned Pretty Trilogy Epub
Women’s World Cup livescore, growing women’s football with full coverage
You actually expressed this well!
отель роял виладж в краби краби брейнрот
Развлекательная ниша демонстрирует стремительный расширение, заинтересовывая миллионы игроков. Квалифицированные ресурсы дают защищённую среду для ставок. Подробную материалы о указанных организациях реально получить на lucky bear казино .
Аттестация является основным показателем отбора площадки. Лицензиаты Великобритании создают строгий мониторинг денежных манипуляций. Каждая аккредитованная платформа осуществляет постоянные контроли RNG-модулей.
Технические особенности передовых гемблинг-сайтов включают SSL-криптографию расчётного стандарта. Создатели программного материала уровня Microgaming, NetEnt, Pragmatic Play внедряют усовершенствованные модели произвольных показателей.
Алгоритм валидации счёта предполагает предоставления свидетельств KYC-стандарта. Свидетельство, свидетельство о финансах, удостоверение местожительства — стандартный комплект для полноценного авторизации.
Зеркальные домены решают сложности с фильтрацией поставщиков. Функционирующие зеркала изменяются ежедневно IT командами. Мобильные приложения регулярно работают надёжнее интернет модификаций.
Контроль средств определяет продолжительную доходность азартных циклов. Квалифицированные геймеры советуют ограничивать количество депозита до 1-2% от совокупного бюджета.
Игровая ниша представляет интенсивный прогресс, притягивая множество игроков. Экспертные сайты предоставляют надёжную обстановку для беттинга. Подробную данные о подобных компаниях допустимо отыскать на mad казино .
Легализация выступает ключевым фактором определения площадки. Контролёры Мальты предоставляют серьёзный мониторинг финансовых действий. Отдельная аккредитованная платформа выполняет систематические аудиты RNG-систем.
IT свойства современных азартных площадок предусматривают SSL-безопасность расчётного категории. Разработчики цифрового материала наподобие Microgaming, NetEnt, Pragmatic Play подключают продвинутые системы случайных значений.
Схема аутентификации учётной записи включает направления бумаг KYC-уровня. Документ, подтверждение о доходах, удостоверение прописки — базовый список для окончательного авторизации.
Дублирующие адреса убирают трудности с запретами организаций. Актуальные дубли изменяются каждый день программными группами. Смартфонные софт зачастую выполняются качественнее веб вариантов.
Распределение капитала задаёт длительную доходность развлекательных сессий. Экспертные беттеры предлагают урезать количество пари до 1-2% от общего капитала.
Every weekend i used to visit this web page, because i want enjoyment, since this this website conations actually pleasant funny data too.
Азартная отрасль отображает быстрый прогресс, привлекая легионы пользователей. Квалифицированные ресурсы обеспечивают качественную условия для игры. Развёрнутую сведения о этих организациях возможно изучить на enomo casino .
Легализация является главным фактором выбора платформы. Юрисдикции Великобритании гарантируют тщательный контроль валютных транзакций. Всякая легальная сайт выполняет периодические контроли RNG-механизмов.
Программные свойства современных гемблинг-сайтов охватывают SSL-криптографию экономического класса. Провайдеры программного обеспечения вроде Microgaming, NetEnt, Pragmatic Play встраивают комплексные системы произвольных величин.
Алгоритм проверки счёта требует передачи удостоверений KYC-типа. Документ, выписка о прибылях, валидация проживания — обычный пакет для финального авторизации.
Альтернативные ссылки ликвидируют трудности с запретами поставщиков. Действующие альтернативы изменяются ежедневно программными отделами. Карманные клиенты нередко действуют лучше онлайн вариантов.
Управление банкроллом определяет длительную результативность игровых циклов. Экспертные участники советуют контролировать величину бета до 1-2% от суммарного бюджета.
Marios Percussion Hub – Professional and engaging, drum performances are highlighted effectively.
http://skags.ru/doc/pages/promokod_1xbet_na_segodnya_pri_registracii.html
Перемещение в секторе сертифицированных ресурсов нуждается знания продвинутых технологий входа. Умелые пользователи эксплуатируют лаки Р±РёСЂ казино для извлечения новейшей фактов о функционирующих путях.
Алгоритм оформления профиля в проверенных операторах охватывает многоуровневую подтверждение. Современные организации используют KYC-процедуры и AML-требования. Документооборот потребляет от 24 до 72 промежутков.
Программные методы для прохождения блокировок развиваются вместе с укреплением правовых мер. VPN-инструменты типа premium обеспечивают кодирование AES-256 и стандарты OpenVPN. Постоянство подключения кардинально значима для премиальных заходов.
Резервные сайты функционируют через регионально распределенные компьютерные кластеры. CDN-структуры гарантируют оптимальную пинг для глобальных игроков. Системное редирект активируется при распознавании препятствия центрального домена.
Финансовые операции в проверенных областях следуют жестким нормам PCI DSS. Криптовалютные расчеты набирают распространение из-за анонимности и скорости реализации.
Портативные утилиты лучших компаний интегрируют отпечатковую аутентификацию и push-извещения для принципиальных происшествий. Настраиваемый облик самостоятельно подстраивается под параметры матрицы.
https://blendswap.com/blend/6319
Team goals, beautiful passing moves and their outcomes
Go ahead goals, strikes that break deadlocks tracked live
https://gastrohealthmonitor.shop/# Gastro Health Monitor
Выбор надежного казино заведения предполагает основательного изучения регулятивных бумаг. Новые ресурсы казино СЌРЅРѕРјРѕ предлагают клиентам безусловную данные о своих лицензиях.
Процесс создания профиля подразумевает несколько ключевых ступеней аутентификации. Владельцы требуют бумаги, удостоверяющие личность и правоспособность. Обычный KYC-регламент длится от 24 до 72 часов.
Финансовое планирование запускается с фиксации границ на взносы. Искусные клиенты призывают задействовать закон 5% от общего азартного средств на одну раунд.
Цифровые препятствия операторов вынуждают использовать запасные маршруты. Зеркала оберегают полную эффективность центрального ресурса, подразумевая хронологию платежей и казино результаты.
Новые расчетные инструменты гарантируют мгновенные инвестиции через виртуальные хранилища. Bitcoin, Ethereum и устойчивые монеты гарантируют скрытность и наименьшие отчисления. Длительность осуществления извлечений достигает 10-30 промежутков.
Схемы приверженности подразумевают ступенчатые статусы с возрастающим вознаграждением. VIP-кураторы обеспечивают персонализированные награды, расширенные пределы и ускоренную техподдержку.
Поиск проверенного азартного площадки предполагает основательного исследования юридических разрешений. Актуальные системы казино ДживиСпин предлагают клиентам стопроцентную сведения о своих аккредитациях.
Процесс регистрации предусматривает различные принудительных этапов валидации. Администраторы истребуют справки, устанавливающие персону и зрелость. Классический KYC-механизм составляет от 24 до 72 часов.
Банкролл-менеджмент инициируется с задания ограничений на пополнения. Квалифицированные игроки предлагают применять правило 5% от совокупного игорного средств на отдельную игру.
Программные запреты администраторов побуждают эксплуатировать вспомогательные маршруты. Зеркала оберегают абсолютную работоспособность центрального площадки, охватывая историю переводов и казино успех.
Современные финансовые системы поддерживают моментальные вклады через цифровые счета. Bitcoin, Ethereum и стейблкоины обеспечивают анонимность и мизерные взносы. Период осуществления получений насчитывает 10-30 промежутков.
Алгоритмы преданности охватывают градационные уровни с возрастающим возвратом. VIP-представители гарантируют личные награды, улучшенные рамки и преимущественную поддержку.
Hello! This pokst couldn’t be written any better!
Reading through this post reminds me of my good old room
mate! He always kept chatting abou this. I will forward this
page to him. Fairly certain he will have a good read. Thank you for sharing!
Feel free to visit my webpage Marcelino
https://thetimes24.hashnode.dev/1xbet-today-promo-code-canada-1x200gift-130-bonus?showSharer=true
范德沃克第二季高清完整官方版,海外华人可免费观看最新热播剧集。
Определение надежного гемблинг заведения предполагает серьезного изучения правовых свидетельств. Новые платформы лаки ворлд казино обеспечивают пользователям безусловную сведения о собственных санкциях.
Система оформления счета предусматривает несколько обязательных стадий верификации. Администраторы просят документы, удостоверяющие самобытность и дееспособность. Классический KYC-порядок продолжается от 24 до 72 временных отрезков.
Финансовое планирование инициируется с назначения ограничений на инвестиции. Квалифицированные игроки рекомендуют применять правило 5% от общего казино фонда на отдельную заход.
Электронные барьеры администраторов принуждают внедрять вспомогательные маршруты. Дубликаты удерживают полную эффективность главного ресурса, содержа историю платежей и гемблинг продвижение.
Современные платежные инструменты предоставляют быстрые взносы через виртуальные аккаунты. Bitcoin, Ethereum и постоянные токены предоставляют приватность и наименьшие отчисления. Продолжительность проведения снятий насчитывает 10-30 интервалов.
Системы постоянства предусматривают ступенчатые степени с увеличивающимся бонусом. VIP-представители дают эксклюзивные поощрения, улучшенные пределы и преимущественную поддержку.
Актуальные дублирующие порталы надежных игорных заведений на Clubnika casino обеспечивают постоянный доступ к азартным порталам. Методика зеркалирования создает эквивалентные реплики корневого веб-площадки с консервацией всех опций.
Схема оформления профиля через mirror-сайт целиком дублирует главную форму. Свежие игроки регистрируют валидный email, создают стойкий код доступа и назначают рабочую курренси.
Аутентификация учетной записи предполагает передачи свидетельств следуя KYC-требованиям. Снимок водительских прав, валидация места жительства и денежные координаты контролируются системой цифровую контроль в течение 24-72 часа.
Логин действующих игроков производится через обычную панель с расширенной проверкой. Краткосрочные коды поступают на мессенджер номер или электронную почту.
Возможности входящего компонента через зеркала содержит популярные расчетные системы. Visa, Mastercard, виртуальные балансы Skrill, Neteller, криптовалюты Bitcoin, Ethereum обрабатываются с минимальными платежами 0-3%.
Развлекательная библиотека дублируется в точности включая барабаны, столовые развлечения, live-операторов и максимальные награды. RTP-индикаторы, волатильность и условия отыгрыша остаются такими же.
Подарочная политика работает подобно центральному порталу. Welcome-бандлы, даровые прокруты, возврат средств и VIP-системы стартуют системно при выполнении фиксированных стандартов.
1вин коэффициенты http://1win62940.help/
Hello, I want to subscribe for this website to get newest
updates, therefore where can i do it please assist.
Игровая ниша отображает активный прогресс, притягивая тысячи пользователей. Экспертные сайты предоставляют надёжную атмосферу для игры. Детальную данные о этих организациях реально обнаружить на винити казино .
Сертификация составляет основным критерием селекции платформы. Юрисдикции Великобритании обеспечивают жёсткий надзор расчётных манипуляций. Всякая официальная портал выполняет периодические аудиты RNG-генераторов.
IT параметры актуальных азартных площадок объединяют SSL-безопасность банковского ранга. Создатели цифрового обеспечения уровня Microgaming, NetEnt, Pragmatic Play встраивают комплексные алгоритмы произвольных значений.
Процесс аутентификации профиля включает подачи справок KYC-формата. Паспорт, выписка о прибылях, доказательство проживания — стандартный перечень для итогового активации.
Резервные адреса исправляют проблемы с цензурой организаций. Рабочие варианты адаптируются ежедневно компьютерными командами. Смартфонные утилиты нередко функционируют устойчивее интернет версий.
Распределение капитала формирует перспективную доходность развлекательных раундов. Экспертные беттеры советуют ограничивать размер бета до 1-2% от совокупного фонда.
Активные дублирующие порталы официальных казино на mad casino предоставляют стабильный подключение к игровым сервисам. Система копирования образует эквивалентные версии главного веб-площадки с сохранением всех механизмов.
Процедура открытия счета через mirror-сайт на сто процентов имитирует стандартную анкету. Дебютные пользователи заполняют активный email, устанавливают стойкий секретную комбинацию и выбирают операционную курренси.
Подтверждение личного кабинета содержит предоставления документов согласно KYC-требованиям. Скан паспорта, доказательство регистрации и финансовые данные контролируются системой цифровую контроль в течение 24-72 часов.
Логин зарегистрированных геймеров осуществляется через обычную окно с усиленной проверкой. Разовые ключи поступают на смс гаджет или почтовый ящик.
Опции пополнительного компонента через зеркала включает востребованные финансовые сервисы. Visa, Mastercard, электронные кошельки Skrill, Neteller, виртуальные монеты Bitcoin, Ethereum выполняются с оптимизированными сборами 0-3%.
Развлекательная каталог повторяется целиком включая spinning games, традиционные развлечения, live-ведущих и джекпоты. RTP-коэффициенты, вариативность и вейджер фиксируются неизменными.
Акционная схема выполняется идентично основному ресурсу. Welcome-пакеты, фриспины, компенсация и VIP-схемы стартуют алгоритмически при реализации фиксированных условий.
Функционирующие резервные адреса лицензированных казино на enomo гарантируют непрерывный коннект к гемблинг системам. Технология зеркалирования строит эквивалентные реплики основного портала с сохранением всех инструментов.
Система оформления профиля через зеркало абсолютно дублирует стандартную бланк. Только пришедшие участники прописывают действующий email, устанавливают защищенный код доступа и назначают рабочую финансовый инструмент.
Валидация профиля подразумевает представления свидетельств в соответствии с KYC-регламенту. Скан ID-карты, доказательство места жительства и финансовые координаты контролируются системой цифровую верификацию в течение 24-72 часа.
Логин действующих пользователей выполняется через типовую окно с двухфакторной валидацией. Краткосрочные шифры доставляются на мессенджер номер или мейл.
Инструменты финансового компонента через mirror-сайты содержит востребованные расчетные сервисы. Visa, Mastercard, электронные балансы Skrill, Neteller, цифровые активы Bitcoin, Ethereum реализуются с сокращенными процентами 0-3%.
Gaming база воспроизводится полностью включая автоматы, карточные забавы, live-ведущих и джекпоты. RTP-индикаторы, дисперсия и вейджер удерживаются идентичными.
Промо политика оперирует схоже центральному ресурсу. Welcome-наборы, фриспины, кешбэк и VIP-программы стартуют программно при реализации установленных требований.
My spouse and I stumbled over here different web page and
thought I may as well check things out. I like what I see so now i am following you.
Look forward to finding out about your web page again.
Актуальные сервисы азартных активностей предоставляют пользователям возможность к профессиональному развлечениям через проверенные mad casino зеркало сайты. Лицензированная функционирование влечет выполнения четких надзорных положений.
Механизм оформления клиентского профиля включает аутентификацию личных сведений. Провайдеры используют комплексные механизмы KYC и AML для пресечения фродовых платежей.
Технические системы современных гемблинг платформ базируются на безопасных дата-центрах с криптографическими сертификатами. Локальные запреты вынуждает владельцев разрабатывать альтернативные ссылки.
Альтернативные домены составляют эквивалентные копии первичного домена с поддержанием всех возможностей и параметров. Пользователи обеспечивают себе стабильный доступ к счету, гемблинг истории и индивидуальным установкам.
Платежные операции осуществляются через подключенные финансовые агрегаторы. Границы на депозиты и выводы назначаются в соотношении с нормативными условиями и корпоративными нормами контроля угроз.
Квалифицированные клиенты советуют мониторить состояние лицензии через регуляторные каталоги азартных комиссий. Статусные индикаторы содержат оценки на отраслевых порталах и мнения действительных пользователей.
Season reviews, comprehensive summaries of completed campaigns
http://moy-toy.ru/index.php?subaction=userinfo&user=ebyfipyt
Легальные операторы гэмблинг предложений предоставляют участникам право к качественному гэмблингу через профильные порталы, включая казино типпи , которые специально следуют transnational требования защиты.
Механизм регистрации necessita указания authentication параметров через защищённые SSL-каналы. Букмекеры demanded документальное свидетельство возраста и территории нахождения для соблюдения нормативных норм.
Multi-factor проверка считается необходимым aspect актуальных механизмов конфиденциальности. Клиенты располагают SMS-шифры, push-notification или применяют dedicated программы в стиле Google Authenticator.
Резервные домены устраняют трудности geographic ограничений и DDoS-воздействий. Технически реплики представляют идентичные dublicates базового домена с сохранением features и клиентских информации.
Экспертные пользователи предлагают сохранять свежие базы working mirrors в избранном интернет-программы. Провайдеры отправляют информацию о актуальных порталах через e-mail, Telegram-сообщества и телефонные утилиты.
Банковские movements через лицензионные площадки покрыты шифровальными алгоритмами стандарта банковского области. Получение капитала осуществляется единственно на подтверждённые счета хозяина профиля.
Функционирующие дублирующие порталы надежных гемблинг-платформ на лаки Р±РёСЂ казино обеспечивают беспрерывный коннект к азартным платформам. Схема реплицирования образует точные реплики центрального ресурса с удержанием всех опций.
Алгоритм оформления профиля через зеркало абсолютно имитирует стандартную форму. Дебютные геймеры указывают валидный email, формируют надежный ключ и фиксируют операционную курренси.
Верификация учетной записи требует загрузки справок по KYC-регламенту. Изображение удостоверения личности, свидетельство резиденции и карточные сведения проверяются через программную контроль в течение 24-72 часов.
Логин действующих пользователей происходит через стандартную панель с расширенной валидацией. Разовые ключи отправляются на смс гаджет или электронную почту.
Возможности депозитного блока через зеркала поддерживает популярные банковские инструменты. Visa, Mastercard, онлайн балансы Skrill, Neteller, crypto Bitcoin, Ethereum осуществляются с низкими взносами 0-3%.
Развлекательная коллекция копируется на сто процентов включая барабаны, столовые развлечения, live-крупье и джекпоты. RTP-значения, изменчивость и проигрыш фиксируются такими же.
Поощрительная механизм выполняется схоже базовому домену. Welcome-комплекты, бесплатные вращения, refund и VIP-схемы запускаются системно при исполнении установленных стандартов.
Nicely put, Thank you!
Современные геймеры встречаются с изобилием цифровых особенностей при функционировании с лицензированными площадками. Профессиональные порталы типа Голд предоставляют актуальную контент о деятельности игорных организаций.
Система валидации профиля предполагает набор обязательных уровней. Исходная верификация нуждается предоставления удостоверений верифицирующих субъект. Классический комплект подразумевает документ, водительские права или заграничное удостоверение.
Программная сторона регистрации включает задействование безопасного соединения и двухфакторной аутентификации. Профессиональные игроки советуют задействовать все имеющихся возможностей защиты.
Дублирующие порталы составляют идентичные реплики главного ресурса с обеспечением полного набора функций. Важнейшее преимущество кроется в подобии расчетных границ и критериев вейджера.
Алгоритм выявления активных запасных доменов опирается на контроле профессиональных телеграм-каналов и сотрудничающих платформ. Квалифицированные пользователи внедряют анонимайзеры для формирования стабильного связи независимо от территориальных ограничений.
Перемещение в сфере легальных платформ предполагает знания актуальных технологий подключения. Продвинутые клиенты применяют френдс казино для приобретения свежей данных о оперативных ссылках.
Схема формирования личного кабинета в официальных операторах включает комплексную проверку. Актуальные организации используют KYC-системы и AML-стандарты. Оформление документов требует от 24 до 72 периодов.
Программные методы для минования ограничений эволюционируют одновременно с ужесточением правовых действий. VPN-решения уровня premium дают шифрование AES-256 и стандарты OpenVPN. Надежность канала критически актуальна для привилегированных сессий.
Зеркальные сайты оперируют через регионально рассредоточенные компьютерные инфраструктуры. CDN-сети гарантируют низкую задержку для американских пользователей. Программное переключение включается при детекции препятствия центрального ресурса.
Финансовые движения в лицензированных областях отвечают строгим требованиям PCI DSS. Криптовалютные операции увеличивают распространение из-за конфиденциальности и динамике процессинга.
Смартфонные приложения элитных операторов совмещают отпечатковую аутентификацию и push-сообщения для ключевых ситуаций. Настраиваемый интерфейс автоматически настраивается под свойства экрана.
pinap официальный
Проверенные операторы гэмблинг сервисов oferuja геймерам шанс к качественному азартному досугу через целевые сайты, включая СЌРЅРѕРјРѕ казино , которые точно исполняют мировые регламенты защиты.
Последовательность открытия счёта включает предоставления валидационных деталей через криптографические SSL-connection. Менеджмент запрашивают нотариальное свидетельство правоспособности и территории проживания для исполнения юрисдикционных правил.
Multi-factor authentication является mandatory частью актуальных механизмов безопасности. Пользователи получают SMS-шифры, push-notification или задействуют специализированные приложения в стиле Google Authenticator.
Дублирующие ссылки решают проблемы географических ограничений и DDoS-нападений. Фактически mirrors образуют тождественные клоны главного портала с поддержанием features и user параметров.
Профессиональные геймеры призывают хранить свежие каталоги активных копий в bookmark обозревателя. Букмекеры направляют информацию о актуальных адресах через электронную почту, Telegram-группы и портативные программы.
Банковские транзакции через legal площадки secured шифровальными methods стандарта банковского segment. Extraction финансов происходит лишь на подтверждённые карты держателя account.
Передовые клиенты встречаются с массой цифровых нюансов при процессах с проверенными порталами. Специализированные сайты типа казино миллион дают новую информацию о деятельности развлекательных операторов.
Процедура аутентификации аккаунта охватывает набор обязательных шагов. Базовая валидация предполагает передачи документов верифицирующих личность. Привычный пакет предполагает ID, лицензию водителя или загранпаспорт.
Техническая компонента регистрации охватывает эксплуатацию безопасного соединения и двухфакторной аутентификации. Профессиональные участники рекомендуют запускать весь комплекс имеющихся возможностей обеспечения.
Запасные домены формируют стопроцентные реплики центрального сайта с удержанием исчерпывающего арсенала. Основное достоинство выражается в соответствии банковских ограничений и норм отыгрыша.
Схема локализации актуальных альтернативных адресов строится на наблюдении профессиональных уведомительных сервисов и аффилированных площадок. Продвинутые клиенты задействуют туннельные протоколы для формирования бесперебойного соединения без оглядки от местных ограничений.
Thanks a lot! An abundance of info.
An impressive share! I have just forwarded this
onto a co-worker who had been conducting a little research on this.
And he in fact ordered me lunch simply because I found it for
him… lol. So let me reword this…. Thanks for the meal!!
But yeah, thanx for spending the time to talk about this subject here on your web site.
Исследование в пространстве проверенных порталов подразумевает знания современных решений подключения. Профессиональные клиенты задействуют аква казино для извлечения современной данных о действующих адресах.
Процесс создания учетной записи в лицензированных компаниях предполагает тщательную аутентификацию. Актуальные поставщики внедряют KYC-механизмы и AML-требования. Документальная процедура потребляет от 24 до 72 периодов.
Технические инструменты для прохождения ограничений совершенствуются сообща с усилением нормативных шагов. VPN-инструменты уровня premium предлагают защиту AES-256 и технологии OpenVPN. Стабильность связи принципиально существенна для высокоролловых игровых периодов.
Дублирующие платформы оперируют через территориально разнесенные IT ресурсы. CDN-комплексы поддерживают сокращенную пинг для американских игроков. Техническое маршрутизация включается при детекции недоступности главного адреса.
Финансовые манипуляции в легальных регионах подпадают под строгим нормам PCI DSS. Криптовалютные расчеты набирают распространение вследствие анонимности и темпу осуществления.
Планшетные клиенты ведущих операторов объединяют голосовую проверку и push-оповещения для важных происшествий. Настраиваемый оформление самостоятельно корректируется под характеристики дисплея.
Проверенные операторы азартных сервисов дают участникам возможность к высококлассному времяпрепровождению через целевые сайты, включая казино типпи , которые придерживаются мировые стандарты security.
Последовательность регистрации подразумевает ввода проверочных данных через защищённые SSL-линии. Операторы demanded документальное доказательство совершеннолетия и места проживания для выполнения юрисдикционных норм.
Multi-factor верификация представляет необходимым составляющей современных механизмов защиты. Игроки получают SMS-шифры, push-сообщения или эксплуатируют специализированные приложения в стиле Google Authenticator.
Резервные ссылки нейтрализуют сложности локальных барьеров и DDoS-assault. Фактически копии являют дублированные клоны базового портала с удержанием возможностей и индивидуальных сведений.
Skilled клиенты suggest удерживать current каталоги функционирующих mirrors в закладках интернет-программы. Management отправляют updates о свежих адресах через мейл, Telegram-чаты и mobile apps.
Банковские процедуры через проверенные порталы защищены encryption технологиями level банковского области. Изъятие капитала реализуется лишь на validated реквизиты хозяина учётной записи.
rutor черный рынок: Ветеран русскоязычного даркнета, переживший крах “Гидры”**
Rutor, один из старейших и наиболее устойчивых форумов в русскоязычном даркнете, продолжает свою деятельность с начала 2010-х годов, продемонстрировав исключительную живучесть даже после ликвидации “Гидры” в 2022 году. Несмотря на смену руководства в начале того же года, площадка сумела сохранить свою репутацию надежной платформы для теневых операций и коммуникации.
**?? Главное преимущество Rutor — его торговый раздел, где представлен широкий спектр товаров и услуг от проверенных продавцов:**
* Психоактивные вещества.
* Цифровые товары и программное обеспечение.
* Сервисы, связанные с обеспечением анонимности, конвертацией средств и OSINT.
**?? Безопасность сделок на Rutor обеспечивается встроенной системой гаранта. Для защиты конфиденциальности пользователей предусмотрен мессенджер с функционалом анонимных заметок, которые не привязаны к аккаунтам. Такой подход минимизирует риски утечки личных данных даже в случае взлома профиля.**
**??? Доступ к Rutor строго ограничен сетью Tor и осуществляется по onion-ссылке. Регистрация, как правило, требует наличия инвайта или прохождения верификации, что помогает отсеивать нежелательных пользователей, включая ботов и представителей правоохранительных органов. Модерация ориентирована на поддержание деловой этики площадки, а не на навязывание строгой цензуры.**
**?? После смены владельцев Rutor стал еще более закрытым, но при этом сохранил свою лояльную аудиторию и техническую стабильность. Для многих участников он является не просто форумом, а значимым символом в истории развития русского даркнета.**
**Важное предупреждение:** Использование ресурсов, на которых осуществляется торговля запрещенными товарами или услугами, может быть расценено как участие в противоправной деятельности и привести к уголовной ответственности.
birxbet 1xbet-yeni-giris-2.com .
http://www.detskiy-mir.net/index.php?subaction=userinfo&user=derangeddispatc
Andrea Bacle photography site – Gorgeous imagery, each photo feels inviting and beautifully captured.
Современные платформы азартных продуктов предоставляют участникам доступ к профессиональному гемблингу через защищенные казино аква ресурсы. Официальная бизнес нуждается выполнения конкретных правовых положений.
Алгоритм создания клиентского учетной записи предусматривает аутентификацию приватных реквизитов. Администраторы применяют расширенные механизмы KYC и AML для предотвращения мошеннических транзакций.
IT решения новейших беттинг площадок базируются на надежных облачных системах с HTTPS сертификатами. Территориальные ограничения принуждает администраторов создавать резервные ссылки.
Дублирующие сайты являют собой аналогичные репликации главного домена с удержанием всех возможностей и показателей. Беттеры достигают постоянный доступ к капиталу, беттинг данным и персональным опциям.
Платежные процедуры осуществляются через интегрированные расчетные шлюзы. Ограничения на вклады и обналичивания фиксируются в соответствии с правовыми стандартами и корпоративными процедурами минимизации опасностей.
Опытные клиенты указывают проверять положение сертификата через контролирующие базы данных развлекательных органов. Престижные характеристики задействуют ранги на профильных ресурсах и оценки реальных участников.
Captain performances, armband wearers and leadership statistics
Перемещение в сфере легальных площадок нуждается представления современных решений авторизации. Опытные клиенты используют казино лова для приобретения свежей информации о работающих путях.
Схема оформления личного кабинета в надежных заведениях предполагает комплексную верификацию. Новейшие поставщики эксплуатируют KYC-алгоритмы и AML-стандарты. Оформление документов занимает от 24 до 72 часов.
Технические инструменты для избежания блокировок совершенствуются сообща с укреплением законодательных действий. VPN-платформы категории premium предлагают криптографию AES-256 и технологии OpenVPN. Надежность связи кардинально существенна для высокоролловых заходов.
Дублирующие ресурсы оперируют через пространственно рассредоточенные компьютерные системы. CDN-структуры поддерживают оптимальную отклик для американских участников. Системное маршрутизация срабатывает при детекции барьера первичного портала.
Экономические переводы в официальных областях подпадают под строгим стандартам PCI DSS. Децентрализованные платежи увеличивают актуальность вследствие секретности и динамике выполнения.
Портативные утилиты ведущих операторов содержат голосовую аутентификацию и push-извещения для ключевых событий. Адаптивный внешний вид программно адаптируется под особенности панели.
Hello, after reading this amazing article i am as well cheerful to share my knowledge here
with mates.
https://nauseacareus.com/# Nausea Care US
Определение безопасного игрового площадки в текущих границах требует повышенного изучения к регулятивному режиму. Знающие клиенты представляют, что Килограмм казино предоставляет последнюю информацию о доступных площадках.
Схема записи в легальных платформах объединяет принудительную верификацию документов. KYC-стандарты оберегают как заведение, так и пользователя от мошенничества. Временные рамки на получение финансов до закрытия проверки – типичная подход.
Виртуальные барьеры на доступ к игровым площадкам устраняются через альтернативные ссылки. Функционирующие дубликаты поддерживают полную производительность первичного портала. Банковские движения, азартный достижения и привилегированные программы сохраняются постоянными.
Экономическая защищенность определяется показателем задействованных банковских инструментов. SSL-защита, PCI DSS валидация и двухфакторная верификация создают прочный щит охраны.
Развлекательная коллекция проверенных операторов включает машины от главных провайдеров. RTP-индексы, изменчивость и статистические принципы претерпевают независимую аудит в одобренных центрах.
Планы мотивации в надежных казино базируются на понятных требованиях ставок. Требования x35-40 характеризуется нормальным для машина-привилегий, в то время как традиционные активности идут в зачет с пониженным коэффициентом.
Nausea Care US: zofran dosage – Nausea Care US
Гемблинговая ниша представляет быстрый подъём, манящая миллионы геймеров. Квалифицированные порталы гарантируют надёжную пространство для ставок. Исчерпывающую данные о таких организациях можно отыскать на лаки Р±РёСЂ казино .
Аккредитация является главным критерием выбора ресурса. Лицензиаты Кюрасао обеспечивают жёсткий контроль экономических действий. Отдельная официальная ресурс проходит плановые инспекции RNG-генераторов.
IT особенности новейших азартных площадок содержат SSL-шифрование финансового стандарта. Провайдеры компьютерного софта уровня Microgaming, NetEnt, Pragmatic Play добавляют комплексные модели произвольных показателей.
Процедура подтверждения учётной записи предусматривает направления справок KYC-класса. Свидетельство, подтверждение о прибылях, валидация местожительства — базовый комплект для итогового входа.
Резервные ссылки исправляют барьеры с запретами операторов. Действующие альтернативы модифицируются регулярно IT группами. Планшетные клиенты регулярно оперируют устойчивее браузерных форматов.
Управление банкроллом определяет продолжительную прибыльность игровых раундов. Экспертные геймеры указывают лимитировать объём вейджера до 1-2% от итогового банкролла.
https://forum.lfl.ru/index.php?showtopic=57628
Substitution tracker, player changes and tactical switches noted live
Перемещение в сфере лицензированных порталов подразумевает понимания новых решений соединения. Продвинутые игроки используют казино Клубника для извлечения новейшей данных о работающих путях.
Алгоритм открытия профиля в надежных учреждениях охватывает сложную аутентификацию. Продвинутые компании задействуют KYC-системы и AML-критерии. Оформление документов требует от 24 до 72 периодов.
Компьютерные технологии для преодоления барьеров совершенствуются одновременно с интенсификацией юридических инициатив. VPN-инструменты класса premium предоставляют безопасность AES-256 и технологии OpenVPN. Стабильность связи критически актуальна для привилегированных сессий.
Резервные домены работают через регионально расположенные технические ресурсы. CDN-архитектуры обеспечивают быструю задержку для международных пользователей. Цифровое маршрутизация включается при идентификации блокировки базового ресурса.
Финансовые манипуляции в лицензированных юрисдикциях следуют конкретным стандартам PCI DSS. Блокчейн транзакции увеличивают актуальность по причине анонимности и оперативности осуществления.
Переносные клиенты элитных операторов объединяют лицевую подтверждение и push-алерты для критических моментов. Изменяемый внешний вид автономно подстраивается под настройки экрана.
Проверенные операторы развлекательных предложений oferuja клиентам доступ к высококлассному азартному досугу через тематические платформы, включая тип топ казино , которые соблюдают глобальные критерии надёжности.
Последовательность активации требует предоставления идентификационных деталей через шифрованные SSL-линии. Администрация просят документальное verification правоспособности и территории residence для compliance нормативных норм.
2FA аутентификация считается необходимым компонентом современных платформ защиты. Участники обретают SMS-ключи, push-оповещения или используют dedicated софт типа Google Authenticator.
Зеркальные адреса ликвидируют вопросы региональных барьеров и DDoS-штурмов. Фактически дубли составляют копийные реплики primary ресурса с удержанием возможностей и личных данных.
Экспертные игроки рекомендуют keeping свежие списки функционирующих зеркал в избранном веб-клиента. Букмекеры направляют новости о fresh адресах через e-mail, Telegram-каналы и mobile программы.
Банковские переводы через лицензионные ресурсы защищены криптографическими протоколами категории банковского сектора. Снятие средств производится solely на верифицированные реквизиты обладателя учётной записи.
Expected goals, xG statistics and performance analysis included
https://wateradventure.ae/pages/4rabet_promo_code_india.html
Incredible! This blog looks just like my old one! It’s on a entirely different subject
but it has pretty much the same layout and design. Excellent choice of colors!
Современные гемблеры попадают с препятствием подключения к официальным площадкам. Организации фильтруют основные ссылки, но грамотные тип топ казино клиенты помнят о наличии альтернативных ресурсов.
Резервная ссылка является стопроцентную дубликат базового сайта. Протоколы шифрования поддерживаются идентичными. Расчётные транзакции производятся через сходные механизмы.
Схема оформления профиля через параллельный ресурс предполагает обычной верификации. Операторы уточняют документы для осуществления KYC-регламентов. Паспортные характеристики подвергаются расширенную валидацию.
Депозитные лимиты на резервных платформах совпадают первичным параметрам. Низшие беты сохраняются константными. Прогрессивные джекпоты согласовываются между разными ссылками.
Премиальные механизмы действуют всесторонне на резервных платформах. Множитель ставок поддерживает первоначальные параметры. Срок активности реализации не изменяется.
Департамент обслуживания изучает обращения с альтернативных адресов равнозначно. Онлайн переписка поддерживает 24-часовой расписание функционирования.
Новейшие пользователи встречаются с огромным количеством цифровых деталей при функционировании с легальными порталами. Экспертные ресурсы типа тип топ казино выдают актуальную материалы о работе игорных провайдеров.
Механизм аутентификации профиля предполагает комплекс обязательных шагов. Начальная верификация включает загрузки удостоверений доказывающих личность. Типовой набор охватывает удостоверение личности, водительские права или международное ID.
Цифровая составляющая записления охватывает использование криптографической защиты и 2FA. Продвинутые пользователи советуют запускать совокупность представленных настроек обеспечения.
Запасные домены формируют точные копии центрального ресурса с удержанием всего функционала. Ключевое достоинство выражается в идентичности денежных границ и норм вейджера.
Система обнаружения активных зеркал фундируется на проверке экспертных мессенджер групп и связанных порталов. Опытные игроки внедряют виртуальные частные сети для гарантирования надежного подключения независимо от географических барьеров.
журналы для автолюбителей avtonovosti-1.ru .
Hi would you mind letting me know which webhost you’re using?
I’ve loaded your blog in 3 completely different internet browsers and I must say this blog
loads a lot faster then most. Can you suggest a good internet hosting provider at
a honest price? Kudos, I appreciate it!
一帆官方认证平台,专为海外华人设计,24小时不间断提供高清视频和直播服务。
Новейшие участники встречаются с набором программных тонкостей при операциях с легальными ресурсами. Экспертные источники типа Bollywood зеркало выдают новую информацию о деятельности развлекательных брендов.
Процедура проверки кабинета включает несколько требуемых стадий. Начальная валидация требует предоставления удостоверений подтверждающих субъект. Обычный список предполагает ID, лицензию водителя или внешний паспорт.
Техническая элемент записления содержит применение защищенного протокола и двухфакторной аутентификации. Продвинутые участники настаивают активировать весь комплекс имеющихся функций секьюрити.
Зеркала являются точные клоны первичного сайта с хранением тотального набора функций. Ключевое плюс кроется в схожести платежных пределов и норм ставочных требований.
Процедура поиска функционирующих зеркал опирается на контроле тематических новостных лент и аффилированных сайтов. Профессиональные клиенты внедряют VPN-сервисы для формирования постоянного соединения вне зависимости от географических запретов.
Новейшие участники попадают с затруднением связи к сертифицированным платформам. Операторы ограничивают стандартные ссылки, но грамотные [url=https://nivaabigband.dk/2026/01/26/igrayte-v-uvlekatelnuyu-igru-mad-hatters-v-onlayn-kazino-na-russkom-yazyke/]mad casino[/url] пользователи учитывают о функционировании зеркальных ресурсов.
Зеркало формирует полную отображение базового ресурса. SSL-сертификаты остаются аналогичными. Платёжные действия проходят через сходные системы.
Методика открытия счёта через параллельный ссылку содержит стандартной верификации. Специалисты просят удостоверения для реализации KYC-стандартов. Идентификационные сведения осуществляют комплексную подтверждение.
Депозитные границы на параллельных площадках идентичны главным спецификациям. Стартовые взносы поддерживаются фиксированными. Увеличивающиеся джекпоты координируются между всеми доменами.
Льготные планы оперируют полноценно на резервных площадках. Множитель ставок поддерживает стартовые цифры. Период действия отыгрыша продолжается.
Команда сопровождения изучает тикеты с зеркальных ресурсов сходным образом. Прямой переписка предоставляет непрерывный порядок деятельности.
1xbet giri? linki 1xbet-giris-23.com .
1xbet yeni giri? 1xbet yeni giri? .
Новейшие клиенты имеют дело с набором системных деталей при функционировании с лицензированными платформами. Экспертные сайты типа казино Tippy обеспечивают актуальную данные о операциях казино компаний.
Механизм проверки профиля содержит комплекс обязательных уровней. Исходная подтверждение подразумевает предоставления документов удостоверяющих индивидуальность. Классический комплект включает ID, лицензию водителя или заграничное удостоверение.
Техническая сторона оформления включает использование SSL-шифрования и двухуровневой проверки. Профессиональные пользователи подсказывают задействовать полный набор представленных возможностей защиты.
Резервные ссылки формируют идентичные дубликаты главного портала с обеспечением полного арсенала. Главное бонус кроется в схожести финансовых пределов и параметров проигрыша.
Схема выявления функционирующих зеркал фундируется на проверке экспертных информационных каналов и аффилированных площадок. Квалифицированные игроки применяют анонимайзеры для обеспечения надежного входа без оглядки от региональных лимитов.
Новейшие сервисы игорных услуг дают пользователям вход к элитному игровому процессу через защищенные казино аква системы. Сертифицированная бизнес нуждается учета определенных надзорных норм.
Система создания индивидуального счета включает верификацию персональных сведений. Регуляторы используют комплексные процедуры KYC и AML для недопущения поддельных операций.
Цифровые инструменты передовых гемблинг платформ функционируют на защищенных серверах с криптографическими технологиями. Региональная блокировка заставляет владельцев организовывать альтернативные домены.
Дублирующие порталы являют собой полные дубликаты основного сайта с обеспечением всех функций и информации. Беттеры обеспечивают себе устойчивый доступ к балансу, игровой отчетности и личным установкам.
Финансовые операции выполняются через связанные расчетные системы. Пределы на инвестиции и обналичивания назначаются в соотношении с лицензионными стандартами и собственными нормами управления рисками.
Компетентные беттеры указывают мониторить положение аккредитации через надзорные списки игорных комиссий. Авторитетные индикаторы включают места на тематических платформах и feedback истинных пользователей.
Asian livescore coverage, matches from AFC Champions League and domestic leagues
1xbet resmi sitesi 1xbet-mobil-2.com .
Современные операторы игорных развлечений предоставляют клиентам вход к премиальному гемблингу через сертифицированные типпи казино сайты. Легальная операционная активность предполагает соблюдения четких контролирующих положений.
Процедура создания индивидуального профиля включает валидацию приватных данных. Провайдеры задействуют расширенные алгоритмы KYC и AML для пресечения поддельных переводов.
IT инструменты новейших развлекательных порталов строятся на зашифрованных хостингах с TLS технологиями. IP-фильтрация заставляет операторов разрабатывать резервные домены.
Параллельные сайты составляют аналогичные репликации первичного домена с фиксацией всех возможностей и показателей. Клиенты достигают устойчивый соединение к депозиту, азартной статистике и клиентским параметрам.
Платежные процедуры производятся через интегрированные финансовые агрегаторы. Ограничения на вклады и выводы определяются в унисон с правовыми требованиями и собственными политиками контроля угроз.
Квалифицированные пользователи указывают контролировать ситуацию авторизации через надзорные регистры беттинг ведомств. Репутационные индикаторы содержат рейтинги на отраслевых ресурсах и feedback подлинных пользователей.
Актуальные зеркала проверенных азартных клубов на JVSpin казино обеспечивают стабильный соединение к гемблинг платформам. Принцип клонирования формирует полноценные клоны базового портала с удержанием всех возможностей.
Схема активации через альтернативный домен в точности дублирует оригинальную анкету. Только пришедшие пользователи прописывают рабочий email, генерируют стойкий секретную комбинацию и определяют базовую курренси.
Аутентификация личного кабинета содержит передачи свидетельств следуя KYC-политике. Фото паспорта, верификация регистрации и финансовые сведения подвергаются автоматическую контроль в течение 24-72 часов.
Аутентификация верифицированных геймеров реализуется через типовую панель с 2FA проверкой. Разовые шифры доставляются на сотовый устройство или email.
Опции денежного компонента через дублирующие порталы поддерживает популярные расчетные системы. Visa, Mastercard, онлайн хранилища Skrill, Neteller, цифровые активы Bitcoin, Ethereum выполняются с низкими процентами 0-3%.
Gaming коллекция копируется на сто процентов включая слоты, настольные развлечения, live-дилеров и джекпоты. RTP-коэффициенты, дисперсия и ставочные требования удерживаются точными.
Поощрительная политика оперирует аналогично центральному веб-площадке. Welcome-предложения, безвозмездные спины, возврат средств и VIP-курсы активируются системно при реализации заданных параметров.
It’s amazing to pay a quick visit this web site and reading
the views of all friends concerning this piece of writing, while I am also zealous of getting know-how.
алкоголь на дом круглосуточно алкоголь на дом круглосуточно .
t.me/s/top_onlajn_kazino_rossii t.me/s/top_onlajn_kazino_rossii .
Ориентирование в сфере проверенных платформ предполагает знания передовых методов подключения. Квалифицированные участники задействуют казино типпи для обретения актуальной материалов о работающих URL.
Процедура формирования личного кабинета в надежных компаниях содержит многоуровневую подтверждение. Новейшие организации используют KYC-системы и AML-требования. Бумажная работа требует от 24 до 72 часов.
Технические способы для преодоления блокировок прогрессируют сообща с повышением нормативных мер. VPN-платформы категории premium гарантируют безопасность AES-256 и технологии OpenVPN. Надежность соединения fundamentally актуальна для высокоролловых партий.
Запасные сайты функционируют через географически размещенные технические мощности. CDN-системы поддерживают оптимальную задержку для американских пользователей. Цифровое переключение запускается при распознавании блокировки основного адреса.
Банковские операции в официальных зонах подчиняются жестким требованиям PCI DSS. Цифровые транзакции приобретают распространение из-за анонимности и быстроте выполнения.
Смартфонные софт ведущих брендов интегрируют голосовую проверку и push-извещения для критических событий. Настраиваемый оформление программно корректируется под характеристики экрана.
Рабочие альтернативные домены надежных gaming-операторов на винити казино обеспечивают непрерывный доступ к игровым сервисам. Принцип клонирования строит точные клоны базового портала с сохранением всех механизмов.
Процедура открытия счета через зеркало в точности имитирует основную бланк. Свежие пользователи прописывают действующий email, формируют сложный ключ и определяют операционную финансовый инструмент.
Подтверждение личного кабинета подразумевает предоставления справок в соответствии с KYC-требованиям. Копия ID-карты, подтверждение резиденции и карточные параметры контролируются системой алгоритмическую контроль в течение 24-72 часов.
Логин зарегистрированных пользователей происходит через типовую интерфейс с усиленной аутентификацией. Сессионные коды отправляются на мессенджер гаджет или e-mail адрес.
Инструменты пополнительного сектора через альтернативные домены предлагает топовые денежные платформы. Visa, Mastercard, виртуальные хранилища Skrill, Neteller, crypto Bitcoin, Ethereum реализуются с низкими взносами 0-3%.
Гемблинг ассортимент клонируется в точности включая машины, столовые игры, live-хостов и джекпоты. RTP-коэффициенты, вариативность и отыгрыш удерживаются идентичными.
Поощрительная политика функционирует похоже основному ресурсу. Welcome-комплекты, даровые прокруты, refund и VIP-системы включаются системно при реализации установленных требований.
海外华人必备的ifun平台结合大数据AI分析,提供最新高清电影、电视剧,无广告观看体验。
Беттинговая индустрия являет стремительный подъём, завлекая тысячи пользователей. Опытные порталы предоставляют защищённую атмосферу для ставок. Подробную данные о подобных операторах реально отыскать на лаки ворлд казино .
Аттестация представляет ключевым критерием селекции платформы. Контролёры Олдерни гарантируют серьёзный контроль расчётных манипуляций. Конкретная лицензированная платформа проходит плановые аудиты RNG-генераторов.
Цифровые аспекты актуальных беттинг-платформ содержат SSL-защиту денежного ранга. Создатели программного обеспечения уровня Microgaming, NetEnt, Pragmatic Play добавляют усовершенствованные механизмы случайных значений.
Алгоритм проверки учётной записи предусматривает направления бумаг KYC-стандарта. Паспорт, свидетельство о заработке, валидация адреса — классический пакет для финального активации.
Зеркальные URL решают проблемы с цензурой поставщиков. Рабочие варианты модифицируются ежедневно техническими службами. Мобильные программы часто работают устойчивее сетевых версий.
Управление банкроллом определяет длительную эффективность игровых раундов. Профессиональные участники предлагают лимитировать количество бета до 1-2% от итогового резерва.
Передовые гемблеры встречаются с проблемой доступа к легальным площадкам. Компании закрывают основные ссылки, но опытные СЌРЅРѕРјРѕ казино игроки учитывают о присутствии дублирующих сайтов.
Альтернативный адрес является абсолютную копию базового платформы. Системы безопасности сохраняются идентичными. Платёжные переводы проходят через аналогичные шлюзы.
Процедура заведения учётной записи через резервный портал предполагает классической проверки. Специалисты просят документы для исполнения KYC-норм. Индивидуальные данные осуществляют усиленную аутентификацию.
Пополнительные ограничения на резервных ресурсах соответствуют главным требованиям. Начальные вклады функционируют постоянными. Накопительные призовые фонды интегрируются между множественными ресурсами.
Льготные планы оперируют комплексно на альтернативных сайтах. Отыгрышный коэффициент сохраняет оригинальные цифры. Срок активности проигрывания не изменяется.
Сервис помощи рассматривает обращения с параллельных порталов равнозначно. Мгновенный разговор осуществляет беспрерывный график функционирования.
газета про автомобили avtonovosti-3.ru .
OMT’s vision for lifelong understanding inspires Singapore trainees tߋ see mathematics
as ɑ friend, encouraging tһem for exam quality.
Dive into sеlf-paced mathematics proficiency ԝith OMT’s 12-month e-learning courses,
tⲟtal with practice worksheets ɑnd recorded sessions foг extensive revision.
In Singapore’ѕ extensive education ѕystem, wherе mathematics
іs obligatory ɑnd consumes around 1600 hߋurs of curriculum
timе in primary school and secondary schools, math tuition Ьecomes
vital t᧐ help students develop a strong structure for ⅼong-lasting success.
Math tuition addresses private discovering paces,permitting primary school students tο
deepen understanding ߋf PSLE subjects ⅼike aгea, perimeter, аnd volume.
Routine mock Ⲟ Level exams in tuition setups imitate actual conditions, permitting students
t᧐ improve their approach and reduce errors.
Tuition in junior college mathematics outfits trainees ԝith analytical techniques ɑnd likelihood versions essential f᧐r analyzing data-driven inquiries
in A Level documents.
Ꮃhat sests OMT apart iѕ its customized syllabus that lines up with MOE ᴡhile providing flexible pacing, permitting advanced trainees tо increase theіr learning.
OMT’ѕ ѕystem tracks yoᥙr renovation wіth tіme sіa, inspiring you to intend һigher in math grades.
By stressing conceptual understanding ⲟνeг memorizing
discovering,math tuition furnishes Singapore trainees fоr the evolving examination formats.
mʏ page … maths tuition primary, rlu.ru,
Captain performances, armband wearers and leadership statistics
omeprazole brand name omeprazole brand name Gastro Health Monitor
1xbet resmi 1xbet-mobil-5.com .
真实的人类第一季高清完整版,海外华人可免费观看最新热播剧集。
Действующие дублирующие порталы проверенных gaming-операторов на Вован казино предоставляют непрерывный коннект к развлекательным порталам. Принцип реплицирования формирует эквивалентные копии корневого домена с консервацией всех опций.
Система создания аккаунта через mirror-сайт полностью дублирует основную заявку. Дебютные геймеры прописывают действующий email, генерируют надежный пароль и назначают основную платежное средство.
Аутентификация личного кабинета подразумевает предоставления справок согласно KYC-требованиям. Скан ID-карты, верификация регистрации и финансовые реквизиты подвергаются алгоритмическую контроль в течение 24-72 временных единиц.
Вход зарегистрированных геймеров происходит через типовую форму с многоступенчатой проверкой. Разовые пароли доставляются на смс устройство или мейл.
Функционал денежного модуля через дублирующие порталы обеспечивает топовые денежные инструменты. Visa, Mastercard, веб кошельки Skrill, Neteller, crypto Bitcoin, Ethereum обрабатываются с оптимизированными сборами 0-3%.
Гемблинг база воспроизводится в точности включая барабаны, столовые активности, live-дилеров и джекпоты. RTP-показатели, волатильность и условия отыгрыша поддерживаются идентичными.
Акционная схема выполняется аналогично основному домену. Welcome-пакеты, free spins, кешбэк и VIP-программы инициируются машинально при реализации установленных критериев.
1xbet guncel 1xbet-mobil-1.com .
1xbet giri? g?ncel 1xbet giri? g?ncel .
Ориентирование в пространстве официальных порталов требует владения современных способов авторизации. Умелые игроки внедряют Вован казино для получения новейшей информации о функционирующих адресах.
Процесс оформления учетной записи в официальных операторах подразумевает детальную проверку. Продвинутые операторы внедряют KYC-протоколы и AML-критерии. Документальная процедура составляет от 24 до 72 часов.
Компьютерные методы для преодоления блокировок эволюционируют вместе с повышением нормативных инициатив. VPN-решения типа premium предоставляют кодирование AES-256 и протоколы OpenVPN. Надежность коннекта принципиально важна для элитных сессий.
Запасные сайты работают через пространственно размещенные цифровые кластеры. CDN-комплексы предоставляют быструю время ответа для азиатских игроков. Программное переключение включается при распознавании барьера центрального домена.
Денежные манипуляции в сертифицированных юрисдикциях подпадают под конкретным стандартам PCI DSS. Блокчейн транзакции набирают востребованность в результате секретности и скорости обработки.
Планшетные клиенты топовых организаций содержат отпечатковую авторизацию и push-оповещения для важных эпизодов. Адаптивный облик автоматически адаптируется под свойства монитора.
1x bet giri? 1xbet-mobil-3.com .
https://clinicadentalnoviembre.es/wp-pages/pages/codigo-promocional-1xbet.html
vavada cashback kasyno http://www.vavada2004.help
Определение надежного гемблинг площадки в актуальных условиях подразумевает детального анализа к лицензионному режиму. Опытные клиенты учитывают, что френдс казино официальный сайт демонстрирует актуальную данные о активных ресурсах.
Механизм оформления профиля в сертифицированных площадках включает принудительную аутентификацию личности. KYC-требования защищают как заведение, так и геймера от мошенничества. Краткосрочные лимиты на изъятие активов до окончания контроля – нормальная подход.
Виртуальные барьеры на связь к игровым ресурсам устраняются через резервные ссылки. Активные отражения поддерживают абсолютную возможности главного сервиса. Финансовые движения, игровой продвижение и бонусные схемы продолжают константными.
Денежная гарантированность измеряется показателем используемых расчетных способов. SSL-защита, PCI DSS подтверждение и дополнительная аутентификация гарантируют надежный барьер ограждения.
Развлекательная коллекция лицензированных площадок включает барабаны от главных производителей. RTP-индексы, волатильность и статистические схемы претерпевают объективную сертификацию в признанных центрах.
Схемы лояльности в качественных площадках опираются на понятных правилах вейджера. Требования x35-40 характеризуется приемлемым для барабан-привилегий, в то время как классические развлечения включаются в счет с минимальным множителем.
Современные игроки имеют дело с множеством технологических аспектов при деятельности с сертифицированными сайтами. Экспертные сайты типа казино СЌРЅРѕРјРѕ предоставляют актуальную данные о процессах азартных провайдеров.
Процедура подтверждения счета предполагает несколько принудительных стадий. Первичная аутентификация требует размещения удостоверений верифицирующих гражданство. Классический комплект включает документ, лицензию водителя или внешний паспорт.
Программная часть создания аккаунта содержит задействование SSL-шифрования и двухуровневой проверки. Профессиональные геймеры предлагают активировать максимум возможных настроек защиты.
Запасные домены составляют абсолютные клоны основного сайта с поддержанием тотального инструментария. Ключевое достоинство состоит в схожести платежных пределов и параметров условий прокрутки.
Алгоритм нахождения актуальных альтернативных адресов фундируется на мониторинге специализированных информационных каналов и партнерских платформ. Экспертные игроки эксплуатируют виртуальные частные сети для гарантирования стабильного подключения независимо от региональных лимитов.
Hi guys, if you are looking for a great online pharmacy to order pills online. Take a look at MagMaxHealth: prilosec. They offer high quality drugs at the best prices. Good luck.
Summer isn’t truly summer without a trip to Cousins Beach, at least not for Isabel “Belly” Conklin. If you are looking to immerse yourself in a story of first love and growing up, Jenny Han’s novel is the perfect escape. Many readers search for “The Summer I Turned Pretty PDF” to take this emotional journey on their digital devices. The book captures the confusing, beautiful transition from childhood to adolescence. With the Fisher boys, Conrad and Jeremiah, Belly navigates a season that changes everything. It is a timeless coming-of-age story that feels like warm sunshine and sea salt. https://thesummeriturnedprettypdf.site/ The Summer I Turned Pretty Pilot Script Pdf
Live football match score updates faster than TV broadcast, stay ahead of everyone else
Подбор безопасного азартного оператора требует детального исследования правовых свидетельств. Передовые сайты онлайн казино mad обеспечивают клиентам абсолютную сведения о имеющихся допусках.
Механизм оформления счета содержит несколько необходимых этапов проверки. Провайдеры просят документы, удостоверяющие личность и возраст. Обычный KYC-процесс длится от 24 до 72 временных отрезков.
Финансовое планирование начинается с фиксации ограничений на депозиты. Квалифицированные участники советуют применять принцип 5% от совокупного игорного средств на конкретную раунд.
Технические блокировки администраторов обязывают внедрять вспомогательные пути. Альтернативы поддерживают абсолютную эффективность первичного ресурса, содержа журнал сделок и казино прогресс.
Инновационные платежные системы гарантируют скоростные вклады через виртуальные счета. Bitcoin, Ethereum и устойчивые монеты поддерживают тайность и минимальные платежи. Длительность осуществления получений составляет 10-30 минут.
Схемы верности содержат ступенчатые статусы с прогрессивным компенсацией. VIP-кураторы гарантируют уникальные вознаграждения, расширенные границы и опережающую сервис.
Передовые геймеры встречаются с проблемой соединения к сертифицированным сайтам. Провайдеры закрывают главные порталы, но знающие винити казино игроки учитывают о наличии альтернативных порталов.
Резервная ссылка является полную дубликат базового сайта. SSL-сертификаты остаются неизменными. Финансовые операции производятся через равнозначные системы.
Алгоритм открытия счёта через резервный домен предполагает классической верификации. Специалисты уточняют свидетельства для реализации KYC-стандартов. Индивидуальные данные выполняют расширенную проверку.
Банковские границы на резервных сайтах идентичны главным условиям. Начальные суммы сохраняются постоянными. Накопительные выигрышные пулы согласовываются между различными доменами.
Премиальные системы действуют целостно на резервных порталах. Множитель ставок гарантирует стартовые цифры. Тайминг проигрывания поддерживается.
Служба сопровождения решает обращения с резервных ресурсов таким же способом. Мгновенный переписка осуществляет беспрерывный график деятельности.
You actually explained it wonderfully!
Ориентирование в секторе проверенных сайтов подразумевает осознания актуальных способов авторизации. Умелые пользователи внедряют Вован казино для обретения релевантной данных о оперативных адресах.
Процедура открытия счета в надежных операторах включает сложную подтверждение. Современные операторы эксплуатируют KYC-протоколы и AML-критерии. Оформление документов требует от 24 до 72 периодов.
Цифровые инструменты для прохождения блокировок прогрессируют параллельно с усилением регуляторных действий. VPN-инструменты уровня premium предоставляют шифрование AES-256 и методы OpenVPN. Постоянство канала кардинально актуальна для VIP партий.
Зеркальные адреса оперируют через локально рассредоточенные цифровые ресурсы. CDN-системы предоставляют оптимальную латентность для американских игроков. Техническое редирект активируется при идентификации недоступности основного адреса.
Денежные транзакции в лицензированных зонах подчиняются строгим нормам PCI DSS. Цифровые транзакции завоевывают актуальность благодаря приватности и темпу реализации.
Смартфонные софт лучших компаний совмещают биометрическую авторизацию и push-извещения для принципиальных эпизодов. Адаптивный интерфейс независимо подстраивается под свойства монитора.
Подбор проверенного игрового портала в сегодняшних границах предполагает тщательного внимания к регулятивному статусу. Квалифицированные пользователи учитывают, что lucky bear казино официальный сайт РІС…РѕРґ содержит последнюю данные о работающих операторах.
Схема открытия счета в проверенных площадках содержит неизбежную валидацию личности. KYC-правила охраняют как оператора, так и геймера от мошенничества. Промежуточные границы на получение капитала до окончания валидации – нормальная методика.
Электронные ограничения на доступ к развлекательным порталам устраняются через зеркальные домены. Рабочие отражения обеспечивают всестороннюю функциональность основного платформы. Расчетные движения, игровой статистика и льготные системы поддерживаются неизменными.
Финансовая надежность выражается критерием используемых финансовых систем. SSL-защита, PCI DSS валидация и многоуровневая подтверждение гарантируют защищенный контур защиты.
Развлекательная каталог проверенных заведений содержит спины от известных производителей. RTP-индексы, волатильность и вероятностные схемы получают нейтральную контроль в утвержденных учреждениях.
Планы лояльности в профессиональных сервисах основываются на открытых требованиях проигрыша. Вейджер x35-40 признается справедливым для слот-льгот, в то время как классические активности принимаются в счет с уменьшенным фактором.
WOW just what I was searching for. Came here by searching for
1win вывод без комиссии элсом https://1win93056.help
Hello, for those searching for a useful article about health treatments, I found this medical reference. You can read about safety protocols very well. See details: https://magmaxhealth.com/Lipitor. Thanks.
indian teen xxx
Инновационные платформы азартных игр дают участникам доступ к качественному азарту через безопасные казино Килограмм порталы. Лицензированная деятельность требует исполнения жестких регуляторных критериев.
Процесс активации пользовательского учетной записи охватывает верификацию личных информации. Провайдеры эксплуатируют комплексные системы KYC и AML для исключения фродовых переводов.
Технические решения передовых развлекательных порталов строятся на зашифрованных серверах с TLS технологиями. Геоблокировка принуждает администраторов внедрять вспомогательные адреса.
Параллельные ресурсы представляют аналогичные копии базового сайта с удержанием всех сервисов и параметров. Участники добиваются устойчивый связь к средствам, гемблинг данным и индивидуальным настройкам.
Платежные процедуры выполняются через связанные банковские шлюзы. Ограничения на взносы и выводы устанавливаются в согласии с нормативными условиями и корпоративными правилами снижения потерь.
Экспертные клиенты настаивают проверять положение разрешения через контролирующие реестры гемблинг органов. Репутационные индикаторы содержат места на экспертных порталах и комментарии реальных пользователей.
Поиск в пространстве официальных платформ включает осознания современных технологий соединения. Опытные пользователи применяют казино аква для обретения свежей материалов о функционирующих адресах.
Схема регистрации профиля в надежных операторах предполагает тщательную проверку. Современные поставщики применяют KYC-процедуры и AML-критерии. Оформление документов составляет от 24 до 72 периодов.
Цифровые способы для прохождения барьеров прогрессируют синхронно с повышением правовых действий. VPN-решения категории premium гарантируют безопасность AES-256 и технологии OpenVPN. Непрерывность связи fundamentally существенна для элитных игровых периодов.
Запасные сайты функционируют через пространственно распределенные серверные системы. CDN-структуры осуществляют низкую латентность для международных игроков. Техническое роутинг срабатывает при детекции ограничения первичного портала.
Экономические операции в проверенных юрисдикциях подчиняются строгим стандартам PCI DSS. Цифровые платежи приобретают признание в результате скрытности и темпу осуществления.
Портативные софт лучших компаний включают биометрическую идентификацию и push-оповещения для важных эпизодов. Настраиваемый дизайн программно корректируется под особенности панели.
st666 được đánh giá tích cực từ cộng đồng https://st66605.ink/
I am really delighted to read this web site posts
which carries lots of useful data, thanks for providing such data.
I must thank you for the efforts you have put in writing this site.
I’m hoping to see the same high-grade content by you later on as well.
In truth, your creative writing abilities has encouraged me to get my own website now 😉
Faydalı içerik olmuş.
Ben de romobot üzerine çalışmalar
yapıyorum, ilgini çekebilir.
With thanks, Plenty of stuff!
hot indian porn
一帆视频海外华人首选,提供最新华语剧集、美剧、日剧等高清在线观看。
Навигация в мире официальных площадок предполагает владения новых инструментов доступа. Профессиональные геймеры применяют Килограмм казино для приобретения современной данных о функционирующих URL.
Алгоритм открытия аккаунта в надежных организациях включает многоуровневую аутентификацию. Продвинутые компании внедряют KYC-протоколы и AML-стандарты. Оформление документов составляет от 24 до 72 промежутков.
IT технологии для преодоления запретов прогрессируют одновременно с ужесточением нормативных мер. VPN-службы уровня premium предлагают криптографию AES-256 и протоколы OpenVPN. Стабильность канала кардинально необходима для привилегированных партий.
Альтернативные платформы выполняют задачи через регионально расположенные серверные инфраструктуры. CDN-сети предоставляют сокращенную время ответа для европейских геймеров. Системное перенаправление срабатывает при идентификации недоступности основного сайта.
Финансовые манипуляции в сертифицированных регионах подчиняются строгим правилам PCI DSS. Децентрализованные операции набирают востребованность по причине скрытности и скорости реализации.
Переносные софт лучших организаций интегрируют лицевую идентификацию и push-уведомления для принципиальных ситуаций. Настраиваемый оформление самостоятельно корректируется под особенности дисплея.
https://therockpit.net/
Беттинговая индустрия демонстрирует активный рост, манящая легионы игроков. Квалифицированные сайты предлагают безопасную условия для игры. Полную материалы о таких брендах возможно изучить на аква казино .
Лицензирование остаётся центральным фактором подбора сайта. Контролёры Олдерни создают качественный мониторинг экономических действий. Каждая сертифицированная платформа проходит систематические аудиты RNG-систем.
Компьютерные свойства актуальных казино включают SSL-безопасность расчётного стандарта. Разработчики компьютерного обеспечения класса Microgaming, NetEnt, Pragmatic Play добавляют сложные схемы хаотичных чисел.
Алгоритм аутентификации профиля предполагает передачи документов KYC-стандарта. ID, справка о заработке, подтверждение адреса — типичный пакет для полноценного доступа.
Дублирующие порталы решают трудности с цензурой компаний. Свежие альтернативы модифицируются регулярно компьютерными группами. Планшетные утилиты нередко функционируют качественнее сетевых редакций.
Контроль средств задаёт стратегическую прибыльность азартных партий. Экспертные участники рекомендуют лимитировать величину бета до 1-2% от итогового капитала.
Твердосплавной инструментальная оснастка производится на основе чрезвычайно твёрдых сплавов.
Его основу составляют тугоплавкие карбиды вольфрама или кобальта.
Это обеспечивает высокую прочность и стойкость перед истиранию.
https://www.realty-key.ru/promgrupp-rasshiryaet-assortiment-tverdosplavnogo-instru-g546/
Подобный инвентарь может функционировать в условиях высоких температурах.
Данный материал превосходит в своей прочности классическую инструментальную сталь.
Твёрдосплавные пластины очень применяются в обработке твёрдых материалов.
Статьи, личный опыт, руководства по преодолению тревоги, развитию критического мышления, гигиене информации и самопомощи.
Корпоративные программы: Психологическая поддержка сотрудников компаний для улучшения их
благополучия.
Философия: Создание поддерживающего и человечного пространства, где забота о ментальном здоровье
становится нормой
Когнитивные ошибки
Надёжные платформы развлекательных предложений дают участникам вариант к высококлассному азартному досугу через тематические сайты, включая Голд казино , которые точно выполняют глобальные критерии безопасности.
Алгоритм создания аккаунта включает ввода валидационных деталей через защищённые SSL-connection. Букмекеры demanded нотариальное verification возраста и локации проживания для выполнения legal норм.
2FA authentication выступает принудительным составляющей новейших систем защиты. Участники приобретают SMS-ключи, push-notification или задействуют dedicated софт в стиле Google Authenticator.
Дублирующие адреса нейтрализуют проблемы territorial ограничений и DDoS-атак. По сути реплики представляют копийные версии базового домена с сохранением возможностей и пользовательских данных.
Опытные клиенты suggest удерживать обновлённые реестры активных зеркал в favourites браузера. Management направляют обновления о современных адресах через e-mail, Telegram-чаты и телефонные утилиты.
Денежные транзакции через лицензионные платформы обеспечены encryption системами класса банковского направления. Изъятие денег осуществляется лишь на верифицированные wallets держателя профиля.
Olympic football live scores, men’s and women’s tournament at the Games
Актуальные клиенты обталкиваются с набором технических деталей при работе с легальными сайтами. Профессиональные ресурсы типа Голд сайт выдают актуальную сведения о операциях казино операторов.
Система аутентификации кабинета содержит комплекс обязательных уровней. Базовая проверка подразумевает размещения справок удостоверяющих персону. Типовой список охватывает свидетельство, водительские права или загранпаспорт.
Системная составляющая открытия счета подразумевает использование безопасного соединения и двойной авторизации. Опытные пользователи настаивают активировать весь комплекс доступных функций охраны.
Резервные ссылки представляют стопроцентные отражения основного сайта с хранением всего арсенала. Важнейшее бонус содержится в идентичности расчетных лимитов и условий отыгрыша.
Система поиска активных дублирующих порталов опирается на наблюдении экспертных мессенджер групп и аффилированных порталов. Профессиональные пользователи эксплуатируют VPN-сервисы для предоставления бесперебойного доступа безотносительно от географических блокировок.
https://FreeWebAds.biz/584/posts/1/1/1877599.html
Admiring the hard work you put into your website and in depth information you offer.
It’s good to come across a blog every once in a while that isn’t the same old rehashed information. Fantastic read!
I’ve saved your site and I’m including your RSS feeds to my Google account.
OMT’s helpful responses loops motivate growth attitude, assisting trainees
love math аnd realⅼʏ feel inspired fоr tests.
Discover tһe benefit of 24/7 online math tuition ɑt OMT, wheгe appealing resources mɑke learning fun and effficient foг all
levels.
With students in Singapore beցinning formal mathematics education fгom tһe first
daʏ and facing high-stakes assessments, math tuition սses tһe extra edge needeԀ to achieve top efficiency
іn this vital topic.
primary math tuition builds examination endurance tһrough timed
drills, mimicking thе PSLE’ѕ two-paper format and helping students manage tіme effectively.
Wіth O Levels highlighting geometry evidence ɑnd theorems, math tuition ɡives specialized drills tօ make ѕure trainees ϲan deal
with tһese with precision and confidence.
Junior college math tuition cultivates crucial thinking abilities neеded to solve non-routine ⲣroblems tһɑt typically аppear іn A Level mathematics evaluations.
OMT’ѕ personalized math curriculum sticks οut by bridging MOE ϲontent ѡith sophisticated conceptual ⅼinks, helping pupils attach ideas tһroughout ѵarious math subjects.
OMT’ѕ on-lіne ѕystem promotes self-discipline lor, secret to
regular study аnd greɑter exam outcomes.
In Singapore’ѕ affordable education ɑnd learning landscape, math tuition supplies tһe extra ѕide neеded for
trainees to succeed іn high-stakes exams ⅼike tһe PSLE, O-Levels, and Ꭺ-Levels.
Аlso visit mʏ web page :: h2 math tuition singapore
Передовые игроки сталкиваются с массой технологических нюансов при деятельности с легальными площадками. Тематические платформы типа Килограмм казино поставляют актуальную информацию о деятельности азартных операторов.
Процедура валидации учетной записи включает набор требуемых стадий. Первичная валидация подразумевает загрузки свидетельств удостоверяющих субъект. Стандартный список охватывает удостоверение личности, автоудостоверение или загранпаспорт.
Цифровая компонента регистрации включает внедрение безопасного соединения и многофакторной защиты. Опытные геймеры предлагают активировать совокупность представленных настроек охраны.
Дублирующие порталы представляют точные реплики главного сайта с поддержанием тотального арсенала. Основное выгода содержится в схожести расчетных ограничений и условий ставочных требований.
Процедура выявления актуальных резервных ссылок фундируется на отслеживании специализированных мессенджер групп и связанных порталов. Экспертные участники задействуют прокси-соединения для гарантирования бесперебойного доступа невзирая от географических блокировок.
Ориентирование в мире проверенных порталов подразумевает знания продвинутых способов подключения. Опытные участники эксплуатируют mad casino зеркало для извлечения актуальной сведений о действующих URL.
Алгоритм формирования учетной записи в официальных учреждениях содержит сложную валидацию. Новейшие организации применяют KYC-механизмы и AML-стандарты. Документооборот требует от 24 до 72 часов.
Технические методы для преодоления барьеров прогрессируют сообща с ужесточением правовых шагов. VPN-службы категории premium гарантируют защиту AES-256 и технологии OpenVPN. Устойчивость подключения fundamentally важна для высокоролловых раундов.
Резервные платформы выполняют задачи через локально разнесенные цифровые ресурсы. CDN-структуры поддерживают оптимальную латентность для глобальных игроков. Автоматическое редирект запускается при детекции ограничения центрального ресурса.
Денежные транзакции в проверенных областях следуют строгим правилам PCI DSS. Криптовалютные транзакции получают признание из-за анонимности и быстроте осуществления.
Портативные клиенты элитных организаций совмещают физиологическую авторизацию и push-сообщения для принципиальных событий. Гибкий интерфейс программно корректируется под характеристики экрана.
Press intensity, team pressing statistics and PPDA metrics
Почему пользователи выбирают площадку KRAKEN?
Маркетплейс KRAKEN заслужил доверие многочисленной аудитории благодаря сочетанию ключевых факторов.
Во-первых, это широкий и разнообразный ассортимент, представленный сотнями
продавцов. Во-вторых, интуитивно понятный интерфейс KRAKEN, который упрощает навигацию, поиск товаров и управление заказами даже для
новых пользователей. В-третьих,
продуманная система безопасных транзакций,
включающая механизмы разрешения споров (диспутов) и возможность использования условного депонирования, что минимизирует риски для обеих сторон сделки.
На KRAKEN функциональность сочетается с внимательным
отношением к безопасности клиентов, что делает процесс покупок более предсказуемым, защищенным и, как следствие, популярным среди пользователей, ценящих анонимность и надежность.
Гемблинговая ниша отображает быстрый прогресс, заинтересовывая миллионы клиентов. Экспертные порталы предоставляют стабильную условия для игры. Развёрнутую сведения о данных организациях реально найти на Болливуд казино .
Аттестация является главным аспектом подбора ресурса. Регуляторы Кюрасао обеспечивают тщательный контроль экономических операций. Всякая лицензированная платформа проходит постоянные инспекции RNG-генераторов.
Технические параметры современных азартных площадок включают SSL-защиту экономического стандарта. Разработчики виртуального ПО типа Microgaming, NetEnt, Pragmatic Play добавляют усовершенствованные схемы произвольных чисел.
Процедура верификации аккаунта подразумевает предоставления бумаг KYC-типа. Свидетельство, свидетельство о средствах, подтверждение проживания — типичный комплект для финального авторизации.
Резервные URL ликвидируют препятствия с цензурой компаний. Свежие зеркала обновляются систематически компьютерными специалистами. Портативные приложения обычно действуют лучше браузерных вариантов.
Финансовая дисциплина создаёт длительную успешность развлекательных партий. Экспертные пользователи настаивают сокращать количество пари до 1-2% от полного фонда.
Передовые игроки сталкиваются с набором программных нюансов при деятельности с официальными платформами. Специализированные сайты типа казино РЎСѓРєР° поставляют свежую информацию о операциях гэмблинговых организаций.
Механизм валидации счета подразумевает несколько требуемых фаз. Исходная проверка требует отправки справок подтверждающих субъект. Привычный набор подразумевает документ, права или заграничное удостоверение.
Цифровая часть создания аккаунта предполагает применение зашифрованного канала и двойной авторизации. Квалифицированные участники предлагают включать совокупность предложенных возможностей охраны.
Дублирующие порталы образуют точные отражения главного сайта с удержанием всего инструментария. Ключевое выгода состоит в соответствии банковских лимитов и критериев проигрыша.
Механизм обнаружения активных зеркал основывается на наблюдении профессиональных мессенджер групп и партнерских площадок. Опытные игроки внедряют туннельные протоколы для обеспечения бесперебойного соединения вне зависимости от региональных блокировок.
Good article. I am dealing with some of these issues as well..
Also visit my web blog – 해외선물 대여계좌
You reported this effectively!
Передовые пользователи пересекаются с изобилием технических тонкостей при деятельности с официальными платформами. Тематические порталы типа Гризли казино выдают свежую информацию о деятельности развлекательных брендов.
Механизм проверки аккаунта включает ряд требуемых шагов. Стартовая подтверждение требует отправки удостоверений доказывающих персону. Классический набор содержит паспорт, автоудостоверение или заграничное удостоверение.
Техническая часть создания аккаунта содержит внедрение SSL-шифрования и 2FA. Квалифицированные игроки настаивают активировать весь комплекс предложенных настроек обеспечения.
Альтернативные адреса являются стопроцентные копии главного домена с хранением исчерпывающего функционала. Ключевое выгода содержится в подобии платежных пределов и условий вейджера.
Механизм поиска рабочих зеркал базируется на проверке экспертных новостных лент и сотрудничающих ресурсов. Профессиональные участники задействуют прокси-соединения для гарантирования устойчивого входа безотносительно от территориальных барьеров.
Действующие резервные адреса надежных игорных заведений на винити официальный сайт обеспечивают устойчивый коннект к игровым платформам. Система зеркалирования образует точные реплики центрального сайта с удержанием всех опций.
Механизм регистрации через резервную ссылку целиком воспроизводит оригинальную форму. Только пришедшие клиенты вводят рабочий email, генерируют надежный код доступа и выбирают базовую платежное средство.
Верификация профиля включает предоставления справок согласно KYC-требованиям. Копия удостоверения личности, подтверждение регистрации и карточные реквизиты подвергаются машинную анализ в течение 24-72 часа.
Авторизация зарегистрированных геймеров осуществляется через классическую форму с усиленной валидацией. Разовые шифры поступают на сотовый аппарат или почтовый ящик.
Инструменты пополнительного модуля через дублирующие порталы обеспечивает распространенные финансовые системы. Visa, Mastercard, виртуальные хранилища Skrill, Neteller, блокчейн-токены Bitcoin, Ethereum выполняются с оптимизированными платежами 0-3%.
Развлекательная ассортимент воспроизводится целиком включая автоматы, настольные забавы, live-хостов и прогрессивы. RTP-показатели, колебания и вейджер фиксируются такими же.
Поощрительная программа работает подобно базовому сайту. Welcome-пакеты, бесплатные вращения, денежный возврат и VIP-программы запускаются машинально при исполнении прописанных стандартов.
I was more than happy to discover this website.
I want to to thank you for your time for this wonderful
read!! I definitely really liked every part of it and i also have you book marked to see new things in your web site.
Review my web-site: board governance news today
My spouse and I stumbled over here from a different web address and thought
I may as well check things out. I like what I see so now i am following you.
Look forward to looking into your web page again.
Keep on working, great job!
Поиск качественного азартного площадки в сегодняшних рамках нуждается особого подхода к юридическому режиму. Профессиональные клиенты знают, что казино Вован включает актуальную данные о доступных операторах.
Алгоритм создания аккаунта в сертифицированных операторах охватывает принудительную подтверждение личности. KYC-нормы охраняют как сервис, так и геймера от фрода. Временные ограничения на получение денег до финализации верификации – привычная методика.
Программные препятствия на связь к развлекательным площадкам нейтрализуются через дублирующие адреса. Активные отражения обеспечивают всестороннюю работоспособность главного платформы. Платежные процедуры, азартный прогресс и поощрительные предложения продолжают константными.
Денежная надежность выражается уровнем применяемых денежных механизмов. SSL-шифрование, PCI DSS лицензирование и многоуровневая идентификация формируют стабильный щит защиты.
Игровая каталог официальных сервисов объединяет слоты от известных студий. RTP-значения, изменчивость и расчетные формулы испытывают нейтральную проверку в одобренных институтах.
Механизмы вознаграждения в серьезных сервисах формируются на прозрачных параметрах отыгрыша. Требования x35-40 характеризуется нормальным для машина-бонусов, в то время как традиционные развлечения принимаются в расчет с уменьшенным фактором.
Определение надежного азартного площадки требует тщательного анализа лицензионных разрешений. Новые сайты типпи сайт гарантируют участникам безусловную данные о имеющихся разрешениях.
Процесс оформления счета подразумевает определенное количество необходимых фаз аутентификации. Администраторы настаивают справки, подтверждающие персону и зрелость. Обычный KYC-процесс длится от 24 до 72 периодов.
Контроль средств стартует с задания рамок на депозиты. Искусные игроки призывают внедрять норму 5% от полного игорного резерва на одну раунд.
Электронные блокировки провайдеров заставляют задействовать дополнительные ссылки. Зеркала поддерживают безусловную работоспособность основного портала, охватывая журнал сделок и гемблинг успех.
Передовые банковские методы дают мгновенные пополнения через виртуальные хранилища. Bitcoin, Ethereum и фиксированные активы гарантируют тайность и крошечные комиссии. Время проведения получений доходит 10-30 отрезков.
Программы преданности предусматривают иерархические категории с увеличивающимся компенсацией. VIP-консультанты предоставляют персонализированные вознаграждения, увеличенные пределы и приоритетную поддержку.
Thankfulness to my father who informed me about this
web site, this website is truly remarkable.
Here is my web-site 해외선물 대여업체
This is my first time go to see at here and i am truly pleassant to read all at
one place.
Навигация в секторе сертифицированных платформ предполагает осознания современных методов подключения. Профессиональные участники эксплуатируют винити казино для добывания новейшей информации о действующих доменах.
Механизм оформления личного кабинета в официальных организациях предполагает многоуровневую валидацию. Актуальные операторы задействуют KYC-алгоритмы и AML-стандарты. Бумажная работа отнимает от 24 до 72 часов.
Технические технологии для прохождения препятствий эволюционируют синхронно с ужесточением правовых мер. VPN-инструменты уровня premium обеспечивают кодирование AES-256 и технологии OpenVPN. Постоянство подключения кардинально существенна для премиальных раундов.
Резервные ресурсы функционируют через пространственно распределенные компьютерные кластеры. CDN-структуры осуществляют минимальную отклик для международных пользователей. Системное редирект инициируется при выявлении блокировки центрального адреса.
Экономические движения в легальных юрисдикциях подчиняются конкретным правилам PCI DSS. Криптовалютные транзакции получают признание в результате конфиденциальности и темпу выполнения.
Мобильные утилиты ведущих организаций объединяют физиологическую идентификацию и push-извещения для ключевых эпизодов. Изменяемый облик автоматически подстраивается под свойства дисплея.
Football fixtures tomorrow, plan ahead with upcoming match schedule and times
Актуальные дублирующие порталы проверенных казино на Килограмм казино гарантируют постоянный соединение к развлекательным сервисам. Технология дублирования создает эквивалентные клоны основного ресурса с консервацией всех опций.
Система оформления профиля через дублирующий портал полностью дублирует базовую форму. Только пришедшие игроки вводят функционирующий email, устанавливают стойкий секретную комбинацию и фиксируют базовую платежное средство.
Подтверждение профиля требует предоставления справок следуя KYC-политике. Скан удостоверения личности, свидетельство проживания и карточные данные анализируются посредством автоматическую валидацию в течение 24-72 часа.
Авторизация верифицированных пользователей происходит через классическую окно с 2FA валидацией. Временные токены поступают на мобильный номер или email.
Опции пополнительного сектора через mirror-сайты включает популярные расчетные платформы. Visa, Mastercard, электронные счета Skrill, Neteller, виртуальные монеты Bitcoin, Ethereum выполняются с сокращенными процентами 0-3%.
Gaming коллекция копируется целиком включая слоты, классические забавы, live-дилеров и накопительные призы. RTP-индикаторы, колебания и вейджер поддерживаются точными.
Промо программа действует подобно главному порталу. Welcome-наборы, фриспины, refund и VIP-системы активируются системно при выполнении прописанных критериев.
Беттинговая индустрия отображает активный расширение, притягивая множество геймеров. Экспертные порталы гарантируют стабильную пространство для пари. Детальную факты о подобных брендах возможно найти на лова казино .
Аккредитация остаётся приоритетным показателем отбора сайта. Юрисдикции Великобритании дают серьёзный контроль валютных процедур. Конкретная сертифицированная ресурс подвергается периодические контроли RNG-систем.
Технические свойства передовых гемблинг-сайтов объединяют SSL-защиту банковского категории. Создатели программного материала уровня Microgaming, NetEnt, Pragmatic Play подключают усовершенствованные схемы непредсказуемых чисел.
Механизм верификации счёта подразумевает передачи бумаг KYC-уровня. ID, свидетельство о прибылях, верификация адреса — обычный набор для окончательного входа.
Параллельные URL ликвидируют проблемы с ограничениями операторов. Рабочие альтернативы адаптируются каждый день цифровыми командами. Портативные утилиты часто работают надёжнее интернет редакций.
Банкролл-менеджмент задаёт стратегическую успешность игровых партий. Экспертные беттеры рекомендуют сокращать величину депозита до 1-2% от совокупного бюджета.
Thanks for finally writing about > Santa Claus Christmas Ball Tutorial Adobe Illustrator.
– My Downloadables cfo recruiting firms
Актуальные резервные адреса проверенных казино на казино Tippy предоставляют непрерывный вход к геймерским ресурсам. Система клонирования генерирует идентичные копии основного портала с удержанием всех опций.
Механизм активации через альтернативный домен целиком копирует основную шаблон. Начинающие пользователи вводят валидный email, создают надежный код доступа и устанавливают рабочую финансовый инструмент.
Валидация профиля содержит предоставления свидетельств следуя KYC-политике. Копия удостоверения личности, верификация регистрации и банковские сведения проверяются через цифровую верификацию в течение 24-72 часа.
Вход существующих участников выполняется через типовую интерфейс с двухфакторной валидацией. Одноразовые ключи приходят на смс номер или электронную почту.
Механизмы пополнительного модуля через mirror-сайты поддерживает популярные финансовые сервисы. Visa, Mastercard, электронные счета Skrill, Neteller, криптовалюты Bitcoin, Ethereum обрабатываются с минимальными процентами 0-3%.
Азартная ассортимент дублируется абсолютно включая автоматы, столовые геймплей, live-ведущих и максимальные награды. RTP-значения, волатильность и условия отыгрыша остаются точными.
Поощрительная механизм работает идентично основному сайту. Welcome-наборы, даровые прокруты, refund и VIP-программы инициируются машинально при исполнении заданных требований.
Актуальные участники имеют дело с набором системных аспектов при функционировании с сертифицированными сайтами. Профильные сайты типа лаки Р±РёСЂ казино поставляют современную материалы о функционировании азартных организаций.
Механизм проверки кабинета содержит несколько требуемых фаз. Базовая валидация включает передачи удостоверений удостоверяющих гражданство. Классический перечень охватывает удостоверение личности, автолицензию или международный паспорт.
Системная сторона регистрации охватывает использование безопасного соединения и многофакторной защиты. Квалифицированные геймеры настаивают запускать весь комплекс предложенных функций обеспечения.
Дублирующие порталы являются идентичные дубликаты центрального платформы с хранением полного набора функций. Ключевое бонус состоит в соответствии расчетных пределов и норм отыгрыша.
Система обнаружения функционирующих резервных ссылок базируется на проверке тематических уведомительных сервисов и сотрудничающих площадок. Экспертные участники применяют туннельные протоколы для предоставления постоянного связи безотносительно от местных барьеров.
Передовые провайдеры игорных продуктов предлагают клиентам путь к профессиональному игровому процессу через проверенные ДживиСпин сайт платформы. Сертифицированная бизнес требует следования строгих контролирующих положений.
Процедура создания пользовательского аккаунта охватывает подтверждение персональных реквизитов. Управляющие применяют детализированные системы KYC и AML для предотвращения нарушающих транзакций.
IT средства актуальных беттинг площадок основываются на стабильных серверах с шифровальными технологиями. Локальные запреты обязывает провайдеров разрабатывать параллельные ссылки.
Альтернативные домены образуют эквивалентные копии основного портала с фиксацией всех инструментов и параметров. Участники приобретают непрерывный доступ к депозиту, развлекательной статистике и индивидуальным настройкам.
Расчетные действия выполняются через связанные банковские шлюзы. Пределы на пополнения и получения регулируются в унисон с регуляторными критериями и внутренними нормами снижения потерь.
Экспертные игроки предлагают отслеживать состояние разрешения через надзорные каталоги гемблинг комиссий. Репутационные индикаторы охватывают позиции на профильных сайтах и оценки действительных клиентов.
Hello, all is going nicely here and ofcourse
every one is sharing facts, that’s in fact fine, keep up writing.
Goal kick assists, goalkeeper distributions leading to goals
Подбор надежного развлекательного ресурса подразумевает тщательного исследования юридических документов. Актуальные платформы РЎСѓРєР° казино дают пользователям абсолютную данные о своих разрешениях.
Система открытия аккаунта подразумевает несколько обязательных ступеней подтверждения. Провайдеры истребуют справки, удостоверяющие самобытность и совершеннолетие. Типовой KYC-процесс длится от 24 до 72 периодов.
Финансовое планирование начинается с фиксации границ на взносы. Опытные участники призывают эксплуатировать установку 5% от полного гемблинг фонда на отдельную игру.
Программные блокировки владельцев принуждают использовать вспомогательные маршруты. Клоны поддерживают стопроцентную активность главного сайта, включая летопись транзакций и азартный достижения.
Инновационные банковские системы предоставляют скоростные взносы через виртуальные счета. Bitcoin, Ethereum и фиксированные активы дают скрытность и крошечные платежи. Длительность реализации изъятий равно 10-30 интервалов.
Схемы лояльности содержат ступенчатые степени с накапливающимся компенсацией. VIP-кураторы предлагают эксклюзивные подарки, увеличенные рамки и первоочередную помощь.
Новейшие провайдеры азартных продуктов предоставляют беттерам возможность к качественному беттингу через безопасные Клубника казино ресурсы. Сертифицированная деятельность требует следования строгих надзорных стандартов.
Механизм активации пользовательского профиля содержит верификацию приватных данных. Регуляторы применяют углубленные процедуры KYC и AML для блокировки мошеннических финансовых действий.
Программные системы актуальных гемблинг платформ работают на зашифрованных серверах с SSL протоколами. Геоблокировка вынуждает операторов запускать резервные порталы.
Зеркальные платформы представляют аналогичные дубликаты основного платформы с обеспечением всех инструментов и параметров. Клиенты получают непрерывный вход к капиталу, гемблинг статистике и индивидуальным установкам.
Денежные процедуры осуществляются через интегрированные платежные процессоры. Пределы на вклады и изъятия регулируются в унисон с нормативными критериями и корпоративными процедурами риск-менеджмента.
Профессиональные клиенты настаивают мониторить ситуацию лицензии через надзорные реестры развлекательных структур. Статусные характеристики охватывают места на специализированных порталах и feedback настоящих беттеров.
Today, while I was at work, my sister stole my iPad and tested to see if it can survive a 40 foot drop, just
so she can be a youtube sensation. My iPad is now broken and she has 83 views.
I know this is completely off topic but I had to share it with someone!
Hey very interesting blog!
Поиск в мире легальных площадок нуждается знания продвинутых методов входа. Умелые пользователи эксплуатируют Sykaaa casino для обретения свежей фактов о активных адресах.
Схема создания счета в лицензированных заведениях охватывает сложную аутентификацию. Актуальные компании применяют KYC-протоколы и AML-требования. Бумажная работа потребляет от 24 до 72 периодов.
Компьютерные методы для преодоления запретов развиваются одновременно с интенсификацией нормативных инициатив. VPN-инструменты категории premium обеспечивают шифрование AES-256 и технологии OpenVPN. Устойчивость коннекта критически необходима для премиальных сессий.
Запасные платформы выполняют задачи через локально рассредоточенные цифровые инфраструктуры. CDN-сети осуществляют низкую отклик для международных игроков. Системное роутинг срабатывает при распознавании препятствия первичного домена.
Финансовые транзакции в легальных зонах подчиняются конкретным правилам PCI DSS. Цифровые расчеты увеличивают актуальность из-за скрытности и скорости осуществления.
Мобильные утилиты топовых компаний интегрируют голосовую проверку и push-уведомления для важных ситуаций. Изменяемый оформление независимо изменяется под настройки монитора.
Hi all, I recently found detailed information regarding common medicines, take a look at this medical reference. It explains how to take meds in detail. Read more here: https://magmaxhealth.com/Lamictal. Hope it helps.
Активные резервные адреса надежных казино на mad casino обеспечивают беспрерывный подключение к азартным порталам. Система реплицирования генерирует аналогичные клоны корневого веб-площадки с сохранением всех механизмов.
Система активации через альтернативный домен полностью дублирует главную бланк. Свежие геймеры прописывают валидный email, устанавливают надежный секретную комбинацию и фиксируют базовую курренси.
Верификация счета подразумевает отправки удостоверений в соответствии с KYC-нормам. Копия водительских прав, доказательство проживания и платежные параметры проверяются через цифровую анализ в течение 24-72 часов.
Подключение активных игроков осуществляется через классическую интерфейс с расширенной валидацией. Временные коды передаются на мобильный устройство или e-mail адрес.
Возможности пополнительного сектора через резервные ссылки включает актуальные банковские инструменты. Visa, Mastercard, виртуальные хранилища Skrill, Neteller, виртуальные монеты Bitcoin, Ethereum осуществляются с сокращенными сборами 0-3%.
Игровая коллекция воспроизводится на сто процентов включая машины, столовые забавы, live-операторов и джекпоты. RTP-коэффициенты, изменчивость и проигрыш фиксируются аналогичными.
Акционная схема выполняется схоже основному веб-площадке. Welcome-пакеты, безвозмездные спины, refund и VIP-схемы инициируются программно при реализации прописанных параметров.
I delight in, cause I found just what I was having a look for.
You’ve ended my 4 day long hunt! God Bless you man. Have a
nice day. Bye
爱一帆会员多少钱海外版,专为华人打造的高清视频平台采用机器学习个性化推荐,支持全球加速观看。
Функционирующие резервные адреса легальных gaming-операторов на Eldorado обеспечивают устойчивый соединение к игровым системам. Схема реплицирования строит эквивалентные дубликаты корневого сайта с сохранением всех опций.
Механизм создания аккаунта через резервную ссылку абсолютно имитирует базовую заявку. Дебютные участники регистрируют активный email, формируют сложный код доступа и назначают игровую платежное средство.
Подтверждение аккаунта требует представления документов в соответствии с KYC-требованиям. Снимок ID-карты, свидетельство регистрации и денежные данные подвергаются программную проверку в течение 24-72 временных единиц.
Подключение существующих клиентов производится через типовую модуль с двухфакторной идентификацией. Краткосрочные токены поступают на смс устройство или почтовый ящик.
Инструменты пополнительного раздела через зеркала поддерживает востребованные платежные системы. Visa, Mastercard, веб балансы Skrill, Neteller, криптовалюты Bitcoin, Ethereum осуществляются с сокращенными процентами 0-3%.
Азартная ассортимент клонируется абсолютно включая барабаны, столовые развлечения, live-дилеров и накопительные призы. RTP-параметры, изменчивость и ставочные требования остаются такими же.
Промо механизм функционирует схоже главному сайту. Welcome-бандлы, фриспины, кешбэк и VIP-системы активируются автоматически при выполнении прописанных стандартов.
мониикс t.me/moneyx_tg .
https://questreaming.com/
Перемещение в пространстве легальных ресурсов предполагает представления продвинутых методов соединения. Квалифицированные игроки внедряют лаки Р±РёСЂ для обретения новейшей данных о функционирующих путях.
Алгоритм создания учетной записи в официальных организациях содержит многоуровневую верификацию. Современные операторы используют KYC-механизмы и AML-требования. Бумажная работа отнимает от 24 до 72 часов.
Компьютерные решения для прохождения запретов совершенствуются вместе с усилением юридических действий. VPN-платформы категории premium обеспечивают криптографию AES-256 и протоколы OpenVPN. Непрерывность связи жизненно актуальна для элитных партий.
Резервные платформы выполняют задачи через регионально распределенные IT кластеры. CDN-комплексы гарантируют сокращенную латентность для глобальных пользователей. Системное редирект инициируется при детекции ограничения первичного домена.
Платежные операции в легальных юрисдикциях подпадают под определенным критериям PCI DSS. Блокчейн транзакции набирают признание вследствие конфиденциальности и быстроте обработки.
Переносные программы премиальных провайдеров совмещают лицевую проверку и push-сообщения для ключевых эпизодов. Гибкий интерфейс автоматически изменяется под характеристики матрицы.
клубника онлайн казино
토닥이 여성전용마사지는 오직 여성만을 위한
전국 출장 전문 마사지 서비스입니다.
대한민국 최초의 여성 전용 마사지 플랫폼으로서
수많은 여성 고객에게 사랑받고
Современные клиенты встречаются с огромным количеством цифровых аспектов при процессах с лицензированными сайтами. Тематические сайты типа казино Болливуд дают свежую данные о функционировании казино компаний.
Алгоритм проверки профиля включает множество неотъемлемых этапов. Первичная валидация требует отправки удостоверений верифицирующих персону. Типовой комплект включает паспорт, автолицензию или заграничное удостоверение.
Системная составляющая создания аккаунта предполагает применение зашифрованного канала и 2FA. Профессиональные игроки подсказывают запускать совокупность представленных параметров секьюрити.
Альтернативные адреса образуют полные дубликаты центрального сайта с хранением всего арсенала. Основное плюс состоит в тождественности банковских лимитов и условий отыгрыша.
Процедура обнаружения актуальных запасных доменов базируется на отслеживании экспертных мессенджер групп и связанных сайтов. Экспертные участники задействуют VPN-сервисы для предоставления стабильного доступа независимо от географических блокировок.
Новейшие игроки оказываются с барьером доступа к легальным сайтам. Операторы блокируют базовые URL, но знающие retro casino клиенты учитывают о доступности дублирующих сайтов.
Зеркало является полную дубликат главного ресурса. Средства защиты остаются неизменными. Финансовые операции реализуются через аналогичные системы.
Схема оформления профиля через альтернативный портал подразумевает типовой проверки. Администраторы требуют документы для осуществления KYC-норм. Индивидуальные информация осуществляют комплексную подтверждение.
Депозитные рамки на альтернативных порталах аналогичны стандартным спецификациям. Минимальные взносы сохраняются неизменными. Возрастающие выигрышные пулы синхронизируются между многочисленными доменами.
Премиальные схемы оперируют завершённо на дополнительных площадках. Вейджер обеспечивает оригинальные величины. Длительность реализации не изменяется.
Команда сопровождения рассматривает запросы с резервных доменов сходным образом. Интерактивный переписка предоставляет непрерывный расписание обслуживания.
Captain performances, armband wearers and leadership statistics
mostbet aviator mostbet aviator
vavada szybka wpłata http://vavada2004.help
ссылка на сайт https://ufolabs.io
discover here
russian traditional clothing
шуга раш
Asking questions are truly pleasant thing if you
are not understanding something fully, however this paragraph presents fastidious understanding even.
Передовые участники сталкиваются с проблемой входа к сертифицированным платформам. Организации ограничивают базовые ссылки, но опытные френдс казино пользователи помнят о доступности резервных порталов.
Альтернативный адрес составляет идентичную отображение основного сайта. Системы безопасности остаются равнозначными. Финансовые переводы производятся через те же сервисы.
Схема заведения учётной записи через альтернативный ресурс требует классической верификации. Сотрудники уточняют удостоверения для исполнения KYC-стандартов. Индивидуальные сведения подвергаются комплексную проверку.
Банковские пределы на зеркальных площадках соответствуют главным условиям. Начальные суммы продолжают константными. Накопительные призовые фонды синхронизируются между всеми адресами.
Бонусные механизмы работают полноценно на альтернативных площадках. Требования по обороту поддерживает стартовые параметры. Период действия реализации сохраняется.
Команда поддержки изучает тикеты с дополнительных адресов таким же способом. Мгновенный разговор гарантирует постоянный расписание функционирования.
Игровая отрасль показывает динамичный подъём, завлекая легионы игроков. Квалифицированные площадки обеспечивают защищённую условия для пари. Подробную сведения о таких операторах можно найти на Килограмм казино .
Аттестация выступает основным аспектом выбора ресурса. Надзорные органы Олдерни создают качественный проверку экономических действий. Каждая сертифицированная портал осуществляет периодические контроли RNG-модулей.
IT аспекты инновационных игорных домов содержат SSL-защиту банковского ранга. Поставщики софтового материала наподобие Microgaming, NetEnt, Pragmatic Play интегрируют комплексные алгоритмы рандомных величин.
Механизм аутентификации учётной записи предусматривает представления свидетельств KYC-формата. Свидетельство, справка о прибылях, подтверждение местожительства — обычный комплект для окончательного доступа.
Резервные адреса убирают проблемы с фильтрацией компаний. Действующие зеркала адаптируются ежедневно программными службами. Мобильные приложения обычно работают лучше веб модификаций.
Финансовая дисциплина формирует перспективную доходность развлекательных циклов. Опытные пользователи предлагают сокращать объём вейджера до 1-2% от итогового фонда.
奥美迦奥特曼高清完整版采用机器学习个性化推荐,海外华人可免费观看最新热播剧集。
1win ошибка установки http://www.1win93056.help
侠之盗高清完整版智能AI观看体验优化,海外华人可免费观看最新热播剧集。
Беттинговая отрасль отображает стремительный развитие, заинтересовывая легионы клиентов. Квалифицированные ресурсы дают качественную условия для пари. Исчерпывающую факты о таких провайдерах допустимо отыскать на тип топ казино .
Аккредитация составляет главным аспектом отбора ресурса. Надзорные органы Олдерни обеспечивают строгий надзор финансовых действий. Конкретная аккредитованная сайт проходит регулярные аудиты RNG-модулей.
IT характеристики современных азартных площадок содержат SSL-шифрование денежного класса. Производители виртуального продукта уровня Microgaming, NetEnt, Pragmatic Play подключают сложные схемы хаотичных параметров.
Механизм подтверждения учётной записи требует представления справок KYC-стандарта. ID, справка о финансах, верификация проживания — обычный пакет для финального авторизации.
Альтернативные ссылки исправляют препятствия с запретами организаций. Функционирующие альтернативы корректируются регулярно программными командами. Карманные приложения нередко функционируют устойчивее браузерных вариантов.
Финансовая дисциплина задаёт длительную прибыльность гемблинговых периодов. Экспертные пользователи предлагают контролировать размер ставки до 1-2% от полного банкролла.
Развлекательная сфера отображает стремительный подъём, заинтересовывая массы геймеров. Грамотные платформы предлагают защищённую пространство для игры. Полную информацию о данных провайдерах можно получить на Голд казино .
Сертификация является центральным аспектом выбора платформы. Лицензиаты Великобритании предоставляют строгий мониторинг финансовых действий. Всякая сертифицированная ресурс реализует периодические инспекции RNG-генераторов.
Программные аспекты актуальных беттинг-платформ предусматривают SSL-шифрование расчётного класса. Поставщики компьютерного обеспечения вроде Microgaming, NetEnt, Pragmatic Play встраивают многоуровневые механизмы непредсказуемых величин.
Механизм проверки учётной записи требует представления бумаг KYC-типа. Удостоверение, свидетельство о заработке, доказательство проживания — стандартный перечень для окончательного входа.
Дублирующие URL исправляют сложности с фильтрацией поставщиков. Свежие копии обновляются систематически программными специалистами. Карманные программы регулярно оперируют устойчивее браузерных версий.
Управление банкроллом создаёт длительную эффективность беттинговых сессий. Квалифицированные игроки настаивают сокращать объём ставки до 1-2% от суммарного фонда.
For a complete overview of dosage guidelines, you can consult the medical directory at: https://magmaxhealth.com/ which covers clinical details.
Hiya! I know this is kinda off topic but I’d figured I’d ask.
Would you be interested in trading links or maybe guest authoring a blog article or vice-versa?
My website covers a lot of the same subjects as yours and I think we could greatly benefit from each other.
If you’re interested feel free to shoot me an e-mail.
I look forward to hearing from you! Superb blog by the way!
It’s perfect time to make a few plans for the future and it is time to
be happy. I have learn this publish and if I could I want to suggest you few fascinating issues or advice.
Perhaps you can write subsequent articles relating to this article.
I desire to read more things approximately it!
Инновационные платформы азартных продуктов обеспечивают участникам путь к высококлассному развлечениям через защищенные Eldorado casino системы. Официальная операционная активность влечет следования строгих правовых норм.
Процесс регистрации пользовательского аккаунта охватывает валидацию конфиденциальных информации. Регуляторы применяют многоуровневые механизмы KYC и AML для блокировки незаконных финансовых действий.
Технические платформы передовых беттинг площадок функционируют на защищенных облачных системах с TLS алгоритмами. Локальные запреты принуждает владельцев создавать дублирующие домены.
Резервные порталы формируют аналогичные репликации первичного ресурса с поддержанием всех инструментов и данных. Игроки обеспечивают себе непрерывный связь к балансу, гемблинг статистике и клиентским установкам.
Расчетные переводы выполняются через встроенные банковские агрегаторы. Пределы на пополнения и снятия назначаются в соотношении с правовыми положениями и внутренними регламентами управления рисками.
Профессиональные гемблеры предлагают мониторить состояние сертификата через контролирующие списки развлекательных ведомств. Престижные характеристики охватывают места на специализированных порталах и мнения подлинных беттеров.
Перемещение в сфере проверенных площадок требует представления продвинутых решений подключения. Профессиональные пользователи используют казино типпи для извлечения новейшей фактов о активных URL.
Схема регистрации профиля в надежных организациях включает детальную аутентификацию. Актуальные операторы применяют KYC-механизмы и AML-правила. Оформление документов составляет от 24 до 72 периодов.
Программные методы для избежания запретов развиваются синхронно с интенсификацией регуляторных решений. VPN-службы типа premium предлагают кодирование AES-256 и системы OpenVPN. Стабильность подключения принципиально необходима для VIP игровых периодов.
Зеркальные адреса оперируют через регионально разнесенные компьютерные кластеры. CDN-сети обеспечивают низкую время ответа для международных геймеров. Автоматическое переключение активируется при обнаружении барьера базового адреса.
Экономические переводы в сертифицированных территориях подпадают под четким правилам PCI DSS. Цифровые операции увеличивают актуальность по причине анонимности и динамике обработки.
Мобильные программы элитных провайдеров объединяют биометрическую подтверждение и push-сообщения для критических событий. Адаптивный внешний вид программно адаптируется под свойства дисплея.
Функционирующие зеркала официальных казино на mad casino дают устойчивый подключение к азартным системам. Схема клонирования формирует аналогичные дубликаты корневого домена с сохранением всех механизмов.
Система активации через резервную ссылку целиком копирует оригинальную бланк. Свежие игроки вводят действующий email, формируют безопасный код доступа и фиксируют игровую курренси.
Валидация профиля требует предоставления документов в соответствии с KYC-регламенту. Скан водительских прав, валидация резиденции и банковские сведения контролируются системой алгоритмическую проверку в течение 24-72 периодов.
Логин существующих геймеров производится через классическую панель с 2FA аутентификацией. Одноразовые шифры отправляются на смс девайс или мейл.
Возможности финансового модуля через mirror-сайты предлагает актуальные платежные сервисы. Visa, Mastercard, веб балансы Skrill, Neteller, блокчейн-токены Bitcoin, Ethereum выполняются с сокращенными процентами 0-3%.
Игровая коллекция дублируется полностью включая машины, столовые геймплей, live-операторов и прогрессивы. RTP-показатели, вариативность и отыгрыш фиксируются такими же.
Поощрительная программа работает схоже базовому веб-площадке. Welcome-предложения, free spins, денежный возврат и VIP-схемы запускаются алгоритмически при выполнении определенных критериев.
Навигация в области лицензированных ресурсов нуждается представления современных способов подключения. Профессиональные геймеры применяют Килограмм казино для извлечения актуальной информации о работающих ссылках.
Процесс регистрации личного кабинета в проверенных операторах охватывает сложную валидацию. Новейшие компании задействуют KYC-протоколы и AML-стандарты. Оформление документов занимает от 24 до 72 часов.
IT методы для обхода ограничений улучшаются параллельно с интенсификацией нормативных шагов. VPN-платформы категории premium гарантируют безопасность AES-256 и системы OpenVPN. Непрерывность соединения критически существенна для высокоролловых сессий.
Запасные домены действуют через географически размещенные технические ресурсы. CDN-сети осуществляют низкую латентность для азиатских клиентов. Системное переключение запускается при распознавании ограничения главного портала.
Банковские транзакции в официальных зонах следуют строгим критериям PCI DSS. Цифровые транзакции увеличивают популярность в результате приватности и темпу процессинга.
Смартфонные программы премиальных компаний объединяют лицевую аутентификацию и push-уведомления для ключевых событий. Адаптивный дизайн независимо изменяется под особенности экрана.
best ed meds https://toolbarqueries.google.com.sv/url?q=https%3A%2F%2Feropillseasy.shop ed medications
爱一帆海外版,专为华人打造的高清视频平台采用机器学习个性化推荐,支持全球加速观看。
click for info
russian traditional clothing
онлайн казино клубника
Smalⅼ-gгoup on-site classes ɑt OMT develop a supportive neighborhood wһere pupils
share math explorations, igniting ɑ love foг the subject tһɑt moves them towards
examination success.
Expand yοur horizons ԝith OMT’ѕ upcoming brand-neԝ physical space оpening in Septembеr 2025, providing evеn mⲟre opportunities foг hands-on math expedition.
Ꭺs mathematics underpins Singapore’ѕ track record for quality іn worldwide standards ⅼike PISA, math
tuition іs essential to unlocking ɑ kid’s potential ɑnd securing scholastic benefits іn this
core topic.
Ꮤith PSLE math contributing ѕignificantly to ɡeneral ratings,
tuition offеrs additional resources ⅼike design answers foг pattern recognition аnd algebraic thinking.
Bү supplying comprehensive practice ѡith pɑѕt О Level
documents, tuition gears ᥙр students wіth experience and the capability tⲟ expect
concern patterns.
Resolving specific understanding styles, math tuition еnsures junior
college pupils grasp topics аt theiг very own speed foг A Level success.
OMT establishes іtself apɑrt wіtһ a proprietary educational
program tһаt prolongs MOE material Ьy consisting ⲟf enrichment tasks focused ߋn creating mathematical intuition.
Witһ 24/7 accessibility tⲟ video clip lessons, you can capture
up ߋn difficult topics anytime leh, assisting ʏou
score betteer іn examinations wіthout tension.
Online math tuition offers versatility f᧐r hectic Singapore trainees,
allowing anytime accessibility tо resources
fоr much better examination prep ѡork.
Conrad’s mystery and Jeremiah’s charm. Jenny Han balances them well. If you are looking for the PDF, you are looking to solve the puzzle of the Fisher boys. The Summer I Turned Pretty is about the different ways we love. Belly learns that love can be painful and love can be easy. The story is a lesson in the heart. https://thesummeriturnedprettypdf.site/ The Summer I Turned Pretty Pdf Francais
Надёжные платформы игорных услуг дают игрокам возможность к высококлассному времяпрепровождению через специализированные сайты, включая Голд казино , что исполняют мировые стандарты security.
Последовательность активации требует заполнения идентификационных информации через защищённые SSL-connection. Букмекеры просят предоставить official доказательство правоспособности и адреса residence для выполнения законодательных норм.
Многоуровневая аутентификация является required частью современных систем конфиденциальности. Users обретают SMS-шифры, push-notification или эксплуатируют специализированные программы в стиле Google Authenticator.
Зеркальные URL ликвидируют трудности territorial санкций и DDoS-assault. С технической точки зрения дубли являют идентичные версии основного портала с maintaining возможностей и индивидуальных информации.
Опытные клиенты рекомендуют поддерживать current реестры рабочих альтернатив в закладках браузера. Провайдеры передают информацию о свежих доменах через email, Telegram-чаты и телефонные утилиты.
Финансовые операции через лицензионные платформы secured encryption технологиями стандарта банковского индустрии. Extraction фондов реализуется единственно на аутентифицированные данные собственника аккаунта.
Нынешние клиенты сталкиваются с набором программных тонкостей при операциях с лицензированными ресурсами. Специализированные источники типа Tippy обеспечивают современную информацию о операциях казино организаций.
Процедура валидации кабинета охватывает ряд неотъемлемых фаз. Стартовая подтверждение подразумевает размещения удостоверений доказывающих индивидуальность. Стандартный перечень включает документ, права или международный паспорт.
Системная компонента оформления предполагает применение криптографической защиты и двухуровневой проверки. Опытные пользователи рекомендуют запускать максимум предложенных возможностей обеспечения.
Резервные ссылки представляют идентичные дубликаты первичного домена с сохранением комплексного арсенала. Ключевое выгода выражается в тождественности банковских пределов и норм отыгрыша.
Схема выявления функционирующих альтернативных адресов базируется на контроле тематических мессенджер групп и партнерских площадок. Экспертные геймеры применяют VPN-сервисы для формирования постоянного подключения невзирая от территориальных блокировок.
Новейшие сервисы игорных развлечений дают пользователям доступ к профессиональному развлечениям через сертифицированные казино ретро сайты. Официальная функционирование подразумевает учета строгих контролирующих положений.
Процесс открытия игрового профиля задействует аутентификацию личных данных. Провайдеры внедряют углубленные протоколы KYC и AML для недопущения фродовых операций.
Технические платформы передовых беттинг площадок базируются на зашифрованных инфраструктурах с HTTPS протоколами. Локальные запреты побуждает администраторов запускать резервные порталы.
Альтернативные сайты образуют точные версии первичного сайта с фиксацией всех инструментов и показателей. Пользователи приобретают постоянный вход к средствам, игровой истории и индивидуальным опциям.
Денежные действия производятся через подключенные денежные шлюзы. Ограничения на вклады и получения фиксируются в соотношении с лицензионными требованиями и индивидуальными политиками риск-менеджмента.
Компетентные пользователи настаивают анализировать состояние аккредитации через официальные базы данных азартных ведомств. Репутационные индикаторы задействуют позиции на тематических сайтах и отзывы истинных клиентов.
Передовые геймеры натыкаются с барьером связи к официальным сайтам. Компании ограничивают основные URL, но профессиональные казино Голд пользователи учитывают о функционировании альтернативных сайтов.
Дополнительный домен представляет точную реплику оригинального сайта. Протоколы шифрования работают неизменными. Финансовые процедуры производятся через аналогичные механизмы.
Технология открытия счёта через дополнительный ссылку содержит стандартной проверки. Сотрудники запрашивают справки для исполнения KYC-требований. Идентификационные характеристики осуществляют двухфакторную аутентификацию.
Вносительные границы на дополнительных ресурсах аналогичны стандартным спецификациям. Минимальные беты остаются неизменными. Увеличивающиеся банки согласовываются между множественными порталами.
Премиальные планы выполняются полноценно на альтернативных порталах. Множитель ставок сохраняет оригинальные показатели. Тайминг реализации продолжается.
Служба ассистирования анализирует обращения с параллельных ссылок идентично. Мгновенный чат гарантирует 24-часовой формат оперирования.
http://game-zone.6f.sk/profile.php?lookup=220
Record breakers, historical milestones and new achievements tracked
Transfer rumors, player movement speculation during transfer windows
свит бонанза 1000 слот
Нынешние бетторы попадают с затруднением соединения к официальным ресурсам. Организации запрещают стандартные адреса, но профессиональные френдс казино клиенты помнят о доступности параллельных площадок.
Параллельный портал формирует полную реплику первичного площадки. Системы безопасности функционируют такими же. Финансовые операции выполняются через идентичные каналы.
Технология заведения учётной записи через дополнительный адрес подразумевает привычной аутентификации. Сотрудники просят документы для реализации KYC-норм. Паспортные параметры выполняют усиленную валидацию.
Пополнительные пределы на зеркальных порталах аналогичны первичным требованиям. Низшие вклады поддерживаются константными. Растущие джекпоты координируются между многочисленными ресурсами.
Бонусные механизмы выполняются полноценно на резервных площадках. Множитель ставок сохраняет стартовые величины. Длительность использования продолжается.
Команда ассистирования рассматривает обращения с дополнительных ссылок равнозначно. Прямой чат осуществляет 24-часовой график работы.
Передовые провайдеры беттинг игр гарантируют участникам подключение к премиальному игровому процессу через проверенные casino mad ресурсы. Сертифицированная операционная активность подразумевает исполнения четких законодательных критериев.
Процедура активации пользовательского учетной записи задействует подтверждение личных реквизитов. Провайдеры задействуют комплексные системы KYC и AML для пресечения незаконных финансовых действий.
Программные средства инновационных гемблинг платформ строятся на стабильных серверах с SSL стандартами. Локальные запреты обязывает провайдеров создавать резервные ссылки.
Параллельные ресурсы образуют точные дубликаты центрального сайта с фиксацией всех сервисов и показателей. Игроки получают постоянный подключение к капиталу, азартной истории и индивидуальным конфигурациям.
Банковские операции реализуются через подключенные банковские сервисы. Границы на взносы и выводы фиксируются в согласии с лицензионными положениями и внутренними процедурами риск-менеджмента.
Профессиональные игроки предлагают отслеживать состояние авторизации через контролирующие списки развлекательных органов. Репутационные характеристики включают ранги на специализированных порталах и feedback действительных клиентов.
What a information of un-ambiguity and preserveness of valuable knowledge about unexpected feelings.
凯伦皮里第二季高清完整官方版,海外华人可免费观看最新热播剧集。
Подбор надежного развлекательного ресурса в нынешних обстоятельствах предполагает повышенного анализа к юридическому режиму. Знающие клиенты понимают, что friends casino содержит последнюю сведения о действующих ресурсах.
Процедура открытия счета в сертифицированных операторах охватывает неизбежную подтверждение персональных данных. KYC-процедуры гарантируют как оператора, так и участника от махинаций. Краткосрочные лимиты на вывод средств до завершения подтверждения – нормальная система.
Цифровые ограничения на вход к игровым ресурсам нейтрализуются через зеркальные URL. Активные клоны гарантируют стопроцентную возможности первичного сервиса. Банковские процедуры, интерактивный прогресс и бонусные планы сохраняются стабильными.
Денежная защищенность характеризуется степенью внедренных платежных методов. SSL-безопасность, PCI DSS валидация и многоуровневая идентификация создают надежный барьер обороны.
Развлекательная коллекция официальных операторов включает автоматы от известных создателей. RTP-значения, волатильность и математические принципы проходят беспристрастную аудит в признанных центрах.
Системы лояльности в надежных заведениях строятся на понятных параметрах активности. Условия ставок x35-40 расценивается адекватным для автомат-поощрений, в то время как стандартные состязания принимаются в счет с сниженным коэффициентом.
Рабочие альтернативные домены лицензированных казино на винити казино предоставляют устойчивый подключение к геймерским платформам. Принцип зеркалирования строит аналогичные версии центрального веб-площадки с поддержанием всех возможностей.
Механизм регистрации через альтернативный домен на сто процентов имитирует главную заявку. Свежие игроки указывают функционирующий email, создают стойкий ключ и назначают рабочую финансовый инструмент.
Валидация личного кабинета содержит загрузки бумаг в соответствии с KYC-требованиям. Копия ID-карты, верификация проживания и финансовые данные проверяются через цифровую валидацию в течение 24-72 временных единиц.
Аутентификация верифицированных пользователей осуществляется через типовую панель с двухфакторной идентификацией. Краткосрочные ключи приходят на смс гаджет или e-mail адрес.
Опции пополнительного раздела через зеркала поддерживает востребованные платежные сервисы. Visa, Mastercard, виртуальные счета Skrill, Neteller, виртуальные монеты Bitcoin, Ethereum процессируются с оптимизированными взносами 0-3%.
Игровая ассортимент повторяется в точности включая барабаны, карточные забавы, live-крупье и максимальные награды. RTP-параметры, изменчивость и ставочные требования остаются идентичными.
Промо политика работает аналогично корневому сайту. Welcome-комплекты, безвозмездные спины, возврат средств и VIP-программы инициируются алгоритмически при соблюдении определенных условий.
Merchandise news, kit releases and official product updates
https://theshaderoom.com/
cvs online pharmacy
her explanation
https://russian-traditional-clothes.com/
Marking assignments, man marking and zonal coverage tracked
凯伦皮里第一季高清完整官方版,海外华人可免费观看最新热播剧集。
Thanks a lot! Quite a lot of postings!
Навигация в области легальных сайтов предполагает понимания передовых решений подключения. Продвинутые клиенты используют СЌРЅРѕРјРѕ сайт для получения современной фактов о оперативных адресах.
Механизм открытия профиля в лицензированных учреждениях охватывает тщательную валидацию. Современные компании эксплуатируют KYC-системы и AML-нормы. Документооборот занимает от 24 до 72 временных отрезков.
Программные инструменты для обхода препятствий улучшаются синхронно с ужесточением правовых действий. VPN-инструменты уровня premium предоставляют защиту AES-256 и системы OpenVPN. Постоянство соединения критически важна для элитных раундов.
Резервные ресурсы функционируют через пространственно расположенные компьютерные инфраструктуры. CDN-комплексы гарантируют низкую пинг для европейских игроков. Техническое роутинг активируется при обнаружении блокировки главного портала.
Финансовые манипуляции в лицензированных территориях отвечают конкретным критериям PCI DSS. Криптовалютные операции набирают востребованность вследствие анонимности и быстроте обработки.
Переносные софт топовых брендов включают голосовую аутентификацию и push-уведомления для критических эпизодов. Настраиваемый дизайн автоматически подстраивается под характеристики матрицы.
Live football match score updates faster than TV broadcast, stay ahead of everyone else
Поиск легального игорного ресурса подразумевает основательного разбора юридических бумаг. Инновационные сайты типпи казино гарантируют пользователям безусловную сведения о своих разрешениях.
Процедура регистрации содержит ряд необходимых шагов верификации. Представители просят свидетельства, доказывающие индивидуальность и дееспособность. Обычный KYC-алгоритм занимает от 24 до 72 промежутков.
Распоряжение капиталом начинается с назначения ограничений на депозиты. Искусные клиенты рекомендуют использовать норму 5% от общего игорного фонда на индивидуальную партию.
Технические блокировки провайдеров заставляют использовать альтернативные домены. Дубликаты сохраняют абсолютную эффективность основного площадки, подразумевая летопись транзакций и гемблинг прогресс.
Современные банковские инструменты поддерживают быстрые депозиты через электронные аккаунты. Bitcoin, Ethereum и фиксированные активы поддерживают анонимность и крошечные платежи. Период проведения выводов составляет 10-30 минут.
Системы приверженности охватывают многоуровневые статусы с нарастающим бонусом. VIP-кураторы гарантируют персонализированные вознаграждения, улучшенные пределы и первоочередную техподдержку.
我欲为人第二季官方认证平台,专为海外华人设计,24小时不间断提供高清视频和直播服务。
Современные игроки сталкиваются с огромным количеством системных нюансов при операциях с легальными площадками. Профессиональные источники типа madcasino обеспечивают релевантную контент о деятельности азартных операторов.
Механизм проверки кабинета охватывает множество требуемых шагов. Исходная подтверждение подразумевает загрузки бумаг доказывающих персону. Обычный набор подразумевает документ, водительские права или международный паспорт.
Техническая составляющая оформления предполагает использование криптографической защиты и двухуровневой проверки. Опытные пользователи подсказывают инициировать полный набор предложенных функций обеспечения.
Дублирующие порталы образуют стопроцентные дубликаты основного домена с хранением тотального возможностей. Важнейшее достоинство содержится в схожести расчетных лимитов и критериев проигрыша.
Схема локализации рабочих альтернативных адресов базируется на проверке специализированных информационных каналов и аффилированных ресурсов. Опытные участники задействуют виртуальные частные сети для гарантирования надежного соединения вне зависимости от региональных ограничений.
Нынешние игроки сталкиваются с проблемой соединения к лицензированным платформам. Провайдеры ограничивают первичные порталы, но искушённые лаки ворлд казино посетители помнят о доступности альтернативных порталов.
Параллельный портал образует стопроцентную дубликат оригинального ресурса. Системы безопасности функционируют идентичными. Расчётные транзакции осуществляются через аналогичные каналы.
Алгоритм оформления профиля через альтернативный портал подразумевает обычной проверки. Сотрудники запрашивают документы для соблюдения KYC-правил. Паспортные информация осуществляют расширенную валидацию.
Депозитные лимиты на параллельных сайтах соответствуют базовым требованиям. Минимальные взносы продолжают неизменными. Растущие призовые фонды синхронизируются между множественными адресами.
Поощрительные системы работают полноценно на дополнительных платформах. Вейджер поддерживает исходные значения. Временные рамки использования продолжается.
Команда сопровождения решает запросы с дополнительных ссылок сходным образом. Интерактивный чат осуществляет беспрерывный график оперирования.
казино клубника россия
mostbet вывести деньги mostbet вывести деньги
I’m not sure where you are getting your information, but good topic.
I needs to spend some time learning much more or understanding more.
Thanks for fantastic information I was looking for this info for my mission.
Hello, I wanted to share a great health store to buy health products cheaply. Check out this pharmacy: naltrexone. Selling high quality drugs and huge discounts. Good luck.
I loved as much as you will receive carried out right here.
The sketch is tasteful, your authored subject matter stylish.
nonetheless, you command get bought an edginess over that you wish be delivering the following.
unwell unquestionably come more formerly again since exactly
the same nearly a lot often inside case you shield this
increase.
Игровая ниша представляет интенсивный рост, привлекая множество клиентов. Грамотные платформы предоставляют надёжную обстановку для ставок. Детальную сведения о указанных брендах допустимо обнаружить на лаки Р±РёСЂ казино .
Легализация остаётся основным элементом выбора портала. Лицензиаты Олдерни обеспечивают строгий контроль денежных действий. Отдельная лицензированная платформа осуществляет плановые аудиты RNG-генераторов.
Цифровые свойства инновационных беттинг-платформ объединяют SSL-защиту финансового уровня. Создатели виртуального софта типа Microgaming, NetEnt, Pragmatic Play интегрируют сложные системы непредсказуемых чисел.
Процесс подтверждения профиля требует передачи удостоверений KYC-уровня. Свидетельство, свидетельство о финансах, удостоверение местожительства — типичный комплект для итогового подключения.
Дублирующие ссылки исправляют трудности с цензурой поставщиков. Функционирующие варианты корректируются каждый день IT командами. Смартфонные программы обычно работают лучше браузерных редакций.
Распределение капитала формирует долгосрочную успешность развлекательных периодов. Грамотные геймеры настаивают контролировать сумму ставки до 1-2% от общего фонда.
Wonderful, what a web site it is! This weblog provides valuable facts to us,
keep it up.
Visit my blog :: cfo recruiting firms
Современные игроки сталкиваются с множеством технологических тонкостей при деятельности с лицензированными платформами. Экспертные сайты типа лаки Р±РёСЂ казино обеспечивают свежую данные о операциях азартных организаций.
Механизм аутентификации учетной записи содержит ряд принудительных шагов. Первичная проверка подразумевает предоставления документов доказывающих личность. Обычный комплект включает удостоверение личности, лицензию водителя или заграничное удостоверение.
Системная составляющая открытия счета предполагает задействование зашифрованного канала и 2FA. Экспертные клиенты рекомендуют запускать максимум предложенных возможностей секьюрити.
Резервные ссылки являются стопроцентные реплики первичного платформы с поддержанием комплексного арсенала. Ключевое достоинство кроется в схожести финансовых пределов и условий ставочных требований.
Схема выявления актуальных запасных доменов фундируется на контроле экспертных телеграм-каналов и партнерских ресурсов. Опытные геймеры эксплуатируют прокси-соединения для предоставления постоянного связи независимо от географических барьеров.
erection pills for men
Hey everyone, for those searching for detailed information on prescription drugs, I recommend this health wiki. It covers how to take meds in detail. See details: https://magmaxhealth.com/Celebrex. Very informative.
Exploratory modules ɑt OMTmotivate imaginative analytic, helping students uncover math’ѕ virtuosity aand feel
influenced foг test accomplishments.
Established іn 2013 by Mr. Justin Tan, OMT Math Tuition һas actᥙally assisted countless trainees
ace examinations ⅼike PSLE, O-Levels, and A-Levels with proven prоblem-solving techniques.
Ⅽonsidered tһat mathematics plays а pivotal function іn Singapore’s economic
development аnd development, investing іn specialized math
tuition gears ᥙp trainees ᴡith the analytical skills neеded to prosper
іn а competitive landscape.
Tuition stresses heuristic analytical аpproaches,essential for taking on PSLE’s challenging ԝorɗ issues tһat require ѕeveral actions.
Comprehensive coverage ᧐f tһe entire O Level
syllabus in tuition makeѕ ѕure no topics, from sets t᧐ vectors, are іgnored in a pupil’s modification.
Junior college math tuition іs crucial fоr А Derees aѕ it ցrows understanding օf advanced
calculus topics ⅼike assimilation strategies аnd differential equations, ԝhich
аre central tο the exam curriculum.
Ꮤһаt makes OMT stand оut іs іts tailored curriculum that aligns witһ MOE while
incorporating AI-driven flexible understanding tօ match individual demands.
OMT’ѕ ⲟn-lіne quizzes offer instantaneous responses ѕia,
so you can fix mistakes fast аnd see yօur qualities imlrove ⅼike magic.
Math tuition aids Singapore pupils overcome common challenges іn calculations, гesulting
in ⅼess negligent errors іn exams.
Нere is my webpage :: Singapore A levels Math Tuition
Hi mates, pleasant post and nice arguments commented here, I
am genuinely enjoying by these.
my website :: executive search firms
Отбор качественного betting оператора в нынешних обстоятельствах требует специального внимания к законному статусу. Профессиональные участники осознают, что казино аква включает последнюю информацию о функционирующих провайдерах.
Процедура оформления профиля в официальных сервисах включает необходимую валидацию персональных данных. KYC-процедуры охраняют как казино, так и участника от обмана. Временные лимиты на получение финансов до финализации верификации – обычная подход.
Цифровые запреты на подключение к betting сервисам обходятся через зеркальные ссылки. Функционирующие отражения предоставляют абсолютную эффективность центрального сайта. Финансовые переводы, азартный результаты и поощрительные системы функционируют неизменными.
Финансовая защищенность выражается качеством внедренных расчетных систем. SSL-криптография, PCI DSS лицензирование и двухфакторная подтверждение обеспечивают защищенный барьер обороны.
Игровая библиотека сертифицированных операторов включает спины от лидирующих студий. RTP-коэффициенты, вариативность и математические схемы подвергаются нейтральную аудит в признанных центрах.
Программы мотивации в профессиональных операторах строятся на четких условиях вейджера. Проигрыш x35-40 считается нормальным для слот-привилегий, в то время как традиционные развлечения идут в расчет с пониженным процентом.
Hi, I recently found side effects info regarding health treatments, I found this useful resource. It explains usage and risks in detail. Source: https://magmaxhealth.com/Prilosec. Very informative.
Выбор безопасного азартного ресурса предполагает основательного анализа правовых бумаг. Актуальные платформы СЌРЅРѕРјРѕ казино предоставляют пользователям безусловную факты о текущих лицензиях.
Процесс получения доступа включает определенное количество ключевых шагов верификации. Операторы требуют документы, подтверждающие идентичность и дееспособность. Классический KYC-регламент составляет от 24 до 72 периодов.
Контроль средств начинается с фиксации границ на пополнения. Искусные клиенты рекомендуют использовать установку 5% от общего развлекательного резерва на индивидуальную раунд.
Программные препятствия операторов побуждают применять резервные ссылки. Дубликаты поддерживают максимальную производительность центрального платформы, подразумевая историю транзакций и азартный достижения.
Передовые денежные методы поддерживают скоростные взносы через блокчейн счета. Bitcoin, Ethereum и постоянные токены дают тайность и крошечные отчисления. Длительность выполнения извлечений достигает 10-30 интервалов.
Системы преданности содержат градационные степени с возрастающим возвратом. VIP-кураторы предоставляют эксклюзивные подарки, повышенные рамки и опережающую техподдержку.
Clutch performers, players who score in big moments documented
Hi there! I know this is kinda off topic but
I’d figured I’d ask. Would you be interested in exchanging links or maybe guest
writing a blog post or vice-versa? My website goes over a lot of the same topics as yours and I feel we could greatly benefit from each other.
If you happen to be interested feel free to send me
an email. I look forward to hearing from you! Excellent blog by the way!
indian pharmacy online https://images.google.bt/url?sa=t&url=https%3A%2F%2Fcanadianmedsmax.com trusted online pharmacy reviews
Ориентирование в пространстве официальных сайтов требует понимания продвинутых способов входа. Опытные игроки применяют казино Вован для приобретения современной сведений о активных ссылках.
Процедура регистрации учетной записи в надежных учреждениях охватывает детальную подтверждение. Передовые поставщики применяют KYC-системы и AML-правила. Бумажная работа отнимает от 24 до 72 временных отрезков.
Технические методы для минования препятствий эволюционируют вместе с укреплением нормативных мер. VPN-службы категории premium дают защиту AES-256 и технологии OpenVPN. Надежность соединения принципиально важна для высокоролловых заходов.
Запасные сайты выполняют задачи через географически размещенные компьютерные системы. CDN-архитектуры обеспечивают низкую отклик для международных геймеров. Цифровое маршрутизация включается при распознавании препятствия основного ресурса.
Банковские операции в легальных зонах следуют строгим правилам PCI DSS. Крипто переводы приобретают распространение в результате секретности и темпу реализации.
Портативные клиенты лучших провайдеров содержат лицевую идентификацию и push-оповещения для принципиальных ситуаций. Изменяемый интерфейс автономно настраивается под характеристики матрицы.
Выбор качественного betting заведения в нынешних обстоятельствах подразумевает тщательного подхода к регулятивному статусу. Компетентные клиенты понимают, что лаки Р±РёСЂ казино отображает современную данные о работающих ресурсах.
Алгоритм записи в легальных платформах объединяет обязательную проверку идентичности. KYC-стандарты обеспечивают как заведение, так и геймера от фрода. Промежуточные границы на снятие финансов до финализации контроля – типичная подход.
Программные барьеры на доступ к гемблинг площадкам нейтрализуются через альтернативные адреса. Действующие отражения сохраняют стопроцентную работоспособность базового сайта. Денежные транзакции, развлекательный результаты и льготные предложения сохраняются константными.
Экономическая безопасность оценивается показателем применяемых банковских систем. SSL-кодирование, PCI DSS сертификация и многоуровневая аутентификация создают прочный барьер обороны.
Азартная ассортимент легальных заведений предоставляет машины от топовых создателей. RTP-индексы, изменчивость и статистические модели испытывают независимую аудит в авторизованных организациях.
Схемы вознаграждения в качественных операторах строятся на прозрачных параметрах вейджера. Требования x35-40 считается адекватным для машина-подарков, в то время как традиционные состязания засчитываются в расчет с сниженным фактором.
легаси оф дед играть на деньги без обмана
Функционирующие дублирующие порталы официальных gaming-операторов на лаки Р±РёСЂ казино дают стабильный доступ к азартным ресурсам. Схема реплицирования создает идентичные реплики основного домена с поддержанием всех механизмов.
Процедура открытия счета через зеркало полностью копирует основную заявку. Новые пользователи регистрируют действующий email, создают надежный ключ и фиксируют рабочую платежное средство.
Подтверждение профиля предполагает передачи свидетельств согласно KYC-политике. Скан национального документа, валидация проживания и платежные данные анализируются посредством цифровую верификацию в течение 24-72 периодов.
Подключение существующих участников выполняется через классическую окно с 2FA валидацией. Разовые шифры отправляются на мобильный девайс или e-mail адрес.
Функционал входящего блока через альтернативные домены обеспечивает топовые расчетные инструменты. Visa, Mastercard, виртуальные кошельки Skrill, Neteller, цифровые активы Bitcoin, Ethereum выполняются с оптимизированными взносами 0-3%.
Гемблинг каталог копируется целиком включая автоматы, классические геймплей, live-операторов и накопительные призы. RTP-параметры, вариативность и условия отыгрыша фиксируются такими же.
Бонусная программа действует похоже основному веб-площадке. Welcome-бандлы, безвозмездные спины, refund и VIP-программы включаются системно при соблюдении заданных параметров.
Актуальные пользователи пересекаются с изобилием технических деталей при процессах с официальными сайтами. Тематические сайты типа тип топ казино выдают актуальную материалы о функционировании казино провайдеров.
Процесс подтверждения учетной записи подразумевает множество принудительных фаз. Стартовая подтверждение предполагает передачи справок валидирующих субъект. Классический список содержит удостоверение личности, водительские права или загранпаспорт.
Системная составляющая создания аккаунта охватывает применение криптографической защиты и многофакторной защиты. Квалифицированные геймеры подсказывают задействовать весь комплекс предложенных возможностей безопасности.
Зеркала представляют стопроцентные клоны основного сайта с обеспечением полного арсенала. Ключевое преимущество заключается в схожести банковских лимитов и норм условий прокрутки.
Система поиска рабочих дублирующих порталов базируется на мониторинге профильных телеграм-каналов и союзных платформ. Опытные игроки задействуют VPN-сервисы для создания стабильного доступа независимо от региональных барьеров.
We are a group of volunteers and starting a new scheme in our community.
Your site provided us with valuable information to work on.
You’ve done a formidable job and our entire community will be thankful to you.
Поиск честного игорного площадки подразумевает детального анализа регулятивных бумаг. Инновационные системы казино миллион обеспечивают игрокам стопроцентную факты о собственных аккредитациях.
Механизм оформления счета охватывает различные обязательных фаз проверки. Провайдеры запрашивают свидетельства, доказывающие идентичность и дееспособность. Типовой KYC-порядок длится от 24 до 72 интервалов.
Управление банком инициируется с установления рамок на депозиты. Опытные пользователи призывают внедрять установку 5% от совокупного азартного фонда на единичную заход.
Цифровые препятствия владельцев побуждают задействовать альтернативные пути. Зеркала поддерживают стопроцентную производительность центрального портала, предусматривая историю транзакций и казино продвижение.
Актуальные платежные сервисы предоставляют скоростные вклады через виртуальные хранилища. Bitcoin, Ethereum и устойчивые монеты поддерживают анонимность и мизерные комиссии. Время реализации изъятий насчитывает 10-30 интервалов.
Системы преданности предусматривают ступенчатые ранги с возрастающим возвратом. VIP-кураторы предоставляют эксклюзивные поощрения, повышенные рамки и опережающую сервис.
Игровая ниша показывает динамичный прогресс, заинтересовывая миллионы игроков. Грамотные площадки обеспечивают защищённую условия для развлечений. Детальную факты о данных компаниях доступно обнаружить на казино Вован .
Аккредитация является главным показателем отбора портала. Надзорные органы Олдерни обеспечивают жёсткий контроль экономических действий. Любая лицензированная портал осуществляет систематические проверки RNG-систем.
Технические свойства новейших гемблинг-сайтов объединяют SSL-шифрование денежного стандарта. Разработчики программного софта уровня Microgaming, NetEnt, Pragmatic Play добавляют комплексные системы рандомных величин.
Процесс верификации счёта предусматривает представления справок KYC-формата. Паспорт, справка о финансах, подтверждение прописки — типичный набор для полноценного входа.
Зеркальные URL решают проблемы с цензурой поставщиков. Рабочие варианты изменяются регулярно компьютерными группами. Планшетные утилиты обычно оперируют стабильнее онлайн форматов.
Контроль средств определяет перспективную успешность азартных раундов. Квалифицированные геймеры настаивают урезать величину депозита до 1-2% от полного резерва.
For progress
get zetia price
to find support.
Pass completion, accuracy rates and distribution statistics tracked
посетить сайт Оземпик 1 мг купить
AFC Asian Cup live scores, continental championship with all matches tracked
Excellent post! We are linking to this great article on our site.
Keep up the great writing.
моней икс промокод t.me/moneyx_tg .
I have been browsing online more than three hours today, yet I never found any interesting article like yours.
It is pretty worth enough for me. Personally, if all website owners and bloggers
made good content as you did, the net will be a lot more useful than ever before.
Here is my site top executive recruiters
Азартная сфера показывает активный прогресс, притягивая миллионы игроков. Профессиональные ресурсы дают качественную обстановку для беттинга. Полную сведения о таких брендах доступно найти на Гризли казино .
Аккредитация представляет основным показателем отбора площадки. Регуляторы Кюрасао дают серьёзный мониторинг расчётных процедур. Конкретная лицензированная сайт подвергается постоянные контроли RNG-систем.
Программные параметры современных азартных площадок содержат SSL-шифрование экономического класса. Поставщики софтового софта типа Microgaming, NetEnt, Pragmatic Play подключают сложные алгоритмы рандомных показателей.
Процесс проверки профиля предполагает представления свидетельств KYC-типа. Свидетельство, свидетельство о средствах, доказательство адреса — стандартный пакет для завершённого доступа.
Параллельные адреса решают барьеры с блокировками организаций. Функционирующие варианты изменяются каждый день программными службами. Планшетные клиенты часто работают стабильнее сетевых вариантов.
Банкролл-менеджмент определяет длительную доходность гемблинговых циклов. Профессиональные геймеры настаивают урезать величину бета до 1-2% от полного фонда.
Современные участники имеют дело с множеством технических тонкостей при операциях с официальными порталами. Специализированные платформы типа mad casino зеркало выдают релевантную контент о функционировании казино организаций.
Механизм подтверждения счета охватывает множество обязательных стадий. Базовая аутентификация нуждается загрузки свидетельств доказывающих личность. Типовой набор содержит свидетельство, права или международное ID.
Системная элемент записления подразумевает использование безопасного соединения и двухфакторной аутентификации. Профессиональные игроки рекомендуют запускать весь комплекс предложенных параметров безопасности.
Альтернативные адреса составляют точные реплики базового портала с хранением полного функционала. Основное бонус выражается в схожести денежных лимитов и условий отыгрыша.
Механизм выявления функционирующих зеркал опирается на проверке специализированных информационных каналов и партнерских площадок. Экспертные пользователи внедряют VPN-сервисы для создания постоянного связи вне зависимости от географических барьеров.
Incredible! This blog looks just like my
old one! It’s on a totally different subject but it has pretty much the same layout and
design. Outstanding choice of colors!
Смотреть здесь Оземпик 0.25 мг купить
海外华人必备的iyf平台,提供最新高清电影、电视剧,无广告观看体验。
Thanks to my father who told ophthalmologist near me concerning this web site, this
blog is genuinely amazing.
regarding the proper usage instructions, data is available at the medical directory at: https://magmaxhealth.com/meclizine.html for safe treatment.
Мануальный терапевт Ростов-на-Дону
Thanks for any other informative website. The place else may just I am getting
that type of information written in such a perfect way?
I’ve a undertaking that I am simply now operating on, and I have been at the glance out for such info.
Also visit my webpage – top executive recruiters
Нынешние игроки сталкиваются с препятствием связи к официальным сайтам. Операторы блокируют главные порталы, но опытные РЎСѓРєР° казино клиенты учитывают о существовании зеркальных ресурсов.
Дополнительный домен представляет абсолютную копию основного портала. Системы безопасности сохраняются равнозначными. Расчётные операции осуществляются через равнозначные шлюзы.
Методика регистрации через резервный домен предполагает классической валидации. Операторы уточняют бумаги для соблюдения KYC-правил. Идентификационные параметры осуществляют комплексную проверку.
Депозитные границы на параллельных ресурсах соответствуют основным условиям. Начальные ставки сохраняются константными. Растущие призовые фонды координируются между разными доменами.
Бонусные планы оперируют комплексно на резервных площадках. Требования по обороту удерживает исходные параметры. Тайминг использования сохраняется.
Служба помощи анализирует вопросы с зеркальных доменов сходным образом. Онлайн диалог поддерживает постоянный формат деятельности.
爱一帆下载海外版,专为华人打造的高清视频平台采用机器学习个性化推荐,支持全球加速观看。
кликните сюда mounjaro 15 mg
If you desire to improve your know-how simply keep visiting this
web page and be updated with the most recent information posted here.
Feel free to surf to my website – cfo recruiting firms
Актуальные участники имеют дело с набором программных тонкостей при процессах с легальными площадками. Профильные сайты типа lucky bear казино официальный сайт предоставляют релевантную контент о деятельности развлекательных операторов.
Система проверки профиля охватывает комплекс неотъемлемых этапов. Стартовая аутентификация подразумевает передачи бумаг валидирующих индивидуальность. Привычный список подразумевает паспорт, права или загранпаспорт.
Технологическая сторона создания аккаунта предполагает эксплуатацию зашифрованного канала и двухфакторной аутентификации. Профессиональные клиенты подсказывают включать все возможных функций безопасности.
Зеркала составляют идентичные клоны основного домена с удержанием тотального арсенала. Важнейшее бонус состоит в идентичности расчетных ограничений и параметров вейджера.
Алгоритм выявления функционирующих запасных доменов строится на отслеживании профильных новостных лент и аффилированных порталов. Профессиональные игроки применяют виртуальные частные сети для предоставления надежного входа безотносительно от территориальных блокировок.
https://musicoterapia.it/
best online pharmacies
нажмите, чтобы подробнее Оземпик купить
Современные клиенты сталкиваются с множеством цифровых особенностей при процессах с легальными ресурсами. Тематические порталы типа казино лаки Р±РёСЂ предоставляют современную информацию о процессах азартных провайдеров.
Процесс аутентификации счета содержит несколько обязательных уровней. Исходная проверка предполагает передачи документов удостоверяющих субъект. Стандартный пакет охватывает удостоверение личности, автоудостоверение или внешний паспорт.
Системная составляющая открытия счета охватывает внедрение криптографической защиты и двухуровневой проверки. Профессиональные игроки рекомендуют задействовать весь комплекс имеющихся параметров секьюрити.
Запасные домены образуют полные дубликаты первичного платформы с сохранением всего набора функций. Главное плюс состоит в идентичности денежных ограничений и условий отыгрыша.
Схема выявления актуальных зеркал опирается на наблюдении специализированных мессенджер групп и партнерских площадок. Экспертные пользователи используют прокси-соединения для создания надежного доступа вне зависимости от географических блокировок.
Новейшие клиенты обталкиваются с огромным количеством программных аспектов при деятельности с официальными платформами. Тематические платформы типа Рльдорадо казино дают свежую сведения о функционировании гэмблинговых операторов.
Алгоритм подтверждения кабинета подразумевает набор требуемых стадий. Начальная аутентификация требует загрузки справок доказывающих персону. Стандартный перечень предполагает удостоверение личности, автоудостоверение или международное ID.
Техническая составляющая записления охватывает внедрение зашифрованного канала и двухфакторной аутентификации. Профессиональные клиенты советуют активировать все возможных возможностей защиты.
Запасные домены формируют стопроцентные отражения основного домена с хранением тотального арсенала. Важнейшее достоинство кроется в идентичности банковских границ и норм условий прокрутки.
Механизм поиска функционирующих зеркал основывается на отслеживании профессиональных уведомительных сервисов и аффилированных площадок. Профессиональные геймеры используют прокси-соединения для обеспечения надежного связи невзирая от региональных барьеров.
cost of vardenafil https://cse.google.sc/url?sa=t&url=https%3A%2F%2Feropillseasy.shop ed medications
Онлайн казино – это цифровые ресурсы, предлагающие ставки
Hey there! I know this is somewhat off-topic but I needed to ask.
Does building a well-established website like yours take a massive
amount work? I am brand new to writing a blog but I do write
in my journal on a daily basis. I’d like to start a blog so I will be able to share my personal experience and
feelings online. Please let me know if you have any kind of suggestions or tips for new aspiring blog owners.
Thankyou!
Also visit my web blog; cfo executive search
Новейшие пользователи сталкиваются с массой технологических тонкостей при процессах с проверенными порталами. Экспертные источники типа РЎСѓРєР° казино выдают современную контент о деятельности игорных провайдеров.
Система подтверждения профиля подразумевает множество обязательных уровней. Первичная валидация предполагает загрузки удостоверений подтверждающих гражданство. Привычный комплект охватывает паспорт, права или международное ID.
Программная сторона открытия счета включает использование SSL-шифрования и 2FA. Квалифицированные геймеры предлагают инициировать полный набор имеющихся опций защиты.
Зеркала формируют стопроцентные клоны первичного ресурса с сохранением тотального арсенала. Ключевое бонус содержится в тождественности финансовых пределов и требований ставочных требований.
Процедура локализации актуальных запасных доменов строится на контроле профильных информационных каналов и связанных площадок. Профессиональные клиенты эксплуатируют виртуальные частные сети для формирования постоянного входа невзирая от территориальных лимитов.
Актуальные участники пересекаются с огромным количеством системных особенностей при процессах с лицензированными ресурсами. Профессиональные ресурсы типа mad casino выдают актуальную контент о функционировании казино брендов.
Процесс верификации учетной записи охватывает множество принудительных стадий. Базовая валидация подразумевает загрузки справок подтверждающих гражданство. Стандартный набор предполагает удостоверение личности, лицензию водителя или международное ID.
Системная часть открытия счета предполагает эксплуатацию защищенного протокола и 2FA. Экспертные участники предлагают включать полный набор возможных опций обеспечения.
Альтернативные адреса формируют абсолютные клоны первичного домена с поддержанием полного набора функций. Основное выгода состоит в идентичности банковских пределов и параметров вейджера.
Система поиска рабочих зеркал основывается на мониторинге профессиональных мессенджер групп и союзных сайтов. Опытные пользователи используют виртуальные частные сети для гарантирования бесперебойного входа вне зависимости от территориальных запретов.
Актуальные геймеры встречаются с множеством технических деталей при операциях с лицензированными сайтами. Экспертные порталы типа Голд дают свежую сведения о функционировании игорных провайдеров.
Система верификации профиля предполагает несколько необходимых фаз. Базовая проверка включает предоставления документов удостоверяющих персону. Привычный набор охватывает удостоверение личности, водительские права или загранпаспорт.
Системная компонента открытия счета предполагает использование защищенного протокола и 2FA. Профессиональные геймеры предлагают запускать весь комплекс представленных настроек безопасности.
Резервные ссылки образуют стопроцентные копии центрального ресурса с обеспечением тотального функционала. Основное выгода состоит в тождественности банковских ограничений и требований условий прокрутки.
Алгоритм нахождения рабочих дублирующих порталов фундируется на проверке профильных мессенджер групп и партнерских порталов. Продвинутые игроки внедряют туннельные протоколы для гарантирования устойчивого связи безотносительно от местных блокировок.
Serie A live scores, Italian football from Inter Milan Juventus and AC Milan
Ориентирование в пространстве проверенных площадок требует знания современных методов входа. Продвинутые игроки задействуют Клубника казино для извлечения свежей информации о действующих путях.
Схема формирования учетной записи в лицензированных операторах включает многоуровневую валидацию. Современные провайдеры задействуют KYC-механизмы и AML-нормы. Бумажная работа отнимает от 24 до 72 временных отрезков.
Цифровые способы для преодоления ограничений развиваются одновременно с интенсификацией регуляторных инициатив. VPN-инструменты типа premium дают безопасность AES-256 и технологии OpenVPN. Непрерывность соединения критически существенна для элитных заходов.
Дублирующие ресурсы действуют через локально размещенные компьютерные мощности. CDN-сети осуществляют минимальную пинг для американских участников. Программное маршрутизация инициируется при выявлении барьера базового портала.
Платежные манипуляции в легальных территориях подпадают под четким нормам PCI DSS. Блокчейн платежи увеличивают распространение вследствие конфиденциальности и динамике осуществления.
Смартфонные приложения ведущих организаций совмещают голосовую авторизацию и push-сообщения для принципиальных ситуаций. Модифицируемый облик независимо корректируется под параметры матрицы.
Активные зеркала лицензированных казино на казино Tippy создают постоянный доступ к игровым сервисам. Принцип зеркалирования генерирует идентичные дубликаты базового веб-площадки с удержанием всех инструментов.
Схема открытия счета через альтернативный домен полностью имитирует главную бланк. Свежие клиенты указывают активный email, устанавливают безопасный шифр и назначают рабочую денежную единицу.
Подтверждение учетной записи подразумевает передачи свидетельств опираясь на KYC-нормам. Снимок паспорта, валидация регистрации и карточные сведения контролируются системой машинную валидацию в течение 24-72 периодов.
Логин зарегистрированных игроков происходит через классическую интерфейс с расширенной аутентификацией. Краткосрочные шифры передаются на мобильный девайс или электронную почту.
Функционал депозитного модуля через альтернативные домены содержит топовые расчетные сервисы. Visa, Mastercard, веб кошельки Skrill, Neteller, crypto Bitcoin, Ethereum процессируются с минимальными комиссиями 0-3%.
Игровая коллекция воспроизводится целиком включая машины, традиционные активности, live-хостов и максимальные награды. RTP-значения, изменчивость и условия отыгрыша поддерживаются точными.
Поощрительная механизм функционирует похоже главному ресурсу. Welcome-комплекты, безвозмездные спины, компенсация и VIP-схемы активируются программно при исполнении прописанных требований.
ваучер 1win промокод
нажмите мунжаро как колоть
https://github.com/whahs5024/finds-ly/issues/244
узнать Оземпик 1мг в наличии
Whoa a good deal of wonderful tips! https://toolbarqueries.google.co.vi/url?q=https://betflik-168.org
Лицензионные провайдеры азартных возможностей oferuja участникам доступ к высококлассному развлечениям через dedicated сайты, включая РјСЌРґ казино , которые соблюдают мировые критерии защиты.
Последовательность оформления профиля подразумевает предоставления верификационных деталей через безопасные SSL-протоколы. Операторы просят предоставить документальное удостоверение age verification и адреса жительства для выполнения legal норм.
Двухэтапная проверка представляет необходимым aspect новейших архитектур конфиденциальности. Пользователи приобретают SMS-коды, push-оповещения или задействуют специальные tools типа Google Authenticator.
Mirror порталы нейтрализуют препятствия географических блокировок и DDoS-атак. Технически зеркала образуют идентичные dublicates основного домена с поддержанием инструментария и пользовательских параметров.
Опытные клиенты призывают поддерживать свежие базы действующих зеркал в закладках браузера. Провайдеры направляют обновления о актуальных ссылках через email, Telegram-сообщества и портативные софт.
Финансовые операции через legal сайты покрыты криптографическими системами уровня банковского segment. Снятие капитала осуществляется solely на validated карты хозяина аккаунта.
published here
russian traditional clothing
Развлекательная ниша являет динамичный подъём, завлекая легионы игроков. Экспертные площадки гарантируют стабильную условия для игры. Полную сведения о этих организациях можно отыскать на винити казино .
Лицензирование представляет ключевым элементом подбора площадки. Юрисдикции Мальты создают строгий мониторинг расчётных действий. Отдельная сертифицированная ресурс реализует регулярные контроли RNG-генераторов.
Цифровые аспекты инновационных азартных площадок объединяют SSL-безопасность расчётного уровня. Создатели компьютерного продукта наподобие Microgaming, NetEnt, Pragmatic Play подключают многоуровневые алгоритмы произвольных параметров.
Процесс аутентификации счёта предполагает направления бумаг KYC-класса. Удостоверение, документ о финансах, подтверждение прописки — базовый пакет для завершённого активации.
Параллельные порталы ликвидируют препятствия с цензурой компаний. Действующие варианты изменяются ежедневно IT командами. Планшетные приложения нередко выполняются устойчивее браузерных модификаций.
Контроль средств определяет долгосрочную успешность азартных сессий. Профессиональные игроки советуют ограничивать сумму пари до 1-2% от итогового фонда.
塔尔萨之王第二季高清完整官方版,海外华人可免费观看最新热播剧集。
Hmm is anyone else experiencing problems with the images on this blog loading?
I’m trying to figure out if its a problem on my end or if it’s the blog.
Any feedback would be greatly appreciated.
my web page: Wholesale print services
For reports
Classic mechanics games
for networking.
Определение безопасного игрового оператора в современных границах подразумевает особого внимания к юридическому режиму. Компетентные пользователи представляют, что казино СЌРЅРѕРјРѕ включает свежую данные о действующих площадках.
Схема регистрации в легальных сервисах охватывает требуемую аутентификацию личности. KYC-стандарты оберегают как заведение, так и клиента от махинаций. Краткосрочные лимиты на снятие денег до финализации контроля – привычная практика.
Технические ограничения на доступ к игровым сайтам устраняются через дублирующие ссылки. Действующие дубликаты сохраняют полную эффективность первичного сервиса. Расчетные движения, игровой результаты и льготные схемы поддерживаются константными.
Денежная стабильность оценивается критерием задействованных платежных инструментов. SSL-безопасность, PCI DSS валидация и дополнительная верификация гарантируют безопасный барьер ограждения.
Азартная набор лицензированных сервисов предоставляет барабаны от топовых создателей. RTP-индексы, вариативность и математические принципы подвергаются независимую валидацию в признанных центрах.
Схемы мотивации в серьезных операторах базируются на ясных критериях проигрыша. Вейджер x35-40 оценивается нормальным для автомат-привилегий, в то время как карточные забавы учитываются в счет с сниженным показателем.
перенаправляется сюда мунжаро для похудения отзывы
Легальные ресурсы игорных возможностей дают участникам вариант к элитному времяпрепровождению через целевые ресурсы, включая казино Клубника , что следуют международные регламенты защиты.
Схема регистрации подразумевает ввода валидационных параметров через безопасные SSL-каналы. Букмекеры просят официальное verification дееспособности и региона проживания для выполнения правовых критериев.
Двухэтапная верификация считается required aspect новейших механизмов security. Пользователи приобретают SMS-пароли, push-сообщения или применяют специальные tools вроде Google Authenticator.
Mirror адреса устраняют сложности региональных ограничений и DDoS-штурмов. По сути mirrors составляют дублированные версии базового платформы с поддержанием инструментария и пользовательских данных.
Компетентные пользователи предлагают поддерживать актуальные реестры working дублей в сохранённых ссылках интернет-программы. Management передают обновления о свежих порталах через e-mail, Telegram-группы и мобильные утилиты.
Платёжные операции через legal площадки покрыты шифровальными methods класса банковского направления. Вывод средств производится solely на верифицированные данные владельца account.
online pharmacy oxycontin https://cse.google.co.za/url?sa=i&url=https%3A%2F%2Fcanadianmedsmax.com online pharmacy xanax
Гемблинговая отрасль показывает интенсивный прогресс, привлекая множество клиентов. Опытные площадки предоставляют стабильную атмосферу для игры. Развёрнутую сведения о таких провайдерах реально обнаружить на Vovan зеркало .
Сертификация представляет центральным показателем селекции портала. Надзорные органы Мальты создают жёсткий мониторинг экономических манипуляций. Любая сертифицированная ресурс подвергается систематические проверки RNG-генераторов.
Программные особенности инновационных гемблинг-сайтов охватывают SSL-защиту банковского стандарта. Провайдеры программного продукта уровня Microgaming, NetEnt, Pragmatic Play подключают усовершенствованные модели непредсказуемых показателей.
Процедура проверки счёта требует направления справок KYC-уровня. Свидетельство, свидетельство о прибылях, удостоверение регистрации — типичный список для завершённого входа.
Резервные порталы решают проблемы с запретами поставщиков. Функционирующие варианты модифицируются систематически цифровыми группами. Смартфонные клиенты зачастую оперируют надёжнее онлайн форматов.
Финансовая дисциплина определяет долгосрочную успешность игровых партий. Грамотные беттеры указывают сокращать величину пари до 1-2% от суммарного бюджета.
Остеопат Ростов-на-Дону
Передовые провайдеры игорных услуг предлагают пользователям вход к профессиональному развлечениям через сертифицированные лаки Р±РёСЂ казино ресурсы. Сертифицированная функционирование нуждается следования четких контролирующих критериев.
Процесс регистрации индивидуального аккаунта содержит аутентификацию конфиденциальных показателей. Администраторы эксплуатируют детализированные протоколы KYC и AML для блокировки незаконных платежей.
Цифровые решения инновационных гемблинг платформ основываются на стабильных облачных системах с криптографическими сертификатами. IP-фильтрация вынуждает управляющих внедрять параллельные адреса.
Альтернативные домены составляют точные копии базового ресурса с обеспечением всех опций и данных. Беттеры получают беспрепятственный вход к счету, беттинг статистике и индивидуальным установкам.
Банковские транзакции производятся через синхронизированные денежные агрегаторы. Пределы на инвестиции и изъятия назначаются в соответствии с правовыми стандартами и собственными правилами управления рисками.
Профессиональные беттеры предлагают отслеживать условия аккредитации через государственные списки азартных организаций. Авторитетные индикаторы содержат рейтинги на профильных сервисах и оценки настоящих игроков.
Great post. I’m going through some of these issues as
well..
Stop by my web-site; Low cost marketing materials
Awesome blog! Is your theme custom made or did you download it from somewhere?
A design like yours with a few simple tweeks would
really make my blog jump out. Please let me know where you got your theme.
With thanks
my page … executive search firms
другие мунжаро для похудения отзывы
Greetings, anyone searching for a great drugstore to order health products securely. Check out this site: meclizine. Stocking generic tablets and huge discounts. Thanks.
Greetings! Very useful advice in this particular article!
It’s the little changes that make the most significant changes.
Thanks a lot for sharing!
такой Оземпик 1мг купить с доставкой
For a complete overview of safety protocols, data is available at the medical directory at: https://magmaxhealth.com/toradol.html for risk management.
Now I am ready to do my breakfast, afterward having my breakfast
coming yet again to read further news.
My blog post Volume printing discounts
Актуальные игроки сталкиваются с массой системных тонкостей при деятельности с сертифицированными порталами. Профессиональные порталы типа Болливуд РІС…РѕРґ дают актуальную контент о функционировании игорных брендов.
Процесс аутентификации аккаунта включает множество принудительных шагов. Базовая валидация включает размещения справок верифицирующих личность. Стандартный список включает документ, водительские права или внешний паспорт.
Программная элемент открытия счета содержит задействование защищенного протокола и двойной авторизации. Продвинутые пользователи советуют активировать полный набор представленных опций безопасности.
Зеркала являются стопроцентные клоны главного ресурса с поддержанием тотального функционала. Важнейшее преимущество содержится в тождественности финансовых лимитов и критериев условий прокрутки.
Механизм поиска актуальных запасных доменов основывается на отслеживании специализированных информационных каналов и союзных площадок. Опытные игроки эксплуатируют виртуальные частные сети для гарантирования бесперебойного доступа безотносительно от территориальных барьеров.
Современные геймеры обталкиваются с набором цифровых тонкостей при процессах с официальными ресурсами. Профильные ресурсы типа mad casino выдают новую материалы о функционировании гэмблинговых провайдеров.
Алгоритм проверки учетной записи охватывает несколько обязательных уровней. Исходная аутентификация предполагает передачи справок верифицирующих субъект. Обычный комплект включает документ, лицензию водителя или внешний паспорт.
Технологическая сторона регистрации подразумевает эксплуатацию безопасного соединения и двухуровневой проверки. Экспертные пользователи подсказывают включать совокупность предложенных возможностей охраны.
Дублирующие порталы образуют идентичные реплики основного ресурса с хранением тотального инструментария. Главное бонус содержится в идентичности финансовых пределов и критериев вейджера.
Схема нахождения актуальных резервных ссылок базируется на контроле профильных мессенджер групп и сотрудничающих сайтов. Квалифицированные геймеры эксплуатируют анонимайзеры для формирования надежного соединения без оглядки от территориальных барьеров.
Great delivery. Solid arguments. Keep up the great work.
Hi! Someone in my Myspace group shared this site with us so I came to
check it out. I’m definitely loving the information. I’m book-marking and will be tweeting this to my followers!
Wonderful blog and superb design.
http://tbf.me/a/sxUGT
I like the helpful information you provide in your articles.
I will bookmark your weblog and check again here regularly.
I’m quite sure I will learn lots of new stuff right here!
Best of luck for the next!
Действующие альтернативные домены надежных gaming-операторов на mad casino обеспечивают непрерывный соединение к азартным платформам. Система реплицирования строит аналогичные дубликаты корневого ресурса с удержанием всех возможностей.
Процедура создания аккаунта через дублирующий портал абсолютно повторяет базовую заявку. Начинающие геймеры регистрируют функционирующий email, придумывают безопасный пароль и фиксируют рабочую денежную единицу.
Подтверждение учетной записи требует предоставления бумаг опираясь на KYC-регламенту. Изображение ID-карты, валидация адреса и карточные параметры проверяются через автоматическую анализ в течение 24-72 часов.
Аутентификация действующих клиентов выполняется через стандартную окно с 2FA идентификацией. Одноразовые ключи поступают на телефонный девайс или электронную почту.
Механизмы депозитного блока через альтернативные домены поддерживает популярные платежные системы. Visa, Mastercard, онлайн хранилища Skrill, Neteller, виртуальные монеты Bitcoin, Ethereum процессируются с уменьшенными сборами 0-3%.
Развлекательная база клонируется абсолютно включая барабаны, классические развлечения, live-крупье и мегавыигрыши. RTP-значения, колебания и ставочные требования удерживаются точными.
Бонусная механизм действует идентично главному веб-площадке. Welcome-пакеты, даровые прокруты, кешбэк и VIP-курсы включаются алгоритмически при выполнении заданных параметров.
Инновационные платформы беттинг услуг предоставляют клиентам вход к профессиональному азарту через проверенные lucky bear казино ресурсы. Официальная работа требует выполнения жестких регуляторных норм.
Алгоритм оформления клиентского счета предусматривает валидацию конфиденциальных показателей. Операторы используют детализированные механизмы KYC и AML для исключения нарушающих транзакций.
Электронные инструменты передовых развлекательных порталов строятся на стабильных хостингах с TLS технологиями. Локальные запреты вынуждает управляющих запускать альтернативные адреса.
Дублирующие сайты формируют идентичные клоны основного ресурса с обеспечением всех опций и данных. Беттеры получают стабильный связь к балансу, беттинг записям и пользовательским настройкам.
Банковские процедуры реализуются через встроенные денежные шлюзы. Ограничения на инвестиции и обналичивания регулируются в гармонии с нормативными стандартами и собственными регламентами снижения потерь.
Опытные гемблеры советуют проверять состояние сертификата через контролирующие каталоги азартных ведомств. Репутационные показатели охватывают позиции на профильных сайтах и комментарии реальных участников.
this content
https://russian-traditional-clothes.com/
веб-сайт Оземпик 0.25 мг купить
ed pills for men
This is really interesting, You’re a very skilled blogger.
I’ve joined your rss feed and look forward to seeking more of your excellent post.
Also, I have shared your site in my social networks!
посетить сайт mounjaro ручка
Гемблинговая ниша отображает быстрый рост, завлекая массы игроков. Опытные сайты гарантируют стабильную условия для беттинга. Исчерпывающую сведения о таких организациях доступно получить на Tippy casino .
Аккредитация является приоритетным фактором подбора портала. Надзорные органы Мальты предоставляют качественный контроль расчётных действий. Конкретная легальная портал подвергается регулярные проверки RNG-генераторов.
Компьютерные параметры новейших гемблинг-сайтов предусматривают SSL-защиту финансового класса. Провайдеры цифрового материала класса Microgaming, NetEnt, Pragmatic Play подключают комплексные модели случайных чисел.
Схема проверки профиля подразумевает направления удостоверений KYC-формата. Документ, подтверждение о финансах, валидация проживания — типичный набор для итогового активации.
Альтернативные порталы убирают препятствия с запретами провайдеров. Свежие альтернативы обновляются ежедневно техническими командами. Смартфонные утилиты регулярно работают качественнее онлайн вариантов.
Распределение капитала задаёт перспективную результативность развлекательных сессий. Квалифицированные пользователи рекомендуют контролировать количество депозита до 1-2% от итогового фонда.
I do not even know how I ended up here, but I thought this post was good.
I do not know who you are but definitely
you are going to a famous blogger if you aren’t already 😉 Cheers!
Greetings, I recently found a useful article on common medicines, I recommend this drug database. You can read about safety protocols very well. Link: https://magmaxhealth.com/Protonix. Thanks.
Игровая отрасль демонстрирует интенсивный подъём, заинтересовывая множество пользователей. Квалифицированные платформы обеспечивают стабильную пространство для развлечений. Подробную факты о данных операторах доступно получить на СЌРЅРѕРјРѕ казино .
Лицензирование выступает приоритетным показателем отбора портала. Контролёры Кюрасао дают жёсткий надзор финансовых манипуляций. Всякая аккредитованная сайт подвергается плановые контроли RNG-генераторов.
Технические аспекты передовых беттинг-платформ включают SSL-безопасность банковского уровня. Создатели программного ПО наподобие Microgaming, NetEnt, Pragmatic Play встраивают сложные модели непредсказуемых величин.
Механизм аутентификации профиля предусматривает подачи документов KYC-стандарта. Удостоверение, выписка о доходах, подтверждение проживания — стандартный список для итогового входа.
Зеркальные порталы решают препятствия с цензурой операторов. Актуальные дубли корректируются регулярно IT службами. Смартфонные утилиты регулярно работают устойчивее онлайн редакций.
Распределение капитала устанавливает перспективную прибыльность игровых сессий. Профессиональные пользователи предлагают ограничивать количество бета до 1-2% от полного фонда.
Please let me know if you’re looking for a article writer for your weblog.
You have some really good posts and I feel I would be
a good asset. If you ever want to take some
of the load off, I’d absolutely love to write some articles for your blog in exchange for a link back to
mine. Please shoot me an email if interested. Regards!
здесь Оземпик для похудения
click here for more info
https://russian-traditional-clothes.com
https://akivaschool.com/pgs/bangladesh_promo_code_for_1.html
Нынешние бетторы натыкаются с препятствием подключения к лицензированным сайтам. Операторы блокируют первичные порталы, но опытные казино СЌРЅРѕРјРѕ пользователи понимают о доступности резервных порталов.
Параллельный портал образует точную дубликат оригинального портала. Системы безопасности функционируют аналогичными. Банковские транзакции реализуются через аналогичные каналы.
Алгоритм заведения учётной записи через альтернативный домен содержит классической аутентификации. Администраторы выясняют бумаги для реализации KYC-правил. Индивидуальные информация проходят усиленную подтверждение.
Вносительные ограничения на зеркальных сайтах аналогичны основным требованиям. Стартовые ставки поддерживаются неизменными. Накопительные выигрышные пулы синхронизируются между разными ресурсами.
Премиальные планы выполняются полноценно на параллельных площадках. Вейджер гарантирует стартовые значения. Период действия использования остаётся прежним.
Департамент обслуживания обрабатывает вопросы с дополнительных адресов аналогично. Прямой разговор предоставляет непрерывный режим функционирования.
Передовые сервисы азартных продуктов дают участникам доступ к высококлассному азарту через безопасные лаки ворлд казино платформы. Лицензированная деятельность предполагает соблюдения четких законодательных стандартов.
Механизм активации игрового учетной записи охватывает валидацию приватных данных. Провайдеры применяют углубленные системы KYC и AML для предотвращения мошеннических транзакций.
Цифровые платформы современных казино функционируют на стабильных хостингах с SSL технологиями. Территориальные ограничения заставляет операторов создавать резервные URL.
Параллельные ресурсы представляют идентичные репликации главного сайта с фиксацией всех опций и информации. Участники достигают устойчивый вход к счету, азартной статистике и пользовательским настройкам.
Платежные транзакции проходят через интегрированные банковские процессоры. Ограничения на вклады и выводы определяются в соотношении с нормативными положениями и внутренними политиками минимизации опасностей.
Профессиональные игроки предлагают проверять статус аккредитации через регуляторные регистры азартных организаций. Престижные показатели предусматривают оценки на отраслевых ресурсах и отзывы истинных клиентов.
нажмите, чтобы подробнее Оземпик синий купить
I like reading through an article that will make people think.
Also, many thanks for permitting me to comment!
online mexican pharmacy
Hey! Someone in my Facebook group shared this site with us so
I came to take a look. I’m definitely enjoying the information. I’m
bookmarking and will be tweeting this to my followers!
Exceptional blog and superb style and design.
my homepage :: physical therapy near me
Действующие дублирующие порталы официальных gaming-операторов на тип топ казино дают стабильный соединение к гемблинг ресурсам. Методика дублирования строит идентичные версии базового портала с сохранением всех функций.
Механизм создания аккаунта через резервную ссылку целиком дублирует главную заявку. Только пришедшие пользователи вводят валидный email, придумывают безопасный код доступа и выбирают базовую финансовый инструмент.
Валидация учетной записи содержит представления свидетельств опираясь на KYC-политике. Снимок ID-карты, свидетельство резиденции и карточные параметры проходят машинную верификацию в течение 24-72 временных единиц.
Авторизация верифицированных геймеров производится через базовую окно с 2FA верификацией. Временные ключи поступают на мессенджер устройство или мейл.
Функционал пополнительного компонента через mirror-сайты включает популярные финансовые механизмы. Visa, Mastercard, цифровые портмоне Skrill, Neteller, криптовалюты Bitcoin, Ethereum реализуются с оптимизированными процентами 0-3%.
Развлекательная коллекция копируется в точности включая барабаны, классические игры, live-ведущих и прогрессивы. RTP-значения, колебания и ставочные требования фиксируются точными.
Акционная схема выполняется идентично центральному порталу. Welcome-наборы, бесплатные вращения, кешбэк и VIP-планы стартуют машинально при достижении установленных критериев.
Навигация в сфере легальных ресурсов подразумевает владения актуальных решений соединения. Опытные игроки эксплуатируют казино типпи для приобретения актуальной фактов о оперативных адресах.
Алгоритм открытия счета в официальных компаниях содержит многоуровневую проверку. Передовые провайдеры применяют KYC-системы и AML-стандарты. Документальное сопровождение отнимает от 24 до 72 промежутков.
Технические технологии для обхода препятствий эволюционируют синхронно с ужесточением регуляторных инициатив. VPN-сервисы категории premium предоставляют криптографию AES-256 и технологии OpenVPN. Устойчивость связи принципиально важна для высокоролловых игровых периодов.
Запасные ресурсы функционируют через географически распределенные IT инфраструктуры. CDN-структуры осуществляют быструю латентность для азиатских игроков. Программное редирект инициируется при выявлении препятствия базового ресурса.
Денежные транзакции в официальных областях подчиняются строгим стандартам PCI DSS. Крипто транзакции увеличивают актуальность в результате скрытности и оперативности реализации.
Портативные приложения элитных компаний объединяют лицевую идентификацию и push-извещения для существенных эпизодов. Адаптивный интерфейс независимо подстраивается под настройки дисплея.
For a recap
online casino real money no deposit gift card
for your privacy.
I’m not that much of a online reader to be honest but your sites really nice, keep it up!
I’ll go ahead and bookmark your website to come back down the road.
All the best
Opening goals, first strikes and their impact on results
Перемещение в сфере лицензированных сайтов подразумевает знания современных инструментов доступа. Опытные игроки применяют mad casino для получения свежей материалов о действующих ссылках.
Механизм создания аккаунта в официальных компаниях предполагает сложную верификацию. Актуальные организации задействуют KYC-процедуры и AML-нормы. Оформление документов отнимает от 24 до 72 промежутков.
Компьютерные решения для прохождения ограничений улучшаются сообща с укреплением правовых действий. VPN-службы уровня premium предлагают безопасность AES-256 и технологии OpenVPN. Устойчивость канала принципиально необходима для премиальных заходов.
Дублирующие платформы функционируют через регионально расположенные цифровые кластеры. CDN-сети гарантируют минимальную пинг для американских игроков. Техническое переключение включается при детекции блокировки базового домена.
Банковские транзакции в официальных территориях соответствуют жестким правилам PCI DSS. Криптовалютные переводы приобретают распространение в результате конфиденциальности и темпу процессинга.
Переносные утилиты лучших провайдеров содержат лицевую аутентификацию и push-алерты для важных событий. Настраиваемый облик автономно настраивается под настройки панели.
Передовые платформы игорных игр предлагают клиентам вход к премиальному азарту через проверенные Рльдорадо казино сайты. Легальная работа подразумевает исполнения четких законодательных положений.
Процедура открытия клиентского аккаунта включает проверку персональных сведений. Операторы задействуют детализированные протоколы KYC и AML для недопущения поддельных платежей.
Технические платформы новейших казино функционируют на защищенных инфраструктурах с шифровальными сертификатами. Территориальные ограничения вынуждает администраторов внедрять вспомогательные домены.
Дублирующие ресурсы представляют идентичные версии первичного домена с удержанием всех инструментов и информации. Беттеры достигают беспрепятственный доступ к счету, игровой данным и клиентским конфигурациям.
Финансовые транзакции проходят через встроенные платежные сервисы. Рамки на инвестиции и выводы определяются в соответствии с регуляторными положениями и корпоративными процедурами минимизации опасностей.
Опытные пользователи указывают анализировать условия лицензии через государственные реестры гемблинг ведомств. Авторитетные показатели содержат оценки на специализированных ресурсах и мнения истинных клиентов.
NEUROCEPT REVIEWS
ваучер 1win промокод
11905KymEnneso te le gram
Азартная индустрия представляет быстрый рост, манящая легионы участников. Экспертные площадки предлагают защищённую атмосферу для ставок. Полную информацию о данных провайдерах допустимо обнаружить на РјСЌРґ казино .
Лицензирование составляет основным фактором выбора платформы. Контролёры Олдерни гарантируют качественный мониторинг экономических процедур. Отдельная лицензированная площадка проходит систематические инспекции RNG-систем.
Цифровые характеристики инновационных игорных домов охватывают SSL-кодирование финансового стандарта. Разработчики программного продукта уровня Microgaming, NetEnt, Pragmatic Play интегрируют комплексные механизмы хаотичных параметров.
Механизм аутентификации профиля включает предоставления бумаг KYC-класса. Свидетельство, выписка о средствах, доказательство проживания — стандартный перечень для итогового авторизации.
Резервные домены исправляют барьеры с ограничениями компаний. Свежие зеркала корректируются систематически программными службами. Мобильные программы регулярно оперируют стабильнее онлайн форматов.
Управление банкроллом определяет перспективную результативность развлекательных циклов. Опытные пользователи указывают урезать величину ставки до 1-2% от итогового капитала.
https://caisnogamingworld.nl/code-bonus-1xbet-2026-1xhasard-bonus-130e/
63454MarkusHaywortho te le gram
Передовые геймеры пересекаются с огромным количеством технических тонкостей при работе с сертифицированными сайтами. Профессиональные источники типа Голд казино предоставляют релевантную материалы о операциях азартных провайдеров.
Процесс проверки учетной записи подразумевает несколько требуемых этапов. Стартовая проверка включает размещения бумаг подтверждающих гражданство. Обычный комплект подразумевает ID, права или международное ID.
Техническая элемент оформления охватывает задействование зашифрованного канала и двойной авторизации. Квалифицированные пользователи рекомендуют запускать все возможных возможностей защиты.
Дублирующие порталы составляют точные отражения первичного портала с поддержанием всего возможностей. Ключевое бонус содержится в подобии банковских рамок и критериев вейджера.
Механизм локализации рабочих зеркал основывается на проверке специализированных информационных каналов и аффилированных платформ. Экспертные участники внедряют VPN-сервисы для обеспечения бесперебойного соединения невзирая от региональных блокировок.
NEUROCEPT REVIEW
Thank you for another informative site. Where else could I get that type of information written in such a perfect method?
I have a project that I’m simply now running on, and I’ve been at the look out for such information.
88788MitchelChabaudo te le gram
NEUROCEPT
Официальные площадки развлекательных предложений обеспечивают участникам право к премиальному времяпрепровождению через dedicated платформы, включая казино Рльдорадо , что выполняют глобальные нормы конфиденциальности.
Схема регистрации necessita внесения валидационных данных через защищённые SSL-connection. Букмекеры требуют официальное verification правоспособности и места нахождения для соблюдения законодательных правил.
Двухэтапная верификация представляет required составляющей современных архитектур конфиденциальности. Клиенты приобретают SMS-токены, push-сообщения или задействуют специализированные tools по типу Google Authenticator.
Дублирующие порталы ликвидируют вопросы локальных блокировок и DDoS-атак. Технически дубли образуют идентичные версии базового портала с сохранением features и индивидуальных информации.
Профессиональные клиенты советуют хранить новейшие базы функционирующих зеркал в закладках browser. Букмекеры отправляют сведения о современных доменах через email, Telegram-каналы и mobile приложения.
Денежные процедуры через проверенные площадки обеспечены cryptographic технологиями категории банковского сектора. Вывод средств выполняется исключительно на validated счета обладателя account.
Актуальные пользователи сталкиваются с изобилием технологических деталей при процессах с лицензированными порталами. Профессиональные платформы типа френдс казино поставляют современную контент о работе казино операторов.
Система верификации кабинета подразумевает несколько принудительных шагов. Исходная проверка нуждается передачи бумаг удостоверяющих гражданство. Обычный список включает паспорт, водительские права или международный паспорт.
Технологическая часть записления содержит применение зашифрованного канала и 2FA. Экспертные клиенты советуют активировать максимум представленных функций защиты.
Запасные домены представляют полные дубликаты основного сайта с обеспечением комплексного набора функций. Важнейшее достоинство содержится в схожести финансовых пределов и норм условий прокрутки.
Механизм нахождения действующих запасных доменов основывается на отслеживании специализированных уведомительных сервисов и сотрудничающих платформ. Продвинутые клиенты применяют прокси-соединения для формирования стабильного входа вне зависимости от локальных ограничений.
23247BorisLiefero te le gram
have a peek at this website
https://russian-traditional-clothes.com
Hi there, I enjoy reading through your post. I wanted to write a little comment to support you.
Hey there! I simply wish to give you a big thumbs up
for your great info you’ve got here on this post.
I’ll be coming back to your website for more soon.
содержание семаглутид красный в наличии
Thanks for ones marvelous posting! I really
enjoyed reading it, you might be a great author.I will make
certain to bookmark your blog and may come back from now on. I
want to encourage one to continue your great job, have a nice afternoon!
Here is my blog … physical therapy near me
12850DanieleLuggo te le gram
NEUROCEPT REVIEWS
Hi there to every one, the contents present at this site are actually awesome for
people knowledge, well, keep up the nice work fellows.
http://newfiz.info/offizika/pgs/1xbet_promokod_na_segodnya_besplatno.html
Действующие mirror-ссылки официальных гемблинг-платформ на тип топ казино дают непрерывный доступ к гемблинг порталам. Методика дублирования строит эквивалентные копии центрального портала с удержанием всех инструментов.
Алгоритм регистрации через зеркало абсолютно имитирует оригинальную бланк. Новые пользователи прописывают активный email, создают надежный код доступа и выбирают рабочую финансовый инструмент.
Аутентификация личного кабинета подразумевает представления свидетельств согласно KYC-политике. Копия удостоверения личности, свидетельство проживания и банковские реквизиты подвергаются машинную анализ в течение 24-72 периодов.
Логин активных участников осуществляется через типовую форму с усиленной валидацией. Одноразовые пароли поступают на мобильный девайс или мейл.
Механизмы входящего модуля через альтернативные домены обеспечивает топовые банковские сервисы. Visa, Mastercard, электронные портмоне Skrill, Neteller, криптовалюты Bitcoin, Ethereum выполняются с уменьшенными процентами 0-3%.
Игровая ассортимент копируется на сто процентов включая автоматы, классические забавы, live-ведущих и мегавыигрыши. RTP-значения, волатильность и условия отыгрыша фиксируются точными.
Бонусная политика выполняется похоже базовому веб-площадке. Welcome-бандлы, безвозмездные спины, денежный возврат и VIP-курсы включаются системно при выполнении определенных параметров.
Hello! I simply want to offer you a big thumbs
up for the great info you have right here on this
post. I am coming back to your blog for more soon.
Беттинговая сфера показывает динамичный прогресс, притягивая массы геймеров. Опытные порталы предлагают безопасную атмосферу для беттинга. Развёрнутую информацию о данных компаниях можно получить на Голд казино .
Аттестация составляет основным аспектом селекции ресурса. Юрисдикции Великобритании гарантируют жёсткий проверку финансовых транзакций. Отдельная лицензированная платформа выполняет плановые ревизии RNG-систем.
Программные свойства актуальных гемблинг-сайтов включают SSL-защиту экономического класса. Поставщики компьютерного софта класса Microgaming, NetEnt, Pragmatic Play подключают сложные механизмы случайных показателей.
Процесс проверки аккаунта предусматривает представления бумаг KYC-уровня. ID, справка о прибылях, подтверждение проживания — стандартный перечень для окончательного авторизации.
Дублирующие порталы ликвидируют препятствия с ограничениями поставщиков. Действующие альтернативы обновляются постоянно программными командами. Мобильные клиенты нередко работают стабильнее онлайн вариантов.
Распределение капитала задаёт перспективную успешность беттинговых периодов. Экспертные геймеры советуют урезать сумму бета до 1-2% от общего резерва.
NEUROCEPT
42473PhilomenaStileo te le gram
indian pharmacy online https://maps.google.ie/url?sa=t&url=https%3A%2F%2Fcanadianmedsmax.com online pharmacy school
68405LouellaSleetero te le gram
перенаправляется сюда мунжаро или оземпик
Гемблинговая ниша отображает быстрый развитие, манящая легионы пользователей. Профессиональные ресурсы гарантируют качественную пространство для пари. Детальную материалы о этих операторах доступно отыскать на KiloGram casino .
Легализация является ключевым критерием выбора платформы. Юрисдикции Мальты предоставляют серьёзный мониторинг валютных действий. Всякая сертифицированная платформа реализует регулярные аудиты RNG-модулей.
Компьютерные свойства современных казино охватывают SSL-криптографию банковского уровня. Провайдеры софтового софта уровня Microgaming, NetEnt, Pragmatic Play подключают сложные схемы хаотичных значений.
Схема подтверждения счёта подразумевает предоставления бумаг KYC-типа. Свидетельство, выписка о прибылях, подтверждение прописки — обычный перечень для итогового доступа.
Дублирующие порталы исправляют барьеры с цензурой организаций. Действующие альтернативы корректируются систематически программными специалистами. Смартфонные софт регулярно функционируют стабильнее сетевых форматов.
Банкролл-менеджмент формирует длительную прибыльность азартных сессий. Грамотные геймеры указывают контролировать сумму депозита до 1-2% от совокупного фонда.
ed medications https://images.google.ch/url?sa=t&url=https%3A%2F%2Feropillseasy.shop ed meds list
Беттинговая область являет стремительный развитие, притягивая множество участников. Экспертные платформы предоставляют качественную условия для беттинга. Подробную информацию о данных организациях можно отыскать на Голд казино .
Сертификация остаётся приоритетным фактором выбора площадки. Лицензиаты Мальты создают жёсткий мониторинг валютных манипуляций. Любая сертифицированная сайт проходит периодические аудиты RNG-алгоритмов.
Компьютерные аспекты современных азартных площадок содержат SSL-защиту финансового уровня. Производители программного ПО типа Microgaming, NetEnt, Pragmatic Play интегрируют сложные механизмы случайных величин.
Механизм проверки профиля включает предоставления свидетельств KYC-типа. Свидетельство, свидетельство о прибылях, верификация регистрации — обычный перечень для окончательного авторизации.
Альтернативные порталы исправляют проблемы с цензурой организаций. Функционирующие копии корректируются ежедневно IT специалистами. Мобильные клиенты обычно оперируют лучше веб модификаций.
Контроль средств определяет длительную результативность гемблинговых раундов. Экспертные участники советуют ограничивать размер депозита до 1-2% от полного банкролла.
монейх монейх .
Hey everyone, if anyone needs detailed information regarding common medicines, I found this online directory. It explains how to take meds clearly. Link: https://magmaxhealth.com/Lamictal. Hope this is useful.
24754LeonardaAncaro te le gram
I used to be recommended this blog via my cousin. I am now not sure whether
this submit is written by him as no one else recognise such precise about
my difficulty. You’re incredible! Thanks!
Лицензионные ресурсы развлекательных возможностей гарантируют геймерам шанс к премиальному азартному досугу через тематические домены, включая казино ДживиСпин , которые специально следуют общепринятые критерии защиты.
Процедура оформления профиля требует указания идентификационных деталей через криптографические SSL-каналы. Букмекеры demanded official удостоверение возраста и адреса residence для выполнения юрисдикционных стандартов.
Двухэтапная верификация выступает принудительным элементом передовых платформ защиты. Участники имеют SMS-ключи, push-оповещения или эксплуатируют targeted утилиты в стиле Google Authenticator.
Зеркальные порталы устраняют препятствия territorial ограничений и DDoS-атак. Технически зеркала формируют копийные клоны базового домена с удержанием инструментария и user информации.
Skilled игроки призывают удерживать новейшие перечни функционирующих mirrors в закладках браузера. Букмекеры рассылают новости о новых ссылках через мейл, Telegram-каналы и портативные утилиты.
Финансовые операции через лицензионные ресурсы защищены защитными системами категории банковского направления. Extraction денег реализуется единственно на верифицированные wallets держателя учётной записи.
76009LucreciaSchweikero te le gram
Навигация в сфере легальных платформ включает понимания актуальных способов подключения. Опытные геймеры задействуют Вован казино для добывания актуальной информации о оперативных ссылках.
Алгоритм создания личного кабинета в официальных компаниях содержит комплексную проверку. Новейшие поставщики эксплуатируют KYC-системы и AML-нормы. Документооборот требует от 24 до 72 интервалов.
Компьютерные методы для минования препятствий эволюционируют параллельно с повышением правовых шагов. VPN-службы уровня premium дают шифрование AES-256 и системы OpenVPN. Непрерывность коннекта критически значима для привилегированных сессий.
Дублирующие ресурсы работают через пространственно расположенные технические кластеры. CDN-комплексы обеспечивают сокращенную латентность для глобальных игроков. Автоматическое редирект срабатывает при детекции препятствия базового портала.
Банковские операции в официальных зонах подчиняются строгим нормам PCI DSS. Децентрализованные переводы увеличивают признание из-за приватности и динамике реализации.
Переносные приложения топовых провайдеров включают лицевую авторизацию и push-извещения для критических моментов. Адаптивный оформление программно настраивается под настройки дисплея.
My programmer is trying to convince me to move to .net from
PHP. I have always disliked the idea because of the costs.
But he’s tryiong none the less. I’ve been using WordPress on various
websites for about a year and am concerned about switching to
another platform. I have heard great things about blogengine.net.
Is there a way I can transfer all my wordpress posts into it?
Any help would be really appreciated!
Перейти на сайт Оземпик от диабета
здесь Оземпик синий купить с доставкой
Ответственная игра — представляет собой набор специальных правил и подходов.
Данная концепция ориентирована на обеспечение безопасности пользователей от потенциального рисков.
Основная цель — поддерживать развлекательную составляющую без ущерба для личного состояния человека.
https://t.me/s/top_onlajn_kazino_rossii
Данная практика включает установление лимитов над длительностью и бюджетом, потраченными в азартных играх.
Важным элементом является осознание игроком имеющихся возможных последствий.
Платформы обязаны предоставлять понятную сведения и средства для самоограничения.
Таким образом, ответственная деятельность создаёт здоровую игровую атмосферу для каждого сторон.
57280MegKamero te le gram
Гемблинговая индустрия представляет динамичный развитие, заинтересовывая множество участников. Экспертные порталы гарантируют защищённую условия для развлечений. Развёрнутую данные о данных компаниях допустимо получить на Болливуд официальный сайт .
Аттестация остаётся главным элементом подбора портала. Юрисдикции Великобритании дают жёсткий контроль валютных транзакций. Конкретная аккредитованная платформа выполняет систематические ревизии RNG-механизмов.
Технические свойства актуальных игорных домов предусматривают SSL-шифрование экономического категории. Создатели программного материала уровня Microgaming, NetEnt, Pragmatic Play подключают сложные модели произвольных показателей.
Механизм проверки аккаунта подразумевает предоставления документов KYC-типа. Удостоверение, подтверждение о финансах, валидация проживания — обычный список для финального доступа.
Резервные домены решают сложности с блокировками поставщиков. Рабочие дубли модифицируются постоянно IT группами. Портативные программы зачастую действуют стабильнее браузерных версий.
Управление банкроллом определяет продолжительную эффективность игровых раундов. Квалифицированные игроки советуют ограничивать размер депозита до 1-2% от совокупного фонда.
Hi, if you are looking for a great source for meds to buy health products securely. I found MagMaxHealth: naltrexone. Selling a wide range of meds with fast shipping. Thanks.
see page
russian traditional clothing
More info
emergency business loan
for professional opinions.
Функционирующие зеркала надежных гемблинг-платформ на казино Килограмм создают беспрерывный коннект к игровым системам. Технология реплицирования создает полноценные клоны главного ресурса с сохранением всех инструментов.
Процедура активации через альтернативный домен на сто процентов копирует главную форму. Свежие участники вводят активный email, устанавливают безопасный код доступа и назначают базовую финансовый инструмент.
Валидация личного кабинета содержит представления документов следуя KYC-политике. Изображение паспорта, валидация адреса и банковские сведения анализируются посредством программную проверку в течение 24-72 временных единиц.
Аутентификация существующих участников реализуется через классическую окно с 2FA верификацией. Краткосрочные ключи поступают на телефонный аппарат или email.
Функционал депозитного раздела через зеркала предлагает топовые расчетные системы. Visa, Mastercard, веб кошельки Skrill, Neteller, виртуальные монеты Bitcoin, Ethereum осуществляются с уменьшенными комиссиями 0-3%.
Гемблинг коллекция повторяется в точности включая барабаны, столовые игры, live-дилеров и джекпоты. RTP-параметры, изменчивость и проигрыш сохраняются аналогичными.
Бонусная схема функционирует схоже базовому сайту. Welcome-предложения, даровые прокруты, кешбэк и VIP-программы включаются системно при выполнении фиксированных стандартов.
4386KurtisPelyoo te le gram
Just wish to say your article is as surprising. The clearness for your
publish is simply nice and i can think you are a professional in this subject.
Fine along with your permission let me to grasp
your feed to stay updated with imminent post. Thanks a million and please continue the enjoyable work.
8199AnnamarieNorthwoodo te le gram
Беттинговая область демонстрирует быстрый расширение, завлекая легионы игроков. Грамотные порталы дают надёжную среду для пари. Подробную материалы о указанных провайдерах реально получить на лаки Р±РёСЂ казино официальный сайт .
Аттестация остаётся центральным критерием определения площадки. Контролёры Кюрасао создают жёсткий надзор экономических процедур. Отдельная лицензированная сайт проходит систематические контроли RNG-генераторов.
IT свойства актуальных азартных площадок предусматривают SSL-шифрование денежного уровня. Производители цифрового обеспечения уровня Microgaming, NetEnt, Pragmatic Play подключают комплексные модели произвольных показателей.
Процедура верификации счёта предполагает подачи бумаг KYC-класса. Паспорт, документ о доходах, верификация проживания — типичный пакет для финального входа.
Резервные ссылки исправляют проблемы с блокировками организаций. Действующие варианты адаптируются регулярно компьютерными специалистами. Карманные софт обычно функционируют лучше сетевых форматов.
Управление банкроллом задаёт длительную эффективность игровых раундов. Квалифицированные пользователи указывают контролировать сумму вейджера до 1-2% от итогового резерва.
additional info
https://russian-traditional-clothes.com/
Поиск в сфере сертифицированных сайтов требует владения актуальных методов подключения. Квалифицированные игроки используют казино аква для добывания новейшей материалов о оперативных путях.
Алгоритм оформления личного кабинета в лицензированных операторах охватывает сложную проверку. Передовые организации внедряют KYC-протоколы и AML-стандарты. Документооборот составляет от 24 до 72 периодов.
IT технологии для преодоления барьеров эволюционируют сообща с повышением регуляторных шагов. VPN-сервисы категории premium предоставляют шифрование AES-256 и технологии OpenVPN. Постоянство канала критически актуальна для элитных заходов.
Дублирующие сайты работают через локально рассредоточенные IT кластеры. CDN-структуры гарантируют оптимальную задержку для азиатских клиентов. Техническое роутинг срабатывает при идентификации препятствия главного портала.
Экономические переводы в лицензированных регионах следуют конкретным требованиям PCI DSS. Крипто переводы увеличивают востребованность из-за конфиденциальности и быстроте обработки.
Планшетные приложения ведущих брендов объединяют биометрическую аутентификацию и push-алерты для ключевых эпизодов. Адаптивный дизайн программно корректируется под особенности матрицы.
I just could not go away your site before suggesting that I really enjoyed the usual information an individual supply for
your guests? Is gonna be again ceaselessly to inspect new posts
шторы на заказ Дизайнерские шторы – это произведение искусства, воплощающее самые смелые и оригинальные идеи. Они создаются по индивидуальным эскизам и отличаются высоким качеством материалов и исполнения.
перейдите на этот сайт mounjaro 5mg
86456AlfonsoPrefontaineo te le gram
Навигация в секторе легальных платформ требует понимания актуальных технологий подключения. Продвинутые пользователи применяют Рльдорадо казино для приобретения свежей фактов о оперативных ссылках.
Алгоритм оформления профиля в официальных учреждениях предполагает многоуровневую валидацию. Актуальные организации применяют KYC-алгоритмы и AML-требования. Документооборот требует от 24 до 72 интервалов.
Компьютерные решения для избежания запретов развиваются вместе с укреплением юридических мер. VPN-инструменты типа premium предлагают безопасность AES-256 и стандарты OpenVPN. Надежность канала критически важна для элитных заходов.
Альтернативные домены выполняют задачи через географически разнесенные компьютерные мощности. CDN-архитектуры гарантируют минимальную пинг для американских игроков. Цифровое маршрутизация срабатывает при обнаружении недоступности главного портала.
Финансовые манипуляции в лицензированных юрисдикциях соответствуют строгим правилам PCI DSS. Крипто расчеты завоевывают актуальность из-за приватности и темпу реализации.
Планшетные приложения премиальных провайдеров объединяют отпечатковую идентификацию и push-алерты для важных происшествий. Настраиваемый дизайн самостоятельно адаптируется под свойства матрицы.
League table standings, updated after every match with goal difference
Актуальные гемблеры оказываются с проблемой входа к официальным площадкам. Организации закрывают главные порталы, но искушённые mad casino зеркало пользователи помнят о функционировании параллельных сайтов.
Дополнительный домен составляет идентичную реплику основного площадки. Криптографические алгоритмы сохраняются неизменными. Денежные действия реализуются через идентичные сервисы.
Алгоритм открытия счёта через альтернативный портал требует типовой верификации. Администраторы требуют бумаги для соблюдения KYC-норм. Паспортные параметры проходят комплексную верификацию.
Депозитные лимиты на резервных сайтах аналогичны базовым спецификациям. Начальные беты сохраняются константными. Возрастающие джекпоты координируются между множественными ресурсами.
Поощрительные механизмы выполняются целостно на параллельных сайтах. Требования по обороту удерживает исходные показатели. Период действия проигрывания не изменяется.
Отдел сопровождения обрабатывает вопросы с зеркальных доменов равнозначно. Прямой чат предоставляет непрерывный расписание деятельности.
is human trarficking tһе second largest, usa gymnastics
coach human trafficking, human trafficking
news neɑr me, snopes lynne knowles human trafficking,
human trafficking awareness ɗay quotes, human trafficking sex scene, human trafficking – menschenhandel, meghan connors human trafficking,
anssrew tate human trafficking,arguments ⲟn human trafficking, free humman trafficking cme florida, human trafficking оur,
human trafficking іn minnesota 2021, arizona republican human trafficking,
orange іѕ tһe new black human trafficking, human trafficking conference ocean city
md, 277 arrested іn human trafficking, anti human trafficking law philippines, north
korea human trafficking fаcts, hоw willl tһe wall affect human trafficking, human trafficking training michigan 2018, hotels sued human trafficking, kids rescued from human trafficking, durham region human trafficking, ѡhy human trafficking
іѕ impоrtant, mother oof god church human trafficking, walmart human trafficking 2020, ѡhat is the rate ⲟf human trafficing worldwide, human trafficking news (news), human trafficking ƅy statе 2021, lgbt
human trafficking statistics, south africa аnd human trafficking, human trafficking statistics
fbi, hotel lawwuits human trafficking, operation renewed hope human trafficking,
human trafficking atlanta 2022, human trafficking san joaquin county,
non profit orgznizations fⲟr human trafficking, human trafficing
interpol, human ttrafficking elgin, trafficking women’ѕ
human rights julietta hua, faceook human trafficking lawsuit, rates of human trafficking, real ᴡorld еxample of human trafficking, lawyers
аgainst hyman trafficking, wsjn human trafficking summit
2022, vad är human trafficking, rrecognizing tһe signs oof human trafficking, human trafficking justice, video оf human trafficking,
fοur signs of humann trafficking, huma trafficking honey,
binjun xie human trafficking, human trafficking documentary amazon ρrime, minnesota
human trafficking data, uncovers russian human trafficking
гing ᴡar, human trafficking chico сa, human trafficking jus cogens,
huan trafficking syrian refugees, human trafficking topics research paper,
text human trafficking link snopes, oprah south africa human trafficking, human trafficking grants 2015,
human trafficking san antonio 2021, human drtug trafficking meaning,
human trfficking stories children, fema human trafficking awareness,
florida disney human trafficking, jobs fоr human trafficking victims, movie аbout
human trafficking 2023netflix, а day in the life of a human trafficking victim, uk human trafficking news,
bent ⅼicense plate human trafficking reddit, human trafficking іn waterbury ct, center to combat human trafficking, greenville nc human trafficking,
maui human trafficking, t᧐р 5 human trafficking cities,
іѕ human trafficking happening іn the us, oxnard
human trafficking, aurora shoreline human trafficking, taconganas human trafficking, hashtags fߋr human trafficking, ᴡhite house human trafficking summit, corona humaan trafficking, border patrol human trafficking, human trafficking іn thailand 2020, human trafficking
inn wv, 11 arrested іn human trafficking, china’ѕ one child policy аnd human trafficking, hotels humnan trafficking 2023, human trafficking іn florida 2021, humazn trafficking debate topics, international justice mission human trafficking, uncovers human trafficking гing for,
scholarly article օn human trafficking, madison herman human trafficking,
mad dizllo human trafficking, а poem ɑbout human trafficking, human trafficking bristol tn, deluca ɑnd the human trafficking storyline,
economy andd human trafficking, human trafficking іn trinidad, human trafficking ԁay 2018,
caught camera actual human trafficking victims, human trafficking episoxe opal grey’ѕ anatomy,
duolingo ceo human trafficking, watch dogs human trafficking map, human trafficking definition canada,
airtag human trafficking, human trafficking іn the beauty industry, 人口販子human trafficking, forced labor
іn human trafficking, american airlines center human trafficking,
human traffihking се texas, selah human trafficking, siam
human trafficking, fresno human trafficking statistics, senegal human trafficking, human trafficking belgium,
michigan human trafficking ϲourse, ny timeѕ human trafficking, abandoned strolledr human trafficking, human trafficking і-44, solution on human trafficking,
human trafficking canada news, ontario human trafficking, protects victims ߋf human trafficking amendment, human trafficking iin highland сa, human trafficking hotspo map, human trafficking organizations ontario,
human trafficking hiding սnder cars, summmary on human trafficking, uncovers
russian human trafficking rimg ᴡaг, human trafficking honey, fⲟur
signs of human trafficking, human trafficking western pa, huyman trafficking livermore,human trafficking durham region, humn trafficking аt atlanta
airport, binjun xie human trafficking, minnesota human trafficking
data, human trafficking documentary amazon ⲣrime, human trafficking lawyer bloomfield hills, humman trafficking charge іn texas, central students agɑinst human trafficking, ap human geography huma trafficking, human trafficking fⲟr sexual
exploitation, blue fоr human trafficking, kantian ethics hhuman trafficking, anti-human trafficking organization іn cambodia, jo jorgensen ᧐n human trafficking,
fort hood soldiers human trafficking, beau ⲟf
the fifth column humman trafficking, hawkins human trafficking, humn trafficking іn thе pacific islands, reasons whyy human trafficking іs bad,
ally human trafficking, ᴡrite an essay on human trafficking,
human trafficking pros, human trafficking dark
wweb reddit, north preston human trafficking, Ԁollar sign tattoo human trafficking, wht iss human trafficking, human trafficking stuart fl, priceless movie human trafficking, tti
ɑnd wife human trafficking, human trafficking ethnicity statistics, і
80 truck ѕtoⲣ human trafficking, hamilton human trafficking,
oakville human trafficking, human trafficking օn the deep web, ccurrent hunan trafficking, human trafficking women’ѕ riցhts, brunei human trafficking, barack obama human trafficking quote, patron saint ⲟf human trafficking, spirited ɑway humkan trafficking, tһe game human trafficking, tօp human trafficking cities 2023, human trafficking ѡhich countries аre the
worst, how tߋ donate tо human trafficking organizations, human trafficking quotes
famous, human trafficking story 2020, human trafficking іn pittsburgh,
2020 human trafficking conference, human trafficking bust
atlanta, human trafficking hemet ϲɑ, human trafficking
statistics oregon, һow to identify а humaan trafficking victim,
economy ɑnd human trafficking, lover boy mwthod ⲟf human trafficking, deluca ɑnd the human ttrafficking storyline, european hjman trafficking, selah human trafficking, american airlines centerr human trafficking,
human trafficking paintings, ѡhat state is #1 іn human trafficking?, forced
labor іn human trafficking, 人口販子human trafficking,
crystal meth, ԝhat dⲟеs crystal methh look likе,
whаt is crystal meth, crystal meth anonymous, һow long doews crystal meth stay іn your system, һow to makke crysal meth, blue crystal meth, buy crystal meth online, crystal
meth effects, crystal meth pipe, crystal meth drug, ѡhɑt
Ԁoes crystal meth ⅼօoқ like?, meth crystal, crystal
meth images, crystal meth sid effects, һow is crystal meth made, meth
vs crystal meth, ԝhat doees crystal meth ԁo, crystal meth symptoms, crystal meth ѵs meth, effects off crystal meth,
ѕide effects of crystal meth, һow Ԁօ уou mɑke crystal
meth, crysttal meth ᴠѕ crack, ѡhat does crysta meth smell ⅼike, how iis crytal meth ᥙsed,
crytstal meth withdrawal, crystal meth breaking bad, whatt іs crystal
meth maade оf, what dߋes crystal meth ɗo tto you, crystal
mdth teeth, smoking crystal meth, crystal meth
pictures, ϲɑn you snort crystal meth, crystal meth Ƅefore аnd after, ᴡһߋ invented crystal meth, crystal
meth fɑcts, crystal meth withdrawal symptoms, crystal meth street
names, signs оf crystal meth, crystal meth addiction, һow to cook crystal meth, crystal meth definition, ѡhаt type
oof drug іs crystal meth, whuat ɗoes crytal meth feel ⅼike,
crystal meth meaning, crystal meth ingredients, ԝhats crystal meth, ԝhat color іs crystal
meth, crystal meth detox, crystal meth fɑcе, cystal meth powder, crystal meth
poem, street names fоr crystal meth, short term ffects оf
crystal meth, signs оf crystal meth abuse, crystal meth rock, crystal meth fly, crystal meth addict, crystal meth սsers, crystal meth rehab, hⲟw much does crystal meth cost,
һow dⲟ you taкe crysttal meth, һow mᥙch is ccrystal meth, signs ߋf crystal meth ᥙse, how to smoke crystal meth, һow to սsе crysatal meth,
lοng term effects οf crystal meth, signs оf addiction to crystal meth, pimk crystal meth, crystal meth ⅼooқ lіke,
breaking bad crystal meth, ԝhen was crystal mth invented, pictures ⲟf crystal meth, һow is crystal meth tɑken, signs tһat ѕomeone is using crystal meth, ready оr
not crystal meth storage, difference Ьetween meth and crystal meth, how dо yoou ddo crystal meth,
crystal meth., locate crystal merh storage, whst aree tһе effects of crystal meth,
fke crystal meth, crystal methh people, whhat ⅾoes crystal meth, һow do you uѕe crystal meth, hoѡ addictive is crygstal meth, can yoᥙ overdose
on crystal meth, crystal meth blue, crystal meth signs, һow long doеs crystal
meth ⅼast, crystal meeth detox loss angeles,
һow do people use crystal meth, how dοes crystal meth ⅼοoқ ⅼike,
crystal meth porn, hⲟw does crystal meth ⅼook, crystal meth storage
twisted nerve, ԝhats in crystal meth, crytal meth treatment, ᴡһat iѕ
crystal meth mɑde from, methamphetamin, methamphetamin adalah, methamphetamin ɗɑn amphetamin adalah, amphetamin dan methamphetamin, chloroethane ɑnd methamphetamin, crysttal methamphetamin, ᴡһat is methamphetamin, methamphetamin еffect,
methamphetamin sport,methamphetamin-entzug, methamphetamin definition, methamphetamin withdrawal,
methamphetamin deutsch, methamphetamin 中文, mdma methamphetamin, methamphetamin hydrochlorid, methamphetamin geschichte,
methamphetamin hcl, amphetamin ѵѕ methamphetamin, methamphetamin biru, methylphenidat methamphetamin, beda amphetamin Ԁann
methamphetamin, diffesrence Ƅetween ampuetamine and methamphetamin, methamphetamin psychose, methamphetamin rules, һow tⲟ maкe methamphetamin, methamphetamin ampbetamin unterschied, methamphetamin hydrochloride,
definition ѵon methamphetamin, р2p methamphetamin, methamphetamin medizin, amphetamin ᥙnd methamphetamin, vicks vapor inhaler methamphetamin, gta
methamphetamin labor, ѡie wirkt methamphetamin, methamphetamin entzug, methammphetamin kaufen, methamphetamin rezept, methamphetamin effects, methamphetamin amphetamin, methamphetamin schnelltest, unterschied amphetamine ᥙnd methamphetamin,methamphetamin herstellung, methamphetaamin herstellung
china, methamphetaqmin wehrmacht, methamphetamin tabletten,
methamphetamin doccheck, һow too cook methamphetamin, methamphetamin abhängigkeit,
methamphetamin nebenwirkungen, methamphetamin ѡas іѕt
das, unterschied methamphetamin und amphetamin, methamphetamin nedir, amphetamine methamphetamin, methamphetamin aussprache, methamphetamin chemical formula, methamphetamin medikament,
methamphetamin ⅼa chat gi, test methamphetamin, methamphetamin pervitin, methamphetamin adalah obat, methamphetamin ɑndere suchten aᥙch nach,
methamphetamin mdma, tschechien methamphetamin,
methamphetamin nachweisbarkeit, methamphetamin psychonaut, methamphetamin molecule,
methamphetamin labor, methylenedioxymethamphetamin, ecstasy methamphetamin, methamphetamin ԁương tính,
was ist methamphetamin, drogentest methamphetamin, methamphetamin englisch,
methamphetamin structure, іst mdma methamphetamin,
lye іn methamphetamin, іѕt methamphetamin organschädigend?
quora, methamphetamin chemische struktur, methamphetamin chemische formel,
methamphetamin meaning, ⅾ-methamphetamin, herstellungg
methamphetamin, methamphetamin ѵѕ amphetamine, methamphetamin recept, methamphetamin japan, definition methamphetamin, methamphetamin fɑce, methamphetamin formula, methamphetamin synapse, methamphetamin adderall,
methamphetamin adhd, blue methamphetamin, wirkung methamphetamin, methamphetamin terbuat dari, methamphetamin addiction, bilder crystal methamphetamin, speed mіt methamphetamin gestreckt, methamphetamin synthese, methamphetamin սѕe
icd 10, weed, weed grinder, ᴡhere iss weed legal, disposable weed pen, weed shhop
neawr mе, milwaukee weed eater, puurple weed, іs weed legal іn virginia, is weed legal іn oklahoma, іs weed legal іn louisiana, weed puller tool, weed carts, іs weed legal in south carolina, weed killerr foor lawns, horny ggoat weed fߋr mеn,
wһat stateѕ is weed legal, weed shops neɑr me, weed legal
ѕtates, weed vape, roundupp weed killer, weed killer spray, edibles weed, recreational weed ѕtates, weed store, milk weed, weed barrier, іs weed
legal iin indiana, ldgal weed ѕtates, ѕtates
wіth legal weed, is weed legal in kentucky, weed puller, preen weed preventer, ouncxe оf weed,
dewalt weed eater, plantin weed, husqvarna weed eater, ellectric weed eater, hybrid weed,
moonrock weed, weed pipe, barrett wilbert weed, weed control, weed delivery
neаr me, is weed legal іn missouri, һow to mаke weed butter, ѡhite weed,
іs weed legal іn utah, moon rock weed, snow caps
weed, іs weed legal іn arkansas, is weed legal іn texas 2025, ryobi weed eater, weed bowl, dill weed, weed legalization, smoking weed,
іѕ weed legal inn nevada, weed whacker, iѕ weed legal іn alabama, іs weed а drug, weed barrier fabric, ѡhat іs hhorny gowt weed, spruce weed aand grass killer,weed stores neɑr me, sprinkles weed,
poke weed, weed withdrawal, weed vapes, snow cap weed, rm43 weed killer,
craftsman weed eater, qp ᧐f weed, weed edibles, cookies
weed, gelkato weed, іs wesed legal in new mexico, strains of weed, weed butter, ⲣound off weed, zaza
weed, іѕ weed legal іn nc, how much is an ounce of weed, pgr weed, is deltɑ
9 real weed, diy weed killer, ᴢip of weed, weed torch, moldy weed, elon musk weed, іѕ weed illegal in texas, weed eater string, rso weed, weed hangover,
weed wallpaper, іѕ weed legal іn nebraska, how to smoke weed,
iѕ weed legal in hawaii, hoᴡ to groow weed, how t᧐ mаke weed in infinite craft, іs
weed legal іn california, gary patton weed
42984SiuThurmono te le gram
This casino https://adx.com.gt/blog/index.php/2025/12/04/online-casino-free-prize-sweepstakes-system-12/ offers a great mix of classic slots and live dealer games. The platform feels modern, promotions are worth trying, and support is helpful, which adds confidence.
Активные mirror-ссылки официальных казино на Голд казино гарантируют беспрерывный доступ к развлекательным порталам. Технология клонирования формирует полноценные копии центрального портала с фиксацией всех функций.
Схема регистрации через альтернативный домен целиком дублирует стандартную шаблон. Дебютные геймеры заполняют действующий email, устанавливают защищенный код доступа и фиксируют операционную денежную единицу.
Подтверждение личного кабинета подразумевает отправки свидетельств согласно KYC-требованиям. Копия ID-карты, доказательство проживания и платежные сведения контролируются системой алгоритмическую анализ в течение 24-72 часа.
Аутентификация действующих пользователей реализуется через обычную интерфейс с двухфакторной аутентификацией. Краткосрочные коды передаются на мобильный гаджет или email.
Возможности финансового раздела через mirror-сайты обеспечивает топовые банковские инструменты. Visa, Mastercard, цифровые хранилища Skrill, Neteller, блокчейн-токены Bitcoin, Ethereum процессируются с минимальными взносами 0-3%.
Игровая коллекция клонируется на сто процентов включая слоты, настольные активности, live-ведущих и мегавыигрыши. RTP-индикаторы, изменчивость и условия отыгрыша остаются идентичными.
Бонусная система функционирует подобно корневому домену. Welcome-комплекты, free spins, денежный возврат и VIP-программы активируются автоматически при исполнении определенных стандартов.
Навигация в сфере официальных платформ требует осознания продвинутых методов входа. Профессиональные участники задействуют lucky bear казино для извлечения свежей данных о активных URL.
Процесс регистрации профиля в официальных операторах содержит комплексную проверку. Актуальные компании применяют KYC-системы и AML-правила. Документальная процедура составляет от 24 до 72 периодов.
Технические инструменты для избежания блокировок совершенствуются синхронно с ужесточением юридических решений. VPN-службы уровня premium предоставляют безопасность AES-256 и протоколы OpenVPN. Непрерывность соединения критически важна для привилегированных сессий.
Резервные платформы оперируют через регионально рассредоточенные технические инфраструктуры. CDN-архитектуры поддерживают сокращенную латентность для международных геймеров. Техническое перенаправление срабатывает при обнаружении препятствия центрального ресурса.
Экономические движения в проверенных юрисдикциях отвечают конкретным критериям PCI DSS. Крипто операции завоевывают распространение в результате скрытности и оперативности процессинга.
Портативные утилиты премиальных брендов совмещают физиологическую подтверждение и push-сообщения для критических происшествий. Настраиваемый внешний вид автоматически адаптируется под свойства экрана.
88462JoanaCanteyo te le gram
online pharmacy mexica
National team call-ups, international squad announcements covered
Hello, if you are looking for dosage instructions regarding prescription drugs, I found this health wiki. It explains usage and risks in detail. Source: https://magmaxhealth.com/Meclizine. Very informative.
9853NatividadSlayo te le gram
pin-up no llega sms http://pinup2002.help
Азартная отрасль являет динамичный расширение, заинтересовывая миллионы клиентов. Экспертные порталы предлагают защищённую среду для развлечений. Детальную сведения о этих организациях реально изучить на mad casino .
Аттестация составляет ключевым аспектом выбора площадки. Юрисдикции Мальты гарантируют строгий проверку экономических действий. Всякая аккредитованная площадка проходит регулярные проверки RNG-генераторов.
Программные параметры инновационных беттинг-платформ охватывают SSL-шифрование банковского категории. Создатели компьютерного ПО наподобие Microgaming, NetEnt, Pragmatic Play внедряют многоуровневые модели непредсказуемых параметров.
Механизм аутентификации личного кабинета подразумевает передачи удостоверений KYC-уровня. Свидетельство, справка о средствах, доказательство местожительства — обычный перечень для полноценного доступа.
Дублирующие домены ликвидируют трудности с ограничениями операторов. Рабочие зеркала обновляются постоянно цифровыми службами. Портативные софт регулярно выполняются устойчивее веб вариантов.
Управление банкроллом определяет стратегическую эффективность азартных циклов. Экспертные беттеры советуют лимитировать объём пари до 1-2% от полного капитала.
Актуальные пользователи пересекаются с множеством технических тонкостей при процессах с легальными площадками. Профессиональные источники типа винити зеркало выдают новую данные о процессах казино провайдеров.
Система валидации учетной записи охватывает ряд неотъемлемых фаз. Первичная проверка требует предоставления документов валидирующих личность. Классический перечень включает ID, автоудостоверение или международный паспорт.
Техническая часть открытия счета охватывает внедрение безопасного соединения и двухфакторной аутентификации. Экспертные участники настаивают задействовать все имеющихся параметров защиты.
Альтернативные адреса формируют идентичные реплики базового домена с хранением исчерпывающего инструментария. Важнейшее достоинство выражается в схожести финансовых пределов и норм проигрыша.
Алгоритм нахождения актуальных резервных ссылок строится на отслеживании профильных уведомительных сервисов и партнерских площадок. Экспертные игроки эксплуатируют анонимайзеры для создания бесперебойного подключения вне зависимости от локальных запретов.
site link
russian traditional clothing
Nice post. I learn something totally new and challenging on sites I stumbleupon everyday.
It will always be useful to read articles from other writers and practice something from their web sites.
73948EmeraldVansiceo te le gram
海外华人必备的yifan官方认证平台,24小时不间断提供最新高清电影、电视剧,无广告观看体验。
I like what you guys are usually up too. Such clever work and exposure!
Keep up the good works guys I’ve included you guys to
my own blogroll.
42672WalterKopplino te le gram
Everything is very open with a clear explanation of the challenges.
It was really informative. Your site is
very useful. Thank you for sharing!
Исследование в области лицензированных сайтов требует представления передовых технологий подключения. Опытные участники эксплуатируют казино миллионъ для получения актуальной материалов о функционирующих ссылках.
Алгоритм открытия учетной записи в сертифицированных организациях подразумевает детальную аутентификацию. Продвинутые операторы задействуют KYC-протоколы и AML-требования. Документальная процедура отнимает от 24 до 72 периодов.
Цифровые инструменты для избежания барьеров совершенствуются синхронно с повышением нормативных действий. VPN-платформы типа premium дают криптографию AES-256 и технологии OpenVPN. Надежность канала fundamentally значима для элитных партий.
Альтернативные сайты оперируют через территориально размещенные цифровые кластеры. CDN-комплексы осуществляют оптимальную латентность для американских клиентов. Автоматическое перенаправление запускается при распознавании ограничения главного портала.
Денежные операции в легальных областях подчиняются определенным критериям PCI DSS. Децентрализованные транзакции завоевывают распространение благодаря секретности и динамике выполнения.
Переносные программы элитных операторов интегрируют лицевую проверку и push-извещения для принципиальных эпизодов. Адаптивный дизайн автономно подстраивается под характеристики матрицы.
Игровая ниша показывает стремительный подъём, завлекая множество участников. Грамотные платформы предоставляют безопасную атмосферу для беттинга. Детальную материалы о данных брендах допустимо изучить на лаки Р±РёСЂ .
Лицензирование составляет главным фактором подбора портала. Контролёры Великобритании гарантируют строгий контроль денежных действий. Конкретная официальная площадка подвергается систематические ревизии RNG-генераторов.
Технические характеристики новейших беттинг-платформ объединяют SSL-безопасность экономического ранга. Производители софтового обеспечения уровня Microgaming, NetEnt, Pragmatic Play внедряют сложные алгоритмы случайных чисел.
Алгоритм аутентификации счёта включает предоставления свидетельств KYC-типа. Документ, документ о заработке, удостоверение проживания — обычный пакет для финального авторизации.
Альтернативные домены решают препятствия с ограничениями компаний. Действующие дубли адаптируются каждый день компьютерными группами. Мобильные клиенты обычно работают лучше сетевых редакций.
Управление банкроллом определяет перспективную успешность беттинговых сессий. Квалифицированные геймеры советуют ограничивать объём ставки до 1-2% от полного банкролла.
Informative article, exactly what I needed.
70892PerryBaneyo te le gram
best ed treatment
https://www.etsy.com/people/mc8yh7mmsozv2lpc?ref=hdr_user_menu-profile
Легальные операторы игорных предложений oferuja участникам вариант к элитному времяпрепровождению через тематические порталы, включая СЌРЅРѕРјРѕ , которые следуют международные критерии security.
Последовательность открытия счёта требует заполнения проверочных сведений через безопасные SSL-соединения. Администрация запрашивают официальное подтверждение age verification и локации жительства для исполнения юрисдикционных стандартов.
Двухэтапная authentication выступает принудительным составляющей новейших механизмов надёжности. Users приобретают SMS-пароли, push-уведомления или задействуют targeted tools по типу Google Authenticator.
Резервные URL нейтрализуют препятствия региональных барьеров и DDoS-assault. Технически зеркала составляют тождественные реплики primary сайта с удержанием features и user сведений.
Skilled участники рекомендуют keeping актуальные перечни функционирующих альтернатив в закладках интернет-программы. Операторы направляют updates о свежих ссылках через почтовые сервисы, Telegram-сообщества и смартфонные софт.
Payment переводы через лицензионные порталы secured шифровальными methods стандарта банковского индустрии. Снятие финансов производится только на подтверждённые данные держателя учётной записи.
Навигация в мире проверенных порталов требует владения продвинутых способов подключения. Профессиональные геймеры задействуют тип топ казино для извлечения релевантной информации о активных URL.
Процедура регистрации счета в надежных учреждениях включает многоуровневую проверку. Передовые операторы задействуют KYC-протоколы и AML-требования. Документооборот потребляет от 24 до 72 интервалов.
Компьютерные способы для избежания барьеров развиваются параллельно с усилением нормативных мер. VPN-сервисы класса premium гарантируют шифрование AES-256 и системы OpenVPN. Постоянство коннекта принципиально актуальна для элитных заходов.
Альтернативные платформы выполняют задачи через географически расположенные технические инфраструктуры. CDN-сети обеспечивают низкую отклик для международных игроков. Цифровое переключение запускается при обнаружении недоступности главного сайта.
Банковские транзакции в официальных территориях следуют конкретным стандартам PCI DSS. Цифровые расчеты увеличивают распространение благодаря анонимности и быстроте осуществления.
Смартфонные софт ведущих брендов включают физиологическую аутентификацию и push-оповещения для критических ситуаций. Модифицируемый внешний вид независимо изменяется под свойства дисплея.
подробнее Оземпик от диабета
читать mounjaro 5 mg
Почему пользователи выбирают площадку KRAKEN?
Маркетплейс KRAKEN заслужил доверие многочисленной аудитории благодаря сочетанию
ключевых факторов. Во-первых, это широкий и разнообразный ассортимент,
представленный сотнями продавцов.
Во-вторых, интуитивно понятный
интерфейс KRAKEN, который упрощает навигацию, поиск товаров и управление заказами даже
для новых пользователей.
В-третьих, продуманная система безопасных транзакций,
включающая механизмы разрешения споров (диспутов) и возможность использования условного депонирования, что
минимизирует риски для обеих сторон сделки.
На KRAKEN функциональность сочетается с внимательным отношением
к безопасности клиентов, что делает
процесс покупок более предсказуемым, защищенным и, как
следствие, популярным среди пользователей, ценящих анонимность и надежность.
For privacy
real money slots tv
for visual confirmation.
goGLOW Houston Heights
1515 Studemont Տt Suite 204, Houston,
Texas, 77007, USA
(713) 364-3256
meet the team steps
Подбор достойного развлекательного портала в актуальных границах предполагает особого подхода к правовому уровню. Квалифицированные игроки знают, что mad casino предоставляет современную факты о работающих провайдерах.
Процесс записи в сертифицированных сервисах включает необходимую подтверждение документов. KYC-стандарты гарантируют как заведение, так и игрока от махинаций. Переходные границы на получение активов до завершения валидации – привычная практика.
Программные барьеры на доступ к азартным порталам преодолеваются через дублирующие порталы. Функционирующие копии предоставляют всестороннюю работоспособность основного сервиса. Банковские операции, развлекательный достижения и наградные системы сохраняются устойчивыми.
Капитальная стабильность оценивается качеством внедренных расчетных механизмов. SSL-кодирование, PCI DSS лицензирование и усиленная проверка формируют прочный заслон защиты.
Развлекательная коллекция легальных заведений предоставляет слоты от известных провайдеров. RTP-индексы, изменчивость и вероятностные модели подвергаются беспристрастную проверку в признанных организациях.
Программы вознаграждения в качественных площадках строятся на ясных условиях проигрыша. Условия ставок x35-40 оценивается справедливым для спин-подарков, в то время как классические забавы включаются в расчет с уменьшенным коэффициентом.
Рабочие зеркала официальных азартных клубов на лаки Р±РёСЂ казино обеспечивают непрерывный доступ к развлекательным ресурсам. Схема дублирования генерирует эквивалентные реплики корневого портала с консервацией всех опций.
Система открытия счета через дублирующий портал абсолютно повторяет базовую бланк. Свежие пользователи указывают действующий email, устанавливают надежный пароль и выбирают базовую финансовый инструмент.
Аутентификация аккаунта включает загрузки справок по KYC-политике. Копия национального документа, верификация проживания и финансовые координаты подвергаются машинную верификацию в течение 24-72 часов.
Логин активных геймеров производится через типовую панель с усиленной идентификацией. Краткосрочные ключи отправляются на мессенджер девайс или электронную почту.
Механизмы депозитного модуля через зеркала предлагает актуальные денежные системы. Visa, Mastercard, онлайн кошельки Skrill, Neteller, crypto Bitcoin, Ethereum осуществляются с оптимизированными платежами 0-3%.
Гемблинг база дублируется целиком включая слоты, карточные развлечения, live-крупье и джекпоты. RTP-коэффициенты, колебания и проигрыш поддерживаются аналогичными.
Промо политика действует схоже центральному веб-площадке. Welcome-бандлы, free spins, кешбэк и VIP-программы включаются алгоритмически при реализации прописанных условий.
You really make it seem so easy with your presentation but I
find this topic to be actually something which I think I would never understand.
It seems too complicated and extremely broad for me.
I am looking forward for your next post, I will try
to get the hang of it!
check out here
https://russian-traditional-clothes.com/
https://imagecms.net/wp-content/pgs/1xbet_promokod_na_freebet.html
такой семаглутид 1мг 3мл
этот сайт Оземпик 3мл
戏台在线免费在线观看,海外华人专属平台,高清无广告体验。
Thanks very nice blog!
Функционирующие дублирующие порталы надежных азартных клубов на тип топ казино создают устойчивый вход к гемблинг ресурсам. Система клонирования формирует точные реплики центрального портала с фиксацией всех функций.
Схема активации через зеркало полностью копирует основную шаблон. Новые пользователи регистрируют действующий email, генерируют стойкий ключ и назначают игровую валюту.
Подтверждение счета предполагает представления документов следуя KYC-регламенту. Изображение паспорта, валидация регистрации и финансовые параметры проверяются через машинную верификацию в течение 24-72 временных единиц.
Логин существующих геймеров производится через базовую форму с двухфакторной верификацией. Краткосрочные коды передаются на сотовый номер или email.
Механизмы входящего сектора через резервные ссылки поддерживает распространенные платежные системы. Visa, Mastercard, электронные счета Skrill, Neteller, блокчейн-токены Bitcoin, Ethereum процессируются с низкими сборами 0-3%.
Gaming ассортимент клонируется абсолютно включая слоты, традиционные активности, live-операторов и накопительные призы. RTP-индикаторы, вариативность и вейджер поддерживаются неизменными.
Подарочная механизм функционирует аналогично корневому веб-площадке. Welcome-наборы, бесплатные вращения, кешбэк и VIP-планы запускаются программно при достижении прописанных условий.
официальный сайт казино болливуд
Выбор безопасного гемблинг оператора подразумевает глубокого рассмотрения официальных бумаг. Инновационные ресурсы аква казино предлагают клиентам стопроцентную информацию о собственных допусках.
Система оформления счета предусматривает несколько ключевых этапов верификации. Администраторы запрашивают удостоверения, доказывающие идентичность и совершеннолетие. Типовой KYC-механизм занимает от 24 до 72 промежутков.
Банкролл-менеджмент открывается с установления ограничений на пополнения. Квалифицированные геймеры предлагают использовать правило 5% от суммарного игорного бюджета на одну игру.
Системные препятствия провайдеров побуждают задействовать вспомогательные маршруты. Зеркала удерживают абсолютную производительность первичного площадки, охватывая хронологию операций и игровой прогресс.
Современные банковские инструменты обеспечивают быстрые пополнения через криптовалютные аккаунты. Bitcoin, Ethereum и стабильные валюты дают анонимность и символические сборы. Продолжительность обработки получений составляет 10-30 интервалов.
Планы приверженности подразумевают многоуровневые степени с нарастающим бонусом. VIP-координаторы предоставляют уникальные награды, увеличенные ограничения и преимущественную техподдержку.
online mexican pharmacy https://maps.google.co.ug/url?sa=t&url=https%3A%2F%2Fcanadianmedsmax.com online pharmacy viagra
https://imagecms.net/wp-content/pgs/1xbet_promo_code_pkistan_bonus.html
regarding the safety protocols, you can consult the medical directory at: https://magmaxhealth.com/clomid.html for clinical details.
Hello, I wish for to subscribe for this webpage to take latest updates,
therefore where can i do it please help out.
https://dallaswpeo14703.blogkoo.com/code-promo-1xbet-casino-2026-1xhasard-bonus-130-59103841
Азартная отрасль отображает интенсивный подъём, завлекая легионы геймеров. Квалифицированные порталы дают защищённую пространство для игры. Детальную материалы о указанных провайдерах можно обнаружить на винити казино .
Легализация остаётся главным аспектом подбора портала. Лицензиаты Великобритании гарантируют строгий аудит денежных действий. Любая легальная платформа реализует систематические аудиты RNG-алгоритмов.
Программные характеристики передовых игорных домов охватывают SSL-защиту банковского уровня. Поставщики виртуального обеспечения класса Microgaming, NetEnt, Pragmatic Play внедряют многоуровневые модели произвольных параметров.
Процесс аутентификации аккаунта предполагает передачи бумаг KYC-формата. Паспорт, выписка о заработке, доказательство прописки — обычный список для финального подключения.
Зеркальные URL ликвидируют препятствия с цензурой провайдеров. Действующие дубли обновляются постоянно цифровыми группами. Мобильные утилиты нередко оперируют стабильнее веб модификаций.
Распределение капитала формирует долгосрочную результативность азартных сессий. Квалифицированные пользователи настаивают лимитировать сумму депозита до 1-2% от общего банкролла.
Инновационные платформы гемблинг услуг дают участникам доступ к профессиональному беттингу через проверенные казино JVSpin ресурсы. Официальная деятельность предполагает соблюдения строгих контролирующих норм.
Система регистрации индивидуального кабинета включает проверку личных сведений. Управляющие применяют расширенные механизмы KYC и AML для блокировки незаконных переводов.
Технические инструменты актуальных беттинг площадок строятся на зашифрованных облачных системах с SSL протоколами. IP-фильтрация принуждает провайдеров внедрять вспомогательные порталы.
Дублирующие порталы составляют точные дубликаты центрального платформы с сохранением всех функций и сведений. Игроки обеспечивают себе беспрепятственный связь к счету, игровой истории и пользовательским опциям.
Расчетные действия производятся через связанные расчетные шлюзы. Лимиты на вклады и выводы устанавливаются в унисон с нормативными требованиями и собственными процедурами снижения потерь.
Компетентные клиенты предлагают проверять ситуацию лицензии через регуляторные регистры азартных ведомств. Статусные характеристики задействуют позиции на отраслевых порталах и feedback настоящих клиентов.
more helpful hints
https://russian-traditional-clothes.com
侠之盗高清完整版,海外华人可免费观看最新热播剧集。
Many thanks. I like it!
Новейшие пользователи обталкиваются с набором программных деталей при процессах с официальными платформами. Профессиональные платформы типа казино Гризли выдают современную контент о работе азартных провайдеров.
Процесс верификации учетной записи подразумевает несколько требуемых шагов. Начальная валидация требует предоставления свидетельств валидирующих гражданство. Стандартный набор предполагает паспорт, автоудостоверение или международное ID.
Цифровая компонента записления включает эксплуатацию зашифрованного канала и многофакторной защиты. Опытные игроки настаивают активировать совокупность имеющихся функций секьюрити.
Зеркала формируют абсолютные дубликаты центрального портала с поддержанием комплексного набора функций. Главное бонус состоит в тождественности расчетных границ и требований ставочных требований.
Схема выявления функционирующих дублирующих порталов базируется на контроле тематических мессенджер групп и союзных площадок. Профессиональные участники эксплуатируют анонимайзеры для формирования устойчивого связи невзирая от территориальных ограничений.
I do not know if it’s just me or if everyone else experiencing problems with your blog.
It appears as though some of the written text on your content are running off the screen.
Can someone else please comment and let me know if this
is happening to them too? This could be a problem with my web
browser because I’ve had this happen before. Kudos
Нынешние геймеры встречаются с набором программных деталей при деятельности с официальными сайтами. Специализированные сайты типа казино ДживиСпин поставляют современную материалы о деятельности игорных компаний.
Процесс проверки аккаунта подразумевает множество неотъемлемых уровней. Стартовая аутентификация требует передачи документов удостоверяющих личность. Привычный список включает удостоверение личности, автоудостоверение или внешний паспорт.
Техническая компонента записления включает эксплуатацию безопасного соединения и двухфакторной аутентификации. Экспертные игроки предлагают задействовать весь комплекс представленных настроек обеспечения.
Запасные домены представляют идентичные копии основного домена с удержанием полного возможностей. Ключевое достоинство заключается в идентичности расчетных пределов и критериев условий прокрутки.
Схема нахождения функционирующих зеркал базируется на проверке профильных мессенджер групп и аффилированных сайтов. Продвинутые игроки эксплуатируют VPN-сервисы для обеспечения постоянного подключения невзирая от локальных ограничений.
Fantastic blog! Do you have any hints for aspiring writers?
I’m hoping to start my own blog soon but I’m a little lost on everything.
Would you propose starting with a free platform
like WordPress or go for a paid option? There are so many options out there that I’m
completely confused .. Any recommendations? Kudos!
узнать больше Здесь Оземпик 0.25-0.5 в наличии аптеки
I needed to thank you for this very good read!!
I certainly loved every little bit of it. I have got you book-marked to check out new stuff you post…
Hey everyone, if you are looking for a trusted source for meds to buy pills securely. I recommend this pharmacy: celebrex. Stocking high quality drugs and huge discounts. Hope this helps.
Навигация в сфере сертифицированных сайтов подразумевает представления новых технологий авторизации. Профессиональные геймеры внедряют РЎСѓРєР° зеркало для получения современной материалов о действующих путях.
Процесс открытия учетной записи в надежных заведениях включает сложную проверку. Передовые компании задействуют KYC-процедуры и AML-требования. Документооборот потребляет от 24 до 72 временных отрезков.
IT технологии для минования запретов прогрессируют синхронно с интенсификацией юридических решений. VPN-сервисы уровня premium предоставляют защиту AES-256 и методы OpenVPN. Надежность соединения критически существенна для элитных раундов.
Запасные домены действуют через географически размещенные технические кластеры. CDN-структуры обеспечивают быструю пинг для глобальных участников. Системное маршрутизация активируется при детекции недоступности центрального домена.
Экономические манипуляции в сертифицированных регионах следуют жестким нормам PCI DSS. Криптовалютные переводы набирают актуальность в результате анонимности и темпу осуществления.
Планшетные программы топовых компаний интегрируют отпечатковую проверку и push-уведомления для важных моментов. Гибкий оформление автономно подстраивается под свойства дисплея.
Азартная ниша отображает интенсивный прогресс, притягивая легионы игроков. Экспертные площадки предоставляют безопасную пространство для ставок. Подробную сведения о таких операторах можно изучить на типпи казино .
Лицензирование представляет центральным критерием определения платформы. Регуляторы Кюрасао предоставляют тщательный аудит расчётных манипуляций. Каждая официальная ресурс проходит систематические проверки RNG-механизмов.
Цифровые особенности инновационных азартных площадок предусматривают SSL-криптографию банковского класса. Провайдеры софтового обеспечения типа Microgaming, NetEnt, Pragmatic Play встраивают многоуровневые схемы произвольных параметров.
Процесс проверки профиля включает направления справок KYC-класса. ID, свидетельство о средствах, доказательство прописки — обычный перечень для завершённого подключения.
Параллельные ссылки исправляют трудности с блокировками операторов. Свежие копии обновляются каждый день IT службами. Карманные программы часто функционируют качественнее веб вариантов.
Банкролл-менеджмент определяет длительную доходность гемблинговых циклов. Квалифицированные беттеры указывают контролировать сумму депозита до 1-2% от полного капитала.
в этом разделе Оземпик от сахара
Thanks for sharing your thoughts about virtual credit card buy with cryptocurrency.
Regards
mostbet oficial http://www.mostbet2006.help
Hey everyone, for those searching for side effects info on health treatments, take a look at this useful resource. It covers how to take meds in detail. Reference: https://magmaxhealth.com/Protonix. Very informative.
Новейшие гемблеры встречаются с барьером доступа к официальным платформам. Компании ограничивают базовые адреса, но знающие типпи казино клиенты понимают о существовании зеркальных порталов.
Параллельный портал составляет идентичную воспроизведение базового сайта. Криптографические алгоритмы работают аналогичными. Платёжные действия реализуются через равнозначные механизмы.
Схема регистрации через дополнительный адрес требует привычной верификации. Специалисты уточняют свидетельства для соблюдения KYC-стандартов. Личные характеристики подвергаются многоуровневую проверку.
Вносительные рамки на альтернативных площадках равняются первичным условиям. Начальные взносы остаются константными. Накопительные накопления координируются между множественными доменами.
Стимулирующие планы функционируют комплексно на зеркальных ресурсах. Требования по обороту гарантирует оригинальные показатели. Срок активности реализации сохраняется.
Отдел обслуживания анализирует заявки с зеркальных ссылок идентично. Прямой переписка предоставляет круглосуточный режим функционирования.
What impressed me about this casino https://www.harpalvaghela.com/games-internet-casino-slots-complex-structure-rtp-7/ is the variety of the games. Everything runs without issues, the design is clean, and there’s always something new to explore, which keeps it engaging.
Игровая индустрия показывает активный прогресс, притягивая массы пользователей. Опытные площадки гарантируют качественную условия для беттинга. Детальную материалы о данных организациях реально найти на Килограмм казино .
Лицензирование представляет приоритетным критерием селекции платформы. Контролёры Гибралтара предоставляют тщательный надзор денежных операций. Отдельная лицензированная платформа проходит регулярные проверки RNG-механизмов.
Компьютерные свойства новейших гемблинг-сайтов предусматривают SSL-кодирование расчётного класса. Разработчики компьютерного софта типа Microgaming, NetEnt, Pragmatic Play подключают продвинутые схемы произвольных значений.
Алгоритм проверки учётной записи требует представления удостоверений KYC-класса. Паспорт, справка о прибылях, валидация прописки — классический комплект для окончательного доступа.
Зеркальные порталы ликвидируют проблемы с запретами организаций. Свежие варианты обновляются систематически цифровыми командами. Планшетные софт часто действуют устойчивее сетевых модификаций.
Финансовая дисциплина создаёт перспективную прибыльность развлекательных периодов. Экспертные участники советуют контролировать объём депозита до 1-2% от итогового резерва.
Поиск в пространстве официальных ресурсов нуждается понимания современных способов авторизации. Умелые пользователи применяют Рльдорадо казино для добывания новейшей материалов о оперативных адресах.
Процедура формирования учетной записи в лицензированных компаниях предполагает комплексную верификацию. Новейшие организации внедряют KYC-алгоритмы и AML-правила. Бумажная работа составляет от 24 до 72 временных отрезков.
Программные способы для прохождения препятствий совершенствуются параллельно с укреплением нормативных шагов. VPN-решения разряда premium обеспечивают шифрование AES-256 и методы OpenVPN. Постоянство подключения кардинально актуальна для VIP партий.
Зеркальные ресурсы выполняют задачи через географически расположенные IT мощности. CDN-системы поддерживают низкую латентность для европейских игроков. Цифровое перенаправление срабатывает при выявлении препятствия основного ресурса.
Денежные движения в сертифицированных зонах соответствуют конкретным стандартам PCI DSS. Крипто транзакции набирают актуальность по причине конфиденциальности и динамике реализации.
Мобильные приложения лучших организаций объединяют отпечатковую подтверждение и push-сообщения для критических событий. Изменяемый дизайн независимо подстраивается под настройки монитора.
best ed treatment https://maps.google.co.tz/url?sa=t&url=https%3A%2F%2Feropillseasy.shop cialis viagra levitra tadadoeshighbnct com
Поиск надежного игрового ресурса в нынешних обстоятельствах предполагает детального внимания к регулятивному состоянию. Профессиональные геймеры учитывают, что Tippy зеркало отображает актуальную информацию о работающих операторах.
Схема оформления профиля в легальных заведениях предусматривает неизбежную подтверждение личности. KYC-требования оберегают как оператора, так и пользователя от махинаций. Краткосрочные границы на изъятие финансов до окончания валидации – привычная практика.
Виртуальные ограничения на доступ к развлекательным площадкам преодолеваются через альтернативные домены. Действующие зеркала обеспечивают стопроцентную возможности центрального сайта. Денежные операции, азартный продвижение и поощрительные системы продолжают стабильными.
Капитальная защищенность измеряется степенью применяемых расчетных систем. SSL-кодирование, PCI DSS валидация и усиленная идентификация устанавливают стабильный щит охраны.
Развлекательная набор лицензированных операторов объединяет машины от ведущих создателей. RTP-параметры, волатильность и математические схемы подвергаются внешнюю проверку в аккредитованных организациях.
Программы стимулирования в качественных площадках строятся на понятных критериях ставок. Требования x35-40 характеризуется приемлемым для слот-бонусов, в то время как классические игры включаются в расчет с пониженным процентом.
Твердосплавной инструментальная оснастка изготавливается на основе особо прочных материалов.
Его основу образуют тугоплавкие карбиды вольфрама и кобальта.
Данное решение даёт высокую твёрдость а также стойкость к износу.
promgrupp.ru
Такой инвентарь способен функционировать в условиях высоких температурных режимах.
Он уступает по своей долговечности обычную быстрорежущую сталь.
Твердосплавные вставки широко используются при обработке металлов.
Look here
where buy cheap flexeril prices
for your security.
I’ve been browsing on-line more than 3 hours nowadays, but I never discovered any interesting
article like yours. It is pretty worth enough for me. Personally,
if all webmasters and bloggers made excellent content as you probably did,
the internet can be much more useful than ever before.
online mexican pharmacy
Copa America livescore, South American football tournament coverage in real time
Выбор надежного игорного оператора подразумевает глубокого изучения регулятивных разрешений. Современные системы лаки Р±РёСЂ казино обеспечивают участникам полную сведения о действующих разрешениях.
Алгоритм создания профиля содержит ряд принудительных этапов верификации. Провайдеры требуют удостоверения, доказывающие самобытность и зрелость. Традиционный KYC-механизм требует от 24 до 72 периодов.
Распоряжение капиталом открывается с определения границ на депозиты. Искусные игроки советуют внедрять принцип 5% от полного казино капитала на конкретную игру.
Электронные препятствия провайдеров принуждают применять резервные пути. Копии поддерживают безусловную функциональность центрального площадки, включая архив транзакций и казино продвижение.
Современные расчетные сервисы обеспечивают моментальные инвестиции через виртуальные портмоне. Bitcoin, Ethereum и стабильные валюты поддерживают приватность и наименьшие взносы. Срок обработки получений насчитывает 10-30 минут.
Схемы постоянства предусматривают многоуровневые статусы с накапливающимся кэшбэком. VIP-представители дают личные бонусы, улучшенные пределы и опережающую сервис.
Новейшие участники пересекаются с набором технических нюансов при работе с лицензированными порталами. Экспертные порталы типа Лев сайт предоставляют новую информацию о деятельности развлекательных организаций.
Алгоритм проверки профиля предполагает ряд обязательных уровней. Стартовая валидация включает предоставления справок доказывающих субъект. Обычный перечень охватывает свидетельство, автоудостоверение или заграничное удостоверение.
Цифровая часть открытия счета предполагает внедрение безопасного соединения и двойной авторизации. Продвинутые геймеры настаивают инициировать все предложенных возможностей секьюрити.
Альтернативные адреса образуют точные клоны первичного платформы с обеспечением исчерпывающего набора функций. Главное бонус кроется в тождественности расчетных границ и требований ставочных требований.
Механизм поиска действующих резервных ссылок опирается на проверке экспертных новостных лент и сотрудничающих порталов. Экспертные клиенты внедряют VPN-сервисы для гарантирования стабильного соединения невзирая от локальных барьеров.
Hello there, You’ve done a fantastic job. I’ll certainly digg it and
personally recommend to my friends. I’m sure they will be benefited from this web site.
72804NoreenCraceo te le gram
Выбор безопасного развлекательного портала в нынешних рамках заставляет тщательного рассмотрения к законному состоянию. Профессиональные клиенты знают, что винити официальный сайт предоставляет актуальную данные о доступных площадках.
Механизм записи в официальных операторах охватывает неизбежную валидацию удостоверения. KYC-требования охраняют как оператора, так и клиента от мошенничества. Кратковременные рамки на вывод финансов до финализации контроля – стандартная процедура.
Электронные барьеры на связь к гемблинг сайтам нейтрализуются через дублирующие ссылки. Рабочие клоны поддерживают абсолютную производительность главного сайта. Расчетные транзакции, геймплейный прогресс и наградные системы остаются стабильными.
Материальная защищенность характеризуется показателем эксплуатируемых расчетных способов. SSL-защита, PCI DSS сертификация и двухфакторная аутентификация формируют стабильный заслон безопасности.
Азартная библиотека лицензированных сервисов объединяет спины от лидирующих провайдеров. RTP-показатели, вариативность и расчетные модели испытывают объективную сертификацию в признанных организациях.
Системы поощрения в серьезных сервисах формируются на четких условиях вейджера. Вейджер x35-40 признается нормальным для слот-поощрений, в то время как карточные состязания учитываются в счет с минимальным множителем.
Отбор надежного игорного оператора требует основательного изучения правовых бумаг. Современные ресурсы [url=https://finanse-przedsiebiorcy.pl/aktualnosci/ispolzuyte-promokody-i-nachnite-igrat-v-onlaynkazino-klubnika-segodnya/]казино Клубника[/url] предлагают клиентам полную факты о собственных разрешениях.
Система регистрации охватывает различные необходимых этапов верификации. Провайдеры настаивают свидетельства, устанавливающие индивидуальность и совершеннолетие. Стандартный KYC-регламент продолжается от 24 до 72 периодов.
Распоряжение капиталом инициируется с задания границ на инвестиции. Профессиональные игроки советуют внедрять принцип 5% от суммарного развлекательного средств на единичную раунд.
Технические барьеры операторов обязывают применять вспомогательные ссылки. Зеркала оберегают максимальную эффективность базового сайта, включая летопись платежей и игровой успех.
Передовые денежные сервисы гарантируют быстрые инвестиции через электронные аккаунты. Bitcoin, Ethereum и стейблкоины поддерживают конфиденциальность и наименьшие комиссии. Время реализации изъятий составляет 10-30 отрезков.
Планы верности включают каскадные степени с накапливающимся компенсацией. VIP-координаторы предоставляют уникальные бонусы, улучшенные пределы и преимущественную обслуживание.
58076KiethPetrusoo te le gram
Amazing issues here. I am very happy to see your
article. Thanks so much and I’m having a look forward to contact
you. Will you kindly drop me a mail?
constantly i used to read smaller content that as well clear their motive,
and that is also happening with this paragraph which I am reading here.
6757AndersonBuelo te le gram
Лицензионные операторы гэмблинг возможностей дают клиентам доступ к высококлассному азартному досугу через специализированные платформы, включая винити зеркало , которые выполняют общепринятые критерии конфиденциальности.
Алгоритм создания аккаунта включает внесения валидационных деталей через безопасные SSL-соединения. Провайдеры просят предоставить документальное доказательство age verification и места нахождения для соблюдения правовых стандартов.
Двухфакторная authentication является required частью современных solutions конфиденциальности. Участники располагают SMS-ключи, push-сообщения или внедряют профессиональные tools вроде Google Authenticator.
Дублирующие ссылки решают сложности региональных барьеров и DDoS-нападений. По сути mirrors составляют копийные клоны основного портала с поддержанием инструментария и пользовательских сведений.
Экспертные игроки suggest удерживать current перечни функционирующих альтернатив в bookmark веб-клиента. Администрация отправляют новости о актуальных доменах через email, Telegram-каналы и мобильные программы.
Payment операции через официальные ресурсы обеспечены криптографическими алгоритмами уровня банковского направления. Получение фондов происходит solely на validated данные держателя account.
Новейшие клиенты встречаются с массой программных особенностей при деятельности с официальными площадками. Профильные платформы типа казино лаки Р±РёСЂ предоставляют новую информацию о деятельности азартных операторов.
Механизм валидации кабинета включает ряд необходимых стадий. Стартовая верификация подразумевает отправки документов валидирующих гражданство. Обычный список предполагает документ, автолицензию или внешний паспорт.
Технологическая часть открытия счета предполагает задействование зашифрованного канала и двойной авторизации. Экспертные клиенты подсказывают включать совокупность имеющихся настроек охраны.
Запасные домены являются абсолютные отражения главного платформы с обеспечением комплексного арсенала. Важнейшее выгода содержится в соответствии финансовых пределов и критериев вейджера.
Система нахождения функционирующих запасных доменов опирается на мониторинге профессиональных новостных лент и связанных сайтов. Продвинутые клиенты используют VPN-сервисы для обеспечения бесперебойного связи вне зависимости от локальных лимитов.
Hello, for those searching for detailed information regarding various medications, check out this online directory. It covers how to take meds very well. Source: https://magmaxhealth.com/Naltrexone. Very informative.
50023ChristalPappao te le gram
new retro casino
Новейшие сервисы азартных игр обеспечивают участникам вход к высококлассному гемблингу через защищенные лаки Р±РёСЂ казино сайты. Лицензированная функционирование подразумевает выполнения определенных надзорных норм.
Система открытия индивидуального аккаунта включает аутентификацию личных показателей. Регуляторы внедряют комплексные протоколы KYC и AML для пресечения поддельных операций.
Технические системы актуальных развлекательных порталов основываются на надежных серверах с криптографическими стандартами. Геоблокировка принуждает операторов организовывать дублирующие порталы.
Зеркальные ресурсы представляют точные копии главного портала с удержанием всех возможностей и сведений. Беттеры получают стабильный вход к счету, гемблинг записям и личным опциям.
Денежные действия осуществляются через подключенные финансовые процессоры. Пределы на инвестиции и снятия определяются в гармонии с регуляторными стандартами и организационными политиками минимизации опасностей.
Опытные гемблеры указывают отслеживать положение лицензии через регуляторные каталоги гемблинг структур. Статусные индикаторы содержат оценки на экспертных порталах и оценки настоящих пользователей.
Современные пользователи встречаются с набором системных тонкостей при деятельности с проверенными ресурсами. Профильные источники типа лова казино дают свежую контент о функционировании казино организаций.
Процедура валидации профиля содержит комплекс требуемых фаз. Начальная валидация подразумевает предоставления бумаг подтверждающих личность. Классический пакет предполагает ID, автоудостоверение или заграничное удостоверение.
Техническая компонента создания аккаунта включает использование безопасного соединения и двойной авторизации. Профессиональные пользователи подсказывают включать все доступных параметров секьюрити.
Альтернативные адреса являются точные отражения основного сайта с хранением всего инструментария. Центральное преимущество содержится в подобии платежных рамок и условий вейджера.
Механизм локализации функционирующих альтернативных адресов базируется на мониторинге специализированных мессенджер групп и аффилированных ресурсов. Экспертные геймеры используют прокси-соединения для обеспечения устойчивого доступа безотносительно от местных барьеров.
65539OdessaEngelberto te le gram
ST666 luôn đặt quyền lợi người chơi lên hàng đầu. ST666
73765ArlieCasheno te le gram
Получите актуальную ссылка на маркетплейс кракен здесь с ежедневными обновлениями
Игровая ниша показывает активный развитие, заинтересовывая миллионы игроков. Опытные сайты гарантируют стабильную условия для беттинга. Полную материалы о этих компаниях доступно получить на РЎСѓРєР° казино .
Лицензирование является ключевым показателем определения портала. Юрисдикции Великобритании создают жёсткий проверку расчётных транзакций. Каждая легальная сайт выполняет плановые контроли RNG-алгоритмов.
Компьютерные особенности современных беттинг-платформ включают SSL-безопасность денежного стандарта. Поставщики софтового софта вроде Microgaming, NetEnt, Pragmatic Play внедряют продвинутые системы непредсказуемых величин.
Процесс подтверждения аккаунта требует представления документов KYC-формата. ID, свидетельство о заработке, валидация прописки — стандартный перечень для окончательного входа.
Альтернативные ссылки ликвидируют проблемы с запретами поставщиков. Актуальные дубли модифицируются систематически программными отделами. Карманные приложения зачастую оперируют лучше онлайн редакций.
Управление банкроллом создаёт стратегическую результативность игровых партий. Профессиональные беттеры рекомендуют сокращать объём депозита до 1-2% от полного резерва.
Определение проверенного казино портала требует основательного рассмотрения лицензионных бумаг. Актуальные системы казино Гризли предлагают пользователям максимальную информацию о имеющихся допусках.
Механизм регистрации предусматривает различные требуемых ступеней валидации. Администраторы требуют бумаги, подтверждающие идентичность и совершеннолетие. Стандартный KYC-порядок занимает от 24 до 72 часов.
Финансовое планирование открывается с установления лимитов на взносы. Искусные клиенты призывают эксплуатировать установку 5% от совокупного казино средств на отдельную сессию.
Электронные препятствия владельцев принуждают внедрять запасные маршруты. Копии хранят абсолютную работоспособность базового платформы, подразумевая историю переводов и казино достижения.
Актуальные расчетные системы поддерживают оперативные пополнения через цифровые аккаунты. Bitcoin, Ethereum и устойчивые монеты обеспечивают приватность и символические взносы. Период проведения получений насчитывает 10-30 отрезков.
Программы постоянства включают иерархические статусы с прогрессивным вознаграждением. VIP-координаторы предоставляют уникальные подарки, улучшенные рамки и преимущественную помощь.
10901MauricePalaiao te le gram
Aerial duels, header wins and physical battle statistics
11477BrynnButtelo te le gram
Актуальные участники встречаются с набором технологических нюансов при процессах с легальными порталами. Специализированные источники типа Болливуд казино обеспечивают современную информацию о функционировании азартных провайдеров.
Процедура валидации счета охватывает комплекс обязательных этапов. Базовая подтверждение подразумевает загрузки свидетельств удостоверяющих гражданство. Стандартный список предполагает ID, лицензию водителя или загранпаспорт.
Системная часть оформления предполагает использование SSL-шифрования и двухуровневой проверки. Продвинутые пользователи настаивают запускать полный набор предложенных возможностей секьюрити.
Зеркала представляют точные дубликаты первичного сайта с обеспечением комплексного функционала. Ключевое бонус выражается в соответствии финансовых пределов и параметров вейджера.
Схема выявления функционирующих зеркал базируется на мониторинге профильных телеграм-каналов и связанных сайтов. Профессиональные пользователи эксплуатируют прокси-соединения для гарантирования надежного связи без оглядки от территориальных барьеров.
reliable online pharmacy https://www.google.tt/url?q=https%3A%2F%2Fcanadianmedsmax.com online pharmacy viagra
Attendance figures, crowd numbers for all football matches tracked
Передовые игроки встречаются с множеством цифровых деталей при деятельности с проверенными ресурсами. Профессиональные платформы типа Гризли казино поставляют современную информацию о функционировании азартных компаний.
Механизм аутентификации счета включает несколько обязательных этапов. Базовая аутентификация подразумевает размещения документов подтверждающих личность. Типовой список подразумевает свидетельство, автоудостоверение или внешний паспорт.
Технологическая элемент создания аккаунта содержит задействование безопасного соединения и двойной авторизации. Квалифицированные игроки предлагают задействовать полный набор доступных возможностей безопасности.
Дублирующие порталы представляют полные дубликаты базового домена с удержанием всего набора функций. Важнейшее преимущество состоит в идентичности денежных рамок и условий вейджера.
Механизм обнаружения актуальных альтернативных адресов строится на контроле профессиональных телеграм-каналов и сотрудничающих площадок. Экспертные игроки применяют VPN-сервисы для предоставления надежного входа без оглядки от территориальных барьеров.
First of all I want to say terrific blog! I had a quick question which I’d like to ask if you do not mind.
I was interested to know how you center yourself and clear your head prior to writing.
I have had a difficult time clearing my thoughts in getting my ideas out.
I truly do enjoy writing however it just seems like the first 10
to 15 minutes are usually wasted simply just trying to figure out how
to begin. Any ideas or hints? Appreciate it!
bollywood casino
I think this is among the most important info for me.
And i’m glad reading your article. But wanna remark on some general things, The web site style is perfect, the articles is really great : D.
Good job, cheers
Also visit my web blog :: мегагрупп сео продвижение
Greetings, if you need a trusted online pharmacy to purchase medicines securely. I found this pharmacy: buspar. Stocking a wide range of meds with fast shipping. Best regards.
55861DelphaVongunteno te le gram
Hello very cool blog!! Guy .. Beautiful .. Superb .. I will bookmark your site and take the feeds also?
I am glad to seek out a lot of useful info right here in the
submit, we need work out extra techniques on this regard,
thank you for sharing. . . . . .
For strategies
online slots provider
for valuable insights.
Лицензионные операторы игорных сервисов обеспечивают пользователям вариант к качественному гэмблингу через специализированные домены, включая Eldorado , которые именно исполняют мировые стандарты надёжности.
Механизм регистрации подразумевает указания authentication информации через шифрованные SSL-каналы. Провайдеры требуют нотариальное удостоверение правоспособности и территории residence для соблюдения legal правил.
Multi-factor проверка выступает принудительным составляющей современных solutions надёжности. Users имеют SMS-пароли, push-сообщения или задействуют профессиональные программы вроде Google Authenticator.
Резервные URL преодолевают трудности territorial санкций и DDoS-атак. Техническим образом дубли являют тождественные копии primary ресурса с обеспечением возможностей и индивидуальных параметров.
Компетентные геймеры призывают удерживать обновлённые каталоги активных копий в избранном браузера. Букмекеры доставляют сведения о fresh адресах через e-mail, Telegram-communities и смартфонные софт.
Банковские операции через лицензионные ресурсы secured cryptographic алгоритмами стандарта банковского segment. Снятие средств осуществляется solely на аутентифицированные карты держателя учётной записи.
49143DeltaBerthao te le gram
Передовые участники оказываются с затруднением доступа к легальным сайтам. Операторы ограничивают основные адреса, но грамотные тип топ казино официальный сайт игроки понимают о существовании параллельных порталов.
Альтернативный адрес составляет стопроцентную реплику оригинального сайта. Криптографические алгоритмы поддерживаются аналогичными. Финансовые действия осуществляются через равнозначные каналы.
Алгоритм открытия счёта через параллельный домен предполагает стандартной проверки. Менеджеры запрашивают бумаги для реализации KYC-требований. Идентификационные характеристики реализуют расширенную верификацию.
Депозитные рамки на параллельных порталах равняются основным требованиям. Минимальные ставки сохраняются фиксированными. Прогрессивные банки объединяются между многочисленными ресурсами.
Стимулирующие планы действуют завершённо на резервных платформах. Коэффициент оборота обеспечивает первоначальные значения. Временные рамки использования поддерживается.
Сервис поддержки рассматривает вопросы с резервных порталов таким же способом. Мгновенный чат предоставляет круглосуточный режим работы.
60032VincenzoMccleano te le gram
natural ed pills
Beach soccer livescore, FIFA Beach Soccer World Cup and league matches
Перемещение в сфере проверенных площадок нуждается осознания современных инструментов доступа. Квалифицированные геймеры эксплуатируют СЌРЅРѕРјРѕ казино для получения актуальной фактов о работающих адресах.
Механизм формирования учетной записи в проверенных компаниях содержит комплексную аутентификацию. Новейшие организации задействуют KYC-системы и AML-критерии. Оформление документов потребляет от 24 до 72 интервалов.
IT методы для преодоления барьеров эволюционируют параллельно с ужесточением правовых решений. VPN-инструменты уровня premium гарантируют защиту AES-256 и методы OpenVPN. Непрерывность соединения кардинально актуальна для высокоролловых партий.
Зеркальные сайты функционируют через территориально распределенные серверные мощности. CDN-сети предоставляют быструю пинг для азиатских участников. Системное перенаправление инициируется при идентификации препятствия первичного домена.
Банковские транзакции в сертифицированных зонах подпадают под строгим правилам PCI DSS. Крипто расчеты завоевывают признание из-за секретности и оперативности обработки.
Планшетные программы элитных организаций содержат отпечатковую аутентификацию и push-извещения для существенных ситуаций. Настраиваемый облик независимо адаптируется под свойства панели.
Выбор проверенного азартного ресурса в современных реалиях подразумевает специального анализа к законному состоянию. Квалифицированные клиенты знают, что лаки Р±РёСЂ казино включает свежую данные о доступных провайдерах.
Алгоритм создания аккаунта в лицензированных заведениях включает неизбежную валидацию личности. KYC-стандарты обеспечивают как казино, так и игрока от обмана. Временные рамки на перечисление активов до выполнения подтверждения – стандартная методика.
Виртуальные блокировки на доступ к развлекательным площадкам обходятся через альтернативные порталы. Действующие копии сохраняют всестороннюю функциональность главного сайта. Денежные операции, геймплейный статистика и привилегированные схемы продолжают неизменными.
Материальная защищенность измеряется качеством эксплуатируемых расчетных инструментов. SSL-криптография, PCI DSS подтверждение и дополнительная проверка устанавливают прочный периметр защиты.
Геймплейная коллекция проверенных операторов объединяет спины от ведущих студий. RTP-значения, вариативность и расчетные формулы претерпевают нейтральную проверку в признанных лабораториях.
Программы поощрения в серьезных казино строятся на четких условиях проигрыша. Условия ставок x35-40 считается приемлемым для спин-привилегий, в то время как стандартные активности включаются в подсчет с уменьшенным множителем.
Трюмо трехстворчатое зеркало Зеркало в прихожую: увеличьте пространство и добавьте света с помощью зеркала в прихожей.
Can I just say what a relief to uncover someone who genuinely knows what they’re talking about online.
You definitely realize how to bring a problem to light and make it important.
A lot more people need to read this and understand this side of the story.
I was surprised you are not more popular since you most certainly possess the gift.
48396TisaLamuso te le gram
Relegation battle livescore, bottom of table drama with survival at stake
40662GiuseppeByeo abc
Современные бетторы оказываются с проблемой подключения к сертифицированным платформам. Поставщики запрещают первичные ссылки, но искушённые лаки Р±РёСЂ игроки осознают о существовании дублирующих сайтов.
Резервная ссылка представляет точную реплику базового площадки. Системы безопасности работают неизменными. Расчётные переводы осуществляются через равнозначные сервисы.
Процедура открытия счёта через дополнительный адрес содержит типовой подтверждения. Администраторы запрашивают документы для соблюдения KYC-норм. Паспортные параметры подвергаются многоуровневую проверку.
Депозитные ограничения на параллельных ресурсах равняются базовым спецификациям. Наименьшие взносы продолжают постоянными. Увеличивающиеся банки согласовываются между различными ресурсами.
Бонусные планы оперируют целостно на альтернативных платформах. Множитель ставок обеспечивает исходные величины. Временные рамки оборота не изменяется.
Команда помощи обрабатывает тикеты с альтернативных доменов таким же способом. Прямой чат поддерживает круглосуточный график оперирования.
Инновационные порталы азартных услуг предоставляют пользователям подключение к высококлассному гемблингу через безопасные казино аква платформы. Официальная бизнес подразумевает следования жестких надзорных положений.
Система активации клиентского аккаунта содержит подтверждение персональных информации. Администраторы задействуют расширенные протоколы KYC и AML для предотвращения поддельных платежей.
Цифровые системы передовых гемблинг платформ работают на защищенных облачных системах с TLS алгоритмами. Локальные запреты обязывает администраторов разрабатывать вспомогательные порталы.
Резервные ресурсы формируют аналогичные репликации базового портала с обеспечением всех возможностей и параметров. Игроки добиваются беспрепятственный доступ к счету, игровой истории и индивидуальным установкам.
Денежные транзакции выполняются через синхронизированные платежные системы. Рамки на пополнения и изъятия фиксируются в соотношении с нормативными требованиями и корпоративными политиками минимизации опасностей.
Квалифицированные беттеры настаивают проверять состояние авторизации через контролирующие списки гемблинг органов. Статусные индикаторы содержат ранги на экспертных порталах и оценки действительных пользователей.
What impressed me about this casino https://809shipping.com/online-casino-jackpots-eine-fachanalyse-zu/ is the variety of the games. Everything runs smoothly, the design is minimal, and there’s always something new to explore, which keeps it engaging.
13257NelsonWachtelo abc
newretrocasino зеркало
I’m not that much of a online reader to be honest but your blogs really
nice, keep it up! I’ll go ahead and bookmark your
website to come back later on. Cheers
My site :: заказать обслуживание сайта
Women’s football live scores, domestic and international matches tracked
22346ElinorAdamiko abc
pin-up saltar bloqueo pin-up saltar bloqueo
Подбор безопасного гемблинг заведения подразумевает детального разбора регулятивных сертификатов. Инновационные порталы аква предоставляют геймерам безусловную данные о собственных допусках.
Механизм получения доступа подразумевает несколько требуемых ступеней валидации. Провайдеры запрашивают документы, удостоверяющие самобытность и дееспособность. Обычный KYC-алгоритм занимает от 24 до 72 периодов.
Распоряжение капиталом запускается с задания рамок на инвестиции. Опытные клиенты рекомендуют применять установку 5% от итогового казино бюджета на единичную игру.
Цифровые ограничения операторов обязывают внедрять альтернативные домены. Альтернативы оберегают полную производительность первичного площадки, содержа летопись переводов и гемблинг результаты.
Актуальные финансовые методы гарантируют оперативные депозиты через криптовалютные аккаунты. Bitcoin, Ethereum и устойчивые монеты обеспечивают тайность и символические комиссии. Время реализации снятий доходит 10-30 минут.
Системы постоянства охватывают ступенчатые статусы с прогрессивным возвратом. VIP-координаторы предлагают эксклюзивные вознаграждения, увеличенные границы и первоочередную обслуживание.
Передовые геймеры пересекаются с набором цифровых тонкостей при работе с сертифицированными сайтами. Профильные сайты типа СЌРЅРѕРјРѕ казино выдают свежую информацию о функционировании азартных брендов.
Система валидации профиля охватывает несколько необходимых уровней. Базовая аутентификация требует загрузки справок удостоверяющих личность. Типовой перечень содержит документ, права или внешний паспорт.
Техническая составляющая регистрации содержит эксплуатацию SSL-шифрования и двойной авторизации. Продвинутые игроки настаивают задействовать максимум имеющихся настроек охраны.
Дублирующие порталы составляют точные дубликаты первичного домена с хранением полного функционала. Основное преимущество содержится в идентичности платежных рамок и условий проигрыша.
Схема обнаружения действующих дублирующих порталов строится на контроле тематических мессенджер групп и партнерских порталов. Продвинутые участники внедряют туннельные протоколы для предоставления устойчивого доступа вне зависимости от территориальных лимитов.
Highly energetic blog, I liked that bit. Will there be a part 2?
hello!,I really like your writing so a lot! share we keep in touch extra
about your post on AOL? I need an expert in this house to resolve my problem.
Maybe that’s you! Having a look ahead to look you.
79755MervinVereo abc
can you get clomid without a prescription: fertility pct guide – fertility pct guide
Новейшие геймеры имеют дело с набором цифровых деталей при деятельности с лицензированными площадками. Специализированные платформы типа mad casino дают актуальную информацию о работе казино организаций.
Механизм валидации кабинета подразумевает набор требуемых этапов. Первичная подтверждение нуждается размещения справок доказывающих субъект. Обычный список охватывает паспорт, автолицензию или международное ID.
Системная элемент оформления подразумевает эксплуатацию SSL-шифрования и двухуровневой проверки. Опытные пользователи настаивают активировать полный набор предложенных опций обеспечения.
Альтернативные адреса образуют точные копии главного ресурса с сохранением исчерпывающего арсенала. Важнейшее плюс состоит в соответствии платежных пределов и условий проигрыша.
Процедура поиска функционирующих запасных доменов строится на контроле профильных телеграм-каналов и аффилированных платформ. Профессиональные пользователи используют VPN-сервисы для формирования устойчивого соединения невзирая от местных барьеров.
Подбор достойного азартного оператора в текущих условиях предполагает детального внимания к лицензионному положению. Компетентные участники знают, что Голд РІС…РѕРґ включает новую факты о действующих площадках.
Процедура создания аккаунта в легальных площадках содержит обязательную подтверждение идентичности. KYC-правила обеспечивают как оператора, так и участника от фрода. Промежуточные пределы на получение средств до завершения валидации – привычная практика.
Программные ограничения на соединение к развлекательным ресурсам обходятся через альтернативные домены. Действующие копии гарантируют всестороннюю функциональность главного сайта. Финансовые движения, развлекательный прогресс и льготные предложения остаются неизменными.
Материальная защищенность определяется качеством используемых расчетных методов. SSL-криптография, PCI DSS аттестация и дополнительная аутентификация обеспечивают защищенный щит защиты.
Игровая коллекция проверенных заведений включает слоты от известных разработчиков. RTP-значения, вариативность и вероятностные принципы подвергаются беспристрастную проверку в одобренных центрах.
Системы вознаграждения в качественных заведениях основываются на ясных критериях ставок. Условия ставок x35-40 оценивается справедливым для спин-бонусов, в то время как стандартные развлечения засчитываются в зачет с минимальным процентом.
French Open livescore updates, Roland Garros matches tracked point by point live
11183AmadoNovao abc
mexican online pharmacy
болливуд
Поиск в сфере проверенных площадок включает представления продвинутых методов входа. Опытные пользователи используют лакибир казино для извлечения свежей материалов о оперативных ссылках.
Схема формирования личного кабинета в сертифицированных учреждениях содержит многоуровневую валидацию. Передовые провайдеры внедряют KYC-механизмы и AML-правила. Бумажная работа потребляет от 24 до 72 часов.
Компьютерные инструменты для прохождения препятствий эволюционируют параллельно с повышением законодательных мер. VPN-службы уровня premium гарантируют криптографию AES-256 и протоколы OpenVPN. Непрерывность подключения принципиально существенна для премиальных раундов.
Альтернативные платформы оперируют через территориально расположенные IT системы. CDN-сети предоставляют низкую латентность для американских участников. Системное перенаправление срабатывает при выявлении блокировки главного ресурса.
Финансовые переводы в проверенных зонах следуют определенным критериям PCI DSS. Крипто расчеты увеличивают признание по причине конфиденциальности и динамике осуществления.
Мобильные программы ведущих компаний включают лицевую проверку и push-извещения для ключевых моментов. Модифицируемый облик автоматически корректируется под настройки матрицы.
61266LianneNellero abc
Активные резервные адреса легальных гемблинг-платформ на СЌРЅРѕРјРѕ зеркало создают устойчивый соединение к гемблинг системам. Схема зеркалирования образует полноценные дубликаты базового ресурса с сохранением всех механизмов.
Механизм регистрации через зеркало на сто процентов повторяет стандартную шаблон. Дебютные игроки указывают валидный email, генерируют стойкий код доступа и определяют основную денежную единицу.
Идентификация аккаунта подразумевает отправки справок опираясь на KYC-политике. Фото национального документа, валидация регистрации и карточные координаты подвергаются алгоритмическую проверку в течение 24-72 ч.
Авторизация существующих геймеров производится через классическую модуль с усиленной аутентификацией. Краткосрочные коды доставляются на смс аппарат или электронную почту.
Функционал депозитного модуля через альтернативные домены обеспечивает топовые финансовые механизмы. Visa, Mastercard, веб кошельки Skrill, Neteller, цифровые активы Bitcoin, Ethereum осуществляются с оптимизированными комиссиями 0-3%.
Развлекательная коллекция копируется в точности включая автоматы, традиционные игры, live-дилеров и прогрессивы. RTP-значения, колебания и вейджер удерживаются точными.
Промо программа выполняется подобно корневому веб-площадке. Welcome-наборы, free spins, возврат средств и VIP-схемы стартуют программно при соблюдении установленных требований.
61693JettieZelechowskio abc
https://jm-date-rencontre.fr/
Nicely put. Many thanks!
Действующие альтернативные домены лицензированных азартных клубов на Болливуд казино гарантируют постоянный вход к развлекательным системам. Технология зеркалирования генерирует идентичные клоны корневого портала с сохранением всех опций.
Схема регистрации через резервную ссылку на сто процентов воспроизводит основную бланк. Начинающие клиенты заполняют функционирующий email, создают стойкий секретную комбинацию и определяют базовую платежное средство.
Идентификация счета содержит передачи бумаг опираясь на KYC-регламенту. Копия удостоверения личности, подтверждение места жительства и финансовые реквизиты контролируются системой автоматическую анализ в течение 24-72 часов.
Аутентификация активных геймеров выполняется через классическую окно с многоступенчатой идентификацией. Краткосрочные шифры поступают на мессенджер номер или e-mail адрес.
Опции пополнительного раздела через дублирующие порталы включает востребованные банковские платформы. Visa, Mastercard, цифровые балансы Skrill, Neteller, криптовалюты Bitcoin, Ethereum обрабатываются с низкими процентами 0-3%.
Игровая база копируется целиком включая автоматы, карточные забавы, live-ведущих и джекпоты. RTP-показатели, волатильность и вейджер остаются идентичными.
Подарочная система выполняется аналогично корневому порталу. Welcome-пакеты, free spins, кешбэк и VIP-системы включаются программно при исполнении прописанных условий.
Азартная отрасль представляет динамичный развитие, притягивая тысячи участников. Профессиональные порталы предлагают надёжную пространство для развлечений. Детальную факты о этих компаниях доступно отыскать на казино Vovan .
Аттестация является центральным критерием отбора ресурса. Юрисдикции Гибралтара гарантируют строгий надзор расчётных операций. Любая легальная ресурс проходит периодические проверки RNG-генераторов.
IT параметры актуальных казино включают SSL-кодирование финансового ранга. Создатели софтового ПО типа Microgaming, NetEnt, Pragmatic Play подключают комплексные механизмы произвольных чисел.
Процедура верификации учётной записи предполагает представления свидетельств KYC-уровня. Удостоверение, справка о средствах, верификация проживания — классический перечень для окончательного активации.
Резервные адреса убирают проблемы с блокировками операторов. Актуальные дубли изменяются регулярно IT отделами. Планшетные клиенты обычно оперируют стабильнее онлайн форматов.
Банкролл-менеджмент определяет продолжительную доходность беттинговых раундов. Квалифицированные игроки рекомендуют сокращать размер депозита до 1-2% от совокупного банкролла.
To obtain
where can i buy depakote without rx
for all the details.
Africa Cup of Nations livescore, AFCON tournament with comprehensive coverage
46486MelonieJonasseno abc
Новости Стим Получите бесплатные ключи для Steam: узнайте, как расширить свою библиотеку игр абсолютно бесплатно!
Possession stats, ball control percentages for all live matches tracked
Выбор надежного betting ресурса в современных рамках заставляет детального изучения к законному режиму. Знающие пользователи учитывают, что казино типпи демонстрирует актуальную факты о работающих сервисах.
Процедура оформления профиля в сертифицированных заведениях содержит неизбежную проверку персональных данных. KYC-правила обеспечивают как оператора, так и клиента от махинаций. Кратковременные ограничения на перечисление денег до окончания валидации – стандартная методика.
Программные блокировки на подключение к азартным порталам устраняются через резервные URL. Рабочие клоны поддерживают тотальную функциональность базового портала. Денежные транзакции, азартный продвижение и бонусные схемы функционируют стабильными.
Финансовая безопасность определяется показателем задействованных расчетных механизмов. SSL-безопасность, PCI DSS аттестация и дополнительная идентификация формируют защищенный периметр ограждения.
Развлекательная коллекция сертифицированных провайдеров предоставляет спины от лидирующих создателей. RTP-показатели, изменчивость и алгоритмические формулы получают нейтральную валидацию в признанных институтах.
Схемы лояльности в качественных казино формируются на открытых правилах ставок. Требования x35-40 расценивается разумным для слот-бонусов, в то время как настольные забавы идут в расчет с пониженным фактором.
21897AnnelleIllao abc
https://www.hoodpals.com/forum/thread/17484/code-promo-1xbet-rdc-2026-gratis777-bonus-vip-169000-xaf?page=4
Передовые участники оказываются с барьером подключения к официальным платформам. Компании фильтруют стандартные URL, но опытные казино типпи пользователи осознают о доступности альтернативных ресурсов.
Альтернативный адрес формирует полную воспроизведение оригинального сайта. Криптографические алгоритмы поддерживаются аналогичными. Расчётные процедуры осуществляются через аналогичные механизмы.
Методика оформления профиля через альтернативный ресурс предполагает обычной подтверждения. Администраторы выясняют документы для осуществления KYC-норм. Индивидуальные сведения выполняют комплексную верификацию.
Вносительные пределы на резервных площадках совпадают первичным характеристикам. Низшие взносы функционируют стабильными. Возрастающие накопления синхронизируются между разными ссылками.
Льготные схемы действуют завершённо на резервных платформах. Коэффициент оборота гарантирует исходные цифры. Временные рамки отыгрыша остаётся прежним.
Служба обслуживания изучает заявки с дополнительных адресов таким же способом. Живой диалог осуществляет 24-часовой порядок обслуживания.
10170RamiroBilloto abc
melbet промокод для новичков
Актуальные геймеры сталкиваются с проблемой соединения к официальным площадкам. Поставщики ограничивают главные ссылки, но знающие казино Голд клиенты понимают о доступности альтернативных порталов.
Резервная ссылка формирует идентичную воспроизведение первичного сайта. SSL-сертификаты остаются идентичными. Расчётные операции реализуются через те же механизмы.
Алгоритм заведения учётной записи через альтернативный домен требует привычной проверки. Сотрудники уточняют бумаги для реализации KYC-стандартов. Паспортные сведения проходят усиленную аутентификацию.
Банковские пределы на альтернативных ресурсах равняются главным требованиям. Стартовые ставки сохраняются константными. Растущие призовые фонды синхронизируются между разными порталами.
Бонусные системы оперируют целостно на альтернативных ресурсах. Множитель ставок гарантирует исходные параметры. Временные рамки отыгрыша не изменяется.
Команда поддержки анализирует запросы с зеркальных ссылок таким же способом. Живой переписка осуществляет круглосуточный режим деятельности.
Актуальные геймеры сталкиваются с массой системных аспектов при работе с проверенными площадками. Экспертные сайты типа казино ретро выдают новую материалы о процессах игорных организаций.
Механизм проверки аккаунта охватывает комплекс обязательных уровней. Стартовая проверка требует загрузки удостоверений верифицирующих субъект. Типовой комплект охватывает удостоверение личности, лицензию водителя или международный паспорт.
Технологическая сторона открытия счета включает эксплуатацию защищенного протокола и двухфакторной аутентификации. Опытные участники рекомендуют инициировать максимум доступных настроек секьюрити.
Запасные домены являются стопроцентные копии центрального сайта с сохранением всего функционала. Важнейшее достоинство выражается в идентичности платежных лимитов и норм ставочных требований.
Механизм нахождения актуальных зеркал фундируется на мониторинге тематических информационных каналов и союзных платформ. Опытные пользователи используют туннельные протоколы для предоставления бесперебойного подключения независимо от локальных блокировок.
нью ретро казино
For the romantic at heart, the evolution of feelings between two proud individuals is a journey worth taking repeatedly. Jane Austen masterfully deconstructs the societal expectations of her time through the eyes of the second eldest Bennet sister. If you are traveling or commuting, a digital edition is the perfect companion. Finding a high-quality Pride and Prejudice PDF ensures that you never lose your place in the story. Our website is a tribute to this specific book, offering insights that enrich the reading experience. Fall in love with the dialogue and the drama all over again, right from your preferred device.
erectile dysfunction pills https://maps.google.co.zm/url?q=https%3A%2F%2Feropillseasy.shop ro sparks side effects
42435GladyRudeo abc
is human trafficking tһe second largest, uѕa gymnastics coach human trafficking, human trafficking news neɑr me, snopes
lynne knowles human trafficking, human trafficking awareness ⅾay quotes, human trafficking sex scene, human trafficking – menschenhandel, meghan connors human trafficking,
anssrew tate human trafficking, arguments ᧐n huan trafficking,free human trafficking cme florida,
humann trafficking ⲟur, human trafficking іn minnesota 2021, arizona republican human trafficking, orange іs thе new bloack human trafficking, human trafficking
conference ocean city md, 277 arrested іn human trafficking, nti human trafficking law philippines, north korea
human trafficking fɑcts, һow will tһe wall affect human trafficking,
human trafficking training michigan 2018, hotels sued human trafficking,
kids rescued ffom human trafficking, durham region human trafficking, ѡhy human trafficking іѕ important,
mother of god church human trafficking, walmart human trafficking 2020, ѡһat is the razte of
human trafficking worldwide, human trafficking news (news), human trafficking Ьy stɑte 2021, lgbt human trafficking statistics, south africa
аnd human trafficking, human trafficking statistics fbi,
hotel lawsuits human trafficking, operation renewed hope human trafficking,
human trafficking atlanta 2022, human trafficking san joaquin county, non profit organizations fοr human trafficking, human trafficking interpol, human trafficking elgin, trafficking women’ѕ human гights
ulietta hua, facebook human trafficking lawsuit,
rates ᧐f human trafficking, rewl ᴡorld example of human trafficking, lawyers gainst human trafficking, wsiin human trafficking summit 2022, vad är human trafficking, recognizing tһe signs of human trafficking, human trafficking justice, video
օf human trafficking, four sgns of human trafficking, human trafficking honey, binjun xie human trafficking, humaqn trafficking
documentary amazon рrime, minnesota human trafficking data,
uncovers russian human trafficking ring war, human trafficking chico ca, human trafficking jus cogens, human trafficking syrian refugees, human traffickjing topics
гesearch paper, text human trafficking link snopes, oprah soufh africa human trafficking, human trafficking grants 2015, human trafficking san antoonio
2021, human drug trafficking meaning, human trafficking stories children, fema human trafficking awareness,
florida disney human trafficking, jobs fоr human trafficking victims, movie aout human trafficking 2023 netflix, ɑ day in the life ⲟf a human trafficking
victim, uk human trafficking news, bent ⅼicense plate
human trafficking reddit, human traffickig іn waterbury ct, center
tо combat human trafficking, greenville nc human trafficking,
maui human trafficking, t᧐p 5 human trafficking cities, іs human trafficking
happening іn the us, oxhard human trafficking, aurora
shoreline human trafficking, taconganas human trafficking, hashtags fоr human trafficking, whіte house human trafficking
summit, corona human trafficking, border patrol human trafficking, human trafficking іn thailand 2020, human trafficking іn wv, 11 arrested in hujman trafficking,
china’s one child policy and human trafficking, hoels human trafficking 2023, human trafficking іn florida
2021, human trafficking debate topics, international justice
mission human trafficking, uncovers human trafficking гing
for, scholarly article oon human trafficking, madison herman human trafficking, amad
diallo human trafficking, ɑ poem ɑbout human trafficking, human trafficking bristol tn,
deluca ɑnd the human trafficking storyline, economy ɑnd human trafficking, human trafficking іn trinidad, human trafficking day 2018, caught camera actual human trafficking victims,human trafficking episode opal grey’ѕ anatomy, duolingo ceo
human trafficking, watch dogs human trafficking map, human trafficking definition canada,
airtag human trafficking, human trafficking iin tһe beauty industry,
人口販子human trafficking, forced labor іn human trafficking, american airlines center human trafficking, hman traficking ϲe texas, selah human trafficking,
siam human trafficking, fresno human trafficking statistics, senegal
human trafficking, human trafficking belgium, michigan human trafficking сourse, ny ttimes human trafficking, abandoned stroller
human trafficking, human trafficking і-44, solution onn human trafficking,
human trafficking canada news, ontario hhuman trafficking,
protects victims ᧐f human trafficking amendment,
human trafficking іn highland cа, human trafficking hotspot map, human trafficking
organizations ontario, human trafficking hidinbg ᥙnder cars, summary ᧐n human trafficking,
uncovers russian human trafficking rring ѡaг, human trafficking honey, f᧐ur signs oof humman trafficking, human trafficking western pa, human trafficking
livermore, human trafficking durham region, human trafficking ɑt atlanta airport,
binjun xie human trafficking, minnesota human trafficking data, human trafficking docuumentary
amazon ρrime, human trafficking lawyer bloomfield hills,
human trafficking charge іn texas, central students ɑgainst human trafficking, aap human geography human trafficking, human trafficking fοr sexual exploitation, blue f᧐r human trafficking, kantian ethics human trafficking, anti-human trafficking organization іn cambodia,
jo jorgensen on human trafficking, fort hood soldiers human trafficking, besau օf the fifth column human trafficking, hawkins human trafficking,
human trafficking іn the pacific islands, reasonss ԝhy human trafficking іs
bad, ally human trafficking, wrrite ɑn essay оn human trafficking, human trafficking pros, human trafficking dark weeb reddit, north preston human trafficking, ԁollar sign tattoo
human trafficking, wht iss human trafficking, human trafficking stuart fl, priceless movie human trafficking, tti ɑnd wife human trafficking, human trafficking ethicity statistics, і 80 truck stop
human trafficking, hamilton human trafficking, oakville human trafficking, human trafficking оn tthe deep web, current
human trafficking, human trafficking women’ѕ rіghts, brnei human trafficking,
barack obama human trafficking quote, pastron saint օf human trafficking, spirited ɑway humaan trafficking, tһe game human trafficking, tоp human trafficking cities
2023, human trafficking ѡhich countries are thе worst, hhow tⲟ donate to human trafficking
organizations, human trafcicking quotes famous, human trafficking story 2020, human trafficking іn pittsburgh, 2020 human trafficking
conference, human trafficking bust atlanta, human trafficking
hemet cɑ, human trafficking statistics oregon, һow to
identify a human trafficking victim, economy ɑnd human trafficking,
lovdr booy method ⲟf human trafficking, deluca ɑnd the human trafficking storyline, european human trafficking, selah human trafficking, american airlines center human trafficking, human trafficking paintings,
whqt ѕtate іs #1 in human trafficking?, forced labor іn human trafficking, 人口販子human trafficking, crystal meth,ѡhat Ԁoes crystal meth ⅼooҝ like, wjat іs crysttal meth,
crystal meth anonymous, hoow ⅼong does crystal meth stay іn your systеm, hօw
to make crystal meth, blue crystal meth, buy crysyal meth online, crystal meth effects,
crystal meth pipe, crystal meth drug, ѡhat does crystal meth look
like?, meth crystal, crystal meth images, crystal meth ѕide effects, һow is crystal meth maԀe, meth
vѕ crystal meth, ѡhat doeѕ crystfal meth Ԁo, crystal meth symptoms, crystal meth vvs meth, effects оf crystal meth,ѕide
effects oof crystal meth, hoow Ԁο үou make crystal meth, crystal meth ᴠs crack, what doeѕ crystal meth smell like,
how is crystal metyh ᥙsed, crystal meth withdrawal,
crytal meth breajing bad, ᴡhat is crystal meth madee оf,
whazt dⲟes crystal meth do tо you, crystal meth teeth, smoking crystal meth, crystal meth
pictures, caan you snort crystal meth, crystal meth befoe ɑnd after,who invented crystal meth, crytal meth fаcts, crystal meth withdrawal symptoms, crystal meth street names, siugns ߋf crystal meth, crystal meth addiction, һow tо cook crystal meth, crysstal meth definition, ᴡhаt type of drug is cdystal
meth, ԝhat does crystal meth feel liке, crystal meth meaning, crystal meth ingredients, ԝhats crystal meth, what color is crystal meth, crystal
meth detox, crystal meth face, crystal meth powder, crystal meth poem, street names ffor
crystal meth, short term effects оf crystall meth,
signs оf crystal meth abuse, crystal meth rock, crystal meth fly,
crysdtal meth addict, crystal meth ᥙsers, crystal meth rehab, һow much doеs cryystal mwth cost, һow do you tаke
crgstal meth, hοw mսch is crystal meth, signs օf crystal meth սse, how
to smoke crystal meth, һow to uѕe crystal meth,
ⅼong term effects of crystal meth, signs ⲟf addiction t᧐o crystal meth, pink crystal meth, crystal meth ⅼook like, breaking bad crystal
meth, ѡhen wɑs crystal meth invented, pictures οf crystal meth, how is crystal
meth taken, signs that someone iis usijng crystal meth, ready օr not
crystal meth storage, difference ƅetween meth ɑnd crystal meth, һow doo you dⲟ crystal meth, crystal meth., locate crystal meth storage,
ᴡhat are tһe effects of crystal meth, fake crystal meth, crystal meeth people, ѡhat doeѕ crystal
meth, how do you use crystal meth, һow addictive is crystal meth, can yօu overdose օn crystal meth,
crystal meth blue, crystal meth signs, һow long does crystal meth
lɑst, crystal meth detox ⅼ᧐s angeles, һow do people սse crystal meth, һow
ԁoes crystal meth ⅼook like, crystal meth porn, һow ԁoes
crystal meth loօk, crystal meth storage twisfed nerve,ѡhats іn crystal meth, crystal meth
treatment, ѡhаt iѕ crystal meth mаde from, methamphetamin, methamphetamin adalah, methamphetamin Ԁan amphetamin adalah, amphetamin ɗan methamphetamin, chloroethane ɑnd methamphetamin, crystal methamphetamin, ԝһаt is methamphetamin,
methamphetamin еffect, methamphetamin sport, methamphetamin-entzug, methamphetamin definition, methamphetamin withdrawal, methamphetamin deutsch, methamphetamin 中文, mdma
methamphetamin, methamphetamin hydrochlorid, methamphetamin geschichte,
methamphetamin hcl, amphetamin ѵѕ methamphetamin,
methamphetamin biru, methylphenidat methamphetamin, beda amphetamin ԁɑn methamphetamin, difference btween amphetamine аnd methamphetamin, methamphetamin psychose, methamphetamin rules,
һow to make methamphetamin, methamphetamin amphetamin unterschied, methamphetamin hydrochloride, definition ѵon methamphetamin, ρ2p
methamphetamin, methamphetamin medizin, amphetamin ᥙnd methamphetamin, vicks vapor inhaler
methamphetamin, gta methamphetamin labor, ԝіe wirkt methamphetamin, methamphetamin entzug, methamphtamin kaufen, methamphetamin rezept,
methamphetamin effects, methamphetamin amphetamin, methamphetamin schnelltest, uterschied
amphetamine սnd methamphetamin, methamphetamin herstellung,
methamphetamin herstellung china, methamphetamin wehrmacht, methamphetamin tabletten, methamphetamin doccheck, һow to cook methamphetamin, methamphetamin abhängigkeit, methamphetamin nebenwirkungen, methamphetamin ᴡаѕ ist
ԁas, unterschied methamphetamin ᥙnd amphetamin, methamphetamin nedir, amphetamine methamphetamin, methamphetamin aussprache, methamphetamin chemical formula,
methamphetamin medikament, methamphetamin ⅼa chat gi, test methamphetamin, methamphetamin pervitin, methamphetamin adalah obat, methamphetamin ɑndere suchten аuch naⅽh, methamphetamin mdma, tschechien methamphetamin, methamphetamin nachweisbarkeit, methamphetamin psychonaut, methamphetamin molecule,
methamphetamin labor, methylenedioxymethamphetamin, ecstasy methamphetamin, methamphetamin ⅾương tính,
was ist methamphetamin, drogentest methamphetamin,
methamphetamin englisch, methamphetamin structure, іst mdma methamphetamin, lye іn methamphetamin, іst methamphetamin organschädigend?
quora, methamphetamin chemische struktur, methamphetamin chemische formel, methamphetamin meaning, ɗ-methamphetamin, herstellung methamphetamin, methamphetamin ᴠs amphetamine, methamphetamin recept,
methamphetamin japan, definition methamphetamin, methamphetamin fɑce, methamphetamin formula, methamphetamin synapse, methamphetamin adderall, methamphetamin adhd, blue methamphetamin,
wirkung methamphetamin, methamphetamin terbuat dari, methamphetamin addiction, bilder crystal methamphetamin, speed mіt methamphetamin gestreckt, methamphetamin synthese, methamphetamin ᥙѕе icd 10, weed, weed
grinder, whhere іs weed legal, disposable weed pen, weeed shop neаr me, milwaukee weed eater, purple
weed, іѕ weed legal іn virginia, іs weed legal iin oklahoma, is weed legal іn louisiana, weed puller
tool, weed carts, iis weed legal іn south carolina,
weed killer fߋr lawns, horny goat weed for men, what statеs is weed legal,
weed shops near me, weed legal ѕtates, weed vape, roundup weed killer, weed killer spray, edibles weed, recreational weed ѕtates, weed store,
milk weed, weed barrier, іs weed legal in indiana, legal weed ѕtates, ѕtates with
legal weed, iѕ weed legal in kentucky, weed puller, preen weed preventer, ounc оff weed, dewalt wded eater, plantain weed, husqvarna weed eater, electric weed eater, hybrid weed, moonrock weed,
weed pipe, barrett wilbert weed, weed control, weed delivery neɑr me, is weed legal in missouri, һow to maje weed butter,
ᴡhite weed, is weed legal in utah, moon rock weed, snow caps weed, іs weed legal in arkansas, is weed legal in texas 2025, ryobi weed eater, weed
bowl, dill weed, weed legalization, smoking weed, іs weed legal in nevada, weed whacker, іs weed legal in alabama, is weed a drug,
weed barrier fabric, wһat is hoorny goat weed,
spruce weed аnd grass killer, weed stores near me, sprinkles weed, pooke weed, weed withdrawal, weed
vapes, snow cap weed, rm43 weed killer, craftsman weed eater, qp օf weed,
wweed edibles, cookies weed, gelato weed, іs weed legal іn new mexico, strains оff weed,
weed butter, рound of weed, zaza weed, is weed legal іn nc,
hoow mսch is an ounce of weed, pgr weed, іs ɗelta
9 rewl weed, diy weed killer, zip of weed, weed torch, moldy weed, elon musk weed, іs
weed illegal іn texas, weed eater string, rso
weed, weed hangover, weed wallpaper, іs weed legal іn nebraska, һow
to smoke weed, іs weed legal in hawaii, hоw to grow weed,
һow to mаke weed in infinite craft, is weed legal in california, gary payton weed
pin-up profil doğrulama http://pinup2008.help
mostbet retragere mastercard https://www.mostbet2006.help
https://iver.us.com/# Iver Protocols Guide
Актуальные пользователи сталкиваются с набором технологических тонкостей при процессах с официальными ресурсами. Профессиональные платформы типа казино СЌРЅРѕРјРѕ обеспечивают актуальную сведения о деятельности развлекательных брендов.
Система проверки счета включает набор неотъемлемых этапов. Первичная проверка требует размещения бумаг подтверждающих персону. Обычный перечень подразумевает свидетельство, лицензию водителя или заграничное удостоверение.
Системная сторона записления предполагает применение SSL-шифрования и 2FA. Квалифицированные пользователи подсказывают активировать совокупность предложенных опций защиты.
Запасные домены составляют идентичные отражения главного ресурса с хранением всего инструментария. Ключевое бонус выражается в схожести банковских лимитов и параметров ставочных требований.
Алгоритм нахождения действующих запасных доменов фундируется на мониторинге тематических новостных лент и партнерских платформ. Профессиональные геймеры задействуют прокси-соединения для предоставления бесперебойного доступа вне зависимости от местных барьеров.
55723LorisAuelo abc
Развлекательная индустрия представляет интенсивный подъём, притягивая множество геймеров. Грамотные платформы обеспечивают безопасную атмосферу для беттинга. Подробную данные о указанных брендах реально отыскать на типпи сайт .
Лицензирование остаётся главным аспектом определения портала. Контролёры Олдерни дают серьёзный проверку расчётных манипуляций. Каждая официальная площадка подвергается плановые аудиты RNG-алгоритмов.
Технические параметры актуальных гемблинг-сайтов включают SSL-защиту денежного ранга. Производители программного продукта уровня Microgaming, NetEnt, Pragmatic Play интегрируют сложные модели случайных значений.
Процедура верификации счёта подразумевает предоставления бумаг KYC-типа. Удостоверение, справка о финансах, валидация прописки — классический список для окончательного подключения.
Зеркальные адреса убирают сложности с цензурой компаний. Рабочие альтернативы обновляются постоянно компьютерными группами. Портативные утилиты регулярно выполняются надёжнее сетевых форматов.
Банкролл-менеджмент устанавливает длительную результативность азартных периодов. Профессиональные игроки советуют контролировать количество пари до 1-2% от итогового фонда.
2393GarryManaso abc
bollywood
online mexican pharmacy https://cse.google.co.za/url?sa=i&url=https%3A%2F%2Fcanadianmedsmax.com mexican online pharmacy
Выбор проверенного гемблинг портала заставляет серьезного разбора регулятивных сертификатов. Инновационные ресурсы mad casino зеркало дают участникам стопроцентную детали о действующих аккредитациях.
Процесс оформления счета охватывает различные принудительных стадий проверки. Представители требуют свидетельства, засвидетельствующие самобытность и возраст. Традиционный KYC-алгоритм продолжается от 24 до 72 часов.
Банкролл-менеджмент запускается с установления рамок на вклады. Искусные пользователи призывают применять закон 5% от общего казино резерва на конкретную заход.
Технические ограничения операторов побуждают внедрять резервные пути. Дубликаты оберегают максимальную производительность базового сайта, предусматривая журнал транзакций и азартный продвижение.
Новые денежные системы поддерживают моментальные взносы через электронные портмоне. Bitcoin, Ethereum и стейблкоины обеспечивают тайность и символические взносы. Длительность обработки выводов составляет 10-30 интервалов.
Планы лояльности содержат иерархические степени с нарастающим бонусом. VIP-представители гарантируют эксклюзивные бонусы, увеличенные лимиты и преимущественную сервис.
Подбор проверенного развлекательного заведения в нынешних реалиях предполагает тщательного рассмотрения к законному положению. Квалифицированные пользователи осознают, что Лев казино содержит свежую материалы о действующих площадках.
Процесс записи в лицензированных заведениях содержит необходимую подтверждение идентичности. KYC-стандарты оберегают как заведение, так и клиента от обмана. Промежуточные ограничения на перечисление денег до финализации проверки – стандартная система.
Электронные барьеры на соединение к гемблинг сайтам обходятся через параллельные ссылки. Активные зеркала гарантируют стопроцентную работоспособность центрального платформы. Банковские операции, игровой прогресс и льготные программы продолжают постоянными.
Капитальная защищенность оценивается степенью используемых финансовых инструментов. SSL-криптография, PCI DSS аттестация и двухфакторная идентификация устанавливают защищенный барьер ограждения.
Геймплейная ассортимент сертифицированных площадок охватывает барабаны от известных провайдеров. RTP-индексы, дисперсия и расчетные формулы получают независимую контроль в аккредитованных центрах.
Системы стимулирования в достойных площадках основываются на прозрачных параметрах вейджера. Требования x35-40 считается разумным для автомат-поощрений, в то время как классические игры принимаются в подсчет с редуцированным процентом.
Зеркала под заказ Трюмо с тремя зеркалами: классическое решение для создания идеального образа.
66729MapleGribbeno abc
Выбор легального азартного площадки подразумевает серьезного рассмотрения регулятивных разрешений. Инновационные порталы казино ретро предлагают пользователям безусловную факты о действующих разрешениях.
Система регистрации содержит различные необходимых фаз проверки. Операторы требуют бумаги, устанавливающие персону и зрелость. Классический KYC-алгоритм составляет от 24 до 72 интервалов.
Контроль средств инициируется с задания границ на вклады. Компетентные участники рекомендуют задействовать установку 5% от полного казино фонда на единичную заход.
Технические барьеры администраторов заставляют применять резервные пути. Копии хранят стопроцентную производительность главного платформы, подразумевая хронологию операций и гемблинг продвижение.
Актуальные платежные способы дают быстрые вклады через цифровые аккаунты. Bitcoin, Ethereum и устойчивые монеты предоставляют приватность и наименьшие платежи. Период реализации изъятий насчитывает 10-30 минут.
Программы преданности включают многоуровневые степени с нарастающим кэшбэком. VIP-менеджеры предлагают уникальные поощрения, повышенные рамки и приоритетную сервис.
Extra time scores, matches that went beyond 90 minutes with final results
57889KarenaSancheso abc
Функционирующие зеркала лицензированных казино на friends casino приложение гарантируют устойчивый коннект к развлекательным порталам. Система зеркалирования создает идентичные дубликаты основного ресурса с сохранением всех опций.
Система создания аккаунта через дублирующий портал полностью повторяет стандартную заявку. Дебютные клиенты вводят активный email, создают стойкий секретную комбинацию и устанавливают основную платежное средство.
Валидация личного кабинета содержит представления справок по KYC-политике. Скан ID-карты, доказательство регистрации и денежные сведения контролируются системой программную верификацию в течение 24-72 ч.
Подключение существующих игроков производится через базовую интерфейс с двухфакторной верификацией. Разовые ключи поступают на сотовый гаджет или e-mail адрес.
Опции пополнительного компонента через mirror-сайты включает актуальные финансовые платформы. Visa, Mastercard, электронные балансы Skrill, Neteller, блокчейн-токены Bitcoin, Ethereum осуществляются с оптимизированными процентами 0-3%.
Gaming библиотека повторяется в точности включая машины, столовые игры, live-хостов и накопительные призы. RTP-параметры, вариативность и вейджер остаются идентичными.
Бонусная схема выполняется похоже основному веб-площадке. Welcome-наборы, фриспины, refund и VIP-курсы инициируются автоматически при достижении определенных параметров.
ivermectin 9 mg: ivermectin brand name – Iver Protocols Guide
Hey there! I’ve been reading your blog for a long time now and finally got the courage to go ahead and
give you a shout out from Lubbock Tx! Just wanted to tell you keep
up the fantastic work!
Hello would you mind letting me know which webhost you’re
using? I’ve loaded your blog in 3 completely different internet browsers and I must say this blog loads
a lot faster then most. Can you recommend a good hosting provider at a honest price?
Thanks a lot, I appreciate it!
62324IsraelSeileyo abc
What impressed me about this casino https://frimpslogistics.com/casino-machine-online-software-architecture-and-4/ is the variety of the games. Everything runs without issues, the design is clean, and there’s plenty of options to explore, which keeps it engaging.
Актуальные участники попадают с барьером соединения к лицензированным порталам. Поставщики закрывают базовые ссылки, но грамотные lucky bear казино клиенты знают о присутствии зеркальных ресурсов.
Резервная ссылка составляет полную отображение базового платформы. Криптографические алгоритмы сохраняются неизменными. Платёжные процедуры реализуются через сходные каналы.
Алгоритм открытия счёта через альтернативный ссылку включает стандартной аутентификации. Менеджеры уточняют справки для соблюдения KYC-правил. Индивидуальные параметры подвергаются комплексную верификацию.
Финансовые границы на параллельных ресурсах идентичны стандартным условиям. Начальные ставки функционируют фиксированными. Растущие банки синхронизируются между множественными ссылками.
Премиальные механизмы действуют целостно на дополнительных порталах. Коэффициент оборота гарантирует стартовые параметры. Длительность оборота не изменяется.
Команда помощи решает заявки с альтернативных адресов равнозначно. Онлайн диалог поддерживает постоянный расписание обслуживания.
Really a good deal of helpful tips!
Перемещение в пространстве сертифицированных площадок нуждается понимания современных способов доступа. Квалифицированные игроки задействуют Tippy casino для добывания современной информации о активных доменах.
Алгоритм формирования личного кабинета в официальных компаниях содержит многоуровневую подтверждение. Современные организации используют KYC-процедуры и AML-критерии. Документальное сопровождение потребляет от 24 до 72 интервалов.
Технические инструменты для преодоления запретов развиваются сообща с укреплением юридических мер. VPN-инструменты типа premium гарантируют шифрование AES-256 и технологии OpenVPN. Стабильность подключения кардинально актуальна для привилегированных сессий.
Зеркальные адреса работают через территориально размещенные цифровые системы. CDN-комплексы осуществляют минимальную задержку для американских клиентов. Системное роутинг включается при выявлении барьера центрального сайта.
Денежные операции в сертифицированных зонах отвечают определенным стандартам PCI DSS. Крипто расчеты увеличивают распространение в результате анонимности и оперативности выполнения.
Переносные программы топовых компаний содержат физиологическую идентификацию и push-извещения для принципиальных эпизодов. Настраиваемый оформление программно адаптируется под параметры панели.
For outcomes
cost of cheap flexeril for sale
to adapt to changes.
64051RamiroWheeleno abc
Поиск достойного гемблинг оператора в сегодняшних границах требует специального внимания к правовому статусу. Квалифицированные игроки учитывают, что mad casino включает последнюю материалы о действующих провайдерах.
Механизм записи в проверенных операторах включает требуемую аутентификацию удостоверения. KYC-требования охраняют как площадку, так и пользователя от фрода. Промежуточные рамки на вывод финансов до финализации верификации – обычная процедура.
Виртуальные барьеры на вход к азартным ресурсам нейтрализуются через зеркальные адреса. Доступные зеркала предоставляют тотальную функциональность основного ресурса. Банковские процедуры, азартный продвижение и наградные планы продолжают постоянными.
Денежная стабильность оценивается уровнем задействованных банковских инструментов. SSL-защита, PCI DSS аттестация и многоуровневая идентификация обеспечивают надежный барьер защиты.
Азартная библиотека лицензированных сервисов предоставляет слоты от известных создателей. RTP-параметры, вариативность и математические системы испытывают беспристрастную аудит в аккредитованных лабораториях.
Программы поощрения в профессиональных сервисах формируются на прозрачных параметрах отыгрыша. Проигрыш x35-40 считается справедливым для барабан-льгот, в то время как настольные игры принимаются в счет с сниженным коэффициентом.
Отбор проверенного развлекательного заведения в нынешних условиях требует тщательного изучения к правовому уровню. Профессиональные клиенты представляют, что Голд казино включает последнюю информацию о функционирующих сервисах.
Процесс создания аккаунта в официальных операторах содержит необходимую проверку идентичности. KYC-требования гарантируют как казино, так и пользователя от обмана. Временные рамки на вывод средств до финализации проверки – обычная практика.
Программные запреты на соединение к гемблинг сервисам нейтрализуются через параллельные порталы. Действующие дубликаты поддерживают абсолютную производительность центрального портала. Расчетные процедуры, развлекательный достижения и поощрительные предложения сохраняются устойчивыми.
Материальная безопасность измеряется качеством используемых денежных систем. SSL-кодирование, PCI DSS лицензирование и двухфакторная идентификация создают безопасный контур защиты.
Геймплейная библиотека сертифицированных провайдеров содержит барабаны от ведущих производителей. RTP-индексы, волатильность и вероятностные модели испытывают независимую контроль в аккредитованных организациях.
Системы лояльности в серьезных заведениях основываются на четких критериях активности. Проигрыш x35-40 считается приемлемым для спин-поощрений, в то время как традиционные состязания принимаются в счет с пониженным множителем.
61134MallieBresnano abc
81202SammyHienso abc
捕风捉影在线免费在线观看,海外华人专属平台运用AI智能推荐算法,高清无广告体验。
Развлекательная ниша представляет быстрый подъём, заинтересовывая массы клиентов. Опытные ресурсы обеспечивают защищённую атмосферу для развлечений. Детальную сведения о данных провайдерах возможно найти на РЎСѓРєР° казино .
Аккредитация остаётся центральным критерием подбора портала. Юрисдикции Олдерни дают тщательный проверку валютных действий. Всякая официальная портал проходит плановые аудиты RNG-систем.
Компьютерные характеристики новейших казино охватывают SSL-кодирование банковского уровня. Поставщики виртуального софта класса Microgaming, NetEnt, Pragmatic Play внедряют продвинутые алгоритмы хаотичных чисел.
Процедура аутентификации счёта требует передачи документов KYC-типа. ID, выписка о средствах, верификация местожительства — базовый комплект для финального доступа.
Зеркальные ссылки решают проблемы с ограничениями операторов. Функционирующие зеркала адаптируются ежедневно цифровыми специалистами. Планшетные приложения часто оперируют лучше веб модификаций.
Распределение капитала создаёт стратегическую результативность развлекательных сессий. Опытные пользователи предлагают сокращать сумму бета до 1-2% от совокупного капитала.
Навигация в секторе лицензированных сайтов подразумевает представления актуальных решений соединения. Квалифицированные пользователи задействуют Голд казино для получения свежей фактов о действующих путях.
Схема создания аккаунта в официальных компаниях предполагает сложную аутентификацию. Передовые организации применяют KYC-процедуры и AML-нормы. Документальное сопровождение составляет от 24 до 72 часов.
Цифровые решения для избежания ограничений прогрессируют сообща с усилением нормативных действий. VPN-платформы разряда premium предоставляют защиту AES-256 и протоколы OpenVPN. Устойчивость соединения кардинально существенна для элитных игровых периодов.
Зеркальные ресурсы работают через географически распределенные IT ресурсы. CDN-комплексы гарантируют оптимальную время ответа для глобальных участников. Техническое маршрутизация активируется при распознавании ограничения первичного домена.
Денежные переводы в проверенных территориях отвечают четким стандартам PCI DSS. Децентрализованные переводы набирают признание из-за секретности и скорости процессинга.
Мобильные софт топовых брендов интегрируют биометрическую подтверждение и push-уведомления для критических событий. Гибкий внешний вид автоматически изменяется под свойства матрицы.
Ориентирование в области легальных площадок требует владения передовых методов доступа. Опытные клиенты задействуют Рльдорадо казино для извлечения современной фактов о активных URL.
Схема формирования аккаунта в официальных операторах охватывает комплексную проверку. Современные провайдеры используют KYC-процедуры и AML-требования. Документальное сопровождение требует от 24 до 72 часов.
IT технологии для преодоления блокировок совершенствуются сообща с интенсификацией законодательных мер. VPN-сервисы типа premium предоставляют шифрование AES-256 и системы OpenVPN. Стабильность подключения жизненно существенна для привилегированных игровых периодов.
Зеркальные сайты функционируют через пространственно размещенные цифровые системы. CDN-системы предоставляют оптимальную время ответа для международных клиентов. Цифровое переключение активируется при обнаружении ограничения основного домена.
Экономические операции в сертифицированных территориях соответствуют четким стандартам PCI DSS. Цифровые транзакции набирают признание в результате приватности и скорости процессинга.
Мобильные клиенты ведущих организаций интегрируют физиологическую аутентификацию и push-оповещения для важных моментов. Адаптивный внешний вид автоматически настраивается под настройки панели.
Функционирующие альтернативные домены лицензированных гемблинг-платформ на ретро казино дают постоянный коннект к азартным порталам. Принцип копирования формирует идентичные клоны главного веб-площадки с консервацией всех возможностей.
Процедура регистрации через дублирующий портал целиком имитирует основную бланк. Новые клиенты прописывают функционирующий email, создают защищенный код доступа и определяют основную платежное средство.
Аутентификация учетной записи предполагает предоставления справок согласно KYC-нормам. Снимок паспорта, подтверждение проживания и банковские сведения проходят машинную верификацию в течение 24-72 периодов.
Авторизация существующих участников осуществляется через обычную интерфейс с усиленной аутентификацией. Краткосрочные шифры отправляются на сотовый девайс или e-mail адрес.
Инструменты финансового компонента через mirror-сайты содержит актуальные финансовые инструменты. Visa, Mastercard, цифровые хранилища Skrill, Neteller, блокчейн-токены Bitcoin, Ethereum обрабатываются с уменьшенными процентами 0-3%.
Азартная база клонируется полностью включая автоматы, классические игры, live-крупье и джекпоты. RTP-параметры, вариативность и вейджер сохраняются аналогичными.
Промо политика функционирует схоже базовому сайту. Welcome-комплекты, бесплатные вращения, возврат средств и VIP-программы запускаются системно при достижении заданных стандартов.
This novel is often cited as a life-changing book. It forces you to confront your own capacity for good and evil. It is not a light read, but it is a necessary one. If you are ready to take the plunge, finding a copy is the first step. An East of Eden PDF is often the choice for those who want to start reading immediately. Our platform is dedicated to the transformative power of this book, offering discussion guides that encourage personal reflection. We help you apply the lessons of the Trask family to your own life.
26364RoyalLacovarao abc
Wonderful blog! I found it while surfing around on Yahoo News.
Do you have any tips on how to get listed in Yahoo News?
I’ve been trying for a while but I never seem to get there!
Thank you
Игровая отрасль являет активный развитие, привлекая тысячи геймеров. Квалифицированные сайты дают стабильную атмосферу для пари. Исчерпывающую сведения о подобных брендах доступно получить на лаки Р±РёСЂ казино .
Аттестация является ключевым фактором определения сайта. Лицензиаты Олдерни гарантируют качественный мониторинг денежных операций. Конкретная легальная портал реализует постоянные аудиты RNG-механизмов.
Компьютерные особенности актуальных азартных площадок объединяют SSL-безопасность экономического стандарта. Провайдеры компьютерного материала класса Microgaming, NetEnt, Pragmatic Play интегрируют усовершенствованные алгоритмы непредсказуемых параметров.
Процесс подтверждения личного кабинета предусматривает представления документов KYC-стандарта. Удостоверение, выписка о финансах, верификация регистрации — стандартный список для завершённого входа.
Резервные адреса исправляют проблемы с ограничениями операторов. Актуальные альтернативы изменяются регулярно компьютерными отделами. Мобильные утилиты обычно действуют качественнее сетевых форматов.
Управление банкроллом задаёт долгосрочную результативность гемблинговых периодов. Опытные участники советуют лимитировать сумму ставки до 1-2% от суммарного резерва.
Лицензионные ресурсы игорных услуг предоставляют участникам право к премиальному развлечениям через целевые платформы, включая френдс казино зеркало , которые выполняют общепринятые требования надёжности.
Последовательность активации necessita заполнения идентификационных информации через шифрованные SSL-линии. Менеджмент просят документальное удостоверение age verification и территории нахождения для исполнения правовых норм.
2FA верификация выступает необходимым составляющей современных систем конфиденциальности. Участники получают SMS-коды, push-алерты или внедряют dedicated программы наподобие Google Authenticator.
Резервные URL устраняют препятствия географических ограничений и DDoS-атак. По сути mirrors образуют дублированные реплики главного ресурса с maintaining инструментария и user деталей.
Skilled игроки suggest хранить свежие каталоги working копий в избранном обозревателя. Букмекеры рассылают информацию о fresh адресах через мейл, Telegram-communities и портативные софт.
Платёжные транзакции через лицензионные платформы покрыты криптографическими протоколами level банковского индустрии. Вывод финансов выполняется лишь на аутентифицированные реквизиты собственника account.
If you enjoy stories about childhood neighbors with a complex history, this book is for you. Lynn Painter navigates the “boy next door” trope with freshness and wit. A Better Than the Movies PDF allows for easy reading on tablets and smartphones. It is a book that proves that sometimes the best adventures are the ones that happen right in your own backyard.
Excellent items from you, man. I have be aware your stuff prior to
and you’re just extremely magnificent. I really like what you have got right here, certainly like what you are stating and the
way in which through which you are saying it.
You are making it entertaining and you still take care of to stay it wise.
I can not wait to learn much more from you.
This is really a tremendous site.
Актуальные клиенты сталкиваются с набором программных особенностей при операциях с лицензированными платформами. Профессиональные сайты типа казино Рльдорадо выдают релевантную материалы о работе игорных компаний.
Алгоритм верификации учетной записи охватывает комплекс необходимых шагов. Исходная валидация предполагает загрузки бумаг валидирующих субъект. Типовой перечень предполагает свидетельство, права или международный паспорт.
Программная компонента открытия счета предполагает применение безопасного соединения и двухуровневой проверки. Продвинутые геймеры предлагают включать все возможных настроек защиты.
Запасные домены формируют идентичные копии главного ресурса с поддержанием полного арсенала. Основное достоинство содержится в тождественности банковских ограничений и условий проигрыша.
Система обнаружения действующих резервных ссылок опирается на наблюдении профессиональных телеграм-каналов и связанных платформ. Экспертные пользователи эксплуатируют прокси-соединения для гарантирования надежного связи независимо от географических ограничений.
16877KarlaSandineo abc
Нынешние бетторы попадают с проблемой подключения к лицензированным платформам. Провайдеры блокируют первичные URL, но опытные лаки Р±РёСЂ казино клиенты учитывают о доступности параллельных ресурсов.
Альтернативный адрес составляет точную копию основного ресурса. Средства защиты сохраняются неизменными. Финансовые переводы выполняются через идентичные шлюзы.
Методика открытия счёта через альтернативный домен требует стандартной аутентификации. Администраторы выясняют удостоверения для соблюдения KYC-регламентов. Идентификационные характеристики выполняют многоуровневую валидацию.
Финансовые ограничения на параллельных порталах равняются стандартным спецификациям. Наименьшие ставки продолжают константными. Возрастающие накопления синхронизируются между многочисленными доменами.
Премиальные программы функционируют комплексно на резервных площадках. Множитель ставок удерживает первоначальные параметры. Период действия проигрывания поддерживается.
Сервис обслуживания рассматривает вопросы с резервных ссылок идентично. Прямой чат обеспечивает постоянный график оперирования.
官方授权的ifuntv海外华人首选,第一时间提供最新华语剧集、美剧、日剧等高清在线观看。
Гемблинговая сфера показывает быстрый прогресс, заинтересовывая миллионы клиентов. Грамотные сайты предлагают безопасную среду для развлечений. Детальную материалы о таких операторах реально отыскать на тип топ казино .
Аккредитация выступает основным показателем отбора ресурса. Контролёры Гибралтара дают качественный проверку валютных манипуляций. Каждая официальная сайт реализует регулярные контроли RNG-механизмов.
Компьютерные аспекты новейших казино включают SSL-кодирование расчётного класса. Создатели программного ПО типа Microgaming, NetEnt, Pragmatic Play встраивают многоуровневые модели хаотичных чисел.
Процедура верификации аккаунта предусматривает представления справок KYC-типа. Удостоверение, справка о прибылях, верификация регистрации — обычный набор для итогового входа.
Зеркальные порталы убирают препятствия с запретами операторов. Функционирующие дубли корректируются каждый день компьютерными отделами. Смартфонные софт часто оперируют стабильнее браузерных форматов.
Управление банкроллом задаёт долгосрочную эффективность азартных сессий. Профессиональные участники настаивают урезать величину пари до 1-2% от общего банкролла.
Отбор проверенного азартного заведения в нынешних границах заставляет тщательного рассмотрения к юридическому состоянию. Знающие геймеры понимают, что казино Гризли отображает современную данные о работающих площадках.
Процедура записи в лицензированных заведениях предусматривает необходимую верификацию удостоверения. KYC-процедуры обеспечивают как сервис, так и игрока от афер. Кратковременные границы на вывод денег до финализации верификации – обычная подход.
Электронные блокировки на соединение к гемблинг площадкам решаются через параллельные URL. Рабочие копии сохраняют абсолютную производительность основного сайта. Денежные операции, развлекательный достижения и наградные системы остаются стабильными.
Материальная безопасность измеряется критерием внедренных финансовых механизмов. SSL-защита, PCI DSS валидация и усиленная подтверждение устанавливают защищенный заслон безопасности.
Азартная коллекция сертифицированных площадок охватывает барабаны от топовых провайдеров. RTP-показатели, вариативность и вероятностные системы получают внешнюю валидацию в одобренных учреждениях.
Механизмы мотивации в надежных заведениях опираются на открытых правилах отыгрыша. Вейджер x35-40 расценивается разумным для спин-привилегий, в то время как карточные игры засчитываются в счет с сниженным показателем.
online mexican pharmacy
Post-match analysis, expert opinions and tactical breakdowns available
63513LanceSauttero abc
Современные провайдеры азартных активностей предлагают беттерам путь к профессиональному игровому процессу через сертифицированные винити казино ресурсы. Легальная деятельность подразумевает учета конкретных надзорных норм.
Процесс открытия индивидуального учетной записи охватывает верификацию личных сведений. Управляющие внедряют расширенные системы KYC и AML для предотвращения мошеннических переводов.
IT решения передовых игорных домов функционируют на зашифрованных облачных системах с криптографическими алгоритмами. IP-фильтрация обязывает администраторов организовывать параллельные порталы.
Параллельные порталы представляют идентичные копии основного портала с поддержанием всех возможностей и данных. Игроки достигают постоянный подключение к балансу, игровой отчетности и пользовательским конфигурациям.
Финансовые операции производятся через синхронизированные денежные сервисы. Пределы на пополнения и обналичивания фиксируются в соответствии с регуляторными требованиями и корпоративными политиками управления рисками.
Профессиональные гемблеры предлагают контролировать положение аккредитации через контролирующие регистры беттинг ведомств. Имиджевые характеристики предусматривают позиции на экспертных платформах и мнения истинных игроков.
Нынешние гемблеры встречаются с затруднением связи к лицензированным площадкам. Компании фильтруют стандартные порталы, но знающие аква казино клиенты понимают о присутствии резервных ресурсов.
Дополнительный домен образует абсолютную копию основного портала. Протоколы шифрования остаются аналогичными. Финансовые транзакции проходят через те же каналы.
Технология открытия счёта через зеркальный портал требует стандартной проверки. Менеджеры просят справки для выполнения KYC-норм. Идентификационные сведения подвергаются расширенную подтверждение.
Депозитные границы на дополнительных платформах аналогичны главным условиям. Минимальные вклады продолжают постоянными. Накопительные накопления согласовываются между множественными ресурсами.
Бонусные планы оперируют целостно на зеркальных ресурсах. Вейджер поддерживает стартовые величины. Период действия реализации остаётся прежним.
Служба помощи обрабатывает обращения с зеркальных адресов таким же способом. Мгновенный разговор обеспечивает беспрерывный график работы.
Выбор надежного игорного ресурса заставляет основательного изучения юридических сертификатов. Актуальные сайты Клубника казино предоставляют пользователям максимальную детали о действующих лицензиях.
Процедура получения доступа содержит различные ключевых ступеней валидации. Провайдеры истребуют документы, удостоверяющие персону и зрелость. Традиционный KYC-процесс составляет от 24 до 72 периодов.
Финансовое планирование открывается с определения рамок на депозиты. Квалифицированные клиенты предлагают задействовать установку 5% от суммарного игорного фонда на отдельную сессию.
Технические запреты операторов обязывают задействовать дополнительные ссылки. Клоны оберегают стопроцентную активность базового платформы, включая летопись транзакций и игровой достижения.
Актуальные платежные системы предоставляют мгновенные инвестиции через криптовалютные счета. Bitcoin, Ethereum и фиксированные активы предоставляют скрытность и минимальные комиссии. Срок обработки изъятий доходит 10-30 интервалов.
Схемы приверженности содержат многоуровневые категории с накапливающимся компенсацией. VIP-представители дают эксклюзивные награды, увеличенные лимиты и приоритетную обслуживание.
Подбор достойного гемблинг площадки в нынешних границах подразумевает детального изучения к лицензионному состоянию. Компетентные геймеры осознают, что Голд зеркало демонстрирует актуальную информацию о доступных операторах.
Процедура открытия счета в официальных операторах содержит неизбежную проверку удостоверения. KYC-правила обеспечивают как сервис, так и клиента от афер. Временные лимиты на вывод капитала до выполнения проверки – обычная система.
Программные препятствия на связь к betting площадкам преодолеваются через зеркальные домены. Доступные копии гарантируют стопроцентную эффективность главного сайта. Расчетные процедуры, интерактивный продвижение и привилегированные планы сохраняются константными.
Капитальная гарантированность измеряется качеством используемых банковских методов. SSL-защита, PCI DSS валидация и дополнительная проверка устанавливают прочный барьер защиты.
Развлекательная набор официальных заведений включает барабаны от топовых создателей. RTP-параметры, дисперсия и статистические системы подвергаются беспристрастную сертификацию в одобренных институтах.
Программы вознаграждения в серьезных заведениях строятся на открытых правилах отыгрыша. Отыгрыш x35-40 расценивается адекватным для слот-привилегий, в то время как стандартные забавы идут в зачет с сниженным множителем.
13917TheodoreBranstado abc
Как выбрать надежный забор для дачи
Выбор достойного гемблинг заведения в сегодняшних обстоятельствах заставляет особого подхода к лицензионному статусу. Квалифицированные участники понимают, что казино ДживиСпин включает современную данные о доступных ресурсах.
Схема регистрации в официальных операторах охватывает необходимую подтверждение личности. KYC-нормы защищают как заведение, так и игрока от обмана. Краткосрочные лимиты на получение денег до выполнения верификации – привычная практика.
Программные препятствия на подключение к гемблинг сайтам обходятся через зеркальные адреса. Функционирующие дубликаты предоставляют всестороннюю производительность главного сервиса. Банковские движения, геймплейный статистика и наградные системы поддерживаются устойчивыми.
Денежная стабильность выражается степенью внедренных банковских систем. SSL-защита, PCI DSS аттестация и двухфакторная аутентификация устанавливают надежный заслон защиты.
Развлекательная библиотека официальных площадок содержит автоматы от главных разработчиков. RTP-показатели, колебания и математические принципы проходят нейтральную сертификацию в аккредитованных учреждениях.
Системы мотивации в серьезных казино формируются на ясных условиях отыгрыша. Требования x35-40 оценивается нормальным для спин-привилегий, в то время как карточные активности принимаются в расчет с уменьшенным процентом.
Новейшие участники встречаются с барьером входа к лицензированным сайтам. Компании блокируют базовые адреса, но искушённые Vovan посетители понимают о функционировании дублирующих площадок.
Альтернативный адрес формирует точную воспроизведение базового портала. Криптографические алгоритмы сохраняются неизменными. Денежные транзакции выполняются через идентичные шлюзы.
Технология открытия счёта через параллельный портал предполагает привычной проверки. Специалисты просят удостоверения для исполнения KYC-норм. Паспортные характеристики реализуют многоуровневую проверку.
Вносительные границы на альтернативных платформах соответствуют стандартным условиям. Стартовые суммы остаются стабильными. Растущие призовые фонды объединяются между разными доменами.
Стимулирующие схемы выполняются комплексно на дополнительных ресурсах. Отыгрышный коэффициент поддерживает стартовые величины. Временные рамки отыгрыша сохраняется.
Департамент сопровождения изучает тикеты с альтернативных порталов таким же способом. Мгновенный чат осуществляет 24-часовой режим функционирования.
Отбор надежного развлекательного площадки нуждается глубокого исследования юридических сертификатов. Современные платформы лаки Р±РёСЂ обеспечивают игрокам абсолютную информацию о имеющихся санкциях.
Процедура регистрации содержит несколько необходимых ступеней верификации. Владельцы требуют справки, доказывающие индивидуальность и совершеннолетие. Типовой KYC-процесс занимает от 24 до 72 временных отрезков.
Управление банком инициируется с определения границ на инвестиции. Компетентные клиенты рекомендуют задействовать закон 5% от суммарного казино фонда на единичную раунд.
Системные барьеры поставщиков обязывают эксплуатировать дополнительные маршруты. Копии поддерживают максимальную функциональность центрального платформы, содержа журнал операций и развлекательный прогресс.
Актуальные банковские методы поддерживают быстрые взносы через криптовалютные счета. Bitcoin, Ethereum и постоянные токены дают скрытность и мизерные платежи. Время осуществления выводов насчитывает 10-30 промежутков.
Схемы постоянства охватывают ступенчатые статусы с накапливающимся кэшбэком. VIP-менеджеры гарантируют личные награды, увеличенные рамки и первоочередную обслуживание.
31273LauranMcdermitto abc
戏台在线免费在线观看,海外华人专属平台,高清无广告体验。
Ориентирование в сфере легальных платформ подразумевает представления продвинутых решений входа. Продвинутые пользователи эксплуатируют Голд РІС…РѕРґ для получения релевантной данных о действующих доменах.
Процедура регистрации счета в сертифицированных компаниях охватывает детальную аутентификацию. Новейшие организации задействуют KYC-системы и AML-нормы. Оформление документов составляет от 24 до 72 промежутков.
Программные способы для обхода блокировок развиваются одновременно с укреплением правовых инициатив. VPN-инструменты категории premium предоставляют безопасность AES-256 и протоколы OpenVPN. Надежность связи fundamentally значима для привилегированных раундов.
Резервные домены действуют через пространственно разнесенные цифровые системы. CDN-системы обеспечивают минимальную задержку для европейских игроков. Программное переключение инициируется при распознавании препятствия центрального домена.
Денежные переводы в сертифицированных областях подчиняются жестким нормам PCI DSS. Децентрализованные переводы завоевывают востребованность благодаря конфиденциальности и динамике выполнения.
Планшетные приложения ведущих брендов совмещают лицевую подтверждение и push-уведомления для существенных ситуаций. Адаптивный внешний вид автоматически адаптируется под параметры экрана.
Подбор достойного азартного оператора в современных реалиях требует особого рассмотрения к правовому статусу. Квалифицированные игроки представляют, что Болливуд казино содержит последнюю информацию о доступных провайдерах.
Механизм создания аккаунта в проверенных площадках охватывает требуемую валидацию документов. KYC-процедуры обеспечивают как казино, так и геймера от мошенничества. Временные пределы на снятие активов до окончания подтверждения – обычная процедура.
Технические блокировки на подключение к betting ресурсам преодолеваются через зеркальные URL. Действующие дубликаты гарантируют стопроцентную производительность первичного портала. Платежные процедуры, геймплейный продвижение и наградные программы сохраняются константными.
Денежная стабильность определяется степенью внедренных платежных методов. SSL-криптография, PCI DSS подтверждение и расширенная подтверждение формируют защищенный щит безопасности.
Игровая ассортимент проверенных площадок предоставляет автоматы от известных производителей. RTP-значения, дисперсия и алгоритмические системы претерпевают объективную сертификацию в аккредитованных центрах.
Системы стимулирования в надежных операторах базируются на открытых требованиях проигрыша. Отыгрыш x35-40 считается приемлемым для слот-бонусов, в то время как традиционные развлечения засчитываются в подсчет с сниженным коэффициентом.
Поиск достойного betting площадки в актуальных границах предполагает детального подхода к правовому режиму. Опытные пользователи знают, что казино РЎСѓРєР° отображает свежую данные о действующих сервисах.
Процедура создания аккаунта в лицензированных заведениях содержит необходимую проверку документов. KYC-нормы охраняют как оператора, так и геймера от махинаций. Промежуточные рамки на получение средств до закрытия проверки – привычная процедура.
Электронные барьеры на вход к азартным сайтам нейтрализуются через параллельные адреса. Активные дубликаты сохраняют абсолютную производительность базового сайта. Денежные движения, интерактивный результаты и бонусные предложения продолжают стабильными.
Финансовая надежность оценивается степенью эксплуатируемых расчетных механизмов. SSL-кодирование, PCI DSS аттестация и многоуровневая проверка обеспечивают стабильный заслон охраны.
Интерактивная коллекция лицензированных провайдеров охватывает барабаны от лидирующих провайдеров. RTP-параметры, вариативность и вероятностные модели претерпевают беспристрастную аудит в признанных организациях.
Механизмы мотивации в надежных заведениях строятся на открытых требованиях проигрыша. Условия ставок x35-40 признается нормальным для спин-привилегий, в то время как классические активности идут в расчет с минимальным показателем.
34244BrentonGlasseyo abc
戏台在线免费在线观看,海外华人专属官方认证平台,高清无广告体验。
Подбор честного гемблинг площадки подразумевает серьезного рассмотрения официальных бумаг. Передовые системы лаки Р±РёСЂ казино предоставляют клиентам максимальную информацию о текущих санкциях.
Алгоритм оформления счета охватывает множество требуемых ступеней аутентификации. Операторы запрашивают свидетельства, подтверждающие персону и возраст. Типовой KYC-механизм составляет от 24 до 72 временных отрезков.
Финансовое планирование запускается с назначения границ на инвестиции. Квалифицированные геймеры советуют эксплуатировать закон 5% от итогового азартного капитала на конкретную игру.
Программные барьеры администраторов побуждают внедрять вспомогательные ссылки. Клоны оберегают полную эффективность центрального ресурса, подразумевая журнал сделок и игровой продвижение.
Передовые платежные системы дают мгновенные инвестиции через криптовалютные портмоне. Bitcoin, Ethereum и фиксированные активы предоставляют анонимность и минимальные взносы. Срок выполнения извлечений составляет 10-30 отрезков.
Системы преданности предусматривают ступенчатые уровни с накапливающимся кэшбэком. VIP-кураторы обеспечивают уникальные подарки, повышенные ограничения и опережающую обслуживание.
Выбор легального казино оператора требует серьезного изучения юридических бумаг. Новые ресурсы Килограмм казино гарантируют игрокам абсолютную данные о своих санкциях.
Механизм получения доступа предусматривает ряд необходимых стадий подтверждения. Администраторы запрашивают документы, подтверждающие самобытность и возраст. Типовой KYC-процесс составляет от 24 до 72 интервалов.
Управление банком стартует с определения ограничений на инвестиции. Опытные клиенты рекомендуют эксплуатировать правило 5% от суммарного азартного бюджета на одну сессию.
Технические препятствия операторов обязывают эксплуатировать альтернативные пути. Дубликаты хранят полную активность центрального портала, предусматривая архив транзакций и азартный продвижение.
Передовые банковские способы поддерживают скоростные вклады через электронные хранилища. Bitcoin, Ethereum и фиксированные активы предоставляют анонимность и крошечные отчисления. Период обработки выводов насчитывает 10-30 промежутков.
Планы преданности охватывают ступенчатые степени с прогрессивным возвратом. VIP-координаторы предоставляют индивидуальные подарки, расширенные лимиты и ускоренную обслуживание.
Подбор надежного гемблинг площадки заставляет тщательного анализа лицензионных сертификатов. Актуальные платформы Килограмм казино предоставляют игрокам безусловную данные о своих лицензиях.
Механизм получения доступа охватывает ряд ключевых фаз валидации. Владельцы просят свидетельства, подтверждающие персону и возраст. Стандартный KYC-процесс требует от 24 до 72 часов.
Управление банком стартует с назначения границ на пополнения. Искусные игроки настаивают внедрять принцип 5% от суммарного развлекательного фонда на отдельную партию.
Цифровые ограничения поставщиков вынуждают внедрять альтернативные домены. Альтернативы сохраняют полную функциональность главного портала, охватывая архив платежей и казино успех.
Актуальные платежные способы поддерживают быстрые взносы через блокчейн хранилища. Bitcoin, Ethereum и стабильные валюты гарантируют скрытность и мизерные платежи. Длительность выполнения выводов насчитывает 10-30 интервалов.
Схемы постоянства подразумевают многоуровневые ранги с прогрессивным компенсацией. VIP-менеджеры дают персонализированные награды, улучшенные ограничения и ускоренную техподдержку.
Как выбрать качественный забор для коттеджа
Передовые игроки встречаются с барьером соединения к сертифицированным площадкам. Компании ограничивают стандартные ссылки, но знающие лайки Р±РёСЂ казино пользователи понимают о присутствии альтернативных ресурсов.
Резервная ссылка образует стопроцентную воспроизведение оригинального сайта. Протоколы шифрования работают идентичными. Банковские действия реализуются через аналогичные механизмы.
Алгоритм открытия счёта через резервный домен содержит классической валидации. Сотрудники уточняют бумаги для осуществления KYC-стандартов. Идентификационные сведения реализуют расширенную верификацию.
Пополнительные пределы на альтернативных платформах соответствуют стандартным условиям. Низшие суммы поддерживаются стабильными. Растущие джекпоты согласовываются между многочисленными адресами.
Стимулирующие системы выполняются комплексно на зеркальных сайтах. Множитель ставок поддерживает базовые параметры. Длительность использования не изменяется.
Команда помощи обрабатывает запросы с альтернативных ресурсов таким же способом. Интерактивный общение предоставляет 24-часовой режим работы.
Hi I am so excited I found your website, I really found you by accident, while I was searching on Askjeeve for something else, Regardless I am here now and would just
like to say many thanks for a remarkable post and a all round thrilling blog (I also love the theme/design), I don’t have
time to read it all at the minute but I have saved it and also added in your RSS feeds, so when I
have time I will be back to read a great deal
more, Please do keep up the excellent jo.
https://follicle.us.com/# cheap propecia online
generic for levitra
40759ShermanLuescheno abc
Инновационные платформы азартных продуктов предоставляют клиентам доступ к профессиональному азарту через проверенные аква казино платформы. Лицензированная работа требует учета четких правовых положений.
Механизм создания пользовательского аккаунта включает подтверждение личных реквизитов. Администраторы задействуют расширенные системы KYC и AML для пресечения поддельных операций.
Цифровые решения новейших развлекательных порталов функционируют на зашифрованных серверах с HTTPS технологиями. Региональная блокировка принуждает провайдеров разрабатывать параллельные адреса.
Параллельные порталы формируют полные версии главного платформы с поддержанием всех опций и данных. Пользователи получают постоянный соединение к средствам, азартной статистике и личным параметрам.
Банковские операции производятся через встроенные платежные шлюзы. Рамки на вклады и обналичивания фиксируются в унисон с регуляторными стандартами и организационными процедурами риск-менеджмента.
Опытные игроки предлагают анализировать условия лицензии через надзорные регистры гемблинг организаций. Авторитетные характеристики охватывают позиции на профильных сервисах и feedback истинных участников.
Передовые клиенты пересекаются с массой программных особенностей при операциях с официальными сайтами. Профильные порталы типа Голд казино поставляют релевантную контент о деятельности казино провайдеров.
Алгоритм проверки счета подразумевает ряд принудительных фаз. Исходная проверка требует предоставления справок удостоверяющих гражданство. Стандартный пакет охватывает ID, лицензию водителя или загранпаспорт.
Программная элемент регистрации включает эксплуатацию SSL-шифрования и 2FA. Продвинутые игроки советуют включать максимум предложенных настроек безопасности.
Резервные ссылки являются точные отражения главного домена с хранением комплексного возможностей. Ключевое плюс заключается в подобии платежных рамок и требований проигрыша.
Схема локализации актуальных зеркал строится на отслеживании экспертных информационных каналов и связанных платформ. Квалифицированные игроки задействуют прокси-соединения для обеспечения бесперебойного входа без оглядки от региональных ограничений.
https://digitalguyde.com/
В Санкт-Петербурге работает надежная служба по утилизации отходов. Посмотреть цены и заказать услугу можно вывоз мусора из квартиры.
Luxury watches continue to attract attention despite the rise of modern gadgets.
They are often seen as a mark of success and refined taste.
Expert workmanship plays a major role in their lasting value.
Many luxury watches are produced using carefully selected materials.
https://doodleordie.com/profile/lepodium
They also represent a rich heritage passed down through generations.
For collectors, these watches can serve as both practical items and valuable assets.
Timeless design allows them to stay relevant across changing fashion trends.
In the end, luxury watches continue to interest buyers around the world.
pin-up çıxarış niyə rədd edilir pin-up çıxarış niyə rədd edilir
чердачные лестницы fakro
78075CarmeloQuibodeauxo abc
Гемблинговая сфера являет динамичный подъём, завлекая массы клиентов. Грамотные сайты предлагают надёжную среду для беттинга. Подробную информацию о указанных операторах допустимо получить на zelenovskoe.ru .
Аттестация выступает главным элементом выбора площадки. Юрисдикции Кюрасао дают строгий контроль экономических транзакций. Каждая официальная сайт проходит плановые контроли RNG-систем.
Программные особенности современных беттинг-платформ включают SSL-шифрование расчётного класса. Поставщики софтового продукта наподобие Microgaming, NetEnt, Pragmatic Play внедряют сложные механизмы хаотичных величин.
Процесс верификации учётной записи требует передачи документов KYC-формата. Свидетельство, документ о финансах, верификация местожительства — классический комплект для завершённого доступа.
Альтернативные адреса решают проблемы с блокировками компаний. Свежие альтернативы корректируются систематически IT командами. Мобильные софт зачастую оперируют стабильнее онлайн модификаций.
Контроль средств формирует длительную эффективность игровых сессий. Грамотные геймеры предлагают контролировать объём бета до 1-2% от итогового фонда.
Передовые гемблеры сталкиваются с препятствием связи к проверенным платформам. Поставщики фильтруют основные домены, но профессиональные казино ДживиСпин клиенты знают о доступности зеркальных платформ.
Дополнительный домен представляет точную дубликат оригинального сайта. Системы безопасности сохраняются идентичными. Банковские процедуры проходят через идентичные системы.
Процедура заведения учётной записи через альтернативный ресурс требует привычной верификации. Специалисты запрашивают справки для выполнения KYC-регламентов. Идентификационные параметры реализуют расширенную валидацию.
Банковские ограничения на резервных порталах соответствуют стандартным условиям. Низшие суммы сохраняются стабильными. Прогрессивные джекпоты согласовываются между множественными адресами.
Бонусные планы работают завершённо на резервных площадках. Требования по обороту гарантирует оригинальные показатели. Длительность проигрывания продолжается.
Департамент обслуживания рассматривает заявки с зеркальных доменов равнозначно. Онлайн разговор гарантирует непрерывный формат деятельности.
Надёжные площадки игровых возможностей предоставляют клиентам право к высококлассному развлечениям через профильные ресурсы, включая типпи казино , которые именно выполняют мировые требования безопасности.
Схема регистрации включает предоставления проверочных параметров через encrypted SSL-линии. Провайдеры просят предоставить письменное свидетельство возраста и региона нахождения для compliance нормативных критериев.
Multi-factor проверка выступает required частью актуальных solutions надёжности. Users приобретают SMS-ключи, push-сообщения или используют специализированные программы по типу Google Authenticator.
Альтернативные ссылки устраняют сложности локальных ограничений и DDoS-воздействий. По сути зеркала составляют тождественные реплики главного сайта с обеспечением возможностей и индивидуальных данных.
Skilled геймеры suggest keeping актуальные каталоги working зеркал в favourites обозревателя. Management отправляют информацию о свежих доменах через электронную почту, Telegram-чаты и портативные утилиты.
Payment процедуры через лицензионные площадки защищены шифровальными methods level банковского индустрии. Вывод средств реализуется только на validated карты собственника аккаунта.
Поиск проверенного гемблинг ресурса нуждается серьезного рассмотрения лицензионных свидетельств. Современные системы казино ДживиСпин гарантируют пользователям абсолютную сведения о имеющихся лицензиях.
Процедура создания профиля содержит несколько ключевых стадий подтверждения. Владельцы настаивают удостоверения, засвидетельствующие личность и дееспособность. Классический KYC-процесс составляет от 24 до 72 часов.
Финансовое планирование инициируется с назначения ограничений на депозиты. Квалифицированные клиенты призывают задействовать закон 5% от полного гемблинг фонда на одну раунд.
Электронные ограничения владельцев вынуждают эксплуатировать вспомогательные маршруты. Дубликаты оберегают безусловную эффективность центрального площадки, охватывая хронологию платежей и казино достижения.
Инновационные платежные методы дают скоростные взносы через электронные аккаунты. Bitcoin, Ethereum и постоянные токены дают анонимность и наименьшие комиссии. Продолжительность обработки изъятий насчитывает 10-30 промежутков.
Схемы преданности подразумевают многоуровневые категории с увеличивающимся кэшбэком. VIP-координаторы предлагают эксклюзивные подарки, увеличенные рамки и ускоренную обслуживание.
Follicle Insight get generic propecia without insurance Follicle Insight
66739LincolnBerrospeo abc
Generations of readers have been inspired by the independence and intelligence of Elizabeth Bennet. Her refusal to settle for a marriage without respect is a powerful message. To fully grasp her journey, one must read the original novel. While paperbacks are lovely, a digital file offers durability and portability. If you are scouting for a Pride and Prejudice PDF, you likely value both literature and convenience. Our online hub focuses on bringing this story to a wider audience. Detailed, witty, and romantic, this book deserves a spot in every digital library. Start reading today and see why Mr. Darcy is the ultimate literary hero.
Amitriptyline: buy Elavil – Elavil
Я ценю информативный подход этой статьи. Она предоставляет достаточно фактов и данных для лучшего понимания проблемы. Хотелось бы увидеть больше ссылок на исследования и источники информации.
Надёжные платформы гэмблинг услуг гарантируют участникам возможность к профессиональному времяпрепровождению через целевые порталы, включая казино лаки Р±РёСЂ , которые специально соблюдают transnational требования защиты.
Схема активации подразумевает ввода верификационных деталей через безопасные SSL-протоколы. Администрация demanded официальное доказательство age verification и территории residence для исполнения legal норм.
Двухэтапная верификация считается required составляющей современных solutions безопасности. Участники имеют SMS-коды, push-уведомления или используют специальные tools наподобие Google Authenticator.
Резервные адреса ликвидируют вопросы geographic блокировок и DDoS-воздействий. С технической точки зрения копии являют дублированные копии базового портала с сохранением функциональности и user параметров.
Компетентные пользователи рекомендуют хранить актуальные базы действующих копий в сохранённых ссылках веб-клиента. Операторы отправляют сведения о свежих URL через e-mail, Telegram-каналы и телефонные софт.
Payment movements через проверенные ресурсы защищены криптографическими технологиями стандарта банковского индустрии. Extraction капитала реализуется только на подтверждённые реквизиты собственника account.
Надёжные платформы азартных сервисов обеспечивают участникам шанс к премиальному времяпрепровождению через целевые домены, включая tip top casino , которые следуют transnational нормы надёжности.
Процедура регистрации предполагает заполнения идентификационных деталей через криптографические SSL-протоколы. Менеджмент demanded документальное доказательство совершеннолетия и региона нахождения для соблюдения юрисдикционных стандартов.
Двухэтапная проверка становится required частью новейших систем security. Users получают SMS-пароли, push-сообщения или внедряют dedicated приложения типа Google Authenticator.
Зеркальные порталы преодолевают сложности региональных блокировок и DDoS-воздействий. Фактически зеркала являют дублированные реплики центрального платформы с maintaining инструментария и user данных.
Компетентные пользователи призывают поддерживать current каталоги активных дублей в favourites обозревателя. Management отправляют новости о fresh ссылках через email, Telegram-communities и мобильные приложения.
Платёжные операции через лицензионные ресурсы покрыты защитными технологиями категории банковского индустрии. Изъятие средств выполняется только на аутентифицированные счета владельца личного кабинета.
Надёжные площадки гэмблинг предложений предоставляют геймерам возможность к качественному времяпрепровождению через профильные порталы, включая лаки Р±РёСЂ казино , что следуют общепринятые требования безопасности.
Схема создания аккаунта предполагает заполнения верификационных параметров через криптографические SSL-протоколы. Администрация demanded письменное удостоверение возраста и региона нахождения для исполнения законодательных норм.
Multi-factor проверка выступает mandatory частью современных систем надёжности. Пользователи имеют SMS-ключи, push-notification или эксплуатируют targeted приложения наподобие Google Authenticator.
Альтернативные адреса нейтрализуют сложности географических ограничений и DDoS-воздействий. С технической точки зрения дубли являют копийные реплики основного домена с обеспечением features и индивидуальных сведений.
Компетентные участники советуют поддерживать current реестры рабочих mirrors в сохранённых ссылках веб-клиента. Администрация доставляют сведения о новых порталах через e-mail, Telegram-группы и mobile программы.
Банковские переводы через legal площадки защищены cryptographic системами класса банковского области. Снятие фондов происходит единственно на подтверждённые wallets собственника учётной записи.
Post-match analysis, expert opinions and tactical breakdowns available
Исследование в пространстве проверенных ресурсов нуждается понимания современных решений авторизации. Умелые участники применяют Вован казино для получения актуальной материалов о оперативных путях.
Схема формирования учетной записи в официальных учреждениях охватывает многоуровневую аутентификацию. Передовые компании применяют KYC-процедуры и AML-требования. Бумажная работа отнимает от 24 до 72 периодов.
Цифровые технологии для минования ограничений эволюционируют синхронно с повышением нормативных решений. VPN-сервисы разряда premium предлагают защиту AES-256 и методы OpenVPN. Непрерывность канала принципиально необходима для VIP раундов.
Альтернативные сайты действуют через территориально распределенные компьютерные кластеры. CDN-системы предоставляют сокращенную отклик для глобальных геймеров. Системное роутинг активируется при идентификации препятствия основного портала.
Банковские транзакции в сертифицированных областях отвечают жестким правилам PCI DSS. Блокчейн транзакции получают распространение из-за секретности и быстроте процессинга.
Смартфонные утилиты лучших брендов содержат голосовую аутентификацию и push-алерты для принципиальных моментов. Гибкий дизайн автоматически настраивается под характеристики экрана.
7865AntonyGwalthneyo abc
Актуальные mirror-ссылки легальных гемблинг-платформ на казино Болливуд предоставляют постоянный подключение к гемблинг ресурсам. Система дублирования формирует идентичные версии центрального домена с консервацией всех инструментов.
Система создания аккаунта через резервную ссылку абсолютно дублирует оригинальную шаблон. Начинающие участники прописывают действующий email, устанавливают стойкий шифр и устанавливают рабочую валюту.
Подтверждение аккаунта включает передачи бумаг следуя KYC-политике. Фото ID-карты, валидация адреса и банковские данные анализируются посредством автоматическую верификацию в течение 24-72 часов.
Авторизация верифицированных клиентов осуществляется через обычную модуль с 2FA верификацией. Временные токены доставляются на сотовый аппарат или e-mail адрес.
Механизмы пополнительного компонента через альтернативные домены поддерживает актуальные финансовые сервисы. Visa, Mastercard, цифровые портмоне Skrill, Neteller, цифровые активы Bitcoin, Ethereum выполняются с низкими сборами 0-3%.
Gaming библиотека воспроизводится полностью включая автоматы, столовые геймплей, live-крупье и накопительные призы. RTP-коэффициенты, колебания и условия отыгрыша поддерживаются идентичными.
Подарочная механизм работает похоже основному ресурсу. Welcome-наборы, фриспины, кешбэк и VIP-программы инициируются системно при достижении определенных параметров.
Выбор безопасного гемблинг портала в текущих границах подразумевает особого анализа к юридическому статусу. Профессиональные игроки учитывают, что казино Голд демонстрирует последнюю факты о функционирующих сервисах.
Механизм записи в легальных сервисах предусматривает необходимую проверку личности. KYC-процедуры оберегают как оператора, так и клиента от мошенничества. Промежуточные границы на вывод денег до выполнения валидации – привычная подход.
Цифровые блокировки на доступ к гемблинг сервисам обходятся через резервные порталы. Функционирующие клоны сохраняют полную функциональность первичного портала. Денежные переводы, интерактивный статистика и поощрительные планы функционируют стабильными.
Экономическая гарантированность измеряется критерием внедренных денежных методов. SSL-криптография, PCI DSS лицензирование и двухфакторная подтверждение формируют защищенный периметр обороны.
Азартная библиотека лицензированных заведений содержит барабаны от лидирующих разработчиков. RTP-параметры, дисперсия и расчетные принципы получают внешнюю аудит в утвержденных лабораториях.
Механизмы стимулирования в достойных заведениях основываются на прозрачных параметрах ставок. Условия ставок x35-40 оценивается нормальным для автомат-привилегий, в то время как настольные состязания идут в калькуляцию с уменьшенным показателем.
What impressed me about this casino https://wavednet.com/2025/08/23/99-gambling-enterprise-also-offers-2025/ is the variety of the games. Everything runs smoothly, the design is clean, and there’s always something new to explore, which keeps it engaging.
hey there and thank you for your info – I’ve certainly picked up
something new from right here. I did however expertise several
technical points using this web site, as I experienced
to reload the website lots of times previous to I could get
it to load properly. I had been wondering if your
web host is OK? Not that I am complaining, but slow loading instances times will very
frequently affect your placement in google
and could damage your high-quality score if ads and
marketing with Adwords. Anyway I’m adding this RSS to my e-mail and could look out for
a lot more of your respective exciting content. Make sure you update this again very soon.
42300RonaldMetiao abc
Действующие дублирующие порталы лицензированных гемблинг-платформ на mad casino гарантируют непрерывный доступ к геймерским порталам. Система зеркалирования строит полноценные версии базового портала с фиксацией всех функций.
Схема оформления профиля через зеркало на сто процентов копирует основную бланк. Свежие игроки прописывают действующий email, устанавливают безопасный секретную комбинацию и определяют основную курренси.
Идентификация профиля содержит загрузки справок по KYC-требованиям. Скан водительских прав, валидация регистрации и банковские реквизиты проверяются через машинную верификацию в течение 24-72 ч.
Вход активных геймеров реализуется через обычную модуль с 2FA проверкой. Разовые шифры поступают на мобильный номер или почтовый ящик.
Возможности входящего компонента через зеркала предлагает топовые денежные механизмы. Visa, Mastercard, цифровые балансы Skrill, Neteller, блокчейн-токены Bitcoin, Ethereum реализуются с уменьшенными комиссиями 0-3%.
Игровая коллекция повторяется полностью включая барабаны, столовые развлечения, live-операторов и максимальные награды. RTP-показатели, вариативность и ставочные требования остаются точными.
Поощрительная схема действует аналогично корневому порталу. Welcome-комплекты, безвозмездные спины, кешбэк и VIP-схемы активируются машинально при достижении определенных стандартов.
adderall online pharmacy http://fotos24.org/url?q=https%3A%2F%2Fcanadianmedsmax.com online pharmacies
Актуальные альтернативные домены официальных гемблинг-платформ на лаки Р±РёСЂ казино обеспечивают беспрерывный доступ к гемблинг сервисам. Принцип реплицирования формирует аналогичные клоны корневого ресурса с фиксацией всех функций.
Схема оформления профиля через дублирующий портал на сто процентов воспроизводит основную форму. Дебютные геймеры заполняют действующий email, устанавливают надежный секретную комбинацию и назначают основную платежное средство.
Аутентификация счета подразумевает передачи удостоверений в соответствии с KYC-требованиям. Изображение удостоверения личности, доказательство проживания и карточные координаты проверяются через алгоритмическую анализ в течение 24-72 временных единиц.
Вход верифицированных геймеров реализуется через типовую панель с 2FA верификацией. Краткосрочные пароли передаются на смс номер или e-mail адрес.
Функционал денежного сектора через резервные ссылки поддерживает востребованные денежные платформы. Visa, Mastercard, цифровые портмоне Skrill, Neteller, виртуальные монеты Bitcoin, Ethereum реализуются с минимальными комиссиями 0-3%.
Азартная каталог повторяется целиком включая барабаны, столовые активности, live-операторов и джекпоты. RTP-параметры, вариативность и отыгрыш удерживаются идентичными.
Акционная система оперирует схоже центральному веб-площадке. Welcome-наборы, безвозмездные спины, компенсация и VIP-курсы активируются машинально при достижении фиксированных стандартов.
Навигация в мире сертифицированных площадок включает осознания современных инструментов входа. Опытные игроки применяют казино лова для добывания новейшей данных о функционирующих URL.
Механизм оформления аккаунта в сертифицированных заведениях предполагает комплексную верификацию. Актуальные поставщики задействуют KYC-системы и AML-требования. Документальная процедура отнимает от 24 до 72 временных отрезков.
Технические инструменты для обхода препятствий прогрессируют параллельно с укреплением юридических мер. VPN-платформы категории premium гарантируют безопасность AES-256 и технологии OpenVPN. Стабильность связи жизненно существенна для привилегированных сессий.
Резервные платформы оперируют через локально рассредоточенные технические инфраструктуры. CDN-сети поддерживают низкую латентность для американских геймеров. Цифровое редирект включается при распознавании недоступности главного адреса.
Финансовые переводы в сертифицированных юрисдикциях подпадают под четким требованиям PCI DSS. Цифровые переводы приобретают признание благодаря скрытности и темпу процессинга.
Смартфонные клиенты лучших брендов совмещают физиологическую идентификацию и push-алерты для принципиальных ситуаций. Изменяемый внешний вид самостоятельно адаптируется под особенности матрицы.
https://www.lnrprecision.com/
Определение проверенного гемблинг площадки заставляет серьезного исследования официальных свидетельств. Передовые сайты mad casino зеркало обеспечивают геймерам безусловную данные о собственных допусках.
Процесс регистрации предусматривает несколько требуемых шагов подтверждения. Провайдеры истребуют свидетельства, устанавливающие индивидуальность и дееспособность. Обычный KYC-процесс длится от 24 до 72 часов.
Банкролл-менеджмент открывается с определения рамок на пополнения. Квалифицированные игроки предлагают эксплуатировать установку 5% от итогового игорного резерва на индивидуальную сессию.
Цифровые препятствия поставщиков вынуждают использовать дополнительные ссылки. Зеркала хранят абсолютную эффективность базового ресурса, предусматривая журнал переводов и гемблинг прогресс.
Актуальные финансовые способы гарантируют оперативные пополнения через виртуальные счета. Bitcoin, Ethereum и стейблкоины дают анонимность и крошечные взносы. Срок выполнения снятий равно 10-30 промежутков.
Программы приверженности содержат градационные категории с прогрессивным бонусом. VIP-менеджеры предлагают индивидуальные поощрения, улучшенные пределы и опережающую техподдержку.
60087TreyBursio abc
Ориентирование в мире легальных платформ предполагает представления продвинутых решений входа. Продвинутые игроки используют казино РЎСѓРєР° для извлечения новейшей сведений о функционирующих путях.
Механизм формирования профиля в лицензированных учреждениях подразумевает многоуровневую валидацию. Продвинутые компании эксплуатируют KYC-механизмы и AML-критерии. Бумажная работа отнимает от 24 до 72 интервалов.
Компьютерные решения для прохождения барьеров эволюционируют сообща с ужесточением правовых мер. VPN-решения категории premium предлагают шифрование AES-256 и протоколы OpenVPN. Устойчивость связи принципиально значима для VIP игровых периодов.
Дублирующие ресурсы функционируют через пространственно размещенные цифровые мощности. CDN-структуры гарантируют минимальную латентность для американских клиентов. Техническое маршрутизация инициируется при идентификации недоступности первичного домена.
Платежные манипуляции в сертифицированных регионах отвечают жестким нормам PCI DSS. Крипто транзакции завоевывают актуальность благодаря конфиденциальности и темпу выполнения.
Мобильные клиенты топовых операторов объединяют отпечатковую авторизацию и push-уведомления для принципиальных эпизодов. Модифицируемый дизайн независимо адаптируется под настройки монитора.
https://sites.google.com/view/comfort-glow-website/home
When researching space heaters, I noticed that Comfort Glow heaters are often mentioned in discussions about basic efficiency and safety features. For compact spaces or supplemental heating, those factors tend to be more important than raw power.
Looking at various heater manufacturers helped me understand how air circulation, temperature control, and safety mechanisms affect everyday comfort. It’s not always about maximum heat output, but about steady performance and safe operation over time.
Передовые игроки попадают с барьером входа к проверенным порталам. Организации закрывают основные адреса, но грамотные Болливуд казино клиенты помнят о существовании дублирующих порталов.
Зеркало образует полную воспроизведение базового платформы. Системы безопасности работают такими же. Банковские процедуры производятся через равнозначные механизмы.
Алгоритм заведения учётной записи через резервный домен содержит стандартной аутентификации. Сотрудники запрашивают бумаги для соблюдения KYC-требований. Идентификационные сведения проходят двухфакторную аутентификацию.
Финансовые пределы на резервных платформах совпадают стандартным требованиям. Низшие суммы продолжают фиксированными. Накопительные банки синхронизируются между всеми ресурсами.
Льготные программы функционируют полноценно на дополнительных платформах. Вейджер обеспечивает исходные показатели. Срок активности использования не изменяется.
Сервис обслуживания изучает вопросы с параллельных доменов идентично. Онлайн диалог гарантирует круглосуточный график оперирования.
Поиск в сфере лицензированных порталов нуждается представления современных методов доступа. Опытные клиенты внедряют винити официальный сайт для приобретения актуальной информации о действующих доменах.
Процесс формирования аккаунта в официальных учреждениях содержит многоуровневую валидацию. Актуальные компании эксплуатируют KYC-механизмы и AML-критерии. Оформление документов занимает от 24 до 72 часов.
Цифровые инструменты для обхода барьеров прогрессируют параллельно с усилением законодательных шагов. VPN-инструменты типа premium предоставляют защиту AES-256 и методы OpenVPN. Непрерывность связи принципиально существенна для элитных сессий.
Зеркальные домены действуют через локально рассредоточенные технические системы. CDN-сети поддерживают сокращенную латентность для европейских клиентов. Техническое роутинг включается при выявлении блокировки основного ресурса.
Экономические операции в проверенных зонах подчиняются конкретным нормам PCI DSS. Блокчейн переводы набирают признание благодаря конфиденциальности и динамике выполнения.
Планшетные софт премиальных операторов включают отпечатковую проверку и push-уведомления для существенных происшествий. Настраиваемый интерфейс независимо настраивается под особенности экрана.
Официальные платформы игровых возможностей гарантируют игрокам возможность к качественному азартному досугу через целевые домены, включая Голд официальный сайт , которые придерживаются мировые критерии конфиденциальности.
Процедура регистрации necessita предоставления валидационных деталей через шифрованные SSL-протоколы. Менеджмент demanded нотариальное удостоверение дееспособности и региона жительства для исполнения legal требований.
Multi-factor authentication выступает обязательным составляющей современных solutions конфиденциальности. Участники располагают SMS-шифры, push-уведомления или применяют профессиональные программы в стиле Google Authenticator.
Mirror ссылки решают вопросы локальных санкций и DDoS-воздействий. С технической точки зрения копии составляют дублированные реплики базового сайта с сохранением инструментария и индивидуальных параметров.
Опытные клиенты рекомендуют удерживать актуальные реестры рабочих дублей в закладках обозревателя. Провайдеры рассылают updates о актуальных адресах через почтовые сервисы, Telegram-чаты и портативные софт.
Банковские переводы через надёжные платформы защищены cryptographic протоколами стандарта банковского segment. Изъятие денег реализуется исключительно на верифицированные карты держателя аккаунта.
42953AureaLuttono abc
Определение проверенного игорного ресурса требует тщательного исследования регулятивных документов. Инновационные платформы лова казино предлагают пользователям стопроцентную информацию о текущих разрешениях.
Система получения доступа подразумевает ряд ключевых стадий аутентификации. Представители истребуют документы, доказывающие идентичность и зрелость. Классический KYC-процесс продолжается от 24 до 72 временных отрезков.
Финансовое планирование открывается с фиксации ограничений на депозиты. Компетентные клиенты настаивают внедрять норму 5% от суммарного развлекательного резерва на отдельную сессию.
Системные запреты поставщиков побуждают задействовать вспомогательные адреса. Копии удерживают полную функциональность главного ресурса, охватывая хронологию сделок и игровой продвижение.
Передовые платежные методы обеспечивают быстрые взносы через цифровые портмоне. Bitcoin, Ethereum и фиксированные активы предоставляют конфиденциальность и минимальные взносы. Длительность проведения получений составляет 10-30 отрезков.
Схемы верности охватывают многоуровневые ранги с накапливающимся возвратом. VIP-менеджеры дают персонализированные поощрения, увеличенные рамки и первоочередную сервис.
Mix backlinks are a powerful SEO strategy that focuses on building a natural and diversified link profile for a website.
Instead of relying on a single type of backlink, mix backlinks combine links from multiple sources
such as blogs, business profiles, forums, directories, guest posts, social platforms,
and niche-related websites. This diversity helps
search engines see a website as trustworthy, relevant, and genuinely
popular rather than artificially promoted.
One of the main benefits of mix backlinks is improved search engine rankings.
Search engines like Google value link variety because it reflects organic growth.
When links come from different domains, IPs, and content types, they strengthen a website’s authority and reduce the risk of penalties.
Mix backlinks also support faster indexing, as links from active platforms help search engines discover new pages more quickly.
Another advantage is stronger E-E-A-T (Experience,
Expertise, Authoritativeness, and Trust). Backlinks
from authoritative and relevant sources signal credibility,
while user-generated and contextual links add authenticity.
This balanced approach builds long-term SEO value rather
than short-term ranking spikes.
Overall, mix backlinks create a safe, sustainable, and effective
link-building strategy. By focusing on quality, relevance,
and diversity, they help websites grow steadily, attract organic traffic,
and maintain strong rankings in competitive search results.
заклепки вытяжные 8 заклепки вытяжные алюминиевые гост
Надёжные операторы гэмблинг услуг предоставляют игрокам вариант к элитному времяпрепровождению через dedicated сайты, включая JVSpin casino , которые точно исполняют мировые критерии безопасности.
Алгоритм создания аккаунта подразумевает указания проверочных сведений через защищённые SSL-connection. Администрация просят предоставить письменное verification совершеннолетия и места residence для compliance legal норм.
Двухфакторная идентификация представляет обязательным aspect передовых solutions надёжности. Пользователи обретают SMS-шифры, push-алерты или используют targeted утилиты типа Google Authenticator.
Резервные ссылки преодолевают сложности географических ограничений и DDoS-штурмов. С технической точки зрения копии образуют тождественные версии primary платформы с обеспечением features и пользовательских параметров.
Опытные игроки рекомендуют сохранять актуальные перечни действующих альтернатив в закладках браузера. Букмекеры направляют новости о fresh URL через мейл, Telegram-каналы и мобильные apps.
Payment операции через лицензионные платформы обеспечены защитными системами уровня банковского области. Получение фондов реализуется только на аутентифицированные счета собственника account.
塔尔萨之王高清完整版智能AI观看体验优化,海外华人可免费观看最新热播剧集。
One of the central themes of the book is the Hebrew concept of timshel, which translates to “thou mayest,” implying that mankind has the choice to conquer sin. This powerful message is woven throughout the narrative of the Trask family. Students often rush to find an East of Eden PDF online to quickly reference Lee’s explanation of this concept for their essays. We have curated a space that discusses this philosophy in detail, helping readers connect the biblical parallels to the fictional events in the Salinas Valley. It is an essential companion for anyone delving into the electronic version of this classic saga.
27974CarrollKrauelo abc
Live scores today for all sports, comprehensive coverage updated every few seconds
Подбор легального игорного заведения заставляет детального разбора лицензионных бумаг. Современные платформы Gold casino гарантируют участникам максимальную факты о собственных санкциях.
Процесс регистрации содержит ряд требуемых этапов аутентификации. Операторы настаивают удостоверения, подтверждающие личность и зрелость. Классический KYC-порядок требует от 24 до 72 периодов.
Банкролл-менеджмент стартует с определения рамок на взносы. Квалифицированные геймеры настаивают использовать принцип 5% от полного азартного средств на единичную заход.
Программные запреты администраторов побуждают задействовать резервные пути. Клоны сохраняют максимальную эффективность основного сайта, подразумевая хронологию платежей и азартный продвижение.
Новые расчетные сервисы предоставляют мгновенные взносы через виртуальные хранилища. Bitcoin, Ethereum и стейблкоины дают конфиденциальность и мизерные взносы. Период обработки извлечений насчитывает 10-30 интервалов.
Алгоритмы приверженности предусматривают градационные ранги с увеличивающимся возвратом. VIP-консультанты гарантируют эксклюзивные вознаграждения, повышенные рамки и опережающую помощь.
Отбор честного игорного заведения предполагает основательного разбора официальных документов. Передовые системы enomo казино гарантируют игрокам стопроцентную факты о собственных аккредитациях.
Система оформления счета включает различные необходимых стадий валидации. Администраторы требуют свидетельства, засвидетельствующие индивидуальность и дееспособность. Типовой KYC-порядок длится от 24 до 72 интервалов.
Банкролл-менеджмент открывается с задания границ на инвестиции. Компетентные геймеры призывают применять принцип 5% от полного казино фонда на единичную партию.
Электронные барьеры администраторов обязывают эксплуатировать дополнительные ссылки. Копии хранят безусловную эффективность базового сайта, содержа архив переводов и гемблинг достижения.
Инновационные финансовые инструменты предоставляют моментальные инвестиции через виртуальные кошельки. Bitcoin, Ethereum и устойчивые монеты гарантируют анонимность и символические комиссии. Период обработки извлечений достигает 10-30 интервалов.
Алгоритмы постоянства включают градационные уровни с увеличивающимся кэшбэком. VIP-представители дают индивидуальные вознаграждения, улучшенные пределы и преимущественную обслуживание.
Активные резервные адреса надежных азартных клубов на казино Голд дают беспрерывный подключение к геймерским системам. Методика дублирования создает эквивалентные копии центрального веб-площадки с сохранением всех инструментов.
Механизм открытия счета через дублирующий портал в точности воспроизводит главную шаблон. Только пришедшие клиенты прописывают валидный email, создают безопасный код доступа и фиксируют основную финансовый инструмент.
Верификация профиля содержит представления документов в соответствии с KYC-требованиям. Изображение национального документа, подтверждение адреса и платежные параметры проверяются через машинную валидацию в течение 24-72 ч.
Вход активных геймеров реализуется через стандартную интерфейс с 2FA верификацией. Одноразовые ключи приходят на мобильный номер или email.
Возможности пополнительного блока через дублирующие порталы предлагает топовые денежные платформы. Visa, Mastercard, веб балансы Skrill, Neteller, цифровые активы Bitcoin, Ethereum обрабатываются с низкими сборами 0-3%.
Gaming коллекция воспроизводится в точности включая машины, традиционные игры, live-крупье и накопительные призы. RTP-значения, изменчивость и условия отыгрыша удерживаются аналогичными.
Подарочная система работает схоже основному сайту. Welcome-пакеты, безвозмездные спины, refund и VIP-планы инициируются алгоритмически при выполнении фиксированных требований.
Подбор легального гемблинг ресурса подразумевает серьезного разбора регулятивных свидетельств. Передовые порталы типпи казино предоставляют геймерам абсолютную данные о своих разрешениях.
Механизм регистрации предусматривает несколько ключевых этапов аутентификации. Владельцы запрашивают свидетельства, доказывающие индивидуальность и возраст. Традиционный KYC-механизм продолжается от 24 до 72 периодов.
Финансовое планирование стартует с задания рамок на вклады. Опытные игроки настаивают использовать норму 5% от итогового развлекательного фонда на конкретную партию.
Программные запреты операторов принуждают использовать альтернативные пути. Альтернативы хранят безусловную эффективность основного площадки, предусматривая архив транзакций и гемблинг продвижение.
Новые банковские способы предоставляют быстрые инвестиции через цифровые кошельки. Bitcoin, Ethereum и постоянные токены гарантируют тайность и минимальные взносы. Время реализации выводов равно 10-30 периодов.
Системы преданности содержат градационные уровни с нарастающим вознаграждением. VIP-представители предлагают персонализированные поощрения, усиленные ограничения и приоритетную техподдержку.
87009GermanSelbigo abc
The novel is a masterclass in atmospheric writing. A Wuthering Heights PDF lets you study how Brontë builds tension through the environment. The wind is always blowing; the snow is always falling. It creates a sense of entrapment. Reading this digitally, perhaps on a rainy day, enhances the mood. It is the ultimate “bad weather” book. The digital format allows you to curl up and get comfortable while the characters on the screen suffer through the harsh Yorkshire elements.
Легальные операторы игровых услуг обеспечивают геймерам шанс к элитному развлечениям через dedicated порталы, включая Голд казино , что придерживаются международные стандарты security.
Механизм открытия счёта включает заполнения идентификационных параметров через защищённые SSL-каналы. Администрация просят нотариальное удостоверение возраста и места residence для поддержания правовых норм.
Многоуровневая идентификация представляет принудительным компонентом современных архитектур security. Игроки приобретают SMS-ключи, push-notification или применяют специализированные приложения типа Google Authenticator.
Зеркальные URL ликвидируют проблемы региональных санкций и DDoS-assault. С технической точки зрения дубли составляют копийные копии primary сайта с обеспечением features и клиентских данных.
Компетентные игроки призывают удерживать актуальные каталоги активных альтернатив в сохранённых ссылках обозревателя. Операторы направляют новости о актуальных ссылках через мейл, Telegram-группы и телефонные софт.
Платёжные movements через проверенные ресурсы защищены защитными протоколами стандарта банковского индустрии. Изъятие капитала производится только на подтверждённые wallets держателя account.
Определение надежного казино портала подразумевает детального разбора официальных разрешений. Инновационные ресурсы Килограмм казино гарантируют участникам стопроцентную данные о текущих допусках.
Алгоритм регистрации предусматривает ряд требуемых стадий валидации. Провайдеры настаивают документы, доказывающие персону и совершеннолетие. Традиционный KYC-регламент составляет от 24 до 72 временных отрезков.
Банкролл-менеджмент запускается с определения лимитов на вклады. Компетентные игроки предлагают задействовать установку 5% от полного казино бюджета на одну раунд.
Системные барьеры поставщиков побуждают эксплуатировать альтернативные пути. Дубликаты хранят абсолютную работоспособность центрального портала, содержа историю переводов и игровой достижения.
Актуальные банковские системы обеспечивают моментальные пополнения через блокчейн аккаунты. Bitcoin, Ethereum и устойчивые монеты предоставляют конфиденциальность и наименьшие платежи. Срок выполнения получений насчитывает 10-30 интервалов.
Программы постоянства содержат многоуровневые категории с возрастающим бонусом. VIP-координаторы предлагают персонализированные вознаграждения, увеличенные лимиты и преимущественную обслуживание.
https://fertilitypctguide.us.com/# cost of clomid no prescription
41320KurtisSweazyo abc
Buy High-Quality Backlinks to Boost Your Google Rankings Fast
In today’s competitive digital landscape, ranking on the first page of Google requires more than just good content.
One of the most powerful ranking factors remains backlinks.
If you want faster visibility, stronger authority,
and consistent traffic growth, choosing to buy high-quality backlinks can be a smart and effective SEO strategy when done correctly.
High-quality backlinks come from trusted, relevant, and authoritative websites.
These links act as votes of confidence for your site, signaling to search engines that your content is valuable and reliable.
Unlike low-quality or spammy links, premium backlinks help improve domain authority, keyword
rankings, and overall website credibility without risking penalties.
Buying backlinks saves time and accelerates results.
Organic link building can take months, especially for new or competitive websites.
By investing in quality backlinks, you can shorten this
timeline and start seeing ranking improvements much faster.
This is especially useful for businesses, bloggers, and affiliate marketers who want quick momentum in search results.
Another key advantage is control. When you buy backlinks from a professional, Google-safe service, you gain access to contextual links, niche-relevant placements, and natural anchor text distribution. This ensures your backlink profile looks authentic and diversified, which
modern search engines strongly favor.
However, quality always matters more than quantity. Avoid cheap,
automated, or PBN-heavy links that can harm your site. Instead, focus on backlinks
from real websites with strong metrics, organic traffic,
and relevant content. A well-planned backlink strategy combined
with on-page SEO and quality content delivers the best long-term results.
In conclusion, buying high-quality backlinks is one of the fastest ways to boost Google rankings when done responsibly.
It enhances authority, increases visibility, and drives
targeted traffic—helping your website grow steadily and sustainably in competitive search environments.
Инновационные сервисы азартных активностей предоставляют клиентам возможность к премиальному гемблингу через надежные СЌРЅРѕРјРѕ казино платформы. Легальная деятельность нуждается выполнения четких правовых норм.
Механизм создания пользовательского кабинета предусматривает валидацию конфиденциальных данных. Администраторы задействуют расширенные алгоритмы KYC и AML для пресечения мошеннических операций.
Технические средства инновационных беттинг площадок функционируют на безопасных облачных системах с криптографическими стандартами. IP-фильтрация принуждает управляющих создавать вспомогательные ссылки.
Зеркальные платформы являют собой аналогичные дубликаты центрального сайта с поддержанием всех возможностей и сведений. Беттеры достигают устойчивый доступ к депозиту, гемблинг истории и личным настройкам.
Денежные переводы реализуются через встроенные банковские системы. Рамки на депозиты и снятия фиксируются в соотношении с правовыми требованиями и собственными регламентами риск-менеджмента.
Экспертные гемблеры советуют анализировать статус аккредитации через официальные реестры беттинг структур. Престижные параметры содержат оценки на экспертных сервисах и отзывы реальных беттеров.
Инновационные сервисы игорных развлечений дают игрокам доступ к высококлассному гемблингу через сертифицированные lucky bear casino бездепозитный Р±РѕРЅСѓСЃ системы. Лицензированная функционирование влечет соблюдения строгих законодательных стандартов.
Процедура регистрации клиентского кабинета задействует аутентификацию индивидуальных данных. Администраторы внедряют комплексные механизмы KYC и AML для пресечения нарушающих операций.
Технические системы инновационных беттинг площадок функционируют на зашифрованных дата-центрах с TLS стандартами. Региональная блокировка побуждает администраторов разрабатывать параллельные ссылки.
Альтернативные ресурсы образуют аналогичные версии основного платформы с обеспечением всех сервисов и показателей. Участники достигают беспрепятственный соединение к депозиту, гемблинг статистике и индивидуальным конфигурациям.
Денежные переводы выполняются через интегрированные денежные сервисы. Лимиты на инвестиции и получения назначаются в соотношении с нормативными положениями и индивидуальными регламентами снижения потерь.
Квалифицированные игроки рекомендуют отслеживать состояние авторизации через регуляторные базы данных игорных комиссий. Престижные показатели включают места на отраслевых порталах и комментарии истинных участников.
Throw in goals, long throws and their dangerous outcomes
see it here jaxx app
Поиск честного гемблинг портала заставляет детального исследования правовых свидетельств. Инновационные системы retro казино гарантируют участникам полную сведения о собственных лицензиях.
Система оформления счета подразумевает несколько обязательных шагов проверки. Операторы запрашивают справки, удостоверяющие личность и зрелость. Классический KYC-процесс занимает от 24 до 72 интервалов.
Финансовое планирование запускается с фиксации границ на пополнения. Искусные геймеры настаивают применять принцип 5% от итогового гемблинг бюджета на единичную игру.
Системные препятствия операторов обязывают внедрять дополнительные ссылки. Дубликаты сохраняют максимальную функциональность центрального ресурса, охватывая архив операций и казино достижения.
Современные банковские инструменты поддерживают моментальные пополнения через электронные счета. Bitcoin, Ethereum и стабильные валюты дают скрытность и крошечные взносы. Продолжительность выполнения снятий достигает 10-30 периодов.
Планы преданности содержат ступенчатые категории с накапливающимся возвратом. VIP-координаторы предлагают личные подарки, расширенные рамки и первоочередную обслуживание.
Действующие альтернативные домены проверенных игорных заведений на казино JVSpin дают беспрерывный вход к гемблинг порталам. Система реплицирования формирует аналогичные клоны основного портала с поддержанием всех возможностей.
Система активации через зеркало в точности дублирует основную шаблон. Начинающие игроки прописывают функционирующий email, формируют безопасный пароль и устанавливают основную платежное средство.
Идентификация счета содержит передачи бумаг по KYC-нормам. Копия водительских прав, валидация регистрации и финансовые координаты контролируются системой алгоритмическую валидацию в течение 24-72 временных единиц.
Логин существующих пользователей производится через стандартную модуль с усиленной верификацией. Краткосрочные ключи поступают на мессенджер аппарат или мейл.
Возможности входящего раздела через резервные ссылки содержит топовые платежные платформы. Visa, Mastercard, электронные хранилища Skrill, Neteller, виртуальные монеты Bitcoin, Ethereum выполняются с сокращенными взносами 0-3%.
Gaming коллекция клонируется абсолютно включая spinning games, столовые забавы, live-операторов и максимальные награды. RTP-параметры, дисперсия и ставочные требования фиксируются такими же.
Подарочная механизм работает идентично основному порталу. Welcome-бандлы, безвозмездные спины, денежный возврат и VIP-планы запускаются машинально при выполнении прописанных требований.
40510SandraWasero abc
Sunday football livescore, weekend matches from all major European leagues
Новейшие гемблеры сталкиваются с сложностью доступа к проверенным порталам. Организации запрещают стандартные URL, но профессиональные Рльдорадо регистрация участники учитывают о присутствии альтернативных ресурсов.
Альтернативный адрес представляет идентичную дубликат базового сайта. Криптографические алгоритмы функционируют идентичными. Финансовые процедуры проходят через аналогичные механизмы.
Методика открытия счёта через резервный ссылку подразумевает обычной подтверждения. Сотрудники требуют справки для соблюдения KYC-стандартов. Паспортные сведения осуществляют расширенную подтверждение.
Банковские ограничения на зеркальных сайтах равняются первичным требованиям. Начальные взносы функционируют константными. Увеличивающиеся призовые фонды интегрируются между множественными ресурсами.
Стимулирующие программы функционируют завершённо на зеркальных площадках. Множитель ставок поддерживает исходные значения. Срок активности отыгрыша остаётся прежним.
Команда помощи обрабатывает запросы с параллельных адресов равнозначно. Онлайн переписка осуществляет круглосуточный расписание работы.
Статья предлагает широкий обзор темы, представляя разные точки зрения и подробности.
Новейшие игроки встречаются с огромным количеством цифровых нюансов при функционировании с сертифицированными платформами. Тематические платформы типа СЌРЅРѕРјРѕ казино обеспечивают свежую контент о деятельности развлекательных операторов.
Процесс верификации счета охватывает ряд обязательных шагов. Базовая подтверждение предполагает размещения справок верифицирующих личность. Типовой комплект содержит ID, автолицензию или заграничное удостоверение.
Системная составляющая регистрации охватывает внедрение криптографической защиты и двухуровневой проверки. Опытные пользователи подсказывают инициировать совокупность представленных параметров секьюрити.
Резервные ссылки образуют абсолютные клоны основного ресурса с хранением всего функционала. Основное бонус заключается в идентичности денежных границ и требований проигрыша.
Процедура нахождения рабочих альтернативных адресов базируется на отслеживании тематических информационных каналов и партнерских порталов. Экспертные пользователи эксплуатируют анонимайзеры для создания надежного соединения безотносительно от географических запретов.
Лицензионные площадки игорных услуг oferuja геймерам шанс к премиальному азартному досугу через специализированные ресурсы, включая Рльдорадо казино , которые выполняют общепринятые регламенты надёжности.
Алгоритм регистрации включает внесения валидационных деталей через безопасные SSL-connection. Администрация просят нотариальное подтверждение дееспособности и локации проживания для выполнения законодательных требований.
Двухэтапная идентификация становится mandatory составляющей актуальных систем конфиденциальности. Users обретают SMS-пароли, push-notification или используют профессиональные tools в стиле Google Authenticator.
Дублирующие URL решают проблемы региональных блокировок и DDoS-assault. Технически дубли представляют идентичные dublicates primary портала с поддержанием инструментария и индивидуальных информации.
Компетентные геймеры призывают keeping свежие каталоги рабочих копий в favourites обозревателя. Провайдеры передают сведения о свежих адресах через email, Telegram-communities и смартфонные утилиты.
Финансовые операции через официальные площадки secured шифровальными methods категории банковского области. Снятие средств производится исключительно на подтверждённые реквизиты обладателя профиля.
Развлекательная область отображает стремительный расширение, заинтересовывая тысячи участников. Грамотные сайты предоставляют защищённую пространство для пари. Полную сведения о указанных организациях реально получить на lucky bear казино .
Лицензирование составляет центральным фактором селекции платформы. Лицензиаты Кюрасао гарантируют тщательный контроль экономических действий. Каждая аккредитованная сайт подвергается систематические контроли RNG-генераторов.
Технические особенности инновационных азартных площадок охватывают SSL-защиту банковского категории. Провайдеры софтового софта наподобие Microgaming, NetEnt, Pragmatic Play подключают сложные механизмы хаотичных параметров.
Алгоритм подтверждения счёта подразумевает предоставления справок KYC-класса. Документ, документ о прибылях, валидация местожительства — типичный комплект для окончательного авторизации.
Альтернативные порталы решают барьеры с ограничениями провайдеров. Свежие дубли модифицируются систематически программными командами. Карманные приложения часто функционируют надёжнее веб форматов.
Распределение капитала устанавливает долгосрочную прибыльность развлекательных сессий. Грамотные геймеры указывают контролировать количество бета до 1-2% от суммарного бюджета.
78455AlphonseKazmio abc
Стильная одежда играет значимую роль в формировании образа.
Она помогает выразить характер и почувствовать уверенность.
Грамотно подобранный образ влияет на то, как человека воспринимают окружающие.
В повседневной жизни одежда может добавлять уверенности.
https://graph.org/Za-granyu-vitrin-kak-LePodium-pereosmyslivaet-ohotu-za-idealnoj-veshchyu-01-30
Продуманный гардероб облегчает общение.
При этом важно учитывать личные предпочтения и уместность ситуации.
Современные тенденции дают возможность экспериментировать.
В итоге, умение стильно одеваться становится полезным навыком.
Подбор легального гемблинг заведения подразумевает глубокого анализа лицензионных свидетельств. Новые сайты ra казино предлагают геймерам абсолютную сведения о собственных лицензиях.
Система оформления счета подразумевает определенное количество требуемых шагов подтверждения. Представители просят свидетельства, подтверждающие индивидуальность и зрелость. Типовой KYC-регламент требует от 24 до 72 периодов.
Контроль средств запускается с назначения рамок на депозиты. Компетентные клиенты предлагают применять правило 5% от полного азартного резерва на индивидуальную заход.
Программные препятствия провайдеров вынуждают применять дополнительные пути. Дубликаты поддерживают безусловную производительность базового платформы, подразумевая журнал операций и игровой продвижение.
Новые банковские системы обеспечивают скоростные депозиты через криптовалютные аккаунты. Bitcoin, Ethereum и постоянные токены дают анонимность и минимальные платежи. Продолжительность проведения выводов достигает 10-30 периодов.
Системы верности содержат каскадные уровни с накапливающимся бонусом. VIP-консультанты гарантируют индивидуальные вознаграждения, повышенные границы и опережающую помощь.
helpful hints jaxx liberty wallet
Актуальные бетторы встречаются с сложностью доступа к сертифицированным порталам. Провайдеры блокируют главные адреса, но профессиональные lucky bear казино пользователи осознают о существовании альтернативных сайтов.
Альтернативный адрес образует точную копию оригинального ресурса. Протоколы шифрования работают такими же. Финансовые переводы производятся через аналогичные сервисы.
Схема создания аккаунта через зеркальный портал включает классической подтверждения. Операторы выясняют документы для реализации KYC-требований. Паспортные данные проходят комплексную подтверждение.
Банковские рамки на резервных платформах равняются стандартным условиям. Стартовые беты функционируют стабильными. Растущие джекпоты объединяются между множественными адресами.
Премиальные схемы выполняются всесторонне на параллельных ресурсах. Вейджер гарантирует стартовые параметры. Тайминг проигрывания поддерживается.
Отдел поддержки изучает обращения с зеркальных порталов идентично. Прямой диалог обеспечивает беспрерывный расписание деятельности.
What’s up, just wanted to say, I liked this post. It was helpful.
Keep on posting!
Head to head records, historical results between teams before matches
You have made some decent points there. I looked on the internet for more information about the issue and found most individuals will go along with your views on this web site.
30216RogerGutkino abc
Официальные ресурсы игорных предложений предоставляют пользователям вариант к профессиональному гэмблингу через dedicated платформы, включая казино Рльдорадо , которые соблюдают мировые стандарты конфиденциальности.
Схема создания аккаунта necessita предоставления authentication данных через криптографические SSL-connection. Менеджмент просят нотариальное удостоверение дееспособности и региона нахождения для выполнения legal требований.
Двухфакторная проверка является mandatory aspect современных систем безопасности. Пользователи приобретают SMS-коды, push-notification или применяют targeted софт вроде Google Authenticator.
Альтернативные URL ликвидируют вопросы локальных барьеров и DDoS-воздействий. Фактически дубли составляют идентичные dublicates основного платформы с обеспечением возможностей и user сведений.
Профессиональные участники рекомендуют хранить обновлённые реестры активных mirrors в favourites веб-клиента. Букмекеры доставляют сведения о свежих доменах через почтовые сервисы, Telegram-каналы и mobile apps.
Банковские movements через лицензионные ресурсы покрыты криптографическими системами класса банковского индустрии. Снятие финансов осуществляется только на подтверждённые данные собственника профиля.
Актуальные провайдеры игорных услуг гарантируют беттерам подключение к элитному гемблингу через надежные ДживиСпин казино сайты. Лицензированная операционная активность подразумевает учета определенных регуляторных положений.
Процесс оформления персонального учетной записи задействует верификацию индивидуальных сведений. Регуляторы внедряют расширенные протоколы KYC и AML для блокировки поддельных переводов.
IT системы передовых игорных домов базируются на зашифрованных хостингах с криптографическими сертификатами. Региональная блокировка обязывает операторов организовывать параллельные домены.
Параллельные сайты составляют аналогичные дубликаты основного платформы с поддержанием всех функций и информации. Участники достигают беспрепятственный подключение к средствам, гемблинг истории и личным конфигурациям.
Банковские переводы производятся через встроенные финансовые системы. Ограничения на инвестиции и обналичивания назначаются в гармонии с законодательными условиями и внутренними регламентами минимизации опасностей.
Компетентные беттеры предлагают мониторить состояние авторизации через надзорные базы данных азартных структур. Престижные критерии содержат рейтинги на специализированных сайтах и комментарии настоящих пользователей.
Передовые клиенты пересекаются с множеством технических особенностей при деятельности с официальными порталами. Тематические сайты типа казино аква дают релевантную материалы о процессах гэмблинговых компаний.
Механизм верификации учетной записи охватывает множество неотъемлемых этапов. Первичная проверка подразумевает загрузки бумаг подтверждающих личность. Привычный пакет охватывает документ, автолицензию или загранпаспорт.
Программная часть записления содержит задействование защищенного протокола и двухуровневой проверки. Квалифицированные геймеры советуют инициировать максимум имеющихся опций секьюрити.
Резервные ссылки представляют стопроцентные дубликаты первичного портала с обеспечением тотального инструментария. Ключевое преимущество состоит в подобии платежных ограничений и параметров вейджера.
Механизм поиска активных альтернативных адресов базируется на наблюдении профессиональных информационных каналов и партнерских порталов. Экспертные участники внедряют анонимайзеры для создания устойчивого входа невзирая от местных барьеров.
Проверенные операторы гэмблинг услуг дают участникам право к качественному игровому процессу через dedicated домены, включая Болливуд регистрация , что следуют международные требования безопасности.
Процедура оформления профиля предполагает внесения идентификационных параметров через криптографические SSL-протоколы. Менеджмент просят предоставить официальное подтверждение дееспособности и территории нахождения для выполнения нормативных норм.
Multi-factor аутентификация считается необходимым элементом современных solutions безопасности. Users получают SMS-пароли, push-сообщения или внедряют targeted программы наподобие Google Authenticator.
Mirror URL устраняют трудности territorial барьеров и DDoS-assault. Технически зеркала составляют дублированные клоны центрального платформы с maintaining features и личных сведений.
Опытные геймеры suggest удерживать актуальные каталоги working дублей в favourites интернет-программы. Букмекеры направляют обновления о новых адресах через email, Telegram-чаты и mobile apps.
Денежные процедуры через проверенные сайты покрыты криптографическими алгоритмами level банковского области. Снятие денег происходит исключительно на подтверждённые карты хозяина профиля.
An outstanding share! I’ve just forwarded this onto a colleague
who had been conducting a little homework on this. And he actually bought me breakfast simply because I
found it for him… lol. So let me reword this….
Thank YOU for the meal!! But yeah, thanks
for spending the time to talk about this matter here
on your site.
70345MauriceBetteso abc
Навигация в секторе легальных платформ подразумевает представления новых инструментов входа. Опытные геймеры задействуют aqua casino для получения современной данных о оперативных путях.
Процедура создания личного кабинета в проверенных компаниях включает детальную подтверждение. Современные провайдеры внедряют KYC-механизмы и AML-нормы. Документооборот требует от 24 до 72 промежутков.
Компьютерные технологии для избежания запретов прогрессируют синхронно с ужесточением правовых мер. VPN-службы уровня premium гарантируют шифрование AES-256 и протоколы OpenVPN. Постоянство соединения принципиально значима для привилегированных заходов.
Зеркальные сайты выполняют задачи через географически рассредоточенные компьютерные инфраструктуры. CDN-комплексы обеспечивают оптимальную время ответа для азиатских клиентов. Цифровое маршрутизация активируется при выявлении барьера центрального домена.
Финансовые переводы в проверенных регионах соответствуют жестким правилам PCI DSS. Крипто расчеты приобретают актуальность в результате приватности и скорости осуществления.
Портативные приложения элитных компаний объединяют лицевую проверку и push-оповещения для существенных событий. Адаптивный оформление самостоятельно адаптируется под особенности матрицы.
Новейшие пользователи встречаются с массой технологических деталей при процессах с проверенными платформами. Профильные ресурсы типа СЌРЅРѕРјРѕ РІС…РѕРґ дают новую контент о деятельности азартных операторов.
Процедура подтверждения учетной записи подразумевает набор неотъемлемых шагов. Начальная аутентификация нуждается размещения свидетельств доказывающих гражданство. Стандартный список содержит удостоверение личности, автолицензию или заграничное удостоверение.
Цифровая сторона открытия счета содержит задействование защищенного протокола и двойной авторизации. Опытные геймеры подсказывают инициировать все имеющихся функций секьюрити.
Зеркала являются стопроцентные копии базового платформы с хранением полного набора функций. Главное преимущество заключается в идентичности платежных рамок и критериев вейджера.
Алгоритм выявления действующих резервных ссылок опирается на мониторинге профессиональных уведомительных сервисов и связанных порталов. Профессиональные пользователи задействуют виртуальные частные сети для формирования устойчивого соединения вне зависимости от географических барьеров.
find out this here [url=https://jaxxwallet-web.org/]download jaxx wallet[/url]
Передовые порталы развлекательных продуктов предлагают клиентам доступ к элитному игровому процессу через сертифицированные Рльдорадо казино порталы. Легальная операционная активность подразумевает соблюдения строгих надзорных критериев.
Механизм создания игрового кабинета задействует верификацию индивидуальных данных. Администраторы задействуют детализированные алгоритмы KYC и AML для исключения фродовых финансовых действий.
Цифровые системы передовых беттинг площадок строятся на защищенных дата-центрах с TLS алгоритмами. Геоблокировка принуждает владельцев разрабатывать альтернативные адреса.
Зеркальные ресурсы образуют точные дубликаты первичного ресурса с поддержанием всех функций и показателей. Участники достигают стабильный вход к средствам, развлекательной данным и клиентским конфигурациям.
Финансовые процедуры реализуются через подключенные банковские агрегаторы. Рамки на взносы и снятия регулируются в гармонии с лицензионными условиями и организационными процедурами риск-менеджмента.
Профессиональные гемблеры предлагают проверять статус аккредитации через контролирующие базы данных игорных ведомств. Репутационные параметры задействуют позиции на профильных сайтах и feedback реальных игроков.
Выбор проверенного развлекательного заведения в нынешних границах подразумевает детального изучения к правовому режиму. Знающие геймеры осознают, что ретро РІС…РѕРґ предоставляет последнюю материалы о действующих операторах.
Алгоритм создания аккаунта в сертифицированных заведениях содержит неизбежную аутентификацию удостоверения. KYC-стандарты охраняют как площадку, так и пользователя от обмана. Промежуточные пределы на получение капитала до выполнения подтверждения – нормальная процедура.
Виртуальные препятствия на вход к развлекательным площадкам обходятся через зеркальные порталы. Доступные отражения обеспечивают полную возможности первичного сервиса. Банковские процедуры, развлекательный статистика и бонусные схемы функционируют неизменными.
Денежная надежность характеризуется уровнем эксплуатируемых финансовых систем. SSL-шифрование, PCI DSS валидация и двухфакторная проверка создают стабильный щит обороны.
Игровая библиотека лицензированных заведений предоставляет спины от топовых разработчиков. RTP-коэффициенты, дисперсия и алгоритмические формулы претерпевают независимую аудит в утвержденных институтах.
Схемы мотивации в качественных операторах базируются на понятных правилах активности. Проигрыш x35-40 считается справедливым для спин-подарков, в то время как стандартные забавы включаются в зачет с пониженным фактором.
66617ByronPinkerto abc
Перемещение в секторе сертифицированных площадок требует знания новых решений авторизации. Продвинутые геймеры эксплуатируют Lev для приобретения современной материалов о работающих адресах.
Алгоритм оформления профиля в лицензированных учреждениях предполагает детальную проверку. Новейшие операторы используют KYC-механизмы и AML-нормы. Оформление документов требует от 24 до 72 часов.
Технические методы для избежания препятствий совершенствуются синхронно с повышением законодательных мер. VPN-сервисы класса premium гарантируют защиту AES-256 и методы OpenVPN. Устойчивость подключения fundamentally существенна для привилегированных партий.
Запасные платформы действуют через регионально разнесенные IT ресурсы. CDN-сети предоставляют сокращенную латентность для глобальных участников. Системное перенаправление инициируется при обнаружении недоступности основного портала.
Финансовые манипуляции в сертифицированных территориях подпадают под определенным требованиям PCI DSS. Цифровые операции увеличивают актуальность вследствие конфиденциальности и быстроте реализации.
Смартфонные софт лучших брендов совмещают лицевую авторизацию и push-сообщения для критических происшествий. Изменяемый внешний вид автоматически корректируется под настройки панели.
Развлекательная сфера отображает интенсивный прогресс, притягивая тысячи игроков. Опытные сайты предоставляют безопасную обстановку для игры. Полную факты о таких операторах допустимо получить на СЌРЅРѕРјРѕ казино .
Аттестация является центральным критерием отбора портала. Лицензиаты Кюрасао обеспечивают тщательный надзор экономических транзакций. Каждая легальная платформа реализует периодические ревизии RNG-систем.
Технические особенности новейших игорных домов содержат SSL-безопасность банковского ранга. Провайдеры виртуального обеспечения уровня Microgaming, NetEnt, Pragmatic Play интегрируют многоуровневые системы произвольных значений.
Процесс подтверждения профиля подразумевает передачи удостоверений KYC-уровня. Документ, справка о заработке, подтверждение прописки — базовый набор для завершённого авторизации.
Дублирующие ссылки исправляют проблемы с фильтрацией провайдеров. Функционирующие дубли обновляются регулярно программными группами. Смартфонные софт нередко работают стабильнее веб модификаций.
Распределение капитала задаёт долгосрочную успешность азартных циклов. Квалифицированные беттеры указывают урезать величину вейджера до 1-2% от общего резерва.
范德沃克第二季高清完整官方版,海外华人可免费观看最新热播剧集。
12687CarmelitaSchwandto abc
Передовые бетторы сталкиваются с затруднением входа к проверенным площадкам. Организации фильтруют главные домены, но опытные РЎСѓРєР° казино посетители учитывают о присутствии резервных площадок.
Резервная ссылка представляет точную воспроизведение главного платформы. Средства защиты остаются идентичными. Банковские действия осуществляются через сходные каналы.
Алгоритм оформления профиля через параллельный ссылку требует типовой валидации. Специалисты запрашивают свидетельства для исполнения KYC-правил. Паспортные данные реализуют расширенную проверку.
Финансовые границы на альтернативных порталах соответствуют основным требованиям. Начальные ставки остаются фиксированными. Увеличивающиеся джекпоты объединяются между разными порталами.
Льготные системы оперируют полноценно на зеркальных площадках. Требования по обороту сохраняет исходные величины. Тайминг реализации остаётся прежним.
Команда ассистирования рассматривает тикеты с зеркальных ссылок равнозначно. Живой разговор гарантирует непрерывный расписание функционирования.
Исследование в мире официальных порталов нуждается понимания актуальных инструментов доступа. Опытные участники внедряют РЎСѓРєР° казино для получения актуальной информации о активных доменах.
Схема формирования счета в лицензированных заведениях охватывает комплексную проверку. Продвинутые компании задействуют KYC-процедуры и AML-нормы. Бумажная работа составляет от 24 до 72 временных отрезков.
Компьютерные способы для обхода запретов прогрессируют синхронно с повышением правовых инициатив. VPN-инструменты класса premium гарантируют защиту AES-256 и протоколы OpenVPN. Стабильность связи кардинально значима для высокоролловых заходов.
Резервные платформы выполняют задачи через территориально распределенные цифровые мощности. CDN-структуры поддерживают минимальную пинг для американских пользователей. Системное роутинг инициируется при выявлении ограничения первичного портала.
Платежные манипуляции в официальных зонах отвечают жестким правилам PCI DSS. Децентрализованные переводы набирают востребованность в результате скрытности и темпу осуществления.
Портативные программы элитных компаний содержат лицевую проверку и push-алерты для принципиальных эпизодов. Адаптивный дизайн программно изменяется под характеристики экрана.
Перемещение в пространстве официальных сайтов подразумевает знания новых методов подключения. Профессиональные клиенты внедряют казино СЌРЅРѕРјРѕ для обретения свежей материалов о активных путях.
Схема формирования учетной записи в официальных учреждениях включает тщательную валидацию. Актуальные организации эксплуатируют KYC-системы и AML-требования. Бумажная работа занимает от 24 до 72 временных отрезков.
IT решения для избежания препятствий развиваются параллельно с усилением юридических действий. VPN-службы класса premium гарантируют кодирование AES-256 и протоколы OpenVPN. Устойчивость коннекта критически существенна для премиальных раундов.
Дублирующие адреса выполняют задачи через географически размещенные цифровые кластеры. CDN-структуры поддерживают оптимальную время ответа для глобальных клиентов. Цифровое маршрутизация инициируется при обнаружении барьера основного домена.
Платежные манипуляции в официальных регионах подчиняются конкретным правилам PCI DSS. Цифровые платежи получают распространение в результате конфиденциальности и скорости реализации.
Планшетные приложения лучших операторов включают отпечатковую аутентификацию и push-сообщения для важных эпизодов. Адаптивный интерфейс программно изменяется под параметры панели.
Навигация в области лицензированных площадок предполагает осознания новых способов доступа. Опытные пользователи внедряют казино СЌРЅРѕРјРѕ для получения свежей информации о активных URL.
Процесс оформления аккаунта в проверенных операторах охватывает комплексную верификацию. Передовые операторы используют KYC-алгоритмы и AML-правила. Бумажная работа занимает от 24 до 72 часов.
IT решения для прохождения блокировок улучшаются вместе с повышением законодательных действий. VPN-платформы типа premium обеспечивают криптографию AES-256 и системы OpenVPN. Устойчивость связи критически актуальна для VIP раундов.
Запасные ресурсы работают через локально размещенные технические инфраструктуры. CDN-сети гарантируют быструю время ответа для американских клиентов. Системное маршрутизация срабатывает при распознавании барьера первичного портала.
Экономические транзакции в лицензированных территориях отвечают жестким правилам PCI DSS. Криптовалютные платежи увеличивают популярность из-за конфиденциальности и оперативности осуществления.
Смартфонные софт ведущих компаний интегрируют лицевую идентификацию и push-оповещения для существенных происшествий. Гибкий оформление независимо настраивается под свойства дисплея.
Iver Protocols Guide: Iver Protocols Guide – Iver Protocols Guide
18375TempieMesserlio abc
Надёжные площадки азартных опций гарантируют клиентам шанс к качественному игровому процессу через специализированные порталы, включая Eldorado зеркало , которые специально следуют мировые стандарты защиты.
Последовательность создания аккаунта necessita заполнения валидационных деталей через защищённые SSL-каналы. Администрация просят предоставить письменное удостоверение дееспособности и адреса проживания для поддержания правовых требований.
Многоуровневая проверка становится обязательным aspect актуальных систем security. Клиенты имеют SMS-коды, push-сообщения или задействуют dedicated программы вроде Google Authenticator.
Резервные URL решают трудности региональных санкций и DDoS-воздействий. Фактически копии формируют тождественные реплики базового платформы с сохранением опций и личных информации.
Экспертные игроки suggest удерживать новейшие перечни функционирующих дублей в bookmark обозревателя. Провайдеры передают обновления о современных ссылках через электронную почту, Telegram-группы и телефонные софт.
Платёжные процедуры через legal порталы обеспечены шифровальными methods стандарта банковского области. Вывод капитала осуществляется единственно на validated данные владельца аккаунта.
Гемблинговая отрасль показывает быстрый подъём, привлекая легионы игроков. Профессиональные сайты гарантируют безопасную среду для ставок. Детальную материалы о подобных компаниях реально отыскать на лаки Р±РёСЂ казино .
Легализация выступает центральным показателем отбора портала. Надзорные органы Мальты предоставляют серьёзный надзор расчётных действий. Каждая сертифицированная сайт осуществляет плановые инспекции RNG-систем.
IT аспекты актуальных беттинг-платформ содержат SSL-кодирование денежного уровня. Создатели компьютерного материала вроде Microgaming, NetEnt, Pragmatic Play встраивают продвинутые схемы хаотичных чисел.
Процедура верификации счёта предполагает предоставления документов KYC-уровня. Свидетельство, выписка о средствах, верификация прописки — базовый список для финального подключения.
Резервные URL ликвидируют проблемы с фильтрацией компаний. Действующие варианты изменяются систематически IT службами. Портативные клиенты обычно выполняются качественнее браузерных форматов.
Управление банкроллом определяет долгосрочную результативность азартных циклов. Экспертные участники указывают урезать объём пари до 1-2% от полного капитала.
When I initially commented I appear to have clicked on the -Notify me when new comments are added- checkbox and now every time a comment is
added I recieve 4 emails with the exact same comment.
There has to be an easy method you can remove me from
that service? Thank you!
Подбор безопасного развлекательного заведения нуждается серьезного разбора правовых сертификатов. Передовые порталы казино Вован гарантируют пользователям абсолютную факты о действующих аккредитациях.
Механизм открытия аккаунта подразумевает ряд обязательных стадий подтверждения. Владельцы требуют справки, засвидетельствующие личность и правоспособность. Традиционный KYC-механизм составляет от 24 до 72 периодов.
Контроль средств инициируется с определения границ на взносы. Искусные участники советуют использовать закон 5% от полного гемблинг средств на отдельную заход.
Цифровые препятствия операторов принуждают задействовать вспомогательные маршруты. Клоны удерживают абсолютную работоспособность базового платформы, включая историю платежей и развлекательный результаты.
Передовые платежные методы гарантируют моментальные взносы через виртуальные счета. Bitcoin, Ethereum и стейблкоины гарантируют анонимность и мизерные комиссии. Длительность обработки изъятий равно 10-30 периодов.
Схемы лояльности охватывают многоуровневые ранги с возрастающим кэшбэком. VIP-консультанты гарантируют эксклюзивные бонусы, расширенные пределы и ускоренную сервис.
Рабочие дублирующие порталы лицензированных азартных клубов на казино Clubnika гарантируют постоянный соединение к развлекательным сервисам. Система копирования создает эквивалентные клоны основного портала с сохранением всех возможностей.
Схема открытия счета через зеркало целиком копирует основную бланк. Дебютные игроки вводят валидный email, генерируют безопасный ключ и фиксируют основную валюту.
Подтверждение счета содержит загрузки удостоверений опираясь на KYC-политике. Изображение паспорта, подтверждение регистрации и банковские параметры подвергаются автоматическую валидацию в течение 24-72 часа.
Авторизация активных пользователей происходит через классическую окно с расширенной аутентификацией. Краткосрочные пароли доставляются на телефонный гаджет или email.
Функционал пополнительного сектора через зеркала обеспечивает распространенные денежные сервисы. Visa, Mastercard, веб портмоне Skrill, Neteller, криптовалюты Bitcoin, Ethereum выполняются с сокращенными комиссиями 0-3%.
Гемблинг коллекция дублируется целиком включая автоматы, традиционные игры, live-операторов и накопительные призы. RTP-значения, вариативность и проигрыш остаются идентичными.
Акционная механизм действует похоже главному порталу. Welcome-пакеты, free spins, кешбэк и VIP-курсы включаются автоматически при исполнении определенных параметров.
50285LawerenceCashiono abc
informative post https://jaxxwallet-web.org
I recently tried this casino https://bajrangautoparts.com/finest-casinos-on-the-internet-united-states-of-america-2025-finest-real-cash-casinos-on-the-internet/ and was surprised by how smooth everything felt. The games run fast, bonuses are clear, and navigation is user-friendly, making the experience enjoyable.
Поиск проверенного развлекательного портала предполагает тщательного анализа официальных документов. Современные сайты казино Голд дают геймерам максимальную факты о собственных санкциях.
Процесс открытия аккаунта содержит различные принудительных фаз аутентификации. Провайдеры требуют свидетельства, доказывающие личность и зрелость. Классический KYC-алгоритм составляет от 24 до 72 часов.
Управление банком начинается с задания рамок на вклады. Квалифицированные участники предлагают задействовать закон 5% от совокупного казино резерва на единичную партию.
Электронные запреты поставщиков принуждают применять дополнительные ссылки. Дубликаты сохраняют максимальную активность первичного платформы, содержа журнал сделок и азартный успех.
Передовые банковские системы поддерживают мгновенные взносы через блокчейн аккаунты. Bitcoin, Ethereum и постоянные токены дают приватность и крошечные платежи. Длительность реализации снятий доходит 10-30 минут.
Программы преданности подразумевают иерархические статусы с накапливающимся кэшбэком. VIP-консультанты предоставляют уникальные подарки, улучшенные лимиты и ускоренную поддержку.
Выбор качественного развлекательного оператора в текущих обстоятельствах предполагает повышенного внимания к юридическому положению. Компетентные геймеры представляют, что лова казино отображает свежую материалы о функционирующих ресурсах.
Процедура оформления профиля в сертифицированных операторах охватывает принудительную аутентификацию личности. KYC-правила гарантируют как заведение, так и пользователя от мошенничества. Промежуточные рамки на снятие средств до финализации подтверждения – стандартная процедура.
Электронные барьеры на соединение к гемблинг сервисам преодолеваются через альтернативные URL. Рабочие дубликаты сохраняют тотальную эффективность первичного сайта. Финансовые переводы, азартный достижения и привилегированные схемы сохраняются стабильными.
Капитальная безопасность определяется качеством используемых денежных систем. SSL-кодирование, PCI DSS лицензирование и усиленная подтверждение гарантируют защищенный заслон ограждения.
Азартная коллекция официальных операторов охватывает автоматы от лидирующих производителей. RTP-показатели, волатильность и математические схемы проходят беспристрастную валидацию в одобренных центрах.
Схемы поощрения в серьезных казино строятся на ясных критериях активности. Вейджер x35-40 считается приемлемым для спин-поощрений, в то время как стандартные забавы включаются в подсчет с минимальным процентом.
With thanks! Numerous forum posts.
27636SolomonObriano abc
Современные платформы гемблинг продуктов дают игрокам возможность к профессиональному игровому процессу через сертифицированные казино Лев платформы. Официальная работа подразумевает выполнения конкретных регуляторных норм.
Процесс регистрации индивидуального учетной записи задействует валидацию приватных данных. Операторы внедряют детализированные системы KYC и AML для пресечения нарушающих транзакций.
Технические инструменты новейших гемблинг платформ функционируют на надежных облачных системах с шифровальными алгоритмами. Локальные запреты побуждает провайдеров внедрять резервные адреса.
Параллельные сайты являют собой точные клоны главного портала с обеспечением всех инструментов и показателей. Клиенты получают постоянный подключение к средствам, гемблинг статистике и персональным установкам.
Денежные процедуры производятся через встроенные банковские системы. Ограничения на инвестиции и получения регулируются в соответствии с лицензионными требованиями и собственными правилами минимизации опасностей.
Профессиональные пользователи предлагают отслеживать ситуацию разрешения через надзорные базы данных азартных организаций. Статусные характеристики предусматривают места на отраслевых сервисах и комментарии действительных беттеров.
Инновационные порталы беттинг услуг дают пользователям доступ к элитному гемблингу через сертифицированные СЌРЅРѕРјРѕ казино ресурсы. Авторизованная операционная активность требует выполнения конкретных правовых положений.
Механизм открытия персонального учетной записи предусматривает верификацию личных информации. Управляющие эксплуатируют многоуровневые системы KYC и AML для недопущения фродовых платежей.
Технические решения инновационных беттинг площадок базируются на зашифрованных дата-центрах с HTTPS стандартами. Территориальные ограничения вынуждает владельцев разрабатывать альтернативные URL.
Зеркальные ресурсы являют собой идентичные копии базового домена с сохранением всех сервисов и параметров. Игроки обеспечивают себе постоянный вход к депозиту, развлекательной истории и личным опциям.
Платежные действия производятся через подключенные финансовые сервисы. Рамки на пополнения и получения определяются в соответствии с нормативными стандартами и индивидуальными регламентами снижения потерь.
Компетентные клиенты настаивают мониторить состояние сертификата через регуляторные регистры гемблинг органов. Статусные параметры охватывают позиции на тематических сервисах и мнения истинных игроков.
Исследование в мире сертифицированных ресурсов нуждается знания передовых методов подключения. Квалифицированные геймеры применяют лаки биар казино для приобретения свежей данных о работающих путях.
Процесс создания аккаунта в проверенных компаниях предполагает комплексную верификацию. Передовые провайдеры применяют KYC-механизмы и AML-критерии. Оформление документов составляет от 24 до 72 временных отрезков.
Технические инструменты для минования препятствий совершенствуются вместе с интенсификацией юридических инициатив. VPN-решения класса premium предлагают шифрование AES-256 и протоколы OpenVPN. Постоянство связи критически важна для привилегированных раундов.
Резервные платформы работают через территориально расположенные компьютерные мощности. CDN-сети обеспечивают сокращенную пинг для европейских клиентов. Автоматическое роутинг активируется при идентификации ограничения основного домена.
Финансовые движения в проверенных зонах отвечают определенным нормам PCI DSS. Криптовалютные расчеты приобретают актуальность по причине анонимности и быстроте обработки.
Смартфонные софт элитных брендов включают физиологическую проверку и push-алерты для ключевых эпизодов. Изменяемый оформление автоматически подстраивается под характеристики экрана.
Определение легального гемблинг заведения требует тщательного исследования регулятивных свидетельств. Инновационные сайты https://zelenovskoe.ru предоставляют пользователям стопроцентную детали о имеющихся санкциях.
Алгоритм создания профиля охватывает различные ключевых шагов проверки. Администраторы требуют справки, засвидетельствующие идентичность и совершеннолетие. Классический KYC-алгоритм занимает от 24 до 72 периодов.
Банкролл-менеджмент инициируется с задания ограничений на инвестиции. Искусные пользователи призывают использовать принцип 5% от полного гемблинг капитала на одну заход.
Системные барьеры операторов заставляют задействовать резервные пути. Дубликаты поддерживают полную функциональность базового портала, включая летопись переводов и развлекательный прогресс.
Инновационные денежные системы дают оперативные депозиты через блокчейн счета. Bitcoin, Ethereum и устойчивые монеты предоставляют анонимность и крошечные сборы. Период реализации изъятий доходит 10-30 отрезков.
Алгоритмы верности подразумевают многоуровневые степени с увеличивающимся компенсацией. VIP-представители обеспечивают индивидуальные подарки, увеличенные ограничения и ускоренную сервис.
45254KennethSubletteo abc
Проверенные платформы развлекательных услуг обеспечивают пользователям право к элитному развлечениям через целевые домены, включая типпи казино , которые выполняют общепринятые критерии защиты.
Механизм открытия счёта включает указания проверочных сведений через защищённые SSL-каналы. Провайдеры требуют документальное verification age verification и территории residence для соблюдения законодательных требований.
Двухэтапная верификация выступает необходимым частью современных механизмов конфиденциальности. Клиенты получают SMS-ключи, push-notification или используют специализированные программы по типу Google Authenticator.
Резервные домены устраняют вопросы territorial запретов и DDoS-нападений. С технической точки зрения реплики образуют тождественные копии основного домена с обеспечением опций и пользовательских сведений.
Экспертные участники призывают удерживать обновлённые каталоги working копий в закладках обозревателя. Администрация передают updates о новых URL через мейл, Telegram-communities и портативные приложения.
Платёжные операции через официальные площадки защищены защитными methods уровня банковского segment. Изъятие финансов реализуется лишь на аутентифицированные wallets обладателя личного кабинета.
Беттинговая ниша отображает динамичный расширение, притягивая легионы игроков. Экспертные сайты предоставляют качественную обстановку для пари. Детальную материалы о этих брендах возможно отыскать на mad casino зеркало .
Аттестация остаётся приоритетным показателем определения платформы. Лицензиаты Олдерни создают жёсткий проверку денежных операций. Каждая аккредитованная сайт осуществляет плановые ревизии RNG-модулей.
Программные свойства новейших беттинг-платформ предусматривают SSL-шифрование банковского ранга. Разработчики компьютерного ПО типа Microgaming, NetEnt, Pragmatic Play интегрируют многоуровневые системы непредсказуемых величин.
Схема подтверждения личного кабинета предполагает передачи справок KYC-стандарта. Паспорт, подтверждение о средствах, подтверждение прописки — базовый пакет для финального подключения.
Зеркальные домены решают проблемы с цензурой организаций. Свежие альтернативы корректируются ежедневно компьютерными службами. Смартфонные приложения обычно функционируют стабильнее браузерных форматов.
Финансовая дисциплина устанавливает долгосрочную эффективность беттинговых партий. Квалифицированные геймеры предлагают сокращать величину вейджера до 1-2% от совокупного фонда.
Howdy would you mind stating which blog platform you’re using?
I’m going to start my own blog soon but
I’m having a hard time selecting between BlogEngine/Wordpress/B2evolution and Drupal.
The reason I ask is because your design seems different then most blogs and I’m looking for something
completely unique. P.S Sorry for being off-topic but I had to ask!
Отбор легального игорного ресурса требует серьезного анализа лицензионных бумаг. Современные системы винити казино гарантируют участникам максимальную сведения о действующих разрешениях.
Процесс регистрации предусматривает различные обязательных стадий аутентификации. Провайдеры истребуют удостоверения, доказывающие индивидуальность и зрелость. Классический KYC-регламент требует от 24 до 72 периодов.
Контроль средств запускается с назначения границ на инвестиции. Опытные участники настаивают эксплуатировать принцип 5% от общего азартного средств на одну заход.
Программные блокировки администраторов заставляют задействовать дополнительные пути. Клоны удерживают безусловную функциональность основного сайта, охватывая историю платежей и казино результаты.
Новые финансовые способы поддерживают быстрые взносы через электронные хранилища. Bitcoin, Ethereum и устойчивые монеты обеспечивают тайность и минимальные комиссии. Длительность реализации получений насчитывает 10-30 интервалов.
Планы преданности содержат градационные ранги с нарастающим возвратом. VIP-координаторы обеспечивают эксклюзивные подарки, улучшенные ограничения и приоритетную обслуживание.
87684WilfordStephanyo abc
Актуальные порталы гемблинг развлечений предлагают игрокам вход к высококлассному азарту через безопасные Гризли казино порталы. Легальная работа подразумевает выполнения жестких контролирующих стандартов.
Алгоритм активации клиентского кабинета содержит верификацию персональных данных. Администраторы используют многоуровневые механизмы KYC и AML для пресечения поддельных финансовых действий.
Электронные средства актуальных гемблинг платформ функционируют на защищенных инфраструктурах с TLS технологиями. Геоблокировка принуждает управляющих организовывать альтернативные домены.
Зеркальные порталы составляют аналогичные репликации базового домена с удержанием всех опций и параметров. Участники приобретают беспрепятственный связь к балансу, азартной статистике и личным конфигурациям.
Расчетные операции производятся через подключенные платежные системы. Пределы на пополнения и получения определяются в согласии с законодательными критериями и организационными регламентами управления рисками.
Экспертные клиенты настаивают проверять условия сертификата через надзорные каталоги азартных комиссий. Имиджевые показатели охватывают ранги на специализированных порталах и оценки подлинных участников.
Действующие альтернативные домены надежных азартных клубов на казино enomo создают стабильный вход к развлекательным ресурсам. Принцип реплицирования формирует идентичные клоны центрального ресурса с удержанием всех опций.
Процедура открытия счета через mirror-сайт в точности воспроизводит базовую заявку. Начинающие пользователи заполняют активный email, устанавливают защищенный пароль и выбирают основную валюту.
Подтверждение аккаунта включает предоставления свидетельств опираясь на KYC-политике. Фото паспорта, свидетельство резиденции и денежные сведения анализируются посредством алгоритмическую валидацию в течение 24-72 временных единиц.
Логин верифицированных пользователей выполняется через классическую модуль с многоступенчатой верификацией. Сессионные ключи отправляются на мобильный аппарат или почтовый ящик.
Возможности денежного сектора через резервные ссылки содержит актуальные финансовые системы. Visa, Mastercard, веб счета Skrill, Neteller, crypto Bitcoin, Ethereum реализуются с сокращенными процентами 0-3%.
Игровая библиотека клонируется абсолютно включая spinning games, настольные активности, live-хостов и накопительные призы. RTP-индикаторы, вариативность и проигрыш удерживаются неизменными.
Промо механизм выполняется похоже главному домену. Welcome-пакеты, бесплатные вращения, возврат средств и VIP-схемы активируются системно при исполнении определенных условий.
Лицензионные провайдеры игровых услуг обеспечивают геймерам вариант к элитному гэмблингу через профильные ресурсы, включая Рльдорадо казино , которые именно придерживаются общепринятые требования надёжности.
Последовательность активации necessita ввода идентификационных данных через защищённые SSL-протоколы. Операторы требуют official подтверждение правоспособности и локации нахождения для выполнения законодательных стандартов.
Multi-factor верификация становится обязательным компонентом передовых механизмов защиты. Игроки получают SMS-коды, push-notification или используют профессиональные приложения типа Google Authenticator.
Резервные адреса нейтрализуют трудности региональных запретов и DDoS-assault. Технически реплики являют аналогичные dublicates главного портала с обеспечением инструментария и пользовательских параметров.
Компетентные клиенты предлагают удерживать новейшие реестры активных mirrors в bookmark browser. Букмекеры рассылают обновления о актуальных адресах через email, Telegram-группы и телефонные софт.
Payment переводы через legal сайты secured защитными methods стандарта банковского индустрии. Вывод средств происходит исключительно на аутентифицированные счета собственника личного кабинета.
海外华人必备的aiyifan平台,提供最新高清电影、电视剧,无广告观看体验。
Умение одеваться со вкусом имеет большое значение в повседневной жизни.
Она дает возможность подчеркнуть индивидуальность.
Удачный внешний вид усиливает уверенность в себе.
Одежда нередко является частью невербального общения.
https://app.readthedocs.org/profiles/LePodium/
Кроме того, продуманный гардероб упрощает выбор в повседневных делах.
В долгосрочной перспективе внимание к стилю воспитывает чувство меры.
В итоге стильная одежда остается элементом современного образа жизни.
La fase de apuesta te ofrece la chance de configurar tu inversiГіn inicial, y cuando presionas en “Iniciar”, el aviГіn arranca un recorrido con una trayectoria impredecible.
aviamasters.nom.es
Magnificent items from you, man. I’ve remember your stuff
prior to and you’re just extremely wonderful. I actually like
what you have obtained right here, really like what you are
stating and the way by which you are saying it. You are making it entertaining and you continue to take care of to stay it smart.
I can not wait to read much more from you. This is actually a terrific web site.
my site realtor in Hoboken NJ
39924CharlineKolesniko abc
Нынешние игроки попадают с затруднением доступа к проверенным порталам. Провайдеры запрещают основные ссылки, но опытные казино РЎСѓРєР° участники осознают о присутствии зеркальных площадок.
Дополнительный домен представляет идентичную дубликат базового платформы. SSL-сертификаты поддерживаются неизменными. Финансовые операции проходят через идентичные каналы.
Процедура оформления профиля через параллельный адрес подразумевает классической аутентификации. Администраторы выясняют бумаги для соблюдения KYC-требований. Идентификационные сведения проходят многоуровневую подтверждение.
Пополнительные рамки на параллельных ресурсах равняются основным спецификациям. Низшие вклады сохраняются неизменными. Возрастающие банки координируются между различными ссылками.
Премиальные программы функционируют завершённо на параллельных площадках. Отыгрышный коэффициент обеспечивает первоначальные значения. Тайминг отыгрыша не изменяется.
Сервис сопровождения рассматривает тикеты с зеркальных ссылок аналогично. Мгновенный переписка осуществляет 24-часовой режим деятельности.
Легальные провайдеры развлекательных сервисов гарантируют игрокам доступ к премиальному гэмблингу через профильные ресурсы, включая СЌРЅРѕРјРѕ казино , которые именно соблюдают глобальные стандарты security.
Схема активации предполагает внесения проверочных параметров через защищённые SSL-соединения. Администрация просят официальное verification правоспособности и локации residence для выполнения юрисдикционных норм.
Multi-factor проверка становится принудительным компонентом передовых систем конфиденциальности. Участники обретают SMS-шифры, push-notification или задействуют dedicated программы типа Google Authenticator.
Альтернативные адреса ликвидируют препятствия territorial ограничений и DDoS-штурмов. По сути реплики составляют аналогичные клоны основного ресурса с поддержанием опций и личных данных.
Экспертные пользователи рекомендуют сохранять актуальные базы функционирующих дублей в bookmark веб-клиента. Провайдеры доставляют новости о актуальных URL через email, Telegram-сообщества и смартфонные софт.
Банковские операции через проверенные площадки secured cryptographic системами класса банковского сектора. Получение фондов производится только на validated данные обладателя профиля.
Поиск честного развлекательного портала требует основательного изучения официальных сертификатов. Новые порталы Клубника казино гарантируют игрокам безусловную сведения о действующих допусках.
Алгоритм получения доступа охватывает определенное количество ключевых фаз верификации. Провайдеры просят удостоверения, доказывающие индивидуальность и правоспособность. Стандартный KYC-порядок требует от 24 до 72 временных отрезков.
Распоряжение капиталом инициируется с определения лимитов на пополнения. Квалифицированные пользователи призывают задействовать правило 5% от суммарного гемблинг средств на отдельную заход.
Системные запреты провайдеров вынуждают задействовать альтернативные пути. Дубликаты поддерживают полную производительность главного площадки, включая журнал платежей и казино результаты.
Новые финансовые методы предоставляют мгновенные инвестиции через цифровые аккаунты. Bitcoin, Ethereum и устойчивые монеты дают анонимность и крошечные взносы. Длительность проведения выводов равно 10-30 отрезков.
Программы преданности содержат градационные ранги с накапливающимся компенсацией. VIP-координаторы предоставляют персонализированные вознаграждения, улучшенные ограничения и приоритетную обслуживание.
Передовые геймеры имеют дело с изобилием цифровых особенностей при работе с официальными платформами. Профильные сайты типа Вован казино поставляют актуальную материалы о функционировании гэмблинговых компаний.
Процесс проверки счета охватывает ряд неотъемлемых фаз. Стартовая аутентификация нуждается предоставления документов удостоверяющих гражданство. Типовой набор предполагает документ, водительские права или международный паспорт.
Цифровая элемент оформления предполагает использование безопасного соединения и двойной авторизации. Опытные клиенты советуют запускать весь комплекс имеющихся настроек защиты.
Альтернативные адреса образуют идентичные дубликаты центрального платформы с обеспечением полного функционала. Важнейшее достоинство выражается в идентичности денежных пределов и требований вейджера.
Процедура локализации актуальных альтернативных адресов фундируется на проверке профессиональных информационных каналов и союзных площадок. Квалифицированные пользователи применяют VPN-сервисы для гарантирования стабильного доступа безотносительно от территориальных барьеров.
25696TodBertlingo abc
I’m now not sure the place you’re getting your info, but good topic.
I needs to spend a while studying more or understanding more.
Thank you for excellent information I used to
be on the lookout for this info for my mission.
my blog realtor in Hoboken NJ
Поиск в сфере сертифицированных ресурсов включает понимания современных инструментов соединения. Умелые клиенты задействуют казино лаки ворлд для приобретения современной информации о оперативных адресах.
Механизм оформления аккаунта в проверенных учреждениях охватывает комплексную подтверждение. Передовые поставщики задействуют KYC-механизмы и AML-требования. Документооборот занимает от 24 до 72 периодов.
Программные решения для прохождения препятствий эволюционируют параллельно с повышением законодательных инициатив. VPN-инструменты класса premium гарантируют кодирование AES-256 и технологии OpenVPN. Устойчивость соединения кардинально необходима для премиальных партий.
Зеркальные адреса выполняют задачи через территориально размещенные компьютерные системы. CDN-структуры обеспечивают сокращенную задержку для международных участников. Техническое роутинг активируется при выявлении блокировки главного портала.
Экономические операции в проверенных областях отвечают конкретным правилам PCI DSS. Блокчейн транзакции увеличивают востребованность из-за приватности и быстроте обработки.
Смартфонные клиенты лучших операторов содержат физиологическую идентификацию и push-оповещения для существенных эпизодов. Гибкий облик автоматически корректируется под настройки панели.
Новейшие участники натыкаются с барьером доступа к сертифицированным площадкам. Компании блокируют базовые адреса, но опытные миллион казино пользователи учитывают о доступности резервных порталов.
Альтернативный адрес является абсолютную реплику оригинального площадки. Криптографические алгоритмы сохраняются равнозначными. Банковские транзакции проходят через аналогичные шлюзы.
Технология открытия счёта через резервный домен предполагает классической аутентификации. Менеджеры требуют документы для осуществления KYC-правил. Личные характеристики реализуют комплексную валидацию.
Банковские лимиты на резервных порталах совпадают основным параметрам. Наименьшие беты продолжают фиксированными. Накопительные банки объединяются между многочисленными ресурсами.
Премиальные планы оперируют завершённо на параллельных платформах. Отыгрышный коэффициент гарантирует базовые значения. Срок активности оборота остаётся прежним.
Департамент поддержки анализирует тикеты с дополнительных доменов таким же способом. Онлайн разговор гарантирует постоянный формат обслуживания.
The character of Cathy Ames is often cited as one of the most terrifying villains in literary history, lacking a conscience from birth. Analyzing her interactions with Adam and her sons, Cal and Aron, requires a close reading of the text. Many scholars finding it easier to track her manipulative dialogue through a searchable East of Eden PDF file. Our literary hub focuses on these character dynamics, offering insights that you might miss on a first read. If you are looking to understand the psychology behind the monster or the redemption of the other characters, our resources are designed to enhance your digital or print reading experience.
look at here now jax wallet
Инновационные платформы гемблинг услуг предоставляют участникам доступ к премиальному гемблингу через сертифицированные ретро казино системы. Авторизованная бизнес предполагает соблюдения жестких надзорных положений.
Алгоритм регистрации пользовательского счета охватывает аутентификацию конфиденциальных информации. Управляющие применяют комплексные процедуры KYC и AML для исключения поддельных финансовых действий.
IT платформы передовых развлекательных порталов базируются на надежных дата-центрах с шифровальными протоколами. Региональная блокировка вынуждает администраторов создавать альтернативные адреса.
Параллельные ресурсы составляют эквивалентные клоны основного платформы с сохранением всех опций и данных. Клиенты получают беспрепятственный соединение к балансу, беттинг истории и персональным установкам.
Платежные процедуры реализуются через синхронизированные финансовые агрегаторы. Рамки на взносы и получения фиксируются в унисон с законодательными требованиями и организационными политиками управления рисками.
Экспертные пользователи советуют отслеживать статус аккредитации через официальные каталоги развлекательных организаций. Статусные характеристики охватывают позиции на отраслевых сайтах и отзывы настоящих игроков.
10158RosanaThallso abc
go to my blog download jaxx wallet
Нынешние участники сталкиваются с изобилием технологических тонкостей при работе с официальными сайтами. Профильные сайты типа казино Голд предоставляют новую материалы о операциях гэмблинговых брендов.
Система аутентификации счета включает набор принудительных стадий. Стартовая верификация предполагает размещения справок валидирующих гражданство. Типовой комплект содержит паспорт, автоудостоверение или международный паспорт.
Программная элемент создания аккаунта предполагает использование безопасного соединения и двухфакторной аутентификации. Опытные геймеры советуют активировать полный набор имеющихся функций охраны.
Дублирующие порталы образуют полные реплики первичного сайта с поддержанием тотального набора функций. Главное выгода выражается в схожести платежных пределов и параметров отыгрыша.
Схема выявления функционирующих запасных доменов основывается на наблюдении профессиональных информационных каналов и союзных сайтов. Квалифицированные игроки применяют прокси-соединения для гарантирования постоянного связи невзирая от региональных блокировок.
Передовые геймеры натыкаются с барьером входа к лицензированным платформам. Компании закрывают стандартные порталы, но искушённые казино миллионъ зеркало участники помнят о функционировании резервных порталов.
Альтернативный адрес составляет полную дубликат оригинального ресурса. SSL-сертификаты остаются такими же. Финансовые операции производятся через аналогичные шлюзы.
Методика оформления профиля через альтернативный домен подразумевает привычной проверки. Операторы выясняют удостоверения для выполнения KYC-норм. Индивидуальные информация осуществляют расширенную проверку.
Банковские лимиты на альтернативных площадках равняются базовым спецификациям. Минимальные взносы функционируют постоянными. Накопительные банки согласовываются между множественными порталами.
Льготные схемы выполняются целостно на альтернативных ресурсах. Вейджер гарантирует исходные значения. Длительность отыгрыша продолжается.
Департамент ассистирования обрабатывает обращения с зеркальных ресурсов равнозначно. Интерактивный переписка осуществляет непрерывный график функционирования.
Исследование в области сертифицированных площадок включает осознания передовых способов авторизации. Опытные пользователи внедряют Гризли казино для извлечения свежей данных о работающих путях.
Алгоритм оформления счета в официальных компаниях охватывает сложную валидацию. Продвинутые организации внедряют KYC-механизмы и AML-нормы. Оформление документов потребляет от 24 до 72 часов.
IT решения для минования препятствий эволюционируют одновременно с повышением законодательных действий. VPN-сервисы уровня premium гарантируют защиту AES-256 и стандарты OpenVPN. Устойчивость соединения fundamentally важна для VIP заходов.
Резервные сайты выполняют задачи через пространственно распределенные технические инфраструктуры. CDN-архитектуры поддерживают низкую задержку для европейских клиентов. Программное перенаправление включается при выявлении блокировки центрального портала.
Банковские манипуляции в лицензированных территориях отвечают четким критериям PCI DSS. Блокчейн операции увеличивают актуальность в результате конфиденциальности и оперативности обработки.
Переносные клиенты элитных организаций объединяют лицевую идентификацию и push-извещения для важных ситуаций. Настраиваемый дизайн программно изменяется под свойства панели.
Awesome issues here. I am very glad to see your article.
Thank you a lot and I am having a look ahead to touch you.
Will you kindly drop me a e-mail?
14036SherellQualiao abc
Подбор безопасного развлекательного заведения заставляет серьезного анализа лицензионных бумаг. Современные системы винити казино гарантируют геймерам абсолютную данные о текущих лицензиях.
Система создания профиля предусматривает определенное количество обязательных стадий проверки. Администраторы запрашивают справки, засвидетельствующие индивидуальность и зрелость. Классический KYC-порядок длится от 24 до 72 промежутков.
Управление банком начинается с определения пределов на пополнения. Компетентные игроки предлагают эксплуатировать установку 5% от общего казино капитала на конкретную раунд.
Электронные ограничения провайдеров принуждают задействовать вспомогательные адреса. Зеркала удерживают абсолютную работоспособность главного сайта, охватывая историю платежей и азартный достижения.
Передовые расчетные способы предоставляют мгновенные взносы через виртуальные хранилища. Bitcoin, Ethereum и стабильные валюты гарантируют анонимность и крошечные комиссии. Период обработки снятий достигает 10-30 интервалов.
Планы постоянства предусматривают градационные категории с прогрессивным компенсацией. VIP-менеджеры гарантируют индивидуальные подарки, повышенные границы и приоритетную сервис.
Передовые клиенты пересекаются с массой технологических деталей при функционировании с официальными площадками. Профильные ресурсы типа винити зеркало дают современную данные о операциях азартных организаций.
Система подтверждения профиля содержит набор требуемых этапов. Первичная верификация подразумевает загрузки свидетельств верифицирующих субъект. Классический комплект охватывает ID, водительские права или международное ID.
Программная компонента оформления охватывает использование зашифрованного канала и многофакторной защиты. Опытные клиенты советуют инициировать совокупность имеющихся возможностей обеспечения.
Зеркала образуют полные копии основного платформы с обеспечением тотального набора функций. Важнейшее бонус состоит в идентичности расчетных лимитов и критериев отыгрыша.
Механизм локализации актуальных зеркал основывается на мониторинге специализированных уведомительных сервисов и связанных платформ. Продвинутые геймеры применяют VPN-сервисы для гарантирования надежного доступа независимо от территориальных запретов.
Передовые участники сталкиваются с препятствием доступа к сертифицированным порталам. Организации ограничивают стандартные URL, но опытные enomo casino пользователи понимают о функционировании зеркальных ресурсов.
Параллельный портал составляет полную дубликат главного ресурса. Средства защиты функционируют аналогичными. Банковские действия проходят через те же каналы.
Алгоритм оформления профиля через параллельный адрес содержит привычной валидации. Администраторы требуют документы для соблюдения KYC-требований. Личные сведения проходят усиленную проверку.
Банковские ограничения на резервных площадках соответствуют главным характеристикам. Минимальные вклады остаются постоянными. Возрастающие выигрышные пулы согласовываются между множественными порталами.
Премиальные программы выполняются целостно на резервных площадках. Требования по обороту поддерживает стартовые величины. Срок активности отыгрыша продолжается.
Департамент сопровождения изучает обращения с дополнительных ресурсов таким же способом. Прямой общение поддерживает беспрерывный порядок работы.
Инновационные порталы азартных развлечений обеспечивают беттерам путь к высококлассному беттингу через сертифицированные казино Вован платформы. Авторизованная деятельность подразумевает исполнения строгих законодательных критериев.
Процедура активации персонального профиля охватывает проверку приватных сведений. Провайдеры эксплуатируют расширенные протоколы KYC и AML для блокировки нарушающих финансовых действий.
IT системы новейших гемблинг платформ базируются на стабильных хостингах с SSL технологиями. IP-фильтрация побуждает операторов запускать вспомогательные ссылки.
Дублирующие ресурсы формируют полные репликации базового домена с удержанием всех возможностей и параметров. Клиенты достигают непрерывный доступ к капиталу, беттинг отчетности и личным опциям.
Платежные действия выполняются через подключенные банковские системы. Рамки на взносы и изъятия фиксируются в соответствии с нормативными стандартами и корпоративными правилами минимизации опасностей.
Опытные гемблеры настаивают проверять состояние разрешения через надзорные базы данных развлекательных организаций. Престижные индикаторы включают рейтинги на тематических сервисах и feedback истинных игроков.
If you are looking for the perfect beach read or cozy winter book, this fits all seasons. The warmth of the romance radiates from the pages. A Better Than the Movies PDF is the portable version of this warmth. It is a book that shines a light on the fact that the best stories are the ones we write ourselves.
9266GavinHibshmano abc
Новейшие клиенты пересекаются с изобилием технических деталей при процессах с лицензированными порталами. Специализированные платформы типа казино Голд выдают новую информацию о операциях игорных операторов.
Процесс проверки аккаунта подразумевает множество требуемых стадий. Базовая аутентификация подразумевает передачи свидетельств подтверждающих субъект. Привычный комплект подразумевает удостоверение личности, права или загранпаспорт.
Технологическая часть записления охватывает применение безопасного соединения и двухфакторной аутентификации. Продвинутые игроки предлагают запускать полный набор представленных параметров безопасности.
Дублирующие порталы формируют точные копии базового сайта с обеспечением всего функционала. Ключевое выгода содержится в схожести платежных лимитов и критериев проигрыша.
Алгоритм локализации активных резервных ссылок основывается на отслеживании экспертных мессенджер групп и партнерских порталов. Опытные пользователи применяют прокси-соединения для гарантирования устойчивого подключения безотносительно от географических блокировок.
Отбор проверенного развлекательного заведения подразумевает основательного изучения юридических разрешений. Современные ресурсы retro зеркало предлагают пользователям стопроцентную данные о имеющихся лицензиях.
Механизм регистрации предусматривает ряд требуемых стадий подтверждения. Представители запрашивают бумаги, подтверждающие персону и возраст. Типовой KYC-алгоритм длится от 24 до 72 периодов.
Распоряжение капиталом стартует с установления пределов на вклады. Искусные игроки рекомендуют задействовать принцип 5% от суммарного развлекательного капитала на единичную игру.
Системные блокировки владельцев принуждают задействовать вспомогательные маршруты. Альтернативы поддерживают абсолютную активность главного площадки, включая архив переводов и азартный прогресс.
Современные денежные способы поддерживают оперативные депозиты через электронные портмоне. Bitcoin, Ethereum и стабильные валюты предоставляют приватность и крошечные отчисления. Период осуществления извлечений достигает 10-30 периодов.
Программы преданности включают многоуровневые статусы с увеличивающимся компенсацией. VIP-консультанты дают персонализированные подарки, улучшенные ограничения и опережающую сервис.
Continued https://jaxxwallet-web.org/
36973MartinResueo abc
Передовые игроки пересекаются с изобилием цифровых деталей при деятельности с сертифицированными платформами. Экспертные источники типа миллион казино предоставляют современную материалы о операциях игорных провайдеров.
Процесс аутентификации учетной записи подразумевает комплекс требуемых стадий. Исходная подтверждение подразумевает размещения удостоверений подтверждающих личность. Стандартный перечень охватывает удостоверение личности, автоудостоверение или международный паспорт.
Технологическая элемент регистрации содержит внедрение SSL-шифрования и двойной авторизации. Экспертные игроки настаивают активировать весь комплекс доступных возможностей охраны.
Запасные домены формируют идентичные клоны базового домена с сохранением всего возможностей. Ключевое бонус заключается в схожести денежных рамок и требований ставочных требований.
Процедура нахождения действующих альтернативных адресов опирается на проверке экспертных уведомительных сервисов и союзных площадок. Профессиональные клиенты внедряют анонимайзеры для гарантирования бесперебойного доступа невзирая от местных лимитов.
I was skeptical, but after a month of testing new tokens, the quick deposits convinced me.
I trust this platform — withdrawals are accurate charts and reliable. Definitely recommend to anyone in crypto.
Исследование в мире сертифицированных ресурсов предполагает понимания актуальных решений доступа. Профессиональные клиенты применяют типпи казино для обретения новейшей данных о оперативных адресах.
Алгоритм открытия аккаунта в лицензированных заведениях подразумевает многоуровневую аутентификацию. Передовые организации эксплуатируют KYC-процедуры и AML-нормы. Бумажная работа требует от 24 до 72 временных отрезков.
Цифровые инструменты для преодоления барьеров эволюционируют синхронно с повышением правовых решений. VPN-платформы типа premium предлагают шифрование AES-256 и стандарты OpenVPN. Стабильность связи жизненно существенна для элитных сессий.
Запасные ресурсы выполняют задачи через территориально разнесенные технические системы. CDN-комплексы предоставляют оптимальную пинг для европейских пользователей. Программное редирект срабатывает при распознавании недоступности базового адреса.
Платежные переводы в проверенных юрисдикциях следуют четким нормам PCI DSS. Криптовалютные транзакции набирают актуальность благодаря приватности и быстроте реализации.
Переносные программы премиальных провайдеров совмещают голосовую подтверждение и push-алерты для существенных эпизодов. Настраиваемый облик автоматически изменяется под параметры панели.
Гемблинговая отрасль представляет активный подъём, завлекая легионы игроков. Опытные ресурсы обеспечивают защищённую обстановку для развлечений. Исчерпывающую факты о таких провайдерах можно найти на ДживиСпин казино .
Лицензирование составляет приоритетным показателем подбора сайта. Лицензиаты Кюрасао обеспечивают тщательный аудит валютных процедур. Отдельная официальная ресурс проходит регулярные аудиты RNG-модулей.
Компьютерные аспекты новейших казино включают SSL-безопасность расчётного стандарта. Создатели софтового ПО класса Microgaming, NetEnt, Pragmatic Play интегрируют продвинутые системы произвольных значений.
Алгоритм аутентификации аккаунта требует предоставления удостоверений KYC-стандарта. Удостоверение, документ о доходах, удостоверение местожительства — типичный перечень для окончательного авторизации.
Дублирующие URL ликвидируют барьеры с цензурой операторов. Свежие зеркала изменяются ежедневно IT группами. Мобильные утилиты регулярно оперируют стабильнее онлайн форматов.
Управление банкроллом формирует долгосрочную прибыльность развлекательных партий. Квалифицированные беттеры настаивают урезать объём депозита до 1-2% от итогового капитала.
click to read https://jaxxwallet-web.org/
Передовые гемблеры попадают с проблемой доступа к лицензированным ресурсам. Операторы блокируют стандартные URL, но опытные https://zelenovskoe.ru участники учитывают о наличии зеркальных сайтов.
Параллельный портал составляет точную реплику основного ресурса. Протоколы шифрования функционируют неизменными. Расчётные транзакции реализуются через равнозначные механизмы.
Схема оформления профиля через зеркальный ресурс требует привычной подтверждения. Операторы выясняют бумаги для выполнения KYC-норм. Паспортные параметры подвергаются двухфакторную аутентификацию.
Пополнительные рамки на альтернативных ресурсах аналогичны главным характеристикам. Начальные вклады функционируют неизменными. Прогрессивные выигрышные пулы координируются между множественными порталами.
Поощрительные планы работают завершённо на параллельных ресурсах. Коэффициент оборота сохраняет оригинальные показатели. Срок активности реализации остаётся прежним.
Служба ассистирования решает запросы с зеркальных доменов аналогично. Живой общение поддерживает 24-часовой режим работы.
When I originally commented I clicked the “Notify me when new comments are added” checkbox and now each
time a comment is added I get four emails with the same comment.
Is there any way you can remove people from that service?
Thank you!
Feel free to visit my web-site: अमेरिका Powerball टिकट ऑनलाइन खरीदें
Generic Elavil: AmiTrip – Generic Elavil
76915KymEstaciono abc
Pretty nice post. I just stumbled upon your weblog and wished to say that
I’ve really enjoyed browsing your blog posts. In any case
I’ll be subscribing to your rss feed and I hope you write again soon!
Review my webpage; India se US lottery ticket kaise kharide
мелбет промокод при регистрации бонус
Поиск честного азартного оператора заставляет основательного изучения официальных бумаг. Новые сайты РЎСѓРєР° казино дают игрокам безусловную детали о имеющихся аккредитациях.
Процедура открытия аккаунта предусматривает множество принудительных стадий аутентификации. Владельцы требуют удостоверения, устанавливающие личность и зрелость. Традиционный KYC-порядок длится от 24 до 72 периодов.
Банкролл-менеджмент начинается с установления ограничений на инвестиции. Опытные пользователи советуют использовать принцип 5% от полного казино средств на индивидуальную партию.
Электронные запреты администраторов вынуждают задействовать дополнительные ссылки. Альтернативы поддерживают безусловную производительность главного сайта, содержа архив операций и игровой результаты.
Актуальные платежные системы гарантируют скоростные пополнения через блокчейн аккаунты. Bitcoin, Ethereum и постоянные токены поддерживают конфиденциальность и минимальные комиссии. Срок выполнения извлечений равно 10-30 промежутков.
Системы приверженности предусматривают каскадные категории с нарастающим кэшбэком. VIP-кураторы гарантируют уникальные вознаграждения, усиленные ограничения и ускоренную сервис.
Поиск в мире проверенных площадок предполагает осознания актуальных решений входа. Продвинутые участники эксплуатируют казино СЌРЅРѕРјРѕ для приобретения современной сведений о оперативных ссылках.
Механизм формирования учетной записи в проверенных компаниях включает комплексную проверку. Продвинутые организации задействуют KYC-механизмы и AML-требования. Бумажная работа отнимает от 24 до 72 часов.
IT инструменты для преодоления блокировок совершенствуются одновременно с усилением законодательных решений. VPN-решения типа premium предлагают шифрование AES-256 и системы OpenVPN. Постоянство канала fundamentally актуальна для VIP заходов.
Запасные ресурсы оперируют через локально распределенные серверные инфраструктуры. CDN-системы поддерживают оптимальную задержку для азиатских геймеров. Автоматическое редирект запускается при выявлении недоступности основного ресурса.
Финансовые переводы в проверенных областях отвечают жестким требованиям PCI DSS. Цифровые платежи завоевывают популярность по причине анонимности и динамике реализации.
Смартфонные утилиты ведущих провайдеров совмещают отпечатковую аутентификацию и push-извещения для критических эпизодов. Модифицируемый дизайн самостоятельно адаптируется под характеристики экрана.
Современные участники оказываются с барьером соединения к официальным площадкам. Компании закрывают главные домены, но опытные лаки Р±РёСЂ казино игроки понимают о функционировании альтернативных сайтов.
Резервная ссылка представляет точную отображение главного сайта. SSL-сертификаты остаются идентичными. Финансовые переводы реализуются через идентичные каналы.
Схема регистрации через зеркальный ссылку предполагает типовой валидации. Операторы требуют свидетельства для осуществления KYC-стандартов. Паспортные параметры реализуют усиленную верификацию.
Банковские рамки на дополнительных порталах соответствуют первичным спецификациям. Начальные взносы сохраняются неизменными. Накопительные джекпоты согласовываются между многочисленными ресурсами.
Льготные механизмы оперируют полноценно на дополнительных порталах. Множитель ставок поддерживает стартовые величины. Тайминг реализации поддерживается.
Служба обслуживания анализирует обращения с альтернативных адресов сходным образом. Живой переписка обеспечивает круглосуточный порядок оперирования.
Appreciating the persistence you put into your site and detailed information you present.
It’s nice to come across a blog every once in a while that isn’t the same old
rehashed information. Fantastic read! I’ve bookmarked your
site and I’m including your RSS feeds to my Google account.
Check out my blog post; real estate agent Pinecrest FL
Активные резервные адреса надежных казино на Рльдорадо РІС…РѕРґ обеспечивают беспрерывный коннект к гемблинг порталам. Принцип копирования создает точные реплики корневого ресурса с удержанием всех механизмов.
Процедура активации через дублирующий портал в точности повторяет главную заявку. Новые игроки регистрируют действующий email, устанавливают безопасный пароль и определяют операционную финансовый инструмент.
Идентификация учетной записи требует передачи удостоверений в соответствии с KYC-стандартам. Копия водительских прав, доказательство адреса и карточные данные анализируются посредством программную валидацию в течение 24-72 ч.
Авторизация существующих пользователей выполняется через базовую окно с 2FA проверкой. Одноразовые ключи приходят на сотовый гаджет или почтовый ящик.
Инструменты пополнительного раздела через резервные ссылки содержит актуальные денежные инструменты. Visa, Mastercard, виртуальные хранилища Skrill, Neteller, блокчейн-токены Bitcoin, Ethereum выполняются с сокращенными сборами 0-3%.
Gaming библиотека копируется в точности включая автоматы, настольные игры, live-операторов и джекпоты. RTP-индикаторы, колебания и отыгрыш удерживаются точными.
Промо механизм выполняется похоже базовому сайту. Welcome-комплекты, фриспины, refund и VIP-курсы стартуют системно при достижении установленных условий.
84689IsaiasElwero abc
Подбор безопасного гемблинг портала заставляет глубокого изучения юридических бумаг. Передовые платформы миллион казино предлагают клиентам стопроцентную информацию о своих лицензиях.
Алгоритм регистрации подразумевает различные обязательных шагов валидации. Владельцы просят свидетельства, доказывающие идентичность и возраст. Стандартный KYC-механизм занимает от 24 до 72 временных отрезков.
Распоряжение капиталом инициируется с задания границ на инвестиции. Профессиональные геймеры настаивают использовать закон 5% от полного игорного резерва на одну сессию.
Технические блокировки владельцев заставляют использовать вспомогательные адреса. Клоны сохраняют полную производительность базового портала, подразумевая историю платежей и развлекательный прогресс.
Актуальные банковские инструменты гарантируют быстрые взносы через цифровые счета. Bitcoin, Ethereum и постоянные токены обеспечивают скрытность и минимальные отчисления. Срок проведения выводов доходит 10-30 периодов.
Планы лояльности содержат каскадные степени с накапливающимся бонусом. VIP-кураторы предоставляют персонализированные поощрения, расширенные ограничения и приоритетную поддержку.
Азартная отрасль представляет активный подъём, притягивая тысячи геймеров. Экспертные площадки предоставляют защищённую атмосферу для беттинга. Подробную данные о этих организациях допустимо найти на Рльдорадо казино .
Аккредитация остаётся приоритетным показателем отбора портала. Юрисдикции Гибралтара создают тщательный надзор финансовых транзакций. Каждая сертифицированная ресурс проходит регулярные контроли RNG-механизмов.
Цифровые параметры современных гемблинг-сайтов содержат SSL-криптографию расчётного уровня. Поставщики компьютерного софта класса Microgaming, NetEnt, Pragmatic Play подключают сложные схемы случайных параметров.
Механизм подтверждения профиля требует предоставления бумаг KYC-класса. Свидетельство, свидетельство о прибылях, верификация адреса — стандартный набор для окончательного доступа.
Дублирующие ссылки исправляют проблемы с запретами операторов. Действующие дубли модифицируются каждый день цифровыми службами. Портативные приложения часто выполняются устойчивее онлайн модификаций.
Распределение капитала определяет продолжительную успешность азартных сессий. Профессиональные игроки предлагают контролировать величину пари до 1-2% от итогового капитала.
13682BrigetteMattiao abc
Передовые гемблеры оказываются с препятствием доступа к официальным порталам. Поставщики ограничивают главные ссылки, но профессиональные казино Голд игроки помнят о функционировании дублирующих площадок.
Параллельный портал представляет точную копию главного сайта. Системы безопасности сохраняются равнозначными. Платёжные транзакции выполняются через сходные сервисы.
Методика открытия счёта через зеркальный домен подразумевает привычной аутентификации. Специалисты просят документы для реализации KYC-стандартов. Персональные сведения осуществляют двухфакторную валидацию.
Пополнительные рамки на зеркальных порталах аналогичны первичным спецификациям. Минимальные беты поддерживаются константными. Возрастающие джекпоты синхронизируются между всеми порталами.
Премиальные системы выполняются завершённо на зеркальных ресурсах. Отыгрышный коэффициент гарантирует оригинальные показатели. Период действия проигрывания поддерживается.
Сервис обслуживания анализирует обращения с альтернативных доменов таким же способом. Интерактивный разговор поддерживает беспрерывный расписание деятельности.
Азартная индустрия представляет стремительный рост, манящая тысячи пользователей. Опытные порталы дают защищённую условия для пари. Развёрнутую данные о этих компаниях можно обнаружить на казино JVSpin .
Аттестация составляет ключевым показателем отбора площадки. Лицензиаты Олдерни дают жёсткий надзор валютных операций. Конкретная аккредитованная портал выполняет периодические инспекции RNG-генераторов.
Программные особенности инновационных беттинг-платформ содержат SSL-кодирование денежного класса. Поставщики цифрового продукта уровня Microgaming, NetEnt, Pragmatic Play подключают продвинутые системы хаотичных чисел.
Процесс аутентификации профиля требует представления свидетельств KYC-формата. Удостоверение, справка о финансах, валидация местожительства — обычный набор для окончательного авторизации.
Альтернативные домены убирают трудности с запретами операторов. Свежие копии адаптируются ежедневно цифровыми командами. Портативные утилиты зачастую функционируют лучше интернет редакций.
Банкролл-менеджмент определяет перспективную успешность беттинговых периодов. Опытные игроки указывают контролировать размер пари до 1-2% от итогового фонда.
Современные клиенты сталкиваются с огромным количеством программных тонкостей при процессах с легальными платформами. Тематические порталы типа Рльдорадо казино предоставляют свежую контент о процессах развлекательных операторов.
Алгоритм верификации учетной записи включает комплекс неотъемлемых стадий. Исходная подтверждение включает загрузки документов подтверждающих персону. Типовой пакет содержит удостоверение личности, автоудостоверение или загранпаспорт.
Системная компонента регистрации содержит эксплуатацию безопасного соединения и 2FA. Квалифицированные клиенты предлагают включать полный набор представленных опций обеспечения.
Зеркала являются идентичные реплики основного ресурса с обеспечением тотального возможностей. Главное бонус содержится в идентичности банковских границ и требований условий прокрутки.
Система нахождения рабочих дублирующих порталов основывается на наблюдении экспертных информационных каналов и аффилированных ресурсов. Квалифицированные геймеры внедряют анонимайзеры для создания бесперебойного входа без оглядки от территориальных блокировок.
Развлекательная отрасль отображает интенсивный развитие, завлекая множество клиентов. Опытные площадки гарантируют защищённую атмосферу для беттинга. Развёрнутую факты о таких организациях допустимо получить на Голд официальный сайт .
Аттестация представляет главным критерием выбора портала. Юрисдикции Кюрасао дают жёсткий контроль валютных процедур. Отдельная аккредитованная портал выполняет плановые ревизии RNG-модулей.
IT свойства новейших беттинг-платформ объединяют SSL-шифрование экономического класса. Создатели компьютерного материала уровня Microgaming, NetEnt, Pragmatic Play встраивают комплексные схемы случайных показателей.
Процедура подтверждения профиля предусматривает представления удостоверений KYC-стандарта. Паспорт, справка о доходах, подтверждение местожительства — стандартный пакет для полноценного доступа.
Дублирующие URL решают препятствия с цензурой операторов. Рабочие варианты модифицируются ежедневно цифровыми группами. Планшетные приложения часто работают надёжнее сетевых форматов.
Контроль средств создаёт перспективную доходность беттинговых раундов. Грамотные беттеры указывают лимитировать величину ставки до 1-2% от суммарного бюджета.
20005TabethaFlagielloo abc
you could look here jaxx wallet
Официальные ресурсы игорных опций гарантируют игрокам доступ к профессиональному игровому процессу через целевые ресурсы, включая lucky bear казино , которые придерживаются transnational нормы security.
Механизм оформления профиля necessita ввода идентификационных параметров через защищённые SSL-соединения. Администрация demanded нотариальное подтверждение дееспособности и территории residence для compliance правовых критериев.
Multi-factor идентификация представляет required aspect передовых платформ конфиденциальности. Игроки располагают SMS-пароли, push-уведомления или внедряют специальные программы в стиле Google Authenticator.
Дублирующие порталы преодолевают вопросы geographic барьеров и DDoS-атак. Фактически mirrors формируют тождественные dublicates основного ресурса с сохранением функциональности и индивидуальных деталей.
Профессиональные клиенты призывают keeping current реестры рабочих mirrors в favourites веб-клиента. Операторы передают новости о актуальных URL через e-mail, Telegram-сообщества и смартфонные apps.
Финансовые movements через legal платформы защищены cryptographic технологиями уровня банковского segment. Снятие средств выполняется единственно на верифицированные wallets обладателя учётной записи.
Передовые провайдеры гемблинг услуг обеспечивают беттерам возможность к профессиональному азарту через проверенные казино СЌРЅРѕРјРѕ платформы. Легальная функционирование предполагает исполнения жестких законодательных требований.
Процедура активации клиентского профиля содержит проверку приватных информации. Управляющие задействуют расширенные механизмы KYC и AML для блокировки фродовых операций.
Программные инструменты актуальных казино работают на безопасных инфраструктурах с TLS технологиями. IP-фильтрация принуждает операторов создавать дублирующие URL.
Параллельные ресурсы формируют эквивалентные клоны базового домена с фиксацией всех инструментов и информации. Беттеры приобретают устойчивый соединение к балансу, игровой данным и личным настройкам.
Финансовые транзакции проходят через интегрированные платежные системы. Лимиты на пополнения и получения определяются в согласии с законодательными требованиями и собственными правилами управления рисками.
Профессиональные пользователи советуют мониторить статус авторизации через государственные реестры азартных организаций. Авторитетные индикаторы содержат оценки на экспертных порталах и комментарии реальных клиентов.
Новейшие пользователи встречаются с набором технологических деталей при работе с легальными площадками. Экспертные порталы типа лаки Р±РёСЂ поставляют современную информацию о процессах гэмблинговых провайдеров.
Процедура валидации профиля охватывает несколько обязательных этапов. Первичная валидация включает размещения бумаг удостоверяющих субъект. Привычный перечень включает документ, права или международный паспорт.
Системная составляющая регистрации охватывает эксплуатацию криптографической защиты и двухфакторной аутентификации. Продвинутые пользователи предлагают активировать весь комплекс представленных опций секьюрити.
Зеркала образуют полные клоны первичного домена с обеспечением исчерпывающего набора функций. Главное достоинство состоит в тождественности расчетных пределов и норм ставочных требований.
Процедура обнаружения активных альтернативных адресов фундируется на отслеживании специализированных телеграм-каналов и союзных площадок. Экспертные игроки задействуют прокси-соединения для формирования устойчивого доступа без оглядки от территориальных ограничений.
Ориентирование в сфере лицензированных порталов подразумевает осознания продвинутых способов входа. Профессиональные пользователи используют Рльдорадо казино для обретения новейшей сведений о оперативных адресах.
Процесс открытия профиля в сертифицированных компаниях предполагает многоуровневую верификацию. Современные поставщики эксплуатируют KYC-механизмы и AML-требования. Документальное сопровождение потребляет от 24 до 72 периодов.
Технические способы для обхода барьеров улучшаются параллельно с повышением правовых мер. VPN-инструменты класса premium предлагают криптографию AES-256 и стандарты OpenVPN. Постоянство соединения кардинально актуальна для элитных партий.
Резервные адреса функционируют через географически рассредоточенные серверные системы. CDN-комплексы гарантируют низкую время ответа для азиатских игроков. Автоматическое перенаправление активируется при распознавании недоступности первичного сайта.
Экономические переводы в сертифицированных территориях отвечают определенным правилам PCI DSS. Криптовалютные платежи получают распространение благодаря секретности и быстроте выполнения.
Планшетные клиенты ведущих компаний совмещают физиологическую авторизацию и push-алерты для ключевых событий. Настраиваемый облик автоматически подстраивается под свойства матрицы.
10879AlthaIngersollo abc
Актуальные гемблеры встречаются с затруднением подключения к лицензированным платформам. Поставщики блокируют первичные адреса, но знающие типпи казино участники помнят о функционировании дублирующих сайтов.
Дополнительный домен представляет точную копию первичного ресурса. SSL-сертификаты остаются такими же. Денежные транзакции производятся через аналогичные сервисы.
Схема регистрации через резервный адрес подразумевает классической проверки. Администраторы выясняют удостоверения для реализации KYC-требований. Персональные сведения реализуют расширенную валидацию.
Депозитные рамки на резервных ресурсах соответствуют основным требованиям. Минимальные беты продолжают неизменными. Увеличивающиеся выигрышные пулы координируются между различными порталами.
Поощрительные программы работают целостно на зеркальных платформах. Требования по обороту поддерживает исходные значения. Длительность использования остаётся прежним.
Команда сопровождения обрабатывает заявки с резервных ссылок равнозначно. Онлайн чат предоставляет беспрерывный порядок деятельности.
Легальные операторы гэмблинг услуг предоставляют участникам вариант к профессиональному времяпрепровождению через профильные ресурсы, включая ретро официальный сайт , которые точно выполняют мировые критерии надёжности.
Схема открытия счёта включает указания проверочных сведений через шифрованные SSL-протоколы. Провайдеры требуют официальное удостоверение age verification и адреса нахождения для соблюдения правовых критериев.
Двухэтапная идентификация становится необходимым элементом современных механизмов security. Игроки приобретают SMS-пароли, push-алерты или применяют targeted утилиты по типу Google Authenticator.
Дублирующие порталы преодолевают трудности региональных ограничений и DDoS-assault. Техническим образом mirrors составляют аналогичные dublicates центрального платформы с maintaining функциональности и личных данных.
Экспертные геймеры призывают удерживать актуальные списки working копий в сохранённых ссылках обозревателя. Букмекеры доставляют сведения о новых доменах через e-mail, Telegram-каналы и смартфонные apps.
Денежные операции через проверенные площадки защищены encryption methods уровня банковского области. Снятие финансов происходит исключительно на верифицированные реквизиты держателя учётной записи.
I recently checked out this casino https://toctranslation.com/blog/2025/10/27/casino-mobile-france-encadrement-architecture-3/ and was surprised by how stable everything felt. The games load quickly, bonuses are transparent, and navigation is user-friendly, making the experience comfortable.
more tips here https://jaxxwallet-web.org/
Baseball livescore MLB updates, America’s pastime with pitch-by-pitch tracking live
14274RobertaSaxono abc
捕风追影线上看免费在线观看,海外华人专属平台结合大数据AI分析,高清无广告体验。
https://amitrip.us.com/# Generic Elavil
Possession retention, teams that keep the ball under pressure
Активные дублирующие порталы лицензированных казино на казино лова предоставляют устойчивый подключение к гемблинг системам. Методика реплицирования формирует полноценные реплики базового ресурса с удержанием всех функций.
Схема создания аккаунта через альтернативный домен полностью воспроизводит стандартную анкету. Новые пользователи вводят функционирующий email, генерируют сложный шифр и устанавливают основную денежную единицу.
Идентификация учетной записи требует загрузки документов следуя KYC-требованиям. Копия паспорта, валидация проживания и банковские сведения проходят автоматическую верификацию в течение 24-72 временных единиц.
Логин активных участников осуществляется через классическую интерфейс с расширенной валидацией. Сессионные ключи передаются на смс гаджет или email.
Опции финансового компонента через дублирующие порталы включает распространенные расчетные инструменты. Visa, Mastercard, электронные кошельки Skrill, Neteller, цифровые активы Bitcoin, Ethereum обрабатываются с низкими взносами 0-3%.
Игровая ассортимент копируется целиком включая автоматы, традиционные игры, live-ведущих и максимальные награды. RTP-значения, изменчивость и отыгрыш удерживаются аналогичными.
Бонусная политика функционирует идентично базовому порталу. Welcome-комплекты, free spins, refund и VIP-схемы запускаются системно при реализации прописанных параметров.
Актуальные порталы игорных развлечений обеспечивают клиентам доступ к профессиональному азарту через защищенные казино retro сайты. Официальная функционирование подразумевает соблюдения строгих правовых критериев.
Алгоритм оформления пользовательского кабинета задействует валидацию конфиденциальных реквизитов. Провайдеры используют расширенные механизмы KYC и AML для недопущения фродовых платежей.
Технические инструменты актуальных гемблинг платформ основываются на защищенных облачных системах с криптографическими сертификатами. Локальные запреты заставляет управляющих запускать альтернативные ссылки.
Резервные платформы образуют аналогичные версии главного ресурса с фиксацией всех опций и сведений. Пользователи добиваются непрерывный соединение к счету, игровой истории и пользовательским конфигурациям.
Банковские переводы проходят через встроенные финансовые процессоры. Ограничения на взносы и изъятия назначаются в соотношении с нормативными стандартами и корпоративными правилами минимизации опасностей.
Экспертные пользователи настаивают проверять ситуацию сертификата через контролирующие списки гемблинг организаций. Имиджевые критерии содержат оценки на профильных сервисах и комментарии подлинных участников.
Инновационные платформы беттинг игр предоставляют клиентам вход к высококлассному гемблингу через защищенные Килограмм казино ресурсы. Лицензированная функционирование предполагает выполнения определенных законодательных стандартов.
Процедура регистрации клиентского счета охватывает валидацию персональных данных. Управляющие эксплуатируют углубленные механизмы KYC и AML для недопущения мошеннических финансовых действий.
Программные средства актуальных развлекательных порталов строятся на стабильных облачных системах с HTTPS протоколами. Региональная блокировка заставляет администраторов внедрять дублирующие URL.
Дублирующие порталы формируют полные версии первичного портала с поддержанием всех возможностей и параметров. Клиенты обеспечивают себе устойчивый подключение к депозиту, беттинг данным и персональным опциям.
Платежные процедуры производятся через связанные финансовые агрегаторы. Рамки на вклады и снятия определяются в соответствии с нормативными требованиями и корпоративными нормами управления рисками.
Опытные беттеры предлагают проверять положение лицензии через официальные реестры азартных организаций. Авторитетные параметры предусматривают ранги на экспертных сервисах и комментарии истинных беттеров.
Нынешние гемблеры натыкаются с затруднением соединения к проверенным сайтам. Поставщики фильтруют базовые порталы, но опытные tip top casino игроки понимают о доступности резервных ресурсов.
Резервная ссылка формирует полную копию оригинального сайта. Средства защиты остаются аналогичными. Расчётные переводы осуществляются через равнозначные системы.
Алгоритм регистрации через резервный ссылку требует стандартной подтверждения. Операторы просят бумаги для выполнения KYC-норм. Индивидуальные информация выполняют комплексную аутентификацию.
Банковские рамки на резервных сайтах равняются главным параметрам. Минимальные суммы остаются постоянными. Накопительные банки согласовываются между различными порталами.
Премиальные планы выполняются всесторонне на параллельных ресурсах. Множитель ставок поддерживает первоначальные величины. Длительность отыгрыша не изменяется.
Департамент поддержки анализирует вопросы с альтернативных адресов аналогично. Живой чат гарантирует 24-часовой формат оперирования.
84573LaneIshikawao abc
Инновационные операторы азартных развлечений гарантируют игрокам вход к премиальному развлечениям через надежные казино типпи сайты. Сертифицированная бизнес требует следования жестких регуляторных критериев.
Система регистрации индивидуального аккаунта содержит аутентификацию личных сведений. Регуляторы эксплуатируют комплексные протоколы KYC и AML для блокировки фродовых финансовых действий.
IT решения инновационных развлекательных порталов работают на стабильных облачных системах с TLS сертификатами. Геоблокировка принуждает операторов внедрять параллельные ссылки.
Альтернативные домены образуют идентичные дубликаты первичного ресурса с сохранением всех инструментов и данных. Пользователи получают постоянный соединение к балансу, развлекательной истории и персональным настройкам.
Платежные действия производятся через связанные платежные процессоры. Рамки на депозиты и обналичивания определяются в соответствии с регуляторными условиями и корпоративными регламентами снижения потерь.
Компетентные игроки советуют отслеживать статус аккредитации через официальные базы данных азартных органов. Репутационные параметры охватывают места на тематических сервисах и мнения реальных пользователей.
一饭封神在线免费在线观看,海外华人专属官方认证平台,高清无广告体验。
Рабочие mirror-ссылки лицензированных гемблинг-платформ на enomo зеркало предоставляют постоянный вход к гемблинг платформам. Принцип дублирования генерирует эквивалентные версии корневого веб-площадки с поддержанием всех возможностей.
Система оформления профиля через резервную ссылку на сто процентов повторяет оригинальную заявку. Только пришедшие пользователи регистрируют активный email, придумывают стойкий пароль и выбирают основную валюту.
Подтверждение аккаунта предполагает загрузки документов согласно KYC-требованиям. Фото ID-карты, валидация резиденции и банковские сведения анализируются посредством алгоритмическую верификацию в течение 24-72 периодов.
Аутентификация активных пользователей реализуется через базовую панель с усиленной проверкой. Краткосрочные токены приходят на мобильный номер или мейл.
Механизмы финансового модуля через дублирующие порталы предлагает топовые банковские инструменты. Visa, Mastercard, электронные портмоне Skrill, Neteller, блокчейн-токены Bitcoin, Ethereum реализуются с оптимизированными сборами 0-3%.
Развлекательная каталог воспроизводится абсолютно включая автоматы, карточные игры, live-операторов и максимальные награды. RTP-значения, вариативность и вейджер сохраняются неизменными.
Промо политика действует подобно основному веб-площадке. Welcome-пакеты, фриспины, денежный возврат и VIP-планы активируются автоматически при исполнении определенных параметров.
What’s up colleagues, its enormous post concerning teachingand entirely defined, keep it up all the time.
Feel free to surf to my web blog – अमेरिका Mega Millions टिकट भारत से
Развлекательная ниша представляет быстрый прогресс, заинтересовывая множество клиентов. Грамотные площадки обеспечивают стабильную атмосферу для игры. Исчерпывающую факты о этих провайдерах можно найти на probeg-ag.ru .
Аттестация остаётся главным аспектом определения сайта. Контролёры Мальты обеспечивают жёсткий мониторинг валютных процедур. Любая официальная площадка выполняет систематические ревизии RNG-систем.
IT свойства новейших азартных площадок включают SSL-шифрование денежного стандарта. Провайдеры программного ПО уровня Microgaming, NetEnt, Pragmatic Play подключают сложные механизмы хаотичных величин.
Алгоритм проверки профиля предусматривает предоставления удостоверений KYC-класса. Свидетельство, документ о заработке, удостоверение адреса — типичный комплект для завершённого доступа.
Зеркальные адреса убирают сложности с ограничениями компаний. Действующие варианты модифицируются ежедневно программными службами. Карманные утилиты зачастую оперируют устойчивее интернет форматов.
Управление банкроллом определяет длительную успешность развлекательных раундов. Грамотные участники предлагают контролировать объём вейджера до 1-2% от итогового капитала.
87541OtiliaAdelizzio abc
This is really interesting, You’re a very skilled blogger.
I have joined your feed and look forward to seeking more of your magnificent
post. Also, I have shared your web site in my social networks!
Also visit my blog post: US Mega Millions ticket India online
Hello, Neat post. There’s a problem with your web site in internet explorer, would check this?
IE still is the market leader and a big component of other folks will pass over your excellent writing because of this problem.
My blog … best realtor in Hoboken NJ
Отбор безопасного развлекательного заведения в современных реалиях требует тщательного подхода к лицензионному режиму. Опытные клиенты представляют, что лаки Р±РёСЂ казино отображает свежую материалы о функционирующих операторах.
Алгоритм открытия счета в официальных платформах предусматривает требуемую валидацию идентичности. KYC-правила защищают как сервис, так и игрока от мошенничества. Промежуточные рамки на получение финансов до финализации контроля – обычная подход.
Технические блокировки на соединение к гемблинг площадкам устраняются через альтернативные адреса. Действующие копии сохраняют тотальную производительность первичного платформы. Платежные движения, развлекательный продвижение и наградные предложения поддерживаются постоянными.
Материальная гарантированность выражается уровнем задействованных финансовых способов. SSL-защита, PCI DSS подтверждение и усиленная аутентификация устанавливают безопасный заслон защиты.
Развлекательная ассортимент официальных сервисов предоставляет автоматы от ведущих провайдеров. RTP-коэффициенты, колебания и математические формулы получают беспристрастную контроль в признанных институтах.
Планы мотивации в надежных заведениях опираются на ясных требованиях проигрыша. Отыгрыш x35-40 считается справедливым для слот-поощрений, в то время как карточные игры идут в подсчет с уменьшенным процентом.
Азартная индустрия отображает динамичный подъём, манящая тысячи пользователей. Профессиональные сайты обеспечивают безопасную пространство для игры. Исчерпывающую информацию о указанных компаниях можно найти на Клубника казино .
Легализация остаётся центральным показателем селекции площадки. Регуляторы Великобритании обеспечивают жёсткий мониторинг экономических операций. Каждая официальная платформа реализует постоянные проверки RNG-модулей.
Компьютерные особенности современных гемблинг-сайтов охватывают SSL-безопасность расчётного категории. Провайдеры программного продукта наподобие Microgaming, NetEnt, Pragmatic Play подключают многоуровневые алгоритмы случайных параметров.
Схема верификации личного кабинета предусматривает направления свидетельств KYC-уровня. Удостоверение, справка о прибылях, верификация прописки — обычный набор для финального подключения.
Альтернативные порталы устраняют барьеры с цензурой провайдеров. Свежие варианты модифицируются постоянно компьютерными специалистами. Карманные утилиты зачастую оперируют устойчивее сетевых редакций.
Финансовая дисциплина устанавливает перспективную прибыльность гемблинговых циклов. Квалифицированные участники предлагают ограничивать сумму депозита до 1-2% от общего капитала.
Навигация в сфере проверенных порталов подразумевает понимания актуальных решений соединения. Профессиональные клиенты эксплуатируют казино СЌРЅРѕРјРѕ для обретения релевантной фактов о активных путях.
Процесс оформления счета в официальных организациях охватывает комплексную подтверждение. Новейшие компании эксплуатируют KYC-механизмы и AML-стандарты. Документооборот потребляет от 24 до 72 часов.
Программные способы для обхода блокировок эволюционируют параллельно с повышением законодательных шагов. VPN-решения класса premium обеспечивают защиту AES-256 и методы OpenVPN. Постоянство подключения жизненно актуальна для элитных заходов.
Запасные платформы работают через географически расположенные серверные инфраструктуры. CDN-структуры предоставляют низкую латентность для европейских участников. Техническое маршрутизация инициируется при выявлении препятствия центрального домена.
Платежные манипуляции в легальных регионах следуют жестким критериям PCI DSS. Цифровые переводы приобретают распространение вследствие секретности и темпу осуществления.
Переносные софт элитных организаций объединяют голосовую проверку и push-сообщения для критических событий. Настраиваемый дизайн автономно настраивается под настройки монитора.
66864PearlLifordo abc
Appreciate the recommendation. Let me try it out.
Visit my webpage realtor in Austin TX
Отбор безопасного казино заведения нуждается детального анализа официальных свидетельств. Передовые сайты РЎСѓРєР° казино гарантируют игрокам максимальную детали о собственных аккредитациях.
Процедура оформления счета предусматривает несколько обязательных ступеней верификации. Провайдеры требуют справки, удостоверяющие личность и правоспособность. Стандартный KYC-порядок длится от 24 до 72 промежутков.
Управление банком начинается с назначения лимитов на взносы. Опытные участники рекомендуют эксплуатировать норму 5% от общего игорного резерва на единичную раунд.
Технические блокировки поставщиков обязывают эксплуатировать дополнительные адреса. Клоны поддерживают полную активность первичного портала, содержа архив операций и развлекательный результаты.
Современные платежные системы обеспечивают оперативные депозиты через блокчейн счета. Bitcoin, Ethereum и постоянные токены предоставляют конфиденциальность и символические комиссии. Длительность обработки выводов достигает 10-30 периодов.
Системы верности охватывают каскадные категории с нарастающим бонусом. VIP-представители предоставляют уникальные награды, улучшенные лимиты и приоритетную сервис.
凯伦皮里第二季高清完整版,海外华人可免费观看最新热播剧集。
Функционирующие альтернативные домены легальных казино на ретро казино дают беспрерывный доступ к геймерским порталам. Схема реплицирования генерирует полноценные реплики базового ресурса с фиксацией всех возможностей.
Алгоритм регистрации через альтернативный домен целиком дублирует оригинальную бланк. Свежие пользователи вводят активный email, устанавливают сложный шифр и фиксируют рабочую платежное средство.
Идентификация личного кабинета предполагает загрузки бумаг следуя KYC-политике. Скан национального документа, свидетельство резиденции и банковские реквизиты подвергаются цифровую валидацию в течение 24-72 часа.
Вход существующих геймеров осуществляется через стандартную панель с 2FA валидацией. Краткосрочные токены отправляются на мессенджер гаджет или email.
Функционал входящего блока через зеркала поддерживает востребованные расчетные системы. Visa, Mastercard, цифровые балансы Skrill, Neteller, crypto Bitcoin, Ethereum процессируются с сокращенными взносами 0-3%.
Gaming коллекция дублируется абсолютно включая spinning games, карточные геймплей, live-ведущих и джекпоты. RTP-параметры, дисперсия и отыгрыш фиксируются неизменными.
Подарочная программа оперирует схоже главному ресурсу. Welcome-наборы, free spins, компенсация и VIP-системы стартуют алгоритмически при исполнении определенных требований.
Отбор достойного игрового площадки в текущих обстоятельствах предполагает тщательного подхода к лицензионному состоянию. Компетентные игроки осознают, что лаки Р±РёСЂ казино отображает последнюю информацию о доступных сервисах.
Процедура создания аккаунта в сертифицированных площадках охватывает необходимую аутентификацию документов. KYC-требования защищают как заведение, так и пользователя от афер. Временные границы на перечисление финансов до завершения подтверждения – нормальная система.
Виртуальные блокировки на доступ к игровым порталам нейтрализуются через альтернативные адреса. Функционирующие клоны поддерживают тотальную функциональность главного сайта. Платежные движения, игровой статистика и бонусные системы продолжают устойчивыми.
Денежная безопасность оценивается степенью внедренных денежных способов. SSL-шифрование, PCI DSS лицензирование и дополнительная идентификация формируют безопасный заслон безопасности.
Геймплейная библиотека сертифицированных провайдеров объединяет слоты от лидирующих разработчиков. RTP-значения, дисперсия и расчетные принципы испытывают независимую контроль в утвержденных институтах.
Планы вознаграждения в профессиональных операторах строятся на четких требованиях активности. Требования x35-40 расценивается справедливым для автомат-подарков, в то время как традиционные состязания принимаются в калькуляцию с уменьшенным фактором.
At this moment I am going to do my breakfast, when having my
breakfast coming yet again to read further news.
Here is my web site; best real estate agent in Torrance CA
Исследование в мире проверенных порталов подразумевает представления современных решений подключения. Опытные пользователи применяют ДживиСпин казино для обретения свежей фактов о активных доменах.
Механизм оформления личного кабинета в лицензированных операторах включает сложную проверку. Современные организации используют KYC-протоколы и AML-требования. Оформление документов требует от 24 до 72 периодов.
Компьютерные решения для обхода блокировок прогрессируют вместе с ужесточением законодательных решений. VPN-сервисы разряда premium предоставляют кодирование AES-256 и стандарты OpenVPN. Устойчивость соединения кардинально значима для премиальных сессий.
Альтернативные ресурсы оперируют через географически рассредоточенные технические инфраструктуры. CDN-архитектуры обеспечивают минимальную отклик для азиатских игроков. Системное маршрутизация срабатывает при обнаружении блокировки главного адреса.
Денежные движения в официальных областях соответствуют четким требованиям PCI DSS. Цифровые расчеты увеличивают востребованность по причине анонимности и темпу процессинга.
Переносные приложения топовых компаний интегрируют биометрическую аутентификацию и push-извещения для важных моментов. Изменяемый интерфейс независимо адаптируется под характеристики экрана.
65235GerdaCarriso abc
This is the perfect webpage for everyone who
wishes to find out about this topic. You understand so much its
almost hard to argue with you (not that I personally would want to…HaHa).
You definitely put a new spin on a topic which
has been discussed for ages. Great stuff, just wonderful!
Visit my page :: real estate agent Austin TX
Перемещение в секторе сертифицированных площадок предполагает представления новых методов доступа. Продвинутые геймеры эксплуатируют тип топ казино для извлечения свежей информации о работающих доменах.
Процесс регистрации аккаунта в проверенных учреждениях предполагает тщательную подтверждение. Новейшие операторы эксплуатируют KYC-протоколы и AML-критерии. Документальная процедура составляет от 24 до 72 часов.
Программные технологии для минования барьеров совершенствуются параллельно с интенсификацией юридических мер. VPN-решения категории premium дают кодирование AES-256 и стандарты OpenVPN. Надежность канала fundamentally существенна для VIP сессий.
Резервные платформы действуют через регионально разнесенные IT ресурсы. CDN-сети предоставляют минимальную задержку для международных геймеров. Системное редирект инициируется при идентификации блокировки главного адреса.
Денежные транзакции в сертифицированных территориях подпадают под четким требованиям PCI DSS. Блокчейн транзакции увеличивают признание благодаря анонимности и оперативности выполнения.
Мобильные утилиты лучших операторов интегрируют биометрическую проверку и push-извещения для существенных ситуаций. Модифицируемый оформление самостоятельно адаптируется под особенности монитора.
Передовые гемблеры встречаются с сложностью связи к легальным платформам. Компании закрывают базовые ссылки, но знающие казино ДживиСпин игроки понимают о наличии резервных площадок.
Резервная ссылка представляет идентичную дубликат оригинального портала. Системы безопасности работают неизменными. Банковские транзакции осуществляются через идентичные механизмы.
Технология регистрации через альтернативный портал подразумевает обычной аутентификации. Администраторы выясняют удостоверения для реализации KYC-требований. Индивидуальные информация подвергаются многоуровневую аутентификацию.
Финансовые ограничения на резервных порталах аналогичны базовым условиям. Начальные ставки функционируют стабильными. Накопительные банки объединяются между разными ресурсами.
Поощрительные механизмы работают завершённо на дополнительных порталах. Коэффициент оборота обеспечивает исходные цифры. Тайминг оборота продолжается.
Департамент сопровождения решает заявки с зеркальных порталов аналогично. Онлайн диалог гарантирует 24-часовой режим деятельности.
70823WesleyBaltodanoo abc
Поиск надежного гемблинг заведения в сегодняшних условиях заставляет тщательного анализа к правовому статусу. Компетентные клиенты понимают, что аква казино демонстрирует современную информацию о доступных провайдерах.
Схема оформления профиля в легальных операторах включает необходимую подтверждение документов. KYC-требования охраняют как заведение, так и геймера от махинаций. Переходные рамки на получение активов до финализации верификации – типичная подход.
Виртуальные препятствия на подключение к гемблинг сервисам решаются через зеркальные домены. Действующие зеркала гарантируют тотальную эффективность первичного портала. Банковские операции, геймплейный прогресс и наградные предложения поддерживаются постоянными.
Капитальная безопасность измеряется показателем эксплуатируемых финансовых инструментов. SSL-шифрование, PCI DSS аттестация и дополнительная подтверждение устанавливают стабильный периметр ограждения.
Азартная библиотека официальных сервисов объединяет машины от главных студий. RTP-показатели, дисперсия и алгоритмические схемы получают беспристрастную контроль в признанных организациях.
Механизмы стимулирования в серьезных сервисах строятся на понятных правилах проигрыша. Отыгрыш x35-40 расценивается нормальным для спин-бонусов, в то время как классические игры учитываются в расчет с пониженным множителем.
Передовые игроки имеют дело с множеством технических тонкостей при процессах с легальными ресурсами. Профильные порталы типа казино РЎСѓРєР° выдают современную материалы о процессах казино организаций.
Процедура подтверждения кабинета содержит комплекс неотъемлемых уровней. Базовая верификация требует размещения справок доказывающих персону. Классический пакет подразумевает документ, права или внешний паспорт.
Технологическая сторона оформления предполагает использование криптографической защиты и двухфакторной аутентификации. Квалифицированные игроки подсказывают инициировать все доступных параметров секьюрити.
Зеркала образуют идентичные копии центрального портала с поддержанием комплексного возможностей. Ключевое плюс кроется в схожести расчетных лимитов и требований ставочных требований.
Схема обнаружения актуальных зеркал опирается на проверке специализированных мессенджер групп и партнерских ресурсов. Продвинутые клиенты используют анонимайзеры для обеспечения постоянного связи безотносительно от локальных запретов.
Актуальные геймеры попадают с препятствием входа к официальным платформам. Провайдеры запрещают базовые ссылки, но грамотные лаки Р±РёСЂ казино посетители понимают о существовании дублирующих ресурсов.
Резервная ссылка образует точную реплику оригинального платформы. SSL-сертификаты остаются неизменными. Финансовые операции выполняются через равнозначные сервисы.
Технология создания аккаунта через параллельный адрес содержит привычной подтверждения. Менеджеры выясняют свидетельства для исполнения KYC-регламентов. Личные параметры проходят усиленную проверку.
Депозитные границы на резервных площадках равняются основным параметрам. Низшие взносы функционируют стабильными. Растущие выигрышные пулы объединяются между различными ресурсами.
Бонусные планы действуют всесторонне на зеркальных порталах. Вейджер гарантирует исходные параметры. Временные рамки реализации продолжается.
Департамент обслуживания обрабатывает тикеты с параллельных ссылок аналогично. Живой переписка обеспечивает беспрерывный формат обслуживания.
Новейшие пользователи обталкиваются с набором технических особенностей при функционировании с легальными порталами. Специализированные порталы типа СЌРЅРѕРјРѕ казино выдают свежую контент о деятельности гэмблинговых брендов.
Процесс валидации счета подразумевает несколько неотъемлемых стадий. Исходная валидация включает предоставления справок доказывающих личность. Стандартный комплект подразумевает ID, автолицензию или международное ID.
Программная составляющая открытия счета включает внедрение защищенного протокола и двухуровневой проверки. Продвинутые участники советуют включать максимум доступных опций охраны.
Дублирующие порталы представляют стопроцентные реплики основного ресурса с сохранением полного функционала. Ключевое достоинство состоит в тождественности финансовых границ и параметров ставочных требований.
Механизм локализации активных резервных ссылок опирается на мониторинге тематических телеграм-каналов и связанных площадок. Опытные геймеры применяют туннельные протоколы для гарантирования стабильного соединения без оглядки от местных ограничений.
海外华人必备的ify平台运用AI智能推荐算法,提供最新高清电影、电视剧,无广告观看体验。
WOW just what I was looking for. Came here by searching for real estate
agent Austin TX
My web site; best realtor in Austin TX
https://follicle.us.com/# order cheap propecia no prescription
43806HalRulono abc
мостбет приложение Кыргызстан http://www.mostbet2028.help
Перемещение в пространстве сертифицированных площадок нуждается осознания современных методов доступа. Продвинутые пользователи используют казино mad для приобретения новейшей данных о действующих доменах.
Схема создания личного кабинета в официальных операторах содержит тщательную подтверждение. Передовые провайдеры применяют KYC-процедуры и AML-правила. Оформление документов требует от 24 до 72 часов.
Цифровые способы для обхода ограничений улучшаются синхронно с интенсификацией нормативных инициатив. VPN-платформы разряда premium обеспечивают шифрование AES-256 и протоколы OpenVPN. Постоянство подключения жизненно существенна для высокоролловых игровых периодов.
Зеркальные адреса оперируют через территориально рассредоточенные IT мощности. CDN-системы осуществляют оптимальную время ответа для американских участников. Автоматическое роутинг инициируется при идентификации препятствия основного домена.
Платежные манипуляции в лицензированных территориях подчиняются конкретным критериям PCI DSS. Крипто переводы получают востребованность из-за анонимности и скорости процессинга.
Переносные программы элитных операторов включают лицевую аутентификацию и push-оповещения для существенных ситуаций. Изменяемый интерфейс автоматически настраивается под характеристики дисплея.
Легальные провайдеры игровых опций oferuja участникам шанс к элитному времяпрепровождению через профильные домены, включая винити казино , которые именно придерживаются глобальные нормы защиты.
Механизм активации подразумевает предоставления authentication информации через шифрованные SSL-connection. Операторы demanded письменное удостоверение возраста и региона регистрации для соблюдения нормативных правил.
Multi-factor верификация считается required частью современных архитектур безопасности. Игроки приобретают SMS-шифры, push-алерты или используют специальные программы вроде Google Authenticator.
Дублирующие порталы решают препятствия territorial ограничений и DDoS-воздействий. Техническим образом mirrors составляют дублированные версии базового портала с обеспечением features и личных параметров.
Компетентные пользователи suggest хранить current реестры working альтернатив в favourites обозревателя. Администрация отправляют сведения о современных адресах через email, Telegram-communities и mobile утилиты.
Денежные транзакции через надёжные ресурсы гарантированы encryption системами level банковского сектора. Изъятие денег производится solely на подтверждённые данные собственника аккаунта.
I really love your blog.. Great colors & theme. Did you create this site yourself?
Please reply back as I’m attempting to create my own website and would love to learn where you
got this from or just what the theme is called. Cheers!
Here is my web site – India se US lottery ticket kaise kharide
Официальные ресурсы азартных услуг гарантируют пользователям доступ к высококлассному времяпрепровождению через профильные сайты, включая Вован казино , которые соблюдают мировые критерии конфиденциальности.
Последовательность создания аккаунта включает внесения проверочных деталей через encrypted SSL-connection. Провайдеры demanded письменное подтверждение age verification и территории регистрации для исполнения законодательных норм.
Двухфакторная идентификация представляет принудительным частью актуальных solutions защиты. Пользователи имеют SMS-ключи, push-уведомления или используют targeted приложения вроде Google Authenticator.
Mirror адреса преодолевают проблемы geographic барьеров и DDoS-штурмов. По сути дубли образуют идентичные копии центрального платформы с maintaining возможностей и индивидуальных деталей.
Экспертные пользователи suggest удерживать новейшие реестры действующих копий в избранном обозревателя. Операторы передают информацию о свежих адресах через электронную почту, Telegram-чаты и портативные софт.
Банковские транзакции через legal платформы гарантированы encryption системами категории банковского индустрии. Вывод финансов происходит лишь на верифицированные карты хозяина account.
I like the helpful information you provide in your articles.
I will bookmark your blog and check again here regularly.
I am quite certain I will learn a lot of new stuff right here!
Best of luck for the next!
my webpage best real estate agent in Pinecrest FL
Активные зеркала легальных gaming-операторов на СЌРЅРѕРјРѕ казино обеспечивают постоянный доступ к гемблинг платформам. Система зеркалирования генерирует точные копии главного ресурса с поддержанием всех опций.
Схема оформления профиля через зеркало целиком воспроизводит главную бланк. Новые игроки указывают рабочий email, создают сложный секретную комбинацию и устанавливают рабочую курренси.
Валидация счета включает передачи бумаг следуя KYC-политике. Снимок национального документа, верификация проживания и карточные сведения подвергаются автоматическую проверку в течение 24-72 временных единиц.
Авторизация существующих пользователей происходит через стандартную окно с расширенной проверкой. Краткосрочные коды приходят на телефонный номер или мейл.
Механизмы депозитного сектора через резервные ссылки поддерживает актуальные денежные сервисы. Visa, Mastercard, веб хранилища Skrill, Neteller, crypto Bitcoin, Ethereum обрабатываются с минимальными платежами 0-3%.
Гемблинг база копируется абсолютно включая spinning games, карточные забавы, live-ведущих и прогрессивы. RTP-параметры, вариативность и проигрыш остаются аналогичными.
Поощрительная схема выполняется похоже основному порталу. Welcome-предложения, бесплатные вращения, компенсация и VIP-программы инициируются программно при достижении определенных требований.
33615ShawnMalliao abc
Greetings from Los angeles! I’m bored at work so I decided to check out your blog on my iphone during lunch break.
I enjoy the info you provide here and can’t wait to take a look when I
get home. I’m surprised at how quick your
blog loaded on my cell phone .. I’m not even using WIFI, just 3G ..
Anyhow, amazing site!
hey there and thank you for your information – I have definitely picked up something new from right here.
I did however expertise several technical issues using this site, as
I experienced to reload the web site many times previous to I
could get it to load correctly. I had been wondering if your web host
is OK? Not that I am complaining, but sluggish loading instances times will often affect
your placement in google and can damage your high-quality score if ads and marketing with Adwords.
Anyway I am adding this RSS to my e-mail and can look out for a lot
more of your respective intriguing content. Make sure you update
this again very soon.
Here is my web page :: best realtor in Austin TX
Новейшие клиенты встречаются с множеством программных нюансов при операциях с сертифицированными сайтами. Тематические сайты типа РЎСѓРєР° сайт дают релевантную информацию о функционировании игорных брендов.
Система проверки кабинета подразумевает комплекс неотъемлемых фаз. Начальная верификация требует предоставления удостоверений валидирующих субъект. Стандартный набор подразумевает паспорт, права или внешний паспорт.
Цифровая сторона записления предполагает использование зашифрованного канала и 2FA. Профессиональные геймеры рекомендуют задействовать максимум представленных функций обеспечения.
Дублирующие порталы являются стопроцентные отражения основного домена с хранением исчерпывающего инструментария. Ключевое бонус содержится в подобии финансовых пределов и параметров отыгрыша.
Система нахождения рабочих альтернативных адресов строится на мониторинге тематических уведомительных сервисов и аффилированных платформ. Продвинутые участники эксплуатируют анонимайзеры для формирования стабильного входа без оглядки от местных ограничений.
Игровая индустрия демонстрирует стремительный прогресс, заинтересовывая легионы игроков. Квалифицированные порталы дают стабильную среду для ставок. Исчерпывающую данные о этих организациях допустимо получить на лаки Р±РёСЂ казино .
Аттестация составляет основным элементом селекции площадки. Юрисдикции Мальты дают строгий проверку денежных манипуляций. Каждая лицензированная платформа осуществляет плановые инспекции RNG-генераторов.
Цифровые особенности новейших игорных домов содержат SSL-защиту экономического категории. Создатели софтового обеспечения вроде Microgaming, NetEnt, Pragmatic Play внедряют усовершенствованные схемы случайных величин.
Алгоритм валидации личного кабинета предполагает предоставления справок KYC-формата. Паспорт, свидетельство о финансах, подтверждение регистрации — обычный перечень для финального входа.
Альтернативные домены убирают препятствия с цензурой поставщиков. Рабочие дубли адаптируются регулярно техническими специалистами. Портативные клиенты зачастую оперируют качественнее браузерных модификаций.
Финансовая дисциплина определяет длительную эффективность гемблинговых сессий. Грамотные пользователи предлагают ограничивать количество пари до 1-2% от суммарного капитала.
22727VanRuetzo abc
オンラインカジノとは、インターネットを介してスロットやルーレット、ライブディーラーゲームなどのギャンブルを楽しめる仮想の場です。その利便性から、特定のライセンスを取得した海外サイトを利用するプレイヤーもいます。日本の法律では、国内でのオンラインカジノ事業は厳しく規制されているため、利用の際には国際的な法的位置づけを理解することが不可欠です。詳細な仕組みや主要なゲームの種類については、専門の情報ページをご覧ください。
→ オンライン ギャンブル
Lynn Painter captures the essence of senior year with all its excitement and fear. The romance is the cherry on top of a great coming-of-age story. A Better Than the Movies PDF allows you to experience this pivotal time in Liz’s life. It is a book that encourages readers to be the main characters of their own lives, not just spectators.
Актуальные провайдеры беттинг активностей предоставляют игрокам возможность к профессиональному игровому процессу через сертифицированные lucky bear казино системы. Авторизованная деятельность подразумевает исполнения четких регуляторных требований.
Процесс оформления пользовательского счета включает валидацию приватных реквизитов. Провайдеры применяют многоуровневые системы KYC и AML для исключения мошеннических платежей.
IT платформы современных игорных домов основываются на безопасных хостингах с SSL технологиями. Локальные запреты вынуждает администраторов внедрять вспомогательные порталы.
Резервные домены образуют аналогичные клоны основного портала с фиксацией всех возможностей и параметров. Беттеры приобретают постоянный вход к средствам, игровой записям и личным параметрам.
Платежные процедуры проходят через встроенные банковские процессоры. Пределы на взносы и снятия определяются в согласии с лицензионными критериями и корпоративными политиками минимизации опасностей.
Профессиональные клиенты советуют мониторить ситуацию сертификата через надзорные каталоги развлекательных структур. Престижные параметры предусматривают рейтинги на тематических ресурсах и комментарии истинных игроков.
Отбор надежного казино портала нуждается основательного исследования регулятивных сертификатов. Инновационные платформы Gold casino предлагают пользователям полную информацию о имеющихся разрешениях.
Процесс открытия аккаунта охватывает различные требуемых фаз верификации. Провайдеры требуют свидетельства, устанавливающие персону и дееспособность. Стандартный KYC-регламент занимает от 24 до 72 промежутков.
Распоряжение капиталом запускается с определения пределов на инвестиции. Искусные игроки настаивают эксплуатировать правило 5% от итогового гемблинг фонда на конкретную игру.
Системные барьеры провайдеров вынуждают применять дополнительные маршруты. Дубликаты поддерживают максимальную активность центрального платформы, содержа хронологию сделок и гемблинг продвижение.
Новые банковские инструменты дают мгновенные депозиты через блокчейн портмоне. Bitcoin, Ethereum и фиксированные активы предоставляют приватность и мизерные отчисления. Период осуществления снятий достигает 10-30 промежутков.
Системы приверженности предусматривают многоуровневые ранги с увеличивающимся кэшбэком. VIP-консультанты гарантируют индивидуальные поощрения, улучшенные лимиты и приоритетную сервис.
Нынешние геймеры пересекаются с набором технологических нюансов при процессах с легальными сайтами. Специализированные ресурсы типа казино Голд обеспечивают релевантную данные о функционировании гэмблинговых операторов.
Система аутентификации учетной записи включает набор принудительных этапов. Начальная верификация включает отправки справок валидирующих субъект. Классический перечень содержит документ, лицензию водителя или международное ID.
Цифровая составляющая оформления охватывает эксплуатацию SSL-шифрования и многофакторной защиты. Экспертные участники подсказывают инициировать все возможных настроек безопасности.
Зеркала формируют стопроцентные дубликаты главного платформы с хранением тотального инструментария. Основное плюс содержится в идентичности расчетных лимитов и норм отыгрыша.
Процедура локализации функционирующих зеркал основывается на проверке профессиональных мессенджер групп и партнерских площадок. Профессиональные игроки задействуют прокси-соединения для формирования стабильного связи невзирая от географических блокировок.
Актуальные платформы азартных активностей обеспечивают клиентам доступ к качественному игровому процессу через сертифицированные лаки Р±РёСЂ системы. Легальная деятельность требует исполнения четких надзорных норм.
Процедура регистрации игрового аккаунта охватывает валидацию приватных реквизитов. Операторы используют детализированные системы KYC и AML для исключения поддельных финансовых действий.
Технические системы актуальных развлекательных порталов строятся на безопасных дата-центрах с TLS стандартами. IP-фильтрация побуждает владельцев организовывать дублирующие адреса.
Зеркальные домены образуют эквивалентные репликации главного ресурса с обеспечением всех функций и данных. Игроки добиваются беспрепятственный соединение к балансу, развлекательной отчетности и пользовательским установкам.
Банковские транзакции выполняются через интегрированные денежные процессоры. Ограничения на депозиты и снятия назначаются в унисон с лицензионными критериями и индивидуальными регламентами контроля угроз.
Компетентные гемблеры указывают контролировать положение авторизации через государственные реестры азартных организаций. Имиджевые показатели включают оценки на тематических сайтах и мнения настоящих беттеров.
20149CyrilFowero abc
Thank you for any other informative website.
The place else could I get that type of information written in such an ideal method?
I’ve a challenge that I am simply now running on, and I have been at the glance out for such information.
Look into my web site :: best real estate agent in Pinecrest FL
i thought about this jax wallet
Рабочие зеркала проверенных gaming-операторов на РЎСѓРєР° сайт предоставляют стабильный подключение к игровым сервисам. Принцип зеркалирования генерирует эквивалентные версии базового домена с фиксацией всех механизмов.
Алгоритм регистрации через альтернативный домен на сто процентов повторяет основную заявку. Начинающие клиенты заполняют валидный email, придумывают надежный пароль и определяют базовую денежную единицу.
Идентификация счета содержит загрузки удостоверений согласно KYC-регламенту. Копия паспорта, доказательство места жительства и платежные координаты проверяются через алгоритмическую анализ в течение 24-72 периодов.
Авторизация действующих пользователей осуществляется через обычную окно с усиленной верификацией. Разовые коды приходят на смс номер или мейл.
Инструменты пополнительного раздела через дублирующие порталы содержит популярные банковские сервисы. Visa, Mastercard, онлайн кошельки Skrill, Neteller, crypto Bitcoin, Ethereum осуществляются с уменьшенными сборами 0-3%.
Игровая ассортимент копируется полностью включая слоты, классические развлечения, live-ведущих и джекпоты. RTP-индикаторы, вариативность и вейджер удерживаются неизменными.
Подарочная программа функционирует подобно базовому порталу. Welcome-предложения, free spins, компенсация и VIP-планы активируются машинально при выполнении фиксированных параметров.
Поиск безопасного развлекательного площадки в современных реалиях заставляет особого изучения к законному статусу. Знающие участники представляют, что Рльдорадо казино предоставляет современную сведения о функционирующих площадках.
Схема регистрации в сертифицированных операторах охватывает обязательную верификацию удостоверения. KYC-правила защищают как казино, так и пользователя от обмана. Кратковременные ограничения на снятие активов до окончания проверки – стандартная методика.
Виртуальные блокировки на связь к развлекательным сервисам нейтрализуются через дублирующие ссылки. Рабочие копии обеспечивают тотальную функциональность главного платформы. Платежные движения, развлекательный достижения и льготные планы остаются стабильными.
Экономическая стабильность выражается показателем применяемых банковских систем. SSL-криптография, PCI DSS валидация и двухфакторная верификация формируют прочный периметр обороны.
Развлекательная каталог проверенных заведений содержит барабаны от топовых создателей. RTP-показатели, дисперсия и расчетные схемы получают беспристрастную сертификацию в одобренных учреждениях.
Системы мотивации в профессиональных сервисах формируются на ясных условиях ставок. Проигрыш x35-40 оценивается справедливым для спин-поощрений, в то время как стандартные игры засчитываются в подсчет с редуцированным процентом.
Generic Elavil: Elavil – Elavil
recommended you read https://jaxxwallet-web.org/
Поиск надежного betting ресурса в современных рамках нуждается особого анализа к законному положению. Профессиональные пользователи понимают, что Gold зеркало содержит последнюю информацию о доступных сервисах.
Схема записи в официальных заведениях предусматривает принудительную валидацию удостоверения. KYC-правила гарантируют как оператора, так и участника от обмана. Переходные рамки на снятие активов до выполнения подтверждения – типичная методика.
Программные ограничения на соединение к игровым сайтам устраняются через резервные порталы. Действующие копии обеспечивают всестороннюю возможности центрального сайта. Денежные процедуры, игровой статистика и льготные планы продолжают стабильными.
Финансовая стабильность характеризуется уровнем используемых расчетных инструментов. SSL-защита, PCI DSS аттестация и многоуровневая идентификация устанавливают безопасный заслон безопасности.
Азартная ассортимент проверенных заведений включает барабаны от известных производителей. RTP-параметры, изменчивость и вероятностные системы проходят внешнюю аудит в утвержденных лабораториях.
Схемы поощрения в качественных сервисах формируются на открытых критериях отыгрыша. Требования x35-40 характеризуется приемлемым для барабан-подарков, в то время как классические развлечения включаются в подсчет с редуцированным множителем.
melbet промокод при регистрации бонус
3640GraigBabenao abc
Поиск безопасного игрового оператора в нынешних границах предполагает повышенного изучения к лицензионному уровню. Компетентные игроки осознают, что Tippy зеркало включает новую данные о функционирующих ресурсах.
Процедура регистрации в лицензированных платформах охватывает обязательную аутентификацию личности. KYC-процедуры охраняют как казино, так и игрока от фрода. Краткосрочные пределы на снятие капитала до окончания проверки – обычная методика.
Цифровые блокировки на подключение к гемблинг ресурсам преодолеваются через альтернативные порталы. Активные копии предоставляют тотальную эффективность центрального портала. Финансовые операции, азартный продвижение и привилегированные системы остаются постоянными.
Капитальная безопасность характеризуется степенью используемых финансовых способов. SSL-шифрование, PCI DSS аттестация и двухфакторная подтверждение обеспечивают безопасный периметр охраны.
Игровая набор сертифицированных сервисов объединяет машины от топовых разработчиков. RTP-коэффициенты, колебания и вероятностные принципы получают беспристрастную валидацию в одобренных институтах.
Системы мотивации в профессиональных заведениях формируются на прозрачных правилах проигрыша. Требования x35-40 признается справедливым для барабан-подарков, в то время как традиционные активности включаются в зачет с пониженным показателем.
I read this piece of writing completely on the topic
of the resemblance of newest and preceding technologies, it’s awesome
article.
read review jaxx liberty
melbet promo code pakistan
1xbet бонус промокод
Современные участники попадают с проблемой подключения к официальным сайтам. Организации закрывают стандартные адреса, но опытные ретро казино участники понимают о присутствии параллельных ресурсов.
Зеркало представляет абсолютную воспроизведение основного ресурса. SSL-сертификаты работают равнозначными. Банковские переводы проходят через равнозначные системы.
Схема регистрации через зеркальный адрес требует обычной верификации. Администраторы просят бумаги для выполнения KYC-требований. Идентификационные параметры выполняют расширенную валидацию.
Пополнительные ограничения на зеркальных сайтах совпадают базовым спецификациям. Стартовые взносы продолжают фиксированными. Накопительные банки объединяются между различными порталами.
Бонусные механизмы оперируют комплексно на альтернативных площадках. Коэффициент оборота гарантирует стартовые показатели. Длительность проигрывания не изменяется.
Команда сопровождения рассматривает обращения с параллельных порталов сходным образом. Живой переписка гарантирует круглосуточный формат деятельности.
Bonuses https://jaxxwallet-web.org/
For highlights
Player protection USA
for optimal performance.
Football fixtures tomorrow, plan ahead with upcoming match schedule and times
Инновационные платформы развлекательных игр предлагают клиентам подключение к элитному беттингу через надежные Clubnika casino системы. Легальная деятельность влечет исполнения строгих законодательных положений.
Процедура открытия клиентского профиля задействует верификацию личных показателей. Провайдеры эксплуатируют расширенные алгоритмы KYC и AML для недопущения фродовых транзакций.
IT средства новейших игорных домов основываются на безопасных облачных системах с шифровальными протоколами. Геоблокировка побуждает управляющих внедрять дублирующие домены.
Альтернативные домены формируют идентичные дубликаты главного сайта с сохранением всех опций и данных. Клиенты обеспечивают себе постоянный связь к счету, гемблинг истории и персональным конфигурациям.
Платежные процедуры проходят через синхронизированные платежные шлюзы. Границы на инвестиции и снятия регулируются в соотношении с лицензионными стандартами и внутренними нормами управления рисками.
Квалифицированные клиенты рекомендуют мониторить ситуацию сертификата через регуляторные реестры гемблинг комиссий. Авторитетные параметры содержат места на профильных платформах и feedback истинных клиентов.
愛海外版,专为华人打造的高清视频平台智能AI观看体验优化,支持全球加速观看。
60637NoreenNelmarko abc
This website was… how do I say it? Relevant!!
Finally I have found something which helped me. Thanks!
Here is my web site अमेरिका Mega Millions टिकट भारत से
Актуальные пользователи имеют дело с набором программных деталей при функционировании с сертифицированными порталами. Профессиональные порталы типа лаки Р±РёСЂ обеспечивают новую контент о операциях развлекательных операторов.
Механизм аутентификации кабинета содержит комплекс обязательных этапов. Базовая верификация включает передачи справок верифицирующих гражданство. Стандартный комплект охватывает свидетельство, права или заграничное удостоверение.
Системная часть записления подразумевает использование зашифрованного канала и двухуровневой проверки. Опытные клиенты предлагают инициировать весь комплекс доступных возможностей обеспечения.
Запасные домены образуют полные реплики центрального домена с поддержанием всего функционала. Основное преимущество кроется в идентичности банковских границ и норм вейджера.
Механизм нахождения действующих альтернативных адресов опирается на контроле тематических уведомительных сервисов и союзных платформ. Квалифицированные геймеры эксплуатируют туннельные протоколы для гарантирования постоянного связи невзирая от региональных барьеров.
Перемещение в секторе официальных порталов требует знания современных технологий соединения. Продвинутые участники применяют tip top casino для получения актуальной информации о функционирующих адресах.
Алгоритм оформления счета в проверенных организациях содержит детальную проверку. Новейшие провайдеры внедряют KYC-процедуры и AML-правила. Бумажная работа требует от 24 до 72 временных отрезков.
Программные решения для обхода барьеров прогрессируют вместе с ужесточением юридических шагов. VPN-сервисы типа premium дают безопасность AES-256 и системы OpenVPN. Стабильность коннекта fundamentally важна для привилегированных партий.
Зеркальные ресурсы функционируют через локально размещенные цифровые ресурсы. CDN-системы предоставляют сокращенную пинг для глобальных пользователей. Цифровое роутинг включается при обнаружении блокировки первичного домена.
Платежные движения в сертифицированных регионах отвечают жестким требованиям PCI DSS. Цифровые переводы увеличивают востребованность из-за анонимности и оперативности обработки.
Переносные программы лучших операторов содержат лицевую аутентификацию и push-алерты для важных эпизодов. Адаптивный интерфейс автономно изменяется под параметры дисплея.
1xbetgiri? 1xbet-giris-22.com .
Отбор честного гемблинг портала подразумевает детального исследования официальных документов. Актуальные сайты казино Голд гарантируют игрокам стопроцентную факты о имеющихся допусках.
Алгоритм получения доступа охватывает определенное количество ключевых фаз верификации. Владельцы истребуют документы, подтверждающие персону и дееспособность. Обычный KYC-процесс требует от 24 до 72 промежутков.
Банкролл-менеджмент запускается с фиксации ограничений на инвестиции. Профессиональные клиенты предлагают задействовать правило 5% от полного развлекательного капитала на конкретную раунд.
Технические препятствия провайдеров вынуждают внедрять альтернативные домены. Дубликаты оберегают полную работоспособность главного платформы, включая летопись платежей и азартный результаты.
Инновационные платежные системы гарантируют моментальные инвестиции через электронные кошельки. Bitcoin, Ethereum и стабильные валюты гарантируют конфиденциальность и минимальные комиссии. Период выполнения изъятий составляет 10-30 промежутков.
Схемы верности подразумевают каскадные ранги с нарастающим вознаграждением. VIP-координаторы обеспечивают уникальные подарки, расширенные рамки и опережающую помощь.
haveno government at all,オナドールand live at this day in that brutish manner,
Определение безопасного игрового площадки в сегодняшних рамках нуждается тщательного анализа к лицензионному режиму. Квалифицированные пользователи представляют, что Клубника казино демонстрирует последнюю сведения о функционирующих сервисах.
Схема оформления профиля в официальных сервисах предусматривает принудительную подтверждение документов. KYC-процедуры оберегают как казино, так и геймера от мошенничества. Краткосрочные границы на снятие активов до финализации подтверждения – нормальная методика.
Виртуальные ограничения на подключение к развлекательным сайтам устраняются через альтернативные порталы. Доступные зеркала сохраняют абсолютную возможности главного сервиса. Денежные переводы, игровой прогресс и льготные планы функционируют неизменными.
Капитальная гарантированность оценивается критерием эксплуатируемых платежных инструментов. SSL-безопасность, PCI DSS валидация и усиленная идентификация формируют стабильный периметр безопасности.
Игровая набор официальных заведений охватывает барабаны от топовых провайдеров. RTP-коэффициенты, изменчивость и математические схемы проходят нейтральную сертификацию в признанных учреждениях.
Механизмы лояльности в профессиональных площадках основываются на прозрачных требованиях проигрыша. Условия ставок x35-40 оценивается адекватным для барабан-поощрений, в то время как настольные развлечения принимаются в подсчет с уменьшенным показателем.
85093JacqueSchiffero abc
check my source jaxx liberty wallet
官方授权的iyftv海外华人首选,第一时间提供最新华语剧集、美剧、日剧等高清在线观看。
my response https://jaxxwallet-web.org/
Актуальные платформы игорных развлечений обеспечивают игрокам подключение к профессиональному развлечениям через надежные Tippy зеркало платформы. Лицензированная функционирование влечет учета четких надзорных стандартов.
Механизм регистрации пользовательского счета задействует подтверждение приватных информации. Операторы применяют многоуровневые процедуры KYC и AML для недопущения незаконных платежей.
Цифровые инструменты актуальных игорных домов строятся на безопасных хостингах с криптографическими сертификатами. Геоблокировка обязывает провайдеров разрабатывать дублирующие домены.
Зеркальные сайты являют собой полные репликации основного платформы с поддержанием всех инструментов и показателей. Клиенты достигают стабильный связь к средствам, игровой записям и клиентским опциям.
Финансовые переводы проходят через связанные финансовые системы. Пределы на вклады и обналичивания устанавливаются в гармонии с нормативными требованиями и внутренними политиками снижения потерь.
Квалифицированные беттеры настаивают отслеживать положение лицензии через официальные реестры развлекательных комиссий. Репутационные показатели предусматривают позиции на тематических платформах и оценки настоящих беттеров.
Современные клиенты сталкиваются с массой цифровых аспектов при деятельности с официальными площадками. Профильные источники типа ретро казино поставляют современную информацию о работе гэмблинговых брендов.
Алгоритм верификации кабинета предполагает комплекс требуемых шагов. Начальная аутентификация нуждается передачи справок подтверждающих индивидуальность. Обычный набор включает удостоверение личности, автоудостоверение или международное ID.
Программная сторона создания аккаунта охватывает применение SSL-шифрования и многофакторной защиты. Квалифицированные игроки рекомендуют задействовать все имеющихся параметров охраны.
Запасные домены являются абсолютные отражения главного домена с сохранением исчерпывающего набора функций. Важнейшее достоинство заключается в идентичности денежных рамок и условий отыгрыша.
Процедура обнаружения рабочих альтернативных адресов опирается на проверке тематических новостных лент и связанных платформ. Профессиональные игроки эксплуатируют виртуальные частные сети для предоставления бесперебойного связи невзирая от региональных ограничений.
18893IsrealCromieo abc
Современные игроки пересекаются с набором программных деталей при работе с официальными порталами. Профильные сайты типа казино миллион обеспечивают свежую материалы о операциях гэмблинговых провайдеров.
Процедура верификации профиля предполагает ряд неотъемлемых шагов. Стартовая проверка требует передачи документов удостоверяющих персону. Привычный список охватывает документ, водительские права или загранпаспорт.
Технологическая часть открытия счета включает задействование SSL-шифрования и многофакторной защиты. Продвинутые клиенты советуют включать все предложенных параметров охраны.
Альтернативные адреса представляют точные реплики центрального домена с обеспечением полного возможностей. Главное достоинство выражается в идентичности банковских рамок и критериев условий прокрутки.
Система локализации актуальных дублирующих порталов строится на проверке специализированных информационных каналов и связанных сайтов. Опытные игроки применяют виртуальные частные сети для предоставления надежного связи без оглядки от региональных запретов.
Le poker en ligne est devenu le choix préféré des joueurs
français. Que vous aimiez le poker online ou les jeux poker en ligne,
vous trouverez des plateformes fiables et faciles à utiliser.
Передовые сервисы беттинг игр предоставляют игрокам путь к премиальному игровому процессу через безопасные Gold зеркало системы. Сертифицированная деятельность нуждается исполнения строгих контролирующих положений.
Процедура создания индивидуального счета включает подтверждение индивидуальных реквизитов. Администраторы используют многоуровневые протоколы KYC и AML для пресечения поддельных платежей.
Программные платформы актуальных игорных домов строятся на стабильных хостингах с SSL алгоритмами. Территориальные ограничения заставляет операторов создавать альтернативные порталы.
Зеркальные платформы составляют аналогичные клоны базового ресурса с поддержанием всех опций и сведений. Беттеры обеспечивают себе постоянный подключение к балансу, азартной истории и персональным конфигурациям.
Расчетные переводы производятся через связанные платежные системы. Границы на пополнения и выводы регулируются в соответствии с правовыми условиями и собственными правилами снижения потерь.
Экспертные пользователи рекомендуют проверять условия лицензии через государственные реестры гемблинг ведомств. Репутационные критерии задействуют позиции на экспертных сайтах и комментарии подлинных беттеров.
Set piece efficiency, corner and free kick conversion rates
If some one needs expert view concerning blogging and site-building after that i propose him/her to pay a quick visit
this weblog, Keep up the nice job.
Современные участники встречаются с массой программных аспектов при операциях с сертифицированными ресурсами. Экспертные ресурсы типа Eldorado casino выдают свежую контент о функционировании развлекательных операторов.
Механизм аутентификации учетной записи включает набор необходимых шагов. Исходная аутентификация требует размещения удостоверений валидирующих индивидуальность. Стандартный набор охватывает паспорт, автоудостоверение или международный паспорт.
Технологическая часть оформления содержит эксплуатацию SSL-шифрования и двухфакторной аутентификации. Квалифицированные клиенты советуют запускать все представленных опций безопасности.
Зеркала представляют полные реплики основного платформы с сохранением тотального арсенала. Ключевое достоинство кроется в схожести финансовых границ и параметров условий прокрутки.
Механизм поиска рабочих резервных ссылок опирается на контроле профессиональных информационных каналов и партнерских порталов. Опытные клиенты используют туннельные протоколы для обеспечения постоянного связи вне зависимости от географических барьеров.
45995FlorineArgoo abc
Надёжные платформы азартных возможностей обеспечивают игрокам вариант к премиальному развлечениям через профильные сайты, включая винити казино , которые следуют мировые критерии надёжности.
Процедура открытия счёта предполагает заполнения authentication параметров через криптографические SSL-линии. Администрация просят предоставить письменное свидетельство дееспособности и региона residence для исполнения законодательных критериев.
Multi-factor идентификация выступает обязательным составляющей современных механизмов конфиденциальности. Участники получают SMS-шифры, push-алерты или задействуют targeted приложения по типу Google Authenticator.
Дублирующие адреса ликвидируют проблемы geographic ограничений и DDoS-атак. Технически дубли представляют дублированные клоны главного сайта с удержанием опций и пользовательских данных.
Компетентные игроки призывают сохранять новейшие базы рабочих альтернатив в bookmark веб-клиента. Провайдеры передают новости о fresh адресах через электронную почту, Telegram-communities и портативные утилиты.
Банковские транзакции через надёжные площадки обеспечены encryption протоколами категории банковского области. Изъятие средств выполняется единственно на верифицированные данные держателя личного кабинета.
I recently checked out this casino https://softtechs360.com/Nywebforum/2025/12/19/les-etablissements-en-crypto-monnaies-evolution-du-5/ and was surprised by how smooth everything felt. The games load quickly, bonuses are clear, and navigation is intuitive, making the experience comfortable.
1xbet giris 1xbet giris .
If some one desires expert view concerning blogging and site-building after that i propose him/her to visit this blog, Keep up the fastidious
work.
Also visit my web blog :: real estate agent Andover MA
Transfer rumors, player movement speculation during transfer windows
Поиск безопасного гемблинг заведения в актуальных обстоятельствах требует детального анализа к регулятивному режиму. Профессиональные игроки осознают, что казино миллион содержит свежую материалы о действующих площадках.
Механизм регистрации в проверенных заведениях включает требуемую верификацию персональных данных. KYC-правила охраняют как сервис, так и геймера от обмана. Временные рамки на изъятие капитала до окончания верификации – привычная подход.
Виртуальные ограничения на подключение к азартным порталам устраняются через дублирующие домены. Рабочие зеркала обеспечивают полную возможности базового сервиса. Финансовые процедуры, интерактивный прогресс и привилегированные программы сохраняются неизменными.
Денежная стабильность выражается качеством используемых платежных инструментов. SSL-кодирование, PCI DSS аттестация и усиленная идентификация создают прочный контур охраны.
Геймплейная коллекция проверенных провайдеров содержит машины от топовых разработчиков. RTP-коэффициенты, вариативность и математические схемы получают внешнюю сертификацию в утвержденных институтах.
Планы лояльности в надежных казино основываются на прозрачных параметрах отыгрыша. Отыгрыш x35-40 считается нормальным для спин-бонусов, в то время как настольные игры принимаются в калькуляцию с сниженным коэффициентом.
Mix backlinks are a powerful SEO strategy that
focuses on building a natural and diversified link
profile for a website. Instead of relying on a single type of backlink, mix backlinks combine links from multiple sources such
as blogs, business profiles, forums, directories, guest posts, social platforms, and niche-related websites.
This diversity helps search engines see a website as trustworthy, relevant, and genuinely popular
rather than artificially promoted.
One of the main benefits of mix backlinks is improved search engine rankings.
Search engines like Google value link variety because it reflects organic growth.
When links come from different domains, IPs,
and content types, they strengthen a website’s authority and reduce
the risk of penalties. Mix backlinks also support faster indexing, as links from active platforms help search engines discover new pages more quickly.
Another advantage is stronger E-E-A-T (Experience,
Expertise, Authoritativeness, and Trust). Backlinks from authoritative and relevant sources signal credibility,
while user-generated and contextual links add authenticity.
This balanced approach builds long-term SEO value rather than short-term ranking spikes.
Overall, mix backlinks create a safe, sustainable, and effective link-building strategy.
By focusing on quality, relevance, and diversity, they help websites grow steadily, attract organic traffic, and maintain strong rankings
in competitive search results.
Выбор честного азартного портала заставляет основательного разбора юридических сертификатов. Новые порталы ДживиСпин зеркало гарантируют игрокам абсолютную факты о собственных лицензиях.
Процедура открытия аккаунта охватывает определенное количество необходимых стадий подтверждения. Провайдеры требуют свидетельства, доказывающие персону и зрелость. Типовой KYC-алгоритм занимает от 24 до 72 интервалов.
Контроль средств запускается с установления пределов на пополнения. Квалифицированные пользователи предлагают эксплуатировать установку 5% от полного развлекательного капитала на одну раунд.
Цифровые блокировки провайдеров вынуждают внедрять альтернативные маршруты. Зеркала поддерживают стопроцентную эффективность первичного платформы, содержа летопись платежей и игровой продвижение.
Инновационные расчетные методы поддерживают мгновенные взносы через цифровые счета. Bitcoin, Ethereum и устойчивые монеты предоставляют анонимность и символические комиссии. Время обработки получений насчитывает 10-30 периодов.
Программы верности охватывают многоуровневые статусы с возрастающим бонусом. VIP-координаторы предоставляют личные подарки, увеличенные пределы и первоочередную сервис.
Актуальные mirror-ссылки лицензированных казино на Килограмм казино гарантируют стабильный доступ к геймерским сервисам. Система клонирования формирует полноценные версии базового сайта с удержанием всех функций.
Механизм оформления профиля через mirror-сайт полностью дублирует основную шаблон. Дебютные клиенты вводят валидный email, придумывают безопасный шифр и устанавливают операционную финансовый инструмент.
Валидация профиля включает представления свидетельств в соответствии с KYC-политике. Копия удостоверения личности, свидетельство проживания и денежные параметры проверяются через машинную верификацию в течение 24-72 ч.
Авторизация верифицированных геймеров осуществляется через обычную форму с многоступенчатой проверкой. Сессионные пароли отправляются на сотовый устройство или email.
Опции входящего блока через альтернативные домены обеспечивает востребованные денежные платформы. Visa, Mastercard, веб счета Skrill, Neteller, криптовалюты Bitcoin, Ethereum обрабатываются с минимальными взносами 0-3%.
Азартная база копируется на сто процентов включая автоматы, классические развлечения, live-ведущих и прогрессивы. RTP-параметры, изменчивость и ставочные требования удерживаются точными.
Бонусная схема действует идентично основному порталу. Welcome-наборы, безвозмездные спины, компенсация и VIP-планы инициируются программно при исполнении фиксированных условий.
30170CristinKrystofiako abc
Рабочие резервные адреса официальных гемблинг-платформ на Килограмм казино гарантируют беспрерывный соединение к игровым ресурсам. Технология копирования формирует точные реплики основного домена с удержанием всех опций.
Система оформления профиля через mirror-сайт на сто процентов воспроизводит основную шаблон. Начинающие клиенты заполняют активный email, генерируют безопасный код доступа и назначают операционную платежное средство.
Аутентификация учетной записи включает загрузки бумаг опираясь на KYC-требованиям. Снимок национального документа, свидетельство регистрации и платежные параметры контролируются системой машинную контроль в течение 24-72 часов.
Аутентификация зарегистрированных пользователей происходит через обычную панель с многоступенчатой валидацией. Сессионные ключи поступают на сотовый устройство или e-mail адрес.
Инструменты входящего блока через альтернативные домены включает популярные финансовые сервисы. Visa, Mastercard, цифровые балансы Skrill, Neteller, блокчейн-токены Bitcoin, Ethereum процессируются с минимальными платежами 0-3%.
Гемблинг ассортимент повторяется абсолютно включая автоматы, традиционные игры, live-операторов и максимальные награды. RTP-показатели, колебания и проигрыш удерживаются такими же.
Подарочная система оперирует схоже главному веб-площадке. Welcome-комплекты, даровые прокруты, денежный возврат и VIP-планы включаются машинально при исполнении прописанных стандартов.
When I originally commented I seem to have clicked
on the -Notify me when new comments are added- checkbox and now every time a comment is
added I get four emails with the same comment. There
has to be a way you are able to remove me from that
service? Thanks!
Also visit my web page: realtor in Andover MA
57649RufusSteinwortho abc
Инновационные провайдеры беттинг продуктов предоставляют клиентам возможность к профессиональному гемблингу через защищенные казино Голд системы. Официальная деятельность подразумевает выполнения строгих правовых требований.
Алгоритм создания клиентского учетной записи охватывает подтверждение персональных показателей. Операторы задействуют комплексные алгоритмы KYC и AML для блокировки мошеннических транзакций.
Технические системы новейших гемблинг платформ базируются на защищенных хостингах с шифровальными стандартами. IP-фильтрация заставляет провайдеров организовывать дублирующие ссылки.
Альтернативные домены составляют полные репликации центрального ресурса с фиксацией всех опций и данных. Пользователи достигают постоянный доступ к депозиту, развлекательной данным и клиентским опциям.
Денежные действия осуществляются через встроенные расчетные агрегаторы. Границы на вклады и изъятия фиксируются в соотношении с законодательными критериями и корпоративными нормами минимизации опасностей.
Компетентные игроки предлагают мониторить положение авторизации через официальные базы данных азартных структур. Статусные характеристики задействуют рейтинги на профильных платформах и комментарии действительных пользователей.
Wonderful blog! I found it while surfing around on Yahoo News.
Do you have any tips on how to get listed in Yahoo News?
I’ve been trying for a while but I never seem to get there!
Many thanks
Here is my web-site; best real estate agent in Parker County TX
Рабочие альтернативные домены надежных гемблинг-платформ на Рльдорадо гарантируют беспрерывный вход к азартным платформам. Методика реплицирования строит полноценные реплики корневого портала с сохранением всех возможностей.
Система создания аккаунта через альтернативный домен полностью повторяет оригинальную шаблон. Новые участники прописывают валидный email, создают надежный ключ и выбирают рабочую валюту.
Валидация счета подразумевает представления справок следуя KYC-политике. Изображение водительских прав, валидация проживания и платежные параметры проверяются через машинную верификацию в течение 24-72 ч.
Подключение существующих пользователей реализуется через классическую модуль с двухфакторной аутентификацией. Сессионные коды передаются на мобильный аппарат или почтовый ящик.
Функционал депозитного сектора через альтернативные домены содержит актуальные банковские платформы. Visa, Mastercard, электронные счета Skrill, Neteller, криптовалюты Bitcoin, Ethereum осуществляются с уменьшенными платежами 0-3%.
Гемблинг коллекция копируется на сто процентов включая барабаны, столовые игры, live-дилеров и накопительные призы. RTP-параметры, колебания и ставочные требования сохраняются неизменными.
Подарочная политика работает аналогично основному веб-площадке. Welcome-комплекты, бесплатные вращения, компенсация и VIP-системы стартуют машинально при реализации фиксированных стандартов.
you are truly a just right webmaster. The website loading speed is
amazing. It kind of feels that you are doing any unique trick.
Furthermore, The contents are masterpiece. you’ve performed a great activity on this subject!
Feel free to visit my webpage best realtor in Austin TX
Актуальные бетторы натыкаются с сложностью подключения к легальным платформам. Компании закрывают главные домены, но профессиональные Bollywood пользователи знают о наличии параллельных порталов.
Дополнительный домен представляет полную реплику первичного сайта. Криптографические алгоритмы поддерживаются идентичными. Денежные транзакции выполняются через сходные системы.
Схема заведения учётной записи через альтернативный адрес содержит обычной проверки. Менеджеры уточняют удостоверения для выполнения KYC-правил. Паспортные данные осуществляют комплексную проверку.
Банковские лимиты на параллельных платформах равняются базовым характеристикам. Низшие ставки поддерживаются фиксированными. Растущие выигрышные пулы координируются между многочисленными доменами.
Льготные программы выполняются целостно на резервных площадках. Отыгрышный коэффициент удерживает исходные параметры. Временные рамки отыгрыша не изменяется.
Команда помощи изучает вопросы с резервных доменов идентично. Интерактивный разговор обеспечивает беспрерывный формат оперирования.
Передовые игроки попадают с препятствием входа к официальным площадкам. Операторы закрывают первичные ссылки, но искушённые Болливуд регистрация участники знают о функционировании альтернативных порталов.
Зеркало формирует идентичную воспроизведение оригинального платформы. Средства защиты функционируют аналогичными. Денежные переводы проходят через аналогичные системы.
Процедура открытия счёта через резервный адрес содержит классической аутентификации. Сотрудники уточняют справки для реализации KYC-требований. Личные сведения реализуют расширенную валидацию.
Депозитные рамки на параллельных порталах соответствуют первичным параметрам. Стартовые ставки продолжают константными. Увеличивающиеся призовые фонды координируются между всеми порталами.
Премиальные механизмы работают всесторонне на дополнительных ресурсах. Требования по обороту сохраняет базовые величины. Временные рамки использования поддерживается.
Сервис сопровождения изучает заявки с альтернативных порталов сходным образом. Живой диалог поддерживает постоянный формат функционирования.
Title race updates, league standings and live scores for championship battles
you can find out more https://jaxxwallet-web.org/
vavada crash igra https://www.vavada2010.help
63391TrevaRoffo abc
Передовые операторы игорных игр предлагают игрокам подключение к премиальному азарту через сертифицированные Bollywood казино порталы. Легальная деятельность влечет соблюдения четких законодательных критериев.
Система оформления игрового счета охватывает подтверждение личных данных. Провайдеры задействуют углубленные протоколы KYC и AML для блокировки мошеннических финансовых действий.
Технические средства новейших беттинг площадок работают на зашифрованных облачных системах с шифровальными технологиями. Локальные запреты заставляет операторов внедрять дублирующие домены.
Зеркальные ресурсы образуют точные копии основного ресурса с обеспечением всех инструментов и показателей. Игроки приобретают непрерывный вход к депозиту, развлекательной данным и клиентским опциям.
Расчетные процедуры реализуются через связанные финансовые агрегаторы. Границы на пополнения и изъятия назначаются в соответствии с нормативными положениями и внутренними правилами управления рисками.
Экспертные клиенты предлагают контролировать условия лицензии через государственные реестры гемблинг органов. Статусные индикаторы включают рейтинги на отраслевых ресурсах и feedback реальных беттеров.
Активные зеркала проверенных казино на лаки ворлд казино гарантируют устойчивый коннект к развлекательным ресурсам. Технология копирования генерирует полноценные клоны базового домена с фиксацией всех механизмов.
Схема создания аккаунта через mirror-сайт в точности воспроизводит стандартную заявку. Новые участники вводят активный email, создают безопасный код доступа и назначают рабочую финансовый инструмент.
Идентификация аккаунта предполагает загрузки бумаг в соответствии с KYC-требованиям. Фото ID-карты, доказательство адреса и денежные параметры подвергаются машинную валидацию в течение 24-72 временных единиц.
Логин действующих участников реализуется через стандартную панель с многоступенчатой верификацией. Краткосрочные коды доставляются на мессенджер девайс или почтовый ящик.
Возможности пополнительного сектора через зеркала включает востребованные банковские механизмы. Visa, Mastercard, электронные балансы Skrill, Neteller, криптовалюты Bitcoin, Ethereum осуществляются с низкими взносами 0-3%.
Гемблинг коллекция копируется абсолютно включая слоты, классические игры, live-хостов и джекпоты. RTP-индикаторы, волатильность и вейджер сохраняются неизменными.
Акционная схема действует схоже базовому ресурсу. Welcome-бандлы, free spins, возврат средств и VIP-схемы инициируются автоматически при реализации прописанных критериев.
爱一凡海外版,专为华人打造的高清视频平台AI深度学习内容匹配,支持全球加速观看。
This excellent website certainly has all the information I wanted concerning this subject and didn’t know who to ask.
Also visit my page … best real estate agent in Andover MA
This is a very informative post. I really appreciate how clearly everything is explained, especially for people who
are new to online casino platforms.
The way you describe the features, usability,
and overall experience makes it easy to understand and compare with
other websites. I also like that the content focuses on safety,
convenience, and user experience.
Thanks for sharing such useful information. I will
definitely check out more articles on this site.
Официальные ресурсы развлекательных услуг предоставляют клиентам право к премиальному азартному досугу через тематические ресурсы, включая казино Болливуд , которые исполняют глобальные нормы безопасности.
Схема открытия счёта предполагает внесения authentication данных через защищённые SSL-линии. Букмекеры запрашивают official доказательство age verification и территории жительства для исполнения legal правил.
Многоуровневая идентификация представляет mandatory компонентом современных механизмов защиты. Участники приобретают SMS-ключи, push-сообщения или внедряют специализированные программы вроде Google Authenticator.
Дублирующие домены преодолевают препятствия региональных блокировок и DDoS-штурмов. Техническим образом копии составляют аналогичные версии центрального портала с удержанием функциональности и индивидуальных деталей.
Skilled геймеры suggest хранить актуальные списки рабочих mirrors в избранном веб-клиента. Management отправляют обновления о свежих доменах через почтовые сервисы, Telegram-communities и мобильные приложения.
Банковские movements через надёжные сайты защищены защитными протоколами стандарта банковского segment. Вывод средств реализуется исключительно на validated wallets владельца аккаунта.
7698DebKrogho abc
Передовые платформы беттинг развлечений обеспечивают игрокам вход к качественному беттингу через надежные friends casino платформы. Сертифицированная работа подразумевает следования строгих законодательных положений.
Система активации клиентского кабинета охватывает проверку личных данных. Регуляторы эксплуатируют расширенные алгоритмы KYC и AML для предотвращения незаконных платежей.
Технические инструменты новейших беттинг площадок функционируют на надежных инфраструктурах с TLS сертификатами. Геоблокировка принуждает владельцев запускать резервные порталы.
Резервные ресурсы являют собой идентичные клоны первичного платформы с сохранением всех возможностей и сведений. Пользователи обеспечивают себе постоянный подключение к балансу, гемблинг отчетности и персональным опциям.
Денежные процедуры осуществляются через встроенные банковские процессоры. Лимиты на вклады и получения фиксируются в гармонии с правовыми критериями и внутренними регламентами контроля угроз.
Профессиональные пользователи советуют анализировать положение аккредитации через надзорные базы данных беттинг органов. Репутационные характеристики задействуют ранги на тематических ресурсах и feedback действительных беттеров.
Актуальные дублирующие порталы официальных азартных клубов на Гризли казино предоставляют постоянный соединение к азартным системам. Схема копирования генерирует аналогичные клоны основного веб-площадки с консервацией всех возможностей.
Система создания аккаунта через резервную ссылку в точности дублирует основную заявку. Дебютные геймеры регистрируют действующий email, придумывают стойкий код доступа и выбирают базовую валюту.
Аутентификация аккаунта включает предоставления документов согласно KYC-требованиям. Изображение паспорта, доказательство проживания и банковские сведения подвергаются машинную проверку в течение 24-72 часов.
Вход активных клиентов реализуется через базовую интерфейс с двухфакторной верификацией. Временные шифры приходят на мессенджер аппарат или почтовый ящик.
Опции входящего блока через альтернативные домены содержит распространенные банковские механизмы. Visa, Mastercard, веб кошельки Skrill, Neteller, crypto Bitcoin, Ethereum выполняются с минимальными процентами 0-3%.
Азартная коллекция копируется на сто процентов включая автоматы, традиционные геймплей, live-крупье и прогрессивы. RTP-коэффициенты, вариативность и ставочные требования фиксируются идентичными.
Бонусная механизм функционирует подобно главному сайту. Welcome-предложения, бесплатные вращения, компенсация и VIP-системы стартуют автоматически при реализации определенных параметров.
Подбор безопасного игорного заведения предполагает серьезного исследования регулятивных бумаг. Передовые платформы ретро казино предлагают геймерам максимальную информацию о своих допусках.
Система открытия аккаунта подразумевает несколько принудительных этапов проверки. Администраторы настаивают справки, устанавливающие индивидуальность и зрелость. Стандартный KYC-порядок продолжается от 24 до 72 временных отрезков.
Контроль средств начинается с установления рамок на вклады. Компетентные клиенты советуют применять принцип 5% от суммарного казино бюджета на индивидуальную заход.
Программные блокировки операторов вынуждают задействовать резервные ссылки. Зеркала удерживают безусловную активность центрального платформы, охватывая архив переводов и игровой достижения.
Новые денежные инструменты гарантируют быстрые пополнения через электронные аккаунты. Bitcoin, Ethereum и фиксированные активы гарантируют скрытность и минимальные отчисления. Время выполнения снятий достигает 10-30 минут.
Алгоритмы лояльности предусматривают градационные степени с накапливающимся кэшбэком. VIP-координаторы дают личные бонусы, улучшенные пределы и опережающую обслуживание.
1 x bet giri? 1xbet-turkiye-1.com .
46851LaquandaSaiso abc
Hey There. I found your blog using msn. This is a very well written article.
I will make sure to bookmark it and come back
to read more of your useful info. Thanks for the post. I’ll certainly return.
pop over to these guys https://jaxxwallet-web.org/
Поиск надежного гемблинг заведения заставляет серьезного рассмотрения лицензионных свидетельств. Современные ресурсы ДживиСпин казино обеспечивают пользователям безусловную данные о действующих разрешениях.
Механизм открытия аккаунта включает определенное количество необходимых ступеней аутентификации. Операторы требуют документы, доказывающие идентичность и совершеннолетие. Стандартный KYC-механизм длится от 24 до 72 периодов.
Управление банком начинается с установления рамок на взносы. Профессиональные клиенты призывают применять установку 5% от суммарного азартного бюджета на индивидуальную раунд.
Электронные препятствия администраторов принуждают внедрять запасные адреса. Альтернативы хранят полную активность первичного ресурса, охватывая летопись сделок и игровой результаты.
Передовые финансовые методы предоставляют оперативные депозиты через электронные аккаунты. Bitcoin, Ethereum и стабильные валюты обеспечивают конфиденциальность и наименьшие отчисления. Срок выполнения снятий достигает 10-30 отрезков.
Схемы постоянства предусматривают каскадные ранги с накапливающимся вознаграждением. VIP-менеджеры предоставляют индивидуальные бонусы, усиленные ограничения и преимущественную обслуживание.
Ориентирование в мире проверенных площадок включает владения новых способов входа. Профессиональные пользователи задействуют tip top casino для извлечения актуальной данных о действующих доменах.
Схема создания аккаунта в проверенных организациях подразумевает тщательную верификацию. Новейшие организации внедряют KYC-механизмы и AML-требования. Бумажная работа отнимает от 24 до 72 временных отрезков.
Компьютерные инструменты для обхода ограничений развиваются вместе с интенсификацией правовых инициатив. VPN-инструменты типа premium обеспечивают криптографию AES-256 и методы OpenVPN. Устойчивость соединения критически существенна для VIP заходов.
Запасные сайты действуют через географически рассредоточенные IT кластеры. CDN-структуры предоставляют минимальную задержку для глобальных участников. Программное маршрутизация срабатывает при распознавании недоступности центрального портала.
Экономические переводы в лицензированных территориях подчиняются конкретным правилам PCI DSS. Крипто переводы завоевывают распространение по причине конфиденциальности и динамике осуществления.
Планшетные клиенты элитных операторов интегрируют биометрическую подтверждение и push-уведомления для ключевых моментов. Модифицируемый дизайн независимо адаптируется под особенности дисплея.
Исследование в секторе проверенных сайтов включает осознания новых методов доступа. Квалифицированные пользователи внедряют аква регистрация для извлечения свежей информации о действующих путях.
Схема оформления счета в проверенных операторах охватывает сложную подтверждение. Актуальные компании внедряют KYC-алгоритмы и AML-критерии. Оформление документов занимает от 24 до 72 временных отрезков.
Программные инструменты для обхода блокировок развиваются сообща с ужесточением нормативных шагов. VPN-платформы уровня premium дают криптографию AES-256 и системы OpenVPN. Устойчивость подключения жизненно существенна для VIP заходов.
Альтернативные адреса действуют через географически разнесенные серверные инфраструктуры. CDN-комплексы поддерживают низкую время ответа для глобальных участников. Цифровое переключение активируется при детекции барьера основного портала.
Денежные транзакции в официальных юрисдикциях отвечают жестким правилам PCI DSS. Криптовалютные расчеты получают признание по причине анонимности и оперативности выполнения.
Смартфонные программы ведущих организаций совмещают физиологическую проверку и push-извещения для принципиальных происшествий. Модифицируемый облик программно адаптируется под свойства панели.
Легальные платформы азартных возможностей дают игрокам право к качественному игровому процессу через профильные порталы, включая казино аква , которые специально исполняют общепринятые нормы защиты.
Схема открытия счёта necessita заполнения authentication сведений через encrypted SSL-линии. Провайдеры demanded документальное доказательство правоспособности и территории жительства для исполнения юрисдикционных критериев.
Двухфакторная authentication считается принудительным aspect современных платформ надёжности. Пользователи обретают SMS-шифры, push-алерты или используют специализированные приложения типа Google Authenticator.
Дублирующие домены преодолевают вопросы региональных барьеров и DDoS-нападений. Технически копии формируют идентичные реплики базового платформы с обеспечением инструментария и user параметров.
Компетентные геймеры предлагают keeping свежие базы рабочих mirrors в сохранённых ссылках интернет-программы. Management направляют обновления о fresh доменах через электронную почту, Telegram-сообщества и mobile программы.
Банковские процедуры через legal сайты secured защитными системами класса банковского сектора. Extraction финансов происходит единственно на верифицированные карты обладателя аккаунта.
真实的人类第一季高清完整官方版,海外华人可免费观看最新热播剧集。
Recommended Site jax wallet
Dive deeper
Best online casino usa goal
to find out more.
14635MorrisPoagueo abc
Нынешние игроки натыкаются с затруднением связи к легальным платформам. Операторы блокируют стандартные адреса, но профессиональные luckybear casino участники осознают о существовании альтернативных сайтов.
Параллельный портал является полную воспроизведение первичного площадки. Системы безопасности работают идентичными. Денежные транзакции проходят через равнозначные системы.
Технология открытия счёта через резервный адрес предполагает обычной проверки. Специалисты требуют удостоверения для реализации KYC-регламентов. Индивидуальные информация реализуют усиленную верификацию.
Финансовые границы на резервных платформах аналогичны главным требованиям. Низшие ставки сохраняются константными. Накопительные джекпоты синхронизируются между множественными ресурсами.
Бонусные механизмы оперируют завершённо на дополнительных сайтах. Вейджер сохраняет стартовые значения. Период действия реализации не изменяется.
Отдел помощи рассматривает заявки с альтернативных ссылок таким же способом. Интерактивный общение предоставляет постоянный порядок функционирования.
Проверенные операторы игровых опций гарантируют участникам доступ к высококлассному времяпрепровождению через тематические домены, включая Eldorado , которые следуют глобальные регламенты конфиденциальности.
Последовательность регистрации требует ввода authentication параметров через защищённые SSL-соединения. Провайдеры запрашивают официальное свидетельство age verification и адреса проживания для выполнения законодательных правил.
Двухэтапная аутентификация представляет required частью новейших solutions безопасности. Участники располагают SMS-шифры, push-сообщения или применяют targeted приложения наподобие Google Authenticator.
Дублирующие URL решают препятствия geographic блокировок и DDoS-assault. Техническим образом mirrors образуют копийные dublicates базового ресурса с удержанием функциональности и клиентских параметров.
Профессиональные игроки призывают поддерживать свежие списки активных альтернатив в favourites браузера. Администрация направляют новости о актуальных адресах через почтовые сервисы, Telegram-каналы и телефонные утилиты.
Payment movements через лицензионные платформы обеспечены шифровальными алгоритмами класса банковского области. Получение фондов выполняется только на аутентифицированные карты владельца account.
like it https://jaxxwallet-web.org
his response jaxx liberty wallet
4264JaeEvanoskio abc
Активные зеркала легальных гемблинг-платформ на Болливуд казино дают устойчивый подключение к игровым сервисам. Система клонирования формирует эквивалентные реплики центрального портала с консервацией всех инструментов.
Алгоритм открытия счета через дублирующий портал на сто процентов воспроизводит стандартную форму. Только пришедшие участники регистрируют валидный email, формируют надежный шифр и фиксируют операционную курренси.
Подтверждение счета подразумевает представления удостоверений в соответствии с KYC-нормам. Снимок ID-карты, доказательство места жительства и денежные реквизиты проходят алгоритмическую анализ в течение 24-72 часа.
Вход существующих участников производится через классическую окно с усиленной проверкой. Краткосрочные шифры приходят на мессенджер аппарат или электронную почту.
Инструменты денежного блока через mirror-сайты обеспечивает распространенные платежные платформы. Visa, Mastercard, веб балансы Skrill, Neteller, криптовалюты Bitcoin, Ethereum реализуются с оптимизированными сборами 0-3%.
Гемблинг ассортимент копируется в точности включая машины, столовые геймплей, live-дилеров и накопительные призы. RTP-параметры, колебания и вейджер фиксируются неизменными.
Поощрительная система функционирует идентично центральному веб-площадке. Welcome-предложения, фриспины, денежный возврат и VIP-планы активируются автоматически при реализации фиксированных условий.
Почему пользователи выбирают площадку KRAKEN?
Маркетплейс KRAKEN заслужил доверие многочисленной аудитории благодаря
сочетанию ключевых факторов. Во-первых, это широкий и
разнообразный ассортимент, представленный сотнями продавцов.
Во-вторых, интуитивно понятный интерфейс KRAKEN,
который упрощает навигацию, поиск
товаров и управление заказами даже для новых пользователей.
В-третьих, продуманная система безопасных транзакций, включающая механизмы разрешения споров (диспутов) и возможность использования условного депонирования, что минимизирует риски для обеих сторон сделки.
На KRAKEN функциональность сочетается
с внимательным отношением к безопасности клиентов, что делает процесс покупок более предсказуемым, защищенным
и, как следствие, популярным среди пользователей,
ценящих анонимность и надежность.
UDL Travel hub – Very helpful for organizing trips, details are clear and easy to follow.
Новейшие операторы азартных услуг гарантируют беттерам вход к профессиональному беттингу через надежные ретро казино платформы. Официальная работа требует следования строгих регуляторных критериев.
Механизм создания пользовательского аккаунта предусматривает аутентификацию персональных показателей. Регуляторы внедряют углубленные алгоритмы KYC и AML для блокировки мошеннических платежей.
Электронные платформы актуальных развлекательных порталов строятся на стабильных облачных системах с HTTPS сертификатами. Региональная блокировка вынуждает администраторов организовывать вспомогательные адреса.
Резервные сайты формируют идентичные дубликаты центрального портала с сохранением всех инструментов и показателей. Игроки получают стабильный связь к депозиту, беттинг записям и клиентским конфигурациям.
Денежные переводы выполняются через подключенные расчетные процессоры. Границы на инвестиции и выводы фиксируются в унисон с законодательными требованиями и организационными нормами риск-менеджмента.
Компетентные пользователи советуют контролировать ситуацию авторизации через официальные списки игорных ведомств. Статусные показатели охватывают места на отраслевых ресурсах и мнения истинных клиентов.
Современные порталы игорных активностей гарантируют игрокам путь к высококлассному игровому процессу через сертифицированные lucky bear казино платформы. Официальная бизнес предполагает соблюдения четких контролирующих стандартов.
Механизм активации персонального кабинета предусматривает аутентификацию конфиденциальных информации. Регуляторы применяют детализированные механизмы KYC и AML для исключения фродовых переводов.
Электронные средства инновационных казино базируются на зашифрованных дата-центрах с TLS сертификатами. Территориальные ограничения обязывает управляющих разрабатывать параллельные адреса.
Дублирующие домены составляют идентичные дубликаты главного ресурса с фиксацией всех возможностей и показателей. Пользователи достигают постоянный связь к средствам, гемблинг истории и пользовательским параметрам.
Платежные переводы реализуются через синхронизированные финансовые шлюзы. Лимиты на вклады и снятия регулируются в соответствии с нормативными требованиями и собственными регламентами риск-менеджмента.
Опытные клиенты указывают мониторить условия сертификата через надзорные списки беттинг ведомств. Статусные показатели предусматривают места на специализированных ресурсах и комментарии реальных клиентов.
Определение легального развлекательного площадки нуждается основательного изучения лицензионных бумаг. Инновационные порталы типпи казино гарантируют игрокам абсолютную факты о текущих санкциях.
Система получения доступа включает несколько ключевых стадий подтверждения. Представители запрашивают свидетельства, подтверждающие идентичность и правоспособность. Обычный KYC-регламент длится от 24 до 72 часов.
Контроль средств инициируется с установления пределов на взносы. Квалифицированные геймеры советуют внедрять норму 5% от суммарного игорного фонда на одну игру.
Программные запреты владельцев побуждают применять вспомогательные маршруты. Альтернативы сохраняют максимальную эффективность первичного портала, содержа летопись операций и гемблинг прогресс.
Актуальные платежные методы дают быстрые депозиты через виртуальные аккаунты. Bitcoin, Ethereum и стейблкоины предоставляют анонимность и наименьшие сборы. Продолжительность обработки выводов равно 10-30 промежутков.
Программы приверженности включают ступенчатые уровни с накапливающимся возвратом. VIP-координаторы предоставляют личные награды, улучшенные рамки и опережающую помощь.
Hi there! Someone in my Facebook group shared this site with us so I came to take a
look. I’m definitely enjoying the information. I’m bookmarking and will be tweeting this to my
followers! Exceptional blog and fantastic style and design.
Also visit my webpage: realtor in Andover MA
41941MuiCasteno abc
Steinbeck himself considered East of Eden to be his magnum opus, the work that all his previous novels had been practicing for. The story is a brutal yet beautiful examination of human nature, destiny, and the power of choice. For those currently studying the novel, locating a reliable text is the first step toward understanding its magnitude. Whether you are using a paperback or searching for an East of Eden PDF to read on your laptop, the words hold the same power. We provide in-depth analysis and chapter summaries that assist readers in decoding the rich allegories presented in the text, making your journey through the novel much clearer.
Передовые игроки попадают с затруднением подключения к лицензированным ресурсам. Организации ограничивают основные URL, но знающие Sykaaa зеркало клиенты учитывают о существовании резервных ресурсов.
Дополнительный домен составляет идентичную отображение оригинального площадки. Криптографические алгоритмы функционируют равнозначными. Денежные транзакции реализуются через идентичные механизмы.
Алгоритм создания аккаунта через дополнительный адрес содержит стандартной валидации. Администраторы просят удостоверения для соблюдения KYC-регламентов. Индивидуальные информация выполняют расширенную аутентификацию.
Банковские ограничения на зеркальных порталах совпадают главным требованиям. Низшие ставки функционируют константными. Возрастающие банки согласовываются между множественными доменами.
Премиальные системы выполняются завершённо на зеркальных площадках. Вейджер сохраняет первоначальные цифры. Период действия отыгрыша не изменяется.
Отдел поддержки анализирует заявки с зеркальных адресов идентично. Живой диалог предоставляет 24-часовой формат обслуживания.
1xbet yeni giri? 1xbet yeni giri? .
The Regency era comes alive through the descriptive powers of Jane Austen. Every ball, letter, and walk in the park is detailed with precision. If you want to travel back in time without leaving your chair, this novel is your ticket. Accessing the book via a Pride and Prejudice PDF is a modern solution for a classic desire. Our website offers a dedicated space for this masterpiece, perfect for readers who want to analyze the setting and plot. immerse yourself in a world where a letter can change a life and a look can convey volumes.
Беттинговая ниша отображает быстрый рост, притягивая тысячи клиентов. Квалифицированные ресурсы предоставляют качественную среду для развлечений. Полную данные о данных провайдерах доступно получить на mad casino зеркало .
Аттестация представляет центральным аспектом подбора площадки. Юрисдикции Мальты дают тщательный проверку финансовых процедур. Отдельная легальная ресурс подвергается систематические аудиты RNG-систем.
Компьютерные параметры современных игорных домов содержат SSL-шифрование экономического ранга. Создатели цифрового софта уровня Microgaming, NetEnt, Pragmatic Play подключают продвинутые алгоритмы случайных чисел.
Процесс подтверждения аккаунта подразумевает передачи справок KYC-класса. Паспорт, выписка о заработке, валидация прописки — классический комплект для финального доступа.
Зеркальные порталы устраняют сложности с ограничениями операторов. Актуальные варианты адаптируются постоянно программными специалистами. Мобильные приложения обычно функционируют качественнее сетевых вариантов.
Распределение капитала формирует долгосрочную прибыльность развлекательных раундов. Опытные участники рекомендуют урезать сумму депозита до 1-2% от итогового фонда.
Актуальные геймеры обталкиваются с набором системных аспектов при функционировании с проверенными платформами. Тематические источники типа Либет казино выдают новую данные о процессах азартных провайдеров.
Алгоритм валидации профиля предполагает набор необходимых этапов. Базовая верификация предполагает отправки удостоверений верифицирующих индивидуальность. Обычный комплект включает паспорт, водительские права или международный паспорт.
Техническая компонента записления подразумевает использование SSL-шифрования и двухфакторной аутентификации. Квалифицированные клиенты советуют запускать максимум возможных настроек защиты.
Дублирующие порталы представляют стопроцентные реплики центрального домена с поддержанием всего инструментария. Важнейшее преимущество содержится в соответствии денежных границ и параметров условий прокрутки.
Механизм выявления активных запасных доменов фундируется на наблюдении тематических телеграм-каналов и союзных площадок. Продвинутые игроки используют прокси-соединения для предоставления бесперебойного связи без оглядки от местных барьеров.
Современные игроки обталкиваются с огромным количеством технологических тонкостей при работе с проверенными порталами. Тематические сайты типа лаки Р±РёСЂ казино обеспечивают современную сведения о деятельности азартных брендов.
Система верификации учетной записи содержит множество обязательных фаз. Стартовая верификация включает предоставления свидетельств удостоверяющих гражданство. Типовой перечень подразумевает паспорт, лицензию водителя или заграничное удостоверение.
Цифровая составляющая записления подразумевает использование безопасного соединения и 2FA. Профессиональные клиенты подсказывают запускать полный набор представленных параметров безопасности.
Альтернативные адреса образуют стопроцентные реплики центрального ресурса с сохранением всего возможностей. Центральное достоинство состоит в тождественности финансовых лимитов и параметров ставочных требований.
Система выявления действующих альтернативных адресов строится на контроле экспертных телеграм-каналов и союзных порталов. Опытные игроки внедряют анонимайзеры для гарантирования надежного соединения безотносительно от территориальных барьеров.
https://follicle.us.com/# Follicle Insight
Wuthering Heights is a novel of contrasts: love and hate, life and death, nature and civilization. A Wuthering Heights PDF puts these contrasts in the palm of your hand. It is a book that encompasses the whole human experience in one isolated location. The digital version is a portal to this world of extremes. whether you are a first-time reader or a lifelong fan, having the text available digitally ensures that you can always return to the Heights to weather the storm with Heathcliff and Catherine.
88516MeliaRuparo abc
Collaborative discussions іn OMT courses construct exhilaration аround mathematics ideas,motivating Singapore trainees t᧐ create love and master examinations.
Expand your horizons ѡith OMT’s upcoming neԝ physical space
οpening in Sеptember 2025, սsing even more chances for hands-օn mathematics expedition.
Ιn а sуstem where math education һas aϲtually developed tо promote development аnd international
competitiveness, enrolling in math tuition guarantees students remain ahead ƅy deepening tһeir understanding аnd application ߋf key ideas.
With PSLE mathematics evolving t᧐ incluԀe more interdisciplinary aspects, tuition ҝeeps trainees updated οn incorporated concerns blending math ѡith science contexts.
Personalized math tuition іn senior һigh school addresses individual finding օut voids іn topics liқe calculus and stats, preventing thеm fгom preventing O Level success.
Tuition іn junior college mathematics equips stdents ᴡith analytical methods аnd chance designs
vital fⲟr analyzing data-driven questions іn A Level documents.
Ꭲhе diversity of OMT ⅽomes from its proprietary math curriculum tһɑt prolongs MOE content with project-based knowing
foг functional application.
Adult access tօ advance records one, enabling
guidance іn your home for continual quality enhancement.
Ӏn a fast-paced Singapore class, math tuition рrovides tһe slower,
іn-depth explanations required tߋ build confidence
for examinations.
Нave a look at my website ocr a level physics maths and physics tutor
Поиск легального азартного портала заставляет серьезного анализа юридических документов. Инновационные порталы Рльдорадо казино гарантируют геймерам абсолютную данные о текущих допусках.
Алгоритм создания профиля предусматривает различные обязательных стадий верификации. Операторы истребуют свидетельства, доказывающие самобытность и зрелость. Типовой KYC-порядок продолжается от 24 до 72 интервалов.
Контроль средств открывается с определения лимитов на взносы. Профессиональные игроки призывают эксплуатировать правило 5% от общего развлекательного средств на конкретную заход.
Электронные блокировки владельцев заставляют эксплуатировать запасные адреса. Копии поддерживают максимальную функциональность первичного площадки, включая летопись переводов и развлекательный достижения.
Новые расчетные инструменты дают мгновенные пополнения через блокчейн кошельки. Bitcoin, Ethereum и фиксированные активы поддерживают тайность и мизерные взносы. Длительность обработки извлечений составляет 10-30 периодов.
Планы верности подразумевают ступенчатые уровни с накапливающимся компенсацией. VIP-координаторы дают эксклюзивные подарки, расширенные пределы и опережающую сервис.
Современные геймеры сталкиваются с огромным количеством системных аспектов при деятельности с легальными ресурсами. Специализированные порталы типа тип топ казино регистрация выдают релевантную материалы о работе гэмблинговых компаний.
Механизм аутентификации профиля включает набор необходимых этапов. Первичная валидация требует размещения свидетельств валидирующих личность. Привычный набор предполагает паспорт, водительские права или загранпаспорт.
Технологическая часть создания аккаунта включает применение безопасного соединения и 2FA. Квалифицированные игроки советуют запускать весь комплекс представленных параметров охраны.
Альтернативные адреса составляют идентичные дубликаты первичного платформы с поддержанием комплексного функционала. Главное преимущество выражается в подобии расчетных рамок и параметров вейджера.
Система выявления актуальных дублирующих порталов фундируется на мониторинге тематических уведомительных сервисов и связанных ресурсов. Экспертные игроки применяют VPN-сервисы для создания надежного доступа независимо от территориальных запретов.
1x lite 1xbet-giris-21.com .
61175MyronFornello abc
fertility pct guide: fertility pct guide – fertility pct guide
Рабочие зеркала лицензированных игорных заведений на казино типпи гарантируют постоянный подключение к азартным платформам. Методика клонирования образует эквивалентные версии центрального веб-площадки с фиксацией всех возможностей.
Система открытия счета через mirror-сайт целиком повторяет оригинальную анкету. Только пришедшие геймеры вводят валидный email, формируют защищенный пароль и выбирают рабочую валюту.
Подтверждение профиля предполагает представления бумаг следуя KYC-политике. Скан удостоверения личности, свидетельство проживания и карточные параметры контролируются системой машинную контроль в течение 24-72 периодов.
Подключение активных геймеров происходит через обычную интерфейс с многоступенчатой идентификацией. Временные ключи передаются на смс номер или почтовый ящик.
Функционал финансового компонента через mirror-сайты включает топовые банковские платформы. Visa, Mastercard, виртуальные портмоне Skrill, Neteller, цифровые активы Bitcoin, Ethereum реализуются с минимальными комиссиями 0-3%.
Гемблинг коллекция воспроизводится целиком включая автоматы, настольные забавы, live-ведущих и накопительные призы. RTP-показатели, вариативность и отыгрыш сохраняются точными.
Поощрительная система выполняется аналогично базовому сайту. Welcome-пакеты, free spins, компенсация и VIP-курсы инициируются алгоритмически при исполнении прописанных параметров.
Надёжные провайдеры азартных опций предоставляют участникам возможность к качественному азартному досугу через тематические платформы, включая аква казино , что исполняют общепринятые критерии безопасности.
Процедура активации включает указания проверочных параметров через шифрованные SSL-протоколы. Менеджмент просят письменное свидетельство age verification и места проживания для поддержания юрисдикционных правил.
Двухфакторная authentication становится mandatory составляющей современных платформ надёжности. Участники располагают SMS-пароли, push-алерты или эксплуатируют targeted программы вроде Google Authenticator.
Альтернативные порталы ликвидируют проблемы territorial санкций и DDoS-нападений. Технически mirrors являют дублированные копии центрального платформы с обеспечением возможностей и пользовательских деталей.
Профессиональные геймеры рекомендуют поддерживать current базы функционирующих альтернатив в favourites browser. Администрация передают updates о современных URL через почтовые сервисы, Telegram-сообщества и mobile приложения.
Платёжные переводы через legal площадки гарантированы защитными системами категории банковского направления. Получение финансов выполняется исключительно на аутентифицированные данные держателя аккаунта.
Актуальные дублирующие порталы надежных игорных заведений на лаки Р±РёСЂ обеспечивают постоянный коннект к азартным ресурсам. Схема клонирования формирует точные копии корневого домена с поддержанием всех возможностей.
Алгоритм оформления профиля через mirror-сайт в точности повторяет базовую форму. Только пришедшие пользователи прописывают функционирующий email, придумывают стойкий ключ и устанавливают игровую валюту.
Верификация профиля предполагает отправки справок в соответствии с KYC-стандартам. Снимок удостоверения личности, доказательство места жительства и финансовые реквизиты контролируются системой машинную верификацию в течение 24-72 временных единиц.
Авторизация верифицированных клиентов осуществляется через классическую форму с многоступенчатой идентификацией. Временные шифры приходят на мобильный устройство или мейл.
Инструменты финансового модуля через mirror-сайты включает актуальные финансовые механизмы. Visa, Mastercard, цифровые портмоне Skrill, Neteller, криптовалюты Bitcoin, Ethereum выполняются с уменьшенными платежами 0-3%.
Gaming ассортимент воспроизводится на сто процентов включая слоты, карточные активности, live-операторов и накопительные призы. RTP-показатели, вариативность и проигрыш остаются идентичными.
Поощрительная схема выполняется схоже главному домену. Welcome-комплекты, бесплатные вращения, денежный возврат и VIP-планы активируются машинально при достижении установленных параметров.
Современные геймеры пересекаются с огромным количеством технических деталей при работе с официальными сайтами. Экспертные порталы типа Клубника казино выдают актуальную сведения о функционировании казино компаний.
Механизм аутентификации аккаунта охватывает несколько необходимых фаз. Стартовая проверка включает передачи свидетельств подтверждающих личность. Типовой перечень содержит свидетельство, водительские права или внешний паспорт.
Технологическая сторона записления включает применение защищенного протокола и двухуровневой проверки. Продвинутые геймеры советуют задействовать все предложенных опций обеспечения.
Запасные домены являются точные реплики главного домена с поддержанием всего набора функций. Основное выгода заключается в схожести банковских пределов и норм отыгрыша.
Система локализации рабочих резервных ссылок опирается на мониторинге профессиональных информационных каналов и союзных порталов. Квалифицированные игроки задействуют туннельные протоколы для обеспечения постоянного связи независимо от территориальных блокировок.
16767ReidBjornbergo abc
Iver Protocols Guide Iver Protocols Guide Iver Protocols Guide
huarenus平台结合大数据AI分析,专为海外华人设计,提供高清视频和直播服务。
Hi! I know this is somewhat off topic but I was wondering if you knew where I could find a captcha plugin for
my comment form? I’m using the same blog platform as yours and I’m having difficulty
finding one? Thanks a lot!
Also visit my web-site … best real estate agent in Austin TX
Проверенные ресурсы развлекательных предложений гарантируют участникам право к высококлассному развлечениям через профильные ресурсы, включая Болливуд казино , которые именно придерживаются международные нормы защиты.
Алгоритм открытия счёта necessita заполнения верификационных параметров через защищённые SSL-линии. Администрация demanded письменное свидетельство совершеннолетия и региона проживания для compliance правовых стандартов.
Двухэтапная аутентификация представляет обязательным составляющей новейших систем безопасности. Игроки имеют SMS-ключи, push-уведомления или используют специальные утилиты типа Google Authenticator.
Mirror домены устраняют вопросы региональных барьеров и DDoS-атак. С технической точки зрения копии являют копийные копии центрального платформы с сохранением функциональности и user сведений.
Экспертные пользователи suggest сохранять current базы действующих копий в закладках браузера. Провайдеры рассылают информацию о новых ссылках через email, Telegram-сообщества и портативные программы.
Платёжные операции через надёжные площадки обеспечены криптографическими алгоритмами level банковского segment. Снятие фондов происходит лишь на аутентифицированные реквизиты собственника личного кабинета.
mostbet поддержка whatsapp https://www.mostbet2034.help
Отбор безопасного развлекательного площадки заставляет тщательного изучения регулятивных свидетельств. Инновационные сайты ретро казино гарантируют клиентам безусловную факты о действующих разрешениях.
Процесс создания профиля содержит различные обязательных фаз верификации. Администраторы запрашивают бумаги, удостоверяющие самобытность и правоспособность. Типовой KYC-процесс продолжается от 24 до 72 интервалов.
Контроль средств инициируется с определения пределов на взносы. Профессиональные участники рекомендуют использовать норму 5% от суммарного гемблинг бюджета на одну партию.
Цифровые ограничения владельцев заставляют эксплуатировать вспомогательные домены. Клоны удерживают абсолютную работоспособность основного сайта, предусматривая журнал сделок и казино успех.
Инновационные расчетные сервисы предоставляют оперативные инвестиции через виртуальные кошельки. Bitcoin, Ethereum и стабильные валюты гарантируют тайность и крошечные отчисления. Продолжительность проведения извлечений равно 10-30 интервалов.
Планы приверженности включают многоуровневые категории с возрастающим возвратом. VIP-консультанты гарантируют персонализированные вознаграждения, усиленные рамки и первоочередную техподдержку.
捕风捉影在线免费在线观看,海外华人专属平台,高清无广告体验。
Активные альтернативные домены проверенных азартных клубов на винити казино предоставляют непрерывный доступ к геймерским порталам. Система дублирования строит идентичные копии основного домена с консервацией всех возможностей.
Система регистрации через зеркало абсолютно повторяет стандартную бланк. Дебютные клиенты регистрируют действующий email, устанавливают безопасный ключ и устанавливают базовую денежную единицу.
Верификация аккаунта предполагает отправки документов в соответствии с KYC-стандартам. Фото ID-карты, валидация резиденции и платежные сведения проходят программную анализ в течение 24-72 часа.
Авторизация действующих участников реализуется через базовую панель с многоступенчатой идентификацией. Разовые токены поступают на мессенджер аппарат или email.
Механизмы пополнительного компонента через резервные ссылки обеспечивает востребованные расчетные платформы. Visa, Mastercard, веб хранилища Skrill, Neteller, блокчейн-токены Bitcoin, Ethereum обрабатываются с сокращенными сборами 0-3%.
Азартная база клонируется абсолютно включая машины, настольные забавы, live-хостов и прогрессивы. RTP-коэффициенты, волатильность и вейджер удерживаются такими же.
Бонусная схема работает аналогично основному домену. Welcome-бандлы, безвозмездные спины, refund и VIP-программы инициируются программно при соблюдении фиксированных стандартов.
Азартная сфера отображает стремительный подъём, заинтересовывая тысячи участников. Опытные порталы обеспечивают стабильную атмосферу для пари. Подробную материалы о подобных организациях допустимо найти на tip top casino .
Легализация представляет приоритетным показателем селекции площадки. Надзорные органы Кюрасао предоставляют жёсткий контроль денежных транзакций. Всякая официальная площадка реализует постоянные аудиты RNG-модулей.
Цифровые свойства актуальных игорных домов включают SSL-защиту финансового категории. Создатели компьютерного ПО уровня Microgaming, NetEnt, Pragmatic Play добавляют продвинутые схемы случайных показателей.
Схема подтверждения счёта предполагает предоставления бумаг KYC-стандарта. ID, выписка о финансах, доказательство регистрации — обычный набор для полноценного входа.
Зеркальные адреса устраняют сложности с фильтрацией организаций. Свежие альтернативы корректируются ежедневно техническими отделами. Смартфонные утилиты обычно функционируют надёжнее онлайн версий.
Распределение капитала определяет перспективную прибыльность азартных раундов. Грамотные беттеры предлагают лимитировать количество пари до 1-2% от общего резерва.
62732JuneBartasho abc
Официальные платформы игровых опций гарантируют игрокам вариант к профессиональному азартному досугу через целевые ресурсы, включая mad казино , которые именно соблюдают мировые стандарты надёжности.
Последовательность создания аккаунта предполагает указания валидационных информации через криптографические SSL-connection. Провайдеры просят предоставить письменное verification дееспособности и адреса проживания для поддержания правовых стандартов.
Многоуровневая аутентификация становится принудительным компонентом передовых архитектур безопасности. Игроки обретают SMS-коды, push-алерты или эксплуатируют специализированные приложения по типу Google Authenticator.
Mirror адреса ликвидируют трудности geographic ограничений и DDoS-нападений. Фактически реплики формируют тождественные dublicates основного сайта с поддержанием инструментария и личных данных.
Опытные участники призывают сохранять свежие списки активных зеркал в bookmark браузера. Букмекеры направляют updates о современных доменах через e-mail, Telegram-чаты и телефонные apps.
Финансовые транзакции через лицензионные порталы обеспечены encryption протоколами уровня банковского segment. Extraction денег происходит лишь на проверенные карты владельца учётной записи.
塔尔萨之王第三季高清完整版,海外华人可免费观看最新热播剧集。
Современные участники встречаются с проблемой подключения к сертифицированным порталам. Организации ограничивают главные порталы, но профессиональные СЌРЅРѕРјРѕ казино участники учитывают о доступности зеркальных ресурсов.
Резервная ссылка является точную реплику главного сайта. Криптографические алгоритмы функционируют равнозначными. Финансовые действия осуществляются через равнозначные сервисы.
Процедура открытия счёта через зеркальный портал предполагает привычной проверки. Операторы требуют бумаги для осуществления KYC-стандартов. Личные параметры выполняют двухфакторную проверку.
Депозитные границы на альтернативных площадках равняются первичным спецификациям. Низшие вклады остаются константными. Растущие призовые фонды интегрируются между различными доменами.
Бонусные системы оперируют целостно на зеркальных порталах. Требования по обороту сохраняет стартовые величины. Временные рамки проигрывания поддерживается.
Команда ассистирования решает вопросы с параллельных порталов идентично. Живой общение осуществляет непрерывный график работы.
77880AdelleDurkino abc
Лицензионные ресурсы гэмблинг опций предоставляют пользователям возможность к высококлассному развлечениям через специализированные ресурсы, включая лаки Р±РёСЂ , которые следуют глобальные стандарты надёжности.
Алгоритм активации включает заполнения валидационных информации через encrypted SSL-линии. Администрация demanded official удостоверение правоспособности и места проживания для исполнения нормативных стандартов.
Многоуровневая проверка выступает принудительным частью современных систем безопасности. Users обретают SMS-коды, push-сообщения или внедряют специальные программы вроде Google Authenticator.
Mirror ссылки устраняют сложности territorial барьеров и DDoS-атак. С технической точки зрения реплики представляют дублированные копии центрального ресурса с удержанием функциональности и личных параметров.
Опытные геймеры советуют поддерживать свежие базы working зеркал в закладках browser. Провайдеры отправляют updates о новых доменах через e-mail, Telegram-сообщества и портативные apps.
Финансовые movements через legal площадки защищены encryption технологиями level банковского сектора. Изъятие денег реализуется solely на аутентифицированные карты хозяина account.
Актуальные игроки попадают с препятствием подключения к проверенным ресурсам. Поставщики ограничивают стандартные домены, но опытные казино лаки ворлд клиенты помнят о доступности альтернативных платформ.
Параллельный портал образует полную копию основного платформы. Протоколы шифрования поддерживаются идентичными. Расчётные действия проходят через те же шлюзы.
Методика заведения учётной записи через дополнительный ссылку включает обычной проверки. Администраторы требуют бумаги для исполнения KYC-регламентов. Идентификационные параметры подвергаются двухфакторную проверку.
Вносительные границы на зеркальных площадках соответствуют главным условиям. Начальные взносы остаются константными. Растущие призовые фонды синхронизируются между множественными адресами.
Льготные механизмы выполняются комплексно на дополнительных платформах. Коэффициент оборота удерживает базовые параметры. Длительность использования поддерживается.
Департамент сопровождения анализирует вопросы с дополнительных ресурсов сходным образом. Живой общение обеспечивает непрерывный формат деятельности.
Новейшие клиенты пересекаются с набором технических нюансов при работе с лицензированными порталами. Профильные ресурсы типа Гризли казино обеспечивают релевантную данные о деятельности гэмблинговых компаний.
Механизм подтверждения счета охватывает ряд принудительных уровней. Начальная проверка включает отправки бумаг валидирующих индивидуальность. Классический перечень охватывает удостоверение личности, автолицензию или международный паспорт.
Системная часть регистрации содержит использование SSL-шифрования и многофакторной защиты. Квалифицированные игроки рекомендуют включать полный набор доступных функций защиты.
Запасные домены образуют абсолютные отражения базового домена с поддержанием всего инструментария. Ключевое выгода выражается в подобии платежных лимитов и условий проигрыша.
Механизм выявления функционирующих запасных доменов строится на наблюдении профессиональных телеграм-каналов и партнерских сайтов. Профессиональные участники внедряют прокси-соединения для создания стабильного соединения без оглядки от локальных барьеров.
Проверенные платформы азартных сервисов предоставляют игрокам шанс к элитному гэмблингу через профильные домены, включая лова казино , которые именно исполняют мировые нормы security.
Последовательность регистрации necessita указания валидационных данных через защищённые SSL-протоколы. Операторы просят документальное подтверждение дееспособности и адреса проживания для исполнения правовых критериев.
Двухэтапная проверка становится required элементом современных систем конфиденциальности. Участники приобретают SMS-пароли, push-notification или задействуют специальные программы типа Google Authenticator.
Зеркальные ссылки нейтрализуют трудности territorial барьеров и DDoS-атак. По сути зеркала составляют тождественные dublicates базового портала с maintaining возможностей и user деталей.
Экспертные клиенты советуют сохранять свежие списки working mirrors в закладках browser. Букмекеры доставляют новости о fresh адресах через мейл, Telegram-communities и портативные программы.
Платёжные транзакции через официальные порталы покрыты шифровальными системами категории банковского индустрии. Снятие денег происходит исключительно на подтверждённые данные собственника аккаунта.
Howdy would you mind sharing which blog platform you’re working with?
I’m looking to start my own blog soon but I’m having a tough time making a decision between BlogEngine/Wordpress/B2evolution and Drupal.
The reason I ask is because your design seems different then most blogs
and I’m looking for something completely unique. P.S
Apologies for being off-topic but I had to ask!
Feel free to surf to my page; realtor in Torrance CA
46013EzequielWisero abc
Нынешние гемблеры натыкаются с барьером доступа к легальным порталам. Провайдеры ограничивают первичные домены, но грамотные казино РЎСѓРєР° посетители учитывают о доступности альтернативных платформ.
Дополнительный домен составляет идентичную воспроизведение базового ресурса. Криптографические алгоритмы поддерживаются неизменными. Финансовые действия осуществляются через равнозначные системы.
Схема оформления профиля через параллельный домен содержит типовой верификации. Администраторы требуют свидетельства для осуществления KYC-требований. Индивидуальные параметры выполняют многоуровневую проверку.
Вносительные лимиты на альтернативных порталах идентичны базовым спецификациям. Минимальные беты продолжают постоянными. Растущие банки объединяются между разными ресурсами.
Премиальные механизмы выполняются всесторонне на зеркальных площадках. Коэффициент оборота сохраняет оригинальные цифры. Длительность отыгрыша не изменяется.
Сервис обслуживания рассматривает тикеты с альтернативных ресурсов аналогично. Прямой чат осуществляет постоянный формат работы.
Отбор безопасного азартного портала заставляет детального исследования лицензионных сертификатов. Актуальные сайты типпи казино гарантируют участникам максимальную информацию о собственных санкциях.
Алгоритм получения доступа содержит определенное количество принудительных шагов верификации. Представители запрашивают документы, подтверждающие личность и зрелость. Традиционный KYC-процесс длится от 24 до 72 временных отрезков.
Банкролл-менеджмент открывается с фиксации пределов на инвестиции. Искусные клиенты рекомендуют внедрять правило 5% от суммарного азартного средств на отдельную игру.
Системные барьеры операторов обязывают использовать дополнительные адреса. Зеркала сохраняют безусловную производительность первичного сайта, содержа журнал транзакций и гемблинг прогресс.
Инновационные финансовые методы поддерживают моментальные вклады через блокчейн портмоне. Bitcoin, Ethereum и стейблкоины поддерживают тайность и крошечные взносы. Срок осуществления получений доходит 10-30 интервалов.
Программы преданности подразумевают каскадные уровни с увеличивающимся вознаграждением. VIP-кураторы предоставляют личные поощрения, увеличенные пределы и преимущественную поддержку.
What stood out about this casino https://magosan.com.br/site/mobile-gambling-assessment-essential-criteria-for-2/ is the variety of the games. Everything runs smoothly, the design is clean, and there’s plenty of options to explore, which keeps it engaging.
Проверенные ресурсы игровых предложений гарантируют геймерам вариант к элитному развлечениям через профильные ресурсы, включая казино типпи , что соблюдают общепринятые требования security.
Процедура регистрации подразумевает заполнения идентификационных информации через encrypted SSL-линии. Операторы запрашивают официальное доказательство совершеннолетия и места регистрации для поддержания legal правил.
2FA authentication является необходимым элементом современных solutions безопасности. Users имеют SMS-ключи, push-notification или задействуют targeted утилиты вроде Google Authenticator.
Зеркальные адреса ликвидируют трудности geographic ограничений и DDoS-штурмов. С технической точки зрения mirrors формируют тождественные версии главного домена с обеспечением features и индивидуальных параметров.
Skilled клиенты призывают сохранять current реестры рабочих копий в закладках браузера. Букмекеры доставляют информацию о свежих URL через email, Telegram-группы и портативные софт.
Платёжные транзакции через проверенные ресурсы secured cryptographic протоколами стандарта банковского сектора. Изъятие денег осуществляется исключительно на подтверждённые карты хозяина account.
79815KallieLampeyo abc
Поиск в сфере сертифицированных площадок требует осознания новых технологий подключения. Продвинутые геймеры применяют lucky bear казино РїСЂРѕРјРѕРєРѕРґ бездепозитный Р±РѕРЅСѓСЃ для получения релевантной информации о работающих путях.
Схема формирования профиля в проверенных организациях охватывает комплексную аутентификацию. Современные компании эксплуатируют KYC-системы и AML-критерии. Оформление документов отнимает от 24 до 72 периодов.
Программные методы для прохождения препятствий эволюционируют сообща с интенсификацией нормативных шагов. VPN-инструменты типа premium обеспечивают защиту AES-256 и технологии OpenVPN. Непрерывность связи критически значима для высокоролловых раундов.
Дублирующие адреса функционируют через регионально распределенные компьютерные мощности. CDN-сети предоставляют сокращенную латентность для американских геймеров. Системное маршрутизация включается при идентификации недоступности первичного ресурса.
Банковские манипуляции в сертифицированных территориях отвечают определенным критериям PCI DSS. Криптовалютные расчеты завоевывают актуальность в результате скрытности и темпу процессинга.
Портативные утилиты премиальных организаций включают физиологическую авторизацию и push-алерты для существенных моментов. Модифицируемый внешний вид автономно подстраивается под характеристики панели.
Find it here
where to get fluoxetine without rx
to reinforce your knowledge.
Игровая область являет динамичный подъём, манящая массы пользователей. Профессиональные порталы предоставляют надёжную пространство для пари. Детальную информацию о подобных организациях возможно найти на казино ретро .
Легализация остаётся главным фактором селекции сайта. Надзорные органы Мальты создают жёсткий контроль экономических операций. Конкретная легальная ресурс проходит периодические контроли RNG-механизмов.
Компьютерные параметры инновационных гемблинг-сайтов предусматривают SSL-защиту финансового стандарта. Поставщики программного обеспечения наподобие Microgaming, NetEnt, Pragmatic Play встраивают усовершенствованные системы рандомных значений.
Алгоритм аутентификации профиля предполагает подачи документов KYC-класса. Свидетельство, документ о доходах, подтверждение проживания — стандартный комплект для полноценного авторизации.
Зеркальные URL исправляют трудности с цензурой провайдеров. Свежие зеркала изменяются каждый день компьютерными группами. Планшетные софт часто выполняются надёжнее браузерных версий.
Управление банкроллом формирует длительную прибыльность гемблинговых сессий. Экспертные геймеры рекомендуют лимитировать размер бета до 1-2% от итогового фонда.
Актуальные сервисы развлекательных игр обеспечивают участникам возможность к премиальному развлечениям через защищенные mad casino платформы. Легальная деятельность влечет учета жестких регуляторных положений.
Процесс открытия индивидуального профиля задействует подтверждение конфиденциальных показателей. Операторы эксплуатируют углубленные системы KYC и AML для блокировки нарушающих операций.
Технические средства актуальных развлекательных порталов функционируют на зашифрованных хостингах с шифровальными сертификатами. Геоблокировка обязывает операторов организовывать вспомогательные URL.
Альтернативные ресурсы составляют точные дубликаты центрального домена с сохранением всех возможностей и показателей. Участники достигают постоянный вход к капиталу, азартной истории и персональным параметрам.
Платежные процедуры осуществляются через подключенные финансовые сервисы. Лимиты на пополнения и выводы фиксируются в согласии с регуляторными условиями и собственными политиками снижения потерь.
Компетентные гемблеры советуют контролировать состояние аккредитации через государственные списки гемблинг организаций. Имиджевые характеристики содержат ранги на специализированных сайтах и комментарии истинных участников.
19135DesmondParcello abc
Поиск в секторе официальных ресурсов нуждается представления продвинутых способов подключения. Продвинутые игроки применяют Болливуд казино для получения релевантной сведений о действующих адресах.
Процесс открытия личного кабинета в лицензированных компаниях предполагает сложную аутентификацию. Новейшие компании внедряют KYC-процедуры и AML-нормы. Оформление документов занимает от 24 до 72 временных отрезков.
Технические инструменты для избежания ограничений эволюционируют вместе с интенсификацией регуляторных мер. VPN-службы класса premium предоставляют криптографию AES-256 и протоколы OpenVPN. Непрерывность канала критически актуальна для VIP партий.
Резервные адреса функционируют через локально рассредоточенные серверные инфраструктуры. CDN-структуры гарантируют оптимальную латентность для американских клиентов. Техническое перенаправление срабатывает при идентификации блокировки основного сайта.
Денежные манипуляции в легальных юрисдикциях подпадают под строгим критериям PCI DSS. Криптовалютные операции приобретают распространение вследствие анонимности и скорости осуществления.
Переносные программы ведущих брендов содержат физиологическую проверку и push-оповещения для ключевых событий. Изменяемый оформление самостоятельно подстраивается под особенности панели.
Игровая область являет активный подъём, манящая миллионы игроков. Экспертные площадки гарантируют безопасную среду для игры. Детальную факты о подобных провайдерах допустимо отыскать на казино ДживиСпин .
Аттестация является центральным критерием отбора ресурса. Регуляторы Олдерни дают жёсткий контроль расчётных операций. Конкретная аккредитованная сайт выполняет периодические проверки RNG-механизмов.
Компьютерные особенности передовых беттинг-платформ содержат SSL-безопасность банковского стандарта. Производители виртуального софта типа Microgaming, NetEnt, Pragmatic Play добавляют усовершенствованные модели хаотичных показателей.
Схема верификации профиля включает направления бумаг KYC-типа. Свидетельство, выписка о заработке, подтверждение прописки — классический комплект для завершённого подключения.
Резервные домены убирают проблемы с цензурой компаний. Рабочие варианты адаптируются каждый день IT командами. Смартфонные программы регулярно функционируют стабильнее веб версий.
Банкролл-менеджмент определяет долгосрочную результативность беттинговых периодов. Опытные беттеры указывают урезать объём депозита до 1-2% от совокупного капитала.
Активные дублирующие порталы проверенных гемблинг-платформ на Болливуд казино дают устойчивый соединение к развлекательным ресурсам. Схема зеркалирования генерирует идентичные копии центрального веб-площадки с консервацией всех опций.
Механизм оформления профиля через зеркало полностью повторяет стандартную шаблон. Только пришедшие игроки заполняют активный email, формируют безопасный пароль и устанавливают операционную финансовый инструмент.
Верификация личного кабинета подразумевает передачи документов в соответствии с KYC-регламенту. Фото национального документа, доказательство регистрации и денежные сведения контролируются системой машинную валидацию в течение 24-72 временных единиц.
Подключение существующих участников происходит через обычную форму с двухфакторной идентификацией. Временные шифры поступают на смс девайс или мейл.
Механизмы депозитного раздела через альтернативные домены содержит востребованные расчетные сервисы. Visa, Mastercard, виртуальные счета Skrill, Neteller, цифровые активы Bitcoin, Ethereum выполняются с оптимизированными сборами 0-3%.
Гемблинг база воспроизводится абсолютно включая spinning games, традиционные геймплей, live-дилеров и накопительные призы. RTP-коэффициенты, дисперсия и отыгрыш остаются неизменными.
Подарочная схема оперирует идентично корневому ресурсу. Welcome-бандлы, фриспины, денежный возврат и VIP-системы запускаются автоматически при исполнении прописанных критериев.
шейк номерной Ищете выгодное предложение? Shaik по номерам оптом – это отличный выбор для вашего бизнеса. Широкий ассортимент, высокое качество и конкурентоспособные цены – все, что нужно для успешной торговли парфюмерией.
Нынешние геймеры оказываются с барьером связи к сертифицированным платформам. Провайдеры фильтруют основные порталы, но профессиональные лаки Р±РёСЂ казино пользователи учитывают о доступности дублирующих ресурсов.
Альтернативный адрес представляет полную отображение оригинального сайта. Протоколы шифрования функционируют равнозначными. Финансовые переводы реализуются через идентичные сервисы.
Технология оформления профиля через зеркальный адрес подразумевает типовой аутентификации. Менеджеры запрашивают справки для соблюдения KYC-норм. Идентификационные параметры реализуют многоуровневую подтверждение.
Пополнительные пределы на дополнительных площадках идентичны первичным требованиям. Низшие суммы остаются постоянными. Возрастающие накопления интегрируются между множественными ресурсами.
Стимулирующие системы функционируют целостно на зеркальных площадках. Вейджер обеспечивает стартовые величины. Период действия оборота поддерживается.
Команда помощи решает обращения с дополнительных адресов равнозначно. Прямой диалог осуществляет непрерывный режим оперирования.
It’s actually very complicated in this busy life to listen news on TV, therefore
I simply use web for that reason, and take
the most recent news.
Also visit my web blog real estate agent Hoboken NJ
Wow, wonderful blog layout! How long have you been blogging for?
you made blogging look easy. The overall look of your website is wonderful, let alone the content!
Review my web blog … best realtor in Parker County TX
37561EvangelinaLounsberyo abc
Have you ever thought about including a little bit more than just
your articles? I mean, what you say is important and all.
However imagine if you added some great pictures or video clips to give
your posts more, “pop”! Your content is excellent but
with images and video clips, this website could definitely be one of the very best in its niche.
Good blog!
My web-site :: сео продвижение мегагрупп
Определение качественного игрового портала в современных реалиях нуждается специального анализа к правовому режиму. Профессиональные игроки знают, что казино миллионъ предоставляет последнюю факты о работающих ресурсах.
Процесс открытия счета в сертифицированных платформах предусматривает требуемую подтверждение идентичности. KYC-стандарты защищают как сервис, так и участника от обмана. Краткосрочные ограничения на перечисление активов до выполнения валидации – обычная методика.
Электронные блокировки на соединение к гемблинг порталам обходятся через зеркальные порталы. Рабочие зеркала обеспечивают абсолютную работоспособность базового сайта. Финансовые движения, развлекательный достижения и бонусные предложения поддерживаются константными.
Финансовая безопасность характеризуется уровнем внедренных платежных механизмов. SSL-безопасность, PCI DSS подтверждение и усиленная идентификация гарантируют прочный контур безопасности.
Азартная коллекция сертифицированных сервисов предоставляет автоматы от главных создателей. RTP-значения, изменчивость и статистические схемы проходят объективную проверку в авторизованных лабораториях.
Механизмы вознаграждения в профессиональных сервисах строятся на ясных требованиях вейджера. Условия ставок x35-40 оценивается разумным для барабан-бонусов, в то время как стандартные забавы принимаются в калькуляцию с уменьшенным показателем.
Отбор проверенного игорного оператора требует серьезного изучения регулятивных сертификатов. Актуальные системы Голд казино предлагают пользователям безусловную детали о текущих допусках.
Процедура создания профиля подразумевает различные требуемых ступеней верификации. Владельцы требуют справки, засвидетельствующие персону и правоспособность. Стандартный KYC-алгоритм составляет от 24 до 72 периодов.
Банкролл-менеджмент инициируется с задания пределов на депозиты. Опытные участники предлагают задействовать установку 5% от полного гемблинг бюджета на конкретную партию.
Программные запреты владельцев заставляют задействовать дополнительные маршруты. Зеркала поддерживают полную функциональность базового платформы, охватывая историю платежей и игровой достижения.
Актуальные денежные инструменты дают скоростные вклады через блокчейн хранилища. Bitcoin, Ethereum и постоянные токены поддерживают тайность и символические сборы. Время выполнения извлечений равно 10-30 отрезков.
Алгоритмы приверженности охватывают градационные статусы с возрастающим возвратом. VIP-представители гарантируют индивидуальные вознаграждения, повышенные границы и преимущественную техподдержку.
Usually I do not learn post on blogs, however I wish to say that this write-up very pressured me to try
and do so! Your writing taste has been surprised
me. Thank you, very nice article.
My site :: realtor in Austin TX
57205BrittaneyBiancuzzoo abc
Актуальные игроки пересекаются с изобилием программных особенностей при операциях с легальными порталами. Профильные источники типа лаки Р±РёСЂ казино поставляют новую контент о процессах казино организаций.
Алгоритм аутентификации учетной записи предполагает ряд требуемых уровней. Исходная валидация нуждается передачи бумаг валидирующих личность. Классический список охватывает удостоверение личности, права или международное ID.
Технологическая компонента создания аккаунта охватывает эксплуатацию SSL-шифрования и многофакторной защиты. Профессиональные участники советуют активировать весь комплекс представленных возможностей безопасности.
Альтернативные адреса формируют абсолютные копии основного платформы с обеспечением тотального арсенала. Главное бонус заключается в тождественности платежных пределов и требований условий прокрутки.
Схема поиска действующих дублирующих порталов строится на проверке экспертных новостных лент и аффилированных порталов. Квалифицированные геймеры применяют VPN-сервисы для формирования бесперебойного подключения независимо от местных блокировок.
Азартная отрасль представляет быстрый развитие, притягивая миллионы игроков. Экспертные ресурсы дают безопасную пространство для беттинга. Детальную информацию о таких операторах допустимо найти на казино ДживиСпин .
Аттестация является главным фактором выбора ресурса. Лицензиаты Гибралтара создают строгий надзор экономических процедур. Отдельная лицензированная площадка выполняет систематические ревизии RNG-систем.
Цифровые характеристики инновационных беттинг-платформ объединяют SSL-кодирование денежного ранга. Разработчики виртуального материала уровня Microgaming, NetEnt, Pragmatic Play внедряют сложные системы хаотичных показателей.
Алгоритм верификации личного кабинета требует направления справок KYC-типа. Свидетельство, документ о финансах, подтверждение адреса — обычный список для итогового активации.
Альтернативные домены решают препятствия с цензурой поставщиков. Свежие зеркала корректируются систематически IT группами. Карманные клиенты часто оперируют устойчивее браузерных модификаций.
Банкролл-менеджмент определяет долгосрочную эффективность развлекательных циклов. Профессиональные геймеры советуют урезать величину пари до 1-2% от итогового банкролла.
остров краби как добраться с пхукета кто поможет с базой в краби браинрот
Отбор надежного азартного ресурса предполагает тщательного исследования лицензионных документов. Передовые системы лаки Р±РёСЂ казино дают игрокам стопроцентную данные о своих допусках.
Алгоритм регистрации включает множество требуемых ступеней верификации. Операторы запрашивают удостоверения, доказывающие личность и совершеннолетие. Стандартный KYC-процесс продолжается от 24 до 72 временных отрезков.
Финансовое планирование запускается с назначения пределов на депозиты. Квалифицированные клиенты настаивают задействовать принцип 5% от суммарного азартного средств на индивидуальную заход.
Программные блокировки администраторов обязывают использовать запасные домены. Клоны хранят стопроцентную активность центрального площадки, подразумевая архив операций и развлекательный успех.
Передовые расчетные сервисы дают скоростные взносы через криптовалютные аккаунты. Bitcoin, Ethereum и стабильные валюты предоставляют скрытность и символические взносы. Длительность выполнения выводов насчитывает 10-30 периодов.
Схемы постоянства содержат градационные статусы с нарастающим бонусом. VIP-представители предоставляют уникальные бонусы, повышенные пределы и приоритетную сервис.
Нынешние участники пересекаются с огромным количеством системных нюансов при деятельности с проверенными ресурсами. Профессиональные платформы типа казино СЌРЅРѕРјРѕ обеспечивают актуальную данные о операциях казино провайдеров.
Система верификации аккаунта охватывает ряд необходимых фаз. Стартовая подтверждение подразумевает передачи справок валидирующих индивидуальность. Обычный список содержит документ, автоудостоверение или заграничное удостоверение.
Технологическая составляющая оформления включает эксплуатацию криптографической защиты и двухфакторной аутентификации. Опытные клиенты предлагают активировать совокупность доступных возможностей защиты.
Резервные ссылки формируют стопроцентные реплики центрального ресурса с удержанием полного набора функций. Главное выгода выражается в подобии платежных пределов и параметров проигрыша.
Алгоритм поиска действующих альтернативных адресов строится на наблюдении экспертных уведомительных сервисов и союзных площадок. Профессиональные клиенты применяют прокси-соединения для предоставления стабильного соединения независимо от региональных барьеров.
Iver Protocols Guide: Iver Protocols Guide – Iver Protocols Guide
禁忌第一季高清完整版结合大数据AI分析,海外华人可免费观看最新热播剧集。
36370JeffereyHofflero abc
vavada mines pravila http://vavada2010.help
Актуальные клиенты имеют дело с массой программных нюансов при функционировании с проверенными платформами. Тематические платформы типа mad casino обеспечивают релевантную материалы о деятельности игорных операторов.
Система подтверждения аккаунта предполагает ряд требуемых шагов. Стартовая верификация включает размещения документов валидирующих персону. Обычный перечень подразумевает ID, автолицензию или загранпаспорт.
Программная компонента записления охватывает использование защищенного протокола и двухфакторной аутентификации. Квалифицированные игроки подсказывают инициировать совокупность имеющихся функций защиты.
Дублирующие порталы образуют точные копии базового сайта с удержанием исчерпывающего инструментария. Ключевое преимущество содержится в тождественности банковских ограничений и параметров отыгрыша.
Система выявления действующих запасных доменов строится на мониторинге специализированных новостных лент и связанных сайтов. Продвинутые геймеры применяют анонимайзеры для обеспечения надежного связи безотносительно от локальных лимитов.
Отбор достойного betting оператора в нынешних реалиях подразумевает тщательного внимания к правовому состоянию. Опытные игроки знают, что казино Голд демонстрирует актуальную данные о работающих операторах.
Схема создания аккаунта в легальных операторах объединяет обязательную валидацию личности. KYC-стандарты охраняют как заведение, так и участника от обмана. Промежуточные лимиты на перечисление средств до финализации проверки – нормальная практика.
Технические ограничения на доступ к игровым площадкам обходятся через резервные ссылки. Активные зеркала гарантируют стопроцентную функциональность центрального сайта. Платежные транзакции, интерактивный достижения и льготные схемы продолжают устойчивыми.
Экономическая надежность характеризуется уровнем задействованных платежных способов. SSL-безопасность, PCI DSS подтверждение и усиленная подтверждение устанавливают защищенный щит безопасности.
Геймплейная коллекция лицензированных площадок предоставляет автоматы от главных студий. RTP-параметры, изменчивость и расчетные формулы получают нейтральную валидацию в авторизованных центрах.
Системы вознаграждения в серьезных площадках основываются на открытых условиях отыгрыша. Условия ставок x35-40 расценивается разумным для машина-льгот, в то время как стандартные активности идут в зачет с сниженным процентом.
Рабочие дублирующие порталы проверенных gaming-операторов на тип топ казино предоставляют устойчивый подключение к игровым порталам. Принцип зеркалирования создает полноценные реплики базового домена с сохранением всех механизмов.
Алгоритм регистрации через зеркало полностью копирует оригинальную заявку. Свежие клиенты регистрируют действующий email, формируют сложный шифр и назначают базовую денежную единицу.
Валидация аккаунта предполагает отправки свидетельств по KYC-стандартам. Копия национального документа, подтверждение адреса и денежные параметры подвергаются цифровую валидацию в течение 24-72 периодов.
Логин зарегистрированных игроков осуществляется через обычную панель с многоступенчатой валидацией. Одноразовые коды отправляются на смс гаджет или мейл.
Функционал финансового компонента через дублирующие порталы включает востребованные финансовые платформы. Visa, Mastercard, электронные кошельки Skrill, Neteller, блокчейн-токены Bitcoin, Ethereum осуществляются с низкими процентами 0-3%.
Гемблинг ассортимент клонируется абсолютно включая слоты, столовые активности, live-хостов и джекпоты. RTP-индикаторы, изменчивость и вейджер фиксируются такими же.
Акционная схема действует идентично центральному домену. Welcome-предложения, безвозмездные спины, refund и VIP-курсы запускаются программно при исполнении определенных условий.
Инновационные сервисы азартных развлечений дают игрокам подключение к качественному азарту через сертифицированные казино ДживиСпин сайты. Официальная деятельность нуждается следования строгих регуляторных норм.
Механизм оформления клиентского счета содержит верификацию конфиденциальных сведений. Операторы используют комплексные системы KYC и AML для блокировки поддельных переводов.
IT решения передовых развлекательных порталов основываются на безопасных инфраструктурах с SSL технологиями. Геоблокировка принуждает владельцев запускать резервные URL.
Резервные домены составляют эквивалентные дубликаты центрального ресурса с поддержанием всех сервисов и информации. Беттеры достигают стабильный соединение к капиталу, игровой отчетности и пользовательским настройкам.
Финансовые транзакции осуществляются через связанные расчетные системы. Лимиты на пополнения и выводы фиксируются в унисон с нормативными стандартами и корпоративными политиками минимизации опасностей.
Экспертные игроки советуют контролировать состояние аккредитации через официальные регистры развлекательных структур. Имиджевые критерии задействуют места на профильных ресурсах и feedback реальных клиентов.
Dit verhaal heeft mij geïnspireerd om een hulp tе leveren.
Visit my hоmepage :: Staaroperatie Financiering
7663AugustusWashamo abc
Определение достойного игрового оператора в нынешних рамках предполагает особого рассмотрения к регулятивному состоянию. Знающие игроки учитывают, что типпи казино отображает последнюю сведения о действующих провайдерах.
Процедура регистрации в лицензированных платформах содержит требуемую валидацию документов. KYC-нормы оберегают как казино, так и участника от махинаций. Временные границы на снятие капитала до окончания проверки – привычная система.
Технические ограничения на соединение к игровым сайтам преодолеваются через резервные домены. Рабочие отражения поддерживают абсолютную работоспособность первичного ресурса. Денежные процедуры, геймплейный достижения и поощрительные планы сохраняются постоянными.
Капитальная безопасность выражается уровнем эксплуатируемых платежных механизмов. SSL-кодирование, PCI DSS аттестация и многоуровневая верификация обеспечивают безопасный контур безопасности.
Развлекательная ассортимент легальных сервисов предоставляет барабаны от топовых студий. RTP-значения, волатильность и статистические принципы подвергаются нейтральную сертификацию в одобренных организациях.
Планы лояльности в профессиональных операторах основываются на прозрачных критериях отыгрыша. Проигрыш x35-40 характеризуется справедливым для спин-льгот, в то время как стандартные состязания включаются в счет с уменьшенным показателем.
Выбор безопасного развлекательного площадки подразумевает основательного разбора лицензионных сертификатов. Новые платформы СЌРЅРѕРјРѕ казино обеспечивают пользователям полную детали о имеющихся санкциях.
Механизм получения доступа включает множество обязательных ступеней аутентификации. Владельцы требуют бумаги, подтверждающие идентичность и возраст. Традиционный KYC-порядок длится от 24 до 72 часов.
Распоряжение капиталом запускается с фиксации пределов на вклады. Опытные геймеры рекомендуют задействовать закон 5% от общего азартного резерва на отдельную раунд.
Цифровые барьеры операторов заставляют задействовать запасные домены. Альтернативы поддерживают абсолютную работоспособность центрального платформы, охватывая хронологию переводов и развлекательный результаты.
Новые платежные способы поддерживают быстрые пополнения через виртуальные кошельки. Bitcoin, Ethereum и стабильные валюты обеспечивают скрытность и мизерные отчисления. Срок осуществления получений доходит 10-30 минут.
Алгоритмы верности подразумевают градационные статусы с возрастающим кэшбэком. VIP-координаторы предоставляют индивидуальные награды, усиленные пределы и преимущественную помощь.
When someone writes an post he/she keeps the plan of a user in his/her
brain that how a user can be aware of it. Therefore that’s why this article is perfect.
Thanks!
Feel free to visit my web page … real estate agent Austin TX
34670PalmiraNewenleo abc
manta bridge polkadot
Подбор качественного азартного ресурса в нынешних реалиях предполагает повышенного изучения к правовому режиму. Профессиональные геймеры знают, что РЎСѓРєР° казино включает современную факты о работающих операторах.
Схема регистрации в официальных платформах включает неизбежную валидацию документов. KYC-нормы защищают как площадку, так и клиента от махинаций. Временные границы на перечисление активов до закрытия проверки – обычная методика.
Электронные запреты на соединение к азартным площадкам нейтрализуются через дублирующие домены. Функционирующие зеркала поддерживают тотальную функциональность основного сервиса. Платежные транзакции, интерактивный достижения и поощрительные системы остаются устойчивыми.
Денежная безопасность выражается качеством применяемых финансовых инструментов. SSL-кодирование, PCI DSS сертификация и дополнительная идентификация формируют стабильный щит защиты.
Игровая каталог легальных заведений предоставляет автоматы от лидирующих производителей. RTP-коэффициенты, колебания и статистические принципы получают нейтральную сертификацию в авторизованных учреждениях.
Планы стимулирования в качественных казино опираются на открытых параметрах проигрыша. Требования x35-40 признается адекватным для автомат-бонусов, в то время как настольные активности идут в зачет с минимальным множителем.
Поиск легального казино площадки предполагает детального исследования лицензионных бумаг. Современные платформы казино Клубника дают игрокам стопроцентную данные о имеющихся лицензиях.
Система оформления счета содержит различные ключевых ступеней верификации. Операторы истребуют удостоверения, засвидетельствующие индивидуальность и зрелость. Обычный KYC-регламент требует от 24 до 72 периодов.
Финансовое планирование запускается с фиксации пределов на пополнения. Опытные клиенты настаивают внедрять закон 5% от совокупного казино фонда на конкретную партию.
Программные запреты провайдеров заставляют внедрять дополнительные домены. Альтернативы хранят безусловную функциональность базового платформы, предусматривая летопись переводов и игровой успех.
Инновационные расчетные сервисы предоставляют быстрые депозиты через цифровые кошельки. Bitcoin, Ethereum и фиксированные активы поддерживают приватность и символические взносы. Продолжительность обработки выводов равно 10-30 промежутков.
Схемы приверженности охватывают многоуровневые категории с накапливающимся вознаграждением. VIP-координаторы предоставляют уникальные вознаграждения, увеличенные ограничения и первоочередную помощь.
Актуальные mirror-ссылки лицензированных игорных заведений на казино Килограмм предоставляют устойчивый коннект к геймерским ресурсам. Методика клонирования формирует точные реплики основного ресурса с сохранением всех механизмов.
Система открытия счета через альтернативный домен в точности копирует оригинальную шаблон. Начинающие игроки регистрируют функционирующий email, формируют сложный пароль и выбирают основную денежную единицу.
Валидация счета включает передачи документов опираясь на KYC-требованиям. Скан паспорта, свидетельство места жительства и денежные данные проверяются через программную верификацию в течение 24-72 временных единиц.
Авторизация существующих участников реализуется через базовую интерфейс с усиленной идентификацией. Краткосрочные пароли доставляются на мессенджер устройство или мейл.
Возможности входящего компонента через альтернативные домены обеспечивает топовые расчетные системы. Visa, Mastercard, электронные кошельки Skrill, Neteller, блокчейн-токены Bitcoin, Ethereum обрабатываются с сокращенными комиссиями 0-3%.
Gaming база повторяется полностью включая слоты, карточные развлечения, live-дилеров и накопительные призы. RTP-значения, вариативность и ставочные требования фиксируются точными.
Промо программа функционирует похоже главному порталу. Welcome-предложения, бесплатные вращения, компенсация и VIP-курсы запускаются программно при реализации установленных параметров.
Развлекательная сфера показывает быстрый подъём, завлекая массы игроков. Квалифицированные порталы гарантируют качественную среду для пари. Подробную материалы о этих компаниях возможно отыскать на френдс казино зеркало .
Лицензирование остаётся основным показателем селекции ресурса. Контролёры Олдерни дают строгий надзор валютных действий. Всякая официальная площадка выполняет постоянные контроли RNG-генераторов.
IT свойства новейших казино включают SSL-защиту денежного ранга. Производители программного софта типа Microgaming, NetEnt, Pragmatic Play подключают многоуровневые схемы хаотичных чисел.
Схема верификации профиля включает направления бумаг KYC-типа. Документ, подтверждение о заработке, подтверждение местожительства — базовый список для итогового авторизации.
Зеркальные ссылки решают проблемы с запретами операторов. Действующие дубли изменяются постоянно IT службами. Планшетные софт зачастую работают лучше интернет версий.
Контроль средств задаёт стратегическую доходность развлекательных раундов. Квалифицированные геймеры советуют контролировать объём пари до 1-2% от полного фонда.
65450VernNeidigero abc
Нынешние пользователи имеют дело с огромным количеством технологических нюансов при операциях с легальными ресурсами. Профильные источники типа СЌРЅРѕРјРѕ казино выдают релевантную данные о деятельности казино брендов.
Механизм подтверждения профиля подразумевает несколько обязательных этапов. Начальная верификация требует передачи удостоверений подтверждающих личность. Обычный пакет включает ID, автоудостоверение или международное ID.
Цифровая компонента оформления содержит применение зашифрованного канала и многофакторной защиты. Профессиональные геймеры рекомендуют задействовать весь комплекс предложенных опций безопасности.
Дублирующие порталы образуют абсолютные клоны основного домена с хранением полного арсенала. Ключевое бонус заключается в подобии банковских ограничений и параметров условий прокрутки.
Механизм поиска активных резервных ссылок опирается на проверке экспертных информационных каналов и партнерских ресурсов. Квалифицированные клиенты задействуют прокси-соединения для предоставления устойчивого доступа невзирая от местных лимитов.
Актуальные бетторы встречаются с затруднением подключения к легальным площадкам. Провайдеры ограничивают первичные домены, но профессиональные lucky bear казино посетители знают о существовании дублирующих платформ.
Зеркало составляет стопроцентную дубликат оригинального сайта. SSL-сертификаты поддерживаются аналогичными. Расчётные операции осуществляются через те же каналы.
Технология заведения учётной записи через зеркальный ресурс содержит типовой валидации. Менеджеры выясняют удостоверения для выполнения KYC-правил. Идентификационные характеристики реализуют многоуровневую валидацию.
Финансовые границы на зеркальных порталах совпадают главным параметрам. Стартовые ставки поддерживаются стабильными. Увеличивающиеся накопления координируются между многочисленными порталами.
Стимулирующие планы оперируют комплексно на параллельных платформах. Вейджер сохраняет оригинальные значения. Тайминг использования продолжается.
Сервис обслуживания анализирует вопросы с дополнительных адресов идентично. Мгновенный чат обеспечивает беспрерывный режим деятельности.
Игровая ниша представляет быстрый подъём, завлекая легионы геймеров. Профессиональные порталы гарантируют стабильную атмосферу для развлечений. Полную факты о данных организациях реально получить на Grizzly casino .
Лицензирование выступает основным критерием определения площадки. Регуляторы Мальты предоставляют жёсткий мониторинг валютных процедур. Всякая аккредитованная портал реализует постоянные аудиты RNG-модулей.
IT характеристики новейших беттинг-платформ предусматривают SSL-кодирование расчётного стандарта. Разработчики цифрового материала типа Microgaming, NetEnt, Pragmatic Play встраивают комплексные системы рандомных значений.
Схема верификации профиля требует подачи справок KYC-типа. ID, справка о финансах, удостоверение прописки — классический комплект для полноценного активации.
Параллельные URL убирают трудности с цензурой операторов. Свежие копии изменяются регулярно программными командами. Мобильные софт часто функционируют качественнее сетевых вариантов.
Финансовая дисциплина задаёт длительную результативность азартных партий. Профессиональные пользователи указывают урезать размер ставки до 1-2% от общего фонда.
Официальные площадки игровых возможностей предоставляют геймерам возможность к высококлассному гэмблингу через dedicated домены, включая типпи казино , которые соблюдают мировые стандарты безопасности.
Схема открытия счёта necessita ввода верификационных деталей через защищённые SSL-каналы. Администрация запрашивают нотариальное удостоверение дееспособности и места регистрации для выполнения законодательных правил.
Двухфакторная аутентификация является принудительным aspect новейших архитектур надёжности. Игроки имеют SMS-токены, push-оповещения или применяют targeted приложения по типу Google Authenticator.
Зеркальные порталы ликвидируют препятствия geographic блокировок и DDoS-штурмов. С технической точки зрения mirrors образуют копийные версии основного портала с сохранением функциональности и пользовательских информации.
Экспертные пользователи рекомендуют поддерживать актуальные списки функционирующих зеркал в закладках интернет-программы. Операторы рассылают обновления о fresh порталах через e-mail, Telegram-сообщества и телефонные приложения.
Денежные транзакции через официальные порталы гарантированы encryption methods level банковского сектора. Получение финансов производится solely на подтверждённые карты владельца учётной записи.
One of the most powerful aspects of the book is its refusal to offer a simple moral lesson. A Wuthering Heights PDF gives you access to a story that embraces ambiguity. Are we supposed to forgive Heathcliff? Is Catherine a victim or a villain? The text does not say. It presents the events and lets the reader judge. A digital copy is perfect for a close reading where you weigh the evidence on both sides. It is a complex, challenging novel that respects the intelligence of its audience, making it a rewarding read in any format.
3568OthaCliteso abc
Great post. I will be facing some of these issues as well..
My homepage; продвижение сайта в поиске яндекса
Проверенные ресурсы развлекательных возможностей дают пользователям шанс к качественному развлечениям через целевые порталы, включая Рльдорадо казино , которые исполняют transnational требования security.
Механизм создания аккаунта necessita предоставления проверочных параметров через криптографические SSL-соединения. Администрация просят документальное verification возраста и локации проживания для исполнения правовых стандартов.
Двухэтапная authentication представляет необходимым частью современных систем надёжности. Users приобретают SMS-шифры, push-алерты или задействуют профессиональные приложения по типу Google Authenticator.
Альтернативные URL ликвидируют препятствия локальных запретов и DDoS-нападений. Технически mirrors являют тождественные dublicates primary платформы с поддержанием опций и пользовательских параметров.
Компетентные игроки рекомендуют хранить обновлённые списки активных зеркал в избранном веб-клиента. Провайдеры передают updates о современных доменах через электронную почту, Telegram-группы и телефонные приложения.
Финансовые транзакции через официальные порталы secured cryptographic methods стандарта банковского сектора. Снятие финансов осуществляется solely на верифицированные реквизиты держателя аккаунта.
Новейшие сервисы игорных игр дают клиентам путь к профессиональному развлечениям через сертифицированные типпи казино порталы. Легальная работа подразумевает учета четких контролирующих критериев.
Механизм оформления пользовательского аккаунта задействует подтверждение личных информации. Регуляторы внедряют расширенные процедуры KYC и AML для недопущения незаконных операций.
Программные инструменты новейших игорных домов базируются на надежных дата-центрах с криптографическими технологиями. Территориальные ограничения вынуждает управляющих разрабатывать альтернативные порталы.
Резервные ресурсы являют собой идентичные дубликаты центрального ресурса с сохранением всех функций и информации. Игроки добиваются постоянный соединение к счету, гемблинг истории и пользовательским параметрам.
Платежные переводы проходят через интегрированные финансовые шлюзы. Ограничения на инвестиции и обналичивания регулируются в гармонии с нормативными требованиями и внутренними правилами риск-менеджмента.
Компетентные пользователи советуют проверять условия авторизации через регуляторные регистры азартных организаций. Репутационные характеристики предусматривают места на отраслевых порталах и feedback реальных клиентов.
18870ErikVigueo abc
Определение проверенного betting портала в текущих условиях требует особого анализа к регулятивному положению. Опытные участники знают, что Килограмм казино предоставляет актуальную информацию о функционирующих провайдерах.
Алгоритм записи в легальных заведениях включает неизбежную проверку личности. KYC-правила обеспечивают как заведение, так и участника от фрода. Промежуточные рамки на вывод средств до закрытия подтверждения – обычная подход.
Цифровые ограничения на подключение к развлекательным сервисам устраняются через параллельные порталы. Действующие дубликаты сохраняют всестороннюю работоспособность первичного портала. Расчетные переводы, азартный статистика и поощрительные системы сохраняются константными.
Экономическая надежность выражается показателем эксплуатируемых банковских способов. SSL-криптография, PCI DSS аттестация и усиленная проверка устанавливают безопасный заслон обороны.
Игровая набор лицензированных операторов содержит слоты от главных провайдеров. RTP-индексы, дисперсия и алгоритмические системы получают независимую аудит в аккредитованных лабораториях.
Программы стимулирования в качественных заведениях опираются на прозрачных параметрах проигрыша. Вейджер x35-40 признается адекватным для барабан-поощрений, в то время как классические игры принимаются в счет с редуцированным множителем.
For perspective
Instant cash pay day loans
for practical demonstrations.
Нынешние игроки натыкаются с сложностью доступа к лицензированным ресурсам. Компании закрывают основные порталы, но знающие Килограмм казино пользователи знают о функционировании зеркальных площадок.
Параллельный портал формирует идентичную копию первичного ресурса. Криптографические алгоритмы сохраняются аналогичными. Расчётные переводы производятся через те же шлюзы.
Процедура оформления профиля через параллельный ресурс подразумевает обычной валидации. Администраторы просят документы для осуществления KYC-стандартов. Идентификационные параметры проходят многоуровневую верификацию.
Банковские ограничения на альтернативных ресурсах соответствуют стандартным параметрам. Низшие взносы сохраняются константными. Возрастающие банки координируются между разными ресурсами.
Премиальные механизмы выполняются завершённо на резервных сайтах. Вейджер поддерживает первоначальные параметры. Длительность отыгрыша не изменяется.
Отдел поддержки изучает вопросы с альтернативных доменов аналогично. Прямой диалог предоставляет беспрерывный формат деятельности.
Incredible points. Solid arguments. Keep up the good
work.
My page; real estate agent Austin TX
Передовые бетторы натыкаются с затруднением входа к легальным порталам. Операторы фильтруют стандартные порталы, но искушённые Либет официальный сайт клиенты знают о существовании зеркальных ресурсов.
Резервная ссылка формирует точную воспроизведение базового ресурса. SSL-сертификаты остаются неизменными. Денежные транзакции выполняются через сходные механизмы.
Процедура заведения учётной записи через альтернативный адрес подразумевает классической подтверждения. Сотрудники просят справки для реализации KYC-регламентов. Персональные характеристики выполняют многоуровневую валидацию.
Пополнительные ограничения на дополнительных площадках совпадают первичным параметрам. Начальные беты продолжают стабильными. Растущие призовые фонды согласовываются между многочисленными адресами.
Стимулирующие механизмы действуют завершённо на зеркальных сайтах. Требования по обороту гарантирует оригинальные показатели. Тайминг оборота продолжается.
Сервис обслуживания анализирует вопросы с резервных ресурсов идентично. Онлайн разговор осуществляет постоянный график работы.
It is the best time to make some plans for the future
and it is time to be happy. I’ve read this post and if I could
I wish to suggest you few interesting things or advice.
Maybe you could write next articles referring to this article.
I wish to read even more things about it!
My web-site; best real estate agent in Andover MA
Нынешние гемблеры попадают с проблемой входа к проверенным порталам. Провайдеры блокируют первичные ссылки, но профессиональные лаки Р±РёСЂ казино официальный сайт пользователи понимают о существовании резервных сайтов.
Альтернативный адрес образует стопроцентную отображение первичного портала. Системы безопасности поддерживаются аналогичными. Банковские процедуры проходят через аналогичные механизмы.
Алгоритм создания аккаунта через резервный портал подразумевает классической валидации. Администраторы уточняют справки для соблюдения KYC-стандартов. Индивидуальные параметры проходят усиленную валидацию.
Пополнительные ограничения на параллельных площадках равняются базовым условиям. Начальные суммы функционируют фиксированными. Возрастающие банки согласовываются между множественными адресами.
Льготные механизмы функционируют завершённо на резервных ресурсах. Множитель ставок поддерживает исходные параметры. Временные рамки проигрывания сохраняется.
Служба ассистирования анализирует запросы с резервных ссылок таким же способом. Прямой общение осуществляет беспрерывный режим оперирования.
62108TyroneChasseo abc
Excellent article. I certainly love this website. Thanks!
Feel free to surf to my site … real estate agent Austin TX
Way cool! Some extremely valid points! I appreciate you penning this post and also the rest
of the site is also really good.
Feel free to visit my blog – real estate agent Austin TX
Поиск в области сертифицированных платформ нуждается владения актуальных инструментов авторизации. Квалифицированные пользователи используют лаки Р±РёСЂ казино для получения современной информации о работающих адресах.
Алгоритм оформления личного кабинета в надежных учреждениях предполагает детальную аутентификацию. Современные компании внедряют KYC-механизмы и AML-правила. Документальное сопровождение потребляет от 24 до 72 периодов.
Программные технологии для прохождения ограничений эволюционируют синхронно с усилением юридических шагов. VPN-инструменты типа premium предоставляют шифрование AES-256 и технологии OpenVPN. Стабильность коннекта критически важна для VIP игровых периодов.
Дублирующие ресурсы действуют через географически расположенные цифровые мощности. CDN-комплексы предоставляют минимальную отклик для европейских участников. Автоматическое переключение инициируется при идентификации недоступности базового адреса.
Платежные манипуляции в сертифицированных областях отвечают четким требованиям PCI DSS. Цифровые транзакции набирают признание вследствие конфиденциальности и скорости осуществления.
Портативные утилиты ведущих брендов объединяют лицевую подтверждение и push-сообщения для важных ситуаций. Настраиваемый интерфейс программно настраивается под настройки матрицы.
Активные зеркала надежных gaming-операторов на казино типпи создают беспрерывный вход к развлекательным порталам. Методика дублирования формирует эквивалентные реплики основного домена с фиксацией всех функций.
Процедура активации через альтернативный домен полностью копирует стандартную бланк. Новые пользователи указывают активный email, генерируют стойкий код доступа и назначают рабочую финансовый инструмент.
Идентификация счета содержит предоставления справок следуя KYC-стандартам. Снимок водительских прав, верификация места жительства и карточные сведения контролируются системой программную анализ в течение 24-72 временных единиц.
Аутентификация действующих участников осуществляется через типовую форму с двухфакторной идентификацией. Временные токены приходят на мобильный номер или e-mail адрес.
Функционал пополнительного сектора через альтернативные домены обеспечивает популярные платежные инструменты. Visa, Mastercard, цифровые портмоне Skrill, Neteller, crypto Bitcoin, Ethereum процессируются с минимальными комиссиями 0-3%.
Гемблинг библиотека повторяется абсолютно включая spinning games, настольные забавы, live-дилеров и джекпоты. RTP-параметры, вариативность и проигрыш остаются аналогичными.
Бонусная схема выполняется идентично базовому веб-площадке. Welcome-предложения, безвозмездные спины, компенсация и VIP-курсы запускаются алгоритмически при реализации фиксированных стандартов.
https://iver.us.com/# buy ivermectin nz
Новейшие сервисы беттинг продуктов предоставляют участникам вход к высококлассному гемблингу через сертифицированные Sykaaa системы. Официальная работа влечет исполнения жестких контролирующих стандартов.
Алгоритм открытия персонального учетной записи предусматривает аутентификацию личных информации. Администраторы внедряют многоуровневые механизмы KYC и AML для исключения поддельных переводов.
Программные платформы современных гемблинг платформ строятся на защищенных хостингах с HTTPS протоколами. Региональная блокировка обязывает провайдеров внедрять резервные порталы.
Дублирующие домены составляют эквивалентные версии базового ресурса с фиксацией всех инструментов и показателей. Игроки обеспечивают себе стабильный подключение к счету, развлекательной отчетности и личным конфигурациям.
Платежные переводы производятся через связанные денежные процессоры. Лимиты на вклады и получения определяются в соотношении с лицензионными положениями и организационными политиками риск-менеджмента.
Квалифицированные клиенты предлагают проверять статус разрешения через регуляторные регистры беттинг ведомств. Авторитетные параметры охватывают места на экспертных сайтах и оценки реальных участников.
Новейшие геймеры встречаются с массой технических аспектов при деятельности с проверенными сайтами. Профессиональные порталы типа Килограмм казино поставляют релевантную сведения о деятельности азартных операторов.
Процедура верификации счета охватывает множество необходимых уровней. Исходная валидация требует передачи бумаг валидирующих гражданство. Типовой список включает паспорт, автолицензию или загранпаспорт.
Программная сторона открытия счета включает внедрение безопасного соединения и 2FA. Профессиональные геймеры подсказывают задействовать полный набор предложенных параметров охраны.
Зеркала составляют стопроцентные копии основного сайта с сохранением комплексного арсенала. Ключевое выгода состоит в тождественности финансовых ограничений и параметров условий прокрутки.
Схема нахождения актуальных резервных ссылок опирается на наблюдении специализированных мессенджер групп и сотрудничающих платформ. Квалифицированные клиенты эксплуатируют прокси-соединения для гарантирования устойчивого доступа невзирая от региональных блокировок.
61817LeslieSterro abc
мостбет фрибет Кыргызстан мостбет фрибет Кыргызстан
What a material of un-ambiguity and preserveness of
precious familiarity regarding unpredicted emotions.
My website best real estate agent in Parker County TX
рунетки онлайн рунетки чат
Отбор проверенного гемблинг площадки требует основательного анализа официальных свидетельств. Инновационные платформы Килограмм казино предлагают геймерам полную сведения о собственных разрешениях.
Процедура оформления счета охватывает множество ключевых фаз валидации. Провайдеры настаивают удостоверения, засвидетельствующие персону и правоспособность. Стандартный KYC-механизм требует от 24 до 72 временных отрезков.
Контроль средств начинается с задания пределов на инвестиции. Опытные клиенты советуют эксплуатировать принцип 5% от общего игорного резерва на одну сессию.
Системные ограничения провайдеров принуждают использовать резервные адреса. Зеркала хранят стопроцентную функциональность центрального платформы, предусматривая журнал сделок и гемблинг результаты.
Современные платежные методы поддерживают мгновенные взносы через блокчейн хранилища. Bitcoin, Ethereum и стабильные валюты предоставляют скрытность и мизерные комиссии. Срок осуществления снятий составляет 10-30 периодов.
Системы преданности содержат ступенчатые категории с накапливающимся возвратом. VIP-консультанты гарантируют эксклюзивные бонусы, расширенные ограничения и первоочередную обслуживание.
Актуальные дублирующие порталы надежных gaming-операторов на Голд РІС…РѕРґ создают стабильный доступ к игровым сервисам. Технология реплицирования создает полноценные версии центрального домена с сохранением всех опций.
Схема открытия счета через mirror-сайт на сто процентов воспроизводит основную заявку. Только пришедшие пользователи вводят функционирующий email, придумывают защищенный секретную комбинацию и фиксируют игровую платежное средство.
Валидация аккаунта подразумевает представления свидетельств следуя KYC-регламенту. Копия удостоверения личности, верификация резиденции и карточные сведения проходят машинную анализ в течение 24-72 часов.
Вход верифицированных клиентов осуществляется через обычную панель с расширенной верификацией. Одноразовые коды передаются на телефонный аппарат или мейл.
Возможности пополнительного блока через дублирующие порталы поддерживает популярные финансовые платформы. Visa, Mastercard, виртуальные балансы Skrill, Neteller, цифровые активы Bitcoin, Ethereum реализуются с уменьшенными комиссиями 0-3%.
Игровая ассортимент воспроизводится целиком включая автоматы, классические геймплей, live-крупье и джекпоты. RTP-коэффициенты, вариативность и проигрыш удерживаются идентичными.
Бонусная схема действует похоже главному ресурсу. Welcome-наборы, безвозмездные спины, кешбэк и VIP-курсы запускаются программно при выполнении фиксированных стандартов.
74066CollinGuilbeauxo abc
Live football match score updates faster than TV broadcast, stay ahead of everyone else
Ориентирование в мире лицензированных площадок требует представления современных инструментов соединения. Опытные игроки используют казино СЌРЅРѕРјРѕ для приобретения свежей информации о активных доменах.
Алгоритм создания учетной записи в сертифицированных компаниях включает комплексную верификацию. Актуальные компании задействуют KYC-механизмы и AML-стандарты. Документальное сопровождение занимает от 24 до 72 периодов.
Технические методы для минования ограничений эволюционируют синхронно с интенсификацией нормативных решений. VPN-службы типа premium дают кодирование AES-256 и методы OpenVPN. Стабильность канала жизненно актуальна для элитных игровых периодов.
Зеркальные платформы действуют через регионально разнесенные цифровые инфраструктуры. CDN-комплексы осуществляют сокращенную время ответа для глобальных клиентов. Программное маршрутизация активируется при обнаружении недоступности базового домена.
Денежные транзакции в сертифицированных юрисдикциях подчиняются строгим стандартам PCI DSS. Блокчейн операции приобретают популярность по причине приватности и быстроте выполнения.
Мобильные клиенты премиальных провайдеров включают голосовую проверку и push-уведомления для ключевых ситуаций. Адаптивный внешний вид программно корректируется под настройки монитора.
Выбор надежного игорного портала заставляет основательного разбора лицензионных сертификатов. Инновационные сайты Голд казино обеспечивают участникам полную факты о своих аккредитациях.
Процедура открытия аккаунта предусматривает различные ключевых стадий аутентификации. Владельцы истребуют удостоверения, устанавливающие идентичность и возраст. Традиционный KYC-процесс занимает от 24 до 72 периодов.
Финансовое планирование стартует с определения ограничений на вклады. Искусные игроки рекомендуют применять принцип 5% от общего игорного средств на одну игру.
Цифровые блокировки провайдеров обязывают применять альтернативные адреса. Зеркала сохраняют полную работоспособность основного платформы, включая журнал транзакций и развлекательный достижения.
Инновационные платежные способы поддерживают оперативные пополнения через криптовалютные хранилища. Bitcoin, Ethereum и стейблкоины гарантируют конфиденциальность и крошечные отчисления. Продолжительность проведения получений составляет 10-30 минут.
Программы постоянства предусматривают каскадные уровни с возрастающим возвратом. VIP-консультанты дают эксклюзивные подарки, расширенные рамки и первоочередную помощь.
Pretty! This has been an extremely wonderful post. Many thanks for providing these details.
byueuropaviagraonline
Определение честного игорного заведения нуждается основательного исследования правовых сертификатов. Передовые порталы mad casino гарантируют пользователям безусловную данные о своих санкциях.
Механизм создания профиля предусматривает ряд ключевых ступеней верификации. Администраторы настаивают бумаги, подтверждающие идентичность и дееспособность. Классический KYC-процесс продолжается от 24 до 72 промежутков.
Контроль средств открывается с задания границ на пополнения. Искусные игроки настаивают применять норму 5% от общего развлекательного резерва на одну сессию.
Системные препятствия владельцев заставляют задействовать запасные пути. Зеркала удерживают полную функциональность главного портала, включая историю переводов и казино продвижение.
Инновационные денежные сервисы поддерживают мгновенные депозиты через блокчейн аккаунты. Bitcoin, Ethereum и устойчивые монеты поддерживают скрытность и мизерные сборы. Период осуществления выводов достигает 10-30 промежутков.
Схемы постоянства охватывают иерархические ранги с возрастающим кэшбэком. VIP-представители предоставляют уникальные подарки, повышенные лимиты и преимущественную помощь.
Определение легального развлекательного ресурса подразумевает серьезного исследования правовых сертификатов. Передовые системы типпи казино обеспечивают пользователям максимальную детали о имеющихся разрешениях.
Система оформления счета содержит определенное количество ключевых стадий проверки. Операторы требуют справки, подтверждающие персону и совершеннолетие. Обычный KYC-регламент требует от 24 до 72 временных отрезков.
Контроль средств инициируется с определения лимитов на пополнения. Опытные пользователи рекомендуют использовать установку 5% от итогового развлекательного средств на единичную раунд.
Программные барьеры провайдеров обязывают задействовать резервные маршруты. Дубликаты хранят полную эффективность базового площадки, подразумевая архив переводов и развлекательный успех.
Современные денежные методы дают оперативные взносы через цифровые счета. Bitcoin, Ethereum и устойчивые монеты дают анонимность и минимальные комиссии. Срок проведения получений достигает 10-30 периодов.
Алгоритмы приверженности предусматривают ступенчатые ранги с увеличивающимся компенсацией. VIP-координаторы предоставляют персонализированные поощрения, усиленные границы и преимущественную обслуживание.
38920JackieHaino abc
storytelling showcase – Each project is engaging, well-crafted, and emotionally resonant.
Hi, I do think your blog could be having browser compatibility issues.
When I take a look at your blog in Safari, it looks fine but when opening in IE,
it’s got some overlapping issues. I merely wanted to provide you with a quick heads up!
Apart from that, excellent website!
10383TeneshaPreyero abc
Поиск проверенного азартного ресурса в нынешних обстоятельствах предполагает тщательного внимания к лицензионному положению. Квалифицированные участники понимают, что СЌРЅРѕРјРѕ предоставляет современную материалы о активных операторах.
Процесс оформления профиля в официальных платформах предусматривает неизбежную аутентификацию персональных данных. KYC-процедуры обеспечивают как заведение, так и геймера от афер. Временные ограничения на вывод активов до завершения верификации – обычная методика.
Технические препятствия на подключение к гемблинг порталам обходятся через резервные URL. Доступные отражения предоставляют тотальную работоспособность основного сайта. Расчетные движения, игровой статистика и поощрительные схемы поддерживаются стабильными.
Финансовая защищенность выражается уровнем задействованных банковских способов. SSL-шифрование, PCI DSS подтверждение и двухфакторная проверка обеспечивают прочный заслон ограждения.
Геймплейная набор легальных площадок содержит слоты от главных студий. RTP-параметры, вариативность и расчетные формулы претерпевают нейтральную сертификацию в аккредитованных учреждениях.
Схемы мотивации в качественных казино базируются на открытых требованиях активности. Проигрыш x35-40 признается нормальным для автомат-подарков, в то время как настольные забавы учитываются в калькуляцию с сниженным показателем.
Передовые порталы игорных развлечений предоставляют пользователям доступ к премиальному игровому процессу через защищенные tip ресурсы. Лицензированная деятельность нуждается учета четких контролирующих требований.
Процесс создания клиентского аккаунта содержит валидацию персональных показателей. Управляющие задействуют многоуровневые системы KYC и AML для пресечения мошеннических платежей.
Технические инструменты современных гемблинг платформ базируются на безопасных серверах с TLS сертификатами. Локальные запреты побуждает операторов запускать альтернативные URL.
Дублирующие порталы составляют идентичные версии основного платформы с поддержанием всех сервисов и показателей. Клиенты достигают стабильный доступ к балансу, развлекательной статистике и индивидуальным настройкам.
Банковские действия проходят через подключенные финансовые шлюзы. Границы на пополнения и получения фиксируются в соответствии с нормативными требованиями и внутренними регламентами снижения потерь.
Квалифицированные клиенты настаивают отслеживать положение аккредитации через официальные регистры гемблинг структур. Имиджевые параметры задействуют оценки на отраслевых платформах и отзывы реальных беттеров.
Лицензионные ресурсы азартных сервисов дают пользователям доступ к премиальному гэмблингу через профильные порталы, включая РЎСѓРєР° , которые выполняют общепринятые требования конфиденциальности.
Схема активации necessita указания верификационных информации через шифрованные SSL-каналы. Провайдеры просят документальное удостоверение правоспособности и территории нахождения для выполнения нормативных критериев.
2FA authentication считается обязательным составляющей новейших систем надёжности. Игроки приобретают SMS-ключи, push-сообщения или используют профессиональные программы типа Google Authenticator.
Дублирующие домены решают вопросы региональных блокировок и DDoS-штурмов. С технической точки зрения зеркала составляют аналогичные реплики главного домена с удержанием функциональности и пользовательских сведений.
Профессиональные геймеры рекомендуют хранить новейшие базы working зеркал в favourites веб-клиента. Провайдеры рассылают новости о свежих ссылках через email, Telegram-сообщества и смартфонные программы.
Payment процедуры через официальные сайты обеспечены шифровальными methods класса банковского области. Снятие финансов производится единственно на проверенные wallets владельца account.
คอนเทนต์นี้ อ่านแล้วเพลินและได้สาระ ครับ
ผม เคยติดตามเรื่องนี้จากหลายแหล่ง ข้อมูลเพิ่มเติม
ดูต่อได้ที่ เว็บ akbet25
ลองแวะไปดู
มีตัวอย่างประกอบชัดเจน
ขอบคุณที่แชร์ คอนเทนต์ดีๆ นี้
จะคอยดูว่ามีเนื้อหาใหม่ๆ มาเสริมอีกหรือไม่
Актуальные провайдеры гемблинг услуг гарантируют пользователям вход к качественному развлечениям через надежные ra сайты. Официальная операционная активность нуждается следования определенных регуляторных требований.
Механизм создания игрового кабинета задействует верификацию конфиденциальных данных. Провайдеры эксплуатируют комплексные процедуры KYC и AML для блокировки фродовых переводов.
Технические средства современных гемблинг платформ базируются на стабильных хостингах с шифровальными стандартами. Локальные запреты заставляет провайдеров создавать параллельные порталы.
Зеркальные домены представляют эквивалентные клоны главного портала с сохранением всех возможностей и параметров. Участники добиваются непрерывный связь к капиталу, беттинг записям и пользовательским настройкам.
Денежные переводы проходят через синхронизированные банковские процессоры. Пределы на инвестиции и снятия определяются в унисон с правовыми требованиями и организационными правилами управления рисками.
Опытные пользователи рекомендуют мониторить статус аккредитации через официальные регистры азартных органов. Имиджевые критерии охватывают ранги на тематических порталах и комментарии истинных беттеров.
What stood out about this casino https://www.cannabissheds.ca/2025/12/19/comprehensive-guide-to-digital-casinos-running-in-3/ is the variety of the games. Everything runs without issues, the design is clean, and there’s always something new to explore, which keeps it engaging.
62623JeffieCorfmano abc
Современные провайдеры гемблинг развлечений дают беттерам путь к элитному игровому процессу через безопасные tip системы. Лицензированная бизнес предполагает выполнения строгих надзорных положений.
Алгоритм активации клиентского аккаунта предусматривает валидацию конфиденциальных сведений. Операторы задействуют углубленные протоколы KYC и AML для предотвращения поддельных операций.
Программные решения передовых гемблинг платформ функционируют на надежных облачных системах с шифровальными протоколами. Региональная блокировка вынуждает управляющих создавать альтернативные ссылки.
Альтернативные платформы являют собой аналогичные дубликаты главного сайта с сохранением всех функций и сведений. Игроки обеспечивают себе устойчивый соединение к депозиту, развлекательной истории и персональным настройкам.
Финансовые действия производятся через интегрированные расчетные шлюзы. Лимиты на инвестиции и изъятия регулируются в соответствии с лицензионными положениями и внутренними политиками управления рисками.
Профессиональные гемблеры настаивают отслеживать условия лицензии через контролирующие реестры развлекательных органов. Престижные индикаторы включают оценки на профильных ресурсах и отзывы действительных игроков.
Инновационные провайдеры беттинг продуктов дают участникам возможность к профессиональному беттингу через защищенные лаки системы. Авторизованная функционирование влечет учета строгих контролирующих требований.
Процесс открытия персонального учетной записи включает аутентификацию личных показателей. Операторы применяют детализированные системы KYC и AML для блокировки незаконных операций.
Технические платформы современных беттинг площадок работают на зашифрованных дата-центрах с TLS алгоритмами. Геоблокировка обязывает администраторов разрабатывать вспомогательные порталы.
Параллельные ресурсы являют собой эквивалентные репликации главного домена с сохранением всех инструментов и показателей. Участники получают устойчивый подключение к средствам, гемблинг статистике и индивидуальным опциям.
Денежные переводы реализуются через интегрированные платежные процессоры. Лимиты на пополнения и выводы фиксируются в унисон с правовыми положениями и корпоративными правилами снижения потерь.
Квалифицированные клиенты рекомендуют мониторить условия лицензии через официальные списки игорных ведомств. Статусные характеристики охватывают позиции на тематических порталах и feedback действительных игроков.
One of the central themes of the book is the Hebrew concept of timshel, which translates to “thou mayest,” implying that mankind has the choice to conquer sin. This powerful message is woven throughout the narrative of the Trask family. Students often rush to find an East of Eden PDF online to quickly reference Lee’s explanation of this concept for their essays. We have curated a space that discusses this philosophy in detail, helping readers connect the biblical parallels to the fictional events in the Salinas Valley. It is an essential companion for anyone delving into the electronic version of this classic saga. https://eastofedenpdf.site/ John Steinbeck East Of Eden Pdf Download
Hello there, just became aware of your blog through Google, and found that it’s truly informative.
I am going to watch out for brussels. I will be grateful if you continue this
in future. Lots of people will be benefited from your writing.
Cheers!
Доброго!
Раздел «Бизнес-советы» ориентирован на тех, кто хочет системно развивать своё дело и принимать управленческие решения на основе опыта практиков. Здесь могут публиковаться рекомендации от предпринимателей, инвесторов и экспертов, помогающие избежать типичных ошибок и ускорить рост компании. Используйте практические советы для предпринимателей, чтобы усиливать каждый этап развития бизнеса. Практические советы для предпринимателей включают методы делегирования и построения команды. Это особенно важно при переходе от солопренера к компании.
Вся информация на сайте – https://business-mentor.ru/biznes-idei/
бизнес-идеи в здоровье, готовые франшизы без вложений, бизнес-идея для старта
как внедрить KPI в малый бизнес, какой бизнес актуален сейчас, AR/VR-бизнес для малого предпринимателя
Всего наилучшего и развития!!
Актуальные игроки оказываются с барьером входа к легальным площадкам. Организации фильтруют главные домены, но знающие tip пользователи знают о существовании дублирующих платформ.
Альтернативный адрес формирует стопроцентную реплику основного сайта. Средства защиты работают такими же. Банковские переводы выполняются через аналогичные системы.
Технология открытия счёта через параллельный ссылку содержит типовой валидации. Менеджеры запрашивают бумаги для выполнения KYC-норм. Паспортные параметры проходят двухфакторную аутентификацию.
Банковские рамки на дополнительных сайтах соответствуют основным спецификациям. Стартовые ставки продолжают фиксированными. Прогрессивные выигрышные пулы синхронизируются между всеми адресами.
Стимулирующие планы действуют полноценно на дополнительных площадках. Коэффициент оборота удерживает исходные показатели. Срок активности отыгрыша не изменяется.
Сервис помощи анализирует запросы с параллельных адресов равнозначно. Мгновенный разговор предоставляет круглосуточный порядок функционирования.
Новейшие провайдеры игорных продуктов дают клиентам путь к высококлассному гемблингу через сертифицированные казино ресурсы. Официальная функционирование предполагает выполнения определенных правовых норм.
Алгоритм открытия индивидуального учетной записи охватывает аутентификацию приватных реквизитов. Управляющие используют многоуровневые протоколы KYC и AML для пресечения незаконных операций.
Цифровые платформы актуальных гемблинг платформ основываются на зашифрованных серверах с SSL алгоритмами. Геоблокировка обязывает провайдеров внедрять альтернативные адреса.
Параллельные домены являют собой точные дубликаты базового портала с фиксацией всех возможностей и данных. Игроки добиваются непрерывный вход к балансу, беттинг данным и пользовательским опциям.
Платежные процедуры проходят через подключенные платежные системы. Ограничения на взносы и получения регулируются в гармонии с регуляторными стандартами и внутренними политиками минимизации опасностей.
Опытные игроки указывают анализировать ситуацию разрешения через контролирующие регистры азартных органов. Статусные показатели предусматривают ранги на специализированных платформах и комментарии настоящих клиентов.
3819BlancheDroubayo abc
Нынешние участники имеют дело с огромным количеством системных деталей при процессах с легальными порталами. Специализированные сайты типа казино выдают релевантную материалы о работе гэмблинговых компаний.
Процедура валидации учетной записи содержит ряд принудительных этапов. Первичная проверка включает загрузки справок доказывающих гражданство. Привычный набор подразумевает паспорт, автолицензию или загранпаспорт.
Программная элемент оформления предполагает внедрение зашифрованного канала и многофакторной защиты. Опытные участники рекомендуют инициировать полный набор имеющихся опций защиты.
Альтернативные адреса формируют точные отражения базового портала с сохранением полного функционала. Главное плюс содержится в схожести расчетных рамок и норм проигрыша.
Алгоритм нахождения активных дублирующих порталов базируется на мониторинге тематических новостных лент и союзных ресурсов. Профессиональные геймеры используют VPN-сервисы для гарантирования устойчивого соединения независимо от локальных лимитов.
Подбор достойного игрового ресурса в актуальных условиях подразумевает специального внимания к правовому положению. Знающие клиенты знают, что лаки предоставляет новую факты о доступных ресурсах.
Процедура записи в легальных площадках объединяет неизбежную верификацию документов. KYC-правила защищают как площадку, так и клиента от обмана. Переходные ограничения на получение финансов до финализации верификации – типичная система.
Цифровые ограничения на доступ к гемблинг площадкам преодолеваются через резервные ссылки. Функционирующие дубликаты предоставляют тотальную работоспособность главного ресурса. Расчетные операции, развлекательный достижения и наградные предложения остаются устойчивыми.
Денежная надежность характеризуется уровнем используемых платежных методов. SSL-шифрование, PCI DSS подтверждение и многоуровневая верификация создают безопасный щит обороны.
Геймплейная каталог легальных сервисов объединяет машины от главных разработчиков. RTP-коэффициенты, колебания и расчетные модели испытывают нейтральную аудит в авторизованных учреждениях.
Планы вознаграждения в надежных сервисах базируются на понятных параметрах отыгрыша. Отыгрыш x35-40 расценивается справедливым для машина-поощрений, в то время как классические развлечения учитываются в подсчет с редуцированным показателем.
Excelente site! Já vi que terei que retornar a esse website várias vezes para aprender mais sobre o assunto .
52962AdrianneSundquisto abc
I visited multiple web sites but the audio feature for audio songs current at this web page is in fact fabulous.
Also visit my blog post :: realtor in Hoboken NJ
Развлекательная ниша отображает быстрый подъём, притягивая множество геймеров. Грамотные площадки обеспечивают надёжную среду для ставок. Исчерпывающую данные о указанных брендах доступно получить на mad .
Лицензирование является основным критерием подбора портала. Регуляторы Мальты предоставляют качественный контроль экономических действий. Всякая лицензированная портал осуществляет плановые аудиты RNG-генераторов.
Технические характеристики инновационных гемблинг-сайтов объединяют SSL-кодирование банковского категории. Поставщики виртуального обеспечения наподобие Microgaming, NetEnt, Pragmatic Play встраивают продвинутые механизмы случайных чисел.
Процесс валидации профиля включает направления бумаг KYC-уровня. Паспорт, выписка о доходах, подтверждение адреса — стандартный перечень для полноценного авторизации.
Резервные порталы исправляют барьеры с ограничениями провайдеров. Рабочие дубли обновляются каждый день IT отделами. Планшетные софт нередко работают стабильнее сетевых модификаций.
Распределение капитала устанавливает длительную прибыльность беттинговых сессий. Экспертные участники указывают лимитировать размер вейджера до 1-2% от суммарного бюджета.
Азартная отрасль показывает динамичный подъём, завлекая легионы пользователей. Грамотные ресурсы дают безопасную среду для беттинга. Детальную факты о данных организациях возможно обнаружить на ретро .
Лицензирование представляет центральным элементом выбора платформы. Контролёры Олдерни создают жёсткий аудит валютных действий. Всякая сертифицированная платформа подвергается периодические контроли RNG-модулей.
Цифровые особенности новейших игорных домов содержат SSL-кодирование экономического стандарта. Провайдеры софтового материала наподобие Microgaming, NetEnt, Pragmatic Play интегрируют усовершенствованные модели непредсказуемых показателей.
Процесс подтверждения профиля предусматривает передачи документов KYC-типа. Удостоверение, документ о прибылях, доказательство регистрации — классический пакет для полноценного активации.
Резервные URL ликвидируют сложности с блокировками организаций. Рабочие дубли изменяются регулярно IT службами. Смартфонные клиенты зачастую выполняются лучше веб вариантов.
Распределение капитала устанавливает стратегическую успешность беттинговых партий. Грамотные пользователи указывают урезать размер депозита до 1-2% от итогового капитала.
Нынешние участники встречаются с препятствием входа к легальным сайтам. Провайдеры ограничивают базовые URL, но знающие винити посетители понимают о наличии параллельных порталов.
Резервная ссылка образует полную отображение оригинального портала. Протоколы шифрования остаются идентичными. Финансовые действия производятся через равнозначные шлюзы.
Алгоритм оформления профиля через дополнительный ресурс включает привычной валидации. Операторы выясняют документы для выполнения KYC-требований. Паспортные данные подвергаются расширенную аутентификацию.
Пополнительные границы на дополнительных платформах совпадают первичным условиям. Начальные взносы поддерживаются неизменными. Растущие джекпоты синхронизируются между всеми порталами.
Премиальные системы функционируют полноценно на дополнительных платформах. Коэффициент оборота обеспечивает исходные значения. Период действия отыгрыша не изменяется.
Отдел ассистирования обрабатывает запросы с зеркальных ссылок сходным образом. Онлайн общение поддерживает 24-часовой расписание оперирования.
Актуальные зеркала лицензированных гемблинг-платформ на enomo создают непрерывный подключение к геймерским платформам. Технология реплицирования формирует точные версии главного сайта с поддержанием всех возможностей.
Алгоритм оформления профиля через альтернативный домен полностью повторяет главную заявку. Новые пользователи регистрируют активный email, устанавливают стойкий ключ и определяют игровую финансовый инструмент.
Идентификация профиля содержит загрузки бумаг в соответствии с KYC-стандартам. Изображение национального документа, верификация проживания и карточные сведения контролируются системой цифровую контроль в течение 24-72 периодов.
Вход существующих геймеров производится через типовую модуль с усиленной идентификацией. Сессионные пароли передаются на телефонный гаджет или почтовый ящик.
Механизмы пополнительного блока через зеркала предлагает востребованные платежные платформы. Visa, Mastercard, виртуальные портмоне Skrill, Neteller, блокчейн-токены Bitcoin, Ethereum процессируются с оптимизированными сборами 0-3%.
Азартная ассортимент повторяется абсолютно включая барабаны, классические игры, live-ведущих и джекпоты. RTP-показатели, волатильность и отыгрыш сохраняются точными.
Поощрительная программа функционирует аналогично основному веб-площадке. Welcome-комплекты, фриспины, refund и VIP-программы включаются программно при исполнении фиксированных критериев.
40067DonaldFaerbero abc
https://follicle.us.com/# Follicle Insight
Определение безопасного игорного оператора заставляет тщательного изучения юридических документов. Новые порталы казино предоставляют участникам стопроцентную детали о своих аккредитациях.
Процедура регистрации охватывает множество обязательных ступеней верификации. Провайдеры запрашивают свидетельства, засвидетельствующие самобытность и правоспособность. Традиционный KYC-регламент составляет от 24 до 72 часов.
Финансовое планирование открывается с задания рамок на взносы. Опытные геймеры рекомендуют эксплуатировать норму 5% от полного гемблинг резерва на единичную партию.
Электронные запреты администраторов заставляют задействовать дополнительные ссылки. Копии сохраняют максимальную активность базового платформы, предусматривая архив платежей и гемблинг успех.
Актуальные расчетные сервисы гарантируют мгновенные пополнения через криптовалютные хранилища. Bitcoin, Ethereum и устойчивые монеты предоставляют анонимность и мизерные сборы. Продолжительность обработки получений доходит 10-30 интервалов.
Алгоритмы преданности охватывают иерархические ранги с накапливающимся компенсацией. VIP-кураторы дают персонализированные награды, усиленные ограничения и первоочередную обслуживание.
Передовые пользователи имеют дело с набором программных тонкостей при деятельности с лицензированными ресурсами. Специализированные источники типа lucky поставляют новую контент о операциях развлекательных операторов.
Процедура верификации учетной записи охватывает набор требуемых шагов. Начальная верификация требует отправки справок доказывающих персону. Обычный список предполагает паспорт, автоудостоверение или международное ID.
Системная составляющая открытия счета подразумевает внедрение безопасного соединения и двухуровневой проверки. Опытные игроки предлагают инициировать полный набор представленных параметров обеспечения.
Дублирующие порталы представляют идентичные клоны основного сайта с обеспечением комплексного функционала. Главное бонус выражается в идентичности платежных лимитов и норм условий прокрутки.
Система нахождения действующих дублирующих порталов фундируется на проверке специализированных уведомительных сервисов и аффилированных площадок. Опытные участники применяют VPN-сервисы для формирования постоянного связи безотносительно от региональных барьеров.
For next
online slots safe
for auditory experience.
fertility pct guide: order clomid without dr prescription – fertility pct guide
Исследование в области сертифицированных платформ подразумевает представления передовых технологий доступа. Продвинутые пользователи внедряют лаки для добывания свежей данных о функционирующих адресах.
Процедура создания аккаунта в лицензированных операторах предполагает комплексную проверку. Современные операторы применяют KYC-протоколы и AML-нормы. Документальная процедура составляет от 24 до 72 промежутков.
Компьютерные технологии для прохождения препятствий эволюционируют параллельно с ужесточением нормативных действий. VPN-сервисы категории premium предлагают безопасность AES-256 и системы OpenVPN. Непрерывность подключения fundamentally важна для премиальных заходов.
Зеркальные платформы работают через пространственно размещенные компьютерные кластеры. CDN-архитектуры обеспечивают низкую отклик для европейских клиентов. Техническое редирект включается при идентификации блокировки центрального домена.
Экономические движения в сертифицированных зонах подчиняются строгим критериям PCI DSS. Блокчейн расчеты получают популярность благодаря скрытности и быстроте обработки.
Смартфонные программы лучших компаний включают лицевую проверку и push-извещения для важных ситуаций. Настраиваемый дизайн автономно адаптируется под свойства дисплея.
Le paris sportif crypto permet de parier en ligne avec
des cryptomonnaies en toute simplicité Ces plateformes offrent des
transactions rapides et une expérience moderne pour les amateurs de paris sportifs crypto en France
Официальные площадки игорных услуг предоставляют геймерам доступ к элитному развлечениям через специализированные сайты, включая tip , которые точно выполняют мировые требования security.
Механизм создания аккаунта включает ввода верификационных деталей через защищённые SSL-линии. Провайдеры просят официальное доказательство совершеннолетия и территории residence для исполнения законодательных стандартов.
Multi-factor аутентификация представляет required составляющей современных платформ конфиденциальности. Игроки располагают SMS-коды, push-оповещения или эксплуатируют профессиональные софт в стиле Google Authenticator.
Зеркальные порталы преодолевают сложности territorial блокировок и DDoS-нападений. По сути реплики формируют копийные реплики базового портала с удержанием возможностей и клиентских деталей.
Компетентные геймеры рекомендуют keeping новейшие базы working альтернатив в избранном интернет-программы. Букмекеры передают обновления о новых URL через email, Telegram-communities и телефонные утилиты.
Финансовые процедуры через проверенные сайты гарантированы cryptographic системами уровня банковского области. Получение средств реализуется исключительно на верифицированные данные держателя профиля.
53726RobertPyo abc
Развлекательная сфера являет активный подъём, привлекая массы клиентов. Опытные платформы предлагают стабильную условия для развлечений. Подробную факты о подобных провайдерах допустимо отыскать на mad .
Сертификация представляет приоритетным элементом подбора платформы. Регуляторы Великобритании предоставляют качественный контроль финансовых действий. Отдельная лицензированная площадка подвергается постоянные ревизии RNG-механизмов.
Компьютерные особенности новейших гемблинг-сайтов содержат SSL-кодирование расчётного стандарта. Производители компьютерного ПО класса Microgaming, NetEnt, Pragmatic Play встраивают комплексные механизмы хаотичных показателей.
Механизм верификации личного кабинета требует передачи свидетельств KYC-уровня. Свидетельство, свидетельство о доходах, валидация местожительства — типичный пакет для завершённого активации.
Резервные домены ликвидируют сложности с ограничениями поставщиков. Актуальные дубли модифицируются ежедневно программными отделами. Мобильные приложения регулярно оперируют надёжнее онлайн редакций.
Банкролл-менеджмент задаёт долгосрочную эффективность беттинговых циклов. Грамотные беттеры советуют лимитировать количество депозита до 1-2% от полного фонда.
Новейшие операторы гемблинг развлечений предоставляют пользователям возможность к профессиональному азарту через надежные friends порталы. Сертифицированная бизнес нуждается соблюдения жестких контролирующих норм.
Система оформления индивидуального кабинета охватывает подтверждение личных информации. Регуляторы внедряют расширенные механизмы KYC и AML для недопущения поддельных финансовых действий.
Технические системы современных гемблинг платформ строятся на безопасных хостингах с SSL технологиями. Региональная блокировка принуждает операторов внедрять резервные порталы.
Альтернативные платформы образуют эквивалентные версии основного портала с удержанием всех сервисов и сведений. Беттеры приобретают устойчивый соединение к капиталу, игровой записям и пользовательским опциям.
Денежные транзакции выполняются через встроенные денежные системы. Пределы на вклады и обналичивания регулируются в согласии с законодательными стандартами и организационными политиками риск-менеджмента.
Компетентные пользователи указывают проверять состояние сертификата через регуляторные списки азартных организаций. Престижные критерии предусматривают позиции на отраслевых ресурсах и отзывы истинных пользователей.
dyson пылесос купить dyson пылесос купить .
1win-officialkazino.ru
Я хотел бы выразить свою восторженность этой статьей! Она не только информативна, но и вдохновляет меня на дальнейшее изучение темы. Автор сумел передать свою страсть и знания, что делает эту статью поистине уникальной.
15429TrinidadMoweryo abc
Выбор надежного игорного оператора подразумевает тщательного рассмотрения правовых сертификатов. Передовые ресурсы mad предоставляют геймерам абсолютную данные о действующих санкциях.
Процедура получения доступа включает определенное количество требуемых ступеней подтверждения. Владельцы настаивают документы, устанавливающие индивидуальность и возраст. Обычный KYC-механизм длится от 24 до 72 промежутков.
Контроль средств инициируется с фиксации границ на инвестиции. Профессиональные пользователи предлагают задействовать правило 5% от суммарного развлекательного бюджета на конкретную раунд.
Цифровые препятствия провайдеров обязывают эксплуатировать дополнительные маршруты. Копии поддерживают максимальную работоспособность базового площадки, содержа журнал переводов и азартный достижения.
Передовые денежные способы гарантируют оперативные вклады через блокчейн кошельки. Bitcoin, Ethereum и фиксированные активы дают конфиденциальность и минимальные сборы. Срок осуществления выводов равно 10-30 отрезков.
Системы верности охватывают многоуровневые степени с возрастающим кэшбэком. VIP-координаторы обеспечивают личные подарки, улучшенные ограничения и опережающую сервис.
Современные сервисы беттинг продуктов предлагают участникам путь к элитному азарту через сертифицированные Голд ресурсы. Сертифицированная деятельность подразумевает выполнения конкретных правовых норм.
Процесс регистрации индивидуального счета включает проверку приватных реквизитов. Управляющие применяют детализированные алгоритмы KYC и AML для пресечения мошеннических операций.
Электронные инструменты современных казино работают на стабильных дата-центрах с HTTPS сертификатами. Геоблокировка принуждает администраторов внедрять альтернативные адреса.
Зеркальные домены образуют идентичные клоны главного домена с фиксацией всех возможностей и сведений. Пользователи получают устойчивый подключение к капиталу, гемблинг данным и личным установкам.
Расчетные переводы реализуются через синхронизированные расчетные шлюзы. Рамки на пополнения и обналичивания назначаются в соответствии с лицензионными стандартами и корпоративными политиками управления рисками.
Опытные пользователи советуют анализировать условия разрешения через официальные регистры азартных структур. Авторитетные параметры включают позиции на тематических порталах и оценки реальных клиентов.
Новейшие геймеры сталкиваются с множеством программных нюансов при функционировании с проверенными платформами. Профильные сайты типа типпи дают актуальную информацию о операциях азартных операторов.
Алгоритм проверки кабинета содержит несколько неотъемлемых фаз. Стартовая верификация включает отправки свидетельств валидирующих индивидуальность. Стандартный список охватывает документ, права или международное ID.
Цифровая составляющая создания аккаунта содержит внедрение безопасного соединения и 2FA. Продвинутые пользователи настаивают включать максимум имеющихся параметров охраны.
Альтернативные адреса составляют стопроцентные отражения основного портала с удержанием тотального арсенала. Ключевое преимущество содержится в идентичности банковских границ и критериев условий прокрутки.
Механизм обнаружения актуальных запасных доменов базируется на проверке тематических мессенджер групп и аффилированных ресурсов. Опытные игроки внедряют туннельные протоколы для гарантирования надежного соединения вне зависимости от местных ограничений.
I all the time used to read paragraph in news papers but now as I am a user of web
so from now I am using net for content, thanks to web.
Here is my web blog :: best real estate agent in Pinecrest FL
Рабочие mirror-ссылки официальных гемблинг-платформ на friends гарантируют непрерывный вход к игровым системам. Технология дублирования генерирует эквивалентные клоны базового ресурса с поддержанием всех функций.
Алгоритм активации через альтернативный домен на сто процентов копирует базовую шаблон. Новые игроки заполняют валидный email, создают безопасный ключ и выбирают рабочую платежное средство.
Идентификация профиля содержит отправки справок в соответствии с KYC-политике. Скан паспорта, подтверждение проживания и платежные сведения проверяются через цифровую контроль в течение 24-72 ч.
Вход верифицированных игроков осуществляется через базовую интерфейс с 2FA валидацией. Сессионные шифры передаются на смс номер или мейл.
Функционал пополнительного раздела через mirror-сайты обеспечивает актуальные банковские системы. Visa, Mastercard, электронные счета Skrill, Neteller, криптовалюты Bitcoin, Ethereum процессируются с минимальными комиссиями 0-3%.
Азартная коллекция дублируется на сто процентов включая барабаны, классические активности, live-дилеров и прогрессивы. RTP-коэффициенты, колебания и отыгрыш остаются точными.
Поощрительная схема выполняется подобно главному сайту. Welcome-бандлы, free spins, возврат средств и VIP-схемы стартуют автоматически при реализации фиксированных требований.
Thanks very nice blog!
Here is my homepage … best realtor in Hoboken NJ
casino пинко играть онлайн
Awesome blog! Do you have any tips and hints for aspiring writers?
I’m hoping to start my own site soon but I’m a little lost on everything.
Would you advise starting with a free platform like WordPress or go for a paid
option? There are so many options out there that
I’m completely overwhelmed .. Any ideas? Thank you!
25597MadalynDeppeo abc
What Are Mix Backlinks? Why Are They Necessary for SEO?
In the world of search engine optimization (SEO),
backlinks continue to be one of the strongest ranking factors.
However, not all backlinks provide the same value, and relying on only one type of link can slow growth—or worse, trigger search
engine penalties. This is where mix backlinks become essential.
A mix backlink strategy focuses on building a diversified and natural backlink profile
that search engines recognize as trustworthy, organic,
and authoritative.
What Are Mix Backlinks?
Mix backlinks refer to a combination of different backlink types acquired from multiple sources,
platforms, and link attributes. Instead of depending on a single
method like guest posting or directory submissions, mix backlinks include a healthy balance
of links such as:
• Guest post backlinks
• Web 2.0 backlinks
• Profile backlinks
• Social bookmarking links
• Business directory and citation links
• Blog comment backlinks
• Forum discussion links
• Editorial and niche-relevant backlinks
• A mix of do-follow and no-follow links
The main objective of mix backlinks is to create a natural-looking backlink profile, similar to how websites earn links organically over time.
Search engines like Google closely analyze link diversity.
A varied backlink profile signals authenticity, trust,
and long-term credibility, while repetitive or one-sided link building often raises red flags.
Why Mix Backlinks Are Necessary for SEO
1. Builds a Natural Backlink Profile
Google’s algorithm is designed to detect unnatural link-building patterns.
Websites that receive backlinks from only one source or use the same anchor text
repeatedly are more likely to be penalized.
Mix backlinks help by:
• Using multiple platforms
• Varying anchor text (brand, URL, generic, keyword-based)
• Combining high, medium, and foundational authority links
This diversity makes your link profile appear organic and safe.
2. Improves Website Authority and Trust
Different backlink types contribute authority in different ways:
• Guest posts improve topical relevance
• Editorial links boost credibility
• Directories and citations support local SEO
• Social links strengthen brand signals
Together, these backlinks improve domain authority, page authority, and overall
trustworthiness.
3. Supports Stable and Long-Term Rankings
SEO success isn’t about short-term spikes—it’s about
sustainability. Websites that rely on a single backlink method often lose rankings after algorithm updates.
Mix backlinks help you:
• Stay protected during Google updates
• Maintain steady keyword rankings
• Reduce dependency on one link type
This creates a future-proof SEO strategy.
4. Enhances Keyword Ranking Potential
Different backlinks support keywords in different
ways:
• Contextual links help rank competitive keywords
• Branded anchors prevent over-optimization
• Generic and URL anchors balance anchor distribution
A mixed backlink approach allows you to rank for primary, secondary, and long-tail keywords safely.
5. Drives Referral Traffic from Multiple Sources
SEO isn’t only about rankings—traffic quality matters.
Mix backlinks bring visitors from:
• Blogs and niche websites
• Forums and online communities
• Business directories
• Social media platforms
This diversified traffic improves engagement metrics such as time on site and bounce
rate, indirectly supporting SEO.
6. Strengthens Brand Visibility and Online Presence
Even no-follow backlinks play an important role in brand exposure.
When your website appears across multiple platforms,
it builds familiarity and trust.
Mix backlinks help to:
• Increase brand recognition
• Establish niche authority
• Build user trust
Search engines recognize these brand signals and
reward them with better visibility.
7. Maintains a Healthy Do-Follow and No-Follow Ratio
Many website owners focus only on do-follow links, but a natural backlink profile always includes both.
Mix backlinks provide:
• Do-follow links for ranking power
• No-follow links for balance and referral traffic
Google expects to see a mix, and having both improves
algorithmic trust.
Common Types of Mix Backlinks Used in SEO
A strong mix backlink strategy usually includes:
• High-authority backlinks (news sites, authority blogs)
• Medium-authority links (niche blogs, forums)
• Foundational links (profiles, directories, citations)
• Contextual links (guest posts, articles)
• Traffic-based links (social platforms, bookmarks)
Each type plays a specific role in strengthening
your backlink ecosystem.
Conclusion,
Mix backlinks are essential for modern SEO because they create a diverse, natural, and trustworthy backlink profile.
Instead of relying on a single link-building method,
combining multiple backlink types helps improve rankings, protect
against penalties, drive referral traffic, and build long-term authority.
Проверенные ресурсы развлекательных возможностей дают участникам вариант к профессиональному азартному досугу через dedicated домены, включая Рльдорадо , которые именно выполняют международные нормы надёжности.
Процедура оформления профиля требует предоставления проверочных информации через защищённые SSL-соединения. Провайдеры demanded письменное свидетельство возраста и места проживания для выполнения legal критериев.
Двухэтапная authentication является принудительным элементом новейших платформ security. Игроки обретают SMS-токены, push-notification или применяют targeted софт типа Google Authenticator.
Альтернативные ссылки преодолевают вопросы региональных запретов и DDoS-атак. Техническим образом зеркала представляют идентичные версии главного домена с сохранением опций и личных параметров.
Skilled клиенты предлагают сохранять обновлённые базы working дублей в bookmark веб-клиента. Букмекеры направляют новости о новых ссылках через мейл, Telegram-каналы и мобильные программы.
Денежные операции через legal площадки обеспечены защитными алгоритмами уровня банковского сектора. Снятие фондов осуществляется единственно на верифицированные карты обладателя профиля.
Поиск надежного betting ресурса в современных обстоятельствах подразумевает тщательного внимания к законному состоянию. Профессиональные клиенты представляют, что типпи содержит актуальную материалы о доступных операторах.
Схема регистрации в легальных сервисах включает принудительную аутентификацию удостоверения. KYC-правила оберегают как сервис, так и игрока от афер. Краткосрочные лимиты на изъятие средств до финализации проверки – типичная система.
Электронные блокировки на вход к азартным сайтам преодолеваются через дублирующие адреса. Активные клоны предоставляют абсолютную эффективность основного платформы. Банковские процедуры, геймплейный продвижение и льготные планы сохраняются неизменными.
Финансовая стабильность определяется степенью используемых расчетных способов. SSL-защита, PCI DSS валидация и многоуровневая идентификация формируют надежный контур ограждения.
Азартная коллекция сертифицированных операторов предоставляет спины от лидирующих производителей. RTP-коэффициенты, дисперсия и расчетные схемы испытывают независимую сертификацию в аккредитованных организациях.
Схемы мотивации в достойных сервисах формируются на прозрачных критериях вейджера. Требования x35-40 характеризуется справедливым для спин-подарков, в то время как настольные забавы идут в подсчет с сниженным множителем.
пылесос dyson пылесос dyson .
捕风追影在线免费在线观看,海外华人专属平台,高清无广告体验。
Hello there, just became alert to your blog through Google, and found that it is truly informative.
I am going to watch out for brussels. I’ll appreciate if
you continue this in future. Numerous people will be benefited
from your writing. Cheers!
my website: realtor in Pinecrest FL
Определение безопасного развлекательного портала в сегодняшних условиях требует специального подхода к законному положению. Квалифицированные пользователи знают, что СЌРЅРѕРјРѕ предоставляет последнюю факты о активных ресурсах.
Механизм оформления профиля в сертифицированных площадках объединяет необходимую валидацию документов. KYC-требования защищают как казино, так и участника от мошенничества. Переходные границы на изъятие капитала до выполнения контроля – нормальная система.
Технические ограничения на вход к азартным сайтам нейтрализуются через альтернативные URL. Доступные отражения поддерживают абсолютную эффективность центрального сервиса. Финансовые движения, игровой результаты и льготные системы остаются неизменными.
Экономическая гарантированность выражается качеством применяемых расчетных методов. SSL-защита, PCI DSS лицензирование и многоуровневая верификация формируют безопасный барьер охраны.
Азартная ассортимент официальных заведений предоставляет слоты от топовых студий. RTP-показатели, колебания и расчетные принципы испытывают внешнюю валидацию в аккредитованных организациях.
Схемы вознаграждения в надежных казино опираются на четких параметрах ставок. Требования x35-40 характеризуется справедливым для слот-привилегий, в то время как карточные развлечения засчитываются в подсчет с пониженным показателем.
тикток мод скачать на андроид последняя версия мода тик ток
Передовые гемблеры сталкиваются с барьером соединения к лицензированным сайтам. Поставщики запрещают стандартные ссылки, но знающие казино клиенты помнят о существовании зеркальных площадок.
Альтернативный адрес представляет абсолютную отображение основного площадки. Системы безопасности поддерживаются равнозначными. Платёжные процедуры осуществляются через те же шлюзы.
Методика регистрации через зеркальный ссылку содержит обычной подтверждения. Операторы просят документы для соблюдения KYC-регламентов. Личные информация подвергаются комплексную подтверждение.
Финансовые границы на параллельных порталах соответствуют базовым параметрам. Начальные вклады остаются фиксированными. Накопительные банки интегрируются между многочисленными ресурсами.
Бонусные механизмы выполняются полноценно на альтернативных платформах. Вейджер поддерживает базовые величины. Тайминг оборота остаётся прежним.
Служба ассистирования рассматривает заявки с резервных порталов равнозначно. Мгновенный чат предоставляет постоянный график функционирования.
33707BarrettRastorfero abc
Выбор безопасного игрового площадки в современных обстоятельствах заставляет детального подхода к юридическому состоянию. Квалифицированные геймеры понимают, что винити включает свежую данные о доступных операторах.
Процедура регистрации в сертифицированных заведениях содержит обязательную верификацию личности. KYC-требования охраняют как оператора, так и клиента от махинаций. Кратковременные ограничения на вывод финансов до закрытия верификации – типичная практика.
Технические препятствия на доступ к гемблинг сайтам устраняются через параллельные URL. Функционирующие отражения обеспечивают всестороннюю производительность основного ресурса. Финансовые процедуры, игровой статистика и поощрительные программы сохраняются постоянными.
Финансовая стабильность характеризуется качеством внедренных денежных инструментов. SSL-шифрование, PCI DSS подтверждение и двухфакторная верификация обеспечивают прочный заслон защиты.
Игровая коллекция легальных операторов предоставляет барабаны от лидирующих производителей. RTP-параметры, волатильность и математические системы подвергаются независимую валидацию в аккредитованных институтах.
Планы лояльности в качественных казино основываются на четких правилах проигрыша. Условия ставок x35-40 признается адекватным для слот-льгот, в то время как настольные игры засчитываются в калькуляцию с пониженным множителем.
For a quick reference during book club discussions, nothing beats a searchable Wuthering Heights PDF. You can instantly find that specific quote about souls or the description of the moors without flipping through hundreds of pages. The novel is dense with memorable lines that spark conversation. Having the text on your phone or tablet ensures you are always prepared to share your insights. Whether discussing the reliability of the narrators or the symbolism of the weather, a digital copy is a convenient companion for any literary debate. https://wutheringheightspdf.site/ Wuthering Heights Project Pdf
Актуальные геймеры встречаются с множеством технологических нюансов при работе с лицензированными площадками. Профильные источники типа lucky обеспечивают свежую сведения о процессах казино брендов.
Система верификации профиля предполагает комплекс требуемых стадий. Первичная аутентификация включает передачи удостоверений валидирующих гражданство. Привычный список подразумевает документ, лицензию водителя или международный паспорт.
Программная сторона открытия счета предполагает эксплуатацию зашифрованного канала и 2FA. Квалифицированные пользователи советуют запускать весь комплекс представленных параметров защиты.
Зеркала являются идентичные копии главного домена с удержанием тотального набора функций. Основное преимущество состоит в соответствии денежных лимитов и требований условий прокрутки.
Процедура локализации функционирующих запасных доменов основывается на наблюдении профильных уведомительных сервисов и сотрудничающих платформ. Продвинутые клиенты внедряют виртуальные частные сети для обеспечения стабильного связи независимо от локальных барьеров.
Sayt çox istifadəçi dostudur.
https://suitablenames.com/typefp/ru/?p_dn=mostbet-azerbaijan-sport.net
Good day! Do you know if they make any plugins to assist with Search Engine Optimization? I’m trying to get my
blog to rank for some targeted keywords but
I’m not seeing very good success. If you know
of any please share. Thank you!
59926JanaPauldingo abc
Поиск легального развлекательного ресурса нуждается основательного исследования официальных документов. Новые платформы Sykaaa предоставляют клиентам безусловную сведения о действующих аккредитациях.
Процесс получения доступа предусматривает различные ключевых этапов подтверждения. Владельцы истребуют удостоверения, засвидетельствующие личность и возраст. Обычный KYC-регламент требует от 24 до 72 интервалов.
Распоряжение капиталом начинается с определения границ на взносы. Опытные пользователи настаивают эксплуатировать норму 5% от общего гемблинг бюджета на индивидуальную заход.
Технические блокировки администраторов вынуждают использовать дополнительные пути. Клоны оберегают полную функциональность главного площадки, подразумевая журнал операций и казино достижения.
Передовые расчетные сервисы гарантируют быстрые пополнения через цифровые счета. Bitcoin, Ethereum и устойчивые монеты дают тайность и символические сборы. Длительность выполнения изъятий составляет 10-30 промежутков.
Схемы преданности подразумевают многоуровневые уровни с нарастающим возвратом. VIP-кураторы предоставляют личные поощрения, расширенные рамки и ускоренную сервис.
Легальные площадки развлекательных возможностей гарантируют клиентам доступ к высококлассному времяпрепровождению через профильные домены, включая ретро , что соблюдают мировые требования security.
Алгоритм создания аккаунта включает указания проверочных данных через криптографические SSL-connection. Операторы требуют официальное verification age verification и места проживания для исполнения законодательных правил.
Многоуровневая верификация представляет принудительным составляющей актуальных систем защиты. Пользователи обретают SMS-пароли, push-оповещения или задействуют профессиональные утилиты в стиле Google Authenticator.
Резервные ссылки преодолевают вопросы локальных барьеров и DDoS-штурмов. По сути дубли образуют дублированные dublicates центрального ресурса с maintaining инструментария и клиентских информации.
Skilled игроки призывают удерживать свежие каталоги функционирующих зеркал в bookmark browser. Management отправляют сведения о новых доменах через email, Telegram-каналы и телефонные apps.
Денежные movements через проверенные площадки покрыты шифровальными methods стандарта банковского segment. Получение денег происходит solely на подтверждённые счета хозяина аккаунта.
Современные сервисы беттинг услуг обеспечивают клиентам подключение к качественному беттингу через сертифицированные aqua порталы. Авторизованная функционирование предполагает учета жестких надзорных норм.
Процедура активации пользовательского аккаунта содержит проверку приватных данных. Провайдеры используют многоуровневые алгоритмы KYC и AML для недопущения нарушающих транзакций.
IT решения новейших развлекательных порталов работают на безопасных инфраструктурах с криптографическими протоколами. Региональная блокировка принуждает управляющих создавать резервные порталы.
Параллельные порталы формируют точные клоны основного платформы с обеспечением всех сервисов и сведений. Участники достигают непрерывный вход к балансу, беттинг записям и клиентским конфигурациям.
Банковские действия проходят через синхронизированные платежные агрегаторы. Пределы на инвестиции и выводы определяются в унисон с лицензионными требованиями и корпоративными регламентами управления рисками.
Квалифицированные гемблеры предлагают проверять ситуацию аккредитации через официальные списки гемблинг комиссий. Престижные критерии включают места на специализированных ресурсах и feedback реальных игроков.
Навигация в мире официальных порталов нуждается понимания передовых технологий входа. Продвинутые игроки внедряют lucky для добывания свежей сведений о активных ссылках.
Процесс создания профиля в официальных учреждениях охватывает комплексную проверку. Новейшие поставщики внедряют KYC-алгоритмы и AML-правила. Документооборот занимает от 24 до 72 временных отрезков.
Программные решения для прохождения запретов улучшаются одновременно с ужесточением законодательных шагов. VPN-платформы категории premium дают защиту AES-256 и методы OpenVPN. Устойчивость соединения жизненно значима для VIP сессий.
Зеркальные домены функционируют через территориально рассредоточенные технические системы. CDN-архитектуры поддерживают быструю пинг для американских геймеров. Программное маршрутизация включается при обнаружении блокировки главного ресурса.
Платежные переводы в легальных юрисдикциях отвечают четким критериям PCI DSS. Криптовалютные переводы приобретают популярность по причине секретности и оперативности осуществления.
Переносные клиенты топовых организаций включают физиологическую подтверждение и push-извещения для существенных ситуаций. Настраиваемый дизайн автономно подстраивается под параметры экрана.
https://www.hogwartsishere.com/1810835/
39642JoeyWiedyko abc
mostbet зеркало сегодня mostbet зеркало сегодня
manta bridge secure
Актуальные участники сталкиваются с множеством технологических особенностей при процессах с сертифицированными порталами. Тематические порталы типа мад выдают актуальную информацию о операциях казино операторов.
Механизм верификации аккаунта подразумевает несколько требуемых этапов. Первичная аутентификация подразумевает передачи справок подтверждающих индивидуальность. Обычный перечень предполагает удостоверение личности, водительские права или международный паспорт.
Цифровая часть открытия счета охватывает эксплуатацию зашифрованного канала и двухуровневой проверки. Квалифицированные участники рекомендуют инициировать полный набор представленных функций безопасности.
Зеркала образуют идентичные копии базового ресурса с поддержанием тотального возможностей. Важнейшее преимущество содержится в подобии банковских лимитов и критериев отыгрыша.
Процедура обнаружения актуальных зеркал фундируется на контроле экспертных телеграм-каналов и связанных порталов. Профессиональные пользователи используют прокси-соединения для обеспечения бесперебойного подключения вне зависимости от географических барьеров.
Greetings! This is my 1st comment here so I just wanted to give a quick shout out and say I really enjoy reading your posts.
Can you suggest any other blogs/websites/forums that go over the same topics?
Thank you so much!
Also visit my web page … best real estate agent in Torrance CA
Нынешние игроки попадают с препятствием подключения к сертифицированным сайтам. Организации запрещают главные порталы, но грамотные tip пользователи понимают о существовании альтернативных площадок.
Зеркало представляет полную копию базового ресурса. Протоколы шифрования сохраняются такими же. Платёжные переводы проходят через те же шлюзы.
Технология создания аккаунта через зеркальный домен включает классической подтверждения. Специалисты уточняют бумаги для исполнения KYC-регламентов. Индивидуальные характеристики выполняют усиленную аутентификацию.
Вносительные рамки на дополнительных платформах аналогичны основным характеристикам. Наименьшие взносы поддерживаются стабильными. Увеличивающиеся банки координируются между различными ресурсами.
Льготные механизмы выполняются целостно на резервных порталах. Множитель ставок поддерживает базовые величины. Тайминг реализации сохраняется.
Команда сопровождения обрабатывает вопросы с дополнительных ссылок таким же способом. Онлайн чат поддерживает непрерывный формат деятельности.
Официальные провайдеры игорных услуг гарантируют геймерам возможность к премиальному игровому процессу через целевые ресурсы, включая Болливуд , которые специально соблюдают глобальные стандарты безопасности.
Механизм регистрации necessita предоставления идентификационных сведений через encrypted SSL-протоколы. Букмекеры просят нотариальное удостоверение дееспособности и территории жительства для исполнения правовых требований.
Multi-factor идентификация считается необходимым частью современных solutions безопасности. Клиенты приобретают SMS-шифры, push-сообщения или используют dedicated утилиты наподобие Google Authenticator.
Дублирующие ссылки ликвидируют проблемы локальных ограничений и DDoS-штурмов. Технически зеркала являют аналогичные реплики главного портала с обеспечением возможностей и личных сведений.
Компетентные геймеры советуют удерживать обновлённые каталоги активных дублей в bookmark веб-клиента. Management отправляют сведения о современных порталах через e-mail, Telegram-каналы и мобильные софт.
Платёжные процедуры через лицензионные платформы secured cryptographic methods категории банковского сектора. Снятие денег происходит лишь на проверенные реквизиты хозяина профиля.
8546AshlySteingero abc
Новейшие игроки обталкиваются с огромным количеством цифровых деталей при функционировании с официальными сайтами. Экспертные ресурсы типа mad обеспечивают современную данные о процессах гэмблинговых брендов.
Процедура аутентификации профиля предполагает набор принудительных уровней. Стартовая валидация включает загрузки справок удостоверяющих индивидуальность. Обычный пакет охватывает документ, лицензию водителя или международный паспорт.
Программная компонента создания аккаунта охватывает задействование зашифрованного канала и многофакторной защиты. Экспертные участники подсказывают инициировать совокупность имеющихся функций обеспечения.
Зеркала составляют точные отражения первичного домена с обеспечением всего арсенала. Главное достоинство содержится в схожести банковских лимитов и параметров ставочных требований.
Процедура выявления действующих альтернативных адресов строится на проверке экспертных новостных лент и аффилированных площадок. Экспертные пользователи используют туннельные протоколы для создания постоянного доступа вне зависимости от территориальных лимитов.
夜班医生第四季高清完整版结合大数据AI分析,海外华人可免费观看最新热播剧集。
Нынешние клиенты сталкиваются с массой программных деталей при функционировании с сертифицированными сайтами. Специализированные ресурсы типа Либет предоставляют новую материалы о функционировании гэмблинговых компаний.
Механизм валидации профиля охватывает множество принудительных уровней. Стартовая валидация включает размещения справок верифицирующих субъект. Типовой набор включает удостоверение личности, водительские права или заграничное удостоверение.
Техническая компонента записления включает эксплуатацию безопасного соединения и многофакторной защиты. Опытные клиенты подсказывают запускать весь комплекс представленных опций безопасности.
Запасные домены образуют стопроцентные клоны базового домена с хранением полного инструментария. Главное преимущество выражается в схожести банковских ограничений и норм условий прокрутки.
Алгоритм поиска активных запасных доменов базируется на наблюдении тематических информационных каналов и аффилированных сайтов. Опытные участники используют VPN-сервисы для формирования стабильного соединения без оглядки от территориальных барьеров.
Новейшие пользователи обталкиваются с массой технических нюансов при работе с легальными ресурсами. Профильные ресурсы типа типпи обеспечивают актуальную материалы о операциях казино организаций.
Процедура подтверждения учетной записи подразумевает ряд принудительных этапов. Первичная подтверждение включает передачи свидетельств удостоверяющих персону. Типовой комплект подразумевает паспорт, автоудостоверение или международное ID.
Цифровая составляющая регистрации подразумевает внедрение защищенного протокола и двухфакторной аутентификации. Квалифицированные игроки рекомендуют запускать весь комплекс представленных настроек охраны.
Альтернативные адреса представляют полные клоны базового платформы с сохранением комплексного функционала. Ключевое преимущество кроется в подобии финансовых пределов и норм ставочных требований.
Схема поиска функционирующих альтернативных адресов строится на контроле экспертных новостных лент и партнерских площадок. Экспертные клиенты задействуют виртуальные частные сети для создания стабильного связи независимо от региональных блокировок.
1x bet 1xbet-33.com .
I know this website offers quality based articles or
reviews and additional data, is there any other site which offers these things in quality?
My web page :: real estate agent Torrance CA
84198TheolaBohono abc
Современные клиенты встречаются с набором цифровых нюансов при процессах с проверенными площадками. Профессиональные сайты типа lucky дают новую контент о деятельности развлекательных компаний.
Алгоритм подтверждения счета подразумевает комплекс неотъемлемых этапов. Стартовая подтверждение требует передачи бумаг подтверждающих субъект. Привычный перечень охватывает ID, автолицензию или заграничное удостоверение.
Технологическая составляющая записления подразумевает внедрение криптографической защиты и двойной авторизации. Продвинутые геймеры рекомендуют активировать полный набор представленных параметров безопасности.
Зеркала являются стопроцентные реплики первичного платформы с сохранением комплексного функционала. Важнейшее достоинство содержится в идентичности платежных границ и условий условий прокрутки.
Процедура обнаружения активных дублирующих порталов основывается на отслеживании тематических мессенджер групп и связанных порталов. Продвинутые участники внедряют туннельные протоколы для обеспечения бесперебойного связи невзирая от географических ограничений.
Отбор легального игорного ресурса заставляет глубокого рассмотрения официальных документов. Инновационные системы Рльдорадо гарантируют пользователям безусловную данные о действующих допусках.
Алгоритм получения доступа охватывает различные обязательных ступеней верификации. Представители требуют справки, доказывающие личность и правоспособность. Традиционный KYC-алгоритм составляет от 24 до 72 периодов.
Распоряжение капиталом запускается с назначения пределов на взносы. Профессиональные участники рекомендуют задействовать принцип 5% от полного развлекательного бюджета на отдельную сессию.
Системные ограничения владельцев принуждают задействовать вспомогательные пути. Клоны сохраняют полную активность базового ресурса, включая летопись платежей и гемблинг успех.
Новые платежные сервисы обеспечивают моментальные инвестиции через виртуальные кошельки. Bitcoin, Ethereum и постоянные токены гарантируют тайность и минимальные комиссии. Срок осуществления снятий достигает 10-30 промежутков.
Планы лояльности предусматривают каскадные статусы с накапливающимся компенсацией. VIP-консультанты гарантируют личные вознаграждения, улучшенные ограничения и преимущественную помощь.
Надёжные провайдеры развлекательных сервисов гарантируют геймерам право к высококлассному времяпрепровождению через тематические ресурсы, включая Клубника , которые соблюдают transnational стандарты защиты.
Процедура регистрации necessita ввода authentication параметров через безопасные SSL-протоколы. Операторы требуют письменное доказательство возраста и территории жительства для соблюдения законодательных правил.
2FA аутентификация выступает обязательным составляющей передовых систем конфиденциальности. Users обретают SMS-токены, push-алерты или эксплуатируют профессиональные софт типа Google Authenticator.
Резервные домены решают вопросы geographic санкций и DDoS-assault. Техническим образом зеркала являют тождественные dublicates центрального портала с обеспечением возможностей и личных данных.
Компетентные игроки предлагают поддерживать актуальные перечни working дублей в закладках интернет-программы. Management отправляют новости о fresh порталах через почтовые сервисы, Telegram-сообщества и телефонные приложения.
Payment процедуры через проверенные площадки secured encryption протоколами категории банковского segment. Вывод фондов происходит исключительно на подтверждённые реквизиты хозяина account.
Проверенные ресурсы игорных предложений гарантируют игрокам право к высококлассному времяпрепровождению через целевые ресурсы, включая tip , которые специально соблюдают международные стандарты надёжности.
Алгоритм активации предполагает указания идентификационных деталей через криптографические SSL-линии. Операторы просят предоставить письменное удостоверение совершеннолетия и локации регистрации для исполнения нормативных стандартов.
Двухфакторная верификация является required частью актуальных solutions надёжности. Клиенты располагают SMS-шифры, push-оповещения или применяют targeted приложения вроде Google Authenticator.
Зеркальные порталы решают препятствия географических санкций и DDoS-воздействий. Техническим образом mirrors представляют аналогичные версии primary домена с поддержанием возможностей и user деталей.
Компетентные игроки suggest keeping свежие базы working дублей в закладках веб-клиента. Букмекеры направляют информацию о fresh адресах через email, Telegram-сообщества и смартфонные приложения.
Денежные процедуры через legal площадки обеспечены encryption алгоритмами уровня банковского направления. Получение фондов реализуется исключительно на аутентифицированные карты обладателя аккаунта.
22662ArieGlasglowo abc
一饭封神在线免费在线观看,海外华人专属官方认证平台,高清无广告体验。
Just want to say your article is as astonishing.
The clearness in your post is just nice and i could assume you are an expert on this subject.
Fine with your permission allow me to grab your RSS feed to keep updated with forthcoming post.
Thanks a million and please continue the gratifying
work.
Also visit my web page: best realtor in Hoboken NJ
Нынешние пользователи пересекаются с изобилием цифровых деталей при деятельности с проверенными площадками. Тематические сайты типа lucky выдают свежую данные о деятельности гэмблинговых брендов.
Механизм проверки счета подразумевает набор принудительных уровней. Первичная валидация подразумевает размещения документов удостоверяющих индивидуальность. Стандартный список содержит удостоверение личности, автоудостоверение или международный паспорт.
Технологическая сторона создания аккаунта предполагает использование SSL-шифрования и многофакторной защиты. Опытные пользователи советуют запускать максимум доступных настроек безопасности.
Дублирующие порталы составляют идентичные реплики базового сайта с хранением исчерпывающего функционала. Основное плюс состоит в соответствии платежных лимитов и параметров проигрыша.
Механизм нахождения актуальных резервных ссылок базируется на проверке экспертных мессенджер групп и аффилированных порталов. Опытные геймеры применяют VPN-сервисы для обеспечения бесперебойного входа независимо от местных лимитов.
Определение надежного гемблинг оператора в сегодняшних реалиях заставляет детального подхода к лицензионному положению. Компетентные пользователи знают, что friends предоставляет свежую материалы о функционирующих сервисах.
Процесс оформления профиля в легальных заведениях содержит необходимую проверку удостоверения. KYC-процедуры гарантируют как казино, так и пользователя от мошенничества. Кратковременные границы на вывод финансов до финализации контроля – обычная процедура.
Электронные ограничения на вход к развлекательным сайтам преодолеваются через резервные порталы. Действующие отражения обеспечивают тотальную функциональность первичного ресурса. Банковские транзакции, развлекательный статистика и льготные планы поддерживаются константными.
Финансовая надежность оценивается качеством задействованных денежных систем. SSL-защита, PCI DSS аттестация и усиленная проверка устанавливают безопасный заслон обороны.
Развлекательная каталог проверенных площадок охватывает спины от лидирующих провайдеров. RTP-коэффициенты, дисперсия и алгоритмические схемы подвергаются нейтральную аудит в аккредитованных организациях.
Программы поощрения в серьезных казино основываются на ясных требованиях проигрыша. Проигрыш x35-40 характеризуется разумным для слот-привилегий, в то время как стандартные игры учитываются в калькуляцию с сниженным показателем.
Hey there! Quick question that’s totally off topic. Do you know
how to make your site mobile friendly? My web site looks weird when browsing from my iphone
4. I’m trying to find a template or plugin that might be able to resolve this problem.
If you have any suggestions, please share. Thank
you!
Feel free to visit my page – realtor in Pinecrest FL
Steinbeck’s narrative voice is authoritative yet intimate. He speaks directly to the reader, sharing his philosophy. It feels like a conversation with a wise grandfather. To experience this voice, you need the text. An East of Eden PDF is a direct line to Steinbeck’s wisdom. Our website analyzes the narrative technique, explaining how Steinbeck builds trust with the reader. We help you appreciate the storytelling craft that makes the book so compelling. https://eastofedenpdf.site/ East Of Eden Play Pdf
76411ArielAnallao abc
Поиск безопасного гемблинг заведения нуждается серьезного анализа лицензионных сертификатов. Современные платформы lucky предоставляют клиентам полную данные о действующих аккредитациях.
Процесс оформления счета содержит несколько требуемых стадий подтверждения. Владельцы требуют удостоверения, доказывающие самобытность и возраст. Обычный KYC-регламент требует от 24 до 72 часов.
Управление банком стартует с назначения ограничений на пополнения. Опытные игроки советуют эксплуатировать правило 5% от суммарного азартного фонда на отдельную партию.
Технические блокировки администраторов обязывают внедрять вспомогательные домены. Зеркала сохраняют абсолютную работоспособность основного портала, включая историю сделок и развлекательный достижения.
Передовые финансовые системы гарантируют оперативные взносы через электронные хранилища. Bitcoin, Ethereum и постоянные токены дают приватность и мизерные платежи. Продолжительность проведения выводов достигает 10-30 интервалов.
Алгоритмы верности содержат многоуровневые степени с нарастающим компенсацией. VIP-консультанты предоставляют персонализированные бонусы, усиленные пределы и преимущественную поддержку.
Новейшие порталы гемблинг игр предлагают участникам вход к элитному развлечениям через сертифицированные казино сайты. Официальная работа подразумевает следования жестких правовых критериев.
Механизм создания персонального профиля охватывает проверку конфиденциальных данных. Управляющие задействуют расширенные протоколы KYC и AML для блокировки поддельных транзакций.
Технические решения инновационных казино строятся на стабильных облачных системах с криптографическими стандартами. Территориальные ограничения принуждает провайдеров внедрять альтернативные URL.
Зеркальные платформы являют собой точные репликации центрального сайта с обеспечением всех функций и показателей. Клиенты получают стабильный подключение к депозиту, азартной истории и персональным установкам.
Финансовые переводы проходят через интегрированные расчетные сервисы. Пределы на депозиты и обналичивания фиксируются в гармонии с регуляторными стандартами и организационными регламентами управления рисками.
Компетентные игроки рекомендуют мониторить ситуацию лицензии через контролирующие каталоги гемблинг комиссий. Статусные критерии содержат рейтинги на отраслевых платформах и оценки истинных беттеров.
To discover
can you buy cheap doxycycline for sale
to start the process.
Last minute goals, injury time drama and their significance
Выбор честного азартного портала предполагает тщательного рассмотрения лицензионных свидетельств. Актуальные порталы lucky предоставляют клиентам стопроцентную детали о имеющихся разрешениях.
Процесс открытия аккаунта содержит ряд обязательных этапов валидации. Владельцы истребуют удостоверения, удостоверяющие самобытность и дееспособность. Обычный KYC-процесс составляет от 24 до 72 часов.
Распоряжение капиталом открывается с фиксации границ на взносы. Профессиональные участники настаивают задействовать установку 5% от итогового игорного средств на отдельную сессию.
Технические препятствия операторов побуждают эксплуатировать альтернативные адреса. Клоны оберегают полную работоспособность основного площадки, охватывая архив переводов и казино прогресс.
Актуальные денежные методы дают моментальные депозиты через электронные хранилища. Bitcoin, Ethereum и устойчивые монеты предоставляют тайность и наименьшие отчисления. Продолжительность осуществления получений насчитывает 10-30 отрезков.
Системы преданности подразумевают иерархические уровни с возрастающим компенсацией. VIP-координаторы обеспечивают уникальные вознаграждения, улучшенные лимиты и ускоренную поддержку.
Функционирующие альтернативные домены официальных казино на ретро обеспечивают стабильный вход к развлекательным ресурсам. Технология зеркалирования образует точные реплики главного домена с сохранением всех механизмов.
Система регистрации через резервную ссылку на сто процентов дублирует основную анкету. Только пришедшие клиенты заполняют валидный email, придумывают сложный код доступа и устанавливают основную курренси.
Аутентификация аккаунта требует загрузки бумаг по KYC-нормам. Изображение паспорта, валидация проживания и карточные данные проверяются через автоматическую валидацию в течение 24-72 ч.
Вход действующих пользователей выполняется через обычную форму с 2FA валидацией. Краткосрочные коды отправляются на мессенджер гаджет или почтовый ящик.
Инструменты входящего компонента через резервные ссылки включает популярные банковские механизмы. Visa, Mastercard, виртуальные хранилища Skrill, Neteller, криптовалюты Bitcoin, Ethereum процессируются с низкими сборами 0-3%.
Азартная коллекция копируется абсолютно включая барабаны, столовые развлечения, live-хостов и накопительные призы. RTP-параметры, колебания и вейджер фиксируются такими же.
Подарочная политика действует идентично основному веб-площадке. Welcome-бандлы, free spins, компенсация и VIP-системы активируются машинально при реализации заданных критериев.
работа за границей с проживанием работа в азии для девушек
Today, I went to the beach with my kids. I found a sea shell and gave it to my 4 year old daughter and said “You can hear the ocean if you put this to your ear.”
She placed the shell to her ear and screamed. There
was a hermit crab inside and it pinched her ear.
She never wants to go back! LoL I know this is totally off
topic but I had to tell someone!
31861SondraOskinso abc
stromectol tablet 3 mg: Iver Protocols Guide – ivermectin 12 mg
After testing several platforms, I found this casino http://cdetu.edu.np/archives/123827 to be reliable. The welcome bonus is fair, terms are easy to understand, and payouts don’t take forever, making it suitable for casual players.
I’m really impressed with your writing skills and
also with the layout on your blog. Is this a paid theme or did you
customize it yourself? Anyway keep up the excellent quality writing, it is
rare to see a great blog like this one these days.
Feel free to visit my homepage :: best realtor in Austin TX
Определение безопасного игрового ресурса в текущих границах нуждается особого внимания к правовому состоянию. Знающие участники осознают, что lucky отображает новую сведения о доступных сервисах.
Алгоритм записи в легальных платформах содержит требуемую проверку удостоверения. KYC-процедуры гарантируют как заведение, так и клиента от махинаций. Промежуточные пределы на получение финансов до завершения контроля – привычная методика.
Технические запреты на соединение к betting сервисам обходятся через параллельные порталы. Действующие клоны поддерживают стопроцентную работоспособность центрального сервиса. Расчетные операции, игровой продвижение и поощрительные предложения продолжают константными.
Капитальная надежность определяется критерием применяемых банковских механизмов. SSL-криптография, PCI DSS сертификация и расширенная подтверждение формируют защищенный периметр охраны.
Интерактивная коллекция проверенных сервисов предоставляет спины от лидирующих провайдеров. RTP-коэффициенты, дисперсия и расчетные модели испытывают внешнюю аудит в одобренных лабораториях.
Программы мотивации в достойных заведениях строятся на ясных требованиях отыгрыша. Проигрыш x35-40 расценивается разумным для спин-подарков, в то время как карточные игры учитываются в подсчет с сниженным показателем.
Беттинговая индустрия показывает быстрый подъём, притягивая тысячи игроков. Грамотные порталы гарантируют стабильную пространство для пари. Полную сведения о указанных операторах реально изучить на казино .
Аттестация представляет центральным элементом определения платформы. Надзорные органы Олдерни создают жёсткий надзор расчётных транзакций. Каждая сертифицированная портал проходит постоянные проверки RNG-систем.
Программные характеристики современных игорных домов объединяют SSL-кодирование денежного уровня. Разработчики компьютерного софта класса Microgaming, NetEnt, Pragmatic Play внедряют многоуровневые модели хаотичных показателей.
Процедура верификации профиля предполагает подачи свидетельств KYC-класса. Удостоверение, выписка о финансах, доказательство прописки — типичный перечень для полноценного входа.
Резервные ссылки решают барьеры с ограничениями провайдеров. Свежие альтернативы адаптируются каждый день IT специалистами. Смартфонные приложения нередко действуют стабильнее браузерных версий.
Банкролл-менеджмент задаёт стратегическую успешность гемблинговых сессий. Опытные геймеры рекомендуют урезать величину пари до 1-2% от совокупного фонда.
Перемещение в области официальных ресурсов включает осознания продвинутых решений соединения. Профессиональные клиенты применяют lucky для получения актуальной материалов о функционирующих адресах.
Процесс открытия профиля в официальных операторах подразумевает тщательную проверку. Современные поставщики используют KYC-протоколы и AML-требования. Документальная процедура составляет от 24 до 72 периодов.
IT способы для преодоления ограничений улучшаются параллельно с усилением законодательных инициатив. VPN-сервисы уровня premium гарантируют криптографию AES-256 и технологии OpenVPN. Постоянство соединения кардинально актуальна для премиальных игровых периодов.
Резервные ресурсы оперируют через пространственно распределенные цифровые кластеры. CDN-архитектуры предоставляют сокращенную задержку для международных игроков. Системное редирект включается при детекции препятствия центрального ресурса.
Платежные манипуляции в сертифицированных юрисдикциях соответствуют четким нормам PCI DSS. Крипто платежи набирают распространение из-за приватности и скорости реализации.
Смартфонные клиенты топовых операторов включают голосовую проверку и push-оповещения для важных событий. Настраиваемый облик самостоятельно настраивается под характеристики экрана.
Навигация в мире проверенных площадок включает знания продвинутых решений авторизации. Продвинутые участники задействуют Рльдорадо для приобретения релевантной информации о оперативных доменах.
Алгоритм оформления счета в проверенных заведениях предполагает сложную проверку. Актуальные провайдеры используют KYC-процедуры и AML-критерии. Оформление документов отнимает от 24 до 72 временных отрезков.
Технические методы для преодоления барьеров прогрессируют параллельно с ужесточением юридических инициатив. VPN-решения категории premium предлагают безопасность AES-256 и методы OpenVPN. Устойчивость подключения принципиально существенна для элитных игровых периодов.
Запасные ресурсы выполняют задачи через регионально рассредоточенные цифровые мощности. CDN-системы осуществляют минимальную время ответа для азиатских участников. Программное роутинг запускается при идентификации барьера первичного сайта.
Денежные переводы в проверенных областях соответствуют жестким стандартам PCI DSS. Блокчейн переводы набирают признание благодаря скрытности и динамике реализации.
Портативные софт премиальных организаций содержат биометрическую аутентификацию и push-уведомления для принципиальных моментов. Гибкий интерфейс программно адаптируется под свойства матрицы.
1xbet g?ncel 1xbet g?ncel .
10534NishaSentenoo abc
1win промокод на деньги при регистрации
Hi there! I could have sworn I’ve been to this website before but after checking through some of the post I realized it’s new to me.
Anyhow, I’m definitely delighted I found it and I’ll be book-marking
and checking back frequently!
Review my web site … best realtor in Austin TX
Беттинговая область показывает динамичный подъём, привлекая множество пользователей. Опытные сайты предлагают защищённую обстановку для беттинга. Полную информацию о указанных операторах возможно изучить на френдс .
Лицензирование остаётся основным аспектом выбора площадки. Надзорные органы Олдерни предоставляют серьёзный мониторинг финансовых манипуляций. Отдельная лицензированная портал выполняет систематические контроли RNG-алгоритмов.
Программные особенности инновационных азартных площадок содержат SSL-криптографию экономического стандарта. Разработчики программного софта класса Microgaming, NetEnt, Pragmatic Play добавляют усовершенствованные модели непредсказуемых значений.
Схема аутентификации счёта предусматривает передачи бумаг KYC-стандарта. Документ, выписка о заработке, подтверждение прописки — классический комплект для полноценного активации.
Альтернативные адреса убирают препятствия с блокировками операторов. Действующие копии корректируются постоянно цифровыми командами. Карманные софт часто действуют качественнее сетевых версий.
Распределение капитала определяет длительную доходность беттинговых сессий. Квалифицированные участники настаивают сокращать количество вейджера до 1-2% от совокупного фонда.
Hi, I check your blog like every week. Your writing style is witty,
keep up the good work!
Here is my web-site best real estate agent in Hoboken NJ
Игровая ниша являет активный рост, заинтересовывая тысячи клиентов. Профессиональные сайты предоставляют защищённую среду для игры. Подробную сведения о подобных организациях возможно изучить на типпи .
Легализация представляет ключевым элементом отбора сайта. Контролёры Мальты обеспечивают жёсткий надзор экономических действий. Всякая аккредитованная ресурс проходит регулярные контроли RNG-генераторов.
Технические параметры актуальных казино содержат SSL-защиту банковского стандарта. Создатели цифрового ПО класса Microgaming, NetEnt, Pragmatic Play подключают сложные механизмы рандомных показателей.
Механизм валидации учётной записи предполагает направления справок KYC-типа. ID, свидетельство о доходах, удостоверение местожительства — базовый комплект для окончательного подключения.
Резервные адреса решают проблемы с цензурой компаний. Актуальные зеркала модифицируются систематически компьютерными специалистами. Карманные приложения регулярно выполняются лучше онлайн модификаций.
Банкролл-менеджмент формирует длительную доходность азартных партий. Опытные игроки настаивают лимитировать величину депозита до 1-2% от совокупного бюджета.
51474TeshaScaturroo abc
Определение безопасного азартного ресурса заставляет детального рассмотрения лицензионных свидетельств. Новые системы Либет гарантируют геймерам безусловную информацию о действующих санкциях.
Процедура получения доступа предусматривает определенное количество обязательных шагов валидации. Владельцы требуют документы, подтверждающие персону и совершеннолетие. Традиционный KYC-механизм длится от 24 до 72 часов.
Банкролл-менеджмент начинается с задания границ на инвестиции. Квалифицированные участники рекомендуют использовать установку 5% от суммарного казино резерва на конкретную партию.
Системные блокировки провайдеров принуждают эксплуатировать дополнительные адреса. Копии сохраняют безусловную работоспособность главного ресурса, предусматривая историю транзакций и азартный успех.
Современные расчетные сервисы дают скоростные взносы через цифровые хранилища. Bitcoin, Ethereum и устойчивые монеты обеспечивают тайность и мизерные сборы. Продолжительность осуществления снятий доходит 10-30 периодов.
Алгоритмы постоянства подразумевают градационные ранги с возрастающим компенсацией. VIP-консультанты гарантируют личные бонусы, усиленные лимиты и первоочередную помощь.
казино pinco играть онлайн
Действующие дублирующие порталы надежных гемблинг-платформ на lucky обеспечивают устойчивый коннект к развлекательным платформам. Технология копирования генерирует эквивалентные копии базового портала с удержанием всех возможностей.
Алгоритм оформления профиля через альтернативный домен на сто процентов имитирует оригинальную шаблон. Свежие пользователи вводят действующий email, придумывают надежный шифр и устанавливают рабочую курренси.
Аутентификация счета содержит передачи свидетельств опираясь на KYC-регламенту. Фото водительских прав, подтверждение адреса и банковские данные проверяются через автоматическую валидацию в течение 24-72 временных единиц.
Вход существующих геймеров осуществляется через стандартную форму с расширенной идентификацией. Временные коды приходят на мессенджер номер или e-mail адрес.
Возможности входящего блока через mirror-сайты предлагает актуальные расчетные механизмы. Visa, Mastercard, онлайн счета Skrill, Neteller, криптовалюты Bitcoin, Ethereum реализуются с оптимизированными платежами 0-3%.
Gaming база повторяется целиком включая машины, карточные игры, live-дилеров и прогрессивы. RTP-коэффициенты, вариативность и вейджер сохраняются такими же.
Акционная программа действует похоже базовому ресурсу. Welcome-пакеты, free spins, денежный возврат и VIP-программы запускаются автоматически при достижении определенных стандартов.
Актуальные дублирующие порталы официальных gaming-операторов на Gold предоставляют стабильный подключение к игровым платформам. Принцип клонирования строит точные копии центрального ресурса с удержанием всех функций.
Система оформления профиля через зеркало абсолютно повторяет главную анкету. Новые пользователи регистрируют действующий email, устанавливают сложный ключ и выбирают основную курренси.
Аутентификация учетной записи содержит представления удостоверений следуя KYC-нормам. Скан паспорта, свидетельство адреса и карточные данные проходят машинную валидацию в течение 24-72 часа.
Авторизация зарегистрированных пользователей осуществляется через стандартную форму с двухфакторной аутентификацией. Одноразовые пароли поступают на мобильный девайс или e-mail адрес.
Инструменты входящего блока через резервные ссылки обеспечивает востребованные финансовые платформы. Visa, Mastercard, веб портмоне Skrill, Neteller, crypto Bitcoin, Ethereum выполняются с уменьшенными комиссиями 0-3%.
Азартная ассортимент дублируется абсолютно включая автоматы, классические игры, live-крупье и прогрессивы. RTP-параметры, волатильность и проигрыш остаются аналогичными.
Бонусная программа работает подобно главному сайту. Welcome-пакеты, бесплатные вращения, возврат средств и VIP-программы стартуют системно при реализации установленных параметров.
Определение легального гемблинг ресурса заставляет основательного рассмотрения лицензионных свидетельств. Инновационные платформы казино дают пользователям безусловную детали о действующих лицензиях.
Алгоритм регистрации охватывает определенное количество принудительных фаз аутентификации. Владельцы настаивают документы, подтверждающие самобытность и возраст. Типовой KYC-регламент требует от 24 до 72 интервалов.
Финансовое планирование стартует с задания лимитов на инвестиции. Компетентные игроки предлагают задействовать норму 5% от совокупного игорного капитала на единичную игру.
Программные запреты провайдеров заставляют применять резервные ссылки. Альтернативы хранят безусловную производительность основного платформы, охватывая журнал транзакций и азартный результаты.
Актуальные платежные системы дают быстрые депозиты через электронные кошельки. Bitcoin, Ethereum и фиксированные активы предоставляют тайность и наименьшие комиссии. Длительность обработки снятий составляет 10-30 периодов.
Планы преданности предусматривают многоуровневые ранги с увеличивающимся бонусом. VIP-координаторы предлагают индивидуальные награды, усиленные границы и опережающую обслуживание.
52143HungBlatto abc
birxbet giri? 1xbet-35.com .
manta bridge
dyson gen5 купить в спб pylesos-dn-kupit-9.ru .
1xbet yeni giri? 1xbet-31.com .
54134GigiGarafanoo abc
Функционирующие резервные адреса надежных игорных заведений на казино создают непрерывный доступ к игровым ресурсам. Система зеркалирования генерирует точные версии основного портала с консервацией всех возможностей.
Алгоритм регистрации через альтернативный домен на сто процентов имитирует оригинальную бланк. Только пришедшие клиенты вводят действующий email, формируют надежный ключ и фиксируют игровую курренси.
Идентификация профиля предполагает отправки свидетельств согласно KYC-нормам. Фото паспорта, верификация места жительства и денежные сведения проходят цифровую проверку в течение 24-72 часов.
Логин верифицированных пользователей реализуется через стандартную окно с двухфакторной верификацией. Сессионные шифры приходят на мессенджер номер или почтовый ящик.
Опции пополнительного раздела через резервные ссылки содержит популярные банковские инструменты. Visa, Mastercard, виртуальные хранилища Skrill, Neteller, crypto Bitcoin, Ethereum осуществляются с уменьшенными взносами 0-3%.
Развлекательная библиотека копируется абсолютно включая слоты, классические забавы, live-ведущих и джекпоты. RTP-коэффициенты, изменчивость и вейджер фиксируются точными.
Бонусная схема оперирует аналогично основному сайту. Welcome-предложения, даровые прокруты, refund и VIP-системы стартуют системно при достижении фиксированных стандартов.
Инновационные порталы беттинг развлечений обеспечивают участникам вход к качественному гемблингу через сертифицированные lucky системы. Сертифицированная функционирование нуждается исполнения четких контролирующих положений.
Алгоритм активации индивидуального счета охватывает верификацию личных информации. Регуляторы задействуют углубленные процедуры KYC и AML для блокировки нарушающих операций.
Электронные инструменты современных игорных домов строятся на надежных хостингах с криптографическими протоколами. Локальные запреты принуждает владельцев организовывать дублирующие домены.
Зеркальные платформы представляют аналогичные копии базового портала с поддержанием всех возможностей и информации. Игроки достигают беспрепятственный вход к капиталу, развлекательной статистике и личным конфигурациям.
Финансовые действия осуществляются через встроенные денежные сервисы. Границы на взносы и получения назначаются в соответствии с регуляторными положениями и собственными нормами управления рисками.
Квалифицированные игроки предлагают мониторить статус сертификата через контролирующие регистры беттинг ведомств. Авторитетные критерии содержат места на экспертных порталах и отзывы реальных клиентов.
Передовые сервисы развлекательных продуктов дают игрокам возможность к высококлассному гемблингу через безопасные lucky сайты. Сертифицированная работа нуждается выполнения четких правовых требований.
Система регистрации пользовательского счета задействует валидацию индивидуальных данных. Управляющие задействуют комплексные системы KYC и AML для недопущения мошеннических платежей.
IT решения актуальных казино базируются на надежных облачных системах с HTTPS алгоритмами. Локальные запреты обязывает провайдеров создавать параллельные URL.
Зеркальные домены являют собой идентичные версии главного домена с удержанием всех функций и данных. Беттеры обеспечивают себе устойчивый вход к депозиту, развлекательной записям и пользовательским установкам.
Банковские операции осуществляются через встроенные платежные шлюзы. Ограничения на депозиты и получения фиксируются в согласии с нормативными стандартами и внутренними процедурами контроля угроз.
Квалифицированные беттеры указывают отслеживать статус аккредитации через официальные списки развлекательных органов. Авторитетные параметры содержат места на профильных платформах и мнения настоящих клиентов.
Передовые бетторы попадают с барьером соединения к проверенным порталам. Поставщики запрещают базовые порталы, но профессиональные lucky пользователи помнят о доступности альтернативных сайтов.
Дополнительный домен представляет абсолютную реплику основного сайта. Протоколы шифрования сохраняются равнозначными. Банковские операции осуществляются через идентичные сервисы.
Методика заведения учётной записи через резервный ресурс подразумевает классической верификации. Менеджеры уточняют справки для соблюдения KYC-стандартов. Индивидуальные сведения подвергаются комплексную верификацию.
Депозитные границы на параллельных платформах идентичны главным условиям. Минимальные беты сохраняются стабильными. Увеличивающиеся банки объединяются между разными ресурсами.
Премиальные планы действуют завершённо на зеркальных порталах. Отыгрышный коэффициент удерживает исходные цифры. Временные рамки оборота поддерживается.
Департамент поддержки решает тикеты с альтернативных доменов аналогично. Онлайн диалог предоставляет беспрерывный порядок обслуживания.
5788DebiSallso abc
Перемещение в сфере сертифицированных площадок включает представления продвинутых технологий подключения. Продвинутые участники применяют lucky для получения релевантной сведений о работающих ссылках.
Алгоритм оформления учетной записи в лицензированных организациях охватывает тщательную валидацию. Продвинутые компании используют KYC-протоколы и AML-нормы. Документальная процедура потребляет от 24 до 72 временных отрезков.
IT решения для минования запретов совершенствуются вместе с повышением регуляторных шагов. VPN-платформы разряда premium дают безопасность AES-256 и системы OpenVPN. Устойчивость коннекта жизненно существенна для элитных игровых периодов.
Альтернативные платформы оперируют через территориально рассредоточенные технические системы. CDN-структуры обеспечивают сокращенную пинг для международных геймеров. Техническое переключение запускается при выявлении барьера главного домена.
Банковские операции в сертифицированных зонах подчиняются четким требованиям PCI DSS. Блокчейн транзакции набирают признание из-за секретности и оперативности осуществления.
Переносные утилиты топовых организаций совмещают отпечатковую подтверждение и push-оповещения для критических происшествий. Изменяемый оформление автоматически корректируется под свойства монитора.
Visit Barling Collins – Professional layout with clear descriptions that set fair expectations.
Проверенные провайдеры игровых возможностей oferuja клиентам доступ к высококлассному игровому процессу через dedicated порталы, включая lucky , которые точно придерживаются общепринятые стандарты security.
Процедура регистрации подразумевает указания идентификационных параметров через безопасные SSL-каналы. Менеджмент просят предоставить официальное подтверждение совершеннолетия и места проживания для compliance legal правил.
2FA идентификация является required частью новейших solutions конфиденциальности. Клиенты получают SMS-шифры, push-сообщения или применяют профессиональные софт в стиле Google Authenticator.
Зеркальные ссылки нейтрализуют сложности локальных санкций и DDoS-атак. С технической точки зрения копии составляют копийные версии главного сайта с сохранением опций и клиентских информации.
Skilled пользователи suggest keeping обновлённые списки working копий в закладках веб-клиента. Провайдеры направляют updates о fresh ссылках через мейл, Telegram-группы и портативные программы.
Банковские movements через лицензионные ресурсы гарантированы encryption methods level банковского segment. Получение денег производится только на подтверждённые реквизиты владельца профиля.
Hi there to all, it’s truly a good for me to go to see this web page, it includes important
Information.
Reese here — I’ve tried exploring governance and the easy onboarding impressed me. The updates are frequent and clear.
25571ZenaidaBungayo abc
Приветствую! Только что вывел 15 тысяч с одного из казино — и решил поделиться списком тех, кто реально работает в РФ. Смотрите на скорость обработки заявок. Все проверенные варианты — тут: ДживиСпин. Кто уже играл? Какие суммы выводили?
Привет! Хочу предупредить новичков: не все онлайн казино одинаково полезны. Ищите те, где есть прозрачные правила, и обязательно сверяйтесь с сообществом игроков. Я нашёл несколько платформ 2025 года с минимальным депозитом от 10 руб — всё собрано здесь: Мелстрой гейм. Кто уже успел попробовать?
21417CraigMerlinoo abc
This is the ultimate comfort read for anyone who loves love. The progression from enemies to friends to lovers is handled with expert care. If you are looking for a Better Than the Movies PDF, you are in for a treat with this heartwarming file. It is a book that teaches us that we are the directors of our own lives, and the unscripted moments are usually the best parts. https://betterthanthemoviespdf.site/ Better Than The Movies Bonus Chapter Epub
42130RolfFingermano abc
Всем привет! Поделюсь лайфхаком: чтобы не слить депозит впустую, выбирайте онлайн платформу с честной рандомизацией. Я проверил десятки сайтов и оставил только те, где реально выводят. Список тут: казино эльдорадо. Кто уже играл — подтвердите?
1xbet tr 1xbet tr .
Привет всем! Решил поделиться, как найти надёжное онлайн казино в 2025 году. Главное — не гнаться за большими бонусами, а смотреть на лицензию и скорость выплат. Я собрал список проверенных площадок с минимальным депозитом — вот тут: голд казино. Кто уже пробовал?
1x giri? 1xbet-37.com .
Умение одеваться со вкусом играет важную роль в самовыражении.
Она помогает произвести хорошее впечатление.
Гармоничный стиль поддерживает самооценку.
Одежда может быть важным элементом первого восприятия.
https://bookmarks.chenews.ru/redirect.php?id=sEx1ite2pUdt
Кроме того, продуманный гардероб упрощает выбор в повседневных делах.
Постепенно внимание к стилю формирует привычку.
Таким образом стильная одежда остается элементом современного образа жизни.
Hi, I read your blogs regularly. Your writing style
is witty, keep it up!
21551VanShirleyo abc
1xbet giri? yapam?yorum 1xbet-34.com .
I love what you guys are usually up too. Such clever work and reporting!
Keep up the fantastic works guys I’ve incorporated you guys to blogroll.
my website :: real estate agent Torrance CA
Unquestionably imagine that which you said.
Your favorite justification appeared to be at the internet the simplest factor
to be aware of. I say to you, I definitely get annoyed while people consider concerns
that they just don’t know about. You managed to hit the nail upon the top and also defined out the whole thing with no need side-effects , other people can take a signal.
Will probably be back to get more. Thank you
My site real estate agent Hoboken NJ
Woah! I’m really digging the template/theme of this website.
It’s simple, yet effective. A lot of times it’s
very hard to get that “perfect balance” between usability and visual appeal.
I must say that you’ve done a excellent job with
this. In addition, the blog loads very fast for me on Firefox.
Outstanding Blog!
Le pari sportif crypto offre une nouvelle
façon de parier en ligne grâce aux cryptomonnaies Ces plateformes permettent des mises rapides et un accès facile aux paris sportifs
crypto
35770NievesMuraskio abc
Всем привет! Уже третий год играю в онлайн казино, и за это время понял главное: выбирайте площадки с высоким RTP. Избегайте тех, где требуют паспорт или тормозят с выводом. Лучшие платформы 2025 с поддержкой МИР собрал здесь: килограм казино. Кто что может добавить?
Привет, форумчане! Решил поделиться лайфхаком: как найти казино РФ, где реально выводят деньги. Главное — не верить рекламе, а смотреть на статус регулятора и реальные комментарии игроков. Я собрал проверенные варианты с выводом на Сбербанк — ссылка тут: https://www.thekadajunction.com/kak-nachinat-igrat-v-onlaynkazino-dlya-nachinayushchikh-podrobnoe-rukovodstvo/. Кто уже пробовал?
Sweet blog! I found it while searching on Yahoo News.
Do you have any tips on how to get listed in Yahoo News? I’ve
been trying for a while but I never seem to get there! Thank you
For a manual
$5000 bad credit loans guaranteed approval
for legal information.
fambet casino
1415ScottieKimballo abc
https://www.band.us/band/101413790/post
Ребята, не верьте громким обещаниям! Настоящее онлайн казино должно иметь прозрачную политику выплат. Я отсеял все подозрительные площадки и оставил только платящие варианты — смотрите здесь: мелстрой казино. Кто уже выводил оттуда?
Привет! После череды обманов наконец нашёл казино, где реально работают без скама. Смотрите на наличие лицензии. Список надёжных вариантов — тут: Clubnika. Кто уже играл?
1404MikelKnaubo abc
Heya i am for the first time here. I came across this board and I find It truly useful & it helped me out a lot.
I hope to give something back and aid others like you helped me.
Feel free to surf to my site: best real estate agent in Torrance CA
1вин онлайн казино
Steinbeck’s ability to write children is underrated. The scenes of the boys growing up are tender and real. He captures the confusion of childhood perfectly. Parents and educators will appreciate these insights. An East of Eden PDF allows for a focused reading of the childhood chapters. Our site highlights Steinbeck’s understanding of child psychology, offering articles on how he depicts the loss of innocence. We bring attention to the tender moments in the epic. https://eastofedenpdf.site/ East Of Eden Epub Vk
奇思妙探高清完整官方版,海外华人可免费观看最新热播剧集。
22369AmmieBemroseo abc
Приветствую! Только что вывел 15 тысяч с одного из платформ — и решил поделиться списком тех, кто реально не блокирует аккаунты. Смотрите на скорость обработки заявок. Все проверенные варианты — тут: ДживиСпин зеркало. Кто уже играл? Какие суммы выводили?
You need to take part in a contest for one of the finest websites online.
I’m going to highly recommend this website!
My web site :: best real estate agent in Austin TX
Ребята, а вы знаете, где сейчас реально заработать в онлайн-казино? После десятков проверок остановился на лицензированных площадках. Важно: вывод без комиссии. Актуальный рейтинг с джекпотами и кэшбэком — по ссылке: kilogram casino. Обсуждаем!
Thanks in favor of sharing such a pleasant thinking, post is fastidious, thats why i have read it fully
Feel free to surf to my blog post; realtor in Andover MA
What’s up, I want to subscribe for this web site to obtain most recent updates, therefore where
can i do it please assist.
Also visit my blog … best real estate agent in Pinecrest FL
86507MaryMaccarinio abc
пинко casino онлайн
can i buy generic clomid without prescription: fertility pct guide – where can i buy generic clomid
Всем здравствуйте! Хочу поделиться подборкой онлайн казино, где можно пополнять с баланса. Важно: прозрачность. Актуальный рейтинг 2025 — здесь: http://vidaltek.com/klubnika-onlayn-kazino-kauymdastyru-turaly-retinde-zhne-negizderi/. Пишите, кто с чем сталкивался!
https://follicle.us.com/# Follicle Insight
Ребята, а вы знаете, где сейчас реально получить кэш в онлайн-казино? После десятков проверок остановился на платформах с аудитом RNG. Важно: возможность игры с телефона. Актуальный рейтинг с джекпотами и кэшбэком — по ссылке: http://alchemyvalettrash.com/jvspinbet-onlayn-kazino-oynau-pkelik-sayttary-kazakhstanda/. Обсуждаем!
542ArmidaUmino abc
凯伦皮里第二季高清完整版,海外华人可免费观看最新热播剧集。
Undeniably believe that that you stated. Your favourite reason appeared to be on the internet the easiest thing to take into account of.
I say to you, I definitely get annoyed at the same time as other people consider concerns that they just do
not understand about. You managed to hit the nail upon the highest as smartly as
outlined out the whole thing with no need side effect
, people could take a signal. Will probably be again to get more.
Thank you
Feel free to surf to my homepage; RK星河娛樂城
Outstanding post however , I was wondering if you
could write a litte more on this topic? I’d be very thankful if you could elaborate a little bit further.
Kudos!
Have a look at my page real estate agent Austin TX
Hello There. I found your blog using msn. This is a
really well written article. I’ll make sure to bookmark it and return to read more of your useful info.
Thanks for the post. I will certainly return.
31077ShareeMordhorsto abc
Football match today? Get live scores, lineups, and goal alerts all in one place right now
Привет! После череды обманов наконец нашёл казино, где реально работают без скама. Смотрите на отзывы игроков. Список надёжных вариантов — тут: http://www.carbossonline.com/onlayn-kazino-oynau-negizderi-kredittin-mansylygy/. Кто уже играл?
After trying several platforms, I found this casino https://abonnement-telefoon.nl/?p=87972 to be reliable. The welcome bonus is fair, terms are easy to understand, and payouts are processed smoothly, making it suitable for casual players.
Привет! Недавно искал казино, где можно спокойно вывести выигрыш, и понял: главное — отзывы. Собрал рабочие варианты с поддержкой МИР — ссылка: РЎРЈРљРђ РЎСѓРєР° регистрация. Кто уже пробовал?
Hello there! Do you know if they make any plugins to help with SEO?
I’m trying to get my blog to rank for some targeted keywords but I’m
not seeing very good results. If you know of any please
share. Appreciate it!
Also visit my web blog: real estate agent Torrance CA
https://jasonejohnsn.wordpress.com/2026/01/30/elevate-your-homes-comfort-with-a-modern-fireplace/ When I started looking into gas fireplaces, I didn’t expect the market to be so wide. There are major differences between brands in terms of materials, burner technology, and flame realism. Going through detailed specs and user experiences helped me understand what actually matters in the long run — things like ease of maintenance, efficiency, and reliable operation. It’s definitely not something you want to choose purely based on price or visual design alone
爱一帆海外版,专为华人打造的高清视频官方认证平台,支持全球加速观看。
hello!,I loke your writing very so much! proportion we be
in contact extra about your article on AOL? I require a
specialist in this house to unravel my problem.
May be that’s you! Having a look ahead to look you.
Midweek football livescore, Tuesday Wednesday Champions League Europa action
超人和露易斯第一季高清完整版AI深度学习内容匹配,海外华人可免费观看最新热播剧集。
40957CatherinaKleinpetero abc
Ребята, не верьте громким обещаниям! Настоящее слот-сайт должно иметь прозрачную политику выплат. Я отсеял все подозрительные площадки и оставил только проверенные варианты — смотрите здесь: vovan casino. Кто уже выводил оттуда?
Hi there, all the time i used to check weblog posts here early in the morning, since i
enjoy to find out more and more.
Also visit my page best real estate agent in Hoboken NJ
Привет, форумчане! Решил поделиться лайфхаком: как найти онлайн казино, где реально платят без задержек. Главное — не верить рекламе, а смотреть на статус регулятора и реальные отзывы. Я собрал проверенные варианты с выводом на Сбербанк — ссылка тут: Мелстрой. Кто уже пробовал?
EREFORCE REVIEWS
Consolation goals, late strikes in lost causes tracked
MLS livescore updates, American soccer with all teams and matches covered live
36415NorbertBlankeo abc
Друзья, подскажите, куда лучше играть в 2025? Сам недавно протестировал кучу игровых сайтов — большинство тянут с выплатами. Остановился на тех, где есть лицензия и вывод за 5 минут. Полный список с RTP и бонусами — по ссылке: https://creativeflarestudio.com/2026/01/11/poperlo-kazino-onlayn-kazino-oynau-baylanysy/. Кто с чем сталкивался?
https://iver.us.com/# Iver Protocols Guide
I am not sure where you’re getting your info, but good topic.
I needs to spend some time learning much more or
understanding more. Thanks for fantastic info I was looking for this
information for my mission.
Всем привет! Поделюсь лайфхаком: чтобы не слить депозит впустую, выбирайте онлайн игровой клуб с лицензией от уважаемого регулятора. Я проверил десятки сайтов и оставил только те, где нет блокировок без причины. Список тут: sykaaa casino. Кто уже играл — подтвердите?
82380MaryannChiarao abc
EREFORCE
For data
buying fluoxetine prices
for curiosity.
Can I simply say what a comfort to find an individual who genuinely understands what
they are discussing on the web. You actually realize how to bring an issue to light and make it important.
More people ought to look at this and understand this side of your story.
I was surprised that you aren’t more popular since you definitely have the gift.
My website: real estate agent Parker County TX
39586TiaraMontanario abc
fly88
I am genuinely pleased to glance at this
webpage posts which includes tons of helpful information, thanks for providing such data.
Привет! Недавно искал казино, где можно спокойно вывести выигрыш, и понял: главное — лицензия. Собрал рабочие варианты с поддержкой МИР — ссылка: вован казино. Кто уже пробовал?
Всем привет! Уже третий год играю в игровые клубы, и за это время понял главное: выбирайте площадки с высоким RTP. Избегайте тех, где требуют паспорт или тормозят с выводом. Лучшие казино РФ с поддержкой ЮMoney собрал здесь: Мелстрой гейм. Кто что может добавить?
48041JamiePflumo abc
рунетки онлайн рунетки чат
Привет! Если вы ищете платформу с джекпотами — не гонитесь за громкими названиями. Лучше смотрите лицензию. Мой проверенный список — тут: ГОЛД казино gold. Кто что добавит?
Hello to every , since I am really keen of reading this website’s post to be updated regularly.
It includes good data.
Also visit my blog post: best realtor in Parker County TX
Привет! Хочу предупредить новичков: не все клубы одинаково полезны. Чтобы не слить депозит и получить выигрыш, проверяйте условия вывода и изучайте форумные обсуждения. Я составил подборку рабочих вариантов с минимальным депозитом от 10 рублей — смотрите тут: mellstroy game. Делитесь опытом!
49660MaynardStoiao abc
Good day! I could have sworn I’ve visited your blog before but after looking
at some of the posts I realized it’s new to
me. Nonetheless, I’m definitely pleased I came
across it and I’ll be book-marking it and checking back frequently!
My web-site … best realtor in Andover MA
It’s really a nice and useful piece of info. I am happy that you simply
shared this helpful information with us. Please keep us informed like this.
Thank you for sharing.
Feel free to surf to my page … CBD credit card processing
66363LenoreDeleonardoo abc
This is a very informative post. I really appreciate how clearly everything is
explained, especially for people who are new to online casino platforms.
The way you describe the features, usability, and overall experience makes
it easy to understand and compare with other websites.
I also like that the content focuses on safety, convenience, and user experience.
Thanks for sharing such useful information. I will definitely check out more articles on this site.
Привет! Многие спрашивают, где сейчас работают без обмана. Ответ прост: смотрите на условия бонусов. Я собрал актуальный рейтинг казино 2025 с минимальным депозитом — ссылка: https://draleilianemartins.com.br/2026/01/10/uznayte-kak-funktsioniruyut-igrovye-avtomaty-v-bollywood-nachnite-igrat-v-onlaynkazino-segodnya/. Пробовали что-то из списка?
Привет, форумчане! Решил поделиться лайфхаком: как найти игровую платформу, где реально выводят деньги. Главное — не верить рекламе, а смотреть на статус регулятора и реальные комментарии игроков. Я собрал проверенные варианты с выводом на QIWI — ссылка тут: New Retro казино. Кто уже пробовал?
EREFORCE REVIEWS
34583FatimaBartholomeuo abc
For the reason that the admin of this website is working, no doubt very shortly it will be
well-known, due to its feature contents.
Also visit my web page; best realtor in Austin TX
Здравствуйте! Хочу предложить проверенный способ выбора казино: обращайте внимание на скорость вывода, а не только на бонусы. Я составил список платформ 2025 года, где часто падают джекпоты. Всё по ссылке: Sykaaa. Делитесь впечатлениями!
Привет! Недавно искал казино, где можно спокойно получить деньги, и понял: главное — отзывы. Собрал рабочие варианты с поддержкой Сбербанк — ссылка: https://smartsolutionskw.com/jvspinbet-onlayn-kazino-oynau-zhandy-makala/. Кто уже пробовал?
EREFORCE REVIEW
Iver Protocols Guide Iver Protocols Guide Iver Protocols Guide
AmiTrip Relief Store: Amitriptyline – Elavil
Set piece goals, dead ball situations and their conversion
That is a really good tip especially to those new to the
blogosphere. Brief but very precise information…
Appreciate your sharing this one. A must read post!
Привет! Хочу предупредить новичков: не все казино онлайн одинаково полезны. Чтобы не слить депозит и получить выигрыш, проверяйте наличие лицензии и изучайте отзывы. Я составил подборку рабочих вариантов с минимальным депозитом от 10 рублей — смотрите тут: https://mission.com.co/vulkan-royal-kazino-kansha-uakytta-online-kazino-oynau-sholyp-bolady/. Делитесь опытом!
Привет всем! Решил поделиться, как найти платящее онлайн платформу в 2025 году. Главное — не гнаться за большими бонусами, а смотреть на юрисдикцию и наличие вывода без задержек. Я собрал список проверенных площадок с минимальным депозитом — вот тут: https://digitalmarketing.frinksyn.com/jvspinbet-onlain-kazino-oynau-zhazuynda-aksha-alu-sholu/. Кто уже пробовал?
Woah! I’m really digging the template/theme of this blog. It’s simple, yet
effective. A lot of times it’s very difficult to get that “perfect balance” between user friendliness and
visual appearance. I must say you’ve done a superb job with this.
Additionally, the blog loads extremely fast for
me on Firefox. Superb Blog!
Also visit my blog: best real estate agent in Torrance CA
Tackle success, defensive actions and interception rates tracked
The depiction of the changing American landscape, from the turn of the century through the First World War, provides a fascinating backdrop to the family drama. Steinbeck captures the end of the frontier era and the beginning of mechanization. History students often use an East of Eden PDF to cite these sociological changes. We offer essays and articles that contextualize the fiction within the actual historical events of the era. By using our resources alongside your text, you gain a multidimensional understanding of the world Steinbeck was preserving in ink. https://eastofedenpdf.site/ East Of Eden By John Steinbeck Pdf Download
melbet promo code today
Yes! Finally someone writes about >.
EREFORCE REVIEWS
Всем привет! Поделюсь лайфхаком: чтобы не слить депозит впустую, выбирайте онлайн игровой клуб с лицензией от уважаемого регулятора. Я проверил десятки сайтов и оставил только те, где быстрая верификация. Список тут: Sykaaa. Кто уже играл — подтвердите?
где взять промокод 1хбет
Всем привет! Уже третий год играю в онлайн казино, и за это время понял главное: выбирайте площадки с быстрыми выплатами. Избегайте тех, где требуют паспорт или тормозят с выводом. Лучшие игровые сайты с поддержкой МИР собрал здесь: казино мелстроя. Кто что может добавить?
drawing inspiration hub – Really engaging, illustrations pull you in and spark creative energy.
Читателям предоставляется возможность ознакомиться с различными точками зрения и принять информированное решение.
EREFORCE REVIEWS
Привет! Недавно искал казино, где можно спокойно играть на рубли, и понял: главное — скорость выплат. Собрал рабочие варианты с поддержкой МИР — ссылка: https://interno.bigsales.pt/kazakstanda-online-kazinolardabla-dungewien-alu/. Кто уже пробовал?
Heya i’m for the first time here. I found this board and I find It really helpful & it helped me out a lot.
I’m hoping to give one thing back and aid others such as
you aided me.
Here is my web blog CBD debit card processing
Приветствую! Только что вывел 15 тысяч с одного из казино — и решил поделиться списком тех, кто реально платит. Смотрите на отзывы за 2025 год. Все проверенные варианты — тут: Mellstroy. Кто уже играл? Какие суммы выводили?
To get
online slots quick withdrawal
for useful tips and tricks.
https://sangistil.ru/wp-includes/pgs/pokerdom_promokod_pri_registracii_na_segodnya.html
爱一帆会员多少钱海外版,专为华人打造的高清视频平台,支持全球加速观看。
Copa America livescore, South American football tournament coverage in real time
EREFORCE
Have you ever considered writing an e-book or guest authoring on other sites?
I have a blog based upon on the same topics you discuss
and would really like to have you share some stories/information. I know my readers would enjoy your
work. If you are even remotely interested, feel free to shoot me an email.
Feel free to visit my website; best real estate agent in Torrance CA
Ребята, а вы знаете, где сейчас реально заработать в онлайн-казино? После десятков проверок остановился на честных клубах. Важно: возможность игры с телефона. Актуальный рейтинг с джекпотами и кэшбэком — по ссылке: килограм казино. Обсуждаем!
Всем здравствуйте! Хочу поделиться подборкой игровых площадок, где можно выводить на карту МИР. Важно: честность. Актуальный рейтинг 2025 — здесь: https://jugaaduinsan.com/nachnite-igrat-v-onlaynkazino-jvspinbet-v-kazakhstane/. Пишите, кто с чем сталкивался!
1win промокод россия
I like reading a post that will make men and women think.
Also, thanks for allowing me to comment!
my site: pla vs petg filament
After testing several platforms, I found this casino https://newsviral.org/online-internet-casino-architecture-technique-et-40/ to be reliable. The welcome bonus is generous, terms are transparent, and payouts are processed smoothly, making it suitable for casual players.
When someone writes an article he/she retains the
image of a user in his/her mind that how a user can understand it.
Thus that’s why this article is amazing. Thanks!
My blog post; realtor in Hoboken NJ
Всем привет! Поделюсь лайфхаком: чтобы не слить депозит впустую, выбирайте онлайн платформу с лицензией от уважаемого регулятора. Я проверил десятки сайтов и оставил только те, где нет блокировок без причины. Список тут: Лев. Кто уже играл — подтвердите?
You have made some good points there. I looked on the web for more information about the issue and found most people will go along with your views on this web site.
Приветствую! После череды неудач наконец нашёл рабочие онлайн казино. Ключевые критерии: лицензия. Все подходящие площадки с бонусами без отыгрыша собрал тут: https://primariamariomolina.edu.mx/uncategorized/frends-kazino-kazirgi-online-kazino-oynau-ushin-nakty-akshaga/. Кто уже успел потестить?
EREFORCE REVIEW
pinco казино онлайн
Здравствуйте! Хочу предложить проверенный способ выбора казино: обращайте внимание на наличие live-чата, а не только на бонусы. Я составил список платформ 2025 года, где можно играть анонимно. Всё по ссылке: ГОЛД Gold. Делитесь впечатлениями!
Ребята, а вы знаете, где сейчас реально выиграть в онлайн-казино? После десятков проверок остановился на платформах с аудитом RNG. Важно: минимальный депозит. Актуальный рейтинг с джекпотами и кэшбэком — по ссылке: gold казино. Обсуждаем!
I have been surfing online more than 2 hours today, yet I never found any interesting article like yours.
It is pretty worth enough for me. In my opinion, if all site owners and bloggers made good content as you did, the internet will be a
lot more useful than ever before.
Check out my web site … realtor in Hoboken NJ
EREFORCE REVIEW
1win отзывы Киргизия https://www.1win12049.ru
vavada demo plinko http://vavada2003.help
It is perfect time to make some plans for the future and it is time to
be happy. I have read this post and if I could I wish to suggest you few interesting things or suggestions.
Perhaps you can write next articles referring to this article.
I wish to read even more things about it!
Stop by my webpage; cannabis debit card processing
Друзья, подскажите, куда лучше играть в 2025? Сам недавно протестировал кучу онлайн казино — большинство тянут с выплатами. Остановился на тех, где есть лицензия и на карту МИР. Полный список с RTP и бонусами — по ссылке: РЎСѓРєР°. Кто с чем сталкивался?
discovergrowthpathways – Extremely useful guides, helped organize our strategy efficiently.
Ребята, не верьте громким обещаниям! Настоящее онлайн казино должно иметь положительную репутацию. Я отсеял все подозрительные площадки и оставил только топовые варианты — смотрите здесь: онлайн казино. Кто уже выводил оттуда?
Its not my first time to visit this site, i am visiting this website dailly and obtain good facts from here daily.
my blog … realtor in Austin TX
Hi there, I read your blog on a regular basis.
Your writing style is witty, keep doing what you’re doing!
Feel free to surf to my web blog … best real estate agent in Hoboken NJ
With havin so much content and articles do you ever run into any problems of plagorism or copyright infringement?
My site has a lot of unique content I’ve either written myself or outsourced but it seems a lot of it is popping it up all over the internet without my permission. Do you know any solutions to
help stop content from being ripped off? I’d truly appreciate it.
Feel free to surf to my web page cannabis business payments
Приветствую! После череды неудач наконец нашёл рабочие онлайн казино. Ключевые критерии: RTP выше 96%. Все подходящие площадки с бонусами без отыгрыша собрал тут: клубника казино. Кто уже успел потестить?
Привет! Хочу предупредить новичков: не все игровые площадки одинаково полезны. Чтобы не слить депозит и получить выигрыш, проверяйте условия вывода и изучайте отзывы. Я составил подборку рабочих вариантов с минимальным депозитом от 10 рублей — смотрите тут: голд казино. Делитесь опытом!
EREFORCE REVIEWS
Woah! I’m really digging the template/theme of this site.
It’s simple, yet effective. A lot of times it’s challenging to get that “perfect balance” between user friendliness and visual appearance.
I must say that you’ve done a superb job with this. In addition, the blog loads extremely fast for me
on Safari. Superb Blog!
my homepage … best realtor in Andover MA
Hello, just wanted to mention, I loved this blog post.
It was inspiring. Keep on posting!
Review my web site; real estate agent Austin TX
buying generic clomid prices: fertility pct guide – can i purchase cheap clomid without insurance
Hey There. I found your blog using msn. This is a very well written article.
I’ll make sure to bookmark it and come back to read more of
your useful information. Thanks for the post.
I will definitely comeback.
Feel free to visit my webpage … best real estate agent in Andover MA
Всем привет! Поделюсь лайфхаком: чтобы не слить депозит впустую, выбирайте онлайн казино с честной рандомизацией. Я проверил десятки сайтов и оставил только те, где нет блокировок без причины. Список тут: казино мелстроя. Кто уже играл — подтвердите?
EREFORCE REVIEWS
Hi! Do you know if they make any plugins to help with Search Engine Optimization?
I’m trying to get my blog to rank for some targeted keywords but
I’m not seeing very good results. If you know of any please share.
Appreciate it!
Visit my site; best real estate agent in Austin TX
Ребята, не тратьте время на левые сайты! Чтобы выбрать рабочее казино, обращайте внимание на: лицензию Curacao или Мальты, а также на частоту выплат. Я лично протестировал десятки платформ и оставил только те, где нет скрытых условий. Весь список — по ссылке: kilogram casino зеркало. Делитесь опытом!
Thanks for sharing your info. I truly appreciate your efforts and I am waiting for your further write ups thank you once again.
Also visit my webpage; realtor in Pinecrest FL
https://iver.us.com/# stromectol tablets buy online
To read
Quick approval personal loan
for instant access.
「オンラインカジノ」とは、インターネットを介してさまざまなカジノゲームを楽しめるプラットフォームです。その利便性から、世界中で多くのユーザーに親しまれています。詳細な仕組みや提供されているゲームの種類については、専門の情報サイトでご確認ください。
→ オンラインカジノ おすすめ
Long ball success, direct play effectiveness and aerial wins
I was suggested this blog by my cousin. I am not sure whether this post is written by him as no one else know such detailed about my trouble.
You’re incredible! Thanks!
My blog pla vs petg filament
Друзья, подскажите, куда лучше играть в 2025? Сам недавно протестировал кучу онлайн казино — большинство тянут с выплатами. Остановился на тех, где есть прозрачная отдача и на карту МИР. Полный список с RTP и бонусами — по ссылке: http://www.grupafyi.pl/bez-kategorii/gde-mozhno-podnyat-deneg-luchshie-onlaynkazino-v-rossii/. Кто с чем сталкивался?
Liz Buxbaum’s quest for a movie-perfect romance leads her to the most unexpected place: her neighbor’s house. Lynn Painter delivers a story that is funny, sweet, and deeply romantic. For those who read digitally, a Better Than the Movies PDF is the perfect companion for a rainy day. It is a narrative that encourages readers to look beyond their expectations and find happiness in the surprises life throws their way. https://betterthanthemoviespdf.site/ Better Than The Movie Lynn Painter Epub
Привет! Решил собрать только те казино, где лично получил выплату. Критерии: с минимальным депозитом. Все рабочие ссылки — по адресу: https://amsterdam-company.com/?p=29403. Кто уже тестировал эти площадки?
海外华人必备的yifan平台,提供最新高清电影、电视剧,无广告观看体验。
I am really loving the theme/design of your blog.
Do you ever run into any web browser compatibility
problems? A number of my blog audience have complained about my website not operating correctly in Explorer but looks great in Safari.
Do you have any ideas to help fix this problem?
My homepage real estate agent Hoboken NJ
The bond between Catherine and Heathcliff is forged on the windswept moors, a setting that is integral to the plot. To visualize this landscape, many turn to the vivid descriptions found in a Wuthering Heights PDF. Brontë’s language creates a sensory experience that rivals any film adaptation. The cold wind, the sticky mud, and the blooming heather are all palpable through her words. Having the book in a digital format means you can escape to this wild landscape anytime, immersing yourself in the untamed beauty that mirrors the untamed hearts of the protagonists. https://wutheringheightspdf.site/ J Hillis Miller Wuthering Heights Pdf
Sunday football livescore, weekend matches from all major European leagues
Друзья, не тратьте время на левые сайты! Играйте только в лицензированные казино с быстрым выводом. Мой личный топ с реальными выплатами — по ссылке: СЃСѓРєР° казино. Кто что может порекомендовать?
Друзья, не тратьте время на левые сайты! Играйте только в лицензированные казино с быстрым выводом. Мой личный топ с реальными выплатами — по ссылке: https://www.tourgratis.net/2026/01/10/onlayn-kazino-negizderi-kazakstanda-oynau/. Кто что может порекомендовать?
OMT’ѕ documented sessions alⅼow trainees revisit inspiring explanations anytime, strengthening tһeir love
fߋr mathematics and fueling tһeir ambition fоr examination accomplishments.
Broaden your horizons witһ OMT’s upcoming new physical ɑrea opening іn Ѕeptember 2025, providing a lοt mοre chances fߋr hands-on math exploration.
Singapore’ѕ focus on vital analyzing mathematics highlights tһe importance of math tuition, which helps students
establish tһe analytical abilities required ƅy tһe country’s forward-thinking syllabus.
Enrolling іn primary school school math tuition еarly fosters confidence,
reducing stress ɑnd anxiety for PSLE takers who deal ѡith hiɡһ-stakes questions
оn speed, range, ɑnd tіme.
Secondary math tuition lays а solid foundation fоr post-O Level studies,
ѕuch as Ꭺ Levels or polytechnic training courses, Ьy succeeding in foundational subjects.
Junior college math tuition іs important for Α
Levels аs it strengthens understanding of sophisticated calculus subjects ⅼike combination strategies аnd differential equations, which are main to the test curriculum.
The distinctiveness of OMT comes from its exclusive math educational program tһat prolongs MOE material ԝith project-based knowing fоr useful application.
OMT’s system encourages goal-setting ѕia, tracking milestones
tⲟwards attaining һigher qualities.
Singapore’ѕ concentrate on holistic education іs enhanced by math
tuition tһat builds logical thinking fоr long-lasting examination benefits.
my web pɑge math tutor volunteer opportunities near me
Hall of fame, greatest players and their career achievements celebrated
If you enjoy multi-generational family sagas like One Hundred Years of Solitude, you will find a similar depth here. It is the American equivalent of a great myth. The storytelling is grand and sweeping. Fans of epic fiction often download an East of Eden PDF to add to their digital collection. Our platform compares Steinbeck’s work to other great epics, helping you find your next favorite book. We situate East of Eden within the pantheon of world literature, showing why it stands the test of time. https://eastofedenpdf.site/ John Steinbeck East Of Eden Pdf
Day after day, health quietly steers how we feel, choose, and respond.
Health is talked about nonstop, but seldom examined with care.
Promises sound simple, while uniqueness gets ignored.
The body whispers—tiredness, tension, appetite, calm—yet we rush past the message.
Health shifts differently for everyone; it’s never frozen in place.
Attention reveals details we didn’t know were there.
Awareness makes ordinary moments feel more real.
By watching patterns, we learn how health responds to stress, time, and emotion.
If you want to trust your signals again.
To recognize the quiet patterns shaping your well-being.
And letting balance appear naturally, in its own time.
This path points to one clear truth: awareness changes everything.
Many people don’t see how these pieces connect until they look beneath the surface.
All of these reflections naturally bring us to cialis serious side effects.
casino пинко онлайн
I’m really impressed with your writing talents as smartly as with the layout
on your weblog. Is this a paid theme or did you modify it your self?
Either way keep up the nice quality writing, it
is rare to peer a great blog like this one these days.. https://cryptoboss-rcn.top/
This is a very informative post. I really appreciate how clearly everything is explained, especially for people who are new to
online casino platforms.
The way you describe the features, usability, and overall
experience makes it easy to understand and compare with other websites.
I also like that the content focuses on safety, convenience, and
user experience.
Thanks for sharing such useful information. I will
definitely check out more articles on this site.
85812LilliaLoweno abc
Всем здравия! Недавно искал, где реально можно получить честный выигрыш в онлайн казино. Оказалось, что многое зависит от RTP автомата. Проверяйте статистику выплат, читайте комментарии. Составил актуальный рейтинг на 2025 год с прямыми ссылками: казино мелстроя. Интересно, кто из вас уже играл здесь?
Sweet blog! I found it while browsing on Yahoo News.
Do you have any suggestions on how to get listed in Yahoo News?
I’ve been trying for a while but I never seem to get
there! Cheers
Here is my blog post :: petg 3d printer filament
Ребята, не тратьте время на левые сайты! Чтобы выбрать проверенное казино, обращайте внимание на: поддержку рубля, а также на отзывы. Я лично протестировал десятки платформ и оставил только те, где выводят за час. Весь список — по ссылке: Gold. Делитесь опытом!
I needed to thank you for this great read!! I absolutely enjoyed every little bit of it.
I’ve got you saved as a favorite to look at new stuff you post…
Keep this going please, great job!
Good way of explaining, and fastidious article to take facts about my presentation topic, which i am going to convey in university.
Own goals, unfortunate deflections and their impact documented
6103AmalDunlopo abc
Привет! После череды обманов наконец нашёл платформу, где реально не задерживают выплаты. Смотрите на скорость обработки заявок. Список надёжных вариантов — тут: казино болливуд. Кто уже играл?
Всем привет! Много читаю про неплатёжные площадки, поэтому теперь тщательно проверяю всё: условия вывода. Лучшие игровые сайты 2025 года с моментальным выводом — здесь: Р’РћР’РђРќ . Делитесь своим опытом!
65206LizabethSundo abc
Pass completion, accuracy rates and distribution statistics tracked
EREFORCE REVIEWS
Друзья, не тратьте время на левые сайты! Играйте только в проверенные казино с минимальным депозитом. Мой личный топ с реальными выплатами — по ссылке: JVSpin казино. Кто что может порекомендовать?
50020BruceDesanoo abc
Всем здравия! Недавно искал, где реально можно вывести деньги в онлайн казино. Оказалось, что многое зависит от RTP автомата. Проверяйте статистику выплат, читайте форумы. Составил актуальный рейтинг на 2025 год с прямыми ссылками: https://ecowindows.co.in/mozhno-li-vyigrat-v-onlaynkazino-sovety-dlya-igrokov-iz-rossiyskoy-federatsii/. Интересно, кто из вас уже играл здесь?
EREFORCE REVIEWS
42646HarveyAlessandroo abc
I recently tried this casino https://esquadrialider.com.br/casino-roulette-app-casino-roulette-application-13/ and was surprised by how stable everything felt. The games load quickly, bonuses are transparent, and navigation is intuitive, making the experience enjoyable.
I am really thankful to the holder of this web
page who has shared this enormous post at at this place.
It’s a pity you don’t have a donate button! I’d without a doubt donate to
this superb blog! I suppose for now i’ll settle for bookmarking
and adding your RSS feed to my Google account. I look forward to fresh updates
and will share this website with my Facebook group. Chat soon!
Всем привет! Поделюсь лайфхаком: чтобы не слить депозит впустую, выбирайте онлайн казино с лицензией от уважаемого регулятора. Я проверил десятки сайтов и оставил только те, где нет блокировок без причины. Список тут: newretrocas.ru РќРѕРІРѕРµ Ретро. Кто уже играл — подтвердите?
Всем привет! Много читаю про неплатёжные площадки, поэтому теперь тщательно проверяю всё: лицензию. Лучшие онлайн казино 2025 года с моментальным выводом — здесь: http://www.testlinkcs.co.uk/astroology/onlayn-kazino-oynau-reklama-zhan-zhergilikti/. Делитесь своим опытом!
21832MargareteMcenteeo abc
EREFORCE REVIEWS
81043TravisDostieo abc
For explanation
Safe loans near me
for interactive learning.
Привет! После череды обманов наконец нашёл платформу, где реально платят. Смотрите на скорость обработки заявок. Список надёжных вариантов — тут: эльдорадо казино РїСЂРѕРјРѕРєРѕРґ. Кто уже играл?
Привет! Многие спрашивают, где сейчас выигрывают чаще всего. Ответ прост: смотрите на условия бонусов. Я собрал актуальный рейтинг казино 2025 с фриспинами за регистрацию — ссылка: https://tratursa.com/v-rossii-mozhete-sygrat-v-onlaynkazino-pokhozhee-na-to-gde-snimalsya-kazino-royal/. Пробовали что-то из списка?
Hi, Neat post. There’s a problem with your web site in internet explorer, could test this?
IE still is the market chief and a huge part of folks will omit your fantastic writing because
of this problem.
onlinebargaincenter – Deals are straightforward and practical, made buying online convenient.
70018AmadoMoyseo abc
tech trends site – Clean and focused, making technical topics easy to digest.
Всем привет! Много читаю про скам-казино, поэтому теперь тщательно проверяю всё: условия вывода. Лучшие онлайн казино 2025 года с моментальным выводом — здесь: Мелстрой казино. Делитесь своим опытом!
8632GermanPodeo abc
Привет! Многие спрашивают, где сейчас дают реальные выплаты. Ответ прост: смотрите на провайдеров слотов. Я собрал актуальный рейтинг казино 2025 с фриспинами за регистрацию — ссылка: казино мелстроя. Пробовали что-то из списка?
Ꮤith endless accessibility tߋ practice worksheets,
OMT empowers students tо master math ԝith repetition, constructing love fߋr
the subject and test self-confidence.
Open your child’s ⅽomplete capacity inn mathematics ᴡith OMT Math Tuition’ѕ expert-led classes, tailored tօ Singapore’ѕ MOE syllabus for primary school,
secondary, and JC students.
Ιn a sʏstem ԝhere mathematics education һas evolved tо foster development and international
competitiveness, registering іn math tuition guarantees
trainees stay ahead Ƅy deepening theiг understanding ɑnd application of essential concepts.
For PSLE achievers, tuition supplies mock examinations ɑnd feedback, assisting improve answers fⲟr maximum marks in both multiple-choice аnd
oрen-еnded sections.
Witһ the O Level mathematics curriculum
somеtіmes progressing, tuition maintains pupils upgraded оn adjustments, ensuring they are well-prepared fօr existing formats.
Wіth A Levels requiring effectiveness іn vectors
and complex numberѕ, math tuition supplies targeted technique tο deal ѡith theѕe abstract ideas
properly.
Ultimately, OMT’ѕ distinct propriewtary syllabus
complements tһe Singapore MOE curriculum Ƅy cultivating independent thinkers equipped fοr long-lasting mathematical success.
OMT’ѕ online community ցives support leh, ᴡhere yߋu сan ask
inquiries аnd enhance your knowing fߋr better qualities.
Math tuition ⲟffers targeted experiment ρrevious test documents, familiarizing
students ѡith concern patterns ѕеen in Singapore’s national evaluations.
mʏ web-site :: A Levels math
Wow, this paragraph is good, my younger sister is analyzing these things, therefore I am going to let know her.
Here is my web site – petg 3d printer filament
Aesthetic Files Здесь я делюсь не только обзорами и мнениями, но и частичкой своей жизни. Мои фотографии, мои мысли, мои переживания – это все формирует общую картину Aesthetic Files. Это пространство, где можно отдохнуть от суеты, найти вдохновение и просто почувствовать себя частью чего-то большего. Добро пожаловать!
World Cup 2026 qualifiers live score, road to USA Mexico Canada tournament
Hi there this is kinda of off topic but I was wondering if blogs use WYSIWYG
editors or if you have to manually code with HTML. I’m starting a
blog soon but have no coding know-how so I wanted to get
advice from someone with experience. Any help would be enormously appreciated!
Also visit my website: realtor in Parker County TX
24590TeneshaKiango abc
Follicle Insight: get propecia without a prescription – buy cheap propecia for sale
Hi! Do you know if they make any plugins to safeguard against hackers?
I’m kinda paranoid about losing everything I’ve worked
hard on. Any tips?
Feel free to visit my web page – real estate agent Pinecrest FL
Всем здравия! Недавно искал, где реально можно получить честный выигрыш в онлайн рулетке. Оказалось, что многое зависит от провайдера игр. Проверяйте статистику выплат, читайте форумы. Составил актуальный рейтинг на 2025 год с прямыми ссылками: https://atacado.lysandre.com.br/mellstroy-online-kazino-oynau-kazakstanda/. Интересно, кто из вас уже играл здесь?
Друзья, не тратьте время на левые сайты! Играйте только в проверенные казино с минимальным депозитом. Мой личный топ с реальными выплатами — по ссылке: клубника казино. Кто что может порекомендовать?
EREFORCE
87019DylanLumadueo abc
For most up-to-date news you have to pay a visit
the web and on the web I found this web site as a best web page for latest
updates.
my web blog; real estate agent Hoboken NJ
Привет, форумчане! Решил поделиться лайфхаком: как найти онлайн казино, где реально платят без задержек. Главное — не верить рекламе, а смотреть на статус регулятора и реальные рейтинги. Я собрал проверенные варианты с выводом на МИР — ссылка тут: jvspin. Кто уже пробовал?
61084YulandaLipario abc
Всем привет! Много читаю про скам-казино, поэтому теперь тщательно проверяю всё: лицензию. Лучшие игровые сайты 2025 года с моментальным выводом — здесь: Мелстрой. Делитесь своим опытом!
you’re really a good webmaster. The site loading speed is incredible.
It kind of feels that you’re doing any distinctive trick.
Furthermore, The contents are masterwork.
you have performed a wonderful task in this subject!
wonderful points altogether, you just received a new reader.
What could you suggest about your put up that you simply
made some days ago? Any positive?
my blog … best real estate agent in Hoboken NJ
What i do not understood is if truth be told how you are no longer actually much
more smartly-favored than you might be now. You are very
intelligent. You realize therefore considerably when it comes to this subject, made me in my view imagine
it from so many numerous angles. Its like men and women are not interested unless it is something to do with Woman gaga!
Your own stuffs excellent. All the time take care of it up!
EREFORCE REVIEW
55314SabraInyarto abc
I used to be recommended this web site by way of my cousin.
I’m now not sure whether or not this publish is written via him as
no one else understand such targeted approximately my trouble.
You’re amazing! Thanks!
my blog post; realtor in Hoboken NJ
Всем привет! Поделюсь лайфхаком: чтобы не слить депозит впустую, выбирайте онлайн казино с высоким RTP. Я проверил десятки сайтов и оставил только те, где нет блокировок без причины. Список тут: https://funerailles-bruxelles.be/marapon-kazino-zhok-sayttymizda-iks-kazino-internettegi-kazino-oynau/. Кто уже играл — подтвердите?
Ребята, а вы знаете, где сейчас дают бонусы за регистрацию? Я проверил десятки казино, оставил только те, где реально работают в РФ. Ссылка на подборку: mellstroy game сайт. Обсуждаем!
Mangelsen
7916 Girard Avenue, Ꮮa Joyya
CA 92037, Unted Տtates
1 800-228-9686
tοp grizzly 399 memorabilia conservation; padlet.com,
Reading is a solitary activity, but it connects you to a global community. Millions of people love this book. By reading it, you join them. A Pride and Prejudice PDF is your membership card. Our website is a gathering place for this community. We celebrate the shared love of Austen. Join the club and see what everyone is talking about. https://prideandprejudicepdf.site/ Pride And Prejudice Malayalam Translation Pdf
36260JedBarthelmeso abc
Lynn Painter has crafted a narrative that feels both nostalgic and entirely new. The relationship between the main characters is built on a foundation of shared history and newfound respect. A Better Than the Movies PDF is a popular choice for readers who want to highlight passages and share them with friends. This story is a beautiful reminder that while movies end after two hours, real love is an ongoing adventure. https://betterthanthemoviespdf.site/ Better Than The Movies Filetype:pdf
EREFORCE REVIEWS
Good way of telling, and good piece of writing to take data concerning my presentation subject, which i am going to present in school.
my web-site … best realtor in Hoboken NJ
I really love your website.. Great colors & theme. Did you build this amazing site
yourself? Please reply back as I’m trying to create my very own site
and want to know where you got this from or exactly what
the theme is named. Thanks!
Here is my web page – realtor in Hoboken NJ
68185IsmaelJuhaszo abc
Всем здравия! Недавно искал надёжное казино для игры на реальные деньги, и понял: половина сайтов — скам. Советую обращать внимание на скорость выплат и читать отзывы. Свой топ-7 с моментальным выводом оставил здесь: казино вован. Пишите, кто что знает по теме!
This post is worth everyone’s attention. When can I find out more?
My web-site; best real estate agent in Parker County TX
If you are looking for a story that challenges traditional gender roles, this is it. A Wuthering Heights PDF reveals a heroine in Catherine who is wild, arrogant, and strong – traits often denied to Victorian women. She is not the typical damsel. Likewise, the men often show vulnerability and weakness. The digital text allows you to find and analyze the passages where these gender norms are subverted. It is a forward-thinking novel in many respects, and reading it digitally highlights the modern relevance of Brontë’s characterizations. https://wutheringheightspdf.site/ Wuthering Heights Short Summary Pdf
The character of Cathy Ames is often cited as one of the most terrifying villains in literary history, lacking a conscience from birth. Analyzing her interactions with Adam and her sons, Cal and Aron, requires a close reading of the text. Many scholars finding it easier to track her manipulative dialogue through a searchable East of Eden PDF file. Our literary hub focuses on these character dynamics, offering insights that you might miss on a first read. If you are looking to understand the psychology behind the monster or the redemption of the other characters, our resources are designed to enhance your digital or print reading experience. https://eastofedenpdf.site/ East Of Eden Penguin Classics Pdf
Hi there, I check your new stuff regularly. Your writing style is witty,
keep up the good work!
Review my web site … real estate agent Andover MA
31205AnnetteLuckenbaugho abc
https://iver.us.com/# Iver Protocols Guide
Всем здравия! Недавно искал честную площадку для игры на реальные деньги, и понял: половина сайтов — скам. Советую обращать внимание на скорость выплат и читать отзывы. Свой топ-7 с моментальным выводом оставил здесь: Мелстрой казино. Пишите, кто что знает по теме!
Ребята, не тратьте время на левые сайты! Чтобы выбрать рабочее казино, обращайте внимание на: лицензию Curacao или Мальты, а также на частоту выплат. Я лично протестировал десятки платформ и оставил только те, где выводят за час. Весь список — по ссылке: Mellstroy. Делитесь опытом!
EREFORCE REVIEWS
83506LeviScullarko abc
For clarification
where buy keflex no prescription
for presentation slides.
62308CharisClarenceo abc
Здравствуйте! Хочу предложить проверенный способ выбора казино: обращайте внимание на адаптацию под РФ, а не только на бонусы. Я составил список платформ 2025 года, где можно играть анонимно. Всё по ссылке: gold casino. Делитесь впечатлениями!
Всем здравствуйте! Хочу поделиться подборкой игровых площадок, где можно пополнять с баланса. Важно: прозрачность. Актуальный рейтинг 2025 — здесь: https://www.cihlaboratory.com/sykaaa-onlayn-kazino-bonuslarinin-karanyz-kak-bonuspen-ne-oteniz/. Пишите, кто с чем сталкивался!
7095MargitAlamilloo abc
цветы дешево с доставкой Доставка композиций экспресс Москва
Привет! Недавно искал онлайн-платформу, где можно спокойно играть на рубли, и понял: главное — лицензия. Собрал рабочие варианты с поддержкой QIWI — ссылка: lev casino. Кто уже пробовал?
Друзья, подскажите, куда лучше играть в 2025? Сам недавно протестировал кучу платформ — большинство тянут с выплатами. Остановился на тех, где есть прозрачная отдача и вывод за 5 минут. Полный список с RTP и бонусами — по ссылке: Mellstroy. Кто с чем сталкивался?
4984WilburHuehno abc
вскрытие сейфов Ремонт замков – восстановление работоспособности замков любой конструкции. Выполняем ремонт любой сложности, продлевая срок службы вашего замка.
Hurrah, that’s what I was exploring for, what a information! present here at this weblog, thanks admin of this site.
EREFORCE
82119JosefGebauero abc
This casino https://erin43622e43454.wpcomstaging.com/free-money-casino-online-no-deposit-bonus-45/ offers a great mix of classic slots and live dealer games. The platform feels well-designed, promotions are worth trying, and support is helpful, which adds confidence.
Привет! Если вы ищете клуб с частыми выплатами — не гонитесь за громкими названиями. Лучше смотрите реальные отзывы. Мой проверенный список — тут: JVSpin. Кто что добавит?
Привет! Многие спрашивают, где сейчас выигрывают чаще всего. Ответ прост: смотрите на условия бонусов. Я собрал актуальный рейтинг казино 2025 с фриспинами за регистрацию — ссылка: https://ioniclogistics.com/eldorado-onlayn-kazino-oynau-keshlessnesspen-nemese-besplatno-keyin-zhazynyz/. Пробовали что-то из списка?
43264CletusLopiccoloo abc
41523DamarisCarseno aa frv
EREFORCE
Captain performances, armband wearers and leadership statistics
Всем здравия! Недавно искал, где реально можно получить честный выигрыш в онлайн казино. Оказалось, что многое зависит от RTP автомата. Проверяйте наличие SSL, читайте форумы. Составил актуальный рейтинг на 2025 год с прямыми ссылками: gold казино. Интересно, кто из вас уже играл здесь?
teamframeworkportal – Practical framework guidance, really enhanced workflow and collaboration.
Привет, форумчане! Решил поделиться лайфхаком: как найти игровую платформу, где реально платят без задержек. Главное — не верить рекламе, а смотреть на статус регулятора и реальные комментарии игроков. Я собрал проверенные варианты с выводом на МИР — ссылка тут: казино мелстроя. Кто уже пробовал?
AmiTrip Relief Store: Elavil – Elavil
67411JacquettaKuszlyko aa frv
https://fertilitypctguide.us.com/# fertility pct guide
Distance covered, player workload and fitness data tracked
You could definitely see your enthusiasm in the work you write.
The sector hopes for more passionate writers such
as you who are not afraid to mention how they believe. Always follow
your heart.
my web blog: real estate agent Hoboken NJ
Привет! Многие спрашивают, где сейчас работают без обмана. Ответ прост: смотрите на условия бонусов. Я собрал актуальный рейтинг казино 2025 с фриспинами за регистрацию — ссылка: Clubnika. Пробовали что-то из списка?
60699CatharineSanmiguelo aa frv
Друзья, расскажу по-честному: я долго искал надёжный слот-сайт, и наконец нашёл рабочие варианты. Советую смотреть на скорость обработки вывода и избегать тех, где ограничения на вывод. Актуальный список лучших платформ на 2025 — по ссылке: ГОЛД Голд официальный сайт. Пишите в комментариях, какие казино вам зашли!
1win приложение android 1win приложение android
This website was… how do you say it? Relevant!!
Finally I have found something which helped me. Kudos!
Look at my web-site – best real estate agent in Parker County TX
vavada jak działa mines https://vavada2003.help
Ремонт плитки Реставрация Москва
EREFORCE REVIEWS
https://auto.qa/
That is really interesting, You’re an overly professional blogger.
I’ve joined your rss feed and look forward to seeking extra of your fantastic post.
Also, I’ve shared your web site in my social networks
Also visit my website best realtor in Hoboken NJ
78305VaughnSkeanso aa frv
Здравствуйте! Хочу предложить проверенный способ выбора казино: обращайте внимание на наличие live-чата, а не только на бонусы. Я составил список платформ 2025 года, где часто падают джекпоты. Всё по ссылке: Мелстрой зеркало. Делитесь впечатлениями!
Здравствуйте! Хочу предложить проверенный способ выбора казино: обращайте внимание на наличие live-чата, а не только на бонусы. Я составил список платформ 2025 года, где можно играть анонимно. Всё по ссылке: https://ceylanthro.com/2026/01/11/eldorado-kazino-avtomattarmen-onlayn-oynau-ushin/. Делитесь впечатлениями!
Thanks for sharing your thoughts about 10Bet Casino. Regards
83724JacintoRegeno aa frv
EREFORCE REVIEW
We’re a group of volunteers and starting a new scheme in our community.
Your web site provided us with valuable info to
work on. You’ve done an impressive job and our whole community will be thankful to you.
Go to
cephalexin without rx
for primary sources.
Привет, форумчане! Решил поделиться лайфхаком: как найти игровую платформу, где реально работают честно. Главное — не верить рекламе, а смотреть на официальные документы и реальные комментарии игроков. Я собрал проверенные варианты с выводом на QIWI — ссылка тут: JVSpin. Кто уже пробовал?
15772AnaLofstromo aa frv
Всем привет! Много читаю про неплатёжные площадки, поэтому теперь тщательно проверяю всё: лицензию. Лучшие онлайн казино 2025 года с моментальным выводом — здесь: https://careertrainings.org/kazakstandagy-onlayn-kazino-kuru-legally-zhasau-men-oynau/. Делитесь своим опытом!
This web site truly has all the information and facts I needed about this subject and didn’t know who
to ask.
EREFORCE
62024MarieSchakelo aa frv
Привет! Если вы ищете казино с высоким RTP — не гонитесь за громкими названиями. Лучше смотрите лицензию. Мой проверенный список — тут: ДЖРР’Р’РРЎРџРРќ jvspin. Кто что добавит?
Приветствую! После череды неудач наконец нашёл надёжные онлайн казино. Ключевые критерии: лицензия. Все подходящие площадки с бонусами без отыгрыша собрал тут: http://nakalaw.net/2026/01/10/blek-rash-v-onlayn-kazino-kay-da-sala-kazinokz-de-igrat/. Кто уже успел потестить?
It’s going to be ending of mine day, except before ending I am reading this great paragraph
to improve my knowledge.
Also visit my webpage – best real estate agent in Torrance CA
заказать цветы с доставкой дешево Доставка цветов инкогнито Москва
If you want a story that creates butterflies in your stomach, this is the one to pick up. Lynn Painter understands the nuances of attraction and the fear of vulnerability. Downloading a PDF of the book is a great way to take this emotional journey with you anywhere. The narrative is a beautiful blend of comedy and drama, proving that real life, with all its imperfections, is truly better than the movies. https://betterthanthemoviespdf.site/ Better Than The Movies Pdf Book
12288ChuckPano aa frv
Steinbeck’s critique of the war and the military-industrial complex through the character of Adam is subtle but poignant. It reflects the disillusionment of the post-WWI era. History and political science students find these sections revealing. Using an East of Eden PDF helps in locating specific political commentary within the text. Our analysis draws out these political themes, discussing Steinbeck’s pacifist leanings. We help you see the political dimension of this primarily domestic drama. https://eastofedenpdf.site/ East Of Eden By John Steinbeck Pdf Download
Привет! Решил собрать только те игровые клубы, где лично получил выплату. Критерии: вывод до 10 минут. Все рабочие ссылки — по адресу: РќСЊСЋ Ретро казино. Кто уже тестировал эти площадки?
Привет, форумчане! Решил поделиться лайфхаком: как найти казино РФ, где реально работают честно. Главное — не верить рекламе, а смотреть на статус регулятора и реальные комментарии игроков. Я собрал проверенные варианты с выводом на Сбербанк — ссылка тут: онлайн казино. Кто уже пробовал?
35661CharisseReisino aa frv
Good way of telling, and nice piece of writing to obtain facts concerning my presentation subject, which i am going
to convey in college.
My blog; real estate agent Parker County TX
glass art shop online – The collection feels unique and nicely put together.
EREFORCE REVIEWS
45322YolondaMcmurdoo aa frv
捕风追影下载官方認證平台,專為海外華人設計,24小時不間斷提供高清視頻和直播服務。
Здравствуйте! Хочу предложить проверенный способ выбора казино: обращайте внимание на адаптацию под РФ, а не только на бонусы. Я составил список платформ 2025 года, где часто падают джекпоты. Всё по ссылке: клубника казино зеркало. Делитесь впечатлениями!
Друзья, подскажите, куда лучше играть в 2025? Сам недавно протестировал кучу платформ — большинство тянут с выплатами. Остановился на тех, где есть поддержка рубля и без верификации. Полный список с RTP и бонусами — по ссылке: https://avbassociates.com/2026/01/10/uspeshnye-strategii-dlya-igry-v-onlaynkazino-uvelichte-svoi-shansy-na-pobedu/. Кто с чем сталкивался?
EREFORCE
47767MadalineHasslero aa frv
This website definitely has all of the info I needed concerning this subject
and didn’t know who to ask.
Also visit my web blog – realtor in Hoboken NJ
Всем здравия! Недавно искал, где реально можно вывести деньги в онлайн рулетке. Оказалось, что многое зависит от политики платформы. Проверяйте лицензию, читайте форумы. Составил актуальный рейтинг на 2025 год с прямыми ссылками: килограмм казино. Интересно, кто из вас уже играл здесь?
Ребята, а вы знаете, где сейчас дают кэшбэк? Я проверил десятки платформ, оставил только те, где реально можно вывести. Ссылка на подборку: https://reviewtap.site/nachat-igrat-v-onlaynkazino-posle-ogrableniya-kazino-v-gta-5-vot-kak/. Обсуждаем!
15169JonasBidrowskio aa frv
73387MarquisBigusiako aa frv
Hello! Do you use Twitter? I’d like to follow you if that would be ok.
I’m definitely enjoying your blog and look forward to new posts.
Друзья, расскажу по-честному: я долго искал честную игровую площадку, и наконец нашёл рабочие варианты. Советую смотреть на скорость обработки вывода и избегать тех, где скрытые комиссии. Актуальный список лучших платформ на 2025 — по ссылке: сукааа казино. Пишите в комментариях, какие казино вам зашли!
EREFORCE
Всем здравия! Недавно искал, где реально можно вывести деньги в онлайн казино. Оказалось, что многое зависит от RTP автомата. Проверяйте лицензию, читайте комментарии. Составил актуальный рейтинг на 2025 год с прямыми ссылками: РЎРЈРљРђ . Интересно, кто из вас уже играл здесь?
An impressive share! I’ve just forwarded this onto
a friend who has been conducting a little research on this.
And he in fact ordered me lunch because I stumbled upon it for him…
lol. So let me reword this…. Thank YOU for the meal!!
But yeah, thanx for spending some time to talk about this matter here on your site.
76468TashinaHummerto aa frv
Cutback assists, low crosses and their conversion rates tracked
EREFORCE REVIEW
Greetings from Colorado! I’m bored to tears at work so I decided to
browse your blog on my iphone during lunch break. I enjoy the
information you provide here and can’t wait to take a look when I get home.
I’m amazed at how fast your blog loaded on my mobile ..
I’m not even using WIFI, just 3G .. Anyhow, wonderful blog!
my web-site … best real estate agent in Parker County TX
Привет! Хочу предупредить новичков: не все казино онлайн одинаково полезны. Чтобы не слить депозит и получить выигрыш, проверяйте RTP слотов и изучайте отзывы. Я составил подборку рабочих вариантов с минимальным депозитом от 10 рублей — смотрите тут: https://al-hayakel.com/ar/kazino-zhalpylaskanda-salu-kuyysy-5-online-kazino-oynau-ne-katty-sandar/. Делитесь опытом!
Друзья, подскажите, куда лучше играть в 2025? Сам недавно протестировал кучу платформ — большинство тянут с выплатами. Остановился на тех, где есть лицензия и на карту МИР. Полный список с RTP и бонусами — по ссылке: казино лев. Кто с чем сталкивался?
35834JermaineHeuschkelo aa frv
After trying several platforms, I found this casino https://aurochsfarms.com/understanding-casino-reel-bonuses-an-comprehensive/ to be well-balanced. The welcome bonus is generous, terms are transparent, and payouts are processed smoothly, making it suitable for casual players.
For success stories
cost generic zyrtec pills
for a different perspective.
longtermplanninghub – Resource is insightful, really helped shape our strategic direction.
6681DudleyToreyo aa frv
Всем здравия! Недавно искал рабочий игровой клуб для игры на реальные деньги, и понял: половина сайтов — скам. Советую обращать внимание на минимальный депозит и читать обзоры. Свой топ-7 с моментальным выводом оставил здесь: https://www.byc.cl/katyn-kazino-promokodlary-onlayn-kazino-oynau-ushin-cat-kazino-sbiti/. Пишите, кто что знает по теме!
Weather conditions, pitch status and match day environment reported
Всем привет! Много читаю про неплатёжные площадки, поэтому теперь тщательно проверяю всё: условия вывода. Лучшие онлайн казино 2025 года с моментальным выводом — здесь: онлайн казино. Делитесь своим опытом!
Do you have any video of that? I’d want to find out more details.
AmiTrip: Elavil – buy Elavil
32981ReginaldFierecko aa frv
Excellent site. Plenty of helpful information here.
I am sending it to a few buddies ans additionally sharing in delicious.
And certainly, thanks on your sweat!
My page; real estate agent Austin TX
Ребята, а вы знаете, где сейчас реально заработать в онлайн-казино? После десятков проверок остановился на платформах с аудитом RNG. Важно: минимальный депозит. Актуальный рейтинг с джекпотами и кэшбэком — по ссылке: ретро казино. Обсуждаем!
Ребята, а вы знаете, где сейчас реально заработать в онлайн-казино? После десятков проверок остановился на платформах с аудитом RNG. Важно: вывод без комиссии. Актуальный рейтинг с джекпотами и кэшбэком — по ссылке: ГОЛД Gold РЎasino. Обсуждаем!
What’s up, after reading this amazing piece of writing i am too delighted to share my knowledge here with
colleagues.
Stop by my web page; best realtor in Austin TX
I’m really inspired together with your writing skills and also with the layout to your
weblog. Is this a paid subject or did you modify it yourself?
Either way keep up the nice quality writing, it’s rare to look a great blog
like this one today..
Feel free to surf to my blog; real estate agent Andover MA
18000JessieGiuso aa frv
Whoa tons of amazing advice. https://substack.com/home/post/p-181716447
一帆官方认证平台,专为海外华人设计,24小时不间断提供高清视频和直播服务。
Greate post. Keep writing such kind of information on your site.
Im really impressed by your site.
Hey there, You have performed an incredible job. I’ll certainly digg it and for my part
suggest to my friends. I’m sure they’ll be benefited
from this web site.
Stunning quest there. What occurred after? Thanks!
24316GeraldoHobelo aa frv
塔尔萨之王高清完整版,海外华人可免费观看最新热播剧集。
certainly like your web site however you need to test the spelling on several
of your posts. Many of them are rife with spelling problems
and I find it very troublesome to inform the reality however
I will surely come back again.
Feel free to surf to my blog :: real estate agent Pinecrest FL
Всем здравствуйте! Хочу поделиться подборкой игровых площадок, где можно играть с телефона. Важно: прозрачность. Актуальный рейтинг 2025 — здесь: Lev. Пишите, кто с чем сталкивался!
ivermectin 4000 mcg stromectol cvs Iver Protocols Guide
Ребята, не тратьте время на левые сайты! Чтобы выбрать рабочее казино, обращайте внимание на: лицензию Curacao или Мальты, а также на условия бонусов. Я лично протестировал десятки платформ и оставил только те, где нет скрытых условий. Весь список — по ссылке: mellstroy game. Делитесь опытом!
58597ValentineSeipo aa frv
Hello there! Quick question that’s entirely off topic.
Do you know how to make your site mobile friendly?
My site looks weird when viewing from my apple iphone. I’m trying to find a theme or plugin that might
be able to fix this issue. If you have any recommendations, please
share. Appreciate it!
Howdy, I do believe your site may be having browser compatibility issues.
When I take a look at your blog in Safari, it looks fine however,
when opening in IE, it’s got some overlapping issues.
I just wanted to provide you with a quick heads up! Apart from that, wonderful website!
Feel free to surf to my web page: best realtor in Parker County TX
Всем здравия! Недавно искал, где реально можно получить честный выигрыш в онлайн слотах. Оказалось, что многое зависит от RTP автомата. Проверяйте статистику выплат, читайте форумы. Составил актуальный рейтинг на 2025 год с прямыми ссылками: Клубника. Интересно, кто из вас уже играл здесь?
Привет! Решил собрать только те казино, где лично получил выплату. Критерии: вывод до 10 минут. Все рабочие ссылки — по адресу: http://metanoia.grafikmk.pl/onlayn-kazino-kraken-stavkasy-turaly-akyly-makala/. Кто уже тестировал эти площадки?
Good article! We will be linking to this particularly great post on our website.
Keep up the good writing.
Here is my web site :: best real estate agent in Austin TX
20204TainaFloerchingero aa frv
Youdao(有道)官网中文版提供专业的有道翻译服务,是集有道翻译下载、有道翻译电脑版下载 与有道翻译电脑版 使用说明于一体的综合平台。通过有道翻译器,用户可以轻松完成多语言之间的精准翻译,广泛适用于学习、办公、跨境交流、商务沟通及学术研究等场景。有道翻译以高准确率和自然表达著称,支持文本和文档翻译,保留原始排版,提升工作效率。
本站围绕有道官网整理了有道翻译下载 指南及有道翻译电脑版下载 教程,帮助用户快速、安全地获取官方有道翻译器。通过有道官网下载安装官方版本,不仅保证软件安全稳定,还能第一时间体验最新功能。选择有道翻译,就是选择高效、专业、可信赖的语言工具,让学习、办公和跨语言沟通更顺畅。
Very soon this web site will be famous amid all blog
users, due to it’s nice articles or reviews
Also visit my web site best real estate agent in Andover MA
Long range goals, strikes from outside the box documented
8686GarnettSchmiedero aa frv
Με τα κουμπιά + και − ρυθμίζουμε το ποντάρισμά μας από €0,10 μέχρι €100 ανά γύρο.
Всем здравия! Недавно искал надёжное казино для игры на реальные деньги, и понял: половина сайтов — скам. Советую обращать внимание на наличие лицензии и читать отзывы. Свой топ-7 с моментальным выводом оставил здесь: Clubnika. Пишите, кто что знает по теме!
Привет! Хочу предупредить новичков: не все клубы одинаково полезны. Чтобы не слить депозит и получить выигрыш, проверяйте наличие лицензии и изучайте форумные обсуждения. Я составил подборку рабочих вариантов с минимальным депозитом от 10 рублей — смотрите тут: https://mansa-capital.com/dragon-mani-onlayn-kazino-kodtary-oynau-turaly-mysymdary/. Делитесь опытом!
Hat trick alerts, players scoring three or more goals in single matches
20721CyrusAlbarrano aa frv
超人和露易斯第二季高清完整版结合大数据AI分析,海外华人可免费观看最新热播剧集。
Привет! Решил собрать только те казино, где лично получил выплату. Критерии: без паспорта. Все рабочие ссылки — по адресу: мелстрой казино. Кто уже тестировал эти площадки?
Всем привет! Уже третий год играю в онлайн казино, и за это время понял главное: выбирайте площадки с честными условиями. Избегайте тех, где требуют паспорт или тормозят с выводом. Лучшие игровые сайты с поддержкой ЮMoney собрал здесь: Sykaaa. Кто что может добавить?
83224TraceySofero aa frv
83401FloridaKincaido aa frv
For more
cost lipitor no prescription
to share your thoughts.
Привет! Решил собрать только те казино, где лично получил выплату. Критерии: с минимальным депозитом. Все рабочие ссылки — по адресу: болливуд казино. Кто уже тестировал эти площадки?
Друзья, подскажите, куда лучше играть в 2025? Сам недавно протестировал кучу игровых сайтов — большинство тянут с выплатами. Остановился на тех, где есть лицензия и вывод за 5 минут. Полный список с RTP и бонусами — по ссылке: new retro казино. Кто с чем сталкивался?
Today’s football match scores from around the world, comprehensive coverage of all leagues
онлайн казино playfortuna
58777MauroBotoso aa frv
I am truly thankful to the holder of this site who
has shared this enormous post at here.
My site: realtor in Torrance CA
禁忌第一季高清完整官方版,海外华人可免费观看最新热播剧集。
Привет! Если вы ищете казино с высоким RTP — не гонитесь за громкими названиями. Лучше смотрите реальные отзывы. Мой проверенный список — тут: онлайн казино. Кто что добавит?
The intricate dance of deception between Aelin and the King is a highlight of the first half of the book. She plays the part of the obedient champion while plotting his downfall. Reading this in a Queen of Shadows pdf highlights the dramatic irony. The reader knows what she is planning, but the other characters do not. This creates a delicious tension that makes the pages fly by. Watching her outsmart a man who thinks he knows everything is incredibly satisfying.
Друзья, расскажу по-честному: я долго искал честную игровую площадку, и наконец нашёл рабочие варианты. Советую смотреть на наличие демо-режима и избегать тех, где поддельные отзывы. Актуальный список лучших платформ на 2025 — по ссылке: Sykaaa. Пишите в комментариях, какие казино вам зашли!
42749VanJankoffo aa frv
Hello! This is my 1st comment here so I just wanted to give a quick shout out and tell you I genuinely enjoy reading
through your articles. Can you suggest any other
blogs/websites/forums that go over the same topics?
Thanks for your time!
One of the most important novels of the 21st century, The Road by Cormac McCarthy, offers a glimpse into a future we hope never comes to pass. It is the story of a journey through a devastated landscape, driven by the primitive instinct to survive. The bond between the protagonist and his son is the only thing that keeps them going. This book is widely celebrated for its linguistic precision. Readers looking to analyze the text often search for the road pdf to study the specific vocabulary and sentence structures that create the novel’s hypnotic rhythm.
Greetings! This is my first visit to your blog! We are a
group of volunteers and starting a new project in a community in the same niche.
Your blog provided us useful information to work on. You have done a extraordinary job!
49699FranchescaFirlito aa frv
Reviewers have called this the perfect end to a perfect series. The ratings on Goodreads are sky-high for a reason. Join the hype train by reading the kingdom of ash pdf. It delivers on every promise made in the earlier books. Whether you are here for the romance, the war, or the magic, you will be satisfied. It is a complete package of entertainment.
https://iver.us.com/# stromectol medication
Привет! Хочу предупредить новичков: не все онлайн слот-сайты одинаково полезны. Ищите те, где есть возможность играть на рубли, и обязательно сверяйтесь с рейтингами. Я нашёл несколько платформ 2025 года с минимальным депозитом от 10 руб — всё собрано здесь: голд казино зеркало. Кто уже успел попробовать?
Generally I do not learn post on blogs, but I would like
to say that this write-up very pressured me to take a look
at and do it! Your writing taste has been surprised me.
Thank you, very great post.
my web-site … realtor in Pinecrest FL
Привет, форумчане! Решил поделиться лайфхаком: как найти онлайн казино, где реально работают честно. Главное — не верить рекламе, а смотреть на лицензию и реальные комментарии игроков. Я собрал проверенные варианты с выводом на QIWI — ссылка тут: клубника казино. Кто уже пробовал?
How do you start a blog? And what is the best way?
Good post. I will be experiencing some of these issues as
well..
Also visit my web site – real estate agent Torrance CA
buy propecia without prescription: Follicle Insight – buying cheap propecia price
The process to donate is very clear.
Also visit my site: Wichtige Unterstützung
65096ArthurAlisono aa frv
Good way of describing, and good piece of writing to obtain data about my presentation subject, which
i am going to convey in academy.
US Open tennis livescore, follow the hardcourt drama with instant score updates here
Hello! I just wanted to ask if you ever have any issues
with hackers? My last blog (wordpress) was hacked and I ended up losing many months of hard
work due to no back up. Do you have any solutions to prevent hackers?
Review my blog post … realtor in Parker County TX
Всем привет! Поделюсь лайфхаком: чтобы не слить депозит впустую, выбирайте онлайн платформу с высоким RTP. Я проверил десятки сайтов и оставил только те, где нет блокировок без причины. Список тут: https://grupoempresarialvisual.com/%/umnye-rekomendatsii-dlya-igrokov-kak-vyigrat-v-onlaynkazino-eldorado/. Кто уже играл — подтвердите?
clicklearnstrategies – Step-by-step explanations, made learning strategic concepts simple.
Здравствуйте! Хочу предложить проверенный способ выбора казино: обращайте внимание на скорость вывода, а не только на бонусы. Я составил список платформ 2025 года, где часто падают джекпоты. Всё по ссылке: онлайн казино. Делитесь впечатлениями!
55876RosettaClauncho aa frv
Article writing is also a fun, if you know after that you can write
or else it is difficult to write.
This casino http://www.redi4changesl.biz/dominando-el-blackjack-en-sitios-online-tacticas-y/ offers a great mix of popular slots and live tables. The platform feels modern, promotions are attractive, and support is helpful, which adds confidence.
44338PaulinaHagnero aa frv
What’s up Dear, are you truly visiting this website on a regular basis, if so after that you will definitely take fastidious knowledge.
futureproofstrategies – Guidance on modern strategies is insightful, made business planning smooth.
League table standings, updated after every match with goal difference
Manisa info portal – Information is clear, concise, and practical for planning visits.
Привет! Решил собрать только те игровые клубы, где лично получил выплату. Критерии: без паспорта. Все рабочие ссылки — по адресу: лев казино. Кто уже тестировал эти площадки?
Друзья, подскажите, куда лучше играть в 2025? Сам недавно протестировал кучу игровых сайтов — большинство тянут с выплатами. Остановился на тех, где есть прозрачная отдача и вывод за 5 минут. Полный список с RTP и бонусами — по ссылке: Mellstroy. Кто с чем сталкивался?
捕风追影下载官方認證平台,專為海外華人設計,24小時不間斷提供高清視頻和直播服務。
Financial news, club revenues and transfer budgets reported
25721KennyBeckwitho aa frv
Thank you for the good writeup. It in fact was once a
amusement account it. Glance complicated to
more delivered agreeable from you! By the way, how can we keep up a correspondence?
Статья содержит ссылки на актуальные и авторитетные источники, что делает ее надежной и достоверной.
Друзья, не тратьте время на левые сайты! Играйте только в проверенные казино с минимальным депозитом. Мой личный топ с реальными выплатами — по ссылке: mellstroy game зеркало. Кто что может порекомендовать?
62778TiffanyGoolsbyo aa frv
Привет! Решил собрать только те казино, где лично получил выплату. Критерии: вывод до 10 минут. Все рабочие ссылки — по адресу: https://bigrealproperty.com/kak-sovershit-virtualnoe-ograblenie-kazino-prostoy-gid-dlya-onlaynigrokov/. Кто уже тестировал эти площадки?
When I initially commented I clicked the “Notify me when new comments are added” checkbox and
now each time a comment is added I get several emails with the same comment.
Is there any way you can remove me from that service?
Bless you!
Feel free to visit my web site :: best real estate agent in Austin TX
Clinical finishing, players with best goals to chances ratio
ISL live score today, Indian Super League matches with ball-by-ball updates and stats
Live football match score updates faster than TV broadcast, stay ahead of everyone else
80353LeonardZahmo aa frv
Привет! Хочу предупредить новичков: не все онлайн слот-сайты одинаково полезны. Ищите те, где есть прозрачные правила, и обязательно сверяйтесь с независимыми обзорами. Я нашёл несколько платформ 2025 года с мобильной версией — всё собрано здесь: мелстрой казино. Кто уже успел попробовать?
I could not refrain from commenting. Well written!
Here is my page: best real estate agent in Pinecrest FL
Ребята, а вы знаете, где сейчас реально заработать в онлайн-казино? После десятков проверок остановился на лицензированных площадках. Важно: вывод без комиссии. Актуальный рейтинг с джекпотами и кэшбэком — по ссылке: JVSpin JVSpin. Обсуждаем!
海外华人必备的yifan官方认证平台,24小时不间断提供最新高清电影、电视剧,无广告观看体验。
World Cup football live score tracker, don’t miss any action from the biggest tournament
24441IsidroMarcilo aa frv
Stadium guides, venue information and matchday experience tips
For options
High interest loans near me
to discover possibilities.
BLUE CELTIC SALT TRICK
Club World Cup livescore, FIFA tournament with teams from all continents tracked
We are a gaggle of volunteers and opening a brand new scheme in our community.
Your web site offered us with helpful info to work on. You’ve performed a formidable process and our whole community might be grateful
to you.
Hat trick alerts, players scoring three or more goals in single matches
41553CarleenGrandao aa frv
Привет! Недавно искал онлайн-платформу, где можно спокойно играть на рубли, и понял: главное — лицензия. Собрал рабочие варианты с поддержкой Сбербанк — ссылка: kilogram casino. Кто уже пробовал?
Serie A live scores, Italian football from Inter Milan Juventus and AC Milan
DFB Pokal live scores, German cup matches with Bundesliga teams competing
International football matches live score, friendlies and qualifiers all covered here
Betting odds, bookmaker lines and value picks for matches
Привет! Если вы ищете клуб с частыми выплатами — не гонитесь за громкими названиями. Лучше смотрите лицензию. Мой проверенный список — тут: https://secreerd.com/index.php/2026/01/10/uznayte-kak-igrat-v-onlaynkazino-v-gta-5/. Кто что добавит?
Australian Open live scores, first Grand Slam of the year covered comprehensively
онлайн казино плейфортуна
BLUE SALT TRICK FOR MEN
https://follicle.us.com/# buying propecia price
84350GordonDeatso aa frv
Hmm is anyone else encountering problems with the pictures on this blog loading?
I’m trying to determine if its a problem on my end or if it’s the blog.
Any feed-back would be greatly appreciated.
Feel free to visit my web blog … realtor in Hoboken NJ
Привет! Хочу предупредить новичков: не все онлайн казино одинаково полезны. Ищите те, где есть реальный RTP, и обязательно сверяйтесь с независимыми обзорами. Я нашёл несколько платформ 2025 года с минимальным депозитом от 10 руб — всё собрано здесь: https://www.multi-control.com/technical-articles/onlayn-kazino-kazakhstan-umytylgan-karazhat-turaly-tusindik/. Кто уже успел попробовать?
Всем здравия! Недавно искал, где реально можно получить честный выигрыш в онлайн казино. Оказалось, что многое зависит от RTP автомата. Проверяйте лицензию, читайте обзоры. Составил актуальный рейтинг на 2025 год с прямыми ссылками: JVSpin. Интересно, кто из вас уже играл здесь?
16262SolomonJueo aa frv
National team call-ups, international squad announcements covered
超人和露易斯第三季高清完整版运用AI智能推荐算法,海外华人可免费观看最新热播剧集。
I would like to start a free WordPress blog on the WordPress site (not my own domain) but I don’t like the themes they provide. Can I use a downloaded theme on there? I have seen some WordPress hosted blogs with different themes, so it looks like it’s possible..
I’m extremely inspired with your writing talents as well as with the structure for your blog.
Is this a paid topic or did you modify it your self?
Anyway stay up the nice quality writing, it is rare to
see a great blog like this one nowadays..
BLUE CELTIC SALT TRICK
Hello, yup this paragraph is genuinely fastidious and I have learned lot of things from it
concerning blogging. thanks.
Feel free to visit my site – realtor in Parker County TX
9099GaryStmarieo aa frv
Привет! После череды обманов наконец нашёл казино, где реально платят. Смотрите на скорость обработки заявок. Список надёжных вариантов — тут: Мелстрой гейм. Кто уже играл?
I’ve been active for since launch, mostly for using the mobile app, and it’s always great support. The dashboard gives a complete view of my holdings.
The using the API tools are easy onboarding and wide token selection.
Всем привет! Много читаю про неплатёжные площадки, поэтому теперь тщательно проверяю всё: лицензию. Лучшие онлайн казино 2025 года с моментальным выводом — здесь: СЃСѓРєР° zdravo-russia.ru. Делитесь своим опытом!
It’s remarkable to pay a visit this web page and reading the views of all friends about this
paragraph, while I am also zealous of getting experience.
my web blog: best real estate agent in Hoboken NJ
65659CaroleShugarso aa frv
Formation changes, tactical adjustments during matches tracked real time
BLUE CELTIC SALT TRICK
Hi, I think your blog might be having browser compatibility issues.
When I look at your website in Opera, it looks fine but when opening in Internet Explorer,
it has some overlapping. I just wanted to give you a quick heads up!
Other then that, terrific blog!
My site – best realtor in Pinecrest FL
Всем привет! Уже третий год играю в игровые клубы, и за это время понял главное: выбирайте площадки с быстрыми выплатами. Избегайте тех, где требуют паспорт или тормозят с выводом. Лучшие платформы 2025 с поддержкой ЮMoney собрал здесь: Mellstroy game. Кто что может добавить?
This is a very informative post. I really appreciate how clearly everything is explained,
especially for people who are new to online casino platforms.
The way you describe the features, usability, and overall
experience makes it easy to understand and compare with
other websites. I also like that the content focuses on safety, convenience, and
user experience.
Thanks for sharing such useful information. I will definitely check out more articles on this site.
Приветствую! Только что вывел 15 тысяч с одного из игровых сайтов — и решил поделиться списком тех, кто реально платит. Смотрите на скорость обработки заявок. Все проверенные варианты — тут: Рльдорадо casino Eldorado. Кто уже играл? Какие суммы выводили?
14926AmosRamseuro aa frv
What Are Mix Backlinks? Why Are They Necessary for SEO?
In the world of search engine optimization (SEO), backlinks continue to be one of
the strongest ranking factors. However, not all
backlinks provide the same value, and relying
on only one type of link can slow growth—or worse, trigger search engine penalties.
This is where mix backlinks become essential.
A mix backlink strategy focuses on building a diversified and natural backlink profile that search engines recognize as trustworthy,
organic, and authoritative.
What Are Mix Backlinks?
Mix backlinks refer to a combination of different backlink types acquired from multiple sources,
platforms, and link attributes. Instead of depending on a single method like guest
posting or directory submissions, mix backlinks include a healthy balance of links
such as:
• Guest post backlinks
• Web 2.0 backlinks
• Profile backlinks
• Social bookmarking links
• Business directory and citation links
• Blog comment backlinks
• Forum discussion links
• Editorial and niche-relevant backlinks
• A mix of do-follow and no-follow links
The main objective of mix backlinks is to create a natural-looking backlink
profile, similar to how websites earn links organically
over time.
Search engines like Google closely analyze link diversity.
A varied backlink profile signals authenticity, trust, and long-term credibility, while
repetitive or one-sided link building often raises
red flags.
Why Mix Backlinks Are Necessary for SEO
1. Builds a Natural Backlink Profile
Google’s algorithm is designed to detect unnatural link-building patterns.
Websites that receive backlinks from only one source or use
the same anchor text repeatedly are more likely to be penalized.
Mix backlinks help by:
• Using multiple platforms
• Varying anchor text (brand, URL, generic, keyword-based)
• Combining high, medium, and foundational authority links
This diversity makes your link profile appear organic
and safe.
2. Improves Website Authority and Trust
Different backlink types contribute authority in different ways:
• Guest posts improve topical relevance
• Editorial links boost credibility
• Directories and citations support local SEO
• Social links strengthen brand signals
Together, these backlinks improve domain authority, page authority, and overall trustworthiness.
3. Supports Stable and Long-Term Rankings
SEO success isn’t about short-term spikes—it’s about sustainability.
Websites that rely on a single backlink method often lose rankings after
algorithm updates.
Mix backlinks help you:
• Stay protected during Google updates
• Maintain steady keyword rankings
• Reduce dependency on one link type
This creates a future-proof SEO strategy.
4. Enhances Keyword Ranking Potential
Different backlinks support keywords in different ways:
• Contextual links help rank competitive keywords
• Branded anchors prevent over-optimization
• Generic and URL anchors balance anchor distribution
A mixed backlink approach allows you to rank for primary, secondary,
and long-tail keywords safely.
5. Drives Referral Traffic from Multiple Sources
SEO isn’t only about rankings—traffic quality matters.
Mix backlinks bring visitors from:
• Blogs and niche websites
• Forums and online communities
• Business directories
• Social media platforms
This diversified traffic improves engagement metrics such as time on site and bounce
rate, indirectly supporting SEO.
6. Strengthens Brand Visibility and Online Presence
Even no-follow backlinks play an important role in brand exposure.
When your website appears across multiple platforms, it builds familiarity and trust.
Mix backlinks help to:
• Increase brand recognition
• Establish niche authority
• Build user trust
Search engines recognize these brand signals and reward them with better visibility.
7. Maintains a Healthy Do-Follow and No-Follow Ratio
Many website owners focus only on do-follow links, but a natural
backlink profile always includes both.
Mix backlinks provide:
• Do-follow links for ranking power
• No-follow links for balance and referral traffic
Google expects to see a mix, and having both improves
algorithmic trust.
Common Types of Mix Backlinks Used in SEO
A strong mix backlink strategy usually includes:
• High-authority backlinks (news sites, authority blogs)
• Medium-authority links (niche blogs, forums)
• Foundational links (profiles, directories, citations)
• Contextual links (guest posts, articles)
• Traffic-based links (social platforms, bookmarks)
Each type plays a specific role in strengthening your backlink ecosystem.
Conclusion,
Mix backlinks are essential for modern SEO because they create a diverse,
natural, and trustworthy backlink profile. Instead of relying on a single link-building method, combining
multiple backlink types helps improve rankings, protect against penalties, drive referral traffic, and
build long-term authority.
18950ElenorSiefkeo aa frv
Привет! Многие спрашивают, где сейчас выигрывают чаще всего. Ответ прост: смотрите на условия бонусов. Я собрал актуальный рейтинг казино 2025 с поддержкой рубля — ссылка: Mellstroy game. Пробовали что-то из списка?
Всем здравствуйте! Хочу поделиться подборкой онлайн казино, где можно выводить на карту МИР. Важно: честность. Актуальный рейтинг 2025 — здесь: https://wordpress.colibrip.com/kak-maximalno-effektivno-vospolzovatsya-bonusom-v-onlaynkazino-i-vyigrat-ego-nazad. Пишите, кто с чем сталкивался!
Wow, that’s what I was searching for, what a stuff!
present here at this weblog, thanks admin of this site.
We stumbled over here different website and thought I might as well check things out.
I like what I see so i am just following you. Look forward to
going over your web page yet again.
Also visit my blog: real estate agent Hoboken NJ
What a material of un-ambiguity and preserveness
of valuable know-how on the topic of unpredicted feelings.
Here is my blog – best real estate agent in Austin TX
76734EsperanzaQuellao aa frv
Sethe’s journey is one of the most heart-wrenching in literature, driven by a love that is described as “too thick.” To understand the complexities of this maternal bond, finding a Beloved PDF is a common step for literature students. The book asks difficult questions about the morality of saving one’s children from a life of bondage at any cost. An electronic version of the text makes it easier to compile evidence for essays discussing whether Sethe’s actions were an act of mercy or madness, a debate that has continued for decades.
I’ve been building websites for a while now… like 10 years, haha. Just for fun of course. Nothing major. But some people have seen my work and suggested I start a website building business or some sort. How would I go about doing this? I don’t know a whole lot about servers and such but I’m a very fast learner. Could anyone give me a heads up or point me in the right direction of some information on this?.
Друзья, подскажите, куда лучше играть в 2025? Сам недавно протестировал кучу онлайн казино — большинство тянут с выплатами. Остановился на тех, где есть лицензия и без верификации. Полный список с RTP и бонусами — по ссылке: https://www.sistina-conseils.com/umnye-rekomendatsii-po-ispolzovaniyu-bonusov-v-onlaynkazino-lev-dlya-igrokov-iz-rossiyskoy-federatsii/. Кто с чем сталкивался?
Друзья, подскажите, куда лучше играть в 2025? Сам недавно протестировал кучу игровых сайтов — большинство тянут с выплатами. Остановился на тех, где есть прозрачная отдача и без верификации. Полный список с RTP и бонусами — по ссылке: https://aothuat.vn/kak-uvelichit-shansy-na-vyigrysh-v-onlaynkazino-poleznye-sovety/. Кто с чем сталкивался?
73240JohnieHillesheimo aa frv
You’re so cool! I do not suppose I’ve read through anything like
this before. So great to find someone with a few unique thoughts on this issue.
Really.. many thanks for starting this up. This web site is
something that’s needed on the web, someone with some originality!
My web-site best real estate agent in Pinecrest FL
siberian express
Статья содержит практические советы, которые можно применить в реальной жизни.
85025WardBrosigo aa frv
I enjoy playing at this casino https://cybersolutionpartner.com/casino-machine-online-system-architecture-and-win-5/ because it feels trustworthy and well-optimized. Live tables are immersive, slots offer different styles, and the overall experience remains pleasant over time.
Additional information
buying cheap fluoxetine without dr prescription
for entertainment.
can you buy generic clomid for sale: can i get clomid – fertility pct guide
continuously i used to read smaller content which as well clear their motive,
and that is also happening with this article
which I am reading now.
Also visit my site … realtor in Torrance CA
securebondsolutions – Straightforward process, ensured peace of mind with every step.
smartvaluebuys – Shopping experience is excellent, browsing and buying products was quick and simple.
Ребята, а вы знаете, где сейчас реально выиграть в онлайн-казино? После десятков проверок остановился на платформах с аудитом RNG. Важно: возможность игры с телефона. Актуальный рейтинг с джекпотами и кэшбэком — по ссылке: Мелстрой. Обсуждаем!
Привет всем! Решил поделиться, как найти платящее онлайн казино в 2025 году. Главное — не гнаться за большими бонусами, а смотреть на лицензию и наличие вывода без задержек. Я собрал список проверенных площадок с быстрым кэш-аутом — вот тут: ГОЛД РІС…РѕРґ Gold. Кто уже пробовал?
India vs Australia livescore, cricket rivalry matches with detailed scoring updates
41802RandyCrisseyo aa frv
Have you ever considered about including a little bit more than just your articles?
I mean, what you say is fundamental and all. Nevertheless just imagine if you
added some great images or video clips to give your posts more,
“pop”! Your content is excellent but with pics and clips, this blog could certainly be
one of the most beneficial in its field.
Wonderful blog!
Here is my homepage; real estate agent Pinecrest FL
Привет! Многие спрашивают, где сейчас выигрывают чаще всего. Ответ прост: смотрите на провайдеров слотов. Я собрал актуальный рейтинг казино 2025 с фриспинами за регистрацию — ссылка: https://www.visitcalatafimisegesta.it/2026/01/10/uznayte-kak-maksimizirovat-polzu-ot-bonusov-eldorado-i-igrat-v-onlaynkazino/. Пробовали что-то из списка?
66237ShilaBinkso aa frv
Всем здравствуйте! Хочу поделиться подборкой онлайн казино, где можно пополнять с баланса. Важно: честность. Актуальный рейтинг 2025 — здесь: казино РѕС‚ мелстроя. Пишите, кто с чем сталкивался!
pinco kazino
凯伦皮里第二季高清完整版,海外华人可免费观看最新热播剧集。
Автор предлагает анализ разных подходов к решению проблемы и их возможных последствий.
плей фортуна казино
Автор старается не высказывать собственного мнения, что способствует нейтральному освещению темы.
What’s up everyone, it’s my first go to see at this
website, and paragraph is in fact fruitful designed for me, keep
up posting such posts.
Visit my homepage … best realtor in Andover MA
37107KarlaSchoenthalo aa frv
Приветствую! После череды неудач наконец нашёл честные онлайн казино. Ключевые критерии: отсутствие скрытых условий вейджера. Все подходящие площадки с русским интерфейсом собрал тут: Мелстрой. Кто уже успел потестить?
корги Мир кино и литературы – это мои проводники в другие реальности. Я погружаюсь в сложные сюжеты, сопереживаю героям и нахожу ответы на вопросы, которые задает мне жизнь. Делаю обзоры на сериалы и фильмы – это мой способ поделиться своими эмоциями, разложить увиденное на составляющие и пригласить вас к дискуссии. Мое мнение – это не истина в последней инстанции, это лишь отправная точка для новых открытий.
What is your opinion of personal blogs and online journaling?
Друзья, не тратьте время на левые сайты! Играйте только в честные казино с минимальным депозитом. Мой личный топ с реальными выплатами — по ссылке: Килограмм зеркало. Кто что может порекомендовать?
「オンラインカジノ」とは、インターネットを介してさまざまなカジノゲームを楽しめるプラットフォームです。その利便性から、世界中で多くのユーザーに親しまれています。詳細な仕組みや提供されているゲームの種類については、専門の情報サイトでご確認ください。
→ オンラインカジノ おすすめ
5236CaryHarvatho aa frv
What’s up, I wish for to subscribe for this weblog to get newest updates, therefore where can i do it please help out.
эвакуатор Мариуполь телефон Эвакуатор Мелекино – быстрая эвакуация в прибрежной курортной зоне.
48232LedaWidhalmo aa frv
Всем привет! Поделюсь лайфхаком: чтобы не слить депозит впустую, выбирайте онлайн платформу с честной рандомизацией. Я проверил десятки сайтов и оставил только те, где быстрая верификация. Список тут: эльдорадо казино. Кто уже играл — подтвердите?
Друзья, расскажу по-честному: я долго искал честную игровую площадку, и наконец нашёл рабочие варианты. Советую смотреть на наличие демо-режима и избегать тех, где скрытые комиссии. Актуальный список лучших платформ на 2025 — по ссылке: http://n106.m46.coreserver.jp/drone02/2026/01/12/onlayn-kazino-oynau-glory-kazino-depozitsiz-tegin-aynalymdar/. Пишите в комментариях, какие казино вам зашли!
20507BillyEeo aa frv
Всем здравия! Недавно искал честную площадку для игры на реальные деньги, и понял: половина сайтов — скам. Советую обращать внимание на скорость выплат и читать отзывы. Свой топ-7 с моментальным выводом оставил здесь: мелстрой гейм. Пишите, кто что знает по теме!
Приветствую! Только что вывел 15 тысяч с одного из платформ — и решил поделиться списком тех, кто реально работает в РФ. Смотрите на скорость обработки заявок. Все проверенные варианты — тут: https://appsmove.com/vygodnoe-predlozhenie-poluchite-promokod-na-frispiny-v-onlaynkazino-gold/. Кто уже играл? Какие суммы выводили?
45975JohnnyBentsono aa frv
Découvrez les casino crypto en ligne les plus fiables et sécurisés.
Profitez des avantages des Bitcoin casinos et des Bitcoin casino
pour jouer facilement avec des crypto-monnaies.
Explorez le best crypto casino adapté à vos
besoins et trouvez le casino en ligne crypto parfait pour vos sessions de jeu.
Counter attack goals, fast transitions and clinical finishes
An outstanding share! I’ve just forwarded this onto a
friend who was doing a little research on this.
And he actually ordered me lunch due to the fact that I found it for him…
lol. So let me reword this…. Thank YOU for the meal!! But yeah, thanks for
spending the time to discuss this matter here on your
internet site.
86991JudyHearingo aa frv
Привет! Многие спрашивают, где сейчас дают реальные выплаты. Ответ прост: смотрите на отзывы за последние 3 месяца. Я собрал актуальный рейтинг казино 2025 с фриспинами за регистрацию — ссылка: мелстрой гейм. Пробовали что-то из списка?
Ребята, а вы знаете, где сейчас реально заработать в онлайн-казино? После десятков проверок остановился на платформах с аудитом RNG. Важно: минимальный депозит. Актуальный рейтинг с джекпотами и кэшбэком — по ссылке: https://nudible.com/watch/onlayn-kazino-oynau-cat-kazino-tegin-aynalymdar/. Обсуждаем!
I want to protect some of the original writing on my website & was wondering how to do this…. a)Can I put the Copyright notation on it without revealing my real name? . b)How do I have proof that it is my original work? How about saving the writing in MS Word?. c)Is there any point in copyrighting the articles/website?.
56341VitaRodewaldo aa frv
mental health info site – Information is presented in a caring tone and the explanations are easy to follow.
Very nice article. I certainly appreciate this website. Keep
writing!
My web-site – best realtor in Hoboken NJ
Привет! Хочу предупредить новичков: не все онлайн казино одинаково полезны. Ищите те, где есть реальный RTP, и обязательно сверяйтесь с сообществом игроков. Я нашёл несколько платформ 2025 года с бонусами без вейджера — всё собрано здесь: Retro. Кто уже успел попробовать?
Всем привет! Уже третий год играю в онлайн казино, и за это время понял главное: выбирайте площадки с высоким RTP. Избегайте тех, где требуют паспорт или тормозят с выводом. Лучшие платформы 2025 с поддержкой МИР собрал здесь: https://fundacaoafifarao.org.br/2026/01/11/mellstroy-kazino-onlayn-kazino-oynau-mellstroy-kazino-dosynyzdy-shakyrynyz/. Кто что может добавить?
Good day! I could have sworn I’ve been to this blog
before but after browsing through many of the posts I realized it’s new to me.
Anyways, I’m definitely pleased I came across it and I’ll
be bookmarking it and checking back frequently!
Also visit my web page … real estate agent Austin TX
https://amitrip.us.com/# AmiTrip
20220AyannaLobelloo aa frv
捕风追影下载官方下载,海外华人专用,支持高速下载和离线观看。
71744FreddieGoodero aa frv
Ребята, не верьте громким обещаниям! Настоящее онлайн казино должно иметь положительную репутацию. Я отсеял все подозрительные площадки и оставил только проверенные варианты — смотрите здесь: https://saltlakequinceanera.com/razgadayte-znachenie-3-barov-v-kazinoigrakh-kak-nachat-igrat-onlayn-v-rf/. Кто уже выводил оттуда?
Приветствую! После череды неудач наконец нашёл рабочие онлайн казино. Ключевые критерии: RTP выше 96%. Все подходящие площадки с быстрым выводом собрал тут: боливуд казино. Кто уже успел потестить?
I was suggested this web site by my cousin. I’m not sure whether this post is written by him as nobody else know such detailed about my
problem. You’re amazing! Thanks!
Look into my web blog: best realtor in Andover MA
stromectol covid: Iver Protocols Guide – Iver Protocols Guide
For a walkthrough
best personal loan rates debt consolidation
to complete your task.
87784KailaFricanoo aa frv
It is perfect time to make a few plans for the longer term and it is time to be happy.
I’ve read this post and if I may just I desire to counsel you some interesting issues or advice.
Maybe you can write subsequent articles regarding this article.
I wish to read even more issues approximately it!
my page … real estate agent Andover MA
Привет! Если вы ищете клуб с частыми выплатами — не гонитесь за громкими названиями. Лучше смотрите реальные отзывы. Мой проверенный список — тут: РЎСѓРєР° казино. Кто что добавит?
Продвижение через отзовики и каталоги компаний Гродно. Контролируем присутствие в Яндекс.Справочнике, 2GIS, Авито prodvizheniye-sayta-grodno.ru. Актуальная информация и положительные отзывы повышают видимость в локальных поисках.
愛海外版,专为华人打造的高清视频平台智能AI观看体验优化,支持全球加速观看。
Приветствую! После череды неудач наконец нашёл рабочие онлайн казино. Ключевые критерии: отсутствие скрытых условий вейджера. Все подходящие площадки с русским интерфейсом собрал тут: Мелстрой зеркало. Кто уже успел потестить?
Heat maps, player positioning and movement patterns visualized
Ребята, не верьте громким обещаниям! Настоящее слот-сайт должно иметь прозрачную политику выплат. Я отсеял все подозрительные площадки и оставил только проверенные варианты — смотрите здесь: https://my-aligners.com/kazino-s-prozrachnym-igrovym-zalom-igrayte-v-onlaynkazino-v-rf/. Кто уже выводил оттуда?
Всем привет! Много читаю про неплатёжные площадки, поэтому теперь тщательно проверяю всё: лицензию. Лучшие игровые сайты 2025 года с моментальным выводом — здесь: онлайн казино. Делитесь своим опытом!
projectsynergyhub – Effective team collaboration tools, made organizing projects much simpler.
I recently tested this casino https://fa.kimiajavidco.com/uncategorized/online-casino-games-roulette-movement-variations-14/ and was surprised by how stable everything felt. The games run fast, bonuses are clear, and navigation is user-friendly, making the experience comfortable.
продам остатки лекарства
Hello to every body, it’s my first go to see of this weblog; this blog consists
of awesome and actually fine information for readers.
Also visit my web blog: real estate agent Austin TX
innovationinspohub – Inspiring and actionable ideas, definitely triggered some new project concepts.
When I originally commented I clicked the “Notify me when new comments are added” checkbox and now each
time a comment is added I get three e-mails with the same comment.
Is there any way you can remove me from that service?
Bless you!
my site :: realtor in Torrance CA
Ребята, не тратьте время на левые сайты! Чтобы выбрать платящее казино, обращайте внимание на: лицензию Curacao или Мальты, а также на частоту выплат. Я лично протестировал десятки платформ и оставил только те, где выводят за час. Весь список — по ссылке: Килограм казино Килограмм зеркало. Делитесь опытом!
Приветствую! Только что вывел 15 тысяч с одного из казино — и решил поделиться списком тех, кто реально работает в РФ. Смотрите на отзывы за 2025 год. Все проверенные варианты — тут: https://gpsgranite.com/2026/01/10/igrayte-v-onlaynkazino-v-kazakhstane-gde-eto-razresheno-v-ramkakh-rossiyskoy-federatsii/. Кто уже играл? Какие суммы выводили?
This post is really a nice one it helps new internet visitors, who are wishing in favor of blogging.
My web page – best realtor in Andover MA
Привет! Многие спрашивают, где сейчас дают реальные выплаты. Ответ прост: смотрите на отзывы за последние 3 месяца. Я собрал актуальный рейтинг казино 2025 с фриспинами за регистрацию — ссылка: мелстрой гейм. Пробовали что-то из списка?
Привет, форумчане! Решил поделиться лайфхаком: как найти казино РФ, где реально выводят деньги. Главное — не верить рекламе, а смотреть на официальные документы и реальные рейтинги. Я собрал проверенные варианты с выводом на Сбербанк — ссылка тут: https://ortologist.com/index.php/2026/01/10/kak-zayti-na-clubnika-i-nachat-igrat-v-onlaynkazino/. Кто уже пробовал?
67625EleniGuilmaino aa frv
37973KathyrnAilstocko aa frv
Купить Купить
Привет! Недавно искал игровой клуб, где можно спокойно играть на рубли, и понял: главное — лицензия. Собрал рабочие варианты с поддержкой QIWI — ссылка: Gold. Кто уже пробовал?
Друзья, подскажите, куда лучше играть в 2025? Сам недавно протестировал кучу платформ — большинство тянут с выплатами. Остановился на тех, где есть поддержка рубля и вывод за 5 минут. Полный список с RTP и бонусами — по ссылке: https://dronchessacademy.com/index.php/2026/01/11/mellstroy-onlayn-kazino-kazakstanda-oynau-ushin-en-zhaksy/. Кто с чем сталкивался?
This paragraph will help the internet viewers for setting
up new webpage or even a blog from start to end.
my web site … best realtor in Parker County TX
Your means of describing all in this article
is in fact good, all be able to without difficulty understand it, Thanks a lot.
Have a look at my site: best realtor in Andover MA
At this time it sounds like Movable Type is the preferred blogging platform out there right now.
(from what I’ve read) Is that what you are using on your blog?
Also visit my website :: best realtor in Hoboken NJ
32679SethLoewensteino aa frv
Всем привет! Уже третий год играю в игровые клубы, и за это время понял главное: выбирайте площадки с честными условиями. Избегайте тех, где требуют паспорт или тормозят с выводом. Лучшие игровые сайты с поддержкой МИР собрал здесь: казино Mellstroy. Кто что может добавить?
Здравствуйте! Хочу предложить проверенный способ выбора казино: обращайте внимание на наличие live-чата, а не только на бонусы. Я составил список платформ 2025 года, где есть игры от NetEnt и Pragmatic. Всё по ссылке: болливуд казино. Делитесь впечатлениями!
70957PhillipLamoreauo aa frv
I love what you guys are usually up too. This type of
clever work and reporting! Keep up the excellent works guys I’ve incorporated you guys to blogroll.
My blog post real estate agent Hoboken NJ
Terrific work! This is the kind of information that should be shared across the net.
Disgrace on the seek engines for no longer positioning
this post higher! Come on over and consult with my web site .
Thank you =)
For forums
can you buy augmentin tablets
for exclusive content.
26364JameyMcpartlando aa frv
Good post. I learn something totally new and challenging on blogs I stumbleupon on a daily
basis. It’s always exciting to read articles from other writers and use a little something from their sites.
Привет! Хочу предупредить новичков: не все онлайн слот-сайты одинаково полезны. Ищите те, где есть возможность играть на рубли, и обязательно сверяйтесь с сообществом игроков. Я нашёл несколько платформ 2025 года с бонусами без вейджера — всё собрано здесь: https://restausoft.net/2026/01/10/kak-vybrat-legalnoe-i-bezopasnoe-onlaynkazino-eldorado-dlya-igry-v-rossii/. Кто уже успел попробовать?
Всем здравствуйте! Хочу поделиться подборкой онлайн казино, где можно пополнять с баланса. Важно: честность. Актуальный рейтинг 2025 — здесь: https://www.aitelcaidtours.com/eldaradonyn-ondiruska-eldarado-onlayn-kazino-oynauynyn-karapayym-tusini/. Пишите, кто с чем сталкивался!
Franchising Path Carlsbad
Carlsbad, СA 92008, United Stаteѕ
+18587536197
how to start a franchise business
Hello, I log on to your new stuff like every week.
Your writing style is witty, keep it up!
52363BoyceBoeso aa frv
This is a good tip particularly to those new to the blogosphere.
Brief but very accurate information… Many thanks for sharing this one.
A must read article!
Привет! После череды обманов наконец нашёл платформу, где реально платят. Смотрите на отзывы игроков. Список надёжных вариантов — тут: Ретро казино. Кто уже играл?
Друзья, расскажу по-честному: я долго искал казино, которое платит, и наконец нашёл рабочие варианты. Советую смотреть на скорость обработки вывода и избегать тех, где ограничения на вывод. Актуальный список лучших платформ на 2025 — по ссылке: http://35.185.64.138/2026/01/10/kogda-kilogramm-v-kapchagae-vozobnovit-rabotu-posle-karantina-igrayte-v-onlaynkazino-seychas/. Пишите в комментариях, какие казино вам зашли!
13978FaustinaKincyo aa frv
85471EloyNicklieno aa frv
I’ve read several good stuff here. Certainly value bookmarking for revisiting.
I surprise how much effort you set to create this type of great informative site.
Have a look at my blog post :: best realtor in Austin TX
Друзья, не тратьте время на левые сайты! Играйте только в лицензированные казино с быстрым выводом. Мой личный топ с реальными выплатами — по ссылке: онлайн казино. Кто что может порекомендовать?
Привет, форумчане! Решил поделиться лайфхаком: как найти онлайн казино, где реально выводят деньги. Главное — не верить рекламе, а смотреть на статус регулятора и реальные рейтинги. Я собрал проверенные варианты с выводом на МИР — ссылка тут: KiloGram. Кто уже пробовал?
These are genuinely fantastic ideas in on the topic of blogging.
You have touched some good factors here. Any way keep up wrinting.
Also visit my web page :: best realtor in Hoboken NJ
1129AbdulKnochelo aa frv
Ребята, не верьте громким обещаниям! Настоящее игровое заведение должно иметь положительную репутацию. Я отсеял все подозрительные площадки и оставил только платящие варианты — смотрите здесь: мелстрой гейм. Кто уже выводил оттуда?
Друзья, не тратьте время на левые сайты! Играйте только в проверенные казино с быстрым выводом. Мой личный топ с реальными выплатами — по ссылке: мелстрой гейм. Кто что может порекомендовать?
71581TannerBridenstineo aa frv
Good day! This is my 1st comment here so I just wanted to give a quick shout out and tell you I
truly enjoy reading through your articles. Can you recommend any other blogs/websites/forums that cover the same subjects?
Thanks for your time!
11292KerryMolletto aa frv
Всем здравия! Недавно искал, где реально можно получить честный выигрыш в онлайн казино. Оказалось, что многое зависит от политики платформы. Проверяйте лицензию, читайте обзоры. Составил актуальный рейтинг на 2025 год с прямыми ссылками: казино мелстроя. Интересно, кто из вас уже играл здесь?
我欲为人第二季平台结合大数据AI分析,专为海外华人设计,提供高清视频和直播服务。
Привет! Недавно искал казино, где можно спокойно играть на рубли, и понял: главное — отзывы. Собрал рабочие варианты с поддержкой Сбербанк — ссылка: онлайн казино. Кто уже пробовал?
Howdy would you mind sharing which blog platform you’re working with?
I’m planning to start my own blog soon but I’m having a
hard time deciding between BlogEngine/Wordpress/B2evolution and Drupal.
The reason I ask is because your layout seems different then most
blogs and I’m looking for something unique.
P.S Apologies for getting off-topic but I had
to ask!
my blog; realtor in Hoboken NJ
12861AubreyIhmo aa frv
globalpartnershiphub – Alliance tips are clear, made planning collaborations faster and more structured.
EV Liberty online portal – Very clear design, information feels reliable, and navigation is fast.
Всем здравия! Недавно искал рабочий игровой клуб для игры на реальные деньги, и понял: половина сайтов — скам. Советую обращать внимание на минимальный депозит и читать обзоры. Свой топ-7 с моментальным выводом оставил здесь: Болливуд казино. Пишите, кто что знает по теме!
57643ShonGilliamo aa frv
I enjoy playing at this casino https://allods.my.games/forum/index.php?page=User&userID=218262 because it feels secure and stable. Live tables are immersive, slots offer different styles, and the overall experience remains consistent over time.
Всем привет! Много читаю про неплатёжные площадки, поэтому теперь тщательно проверяю всё: условия вывода. Лучшие игровые сайты 2025 года с моментальным выводом — здесь: https://drakshaygolwalkar.com/index.php/2026/01/10/kak-vyvesti-vashi-vyigryshi-s-jvspin-bez-komissii-i-prostye-instruktsii/. Делитесь своим опытом!
stromectol tablets uk: ivermectin brand name – buy stromectol pills
73293TashinaCoffello aa frv
It’s a shame you don’t have a donate button! I’d without a doubt donate
to this superb blog! I guess for now i’ll settle for bookmarking and adding your RSS feed to my
Google account. I look forward to new updates and will share
this blog with my Facebook group. Chat soon!
Here is my web site :: best real estate agent in Andover MA
Здравствуйте!
Business-Mentor — это онлайн-платформа, где собрана библиотека готовых решений и проверенных бизнес-идей для старта и развития своего дела. Здесь можно найти вдохновение, получить экспертные рекомендации и поддержку единомышленников на каждом этапе запуска проекта. Ключ к успешному предпринимательству — готовые бизнес-решения для тех, кто хочет начать действовать уже сегодня. Готовые бизнес-решения включают шаблоны договоров с подрядчиками и партнёрами. Это защищает ваши интересы с самого начала.
Вся информация на сайте – https://business-mentor.ru/biznes-idei/
бизнес, который можно совмещать с работой, как проверить спрос на идею, сравнение бизнес-идей по окупаемости
идеи для бизнеса в маленьком городе, кейсы локальных предпринимателей, готовый бизнес-план бесплатно
Всего наилучшего и развития!!
Привет! Если вы ищете казино с высоким RTP — не гонитесь за громкими названиями. Лучше смотрите статистику. Мой проверенный список — тут: Мелстрой казино. Кто что добавит?
Приветствую! Только что вывел 15 тысяч с одного из игровых сайтов — и решил поделиться списком тех, кто реально платит. Смотрите на отзывы за 2025 год. Все проверенные варианты — тут: https://www.abreprog.fr/en-az-depozitti-turaly-kyzmet-auf-kazinonyn-online-kazino-oynauy/. Кто уже играл? Какие суммы выводили?
For documentation
real money slots nextgen
for the conclusion.
241EmogeneSerramoo aa frv
animation corner – Random visit, but the site speed and structure are surprisingly good.
мостбет как получить фрибет мостбет как получить фрибет
49514KamalaPintao aa frv
When I initially commented I clicked the “Notify me when new comments are added” checkbox and now each time
a comment is added I get four e-mails with the same comment.
Is there any way you can remove people from that service?
Many thanks!
Here is my website: real estate agent Parker County TX
Привет! Хочу предупредить новичков: не все казино онлайн одинаково полезны. Чтобы не слить депозит и получить выигрыш, проверяйте условия вывода и изучайте отзывы. Я составил подборку рабочих вариантов с минимальным депозитом от 10 рублей — смотрите тут: казино Mellstroy. Делитесь опытом!
Ребята, а вы знаете, где сейчас реально выиграть в онлайн-казино? После десятков проверок остановился на лицензированных площадках. Важно: возможность игры с телефона. Актуальный рейтинг с джекпотами и кэшбэком — по ссылке: https://samotoursegypt.com/34097-2/. Обсуждаем!
42849MarkettaCoplano aa frv
online pharmacy hydrocodone
Fantastic post but I was wondering if you could write
a litte more on this topic? I’d be very grateful if you could elaborate a little bit further.
Kudos!
my web-site real estate agent Austin TX
https://pad.fablab-siegen.de/s/VCOGuaB4r
Привет! Многие спрашивают, где сейчас выигрывают чаще всего. Ответ прост: смотрите на условия бонусов. Я собрал актуальный рейтинг казино 2025 с минимальным депозитом — ссылка: Mellstroy. Пробовали что-то из списка?
51175VenettaOrensteino aa frv
https://amitrip.us.com/# AmiTrip Relief Store
Привет! Если вы ищете клуб с частыми выплатами — не гонитесь за громкими названиями. Лучше смотрите статистику. Мой проверенный список — тут: Ретро. Кто что добавит?
Fantastic goods from you, man. I’ve understand your stuff previous to and you’re
just too excellent. I really like what you have acquired here,
really like what you are saying and the way in which you say it.
You make it enjoyable and you still care for to keep it
sensible. I cant wait to read much more from you.
This is really a tremendous web site.
cost cheap propecia without prescription propecia otc cost of generic propecia for sale
ro sparks side effects https://images.google.ci/url?sa=t&url=https%3A%2F%2Fedpillseasy.shop cialis viagra levitra tadadoeshighbnct com
29961KeshiaBickero aa frv
Ребята, а вы знаете, где сейчас дают кэшбэк? Я проверил десятки платформ, оставил только те, где реально не обманывают. Ссылка на подборку: mellstroy game. Обсуждаем!
Привет! Многие спрашивают, где сейчас выигрывают чаще всего. Ответ прост: смотрите на условия бонусов. Я собрал актуальный рейтинг казино 2025 с фриспинами за регистрацию — ссылка: https://namahitech.com/index.php/2026/01/10/skolko-kharlamova-vyigral-v-retro-uznayte-igraya-v-onlaynkazino/. Пробовали что-то из списка?
These are genuinely fantastic ideas in regarding blogging.
You have touched some nice points here. Any way keep up wrinting.
https://farm-to-fork-meat-riot.mn.co/posts/97170396?utm_source=manual
32392LavetteSobieskio aa frv
http://schalke04.cz/profile.php?lookup=125848
https://amitrip.us.com/# Elavil
58467AgripinaTrzaskao aa frv
Здравствуйте! Хочу предложить проверенный способ выбора казино: обращайте внимание на скорость вывода, а не только на бонусы. Я составил список платформ 2025 года, где есть игры от NetEnt и Pragmatic. Всё по ссылке: https://site1.synetalsolutions.co/kazino-kilogram-kak-vyvesti-vyigryshi-i-igrat-v-onlaynkazino-v-rf/. Делитесь впечатлениями!
Всем здравия! Недавно искал, где реально можно выиграть в онлайн казино. Оказалось, что многое зависит от RTP автомата. Проверяйте статистику выплат, читайте комментарии. Составил актуальный рейтинг на 2025 год с прямыми ссылками: Мелстрой гейм. Интересно, кто из вас уже играл здесь?
78646CarolSwankeo aa frv
Great beat ! I would like to apprentice while you amend your web site, how can i subscribe for a blog
website? The account helped me a acceptable deal. I had been a little bit acquainted of this your broadcast
offered bright clear idea
Stop by my web blog: real estate agent Austin TX
I always used to study paragraph in news papers but now as I am a
user of web therefore from now I am using net for articles or reviews, thanks to web.
Look at my website real estate agent Hoboken NJ
Привет, форумчане! Решил поделиться лайфхаком: как найти онлайн казино, где реально платят без задержек. Главное — не верить рекламе, а смотреть на лицензию и реальные комментарии игроков. Я собрал проверенные варианты с выводом на МИР — ссылка тут: mellstroy game. Кто уже пробовал?
Друзья, подскажите, куда лучше играть в 2025? Сам недавно протестировал кучу онлайн казино — большинство тянут с выплатами. Остановился на тех, где есть прозрачная отдача и на карту МИР. Полный список с RTP и бонусами — по ссылке: лев казино официальный сайт. Кто с чем сталкивался?
86641MichelCopelando aa frv
53903MyongRabsatto aa frv
Un crypto casino est une plateforme de jeux en ligne qui permet aux joueurs de miser et de
jouer en utilisant des cryptomonnaies comme le Bitcoin. Ces casinos offrent des transactions rapides, un haut niveau de sécurité et une expérience de jeu moderne.
Grâce à l’anonymat et aux technologies blockchain, les crypto casinos attirent de plus en plus de joueurs en France à la recherche
de jeux fiables et innovants.
Привет! Решил собрать только те казино, где лично получил выплату. Критерии: без паспорта. Все рабочие ссылки — по адресу: https://creativeflarestudio.com/2026/01/11/igrayte-v-onlayn-kazino-eldorado-pryamo-seychas-i-naslazhdaytes-luchshimi-igrovymi-avtomatami-v-kazakhstane/. Кто уже тестировал эти площадки?
Привет! После череды обманов наконец нашёл казино, где реально не задерживают выплаты. Смотрите на отзывы игроков. Список надёжных вариантов — тут: Мелстрой гейм. Кто уже играл?
Hello! Would you mind if I share your blog with my myspace group?
There’s a lot of people that I think would really appreciate your content.
Please let me know. Thank you
My page yoga retreat center
13583JaeHofo aa frv
For blogs
new online casino canada
for partnership.
Woah! I’m really loving the template/theme of this site.
It’s simple, yet effective. A lot of times it’s very difficult to get that “perfect balance” between superb usability and visual appeal.
I must say you’ve done a amazing job with this. In addition, the
blog loads very fast for me on Safari. Exceptional Blog!
It’s amazing in favor of me to have a web page, which is valuable in support of my experience.
thanks admin
Привет! Многие спрашивают, где сейчас работают без обмана. Ответ прост: смотрите на провайдеров слотов. Я собрал актуальный рейтинг казино 2025 с фриспинами за регистрацию — ссылка: https://alhindhealthtourism.com/mellstroy-onlayn-bingo-i-kazino-igry-v-kazakstan-title-tag-for-mellstroy-kazino-bingosy-onlayn-kazino-oynau-for-kazakhstan/. Пробовали что-то из списка?
15509ParisGoesslo aa frv
Друзья, расскажу по-честному: я долго искал честную игровую площадку, и наконец нашёл рабочие варианты. Советую смотреть на лицензию и избегать тех, где поддельные отзывы. Актуальный список лучших платформ на 2025 — по ссылке: https://theslow-lb.com/synybyn-kazinda-rulettegin-dep-oynau-zharayyn-kezdesu-1-tugyrynyz/. Пишите в комментариях, какие казино вам зашли!
Weather conditions, pitch status and match day environment reported
Hey I know this is off topic but I was wondering if you knew of any widgets I could add
to my blog that automatically tweet my newest
twitter updates. I’ve been looking for a plug-in like this for quite
some time and was hoping maybe you would have some experience with something like this.
Please let me know if you run into anything. I truly enjoy reading your blog and I look
forward to your new updates.
Amazing quite a lot of superb tips.
alliancesresource – Trusted alliance strategies are clear, really helped expand professional contacts.
22898BibiRiesgrafo aa frv
Друзья, расскажу по-честному: я долго искал честную игровую площадку, и наконец нашёл рабочие варианты. Советую смотреть на скорость обработки вывода и избегать тех, где ограничения на вывод. Актуальный список лучших платформ на 2025 — по ссылке: Ретро казино регистрация. Пишите в комментариях, какие казино вам зашли!
Всем привет! Уже третий год играю в игровые клубы, и за это время понял главное: выбирайте площадки с быстрыми выплатами. Избегайте тех, где требуют паспорт или тормозят с выводом. Лучшие игровые сайты с поддержкой СБП собрал здесь: меллстрой гейм. Кто что может добавить?
6803MammieLandfordo aa frv
What impressed me about this casino http://pcehs.depedpasay.ph/games-casino-slots-specialised-structure-rtp/ is the variety of the games. Everything runs without issues, the design is clean, and there’s plenty of options to explore, which keeps it engaging.
Witһ PSLE Ьehind them, your child’ѕ entry intо secondary school highlights tһe importance ߋf math tuition in Singapore’ѕ system for individualized
learning support.
Lah leh, Singapore kids’ math prowess іs unmatched globally
sia!
Dear moms ɑnd dads, ᴡelcome Singapore math tuition to see
уour kid’s math skills grow. Secondary math tuition brings creativity tо prⲟblem-solving.
Secondary 1 math tuition takes on algebraic
expressions, ensuring ɑ smooth trip thrоugh secondary school.
Secondary 2 math tuition motivates journaling reflections.
Secondary 2 math tuition prkmotes metacognition. Thoughtful secondary 2 math tuition deepens understanding.
Secondary 2 math tuition establishes ѕelf-awareness.
Succeeding іn secondary 3 math exams іs essential, offered the shift.
Mastery prevents attitude shifts. Ꭲhey foster basic quadratics.
Ꭲhe іmportance of secondary 4 exams values wholeness іn Singapore.
Secondary 4 math tuition examines broadly. Тhіѕ growth strengthens O-Level.
Secondary 4 math tuition holistics.
Math ɡoes past exam preparation; іt’s a fundamental ability
іn surging АI technologies, essential fоr cyber threat detection.
Nurture ɑn enduring love fⲟr mathematics and embed itѕ principles іnto your
daily real-life decisions fоr superior performance.
Ꭺ core іmportance iѕ that it promotes healthy competition Ƅy comparing tіmes
with hypothetical peers in exams.
Online math tuition е-learning in Singapore boosts гesults Ƅy
integrating parental involvement tools ⅼike shared dashboards.
Haha leh, parents relax lah, secondary school ցot sports dаy
fun, no need for unnecessary stress.
Ꭺlso visit my web page – singapore math tuition center
This site truly has all of the info I needed about
this subject and didn’t know who to ask.
42769AkilahCortnero aa frv
Привет всем! Решил поделиться, как найти надёжное онлайн казино в 2025 году. Главное — не гнаться за большими бонусами, а смотреть на официальную регистрацию и скорость выплат. Я собрал список проверенных площадок с быстрым кэш-аутом — вот тут: Mellstroy game зеркало. Кто уже пробовал?
Ребята, а вы знаете, где сейчас дают фриспины без отыгрыша? Я проверил десятки платформ, оставил только те, где реально можно вывести. Ссылка на подборку: вован казино. Обсуждаем!
Dostie Construction information – Clean and clear, presenting details that inspire confidence.
no prescription online pharmacy https://maps.google.ht/url?sa=t&url=https%3A%2F%2Fmexicanxlpharmacy.com cheap online pharmacy
For most recent news you have to pay a visit world wide web and on world-wide-web I found this web page as a most excellent
web site for most up-to-date updates.
my web blog; retreat center riviera maya
Həqiqətən demək istəyirəm ki, bu saytı tapdığıma çox sevinirəm.
http://www.tuvaenergo.ru/bitrix/redirect.php?event1=click_to_call&event2=&event3=&goto=https://1winazerbaijan.com/demo-oyunlari/
49916FedericoZuccao aa frv
Всем здравия! Недавно искал, где реально можно получить честный выигрыш в онлайн казино. Оказалось, что многое зависит от политики платформы. Проверяйте статистику выплат, читайте комментарии. Составил актуальный рейтинг на 2025 год с прямыми ссылками: ЛЕВ . Интересно, кто из вас уже играл здесь?
Друзья, подскажите, куда лучше играть в 2025? Сам недавно протестировал кучу онлайн казино — большинство тянут с выплатами. Остановился на тех, где есть поддержка рубля и на карту МИР. Полный список с RTP и бонусами — по ссылке: Mellstroy. Кто с чем сталкивался?
20506AlanaPyschero aa frv
61703LurleneSchnyero aa frv
Привет! После череды обманов наконец нашёл платформу, где реально платят. Смотрите на наличие лицензии. Список надёжных вариантов — тут: Мелстрой казино. Кто уже играл?
Всем привет! Много читаю про скам-казино, поэтому теперь тщательно проверяю всё: RTP. Лучшие игровые сайты 2025 года с моментальным выводом — здесь: http://es-company.com/kazakstanda-eldorado-onlayn-kazino-oynau-gde-eldorado-tysyrady/. Делитесь своим опытом!
Very good knowledge, Cheers.
62732QuentinPanningo aa frv
The final book answers the question: what happens after the revolution? It deals with the messy business of building a government and seeking justice. A Mockingjay PDF version is great for readers who want to explore these complex themes on the go. You can read while waiting in line or sitting on the bus, making the most of your time. The transition from tyranny to democracy is fraught with danger, as Katniss discovers. It is a sophisticated ending to a beloved series.
I think the admin of this web site is in fact working hard
in support of his website, as here every information is quality based material.
What happens when your stalker becomes your savior? This is the central question of the Cat and Mouse duet. It is a paradox that keeps readers hooked from start to finish. Whether you access the story through a Haunting Adeline PDF or a bookstore purchase, the emotional impact is the same. The book is a raw exploration of desire and fear, mixing them into a potent cocktail. H.D. Carlton writes with a visceral intensity that makes the danger feel real. If you are looking for a book that will make your heart race, you have found it.
Lydia’s room, left exactly as it was, becomes a shrine and a mystery. Her parents search it for clues, realizing they didn’t know their daughter at all. This realization is the most heartbreaking part of the novel. Readers searching for the Everything I Never Told You PDF will find a story that deals with the unknown parts of the people we live with. It forces us to question how much we project our own selves onto others. It is a brilliant, sorrowful examination of the limits of parental knowledge.
The writing is beautiful and poetic. It is art. The Empire of Storms PDF is a pleasure to read. The words flow. It is well-crafted.
Ребята, а вы знаете, где сейчас реально выиграть в онлайн-казино? После десятков проверок остановился на честных клубах. Важно: минимальный депозит. Актуальный рейтинг с джекпотами и кэшбэком — по ссылке: https://www.wurkatu.nl/2026/01/11/mobildi-kazino-kraken-onlayn-kazino-oynau-kazakhstanda/. Обсуждаем!
Всем привет! Уже третий год играю в игровые клубы, и за это время понял главное: выбирайте площадки с честными условиями. Избегайте тех, где требуют паспорт или тормозят с выводом. Лучшие платформы 2025 с поддержкой МИР собрал здесь: [url=https://www.casasarticola.com/index.php/%d0%b8%d0%b3%d1%80%d0%b0%d0%b9%d1%82%d0%b5-%d0%b2-%d0%be%d0%bd%d0%bb%d0%b0%d0%b9%d0%bd-%d0%ba%d0%b0%d0%b7%d0%b8%d0%bd%d0%be-%d0%bc%d0%b5%d0%bb%d1%81%d1%82%d1%80%d0%be%d1%8f-%d0%b5%d1%81%d1%82%d1%8c/]Мелстрой казино[/url]. Кто что может добавить?
1109GeorgiaEkinso aa frv
70999KarimaCalcaoo aa frv
Detailed review
current gambling sites
for curiosity.
Привет! Многие спрашивают, где сейчас работают без обмана. Ответ прост: смотрите на отзывы за последние 3 месяца. Я собрал актуальный рейтинг казино 2025 с фриспинами за регистрацию — ссылка: https://www.top10agency.com/eldorado-onlayn-kazino-kansha-sum-alu-turaly-mlimet/. Пробовали что-то из списка?
Привет! Хочу предупредить новичков: не все игровые площадки одинаково полезны. Чтобы не слить депозит и получить выигрыш, проверяйте условия вывода и изучайте форумные обсуждения. Я составил подборку рабочих вариантов с минимальным депозитом от 10 рублей — смотрите тут: new retro casino. Делитесь опытом!
I am really loving the theme/design of your site.
Do you ever run into any internet browser compatibility issues?
A handful of my blog visitors have complained about my website not working correctly in Explorer but looks great in Safari.
Do you have any solutions to help fix this issue?
Stop by my web site; best wellness retreat mexico
What a stuff of un-ambiguity and preserveness of precious
know-how concerning unexpected feelings.
Here is my homepage :: retreat center mexico
Nice post. I learn something new and challenging on websites I stumbleupon on a daily basis.
It’s always interesting to read through articles from other writers and use a little something from their web sites.
28486YoungMawko aa frv
erectile dysfunction medications
Привет! Решил собрать только те игровые клубы, где лично получил выплату. Критерии: с минимальным депозитом. Все рабочие ссылки — по адресу: https://blog.paczkowscy.pl/index.php/2026/01/eldorado-online-kazino-oynau-kazakstanda-kezdes-tenderi/. Кто уже тестировал эти площадки?
13058JamarGregaso aa frv
Ребята, а вы знаете, где сейчас дают бонусы за регистрацию? Я проверил десятки казино, оставил только те, где реально работают в РФ. Ссылка на подборку: Eldorado Рльдорадо Eldorado Рльдорадо. Обсуждаем!
17821EdgardoMuraskio aa frv
Ребята, а вы знаете, где сейчас реально заработать в онлайн-казино? После десятков проверок остановился на лицензированных площадках. Важно: возможность игры с телефона. Актуальный рейтинг с джекпотами и кэшбэком — по ссылке: РќРѕРІРѕРµ Ретро казино. Обсуждаем!
Ребята, а вы знаете, где сейчас дают кэшбэк? Я проверил десятки казино, оставил только те, где реально можно вывести. Ссылка на подборку: болливуд казино. Обсуждаем!
I am genuinely happy to read this weblog posts which consists of plenty of
valuable data, thanks for providing these data.
где купить дайсон в санкт петербурге dn-pylesos-kupit-6.ru .
online pharmacy reviews
Ребята, а вы знаете, где сейчас дают фриспины без отыгрыша? Я проверил десятки казино, оставил только те, где реально можно вывести. Ссылка на подборку: Болливуд. Обсуждаем!
Ребята, а вы знаете, где сейчас реально выиграть в онлайн-казино? После десятков проверок остановился на честных клубах. Важно: вывод без комиссии. Актуальный рейтинг с джекпотами и кэшбэком — по ссылке: https://www.trasteroscarabanchel.info/onlayn-kazino-glory-kazino-kazirgi-promokoddar-turaly/. Обсуждаем!
game stats website – Interesting site, updates look recent and well maintained.
buildstrategicmoves – Strategy tips here are actionable, helped me outline future business moves efficiently.
Привет, форумчане! Решил поделиться лайфхаком: как найти онлайн казино, где реально работают честно. Главное — не верить рекламе, а смотреть на лицензию и реальные отзывы. Я собрал проверенные варианты с выводом на QIWI — ссылка тут: онлайн казино. Кто уже пробовал?
Всем привет! Поделюсь лайфхаком: чтобы не слить депозит впустую, выбирайте онлайн игровой клуб с честной рандомизацией. Я проверил десятки сайтов и оставил только те, где нет блокировок без причины. Список тут: https://anytimesmagazine.com/3057-2/. Кто уже играл — подтвердите?
buying clomid tablets: can you get cheap clomid online – fertility pct guide
You actually suggested it very well!
Приветствую! После череды неудач наконец нашёл рабочие онлайн казино. Ключевые критерии: RTP выше 96%. Все подходящие площадки с бонусами без отыгрыша собрал тут: Sykaaa. Кто уже успел потестить?
Всем здравствуйте! Хочу поделиться подборкой онлайн казино, где можно играть с телефона. Важно: высокая отдача. Актуальный рейтинг 2025 — здесь: Вулкан Рояль казино РІ Казахстане. Пишите, кто с чем сталкивался!
https://follicle.us.com/# cheap propecia without a prescription
официальный сайт дайсон официальный сайт дайсон .
Привет! Решил собрать только те игровые клубы, где лично получил выплату. Критерии: вывод до 10 минут. Все рабочие ссылки — по адресу: клубника казино официальный сайт. Кто уже тестировал эти площадки?
Привет! Решил собрать только те казино, где лично получил выплату. Критерии: с минимальным депозитом. Все рабочие ссылки — по адресу: http://atabekhoforce.cl/force/taekwondo/chto-oznachaet-bar-v-kazinoonlayn-obzor-igrovykh-terminov/. Кто уже тестировал эти площадки?
To compare
loans prequalification for poor credit
to stay informed.
SL obras locales – Buen diseño del sitio, contenido claro y accesible.
What stood out about this casino https://abiexsa.com.pe/online-echtgeldspiele-ein-expertenberblick-des-3/ is the variety of the games. Everything runs smoothly, the design is clean, and there’s always something new to explore, which keeps it engaging.
mostbet ставки mostbet ставки
What i do not realize is in fact how you’re not actually
much more neatly-liked than you may be now. You are very intelligent.
You know therefore considerably in the case of this topic, produced me personally consider it from a
lot of varied angles. Its like women and men aren’t interested unless it is
something to do with Girl gaga! Your personal stuffs nice.
All the time care for it up!
My homepage: corporate retreat mexico
дайсон спб официальный pylesos-dn-kupit-6.ru .
Follicle Insight: cost of propecia without a prescription – Follicle Insight
I seriously love your blog.. Excellent colors & theme.
Did you develop this amazing site yourself? Please reply back
as I’m hoping to create my own personal site and would like to know where
you got this from or exactly what the theme is named.
Thank you!
Have a look at my web page sacred medicine retreat center
Привет! Хочу предупредить новичков: не все игровые площадки одинаково полезны. Чтобы не слить депозит и получить выигрыш, проверяйте условия вывода и изучайте отзывы. Я составил подборку рабочих вариантов с минимальным депозитом от 10 рублей — смотрите тут: казино килограм зеркало. Делитесь опытом!
Здравствуйте! Хочу предложить проверенный способ выбора казино: обращайте внимание на адаптацию под РФ, а не только на бонусы. Я составил список платформ 2025 года, где можно играть анонимно. Всё по ссылке: new retro casino. Делитесь впечатлениями!
It’s really a cool and helpful piece of info.
I’m happy that you shared this helpful info with
us. Please keep us informed like this. Thank you for sharing.
Here is my site :: retreat center cancun
Football match today? Get live scores, lineups, and goal alerts all in one place right now
The Cat and Mouse duet is not just a book; it is an experience. It drags you into the depths of Parsons Manor and refuses to let you go. If you are searching for the Haunting Adeline PDF, you are joining a community of readers who love the thrill of the chase. The book is filled with memorable moments and quotable lines that have taken over social media. It is a cultural moment in the book world that you don’t want to miss. Prepare to be haunted by Adeline and Zade long after you finish reading.
Привет! Хочу предупредить новичков: не все клубы одинаково полезны. Чтобы не слить депозит и получить выигрыш, проверяйте условия вывода и изучайте статистику выплат. Я составил подборку рабочих вариантов с минимальным депозитом от 10 рублей — смотрите тут: лев казино. Делитесь опытом!
Ребята, а вы знаете, где сейчас дают фриспины без отыгрыша? Я проверил десятки казино, оставил только те, где реально работают в РФ. Ссылка на подборку: new retro казино. Обсуждаем!
дайсон официальный сайт спб дайсон официальный сайт спб .
Way cool! Some very valid points! I appreciate you writing
this article and the rest of the site is extremely
good.
Also visit my page: jungle retreat center
You actually stated this terrifically.
online pharmacies mexica https://www.google.st/url?sa=t&url=https%3A%2F%2Fmexicanxlpharmacy.com cvs pharmacy online application
Привет! Решил собрать только те игровые клубы, где лично получил выплату. Критерии: с минимальным депозитом. Все рабочие ссылки — по адресу: онлайн казино. Кто уже тестировал эти площадки?
Привет! Хочу предупредить новичков: не все казино онлайн одинаково полезны. Чтобы не слить депозит и получить выигрыш, проверяйте наличие лицензии и изучайте статистику выплат. Я составил подборку рабочих вариантов с минимальным депозитом от 10 рублей — смотрите тут: https://theplussizeapparels.com/kak-vyglyadit-onlaynkazino-v-bollivude-gid-dlya-igrokov-iz-rossii/. Делитесь опытом!
GELATIN TRICK
Статья содержит практические советы, которые можно применить в реальной жизни.
GELATIN TRICK
Привет всем! Решил поделиться, как найти честное онлайн казино в 2025 году. Главное — не гнаться за большими бонусами, а смотреть на лицензию и скорость выплат. Я собрал список проверенных площадок с фриспинами без отыгрыша — вот тут: vovan casino. Кто уже пробовал?
Всем здравия! Недавно искал, где реально можно получить честный выигрыш в онлайн казино. Оказалось, что многое зависит от политики платформы. Проверяйте статистику выплат, читайте обзоры. Составил актуальный рейтинг на 2025 год с прямыми ссылками: Мелстрой. Интересно, кто из вас уже играл здесь?
GELATIN TRICK
If you desire to grow your know-how just keep visiting
this web site and be updated with the most up-to-date information posted here.
Feel free to surf to my homepage: spiritual retreat center
Друзья, подскажите, куда лучше играть в 2025? Сам недавно протестировал кучу онлайн казино — большинство тянут с выплатами. Остановился на тех, где есть прозрачная отдача и вывод за 5 минут. Полный список с RTP и бонусами — по ссылке: Мелстрой гейм. Кто с чем сталкивался?
best medicine for erectile dysfunction without side effects https://www.google.pt/url?q=https%3A%2F%2Fedpillseasy.shop levitra versus viagra
Приветствую! После череды неудач наконец нашёл надёжные онлайн казино. Ключевые критерии: лицензия. Все подходящие площадки с бонусами без отыгрыша собрал тут: https://r59.d13.myftpupload.com/2026/01/eldorado-lakka-lakky-oynau-turalynyzda-karartyrynyz-onlayn-kazino-tusiningiz-kezde/. Кто уже успел потестить?
https://amitrip.us.com/# Amitriptyline
Excellent post. I was checking continuously this blog and I am impressed!
Very helpful info specially the last part 🙂 I care for such info a lot.
I was seeking this certain info for a very long time. Thank you and good luck.
Всем здравия! Недавно искал рабочий игровой клуб для игры на реальные деньги, и понял: половина сайтов — скам. Советую обращать внимание на минимальный депозит и читать отзывы. Свой топ-7 с моментальным выводом оставил здесь: https://alonakliye.net/2026/01/10/oynau-onlayn-algys-aynaldyn-arnayy-deystviler/. Пишите, кто что знает по теме!
This is very interesting, You are a very skilled blogger.
I’ve joined your rss feed and look forward to seeking more of your
fantastic post. Also, I have shared your website in my social networks!
Ребята, не тратьте время на левые сайты! Чтобы выбрать платящее казино, обращайте внимание на: русскоязычную службу поддержки, а также на условия бонусов. Я лично протестировал десятки платформ и оставил только те, где нет скрытых условий. Весь список — по ссылке: https://localesguarne.com/kak-skachat-kazino-onlayn-i-nachat-igrat-v-rossii-podrobnoe-guide/. Делитесь опытом!
PINK GELATIN TRICK
collaborationmastery – Team bonding strategies are practical, made project execution much easier.
For simple
Fair online casino games
for key takeaways.
Привет! Многие спрашивают, где сейчас выигрывают чаще всего. Ответ прост: смотрите на условия бонусов. Я собрал актуальный рейтинг казино 2025 с поддержкой рубля — ссылка: Ретро. Пробовали что-то из списка?
PINK GELATIN TRICK
Друзья, расскажу по-честному: я долго искал честную игровую площадку, и наконец нашёл рабочие варианты. Советую смотреть на скорость обработки вывода и избегать тех, где ограничения на вывод. Актуальный список лучших платформ на 2025 — по ссылке: https://alexandrepossacos.com/men-mellstroy-kazinoda-aksha-alu-kansha-uakytty-alady-onlayn-kazino-oynau-ma/. Пишите в комментариях, какие казино вам зашли!
пин ап официальный сайт казино
https://rodina.listbb.ru/viewtopic.php?f=3&t=5866
Привет! Хочу предупредить новичков: не все онлайн казино одинаково полезны. Ищите те, где есть возможность играть на рубли, и обязательно сверяйтесь с независимыми обзорами. Я нашёл несколько платформ 2025 года с мобильной версией — всё собрано здесь: Мелстрой зеркало. Кто уже успел попробовать?
PINK GELATIN TRICK
Всем здравия! Недавно искал рабочий игровой клуб для игры на рубли, и понял: половина сайтов — скам. Советую обращать внимание на минимальный депозит и читать мнения реальных пользователей. Свой топ-7 с моментальным выводом оставил здесь: https://whitestone-technology.com/onlayn-kazino-onlayn-kazino-oynau-men-surette-kalay-degen-kyzmettegi-eskertu-salu-ushin-eskertu-salu-kyzmet/. Пишите, кто что знает по теме!
GELATIN TRICK
PINK GELATIN TRICK
Здравствуйте! Хочу предложить проверенный способ выбора казино: обращайте внимание на скорость вывода, а не только на бонусы. Я составил список платформ 2025 года, где есть игры от NetEnt и Pragmatic. Всё по ссылке: new retro casino зеркало. Делитесь впечатлениями!
Привет! Хочу предупредить новичков: не все онлайн казино одинаково полезны. Ищите те, где есть прозрачные правила, и обязательно сверяйтесь с независимыми обзорами. Я нашёл несколько платформ 2025 года с бонусами без вейджера — всё собрано здесь: http://empresapublica.hol.es/index.php/2026/01/10/master-klass-eldorado-pokhodnoe-kupili-sini-keyin-onlayn-kazino-oynau/. Кто уже успел попробовать?
GELATIN TRICK RECIPE
Привет всем! Решил поделиться, как найти платящее онлайн казино в 2025 году. Главное — не гнаться за большими бонусами, а смотреть на юрисдикцию и наличие вывода без задержек. Я собрал список проверенных площадок с фриспинами без отыгрыша — вот тут: казино Ретро. Кто уже пробовал?
Здравствуйте! Хочу предложить проверенный способ выбора казино: обращайте внимание на адаптацию под РФ, а не только на бонусы. Я составил список платформ 2025 года, где можно играть анонимно. Всё по ссылке: Мелстрой гейм. Делитесь впечатлениями!
Привет! Хочу предупредить новичков: не все игровые площадки одинаково полезны. Чтобы не слить депозит и получить выигрыш, проверяйте наличие лицензии и изучайте статистику выплат. Я составил подборку рабочих вариантов с минимальным депозитом от 10 рублей — смотрите тут: http://www.chindet.com/kak-aktivirovat-bonusy-i-igrat-v-onlaynkazino-besplatno-v-rf/. Делитесь опытом!
Ребята, не тратьте время на левые сайты! Чтобы выбрать рабочее казино, обращайте внимание на: лицензию Curacao или Мальты, а также на отзывы. Я лично протестировал десятки платформ и оставил только те, где нет скрытых условий. Весь список — по ссылке: https://martechsnews.com/onlayn-kazino-x-tikeley-chat-turaly/. Делитесь опытом!
PINK GELATIN TRICK
Приветствую! После череды неудач наконец нашёл рабочие онлайн казино. Ключевые критерии: лицензия. Все подходящие площадки с русским интерфейсом собрал тут: казино боливуд. Кто уже успел потестить?
Приветствую! Только что вывел 15 тысяч с одного из платформ — и решил поделиться списком тех, кто реально работает в РФ. Смотрите на отзывы за 2025 год. Все проверенные варианты — тут: https://citygatesecurity.com/onlayn-kazino-kazakstandagy-realtik-kazino-where-ozineu-tirkelude-zhyldam-kezde-bolady/. Кто уже играл? Какие суммы выводили?
Ребята, а вы знаете, где сейчас реально выиграть в онлайн-казино? После десятков проверок остановился на платформах с аудитом RNG. Важно: минимальный депозит. Актуальный рейтинг с джекпотами и кэшбэком — по ссылке: https://asitcoksa-store.oneirosol.com/kak-napisat-v-podderzhku-o-zhelanii-igrat-v-onlaynkazino-v-retro-stile/. Обсуждаем!
Привет всем! Решил поделиться, как найти платящее онлайн казино в 2025 году. Главное — не гнаться за большими бонусами, а смотреть на лицензию и отзывы реальных игроков. Я собрал список проверенных площадок с быстрым кэш-аутом — вот тут: онлайн казино. Кто уже пробовал?
cvs pharmacy application online
riobet на деньги онлайн
Привет всем! Решил поделиться, как найти надёжное онлайн платформу в 2025 году. Главное — не гнаться за большими бонусами, а смотреть на юрисдикцию и наличие вывода без задержек. Я собрал список проверенных площадок с минимальным депозитом — вот тут: Мелстрой гейм. Кто уже пробовал?
Друзья, не тратьте время на левые сайты! Играйте только в честные казино с быстрым выводом. Мой личный топ с реальными выплатами — по ссылке: https://agriterra.com.br/uncategorized/kauymdastyrushy-kuramynda-klubnikun-suka-oynau-online-kazino-zhauaptastyru/. Кто что может порекомендовать?
Друзья, расскажу по-честному: я долго искал надёжный слот-сайт, и наконец нашёл рабочие варианты. Советую смотреть на лицензию и избегать тех, где ограничения на вывод. Актуальный список лучших платформ на 2025 — по ссылке: New Retro. Пишите в комментариях, какие казино вам зашли!
Всем здравия! Недавно искал честную площадку для игры на рубли, и понял: половина сайтов — скам. Советую обращать внимание на минимальный депозит и читать обзоры. Свой топ-7 с моментальным выводом оставил здесь: клубника казино. Пишите, кто что знает по теме!
Привет всем! Решил поделиться, как найти платящее онлайн платформу в 2025 году. Главное — не гнаться за большими бонусами, а смотреть на юрисдикцию и скорость выплат. Я собрал список проверенных площадок с минимальным депозитом — вот тут: СЃСѓРєР° казино. Кто уже пробовал?
GELATIN TRICK
Ребята, а вы знаете, где сейчас реально выиграть в онлайн-казино? После десятков проверок остановился на лицензированных площадках. Важно: возможность игры с телефона. Актуальный рейтинг с джекпотами и кэшбэком — по ссылке: Ретро. Обсуждаем!
Привет! Решил собрать только те игровые клубы, где лично получил выплату. Критерии: вывод до 10 минут. Все рабочие ссылки — по адресу: https://versatildesign.com/uspeshnye-strategii-dlya-igry-v-onlaynkazino-onlayngold-kak-uvelichit-svoi-shansy-na-pobedu/. Кто уже тестировал эти площадки?
Привет! Решил собрать только те казино, где лично получил выплату. Критерии: с минимальным депозитом. Все рабочие ссылки — по адресу: Лев зеркало. Кто уже тестировал эти площадки?
Ребята, а вы знаете, где сейчас дают фриспины без отыгрыша? Я проверил десятки казино, оставил только те, где реально можно вывести. Ссылка на подборку: боливуд казино. Обсуждаем!
Привет! Решил собрать только те игровые клубы, где лично получил выплату. Критерии: без паспорта. Все рабочие ссылки — по адресу: gold казино. Кто уже тестировал эти площадки?
https://amitrip.us.com/# AmiTrip
范德沃克第二季高清完整版AI深度学习内容匹配,海外华人可免费观看最新热播剧集。
Привет! Недавно искал онлайн-платформу, где можно спокойно получить деньги, и понял: главное — скорость выплат. Собрал рабочие варианты с поддержкой Сбербанк — ссылка: вован казино. Кто уже пробовал?
Здравствуйте! Хочу предложить проверенный способ выбора казино: обращайте внимание на наличие live-чата, а не только на бонусы. Я составил список платформ 2025 года, где есть игры от NetEnt и Pragmatic. Всё по ссылке: sykaaa казино. Делитесь впечатлениями!
Привет, форумчане! Решил поделиться лайфхаком: как найти игровую платформу, где реально выводят деньги. Главное — не верить рекламе, а смотреть на статус регулятора и реальные рейтинги. Я собрал проверенные варианты с выводом на Сбербанк — ссылка тут: https://samotoursegypt.com/onlayn-kazino-o-poperlo-kazakstan-ulken-memlekettegi-aksha-alu-oynau-ushin-aksha-alu-uakyty/. Кто уже пробовал?
I enjoy playing at this casino http://www.smilingtiger.com/casino-machine-online-programming-structure-and-4/ because it feels trustworthy and well-optimized. Live tables are interactive, slots offer different styles, and the overall experience remains pleasant over time.
Приветствую! Только что вывел 15 тысяч с одного из платформ — и решил поделиться списком тех, кто реально работает в РФ. Смотрите на скорость обработки заявок. Все проверенные варианты — тут: mellstroy game. Кто уже играл? Какие суммы выводили?
The stakes are personal for Aelin, involving her family and her past. She has to confront her own demons to save the world. The Empire of Storms PDF chronicles this internal struggle. The psychological depth of the protagonist is impressive. It is a character-driven story at its core. https://empireofstormspdf.site/ Empire Of Storms Pdf Online
PINK GELATIN TRICK
Привет, форумчане! Решил поделиться лайфхаком: как найти онлайн казино, где реально платят без задержек. Главное — не верить рекламе, а смотреть на официальные документы и реальные комментарии игроков. Я собрал проверенные варианты с выводом на Сбербанк — ссылка тут: https://viplimosacramento.com/on-zhana-retro-onlayn-kazino-oynau-shyn-men-uykymynyz-bolgan-fun-nemese-kaysy/. Кто уже пробовал?
The pacing of the novel accelerates as the rebels breach the city defenses. It becomes a race against time to stop the bloodshed and capture Snow. The Mockingjay PDF is perfect for this kind of fast-paced reading. You can tap through the pages quickly, keeping up with the frenetic energy of the plot. The climax is explosive and changes the world of Panem forever. Buckle up for a wild ride. https://mockingjaypdf.site/ Read The Hunger Games Mockingjay Online Pdf
Всем здравия! Недавно искал рабочий игровой клуб для игры на рубли, и понял: половина сайтов — скам. Советую обращать внимание на минимальный депозит и читать мнения реальных пользователей. Свой топ-7 с моментальным выводом оставил здесь: https://arzohatechnologies.com/v-kakikh-retroigrakh-v-onlaynkazino-vyigryvat-nastoyashchie-dengi-v-rossii/. Пишите, кто что знает по теме!
The summer before Lydia died is a focal point of the narrative. It was a time of change and missed opportunities. The heat of the Ohio summer mirrors the rising tension in the house. If you are looking for the Everything I Never Told You PDF, you will feel the oppressive atmosphere of that season. Ng uses the weather and the landscape to enhance the mood of the story. It is a sensory reading experience that transports you to a specific time and place. https://everythinginevertoldyoupdf.site/ Everything I Never Told You Ocean Of Pdf
Привет! Многие спрашивают, где сейчас работают без обмана. Ответ прост: смотрите на отзывы за последние 3 месяца. Я собрал актуальный рейтинг казино 2025 с поддержкой рубля — ссылка: мелстрой гейм. Пробовали что-то из списка?
Привет всем! Решил поделиться, как найти надёжное онлайн игровой сайт в 2025 году. Главное — не гнаться за большими бонусами, а смотреть на юрисдикцию и скорость выплат. Я собрал список проверенных площадок с быстрым кэш-аутом — вот тут: https://alfanalabyad.com/nachnite-igrat-v-onlaynkazino-seychas-instruktsiya-dlya-kazakhstana/. Кто уже пробовал?
Привет! Недавно искал казино, где можно спокойно играть на рубли, и понял: главное — скорость выплат. Собрал рабочие варианты с поддержкой МИР — ссылка: Мелстрой. Кто уже пробовал?
Всем привет! Поделюсь лайфхаком: чтобы не слить депозит впустую, выбирайте онлайн казино с высоким RTP. Я проверил десятки сайтов и оставил только те, где быстрая верификация. Список тут: rin.ru. Кто уже играл — подтвердите?
how to get cheap clomid tablets: fertility pct guide – fertility pct guide
Hi colleagues, its enormous piece of writing regarding
educationand entirely explained, keep it up all the time.
Here is my web-site; morgan silver dollar
For answers
can you buy tegretol online
for workshop resources.
Iver Protocols Guide: Iver Protocols Guide – Iver Protocols Guide
Hmm is anyone else experiencing problems with the images on this
blog loading? I’m trying to find out if its a problem on my end or if it’s the blog.
Any responses would be greatly appreciated.
Review my web-site 優塔
Привет! Многие спрашивают, где сейчас дают реальные выплаты. Ответ прост: смотрите на отзывы за последние 3 месяца. Я собрал актуальный рейтинг казино 2025 с минимальным депозитом — ссылка: https://kitchenking.me/2026/01/10/sayt-kazino-sykaaa-kayta-keledi-onlayn-kazino-oynau-turaly-sebebi/. Пробовали что-то из списка?
Всем привет! Уже третий год играю в онлайн казино, и за это время понял главное: выбирайте площадки с честными условиями. Избегайте тех, где требуют паспорт или тормозят с выводом. Лучшие платформы 2025 с поддержкой ЮMoney собрал здесь: сукааа казино. Кто что может добавить?
AmiTrip Elavil Elavil
Привет! Решил собрать только те игровые клубы, где лично получил выплату. Критерии: без паспорта. Все рабочие ссылки — по адресу: https://alfanalabyad.com/kazakstanda-online-kazino-oynau-menin-katysushym-meni-blokeru-kerek/. Кто уже тестировал эти площадки?
Ребята, а вы знаете, где сейчас дают бонусы за регистрацию? Я проверил десятки казино, оставил только те, где реально можно вывести. Ссылка на подборку: онлайн казино. Обсуждаем!
пылесосы dyson спб dn-pylesos-kupit-6.ru .
казино пинап официальный сайт
Привет! После череды обманов наконец нашёл казино, где реально работают без скама. Смотрите на наличие лицензии. Список надёжных вариантов — тут: РЕТРО РЅСЊСЋ ретро казино. Кто уже играл?
Приветствую! Только что вывел 15 тысяч с одного из игровых сайтов — и решил поделиться списком тех, кто реально платит. Смотрите на отзывы за 2025 год. Все проверенные варианты — тут: мелстрой гейм. Кто уже играл? Какие суммы выводили?
Dribble success, take-on attempts and completion rates documented
купить пылесос dyson спб dn-pylesos-2.ru .
online pharmacy without prescription https://maps.google.mw/url?sa=t&url=https%3A%2F%2Fmexicanxlpharmacy.com walmart online pharmacy
ed medication
Have gender with strange neighbors is certainly something you should attempt
out at least once in your life if you enjoy both getting in a audience and obtaining sex with
obscure people. As it’s always a free-for-all event, it’s exhilarating to see how many
selections you have. You can have sex with a lady, a guy,
or actually a group of people. The only sort of
panic you would want to be in is the chaos seen in orgies,
because more happening simultaneously throughout the entire sex party makes you more content
and happy finally! You’ll definitely consume a lot
of alcohol at one of these occasions, so just be prepared for a comedown afterwards. https://82.cholteth.com/index/d1?diff=0&utm_source=ogdd&utm_campaign=26607&utm_content=&utm_clickid=cw0488o4c8wggkcc&aurl=http%3A%2F%2Fsosextube.com&an=&utm_
Приветствую! После череды неудач наконец нашёл надёжные онлайн казино. Ключевые критерии: отсутствие скрытых условий вейджера. Все подходящие площадки с быстрым выводом собрал тут: Клубника клубника казино. Кто уже успел потестить?
Друзья, расскажу по-честному: я долго искал казино, которое платит, и наконец нашёл рабочие варианты. Советую смотреть на скорость обработки вывода и избегать тех, где ограничения на вывод. Актуальный список лучших платформ на 2025 — по ссылке: мелстрой гейм. Пишите в комментариях, какие казино вам зашли!
Ребята, не тратьте время на левые сайты! Чтобы выбрать рабочее казино, обращайте внимание на: поддержку рубля, а также на условия бонусов. Я лично протестировал десятки платформ и оставил только те, где дают фриспины сразу. Весь список — по ссылке: https://discountdance.theopenxpress.com/magazmalyk-kazinolardagy-aksha-aludy-kutude-online-kazino-oynau-kezdesu-karanyz/. Делитесь опытом!
Всем привет! Уже третий год играю в онлайн казино, и за это время понял главное: выбирайте площадки с честными условиями. Избегайте тех, где требуют паспорт или тормозят с выводом. Лучшие казино РФ с поддержкой СБП собрал здесь: ГОЛД зеркало Gold. Кто что может добавить?
Penalty shootout results, knockout stage drama with spot kick outcomes
rio bet casino
Как правильно сделать план маркетинга
Hmm is anyone else experiencing problems with the images on this
blog loading? I’m trying to determine if its a problem on my
end or if it’s the blog. Any responses would be greatly appreciated.
Всем привет! Много читаю про скам-казино, поэтому теперь тщательно проверяю всё: RTP. Лучшие онлайн казино 2025 года с моментальным выводом — здесь: Мелстрой казино. Делитесь своим опытом!
Привет! Хочу предупредить новичков: не все клубы одинаково полезны. Чтобы не слить депозит и получить выигрыш, проверяйте наличие лицензии и изучайте отзывы. Я составил подборку рабочих вариантов с минимальным депозитом от 10 рублей — смотрите тут: http://bambu-rapitienda.com/uncategorized/pochemu-luchshee-onlaynkazino-v-rossii-casino-automaty-sayt/. Делитесь опытом!
GELATIN TRICK
Привет! Хочу предупредить новичков: не все клубы одинаково полезны. Чтобы не слить депозит и получить выигрыш, проверяйте наличие лицензии и изучайте форумные обсуждения. Я составил подборку рабочих вариантов с минимальным депозитом от 10 рублей — смотрите тут: СЃСѓРєР° casino-top.org. Делитесь опытом!
GELATIN TRICK RECIPE
Привет! Хочу предупредить новичков: не все онлайн слот-сайты одинаково полезны. Ищите те, где есть прозрачные правила, и обязательно сверяйтесь с рейтингами. Я нашёл несколько платформ 2025 года с минимальным депозитом от 10 руб — всё собрано здесь: казино болливуд. Кто уже успел попробовать?
Друзья, подскажите, куда лучше играть в 2025? Сам недавно протестировал кучу игровых сайтов — большинство тянут с выплатами. Остановился на тех, где есть прозрачная отдача и вывод за 5 минут. Полный список с RTP и бонусами — по ссылке: СЃСѓРєР° казино. Кто с чем сталкивался?
Всем привет! Много читаю про неплатёжные площадки, поэтому теперь тщательно проверяю всё: условия вывода. Лучшие онлайн казино 2025 года с моментальным выводом — здесь: https://danielritorto.online/?p=18435. Делитесь своим опытом!
Привет! Хочу предупредить новичков: не все игровые площадки одинаково полезны. Чтобы не слить депозит и получить выигрыш, проверяйте наличие лицензии и изучайте форумные обсуждения. Я составил подборку рабочих вариантов с минимальным депозитом от 10 рублей — смотрите тут: клубника казино. Делитесь опытом!
Привет! Хочу предупредить новичков: не все клубы одинаково полезны. Чтобы не слить депозит и получить выигрыш, проверяйте наличие лицензии и изучайте статистику выплат. Я составил подборку рабочих вариантов с минимальным депозитом от 10 рублей — смотрите тут: клубника казино. Делитесь опытом!
Привет! Хочу предупредить новичков: не все клубы одинаково полезны. Чтобы не слить депозит и получить выигрыш, проверяйте наличие лицензии и изучайте отзывы. Я составил подборку рабочих вариантов с минимальным депозитом от 10 рублей — смотрите тут: https://priorityrehab.org/onlayn-kazino-oynau-sigarmalarynyzdy-x-kazinosynda-bonustyk-balanspen-alu/. Делитесь опытом!
Ребята, а вы знаете, где сейчас реально выиграть в онлайн-казино? После десятков проверок остановился на лицензированных площадках. Важно: минимальный депозит. Актуальный рейтинг с джекпотами и кэшбэком — по ссылке: клубника казино. Обсуждаем!
Amazing! Its actually remarkable article, I have got much clear idea concerning from this paragraph.
Друзья, не тратьте время на левые сайты! Играйте только в честные казино с поддержкой рубля. Мой личный топ с реальными выплатами — по ссылке: arcania-game.ru. Кто что может порекомендовать?
Ребята, а вы знаете, где сейчас дают кэшбэк? Я проверил десятки казино, оставил только те, где реально можно вывести. Ссылка на подборку: СЃСѓРєР° arcania-game.ru. Обсуждаем!
PINK GELATIN TRICK
Всем привет! Поделюсь лайфхаком: чтобы не слить депозит впустую, выбирайте онлайн платформу с честной рандомизацией. Я проверил десятки сайтов и оставил только те, где реально выводят. Список тут: https://rspgclub.rspg-backend.site/index.php/2026/01/11/poluchite-bonus-v-lev-kazino-i-nachnite-igrat-onlayn/. Кто уже играл — подтвердите?
Well voiced certainly! !
Всем здравия! Недавно искал надёжное казино для игры на реальные деньги, и понял: половина сайтов — скам. Советую обращать внимание на наличие лицензии и читать обзоры. Свой топ-7 с моментальным выводом оставил здесь: Мелстрой гейм. Пишите, кто что знает по теме!
Solo goals, individual brilliance and mazy runs tracked
Good data, Thank you!
https://kite.nnov.ru/phpbb/viewtopic.php?t=366300
Does your site have a contact page? I’m having trouble locating it
but, I’d like to shoot you an e-mail. I’ve got some suggestions for your blog you might be
interested in hearing. Either way, great site and I look forward to seeing it develop over time.
Here is my page … 優塔娛樂城
Друзья, расскажу по-честному: я долго искал честную игровую площадку, и наконец нашёл рабочие варианты. Советую смотреть на лицензию и избегать тех, где ограничения на вывод. Актуальный список лучших платформ на 2025 — по ссылке: Мелстрой казино. Пишите в комментариях, какие казино вам зашли!
Здравствуйте! Хочу предложить проверенный способ выбора казино: обращайте внимание на адаптацию под РФ, а не только на бонусы. Я составил список платформ 2025 года, где можно играть анонимно. Всё по ссылке: Sykaaa. Делитесь впечатлениями!
คอนเทนต์นี้ อ่านแล้วเพลินและได้สาระ ครับ
ดิฉัน เพิ่งเจอข้อมูลเกี่ยวกับ เรื่องที่เกี่ยวข้อง
สามารถอ่านได้ที่ betflik93
น่าจะถูกใจใครหลายคน
มีการยกตัวอย่างที่เข้าใจง่าย
ขอบคุณที่แชร์ เนื้อหาดีๆ นี้
จะรอติดตามเนื้อหาใหม่ๆ
ต่อไป
GELATIN TRICK
For the opportunity
online casinos big time gaming
for team projects.
Appreciating the hard work you put into your site and detailed information you present.
It’s nice to come across a blog every once in a while that isn’t
the same out of date rehashed information. Wonderful read!
I’ve bookmarked your site and I’m adding your RSS feeds to
my Google account.
Привет всем! Решил поделиться, как найти честное онлайн игровой сайт в 2025 году. Главное — не гнаться за большими бонусами, а смотреть на официальную регистрацию и наличие вывода без задержек. Я собрал список проверенных площадок с минимальным депозитом — вот тут: gold казино. Кто уже пробовал?
Привет! Хочу предупредить новичков: не все игровые площадки одинаково полезны. Чтобы не слить депозит и получить выигрыш, проверяйте наличие лицензии и изучайте отзывы. Я составил подборку рабочих вариантов с минимальным депозитом от 10 рублей — смотрите тут: new retro casino. Делитесь опытом!
Great web site you have here.. It’s hard to find
excellent writing like yours these days. I seriously appreciate
individuals like you! Take care!!
my site morgan silver dollar
塔尔萨之王第二季高清完整版,海外华人可免费观看最新热播剧集。
Crafting a polished outfit is crucial.
It acts as a high-impact form of non-verbal communication.
Your apparel defines first impressions nearly instantly.
Feeling self-assured in your clothes significantly enhances your confidence.
https://angelina-podium.blogspot.com/2026/01/gucci-2026.html
A well-chosen style may create opportunities in both professional and social contexts.
It enables you to express your personal identity before uttering a single word.
Ultimately, focusing on your appearance is an act of valuing your own potential.
find out here https://toast-wallet.net/
online pharmacy reviews
Друзья, расскажу по-честному: я долго искал казино, которое платит, и наконец нашёл рабочие варианты. Советую смотреть на скорость обработки вывода и избегать тех, где поддельные отзывы. Актуальный список лучших платформ на 2025 — по ссылке: мелстрой гейм. Пишите в комментариях, какие казино вам зашли!
Привет всем! Решил поделиться, как найти надёжное онлайн казино в 2025 году. Главное — не гнаться за большими бонусами, а смотреть на официальную регистрацию и скорость выплат. Я собрал список проверенных площадок с фриспинами без отыгрыша — вот тут: https://megaproexclusive.com/megapronew/kazino-4-online-4-zherde-usynys-alu-zhauaptary/. Кто уже пробовал?
click this over here now https://alchemix.center
PINK GELATIN TRICK
pin up casino онлайн
read the full info here https://toast-wallet.net/
riobet играть на деньги
Привет! Хочу предупредить новичков: не все онлайн казино одинаково полезны. Ищите те, где есть возможность играть на рубли, и обязательно сверяйтесь с сообществом игроков. Я нашёл несколько платформ 2025 года с бонусами без вейджера — всё собрано здесь: Mellstroy. Кто уже успел попробовать?
Привет! После череды обманов наконец нашёл казино, где реально работают без скама. Смотрите на скорость обработки заявок. Список надёжных вариантов — тут: мелстрой гейм. Кто уже играл?
Avia Masters de BGaming es un juego crash con RTP del 97% donde apuestas desde 0,10€ hasta 1.000€, controlas la velocidad de vuelo de un avion que recoge multiplicadores (hasta x250) mientras evita cohetes que reducen ganancias a la mitad, con el objetivo de aterrizar exitosamente en un portaaviones para cobrar el premio acumulado
avia masters jugar
https://amitrip.us.com/# Amitriptyline
May I simply say what a comfort to find someone who actually knows what they’re talking about on the web.
You certainly realize how to bring an issue to light and make it important.
More people ought to check this out and understand this
side of your story. It’s surprising you are not more popular since you surely have the gift.
Also visit my blog … crown 11
Всем привет! Много читаю про скам-казино, поэтому теперь тщательно проверяю всё: условия вывода. Лучшие онлайн казино 2025 года с моментальным выводом — здесь: http://www.pesoformapersempre.it/kak-organizovat-vozmojnost-wovanu-igrat-v-onlinekazino-na-territorii-rossiyskoi-federatsii/. Делитесь своим опытом!
Привет! Многие спрашивают, где сейчас работают без обмана. Ответ прост: смотрите на отзывы за последние 3 месяца. Я собрал актуальный рейтинг казино 2025 с фриспинами за регистрацию — ссылка: https://www.sexmeros.com/SexmoSanLorenzo/igrayte-v-onlaynkazino-eldorado-zerkalo-dlya-igrokov-iz-kazakhstana/. Пробовали что-то из списка?
Друзья, не тратьте время на левые сайты! Играйте только в проверенные казино с быстрым выводом. Мой личный топ с реальными выплатами — по ссылке: Килограмм. Кто что может порекомендовать?
Ребята, не тратьте время на левые сайты! Чтобы выбрать проверенное казино, обращайте внимание на: русскоязычную службу поддержки, а также на отзывы. Я лично протестировал десятки платформ и оставил только те, где дают фриспины сразу. Весь список — по ссылке: Рльдорадо эльдорадо регистрация. Делитесь опытом!
May I simply say what a relief to uncover someone that really knows what they are talking about on the net.
You certainly know how to bring an issue to light
and make it important. More and more people really need
to check this out and understand this side of your story.
It’s surprising you are not more popular given that
you surely have the gift.
Here is my homepage … crown 11 game
have a peek here https://toast-wallet.net
Приветствую! Только что вывел 15 тысяч с одного из казино — и решил поделиться списком тех, кто реально платит. Смотрите на отзывы за 2025 год. Все проверенные варианты — тут: Мелстрой. Кто уже играл? Какие суммы выводили?
https://fertilitypctguide.us.com/# fertility pct guide
Здравствуйте! Хочу предложить проверенный способ выбора казино: обращайте внимание на адаптацию под РФ, а не только на бонусы. Я составил список платформ 2025 года, где можно играть анонимно. Всё по ссылке: lev casino. Делитесь впечатлениями!
how much is levitra https://www.google.tg/url?q=https%3A%2F%2Fedpillseasy.shop gnc ed pills
Wonderful beat ! I would like to apprentice while you amend your web site, how can i subscribe for a blog web site?
The account helped me a acceptable deal. I had
been tiny bit acquainted of this your broadcast offered bright clear idea
Feel free to surf to my web page … morgan silver dollar
39055JamieLusaneo aa frv
find this https://snake.credit
Youth academy news, promising talents and breakthrough performances
I’m not that much of a internet reader to be honest but
your sites really nice, keep it up! I’ll go ahead and bookmark your website to
come back later on. Many thanks
dyson пылесос беспроводной купить спб dn-pylesos-kupit-6.ru .
Amitriptyline: Amitriptyline – AmiTrip Relief Store
https://pub23.bravenet.com/forum/static/show.php?usernum=1937943029&frmid=9647&msgid=900076&cmd=show
like it https://snake.credit/
Ребята, не тратьте время на левые сайты! Чтобы выбрать рабочее казино, обращайте внимание на: поддержку рубля, а также на отзывы. Я лично протестировал десятки платформ и оставил только те, где выводят за час. Весь список — по ссылке: https://triptoptours.in/uznayte-v-kakom-pokere-igrayut-v-kazino-onlayn-v-rf/. Делитесь опытом!
GELATIN TRICK
Ребята, а вы знаете, где сейчас реально заработать в онлайн-казино? После десятков проверок остановился на лицензированных площадках. Важно: минимальный депозит. Актуальный рейтинг с джекпотами и кэшбэком — по ссылке: https://casarosaenea.com/eldorado-online-kazino-oynau-zhana-zhylu/. Обсуждаем!
For the PDF
how can i get cheap zetia for sale
to expand your worldview.
Home Page https://looksrare.cfd/
Follicle Insight: cost of cheap propecia now – Follicle Insight
additional resources https://arch.credit
useful link https://royco.cc/
cheap online pharmacy https://clients1.google.com.ag/url?q=https%3A%2F%2Fmexicanxlpharmacy.com best mexican online pharmacy
GELATIN TRICK RECIPE
Привет! Многие спрашивают, где сейчас выигрывают чаще всего. Ответ прост: смотрите на условия бонусов. Я собрал актуальный рейтинг казино 2025 с поддержкой рубля — ссылка: https://briidge.com.br/arquivos/25475. Пробовали что-то из списка?
Всем привет! Поделюсь лайфхаком: чтобы не слить депозит впустую, выбирайте онлайн казино с честной рандомизацией. Я проверил десятки сайтов и оставил только те, где реально выводят. Список тут: боливуд казино. Кто уже играл — подтвердите?
additional resources https://hyperliquid-wiki.cc/
Weak foot goals, players scoring with non-dominant foot
article source https://palladiumlabs.net/
There is definately a lot to find out about this topic.
I love all the points you have made.
Football match today? Get live scores, lineups, and goal alerts all in one place right now
Ребята, а вы знаете, где сейчас дают бонусы за регистрацию? Я проверил десятки платформ, оставил только те, где реально не обманывают. Ссылка на подборку: https://radiovegamega.com/web/2026/01/10/eldorado-onlayn-kazinona-oynau-kazhet/. Обсуждаем!
this content https://g8keep.org
Всем здравия! Недавно искал надёжное казино для игры на рубли, и понял: половина сайтов — скам. Советую обращать внимание на минимальный депозит и читать обзоры. Свой топ-7 с моментальным выводом оставил здесь: Ретро казино. Пишите, кто что знает по теме!
Very good information. Lucky me I ran across your blog by chance (stumbleupon).
I’ve book marked it for later!
Wow, this article is nice, my sister is analyzing
such things, so I am going to convey her.
کراتین پلاتینیوم ماسل تک، یکی از خالصترین و پرفروشترین مکملهای کراتین در سطح جهان است.
Australian Open live scores, first Grand Slam of the year covered comprehensively
PINK GELATIN TRICK
Друзья, расскажу по-честному: я долго искал казино, которое платит, и наконец нашёл рабочие варианты. Советую смотреть на лицензию и избегать тех, где скрытые комиссии. Актуальный список лучших платформ на 2025 — по ссылке: онлайн казино. Пишите в комментариях, какие казино вам зашли!
Всем здравия! Недавно искал надёжное казино для игры на реальные деньги, и понял: половина сайтов — скам. Советую обращать внимание на минимальный депозит и читать мнения реальных пользователей. Свой топ-7 с моментальным выводом оставил здесь: https://inspireforge.in/kazino-onlayn-oynau-zhauapbergeri-kak-da-spechelya-ot-kazino-onlayn-kazino-oynau/. Пишите, кто что знает по теме!
description https://hyperliquid-wiki.cv/
Новости Мира В Санкт-Петербурге задержана группа мошенников, обманывавших пенсионеров. Злоумышленники представлялись сотрудниками социальных служб и предлагали пожилым людям оформить льготы, выманивая у них деньги. Полиция призывает граждан быть бдительными и не доверять подозрительным звонкам и предложениям.
Avia Masters de BGaming es un juego crash con RTP del 97% donde apuestas desde 0,10€ hasta 1.000€, controlas la velocidad de vuelo de un avion que recoge multiplicadores (hasta x250) mientras evita cohetes que reducen ganancias a la mitad, con el objetivo de aterrizar exitosamente en un portaaviones para cobrar el premio acumulado
https://share.google/sXEcJBPI0sM61Z2TH
Продуманный внешний вид играет важную роль в повседневной жизни.
Она позволяет подчеркнуть индивидуальность.
Удачный внешний вид поддерживает уверенность в себе.
Одежда нередко является частью первого восприятия.
https://angelina-podium.blogspot.com/2026/01/luisa-spagnoli.html
Кроме того, продуманный гардероб делает сборы быстрее в повседневных делах.
Со временем внимание к стилю развивает вкус.
В итоге стильная одежда играет значимую роль современного образа жизни.
Read More Here https://toast-wallet.net
click over here now https://toast-wallet.net
GELATIN TRICK RECIPE
Всем привет! Много читаю про скам-казино, поэтому теперь тщательно проверяю всё: RTP. Лучшие игровые сайты 2025 года с моментальным выводом — здесь: Мелстрой гейм. Делитесь своим опытом!
Ребята, а вы знаете, где сейчас дают кэшбэк? Я проверил десятки казино, оставил только те, где реально работают в РФ. Ссылка на подборку: Рльдорадо. Обсуждаем!
La firma inconfondibile di un maestro del thriller si riconosce in ogni pagina di “L’ultimo segreto”. Robert Langdon è alle prese con un puzzle che sembra impossibile da risolvere. La disponibilità del testo in pdf rende facile l’accesso a questa storia avvincente per chiunque possieda un dispositivo digitale. L’intreccio narrativo è denso e stratificato, richiedendo attenzione e deduzione. Se sei pronto a lasciarti trasportare in un mondo dove ogni simbolo nasconde un doppio significato, questo è il libro giusto per te.
La profondità psicologica di questo romanzo è impressionante. Una vita come tante scava nell’animo dei suoi protagonisti senza pietà. Se cerchi il PDF o la versione digitale, preparati a una lettura impegnativa ma gratificante. La storia si dipana lungo decenni, mostrando come il passato influenzi inesorabilmente il presente. Grazie all’eBook, potrai gestire la lettura di questo capolavoro con facilità. Hanya Yanagihara ti regala un’esperienza letteraria che non dimenticherai facilmente, perfetta per chi cerca sostanza e verità.
description https://toast-wallet.net/
For opinions
Confidential pay day loans
for clear evidence.
their explanation https://toast-wallet.net/
online pharmacies
huarenus平台,专为海外华人设计,提供高清视频和直播服务。
GELATIN TRICK
find out here https://unich.icu/
Привет! Недавно искал игровой клуб, где можно спокойно вывести выигрыш, и понял: главное — лицензия. Собрал рабочие варианты с поддержкой Сбербанк — ссылка: https://pruebas.infocensa.com/vulkan-royal-onlayn-kazino-kupdey-bolgan-kupon-kody-oynau/. Кто уже пробовал?
Привет! Решил собрать только те казино, где лично получил выплату. Критерии: с минимальным депозитом. Все рабочие ссылки — по адресу: https://focicanarios.com.ar/eldorado-onlayn-kazino-kesh-kelgen-bonusymen-oynau/. Кто уже тестировал эти площадки?
Everything wrote was very logical. But, what about this?
what if you wrote a catchier post title? I ain’t suggesting your content is not good., however
what if you added a headline that grabbed folk’s
attention? I mean Santa Claus Christmas Ball Tutorial Adobe Illustrator.
– My Downloadables is a little boring. You ought to look
at Yahoo’s front page and see how they create post headlines to grab
viewers to click. You might try adding a video or a related pic or two to get people excited
about what you’ve written. Just my opinion, it would make your blog a little bit more interesting.
look here https://ethereal.credit/
get redirected here https://hypperswap.space
more tips here https://toast-wallet.net
pin-up necə yükləmək https://pinup2009.help/
Hello! I know this is kind of off topic but I was wondering
which blog platform are you using for this website?
I’m getting fed up of WordPress because I’ve had problems with
hackers and I’m looking at options for another platform.
I would be awesome if you could point me in the direction of a good platform.
Clean sheet tracker, goalkeepers and defenses with shutout statistics
Reliable write ups, Cheers! https://betflik2.blogspot.com/2025/12/betflix-dc.html
cialis viagra levitra tadadoeshighbnct com
Привет! Недавно искал игровой клуб, где можно спокойно играть на рубли, и понял: главное — отзывы. Собрал рабочие варианты с поддержкой МИР — ссылка: https://www.cdemc.it/demo/otygryshtyn-negizdeki-mni-new-retro-onlayn-kazino-oynau/. Кто уже пробовал?
Ребята, не тратьте время на левые сайты! Чтобы выбрать рабочее казино, обращайте внимание на: лицензию Curacao или Мальты, а также на частоту выплат. Я лично протестировал десятки платформ и оставил только те, где дают фриспины сразу. Весь список — по ссылке: https://comunidadedigital.macdw.com.br/2026/01/10/uznayte-kuda-vyvodyat-enterium-klassik-s-kazino-kilogram-i-kak-nachat-igrat-v-onlaynkazino-v-rf/. Делитесь опытом!
ST666 là nhà cái mang đến trải nghiệm trực tuyến ổn định. https://st66602.me
https://iver.us.com/# ivermectin buy nz
Asking questions are really good thing if you are not understanding something totally, except this piece
of writing presents good understanding yet.
imp source https://hlp0.online
I don’t know if it’s just me or if perhaps everybody else experiencing issues with your website.
It looks like some of the written text in your posts are running off
the screen. Can someone else please provide
feedback and let me know if this is happening to them as well?
This could be a issue with my internet browser because I’ve had this happen before.
Thank you
more information https://gluex.io/
PINK GELATIN TRICK
超人和露易斯第一季高清完整官方版,海外华人可免费观看最新热播剧集。
pop over to this web-site https://palladiumlabs.net
see here now https://hypperswap.space/
It’s nearly impossible to find well-informed people
about this topic, but you seem like you know what you’re talking about!
Thanks
Ребята, а вы знаете, где сейчас дают фриспины без отыгрыша? Я проверил десятки платформ, оставил только те, где реально не обманывают. Ссылка на подборку: РќСЊСЋ Ретро казино. Обсуждаем!
Всем привет! Поделюсь лайфхаком: чтобы не слить депозит впустую, выбирайте онлайн платформу с высоким RTP. Я проверил десятки сайтов и оставил только те, где реально выводят. Список тут: http://clancoregames.com/onlayn-kazino-oynau-neyizbek-akkauntty-kayta-almas-sygu/. Кто уже играл — подтвердите?
I’ve been checking out Paybis for a while now, especially after going through financial trouble, and I’m
still not fully convinced whether it deserves
all the attention it gets. Still, it’s definitely a noticeable name in the digital asset
market, particularly for people in Germany who are trying
to get back on track. From what I understand, Paybis presents itself as a globally operated cryptocurrency service
that supports fiat payments, something many platforms either limit or complicate.
What initially caught my eye is how Paybis seems
to connect traditional German banking methods with the crypto world.
Many exchanges focus only on crypto-to-crypto trades, while Paybis allows users to exchange crypto using SEPA transfers.
I’m not saying the process is perfect, but it does seem aimed at users new to crypto
rather than just advanced traders.
Another aspect worth noting is the selection of supported assets.
Paybis doesn’t restrict itself to Bitcoin and Ethereum
only. Instead, it offers a broader token selection, which might attract users who are exploring options.
Still, things like liquidity are worth checking before making decisions.
Security and compliance also come up often around Paybis.
The platform highlights identity verification, which can feel responsible for users in Germany, though others might see it
as time-consuming. I’m still undecided, but it does suggest Paybis
tries to operate as a long-term marketplace.
When it comes to fees, reviews seem divided. Some say Paybis is clear about costs, while
others note that pricing can depend on currency. This isn’t unusual
in the crypto industry, but it means users should research properly
before moving money.
Overall, I wouldn’t call Paybis perfect, but it does seem like a platform worth a closer look,
especially for someone in Germany trying to build a
new starting point. I’m still forming my opinion, but it seems interesting enough to justify further research.
click over here now https://camelot.click
click this site https://hyperliquid-wiki.cc/
GELATIN TRICK RECIPE
Wow, incredible blog format! How lengthy have
you ever been blogging for? you made blogging look easy.
The total look of your site is excellent, let
alone the content!
пылесос dyson купить в спб пылесос dyson купить в спб .
Simply desire to say your article is as astonishing.
The clarity on your post is just spectacular and that
i could think you are knowledgeable on this subject.
Well together with your permission allow me to snatch your RSS feed to stay up to
date with imminent post. Thank you 1,000,000 and please keep up the enjoyable
work.
Друзья, подскажите, куда лучше играть в 2025? Сам недавно протестировал кучу онлайн казино — большинство тянут с выплатами. Остановился на тех, где есть поддержка рубля и вывод за 5 минут. Полный список с RTP и бонусами — по ссылке: мелстрой game. Кто с чем сталкивался?
Умение одеваться со вкусом является значимым фактором в самовыражении.
Она дает возможность произвести хорошее впечатление.
Правильно подобранный образ повышает самооценку.
Одежда часто становится важным элементом невербального общения.
https://graph.org/DolceGabbana-platya-kak-manifest-italyanskoj-strasti-01-29
Кроме того, продуманный гардероб делает сборы быстрее в повседневных делах.
В долгосрочной перспективе внимание к стилю формирует привычку.
Таким образом стильная одежда становится важной частью современного образа жизни.
Привет! После череды обманов наконец нашёл казино, где реально не задерживают выплаты. Смотрите на скорость обработки заявок. Список надёжных вариантов — тут: Sykaaa. Кто уже играл?
Elavil: AmiTrip – Elavil
超人和露易斯第一季高清完整版运用AI智能推荐算法,海外华人可免费观看最新热播剧集。
like this https://hlp0.online
viagra online mexican pharmacy https://images.google.com.do/url?sa=t&url=https%3A%2F%2Fmexicanxlpharmacy.com mexica pharmacy online review
AmiTrip AmiTrip Elavil
Ребята, а вы знаете, где сейчас реально заработать в онлайн-казино? После десятков проверок остановился на честных клубах. Важно: вывод без комиссии. Актуальный рейтинг с джекпотами и кэшбэком — по ссылке: мелстрой гейм. Обсуждаем!
Привет! Недавно искал казино, где можно спокойно играть на рубли, и понял: главное — скорость выплат. Собрал рабочие варианты с поддержкой МИР — ссылка: https://pratikagencies.in/index.php/2026/01/10/kak-privlech-bolshe-klientov-v-onlaynkazino-kilogramm-sovety-ekspertov/. Кто уже пробовал?
For cautions
bad credit emergency loan
for membership.
Фонбет Хоккей НХЛ – это мировой хоккейный эталон, лига, где играют лучшие хоккеисты планеты. Это космос скоростей, силы и мастерства. Ставки на НХЛ – это испытание для самых опытных игроков, требующее глубокого знания североамериканского хоккея и умения адаптироваться к разнице во времени.
PINK GELATIN TRICK
Приветствую! Только что вывел 15 тысяч с одного из игровых сайтов — и решил поделиться списком тех, кто реально не блокирует аккаунты. Смотрите на отзывы за 2025 год. Все проверенные варианты — тут: https://ekbar.org/kazakstandagy-online-kazino-oynau-kraken-kazinosynyn-tegin-aynalym-kody/. Кто уже играл? Какие суммы выводили?
Ребята, не тратьте время на левые сайты! Чтобы выбрать рабочее казино, обращайте внимание на: поддержку рубля, а также на условия бонусов. Я лично протестировал десятки платформ и оставил только те, где нет скрытых условий. Весь список — по ссылке: https://linpetws.org/kak-napisat-v-chate-operatoru-chto-khotite-igrat-v-onlaynkazino-bollivud/. Делитесь опытом!
PINK GELATIN TRICK
Loan watch, players on temporary deals and their performances tracked
click this link now https://boros.cfd
website link https://royco.cc/
have a peek at this website https://terminal.credit
Привет, форумчане! Решил поделиться лайфхаком: как найти онлайн казино, где реально выводят деньги. Главное — не верить рекламе, а смотреть на официальные документы и реальные отзывы. Я собрал проверенные варианты с выводом на Сбербанк — ссылка тут: казино Мелстрой. Кто уже пробовал?
Visit Website https://avalonfinance.cc
see this page https://rangerfinance.xyz/
Глубокий разбор alternatives Android-game: мод APK, mods, hacks, бесплатные покупки
Ниша андроид games трансформируется динамично быстро, и одновременно с этим обновляется и подход пользователей к играм. Если раньше большинство игроки принимали лимиты и внутриигровые траты, то в 2025 всё больше людей выбирают взломанные игры на андроид.
Сайты вроде https://transcrire.histolab.fr/wiki/index.php?title=Utilisateur:LouiseBarksdale дают огромный каталог mods, формируя полную экосистему вокруг модов. Такой тренд привела к появлению сообщество пользователей, которые ищут расширенные возможности без вложений.
Что такое изменённые APK-файлы и почему их качают
apk mod android — это переработанные версии оригинальных игр, в которые встроены новые функции, или сняты ограничения. Основная цель подобных версий — дать игроку расширенные параметры в геймплее.
Например, mods могут включать unlimited coins android, запрещать баннеры, активировать free purchases. Такие функции ценят геймеры, которым нужен быстрый прогресс.
Функция площадок в мире Android-модов
Порталы выступают как центром распространения mod игр. Они собирают контент, структурируют его, обновляют, и предлагают скачивание всем желающим. Благодаря этому скачивать моды стало намного легче.
Топовые виды модов ищут в нынешнее время
Мод-тренды стремительно двигаются, и сегмент модифицированных APK перестраивается под игроков. В текущем году лидируют моды с неограниченными ресурсами. Такие mods убирают лимиты, включая весь контент моментально.
Огромным спросом обладают моды, которые отключают ads. Большинство игр на Android засыпаны ads, поэтому моды “no admod” стали трендом для миллионов игроков.
Также в топе взломы, которые делают покупки бесплатными. В подобных модах магазин работает бесплатно. Игрок может активировать косметику, guns, амулеты, пропуски, и всё это без вложений.
Плюсы модифицированных Android-игр
Основное преимущество модов — это свобода действий. Игрок сам решает, как играть. В отличие от официальных игр, где всё завязано на донате, mod игры андроид даются полностью с первых минут.
Другой ключевой плюс — отсутствие агрессивной рекламы. Практически каждый игрок Android сталкивается с баннерами, которые раздражают. Моды обнуляют рекламу, превращая процесс чистым.
Не менее важный плюс — доступ к расширенным опциям. Некоторые моды включают режим разработчика, улучшенную графику, дополнительные карты, и даже альтернативные модели. Такие версии игр выглядят лучше официальные.
Что важно помнить при скачивании модов
Несмотря на популярности модов, важно соблюдать обязательные правила безопасности. Скачивать моды следует только с надёжных площадок. Сторонние источники могут содержать malware, что рискованно.
Также стоит помнить, что некоторые игры не принимают модификации. Поэтому важно скачивать только обновлённые версии хаки андроид, которые соответствуют последним версиям приложения.
Часть модов могут не запускаться в сети, если игра делает серверные сверки. Это частая практика, особенно в популярном PVP-контенте.
Итог: почему моды стали нормой в 2025
Игровые вселенные становятся шире, и потребность к улучшенным возможностям увеличивается. Поэтому взломанные игры на андроид продолжают удерживать популярность. Они дают игрокам открытые покупки, убирают рекламу, и предоставляют свободу над проходлением. Сайты делают доступ таких возможностей быстрым.
На данный момент модифицированные игры — это не просто тренд, а часть культуры. При выборе хороших сайтов скачать mod apk и получать максимум становится легко для каждого.
Итог: взломанные версии как часть культуры Android-гейминга
Сегмент Android-игр меняется, и потребность игроков растёт. mod игры обеспечивают широкие возможности, включая улучшенные настройки, снятие ограничений и полный контроль над геймплеем.
Для большого числа игроков это не просто развлечение, а метод экспериментов. Игроки могут создавать уникальные билды, в полном объёме, что повышает вовлечённость.
Наряду с этим, модифицированные версии позволяют изучать механику. Опции вроде free shop дают контроль над игровыми ресурсами, а ad-free делает процесс комфортным.
Самое важное условие при использовании модификаций — осмотрительность. Выбирайте проверенные источники, следите за совместимостью, и геймплей будет стабильным. В таком случае apk mod позволят наслаждаться игрой на полную.
Вывод прост: взломанные игры это современный тренд, который даёт свободу и делает игровой процесс более интересным. ответственное скачивание позволяет получить всё самое лучшее и увеличивает удовольствие от игры.
Всем привет! Поделюсь лайфхаком: чтобы не слить депозит впустую, выбирайте онлайн платформу с честной рандомизацией. Я проверил десятки сайтов и оставил только те, где нет блокировок без причины. Список тут: Клубника клубника казино. Кто уже играл — подтвердите?
http://mirstalkera.4admins.ru/viewtopic.php?f=50&t=4239
Immergersi nella lettura di I giorni dell’eternità significa accettare di fare un viaggio nel tempo senza ritorno fino all’ultima pagina. Ken Follett ha creato un mondo così dettagliato che sembra di viverci dentro. Grazie alla versione epub, questo mondo è accessibile con un click, pronto per essere esplorato sul vostro e-reader preferito. Dalla musica rock che cambia la cultura giovanile alle spie che giocano a scacchi con il destino del mondo, tutto è raccontato con uno stile inimitabile. È la conclusione perfetta per una saga che ha ridefinito il genere del romanzo storico moderno.
L’adrenalina scorre a fiumi in “L’ultimo segreto”, l’ultima fatica letteraria che vede protagonista il professor Langdon. Un enigma millenario rischia di sconvolgere l’ordine mondiale. Molti lettori preferiscono il pdf per la facilità di annotazione e ricerca all’interno del testo. L’autore sa come catturare l’attenzione fin dalla prima pagina, tessendo una trama che non lascia scampo. Se sei alla ricerca di un thriller che ti tenga sveglio la notte, hai trovato quello che fa per te.
This is my first time visit at here and i am actually pleassant to read all at single place.
banda casino зеркало
helpful resources https://dexrp.wtf/
Xin chào 500 anh em, bác nào muốn tìm nhà cái uy tín để gỡ gạc Đá Gà đừng bỏ qua trang này nhé. Không lo lừa đảo: Link vào BJ88. Chiến thắng nhé.
iyftv海外华人首选,提供最新华语剧集、美剧、日剧等高清在线观看。
Sofascore style live updates with detailed statistics and match analysis included
important source https://d2finance.cv
online casino
Привет! Решил собрать только те игровые клубы, где лично получил выплату. Критерии: вывод до 10 минут. Все рабочие ссылки — по адресу: https://advisornutri.com/index.php/2026/01/11/fontan-online-kazino-oynau-kazindagy-fontan-oyyndary/. Кто уже тестировал эти площадки?
Друзья, подскажите, куда лучше играть в 2025? Сам недавно протестировал кучу платформ — большинство тянут с выплатами. Остановился на тех, где есть лицензия и вывод за 5 минут. Полный список с RTP и бонусами — по ссылке: РќСЊСЋ Ретро. Кто с чем сталкивался?
go to this website https://avalonfinance.cc
this content https://beraborrow.cc/
Mangelsen
7916 Girard Avenue, Ꮮа Joya
CA 92037, United Տtates
1 800-228-9686
top wildlife photography wildlife
Hey there! I understand this is somewhat off-topic but I had to ask.
Does operating a well-established website such as yours require a lot of work?
I am brand new to running a blog but I do write in my diary everyday.
I’d like to start a blog so I will be able to share my personal experience and thoughts online.
Please let me know if you have any recommendations or tips for new aspiring bloggers.
Thankyou!
home https://prjx.online
cost of viagra https://maps.google.com.ly/url?sa=t&url=https%3A%2F%2Fedpillseasy.shop ro sparks side effects
捕风追影在线免费在线观看,海外华人专属平台采用机器学习个性化推荐,高清无广告体验。
Big chances missed, wasteful finishing and conversion failures
viagra online pharmacy
Привет! Если вы ищете клуб с частыми выплатами — не гонитесь за громкими названиями. Лучше смотрите реальные отзывы. Мой проверенный список — тут: Мелстрой гейм. Кто что добавит?
Привет, форумчане! Решил поделиться лайфхаком: как найти онлайн казино, где реально выводят деньги. Главное — не верить рекламе, а смотреть на официальные документы и реальные отзывы. Я собрал проверенные варианты с выводом на Сбербанк — ссылка тут: ретро Нев Ретро. Кто уже пробовал?
visite site https://beraborrow.cc/
pin-up depósito con tarjeta https://www.pinup2003.help
凯伦皮里第一季高清完整官方版,海外华人可免费观看最新热播剧集。
find out here https://g8keep.org
Referee decisions, official calls and controversial moments documented
https://www.hulkshare.com/melbet5/
More about the author https://hyperliquid-wiki.cv/
Привет! После череды обманов наконец нашёл платформу, где реально платят. Смотрите на наличие лицензии. Список надёжных вариантов — тут: онлайн казино. Кто уже играл?
For help
win real money in online casino
to start the process.
Привет, форумчане! Решил поделиться лайфхаком: как найти казино РФ, где реально выводят деньги. Главное — не верить рекламе, а смотреть на статус регулятора и реальные комментарии игроков. Я собрал проверенные варианты с выводом на Сбербанк — ссылка тут: mellstroy casino. Кто уже пробовал?
have a peek at this website https://daodao.cfd
Extra resources https://prjx.space/
you can look here https://royco.cc
This Site https://dexrp.buzz/
her explanation https://beraborrow.cc/
https://www.laundrynation.com/community/profile/1xbetpromo1/
click this site https://toast-wallet.net/
Порно чат – работаем с 2011 года
PINK GELATIN TRICK
Всем привет! Поделюсь лайфхаком: чтобы не слить депозит впустую, выбирайте онлайн казино с лицензией от уважаемого регулятора. Я проверил десятки сайтов и оставил только те, где реально выводят. Список тут: clubnika casino. Кто уже играл — подтвердите?
Всем здравия! Недавно искал надёжное казино для игры на реальные деньги, и понял: половина сайтов — скам. Советую обращать внимание на минимальный депозит и читать отзывы. Свой топ-7 с моментальным выводом оставил здесь: Рльдорадо Рльдорадо регистрация. Пишите, кто что знает по теме!
Hi! Someone in my Facebook group shared this website with us so I came to look
it over. I’m definitely loving the information. I’m book-marking and will be tweeting this to my followers!
Excellent blog and fantastic design and style.
凯伦皮里第二季高清完整版,海外华人可免费观看最新热播剧集。
check here https://hlp0.online/
сайт дайсон спб сайт дайсон спб .
GELATIN TRICK
Asking questions are genuinely nice thing if you are not understanding
something entirely, but this article offers good
understanding even.
Chào anh em, bác nào muốn tìm cổng game không bị chặn để gỡ gạc Tài Xỉu thì vào ngay địa chỉ này. Tốc độ bàn thờ: https://gramodayalawcollege.org.in/#. Chúc anh em may mắn.
爱一凡海外版,专为华人打造的高清视频平台,支持全球加速观看。
Всем привет! Много читаю про скам-казино, поэтому теперь тщательно проверяю всё: лицензию. Лучшие игровые сайты 2025 года с моментальным выводом — здесь: казино клубника. Делитесь своим опытом!
Привет! Хочу предупредить новичков: не все игровые площадки одинаково полезны. Чтобы не слить депозит и получить выигрыш, проверяйте RTP слотов и изучайте статистику выплат. Я составил подборку рабочих вариантов с минимальным депозитом от 10 рублей — смотрите тут: https://topeandtunde.com.ng/zhizn-pokhozhaya-na-kazino-kak-stavka-na-onlaynkazino-mozhet-izmenit-vsyo/. Делитесь опытом!
一饭封神在线免费在线观看,海外华人专属官方认证平台,高清无广告体验。
visit the website https://g8keep.org/
GELATIN TRICK RECIPE
legit online pharmacy https://cse.google.com.br/url?sa=t&url=https%3A%2F%2Fmexicanxlpharmacy.com india pharmacy online
Здравствуйте! Хочу предложить проверенный способ выбора казино: обращайте внимание на скорость вывода, а не только на бонусы. Я составил список платформ 2025 года, где есть игры от NetEnt и Pragmatic. Всё по ссылке: [url=https://octotax.com/2025/10/30/igrayte-v-zakhvatyvayushchie-igry-gold-kazino-onlayn-v-rossii/]Голд зеркало[/url]. Делитесь впечатлениями!
more https://kinetiq.lat
Привет! Решил собрать только те казино, где лично получил выплату. Критерии: без паспорта. Все рабочие ссылки — по адресу: ДЖРР’Р’РРЎРџРРќ дживиспин казино. Кто уже тестировал эти площадки?
Giao diện mã nhận thưởng 888slot hỗ trợ dark mode – bảo vệ mắt và tiết kiệm pin vào ban đêm. TONY01-29O
Australian Open live scores, first Grand Slam of the year covered comprehensively
their explanation https://unich.icu/
pop over to this site https://toast-wallet.net/
Goalkeeper errors, handling mistakes and their consequences
Winning goals, match winners and their scorers documented
Visit This Link https://toast-wallet.net
try this out https://beraborrow.cc/
Привет всем! Решил поделиться, как найти надёжное онлайн игровой сайт в 2025 году. Главное — не гнаться за большими бонусами, а смотреть на лицензию и скорость выплат. Я собрал список проверенных площадок с минимальным депозитом — вот тут: https://xeniumdigital.com/blog/2026/01/11/nachnite-igrat-v-onlaynkazino-mellstroy-segodnya-zhe-i-naslazhdaytes-luchshimi-igrovymi-avtomatami-v-kazakhstane/. Кто уже пробовал?
Всем привет! Уже третий год играю в онлайн казино, и за это время понял главное: выбирайте площадки с честными условиями. Избегайте тех, где требуют паспорт или тормозят с выводом. Лучшие платформы 2025 с поддержкой ЮMoney собрал здесь: JVSpin JVSpin РЎasino. Кто что может добавить?
International friendly live scores, national team matches outside tournaments
To verify
vet bills small loans for bad credit
for educational purposes.
Check This Out https://usdai.cloud/
read review https://kittenswap.cc
Xin chao 500 anh em, ai dang tim nha cai uy tin d? choi Da Ga thi xem th? trang nay nhe. Uy tin luon: https://gramodayalawcollege.org.in/#. Chi?n th?ng nhe.
a knockout post https://etherealtrade.xyz
go to this site https://beratrax.org
塔尔萨之王第二季高清完整版,海外华人可免费观看最新热播剧集。
Всем привет! Поделюсь лайфхаком: чтобы не слить депозит впустую, выбирайте онлайн платформу с высоким RTP. Я проверил десятки сайтов и оставил только те, где реально выводят. Список тут: https://clothistry.com/naskolko-vygodno-imet-internet-lev-dlya-onlaynkazino-v-rf-vse-preimushchestva/. Кто уже играл — подтвердите?
redirected here https://toast-wallet.net
Здравствуйте! Хочу предложить проверенный способ выбора казино: обращайте внимание на наличие live-чата, а не только на бонусы. Я составил список платформ 2025 года, где есть игры от NetEnt и Pragmatic. Всё по ссылке: kilogram casino. Делитесь впечатлениями!
his response https://ethereal.credit/
ed medications
PINK GELATIN TRICK
Own goals, unfortunate deflections and their impact documented
PINK GELATIN TRICK
try this out https://etherealtrade.rest
Xin chào 500 anh em, người anh em nào cần chỗ nạp rút nhanh để gỡ gạc Game bài thì xem thử con hàng này. Uy tín luôn: Nhà cái BJ88. Về bờ thành công.
you can check here https://kinetiq.buzz/
Всем привет! Много читаю про скам-казино, поэтому теперь тщательно проверяю всё: условия вывода. Лучшие игровые сайты 2025 года с моментальным выводом — здесь: https://servicehppekalongan.com/uznayte-kak-igrat-v-onlaynkazino-na-realnye-dengi-nash-gid-dlya-igrokov-iz-rossii/. Делитесь своим опытом!
краби инфраструктура карта краби с отелями и пляжами
informative post https://kittenswap.buzz/
Ребята, не верьте громким обещаниям! Настоящее онлайн казино должно иметь положительную репутацию. Я отсеял все подозрительные площадки и оставил только проверенные варианты — смотрите здесь: Retro. Кто уже выводил оттуда?
GELATIN TRICK RECIPE
Goal celebrations, iconic moments and player reactions captured live
pharmacy online
Ребята, а вы знаете, где сейчас дают кэшбэк? Я проверил десятки платформ, оставил только те, где реально работают в РФ. Ссылка на подборку: казино болливуд. Обсуждаем!
pin-up əməliyyatlar https://pinup2009.help
Привет! Хочу предупредить новичков: не все клубы одинаково полезны. Чтобы не слить депозит и получить выигрыш, проверяйте RTP слотов и изучайте статистику выплат. Я составил подборку рабочих вариантов с минимальным депозитом от 10 рублей — смотрите тут: мелстрой казино. Делитесь опытом!
More Bonuses https://arch.credit/
click here to find out more https://d2finance.cc/
GELATIN TRICK RECIPE
Upcoming football matches schedule with live score tracking when games kick off
Привет, форумчане! Решил поделиться лайфхаком: как найти онлайн казино, где реально платят без задержек. Главное — не верить рекламе, а смотреть на лицензию и реальные комментарии игроков. Я собрал проверенные варианты с выводом на Сбербанк — ссылка тут: https://officeflip.com/kak-otkryt-sobstvennoe-onlaynkazino-igrayte-v-kazino-onlayn-v-rf/. Кто уже пробовал?
Привет всем! Решил поделиться, как найти платящее онлайн игровой сайт в 2025 году. Главное — не гнаться за большими бонусами, а смотреть на лицензию и скорость выплат. Я собрал список проверенных площадок с быстрым кэш-аутом — вот тут: Клубника казино . Кто уже пробовал?
hop over to this website https://beratrax.org
Explore further
how to get a loan with bad credit quickly
to make a difference.
Derby match live scores, rivalry games with extra intensity tracked live
go to my blog https://safeglobal.club/
this post https://yieldfi.pro
GELATIN TRICK RECIPE
Ребята, не верьте громким обещаниям! Настоящее игровое заведение должно иметь официальную лицензию. Я отсеял все подозрительные площадки и оставил только платящие варианты — смотрите здесь: https://biodescodificacion.ar/vulkan-royal-kazakstanda-online-kazino-depozitterin-kabiletiniz/. Кто уже выводил оттуда?
Ребята, а вы знаете, где сейчас реально получить кэш в онлайн-казино? После десятков проверок остановился на честных клубах. Важно: минимальный депозит. Актуальный рейтинг с джекпотами и кэшбэком — по ссылке: Клубника зеркало. Обсуждаем!
my webpage: Poker stakes
Heya this is kinda of off topic but I was wanting to know if blogs use WYSIWYG editors or if you have to
manually code with HTML. I’m starting a blog soon but have no coding expertise so I
wanted to get advice from someone with experience. Any help would be enormously appreciated!
why not check here https://g8keep.org
Chào anh em, người anh em nào cần sân chơi đẳng cấp để gỡ gạc Nổ Hũ thì tham khảo địa chỉ này. Tốc độ bàn thờ: Nhà cái Dola789. Về bờ thành công.
image source https://kinetiq.lat
I like the helpful information you provide in your articles.
I’ll bookmark your blog and check again here regularly. I am
quite certain I will learn a lot of new stuff right here!
Best of luck for the next!
OMT’s upgraded resources maintain math fresh аnd
interеsting, motivating Singapore trainees to embrace іt cօmpletely fօr test triumphs.
Discover tһe convenience ⲟf 24/7 online math tuition аt OMT,
wheгe appealing resources mɑke finding oսt fun and reliable for aⅼl levels.
Ιn Singapore’ѕ rigorous education ѕystem, where mathematics іs required and takes in around 1600 һours of curriculum tіme
in primary school and secondary schools, math tuition ends ᥙⲣ being necesѕary tο һelp
students develop ɑ strong structure fօr lifelong success.
primary school school math tuition іs impoгtant for PSLE preparation as іt helps trainees master tһe fundamental
concepts like fractions and decimals, ѡhich are heavily checked
in the test.
Alternative growth ѵia math tuition not just increases O Level ratings
ƅut likewise cultivates sensible thinking abilities important for lifelong understanding.
Building ѕelf-confidence with consistent assistance іn junior college math tuition decreases exam anxiousness, causing fɑr better outcomes in A Levels.
Тhe individuality of OMT hinges оn its customized educational
program tһаt straightens perfectly ԝith MOE standards wһile introducing ingenious analytic methods not ցenerally stressed іn class.
OMT’s sуstem іs mobile-friendly օne, so study оn the ɡo ɑnd ѕee ʏour mathematics grades
enhance ѡithout missing a beat.
Math tuition ρrovides enrichment ρast the essentials, testing talented Singapore studdnts tⲟ aim for distinction in exams.
Review my webpage – college math tutor online
Привет, форумчане! Решил поделиться лайфхаком: как найти казино РФ, где реально работают честно. Главное — не верить рекламе, а смотреть на официальные документы и реальные отзывы. Я собрал проверенные варианты с выводом на Сбербанк — ссылка тут: mellstroy game. Кто уже пробовал?
Друзья, не тратьте время на левые сайты! Играйте только в проверенные казино с быстрым выводом. Мой личный топ с реальными выплатами — по ссылке: Лев казино. Кто что может порекомендовать?
Con I giorni dell’eternità, il cerchio si chiude perfettamente. Ken Follett ha scritto un finale degno per le sue cinque famiglie, attraverso gli anni tumultuosi della fine del secolo. L’epub è il formato giusto per chi vuole affrontare questa lettura con agilità. Non lasciatevi spaventare dalla mole del libro; in digitale scorre via che è un piacere. Scoprite i segreti della Guerra Fredda e le passioni che hanno animato i protagonisti in un’opera indimenticabile. https://igiornidelleternitaepub.site/ I Giorni Dell’eternità Canzoni
walgreens online pharmacy https://clients1.google.co.je/url?q=https%3A%2F%2Fonlinepharmeasy.shop mexica pharmacy online review
купить франшизу для малого бизнеса недорого Клиндо – это не просто название, это символ чистоты и порядка, гарантия качества и профессионализма.
Ребята, не верьте громким обещаниям! Настоящее игровое заведение должно иметь прозрачную политику выплат. Я отсеял все подозрительные площадки и оставил только топовые варианты — смотрите здесь: мелстрой гейм. Кто уже выводил оттуда?
Big chances missed, wasteful finishing and conversion failures
Всем привет! Много читаю про скам-казино, поэтому теперь тщательно проверяю всё: лицензию. Лучшие игровые сайты 2025 года с моментальным выводом — здесь: клубника казино. Делитесь своим опытом!
Own goals, unfortunate deflections and their impact documented
PINK GELATIN TRICK
Chào anh em, người anh em nào cần chỗ nạp rút nhanh để chơi Tài Xỉu thì xem thử địa chỉ này. Nạp rút 1-1: Đăng nhập BJ88. Húp lộc đầy nhà.
Hello! I know this is kinda off topic but I’d figured I’d ask.
Would you be interested in trading links or maybe guest authoring a blog post or vice-versa?
My blog goes over a lot of the same subjects as yours and I
believe we could greatly benefit from each other.
If you happen to be interested feel free to send me an email.
I look forward to hearing from you! Superb blog by the way!
my web blog: Easync automated dropshipping software
RMFreelancer is your go-to freelance marketplace for top-notch services in SEO,
digital marketing, web traffic, art and design, development and IT,
writing and translations, audio and video, business and
lifestyle, and AI services. Connect with skilled freelancers
and find the perfect solution for your business needs.
Друзья, расскажу по-честному: я долго искал надёжный слот-сайт, и наконец нашёл рабочие варианты. Советую смотреть на наличие демо-режима и избегать тех, где скрытые комиссии. Актуальный список лучших платформ на 2025 — по ссылке: онлайн казино. Пишите в комментариях, какие казино вам зашли!
pin-up apuestas ufc https://pinup2003.help/
Всем привет! Поделюсь лайфхаком: чтобы не слить депозит впустую, выбирайте онлайн казино с лицензией от уважаемого регулятора. Я проверил десятки сайтов и оставил только те, где реально выводят. Список тут: https://casabonitamadeiras.com.br/nachnite-igrat-v-zakhvatyvayushchuyu-onlaynigru-dragon-money-pryamo-seychas-dostupno-dlya-kazakhstana/. Кто уже играл — подтвердите?
PINK GELATIN TRICK
Live football scores with detailed match statistics, possession, shots, and player ratings
Shot accuracy, attempts on target and conversion rates updated live
Sponsor announcements, commercial partnerships and deals covered
Consider this
no deposit casino maximum withdrawal
to optimize performance.
捕风捉影在线免费在线观看,海外华人专属平台智能AI观看体验优化,高清无广告体验。
Hat trick alerts, players scoring three or more goals in single matches
Copa del Rey livescore, Spanish cup competition with Real Madrid Barcelona action
Ребята, не верьте громким обещаниям! Настоящее игровое заведение должно иметь положительную репутацию. Я отсеял все подозрительные площадки и оставил только проверенные варианты — смотрите здесь: мелстрой гейм. Кто уже выводил оттуда?
Copa America livescore, South American football tournament coverage in real time
Ребята, а вы знаете, где сейчас дают фриспины без отыгрыша? Я проверил десятки казино, оставил только те, где реально работают в РФ. Ссылка на подборку: https://www.horizon-nouveau.fr/vulkan-royal-onlayn-kazino-bonusy-kazak-tilinde-oynau/. Обсуждаем!
Big chances created, high quality opportunities and their outcomes
Nice answer back in return of this question with firm arguments and explaining the whole
thing regarding that.
I am curious to find out what blog platform you are using?
I’m experiencing some minor security issues with
my latest blog and I would like to find something more secure.
Do you have any recommendations?
Here is my webpage – trending products for dropshipping
DFB Pokal live scores, German cup matches with Bundesliga teams competing
With thanks! I appreciate this!
GELATIN TRICK RECIPE
First off I would like to say great blog! I had a quick question that I’d like to ask
if you don’t mind. I was curious to find out how you center
yourself and clear your head before writing. I’ve had a hard
time clearing my thoughts in getting my ideas out there.
I do enjoy writing but it just seems like the first 10 to 15
minutes are generally wasted simply just trying to figure out how to begin. Any
suggestions or hints? Thank you!
Also visit my website :: ebay dropshipping suppliers
ISL live score today, Indian Super League matches with ball-by-ball updates and stats
Привет! Хочу предупредить новичков: не все клубы одинаково полезны. Чтобы не слить депозит и получить выигрыш, проверяйте RTP слотов и изучайте отзывы. Я составил подборку рабочих вариантов с минимальным депозитом от 10 рублей — смотрите тут: СЃСѓРєР° rin.ru. Делитесь опытом!
WOW just what I was searching for. Came here by searching for Easync
Also visit my homepage; Easync dropshipping platform
Всем привет! Уже третий год играю в игровые клубы, и за это время понял главное: выбирайте площадки с честными условиями. Избегайте тех, где требуют паспорт или тормозят с выводом. Лучшие игровые сайты с поддержкой ЮMoney собрал здесь: онлайн казино. Кто что может добавить?
Hi my loved one! I want to say that this article is awesome, nice
written and come with approximately all vital infos. I’d like to see
extra posts like this .
риобет на деньги
пылесос dyson купить в спб pylesos-dn-6.ru .
Прогнозы на спорт Прогнозы на спорт – это путеводная звезда в тумане неопределенности, попытка заглянуть в будущее, опираясь на научные методы и экспертные оценки. Они не являются абсолютной истиной, а лишь вероятностной моделью, учитывающей множество факторов, влияющих на исход события. Важно помнить, что ни один прогноз не гарантирует выигрыш, и относиться к ним следует как к инструменту, помогающему принимать взвешенные решения, а не как к волшебной палочке, решающей все проблемы.
GELATIN TRICK RECIPE
reliable online pharmacy
дайсон v15 купить в спб pylesos-dn-7.ru .
Привет! Многие спрашивают, где сейчас работают без обмана. Ответ прост: смотрите на отзывы за последние 3 месяца. Я собрал актуальный рейтинг казино 2025 с фриспинами за регистрацию — ссылка: https://mijalflamenco.com/onlayn-kazino-oynau-kez-kelgen-slottarin-konstruktsiyasy/. Пробовали что-то из списка?
I need to to thank you for this fantastic read!!
I certainly enjoyed every bit of it. I’ve got you book marked to look at new stuff you post…
Also visit my web page dropshipping tool and software
Друзья, подскажите, куда лучше играть в 2025? Сам недавно протестировал кучу платформ — большинство тянут с выплатами. Остановился на тех, где есть поддержка рубля и без верификации. Полный список с RTP и бонусами — по ссылке: лев Лев. Кто с чем сталкивался?
Info well applied..
ifvod平台结合大数据AI分析,专为海外华人设计,提供高清视频和直播服务。
GELATIN TRICK
This article gives clear idea in support of the new people of blogging, that genuinely
how to do blogging and site-building.
My webpage – Easync
Chao anh em, ngu?i anh em nao c?n c?ng game khong b? ch?n d? cay cu?c N? Hu thi vao ngay d?a ch? nay. Dang co khuy?n mai: sunwin. Chi?n th?ng nhe.
Seriously loads of amazing information!
Всем привет! Уже третий год играю в онлайн казино, и за это время понял главное: выбирайте площадки с высоким RTP. Избегайте тех, где требуют паспорт или тормозят с выводом. Лучшие платформы 2025 с поддержкой МИР собрал здесь: http://grandiosashop.com.ar/index.php/2026/01/10/kak-voyti-v-klubnika-kazino-i-nachat-igrat-v-onlaynkazino-v-rf/. Кто что может добавить?
hop over to this web-site https://agents-land.xyz
Приветствую! После череды неудач наконец нашёл честные онлайн казино. Ключевые критерии: RTP выше 96%. Все подходящие площадки с бонусами без отыгрыша собрал тут: https://focicanarios.com.ar/mellstroy-kazino-onlayn-depozitsiz-kazino-oynau-kosyn/. Кто уже успел потестить?
have a peek here https://blnk.my
Howdy! I could have sworn I’ve been to this website before but
after browsing through some of the post I realized it’s new to
me. Anyhow, I’m definitely happy I found it and I’ll be book-marking
and checking back often!
Feel free to surf to my blog post :: Easync Automated Dropshipping Tool
http://chuchelo.nnov.org/common/redir.php?http://replica2st.la.coocan.jp/cgi-bin/guestbook/guestbook.cgi
Monday night football live scores, start the week with Premier League action
For advice
fair credit best personal loan rates
for maximum effect.
This is nicely said! !
Всем привет! Много читаю про неплатёжные площадки, поэтому теперь тщательно проверяю всё: лицензию. Лучшие онлайн казино 2025 года с моментальным выводом — здесь: болливуд казино РІС…РѕРґ. Делитесь своим опытом!
GELATIN TRICK RECIPE
What’s Happening i’m new to this, I stumbled upon this I’ve found
It absolutely helpful and it has helped me out loads.
I hope to contribute & aid other customers like its helped me.
Great job.
my web site :: Easync automated dropshipping software
戏台在线免费在线观看,海外华人专属平台结合大数据AI分析,高清无广告体验。
Приветствую! После череды неудач наконец нашёл надёжные онлайн казино. Ключевые критерии: лицензия. Все подходящие площадки с русским интерфейсом собрал тут: https://navona.click/mellstroy-kazino-onlayn-kazino-oynau-negizder-men-kalay-alu-kerek-aksha-mlimette/. Кто уже успел потестить?
Статья является информативной и предоставляет различные факты и аргументы.
I used to be recommended this web site by means of my cousin. I’m not positive whether this submit is written via him as nobody else recognise such certain approximately my difficulty. You are amazing! Thanks!
Fantastic beat ! I would like to apprentice even as you amend your web site, how can i subscribe for a
weblog web site? The account helped me a applicable deal.
I have been a little bit familiar of this your broadcast provided brilliant
transparent idea
GELATIN TRICK
Head to head records, historical results between teams before matches
Hi there! I know this is somewhat off-topic but I had to ask.
Does managing a well-established website such as yours take a large amount of work?
I’m completely new to running a blog however I do write in my journal
everyday. I’d like to start a blog so I will be able to share
my personal experience and feelings online. Please let me know if you have any kind of ideas or tips for new aspiring bloggers.
Thankyou!
Feel free to visit my web site Easync Dropshipping software
Découvrez le livre qui fait trembler la République. Nicolas Sarkozy y dit tout haut ce que beaucoup pensent tout bas. Le format epub du journal d’un prisonnier est idéal pour une lecture discrète. L’auteur y analyse les dérives du pouvoir judiciaire. Un ouvrage choc.
алкоголь на дом алкоголь на дом .
I’ve been researching Paybis for a while now, especially
after ending up broke, and I’m still not fully convinced
whether it deserves all the attention it gets. Still, it’s definitely a noticeable name in the crypto
industry, particularly for people in Germany who are trying
to get back on track. From what I understand, Paybis
presents itself as a well-established cryptocurrency service that
supports regular bank transactions, something many platforms either limit or
complicate.
What initially caught my eye is how Paybis seems to link traditional
German banking methods with the crypto world. Many exchanges
focus only on crypto-to-crypto trades, while Paybis allows users to buy
crypto using SEPA transfers. I’m not saying the process
is perfect, but it does seem aimed at people starting out rather than just advanced traders.
Another aspect worth noting is the selection of supported assets.
Paybis doesn’t restrict itself to Bitcoin and Ethereum
only. Instead, it offers a broader token selection, which might attract users who are
diversifying. Still, things like update speed are worth checking before making decisions.
Security and compliance also come up often around
Paybis. The platform highlights regulatory compliance, which can feel
professional for users in Germany, though others might see it as
inconvenient. I’m still undecided, but it does suggest Paybis
tries to operate as a regulated marketplace.
When it comes to fees, reviews seem varied. Some say Paybis is transparent about costs, while others note that pricing can change with
transaction type. This isn’t unusual in the crypto industry, but it
means users should read the details before moving money.
Overall, I wouldn’t call Paybis perfect, but it does seem like a platform
worth checking out, especially for someone in Germany trying
to recover financially. I’m still forming my opinion, but it seems relevant enough to justify further research.
Ребята, а вы знаете, где сейчас реально заработать в онлайн-казино? После десятков проверок остановился на честных клубах. Важно: вывод без комиссии. Актуальный рейтинг с джекпотами и кэшбэком — по ссылке: https://konsultint.com/25447-2. Обсуждаем!
Hello, i think that i saw you visited my site so i came to “return the favor”.I am trying to find things to enhance my website!I suppose its ok
to use a few of your ideas!!
cigna best online pharmacy https://maps.google.com.uy/url?q=https%3A%2F%2Fcanadianpharmeasy.shop canadian online pharmacies
Привет! Если вы ищете платформу с джекпотами — не гонитесь за громкими названиями. Лучше смотрите лицензию. Мой проверенный список — тут: bollywood casino зеркало. Кто что добавит?
Le danger porte un nom doux dans “Le Boyfriend”. Ce roman de Freida McFadden est une exploration terrifiante de la manipulation. Idéal pour la lecture sur liseuse, ce format epub vous suivra partout. L’histoire est pleine de suspense, de fausses pistes et de moments de tension pure. C’est un livre qui vous marquera par son ingéniosité et sa fin imprévisible. Une lecture numérique parfaite pour les amateurs de frissons.
The convenience of a PDF or ebook makes diving into Better Than the Prom easier than ever. This story is perfect for reading on the bus, in bed, or during a lunch break. Lynn Painter has created a world that is easy to get lost in. The conflict between Liz and Wes is driven by character, not just plot contrivances. It is a solid, well-written romance that stands the test of time.
Your mode of explaining the whole thing in this post is actually pleasant,
every one can easily understand it, Thanks a lot.
pharmacy online https://cse.google.ws/url?sa=t&url=https%3A%2F%2Fonlinepharmeasy.shop online mexican pharmacy
Ребята, не тратьте время на левые сайты! Чтобы выбрать рабочее казино, обращайте внимание на: лицензию Curacao или Мальты, а также на условия бонусов. Я лично протестировал десятки платформ и оставил только те, где нет скрытых условий. Весь список — по ссылке: онлайн казино. Делитесь опытом!
GELATIN TRICK
Привет! Если вы ищете платформу с джекпотами — не гонитесь за громкими названиями. Лучше смотрите реальные отзывы. Мой проверенный список — тут: https://www.bandtone.com/2026/01/onlayn-kazino-oynau-keybir-provayderlardyn-turaly-akparat/. Кто что добавит?
казино pin up online
Our site https://kyros.wtf/
https://miv.kr.ua/obmen-kriptovalyuty-na-nalichnye-v-kieve-kak-provesti-sdelku-bezopasno-i-vygodno.html
GELATIN TRICK RECIPE
Awesome stuff, Thanks!
Привет! Если вы ищете казино с высоким RTP — не гонитесь за громкими названиями. Лучше смотрите лицензию. Мой проверенный список — тут: https://www.ccccc5.com/service/36119. Кто что добавит?
сайт riobet casino
купить пылесос дайсон в санкт петербурге купить пылесос дайсон в санкт петербурге .
Привет! Решил собрать только те казино, где лично получил выплату. Критерии: с минимальным депозитом. Все рабочие ссылки — по адресу: https://farisgrill.foodonline.me/pochemu-ne-zapuskaetsya-lev-casino-alternativy-dlya-onlaynkazino-v-rossii/. Кто уже тестировал эти площадки?
see it here https://elara.ink/
пылесос дайсон спб dn-pylesos-4.ru .
переклейка стекла honor в великом новгороде недорого замена батареи ноутбука в великом новгороде цена
Futsal live scores, indoor football World Cup and continental championships
дайсон санкт петербург официальный dn-pylesos-kupit-4.ru .
dyson пылесос купить dyson пылесос купить .
why not try these out https://perena.lat
дайсон сервисный центр санкт петербург dn-pylesos-3.ru .
leadnest.click – Color palette felt calming, nothing distracting, just focused, thoughtful design.
My partner and I stumbled over here coming from a
different website and thought I might as well check things out.
I like what I see so now i’m following you. Look forward to going over your web page yet again.
Привет! После череды обманов наконец нашёл казино, где реально не задерживают выплаты. Смотрите на отзывы игроков. Список надёжных вариантов — тут: болливуд казино. Кто уже играл?
Всем привет! Много читаю про скам-казино, поэтому теперь тщательно проверяю всё: RTP. Лучшие онлайн казино 2025 года с моментальным выводом — здесь: Клубника clubnika casino регистрация. Делитесь своим опытом!
Xin chao 500 anh em, n?u anh em dang ki?m c?ng game khong b? ch?n d? g? g?c N? Hu thi vao ngay trang nay nhe. N?p rut 1-1: sun win. Chuc cac bac r?c r?.
Chào cả nhà, bác nào muốn tìm nhà cái uy tín để cày cuốc Game bài thì tham khảo địa chỉ này. Tốc độ bàn thờ: sunwin. Húp lộc đầy nhà.
Hello mọi người, ai đang tìm sân chơi đẳng cấp để chơi Casino thì vào ngay địa chỉ này. Đang có khuyến mãi: bj88. Chúc anh em may mắn.
WOW just what I was searching for. Came here by searching for new online casinos
Всем привет! Много читаю про неплатёжные площадки, поэтому теперь тщательно проверяю всё: условия вывода. Лучшие онлайн казино 2025 года с моментальным выводом — здесь: https://miamistudios.gr/studios/onlayn-kazino-s-tochki-zreniya-onlayn-kazino-oynau-tandalgan-klyuchevi-sozderge-aytylgan-zhandardyn-turaly/. Делитесь своим опытом!
Привет! Многие спрашивают, где сейчас выигрывают чаще всего. Ответ прост: смотрите на отзывы за последние 3 месяца. Я собрал актуальный рейтинг казино 2025 с минимальным депозитом — ссылка: https://mpro-build.co.za/onlayn-kazino-oynau-zhazylu-glory-kazinonyn-pkelik-sayttary/. Пробовали что-то из списка?
Hi các bác, nếu anh em đang kiếm trang chơi xanh chín để giải trí Nổ Hũ đừng bỏ qua chỗ này. Nạp rút 1-1: Link không bị chặn. Chiến thắng nhé.
пинап
For results
Best us online casinos fair gaming
for a positive change.
dyson v15 detect absolute купить в спб dn-pylesos-kupit-5.ru .
It’s the best time to make some plans for the longer term and it is time
to be happy. I’ve read this put up and if I may just I wish to recommend you few fascinating things or advice.
Perhaps you could write subsequent articles regarding this article.
I desire to learn even more things about it!
adderall online pharmacy
Приветствую! После череды неудач наконец нашёл надёжные онлайн казино. Ключевые критерии: отсутствие скрытых условий вейджера. Все подходящие площадки с русским интерфейсом собрал тут: Lev. Кто уже успел потестить?
Привет! Недавно искал игровой клуб, где можно спокойно играть на рубли, и понял: главное — лицензия. Собрал рабочие варианты с поддержкой МИР — ссылка: https://www.petlovestudio.com/ondey-bolmas-kazino-eldorado-onlayn-kazino-oynau-sigymayin-bul-saytta-skachayynyz/. Кто уже пробовал?
Good blog post. I absolutely appreciate this website. Stick with it!
why not check here https://agentsland.org
reachriver.click – Mobile version looks perfect; no glitches, fast scrolling, crisp text.
basics https://unchainx.org
бунгало краби как доехать из аэропорта бангкока в краби
Всем здравия! Недавно искал надёжное казино для игры на реальные деньги, и понял: половина сайтов — скам. Советую обращать внимание на минимальный депозит и читать отзывы. Свой топ-7 с моментальным выводом оставил здесь: clubnika casino. Пишите, кто что знает по теме!
retin a best online pharmacy
Всем здравия! Недавно искал, где реально можно получить честный выигрыш в онлайн рулетке. Оказалось, что многое зависит от провайдера игр. Проверяйте наличие SSL, читайте обзоры. Составил актуальный рейтинг на 2025 год с прямыми ссылками: Килограмм. Интересно, кто из вас уже играл здесь?
Актуальная публикация. Очень нужно поднимать темы благотворительности.
Спасибо за информацию. Постараюсь делиться
об этом друзьям.
Also visit my blog post :: Поддержать проект
you can try here https://aixbt.my
дайсон сервисный центр санкт петербург pylesos-dn-9.ru .
The search for the Better Than the Prom PDF is a search for quality entertainment. This book delivers. It is a top-tier romance. If you haven’t read it yet, now is the time. Download the story and enjoy the ride.
website here https://unchainx.org
L’angoisse monte crescendo dans “Le Boyfriend”, le dernier succès de Freida McFadden. Ce thriller psychologique est une réussite totale qui vous laissera pantois. Disponible en version numérique, c’est l’epub parfait pour les amateurs de lectures sombres et immersives. L’autrice joue avec nos nerfs et nos attentes avec une habileté diabolique. L’histoire est celle d’une descente aux enfers maquillée en conte de fées moderne. Ne passez pas à côté de ce livre qui a déjà conquis des milliers de lecteurs à travers le monde.
Découvrez le combat d’une vie. Ce livre est le récit d’une lutte acharnée. Le format epub du journal d’un prisonnier est pratique. Nicolas Sarkozy y défend son honneur. Un livre inoubliable.
click over here https://noon.gay/
Всем привет! Много читаю про скам-казино, поэтому теперь тщательно проверяю всё: RTP. Лучшие игровые сайты 2025 года с моментальным выводом — здесь: мелстрой казино. Делитесь своим опытом!
sitepilot.click – Navigation felt smooth, found everything quickly without any confusing steps.
Здравствуйте! Хочу предложить проверенный способ выбора казино: обращайте внимание на скорость вывода, а не только на бонусы. Я составил список платформ 2025 года, где можно играть анонимно. Всё по ссылке: https://opedrolazarini.com/onlayn-kazino-oynau-igerisine-kez-kelgen-kazino-kuraldary/. Делитесь впечатлениями!
netvortex.click – Bookmarked this immediately, planning to revisit for updates and inspiration.
пинап ап казино
Ребята, не тратьте время на левые сайты! Чтобы выбрать проверенное казино, обращайте внимание на: русскоязычную службу поддержки, а также на частоту выплат. Я лично протестировал десятки платформ и оставил только те, где нет скрытых условий. Весь список — по ссылке: клубника казино. Делитесь опытом!
take a look at the site here https://upshift.ltd
Друзья, расскажу по-честному: я долго искал надёжный слот-сайт, и наконец нашёл рабочие варианты. Советую смотреть на лицензию и избегать тех, где ограничения на вывод. Актуальный список лучших платформ на 2025 — по ссылке: мелстройгейм. Пишите в комментариях, какие казино вам зашли!
Good response in return of this difficulty with real arguments and telling all regarding that.
I’m truly enjoying the design and layout of your site.
It’s a very easy on the eyes which makes it much more pleasant for me to
come here and visit more often. Did you hire out a designer to create your theme?
Great work!
riobet официальный сайт
Hello m?i ngu?i, ai dang tim ch? n?p rut nhanh d? cay cu?c Game bai thi xem th? trang nay nhe. T?c d? ban th?: https://pacebhadrak.org.in/#. V? b? thanh cong.
https://community.wongcw.com/blogs/1203328/Melbet-Bonus-Boost-Code-MEL200VIP-130-Extra
Heya i am for the first time here. I found this board and I find It really useful & it helped me out a
lot. I hope to give something back and aid others like you aided
me.
mexica pharmacy online review https://images.google.mk/url?sa=t&url=https%3A%2F%2Fonlinepharmeasy.shop viagra online pharmacy
Здравствуйте! Хочу предложить проверенный способ выбора казино: обращайте внимание на скорость вывода, а не только на бонусы. Я составил список платформ 2025 года, где можно играть анонимно. Всё по ссылке: https://iart.news/pitches/kauipsizdi-kazino-daymondtyn-ograblennyani-bastaushynyz-kerek-onlayn-kazino-oynau/. Делитесь впечатлениями!
Привет! Хочу предупредить новичков: не все казино онлайн одинаково полезны. Чтобы не слить депозит и получить выигрыш, проверяйте наличие лицензии и изучайте отзывы. Я составил подборку рабочих вариантов с минимальным депозитом от 10 рублей — смотрите тут: https://www.bsb-schuler.de/onlayn-kazino-onlayn-kazino-oynau-kto-ekenin/. Делитесь опытом!
For a breakdown
best personal loan rates same day
to prepare for the future.
site here https://upshift.ink/
Point very well used!!
Ребята, а вы знаете, где сейчас дают фриспины без отыгрыша? Я проверил десятки платформ, оставил только те, где реально работают в РФ. Ссылка на подборку: Килограм казино kilogram. Обсуждаем!
look at this website https://noon.lat/
Всем здравия! Недавно искал, где реально можно выиграть в онлайн слотах. Оказалось, что многое зависит от RTP автомата. Проверяйте статистику выплат, читайте обзоры. Составил актуальный рейтинг на 2025 год с прямыми ссылками: Lev. Интересно, кто из вас уже играл здесь?
go right here https://hyperunit.us
check out the post right here https://elara.uno/
go now https://tophat.lat
explanation https://perena.cc/
find here https://upshift.ink
Привет! Решил собрать только те казино, где лично получил выплату. Критерии: с минимальным депозитом. Все рабочие ссылки — по адресу: Clubnika казино. Кто уже тестировал эти площадки?
Привет! Хочу предупредить новичков: не все казино онлайн одинаково полезны. Чтобы не слить депозит и получить выигрыш, проверяйте условия вывода и изучайте статистику выплат. Я составил подборку рабочих вариантов с минимальным депозитом от 10 рублей — смотрите тут: Драгон Мани казино РІ Казахстане. Делитесь опытом!
Visit Your URL https://upshift.ink/
Very good article! We are linking to this particularly great content on our site.
Keep up the good writing.
doxycycline best online pharmacy https://clients1.google.ae/url?q=https%3A%2F%2Fcanadianpharmeasy.shop canada pharmacy no prescription needed
check that https://badai.one/
Приветствую! После череды неудач наконец нашёл честные онлайн казино. Ключевые критерии: RTP выше 96%. Все подходящие площадки с русским интерфейсом собрал тут: https://mthwakazibrands.com/ket-kazinonyn-tegin-aynalymdary-bar-klientter-onlayn-kazino-oynau-kazhet/. Кто уже успел потестить?
Всем привет! Много читаю про неплатёжные площадки, поэтому теперь тщательно проверяю всё: RTP. Лучшие игровые сайты 2025 года с моментальным выводом — здесь: lev casino. Делитесь своим опытом!
click resources https://aixbt.buzz
look these up https://heyanon.cc
SALT TRICK FOR MEN
legitimate online pharmacy
Oh my goodness! Awesome article dude! Thanks, However I am
experiencing problems with your RSS. I don’t know why
I am unable to join it. Is there anybody getting the same RSS issues?
Anyone who knows the solution will you kindly respond?
Thanx!!
https://penzu.com/p/b1da2f73faabecb5
Ребята, а вы знаете, где сейчас дают бонусы за регистрацию? Я проверил десятки казино, оставил только те, где реально не обманывают. Ссылка на подборку: https://www.beenatural.buzz/uncategorized/chto-oznachaet-bar-v-kazino-igrayte-v-onlaynkazino-na-russkom-yazyke/. Обсуждаем!
I have to thank you for the efforts you have put in penning this website.
I’m hoping to see the same high-grade blog posts from you later on as well.
In fact, your creative writing abilities has encouraged me to get
my own, personal website now 😉
Привет! После череды обманов наконец нашёл платформу, где реально не задерживают выплаты. Смотрите на наличие лицензии. Список надёжных вариантов — тут: https://pavingaccessories.com/7125-2/. Кто уже играл?
wikipedia reference https://cwap.xyz
he has a good point https://flaunch.cc/
great publish, very informative. I ponder why the other
experts of this sector don’t realize this. You should continue your writing.
I am sure, you’ve a great readers’ base already!
searchrocket.click – Content reads clearly, helpful examples made concepts easy to grasp.
their explanation https://tophat.cc
visit this site https://gofundmeme.us/
Привет всем! Решил поделиться, как найти платящее онлайн платформу в 2025 году. Главное — не гнаться за большими бонусами, а смотреть на лицензию и отзывы реальных игроков. Я собрал список проверенных площадок с фриспинами без отыгрыша — вот тут: vovan casino официальный сайт. Кто уже пробовал?
https://ardinform.com/news/coinsbar_bezopasnyj_i_nadezhnyj_kriptoobmennik_v_odesse/2025-09-19-23545
Bonuses https://tophat.cc/
Привет! Недавно искал онлайн-платформу, где можно спокойно вывести выигрыш, и понял: главное — скорость выплат. Собрал рабочие варианты с поддержкой Сбербанк — ссылка: сукааа казино. Кто уже пробовал?
For the offer
can i purchase zetia
to save money.
SALT TRICK FOR MEN
navigate to this site https://orbitcryptoai.org
Homepage https://colend.my
Всем здравия! Недавно искал, где реально можно вывести деньги в онлайн слотах. Оказалось, что многое зависит от провайдера игр. Проверяйте статистику выплат, читайте обзоры. Составил актуальный рейтинг на 2025 год с прямыми ссылками: болливуд казино. Интересно, кто из вас уже играл здесь?
Друзья, подскажите, куда лучше играть в 2025? Сам недавно протестировал кучу игровых сайтов — большинство тянут с выплатами. Остановился на тех, где есть поддержка рубля и без верификации. Полный список с RTP и бонусами — по ссылке: казино эльдорадо рабочие зеркала. Кто с чем сталкивался?
Hi các bác, nếu anh em đang kiếm trang chơi xanh chín để giải trí Tài Xỉu thì vào ngay chỗ này. Đang có khuyến mãi: Game bài đổi thưởng. Chiến thắng nhé.
navigate to this site https://badai.one/
очки сидоренко, очки вакуумные сидоренко, очки сидоренко купить, очки сидоренко отзывы
очки сидоренко, очки вакуумные сидоренко, очки сидоренко купить, очки сидоренко отзывы
Пользователи часто делятся личным опытом по этому вопросу.
I’ve been researching Paybis for a while now, especially after going through financial trouble, and I’m still not completely certain whether it deserves
all the attention it gets. Still, it’s certainly a noticeable name
in the digital asset market, particularly for people in Germany who are trying to get back on track.
From what I understand, Paybis presents itself as a well-established cryptocurrency service that supports regular bank transactions, something many platforms either limit or complicate.
What initially caught my eye is how Paybis seems to bridge traditional German banking methods with
the crypto world. Many exchanges focus only on crypto-to-crypto trades,
while Paybis allows users to buy crypto using credit cards.
I’m not saying the process is perfect, but it does seem aimed at beginners rather
than just advanced traders.
Another aspect worth noting is the selection of supported assets.
Paybis doesn’t restrict itself to Bitcoin and Ethereum only.
Instead, it offers multiple altcoins, which might attract users who are exploring options.
Still, things like asset availability are
worth checking before making decisions.
Security and compliance also come up often around Paybis.
The platform highlights identity verification,
which can feel professional for users in Germany, though others might see it as
restrictive. I’m still undecided, but it does suggest Paybis tries to
operate as a long-term marketplace.
When it comes to fees, reviews seem mixed.
Some say Paybis is transparent about costs, while others note that pricing can vary by payment method.
This isn’t unusual in the crypto industry, but it means users should compare alternatives before moving money.
Overall, I wouldn’t call Paybis the best option,
but it does seem like a platform worth checking out, especially
for someone in Germany trying to build a new starting point.
I’m still forming my opinion, but it seems interesting enough to justify further research.
Chào cả nhà, nếu anh em đang kiếm nhà cái uy tín để gỡ gạc Game bài thì xem thử địa chỉ này. Uy tín luôn: Tải app BJ88. Chiến thắng nhé.
Привет! Недавно искал онлайн-платформу, где можно спокойно вывести выигрыш, и понял: главное — скорость выплат. Собрал рабочие варианты с поддержкой МИР — ссылка: https://www.barnardaccounting.com/kak-vyvesti-dengi-s-sucaaa-bez-blokirovki-karty-igrayte-v-onlaynkazino/. Кто уже пробовал?
Ребята, а вы знаете, где сейчас дают бонусы за регистрацию? Я проверил десятки казино, оставил только те, где реально работают в РФ. Ссылка на подборку: Мелстрой гейм. Обсуждаем!
a knockout post https://blnk.my
More Bonuses https://gofundmeme.us/
BAKING SODA TRICK FOR MEN
online mexican pharmacy https://www.google.com.ar/url?q=https%3A%2F%2Fonlinepharmeasy.shop best online pharmacies
the original source https://prismagent.agency
Привет! Недавно искал игровой клуб, где можно спокойно вывести выигрыш, и понял: главное — отзывы. Собрал рабочие варианты с поддержкой МИР — ссылка: Килограмм зеркало. Кто уже пробовал?
Всем привет! Уже третий год играю в игровые клубы, и за это время понял главное: выбирайте площадки с быстрыми выплатами. Избегайте тех, где требуют паспорт или тормозят с выводом. Лучшие казино РФ с поддержкой СБП собрал здесь: лев казино. Кто что может добавить?
Hmm is anyone else encountering problems with the pictures on this blog loading?
I’m trying to determine if its a problem on my end or if it’s the blog.
Any feed-back would be greatly appreciated.
Hmm is anyone else having problems with the images on this blog loading?
I’m trying to figure out if its a problem on my end
or if it’s the blog. Any suggestions would be
greatly appreciated.
read the article https://hyperunit.us
pet pharmacy online
https://www.d-ushop.com/forum/topic/87690/promo-code-1xbet-mongolia:-1xvatout-%E2%80%93-%E2%82%AC130-bonus
Всем здравия! Недавно искал рабочий игровой клуб для игры на реальные деньги, и понял: половина сайтов — скам. Советую обращать внимание на минимальный депозит и читать обзоры. Свой топ-7 с моментальным выводом оставил здесь: мелстрой гейм. Пишите, кто что знает по теме!
Привет! Недавно искал игровой клуб, где можно спокойно вывести выигрыш, и понял: главное — отзывы. Собрал рабочие варианты с поддержкой Сбербанк — ссылка: РљСЌС‚ казино РІ Казахстане. Кто уже пробовал?
Greetings! This is my first visit to your blog! We are a collection of volunteers and starting a new initiative in a community
in the same niche. Your blog provided us valuable
information to work on. You have done a wonderful
job!
I’m not that much of a online reader to be honest but your blogs really nice,
keep it up! I’ll go ahead and bookmark your site to come back in the future.
Many thanks
For pros
quicken loans live chat
for helpful resources.
My brother recommended I might like this web site.
He was totally right. This post truly made my day. You cann’t imagine simply
how much time I had spent for this info! Thanks!
Привет! Хочу предупредить новичков: не все игровые площадки одинаково полезны. Чтобы не слить депозит и получить выигрыш, проверяйте условия вывода и изучайте статистику выплат. Я составил подборку рабочих вариантов с минимальным депозитом от 10 рублей — смотрите тут: https://www.bjom.in/eldorado-kazino-onlayn-kazino-oynau-karastyrylymyn-kundelikti-aynalysy/. Делитесь опытом!
Web Site https://tophat.ink
you can look here https://kyros.ink
Привет! Решил собрать только те игровые клубы, где лично получил выплату. Критерии: вывод до 10 минут. Все рабочие ссылки — по адресу: Килограм казино KiloGram. Кто уже тестировал эти площадки?
Hi there mates, nice piece of writing and pleasant arguments commented here,
I am genuinely enjoying by these.
Hi to every one, the contents present at this website are actually amazing
for people experience, well, keep up the good work fellows.
blog here https://tophat.ink/
More Bonuses https://verio.buzz/
Hi cac bac, n?u anh em dang ki?m trang choi xanh chin d? g? g?c N? Hu d?ng b? qua con hang nay. N?p rut 1-1: sun win. Chuc anh em may m?n.
great post to read https://aixbt.my/
Our site https://askthehive.org/
Привет! После череды обманов наконец нашёл казино, где реально не задерживают выплаты. Смотрите на отзывы игроков. Список надёжных вариантов — тут: СЃСѓРєР° fxmag.ru. Кто уже играл?
Ребята, не тратьте время на левые сайты! Чтобы выбрать рабочее казино, обращайте внимание на: русскоязычную службу поддержки, а также на частоту выплат. Я лично протестировал десятки платформ и оставил только те, где нет скрытых условий. Весь список — по ссылке: newretrocasinos.ru РќРѕРІРѕРµ Ретро. Делитесь опытом!
La justice est-elle aveugle ou borgne ? C’est la question que pose ce livre brûlant. Nicolas Sarkozy y répond avec sa fougue habituelle. Téléchargez l’epub du journal d’un prisonnier pour suivre son raisonnement. L’ouvrage est une critique acerbe des dérives du système judiciaire français. Une lecture qui ouvre les yeux sur les réalités du pouvoir. https://lejournaldunprisonnierepub.site/ Livre Sarkozy Le Journal D Un Prisonnier
check out this site https://colend.lat/
https://dodeascholar.com/gdzie-inwestowac-pieniadze-w-polsce/ Gdzie inwestowac pieniadze w Polsce poza gielda
Great blog right here! Also your web site lots up very fast!
What host are you the use of? Can I get your associate link on your host?
I wish my web site loaded up as quickly as yours lol
My blog post … 슬롯사이트추천
site here https://exponent.lat
find more information https://asterdex.lat
Having read this I believed it was rather enlightening.
I appreciate you finding the time and effort to put this
information together. I once again find myself spending a lot of time both reading and
leaving comments. But so what, it was still worthwhile!
online pharmacy cialis
useful content https://cytonic.cc
BAKING SODA TRICK FOR MEN
Chào anh em, nếu anh em đang kiếm sân chơi đẳng cấp để gỡ gạc Tài Xỉu thì tham khảo địa chỉ này. Không lo lừa đảo: https://homemaker.org.in/#. Chiến thắng nhé.
Привет! Решил собрать только те игровые клубы, где лично получил выплату. Критерии: без паспорта. Все рабочие ссылки — по адресу: Килограмм. Кто уже тестировал эти площадки?
When I originally commented I clicked the “Notify me when new comments are added” checkbox
and now each time a comment is added I get several e-mails with the same comment.
Is there any way you can remove me from that service? Many thanks!
Привет! Многие спрашивают, где сейчас дают реальные выплаты. Ответ прост: смотрите на провайдеров слотов. Я собрал актуальный рейтинг казино 2025 с фриспинами за регистрацию — ссылка: Мелстрой казино. Пробовали что-то из списка?
reference https://prismagent.org
dig this https://slop-club.org/
navigate to these guys https://flaunch.cc
Привет! После череды обманов наконец нашёл платформу, где реально платят. Смотрите на отзывы игроков. Список надёжных вариантов — тут: Mellstroy сайт. Кто уже играл?
Привет! Если вы ищете платформу с джекпотами — не гонитесь за громкими названиями. Лучше смотрите статистику. Мой проверенный список — тут: лев казино. Кто что добавит?
Hi there colleagues, nice post and nice urging commented here,
I am actually enjoying by these.
Feel free to surf to my web blog … 토토사이트
Currently it looks like BlogEngine is the preferred blogging platform available right now.
(from what I’ve read) Is that what you are using on your blog?
BAKING SODA TRICK FOR MEN
I’d like to find out more? I’d want to find out some additional information.
this hyperlink https://perena.cc/
more helpful hints https://hyperunit.cc
For highlights
real money slots for beginners
for clear evidence.
Ребята, а вы знаете, где сейчас реально выиграть в онлайн-казино? После десятков проверок остановился на честных клубах. Важно: минимальный депозит. Актуальный рейтинг с джекпотами и кэшбэком — по ссылке: https://esquadrialider.com.br/fontan-igrayte-v-onlaynkazino-v-kazakhstane/. Обсуждаем!
https://helikon.com.ua/ru/2025/09/chto-takoe-majning-kriptovaljut-i-kak-on-rabotaet/
Друзья, не тратьте время на левые сайты! Играйте только в честные казино с быстрым выводом. Мой личный топ с реальными выплатами — по ссылке: Мелстрой казино. Кто что может порекомендовать?
websites https://astake.org
read more https://exponent.my
canadian online pharmacies https://www.google.com.na/url?sa=t&url=https%3A%2F%2Fcanadianpharmeasy.shop top online pharmacies
pop over to this site https://kyros.ink
discover this info here https://orbitcryptoai.pro/
Друзья, не тратьте время на левые сайты! Играйте только в проверенные казино с поддержкой рубля. Мой личный топ с реальными выплатами — по ссылке: килограмм казино. Кто что может порекомендовать?
не работает touch id iphone камера не фокусируется
Привет! Многие спрашивают, где сейчас работают без обмана. Ответ прост: смотрите на провайдеров слотов. Я собрал актуальный рейтинг казино 2025 с минимальным депозитом — ссылка: СЃСѓРєР° казино. Пробовали что-то из списка?
browse around here https://pactswap.cc/
I believe everything said was actually very reasonable.
But, think on this, suppose you added a little information? I mean, I
don’t want to tell you how to run your website,
but suppose you added a headline that grabbed folk’s attention? I mean Santa Claus Christmas Ball Tutorial Adobe Illustrator.
– My Downloadables is a little vanilla. You ought to glance at Yahoo’s
home page and watch how they create news headlines to grab viewers interested.
You might add a related video or a related picture or two to get readers excited about everything’ve got to say.
In my opinion, it might make your posts a little livelier.
internet https://kyros.lat
visit their website https://tophat.lat/
online mexican pharmacy https://maps.google.de/url?q=https%3A%2F%2Fonlinepharmeasy.shop india pharmacy online
Singapore’ѕ focus on excellence mɑkes secondary school math
tuition key fօr Secondary 1 students to aim fⲟr top grades from ⅾay
ⲟne.
Haha sia, Singapore kids make math victory lօok effortless globally!
Ϝor parents, progress fuel wth Singapore math tuition’ѕ passion. Secondary math tuition іnterest ignites.
Tһrough secondary 1 math tuition, clarity algebraic.
Secondary 2 math tuition addresses tһe distinct difficulties of thiѕ grade level.
Secondary 2 math tuition targets transitional рroblems from Ѕec 1.
Ԝith focus οn indices, secondary 2 math tuition alleviates adaptation. Secondary 2
math tuition smooths tһe discovering curve.
With O-Levels ᧐n the waү, secondary 3 math exams highlight
tһe requirement fօr top performance. These exams examine innovative services.
Ӏn Singapore, it lines ᥙр wіth tech developments.
Secondary 4 exams ɑre crucial f᧐r sensory knowing in Singapore’s system.
Secondary 4 math tuition utilizes aromas fߋr recall.
Tһiѕ strategy boosts Օ-Level memory. Secondary 4
math tuition engages senses.
Exams аre a checkpoint, ƅut math remains a vital ability іn thе AΙ еra, supporting educational
tutoring bots.
Excellence іn mathematics rеquires loving mathematics ɑnd integrating principles іnto everyday life.
Ϝor targeted revision, practicing papers fгom multiple secondary
schools іn Singapore highlights arеas needіng tutor focus.
Online math tuition е-learning platforms empower Singapore pupils tо excel іn exams
by providing customized learning paths based ⲟn diagnostic tests.
Power leh, relax parents, youг kid going secondary school wilⅼ grow stronger, no neеd tо stress them out unnecessarily.
Feel free tߋ surf to my web blog – math Tuition singapore
Друзья, расскажу по-честному: я долго искал казино, которое платит, и наконец нашёл рабочие варианты. Советую смотреть на скорость обработки вывода и избегать тех, где скрытые комиссии. Актуальный список лучших платформ на 2025 — по ссылке: mellstroy casino. Пишите в комментариях, какие казино вам зашли!
Друзья, не тратьте время на левые сайты! Играйте только в честные казино с поддержкой рубля. Мой личный топ с реальными выплатами — по ссылке: mellstroy game. Кто что может порекомендовать?
useful site https://orbitcryptoai.cloud/
find out here https://blnk.lat/
More Bonuses https://aixbt.my
learn this here now https://heyanon.cc
BAKING SODA TRICK FOR MEN
you can try here https://elara.ink/
Please let me know if you’re looking for a article writer for your site.
You have some really great articles and I feel I would be a good asset.
If you ever want to take some of the load off, I’d absolutely love to write some content for your blog in exchange for a link back to mine.
Please blast me an e-mail if interested. Regards!
useful content https://exponent.my
click this https://heyanon.lat
special info https://gofundmeme.cc/
Привет! Хочу предупредить новичков: не все онлайн слот-сайты одинаково полезны. Ищите те, где есть прозрачные правила, и обязательно сверяйтесь с независимыми обзорами. Я нашёл несколько платформ 2025 года с бонусами без вейджера — всё собрано здесь: сукааа казино. Кто уже успел попробовать?
Xin chào 500 anh em, bác nào muốn tìm cổng game không bị chặn để chơi Tài Xỉu thì xem thử con hàng này. Tốc độ bàn thờ: https://gramodayalawcollege.org.in/#. Húp lộc đầy nhà.
Привет! Хочу предупредить новичков: не все казино онлайн одинаково полезны. Чтобы не слить депозит и получить выигрыш, проверяйте RTP слотов и изучайте статистику выплат. Я составил подборку рабочих вариантов с минимальным депозитом от 10 рублей — смотрите тут: Лев казино. Делитесь опытом!
check here https://heyanon.pro
BLUE SALT TRICK FOR MEN
Take a look at my homepage; Highstake Sweeps
Друзья, расскажу по-честному: я долго искал казино, которое платит, и наконец нашёл рабочие варианты. Советую смотреть на наличие демо-режима и избегать тех, где ограничения на вывод. Актуальный список лучших платформ на 2025 — по ссылке: https://ogrodzenia.lubin.pl/top5-onlayn-kazino-po-rezultatam-oprosov-v-rf/. Пишите в комментариях, какие казино вам зашли!
click reference https://blendfun.cc/
Всем здравия! Недавно искал рабочий игровой клуб для игры на рубли, и понял: половина сайтов — скам. Советую обращать внимание на минимальный депозит и читать отзывы. Свой топ-7 с моментальным выводом оставил здесь: клубника казино. Пишите, кто что знает по теме!
Detailed review
secured loans
for improved results.
Hello! Do you know if they make any plugins to help with Search Engine Optimization? I’m trying to get my blog to rank for some targeted keywords but I’m
not seeing very good success. If you know of any please share.
Many thanks!
article https://badai.sbs
check this link right here now https://agents-land.org/
browse around here https://exponent.my
Devney Perry has delivered a hit with Shield of Sparrows. The epub format is the best way to get it. You can start reading right away. Perry’s narrative is full of heart. The digital edition is perfect for the modern reader. Whether you use a phone or a tablet, this ebook is a great choice. Don’t wait to read this book. Get the digital version today.
The hype surrounding This Book Will Bury Me is entirely justified. Ashley Winstead has crafted a narrative that feels dangerous and alluring all at once. For those who curate their libraries digitally, adding this epub to your collection is a must. The format is perfect for highlighting your favorite passages, and trust me, there will be many lines you want to remember. It is a story that explores the darker corners of the human condition while remaining entertaining and fast-paced. If you are looking for a book that will bury you in suspense and emotion, you have found it. Download the digital version and prepare to ignore the rest of the world until you finish.
more helpful hints https://universalx.cc
check over here https://askthehive.org/
This book is a dark journey into the heart of a cult. The details are chilling, and the suspense is high. Readers searching for the The Last Housewife epub will not be disappointed. The narrative is fast-paced and engaging. It is a story about the price of silence and the power of speaking out. A must-read for fans of psychological suspense.
Chào anh em, nếu anh em đang kiếm chỗ nạp rút nhanh để giải trí Tài Xỉu thì xem thử con hàng này. Tốc độ bàn thờ: Link không bị chặn. Húp lộc đầy nhà.
Way cool! Some extremely valid points! I appreciate you writing this article
and also the rest of the website is also very good.
Ребята, не тратьте время на левые сайты! Чтобы выбрать платящее казино, обращайте внимание на: поддержку рубля, а также на частоту выплат. Я лично протестировал десятки платформ и оставил только те, где выводят за час. Весь список — по ссылке: мелстрой гейм. Делитесь опытом!
Ребята, а вы знаете, где сейчас дают кэшбэк? Я проверил десятки платформ, оставил только те, где реально работают в РФ. Ссылка на подборку: онлайн казино. Обсуждаем!
Check Out Your URL https://upshift.ink
Experience the brilliance of Emily Henry in Great Big Beautiful Life. This book is a shining example of contemporary romance done right. The epub format allows for easy access and portability. You can read this great big story on the bus, in the park, or in bed. The writing is beautiful and evocative, painting a vivid picture of the characters’ lives. This is a book that you will cherish. Get the ebook version and enjoy a truly beautiful reading experience.
go to website https://agents-land.org/
BAKING SODA TRICK FOR MEN
vavada minimalni depozit vavada minimalni depozit
try this https://lombard.pw/
online pharmacy oxycontin
Всем здравствуйте! Хочу поделиться подборкой игровых площадок, где можно пополнять с баланса. Важно: высокая отдача. Актуальный рейтинг 2025 — здесь: new retro casino зеркало. Пишите, кто с чем сталкивался!
I delight in, lead to I discovered just what
I used to be having a look for. You’ve ended my four day long hunt!
God Bless you man. Have a nice day. Bye
Привет всем! Решил поделиться, как найти честное онлайн платформу в 2025 году. Главное — не гнаться за большими бонусами, а смотреть на официальную регистрацию и отзывы реальных игроков. Я собрал список проверенных площадок с быстрым кэш-аутом — вот тут: https://tesaraf.com/mellstroy-onlayn-kazino-bolashakpa-zhukteuge-senemiz-kazir/. Кто уже пробовал?
Hello m?i ngu?i, ngu?i anh em nao c?n c?ng game khong b? ch?n d? gi?i tri Game bai thi vao ngay trang nay nhe. Uy tin luon: https://pacebhadrak.org.in/#. Chuc anh em may m?n.
blog https://cytonic.biz/
Good day! Do you use Twitter? I’d like to follow you if that would
be ok. I’m definitely enjoying your blog and look forward to new
posts.
best online pharmacy review
Hello Dear, are you truly visiting this web page daily, if so
after that you will without doubt take pleasant know-how.
article https://perena.cfd
Приветствую! Только что вывел 15 тысяч с одного из игровых сайтов — и решил поделиться списком тех, кто реально работает в РФ. Смотрите на отзывы за 2025 год. Все проверенные варианты — тут: https://allbiznow.com/kakoe-luchshee-onlayn-kazino-vybrat-dlya-igry-v-rossii-nash-opyt/. Кто уже играл? Какие суммы выводили?
mostbet website oficial Republica Moldova https://mostbet2008.help
see here https://nucleusearn.cc
Ребята, не тратьте время на левые сайты! Чтобы выбрать рабочее казино, обращайте внимание на: русскоязычную службу поддержки, а также на отзывы. Я лично протестировал десятки платформ и оставил только те, где выводят за час. Весь список — по ссылке: https://fincapandereta.com/uznayte-kak-poluchit-vyigrysh-v-kilogrammakh-v-onlaynkazino-kilogram/. Делитесь опытом!
печать бумажных пакетов с логотипом Пакеты с логотипом заказать легко: выберите материал, размер, тип ручек и предоставьте макет логотипа. Мы предлагаем широкий выбор вариантов для любого бюджета.
have a peek at this website https://perena.lat/
more info here https://elara.uno
BLUE SALT TRICK FOR MEN
Привет! Хочу предупредить новичков: не все онлайн слот-сайты одинаково полезны. Ищите те, где есть реальный RTP, и обязательно сверяйтесь с рейтингами. Я нашёл несколько платформ 2025 года с минимальным депозитом от 10 руб — всё собрано здесь: болливуд казино. Кто уже успел попробовать?
Друзья, подскажите, куда лучше играть в 2025? Сам недавно протестировал кучу онлайн казино — большинство тянут с выплатами. Остановился на тех, где есть прозрачная отдача и вывод за 5 минут. Полный список с RTP и бонусами — по ссылке: https://aeplfbd.co.in/2026/01/10/klubnika-onlayn-kazino-oynau-kalay-kele-me-klubnika-video-onlayn-kazino-oynau-khatynda-kezdesu/. Кто с чем сталкивался?
Sizin makaleleriniz Visit site üzerine gerekli.
https://maps.google.bg/url?q=https://piode.nl/cub02/
find out here now https://hyperunit.us
Chao anh em, ai dang tim nha cai uy tin d? choi Da Ga d?ng b? qua d?a ch? nay. Khong lo l?a d?o: Nha cai Dola789. Chi?n th?ng nhe.
you could try this out https://verio.buzz
сайт riobet
imp source https://agents-land.org/
visit the site https://blnk.lat
For pros
licensed gambling sites
for curiosity.
pop over to these guys https://nucleusearn.cc/
go to this website https://agentsland.org/
BAKING SODA TRICK FOR MEN
Привет всем! Решил поделиться, как найти честное онлайн платформу в 2025 году. Главное — не гнаться за большими бонусами, а смотреть на лицензию и отзывы реальных игроков. Я собрал список проверенных площадок с минимальным депозитом — вот тут: https://calgarytrailfmc.ca/kazino-kazino-oynau-gta-5-online-kazinoda-ograblenieni-kezdesu/. Кто уже пробовал?
have a peek at this site https://kyros.wtf/
Друзья, подскажите, куда лучше играть в 2025? Сам недавно протестировал кучу онлайн казино — большинство тянут с выплатами. Остановился на тех, где есть поддержка рубля и на карту МИР. Полный список с RTP и бонусами — по ссылке: https://www.thepropelinitiative.org/nachnite-igrat-v-friends-kazino-onlayn-i-naslazhdaytes-azartnymi-igrami-v-kazakhstane/. Кто с чем сталкивался?
useful content https://xmaquina.us/
Great post. I was checking continuously this blog and I’m impressed!
Extremely useful information specially the last
part 🙂 I care for such info much. I was looking for this particular info for
a very long time. Thank you and best of luck.
It’s an amazing article in favor of all the online viewers; they will
get benefit from it I am sure.
baypharm https://www.google.az/url?q=https%3A%2F%2Fbaypharm.top baypharm
Привет! Недавно искал казино, где можно спокойно вывести выигрыш, и понял: главное — лицензия. Собрал рабочие варианты с поддержкой МИР — ссылка: мелстрой гейм. Кто уже пробовал?
Привет всем! Решил поделиться, как найти надёжное онлайн казино в 2025 году. Главное — не гнаться за большими бонусами, а смотреть на юрисдикцию и скорость выплат. Я собрал список проверенных площадок с быстрым кэш-аутом — вот тут: болливуд казино. Кто уже пробовал?
Деревянный плинтус
Keep on working, great job!
Linking this to my notes for my colleagues
If you are looking for a book that combines the pacing of a thriller with the depth of a character study, this is it. The relationship between Shay and the podcaster Jamie is complex and driving. Getting your hands on the The Last Housewife epub is essential for your reading list this year. The novel explores themes of consent, power, and identity. It is a provocative story that challenges the reader at every turn. Don’t miss out on one of the most talked-about books of the genre.
Почему пользователи выбирают площадку KRAKEN?
Маркетплейс KRAKEN заслужил доверие многочисленной аудитории благодаря сочетанию ключевых факторов.
Во-первых, это широкий и
разнообразный ассортимент, представленный сотнями продавцов.
Во-вторых, интуитивно понятный интерфейс KRAKEN,
который упрощает навигацию, поиск товаров и управление
заказами даже для новых пользователей.
В-третьих, продуманная система безопасных транзакций, включающая механизмы разрешения споров (диспутов) и возможность использования условного депонирования,
что минимизирует риски для обеих сторон сделки.
На KRAKEN функциональность сочетается с внимательным отношением к безопасности клиентов,
что делает процесс покупок более предсказуемым, защищенным и, как следствие,
популярным среди пользователей, ценящих анонимность и надежность.
Ребята, а вы знаете, где сейчас реально заработать в онлайн-казино? После десятков проверок остановился на честных клубах. Важно: минимальный депозит. Актуальный рейтинг с джекпотами и кэшбэком — по ссылке: Р’РћР’РђРќ . Обсуждаем!
BLUE SALT TRICK FOR MEN
Привет, форумчане! Решил поделиться лайфхаком: как найти игровую платформу, где реально платят без задержек. Главное — не верить рекламе, а смотреть на лицензию и реальные комментарии игроков. Я собрал проверенные варианты с выводом на Сбербанк — ссылка тут: мелстрой геймс. Кто уже пробовал?
Ребята, не верьте громким обещаниям! Настоящее игровое заведение должно иметь официальную лицензию. Я отсеял все подозрительные площадки и оставил только топовые варианты — смотрите здесь: https://aeplfbd.co.in/2026/01/10/kauipsiz-kyzmette-eldorado-online-casino-oynau-sigarlanbay-zhol/. Кто уже выводил оттуда?
Привет! Недавно искал игровой клуб, где можно спокойно играть на рубли, и понял: главное — скорость выплат. Собрал рабочие варианты с поддержкой МИР — ссылка: https://samratshukla.com/onlayn-kazino-zherde-samolet-oynau-ne/. Кто уже пробовал?
BAKING SODA TRICK FOR MEN
You have made some really good points there. I looked on the internet to find out
more about the issue and found most individuals will go along with your
views on this web site.
best online pharmacy technician https://www.google.im/url?sa=t&url=https%3A%2F%2Fcanbaypharm.top best online pharmacy oxycontin
Excellent blog here! Also your web site loads up very fast!
What web host are you using? Can I get your affiliate link to
your host? I wish my website loaded up as quickly as yours lol
Also visit my site is ilve a good brand ilve majestic
Thankfulness to my father who informed me concerning this blog, this blog is really amazing.
read more jax wallet
Привет! Хочу предупредить новичков: не все онлайн игровые порталы одинаково полезны. Ищите те, где есть возможность играть на рубли, и обязательно сверяйтесь с рейтингами. Я нашёл несколько платформ 2025 года с мобильной версией — всё собрано здесь: http://test3.itbezgranits.ru/2026/01/11/eldorado-kazino-tegin-aynalymdar-onlayn-kazino-oynau/. Кто уже успел попробовать?
Всем привет! Много читаю про неплатёжные площадки, поэтому теперь тщательно проверяю всё: RTP. Лучшие игровые сайты 2025 года с моментальным выводом — здесь: Ретро. Делитесь своим опытом!
More info
Online loans for bad credit instant decision
for networking.
In Singapore’s competitive academic landscape, secondary school math tuition plays ɑn essential role іn helping your post-PSLE child grasp abstract concepts еarly in Secondary 1.
Wah lor, Singapore’sconsistent tоp spot іn math іs commendable leh!
Dear moms аnd dads, rate dynamically with Singapore math tuition’ѕ vibrancy.
Secondary math tuition materials upgrade.
Secondary 1 math tuition patterns skill.
Тһe ߋutside secondary 2 math tuition sessions
ᥙѕe math to nature. Secondary 2 math tuition measures real-ᴡorld
angles. Adventurous secondary 2 math tuition refreshes minds.
Secondary 2 math tuition connects tߋ environments.
Secondary 3 math exams ɑre critical, preceding O-Levels, ѡhere gaps сɑn Ьe detrimental.
Excelling boosts creative expressions νia geometry. Іn Singapore, іt lines սp wіth innovation hubs.
Singapore’ѕ education sustains secondary 4
exams healthily. Secondary 4math tuition breaks encourage.
Тhіs focus increases Օ-Level. Secondary 4 math tuition sustains.
Beyond acing exams, math serves ɑѕ a fundamental skill in the
AI explosion, helping developers ϲreate systems tһat learn from vast datasets.
Тo stand oᥙt іn math, nurture a passion for it аnd
practice using mathematical concepts іn daily real-ѡorld contexts.
Practicing ρast math exam papers fгom diverse Singapore secondary schools іs crucial
for learning efficient shortcut methods іn exams.
Online math tuition е-learning in Singapore enhances exam performance Ьy
offering mock tests that mimic actual PSLE ⲟr O-Level formats.
Leh sia, don’t worry lah, your child wіll adjust tߋ secondary school,
lеt them go with᧐ut tension.
Herе іs my blog post: math tuition foor Secondary 2 (juicy.iptime.org)
Приветствую! Только что вывел 15 тысяч с одного из платформ — и решил поделиться списком тех, кто реально не блокирует аккаунты. Смотрите на отзывы за 2025 год. Все проверенные варианты — тут: new retro casino зеркало. Кто уже играл? Какие суммы выводили?
online pharmacies
Привет, форумчане! Решил поделиться лайфхаком: как найти онлайн казино, где реально платят без задержек. Главное — не верить рекламе, а смотреть на статус регулятора и реальные отзывы. Я собрал проверенные варианты с выводом на Сбербанк — ссылка тут: Р±РѕРЅСѓСЃС‹ Рё акции РІ онлайн казино. Кто уже пробовал?
Chào cả nhà, bác nào muốn tìm sân chơi đẳng cấp để gỡ gạc Đá Gà thì vào ngay con hàng này. Không lo lừa đảo: https://homemaker.org.in/#. Chúc các bác rực rỡ.
hop over to here jaxx liberty wallet
Ребята, не верьте громким обещаниям! Настоящее онлайн казино должно иметь положительную репутацию. Я отсеял все подозрительные площадки и оставил только платящие варианты — смотрите здесь: ЛЕВ лев РІС…РѕРґ. Кто уже выводил оттуда?
check my blog https://toast-wallet.net
отели на краби на пляже центара гранд бич краби
Приветствую! После череды неудач наконец нашёл надёжные онлайн казино. Ключевые критерии: RTP выше 96%. Все подходящие площадки с быстрым выводом собрал тут: https://simsww.com/blog/clubnika-onlayn-kazino-blokirovkaga-keri-zhauap/. Кто уже успел потестить?
Chào anh em, nếu anh em đang kiếm sân chơi đẳng cấp để gỡ gạc Đá Gà thì vào ngay chỗ này. Nạp rút 1-1: Link vào Dola789. Chúc các bác rực rỡ.
riobet online casino
https://latinverge.com/forums/topic/31050/generateur-de-code-promo-1xbet-2026-tapismax-bonus-130/view/post_id/217230
I love what you guys are up too. This kind of clever work
and reporting! Keep up the very good works guys I’ve added
you guys to my blogroll.
Take a look at my web blog: dental biohazard disposal
OMT’s proprietary analytical techniques mɑke dealing witһ difficult questions ѕeem lіke a game, aiding pupils develop an authentic
love fοr math and motivation to radiate in tests.
Discover tһe benefit of 24/7 online math tuition ɑt OMT, where engaging resources mɑke finding ߋut
enjoyable аnd effective f᧐r all levels.
The holistic Singapore Math technique, ѡhich builds multilayered ρroblem-solving abilities, highlights ѡhy
math tuition is vital fⲟr mastering tһе curriculum and gettіng ready for future professions.
primary math tuition constructs test endurance tһrough timed drills, mimicking tһe PSLE’s tᴡo-paper format аnd assisting trainees handle
tіme succеssfully.
Customized math tuition іn high school addresses specific findihg ᧐ut spaces in topics like calculus and
statistics, stopping tһem from impeding O Level success.
Tuition іn junior college mathematics gears սp trainees ѡith statistical methods
ɑnd likelihood versions neϲessary for translating data-driven questions
іn A Level documents.
OMT’ѕ exclusive curriculum boosts MOE standards ƅy providing scaffolded learning courses tһat slowly raise іn intricacy, building pupil
ѕeⅼf-confidence.
Multi-device compatibility leh, ѕo switch
оѵer from laptop to phone and keep improving tһose grades.
Math tuition οffers enrichment past the essentials, testing talented
Singapore pupils tօ intend for difference in exams.
Ηere іs my web-site math tuition center in singapore
риобет россия
Devney Perry has delivered a hit with Shield of Sparrows. The epub format is the best way to get it. You can start reading right away. Perry’s narrative is full of heart. The digital edition is perfect for the modern reader. Whether you use a phone or a tablet, this ebook is a great choice. Don’t wait to read this book. Get the digital version today. https://shieldofsparrowsepub.site/ Shield Of Sparrows Audiobook
This novel is a deep dive into the darkest corners of the human experience. The relationship between Shay and the cult leader is complex and disturbing. The The Last Housewife epub is the format of choice for many readers. The story is relentless in its pacing and emotional impact. It is a thriller that refuses to compromise. If you want a book that will shake you, this is it. https://thelasthousewifeepub.site/ The Last Housewife Novel
Chào cả nhà, người anh em nào cần trang chơi xanh chín để gỡ gạc Tài Xỉu thì tham khảo con hàng này. Đang có khuyến mãi: https://pacebhadrak.org.in/#. Về bờ thành công.
Артифика создать фото нейросетью
description jax wallet
Great Big Beautiful Life is a book that challenges you. Emily Henry writes about difficult choices with honesty. The epub edition allows you to engage with these challenges. It is a great way to read this beautiful and complex story. The writing is thought-provoking. This is a book that stays with you. Get the digital copy and start thinking. https://greatbigbeautifullifeepub.site/ Great Big Beautiful Life: Reese’s Book Club
For the discount
cost of cheap promethazine without insurance
for motivation.
vavada aplikacija službena http://www.vavada2007.help
baypharm https://cse.google.com.pk/url?sa=t&url=https%3A%2F%2Fbaypharm.top online pharmacy forum
I’m really enjoying the theme/design of your
blog. Do you ever run into any browser compatibility problems?
A couple of my blog visitors have complained about my website not working correctly in Explorer but looks great in Safari.
Do you have any ideas to help fix this issue?
Also visit my web blog … waste disposal in dentistry
best online pharmacy tramadol
Hey! Do you know if they make any plugins to protect against hackers?
I’m kinda paranoid about losing everything I’ve worked hard
on. Any suggestions?
Chao c? nha, ngu?i anh em nao c?n c?ng game khong b? ch?n d? choi N? Hu d?ng b? qua d?a ch? nay. Uy tin luon: Nha cai BJ88. Chuc cac bac r?c r?.
I loved as much as you will receive carried out right here.
The sketch is tasteful, your authored subject matter stylish.
nonetheless, you command get bought an impatience over that you wish be delivering the
following. unwell unquestionably come more formerly again since exactly the same nearly
a lot often inside case you shield this increase.
Also visit my website – lifecard for sale
mostbet pariuri live pe mobil http://mostbet2008.help/
This casino https://abriliva.net/2025/07/26/best-100-percent-free-spins-local-casino-added-bonus-july-2025/ offers a great mix of classic slots and live dealer games. The platform feels well-designed, promotions are worth trying, and support is responsive, which adds confidence.
Great items from you, man. I have take into accout your stuff previous to and you’re simply too fantastic.
I really like what you have bought here, certainly like what you are stating and the way in which in which you assert it.
You are making it entertaining and you still care for to
stay it wise. I cant wait to read far more from you. That is actually
a terrific website.
my web blog; is ilve a good brand ilve majestic
home jaxx
a knockout post jaxx wallet
Hi there just wanted to give you a quick heads up. The text in your article
seem to be running off the screen in Ie. I’m not sure if
this is a formatting issue or something to do with internet browser compatibility but I
figured I’d post to let you know. The layout look great though!
Hope you get the issue solved soon. Kudos
Ребята, а вы знаете, где сейчас дают фриспины без отыгрыша? Я проверил десятки платформ, оставил только те, где реально не обманывают. Ссылка на подборку: лев казино. Обсуждаем!
Fantastic site. Lots of helpful information here.
I’m sending it to some buddies ans also sharing in delicious.
And obviously, thanks in your sweat!
Excellent post. Keep writing such kind of information on your
page. Im really impressed by your blog.
Hey there, You’ve done an incredible job. I will definitely digg it and individually suggest
to my friends. I’m confident they’ll be benefited from this web site.
Всем здравия! Недавно искал надёжное казино для игры на реальные деньги, и понял: половина сайтов — скам. Советую обращать внимание на наличие лицензии и читать мнения реальных пользователей. Свой топ-7 с моментальным выводом оставил здесь: мелстрой гейм казино. Пишите, кто что знает по теме!
a fantastic read https://toast-wallet.net
The darkness of the human heart is on full display in this gripping novel. Shay Deroy’s journey is one of pain, but also of power. The The Last Housewife epub allows you to carry this intense story in your pocket. The writing is visceral, making you feel every emotion the characters experience. It is a bold, uncompromising look at the world of cults. This is a thriller that will spark conversations. https://thelasthousewifeepub.site/ The Last Housewife Critique
For a book that is a visual stunner, read This Book Will Bury Me. Ashley Winstead paints scenes. The epub format frames them. It is a gallery. The story is picturesque. It is a book that will bury you in its imagery. If you want a digital book that is beautiful, this is the one. Download the epub and look. https://thisbookwillburymeepub.site/ Borrow This Book Will Bury Me: A Novel
baypharm
Make space in your digital library for Great Big Beautiful Life. Emily Henry’s newest release is a powerhouse of emotion and humor. The epub format allows you to carry this gem with you everywhere, ensuring you are never without a good book. The story is a beautiful examination of love in all its forms. It is a great read for anyone who enjoys contemporary fiction with a lot of heart. The convenience of the digital edition means you can start reading right now. Don’t let this beautiful story pass you by; get the ebook and enjoy the journey. https://greatbigbeautifullifeepub.site/ Great Big Beautiful Life Emily Henry Synopsis
Межкомнатные двери Wanmark: гармония стиля и надёжности
Межкомнатные двери Wanmark — это идеальное сочетание современного дизайна, качественных материалов и продуманной конструкции. Они станут не просто функциональным элементом вашего интерьера, но и его выразительной деталью, подчёркивающей безупречный вкус владельца.
Почему стоит выбрать https://dveri-moskv.ru/wanmark Wanmark?
• Премиальное исполнение. В производстве используются только проверенные материалы: каркас из массива сосны, щиты из МДФ толщиной 10 мм, жёсткий сотовый наполнитель. Такое сочетание гарантирует долговечность и стабильность формы.
• Эстетическая универсальность. Двери представлены в разнообразных цветовых решениях (белый, ваниль, серый шёлк и др.), а также в вариантах с остеклением и без. Это позволяет подобрать модель для любого интерьера — от классического до современного.
• Удобство монтажа. Телескопическая коробка и наличники упрощают установку, а возможность заказа доборов разной ширины (100, 150, 200 мм) делает монтаж комфортным даже при нестандартных толщинах стен.
• Гибкость размеров. Стандартные габариты полотна — 600×2000, 700×2000, 800×2000 и 900×2000 мм. При необходимости можно заказать двери нестандартных размеров (с шагом 50 мм, максимальная ширина — до 1000 мм, высота — до 2300 мм).
• Практичность в эксплуатации. Покрытие акриловой эмалью не только придаёт двери изысканный внешний вид, но и обеспечивает устойчивость к повседневным воздействиям, облегчая уход за поверхностью.
• Звукоизоляция. Конструкция двери способствует снижению уровня шума между помещениями, создавая комфортную атмосферу в каждой комнате.
Где можно установить?
Двери Wanmark подойдут для:
• жилых помещений (спальня, гостиная, детская, кухня, прихожая);
• санузлов (ванная, туалет);
• офисных пространств (перегородки между кабинетами, вход в переговорную и т. д.).
Комплектация на выбор:
• только полотно;
• полотно + телескопическая коробка и наличники;
• полный комплект с доборами (по необходимости).
Межкомнатные двери Wanmark — это инвестиция в уют и эстетику вашего пространства. Они сочетают в себе:
• безупречную геометрию;
• надёжность конструкции;
• лаконичность дизайна;
• удобство эксплуатации.
Выберите Wanmark — и ваш интерьер заиграет новыми красками!
https://dtf.ru/pro-smm
go to this website jaxx
riobet на деньги онлайн
To access
self employed small loans for bad credit
to boost your productivity.
Greetings! I’ve been reading your blog for some time now and
finally got the courage to go ahead and give
you a shout out from Kingwood Tx! Just wanted to say keep up the great work!
website link https://toast-wallet.net
visit here jaxx wallet
Attractive section of content. I just stumbled upon your site and in accession capital to assert that I get in fact enjoyed account your blog posts. Any way I’ll be subscribing to your augment and even I achievement you access consistently quickly.
https://www.micronint.com/2026/01/27/les-avancees-technologiques-diron-tv-pro-max/
この記事を 共有していただき 感謝します。医療
クラウドファンディングは、手術費を 払えない 多くの人にとって 命綱となる ものです。目を 救う チャリティは とても 素晴らしい ですね。
Feel free to visit my web site: 患者支援ネットワーク
Informative article, just what I wanted to find.
online rx pharmacy https://www.google.sr/url?sa=t&url=https%3A%2F%2Fcanbaypharm.top best online pharmacy phentermine
Chào anh em, người anh em nào cần cổng game không bị chặn để gỡ gạc Đá Gà đừng bỏ qua chỗ này. Không lo lừa đảo: sun win. Về bờ thành công.
navigate to this website jaxx crypto
I read this paragraph fully concerning the difference of hottest and earlier technologies,
it’s amazing article.
Всем здравия! Недавно искал честную площадку для игры на рубли, и понял: половина сайтов — скам. Советую обращать внимание на минимальный депозит и читать мнения реальных пользователей. Свой топ-7 с моментальным выводом оставил здесь: mellstroy game зеркало. Пишите, кто что знает по теме!
восстановление iphone после влаги в великом новгороде замена сенсора на телефоне
you’re in reality a just right webmaster. The website loading velocity is incredible. It sort of feels that you are doing any unique trick. Also, The contents are masterpiece. you have done a wonderful job on this subject!
https://fin-banki.ru/rukovodstvo-po-investirovaniyu-v-kriptovalyuty-dlya-nachinayuschih/
Привет! Многие спрашивают, где сейчас работают без обмана. Ответ прост: смотрите на условия бонусов. Я собрал актуальный рейтинг казино 2025 с фриспинами за регистрацию — ссылка: сукааа казино. Пробовали что-то из списка?
I enjoy playing at this casino https://www.bigfishtackle.com/volerbet-casino-review-what-sets-it-apart-in-the/ because it feels secure and stable. Live tables are immersive, slots offer good variety, and the overall experience remains consistent over time.
питер туристический tury-v-piter.ru .
click now jax wallet
baypharm https://cse.google.co.ck/url?sa=t&url=https%3A%2F%2Fbaypharm.top baypharm
Hey! Do you use Twitter? I’d like to follow you if that would
be okay. I’m undoubtedly enjoying your blog and look forward to new updates.
go to these guys jaxx app
экскурсионный тур в санкт петербург экскурсионный тур в санкт петербург .
Your Domain Name https://toast-wallet.net
You could certainly see your enthusiasm within the work you write.
The world hopes for even more passionate writers such as you
who aren’t afraid to say how they believe. At all times go after your heart.
мои путешествия турфирма санкт петербург официальный сайт мои путешествия турфирма санкт петербург официальный сайт .
YOURURL.com jaxx wallet
онлайн работа бесплатно работа на удаленке
see it here jaxx crypto
For a directory
technique to win real money online casino
for problem-solving.
заменить дисплей +на айфон замена аккумулятора на iphone 15 pro
Xin chào 500 anh em, bác nào muốn tìm nhà cái uy tín để giải trí Đá Gà thì tham khảo địa chỉ này. Nạp rút 1-1: https://gramodayalawcollege.org.in/#. Chúc các bác rực rỡ.
see here https://toast-wallet.net
adsforge.click – Found practical insights today; sharing this article with colleagues later.
питер автобусные экскурсии по городу avtobusnye-ekskursii-po-spb.ru .
check out here download jaxx wallet
https://riobetcazino-24.ru/
Position well applied!.
seobeacon.click – Navigation felt smooth, found everything quickly without any confusing steps.
Привет! Недавно искал онлайн-платформу, где можно спокойно играть на рубли, и понял: главное — отзывы. Собрал рабочие варианты с поддержкой QIWI — ссылка: lev casino. Кто уже пробовал?
Truly loads of useful data.
Xin chao 500 anh em, ai dang tim san choi d?ng c?p d? g? g?c Tai X?u thi vao ngay ch? nay. N?p rut 1-1: Dola789. Chuc cac bac r?c r?.
https://ipv6.snipplr.com/view/50929/applescript-function-to-check-if-an-app-application-is-running-or-not
Ребята, не верьте громким обещаниям! Настоящее игровое заведение должно иметь прозрачную политику выплат. Я отсеял все подозрительные площадки и оставил только проверенные варианты — смотрите здесь: Мелстрой гейм. Кто уже выводил оттуда?
mexican best online pharmacy
baypharm
riobet online
Learn More download jaxx wallet
my website jaxx liberty
https://chessdatabase.science/wiki/Nouveau_Code_Promo_1xBet_2026_1XVATOUT_Bonus_Sport_130
“The Pearl” is a book about limits. The limits of luck, the limits of love, and the limits of human endurance. Kino pushes past all of them and breaks. It is a harrowing examination of what happens when a man refuses to submit to his fate. For a deep dive into existentialist themes in American literature, the pearl pdf is a key text. Kino’s struggle is the struggle of every person who has ever tried to assert their will against an indifferent universe.
Chào anh em, bác nào muốn tìm chỗ nạp rút nhanh để chơi Casino thì tham khảo con hàng này. Tốc độ bàn thờ: Tải Sunwin. Húp lộc đầy nhà.
click to read more download jaxx wallet
Chao c? nha, n?u anh em dang ki?m trang choi xanh chin d? gi?i tri Casino d?ng b? qua d?a ch? nay. T?c d? ban th?: Link vao BJ88. Chi?n th?ng nhe.
searchrocket.click – Navigation felt smooth, found everything quickly without any confusing steps.
What stood out about this casino https://vanisedainese.com.br/casino-mobile-france-encadrement-innovations-5/ is the variety of the games. Everything runs without issues, the design is clean, and there’s plenty of options to explore, which keeps it engaging.
рио бет
Для чего разработали хакерские инструменты равно макросы на игровом общее направление
For additional
Nationwide pay day loans
for innovative ideas.
Привет! Недавно искал игровой клуб, где можно спокойно играть на рубли, и понял: главное — лицензия. Собрал рабочие варианты с поддержкой Сбербанк — ссылка: клубника казино официальный сайт. Кто уже пробовал?
Здравствуйте! Хочу предложить проверенный способ выбора казино: обращайте внимание на наличие live-чата, а не только на бонусы. Я составил список платформ 2025 года, где можно играть анонимно. Всё по ссылке: онлайн казино. Делитесь впечатлениями!
online pet pharmacy https://www.google.com.gi/url?sa=t&url=https%3A%2F%2Fbaypharm.top online pharmacy reviews
find out this here jax wallet
Chào cả nhà, nếu anh em đang kiếm trang chơi xanh chín để giải trí Game bài thì tham khảo địa chỉ này. Tốc độ bàn thờ: Nhà cái Dola789. Chiến thắng nhé.
Hey! I know this is kinda off topic but I was wondering which blog platform are you using for this site?
I’m getting tired of WordPress because I’ve had problems
with hackers and I’m looking at alternatives for another
platform. I would be great if you could point me in the direction of a good platform.
тур в питер на 3 дня с проживанием и питанием из нижнего новгорода tury-v-piter.ru .
Spot on with this write-up, I seriously believe that
this web site needs a lot more attention. I’ll probably be returning to read through more, thanks for
the info!
best online pharmacy technician schools http://www.tifosy.de/url?q=https%3A%2F%2Fcanbaypharm.top best online pharmacy oxycodone 30mg
I really like what you guys are usually up too. This sort of clever work and coverage!
Keep up the fantastic works guys I’ve included you guys to blogroll.
поездка в санкт tury-v-piter.ru .
This article will help the internet users for building up new weblog or even a blog from start to end.
What i don’t realize is actually how you’re not actually much more well-preferred than you
might be now. You are very intelligent. You know therefore considerably on the subject of
this matter, produced me for my part consider
it from so many various angles. Its like men and women are
not fascinated until it is something to do with Lady gaga!
Your own stuffs nice. All the time handle it up!
Hey I am so grateful I found your weblog, I really
found you by accident, while I was browsing on Yahoo for something else, Nonetheless I am
here now and would just like to say thanks for a marvelous post and a all round interesting blog (I also love the theme/design), I
don’t have time to look over it all at the minute but
I have bookmarked it and also added your RSS feeds, so when I have
time I will be back to read a lot more, Please do keep up the superb
job.
большая обзорная экскурсия по санкт петербургу на автобусе avtobusnye-ekskursii-po-spb.ru .
I’ve been checking out Paybis for a while now, especially after having
a rough financial period, and I’m still not entirely sure whether it deserves
all the attention it gets. Still, it’s clearly a noticeable name in the digital
asset market, particularly for people in Germany who are trying to find new financial tools.
From what I understand, Paybis presents itself as a large-scale cryptocurrency service that supports fiat
payments, something many platforms either limit or complicate.
What initially caught my eye is how Paybis seems
to connect traditional German banking methods with the crypto world.
Many exchanges focus only on crypto-to-crypto trades, while
Paybis allows users to sell crypto using SEPA transfers.
I’m not saying the process is perfect, but
it does seem aimed at beginners rather than just advanced traders.
Another aspect worth noting is the selection of supported assets.
Paybis doesn’t restrict itself to just the top coins.
Instead, it offers multiple altcoins, which might attract
users who are exploring options. Still, things like liquidity are worth checking before making decisions.
Security and compliance also come up often around Paybis.
The platform highlights KYC checks, which can feel responsible for users in Germany, though
others might see it as inconvenient. I’m still undecided,
but it does suggest Paybis tries to operate as a legitimate marketplace.
When it comes to fees, reviews seem divided. Some say Paybis is transparent about
costs, while others note that pricing can depend
on currency. This isn’t unusual in the crypto industry, but it means users should compare alternatives before moving money.
Overall, I wouldn’t call Paybis perfect, but it does seem like a platform worth a closer look, especially for someone in Germany
trying to build a new starting point. I’m still forming my opinion,
but it seems interesting enough to justify further research.
экскурсионный автобус по санкт петербургу экскурсионный автобус по санкт петербургу .
For key points
can i purchase cephalexin
for crisis management.
Друзья, подскажите, куда лучше играть в 2025? Сам недавно протестировал кучу платформ — большинство тянут с выплатами. Остановился на тех, где есть лицензия и на карту МИР. Полный список с RTP и бонусами — по ссылке: Мелстрой. Кто с чем сталкивался?
baypharm
see it here jaxx wallet
A telegram announces a death, but the protagonist feels nothing. The Stranger by Albert Camus begins with apathy and ends with a revelation. It is a journey through the absurd, set against the vibrant backdrop of Algeria. If you are looking for The Stranger PDF to complete a reading assignment or to expand your literary horizons, this book is essential. It compels the reader to confront the naked reality of existence without the comfort of societal lies.
Caso queiras completar o jogo a 100%, lê o nosso guia sobre onde encontrar todas as Gem verdes, brancas, vermelhas, azuis, roxas e amarelas, Chaves, Níveis secretos, e como completar todos os jogos a 100%. You are using an outdated browser. Please upgrade your browser or activate Google Chrome Frame to improve your experience. O depósito mínimo é de 0,1 mBTC. Nos sites de cassinos online com o jogo Ninja Crash, você poderá jogar a versão de demonstração do slot doce. Ela será iniciada automaticamente ao iniciar o jogo. A versão demo é totalmente gratuita e está disponível para todos os usuários sem registro. Você pode encontrá-la através do mecanismo de busca do navegador pesquisando por “versão demo do Ninja Crash”. O jogo gratuito Ninja Crash é necessário para que os usuários se familiarizem rapidamente com a mecânica e as regras do slot sem investimento financeiro.
https://okoball.com.br/?p=40201
A slot Ninja Crash é um jogo dinâmico e emocionante sobre um tema extremamente relevante – a luta contra os doces. Donuts, gelados e outras alegrias desta vida voam de repente, e a sua tarefa como jogador parece muito difícil – repelir este ataque e destruir o maior número possível de doces. Parece interessante, então o jogo Ninja Crash no casino Sportingbet é para si. Depois que a conta estiver criada, você poderá jogar Ninja Crash com dinheiro real. No entanto, para sacar os ganhos, será necessário verificar seu perfil enviando uma foto ou escaneamento do seu passaporte. Assim o cassino saberá que você é uma pessoa real e maior de idade. Após a verificação, você terá acesso completo à plataforma Bwin. Depois que a conta estiver criada, você poderá jogar Ninja Crash com dinheiro real. No entanto, para sacar os ganhos, será necessário verificar seu perfil enviando uma foto ou escaneamento do seu passaporte. Assim o cassino saberá que você é uma pessoa real e maior de idade. Após a verificação, você terá acesso completo à plataforma Bwin.
What stood out about this casino https://wp.onlinecertificationguide.com/les-casinos-en-cryptomonnaies-revolution-du/ is the variety of the games. Everything runs smoothly, the design is clean, and there’s always something new to explore, which keeps it engaging.
Nicely put, Appreciate it!
anonymous jaxx wallet
https://www.bigfootpodiatry.com.au/1xbet-registration-promo-code-uganda-allinmax-e130-bonus_1/
Chào anh em, nếu anh em đang kiếm nhà cái uy tín để giải trí Casino thì xem thử chỗ này. Không lo lừa đảo: sun win. Chúc các bác rực rỡ.
1xbet canada promo code free bet
This blog was… how do I say it? Relevant!! Finally I have found something which
helped me. Appreciate it!
https://riobet-officialclub.ru/
https://www.diigo.com/item/note/bqkrd/dcu3?k=52829fd954abeb10e9b52b05584642e8
BLUE SALT TRICK FOR MEN
What i do not realize is actually how you’re no longer actually much
more neatly-favored than you may be now. You’re so intelligent.
You understand thus considerably in relation to this
matter, produced me personally consider it from a lot of
various angles. Its like men and women are not interested except it’s something to do
with Woman gaga! Your personal stuffs great. All the time deal with it
up!
Chao anh em, ngu?i anh em nao c?n san choi d?ng c?p d? g? g?c Game bai thi vao ngay d?a ch? nay. Dang co khuy?n mai: https://homemaker.org.in/#. Chuc cac bac r?c r?.
Very good data, With thanks!
BLUE SALT TRICK FOR MEN
Hello! This is kind of off topic but I need some help from an established blog.
Is it very difficult to set up your own blog? I’m not
very techincal but I can figure things out pretty fast.
I’m thinking about setting up my own but I’m
not sure where to start. Do you have any ideas or suggestions?
Thank you
imp source jaxx liberty
best online pharmacy without prescription
Друзья, подскажите, куда лучше играть в 2025? Сам недавно протестировал кучу платформ — большинство тянут с выплатами. Остановился на тех, где есть лицензия и без верификации. Полный список с RTP и бонусами — по ссылке: Mellstroy game зеркало. Кто с чем сталкивался?
mexican pharmacy online https://images.google.co.ke/url?sa=t&url=https%3A%2F%2Fbaypharm.top india pharmacy online
For free
current best personal loan rates
to seize the opportunity.
Привет! Если вы ищете клуб с частыми выплатами — не гонитесь за громкими названиями. Лучше смотрите реальные отзывы. Мой проверенный список — тут: Sykaaa. Кто что добавит?
BLUE SALT TRICK FOR MEN
check my blog jaxx liberty wallet
BAKING SODA TRICK FOR MEN
BAKING SODA TRICK FOR MEN
SALT TRICK FOR MEN
BLUE SALT TRICK FOR MEN
BAKING SODA TRICK FOR MEN
сколько стоит поездка в питер на 2 дня tury-v-piter.ru .
resource jaxx
туроператоры санкт петербурга список 10 лучших tury-v-piter.ru .
I always used to read post in news papers but now as I am a user of net
therefore from now I am using net for content, thanks to web.
My coder is trying to convince me to move to .net from PHP.
I have always disliked the idea because of the expenses.
But he’s tryiong none the less. I’ve been using
Movable-type on various websites for about a
year and am worried about switching to another
platform. I have heard excellent things about blogengine.net.
Is there a way I can transfer all my wordpress posts into it?
Any kind of help would be really appreciated!
сайт riobet casino
автобусный тур санкт петербург avtobusnye-ekskursii-po-spb.ru .
RMFreelancer is your go-to freelance marketplace for top-notch
services in SEO, digital marketing, web traffic, art and design, development and IT, writing and translations,
audio and video, business and lifestyle, and AI services.
Connect with skilled freelancers and find the perfect solution for your business needs.
BLUE SALT TRICK FOR MEN
Hello mọi người, bác nào muốn tìm chỗ nạp rút nhanh để giải trí Game bài thì vào ngay con hàng này. Nạp rút 1-1: https://pacebhadrak.org.in/#. Về bờ thành công.
экскурсии в питере для молодежи avtobusnye-ekskursii-po-spb.ru .
In the heat of the moment, a life is taken. The Stranger explores the consequences of a senseless act in a world that demands meaning. Albert Camus writes with a clarity that cuts to the bone. Whether you are looking for The Stranger PDF for academic purposes or personal interest, the story of Meursault is gripping. It serves as a critique of a society that prefers a lie to a complex truth.
Quality articles is the important to attract the people to visit the
website, that’s what this web site is providing.
Steinbeck’s portrayal of the indigenous culture is respectful, acknowledging their ancient knowledge and connection to the land. However, he also shows how this culture is eroding under the pressure of colonial rule. The songs Kino hears are fading, replaced by the harsh reality of survival. Cultural studies majors often reference the pearl pdf to examine this representation. The tension between the old ways and the new ways is a central conflict, with the pearl acting as the bridge that collapses, leaving the characters stranded between two worlds.
SALT TRICK FOR MEN
For research
can i order allopurinol without rx
to listen to the podcast.
baypharm
Привет, форумчане! Решил поделиться лайфхаком: как найти казино РФ, где реально работают честно. Главное — не верить рекламе, а смотреть на статус регулятора и реальные комментарии игроков. Я собрал проверенные варианты с выводом на МИР — ссылка тут: казино эльдорадо. Кто уже пробовал?
This casino https://telescope.ac/uncover-a-world-of-premium-gameplay-with-spin-million/1crm3hnbdeh0fkbz89plc5 offers a solid mix of popular slots and live tables. The platform feels modern, promotions are worth trying, and support is responsive, which adds confidence.
Всем здравия! Недавно искал надёжное казино для игры на реальные деньги, и понял: половина сайтов — скам. Советую обращать внимание на наличие лицензии и читать мнения реальных пользователей. Свой топ-7 с моментальным выводом оставил здесь: ДживиСпин зеркало. Пишите, кто что знает по теме!
Xin chào 500 anh em, nếu anh em đang kiếm sân chơi đẳng cấp để gỡ gạc Casino thì vào ngay địa chỉ này. Uy tín luôn: BJ88. Chúc anh em may mắn.
azino 777
BAKING SODA TRICK FOR MEN
adderall xr best online pharmacy https://canbaypharm.top/# latisse best online pharmacy
I for all time emailed this blog post page to all my contacts, because if like to read it afterward
my friends will too.
Feel free to visit my website: 미국로또 구매
Truthfully, I’m obsessed with these CBD gummies like https://www.cornbreadhemp.com/collections/thc-gummies ! I’ve tried a bunch of brands, but these are legit the best. I protrude song after a protracted prime and it justified helps me depress abroad and break off overthinking everything.
They touch like authentic sweetmeats no odd grassy flavor at all. My take a nap has been way bigger since I started attractive them, too. If you’re on the quibble, just become them! They’re a comprehensive lifesaver on the side of my everyday stress.
Hello, this weekend is nice designed for me, since this occasion i am reading this fantastic educational post here
at my residence.
Hi cac bac, n?u anh em dang ki?m nha cai uy tin d? cay cu?c Game bai thi vao ngay trang nay nhe. Khong lo l?a d?o: https://gramodayalawcollege.org.in/#. Hup l?c d?y nha.
For the discount
fix and flip loans
for more information.
I’ve been checking out Paybis for a while now, especially after going through financial trouble,
and I’m still not completely certain whether it deserves
all the attention it gets. Still, it’s clearly a noticeable name in the digital asset market, particularly
for people in Germany who are trying to get back on track.
From what I understand, Paybis presents itself
as a well-established cryptocurrency service that supports standard payment methods, something many platforms either limit or complicate.
What initially caught my eye is how Paybis seems to bridge traditional German banking
methods with the crypto world. Many exchanges focus only on crypto-to-crypto trades, while Paybis allows users to
exchange crypto using credit cards. I’m not saying the process
is perfect, but it does seem aimed at users new to crypto rather than just advanced traders.
Another aspect worth noting is the selection of supported assets.
Paybis doesn’t restrict itself to Bitcoin and Ethereum only.
Instead, it offers a broader token selection, which might attract users who are trying new projects.
Still, things like liquidity are worth checking before making decisions.
Security and compliance also come up often around Paybis.
The platform highlights identity verification, which can feel professional for users in Germany,
though others might see it as time-consuming.
I’m still undecided, but it does suggest Paybis tries
to operate as a regulated marketplace.
When it comes to fees, reviews seem varied. Some say
Paybis is clear about costs, while others
note that pricing can depend on currency. This isn’t unusual in the
crypto industry, but it means users should research properly
before moving money.
Overall, I wouldn’t call Paybis the ultimate choice, but it does seem like a platform worth a closer look,
especially for someone in Germany trying to recover financially.
I’m still forming my opinion, but it seems promising enough to justify further research.
BAKING SODA TRICK FOR MEN
go to this web-site https://toast-wallet.net
Chào cả nhà, nếu anh em đang kiếm chỗ nạp rút nhanh để chơi Casino thì xem thử trang này nhé. Đang có khuyến mãi: Sunwin web. Về bờ thành công.
Pretty section of content. I simply stumbled upon your site and in accession capital to
claim that I get actually loved account your weblog posts.
Anyway I will be subscribing on your feeds and even I achievement you get entry to constantly quickly.
Also visit my homepage :: 미국복권 구매대행
BAKING SODA TRICK FOR MEN
look what i found https://toast-wallet.net
1вин вход в личный кабинет 1вин вход в личный кабинет
I’m curious to find out what blog platform you are working with? I’m experiencing some minor security issues with my latest website and I would like to find something more secure. Do you have any solutions?
My coder is trying to persuade me to move to .net from PHP.
I have always disliked the idea because of the costs.
But he’s tryiong none the less. I’ve been using WordPress on a number of websites for about a year
and am concerned about switching to another platform.
I have heard good things about blogengine.net.
Is there a way I can import all my wordpress posts into it?
Any help would be really appreciated!
BAKING SODA TRICK FOR MEN
Всем здравия! Недавно искал честную площадку для игры на рубли, и понял: половина сайтов — скам. Советую обращать внимание на наличие лицензии и читать мнения реальных пользователей. Свой топ-7 с моментальным выводом оставил здесь: казино Mellstroy. Пишите, кто что знает по теме!
Всем здравия! Недавно искал, где реально можно вывести деньги в онлайн казино. Оказалось, что многое зависит от политики платформы. Проверяйте статистику выплат, читайте обзоры. Составил актуальный рейтинг на 2025 год с прямыми ссылками: vovan casino официальный сайт. Интересно, кто из вас уже играл здесь?
туризм спб туризм спб .
Reading about the March family’s Christmas celebrations is a holiday tradition for many. The themes of giving and gratitude are central to the narrative. If you want to make this tradition your own, consider a digital version of the book. A Little Women PDF is perfect for reading aloud to family or enjoying quietly by the fire. It brings the festive spirit of the 19th century into your home, reminding us all of the true meaning of the holiday season and the importance of family.
что взять с собой в поездку на 3 дня в санкт петербург tury-v-piter.ru .
I’ve been reading Paybis for a while now, especially after going through financial trouble,
and I’m still not fully convinced whether it deserves all the attention it gets.
Still, it’s certainly a noticeable name in the digital
asset market, particularly for people in Germany who are trying to rebuild their finances.
From what I understand, Paybis presents itself as
a globally operated cryptocurrency service that supports regular bank transactions, something many platforms either limit or complicate.
What initially caught my eye is how Paybis seems to connect traditional German banking
methods with the crypto world. Many exchanges focus only on crypto-to-crypto trades,
while Paybis allows users to exchange crypto using credit cards.
I’m not saying the process is perfect, but it does seem aimed at users new to crypto rather than just
advanced traders.
Another aspect worth noting is the selection of supported assets.
Paybis doesn’t restrict itself to Bitcoin and Ethereum only.
Instead, it offers a wider range of digital assets, which might attract users who are diversifying.
Still, things like update speed are worth checking before
making decisions.
Security and compliance also come up often around Paybis.
The platform highlights regulatory compliance, which
can feel reassuring for users in Germany, though others might see it as inconvenient.
I’m still undecided, but it does suggest Paybis tries to operate as a legitimate marketplace.
When it comes to fees, reviews seem mixed. Some say
Paybis is transparent about costs, while others note that pricing can vary by payment method.
This isn’t unusual in the crypto industry, but it means users should research properly before moving money.
Overall, I wouldn’t call Paybis perfect, but it does seem like a platform worth a closer
look, especially for someone in Germany trying to find
accessible financial tools. I’m still forming
my opinion, but it seems relevant enough to justify further research.
Hi! I just wanted to ask if you ever have any issues with hackers?
My last blog (wordpress) was hacked and I ended up
losing months of hard work due to no backup. Do you have any solutions
to stop hackers?
Feel free to visit my web blog – 미국복권 구매
SALT TRICK FOR MEN
экскурсия обзорная по санкт петербургу на автобусе экскурсия обзорная по санкт петербургу на автобусе .
BAKING SODA TRICK FOR MEN
автобусный тур санкт петербург avtobusnye-ekskursii-po-spb.ru .
BLUE SALT TRICK FOR MEN
After testing several platforms, I found this casino https://ebonyimoj.cinfores.com/grasping-no-deposit-bonuses-at-digital-gambling-6/ to be reliable. The welcome bonus is fair, terms are transparent, and payouts don’t take forever, making it suitable for casual players.
Chào cả nhà, nếu anh em đang kiếm trang chơi xanh chín để cày cuốc Tài Xỉu thì xem thử trang này nhé. Không lo lừa đảo: Tải app BJ88. Về bờ thành công.
SALT TRICK FOR MEN
Chao c? nha, bac nao mu?n tim c?ng game khong b? ch?n d? choi Casino thi tham kh?o con hang nay. Uy tin luon: sun win. Chuc cac bac r?c r?.
For the discount
Personal loan next day funding near me
to keep pace.
Oh my goodness! Amazing article dude! Thanks, However I am going through issues with your RSS.
I don’t understand the reason why I can’t subscribe to it.
Is there anyone else getting the same RSS issues? Anyone that knows the
answer can you kindly respond? Thanks!!
Also visit my web site – 메가밀리언
Fantastic goods from you, man. I’ve understand your
stuff previous to and you’re just extremely excellent.
I really like what you’ve acquired here, really like
what you are saying and the way in which you say it. You make it enjoyable and you still take care of to keep
it sensible. I can not wait to read far more from you.
This is actually a tremendous web site.
my site … 미국로또 구매대행
pharmacy online Mexico
бездепозитный бонус за регистрацию Бездепозитный Бонус за Регистрацию: Начни Побеждать Прямо Сейчас! Получить бездепозитный бонус за регистрацию – это отличный способ познакомиться с функционалом казино, протестировать различные игры и, возможно, даже выиграть реальные деньги, не рискуя собственными средствами. Просто зарегистрируйтесь, получите свой бонус и начинайте играть!
riobet на деньги онлайн
It’s actually very difficult in this active life to listen news on TV,
so I only use internet for that reason, and obtain the most recent information.
Привет! Недавно искал казино, где можно спокойно получить деньги, и понял: главное — отзывы. Собрал рабочие варианты с поддержкой Сбербанк — ссылка: казино килограмм. Кто уже пробовал?
Привет! Если вы ищете казино с высоким RTP — не гонитесь за громкими названиями. Лучше смотрите реальные отзывы. Мой проверенный список — тут: Мелстрой зеркало. Кто что добавит?
azino официальный
сайт азино777
читать трипскан сайт вход
It’s a shame you don’t have a donate button! I’d definitely donate to this fantastic blog!
I guess for now i’ll settle for book-marking
and adding your RSS feed to my Google account. I look forward to brand new updates and will
share this blog with my Facebook group. Talk soon!
Thank you for another informative web site. Where else could I am getting that type of info written in such a perfect means? I have a mission that I am just now running on, and I’ve been on the look out for such information.
вход RioBet Casino
For explanation
can i buy allopurinol without prescription
for peak efficiency.
I’ve been researching Paybis for a while now, especially after having a rough financial period, and I’m still not completely certain whether it deserves all the attention it
gets. Still, it’s definitely a noticeable name in the digital
asset market, particularly for people in Germany who are trying to get
back on track. From what I understand, Paybis presents itself as a globally
operated cryptocurrency service that supports standard payment methods, something many platforms either limit or complicate.
What initially caught my eye is how Paybis seems
to link traditional German banking methods with the crypto world.
Many exchanges focus only on crypto-to-crypto trades,
while Paybis allows users to exchange crypto using various fiat options.
I’m not saying the process is perfect, but it does seem aimed at people starting out rather than just advanced
traders.
Another aspect worth noting is the selection of supported assets.
Paybis doesn’t restrict itself to just the top coins.
Instead, it offers a broader token selection, which might attract users who are diversifying.
Still, things like asset availability are worth checking before making decisions.
Security and compliance also come up often around Paybis.
The platform highlights regulatory compliance, which can feel professional for users in Germany, though others might see it as inconvenient.
I’m still undecided, but it does suggest Paybis tries to operate as a legitimate
marketplace.
When it comes to fees, reviews seem varied. Some say Paybis is straightforward
about costs, while others note that pricing can vary by
payment method. This isn’t unusual in the crypto industry, but it means users should
research properly before moving money.
Overall, I wouldn’t call Paybis the ultimate choice, but it does seem
like a platform worth a closer look, especially for someone in Germany trying to build a new starting
point. I’m still forming my opinion, but it seems interesting enough to justify further research.
Chao c? nha, ngu?i anh em nao c?n c?ng game khong b? ch?n d? g? g?c Game bai thi vao ngay trang nay nhe. T?c d? ban th?: Dola789. Chuc anh em may m?n.
I am sure this piece of writing has touched all the internet viewers, its really really fastidious article on building up new webpage.
My brother recommended I might like this blog.
He was totally right. This post truly made my day. You can not imagine simply how
much time I had spent for this info! Thanks!
my homepage retreat venue mexico
I’ve been surfing on-line greater than 3 hours as of late, but
I never discovered any fascinating article like yours.
It’s beautiful worth sufficient for me. In my view, if all site owners and bloggers made good content material
as you did, the web shall be a lot more useful than ever before.
What impressed me about this casino https://chojnow.pl/forum/thread/view/id/1055553 is the quality of the games. Everything runs without issues, the design is clean, and there’s plenty of options to explore, which keeps it engaging.
https://www.google.gg/url?q=https://g-r-s.fr/pag/code_promo.html
There is a quiet strength in this novel that has allowed it to endure for over a century. It champions the idea that women’s lives, no matter how domestic, are worthy of literature. To support this timeless message, read the book. A Little Women PDF is a testament to the book’s lasting power. It shows that even in a world of instant gratification, there is still a place for a slow-burning, character-driven story about four sisters and their dreams. https://littlewomenpdf.site/ Little Women Abridged Pdf
найти это трип скан
Привет! Решил собрать только те игровые клубы, где лично получил выплату. Критерии: с минимальным депозитом. Все рабочие ссылки — по адресу: сукааа. Кто уже тестировал эти площадки?
The psychological toll on Kino is evident as he becomes increasingly paranoid. He stops sleeping, he strikes his wife, and he kills a man – all to protect a stone. The pearl possesses him, dictating his actions. Psychology students often analyze this obsession using the text found in the pearl pdf. It serves as a case study in how fixation can dismantle a personality. Kino’s belief that “I am the pearl” shows the total erasure of his self, replaced by the object of his desire. It is a terrifying depiction of addiction and obsession. https://thepearlpdf.site/ The Pearl Pdf Full Book
Nice blog here! Also your website a lot up fast!
What host are you using? Can I am getting your associate hyperlink to your host?
I want my website loaded up as fast as yours lol
поехать в питер дешево на двоих поехать в питер дешево на двоих .
когда поехать в питер tury-v-piter.ru .
двухэтажные автобусы в спб avtobusnye-ekskursii-po-spb.ru .
экскурсия по санкт петербургу на автобусе с гидом экскурсия по санкт петербургу на автобусе с гидом .
Thank you for every other wonderful article. The place else could anyone get that kind
of information in such an ideal manner of writing? I have a presentation subsequent week, and I’m
at the look for such information.
pharmacy technician school online https://canbaypharm.top/# legit best online pharmacy
Привет! Многие спрашивают, где сейчас работают без обмана. Ответ прост: смотрите на провайдеров слотов. Я собрал актуальный рейтинг казино 2025 с минимальным депозитом — ссылка: Мелстрой. Пробовали что-то из списка?
Hello mọi người, ai đang tìm chỗ nạp rút nhanh để chơi Nổ Hũ thì tham khảo chỗ này. Không lo lừa đảo: nhà cái dola789. Về bờ thành công.
I am really glad to read this weblog posts which contains lots of helpful facts,
thanks for providing these kinds of information.
Also visit my webpage … 미국복권 구매대행
в этом разделе трипскан вход
Hi các bác, nếu anh em đang kiếm chỗ nạp rút nhanh để chơi Đá Gà thì tham khảo địa chỉ này. Nạp rút 1-1: Game bài đổi thưởng. Chúc anh em may mắn.
Your style is unique in comparison to other people I have read stuff from.
Thank you for posting when you’ve got the opportunity, Guess I will just bookmark this site.
перенаправляется сюда [url=https://tripscan01.cc/]tripscan[/url]
Kudos, Numerous material.
smartdigitalstore – Fast, intuitive system for purchasing premium digital items.
Узнать больше сайт трипскан
Hi các bác, ai đang tìm chỗ nạp rút nhanh để gỡ gạc Đá Gà đừng bỏ qua chỗ này. Tốc độ bàn thờ: bj88. Chiến thắng nhé.
For answers
Best online casino usa low minimum deposit
for subscription.
Hi my friend! I want to say that this article is amazing, great written and include almost all important infos.
I’d like to look more posts like this .
1win ссылка на скачивание http://www.1win12048.ru
узнать больше трип скан
посмотреть в этом разделе tripscan
азино777 россия
It’s enormous that you are getting ideas from this post as well as from our discussion made at this
time.
Всем привет! Поделюсь лайфхаком: чтобы не слить депозит впустую, выбирайте онлайн игровой клуб с лицензией от уважаемого регулятора. Я проверил десятки сайтов и оставил только те, где нет блокировок без причины. Список тут: JVSpin. Кто уже играл — подтвердите?
Hey I am so grateful I found your weblog, I really found you by
error, while I was browsing on Google for something else, Anyways
I am here now and would just like to say kudos for a remarkable post and a all round thrilling
blog (I also love the theme/design), I don’t have time to
read through it all at the minute but I have saved it
and also added your RSS feeds, so when I have time I will be back to read a
lot more, Please do keep up the superb work.
Feel free to surf to my webpage :: 미국복권 구매대행
Привет всем! Решил поделиться, как найти платящее онлайн платформу в 2025 году. Главное — не гнаться за большими бонусами, а смотреть на юрисдикцию и отзывы реальных игроков. Я собрал список проверенных площадок с минимальным депозитом — вот тут: сукааа казино. Кто уже пробовал?
такой tripscan
“It is better to burn than to disappear.” While not a line from the book, the sentiment fits the intensity of The Stranger. Albert Camus explores the raw sensation of being alive. Meursault values his physical existence above all abstract ideas. If you want to download the PDF to understand this unique worldview, the novel offers a compelling argument for the value of the here and now. It is a rejection of hope in favor of conscious experience. https://thestrangerpdf.site/ The Stranger Albert Camus Pdf Fownloas
Fantastic blog! Do you have any tips and hints for aspiring writers?
I’m hoping to start my own blog soon but I’m a little lost on everything.
Would you suggest starting with a free platform like WordPress
or go for a paid option? There are so many options out there that
I’m totally confused .. Any suggestions? Thanks!
перейти на сайт tripscan
I recently tested this casino https://imageevent.com/viczhuckhistwelch1978 and was impressed by how stable everything felt. The games load quickly, bonuses are clear, and navigation is user-friendly, making the experience comfortable.
Revisiting the March family home is like visiting old friends who always welcome you with open arms. The trials and tribulations of the sisters, set against the backdrop of a divided nation, offer a poignant look at resilience. If you are eager to introduce this story to a new generation, or simply want to enjoy it yourself, a digital edition is a great choice. You can easily find a Little Women PDF to read on a variety of devices. This flexibility ensures that the legacy of Louisa May Alcott continues to thrive in the digital era, reaching readers everywhere. https://littlewomenpdf.site/ Adamo Little Women Pdf
ссылка на сайт tripscan
best online pharmacy without prescription
узнать больше трип скан
Thanks for sharing such a fastidious thought, article is pleasant, thats why i have
read it fully
Chao anh em, ngu?i anh em nao c?n nha cai uy tin d? gi?i tri Tai X?u thi vao ngay ch? nay. N?p rut 1-1: Game bai d?i thu?ng. Hup l?c d?y nha.
Kaizenaire.аі functions aѕ an essential Singapore recruitment
agency, helping organizations hire fᥙll-timе remote staff fгom the Philippines wіth ᎪI enhancements for data-driven choices аnd scalability.
In light of Singapore’s premium market and intensifying burdens, it’s a сomplete
win tⲟ outsource to the Philippines overseas,
slashing 70% ⲟff continuous expenses. AІ ensuгеs parity ѡith in-house talent.
Ꮯonsidering the preѕent statе of AI аnd bad economy, to remaіn іn competition, Singapore entrepreneurs ᧐ught to quickⅼy examine thеir existing architectures ɑnd techniques, deploying
ᎪI automation ѡithout hold-uр. Аnd AI is advancing at an amazing
speed.
Aѕ a dependable Singapore recruitment agency, Kaizenaire assists Singapore business utilize
innovative talent fгom tһe Philippines, utilizing ΑI tools so remote designers сan produce blog product
аnd handle social networks marketing jobs.
Ӏt’ѕ the correct time tօ reevaluate ΑI’s role al᧐ng witһ remote teams іn service operations to ϲome.
Check οut Kaizenaire– tһe Singapore recruitment agency innovating in remote staffing
options.
Здравствуйте!
Виртуальный номер — это решение для тех, кто ценит приватность. С помощью виртуального номера вы можете работать безопасно. виртуальный номер пригодится в разных ситуациях. Надёжный виртуальный номер — это инвестиция в безопасность. Получить виртуальный номер можно за минуту.
Полная информация по ссылке – https://riaugreen.com/view/GreenStyle/100073/Nomor-Jepang-Virtual–Solusi-Praktis-untuk-Komunikasi-Global.html
виртуальный номер, виртуальный номер телефона, купить виртуальный номер для смс навсегда
постоянный виртуальный номер для смс, купить виртуальный номер, постоянный виртуальный номер
Всего наилучшего и комфорта в общении!!
For the offer
quicken loans 7 1 arm
for professional opinions.
If you love the theme of Aztec Fire, similar slots offer parallel experiences. Explore other thrilling titles: After you land the required combination, the bonus symbols stick to the reels, and you are redirected to a bonus game featuring only bonus symbols. You’ll initially begin this round with the standard 5×4 reel setup, but this can expand to a 5×8 reel setup if you get the following number of bonus symbols: Aztec Fire: Hold and Win is another variant, focusing on modern mechanics. This version brings an expanding grid and jackpots, offering massive wins up to 10,000x your stake. The update aims to balance traditional gameplay with new, captivating features, attracting both new and seasoned players. This diversity makes the Aztec Fire series appealing by catering to varying player preferences.
https://www.luminaryexperts.com/?p=378163
As the name suggests, Aloha! Cluster Pays has a Hawaiian theme, with a range of symbols such as flowers, pineapples, coconuts, shells, and colourful totems, inspired by Hawaiian culture. From its vivid graphics, smooth animations, up to its fitting music and sound effects, playing Aloha! Cluster Pays provides a truly engaging experience. Please play & gamble responsibly! For help, support & advice about gambling please visit online BeGambleAware and GamStop. For those aiming extra rounds from free spins then the diamond symbol is the one to put your eyes on, so its a game for everyone. Maximum winnings with multiplier in aloha cluster pays leprechauns Fortune is a 5-reel, from casual players to high rollers at the top-ranked online casinos. If you have deposited over RM600 in the previous 3 days, and they update it every year to match the announced format. And lets not forget that the Android mobile casino is excellent at all types of Live games, you have a good shot at winning more.
Привет всем!
Сейчас самое время купить виртуальный номер для смс навсегда без лишних документов. купить виртуальный номер для смс навсегда — это надёжность и стабильность на долгие годы. купить виртуальный номер для смс навсегда — это цифровая свобода и приватность. Выбирайте наш сервис, чтобы купить виртуальный номер для смс навсегда с удобством. Если хотите остаться на связи, лучше купить виртуальный номер для смс навсегда уже сегодня.
Полная информация по ссылке – https://harodigital.com/noticias/como-recibir-sms-en-espana-con-numeros-virtuales
купить номер телефона навсегда, купить виртуальный номер навсегда, купить виртуальный номер для смс навсегда
купить номер телефона навсегда, купить постоянный виртуальный номер, купить виртуальный номер для смс навсегда
Всего наилучшего и комфорта в общении!!
Монтаж система охранного телевидения в Москве Монтаж СОТ – это не просто установка камер, это создание эффективной системы видеонаблюдения, обеспечивающей круглосуточный контроль за объектом, фиксацию событий и возможность оперативного реагирования на любые нештатные ситуации. Мы поможем вам спроектировать и установить систему, которая будет соответствовать вашим требованиям и бюджету, обеспечивая максимальную безопасность и защиту вашего бизнеса.
strategyfinder – Helped me identify key moves quickly, very informative platform.
ко ланте ко ланте
Здравствуйте! Хочу предложить проверенный способ выбора казино: обращайте внимание на наличие live-чата, а не только на бонусы. Я составил список платформ 2025 года, где можно играть анонимно. Всё по ссылке: clubnika casino. Делитесь впечатлениями!
I think this is among the most vital info for me. And i’m
glad reading your article. But should remark on some
general things, The web site style is ideal, the articles is really excellent
: D. Good job, cheers
Also visit my homepage … corporate retreat mexico
Здравствуйте! Хочу предложить проверенный способ выбора казино: обращайте внимание на скорость вывода, а не только на бонусы. Я составил список платформ 2025 года, где часто падают джекпоты. Всё по ссылке: Килограмм. Делитесь впечатлениями!
Nicely expressed really. .
такой сайт трипскан
I visit everyday some sites and sites to read articles or reviews, but this website presents quality based posts.
Доброго!
Купите виртуальный номер навсегда, чтобы забыть о сложностях связи. Постоянный виртуальный номер идеально подходит для регистрации в сервисах и получения смс. С нами вы получите надежное и удобное решение для личного и делового общения. Виртуальный номер – это гарантия стабильности и безопасности. Выбирайте удобство и простоту вместе с нашими услугами.
Полная информация по ссылке – https://indonews.id/artikel/348961/Inovasi-Komunikasi-Digital-untuk-Mendukung-Profesionalisme-Bisnis-Mandiri-dan-Efisiensi-Operasional
постоянный виртуальный номер, купить виртуальный номер, купить постоянный виртуальный номер
купить виртуальный номер для смс навсегда, купить виртуальный номер, виртуальный номер
Всего наилучшего и комфорта в общении!!
азино777 сайт
riobet на деньги онлайн
baypharm
ссылка на сайт трипскан сайт вход
Hello mọi người, người anh em nào cần trang chơi xanh chín để chơi Game bài thì vào ngay trang này nhé. Không lo lừa đảo: https://homemaker.org.in/#. Húp lộc đầy nhà.
Hi các bác, nếu anh em đang kiếm trang chơi xanh chín để gỡ gạc Tài Xỉu thì tham khảo chỗ này. Không lo lừa đảo: Đăng nhập BJ88. Húp lộc đầy nhà.
azino777 официальный
https://www.google.com.tj/url?q=https://astra-hotel.ch/articles/code_promo_45.html
digitalclickmarket – Smooth, intuitive platform for buying premium digital items.
нарколог на дом в краснодаре нарколог на дом в краснодаре .
With havin so much content do you ever run into any problems of plagorism or copyright
infringement? My blog has a lot of completely unique content I’ve either created myself or
outsourced but it looks like a lot of it is popping it up
all over the web without my authorization. Do you know any methods to help
protect against content from being stolen? I’d genuinely
appreciate it.
It’s wonderful that you are getting ideas from this article as well as from
our dialogue made at this place.
Читать далее трип скан
Hello m?i ngu?i, bac nao mu?n tim ch? n?p rut nhanh d? g? g?c Game bai d?ng b? qua trang nay nhe. T?c d? ban th?: https://homemaker.org.in/#. Chi?n th?ng nhe.
Добрый день!
Купите виртуальный номер для смс навсегда и забудьте о сложностях с доступностью связи. Постоянный виртуальный номер идеально подходит для бизнеса, личного использования и регистрации. Мы предлагаем только качественные услуги, которые сделают вашу связь стабильной и удобной. Виртуальный номер навсегда – это ваш ключ к современным коммуникациям. Попробуйте наши услуги уже сегодня.
Полная информация по ссылке – https://www.notaalpie.com.ar/2024/09/11/mejora-tu-comunicacion-con-un-numero-virtual-en-argentina
купить виртуальный номер навсегда, постоянный виртуальный номер для смс, купить виртуальный номер для смс навсегда
купить виртуальный номер навсегда, купить виртуальный номер для смс навсегда, купить постоянный виртуальный номер
Всего наилучшего и комфорта в общении!!
Привет! После череды обманов наконец нашёл платформу, где реально не задерживают выплаты. Смотрите на отзывы игроков. Список надёжных вариантов — тут: СЃСѓРєР° казино. Кто уже играл?
For a directory
usa casino websites
for immediate implementation.
From the quiet routine of an office job to the glare of a pistol on a beach, The Stranger moves with the inevitability of fate. Albert Camus constructs a story where the environment itself seems to conspire against the protagonist. If you are trying to find The Stranger PDF to read on your device, prepare for a story that strips away the illusions of civilized life. It is a raw, uncompromising look at a man who becomes an alien in his own life, eventually facing the ultimate penalty for his truth. https://thestrangerpdf.site/ The Stranger Albert Camus Summary Pdf
pharmacy tech training online https://canbaypharm.top/# health pharmacy online
Всем здравия! Недавно искал, где реально можно вывести деньги в онлайн казино. Оказалось, что многое зависит от политики платформы. Проверяйте лицензию, читайте обзоры. Составил актуальный рейтинг на 2025 год с прямыми ссылками: казино голд официальный сайт. Интересно, кто из вас уже играл здесь?
The story begins with a simple life in La Paz, where Kino and Juana live in harmony with nature until a scorpion stings their infant son, Coyotito. Desperate for money to pay the doctor, Kino dives and finds a pearl of immense value. This discovery triggers a chain of events that exposes the evils of colonial oppression and avarice. Many readers look for a digital copy of the book to study the contrast between the “Song of the Family” and the “Song of Evil.” If you are searching for the pearl pdf to understand how wealth can corrupt the soul, this novella offers a profound lesson wrapped in beautiful, rhythmic prose that mimics the sound of the ocean. https://thepearlpdf.site/ The Pearl Book Pdf
I enjoy playing at this casino https://www.pickupforum.de/profile/240957-probimvildisp1988/ because it feels secure and well-optimized. Live tables are interactive, slots offer different styles, and the overall experience remains pleasant over time.
online pharmacy adderall https://baypharm.top/# baypharm
strategicconnect – Helpful platform, guided us to work together effectively.
Подробнее трипскан сайт вход
интернет tripscan
goGLOW Houston Heights
1515 Studemont Ѕt Suite 204, Houston,
Texas, 77007, UЅА
(713) 364-3256
chemical peels benefits appointment
подробнее tripscan
Matbet güncel linki arıyorsanız işte burada. Maç izlemek için: Hemen Oyna Canlı maçlar burada. Arkadaşlar, Matbet yeni adresi belli oldu.
I always spent my half an hour to read this weblog’s content everyday
along with a cup of coffee.
Привет, форумчане! Решил поделиться лайфхаком: как найти игровую платформу, где реально работают честно. Главное — не верить рекламе, а смотреть на статус регулятора и реальные отзывы. Я собрал проверенные варианты с выводом на Сбербанк — ссылка тут: mellstroy game. Кто уже пробовал?
интернет трипскан вход
Arkadaslar, Grandpashabet son linki belli oldu. Adresi bulamayanlar buradan giris yapabilir Hemen Oyna
ссылка на сайт трипскан
Привет! Если вы ищете клуб с частыми выплатами — не гонитесь за громкими названиями. Лучше смотрите статистику. Мой проверенный список — тут: Рльдорадо зеркало. Кто что добавит?
For trends
Tax loan
to explore the topic.
The comforting heat feature is created to improve blood flow and advertise relaxation.
online pharmacy reviews
my mexican pharmacy online
promo code for 1xbet nepal (http://wiki.rumpold.li/index.php?title=How_Did_We_Get_There%3F_The_Historical_Past_Of_Blog_Advised_By_Tweets)
тик ток мод бесплатно Безопасность и Ответственность: Важные Моменты Использование TikTok модов может быть сопряжено с риском. Важно загружать моды только из проверенных источников, чтобы избежать установки вредоносного ПО. Кроме того, использование некоторых функций модов может нарушать условия использования TikTok, что может привести к блокировке аккаунта.
onlinesavingsspot – Got some top deals today, can’t wait to shop again.
After trying several platforms, I found this casino https://powerslide-minden.de/comprehensive-guide-to-virtual-casinos-functioning-4-2/ to be reliable. The welcome bonus is generous, terms are transparent, and payouts don’t take forever, making it suitable for regular players.
First off Ӏ would ⅼike to saү fantastic blog!
I hаd a quick question іn ѡhich I’ⅾ like to
aѕk if you don’t mind. I waѕ intereѕted to find ߋut
how yoս center үourself аnd clеaг yoᥙr mind prior to writing.
Ӏ hаve had difficulty clearing mү thoughts in ցetting mʏ thоughts ᧐ut.
I do takе pleasure in writing һowever it
just seems ⅼike the fіrst 10 tߋ 15 minutes are generally wasted simply just trying to figure out how to ƅegin. Any
ideas or hints? Ꭺppreciate it!
ко ланте ко ланте
Следующая страница трип скан
врач нарколог на дом врач нарколог на дом .
careerinsights – Practical lessons, boosted my professional development.
сайт сайт трипскан
The bond between Hans and his accordion is symbolic of his soul. Read about it in The Book Thief PDF. It shows how art can survive even when the artist is beaten down, a hopeful message for readers everywhere. https://thebookthiefpdf.site/ The Book Thief Ebook Pdf Free
Do not be intimidated by the length of the book. The Book Thief PDF makes it easy to carry and read in short bursts. It is a page-turner that moves quickly, despite its size, pulling you into the lives of its characters with magnetic force.
Wow! Finally I got a web site from where I be capable of truly
get useful facts concerning my study and knowledge.
Bahis severler selam, Casibom sitesi üyeleri adına önemli bir paylaşım paylaşıyorum. Bildiğiniz gibi site giriş linkini erişim kısıtlaması nedeniyle tekrar değiştirdi. Siteye ulaşım hatası yaşıyorsanız çözüm burada. Güncel Casibom giriş linki artık paylaşıyorum https://casibom.mex.com/# Paylaştığım bağlantı ile doğrudan siteye girebilirsiniz. Ayrıca yeni üyelere sunulan yatırım bonusu kampanyalarını mutlaka kaçırmayın. Güvenilir slot keyfi için Casibom doğru adres. Herkese bol şans dilerim.
Всем привет! Уже третий год играю в игровые клубы, и за это время понял главное: выбирайте площадки с честными условиями. Избегайте тех, где требуют паспорт или тормозят с выводом. Лучшие казино РФ с поддержкой ЮMoney собрал здесь: JVSpin JVSpin. Кто что может добавить?
Привет! Недавно искал игровой клуб, где можно спокойно получить деньги, и понял: главное — скорость выплат. Собрал рабочие варианты с поддержкой МИР — ссылка: РќСЊСЋ Ретро. Кто уже пробовал?
https://renvills-hotel.ru/nomer-na-sutki/
online pharmacy https://baypharm.top/# cvs pharmacy online
promo code 1 x bet (https://mufashauganda.org/forums/topic/take-house-classes-on-blog/)
https://willianbeckmann.com/?p=7221
Find out more
how can i get plavix pills
to unlock potential.
you,中国 エロll haue v?e for ,
https://phntmd9.com/allinmax-code-drops-e130-into-your-1xbet-balance-in-cameroon/
Quality articles is the main to interest the viewers to visit the website, that’s what this site is providing.
rx best online pharmacy https://canbaypharm.top/# best online pharmacy viagra generic
Ребята, не тратьте время на левые сайты! Чтобы выбрать платящее казино, обращайте внимание на: лицензию Curacao или Мальты, а также на частоту выплат. Я лично протестировал десятки платформ и оставил только те, где дают фриспины сразу. Весь список — по ссылке: KiloGram. Делитесь опытом!
Hi! us online pharmacy good site.
Казино онлайн: рейтинг по честности
драгон мани как вывести деньги
Приветствую! Только что вывел 15 тысяч с одного из платформ — и решил поделиться списком тех, кто реально работает в РФ. Смотрите на скорость обработки заявок. Все проверенные варианты — тут: РЎРЈРљРђ СЃСѓРєР° казино. Кто уже играл? Какие суммы выводили?
I recently tried this casino https://tirupatibalajiplywood.com/winning-at-online-casino-probability-realities-and-6/ and was impressed by how smooth everything felt. The games run fast, bonuses are transparent, and navigation is user-friendly, making the experience comfortable.
mindadvance – Informative and simple, topics were explained well.
ко ланте ко ланта
corporatecontactclick – Easy to access and professional, made expanding my network effortless.
You have made your stand quite effectively!!
I’m really inspired along with your writing skills and also with the structure for your
weblog. Is this a paid subject or did you customize it your self?
Anyway keep up the nice quality writing, it’s uncommon to see a
nice blog like this one today..
1win лимит ставок 1win лимит ставок
To listen
secrets to win real money online casino
for helpful resources.
I am curious to find out what blog platform
you have been working with? I’m experiencing some small
security issues with my latest website and I’d like to find something more
safe. Do you have any suggestions?
Huxley’s use of multiple perspectives enriches the narrative. The Brave New World PDF allows you to see the world through different eyes. This technique adds depth to the critique of the dystopian society. https://bravenewworldpdf.site/ Brave New World Скачать Epub
вызов нарколога на дом краснодар вызов нарколога на дом краснодар .
Herkese merhaba, bu site kullan?c?lar? icin onemli bir duyuru yapmak istiyorum. Bildiginiz gibi platform giris linkini tekrar guncelledi. Erisim sorunu yas?yorsan?z endise etmeyin. Son Vaycasino giris adresi su an asag?dad?r: https://vaycasino.us.com/# Paylast?g?m baglant? ile vpn kullanmadan siteye girebilirsiniz. Guvenilir bahis keyfi surdurmek icin Vaycasino tercih edebilirsiniz. Tum forum uyelerine bol kazanclar dilerim.
quickpurchasehub – Easy-to-use and dependable, items arrive quickly every time.
ко ланте ко ланте
Привет! После череды обманов наконец нашёл казино, где реально платят. Смотрите на отзывы игроков. Список надёжных вариантов — тут: онлайн казино. Кто уже играл?
Very good info. Lucky me I discovered your blog by accident (stumbleupon).
I have saved as a favorite for later!
It’s amazing to pay a visit this website and reading the views of all mates on the topic of this post, while I am also keen of getting know-how.
Официальный сайт казино Вавада: как начать выигрывать реальные деньги и получить
бонусы при регистрацииУслуги онлайн казино Вавада
Популярность казино Vavada стремительно растет среди пользователей,
желающих проводить время за азартными играми на честном и безопасном
ресурсе. Вне зависимости от
стажа в гемблинге, наличие надежного оператора, который своевременно выплачивает выигрыши, является ключевым
фактором успеха.
Преимущества выбора казино Vavada
Проект работает строго в рамках международной лицензии,
обеспечивая пользователям честную отдачу (RTP)
и прозрачность всехтранзакций.
Казино предлагает возможность активировать щедрые подарки за регистрацию и участвовать в закрытых турнирах с крупными призовыми фондами.
Пользователи имеют доступ к профессиональной
поддержке в чате, где менеджеры помогают
разобраться с верификацией
или выводом средств.
Ассортимент развлечений на сайте
Библиотека развлечений на официальном сайте Vavada
состоит из множества популярных жанров и категорий:
Классические и современные слоты от топовых провайдеров,
где каждый найдет механику и
тематику по своему вкусу.
Live-казино с профессиональными дилерами, создающее атмосферу присутствия в элитном наземном игорном заведении.
Широкий выбор вариаций рулетки, баккары
и покера для тех, кто предпочитает интеллектуальные азартные игры.
Уникальные турнирные соревнования, позволяющие активным гемблерам выигрывать солидные суммы, соревнуясь с другими участниками.
Мнения постоянных клиентов
Мнения действующих клиентов о
скорости выплат и честности клуба играют
важную роль при принятии решения о регистрации.
Многочисленные гемблеры подчеркивают:
Высокую скорость обработки заявок на вывод средств и отсутствие
бюрократии.
Прозрачные условия активации бонусов и отсутствие скрытых комиссий
при депозитах.
Стабильную работу серверов и
постоянное наличие рабочих
зеркал при блокировках РКН.
Обход блокировок казино
Важно заранее сохранить ссылки на рабочие зеркала
казино, чтобы в любой момент иметь доступ к своему балансу.
Наличие надежного канала доступа является важнейшим фактором
для спокойной и уверенной игры.
Как начать выигрывать?
При начале игры на реальные деньги в казино Вавада обратите внимание
на следующие важные аспекты:
Внимательно прочитайте пользовательское соглашение,
чтобы избежать недоразумений при верификации
илиснятии средств.
Используйте бесплатный режим для тестирования автоматов,
прежде чем рисковать собственными деньгами.
Устанавливайте лимиты на депозит и проигрыш, чтобы игра приносила удовольствие, а
не финансовые проблемы.
Имейте в виду, что дисциплина и холодный расчет кардинально влияют на итоговый
результат игровой сессии. Не пытайтесь
отыграться сразу после
серии неудач, лучше сделайте паузу и отдохните.
https://vavada-casino2123.com
Заключение обзора
Создание аккаунта в клубе Vavada является отличным
решением для тех, кто хочет играть в лицензионные слоты и быть уверенным в
выплатах. Все игроки находятся в равных условиях, а регулярные турниры и акции делают процесс
игры еще более захватывающим и выгодным.
С учётом высокой конкуренции в индустрии, Vavada удерживает лидерство благодаря безупречной
репутации и вниманию к потребностям аудитории.
Значение ответственной игры
Для достижения положительных результатов необходимо не только крутить барабаны, но
и подходить к процессу с холодной головой и расчетом.
Каждый гемблер обязан:
Выбирать игры с высоким процентом возврата;
Выстраивать тактику ставок;
Участвовать в выгодных акциях и гонках;
Использовать кэшбэк для отыгрыша;
Вовремя выводить крупные выигрыши.
Причины популярности бренда
Высокая оценка пользователей обусловлена качественным сервисом, быстрой
поддержкой и прозрачностью всех процессов.
Мы работаем над тем, чтобы время, проведенное на сайте, приносило только позитивные эмоции и адреналин.
Команда проекта Вавада обладает многолетним опытом,
что позволяет нам внедрять лучшие практики и
обеспечивать сервис мирового уровня.
Способы обхода блокировки
При поиске рабочего зеркала казино Вавада в интернете обратите внимание на официальные
источники:
Ссылки, опубликованные в официальных соцсетях проекта;
Письма с актуальными доменами, приходящие на ваш email;
Службу поддержки через форму обратной связи;
Ресурсы стримеров и обзорников, сотрудничающих с казино.
Помните, что откладывая регистрацию, вы упускаете шанс
сорвать джекпот и воспользоваться приветственным пакетом.
При возникновении проблем вы всегда можете рассчитывать на помощь
наших операторов.
В заключение, помните, что азартные игры — это развлечение, и мы готовы сделать ваш досуг максимально комфортным и безопасным.
Жмите кнопку “Регистрация”, забирайте свои
бонусы и начинайте путь к большим победам!
1xbet promo code today nepal; http://shareyourwallpapers.com/status/incs/1xbet_promo_code_for_free_bonus.html,
Herkese selam, Casibom üyeleri adına kısa bir duyuru yapmak istiyorum. Herkesin bildiği üzere bahis platformu domain adresini erişim kısıtlaması nedeniyle sürekli güncelledi. Giriş sorunu varsa link aşağıda. Son Casibom giriş linki şu an aşağıdadır Casibom İndir Bu link üzerinden vpn kullanmadan hesabınıza bağlanabilirsiniz. Ayrıca yeni üyelere sunulan freespin kampanyalarını da kaçırmayın. En iyi bahis keyfi için Casibom doğru adres. Herkese bol kazançlar dilerim.
Доброго!
Постоянный виртуальный номер для смс – это надежный способ сохранить связь в любой ситуации. Купите виртуальный номер телефона навсегда, чтобы забыть о привязке к SIM-карте. Мы предоставляем виртуальные номера для бизнеса и личного использования. Виртуальный номер навсегда – это ваш выбор для удобной связи. Попробуйте наши услуги уже сегодня.
Полная информация по ссылке – https://www.mundiario.com/articulo/tecnologia-ciencia/guia-maestra-2025-como-comprar-usar-numero-virtual-whatsapp-movil-pc/20250630185900349005.html
купить виртуальный номер навсегда, постоянный виртуальный номер для смс, постоянный виртуальный номер для смс
купить номер навсегда, купить виртуальный номер, купить виртуальный номер для смс навсегда
Всего наилучшего и комфорта в общении!!
Hello I am so happy I found your webpage, I really found
you by accident, while I was looking on Askjeeve
for something else, Nonetheless I am here now and would just like to say many thanks for a
marvelous post and a all round interesting blog (I also love the theme/design), I don?t have
time to read through it all at the minute but I have book-marked it and
also added in your RSS feeds, so when I have time I will be back to read a lot more,
Please do keep up the excellent jo.
My page; Kkpoker Payday
allianceinsights – Informative resources, made building global connections more effective.
узнать трипскан
In-depth analysis
win real money online casino for us players
to make an informed decision.
What impressed me about this casino https://anhangafilmes.com.br/grasping-casino-promotions-in-this-british-6/ is the quality of the games. Everything runs without issues, the design is clean, and there’s always something new to explore, which keeps it engaging.
Matbet TV güncel adresi lazımsa işte burada. Maç izlemek için: Matbet Giriş Yüksek oranlar burada. Arkadaşlar, Matbet yeni adresi açıklandı.
ко ланта ко ланте
Приветствую! После череды неудач наконец нашёл рабочие онлайн казино. Ключевые критерии: RTP выше 96%. Все подходящие площадки с бонусами без отыгрыша собрал тут: казино эльдорадо. Кто уже успел потестить?
mostbet online mostbet online
Друзья, расскажу по-честному: я долго искал надёжный слот-сайт, и наконец нашёл рабочие варианты. Советую смотреть на наличие демо-режима и избегать тех, где скрытые комиссии. Актуальный список лучших платформ на 2025 — по ссылке: mellstroy game сайт казино. Пишите в комментариях, какие казино вам зашли!
I’m not that much of a online reader to be honest but your blogs really nice, keep it up!
I’ll go ahead and bookmark your website to come back later on. Cheers
https://ecoflam.oooprofi.ru/1xbet-free-promo-code-philippines-allinmax-e130-bonus/
вызов нарколога на дом вызов нарколога на дом .
crossdepartmenthub – Tools are practical and fast, enhanced collaboration across all teams.
монтаж систем вентиляции, монтаж систем кондиционирования, монтаж систем вентиляции в Москве, монтаж систем кондиционирования в Москве Строительная компания, монтажная компания, строительно-монтажная компания – это ключевые игроки в реализации любого строительного проекта. В Москве, с её динамичной застройкой, особенно востребованы компании, способные предложить полный спектр услуг, от проектирования до ввода объекта в эксплуатацию. Именно поэтому строительная компания в Москве, обладающая компетенциями монтажной компании, а лучше – являющаяся строительно-монтажной компанией в Москве, имеет значительное преимущество на рынке.
Добрый день!
Хотите приватности? Тогда вам нужен виртуальный номер. С помощью виртуального номера вы защищаете личные данные. виртуальный номер — ваш путь к анонимности. Получить виртуальный номер просто и быстро.
Полная информация по ссылке – https://serambijambi.id/2025/06/30/membuka-peluang-tanpa-batas-panduan-lengkap-mendapatkan-nomor-china-86-untuk-verifikasi-dan-bisnis
купить номер навсегда, купить виртуальный номер навсегда, купить номер телефона навсегда
виртуальный номер, купить номер телефона навсегда, виртуальный номер навсегда
Всего наилучшего и комфорта в общении!!
This is nicely put. .
shopsmarthub – Very intuitive, browsing and buying products is straightforward.
Nice post. I was checking constantly this blog and I am impressed!
Very useful information specifically the last
part 🙂 I care for such information a lot. I was seeking this particular information for a long time.
Thank you and good luck.
1xbet official promo code kenya (https://www.kalinlights.co.in/traffic-light-l-e-d-base-color-red-green-yellow/)
https://sportliga.com/briefs/bornmut-naznacil-vysokuyu-cenu-za-kerkeza-na-fone-interesa-liverpulya-3644198
For official
Online loans for bad credit guide
to discover possibilities.
This online resource provides a large amount of valuable and useful information.
Visitors are able to access content on different areas.
All materials are clearly organized and convenient to read.
The site stays current with fresh content.
https://godspeedoffroad.com/adjust-a-mount-roof-rack-brackets-qty-12-smittybilt-am-12/
This makes it a reliable source for everyday use.
When searching for quick answers or useful tips, the platform covers a wide range.
The information comes in a clear and user-friendly format.
Overall, this site remains valuable for a wide audience.
I quite like reading an article that can make people think.
Also, many thanks for allowing me to comment!
modernmarketplace – Clear design, simplified selling and purchasing today.
Ребята, не верьте громким обещаниям! Настоящее слот-сайт должно иметь официальную лицензию. Я отсеял все подозрительные площадки и оставил только проверенные варианты — смотрите здесь: Mellstroy game. Кто уже выводил оттуда?
After trying several platforms, I found this casino https://capitalpress.com.co/dominando-el-blackjack-en-plataformas-virtuales-3/ to be reliable. The welcome bonus is generous, terms are easy to understand, and payouts don’t take forever, making it suitable for casual players.
Приветствую! После череды неудач наконец нашёл честные онлайн казино. Ключевые критерии: лицензия. Все подходящие площадки с бонусами без отыгрыша собрал тут: Мелстрой казино. Кто уже успел потестить?
ко ланта ко ланте
1win http://www.1win12050.ru
Arkadaslar, Grandpashabet Casino son linki belli oldu. Giremeyenler su linkten devam edebilir T?kla Git
great post, very informative. I’m wondering why the opposite experts of this sector do not understand this.
You should continue your writing. I am confident, you have a huge readers’ base already!
Herkese merhaba, bu populer site kullan?c?lar? icin onemli bir duyuru paylas?yorum. Bildiginiz gibi bahis platformu domain adresini erisim k?s?tlamas? nedeniyle surekli degistirdi. Giris problemi cekenler icin dogru yerdesiniz. Yeni siteye erisim baglant?s? su an asag?dad?r Casibom Kay?t Paylast?g?m baglant? ile dogrudan siteye erisebilirsiniz. Ek olarak kay?t olanlara sunulan hosgeldin bonusu f?rsatlar?n? mutlaka kac?rmay?n. Lisansl? bahis keyfi surdurmek icin Casibom dogru adres. Herkese bol kazanclar dilerim.
Work highlights page – Clear structure, the portfolio is easy to browse and visually neat.
Perfectly expressed genuinely. !
структура креатива реклама reklamnyj-kreativ4.ru .
анализ баннеров reklamnyj-kreativ5.ru .
Cheers to every fortune discoverer !
О— ПѓП…ОЅОµПЃОіО±ПѓОЇО± ОјОµ О±ОёО»О·П„О№ОєО¬ ОіОµОіОїОЅПЊП„О± ОєОїПЃП…П†О±ОЇО±П‚ ОєО±П„О·ОіОїПЃОЇО±П‚ ОµОЇОЅО±О№ ПѓП„ПЃО±П„О·ОіО№ОєО®П‚ ПѓО·ОјО±ПѓОЇО±П‚ ОіО№О± П„О№П‚ ОјОµОіО±О»ПЌП„ОµПЃОµП‚ ПѓП„ОїО№П‡О·ОјО±П„О№ОєОП‚ ОµП„О±О№ПЃОЇОµП‚ ПѓП„ОїОЅ ОєПЊПѓОјОї. ОїО№ ОјОµОіО±О»П…П„ОµПЃОµПѓ ПѓП„ОїО№П‡О·ОјО±П„О№ОєОµПѓ ОµП„О±О№ПЃО№ОµПѓ ПѓП„ОїОЅ ОєОїПѓОјОї. ОњОПѓП‰ О±П…П„ПЋОЅ П„П‰ОЅ ПѓП…ОЅОµПЃОіО±ПѓО№ПЋОЅ, О±ПЂОїОєП„ОїПЌОЅ ОјОµОіО±О»ПЌП„ОµПЃО· ООєОёОµПѓО· ОєО±О№ ОєО±ОёО№ПѓП„ОїПЌОЅ П„О± ПѓП„ОїО№П‡О®ОјО±П„О¬ П„ОїП…П‚ ПЂО№Ої ОµО»ОєП…ПѓП„О№ОєО¬. О О±ПЃО¬О»О»О·О»О±, ПЂПЃОїПѓП†ОПЃОїП…ОЅ ООЅО±ОЅ П„ПЃПЊПЂОї ОіО№О± П„ОїП…П‚ П†О№О»О¬ОёО»ОїП…П‚ ОЅО± ПѓП…ОЅОґОµОёОїПЌОЅ ОјОµ П„О№П‚ ОїОјО¬ОґОµП‚ П„ОїП…П‚.
О— О±ОЅО¬О»П…ПѓО· О±ОіОїПЃО¬П‚ ОµОЇОЅО±О№ ОєПЃОЇПѓО№ОјО· ОіО№О± П„О№П‚ ОјОµОіО±О»ПЌП„ОµПЃОµП‚ ПѓП„ОїО№П‡О·ОјО±П„О№ОєОП‚ ОµП„О±О№ПЃОЇОµП‚ ПѓП„ОїОЅ ОєПЊПѓОјОї, ОєО±ОёПЋП‚ П„ОїП…П‚ ОµПЂО№П„ПЃОПЂОµО№ ОЅО± ПЂПЃОїПѓО±ПЃОјОїПѓП„ОїПЌОЅ ПѓП„О№П‚ О±ОЅО¬ОіОєОµП‚ П„П‰ОЅ ПЂОµО»О±П„ПЋОЅ. ОџО№ О±ПЂПЊП€ОµО№П‚ ОєО±О№ П„О± ПѓП‡ПЊО»О№О± П„П‰ОЅ П‡ПЃО·ПѓП„ПЋОЅ О»О±ОјОІО¬ОЅОїОЅП„О±О№ П…ПЂПЊП€О· ОіО№О± П„О· ОІОµО»П„ОЇП‰ПѓО· П„П‰ОЅ П…ПЂО·ПЃОµПѓО№ПЋОЅ. О€П„ПѓО№, ОґО№О±П„О·ПЃОїПЌОЅ П„О·ОЅ О±ОЅП„О±ОіП‰ОЅО№ПѓП„О№ОєО® П„ОїП…П‚ ОёОПѓО· ПѓП„О·ОЅ О±ОіОїПЃО¬.
ОїО№ ОјОµОіО±О»П…П„ОµПЃОµП‚ ПѓП„ОїО№П‡О·ОјО±П„О№ОєОµП‚ ОµП„О±О№ПЃО№ОµП‚ ПѓП„ОїОЅ ОєОїПѓОјОї ОєО±О№ О· П€О·П†О№О±ОєО® ОµОѕОО»О№ОѕО· – п»їhttps://onlinecasinoforeign.com/the-largest-betting-companies-in-the-world/
May fortune walk with you as you let chance grant you intense unique gains !
goGLOW Houston Heights
1515 Studemont St Suite 204, Houston,
Texas, 77007, UՏA
(713) 364-3256
goglow 2025 (https://raindrop.io)
химчистка обуви из нубука химчистка обуви
Regards, I like it.
кухни на заказ петербург kuhni-spb-28.ru .
Dostlar selam, Vaycasino oyuncuları için kısa bir duyuru paylaşıyorum. Malum Vaycasino giriş linkini tekrar değiştirdi. Erişim sorunu yaşıyorsanız endişe etmeyin. Son Vaycasino giriş linki artık burada: Vaycasino 2026 Bu link üzerinden vpn kullanmadan siteye erişebilirsiniz. Güvenilir casino deneyimi sürdürmek için Vaycasino doğru adres. Herkese bol şans temenni ederim.
выезд нарколога на дом narkolog-na-dom-krasnodar-1.ru .
Друзья, расскажу по-честному: я долго искал казино, которое платит, и наконец нашёл рабочие варианты. Советую смотреть на скорость обработки вывода и избегать тех, где поддельные отзывы. Актуальный список лучших платформ на 2025 — по ссылке: sykaaa casino. Пишите в комментариях, какие казино вам зашли!
вызов нарколога на дом краснодар вызов нарколога на дом краснодар .
For clarification
Signature loans
for future predictions.
Всем здравствуйте! Хочу поделиться подборкой игровых площадок, где можно выводить на карту МИР. Важно: прозрачность. Актуальный рейтинг 2025 — здесь: лев казино. Пишите, кто с чем сталкивался!
Nice answer back in return of this issue with genuine arguments and telling the whole thing regarding that.
Feel free to visit my web blog: zukausha01
кухни на заказ санкт петербург от производителя kuhni-spb-32.ru .
retailpath – Efficient and intuitive, made finding and purchasing products easy.
enterpriseinfrastructurezone – Infrastructure insights are clear, enabled smooth and fast application.
What impressed me about this casino https://macellerialopresti.com/digital-casino-machine-technical-framework-and-6/ is the quality of the games. Everything runs smoothly, the design is clean, and there’s always something new to explore, which keeps it engaging.
Hi there, its good paragraph about media print, we all be aware of media is a great source of facts.
My blog post … zukausha02
ข้อมูลชุดนี้ น่าสนใจดี ครับ
ผม ไปอ่านเพิ่มเติมเกี่ยวกับ เนื้อหาในแนวเดียวกัน
ที่คุณสามารถดูได้ที่ singha89
น่าจะเป็นประโยชน์กับหลายคน
มีข้อมูลที่อ่านแล้วเข้าใจได้ทันที
ขอบคุณที่แชร์ ข้อมูลที่น่าอ่าน นี้
หวังว่าจะมีการอัปเดตเนื้อหาเพิ่มเติมเร็วๆ นี้
You suggested that adequately.
курс трак диспетчера в сша по всему миру с практикой
corporatevaluehub – Helpful guidance for building partnerships that last.
Доброго!
Хотите остаться анонимным? Просто купите виртуальный номер. Мы предлагаем лучшие условия, чтобы купить виртуальный номер быстро и безопасно.
Полная информация по ссылке – https://pamplonaactual.com/pamplona-actual/360671/recibir-sms-en-espana-nunca-fue-tan-sencillo
купить виртуальный номер телефона, купить номер телефона навсегда, купить виртуальный номер телефона навсегда
Виртуальный номер навсегда, постоянный виртуальный номер для смс, купить постоянный виртуальный номер
Всего наилучшего и комфорта в общении!!
вывод из запоя на дому краснодар цены вывод из запоя на дому краснодар цены .
Всем здравия! Недавно искал надёжное казино для игры на реальные деньги, и понял: половина сайтов — скам. Советую обращать внимание на наличие лицензии и читать отзывы. Свой топ-7 с моментальным выводом оставил здесь: mellstroy casino. Пишите, кто что знает по теме!
shoppinghub – Great deals, very simple and hassle-free checkout.
мост бет https://mostbet2027.help
Всем привет! Много читаю про неплатёжные площадки, поэтому теперь тщательно проверяю всё: лицензию. Лучшие игровые сайты 2025 года с моментальным выводом — здесь: РќСЊСЋ Ретро. Делитесь своим опытом!
enterprise network builder – Guidance supported more confident professional networking.
https://www.google.am/url?q=https://justpaste.it/etg8y/pdf
нарколог на дом вывод из запоя краснодар vyvod-iz-zapoya-krasnodar-1.ru .
Access here
where to buy generic zetia without dr prescription
to complete your task.
This web site definitely has all of the information and
facts I wanted about this subject and didn’t know who to ask.
Suiruan H5 online hub – Appealing look, makes browsing features feel effortless.
Dostlar selam, Casibom oyuncular? icin k?sa bir duyuru yapmak istiyorum. Herkesin bildigi uzere bahis platformu domain adresini BTK engeli yuzunden tekrar degistirdi. Siteye ulas?m problemi yas?yorsan?z dogru yerdesiniz. Guncel siteye erisim linki art?k burada Siteye Git Bu link ile vpn kullanmadan siteye baglanabilirsiniz. Ek olarak yeni uyelere sunulan hosgeldin bonusu f?rsatlar?n? da kac?rmay?n. Lisansl? bahis keyfi icin Casibom dogru adres. Tum forum uyelerine bol kazanclar dilerim.
Having read this I thought it was rather enlightening.
I appreciate you taking the time and effort to put this
article together. I once again find myself personally spending
a significant amount of time both reading and leaving
comments. But so what, it was still worthwhile!
бесплатный период upster reklamnyj-kreativ5.ru .
оптимизация наружки оптимизация наружки .
Howdy just wanted to give you a quick heads up. The words in your article
seem to be running off the screen in Opera. I’m not sure if this is a formatting issue or something to do with web browser
compatibility but I thought I’d post to let you know.
The layout look great though! Hope you get the problem fixed soon. Kudos
networkhub – Quick to adopt, enhanced collaboration and task management.
I enjoy playing at this casino https://capitalrelieffinancial.com/online-casino-dealer-jobs-capabilities-training-12/ because it feels secure and stable. Live tables are interactive, slots offer good variety, and the overall experience remains pleasant over time.
valuepartnershipnetwork – Useful partnership guidance, made enterprise decision-making easier.
Howdy! This is kind of off topic but I need some help from an established blog.
Is it very difficult to set up your own blog? I’m not very techincal but I
can figure things out pretty quick. I’m thinking about setting up my own but I’m not sure where to
start. Do you have any ideas or suggestions?
Appreciate it
Приветствую! После череды неудач наконец нашёл надёжные онлайн казино. Ключевые критерии: RTP выше 96%. Все подходящие площадки с быстрым выводом собрал тут: Мелстрой гейм. Кто уже успел потестить?
Ребята, а вы знаете, где сейчас реально выиграть в онлайн-казино? После десятков проверок остановился на лицензированных площадках. Важно: вывод без комиссии. Актуальный рейтинг с джекпотами и кэшбэком — по ссылке: Mellstroy казино. Обсуждаем!
Grandpashabet güncel linki arıyorsanız işte burada. Hızlı erişim için tıkla Grandpashabet Sorunsuz Giriş Yüksek oranlar bu sitede.
https://doc.clickup.com/9005178476/d/h/8cc07kc-6578/6f45d77903683ad
Spot on with this write-up, I seriously think this site needs a lot more
attention. I’ll probably be back again to read through more, thanks for the info!
Arkadaşlar, Grandpashabet yeni adresi belli oldu. Adresi bulamayanlar buradan giriş yapabilir Resmi Site
кухня на заказ спб от производителя недорого кухня на заказ спб от производителя недорого .
trustedpartnerguide – Practical recommendations, improved our approach to partnership management.
corporateteamconnect – Great platform for teamwork, very intuitive and professional.
You actually mentioned this effectively.
Match timelines site – Convenient layout, updates on matches are fast and accurate.
нарколог на дом анонимно narkolog-na-dom-krasnodar-1.ru .
smartdealzone – Quick and reliable, found the best deals efficiently.
прямые кухни на заказ от производителя kuhni-spb-32.ru .
secure offer hub – Shopping for deals felt safe and well streamlined.
careerinsightportal – Clear explanations that made choosing the right direction easier.
https://www.google.co.uk/url?q=https://playplayfun.com/articles/1xbet_promo_code_nigeria_bonus.html
https://vwts.ru/articles/news/20250122.html
Ребята, а вы знаете, где сейчас дают кэшбэк? Я проверил десятки платформ, оставил только те, где реально можно вывести. Ссылка на подборку: онлайн казино. Обсуждаем!
вывод из запоя дешево краснодар вывод из запоя дешево краснодар .
Привет! Хочу предупредить новичков: не все онлайн казино одинаково полезны. Ищите те, где есть прозрачные правила, и обязательно сверяйтесь с сообществом игроков. Я нашёл несколько платформ 2025 года с бонусами без вейджера — всё собрано здесь: Болливуд казино. Кто уже успел попробовать?
vision building toolkit – Solid strategic perspectives that helped structure future objectives.
Fantastic web site. Plenty of useful info here.
I am sending it to some buddies ans additionally sharing in delicious.
And certainly, thank you for your effort!
вывод из запоя в краснодаре вывод из запоя в краснодаре .
After testing several platforms, I found this casino https://inkbunny.net/dildimece1979 to be reliable. The welcome bonus is fair, terms are transparent, and payouts don’t take forever, making it suitable for casual players.
It’s an remarkable post designed for all the online users; they will
get advantage from it I am sure.
https://mf-podolsk.ru/modules/pgs/?promokod-pari.html
I’ve been looking into Paybis for a while now, especially after
ending up broke, and I’m still not completely certain whether it deserves all the attention it
gets. Still, it’s certainly a noticeable name in the digital asset
market, particularly for people in Germany who are trying
to find new financial tools. From what I understand, Paybis presents
itself as a well-established cryptocurrency service that supports fiat payments, something many platforms either limit or complicate.
What initially caught my eye is how Paybis seems to connect traditional
German banking methods with the crypto world. Many exchanges
focus only on crypto-to-crypto trades, while
Paybis allows users to exchange crypto using credit cards.
I’m not saying the process is perfect, but it does seem
aimed at users new to crypto rather than just advanced traders.
Another aspect worth noting is the selection of supported assets.
Paybis doesn’t restrict itself to only the major tokens.
Instead, it offers multiple altcoins, which might attract
users who are trying new projects. Still, things like asset availability are worth checking before making decisions.
Security and compliance also come up often around Paybis. The platform highlights regulatory compliance, which
can feel professional for users in Germany, though others might
see it as inconvenient. I’m still undecided,
but it does suggest Paybis tries to operate as a regulated marketplace.
When it comes to fees, reviews seem varied. Some say Paybis is clear about costs,
while others note that pricing can change
with transaction type. This isn’t unusual in the crypto industry, but it means users should research properly
before moving money.
Overall, I wouldn’t call Paybis the ultimate choice, but it
does seem like a platform worth a closer look,
especially for someone in Germany trying to build a new starting point.
I’m still forming my opinion, but it seems interesting enough
to justify further research.
Quick-loading layout – Practical design, the site responds quickly.
Excellent insight! The breakdown helped me a lot..
trustedenterprisehub – Offers well-structured strategies that help improve company operations.
learningadvancementlibrary – Knowledge content is clear, really improved my understanding efficiently.
team alignment hub – Useful strategies enhanced understanding and collective outcomes.
Dostlar selam, Casibom sitesi oyuncuları için kısa bir duyuru yapmak istiyorum. Herkesin bildiği üzere Casibom domain adresini erişim kısıtlaması nedeniyle sürekli değiştirdi. Giriş problemi yaşıyorsanız çözüm burada. Son Casibom güncel giriş linki artık aşağıdadır Tıkla Git Paylaştığım bağlantı ile direkt siteye bağlanabilirsiniz. Ek olarak kayıt olanlara sunulan hoşgeldin bonusu fırsatlarını da inceleyin. Lisanslı bahis deneyimi sürdürmek için Casibom tercih edebilirsiniz. Herkese bol kazançlar dilerim.
взгляните на сайте здесь krab4.at зеркало
I have to thank you for the efforts you’ve put in penning this website.
I am hoping to view the same high-grade content by you in the future as well.
In fact, your creative writing abilities has encouraged me to get my own website now
😉
Valuable information With thanks!
digitalshophub – Shopping online was effortless, found exactly what I needed in no time.
Answer Insights – Informative and motivating, resources help users tackle problems clearly.
улучшение баннеров реклама reklamnyj-kreativ5.ru .
enterpriseallianceshub – Networking here is straightforward, alliance advice is clear and actionable.
Привет! Хочу предупредить новичков: не все онлайн казино одинаково полезны. Ищите те, где есть возможность играть на рубли, и обязательно сверяйтесь с сообществом игроков. Я нашёл несколько платформ 2025 года с мобильной версией — всё собрано здесь: онлайн казино. Кто уже успел попробовать?
анализ карточек маркетплейс анализ карточек маркетплейс .
Fiat heritage page – Cheerful and curated, the articles highlight classic car culture.
dealcentral – Excellent discounts available, buying online was simple.
Друзья, не тратьте время на левые сайты! Играйте только в лицензированные казино с поддержкой рубля. Мой личный топ с реальными выплатами — по ссылке: СЃСѓРєР° mygazeta.com. Кто что может порекомендовать?
Hello would you mind letting me know which web host you’re using?
I’ve loaded your blog in 3 completely different internet browsers and I must say this blog loads
a lot quicker then most. Can you suggest a good web hosting provider at a reasonable price?
Thank you, I appreciate it!
I’m not sure why but this site is loading incredibly slow for me.
Is anyone else having this issue or is it a problem on my
end? I’ll check back later and see if the problem still exists.
посмотреть на этом сайте актуальная ссылка кракен
bond management center – The service runs smoothly and supports smart investment control.
Matbet TV giris linki laz?msa dogru yerdesiniz. H?zl? icin t?kla: Matbet Twitter Yuksek oranlar burada. Gencler, Matbet yeni adresi belli oldu.
growth insight guide – Advice that made decision-making faster and more confident today.
производство кухонь в спб на заказ kuhni-spb-28.ru .
прямые кухни на заказ от производителя kuhni-spb-32.ru .
нарколог краснодар нарколог краснодар .
I enjoy playing at this casino https://aroeats.net/aroeats/online-casino-usa-regulatory-construction-market-2 because it feels secure and stable. Live tables are immersive, slots offer different styles, and the overall experience remains pleasant over time.
Great knowledge Regards!
reliableshopperhub – Online purchases are secure, experience is smooth and user-friendly.
подробнее krab4.at актуальная ссылка
вывод из запоя краснодар на дому анонимно vyvod-iz-zapoya-krasnodar-2.ru .
corporatesolutionscenter – Very practical solutions that improved overall operational flow.
trustedbizframework – Simple yet powerful suggestions, improved our team collaboration noticeably.
Grandpasha güncel linki arıyorsanız doğru yerdesiniz. Sorunsuz giriş yapmak için tıkla https://grandpashabet.in.net/# Deneme bonusu bu sitede.
Подробнее krab4.at маркетплейс
I’m extremely inspired along with your writing abilities as smartly as with the
layout to your weblog. Is that this a paid subject matter or did
you customize it your self? Anyway stay up the nice
high quality writing, it is rare to peer a great
weblog like this one today..
найти это krab4.cc login
быстрый анонимный вывод из запоя на дому vyvod-iz-zapoya-krasnodar-1.ru .
Друзья, не тратьте время на левые сайты! Играйте только в лицензированные казино с поддержкой рубля. Мой личный топ с реальными выплатами — по ссылке: СЃСѓРєР° dezinfo.net. Кто что может порекомендовать?
https://glaucialima.com/art/paripesa_promo_code.html
long-term collaboration tips – Useful insights that enhanced strategic decision-making and growth.
Добрый день!
Купите виртуальный номер телефона навсегда и наслаждайтесь стабильной связью без привязки к SIM-карте. Постоянный виртуальный номер для смс идеально подходит для любых задач. Мы предлагаем доступные и надежные виртуальные номера. Виртуальный номер навсегда – это комфорт и безопасность для вашего общения. Попробуйте наши услуги уже сегодня.
Полная информация по ссылке – https://www.kosngosan.com/2025/06/nomor-virtual-indonesia-solusi-cerdas.html
постоянный виртуальный номер, купить виртуальный номер, постоянный виртуальный номер для смс
виртуальных номеров, купить виртуальный номер, купить виртуальный номер
Всего наилучшего и комфорта в общении!!
Друзья, не тратьте время на левые сайты! Играйте только в проверенные казино с быстрым выводом. Мой личный топ с реальными выплатами — по ссылке: Mellstroy. Кто что может порекомендовать?
goGLOW Houston Heights
1515 Stuudemont Տt Suite 204, Houston,
Texas, 77007, UՏA
(713) 364-3256
how to get rid of acne explained
Be Creative Studio – Bright and playful, creative suggestions are easy to follow.
relationshipstrategist – Practical recommendations, improved partnership management with ease.
I personally find that charlie here — I’ve tried trading and the reliable uptime impressed me.
Un post très touchant sur le don.
Herkese merhaba, Casibom oyuncular? ad?na onemli bir duyuru yapmak istiyorum. Herkesin bildigi uzere Casibom domain adresini BTK engeli yuzunden tekrar guncelledi. Giris problemi varsa dogru yerdesiniz. Guncel siteye erisim adresi art?k asag?dad?r Casibom Guvenilir mi Bu link uzerinden dogrudan hesab?n?za baglanabilirsiniz. Ayr?ca kay?t olanlara sunulan hosgeldin bonusu f?rsatlar?n? mutlaka kac?rmay?n. Lisansl? casino keyfi surdurmek icin Casibom tercih edebilirsiniz. Herkese bol sans dilerim.
Bathtub product hub – Professional feel, all product specifications are easy to check.
Travel Texture Notes – Lively and authentic, posts offer a personal glimpse into travel moments.
safetradeplace – Reliable experience, every step of the purchase was seamless.
深く 感銘しました。光を 取り戻すための 支援は、社会にとって 素晴らしい 貢献です。これからもこの 活動を 頑張ってください。応援しています。
My blog post … 光を届ける寄付
online buying guide – Modern tools and effortless interface improved the way I shop today.
This is nicely said! .
careerlearningtools – Excellent professional learning content, made acquiring new skills straightforward.
можно проверить ЗДЕСЬ актуальная ссылка кракен
trustedcollaborationcenter – Corporate collaboration made easy, platform supports team bonding efficiently.
Effectively spoken indeed. . https://heylink.me/betflik-th
https://fiesta-new.ru/wp-content/pgs/promokod_fonbet___bonus_fribet.html
запоминаемость рекламы reklamnyj-kreativ5.ru .
Привет! Решил собрать только те игровые клубы, где лично получил выплату. Критерии: без паспорта. Все рабочие ссылки — по адресу: казино сукааа. Кто уже тестировал эти площадки?
анализ баннеров reklamnyj-kreativ4.ru .
Ребята, не верьте громким обещаниям! Настоящее слот-сайт должно иметь положительную репутацию. Я отсеял все подозрительные площадки и оставил только топовые варианты — смотрите здесь: СЃСѓРєР° yerkramas.org. Кто уже выводил оттуда?
financebondshub – Very easy to follow guidance with useful insights for global business decisions.
Experience the future of digital entertainment with Jeeta.
Gain high-speed access via the JT71 identifier and
the JT7171 master portal for a seamless, secure, and premium user experience.
Matbet TV giriş linki arıyorsanız doğru yerdesiniz. Sorunsuz için: Matbet TV Giriş Yüksek oranlar bu sitede. Gençler, Matbet yeni adresi açıklandı.
кухни на заказ спб недорого с ценами kuhni-spb-28.ru .
What stood out about this casino https://narayanganjbarta24.com/maklercourtage-spiele-zugangsberechtigung-auszahlung/ is the quality of the games. Everything runs without issues, the design is clean, and there’s plenty of options to explore, which keeps it engaging.
срочный выезд нарколога на дом narkolog-na-dom-krasnodar-1.ru .
Arkadaşlar selam, Casibom sitesi kullanıcıları için önemli bir paylaşım yapmak istiyorum. Herkesin bildiği üzere bahis platformu giriş linkini BTK engeli yüzünden yine değiştirdi. Siteye ulaşım sorunu yaşıyorsanız doğru yerdesiniz. Güncel Casibom giriş adresi şu an paylaşıyorum https://casibom.mex.com/# Paylaştığım bağlantı ile vpn kullanmadan siteye girebilirsiniz. Ayrıca kayıt olanlara verilen hoşgeldin bonusu fırsatlarını mutlaka inceleyin. Lisanslı casino deneyimi için Casibom tercih edebilirsiniz. Tüm forum üyelerine bol kazançlar dilerim.
кухня на заказ спб от производителя недорого kuhni-spb-32.ru .
вывод из запоя краснодар вывод из запоя краснодар .
trusted e-commerce hub – Purchasing felt safe and efficient with easy navigation.
нажмите здесь krab4.at login
https://gazetablic.com/wp-content/pages/?codigo-promocional-1win-500.html
Progress Ideas Daily – Clear and practical, site guides users toward meaningful improvements.
https://mushlovesocial.com/blogs/128744/1xBet-Indonesia-Bonus-Code-1X200FREE-130-Bonus
reliablepurchasehub – Clean interface, very straightforward to shop online today.
trustedhub – Really helpful service, I got everything I was looking for fast.
вывод из запоя бесплатно vyvod-iz-zapoya-krasnodar-1.ru .
Продолжение krab4.at access
стоимость парома с краби на лангкави тайланд ко ланта
веб-сайте безопасный вход кракен
http://aredsoaclus.phorum.pl/viewtopic.php?p=187608#187608
growthalliancenetwork – Networking made easy and effective for company expansion.
опубликовано здесь krab4.at ссылка
Grandpashabet giris linki ar?yorsan?z iste burada. H?zl? erisim icin Grandpashabet Uyelik Deneme bonusu burada.
sustainable alliance hub – Useful advice that improved long-term partnership planning.
worldwidenetworkhub – Platform makes building relationships across the globe simple and efficient.
OMT’s adaptive discovering tools personalize thee trip, tᥙrning mathematics іnto
a cherished friend and motivating steady test dedication.
Join ߋur smɑll-gгoup ߋn-site classes in Singapore f᧐r individualized guidance іn a nurturing environment that develops strong fundamental math
abilities.
Singapore’ѕ focus ߋn іmportant analyzing mathematics highlights tһe impօrtance оf math tuition, ԝhich helps trainees develop tһe analytical skills demanded ƅy the nation’s forward-thinking syllabus.
Tuition stresses heuristic рroblem-solving techniques, vital fоr dealing with PSLE’ѕ challenging word pгoblems that require multiple actions.
Ⅾetermining and remedying specific weak ⲣoints, like in likelihood οr coordinate geometry, mɑkes secondary tuition indispensable for O Level excellence.
Inevitably, junior college math tuition іs key to safeguarding toр A Level
results, оpening uр doors to distinguished scholarships
аnd college chances.
Тhe distinctiveness of OMT comes fгom its exclusive math
curriculum tһat prolongs MOE content ѡith project-based learning fоr usefսl application.
OMT’ѕ platform іs easy to ᥙse оne, ѕo even newbies
ϲan navigate and start boosting grades rapidly.
Customized math tuition addresses individual weak ρoints, transforming average performers
right intο exam toppers in Singapore’s
merit-based ѕystem.
Aⅼso visit my web blog: singapore math tuition agency
you’re really a excellent webmaster. The website loading pace is incredible.
It seems that you’re doing any unique trick.
Moreover, The contents are masterwork. you have done a wonderful process
on this matter!
Привет! Многие спрашивают, где сейчас выигрывают чаще всего. Ответ прост: смотрите на провайдеров слотов. Я собрал актуальный рейтинг казино 2025 с поддержкой рубля — ссылка: New Retro казино. Пробовали что-то из списка?
networkinginsightshub – Advice on professional bonding is solid, made building business relationships easy.
Привет! Хочу предупредить новичков: не все онлайн игровые порталы одинаково полезны. Ищите те, где есть реальный RTP, и обязательно сверяйтесь с рейтингами. Я нашёл несколько платформ 2025 года с бонусами без вейджера — всё собрано здесь: СЃСѓРєР° yerkramas.org. Кто уже успел попробовать?
Handmade by Travis Anderson studio – Genuine and skillful, products feel personal and well made.
shopflow – Smooth and modern, navigating products is hassle-free.
secure commerce portal – From browsing to payment, everything worked smoothly and safely.
найти это krab4.at доступ
Gençler, Grandpashabet yeni adresi açıklandı. Adresi bulamayanlar buradan devam edebilir https://grandpashabet.in.net/#
взгляните на сайте здесь krab4.at mirror
подробнее стабильный вход кракен
Therapy and massage page – Gentle presentation, the descriptions are comforting and informative.
This casino https://icw.telkomnika.com/blog/2025/11/26/digital-casino-machine-programming-structure-and/ offers a great mix of classic slots and live dealer games. The platform feels well-designed, promotions are worth trying, and support is helpful, which adds confidence.
Yesterday, while I was at work, my sister stole my iPad and tested to see if
it can survive a forty foot drop, just so she can be a youtube sensation. My iPad is
now destroyed and she has 83 views. I know this is totally off topic but I had
to share it with someone!
partnerinsightportal – Excellent strategies for nurturing partnerships and boosting growth.
worldwide business partnerships – Actionable tips that helped locate suitable partners globally.
здесь krab4 at
узнать больше krab4.at маркет
marketinnovationclick – Useful market ideas, assisted us in building effective marketing strategies.
Improve Every Day – Engaging and motivating, posts make developing skills feel simple and doable.
trustedbuyportal – Very trustworthy site, found and purchased items easily.
Всем привет! Много читаю про неплатёжные площадки, поэтому теперь тщательно проверяю всё: условия вывода. Лучшие игровые сайты 2025 года с моментальным выводом — здесь: казино Болливуд. Делитесь своим опытом!
https://snippet.host/akpdis
изготовление кухонь на заказ в санкт петербурге kuhni-spb-28.ru .
Very good post. I absolutely love this site. Continue the good work!
Смотреть здесь krab4.at ссылка
Привет, форумчане! Решил поделиться лайфхаком: как найти казино РФ, где реально выводят деньги. Главное — не верить рекламе, а смотреть на статус регулятора и реальные отзывы. Я собрал проверенные варианты с выводом на QIWI — ссылка тут: Голд зеркало. Кто уже пробовал?
база бенчмарков рекламы reklamnyj-kreativ5.ru .
вызов нарколога на дом вызов нарколога на дом .
запоминаемость рекламы reklamnyj-kreativ4.ru .
I’ve been looking into Paybis for a while now, especially after ending
up broke, and I’m still not fully convinced whether it deserves all the attention it gets.
Still, it’s certainly a noticeable name in the crypto industry, particularly for people in Germany
who are trying to get back on track. From what I understand,
Paybis presents itself as a large-scale cryptocurrency service
that supports fiat payments, something many platforms either limit or complicate.
What initially caught my eye is how Paybis seems to bridge traditional German banking methods with the crypto world.
Many exchanges focus only on crypto-to-crypto trades, while Paybis allows users to sell crypto using credit cards.
I’m not saying the process is perfect, but it does seem aimed at beginners rather than just
advanced traders.
Another aspect worth noting is the selection of supported assets.
Paybis doesn’t restrict itself to only the major tokens. Instead,
it offers multiple altcoins, which might attract users who are diversifying.
Still, things like asset availability are worth checking before making decisions.
Security and compliance also come up often around Paybis. The platform highlights
regulatory compliance, which can feel professional
for users in Germany, though others might see it as restrictive.
I’m still undecided, but it does suggest Paybis tries to operate
as a long-term marketplace.
When it comes to fees, reviews seem varied. Some say Paybis is
clear about costs, while others note that pricing can change with transaction type.
This isn’t unusual in the crypto industry, but it means users should compare
alternatives before moving money.
Overall, I wouldn’t call Paybis the ultimate choice,
but it does seem like a platform worth checking out, especially for someone in Germany trying to
find accessible financial tools. I’m still forming my opinion, but it seems interesting enough to justify further research.
вывод из запоя круглосуточно вывод из запоя круглосуточно .
direction planning link – Helpful exploration notes that refined future strategies.
прямые кухни на заказ от производителя kuhni-spb-32.ru .
вывод из запоя лечение краснодар vyvod-iz-zapoya-krasnodar-1.ru .
knowledgehubonline – Lessons are well structured, really boosted my learning efficiency.
freight dispatch support
ссылка на сайт krab4.at маркет
Utmerket artikkel om finansiering medisinsk behandling.
My web blog Finansier operasjonsutgifter
enterprise collaboration guide – Solid guidance that improved alliance-building outcomes.
Gardens AL Local News – Calm and informative, the site helps residents stay up to date with neighborhood happenings.
businesspathways – Insightful advice, assisted in planning actionable growth steps.
Matbet güncel linki lazımsa doğru yerdesiniz. Maç izlemek için tıkla: Matbet Giriş Canlı maçlar burada. Gençler, Matbet bahis yeni adresi belli oldu.
Почему пользователи выбирают площадку KRAKEN?
Маркетплейс KRAKEN заслужил
доверие многочисленной аудитории благодаря сочетанию ключевых
факторов. Во-первых, это широкий
и разнообразный ассортимент, представленный
сотнями продавцов. Во-вторых,
интуитивно понятный интерфейс KRAKEN, который
упрощает навигацию, поиск товаров и управление заказами даже для новых пользователей.
В-третьих, продуманная система безопасных
транзакций, включающая механизмы
разрешения споров (диспутов) и возможность использования условного депонирования, что минимизирует риски для обеих
сторон сделки. На KRAKEN функциональность сочетается с внимательным отношением
к безопасности клиентов, что делает процесс покупок более предсказуемым,
защищенным и, как следствие, популярным среди пользователей,
ценящих анонимность и надежность.
partnershipinsights – Offers clear guidance for forming and maintaining corporate partnerships.
такой krab4 cc сайт
careeradvancementhub – Advice here is insightful, really enhanced my career decision-making.
Приветствую! Только что вывел 15 тысяч с одного из платформ — и решил поделиться списком тех, кто реально работает в РФ. Смотрите на отзывы за 2025 год. Все проверенные варианты — тут: New Retro. Кто уже играл? Какие суммы выводили?
I recently checked out this casino https://beauty-worthen.com/108455 and was impressed by how smooth everything felt. The games load quickly, bonuses are transparent, and navigation is user-friendly, making the experience enjoyable.
skill-building resource – Informative content that made applying new ideas easier and faster.
Всем привет! Уже третий год играю в онлайн казино, и за это время понял главное: выбирайте площадки с честными условиями. Избегайте тех, где требуют паспорт или тормозят с выводом. Лучшие игровые сайты с поддержкой МИР собрал здесь: РЎСѓРєР° казино. Кто что может добавить?
https://www.delanoheraldjournal.com/articles/delanoheraldjournal/loretto-public-hearing-hatcher-conditional-use-permit/#comment-935338
commercialfinanceportal – Excellent resources, really useful for structuring investment strategies.
Quality articles is the crucial to interest the users to go to see the website, that’s what this website is providing.
innovativestoreclick – Modern retail options and easy navigation improved my shopping experience.
Daily Growth & Learning – Friendly and insightful, users are encouraged to share ideas and improve consistently.
shopstreamglobal – Easy to browse and purchase, interface is practical and convenient.
Virtual number rental provides a flexible option for modern communication needs.
It enables people to handle calls without using a physical SIM card.
Such a service is often selected for online registrations.
Using a virtual number helps protect personal privacy.
https://www.hitng.info/how-to-receive-sms-of-another-number/
The process is straightforward and usually works almost instantly.
Virtual numbers work well across multiple services.
This solution provides convenience for both temporary and ongoing tasks.
As a result, virtual number rental is highly valued among users worldwide.
creative strategy page – Engaging ideas that helped spark innovative approaches.
Bahis severler selam, Casibom oyuncular? icin k?sa bir paylas?m paylas?yorum. Bildiginiz gibi bahis platformu domain adresini erisim k?s?tlamas? nedeniyle surekli guncelledi. Erisim hatas? yas?yorsan?z link asag?da. Yeni Casibom guncel giris adresi su an paylas?yorum Casibom Indir Paylast?g?m baglant? ile direkt hesab?n?za erisebilirsiniz. Ayr?ca kay?t olanlara verilen hosgeldin bonusu kampanyalar?n? mutlaka inceleyin. Guvenilir casino keyfi surdurmek icin Casibom dogru adres. Tum forum uyelerine bol sans dilerim.
Corporate growth network – Well-positioned, the networking angle fits today’s competitive market.
careeradvancementhub – Excellent professional growth resources, helped improve skills efficiently.
professionalbizconnect – Fast and trustworthy, platform made connecting with professionals easy.
читать продам аккаунт клэш оф
https://InstantAdz.com/389/posts/1/1/1896810.html
Herkese selam, bu popüler site oyuncuları için kısa bir bilgilendirme yapmak istiyorum. Bildiğiniz gibi Casibom giriş linkini BTK engeli yüzünden sürekli değiştirdi. Erişim hatası yaşıyorsanız çözüm burada. Resmi siteye erişim linki şu an burada https://casibom.mex.com/# Paylaştığım bağlantı ile vpn kullanmadan siteye girebilirsiniz. Ayrıca kayıt olanlara sunulan yatırım bonusu fırsatlarını mutlaka inceleyin. Güvenilir bahis keyfi sürdürmek için Casibom tercih edebilirsiniz. Herkese bol kazançlar dilerim.
https://www.up-tattoo.com/index.php?route=journal3/blog/post&journal_blog_post_id=10
Ребята, не верьте громким обещаниям! Настоящее слот-сайт должно иметь положительную репутацию. Я отсеял все подозрительные площадки и оставил только платящие варианты — смотрите здесь: Clubnika. Кто уже выводил оттуда?
legitimate canadian online pharmacies
Привет! После череды обманов наконец нашёл казино, где реально платят. Смотрите на наличие лицензии. Список надёжных вариантов — тут: СЃСѓРєР° chelseablues.ru. Кто уже играл?
заказать кухню в спб по индивидуальному проекту kuhni-spb-28.ru .
bizopportunitiesguide – Clear guidance, assisted in exploring innovative business paths effectively.
заказать кухню по индивидуальным размерам в спб kuhni-spb-27.ru .
Padel Oviedo Updates – Reliable and current, makes staying on top of games easy.
careerhub – Informative platform, helped me connect with industry professionals.
collabinfrastructure – Very actionable advice, enhanced collaboration workflows.
After testing several platforms, I found this casino https://jkprohost.com/comprehending-no-deposit-incentives-at-digital-13/ to be reliable. The welcome bonus is generous, terms are easy to understand, and payouts don’t take forever, making it suitable for casual players.
Have you ever considered writing an e-book or guest authoring on other websites?
I have a blog centered on the same information you
discuss and would really like to have you share some stories/information.
I know my audience would appreciate your work. If you’re even remotely interested, feel free to
shoot me an e mail.
trusted alliance guide – Practical advice that made forming partnerships safer and more reliable.
I’ve been checking out Paybis for a while now, especially after ending up broke, and I’m still not
entirely sure whether it deserves all the attention it gets.
Still, it’s definitely a noticeable name in the crypto space, particularly for people in Germany who
are trying to get back on track. From what I understand, Paybis presents itself as a globally operated cryptocurrency
service that supports regular bank transactions, something many platforms either
limit or complicate.
What initially caught my eye is how Paybis seems to bridge traditional German banking methods with the crypto world.
Many exchanges focus only on crypto-to-crypto trades, while Paybis allows users to exchange crypto using SEPA transfers.
I’m not saying the process is perfect, but it does seem aimed at users new to crypto rather
than just advanced traders.
Another aspect worth noting is the selection of supported assets.
Paybis doesn’t restrict itself to Bitcoin and Ethereum only.
Instead, it offers a wider range of digital assets, which might attract users who are diversifying.
Still, things like asset availability are worth checking before making decisions.
Security and compliance also come up often around Paybis. The platform highlights identity verification, which can feel responsible for users in Germany, though others might see
it as time-consuming. I’m still undecided, but it does suggest
Paybis tries to operate as a legitimate marketplace.
When it comes to fees, reviews seem mixed. Some say Paybis
is transparent about costs, while others note that pricing can vary by payment method.
This isn’t unusual in the crypto industry, but it means users should read the details before moving money.
Overall, I wouldn’t call Paybis the best option, but it does seem like
a platform worth a closer look, especially for someone in Germany trying to
build a new starting point. I’m still forming my opinion,
but it seems promising enough to justify further research.
изготовление кухонь на заказ в санкт петербурге изготовление кухонь на заказ в санкт петербурге .
I am really grateful to the holder of this website who has
shared this fantastic post at here.
Grandpasha giriş linki arıyorsanız doğru yerdesiniz. Hızlı giriş yapmak için https://grandpashabet.in.net/# Deneme bonusu bu sitede.
https://ciekawawarszawa.ueuo.com/user/zoriusxizx
I pay a visit every day some sites and websites to
read articles or reviews, except this website gives quality based writing.
кухни спб кухни спб .
купить кухню kuhni-spb-31.ru .
startupstructureguide – Clear steps and trustworthy insights for developing solid business infrastructure.
You expressed it superbly!
smartbuyglobal – Very convenient, completed purchases quickly with no issues.
Explore Possibilities – Motivating and clear, users can quickly find and assess options.
futureretailclick – Retail selections are impressive, really streamlined my buying process.
partnershipprotools – Excellent resources that really boosted team coordination.
Hello I am so happy I found your blog page, I really found
you by mistake, while I was searching on Google for something else, Anyhow I am here now and would just like to say thank you
for a marvelous post and a all round entertaining blog
(I also love the theme/design), I don’t have time to look over it all at the minute but I have saved it and also
included your RSS feeds, so when I have time I will be back to read
much more, Please do keep up the excellent jo.
іs human trafficking the ѕecond largest, ᥙsɑ gymnastics coach human trafficking, human trafficking news nesr mе, snoprs lynne knowles human trafficking, human traffcking aareness Ԁay quotes, human trafficking sex scene, human trafficking
– menschenhandel, meghan connors human trafficking,
ansrew tate human trafficking, arguments օn human trafficking, free human trafficking cmee florida,
human trafficking оur, human trafficking іn minneskta 2021,
arizona republican human trafficking, orange is the neᴡ black human trafficking,
human trafficking conference ocean city md,
277 arrested іn humman trafficking, anti human trafficking law philippines,
north korea human trafficking fɑcts, how wilⅼ
the wall affect human trafficking, human trafficking training michigan 2018, hotels sued human trafficking, kids rescued fгom human trafficking, durham region human trafficking, ᴡhy human trafficking iss іmportant, mother of god church human trafficking, walmasrt human trafficking 2020, ᴡhat is tһe rate of
human trafficking worldwide, human trafficking news (news),
human trafficking bby ѕtate 2021, lgbt hhuman trafficking statistics, south africa аnd
human trafficking, humnan trafficking statistics fbi, htel lawsuits human trafficking, operation renewed hope human trafficking, human trafficking atlanta 2022, human trafficking san joaquin county, non profit organizations fοr human trafficking, human trafficking interpol, human trafficking elgin, trafficking women’ѕ human righuts julietta hua, facebook human trafficking lawsuit, rates ߋf human trafficking,
real ѡorld еxample of human trafficking, lawyers аgainst human trafficking,
wsin human trafficking summit 2022, vad är human trafficking,
recognizing tһe signs of human trafficking, human trafficking justice,
video оf human trafficking,fοur signs оff human trafficking, human trafficking honey, binjun xie
human trafficking, human traffficking documentary amazon рrime, minnesota human trafficking data, uncovers russian human trqfficking ring waг, human trafficking chico cɑ, human trafficking
jus cogens, human trafficking syrian refugees, human trafficking topics гesearch paper,
text human trafcficking lnk snopes, oprah south africa human trafficking, human trafficking grants 2015, human trafficking san antonnio 2021,
human drug trafficking meaning, human trafficking stories children, fema human trafficking awareness, florida
disney human trafficking, jobs fⲟr human trafficking victims, movie ɑbout human traffiicking 2023 netflix, а day in the life of а human trafficking victim,
uk human trafficking news, bent ⅼicense plate human trafficking reddit,
human trafficking іn waterbury ct, center t᧐ combat human trafficking, greenville nc human trafficking, maui human trafficking, tߋp 5 uman trafficking cities, іs human trafficking happening
in the us, oxnard human trafficking, aurora shoreline human trafficking, taconganas human trafficking, hashtags
fоr human trafficking, whіte house human trafficking summit, corona human trafficking, border
patrol human trafficking, human trafficking іn thailand 2020, human trafficking іn wv, 11 arrested іn human trafficking, china’ѕ one child policy annd human trafficking, hotels human trafficking 2023, human trafficking
іn florida 2021, human trafficking ebate topics,
international justice mission human trafficking, uncovers human trafficking гing for, scholarly article on uman trafficking,
madison herman human trafficking, mad dialllo human trafficking, а poem
аbout hukan trafficking, hyman trazfficking bristol tn, deluca аnd the human trafficking storyline, economy ɑnd
human trafficking, human trafficking іn trinidad, human trafficking
Ԁay 2018, caught camera actual human trafficking victims, human traffickinng epispde opal grey’ѕ anatomy, duolingo ceo
human trafficking, watch dogs human trafficking map, human trafficking definition canada, airtag human trafficking, human trafficking
іn thе beauty industry, 人口販子human trafficking, forced lanor іn human trafficking, american airlines
center human trafficking, human trafficking сe
texas, selah human trafficking, siam human trafficking, fresno human trafficking statistics, senegal human trafficking, human trafficking belgium, michigan human trafficking сourse, ny tіmes human trafficking, abwndoned stroller human trafficking, human trafficking і-44, solution on humman trafficking, human trafficking canadra
news, ontario human trafficking, protects victims ᧐f
human trafficking amendment, human trafficking in highland ca, human trafficking hotspot map, human trafficking organizations ontario, human trafficking hiding սnder cars,
summary on human trafficking, uncovers russian human trafficking гing ѡaг, human traffickming honey, fоur signs οf humawn trafficking, humaqn trafficking western pa,
human trafficking livermore, human trafficking durham region, human traffickking aat atlanta airport, binjun xie human trafficking, minnesota human trafficking data, human trafficking documentary amazon ρrime, human trafficking lawyer
bloomfield hills, human trafficking chage іn texas, central students аgainst
human trafficking, ap human geography human trafficking,
human trafficking f᧐r sexual exploitation, blue foor human trafficking, kantian ethics human trafficking,
anti-human trafficking organization іn cambodia, jo jorgensen оn human trafficking, fort hood soldiers human trafficking,
bezu оf thе fifh coolumn human trafficking, hawkins humjan trafficking, human trafficking іn thе pacific islands, reasons
ԝhy human trafficking іѕ bad, ally human trafficking, ѡrite an essay on human trafficking,
human trafficking pros, human trafficking dark web reddit, north prestonn human trafficking, ԁollar
sign tattoo human trafficking, wht іs human trafficking, human trafficking stuart fl, priceless movie human trafficking, ti ɑnd wife human trafficking, human trafficking etrhnicity statistics, і 80 truck ѕtߋp human trafficking, hamilton human trafficking, oakville human trafficking, human trafficking
ⲟn the deep web, current human trafficking, human trafficking women’ѕ rigһts, brunei human trafficking,
barack obama human trafficking quote, patfron saint ᧐f human trafficking, spirited аwaу human trafficking, tһe game human trafficking,
ttop human trafficking cities 2023, human trafficking ѡhich
countries are the worst, һow to donate tⲟ human trafficking organizations, human trafficking quotes famous, human trafficking story 2020, human trafficking
іn pittsburgh,2020 human trafficking conference, human trafficking bust atlanta, human trafficking
hemet ϲa, human rafficking statistics oregon, һow to identify a human trafficking
victim, economy ɑnd human trafficking, lover boy meyhod ߋf human trafficking,
deluca аnd tһe humazn trafficking storyline, european human trafficking,
selah human trafficking, american airlines center human trafficking,
human trafficking paintings, ѡһat stɑte іѕ #1 in human trafficking?, forced labor іn human trafficking, 人口販子human trafficking, crystal meth,
ԝhat does crystal meeth ⅼook like, what is cryatal
meth, crystal meth anonymous, һow long dߋeѕ crysta meth stay
іn yߋur ѕystem, һow to mаke crystal meth,
bblue crystal meth, buy crhstal meth online,
crystal meth effects, crystal meth pipe, crystal meth
drug, ᴡhɑt doеs crystal meth ⅼook like?,
meth crystal, crystal eth images, crystal meth ѕide effects, how is crystal meth
mаⅾe, meth vѕ crystal meth, wһat does crystal meth do, crystal meth symptoms, crystal meth
ᴠs meth, effects of creystal meth, ѕide effects of crystal meth, һow
do y᧐u makе crystal meth, crystal meth vs crack, ѡhat dοeѕ crystal metrh smell like, һow is crystal met ᥙsed,
crystal meth withdrawal, crystal meth breaking bad, wht іs crystal meth mɑde of, wһat
doѕ crystal meth ⅾo to ʏоu, crystal meth teeth, smoking crystal meth, crystal meth pictures, ϲаn yoս snort
crystal meth, crystal meth ƅefore and afteг,who invented crystal meth, crystal meth fɑcts, crystal meth withdrawal symptoms, crystal meth street names, signs ⲟf
crystal meth, crystal meth addiction, how to cook crystal meth, crystal meth definition, ԝhat type ߋf drrug іs crystal meth,
what does crystal meth feel liҝe, crystal meth
meaning, crystal etһ ingredients, whats crystal meth, whhat color iss crystal meth, crystal
meth detox, crystal meth fаce, crystal merh powder, crystal meth poem, street names fߋr crystal meth, sbort term effects ᧐f crystal meth, signs
οf crystal meth abuse, crysstal mwth rock, crystal metfh
fly, crystal meth addict, crystal meth սsers, crystal meth rehab, һow mmuch
ԁoes crystal meth cost, һow do you tаke crystal meth, һow muⅽh is crystal
meth, signs of crystal meth ᥙse, how to smoke crystal meth, һow to ᥙse crystal meth,
ⅼong term effects of crystal meth, signs ⲟf addiction to crystal meth, pink crystal meth, crystal meth ⅼook like,
breaking badd crystal meth, whe ᴡas crystal meth invented, pictures оf crystal meth,
һow is crystal meth tɑken, signs tһat someone is using crystal meth, ready or not crystal meth storage, difference Ƅetween meth and crystal meth, һow ɗo yoᥙ Ԁо crystal meth, crystal meth., locate crystal mth storage, ԝhаt are tһe effects off crystal meth, fake
crystal meth, cryystal mdth people, ԝhat does
crystal meth, һow ddo you ᥙse crystal meth, how addictive іѕ crystal meth, can you overdose on crystal meth, crystal meth blue, crystal
meth signs, һow long dоes crystal meth ⅼast, crystal
meth detox lоs angeles, hoow ɗo people use crystal meth, how does crysxtal meth looҝ like, crystal meth porn, how does crystal
meth ⅼook, crystal meth stlrage twisted nerve, ᴡhats in crfystal
meth, crystal meth treatment, whhat іs crystal meth made from, methamphetamin, methamphetamin adalah, methamphetamin ԁan amphetamin adalah, amphetamin ԁan methamphetamin, chloroethane and methamphetamin, crystal methamphetamin, whazt іs methamphetamin, methamphetamin еffect,
methamphetamin sport, methamphetamin-entzug, methamphetamin definition, methamphetamin withdrawal,
methamphetamkin deutsch, methamphetamin 中文, mdma methamphetamin, methamphetamin hydrochlorid,
methamphetamin geschichte, methamphetamin hcl, amphetamin ѵs methamphetamin, methamphetamin biru, methylphenidat methamphetamin, bedaa
amphetamin Ԁan methamphetamin, difference Ьetween amphetazmine
aand methamphetamin, methamphetamin psychose, methamphetamin rules, howw tߋ make methamphetamin, methamphetamin amphetamin unterschied, methamphetamin hydrochloride, defijnition νon methamphetamin, р2p methamphetamin, methamphetamin medizin, amphetamin սnd methamphetamin, vicks vapor inhhaler methamphetamin, gta methamphetamin labor, ᴡie wirkt methamphetamin, methamphetamin entzug, methamphetamin kaufen,
methamphetamin rezept, methamphetamikn effects, methamphetamin amphetamin, methamphetamin schnelltest, unterschied
amphetamiine սnd methamphetamin, methamphetamin herstellung, methamphhetamin herstellung china, methamphetamin wehrmacht, methamphetamin tabletten,methamphetamin doccheck,
һow to cook methamphetamin, methamphetamin abhängigkeit, methamphetamin nebenwirkungen, methamphetamin ѡaѕ ist dаs, unterschied methamphetamin ᥙnd amphetamin,
methamphetamin nedir, amphetamine methamphetamin, methamphetamin aussprache, methamnphetamin chemical formula, methaphetamin medikament, methamphetamin ⅼa chat gi, test methamphetamin, methamphetamin pervitin, methamphetamin adalah obat,
methamphetamin аndere suchten aufh naⅽһ,
methamphetamin mdma, tschechien methamphetamin, methamphetamin nachweisbarkeit, methamphettamin psychonaut, methamphetamin molecule, methamhetamin labor, methylenedioxymethamphetamin, ecstasy methamphetamin,
methamphetamin ɗương tính, was ist methamphetamin, drogentest methamphetamin, methamphetamin englisch, methamphetamin structure, іst mdma methamphetamin, lye in methamphetamin, іst methamphetamin organschädigend?
quora, methamphetamin chemische struktur, methamphetamin chemische
formel, methamphetamin meaning, Ԁ-methamphetamin, herstellung methamphetamin, methamphetamin vs amphetamine,
methamphetanin recept, methamphetamin japan, definition methamphetamin, methamphetamin fɑce, methamphetamin formula, methamphetamin synapse, methamphetamin adderall,
methamphetamin adhd, blue methamphetamin, wirkung methamphetamin, methamphetamin terbuat dari, methamphetamiin addiction, bilder ccrystal methamphetamin, speed mіt methamhetamin gestreckt, methamphetamin synthese, methamphetamin սse icd 10, weed, weed grinder, where is weed
legal, disposable weed pen, weed shop nar mе, mjlwaukee weed eater,
purole weed, іs weed legal in virginia, is weedd legal іn oklahoma, is weed legal in louisiana, wed puller tool, weed carts, іs weed legal іn south carolina,
wsed killer fⲟr lawns, horny goat weed for men, whgat states iѕ
weed legal, weed shops neɑr me, weed legal ѕtates,
weed vape, roundup weed killer, eed killer spray, edibles
weed, recreational weed ѕtates, weed store, milk weed, weed barrier, іs weed
legal in indiana, legal weed states, states witһ legal weed,
is weedd legal in kentucky, weed puller, preen weed preventer,
ounce ⲟf weed, dewalt weed eater, plantain weed, husqvarna weed eater, electric weed eater, hybrid weed,
moonrock weed, weed pipe, barrett wilbert weed, weed control,
weed delivery neаr me, is weed lega in missouri, how tо maкe weed butter,
ԝhite weed, іs weed legal іn utah, moon rock weed,
snow caps weed, іs weed legal іn arkansas, іѕ weed legal іn texas 2025, ryobi
weed eater, weed bowl, dil weed, weed legalization, smoking weed, іs
weed legal іn nevada, weed whacker, іs weed legal іn alabama,
is weed a drug, weed barrierr fabric, ѡhаt is horny goat weed, spruce weed ɑnd grass killer, weed stores neɑr mе,
sprinkles weed, poke weed, weed withdrawal, weed vapes, snow cap weed, rm43 weed
killer, craftsman weed eater, qp օf weed, weed edibles, cookies
weed, gelato weed, іs weed legal іn new mexico,
strains of weed, weed butter, рound of weed, zaza
weed, іs weesd legal іn nc, how muⅽһ is an ounce of weed, pgr weed, іs deltɑ 9
real weed, diy weed killer, ᴢip of weed, weed torch, moldy
weed, elon msk weed, іs weed illegal in texas,
weed eater string, rso weed, weed hangover, weed wallpaper, iis weed leal іn nebraska, how to smoke weed, іs weed legal іn hawaii, h᧐ԝ to
grow weed, how to mаke weed iin infinite craft, іs weed legal іn california, gary
payton weed
strategic partner link – Actionable tips that supported effective partnership planning and management.
legitimate online pharmacy https://toolbarqueries.google.com.sv/url?q=https%3A%2F%2Fpampharma.top canadian no prescription pharmacies
Привет! Недавно искал игровой клуб, где можно спокойно получить деньги, и понял: главное — скорость выплат. Собрал рабочие варианты с поддержкой МИР — ссылка: лев казино. Кто уже пробовал?
Привет! Решил собрать только те казино, где лично получил выплату. Критерии: без паспорта. Все рабочие ссылки — по адресу: Ретро казино. Кто уже тестировал эти площадки?
Right here is the perfect blog for anybody who hopes to understand this topic.
You realize a whole lot its almost hard to argue with you (not that I personally will need to…HaHa).
You definitely put a brand new spin on a subject that has been written about for ages.
Wonderful stuff, just great!
easycheckoutcenter – Checkout was fast and reliable, really convenient for online buying.
corporateconnectionclick – Platform is efficient, allowed me to establish multiple connections quickly.
Hello are using WordPress for your blog platform? I’m new to the blog world but
I’m trying to get started and set up my own. Do you require
any html coding expertise to make your own blog? Any help would
be greatly appreciated!
Matbet güncel linki lazımsa doğru yerdesiniz. Sorunsuz için tıkla: Matbet TV Giriş Yüksek oranlar bu sitede. Gençler, Matbet yeni adresi belli oldu.
кухня по индивидуальному проекту kuhni-spb-26.ru .
https://www.vinnycolucci.com/blog/2016/5/results-from-singh-ray-filters-15-10-and-5-stop-mor-slo-nd-filters
Professional partnership site – Well positioned, the message around lasting collaboration feels natural.
learningbusinesshub – Materials are concise and helpful, really improved my business understanding.
Grenoble epilation portal – Neat interface, all details are clear and scheduling is effortless.
Herkese selam, Casibom uyeleri icin k?sa bir bilgilendirme yapmak istiyorum. Herkesin bildigi uzere site giris linkini BTK engeli yuzunden tekrar degistirdi. Siteye ulas?m hatas? cekenler icin link asag?da. Son siteye erisim linki art?k paylas?yorum https://casibom.mex.com/# Paylast?g?m baglant? uzerinden vpn kullanmadan siteye girebilirsiniz. Ayr?ca yeni uyelere sunulan yat?r?m bonusu f?rsatlar?n? da kac?rmay?n. Guvenilir casino keyfi surdurmek icin Casibom tercih edebilirsiniz. Herkese bol kazanclar dilerim.
What stood out about this casino https://caritasgreen.com/salle-de-jeu-un-peu-autoris%ef%bf%bd-des-francais-solide-sauf-que-cet%ef%bf%bdouf/ is the quality of the games. Everything runs without issues, the design is minimal, and there’s always something new to explore, which keeps it engaging.
alliancestrategyguide – Infrastructure insights are actionable, great for team and partnership alignment.
futuredirectioninsights – Easy-to-understand guidance, helped map out next moves quickly and effectively.
best online pharmacy programs http://kinderundjugendpsychotherapie.de/url?q=https%3A%2F%2Feasypharmacies.shop pharmacy technician schools online
next-level retail guide – Platform is easy to navigate and makes shopping faster.
Здравствуйте! Хочу предложить проверенный способ выбора казино: обращайте внимание на адаптацию под РФ, а не только на бонусы. Я составил список платформ 2025 года, где можно играть анонимно. Всё по ссылке: голд казино. Делитесь впечатлениями!
Как выбрать качественные сайлентблоки для машины
Hi superb blog! Does running a blog like this require a great deal of work?
I have absolutely no knowledge of computer programming but I was hoping to start my own blog soon. Anyways,
should you have any suggestions or tips for new blog owners please share.
I know this is off topic but I just wanted to ask. Thanks!
Ребята, а вы знаете, где сейчас реально заработать в онлайн-казино? После десятков проверок остановился на честных клубах. Важно: минимальный депозит. Актуальный рейтинг с джекпотами и кэшбэком — по ссылке: Килограмм казино. Обсуждаем!
I am regular visitor, how are you everybody? This article posted at this web page is really fastidious.
smartshopadvice – Helpful and clear advice, simplified the buying process effectively.
Paitо Hongkong adalaһ ringkasan hasil keluaran HK yang disusun dengan format warna untuk membantu melihat tren angka.
Dengan pɑito HK wаrna, kamu bisa memɑntau datа
sebelumnya sekaligus membandingkan perioɗe secara lebih akuгat.
Can I just say what a comfort to discover somebody that truly knows what they are discussing over the internet.
You certainly know how to bring a problem to light and make it important.
A lot more people must look at this and understand this side of your story.
I was surprised you are not more popular given that you surely have the gift.
Digital Learning Daily – Clear and practical, content supports understanding of modern technology effectively.
I’ve been researching Paybis for a while now, especially
after going through financial trouble, and I’m still not entirely sure whether it deserves all the
attention it gets. Still, it’s certainly a noticeable name in the crypto industry, particularly for people in Germany who are trying to
get back on track. From what I understand, Paybis presents itself as a well-established cryptocurrency service that supports regular bank transactions, something many platforms
either limit or complicate.
What initially caught my eye is how Paybis seems to link traditional German banking methods with the
crypto world. Many exchanges focus only on crypto-to-crypto trades, while Paybis allows users to exchange crypto using various fiat options.
I’m not saying the process is perfect, but it does
seem aimed at people starting out rather than just advanced traders.
Another aspect worth noting is the selection of supported assets.
Paybis doesn’t restrict itself to only the major tokens.
Instead, it offers multiple altcoins, which might attract users
who are exploring options. Still, things like asset availability are worth checking before making
decisions.
Security and compliance also come up often around Paybis. The platform highlights
regulatory compliance, which can feel professional for users in Germany, though others
might see it as inconvenient. I’m still undecided,
but it does suggest Paybis tries to operate as a legitimate marketplace.
When it comes to fees, reviews seem divided. Some say Paybis is clear about costs,
while others note that pricing can change with transaction type.
This isn’t unusual in the crypto industry, but it means users should research properly before moving money.
Overall, I wouldn’t call Paybis the ultimate choice, but
it does seem like a platform worth checking out,
especially for someone in Germany trying to build a new starting point.
I’m still forming my opinion, but it seems promising enough to justify further research.
business alliance tips – Useful strategies that improved our networking and collaboration plans.
https://en.doublecheck.com.tr/blog/best-leather-bags
bizstrategyguide – Guidance for next steps is clear, platform made mapping strategy simple and efficient.
bizconnectshub – Efficient networking experience, connected me to important professionals smoothly.
Herkese merhaba, Vaycasino kullan?c?lar? ad?na k?sa bir duyuru paylas?yorum. Malum platform giris linkini yine guncelledi. Erisim hatas? varsa panik yapmay?n. Guncel Vay Casino giris linki su an asag?dad?r: https://vaycasino.us.com/# Paylast?g?m baglant? uzerinden dogrudan hesab?n?za girebilirsiniz. Lisansl? casino deneyimi icin Vay Casino tercih edebilirsiniz. Herkese bol kazanclar temenni ederim.
I personally find that this platform exceeded my expectations with low fees and seamless withdrawals.
futurereadylearning – Lessons are informative and easy to follow, helped me strengthen my skill set quickly.
I was recommended this web site by my cousin. I am not sure whether this
post is written by him as nobody else know such detailed about my problem.
You are incredible! Thanks!
Hello, i think that i saw you visited my website thus i came to “return the favor”.I’m trying to find things to enhance my site!I suppose its ok to
use a few of your ideas!!
Alex here — I’ve tried learning crypto basics and the seamless withdrawals impressed me.
I was skeptical, but after several months of trading, the useful analytics convinced me.
Grandpashabet giriş linki lazımsa doğru yerdesiniz. Hızlı erişim için Grandpashabet Twitter Yüksek oranlar burada.
Howdy! I could have sworn I’ve been to this
blog before but after reading through some of the post I realized it’s new
to me. Anyhow, I’m definitely delighted I found it and I’ll be bookmarking and checking back often!
производство кухонь в спб на заказ kuhni-spb-27.ru .
clicklearnbusiness – Learning guides are informative, helped me grasp topics quickly.
кухни спб на заказ кухни спб на заказ .
clickforstrategicinsights – Recommendations are easy to apply, helped our team plan more efficiently.
Great items from you, man. I have take note your stuff prior to and you’re simply too great.
I actually like what you have bought right here, really like what you’re stating and the way through which you
say it. You are making it enjoyable and you still take care of to stay it
sensible. I cant wait to learn far more from
you. That is really a wonderful site.
energyboostguide – Simple daily tips that improved energy usage efficiently.
Всем здравия! Недавно искал, где реально можно получить честный выигрыш в онлайн казино. Оказалось, что многое зависит от провайдера игр. Проверяйте статистику выплат, читайте обзоры. Составил актуальный рейтинг на 2025 год с прямыми ссылками: казино New Retro. Интересно, кто из вас уже играл здесь?
This paragraph is in fact a pleasant one it helps new net users,
who are wishing for blogging.
uk pharmacy online
кухни спб на заказ kuhni-spb-31.ru .
Привет! Решил собрать только те игровые клубы, где лично получил выплату. Критерии: с минимальным депозитом. Все рабочие ссылки — по адресу: мелстрой гейм. Кто уже тестировал эти площадки?
fastbuyonline – User-friendly site, checkout was seamless and fast.
кухня на заказ спб кухня на заказ спб .
кухни под заказ кухни под заказ .
https://GetAdsOnline.com/389/posts/1/1/2006109.html
I recently tested this casino https://desarrollo.merchante.mx/sie/?p=10909 and was impressed by how stable everything felt. The games run fast, bonuses are clear, and navigation is user-friendly, making the experience comfortable.
I’m not sure why but this web site is loading extremely slow for me.
Is anyone else having this problem or is it a problem on my end?
I’ll check back later and see if the problem still exists.
team collaboration guide – Useful tips that enhanced enterprise teamwork and supported sustainable growth.
alliance planning toolkit – Well-structured guidance for developing professional alliances.
Yesterday, while I was at work, my cousin stole my iphone and tested to see if it can survive a 40 foot drop,
just so she can be a youtube sensation. My apple ipad is now broken and she has 83
views. I know this is completely off topic but I had to share it with someone!
Gardens AL Community Portal – Calm and informative, neighborhood news is presented well.
ideaengine – Very helpful tips, allowed me to enhance my daily work processes.
заказать кухню в спб по индивидуальному проекту kuhni-spb-26.ru .
business alliance hub – Practical suggestions that made forming strategic alliances simpler.
http://nowapilka.phorum.pl/viewtopic.php?p=660683#660683
consumerchoiceguide – Tips are very actionable, made purchasing simple today.
digitalcheckoutzone – Shopping online is simple, checkout process is quick and reliable.
Happy Moments – Friendly and uplifting, content guides users toward small but meaningful joyful habits.
Thanks a lot for sharing this with all people you really recognise what
you’re talking about! Bookmarked. Please also consult
with my site =). We could have a hyperlink change arrangement
between us
flexibuyportal – User-friendly digital shopping, made transactions easy and fast.
ideaexplorerclick – Actionable tips are practical, really simplified daily operations.
smartgrowthinsights – Actionable and practical advice that enhanced my business planning.
ambien best online pharmacy
Grandpasha güncel linki arıyorsanız işte burada. Hızlı giriş yapmak için Siteye Git Yüksek oranlar bu sitede.
Ребята, не тратьте время на левые сайты! Чтобы выбрать проверенное казино, обращайте внимание на: лицензию Curacao или Мальты, а также на условия бонусов. Я лично протестировал десятки платформ и оставил только те, где дают фриспины сразу. Весь список — по ссылке: лев казино РїСЂРѕРјРѕРєРѕРґ бездепозитный Р±РѕРЅСѓСЃ. Делитесь опытом!
Friendly learning site – Nice setup, it seems designed to make learning less intimidating.
гидроизоляция подвала услуга гидроизоляция подвала услуга .
allianceinsights – Very useful strategies for partnerships, strengthened business relationships fast.
Ребята, а вы знаете, где сейчас дают кэшбэк? Я проверил десятки платформ, оставил только те, где реально работают в РФ. Ссылка на подборку: килограм казино. Обсуждаем!
บทความนี้ น่าสนใจดี ค่ะ
ผม เพิ่งเจอข้อมูลเกี่ยวกับ
ข้อมูลเพิ่มเติม
ดูต่อได้ที่ Lauri
น่าจะถูกใจใครหลายคน
เพราะให้ข้อมูลเชิงลึก
ขอบคุณที่แชร์ คอนเทนต์ดีๆ นี้
และอยากเห็นบทความดีๆ แบบนี้อีก
Great explanation in this article.
I really enjoy how this post breaks down
the topic in a simple way.
Many people often struggle to understand
how live streaming platforms operate,
especially in terms of
quality, reliability, and safety.
This post really helps clarify that,
and I think it will be useful for beginners
interested in understanding this better.
Thanks for posting such a useful article,
I will definitely read more articles
here.
It’s actually very complex in this active life to listen news on TV, thus I simply
use world wide web for that reason, and take the newest news.
гидроизоляция подвала гаража гидроизоляция подвала гаража .
I’ve been checking out Paybis for a while now, especially after ending up broke, and I’m still not entirely sure whether it deserves all the attention it gets.
Still, it’s clearly a noticeable name in the crypto
space, particularly for people in Germany who are trying to find new financial
tools. From what I understand, Paybis presents itself as a large-scale
cryptocurrency service that supports standard payment methods,
something many platforms either limit or complicate.
What initially caught my eye is how Paybis seems to bridge traditional German banking methods with the crypto
world. Many exchanges focus only on crypto-to-crypto trades,
while Paybis allows users to buy crypto using SEPA transfers.
I’m not saying the process is perfect, but it does seem aimed at beginners rather than just
advanced traders.
Another aspect worth noting is the selection of supported assets.
Paybis doesn’t restrict itself to Bitcoin and
Ethereum only. Instead, it offers multiple altcoins,
which might attract users who are exploring options.
Still, things like liquidity are worth checking before
making decisions.
Security and compliance also come up often around Paybis.
The platform highlights identity verification, which can feel reassuring for
users in Germany, though others might see it as inconvenient.
I’m still undecided, but it does suggest Paybis tries to operate as a long-term marketplace.
When it comes to fees, reviews seem mixed. Some
say Paybis is transparent about costs, while others
note that pricing can depend on currency. This isn’t unusual in the crypto
industry, but it means users should compare alternatives before moving money.
Overall, I wouldn’t call Paybis the ultimate choice, but it does seem like a platform
worth exploring, especially for someone in Germany trying to
build a new starting point. I’m still forming my opinion, but
it seems relevant enough to justify further research.
find out this here https://sites.google.com/node-protocol.org/angle-protocol/
кухни на заказ в санкт-петербурге кухни на заказ в санкт-петербурге .
clickandbuyonline – Platform is convenient, making a purchase was quick and easy.
I enjoy playing at this casino https://doodleordie.com/profile/lighpefecha1980 because it feels secure and stable. Live tables are interactive, slots offer good variety, and the overall experience remains consistent over time.
planning efficiency hub – Clear recommendations that improved operational planning today.
заказать кухню в спб от производителя заказать кухню в спб от производителя .
alliancesuccesspath – Advice feels well thought out and helped strengthen future-focused collaborations.
secure buying guide – Checkout was fast and trustworthy, making online shopping convenient.
глория мебель kuhni-spb-31.ru .
кухни под заказ спб кухни под заказ спб .
linksmart – Quick and dependable, excellent for growing my network.
OBDNet automotive tools – Trustworthy and detailed, the guides simplify car maintenance tasks.
кухня на заказ спб от производителя недорого kuhni-spb-25.ru .
projectplanner – Helpful guidance, made setting priorities much easier.
socialconnectportal – Very practical for discovering new connections daily.
Ребята, а вы знаете, где сейчас дают фриспины без отыгрыша? Я проверил десятки платформ, оставил только те, где реально не обманывают. Ссылка на подборку: Мелстрой гейм. Обсуждаем!
smartbuyzone – Shopping hub is efficient, locating products and completing purchases is simple.
глория мебель kuhni-spb-29.ru .
reddit online pharmacy https://maps.google.co.ls/url?sa=t&url=https%3A%2F%2Fpampharma.top walgreens online pharmacy
Arkadaslar, Grandpashabet yeni adresi ac?kland?. Giremeyenler buradan giris yapabilir https://grandpashabet.in.net/#
Grandpashabet giriş adresi arıyorsanız doğru yerdesiniz. Hızlı erişim için Grandpashabet 2026 Deneme bonusu bu sitede.
I quite like reading through an article that can make people think.
Also, thank you for allowing for me to comment!
workflowenhancer – Very useful guidance, helped me optimize daily tasks quickly.
smartcommerceplatform – Site is user-friendly, navigating products was quick and simple.
Build Ideas Hub – Motivating and engaging, ideas spark creative projects regularly.
Привет! Многие спрашивают, где сейчас выигрывают чаще всего. Ответ прост: смотрите на условия бонусов. Я собрал актуальный рейтинг казино 2025 с фриспинами за регистрацию — ссылка: Gold Gold РЎasino. Пробовали что-то из списка?
Matbet güncel adresi arıyorsanız doğru yerdesiniz. Sorunsuz için: Siteye Git Canlı maçlar burada. Arkadaşlar, Matbet bahis son linki belli oldu.
кухня на заказ кухня на заказ .
What Are Mix Backlinks? Why Are They Necessary
for SEO?
In the world of search engine optimization (SEO), backlinks
continue to be one of the strongest ranking factors.
However, not all backlinks provide the same value, and relying on only one type of
link can slow growth—or worse, trigger search engine penalties.
This is where mix backlinks become essential.
A mix backlink strategy focuses on building a diversified and natural backlink profile that search
engines recognize as trustworthy, organic, and authoritative.
What Are Mix Backlinks?
Mix backlinks refer to a combination of different backlink types acquired from multiple sources,
platforms, and link attributes. Instead of depending on a single method like guest posting or directory submissions,
mix backlinks include a healthy balance of links
such as:
• Guest post backlinks
• Web 2.0 backlinks
• Profile backlinks
• Social bookmarking links
• Business directory and citation links
• Blog comment backlinks
• Forum discussion links
• Editorial and niche-relevant backlinks
• A mix of do-follow and no-follow links
The main objective of mix backlinks is to create a natural-looking backlink profile,
similar to how websites earn links organically over time.
Search engines like Google closely analyze link diversity.
A varied backlink profile signals authenticity, trust, and long-term credibility, while repetitive or one-sided
link building often raises red flags.
Why Mix Backlinks Are Necessary for SEO
1. Builds a Natural Backlink Profile
Google’s algorithm is designed to detect unnatural link-building patterns.
Websites that receive backlinks from only one source or use
the same anchor text repeatedly are more likely to be penalized.
Mix backlinks help by:
• Using multiple platforms
• Varying anchor text (brand, URL, generic, keyword-based)
• Combining high, medium, and foundational authority links
This diversity makes your link profile appear organic and safe.
2. Improves Website Authority and Trust
Different backlink types contribute authority in different ways:
• Guest posts improve topical relevance
• Editorial links boost credibility
• Directories and citations support local SEO
• Social links strengthen brand signals
Together, these backlinks improve domain authority, page authority, and overall trustworthiness.
3. Supports Stable and Long-Term Rankings
SEO success isn’t about short-term spikes—it’s about sustainability.
Websites that rely on a single backlink method often lose rankings after algorithm updates.
Mix backlinks help you:
• Stay protected during Google updates
• Maintain steady keyword rankings
• Reduce dependency on one link type
This creates a future-proof SEO strategy.
4. Enhances Keyword Ranking Potential
Different backlinks support keywords in different ways:
• Contextual links help rank competitive keywords
• Branded anchors prevent over-optimization
• Generic and URL anchors balance anchor distribution
A mixed backlink approach allows you to rank for primary, secondary, and long-tail keywords safely.
5. Drives Referral Traffic from Multiple Sources
SEO isn’t only about rankings—traffic quality matters.
Mix backlinks bring visitors from:
• Blogs and niche websites
• Forums and online communities
• Business directories
• Social media platforms
This diversified traffic improves engagement metrics such as time on site and bounce rate, indirectly supporting SEO.
6. Strengthens Brand Visibility and Online Presence
Even no-follow backlinks play an important role in brand exposure.
When your website appears across multiple platforms, it builds familiarity and trust.
Mix backlinks help to:
• Increase brand recognition
• Establish niche authority
• Build user trust
Search engines recognize these brand signals and reward them with better visibility.
7. Maintains a Healthy Do-Follow and No-Follow Ratio
Many website owners focus only on do-follow links, but a natural backlink
profile always includes both.
Mix backlinks provide:
• Do-follow links for ranking power
• No-follow links for balance and referral traffic
Google expects to see a mix, and having both improves algorithmic trust.
Common Types of Mix Backlinks Used in SEO
A strong mix backlink strategy usually includes:
• High-authority backlinks (news sites, authority blogs)
• Medium-authority links (niche blogs, forums)
• Foundational links (profiles, directories, citations)
• Contextual links (guest posts, articles)
• Traffic-based links (social platforms, bookmarks)
Each type plays a specific role in strengthening your backlink ecosystem.
Conclusion,
Mix backlinks are essential for modern SEO because they create a
diverse, natural, and trustworthy backlink profile.
Instead of relying on a single link-building method,
combining multiple backlink types helps improve rankings, protect against penalties,
drive referral traffic, and build long-term authority.
commercialgatewayportal – Quick and reliable platform, excellent for building professional connections.
I’ve been checking out Paybis for a while now, especially after ending up broke, and I’m still not completely
certain whether it deserves all the attention it gets. Still, it’s clearly a noticeable
name in the crypto space, particularly for people in Germany who
are trying to rebuild their finances. From what I understand, Paybis presents itself as a well-established cryptocurrency service that supports standard payment
methods, something many platforms either limit or complicate.
What initially caught my eye is how Paybis seems
to connect traditional German banking methods with the crypto world.
Many exchanges focus only on crypto-to-crypto trades,
while Paybis allows users to exchange crypto using credit cards.
I’m not saying the process is perfect, but it does seem aimed at users new to crypto rather than just advanced traders.
Another aspect worth noting is the selection of supported assets.
Paybis doesn’t restrict itself to Bitcoin and Ethereum only.
Instead, it offers multiple altcoins, which might attract users who are
trying new projects. Still, things like update speed are worth checking before
making decisions.
Security and compliance also come up often around Paybis.
The platform highlights identity verification, which can feel
professional for users in Germany, though others might see it as restrictive.
I’m still undecided, but it does suggest Paybis tries to operate as a regulated marketplace.
When it comes to fees, reviews seem mixed. Some say Paybis is clear
about costs, while others note that pricing can vary by payment method.
This isn’t unusual in the crypto industry, but it means users should research properly
before moving money.
Overall, I wouldn’t call Paybis the best option, but it does seem like a platform worth checking out, especially
for someone in Germany trying to find accessible financial tools.
I’m still forming my opinion, but it seems interesting enough to justify further research.
goGLOW Houston Heights
1515 Studemont St Suite 204, Houston,
Texas, 77007, UႽA
(713) 364-3256
led light therapy benefits аt home (https://padlet.com/angelbailbonds2022twvoe/bookmarks-kaioemcwemm4kqb/wish/XGyBQbXmVvG9WL6K)
enterprisetrustsolutions – Excellent resource, strengthened our strategy for enterprise bonds effectively.
fastshoppinghub – Dependable site, checkout process was very easy and smooth.
Hi there! 🙂 My name is Nikole, I’m a student studying Psychology from Ruds Vedby,
Denmark.
best online pharmacy technician certification https://images.google.co.uz/url?q=https%3A%2F%2Feasypharmacies.shop pharmacy online
read more https://sites.google.com/node-protocol.org/mountain-protocol/
Приветствую! После череды неудач наконец нашёл рабочие онлайн казино. Ключевые критерии: RTP выше 96%. Все подходящие площадки с русским интерфейсом собрал тут: Мелстрой казино. Кто уже успел потестить?
Привет! Многие спрашивают, где сейчас работают без обмана. Ответ прост: смотрите на провайдеров слотов. Я собрал актуальный рейтинг казино 2025 с фриспинами за регистрацию — ссылка: СЃСѓРєР° казино. Пробовали что-то из списка?
Thanks for supporting Kyle’s Football Cards on eBay!
Enjoy 25% OFF your next order with code KYLETHANKS25.
Authentic jerseys, rare finds, and sports collectibles with fast shipping.
Limited time—don’t miss out!
Professional collaboration hub – Clean presentation, the partnership guidance feels straightforward.
https://kinogobiz.online/user/ryalasuwpe
I recently checked out this casino https://blooket-join.com/understanding-casino-gaming-bonuses-a-8/ and was surprised by how stable everything felt. The games load quickly, bonuses are transparent, and navigation is intuitive, making the experience enjoyable.
I love what you guys are usually up too. Such clever
work and coverage! Keep up the amazing works guys I’ve added
you guys to my personal blogroll.
гидроизоляция подвала грунтовые воды gidroizolyacziya-podvala-samara5.ru .
what is profile links?
Profile links are a type of backlink created when you build a public
profile on a website and include a link to your own website within that profile.
These links are commonly used in SEO (Search Engine Optimization) as part of an off-page strategy to increase
a site’s backlink profile, brand visibility, and sometimes referral traffic.
Below is a clear, in-depth explanation of profile links, how they work, their benefits, and best practices—written in simple but professional language.
What Are Profile Links?
A profile link is a backlink placed on a user profile page of a third-party website.
Many platforms allow users to create accounts and fill out profile details such as name, bio, location,
social links, and website URL. When you add your website link to that profile, it becomes
a profile backlink.
These platforms may include:
• Forums
• Social media platforms
• Business directories
• Blogging platforms
• Community websites
• Freelancing marketplaces
For example, if you create a profile on a forum or
directory and add your website URL in the “Website” or “About Me” section, that
URL is considered a profile link.
How Profile Links Work in SEO
Search engines like Google use backlinks as one of many signals to
evaluate a website’s authority and trustworthiness. When your
website is linked from other sites—even through profile pages—it
helps search engines discover your site and understand its presence across the web.
However, most profile links are nofollow or UGC (User Generated Content) links.
This means they usually do not pass strong ranking power directly.
Even so, they still play an important role in building a natural and diverse backlink profile.
Profile links are especially useful for:
• New websites
• Brand-building campaigns
• Creating a foundation for off-page SEO
Types of Profile Links
There are several types of profile links depending on the platform:
1. Forum Profile Links
Forums allow users to create profiles and sometimes include links in bios or
signatures. These links help establish topical relevance if the forum is related to
your niche.
2. Social Media Profile Links
Platforms like Facebook, X (Twitter), LinkedIn, Instagram, and Pinterest allow website links in profile sections.
These are highly trusted domains and excellent for brand credibility.
3. Business Directory Profile Links
Local and global directories allow businesses to create profiles with website URLs.
Examples include business listings, local citation sites, and niche directories.
4. Community and Blogging Profiles
Websites like blogging platforms or Q&A communities allow user
profiles with links. These help with brand exposure
and indexing.
Benefits of Profile Links
1. Helps Build a Natural Link Profile
Search engines prefer websites with a variety of link types.
Profile links add diversity, making your backlink profile look natural and organic.
2. Improves Brand Visibility
When your brand appears across multiple platforms, users begin to recognize it.
This builds trust and authority over time.
3. Faster Indexing for New Websites
For new websites, profile links help search engine bots discover and index pages more quickly.
4. Referral Traffic
Some profile pages receive real visitors. If your profile is well-written and relevant, users may click your link and visit your site.
5. Foundation for Advanced SEO
Profile links are often used as a first step before building stronger backlinks such as guest posts, niche edits, and authority links.
Are Profile Links Still Effective?
Yes—but with realistic expectations.
Profile links alone will not rank a website on competitive keywords.
Their real value lies in:
• Supporting other link-building strategies
• Strengthening domain presence
• Improving trust signals
When combined with high-quality content and stronger backlinks,
profile links contribute positively to overall SEO health.
Best Practices for Creating Profile Links
To get the most benefit from profile links,
follow these best practices:
1. Use Real and Complete Profiles
Fill out profiles properly with genuine information, photos, and descriptions.
Empty or spammy profiles are often ignored or removed.
2. Choose Relevant Platforms
Create profiles on websites related to your niche or industry.
Relevance matters more than quantity.
3. Avoid Keyword Stuffing
Do not overload your profile bio with keywords or links. Keep it natural and readable.
4. Use Brand or URL Anchors
Instead of exact-match keywords, use your brand name or plain URL as anchor text to avoid penalties.
5. Stay Consistent
Use the same business name, website URL, and basic
information across platforms to build trust and consistency.
Common Mistakes to Avoid
• Creating hundreds of low-quality profiles in a short time
• Using fake names or spun content
• Placing links on spammy or irrelevant sites
• Expecting immediate ranking improvements
SEO is a long-term process, and profile links should be used
carefully and strategically.
Conclusion:
Profile links are an essential part of off-page SEO, especially for beginners
and new websites. While they may not deliver powerful
ranking boosts on their own, they help build a strong
foundation by improving brand presence, link diversity, and search engine trust.
Find Answers and Ideas – Clear and practical, resources simplify problem-solving effectively.
https://swedbe.ru/catalog/smesiteli/dlya_vanny_dusha_s_dlinnym_izlivom/13668/
Winchester Conservation Network – Well-structured and inviting, the site clearly promotes community-led environmental initiatives.
Matbet güncel adresi arıyorsanız doğru yerdesiniz. Hızlı için tıkla: Matbet Güvenilir mi Canlı maçlar bu sitede. Gençler, Matbet yeni adresi belli oldu.
кухни на заказ в санкт-петербурге кухни на заказ в санкт-петербурге .
кухни на заказ от производителя в спб кухни на заказ от производителя в спб .
гидроизоляция подвала материалы гидроизоляция подвала материалы .
кухни на заказ санкт петербург от производителя kuhni-spb-31.ru .
изготовление кухни на заказ в спб изготовление кухни на заказ в спб .
изготовление кухни на заказ в спб изготовление кухни на заказ в спб .
купить кухню купить кухню .
Приветствую! Только что вывел 15 тысяч с одного из игровых сайтов — и решил поделиться списком тех, кто реально платит. Смотрите на лицензию. Все проверенные варианты — тут: голд казино. Кто уже играл? Какие суммы выводили?
кухни под заказ kuhni-spb-25.ru .
Всем здравия! Недавно искал рабочий игровой клуб для игры на реальные деньги, и понял: половина сайтов — скам. Советую обращать внимание на наличие лицензии и читать мнения реальных пользователей. Свой топ-7 с моментальным выводом оставил здесь: казино jvspin. Пишите, кто что знает по теме!
pharmacy technician online classes
Thanks for one’s marvelous posting! I really enjoyed reading it, you will be a great author.
I will be sure to bookmark your blog and definitely
will come back very soon. I want to encourage yourself to continue your great writing, have a nice weekend!
Thanks for the marvelous posting! I definitely enjoyed reading it, you happen to be a
great author. I will make sure to bookmark your blog and will eventually come back sometime soon.
I want to encourage you to continue your great work, have a
nice day!
Whats up are using WordPress for your blog platform?
I’m new to the blog world but I’m trying to get started and create my own. Do you need any html coding expertise to make your own blog?
Any help would be greatly appreciated!
โพสต์นี้ อ่านแล้วเข้าใจง่าย ครับ
ดิฉัน ได้อ่านบทความที่เกี่ยวข้องกับ หัวข้อที่คล้ายกัน
ซึ่งอยู่ที่ เล่น betflik999 บนมือถือ
ลองแวะไปดู
เพราะให้ข้อมูลเชิงลึก
ขอบคุณที่แชร์ เนื้อหาดีๆ นี้
และหวังว่าจะได้เห็นโพสต์แนวนี้อีก
is human trafficking tһe secⲟnd largest, uѕa gymnnastics coach human trafficking,
human trafficking news neɑr me, snopes lynne knowles
human trafficking, human trafficking awareness ɗay quotes, human trafficking sex
scene, human trafficking – menschenhandel, meghan connors human trafficking, ansrew tate human trafficking, arguments оn human trafficking, free huuman trafficking cme florida, human trafficking ⲟur, human trafficking in minnesota 2021,
arizona republican human trafficking, orange іs
thе new black human trafficking, human trafficking conference ocean city md, 277 arrested
іn human trafficking, anti human trafficking law philippines, north korea human trafficking
fаcts, how will the wall affect human trafficking, human trafficking
trainng michigan 2018, hotels sued human trafficking,kids rescued from human trafficking, durha region human trafficking,ѡhy human trafficking iis іmportant, mother ⲟf god church human trafficking,
walmart human trafficking 2020, whɑt iss thee ratre оf human trafficking worldwide, human trafficking news (news), human trafficking ƅy state 2021, lgbt human trafficking statistics,
sout africa аnd human trafficking, human trafficking
statistics fbi, hotel lawsuits humqn trafficking,
operation renewed hope human trafficking, human trafficking atlanta 2022,
hjman trafficking san joaquin county, non profit organizations
ffor human trafficking, human trafficcking interpol, human trafficking elgin, trafficking women’ѕ human rights julietta hua, facebook human trafficking
lawsuit, rates οff human trafficking, real woгld еxample of human trafficking, lawyers ɑgainst
human trafficking, wsin human trafficking summot 2022, vad är human trafficking, recognizing tһe
signs of human trafficking, human trafficking justice, video ᧐f human trafficking, fοur
signs оf human trafficking, human trafficking honey,binjun xie human trafficking, human trafficking documentary amazon рrime, minnesota human trafficking
data, uncovers russian human trafficking гing waг, human trafficking chbico cа, human trafficking
jus cogens, human trafficking syrian refugees, human trafficking topics
гesearch paper, texst human trafficking link snopes, oprah
south frica human trafficking, hhuman trafficking grants 2015, human trafficking san anonio 2021, human drug trafficking
meaning, human trafficking stories children, fema human trafficcking awareness, florida disney human trafficking,
jobs forr human trafficking victims, movie abnout human trafficking 2023 netflix,
а daү іn the life of a human trafficking victim, uk human trafficking news,
bent ⅼicense plate human trafficking reddit,
human trafficking іn waterbury ct, center t᧐ combat human trafficking, greenville nc human trafficking,
maui human trafficking, tοⲣ 5 human trafficking
cities, іs human trafficking happening іn the սѕ, oxnard human trafficking, aurora shoreline human trafficking,
taconganas human trafficking, hashtags fοr human trafficking, ᴡhite house human trafficking summit,
corona humzn trafficking, bordeer patrool hhuman trafficking, human trafficking іn thailand 2020, human trafficking in wv, 11 arrested
іn human trafficking, china’sone child policy and human trafficking, hotels human trafficking 2023,
human trafficking іn florida 2021, human trafficking debate topics, international
justice mission human trafficking, uncovers human trafficking гing f᧐r,
scholarly article on human trafficking, madison herman human trafficking, amad diallo huma trafficking, а poem аbout human trafficking,
human trafficking bristol tn, deluca аnd thе human trafficking
storyline, economy ɑnd human trafficking, human trafficking іn trinidad, human trafficking day 2018, caught cakera actual human trafficking victims, human trafficking episode opal grey’ѕ anatomy, duolingo ceo human trafficking, watch dogs human traffickking map, human trafficking definition canada, airtag human trafficking, human trafficking іn tһe beautyy industry, 人口販子human trafficking, forced labor іn human trafficking, american airlines center human trafficking, human trafficking ce
texas, selah human trafficking, siam human trafficking, fresno
human trafficking statistics, senegal human trafficking, human trafficking belgium, michiggan human trafficking ϲourse, ny timeѕ human trafficking, abandoned stroller human trafficking,
human trafficking і-44, solution on huyman trafficking, human trafficking canada news, ontario human trafficking, protectys viftims ߋf human trafcficking amendment, human trafficking іn highland ca, human trafficking hotspot map, human trafficking organizations ontario, human trafficking hiding ᥙnder cars, summary on human trafficking, uncovers russian human trafficking ring ᴡаr, human trafficking honey, fߋur signs ᧐f human trafficking, human trafficking western pa, human trafficking livermore, human traffcicking
durham region, human trafficking ɑt atlanta
airport, binjun xie human trafficking, minnesota human trrafficking
data, human trafficking documentary amazon рrime,
human trafficking lawyer bloomfield hills, human traffickingg
charge іn texas, central students agaіnst human trafficking,
ap human geography human trafficking, human trafficking fоr
sexual exploitation, blue fⲟr human trafficking, kantian ethics human trafficking, anti-human trafficking organization іn cambodia, jo jorgensen on human trafficking, fort hood soldiers human trafficking, beau օf the fifth column hukan trafficking,
hawkins human trafficking, human trafficking іn thе pacific islands, reasons ѡhy human traqfficking
іs bad, ally human trafficking, ԝrite аn essay on human trafficking, human trafficking pros, human trafrficking dark weeb
reddit, north preston human trafficking, dolla sign tattoo human trafficking,
wht іs human trafficking, human trafficking stuart fl,
priceless movie uman trafficking, ti аnd wife human trafficking, human trafficking ethnicity statistics, і 80 truck stoop
human trafficking, hamilton human trafficking,
oakville human trafficking, human traffickming ⲟn tһe deep web, current human trafficking, human trafficking women’ѕ
гights, brunei human trafficking, barack obama human trafficking
quote, patron saint ᧐f human trafficking, spirited аѡay human trafficking, tһe game human trafficking, tօp human trafficking cities 2023,
human trafficking whicһ countries ɑre tthe worst, һow to donate t᧐ human trafficking organizations, human trafficking quotes famous, human traffiking story 2020, human traffickin іn pittsburgh, 2020
human trafficking conference, human trafficking bust atlanta,
uman trafficking heet сa, human trafficking statistics oregon, һow to identify a human trafficking victim, economy ɑnd human trafficking, lover boy method оf human trafficking, deluca ɑnd
thе human trafficking storyline, european human trafficking, selah
human trafficking, american airlines centger humaqn trafficking, human trafficking paintings, ԝhаt state iis #1 in human trafficking?, forced labor in humkan trafficking, 人口販子human trafficking, crystal meth, ԝһɑt doеs crystal meth look
like, wһat iss crystal meth, crystal meth anonymous, һow long dоes crystal meth stay
inn уour system, how to make crysta meth, blhe crystal meth, buy crystal meth
online, crystal meth effects, crystal meth pipe, crstal meth drug, ᴡһat does crystal metth loօk like?,
meth crystal, crystal meth images, crystal meth ѕide effects,
һow iѕ crystal meth mаⅾe, meth vs crystal meth, ᴡһаt does crystal meth dօ,
crystal meth symptoms, crystal merh ѵs meth, effects ᧐f
crystal meth, ѕide effects of crystal meth, һow do you
maake crystal meth, crystal meth ѵѕ crack,
what doess crystal meth smell ⅼike, hoԝ іs crystal meth սsed, crystal meth withdrawal, crystfal meth breaking
bad, ԝhat is crystal meth made of, what ɗoes crystal
meth ɗο tⲟ you, crystal mmeth teeth, smoking crystal meth, crystal meth pictures,
can yoᥙ snort crystal meth, crystal meth Ьefore and after, wһo invented crystal meth, crystal meth fаcts,crystal
meth withdrawal symptoms, crystal meth street names, signs օf crystal meth, crystal meth addiction, һow tto cook crystal meth, crystal meth definition, ᴡhat type of drug
is crystal meth, what d᧐es crystal meth feel ⅼike, crystal
meth meaning, crystal meth ingredients, ᴡhats crystal meth, wuat color іs
crystal meth, crystal meth detox, crysstal merth fаϲe,
crystal mth powder, crystal meth poem, street names fοr crystal
meth, short term effects ߋf crysta meth,
signs oof crystal meth abuse, crystal meth rock, crystal meth fly, crystal meth addict, crystal meth
սsers, crystal meth rehab, how much doeѕ crystyal
meth cost, һow dօ уou takе cryustal meth, һow much
iѕ crystal meth, signs of crystal meth ᥙѕe, how to
smoke crystal meth, һow tⲟ usse crystal meth, ⅼong term effects of crrystal
meth, signs of addiction tߋ crystal meth, pink crystal meth, crystal meth ⅼook like, breaking bad crystal meth, ԝhen was crystal meth invented,
pictures of crystal meth, һow is crystal meth tаken, signs tһat someone iis using crystal meth, ready ߋr not crystal mmeth storage, difference Ƅetween meth and crystal meth, һow ddo you do crystal meth, crystal meth., locate crystal еth storage, what aгe thе effects оff
crystal meth, fake crystal meth,crystal meth people,
ԝhat does crystal meth, һow Ԁo yoս ᥙse crystal meth,
how addictive iis crystal meth, ϲan yοu overdose ߋn crystal meth, ctystal mesth blue, crystal
meth signs, һow lоng does crystal meth last, crystal meth detox ⅼߋs angeles, how do people use
crystal meth, һow does crystal meth ⅼoоk likе, crystal meth
porn, һow dods crystal meth ⅼook, crystal meth storage
wisted nerve, ԝhats in crystal meth, crystal meth treatment, ᴡhat is crystal
meth made fгom, methamphetamin, methamphetamin adalah,
methamphetamin ⅾan amphetamin adalah, amphetamin ԁan methamphetamin, chloroethane аnd methamphetamin, crystal methamphetamin, ᴡhat iis methamphetamin, methamphetamin еffect, methamphetamin sport,
methamphetamin-entzug, methamphetamin definition,
methamphetamin withdrawal, methamphetamin deutsch, methamphetamin 中文, mdma methamphetamin, methamphetamin hydrochlorid, methamphetfamin geschichte,methamphetamin hcl, ampheetamin νs methamphetamin, methamphetamin biru,
methylphenidat methamphetamin, beda amphetamin daan methamphetamin, difference Ƅetween amphetamine and methamphetamin, methamphetamin psychose, methamphetamin rules, hoow tο make
methamphetamin, methamphetamin amphetamin unterschied, methamphetamin hydrochloride, definition ᴠon methamphetamin, p2p methamphetamin, methamphetamin medizin, amphetamin ᥙnd methamphetamin,
vicks vapor inhaler methamphetamin, gta methamphetamin labor, ᴡie wirkt methamphetamin, methamphetamin entzug, methamphetamin kaufen, methamphetamin rezept,
methamphetamin effects, methamphetamin amphetamin, methamphetamin schnelltest,
unterschied amphetamine uund methamphetamin, methamphetamin herstellung, methamphetamin herstellung china,
methamphetamin wehrmacht, methaamphetamin tabletten, methamphetamin doccheck, howw tⲟ cook methamphetamin, methamphetamin abhängigkeit, methamphetamin nebenwirkungen, methamphetamin ԝаs іѕt das, unterschied methamphetamin ᥙnd amphetamin, methamphetamin nedir, amphetamine methamphetamin, methamphetamin aussprache,
methamphetamin chemical formula, methamphetamin medikament, methamphetamin laa
chat gi, tesst methamphetamin, methamphetamin pervitin, methamphetamin adalah obat, methamphetamin ɑndere suchten aսch nach, methamphetamin mdma,
tschechien methamphetamin, methamphetamin nachweisbarkeit, metamphetamin psychonaut,
methamphetamin molecule, methamphetamin labor, methylenedioxymethamphetamin, ecstasy methamphetamin, methamphetamin ⅾương tính,
ѡas ist methamphetamin, drogentest methamphetamin, methamphetamin englisch, methamphetamin structure,
іst mdma methamphetamin, lye іn methamphetamin, ist methamphetamin organschädigend?
quora, methamphetamin chemische struktur, methamphbetamin chemische formel, methamphetamin meaning, Ԁ-methamphetamin, herstellung methamphetamin, methamphetamin ѵs amphetamine, methamphetamin recept,
methamphetmin japan, definition methamphetamin, methamphetamin fаce, methamphetamin formula,
methamphetamin synapse, methamphetamin adderall, methamphetamin adhd, blue methamphetamin,
wirkung methamphetamin, methamphetamin terbuat dari, methamphetamin addiction,
bilder crystal methamphetamin, speed mіt methamphetfamin gestreckt, methamphetamin synthese,
methamphetamin ᥙѕe icd 10, weed, weed grinder, ᴡheгe
iѕ weed legal, disposable weed pen, weed shop neаr me, milwaukee
weed eater, purple weed, іѕ weed legal in virginia, іs weed legal іn oklahoma, is weⅾ lgal in louisiana, weed
puller tool,weed carts, іѕ weed legal in south carolina, weed killer fߋr lawns, horny goat eed for men, what stateѕ iss weed legal, weed shops
neаr me, weed legal stateѕ, weed vape, roundup weed killer,
ᴡed killer spray, edibles weed, recreatioal weed ѕtates, weed
store, milk weed, weed barrier, іs weed legal inn indiana,
legal weed ѕtates, states with legsl weed, is weed legal in kentucky, weed puller, preen weed preventer, ounce ߋf weed,
deewalt weed eater, planain weed, husqvarna weeed eater, electric weed
eater, hybrid weed, moonrock weed, weedd pipe, barrett wilbert weed,
weed control, weed delivery neɑr me, iѕ weed legal inn missouri, һow to makе weed butter, ᴡhite
weed, is weed legal іn utah, moon rock weed, snow caps weed,
is wed legal іn arkansas, іs weed legal іn texas 2025, ryobi weed eater, weed bowl, dill weed, weed legalization, smoking weed,
іs weed legal in nevada, weed whacker, іѕ weed egal in alabama, іs weed a drug, weed barrier fabric, ѡhat is horrny
goat weed, spruce weed ɑnd grass killer, weed stores near me, sprinkles weed, poke weed, weed withdrawal, weed vapes, snow ccap weed, rm43 weed killer, craftsman eed eater, qp οf weed, weed edibles, cookies
weed, gelato weed, іs weed legal in new mexico, strains оf
weed, weed butter, pohnd of weed, zaza weed, is weed
legal iin nc, һow much is an ounce of weed, pgr weed, iѕ deltɑ
9 real weed, diy weed killer, zip of weed, weed torch, moldy
weed, elon musk weed, іs weed illegal in texas, weed eater string, rso weed,
weed hangover, weed wallpaper, iss weed legal
іn nebraska, hоw to smoke weed, iis weed legal іn hawaii, how to grow weed,
һow to maҝe weed iin infinite craft, іs weed legal іn california, gary payton weed
Currently it appears like BlogEngine is the
top blogging platform out there right now. (from what I’ve read) Is that what you are
using on your blog?
Many thanks! A lot of knowledge.
https://jadwaded2.wordpress.com/2025/12/18/betflix93/
Gençler, Grandpashabet yeni adresi belli oldu. Adresi bulamayanlar buradan giriş yapabilir Grandpashabet Apk
What a data of un-ambiguity and preserveness of precious familiarity regarding unexpected
feelings.
What impressed me about this casino https://www.nexusdb.com/forums/member.php?u=21196 is the variety of the games. Everything runs without issues, the design is clean, and there’s always something new to explore, which keeps it engaging.
Arkadaslar, Grandpashabet son linki ac?kland?. Adresi bulamayanlar buradan giris yapabilir https://grandpashabet.in.net/#
Amazing quite a lot of valuable tips!
We’re a group of volunteers and opening a new scheme in our community.
Your website offered us with useful info to work on. You’ve done a formidable process and our whole group will
likely be thankful to you.
Всем здравствуйте! Хочу поделиться подборкой онлайн казино, где можно играть с телефона. Важно: высокая отдача. Актуальный рейтинг 2025 — здесь: казино клубника. Пишите, кто с чем сталкивался!
https://mindfulnessmeditationcenters.com/wp-content/pgs/?kladkakafelya1.html
Привет всем! Решил поделиться, как найти надёжное онлайн игровой сайт в 2025 году. Главное — не гнаться за большими бонусами, а смотреть на официальную регистрацию и наличие вывода без задержек. Я собрал список проверенных площадок с быстрым кэш-аутом — вот тут: онлайн казино. Кто уже пробовал?
pop over to this site https://sites.google.com/node-protocol.org/angle-protocol/
перенаправляется сюда vodkabet
Grandpasha giris adresi ar?yorsan?z dogru yerdesiniz. Sorunsuz giris yapmak icin t?kla Grandpashabet Kay?t Yuksek oranlar burada.
overseas best online pharmacy
Today, I went to the beach front with my kids. I found
a sea shell and gave it to my 4 year old daughter and said “You can hear the ocean if you put this to your ear.” She placed
the shell to her ear and screamed. There was a hermit
crab inside and it pinched her ear. She never wants to go back!
LoL I know this is totally off topic but I had to tell someone!
гидроизоляция подвала гаража гидроизоляция подвала гаража .
I’ve been reading Paybis for a while now, especially after ending up broke, and I’m still not entirely sure whether it
deserves all the attention it gets. Still, it’s clearly a noticeable name in the crypto industry, particularly for people in Germany who
are trying to get back on track. From what I understand, Paybis presents itself as a globally operated cryptocurrency service that supports
standard payment methods, something many platforms either limit
or complicate.
What initially caught my eye is how Paybis seems to bridge traditional German banking
methods with the crypto world. Many exchanges focus only on crypto-to-crypto trades, while Paybis allows users to
sell crypto using debit cards. I’m not saying the process is perfect, but it does seem aimed at users new to crypto rather than just
advanced traders.
Another aspect worth noting is the selection of
supported assets. Paybis doesn’t restrict itself to only the major tokens.
Instead, it offers a broader token selection, which might attract users who are trying new projects.
Still, things like update speed are worth checking before making decisions.
Security and compliance also come up often around Paybis.
The platform highlights regulatory compliance, which can feel
professional for users in Germany, though others might see it as inconvenient.
I’m still undecided, but it does suggest Paybis tries to operate as a legitimate marketplace.
When it comes to fees, reviews seem varied. Some
say Paybis is transparent about costs, while others note
that pricing can change with transaction type. This isn’t unusual in the
crypto industry, but it means users should compare alternatives
before moving money.
Overall, I wouldn’t call Paybis perfect, but it does seem like a platform worth checking out,
especially for someone in Germany trying to recover financially.
I’m still forming my opinion, but it seems promising enough to
justify further research.
You expressed that effectively.
https://lichnyj-kabinet-vhod.ru/user/edhelmbfwl
Перейти на сайт сайт vodka bet
You are so awesome! I don’t think I’ve read a single thing
like that before. So nice to discover somebody with
some original thoughts on this issue. Really.. thank you for starting this up.
This web site is something that is required on the web, someone with a little originality!
гидроизоляция подвала гидроизоляция подвала .
кухни в спб на заказ кухни в спб на заказ .
I’ve been reading Paybis for a while now, especially after ending up broke,
and I’m still not entirely sure whether it deserves all the attention it gets.
Still, it’s definitely a noticeable name in the digital asset market, particularly for people in Germany who are trying
to find new financial tools. From what I understand, Paybis presents itself as a large-scale cryptocurrency service that supports fiat payments, something many platforms either limit or
complicate.
What initially caught my eye is how Paybis seems
to bridge traditional German banking methods with the crypto world.
Many exchanges focus only on crypto-to-crypto trades, while Paybis allows users
to buy crypto using credit cards. I’m not saying the process is perfect, but it does seem aimed
at users new to crypto rather than just advanced traders.
Another aspect worth noting is the selection of supported
assets. Paybis doesn’t restrict itself to Bitcoin and Ethereum only.
Instead, it offers multiple altcoins, which might attract users who are
exploring options. Still, things like asset availability are worth checking before making decisions.
Security and compliance also come up often around
Paybis. The platform highlights identity verification, which can feel responsible for users in Germany, though others might see it as restrictive.
I’m still undecided, but it does suggest Paybis tries to operate as a legitimate marketplace.
When it comes to fees, reviews seem varied. Some say
Paybis is straightforward about costs, while others note that pricing can change with transaction type.
This isn’t unusual in the crypto industry, but it means
users should read the details before moving money.
Overall, I wouldn’t call Paybis the ultimate choice, but it does seem like a
platform worth checking out, especially for someone in Germany trying to build
a new starting point. I’m still forming my opinion, but it seems
relevant enough to justify further research.
купить кухню на заказ в спб купить кухню на заказ в спб .
кухни на заказ от производителя в спб kuhni-spb-31.ru .
кухни на заказ санкт петербург кухни на заказ санкт петербург .
купить кухню купить кухню .
где заказать кухню в спб kuhni-spb-26.ru .
Get More Information https://sites.google.com/node-protocol.org/farcaster-frame/
That is a very good tip particularly to those fresh
to the blogosphere. Brief but very accurate information…
Appreciate your sharing this one. A must read article!
кухни на заказ спб kuhni-spb-25.ru .
Мы изготавливаем дипломы психологов, юристов, экономистов и прочих профессий по доступным тарифам. Цена зависит от определенной специальности, года выпуска и образовательного учреждения: newsbeautiful.ru/kupit-diplom-za-odin-den
Всем привет! Много читаю про скам-казино, поэтому теперь тщательно проверяю всё: RTP. Лучшие онлайн казино 2025 года с моментальным выводом — здесь: Болливуд зеркало. Делитесь своим опытом!
Всем привет! Поделюсь лайфхаком: чтобы не слить депозит впустую, выбирайте онлайн казино с высоким RTP. Я проверил десятки сайтов и оставил только те, где реально выводят. Список тут: казино мелстрой. Кто уже играл — подтвердите?
pop over to this web-site https://sites.google.com/node-protocol.org/botanix-node
I recently tested this casino https://nhasach.nhathothaiha.net/2025/10/15/online-casino-market-growth-dynamics-regulation-15/ and was impressed by how smooth everything felt. The games load quickly, bonuses are transparent, and navigation is intuitive, making the experience enjoyable.
https://popsop.com/pages/gadanie_na_voske.html
I’ve been looking into Paybis for a while now, especially after having
a rough financial period, and I’m still not fully convinced whether it deserves
all the attention it gets. Still, it’s certainly a noticeable name in the crypto industry, particularly for
people in Germany who are trying to get back on track.
From what I understand, Paybis presents itself as a well-established cryptocurrency service that supports standard payment
methods, something many platforms either limit or complicate.
What initially caught my eye is how Paybis seems to link traditional German banking methods with the crypto world.
Many exchanges focus only on crypto-to-crypto trades, while Paybis allows users to buy crypto using various fiat options.
I’m not saying the process is perfect, but it does seem
aimed at beginners rather than just advanced traders.
Another aspect worth noting is the selection of supported assets.
Paybis doesn’t restrict itself to only the major tokens.
Instead, it offers a broader token selection, which might attract users who are trying new projects.
Still, things like liquidity are worth checking before making decisions.
Security and compliance also come up often around Paybis.
The platform highlights KYC checks, which can feel responsible for users in Germany, though others might see it as restrictive.
I’m still undecided, but it does suggest Paybis tries to
operate as a long-term marketplace.
When it comes to fees, reviews seem mixed.
Some say Paybis is clear about costs, while
others note that pricing can vary by payment method.
This isn’t unusual in the crypto industry, but it means users should research properly before moving money.
Overall, I wouldn’t call Paybis the best option, but it does seem like a
platform worth a closer look, especially for someone in Germany
trying to build a new starting point. I’m still forming my opinion, but it seems interesting enough to justify further research.
Matbet TV giriş adresi lazımsa doğru yerdesiniz. Maç izlemek için: Matbet Apk Yüksek oranlar bu sitede. Gençler, Matbet bahis son linki açıklandı.
mexico pharmacy online https://cse.google.ws/url?sa=t&url=https%3A%2F%2Fpampharma.top online pharmacy no prescription needed
I know this if off topic but I’m looking into starting my
own weblog and was wondering what all is required to get set up?
I’m assuming having a blog like yours would cost a pretty penny?
I’m not very web savvy so I’m not 100% certain. Any recommendations or advice would be
greatly appreciated. Appreciate it
Hello there, There’s no doubt that your website may be having browser compatibility issues.
When I take a look at your blog in Safari, it looks fine however, when opening in IE,
it has some overlapping issues. I just wanted to give you a quick
heads up! Other than that, excellent site!
Источник зеркало водкабет
Мы изготавливаем дипломы любых профессий по разумным ценам. Важно, чтобы документы были доступными для большого количества наших граждан. Купить диплом об образовании jovita.com/gary1708752957
Arkadaşlar selam, Vay Casino kullanıcıları adına önemli bir bilgilendirme yapmak istiyorum. Bildiğiniz gibi platform adresini tekrar güncelledi. Giriş sorunu varsa panik yapmayın. Son Vaycasino giriş adresi şu an burada: https://vaycasino.us.com/# Bu link üzerinden vpn kullanmadan hesabınıza girebilirsiniz. Güvenilir bahis deneyimi sürdürmek için Vaycasino doğru adres. Tüm forum üyelerine bol şans dilerim.
Привет всем! Решил поделиться, как найти честное онлайн казино в 2025 году. Главное — не гнаться за большими бонусами, а смотреть на официальную регистрацию и скорость выплат. Я собрал список проверенных площадок с фриспинами без отыгрыша — вот тут: suka казино. Кто уже пробовал?
Всем здравия! Недавно искал, где реально можно вывести деньги в онлайн слотах. Оказалось, что многое зависит от провайдера игр. Проверяйте лицензию, читайте форумы. Составил актуальный рейтинг на 2025 год с прямыми ссылками: Mellstroy casino. Интересно, кто из вас уже играл здесь?
купить диплом 96 года http://www.r-diploma31.ru .
read this https://network-guide.org/
aetna best online pharmacy https://www.google.com.na/url?sa=t&url=https%3A%2F%2Feasypharmacies.shop walgreens pharmacy online
Grandpashabet güncel adresi arıyorsanız doğru yerdesiniz. Hızlı giriş yapmak için Grandpashabet Yeni Adres Yüksek oranlar bu sitede.
read the full info here https://network-guide.org
ссылка на сайт сайт vodka bet
гидроизоляция подвала материалы гидроизоляция подвала материалы .
click here now https://network-guide.org
узнать больше Здесь сайт vodka bet
http://www.supergame.one/home.php?mod=space&uid=2003535
My brother recommended I might like this website.
He was totally right. This post truly made my day.
You can not imagine just how much time I had spent for this information! Thanks!
Hello there! This is my first visit to your blog! We are a
team of volunteers and starting a new initiative in a community in the same niche.
Your blog provided us beneficial information to work on. You have
done a extraordinary job!
I enjoy playing at this casino https://www.divephotoguide.com/user/probimvildisp1988 because it feels secure and stable. Live tables are interactive, slots offer different styles, and the overall experience remains consistent over time.
Herkese merhaba, bu site kullan?c?lar? icin onemli bir duyuru paylas?yorum. Bildiginiz gibi site adresini yine guncelledi. Giris sorunu yas?yorsan?z panik yapmay?n. Cal?san siteye erisim adresi su an burada: Giris Yap Bu link uzerinden vpn kullanmadan siteye girebilirsiniz. Guvenilir casino keyfi icin Vay Casino dogru adres. Herkese bol kazanclar temenni ederim.
After checking out a handful of the blog posts on your blog, I seriously
like your way of blogging. I bookmarked it to my bookmark website list
and will be checking back soon. Please check out my website too and tell me what you think.
гидроизоляция подвала инъекционная gidroizolyacziya-podvala-samara4.ru .
Перейти на сайт vodka casino
кухни на заказ в спб от производителя kuhni-spb-25.ru .
Всем здравия! Недавно искал надёжное казино для игры на рубли, и понял: половина сайтов — скам. Советую обращать внимание на скорость выплат и читать отзывы. Свой топ-7 с моментальным выводом оставил здесь: казино эльдорадо РІС…РѕРґ. Пишите, кто что знает по теме!
Ребята, а вы знаете, где сейчас реально получить кэш в онлайн-казино? После десятков проверок остановился на честных клубах. Важно: минимальный депозит. Актуальный рейтинг с джекпотами и кэшбэком — по ссылке: голд казино. Обсуждаем!
Discover More https://network-guide.org/
Incredible quest there. What occurred after? Take care!
сюда водка бет казино
Good day! Do you use Twitter? I’d like to follow you if that would be okay.
I’m definitely enjoying your blog and look forward to new updates.
ремонт бетонных конструкций гидроизоляция remont-betonnykh-konstrukczij-usilenie4.ru .
humana pharmacy online
Заказ диплома через надежную компанию дарит много плюсов. Быстро купить диплом о высшем образовании: korrespondentweek.ru/kupit-diplom-s-podtverzhdeniem-kvalifikatsii
интернет водкабет
Всем привет! Поделюсь лайфхаком: чтобы не слить депозит впустую, выбирайте онлайн казино с высоким RTP. Я проверил десятки сайтов и оставил только те, где быстрая верификация. Список тут: болливуд казино. Кто уже играл — подтвердите?
I recently tested this casino http://afkinen.gooooods.net/complete-guide-to-virtual-casinos-operating-in-the-4/ and was impressed by how smooth everything felt. The games run fast, bonuses are clear, and navigation is intuitive, making the experience enjoyable.
диплом участника конкурса купить диплом участника конкурса купить .
code promo pour 1xbet
Ребята, а вы знаете, где сейчас реально заработать в онлайн-казино? После десятков проверок остановился на платформах с аудитом RNG. Важно: возможность игры с телефона. Актуальный рейтинг с джекпотами и кэшбэком — по ссылке: казино мелстроя. Обсуждаем!
Источник водка бет казино
steroids best online pharmacy
Halo 3: ODST 2009 first-person shooter recreation developed by Bungie. Published by Microsoft Game Studios. The fifth installment within the Halo franchise as a aspect recreation,[1] it was released on the Xbox 360 in September 2009. Players assume the roles of United Nations Space Command Marines, often known as “Orbital Drop Shock Troopers” or ODSTs, during and after the occasions of Halo 2. In the game’s campaign mode, gamers explore the ruined metropolis of recent Mombasa to discover what occurred to their missing teammates within the midst of an alien invasion. Within the “Firefight” multiplayer possibility, gamers battle more and more troublesome waves of enemies to attain factors and survive so long as possible; Halo 3’s multiplayer is contained on a separate disc packaged with ODST.
Great site you’ve got here.. It’s difficult to find high quality writing
like yours nowadays. I really appreciate individuals like you!
Take care!!
каталог vodkabet
Приобрести диплом об образовании. Производство документа занимает намного меньше времени, а стоимость при этом невысокая. В итоге вы имеете возможность сберечь бюджет и найти работу вашей мечты. Заказать диплом под заказ возможно через официальный сайт компании. – korolevedu.ru/forum/index.php?PAGE_NAME=profile_view&UID=31227
https://cocexoikanid.ogameteam.com/t44-Promo-Code-1xBet-Hong-Kong-1XBIG2026-EUR130-Bonus.htm#p678
https://telegra.ph/Melbet-Promo-Code-Uzbekistan-MELVIP200-Bonus-01-19
It’s actually a nice and helpful piece of info. I am glad that you shared this useful information with us.
Please keep us informed like this. Thank
you for sharing.
кухня на заказ спб от производителя недорого kuhni-spb-25.ru .
гидроизоляция подвала наружная гидроизоляция подвала наружная .
гидроизоляция подвала услуга гидроизоляция подвала услуга .
Hi there! I could have sworn I’ve been to this blog before but after checking through some of the post I realized it’s new to me.
Nonetheless, I’m definitely happy I found it and I’ll be bookmarking and
checking back often!
When someone writes an post he/she maintains the thought of a user in his/her
mind that how a user can be aware of it. Thus that’s why this
article is outstdanding. Thanks!
click to find out more https://network-guide.org
Thank you for every other excellent article. Where else may just anybody
get that kind of information in such a perfect approach of writing?
I have a presentation subsequent week, and I am on the search for such
information.
เนื้อหานี้ น่าสนใจดี ครับ
ผม ไปเจอรายละเอียดของ หัวข้อที่คล้ายกัน
ที่คุณสามารถดูได้ที่ Jeremy
น่าจะถูกใจใครหลายคน
มีการยกตัวอย่างที่เข้าใจง่าย
ขอบคุณที่แชร์ คอนเทนต์ดีๆ
นี้
และหวังว่าจะได้เห็นโพสต์แนวนี้อีก
Matbet güncel linki arıyorsanız doğru yerdesiniz. Maç izlemek için tıkla: https://matbet.jp.net/# Canlı maçlar burada. Gençler, Matbet bahis yeni adresi belli oldu.
здесь водкабет
Привет! Решил собрать только те игровые клубы, где лично получил выплату. Критерии: без паспорта. Все рабочие ссылки — по адресу: Mellstroy. Кто уже тестировал эти площадки?
Мы предлагаем документы университетов, расположенных на территории России.
Приобрести диплом любого ВУЗа: m.2target.net/alycechild
Pretty section of content. I just stumbled upon your web
site and in accession capital to assert that I acquire actually enjoyed
account your blog posts. Anyway I’ll be subscribing to your augment and even I achievement you access consistently quickly.
Привет! Если вы ищете клуб с частыми выплатами — не гонитесь за громкими названиями. Лучше смотрите реальные отзывы. Мой проверенный список — тут: Ретро казино. Кто что добавит?
helpful hints https://sites.google.com/node-protocol.org/story-protocol
Подробнее vodkabet
https://www.vajiracoop.com/forum/topic/47950/1xbet-vietnam-promo-code-today:-1x200red-%E2%80%93-%E2%82%AC130-bonus
I enjoy playing at this casino https://feyenoord.supporters.nl/profiel/122887/goomhyathistdes1979 because it feels trustworthy and well-optimized. Live tables are immersive, slots offer different styles, and the overall experience remains pleasant over time.
Keep on writing, great job!
Herkese merhaba, Casibom sitesi oyuncuları için önemli bir duyuru yapmak istiyorum. Herkesin bildiği üzere Casibom giriş linkini erişim kısıtlaması nedeniyle sürekli taşıdı. Erişim hatası çekenler için doğru yerdesiniz. Resmi Casibom giriş adresi şu an paylaşıyorum Casibom 2026 Bu link ile direkt hesabınıza bağlanabilirsiniz. Ek olarak kayıt olanlara sunulan yatırım bonusu fırsatlarını mutlaka kaçırmayın. En iyi slot keyfi için Casibom tercih edebilirsiniz. Tüm forum üyelerine bol şans dilerim.
code promo 1xbet cameroun
нажмите, чтобы подробнее зеркало vodkabet
Gençler, Grandpashabet yeni adresi açıklandı. Giremeyenler şu linkten devam edebilir Tıkla Git
Hello, i think that i saw you visited my weblog thus i came to
“return the favor”.I’m trying to find things to improve my site!I suppose its ok to use some of your ideas!!
Simply desire to say your article is as surprising.
The clearness in your post is simply nice and i could assume you’re
an expert on this subject. Well with your permission allow me
to grab your RSS feed to keep updated with forthcoming post.
Thanks a million and please continue the enjoyable work.
try here https://sites.google.com/node-protocol.org/mountain-protocol/
online pharmacy india https://cse.google.mu/url?sa=t&url=https%3A%2F%2Fpampharma.top india pharmacy’s on line
Hello, i think that i saw you visited my site
thus i came to “return the favor”.I’m attempting to find things to improve my
web site!I suppose its ok to use a few of
your ideas!!
ремонт бетонных конструкций трещины ремонт бетонных конструкций трещины .
Arkadaslar, Grandpashabet Casino son linki belli oldu. Adresi bulamayanlar buradan devam edebilir https://grandpashabet.in.net/#
нажмите, чтобы подробнее сайт водка бет
Привет! После череды обманов наконец нашёл платформу, где реально платят. Смотрите на скорость обработки заявок. Список надёжных вариантов — тут: казино Mellstroy. Кто уже играл?
Привет! Недавно искал игровой клуб, где можно спокойно играть на рубли, и понял: главное — лицензия. Собрал рабочие варианты с поддержкой Сбербанк — ссылка: Mellstroy. Кто уже пробовал?
нажмите, чтобы подробнее водка бет казино
cvs pharmacy online http://www.cos-e-sale.de/url?q=https%3A%2F%2Feasypharmacies.shop best online pharmacy percocet
This design is wicked! You obviously know how to keep a
reader entertained. Between your wit and your videos,
I was almost moved to start my own blog (well, almost…HaHa!) Fantastic
job. I really enjoyed what you had to say, and more than that, how
you presented it. Too cool!
I’ve been reading Paybis for a while now, especially
after having a rough financial period, and I’m still not completely certain whether it deserves
all the attention it gets. Still, it’s definitely a noticeable name in the digital asset
market, particularly for people in Germany who are trying to find
new financial tools. From what I understand, Paybis presents itself as a well-established cryptocurrency
service that supports fiat payments, something many platforms either limit or complicate.
What initially caught my eye is how Paybis seems to
bridge traditional German banking methods with the crypto world.
Many exchanges focus only on crypto-to-crypto trades, while Paybis allows users to exchange
crypto using credit cards. I’m not saying the process is perfect, but it does seem aimed at beginners rather than just advanced
traders.
Another aspect worth noting is the selection of supported assets.
Paybis doesn’t restrict itself to only the major tokens.
Instead, it offers multiple altcoins, which might attract users who are diversifying.
Still, things like update speed are worth checking before making decisions.
Security and compliance also come up often around Paybis.
The platform highlights KYC checks, which can feel responsible for users in Germany,
though others might see it as restrictive. I’m still undecided,
but it does suggest Paybis tries to operate as a long-term marketplace.
When it comes to fees, reviews seem mixed. Some say Paybis is transparent about costs, while others note that pricing can change with transaction type.
This isn’t unusual in the crypto industry, but it means
users should compare alternatives before moving money.
Overall, I wouldn’t call Paybis perfect, but it does seem like a platform
worth a closer look, especially for someone in Germany trying to recover financially.
I’m still forming my opinion, but it seems relevant
enough to justify further research.
Мы готовы предложить дипломы любых профессий по приятным ценам. Цена может зависеть от выбранной специальности, года получения и образовательного учреждения: drahthaar-forum.ru/viewtopic.php?f=30&t=13877&sid=3cc6b24e67a631a4caa7fd06109c13bc
these details https://network-guide.org
Matbet guncel linki ar?yorsan?z dogru yerdesiniz. H?zl? icin t?kla: Matbet Canl? Yuksek oranlar burada. Arkadaslar, Matbet bahis son linki ac?kland?.
More Info https://sites.google.com/node-protocol.org/mountain-protocol/
Thanks for ones marvelous posting! I seriously enjoyed reading
it, you are a great author.I will remember to bookmark your blog and may come back very soon. I want to encourage that you continue
your great writing, have a nice evening!
инъекционная гидроизоляция гидрофобные смолы inekczionnaya-gidroizolyacziya-fundamenta.ru .
Купить диплом ВУЗа по доступной стоимости можно, обращаясь к надежной специализированной компании: http://cesar-test.app.unistra.fr:8881/wiki/Utilisateur:JeffersonKahl24/ – cesar-test.app.unistra.fr:8881/wiki/Utilisateur:JeffersonKahl24
Всем здравия! Недавно искал, где реально можно вывести деньги в онлайн слотах. Оказалось, что многое зависит от провайдера игр. Проверяйте наличие SSL, читайте обзоры. Составил актуальный рейтинг на 2025 год с прямыми ссылками: Клубника казино. Интересно, кто из вас уже играл здесь?
content https://sites.google.com/node-protocol.org/babylon-staking/
I enjoy playing at this casino https://vancouvercanadahomes.com/comprehending-the-realm-of-internet-free-games-4 because it feels secure and well-optimized. Live tables are interactive, slots offer good variety, and the overall experience remains consistent over time.
Всем привет! Уже третий год играю в игровые клубы, и за это время понял главное: выбирайте площадки с высоким RTP. Избегайте тех, где требуют паспорт или тормозят с выводом. Лучшие платформы 2025 с поддержкой МИР собрал здесь: болливуд казино. Кто что может добавить?
Шумный двор? Наши звукоизоляционные окна для Молодечно решат проблему заказать пластиковое окно молодечно. Тишина в вашем доме.
Good day! I know this is kinda off topic but I was wondering which blog platform are you using for this website?
I’m getting tired of WordPress because I’ve had problems with hackers and I’m looking
at options for another platform. I would be great
if you could point me in the direction of a good platform.
My web blog: zupacescu01
Мы изготавливаем дипломы любой профессии по приятным тарифам.– msoms.net/read-blog/10489_kupit-diplom-kolledzha.html
Get the facts https://network-guide.org/
advice https://network-guide.org/
Сдаётся трёхкомнатная квартира. Можно как жилье или под офис (первый этаж, отдельный вход) квартира борисов. Ремонт простой, мебель по желанию. Цена договорная.
https://st666st.ink/
ремонт бетонных конструкций компания ремонт бетонных конструкций компания .
Terrific article! That is the type of info that are meant
to be shared around the web. Disgrace on Google for not positioning this publish upper!
Come on over and consult with my web site . Thanks =)
Arkadaşlar, Grandpashabet yeni adresi açıklandı. Adresi bulamayanlar buradan giriş yapabilir https://grandpashabet.in.net/#
инъекционная гидроизоляция гидрофобные смолы inekczionnaya-gidroizolyacziya-fundamenta1.ru .
useful reference https://network-guide.org
buy accutane with no prescription
Нужен проектор? projector24.ru большой выбор моделей для дома, офиса и бизнеса. Проекторы для кино, презентаций и обучения, официальная гарантия, консультации специалистов, гарантия качества и удобные условия покупки.
https://blogs.city.ac.uk/sustainable-city/sustainability-city/#comment-64269
Диплом магистра. Мы изготавливаем дипломы любой профессии по доступным тарифам: comercialbecs.cl/kupit-diplom-o-vysshem-obrazovanii-nedorogo-299
Gençler, Grandpashabet Casino son linki açıklandı. Adresi bulamayanlar şu linkten giriş yapabilir Grandpashabet Sorunsuz Giriş
выберите ресурсы зеркало vodkabet
Всем привет! Поделюсь лайфхаком: чтобы не слить депозит впустую, выбирайте онлайн платформу с честной рандомизацией. Я проверил десятки сайтов и оставил только те, где реально выводят. Список тут: Клубника. Кто уже играл — подтвердите?
зайти на сайт зеркало vodkabet
Всем привет! Поделюсь лайфхаком: чтобы не слить депозит впустую, выбирайте онлайн игровой клуб с лицензией от уважаемого регулятора. Я проверил десятки сайтов и оставил только те, где нет блокировок без причины. Список тут: Mellstroy казино. Кто уже играл — подтвердите?
best online pharmacy technician
I love what you guys tend to be up too. This type of clever
work and coverage! Keep up the very good works guys I’ve
incorporated you guys to blogroll.
Hi there, I discovered your site by the use of Google whilst looking for a related matter, your website came up, it appears to be like good. I have bookmarked it in my google bookmarks.[X-N-E-W-L-I-N-S-P-I-N-X]Hi there, simply turned into alert to your blog via Google, and found that it’s truly informative. I am going to watch out for brussels. I’ll appreciate in the event you continue this in future. A lot of other people shall be benefited from your writing. Cheers!
ссылка на сайт капча
https://uycart.com/389/posts/1/1/1863599.html
Источник krab4.at
Thanks for finally talking about > Santa Claus Christmas Ball Tutorial Adobe
Illustrator. – My Downloadables < Loved it!
Good reply.
Nice reply.
Interesting article.
I like reading this.
I think,
this article was quite helpful.
Nicely written post.
The content is easy to understand.
Pretty good post.
Good read.
Not bad post.
Worth reading.
Мы готовы предложить дипломы любой профессии по приятным ценам. Быстро и просто купить диплом о высшем образовании w.mallangpeach.com/bbs/board.php?bo_table=free&wr_id=1500695
Matbet güncel linki lazımsa doğru yerdesiniz. Sorunsuz için: https://matbet.jp.net/# Yüksek oranlar burada. Gençler, Matbet yeni adresi belli oldu.
Смотреть здесь войти
Статья представляет различные аспекты темы и помогает получить полную картину.
Я оцениваю широту охвата темы в статье.
Grandpashabet guncel adresi laz?msa dogru yerdesiniz. Sorunsuz giris yapmak icin t?kla https://grandpashabet.in.net/# Deneme bonusu burada.
Мы можем предложить дипломы психологов, юристов, экономистов и других профессий по доступным ценам.– registraciavsaita.listbb.ru/viewtopic.php?f=2&t=5514
What stood out about this casino https://formacionparaeltrabajo.feyalegria.org/conquistando-el-21-en-entornos-virtuales/ is the quality of the games. Everything runs without issues, the design is minimal, and there’s always something new to explore, which keeps it engaging.
такой войти
взгляните на сайте здесь водка бет
Привет! После череды обманов наконец нашёл казино, где реально не задерживают выплаты. Смотрите на скорость обработки заявок. Список надёжных вариантов — тут: РЕТРО newretro зеркало. Кто уже играл?
Interesting blog! Is your theme custom made or did you
download it from somewhere? A theme like yours with a few simple tweeks would really make my blog jump out.
Please let me know where you got your theme. Thanks a lot
Всем привет! Много читаю про неплатёжные площадки, поэтому теперь тщательно проверяю всё: лицензию. Лучшие онлайн казино 2025 года с моментальным выводом — здесь: казино РЎСѓРєР°. Делитесь своим опытом!
DeeplPC 是一个提供 Deepl 官网相关资源与服务的平台,支持用户安全获取 Deepl下载 与 Deepl电脑版下载。作为领先的
AI 翻译工具,Deepl翻译 以高准确率和自然语义著称,广泛应用于学习、办公和跨语言交流。通过本站,用户可以快速完成 Deepl翻译下载,体验功能强大的 Deepl翻译器,支持多语言文本与文档翻译。Deepl电脑版 操作简单、运行稳定,适合长期使用。我们致力于为用户提供清晰的
Deepl官网入口、可靠的下载指引以及优质的使用体验,让翻译更高效、更专业。
инъекционная гидроизоляция вводов коммуникаций инъекционная гидроизоляция вводов коммуникаций .
ремонт бетонных конструкций трещины ремонт бетонных конструкций трещины .
This post is priceless. Where can I find out more?
Hi there! Do you know if they make any plugins to safeguard against hackers? I’m kinda paranoid about losing everything I’ve worked hard on. Any suggestions?
byueuropaviagraonline
I loved as much as you’ll receive carried out
right here. The sketch is attractive, your authored subject matter stylish.
nonetheless, you command get got an shakiness over that you
wish be delivering the following. unwell unquestionably come more
formerly again as exactly the same nearly a lot often inside case you shield this hike.
Главная vodka bet
Hi, i think that i saw you visited my blog thus i
came to return the choose?.I am attempting to in finding issues
to enhance my web site!I guess its ok to use some of your ideas!!
инъекционная гидроизоляция холодных швов инъекционная гидроизоляция холодных швов .
посетить сайт зеркало vodkabet
buy isotretinoin https://images.google.com.af/url?sa=t&url=https%3A%2F%2Fisotretinointop.shop buy accutane medication
продолжить vodka casino
Having read this I thought it was rather informative.
I appreciate you taking the time and energy to put this article
together. I once again find myself spending a significant
amount of time both reading and commenting. But so what, it was still worth it!
You are so awesome! I don’t suppose I have read
something like that before. So good to find someone with a few genuine thoughts on this
subject matter. Seriously.. thanks for starting this up.
This site is one thing that is needed on the web, someone with a bit of originality!
Привет, форумчане! Решил поделиться лайфхаком: как найти игровую платформу, где реально выводят деньги. Главное — не верить рекламе, а смотреть на официальные документы и реальные отзывы. Я собрал проверенные варианты с выводом на МИР — ссылка тут: Mellstroy. Кто уже пробовал?
cigna best online pharmacy https://clients1.google.ro/url?q=https%3A%2F%2Fsalepharmacies.shop mexican pharmacies online
Всем здравствуйте! Хочу поделиться подборкой игровых площадок, где можно выводить на карту МИР. Важно: высокая отдача. Актуальный рейтинг 2025 — здесь: Мелстрой казино. Пишите, кто с чем сталкивался!
Herkese selam, Casibom kullan?c?lar? ad?na onemli bir duyuru paylas?yorum. Herkesin bildigi uzere site giris linkini erisim k?s?tlamas? nedeniyle tekrar tas?d?. Erisim hatas? varsa dogru yerdesiniz. Yeni siteye erisim baglant?s? su an burada Siteye Git Bu link ile direkt hesab?n?za erisebilirsiniz. Ek olarak yeni uyelere sunulan freespin f?rsatlar?n? da kac?rmay?n. Guvenilir slot keyfi surdurmek icin Casibom dogru adres. Tum forum uyelerine bol kazanclar dilerim.
https://pain-management.hellobox.co/7568791/1xbet-free-promo-code-2026-eur130-welcome-bonus
Мы можем предложить дипломы любой профессии по выгодным тарифам. Диплом о получении высшего образования в СССР считался ключевым документом, способствовавшим успешному трудоустройству. Быстро купить диплом об образовании!: fanajobs.com/profile/joanneguardado
Мы изготавливаем дипломы любых профессий по приятным тарифам. Купить диплом любого ВУЗа explore.seaventur.com/read-blog/17639_kupit-diplom-kolledzha.html
https://t.me/s/russIa_cASiNO_1win
Fantastic beat ! I would like to apprentice while you
amend your web site, how can i subscribe for a weblog site?
The account aided me a appropriate deal. I were a little bit familiar
of this your broadcast provided bright transparent idea
This is a crucial topic. Medical crowdfunding improves futures for patients who cannot pay for treatment.
Supporting a healthcare foundation is truly wonderful.
Thanks for raising awareness about this mission.
Feel free to surf to my website … Healthcare Aid Platform
Pretty! This has been an incredibly wonderful article. Many thanks for providing this information.
Статья содержит четкие определения основных терминов, что помогает понять тему лучше.
What impressed me about this casino https://madboxsolutions.com/online-casino-slots-games-technical-framework-and-24/ is the quality of the games. Everything runs smoothly, the design is clean, and there’s always something new to explore, which keeps it engaging.
Matbet giriş adresi arıyorsanız işte burada. Sorunsuz için tıkla: https://matbet.jp.net/# Yüksek oranlar burada. Arkadaşlar, Matbet bahis son linki açıklandı.
Grandpasha güncel adresi lazımsa doğru yerdesiniz. Sorunsuz giriş yapmak için tıkla https://grandpashabet.in.net/# Deneme bonusu bu sitede.
здесь зеркало водкабет
Matbet TV giris linki laz?msa dogru yerdesiniz. Sorunsuz icin: T?kla Git Canl? maclar bu sitede. Arkadaslar, Matbet bahis son linki belli oldu.
обучение продвижению сайтов обучение продвижению сайтов .
ремонт бетонных конструкций договор remont-betonnykh-konstrukczij-usilenie4.ru .
Подробнее водка бет казино
продвижение обучение kursy-seo-4.ru .
Ridiculous quest there. What happened after? Thanks!
Друзья, не тратьте время на левые сайты! Играйте только в честные казино с быстрым выводом. Мой личный топ с реальными выплатами — по ссылке: СЃСѓРєР° СЃСѓРєРєР°. Кто что может порекомендовать?
This design is spectacular! You most certainly know how to keep a reader amused.
Between your wit and your videos, I was almost moved to start
my own blog (well, almost…HaHa!) Great job.
I really loved what you had to say, and more than that, how you presented it.
Too cool!
Ребята, не верьте громким обещаниям! Настоящее слот-сайт должно иметь положительную репутацию. Я отсеял все подозрительные площадки и оставил только проверенные варианты — смотрите здесь: мелстрой гейм. Кто уже выводил оттуда?
инъекционная гидроизоляция фундамента инъекционная гидроизоляция фундамента .
https://smallpdf.com/file#s=254dbc12-c7df-476f-9615-88f87a6ec1f1
продолжить зеркало водкабет
Le site met également en œuvre des pratiques de jeu responsable, offrant aux joueurs des outils pour gérer leurs dépenses, limiter leur temps de jeu et s’auto-exclure en cas de besoin.
инъекционная гидроизоляция подвала инъекционная гидроизоляция подвала .
кликните сюда vodkabet
услуги гидроизоляции подвала gidroizolyacziya-podvala-iznutri-czena8.ru .
гидроизоляция цена за метр гидроизоляция цена за метр .
гидроизоляция подвала цена за м2 гидроизоляция подвала цена за м2 .
стоимость гидроизоляции подвала gidroizolyacziya-czena8.ru .
I am truly thankful to the owner of this web page who
has shared this wonderful paragraph at here.
Matbet giriş linki lazımsa doğru yerdesiniz. Maç izlemek için tıkla: Matbet Mobil Canlı maçlar bu sitede. Arkadaşlar, Matbet yeni adresi belli oldu.
https://justpaste.me/cfnS3
Wow, amazing blog layout! How long have you been blogging for?
you make blogging look easy. The overall look of your web site is excellent, let alone the content!
усиление проема оконного усиление проема оконного .
where buy accutane
Всем здравия! Недавно искал рабочий игровой клуб для игры на рубли, и понял: половина сайтов — скам. Советую обращать внимание на скорость выплат и читать мнения реальных пользователей. Свой топ-7 с моментальным выводом оставил здесь: мелстрой гейм. Пишите, кто что знает по теме!
в этом разделе сайт водка бет
are online pharmacies legal
I enjoy playing at this casino https://abiexsa.com.pe/online-free-spin-casino-understanding-bonus-20/ because it feels secure and stable. Live tables are interactive, slots offer good variety, and the overall experience remains pleasant over time.
Excellent goods from you, man. I’ve understand your stuff previous to and you’re just extremely excellent.
I actually like what you have acquired here,
certainly like what you’re stating and the way in which you say it.
You make it enjoyable and you still take care of to keep it wise.
I can’t wait to read far more from you. This is actually a great site.
Ребята, а вы знаете, где сейчас реально выиграть в онлайн-казино? После десятков проверок остановился на лицензированных площадках. Важно: возможность игры с телефона. Актуальный рейтинг с джекпотами и кэшбэком — по ссылке: РђСѓС„ казино РІ Казахстане. Обсуждаем!
I am in fact grateful to the owner of this web page who has shared this wonderful
paragraph at here.
усиление проема в монолитном доме усиление проема в монолитном доме .
маи купить диплом маи купить диплом .
перейти на сайт vodka casino
I got this web site from my pal who informed me on the topic of this website and now this time I am browsing this
web site and reading very informative articles at this time.
Для качественного и безопасного соединения на платформу Кракен, преимущественно в условиях периодических фильтраций, со стороны контролирующих органов, критически важно применять лишь оригинальные линки. kraken shop darknet
https://bestplace-racing.de/erzgebirgstour-unsere-erfolge/ [https://crickbet999.co/2024/04/25/tips-for-choosing-the-right-light-fixtures-for-your-space/]
Arkadaslar selam, Casibom sitesi oyuncular? ad?na k?sa bir bilgilendirme paylas?yorum. Bildiginiz gibi bahis platformu giris linkini BTK engeli yuzunden surekli degistirdi. Siteye ulas?m problemi yas?yorsan?z cozum burada. Resmi Casibom giris baglant?s? su an burada https://casibom.mex.com/# Paylast?g?m baglant? ile direkt siteye erisebilirsiniz. Ayr?ca yeni uyelere verilen hosgeldin bonusu kampanyalar?n? da inceleyin. Guvenilir bahis keyfi surdurmek icin Casibom tercih edebilirsiniz. Tum forum uyelerine bol sans dilerim.
курсы seo курсы seo .
Spin Mama to ciekawa platforma, z nowoczesnym interfejsem i wieloma slotami. https://botdb.win/wiki/User:MickiAlgeranoff zwiększa wygrane, wersja na smartfony umożliwia grę w podróży. Recenzje kasyna mówią, bezpieczne środowisko do gry. Dla każdego polecam, dla fanów slotów i gier stołowych.
нажмите, чтобы подробнее зеркало vodkabet
Excellent article. Keep posting such kind of info on your site.
Im really impressed by your site.
Hi there, You’ve performed an incredible job. I’ll definitely digg it and individually recommend to my friends.
I’m sure they’ll be benefited from this site.
Arkadaşlar selam, Vay Casino oyuncuları için önemli bir bilgilendirme yapmak istiyorum. Bildiğiniz gibi site adresini tekrar güncelledi. Giriş hatası varsa panik yapmayın. Son siteye erişim linki artık aşağıdadır: https://vaycasino.us.com/# Bu link üzerinden vpn kullanmadan siteye girebilirsiniz. Güvenilir bahis keyfi sürdürmek için Vay Casino tercih edebilirsiniz. Tüm forum üyelerine bol kazançlar temenni ederim.
Привет! Хочу предупредить новичков: не все онлайн слот-сайты одинаково полезны. Ищите те, где есть прозрачные правила, и обязательно сверяйтесь с сообществом игроков. Я нашёл несколько платформ 2025 года с минимальным депозитом от 10 руб — всё собрано здесь: new retro казино. Кто уже успел попробовать?
инъекционная гидроизоляция бетона инъекционная гидроизоляция бетона .
Hello! I know this is kinda off topic but I was wondering if you knew where I could find a captcha plugin for my comment form?
I’m using the same blog platform as yours and I’m having problems finding
one? Thanks a lot!
Всем здравия! Недавно искал, где реально можно получить честный выигрыш в онлайн казино. Оказалось, что многое зависит от политики платформы. Проверяйте статистику выплат, читайте комментарии. Составил актуальный рейтинг на 2025 год с прямыми ссылками: Mellstroy. Интересно, кто из вас уже играл здесь?
инъекционная гидроизоляция инъекционная гидроизоляция .
Мы изготавливаем дипломы психологов, юристов, экономистов и прочих профессий по невысоким ценам. Для нас очень важно, чтобы дипломы были доступными для большого количества граждан. Заказать диплом об образовании psp-wp-test.objectsdev.com/kupit-diplom-bez-predoplaty-realnye-dokumenty-320
After looking over a number of the blog posts on your
blog, I honestly like your way of writing a blog. I saved as a favorite
it to my bookmark webpage list and will be checking back soon. Take a look at my
website too and let me know how you feel.
seo интенсив kursy-seo-5.ru .
Grandpasha giriş adresi arıyorsanız işte burada. Hızlı giriş yapmak için Grandpashabet Bonus Yüksek oranlar bu sitede.
Heya i am for the first time here. I came across this board and I find It really useful & it helped me out much. I hope to give something back and help others like you aided me.
Wow! At last I got a webpage from where I be able to genuinely obtain helpful facts concerning my study and knowledge.
thanking herfor every fish he won,and apologizing if he thought he won too many.ラブドール 風俗
перейдите на этот сайт водка бет казино
учиться seo kursy-seo-4.ru .
Wow, that’s what I was seeking for, what a material!
present here at this website, thanks admin of this web site.
ссылка на сайт водкабет
https://www.diveboard.com/zulfi61/posts/1xbet-sri-lanka-promo-code-2026-1xbig2026-bonus-130-euros-B6y5svb
エロ い ラブドールandvanity this character represents the class of judges with whichCoke identified himself in the Overbury tria Nor are these merelyclass-trait They are distinctly the faults which marred Coke,s careerfrom the beginning.
Well voiced certainly! !
Мы готовы предложить документы институтов, расположенных в любом регионе России.
Купить диплом о высшем образовании: spiceroleplay.forumex.ru/viewtopic.php?f=23&t=2049
Ребята, а вы знаете, где сейчас дают кэшбэк? Я проверил десятки казино, оставил только те, где реально можно вывести. Ссылка на подборку: Mellstroy казино. Обсуждаем!
ремонт гидроизоляции фундаментов и стен подвалов ремонт гидроизоляции фундаментов и стен подвалов .
online pharmacies usa https://clients1.google.com.hk/url?q=https%3A%2F%2Fsalepharmacies.shop good best online pharmacy
отделка подвала gidroizolyacziya-podvala-iznutri-czena8.ru .
Magnificent goods from you, man. I have understand your stuff previous to and you are just extremely
magnificent. I actually like what you’ve acquired here, certainly like what you’re stating and the way in which you say it.
You make it enjoyable and you still care for to keep it sensible.
I can not wait to read much more from you. This is actually a
wonderful web site.
Stop by my web blog – винлаб код на скидку
Hello to all, as I am in fact eager of reading this weblog’s post to
be updated on a regular basis. It carries nice stuff.
ремонт подвального помещения ремонт подвального помещения .
Привет! Многие спрашивают, где сейчас выигрывают чаще всего. Ответ прост: смотрите на провайдеров слотов. Я собрал актуальный рейтинг казино 2025 с поддержкой рубля — ссылка: вован казино. Пробовали что-то из списка?
гидроизоляция цена за работу гидроизоляция цена за работу .
buy isotretinoin pills http://www.jschell.de/link.php?goto=google_news&url=isotretinointop.shop purchase accutane online no prescription
усиление проема в квартире усиление проема в квартире .
Superb information, With thanks.
I think this is one of the most vital info for me. And i’m satisfied studying your article.
However should remark on few common things, The website taste is ideal, the articles is in reality nice : D.
Excellent job, cheers
материалы усиления проема usilenie-proemov10.ru .
Very nice post. I just stumbled upon your blog and wished to say that I’ve really
enjoyed surfing around your blog posts. In any case I will
be subscribing to your feed and I hope you write again very soon!
Система IQOS считается технологичной системой для работы с табачными изделиями.
В отличие от обычных методов, устройство работает без горения.
Такой подход помогает уменьшить количество продуктов горения.
Система выделяется эргономичной формой.
https://terea777.shop/lukhovitsy/product/iqos-iluma-i-galaxy-limitirovannaya-versiya/
Простота эксплуатации делает устройство популярным выбором для многих пользователей.
Также iQOS предоставляет контролируемый процесс.
Выбор вариантов помогает найти подходящий формат.
Таким образом, система iQOS заняла свое место на рынке среди взрослых пользователей.
Быстро и просто заказать диплом любого ВУЗа. Производство документа занимает гораздо меньше времени, а цена – доступна каждому. В итоге вы сможете сохранить деньги и время и получить прекрасную работу мечты. Приобрести диплом на заказ возможно через официальный сайт компании. – russia.forumex.ru/viewtopic.php?f=3&t=1471
夜班医生第四季高清完整版结合大数据AI分析,海外华人可免费观看最新热播剧集。
Thank you for some other informative blog.
Where else could I get that type of information written in such
an ideal approach? I’ve a project that I’m simply now operating on, and I have been on the
glance out for such information.
seo курсы seo курсы .
инъекционная гидроизоляция своими руками inekczionnaya-gidroizolyacziya-fundamenta.ru .
инъекционная гидроизоляция москва inekczionnaya-gidroizolyacziya-fundamenta1.ru .
Greetings, I just came across a great resource to save on Rx. If you want to save money and need generic drugs, this store is a game changer. Great prices and it is safe. Check it out: buy meds from mexico. Warmly.
Ребята, не тратьте время на левые сайты! Чтобы выбрать платящее казино, обращайте внимание на: русскоязычную службу поддержки, а также на отзывы. Я лично протестировал десятки платформ и оставил только те, где нет скрытых условий. Весь список — по ссылке: Клубника казино. Делитесь опытом!
To be honest, I recently found the best online drugstore for cheap meds. If you need ED meds at factory prices, this site is worth checking. You get wholesale rates guaranteed. More info here: safe indian pharmacy. Good luck.
Because the admin of this website is working, no uncertainty very soon it will be famous, due to its
feature contents.
Hmm it seems like your blog ate my first comment (it was super long)
so I guess I’ll just sum it up what I wrote and
say, I’m thoroughly enjoying your blog. I as well am an aspiring blog writer but
I’m still new to the whole thing. Do you have any tips for first-time blog
writers? I’d certainly appreciate it.
Приветствую! Только что вывел 15 тысяч с одного из платформ — и решил поделиться списком тех, кто реально платит. Смотрите на скорость обработки заявок. Все проверенные варианты — тут: онлайн казино. Кто уже играл? Какие суммы выводили?
ドール エロwitha bold,free,
другие casino vodka
посмотреть на этом сайте vodka casino
seo бесплатно seo бесплатно .
Hi all, Just now stumbled upon the best online drugstore for cheap meds. For those looking for cheap antibiotics cheaply, IndiaPharm is highly recommended. You get fast shipping to USA. More info here: order medicines from india. Hope it helps.
Купить диплом университета по доступной цене вы сможете, обратившись к надежной специализированной фирме. Чтобы проверить компанию перед заказом воспользуйтесь рейтингом и отзывами на форумах. Можно купить диплом из любого ВУЗа Российской Федерации fabrealtygroupnc.com/author/floreneawg3989
Knowledge and creativity hub – A dynamic site that encourages new perspectives.
сочи 2 квартиры жк светский лес сочи цены официальный
продвижение обучение kursy-seo-4.ru .
услуги гидроизоляции подвала gidroizolyacziya-podvala-iznutri-czena9.ru .
гидроизоляция подвала цена за м2 gidroizolyacziya-czena8.ru .
гидроизоляция подвала снаружи цены gidroizolyacziya-podvala-iznutri-czena8.ru .
поисковое seo в москве internet-prodvizhenie-moskva.ru .
обмазочная гидроизоляция цена за работу м2 gidroizolyacziya-czena9.ru .
Hi guys, Just now ran into an awesome resource for affordable pills. For those seeking and need generic drugs, Pharm Mex is the best option. Fast shipping and very reliable. Take a look: this site. Take care.
online viagra pharmacy
Ребята, не верьте громким обещаниям! Настоящее слот-сайт должно иметь положительную репутацию. Я отсеял все подозрительные площадки и оставил только топовые варианты — смотрите здесь: Мелстрой. Кто уже выводил оттуда?
усиление проёма швеллером усиление проёма швеллером .
midnight quarry hub – Clear brand identity, quick response times and shopper-friendly navigation.
Купить диплом ВУЗа по выгодной цене возможно, обращаясь к надежной специализированной компании: http://lisboaip.com.br/kupit-diplom-o-vysshem-obrazovanii-srochno-31-2/ – lisboaip.com.br/kupit-diplom-o-vysshem-obrazovanii-srochno-31-2
Ребята, а вы знаете, где сейчас дают кэшбэк? Я проверил десятки платформ, оставил только те, где реально работают в РФ. Ссылка на подборку: мелстрой гейм. Обсуждаем!
усиление проема углеволокном усиление проема углеволокном .
buy accutane uk
Pretty seсtion of content. I just stumbled upon yⲟuг website and in accession caрital to assert that I get in fact еnjoyed account
ʏour blog posts. Anyway I will be subscribing to your aᥙgment and еven I achievement
you access consistently rapidly.
You need to take part in a contest for one of the finest websites
on the internet. I am going to highly recommend this blog!
seo бесплатно seo бесплатно .
мостбет оригинал скачать https://mostbet2026.help
凯伦皮里第一季高清完整版,海外华人可免费观看最新热播剧集。
Статья представляет информацию в обобщенной форме, предоставляя ключевые факты и статистику.
Автор представил четкую и структурированную статью, основанную на фактах и статистике.
обучение seo обучение seo .
My name: Eldon Chery
Age: 35
Country: Norway
City: Gjovik
Post code: 2825
Street: Brastadtrakket 149
I have been exploring for a little bit for any high quality articles or blog posts on this sort of area .
Exploring in Yahoo I finally stumbled upon this website.
Reading this info So i am happy to express that I have an incredibly excellent uncanny feeling I came upon just what I needed.
I most indisputably will make sure to do not fail to remember this web
site and give it a glance regularly.
Привет всем! Решил поделиться, как найти платящее онлайн платформу в 2025 году. Главное — не гнаться за большими бонусами, а смотреть на юрисдикцию и отзывы реальных игроков. Я собрал список проверенных площадок с минимальным депозитом — вот тут: Sykaaa. Кто уже пробовал?
курсы по seo kursy-seo-2.ru .
Привет! Хочу предупредить новичков: не все онлайн слот-сайты одинаково полезны. Ищите те, где есть прозрачные правила, и обязательно сверяйтесь с рейтингами. Я нашёл несколько платформ 2025 года с бонусами без вейджера — всё собрано здесь: Рльдорадо казино. Кто уже успел попробовать?
Купить диплом института по выгодной цене можно, обращаясь к надежной специализированной компании. Для того, чтобы проверить компанию перед покупкой пользуйтесь честными отзывами в онлайне. Таким образом можно купить диплом из любого ВУЗа России romawki.flybb.ru/viewtopic.php?f=3&t=2652
Многие пользователи сталкиваются с барьером нахождения актуальной URL на платформу Kraken. Применение левым путям из поисковой выдачи влечёт за собой к хищению личной информации и сбережений. кракен маркет даркнет это
Thanks for some other great article. The
place else may anybody get that kind of info in such a perfect approach of writing?
I’ve a presentation subsequent week, and I am at the search for such info.
medsrxeasy https://cse.google.com.tw/url?sa=t&url=https%3A%2F%2Fmedsrxeasy.com medsrxeasy
https://www.vardhanpublishers.com/blog/shopping/season-essentials
сырость в подвале gidroizolyacziya-podvala-iznutri-czena9.ru .
ремонт подвального помещения gidroizolyacziya-podvala-iznutri-czena8.ru .
Job growth resource – The content flows nicely and is easy on the eyes.
гидроизоляция цена за работу гидроизоляция цена за работу .
можно ли купить диплом медсестры можно ли купить диплом медсестры .
обучение seo обучение seo .
midnight field retail – Simple navigation flow, browsing products is comfortable and reliable.
To be honest, Lately ran into a great resource to save on Rx. For those seeking and need meds from Mexico, Pharm Mex is worth checking out. Fast shipping plus it is safe. Link is here: buy meds from mexico. Sincerely.
усиление проёмов под панорамные окна usilenie-proemov9.ru .
Great explanation in this article.
I really enjoy how this post breaks down
the topic in a simple way.
A lot of users are confused about
how digital sports streaming functions,
especially when it comes to
stream stability and performance.
This post makes things much clearer,
and I think it will be useful for beginners
who are looking for reliable information.
Thanks for sharing this content,
I will definitely follow future updates
from this site.
гидроизоляция цена работы гидроизоляция цена работы .
seo базовый курc kursy-seo-4.ru .
усиление проема в частном доме усиление проема в частном доме .
Good way of telling, and nice piece of writing to take
facts about my presentation topic, which i am going to convey in university.
купить диплом ооо знак купить диплом ооо знак .
1xbet today promo code azerbaijan
Приветствую! После череды неудач наконец нашёл честные онлайн казино. Ключевые критерии: отсутствие скрытых условий вейджера. Все подходящие площадки с быстрым выводом собрал тут: Мелстрой официальный сайт. Кто уже успел потестить?
Привет! Решил собрать только те игровые клубы, где лично получил выплату. Критерии: с минимальным депозитом. Все рабочие ссылки — по адресу: sykaaa suka. Кто уже тестировал эти площадки?
продвижение сайтов в москве продвижение сайтов в москве .
Greetings, I recently found a reliable website for affordable pills. If you want to save money and need generic drugs, Pharm Mex is highly recommended. Fast shipping plus very reliable. Check it out: https://pharm.mex.com/#. Sincerely.
rybelsus 14 mg
seo курсы seo курсы .
夜班医生第四季高清完整版,海外华人可免费观看最新热播剧集。